
Tapo App Guide
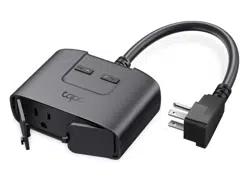
Smart Plugs
©2024 TP-Link 1910013675 REV1.0.0

Contents
About This Guide ···················································· 1
Introduction to Tapo App 3.0 ··························· 2
Set Up Your Smart Plug ······································· 3
Basic Device Control ············································ 4
Basic Device Settings ·········································· 5
Set LED Status ························································· 6
Set Default State ····················································· 8
Power Protection ···················································· 9
Charge Guard ··························································10
Favorite Devices ····················································11
Congure Your Smart Plug ······························12
Set Schedules ························································13
Set Timer ···································································14
Set Away Mode ······················································16
Energy Monitoring ················································17
Smart Actions ·························································21
Share Your Smart Plug ·······································23
Reset Your Smart Plug ·······································24
Me Page ·····································································27
Manage Your Account ·······································27
Tapo Care ··································································27
Firmware Update ···················································28
Notications ····························································28
Device Sharing ·······················································28
Link Tapo with Kasa ·············································29
Widgets ······································································29
Third-Party Services ···········································30
1
About This Guide
This guide provides a brief introduction to the Tapo Smart Plugs and the Tapo app, as well as regulatory information.
Features available in Tapo may vary by model and software version. Tapo availability may also vary by region. All images, steps, and descriptions in this
guide are only examples and may not reect your actual Tapo experience.
Conventions
In this guide, the following convention is used:
Convention Description
Blue
Key information appears in teal, including management page text such as menus, items, buttons and so on.
Underline
Hyperlinks are in teal and underlined. You can click to redirect to a website.
Note
Ignoring this type of note might result in a malfunction or damage to the device.
More Info
• Specications can be found on the product page at https://www.tapo.com.
• Our Technical Support and troubleshooting information can be found at https://www.tapo.com/support/.
• A Technical Community is provided for you to discuss our products at https://community.tp-link.com.
• Setup Video can be found at https://www.tp-link.com/support/setup-video/.
2
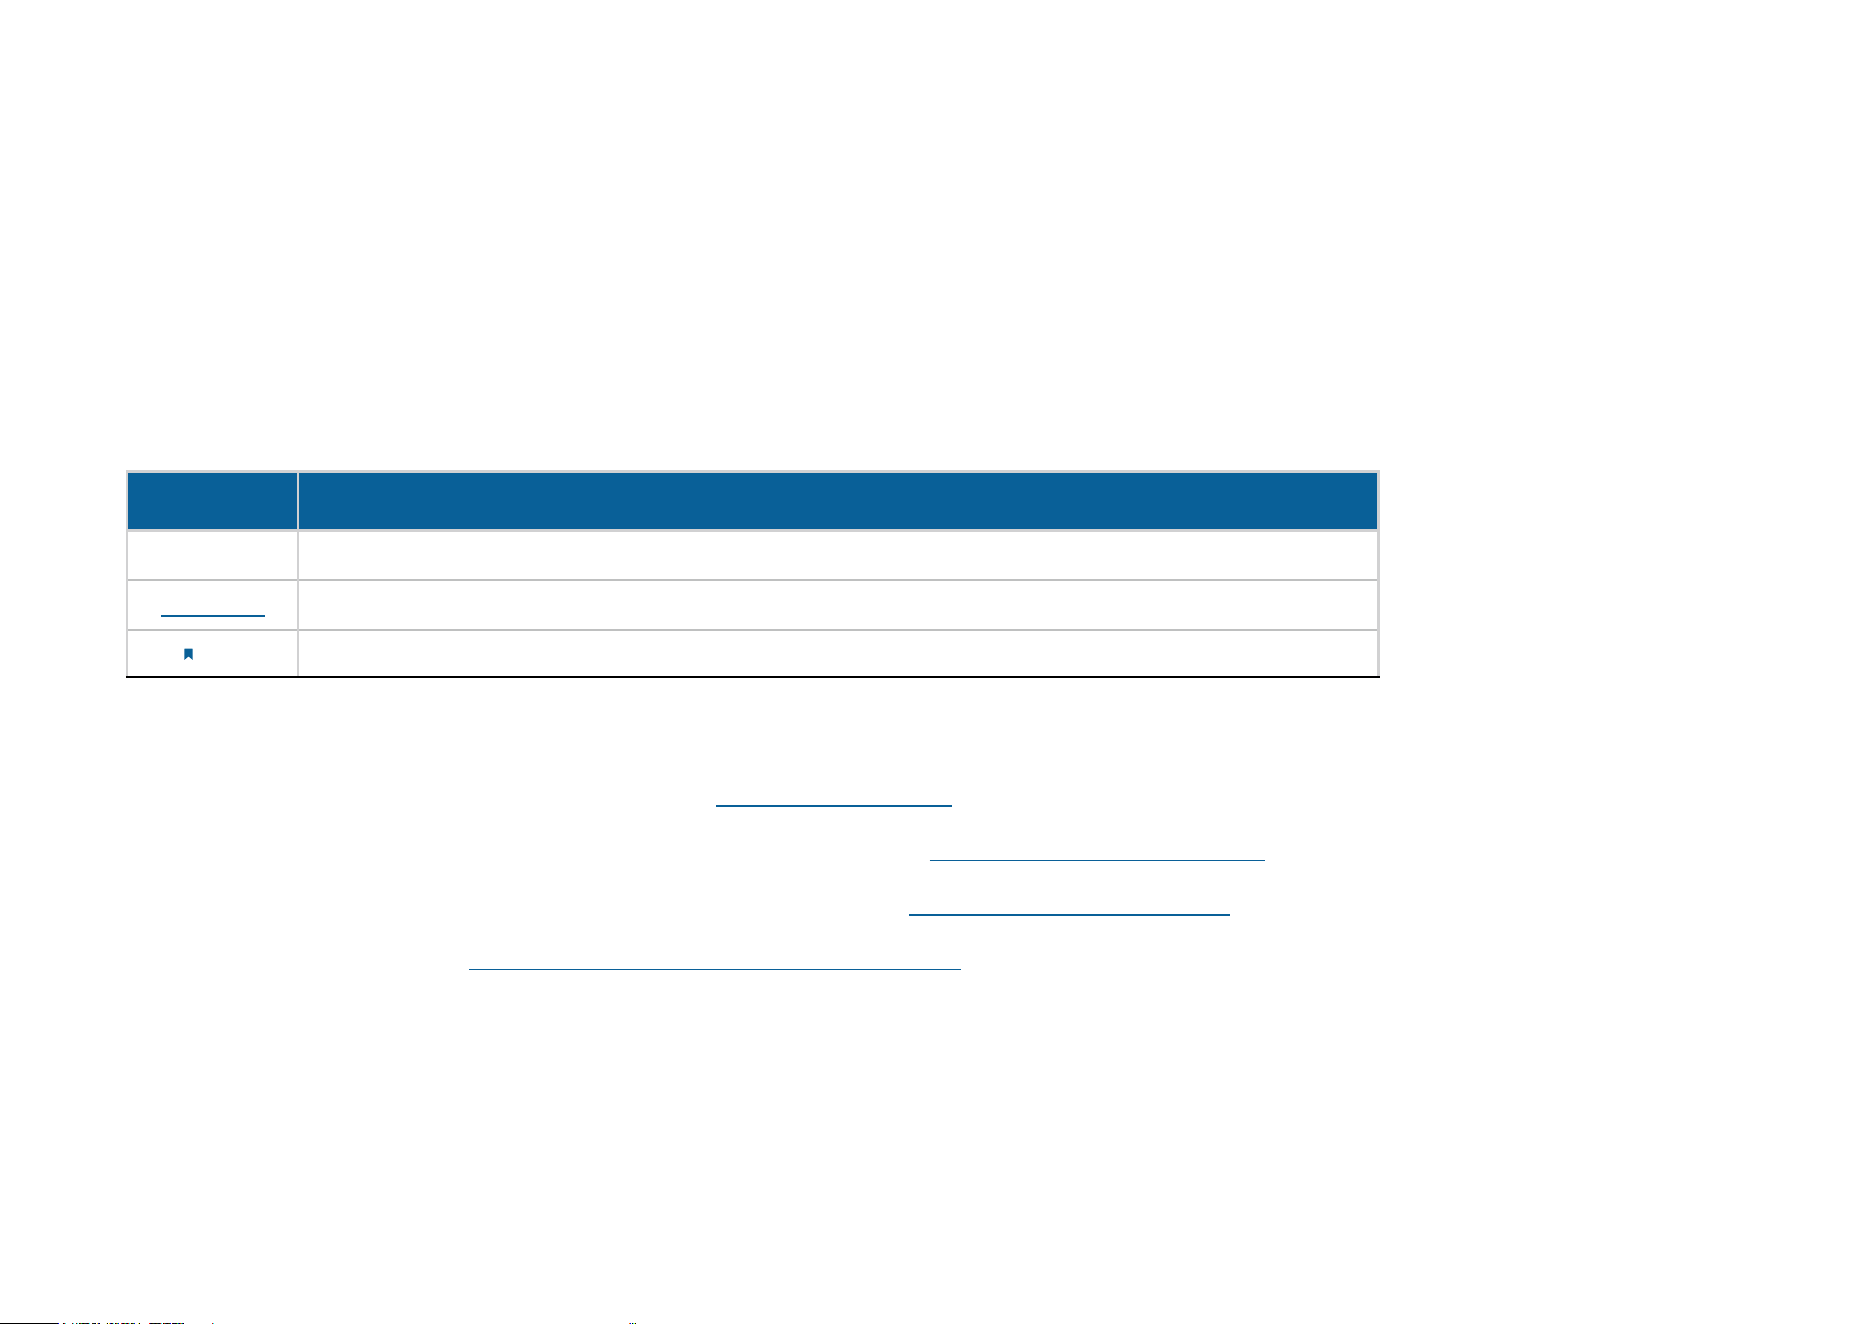
Introduction to Tapo App 3.0
Tapo aims to help you live a smarter, easier, and more secure life. In the past few years, we are constantly striving to enhance customer experience and
provide the best products and services possible. Marking a signicant milestone, we're thrilled to introduce Tapo app 3.0. Dive into its new features!
• Better Looking – The brand-new UI brings a fresh experience.
• More User-Friendly – Optimized interaction and functions enable easy conguration.
• More Compatible – Tapo app 3.0 supports Kasa devices.
Know more about Tapo app 3.0 at https://www.tp-link.com/landing/tapo-app-v3/.
3
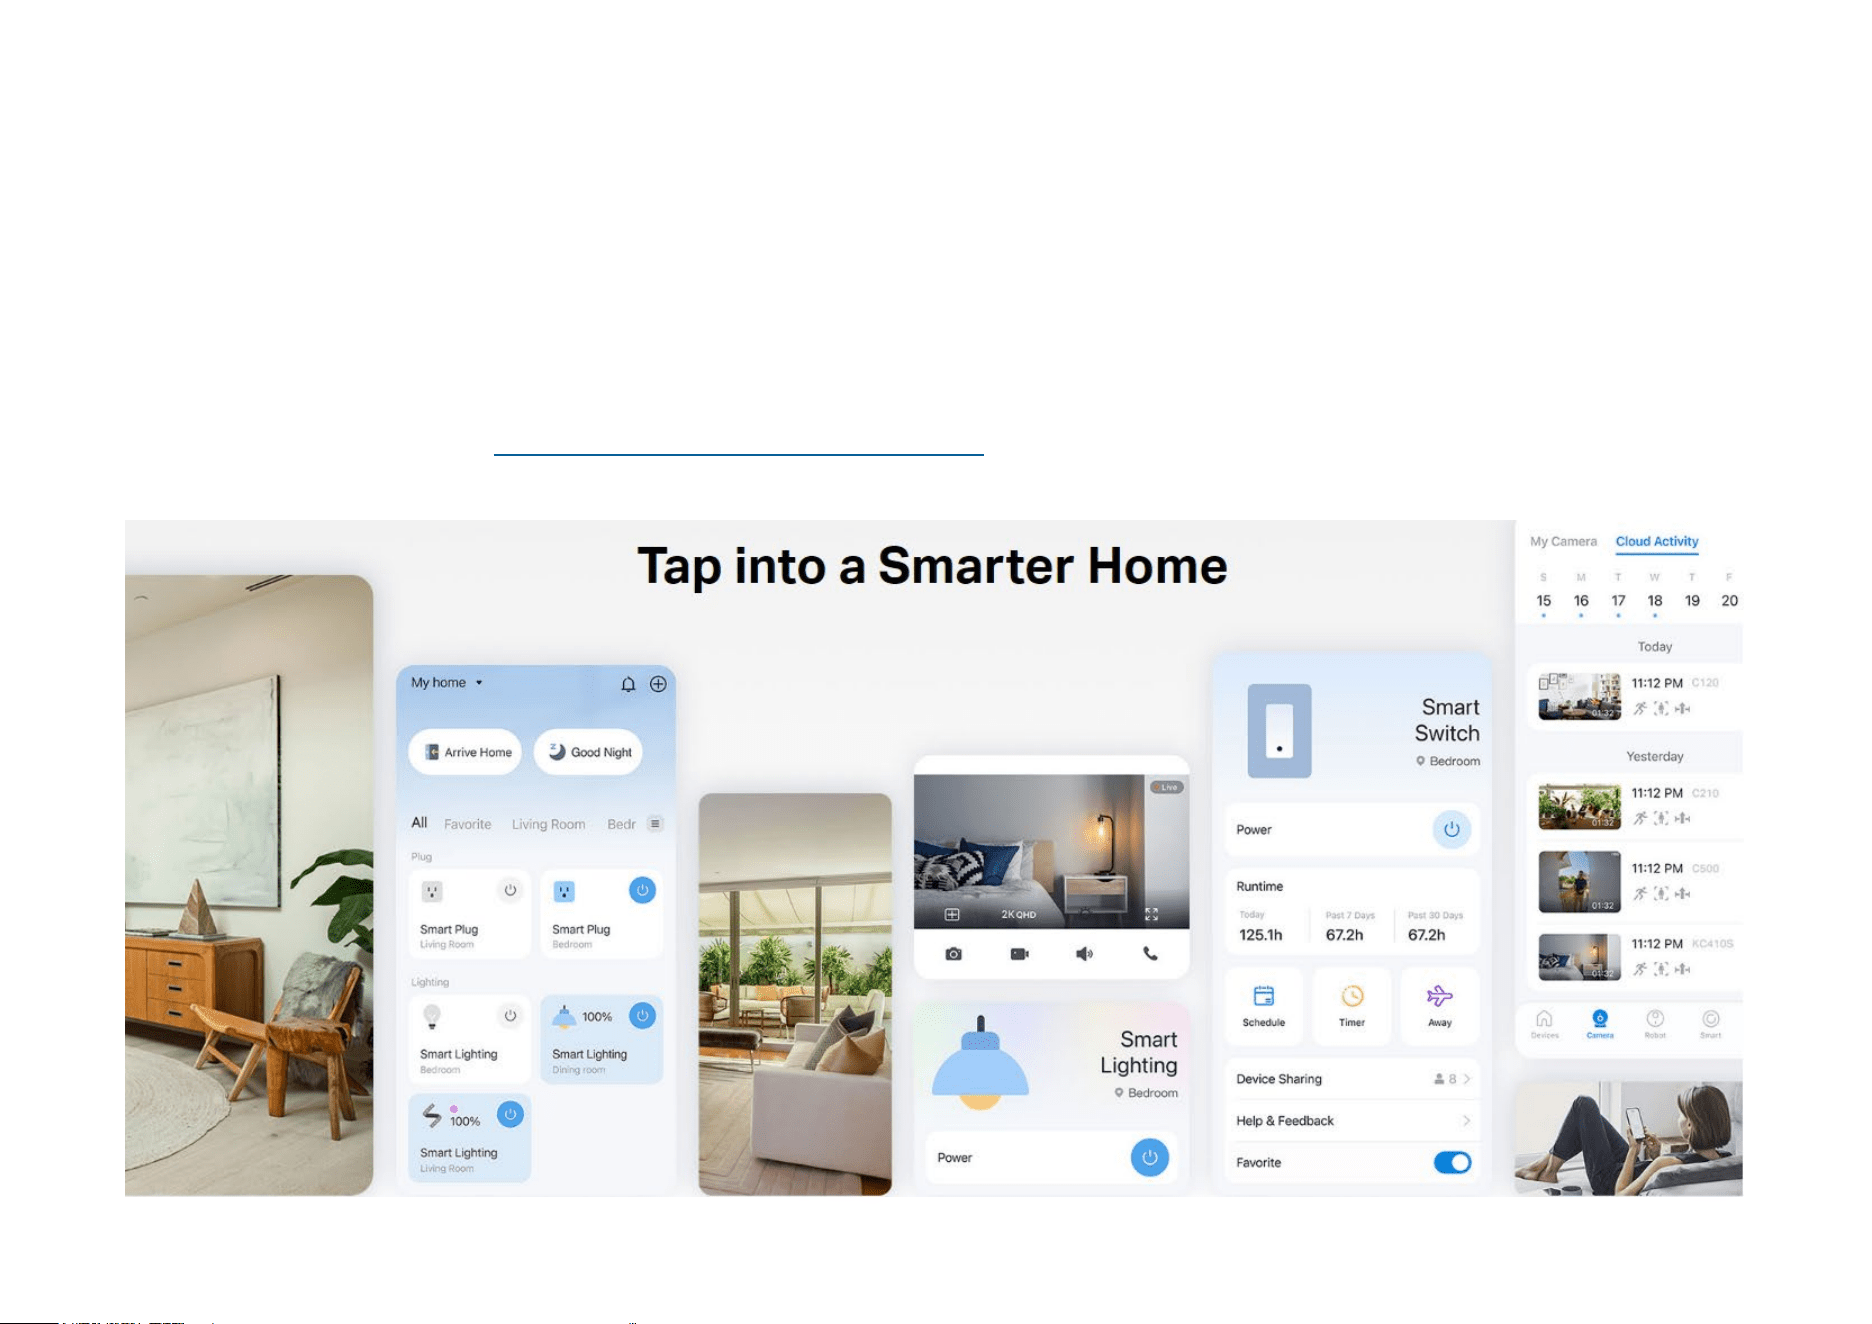
Set Up Your Smart Plug
Follow the steps below to get started with your smart plug. Setup Videos can be found at https://www.tp-link.com/support/setup-video/.
Step 1. Download Tapo App
Get the Tapo app from the App Store or
Google Play, or by scanning the QR code
below.
Step 2. Log In
Open the app, and log in with your TP-Link ID.
If you don't have an account, create one rst.
Step 3. Add Your Smart Plug
Tap the button in the app, tap Plugs and
select your model and follow the in-app
instructions to complete the setup.
OR
4
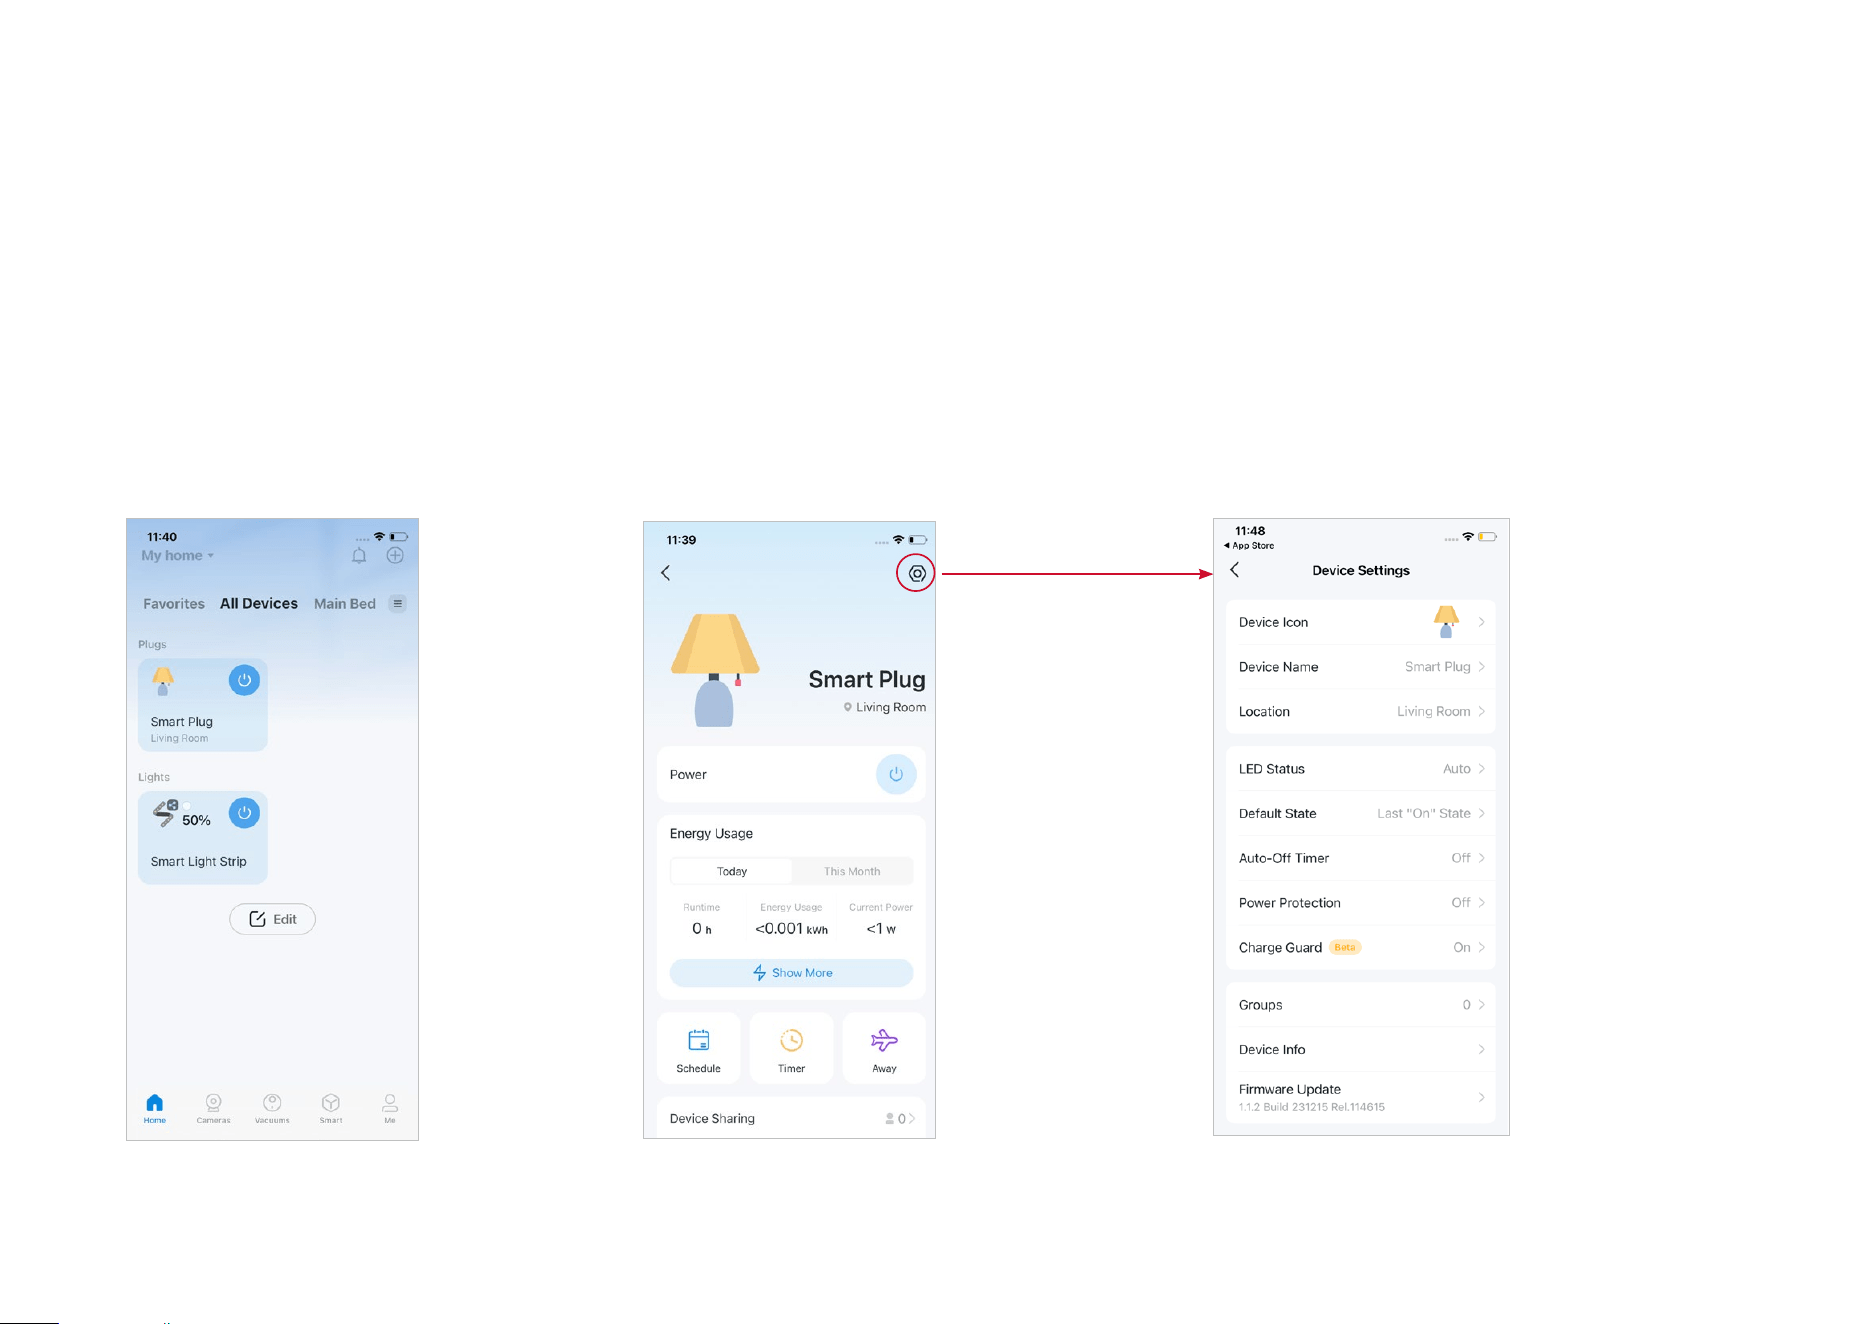
Basic Device Control
After successfully setting up your smart plug, you will see the home page of the Tapo app. Here you can view the status of all devices that you've added
and manage them. You can tap on the device to control and manage.
Home Page
You can turn on or o the plug anytime
anywhere and tap the card to enter the
status page.
Device Status Page
You can create schedules, enable away mode, or
set a timer to automatically control your device,
view its runtime & energy usage, and more.
Device Settings Page
You can change your plug's name and icon, set
the LED status, set default state, update rmware,
and more.
*Features and images may vary from product models.
5
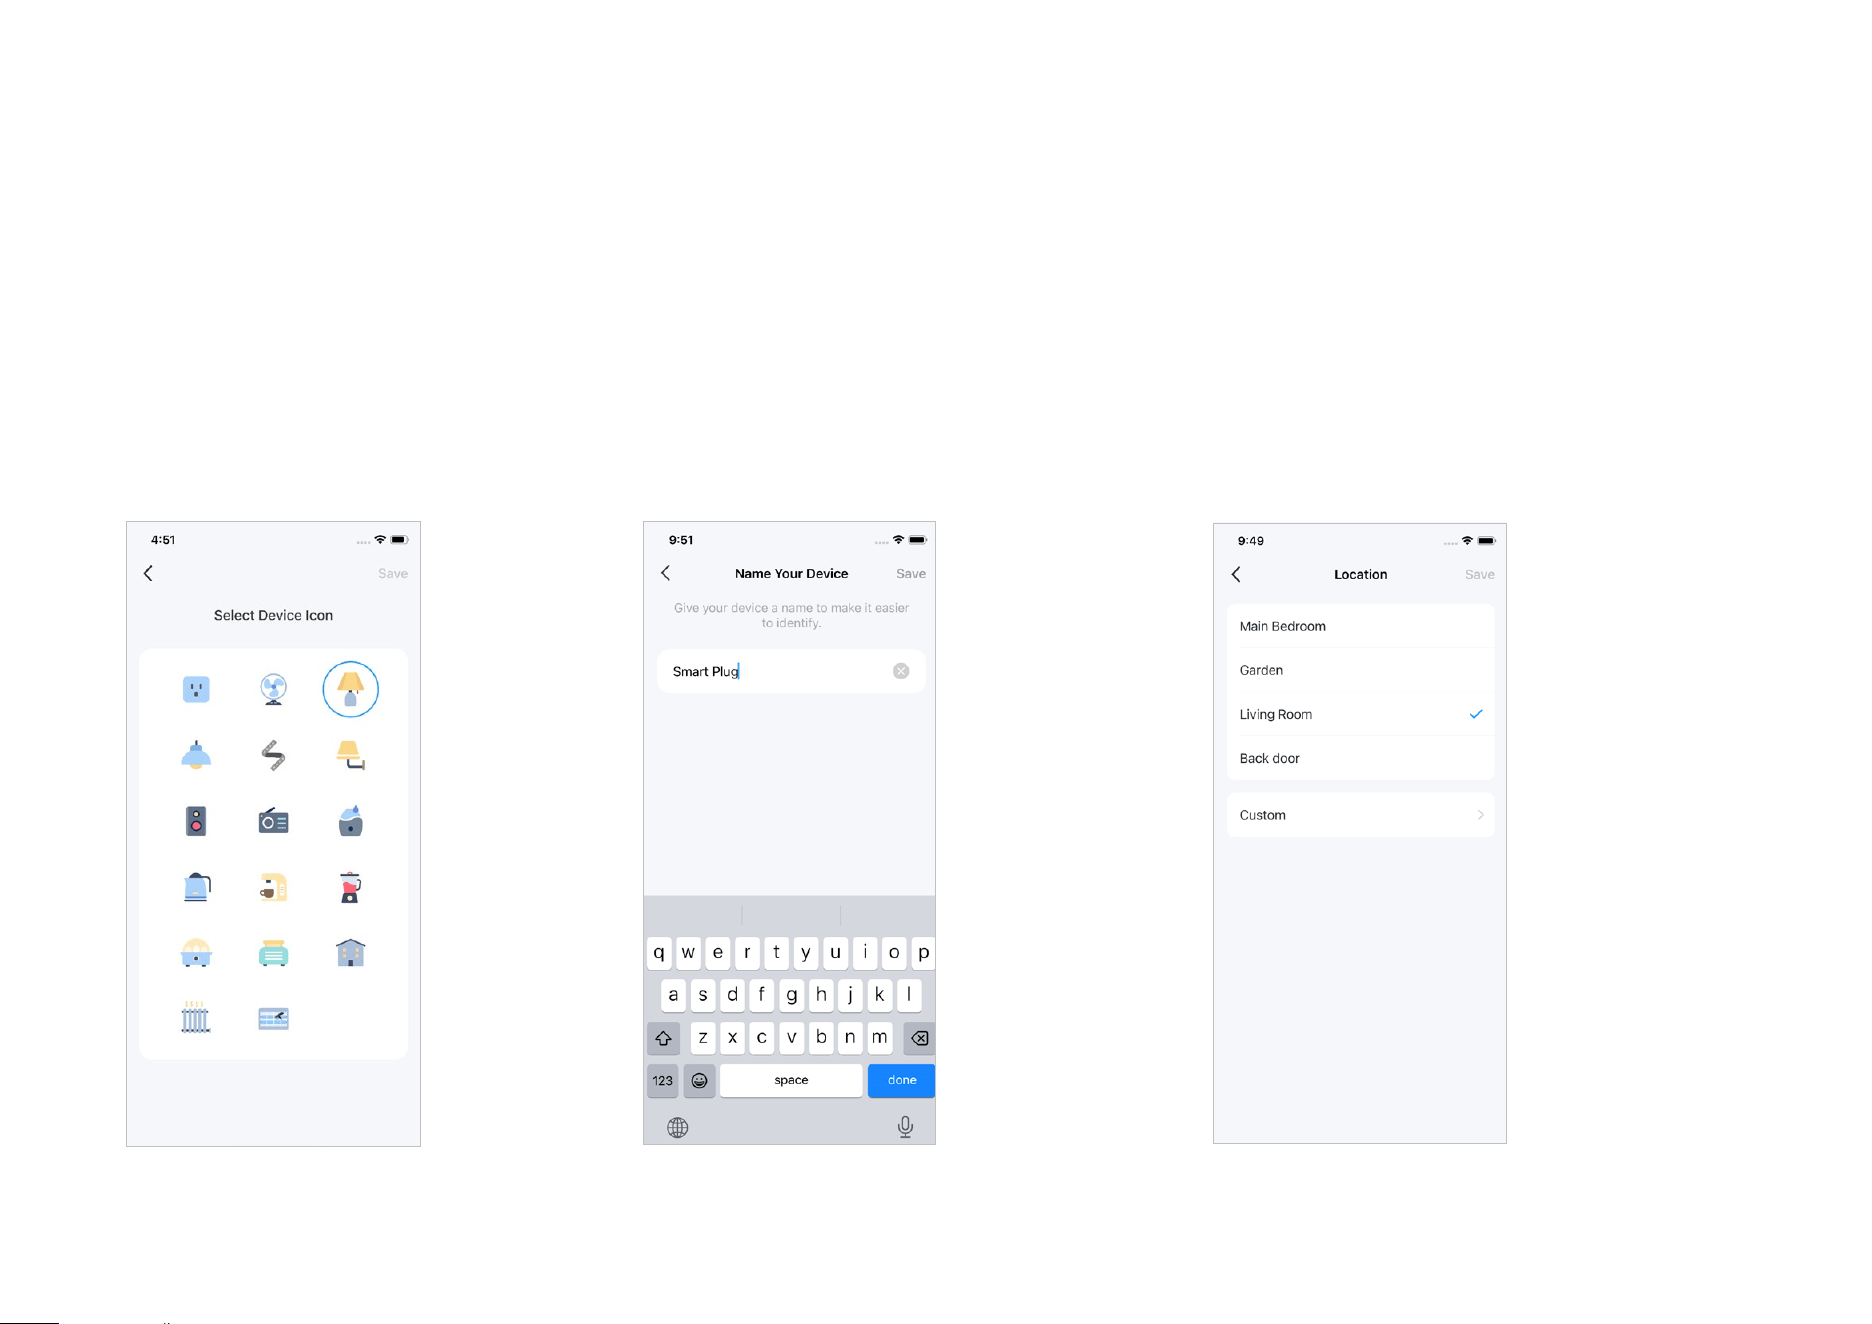
Basic Device Settings
Check the device information and change its settings on the device settings page.
Basic Device Settings
Select the icon suitable for your device.
Change Device Name
Give your device a name to make it easier to
identify.
Change Device Location
Choose where you've placed your device or
customize the location as you want.
*Features and images may vary from product models.
6
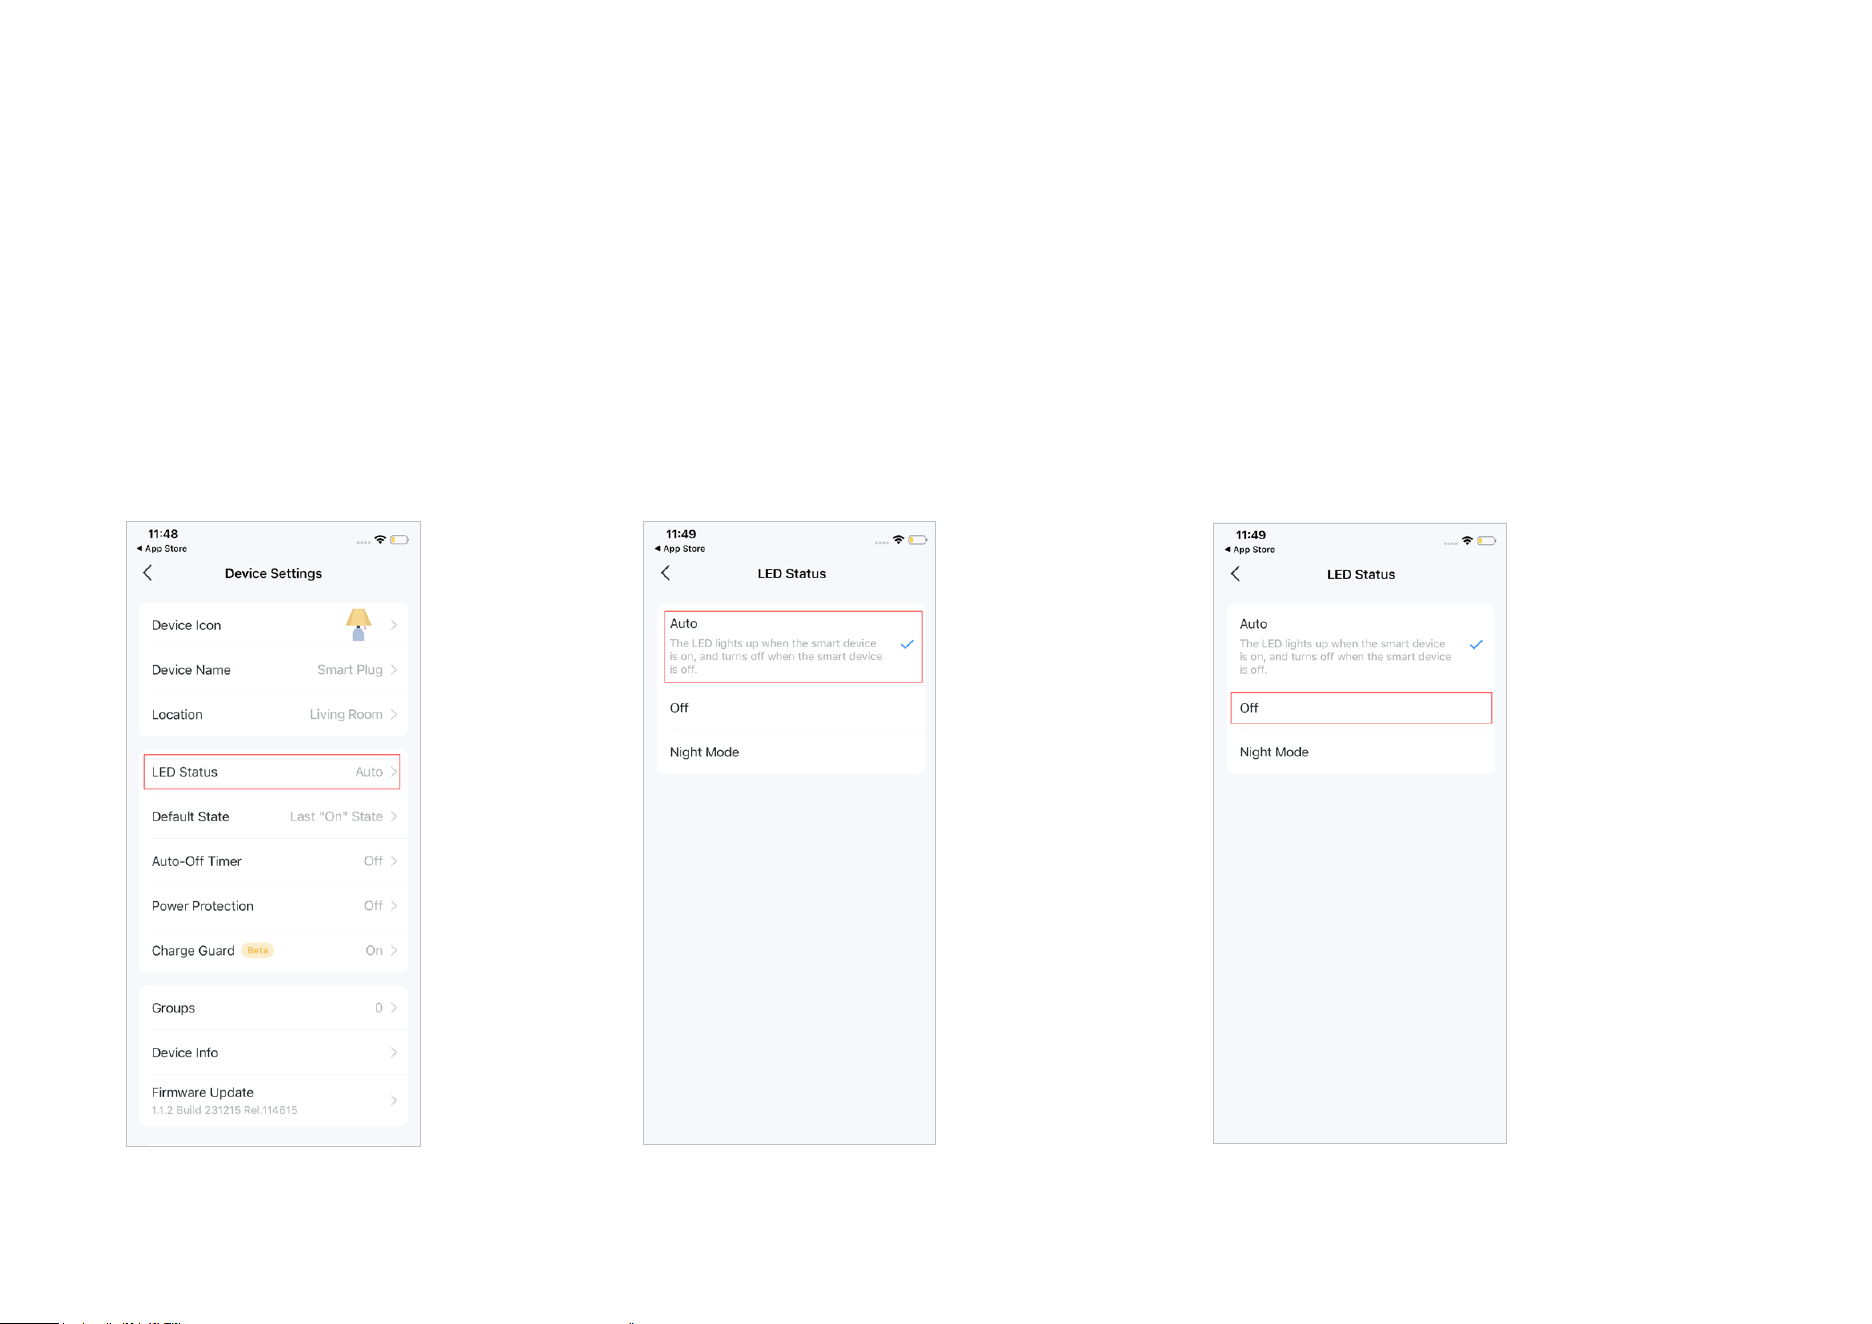
Set LED Status
Customize the LED status settings to make it more compatible with your life.
LED Status
Set LED status on the device settings page.
Auto Mode
The auto mode means that the LED lights up
when your plug is on, and vice versa.
O Mode
The o mode means that the LED won't light up
or turn o regardless of whether your plug is on
or o.
*Features and images may vary from product models.

7
Night Mode
The night mode means that the LED will not
light up during the specied period every
day.
If your plug is in the same area as you, you have
the option to enable the LED to automatically turn
o at sunset and turn back on at sunrise.
Or, you can customize the LED o time as you
need.
*Features and images may vary from product models.
8
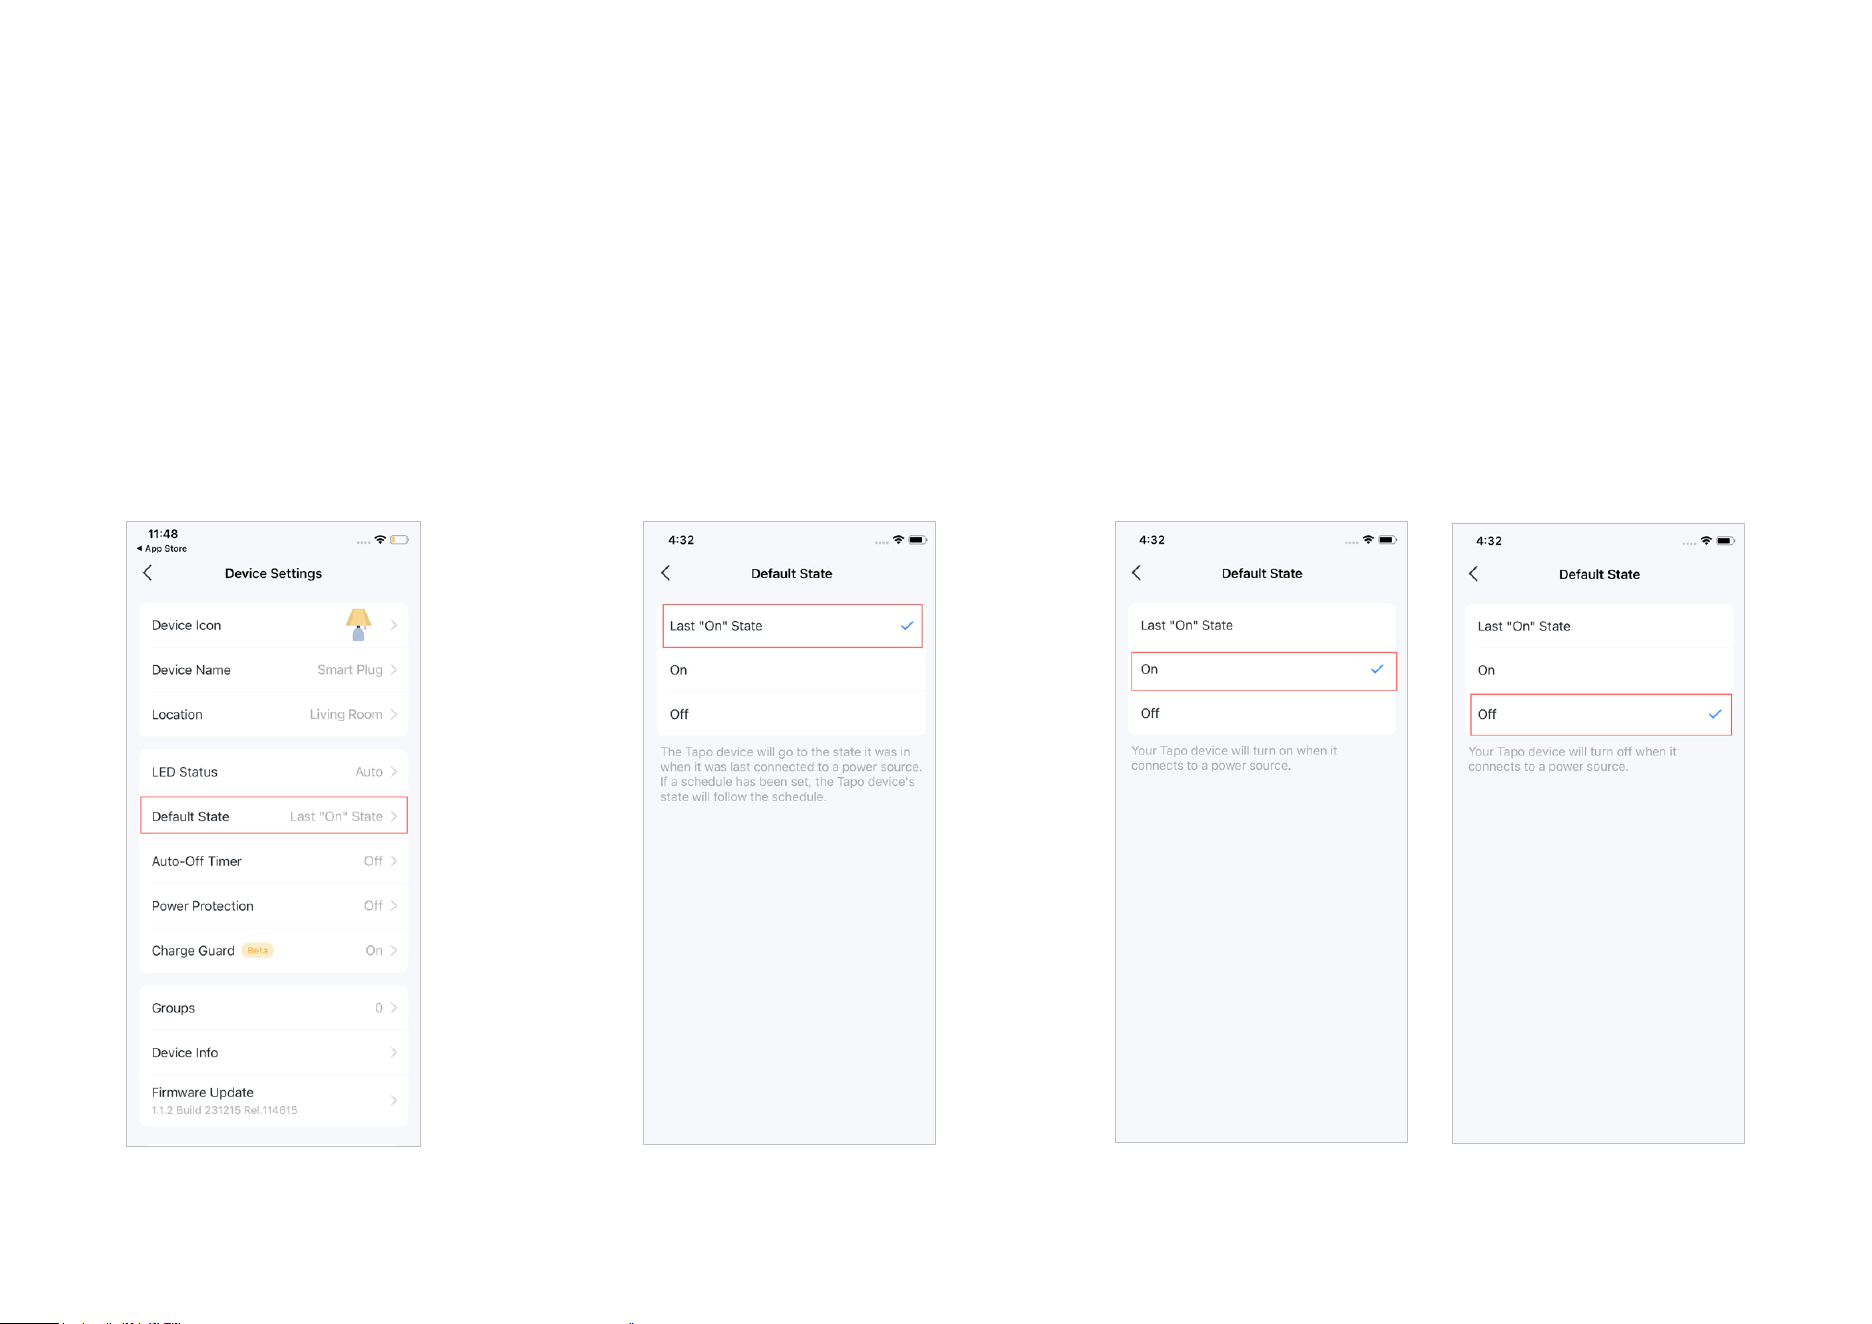
Default State
You can set your plug's state your device will
be in when it reconnects to a power source
as you need.
Last "On" State
The Last "On" State means that your
device will return to the same state it
was in when it was last connected to
a power source.
On/O Mode
You can also choose the On/O mode to turn on/o your
device when it connects to a power source.
Set Default State
Set the default state you want your device to go to when it is reconnected to a power source.
*Features and images may vary from product models.
9
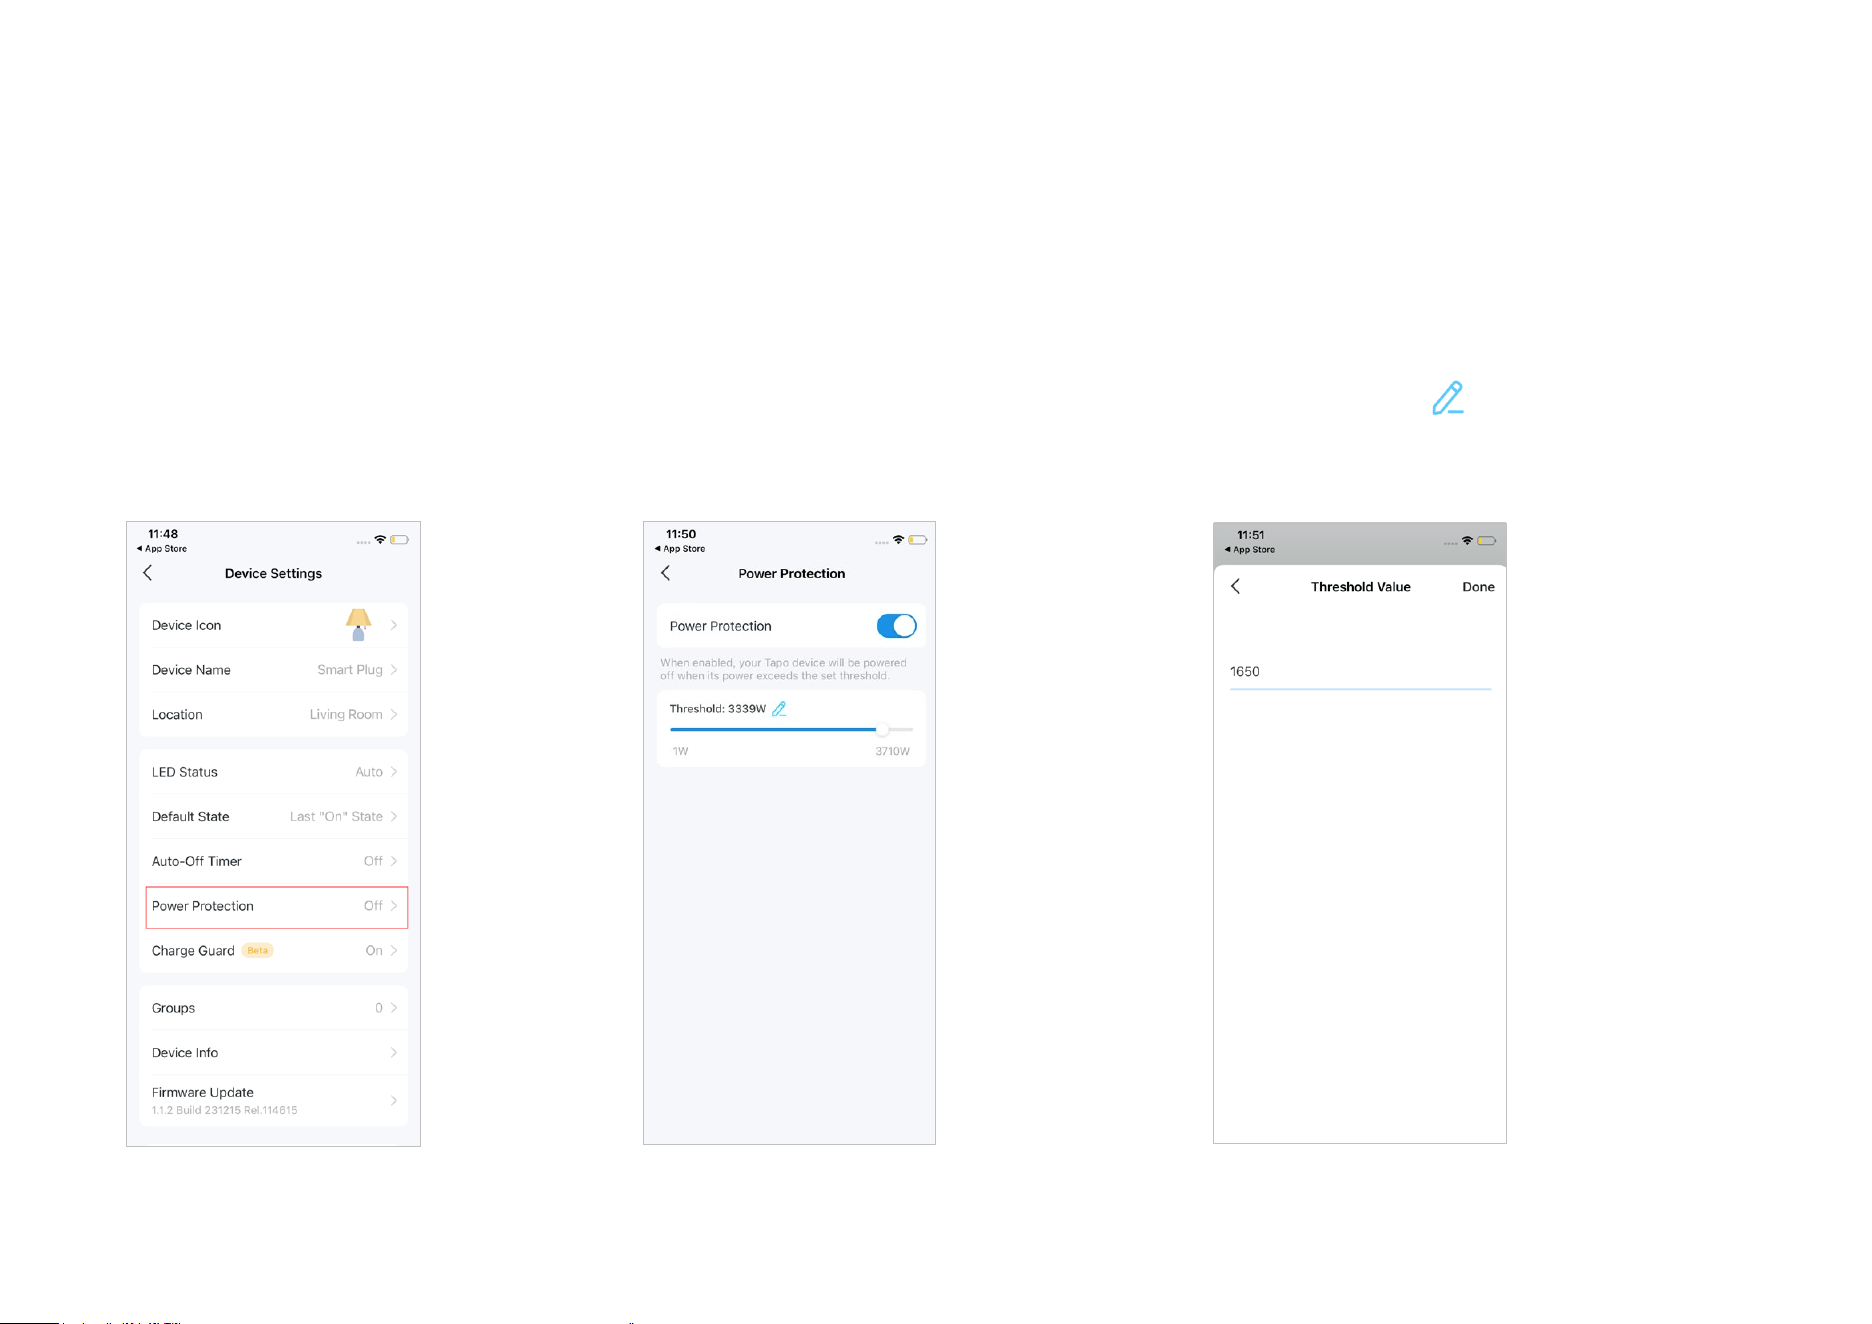
Power Protection
Enable this feature to power o your device when its power exceeds the set threshold.
Power Protection
Set Power Protection settings on the device
settings page.
Custom Power
You can slide to customize the threshold for
powering o your device as you need.
Or you can just tap to enter the number you
want.
*Features and images may vary from product models.
10
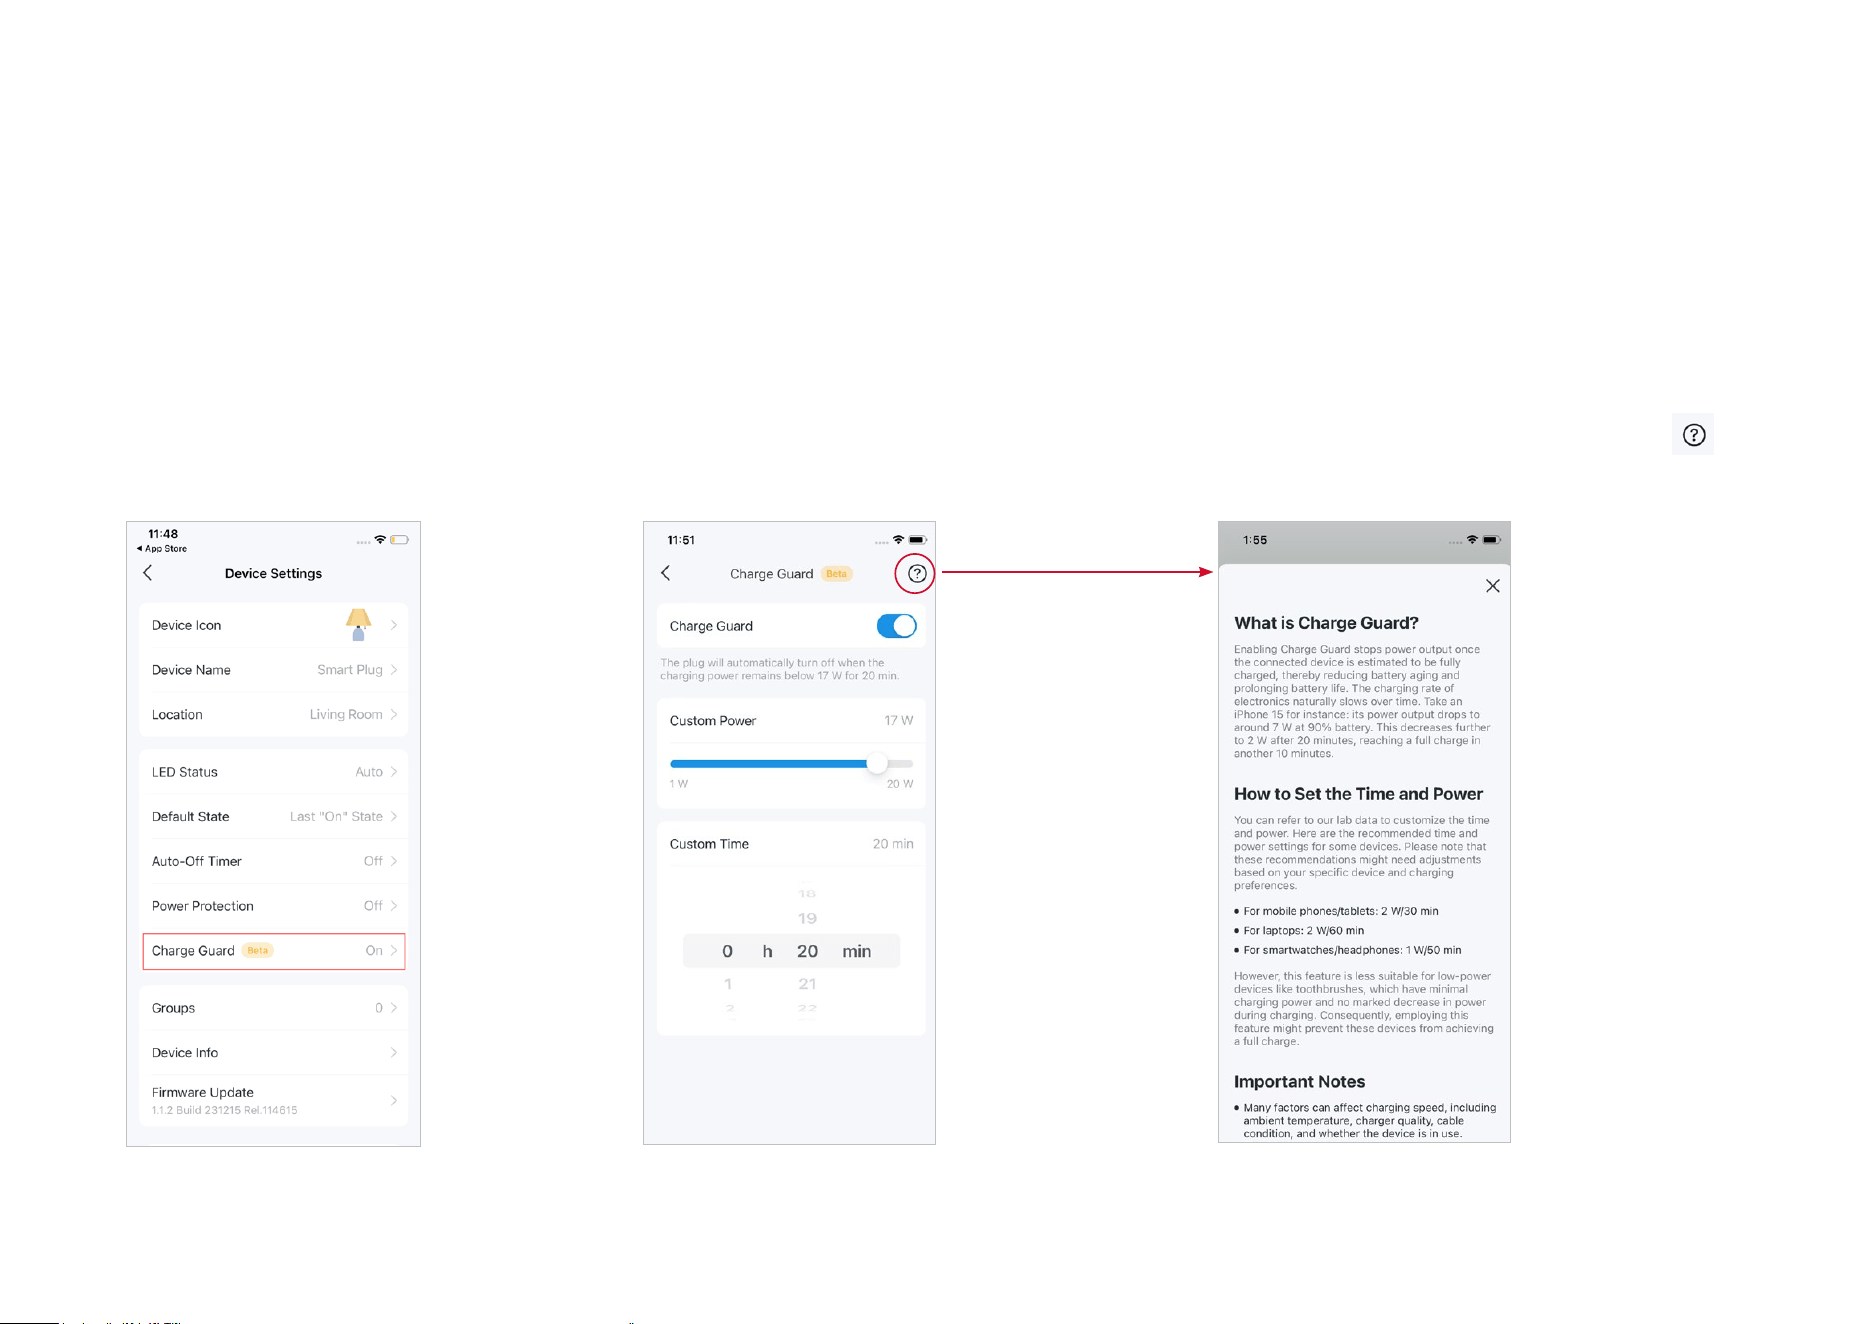
Charge Guard
Charge Guard could stop power output once the connected device is estimated to be fully charged, thereby reducing battery aging and prolonging
battery life.
Charge Guard
Set Charge Guard settings on the device
settings page.
Custom Power/Time
Customize the power and time as you need.
Once set, your plug will automatically turn off
when the charging power remains below the set
power for the designated period.
If you are not sure about the time and power
setttings or simply want to learn more, tap
on the upper right and refer to the FAQ.
*Features and images may vary from product models.
11
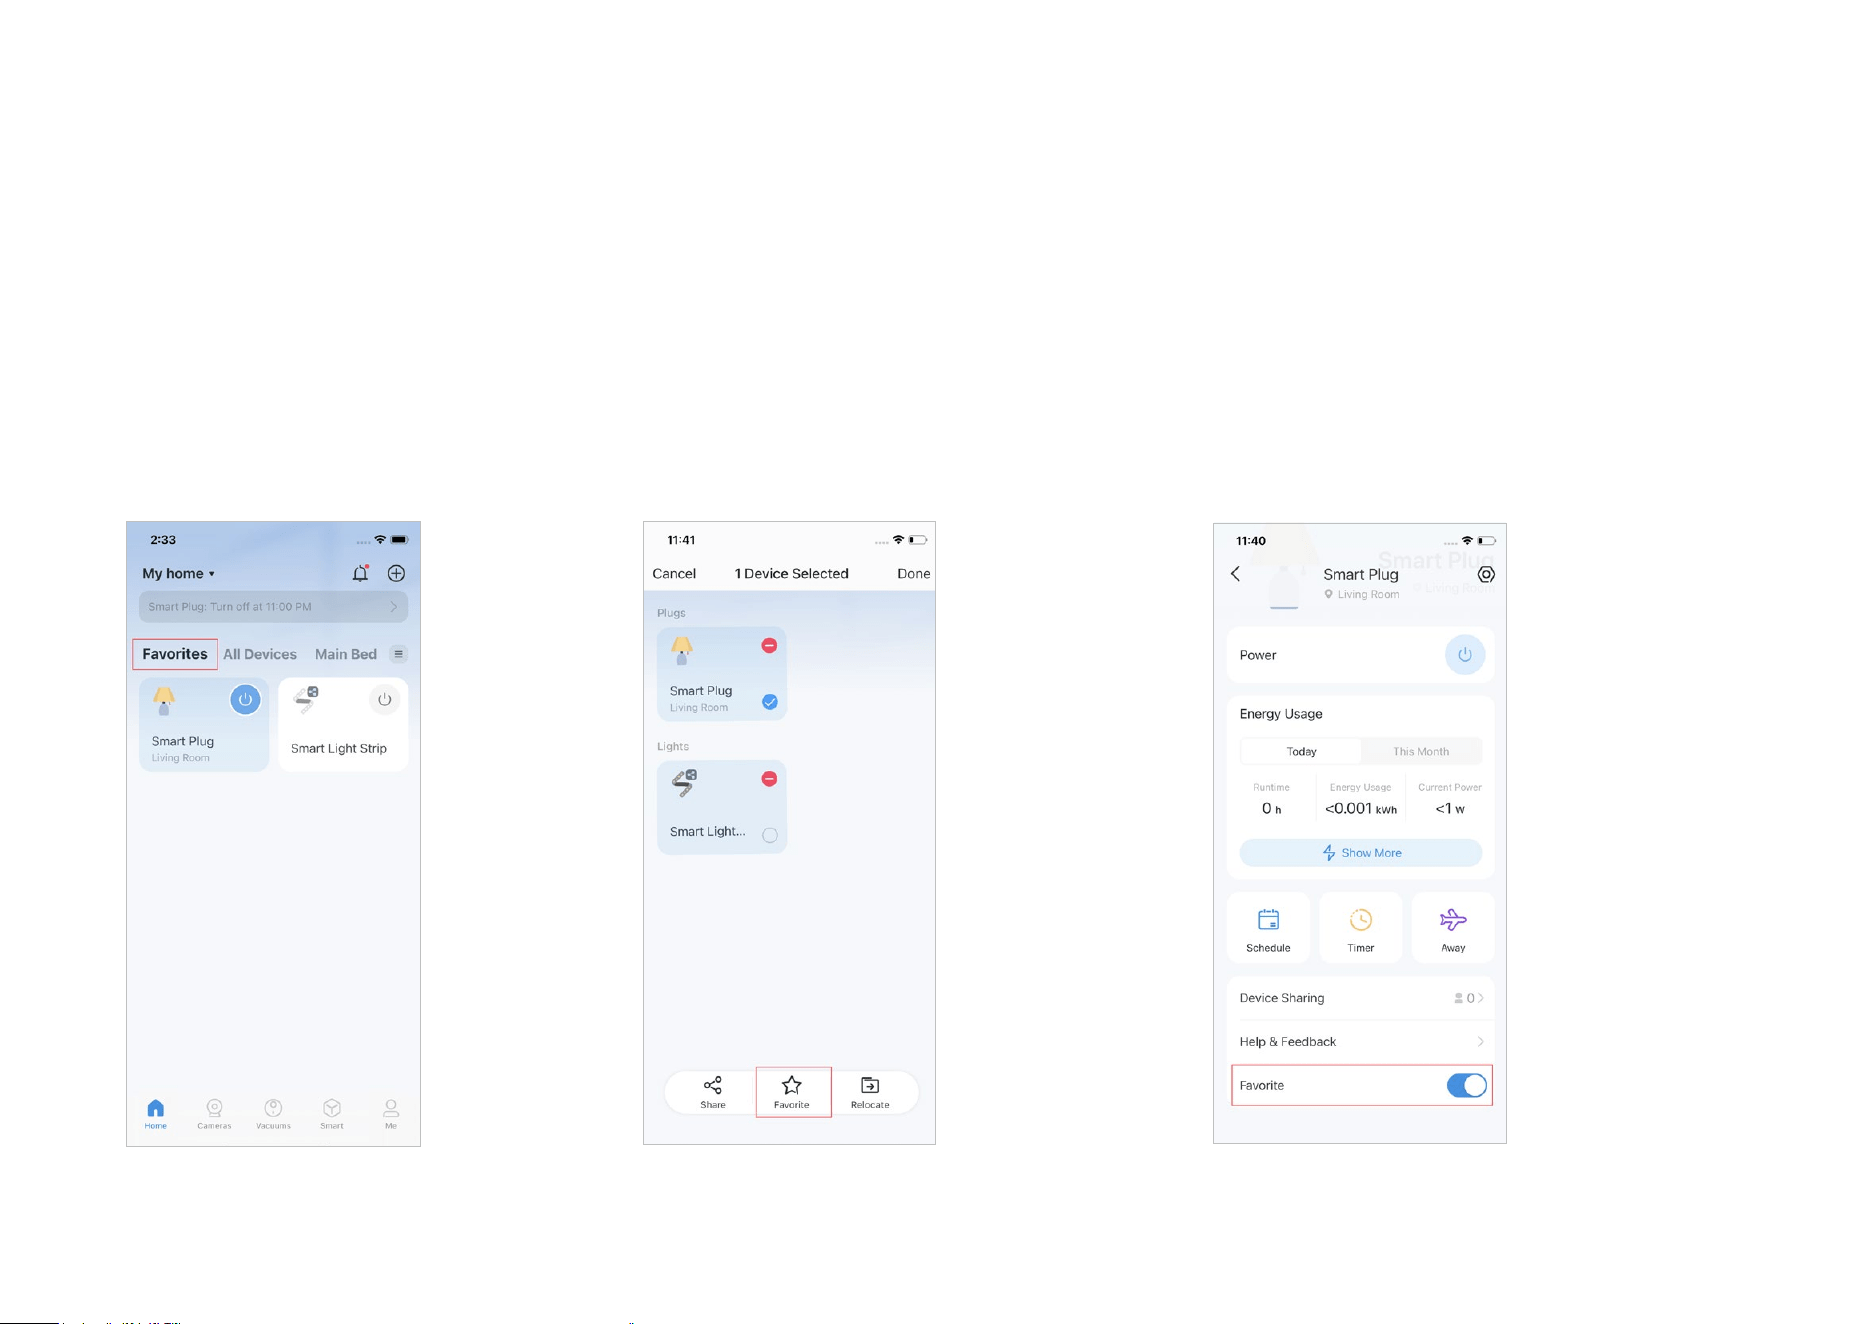
Favorite Devices
Gather the devices you use most often to Favorites so you can easily nd them.
Favorites
You can easily nd and control your plugs
under Favorites.
Method 1: On the Home Page
Long press your device card on the home page
and tap Favorite.
Method 2: On the Device Settings Page
Go to your plug's device settings page and turn
on Favorite at the bottom.
*Features and images may vary from product models.
12
Congure Your Smart Plug
You can congure your smart plug by setting Schedule, Timer, Away Mode and more.
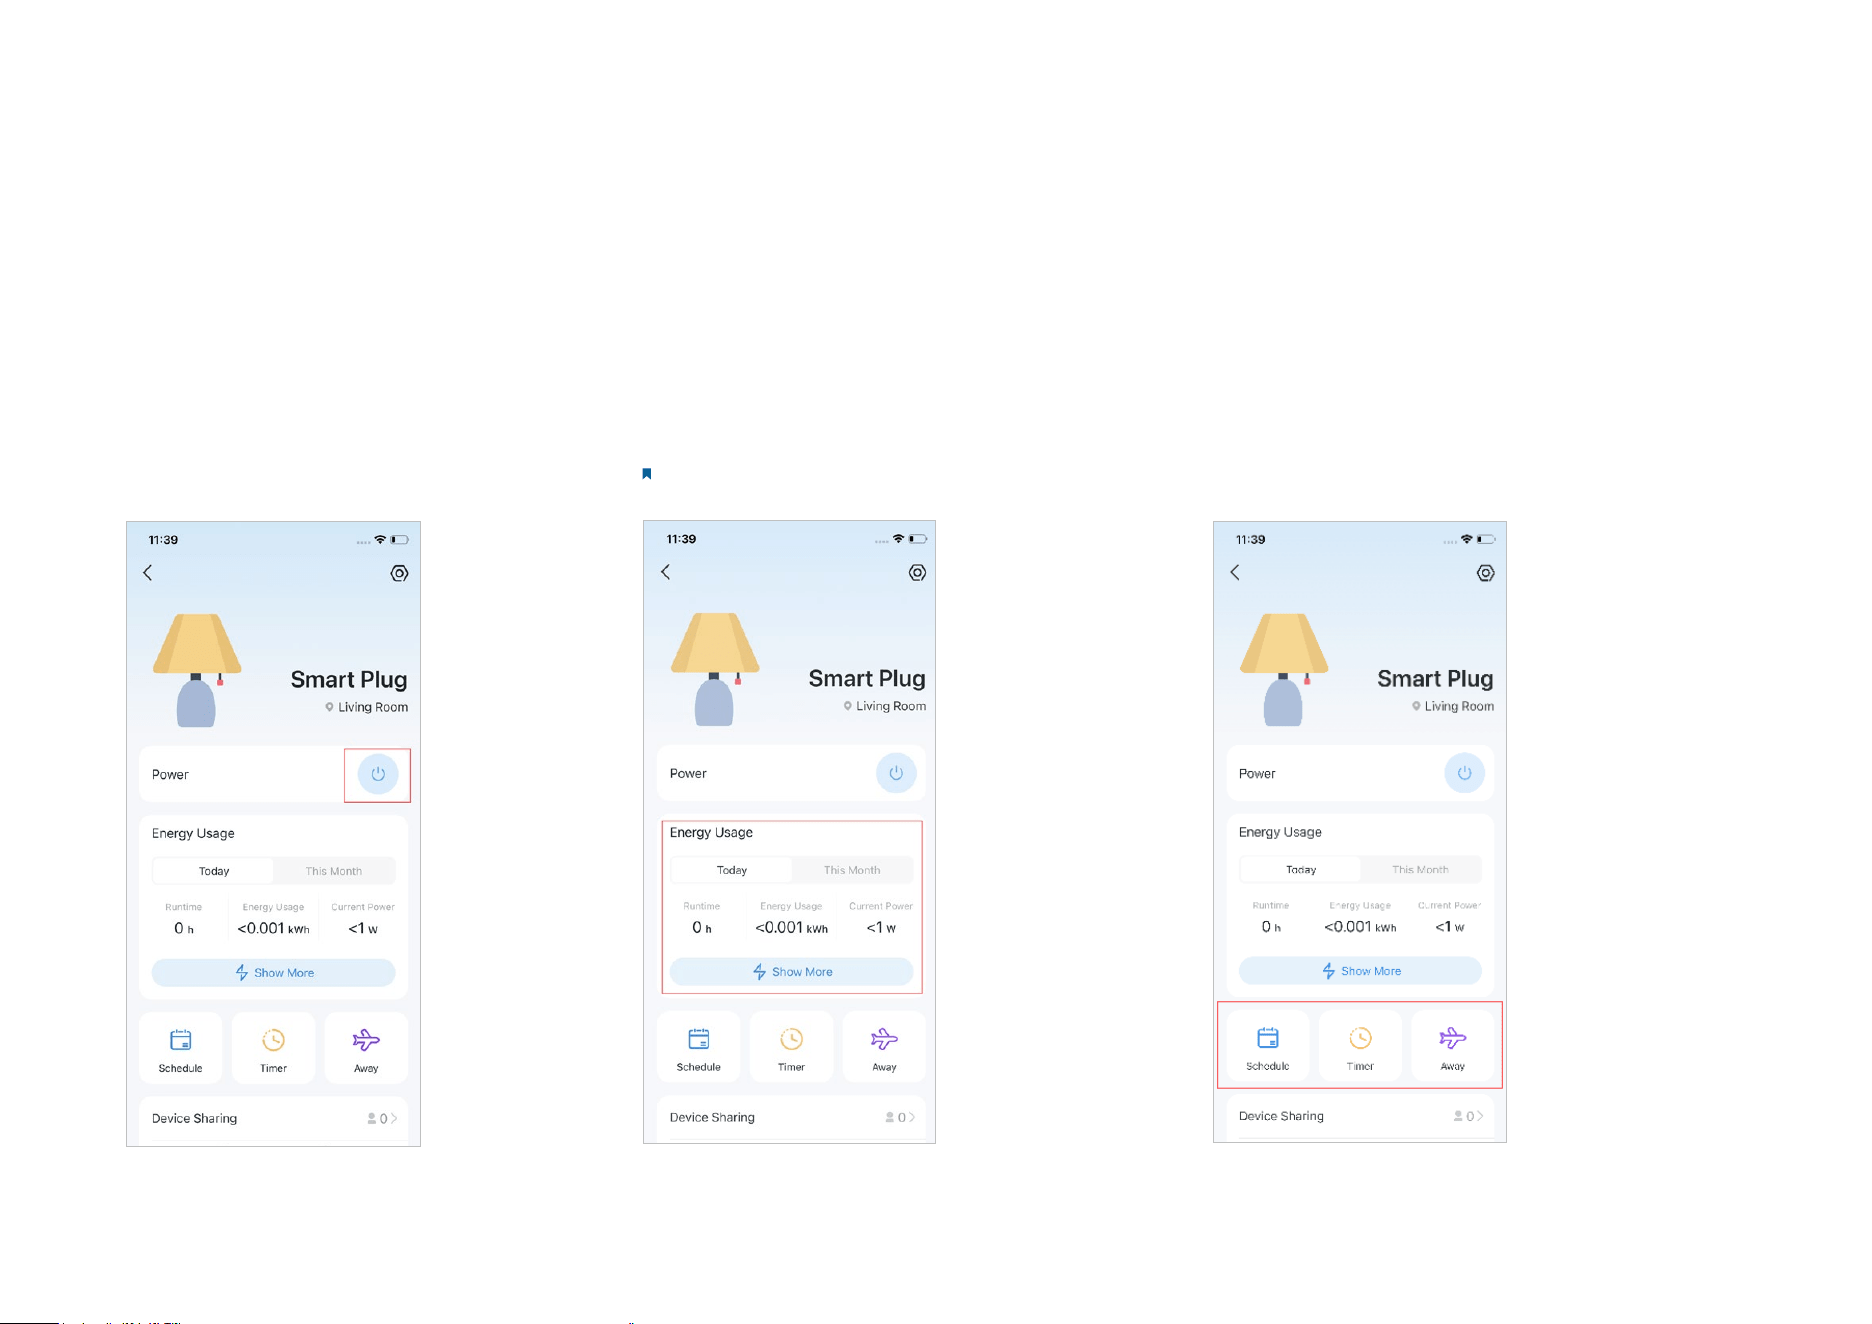
Power On/O At One Tap
Quickly power on or o your plug with a tap.
Check Runtime and Energy Usage
Check the runtime, energy use, and current
power of your plug today and this month.
Note: Not available for all Tapo smart plugs.
Main Features
On the device status page, you can use the
Schedule, Timer, and Away Mode features.
*Features and images may vary from product models.
13
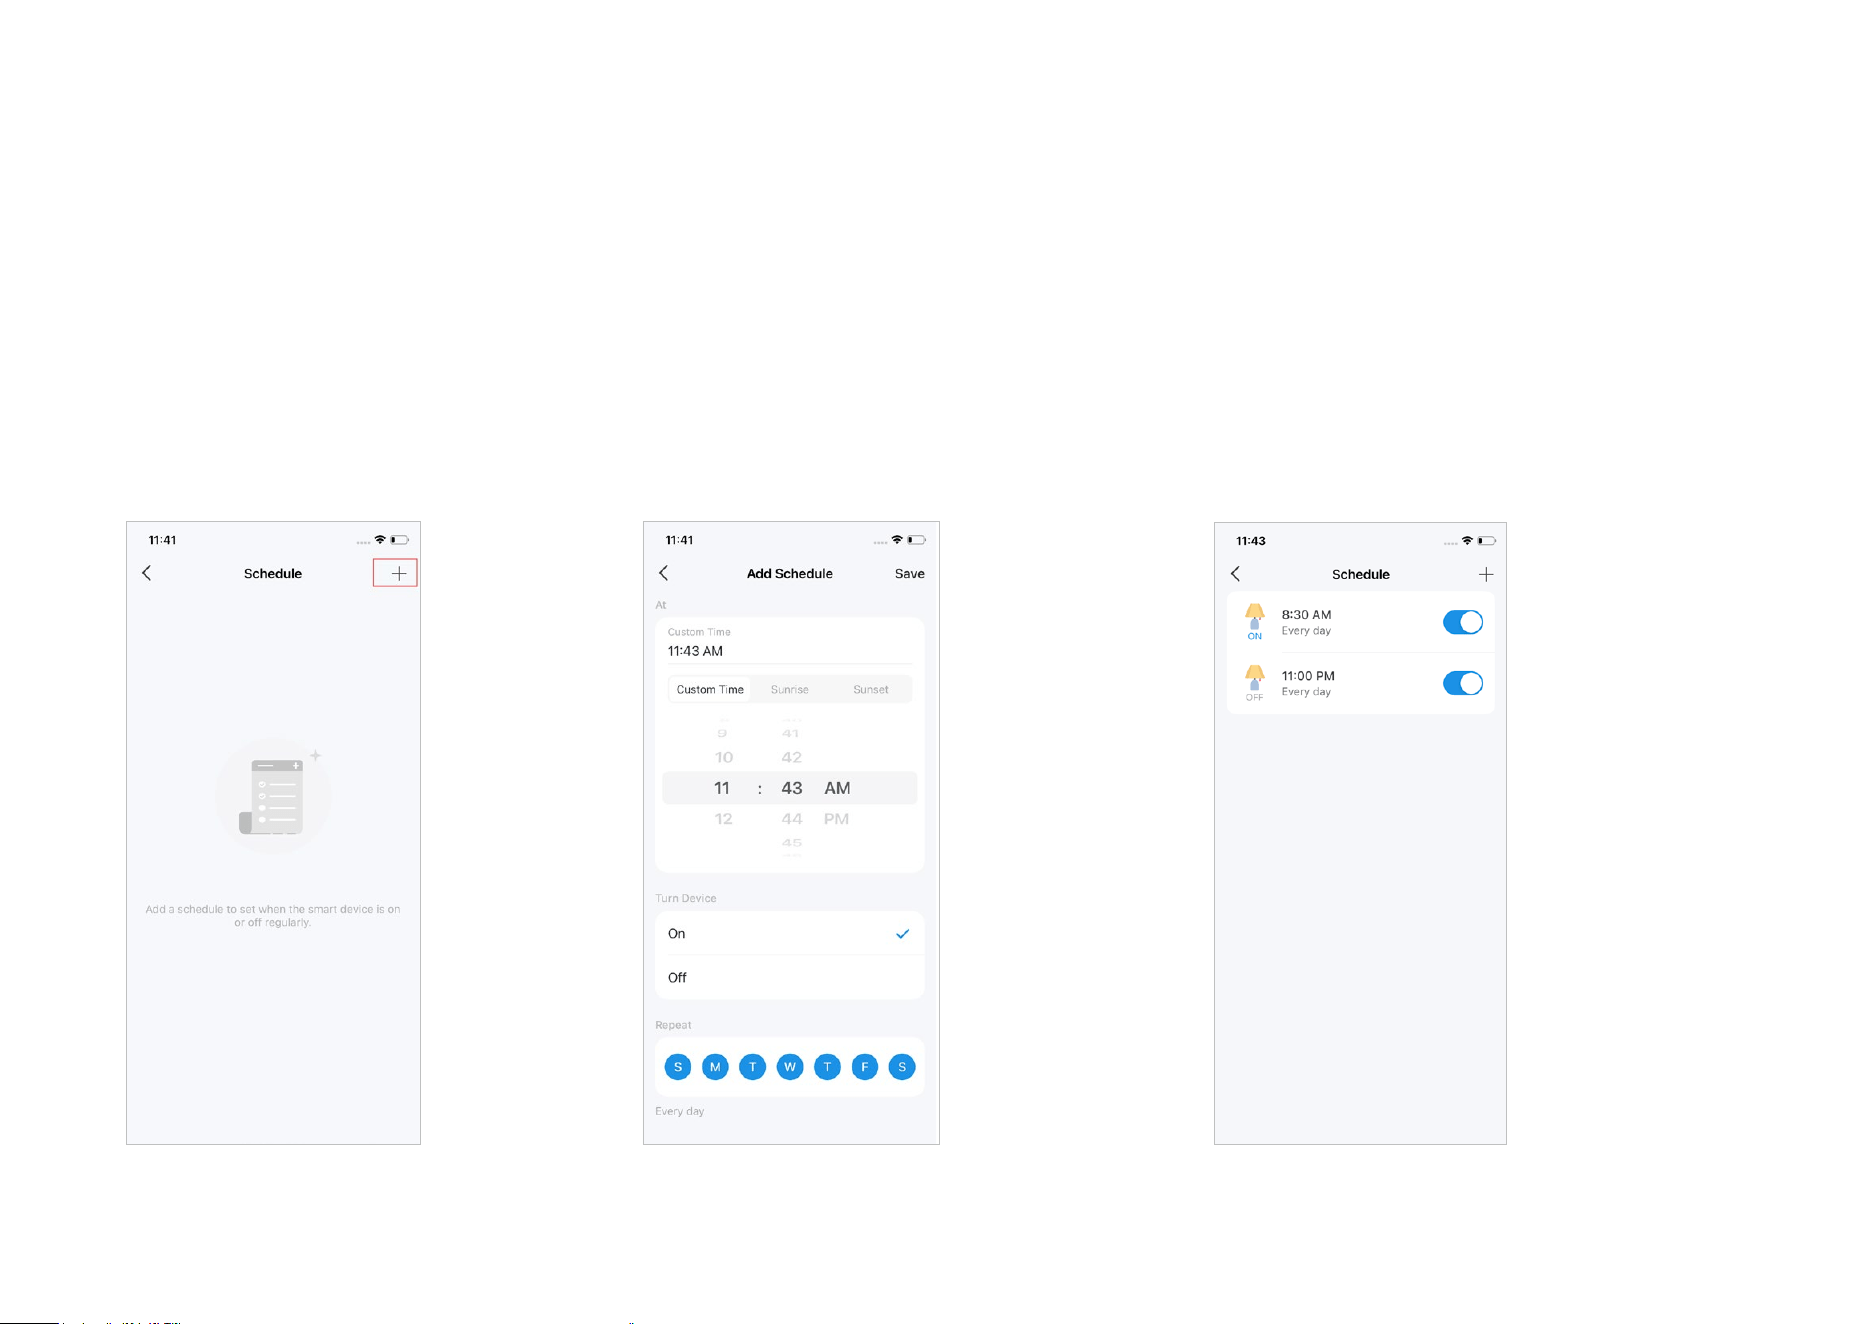
1. Tap Schedule on the Device Setting page
and tap the + icon in upper right corner.
2. Add a schedule for your plugged device to
automatically turn on/o to simplify your daily
routine.
For example, you can set your plugged light to
turn on at 8:30 AM and turn o at 11:00 PM every
day.
Set Schedules
Set Schedules to automatically turn on/o your device at set times according to your daily routine.
*Features and images may vary from product models.
14
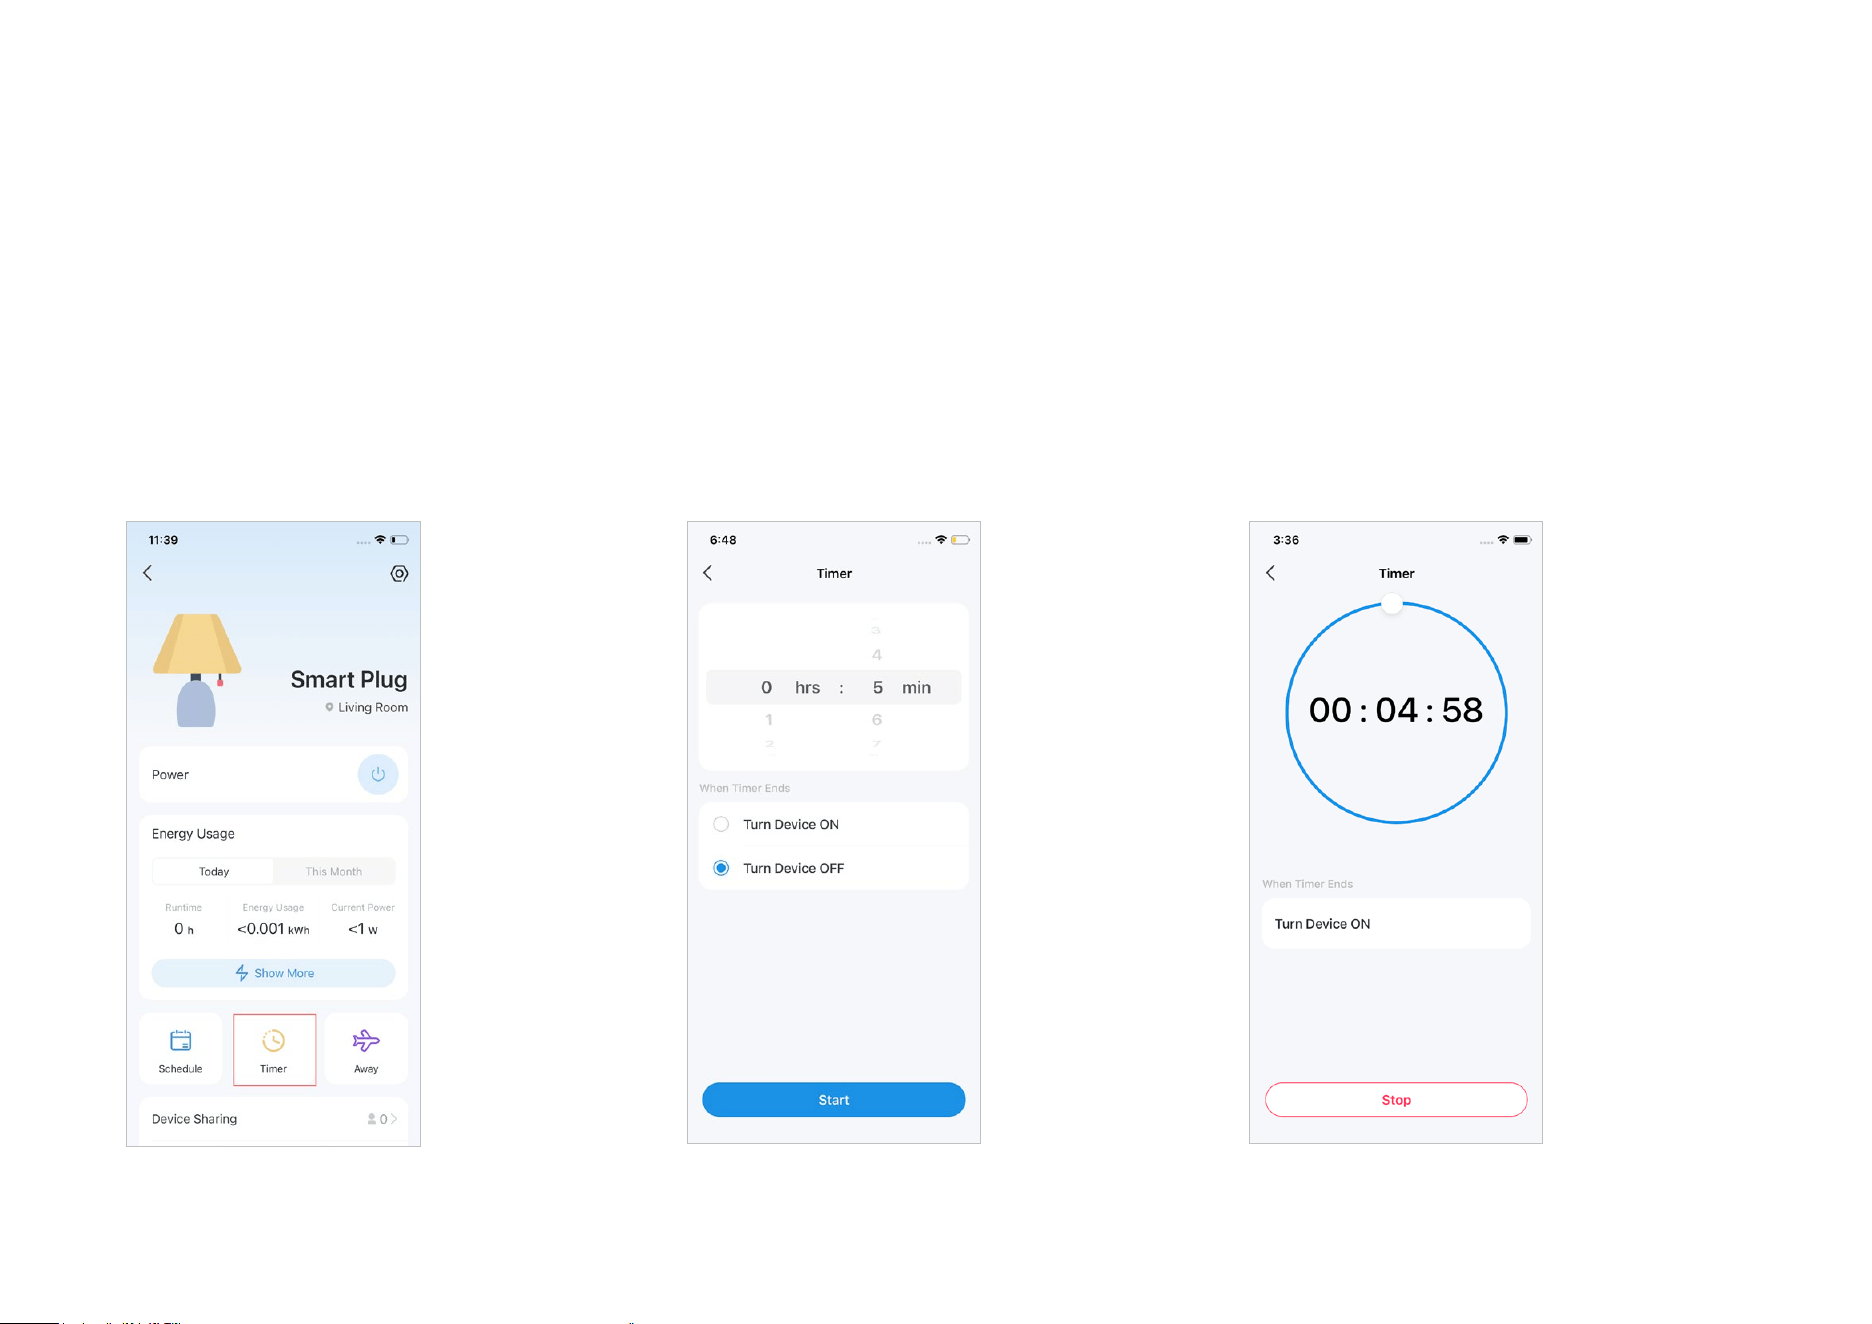
Method 1: On the Device Status Page
1. Tap Timer to set the timer settings.
2. Set the time you want your device to
automatically turn on/o after the timer ends.
Once you start the timer, a countdown will
begin, and your device will be automatically
turned on or o when the countdown reaches
zero.
Set Timer
Set the countdown timer and your smart plug will be automatically turned on/o after the time ends.
*Features and images may vary from product models.
15
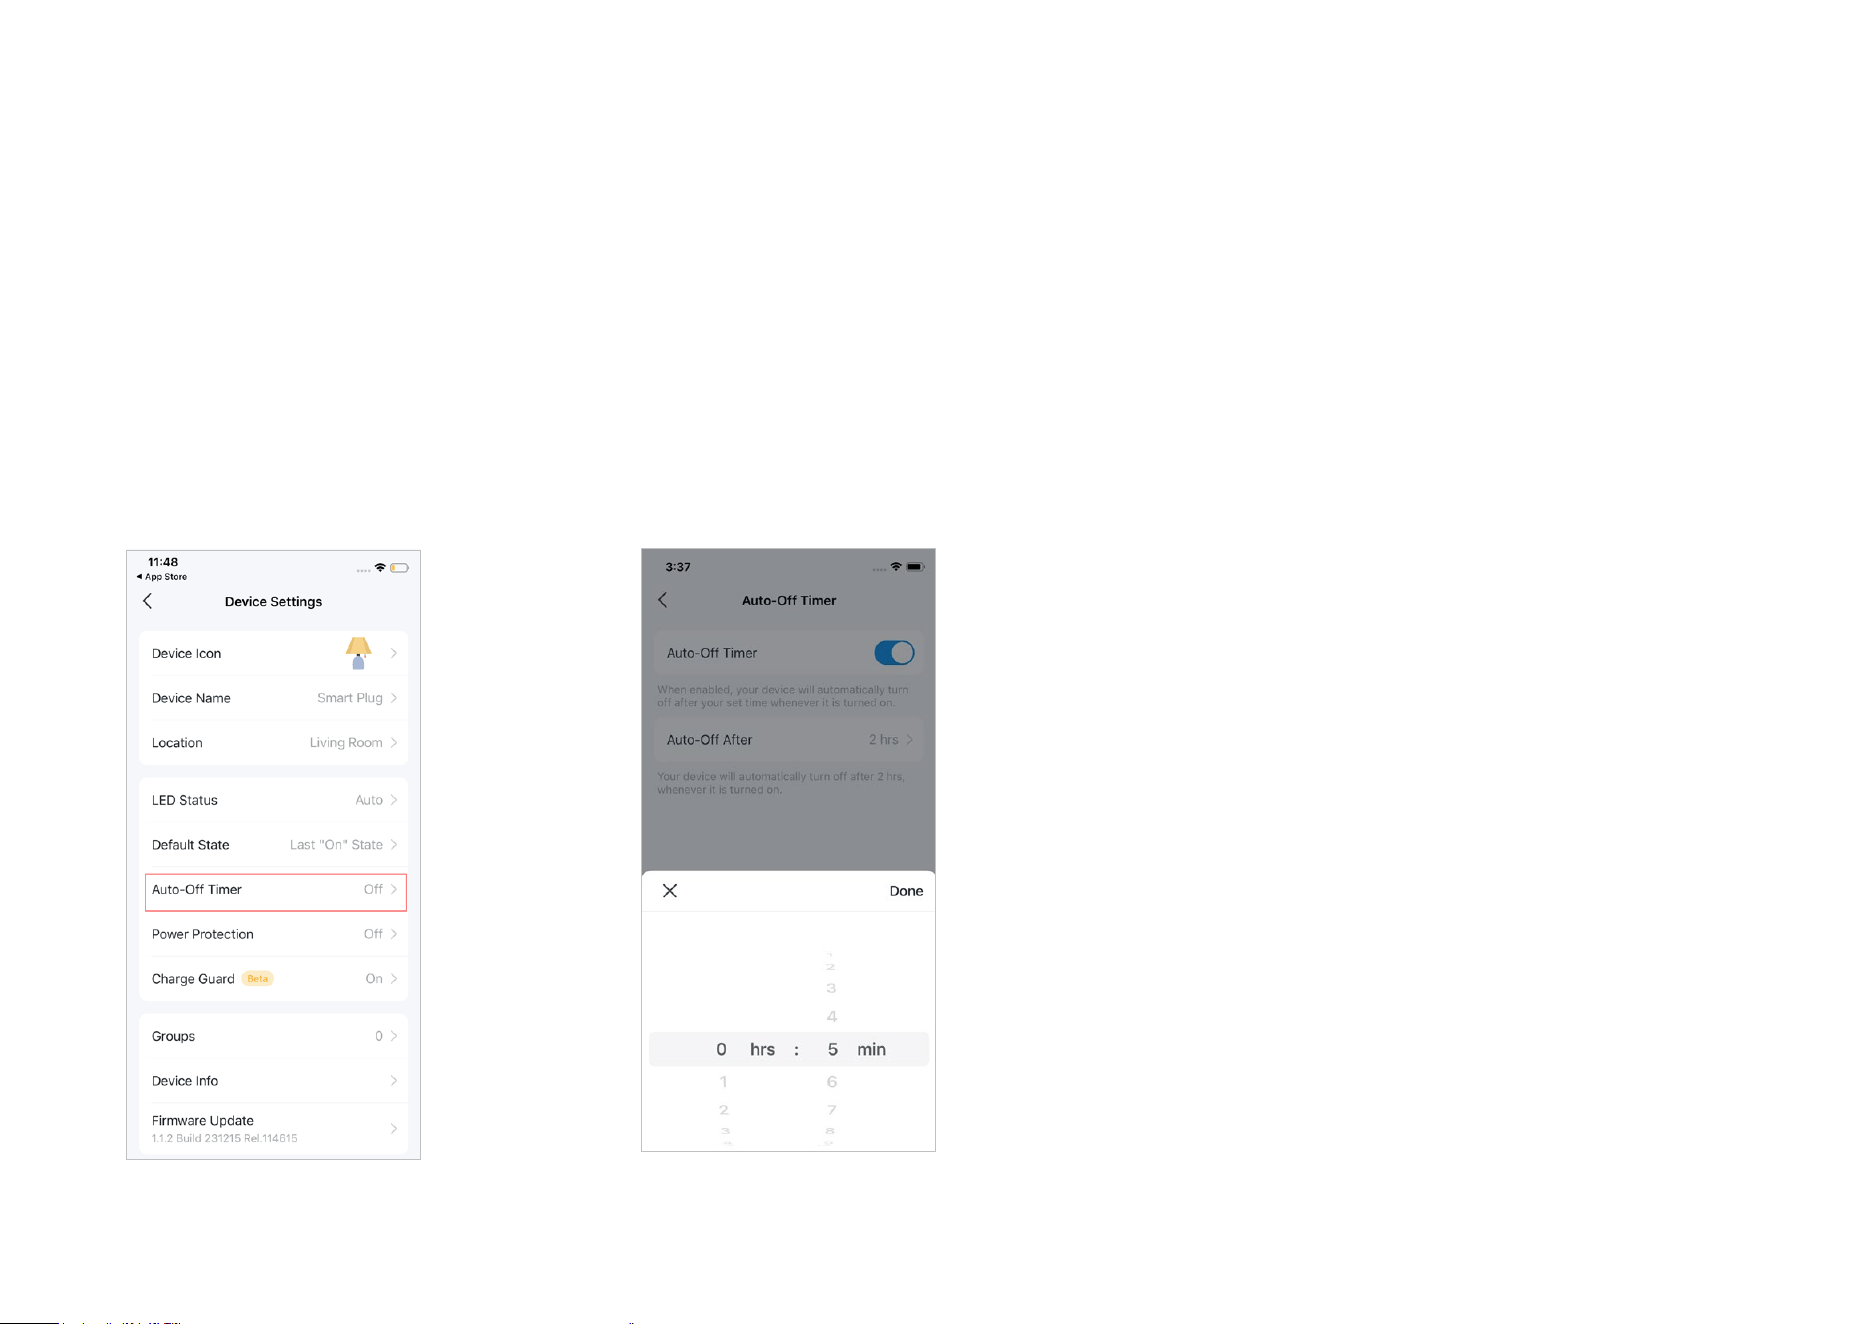
Method 2:
On the Device Settings Page
1. Choose the Auto-O Timer on the device
settings page.
2. Enable the timer and set the time. Once your device is turned on, it will automatically turn o after the
time ends.
*Features and images may vary from product models.
16
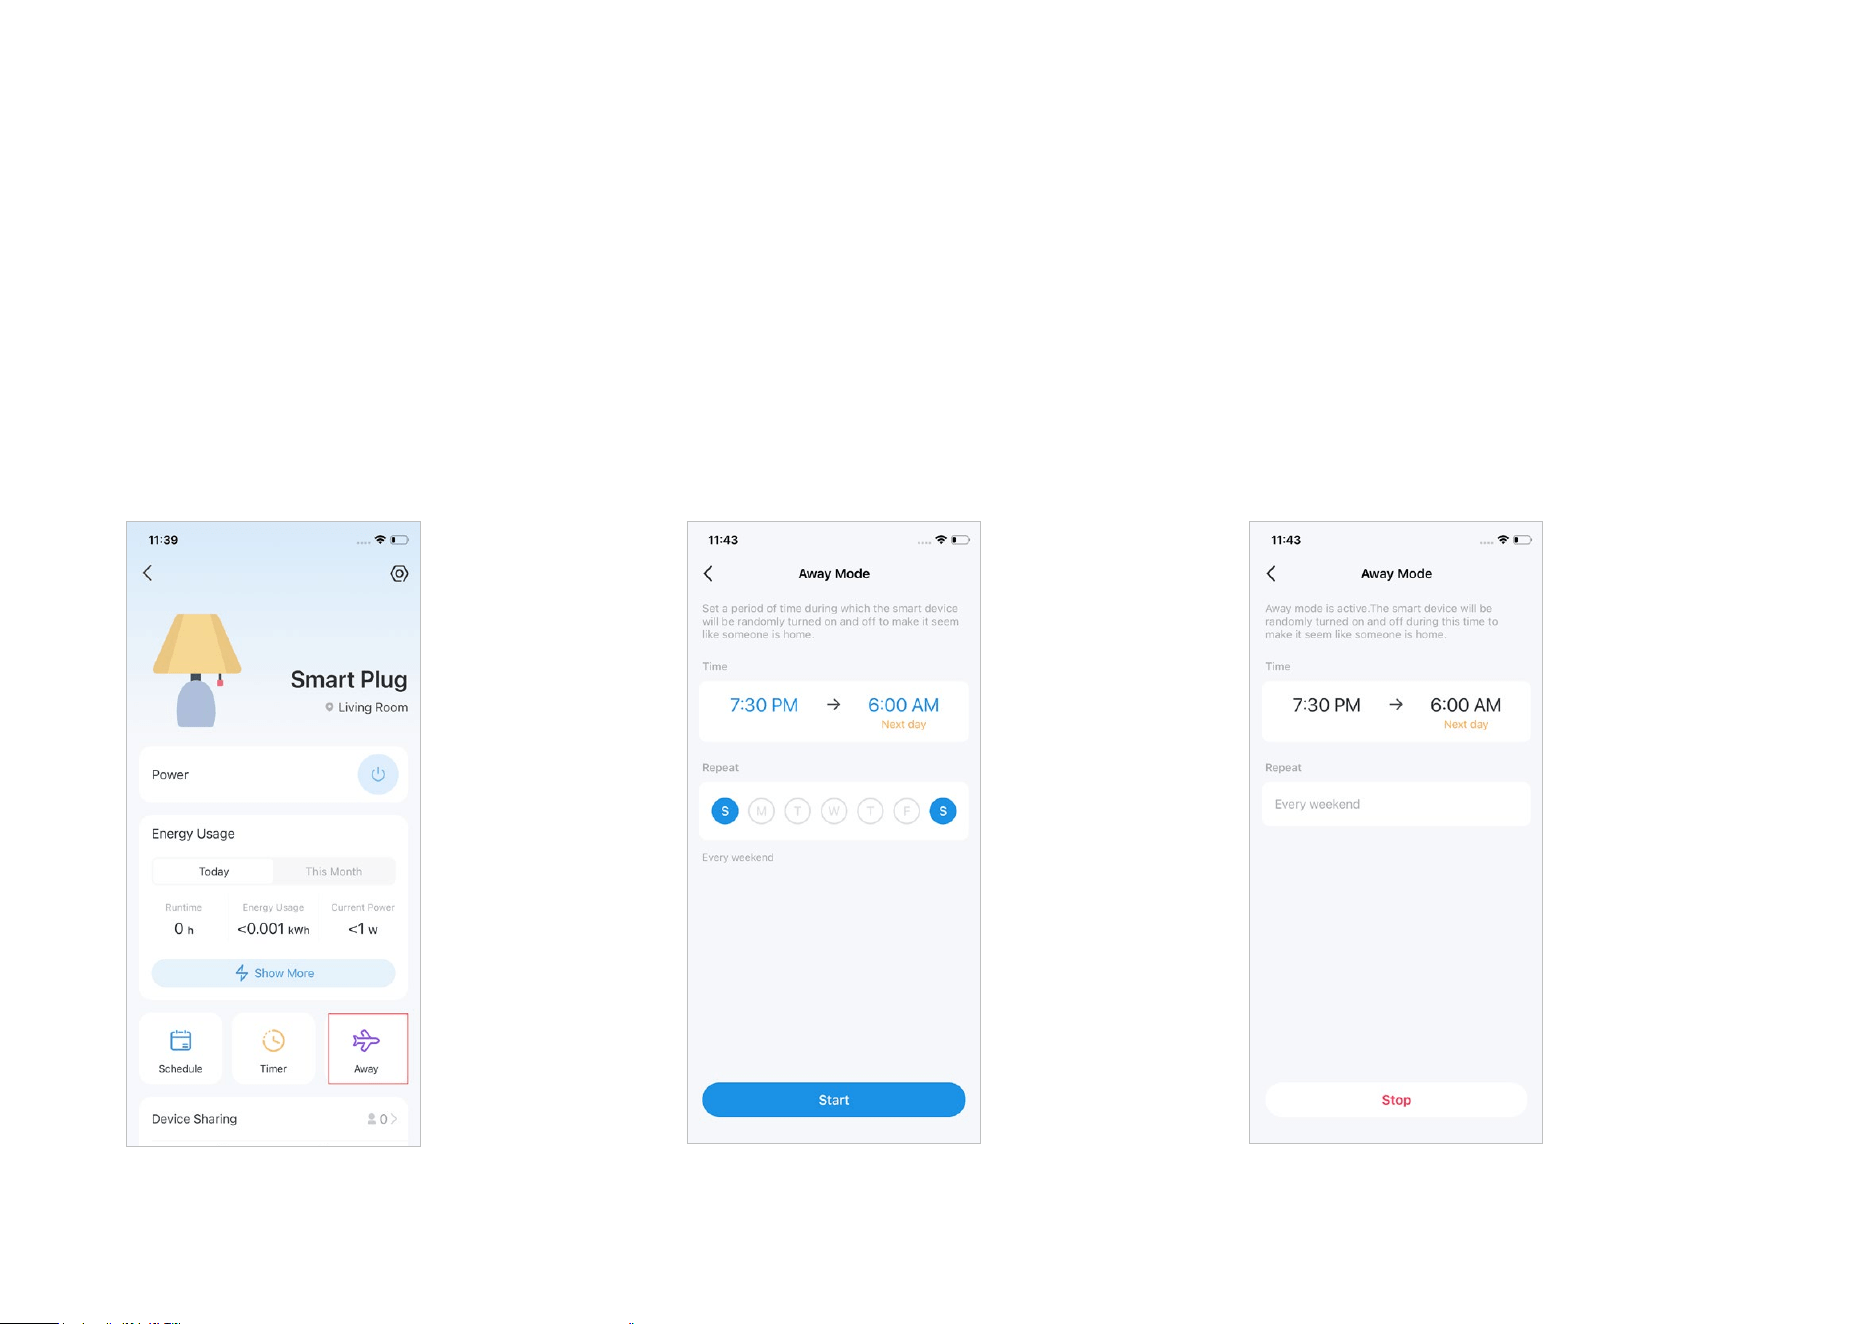
1. Tap Away Mode on the device status page.
2. Set the time and the days you want your device to randomly turn on/o to make it seem like
someone is at home.
e.g. I want the light to turn on and o between 07:30 to 06:00 every Saturday and Sunday.
Set Away Mode
Set Away Mode for your smart plug to turn on/o automatically at random intervals while you are away to make the appearance that someone is at
home
*Features and images may vary from product models.
17
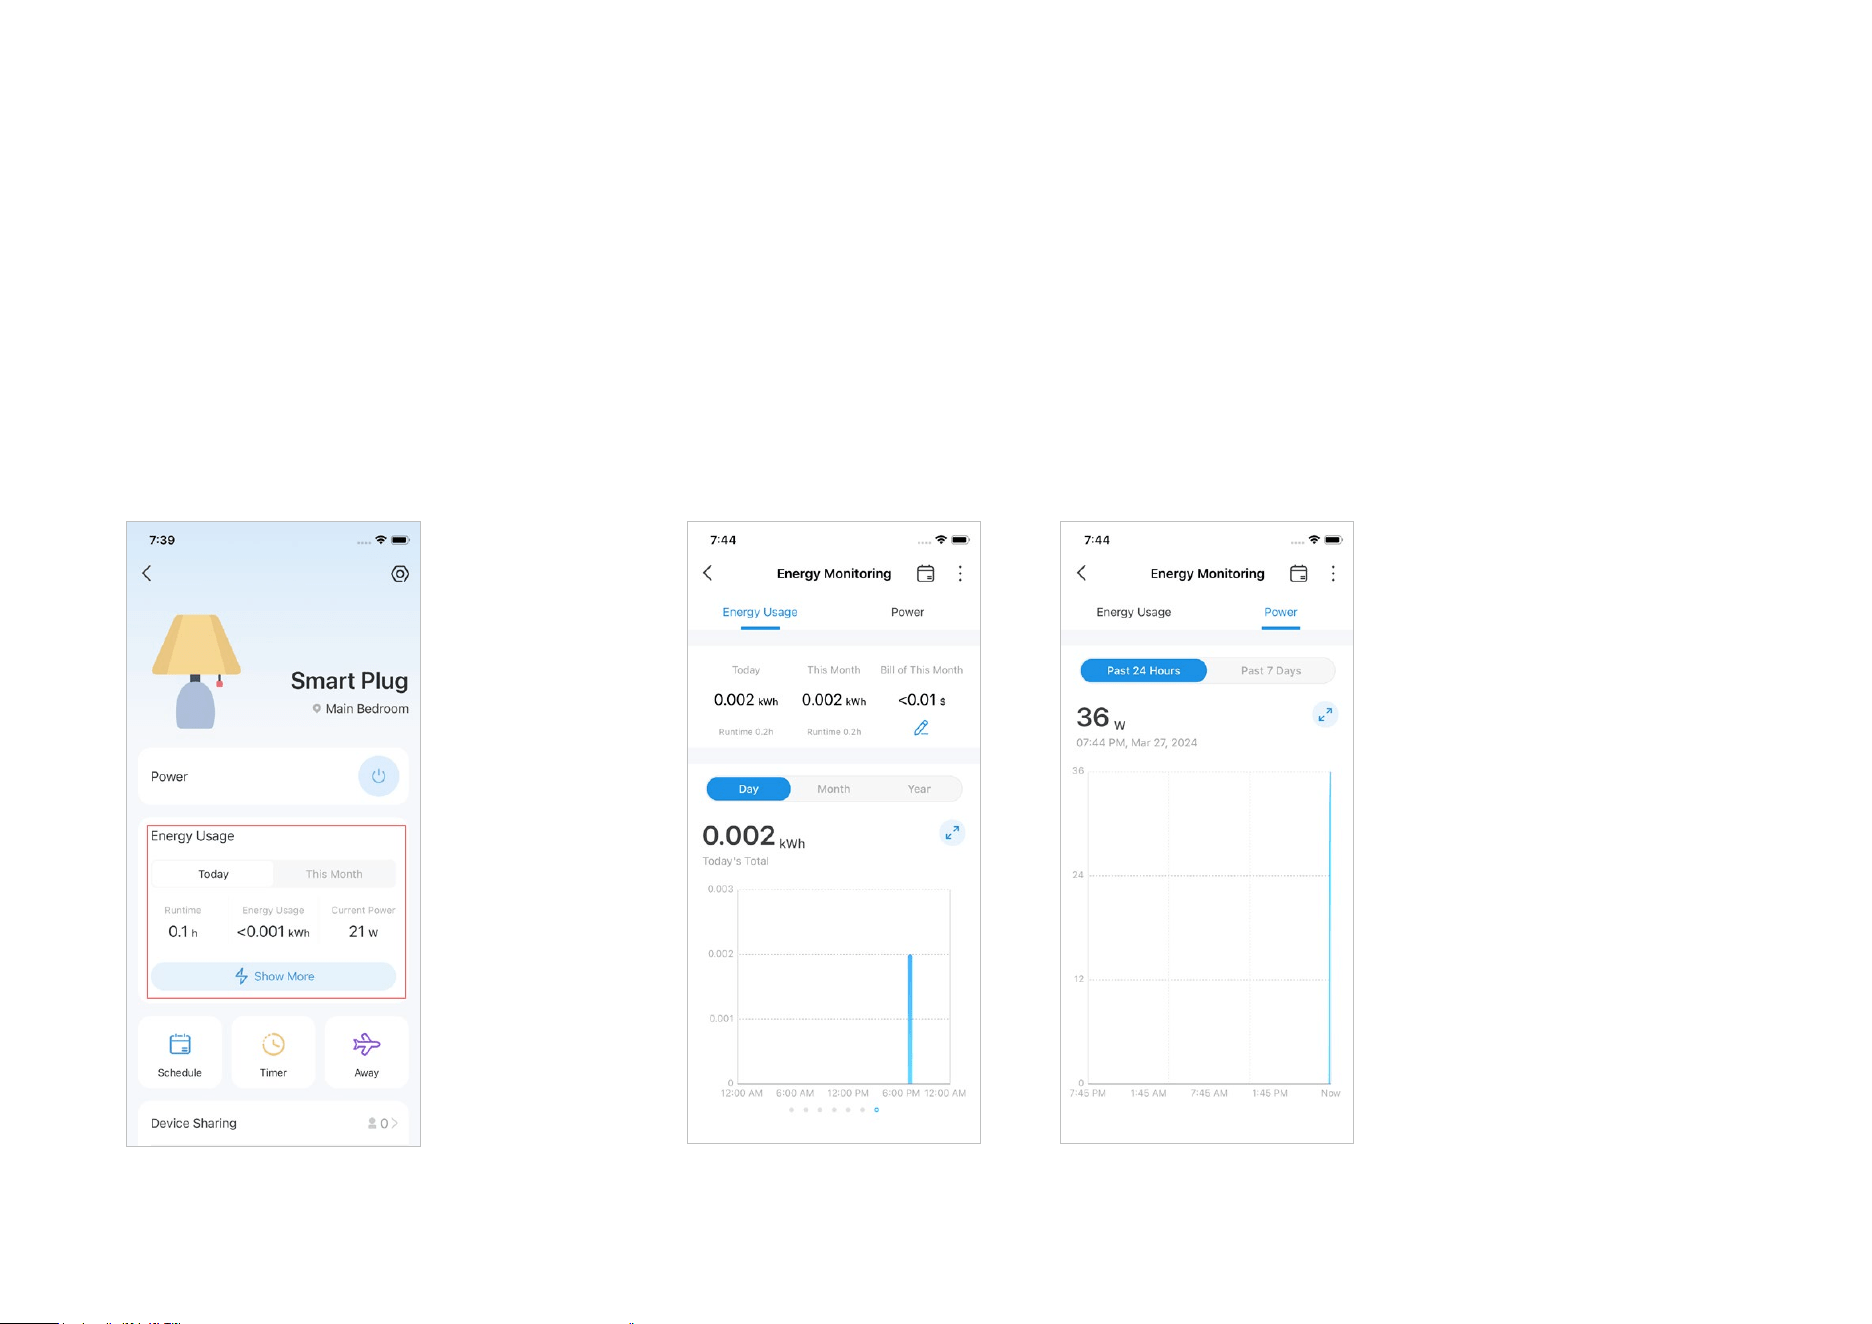
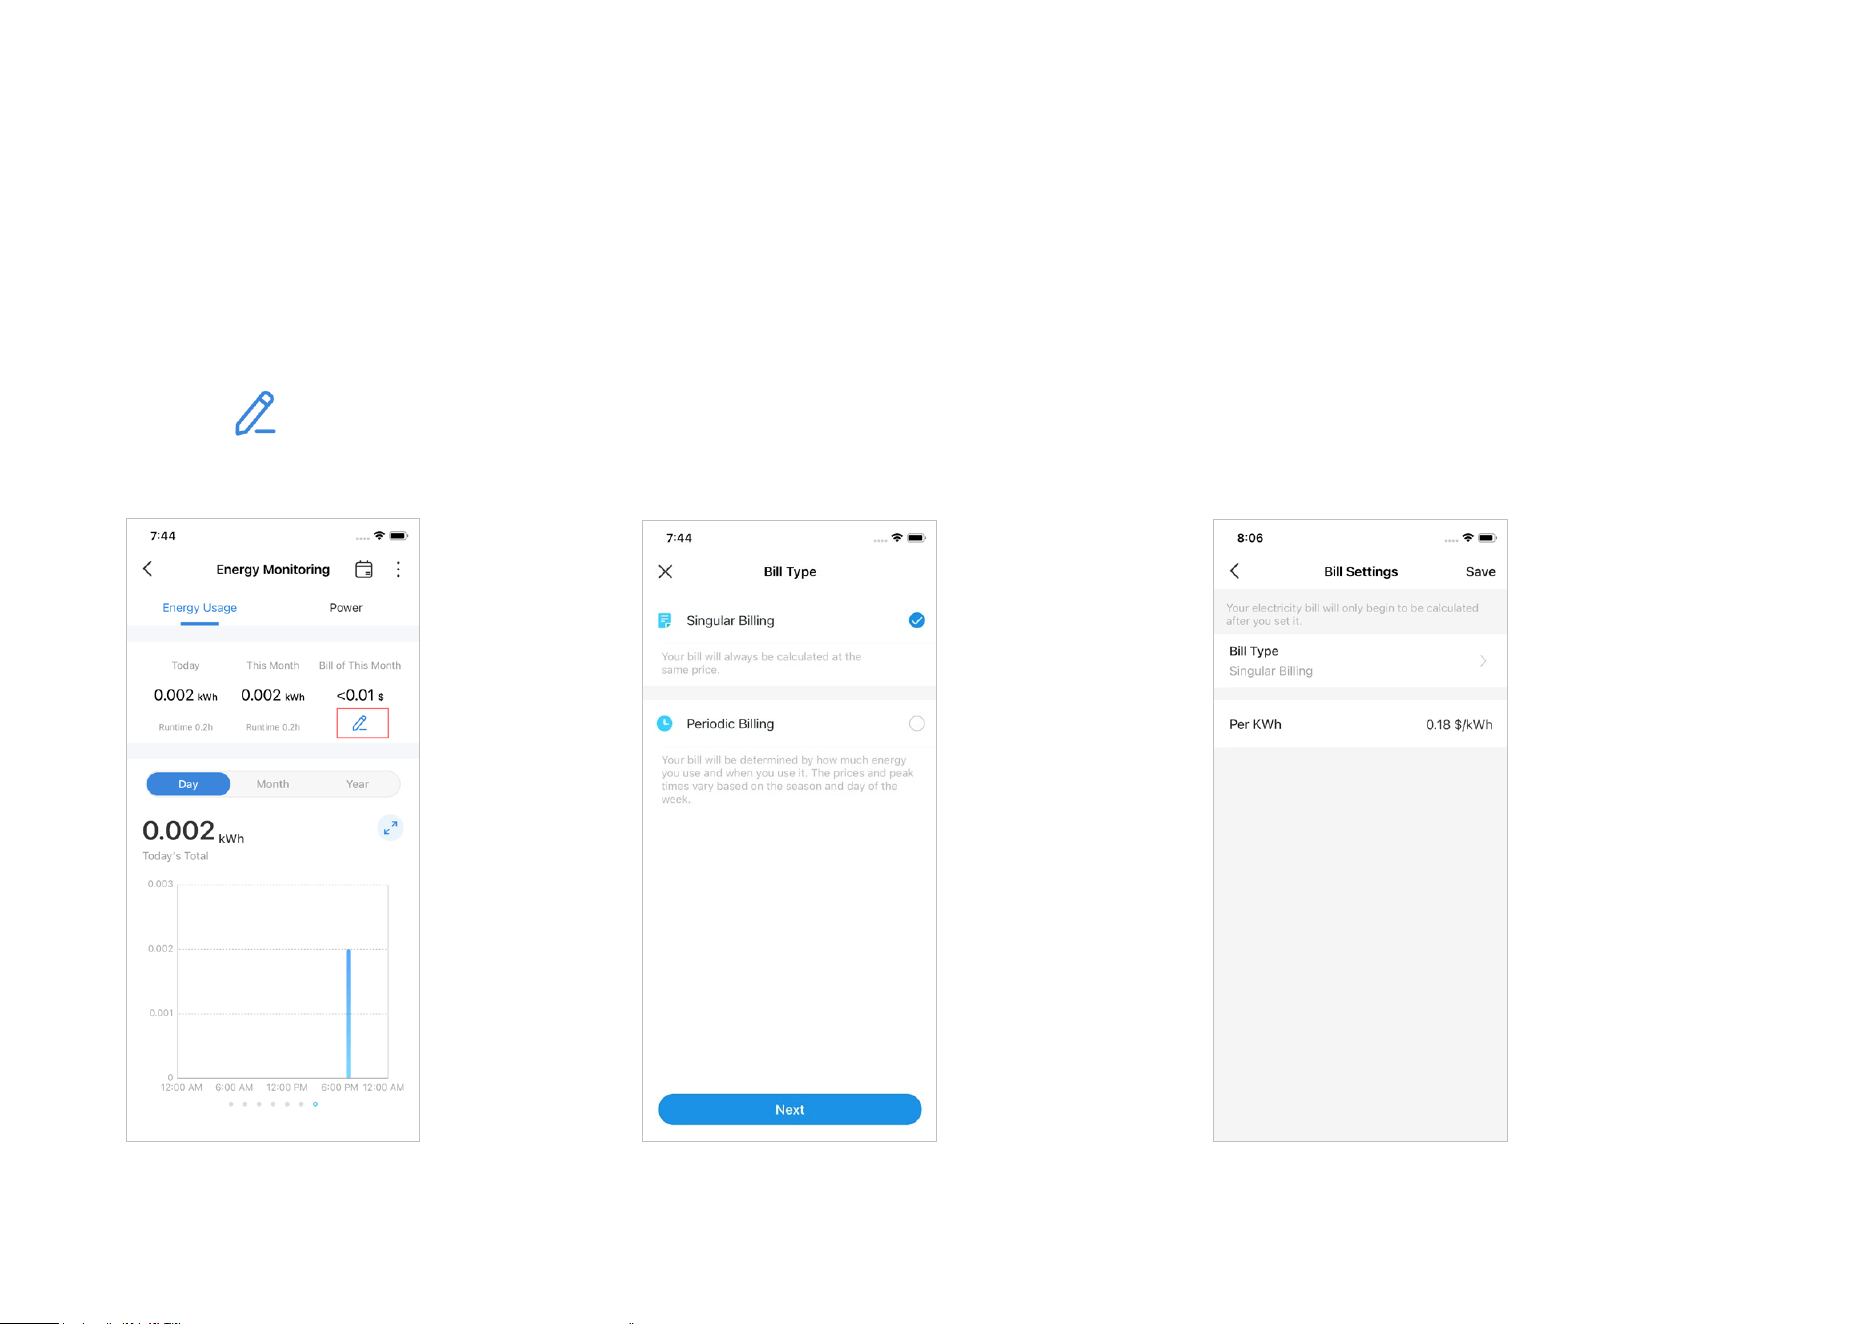
1. Engery Monitoring
Your device's runtime, real-time energy usage,
and currect power today and this month are
shown clearly on the device status page.
2. Energy/Power Usage
Tap Show More to learn about the details about your daily, monthly, and yearly energy usage and
power usage in the past 24 hours or 7 days.
Energy Monitoring
Use Energy Monitoring to check your device's runtime, real-time energy use, and current power today and this month.
*Features and images may vary from product models.
18
2.1 Bill Settings
Click the icon on the energy
monitoring page to custom your bill settings.
2.1.1 Singular Billing
For Singular Billing, your bill will only be calculated
at the same price.
You can set the electricity price as you need and
it will only be calculated after you set it.
*Features and images may vary from product models.
19
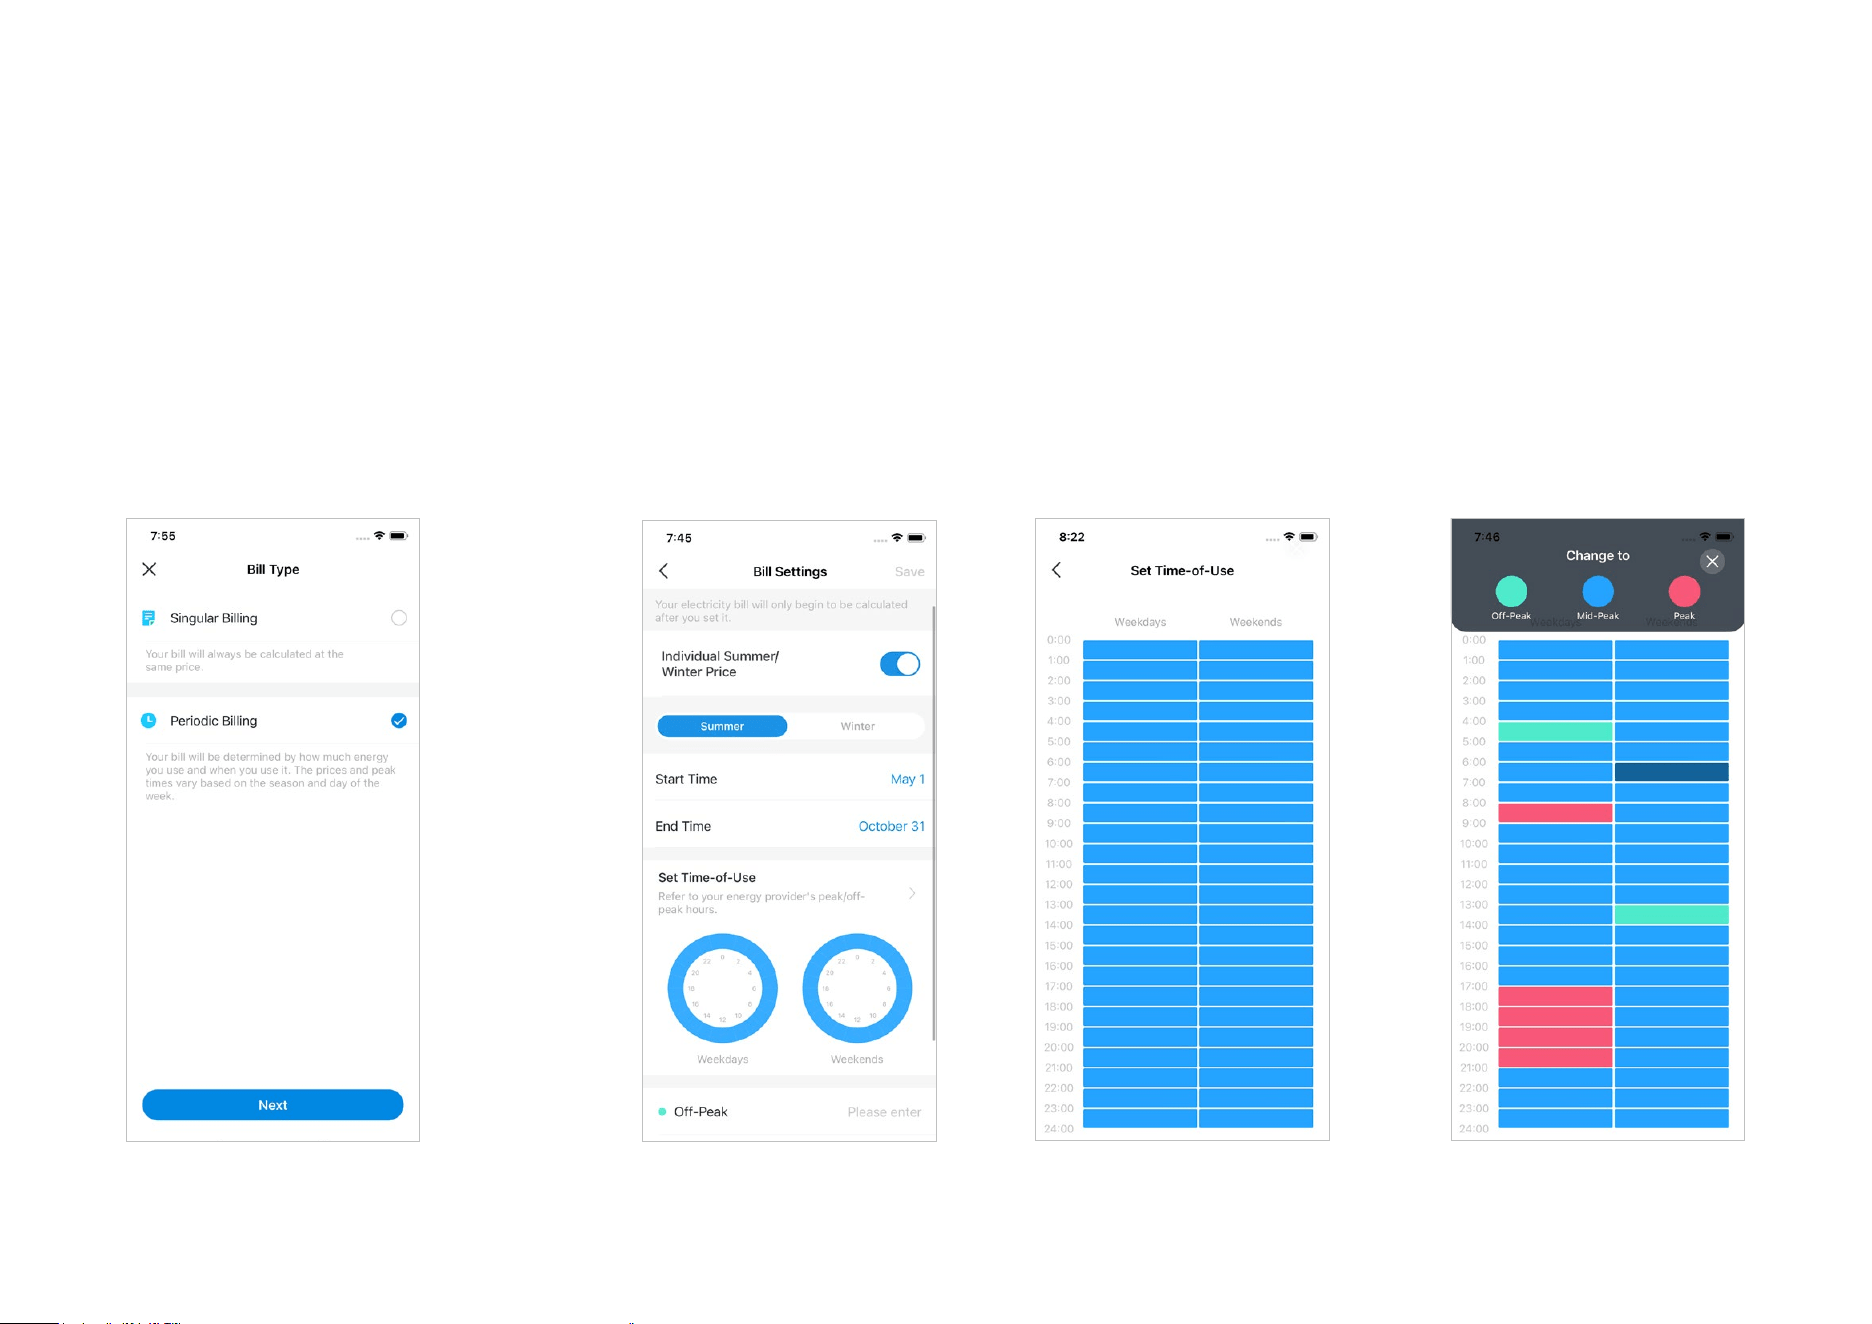
2.1.2 Periodic Billing
For Periodic Billing, your bill will be
determined by how much energy and when
you use it.
You can set the prices for dierent peak times as you need based on the season and day of the week
with Individual Summer/Winter Price and Set Time of Use options.
*Features and images may vary from product models.
20
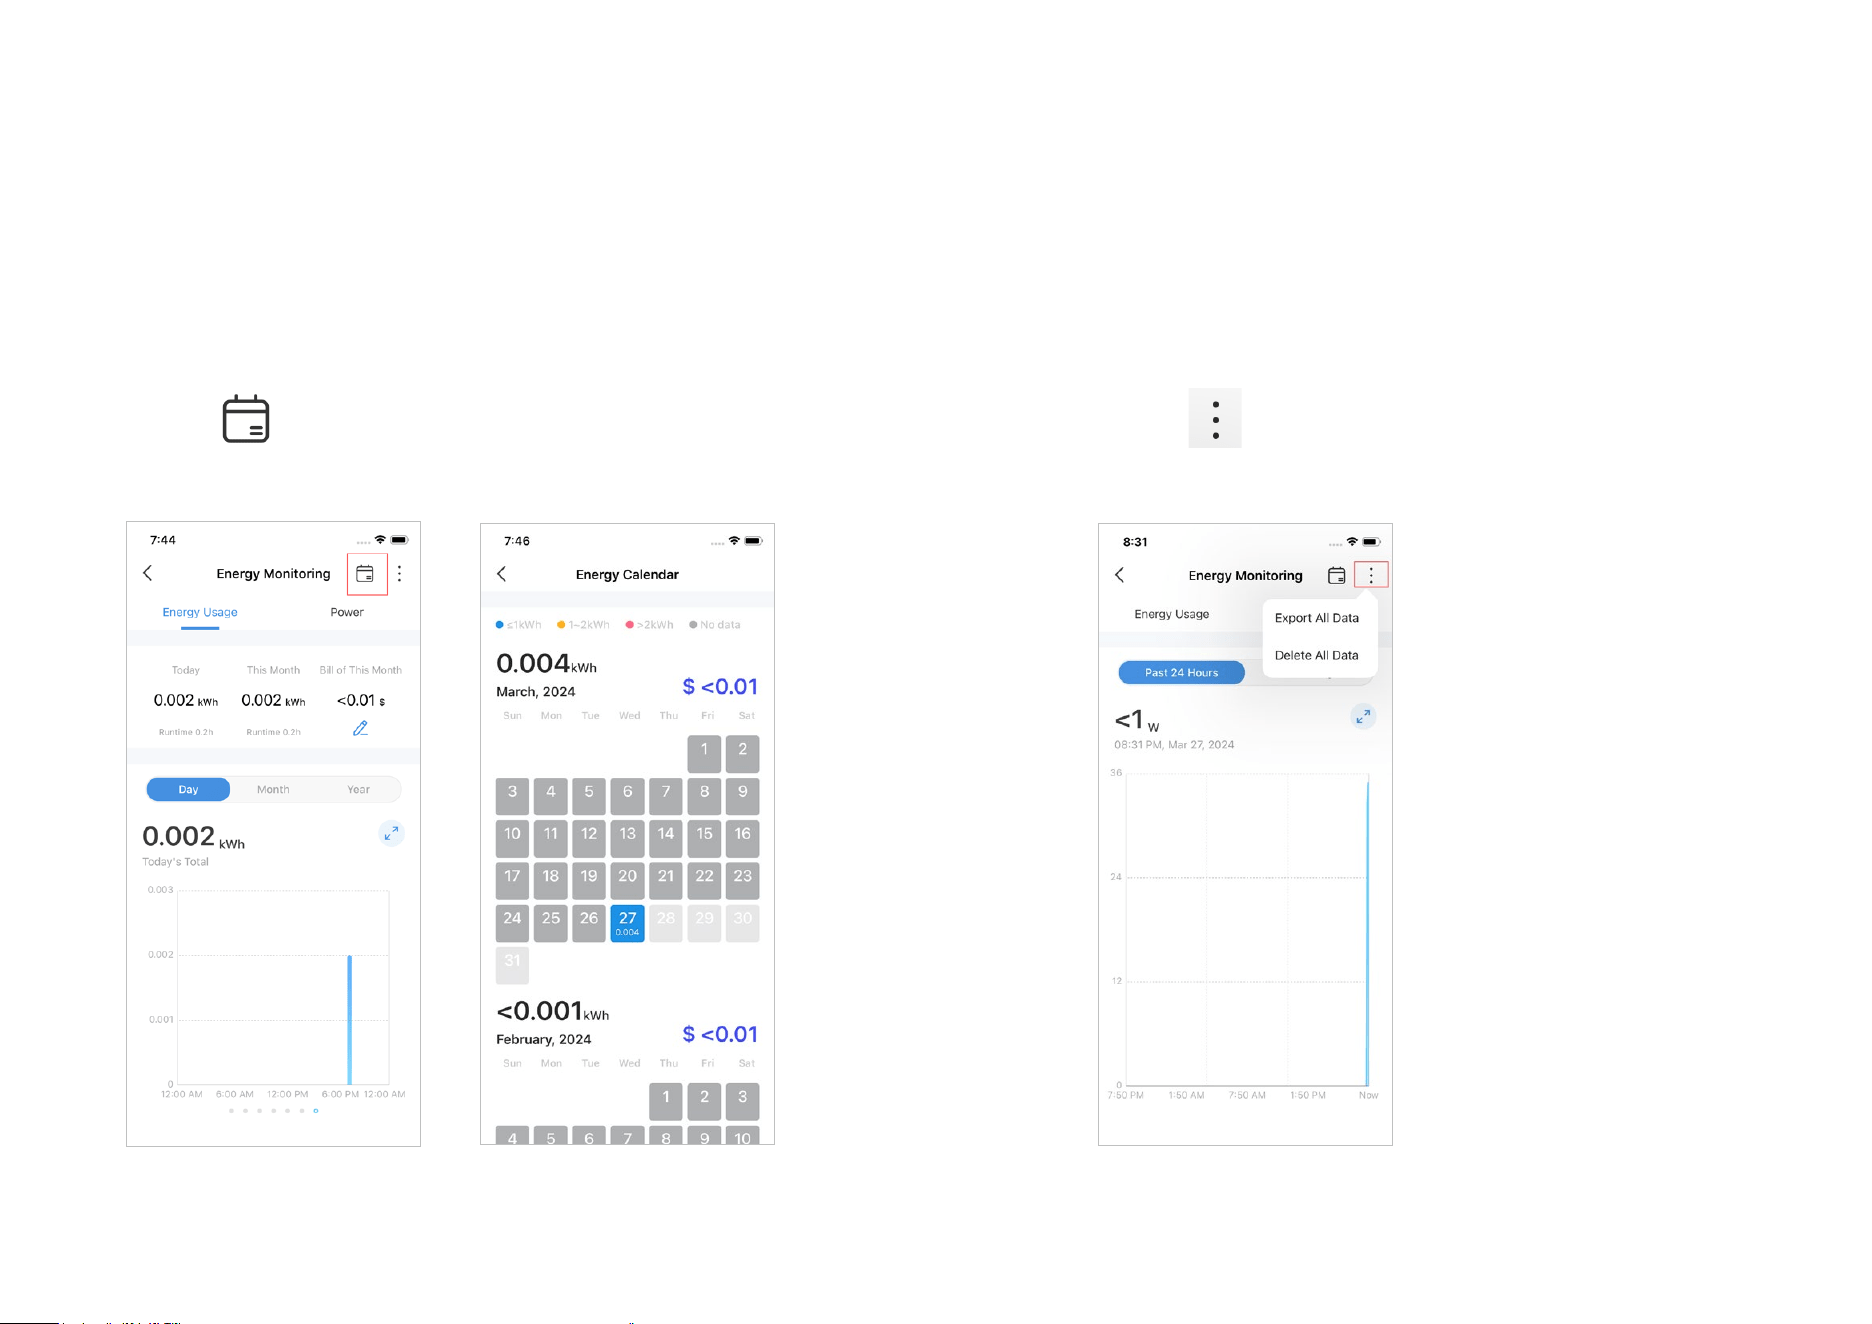
3. Energy Calendar
Tap the icon on the upper right to check your energy calender.
4. Export/Delete Data
Tap the icon on the upper right to export or delete
your energy monitoring data.
*Features and images may vary from product models.
21
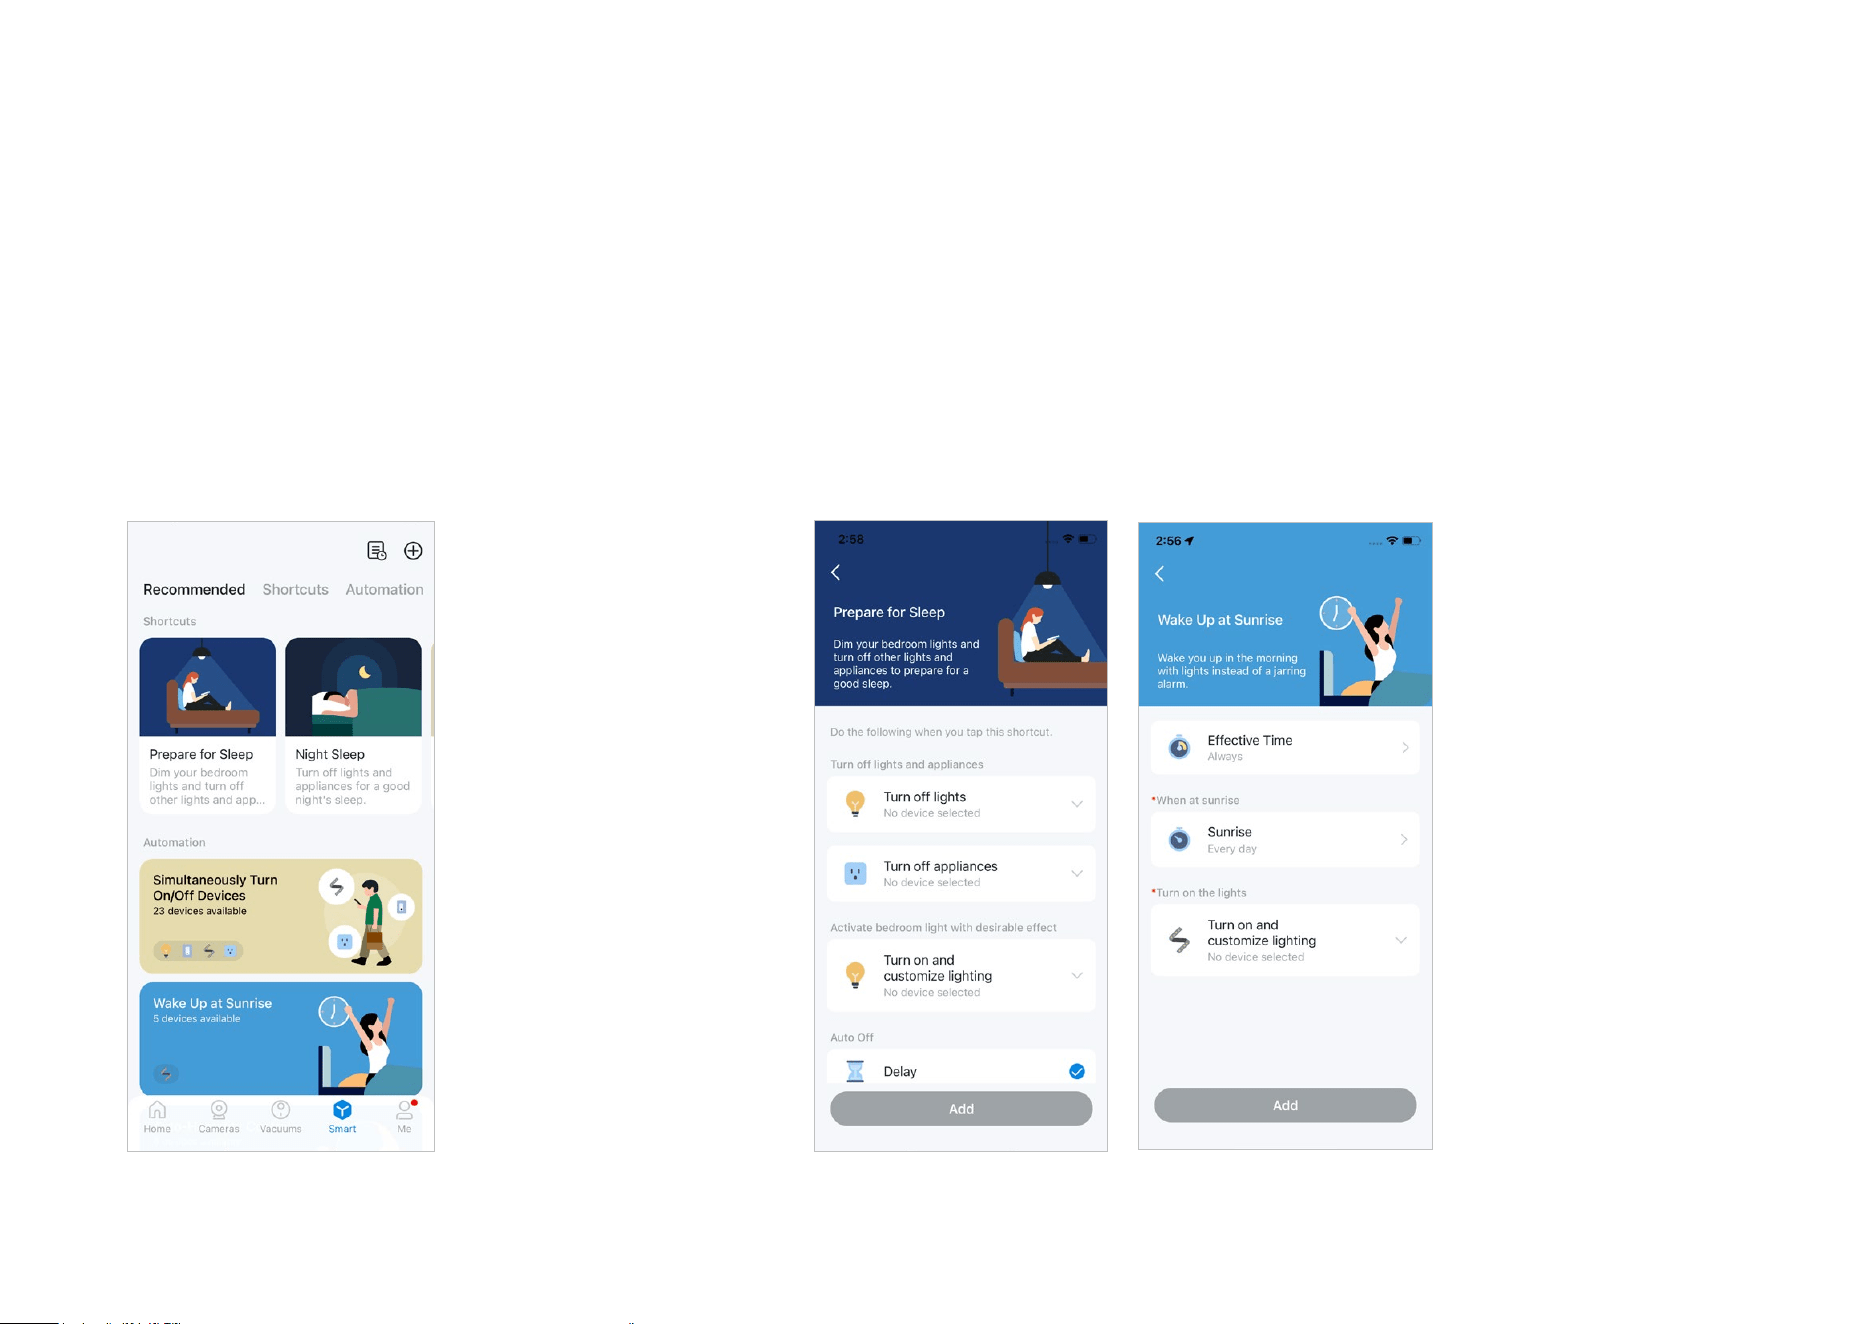
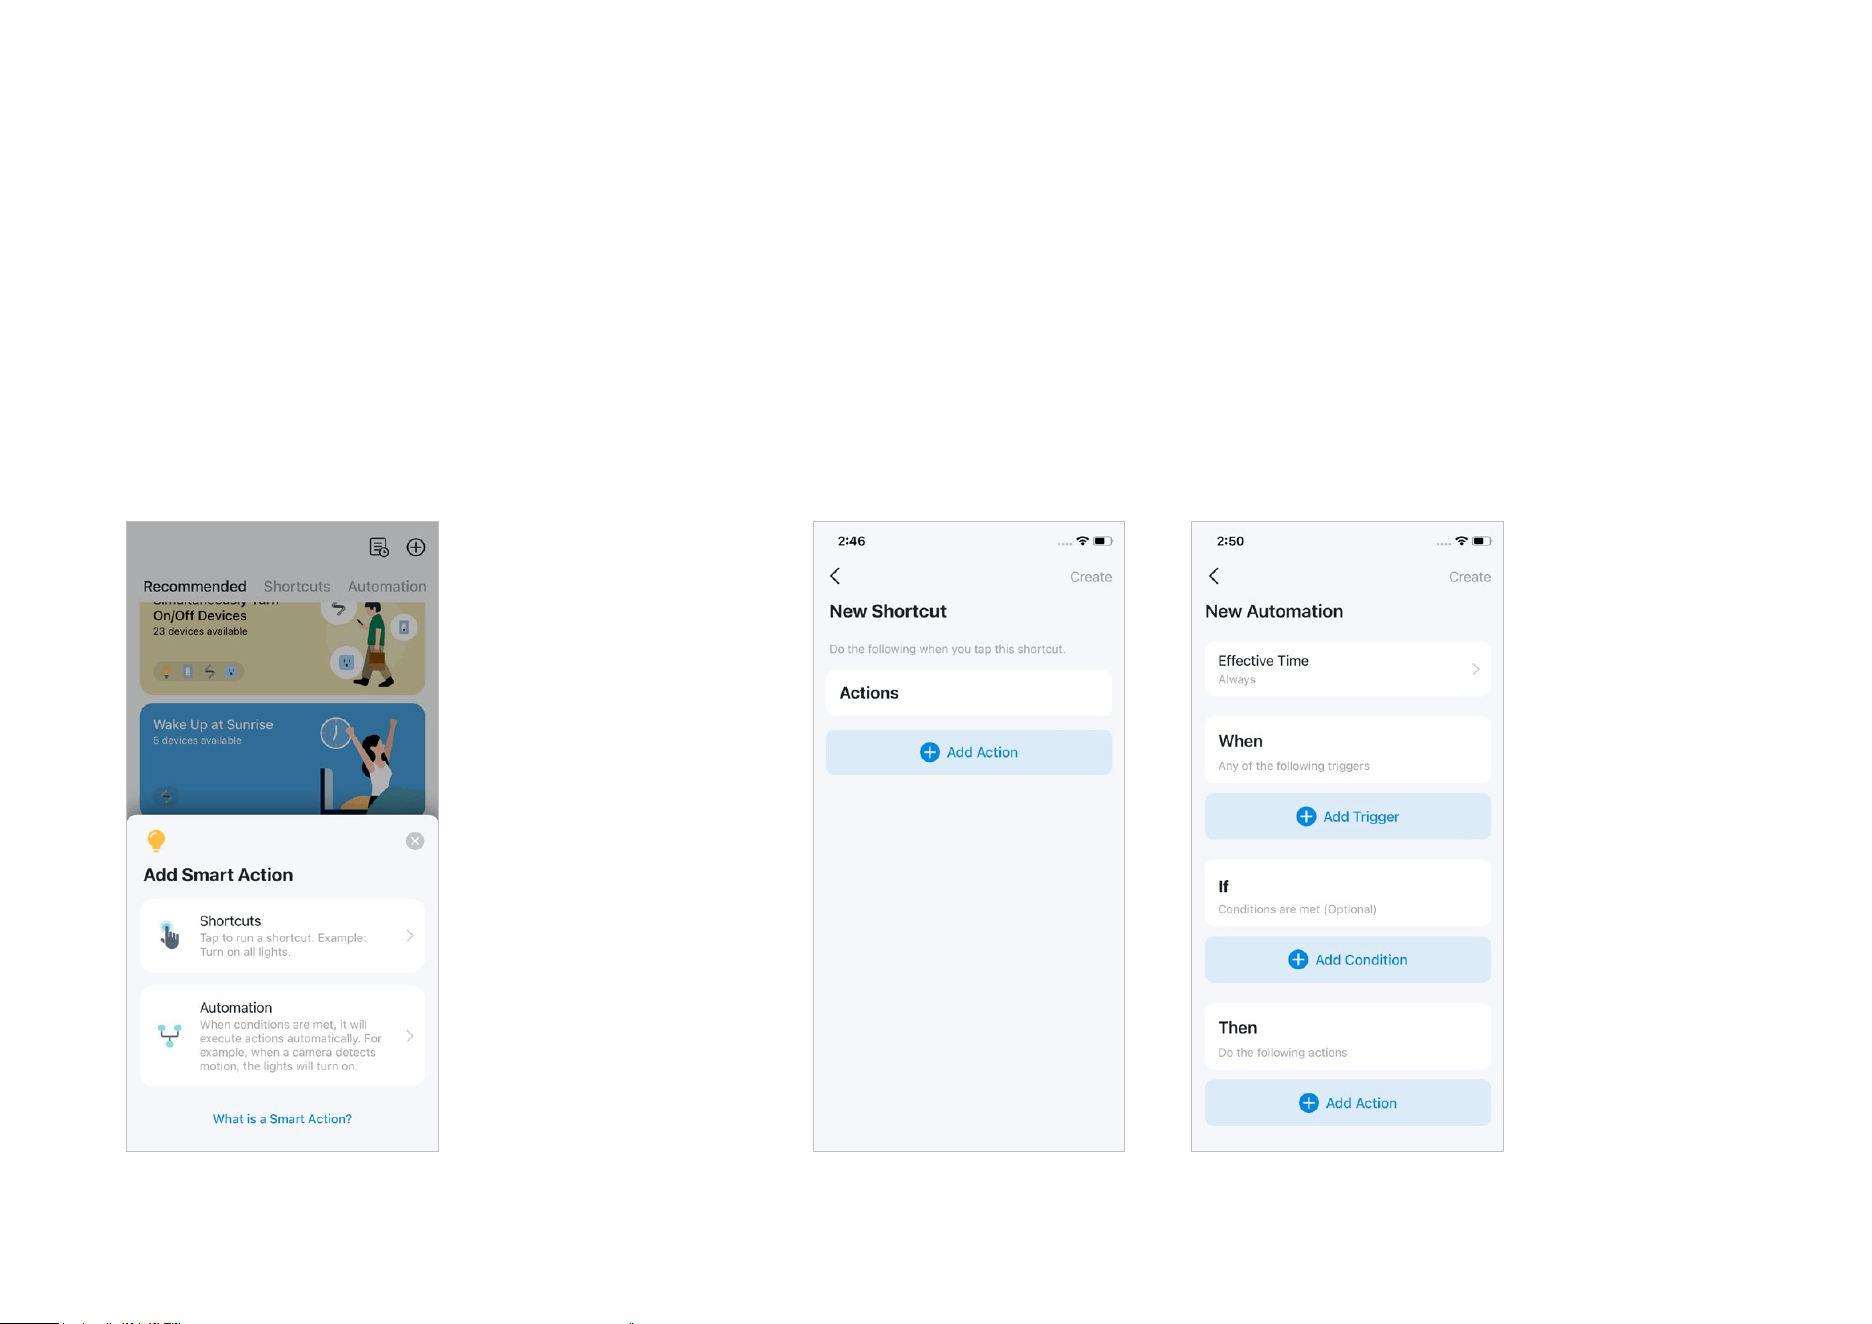
Option 1: Edit based on the featured actions
1. Go to the Smart Actions page and you will see the
Featured Actions (Shortcut or Automation).
2. Tap on a featured action. Select the devices and set the time as needed and tap
ADD to save changes.
Smart Actions
Smart Actions automate repetitive tasks, allowing you to breeze through tedium with utmost ease. Set everything up once and never have to worry
about it again. With Smart Actions, giving your home that level of intelligence is a cinch. Shortcut lets you control multiple devices with just a tap.
Automation allows your devices to do what you want, when you want; for example, turn o the plug at sunset.
22
Option 2: Create your own actions
1. Go to Smart page. Tap + on the top right to add a simple
and smart action.
2. For Shorcuts: Tap + to add action like turning on the smart plug.
For Automation: Tap + to add triggers (When) like the trigger time, tap + to add
conditions (If) like when the bedroom light is on, and tap + to add actions (Then) like
turning on the smart light plug.
23
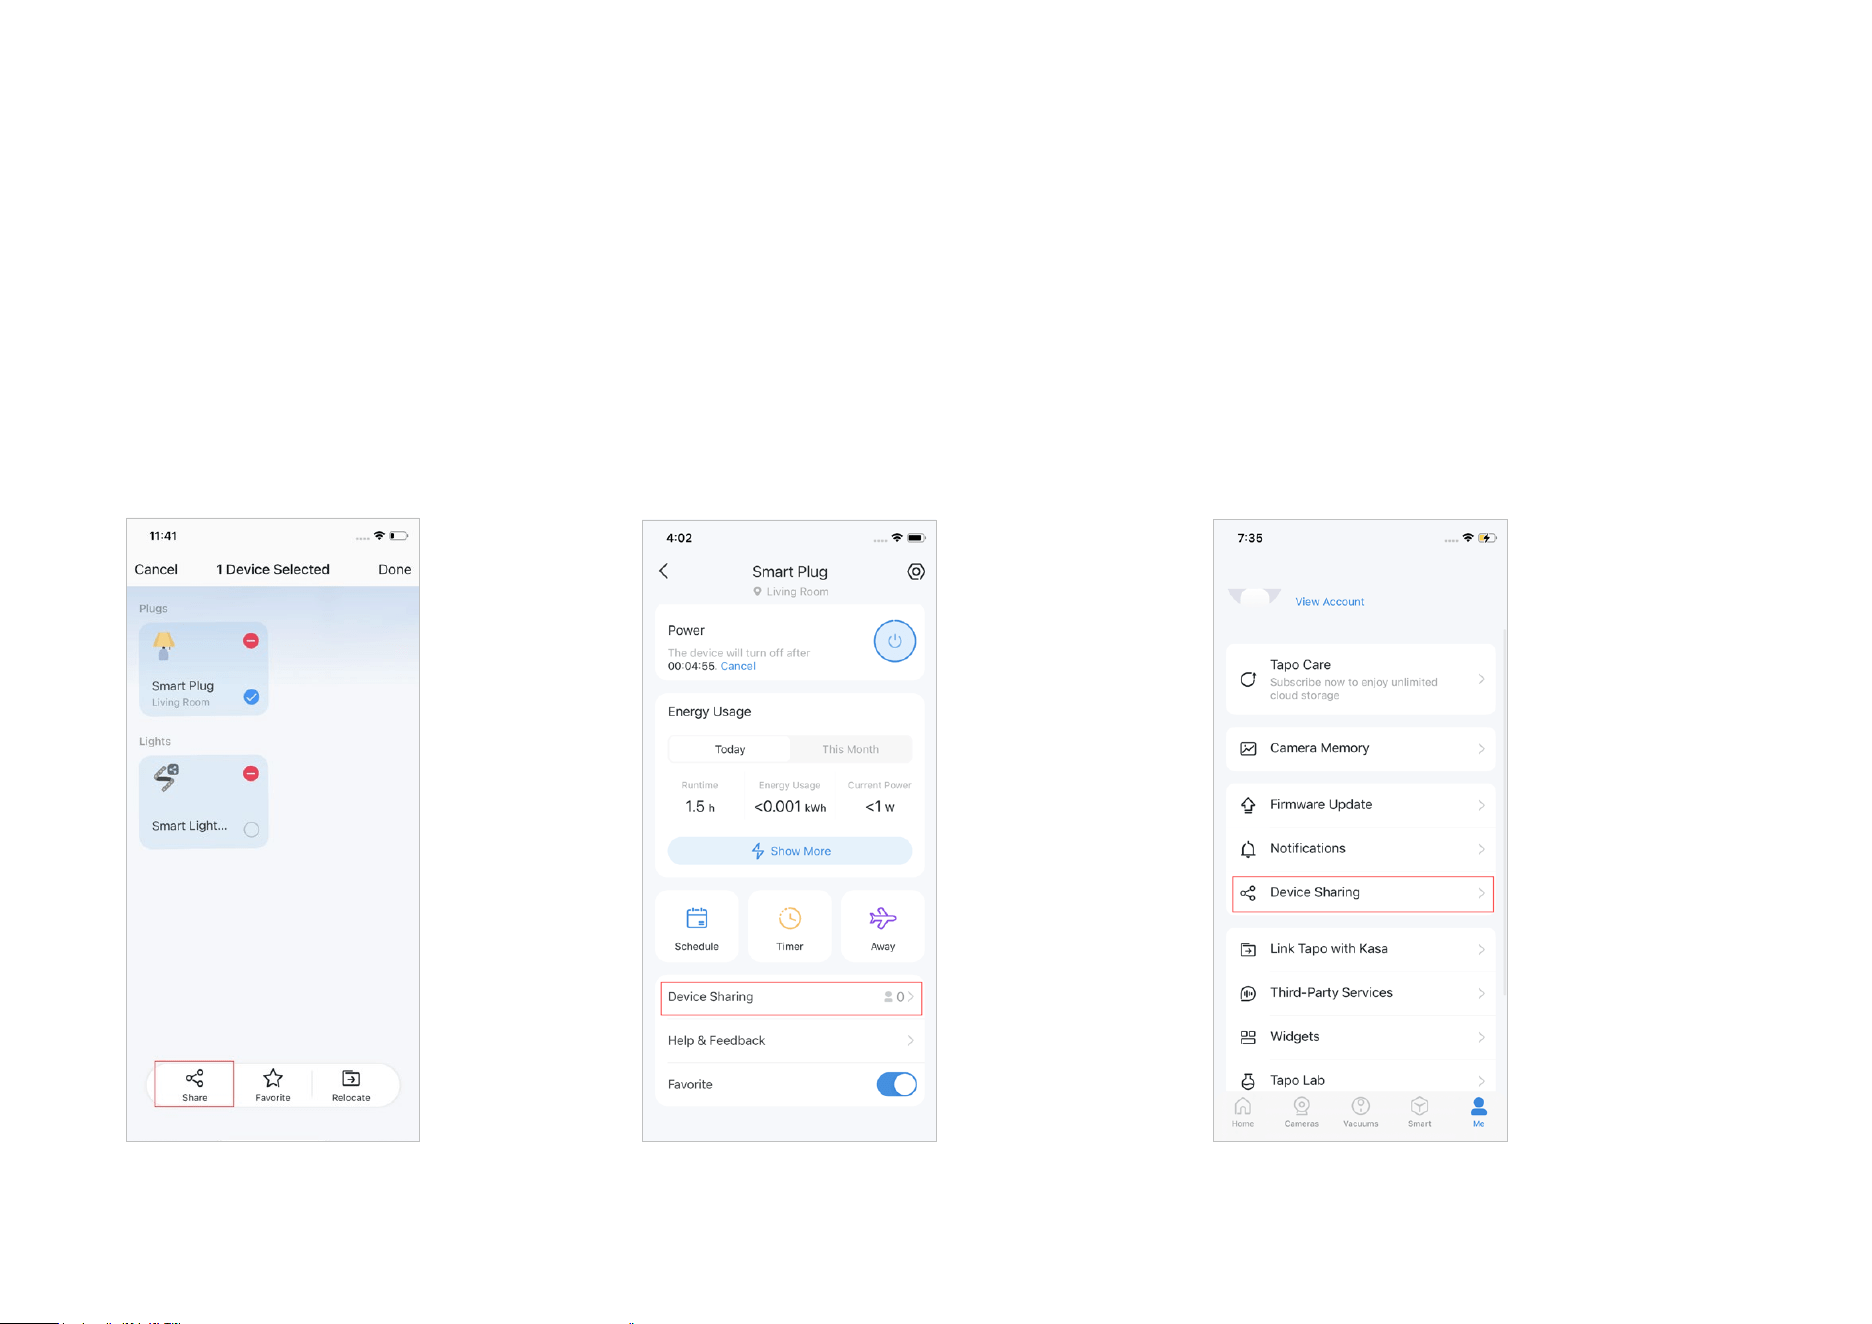
Share Your Smart Plug
You can invite your family members to manage your Tapo devices together by entering the TP-Link ID (email) you want to share the devices with.
Option 1
On the home page, long press the plug card
and tap Share.
Option 2
Go to the Device Status page, slide up and tap
Device Sharing.
Option 3
Go to the Me page and tap Device Sharing
to view your shared devices and devices
shared from others.
*Features and images may vary from product models.
24
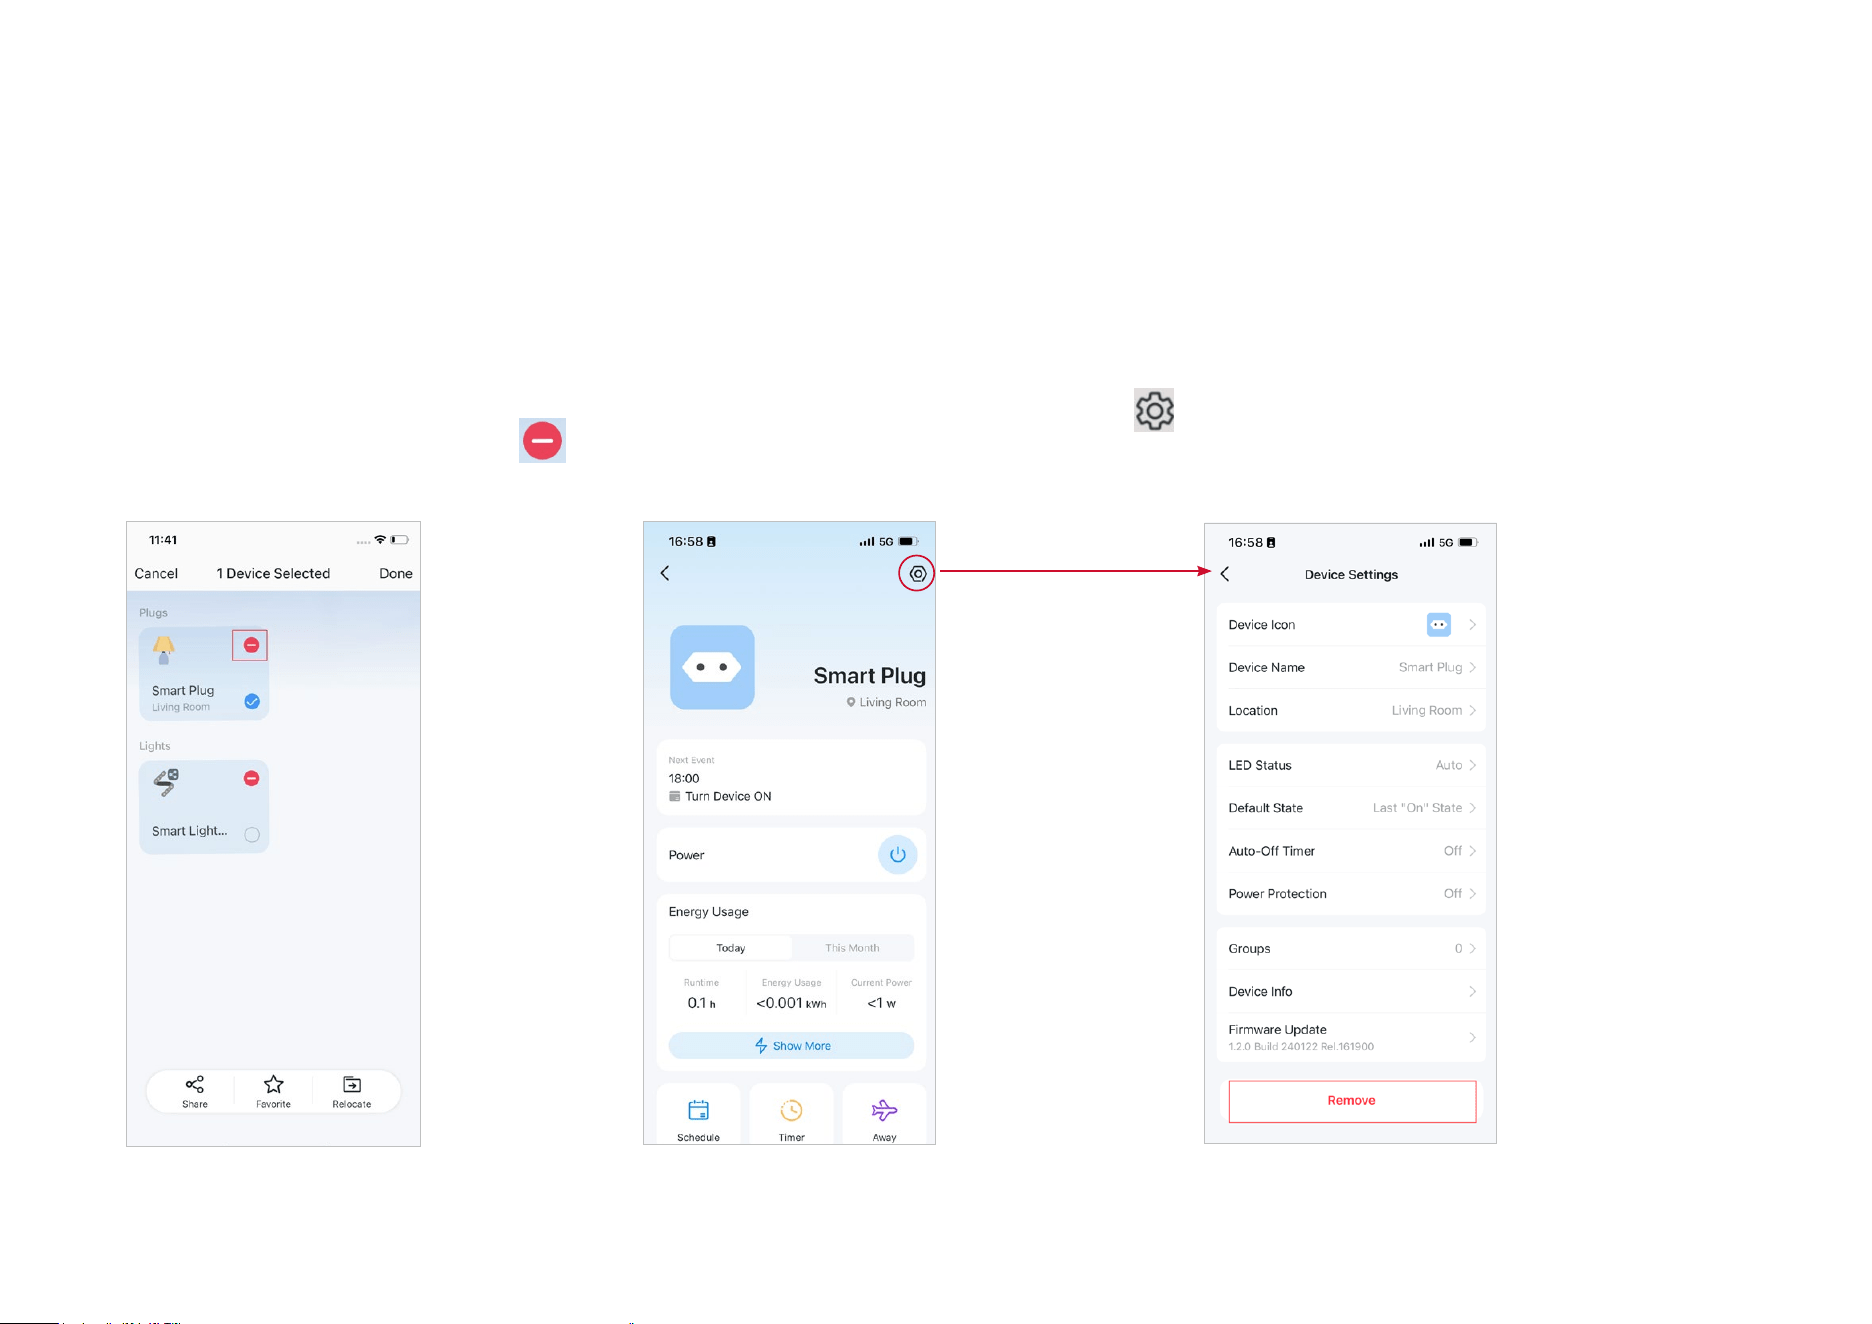
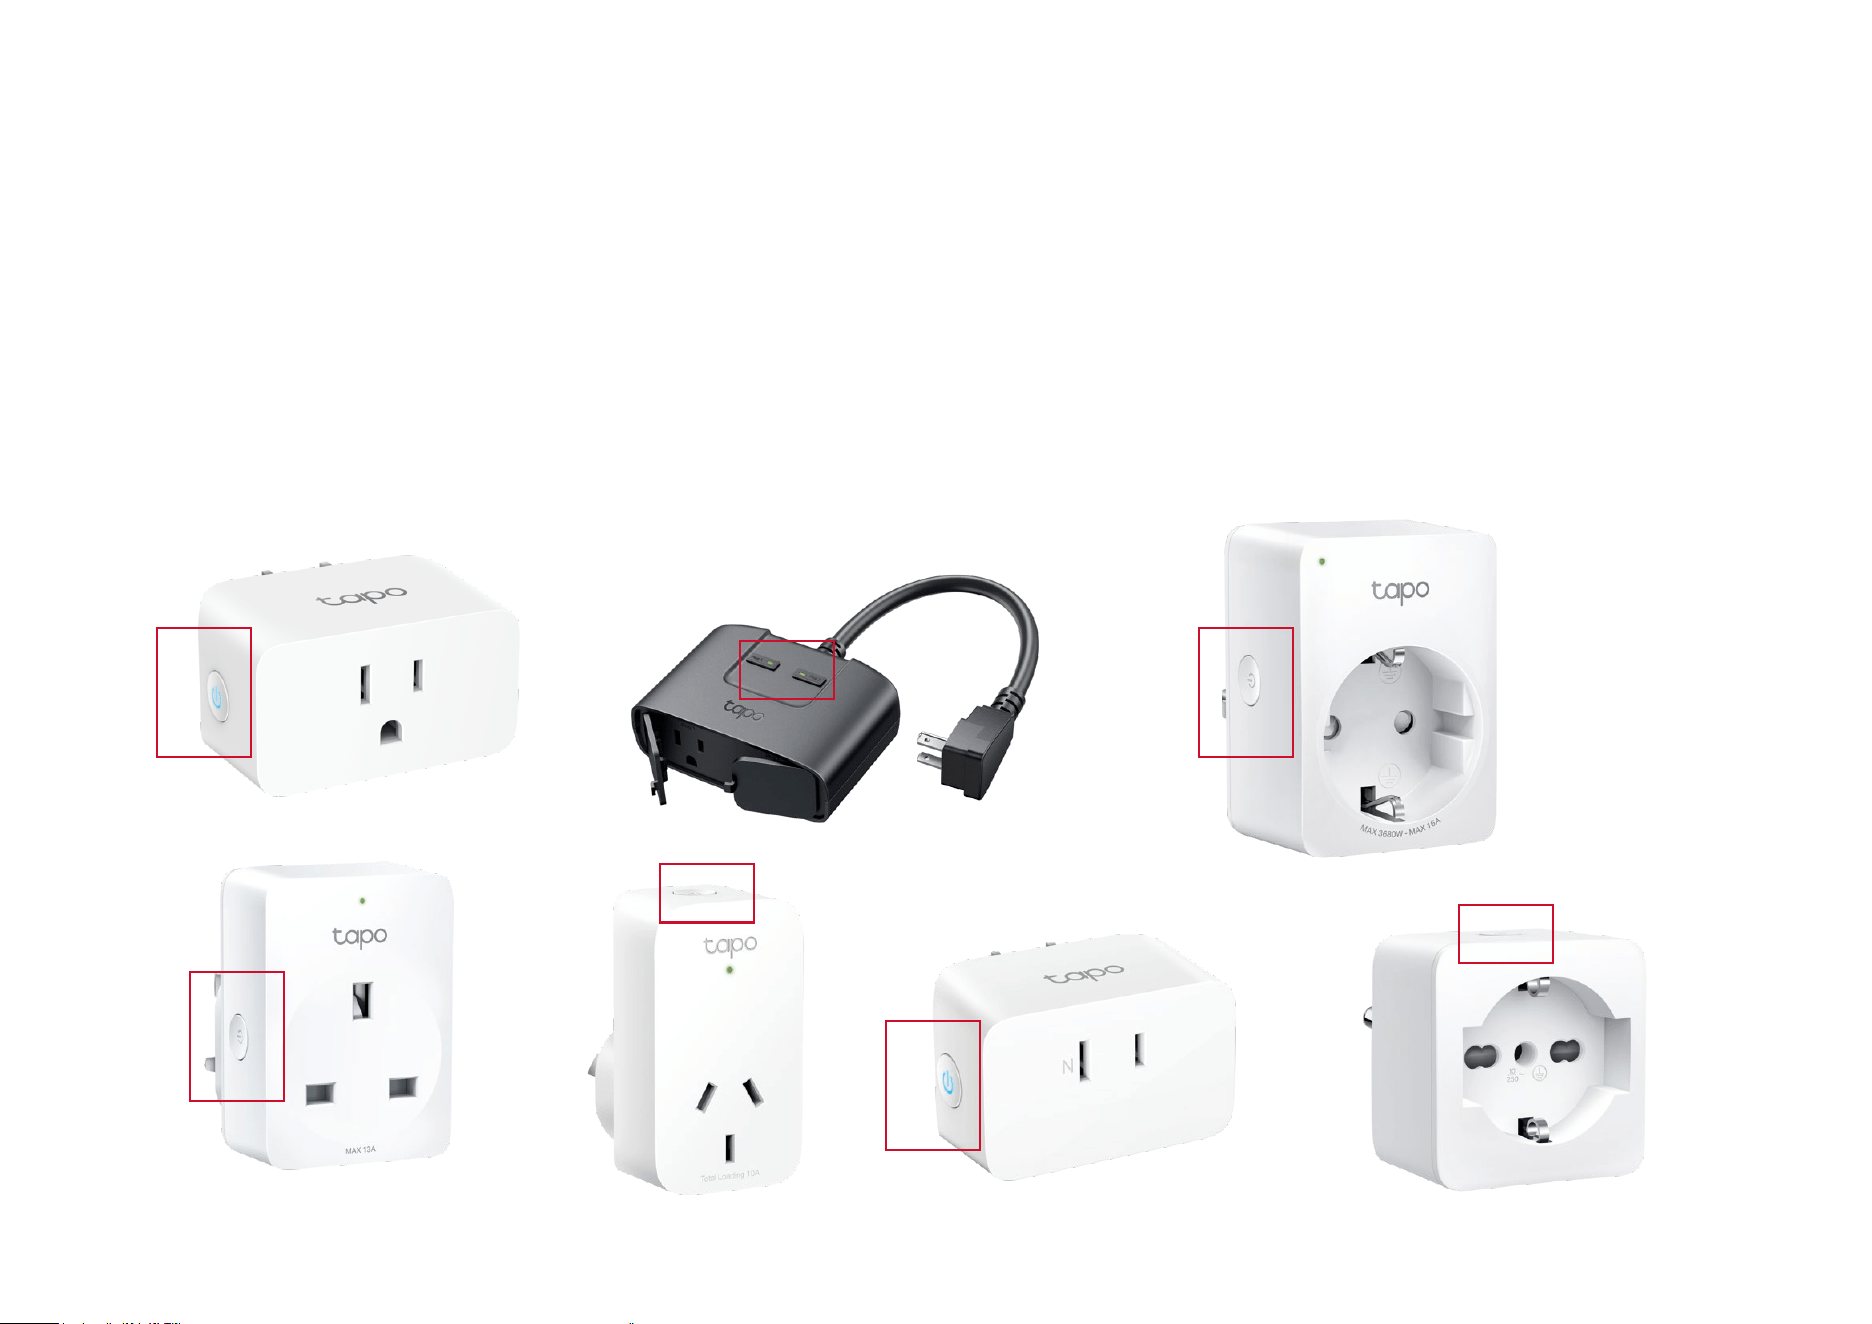
Reset Your Smart Plug
There are three ways to reset your smart plug.
Option 1
Go to the Home page. Long press your
smart device icon card and then tap
to
remove and reset your device.
Option 2
Go to the Device Status page and tap the
icon in the top right corner.
Tap REMOVE at the bottom to reset your device.
*Features and images may vary from product models.
25
Option 3
Press and hold the control/power button for about 5 seconds to reset Wi-Fi while keeping previous settings.
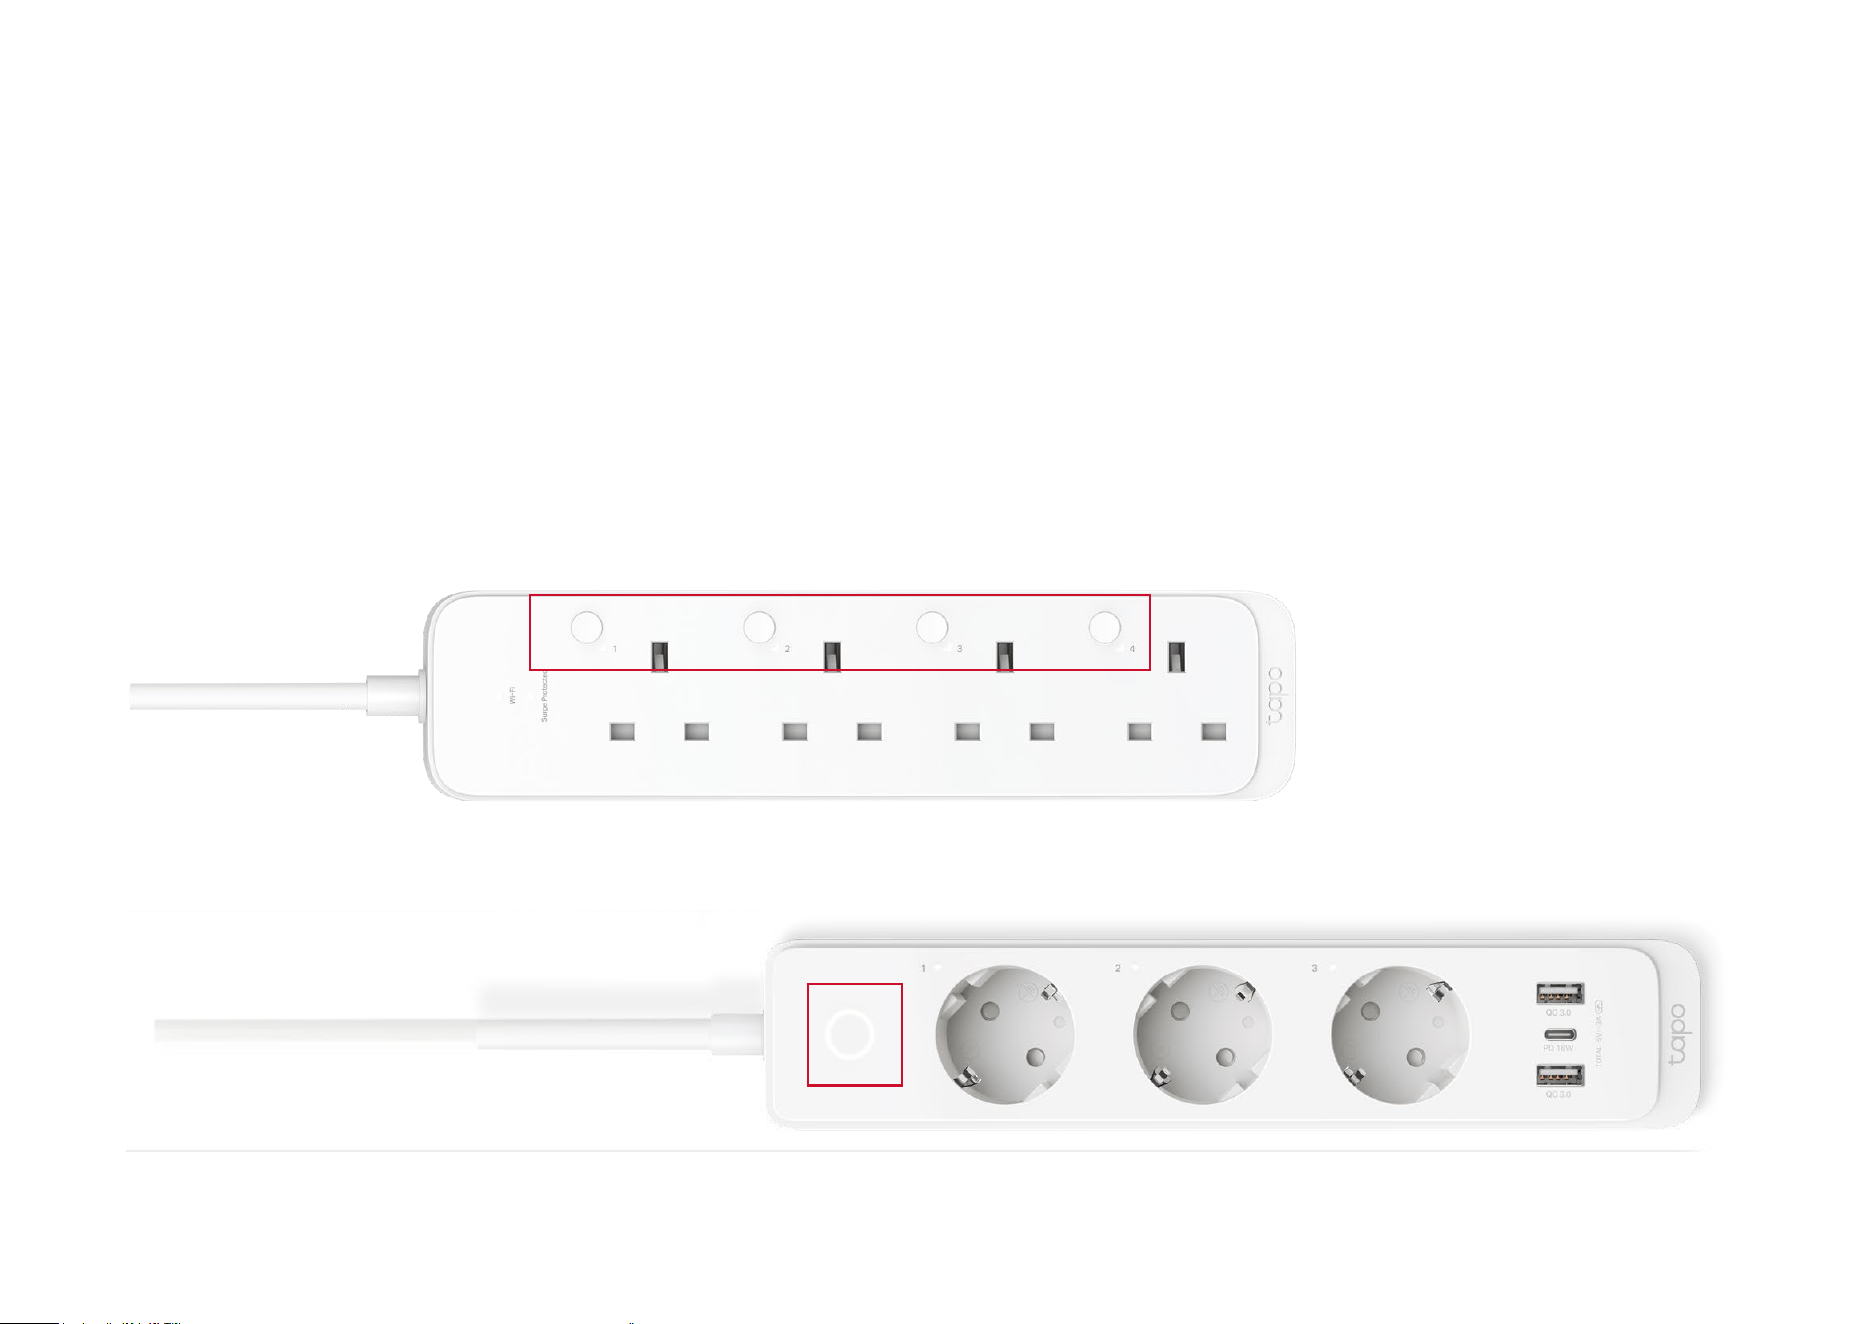
Press and hold the control/power button for about 10 seconds to factory reset the plug.
*Here are for demonstrations only. Images may dier from actual products.
26
Option 3
Press and hold the control/power button for about 5 seconds to reset Wi-Fi while keeping previous settings.
Press and hold the control/power button for about 10 seconds to factory reset the plug.
*Here are for demonstrations only. Images may dier from actual products.
27
Me Page
The Tapo app oers a list of advanced features to fulll diverse smart home needs.
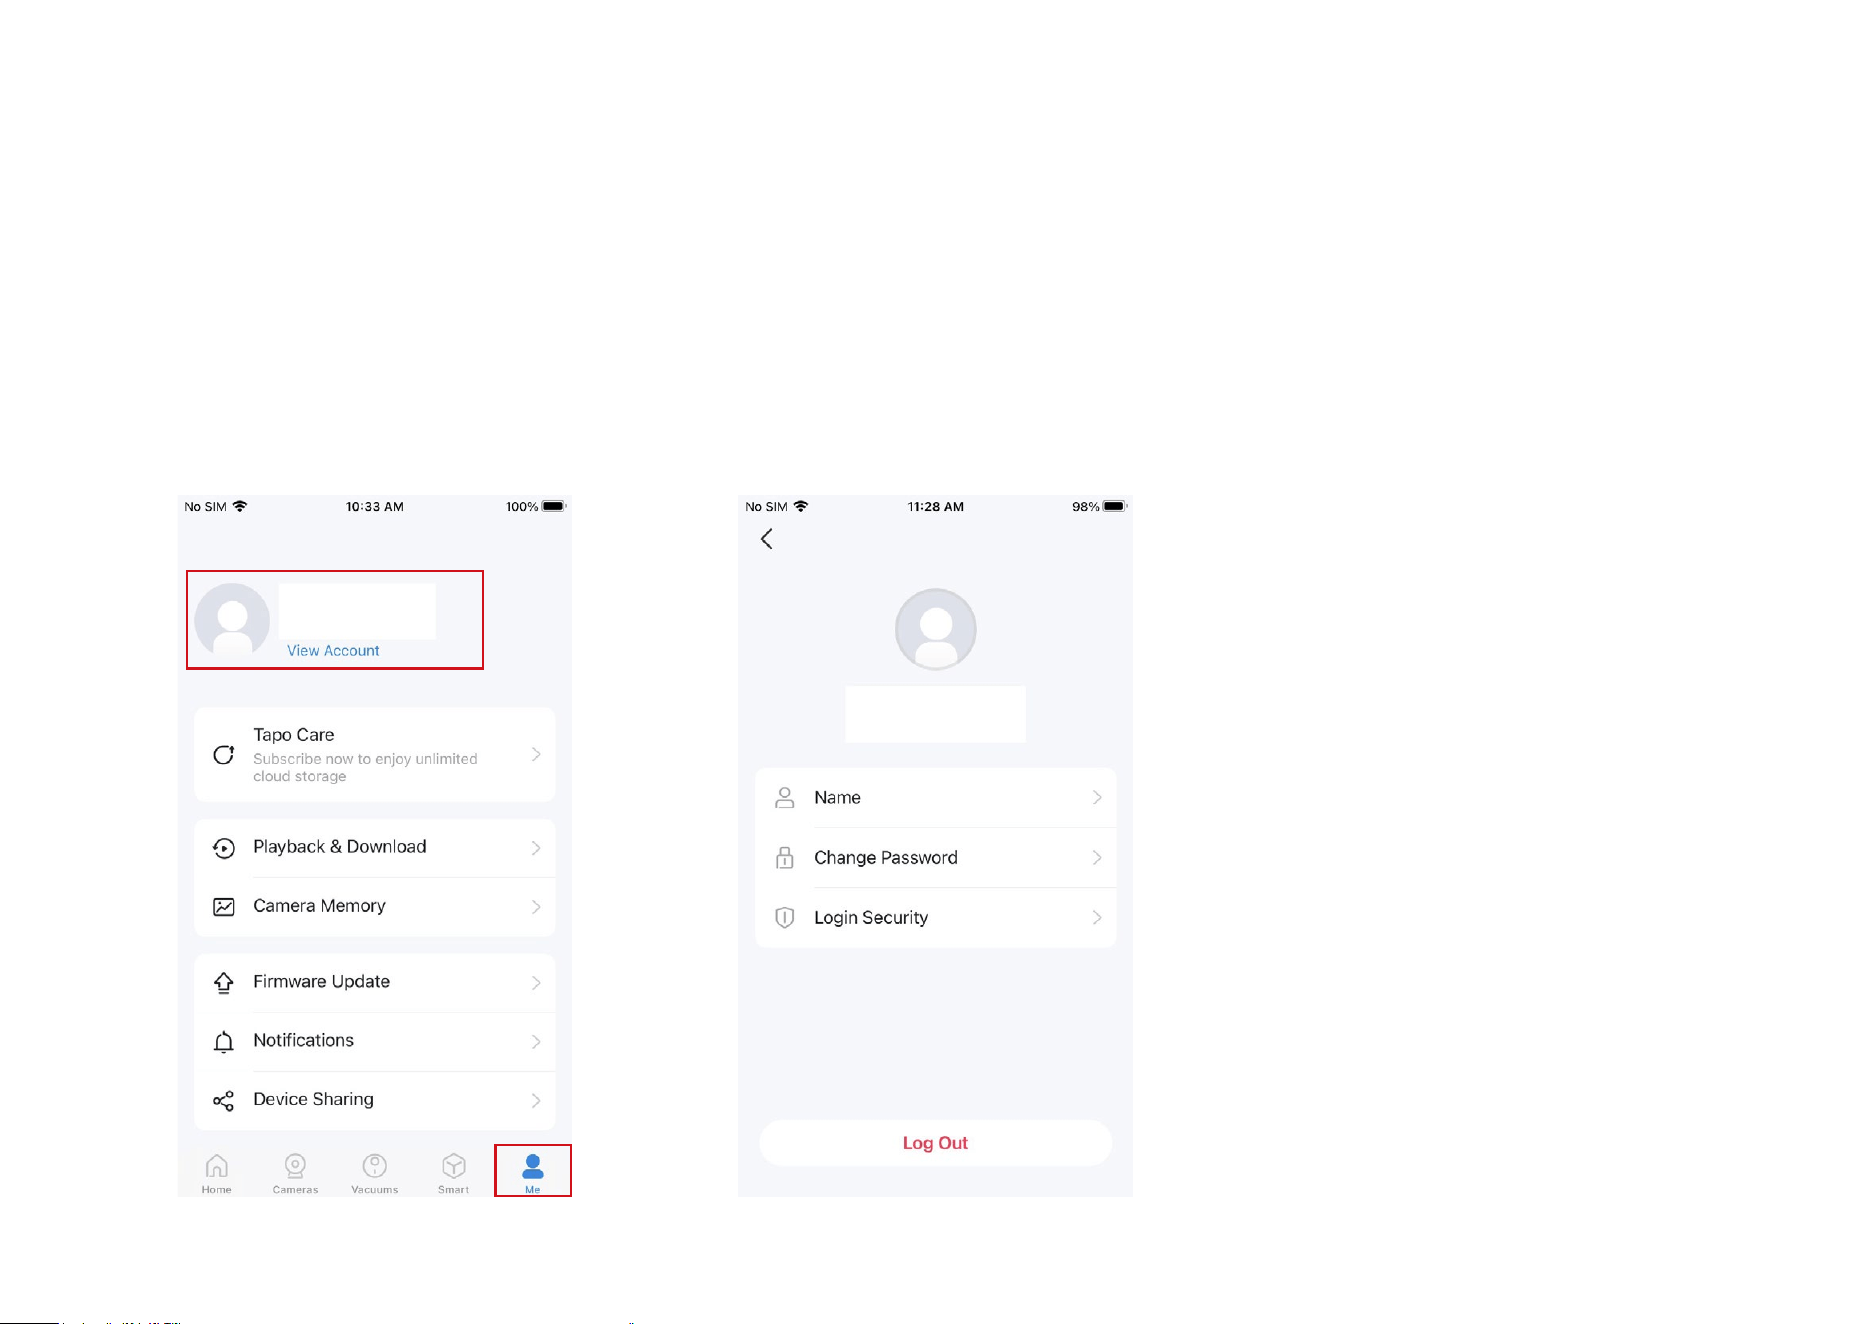
Manage Your Account
Open the Tapo app, tap Me on the bottom to enter the page. Then you can tap your avatar or account to change the avatar, name, password, and login
security.
28
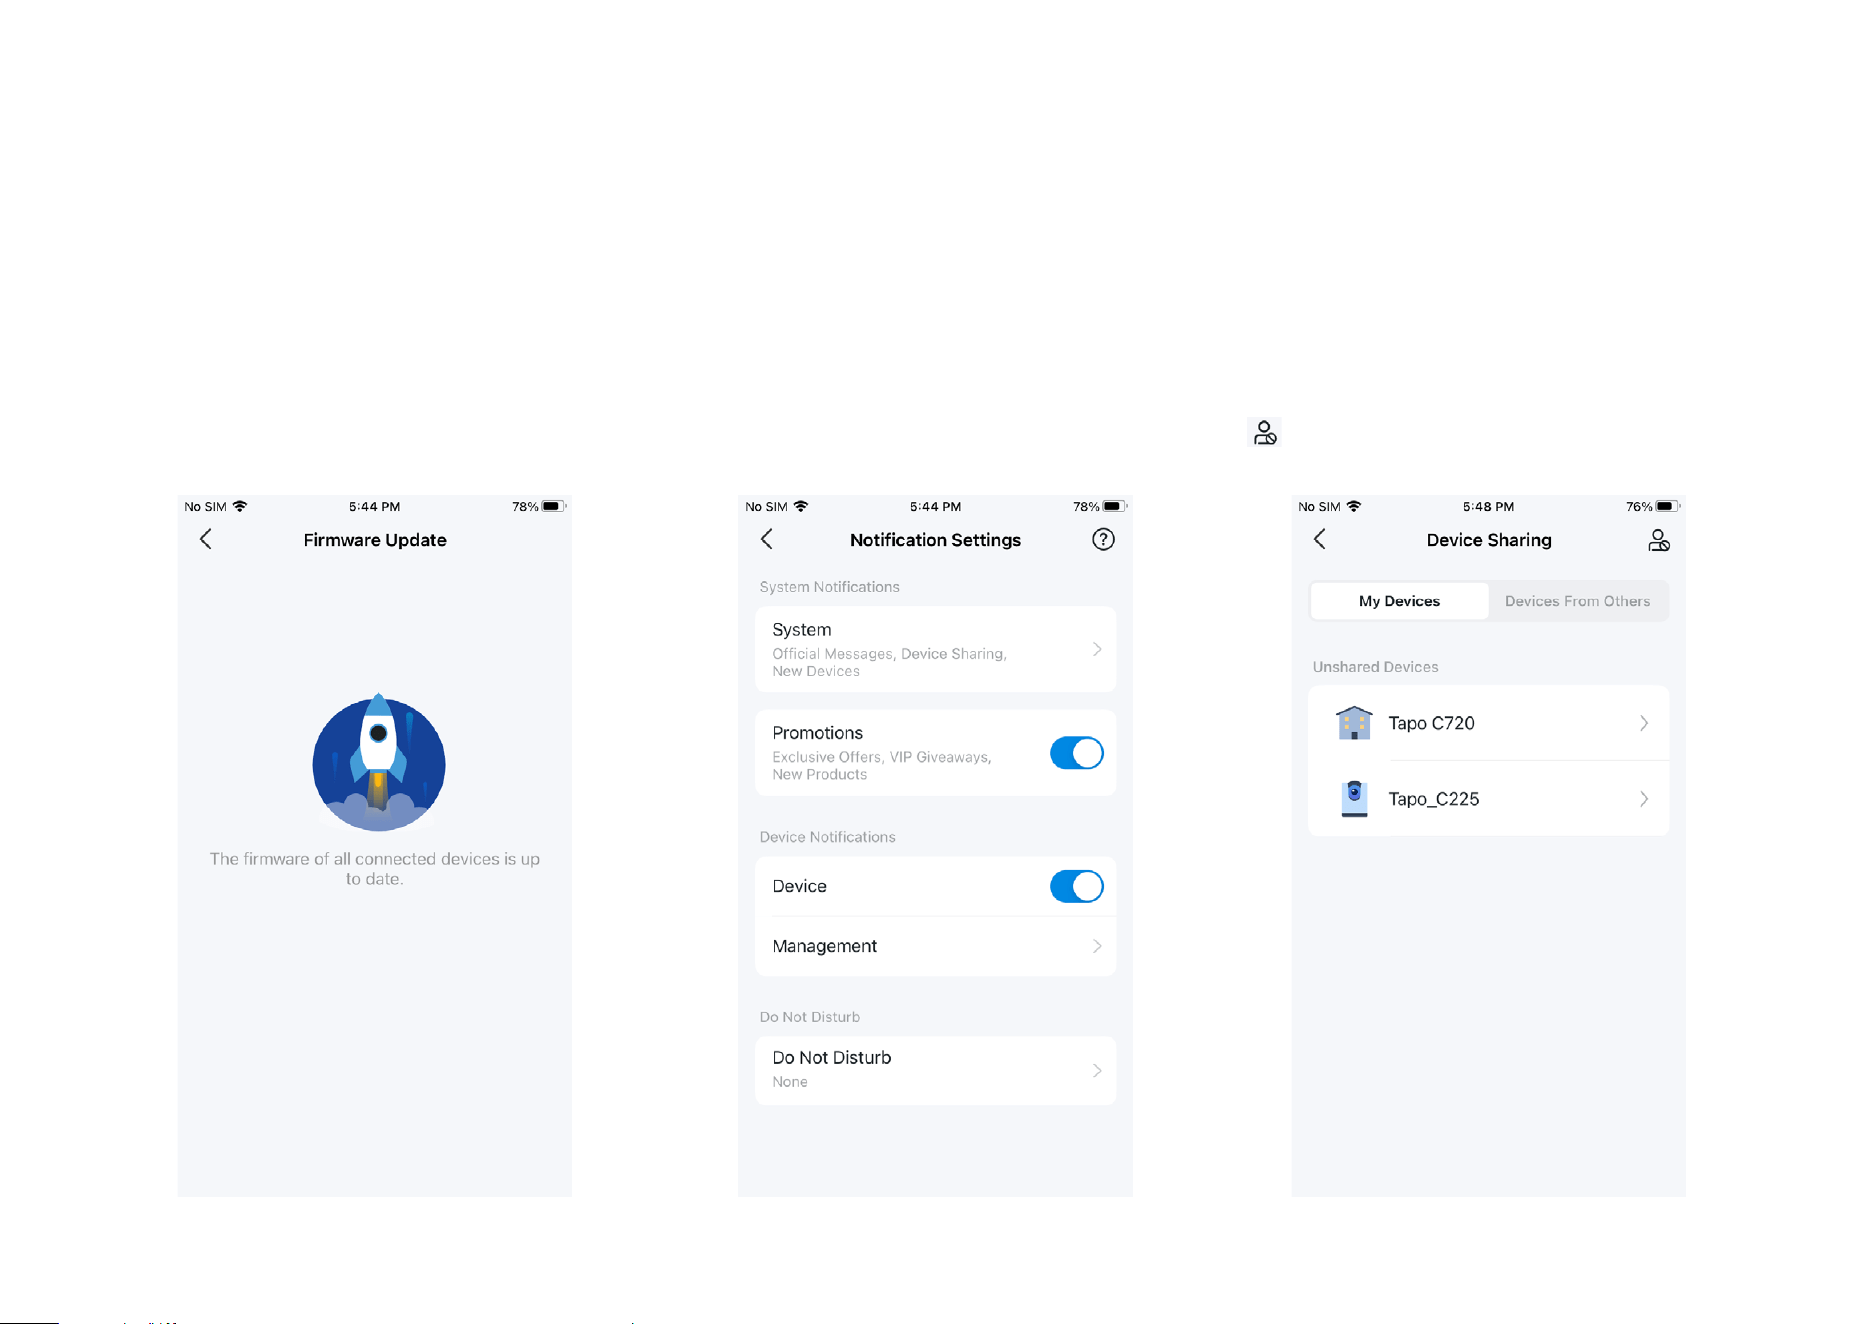
Notications
Turn on Notications to allow Tapo to show
alerts on the Lock Screen, Banners, and
Notication Center as needed.
Firmware Update
Tap to check if any rmware updates are
available on this page and update your
devices as instructed.
Device Sharing
Share your Tapo device with your families and
check the devices shared by others. Tap the
icon to add a bothering inviter to the Deny
List.
29
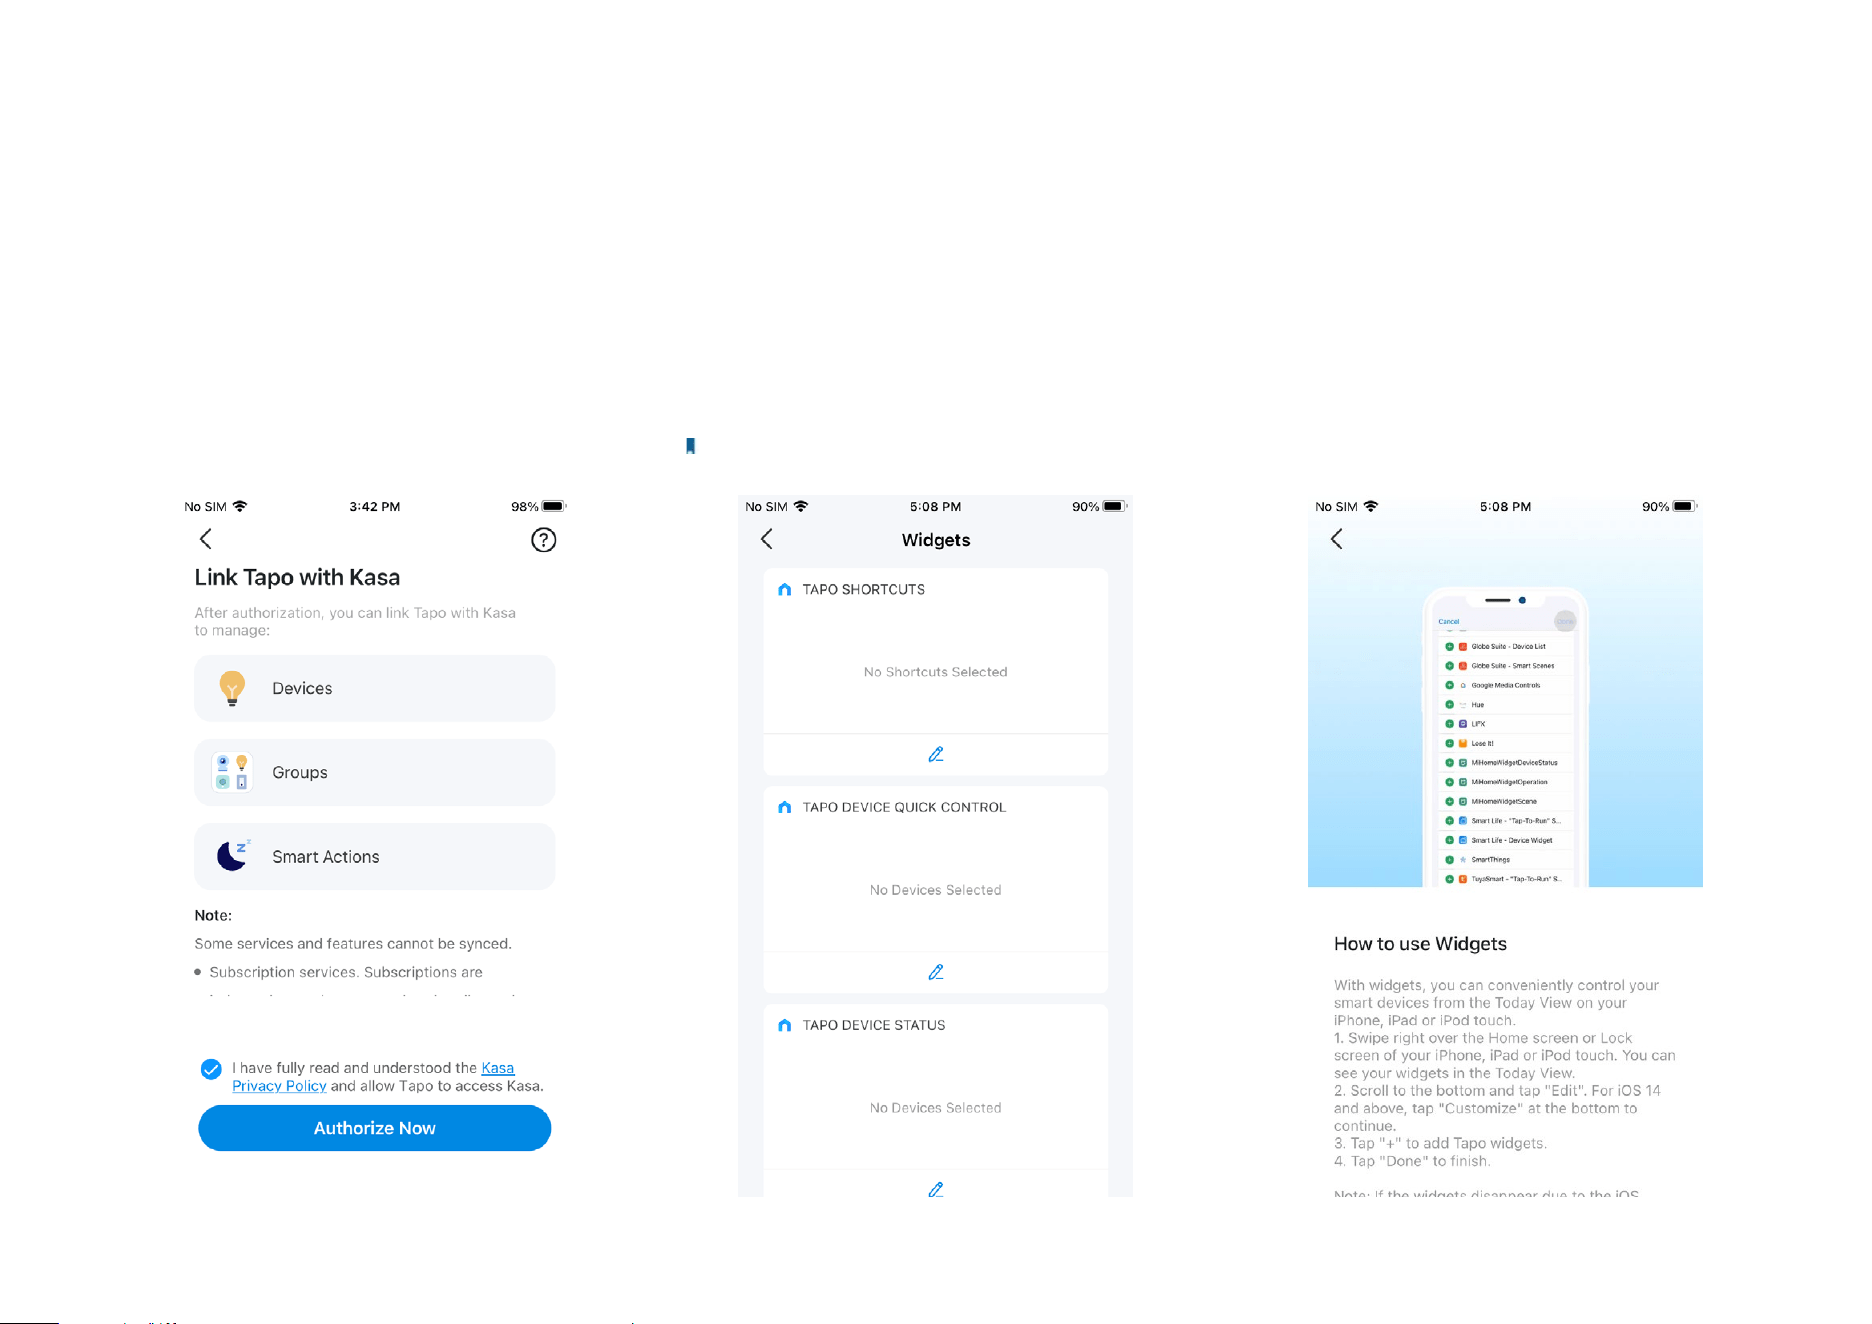
Link Tapo with Kasa
You can link Tapo with Kasa to Manage
Devices, Groups, and Smart Actions. Tap
Authorize Now to allow Tapo to access Kasa.
Widgets
With Widgets, you can conveniently control your smart device from the home screen on Android
devices or the Today View on iOS devices.
Note: For detailed instructions, please refer to https://www.tp-link.com/support/faq/3313/.
30
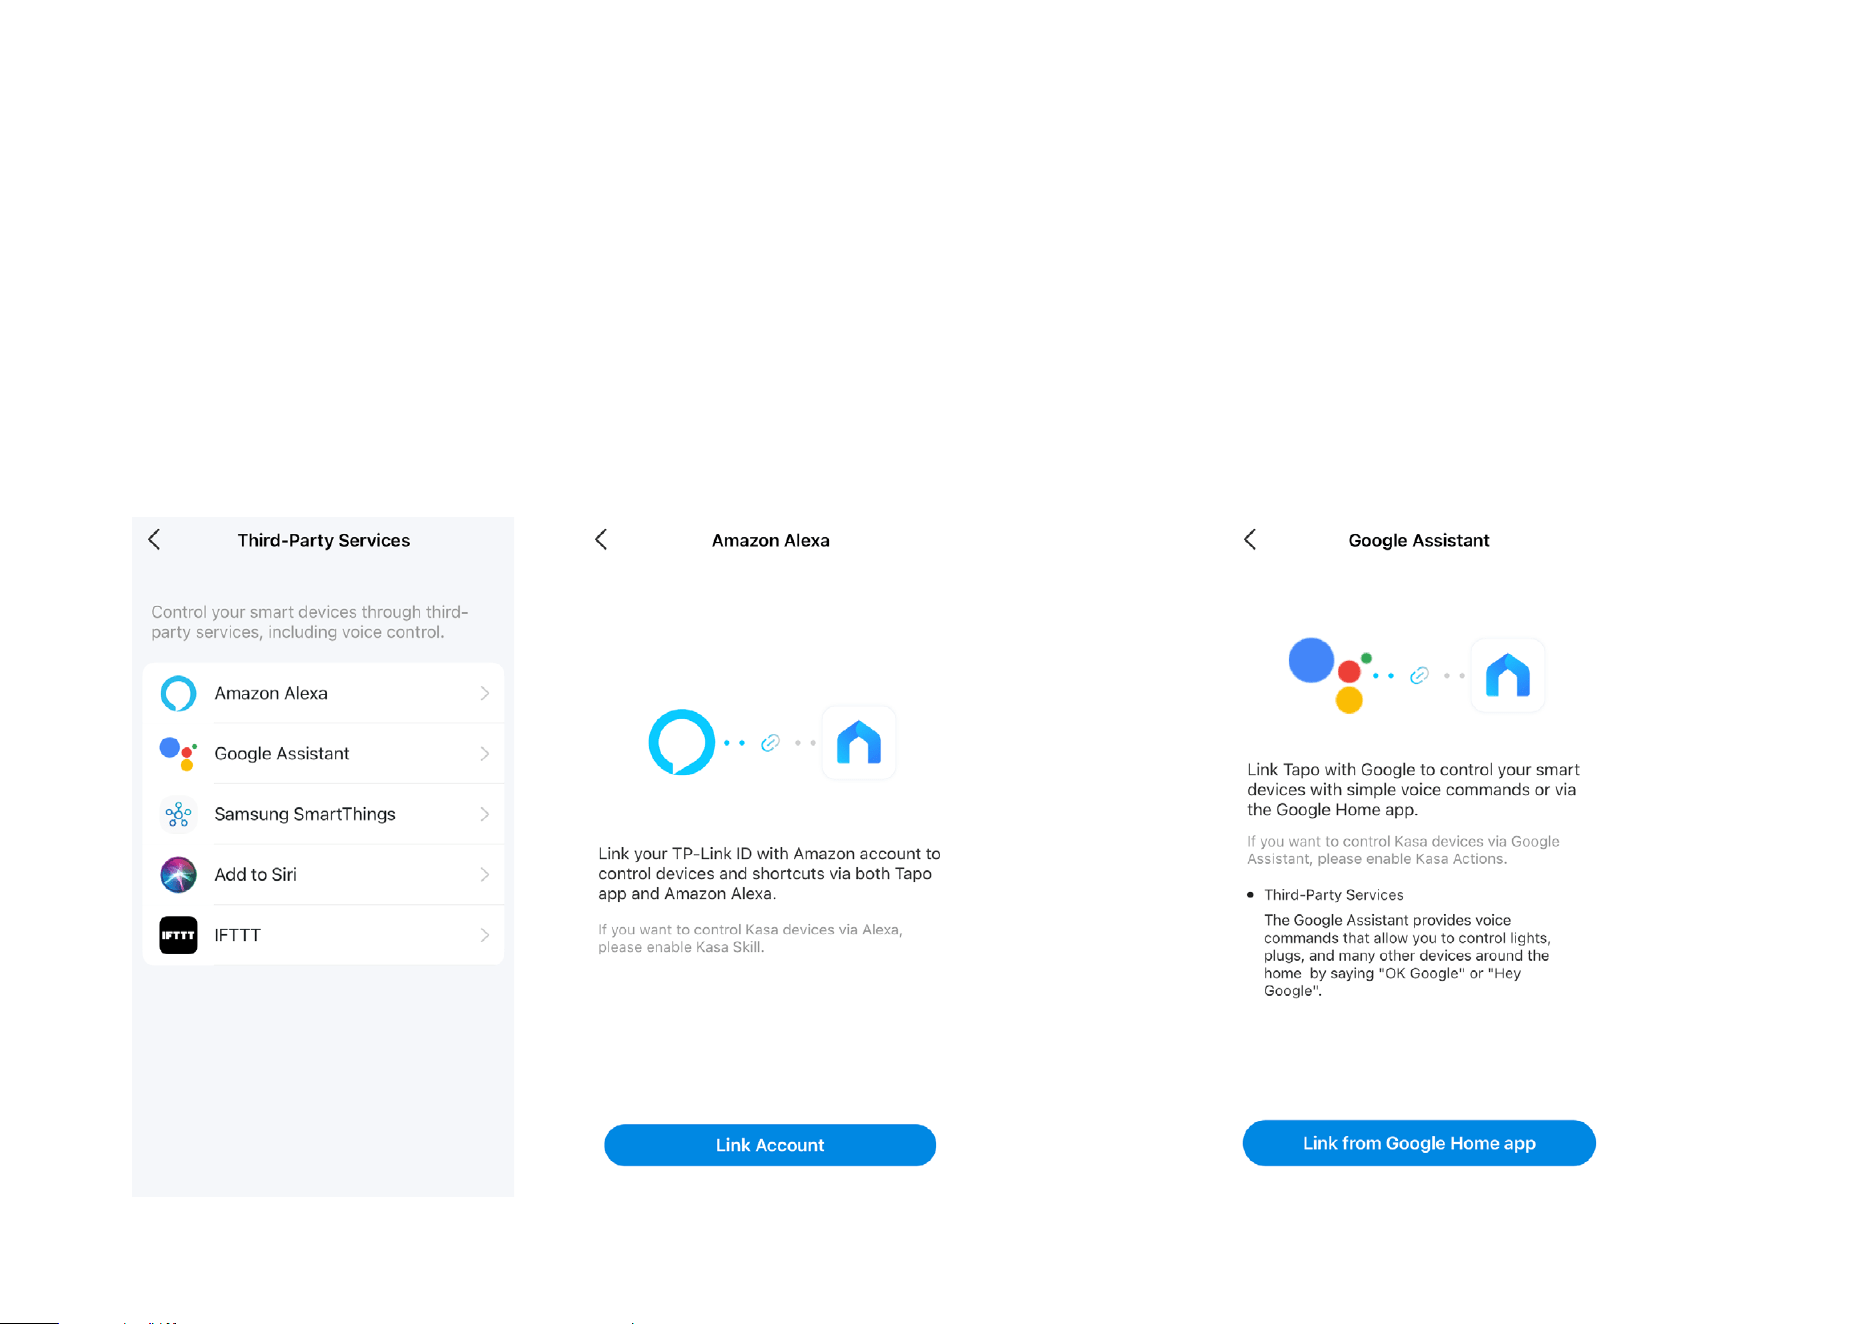
Third-Party Services
You can control your smart devices through third-party services, including voice control.
Amazon Alexa
Follow the in-app instructions.
For troubleshooting, visit https://www.tp-link.com/support/faq/2780/.
Google Assistant
Follow the in-app instructions.
For troubleshooting, visit https://www.tp-link.com/support/faq/2779/.
31
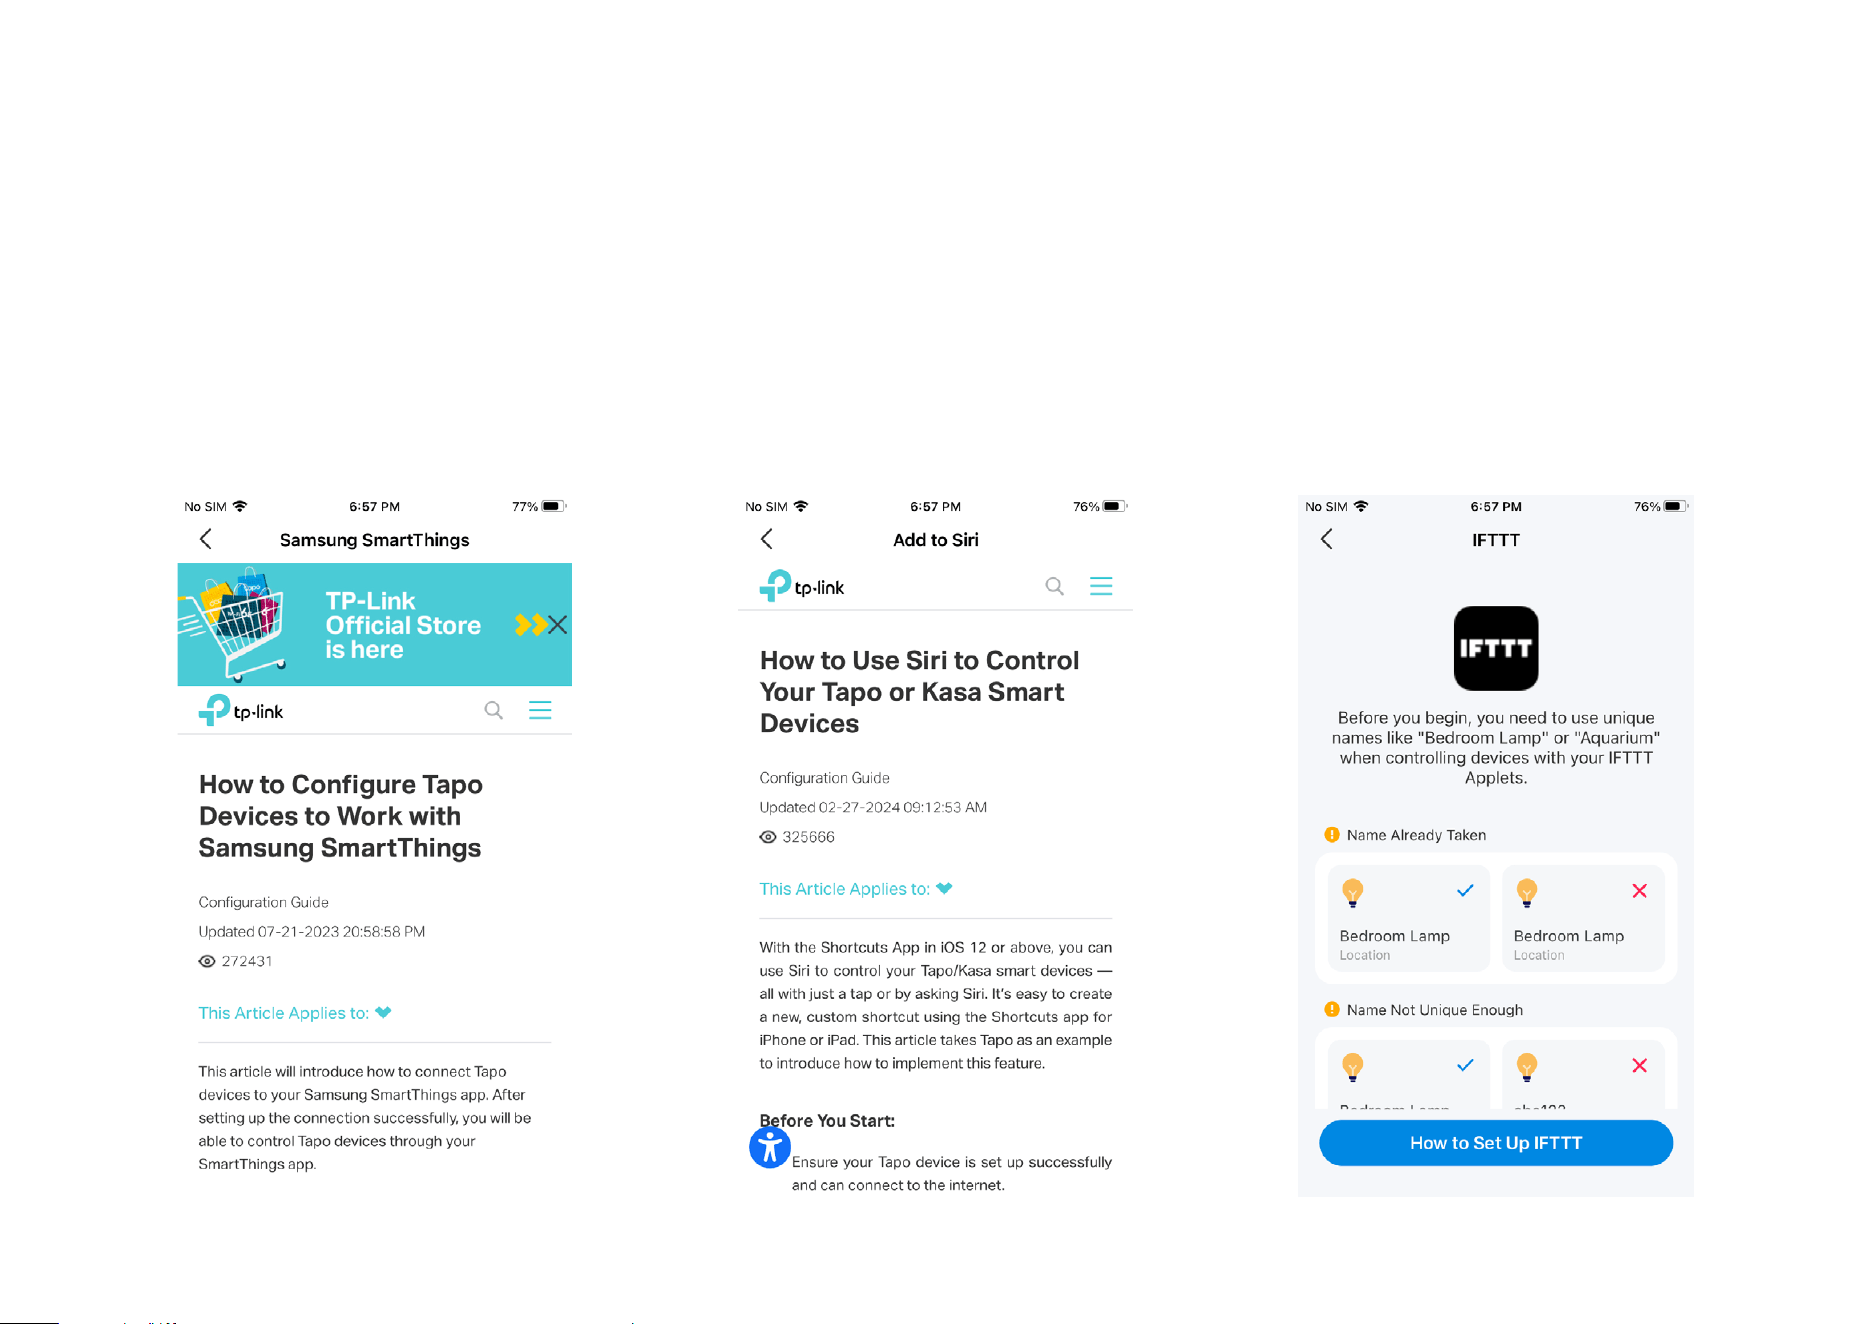
Third-Party Services
You can control your smart devices through third-party services, including voice control.
Samsung SmartThings / Add to Siri / IFTTT
Tap the one as needed and refer to the FAQs to set up. Add to Siri is for iOS devices only.