
WATER FILTER
REPLACEMENT INSTRUCTIONS
All ice and water refrigeration products
INSTALLATION GUIDE
NZ AU UK IE HK SG IN US CA


1
SAFETY AND WARNINGS
847200 – Certified by: IAPMO R&T against NSF/ANSI Standards 43, 53, 401 and
CSAB4831.1 for the reduction of claims specified on the performance data sheet
and at iapmort.org. 847200 compounds certified under NSF/ANSI 401 have been
deemed as incidental contaminants/emerging compounds. Incidental contaminants are
those compounds that have been detected in drinking water supplies at trace levels.
Whileoccurring at only trace levels, these compounds can affect the public acceptance
of drinking quality water.
847201 – Certified by: IAPMO R&T against NSF/ANSI Standards 43 and CSA B4831.1
forthe reduction of claims specified on the performance data sheet and at iapmort.org
FWC5 - Certified by: IAPMO R&T against NSF/ANSI Standards 42, 53, 401 and P473 for
the reduction of claims specified on the performance data sheet and at www.iapmort.org
Rated capacity
847200 – 102 gallons (386 litres)
847201 – 102 gallons (386 litres)
FWC5 – 102 gallons (386 litres)
Flow rate
0.5 gpm (1.89 Lpm)
Replacement filter cartridges can be purchased online at fisherpaykel.com or
bycallingFisher&Paykel Customer Care. Details of the replacement filter cartridge
arelabelledon the cartridge.
Office address
Fisher & Paykel Appliances Ltd
PO Box 58550
Botany
Auckland 2013
New Zealand
Customer Care
Phone: +64 9 273 0660
Water filter
IMPORTANT!
●
The water connection to your ice & water refrigerator must be installed by an qualified
plumber or Fisher & Paykel trained and supported service technician and comply with
all state and local laws.
●
Installation and use MUST comply with all state and local plumbing codes. Checkwith
your local public works department for plumbing codes. You must follow their
guidelines as you install the water filtration system.
●
To avoid serious illness or death, only connect your water filter to safe drinking water.
●
The water filter cartridge needs to be changed when the replacement indicator icon
illuminates. This will happen every 6 months.
●
If the water filtration system has been allowed to freeze, replace filter cartridge.
Failure to replace the disposable filter at recommended intervals may lead to reduced
filter performance and failure of the filter, causing property damage from water
leakage or flooding.
●
In cases of excessively reduced filter life — we recommend that you consult a local
plumber or your water supplier for advice on suitable filtration requirements for the
water supplied to your home.
●
Filter replacement is the consumer’s responsibility and will not be covered by the
warranty except in the case of faulty parts or materials within the filter cartridge.
●
If the water has not created ice for some time or ice has an unpleasant taste or odor
dispose of ice and refer to the flushing instructions in this book. If unpleasant taste or
odor persists, you may wish to fit a new filter cartridge.
●
Your water filtration system can withstand up to 120psi (827kPa) of water pressure.
If a pressure reducing valve was supplied with your product, this must be installed
before the water filtration system. DO NOT install if water pressure exceeds 120psi
(827kPa).
To reduce the risk associated with property damage due to water leakage or flooding:
●
DO NOT install systems in areas where ambient temperatures may go above 100°F
(38°C) or drop below 33°F (0.6°C).
●
DO NOT install on hot water supply lines. The maximum operating water temperature
of this filter system is 100°F (38°C).
●
DO NOT install where water hammer conditions may occur. If water hammer
conditions exist, you must install a water hammer arrester.
2
3
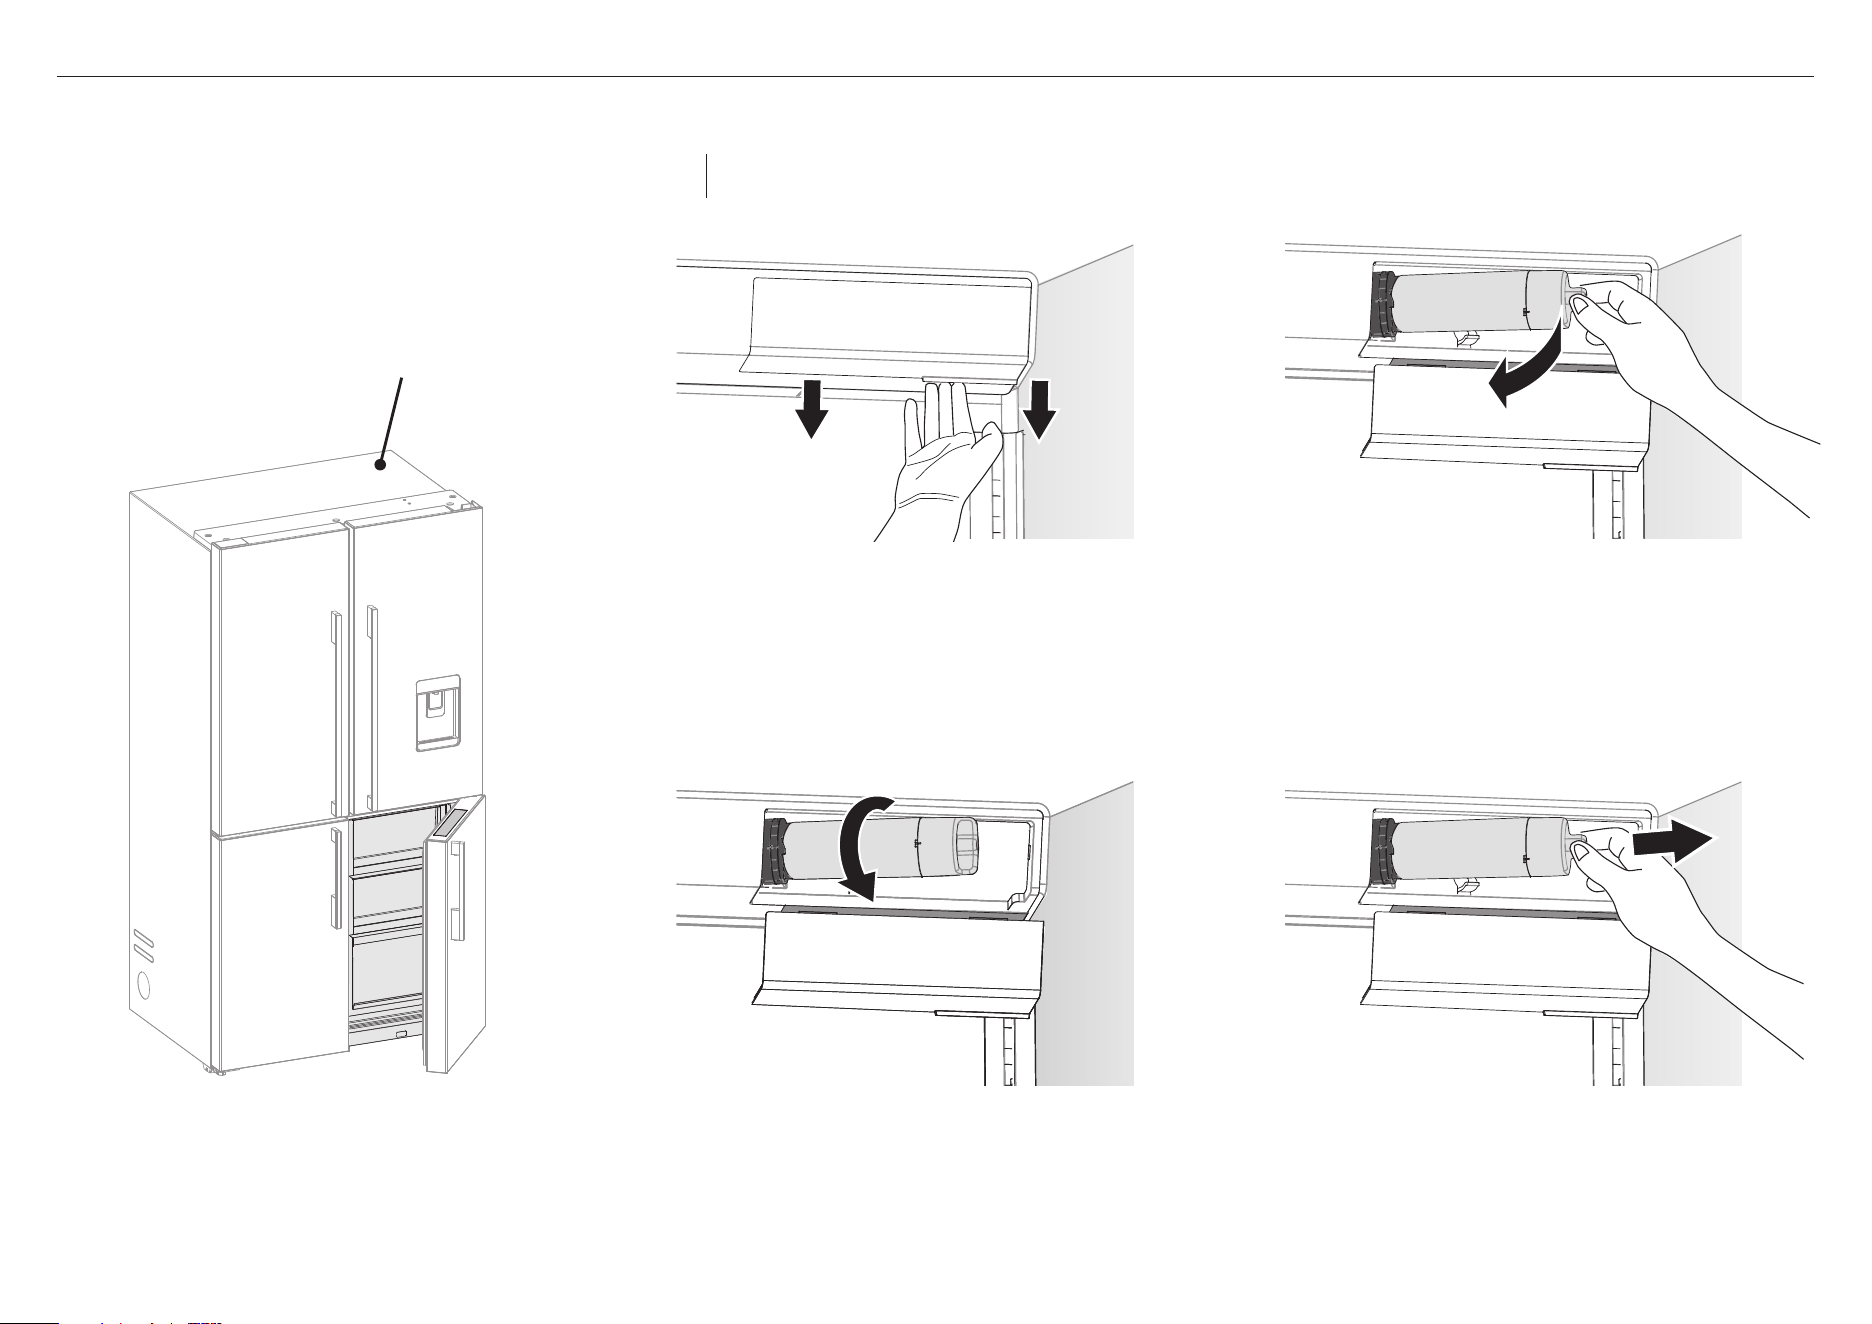
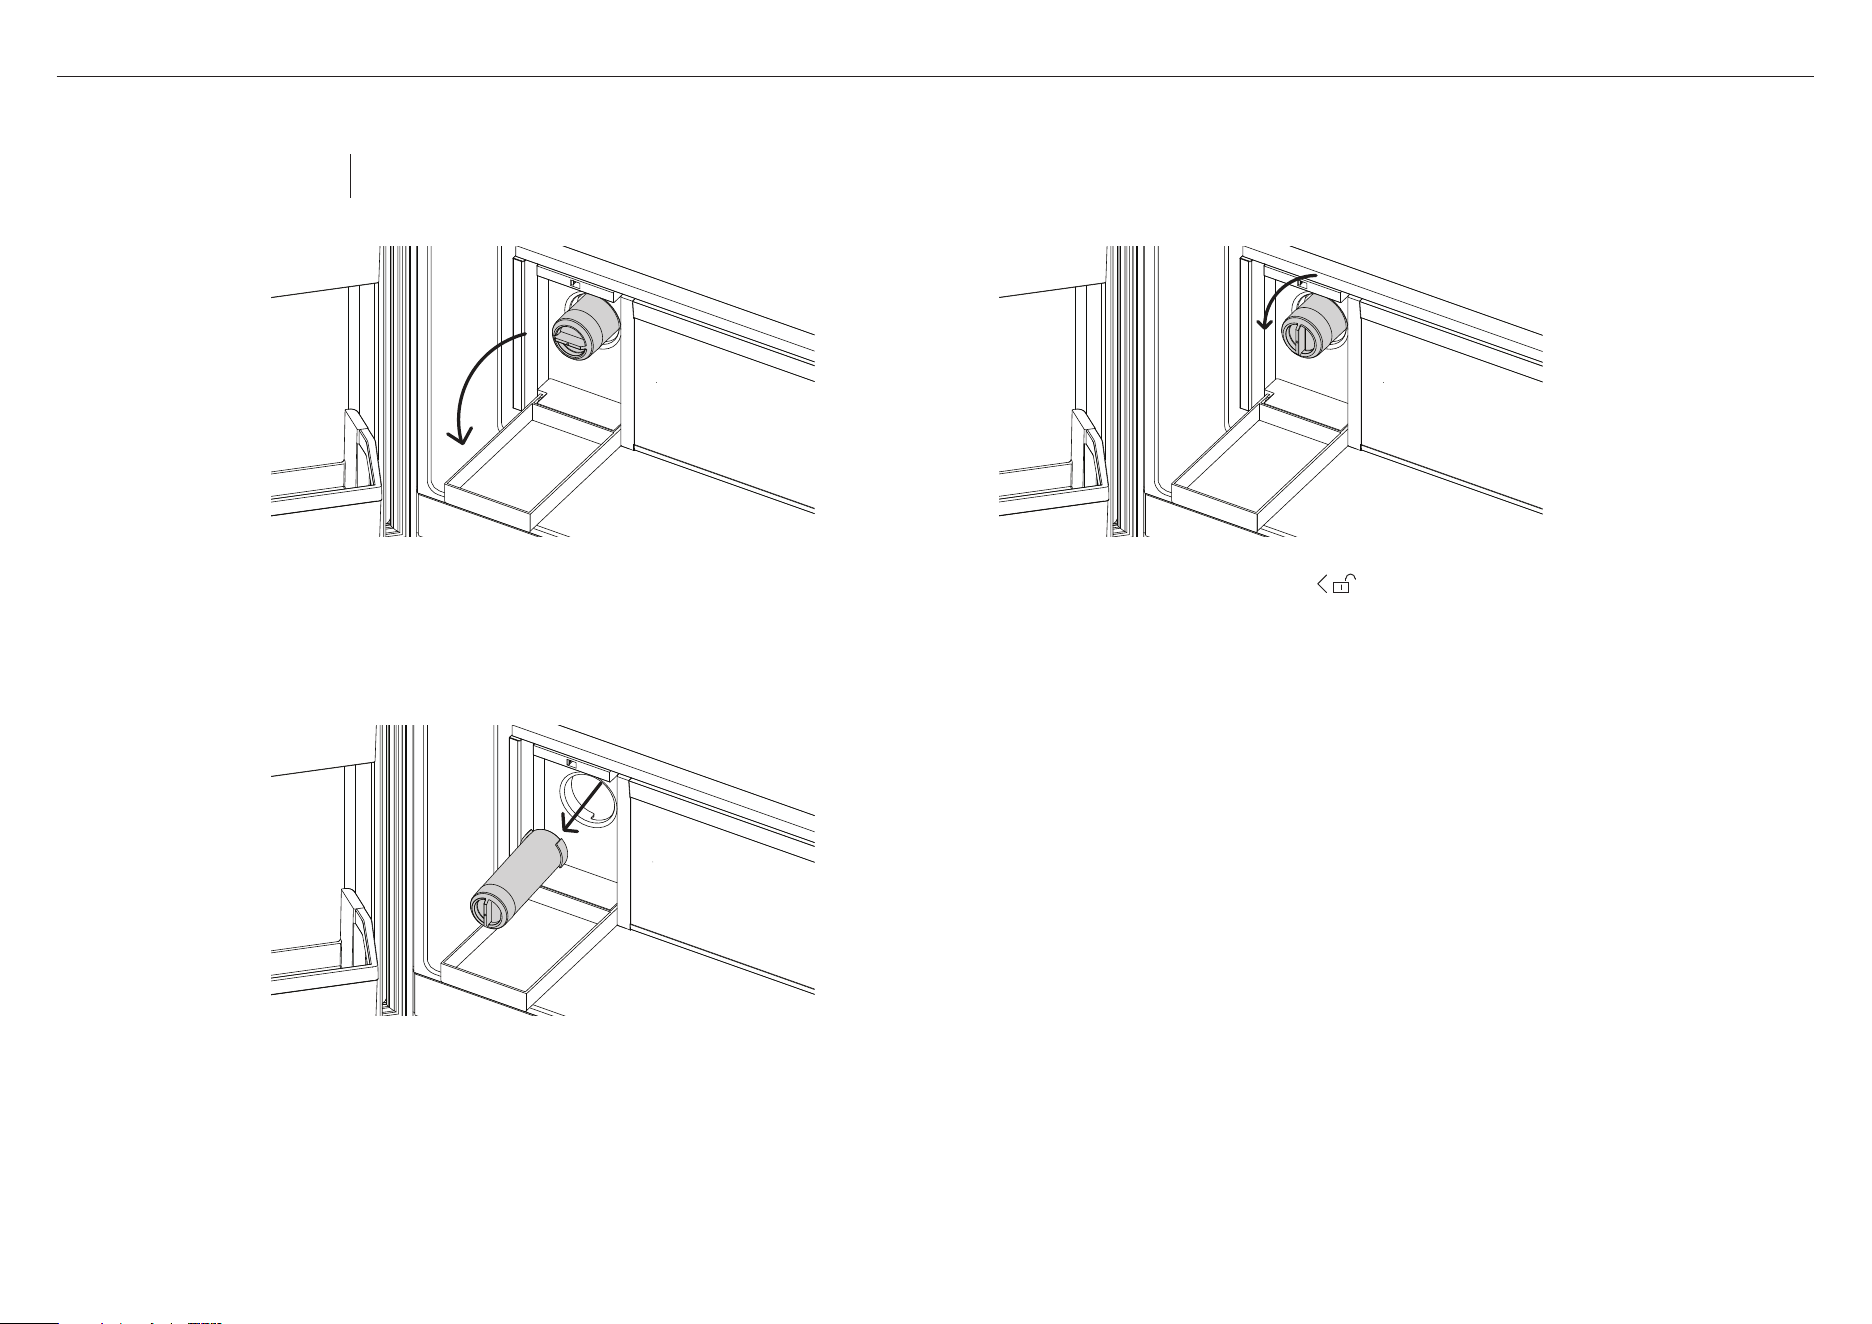
Hold the base of the filter firmly and pull
towards you (B).
C
4
Rotate the filter counterclockwise 90°.
Thefiltershould release from the filter head (C),
if it does not, pull the filter toward you.
D
5
Pull out the filter (D) to remove it from the filter head.
Discard the old filter.
– If the filter is difficult to remove, runwater through
the filter by dispensing water.
– A small amount of water will drip after you remove
thefilter. This is normal.
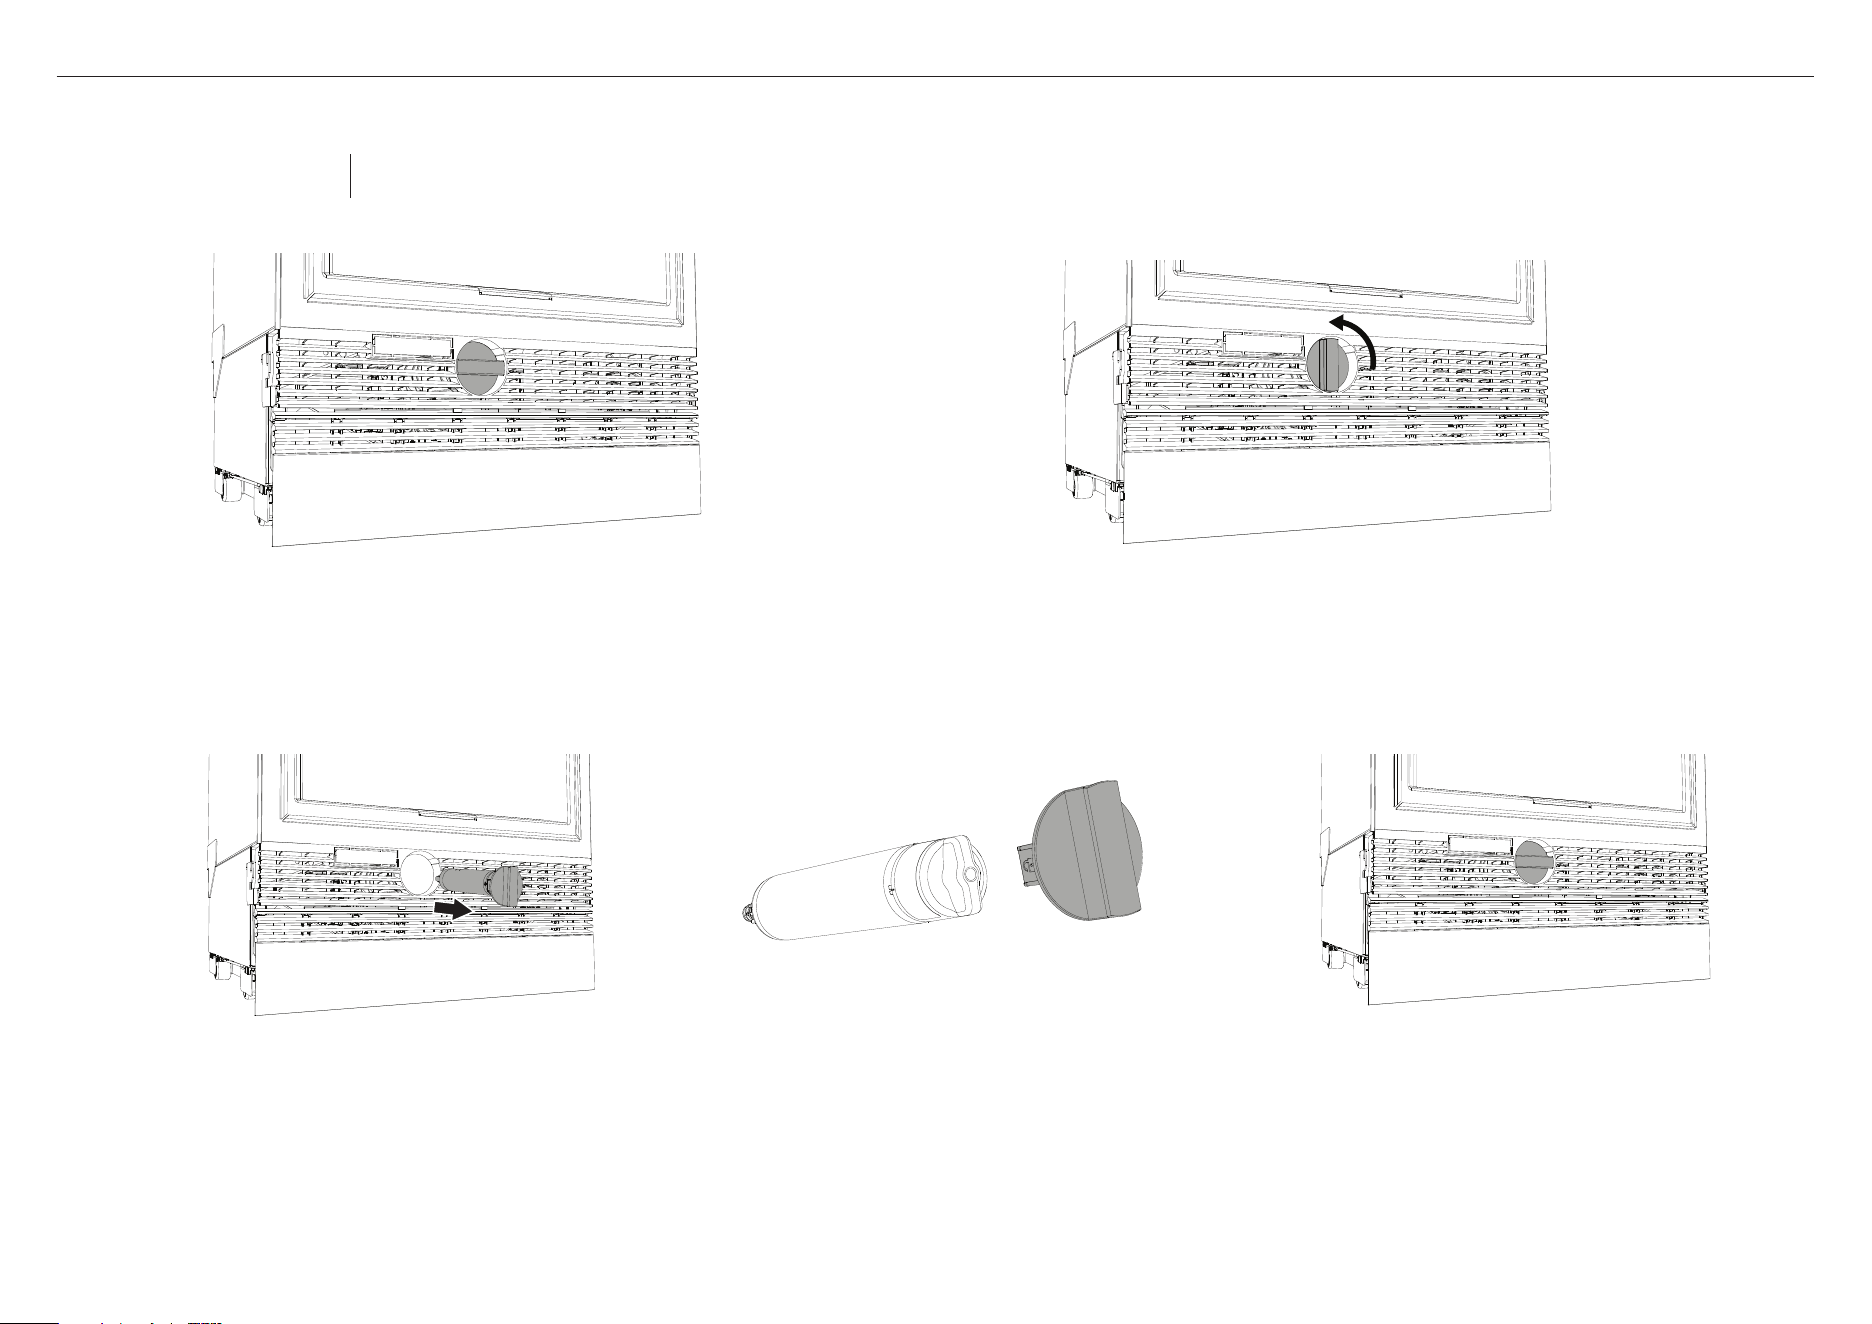
1 Find the filter cover on the back wall, top right
ofyourrefrigerator.
2
Pull the tab (A) at the bottom of the cover towards
you to release. The cover will slide down upon release.
Note: Remove the top shelf if you need more space
while removing the filter.
A
B
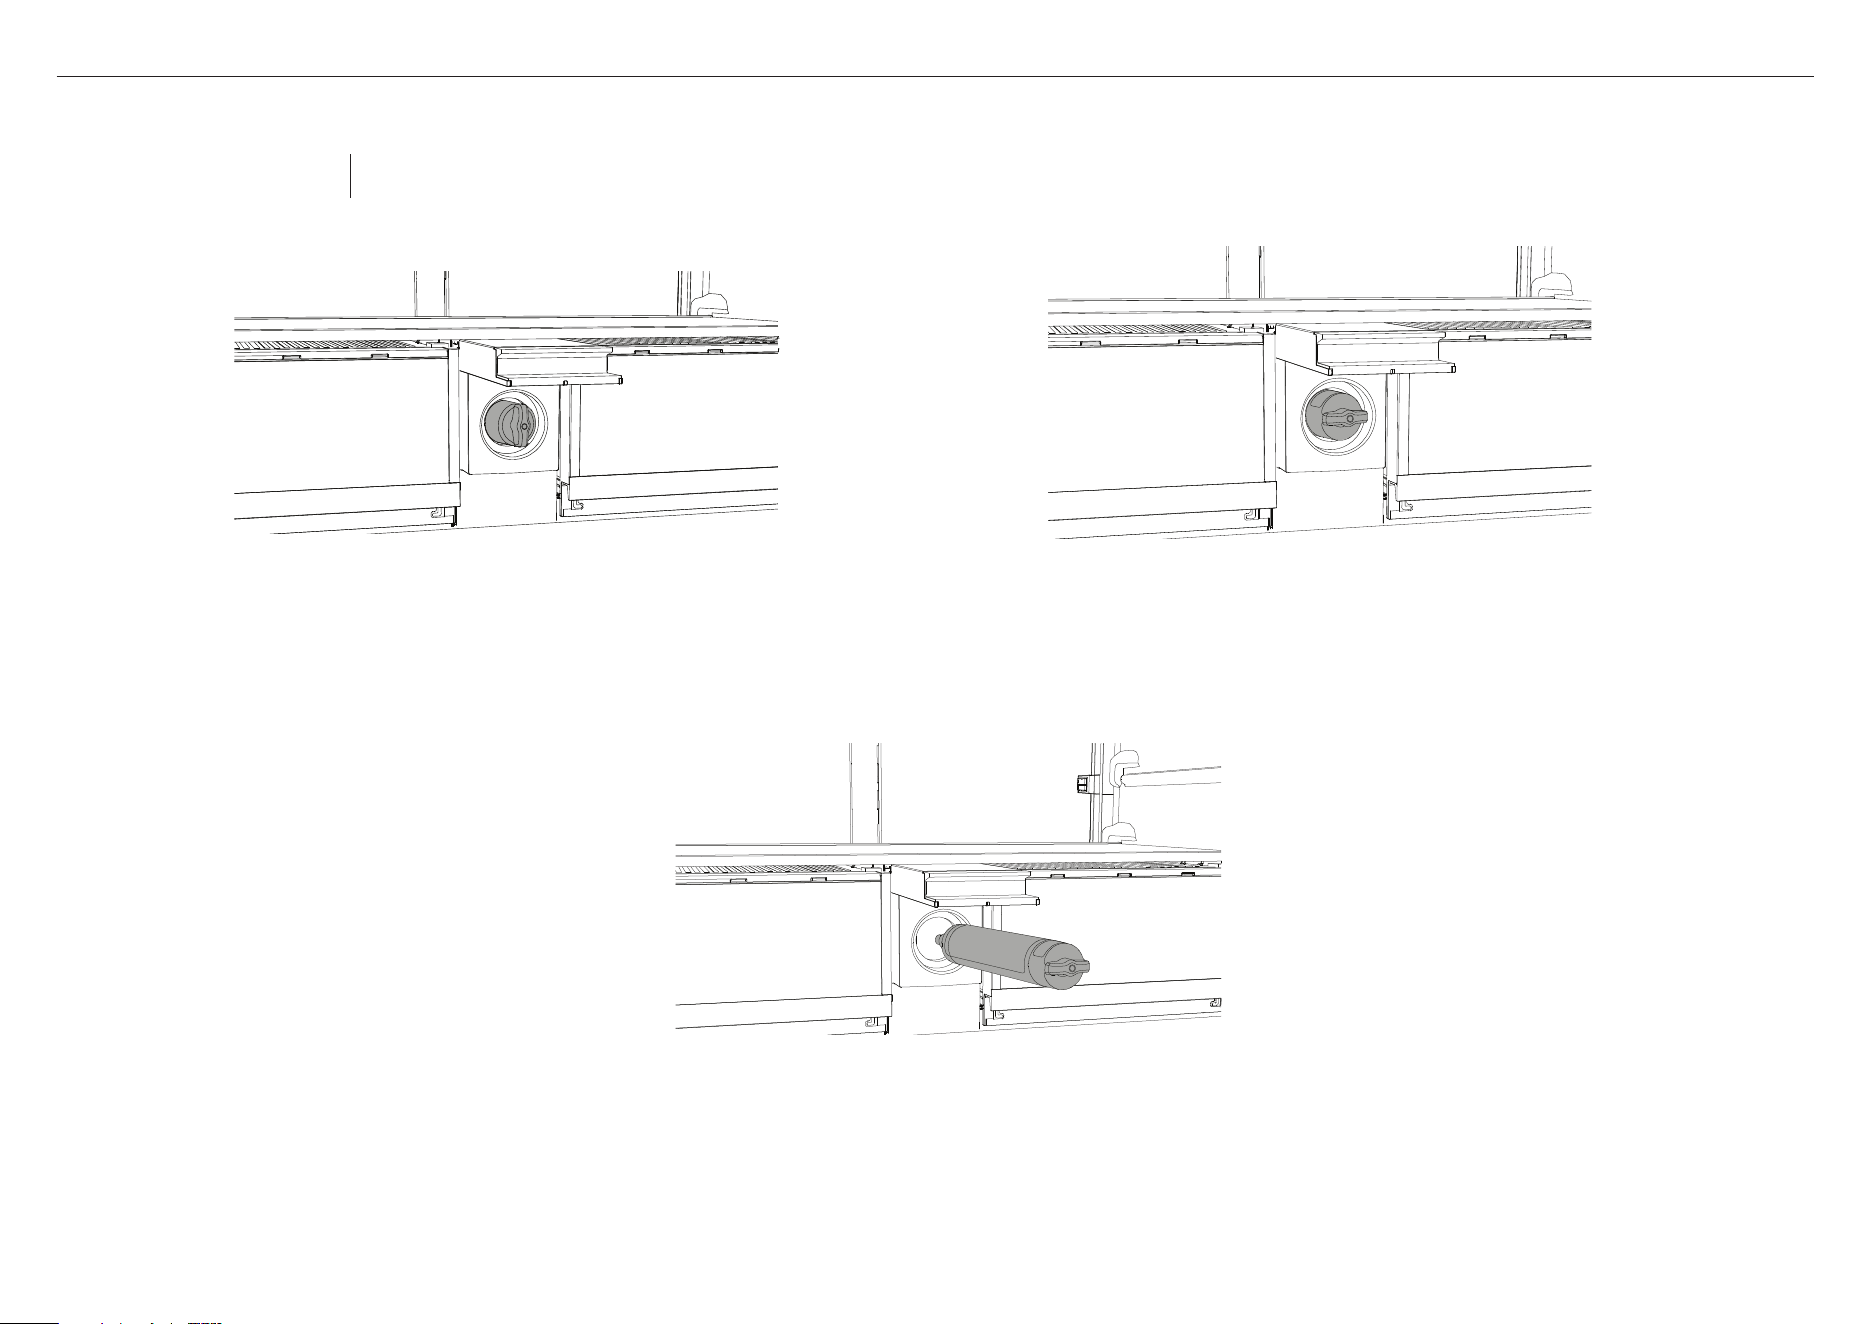
FOR RF605, RF203, RF523 AND RF172 MODELS
The filter is located internally
at the back top right corner
of the refrigerator.
Removing the old filter
Replacement filter for RF605 & RF203: 847200 for FPWF1 system
Replacement filter for RF523 & RF172: 847201 for FPWF1 system
Note: It is not necessary to turn the water supply off when removing the water filter.
It is easier to remove the water filter with the water turned on.
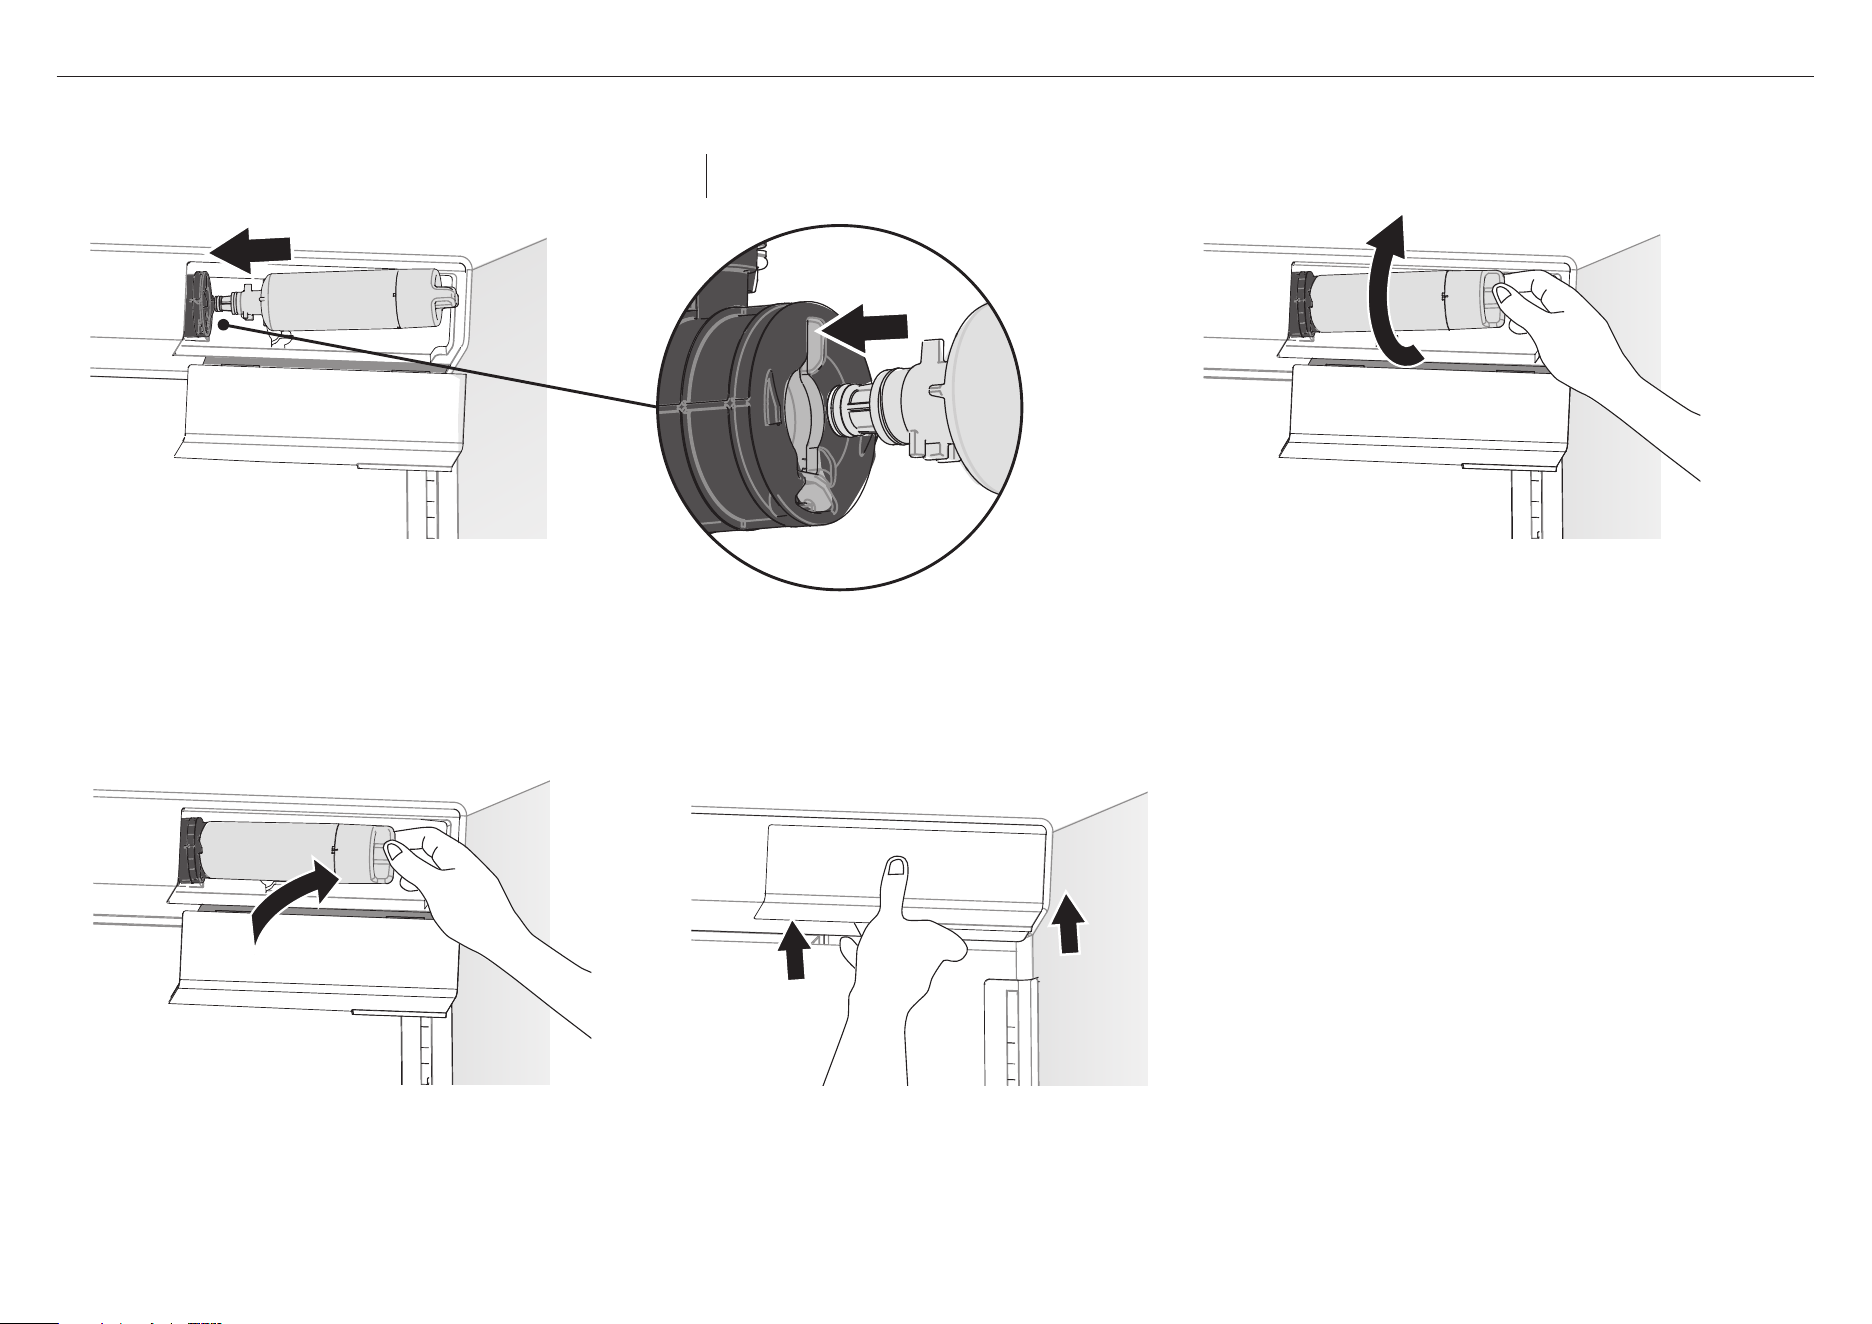
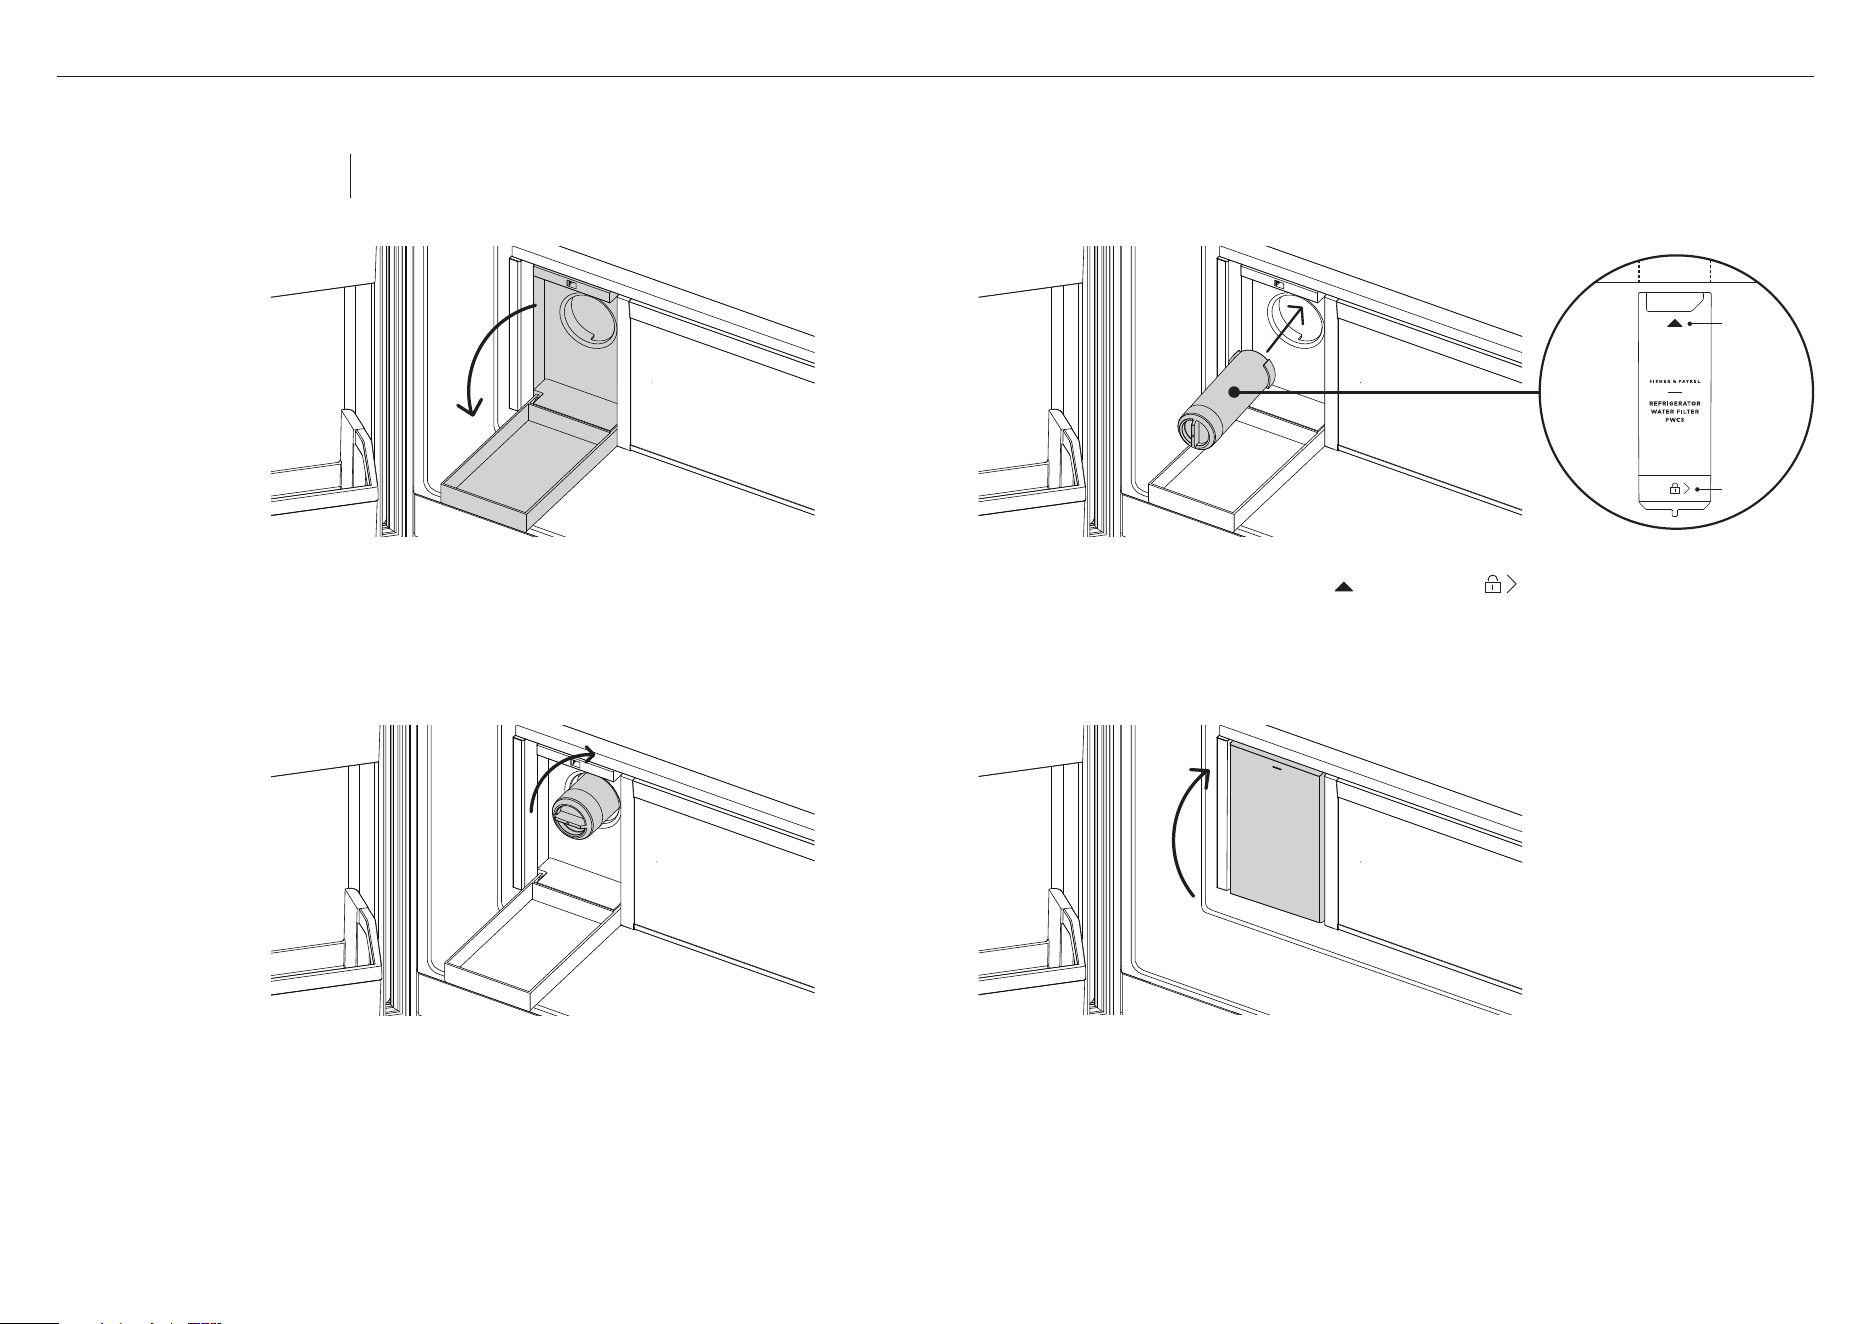
3
C
4
Push the entire filter back into the bracket (C).
D
5
Push the cover up and into the slots at the top of the
filter housinguntil it clicks and the base locks firmly
into place (D).
IMPORTANT!
After installation, the water filter MUST be flushed.
Referto‘Flushing the water filter’ for details.
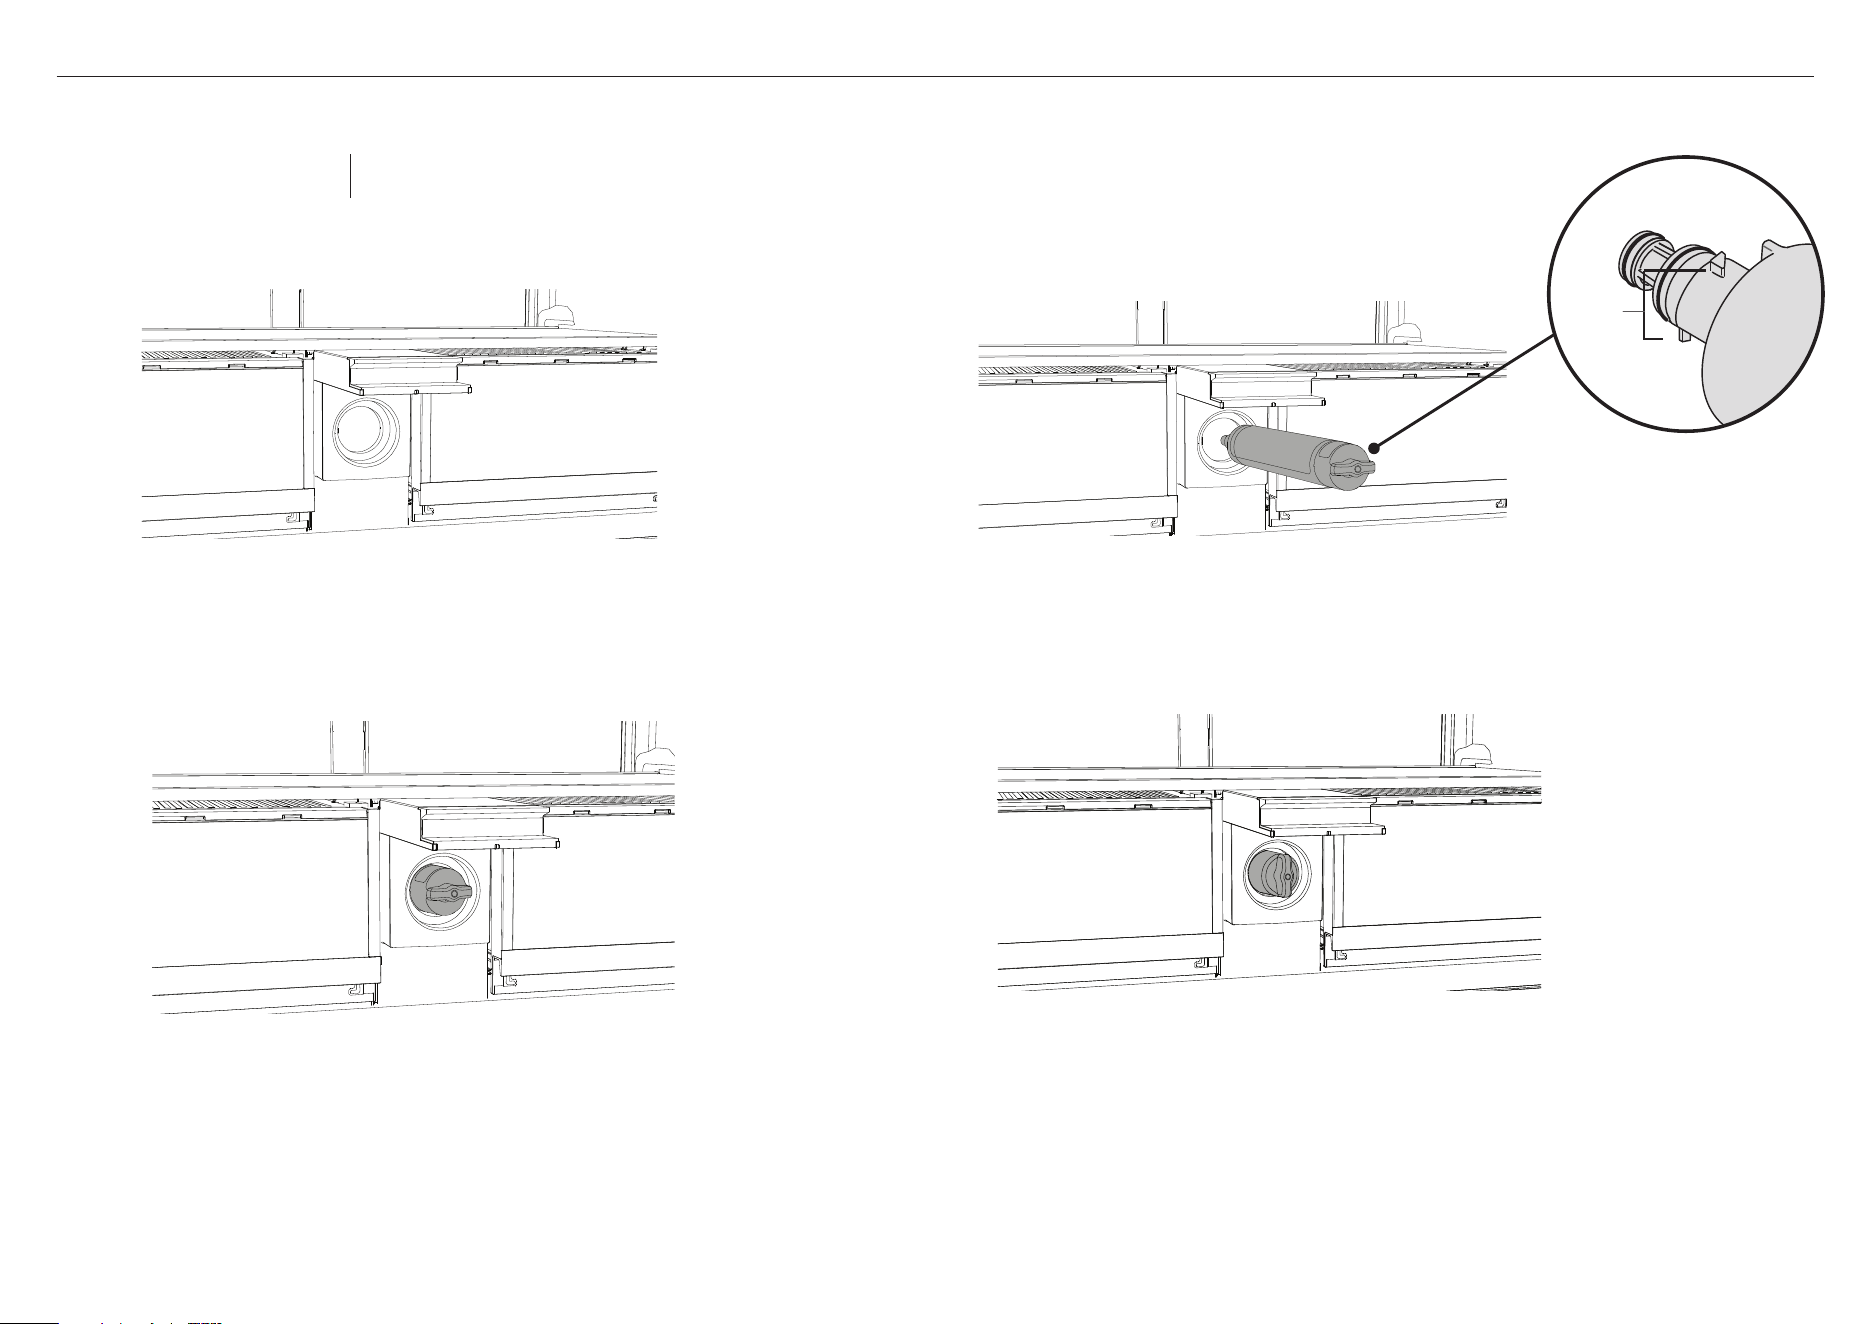
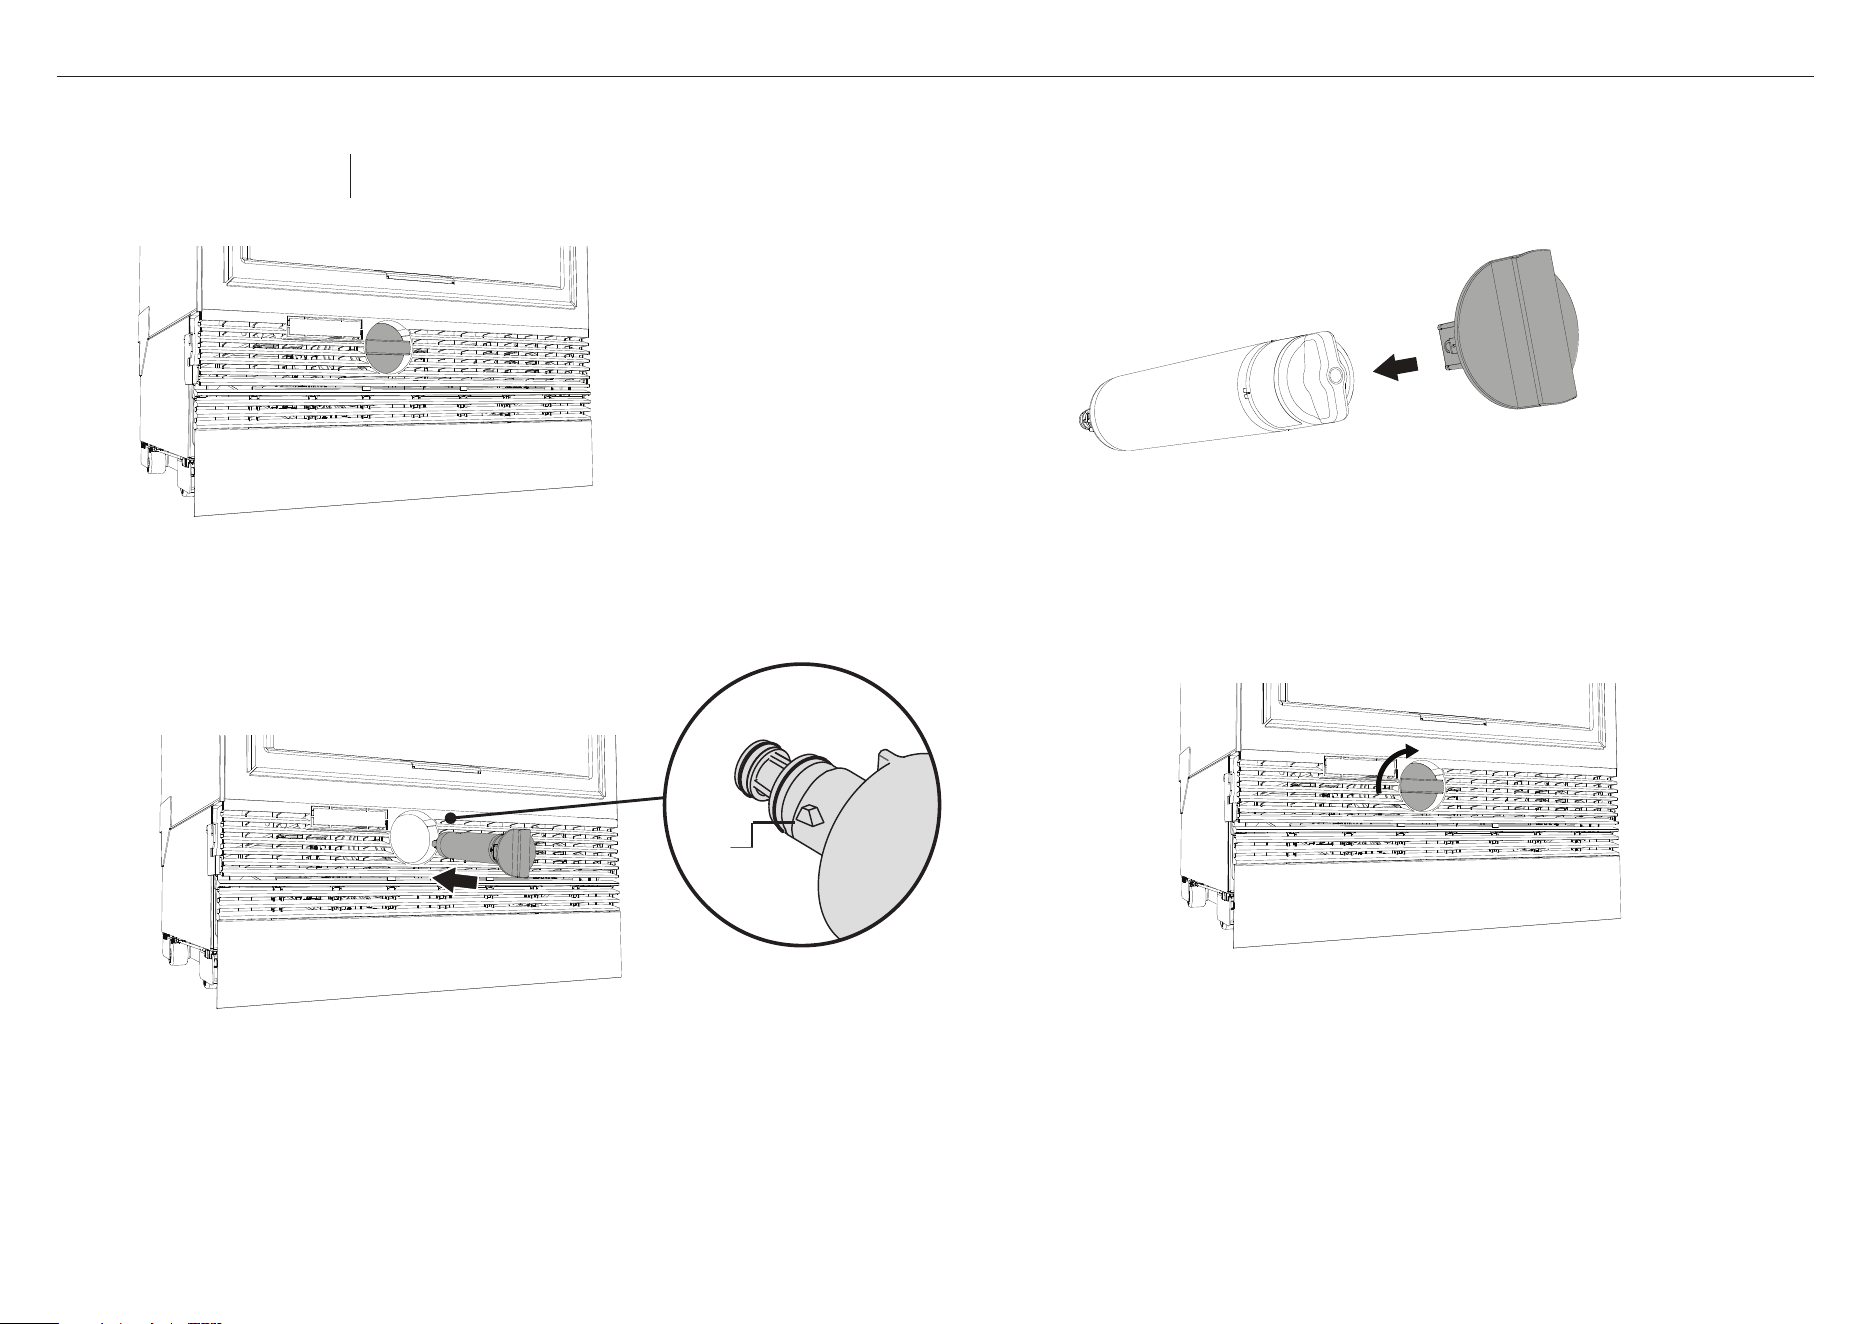
B
3
Push the filter firmly all the way into the filter head then rotate
thefilter clockwise 90° until it locks into place (B).
– If the filter will not turn, ensure the filter is correctly aligned
(A), to allow the filter to be pushed firmly into the filter head.
– Ensure the filter is fully rotated 90° to allow the water to flow.
1
Remove the plastic wrapping from the new filter.
2
Align the filter correctly (A). Insert the filter into the filter head.
FOR RF605, RF203, RF523 AND RF172 MODELS
A
Replacement filter for RF605 & RF203: 847200 for FPWF1 system
Replacement filter for RF523 & RF172: 847201 for FPWF1 system
Note: It is not necessary to turn the water supply
off when installing the water filter.
Installing the new filter
4
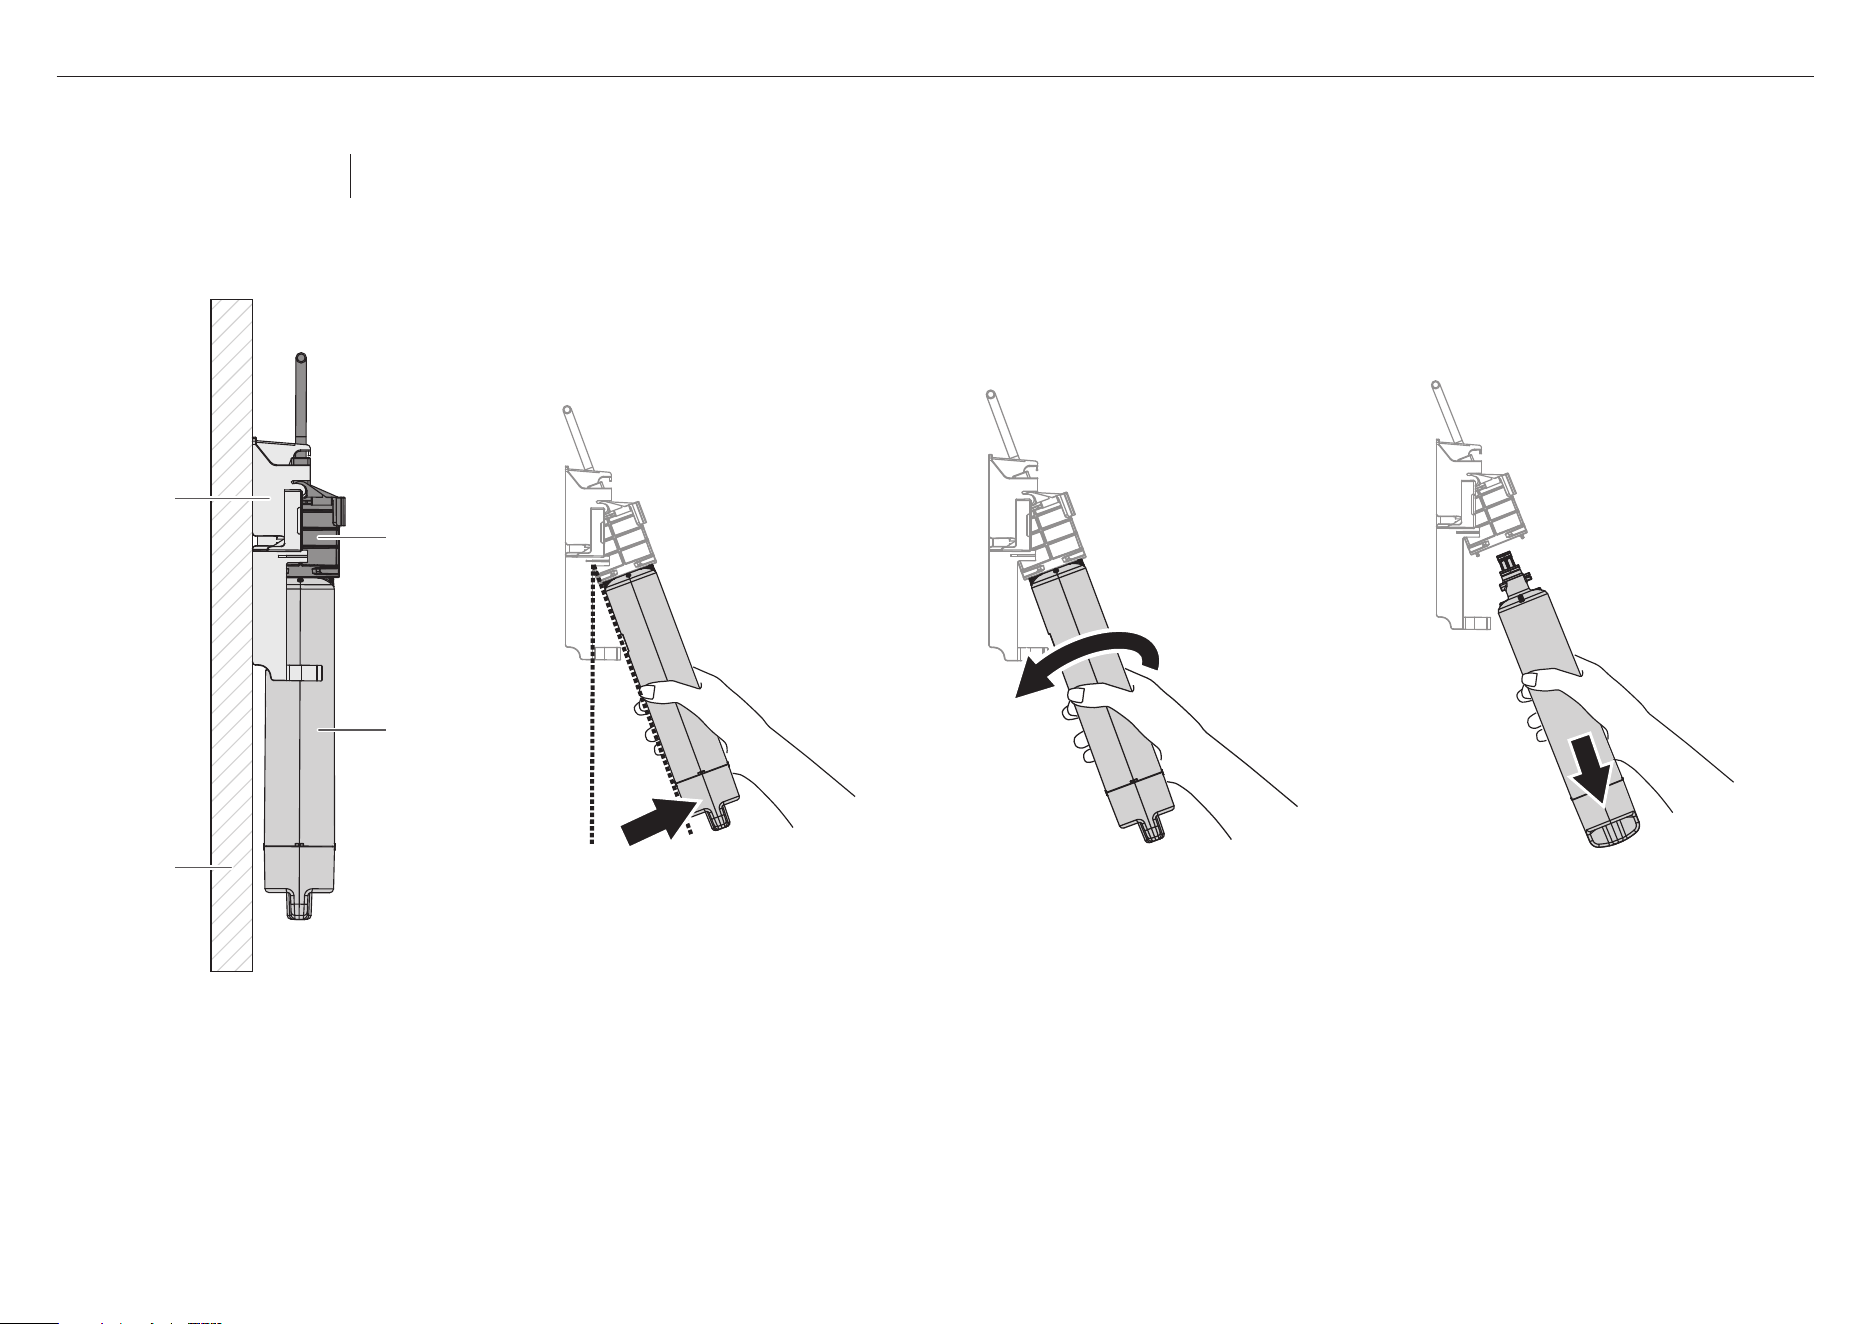
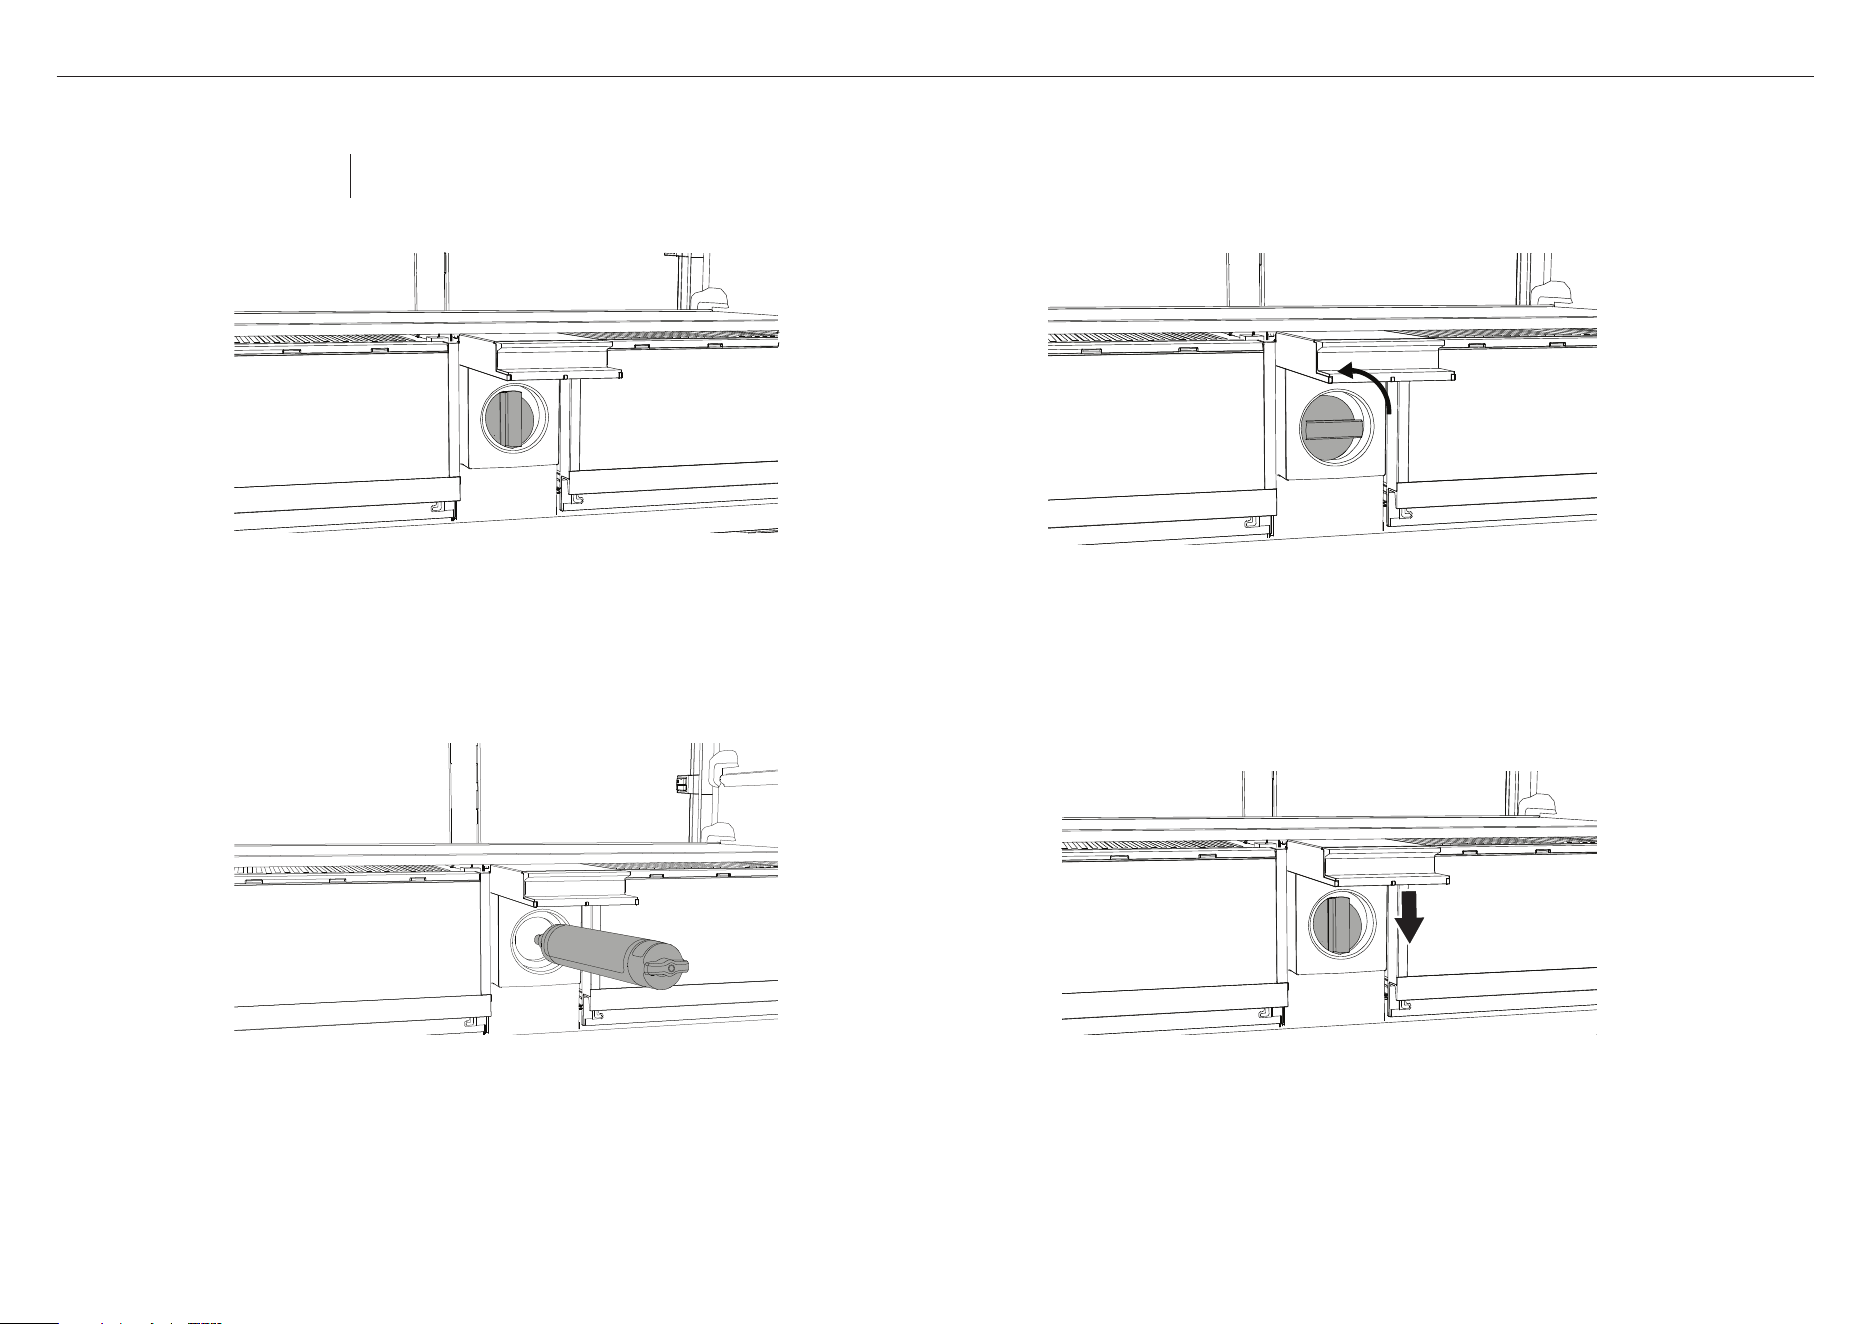
FOR REFRIGERATORS WITH EXTERNAL FILTER
B CA
3
Pull down vertically to remove the filter
from the bracket(C). Discard the old filter.
– A small amount of water will
drip after you removethefilter.
Thisisnormal.
2
Rotate the filter counterclockwise until
itreleases from thefilter head (B).
– If the filter is difficult to remove,
runwater through the filter by
dispensing water.
1
Hold the base of the filter firmly and
pulltowards you. Thefilter will tilt
towards you from the bracket (A).
External water filter attached to wall
filter mounting
bracket
filter head
filter cartridge
wall
Removing the old filter
Replacement filter:
847200 for FPWF1 system
Note: It is not necessary to turn the water supply off when removing the water filter.
It is easier to remove the water filter with the water turned on.
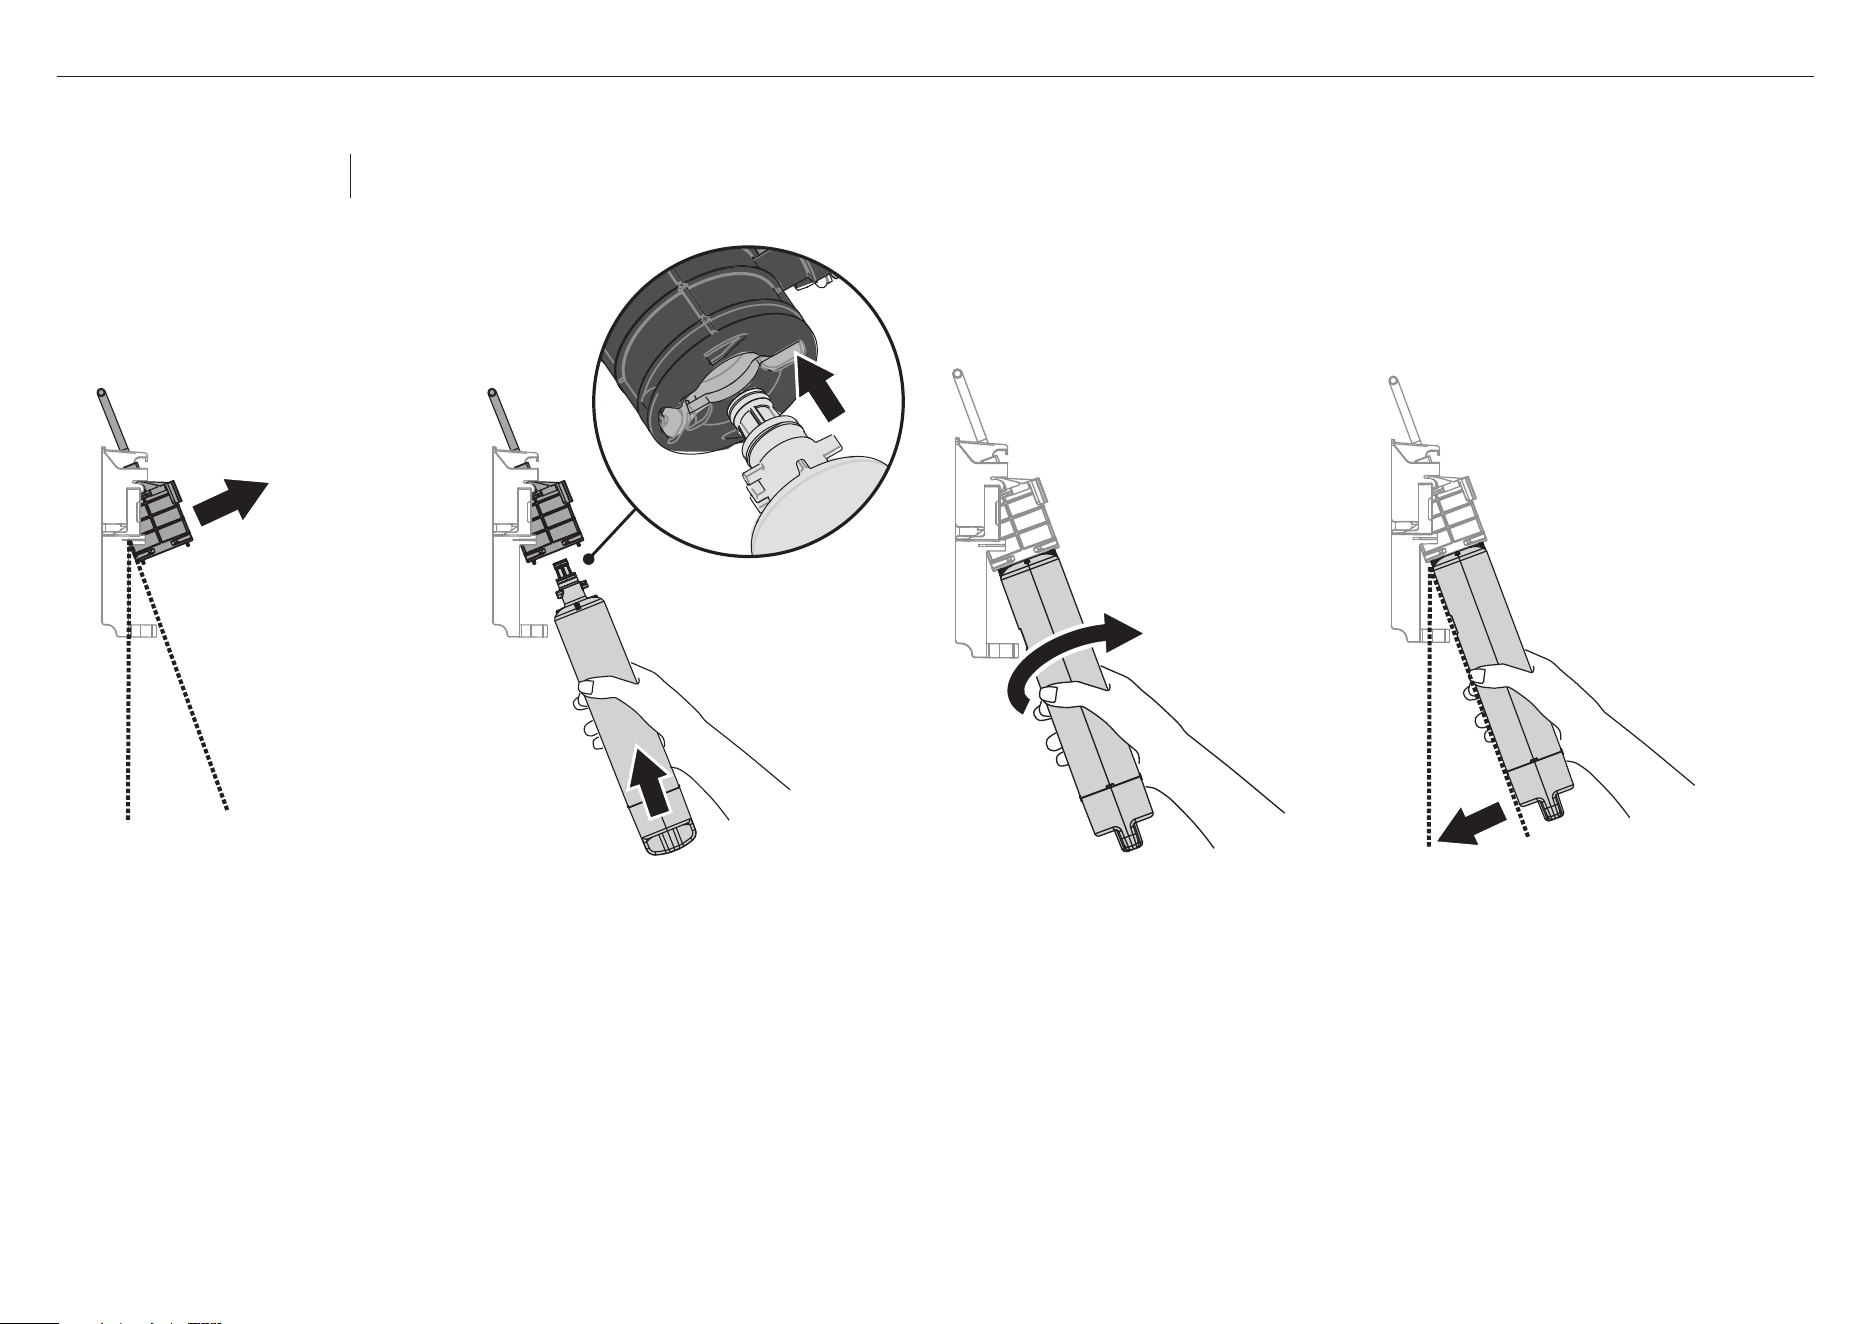
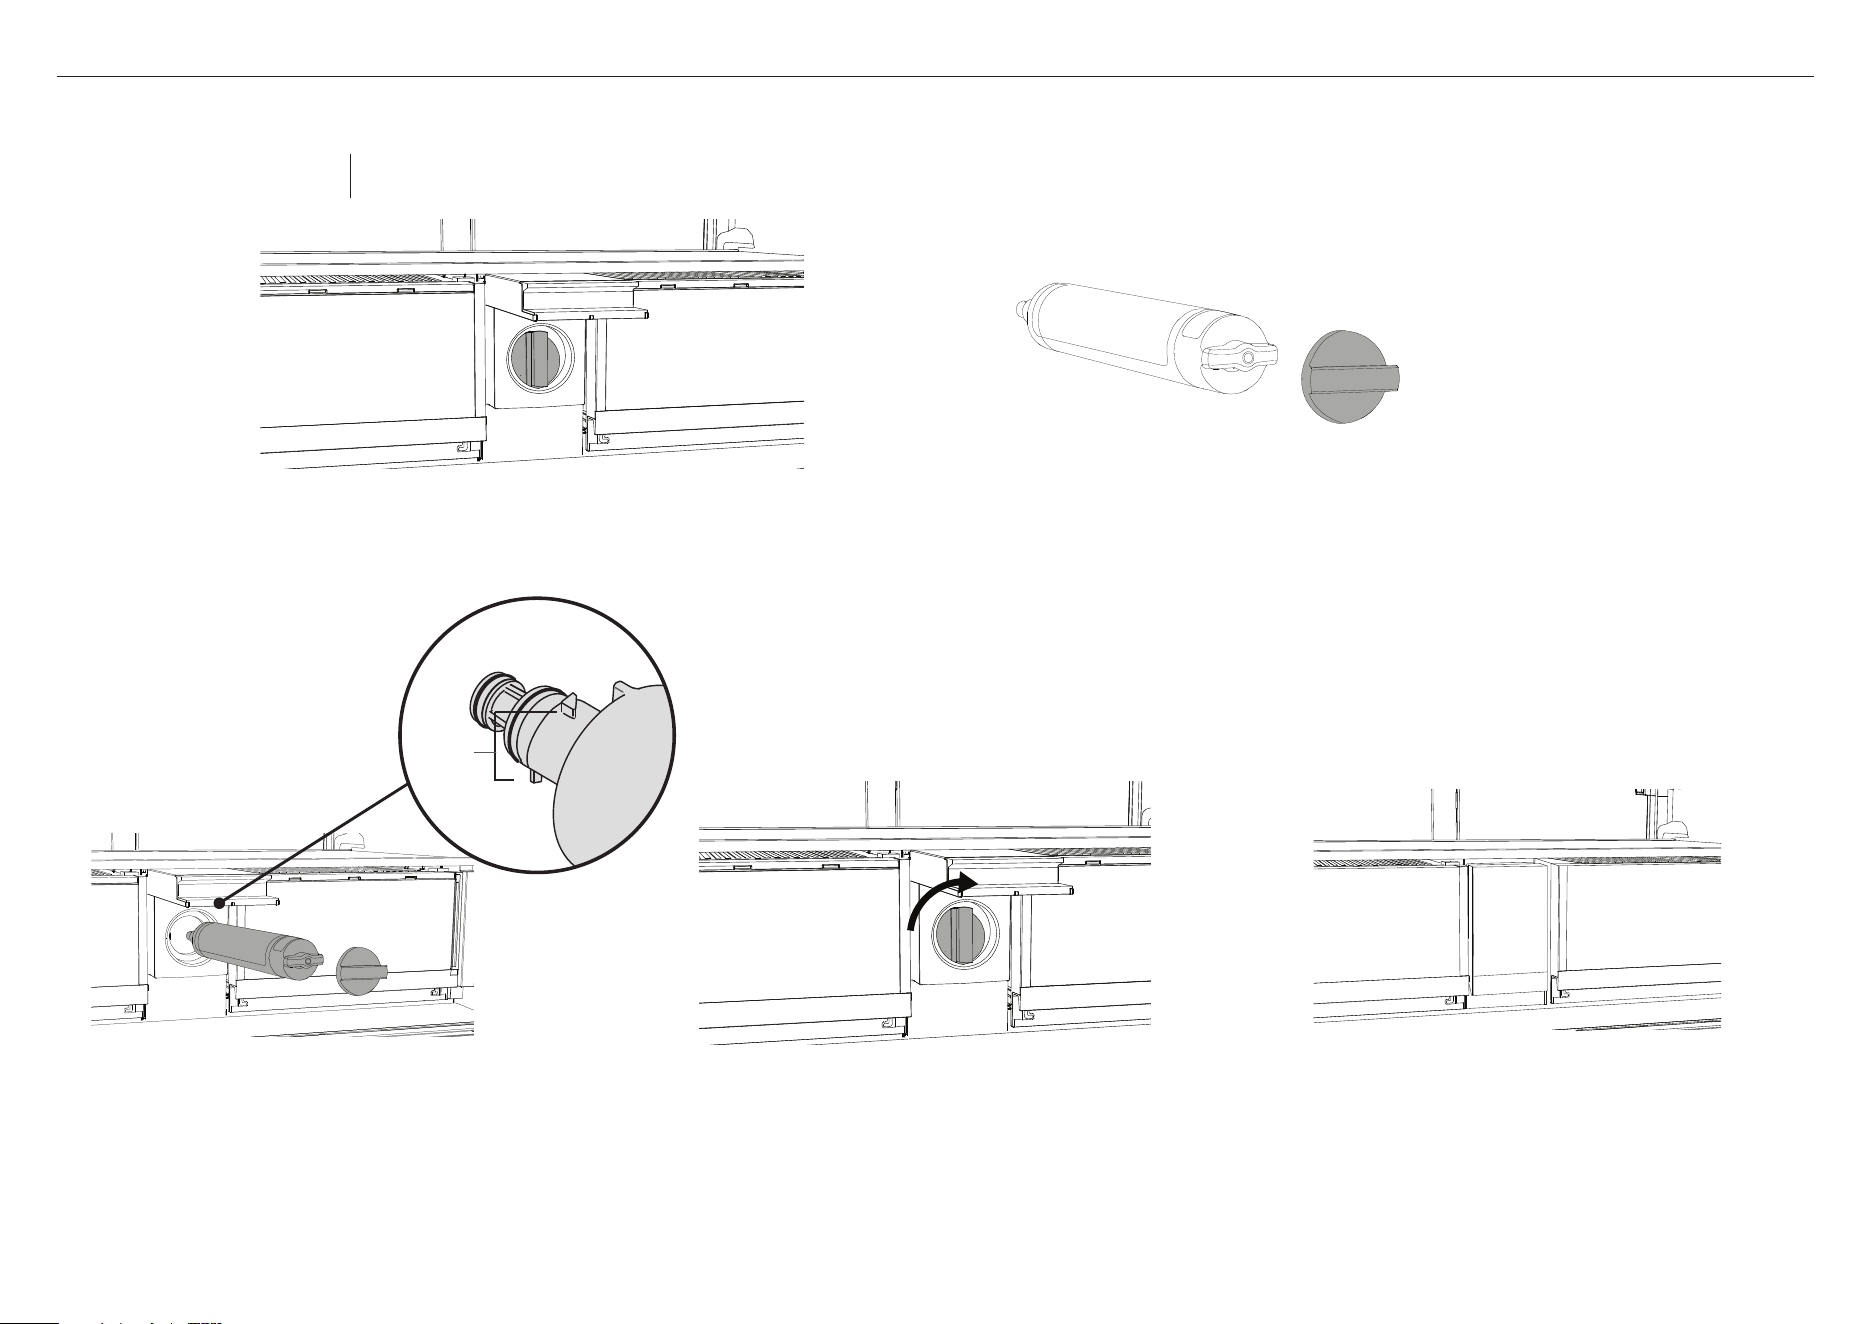
5
1
Remove the plastic wrapping from
the new filter.
2
Pull the filter head towards you (A).
E
5
Push the entire filter back into the bracket (E).
IMPORTANT!
After installation, the water filter MUST be flushed.
Refer to ‘Flushing the water filter’ for details.
FOR REFRIGERATORS WITH EXTERNAL FILTER
4
Push the filter firmly all the way into the filter
head then rotate the filter clockwise 90°
until it locks into place (D).
– If the filter will not turn, ensure the
filter is correctly aligned (B), to allow
the filter to be pushed firmly into the
filter head.
– Ensure the filter is fully rotated 90°
toallow the water to flow.
A
C
3
Align the filter correctly (B).
Insertthefilter into the filter head (C).
B
D
Replacement filter:
847200 for FPWF1 system
Note: It is not necessary to turn the water supply
off when installing the water filter.
Installing the new filter
6
FOR RF730Q MODELS
1
Locate the filter hatch between the two produce bins inside the fresh
food compartment. Lift the hatch to access the filter tool (A).
A
2
Turn the filter tool 90° counterclockwise to the unlock
position (B).
B
C
3
Pull out the filter from the filter casing. Discard the old
filter (C).
– If you have difficulty removing the filter, an
additional tool may be required e.g. pliers (not
supplied).
Removing the old filter
Replacement filter:
847200 for FPWF1 system
Note: It is not necessary to turn the water supply off when removing the water filter.
It is easier to remove the water filter with the water turned on.
7
FOR RF730Q MODELS
1
Locate the filter hatch between the two produce bins
inside the fresh food compartment. Lift the hatch to
access the filter tool (A).
IMPORTANT!
After installation, the water filter MUSTbe flushed.
Refer to ‘Flushing thewater filter’ for details.
4
Close the filter hatch.
D
C
A
B
2
Align the filter correctly (B). Insert the filter into the
filter housing until the tool is flush and in the unlock
position (C).
3
Push the filter firmly in and rotate clockwise 90° into
the lock position (D) to allow water to flow.
– If the filter will not turn, ensure the filter is
correctly aligned, (C) to allow the filter to be
pushed firmly into the filter head.
lugs
Replacement filter:
847200 for FPWF1 system
Note: It is not necessary to turn the water supply
off when installing the water filter.
Installing the new filter
8
FOR RF730Q MODELS WITH FILTER TOOL
1
Locate the filter hatch between the two produce bins inside
the fresh food compartment. Lift the hatch to access the
filter tool (A).
A
2
Turn the filter tool 90° counterclockwise to the unlock
position (B).
B
C
3
Remove the tool and pull out the filter from the filter
casing. Discard the old filter (C).
– If you have difficulty removing the filter, an
additional tool may be required e.g. pliers (not
supplied).
4
Return the filter tool to its storage position and close
the filter hatch.
Removing the old filter
Replacement filter:
847200 for FPWF1 system
Note: It is not necessary to turn the water supply off when removing the water filter.
It is easier to remove the water filter with the water turned on.
9
FOR RF730Q MODELS WITH FILTER TOOL
1
Locate the filter hatch between the two produce bins inside
the fresh food compartment. Lift the hatch to access the
filter tool (A).
IMPORTANT!
After installation, the water filter MUSTbe
flushed. Refer to ‘Flushing thewater filter’ for
details.
6
Close the filter hatch.
2
Remove the plastic wrapping from the new filter.
3
Place the filter tool on the filter handle (B).
E
A
C
4
Align the filter correctly (C). Insert the filter
into the filter housing until the tool is flush
and in the unlock position (D).
B
5
Push the filter firmly in and rotate clockwise 90°
into the lock position (E) to allow water to flow.
– If the filter will not turn, ensure the filter is
correctly aligned, (C) to allow the filter to be
pushed firmly into the filter head.
D
lugs
Replacement filter:
847200 for FPWF1 system
Note: It is not necessary to turn the water supply
off when installing the water filter.
Installing the new filter
10
FOR RF500QNU MODELS
1
Locate filter hatch beside the produce bins inside the
fresh food compartment. Push to open the hatch and
access the filter.
3
Pull out the filter from the filter casing.
Discard the old filter.
– If you have difficulty removing the filter, an
additional tool may be required e.g. pliers
(not supplied).
2
Turn the filter counterclockwise to unlock it.
Removing the old filter
Replacement filter:
FWC5 for FPWF2 system
Note: It is not necessary to turn the water supply off when removing the water filter.
It is easier to remove the water filter with the water turned on.
11
FOR RF500QNU MODELS
1
Locate filter hatch beside the produce bins inside the
fresh food compartment. Push to open the hatch. Refer
to 'Removing the old filter' to remove the old filter.
IMPORTANT!
After installation, the water filter MUSTbe flushed.
Refer to ‘Flushing thewater filter’ for details.
4
Close the filter hatch.
2
Align the filter correctly. With arrow and lock icon
centred at the top, push the filter firmly in into the housing
and ensure that the filter is in the correct position.
3
Rotate clockwise 90° into the lock position to allow
water to flow.
– If the filter will not turn, ensure the filter is
correctly aligned to allow the filter to be pushed
firmly into the filter head.
TOP VIEW
arrow
lock
icon
Replacement filter:
FWC5 for FPWF2 system
Note: It is not necessary to turn the water supply
off when installing the water filter.
Installing the new filter
12
FOR INTEGRATED COLUMN REFRIGERATORS AND FREEZERS
E
D
1
Open the water filter hatch to access the filter (A), press the hatch in then pull the hatch down (B).
C
4
Pull out the filter from the
filter casing (E). Discard the old filter.
– If the filter is difficult to remove,
run water through the filter by using the
automatic ice maker. Refer to the user guide
for your appliance for further details.
3
Using the filter tool, rotate the filter head
90°counterclockwise to release (D).
2
Pull the filter tool gently to dislodge from the front
oftheappliance (C).
A
B
Removing the old filter
Replacement filter:
847200 for FPWF1 system
Note: It is not necessary to turn the water supply off when removing the water filter.
It is easier to remove the water filter with the water turned on.
13
FOR INTEGRATED COLUMN REFRIGERATORS AND FREEZERS
G
1
Remove the plastic wrapping from the new filter.
2
Open the water filter hatch to access the filter (A), press the hatch in then pull the hatch down (B).
6
Return the filter tool to its storage position (H).
IMPORTANT!
After installation, the water filter MUSTbe flushed.
Refer to ‘Flushing thewater filter’ for details.
5
Using the filter tool, rotate the filter head
clockwise 90° to lock in place (G).
– If the filter will not turn, ensure the filter is
correctly aligned (D & E), to allow the filter
to be pushed firmly into the filter head.
– Ensure the filter is fully rotated 90°
toallow the water to flow.
4
Align the filter correctly,
ensure the filter handle is
positioned vertically (D) and
the lugs are aligned correctly(E).
Push the filter firmly inside the casing
all the way into the filter head (F).
3
Pull the filter tool gently to dislodge fromthe
front of the appliance (C).
C
A
B
H
F
filter
handle
D
E
lugs
Replacement filter:
847200 for FPWF1 system
Note: It is not necessary to turn the water supply
off when installing the water filter.
Installing the new filter
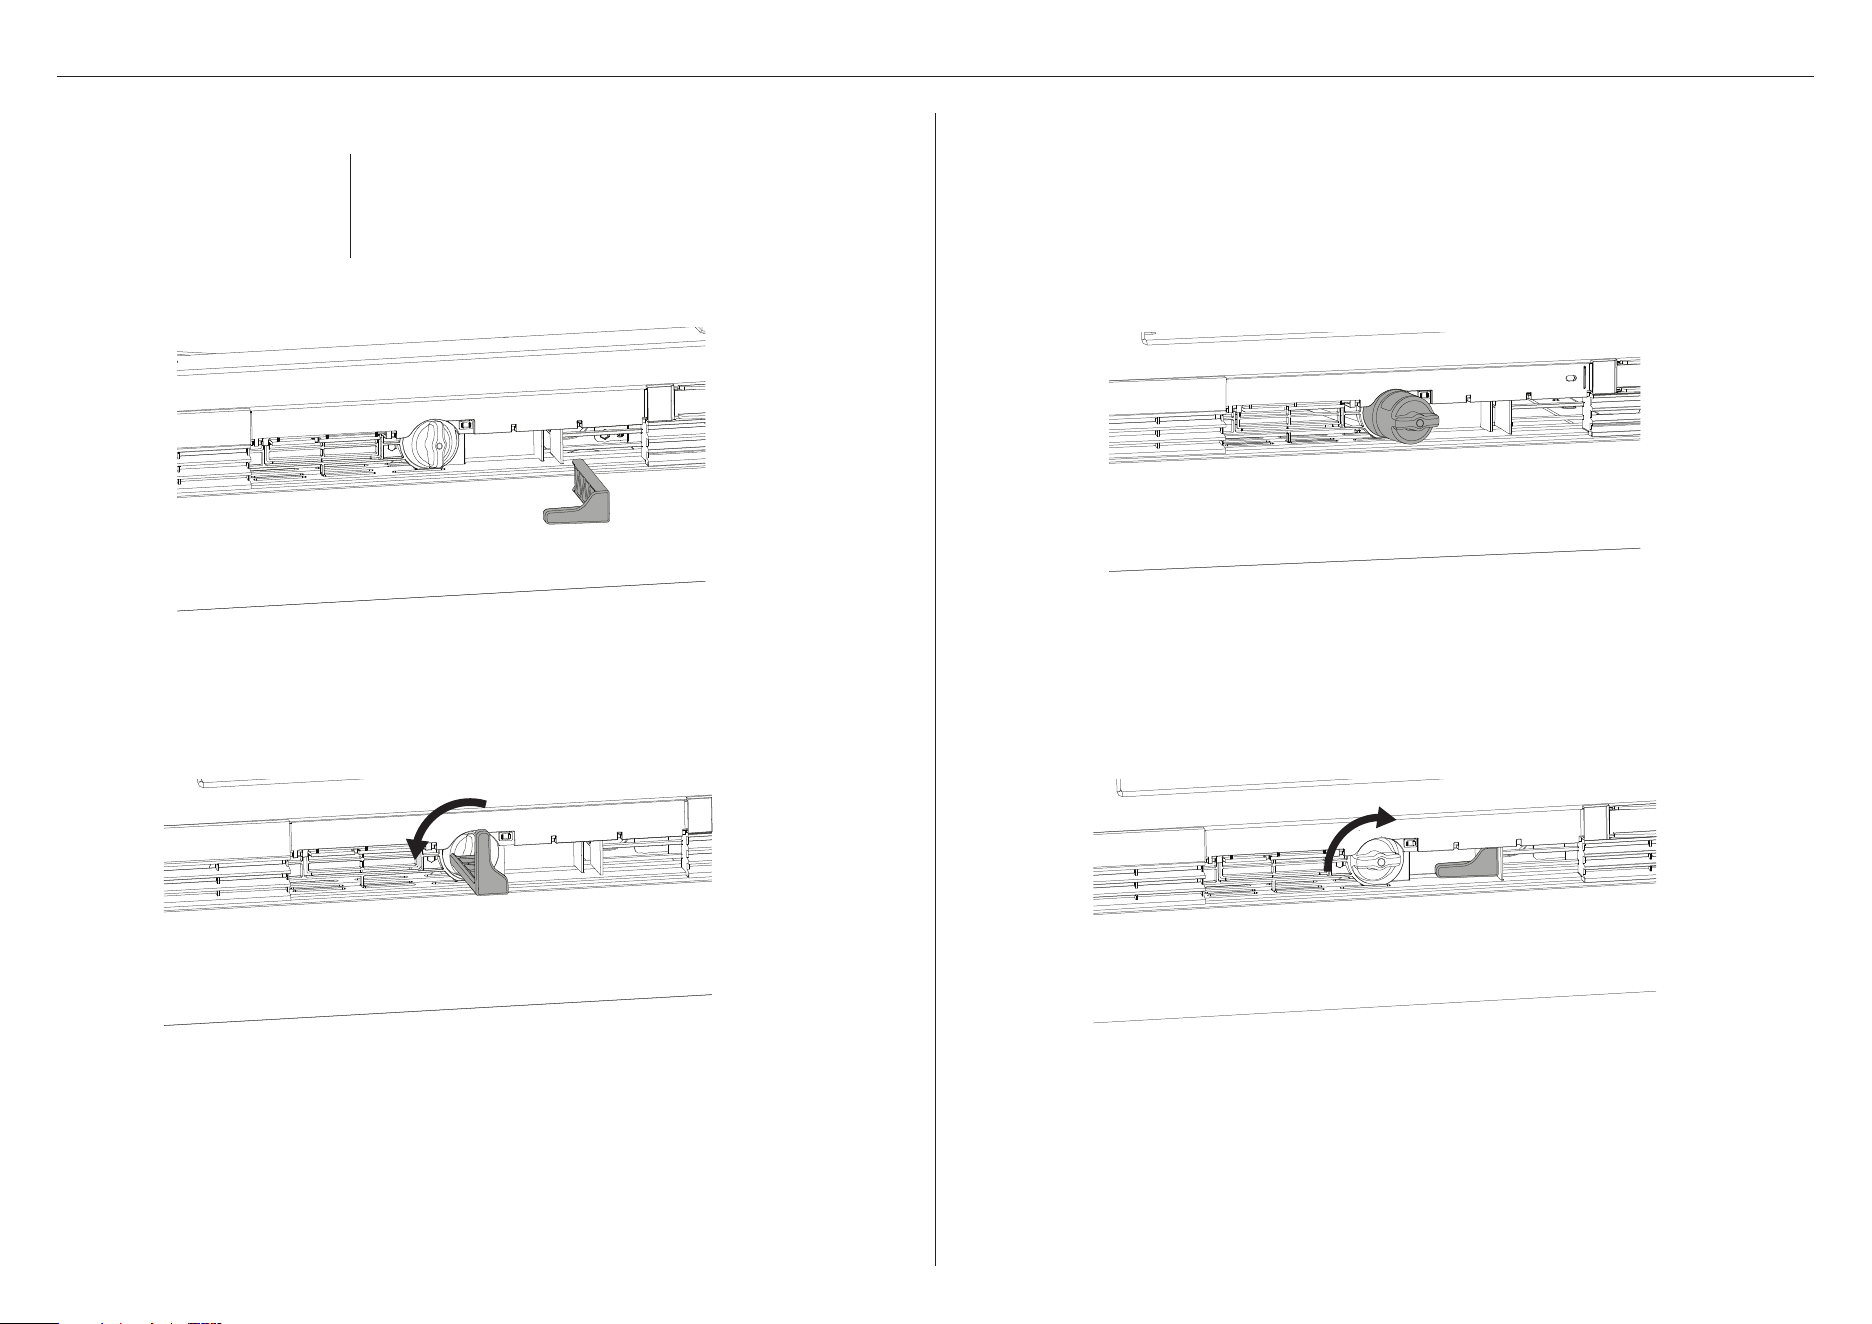
14
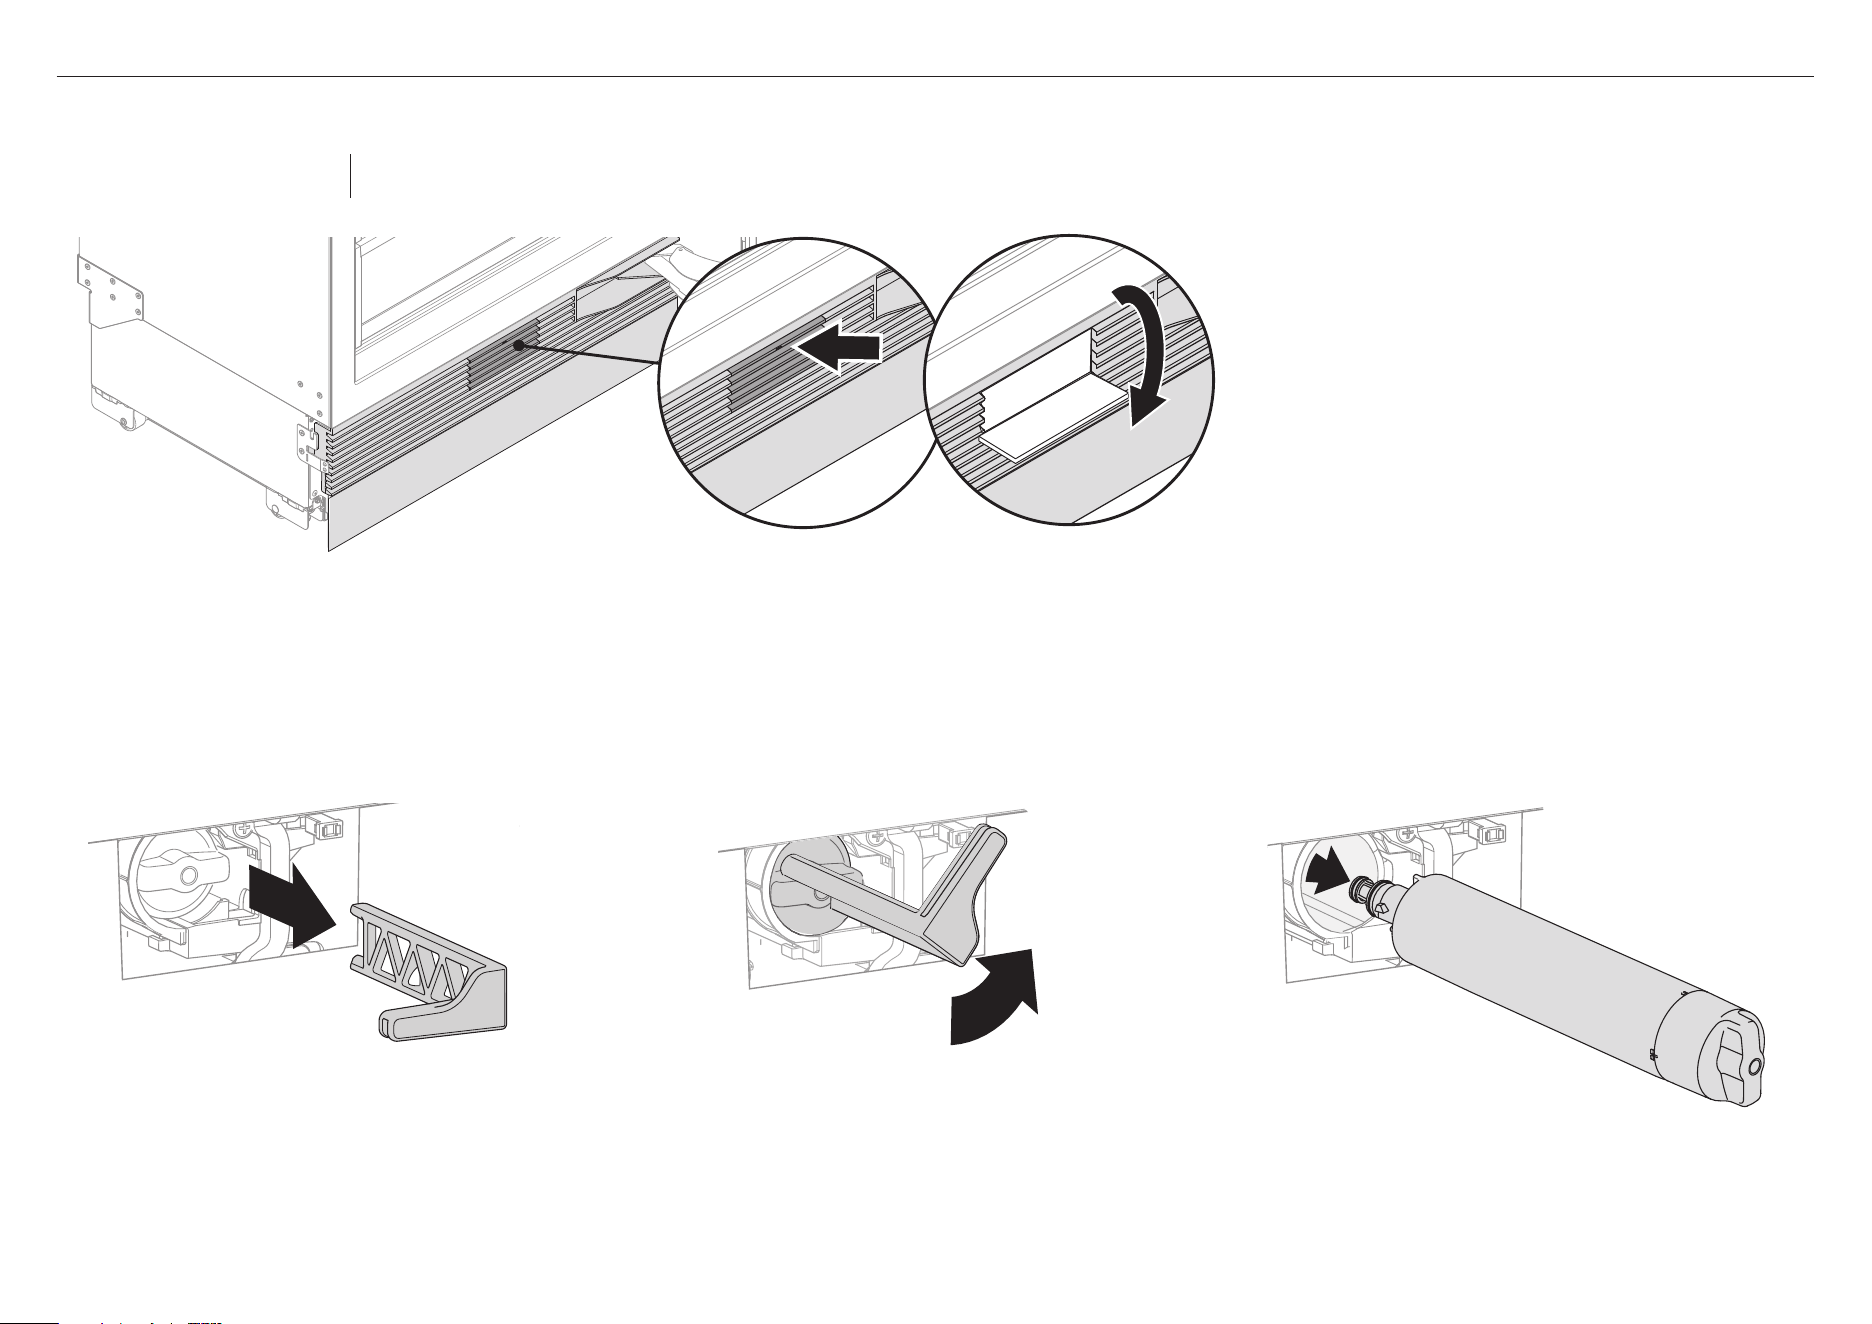
FOR INTEGRATED COLUMN REFRIGERATOR FREEZER MODELS
1
Open the freezer drawer to access the filter tool in the
middle of the grille (A).
5
Return the tool to its storage position.
4
Remove the filter tool from the filter handle.
Discard the old filter. (D).
3
Pull out the filter tool and filter from the filter
casing. If the filter is difficult to remove, run water
by using the water dispenser. Refer to the user
guide for your appliance for further details. (C).
A
2
Rotate the filter tool 90° counterclockwise to release (B).
B
C
D
Removing the old filter
Replacement filter:
847200 for FPWF1 system
Note: It is not necessary to turn the water supply off when removing the water filter.
It is easier to remove the water filter with the water turned on. The filter can be accessed from the side of the drawer.
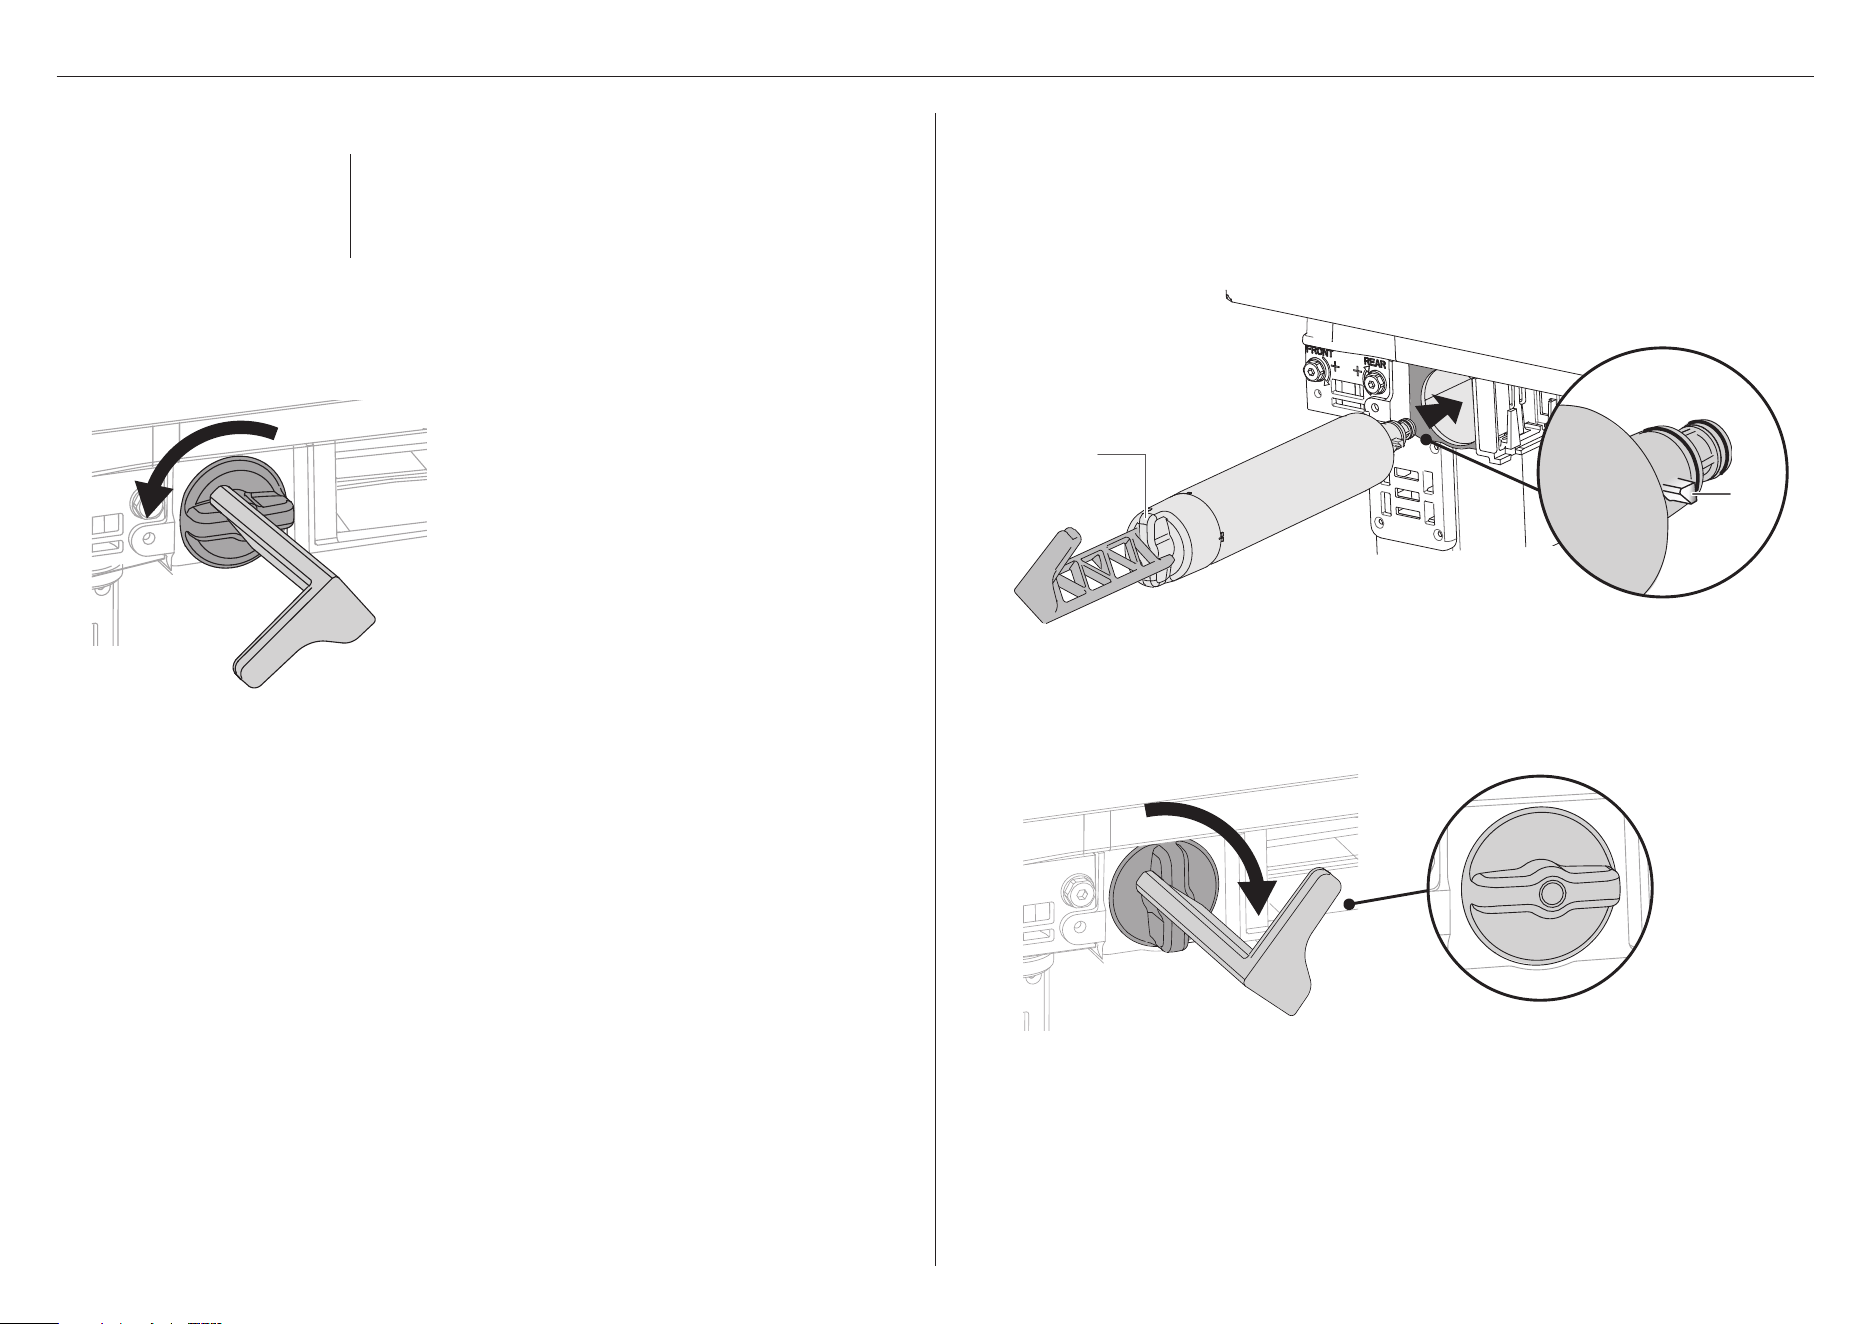
15
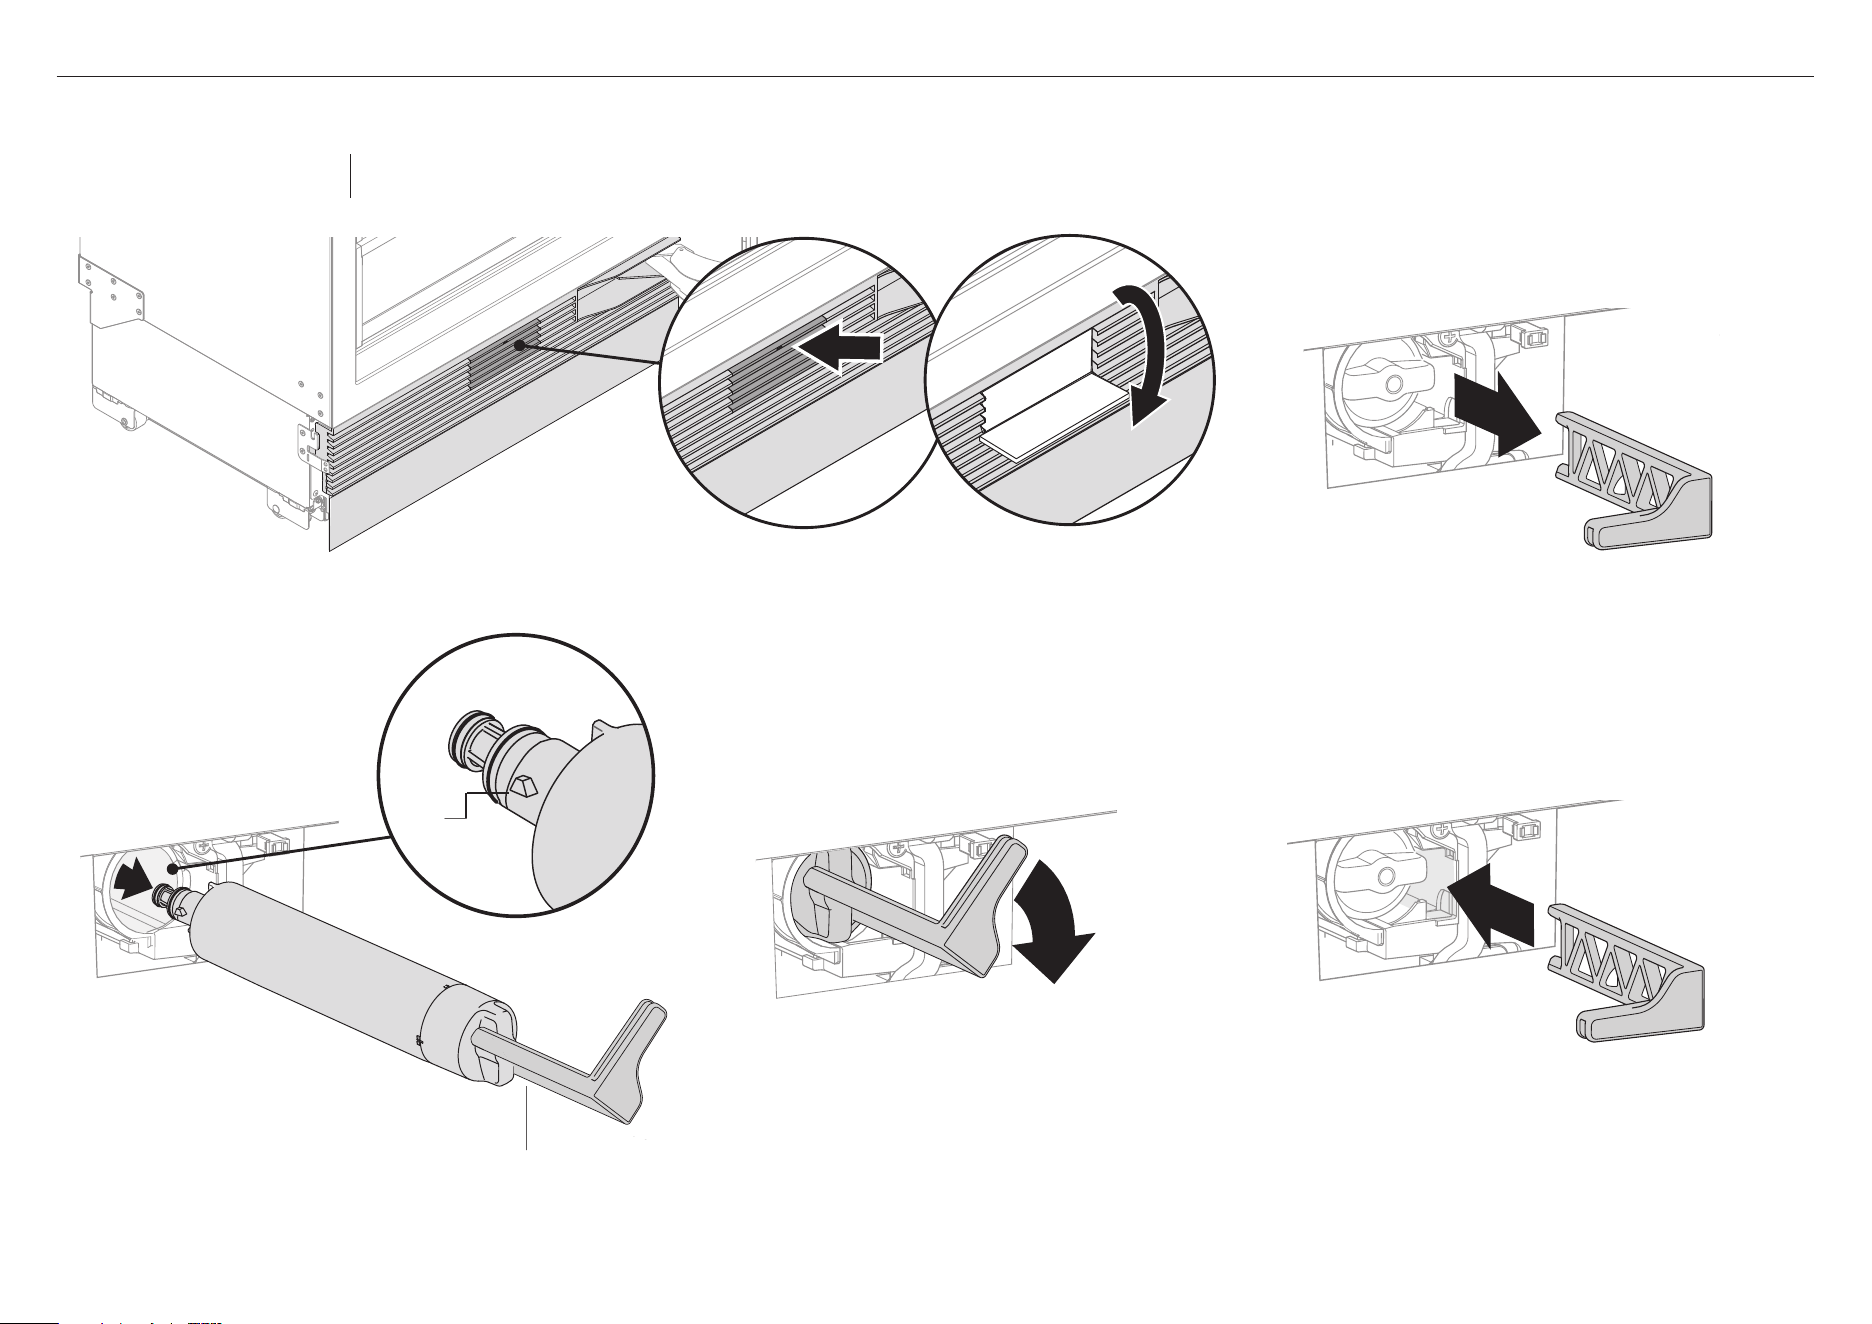
5
Return the tool to its storage position.
FOR INTEGRATED COLUMN REFRIGERATOR FREEZER MODELS
E
1
Remove the plastic wrapping from the new filter.
2
Open the freezer drawer to access the filter tool in the middle
of the grille (A).
IMPORTANT!
After installation, the water filter MUSTbe flushed.
Refer to ‘Flushing thewater filter’ for details.
5
Using the filter tool, rotate the filter head clockwise 90° to
lock in place (E).
– If the filter will not turn, ensure the filter is correctly
aligned, to allow the filter to be pushed firmly into the
filter head.
– Ensure the filter is fully rotated 90° toallow the water to
flow.
4
Align the filter correctly, ensure the filter tool is positioned
vertically (C) and the lugs are aligned correctly(D). Push the
filter inside the casing all the way and rotate the filter tool
until it fits in place.
C
A
B
3
Pull the filter tool gently to dislodge from the front of
the appliance (B). Place the tool on the filter handle.
D
lugs
Replacement filter:
847200 for FPWF1 system
Note: It is not necessary to turn the water supply
off when installing the water filter.
Installing the new filter
16
FOR RS60 MODELS
1
Push grille flap to access filter. Pull tool outwards to remove (A).
A
2
Using the filter tool, rotate filter 90° anti-clockwise to unlock and
remove (B).
– If you have difficulty removing the filter, an additional tool may be
required e.g. pliers (not supplied).
B
1
Remove packaging. Ensure filter handle is positioned
horizontally and push all the way in. Rotate clockwise to lock
into place (A).
A
2
Slot tool into place and push to close the grille flap (B).
B
IMPORTANT!
After installation, the water filter MUSTbe flushed.
Refer to ‘Flushing thewater filter’ for details.
Installing the new filterRemoving the old filter
Replacement filter:
847200 for FPWF1 system
Note: It is not necessary to turn the water supply off
when removing the water filter. It is easier to remove the
water filter with the water turned on.
The filter is located behind the toe kick grille.
Note: It is not necessary to turn the water supply off when installing the water filter.
17
FOR INTEGRATED FRENCH DOOR REFRIGERATOR FREEZER
1
Remove toe kick grille by inserting fingers into the left and right square openings on
the grille. Pull grille towards you.
2
Pull the freezer drawer out slightly, the filter is located on the left-hand side.
5
Using the filter tool, rotate the filter head clockwise 90° to lock in place (D).
– If the filter will not turn, ensure the filter is correctly aligned (B & C),
toallow the filter to be pushed firmly into the filter head.
6
Remove filter removal tool and close the freezer drawer.
IMPORTANT!
After installation, the water filter MUST be flushed.
Refer to ‘Flushing the water filter’ fordetails.
Installing the new filter
1
Remove the plastic wrapping from the new filter.
2
Remove toe kick grille by inserting fingers into the left and right square openings on
the grille. Pull grille towards you.
A
3
Using the filter removal tool, align the tool to the cartridge handle and turn
90°counterclockwise to loosen (A).
4
Remove the tool, grasp firmly onto the cartridge handle and pull towards you to remove.
Discard the old filter.
– If the filter is difficult to remove, run water through the filter by dispensing water or
using the automatic ice maker.
– A small amount of water will drip after you remove the filter. This is normal.
3
Pull the freezer drawer out slightly to access the filter casing. Align the filter correctly,
ensure the filter handle is positioned vertically (B) and the lugs are aligned correctly (C).
4
Push the filter firmly inside the casing all the way into the filter head.
D
Filter in locked position
B
filter
handle
C
lugs
Removing the old filter
Replacement filter:
847200 for FPWF1 system
Note: It is not necessary to turn the water supply off
when removing the water filter. It is easier to remove the
water filter with the water turned on.
The filter is located behind the toe kick grille.
Note: It is not necessary to turn the water supply off when installing the water filter.

18
Flushing the water filter
For optimal performance, there is a requirement to flush 8L (2 gal) of water through your
new water filter before use.
For models with water dispensers:
Flushing must be completed through both the water dispenser and ice maker.
For models with ice makers only:
Flushing must be completed through the ice maker.
For some models, a safety lockout feature may activate during the flushing of your water
filter. If this occurs, wait a few minutes before dispensing again. For flushing information
for your specific model, refer to your products User Guide.
Resetting the filter indicator
A replacement indicator of filter reminder message will show on the control panel of
your product when you need to replace the water filter.
To reset indicator
●
Press and together for 4 seconds.
●
To reset the filter reminder message, follow onscreen instructions.
IMPORTANT!
●
We recommend the water filter to be used from the time of installation.
●
Do not reset indicator before filter is changed or filter monitoring will be inaccurate.
WATER FILTER FLUSHING INSTRUCTIONS (ALL MODELS)

849725C 07.24
FISHERPAYKEL.COM
© Fisher & Paykel Appliances 2024. All rights reserved.
The models shown in this guide may not be available in all markets
and are subject to change at any time.
The product specifications in this guide apply to the specific products and
models described at the date of issue. Under our policy of continuous product
improvement, these specifications may change at any time.
For current details about model and specification availability in your country,
please go to our website or contact your local Fisher&Paykel dealer.

