USER MANUAL
Before using, please read the operating instructions carefully to
ensure proper application and achieve satisfactory results.
KoolMore French Door Refrigerator
Models: RERFDSS-22C
REFRIGERATOR
Stay informed with the latest information for your
KoolMore Appliance.
Scan the QR code above to access the most recent user manual
on our website, which is constantly being updated and improved.
If you need any assistance or have questions, our customer support
team is here to help.
P- 718-576-6342 E- Suppor[email protected]
Please write down the model number and serial number below for future reference. Both numbers are located on the
rating label on the back of your unit or inside of the unit and are needed to obtain warranty service. You may also want to
staple your receipt to this manual as it is the proof of your purchase and may also be needed for service under warranty.
Model Number: ______________________________________
Serial Number: _______________________________________
Date of Purchase: ____________________________________
To better serve you, please do the following before contacting customer service:
If you received a damaged product, immediately contact the retailer or dealer that sold you the product.
Read and follow this instruction manual carefully to help you install, use, and maintain your unit.
Refer to the Troubleshooting section of this manual as it will help you diagnose and solve many common issues.

3
Safety
Safety ..................................................................... 4
Set Up ..................................................................... 7
Product Overview .................................................... 9
Installation ............................................................ 10
Operation ............................................................. 15
Maintenance ......................................................... 18
Troubleshooting ..................................................... 20
Warranty ................................................................ 21

4
Intended Use
Before switching on the appliance for the rst time, read the following safety information!
This appliance is intended to be used in household and similar applications such as:
• Staff kitchen areas in shops, oces, and other working environments;
• Farmhouses;
• By clients in hotels, motels, and other residential-type environments;
• Bed and breakfast type environments;
• Catering and similar non-retail applications.
If the appliance is used commercially or for purposes other than cooling food, please note that the
manufacturer cannot accept any liability for any damage. Modications or alterations to the unit are
not permitted for safety reasons.
Read these operating instructions carefully and attentively before using/ commissioning the unit and
keep them in the immediate vicinity of the installation site or unit for later use!
Risk of re / Flammable material
DANGER Risk of re or explosion. Flammable refrigerant used. Do not use mechanical devices to de-
frost the refrigerator. Do not puncture refrigerant tubing.
DANGER Risk of re or explosion. Flammable refrigerant used. To be repaired only by trained service
personnel. Use only manufacturer authorized service parts. Any repair equipment used must be de-
signed for ammable refrigerants. Follow all manufacturer repair instructions. Do not puncture refrig-
erant tubing.
CAUTION
CAUTION! Risk of re or explosion. Dispose of refrigerator properly in accordance with the applicable
federal or local regulations. Flammable refrigerant used.
CAUTION! Risk of re or explosion due to puncture of refrigerant tubing. Follow handling instructions
carefully. Flammable refrigerant used.
General safety
Install in accordance with the manufacturer’s instructions.
This product should not be recessed or built-in an enclosed cabinet. It is designed for freestanding
installation only.
WARNING
CAUTION
WARNING
Safety

5
WARNING
• Keep ventilation openings, in the product, clear of obstruction.
• Do not install near any heat sources, such as radiators, heat registers, stoves, or other cooking
appliances or in direct sunlight.
• Do not store or use gasoline or any ammable liquids inside or in the vicinity of this refrigerator.
• Do not store explosive substances such as aerosol cans with a ammable propellant in this appli-
ance.
• Do not use electrical appliances inside the food storage compartments of the appliance, unless
they are of the type recommended by the manufacturer.
• Do not use mechanical devices or other means to accelerate the defrosting process, other than
those recommended by the manufacturer.
• This appliance is not intended for use by persons (including children) with reduced physical,
sensory or mental capabilities, or lack of experience and knowledge, unless they have been given
supervision or instruction concerning use of the appliance by a person responsible for their safety.
WARNING
Electrical safety
Incorrect electrical installation or excessive mains voltage can lead to electric shocks!
• Only connect your fridge-freezer to a properly installed earthed socket if the mains voltage of the
socket corresponds to the specication on the rating label.
• Please use a dedicated power outlet. Do not share power outlet with other electrical appliances.
Do not use an extension cord, power-strip, ungrounded (two-pin) adapters or similar devices.
• Make sure that all electrical cables outside the appliance are protected from damage (e.g., by ani-
mals or sharp edges).
• Do not locate multiple portable socket outlets or portable power supplies at the rear of the appli-
ance.
• Improper power supply may result in re or electric shocks.
• Avoid electrical overload. Disconnect the main plug from the main socket before carrying out care,
maintenance and repair work on the unit.
• Switch off the unit and disconnect the mains plug from the mains socket when you are not using
the unit.
• Do not pull the power cord to disconnect from the outlet. Please rmly grasp the plug and pull it
out from the socket directly.
• Ensure the plug is rmly seated in the power outlet to ensure a proper connection. Loose tting or
improperly seated plugs pose a re hazard.
• In the event of a gas leak, rst close the gas valve, then open the doors and windows to provide
proper ventilation. Do not disconnect the power cord from the outlet at this time to avoid an elec-
tric spark potentially igniting the ammable gas.
• If the supply cord is damaged, it must be replaced by the manufacturer, its service agent or simi-
larly qualied persons in order to avoid a hazard.
• When positioning the appliance, ensure the supply cord is not trapped or damaged.
• If the products are equipped with LEDs, do not remove the lighting cover and LED yourself. Any
replacement or maintenance of the LED lamps is intended to be made by the manufacturer, its
service agent or similar qualied person.
• This product is not recommended for use with sockets or main switch with the AFCI/GFCI func-
tion, otherwise it may cause false tripping.
• The product does not pose a safety risk when tripped, but if tripping persists, it is recommended to
6
replace the socket or main switch without AFCI/GFCI function.
Child safety
• Children should be supervised to ensure that they do not play with the appliance.
• Destroy carton, plastic bags, and any exterior wrapping material immediately after the product is
unpacked.
• Children should never use these items to play. Cartons covered with rugs, bedspreads, plastic
sheets or stretch wrap may become airtight chambers, and can quickly cause suffocation.
• Remove all staples from the carton. Staples can cause severe cuts and destroy nishes if they
come in contact with other appliances or furniture.
Risk of child entrapment. Before you throw away your old refrigerator or freezer:
1. Take off the doors.
2. Leave the shelves in place so that children may not easily climb inside.
Risk of injury and damage!
Never put frozen food in your mouth immediately after taking it out of the freezer.
Avoid prolonged skin contact with frozen food, ice and the pipes in the freezer compartment.
Do not store explosive substances such as aerosol cans with a ammable propellant in this appli-
ance. Also do not place ammable products near the appliance.
Do not store beer, drinks or other liquids in bottles or tightly closed containers in the freezer compart-
ment!
WARNING
State of California Proposition 65 Warnings:
This product can expose you to chemicals including lead, which is known to the State of California
to cause cancer, and bisphenol A (BPA) and lead which are known to the State of California to cause
birth defects or other reproductive harm. For more information go to www.P65Warnings.ca.gov.
CAUTION
To avoid contamination of food, please respect the following instructions:
• Opening the door for long periods can cause a signicant increase of the temperature in the com-
partments of the appliance.
• Clean regularly surfaces that can come in contact with food and accessible drainage systems.*
• Clean water tanks if they have not been used for 48h; ush the water system connected to a water
supply if water has not been drawn for 5 days.
WARNING
Fill with potable water only.
WARNING
Connect to potable water supply only. (Suitable for ice making machine)
ATTENTION! This feature varies depending on the model purchased. Please conrm whether it is
applicable according to your product.
WARNING
CAUTION

7
Before The First Use
The packaging must be undamaged. Check the device for transport damage. Do not connect a dam-
aged device under any circumstances. In case of damage, please contact the supplier.
Remove transport cover
The unit and parts of the interior are protected for transport. You can remove all adhesive tapes on
the right and left side of the device door as well as any adhesive residues with cleaning solvent. Re-
move all adhesive tapes and packaging parts from the interior of the device as well.
CAUTION
Risk of damage!
Set up device
• The ambient temperature affects the power consumption and proper functioning of the device.
Therefore, the device should be placed in a well-ventilated and dry room with an ambient tempera-
ture corresponding to the climate class for which the device is designed.
• Do not place the device outdoors (e.g., balcony, terrace, garden shed, etc.).
• Do not use sharp knives or pointed objects when opening the device.
Please observe the notes when setting up: “Tips for energy saving”.
Remove the device doors
If the unit does not t through the entry doors or hallways, the unit doors can be unscrewed.
ATTENTION! The unscrewing of the unit doors may only be carried out by customer service.
Notes For Cleaning
• Disconnect the appliance from the power supply before cleaning.
• Dust behind the product and on the oor must be cleaned to improve the cooling effect and ener-
gy saving.
• Check the door gasket regularly to make sure there is no debris. Clean the door gasket with a soft
cloth dampened with soapy water or diluted detergent.
• The interior of the product should be cleaned regularly to avoid odors. Please turn off the power
before cleaning the interior, remove all foods, drinks, shelves, drawers, etc.
• Use a soft cloth or sponge to clean the inside of the product, with two tablespoons of baking soda
and a quart of clean water. After cleaning, open the door and let it dry naturally before turning on
the power.
• For areas that are dicult to clean inside the product (such as narrow places, gaps or corners),
we recommend to wiping them regularly with a soft rag, soft brush, etc., and when necessary, with
some tools (such as thin sticks) to ensure no contaminants or bacterial accumulation in these
areas.
• Do not use soap, detergent, scrub powder, spray cleaner, etc., as these may cause odors inside the
product or contaminate food.
Set Up

8
• Clean the door tray, shelves and drawers with a soft cloth dampened with soapy water or diluted
detergent. Dry with a soft cloth or dry naturally.
• Wipe the outer surface of the product with a soft cloth dampened with soapy water, detergent,
etc., and then wipe dry.
• Do not use hard brushes, scouring pads, wire brushes, abrasives (such as steel wool, acid or alka-
line items, which may damage the fridge surface and interior). Boiling water and organic solvents
such as benzene may deform or damage plastic parts.
• Do not rinse directly with water or other liquids during cleaning to avoid short circuit or direct elec-
trical insulation after immersion.
9
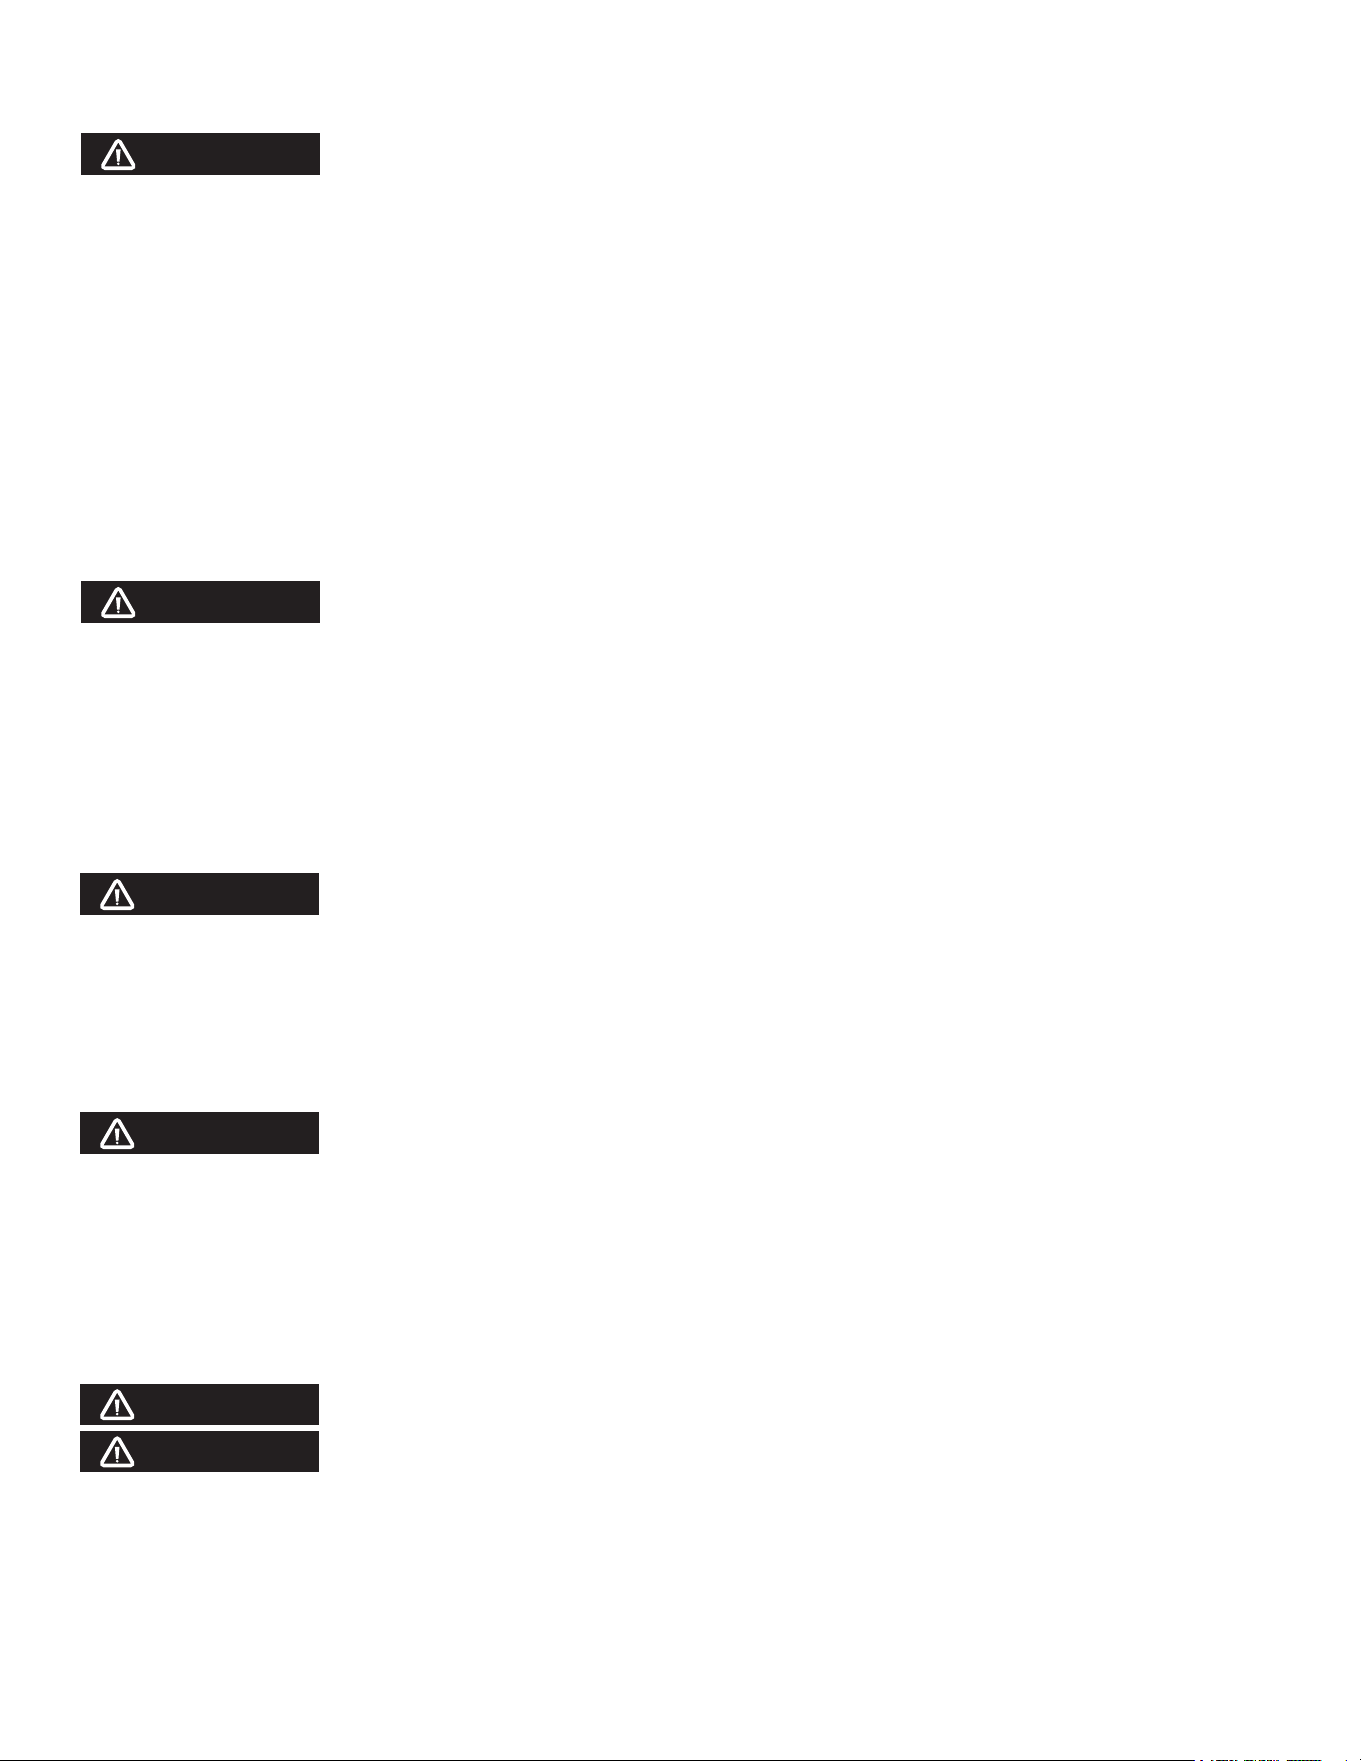
1. LED lighting
2. Control and display panel
3. Dairy bin
4. Door tray
5. Crisper drawer
6. Big drawer
7. Shelf
8. Door tray
9. Upper freezer drawer
10. Lower freezer drawer
11. Ice storage bin
12. Freezer drawer
ATTENTION
The picture above is only for reference. The actual conguration will depend on the physical product
or statement by the distributor
Product Overview
10
Install Instruction
Finding a suitable location
• This refrigerator is designed to be free standing only, and should not be recessed or built-in.
• The refrigerator should be placed in a well-ventilated indoor place; the ground shall be at and
sturdy.
• Keep away from heat and avoid direct sunlight. Do not place the refrigerator in moist or watery
places to prevent rust or reduction of insulating effect.
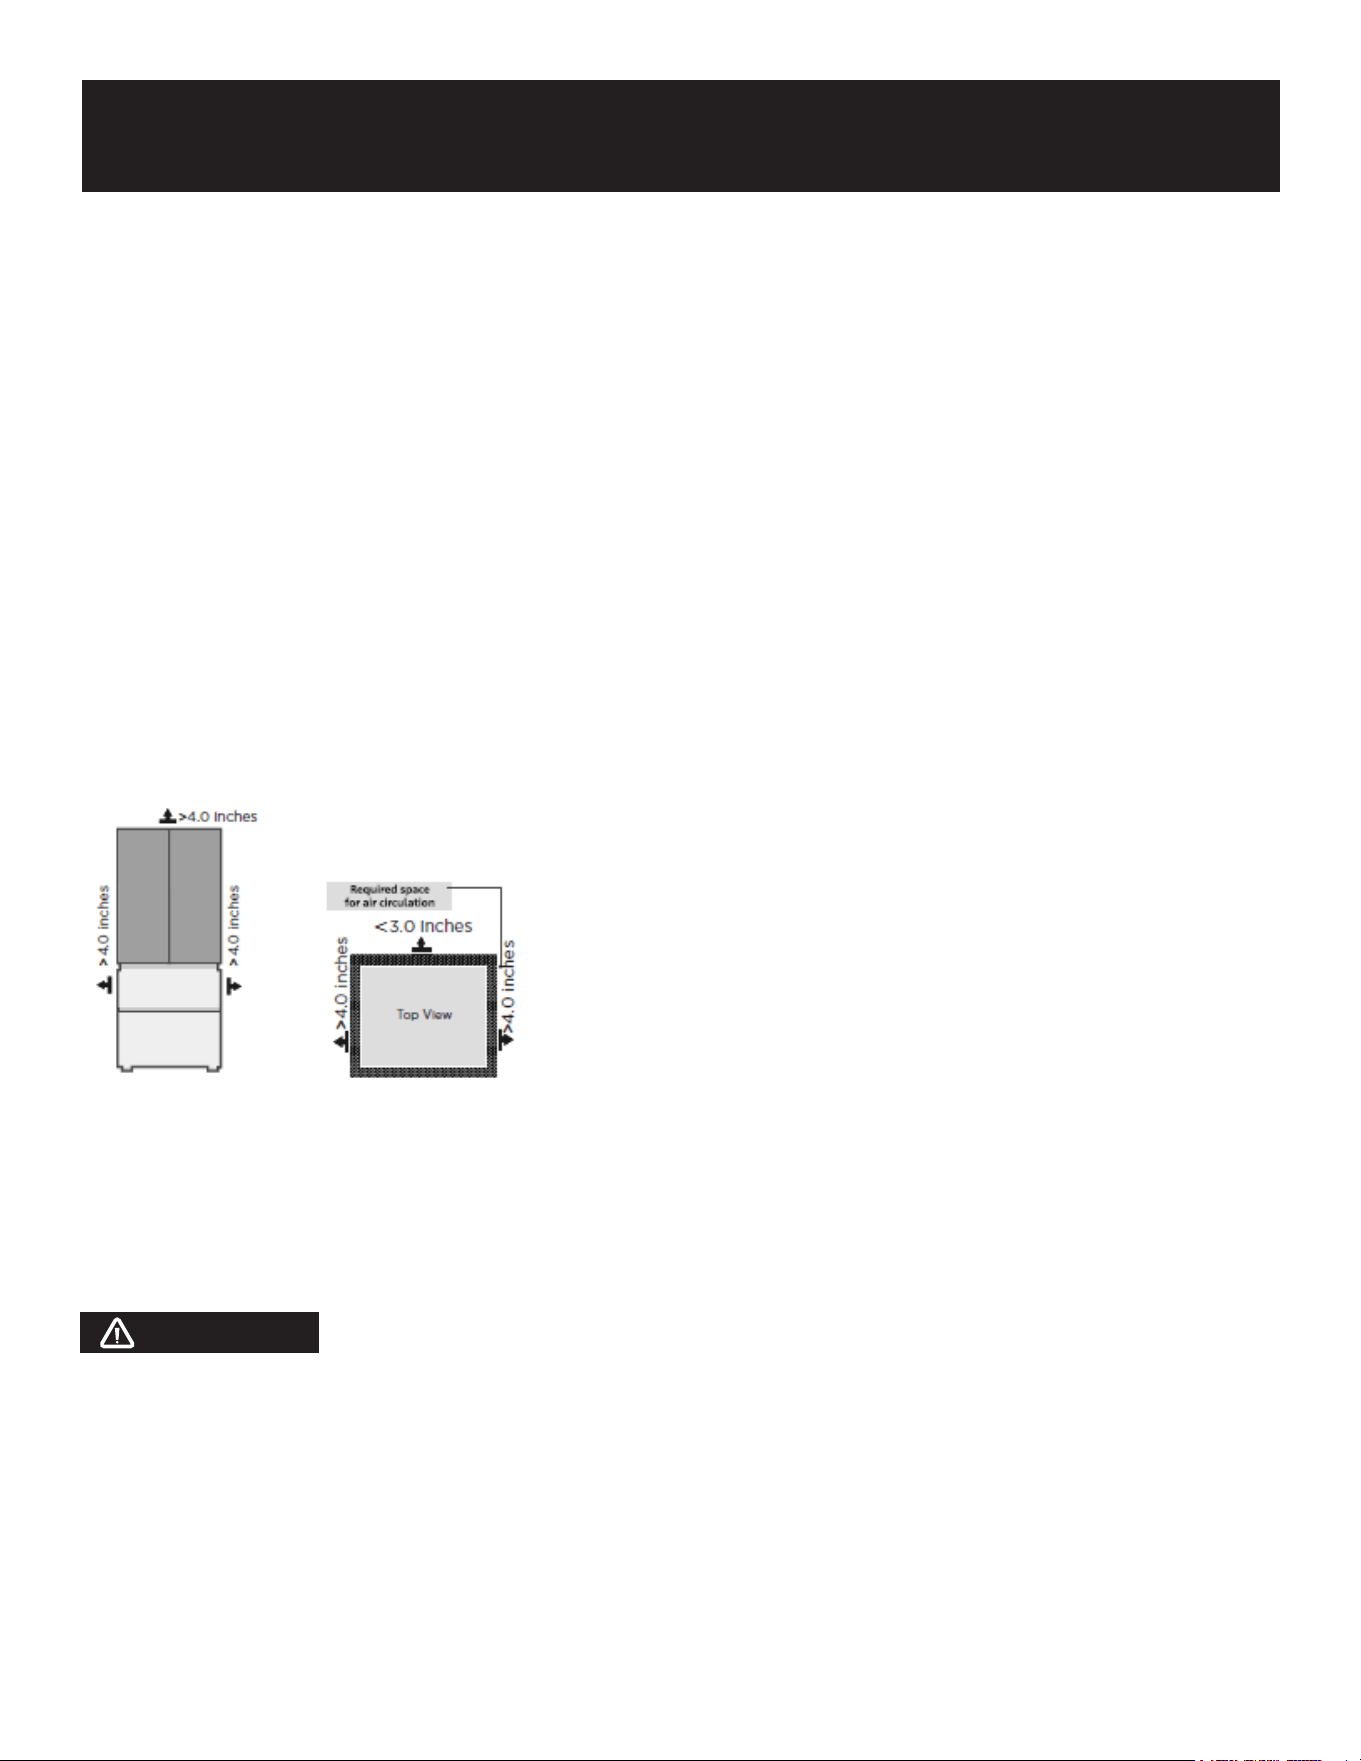
Dimensions and Clearances
Too small of a distance from adjacent items may result in the degradation of freezing capability and
increased electricity costs. The refrigerator on both sides should be placed against the wall with a
free distance more than 4.0 inches, and the refrigerator back against the wall distance not more than
3.0 inches.
Providing a proper power supply
Check your local power source. This refrigerator requires an AC115 V, 60 Hz power supply.
Use a receptacle that accepts the grounding prong. The power cord is equipped with a 3-prong
(grounding) plug which mates with a standard 3-prong (grounding) wall outlet to minimize the possi-
bility of electric shock hazard from this refrigerator.
CAUTION
The refrigerator should always be plugged into its own individual electrical outlet which has a volt-
age rating that matches the rating plate. Never unplug your refrigerator by pulling on the power cord.
Always grip the plug rmly and pull straight out from the outlet.
Start to use
• The refrigerator shall stay for half an hour before connecting power when it is rstly started.
• The refrigerator shall run 2 to 3 hours before loading fresh or frozen foods; the refrigerator shall
run for more than 4 hours in summer in advance considering that the ambient temperature is high.
Installation
11
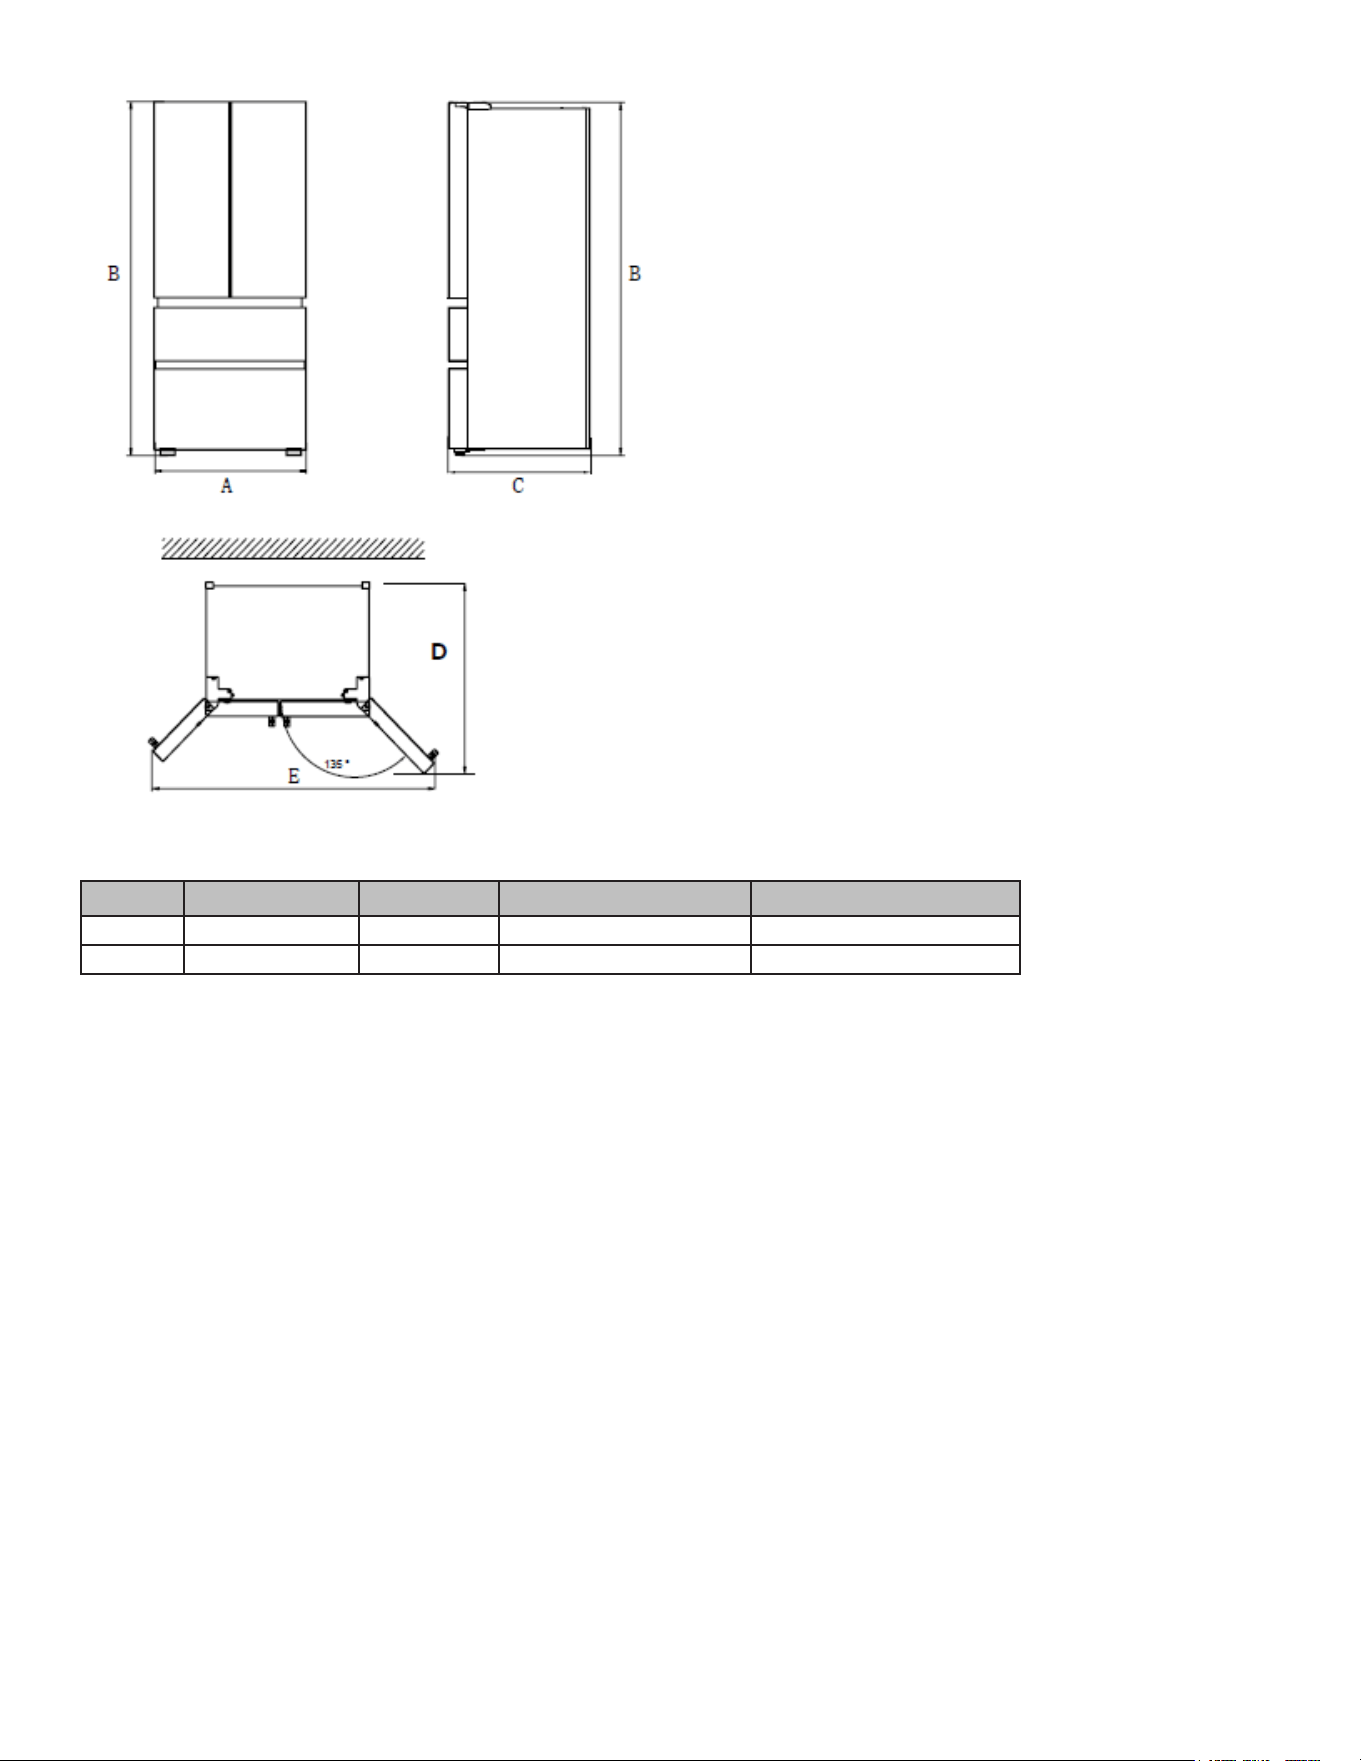
Width Overall Height Depth Depth Doors Open 15° Width Doors Open 15°
A B C D E
35.8 69.9 29 41.2 63
12
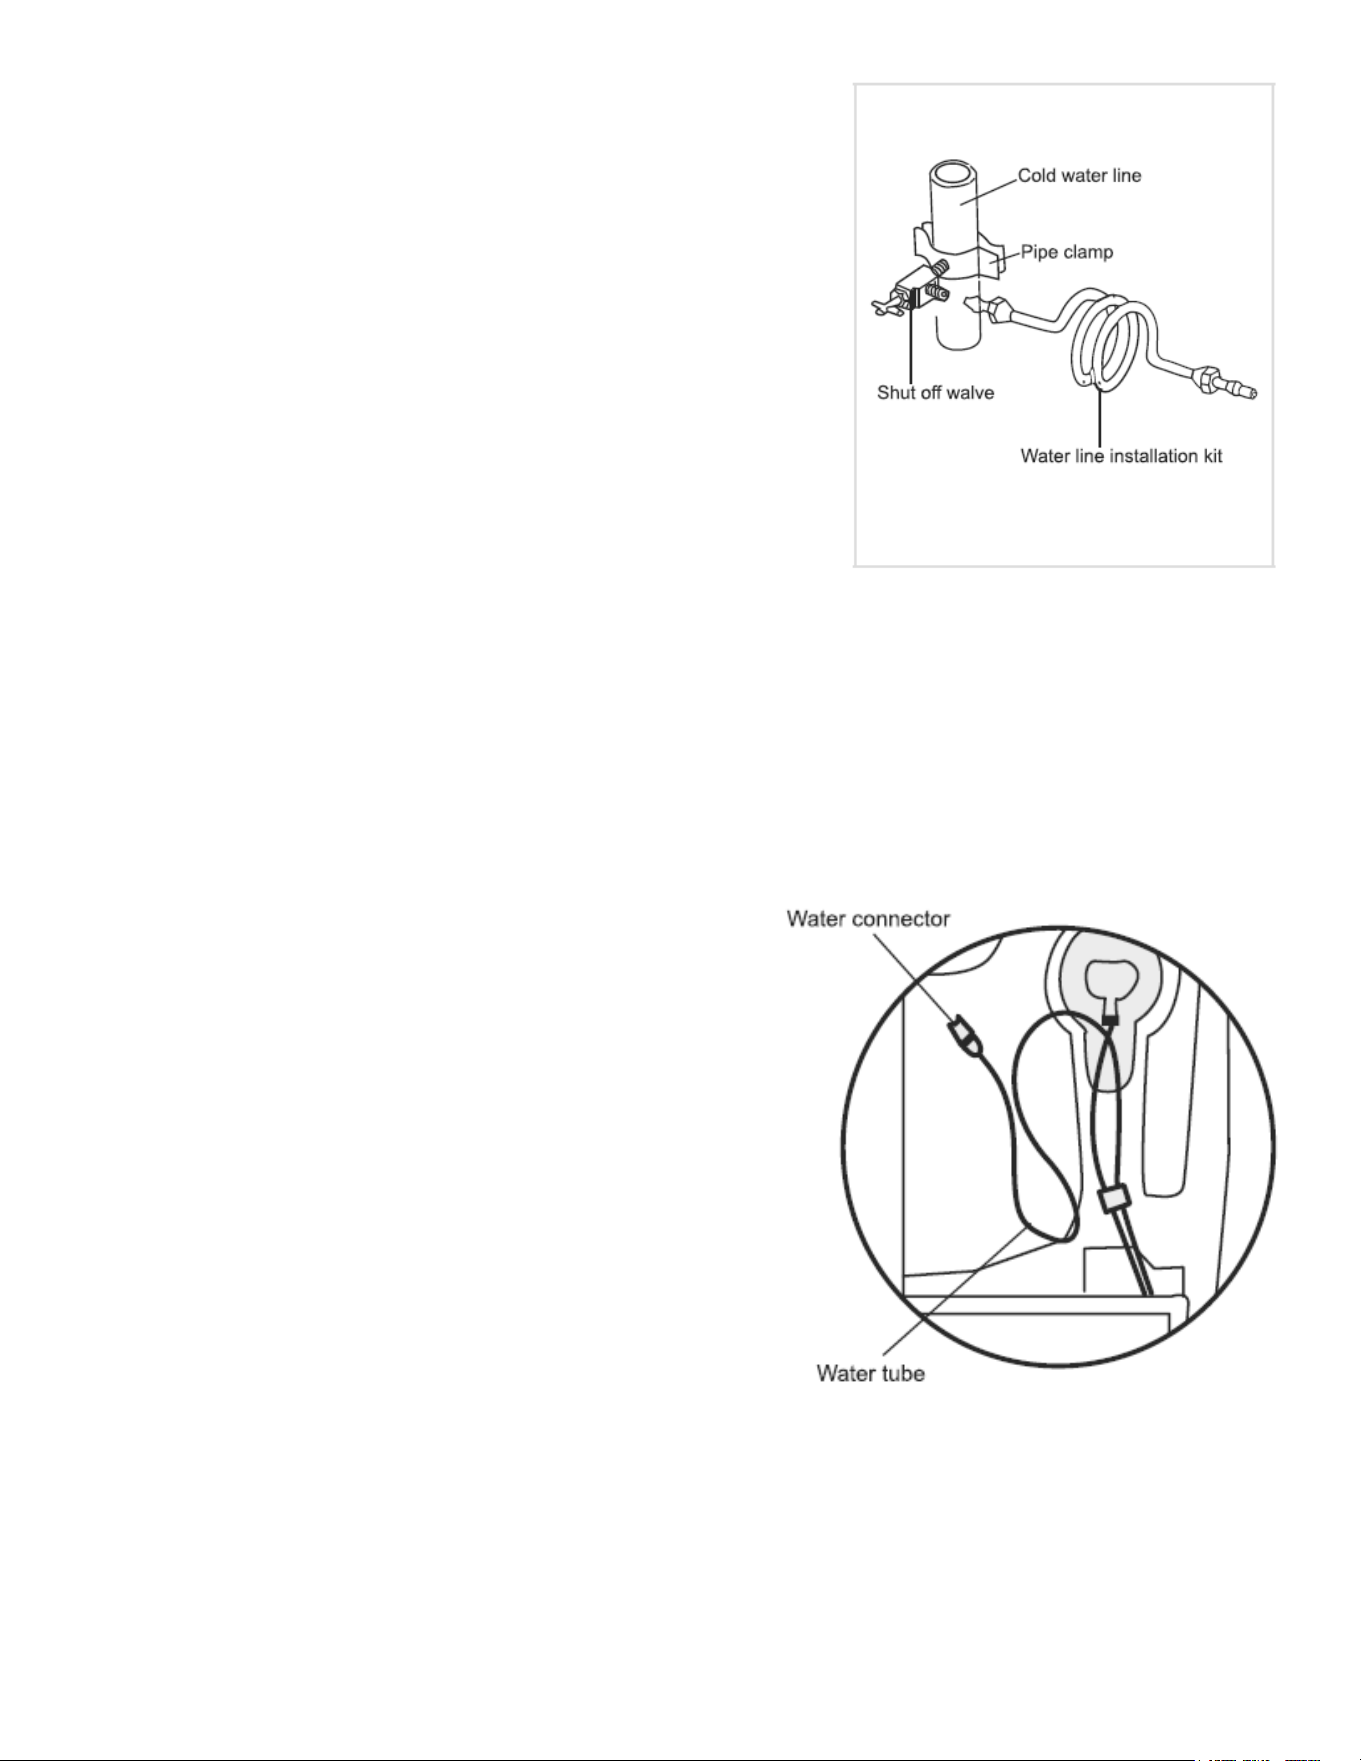
Installing the Waterline
Waterline installation kits are available as an additional accesso-
ry from your dealer or at a local hardware store.
1. First, shut off the main water supply line and turn the icemak-
er off.
2. Locate the nearest cold water supply valve.
3. After connecting the water supply to the water valve, turn
your main water supply back on and ush several gallons of
water to clear the water supply line.
Connecting the Water Line to The Refrigerator
There are several items that you need to purchase to complete this connection.
You will nd these items sold as a kit at your local hardware store.
1. First, water tubes (supplied) insert into corresponding hole of water connector (supplied).
2. Second, water line installation kit (not included) inserts into another hole of water connector (sup-
plied).
3. Turn water valve on and check for any leakage.
Connecting the Water Line to A Drinkable Water Source
If your water line is not drinkable, please add an external
water lter.
If you must repair or disassemble the water line, cut off the
plastic tubing to make sure you get a snug, leak-free con-
nection.
ATTENTION
The minimum inlet water pressure: 276kPa. The maximum
inlet water pressure: 689kPa. WARNING: Connect to po-
table water supply only. New hose sets supplied with the
appliance are to be used and the old hose set should not
be reused.
Leveling feet
To avoid vibration, the unit must be leveled. If required, adjust the leveling screws to compensate
for the uneven oor. The front should be slightly higher than the rear to aid in door closing. Leveling
screws can be turned easily by tipping the cabinet slightly. Turn the leveling screws counterclockwise
to raise the unit, clockwise to lower it.
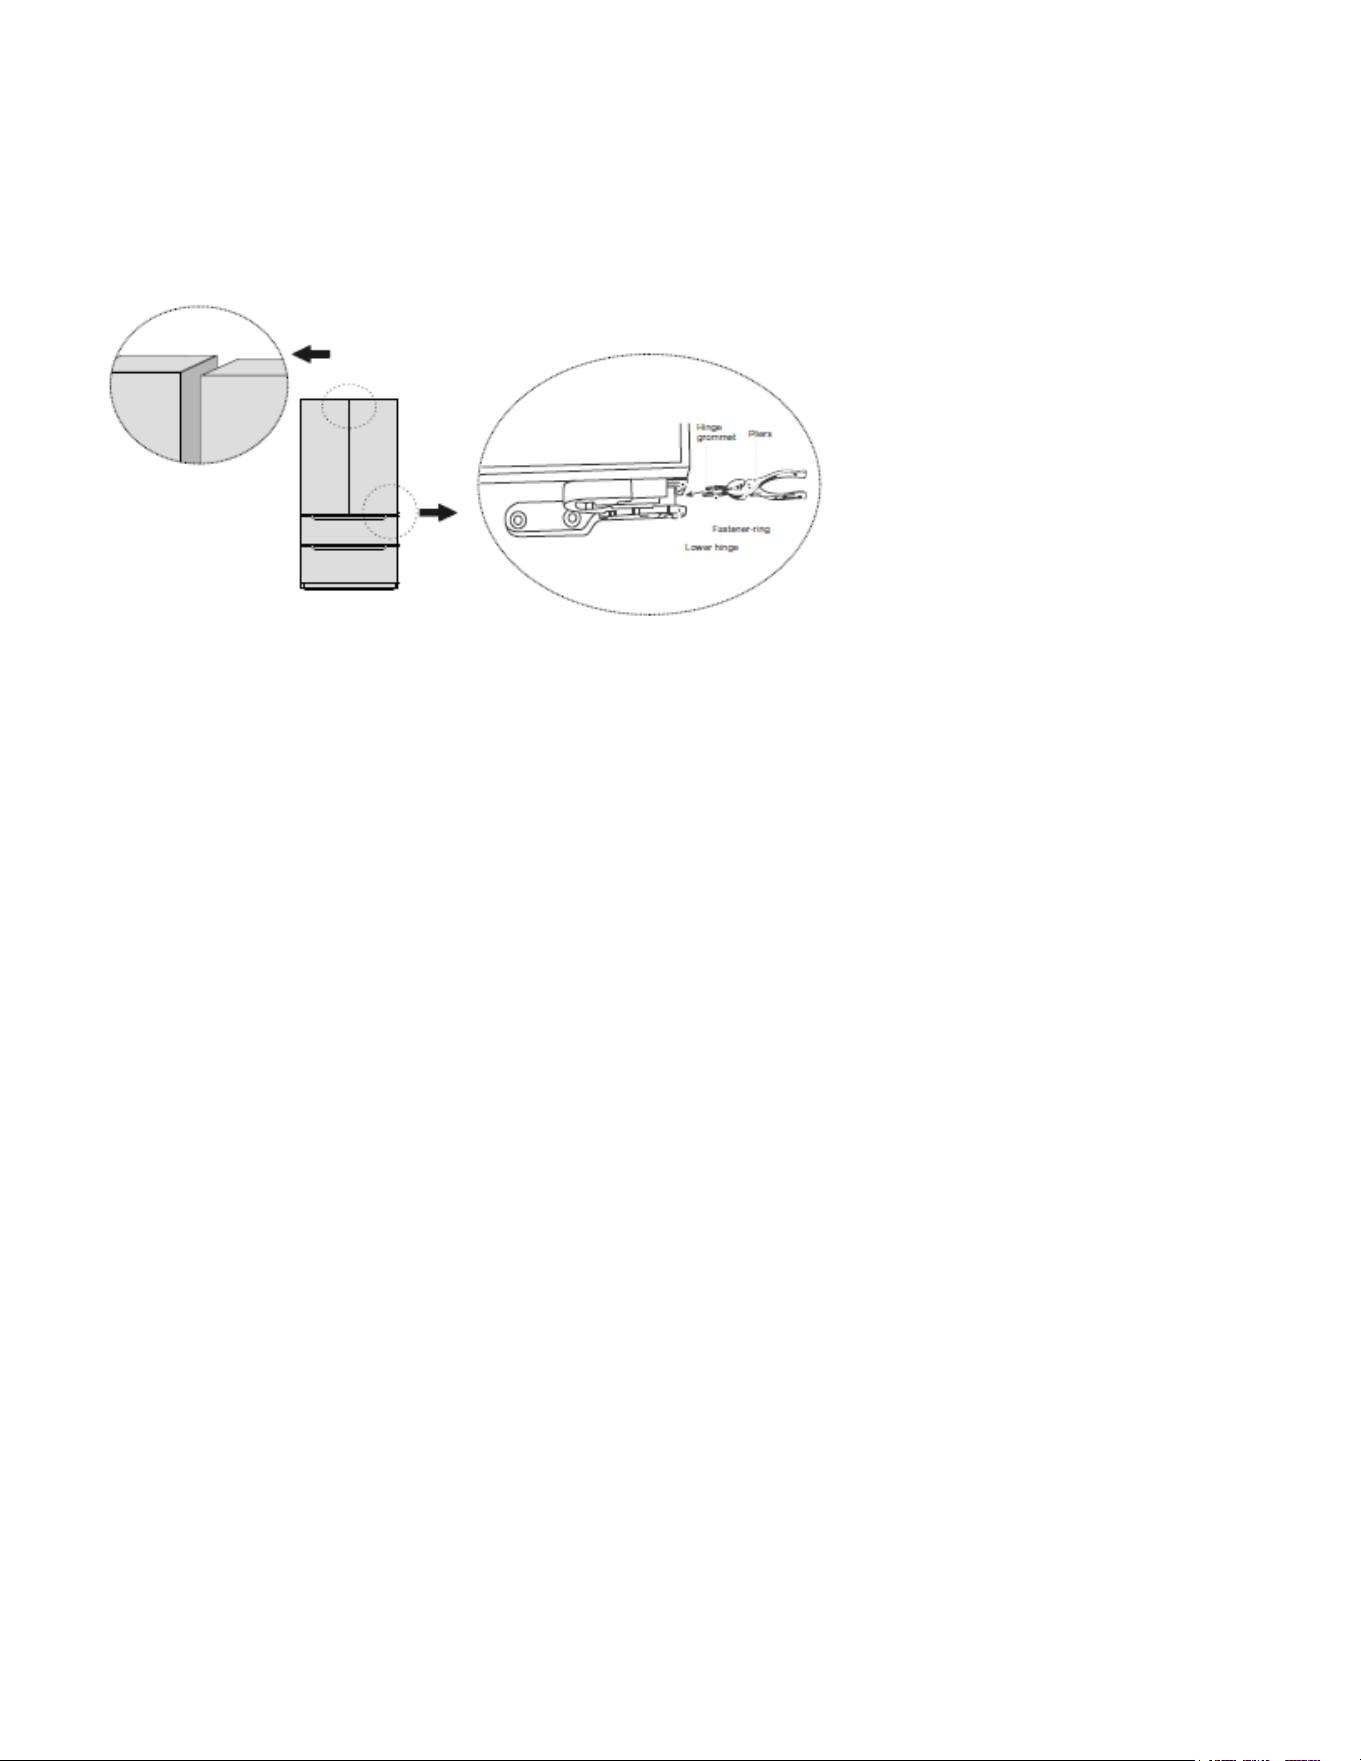
Leveling doors
13
Tools You Need:
• Pliers
1. Raise the lower door up to the level of the higher door.
2. Insert the supplied fastener-ring by using plier in the gap between the hinge-grommet and the low-
er hinge. The number of fastener-rings you will need to insert depends on the gap.
Moving the appliance
1. Remove all food from inside the appliance.
2. Pull the power plug out. Insert and x it into the power plug hook at the rear or on top of the appli-
ance.
3. Tape parts such as shelves and the door handle to prevent from falling off while moving the appli-
ance.
4. Move the appliance with more than two people carefully. When transporting the appliance over a
long distance, keep the appliance upright.
5. After installing the appliance, connect the power plug into a socket outlet to switch on the appli-
ance.
Changing the light
Any replacement or maintenance of the LED lamps is intended to be made by the manufacturer, its
service agent or similar qualied person.
Connecting the appliance
After installing the appliance, connect the power plug into a socket outlet.
ATTENTION
After connecting the power supply cord (or plug) to the outlet, wait 2 or 3 hours before you put food
into the appliance. If you add food before the appliance has cooled completely, your food may spoil.
Precautions before operation:
Before making changes, the refrigerator must be disconnected from power.
Precautions should be taken to prevent any personal injury.
Tips for energy saving
• Do not place the appliance near cookers, radiators or other heat sources. If the ambient tempera-
ture is high, the compressor will run more frequently and for longer, resulting in increased energy

14
consumption.
• Ensure that there is sucient ventilation at the base of the appliance, on the sides of the appliance
and at the back of the appliance. Never cover ventilation openings.
• Please also observe the spacing dimensions in the chapter “Installation”.
• The arrangement of drawers, shelves and racks as shown in the illustration offers the most e-
cient use of energy and should therefore be retained as far as possible. All drawers and shelves
should remain in the appliance to keep the temperature stable and save energy.
• To obtain a larger storage space (e.g. for large refrigerated/frozen goods), the middle drawers can
be removed. The top and bottom drawers and shelves should be removed last if necessary.
• An evenly lled refrigerator/freezer compartment contributes to optimal energy use. Therefore,
avoid empty or half empty compartments.
• Always allow warm food to cool down before placing it in the refrigerator/freezer. Food that has
already cooled down increases energy eciency.
• Allow frozen food to defrost in the refrigerator. The coldness of the frozen food decreases the
energy eciency.
• Open the door as briey as necessary to minimize cold loss. Opening the door briey and closing
it properly reduces energy consumption.
• The door seals of your appliance must be perfectly intact so that the doors close properly and
energy consumption is not increased unnecessarily.
15
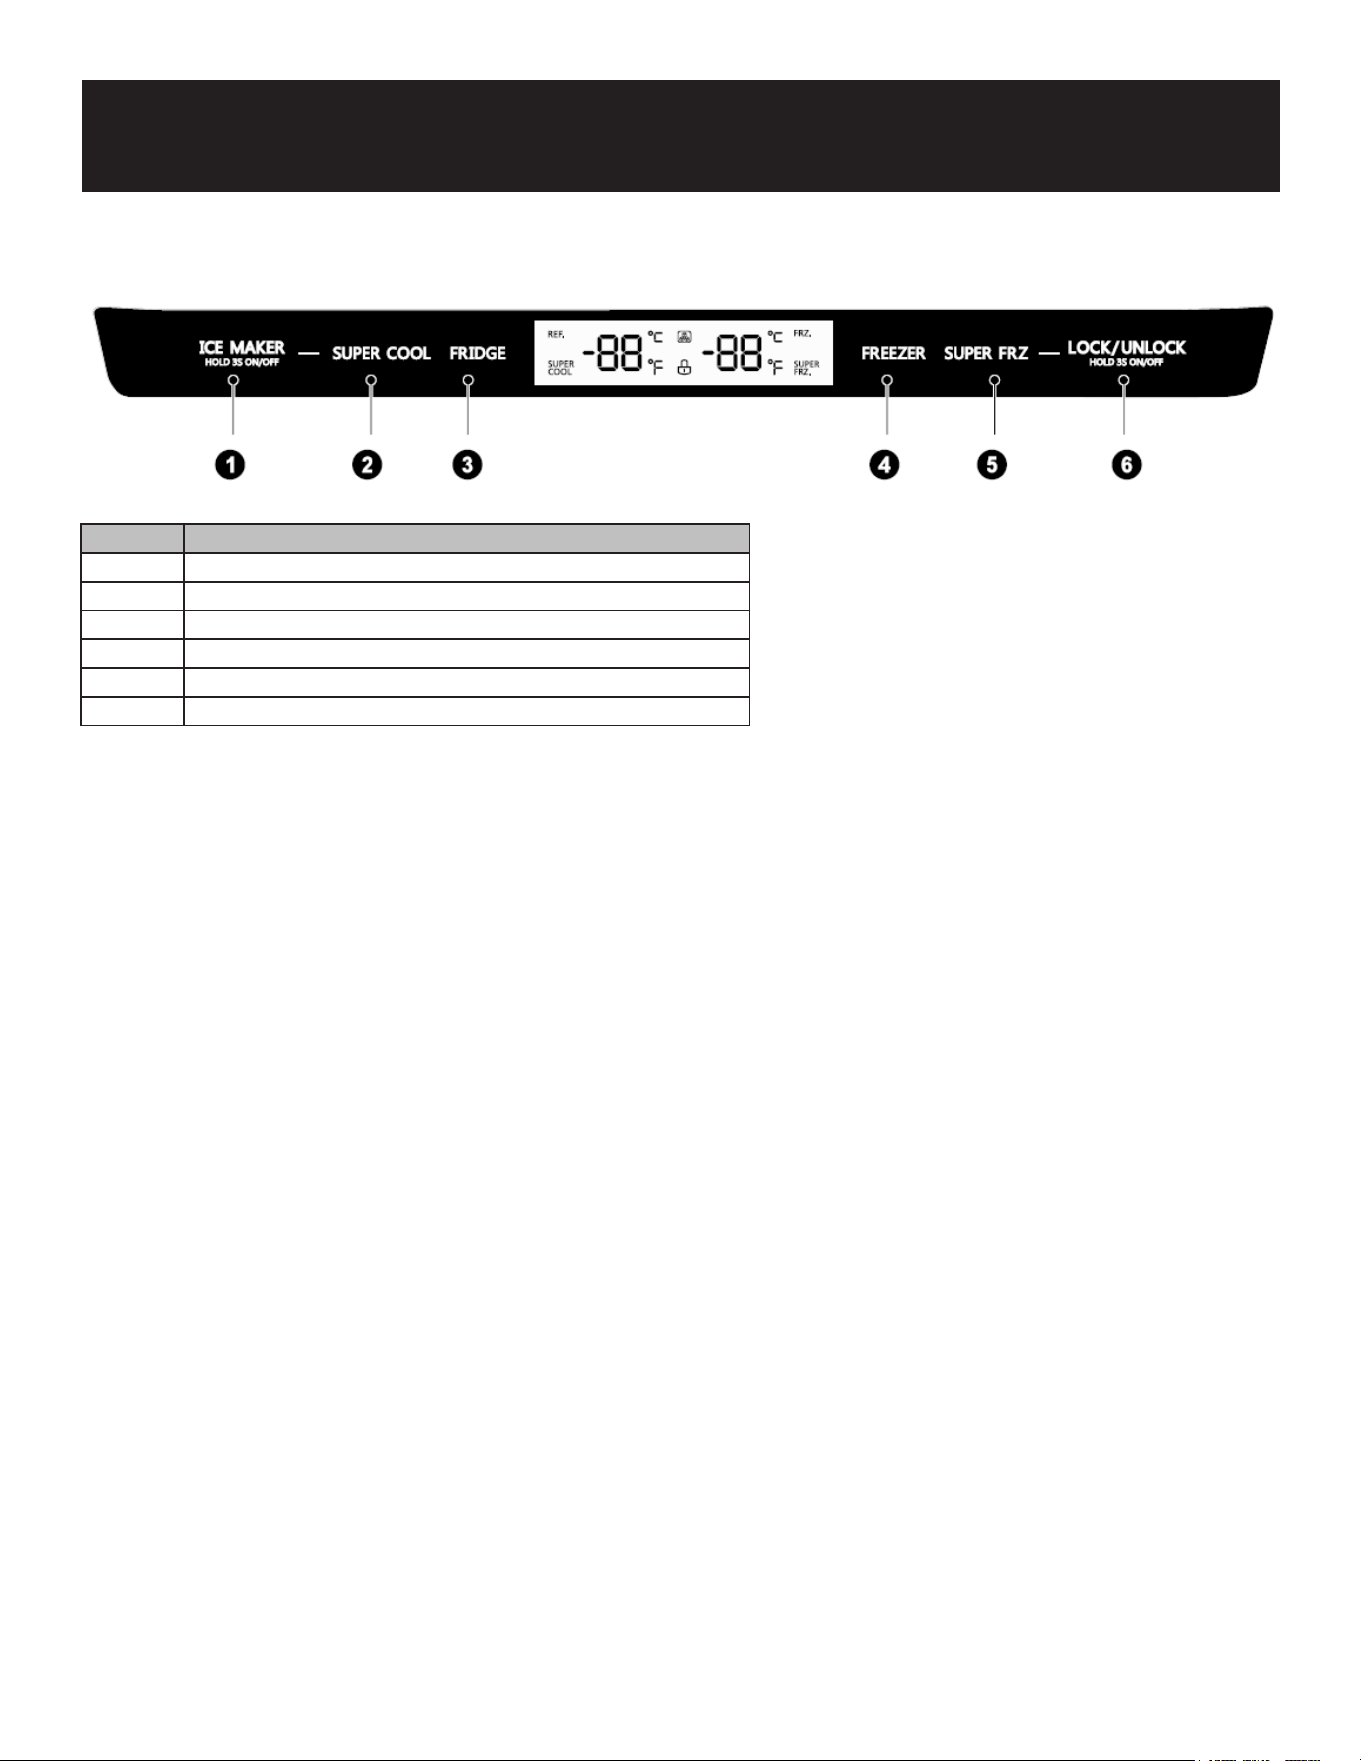
Display
1. When the refrigerator is plugged-in and powered, the display screen will totally display for 3 sec-
onds, followed by a ringing bell sound, then the display screen enters the normal display of opera-
tion. (If power-on for rst time, the default set temperature of the refrigerator room and the freezer
room is 41°F / 0°F).
2. It will display the set temperature of both refrigerator and freezer rooms when there is no fault.
3. Under normal circumstances, the display light will go out after 30 seconds in lock state; button
operation on display panel would wake up the display screen; if the opening door action wakes up
the display screen, the display light would go out immediately when the door is closed; when the
“fault code visible” type of fault occurs, the display screen lights up, and will go out after 30 sec-
onds.
ATTENTION
The actual control panel may differ from model to model.
Lock/Unlock
1. In the unlock state, press and hold the lock/unlock button for 3 seconds to enter the lock state,
and the buzzer sound rings.
2. In the lock state, press and hold the lock button for 3 seconds to enter the unlock state and the
buzzer sound rings.
3. It will enter the lock state if there is no opening door action or any buttons operation within 30
seconds.
4. The alarm sound can be stopped by pressing any one button in lock state, but all other button
operations need to be performed in unlock state. If you operate in the lock state, an error beep will
be given.
Operation
Number Button Name
1 Ice-making button
2 Super cool button
3 Temperature adjusting button of refrigerator room
4 Temperature adjusting button of freezer room
5 Super freeze button
6 Lock/unlock button
16
Refrigerator temperature setting
Click the temperature adjusting button of refrigerator room to change the set temperature of refrig-
erator room. Each time click the button, the set temperature will drop 1°F, when the set temperature
reaches 24°F, click the button again, the set temperature will switch to 44°F. The temperature setting
will take effect after the display panel is locked.
Freezer temperature setting
Click the temperature adjusting button of freezer room to change the set temperature of freezer room.
Each time click the button, the set temperature will drop 1°F, when the set temperature reaches -7°F,
click the button again, the set temperature will switch to 7°F. The temperature setting will take effect
after the display panel is locked.
Switching between Fahrenheit and Celsius
By pressing “FRIDGE” and “FREEZER” for 3 seconds, Fahrenheit and Celsius conversion can be
achieved, and the corresponding icon “°C” and “°F” will be on. This setting takes effect after the dis-
play panel is locked.
Mode setting
Press the “SUPER COOL” button to start the super cool function. The refrigerator room is set at 34°F
automatically, and the “SUPER” icon shines. When exit the super cool mode, the set temperature of
refrigerator room will go back to the set temperature before super cool mode.
Press the “SUPER FRZ” button to start the super freeze function. The freezer room is set at -7°F auto-
matically, and the “SUPER FRZ” icon shines. When exit the super freeze mode, the set temperature of
freezer room will go back to the set temperature before super freeze mode.
Press the “ICE MAKER” button, the ice-making function could be switched between on/off. When the
“ ” icon is on, it indicates that the ice-making function is activated.
Fault indication
When the following tips appear on the display screen, it indicates a problem with the refrigerator.
Although the refrigerator can still provide cool/freeze functions, the user in the following fault case
cannot ensure the normal use of refrigerator.
Fault Code Fault Description
E1 Temperature sensor failure of refrigerator room
E2 Temperature sensor failure of freezer room
E5 Defrost sensor error
E6 Communication error
E7 Ambient temperature sensor error
EH Humidity sensor error
EO Ice maker error
EP Ice maker sensor fault
EE Failure of separating ice
ATTENTION
The SUPER FREEZING function is
designed to maintain the nutritional
value of the food in the freezer by
freezing the food in the shortest
time. If a large amount of food is fro-
zen at one time, this function can be
used. At this time, the freezing speed
of freezer compartment is increased,
which can quickly freeze the food,
effectively lock the nutrition of the
food, and facilitate storage.

17
Tips on storing food
Freezer compartment
• The freezer is designated for the storage of food frozen at very low temperature, long-term storage
of frozen food, to produce ice.
• Only use the shelves in the door of the freezer to store frozen food, not for storing hot food desig-
nated for freezing.
• Do not put fresh and frozen food next to each other. The frozen food may thaw.
• When freezing fresh food (such as meat, sh or chopped meat), cut them into parts that can be
used at the same time.
• Storing frozen food: instructions are usually stated on the packages, which must be followed. If
there is no information on the packaging, food should not be stored for longer than three months
from the date of purchase.
• When purchasing frozen food, make sure that it is frozen at a suitable temperature and that the
packaging is not damaged.
• Frozen food should be kept in suitable packages to retain the quality and should be returned to the
freezer compartment as soon as possible.
• If a package of frozen food shows moisture or abnormal bulging, it is probable that it was stored
at the wrong temperature and the content is spoiled.
• The storage period for frozen food depends on the room temperature, the thermostat setting, the
frequency of opening the door of the freezer, the type of food and the time of transporting the
product from the shop to the household. Always follow the instructions printed on the packaging
and never exceed the maximum storage time stated on the package.
Cooling compartment
• To reduce moisture and subsequent ice build-up, never put liquid into the refrigerator in unsealed
containers. Frost tends to concentrate in the coolest parts of the evaporator. Storing uncovered
liquids results in a more frequent need for defrosting.
• Never put warm foods in the refrigerator. Food should rst cool down at room temperature and
then be placed to ensure adequate air circulation in the refrigerator.
• Foods or food containers should not touch the back wall of the refrigerator because they could
freeze to the wall. Do not keep regularly opening the door of the refrigerator.
• Meat and clean sh (packed in a package or plastic foil) can be placed in the refrigerator, which
can be used in 1-2 days.
• Fruit and vegetables without packaging can be placed in the part designated for fresh fruit and
vegetables.
Recommended Temperature
The optimal temperature setting for food storage:
Fridge: 39 °F (4°C) , Freezer: 0 °F (-18°C)
ATTENTION
The optimal temperature setting of each compartment depends on the ambient temperature. Optimal
temperature is based on the ambient temperature of 75 °F (25°C).
18
Maintenance
Defrosting
The refrigerator is made based on the air-cooling principle and thus has an automatic defrosting func-
tion. Frost formed due to change of season or temperature may also be manually removed by discon-
nection of the appliance from power supply or by wiping with a dry towel.
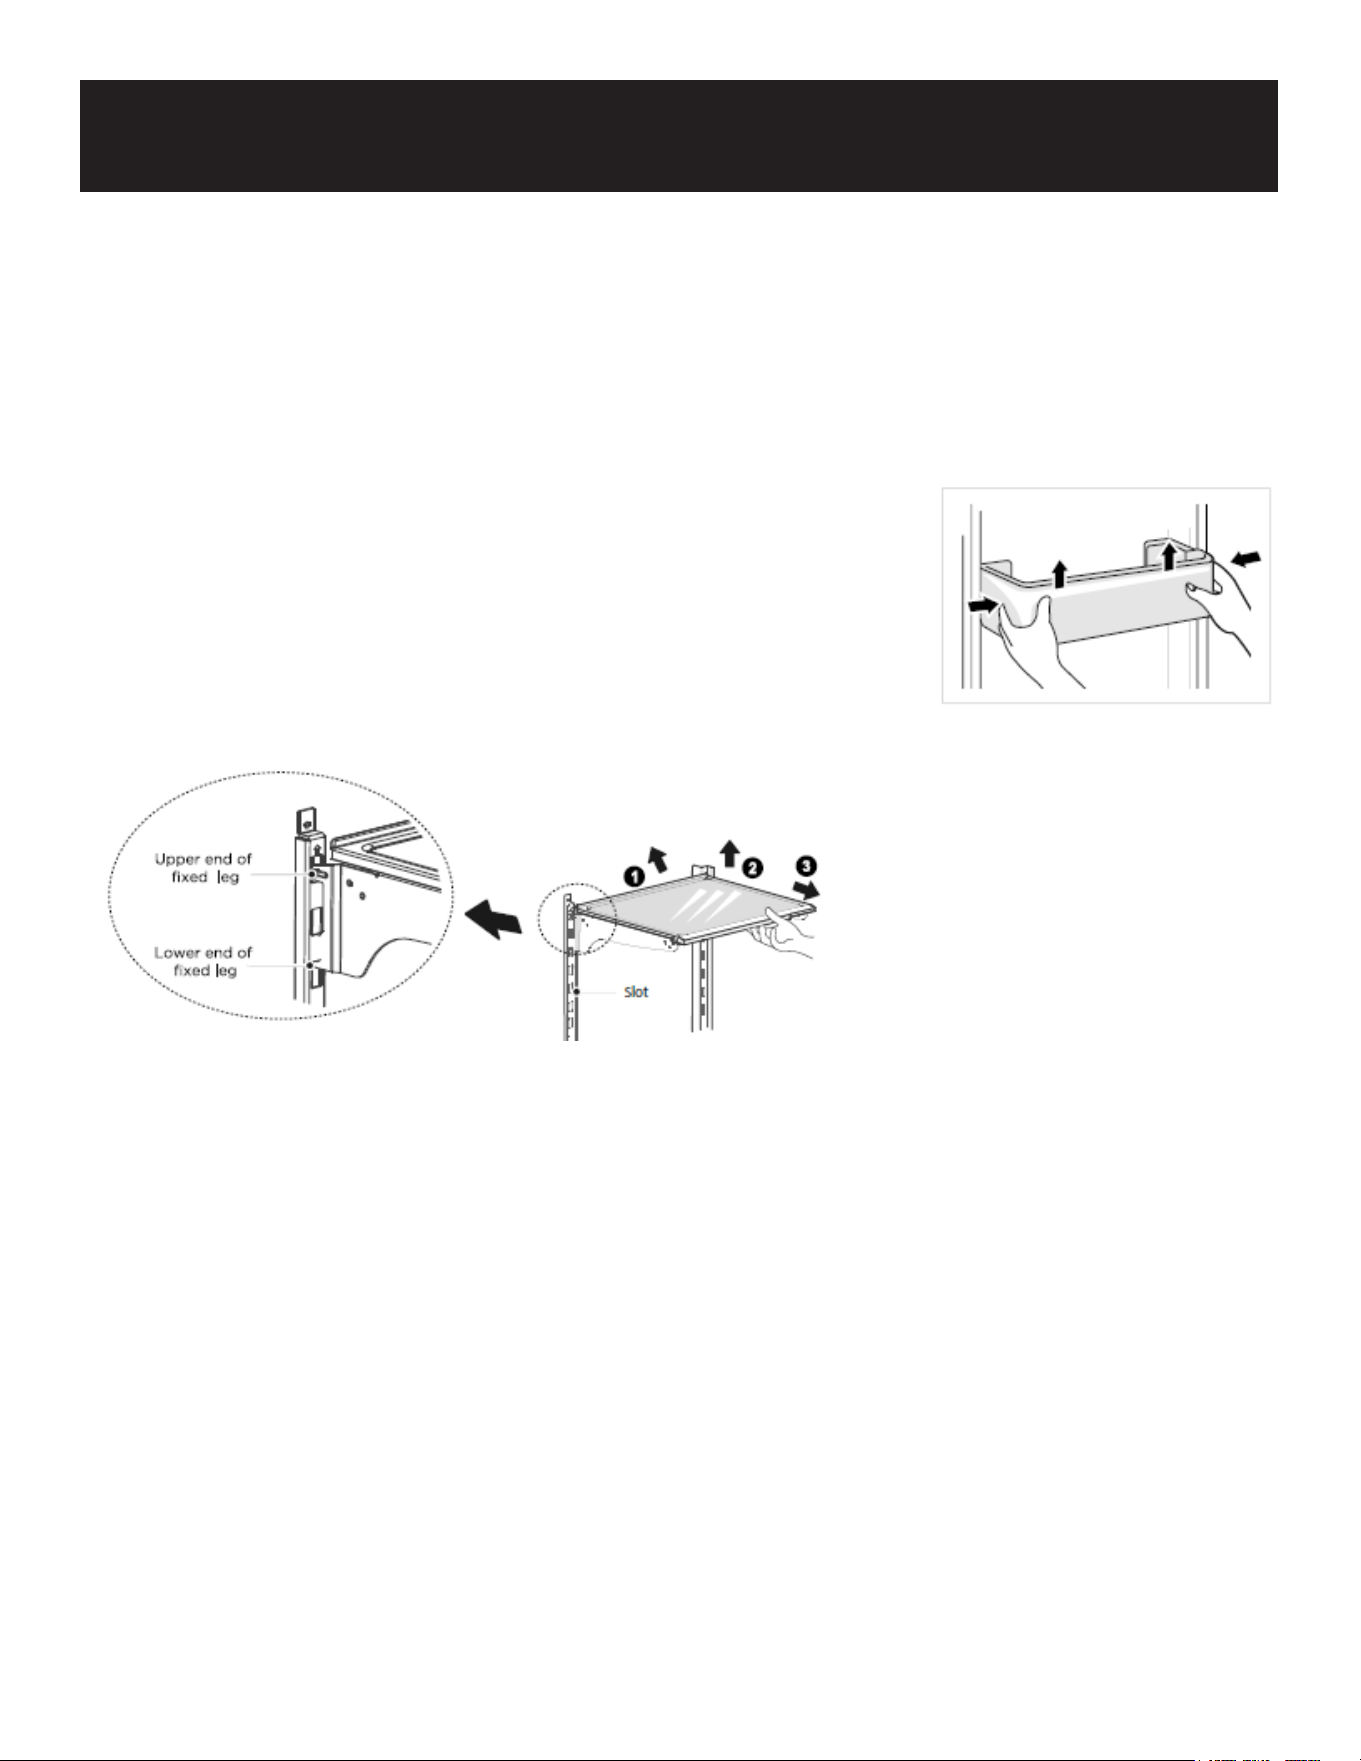
Cleaning of door tray
According to the direction arrow in the gure below, use both hands to
squeeze the tray, and push it upward, then you can take it out.
After removing and washing the tray, you can replace and adjust the
height in accordance with your preference.
Cleaning of glass shelf
Please dismantle the cantilever shelf according to the arrows shown as above:
1. Please hold the front edge of the shelf and tilt the shelf inwards until the lower end of xed leg is
separated from the slot of supporting iron.
2. Uplift the whole shelf until it cannot rise anymore.
3. Take out the shelf horizontally.
During installation, put the upper end of the xed leg into one of the upper slots on the supporting iron
rst and then put the lower end of the xed leg into the third slot on the lower part of the supporting
iron.
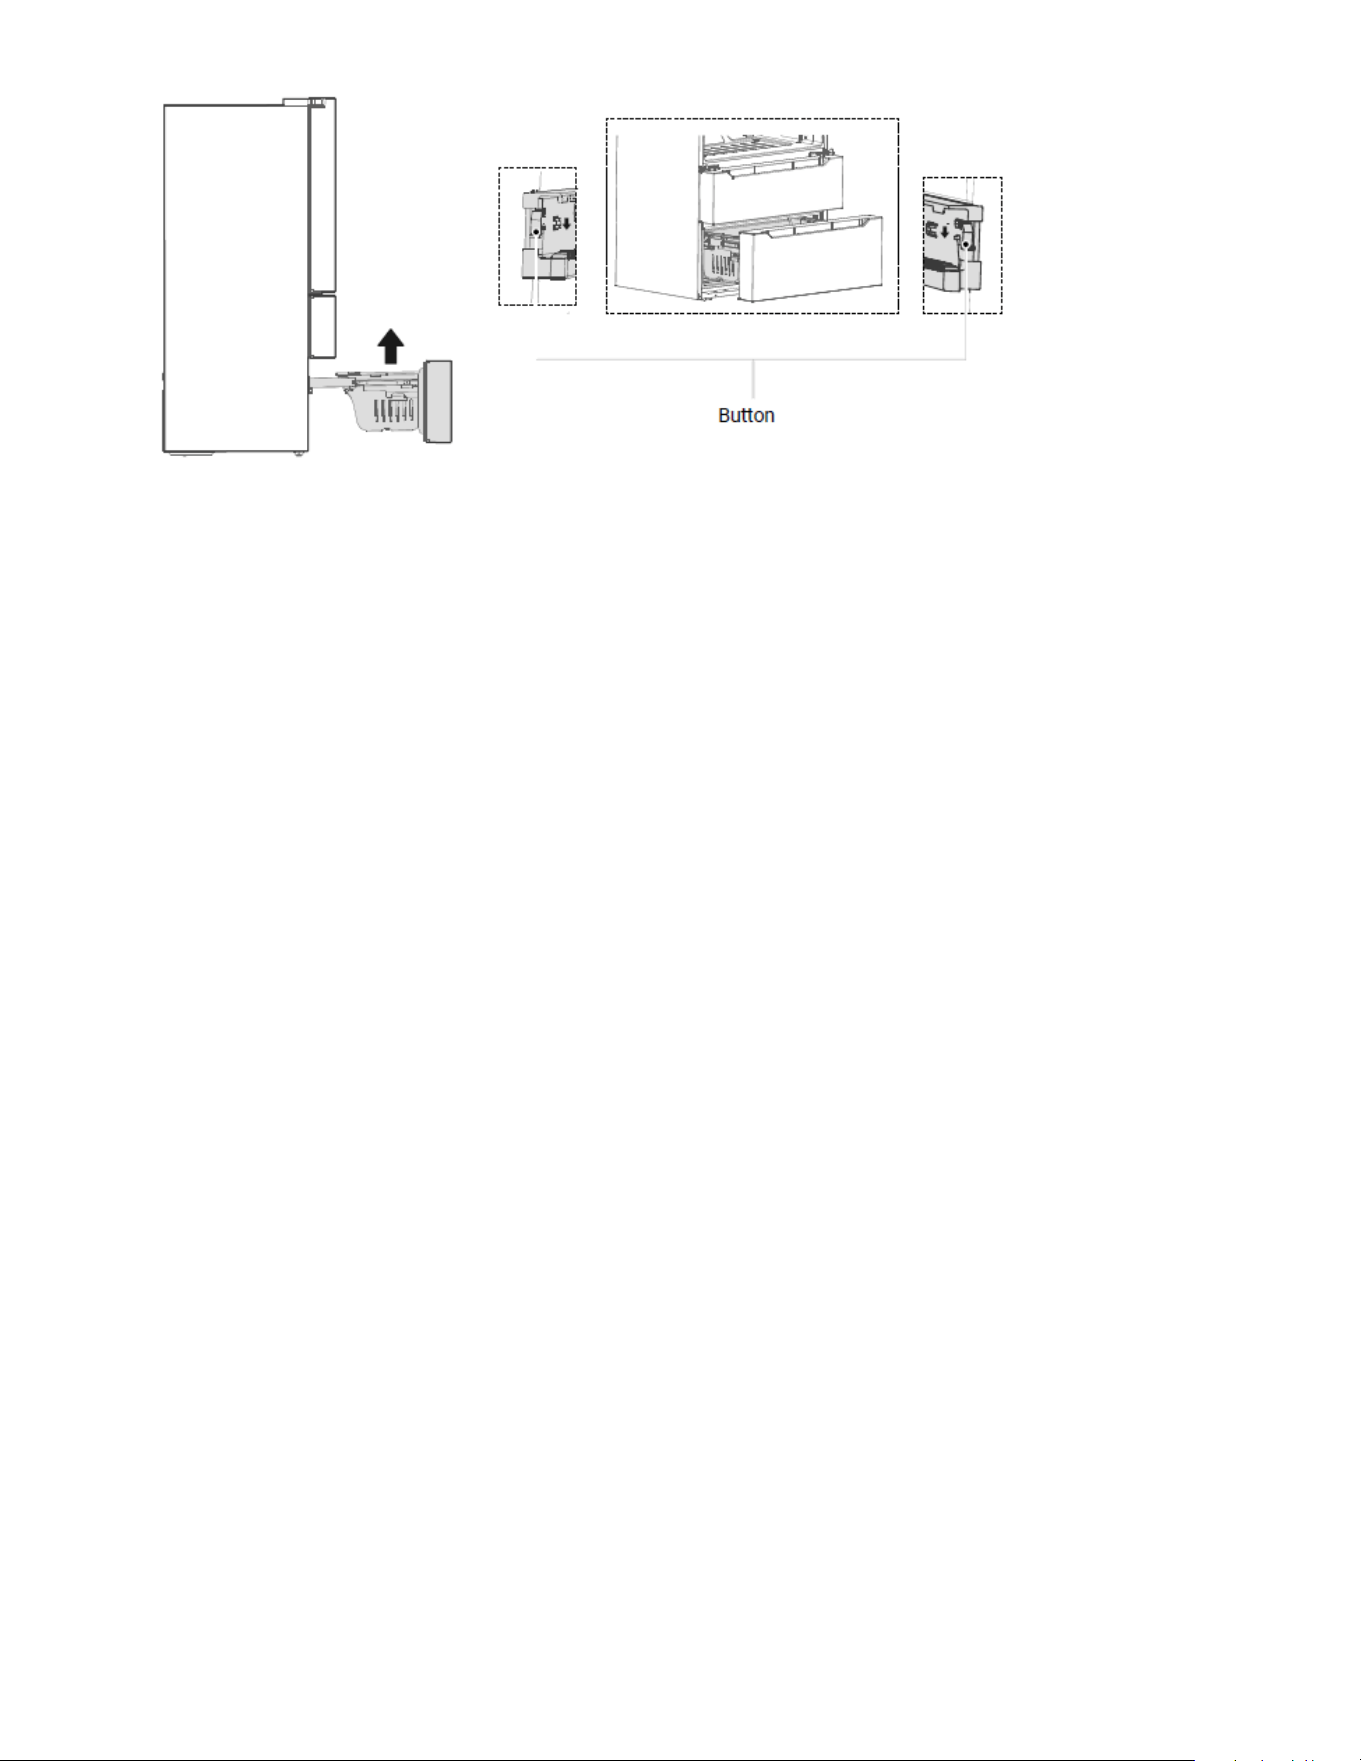
19
• Pull out the lower freezer drawer to the proper position.
• As shown in the illustration, press the buttons in both slots respectively (must press both sides at
the same time), pull out the freezer drawer until it stops.
• Take out the lower drawer as directed by the arrows.
• After cleaning, replace the drawer to original position, then close the lower drawer.
• The button will lock the drawer automatically.
Note: Don’t remove the lower freezer drawer if not necessary.
Stop Using
Power failure:
In case of power failure, even if it is in summer, food inside the appliance can be kept for several
hours; during the power failure, the times of door opening shall be reduced, and no more fresh food
shall be put into the appliance.
Extended Time Of No Use:
The appliance shall be unplugged and then cleaned; then the doors are left open to prevent odor.
Moving:
Before the refrigerator is moved, take all objects inside out, x the glass partitions, vegetable holder,
freezing chamber drawers and etc. with tape, and tighten the leveling feet; close the doors and seal
them with tape. During moving, the appliance shall not be upside down, horizontally or be vibrated; the
inclination during movement shall not be more than 45°.
Note:
The appliance shall run continuously once it is started. Generally, the operation of the appliance shall
not be interrupted; otherwise the service life may be impaired. It is recommended to reduce the fre-
quency of opening the door in case of power failure.
20
Problem Possible reason
Failed operation Check whether the appliance is connected to power or whether the plug is
in well contact
Check whether the voltage is too low
Check whether there is a power failure or partial circuits have tripped
Odor Odorous foods shall be tightly wrapped
Check whether there is any rotten food
Clean the inside of the refrigerator
Long-time operation of
the compressor
Long operation of the refrigerator is normal in summer when the ambient
temperature is high; it is not suggestible having too much food in the
appliance at the same time
Food shall get cool before being put into the appliance
Light fails to get
illuminated
Check whether the refrigerator is connected to power supply and whether
the illuminating light is damaged
Have the light replaced by a specialist
The door cannot be
properly closed
The door is stuck by food packages Too much food is placed
The refrigerator is tilted.
Loud noises Check whether the oor is level and whether the refrigerator is placed
stably
Check whether accessories are placed at proper locations
Door seal fails to be
tight
Remove foreign matters on the door seal
Heat the door seal and then cool it for restoration (or blow it with an
electrical drier or use a hot towel for heating)
Water pan overows There is too much food in the chamber or food stored contains too much
water, resulting in heavy defrosting
The doors are not closed properly, resulting in frosting due to entry of air
and increased water due to defrosting
Hot housing Heat distortion of the built-in sensor due to the housing which is normal
when housing becomes hot due to high ambient temperature, storage of
too much food or shutdown of the compressor is shut down, provide sound
ventilation to facilitate heat dissipation
Surface condensation Condensation on the exterior surfaces and door seals of the refrigerator is
normal when the ambient humidity is too high. Just wipe the condensate
with a clean towel.
Abnormal noise Buzz: The compressor may produce buzzes during operation, and the
buzzes are loud particularly upon start or stop. This is normal.
Creaks: Refrigerant owing inside of the appliance may produce creak,
which is normal.
Troubleshooting

21
WARRANTY
LIMITED WARRANTY
Koolmore Supply, Inc. extends a limited warranty to the original purchaser, guaranteeing that this Koolmore
product is free from manufacturing defects in material or workmanship for one year from the date of
purchase.
Should you discover any such defect within the warranty period, Koolmore Supply, Inc., reserves the right to
repair or replace the product without charge, or to cover the cost of replacement parts and repair labor needed
to correct defects present at the time of purchase or resulting from regular usage, when the appliance has been
installed, operated, and maintained as per the instructions provided.
At its sole discretion, Koolmore Supply Inc. may decide to replace the product. In such an event, your replace-
ment appliance will carry the warranty for the remaining term of the original unit's warranty period.
This warranty is valid exclusively to the original purchaser of the product and only applicable within the United
States. The warranty commences from the date of original consumer purchase. Proof of the original purchase
date will be required to obtain service under this warranty.
Under this limited warranty, your sole and exclusive remedy will be product repair, as outlined above. All
services must be provided by a Koolmore-designated service company.
To claim warranty or request repair service:
Email support@koolmore.com. Please include your name, address, phone number, warranty repair request,
and a copy of your proof of purchase receipt. Alternatively, visit koolmore.com and use the contact us page. A
Koolmore customer service representative will promptly arrange service for your appliance.
We thank you for choosing Koolmore.
WARRANTY EXCLUSIONS
This limited warranty will not cover:
1. Failure of the product to perform during power failures or interruptions,
or due to inadequate electrical service.
2. Damage incurred during transportation or handling.
3. Damage caused by accidents, vermin, lightning, winds, re, oods, or acts of God.
4. Damage resulting from accidents, alterations, misuse, abuse, improper installation, repair, or maintenance.
This includes using any external device that alters or converts the voltage or frequency of
electricity.
5. Unauthorized product modications, repairs by unauthorized centers, or use of non-approved
replacement parts.
6. Abnormal cleaning and maintenance not aligned with the user's manual.
7. Use of incompatible accessories or components.
8. Any costs associated with repairs or replacements under these excluded circumstances shall be the
responsibility of the consumer.