www.auna-multimedia.com
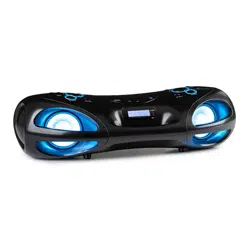
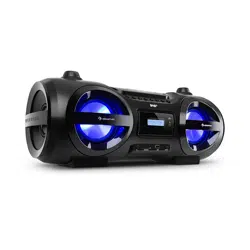
Spacewoofer DAB +
Boombox
10036341 10036342


3
DE
Technische Daten 4
Sicherheitshinweise 4
Geräteübersicht und Funktionstasten 6
Stromversorgung 7
Fernbedienung 8
Grundfunktionen 9
Radio FM 11
DAB-Radio 13
CD/MP3 16
USB 19
BT 20
AUX-IN 21
Spezielle Entsorgungshinweise für Verbraucher in Deutschland 22
Hinweise zur Entsorgung 24
Konformitätserklärung 24
Sehr geehrter Kunde,
wir gratulieren Ihnen zum Erwerb Ihres Gerätes.
Lesen Sie die folgenden Hinweise sorgfältig durch
und befolgen Sie diese, um möglichen Schäden
vorzubeugen. Für Schäden, die durch Missachtung der
Hinweise und unsachgemäßen Gebrauch entstehen,
übernehmen wir keine Haftung. Scannen Sie den
folgenden QR-Code, um Zugri auf die aktuellste
Bedienungsanleitung und weitere Informationen rund
um das Produkt zu erhalten:
INHALT

4
DE
TECHNISCHE DATEN
Artikelnummer 10036341 10036342
Stromversorgung AC 100-240 V ~ 50/60 Hz
DC 12V LR6 (8 Stück)
Leistung (Watt)
30 W
Standby Leistung (Watt)
0,5 W
UKW-Frequenzbereich
87.5 – 108 MHz
DAB-Frequenzbereich
174,928 – 239,200 MHz (Band III)
CD Player Frequenzbereich
100 Hz – 16 KHz
BT Reichweite
Bis zu 10 Meter
Betriebstemperatur
+ 5°C – + 35° C
Anschlüsse
AUX-IN-Eingang
3,5 mm
Köpfhörer-Anschluss (Klinkenstecker)
3,5 mm
USB-Anschluss
SICHERHEITSHINWEISE
• Dieses Gerät kann von Kindern ab 8 Jahren sowie von Personen mit
verringerten physischen, sensorischen und geistigen Fähigkeiten
oder Mangel an Erfahrung und/oder Wissen benutzt werden, wenn
sie beaufsichtigt werden oder im sicheren Gebrauch des Gerätes
unterwiesen wurden und die daraus resultierenden Gefahren
verstanden haben.
• Reinigung und Wartung durch den Benutzer dürfen nicht von Kindern
vorgenommen werden, es sei denn, sie sind 8 Jahre oder älter und
werden beaufsichtigt.
• Kinder dürfen nicht mit dem Gerät spielen.
• Beachten Sie alle in der Bedienungsanleitung aufgeführten Hinweise.
• Das Gerät darf nicht in der Nähe von Wasser oder in feuchter
Umgebung verwendet werden.

5
DE
• Achten Sie darauf, dass keine Flüssigkeit über dem Gerät und den
Geräteönungen verschüttet wird.
• Bewegen Sie das Gerät vorsichtig, um es nicht zu beschädigen.
• Blockieren Sie nicht die Geräteausgänge.
• Stellen Sie das Gerät nicht in die Nähe von Wärmequellen
(beispielsweise Heizung). Setzen Sie das Gerät keiner direkten
Sonneneinstrahlung aus.
• Stecken Sie den Netzstecker des Geräts auf die dafür vorgesehene Art
und Weise in die Steckdose.
• Das Gerät ist mit einem Überlastungsschutz ausgestattet. Sollte dieser
ersetzt werden müssen, wenden Sie sich an den Kundendienst oder
einen in ähnlicher Weise qualizierte Person.
• Ziehen Sie den Netzstecker des Geräts aus der Steckdose, wenn Sie
dieses für einen längeren Zeitraum nicht verwenden.
• Versuchen Sie keinesfalls, dass Gerät selbst zu warten oder zu
reparieren. In diesem Fall erlischt die Garantie.
• Der Netzstecker dient dazu, das Gerät nach dem Ausschalten vom
Stromnetz zu trennen. Achten Sie darauf, dass der Netzstecker immer
frei zugänglich ist.
• Setzen Sie das Gerät keinem Spritzwasser aus und stellen Sie keine mit
Flüssigkeit gefüllten Objekte, wie beispielsweise Vasen, auf das Gerät.
• Setzen Sie die Batterien keiner extremen Hitze wie beispielsweise
Sonnenlicht oder Feuer aus.
• Behindern Sie die Belüftung des Geräts keinesfalls durch Blockieren der
Belüftungsönungen mit Gegenständen wie beispielsweise Zeitungen,
Tischdecken, Vorhängen etc.
• Vergewissern Sie sich, dass ein Mindestabstand von 5 mm zu allen
Seiten des Geräts eingehalten wird.
• Stellen Sie keine Zündquellen mit oener Flamme, wie beispielsweise
angezündete Kerzen, auf das Gerät.
• Entsorgen Sie Altbatterien umweltgerecht.
• Verwenden Sie das Gerät nur bei gemäßigtem Klima, nicht bei
tropischem Klima.
WARNUNG
Verletzungsgefahr! Önen Sie, zum Reduzieren der
Stromschlaggefahr, weder die Geräteabdeckung noch die
Rückseite des Geräts. Das Gerät enthält keine Teile, die vom
Kunden gewartet werden könnten. Bitte wenden Sie sich zur
Wartung und Reparatur an den Kundendienst oder an in
ähnlicher Weise qualiziertes Personal.
6
DE
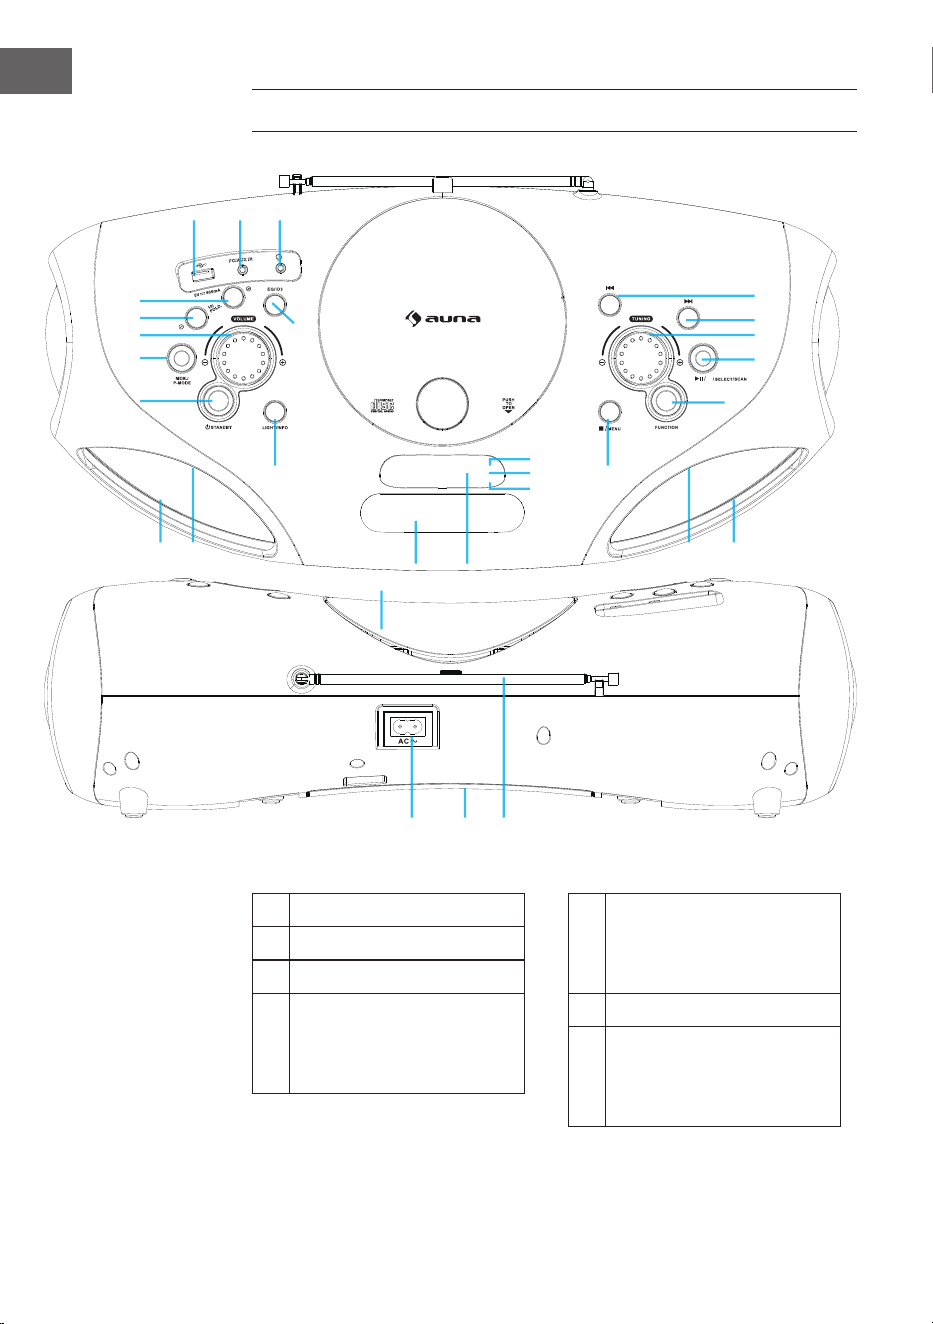
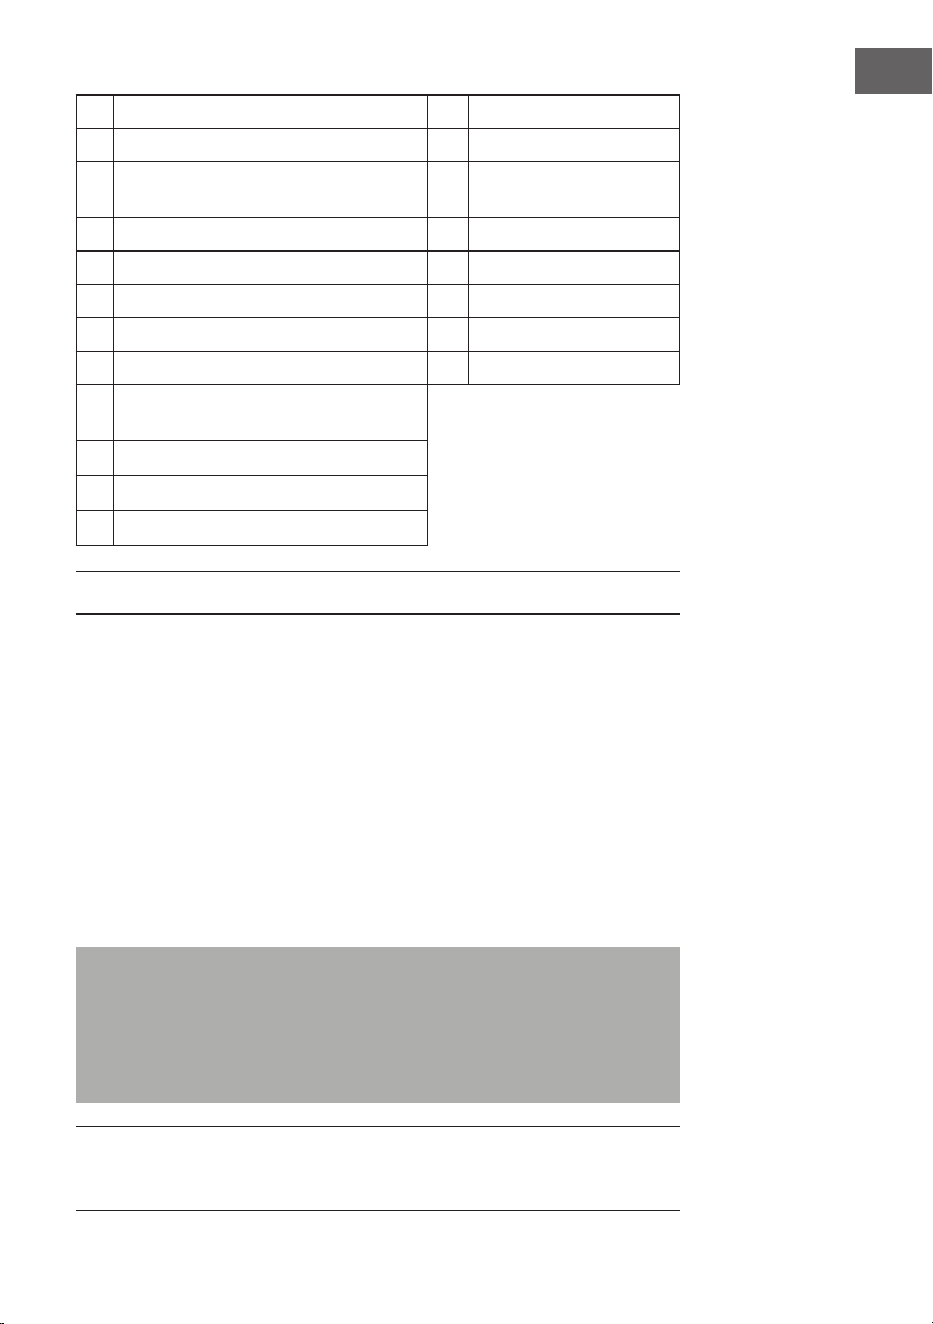
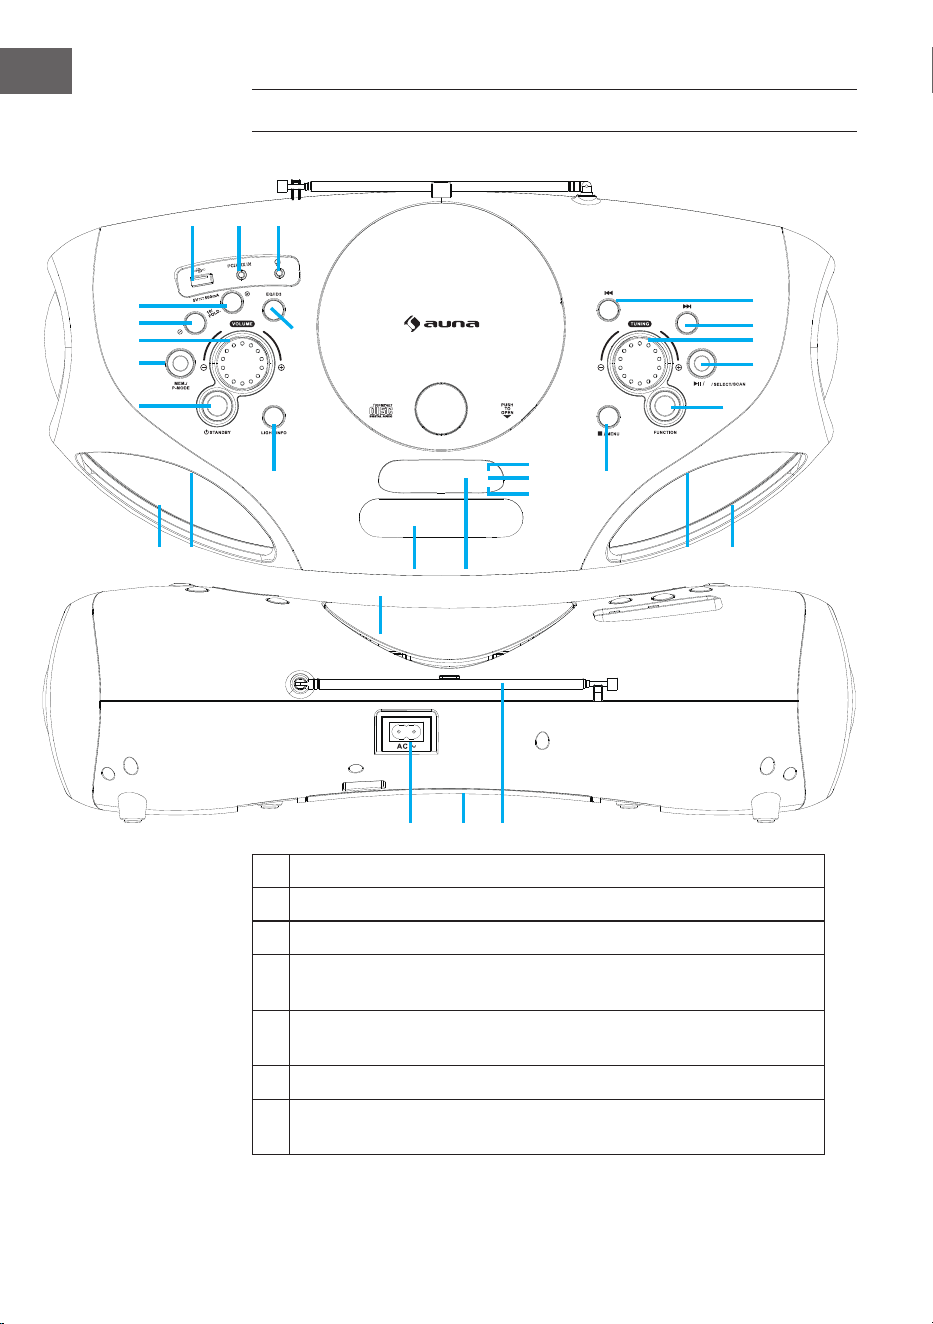
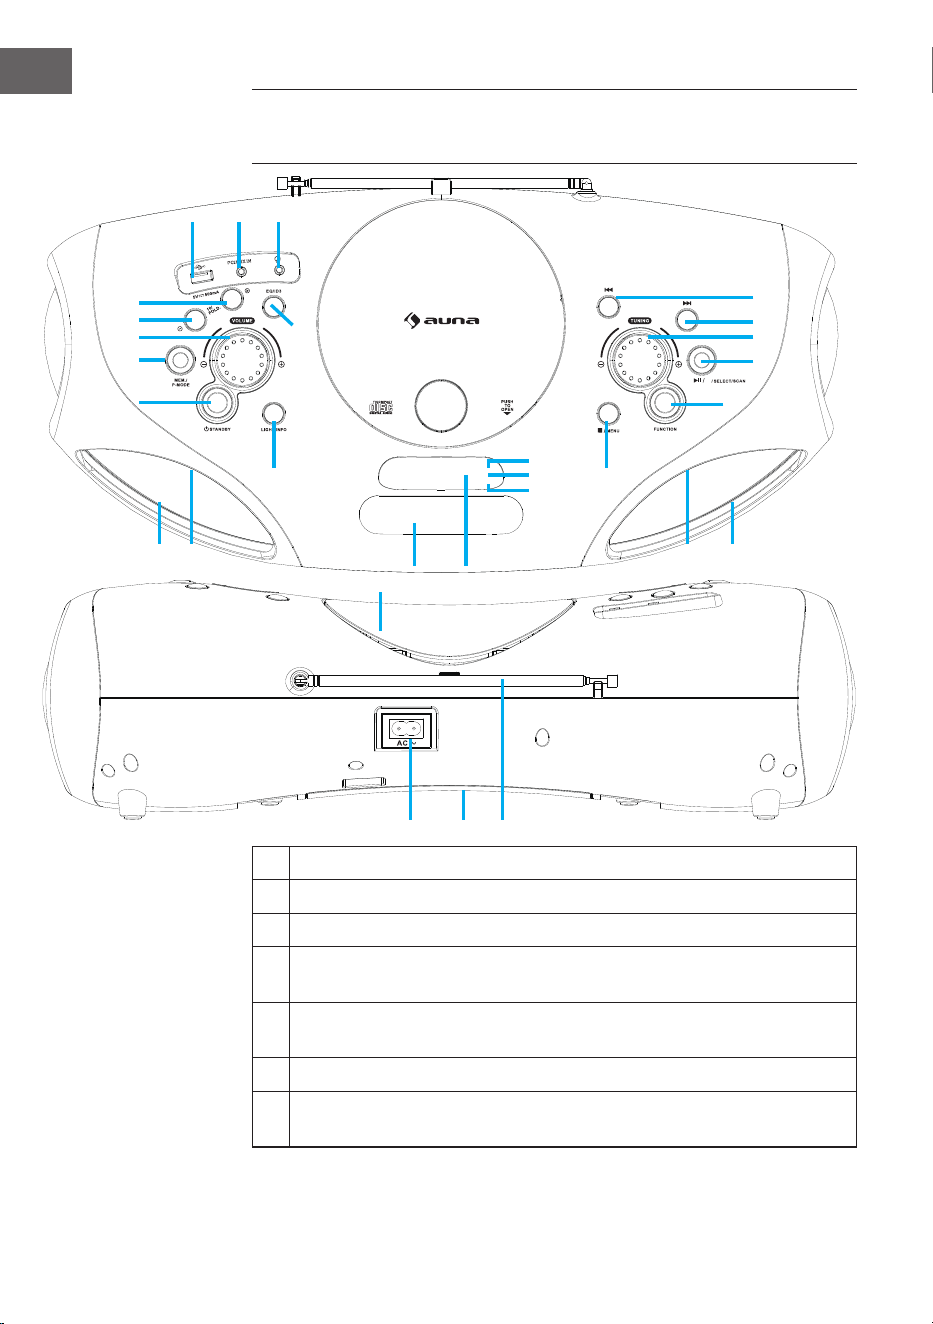
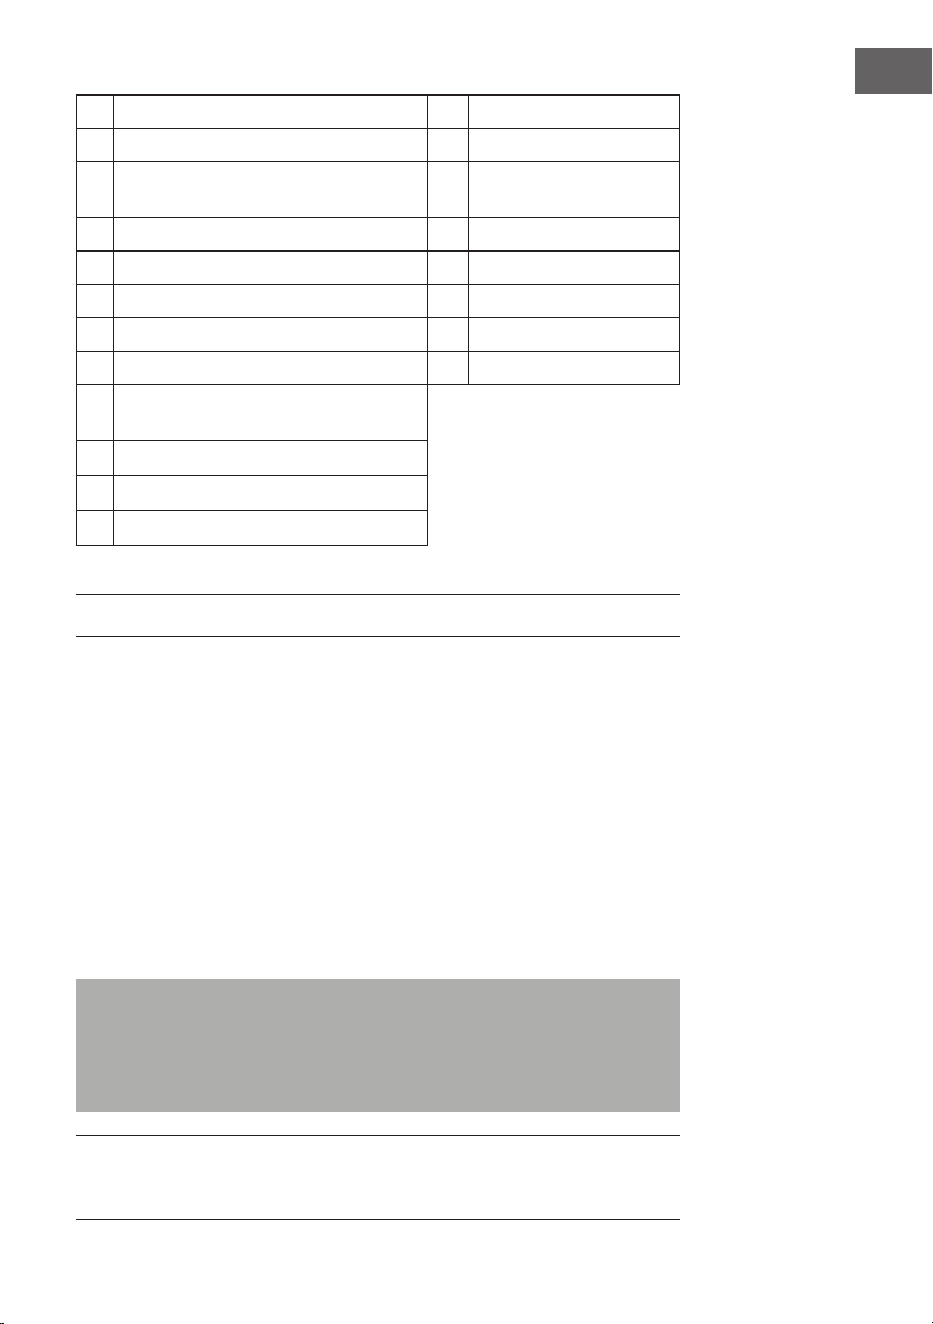
GERÄTEÜBERSICHT UND FUNKTIONSTASTEN
1 USB-Anschluss
2 AUX-IN-Anschluss
3 Kopfhörer-Anschluss
4 Taste FOLD.+/+10/MEM.+
(Aufwärts blättern
in Ordnern/Listen/
Speicherliste)
5 Taste FOLD.-/-10/MEM.-
(Abwärts blättern
in Ordnern/Listen/
Speicherliste)
6 Lautstärkeregler
7 Taste MEM./P-MODE
(Programmwahl /
Programmiermodus /
Speicher)
BT
M./
1 2 3
4
5
6
7
8
9
10
12
11
13
222120
14
19
18
17
16
15
23
26
27
26 2425 25
7
DE
8 Standby-Taste 20 AC-Anschluss
9 Licht-Taste / Stopp-Taste 21 Batteriefach
10 EQ/ID3-Taste (Klangregelung/
Anzeige MP3 Informationen)
22 Radioantenne
11 CD-Fach 23 Standby-Anzeige
12 Gri 24 Lautsprecher
13 Display 25 LED-Licht
14 Stopp/Menü-Taste 26 IR-Anzeige
15 Funktionswahl-Taste 27 BT Pairing-Anzeige
16 Wiedergabe/Pause/BT Pairing
Select/Scan-Taste
17 Tuning-Regler
18 Weiter/Schnell-Vorwärts-Taste
19 Zurück/Schnell-Rückwärts-Taste
STROMVERSORGUNG
Dieses Gerät ist für den Betrieb mit Wechselstrom/Gleichstrom ausgelegt.
Wechselstrombetrieb
• Stecken Sie das Ende des mitgelieferten Netzkabels in die
Netzsteckdose am Gerät und den Stecker in die Steckdose.
Die Batterien werden automatisch vom Stromnetz getrennt.
Gleichstrombetrieb
• Önen Sie die Batteriefachklappe. Legen Sie 8 Stück UM2 „C“ Batterien
(nicht im Lieferumfang enthalten) in das Fach ein. Bitte beachten Sie die
korrekten Polaritäten wie in der Bedienungsanleitung dargestellt.
Hinweise: Wenn Sie die Batterie verwenden, sollten Sie das Netzkabel
vom Gerät aus der Steckdose ziehen.
Entfernen Sie die Batterien, wenn sie leer sind oder für längere Zeit nicht
benutzt werden.
Batterien enthalten chemische Substanzen und sollten daher
ordnungsgemäß entsorgt werden.
ESD-Hinweise - Das Produkt kann durch elektrostatische Entladungen in
den Regelbetrieb zurückgesetzt bzw. nicht zurückgesetzt werden, einfach
das Gerät abschalten und wieder anschließen.
8
DE
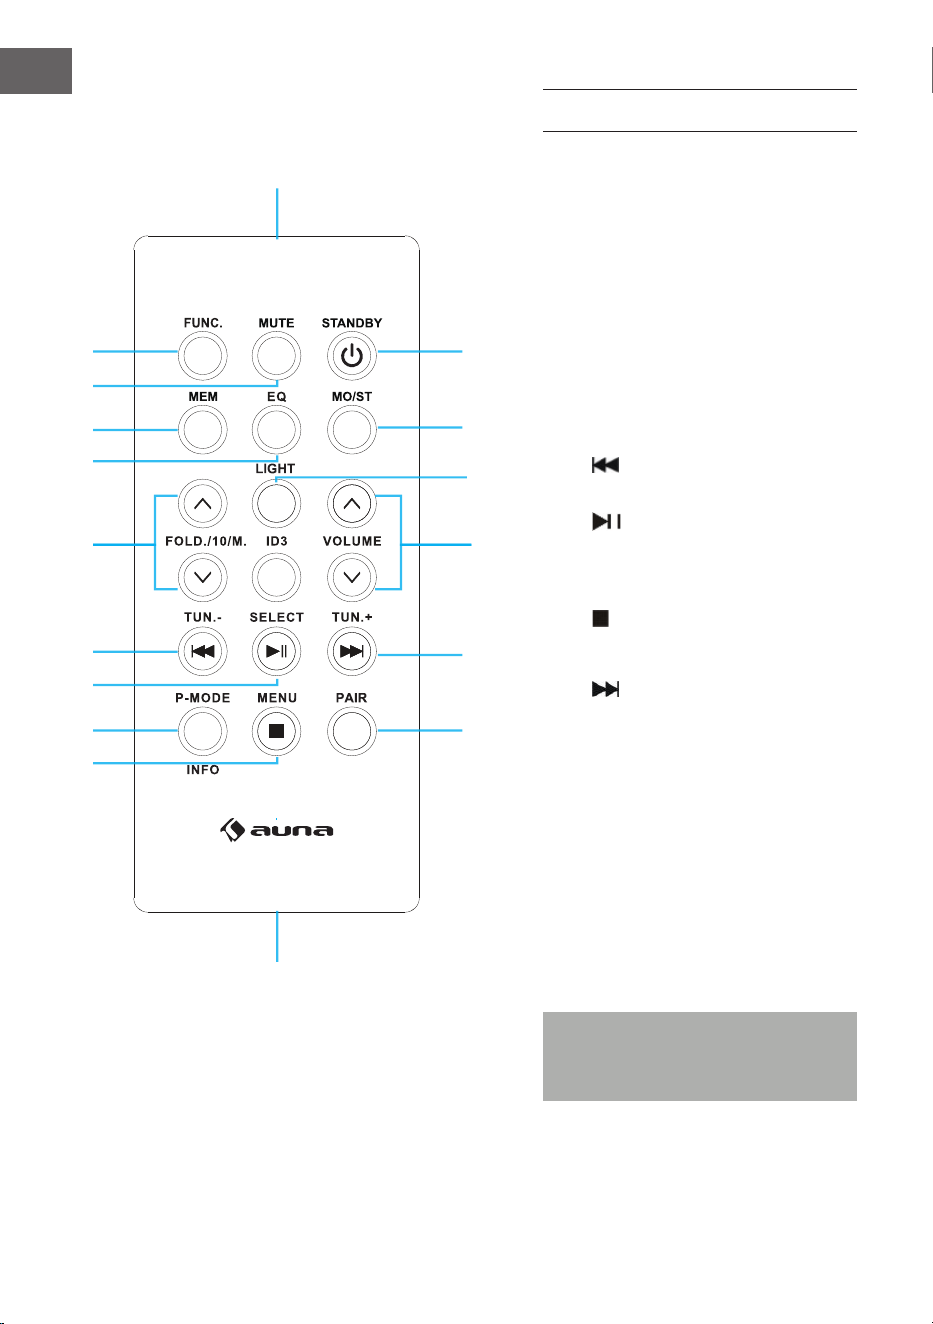
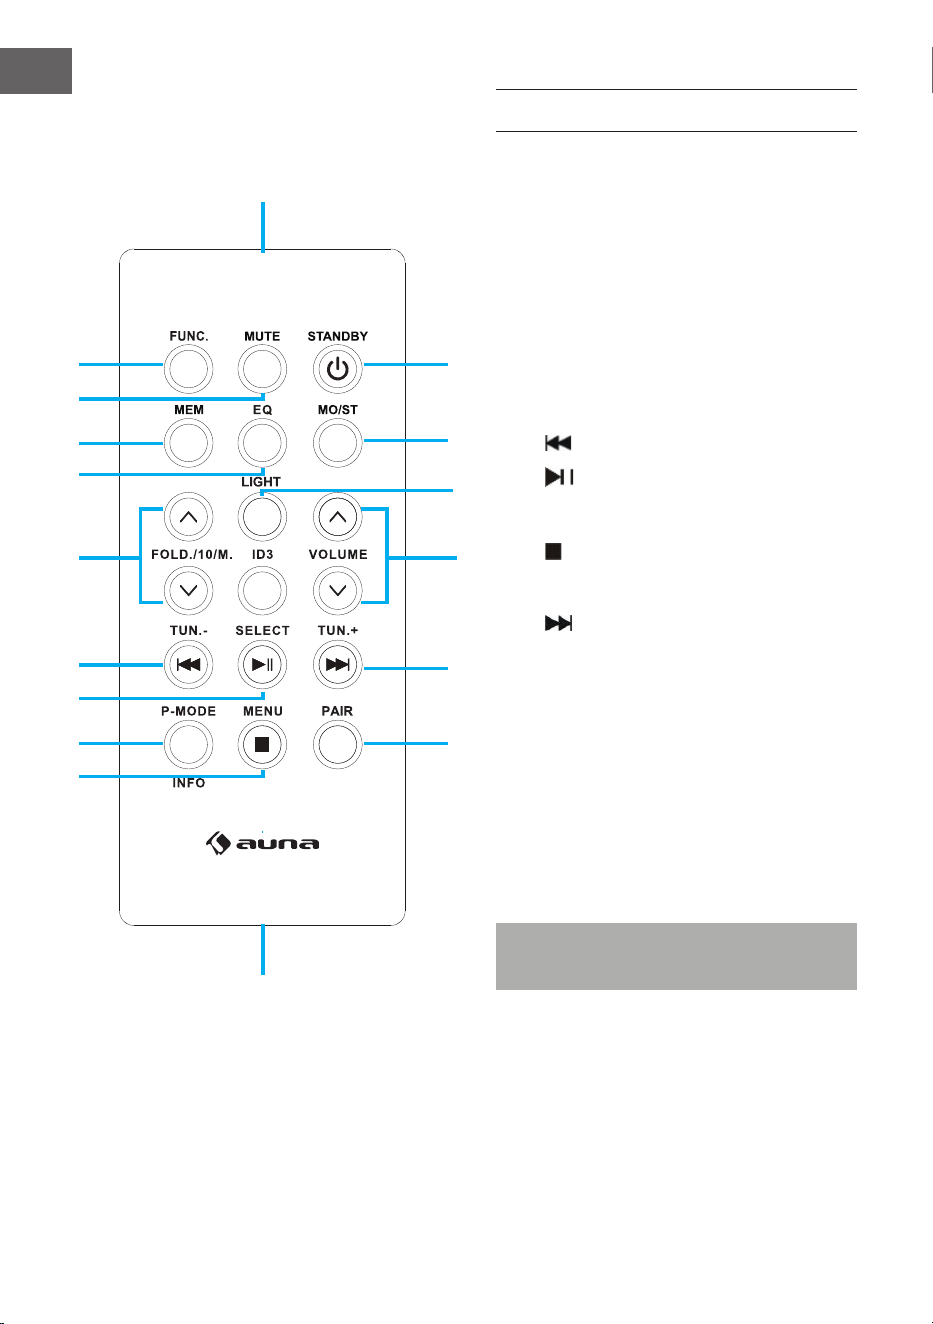
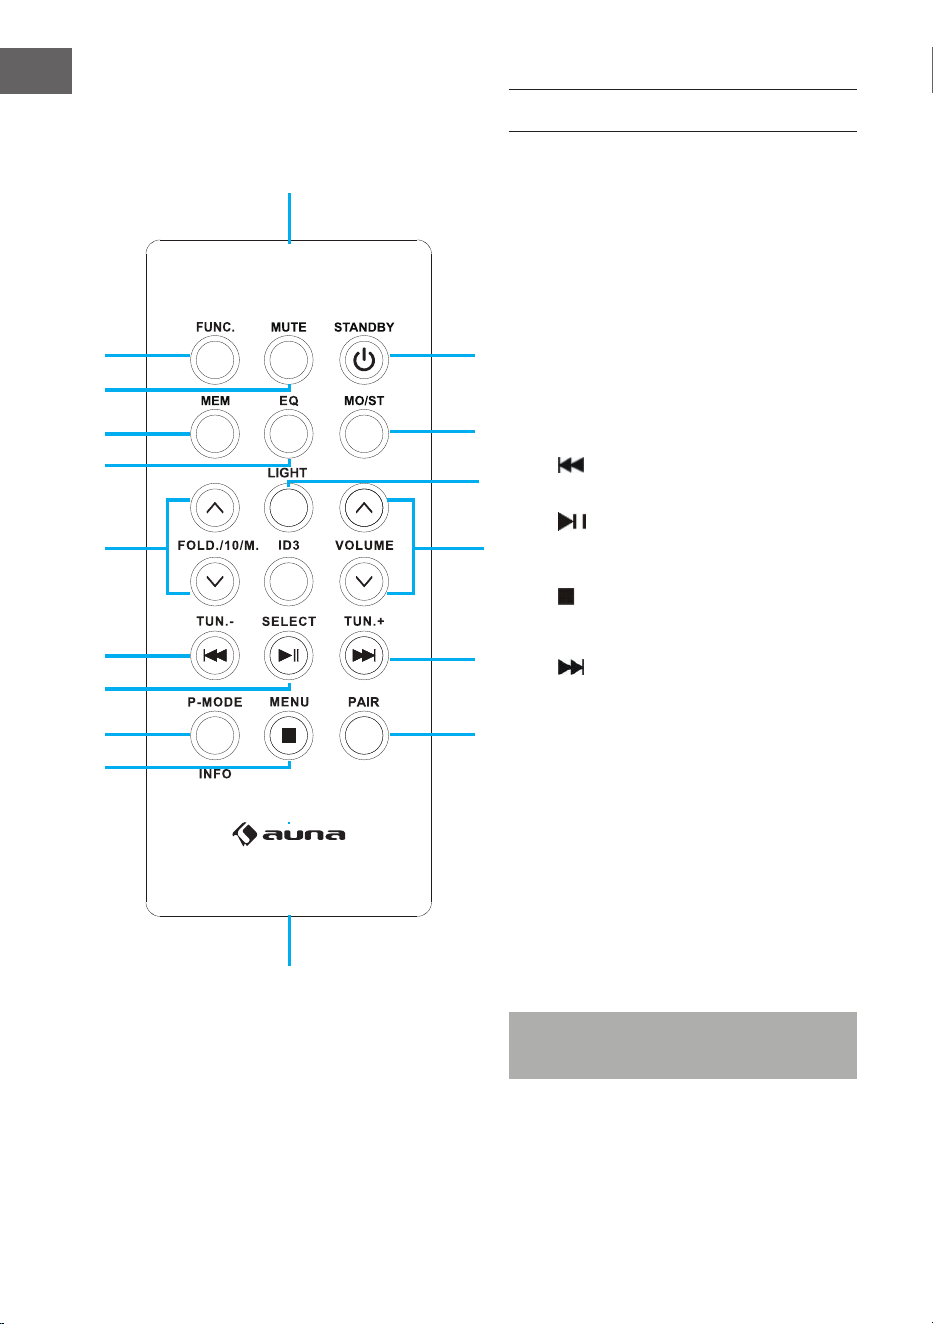
FERNBEDIENUNG
Tastenfunktionen
1 FUNC (Funktionswahl-Taste)
2 MUTE (Stumm-Taste)
3 MEM (Speicher-Taste)
4 EQ (Klangregelung)
5 FOLD./10/M. (AUF/AB)
Aufwärts/Abwärts blättern (Ordner/
Listen)
6 Rückwärts/Schneller Rücklauf/
Tuning (-)-Taste
7 Wiedergabe/Pause/'Scan-Taste
8 P-MODE/Info
Programmierungsmodus
9 Stopp/Menü-Taste
10 PAIR (BT Pairing-Taste)
11 Vorwärts/Schneller Vorlauf/
Tuning (+-)-Taste
12 ID3 (MP3-Informationen anzeigen)
13 VOLUME (Lautstärke-AUF/AB-Taste)
14 LIGHT (Licht-Taste)
15 MO/ST (Mono/Stereo-Taste)
16 STANDBY (Ein-/Ausschalten-Taste)
17 Remote-Sensor
18 Batteriefach
Hinweis: Entfernen Sie
den Batterieschutz vor der
Inbetriebnahme.
1
17
18
15
16
10
11
12
13
14
2
3
4
5
6
7
8
9
9
DE
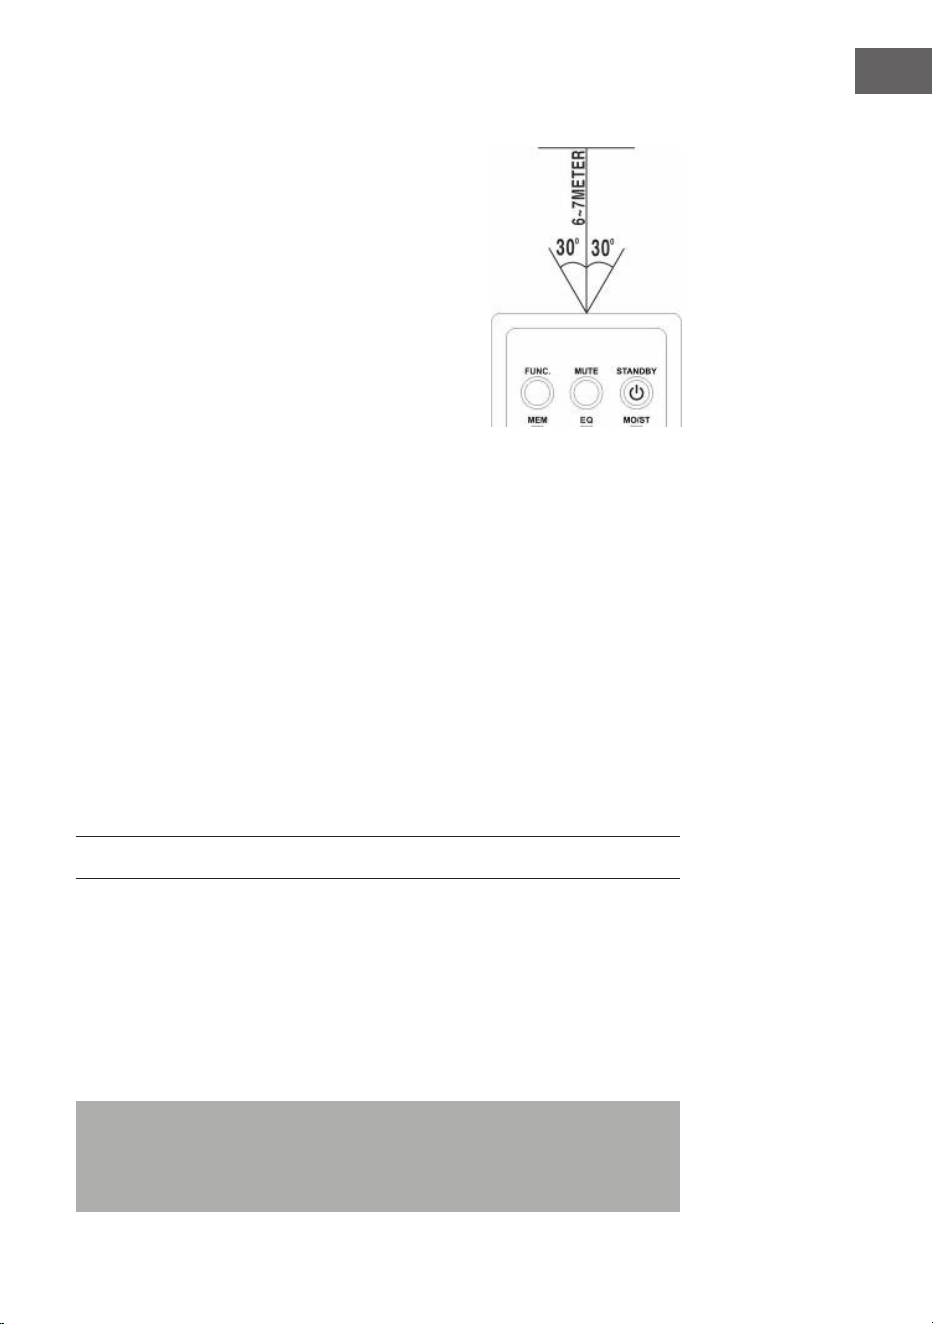
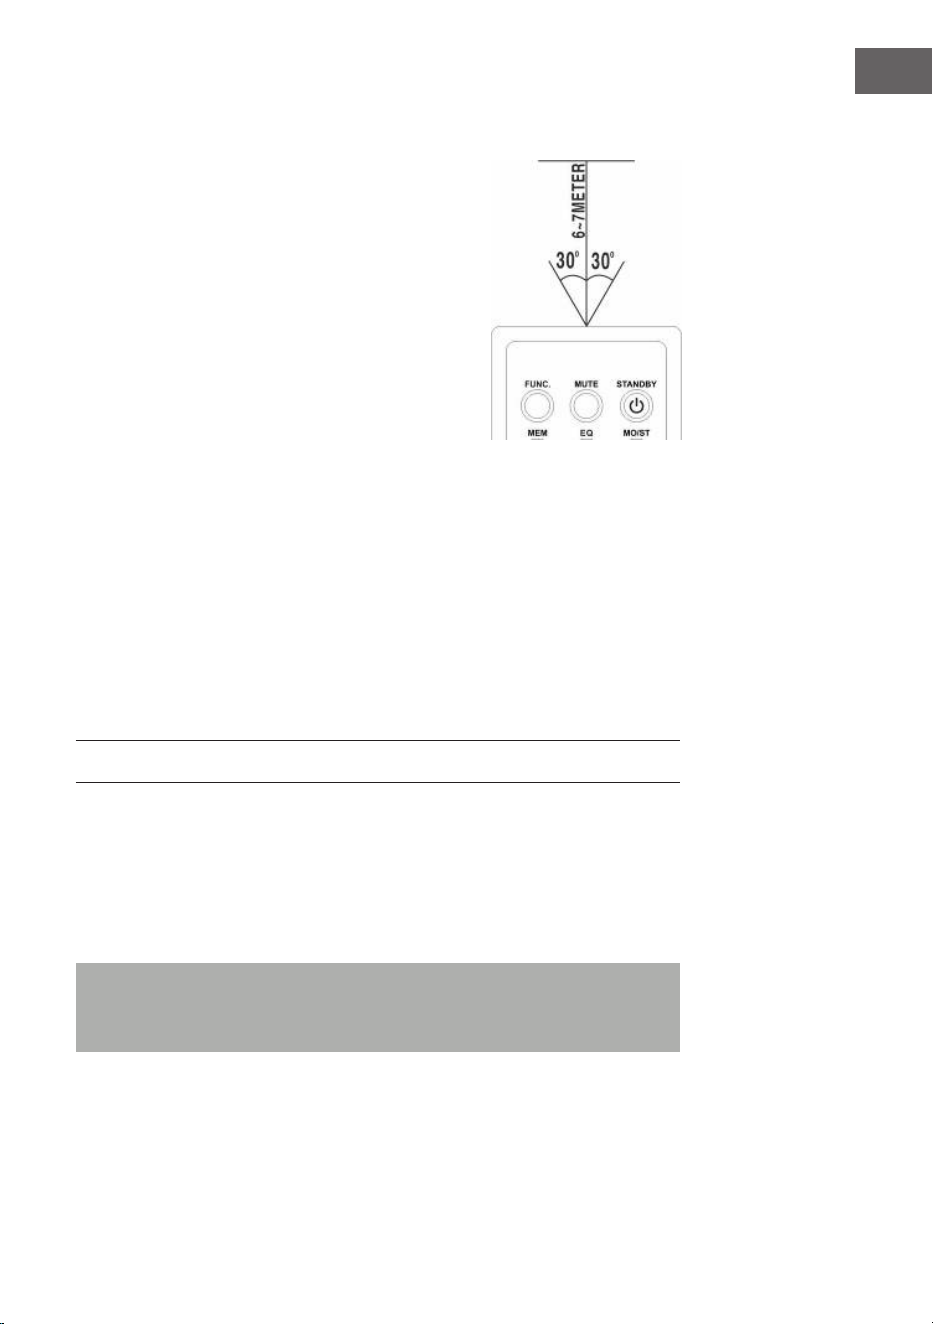
Bedienung der Fernbedienung
• Um das Gerät mit der Fernbedienung zu
bedienen, richten Sie die Fernbedienung
auf den Fernbedienungs-Sensor auf der
Gerätevorderseite und drücken Sie die
entsprechende Taste auf der Fernbedienung.
• Die Fernbedienung funktioniert am besten,
wenn Sie diese in einem Abstand von
6-7Metern zur Gerätevorderseite und in einem
Winkel von 30Grad halten.
• Helle Sonneneinstrahlung oder
Raumlichtverhältnisse können die
Fernbedienung stören.
• Wenn die Fernbedienung unzureichend
funktioniert oder ganz ausfällt, versuchen
Sie zuerst, die Batterien der Fernbedienung
auszutauschen und dann die Lichtverhältnisse
im Raum zu reduzieren.
Das Einsetzen der Lithiumbatterie in die Fernbedienung
Die Fernbedienung enthält eine CR2025 (3V) Lithium-Batterie.
• Um die Batterie auszutauschen, schieben Sie die Verschlusskappe
entsprechend der Anleitung vorsichtig in die richtige Richtung und
ziehen Sie dann das Batteriefach heraus.
• Nehmen Sie die leere Batterie heraus und legen Sie eine neue
Lithiumbatterie (CR-2025) mit der positiven Polarität nach oben in
das Batteriefach ein. Schieben Sie dann das Fach mit einem „Klick“-
Geräusch in seine Position zurück.
GRUNDFUNKTIONEN
Einstellung des Gerätes
• Drücken Sie nach dem Anschließen an die Stromversorgung die
Standby-Taste (23) am Gerät oder die STANDBY-Taste (16) auf der
Fernbedienung, um das Gerät einzuschalten.
• Drücken Sie die Funktionswahl-Taste (15) am Gerät oder FUNC-Taste (1)
auf der Fernbedienung, um eine der Funktionen FM/CD/USB/BT/AUX
auszuwählen.
Hinweis: Im CD/USB/BT/AUX-Modus wechselt das Gerät automatisch
in den Standby-Modus, wenn es 15 Minuten lang keine Grundfunktion
ausführt. Drücken Sie die Standby-Taste, um das Gerät wieder
einzuschalten.
10
DE
Lautstärkeregelung
• Drehen Sie den Lautstärkeregler (6) am Gerät, um die Lautstärke zu
erhöhen oder zu verringern.
Kopfhörer-Anschluss
• Stecken Sie bei Bedarf einen Kopfhörer mit 3,5-mm-Klinkenstecker
(nicht im Lieferumfang enthalten) in die Kopfhörerbuchse (3). Der
Lautsprecher (24) wird automatisch stummgeschaltet.
VORSICHT:
Das Hören von Musik bei hoher Lautstärke über einen
längeren Zeitraum kann die Ohren schädigen.
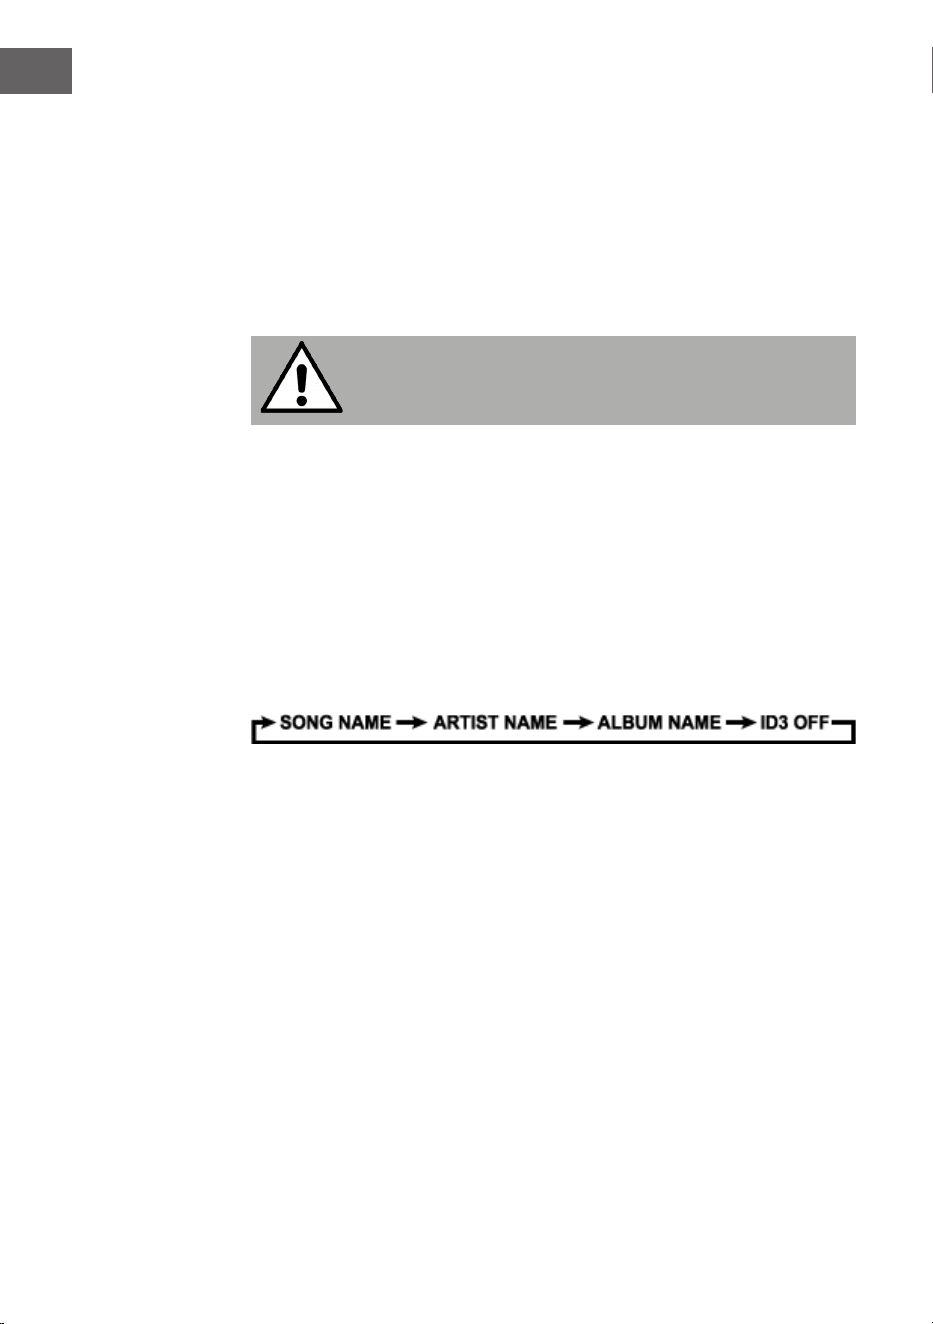
ID3-Tag-System (MP3-Infos anzeigen)
Einige MP3-Dateien sind mit Informationen wie dem Namen des Songs,
dem Interpreten und dem Album versehen. Zusammen werden diese
Informationen als „ID3-Tag“ bezeichnet.
• Halten Sie die EQ/ID3-Taste (10) am Gerät oder die ID3-Taste (12)
auf der Fernbedienung gedrückt, um die ID3-Tag-Anzeige ein- oder
auszuschalten. Wenn die ID3-Tag-Anzeige eingeschaltet ist, zeigt das
Gerät die Tag-Informationen in der unten angegebenen Reihenfolge an.
EQ-Funktion (Equalizer)
Dieses Gerät verfügt über ein eingebautes Equalizer-System.
• Drücken Sie die EQ/ID3-Taste (10) am Gerät oder die EQ-Taste (4) auf
der Fernbedienung, um einen anderen Musikstil (Ton) auszuwählen:
FLAT, CLASSIC, ROCK, POP, JAZZ und DBBS.
LED-Licht
• Drücken Sie die Licht-Taste (9) am Gerät oder die LIGHT-Taste (14) auf
der Fernbedienung, um das LED-Licht einzuschalten und wählen Sie aus
8verschiedenen Blink-Eekten aus. Um das LED-Licht zu deaktivieren,
drücken Sie erneut die Licht-Taste, bis im Display „LIGHT OFF“
angezeigt wird.

11
DE
RADIO FM
Einstellen der Radiosender
1 Drücken Sie die Funktionswahltaste (15) am Gerät oder die FUNC-Taste
(1) auf der Fernbedienung, um den Funkmodus auszuwählen: FM bzw.
DAB.
2 Durch das Drehen des Tuning-Reglers (17) am Gerät wird die
Bandfrequenz angezeigt. Beispiel: FM 97,10 MHz. Sie können auch
die VOR- oder RÜCK-Taste drücken und gedrückt halten,
um schneller zu suchen. Das Gerät stoppt automatisch bei jedem
Radiosender mit einem starken Signal.
3 Drehen Sie den Lautstärkeregler (6) am Gerät, um die Lautstärke zu
erhöhen oder zu verringern.
4 Schieben Sie die Teleskop-Antenne (22) auf ihre volle Länge aus und
bewegen Sie das Gerät vorsichtig hin und her, um den besten Empfang
zu erhalten, oder stellen Sie das Gerät an einem geeigneten Ort auf.
5 Um das Radio auszuschalten, drücken Sie die Funktionswahltaste
(15) am Gerät oder die FUNC-Taste (1) auf der Fernbedienung, um zu
anderen Funktionen zu wechseln, oder drücken Sie die Standby-Taste
(8) am Gerät oder die STANDBY-Taste (16) auf der Fernbedienung, um
das Gerät auszuschalten.
Automatisch voreingestellte Senderspeicherplätze/Scan
• Um Sender zu suchen und automatisch zu speichern, halten Sie die
Wiedergabe-Taste (16) am Gerät gedrückt. Jeder Sender mit einem
ausreichend starken Signal wird im Speicher abgelegt. Nachdem das
Gerät den Scanvorgang beendet hat, stellt es sich automatisch auf die
Sendernummer 1 (P01) ein.
• Um den nächsten oder vorherigen Sender einzustellen, drücken Sie die
Tasten FOLD./10/M.+/- (4 & 5) am Gerät oder die Taste FOLD./10/M.
(AUF/AB) (5) auf der Fernbedienung.
Bedienung der manuell eingestellten Sender
Sie können 30 Radiosender nach Ihren Wünschen speichern.
1 Drehen Sie den Tuning-Regler (17) am Gerät, um den gewünschten
Sender auszuwählen, den Sie als Vorwahl speichern möchten.
2 Drücken Sie die Taste MEM./P-MODE (7) am Gerät oder drücken Sie die
MEM-Taste (3) auf der Fernbedienung, „P01“ blinkt im Display auf, um
anzuzeigen, dass Sie den Sender auf dem Speicherplatz abspeichern.
Drücken Sie die Taste FOLD./10/M +/- (4 & 5) am Gerät oder die Taste
FOLD./10/M (AUF/AB) (5) auf der Fernbedienung, und drücken Sie dann
die Taste MEM./P-MODE (7) am Gerät oder drücken Sie erneut die
MEM-Taste (3) auf der Fernbedienung, um in den Speicher zu gelangen.

12
DE
3 Um einen anderen Sender zu suchen, wiederholen Sie die Schritte (1)
und (2), bis alle gewünschten Sender gespeichert sind. Es können bis zu
30 FM-Sender gespeichert werden.
4 Drücken Sie die Taste FOLD./10/M +/- (4 & 5) am Gerät oder die Taste
FOLD./10/M (AUF/AB) (5) auf der Fernbedienung, um zwischen den
gespeicherten Sendern zu wählen.

13
DE
DAB-RADIO
Der DAB-Radiomodus empfängt digitales DAB/DAB+-Radio und zeigt
Informationen über den Sender und den programmierten Titel als Sendung
an. Drücken Sie die FUNCTION-Taste am Gerät oder auf der Fernbedienung,
bis auf dem Display "Welcome to DAB" erscheint.
1 Um einen vollständigen Suchlauf durchzuführen, halten Sie die Taste
STOP/MENU am Gerät gedrückt oder drücken Sie die Taste STOP/
MENU auf der Fernbedienung, um das Menü aufzurufen, wählen Sie die
Option "vollständiger Suchlauf" und drücken Sie die Taste PLAY/PAUSE/
PAIR/SELECT/SCAN am Gerät oder die Taste PLAY/PAUSE/SELECT
auf der Fernbedienung, um den Vorgang zu bestätigen. Sobald ein
vollständiger Suchlauf abgeschlossen ist, spielt das Radio den ersten
Sender aus der Senderliste ab.
2 Um zwischen den gescannten Sendern zu wählen, drehen Sie den
TUNING-Knopf am Gerät oder drücken Sie TUN-/⏮ oder TUN+/⏭ auf
der Fernbedienung, um durch die Senderliste zu blättern, und drücken
Sie die Taste PLAY/PAUSE/PAIR/SELECT/SCAN am Gerät oder die
Taste PLAY/PAUSE/SELECT auf der Fernbedienung zur Bestätigung. Auf
dem Bildschirm Aktuelle Wiedergabe werden die neuen Senderdetails
angezeigt.
3 Um aufgelistete, aber nicht verfügbare Sender zu entfernen, halten Sie
die Taste STOP/MENU am Gerät gedrückt oder drücken Sie die Taste
STOP/MENU auf der Fernbedienung, um die Menüauswahl aufzurufen,
drücken Sie die Taste TUN-/⏮ oder TUN+/⏭ am Gerät oder auf der
Fernbedienung, um die Option "Prune" auszuwählen, und drücken
Sie die Taste PLAY/PAUSE/PAIR/SELECT/SCAN am Gerät oder die
Taste PLAY/PAUSE/SELECT auf der Fernbedienung, um die Auswahl
zu bestätigen, und drücken Sie dann die Taste PLAY/PAUSE/PAIR/
SELECT/SCAN am Gerät oder die Taste PLAY/PAUSE/SELECT auf der
Fernbedienung, um die Option YES oder NO auszuwählen, und drücken
Sie die Taste PLAY/PAUSE/PAIR/SELECT/SCAN am Gerät oder die
Taste PLAY/PAUSE/SELECT auf der Fernbedienung, um die Auswahl
zu bestätigen. Dadurch werden alle ungültigen Sender, die in der
Senderliste mit einem "?" vor dem Sendernamen gekennzeichnet sind,
gelöscht.
Speichern von Sendern
Um einen Sender auf einem Speicherplatz zu speichern, stellen Sie den
Sender ein, den Sie als Speicherplatz speichern möchten, und halten
Sie dann die Taste MEM/P-MODE am Gerät oder die Taste MEM auf der
Fernbedienung gedrückt, bis auf dem Display "Preset Store" angezeigt
wird. Drücken Sie die Taste TUN-/⏮ oder TUN+/⏭ am Gerät oder auf
der Fernbedienung, um einen Speicherplatz auszuwählen (z. B. "Preset
1"), und drücken Sie dann zur Bestätigung die Taste PLAY/PAUSE/PAIR/

14
DE
SELECT/SCAN am Gerät oder die Taste PLAY/PAUSE/SELECT auf der
Fernbedienung. Verwenden Sie die 10/M./FOLD. +/- Taste am Gerät
oder die FOLD./10/M UP/DOWN Taste auf der Fernbedienung, um die
gewünschten Sender einzustellen. Wiederholen Sie diesen Vorgang, um bis
zu 30 Speicherplätze für Sender zu speichern.
Manuelle Abstimmung
Um einen manuellen Sendersuchlauf durchzuführen, halten Sie die Taste
STOP/MENU am Gerät gedrückt oder drücken Sie die Taste STOP/MENU
auf der Fernbedienung, um das Menü aufzurufen, wählen Sie die Option
"Manueller Sendersuchlauf" und drücken Sie die Taste PLAY/PAUSE/
PAIR/SELECT/SCAN am Gerät oder die Taste PLAY/PAUSE/SELECT auf
der Fernbedienung, um den Vorgang zu bestätigen. Drücken Sie die Taste
TUN-/⏮ oder TUN+/⏭ am Gerät oder auf der Fernbedienung, um die
gewünschten Sender einzustellen.
Informationen zur aktuellen Wiedergabe
Während der Wiedergabe eines Senders werden auf dem Bildschirm der
Name des Senders und die vom Sender ausgestrahlten DLS-Informationen
(Dynamic Label Segment) angezeigt, z. B. der Name des Programms, der
Titel und die Kontaktinformationen. Um weitere Informationen anzuzeigen,
drücken Sie die Taste LIGHT/INFO am Gerät oder die Taste P-MODE/INFO,
um die nächsten Informationen anzuzeigen, die nacheinander angezeigt
werden: DLS-Text, DL Plus-Informationen (werden nur angezeigt, wenn sie
vom Sender ausgestrahlt werden), Signalstärke, Programmtyp, Ensemble-
Name, Kanalnummer/Frequenz, Signalfehlerrate und Bitrate.
Komprimierung des Dynamikbereichs (DRC)
Mit dieser Funktion wird der Unterschied zwischen dem lautesten und
dem leisesten übertragenen Ton verringert. Für diese Einstellung stehen 3
Optionen zur Verfügung, und zwar: DRC aus/DRC hoch/DRC niedrig. Um
die DRC-Einstellung zu ändern, halten Sie die Taste STOP/MENU am Gerät
gedrückt oder drücken Sie die Taste STOP/MENU auf der Fernbedienung,
um das Menü aufzurufen, drücken Sie die Taste TUN-/⏮ oder TUN+/⏭
am Gerät oder auf der Fernbedienung, um die Option "DRC" auszuwählen,
und verwenden Sie dann die Taste PLAY/PAUSE/PAIR/SELECT/SCAN am
Gerät oder die Taste PLAY/PAUSE/SELECT auf der Fernbedienung, um die
gewünschte Option auszuwählen.
System
In den Systemeinstellungen können Sie Anzeigesprachen auswählen, das
Gerät auf die Werkseinstellungen zurücksetzen und die Softwareversion
anzeigen..
Sprache
So wählen Sie verschiedene Sprachen für die Displaymeldungen aus. Halten
Sie die Taste STOP/MENU am Gerät gedrückt oder drücken Sie die Taste
STOP/MENU auf der Fernbedienung, um das Menü aufzurufen, drücken Sie

15
DE
die Taste TUN-/⏮ oder TUN+/⏭ am Gerät oder auf der Fernbedienung, um
die Option "System" auszuwählen, und drücken Sie die Taste PLAY/PAUSE/
PAIR/SELECT/SCAN am Gerät oder die Taste PLAY/PAUSE/SELECT auf der
Fernbedienung, um die Auswahl zu bestätigen, wählen Sie "Sprache", und
wählen Sie dann die gewünschte Sprache aus.
Zurücksetzen auf Werkseinstellungen
Das Zurücksetzen auf die Werkseinstellungen kann helfen, alle
benutzerdenierten Einstellungen zu löschen und sie durch die
ursprünglichen Standardwerte zu ersetzen, einschließlich der DAB-
Senderliste und der Speicherplätze. Halten Sie die Taste STOP/MENU
am Gerät gedrückt oder drücken Sie die Taste STOP/MENU auf der
Fernbedienung, um das Menü aufzurufen, drücken Sie TUN-/⏮ oder
TUN+/⏭ am Gerät oder auf der Fernbedienung, um die Option "System"
auszuwählen, und drücken Sie die Taste PLAY/PAUSE/PAIR/SELECT/SCAN
am Gerät oder die Taste PLAY/PAUSE/SELECT auf der Fernbedienung,
Wählen Sie "Factory Reset" und drücken Sie dann die TUN-/⏮ oder
TUN+/⏭ Taste auf dem Gerät oder der Fernbedienung, um die Option
YES oder NO auszuwählen, und drücken Sie dann die PLAY/PAUSE/PAIR/
SELECT/SCAN Taste auf dem Gerät oder die PLAY/PAUSE/SELECT Taste auf
der Fernbedienung zur Bestätigung.
Software-Update
So aktualisieren Sie die Software des Geräts. Halten Sie die Taste STOP/
MENU am Gerät gedrückt oder drücken Sie die Taste STOP/MENU auf
der Fernbedienung, um das Menü aufzurufen, drücken Sie die Taste
TUN-/⏮ oder TUN+/⏭ am Gerät oder auf der Fernbedienung, um die
Option "System" auszuwählen, und drücken Sie die Taste PLAY/PAUSE/
PAIR/SELECT/SCAN am Gerät oder die Taste PLAY/PAUSE/SELECT auf
der Fernbedienung, Wählen Sie die Option "Software Upgrade" und
drücken Sie dann die Taste TTUN-/⏮ oder TUN+/⏭ am Gerät oder auf der
Fernbedienung, um die Option JA oder NEIN auszuwählen, und drücken Sie
dann zur Bestätigung die Taste PLAY/PAUSE/PAIR/SELECT/SCAN am Gerät
oder die Taste PLAY/PAUSE/SELECT auf der Fernbedienung.
Software-Version
Hier wird die aktuelle Softwareversion angezeigt. Halten Sie die Taste
STOP/MENU am Gerät gedrückt oder drücken Sie die Taste STOP/MENU
auf der Fernbedienung, um das Menü aufzurufen, drücken Sie die Taste
TUN-/⏮ oder TUN+/⏭ am Gerät oder auf der Fernbedienung, um die
Option "System" auszuwählen, und drücken Sie die Taste PLAY/PAUSE/
PAIR/SELECT/SCAN am Gerät oder die Taste PLAY/PAUSE/SELECT auf der
Fernbedienung, um die Auswahl zu bestätigen, Wählen Sie "SW-Version"
und drücken Sie dann die Taste PLAY/PAUSE/PAIR/SELECT/SCAN am Gerät
oder die Taste PLAY/PAUSE/SELECT auf der Fernbedienung, um die aktuelle
Softwareversion anzuzeigen.
16
DE
CD/MP3
CDs zum Abspielen
Dieses System kann alle digitalen Audio-CDs/MP3, CD-Rs, CD-RWs und
digitale Audio-CDs im CD-DA-Format wiedergeben.
Einlegen einer CD
• Drücken Sie die Funktionswahltaste (15) am Gerät oder FUNC-Taste (1)
auf der Fernbedienung, um den Modus „CD“ auszuwählen.
• Drücken Sie die Taste PUSH TO OPEN (ZUM ÖFFNEN DRÜCKEN), um
das CD-Fach zu önen, auf dem Display erscheint dann „OP“.
• Legen Sie eine Audio-CD/MP3-DISC mit der Vorderseite nach oben in
das Laufwerk ein.
• Schließen Sie das CD-Laufwerk.
• Im Display blinkt „READING“ (CD LESEN), dann wird die Gesamtanzahl
der Songs angezeigt und die Wiedergabe beginnt von vorne.
• Um die CD zu entnehmen, drücken Sie die Stopp-Taste (14) am Gerät,
um das Gerät auszuschalten, und drücken Sie dann die PUSH TO OPEN-
Taste, um das CD-Fach zu önen. Halten Sie die CD an den Rändern
und nehmen Sie sie vorsichtig heraus.
Hinweis: Vergewissern Sie sich, dass die CD gestoppt ist, bevor Sie das
CD-Fach (11) önen. Um eine gute Systemleistung zu gewährleisten,
warten Sie, bis das Gerät die Disc vollständig eingelesen hat und fahren
Sie dann fort. Wenn keine Disc in das Fach eingelegt ist oder die Disc
nicht lesbar ist, zeigt das Display „NO“ an.
Wiedergabe einer CD
• Um die Wiedergabe zu unterbrechen, drücken Sie die Wiedergabe/
Pause-Taste (16) am Gerät oder die Wiedergabe/Pause-Taste (7)
auf der Fernbedienung, die aktuelle Wiedergabezeit blinkt im Display
auf. Um die Wiedergabe fortzusetzen, drücken Sie erneut die
Wiedergabe/Pause-Taste (16) am Gerät oder die Wiedergabe/Pause-
Taste (7) auf der Fernbedienung.

17
DE
• Um die Wiedergabe zu stoppen, drücken Sie die Stopp-Taste (14) am
Gerät oder (9) auf der Fernbedienung.
Auswahl eines gewünschten Titels/Passage
So wählen Sie einen gewünschten Titel aus:
• Drücken Sie die VOR- oder RÜCK-Taste im Stopp-Modus oder
während der Wiedergabe, bis der gewünschte Titel auf dem Display
erscheint. Die Wiedergabe wird automatisch gestartet.
So suchen Sie während der Wiedergabe nach einer bestimmten Passage
(Titelsuche mit hoher Geschwindigkeit):
• Halten Sie die VOR- oder RÜCK-Taste gedrückt, um den
aktuellen Titel mit hoher Geschwindigkeit zu scannen, bis der
gewünschte Punkt (Passage) erscheint, und lassen Sie dann die Taste
für den normalen Wiedergabemodus los. Die Wiedergabe beginnt an
dieser Stelle erneut.
So wählen Sie einen Song aus, dessen Titelnummer 10 übersteigt (nur bei
MP3-Discs):
• Um einen Song/Musiktitel auszuwählen, dessen Nummer 10 übersteigt,
drücken Sie die Tasten FOLD/10/M +/- (4 & 5) am Gerät oder die Taste
FOLD/10/M (AUF/AB) (5) auf der Fernbedienung, um jeweils 10 Titel
vorwärts oder rückwärts zu springen.
So wählen Sie einen gewünschten Ordner aus (wenn die Disc mehr als
einen Ordner enthält):
• Um einen gewünschten Ordner auszuwählen, halten Sie die Tasten
FOLD/10/M +/- (4 & 5) am Gerät oder die Taste FOLD/10/M (AUF/
AB) (5) auf der Fernbedienung gedrückt, um einen Ordner vor- oder
zurückzuspringen.
Programmierung von Titeln
Das Programmieren von Disc-Titeln ist möglich, wenn die Wiedergabe
gestoppt ist. Bis zu 20 Titel für CD-Discs und 99 Titel für MP3-Discs können
in beliebiger Reihenfolge im Speicher abgelegt werden.
1 Im Stopp-Modus drücken Sie die Taste MEM./P-MODE (7) am
Gerät oder die MEM-Taste (3) auf der Fernbedienung, um die
Programmeinstellung zu starten, das MEM-Logo und „P01“ werden
auf dem Display mit „F00“ blinkend angezeigt, drücken Sie die Taste
FOLD/10/M +/- (4 & 5) am Gerät oder die Taste FOLD/10/M (AUF/AB)
(5) auf der Fernbedienung, um den gewünschten Ordner auszuwählen.

18
DE
Drücken Sie die VOR- oder -Taste, um den gewünschten Titel
auszuwählen, der als „P01“ programmiert werden soll, und drücken Sie
dann die Taste MEM./P-MODE (7) auf dem Gerät oder die MEM-Taste
(3) auf der Fernbedienung erneut, um die Eingabe zu bestätigen.
2 Wiederholen Sie Schritt 1, um weitere gewünschte Titel zu speichern, bis
alle Titel in der Liste erscheinen.
3 Drücken Sie die die -Taste am Gerät (16) oder die -Taste auf der
Fernbedienung (7), um die Wiedergabe der erstellten Liste zu starten.
4 Drücken Sie die Taste (14) am Gerät, um die Programmwiedergabe zu
stoppen.
5 Um das Musikprogramm zu löschen, können Sie die Taste (14) am
Gerät drücken, wenn die Disc gestoppt ist, und das CD-Fach önen, das
Programm wird anschließend gelöscht.
Wiederholungsmodus
Sie können einen Titel oder alle Titel auf der Disc wiederholt abspielen.
So wiederholen Sie einen einzelnen Titel:
1 Drücken Sie während der Wiedergabe die Taste MEM./P-MODE (7)
am Gerät oder die P-MODE-Taste (8) auf der Fernbedienung, auf dem
Display erscheint "REP-1" (WIEDERHOLEN) und der aktuelle Titel wird
so lange wiederholt, bis Sie die Taste drücken.
2 Um die Wiederholung abzubrechen, drücken Sie die Taste MEM./P-
MODE (7) am Gerät oder die P-MODE-Taste (8) auf der Fernbedienung,
bis das REPEAT-Symbol “REP-1” vom Display verschwindet.
So wiederholen Sie alle Titel:
1 Drücken Sie die Taste MEM./P-MODE (7) am Gerät oder die P-MODE-
Taste (8) auf der Fernbedienung, bis das REP-ALL-Symbol dauerhaft
auf dem Display erscheint, alle Titel auf der Disc werden immer wieder
abgespielt, bis Sie die Stopp-Taste drücken.
2 Um die Wiederholung abzubrechen, drücken Sie die Taste MEM./P-
MODE (7) am Gerät oder die P-MODE-Taste (8) auf der Fernbedienung,
bis das REP-ALL-Symbol vom Display verschwindet.

19
DE
So wiederholen Sie einen Ordner (nur bei MP3-Discs, die mehr als einen
Ordner enthalten):
1 Drücken Sie die Taste MEM./P-MODE (7) am Gerät oder die P-MODE-
Taste (8) auf der Fernbedienung, bis das REP-DIR-Symbol (Ordner
wiederholen) dauerhaft auf dem Display erscheint, alle Titel auf der Disc
werden immer wieder abgespielt, bis Sie die Stopp-Taste drücken.
2 Um die Wiederholung abzubrechen, drücken Sie die Taste MEM./P-
MODE (7) am Gerät oder die P-MODE-Taste (8) auf der Fernbedienung,
bis das REP-DIR-Symbol vom Display verschwindet.
Zufallswiedergabe
1 Drücken Sie die Taste MEM./P-MODE (7) am Gerät oder die P-MODE-
Taste (8) auf der Fernbedienung im Wiedergabemodus, bis „SHUFFLE“
auf dem Display angezeigt wird, die Zufallswiedergabe startet
automatisch ab dem nächsten Titel und endet automatisch, wenn alle
Titel wiedergegeben wurden.
2 Drücken Sie die Taste MEM./P-MODE (7) am Gerät oder die P-MODE-
Taste (8) auf der Fernbedienung erneut, bis die Anzeige „SHUFFLE“
erlischt.
Intro-Wiedergabe
1 Drücken Sie die Taste MEM./P-MODE (7) am Gerät oder die P-MODE-
Taste (8) auf der Fernbedienung im Wiedergabemodus, bis „INTRO“ auf
dem Display erscheint, die Intro-Wiedergabe startet und scannt jeden
Titel 10 Sekunden lang.
2 Um die Intro-Wiedergabe abzubrechen, drücken Sie die Taste MEM./P-
MODE (7) am Gerät oder die P-MODE-Taste (8) auf der Fernbedienung
erneut, bis „INTRO“ nicht mehr auf dem Display angezeigt wird.
USB
• Drücken Sie die Funktionswahltaste (15) am Gerät, um den „USB“-
Modus auszuwählen.
• Schließen Sie das USB-Gerät an den USB-Eingang (1) an. Die LCD-
Anzeige zeigt die Gesamtzahl der auf dem USB-Gerät gespeicherten
Titel an. Die Wiedergabe von Titel 1 erfolgt automatisch nach dem Lesen
des USB.
20
DE
• Um die Wiedergabe zu unterbrechen, drücken Sie die ⏯-Taste (16) am
Gerät oder ⏯ (7) auf der Fernbedienung, die aktuelle Wiedergabezeit
blinkt im Display auf. Um die Wiedergabe fortzusetzen, drücken Sie die
Taste erneut.
• Drücken Sie die ⏯-Taste (16) am Gerät oder die ⏯-Taste (10) auf der
Fernbedienung, um die Wiedergabe zu beenden. Das Display zeigt die
Gesamtanzahl der Titel auf dem USB-Gerät und „STOP“ an.
• Die verschiedenen Auswahlmodi Programmwiedergabe/
Wiederholungsmodus (1 Ordner wiederholen - alle Titel wiederholen)/
Zufallswiedergabe/Intro-Wiedergabe funktionieren nach dem gleichen
Prinzip wie oben im Abschnitt „CD/MP3“ beschrieben.
Hinweis: Verwenden Sie kein USB-Verlängerungskabel für den
Anschluss eines USB-Geräts, da dies zu Störungen führen kann.
BT
• Drücken Sie die Funktionswahl-Taste (15) am Gerät oder FUNC-Taste (1)
auf der Fernbedienung, um zur BT-Funktion zu wechseln, auf der LCD-
Anzeige erscheint „BT“ und die Anzeige für die Verbindung der Geräte
(27) blinkt mit hoher Geschwindigkeit.
• Schalten Sie die BT-Funktion am Gerät ein, suchen Sie das Gerät
„Spacewoofer DAB+“ und verbinden Sie sich mit dem Gerät, geben
Sie dann bei Bedarf das Passwort „0000“ ein, das blaue Licht für die
erfolgreiche Verbindung leuchtet auf und auf dem Display erscheint
„BT“. Drücken Sie die BT Pairing-Taste (16) am Gerät oder die
Wiedergabe-Taste (7) auf der Fernbedienung, um die Wiedergabe zu
starten. Wenn das Gerät innerhalb von 2 Minuten keine Verbindung
zum entsprechenden BT-Gerät herstellen kann, drücken Sie die
Wiedergabe/Pause/BT Pairing-Taste (16) am Gerät oder die PAIR-Taste
(10) auf der Fernbedienung, um die Verbindung wieder herzustellen.
• Drehen Sie den Lautstärkeregler (6) am Gerät oder stellen Sie die
Lautstärke mit Ihrem BT-Gerät wie gewünscht ein.
• Drücken Sie die VOR- oder RÜCK-Taste am Gerät oder auf dem
externen Gerät, um den gewünschten Titel auszuwählen.
• Um die Wiedergabe zu stoppen, drücken Sie die Wiedergabe/
Pause/BT Pairing-Taste (16) am Gerät oder die Stopp-Taste auf dem
externen Gerät.
Hinweis: Das BT funktioniert am besten innerhalb einer Entfernung von
10Metern.

21
DE
AUX-IN
• Drücken Sie die die Funktionswahl-Taste (15) am Gerät oder FUNC-Taste
(1) auf der Fernbedienung, um den Modus „AUX“ auszuwählen.
• Stecken Sie das Audiokabel in den AUX-IN-Anschluss (Ø 3.5 mm) (2) des
Players, die Musik vom Gerät wird verstärkt und über die Lautsprecher
abgespielt.
• Stellen Sie die Lautstärke an der Anlage oder am externen Gerät auf die
gewünschte Lautstärke ein.
• Die Funktionen Wiedergabe/Pause und nächster/vorheriger Titel
können auf dem externen Gerät ausgeführt werden.

22
DE
SPEZIELLE ENTSORGUNGSHINWEISE FÜR
VERBRAUCHER IN DEUTSCHLAND
Entsorgen Sie Ihre Altgeräte fachgerecht. Dadurch wird gewährleistet,
dass die Altgeräte umweltgerecht verwertet und negative Auswirkungen
auf die Umwelt und menschliche Gesundheit vermieden werden. Bei der
Entsorgung sind folgende Regeln zu beachten:
• Jeder Verbraucher ist gesetzlich verpichtet, Elektro- und
Elektronikaltgeräte (Altgeräte) sowie Batterien und Akkus
getrennt vom Hausmüll zu entsorgen. Sie erkennen die
entsprechenden Altgeräte durch folgendes Symbol der
durchgestrichene Mülltonne (WEEE-Symbol).
• Sie haben Altbatterien und Altakkumulatoren, die nicht vom Altgerät
umschlossen sind, sowie Lampen, die zerstörungsfrei aus dem
Altgerät entnommen werden können, vor der Abgabe an einer
Entsorgungsstelle vom Altgerät zerstörungsfrei zu trennen.
• Bestimmte Lampen und Leuchtmittel fallen ebenso unter das Elektro-
und Elektronikgesetz und sind dementsprechend wie Altgeräte zu
behandeln. Ausgenommen sind Glühbirnen und Halogenlampen.
Entsorgen Sie Glühbirnen und Halogenlampen bitte über den Hausmüll,
sofern sie nicht das WEEE-Symbol tragen.
• Jeder Verbraucher ist für das Löschen von personenbezogenen Daten
auf dem Elektro- bzw. Elektronikgerät selbst verantwortlich.
Rücknahmepicht der Vertreiber
Vertreiber mit einer Verkaufsäche für Elektro- und Elektronikgeräte von
mindestens 400 Quadratmetern sowie Vertreiber von Lebensmitteln mit
einer Gesamtverkaufsäche von mindestens 800 Quadratmetern, die
mehrmals im Kalenderjahr oder dauerhaft Elektro- und Elektronikgeräte
anbieten und auf dem Markt bereitstellen, sind verpichtet,
1 bei der Abgabe eines neuen Elektro- oder Elektronikgerätes an einen
Endnutzer ein Altgerät des Endnutzers der gleichen Geräteart, das
im Wesentlichen die gleichen Funktionen wie das neue Gerät erfüllt,
am Ort der Abgabe oder in unmittelbarer Nähe hierzu unentgeltlich
zurückzunehmen und
2 auf Verlangen des Endnutzers Altgeräte, die in keiner äußeren
Abmessung größer als 25 Zentimeter sind, im Einzelhandelsgeschäft
oder in unmittelbarer Nähe hierzu unentgeltlich zurückzunehmen; die
Rücknahme darf nicht an den Kauf eines Elektro- oder Elektronikgerätes
geknüpft werden und ist auf drei Altgeräte pro Geräteart beschränkt.

23
DE
• Bei einem Vertrieb unter Verwendung von Fernkommunikationsmitteln
ist die unentgeltliche Abholung am Ort der Abgabe auf Elektro- und
Elektronikgeräte der Kategorien 1, 2 und 4 gemäß § 2 Abs. 1 ElektroG,
nämlich „Wärmeüberträger“, „Bildschirmgeräte“ (Oberäche von mehr
als 100 cm²) oder „Großgeräte“ (letztere mit mindestens einer äußeren
Abmessung über 50 Zentimeter) beschränkt. Für andere Elektro- und
Elektronikgeräte (Kategorien 3, 5, 6) ist eine Rückgabemöglichkeit in
zumutbarer Entfernung zum jeweiligen Endnutzer zu gewährleisten.
• Altgeräte dürfen kostenlos auf dem lokalen Wertstohof oder in
folgenden Sammelstellen in Ihrer Nähe abgegeben werden: www.take-
e-back.de
• Für Elektro- und Elektronikgeräte der Kategorien 1, 2 und 4 bieten
wir auch die Möglichkeit einer unentgeltlichen Abholung am Ort der
Abgabe. Beim Kauf eines Neugeräts haben Sie die Möglichkeit, eine
Altgerätabholung über die Webseite auszuwählen.
• Batterien können überall dort kostenfrei zurückgegeben werden, wo sie
verkauft werden (z. B. Super-, Bau-, Drogeriemarkt). Auch Wertsto- und
Recyclinghöfe nehmen Batterien zurück. Sie können Batterien auch per
Post an uns zurücksenden. Altbatterien in haushaltsüblichen Mengen
können Sie direkt bei uns von Montag bis Freitag zwischen 07:30 und
15:30 Uhr unter der folgenden Adresse unentgeltlich zurückgeben:
Chal-Tec GmbH
Member of Berlin Brands Group
Handwerkerstr. 11
15366 Dahlwitz-Hoppegarten
Deutschland
• Wichtig zu beachten ist, dass Lithiumbatterien aus Sicherheitsgründen
vor der Rückgabe gegen Kurzschluss gesichert werden müssen (z. B.
durch Abkleben der Pole).
• Finden sich unter der durchgestrichenen Mülltonne auf der Batterie
zusätzlich die Zeichen Cd, Hg oder Pb ist das ein Hinweis darauf, dass
die Batterie gefährliche Schadstoe enthält. (»Cd« steht für Cadmium,
»Pb« für Blei und »Hg« für Quecksilber).
Hinweis zur Abfallvermeidung
Indem Sie die Lebensdauer Ihrer Altgeräte verlängern, tragen Sie dazu
bei, Ressourcen eizient zu nutzen und zusätzlichen Müll zu vermeiden.
Die Lebensdauer Ihrer Altgeräte können Sie verlängern, indem Sie defekte
Altgeräte reparieren lassen. Wenn sich Ihr Altgerät in gutem Zustand
bendet, könnten Sie es spenden, verschenken oder verkaufen.

24
DE
HINWEISE ZUR ENTSORGUNG
Wenn es in Ihrem Land eine gesetzliche Regelung
zur Entsorgung von elektrischen und elektronischen
Geräten gibt, weist dieses Symbol auf dem Produkt
oder auf der Verpackung darauf hin, dass dieses
Produkt nicht im Hausmüll entsorgt werden darf.
Stattdessen muss es zu einer Sammelstelle für
das Recycling von elektrischen und elektronischen
Geräten gebracht werden. Durch regelkonforme
Entsorgung schützen Sie die Umwelt und die
Gesundheit Ihrer Mitmenschen vor negativen
Konsequenzen. Informationen zum Recycling
und zur Entsorgung dieses Produkts, erhalten
Sie von Ihrer örtlichen Verwaltung oder Ihrem
Hausmüllentsorgungsdienst.
Dieses Produkt enthält Batterien. Wenn es in Ihrem
Land eine gesetzliche Regelung zur Entsorgung
von Batterien gibt, dürfen die Batterien nicht im
Hausmüll entsorgt werden. Informieren Sie sich
über die örtlichen Bestimmungen zur Entsorgung
von Batterien. Durch regelkonforme Entsorgung
schützen Sie die Umwelt und die Gesundheit Ihrer
Mitmenschen vor negativen Konsequenzen.
KONFORMITÄTSERKLÄRUNG
Hersteller:
Chal-Tec GmbH, Wallstraße 16, 10179 Berlin,
Deutschland.
Importeur für Großbritannien:
Berlin Brands Group UK Limited
PO Box 42
272 Kensington High Street
London, W8 6ND
United Kingdom
Hiermit erklärt Chal-Tec GmbH, dass der
Funkanlagentyp Spacewoofer DAB der Richtlinie
2014/53/EU entspricht. Der vollständige Text der
EU-Konformitätserklärung ist unter der folgenden
Internetadresse verfügbar: use.berlin/10036341

25
EN
Technical Data26
Safety Instructions26
Product description and Controls28
Power Source29
Remote Control30
Basic functions31
FM Radio33
DAB Radio Mode34
CD/MP337
USB40
BT40
AUX-IN41
Disposal Considerations42
Declaration of Conformity42
Dear Customer,
Congratulations on purchasing this equipment.
Please read this manual carefully and take care of the
following hints to avoid damages. Any failure caused
by ignoring the items and cautions mentioned in the
instruction manual is not covered by our warranty and
any liability. Scan the QR code to get access to the
latest user manual and other information about the
product:
CONTENTS

26
EN
TECHNICAL DATA
Item number 10036341 10036342
Power supply AC 100-240 V ~ 50/60 Hz
DC 12V UM-C x 8 pcs
Power consumption (Watt)
30 W
Standby consumption (Watt)
0,5 W
Receiver frequency range
FM 87.5 – 108 MHz
CD player frequency range
100 Hz – 16 KHz
BT reach
Up to 10 meters
DAB/DAB+
174.928 – 239.200 MHz (Band III)
Operation temperature
+ 5°C – + 35° C
Connectors
AUX IN input
3.5 mm
Headphone (jack plug)
3.5 mm
USB port
SAFETY INSTRUCTIONS
• This device may only be used by children from the age of 8 and up and
by persons with reduced physical, sensory and mental capabilities or
a lack of experience and / or knowledge if they are supervised or have
been instructed in the safe use of the device and have understood the
resulting dangers.
• Cleaning and user maintenance should not be done by children unless
they are 8 years of age or older and are supervised.
• Children must not play with the device.
• Observe all notes listed in the operating instructions.
• Do not use the unit near water or in a humid environment.
• Make sure that no liquid is spilled over the unit and the unit openings.
• Move the unit carefully to avoid damaging it.

27
EN
• Do not block the device outputs.
• Do not place the unit near heat sources (e.g. heating). Do not expose
the device to direct sunlight.
• Plug the power plug of the unit into the power outlet in the manner
intended.
• The device is equipped with overload protection. Should this need to be
replaced, contact customer service or a similarly qualied person.
• Unplug the unit from the wall outlet if it will not be used for a long
period of time.
• Do not attempt to service or repair the unit yourself. In this case, the
warranty expires.
• The mains plug is used to disconnect the device from the mains after it
has been switched o. Make sure that the mains plug is always freely
accessible.
• Do not expose the device to splash water or place objects lled with
liquid, such as vases, on the device.
• Do not expose the batteries to extreme heat such as sunlight or re.
• Do not obstruct the ventilation of the unit by blocking the ventilation
openings with objects such as newspapers, tablecloths, curtains, etc..
• Ensure that a minimum distance of 5 mm to all sides of the unit is
maintained.
• Do not place sources of open ame ignition, such as lit candles, on the
unit.
• Dispose of used batteries in an environmentally friendly manner.
• Use the device only in temperate climate, not in tropical climate.
WARNING
Risk of injury! To reduce the risk of electric shock, do not open
either the cover or the back of the unit. The device does not
contain any parts that could be serviced by the customer. Please
contact customer service or similarly qualied personnel for
maintenance and repair.
28
EN
1 USB port
2 AUX IN jack
3 Phones jack
4 FOLD.+/+10/MEM.+ Button
(Scroll up in folders/lists/memory list)
5 FOLD.-/-10/MEM.- Button
(Scroll down in folders/lists/memory list)
6 Volume Knob
7 MEM./P-MODE Button
(Program selection/Programming mode/Memory)
PRODUCT DESCRIPTION AND CONTROLS
BT
M./
1 2 3
4
5
6
7
8
9
10
12
11
13
222120
14
19
18
17
16
15
23
26
27
26 2425 25
29
EN
8 Standby button 18 Next/Fast Forward button
9 Light / Info button 19 Back/Fast Backward button
10 EQ/ID3 Button (Tone Control/
Display MP3 Information)
20 AC socket
11 CD door 21 Battery compartment
12 Handle 22 FM antenna
13 Display 23 Standby indicator
14 Stop / Menu button 24 Speakers
15 Function button 25 LED light
16 Play/Pause/Pair/Select/Scan
button
26 IR indicator
17 Tuning Knob 27 Pair indicator
POWER SOURCE
This unit is designed to be operated on AC/DC.
AC Operation
• Plug the tail of supplied AC power cord into AC socket on unit and
the plug into household AC outlet. The batteries will be automatically
disconnected.
DC Operation
• Open the battery compartment door. Install 8 pcs UM-2 “C” size
batteries (not included) into compartment. Please follow correct
polarities as indicated.
Note: When using battery, take o the AC cable from unit.
Remove batteries if they are at or not being used for a long period of time.
Batteries contain chemical substances, so they should be disposed of
properly.
ESD hints – The product maybe reset or not reset to operation of control
due to electrostatic discharge, just switch o and reconnect again.
30
EN
REMOTE CONTROL
Key functions
1 FUNC (Function selection key)
2 MUTE
3 MEM (Memory key)
4 EQ (Tone control)
5 FOLD./10/M. (UP/DOWN)
(Scroll up/down in folders/lists)
6 Back/Fast Backward/Tuning -
7 Play/Pause
8 P-MODE/Info (Programming mode)
9 Stop / Menu
10 PAIR (BT Pairing key)
11 Next/Fast Forward/Tuning +
12 ID3 (Display MP3 information)
13 VOLUME (UP/DOWN)
14 LIGHT
15 MO/ST (Mono/stereo key)
16 STANDBY (On/O key)
17 Remote sensor
18 Battery compartment
Note: Please pull battery protector before
using.
1
17
18
15
16
10
11
12
13
14
2
3
4
5
6
7
8
9
31
EN
Remote control operation
• To operate the unit with the remote control,
point the remote handset at the remote sensor
on the front panel and press the appropriate
button on the remote handset.
• The remote works best within a range of 6 ~ 7
meters from the front panel and on an angle of
30 degrees.
• Bright sunlight or room light conditions can
interfere with the remote control.
• If the remote operation is unsatisfactory or
stops working entirely, rst try replacing the
remote batteries, then try reducing the room
lighting conditions.
Lithium battery installation of remote control
The remote control includes one CR2025(3V) lithium battery.
• To replace the battery, gently push the clasp to the right direction
accordingly to the instruction and then pull out the battery
compartment.
• Take the drained battery out and install a new lithium battery(CR-2025)
in the compartment with the positive polarity upwarded. Then push
the compartment back to its position with a “click” sound indicating
installation nished.
BASIC FUNCTIONS
Tuning on the unit
• After connecting the power, press the Standby button (8) on unit or the
STANDBY button (16) on remote control to turn on the unit.
• Press the Function selection button (15) on unit or the FUNC button (1)
on remote control to choose FM/CD/USB/BT/AUX/DAB function.
Note: In CD/USB/BT/AUX mode, when the unit is not providing the main
function for 15 minutes, the unit will automatically switch into standby
mode. Press the Standby button to turn on the unit again.
Volume control
• Rotate the Volume knob (6) on unit to increase or decrease volume.

32
EN
Headphone jack
• If required, insert a headphone with a 3.5 mm jack plug (not included)
into the headphone jack (3). The speaker (24) is automatically muted.
CAUTION:
Listening at high volume over a long period of time can
damage your ears.
ID3 tag system (show MP3 info)
Some MP3 les are encoded with information such as the name of the song,
the artist, and the album. Together, this information is called an "ID3 tag".
• Press and hold the EQ/ID3 button (10) on unit or the ID3 key (12) on
remote control to turn the ID3 tag display on or o. When the ID3 tag
display is on, the unit will display tag information in the order shown
below.
EQ function (equalizer)
This unit has a built-in equalizer system.
• Press the EQ/ID3 button (10) on unit or the EQ key (4) on remote control
to select a dierent music style (sound tone): FLAT, CLASSIC, ROCK,
POP, JAZZ and DBBS.
LED light
• Press and hold the Light button (9) on unit or the LIGHT key (14) on
remote control to turn on the LED light and choose from 8 dierent
ashing modes eect. To disable the LED light, press the Light button
until the display shows “LIGHT OFF”.

33
EN
FM RADIO
Tuning radio stations
1. Press the Function selection button (15) on unit or the FUNC key (1) on
remote control to select the radio mode: FM.
2. Tune to desired station by rotating the Tuning knob (17) on unit, the
display will show the band frequency. Example: FM 97.10 MHz. You
can also press and hold the FORWARD or BACK button for fast
searching, it will auto stop at any station with strong signal.
3. Rotate the Volume knob (6) on unit to increase or decrease volume.
4. Extend the telescopic antenna (22) to its full length and gently move the
unit back and forth to get the best reception, or place the unit in an open
location.
5. To turn o the radio, press the Function selection button (15) on unit or
the FUNC key (1) on remote control to switch to other functions or press
Standby button (8) on unit or STANDBY key (16) on remote control to
turn o the unit.
Auto preset memory / scan
• To search for and automatically save stations to preset memory, press
and hold the Play button (16) on unit. Any station with a strong enough
signal will be saved to preset memory. After the unit nishes scanning,
the unit will automatically tune to preset station number 1 (P01).
• To tune to the next or previous preset station, press FOLD./10/M.+/-
button (4 & 5) on the unit or FOLD./10/M. (UP/DOWN) key (5) on the
remote control.
Manual preset memory operation
You may pre-store 30 radio stations in memory for your preference.
1. Rotate the Tuning knob (17) on unit to select the desired station that you
want to save as a preset.
2. Press the MEM./P-MODE button (7) on unit or press MEM key (3) on
remote control, “P01” will ash on the display to indicate that you
are saving the station as preset memory 01. To change the preset
memory sequence, press the FOLD./10/M +/- button (4 & 5) on unit or
FOLD./10/M (UP/DOWN) key (5) on remote control, then press MEM./P-
MODE button (7) on unit or press MEM key (3) on remote again to enter.
3. Search another station, repeat steps (1) and (2) until all desired stations
stored. Up to 30 FM stations can be programmed.
4. Press the FOLD./10/M +/- button (4 & 5) on unit or FOLD./10/M (UP/
DOWN) key (5) on remote control to switch between the stored stations.

34
EN
DAB RADIO MODE
DAB radio mode receives DAB/DAB+ digital radio and displays
information about the station and programmed/track as broadcast. Press
the FUNCTION button on the unit or remote control until display reads
“Welcome to DAB”.
1. To do a full scan, press and hold the STOP/MENU button on the unit or
press STOP/MENU key on the remote control to enter menu selection,
select the “full scan” option and press the PLAY/PAUSE/PAIR/SELECT/
SCAN button on the unit or PLAY/PAUSE/SELECT key on the remote
control to conrm. Once a full scan is complete, the radio will play the
rst station on the station list.
2. To choose between the scanned station list, rotate the TUNING knob
on the unit or press TUN-/⏮ or TUN+/⏭ on the remote control to scroll
through the list of stations and press the PLAY/PAUSE/PAIR/SELECT/
SCAN button on the unit or PLAY/PAUSE/SELECT key on the remote
control to conrm. The Now playing screen will display the new station
details.
3. To remove stations that are listed but unavailable, press and hold the
STOP/MENU button on the unit or press STOP/MENU key on the remote
control to enter menu selection, press TUN-/⏮ or TUN+/⏭ button on
unit or remote control to select the “Prune” option and press the PLAY/
PAUSE/PAIR/SELECT/SCAN button on the unit or PLAY/PAUSE/SELECT
key on the remote control to enter, and then press the PLAY/PAUSE/
PAIR/SELECT/SCAN button on the unit or PLAY/PAUSE/SELECT key on
the remote control to choose YES or NO option, press the PLAY/PAUSE/
PAIR/SELECT/SCAN button on the unit or PLAY/PAUSE/SELECT key on
the remote control to conrm. This removes all invalid stations, indicated
in the station list with a “?” in front of the station name.
Preset stations
To store a station in a preset memory, tune to the station that you want to
save as a preset, then Press and hold the MEM/P-MODE button on the unit
or press and hold MEM key on the remote control until the display shows
“Preset Store”. Press TUN-/⏮ or TUN+/⏭ button on the unit or remote
control to choose a preset memory position (for example, “preset 1”), then
press the PLAY/PAUSE/PAIR/SELECT/SCAN button on the unit or PLAY/
PAUSE/SELECT key on the remote control to conrm. Use the 10/M./FOLD.
+/- button on the unit or FOLD./10/M UP/DOWN key on the remote control
to tune to the desired stations. Repeat this operation to save up to 30
preset stations.
Manual tune
To do a manual tune, press and hold the STOP/MENU button on the unit

35
EN
or press STOP/MENU key on the remote control to enter menu selection,
select the “Manual tune” option and press the PLAY/PAUSE/PAIR/SELECT/
SCAN button on the unit or PLAY/PAUSE/SELECT key on the remote control
to conrm. Press TUN-/⏮ or TUN+/⏭ button on the unit or remote control
to tune to the desired stations.
Now playing information
While a station is playing, the screen shows its name and DLS (Dynamic
Label Segment) information broadcast by the station such as program
name, track title and contact details. To view further information, press the
LIGHT/INFO button on the unit or press the P-MODE/INFO key each time to
show next set of information, cycling through: DLS text, DL Plus information
(this is only displayed if broadcast by the station), signal strength, program
type, ensemble name, channel number/frequency, signal error rate and bit
rate.
Dynamic range compression (DRC)
This function helps to reduce the dierence between the loudest and
quietest audio being broadcast. There are 3 options in this setting, the
options available are: DRC o/DRC high/DRC low. To change the DRC
setting, press and hold the STOP/MENU button on the unit or press STOP/
MENU key on the remote control to enter menu selection, press TUN-/⏮ or
TUN+/⏭ button on the unit or remote control to select the “DRC” option
then use the PLAY/PAUSE/PAIR/SELECT/SCAN button on the unit or PLAY/
PAUSE/SELECT key on the remote control to choose a desired option.
System
The system setting allows you to select display languages, reset to factory
settings and view the software version.
Language
To select dierent languages for display messages. Press and hold the
STOP/MENU button on the unit or press STOP/MENU key on the remote
control to enter menu selection, press TUN-/⏮ or TUN+/⏭ on the unit or
remote control to select the “System” option, and press the PLAY/PAUSE/
PAIR/SELECT/SCAN button on the unit or PLAY/PAUSE/SELECT key on the
remote control to conrm, select “language”, and then you can choose the
language you want.
Factory reset
Factory reset can help to clear all user dened settings, replacing them
with the original default values, including the DAB station list and preset
stations. Press and hold the STOP/MENU button on the unit or press STOP/
MENU key on the remote control to enter menu selection, press TUN-/⏮
or TUN+/⏭ on the unit or remote control to select the “System” option and
press the PLAY/PAUSE/PAIR/SELECT/SCAN button on the unit or PLAY/

PAUSE/SELECT key on the remote control to enter, select “Factory Reset”
then press TUN-/⏮ or TUN+/⏭ button on the unit or remote control to
choose YES or NO option, then press the PLAY/PAUSE/PAIR/SELECT/SCAN
button on the unit or PLAY/PAUSE/SELECT key on the remote control to
conrm.
Software upgrade
To upgrade the software for the unit. Press and hold the STOP/MENU
button on the unit or press STOP/MENU key on the remote control to
enter menu selection, press TUN-/⏮ or TUN+/⏭ button on the unit or
remote control to select the “System” option and press the PLAY/PAUSE/
PAIR/SELECT/SCAN button on the unit or PLAY/PAUSE/SELECT key on the
remote control to enter, select “Software Upgrade” then press TTUN-/⏮ or
TUN+/⏭ button on the unit or remote control to choose YES or NO option,
then press the PLAY/PAUSE/PAIR/SELECT/SCAN button on the unit or
PLAY/PAUSE/SELECT key on the remote control to conrm.
Software version
This displays the current software version. Press and hold the STOP/
MENU button on the unit or press STOP/MENU key on the remote control
to enter menu selection, press TUN-/⏮ or TUN+/⏭ button on the unit or
remote control to select the “System” option and press the PLAY/PAUSE/
PAIR/SELECT/SCAN button on the unit or PLAY/PAUSE/SELECT key on the
remote control to enter, select “SW version” then press the PLAY/PAUSE/
PAIR/SELECT/SCAN button on the unit or PLAY/PAUSE/SELECT key on the
remote control to view the current software version.
37
EN
CD/MP3
Discs for Playback
This system can playback all digital audio CD/MP3, nalized digital audio
CD-Recordable (CD-R) discs, nalized digital audio CD-Rewritable (CD-RW)
discs and CD-DA format digital audio CD/CD-R/CD-RW discs.
LOADING A DISC
• Press the Function selection button (15) on unit or the FUNC key (1) on
remote control to select “CD” mode.
• Press the PUSH TO OPEN button to open the CD door, “OP” will be
shown on the display.
• Place an audio CD/MP3 DISC into the tray with the front side facing up.
• Close the CD door.
• The display will show a ashing “READING”, then the total number of
tracks would be shown and the playback will start from track.
• To remove the CD, press Stop button (14) to turn o the unit, then
press the PUSH TO OPEN button to open the CD compartment lid. Hold
the CD by its edges, and take it out carefully.
Note: Make sure the disc is stopped before opening the CD door (11). To
ensure good system performance, wait until the unit completely reads
the disc before proceeding. If no disc loaded into the tray, or the disc is
unreadable, the display will show “NO”.
Playing a disc
• To pause playback, press Play/Pause button (16) on unit or Play/
Pause key (7) on remote control, the current playing time will ash on
the display. To resume playback, press Play/Pause button (16) on
unit or Play/Pause key (7) on remote control again.
• To stop playback, press Stop button (14) on unit or (9) on remote
control.
Selecting a desired track/passage
To select a desired track:
• Press the FORWARD oder BACK button on stop mode or during
playing until the desired track appears on the display. It will start play
automatically.

38
EN
To search for a particular passage during playback (track scanning at high
speed):
• Press and hold FORWARD oder BACK button to scan the current
playing track at high speed until desired point (passage) appears, then
release the button for normal playback mode. Playback will start again
from this point.
To select a song which track number exceeds 10 (for MP3 disc only):
• To select a song/track which number exceeds 10, press the FOLD/10/M
+/- button (4 & 5) on unit or FOLD/10/M (UP/DOWN) key (5) on remote
control each time to skip forward or backward 10 tracks.
To select a desired folder (if the disc contains more than one folder):
• To select a desired folder, press and hold the FOLD/10/M +/- button
(4&5) on unit or FOLD/10/M (UP/DOWN) key (5) on remote control
each time to skip forward or backward a folder.
Programming tracks
Programming tracks of disc is possible when playback is stopped. Up
to 20tracks for CD disc and 99 tracks for MP3 disc can be stored in the
memory in any order.
1. In stop mode, press the MEM./P-MODE button (7) on unit or MEM key
(3) on remote control to enter program setting. The MEM logo and
“P01” will show on the display with “F00” ashing. Press FOLD/10/M
+/- button (4 & 5) on unit or FOLD/10/M (UP/DOWN) key (5) on remote
control to choose the desired folder. Then press the FORWARD oder
BACK button to choose the desired track to be programmed as P01,
then press MEM./P-MODE button (7) on unit or MEM key (3) on remote
control again to conrm.
2. Repeat step 1 to store other desired tracks until all tracks are
programmed.
3. Press the Play button (16) on unit or the Play key on remote control
to start playback from the rst programmed track.
4. Press the Stop button (14) on unit to stop program playback.
To clear the program, you may press the Stop button (14) on unit when
the disc stopped and open the CD compartment lid, the program will be
erased.

39
EN
Repeat play
You can play one track or all tracks on the disc repeatedly.
To Repeat a Single Track:
1. Press MEM./P-MODE button (7) on unit or P-MODE key (8) on remote
control during play, the display will show “REP-1” (REPEAT) and the
current track will be played over an over again till you press the Stop
button .
2. To cancel repeat play, press MEM./P-MODE button (7) on unit or
P-MODE key (8) on remote control until the symbol “REP-1” disappears
from the display.
To repeat all the tracks
1. Press MEM./P-MODE button (7) on unit or the P-MODE key (8) on remote
control until the symbol shows steadily on the display, all tracks on the
disc will be played over and over again till you press the Stop button .
2. To cancel repeat play, press the MEM./P-MODE button (7) on unit or the
P-MODE key (8) on remote control until the symbol REP-ALL disappears
from the display.
To repeat the folder (only for MP3 discs which contain more than one
folder):
1. Press the MEM./P-MODE button (7) on unit or P-MODE key (8)on remote
control until the symbol REP-DIR (REPEAT DIR) shows steadily on the
display, the current folder will be repeated over and over again till you
press the Stop button .
2. To cancel repeat play, press the MEM./P-MODE button (7) on unit or
P-MODE key (8) on remote control until the symbol REP-DIRT (REPEAT
DIR) disappears from the display.
Random play
1. Press the MEM./P-MODE button (7) on unit or P-MODE key (8) on remote
control in play mode till the “SHUFFLE” shows steadily on the display,
the random play will start from next track automatically, until all tracks
are played over and then it will stop.
2. Press the MEM./P-MODE button (7) on unit or P-MODE key (8) on remote
control again until the “SHUFFLE” disappears from the display to cancel.
40
EN
Intro play
1. Press the MEM./P-MODE button (7) on unit or P-MODE key (8)on remote
control in play mode till the “INTRO” shows steadily on the display, the
intro play will start and scan 10 seconds for every track.
2. To cancel intro play, press the MEM./P-MODE button (7) on unit or
P-MODE key (8) on remote control again until “INTRO” disappear from
the display.
USB
• Press the Function selection button (15) on unit to select “USB” mode.
• Connect the USB device to the USB input (1). The LCD will show the total
number of tracks stored in the USB. The playback starts from track 1
automatically after reading the USB.
• To pause playback, press the ⏯ button (16) on unit or ⏯ key (10) on
remote control, the current playing time will ash on the display. To
resume playback, press the button again.
• Press the ⏯ button (16) on unit or the ⏯ (10) on remote control to stop
playing. The display will show total number of USB and “STOP“.
• The dierent selection modes Proceed program play/Repeat play
(repeat 1 - repeat folder - repeat all)/Random play/Intro play operation
as the same described above in the “CD/MP3” section.
Note: Do not use any USB extension cable for connecting the USB device
as it may cause interference.
BT
• Press the Function selection button (15) on unit or the FUNC button (1)
on remote control to switch to BT function, the LCD will display “BT ”
and the Pair indicator (27) will ash at high speed.
• Turn on the BT function on the device, scan the unit “Spacewoofer
DAB+” and connect, then input the password “0000“ if required, the Pair
blue light will light up to indicate connection done, and the display will
show “BT”. Press the Play/Pause/Pair button (16) on the unit or the
Play key (7) on the remote control to start playback. If the unit can‘t
connect the relative BT within 2 minutes, press the Play/Pause/Pair
button (16) on unit or the PAIR key (10) on remote control to reconnect.
• Rotate the Volume knob on unit or adjust the volume on the BT device
to your desired level.

41
EN
• Press FORWARD or BACK button on the unit or on external
device to choose the desired track.
• To stop playback, press Play/Pause/Pair button (16) on unit or the
Stop key on the external device.
Note: The Bluetooth works best within 10 meters.
AUX-IN
• Press the Function selection button (15) on unit or the FUNC key (1) on
remote control to select “AUX” mode.
• Insert the AUX line plug into the AUX IN jack (Ø 3.5 mm) (2) on the
player, music from the device would be amplied and exported from the
speakers.
• Adjust the volume on the unit or on the device to your desired level.
• Proceed play/pause and next/previous on the device.

42
EN
DISPOSAL CONSIDERATIONS
If there is a legal regulation for the disposal of
electrical and electronic devices in your country,
this symbol on the product or on the packaging
indicates that this product must not be disposed of
with household waste. Instead, it must be taken to
a collection point for the recycling of electrical and
electronic equipment. By disposing of it in accordance
with the rules, you are protecting the environment and
the health of your fellow human beings from negative
consequences. For information about the recycling
and disposal of this product, please contact your local
authority or your household waste disposal service.
This product contains batteries. If there is a legal
regulation for the disposal of batteries in your country, the
batteries must not be disposed of with household waste.
Find out about local regulations for disposing of batteries.
By disposing of them in accordance with the rules, you are
protecting the environment and the health of your fellow
human beings from negative consequences.
DECLARATION OF CONFORMITY
Manufacturer:
Chal-Tec GmbH, Wallstrasse 16, 10179 Berlin,
Germany.
Importer for Great Britain:
Berlin Brands Group UK Limited
PO Box 42
272 Kensington High Street
London, W8 6ND
United Kingdom
Hereby, Chal-Tec GmbH declares that the radio
equipment type Spacewoofer DAB is in compliance with
Directive 2014/53/EU. The full text of the EU declaration
of conformity is available at the following internet
address: use.berlin/10036341
For Great Britain: Hereby, Chal-Tec GmbH declares
that the radio equipment type Spacewoofer DAB is in
compliance with the relevant statutory requirements. The
full text of the declaration of conformity is available at the
following internet address: use.berlin/10036341

43
FR
Fiche technique 44
Consignes de sécurité 44
Aperçu de l‘appareil et fonctions des touches 46
Alimentation 47
Télécommande 48
Fonctions de base 49
Radio FM 51
Radio DAB 52
CD/MP3 55
USB 58
BT 59
Aux-in 60
Conseils pour le recyclage 61
Déclaration de conformité 61
Chère cliente, cher client,
Toutes nos félicitations pour l’acquisition de ce nouvel
appareil. Veuillez lire attentivement et respecter
les instructions de ce mode d’emploi an d’éviter
d’éventuels dommages. Nous ne saurions être tenus
pour responsables des dommages dus au non-respect
des consignes et à la mauvaise utilisation de l’appareil.
Scannez le QR-Code pour obtenir la dernière version du
mode d‘emploi et à d‘autres informations concernant
le produit
SOMMAIRE

44
FR
FICHE TECHNIQUE
Numéro d‘article 10036341, 10036342
Alimentation AC 100-240 V ~ 50/60 Hz
DC 12V UM-C (8 piles)
Puissance (watts)
30 W
Puissance en veille (watts)
0,5 W
Plage de fréquences FM
FM 87.5 – 108 MHz
Plage de fréquences DAB/DAB+
174,928 – 239,200 MHz (Bande III)
Plage de fréquences du lecteur CD
100 Hz – 16 KHz
Portée du BT
jusqu‘à 10 mètres
Température de fonctionnement
+ 5°C – + 35° C
Connexions
Entrée AUX -IN
3,5 mm
3,5 mm prise casque (jack)
3,5 mm
Port USB
CONSIGNES DE SÉCURITÉ
• Respectez toutes les instructions gurant dans le mode d‘emploi.
• L‘appareil ne doit pas se trouver près de l‘eau et ne doit pas être utilisé
dans des conditions d‘environnement humides.
• Veillez à ce qu’aucun liquide ne soit renversé sur l‘appareil ou dans ses
ouvertures.
• Déplacez l‘appareil avec précaution pour ne pas l‘endommager.
• Ne bloquez pas les sorties de l‘appareil.
• Ne placez pas l‘appareil à proximité de sources de chaleur (chauage
par exemple). N‘exposez pas l‘appareil à la lumière directe du soleil.
• Insérez la che secteur de l’appareil dans une prise adaptée.
• L‘appareil est équipé d‘une protection contre les surcharges. Si elle

45
FR
doit être remplacée, contactez le service clientèle ou une personne de
qualication équivalente.
• Débranchez l’appareil de la prise secteur si vous ne l’utilisez pas
pendant une longue période.
• N‘essayez pas d‘eectuer la maintenance ou de réparer l‘appareil vous-
même. Cela annulerait la garantie.
• Le cordon d’alimentation sert à déconnecter l’appareil du secteur après
l’avoir éteint. Assurez-vous que la prise secteur est toujours librement
accessible.
• N‘exposez pas l‘appareil à des éclaboussures d‘eau et ne posez dessus
aucun objet contenant des liquides, tels que des vases par exemple.
• N‘exposez pas les piles à une chaleur extrême telle que le soleil ou le
feu.
• Ne gênez pas la ventilation de l’appareil en bloquant les ouvertures de
ventilation avec des objets tels que des journaux, nappes, rideaux etc.
• Assurez-vous de conserver un espace minimal de 5 mm tout autour de
l‘appareil.
• Ne placez pas de sources de feu à amme libre, telles que des bougies
allumées, sur l‘appareil.
• Débarrassez-vous des piles usagées de manière écologique.
• N‘utilisez l‘appareil que dans les climats tempérés, non dans les climats
tropicaux
MISE EN GARDE
Risque de blessure ! Pour réduire les risques d‘électrocution,
n‘ouvrez pas les caches ou l‘arrière de l‘appareil. L‘appareil ne
contient aucune pièce pouvant être réparée par le client. Pour le
service et la réparation, veuillez contacter le service clientèle ou
un personnel de qualication similaire.
46
FR
1 Port USB
2 Prise AUX-IN
3 Prise casque
4 Touche FOLD.+/+10/MEM.+ (naviguer vers le haut dans un dossier /
liste /liste mémorisée)
5 Touche FOLD.-/-10/MEM.- (naviguer vers le bas dans un dossier /
liste /liste mémorisée)
6 Réglage du volume
7 Touche MEM./P-MODE (choix de programme /mode programme/
mémoire)
APERÇU DE L‘APPAREIL ET FONCTIONS DES
TOUCHES
BT
M./
1 2 3
4
5
6
7
8
9
10
12
11
13
222120
14
19
18
17
16
15
23
26
27
26 2425 25
47
FR
8 Touche veille 20 Prise AC
9 Touche d'éclairage / Touche Info 21 Compartiment des piles
10 Touche EQ/ID3 (réglage du son /
aichage des informations MP3)
22 Antenne FM
11 Lecteur CD 23 Témoin de veille
12 Poignée 24 Enceinte
13 Écran 25 Éclairage LED
14 Touche Stop / menu 26 Témoin IR
15 Touche de sélection de fonction 27 Témoin d'appairage BT
16 Touche lecture /Pause/appairage
BT/Sélectionner/Scan
17 Tuner
18 Touche d'avance/avance rapide
19 Touche retour/retour rapide
ALIMENTATION
Cet appareil peut fonctionner avec du courant alternatif ou du courant
continu.
Fonctionnement sur courant alternatif
• Branchez l‘extrémité du cordon d‘alimentation fourni dans la prise
secteur de l‘appareil puis branchez-le dans la prise. Les piles sont
automatiquement déconnectées du secteur.
Fonctionnement sur courant continu
• Ouvrez la porte du compartiment à piles. Insérez 8 morceaux de piles
UM2 „C“ (non fournies) dans le compartiment. Veuillez respecter les
polarités indiquées dans le mode d‘emploi.
Remarque : lorsque vous utilisez des piles, débranchez le câble
d‘alimentation secteur. Retirez les piles lorsqu‘elles sont vides ou lorsque
vous n‘utilisez pas l‘appareil pendant une période prolongée. Les piles
contiennent des produits chimiques et doivent en conséquence être
recyclées de façon écologique.
Remarques ESD - Le produit peut être réinitialisé en cas de décharges
électrostatiques pendant le fonctionnement normal. Il suit d‘éteindre
l‘appareil et de le rebrancher.
48
FR
TÉLÉCOMMANDE
Fonctions des touches
1 FUNC (touche de choix des
fonctions)
2 MUTE (fonction muet)
3 MEM (touche mémoire)
4 EQ (réglage du son)
5 FOLD./10/M. (AUF/AB) (parcourir
vers le haut/vers le bas dans un
dossier / une liste)
6 Touche retour /retour rapide /
Tuning (-)
7 Touche lecture /Pause/Scan
8 P-MODE/Info Mode programmation
9 Touche Stop/Menu
10 PAIR (Touche d‘appairage BT)
11 Touche d‘avance/avance rapide
/ Tuning (+-)
12 ID3 (aichage des informations des
MP3)
13 VOLUME (touche volume +/-)
14 LIGHT (Touche d‘éclairage)
15 MO/ST (Touche Mono/Stéréo)
16 STANDBY (Bouton de marche/arrêt)
17 Capteur de la télécommande
18 Compartiment des piles
Remarque : retirez la protection des piles
avant la mise en marche.
1
17
18
15
16
10
11
12
13
14
2
3
4
5
6
7
8
9

49
FR
Utilisation de la télécommande
• Pour utiliser l‘appareil avec la télécommande,
pointez la télécommande sur le capteur de
télécommande situé à l‘avant de l‘appareil et
appuyez sur le bouton correspondant de la
télécommande.
• La télécommande fonctionne mieux si vous êtes
à une distance de 6 à 7 mètres de l’avant de
l’appareil et à un angle de 30 degrés.
• L’ensoleillement ou les conditions d’éclairage
ambiant peuvent interférer avec la
télécommande.
• Si la télécommande ne fonctionne pas bien ou
pas du tout, commencez par remplacer les piles
de la télécommande, puis réduisez l’éclairage
de la pièce.
Installation de la pile au Lithium dans la télécommande
La télécommande requiert une pile CR2025 (3V) au Lithium.
• Pour remplacer la pile, faites glisser le cache avec précaution dans le
bon sens, puis retirez le compartiment à piles.
• Retirez la pile déchargée et insérez une nouvelle pile au lithium (CR-
2025) dans le compartiment avec le pôle plus vers le haut. Remettez
ensuite le compartiment en place en le faisant glisser jusqu‘au „clic“
sonore.
FONCTIONS DE BASE
Paramétrage de l‘appareil
• Après avoir branché l‘appareil sur l‘alimentation, appuyez sur la
touche de veille (8) de l‘appareil ou sur la touche VEILLE (16) de la
télécommande pour allumer l‘appareil.
• Appuyez sur la touche de sélection de fonction de l‘appareil (15) ou bien
sur la touche FUNC (1) de la télécommande pour sélectionner l‘une des
fonctions FM/CD/USB/BT/AUX/DAB.
Remarque : en mode CD/USB/BT/AUX, l‘appareil passe automatiquement
en mode veille si aucune fonction de base n‘est sélectionnée au bout de 15
minutes. Appuyez sur la touche de veille pour rallumer l‘appareil.
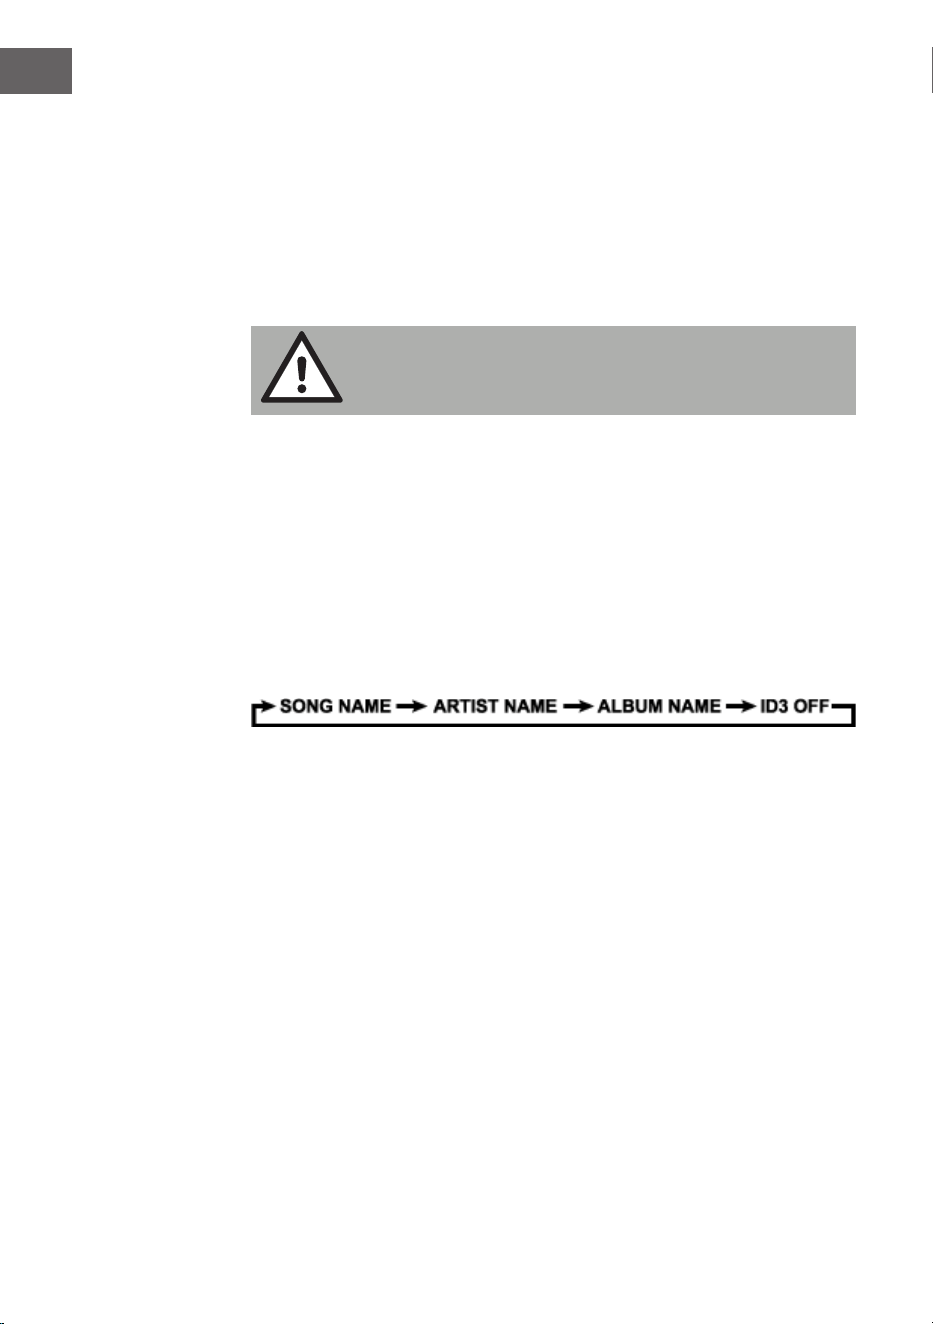
50
FR
Réglage du volume
• Tournez le bouton de réglage du volume de l‘appareil (6) pour
augmenter ou réduire le volume.
Prise casque
• Si nécessaire, branchez un casque avec une che jack 3,5 mm (non
fournie) dans la prise casque (3). L‘enceinte (24) est automatiquement
désactivée.
ATTENTION :
L‘écoute prolongée de musique au casque à un fort volume
peut endommager votre audition.
Système ID3-Tag (aichage des informations des MP3)
Certains chiers MP3 s‘accompagnent d‘informations telles que le titre de
la chanson et de l‘album, et le nom de l‘interprète. Ces informations sont
désignées par l‘appellation „ID3-Tag“.
• Maintenez la touche EQ/ID3 (10) de l‘appareil ou bien la touche ID3
12) de la télécommande pour activer ou désactiver l‘aichage des
informations ID3-Tag. Lorsque l‘aichage des ID3-Tag est activé,
l‘appareil aiche les informations Tag dans l‘ordre suivant.
Fonction EQ (Égaliseur)
Cet appareil dispose d‘un système d‘égaliseur intégré.
• Appuyez sur la touche EQ/ID3 (10) de l‘appareil ou sur la touche EQ (4)
de la télécommande pour sélectionner un autre style de musique (son):
FLAT, CLASSIC, ROCK, POP, JAZZ ou DBBS.
Éclairage LED
• maintenez la touche d‘éclairag (9) de l‘appareil ou bien la touche
LIGHT (14) de la télécommande enfoncée pour allumer l‘éclairage LED,
et sélectionnez 8 eets diérents de clignotement. Pour désactive
l‘éclairage LED, appuyez de nouveau sur la touche d‘éclairage jusqu‘à ce
que l‘écran aiche ‚“LIGHT OFF“.

51
FR
RADIO FM
Réglage des stations de radio
1. Appuyez sur la touche de choix des fonctions sur l‘appareil (15) ou bien
sur la touche FUNC (1) de la télécommande pour sélectionner le mode
radio : FM.
2. En tournant le bouton du tuner (17) de l‘appareil vous aichez la bande
de fréquences radio. Par exemple : FM 97,10 MHz. Vous pouvez aussi
appuyer sur les touches AVANCE ou RETOUR et les maintenir
pour rechercher plus rapidement. L‘appareil s‘arrête automatiquement à
chaque station de radio qui a un signal fort.
3. Tournez le bouton de volume (6) de l’appareil pour augmenter ou
diminuer le volume.
4. Déployez l‘antenne télescopique (22) sur toute sa longueur et déplacez
doucement l‘appareil pour obtenir une meilleure réception ou placez
l‘appareil dans un endroit approprié.
5. Pour éteindre la radio, appuyez sur le bouton de sélection de fonction
(15) de l‘appareil ou sur le bouton FUNC (1) de la télécommande pour
passer à d‘autres fonctions ou appuyez sur le bouton veille (8) de
l‘appareil ou sur le bouton STANDBY (16) de la télécommande pour
éteindre l‘appareil
Mémorisation automatique des stations/Scan
• Pour rechercher et mémoriser automatiquement les stations, appuyez
sur le bouton Lecture (16) de l‘appareil et maintenez-le. Chaque
émetteur avec un signal suisamment fort est enregistré en mémoire.
Une fois le scan terminé, l‘appareil se règle automatiquement sur la
station 1 (P01).
• Pour écouter la station suivante ou précédente, appuyez sur les boutons
FOLD./10/M.+/ (4 & 5) de l‘appareil ou sur le bouton FOLD./10/M. (UP /
DOWN) (5) de la télécommande
Réglage manuel des stations
Vous pouvez mémoriser 30 stations de radio au choix.
1. Tournez le bouton du tuner (17) sur l’appareil pour sélectionner la station
que vous souhaitez prérégler.
2. Appuyez sur le bouton MEM./P-MODE (7) sur l‘appareil ou appuyez sur

52
FR
la touche MEM (3) de la télécommande, „P01“ clignote à l‘écran pour
indiquer que vous allez mémoriser la station. Appuyez sur la touche
FOLD./10/M +/- (4 & 5) de l‘appareil ou sur la touche FOLD./10/M (UP
/ DOWN) (5) de la télécommande, puis appuyez sur la touche MEM./.
P-MODE (7) sur l‘appareil ou appuyez à nouveau sur le bouton MEM (3)
de la télécommande pour entrer dans la mémoire.
3. Pour rechercher une autre station, répétez les étapes (1) et (2), jusqu‘à
ce que vous ayez mémorisé toutes les stations souhaitées. Vous pouvez
mémoriser jusqu‘à 30 stations FM.
4. Appuyez sur la touche FOLD./10/M +/- (4 & 5) de l‘appareil ou sur la
touche FOLD./10/M (AUF/AB) (5) de la télécommande pour choisir parmi
les stations mémorisées.
RADIO DAB
Le mode radio DAB reçoit la radio numérique DAB/DAB+ et aiche des
informations sur la station et le titre programmé sous forme de diusion.
Appuyez sur la touche FUNCTION de l'appareil ou de la télécommande
jusqu'à ce que l'écran aiche « Welcome to DAB ».
1. Pour eectuer une recherche complète, maintenez la touche STOP/
MENU de l'appareil ou appuyez sur la touche STOP/MENU de la
télécommande pour aicher le menu, sélectionnez l'option « recherche
complète » et appuyez sur la touche PLAY/PAUSE/PAIR/SELECT/SCAN
de l'appareil ou sur la touche PLAY/PAUSE/SELECT de la télécommande
pour conrmer l'opération. Dès qu'une recherche complète est terminée,
la radio lit la première station de la liste des stations.
2. Pour choisir parmi les stations parcourues, tournez le bouton TUNING
de l'appareil ou appuyez sur TUN-/⏮ ou TUN+/⏭ de la télécommande
pour faire déler la liste des stations, puis appuyez sur la touche PLAY/
PAUSE/PAIR/SELECT/SCAN de l'appareil ou sur la touche PLAY/PAUSE/
SELECT de la télécommande pour conrmer. L'écran Lecture en cours
aiche les nouveaux détails sur la station.
3. Pour supprimer des stations listées mais non disponibles, maintenez la
touche STOP/MENU de l'appareil ou appuyez sur la touche STOP/MENU
de la télécommande pour accéder à la sélection du menu, appuyez sur la
touche TUN-/⏮ ou TUN+/⏭ de l'appareil ou de la télécommande pour
sélectionner l'option « Prune », et appuyez sur la touche PLAY/PAUSE/
PAIR/SELECT/SCAN de l'appareil ou sur la touche PLAY/PAUSE/SELECT
de la télécommande pour conrmer la sélection, puis appuyez sur la
touche PLAY/PAUSE/PAIR/SELECT/SCAN de l'appareil ou sur la touche
PLAY/PAUSE/SELECT de la télécommande, pour sélectionner l'option
YES ou NO, et appuyez sur la touche PLAY/PAUSE/PAIR/SELECT/SCAN
de l'appareil ou sur la touche PLAY/PAUSE/SELECT de la télécommande
pour conrmer la sélection. Cela permet d'eacer toutes les stations
non disponibles marquées d'un « ? » devant leur nom dans la liste des
stations.

53
FR
Sauvegarde de stations
Pour enregistrer une station sur un emplacement mémoire, réglez la
station que vous souhaitez enregistrer sur un emplacement mémoire, puis
maintenez la touche MEM/P-MODE de l'appareil ou la touche MEM de la
télécommande jusqu'à ce que l'écran aiche « Preset Store ». Appuyez sur
le bouton TUN-/⏮ ou TUN+/⏭ de l'appareil ou de la télécommande pour
sélectionner un préréglage (par exemple « Preset 1 »), puis appuyez sur la
touche PLAY/PAUSE/PAIR/SELECT/ SCAN sur l'appareil ou la touche PLAY
/PAUSE/SELECT de la télécommande pour conrmer. Utilisez la touche
10/M./FOLD. +/- sur l'appareil ou la touche FOLD./10/M UP/DOWN de la
télécommande pour régler les stations souhaitées. Répétez cette procédure
pour enregistrer jusqu'à 30 présélections de stations.
Réglage manuel
Pour eectuer une recherche manuelle de stations, maintenez la touche
STOP/MENU de l'appareil ou appuyez sur la touche STOP/MENU de la
télécommande pour aicher le menu, sélectionnez l'option « recherche
manuelle » et appuyez sur la touche PLAY/PAUSE/PAIR/SELECT/SCAN de
l'appareil ou sur la touche PLAY/PAUSE/SELECT de la télécommande pour
conrmer l'opération. Appuyez sur les touches TUN-/⏮ ou TUN+/⏭ de
l'appareil ou de la télécommande pour sélectionner les stations.
Informations sur la lecture en cours
Pendant la lecture d'une station, l'écran aiche le nom de la station et
les informations DLS (Dynamic Label Segment) diusées par celle-ci, par
exemple le nom du programme, le titre et les informations de contact.
Pour aicher des informations supplémentaires, appuyez sur la touche
LIGHT/INFO de l'appareil ou sur la touche P-MODE/INFO pour aicher les
informations suivantes les unes après les autres : Texte DLS, informations
DL Plus (uniquement lorsqu'elles sont diusées par l'émetteur), intensité
du signal, type de programme, nom de l'ensemble, numéro de canal/
fréquence, taux d'erreur du signal et débit binaire.
Compression de plage dynamique (DRC)
Cette fonction permet de réduire la diérence entre le son le plus fort et
le son le plus faible transmis. Pour ce réglage, 3 options sont disponibles,
à savoir : DRC désactivé/DRC élevé/DRC faible. Pour modier le réglage
de la DRC, maintenez la touche STOP/MENU de l'appareil ou appuyez
sur la touche STOP/MENU de la télécommande pour entrer dans le
menu, appuyez sur la touche TUN-/⏮ ou TUN+/⏭ de l'appareil ou de la
télécommande pour sélectionner l'option « DRC », puis utilisez la touche
PLAY/PAUSE/PAIR/SELECT/SCAN de l'appareil ou la touche PLAY/PAUSE/
SELECT de la télécommande pour sélectionner l'option souhaitée.
Système
Dans les paramètres du système, vous pouvez sélectionner les langues

54
FR
d'aichage, réinitialiser l'appareil sur les paramètres d'usine et aicher la
version du logiciel.
Langue
Comment sélectionner diérentes langues pour les messages à l'écran.
Maintenez la touche STOP/MENU de l'appareil ou appuyez sur la touche
STOP/MENU de la télécommande pour entrer dans le menu, appuyez sur
la touche TUN-/⏮ ou TUN+/⏭ de l'appareil ou de la télécommande pour
sélectionner le « Système » et appuyez sur la touche PLAY/PAUSE/PAIR/
SELECT/SCAN de l'appareil ou sur la touche PLAY/PAUSE/SELECT de la
télécommande pour conrmer la sélection, sélectionnez « Langue », puis
sélectionnez celle que vous souhaitez.
Réinitialisation aux paramètres d'usine
La réinitialisation des paramètres d'usine peut aider à supprimer tous les
paramètres personnalisés et à les remplacer par les valeurs par défaut
d'origine, y compris la liste des stations DAB et les emplacements de
mémoire. Maintenez la touche STOP/MENU de l'appareil ou appuyez sur
la touche STOP/MENU de la télécommande pour entrer dans le menu,
appuyez sur TUN-/⏮ ou TUN+/⏭ sur l'appareil ou la télécommande pour
sélectionner l'option « Système » et appuyez sur la touche PLAY/PAUSE/
PAIR/SELECT/SCAN de l'appareil ou sur la touche PLAY/PAUSE/SELECT
de la télécommande, sélectionnez « Factory Reset » puis appuyez sur la
touche TUN-/⏮ ou TUN+/⏭ de l'appareil ou de la télécommande pour
sélectionner l'option OUI ou NON, et appuyez sur la touche PLAY/PAUSE/
PAIR/SELECT/SCAN de l'appareil ou sur la touche PLAY/PAUSE/SELECT de
la télécommande pour conrmer.
Mise à jour logicielle
Comment mettre à jour le logiciel de l'appareil. Maintenez la touche
STOP/MENU de l'appareil ou appuyez sur la touche STOP/MENU de la
télécommande pour entrer dans le menu, appuyez sur TUN-/⏮ ou TUN+/⏭
sur l'appareil ou la télécommande pour sélectionner l'option « Système » et
appuyez sur la touche PLAY/PAUSE/PAIR/SELECT/SCAN de l'appareil ou sur
la touche PLAY/PAUSE/SELECT de la télécommande, sélectionnez l'opyion
« Software Upgrade » puis appuyez sur la touche TUN-/⏮ ou TUN+/⏭ de
l'appareil ou de la télécommande pour sélectionner l'option OUI ou NON, et
appuyez sur la touche PLAY/PAUSE/PAIR/SELECT/SCAN de l'appareil ou sur
la touche PLAY/PAUSE/SELECT de la télécommande pour conrmer.
Version de logiciel
La version actuelle du logiciel est aichée ici. Maintenez la touche
STOP/MENU de l'appareil ou appuyez sur la touche STOP/MENU de la
télécommande pour entrer dans le menu, appuyez sur TUN-/⏮ ou TUN+/⏭
sur l'appareil ou la télécommande pour sélectionner l'option « Système » et
appuyez sur la touche PLAY/PAUSE/PAIR/SELECT/SCAN de l'appareil ou sur
la touche PLAY/PAUSE/SELECT de la télécommande, sélectionnez l'option «
SW-Version » puis appuyez sur la touche PLAY/PAUSE/PAIR/SELECT/SCAN
de l'appareil ou sur la touche PLAY/PAUSE/SELECT de la télécommande
pour aicher la version actuelle du logiciel.
55
FR
CD/MP3
Lecture des CD
Ce système peut lire tous les CD / MP3, CD-R, CD-RW et CD audio
numériques au format CD-DA.
Insérer un CD
• Appuyez sur le bouton de sélection de fonction (15) de l‘appareil ou
sur le bouton FUNC (1) de la télécommande pour sélectionner le mode
„CD“.
• Appuyez sur le bouton PUSH TO OPEN pour ouvrir le compartiment CD,
l‘écran aichera „OP“.
• Insérez un CD audio / MP3 DISC avec la face imprimée vers le haut dans
le lecteur.
• Fermez le lecteur de CD.
• „READING“ clignote à l‘écran, puis le nombre total de titres s‘aiche et
la lecture recommence.
• Pour retirer le CD, appuyez sur la touche Stop (14) de l‘appareil pur
éteindre l‘appareil, et appuyez sur la touche PUSH TO OPENpur ouvrir le
lecteur CD. Tenez le CD sur ses bords et retirez-le avec précaution.
Remarque : Vériez que le CD est bien arrêté avant d‘ouvrir le lecteur CD
(11). Pour garantir de bonnes performances du système, patientez jusqu‘à ce
que l‘appareil ait lu complètement le disque puis continuez. S‘il n‘y a pas de
disque dans le bac ou si le disque est illisible, l‘écran aichera „NO“.
Lecture d‘un CD
• Pour interrompre la lecture, appuyez sur la touche lecture/ Pause (16)
de l‘appareil ou sur la touche lecture /Pause (7) de la télécommande.
La durée de lecture écoulée s‘aiche en clignotant à l‘écran. Pour
reprendre la lecture, appuyez de nouveau sur la touche lecture/Pause
(16) de l‘appareil ou sur la touche lecture/Pause (16) de l‘appareil ou
sur la touche lecture /Pause (7) de la télécommande.
• Pour terminer la lecture, appuyez sur la touche Stop (14) (14) de
l‘appareil ou sur la touche (9) de la télécommande
Choix d‘un titre / d‘un passage
Comment choisir un titre
• Appuyez sur la touche AVANCE ou RETOUR en mode Stop ou
pendant la lecture, jusqu‘à ce que le titre choisi apparaisse à l‘écran. La
lecture commence automatiquement.

56
FR
Voici comment chercher un passage précis pendant la lecture (recherche de
titre à vitesse rapide):
• Maintenez les touches AVANCE ou RETOUR pour parcourir le
titre en cours à grande vitesse, jusqu‘à atteindre le passage recherché,
puis relâchez la touche pour que l‘appareil lise à vitesse normale. La
lecture reprend à cet endroit précis.
Voici comment choisir un titre avec un numéro supérieur à 10 (uniquement
pour les disques MP3):
• Pour choisir une chanson/titre audio avec un numéro supérieur à 10,
appuyez sur les touches FOLD/10/M +/- (4 & 5) de l‘appareil ou bien
FOLD/10/M (AUF/AB) (5) sur la télécommande pour sauter à chaque fois
10 titres vers l‘avant ou en arrière.
Voici comment choisir un dossier (lorsque le disque contient plus d‘un
dossier):
• Pour sélectionner un dossier précis, maintenez les touches FOLD/10/M
+/- (4 & 5) de l‘appareil ou la touche FOLD/10/M (AUF/ AB) (5) de la
télécommande pour passer au dossier suivant ou précédent.
Programmation de titres
La programmation de titres sur un disque est possible lorsque la lecture est
arrêtée. Vous pouvez mémoriser une liste de lecture comprenant jusqu‘à 20
titres pour les disques CD et 99 titres pour les disques MP3 dans l‘ordre que
vous souhaitez
1. En mode Stop, appuyez sur la touche MEM./P-MODE(7) de l‘appareil ou
sur la touche MEM (3) de la télécommande pour démarrer le réglage
de la programmation. L‘icône MEM et „P01“ s‘aichent à l‘écran en
clignotant avec „F00“. Appuyez sur la touche FOLD/10/M +/- (4 & 5) de
l‘appareil ou sur la touche FOLD/10/M (AUF/AB) (5) de la télécommande
pour sélectionner le dossier recherché.
Appuyez sur la touche AVANCE ou oder RETOUR pour
sélectionner le titre que vous voulez programmer en „P01“ et appuyez à
nouveau sur la touche MEM./P-MODE(7) de l‘appareil ou sur la touche
MEM (3) de la télécommande pour conrmer votre saisie.
2. Répétez l‘étape 1 pour mémoriser d‘autres titres, jusqu‘à ce que tous vos
titres apparaissent dans la liste.
3. Appuyez sur la touche de lecture de l‘appareil (16) ou sur la touche de
lecture de la télécommande (7) pour démarrer la lecture de la liste.
4. Appuyez sur la touche Stop (14) de l‘appareil pour arrêter la lecture du
programme.
5. Pour eacer le programme musical, vous pouvez appuyer sur la touche
Stop (14) de l‘appareil lorsque le disque est à l‘arrêt, et lorsque vous

57
FR
ouvrez le tiroir à CD, le programme est supprimé.
Mode répétition
Vous pouvez répéter un ou tous les titres d‘un disque. Répétition d‘un titre:
1. Pendant la lecture, appuyez sur la touche MEM./P-MODE (7) de
l‘appareil, ou sur la touche P-MODE (8) de la télécommande, l‘écran
aiche le symbole “REP-1” (RÉPÉTITION) et le titre en cours sera répété
aussi longtemps que vous n‘appuyez pas sur la touche Stop .
2. Pour interrompre la répétition, appuyez sur la touche MEM./P-MODE(7)
de l‘appareil ou bien sur la touche P-MODE (8) de la télécommande,
jusqu‘à ce que le symbole“REP-1” disparaisse de l‘écran.
Répétition de tous les titres
1. Appuyez sur la touche MEM./P-MODE (7) de l‘appareil, ou sur la touche
P-MODE-Taste (8) de la télécommande jusqu‘à ce que le symbole REP-
ALL (RÉPÉTER TOUS) reste allumé à l‘écran. Tous les titres du disque
seront alors répétés, tant que vous n‘appuyez pas sur la touche Stop .
2. Pour interrompre la répétition, appuyez sur la touche MEM./P- MODE
(7) de l‘appareil ou bien sur la touche P-MODE (8) de la télécommande,
jusqu‘à ce que le symbole REP-ALL (RÉPÉTER TOUS) disparaisse de
l‘écran.

58
FR
Répétition d‘un dossier (seulement pour les disques MP3 qui contiennent
plus d‘un dossier) :
1. Appuyez sur la touche MEM./P-MODE (7) de l‘appareil ou la touche
P-MODE (8) de la télécommande, jusqu‘à ce que le symbole REPEAT-DIR
„ DIR“ (RÊPÉTER-DIR) reste allumé en permanence à l‘écran. Tous les
titres du dossier se répètent indéniment, tant que vous n‘appuyez pas
sur la touche Stop .
2. Pour interrompre la répétition, appuyez sur la touche MEM./P- MODE (7)
de l‘appareil ou sur la touche P-MODE (8) de la télécommande, jusqu‘à
ce que le symbole REP-DIR“ vdisparaisse de l‘écran.
Lecture aléatoire
1. Appuyez sur la touche MEM./P-MODE (7) de l‘appareil ou la touche
P-MODE (8) de la télécommande en mode lecture, jusqu‘à ce
que „SHUFFLE“ soit aiché à l‘écran. La lecture aléatoire démarre
automatiquement à partir du prochain titre. Lorsque tous les titres ont
été lus, la lecture aléatoire s‘arrête automatiquement.
2. Appuyez sur la touche MEM./P-MODE (7) de l‘appareil ou la touche
3. P-MODE (8) de la télécommande, jusqu‘à ce que le symbole „SHUFFLE“
disparaisse.
Lecture des intros
1. Appuyez sur la touche MEM./P-MODE (7) de l‘appareil ou la touche
P-MODE (8) de la télécommande en mode lecture, jusqu‘à ce que
„INTRO“ apparaisse à l‘écran. La lecture des introductions démarre et lit
chaque titre pendant 10 secondes.
2. Pour interrompre la lecture des intros, appuyez sur la touche MEM./P-
MODE (7) de l‘appareil ou à nouveau sur la touche P-MODE (8) de la
télécommande „INTRO“ ne soit plus aiché à l‘écran.
USB
• Appuyez sur la touche de sélection de fonction (15) de l‘appareil pour
choisir le mode „USB“.
• Branche l‘appareil USB sur le port USB (1). L‘écran LCD indique le total
des titres enregistrés sur l‘appareil USB. La lecture du titre 1 débute
automatiquement après lecture du contenu de la clé USB.
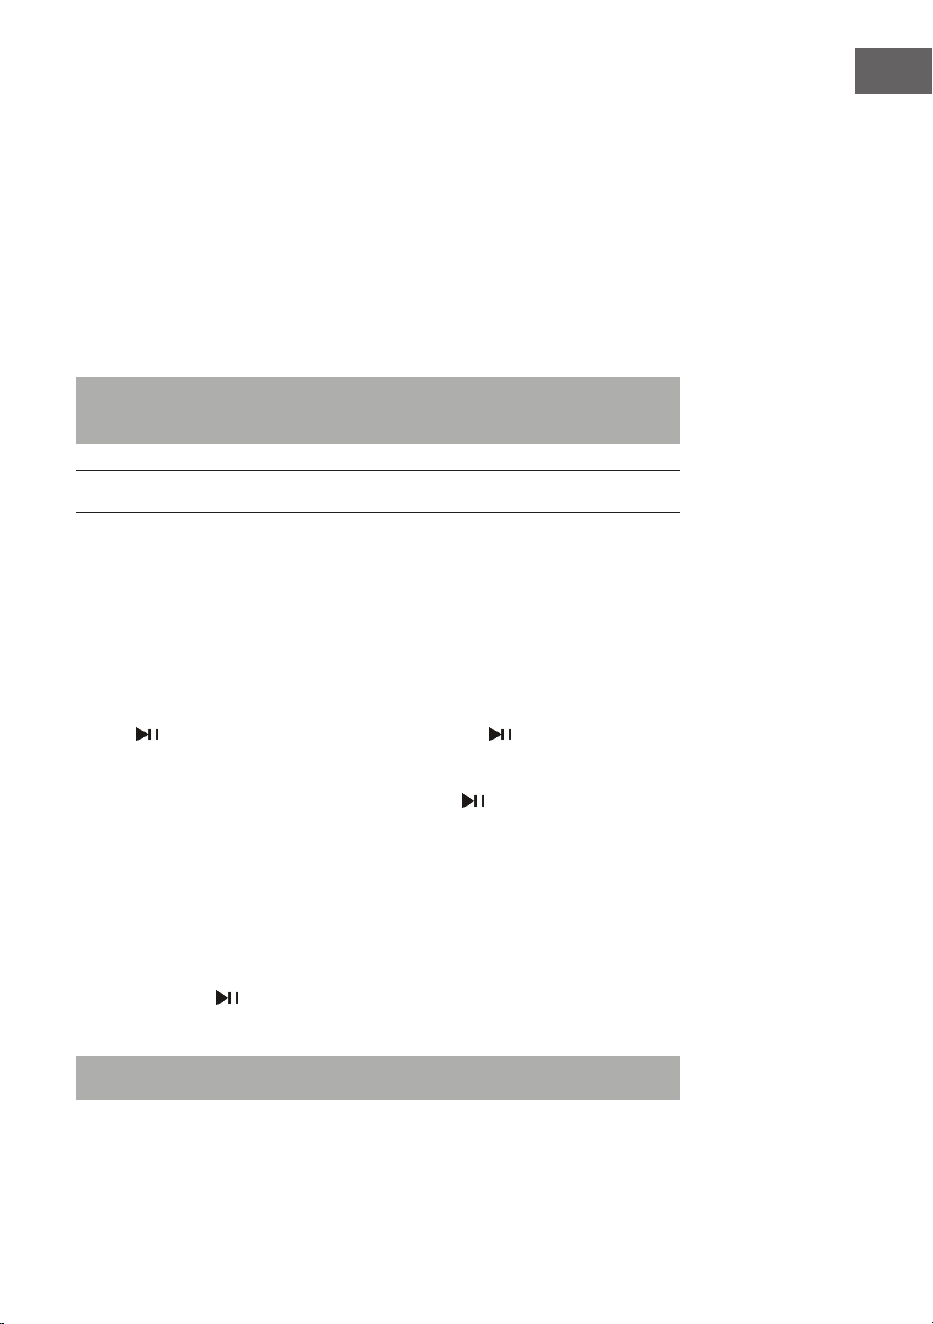
59
FR
• Pour interrompre la lecture, appuyez sur la touche⏯ (16) de l‘appareil
ou bien sur la touche ⏯ (10) de la télécommande, la durée de lecture en
cours clignote à l‘écran. Pour reprendre la lecture, appuyez de nouveau
sur la touche.
• Appuyez sur la touche ⏯ (16) de l‘appareil ou bien sur la touche ⏯ (10)
de la télécommande pour terminer la lecture. L‘écran aiche le nombre
total de titres se trouvant sur la clé USB et „STOP“.
• Les diérents modes Programme Lecture / mode répétition (Répéter
1 dossier - Répéter toutes les pistes) / Lecture aléatoire / Lecture des
intros, fonctionnent de la manière décrite ci-dessus dans la section „CD
/ MP3“.
Remarque : N‘utilisez pas de rallonge USB pour connecter un périphérique
USB, car cela pourrait provoquer des interférences.
BT
• Appuyez sur la touche de sélection de fonction (15) de l‘appareil ou sur
la touche FUNC (1) de la télécommande pour passer à la fonction BT.
L‘écran LCD aiche „BT“ et le témoin de connexion de l‘appareil (27)
clignote rapidement.
• Activez la fonction BT sur le périphérique, localisez le périphérique
„Spacewoofer DAB+“ et connectez-vous à l‘appareil, puis entrez le mot
de passe „0000“ si nécessaire, le voyant bleu de connexion réussie
s‘allume et „BT“ apparaît à l‘écran. Appuyez sur la touche d‘appairage
BT de l‘appareil ou bien la touche de lecture de la télécommande
pour démarrer la lecture. Si l‘appareil ne parvient pas à établir une
connexion BT avec l‘appareil correspondant dans les 2 minutes appuyez
sur la touche lecture / pause / appairage BT de l‘appareil ou bien sur
la touche PAIR (10) de la télécommande pour recommencer la tentative
de connexion.
• Tournez le bouton de réglage du volume (6) sur l‘appareil ou bien réglez
le volume à partir de votre appareil BT.
• Appuyez sur AVANCE ou RETOUR sur l‘appareil ou l‘appareil
externe pour sélectionner le titre voulu.
• Pour stopper la lecture, appuyez sur la touche lecture / pause /
appairage BT de l‘appareil ou bien sur la touche Stop de l‘appareil
externe.
Remarque : le BT fonctionne à une distance maximale de 10 mètres.

60
FR
AUX-IN
• Appuyez sur la touche de sélection de fonction (15) de l‘appareil ou sur
la touche FUNC (1) sur la télécommande pour sélectionner le mode
„AUX“.
• Branchez le câble audio dans la prise AUX-IN du lecteur (Ø 3,5 mm) (2),
la musique de l‘appareil sera ampliée et reproduite via les enceintes.
• Ajustez le volume sur le système ou sur le périphérique externe.
• Les fonctions Play / Pause et Next / Previous Tracks peuvent être
exécutées depuis le périphérique externe.

61
FR
CONSEILS POUR LE RECYCLAGE
S‘il existe une réglementation pour l‘élimination ou le
recyclage des appareils électriques et électroniques
dans votre pays, ce symbole sur le produit ou sur
l‘emballage indique que cet appareil ne doit pas
être jeté avec les ordures ménagères. Vous devez le
déposer dans un point de collecte pour le recyclage
des équipements électriques et électroniques.
La mise au rebut conforme aux règles protège
l‘environnement et la santé de vos semblables des
conséquences négatives. Pour plus d‘informations
sur le recyclage et l‘élimination de ce produit, veuillez
contacter votre autorité locale ou votre service de
recyclage des déchets ménagers.
Ce produit contient des piles. S‘il existe une
réglementation pour l‘élimination ou le recyclage
des piles dans votre pays, vous ne devez pas les
jeter avec les ordures ménagères. Renseignez-vous
sur les dispositions locales relatives à la collecte
des piles usagées. La mise au rebut conforme aux
règles protège l‘environnement et la santé de vos
semblables des conséquences négatives.
DÉCLARATION DE CONFORMITÉ
Fabricant :
Chal-Tec GmbH, Wallstraße 16, 10179 Berlin,
Allemagne.
Importateur pour la Grande Bretagne :
Berlin Brands Group UK Limited
PO Box 42
272 Kensington High Street
London, W8 6ND
United Kingdom
Le soussigné, Chal-Tec GmbH, déclare
que l’équipement radioélectrique du type
Spacewoofer DAB est conforme à la directive
2014/53/UE. Le texte complet de la déclaration UE de
conformité est disponible à l’adresse internet suivante
: use.berlin/10036341


63
ES
Datos técnicos 64
Indicaciones de seguridad 64
Visión general del aparato y funciones de los botones 66
Suministro eléctrico 67
Mando a distancia 68
Funciones básicas 69
Radio FM 71
Radio DAB 72
CD/MP3 75
USB 78
BT 79
Aux-in 80
Retirada del aparato 81
Declaración de conformidad 81
Estimado cliente:
Le felicitamos por la adquisición de este producto.
Lea atentamente el siguiente manual y siga
cuidadosamente las instrucciones de uso con el n de
evitar posibles daños. La empresa no se responsabiliza
de los daños ocasionados por un uso indebido del
producto o por haber desatendido las indicaciones de
seguridad. Escanee el siguiente código QR para tener
acceso al manual de instrucciones más actualizado y a
información adicional sobre el producto.
ÍNDICE

64
ES
DATOS TÉCNICOS
Número de artículo 10036341, 10036342
Suministro eléctrico AC 100-240 V ~ 50/60 Hz
DC 12V UM-C (8 Stück)
Potencia (vatios)
30 W
Potencia en reposo (vatios)
0,5 W
Rango de frecuencia FM
FM 87.5 – 108 MHz
Rango de frecuencia DAB/DAB+
174,928 – 239,200 MHz (Banda III)
Rango de frecuencia reproductor de
CD
100 Hz – 16 KHz
Alcance BT
hasta 10 metros
Temperatura en funcionamiento
+ 5°C – + 35° C
Conexiones
Entrada AUX IN
3,5 mm
Conexión de auriculares (clavija)
3,5 mm
Conexión USB
INDICACIONES DE SEGURIDAD
• Tenga en cuenta todas las indicaciones incluidas en el manual de
instrucciones.
• El aparato no debe utilizarse cerca del agua ni en entornos húmedos.
• Asegúrese de que no se pulverice ningún líquido sobre el aparato ni sus
oricios.
• Mueva el aparato con cuidado para no dañarlo.
• No obstruya las salidas del aparato.
• No coloque el aparato cerca de fuentes de calor (por ejemplo, un
radiador). No exponga el aparato a la radiación solar.
• Conecte el enchufe del aparato del modo previsto a la toma de
corriente.

65
ES
• El aparato está equipado con una función contra el sobrecalentamiento.
Contacte con el servicio de atención al cliente o con una persona
igualmente cualicada si tiene que sustituirla.
• Desconecte el enchufe de la toma de corriente si no utiliza el aparato
durante un periodo prolongado de tiempo.
• No intente en ningún caso reparar el aparato usted mismo. En este
caso, la garantía se cancelará.
• El enchufe se utiliza para interrumpir el suministro eléctrico tras apagar
el aparato. Asegúrese de que el enchufe no quede atrapado.
• No exponga el aparato a salpicaduras y asegúrese de que no se
coloquen encima del aparato ningún tipo de objeto relleno de líquido,
como jarrones.
• Nunca exponga las pilas a una temperatura muy elevada, a la luz
directa del sol ni al fuego.
• No evite la ventilación del aparato de ningún modo bloqueando los
oricios de ventilación con objetos como periódicos, manteles, cortinas,
etc.
• Asegúrese de que se guarde una distancia mínima de 5 mm hacia todos
los lados del aparato.
• No coloque fuentes de ignición, como velas encendidas, encima del
aparato.
• Deseche las pilas usadas como corresponda.
• Utilice el aparato solamente con clima suave, no con clima tropical.
ADVERTENCIA
Riesgo de lesiones. Para reducir el riesgo de descarga eléctrica,
no abra ni la carcasa ni la parte trasera del aparato. El aparato
no contiene ninguna pieza que pueda ser reparara por el
usuario. Contacte con el servicio de atención al cliente o con
personal igualmente cualicado para su reparación y
mantenimiento.
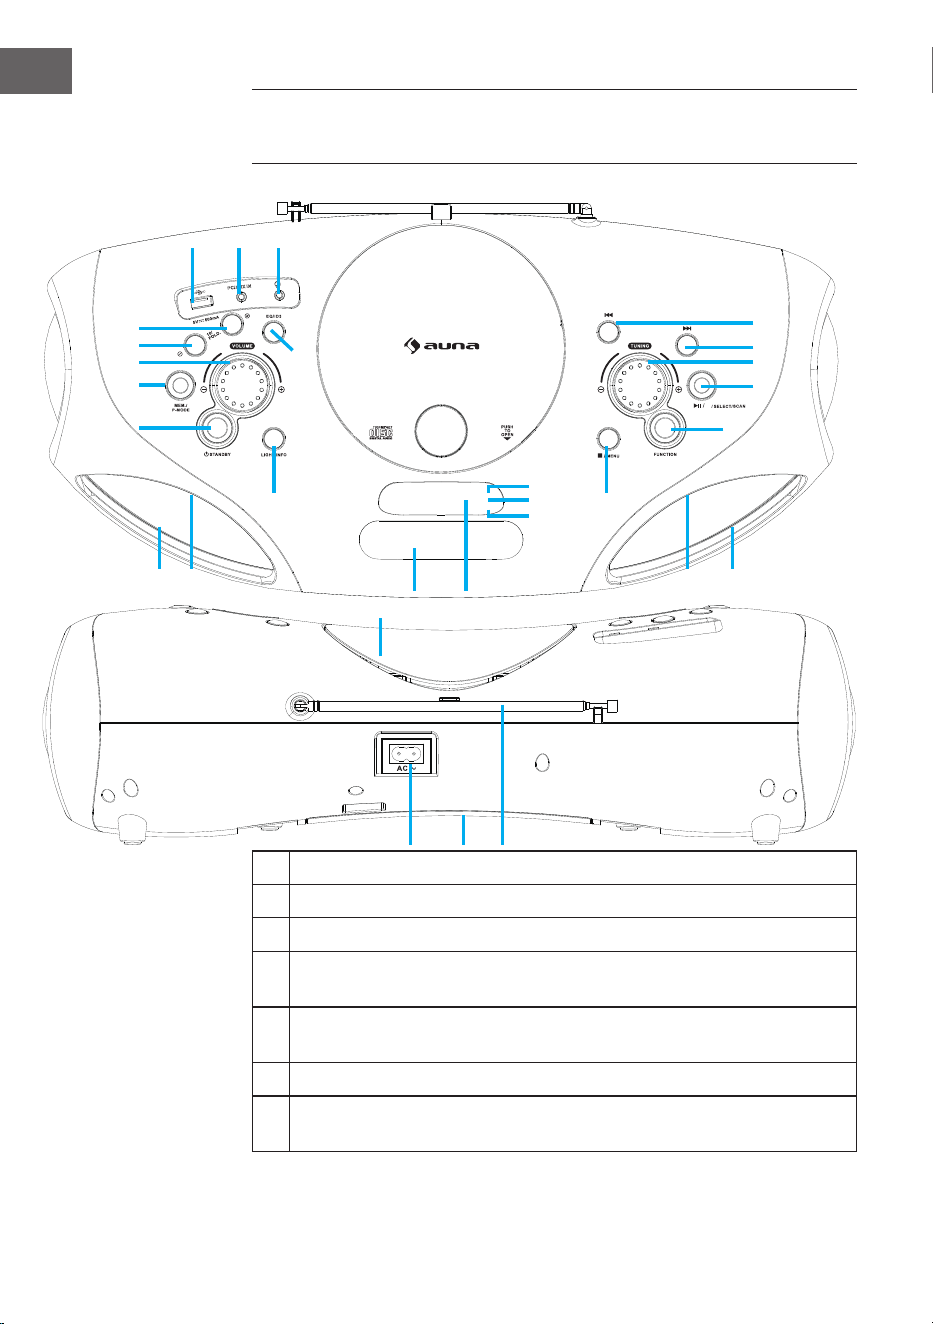
66
ES
1 Conexión USB
2 Conexión AUX-IN
3 Conexión para auriculares
4 Botón FOLD.+/+10/MEM.+ (Navegar hacia adelante en carpetas/
listas/ listas de reproducción)
5 Botón FOLD.-/-10/MEM.- (Navegar hacia atrás en carpetas/ listas/
listas de reproducción)
6 Regulador de volumen
7 Botón MEM./P-MODE (Selección de programa/ modo de
programación/ memoria)
VISIÓN GENERAL DEL APARATO Y FUNCIONES
DE LOS BOTONES
BT
M./
1 2 3
4
5
6
7
8
9
10
12
11
13
222120
14
19
18
17
16
15
23
26
27
26 2425 25

67
ES
8 Botón standby 20 Conexión CA
9 Botón de la luz /info 21 Compartimento para
las pilas
10 Botón EQ/ID3 (regulación de tono/
visualización de información MP3)
22 Antena FM
11 Compartimento para CD 23 Indicador de standby
12 Asa 24 Altavoz
13 Display 25 Luz LED
14 Botón stop /menú 26 Indicador IR
15 Botón de selección de funciones 27 Indicador de
sincronización
16 Botón Reproducción/Pausa/
sincronización BT/Seleccione/
Escanear
17 Sintonizador
18 Botón siguiente/ avance rápido
19 Botón atrás/ retroceso rápido
SUMINISTRO ELÉCTRICO
Este aparato está diseñado para funcionamiento con corriente continua y
alterna.
Funcionamiento con corriente alterna
• Conecte el extremo del cable de alimentación incluido a la toma del
aparato y el enchufe a la toma de corriente. Las pilas se desconectan
automáticamente con suministro eléctrico.
Funcionamiento con corriente continua
• Abra la cubierta del compartimento de las pilas. Introduzca 8 pilas UM2
„C“ (no incluidas en el envío) en el compartimento. Tenga en cuenta la
polaridad correcta como se indica en el manual de instrucciones.
Observaciones: Si utiliza las pilas, el cable de alimentación debe estar
desconectado de la toma de corriente. Retire las pilas si están agotadas o no
utiliza el aparato en un periodo de tiempo prolongado. Las pilas contienen
sustancias químicas y por ello deben desecharse correctamente.
Observaciones ESD - el producto puede restablecerse o no debido a
las descargas electrostáticas; en ese caso, apague el aparato y vuelva a
conectarlo.
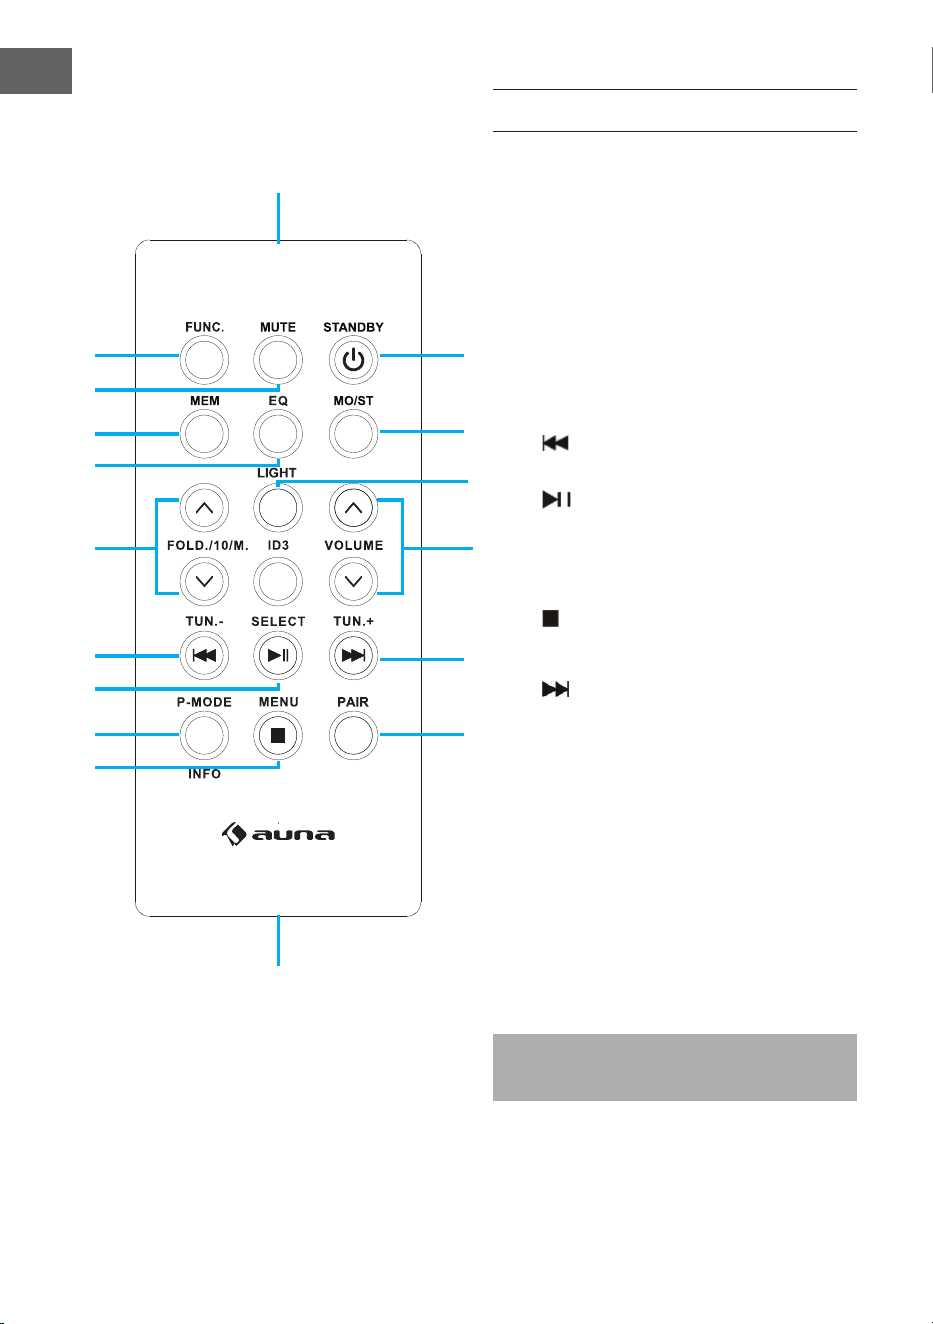
68
ES
MANDO A DISTANCIA
Funciones de las teclas
1 FUNC (Botón de selección de
funciones)
2 MUTE (Botón silencio)
3 MEM (Botón de memoria)
4 EQ (regulación de tono)
5 FOLD./10/M. (AUF/AB) Navegar
adelante/atrás (carpetas/ listas)
6 Botón atrás/ retroceso rápido/
sintonización (-)
7 Botón reproducción/pausa/
escanear
8 Modo de programación P-MODE/
Info
9 Botón stop/menú
10 PAIR (botón sincronización BT)
11 Botón adelante/ avance rápido/
sincronización (+)
12 ID3 ID3 (mostrar información MP3)
13 VOLUME (botón volumen más/
menos)
14 LIGHT (Botón de luz)
15 MO/ST (botón mono/estéreo)
16 STANDBY (botón encender/apagar)
17 Sensor remoto
18 Compartimento para las pilas
Nota: Antes de la puesta en marcha, retire la
protección de las pilas.
1
17
18
15
16
10
11
12
13
14
2
3
4
5
6
7
8
9
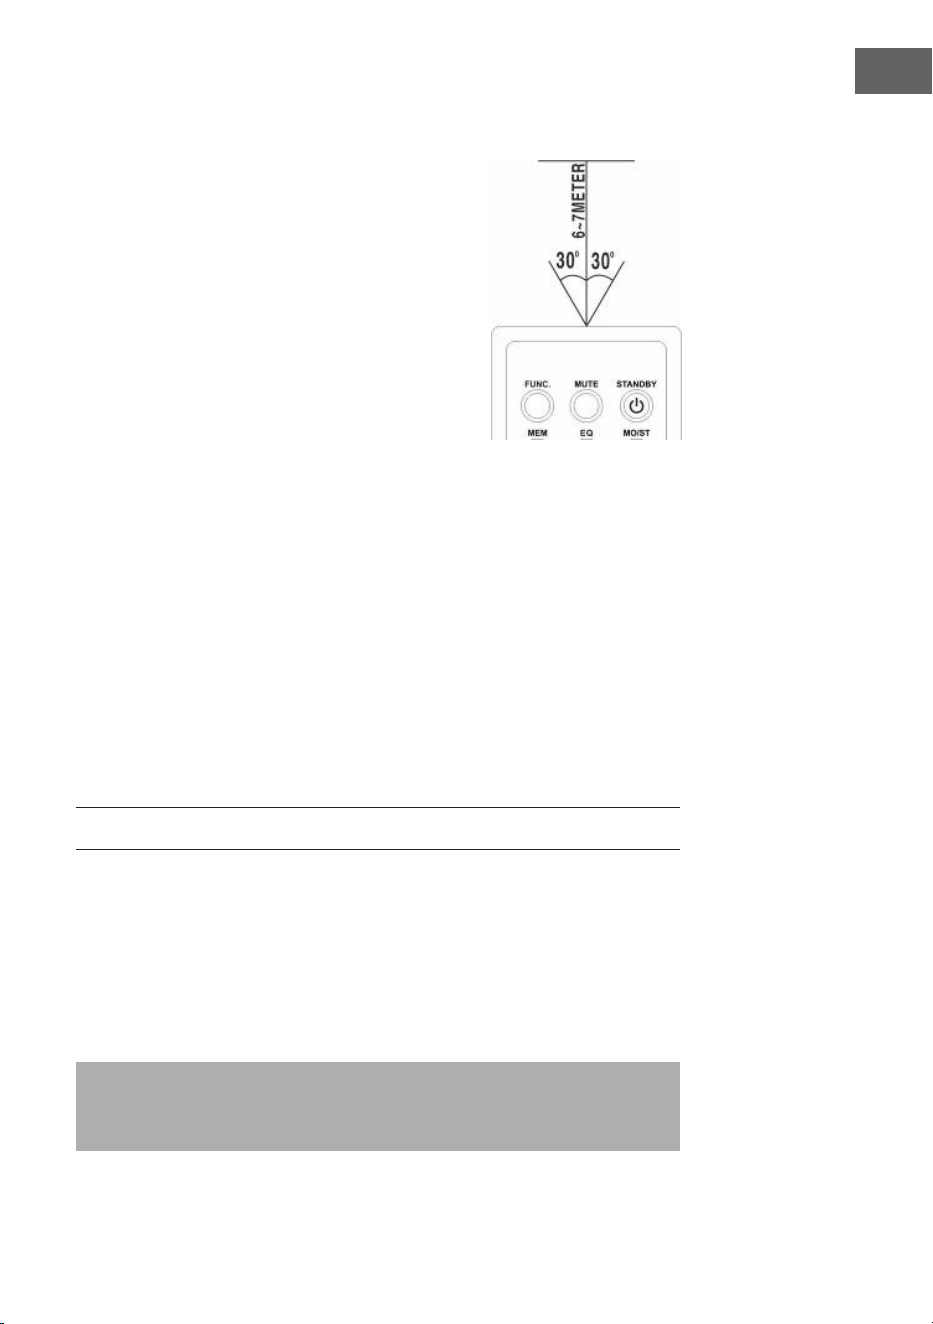
69
ES
Utilización del mando a distancia
• Para controlar el aparato con el mando
a distancia, oriente este último al sensor
correspondiente situado en la parte delantera
del aparato y pulse el botón que desee del
mando.
• El mando a distancia funcionará mejor si
mantiene una distancia de 6-7 metros a la
parte delantera del aparato y lo sostiene en un
ángulo de 30 grados.
• La incidencia del sol o las condiciones de luz
de la estancia pueden interferir en el mando a
distancia.
• Si el mando a distancia no funciona
correctamente o ha dejado de funcionar, intente
primero sustituir las pilas y luego reducir la
proporción de luz en la estancia.
Colocación de la pila de litio en el mando a distancia
El mando a distancia contiene una pila de litio tipo CR2025 (3V).
• Para sustituir la pila, desplace la tapa como se indica en las
instrucciones en la dirección correcta y extraiga el compartimento de la
pila.
• Extraiga la pila vacía e introduzca una batería de litio nueva (CR-2025)
con la polaridad positiva hacia arriba en el compartimento. Desplace el
compartimento con el sonido de un clic a su posición.
FUNCIONES BÁSICAS
Ajuste del aparato
• Tras conectar el suministro eléctrico, pulse el botón standby (8) del
aparato o el botón STANDBY (16) del mando a distancia para encender
el aparato.
• Pulse el botón de selección de función (15) en el aparato o el botón
FUNC (1) del mando a distancia para seleccionar una de las funciones
FM/CD/USB/BT/AUX/DAB.
Nota: En el modo CD/USB/BT/AUX, el aparato cambia automáticamente
al modo standby si en 15 minutos no se realiza ninguna función. Pulse de
nuevo el botón Standby para encender el aparato.
70
ES
Regulador de volumen
• Gire el regulador de volumen (6) en el aparato para aumentar o reducir
el volumen.
Conexión para auriculares
• Si necesita utilizar auriculares, encaje una clavija de 3,5 mm (no incluida
en el envío) en la toma para auriculares (3). El altavoz (24) se silencia
automáticamente.
ATENCIÓN:
Escuchar música a un volumen elevado y durante mucho
tiempo puede provocar daños auditivos
Sistema de etiquetas ID3 (mostrar información MP3)
Algunos archivos MP3 están provistos de información como el nombre de
la canción, el intérprete y el álbum. Toda esta información se conoce como
„etiqueta ID3“.
• Mantenga pulsado el botón EQ/ID3 (10) del aparato o el botón ID3
(12) del mando a distancia para activar o desactivar la visualización
de etiquetas ID3. Si el visualizador de etiquetas ID3 está activado,
el aparato muestra las informaciones de la etiqueta en el orden
anteriormente indicado.
Función EQ (ecualizador)
El aparato cuenta con un sistema ecualizador integrado.
• Pulse el botón EQ/ID3 (10) en el aparato o el botón EQ (4) del mando
a distancia para seleccionar un estilo de música (tono): FLAT, CLASSIC,
ROCK, POP, JAZZ y DBBS.
Luz LED
• Mantener el botón de la luz (9) del aparato o el botón LIGHT (14) del
mando a distancia presionado para encender la luz LED y elegir entre 8
efectos de luz diferentes. Para desactivar la luz LED, pulse de nuevo el
botón de la luz hasta que en el display aparezca „LIGHT OFF“.

71
ES
RADIO FM
Sintonizar las emisoras de radio
1. Pulse el botón de selección de función (15) en el aparato o el botón
FUNC (1) del mando a distancia para seleccionar el modo de radio: FM.
2. Al girar el sintonizador (17) del aparato se muestra la frecuencia de
banda. Ejemplo: FM 97,10 MHz. También puede mantener pulsado el
botón SIGUIENTE o ANTERIOR para buscar más rápido. El aparato
se detiene automáticamente con cada emisora de radio que tenga una
señal potente
3. Gire el regulador de volumen (6) en el aparato para aumentar o reducir
el volumen.
4. Despliegue la antena telescópica (22) hasta su longitud total y muévala
de un lado a otro con cuidado para obtener la mejor recepción o coloque
el aparato en un lugar apropiado.
5. Para apagar la radio, pulse el botón de selección de función (15) en el
aparato o el botón FUNC (1) del mando a distancia para cambiar a otras
funciones o pulse el botón Standby (8) del aparato o el botón STANDBY
(16) del mando a distancia para apagar el aparato.
Escaneo automático/memoria de emisoras predeterminadas
• Para buscar emisoras y guardarlas automáticamente, mantenga pulsado
el botón de reproducción (16) del aparato. Cada emisora con suciente
señal potente se guarda en la memoria. Después de que el aparato
haya nalizado el proceso de escaneo, se regula automáticamente el
número de emisora 1 (P01).
• Para regular la emisora siguiente o anterior, pulse el botón
FOLD./10/M.+/- (4 y 5) del aparato o el botón FOLD./10/M. (Más/
menos) (5) del mando a distancia.
Uso de las emisoras conguradas manualmente
Puede guardar 30 emisoras de radio según sus preferencias.
1. Gire el sintonizador (17) del aparato para seleccionar la emisora deseada
que desea guardar como predeterminada.
2. Pulse el botón MEM./P-MODE (7) en el aparato o el botón MEM (3) en
el mando a distancia. „P01“ parpadea en el display para mostrarle que
está guardando la emisora en el espacio de memoria. Pulse el botón
FOLD./10/M +/- (4 y 5) en el aparato o el botón FOLD./10/M (más/
menos) (5) en el mando a distancia y pulse a continuación el botón
MEM./P-MODE (7) en el aparato o el botón MEM (3) en el mando a
distancia para acceder a la memoria.
3. Para buscar otra emisora, repita los pasos (1) y (2) hasta que se hayan

72
ES
guardado todas las emisoras deseadas. Puede guardar hasta 30
emisorasmémoriser jusqu‘à 30 stations FM.
4. Pulse el botón FOLD./10/M +/- (4 y 5) en el aparato o el botón
FOLD./10/M (más/menos) (5) en el mando a distancia para elegir entre
las emisoras guardadas.
RADIO DAB
El modo de radio DAB recibe la radio digital DAB/DAB+ y muestra
información sobre la emisora y la pista programada como una emisión.
Pulse el botón FUNCTION del aparato o del mando a distancia hasta que
aparezca "Welcome to DAB" en la pantalla.
1. Para realizar un escaneo completo, mantenga pulsado el botón STOP/
MENU de la unidad o pulse el botón STOP/MENU del mando a distancia
para acceder al menú, seleccione la opción de escaneo completo y pulse
el botón PLAY/PAUSE/PAIR/SELECT/SCAN de la unidad o el botón
PLAY/PAUSE/SELECT del mando a distancia para conrmar. En cuanto
se completa la exploración completa, la radio reproduce la primera
emisora de la lista de emisoras.
2. Para seleccionar entre las emisoras escaneadas, gire el botón TUNING
de la unidad o pulse TUN-/⏮ o TUN+/⏮ en el mando a distancia para
desplazarse por la lista de emisoras y pulse el botón PLAY/PAUSE/PAIR/
SELECT/SCAN de la unidad o el botón PLAY/PAUSE/SELECT del mando
a distancia para conrmar. La pantalla de reproducción en curso muestra
los detalles del nuevo canal.
3. Para eliminar los canales listados pero no disponibles, mantenga
pulsada la tecla STOP/MENU del aparato o pulse la tecla STOP/
MENU del mando a distancia para acceder a la selección del menú,
pulse la tecla TUN-/⏮ o TUN+/⏮ del aparato o del mando a distancia
para seleccionar la opción Prune. y pulse el botón PLAY/PAUSE/
PAIR/SELECT/SCAN de la unidad o el botón PLAY/PAUSE/SELECT
del mando a distancia para conrmar la selección, y luego pulse el
botón PLAY/PAUSE/PAIR/SELECT/SCAN de la unidad o el botón PLAY/
PAUSE/SELECT del mando a distancia, para seleccionar SÍ o NO y, a
continuación, pulse el botón PLAY/PAUSE/PAIR/SELECT/SCAN de la
unidad o el botón PLAY/PAUSE/SELECT del mando a distancia para
conrmar la selección. Esto elimina todos los canales no válidos
marcados con un "?" delante del nombre del canal en la lista de canales.
Guardar emisoras
Para almacenar una emisora en una memoria de preselección, sintonice
la emisora que desea almacenar como memoria de preselección y, a
continuación, mantenga pulsado el botón MEM/P-MODE de la unidad o el
botón MEM del mando a distancia hasta que la pantalla muestre "Preset
Store". Pulse el botón TUN-/⏮ o TUN+/⏭ de la unidad o del mando a
distancia para seleccionar una posición de memoria (por ejemplo, "Preset
1"), y luego pulse el botón PLAY/PAUSE/PAIR/SELECT/SCAN de la unidad

73
ES
o el botón PLAY/PAUSE/SELECT del mando a distancia para conrmar.
Utiliza el 10/M./FOLD. +/- del aparato o el botón FOLD./10/M UP/DOWN
del mando a distancia para sintonizar las emisoras deseadas. Repita este
procedimiento para almacenar hasta 30 preselecciones de emisoras.
Sintonización manual
Para realizar una búsqueda manual de canales, mantenga pulsado el botón
STOP/MENU de la unidad o pulse el botón STOP/MENU del mando a
distancia para acceder al menú, seleccione la opción "Búsqueda manual de
canales" y pulse el botón PLAY/PAUSE/PAIR/SELECT/SCAN de la unidad
o el botón PLAY/PAUSE/SELECT del mando a distancia para conrmar la
operación. Pulse los botones ⏮ o ⏭ del dispositivo o del mando a distancia
para seleccionar la emisora.
Información sobre la reproducción actual
Mientras se reproduce una emisora, la pantalla muestra el nombre de la
emisora y la información DLS (Dynamic Label Segment) emitida por la
emisora, por ejemplo, el nombre del programa, el título y la información
de contacto. Para ver más información, pulse el botón LIGHT/INFO de la
unidad o el botón P-MODE/INFO para ver la siguiente información, que
se muestra en secuencia: Texto DLS, información DL Plus (mostrada sólo
cuando la emisora emite), intensidad de la señal, tipo de programa, nombre
del conjunto, número de canal/frecuencia, tasa de error de la señal y tasa
de bits.
Compresión de la zona dinámica (DRC)
Esta función reduce la diferencia entre el sonido más fuerte y el más suave
transmitido. Hay 3 opciones disponibles para esta conguración, a saber:
DRC o/DRC high/DRC low. Para cambiar el ajuste del DRC, mantenga
pulsado el botón STOP/MENU de la unidad o pulse el botón STOP/MENU
del mando a distancia para entrar en el menú, pulse el botón TUN-/⏮ o
TUN+/⏭ de la unidad o del mando a distancia para seleccionar la opción
"DRC" y, a continuación, utilice el botón PLAY/PAUSE/PAIR/SELECT/SCAN
de la unidad o el botón PLAY/PAUSE/SELECT del mando a distancia para
seleccionar la opción deseada.
Sistema
En los ajustes del sistema puedes seleccionar los idiomas de la pantalla,
restablecer los ajustes de fábrica de la unidad y ver la versión del software.
Idioma
Para seleccionar diferentes idiomas para los mensajes de la pantalla.
Mantenga pulsado el botón STOP/MENU de la unidad o pulse el botón
STOP/MENU del mando a distancia para entrar en el menú, pulse el botón
TUN-/⏮ o TUN+/⏭ de la unidad o del mando a distancia para seleccionar

74
ES
"Sistema" y pulse el botón PLAY/PAUSE/PAIR/SELECT/SCAN de la unidad
o el botón PLAY/PAUSE/SELECT del mando a distancia para conrmar
la selección, seleccione "Idioma" y, a continuación, seleccione el idioma
deseado.
Restablecer valor de fábrica
El restablecimiento de los ajustes de fábrica puede ayudar a borrar todos
los ajustes personalizados y sustituirlos por los predeterminados originales,
incluyendo la lista de emisoras DAB y las preselecciones. Mantenga
pulsado el botón STOP/MENU de la unidad o pulse el botón STOP/MENU
del mando a distancia para entrar en el menú, pulse TUN-/⏮o TUN+/⏭
en la unidad o en el mando a distancia para seleccionar "System" y pulse
el botón PLAY/PAUSE/PAIR/SELECT/SCAN de la unidad o el botón PLAY/
PAUSE/SELECT del mando a distancia, Seleccione Factory Reset, luego
pulse el botón TUN-/⏮ o TUN+/⏭ de la unidad o del mando a distancia
para seleccionar YES o NO, y luego pulse el botón PLAY/PAUSE/PAIR/
SELECT/SCAN de la unidad o el botón PLAY/PAUSE/SELECT del mando a
distancia para conrmar.
Actualización de software
Para actualizar el software del aparato. Mantenga pulsado el botón STOP/
MENU de la unidad o pulse el botón STOP/MENU del mando a distancia
para entrar en el menú, pulse el botón TUN-/⏮o TUN+/⏭ de la unidad o
del mando a distancia para seleccionar la opción System y pulse el botón
PLAY/PAUSE/PAIR/SELECT/SCAN de la unidad o el botón PLAY/PAUSE/
SELECT del mando a distancia, Seleccione la opción de Actualización de
Software, luego presione el botón TTUN-/⏮ o TUN+/⏭ en la unidad o en
el control remoto para seleccionar SI o NO, luego presione el botón PLAY/
PAUSE/PAIR/SELECT/SCAN en la unidad o el botón PLAY/PAUSE/SELECT
en el control remoto para conrmar.
Versión de software
Aquí se muestra la versión actual del software. Mantenga pulsado el botón
STOP/MENU de la unidad o pulse el botón STOP/MENU del mando a
distancia para entrar en el menú, pulse el botón TUN-/⏮ o TUN+/⏭ de la
unidad o del mando a distancia para seleccionar "Sistema", y pulse el botón
PLAY/PAUSE/PAIR/SELECT/SCAN de la unidad o el botón PLAY/PAUSE/
SELECT del mando a distancia para conrmar la selección, Seleccione "SW
Version" y, a continuación, pulse el botón PLAY/PAUSE/PAIR/SELECT/SCAN
de la unidad o el botón PLAY/PAUSE/SELECT del mando a distancia para
mostrar la versión de software actual.
75
ES
CD/MP3
CD para reproducir
Este sistema puede reproducir todos los formatos digitales de CD de audio/
MP3, CD-R, CD-RW y CD de audio digital en formado CD-DA.
Introducir un CD
• Pulse el botón de selección de función (15) en el aparato o el botón
FUNC (1) del mando a distancia para seleccionar el modo „CD“.
• Pulse el botón PUSH TO OPEN (PRESIONAR PARA ABRIR) para abrir el
compartimento del CD y en el display aparece „OP“.
• Introduzca un CD de audio/MP3 con la cara delantera hacia arriba
dentro de la unidad.
• Cierre la unidad de CD.
• En el display parpadea „READING „ (LEYENDO CD), y a continuación
se muestra el número total de canciones y la reproducción comienza
desde el principio.
• Para retirar el CD, pulse el botón Stop (14) en el aparato para
apagarlo y pulse a continuación el botón de PUSH TO OPEN para abrir
el compartimento. Sujete el CD por los bordes y extráigalo con cuidado.
Nota: Asegúrese de que el CD esté detenido antes de abrir el
compartimento del CD (11). Para garantizar un buen rendimiento del
sistema, espere hasta que el aparato lea el disco completamente y a
continuación continúe. Si no hay ningún disco en el compartimento o el
disco no se puede leer, el display muestra „NO“.
Reproducción de un CD
• Para interrumpir la reproducción, pulse el botón de Reproducción/
Pausa (16) en el aparato o el botón lecture /Pause (7) de
reproducción/pausa (7) del mando a distancia y el tiempo de
reproducción actual parpadea en el display. Para continuar con la
reproducción, pulse de nuevo el botón de reproducción/pausa
lecture/Pause (16) de l‘appareil ou sur la touche ldel aparato o el
botón reproducción/pausa (7) del mando a distancia.

76
ES
• Para detener la reproducción, pulse el botón Stop (14) en el aparato o
(9) en el mando a distancia.
Selección de la pista/pasaje deseado
Cómo seleccionar una pista en concreto:
• Pulse el botón SIGUIENTE o ANTERIOR en modo Stop o durante
la reproducción hasta que la pista deseada aparezca en el display. La
reproducción se inicia automáticamente.
Cómo buscar durante la reproducción un pasaje en concreto (búsqueda de
pista a alta velocidad):
• Mantenga pulsado el botón SIGUIENTE o ANTERIOR para
escanear la pista actual a velocidad elevada hasta que el punto deseado
(pasaje) aparezca y luego suelte el botón para continuar en un modo
normal de reproducción. La reproducción comenzará de nuevo en ese
punto.
Cómo elegir una canción cuyo número de pista sea superior a 10 (solo con
discos MP3):
• Para seleccionar una canción/pista musical cuyo número supere a
10, pulse los botones FOLD/10/M +/- (4 y 5) en el aparato o el botón
FOLD/10/M (más/menos) (5) en el mando a distancia para avanzar o
retroceder 10 pistas.
Cómo elegir una carpeta deseada (si el disco contiene más de una carpeta):
• Para seleccionar una carpeta en concreto, mantenga pulsado el botón
FOLD/10/M +/- (4 y 5) en el aparato o el botón FOLD/10/M (más/
menos) (5) en el mando a distancia para navegar entre las carpetas.
Programación de pistas
La programación de pistas de discos es posible si se detiene la
reproducción. Se pueden almacenar en la memoria hasta 20 pistas para
discos CD y 99 pistas para discos MP3 en el orden deseado.
1. En modo Stop, pulse el botón MEM./P-MODE (7) del aparato o el
botón MEM (3) del mando a distancia para iniciar una conguración
de programación, el logo MEM y „P01“ aparecen en el dispay con
„F00“ parpadeando, pulse el botón FOLD/10/M +/- (4 y 5) o el botón
FOLD/10/M (más/menos) (5) en el mando a distancia para seleccionar
la carpeta deseada. Pulse el botón SIGUIENTE o ANTERIOR para
seleccionar la pista deseada que debe programarse como „P01“ y pulse a
continuación el botón MEM./P-MODE (7) en el aparato o el botón MEM
(3) en el mando a distancia para conrmar la selección.

77
ES
2. Repita el paso 1 para guardar más pistas hasta que todas aparezcan en
la lista.
3. Pulse el botón del dispositivo (16) o el botón de reproducción en el
mando a distancia (7) para iniciar la reproducción de la lista creada.
4. Pulse el botón Stop (14) en el aparato para detener la reproducción de
la lista programada.
5. Para eliminar el programa de música, puede pulsar el botón (14) en el
aparato cuando el disco se detenga y abrir el compartimento de CD y la
lista de reproducción de eliminará.
Modos de repetición
Puede reproducir una o todas las pistas del disco repetidamente. Cómo
repetir una única pista:
1. Pulse durante la reproducción el botón MEM./P-MODE (7) en el aparato
o el botón P-MODE (8) en el mando a distancia; en el display aparece el
símbolo “REP-1” (REPETIR) y la pista actual se repite hasta que pulse el
botón Stop .
2. Para interrumpir la repetición, pulse el botón MEM./P-MODE (7) en el
aparato o el botón P-MODE (8) en el mando a distancia hasta que el
símbolo “REP-1” desaparezca del display.
Cómo repetir todas las pistas:
1. Pulse el botón MEM./P-MODE (7) en el aparato o el botón P-MODE (8)
en el mando a distancia hasta que aparezca de manera permanente el
símbolo REP-ALL (REPETIR TODAS) en el display y todas las pistas del
disco se repetirán hasta que pulse el botón Stop .
2. Para interrumpir la repetición, pulse el botón MEM./P-MODE (7) en el
aparato o el botón P-MODE (8) en el mando a distancia hasta que el
símbolo REP-ALL (REPETIR TODAS) desaparezca del display.

78
ES
Cómo repetir una carpeta (solo en discos MP3 que contienen más de una
carpeta):
1. Pulse el botón MEM./P-MODE (7) en el aparato o el botón P-MODE (8)
en el mando a distancia hasta que aparezca de manera permanente el
símbolo REP-DIR (REPETIR-DIR) en el display y todas las pistas del disco
se repetirán hasta que pulse el botón Stop .
2. Para interrumpir la repetición, pulse el botón MEM./P-MODE (7) en el
aparato o el botón P-MODE (8) en el mando a distancia hasta que el
símbolo REP-DIR desaparezca del display.
Reproducción aleatoria
1. Pulse el botón MEM./P-MODE (7) en el aparato o el botón P-MODE (8)
del mando a distancia en modo reproducción hasta que „SHUFFLE“
aparezca en el display, la reproducción aleatoria se inicia de manera
automática a partir de la siguiente pista y naliza automáticamente
cuando se reproduzcan todas las pistas.
2. Pulse el botón MEM./P-MODE (7) en el aparato o el botón P-MODE (8)
en el mando a distancia hasta que el indicador „SHUFFLE“ desaparezca.
Reproducción Intro
1. Pulse el botón MEM./P-MODE (7) en el aparato o el botón P-MODE
(8) del mando a distancia en modo reproducción hasta que „INTRO“
aparezca en el display, la reproducción de la introducción se inicia y se
analiza cada pista durante 10 segundos.
2. Para interrumpir la reproducción de cada introducción, pulse el botón
MEM./P-MODE (7) en el aparato o el botón P-MODE (8) en el mando a
distancia hasta que el indicador „INTRO“ desaparezca.
USB
• Pulse el botón de selección de función (15) en el aparato para
seleccionar el modo USB.
• Conecte el dispositivo USB a la entrada USB (1). El display LCD
muestra el número total de pistas guardadas en el dispositivo USB. La
reproducción de la pista 1 se realiza automáticamente tras leer el USB.
79
ES
• Para interrumpir la reproducción, pulse el botón ⏯ BT (16) en el aparato
o el botón ⏯ (10) del mando a distancia y el tiempo de reproducción
actual parpadea en el display. Pulse de nuevo el botón para continuar
con la reproducción.
• Para nalizar la reproducción, pulse el botón ⏯ (16) en el aparato o el
botón ⏯ (10) del mando a distancia. El display muestra el número total
de pistas en el dispositivo USB y „STOP“.
• Los distintos modos de selección de reproducción de programa/
modo de repetición (1 repetir carpeta - repetir todas las pistas)/modo
aleatorio/ reproducción de intro funcionan según el mismo principio
descrito en la sección „CD/MP3“.
Nota: No utilice ningún cable alargador USB para la conexión de un
dispositivo USB, pues esto puede conllevar averías.
BT
• Pulse el botón de selección de función (15) en el aparato o el botón
FUNC (1) del mando a distancia para cambiar a la función BT, en el
display LCD aparece „BT“ y el indicador de la conexión de dispositivos
(27) parpadea a elevada velocidad.
• Active la función BT en el dispositivo, busque „Spacewoofer DAB+“ y
conéctese introduciendo la contraseña „0000“ en caso de que se le
requiera; la luz azul que indica conexión establecida se ilumina y en
el display aparece „BT“. Para iniciar la reproducción, pulse el botón
sincronización BT en el aparato o el botón de reproducción del
mando a distancia. Si el aparato no puede establecer ninguna conexión
en 2 minutos con el dispositivo BT correspondiente, pulse el botón
sincronización BT/reproducción/Pausa (16) en el aparato o el botón
PAIR (10) del mando a distancia para volver a establecer la conexión.
• Gire el regulador de volumen (6) en el aparato o regule el volumen con
su dispositivo BT.
• Pulse SIGUIENTE o ANTERIOR en el aparato o en el dispositivo
externo para seleccionar la pista deseada.
• Para detener la reproducción, pulse el botón reproducción/Pausa/
sincronización BT (16) en el aparato o el botón Stop del dispositivo
externo.
Nota: El BT funcionará mejor a un alcance de 10 metros.

80
ES
AUX-IN
• Pulse el botón de selección de función (15) en el aparato o el botón
FUNC (1) del mando a distancia para seleccionar el modo „AUX“.
• Conecte el cable de audio en la toma AUX-IN (3,5 mm) (2) del
reproductor y la música del aparato se amplicará para ser reproducida
a través del altavoz.
• Regule el volumen en el dispositivo externo o en el equipo.
• Las funciones reproducción/ pausa o pista siguiente/ anterior se
pueden controlar a través del dispositivo externo.

81
ES
RETIRADA DEL APARATO
Si en su país existe una disposición legal relativa a
la eliminación de aparatos eléctricos y electrónicos,
este símbolo estampado en el producto o en
el embalaje advierte que no debe eliminarse
como residuo doméstico. En lugar de ello, debe
depositarse en un punto de recogida de reciclaje
de aparatos eléctricos y electrónicos. Una gestión
adecuada de estos residuos previene consecuencias
potencialmente negativas para el medio ambiente
y la salud de las personas. Puede consultar más
información sobre el reciclaje y la eliminación de este
producto contactando con su administración local o
con su servicio de recogida de residuos.
Este producto contiene baterías. Si en su país existe
una disposición legal relativa a la eliminación de
baterías, estas no deben eliminarse como residuo
doméstico. Infórmese sobre la normativa vigente
relacionada con la eliminación de baterías. Una
gestión adecuada de estos residuos previene
consecuencias potencialmente negativas para el
medio ambiente y la salud de las personas.
DECLARACIÓN DE CONFORMIDAD
Fabricante:
Chal-Tec GmbH, Wallstraße 16, 10179 Berlín, Alemania.
Importador para Gran Bretaña:
Berlin Brands Group UK Limited
PO Box 42
272 Kensington High Street
London, W8 6ND
United Kingdom
Por la presente, Chal-Tec GmbH declara que el tipo de
equipo radioeléctrico Spacewoofer DAB es conforme
con la Directiva 2014/53/UE. El texto completo de la
declaración UE de conformidad está disponible en la
dirección Internet siguiente: use.berlin/10036341


83
IT
Dati tecnici 84
Avvertenze di sicurezza 85
Descrizione del dispositivo e tasti funzione 86
Alimentazione 87
Telecomando 88
Funzioni di base 89
Radio FM 91
Radio DAB 92
CD/MP3 95
USB 98
BT 99
AUX-IN 100
Smaltimento 101
Dichiarazione di conformità 101
Gentile Cliente,
La ringraziamo per aver acquistato il dispositivo.
La preghiamo di leggere attentamente le seguenti
istruzioni per l’uso e di seguirle per evitare possibili
danni tecnici. Non ci assumiamo alcuna responsabilità
per danni scaturiti da una mancata osservazione delle
avvertenze di sicurezza e da un uso improprio del
dispositivo. Scansionare il codice QR seguente, per
accedere al manuale d’uso più attuale e per ricevere
informazioni sul prodotto.
INDICE

84
IT
DATI TECNICI
Numero articolo 10036341, 10036342
Alimentazione AC 100-240 V ~ 50/60 Hz
DC 12V UM-C (8 pezzi)
Potenza (Watt)
30 W
Potenza standby (Watt)
0,5 W
Intervallo di frequenza FM
FM 87.5 – 108 MHz
Intervallo di frequenza DAB/DAB+
174,928-239,200 MHz (Banda III)
Intervallo di frequenza lettore CD
100 Hz – 16 KHz
Copertura BT
Fino a 10 metri
Temperatura di esercizio
+ 5°C – + 35° C
Connessioni
Ingresso AUX IN
3,5 mm
Connessione cuie (jack)
3,5 mm
Connessione USB

85
IT
AVVERTENZE DI SICUREZZA
• Rispettare tutte le avvertenze contenute nel manuale d’uso.
• Il dispositivo non deve essere posizionato nelle vicinanze di acqua o in
ambienti umidi.
• Assicurarsi di non versare acqua sopra al dispositivo e alle sue aperture.
• Spostare il dispositivo facendo attenzione, in modo da non
danneggiarlo.
• Non bloccare le uscite del dispositivo.
• Non posizionare il dispositivo vicino a fonti di calore (ad es. caloriferi).
Non esporre il dispositivo a luce solare diretta.
• Collegare la spina alla presa elettrica in modo adeguato.
• Il dispositivo è dotato di protezione da sovraccarico. Se dovesse essere
sostituita, rivolgersi al servizio di assistenza ai clienti o a una persona
con qualica equivalente.
• Staccare la spina in caso di lunghi periodo di non utilizzo.
• Non cercare di eettuare riparazioni e manutenzione in modo
autonomo, altrimenti la garanzia perde validità.
• La spina serve a scollegare il dispositivo dall’alimentazione dopo lo
spegnimento. Assicurarsi che la spina sia sempre facilmente accessibile.
• Non esporre il dispositivo a spruzzi d’acqua e no poggiarvi sopra
oggetti pieni d’acqua, come ad es. vasi.
• Non esporre le batterie a calore estremo, come luce solare o amme.
• Non impedire la ventilazione bloccando le apposite aperture con
oggetti come giornali, tovaglie, tende, ecc.
• Assicurarsi di mantenere almeno 5 mm di distanza su tutti i lati del
dispositivo.
• Non posizionare oggetti con amma libere sul dispositivo, come ad es.
candele.
• Smaltire le batterie vecchie nel rispetto dell’ambiente.
• Utilizzare il dispositivo solo in climi adeguati, non in climi tropicali.
AVVERTENZA
Pericolo di infortuni! Non aprire il coperchio o il retro del
dispositivo per ridurre il rischio di folgorazione. Il dispositivo
non contiene componenti che necessitano la manutenzione
da parte del cliente. Per riparazioni e manutenzione,
rivolgersi al servizio di assistenza ai clienti o a una persona
con qualica equivalente.
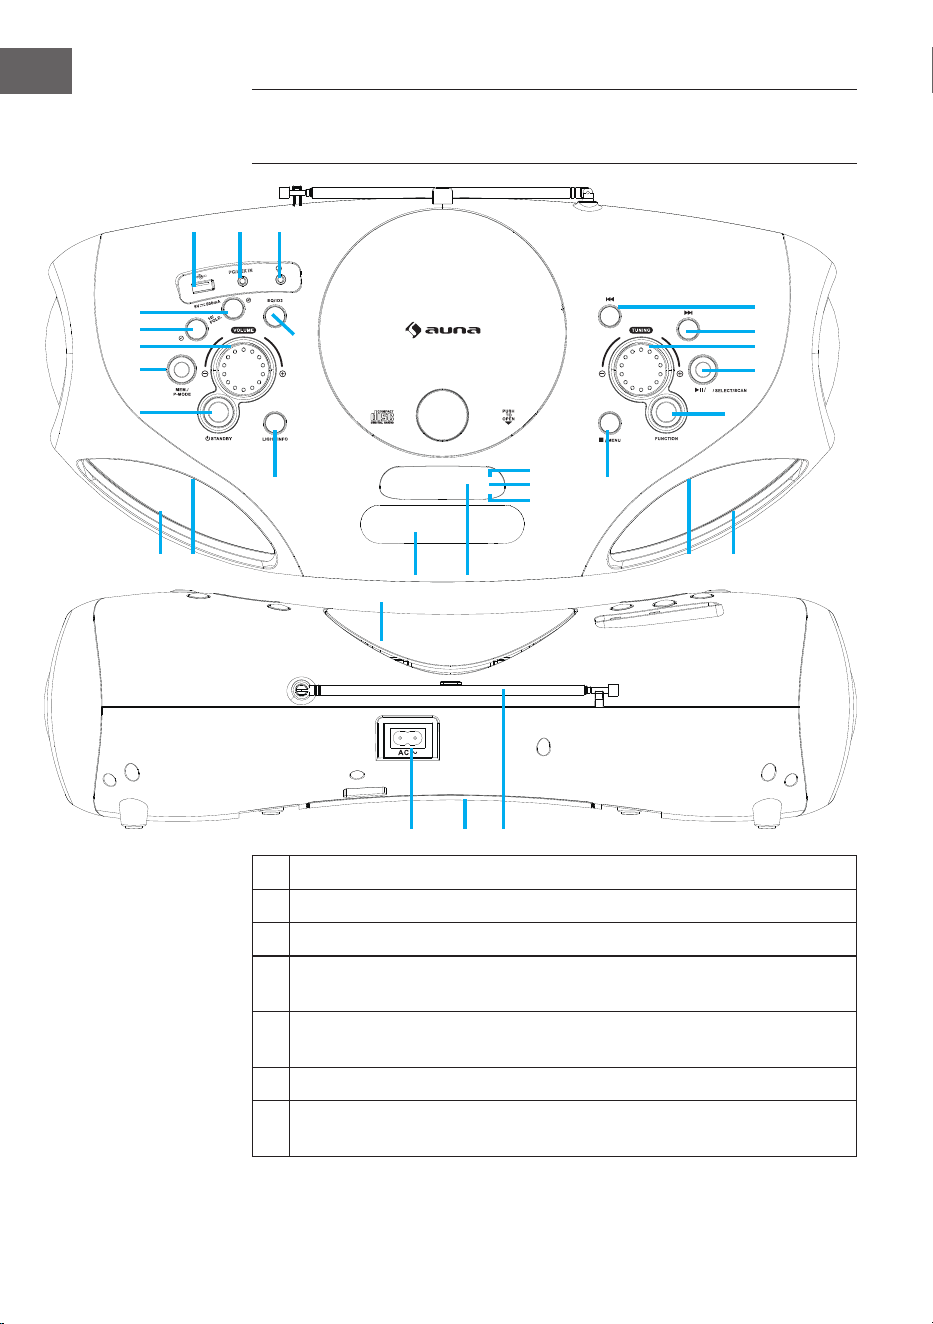
86
IT
1 Connessione USB
2 Connessione AUX IN
3 Connessione cuie
4 Tasto FOLD+/+10/MEM+ (scorrere in avanti nelle cartelle/negli
elenchi/negli elenchi in memoria)
5 Tasto FOLD-/-10/MEM- (scorrere all’indietro nelle cartelle/negli
elenchi/negli elenchi in memoria)
6 Regolazione volume
7 Tasto MEM/P-MODE (selezione programma/modalità di
programmazione/memoria)
DESCRIZIONE DEL DISPOSITIVO E TASTI
FUNZIONE
BT
M./
1 2 3
4
5
6
7
8
9
10
12
11
13
222120
14
19
18
17
16
15
23
26
27
26 2425 25
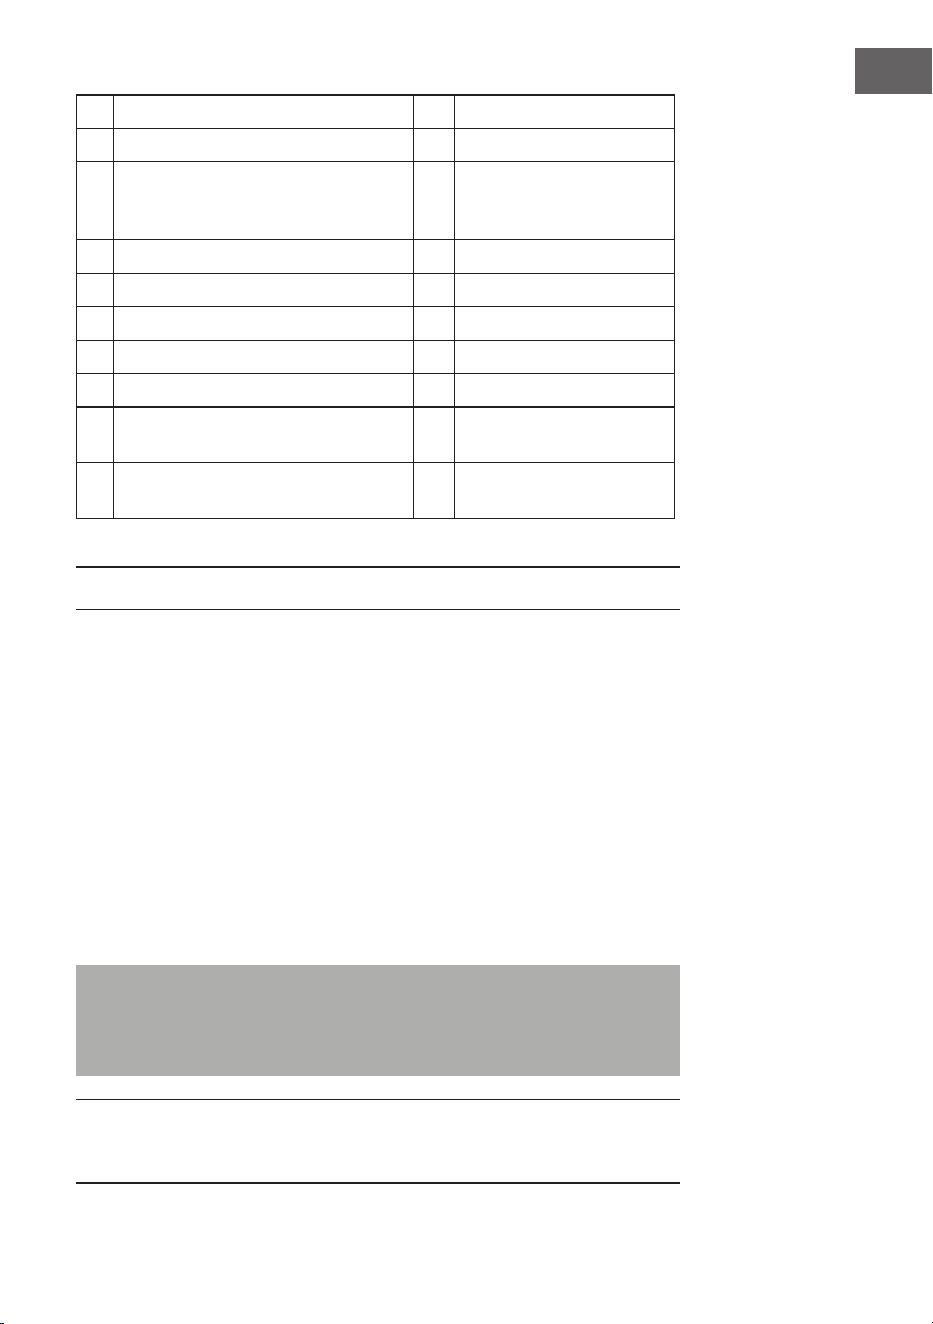
87
IT
8 Tasto standby 18 Avanti/Avanti veloce
9 Tasto luce / info 19 Indietro/Indietro veloce
10 Tasto EQ/ID3 (regolazione del
suono/indicazione di informazioni
MP3)
20 Connessione AC
11 Vano CD 21 Vano batterie
12 Impugnatura 22 Antenna FM
13 Display 23 Indicazione standby
14 Tasto Stop/Menu 24 Altoparlanti
15 Tasto di selezione funzione 25 Luce LED
16 Play/Pausa/Accoppiamento BT/
Seleziona/Scansione
26 Indicazione IR
17 Regolazione tuning 27 Indicazione
accoppiamento BT
ALIMENTAZIONE
Questo dispositivo è adatto al funzionamento con corrente alternata/
continua.
Funzionamento con corrente alternata
• Inserire un’estremità del cavo di alimentazione incluso in consegna nel
dispositivo e l’altra nella presa elettrica. Le batterie vengono scollegate
automaticamente dalla rete elettrica.
Funzionamento con corrente continua
• Aprire lo sportello del vano batterie. Inserire 8 batterie UM2 “C” (non
incluse in consegna) nel vano. Assicurarsi di rispettare la corretta
polarità come mostrato nel manuale
Nota: se si utilizzano le batterie, staccare la spina del dispositivo dalla
presa elettrica. Rimuovere le batterie se sono scariche o se il dispositivo
non viene utilizzato per tempi prolungati. Le batterie contengono
sostanze chimiche e devono essere quindi smaltite in modo corretto.
Nota ESD: il prodotto può essere resettato o non resettato in
funzionamento normale attraverso scariche elettromagnetiche. Basta
spegnere il dispositivo e ricollegarlo.
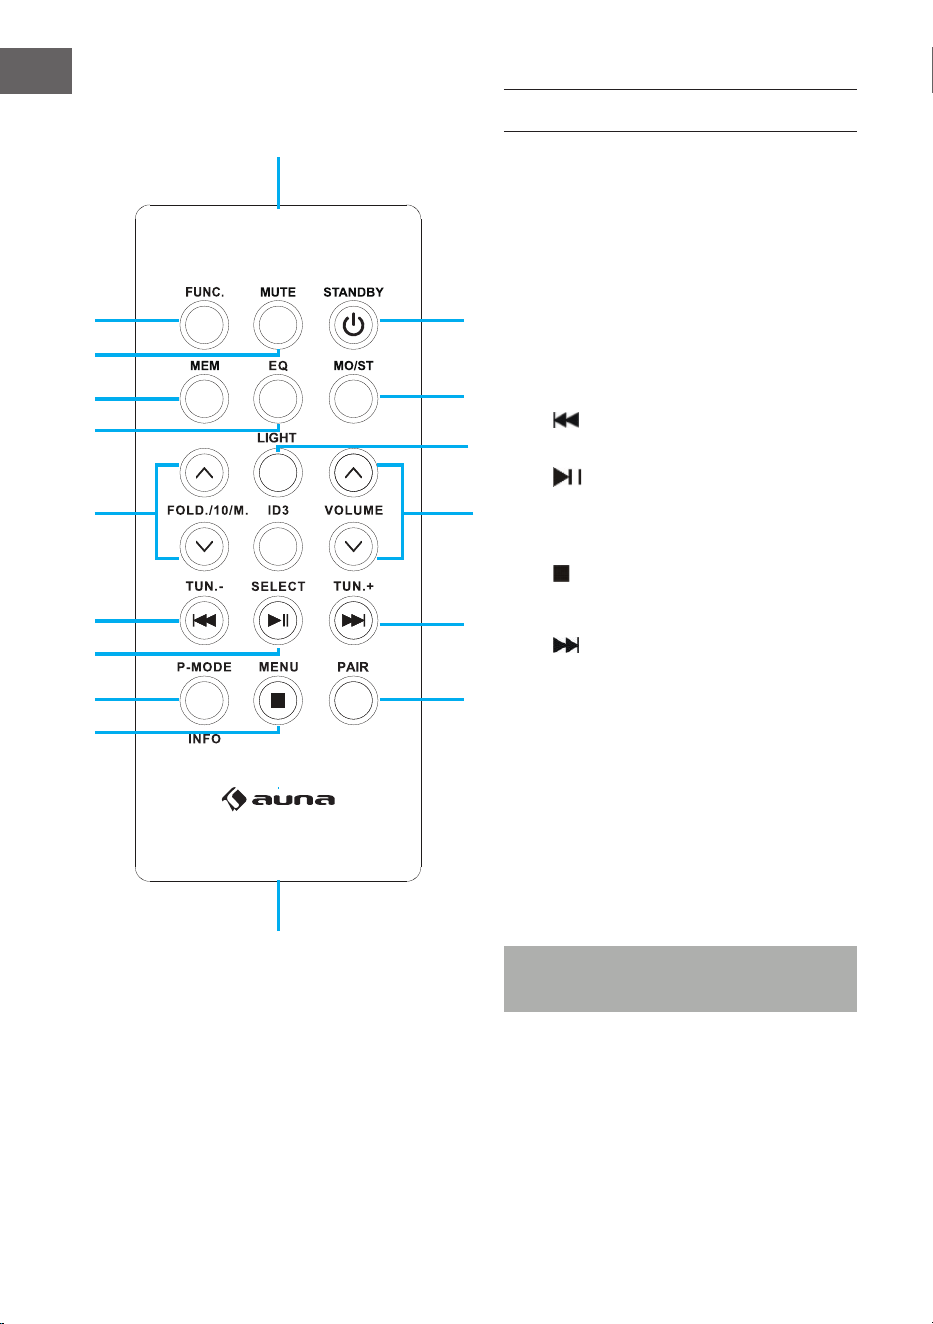
88
IT
TELECOMANDO
Funzioni dei tasti
1 FUNC (selezione funzione)
2 MUTE (muto)
3 MEM (memoria)
4 EQ (regolazione suono)
5 FOLD./10/M. (AUF/AB) Muoversi
avanti e indietro (cartelle/elenchi)
6 Indietro/indietro veloce/Tuning
(-)
7 Play/Pausa / Scansione
8 P-MODE/Info Modalità di
programmazione
9 Stop / Menu
10 PAIR (accoppiamento BT)
11 Avanti/avanti veloce/Tuning (+)
12 ID3 (mostrare informazioni MP3)
13 VOLUME (avanti/indietro volume)
14 LIGHT (luce)
15 MO/ST (mono/estéreo)
16 STANDBY (accendere/spegnere)
17 Sensore telecomando
18 Vano batterie
Nota: togliere la protezione delle
batterie prima della messa in funzione.
1
17
18
15
16
10
11
12
13
14
2
3
4
5
6
7
8
9
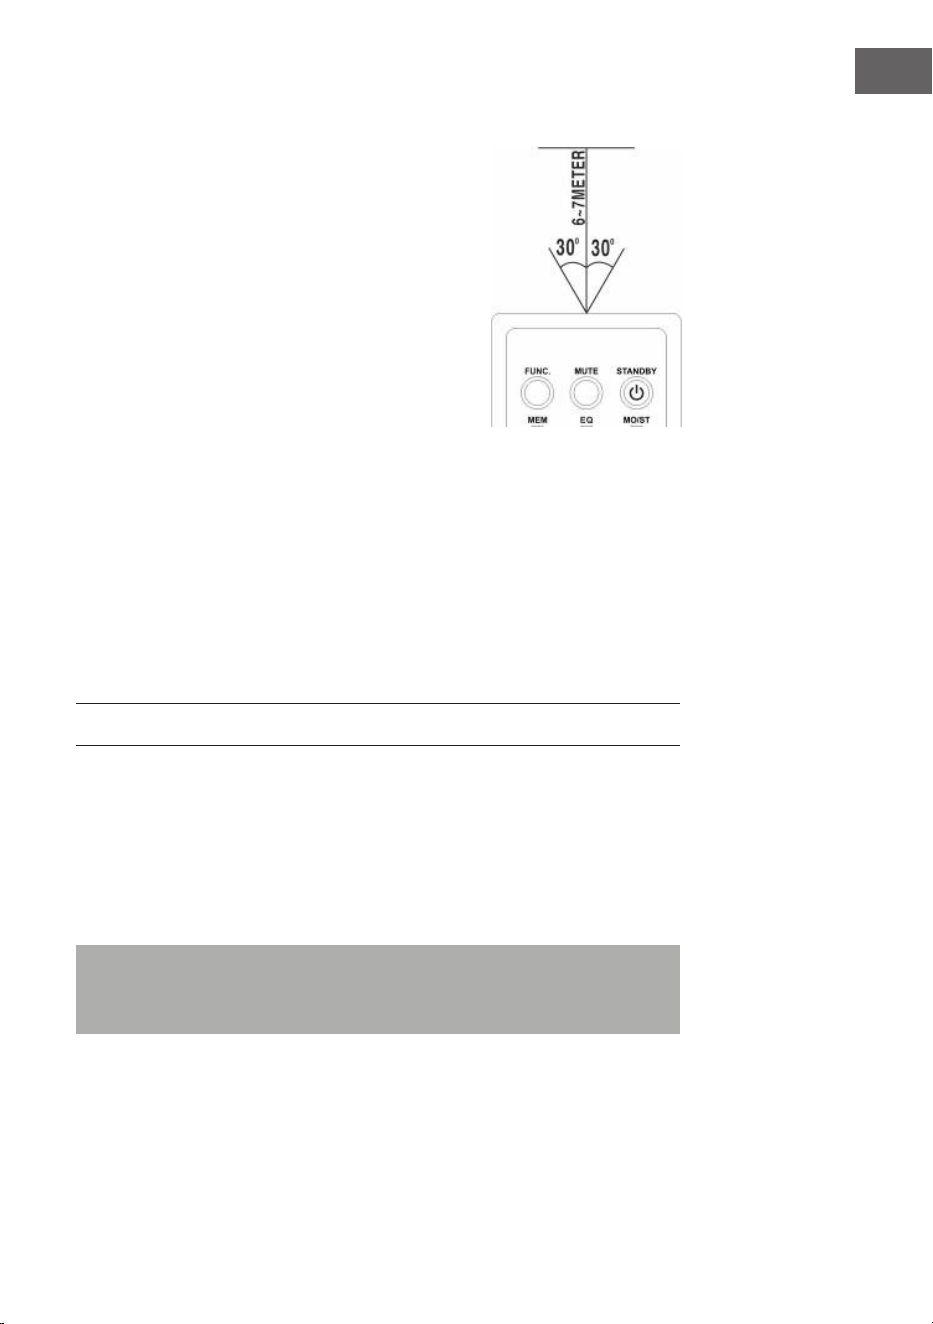
89
IT
Utilizzare il telecomando
• Per utilizzare il dispositivo con il telecomando,
indirizzare il telecomando verso il sensore sul
lato frontale del dispositivo e premere il tasto
desiderato.
• Il telecomando funziona al meglio a una
distanza di 6-7 metri dal lato frontale del
dispositivo e a un’inclinazione di 30 gradi.
• Forte luce solare o illuminazione della
stanza possono disturbare le funzionalità del
telecomando.
• Se il telecomando funziona male o non
funziona, sostituire le batterie o cambiare le
condizioni di luminosità della stanza.
Inserire la batteria al litio nel telecomando
Il telecomando contiene una batteria al litio CR2025
(3V).
• Per sostituire la batteria, rimuovere il coperchio nella direzione indicata
ed estrarlo dal vano.
• Togliere la batteria scarica e inserire una nuova batteria al litio (CR2025)
con il polo positivo verso l’alto. Chiudere nuovamente il vano no a
sentire un clic.
FUNZIONI DI BASE
Impostare il dispositivo
• Premere il tasto Standby sul dispositivo (8) o sul telecomando (16) per
accendere il dispositivo dopo averlo collegato all’alimentazione.
• Premere il tasto di selezione delle funzioni sul dispositivo (15) o FUNC
sul telecomando (1), per scegliere una funzione tra FM/CD/USB/BT/
AUX/DAB.
Nota: in modalità CD/USB/BT/AUX, il dispositivo passa in standby se
non viene selezionata alcuna funzione base entro 15 minuti. Premere
Standby per riattivare il dispositivo.

90
IT
Regolare il volume
• Ruotare la manopola sul dispositivo (6) per alzare o abbassare il
volume.
Connessione cuie
• Se necessario, collegare le cuie con un connettore da 3,5 mm (non
incluso in consegna) nell’ingresso per le cuie (3). L’altoparlante (24)
viene messo automaticamente in muto.
ATTENZIONE:
Ascoltare musica ad alto volume per tempi prolungati può
danneggiare l’udito.
ID3 Tag System (informazioni MP3)
Alcuni le MP3 presentano informazioni quali nome del brano,
dell’interprete e dell’album. Queste informazioni sono denominate “ID3
Tag”.
• Tenere premuto il tasto EQ/ID3 sul dispositivo (10) o ID3 sul
telecomando (12) per accendere o spegnere le ID3 Tag. Quando
l’indicazione delle ID3 Tag è attivata, le informazioni vengono mostrate
sul dispositivo in questa sequenza.
Funzione EQ (equalizzatore)
Questo dispositivo è dotato di funzione di equalizzazione.
• Premere il tasto EQ/ID3 sul dispositivo (10) o EQ sul telecomando (4)
per selezionare uno stile musicale (suono): FLAT, CLASSIC, ROCK, POP,
JAZZ e DBBS.
Luce LED
• Tenere premuto il tasto Luce sul dispositivo (9) o LIGHT sul
telecomando (14) per accendere la luce LED e selezionare uno degli
8 eetti. Per disattivare la luce LED, premere di nuovo il tasto no a
quando sul display compare “LIGHT OFF”.

91
IT
RADIO FM
Sintonizzare i canali radio
1 Premere il tasto per selezionare le funzioni sul dispositivo (15) o FUNC
sul telecomando (1) per selezionare la modalità radio: FM.
2 Ruotando la manopola Tuning (17) viene mostrata la frequenza. Ad
esempio: FM 97,10 MHz. Per cercare più rapidamente è possibile anche
tenere premuti AVANTI o INDIETRO Il dispositivo si ferma su
ogni emittente con segnale intenso.
3 Ruotare la manopola del volume (6) per alzarlo o abbassarlo.
4 Estrarre completamente l’antenna telescopica (22) e muovere
lentamente il dispositivo per ottenere la migliore ricezione possibile o
riposizionare il dispositivo in un luogo adatto.
5 Per spegnere la radio, premere il tasto per selezionare le funzioni sul
dispositivo (15) o FUNC sul telecomando (1) per selezionare un’altra
funzione, oppure premere Standby sul dispositivo (8) o sul telecomando
(16) per spegnere il dispositivo.
Posizioni di salvataggio emittenti predenite/Scan
• Per cercare e salvare automaticamente le emittenti, tenere premuto
Play (16). Ogni emittente con segnale suicientemente intenso viene
salvata. Dopo aver nito la scansione, si imposta in automatico il
numero di emittente 1 (P01).
• Per impostare l’emittente precedente o successiva, premere
FOLD./10/M.+/- (4 & 5) sul dispositivo o FOLD./10/M. (AVANTI/
INDIETRO) (5) sul telecomando.
Utilizzo delle emittenti impostate manualmente
Possono essere salvate 30 emittenti radiofoniche a piacere.
1 Ruotare la manopola Tuning sul dispositivo (17) per selezionare
l’emittente che si desidera salvare come predenita.
2 Premere MEM./P-MODE (7) sul dispositivo o MEM (3) sul telecomando,
“P01” lampeggia sul display per indicare che l’emittente viene salvata
in questa posizione e premere FOLD./10/M.+/- (4 & 5) sul dispositivo
o FOLD./10/M. (AVANTI/INDIETRO) (5) sul telecomando o premere di
nuovo MEM (3) sul telecomando per accedere alla memoria.
3 Per cercare un’altra emittente, ripetere i passaggi (1) e (2) no ad aver
salvato tutte le emittenti desiderate. Possono essere salvate no a 30
emittenti FM.
4 Premere FOLD./10/M.+/- (4 & 5) sul dispositivo o FOLD./10/M. (AVANTI/
INDIETRO) (5) sul telecomando per scegliere tra le emittenti salvate.

92
IT
RADIO DAB
La modalità radio DAB riceve la radio digitale DAB/DAB+ e visualizza
le informazioni sulla stazione e il brano programmato. Premere il tasto
FUNCTION sul dispositivo o sul telecomando nché sul display non appare
"Welcome to DAB".
1 Per eseguire una scansione completa tenere premuto il tasto STOP/
MENU sul dispositivo o sul telecomando per accedere al menu,
selezionare l'opzione "scansione completa" e premere PLAY/PAUSE/
PAIR/SELECT/SCAN sul dispositivo o PLAY/PAUSE/SELECT sul
telecomando per confermare. Non appena viene completata una
scansione completa, la radio riproduce la prima stazione dall'elenco
delle stazioni.
2 Per selezionare le stazioni scansionate ruotare la manopola TUNING sul
dispositivo o premere TUN-/⏮o TUN+/⏭sul telecomando per scorrere
l'elenco delle stazioni e premere PLAY/PAUSE/PAIR/SELECT/SCAN sul
dispositivo o PLAY/PAUSE/SELECT sul telecomando per confermare.
Nella schermata Riproduzione in corso vengono visualizzati i dettagli
del nuovo canale.
3 Per rimuovere i canali elencati ma non disponibili, tenere premuto
STOP/MENU sul dispositivo o premere STOP/MENU sul telecomando
per accedere alla selezione del menu, premere TUN-/⏮o TUN+/⏭sul
dispositivo o sul telecomando per selezionare "Prune" e premere
PLAY/PAUSE/PAIR/SELECT/SCAN sul dispositivo o PLAY/PAUSE/
SELECT sul telecomando per confermare la selezione. Quindi premere
PLAY/PAUSE/PAIR/SELECT/SCAN sul dispositivo o PLAY/PAUSE/
SELECT sul telecomando per selezionare YES o NO. Premere poi PLAY/
PAUSE/PAIR/SELECT/SCAN sul dispositivo o PLAY/PAUSE/SELECT
sul telecomando per confermare la selezione. In questo modo tutti i
canali non validi contrassegnati da un "?" davanti al nome del canale
nell'elenco vengono cancellati.
Salvare le emittenti
Per memorizzare una stazione in una posizione di memoria, sintonizzarsi
sulla stazione che si desidera memorizzare. Quindi tenere premuto
MEM/P-MODE sul dispositivo o MEM sul telecomando nché il display
non visualizza "Preset Store". Per selezionare le stazioni scansionate (p. es.
"Preset 1") premere TUN-/⏮o TUN+/⏭ sul dispositivo o sul telecomando e
premere PLAY/PAUSE/PAIR/SELECT/SCAN sul dispositivo o PLAY/PAUSE/
SELECT sul telecomando per confermare. Utilizzare il tasto 10/M./FOLD. il
tasto +/- sul dispositivo o il tasto FOLD./10/M UP/DOWN sul telecomando
per sintonizzare le stazioni desiderate. Ripetere questa procedura per
memorizzare no a 30 posizioni di memoria.

93
IT
Sintonizzazione manuale
Per eseguire una scansione manuale, tenere premuto STOP/MENU
suldispositivo o sul telecomando per accedere al menu, selezionare
l'opzione "Scansione manuale" e premere PLAY/PAUSE/PAIR/SELECT/SCAN
sul dispositivo o PLAY/PAUSE/SELECT sul telecomando per confermare.
Premere TUN-/⏮ o TUN+/⏭ sul dispositivo o sul telecomando per
selezionare l'emittente desiderata.
Informazioni sulla riproduzione in corso
Durante la riproduzione di una stazione, lo schermo visualizza il nome della
stazione e le informazioni DLS (Dynamic Label Segment) trasmesse dalla
stazione, ad esempio il nome del programma, il brano e le informazioni
di contatto. Per visualizzare altre informazioni, premere LIGHT/INFO sul
dispositivo o P-MODE/INFO per visualizzare le informazioni successive, che
appaiono in sequenza: testo DLS, informazioni DL Plus (visualizzate solo se
trasmesse dalla stazione), potenza del segnale, tipo di programma, nome
dell'ensemble, numero/frequenza del canale, tasso di errore del segnale e
bit rate.
Compressione della gamma dinamica (DRC)
Questa funzione riduce la dierenza tra il suono più forte e quello più
debole trasmesso. Per questa impostazione sono disponibili 3 opzioni,
ovvero: DRC o/DRC alto/DRC basso. Per modicare l'impostazione DRC
tenere premuto STOP/MENU sul dispositivo o premere STOP/MENU
sul telecomando per accedere al menu. Premere TUN-/⏮ o TUN+/⏭ sul
dispositivo o sul telecomando per selezionare l'opzione "DRC" e utilizzare
poi PLAY/PAUSE/PAIR/SELECT/SCAN sul dispositivo o PLAY/PAUSE/
SELECT sul telecomando per selezionare l'opzione desiderata.
Sistema
Nelle impostazioni di sistema è possibile selezionare le lingue di
visualizzazione, ripristinare le impostazioni di fabbrica e visualizzare la
versione del software.
Lingua
Per selezionare diverse lingue per i messaggi del display. Tenere premuto
STOP/MENU sul dispositivo o premere STOP/MENU sul telecomando
per accedere al menu. Premere TUN-/⏮ o TUN+/⏭ sul dispositivo o sul
telecomando per selezionare l'opzione "Sistema" e premere poi PLAY/
PAUSE/PAIR/SELECT/SCAN sul dispositivo o PLAY/PAUSE/SELECT
sul telecomando per confermare. Selezionare "Lingua" e poi la lingua
desiderata.

94
IT
Resettare alle impostazioni di fabbrica
Il ripristino delle impostazioni di fabbrica può aiutare a cancellare tutte le
impostazioni personalizzate e a sostituirle con quelle originali, compreso
l'elenco delle stazioni DAB e le posizioni di memoria. Tenere premuto
STOP/MENU sul dispositivo o premere STOP/MENU sul telecomando
per accedere al menu. Premere TUN-/⏮ o TUN+/⏭ sul dispositivo o sul
telecomandoper selezionare "Sistema" e premere PLAY/PAUSE/PAIR/
SELECT/SCAN sul dispositivo o PLAY/PAUSE/SELECT sul telecomando,
selezionare "Factory Reset" e premere poi TUN-/⏮ oder TUN+/⏭ sul
dispositivo o sul telecomando per selezionare l'opzione YES o NO. Premere
poi PLAY/PAUSE/PAIR/SELECT/SCAN sul dispositivo o PLAY/PAUSE/
SELECT sul telecomando per confermare.
Aggiornamento del software
Come aggiornare il software del dispositivo. Tenere premuto STOP/MENU
sul dispositivo o premere STOP/MENU sul telecomando per accedere al
menu. Premere TUN-/⏮ o TUN+/⏭ sul dispositivo o sul telecomando per
selezionare "Sistema" e premere PLAY/PAUSE/PAIR/SELECT/SCAN sul
dispositivo o PLAY/PAUSE/SELECT sul telecomando, selezionare "Software
Upgrade" e premere poi TUN-/⏮ oder TUN+/⏭ sul dispositivo o sul
telecomando per selezionare l'opzione SI o NO. Premere PLAY/PAUSE/
PAIR/SELECT/SCAN sul dispositivo o PLAY/PAUSE/SELECT sul telecomando
per confermare.
Versione software
Qui viene visualizzata la versione attuale del software. Tenere premuto
STOP/MENU sul dispositivo o premere STOP/MENU sul telecomando
per accedere al menu. Premere TUN-/⏮ o TUN+/⏭ sul dispositivo o sul
telecomando per selezionare "Sistema" e premere PLAY/PAUSE/PAIR/
SELECT/SCAN sul dispositivo o PLAY/PAUSE/SELECT sul telecomando per
confermare. Selezionare "Versione SW" e premere poi PLAY/PAUSE/PAIR/
SELECT/SCAN sul dispositivo o PLAY/PAUSE/SELECT sul telecomando per
visualizzare la versione attuale del software.
95
IT
CD/MP3
Riproduzione CD
Questo sistema può riprodurre tutti i CD digitali audio come CD/MP3, CD-R,
CD-RW e in formato CD-DA.
Inserire un CD
• Premere il tasto di selezione delle funzioni sul dispositivo (5) o FUNC sul
telecomando (1) per selezionare “CD”.
• Premere PUSH TO OPEN (PREMERE PER APRIRE) per aprire il vano CD.
Sul display compare “OP”.
• Inserire il CD/DISCO MP3 con il lato anteriore verso l’alto.
• Chiudere il vano CD.
• Sul display compare “READING” (LETTURA CD), poi viene mostrato il
numero totale di brani e la riproduzione inizia dal principio.
• Per togliere il CD, premere Stop sul dispositivo (14) per spegnere il
dispositivo e premere PUSH TO OPEN per aprire il vano CD. Togliere il
CD facendo attenzione e sollevandolo dai bordi.
Nota: assicurarsi che il CD sia fermo prima di aprire il vano CD. Per
garantire una buona prestazione del sistema, attendere no alla
completa lettura del CD e poi proseguire. Se non ci sono CD nel vano o
se non sono leggibile, il display indica “NO”.
Riprodurre un CD
• Per interrompere la riproduzione, premere Play/Pausa sul dispositivo
(16) o Play/Pausa sul telecomando (7). Il tempo di riproduzione
attuale lampeggia sul display. Per riattivare la riproduzione, premere
di nuovo Play/Pausa sul dispositivo (16) o Play/Pausa sul
telecomando (7).
• Per arrestare la riproduzione, premere Stop sul dispositivo (14) o sul
telecomando (9).

96
IT
Selezionare un titolo/passaggio specico
Come scegliere un titolo specico:
• Premere AVANTI o INDIETRO in modalità stop o durante la
riproduzione, no a quando sul display compare il titolo desiderato. La
riproduzione si attiva automaticamente.
Come cercare un passaggio specico durante la riproduzione (ricerca titolo
ad alta velocità):
• Tenere premuto AVANTI o INDIETRO per scorrere rapidamente
nel titolo attuale, no a quando compare il passaggio desiderato.
Lasciando andare il tasto riprende la normale riproduzione da questo
punto.
Come selezionare un brano il cui titolo è superiore a 10 (solo per CD MP3):
• Per selezionare una canzone il cui numero è superiore a 10, premere
FOLD./10/M.+/- (4 & 5) sul dispositivo o FOLD./10/M. (AVANTI/
INDIETRO) (5) sul telecomando per saltare avanti o indietro di 10 titoli.
Come selezionare una cartella specica
• Per selezionare una carella specica, tenere premuto FOLD./10/M.+/-
(4 & 5) sul dispositivo o FOLD./10/M. (AVANTI/INDIETRO) (5) sul
telecomando per saltare avanti o indietro di una cartella.
Programmare i brani
La programmazione dei brani da CD è possibile se la riproduzione è ferma.
Possono essere programmati in sequenza no a 20 titoli per CD e no a 99
titoli per CD MP3.
1 In modalità stop, premere MEM./P-MODE (7) sul dispositivo o MEM (3)
sul telecomando per avviare la programmazione. Sul display compaiono
il logo MEM, “P01” e “F00”. Per selezionare una carella specica, tenere
premuto FOLD./10/M.+/- (4 & 5) sul dispositivo o FOLD./10/M. (AVANTI/
INDIETRO) (5).
Premere AVANTI o INDIETRO per selezionare il titolo che si
desidera programmare come “P01” e premere poi MEM./P-MODE (7) sul
dispositivo o MEM (3) sul telecomando per confermare.
2 Ripetere il passaggio 1 per programmare ulteriori titoli.
3 Premere Play/Pausa sul dispositivo (16) o Play/Pausa sul
telecomando (7) per avviare la riproduzione della lista programmata.
4 Per arrestare la riproduzione, premere Stop sul dispositivo.
5 Per cancellare la programmazione, premere Stop sul dispositivo (14)
quando il CD si è arrestato e aprire il vano CD. Il programma viene

97
IT
cancellato.
Modalità di ripetizione
Uno o tutti i titoli di un CD possono essere ripetuti. Come ripetere un brano:
1 Durante la riproduzione, premere MEM./P-MODE (7) sul dispositivo o
P-MODE (8) sul telecomando. Sul display compare il simbolo “REP-1”
(RIPETERE) e il titolo attuale viene ripetuto no a quando viene premuto
Stop .
2 Per interrompere la ripetizione, premere MEM./P-MODE (7) sul
dispositivo o P-MODE (8) sul telecomando no a quando sul display
scompare il simbolo “REP-1” .
Come ripetere tutti i brani:
1 Premere MEM./P-MODE (7) sul dispositivo o P-MODE (8) sul
telecomando no a quando sul display compare il simbolo REP-ALL
(RIPETERE TUTTI) e tutti i titoli sul CD attuale vengono ripetuti no a
quando viene premuto Stop .
2 Per interrompere la ripetizione, premere MEM./P-MODE (7) sul
dispositivo o P-MODE (8) sul telecomando no a quando sul display
scompare il simbolo REP-ALL (RIPETERE TUTTI).

98
IT
Come ripetere una cartella (solo per CD MP3 che contengono più di una
cartella):
1 Premere MEM./P-MODE (7) sul dispositivo o P-MODE (8) sul
telecomando no a quando sul display compare il simbolo REP-DIR
(RIPETERE DIR) e tutti i titoli nella cartella vengono ripetuti no a
quando viene premuto Stop .
2 Per interrompere la ripetizione, premere MEM./P-MODE (7) sul
dispositivo o P-MODE (8) sul telecomando no a quando sul display
scompare il simbolo REP-DIR.
Riproduzione casuale
1 Premere MEM./P-MODE (7) sul dispositivo o P-MODE (8) sul
telecomando in modalità di riproduzione no a quando sul display
compare il “SHUFFLE”. La riproduzione casuale inizia dal titolo
successivo e si arresta quando sono stati riprodotti tutti i titoli.
2 Per interrompere la ripetizione, premere MEM./P-MODE (7) sul
dispositivo o P-MODE (8) sul telecomando no a quando sul display
scompare “SHUFFLE”.
Riproduzione Intro
1 Premere MEM./P-MODE (7) sul dispositivo o P-MODE (8) sul
telecomando in modalità di riproduzione no a quando sul display
compare il “INTRO”. La riproduzione Intro si avvia e scansiona ogni
titolo per 10 secondi.
2 Per interrompere la riproduzione Intro, premere MEM./P-MODE (7) sul
dispositivo o P-MODE (8) sul telecomando no a quando sul display
scompare “INTRO”.
USB
• Premere il tasto di selezione delle funzionalità sul dispositivo (15) per
scegliere “USB”.
• Collegare il dispositivo USB all’ingresso USB (1). Lo schermo LCD
mostra il numero totale di titoli sul dispositivo USB. La riproduzione del
titolo 1 inizia automaticamente dopo la lettura dell’USB.
99
IT
• Per interrompere la riproduzione, premere il tasto ⏯ sul dispositivo (16)
o ⏯ sul telecomando (10). L’attuale tempo di riproduzione lampeggia
sullo schermo. Premere di nuovo il tasto per riprendere la riproduzione.
• Premere il tasto ⏯ sul dispositivo (16) o ⏯ sul telecomando (10) per
arrestare la riproduzione. Il display mostra il numero totale di brani sul
dispositivo USB e “STOP”.
• Le diverse modalità di selezione riproduzione programmata/ripetizione
(ripetere una cartella – ripetere tutti i titoli)/riproduzione casuale/
riproduzione Intro funzionano come indicato nel paragrafo “CD/MP3”.
Nota: non utilizzare una prolunga USB per collegare un dispositivo USB,
in quanto potrebbero risultare malfunzionamenti.
BT
• Premere il tasto di selezione delle funzionalità sul dispositivo (15) o
FUNC sul telecomando (1) per passare alla modalità BT. Sullo schermo
LCD compare “BT” e l’indicazione per il collegamento di dispositivi (27)
lampeggia velocemente.
• Accendere la funzione BT del dispositivo, cercare il dispositivo
“Spacewoofer DAB+” e collegarsi. Se necessario, inserire la password
“0000”, la luce blu si accende a indicare che è riuscita la connessione
e sul display compare “BT”. Premere (PLAY/PAUSE) BT Pairing sul
dispositivo (16) o (PLAY/PAUSE) Play/Pausa sul telecomando (7)
per iniziare la riproduzione. Se il dispositivo non riesce a stabilire la
connessione al dispositivo entro 2 minuti, premere (PLAY/PAUSE)
BT Pairing sul dispositivo (16) o PAIR sul telecomando (7) per ristabilire
la connessione.Ruotare la manopola (6) sul dispositivo per regolare il
volume o regolarlo con il dispositivo BT.
• Premere AVANTI o INDIETRO sulla boombox o sul dispositivo
esterno per selezionare il titolo desiderato.
• Per arrestare la riproduzione, premere Play/Pausa/BT Pairing sul
dispositivo (16) o Stop sul dispositivo esterno.
Nota: il BT funziona al meglio entro una distanza di 10 metri.

100
IT
AUX-IN
• Premere il tasto di selezione delle funzionalità sul dispositivo (15) o
FUNC sul telecomando (1) per passare alla modalità “AUX”.
• Inserire il cavo audio nella connessione AUX IN (Ø 3,5 mm) (2) del
lettore. La musica viene amplicata dal dispositivo e riprodotta dagli
altoparlanti.
• Impostare il volume desiderato sull’impianto o sul dispositivo esterno.
• Le funzioni Play/Pausa e titolo successivo/precedente possono essere
gestite sul dispositivo esterno.

101
IT
SMALTIMENTO
Se nel proprio paese si applicano le
regolamentazioni inerenti lo smaltimento di
dispositivi elettrici ed elettronici, questo simbolo
sul prodotto o sulla confezione segnala che questi
prodotti non possono essere smaltiti con i riuti
normali e devono essere portati a un punto di
raccolta di dispositivi elettrici ed elettronici. Grazie
al corretto smaltimento dei vecchi dispositivi si
tutela il pianeta e la salute delle persone da possibili
conseguenze negative. Informazioni riguardanti
il riciclo e lo smaltimento di questi prodotti si
ottengono presso l’amministrazione locale oppure il
servizio di gestione dei riuti domestici.
Il prodotto contiene batterie. Se nel proprio
paese si applicano le regolamentazioni inerenti
lo smaltimento di batterie, non possono essere
smaltite con i normali riuti domestici. Preghiamo
di informarvi sulle regolamentazioni vigenti sullo
smaltimento delle batterie. Grazie al corretto
smaltimento dei vecchi dispositivi si tutela l’ambiente
e la salute delle persone da conseguenze negative.
DICHIARAZIONE DI CONFORMITÀ
Produttore:
Chal-Tec GmbH, Wallstraße 16, 10179 Berlino,
Germania.
Importatore per la Gran Bretagna:
Berlin Brands Group UK Limited
PO Box 42
272 Kensington High Street
London, W8 6ND
United Kingdom
Il fabbricante, Chal-Tec GmbH, dichiara che il tipo di
apparecchiatura radio Spacewoofer DAB è conforme
alla direttiva 2014/53/UE. Il testo completo della
dichiarazione di conformità UE è disponibile al
seguente indirizzo Internet: use.berlin/10036341