
Technical Support and E-Warranty Certificate www.vevor.com/support
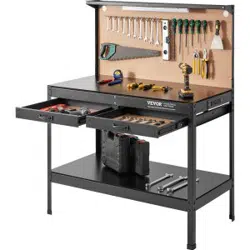
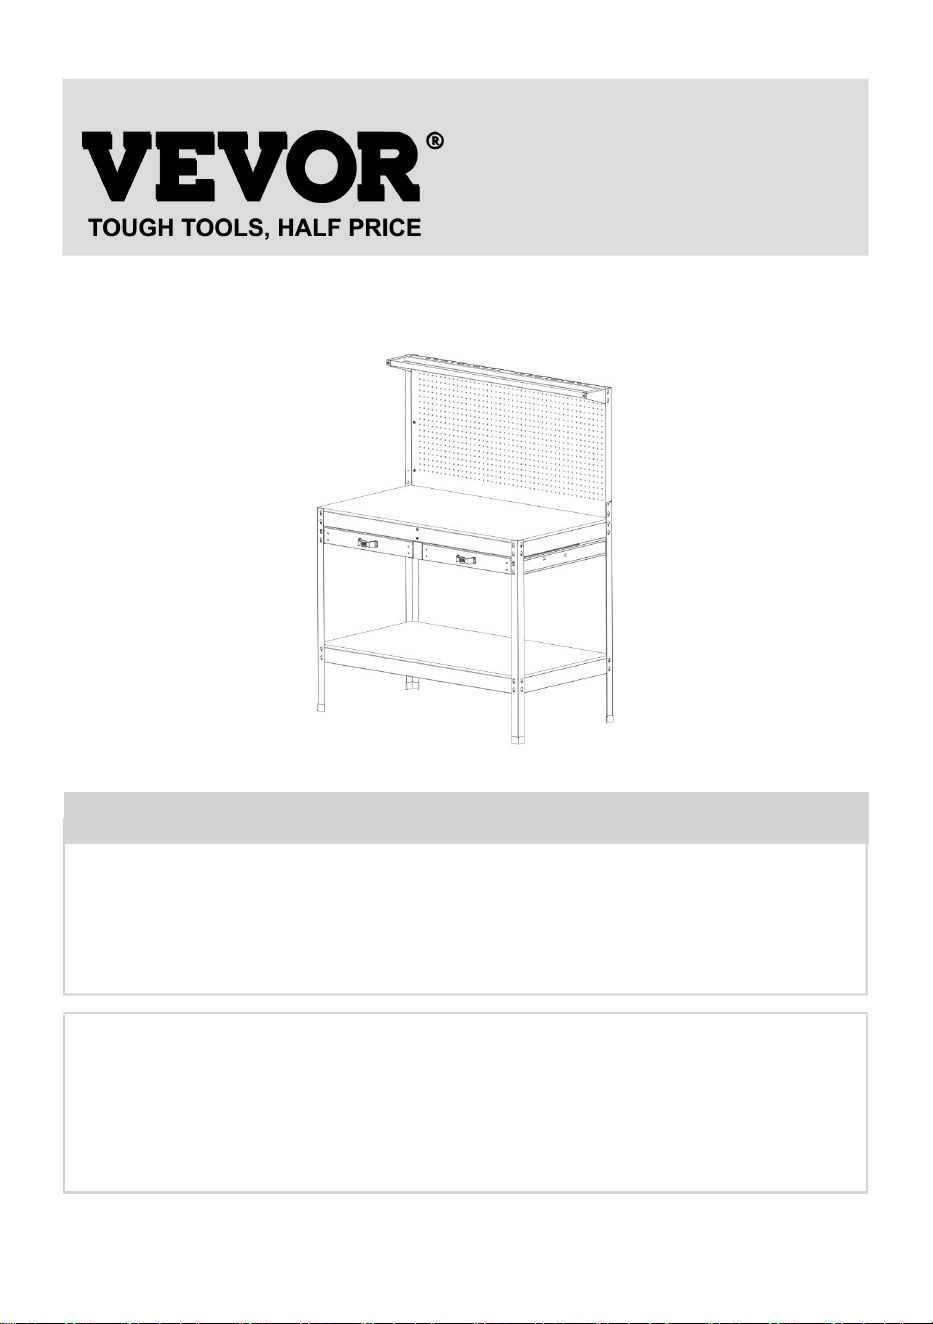
WORKBENCH WITH PEGBOARD
USER'S MANUAL
We continue to be committed to provide you tools with competitive price.
"Save Half", "Half Price" or any other similar expressions used by us only represents an
estimate of savings you might benefit from buying certain tools with us compared to the major
top brands and does not necessarily mean to cover all categories of tools offered by us. You
are kindly reminded to verify carefully when you are placing an order with us if you are
actually saving half in comparison with the top major brands.

- 1 -
MODEL:JL-WB05-3
Have product questions? Need technical support? Please feel free to
contact us:
Technical Support and E-Warranty Certificate
www.vevor.com/support
NEED HELP? CONTACT US!
This is the original instruction, please read all manual instructions
carefully before operating. VEVOR reserves a clear interpretation of our
user manual. The appearance of the product shall be subject to the
product you received. Please forgive us that we won't inform you again if
there are any technology or software updates on our product.
WORKBENCH WITH
PEGBOARD

- 2 -
SAFE INSTRUCTIONS
:Please read this user manual carefully!
Assembly Precautions
1.Assemble only according to these instructions. Improper assembly can
create hazards.
2. Wear ANSI-approved safety goggles and heavy-duty work gloves during
assembly.
3.Keep assembly area clean and well lit.
4.Keep bystanders out of the area during assembly.
5.Do not assemble when tired or when under the influence of alcohol,
drugs or medication.
6.Weight capacity and other product capabilities apply to properly and
completely assembled product only.
7.Assemble on a flat, level, hard and smooth surface capable of safely
supporting a fully loaded workbench.
Use Precautions
1. Do not attach or mount this product to a vehicle.This may cause
personal injury or product damage.
2. Do not stand or step on this product.You may fall which may cause
personal injury.
3. Keep the product on level surfaces.The product may become unstable
and tip if stored or moved on an unlevel surface,which may cause
personal injury or product damage.
4. Lock the drawers before moving this product.The drawers could come
open and make the product unstable and tip,which may cause
personal or product damage.
5. Keep children and bystanders away while loading,unloading and
moving the product.
6. Do not lift the product directly with a forklift or tow with any mechanical
- 3 -
devices.
7. Do not exceed the maximum load capacity,including contents.Do not
exceed the maximum load capacity of each drawer.Do not exceed the
maximum load capacity of each tray.
8. Do not alter this product in any manner.
9. The box contains some small components; please place them properly
before installation to keep them away from kids and ensure safety.
10. Before installing the socket, the desktop should be cleaned to ensure
that there are no stains on the desktop. In particular, attention should
be paid to not bringing water into the socket so as to avoid safety
problems during subsequent use.
CAUTION: Carefully read instructions and procedures for safe operations.
SAVE THESE INSTRUCTIONS
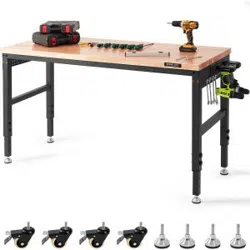
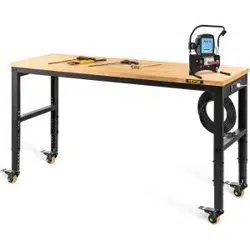
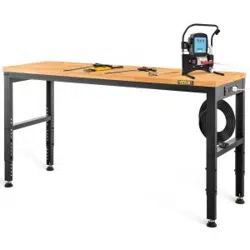
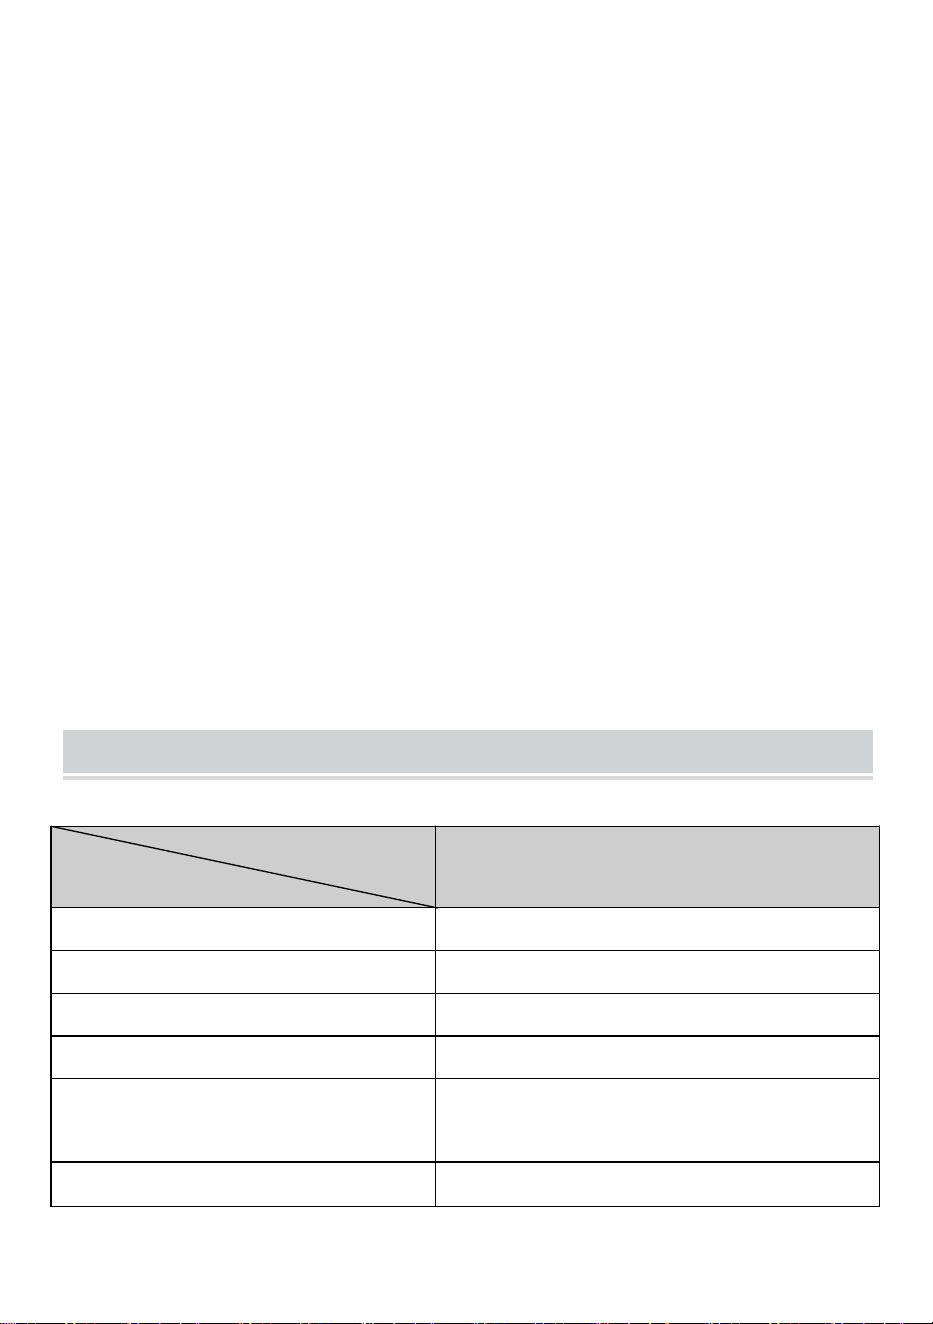
PRODUCT INTRODUCTION
JL-WB05-3
Maximum Load Capacity
220lbs
Desktop Size
120*59.5cm
Material
MDF, Metal
Product Dimensions
120*60W*150cm
Rating(s)
120V~ 60Hz Max.1500W(Power Strip) with
14W LED Light
Pegboard
118.5*59cm
Model
SPEC.
- 4 -
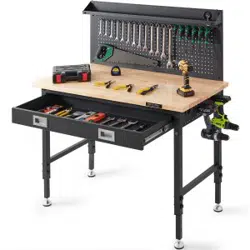
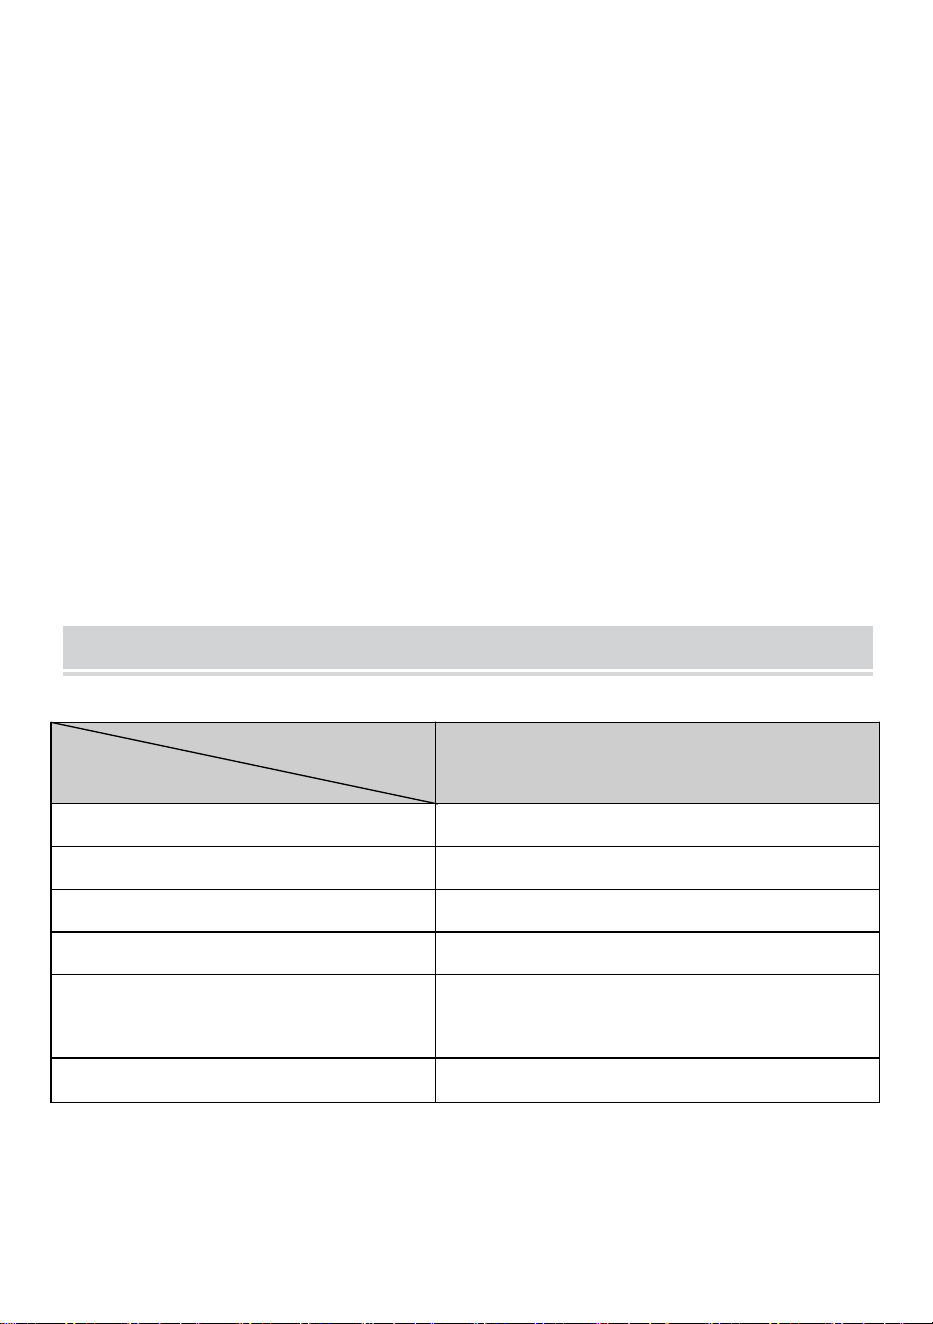
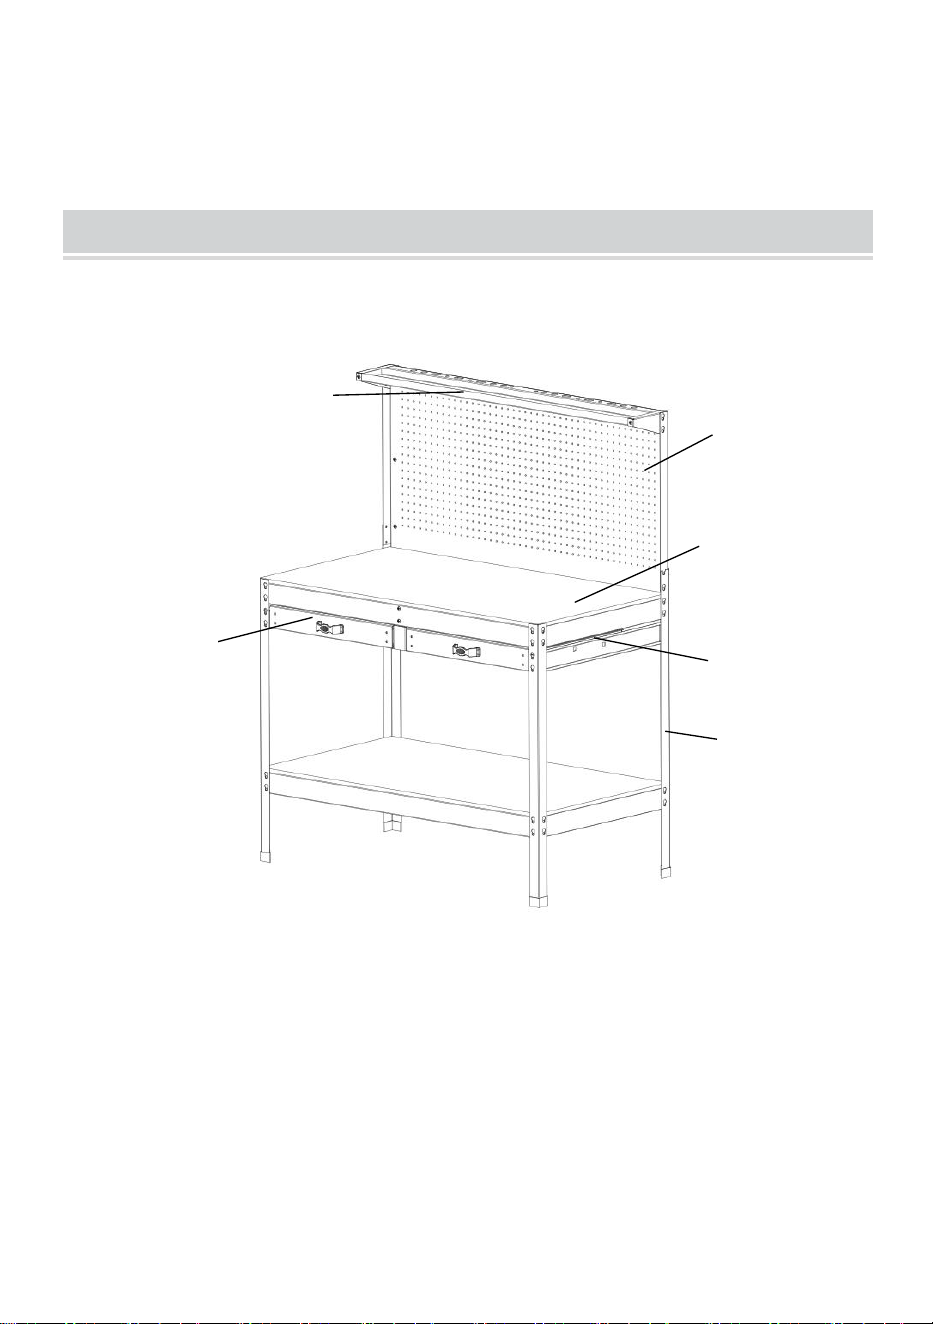
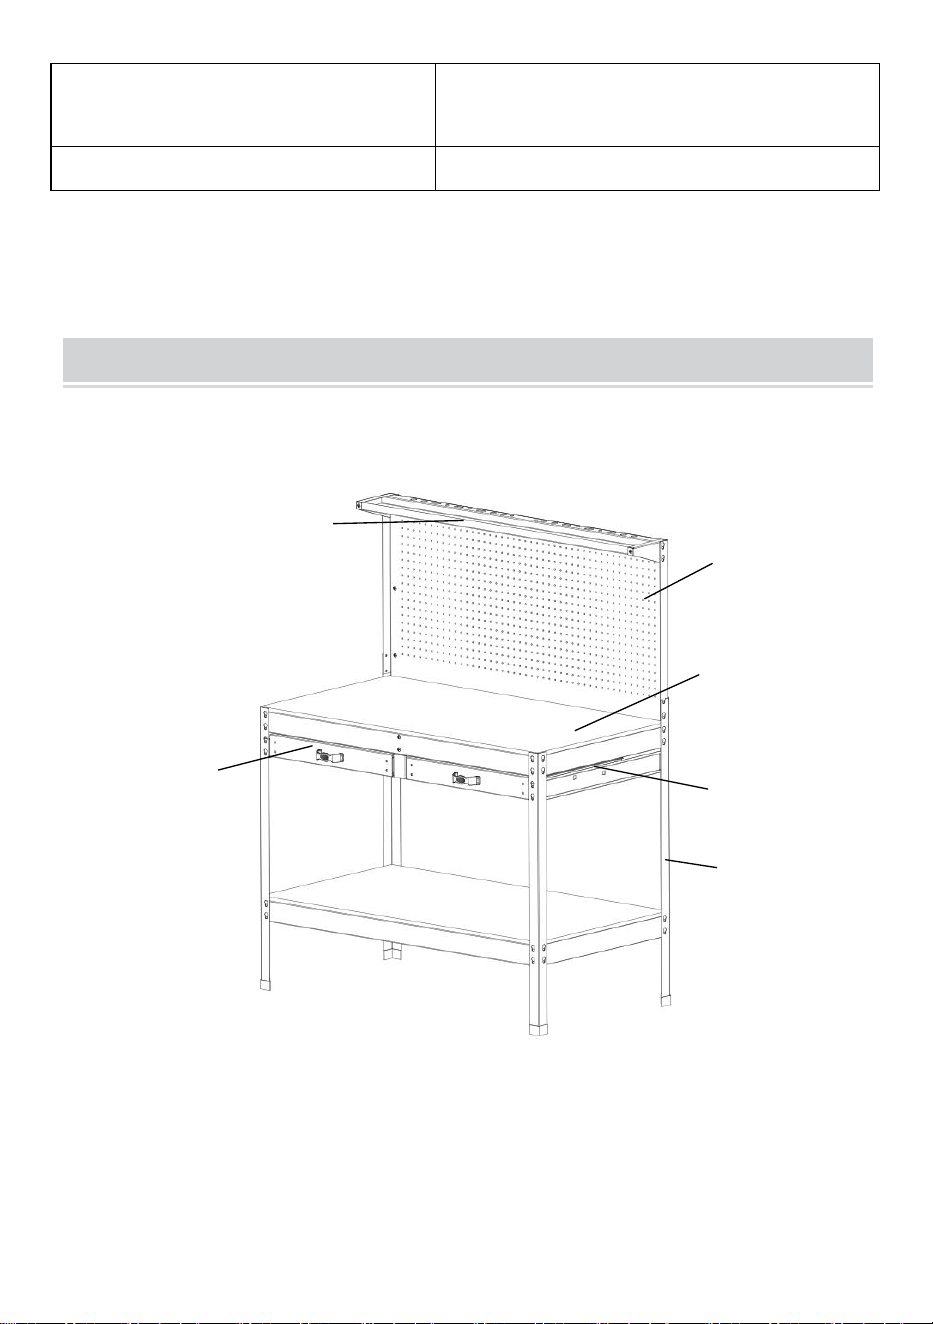
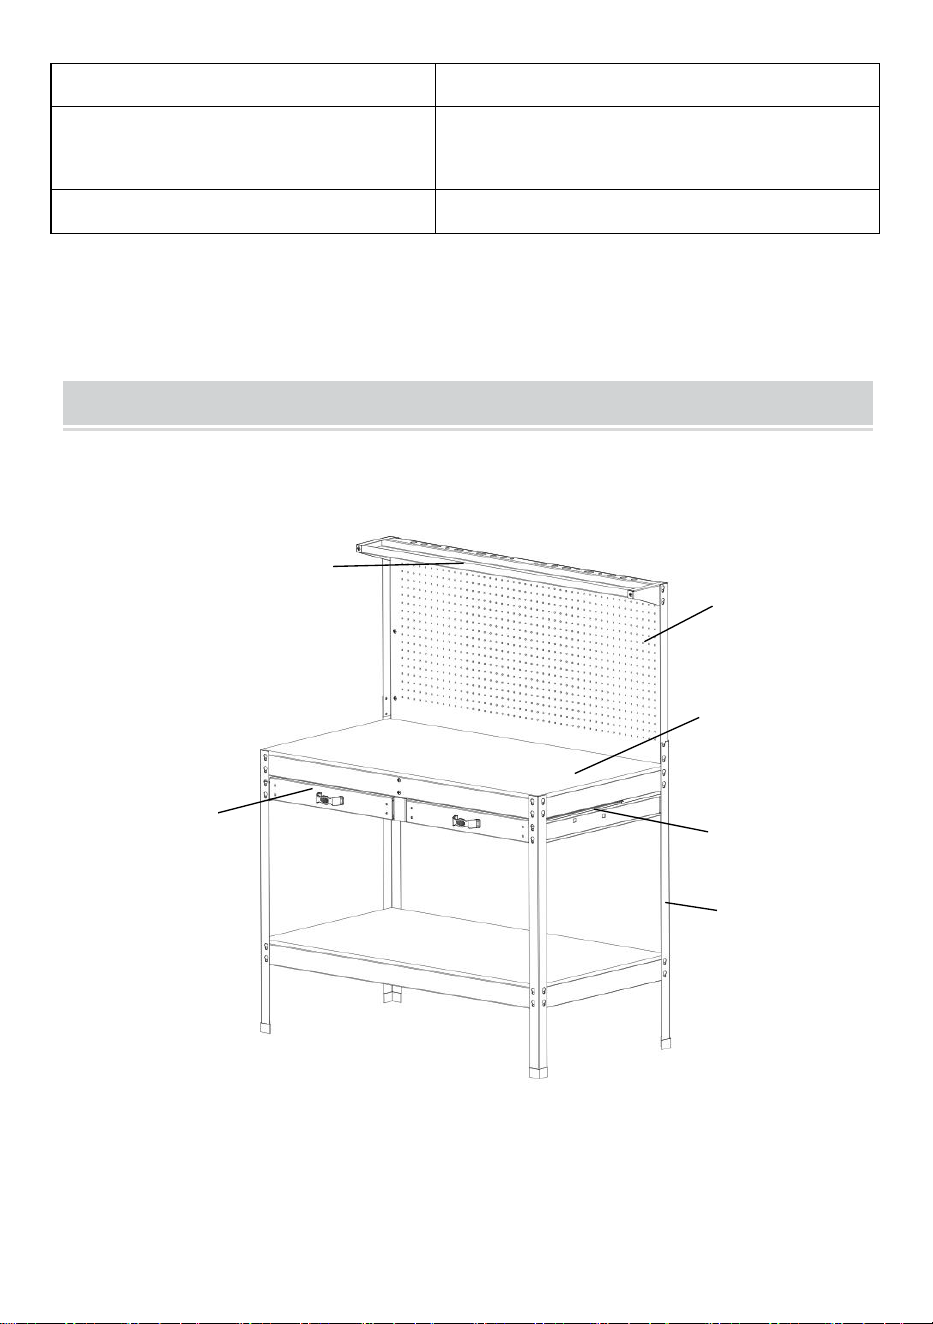
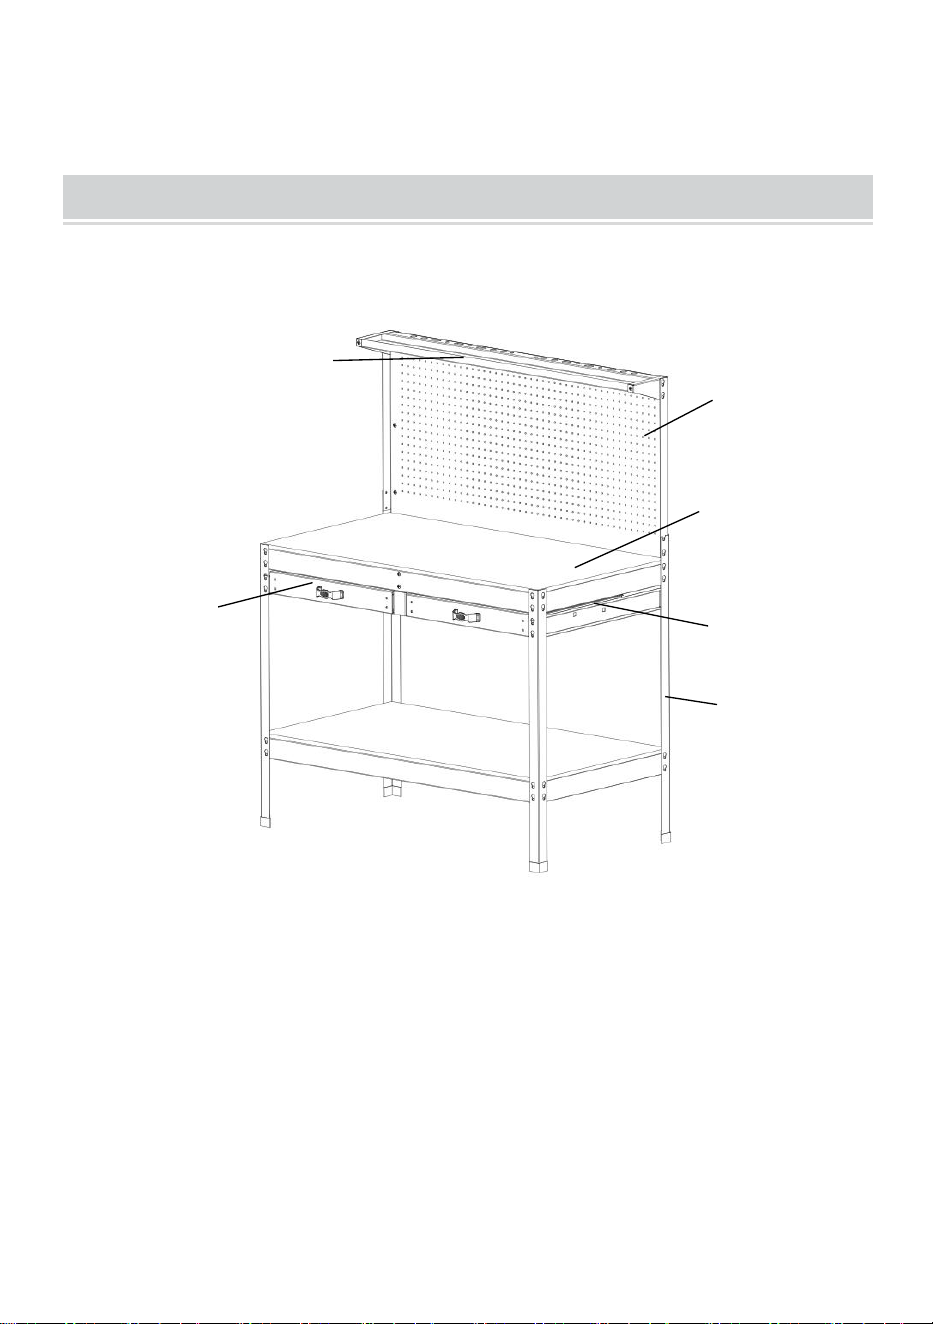
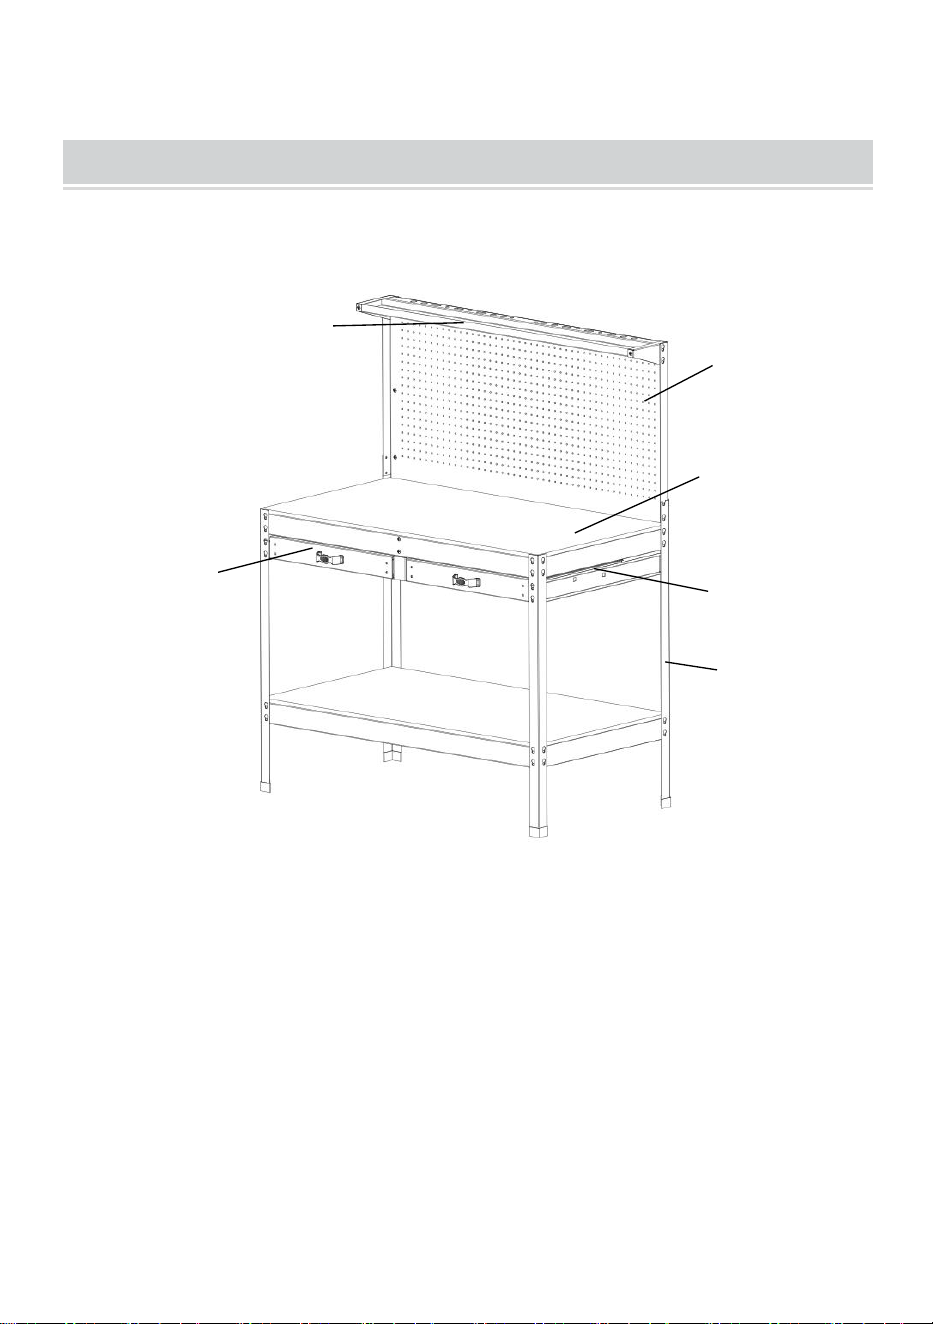
STRUCTURE DIAGRAM
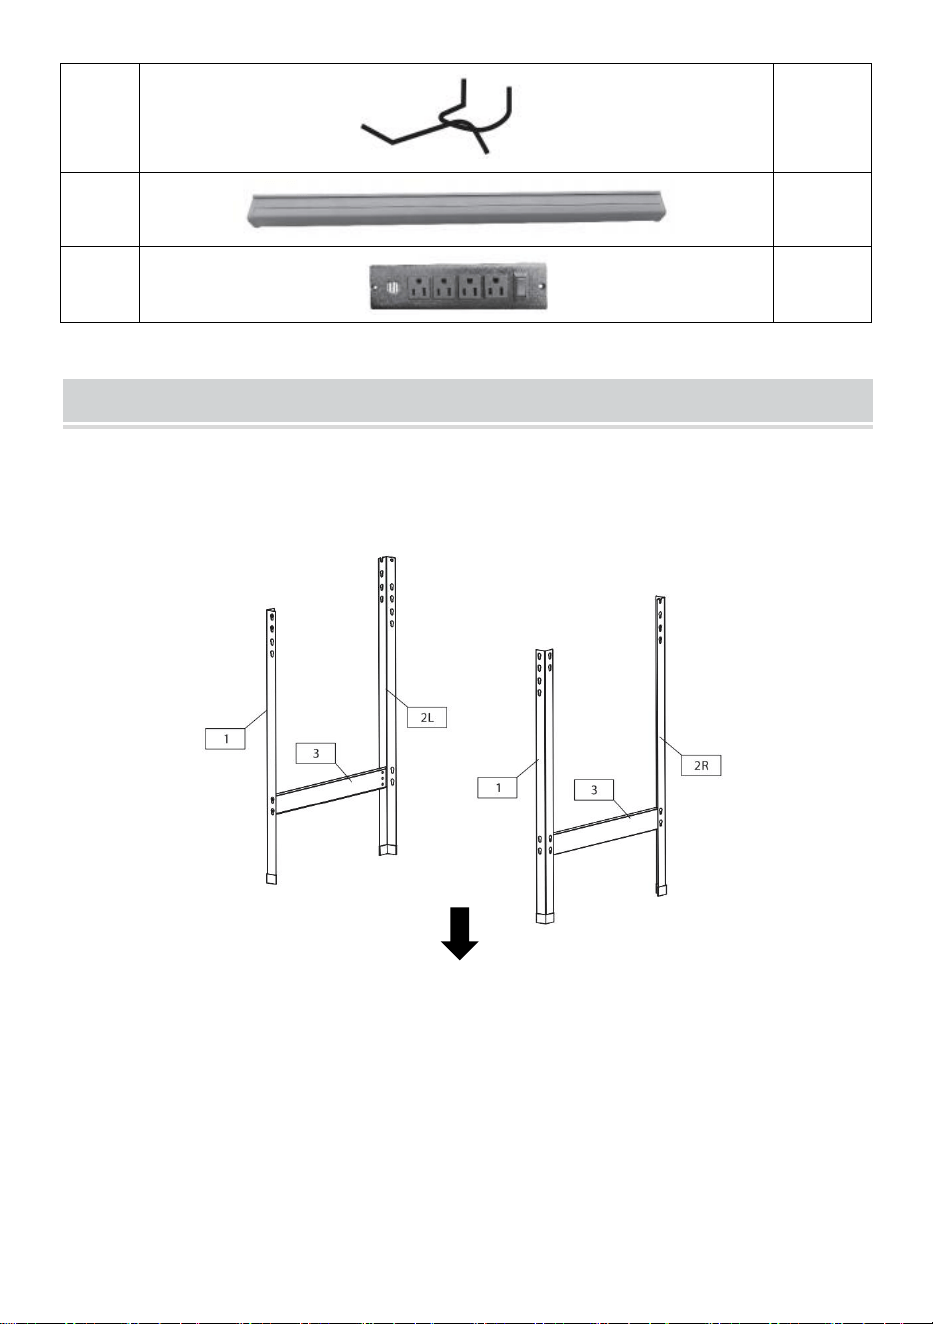
1. Pegboard 2.Desktop 3.Power strip 4.Leg 5. Drawer
6.LED Light
1
2
3
6
5
4

- 5 -
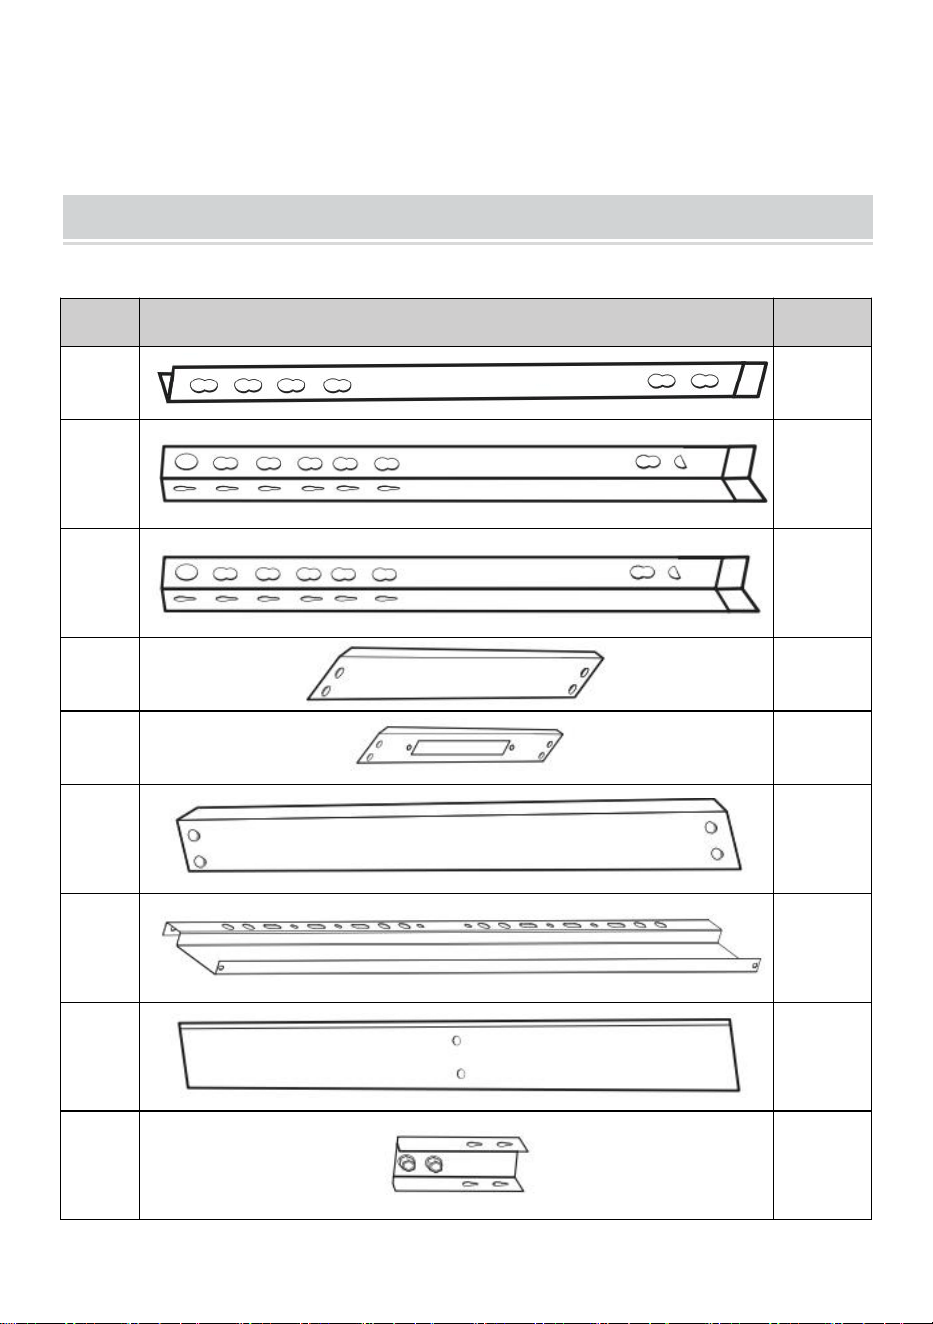
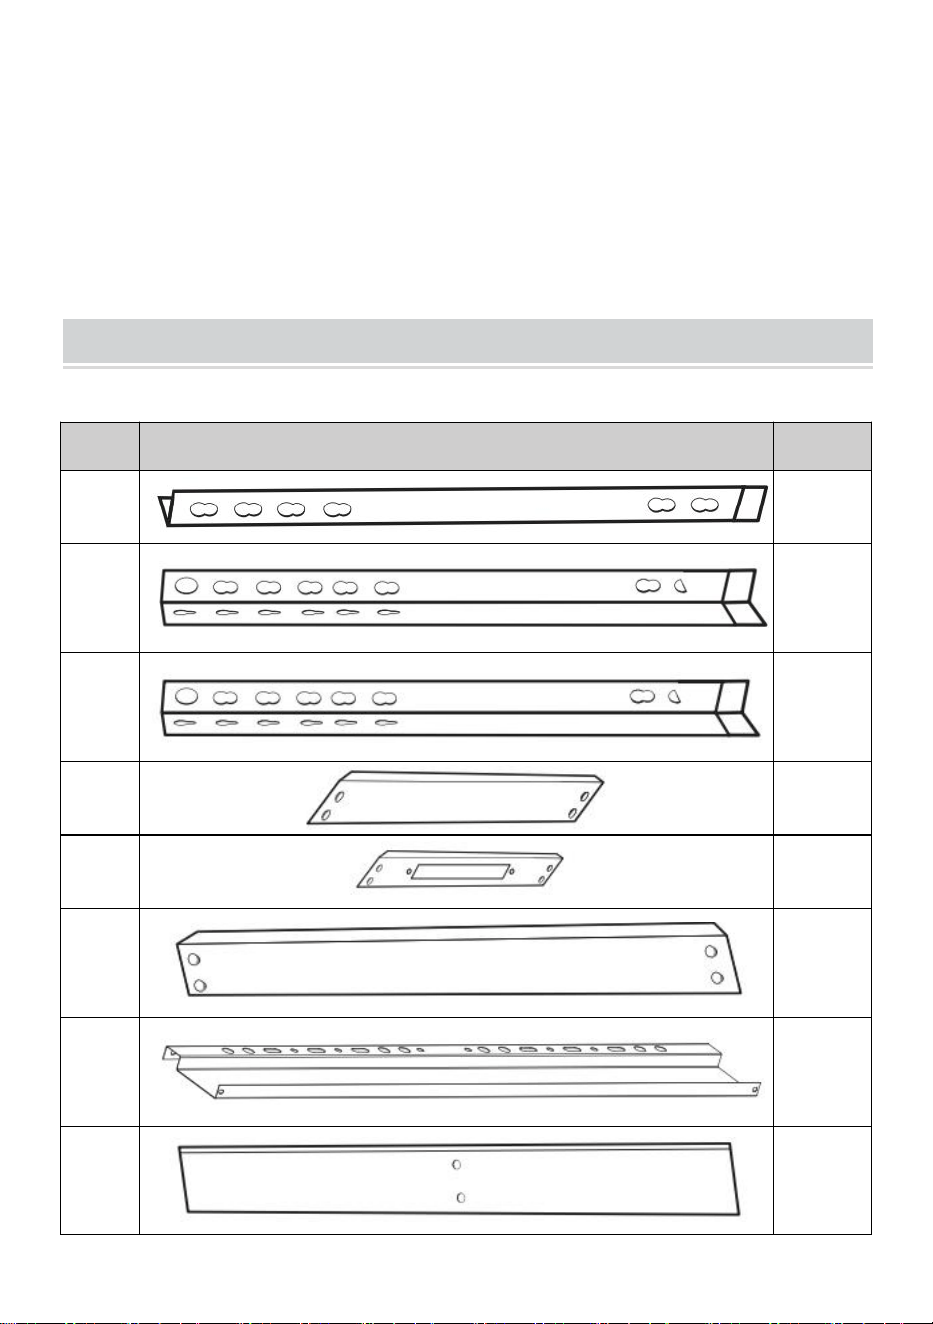
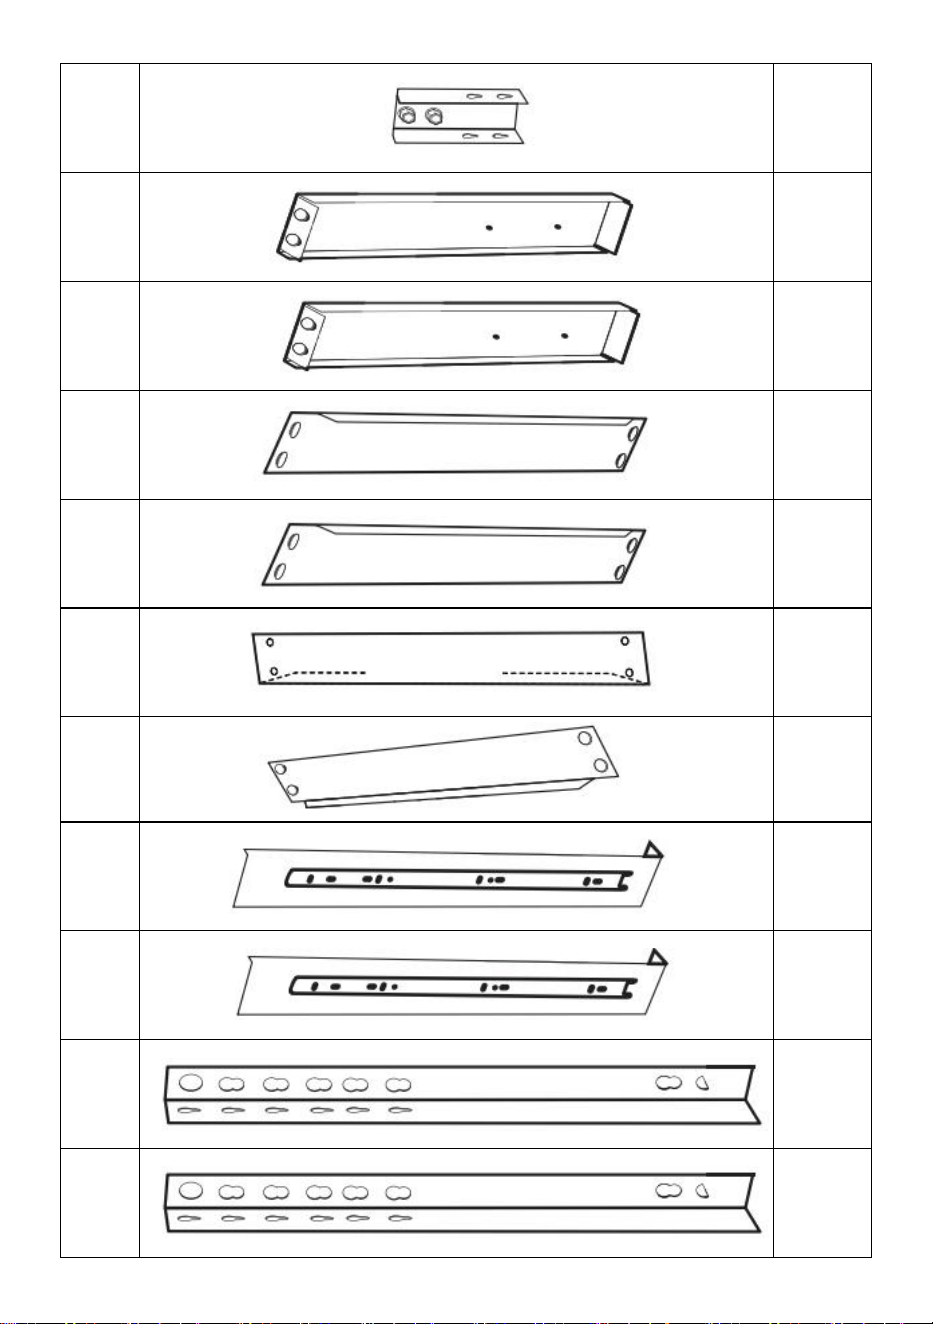
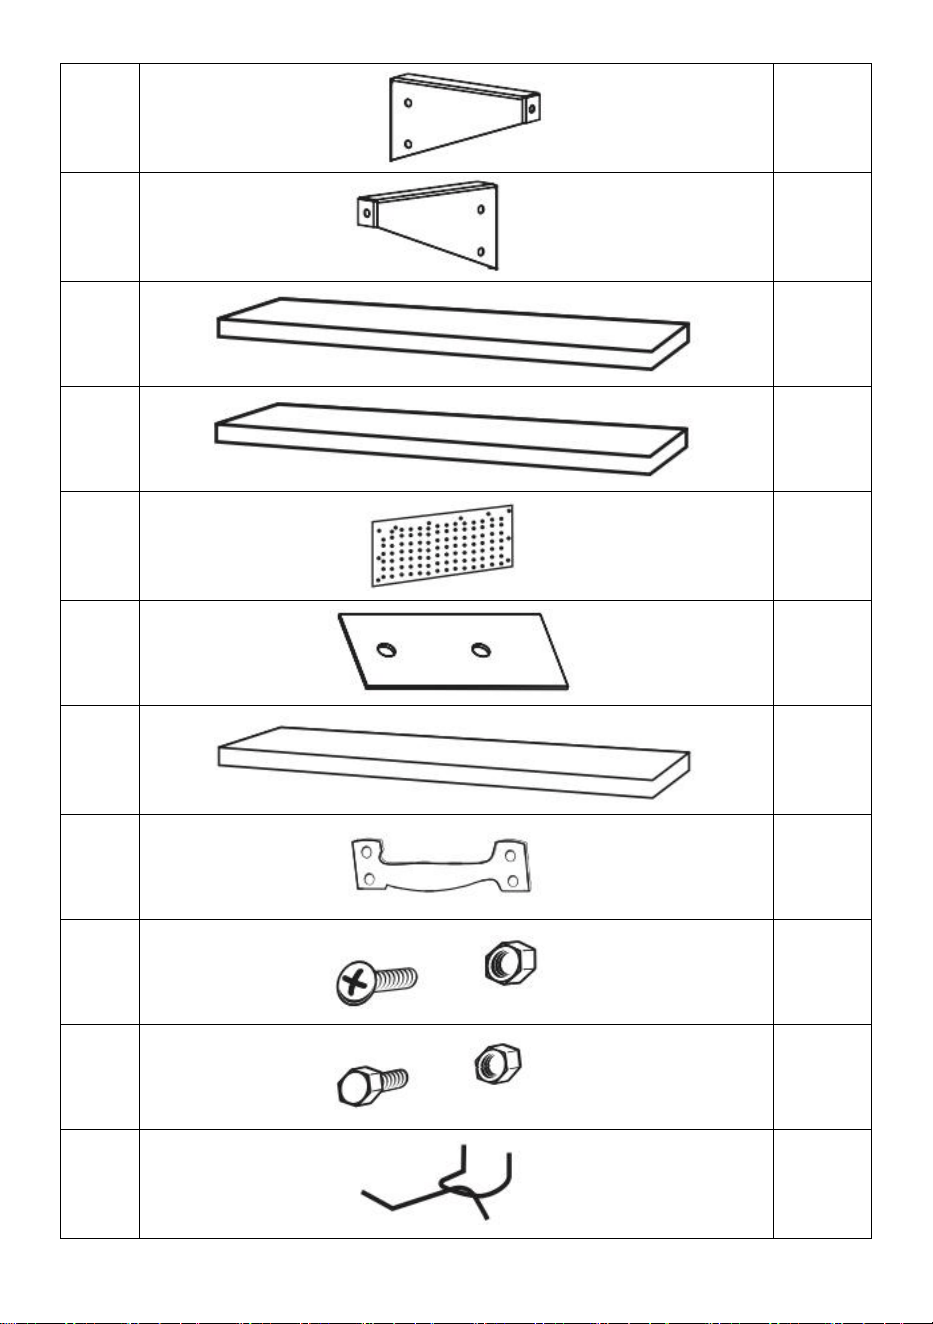
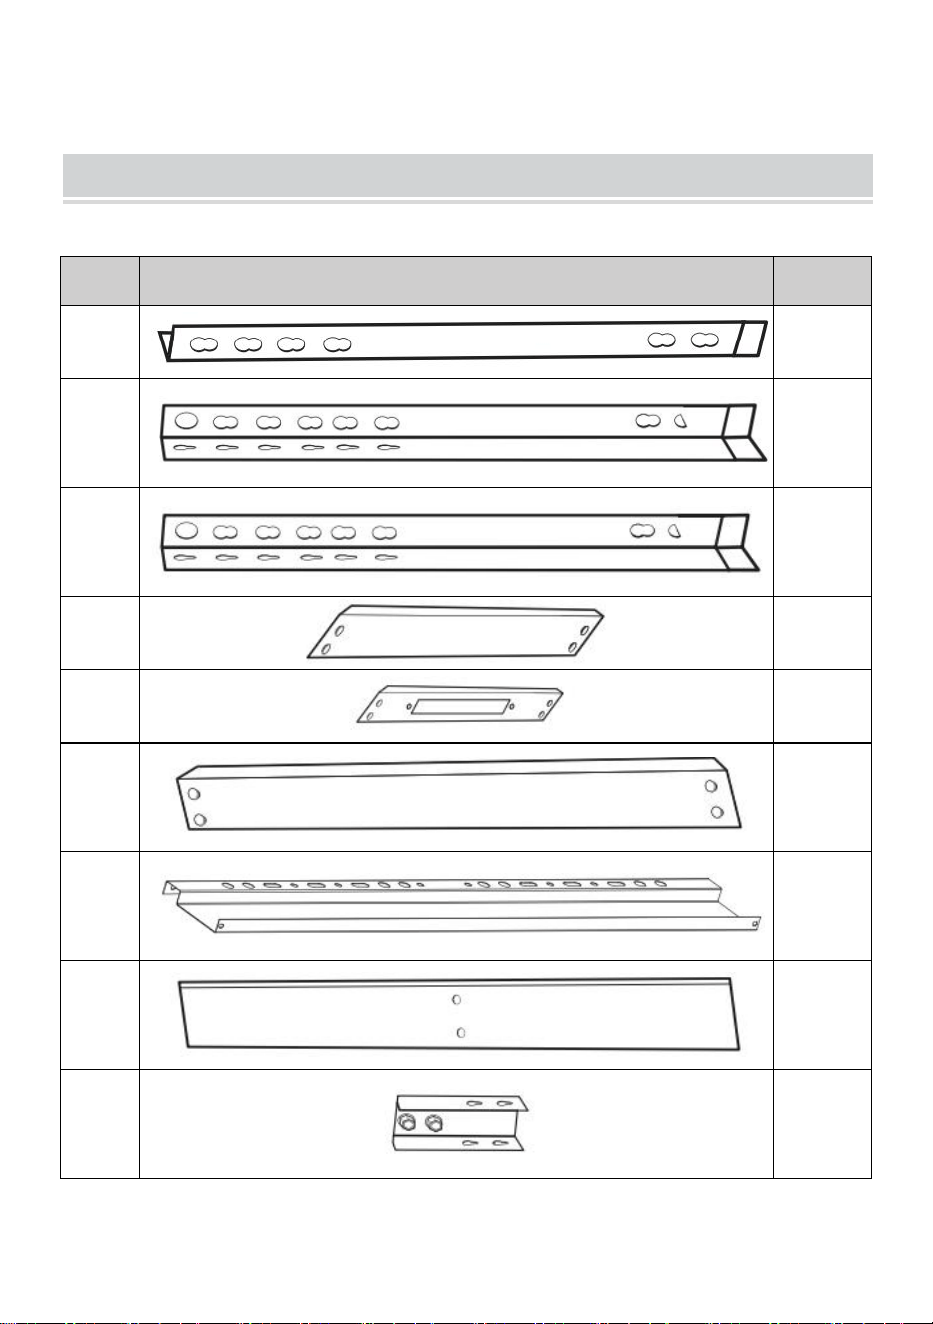
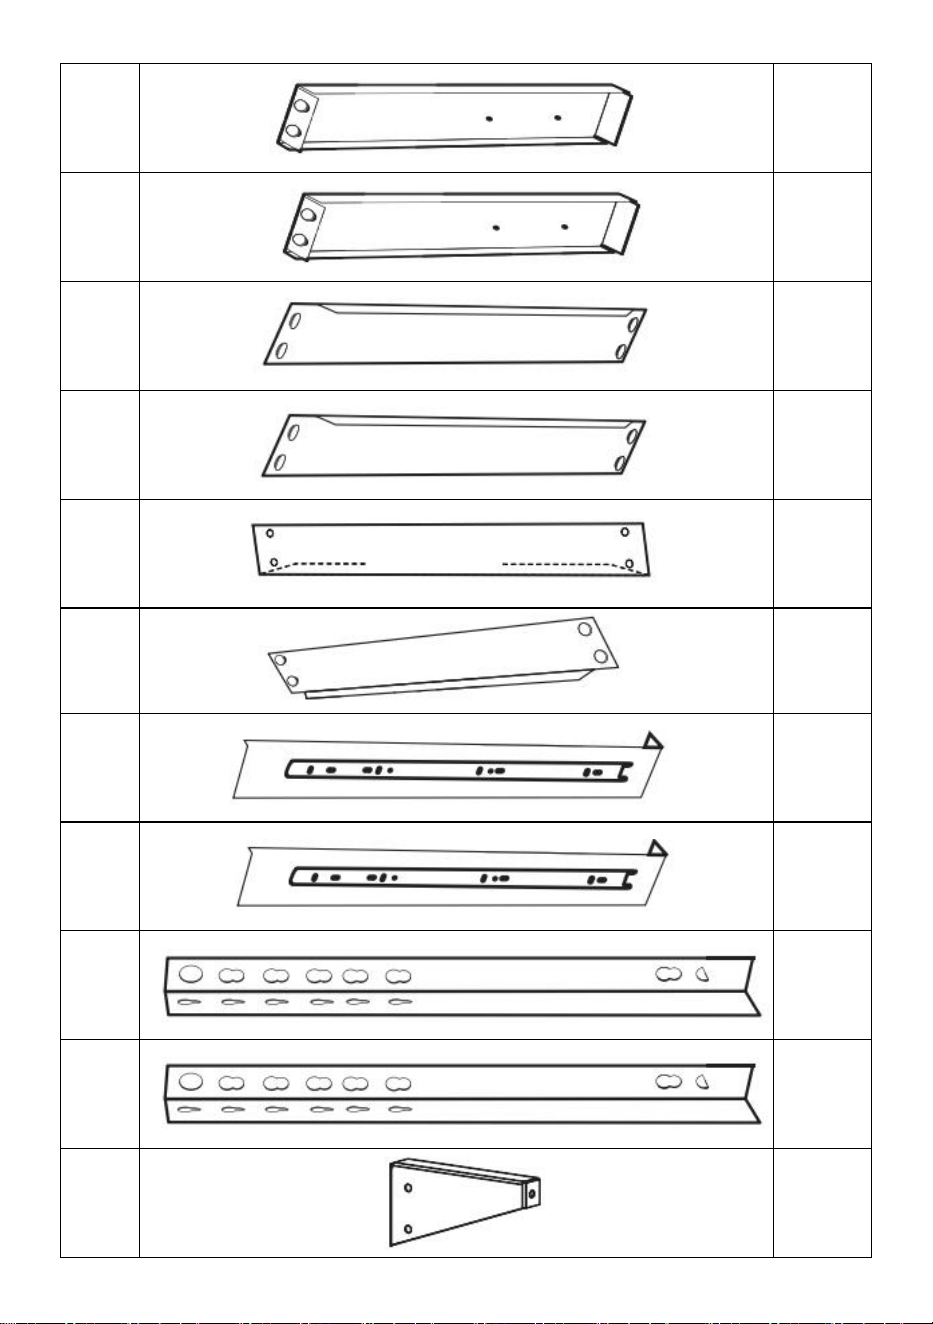
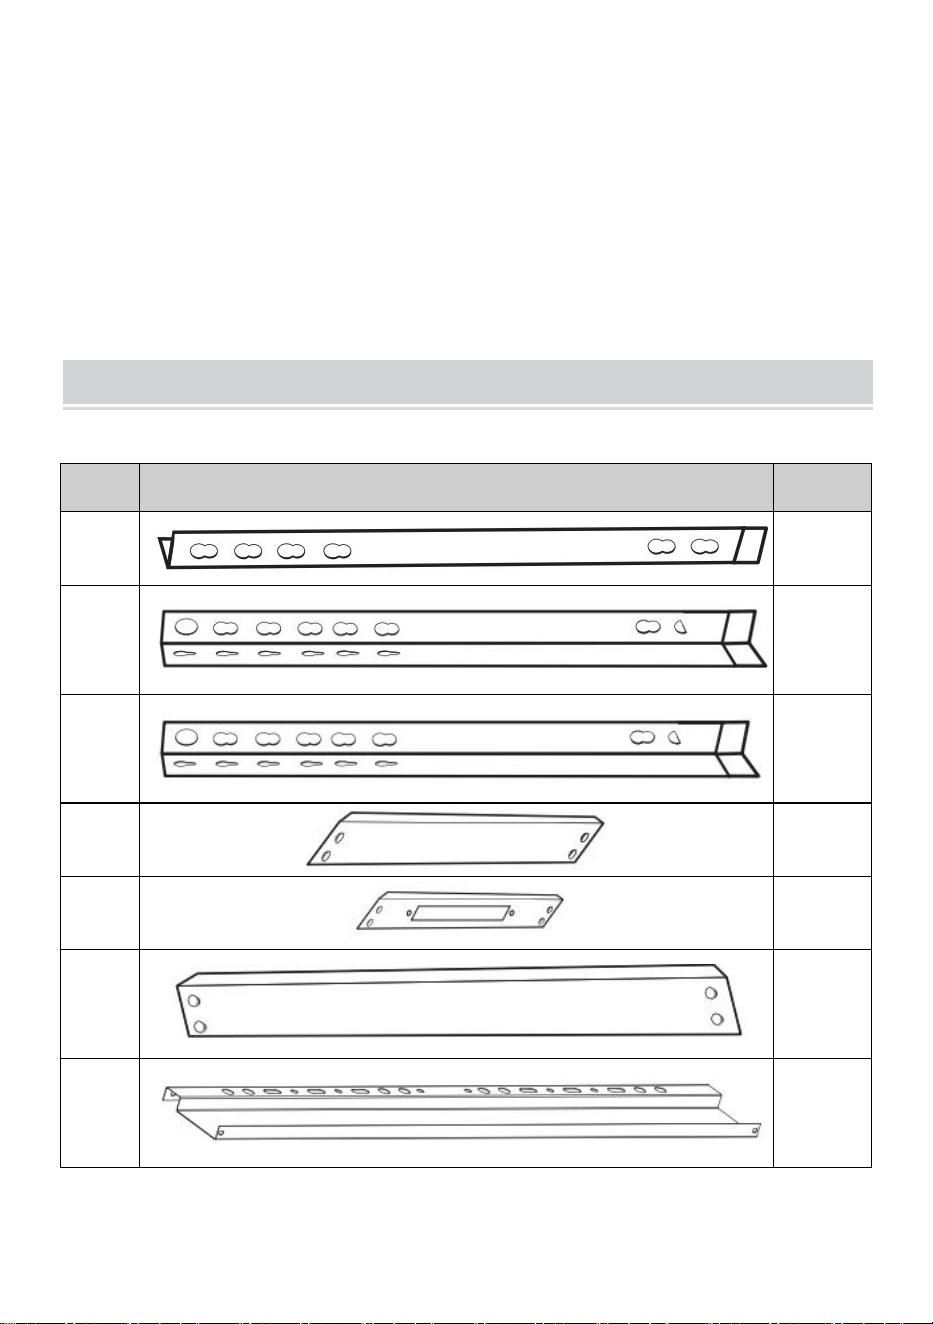
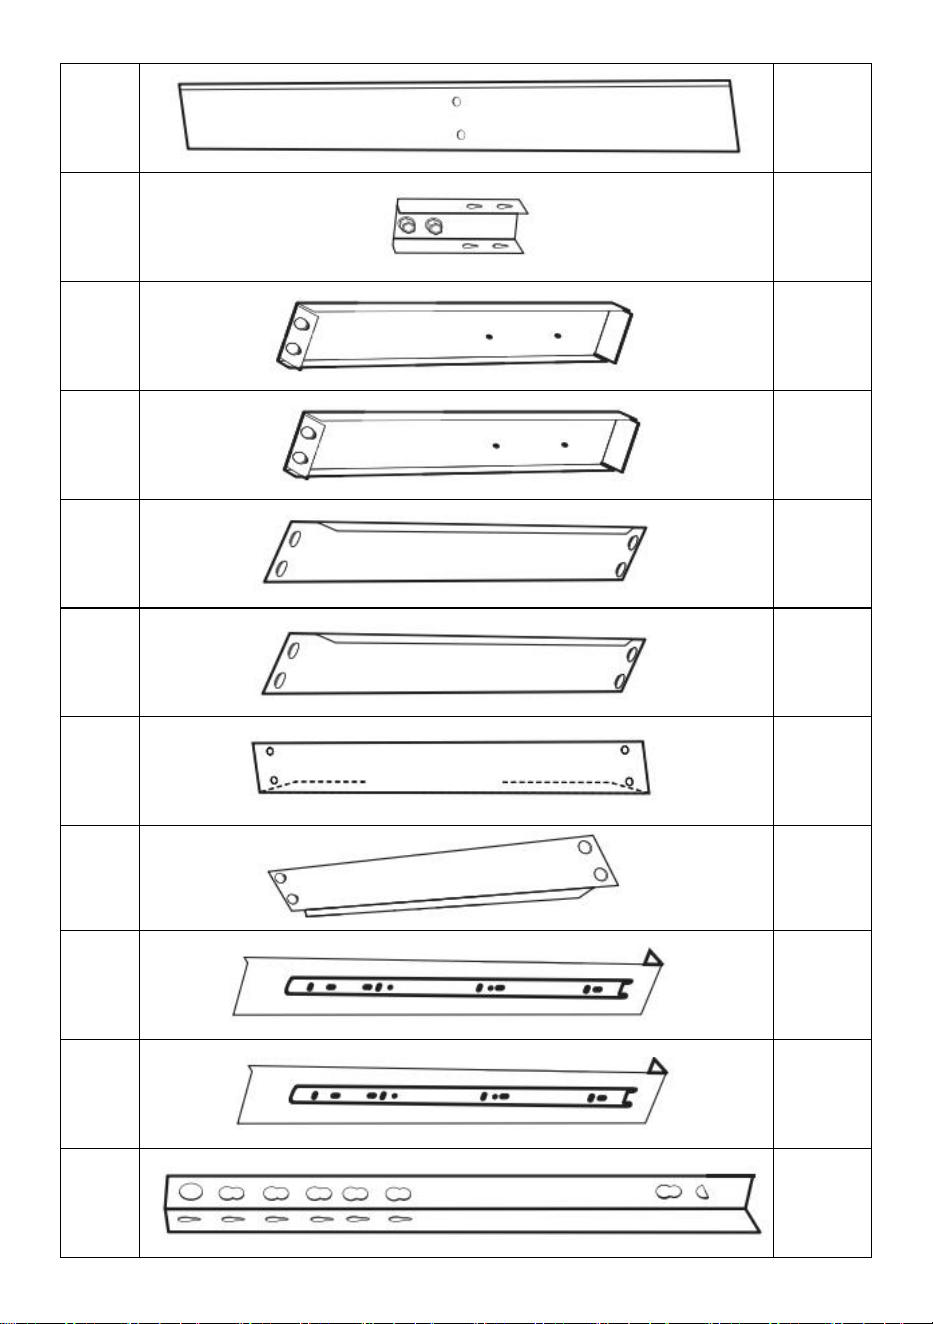
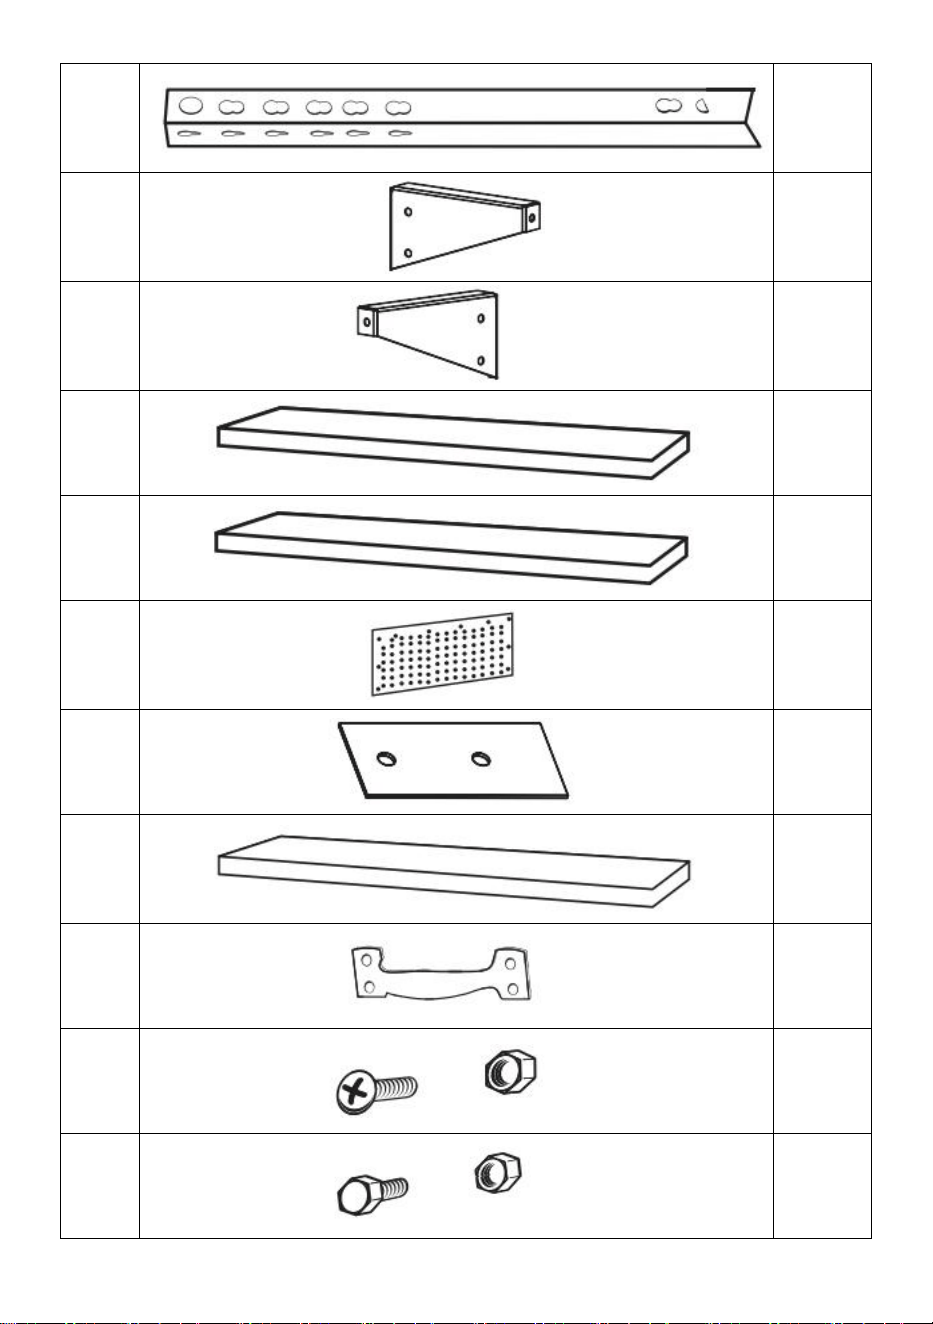
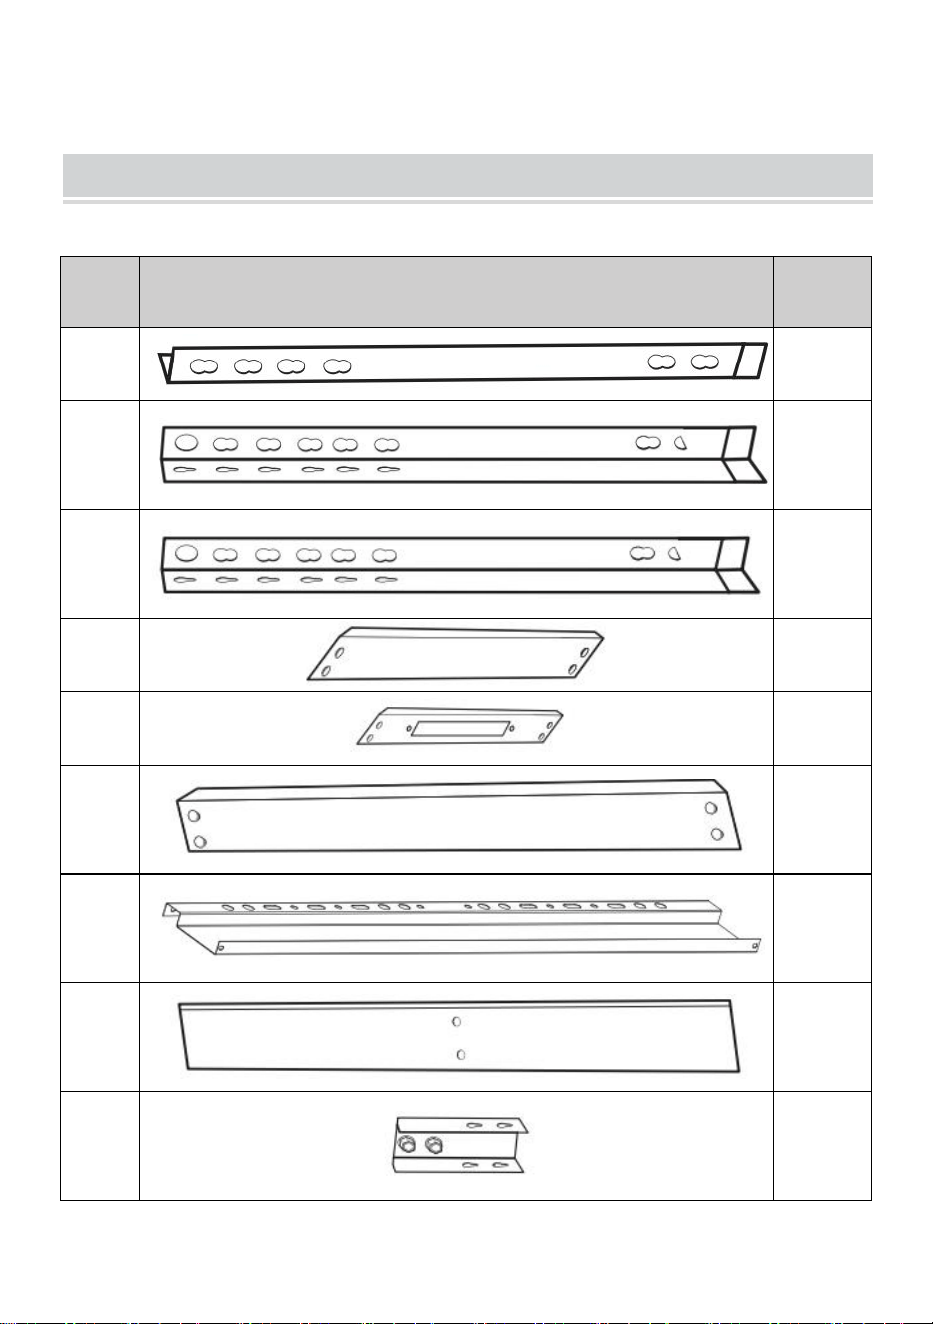
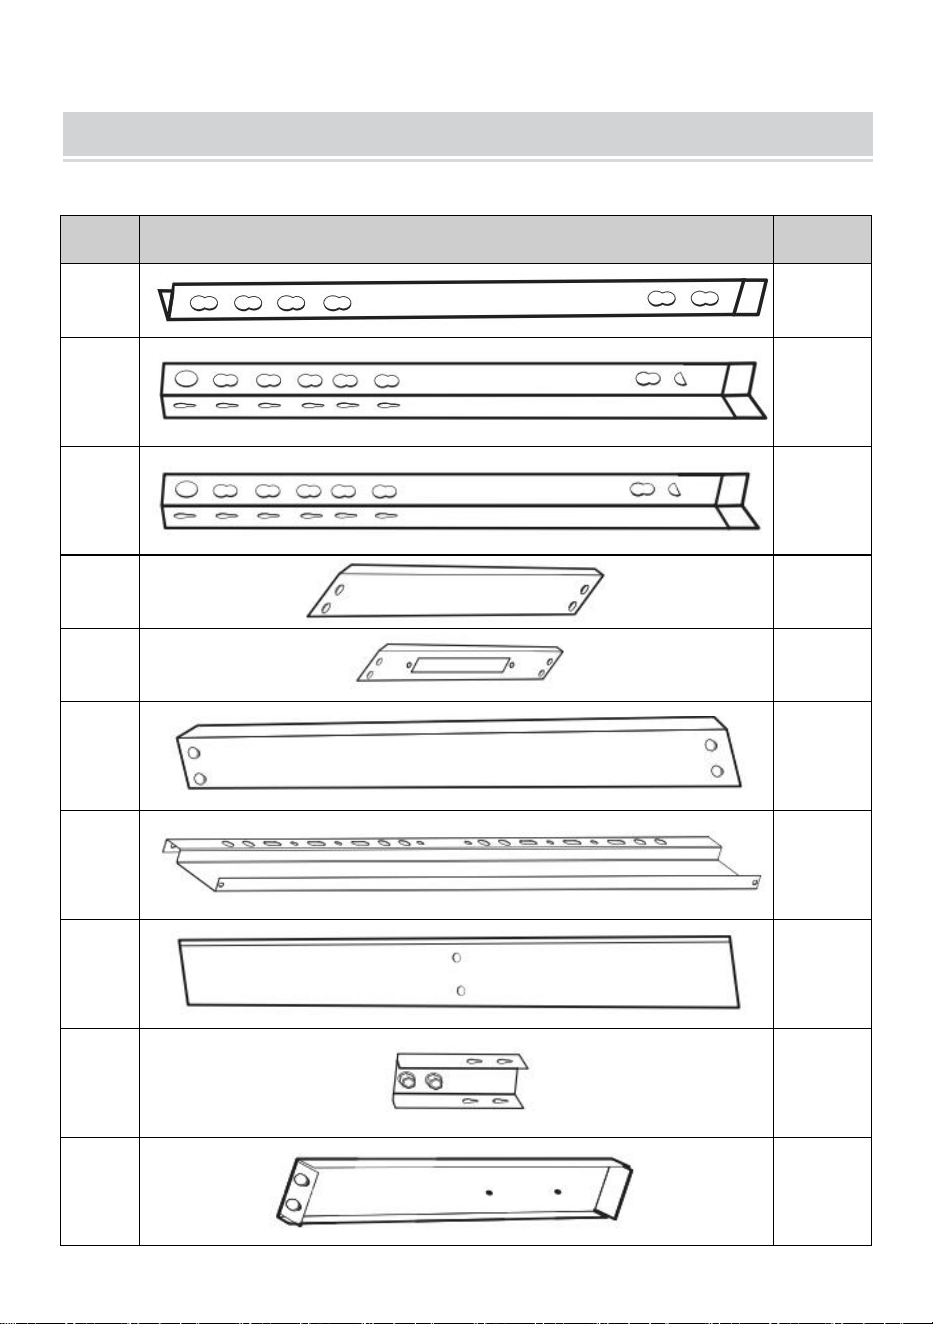
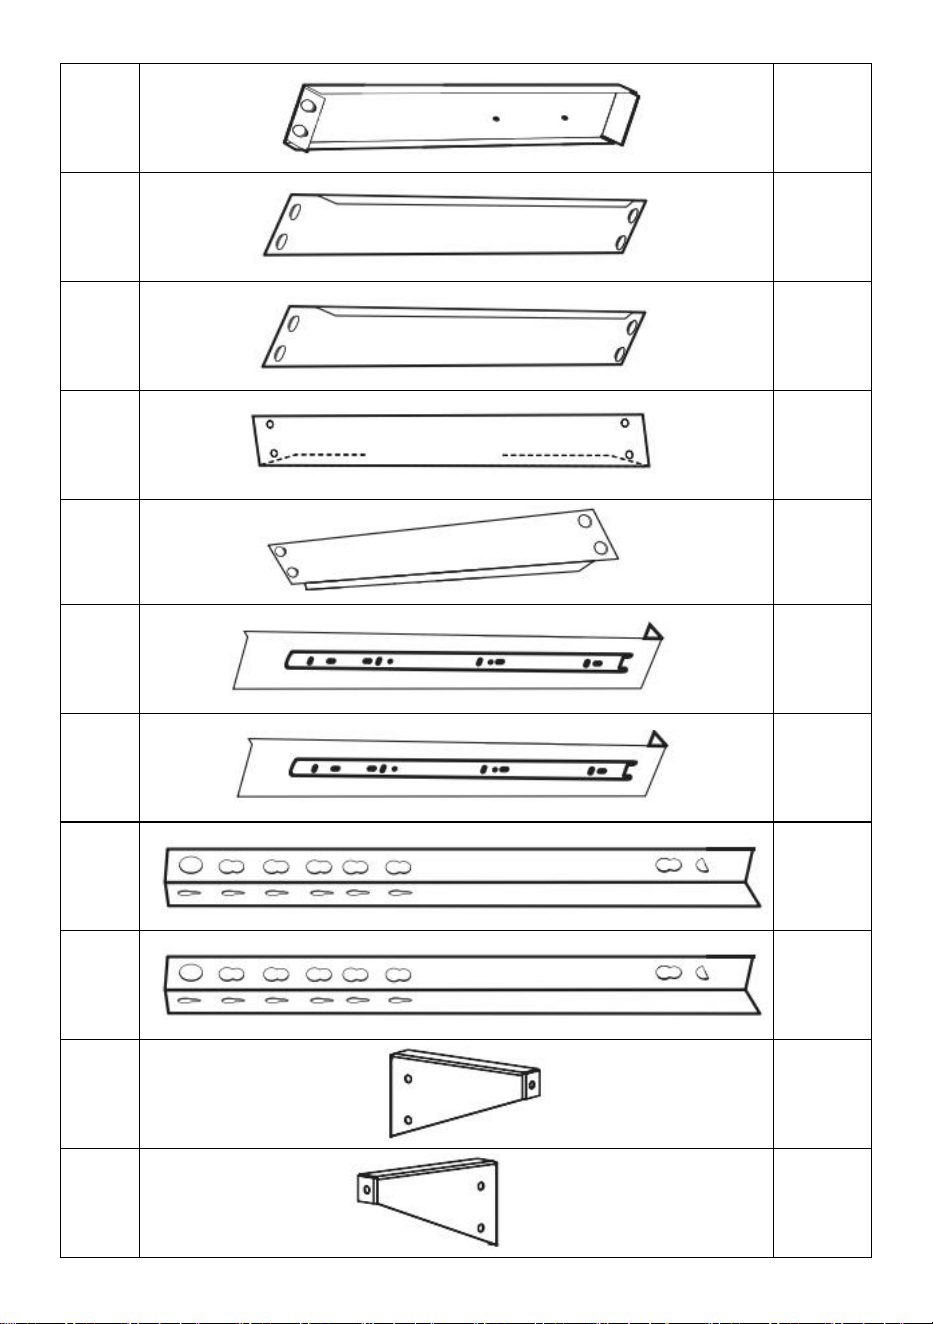
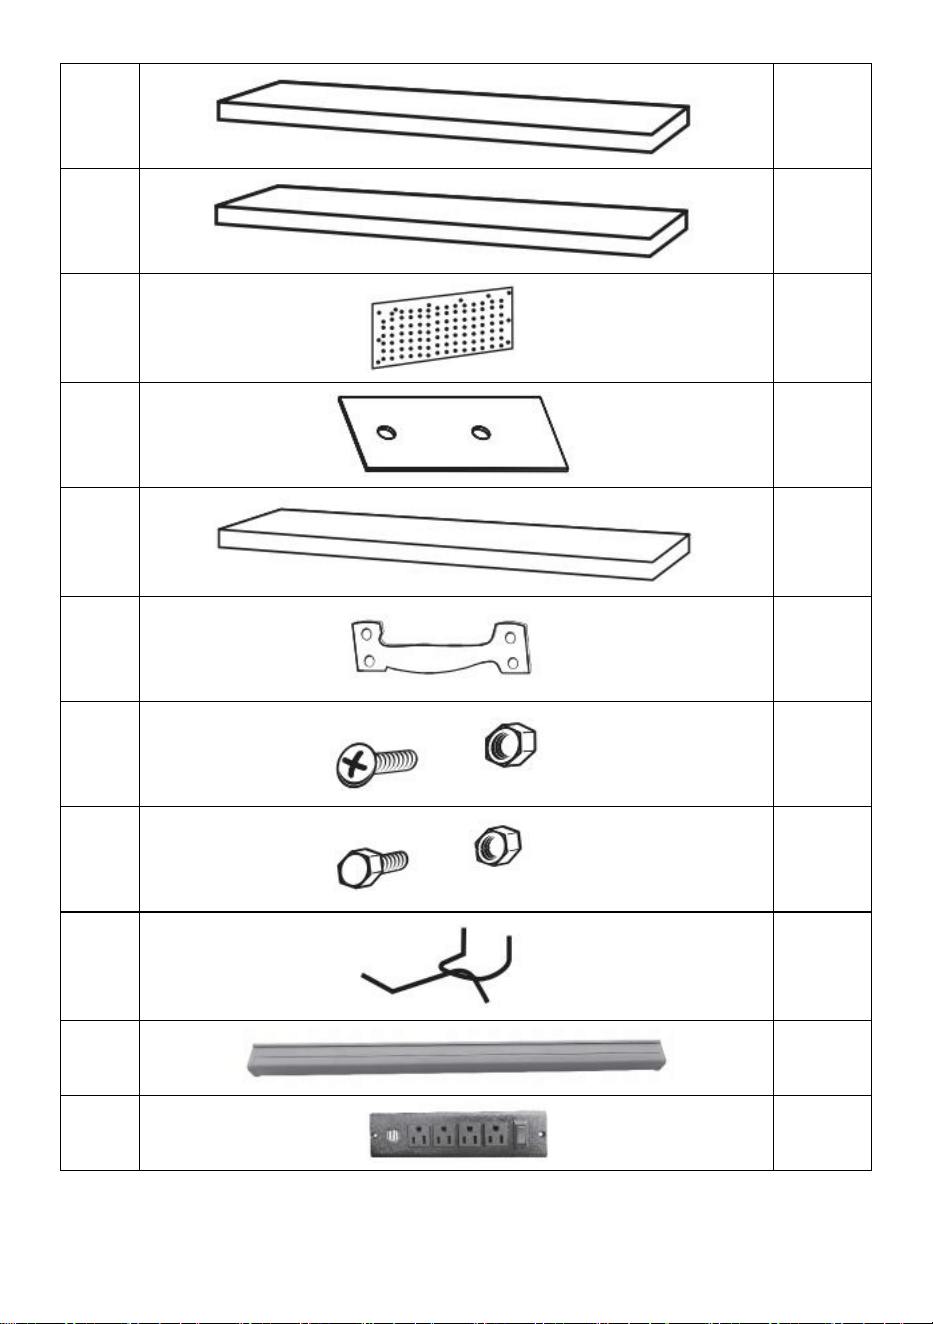
COMPONENTS
Name
Component
Quantity
1
2
2L
1
2R
1
3
3
3(1)
1
4
2
5
1
6
2
7
2
8L
1

- 6 -
8R
1
9L
1
9R
1
10
2
11
2
12L
2
12R
2
13L
1
13R
1
14L
1
14R
1

- 7 -
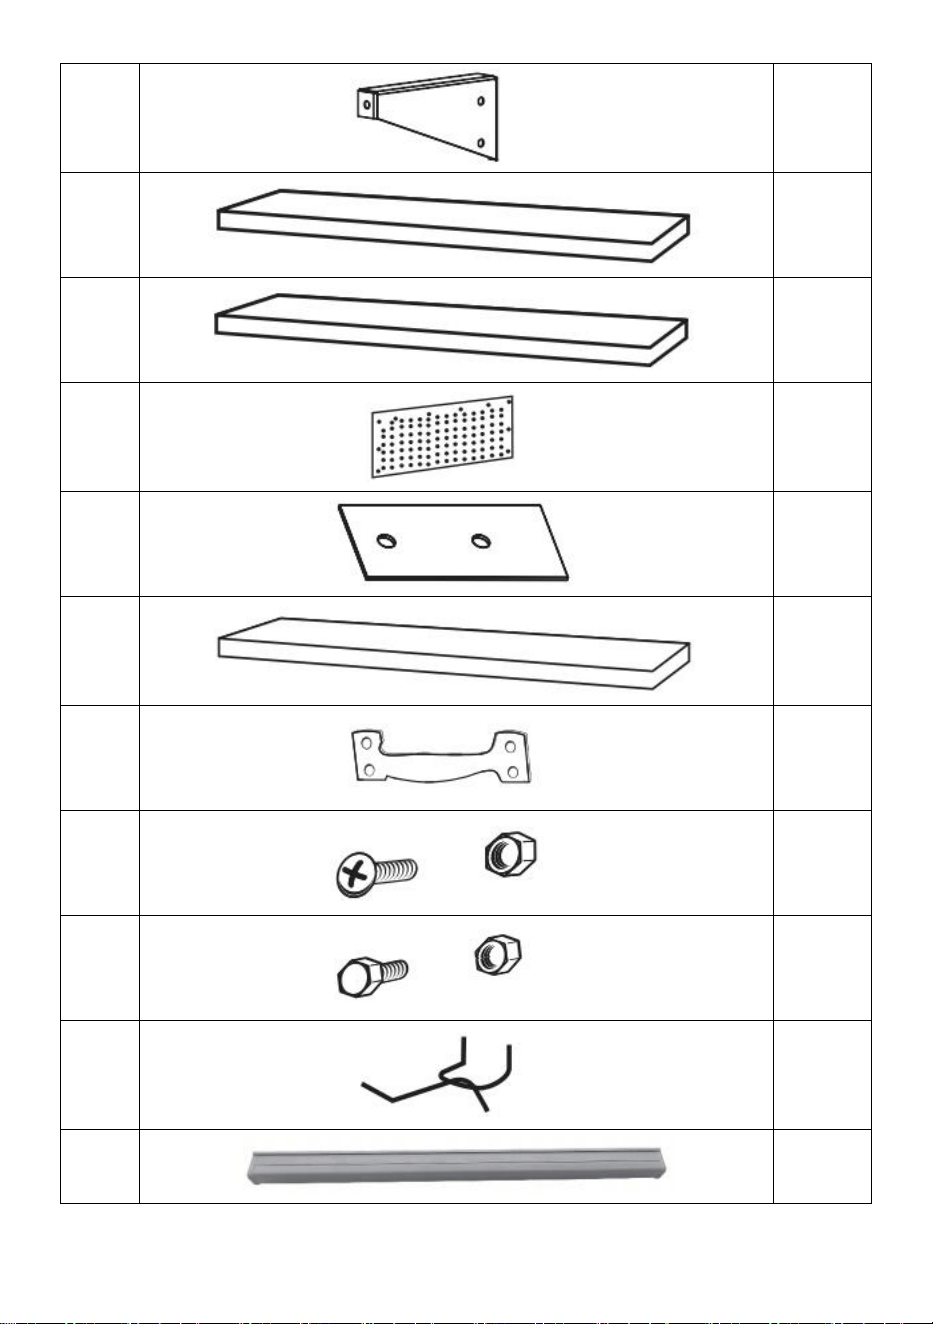
15
1
16
1
17
1
18
1
19
2
20
2
21
16
22
28
23
30
24
1
25
1

- 8 -
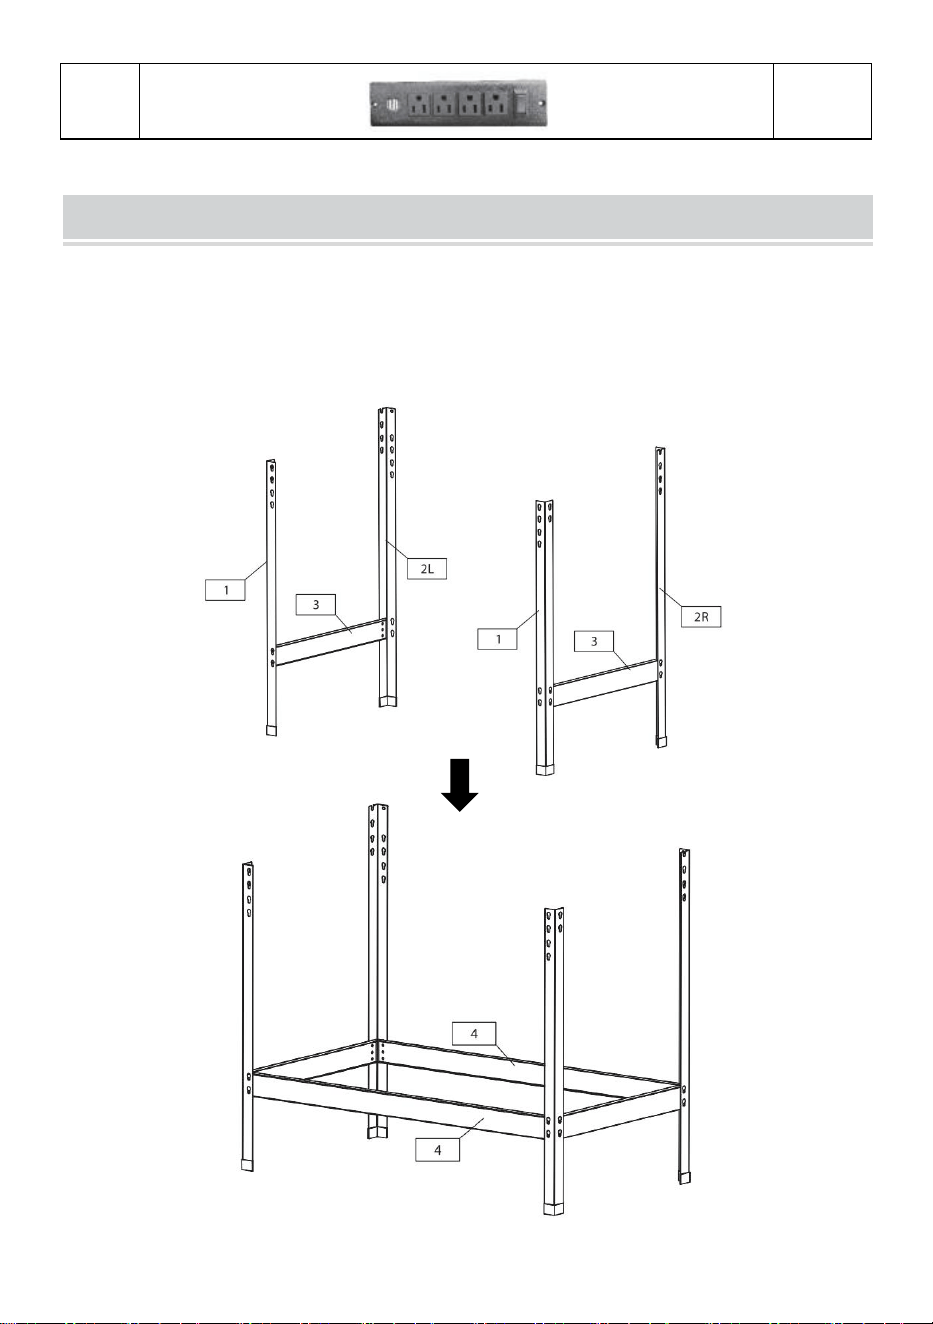
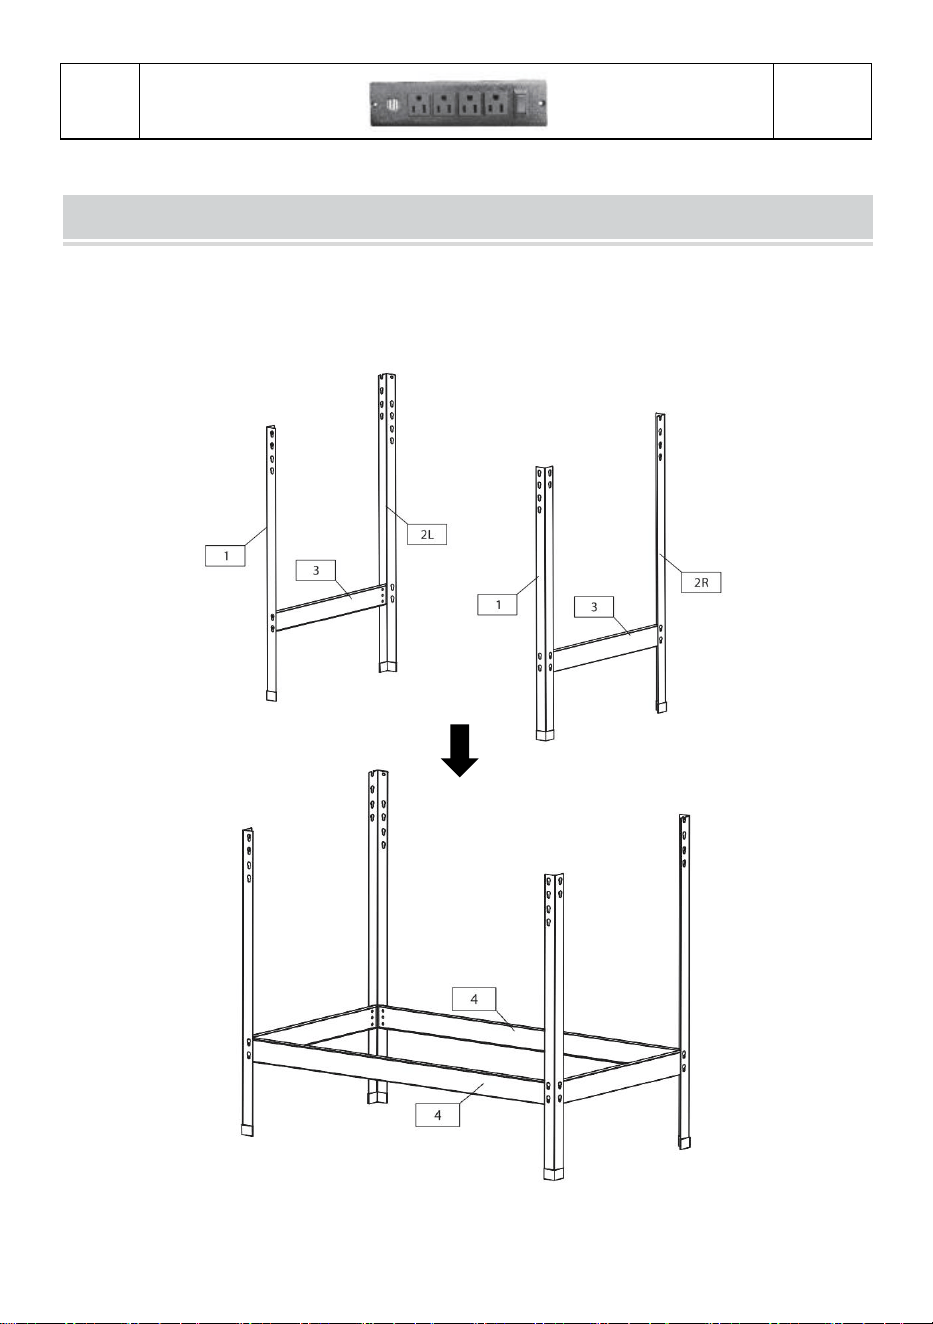
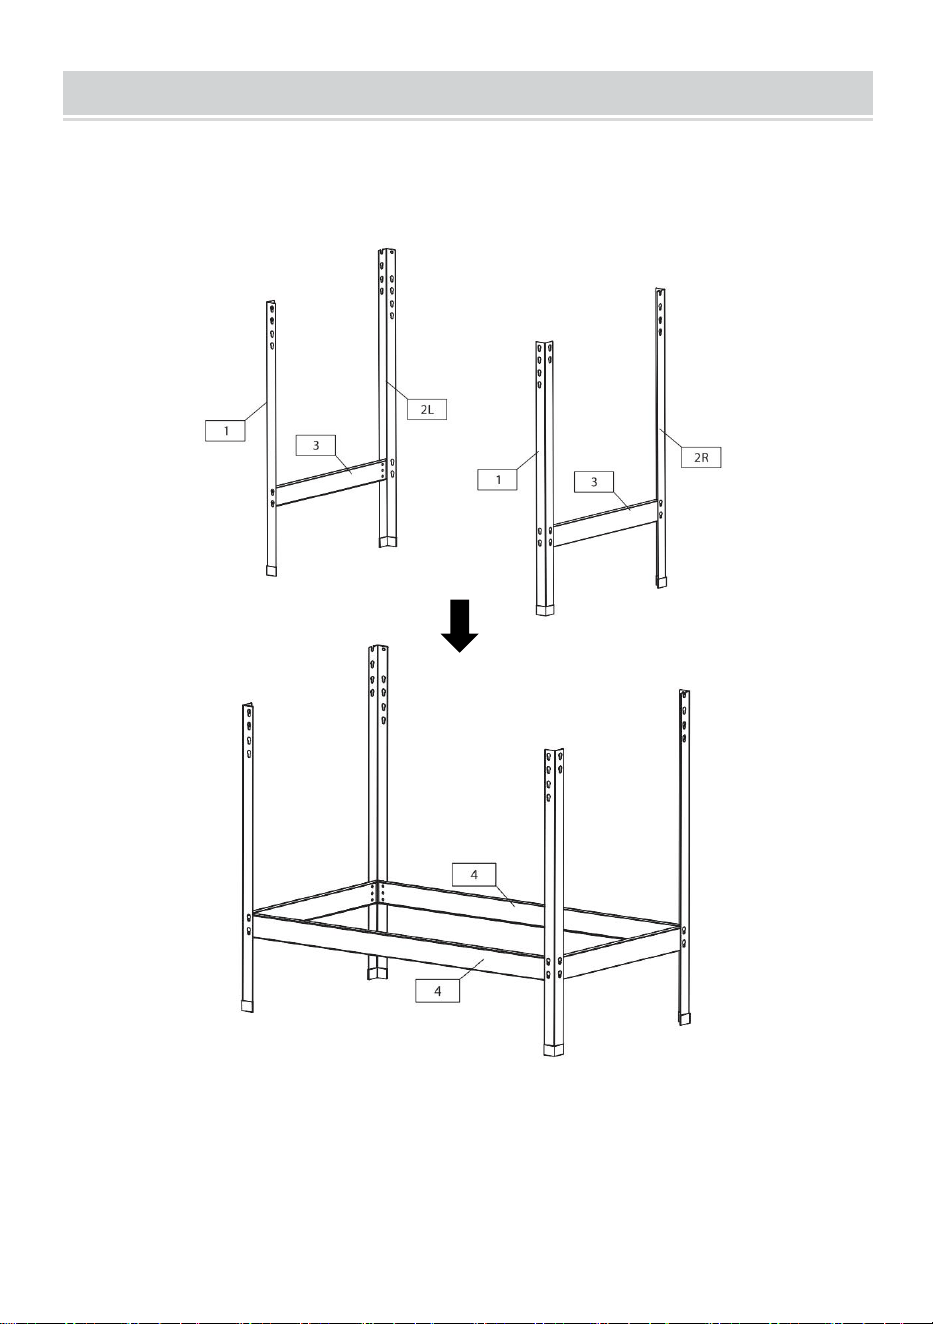
INSTALLATION INSTRUCTION
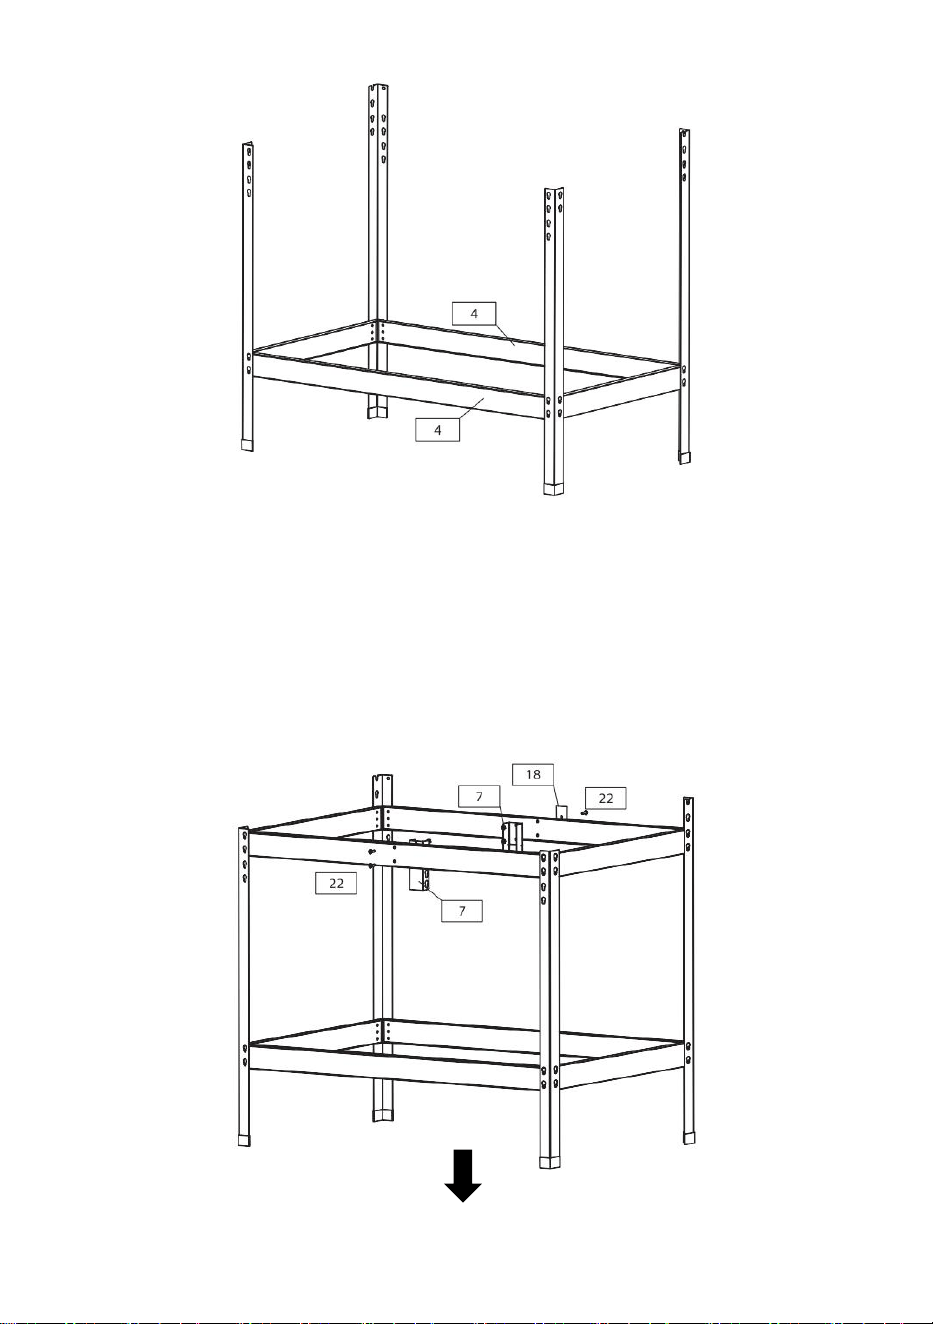
STEP 1: Install the lower workbench support.

- 9 -
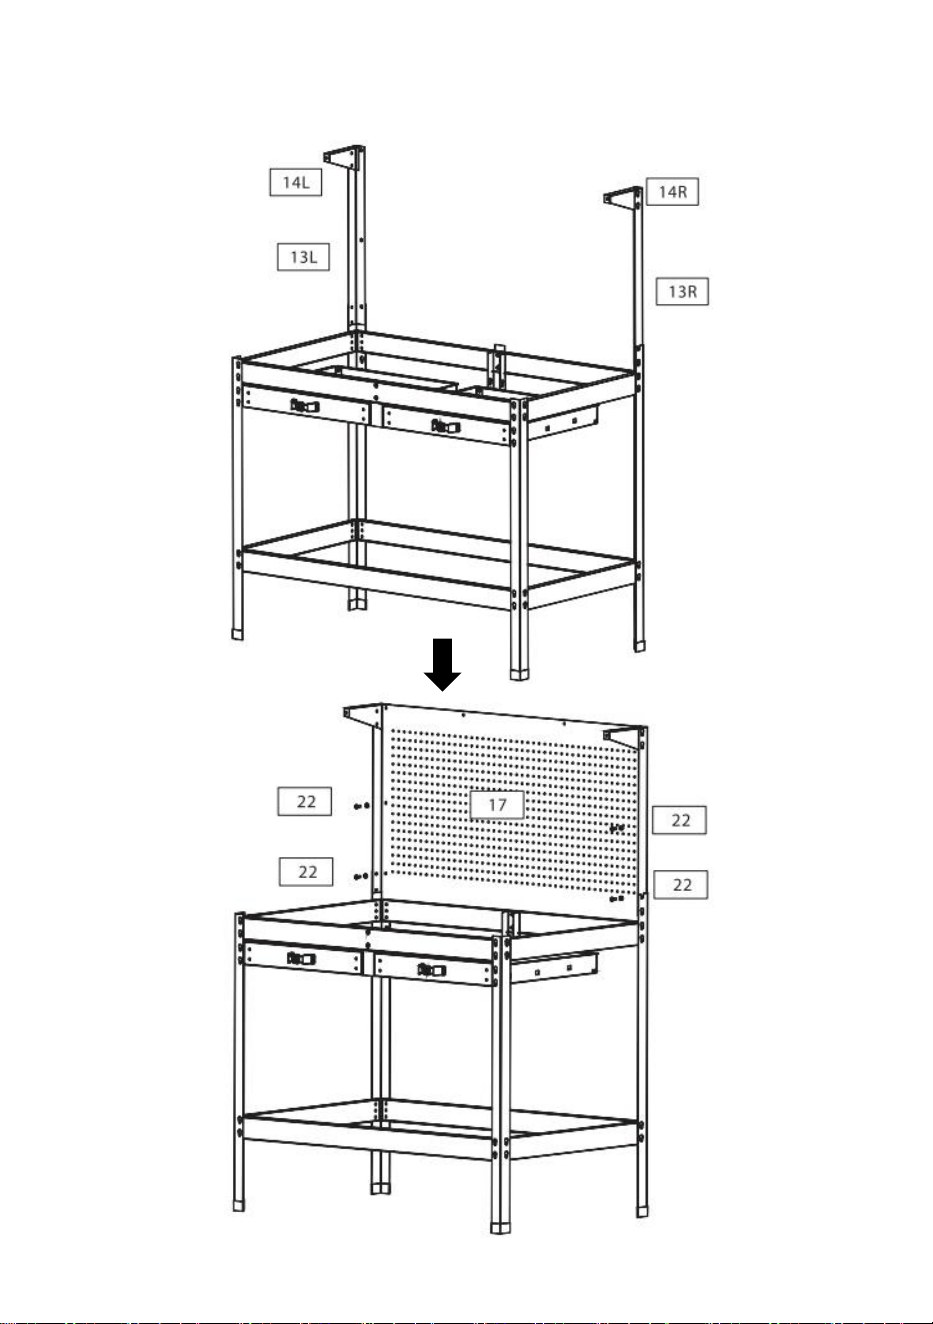
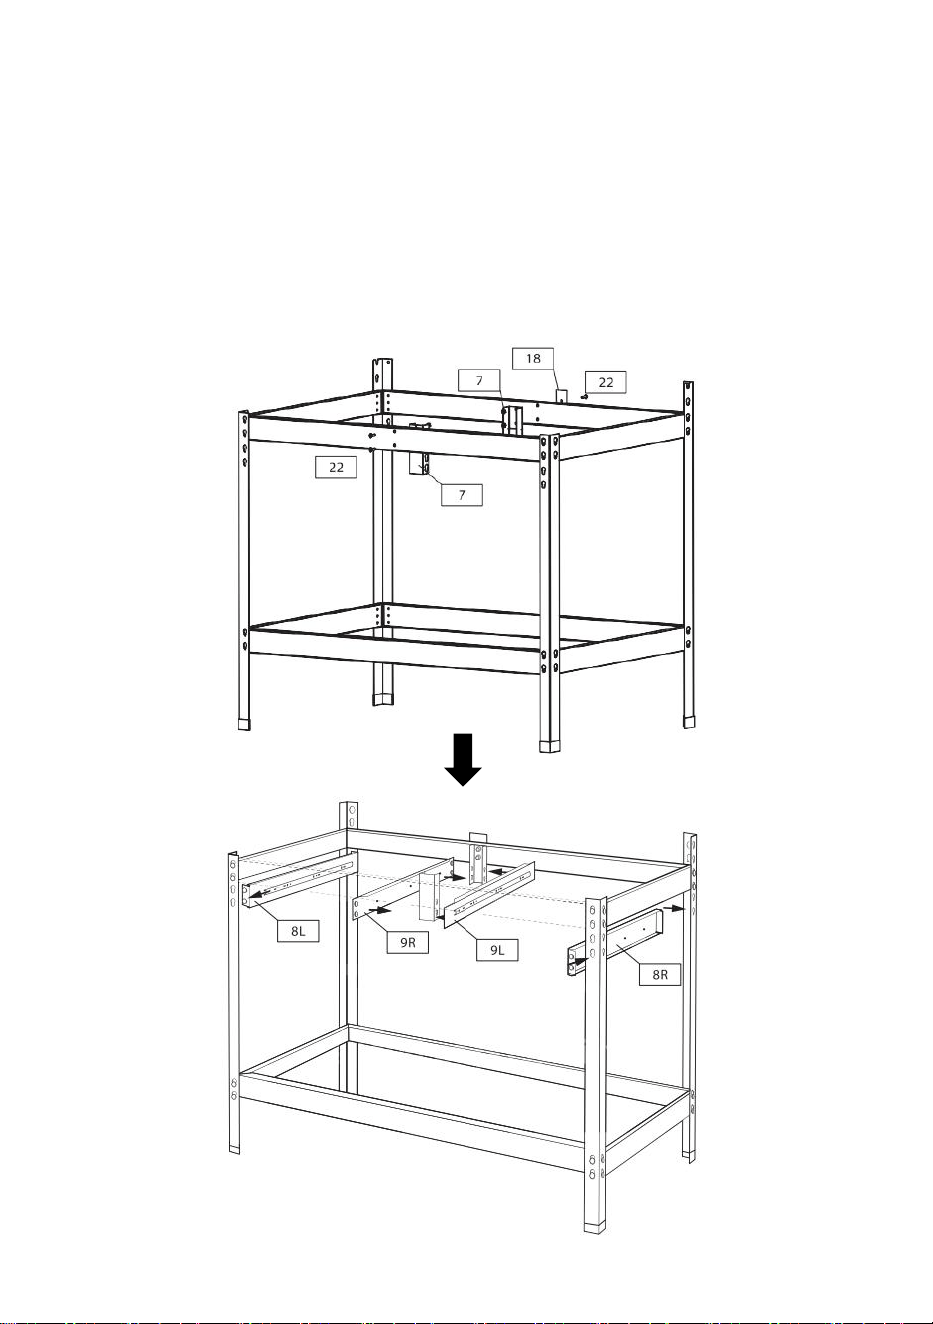
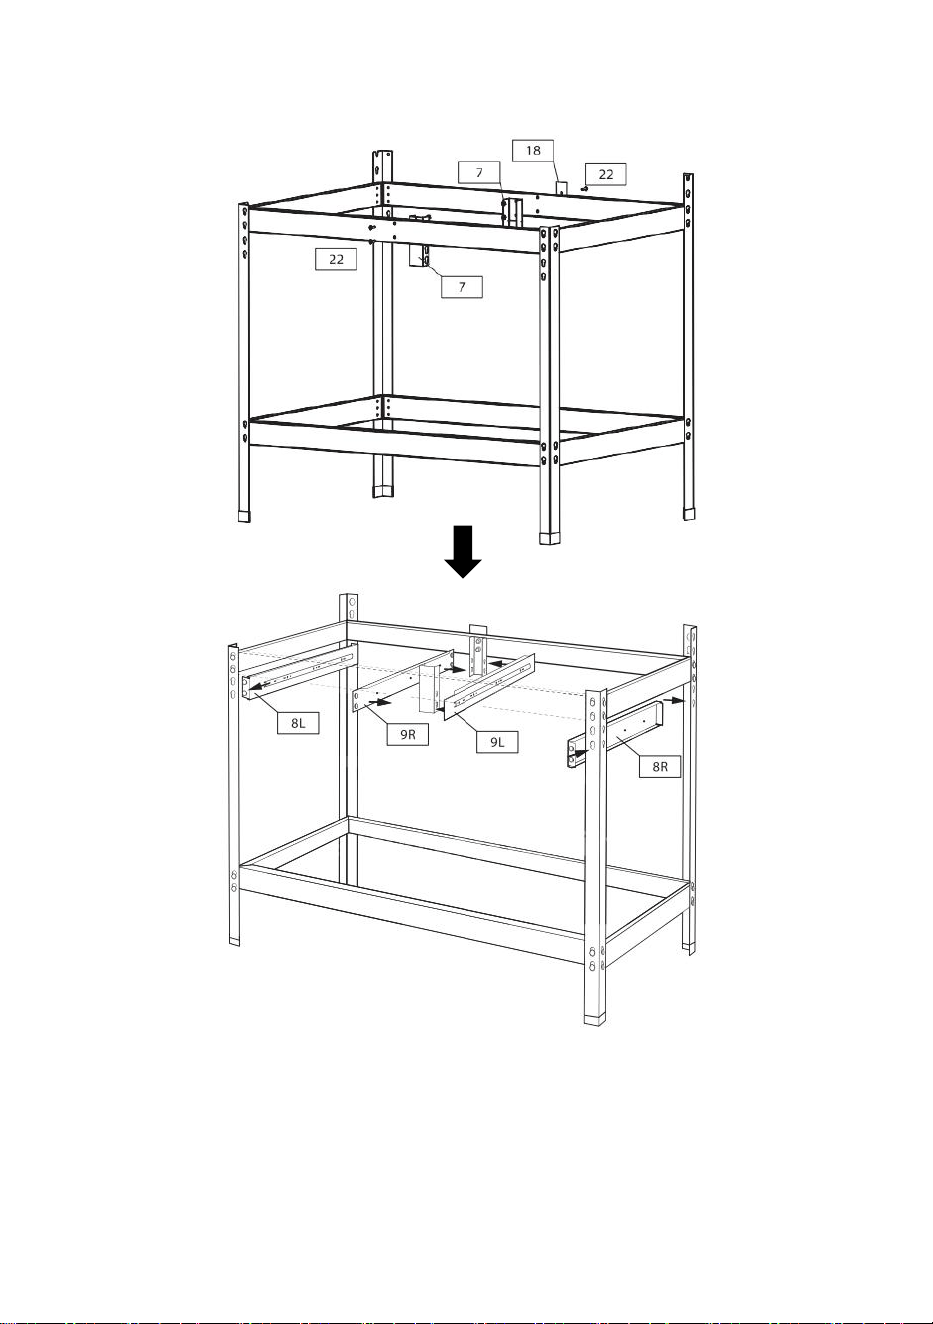
STEP 2: Install the upper workbench support.
- 10 -
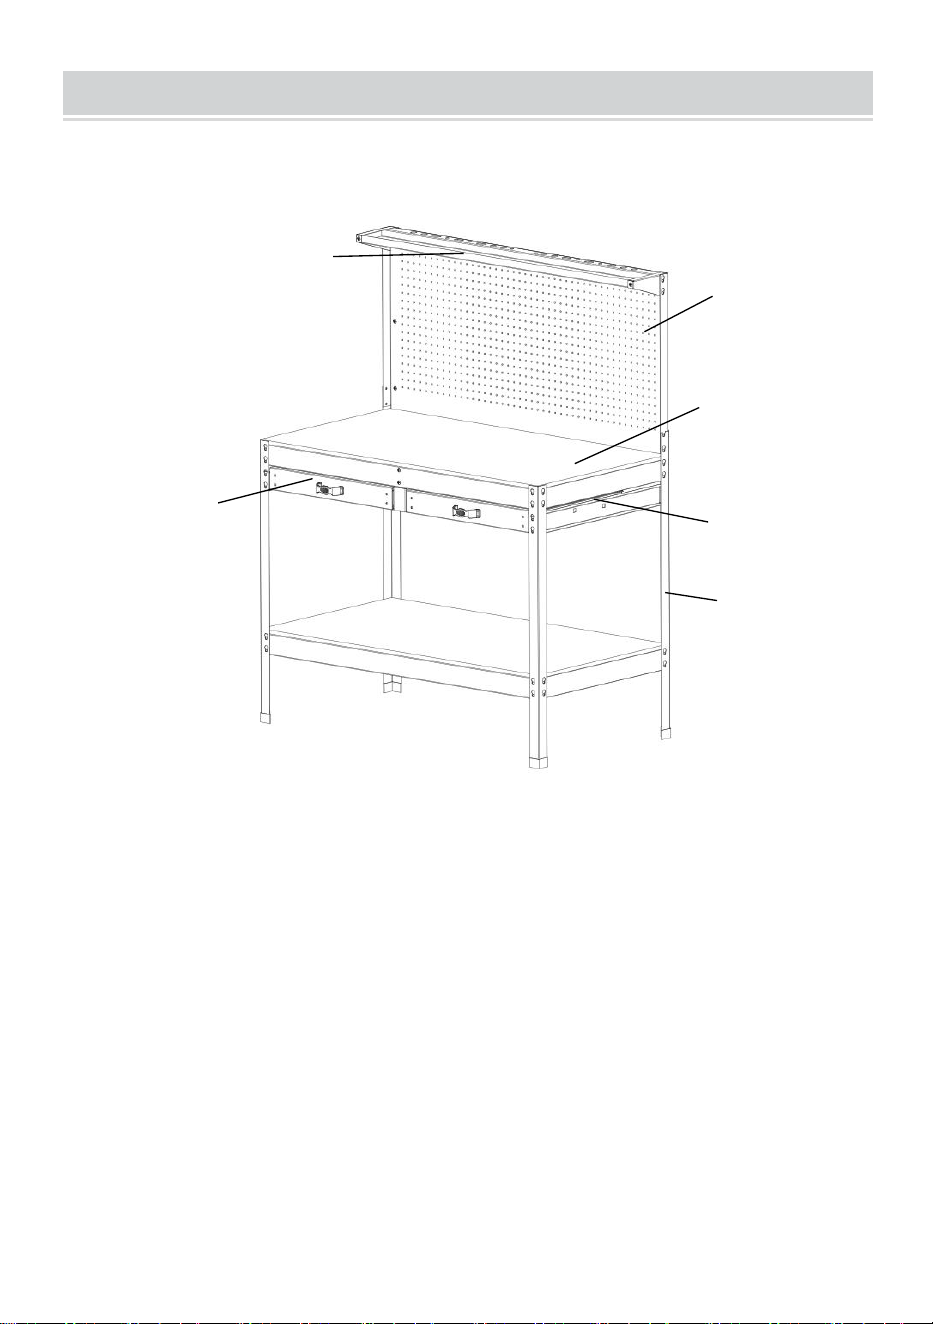
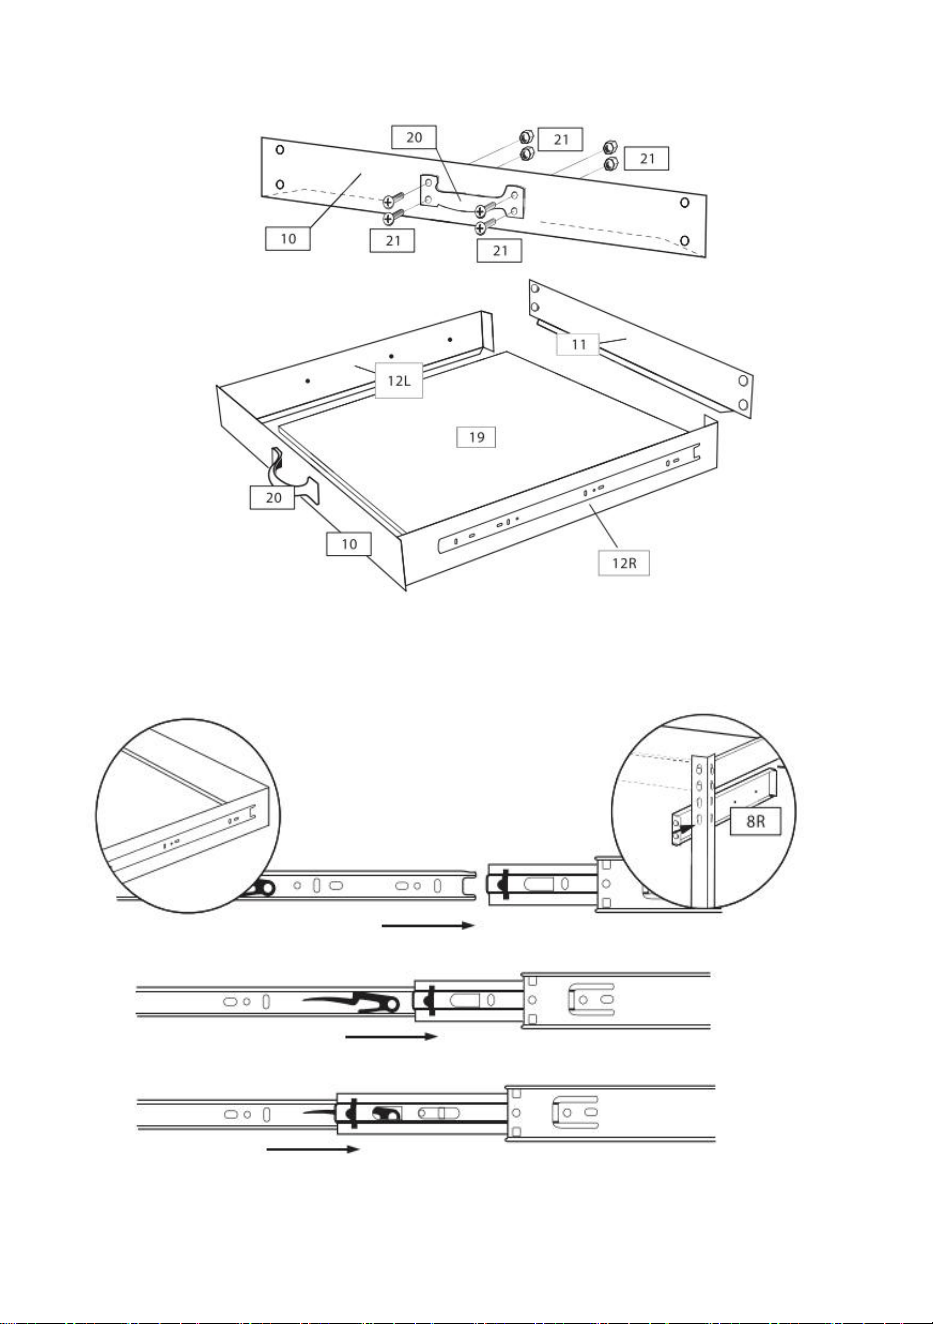
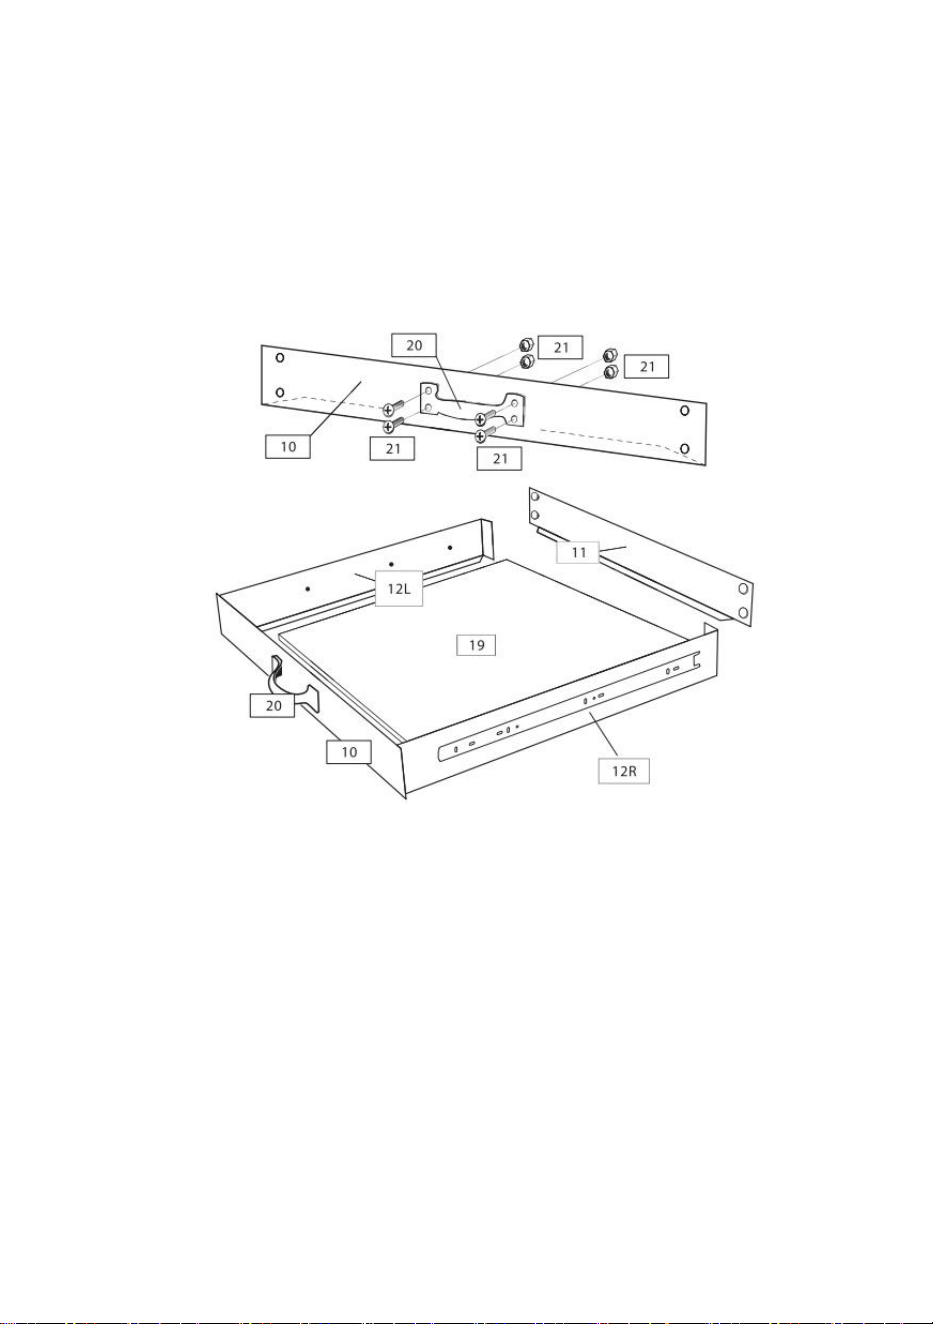
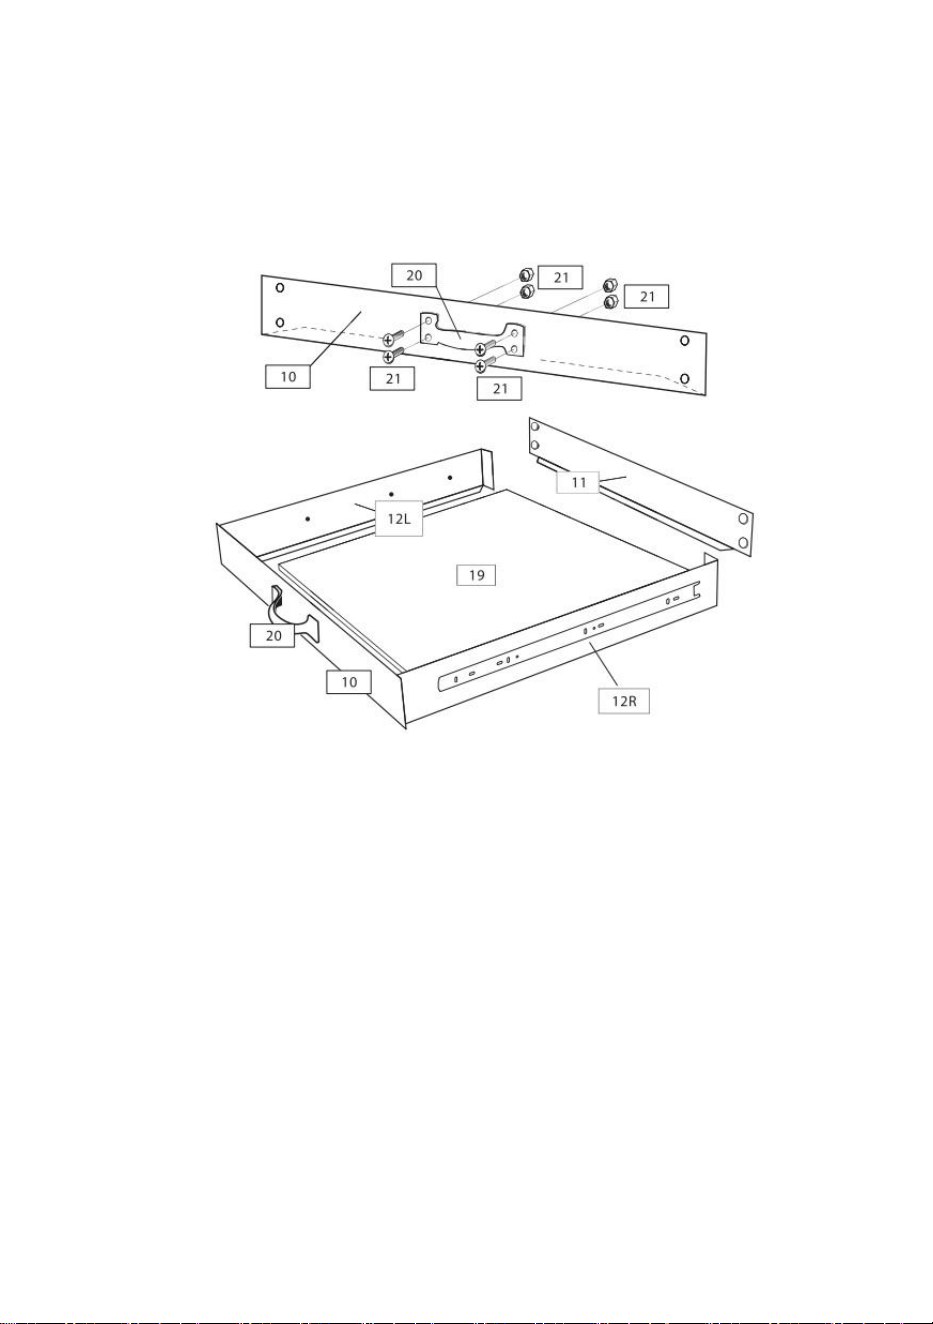
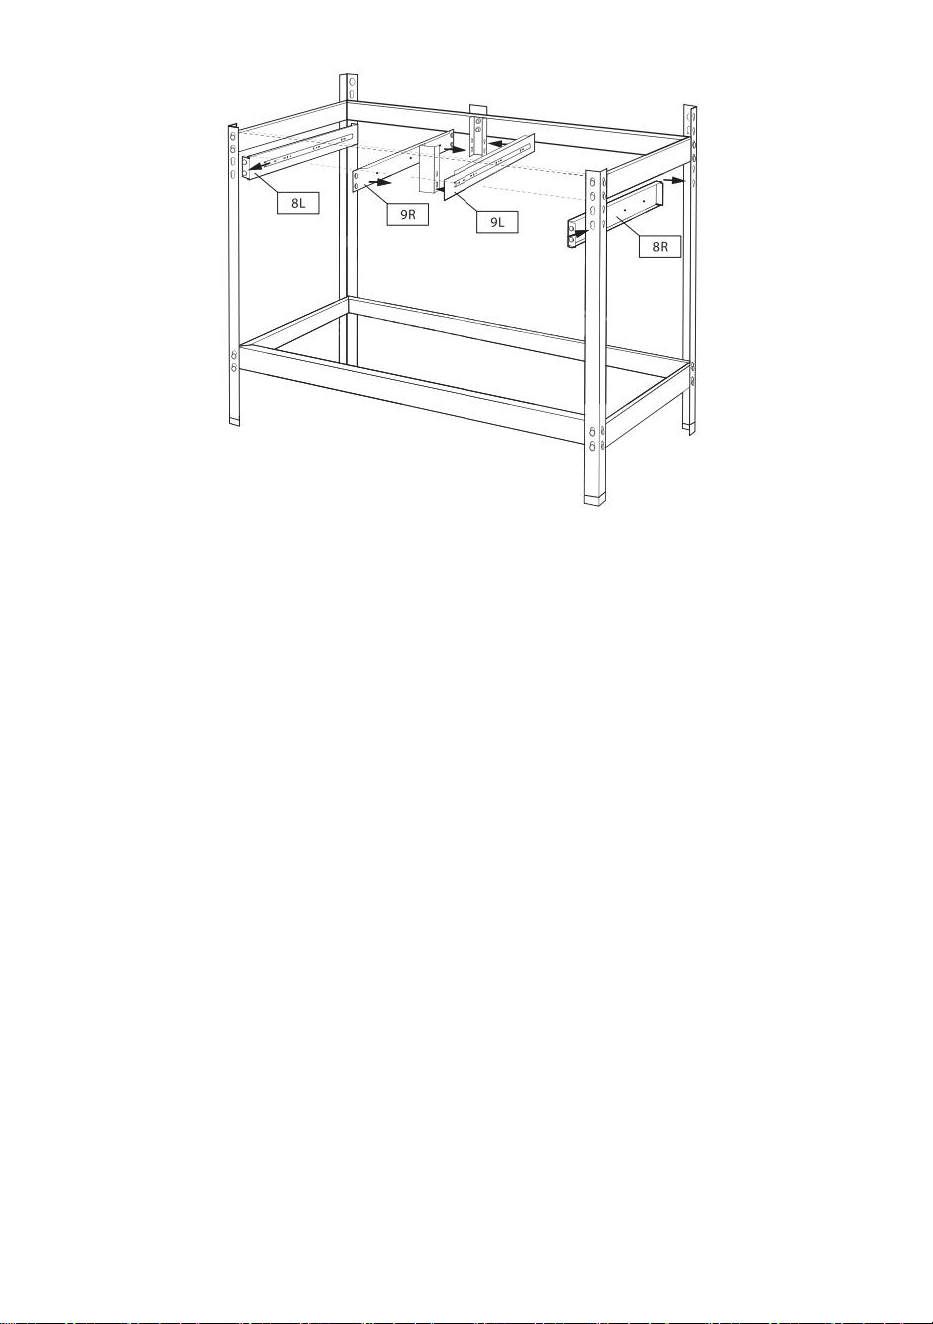
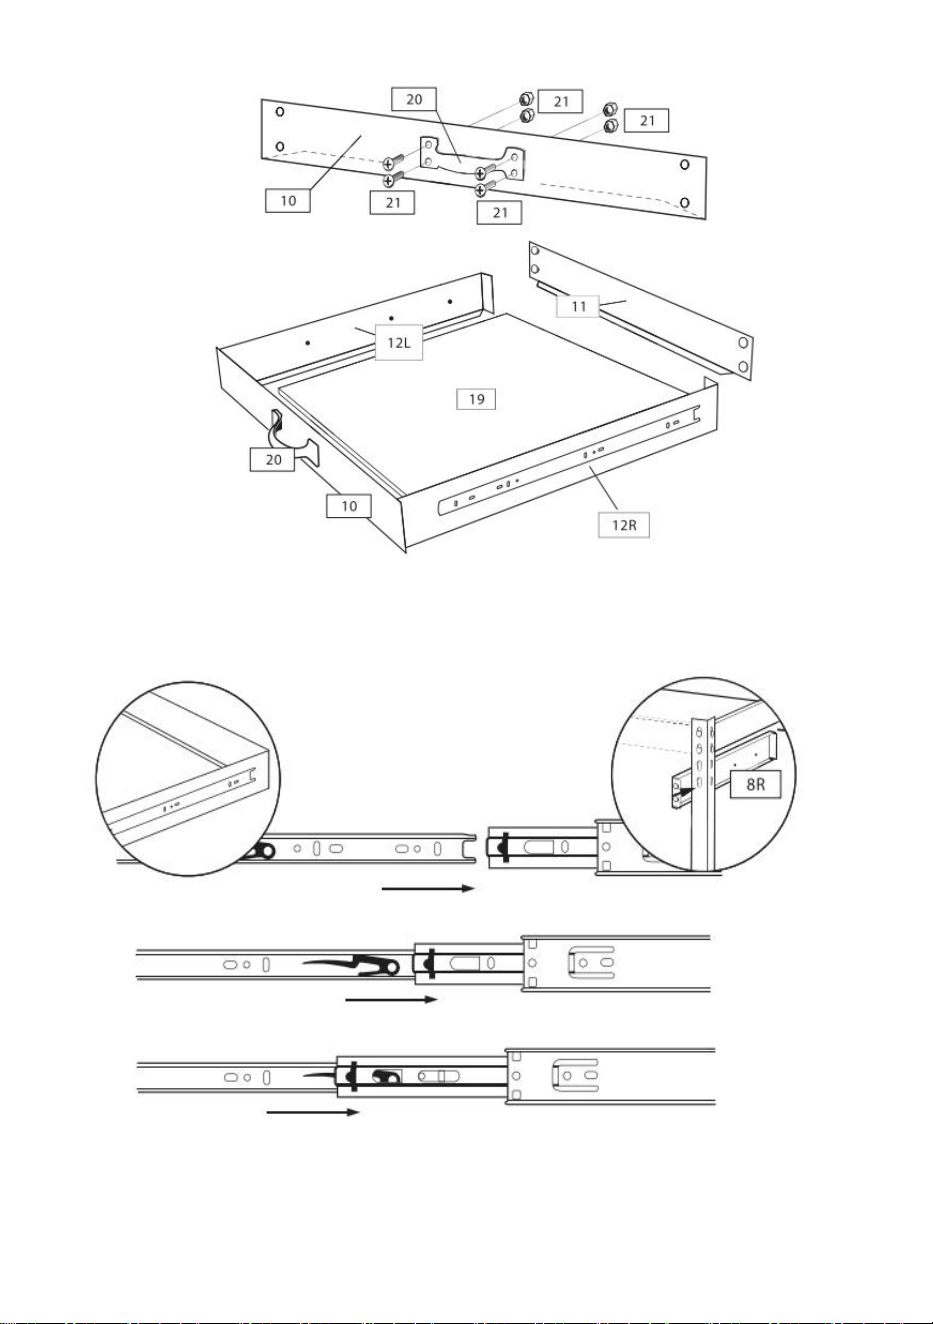
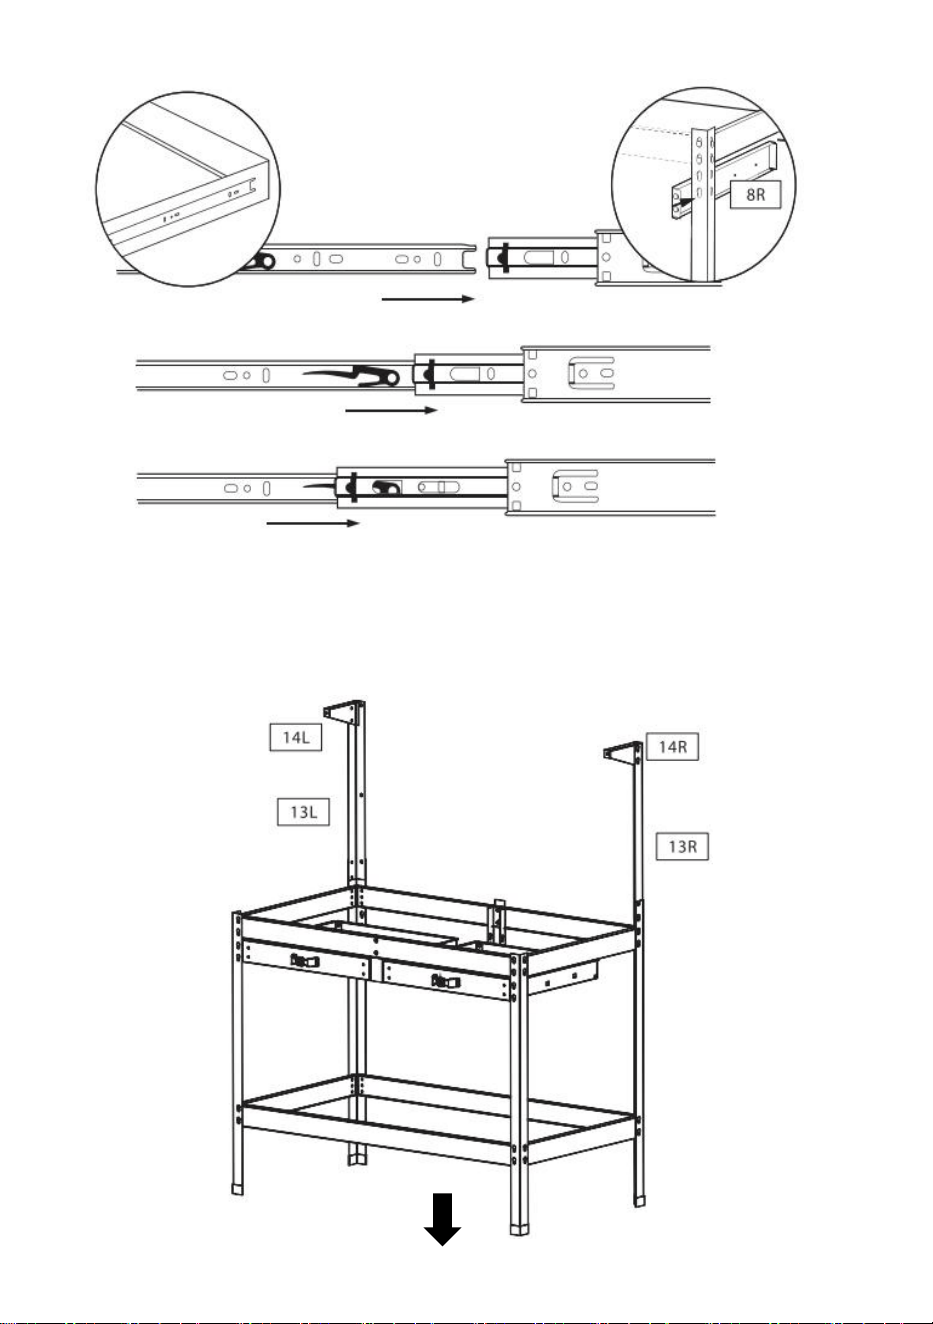
STEP 3:Assemble drawer and install drawer guide.
.
- 11 -
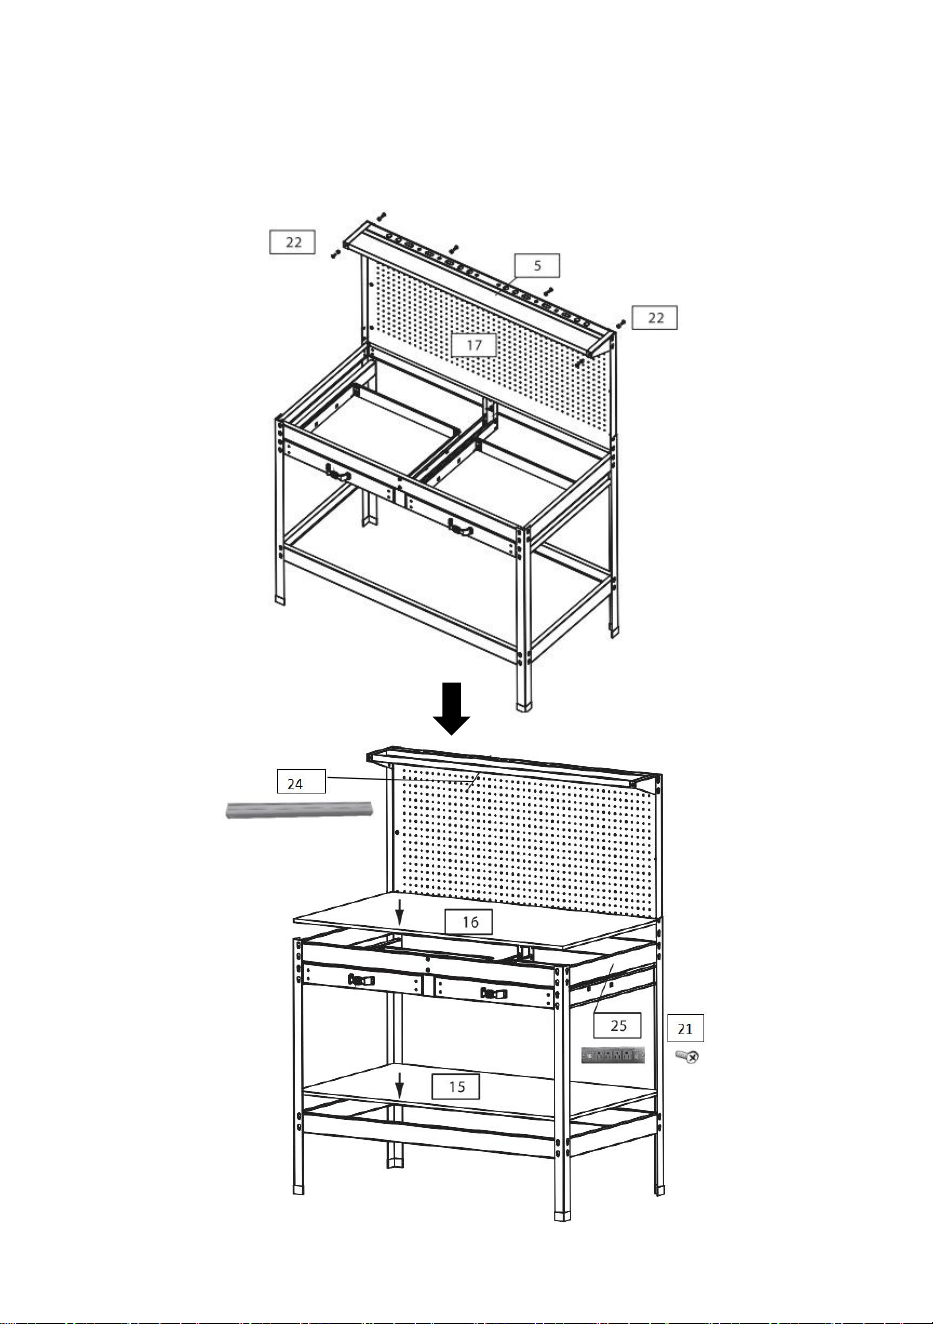
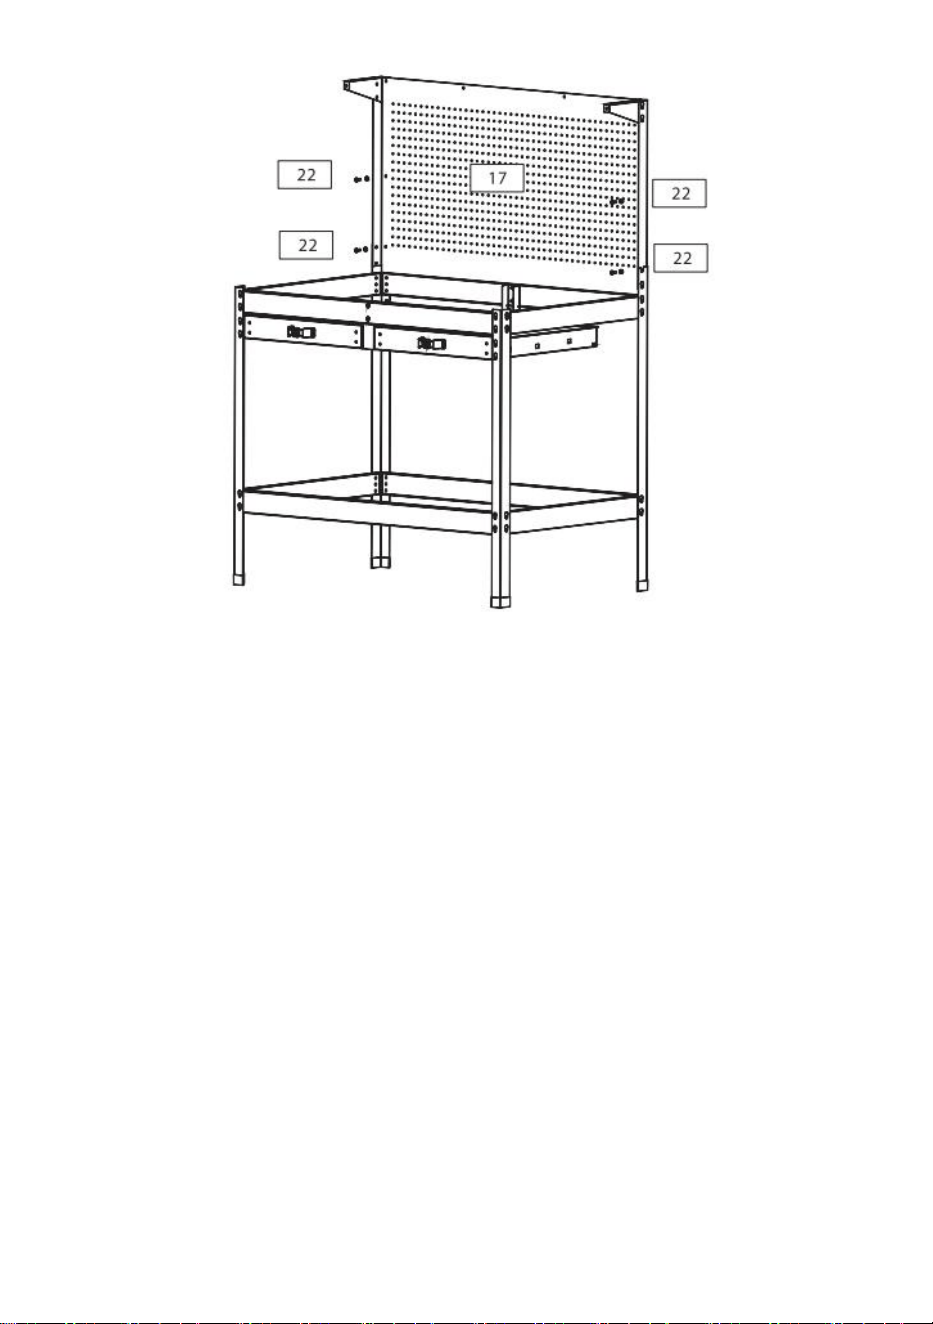
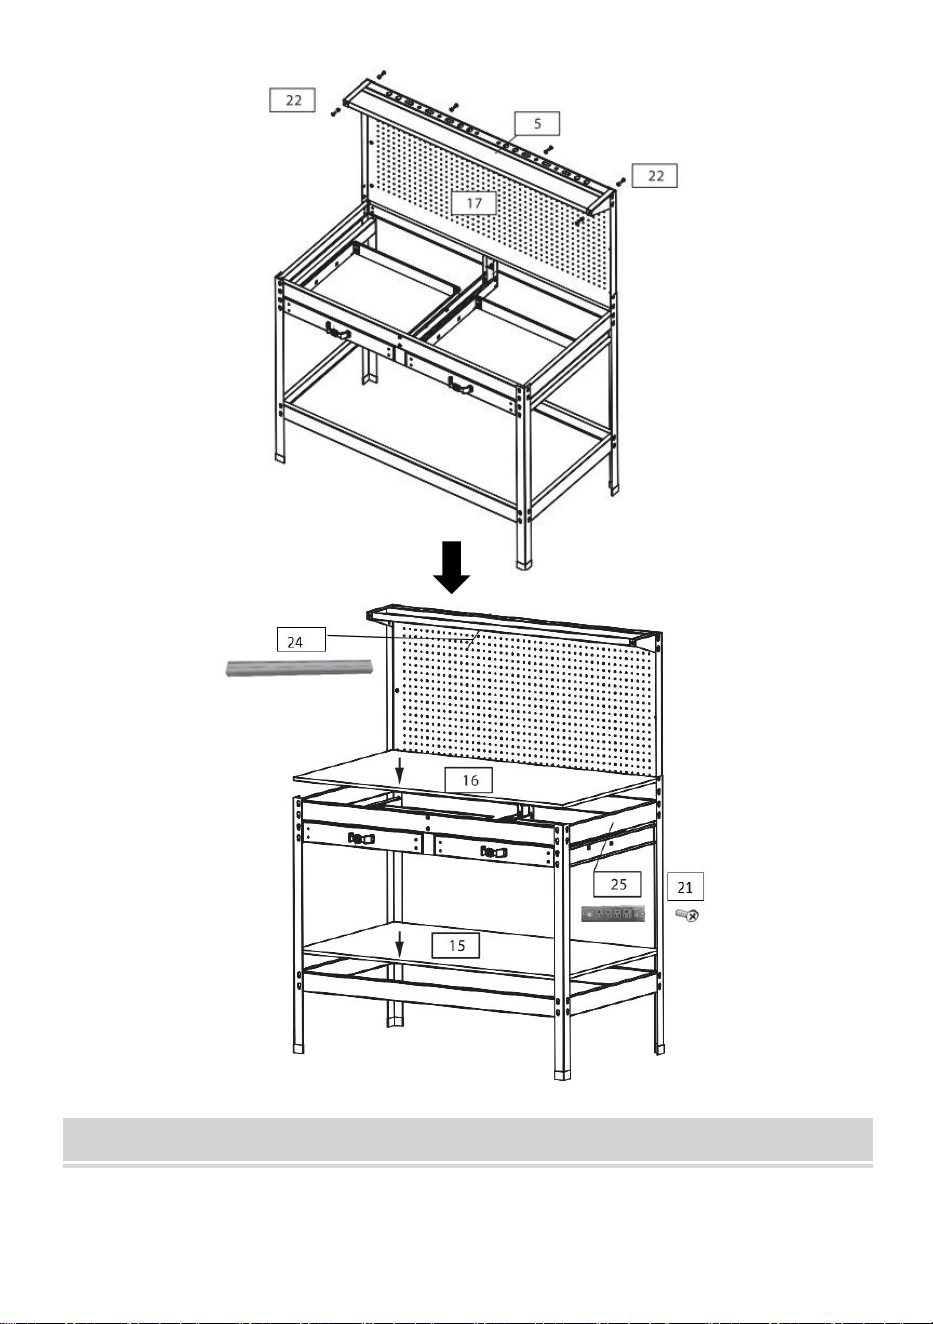
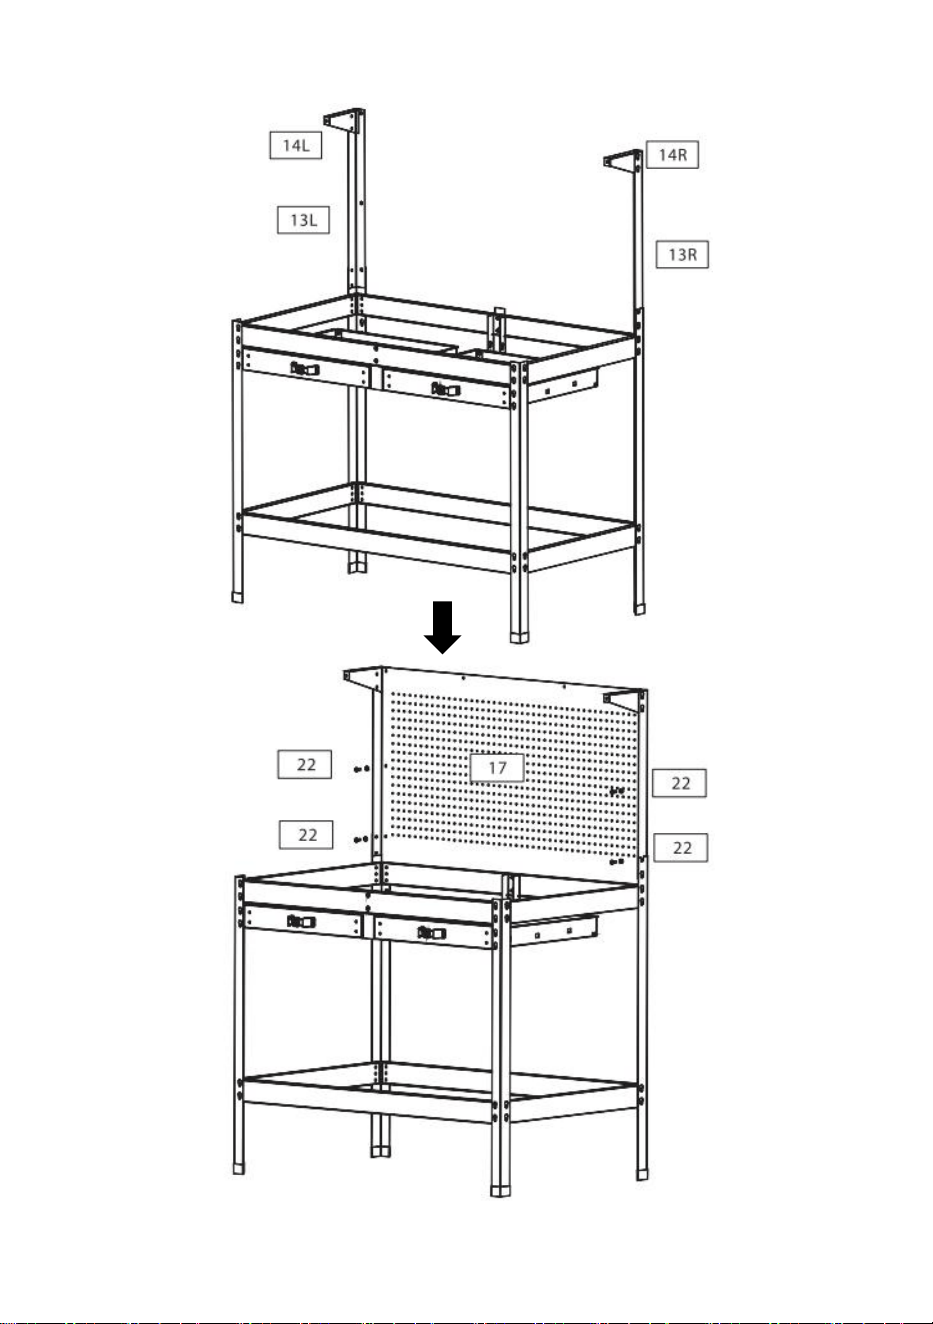
STEP 4:Install pegboard and supports.
- 12 -
STEP 5:Install roof and cover the upper and lower desktop. Install power
strip and LED light.

- 13 -
MAINTENANCE
1. Please try to avoid putting wet items on desktop.
2. Dust off regularly with a clean rag, and arrange items neatly on desktop.
3. Don't let it sit in the sun for too long.
4. Check the table regularly to prevent screws from loosening and falling
off.

- 14 -
Sanven Technology Ltd.
Address: Suite 250, 9166 Anaheim Place, Rancho Cucamonga, CA 91730


- 2 -
Technique Certificat d'assistance et de garantie électronique
www.vevor.com/support
ÉTABLI AVEC PANNEAU PERFORÉ
MANUEL D'UTILISATION
We continue to be committed to provide you tools with competitive price.
"Save Half", "Half Price" or any other similar expressions used by us only represents an
estimate of savings you might benefit from buying certain tools with us compared to the major
top brands and does not necessarily mean to cover all categories of tools offered by us. You
are kindly reminded to verify carefully when you are placing an order with us if you are
actually saving half in comparison with the top major brands.

- 3 -

- 1 -
MODÈLE : JL-WB05-3
Have product questions? Need technical support? Please feel free to
contact us:
Technical Support and E-Warranty Certificate
www.vevor.com/support
NEED HELP? CONTACT US!
This is the original instruction, please read all manual instructions
carefully before operating. VEVOR reserves a clear interpretation of our
user manual. The appearance of the product shall be subject to the
product you received. Please forgive us that we won't inform you again if
there are any technology or software updates on our product.
WORKBENCH WITH
PEGBOARD

- 2 -
SAFE INSTRUCTIONS
: Veuillez lire attentivement ce manuel d'utilisation !
Précautions de montage
1. Assembler uniquement selon ces instructions. Un assemblage incorrect
peut créer des dangers.
2. Portez des lunettes de sécurité approuvées ANSI et des gants de travail
robustes pendant l'assemblage.
3. Gardez la zone de montage propre et bien éclairée.
4. Gardez les spectateurs hors de la zone pendant l’assemblage.
5. Ne montez pas lorsque vous êtes fatigué ou sous l'influence de l'alcool,
de drogues ou de médicaments.
6. La capacité de poids et les autres capacités du produit s'appliquent
uniquement au produit correctement et complètement assemblé.
7. Assemblez sur une surface plane, de niveau, dure et lisse capable de
supporter en toute sécurité un établi entièrement chargé.
Précautions d' emploi
11. Ne fixez pas et ne montez pas ce produit sur un véhicule. Cela pourrait
entraîner des blessures corporelles ou endommager le produit.
12. Ne vous tenez pas debout et ne marchez pas sur ce produit. Vous
risqueriez de tomber et de provoquer des blessures corporelles.
13. Gardez le produit sur des surfaces planes. Le produit peut devenir
instable et basculer s'il est stocké ou déplacé sur une surface instable,
ce qui peut entraîner des blessures corporelles ou endommager le
produit.
14. Verrouillez les tiroirs avant de déplacer ce produit. Les tiroirs
pourraient s'ouvrir et rendre le produit instable et basculer, ce qui
pourrait entraîner des dommages corporels ou matériels.
15. Gardez les enfants et les spectateurs éloignés pendant le chargement,
le déchargement et le déplacement du produit.
- 3 -
16. Ne soulevez pas le produit directement avec un chariot élévateur ni ne
le remorquez avec des dispositifs mécaniques.
17. Ne pas dépasser la capacité de charge maximale, y compris le
contenu. Ne pas dépasser la capacité de charge maximale de chaque
tiroir. Ne pas dépasser la capacité de charge maximale de chaque
plateau.
18. Ne modifiez pas ce produit de quelque manière que ce soit.
19. La boîte contient quelques petits composants ; veuillez les placer
correctement avant l'installation pour les garder hors de portée des
enfants et assurer la sécurité.
20. Avant d'installer la prise, le bureau doit être nettoyé pour s'assurer qu'il
n'y a pas de taches sur le bureau. En particulier, il faut veiller à ne pas
faire entrer d'eau dans la prise afin d'éviter des problèmes de sécurité
lors d'une utilisation ultérieure.
PRUDENCE: Lisez attentivement les instructions et les procédures pour
des opérations en toute sécurité.
CONSERVEZ CES INSTRUCTIONS
PRODUCT INTRODUCTION
JL-WB05-3
Capacité de charge maximale
22 0 lb
Taille du bureau
120*59,5 cm
Matériel
MDF , Métal
Dimensions du produit
120*60 L * 150 cm
Note(s)
120V~ 60Hz Max.1500W (multiprise) avec
lumière LED 14W
Panneau perforé
118,5*59 cm
Model
SPEC.
- 4 -
STRUCTURE DIAGRAM
2. Panneau perforé 2. Bureau 3. Multiprise 4. Pied 5. Tiroir
6. Lumière LED
1
2
3
6
5
4
- 5 -
COMPONENTS
Nom
Composant
Quantité
1
2
2L
1
2R
1
3
3
3(1)
1
4
2
5
1
6
2
7
2

- 6 -
8L
1
8R
1
9L
1
9R
1
10
2
11
2
12L
2
12R
2
13L
1
13R
1
14L
1

- 7 -
14R
1
15
1
16
1
17
1
18
1
19
2
20
2
21
16
22
28
23
30
24
1
- 8 -
25
1
INSTALLATION INSTRUCTION
ÉTAPE 1 : Installer le support inférieur de l’établi.
- 9 -
ÉTAPE 2 : Installer le support supérieur de l’établi.
- 10 -
ÉTAPE 3 : Assemblez le tiroir et installez le guide du tiroir.
.

- 11 -
ÉTAPE 4 : Installez le panneau perforé et les supports.

- 12 -
ÉTAPE 5 : Installez le toit et couvrez le bureau supérieur et inférieur.
Installez la multiprise et l'éclairage LED.

- 13 -
MAINTENANCE

- 14 -
5. Veuillez éviter de mettre des objets mouillés sur le bureau.
6. Dépoussiérez régulièrement avec un chiffon propre et rangez
soigneusement les objets sur le bureau .
7. Ne le laissez pas trop longtemps au soleil.
8. Vérifiez régulièrement la table pour éviter que les vis ne se desserrent
et ne tombent
désactivé.
Sanven Technologie Ltée.

- 15 -
Adresse : Suite 250, 9166 Anaheim Place, Rancho Cucamonga, CA 91730


- 2 -
Technisch Support und E-Garantie-Zertifikat www.vevor.com/support
WERKBANK MIT STECKTAFEL
BENUTZERHANDBUCH
We continue to be committed to provide you tools with competitive price.
"Save Half", "Half Price" or any other similar expressions used by us only represents an
estimate of savings you might benefit from buying certain tools with us compared to the major
top brands and does not necessarily mean to cover all categories of tools offered by us. You
are kindly reminded to verify carefully when you are placing an order with us if you are
actually saving half in comparison with the top major brands.

- 1 -
MODELL: JL-WB05-3
Have product questions? Need technical support? Please feel free to
contact us:
Technical Support and E-Warranty Certificate
www.vevor.com/support
NEED HELP? CONTACT US!
This is the original instruction, please read all manual instructions
carefully before operating. VEVOR reserves a clear interpretation of our
user manual. The appearance of the product shall be subject to the
product you received. Please forgive us that we won't inform you again if
there are any technology or software updates on our product.
WORKBENCH WITH
PEGBOARD

- 2 -
SAFE INSTRUCTIONS
: Bitte lesen Sie dieses Benutzerhandbuch sorgfältig
durch !
Vorsichtsmaßnahmen bei der Montage
1. Nur gemäß dieser Anleitung zusammenbauen. Unsachgemäße
Montage kann Gefahren verursachen.
2. Tragen Sie während der Montage eine ANSI-geprüfte Schutzbrille und
strapazierfähige Arbeitshandschuhe.
3. Halten Sie den Versammlungsbereich sauber und gut beleuchtet.
4. Halten Sie während der Montage unbeteiligte Zuschauer vom Bereich
fern.
5. Nicht zusammenbauen, wenn Sie müde sind oder unter dem Einfluss
von Alkohol, Drogen oder Medikamenten stehen.
6. Gewichtskapazität und andere Produkteigenschaften gelten nur für
ordnungsgemäß und vollständig montierte Produkte.
7. Auf einer flachen, ebenen, harten und glatten Oberfläche
zusammenbauen, die eine voll beladene Werkbank sicher tragen kann.
Vorsichtsmaßnahmen bei der Verwendung
21. Befestigen oder montieren Sie dieses Produkt nicht an einem
Fahrzeug. Dies kann zu Verletzungen oder Produktschäden führen.
22. Stellen Sie sich nicht auf dieses Produkt und treten Sie nicht darauf.
Sie könnten stürzen und sich verletzen.
23. Bewahren Sie das Produkt auf ebenen Flächen auf. Wenn das
Produkt auf einer unebenen Fläche gelagert oder bewegt wird, kann
es instabil werden und umkippen, was zu Verletzungen oder
Produktschäden führen kann.
24. Verriegeln Sie die Schubladen, bevor Sie das Produkt bewegen. Die
Schubladen könnten sich öffnen und das Produkt instabil machen und

- 3 -
kippen, was zu Personen- oder Produktschäden führen kann.
25. Halten Sie Kinder und Zuschauer beim Be- und Entladen sowie beim
Bewegen des Produkts fern.
26. Heben Sie das Produkt nicht direkt mit einem Gabelstapler an und
schleppen Sie es nicht mit mechanischen Geräten.
27. Überschreiten Sie nicht die maximale Tragfähigkeit (einschließlich
Inhalt). Überschreiten Sie nicht die maximale Tragfähigkeit jeder
Schublade. Überschreiten Sie nicht die maximale Tragfähigkeit jedes
Tabletts.
28. Nehmen Sie an diesem Produkt keinerlei Veränderungen vor.
29. Die Box enthält einige kleine Komponenten . Bitte platzieren Sie diese
vor der Installation ordnungsgemäß, um sie von Kindern fernzuhalten
und die Sicherheit zu gewährleisten.
30. Vor dem Einbau der Steckdose sollte die Arbeitsfläche gereinigt
werden, um sicherzustellen, dass keine Flecken darauf vorhanden
sind. Insbesondere sollte darauf geachtet werden, dass kein Wasser
in die Steckdose gelangt, um Sicherheitsprobleme bei der späteren
Verwendung zu vermeiden.
VORSICHT: Lesen Sie die Anweisungen und Verfahren für einen sicheren
Betrieb sorgfältig durch.
BEWAHREN SIE DIESE ANWEISUNGEN AUF
PRODUCT INTRODUCTION
JL-WB05-3
Maximale Tragfähigkeit
22 0 Pfund
Desktop - Größe
120*59,5 cm
Material
MDF , Metall
Technische Daten
120*60 B *150cm
Model
SPEC.
- 4 -
Bewertung(en)
120 V ~ 60 Hz, max. 1500 W
(Steckdosenleiste) mit 14 W LED-Licht
Stecktafel
118,5 x 59 cm
STRUCTURE DIAGRAM
3. P egboard 2. Schreibtisch 3. Steckdosenleiste 4. Bein 5. Schublade
6. LED- Licht
1
2
3
6
5
4
- 5 -
COMPONENTS
Name
Komponente
Menge
1
2
2 Liter
1
2R
1
3
3
3 (1)
1
4
2
5
1
6
2
- 6 -
7
2
8 Liter
1
8R
1
9 Liter
1
9R
1
10
2
11
2
12 Liter
2
12R
2
13 Liter
1
13R
1
- 7 -
14 Liter
1
14R
1
15
1
16
1
17
1
18
1
19
2
20
2
21
16
22
28
23
30

- 8 -
24
1
25
1
INSTALLATION INSTRUCTION
SCHRITT 1 : Installieren Sie die untere Werkbankstütze.

- 9 -
SCHRITT 2 : Installieren Sie die obere Werkbankstütze.

- 10 -
SCHRITT 3: Schublade zusammenbauen und Schubladenführung
installieren.
.

- 11 -
SCHRITT 4: Stecktafel und Stützen installieren.
- 12 -
SCHRITT 5: Dach montieren und obere und untere Tischplatte abdecken.
Steckdosenleiste und LED-Licht montieren.
- 13 -
MAINTENANCE

- 14 -
9. Vermeiden Sie bitte, nasse Gegenstände auf dem Schreibtisch
abzulegen.
10. Stauben Sie regelmäßig mit einem sauberen Lappen ab und ordnen
Sie die Gegenstände ordentlich auf dem Schreibtisch an .
11. Lassen Sie es nicht zu lange in der Sonne liegen.
12. Überprüfen Sie den Tisch regelmäßig, um zu verhindern, dass sich
Schrauben lösen und fallen
aus.

- 15 -
Sanven Technology Ltd.
Adresse: Suite 250, 9166 Anaheim Place, Rancho Cucamonga, CA 91730


- 3 -
We continue to be committed to provide you tools with competitive price.
"Save Half", "Half Price" or any other similar expressions used by us only represents an
estimate of savings you might benefit from buying certain tools with us compared to the major
top brands and does not necessarily mean to cover all categories of tools offered by us. You
are kindly reminded to verify carefully when you are placing an order with us if you are
actually saving half in comparison with the top major brands.
- 1 -
MODELLO: JL-WB05-3
Have product questions? Need technical support? Please feel free to
contact us:
Technical Support and E-Warranty Certificate
www.vevor.com/support
NEED HELP? CONTACT US!
This is the original instruction, please read all manual instructions
carefully before operating. VEVOR reserves a clear interpretation of our
user manual. The appearance of the product shall be subject to the
product you received. Please forgive us that we won't inform you again if
there are any technology or software updates on our product.
WORKBENCH WITH
PEGBOARD

- 2 -
SAFE INSTRUCTIONS
: Si prega di leggere attentamente questo manuale
utente !
Precauzioni di montaggio
1. Assemblare solo secondo queste istruzioni. Un assemblaggio improprio
può creare pericoli.
2. Durante il montaggio, indossare occhiali di sicurezza omologati ANSI e
guanti da lavoro resistenti.
3. Mantenere l'area di assemblaggio pulita e ben illuminata.
4. Tenere gli astanti fuori dall'area durante l'assemblaggio.
5. Non riunirsi quando si è stanchi o sotto l'effetto di alcol, droghe o
farmaci.
6. La capacità di peso e le altre caratteristiche del prodotto si applicano
solo al prodotto correttamente e completamente assemblato.
7. Montare su una superficie piana, livellata, dura e liscia, in grado di
sostenere in modo sicuro un banco da lavoro completamente carico.
Usare le precauzioni
31. Non fissare o montare questo prodotto su un veicolo. Ciò potrebbe
causare lesioni personali o danni al prodotto.
32. Non sostare o calpestare questo prodotto. Potresti cadere e subire
lesioni personali.
33. Conservare il prodotto su superfici piane. Se conservato o spostato su
una superficie non piana, il prodotto potrebbe diventare instabile e
ribaltarsi, causando lesioni personali o danni al prodotto stesso.
34. Prima di spostare il prodotto, bloccare i cassetti. I cassetti potrebbero
aprirsi e rendere il prodotto instabile o ribaltarsi, causando danni a
persone o al prodotto stesso.
35. Tenere lontani i bambini e gli astanti durante le operazioni di carico,
scarico e spostamento del prodotto.

- 3 -
36. Non sollevare il prodotto direttamente con un carrello elevatore né
trainarlo con dispositivi meccanici.
37. Non superare la capacità di carico massima, incluso il contenuto. Non
superare la capacità di carico massima di ciascun cassetto. Non
superare la capacità di carico massima di ciascun vassoio.
38. Non alterare in alcun modo il prodotto.
39. La scatola contiene alcuni piccoli componenti ; posizionarli
correttamente prima dell'installazione per tenerli lontano dalla portata
dei bambini e garantire la sicurezza.
40. Prima di installare la presa, il desktop deve essere pulito per
assicurarsi che non vi siano macchie. In particolare, si deve fare
attenzione a non far entrare acqua nella presa in modo da evitare
problemi di sicurezza durante l'uso successivo.
ATTENZIONE: Leggere attentamente le istruzioni e le procedure per
operare in sicurezza.
SALVA QUESTE ISTRUZIONI
PRODUCT INTRODUCTION
Modello JL-WB05-3
Capacità di carico massima
22 0 libbre
Dimensioni del desktop
120*59,5 cm
Materiale
MDF , Metallo
Dimensioni del prodotto
120*60 L *150cm
Valutazione(i)
120V~ 60Hz Max.1500W (multipresa) con
luce LED da 14W
Pannello forato
118,5*59 cm
Model
SPEC.

- 4 -
STRUCTURE DIAGRAM
4. Pannello forato 2. Scrivania 3. Ciabatta 4. Gambe 5. Cassetto
6. Luce LED
1
2
3
6
5
4
- 5 -
COMPONENTS
Nome
Componente
Quantità
1
2
2 litri
1
2R
1
3
3
3(1)
1
4
2
5
1
6
2
7
2
- 6 -
8L
1
8R
1
9L
1
9R
1
10
2
11
2
12L
2
12R
2
13L
1
13R
1
14L
1

- 7 -
14R
1
15
1
16
1
17
1
18
1
19
2
20
2
21
16
22
28
23
30
24
1

- 8 -
25
1
INSTALLATION INSTRUCTION
FASE 1 : Installare il supporto inferiore del banco da lavoro.

- 9 -
FASE 2 : Installare il supporto superiore del banco da lavoro.
- 10 -
FASE 3: Montare il cassetto e installare la guida.
.

- 11 -
FASE 4: Installare il pannello forato e i supporti.

- 12 -
FASE 5: Installare il tetto e coprire il desktop superiore e inferiore.
Installare la multipresa e la luce LED.

- 13 -
MAINTENANCE

- 14 -
13. Si prega di evitare di appoggiare oggetti bagnati sulla scrivania.
14. Spolverare regolarmente con uno straccio pulito e disporre gli oggetti
in modo ordinato sulla scrivania .
15. Non lasciarlo al sole per troppo tempo.
16. Controllare regolarmente il tavolo per evitare che le viti si allentino e
cadano
spento.
Azienda

- 15 -
Indirizzo: Suite 250, 9166 Anaheim Place, Rancho Cucamonga, CA 91730


- 3 -
We continue to be committed to provide you tools with competitive price.
"Save Half", "Half Price" or any other similar expressions used by us only represents an
estimate of savings you might benefit from buying certain tools with us compared to the major
top brands and does not necessarily mean to cover all categories of tools offered by us. You
are kindly reminded to verify carefully when you are placing an order with us if you are
actually saving half in comparison with the top major brands.

- 1 -
MODELO: JL-WB05-3
Have product questions? Need technical support? Please feel free to
contact us:
Technical Support and E-Warranty Certificate
www.vevor.com/support
NEED HELP? CONTACT US!
This is the original instruction, please read all manual instructions
carefully before operating. VEVOR reserves a clear interpretation of our
user manual. The appearance of the product shall be subject to the
product you received. Please forgive us that we won't inform you again if
there are any technology or software updates on our product.
WORKBENCH WITH
PEGBOARD

- 2 -
SAFE INSTRUCTIONS
: ¡Lea atentamente este manual de usuario !
Precauciones de montaje
1. Realice el montaje únicamente de acuerdo con estas instrucciones. Un
montaje inadecuado puede generar peligros.
2. Use gafas de seguridad aprobadas por ANSI y guantes de trabajo
resistentes durante el montaje.
3. Mantenga el área de reunión limpia y bien iluminada.
4. Mantenga a los transeúntes fuera del área durante el montaje.
5. No realizar el montaje cuando se encuentre cansado o bajo la influencia
de alcohol, drogas o medicamentos.
6. La capacidad de peso y otras capacidades del producto se aplican
únicamente a productos ensamblados de forma correcta y completa.
7.Monte sobre una superficie plana, nivelada, dura y lisa capaz de
soportar de forma segura un banco de trabajo completamente cargado.
Precauciones de uso
41. No acople ni monte este producto en un vehículo. Esto puede
provocar lesiones personales o daños al producto.
42. No se suba ni pise este producto. Podría caerse y provocar lesiones
personales.
43. Mantenga el producto sobre superficies niveladas. El producto puede
volverse inestable y volcarse si se almacena o se mueve sobre una
superficie desnivelada, lo que puede provocar lesiones personales o
daños al producto.
44. Bloquee los cajones antes de mover este producto. Los cajones
podrían abrirse y hacer que el producto sea inestable y se vuelque, lo
que puede provocar daños personales o al producto.
45. Mantenga a los niños y a otras personas alejadas mientras carga,
descarga y mueve el producto.
- 3 -
46. No levante el producto directamente con una carretilla elevadora ni lo
remolque con ningún dispositivo mecánico.
47. No exceda la capacidad máxima de carga, incluido el contenido.No
exceda la capacidad máxima de carga de cada cajón.No exceda la
capacidad máxima de carga de cada bandeja.
48. No altere este producto de ninguna manera.
49. La caja contiene algunos componentes pequeños ; colóquelos
correctamente antes de la instalación para mantenerlos fuera del
alcance de los niños y garantizar la seguridad.
50. Antes de instalar el enchufe, se debe limpiar el escritorio para
asegurarse de que no queden manchas. En particular, se debe prestar
atención a que no entre agua en el enchufe para evitar problemas de
seguridad durante el uso posterior.
PRECAUCIÓN: Lea atentamente las instrucciones y los procedimientos
para realizar operaciones seguras.
GUARDE ESTAS INSTRUCCIONES
PRODUCT INTRODUCTION
JL-WB05-3
Capacidad de carga máxima
22 0 libras
Tamaño del escritorio
120*59,5 cm
Material
MDF , metal
Dimensiones del producto
120 x 60 x 150 cm
Calificación(es)
120 V~ 60 Hz Máx. 1500 W (regleta) con
luz LED de 14 W
Tablero perforado
118,5 x 59 cm
Model
SPEC.

- 4 -
STRUCTURE DIAGRAM
5. Tablero perforado 2. Escritorio 3. Regleta 4. Pata 5. Cajón
6. Luz LED
1
2
3
6
5
4

- 5 -
COMPONENTS
Nombre
Componente
Cantidad
1
2
2 litros
1
2R
1
3
3
3(1)
1
4
2
5
1
6
2
7
2

- 6 -
8 litros
1
8R
1
9 litros
1
9R
1
10
2
11
2
12 litros
2
12R
2
13 litros
1
13R
1
14 litros
1

- 7 -
14R
1
15
1
16
1
17
1
18
1
19
2
20
2
21
16
22
28
23
30
24
1
- 8 -
25
1
INSTALLATION INSTRUCTION
PASO 1 : Instale el soporte del banco de trabajo inferior.

- 9 -
PASO 2 : Instale el soporte del banco de trabajo superior.

- 10 -
PASO 3: Ensamble el cajón e instale la guía del cajón.
.

- 11 -
PASO 4: Instale el tablero perforado y los soportes.

- 12 -
PASO 5: Instale el techo y cubra el escritorio superior e inferior. Instale la
regleta y la luz LED.

- 13 -
MAINTENANCE

- 14 -
17. Intente evitar colocar objetos húmedos sobre el escritorio.
18. Quite el polvo periódicamente con un trapo limpio y coloque los
elementos de forma ordenada en el escritorio .
19. No lo dejes al sol por mucho tiempo.
20. Revise la mesa periódicamente para evitar que los tornillos se aflojen
y se caigan.
apagado.
Tecnología Sanven Ltd.

- 15 -
Dirección: Suite 250, 9166 Anaheim Place, Rancho Cucamonga, CA
91730


- 3 -
We continue to be committed to provide you tools with competitive price.
"Save Half", "Half Price" or any other similar expressions used by us only represents an
estimate of savings you might benefit from buying certain tools with us compared to the major
top brands and does not necessarily mean to cover all categories of tools offered by us. You
are kindly reminded to verify carefully when you are placing an order with us if you are
actually saving half in comparison with the top major brands.

- 1 -
MODELE: JL-WB05-3
Have product questions? Need technical support? Please feel free to
contact us:
Technical Support and E-Warranty Certificate
www.vevor.com/support
NEED HELP? CONTACT US!
This is the original instruction, please read all manual instructions
carefully before operating. VEVOR reserves a clear interpretation of our
user manual. The appearance of the product shall be subject to the
product you received. Please forgive us that we won't inform you again if
there are any technology or software updates on our product.
WORKBENCH WITH
PEGBOARD

- 2 -
SAFE INSTRUCTIONS
: Proszę uważnie przeczytać tę instrukcję obsługi !
Środki ostrożności podczas montażu
1. Montaż należy wykonywać wyłącznie zgodnie z niniejszą instrukcją.
Nieprawidłowy montaż może stwarzać zagrożenia.
2. Podczas montażu należy nosić okulary ochronne z atestem ANSI oraz
wytrzymałe rękawice robocze.
3. Utrzymuj miejsce zgromadzenia w czystości i zapewnij dobre
oświetlenie.
4. Podczas montażu nie dopuszczać osób postronnych na teren montażu.
5. Nie przychodź na spotkania, jeśli jesteś zmęczony lub pod wpływem
alkoholu, narkotyków lub leków.
6. Podane parametry dotyczące nośności i innych parametrów produktu
odnoszą się wyłącznie do produktu prawidłowo i kompletnie
zmontowanego.
7. Montaż należy wykonać na płaskiej, równej, twardej i gładkiej
powierzchni, która będzie w stanie bezpiecznie utrzymać w pełni
obciążony stół roboczy.
Środki ostrożności
51. Nie mocować ani nie montować tego produktu w pojeździe. Może to
spowodować obrażenia ciała lub uszkodzenie produktu.
52. Nie stawaj ani nie stąpaj po tym produkcie. Możesz upaść, co może
spowodować obrażenia ciała.
53. Przechowuj produkt na równych powierzchniach. Produkt może stać
się niestabilny i przewrócić się, jeśli będzie przechowywany lub
przesuwany na nierównej powierzchni, co może spowodować
obrażenia ciała lub uszkodzenie produktu.
54. Przed przenoszeniem produktu należy zablokować szuflady. Szuflady
mogą się otworzyć, co może spowodować niestabilność produktu i

- 3 -
jego przewrócenie, a w rezultacie obrażenia ciała lub uszkodzenie
produktu.
55. Podczas załadunku, rozładunku i przenoszenia produktu należy
trzymać dzieci i osoby postronne z daleka.
56. Nie należy podnosić produktu bezpośrednio za pomocą wózka
widłowego ani holować go przy użyciu żadnych urządzeń
mechanicznych.
57. Nie przekraczaj maksymalnego obciążenia, łącznie z zawartością. Nie
przekraczaj maksymalnego obciążenia każdej szuflady. Nie
przekraczaj maksymalnego obciążenia każdej tacy.
58. Nie wolno modyfikować tego produktu w żaden sposób.
59. W pudełku znajduje się kilka małych elementów . Przed montażem
należy je odpowiednio rozmieścić, aby dzieci miały do nich dostęp, a
urządzenie było bezpieczne.
60. Przed zainstalowaniem gniazda należy oczyścić blat, aby upewnić się,
że nie ma na nim żadnych plam. W szczególności należy zwrócić
uwagę, aby nie wprowadzać wody do gniazda, aby uniknąć
problemów z bezpieczeństwem podczas późniejszego użytkowania.
OSTROŻNOŚĆ: Uważnie przeczytaj instrukcje i procedury w celu
zapewnienia bezpiecznego działania.
ZAPISZ TE INSTRUKCJE
PRODUCT INTRODUCTION
JL-WB05-3
Maksymalna ładowność
22 0 funtów
Rozmiar pulpitu
120*59,5 cm
Tworzywo
Płyta MDF , Metal
Model
SPEC.
- 4 -
Wymiary produktu
120*60 szer. *150cm
Ocena(y)
120 V~ 60 Hz maks. 1500 W (listwa
zasilająca) z oświetleniem LED 14 W
Tablica perforowana
118,5*59 cm
STRUCTURE DIAGRAM
6. tektura perforowana 2. Blat 3. Listwa zasilająca 4. Nóżka 5. Szuflada
6. Światło LED
1
2
3
6
5
4
- 5 -
COMPONENTS
Nazwa
Część
Ilość
1
2
2L
1
2R
1
3
3
3(1)
1
4
2
5
1
- 6 -
6
2
7
2
8L
1
8R
1
9L
1
9R
1
10
2
11
2
12L
2
12R
2
13L
1
- 7 -
13R
1
14L
1
14R
1
15
1
16
1
17
1
18
1
19
2
20
2
21
16
22
28
- 8 -
23
30
24
1
25
1
INSTALLATION INSTRUCTION
KROK 1 : Zamontuj dolną podporę stołu roboczego.
- 9 -
KROK 2 : Zamontuj górną podporę stołu roboczego.
- 10 -
KROK 3: Złóż szufladę i zainstaluj prowadnicę szuflady.
- 11 -
.
KROK 4: Montuję płytę perforowaną i podpory.
- 12 -

- 13 -
KROK 5: Zamontuj dach i przykryj górny i dolny blat. Zainstaluj listwę
zasilającą i oświetlenie LED.

- 14 -
MAINTENANCE
21. Staraj się nie kłaść mokrych przedmiotów na biurku.
22. Regularnie wycieraj kurz czystą szmatką i układaj przedmioty
starannie na biurku .
23. Nie pozostawiaj go na słońcu zbyt długo.
24. Regularnie sprawdzaj stół, aby zapobiec poluzowaniu się i
wypadnięciu śrub.
wyłączony.

- 15 -
Sanven Technology Ltd.
Adres: Suite 250, 9166 Anaheim Place, Rancho Cucamonga, CA 91730


- 2 -
Technisch Ondersteuning en E-garantiecertificaat www.vevor.com/support
WERKBANK MET PRIKBORD
GEBRUIKERSHANDLEIDING
We continue to be committed to provide you tools with competitive price.
"Save Half", "Half Price" or any other similar expressions used by us only represents an
estimate of savings you might benefit from buying certain tools with us compared to the major
top brands and does not necessarily mean to cover all categories of tools offered by us. You
are kindly reminded to verify carefully when you are placing an order with us if you are
actually saving half in comparison with the top major brands.

- 1 -
MODEL: JL-WB05-3
Have product questions? Need technical support? Please feel free to
contact us:
Technical Support and E-Warranty Certificate
www.vevor.com/support
NEED HELP? CONTACT US!
This is the original instruction, please read all manual instructions
carefully before operating. VEVOR reserves a clear interpretation of our
user manual. The appearance of the product shall be subject to the
product you received. Please forgive us that we won't inform you again if
there are any technology or software updates on our product.
WORKBENCH WITH
PEGBOARD

- 2 -
SAFE INSTRUCTIONS
Lees deze gebruikershandleiding aandachtig door !
Montagevoorzorgsmaatregelen
1. Monteer alleen volgens deze instructies. Onjuiste montage kan gevaren
opleveren.
2. Draag tijdens de montage een ANSI-goedgekeurde veiligheidsbril en
stevige werkhandschoenen.
3. Zorg ervoor dat de montageplek schoon en goed verlicht is.
4. Houd omstanders uit de buurt tijdens de montage.
5. Ga niet in de winkel staan als u moe bent of onder invloed van alcohol,
drugs of medicijnen.
6. Het draagvermogen en andere producteigenschappen gelden alleen
voor een correct en volledig gemonteerd product.
7. Monteer het geheel op een vlak, egaal, hard en glad oppervlak dat een
volledig beladen werkbank veilig kan dragen.
Gebruik voorzorgsmaatregelen
61. Bevestig of monteer dit product niet aan een voertuig. Dit kan
persoonlijk letsel of schade aan het product veroorzaken.
62. Ga niet op dit product staan of stappen. U loopt het risico te vallen, wat
tot persoonlijk letsel kan leiden.
63. Plaats het product op een vlakke ondergrond. Het product kan
onstabiel worden en kantelen als het op een oneffen ondergrond wordt
opgeslagen of verplaatst. Dit kan persoonlijk letsel of schade aan het
product veroorzaken.
64. Sluit de laden af voordat u het product verplaatst. De laden kunnen
opengaan en het product onstabiel maken of kantelen, wat kan leiden
tot schade aan personen of het product.
65. Houd kinderen en omstanders uit de buurt tijdens het in- en uitladen
en verplaatsen van het product.

- 3 -
66. Til het product niet rechtstreeks op met een vorkheftruck en sleep het
niet met mechanische hulpmiddelen.
67. Overschrijd het maximale draagvermogen, inclusief de inhoud, niet.
Overschrijd het maximale draagvermogen van elke lade niet.
Overschrijd het maximale draagvermogen van elke lade niet.
68. Breng op geen enkele wijze wijzigingen aan in dit product.
69. De doos bevat enkele kleine onderdelen . Plaats deze voor de
installatie op de juiste plaats, zodat ze buiten bereik van kinderen
blijven en de veiligheid gewaarborgd is.
70. Voordat u de socket installeert, moet u het bureaublad schoonmaken
om ervoor te zorgen dat er geen vlekken op het bureaublad zitten. Let
er vooral op dat er geen water in de socket komt om
veiligheidsproblemen bij later gebruik te voorkomen.
VOORZICHTIGHEID: Lees de instructies en procedures zorgvuldig door
voor veilige handelingen.
BEWAAR DEZE INSTRUCTIES
PRODUCT INTRODUCTION
JL-WB05-3
Maximale laadcapaciteit
22 0 pond
Bureaubladformaat
120*59,5cm
Materiaal
MDF , Metaal
Productafmetingen
120*60B * 150cm
Beoordeling(en)
120V~ 60Hz Max.1500W (stekkerdoos)
met 14W LED-lamp
Pegbord
118,5*59cm
Model
SPEC.
- 4 -
STRUCTURE DIAGRAM
7. Pegbord 2. Bureaublad 3. Stekkerdoos 4. Poot 5. Lade
6. LED- licht
1
2
3
6
5
4
- 5 -
COMPONENTS
Naam
Onderdeel
Hoeveelhe
id
1
2
2L
1
2R
1
3
3
3(1)
1
4
2
5
1
6
2
7
2

- 6 -
8L
1
8R
1
9L
1
9R
1
10
2
11
2
12L
2
12R
2
13L
1
13R
1
14L
1
- 7 -
14R
1
15
1
16
1
17
1
18
1
19
2
20
2
21
16
22
28
23
30
24
1

- 8 -
25
1
INSTALLATION INSTRUCTION
STAP 1 : Installeer de onderste werkbanksteun.

- 9 -
STAP 2 : Monteer de bovenste werkbanksteun.

- 10 -
STAP 3: Monteer de lade en installeer de ladegeleider.
.
- 11 -
STAP 4: Installeer het gaatjesbord en de steunen.

- 12 -
STAP 5: Installeer het dak en bedek het bovenste en onderste bureaublad.
Installeer de stekkerdoos en de ledlamp.

- 13 -
MAINTENANCE

- 14 -
25. Probeer te voorkomen dat er natte voorwerpen op het bureau worden
gelegd.
26. Stof het regelmatig af met een schone doek en sorteer de spullen
netjes op het bureaublad .
27. Laat het niet te lang in de zon staan.
28. Controleer de tafel regelmatig om te voorkomen dat schroeven
losraken en vallen
uit.

- 15 -
Sanven Technologie Ltd.
Adres: Suite 250, 9166 Anaheim Place, Rancho Cucamonga, CA 91730


- 2 -
Teknisk Support och e-garanticertifikat www.vevor.com/support
ARBETSBÄNK MED PINNBRÄDA
ANVÄNDARMANUAL
We continue to be committed to provide you tools with competitive price.
"Save Half", "Half Price" or any other similar expressions used by us only represents an
estimate of savings you might benefit from buying certain tools with us compared to the major
top brands and does not necessarily mean to cover all categories of tools offered by us. You
are kindly reminded to verify carefully when you are placing an order with us if you are
actually saving half in comparison with the top major brands.

- 1 -
MODELL: JL-WB05-3
Have product questions? Need technical support? Please feel free to
contact us:
Technical Support and E-Warranty Certificate
www.vevor.com/support
NEED HELP? CONTACT US!
This is the original instruction, please read all manual instructions
carefully before operating. VEVOR reserves a clear interpretation of our
user manual. The appearance of the product shall be subject to the
product you received. Please forgive us that we won't inform you again if
there are any technology or software updates on our product.
WORKBENCH WITH
PEGBOARD

- 2 -
SAFE INSTRUCTIONS
: Vänligen läs denna bruksanvisning noggrant !
Försiktighetsåtgärder vid montering
1. Montera endast enligt dessa instruktioner. Felaktig montering kan skapa
faror.
2. Bär ANSI-godkända skyddsglasögon och kraftiga arbetshandskar vid
montering.
3. Håll monteringsområdet rent och väl upplyst.
4. Håll åskådare borta från området under monteringen.
5. Sätt dig inte ihop när du är trött eller påverkad av alkohol, droger eller
medicin.
6. Viktkapacitet och andra produktegenskaper gäller endast för korrekt och
färdigmonterad produkt.
7. Montera på en plan, jämn, hård och slät yta som säkert kan stödja en
fullastad arbetsbänk.
Använd försiktighetsåtgärder
71. Fäst eller montera inte denna produkt på ett fordon. Detta kan orsaka
person- eller produktskada.
72. Stå eller trampa inte på den här produkten. Du kan falla vilket kan
orsaka personskada.
73. Håll produkten på plana ytor. Produkten kan bli instabil och tippa om
den förvaras eller flyttas på en ojämn yta, vilket kan orsaka person-
eller produktskada.
74. Lås lådorna innan du flyttar den här produkten. Lådorna kan öppnas
och göra produkten instabil och tippa, vilket kan orsaka person- eller
produktskador.
75. Håll barn och åskådare borta när du lastar, lossar och flyttar
produkten.
76. Lyft inte produkten direkt med en gaffeltruck eller bogser med någon
- 3 -
mekanisk anordning.
77. Överskrid inte den maximala lastkapaciteten, inklusive innehåll.
Överskrid inte den maximala lastkapaciteten för varje låda. Överskrid
inte den maximala lastkapaciteten för varje fack.
78. Ändra inte denna produkt på något sätt.
79. Lådan innehåller några små komponenter ; Vänligen placera dem
ordentligt före installation för att hålla dem borta från barn och
garantera säkerheten.
80. Innan du installerar uttaget bör skrivbordet rengöras för att säkerställa
att det inte finns några fläckar på skrivbordet. Särskilt bör man vara
uppmärksam på att inte föra in vatten i uttaget för att undvika
säkerhetsproblem vid efterföljande användning.
FÖRSIKTIGHET: Läs noggrant instruktionerna och procedurerna för säker
drift.
SPARA DESSA INSTRUKTIONER
PRODUCT INTRODUCTION
JL-WB05-3
Maximal lastkapacitet
22 0lbs
Skrivbordsstorlek
120*59,5 cm
Material
MDF , metall
Produktens mått
120*60 B *150cm
Betyg(er)
120V~ 60Hz Max.1500W (Power Strip)
med 14W LED-ljus
Pinbräda
118,5*59 cm
Model
SPEC.
- 4 -
STRUCTURE DIAGRAM
8. P egboard 2. Skrivbord 3. Eldosa 4. L ex 5. Låda
6. LED- ljus
1
2
3
6
5
4
- 5 -
COMPONENTS
Namn
Komponent
Kvantitet
1
2
2L
1
2R
1
3
3
3(1)
1
4
2
5
1
6
2
7
2
8L
1
- 6 -
8R
1
9L
1
9R
1
10
2
11
2
12L
2
12R
2
13L
1
13R
1
14L
1
14R
1
- 7 -
15
1
16
1
17
1
18
1
19
2
20
2
21
16
22
28
23
30
24
1
25
1
- 8 -
INSTALLATION INSTRUCTION
STEG 1 : Installera det nedre arbetsbänksstödet.
- 9 -
STEG 2 : Installera det övre arbetsbänksstödet.

- 10 -
STEG 3: Montera lådan och installera lådguiden.
.

- 11 -
STEG 4:Jag installerar pegboard och stöd.

- 12 -
STEG 5:Jag installerar taket och täcker det övre och nedre skrivbordet.
Installera grenuttag och LED-lampa.

- 13 -
MAINTENANCE
29. Försök att undvika att lägga blöta föremål på skrivbordet.
30. Damma av regelbundet med en ren trasa och ordna föremålen snyggt
på skrivbordet .
31. Låt den inte sitta i solen för länge.
32. Kontrollera bordet regelbundet för att förhindra att skruvar lossnar och
faller
av.

- 14 -
Sanven Technology Ltd.
Adress: Suite 250, 9166 Anaheim Place, Rancho Cucamonga, CA 91730