Read this booklet thoroughly before using this coffee machine for the quick use.
INSTRUCTION BOOKLET
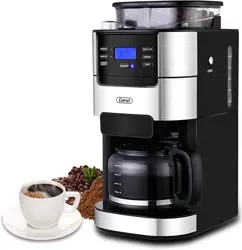
2-in-1 Smart
Drip Coffee Machine
Grinder | Brewer
DCMB0
Please read all the owner’s instruction booklet before use.

11
21
21
21
22
22
23
23
09
01
12
24
32
05
1. Important Safeguards
2. Know Your Machine
3. More Details
4. Before First Use
5. Making Perfect Coffee Guide
6. Other Functions
6.1 Switched On & Off
6.2 Programming the Time
6.3 Switch-Off Time Setting
6.4 Blooming Setting
6.5 Brew Pause Feature
6.6 Button Sound Setting
7. Cleaning & Maintenance
8. Troubleshooting
9. Warranty
Contents
. . . . . . . . . . . . . . . . . . . . . . . . . . . . . . . . . . . . . . . . .
. . . . . . . . . . . . . . . . . . . . . . . . . . . . . . . . . . . . . . . . . . . .
. . . . . . . . . . . . . . . . . . . . . . . . . . . . . . . . . . . . . . . . . . . . . . . . . . .
. . . . . . . . . . . . . . . . . . . . . . . . . . . . . . . . . . . . . . . . . . . . . . . .
. . . . . . . . . . . . . . . . . . . . . . . . . . . . . . . . . . .
. . . . . . . . . . . . . . . . . . . . . . . . . . . . . . . . . . . . . . . . . . . . . . .
. . . . . . . . . . . . . . . . . . . . . . . . . . . . . . . . . . . . . . . . . . . .
. . . . . . . . . . . . . . . . . . . . . . . . . . . . . . . . . . . . . . .
. . . . . . . . . . . . . . . . . . . . . . . . . . . . . . . . . . . . . . . . . . . . .
. . . . . . . . . . . . . . . . . . . . . . . . . . . . . . . . . . . . . . .
. . . . . . . . . . . . . . . . . . . . . . . . . . . . . . . . . . . . . . . . . .
. . . . . . . . . . . . . . . . . . . . . . . . . . . . . . . . . . . . . . .
. . . . . . . . . . . . . . . . . . . . . . . . . . . . . . . . . . . . . . .
. . . . . . . . . . . . . . . . . . . . . . . . . . . . . . . . . . . . . . . . . . . . . . .
41
. . . . . . . . . . . . . . . . . . . . . . . . . . . . . . . . . . . . . . . . . . . . . . . . . . . . . . .

21
1. Important Safeguards1. Important Safeguards
When using electrical machine, basic safety precautions should
always be followed, including the following:
1. Read all instructions.
2. Do not touch hot surfaces. Use handles or knobs.
3. To protect against fire, electric shock and injury to persons do not
immerse cord, plugs, base or the machine in water or other liquid.
4. Close supervision is necessary when any machine is used by or
near children.
5. Unplug from outlet when either the machine or display clock is
not in use, and before cleaning. Allow to cool before putting on or
taking off parts, and before cleaning the machine.
6. Do not operate any machine with a damaged cord or plug or after
the machine malfunctions, or has been damaged in any manner.
Return machine to the nearest authorized service facility for
examination, repair or adjustment.
7. The use of accessory attachments not recommended by the
machine manufacturer may result in fire, electric shock or injury
to persons.
8. Do not use outdoors .
9. Do not let cord hang over edge of table or counter, or touch hot
surfaces.
10.
Do not place on or near a hot gas or electric burner, or in a heated
oven.
11.
Always attach plug to machine first, then plug cord into the wall
outlet. To disconnect, turn any control to off position, then
remove plug from wall outlet.
12.
Do not use machine for other than intended use.
13. Special instructions covering lid placement and removal. Wording
may vary.
14. Scalding may occur if the lid is removed during the brewing cycles.
15. The glass carafe is suitable for this machine only. Do not put it on a
range top unless specific instructions are provided and precautions
are observed.
16. Do not set a hot container on a wet or cold surface.
17. Do not use a cracked container or a container having a loose or
weakened handle.
18. Do not clean container with cleansers, steel wool pads, or other
abrasive material.Scalding may occur if the lid is removed during
the brewing cycles.
19. Check grinder basket for presence of foreign objects before using.
20. Avoid contacting with moving parts.
21. Use the coffee grinder to grind roasted coffee beans only.
Grinding other substances, such as nuts, spices or unroasted
beans, may dull the blade and cause poor grinding or injury.
22. Do not place cloth beneath machine or otherwise restrict
airflow.
23.
Use only the Gevi Filter with this unit. Other filters may cause
the machine to over flow.
24. Do not operate the machine in a machine garage or under a wall
cabinet. When storing in a machine garage, always unplug the
unit from the electrical outlet. Not doing so could create a risk of

43
1. Important Safeguards 1. Important Safeguards
fire, especially if the machine touches the walls of the garage or
the door touches the unit as it closes.
Power cord instructions:
A short power-supply cord (or detachable power-supply cord) may
be provided to reduce risks resulting from becoming entangled in
or tripping over a longer cord. Longer detachable power supply cords
or extension cords are available and may be used if care is exercised
in their use. If a long detachable power-supply cord or extension
cord is used:
a. The marked electrical rating of the detachable power-supply
cord or extension cord should be at least as great as the
North American Models With Grounded Plugs:
This machine has a polarized plug, (one blade is
wider than the other). As a safety feature to reduce
the risk of electrical shock, this plug is intended to fit in a polarized outlet only one
way. If the plug does not fit fully in the outlet, reverse the plug. If it still does not fit,
contact a qualified electrician. Do not attempt to defeat this safety feature or modify
the plug in any way. If the plug fits loosely into the AC outlet or if the AC outlet feels
warm do not use that outlet.
Polarized Plug
NOTE
For electronic instruction booklet, please contact Gevi support team.
SAVE THIS INSTRUCTION BOOKLET
electrical rating of the machine.
b. If the machine is of the grounded type, the extension cord should
be a grounding type 3-wire cord.
c. The Longer cord should be arranged so that it will not drape
over the counter top or table top where it can be pulled on by
children or tripped over unintentionally.
Do not pull, twist or otherwise abuse the power cord.
Product notices:
a. Place the machine on a hard, flat, level surface to avoid
interruption of airflow underneath the machine.
b. Do not operate the machine with an empty water tank.
65
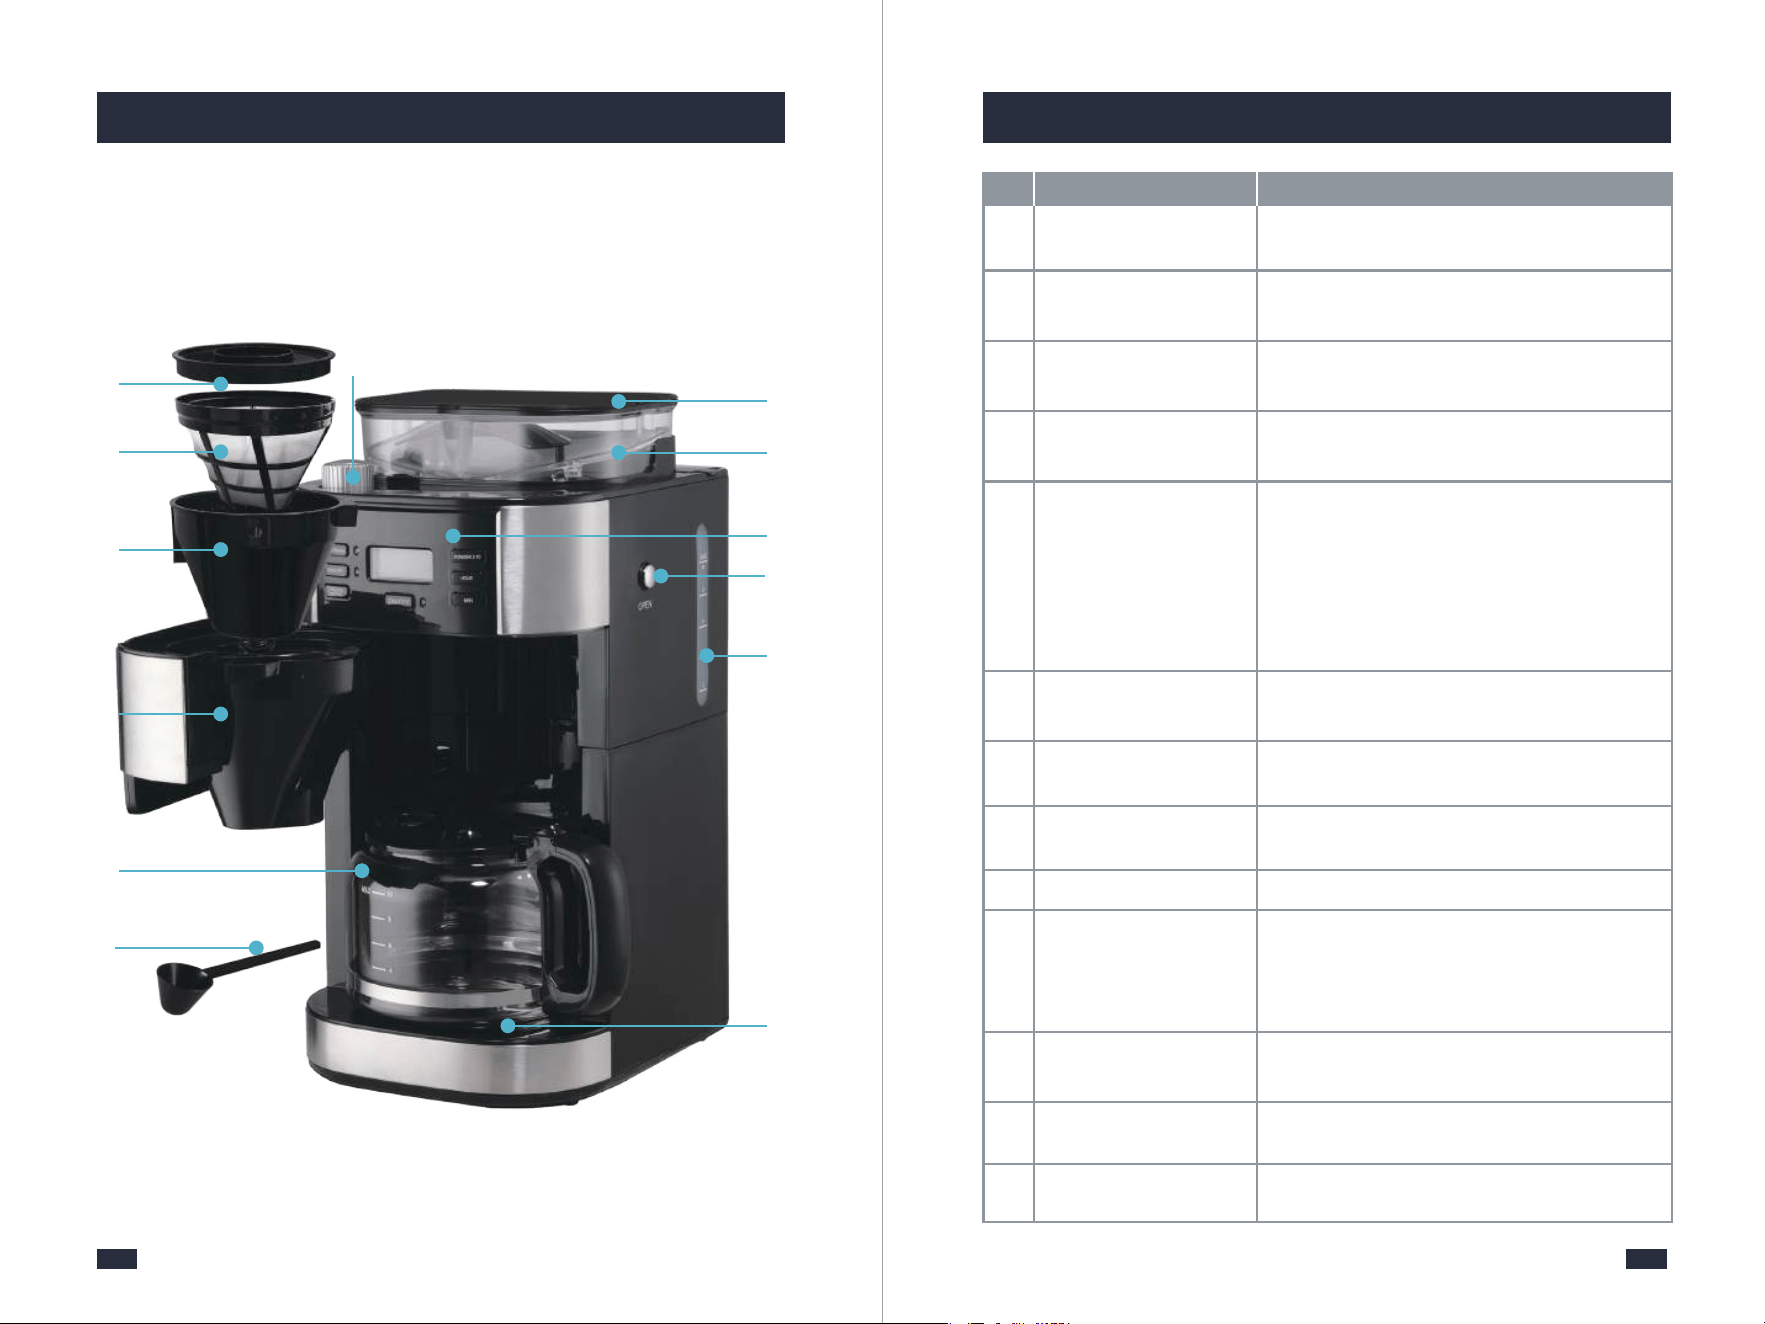
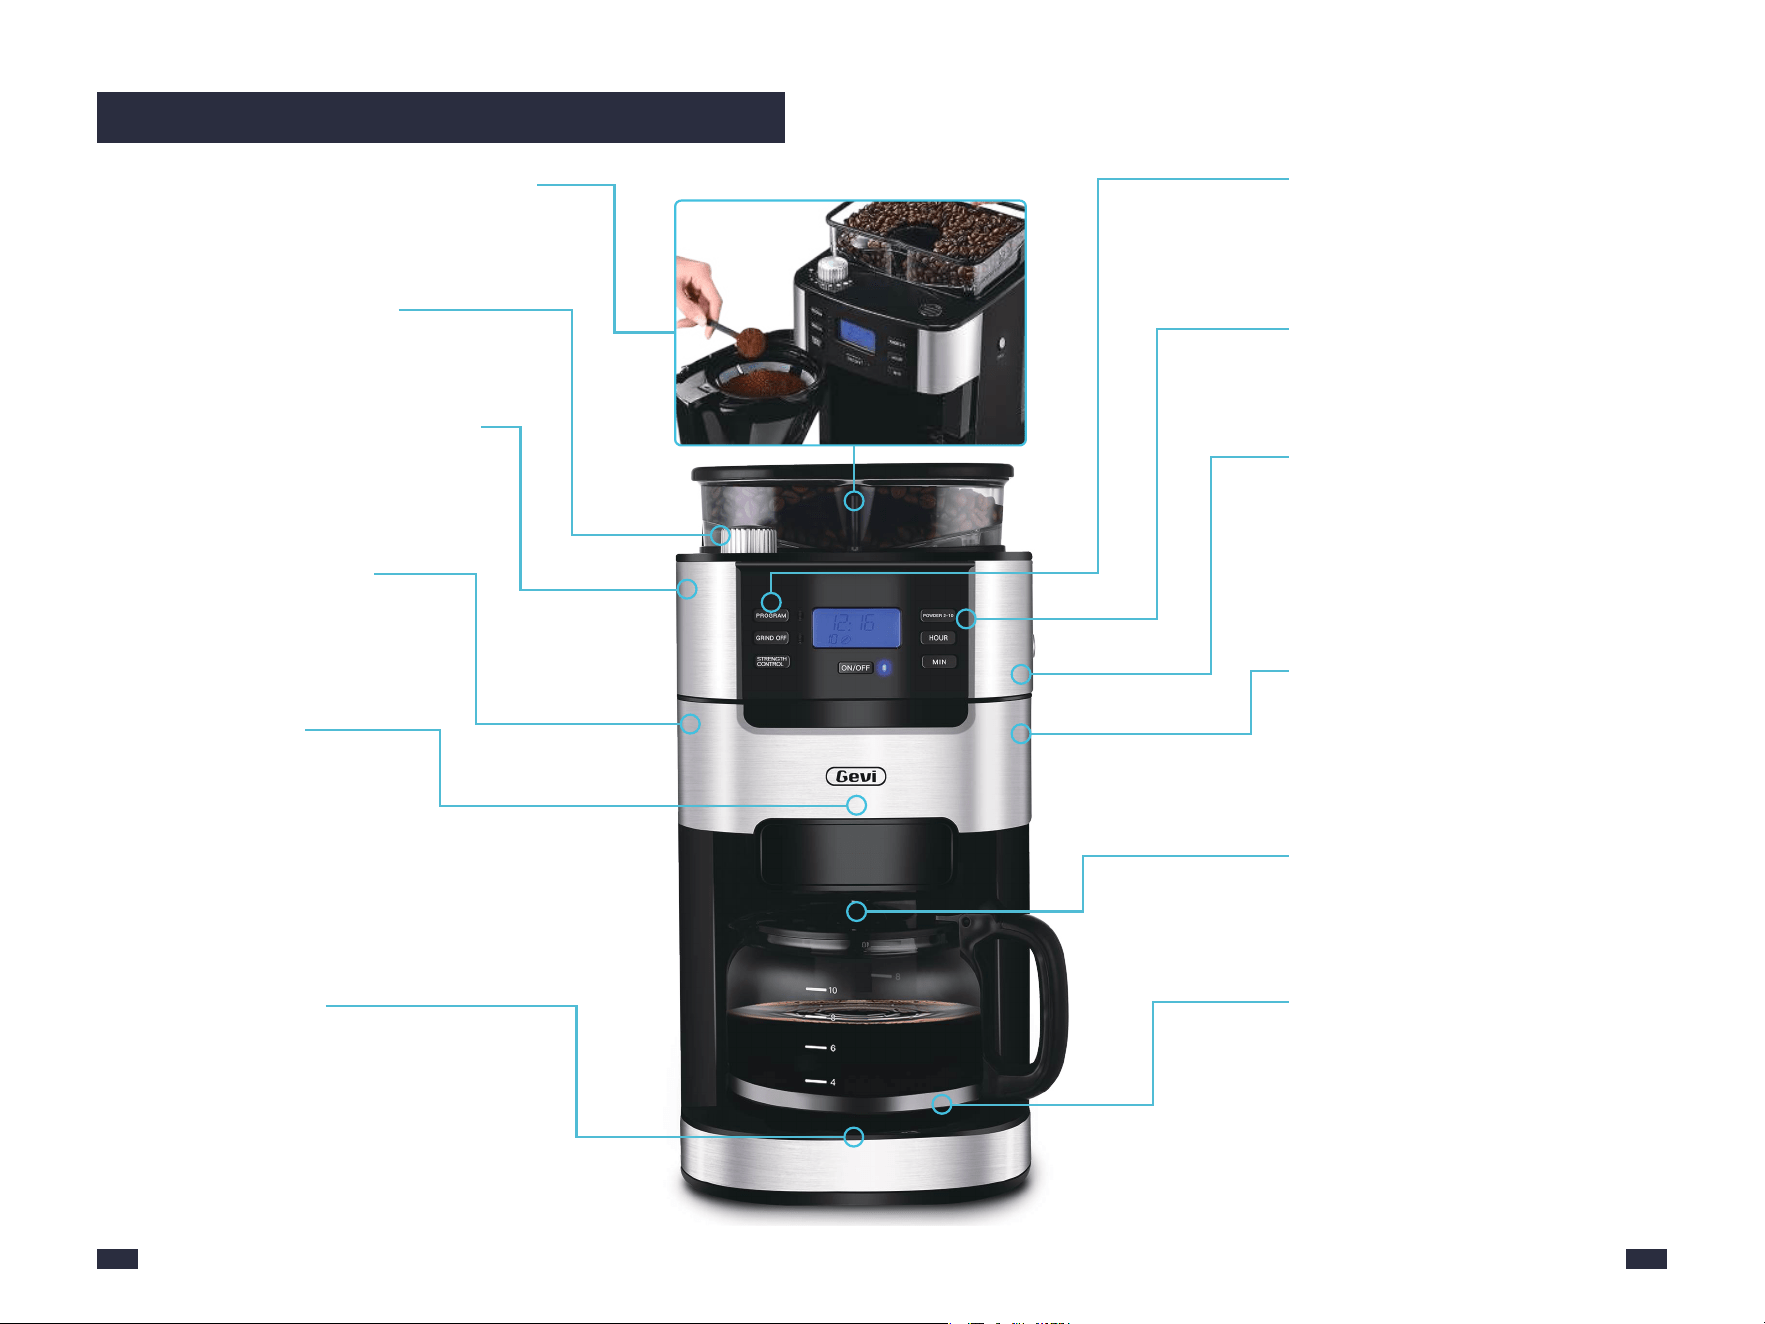
2. Know Your Machine 2. Know Your Machine
Used for adding coffee beans to the bean hopper
or adding the coffee powder to the filter.
Used to fix the filter insert.
- The easy-pour and dripless carafe is available
for making coffee for 2 to 10 cups.
- The cup markings on the carafe are the same
as that on the water tank. You can fill water
according to the markings to get the same
cups of coffee.
Filter Ring
Ensures no steam is leaking out when brewing
to stabilize the coffee temperature.
Holds paper filter or permanent filter.
Reusable for brewing coffee. Do not use it with
a paper filter together.
Comes with 8 grind settings for different needs
of powder sizes.
Prevents the coffee beans from splashing and
keeps the freshness of beans.
Holds a maximum of 250g of beans.
A crystal-clear LCD screen comes together with
highly-intuitive controls, more simple and
convenient to operate and bring you a perfect
coffee-making experience.
Can be pressed to release the filter basket.
⓬
⓬
Water Tank
1.5L Large Capacity Water Tank max to 10
cups.
Warming Plate
⓭
⓭
Available for setting the warm-keeping time
from 0 to 120min.
Re. Description Specification
❺
❺
Coffee Carafe
Grind Regulator
❼
❼
❾
❾
Bean Hopper
❿
❿
Control Panel
Measuring Spoon
❻
❻
⓫
⓫
Filter Basket Release
Button
❷
❷
Permanent Filter
❽
❽
Bean Hopper Lid
❶
❶
❸
❸
Filter Insert With
Drip Stop
❹
❹
Swing-out Filter
Basket
Electrical Parameters: 120V~ 60Hz 900W
Model: DCMB0
87
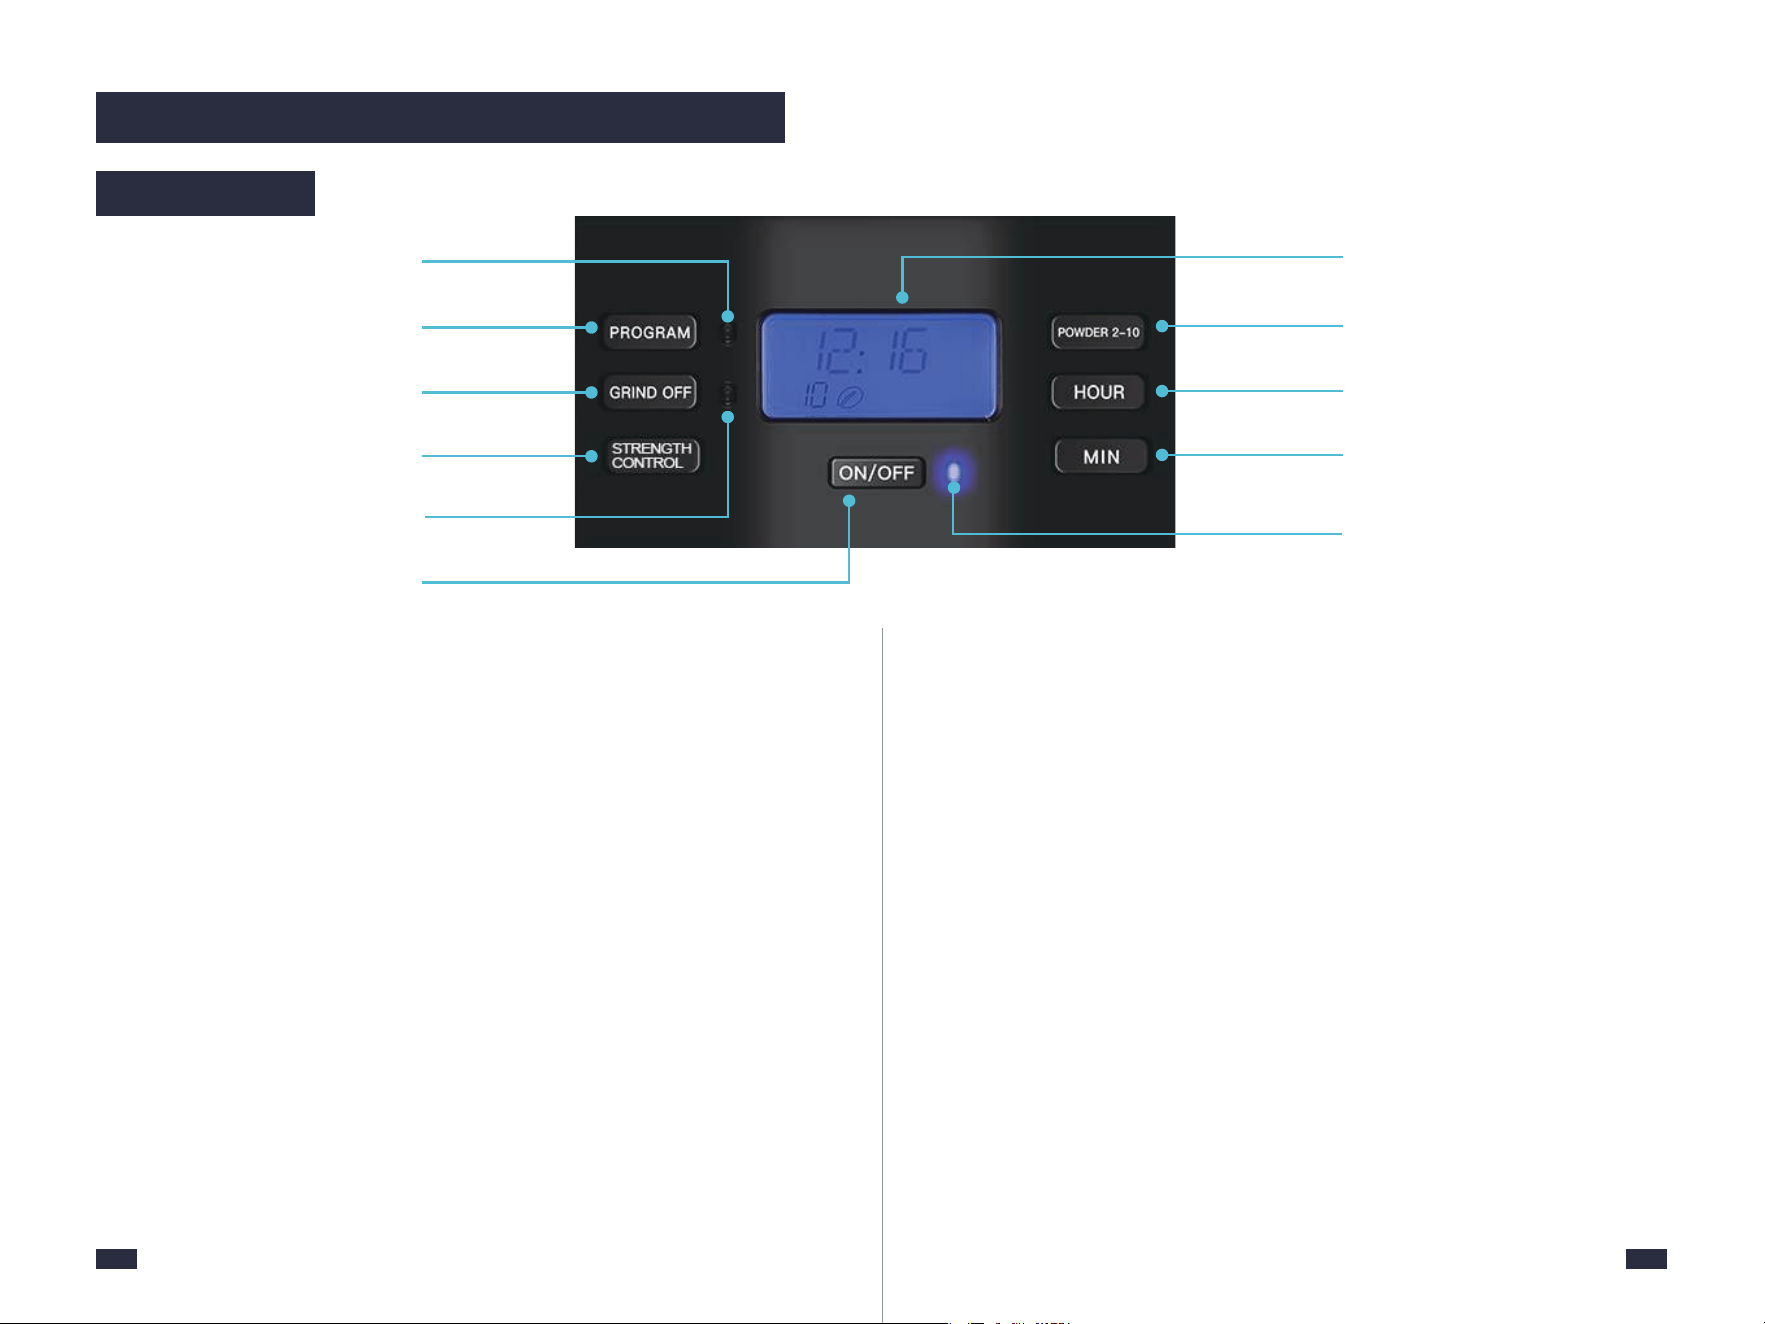
1. PROGRAM Button
Programmable time-setting for auto coffee.
2. GRIND OFF Button
For turning off the grinder if pre-ground coffee is used.
3. STRENGTH CONTROL Button
Three selectable strength levels - strong, medium and mild.
4. PROGRAM Indicator
The PROGRAM Indicator stays fully illuminated when in the PROGRAM
function.
5. GRIND OFF Indicator
The GRIND OFF Indicator stays fully illuminated after you turn off the
grinding function.
6. ON/OFF Button
Press the button to turn on the machine, and long press it for 2 seconds to
cut off the screen.
7. ON/OFF Indicator
The ON/OFF Indicator stays fully illuminated during grinding, brewing, or
keeping warm.
8. Display Screen
Easy to read LCD display, shows a 24-hour clock, auto-on program, current
cup quantity, and coffee strength.
9. POWDER 2-10 Button
Allows you to customize the powder quantities according to the cup
quantities.
10. HOUR Button
For programming the hour. Hold buttons down to scroll through the
digits quickly, or press and release to advance one digit at a time.
11. MIN Button
For programming the minute. Hold buttons down to scroll through the
digits quickly, or press and release to advance one digit at a time.
2. Know Your Machine
Control Panel
1
4
5
6
2
3
9
10
11
8
7
Brew with Whole Beans or Coffee Grinds
-Place the coffee beans in the bean hopper.
-Put the coffee grinds in the filter.
Keep Warm Function
After brewing, coffee in the carafe can be
warmed at around 158-176℉ on the
warming plate for up to 120 minutes.
2-10 Cup Grinding Selection
Accurately controls the bean or powder
amounts.
1.5L Large Capacity Tank
- Can brew up to 10 cups of coffee. Set
powder amount (2, 4, 6, 8 or 10 cups) by
pressing the POWDER 2-10 button
according to your need.
- The default value is 10 cups.
2-in-1 Smart Drip Coffee Machine
2-in-1 smart drip coffee grinder & brewer
machine,each element held to the most
exacting professional grade standards for
a quick cup of coffee.
Switch-Off Time Function
- The warming plate will remain on for
max. 120 minutes after the coffee is
prepared.
- The heat preservation time is customizable,
and the switch-off time can be set to: 0/15/
35/45/60/75/90/100/120 minutes.
24h Programmable Automatic
Start Function
Put coffee beans/powder and set the
time in advance, it will operate automatically.
8 Coffee Grind Size Settings
Choose the correct grind size for your
favorite brewing method.
Built-in Stainless Steel Burr Grinder
- Includes conical burrs.
- Produces perfectly consistent particle
sizes ideal for coffee brew.
Advanced Coffee Powder
Straight Drop Structure
Less coffee powder residue is produced
and is not likely to be blocked.
Blooming Function
In order to retain a more full-bodied
coffee aroma, the machine features
blooming function.
The coffee grounds are moistened with
hot water before brewing and they will
swell up, because of which the coffee
taste will become more intense.
Drip-Stop Function
Allows you to pull out coffee carafe
within 30 seconds before brewing is finished.
109
3. More Details
1211
Both Coffee Carafe and Filter Insert
With Drip Stop are NOT DISHWAS-
HER SAFE.
NOTE
Do not fill the water tank past the
10 cup mark of water level
indicator. Doing so could cause
carafe to overflow.
NOTE
These priming steps must be
completed prior to first use.
IMPORTANT
If there is no water flowing out in
Step 2, please refer to Troubles-
hooting, page 35.
NOTE
Step 1 - Press the ON/OFF Button to
start and the Indicator will be illumi-
nated. It will get into heating.
Step 2 - The machine starts processing
the water into the carafe.
Step 3 - After all of the water has passed
through, push the ON/OFF Button
4. Before First Use 4. Before First Use
5. Making Perfect Coffee Guide
Ensure all packaging has been
removed.
4.1 Remove Packaging
Ensure the machine is always
positioned onto a dry, stable, flat
horizontal counter top.
4.2 Position Machine
Wash the parts listed below in warm
water:
- Filter Ring
- Permanent Filter
- Filter Insert With Drip Stop
- Bean Hopper Lid
- Measuring Spoon
- Coffee Carafe
Rinse & allow thorough air drying.
4.3 Wash & Dry Parts
5.1 Tips for Perfect
Coffee
4.4 Prime the Machine
- Open the lid and fill enough pure
water(recommended) in advance
then close it.
Place the Coffee Carafe on the Warming
Plate.
Cleaning
1. Bean Requirements
2. Roast Degree of Coffee Beans
Fill Water Tank
Place Coffee Carafe
A great coffee is about achieving the
perfect balance between sweetness,
acidity, and bitterness. The flavor of
your coffee will depend on many
factors, such as bean requirement,
roast degree of coffee beans, and so
on. Experiment by adjusting these 8
factors just one at a time to achieve
the taste of your preference.
a. Add an appropriate amount of
coffee beans, no more than 250g each
time, because the coffee beans will
become wet overnight. After adding
the coffee beans, close the lid again
and press down hard to prevent water
from entering the bean box.
b. We recommend quality beans with
a ‘Roasted On’ date stamped on the
bag, not a ‘Best Before’ or ‘Use By’
date. Buy in small batches to reduce
the storage time. Coffee beans are best
consumed between 5‒20 days after
the ‘Roasted On’ date. Stale coffee
may pour too quickly and taste bitter
and watery.
c. Do not fill the bean container with
frozen or coated beans, moisture will
seep into the burr and feed through.
d. Do not add any liquid flavorings or
syrups to the beans.
We recommend medium-roast coffee
beans, this machine is not suitable for
- Insert the Power Plug into a 120V
AC power outlet & switch the power on.
- The default settings are grinding
beans and brewing 10 cups of coffee.
The time value on the screen will flash.
Power
MAX
to exist the Keep Warm Function.
Step 4 - Empty the carafe. Repeat the
above steps for 2 times.
2
6
4
8
10

1413
5. Making Perfect Coffee Guide 5. Making Perfect Coffee Guide
3. Grind Size
deep-roasted beans. Dark, greasy
beans can leave some greasy residue
in the burrs and feeder channels. The
oil residue can cause the ground coffee
to stick in the feeder passages and
clog. Over time, this slows down the
flow of ground coffee. The amount of
ground coffee beans is controlled by
the selection of coffee cups for
grinding time. Therefore, it will not
grind all the beans at one time. If it
continues to develop, the ground
beans will not reach the required
fineness, and eventually, the motor
will get stuck and cannot rotate,
resulting in burnout.
The built-in grinder comes with 8
grind settings for different needs for
powder sizes. Set the grind size that
you need. Turn the regulator anticlo-
ckwise to go coarser and clockwise
to go finer. If you want to adjust the
grind size setting, there are some
notes listed below you need to be
aware of:
a. When you want to adjust a fine
setting to a coarser setting, just rotate
the Grind Regulator directly before
grinding.
4. Suitable Filter
5. Powder Dose
a. Permanent filter is reusable for
brewing coffee, you also can use a
disposable coffee filter instead of a
permanent filter. The permanent filter
and filter paper cannot be used at the
same time.
b. The maximum capacity for ground
coffee is 70g of coffee powder. Exceeding
that amount may cause overflow if the
coffee is too finely ground.
c. Be sure the filter handle is facing
away from the grinder basket, so it does
not interfere with the flow of ground
coffee into the filter basket.
b. When you want to adjust a coarse
setting to a finer setting.
Situation 1: If there are no coffee beans
inside the grinder, you can rotate the
Grind Regulator directly to achieve your
setting.
Situation 2: If there are coffee beans
inside the grinder, you cannot rotate
the Grind Regulator forcibly, otherwise,
grinder damage may occur. In this case,
you can either grind all the coffee beans
inside the grinder and then adjust the
grind setting, or grind beans and rotate
the Grind Regulator simultaneously to
achieve your fine setting.
2
4
6
8
10
1½ - 2
3 - 4
4½ - 6
6 - 8
8 - 10
Number of cups Number of scoops
d. Pace a basket paper filter in the
Filter Insert, making sure the filter is
completely open and touching the
side walls and bottom of the filter
Insert.
should add 2 cups of powder. If you
pour more water than the number of
cups you choose, it will cause the
coffee to become weak(because the
machine will brew all the water in the
tank).
b. If you have set a strong flavor but
the coffee tastes weak. We suggest
you add less amount of water and
more powder. (e.g. select POWDER
2-10 Button for 4 cups but add 2 cups
of water, the flavor will be stronger).
c. The coffee you get would be less
than the water you pour in as some
water had been absorbed by the
coffee powder.
a. 7g or 1 spoon of powder for 1 cup
of coffee is recommended, but you
may adjust according to personal taste.
b. Can brew up to 10 cups of coffee.
Set the powder amount (2, 4, 6, 8, or
10 cups) by pressing the POWDER 2-
10 button according to your need(The
default value is 10 cups).
Use the supplied Measuring Spoon for
this purpose. Refer to the following
table for the required amount:
6. Water Amount
a. The cup markings on the carafe
are the same as that on the water
tank. The amount of water added
should be the same as the amount
of powder cup you choose, such as
you added 2 cups of water and you
7. Use Carafe
Always make sure that the carafe is
transported in an upright position.
If you turn the carafe on its side or
upside down with its lid closed, hot
coffee may escape. When the water
capacity of the coffee carafe is large,
be sure to press the edge of the lid
with your thumb and pour the water
at the correct angle.
8. Enjoy Your Coffee
For a better taste, please enjoy the
coffee within 1 hour.
1615
5. Making Perfect Coffee Guide 5. Making Perfect Coffee Guide
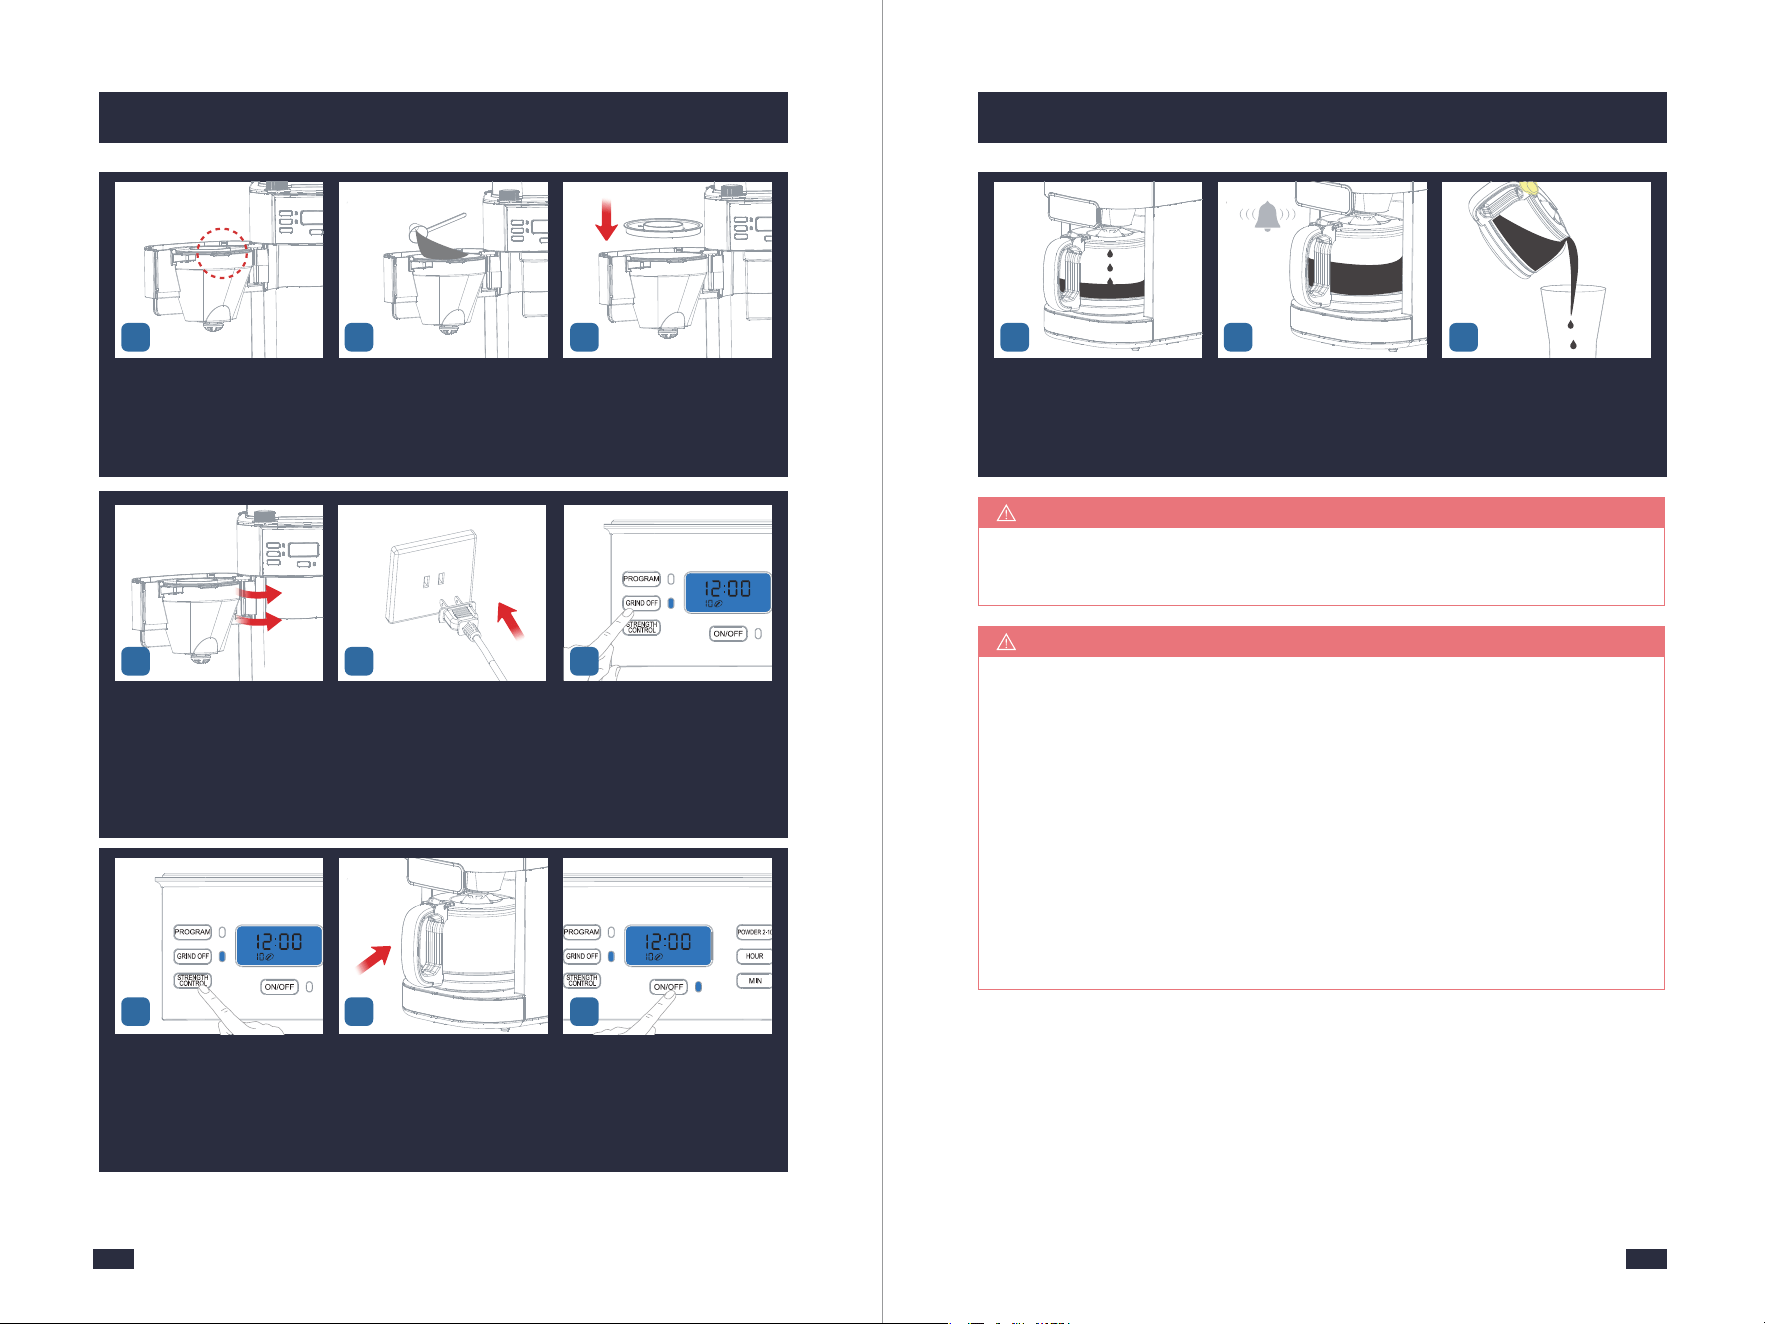
Replace and firmly press down
the lid to prevent beans from
spilling out from the bean hopper.
Press lightly and vertically the
Filter Basket release button to
open the swing-out filter basket.
The swing-out filter basket is
open.
4
2
6
4
8
10
5 6
Put the permanent filter or
paper filter and filter ring into
the filter insert to become a
whole filter assembly.
Make sure the tube of the filter
assembly aligns with the groove
of the swing-out filter basket.
Close the Swing-out Filter
Basket firmly.
7 98
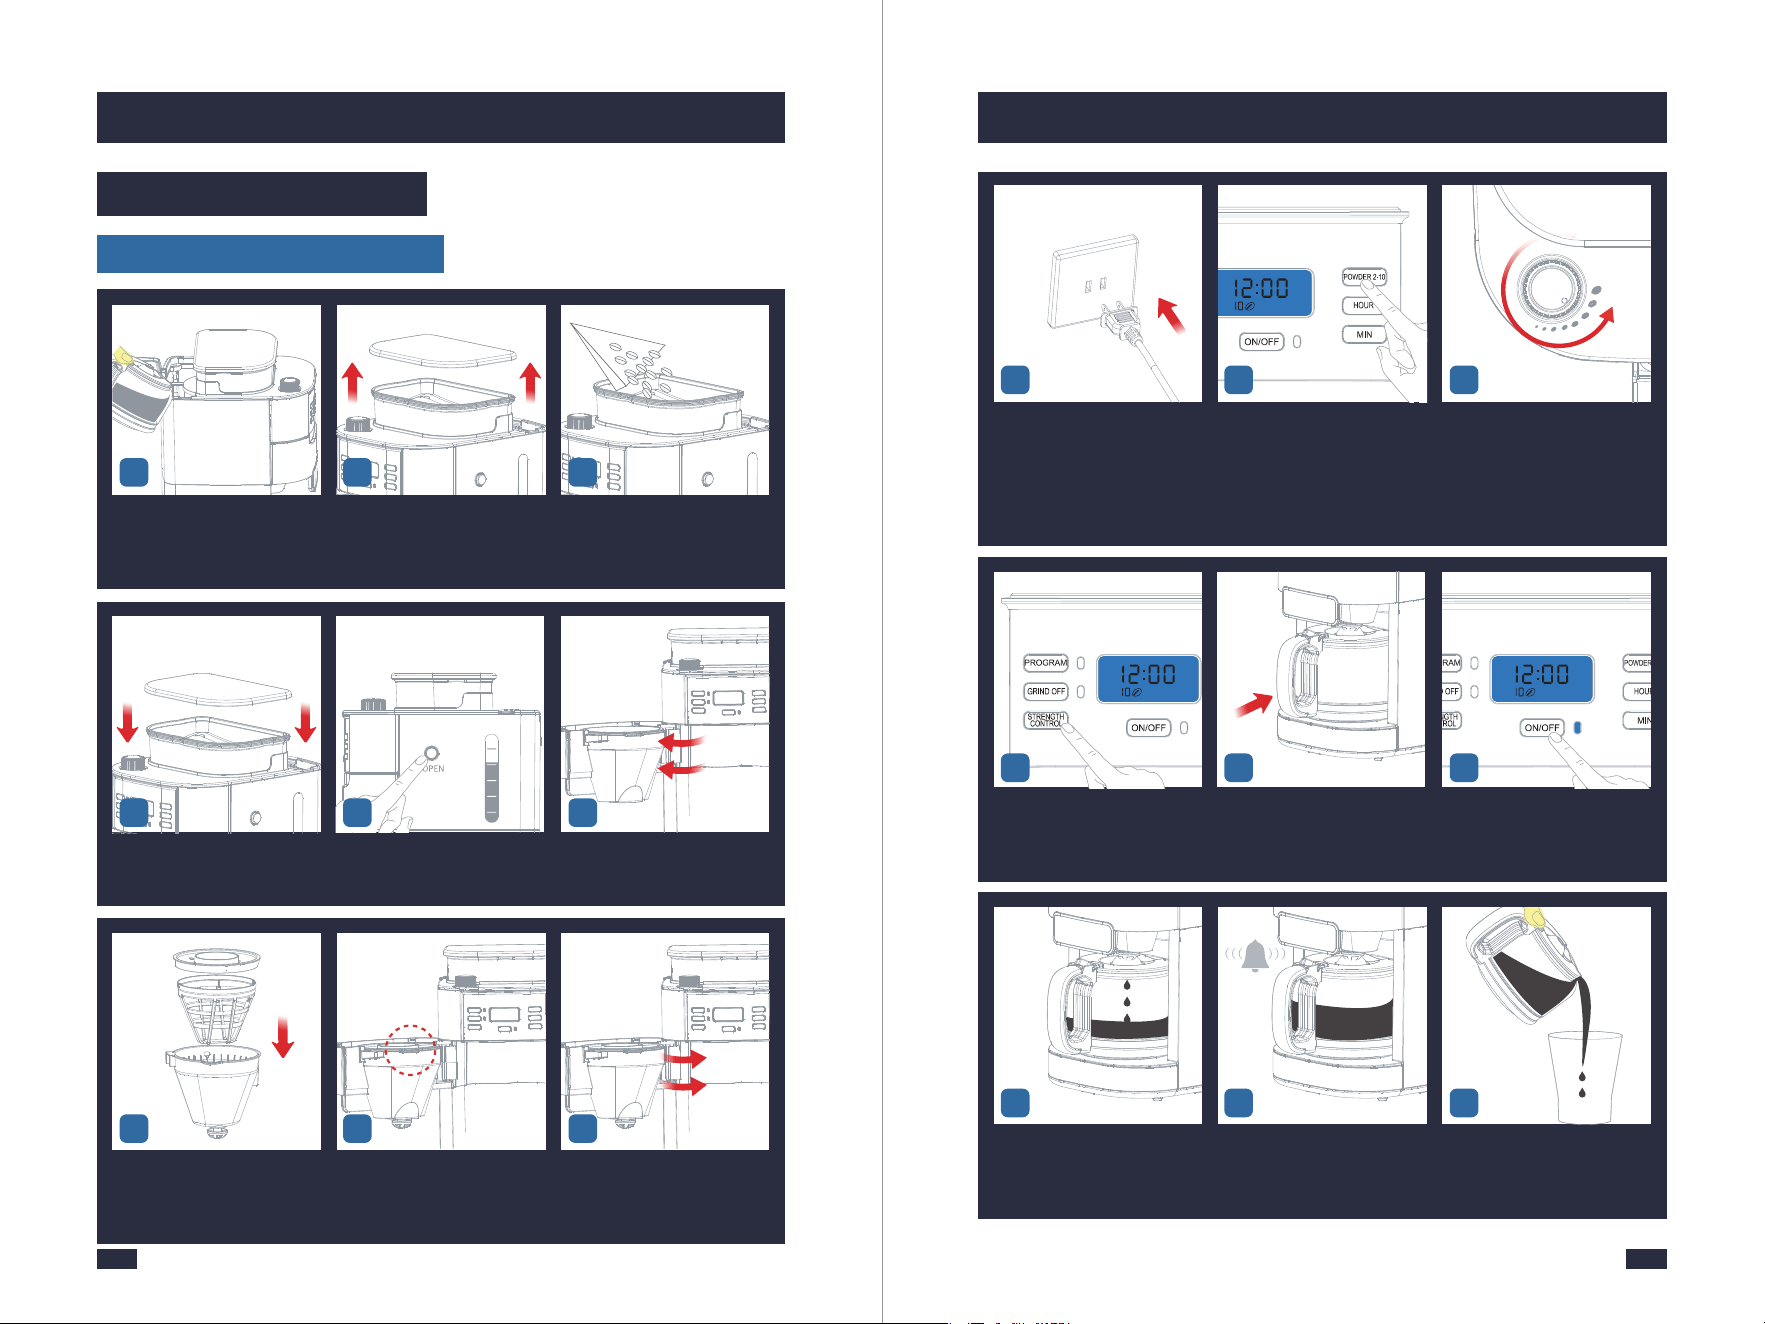
5.2 Operation
Make Coffee With Coffee Beans
Put your desired amount of wa-
ter into the carafe according to its
markings, then open the water
tank lid and pour the water in.
Open the lid of the bean hopper
and wipe it with a dry cloth to
make sure it is dry inside.
Add no more than 250g of
coffee beans to the bean hopper.
1 2 3
Insert the Power Plug into a
120V AC power outlet.
According to added water volu-
me, press the POWDER 2-10 But-
ton to select the required amount
of coffee grinds.
Set the grind regulator to the
required grind.
- Turn the regulator anticlock-
wise to grind the coffee coarser.
- Turn the regulator clockwise
to grind the coffee finer.
10 1211
Press the "STRENGTH CONTROL"
button to select coffee strength.
There are 3 levels of strength,
and the default level is mild.
Place the coffee carafe on the
warming plate.
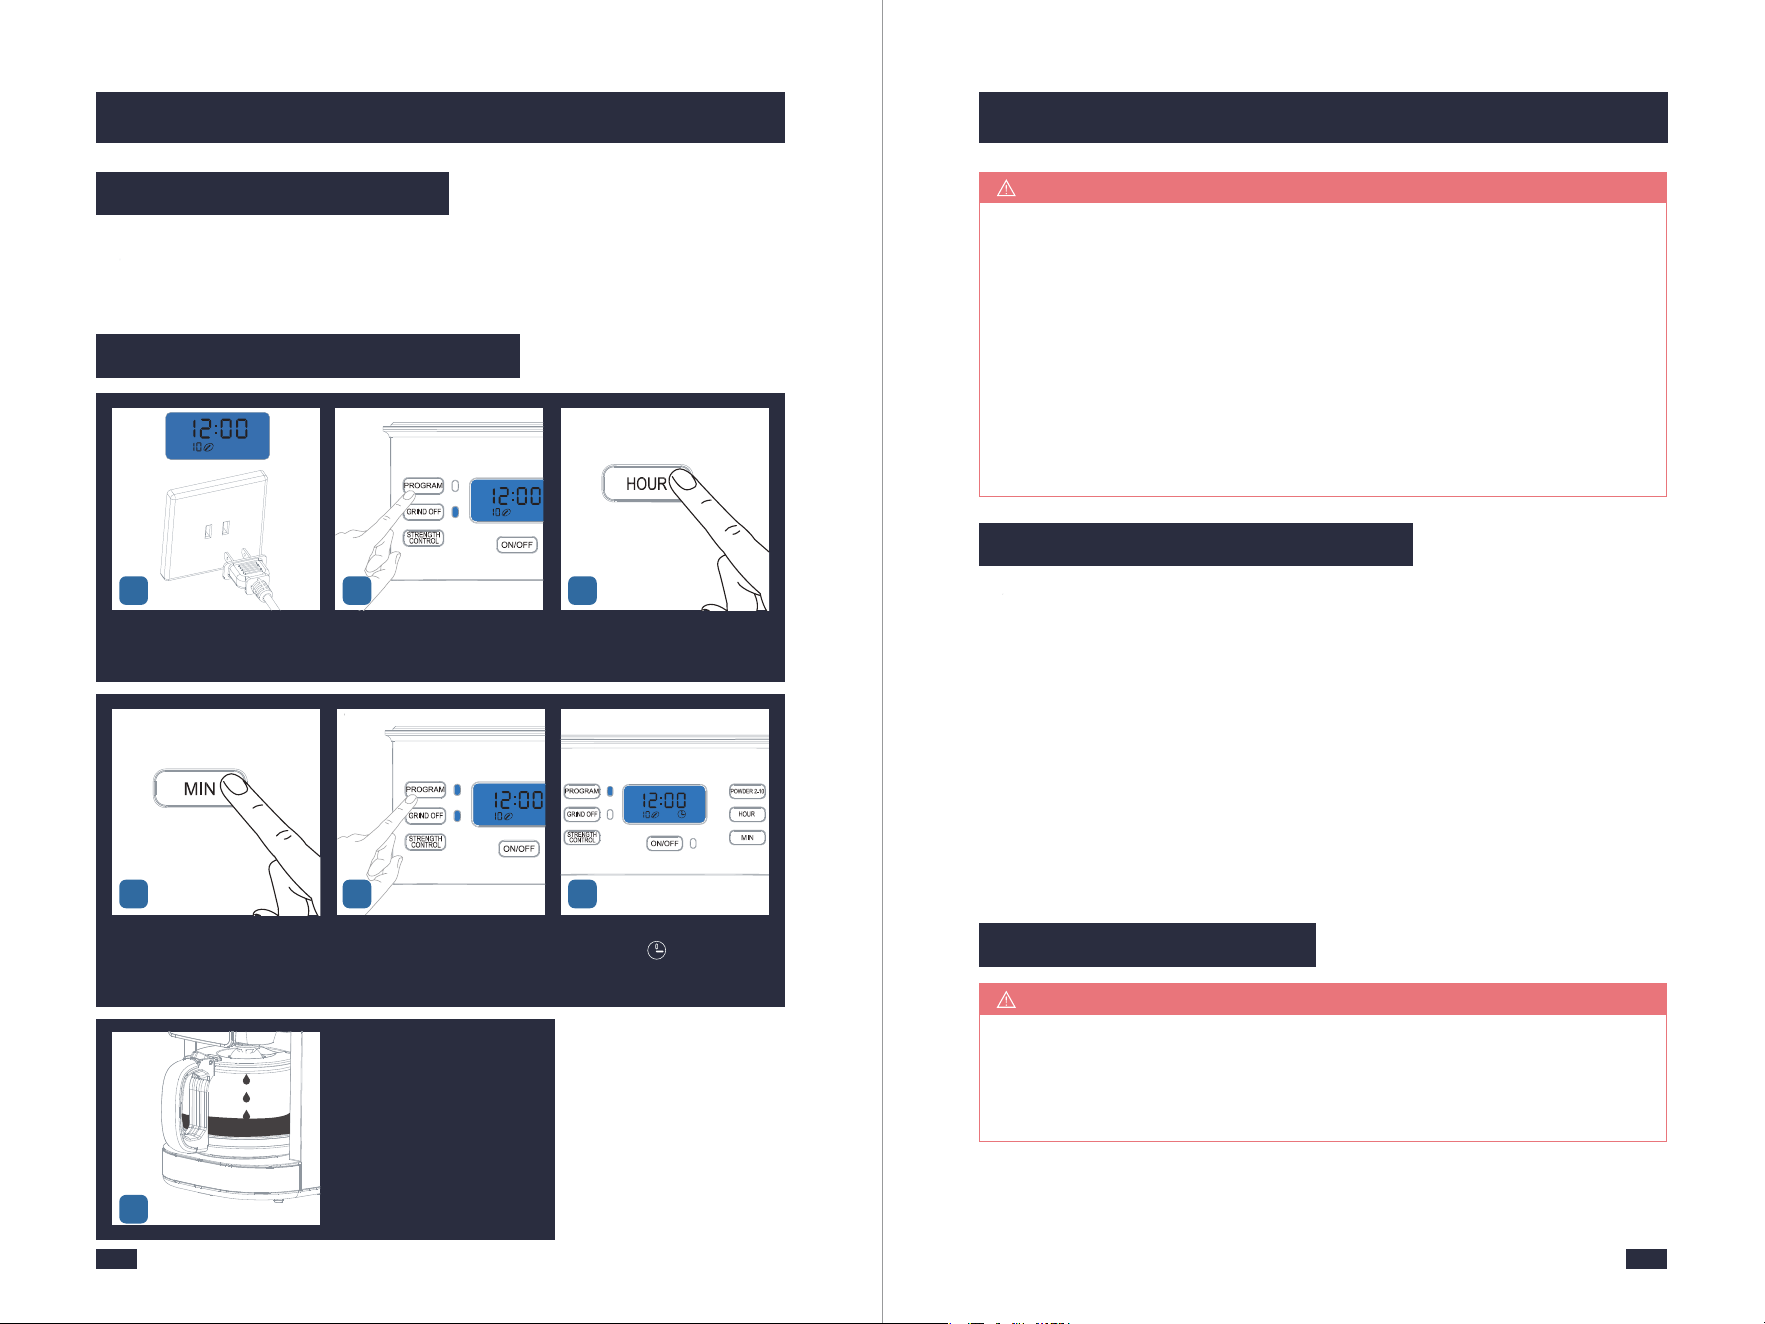
Press the ON/OFF Button to start
making coffee and the Indicator
will be illuminated. It will grind
beans first, then get into heating.
The machine begins to brew (
press the ON/OFF Button to
interrupt the flow of the coffee
from the basket ).
Buzzer will sound 3 times to
notice you when the coffee is
done.
Press the edge of the lid with
your thumb and pour the coffee
at the correct angle.
17
13 14 15
16 18
1817
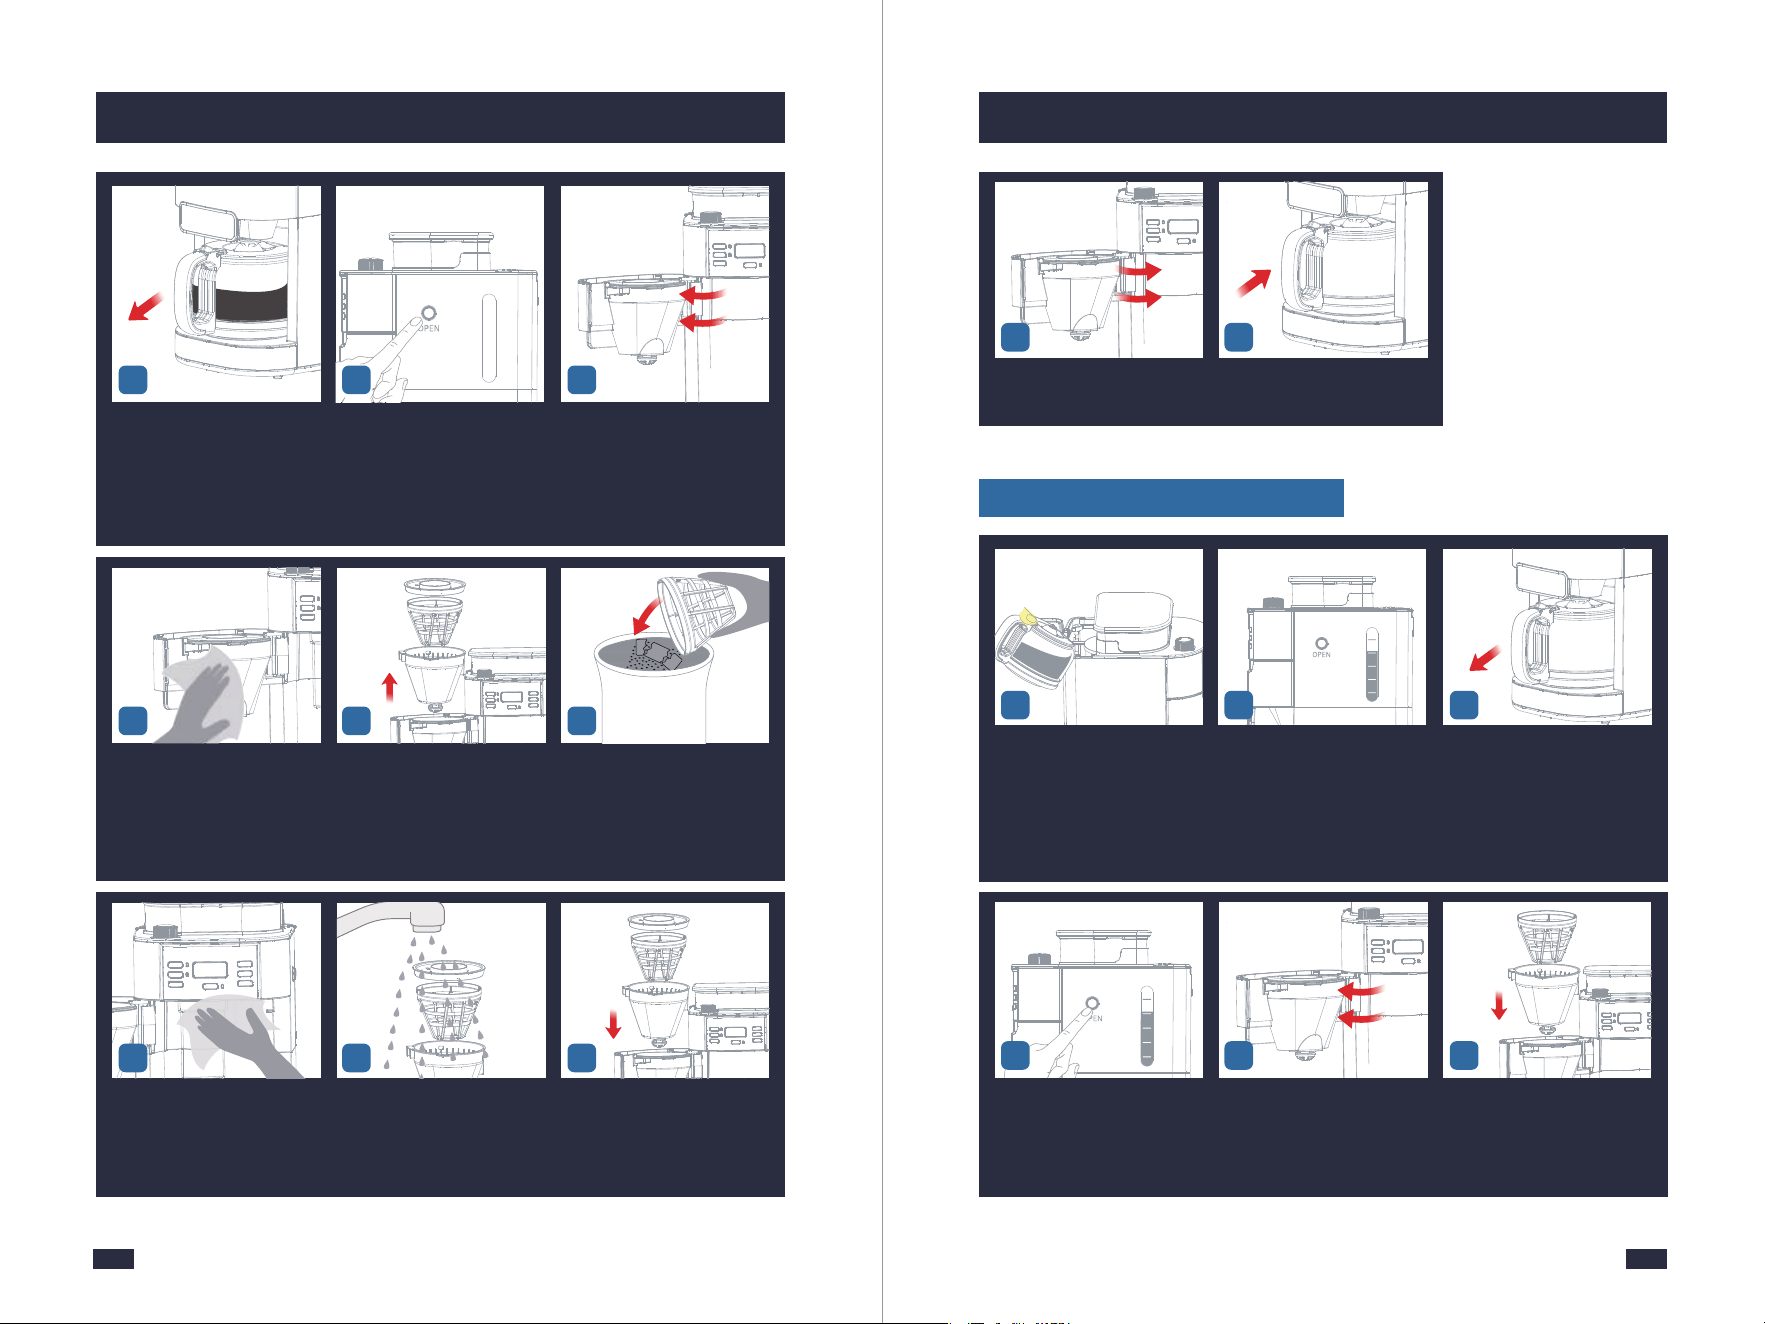
5. Making Perfect Coffee Guide 5. Making Perfect Coffee Guide
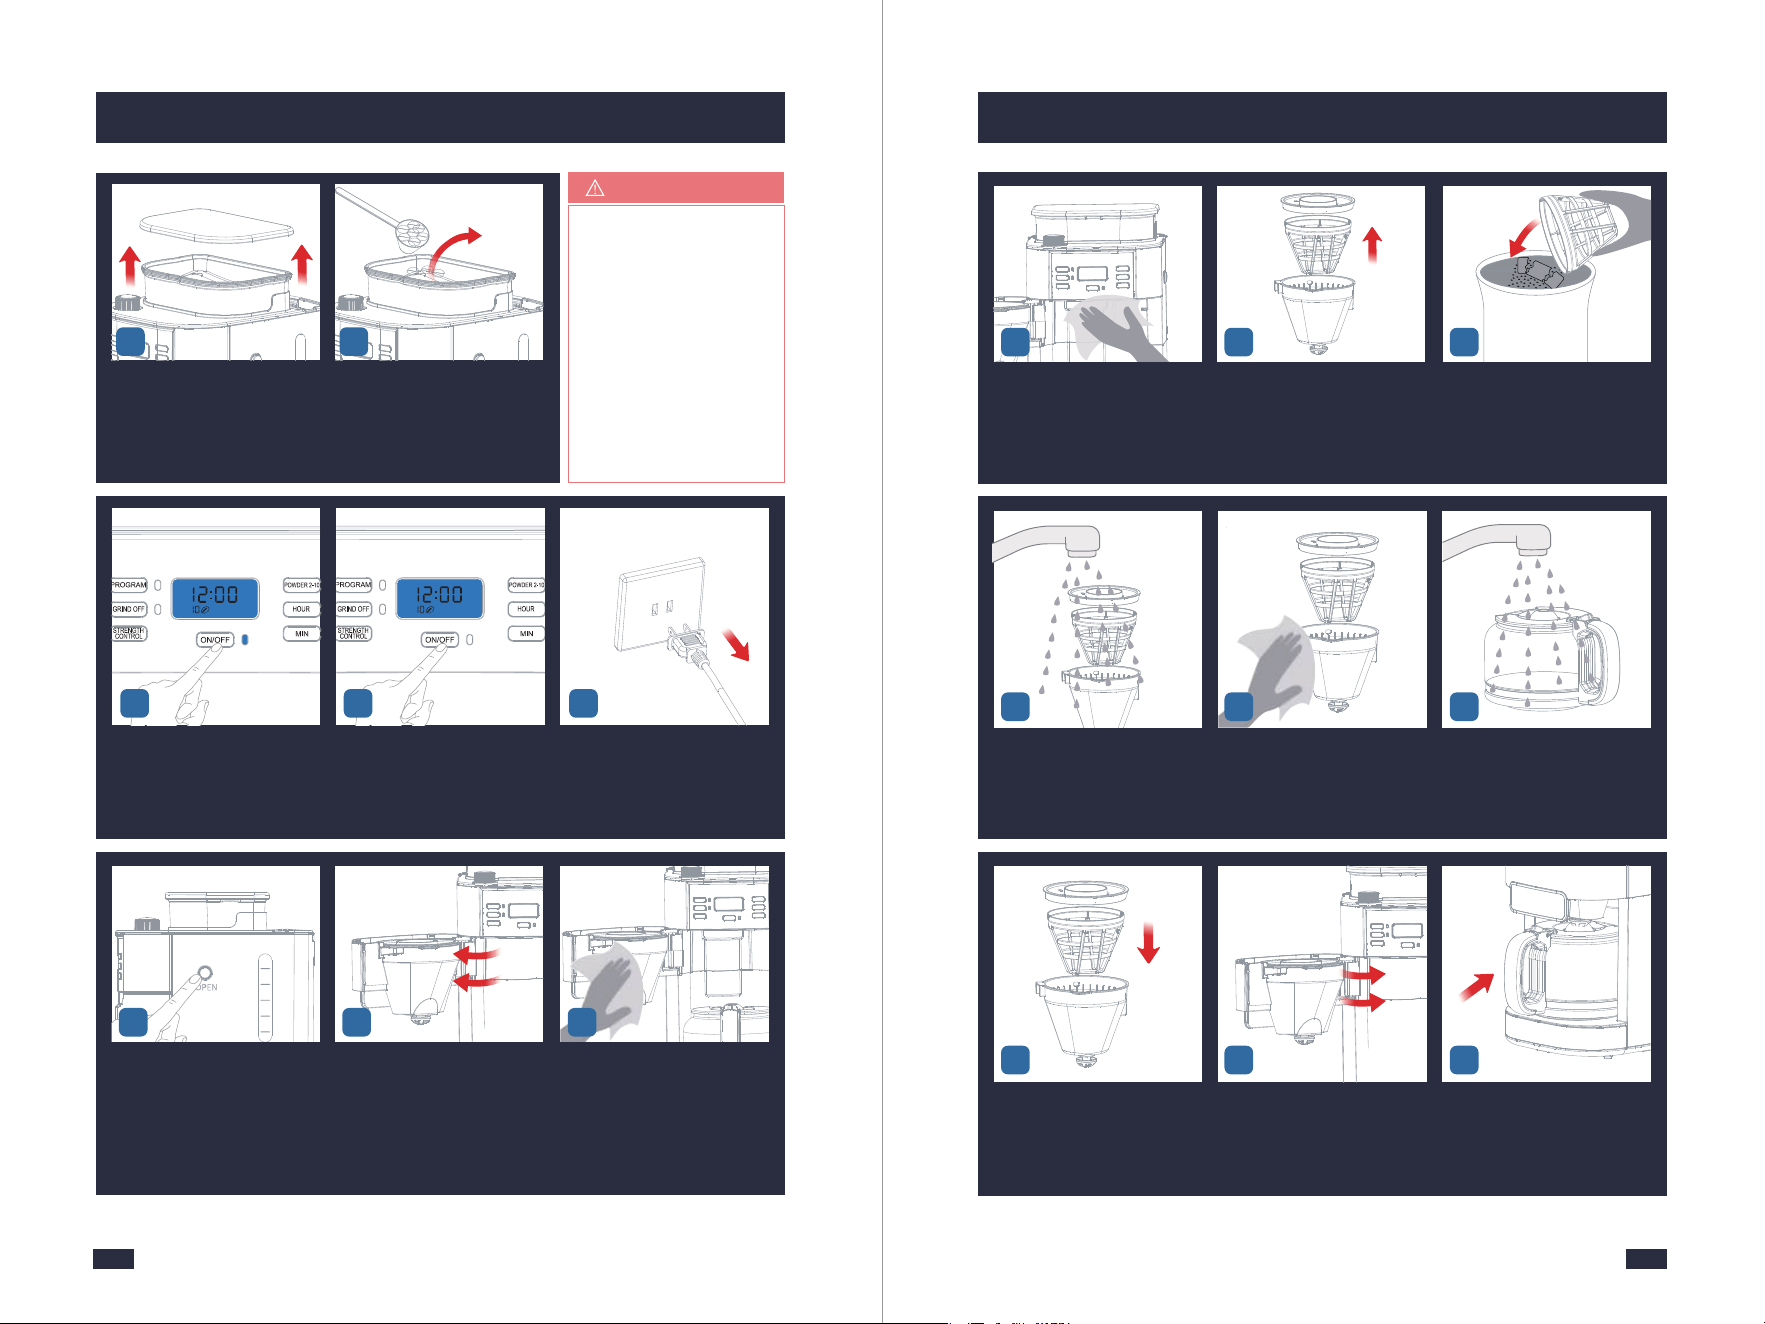
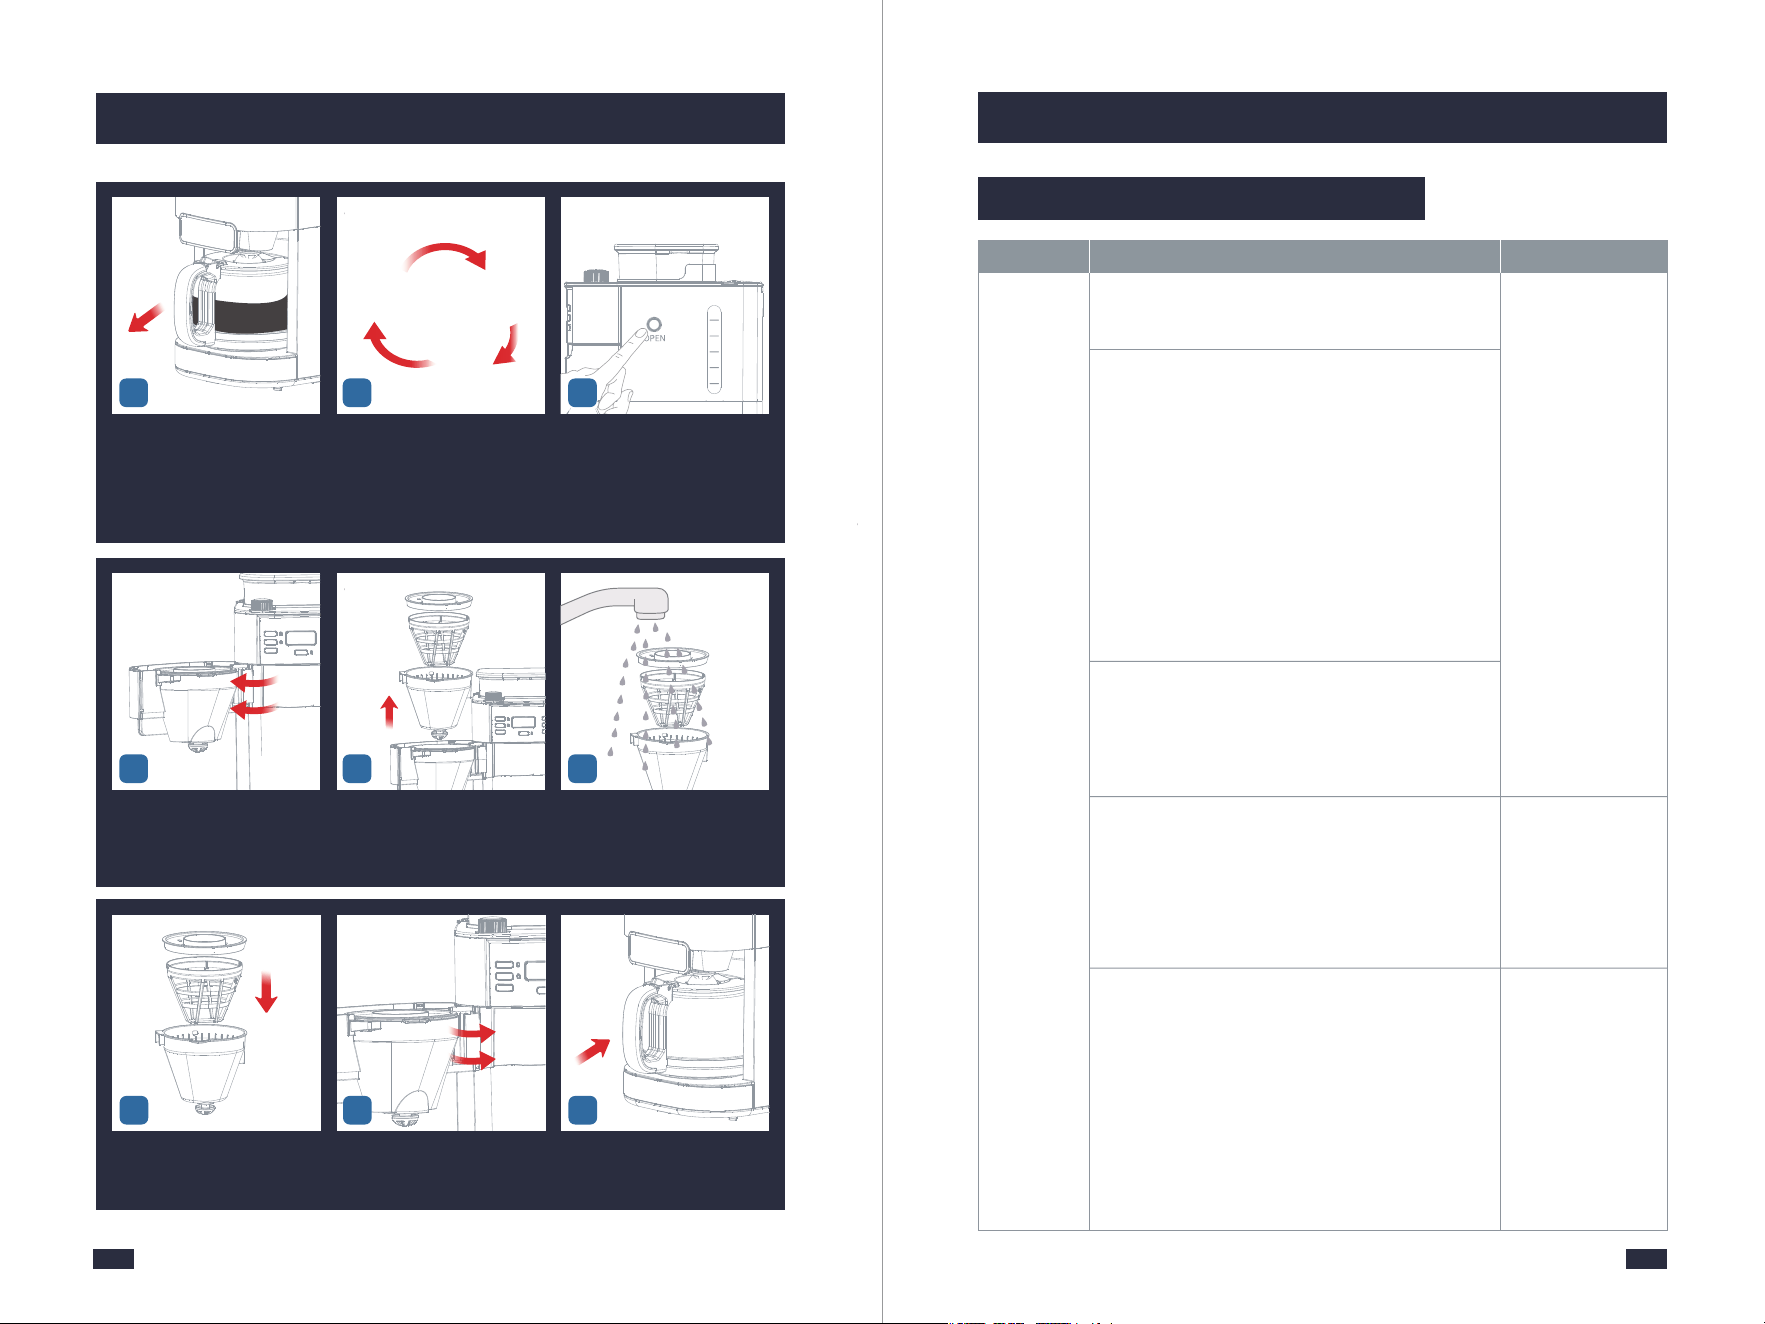
Take out the Coffee Carafe. Press the Filter Basket Release
Button.
Open the Swing-out Filter
Basket.
19 21
2
6
4
8
10
20
Close the Swing-out Filter
Basket lightly.
Put the coffee carafe back in
place.
2928
Wipe the top of the Swing-out
Filter Basket.
Take out the filter insert with
drip stop together with the
permanent filter and filter
ring.
Discard the used coffee grounds.
2422
Wipe the powder outlet and
the inside around with a clean
dry cloth. (Be careful not to
touch the Warming Plate).
Wash the accessories with clean
water and wipe them with a
cloth.
Install them back after
cleaning.
26 2725
23
Make Coffee With Coffee Powder
Press lightly and vertically the
Filter Basket release button to
open the swing-out filter.
The swing-out filter is open. Put the permanent filter into
the filter insert.
Put your desired amount of
water into the carafe according
to its markings, then open the
water tank lid and pour the
water in.
Don't exceed the 10cups line of
the water tank, and also do not
add too little water.
Take out the Coffee Carafe.
1 3
6
2
6
4
8
10
2
2
6
4
8
10
4 5
2019
5. Making Perfect Coffee Guide 5. Making Perfect Coffee Guide
Make sure the tube of the filter
assembly aligns with groove
of the swing-out filter basket.
Add your desired coffee powder
into the filter but not past the
max line.
Put the filter ring onto the swing-
out filter basket.
7 8 9
Press the "STRENGTH CONTROL"
button to select coffee strength.
There are 3 levels of strength,
and the default level is mild.
Place the coffee carafe on the
warming plate.
Press the ON/OFF Button to
start making coffee and the
Indicator will be illuminated.
It will get into heating.
Close the swing-out filter
basket firmly.
Insert the Power Plug into a
120V AC power outlet.
Press the GRIND OFF Button to
cancel grinding, and the GRIND
OFF Indicator will stay fully
illuminated.
1110 12
1413 15
The machine begins to brew (
press the ON/OFF Button to
interrupt the flow of the coffee
from the basket).
Buzzer will sound 3 times to
notice you when the coffee is
done.
Press the edge of the lid with
your thumb and pour the coffee
at the correct angle.
16 17 18
Cleaning after every use guarantees the flavors of your coffee, refer to "Make
Coffee With Coffee Beans ",steps 19-29,on page 17.
NOTE
1 - Do not place parts of the body under the drip stop while the machine
is in operation.
2 - Do not open the Swing-out Filter Basket while the machine is brewing
coffee, otherwise, the steam will wet the powder at the powder outlet
which possibly damages the grinding system.
3 - While the coffee is brewing you can remove the carafe to pour a cup
or two. The drip stop will close automatically. To avoid any overflow,
replace the carafe within 30 seconds.
4 - If the coffee drips onto the warming plate, it should be used a clean
cloth to wipe off the coffee stain in time to avoid oxidation of the coffee
erosion layer.
NOTE
2221
6.2 Programming the Time
6. Other Functions 6. Other Functions
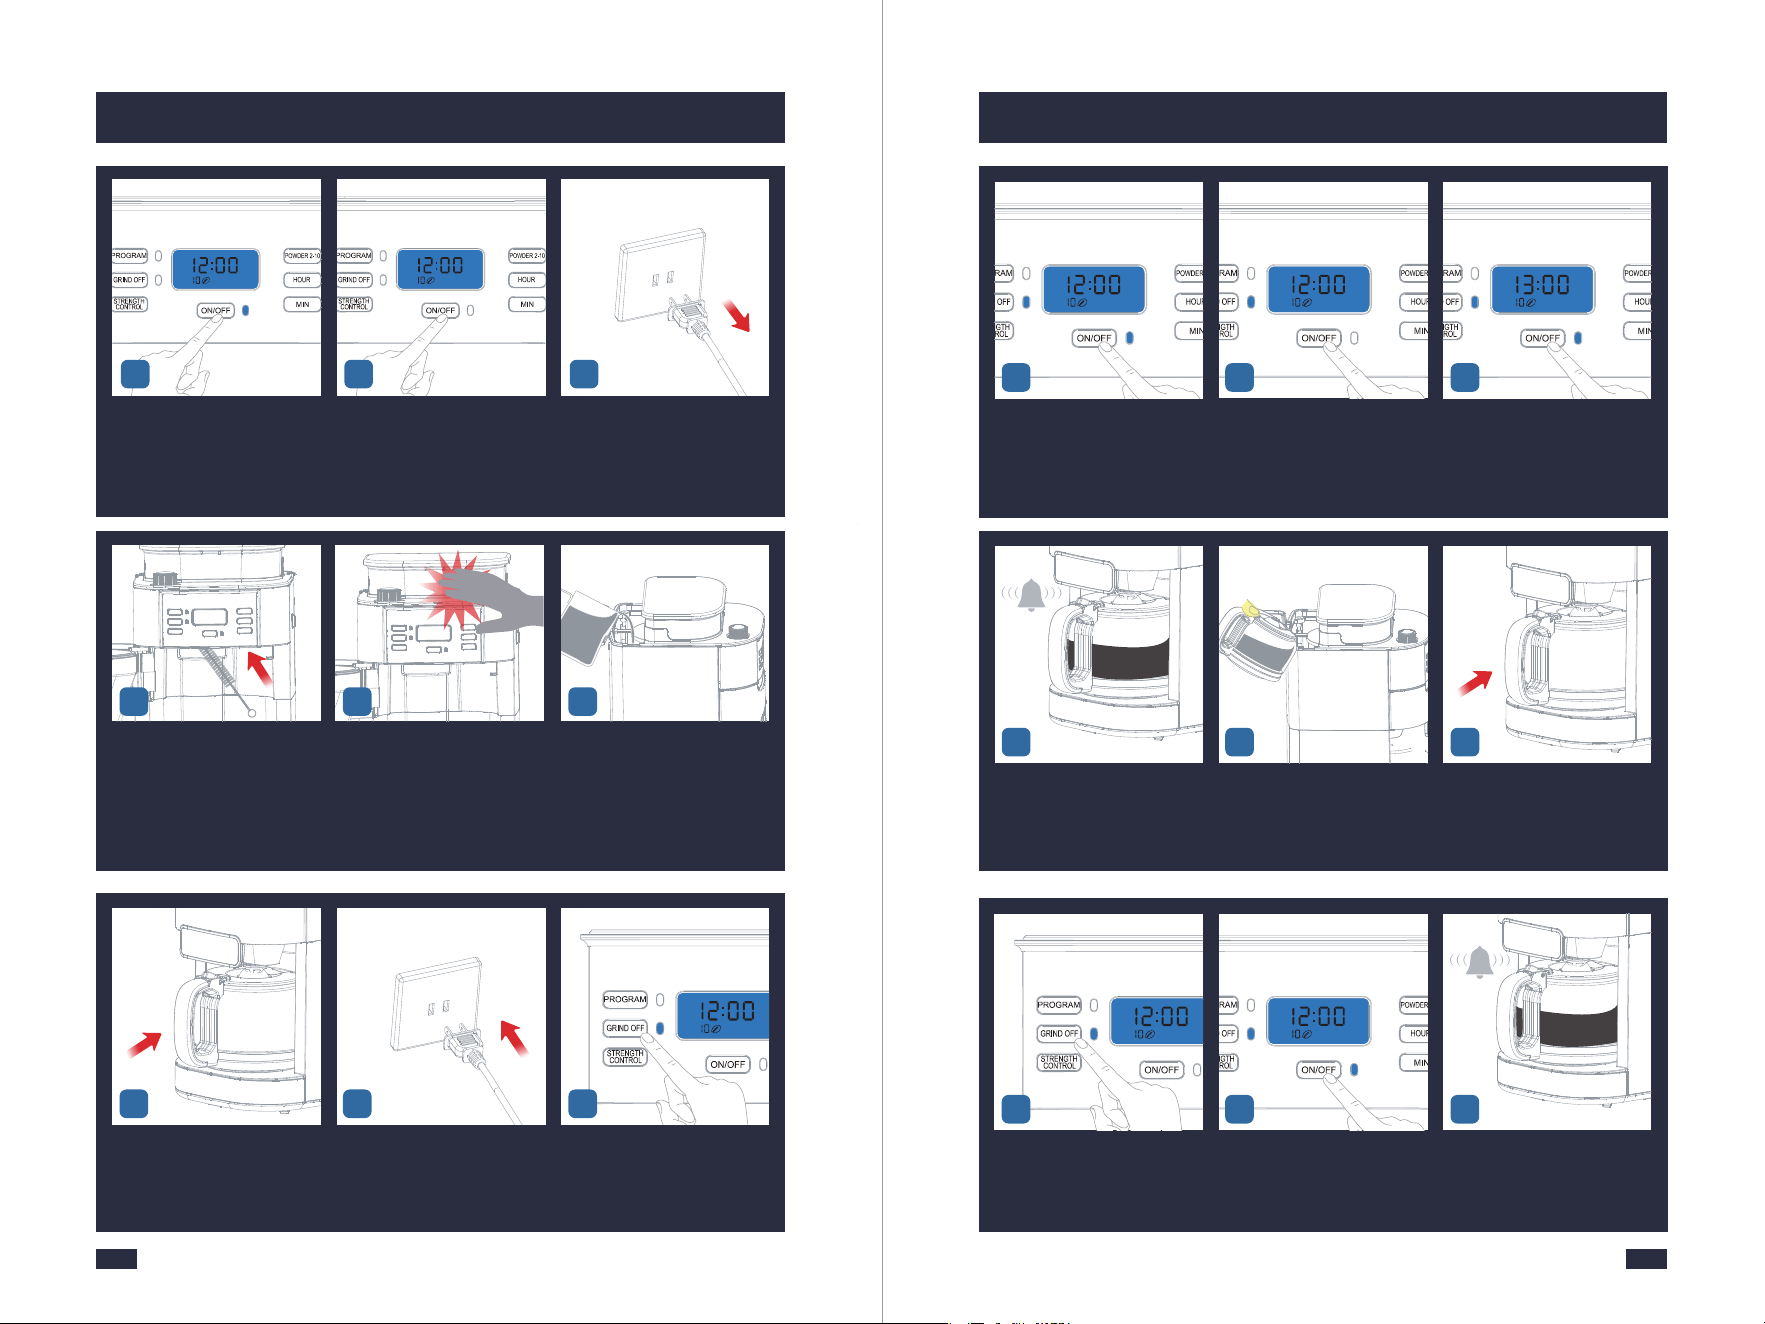
- To switch on the machine: Press the ON/OFF Button.
- To switch off the machine: Long press the ON/OFF Button button for 2 seconds
when the machine is not in use to cut off the screen.
6.1 Switched On & Off
- To switch on the machine: Press the ON/OFF Button.
- To switch off the machine: Long press the ON/OFF Button button for 2 seconds
when the machine is not in use to cut off the screen.
6.1 Switched On & Off
Insert the Power Plug into a
120V AC power outlet.
Long press the PROGRAM Bu-
tton to access the PROGRAM
function.
Press the "HOUR" button to
set the hour.
1 32
1 - If you just want to check the auto-on time you set, long press the PROGRAM
Button then it will show on the display.
2 - Before starting the program, if you want to change the auto-on time, long
press the PROGRAM Button to get into the PROGRAM function. Press the
"HOUR" and"MIN" buttons you need respectively to change the auto-on time.
3 - If the program has already been selected and the PROGRAM Button has
turned blue, you can no longer modify the program time, coffee strength, or
the number of cups. To make any changes you need to turn off the program
settings by briefly pressing the PROGRAM Button, and reset it by following
the section of "5.2 Operation", page 15.
NOTE
The warming plate will remain on for 120 minutes(factory default) after the
coffee is prepared. At the end of the heating process you will hear three beeps.
The switch-off time can be configured as follows: 0/15/35/45/60/75/90/100/120
minutes.
Step1 - Press the POWDER 2-10 Button for 2 seconds. You will see "120" flashing
on the display.
Step2 - Press the POWDER 2-10 Button repeatedly to set your desired switch-off
time.
6.3 Switch-Off Time Setting
Step3 - Wait a few seconds. The most recent option displayed will be applied
and the switch-off time has been set.
In order to retain a more full-bodied coffee aroma, the machine is equipped
with a blooming function. The coffee grounds are moistened with hot water
before brewing. The coffee grounds can swell up, the coffee taste becomes
more intense.
TIPS
6.4 Blooming Setting
The machine automatically
brews coffee at 7:00AM.
7
Press the "MIN" button to set
the minute.
Press the PROGRAM Button again,
the PROGRAM Indicator will be
illuminated and the coffee mac-
hine gets into the PROGRAM mode.
The display will show the act-
ual time and .
4 65

2423
6. Other Functions
Step 1 - Press the PROGRAM Button and STRENGTH CONTROL Button for 2
seconds. You will see “ ” and “ ” flashing on the display.
Step 2 - Press the STRENGTH CONTROL Button.
: blooming function switched on.
: blooming function switched off.
Wait a few seconds. The most recent option displayed will be applied.
6.5 Brew Pause Feature
While the coffee is brewing you can remove the carafe to pour. The drip stop
will close automatically. To avoid any overflow, replace the carafe within 30
seconds.
A beep is emitted to confirm each button press. These button sounds can be
switched off. The beeps emitted after the grinding/brewing/warming proces-
ses/descaling warning cannot be disabled.
TIPS
Be aware that using this feature will weaken the flavor strength of the finished
pot, because the flavor profile of coffee brewed at the beginning of the cycle
differs from coffee made at the end.
TIPS
6.6 Button Sound Setting
Step 1 - Press the STRENGTH CONTROL Button for 2 seconds. You will see
“ ” or “ ” flashing on the display.
Step 2 - Press the STRENGTH CONTROL Button.
: button sounds switched on.
: button sounds switched off.
Wait a few seconds. The most recent option displayed will be applied.
7. Cleaning & Maintenance
7.1 Before Use
A. It is recommended to use pure water; Do not let other objects enter the water
tank, and cover the lid in time after adding water;
B. Please fill enough water in the water tank but do not past the 10 cup marking.
Doing so can cause coffee to overflow from the carafe. Do not add too little water,
otherwise, when the water runs out the water pump will make a loud noise and
affect the coffee effect;
C. Ensure that coffee is made according to the 8 requirements, refer to "5.1 Tips
for Perfect Coffee", page 12.
7.2 In use
A. Do not place parts of the body under the drip stop while the machine is in
operation;
B. Do not open the Swing-out Filter Basket, otherwise, the steam will wet the
powder at the powder outlet and damage the grinding system;
C. While the coffee is brewing you can remove the carafe to pour a cup or two.
The drip stop will close automatically. To avoid any overflow, replace the carafe
within 30 seconds.
After Each Use
7.3 After Use
Please strictly follow the instructions and requirements below to clean the machi-
ne, otherwise, the flavors of your coffee will be affected or the lifespan of the
machine will be shortened.
Cleaning after every use guarantees the flavors of your coffee, for a cleaning guide,
refer to page 17, steps of 19-29 in section “5.2 Operation”.
At the End of the Day
To make sure your machine operates efficiently, you must clean the machine
after your last brew of every day.
2625
7. Cleaning & Maintenance7. Cleaning & Maintenance
53
Press the ON/OFF Button to gri-
nd the remaining coffee beans,
then press it again to stop when
you hear the motor idling sound.
When you hear the motor idling
sound, press the ON/OFF Button
to stop.
Unplug the power cord or power
off cpmpletely
4
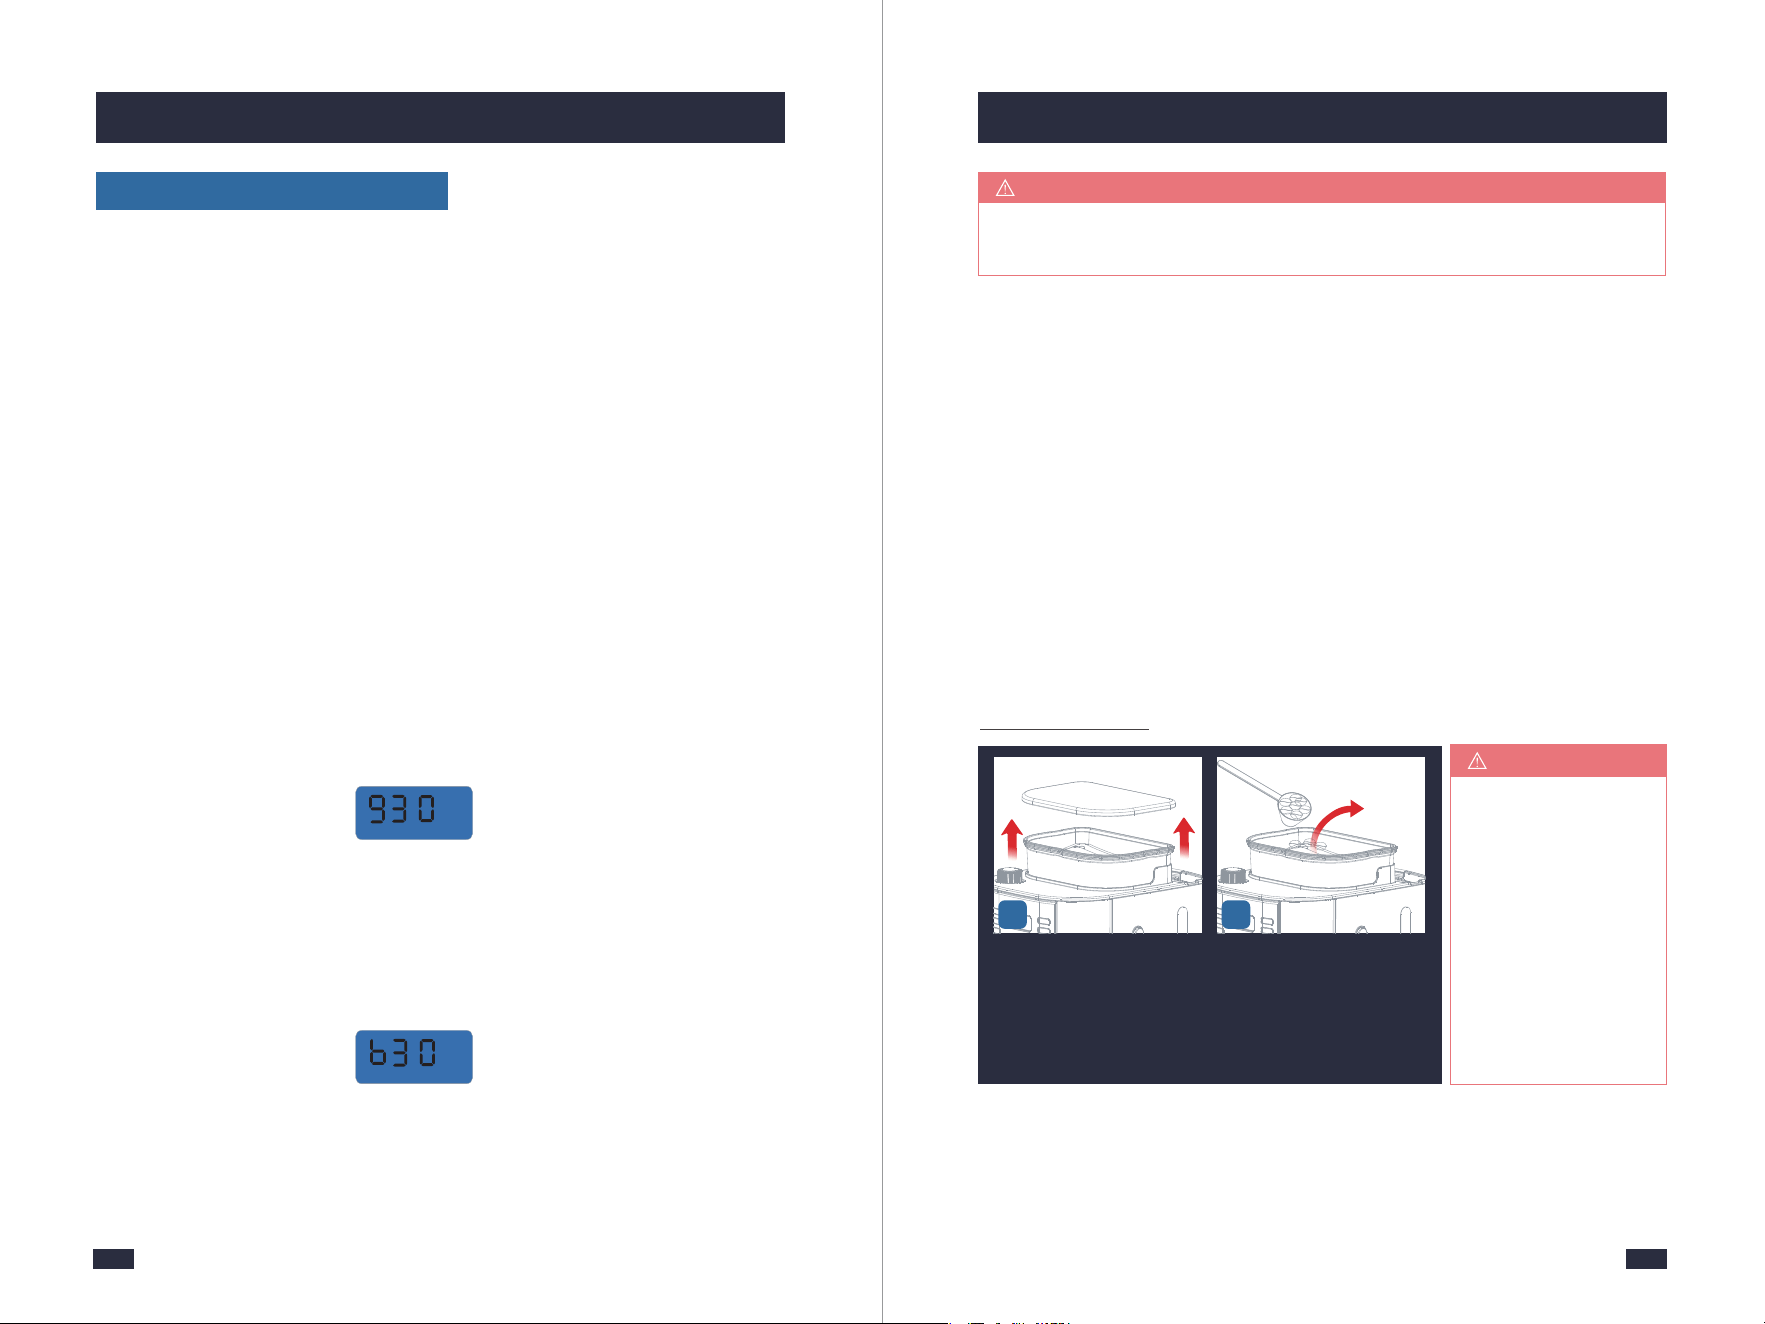
Open the lid of the bean hopper. Empty the coffee beans as much
as possible from the bean cont-
ainer with a spoon and put them
into a jar.
1 2
If there are too many co-
ffee beans, you can tilt
the machine and use a
spoon to empty the co-
ffee beans in the bean
container as much as
possible, but remember
to remove the Coffee
Carafe, otherwise, it co-
uld be easily damaged.
TIPS
Press the Filter Basket Release
Button.
Open the Swing-out Filter Basket. Wipe the top of the Swing-out
Filter Basket with a clean dry
cloth and wipe the inside aro-
und. (Be careful not to touch
the Warming Plate)
7
2
6
4
8
10
6 8
Wipe the inside around. Take out the filter insert with drip
stop together with the perma-
nent filter and filter ring.
Empty the coffee grounds out of
the permanent filter into the ho-
usehold waste.
10 11
Wash the accessories with clean
water.
Dry the filter insert with drip stop,
permanent filter and filter ring .
Clean the Coffee Carafe and wipe
them with a cloth.
12 1413
9
171615
Install them back after cleaning. Close the Swing-out Filter Basket
lightly.
Put the Coffee Carafe back in
place.
2827
7. Cleaning & Maintenance 7. Cleaning & Maintenance
1 - Decalcification refers to the removal of calcium deposits that form over time
on the metal parts of your machine. The mineral content of the tap water in
your area and the frequency of use affects the rate of the calcium buildup, which
can affect the functioning of your machine and the flavor of your coffee. To keep
your coffee machine operating efficiently, you should clean away the mineral
deposits left by the water regularly according to the water quality in your area
and the frequency of use.
2 - Descaling warning will be shown when the machine has cumulatively worked
for 30 brew cycles or 30 grind cycles. All the Indicators on the display will flash
at this point.
Descaling Warning Codes
There are two types of descaling warning codes that will remind you to descale
your machine.
- Codes from grinding: A code "g30", "g60", "g90", or "g+a multiple of 30" will
show up when the machine reaches a certain count of grinding. The format of
the code is "g+a multiple of 30", which means the machine has reached "a
multiple of 30" times of grinding, and it's time for descaling your machine.
- Codes from brewing: A code "b30", "b60", "b90", or "b+a multiple of 30" will
show up and the three lights will flash simultaneously when the machine
reaches a certain count of brewing. The format of the code is "b+a multiple
of 30", which means the machine has reached "a multiple of 30" times of
brewing, and it's time for descaling your machine.
You can long press the GRIND OFF button for 2 seconds to cancel the descaling
warning code. The screen will display a code "g00" or "b00" and then the code
disappears, meaning the machine enters a new round of usage counting.
Descaling should be performed as soon as possible.
After 15 Days or After 100 Uses
If the brewing time increases or the machine becomes noisier, this is a sure
sign that the coffee machine needs to be descaled.
NOTE
You have 3 options:
a. One coffee machine descaling tablet.(Coffee Machine Cleaning Tablets are
available for purchase online or through major retailers.)
or
b. Liquid descaler.
or
c. White vinegar & warm water.
You can also use powder descalers or others to clean your machine as you like.
Descaling Solution
For specific cleaning methods, please refer to the instructions provided by your
descaler provider.
Descaling Cycle
Open the lid of the bean hopper. Empty the coffee beans as much
as possible from the bean cont-
ainer with a spoon and put them
into a jar.
1 2
If there are too many
coffee beans, you can
tilt the machine and
use a spoon to empty
the coffee beans in the
bean container as
much as possible,
but remember to
remove the Coffee
Carafe, otherwise,
it could be easily
damaged.
TIPS
7. Cleaning & Maintenance
30
7. Cleaning & Maintenance
29
53
Press the ON/OFF Button to gri-
nd the remaining coffee beans,
then press it again to stop when
you hear the motor idling sound.
When you hear the motor idling
sound, press the ON/OFF Button
to stop.
Unplug the power cord or power
off cpmpletely
4
Push to open the movable valve,
Insert a cleaning brush (or similar
cleaning tool) into the powder
outlet to clean.
Then tap the machine lightly.
Repeat step 6 and 7 3-5 times.
Prepare 10 cups of water and
add 33 grams of desc aling agent.
Mix them evenly and pour the
descaling solution into the Water
Tank.
86 7
Place the coffee carafe on the
warming plate.
Insert the Power Plug into a 120V
AC power outlet.
Press the GRIND OFF Button and
GRIND OFF Indicator stays fully
illuminated.
9 10 11
Wait until the machine beeps 3
times, press the ON/OFF Button
to exist the Keep Warm Function
and empty the Coffee Carafe.
Fill the Coffee Carafe with 10 cups
of clean water. Pour the water
from the Coffee Carafe into the
Water Tank.
Place the coffee carafe on the
warming plate.
15 1716
Press the ON/OFF Button to start
the cycle and the Indicator will
be illuminated. It will get into
heating.
When the water level of the water
tank reaches 2 cups, press the
ON/OFF Button button, and the
machine will stop pouring.
Wait 60 minutes, and press the
ON/OFF Button button again to
brew the remaining 2 cups of
water.
141312
Press the GRIND OFF Button and
GRIND OFF Indicator stays fully
illuminated.
Press the ON/OFF Button to start
the cycle and the Indicator will
be illuminated. It will get into
heating.
Wait until the machine beeps 3
times, press the ON/OFF Button
to exist the Keep Warm Function.
201918
3231
7. Cleaning & Maintenance
Open the Swing-out Filter Basket. Take out the filter insert with
drip stop together with the
permanent filter and filter
ring.
Wash the accessories with clean
water and wipe them with a
cloth.
24 2625
Take out and empty the coffee
carafe.
Put clean water into the water
tank to repeat the steps 16-21
for 2-3 times to ensure that
the descaling solution has
been removed.
Press the Filter Basket Release
Button.
21 22
Repeat
Step 16-21
for 2-3 times
with clean water
2
6
4
8
10
23
Install them back after cleaning. Close the Swing-out Filter
Basket lightly.
Put the coffee carafe back in
place.
27 2928
Thepowder
outputislow
anddoesnot
matchthe
powderout-
putsetting
Failuretododailyorcompletecleaningcan
causethegrindertoclog.
Usedeep-roastedbeans.Dark,greasybeanscan
leavesomegreasyresidueintheburrsandfeeder
channels.Theoilresiduecancausetheground
coffeetostickinthefeederpassagesandclog.
Overtime,thisslowsdowntheflowofground
coffee.Theamountofgroundcoffeebeansis
controlledbytheselectionofcoffeecupsfor
grindingtime.Therefore,itwillnotgrindallthe
beansatonetime.Ifitcontinuestodevelop,the
groundbeanswillnotreachtherequiredfineness,
andeventually,themotorwillgetstuckand
cannotrotate,resultinginburnout.
Thegrindergroundsubstandardcoffeebeans,
suchasmoistcoffeebeans,coffeebeanswith
liquidflavoringsorsyrups,frozenorcoated
beans,etc.
Suddenlyswitchingfromacoarsetoafinergrind
settingwithcoffeebeansinthegrindercandamage
thegrinder.
Severelyclogged.
Followedtheabove
solutionsbutwas
stillunsuccessful.
Cleanthegrinder
withacoffeegrinder
cleaner.
Thecoffeepowder
willlikelystickon
theburrsandaround
thepowderoutlet,
whichwillleadtoa
severeclog-up.In
thiscase,youhave
toclearallthe
residualpowder
andcoffeeoils
insidethegrinder,
andthenthegrinder
canbebackto
normal.Adeep
descalingisneeded
foryourmachine,
referto"Descaling
Cycle"onpage28.
Usethecorrect
methodtoadjust
thegrindsize
setting.Foran
operationguide,
referto"5.1Tips
forPerfectCoffee",
page12.
Problem Possible Cause What To Do
8.1 Troubleshooting-Grinder
8. Troubleshooting

3433
8. Troubleshooting 8. Troubleshooting
Hearthe
soundofthe
motorruninng
normally,but
thegrinder
doesnot
comeoutof
coffee
powder
Thegrindergroundsubstandardcoffee
beans,suchasmoistcoffeebeans,coffee
beanswithliquidflavoringsorsyrups,
frozenorcoatedbeans,etc.
Usedeep-roastedbeans.Dark,greasy
beanscanleavesomegreasyresiduein
theburrsandfeederchannels.Theoil
residuecancausethegroundcoffeeto
stickinthefeederpassagesandclog.
Overtime,thisslowsdowntheflowof
groundcoffee.Theamountofgroundcoffee
beansiscontrolledbytheselectionofcoffee
cupsforgrindingtime.Therefore,itwill
notgrindallthebeansatonetime.Ifit
continuestodevelop,thegroundbeans
willnotreachtherequiredfineness,and
eventually,themotorwillgetstuckand
cannotrotate,resultinginburnout.
Adeepdescalingisneeded
foryourmachine,referto
step1-7&23-29insection
of"DescalingCycle"on
page28.
Adeepdescalingis
neededforyourmachine,
refertostep1-7&23-29in
sectionof"DescalingCycle"
onpage28.
Problem Possible Cause What To Do
Failuretododailyorcompletecleaning
cancausethegrindertoclog.
Makealoud
noisebythe
grinder
Romovethestonesbeforegrinding
Note:occasionallysmallstonescanbe
foundinbetweencoffeebeans.Verysmall
stoneswillbeprocessedthroughtheburr
grinderwit-houtanyharm(thestonewill
endupinyourfilter,notinyourbrewed
coffee).
PushtheOn/OffButtonto
stopgrindingandhereis
howyoucanavoidstones
enteringthebeancontainer:
1.Shakeyourbeanbag
thoroughlysothatastone
willfalltothebottomofthe
bag.
2.Beforeemptyingthe
bottomhalfofthebagof
beansintothebean
container,checktosee
whetherthereareany
particlesthatlooklike
stones,andremovethem.
Problem Possible Cause What To Do
Errorcodes
E14
CodesE1
showup
Thepowderoutletisblocked
Thepowderoutletbafflecanʼt
beopenedduetocoffeegrounds
residue.
Pleasecontactwiththeauthorized
servicefacilityforrepairing
Adeepdescalingisneededforyour
machine,tocleanthecoffeegrounds
residue,referto"8.3Detailed
TroubleshootingGuideforError
Codes"onpage39.
Coffeegrinds
producedare
coarse
Along-termblockagedeformed
theburrsorenlargedthespace
betweentheburrs.
Deepcleanthegrindertoseeif
thisworks,otherwise,contactanau-
thorizedservicefacilityforrepairing
CodesE2
showup
Thepowderoutletbafflecanʼt
beclosedduetocoffeegrounds
residue.
Adeepdescalingisneededforyour
machine,tocleanthecoffeegrounds
residue,referto"8.3Detailed
TroubleshootingGuideforError
Codes"onpage39.
Acode“g30”,
“g60”,“g90”,
or“g+a
multipleof30”
showsup,and
thethreelights
areflashingat
thesametime.
Theyaredescalingwarning
code.Whenitreachesacertain
grindingcountthenitwillshow
up.Theformatofthecodeis“g+a
multipleof30”,whichmeansthe
machinehasreached"amultiple
of30"timesofgrinding,andit's
timefordescalingyourmachine.
Cancelthedescalingalarmbylong
pressingtheGRINDOFFbuttonfor
2seconds.Thendescalingshould
thenbecarriedoutassoonas
possible,referto“DescalingCycle"
onpage28.

3635
8. Troubleshooting8. Troubleshooting
Wheneverthe
wateroutput
ofthemachine
isextremelyless
thanusual,such
as6cupsare
setbutonly
2cupsare
pouredout.
Thereisabuild-upof
limescaleinsidethe
heatingtubes,which
willresultinamachine
prematureshut-down
withoutbrewingenough
coffee.
Machinedoes
notpump
water
Coffeecarafenotplaced
correctlyunderoutlet
Waterpumpfailure
Checkifthecoffeecarafeisplacedcorrectly
onthewarmingplateandpressingupthe
dripstopintheoutlet.
Refertotheabovecleaningmethodbut
inStep1needtoprepare60gramsof
descalingagent.
Pleasecontactwiththeauthorizedservice
facilityforrepairing.
leaking
steam
Limescale
cloggingcauses
themachineto
heatthewaterfor
alongtime.
Step1-Prepare10cupsofwaterandadd100gramsof
thedescalingagent.Mixthemevenlyandpourthe
descalingsolutionintotheWaterTank.
Step2-PresstheGRINDOFFbutton,presstheON/OFF
Buttonbuttonandthemachinestartstobrew.When
thewaterlevelofthewatertankreaches2cups,press
theON/OFFButtonandthemachinewillstopworking.
Step3-Wait60minutes,andpresstheON/OFFButton
againtobrewtheremaining2cupsofwater.
Step4-Repeatsteps1,step2,andsteps3threetimes.
Thencheckifthemachinecanbebrewednormally.
Step5-Ifitstilldoesnotbrewnormally,pleaserepeat
steps1and2,thenletthemachinestandfor5days.
Notethatthewaterinthewatertankdoesnotneedto
bepouredout.
Step6-After5days,startthemachineandfinish
brewingtheremainingwaterinthewatertank.
Step7-FillthewatertankwithcleanwatertotheMax
lineandthenbrewallthewater,repeatatleast3times.
Problem Possible Cause What To Do
Whenever
thewater
outputof
themachine
islessthan
usual,such
as6cups
aresetbut
only4cups
arepoured
out.
Thereisabuild-up
oflimescaleinside
theheatingtubes,
whichwillresultin
amachine
prematureshut-
downwithout
brewingenough
coffee.
Step1-Prepare10cupsofwaterandadd20gramsof
thedescalingagent.Stirthestickevenlyandpourthe
descalingsolutionintotheWaterTank.
Step2-PresstheGRINDOFFbutton,presstheON/OFF
Buttonbuttonandthemachinestartstobrew.When
thewaterlevelofthewatertankreaches2cups,press
theON/OFFButton,andthemachinewillstopworking.
Step3-Wait60minutes,andpresstheON/OFFButton
againtobrewtheremaining2cupsofwater.
Step4-Repeatsteps1,step2,andsteps3threetimes.
Thencheckifthemachinecanbebrewednormally.
Step5-Ifitstilldoesnotbrewnormally,pleaserepeat
steps1and2,thenletthemachinestandfor3days.
Notethatthewaterinthewatertankdoesnotneedto
bepouredout.
Step6-After3days,startthemachineandfinish
brewingtheremainingwaterinthewatertank.
Step7-FillthewatertankwithcleanwatertotheMax
lineandthenbrewallthewater,repeatatleast3times.
Problem Possible Cause What To Do
8.2 Troubleshooting-Brewer
Inappropriatecoffee
beansareused
Thecoffeebeansare
notfreshenoughoruse
longtermstoragecoffee
beans
Usefreshlyroastedbeanstoensurethebest
flavorofyourcoffee,thefresherthebetter.
Coffeebeansarebestconsumedbetween5
to20daysafterthe"RoastedOn"date.
Differentcoffeebeansaresuitablefor
differentbrewingmethods,pleaseusethe
correctbeanvarietywell-suitedfordrip
coffee.Thedeepertheroastlevel,the
strongerthecoffeeflavorwouldbe.But
deep-roastedcoffeebeansarenotsuitable
fordripcoffee,includingyourGevione.So
maybeyoucanchoosemedium-roasted
beansoraskthebeansupplierfora
suggestion.Theserequirementsapply
tocoffeepowder.
Weakcoffee
Coffeegrindsaretoo
coarse
Coarsecoffeegroundswillmakethecoffee
weaker,sopleaseuseafinercoffeegrind.

8. Troubleshooting 8. Troubleshooting
37
38
Pleasenotethatthetem-
peratureofcoffeebrewed
byadripcoffeemachine
willbenotatahighlevel.
Thedripcoffeemachine
heatswaterthroughits
heatingtubesandthen
pourshotwaterontocoffee
groundstoextractcoffee
flavor.Thetemperatureof
thehotwaterpouredout
fromthewateroutletis
usuallyaround92℃/
197.6℉.Thetemperature
ofthefinalcoffeeisusually
70-77℃/158-170.6℉.
Althoughthemachinehas
amaximumwarm-keeping
timeof2hours,thewarm-
keepingtemperatureisonly
around60℃/140℉.Asthe
amountofcoffeeinthe
glasscarafedecreases,the
heatwillbelostfasterand
thetemperaturewilldrop.
Werecommendfinishingthecoffeeas
soonaspossibleafterbrewing.Ifyou
can'tdrinkitinashorttime,wesuggest
youbrewcoffeeinbatches.
Thecoffee
isnothot
enough.
Theheating
plateis
oxidizeddue
tocoffeestains.
Problem Possible Cause What To Do
CodesE3
showup
Acode“b30”,
“b60”,“b90”,
or“b+a
multipleof
30”showsup,
andthethree
lightsare
flashingatthe
sametime.
Theyaredescalingwarning
code.Whenitreachesa
certainbrewingcountthen
itwillshowup.Theformat
ofthecodeis“b+amultiple
of30”,whichmeansthe
machinehasreached"a
multipleof30"timesof
brewing,andit'stimefor
descalingyourmachine.
Cancelthedescalingalarmbylong
pressingtheGRINDOFFbuttonfor2
seconds.Thendescalingshouldthen
becarriedoutassoonaspossible,refer
to“DescalingCycle"onpage28.
CodesE4
showup
NTCproblem(shortcircuit)
Pleasecontactwiththeauthorizedservice
facilityforrepairing.
Problem Possible Cause What To Do
NTCproblem(open
circuit)
Pleasecontactwiththeauthorizedservice
facilityforrepairing.
Heatingsystemfailure.
Coffeeoftendripsonto
thewarmingplate.
Cleanandmaintainthewarmingplate
aftereachuse.
PleasecontactGevisupportteam.
8. Troubleshooting
39
40
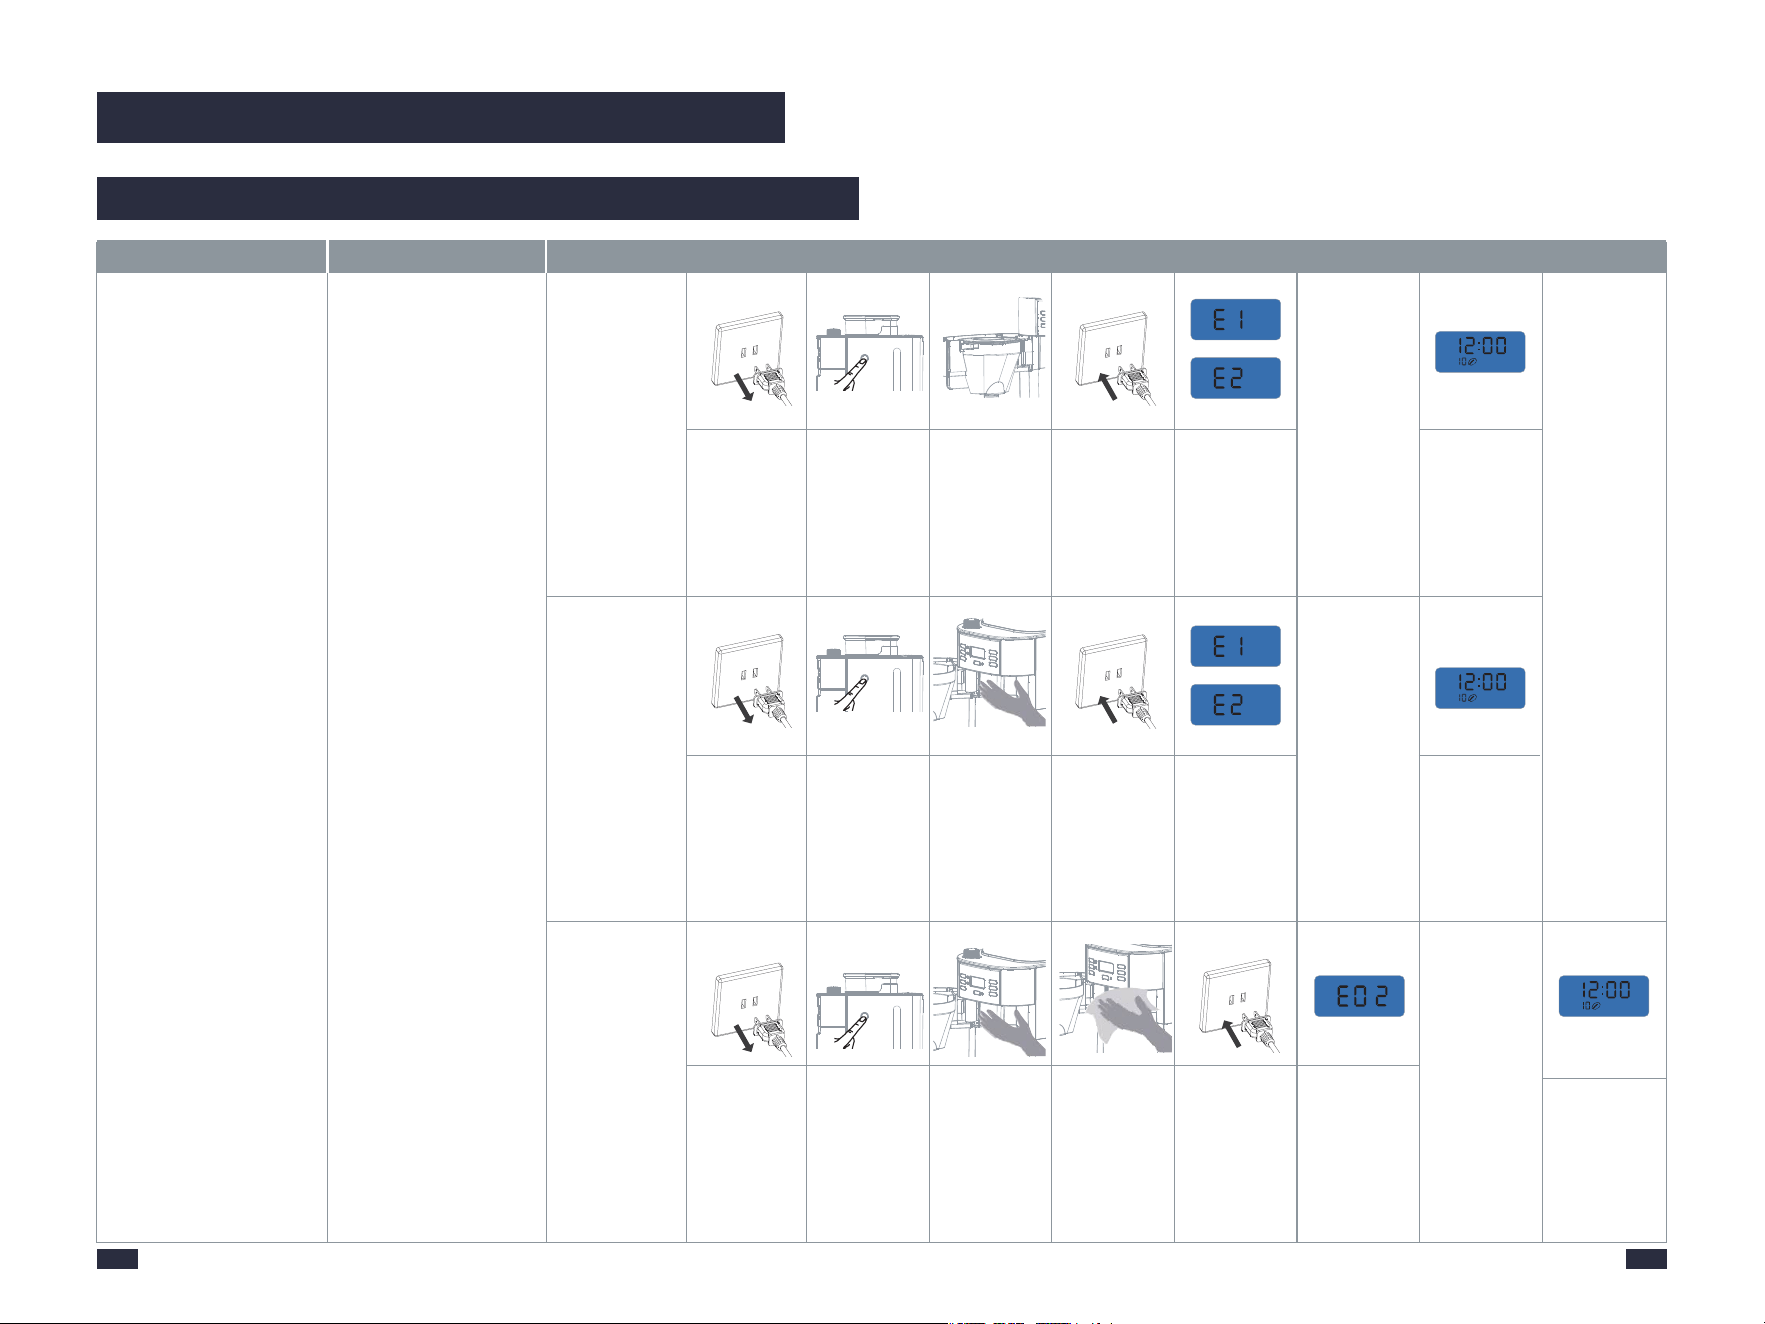
E1/E2
The powder baffle can
NOT be opened/closed.
Step1 : Check whether
the powder is too
much that exceed
the funnel container
(if the used coffee
powder is notcleaned
in time,it will be
gathering more and
more and eventually
blocked the powder
outlet of the bean
grinder)
Step3: Check whether
you have added the
damp/overnight
coffee bean or water
has been poured into
the bean box, which
will cause the coffee
powder to become
damp. The damp
powder will block
the powder baffle,
which made it unable
to open/close.
Step2: Check whether
the powder baffle
is not cleaned and
full of coffee powder
Unplug the
powder supply.
Plug in the power
supply.
Press lightly and
vertically the Open
Button on the side
of the machine.
Turn on the funnel
container.
After turning on,
check whether the
coffee powder is
excceded the filter.
If so, please pour
out the coffee
powder.
Check whether
the E1/E2 is still
displayed. Please
proceed to
step 2.
Check whether
the E1/E2 is still
displayed.Please
proceed to step 2.
E1/E2 is
disappeared.
The machine
returned to
normal status.
or
or
or
Cause OperationError Dispaly
Unplug the
powder supply.
Unplug the
powder supply.
Plug in the power
supply.
Plug in the power
supply.
Press lightly and
vertically the Open
Button on the side
of the machine.
Turn on the funnel
container.
After turning on,
Wipe the powder
baffle with a dry
cloth, and clean
the residual coffee
powder around
the powder baffle.
Press lightly and
vertically the Open
Button on the side
of the machine.
Turn on the funnel
container.
After turning on,
Touch the powder
outlet to check
whether the coffee
powder is damp.
Check whether
the E1/E2 is still
displayed.Contact
professional to
open the bean box
for maintenance.
The time is depends
on how much wet of
coffee powder. Wait
until the powder
become dry, touch
the powder outlet,
feel with your hands
whether the coffee
powder is dry. If so
wipe it with a dry cloth.
E1/E2 is
disappeared.
The machine
returned to
normal status.
E1/E2 is
disappeared.
The machine
returned to
normal status.
8.3 Detailed Troubleshooting Guide for Error Codes

41 42
9. Warranty
Have a question or need assistance?
Please contact Gevi via www.gevi.com/support
Website
9. Warranty
Period Gevi Will Replace
30 Days
From the date of
original purchase
Whole unit if the machine fails
due to a defect in materials or
workmanship
1 Year
From the date of
original purchase
Any part of the machine which
fails due to a defect in materials
or workmanship
Call 1-855-9922-888 during Mon-Fri 9:00 AM to 5:00 PM
Pacific Standard Time (PST)
Wish to speak with someone?
9.1 Customer Support
For detailed information about the warranty policy, please visit
www. gevi.com/pages/warranty.
If you have any further questions, feel free to contact us.
Warranty Extension
Register your warranty at
www.gevi.com/pages/warranty-registration
to receive 3 months warranty extension for FREE.
A valid proof of purchase is required for warranty service.
NOTE

43
9. Warranty
----------------------------------------------------------------
Environmental Protection Treatment
You can help protect the environment!
Strictly follow the rules: please dispose of your waste
electrical equipment at the appropriate waste stations!
Tratamiento para la Protección del Medio Ambiente
¡Cuida el medio ambiente! Deposita tus residuos de
aparatos eléctricos en los puntos de reciclaje
designados.