Setup Instructions
Product No. 2502082
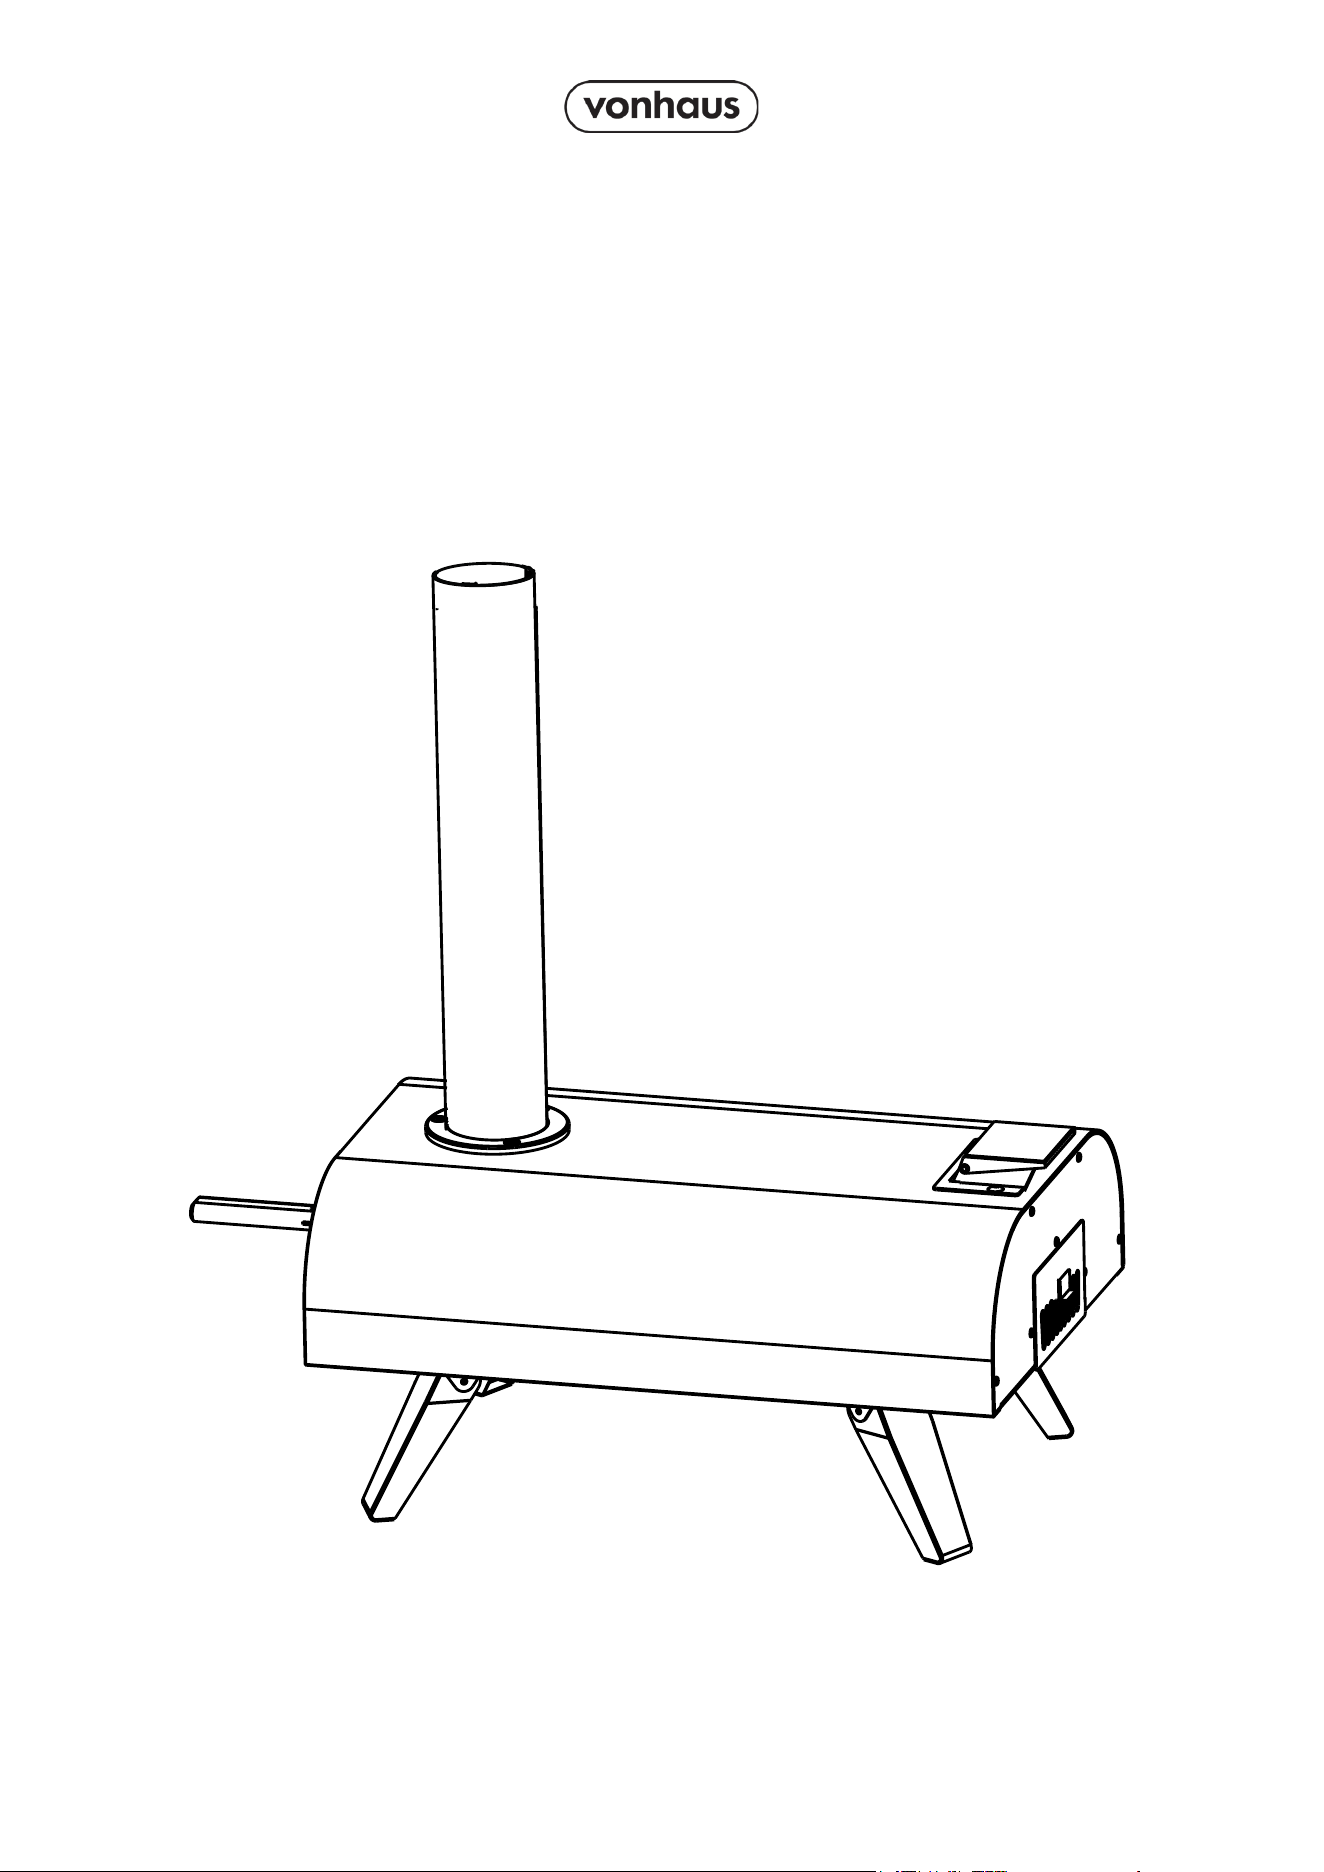
TABLE TOP
PIZZA OVEN
A4L | 01
USAGE / USAGE / VERWENDUNG / USO / UTILIZZO
D
C
Set the Pizza Oven up in a suitable position, on a at,
stable surface away from any combustible items.
Place pellets (recommended 600g not supplied) on the
Pellet Rack (E) and ignite using natural wood relighters.
This may take around 15-20 seconds until fully ignited.
Close the front door (K) to allow the oven to pre-heat.
We advise to temperature and pellet check at 5 minute
intervals. Temperature check with a suitable Thermal
Measurment Gun. To replenish pellets, use the Hopper
Shovel (C) to take some pellets and pour them onto the
Pellet Rack through the Hopper Assembly (D).
NOTE You will be required to top up with pelletts before
the optimum temperature of 400c is reached.
Once at 400c Place your pizza on the Pizza Stone (J)
and place inside the Pizza Oven and close the door (K)
securely.
CAUTION! Wear heat-resistant mitts/gloves when
handling any part of the Pizza Oven during use. The
surface are very hot and will cause burning injuries if
touched with bare hands.
CLEANING & MAINTENANCE
Once the cooking process is complete and you are
ready to extinguish any remaining ames, remove the
Ash Tray/Pellet rack using the Fire Stick (14) and douse
with water.
CAUTION! Take extra care as they may still be very hot.
Once the Pizza Oven has completely cooled, you can
clean the fats/oils from inside using hot and soapy water
with a non-abrasive cleaning pad. This will help remove
any stubborn foods
DO NOT clean your Pizza Stone using a dishwasher.
Clean by hand only using the instructions stated at the
front of this manual.
When the Pizza Oven is not in use during the winter
months, it is highly recommended you cover using a
suitable weather-proof sheet or store in a dry place away
from any harsh weather conditions.
Leaving the Oven out in the rain may cause the item to
rust.
BAKING
Once at 400c Place your pizza on the Pizza Stone (J)
and place inside the Pizza Oven and close the door (K)
securely.
NOTE! Due to the high temperature of the Oven, pizzas
will typically take no longer than 90 seconds to cook.
Ensure you check regularly and rotate the pizza. Avoid
leaving unattended.
Rotate the pizza 90 degrees with pizza peel or baking
tools, then close the door to bake.
Repeat the same process until the pizza is rotated and
baked 360 degrees.
IMPORTANT! When the pellet fuel in the pizza oven is
burning, the door must be closed unless food needs to
be put in or taken out.
This is to prevent too much air coming in from the oven
door, which may cause heavy smoke inside the re box
assembly (E&G) and hopper assembly (D).
Always operate the door with provided handle.
(C) only for extinguishing burn

2
Need further help?
suppor[email protected]
See our full range at
www.vonhaus.com
Besoin d’aide supplémentaire ?
suppor[email protected]
Découvrez notre gamme complète sur
www.vonhaus.com
Benötigen Sie weitere Hilfe?
suppor[email protected]
Entdecken Sie unser gesamtes
Sortiment auf
www.vonhaus.com
Necesita más ayuda?
suppor[email protected]
Descubra toda nuestra gama en
www.vonhaus.com
Hai bisogno di ulteriore assistenza?
suppor[email protected]
Scopri tutta la nostra gamma su
www.vonhaus.com
Assembly Time
20 Minutes
3
A4L | 01
2500553.1
Please read all instructions carefully before use and
retain for future reference.
Veuillez lire attentivement ces instructions avant
utilisation et conservez-les pour pouvoir les consulter
à l’avenir.
Bitte lesen Sie die Anleitung sorgfältig und bewahren Sie
sie als Referenz auf.
Leed todas las instrucciones detenidamente antes de
usar y retened para futuras consultas.
Si prega di leggere attentamente tutte le istruzioni prima
dell’uso e conservarle per una futura consultazione.
CAUTION Do not immerse in water.
ATTENTION Ne pas immerger dans l’eau.
VORSICHT Nicht in Wasser tauchen.
PRECAUCIÓN No sumergid en agua.
AVVERTENZA Non immergere nell’acqua.
CAUTION hot surfaces
ATTENTION Surfaces chaudes
VORSICHT heiße Oberächen
PRECAUCIÓN supercies calientes
AVVERTENZA Superci calde
Ensure product is not damaged before rst use
S’assurer que le produit n’est pas endommagé avant la
première utilisation
Stellen Sie vor dem ersten Gebrauch sicher, dass das
Produkt nicht beschädigt ist
Asegúrese de que el producto no esté dañado antes del
primer uso
Assicurarsi che il prodotto non sia danneggiato prima
del primo utilizzo
WARNING! NEVER leave a re unattended and keep
children and pets well away when ignited.
ATTENTION! Ne laissez JAMAIS un feu sans
surveillance et gardez les enfants et les animaux
domestiques à l’écart lorsqu’ils sont enammés.
WARNUNG! NIEMALS ein Feuer unbeaufsichtigt lassen
und Kinder und Haustiere fernhalten, wenn sie entzündet
werden.
¡ADVERTENCIA! NUNCA deje un fuego desatendido
y mantenga a los niños y mascotas alejados cuando se
encienda.
AVVERTIMENTO! Non lasciare MAI il fuoco incustodito
e tenere lontani i bambini e gli animali domestici quando
vengono accesi.
Do not cover.
Ne pas couvrir.
Nicht abdecken.
No cubrir.
Non coprire.
20min
Estimated assembly time
Temps d’assemblage estimé
Geschätzte Montagezeit
Tiempo Estimado de Ensamblaje
Tempo stimato per il montaggio
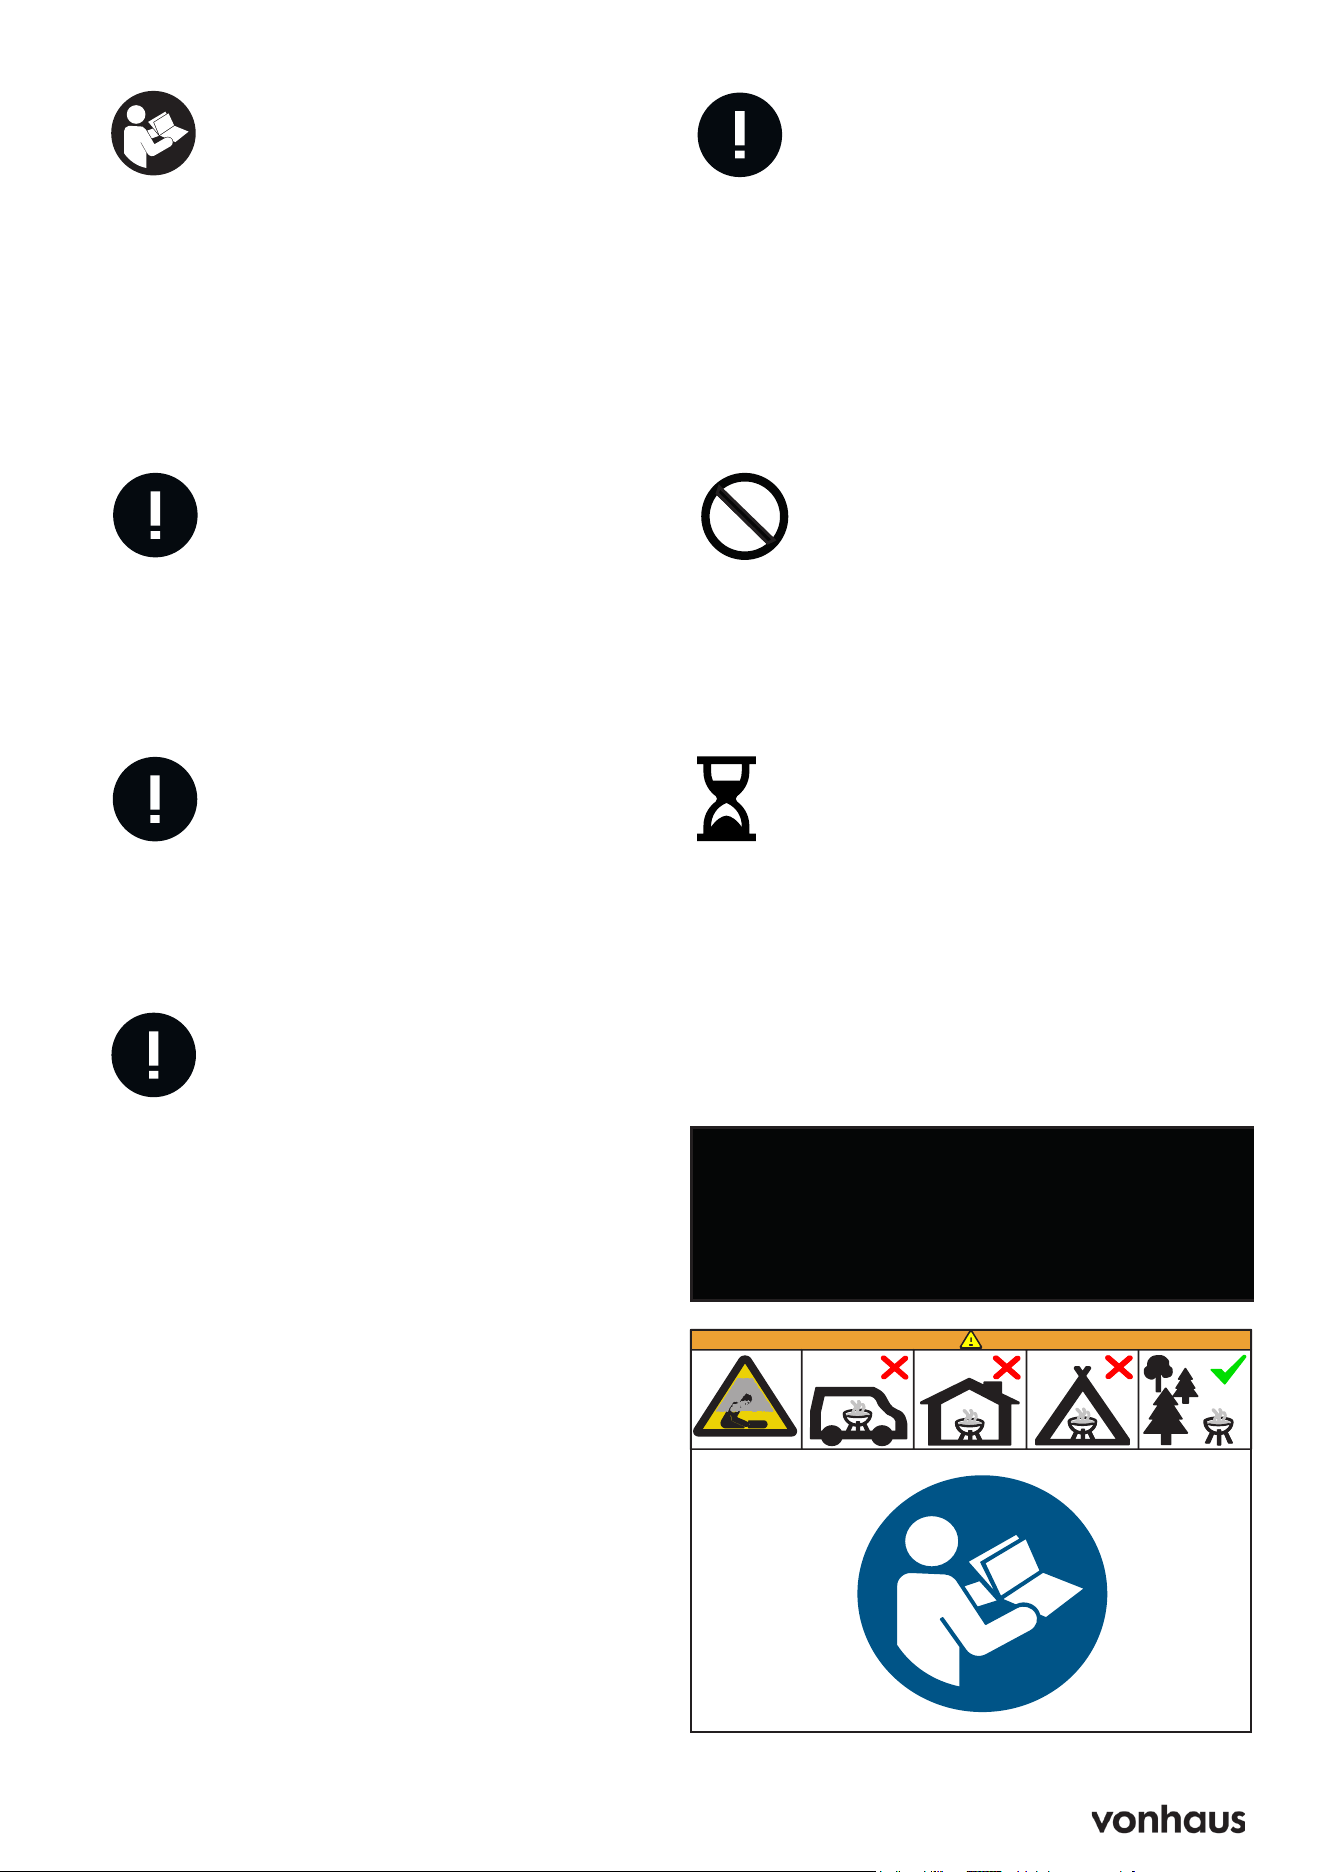
WARNING: Do not use the oven in a conned
and/or habitable space e.g. houses, tents,
caravans, motor homes, boats.
! Danger of carbon monoxide poisoning fatality !
A4L | 01
2500553.1
Please read all instructions carefully before use and
retain for future reference.
Veuillez lire attentivement ces instructions avant
utilisation et conservez-les pour pouvoir les consulter
à l’avenir.
Bitte lesen Sie die Anleitung sorgfältig und bewahren Sie
sie als Referenz auf.
Leed todas las instrucciones detenidamente antes de
usar y retened para futuras consultas.
Si prega di leggere attentamente tutte le istruzioni prima
dell’uso e conservarle per una futura consultazione.
CAUTION Do not immerse in water.
ATTENTION Ne pas immerger dans l’eau.
VORSICHT Nicht in Wasser tauchen.
PRECAUCIÓN No sumergid en agua.
AVVERTENZA Non immergere nell’acqua.
CAUTION hot surfaces
ATTENTION Surfaces chaudes
VORSICHT heiße Oberächen
PRECAUCIÓN supercies calientes
AVVERTENZA Superci calde
Ensure product is not damaged before rst use
S’assurer que le produit n’est pas endommagé avant la
première utilisation
Stellen Sie vor dem ersten Gebrauch sicher, dass das
Produkt nicht beschädigt ist
Asegúrese de que el producto no esté dañado antes del
primer uso
Assicurarsi che il prodotto non sia danneggiato prima
del primo utilizzo
WARNING! NEVER leave a re unattended and keep
children and pets well away when ignited.
ATTENTION! Ne laissez JAMAIS un feu sans
surveillance et gardez les enfants et les animaux
domestiques à l’écart lorsqu’ils sont enammés.
WARNUNG! NIEMALS ein Feuer unbeaufsichtigt lassen
und Kinder und Haustiere fernhalten, wenn sie entzündet
werden.
¡ADVERTENCIA! NUNCA deje un fuego desatendido
y mantenga a los niños y mascotas alejados cuando se
encienda.
AVVERTIMENTO! Non lasciare MAI il fuoco incustodito
e tenere lontani i bambini e gli animali domestici quando
vengono accesi.
Do not cover.
Ne pas couvrir.
Nicht abdecken.
No cubrir.
Non coprire.
20min
Estimated assembly time
Temps d’assemblage estimé
Geschätzte Montagezeit
Tiempo Estimado de Ensamblaje
Tempo stimato per il montaggio
WARNING: Do not use the oven in a conned
and/or habitable space e.g. houses, tents,
caravans, motor homes, boats.
! Danger of carbon monoxide poisoning fatality !
4
A4L | 01
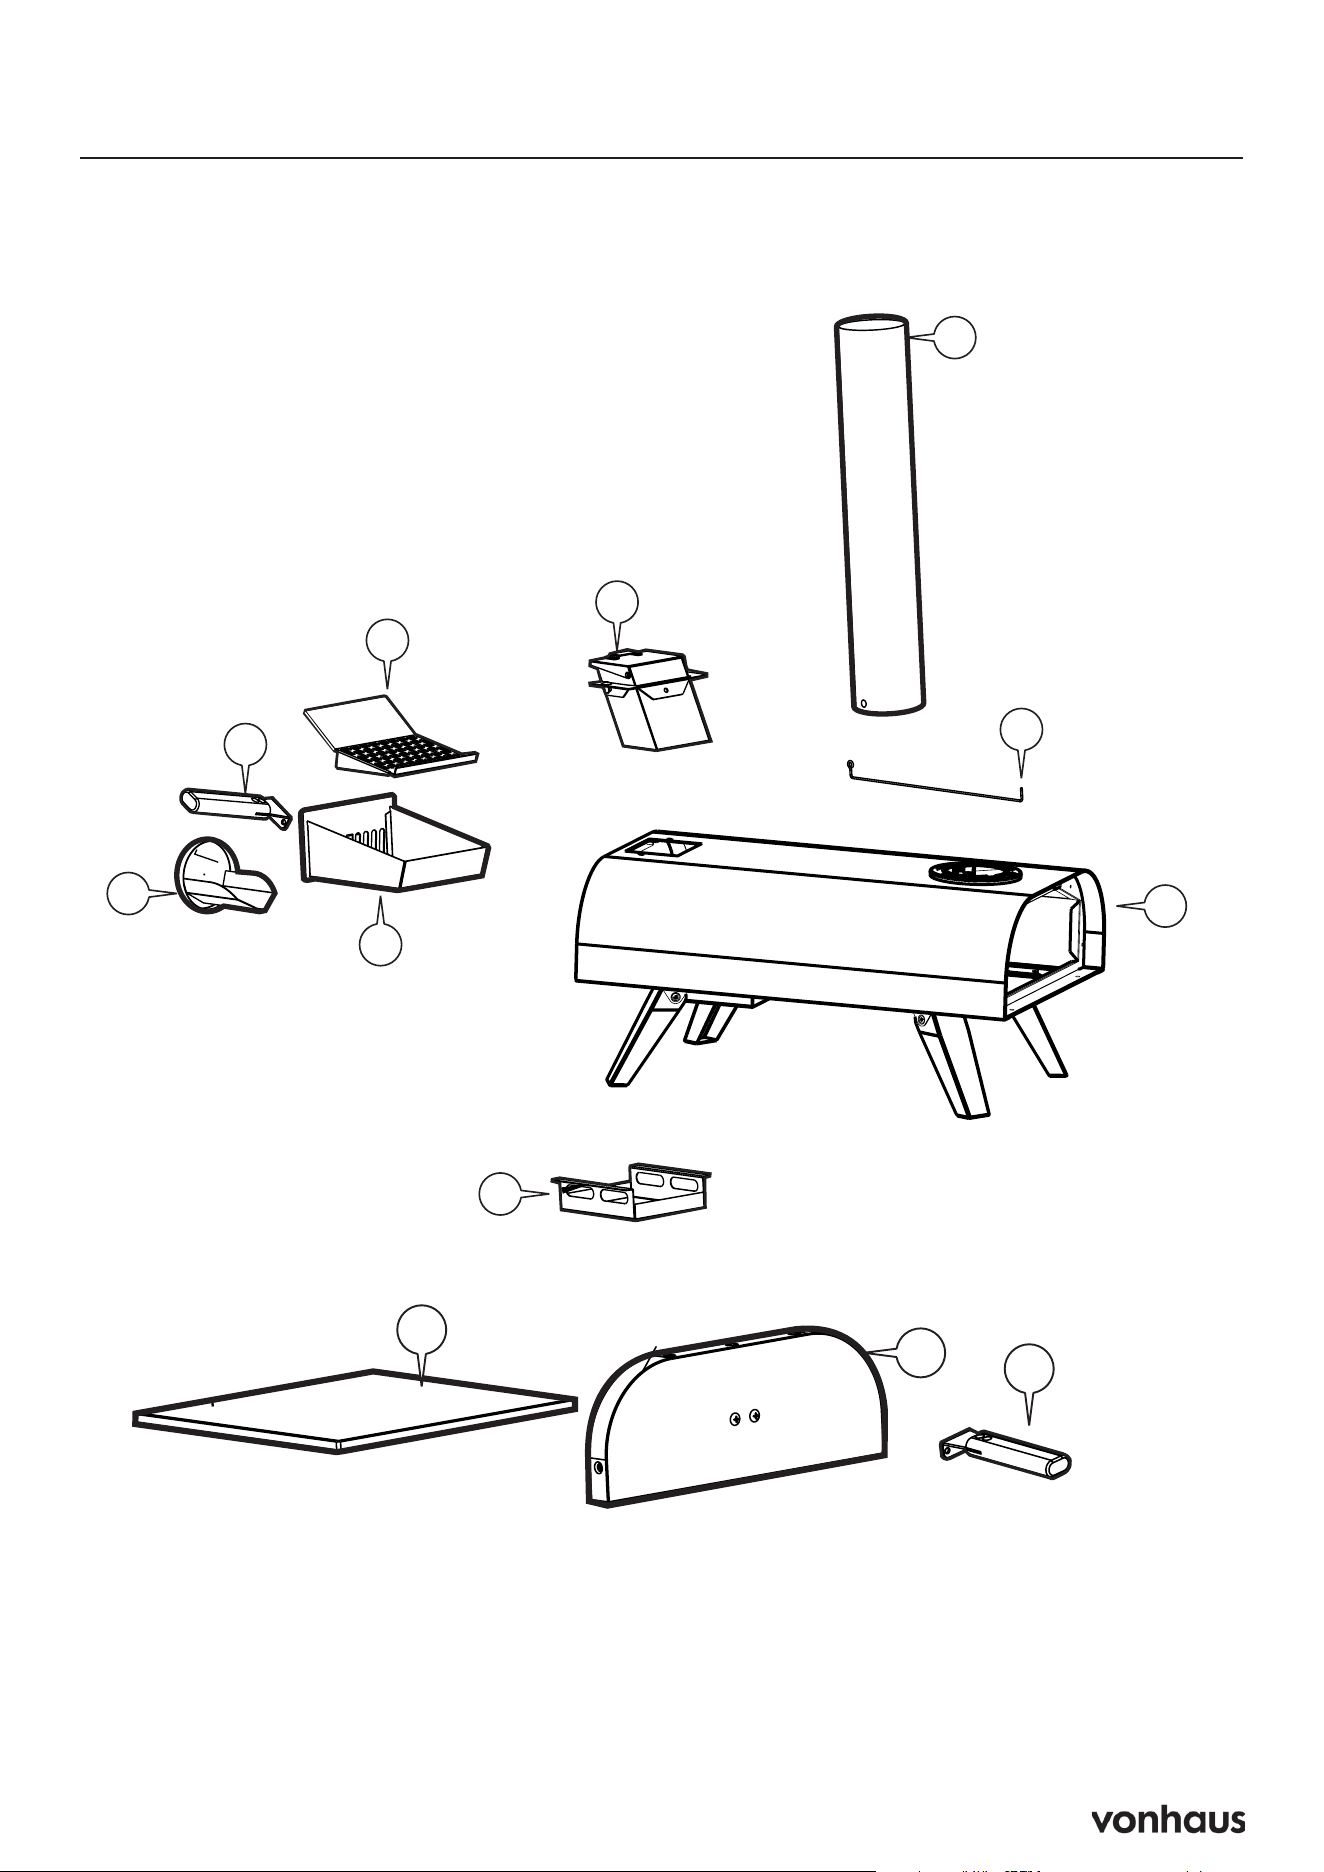
COMPONENTS / COMPOSANTS / KOMPONENTEN / COMPONENTES / COMPONENTI /COMPONENTE
A. Pizza Oven Body.
B. Chimney.
C. Hopper Shovel.
D. Hopper Assembly.
E. Pellet Rack.
F. Fire Box Handle.
G. Fire Box.
B
A
I
D
E
F
C
G
H. Ash tray.
I. Poker.
J. Pizza Stone.
K. Door.
L. Door Handle.
M. Chimney Cover.
N. M4x10 Assembly Screws x4
H
K
J
L
Components Fr: Composants / De: Komponenten / Es: Componentes / It: Componenti
x2
A4L | 01
COMPONENTS / COMPOSANTS / KOMPONENTEN / COMPONENTES / COMPONENTI /COMPONENTE
A. Pizza Oven Body.
B. Chimney.
C. Hopper Shovel.
D. Hopper Assembly.
E. Pellet Rack.
F. Fire Box Handle.
G. Fire Box.
B
A
I
D
E
F
C
G
H. Ash tray.
I. Poker.
J. Pizza Stone.
K. Door.
L. Door Handle.
M. Chimney Cover.
N. M4x10 Assembly Screws x4
H
K
J
L

5
Components Fr: Composants / De: Komponenten / Es: Componentes / It: Componenti
Components
A. Pizza Oven Body.
B. Chimney.
C. Hopper Shovel.
D. Hopper Assembly.
E. Pellet Rack.
F. Fire Box Handle.
G. Fire Box.
H. Ash tray.
I. Poker.
J. Pizza Stone.
K. Door.
L. Door Handle.
M. Chimney Cover.
N. M4x10 Assembly Screws x4
Composants
A. Corps du four à pizza
B. Cheminée
C. Pelle du réservoir
D. Assemblage du réservoir
E. Support à granulés
F. Poignée du foyer
G. Foyer
H. Cendrier
I. Tisonnier
J. Pierre à pizza
K. Porte
L. Poignée de porte
M. Couvercle de cheminée
N. Vis d’assemblage M4x10 x4
Komponenten
A. Pizzaofen-Korpus
B. Schornstein
C. Behälterschaufel
D. Behältereinheit
E. Pelletgestell
F. Feuerboxgriff
G. Feuerbox
H. Aschekasten
I. Schürhaken
J. Pizzastein
K. Tür
L. Türgriff
M. Schornsteinabdeckung
N. M4x10 Montageschrauben x4
Componentes
A. Cuerpo del horno de pizza
B. Chimenea
C. Pala de la tolva
D. Conjunto de la tolva
E. Estante para pellets
F. Manija de la caja de fuego
G. Caja de fuego
H. Cenicero
I. Atizador
J. Piedra para pizza
K. Puerta
L. Manija de la puerta
M. Tapa de la chimenea
N. Tornillos de montaje M4x10 x4
Componenti
A. Corpo del forno per pizza
B. Camino
C. Paletta del serbatoio
D. Gruppo serbatoio
E. Porta pellet
F. Maniglia del braciere
G. Braciere
H. Cassetto cenere
I. Attizzatoio
J. Pietra per pizza
K. Porta
L. Maniglia della porta
M. Coperchio del camino
N. Viti di montaggio M4x10 x4
6
A4L | 01
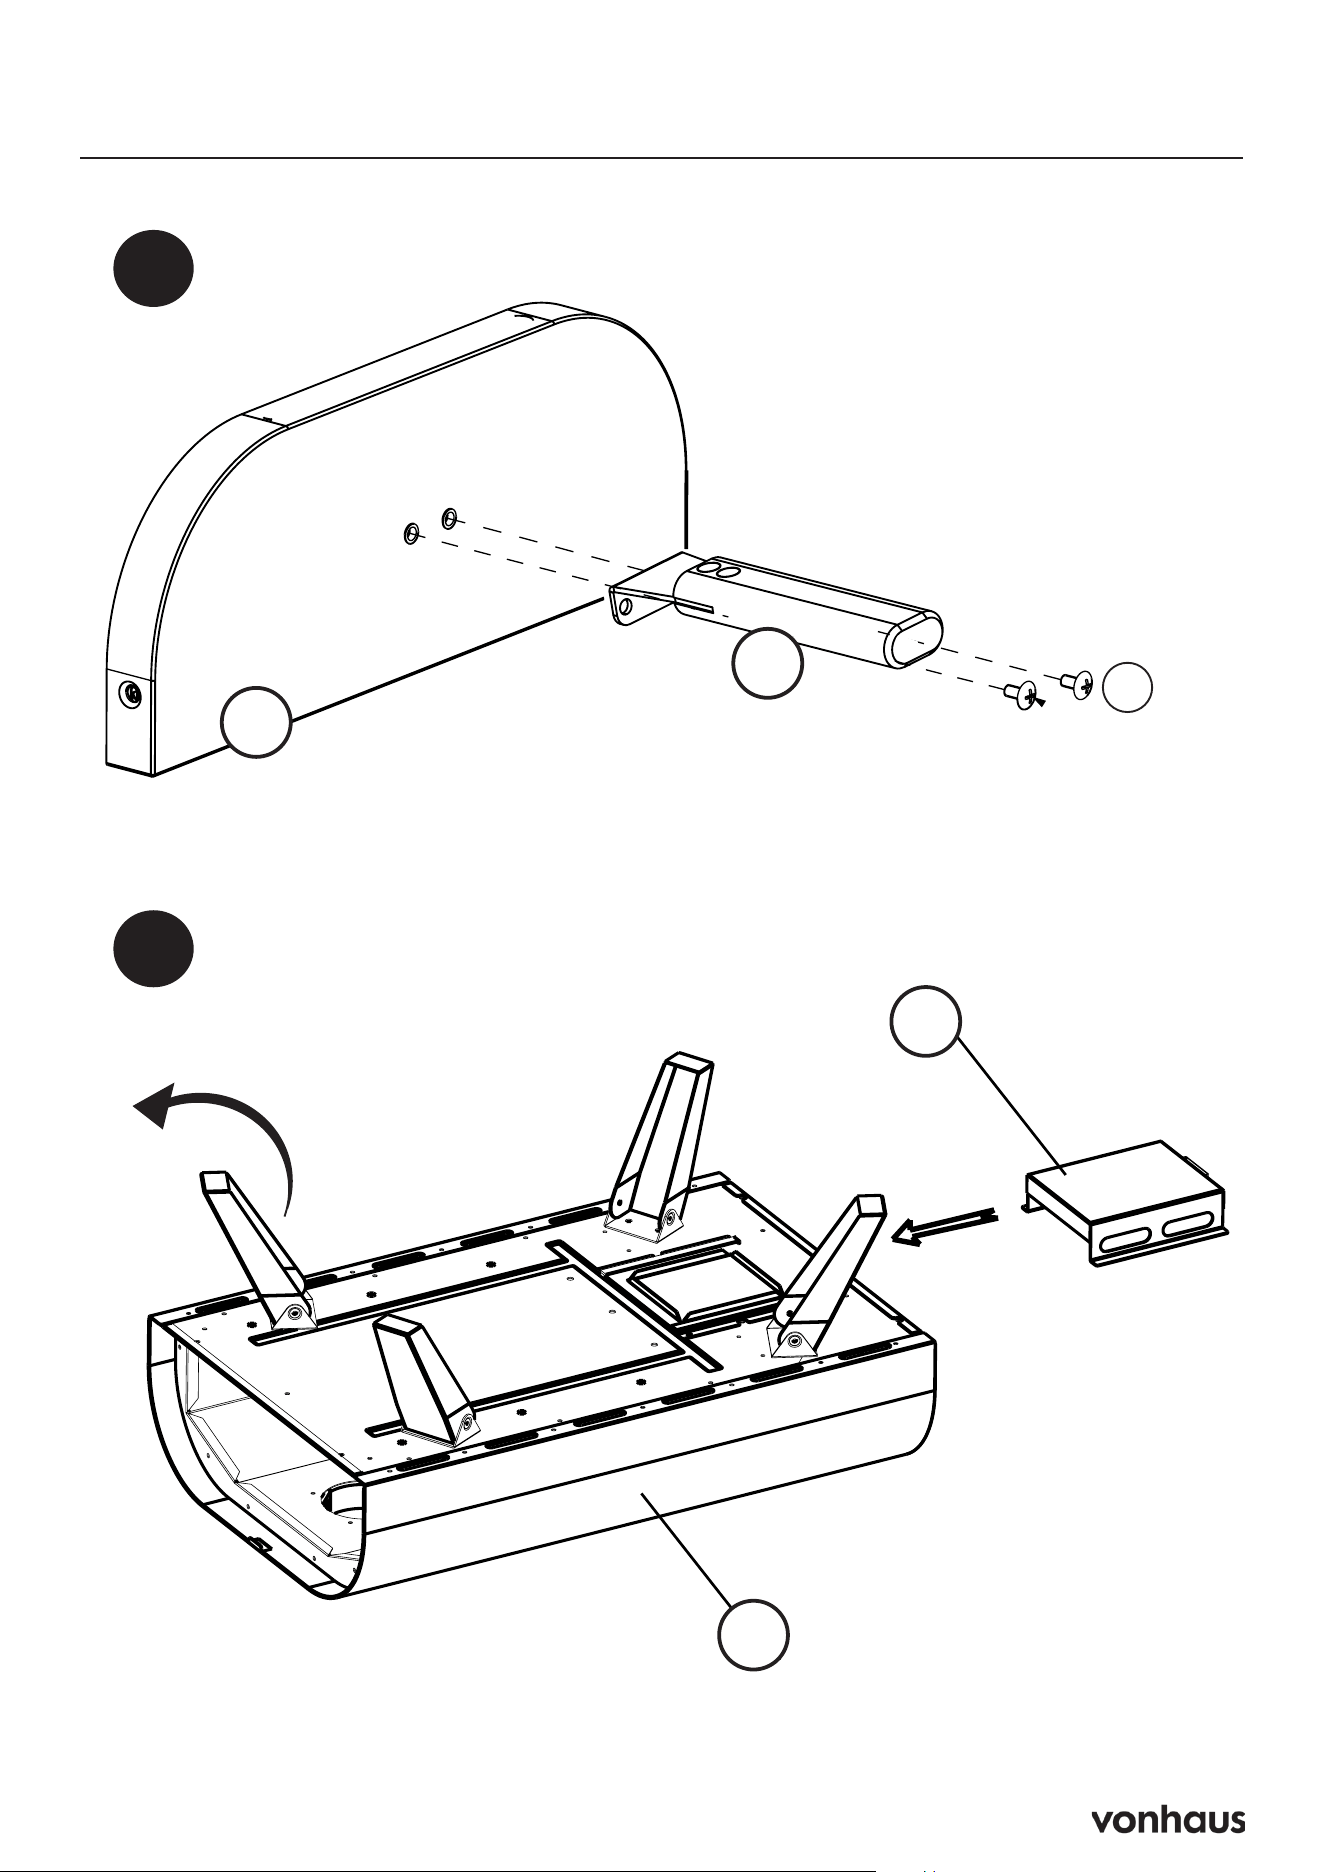
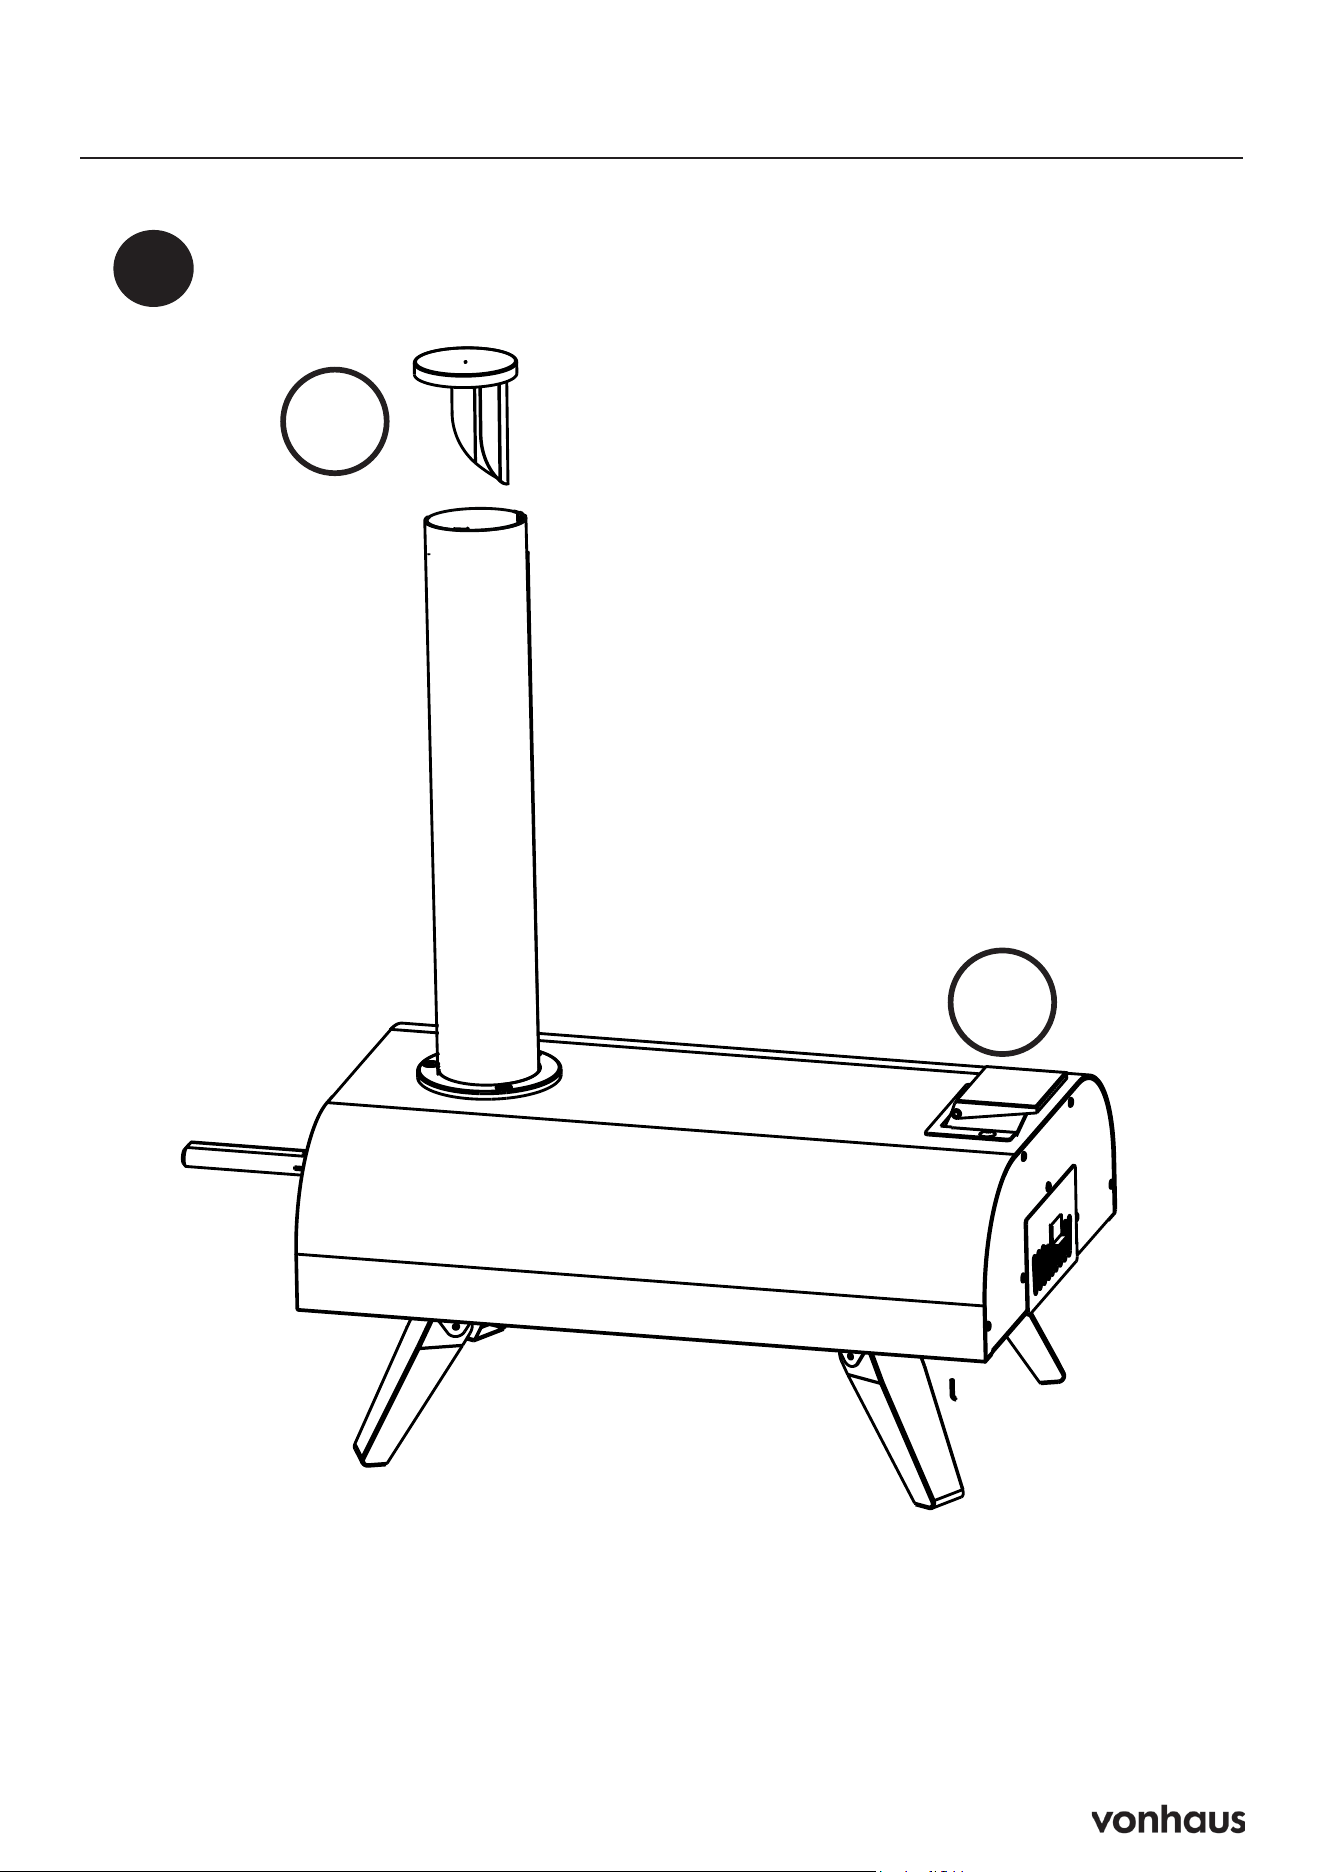
ASSEMBLY / ASSEMBLÉE / VERSAMMLUNG / MONTAJE / MONTAGGIO / EL MONTAJE
N
M4x10 2x
L
K
Assembly Fr: Assemblée / De: Versammlung / Es: Asamblea / It: Assemblea
1
A4L | 01
ASSEMBLY / ASSEMBLÉE / VERSAMMLUNG / MONTAJE / MONTAGGIO / EL MONTAJE
A
H
H
A
Unfold all of the legs (pre-attached).
2
7
A4L | 01
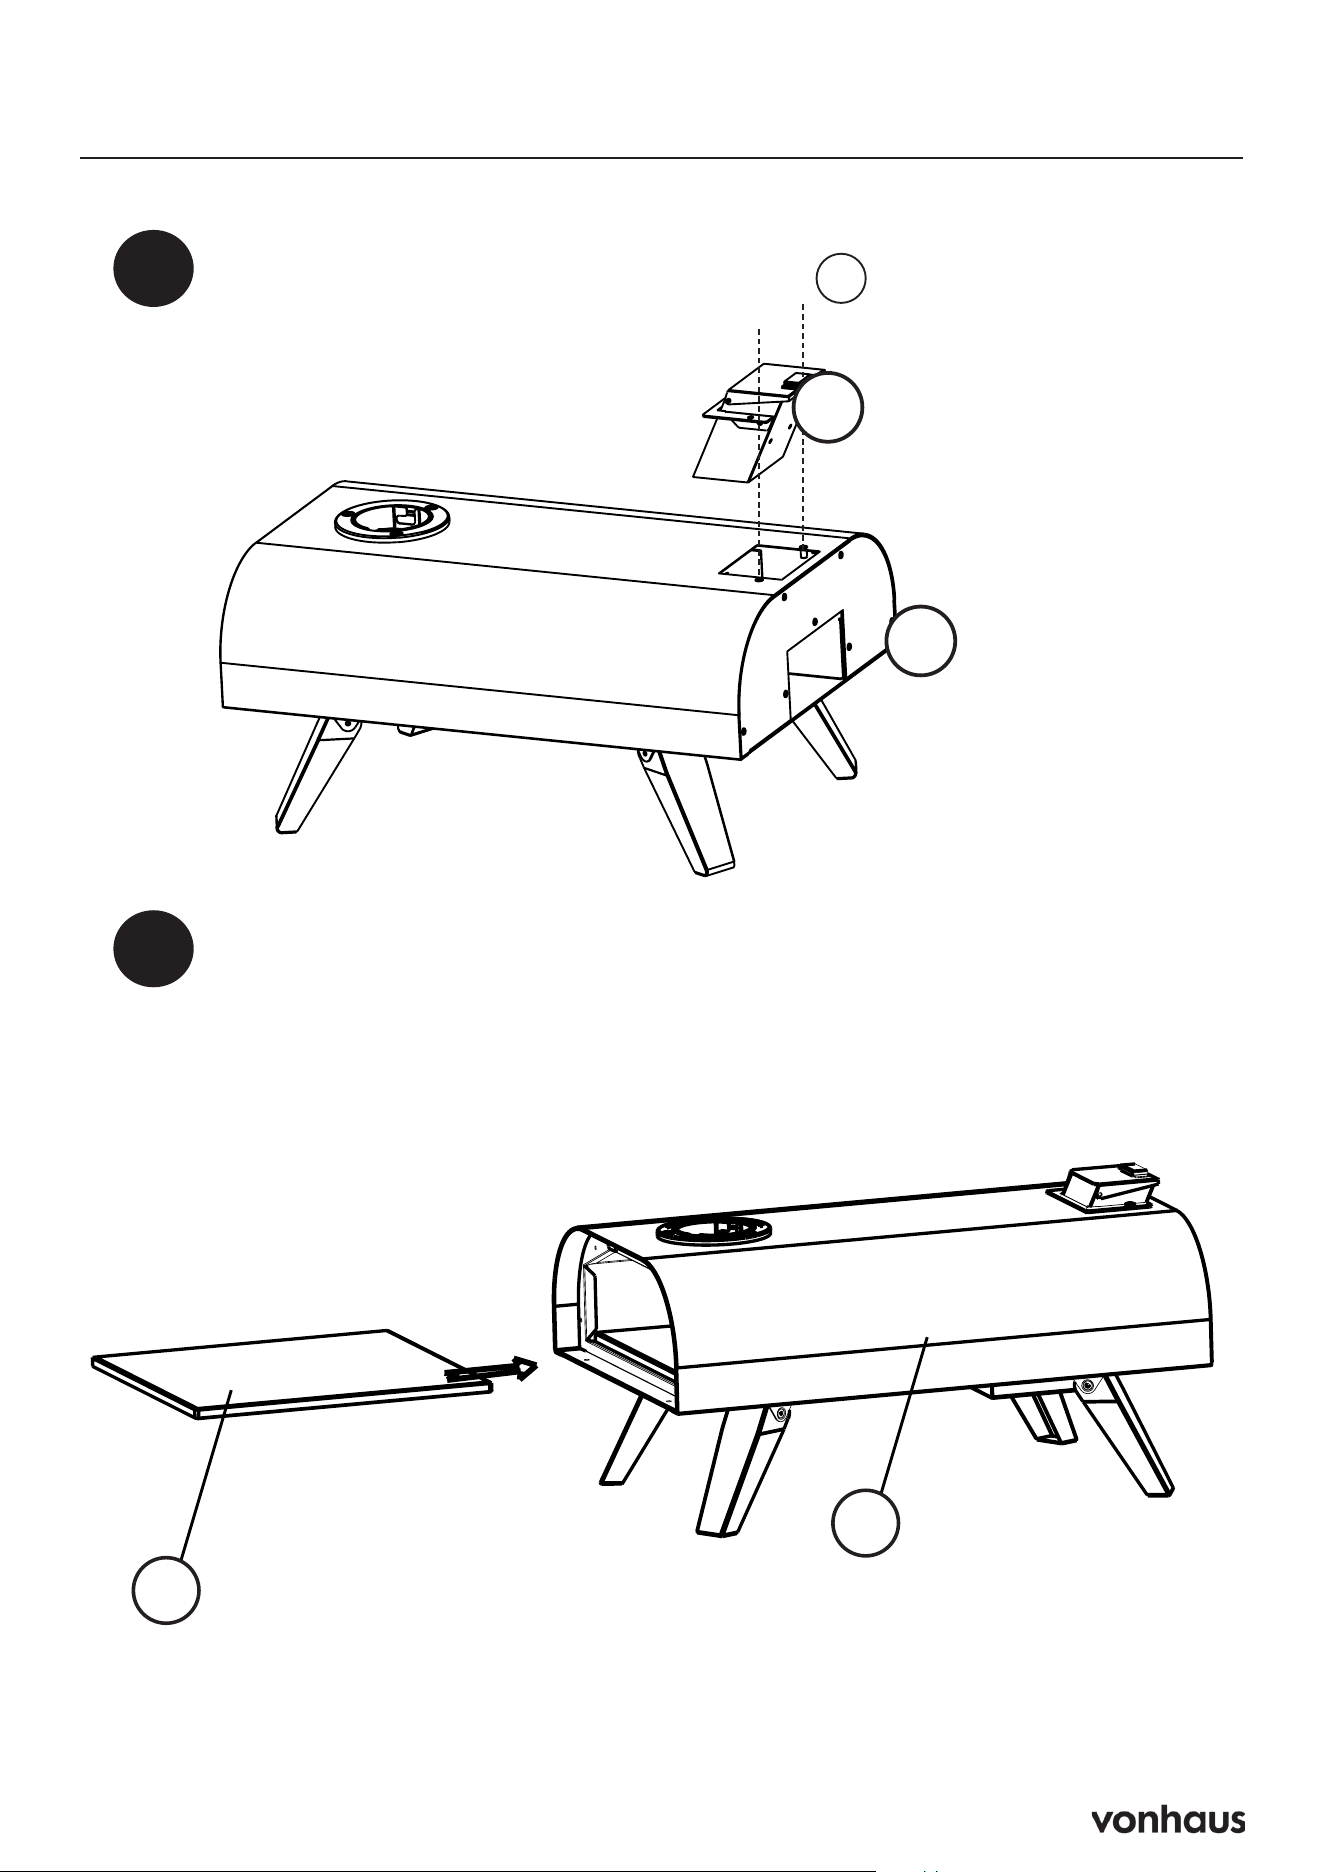
ASSEMBLY / ASSEMBLÉE / VERSAMMLUNG / MONTAJE / MONTAGGIO / EL MONTAJE
N
M4x10 2x
A
D
Assembly Fr: Assemblée / De: Versammlung / Es: Asamblea / It: Assemblea
3
A4L | 01
ASSEMBLY / ASSEMBLÉE / VERSAMMLUNG / MONTAJE / MONTAGGIO / EL MONTAJE
J
A
A
J
4
8
A4L | 01
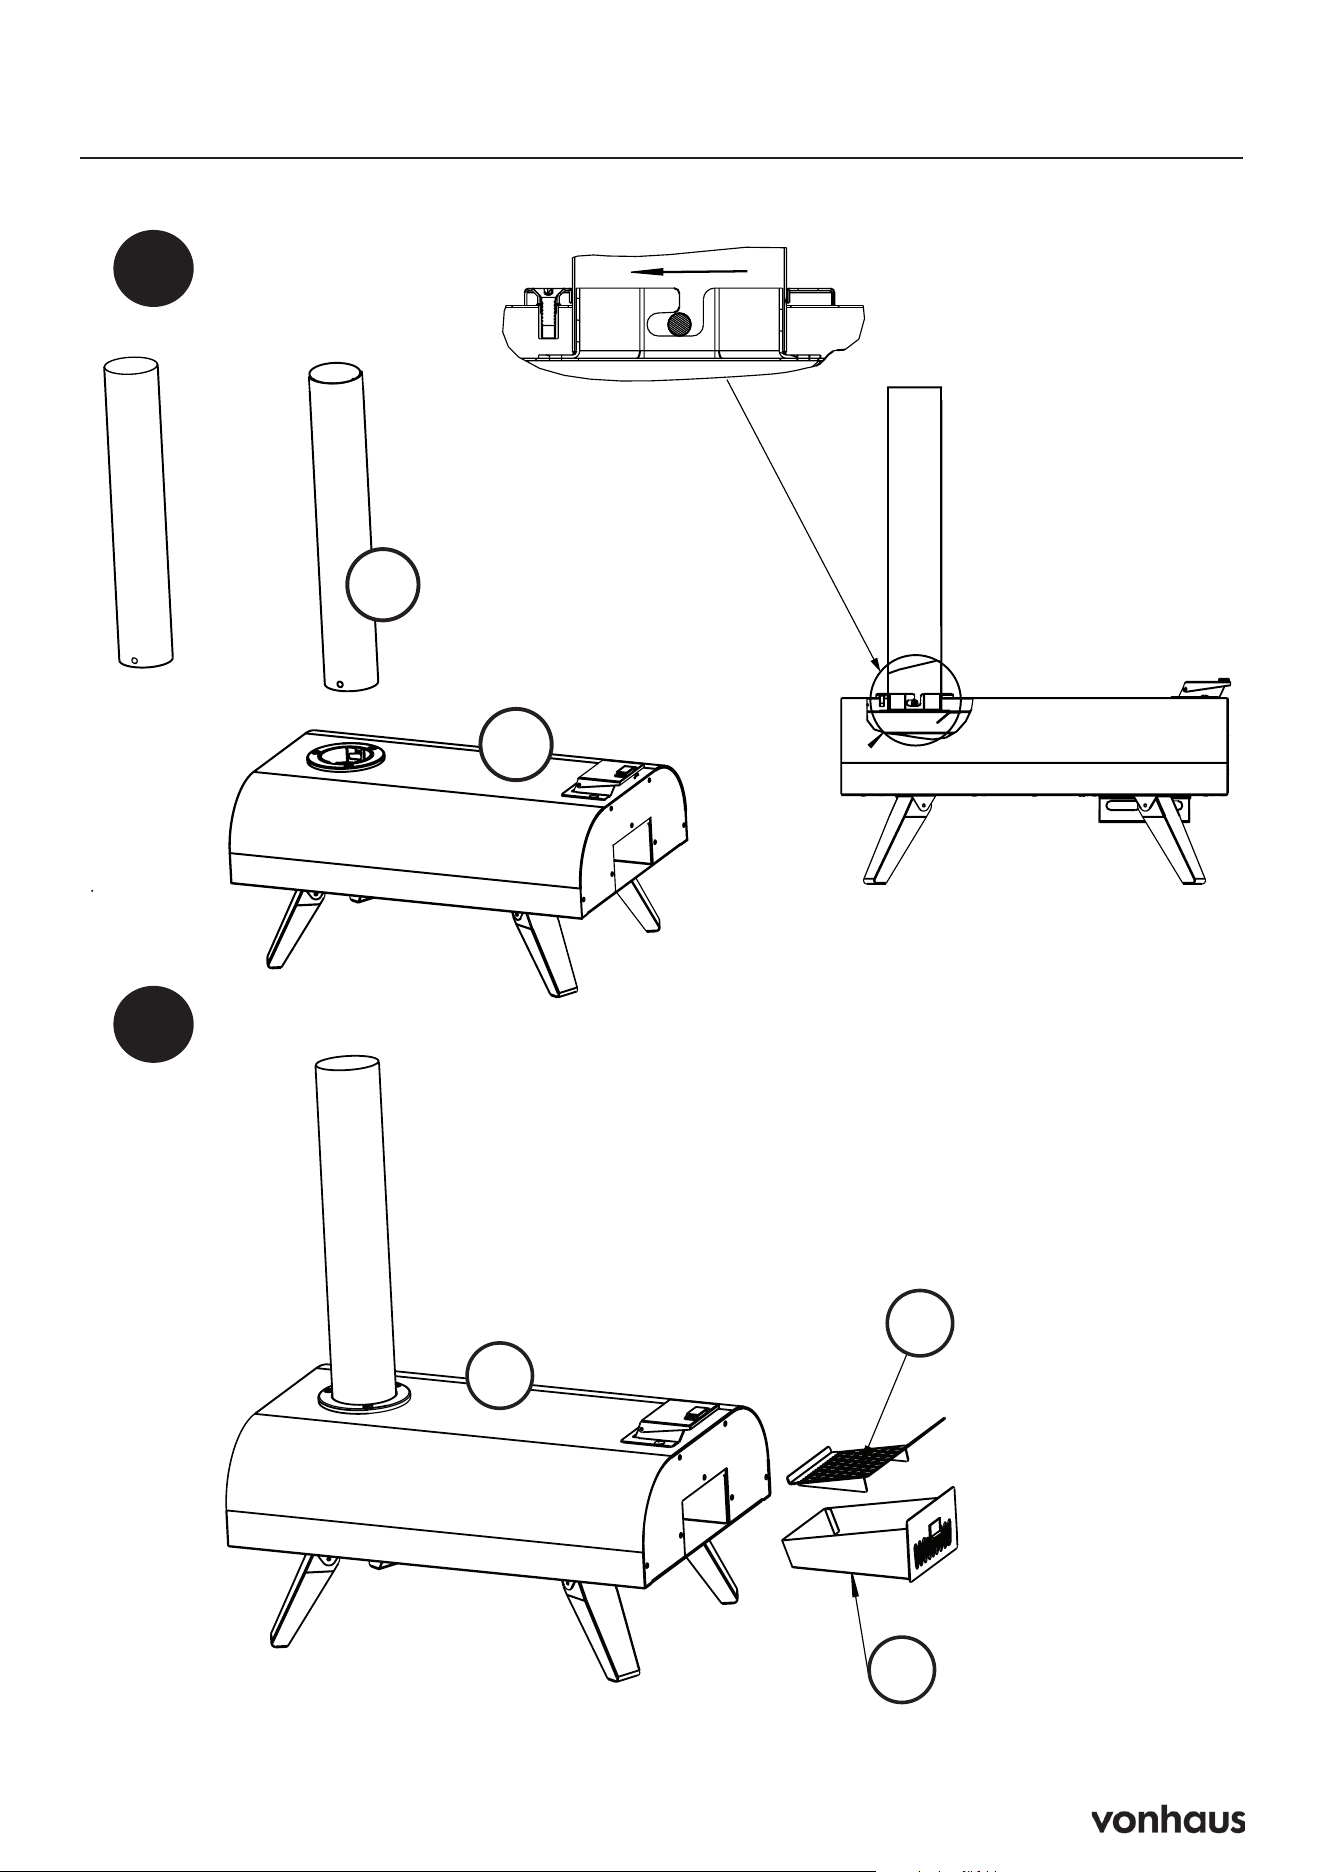
A
B
ASSEMBLY / ASSEMBLÉE / VERSAMMLUNG / MONTAJE / MONTAGGIO / EL MONTAJE
Assembly Fr: Assemblée / De: Versammlung / Es: Asamblea / It: Assemblea
5
A4L | 01
ASSEMBLY / ASSEMBLÉE / VERSAMMLUNG / MONTAJE / MONTAGGIO / EL MONTAJE
A
E
G
6
9
A4L | 01
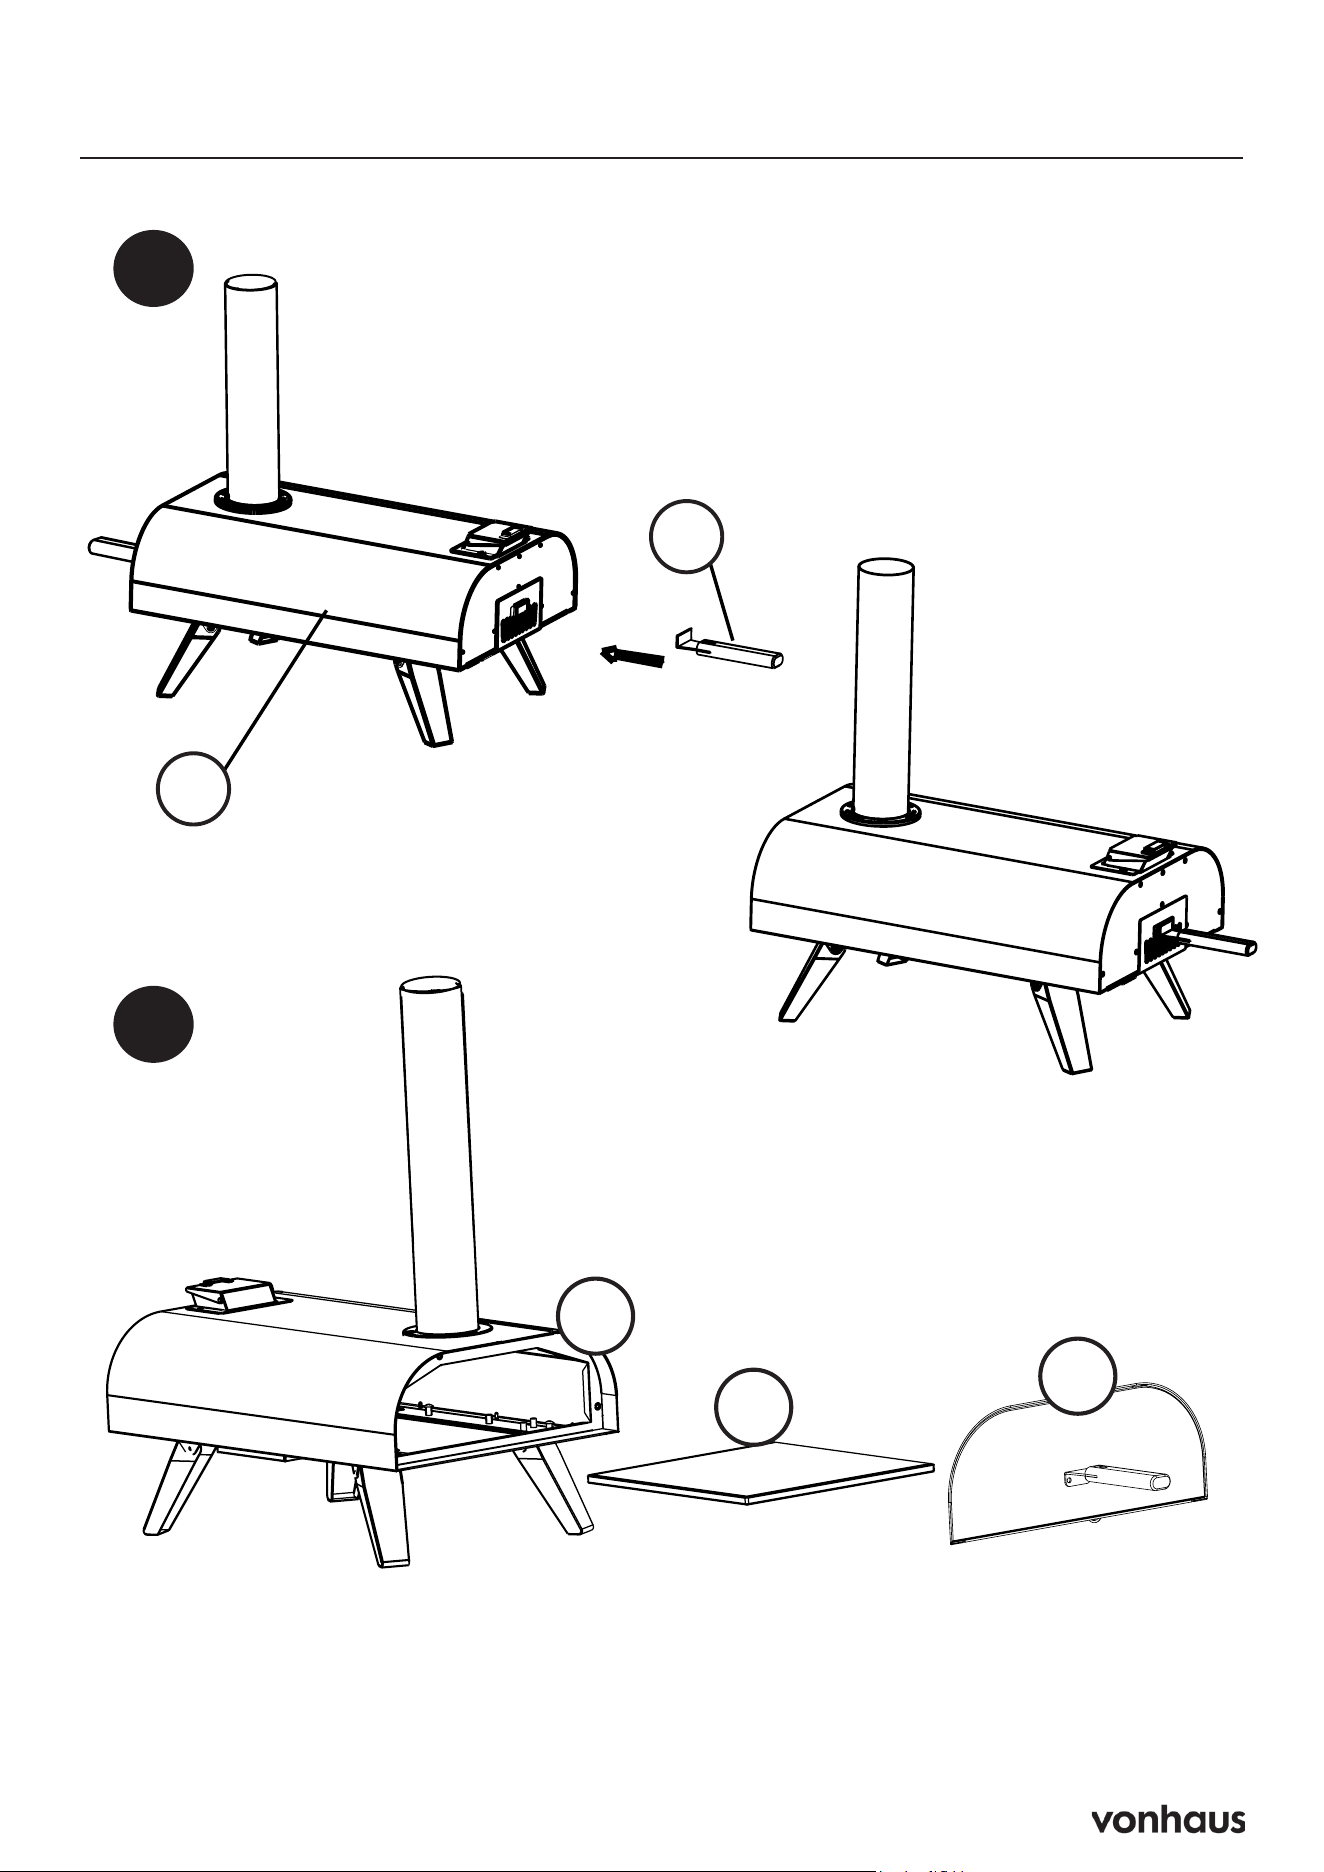
ASSEMBLY / ASSEMBLÉE / VERSAMMLUNG / MONTAJE / MONTAGGIO / EL MONTAJE
F
A
F
A
Assembly Fr: Assemblée / De: Versammlung / Es: Asamblea / It: Assemblea
7
A4L | 01
ASSEMBLY / ASSEMBLÉE / VERSAMMLUNG / MONTAJE / MONTAGGIO / EL MONTAJE
A
J
K
8
10
A4L | 01
USAGE / USAGE / VERWENDUNG / USO / UTILIZZO
D
C
Set the Pizza Oven up in a suitable position, on a at,
stable surface away from any combustible items.
Place pellets (recommended 600g not supplied) on the
Pellet Rack (E) and ignite using natural wood relighters.
This may take around 15-20 seconds until fully ignited.
Close the front door (K) to allow the oven to pre-heat.
We advise to temperature and pellet check at 5 minute
intervals. Temperature check with a suitable Thermal
Measurment Gun. To replenish pellets, use the Hopper
Shovel (C) to take some pellets and pour them onto the
Pellet Rack through the Hopper Assembly (D).
NOTE You will be required to top up with pelletts before
the optimum temperature of 400c is reached.
Once at 400c Place your pizza on the Pizza Stone (J)
and place inside the Pizza Oven and close the door (K)
securely.
CAUTION! Wear heat-resistant mitts/gloves when
handling any part of the Pizza Oven during use. The
surface are very hot and will cause burning injuries if
touched with bare hands.
CLEANING & MAINTENANCE
Once the cooking process is complete and you are
ready to extinguish any remaining ames, remove the
Ash Tray/Pellet rack using the Fire Stick (14) and douse
with water.
CAUTION! Take extra care as they may still be very hot.
Once the Pizza Oven has completely cooled, you can
clean the fats/oils from inside using hot and soapy water
with a non-abrasive cleaning pad. This will help remove
any stubborn foods
DO NOT clean your Pizza Stone using a dishwasher.
Clean by hand only using the instructions stated at the
front of this manual.
When the Pizza Oven is not in use during the winter
months, it is highly recommended you cover using a
suitable weather-proof sheet or store in a dry place away
from any harsh weather conditions.
Leaving the Oven out in the rain may cause the item to
rust.
BAKING
Once at 400c Place your pizza on the Pizza Stone (J)
and place inside the Pizza Oven and close the door (K)
securely.
NOTE! Due to the high temperature of the Oven, pizzas
will typically take no longer than 90 seconds to cook.
Ensure you check regularly and rotate the pizza. Avoid
leaving unattended.
Rotate the pizza 90 degrees with pizza peel or baking
tools, then close the door to bake.
Repeat the same process until the pizza is rotated and
baked 360 degrees.
IMPORTANT! When the pellet fuel in the pizza oven is
burning, the door must be closed unless food needs to
be put in or taken out.
This is to prevent too much air coming in from the oven
door, which may cause heavy smoke inside the re box
assembly (E&G) and hopper assembly (D).
Always operate the door with provided handle.
(C) only for extinguishing burn
Assembly Fr: Assemblée / De: Versammlung / Es: Asamblea / It: Assemblea
9
11
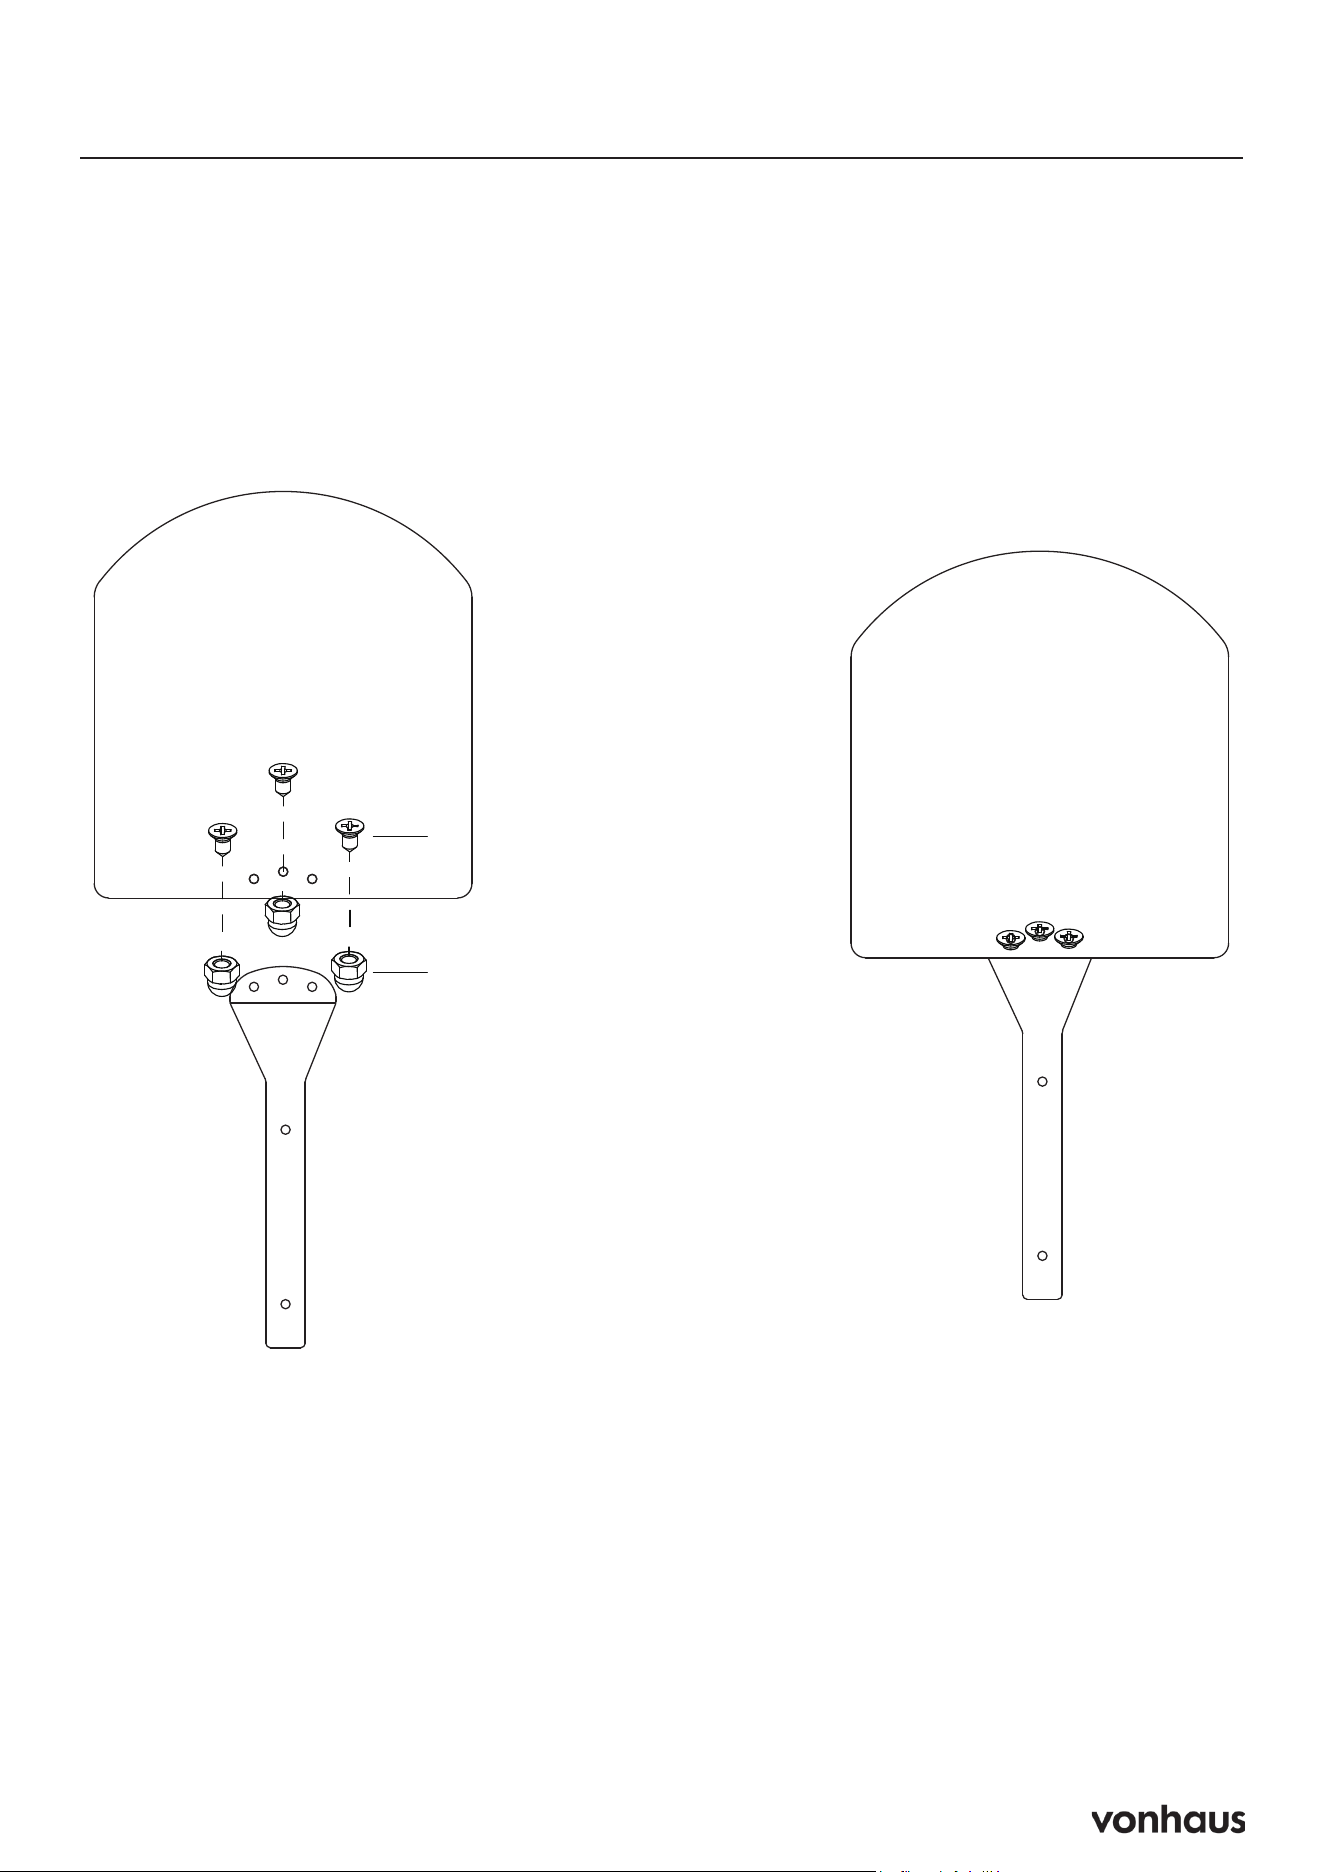
X M5x10mm 3pcs
Y M5 3pcs
X
Y
Accessories Fr: Accessoires / De: Zubehör / Es: Accesorios / It: Accessori
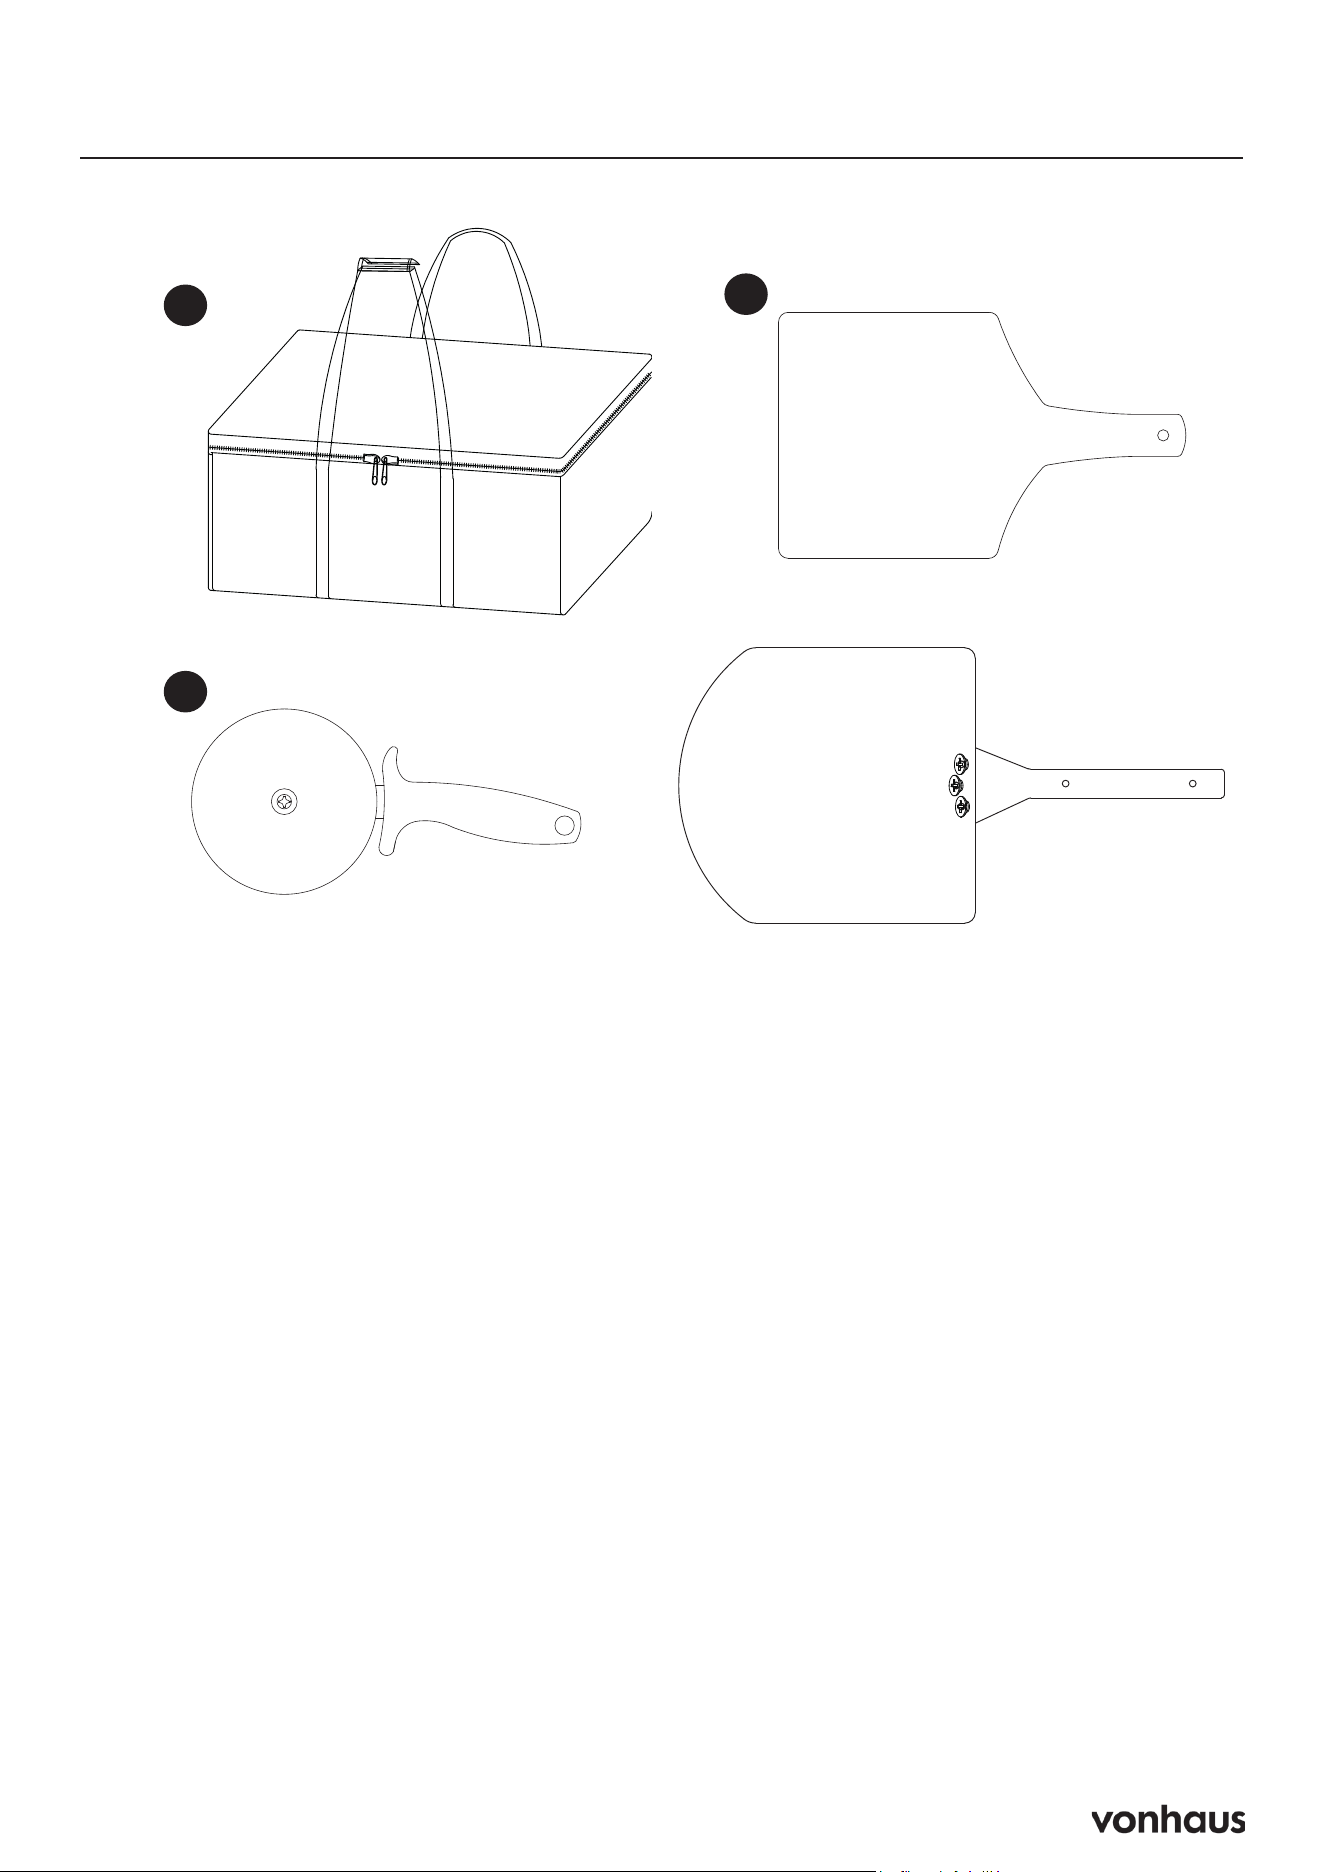
1
2
3
Accessories
1. Bag
2. Bamboo Chopping Board
3. Pizza Cutter/Wheel
4. Stainless Steel Pizza Peel
Accessoires
1. Sac
2. Pelle à Pizza en Bambou
3. Roulette à Pizza
4. Pelle à Pizza en Acier Inoxydable
Zubehör
1. Tasche
2. Bambus-Pizzaschieber
3. Pizzaroller
4. Edelstahl-Pizzaschieber
Accesorios
1. Bolsa
2. Pala de Pizza de Bambú
3. Cortador de Pizza
4. Pala de Pizza de Acero Inoxidable
Accessori
1. Borsa
2. Pala per Pizza in Bambù
3. Rotella Tagliapizza
4. Pala per Pizza in Acciaio Inossidabile
12
X M5x10mm 3pcs
Y M5 3pcs
X
Y
Peel Assembly
Fr: Assemblage de la Pelle / De: Montage des Schiebers /
Es: Montaje de la Pala / It: Assemblaggio della Pala

13
Setup & Operation
1. Set the Pizza Oven on a flat, stable surface
away from any combustible items. Place
pellets (recommended 600g, not supplied)
on the Pellet Rack (E) and ignite using natu-
ral wood firelighters. Allow 15-20 seconds
for full ignition. Close the front door (K) to
begin pre-heating.
2. Monitor temperature and pellets every 5
minutes using a suitable Thermal Measure-
ment Gun. To add pellets, use the Hopper
Shovel (C) to pour them onto the Pellet Rack
through the Hopper Assembly (D).
NOTE: Additional pellets will be needed be-
fore reaching the optimum temperature of
400°C.
Baking Instructions
Once temperature reaches 400°C:
Place pizza on the Pizza Stone (J)
Insert into the Pizza Oven and close door (K)
securely
Cook for approximately 90 seconds, checking
regularly
Rotate pizza 90 degrees using pizza peel or
baking tools
Repeat rotation process until pizza is fully
cooked (360 degrees)
Safety Notes
CAUTION! Always wear heat-resistant gloves
when handling any part of the hot Pizza Oven
Keep door closed during operation except
when adding or removing food
Avoid excess air intake through the door to
prevent smoke in the fire box (E&G) and hop-
per assembly (D)
Always use provided handle to operate door
Cleaning & Maintenance
After Use:
Remove Ash Tray/Pellet rack using Fire Stick
(14) and extinguish with water
CAUTION: Components may still be very hot
Once completely cooled, clean interior with
hot, soapy water and non-abrasive pad
Pizza Stone: Hand wash only - DO NOT use
dishwasher
Regular cleaning of drip tray to prevent fat fires
Allow complete cooling before moving
Do not leave unattended during use
Damage from fat fires not covered under war-
ranty
Pizza Stone Care
Allow to cool completely before cleaning
DO NOT use soap on Pizza Stone:
Soap can be absorbed
May affect taste of future pizzas
Cleaning methods:
Wipe with damp cloth to remove grease
For tough residue:
Use fine grain sandpaper
Wipe clean immediately after
Allow complete drying (1-2 hours minimum)
before next use
Storage:
During winter months, cover with weatherproof
sheet or store in dry location
Avoid exposure to rain to prevent rusting
Always operate door using provided handle
Information

14
Please read all instructions carefully and retain
for future reference.
Warnings
FOR OUTDOOR USE ONLY - DO NOT use
indoors
Use only in uncovered, well-ventilated areas
Position on heat-resistant surface (e.g., con-
crete patio slab)
DO NOT use in:
• Motor homes
• Tents
• Sheds
• Any locations with limited ventilation
Use only approved firelighters complying with
EN1860-3
Keep nearby:
Fire extinguisher
Garden hose
Bucket of sand
WARNING! CARBON MONOXIDE DAN-
GER
Do not use in confined spaces
Do not use under awnings, parasols, or gaze-
bos
Usage Safety
Not intended for: Climbing, Use as a toy, Per-
sons with reduced physical, sensory, or mental
capabilities (unless supervised)
Keep away from unit during use and cooling:
Children, Pets, Flammable materials, Heat-sen-
sitive items, Secure loose clothing and long
hair.
Do not overload the unit
Always use protective gloves when handling
hot surfaces
Ensure all parts are securely attached before
use
Food Safety
Wash hands before and after handling raw
meat
Keep raw meat separate from cooked foods
Clean grill surfaces and tools before use
Use separate utensils for raw and cooked
foods
Ensure thorough cooking of all foods
Safety Equipment
Use only proper thermal-proof mittens or
heat-resistant gloves
WARNING: Standard household oven gloves
are NOT sufficient
Required protection includes:
• Thermal-proof mittens
• Hot pads
• Other rated protective gear
CAUTION: Hot embers may be emitted during
use
Before Use
Verify all pieces are present
Contact customer service if parts are missing
Information

15
Legal
DISPOSAL INFORMATION
Please recycle where facilities exist. Check with
your local authority for recycling advice.
CUSTOMER SERVICE
If you are having difficulty using this product
and require support, please contact support@
vonhaus.com
WARRANTY
To register your product and find out if you
qualify for a free extended warranty please go
to www.vonhaus.com/warranty.
Please retain a proof of purchase receipt or
statement as proof of the purchase date.
The warranty only applies if the product is used
solely in the manner indicated in the warnings
page of this manual, and all other instructions
have been followed accurately.
Any abuse of the product or the manner in which
it is used will invalidate the warranty.
RETURNS
Returned goods will not be accepted unless
re-packaged in its original packaging and ac-
companied by a relevant and completed returns
form. This does not affect your statutory rights.
No rights are given under this warranty to a
person acquiring the appliance second-hand
or for commercial or communal use.
COPYRIGHT
All material in this instruction manual are copy-
righted by DOMU Brands.
Any unauthorised use may violate worldwide
copyright, trademark, and other laws.

16
INSTALLATION ET FONCTIONNEMENT
Placez le four à pizza sur une surface plane et
stable, à l’écart de tout élément combustible.
Placez les granulés (600g recommandés,
non fournis) sur le support à granulés (E) et
allumez-les à l’aide d’allume-feu naturels en
bois. Attendez 15-20 secondes pour une igni-
tion complète. Fermez la porte avant (K) pour
commencer le préchauffage.
Surveillez la température et les granulés toutes
les 5 minutes à l’aide d’un thermomètre in-
frarouge adapté. Pour ajouter des granulés,
utilisez la pelle du réservoir (C) pour les verser
sur le support à granulés via l’assemblage du
réservoir (D).
REMARQUE : Des granulés supplémen-
taires seront nécessaires avant d’atteindre la
température optimale de 400°C.
INSTRUCTIONS DE CUISSON
Une fois la température de 400°C atteinte :
Placez la pizza sur la pierre à pizza (J)
Insérez-la dans le four et fermez la porte (K)
correctement
Cuisez pendant environ 90 secondes, en vérifi-
ant régulièrement
Faites pivoter la pizza de 90 degrés à l’aide
de la pelle à pizza ou des ustensiles de cuisson
Répétez le processus de rotation jusqu’à ce
que la pizza soit entièrement cuite (360 de-
grés)
CONSIGNES DE SÉCURITÉ
ATTENTION ! Portez toujours des gants ré-
sistants à la chaleur lors de la manipulation du
four à pizza chaud
Gardez la porte fermée pendant l’utilisation
sauf pour ajouter ou retirer les aliments
Évitez l’entrée d’air excessive par la porte pour
prévenir la fumée dans le foyer (E&G) et l’as-
semblage du réservoir (D)
Utilisez toujours la poignée fournie pour ma-
nipuler la porte
NETTOYAGE ET ENTRETIEN
Après utilisation :
Retirez le cendrier/support à granulés à l’aide
du tisonnier (14) et éteignez avec de l’eau
ATTENTION : Les composants peuvent encore
être très chauds
Une fois complètement refroidi, nettoyez l’in-
térieur avec de l’eau chaude savonneuse et un
tampon non abrasif
Pierre à pizza : Lavage à la main uniquement -
NE PAS mettre au lave-vaisselle
Nettoyage régulier du bac à graisse pour
prévenir les feux de graisse
Laissez refroidir complètement avant de
déplacer
Ne pas laisser sans surveillance pendant l’utili-
sation
Les dommages causés par les feux de graisse
ne sont pas couverts par la garantie
ENTRETIEN DE LA PIERRE À PIZZA
Laissez refroidir complètement avant le nettoy-
age
NE PAS utiliser de savon sur la pierre à pizza :
Le savon peut être absorbé
Peut affecter le goût des futures pizzas
Méthodes de nettoyage :
Essuyez avec un chiffon humide pour enlever
la graisse
Pour les résidus tenaces :
Utilisez du papier de verre à grain fin
Essuyez immédiatement après
Laissez sécher complètement (minimum 1-2
heures) avant la prochaine utilisation
RANGEMENT :
Pendant les mois d’hiver, couvrez avec une
bâche imperméable ou rangez dans un endroit
sec
Évitez l’exposition à la pluie pour prévenir la
rouille
Utilisez toujours la poignée fournie pour ma-
nipuler la porte
Information

17
Veuillez lire attentivement toutes les instructions
et les conserver pour référence ultérieure.
Avertissements
USAGE EXTÉRIEUR UNIQUEMENT - NE PAS
utiliser à l’intérieur
Utiliser uniquement dans des zones non cou-
vertes et bien ventilées
Placer sur une surface résistante à la chaleur
(ex : dalle de terrasse en béton)
NE PAS utiliser dans :
Les camping-cars
Les tentes
Les abris de jardin
Tout endroit à ventilation limitée
Utiliser uniquement des allume-feu approuvés
conformes à la norme EN1860-3
Garder à proximité :
Un extincteur
Un tuyau d’arrosage
Un seau de sable
ATTENTION ! DANGER DE MONOXYDE DE
CARBONE
Ne pas utiliser dans des espaces confinés
Ne pas utiliser sous des auvents, parasols ou
tonnelles
Sécurité d’utilisation
Non destiné à : L’escalade, Être utilisé comme
jouet, Les personnes ayant des capacités phy-
siques, sensorielles ou mentales réduites (sauf
sous surveillance)
Tenir éloignés pendant l’utilisation et le refroi-
dissement :
Les enfants, Les animaux domestiques, Les
matériaux inflammables, Les objets sensibles à
la chaleur, Attacher les vêtements amples et les
cheveux longs
Ne pas surcharger l’appareil
Toujours utiliser des gants de protection pour
manipuler les surfaces chaudes
S’assurer que toutes les pièces sont solidement
fixées avant utilisation
Sécurité alimentaire
Se laver les mains avant et après la manipula-
tion de viande crue
Séparer la viande crue des aliments cuits
Nettoyer les surfaces du gril et les ustensiles
avant utilisation
Utiliser des ustensiles différents pour les ali-
ments crus et cuits
Assurer une cuisson complète de tous les ali-
ments
Équipement de sécurité
Utiliser uniquement des gants thermiques ap-
propriés ou des gants résistants à la chaleur
ATTENTION : Les gants de cuisine standard
NE sont PAS suffisants
La protection requise comprend :
Des gants thermiques
Des maniques
Autres équipements de protection homologués
ATTENTION : Des braises chaudes peuvent
être émises pendant l’utilisation
Avant utilisation
Vérifier que toutes les pièces sont présentes
Contacter le service client en cas de pièces
manquantes
Information

18
Légal
INFORMATIONS SUR L’ÉLIMINATION
Veuillez recycler lorsque des installations exist-
ent. Consultez votre autorité locale pour obtenir
des conseils sur le recyclage.
CUSTOMER SERVICE
Si vous rencontrez des difficultés pour utiliser
ce produit et avez besoin d’assistance, veuillez
contacter suppor[email protected]
GARANTIE
Pour enregistrer votre produit et savoir si vous
êtes éligible à une extension de garantie gra-
tuite, veuillez vous rendre sur www.vonhaus.
com/warranty.
Veuillez conserver une preuve d’achat ou un
relevé comme preuve de la date d’achat.
La garantie ne s’applique que si le produit est
utilisé uniquement de la manière indiquée dans
la page des avertissements de ce manuel, et
que toutes les autres instructions ont été suivies
avec précision.
Tout abus du produit ou de la manière dont il est
utilisé invalidera la garantie.
RETOURS
Les marchandises retournées ne seront ac-
ceptées que si elles sont remballées dans leur
emballage d’origine et accompagnées d’un
formulaire de retour pertinent et dûment rempli.
Cela n’affecte pas vos droits statutaires.]
Aucun droit n’est accordé en vertu de cette
garantie à une personne acquérant l’appareil
d’occasion ou pour un usage commercial ou
communal.
DROITS D’AUTEUR
Tout le matériel contenu dans ce manuel d’in-
structions est protégé par les droits d’auteur de
DOMU Brands.
Toute utilisation non autorisée peut violer les lois
sur les droits d’auteur, les marques déposées et
autres lois dans le monde entier.
Merci
Nous vous remercions d’avoir acheté votre
produit/appareil.
Si vous avez besoin d’aide concernant votre
achat, veuillez nous contacter à support@
domu.co.uk
VonHaus est une marque déposée de DOMU
Brands Ltd. Fabriqué en Chine pour DOMU
Brands.
Représentant autorisé
Authorised Representative Service
77 Camden Street Lower
Dublin, D02 XE80, Ireland

19
AUFBAU UND BETRIEB
Stellen Sie den Pizzaofen auf eine ebene,
stabile Fläche, fern von brennbaren Gegen-
ständen. Legen Sie die Pellets (600g emp-
fohlen, nicht mitgeliefert) auf das Pelletgestell
(E) und zünden Sie sie mit natürlichen Holzan-
zündern an. Warten Sie 15-20 Sekunden bis
zur vollständigen Zündung. Schließen Sie die
Vordertür (K), um mit dem Vorheizen zu begin-
nen.
Überprüfen Sie Temperatur und Pellets alle 5
Minuten mit einem geeigneten Infrarot-Ther-
mometer. Um Pellets nachzufüllen, verwenden
Sie die Behälterschaufel (C), um sie über die
Behältereinheit (D) auf das Pelletgestell zu
geben.
HINWEIS: Zusätzliche Pellets werden benötigt,
bevor die optimale Temperatur von 400°C
erreicht wird.
BACKANLEITUNG
Sobald 400°C erreicht sind:
Pizza auf den Pizzastein (J) legen
In den Pizzaofen schieben und Tür (K) sicher
schließen
Etwa 90 Sekunden backen, regelmäßig kon-
trollieren
Pizza mit Pizzaschieber oder Backwerkzeug
um 90 Grad drehen
Drehvorgang wiederholen, bis die Pizza voll-
ständig gebacken ist (360 Grad)
SICHERHEITSHINWEISE
ACHTUNG! Beim Umgang mit dem heißen
Pizzaofen immer hitzebeständige Handschuhe
tragen
Tür während des Betriebs geschlossen halten,
außer zum Be- und Entladen
Übermäßigen Lufteinzug durch die Tür vermei-
den, um Rauchbildung in Feuerbox (E&G) und
Behältereinheit (D) zu verhindern
Tür immer mit dem mitgelieferten Griff bedie-
nen
REINIGUNG UND WARTUNG
Nach Gebrauch:
Aschekasten/Pelletgestell mit dem Schürhaken
(14) entfernen und mit Wasser löschen
ACHTUNG: Komponenten können noch sehr
heiß sein
Nach vollständiger Abkühlung Innenraum mit
heißem Seifenwasser und nicht-scheuerndem
Pad reinigen
Pizzastein: Nur Handwäsche - NICHT für
Spülmaschine geeignet
Regelmäßige Reinigung der Fettauffangschale
zur Vermeidung von Fettbränden
Vor dem Bewegen vollständig abkühlen lassen
Während des Betriebs nicht unbeaufsichtigt
lassen
Schäden durch Fettbrände sind nicht von der
Garantie abgedeckt
PFLEGE DES PIZZASTEINS
Vor der Reinigung vollständig abkühlen lassen
KEINE Seife am Pizzastein verwenden:
Seife kann absorbiert werden
Kann den Geschmack künftiger Pizzen beein-
flussen
Reinigungsmethoden:
Mit feuchtem Tuch Fett entfernen
Bei hartnäckigen Rückständen:
Feines Schleifpapier verwenden
Sofort danach abwischen
Vor erneutem Gebrauch vollständig trocknen
lassen (mindestens 1-2 Stunden)
AUFBEWAHRUNG:
In den Wintermonaten mit wetterfester Plane
abdecken oder an trockenem Ort lagern
Regen vermeiden, um Rostbildung zu verhin-
dern
Tür immer mit dem mitgelieferten Griff bedie-
nen
Information

20
NUR FÜR DEN AUSSENBEREICH GEEIGNET
- NICHT im Innenbereich verwenden
Nur in unüberdachten und gut belüfteten Bere-
ichen verwenden
Auf hitzebeständiger Oberfläche aufstellen
(z.B. Terrassenplatte aus Beton)
NICHT verwenden in:
Wohnmobilen
Zelten
Gartenlauben
Allen Orten mit eingeschränkter Belüftung
Nur zugelassene Anzünder gemäß EN1860-3
verwenden
In der Nähe bereithalten:
Feuerlöscher
Gartenschlauch
Eimer mit Sand
ACHTUNG! KOHLENMONOXID-GEFAHR
Nicht in geschlossenen Räumen verwenden
Nicht unter Markisen, Sonnenschirmen oder
Pavillons verwenden
Nutzungssicherheit
Nicht geeignet für: Klettern, Verwendung
als Spielzeug, Personen mit eingeschränkten
körperlichen, sensorischen oder geistigen
Fähigkeiten (außer unter Aufsicht)
Während des Betriebs und der Abkühlphase
fernhalten:
Kinder, Haustiere, Brennbare Materialien, Hit-
zeempfindliche Gegenstände, Lose Kleidung
sichern und lange Haare zusammenbinden
Gerät nicht überladen
Immer Schutzhandschuhe beim Umgang mit
heißen Oberflächen tragen
Vor Gebrauch sicherstellen, dass alle Teile fest
montiert sind
Lebensmittelsicherheit
Hände vor und nach dem Umgang mit rohem
Fleisch waschen
Rohes Fleisch von gegarten Speisen getrennt
halten
Grillflächen und Utensilien vor Gebrauch rein-
igen
Separate Utensilien für rohe und gegarte Spei-
sen verwenden
Vollständige Garung aller Speisen sicherstellen
Schutzausrüstung
Nur geeignete Thermoschutzhandschuhe oder
hitzebeständige Handschuhe verwenden
ACHTUNG: Standard-Küchenhandschuhe sind
NICHT ausreichend
Erforderliche Schutzausrüstung umfasst:
Thermoschutzhandschuhe
Topflappen
Andere zugelassene Schutzausrüstung
ACHTUNG: Während des Betriebs können
heiße Glut und Funken entstehen
Vor dem Gebrauch
Vollständigkeit aller Teile überprüfen
Bei fehlenden Teilen Kundenservice kontaktier-
en
Information

21
Rechtliches
ENTSORGUNGSINFORMATIONEN
Bitte recyceln Sie, wo Einrichtungen vorhanden
sind. Erkundigen Sie sich bei Ihrer örtlichen Be-
hörde nach Recycling-Empfehlungen.
KUNDENSERVICE
Wenn Sie Schwierigkeiten bei der Verwendung
dieses Produkts haben und Unterstützung benö-
tigen, kontaktieren Sie bitte
suppor[email protected]
GARANTIE
Um Ihr Produkt zu registrieren und herauszufin-
den, ob Sie für eine kostenlose erweiterte Ga-
rantie qualifiziert sind, besuchen Sie bitte www.
vonhaus.com/warranty.
Bitte bewahren Sie einen Kaufbeleg oder eine
Kaufbestätigung als Nachweis des Kaufdatums
auf.
Die Garantie gilt nur, wenn das Produkt auss-
chließlich in der in den Warnhinweisen dieses
Handbuchs angegebenen Weise verwendet
wird und alle anderen Anweisungen genau be-
folgt wurden.
Jeglicher Missbrauch des Produkts oder die Art
und Weise, wie es verwendet wird, führt zum
Erlöschen der Garantie.
RÜCKSENDUNGEN
Zurückgesendete Waren werden nur akzeptiert,
wenn sie in ihrer Originalverpackung neu ver-
packt und mit einem relevanten und ausgefüll-
ten Rücksendeformular versehen sind. Dies hat
keinen Einfluss auf Ihre gesetzlichen Rechte.
Im Rahmen dieser Garantie werden einer Per-
son, die das Gerät aus zweiter Hand oder für
gewerbliche oder gemeinschaftliche Nutzung
erwirbt, keine Rechte eingeräumt.
URHEBERRECHT
Alle Materialien in dieser Bedienungsanleitung
sind urheberrechtlich geschützt durch DOMU
Brands.
Jede unbefugte Nutzung kann weltweit gegen
Urheberrechts-, Marken- und andere Gesetze
verstoßen.
VIELEN DANK
Vielen Dank für den Kauf Ihres Produkts/
Geräts.
Sollten Sie Hilfe zu Ihrem Kauf benötigen,
kontaktieren Sie uns bitte unter support@domu.
co.uk
VonHaus ist eine eingetragene Marke von
DOMU Brands Ltd. Hergestellt in China für
DOMU Brands.
AUTORISIERTER VERTRETER
Authorised Representative Service
77 Camden Street Lower
Dublin, D02 XE80, Ireland

22
MONTAJE Y FUNCIONAMIENTO
Coloque el horno de pizza sobre una superfi-
cie plana y estable, lejos de objetos combus-
tibles. Coloque los pellets (600g recomenda-
dos, no incluidos) en el estante para pellets (E)
y enciéndalos usando encendedores naturales
de madera. Espere 15-20 segundos hasta que
se enciendan completamente. Cierre la puerta
frontal (K) para comenzar el precalentamiento.
Controle la temperatura y los pellets cada 5
minutos usando un termómetro infrarrojo adec-
uado. Para añadir pellets, use la pala de la tol-
va (C) para verterlos en el estante para pellets
a través del conjunto de la tolva (D).
NOTA: Se necesitarán pellets adicionales
antes de alcanzar la temperatura óptima de
400°C.
INSTRUCCIONES DE HORNEADO
Una vez alcanzados los 400°C:
Coloque la pizza en la piedra para pizza (J)
Introdúzcala en el horno y cierre la puerta (K)
de forma segura
Hornee durante aproximadamente 90 segun-
dos, revisando regularmente
Gire la pizza 90 grados usando la pala de
pizza o utensilios de horneado
Repita el proceso de rotación hasta que la
pizza esté completamente horneada (360
grados)
INDICACIONES DE SEGURIDAD
¡PRECAUCIÓN! Use siempre guantes resist-
entes al calor cuando manipule el horno de
pizza caliente
Mantenga la puerta cerrada durante el funcio-
namiento, excepto para cargar y descargar
Evite la entrada excesiva de aire por la puer-
ta para prevenir el humo en la caja de fuego
(E&G) y el conjunto de la tolva (D)
Use siempre el mango proporcionado para
operar la puerta
LIMPIEZA Y MANTENIMIENTO
Después del uso:
Retire el cenicero/estante para pellets usando
el atizador (14) y apague con agua
PRECAUCIÓN: Los componentes pueden estar
aún muy calientes
Una vez completamente frío, limpie el interior
con agua caliente jabonosa y una almohadilla
no abrasiva
Piedra para pizza: Solo lavado a mano - NO
apta para lavavajillas
Limpieza regular de la bandeja de grasa para
prevenir incendios por grasa
Deje enfriar completamente antes de mover
No deje sin supervisión durante el uso
Los daños por incendios de grasa no están
cubiertos por la garantía
CUIDADO DE LA PIEDRA PARA PIZZA
Deje enfriar completamente antes de limpiar
NO use jabón en la piedra para pizza:
El jabón puede ser absorbido
Puede afectar el sabor de futuras pizzas
Métodos de limpieza:
Limpie la grasa con un paño húmedo
Para residuos difíciles:
Use papel de lija fino
Limpie inmediatamente después
Deje secar completamente (mínimo 1-2 horas)
antes del próximo uso
ALMACENAMIENTO:
Durante los meses de invierno, cubra con una
lona impermeable o guarde en un lugar seco
Evite la exposición a la lluvia para prevenir la
oxidación
Use siempre el mango proporcionado para
operar la puerta
Información

23
SOLO PARA USO EN EXTERIORES - NO usar
en interiores
Usar únicamente en áreas descubiertas y bien
ventiladas
Colocar sobre una superficie resistente al calor
(por ejemplo: losa de patio de hormigón)
NO usar en:
Autocaravanas
Tiendas de campaña
Cobertizos
Cualquier lugar con ventilación limitada
Usar solo encendedores aprobados que cum-
plan con EN1860-3
Mantener cerca:
Extintor
Manguera de jardín
Cubo de arena
¡ADVERTENCIA! PELIGRO DE MONÓXIDO
DE CARBONO
No usar en espacios cerrados
No usar bajo toldos, sombrillas o cenadores
Seguridad de uso
No destinado a: Escalar, Usar como juguete,
Personas con capacidades físicas, sensoriales
o mentales reducidas (salvo bajo supervisión)
Mantener alejados durante el uso y enfriami-
ento:
Niños, Mascotas, Materiales inflamables, Ob-
jetos sensibles al calor, Asegurar ropa suelta y
atar el pelo largo
No sobrecargar la unidad
Usar siempre guantes protectores al manipular
superficies calientes
Asegurarse de que todas las piezas estén
firmemente fijadas antes del uso
Seguridad alimentaria
Lavarse las manos antes y después de manipu-
lar carne cruda
Mantener la carne cruda separada de los
alimentos cocinados
Limpiar las superficies de la parrilla y utensilios
antes del uso
Usar utensilios diferentes para alimentos cru-
dos y cocinados
Asegurar la cocción completa de todos los
alimentos
Equipo de seguridad
Usar solo guantes térmicos apropiados o
guantes resistentes al calor
ADVERTENCIA: Los guantes de cocina están-
dar NO son suficientes
La protección requerida incluye:
Guantes térmicos
Agarraderas
Otro equipo de protección homologado
PRECAUCIÓN: Pueden emitirse brasas cali-
entes durante el uso
Antes del uso
Verificar que todas las piezas estén presentes
Contactar con servicio al cliente si faltan pie-
zas
Información

24
Legal
INFORMACIÓN SOBRE ELIMINACIÓN
Por favor, recicle donde existan instalaciones.
Consulte con su autoridad local para obtener
consejos sobre reciclaje.
SERVIZIO CLIENTI
Si tiene dificultades para usar este producto y
necesita ayuda, por favor contacte a
suppor[email protected]
GARANTÍA
Para registrar su producto y averiguar si califica
para una garantía extendida gratuita, por favor
visite www.vonhaus.com/warranty
Por favor, conserve un comprobante de com-
pra o declaración como prueba de la fecha de
compra.
La garantía solo se aplica si el producto se uti-
liza únicamente de la manera indicada en la
página de advertencias de este manual, y to-
das las demás instrucciones se han seguido con
precisión.
Cualquier abuso del producto o la manera en
que se utiliza invalidará la garantía.
DEVOLUCIONES
Los productos devueltos no serán aceptados a
menos que sean reempaquetados en su emba-
laje original y acompañados de un formulario
de devolución relevante y completado. Esto no
afecta sus derechos legales.
No se otorgan derechos bajo esta garantía a
una persona que adquiera el aparato de se-
gunda mano o para uso comercial o comuni-
tario.
DERECHOS DE AUTOR
Todo el material en este manual de instruc-
ciones está protegido por derechos de autor de
DOMU Brands.
Cualquier uso no autorizado puede violar las
leyes de derechos de autor, marcas comercial-
es y otras leyes en todo el mundo.
Gracias
Gracias por comprar nuestro producto/apara-
to.
Si necesita ayuda con su compra, contáctenos
en suppor[email protected]
VonHaus es una marca registrada de DOMU
Brands Ltd. Fabricado en China para DOMU
Brands.
REPRESENTANTE AUTORIZADO
Authorised Representative Service
77 Camden Street Lower
Dublin, D02 XE80, Ireland

25
MONTAGGIO E FUNZIONAMENTO
Posizionare il forno per pizza su una superficie
piana e stabile, lontano da oggetti combusti-
bili. Posizionare i pellet (600g raccomandati,
non inclusi) sul porta pellet (E) e accenderli
usando accenditori naturali in legno. Attendere
15-20 secondi fino alla completa accensione.
Chiudere la porta anteriore (K) per iniziare il
preriscaldamento.
Controllare temperatura e pellet ogni 5 minuti
usando un termometro a infrarossi adeguato.
Per aggiungere pellet, usare la paletta del ser-
batoio (C) per versarli sul porta pellet attraver-
so il gruppo serbatoio (D).
NOTA: Saranno necessari pellet aggiuntivi
prima di raggiungere la temperatura ottimale
di 400°C.
ISTRUZIONI PER LA COTTURA
Una volta raggiunti i 400°C:
Posizionare la pizza sulla pietra per pizza (J)
Inserirla nel forno e chiudere la porta (K) in
modo sicuro
Cuocere per circa 90 secondi, controllando
regolarmente
Ruotare la pizza di 90 gradi usando la pala
per pizza o gli utensili da forno
Ripetere il processo di rotazione fino a cottura
completa della pizza (360 gradi)
INDICAZIONI DI SICUREZZA
ATTENZIONE! Usare sempre guanti resisten-
ti al calore quando si maneggia il forno per
pizza caldo
Mantenere la porta chiusa durante il funziona-
mento, eccetto per caricare e scaricare
Evitare l’ingresso eccessivo di aria dalla porta
per prevenire il fumo nel braciere (E&G) e nel
gruppo serbatoio (D)
Usare sempre la maniglia fornita per operare
la porta
PULIZIA E MANUTENZIONE
Dopo l’uso:
Rimuovere il cassetto cenere/porta pellet us-
ando l’attizzatoio (14) e spegnere con acqua
ATTENZIONE: I componenti potrebbero es-
sere ancora molto caldi
Una volta completamente raffreddato, pulire
l’interno con acqua calda saponata e una
spugna non abrasiva
Pietra per pizza: Solo lavaggio a mano -
NON lavabile in lavastoviglie
Pulizia regolare del vassoio raccogligrasso per
prevenire incendi da grasso
Lasciare raffreddare completamente prima di
spostare
Non lasciare incustodito durante l’uso
I danni causati da incendi da grasso non sono
coperti dalla garanzia
CURA DELLA PIETRA PER PIZZA
Lasciare raffreddare completamente prima del-
la pulizia
NON usare sapone sulla pietra per pizza:
Il sapone può essere assorbito
Può influenzare il sapore delle future pizze
Metodi di pulizia:
Pulire il grasso con un panno umido
Per residui ostinati:
Usare carta vetrata fine
Pulire immediatamente dopo
Lasciare asciugare completamente (minimo
1-2 ore) prima del prossimo utilizzo
CONSERVAZIONE:
Durante i mesi invernali, coprire con un telo im-
permeabile o conservare in un luogo asciutto
Evitare l’esposizione alla pioggia per prevenire
la ruggine
Usare sempre la maniglia fornita per operare
la porta
Informazioni

26
Si prega di leggere attentamente tutte le istruz-
ioni e conservarle per riferimento futuro.
Avvertenze
SOLO PER USO ESTERNO - NON utilizzare
all’interno
Utilizzare solo in aree scoperte e ben ventilate
Posizionare su superficie resistente al calore
(es. lastra di cemento per patio)
NON utilizzare in:
Camper
Tende
Capanni
Qualsiasi luogo con ventilazione limitata
Utilizzare solo accenditori approvati conformi
alla norma EN1860-3
Tenere nelle vicinanze:
Estintore
Tubo da giardino
Secchio di sabbia
ATTENZIONE! PERICOLO DI MONOSSIDO
DI CARBONIO
Non utilizzare in spazi ristretti
Non utilizzare sotto tende da sole, ombrelloni
o gazebo
Sicurezza d’uso
Non destinato a: Arrampicata, Uso come gi-
ocattolo, Persone con ridotte capacità fisiche,
sensoriali o mentali (se non supervisionate)
Tenere lontano dall’unità durante l’uso e il raf-
freddamento:
Bambini, Animali domestici, Materiali infi-
ammabili, Oggetti sensibili al calore, Fissare
indumenti larghi e capelli lunghi
Non sovraccaricare l’unità
Utilizzare sempre guanti protettivi quando si
maneggiano superfici calde
Assicurarsi che tutte le parti siano fissate salda-
mente prima dell’uso
Sicurezza alimentare
Lavare le mani prima e dopo aver maneggiato
carne cruda
Tenere la carne cruda separata dai cibi cotti
Pulire le superfici della griglia e gli utensili
prima dell’uso
Utilizzare utensili separati per cibi crudi e cotti
Assicurare una cottura completa di tutti gli
alimenti
Equipaggiamento di sicurezza
Utilizzare solo guanti termici appropriati o
guanti resistenti al calore
ATTENZIONE: I guanti da forno standard
NON sono sufficienti
La protezione richiesta include:
Guanti termici
Presine
Altri dispositivi di protezione certificati
ATTENZIONE: Durante l’uso possono essere
emesse braci calde
Prima dell’uso
Verificare che tutti i pezzi siano presenti
Contattare il servizio clienti in caso di parti
mancanti
Informazioni

27
Legale
INFORMAZIONI SULLO SMALTIMENTO
Si prega di riciclare dove esistono le strutture.
Verificare con l’autorità locale per consigli sul
riciclaggio.
SERVIZIO CLIENTI
Se si hanno difficoltà nell’utilizzo di questo
prodotto e si necessita di supporto, si prega di
contattare suppor[email protected]
GARANZIA
Per registrare il prodotto e scoprire se si ha di-
ritto a un’estensione gratuita della garanzia,
visitare www.vonhaus.com/warranty
Si prega di conservare una prova d’acquisto
o una dichiarazione come prova della data
d’acquisto.
La garanzia si applica solo se il prodotto viene
utilizzato esclusivamente nel modo indicato
nella pagina delle avvertenze di questo man-
uale e tutte le altre istruzioni sono state seguite
accuratamente.
Qualsiasi abuso del prodotto o del modo in
cui viene utilizzato invaliderà la garanzia.
RESI
I beni restituiti non saranno accettati a meno
che non siano reimballati nella confezione
originale e accompagnati da un modulo di
reso pertinente e compilato. Ciò non influisce
sui diritti legali.
Nessun diritto viene concesso in base a ques-
ta garanzia a una persona che acquista l’ap-
parecchio di seconda mano o per uso com-
merciale o comunitario.
DIRITTI D’AUTORE
Tutto il materiale in questo manuale di istruzi-
oni è protetto da copyright di DOMU Brands.
Qualsiasi uso non autorizzato può violare le
leggi sul copyright, sui marchi e altre leggi in
tutto il mondo.
GRAZIE
Grazie per aver acquistato il nostro prodot-
to/apparecchio.
Se hai bisogno di assistenza riguardo al tuo
acquisto, contattaci all’indirizzo support@
domu.co.uk
VonHaus è un marchio registrato di DOMU
Brands Ltd. Prodotto in Cina per DOMU
Brands.
RAPPRESENTANTE AUTORIZZATO
Authorised Representative Service
77 Camden Street Lower
Dublin, D02 XE80, Ireland

Product No. 2502082