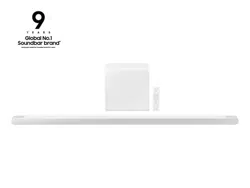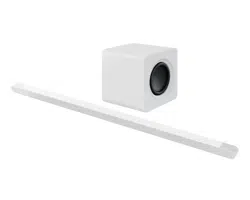
FULL MANUAL
HW-S800B / HW-S801B
Imagine the possibilities
Thank you for purchasing this Samsung product.
To receive more complete service, please register your product at
www.samsung.com/register
ENG - 2
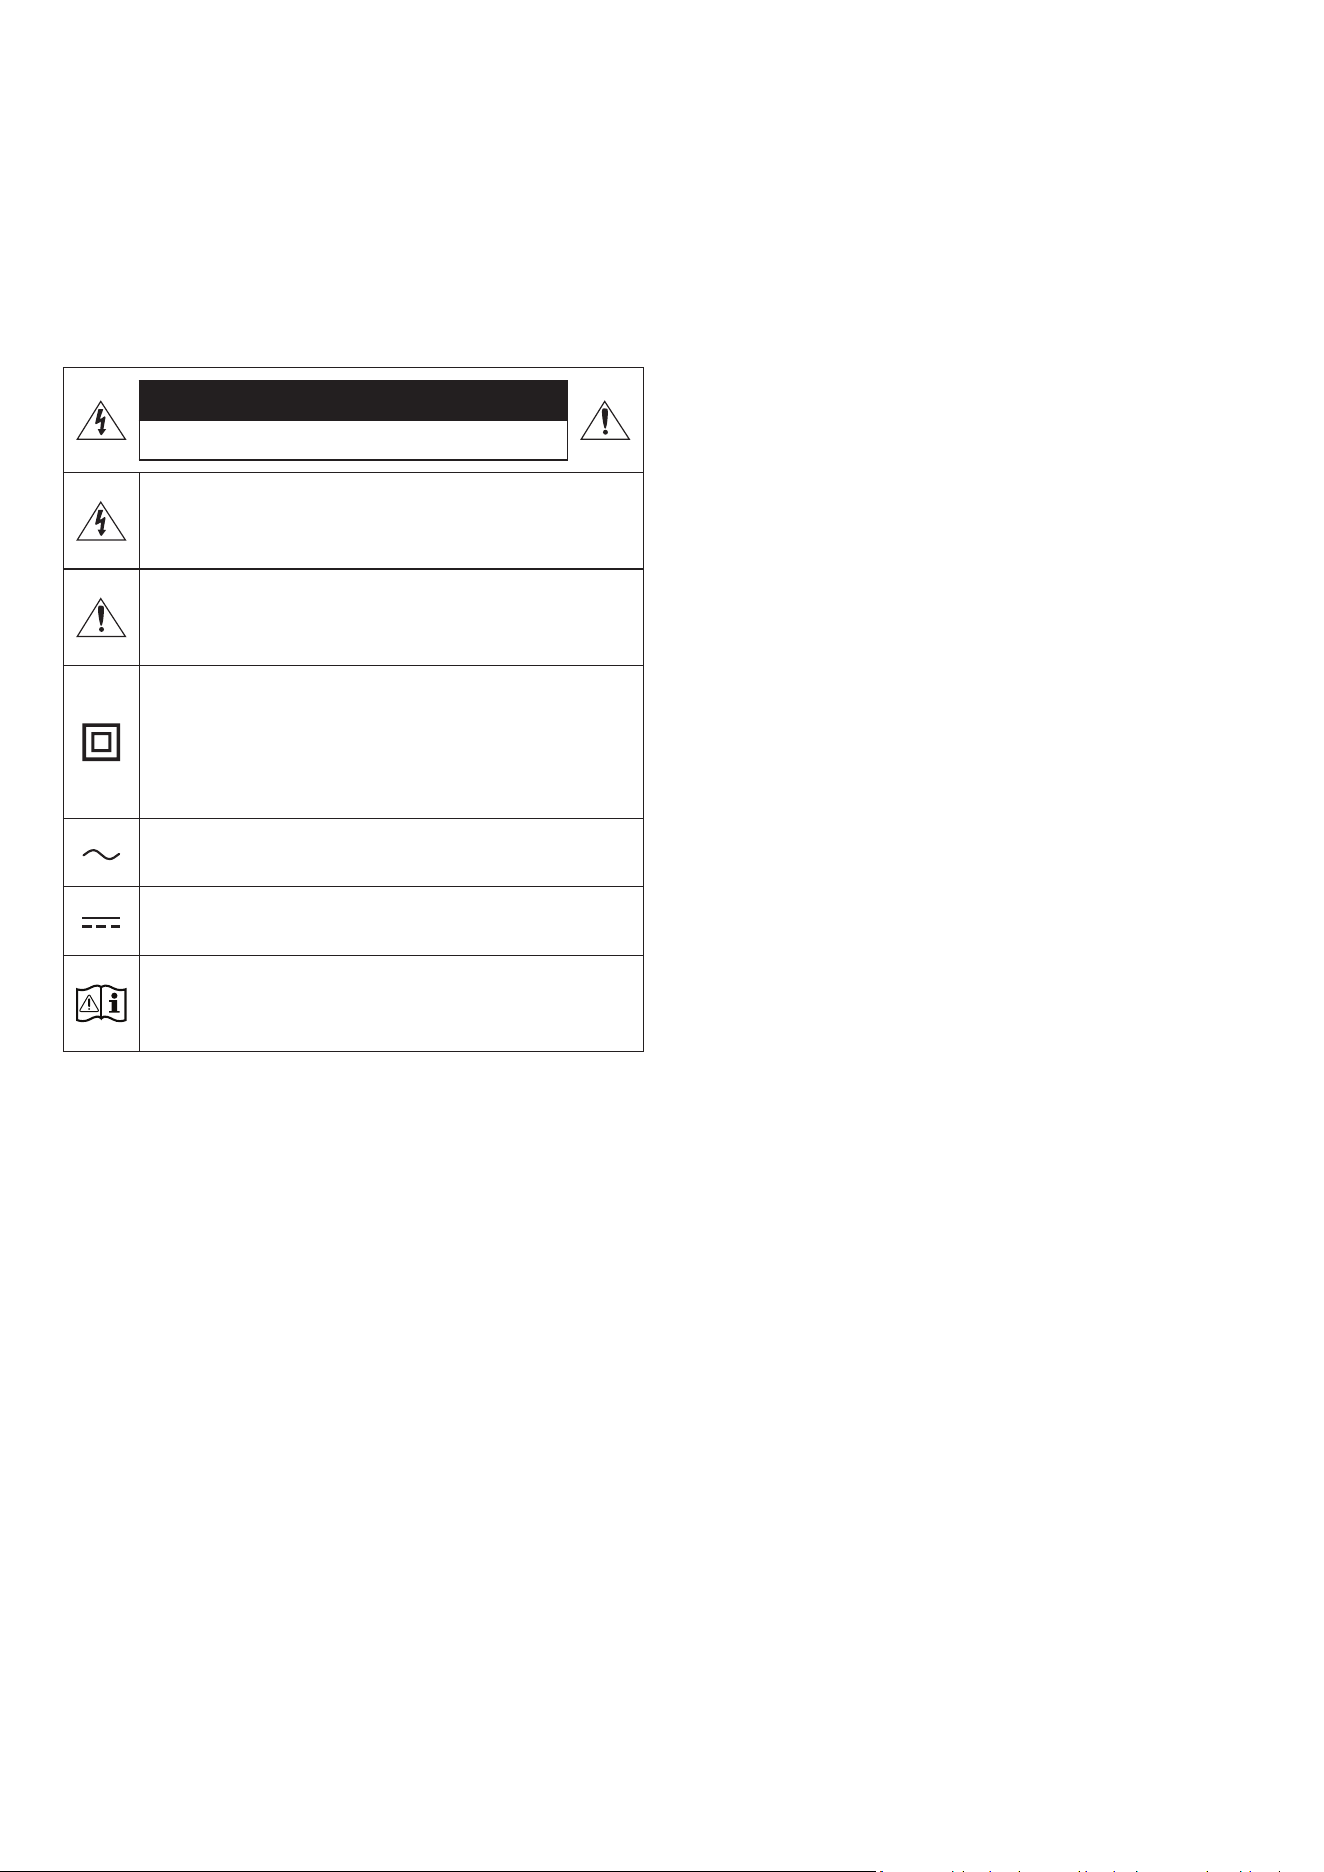
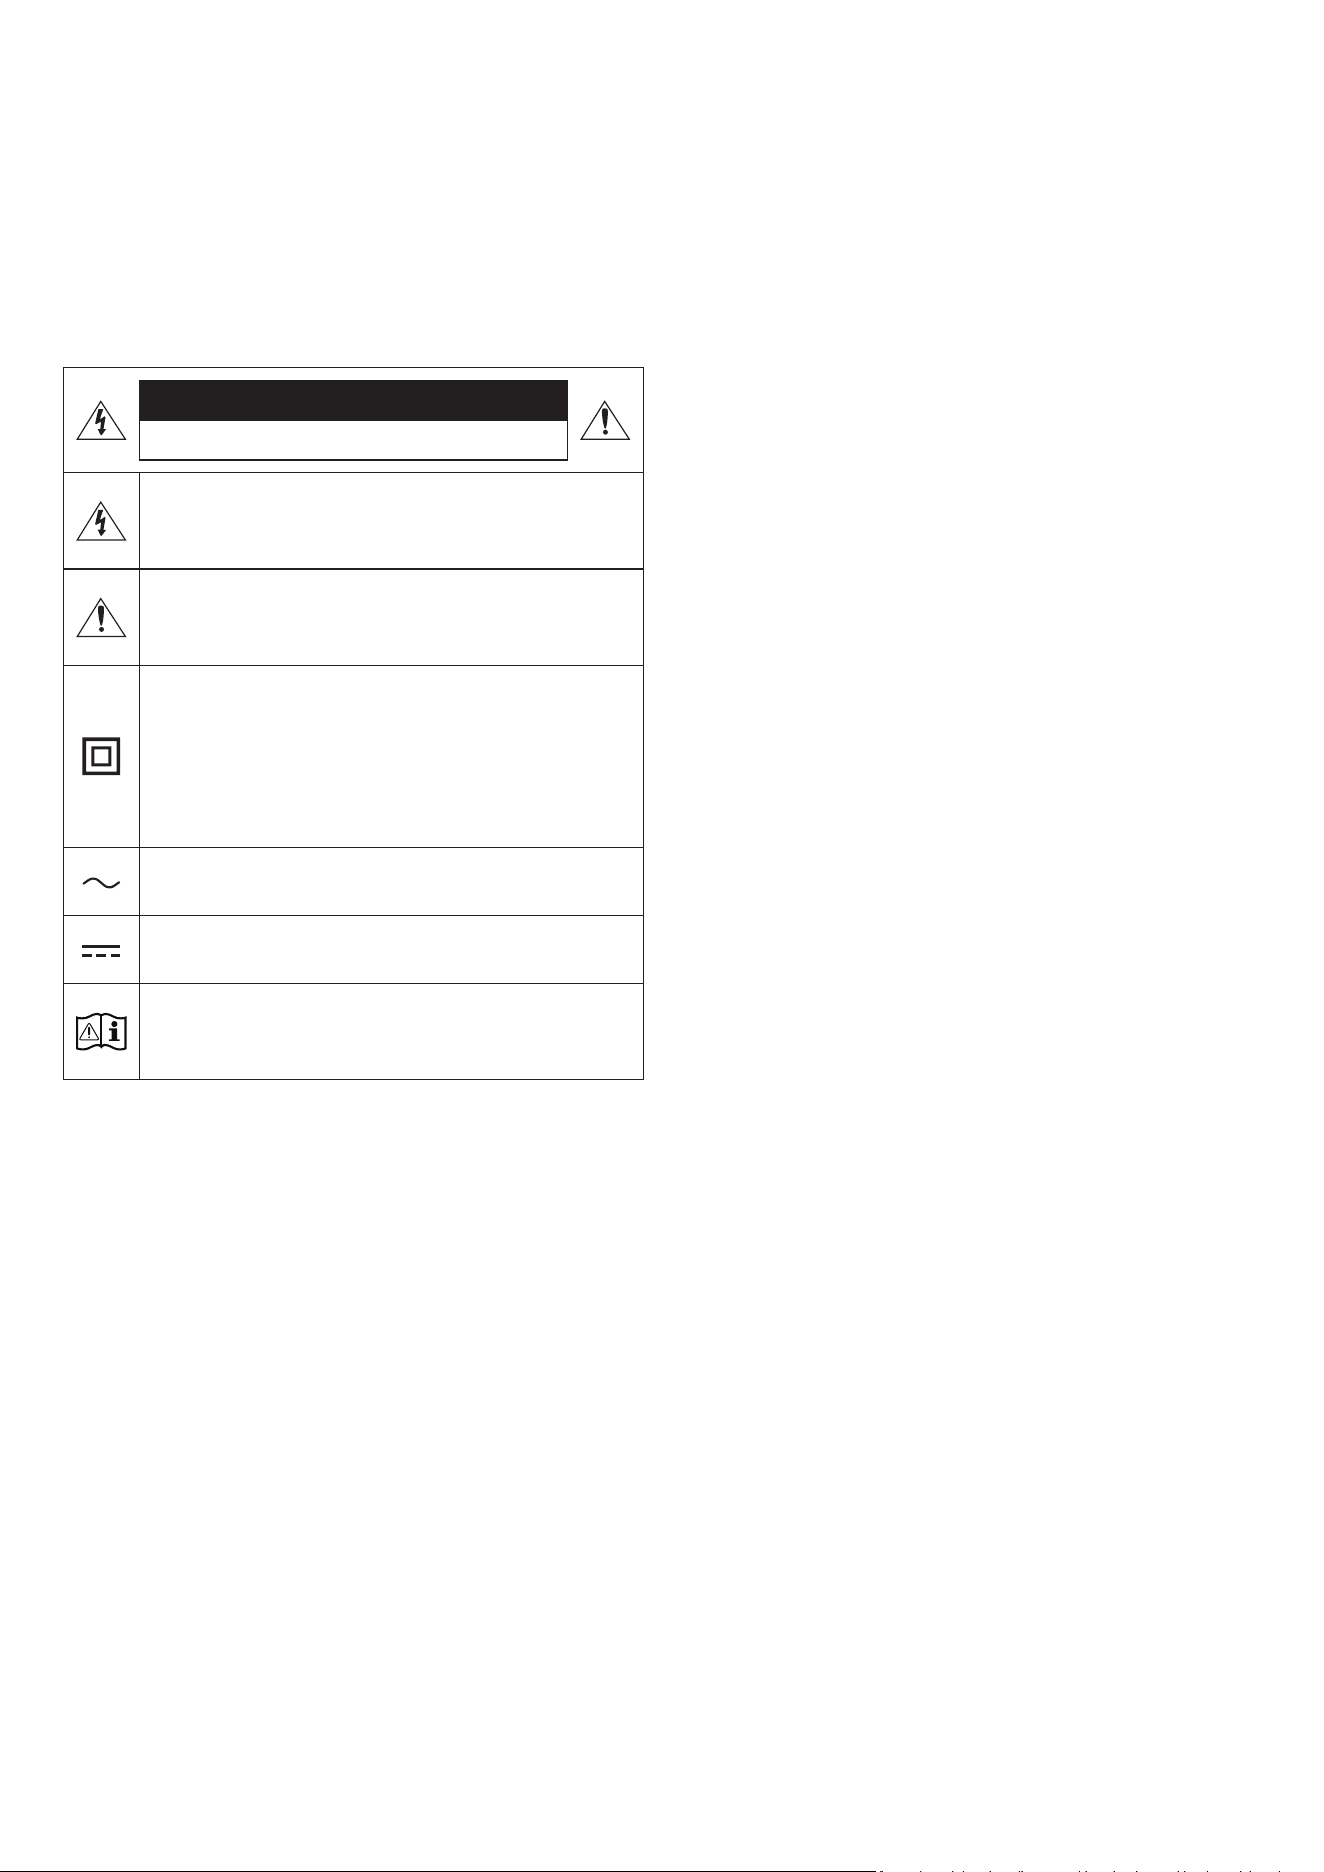
SAFETY INFORMATION
SAFETY WARNINGS
TO REDUCE THE RISK OF ELECTRIC SHOCK, DO NOT REMOVE THE
COVER (OR BACK).
NO USER-SERVICEABLE PARTS ARE INSIDE. REFER SERVICING TO
QUALIFIED SERVICE PERSONNEL.
Refer to the table below for an explanation of symbols which may be
on your Samsung product.
CAUTION
RISK OF ELECTRIC SHOCK. DO NOT OPEN.
This symbol indicates that high voltage is present inside.
It is dangerous to make any kind of contact with any
internal part of this product.
This symbol indicates that this product has included
important literature concerning operation and
maintenance.
Class II product : This symbol indicates that a safety
connection to electrical earth (ground) is not required.
If this symbol is not present on a product with a power
cord, the product MUST have a reliable connection to
protective earth (ground).
AC voltage : Rated voltage marked with this symbol is AC
voltage.
DC voltage : Rated voltage marked with this symbol is DC
voltage.
Caution. Consult Instructions for use : This symbol
instructs the user to consult the user manual for further
safety related information.
WARNING
• To reduce the risk of re or electric shock, do not expose this
appliance to rain or moisture.
CAUTION
• TO PREVENT ELECTRIC SHOCK, MATCH WIDE BLADE OF PLUG TO
WIDE SLOT, FULLY INSERT.
• This apparatus shall always be connected to a AC outlet with a
protective grounding connection.
• To disconnect the apparatus from the mains, the plug must be
pulled out from the mains socket, therefore the mains plug shall
be readily operable.
• Do not expose this apparatus to dripping or splashing. Do not put
objects lled with liquids, such as vases, on the apparatus.
• To turn this apparatus off completely, you must pull the power
plug out of the wall socket. Consequently, the power plug must be
easily and readily accessible at all times.

ENG - 3
PRECAUTIONS
1. Ensure that the AC power supply in your house complies with the
power requirements listed on the identication sticker located
on the bottom of your product. Install your product horizontally,
on a suitable base (furniture), with enough space around it for
ventilation (7~10 cm). Make sure the ventilation slots are not
covered. Do not place the unit on ampliers or other equipment
which may become hot. This unit is designed for continuous use.
To fully turn off the unit, disconnect the AC plug from the wall
outlet. Unplug the unit if you intend to leave it unused for a long
period of time.
2. During thunderstorms, disconnect the AC plug from the wall
outlet. Voltage peaks due to lightning could damage the unit.
3. Do not expose the unit to direct sunlight or other heat sources.
This could lead to overheating and cause the unit to malfunction.
4. Protect the product from moisture (i.e. vases), and excess heat
(e.g. a replace) or equipment creating strong magnetic or electric
elds. Unplug the power cable from the AC wall socket if the unit
malfunctions. Your product is not intended for industrial use. It is
for personal use only. Condensation may occur if your product has
been stored in cold temperatures. If transporting the unit during
the winter, wait approximately 2 hours until the unit has reached
room temperature before using.
5. Fire or explosion may occur, resulting in damage to the remote
control or personal injury.
• Do not apply shock to the remote control.
• Be careful not to let foreign substances such as metal, liquid, or
dust come in contact with the charging terminal of the remote
control.
• When the remote control is damaged or you smell smoke or
burning fumes, immediately stop operation and then repair it at
the Samsung service centre.
• Do not arbitrarily disassemble the remote control.
• Be careful not to let infants or pets suck or bite the remote
control. Fire or explosion may occur, resulting in damage to the
remote control or personal injury.

ENG - 4
CONTENTS
01 Checking the Components 6
02 Product Overview 7
Top Panel of the Soundbar. . . . . . . . . . . . . . . . . . . . . . . . . . . . . . . . . . . . . . . . . . . . . . . . . . . . . . . . . . . . . . . . . . . . . . . . . . . . . . . . . . . . . . . . . . . . . . . . . . . . . .7
Rear Panel of the Soundbar. . . . . . . . . . . . . . . . . . . . . . . . . . . . . . . . . . . . . . . . . . . . . . . . . . . . . . . . . . . . . . . . . . . . . . . . . . . . . . . . . . . . . . . . . . . . . . . . . . . . 8
03 Using the Soundbar Remote Control 9
About the Remote control . . . . . . . . . . . . . . . . . . . . . . . . . . . . . . . . . . . . . . . . . . . . . . . . . . . . . . . . . . . . . . . . . . . . . . . . . . . . . . . . . . . . . . . . . . . . . . . . . . . . . 9
How to Use the Remote Control . . . . . . . . . . . . . . . . . . . . . . . . . . . . . . . . . . . . . . . . . . . . . . . . . . . . . . . . . . . . . . . . . . . . . . . . . . . . . . . . . . . . . . . . . . . . . . . . 9
Active Voice Amplier (AVA) . . . . . . . . . . . . . . . . . . . . . . . . . . . . . . . . . . . . . . . . . . . . . . . . . . . . . . . . . . . . . . . . . . . . . . . . . . . . . . . . . . . . . . . . . . . . . . . . . . .11
Using the Hidden Buttons (Buttons with more than one function). . . . . . . . . . . . . . . . . . . . . . . . . . . . . . . . . . . . . . . . . . . . . . . . . . . . . . . . . . . . . . . . .11
Output specications for the different sound effect modes . . . . . . . . . . . . . . . . . . . . . . . . . . . . . . . . . . . . . . . . . . . . . . . . . . . . . . . . . . . . . . . . . . . . . . .12
Adjusting the Soundbar volume with a TV remote control . . . . . . . . . . . . . . . . . . . . . . . . . . . . . . . . . . . . . . . . . . . . . . . . . . . . . . . . . . . . . . . . . . . . . . . 13
04 Connecting the Soundbar 14
Connecting the power and units. . . . . . . . . . . . . . . . . . . . . . . . . . . . . . . . . . . . . . . . . . . . . . . . . . . . . . . . . . . . . . . . . . . . . . . . . . . . . . . . . . . . . . . . . . . . . . . 14
‒ Manually connecting the Subwoofer. . . . . . . . . . . . . . . . . . . . . . . . . . . . . . . . . . . . . . . . . . . . . . . . . . . . . . . . . . . . . . . . . . . . . . . . . . . . . . . . . . . . . . . . 15
‒ LED Indicator Lights on the Rear of Subwoofer. . . . . . . . . . . . . . . . . . . . . . . . . . . . . . . . . . . . . . . . . . . . . . . . . . . . . . . . . . . . . . . . . . . . . . . . . . . . . . . 16
Connecting an SWA-9500S (Sold Separately) to your Soundbar . . . . . . . . . . . . . . . . . . . . . . . . . . . . . . . . . . . . . . . . . . . . . . . . . . . . . . . . . . . . . . . . . . 16
05 Connecting to a TV 17
Connecting the TV that supports HDMI ARC (Audio Return Channel) . . . . . . . . . . . . . . . . . . . . . . . . . . . . . . . . . . . . . . . . . . . . . . . . . . . . . . . . . . . . . .17
Connecting via Bluetooth. . . . . . . . . . . . . . . . . . . . . . . . . . . . . . . . . . . . . . . . . . . . . . . . . . . . . . . . . . . . . . . . . . . . . . . . . . . . . . . . . . . . . . . . . . . . . . . . . . . . . 18
Connecting via Wi-Fi . . . . . . . . . . . . . . . . . . . . . . . . . . . . . . . . . . . . . . . . . . . . . . . . . . . . . . . . . . . . . . . . . . . . . . . . . . . . . . . . . . . . . . . . . . . . . . . . . . . . . . . . . 19
Connecting to a TV that supports Dolby Atmos . . . . . . . . . . . . . . . . . . . . . . . . . . . . . . . . . . . . . . . . . . . . . . . . . . . . . . . . . . . . . . . . . . . . . . . . . . . . . . . . . 20
Using the Q-Symphony Function . . . . . . . . . . . . . . . . . . . . . . . . . . . . . . . . . . . . . . . . . . . . . . . . . . . . . . . . . . . . . . . . . . . . . . . . . . . . . . . . . . . . . . . . . . . . . . .21
Using the Spacet sound . . . . . . . . . . . . . . . . . . . . . . . . . . . . . . . . . . . . . . . . . . . . . . . . . . . . . . . . . . . . . . . . . . . . . . . . . . . . . . . . . . . . . . . . . . . . . . . . . . . . . 22
06 Connecting a Mobile Device 23
Method 1. Connecting via Bluetooth . . . . . . . . . . . . . . . . . . . . . . . . . . . . . . . . . . . . . . . . . . . . . . . . . . . . . . . . . . . . . . . . . . . . . . . . . . . . . . . . . . . . . . . . . . . 23
Method 2. Connecting via Wi-Fi (Wireless Network). . . . . . . . . . . . . . . . . . . . . . . . . . . . . . . . . . . . . . . . . . . . . . . . . . . . . . . . . . . . . . . . . . . . . . . . . . . . . 25
Using the Tap Sound . . . . . . . . . . . . . . . . . . . . . . . . . . . . . . . . . . . . . . . . . . . . . . . . . . . . . . . . . . . . . . . . . . . . . . . . . . . . . . . . . . . . . . . . . . . . . . . . . . . . . . . . . 26
07 Connecting via Apple Airplay 2 27
08 Installing the Wall Mount 28
Installation Precautions . . . . . . . . . . . . . . . . . . . . . . . . . . . . . . . . . . . . . . . . . . . . . . . . . . . . . . . . . . . . . . . . . . . . . . . . . . . . . . . . . . . . . . . . . . . . . . . . . . . . . . 28
Wallmount Components. . . . . . . . . . . . . . . . . . . . . . . . . . . . . . . . . . . . . . . . . . . . . . . . . . . . . . . . . . . . . . . . . . . . . . . . . . . . . . . . . . . . . . . . . . . . . . . . . . . . . . 28
09 Installing the Soundbar in front of TV 29

ENG - 5
10 Software Update 30
Auto Update. . . . . . . . . . . . . . . . . . . . . . . . . . . . . . . . . . . . . . . . . . . . . . . . . . . . . . . . . . . . . . . . . . . . . . . . . . . . . . . . . . . . . . . . . . . . . . . . . . . . . . . . . . . . . . . . . 30
USB Update . . . . . . . . . . . . . . . . . . . . . . . . . . . . . . . . . . . . . . . . . . . . . . . . . . . . . . . . . . . . . . . . . . . . . . . . . . . . . . . . . . . . . . . . . . . . . . . . . . . . . . . . . . . . . . . . . 30
Reset . . . . . . . . . . . . . . . . . . . . . . . . . . . . . . . . . . . . . . . . . . . . . . . . . . . . . . . . . . . . . . . . . . . . . . . . . . . . . . . . . . . . . . . . . . . . . . . . . . . . . . . . . . . . . . . . . . . . . . . 30
11 Troubleshooting 31
12 Licence 32
13 Open Source Licence Notice 33
14 Important Notes About Service 33
15 Specications and Guide 34
Specications . . . . . . . . . . . . . . . . . . . . . . . . . . . . . . . . . . . . . . . . . . . . . . . . . . . . . . . . . . . . . . . . . . . . . . . . . . . . . . . . . . . . . . . . . . . . . . . . . . . . . . . . . . . . . . . 34
ENG - 6
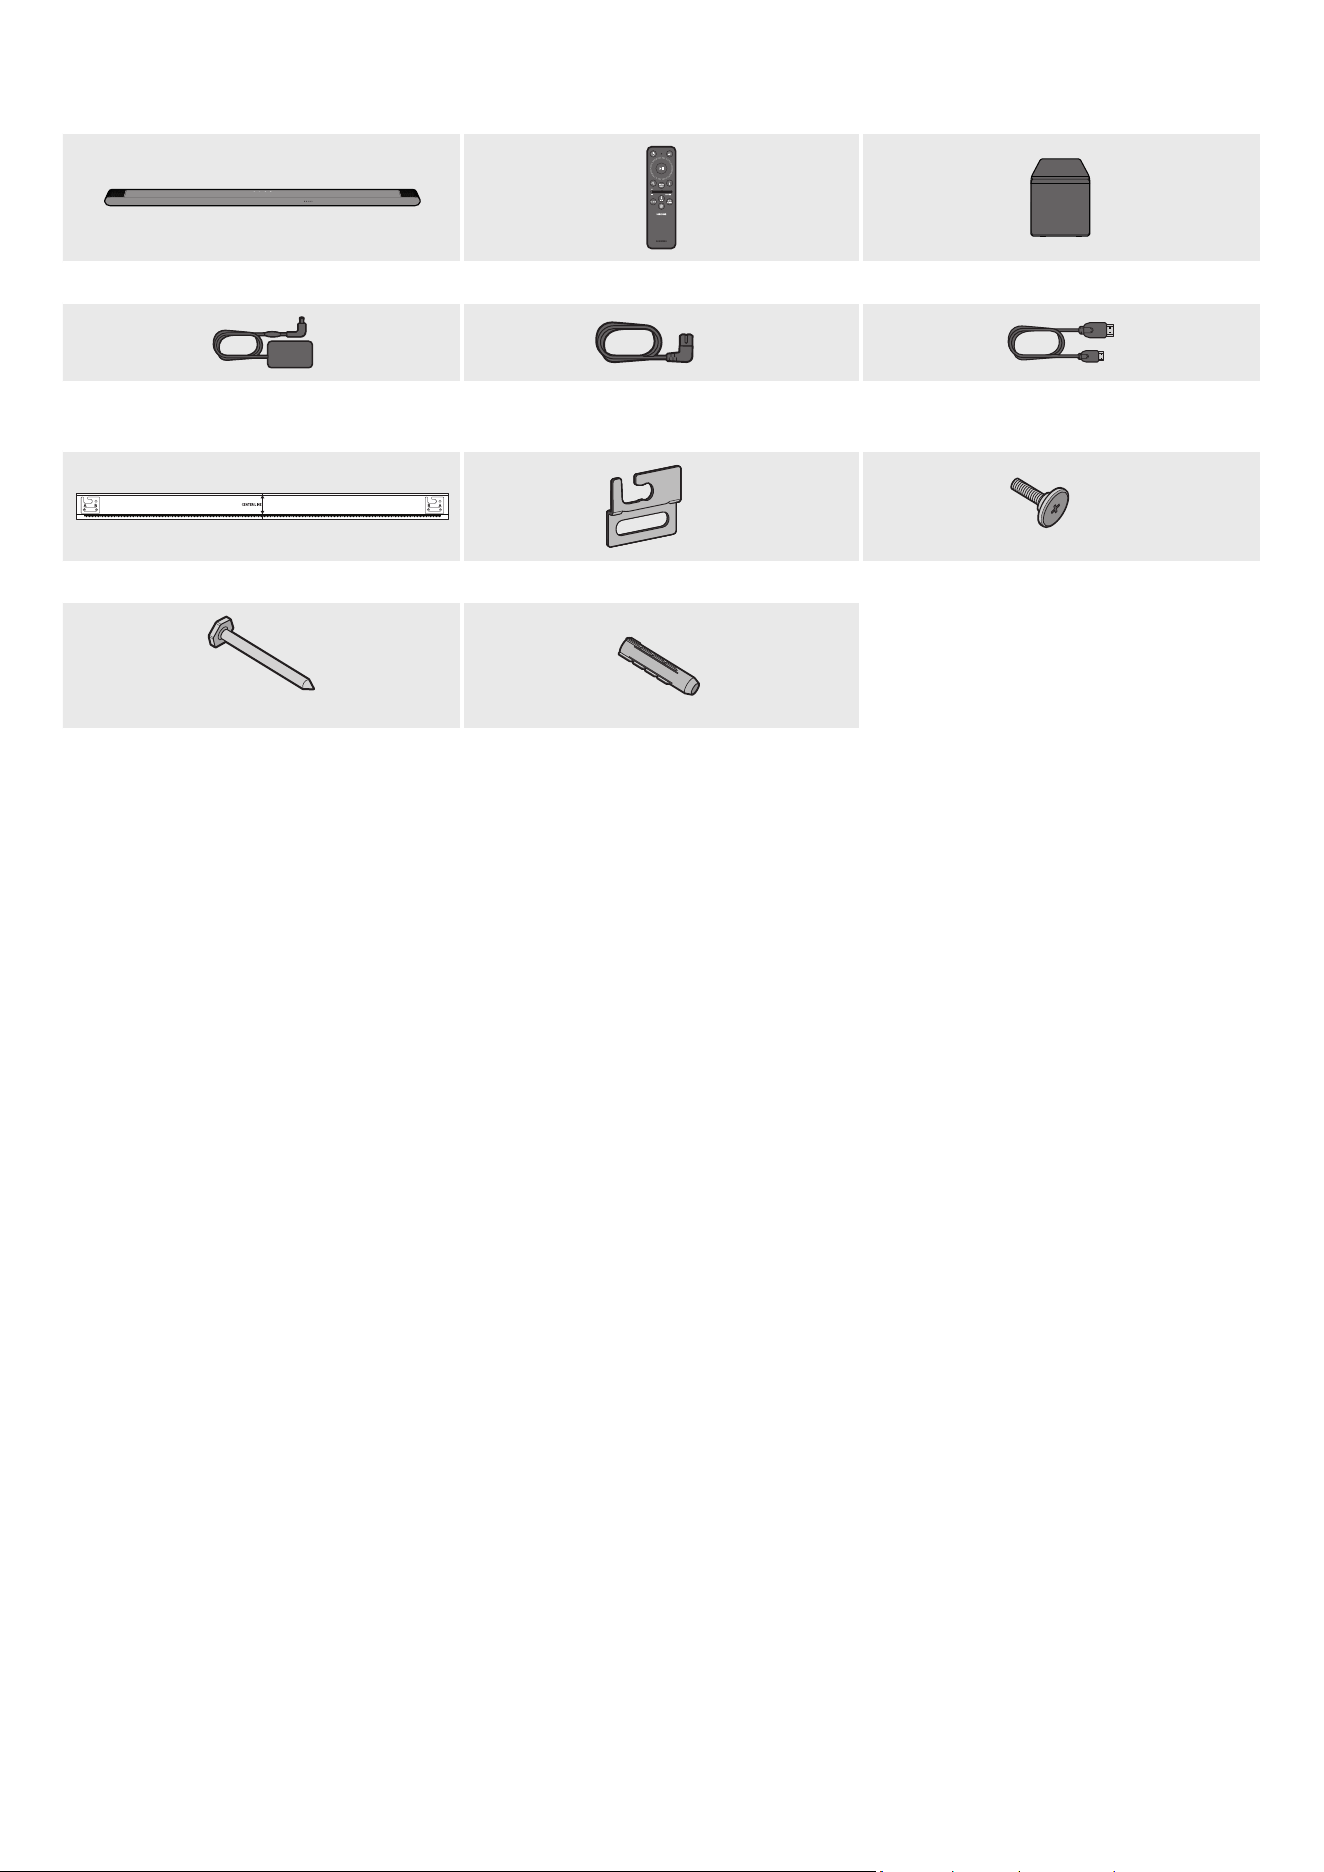
01 CHECKING THE COMPONENTS
Soundbar Main Unit Soundbar Remote Control Subwoofer
x 2
AC/DC Adapter (Soundbar) Power Cord (Subwoofer, Soundbar) HDMI to Micro HDMI Cable
AH81-15127A-01
A TYPE
:
740mm
B TYPE
:
700mm
x 2
x 2
Wall Mount Guide Bracket-Wall Mount Holder-Screw
x 4
(M5 X L55)
x 4
Screw Screw Anchor
• For more information about the power supply and power consumption, refer to the label attached to the product. (Label: Bottom of the
Soundbar Main Unit)
• To purchase additional components or optional cables, contact a Samsung Service Centre or Samsung Customer Care.
• For more information about the wallmount or rubber-foot, see pages 28~29.
• Design, specications, and App screen are subject to change without prior notice.
• The appearance of the accessories may differ slightly from the illustrations above.
ENG - 7
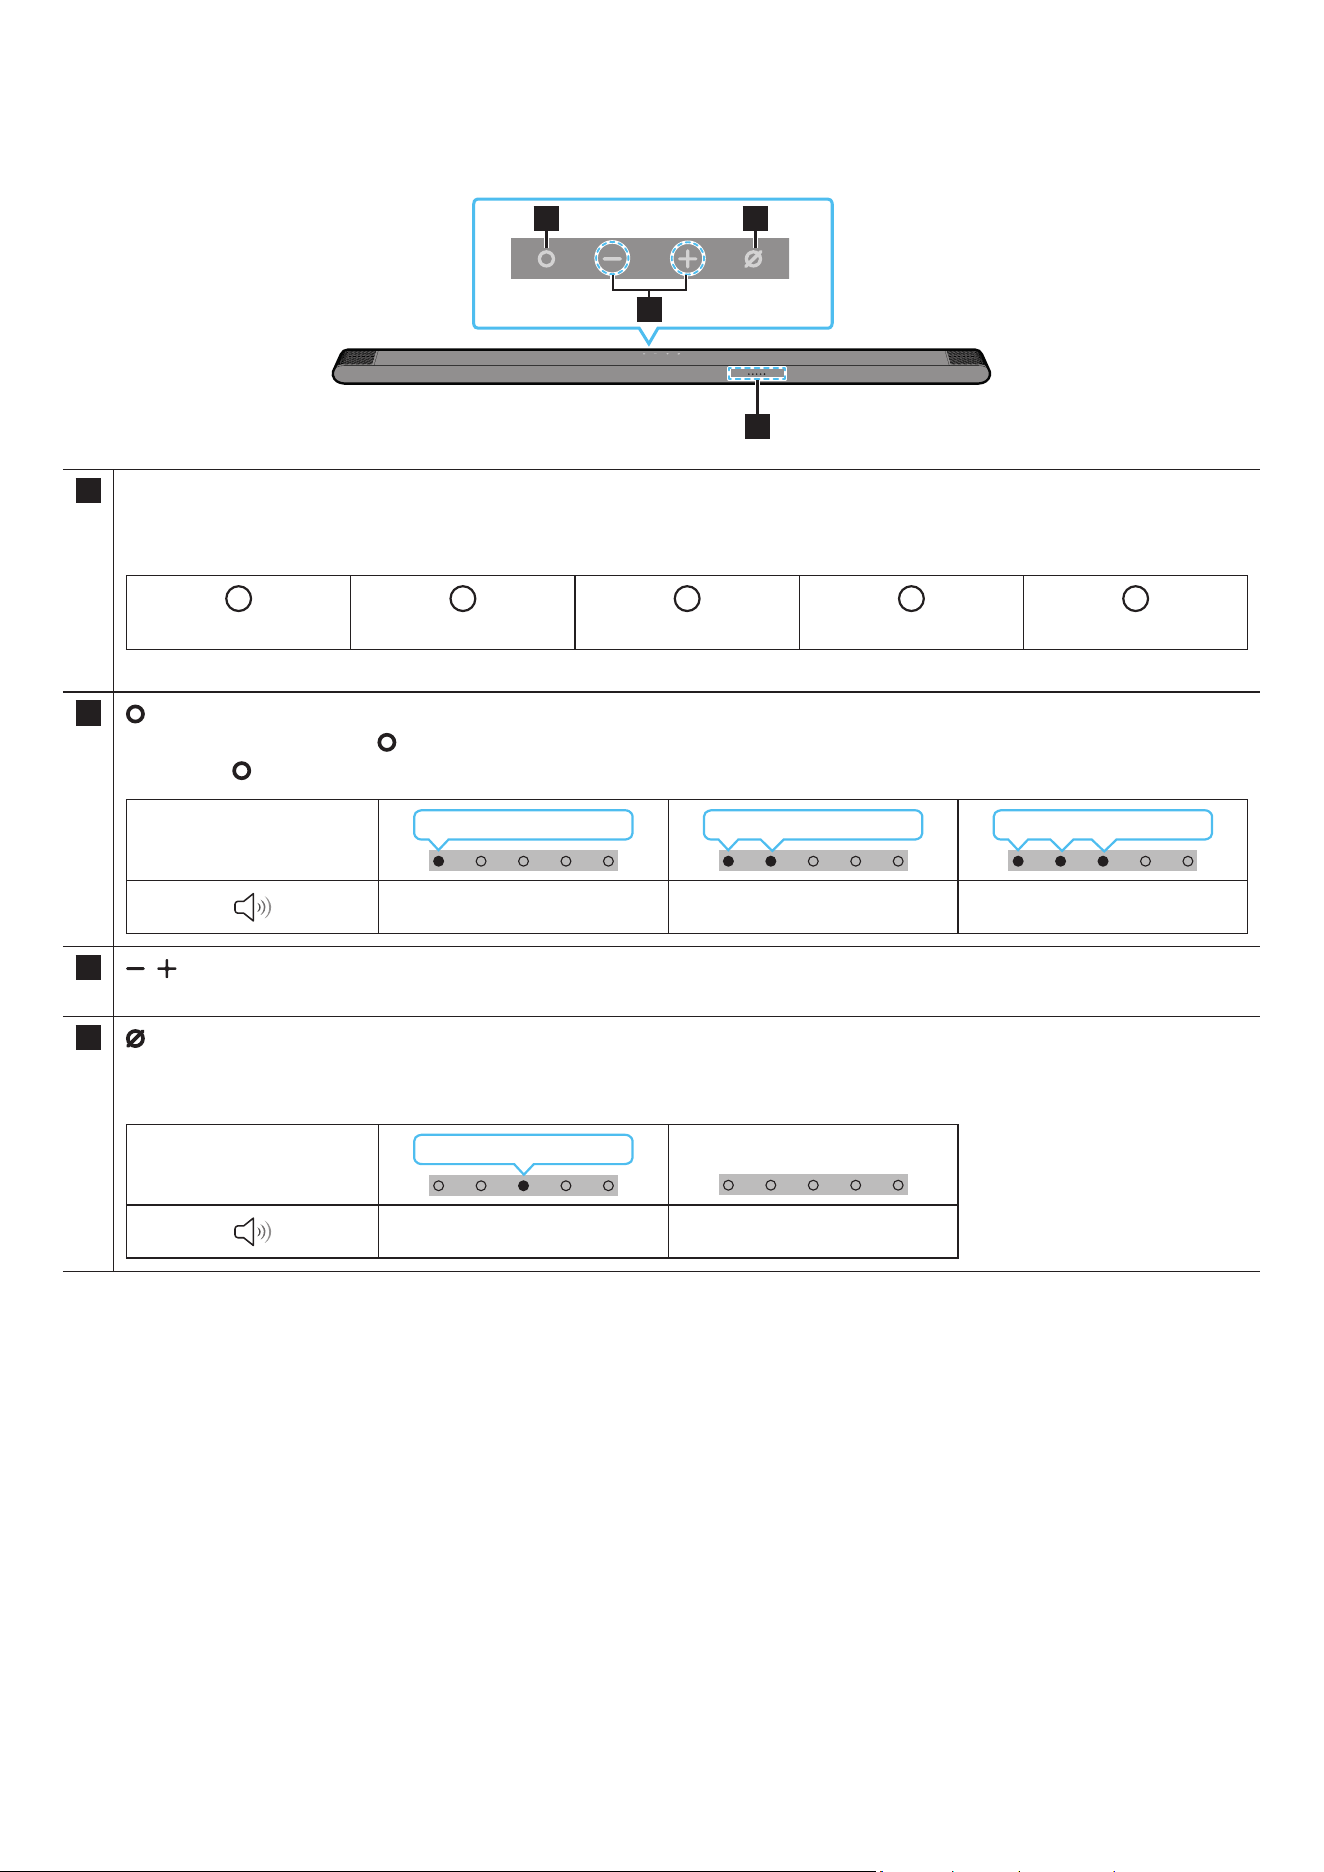
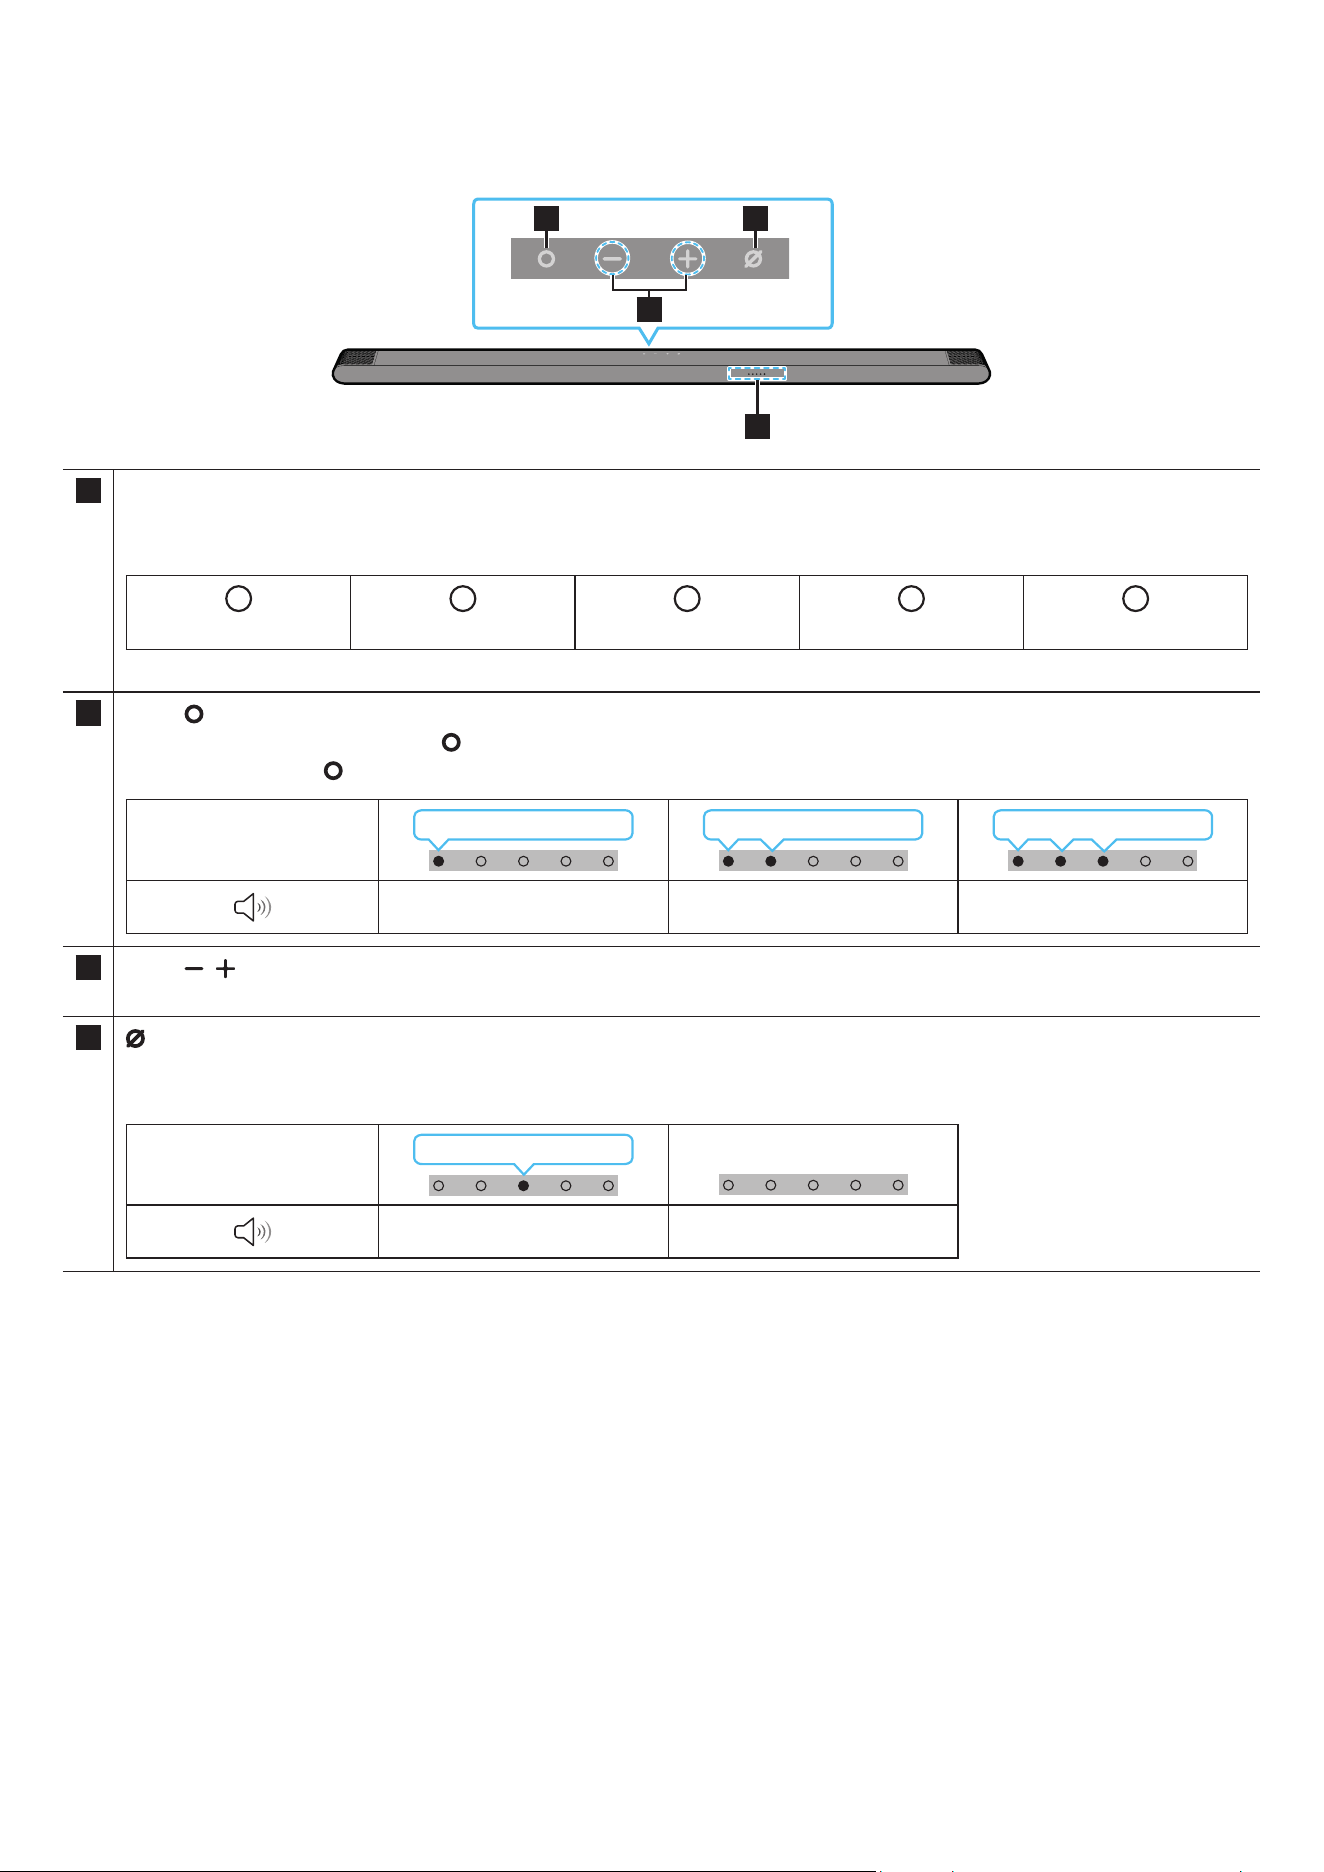
02 PRODUCT OVERVIEW
Top Panel of the Soundbar
2 4
3
1
1 LED indicator
The LED Indicator ashes, glows, or changes colour depending on the Soundbar’s current mode or status. The colour of the LED
indicator and the number of lights indicate the active mode as described below.
W
White LED
W
White LED
M
Multicolour LED
W
White LED
W
White LED
• The Multicolour LED changes to White, Cyan, Green, Red, and Blue depending on the mode or status.
2
(Multi Function) Button
• In standby mode, press the (Multi Function) button to turn on the Soundbar.
• Press the (Multi Function) button to change the mode. Each time you change the mode, the LED lights in white and then turns off.
LED indicator
White On → Off White On → Off White On → Off
“TV ARC” “Wi-Fi” “Bluetooth”
3
(Volume) Button
Adjusts the volume.
4
(Mic On/Off) Button
Press the button to turn the microphone on or off.
When the microphone is off, the LED indicator will light red.
LED indicator
Red On
“Mic Off” “Mic On”
• When you plug in the AC cord, the power button will begin working in 4 to 6 seconds.
• When you turn on this unit, there will be a 4 to 5 second delay before it produces sound.
• If you hear sounds from both the TV and Soundbar, go to the Settings menu for the TV audio and change the TV speaker to External Speaker.
• You can turn on and off audio feedback by using SmartThings app. To learn about using the SmartThings app, refer to “Method 2. Connecting
via Wi-Fi (Wireless Network)”.

ENG - 8
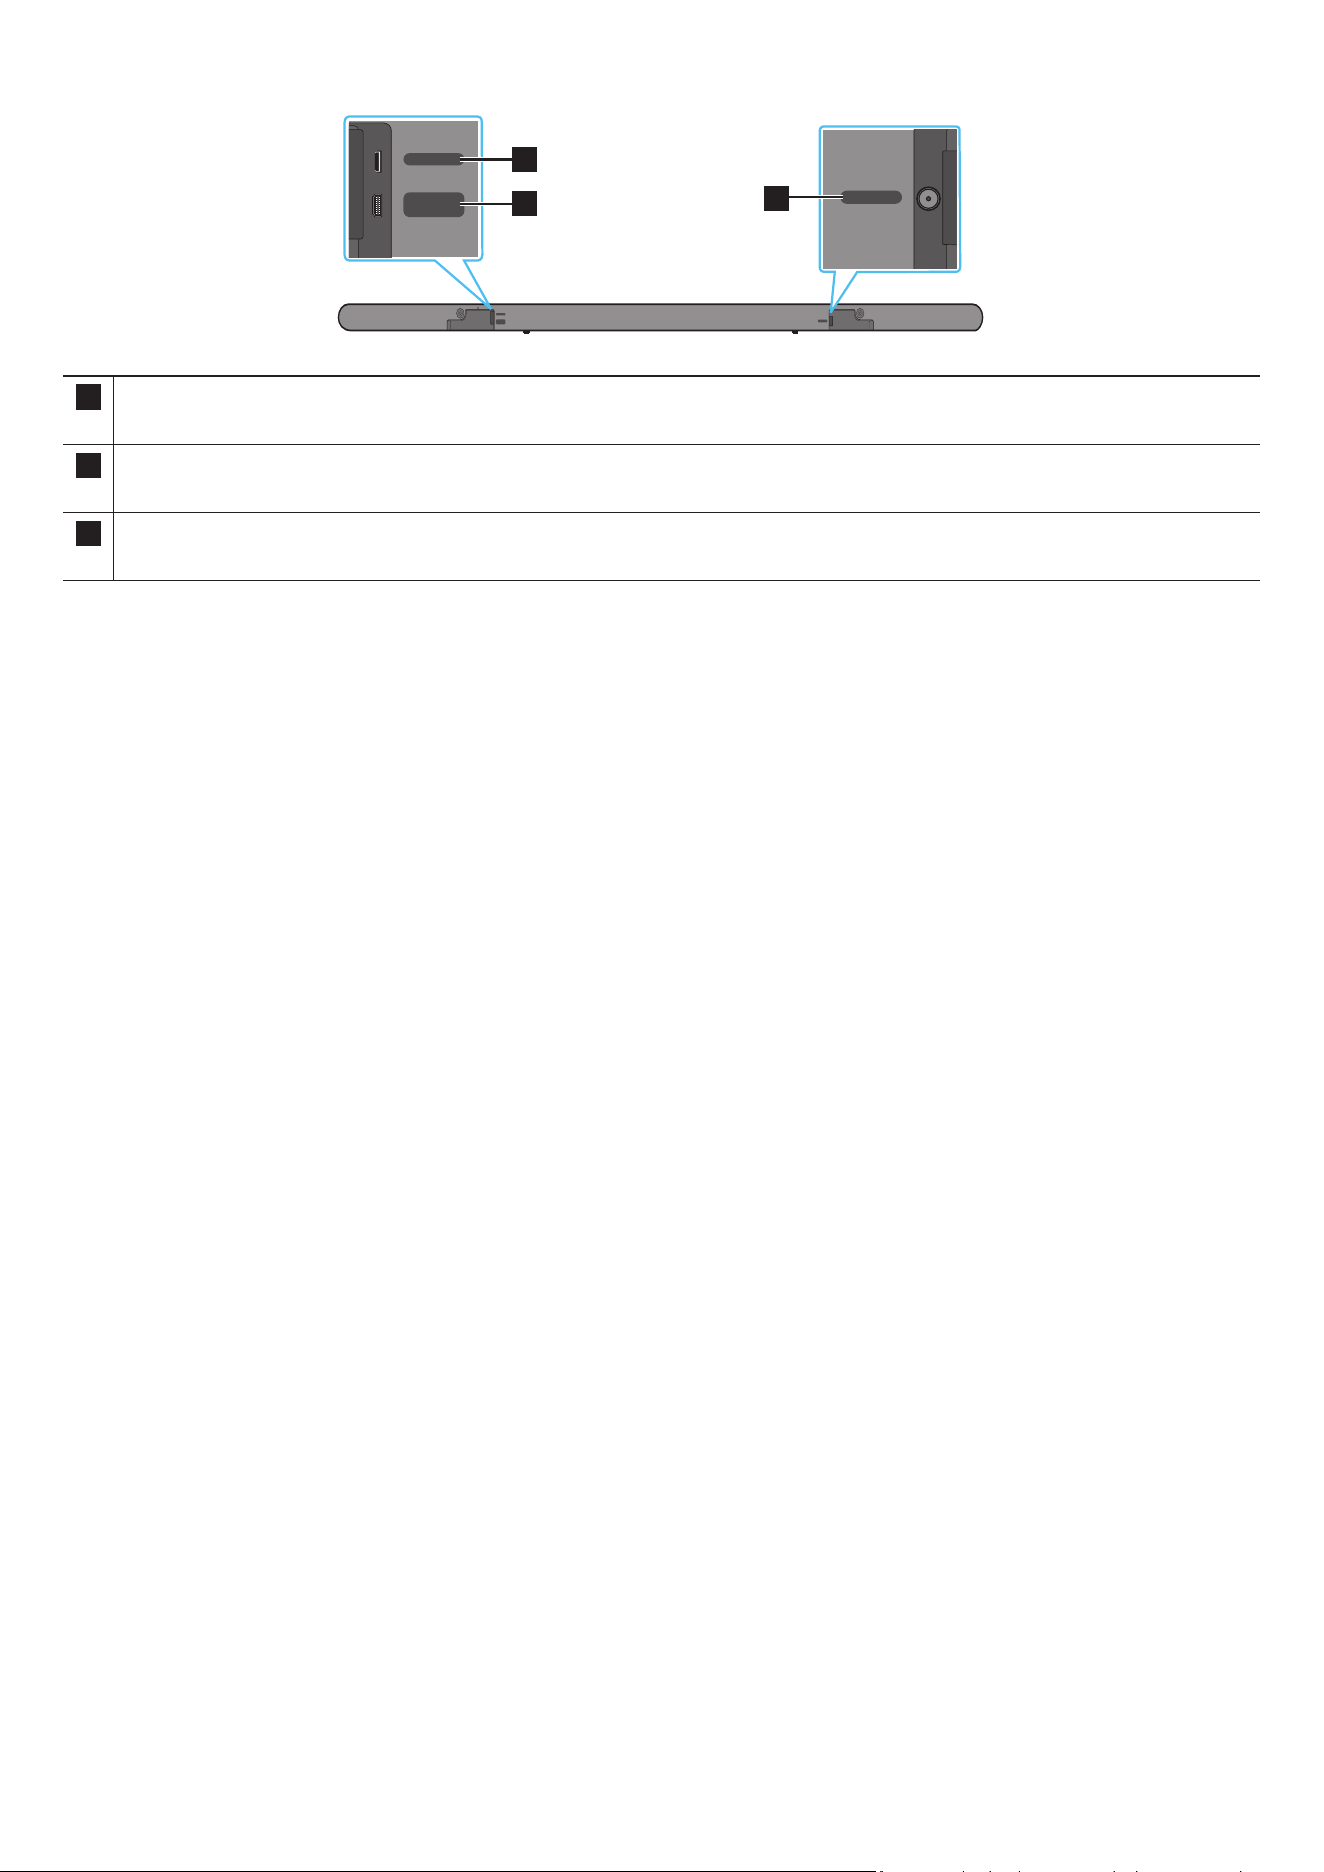
Rear Panel of the Soundbar
DC 19V
SERVICE
HDMI
(ARC)
DC 19V
SERVICE
HDMI
(ARC)
DC 19V
SERVICE
HDMI
(ARC)
DC 19V
SERVICE
HDMI
(ARC)
DC 19V
SERVICE
HDMI
(ARC)
DC 19V
SERVICE
HDMI
(ARC)
3
1
2
1 SERVICE
Connect a USB storage device to upgrade the product’s software.
2 HDMI (ARC)
Connect to the HDMI (ARC) port on a TV. (See page 17)
3 DC 19V
Connect the AC/DC power adapter. (Power Supply In) (See page 14)
• When disconnecting the power cable of the AC/DC power adaptor from a wall outlet, pull the plug.
Do not pull the cable.
• Do not connect this unit or other components to an AC outlet until all connections between components are complete.

ENG - 9
03 USING THE SOUNDBAR REMOTE CONTROL
About the Remote control
• Use the Remote less than 6 m from the product. The usable distance may vary with the wireless
environmental conditions.
• When the remote control does not work due to low battery, charge it by using the USB-C type port.
• The illustration differs with the respective Remote Control model.
USB port (C-type) for
charging
How to Use the Remote Control
1
3
5
8
11
13
7
10
12
2
4
9
6
14
1
Power
Turns the Soundbar on and off.
LED
indicator
Cyan Blinks X1
On
Red Blinks X3
Off
• Auto Power Down Function
The unit turns off automatically in the following situations:
• In “TV ARC” / “Wi-Fi” / “Bluetooth” mode if there is no audio signal
for 18 minutes.
2
Source
Press to select a source connected to the Soundbar.
• Audio Feedback On/Off
You can turn on or off the Audio Feedback. Press and hold the
(Source) button on the remote control for 5 seconds while the
Soundbar is off (Standby mode).
LED
indicator
Cyan Blinks X1
On
Red Blinks X1
Off
3
Up/Down/Left/
Right
Press the indicated areas to select Up/Down/Left/Right.
Press Up/Down/Left/Right on the button to select or set functions.
• Music Skip
Press the Right button to select the next music le. Press the Left
button to select the previous music le.
• ID SET
Press and hold the Up button for 5 seconds to complete ID SET (when
connecting to a wireless subwoofer or wireless rear speakers).
4
Play / Pause
You can also play or pause music by pressing the button.
5
Mute
Press the
(Mute) button to mute the sound.
Press it again to unmute the sound.
LED
indicator
Blinks X Repeatly

ENG - 10
6
Info
Press the button to display information about the current function. (See page 7)
When connected to Dolby Atmos®, the LED indicator blinks cyan 3 times.
7
SOUND MODE
By pressing the button, you can select the desired audio mode. Each time the mode changes, the Multicolour LED
blinks in white.
LED indicator
White Blinks X1
“Surround” → “Game” → “Standard” → “Adaptive Sound” →
“DTS Virtual:X”
• Surround
Provides a wider sound eld than standard.
• Game
Provides stereoscopic sound to immerse you in the action while gaming.
• Standard
Outputs the original sound.
• Adaptive Sound
Analyzes the content in real time and automatically provides the optimal sound eld based on the
characteristics of the content.
• DTS Virtual:X
Immersive 3D sound from any content.
8
VOLUME
Push the button up or down to adjust the volume.
LED indicator
White moves to right X1
Volume Up
White moves to left X1
Volume Down
9
WOOFER (BASS)
LEVEL
Push the button up or down to adjust the level of the woofer (bass) to -12 or between -6 to +6. To set the woofer
(bass) volume level to 0 (Default), press the button.
10
Bluetooth PAIR
Switch the Soundbar to Bluetooth pairing mode.
When you press the button, the LED display changes as shown below.
• Until pairing is complete, the Multicolour LED changes as Red → Green → Blue in turn.
LED indicator
Red → Green →
Blue Blinks
Pairing
Cyan Blinks X3
Connection is complete
“Ready to connect via Bluetooth.”
11
CH LEVEL
By pressing the button, you can adjust the volume of the each speaker.
• To control the volume of the each speaker select “Centre Level” or “Front Top Level” in Sound Settings, and
then adjust the volume between -6~+6 by using the Up/Down buttons.
• If the Rear Speakers (sold separately) are connected, the setting “Rear Level” and “Rear Top Level” is
supported. To adjust the volume of the “Rear Level” and “Rear Top Level” between -6 to +6 by using the Up/
Down buttons.
LED indicator
White Blinks X1
“Centre Level” → “Front Top Level”

ENG - 11
12
TONE CONTROL
By pressing the button, you can adjust the volume of the treble or bass sound. The dered item can be adjusted
using the Up/Down buttons. This function is enabled in Sound mode excluding in Standard mode.
• To control the volume of the treble or bass sound, select “Treble” or “Bass” in Sound Settings, and then adjust
the volume between -6~+6 by using the Up/Down buttons.
• Once the bass level is changed, the woofer level will be also adjusted accordingly.
LED indicator
White Blinks X1
“Treble” → “Bass”
13
Sound Control
By pressing the button, you can set the audio function. The desired item can be adjusted using the Up/Down
buttons. Each time the mode changes, the Multicolour LED blinks in white.
LED indicator
White Blinks X1
“SpaceFit Sound” → “Active Voice Amplier” → “Voice
enhancement” → “Night Mode” → “Sync” → “Virtual”
• Voice enhancement makes it easier to hear spoken dialog in movies and TV.
• Night Mode is optimized for night time viewing with the settings adjusted to bring the volume down but keep
the dialog clear.
• Press and hold the
(Sound Control) button for about 5 seconds to adjust the sound for each frequency band.
150Hz, 300Hz, 600Hz, 1.2kHz, 2.5kHz, 5kHz, and 10kHz are selectable using the Left/Right buttons and each
can be adjusted to a setting between -6 to +6 using the Up/Down buttons.
(Make sure the Sound mode is set to “STANDARD”.)
• If the video on the TV and audio from the Soundbar are not synchronized, select “Sync” in Sound Control, and
then set the audio delay between 0~300 milliseconds by using the Up/Down buttons.
• “Sync” is only supported for some functions.
• The Virtual function can be turned On/Off by using the Up/Down buttons.
14 USB port (C-type)
for charging
The LED lights while charging. When fully charged, the LED turns off.
• The USB Cable is not provided.
• When the remote control does not work due to low battery, charge it by using the USB-C type port.
Active Voice Amplier (AVA)
• Analyzes external noise in real time while soundbar is playing, so that voice audio can always be heard clearly.
• No data is saved during the analysis.
Using the Hidden Buttons (Buttons with more than one function)
Hidden Button
Reference page
Remote Control Button Function
WOOFER (Up) TV remote control On/Off (Standby) page 13
Up ID SET page 9
(Sound Control)
7 Band EQ page 11
(Source)
Audio Feedback On/Off (Standby) page 9

ENG - 12
Output specications for the different sound effect modes
Effect Input
Output
With Subwoofer Only
With Subwoofer & Wireless Rear
Speaker Kit
Surround
2.0 ch 3.1.2 ch 5.1.4 ch
5.1 ch 3.1.2 ch 5.1.4 ch
Dolby Atmos® 3.1.2 ch 5.1.4 ch
Game
2.0 ch 3.1.2 ch 5.1.4 ch
5.1 ch 3.1.2 ch 5.1.4 ch
Dolby Atmos® 3.1.2 ch 5.1.4 ch
Standard
2.0 ch 2.1 ch 2.1 ch
5.1 ch 3.1 ch 5.1 ch
Dolby Atmos® 3.1.2 ch 5.1.4 ch
Adaptive Sound
2.0 ch 3.1.2 ch 5.1.4 ch
5.1 ch 3.1.2 ch 5.1.4 ch
Dolby Atmos® 3.1.2 ch 5.1.4 ch
DTS Virtual:X
2.0 ch 3.1.2 ch 5.1.4 ch
5.1 ch 3.1.2 ch 5.1.4 ch
Dolby Atmos® 3.1.2 ch 5.1.4 ch
• The Samsung Wireless Rear Speaker Kit can be purchased separately. To purchase a Kit, contact the vendor you purchases the Soundbar
from.
• The Surround Speakers will not produce sounds for 2 channel output while STANDARD mode is in use. To enable sound for the Surround
Speakers, change the effect mode to SURROUND.
• When the input source is Dolby Atmos® the Subwoofer-only setup provides 3.1.2 channel audio, while the Subwoofer & Wireless Rear
Speaker Kit setup provides 5.1.4 channel audio.

ENG - 13
Adjusting the Soundbar volume with a TV remote control
Adjust the Soundbar volume using the TV’s remote control.
• This function can be used with IR remote controls only. Bluetooth remote controls (remote controls that require pairing) are not
supported.
• Set the TV speaker to External Speaker to use this function.
• Manufacturers supporting this function:
Samsung, VIZIO, LG, Sony, Sharp, PHILIPS, PANASONIC, TOSHIBA, Hisense, RCA
1. Turn Off the Soundbar.
2. Push up and hold the WOOFER button for 5 seconds.
Each time you push the WOOFER button up and hold it for 5 seconds, the mode switches in the following order: “OFF-TV REMOTE” (Default
mode), “SAMSUNG-TV REMOTE”, “ALL-TV REMOTE”.
Remote Control Button LED Indicator Status
(Default mode)
Red Blinks X1
“Off-TV Remote”
(Default mode)
Disable the TV remote control.
Cyan Blinks X1
“Samsung-TV Remote”
Enable a Samsung TV’s IR remote control.
Blue Blinks X1
“All-TV Remote”
Enable a third-party TV’s IR remote control.
ENG - 14
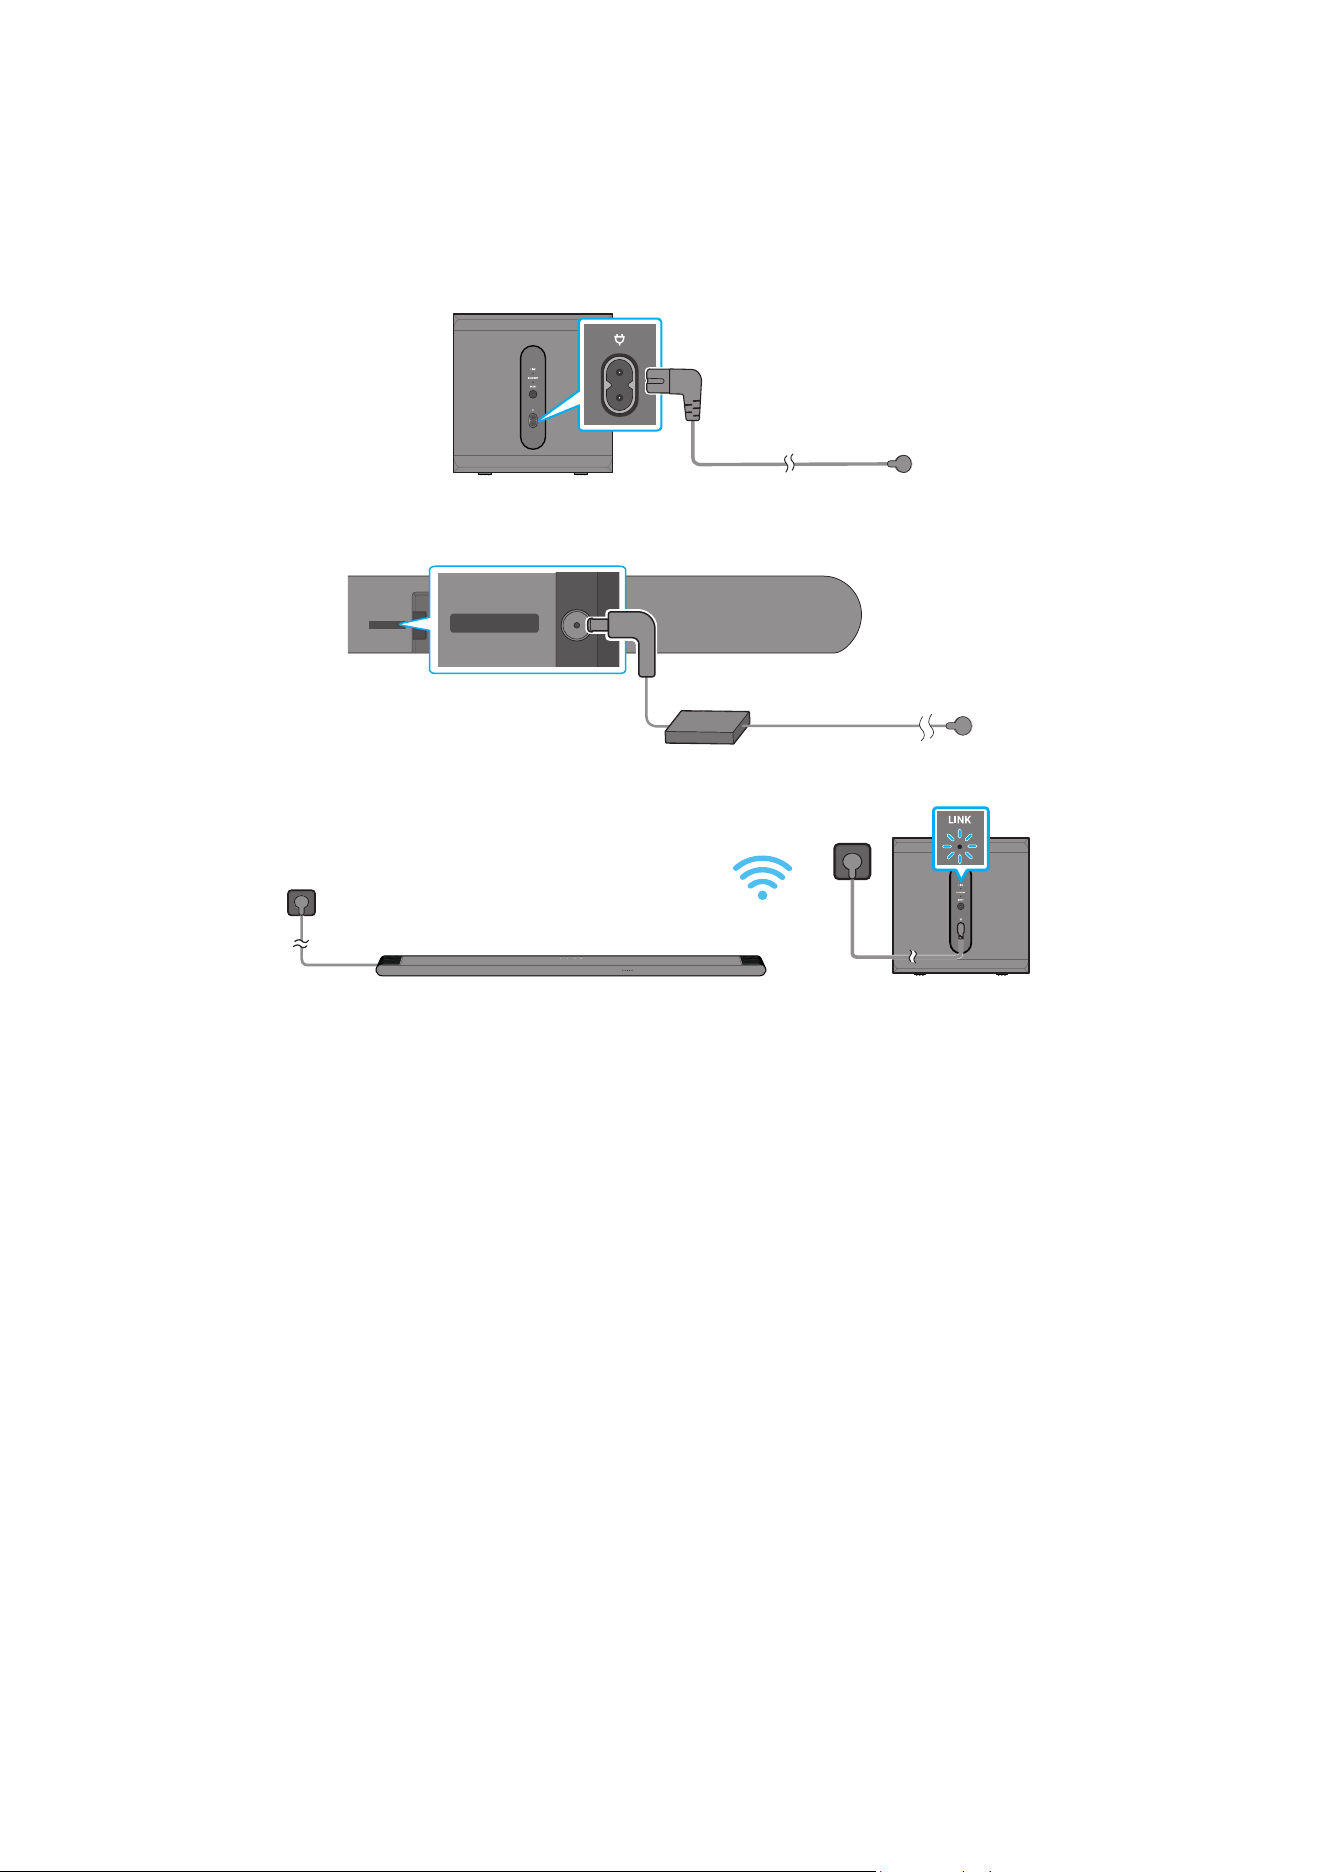
04 CONNECTING THE SOUNDBAR
Connecting the power and units
Use the Power cord to connect the Subwoofer and Soundbar to an electrical outlet in the following order:
• For more information about the required electrical power and power consumption, refer to the label attached to the product. (Label: Bottom
of the Soundbar Main Unit)
1. Connect the Power cord to the Subwoofer.
Rear of Subwoofer
Power Cord
2. Connect the Power cord to the Soundbar.
Rear of the Soundbar
Main Unit
DC 19V
DC 19V
Power Cord
AC/DC Adapter
3. Connect power to the Soundbar and Subwoofer. The Subwoofer is automatically connected when the Soundbar is turned on.
LINK LED - Blue is On
NOTE
• Connect the Subwoofer power before connecting to the Soundbar. The Subwoofer will be automatically connected when turning on the
Soundbar.
• If you unplug and reconnect the power cord when the product is turned on, the Soundbar turns on automatically.

ENG - 15
Manually connecting the Subwoofer
Before performing the manual connection procedure below:
• Check whether the power cables for the Soundbar and subwoofer is connected properly.
• Make sure that the Soundbar is turned off.
1. Turn off the Soundbar main.
2. Press and hold ID SET on the rear of the subwoofer for at least 5 seconds.
• The red indicator at the rear of each speaker turns off and the blue indicator blinks.
5 Sec
Rear of Subwoofer
Blinking
blue fast
Rear of Subwoofer
3. Press the Up button on the remote control for 5 seconds.
• The Soundbar will automatically power on when ID SET is complete.
5 Sec
LED
indicator
Red → Green →
Blue Blinks
4. Check if the LINK LED is solid blue (connection complete).
LINK LED - Blue is On
The LINK LED indicator stops blinking and glows a solid blue when a connection
is established between the Soundbar and the Wireless Subwoofer.

ENG - 16
LED Indicator Lights on the Rear of Subwoofer
LED Status Description Resolution
Blue
On
Successfully connected
(normal operation)
-
Blinking Recovering the connection
Check if the power cable attached to the main Soundbar
unit is connected properly or wait about 5 minutes.
If blinking persists, try manually connecting the
subwoofer. See page 15.
Red
On
Standby (with the
Soundbar main unit turned
off)
Check if the power cable attached to the main Soundbar
unit is connected properly.
Connection failed
Connect again. See the instructions for manual
connection on page 15.
Red and
blue
Blinking Malfunction
See the contact information for the Samsung Service
Centre in this manual.
NOTE
• If the main unit is powered off, the wireless subwoofer will go into stand-by mode and the STANDBY LED on the rear of the sub-woofer will
turn red after blinking in blue several times.
• If you use a device that uses the same frequency as the Soundbar near the Soundbar, interference may cause some sound interruption.
• The maximum transmission distance of the main unit’s wireless signal is about 10 m, but may vary depending on your operating environment.
If a steel-concrete or metallic wall is between the main unit and the wireless subwoofer, the system may not operate at all because the
wireless signal cannot penetrate metal.
CAUTION
• Wireless receiving antennas are built into the wireless subwoofer. Keep the unit away from water and moisture.
• For optimal listening performance, make sure that the area around the wireless subwoofer is clear of any obstructions.
Connecting an SWA-9500S (Sold Separately) to your Soundbar
Expand to true wireless surround sound by connecting the Samsung Wireless Rear Speaker Kit (SWA-9500S, sold separately) to your Soundbar.
For detailed information on connections, see the Samsung Wireless Rear Speaker Kit manual.

ENG - 17
05 CONNECTING TO A TV
Connecting the TV that supports HDMI ARC (Audio Return Channel)
CAUTION
• When using an HDMI to Micro HDMI cable, take caution not to break the cable terminal.
• When the HDMI cable is connected, the HDMI signal is received rst.
• To connect the HDMI cable between the TV and Soundbar, be sure to connect the terminals marked ARC. Otherwise, the TV sound may not
be output.
• The recommended cable is High Speed HDMI Cable with Ethernet.
HDMI IN
(ARC)
SERVICE
HDMI
(ARC)
Connect to the HDMI IN (ARC)
or (eARC) port of your TV.
Connect to the HDMI (ARC)
port of the Soundbar main
unit.
HDMI to Micro
HDMI Cable
Rear of the Soundbar
Top of the Soundbar
LED indicator
White On → Off
“TV ARC”
1. With the Soundbar and TV turned off, connect the HDMI cable as shown in the gure.
2. Turn on the Soundbar and TV.
3. Your TV will output sound via the Soundbar.
• When the TV sound is not output, press the
(Multi Function) button at the top of the Soundbar or the (Source) button on the remote
control to select the “TV ARC” mode.
• When the sound is not output, check the HDMI cable connection again.
• Use the volume buttons on the TV’s remote control to change the volume on the Soundbar.
NOTE
• We recommend you use a coreless HDMI cable if possible. If you use a cored HDMI cable, use one whose diameter is less than 14 mm.
• This function is not available if the HDMI cable does not support ARC.
• When the audio in a broadcast is encoded in Dolby Digital and the “Digital Output Audio Format” on your TV is set to PCM, we recommend that
you change the setting to Dolby Digital. When the setting on the TV is changed, you will experience better sound quality. (The TV menu may
use different words for Dolby Digital and PCM depending on the TV manufacturer.)
ENG - 18
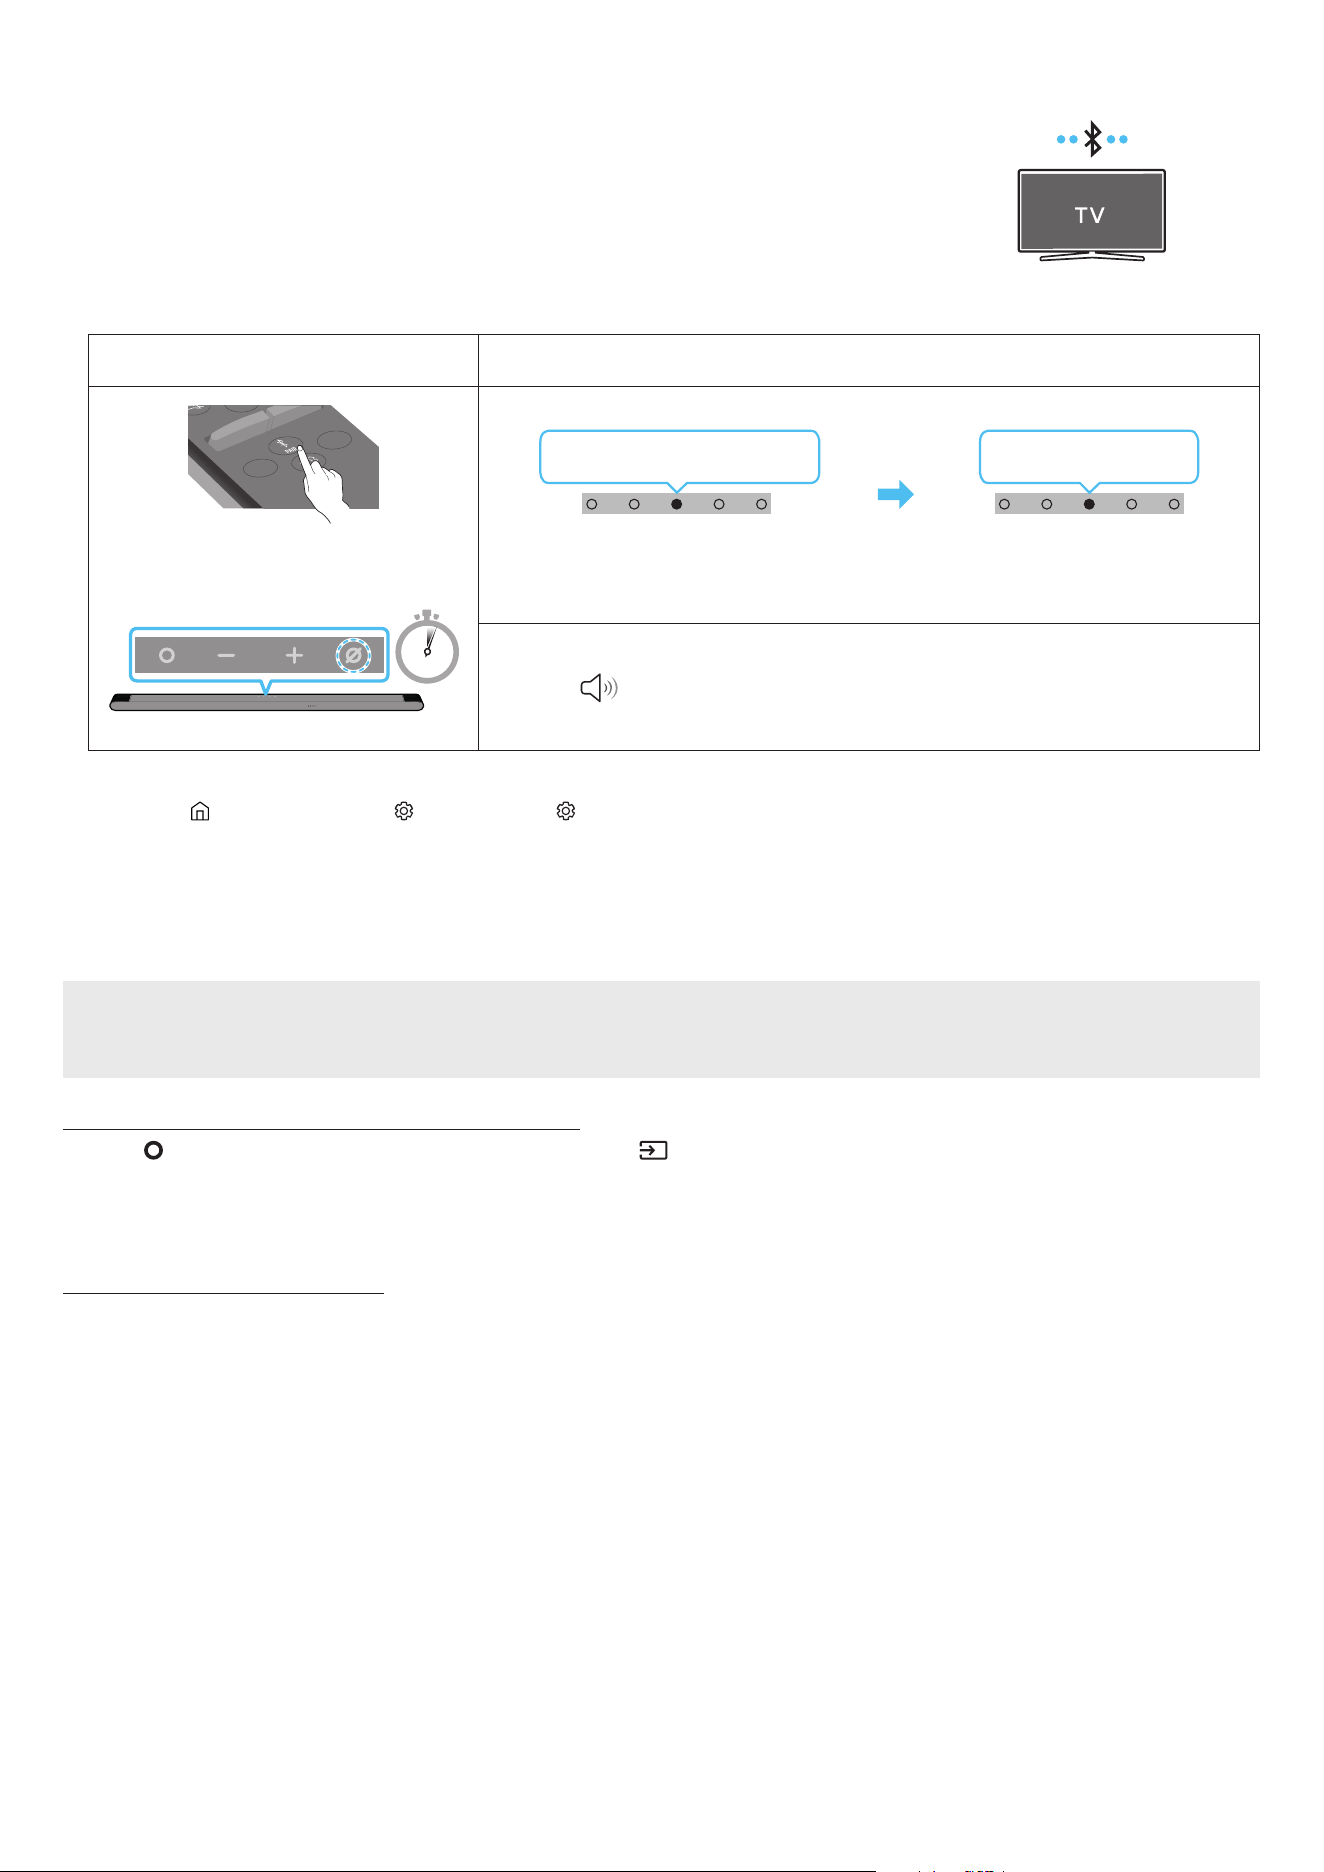
Connecting via Bluetooth
When a Samsung TV is connected using Bluetooth, you can hear stereo sound without the hassle of
cabling.
• Only one Samsung TV can be connected at a time.
• Samsung TV that supports Bluetooth can be connected. Check the specications of your TV.
The initial connection
1.
Bluetooth Pairing button LED Indicator
SOUNDBAR
SOUND
MODE
WOOFER
+
_
CH LEVEL
TONE
CONTROL
(OR)
When in “Bluetooth” mode
5 Sec
Red → Green → Blue Blinks
Pairing
Cyan Blinks X3
Connection is complete
• Until pairing is complete, the Multicolour LED changes as Red → Green → Blue in turn.
“Ready to connect via Bluetooth.”
1.
2. Select Bluetooth mode on the Samsung TV.
(e.g. Home ( ) → Menu → Settings ( ) → All Settings ( ) → Sound → Sound Output → Bluetooth Speaker List → [AV] Samsung Soundbar
S***B (Bluetooth))
3. Select “[AV] Samsung Soundbar S***B” from the list on TV’s screen.
An available Soundbar is indicated with “Need Pairing” or “Paired” on the TV’s Bluetooth device list. To connect the Samsung TV to the
Soundbar, select the message, and then establish a connection.
4. You can now hear Samsung TV sound from the Soundbar.
If the device fails to connect
• If you have an existing Soundbar (e.g., [AV] Samsung Soundbar S***B) on the list of speakers on the Samsung TV, delete it.
• Then repeat steps 1 through 3.
Disconnecting the Soundbar from the Samsung TV
Press the (Multi Function) button at the top of the Soundbar or the (Source) button on the remote control to select the mode other than
“Bluetooth”.
• Disconnecting takes time because the Samsung TV must receive a response from the Soundbar.
(The time required may differ, depending on the Samsung TV model.)
Notes on Bluetooth connection
• Locate a new device within 1 m to connect via Bluetooth communication.
• If asked for a PIN code when connecting a Bluetooth device, enter <0000>.
• The Soundbar automatically turns off after 18 minutes in the Ready state.
• The Soundbar may not perform Bluetooth search or connection correctly under the following circumstances:
‒ If there is a strong electrical eld around the Soundbar.
‒ If several Bluetooth devices are simultaneously paired with the Soundbar.
‒ If the Bluetooth device is turned off, not in place, or malfunctions.
• Electronic devices may cause radio interference. Devices that generate electromagnetic waves must be kept away from the Soundbar main
unit - e.g., microwaves, wireless LAN devices, etc.

ENG - 19
Connecting via Wi-Fi
Pre-connection Checklist
• Wi-Fi connection is available only on Samsung TV.
• Check whether the wireless router (Wi-Fi) is turned on and the TV is connected to the router.
• The TV and Soundbar must be connected to the same wireless network (Wi-Fi).
• If your wireless router (Wi-Fi) uses a DFS channel, you will not be able to establish a Wi-Fi connection between the TV and Soundbar.
Contact your Internet service provider for details.
• Because the menus may differ depending on the year of manufacture, refer to your TV manual.
• To connect the TV to the Soundbar via Wi-Fi, connect the Soundbar to the wireless router rst. See page 25, for details on how to
establish a Wi-Fi connection.
1. For more information about Wi-Fi connection to the Soundbar, see page 25, “Method 2. Connecting via Wi-Fi (Wireless Network)”.
2. Change the input source of the TV by using the Audio menu to Soundbar.
• Samsung TVs released in 2017 or later
Sound → Sound Output → [AV] Samsung Soundbar S***B (Wi-Fi)

ENG - 20
Connecting to a TV that supports Dolby Atmos
Pre-connection Checklist
• Dolby Atmos® is supported in “TV ARC” or “Wi-Fi” mode.
• Make sure that the content supports Dolby Atmos®.
HDMI IN
(ARC)
SERVICE
HDMI
(ARC)
Connect to the HDMI IN
(ARC) port of your TV.
HDMI to Micro
HDMI Cable
Rear of the Soundbar
Top of the Soundbar
LED indicator
White On → Off
“TV ARC”
1. With the Soundbar and TV turned off, connect the HDMI cable as shown in the gure.
2. Turn on the Soundbar and TV.
3. TV sound is output from the Soundbar.
LED
indicator
White On → Off
“Wi-Fi”
TV menu
Wi-Fi
1. Connect the Soundbar and TV to the same wireless network (Wi-Fi).
2. For sound output of the TV, select Soundbar.
3. TV sound is output from the Soundbar.
NOTE
• When you use Dolby Atmos®: If the input source is Dolby Atmos®, refer to “Output specications for the different sound effect modes” on
page 12.
• Conguring Dolby Atmos® on your BD player or other device connected to the TV.
Open the audio output options on the settings menu of your BD player or other device and make sure that “No Encoding” is selected for
Bitstream. For example, on a Samsung BD Player, go to Home Menu → Sound → Digital Output and then select Bitstream (unprocessed).
• This function is available in some Samsung TVs and some Soundbar models.

ENG - 21
Using the Q-Symphony Function
For Q-Symphony, the Soundbar syncs with a Samsung TV to output sound through two devices for optimum surround effect. When the Soundbar
is connected, the menu, “TV+Soundbar” appears under the Sound Output menu of the TV. Select the corresponding menu.
TV menu
HDMI to Micro HDMI Cable
LED
indicator
White On → Off
“TV ARC”
• TV menu example: TV + [AV] Soundbar series name (HDMI)
LED
indicator
White On → Off
“Wi-Fi”
TV menu
Wi-Fi
• TV menu example: TV + [AV] Soundbar series name (Wi-Fi)
NOTE
• It can operate according to the Codec supported by TV.
• This function is supported only when the HDMI Cable or Wi-Fi is connected.
• Ensure that your TV and Soundbar are connected to the same wireless router/frequency.
• This function is available in some Samsung TVs and some Soundbar models.

ENG - 22
Using the Spacet sound
Provides optimized sound quality by analyzing the listening spaces.
Method 1. Connecting via Soundbar
To enable this function, turn on the SpaceFit Sound mode with the remote control of the Soundbar.
( (Sound Control) → “SpaceFit Sound Off” → ( Up ) → “SpaceFit Sound On”)
• This is available in all Sound modes.
Method 2. Connecting via TV
To enable this function, turn on the Adaptive Sound+ mode on your Samsung TV menu.
(Home ( ) → Menu → Settings ( ) → All Settings ( ) → General → Intelligent Mode Settings → Adaptive Sound+)
• The sound mode on your Soundbar will automatically change to Adaptive Sound+ if you enable the Adaptive Sound+ mode on your TV.
NOTE
This function works when the Soundbar connects to some of the Samsung TVs.

ENG - 23
06 CONNECTING A MOBILE DEVICE
Method 1. Connecting via Bluetooth
When a mobile device is connected using Bluetooth, you can hear stereo sound without the hassle of
cabling.
• When you connect a paired Bluetooth device with the Soundbar off, the Soundbar automatically
turns on.
Mobile device
The initial connection
When connecting to a new Bluetooth device, make sure the device is within 1 m distance.
1.
Bluetooth Pairing button LED Indicator
SOUNDBAR
SOUND
MODE
WOOFER
+
_
CH LEVEL
TONE
CONTROL
(OR)
When in “Bluetooth” mode
5 Sec
Red → Green → Blue Blinks
Pairing
Cyan Blinks X3
Connection is complete
• Until pairing is complete, the Multicolour LED changes as Red → Green → Blue in turn.
“Ready to connect via Bluetooth.”
1.
2. On your device, select “[AV] Samsung Soundbar S***B” from the list that appears.
3. Play music les from the device connected via Bluetooth through the Soundbar.
If the device fails to connect
• If you have an existing Soundbar (e.g., “[AV] Samsung Soundbar S***B”) in the list of speakers on the Mobile device, delete it.
• Repeat steps 1 and 2.
Notes on Bluetooth connection
• Locate a new device within 1 m to connect via Bluetooth communication.
• If asked for a PIN code when connecting a Bluetooth device, enter <0000>.
• The Soundbar automatically turns off after 18 minutes in the Ready state.
• The Soundbar may not perform Bluetooth search or connection correctly under the following circumstances:
‒ If there is a strong electrical eld around the Soundbar.
‒ If several Bluetooth devices are simultaneously paired with the Soundbar.
‒ If the Bluetooth device is turned off, not in place, or malfunctions.
• Electronic devices may cause radio interference. Devices that generate electromagnetic waves must be kept away from the Soundbar main
unit - e.g., microwaves, wireless LAN devices, etc.
• The Soundbar supports SBC data (44.1kHz, 48kHz).
• Connect only to a Bluetooth device that supports the A2DP (AV) function.
• You cannot connect the Soundbar to a Bluetooth device that supports only the HF (Hands Free) function.
• When connecting the Soundbar to a Bluetooth device, place them as close to each other as possible.
• The farther the Soundbar and Bluetooth device are from each other, the lower the sound quality will become.
The Bluetooth connection may break when the devices are out of the effective range.
• The Bluetooth connection may not function as intended in areas with poor reception.

ENG - 24
• A Bluetooth device may experience noise or malfunction under in the following conditions:
‒ When the body is in contact with the signal transceiver on the Bluetooth device or Soundbar
‒ In corners or when there is an obstacle in proximity, such as a wall or partition, where electrical changes may occur.
‒ When exposed to radio interferences by other products operating on the same frequency ranges, such as medical equipment, microwave
ovens, and wireless LAN devices.
‒ Obstacles such as doors and walls may still impact the sound quality even when the devices are within the effective range.
• Note that your Soundbar cannot be paired with other Bluetooth devices while using the Bluetooth option.
• This wireless device may cause electrical interference during operation.
Disconnecting the Bluetooth device from a Soundbar
You can disconnect a Bluetooth device from the Soundbar. For instructions, see the Bluetooth device’s user manual.
• The Soundbar will be disconnected.
• If the Soundbar is disconnected from the Bluetooth device, the multicolour LED indicator on the Soundbar blinks “Red” three times.
Disconnecting the Soundbar from the Bluetooth device
Press the (Multi Function) button on the top of the Soundbar or the (Source) button on the remote control to switch the mode from
“Bluetooth”.
• Disconnecting takes time because the Bluetooth device must receive a response from the Soundbar. (Disconnection time may differ,
depending on the Bluetooth device)
ENG - 25
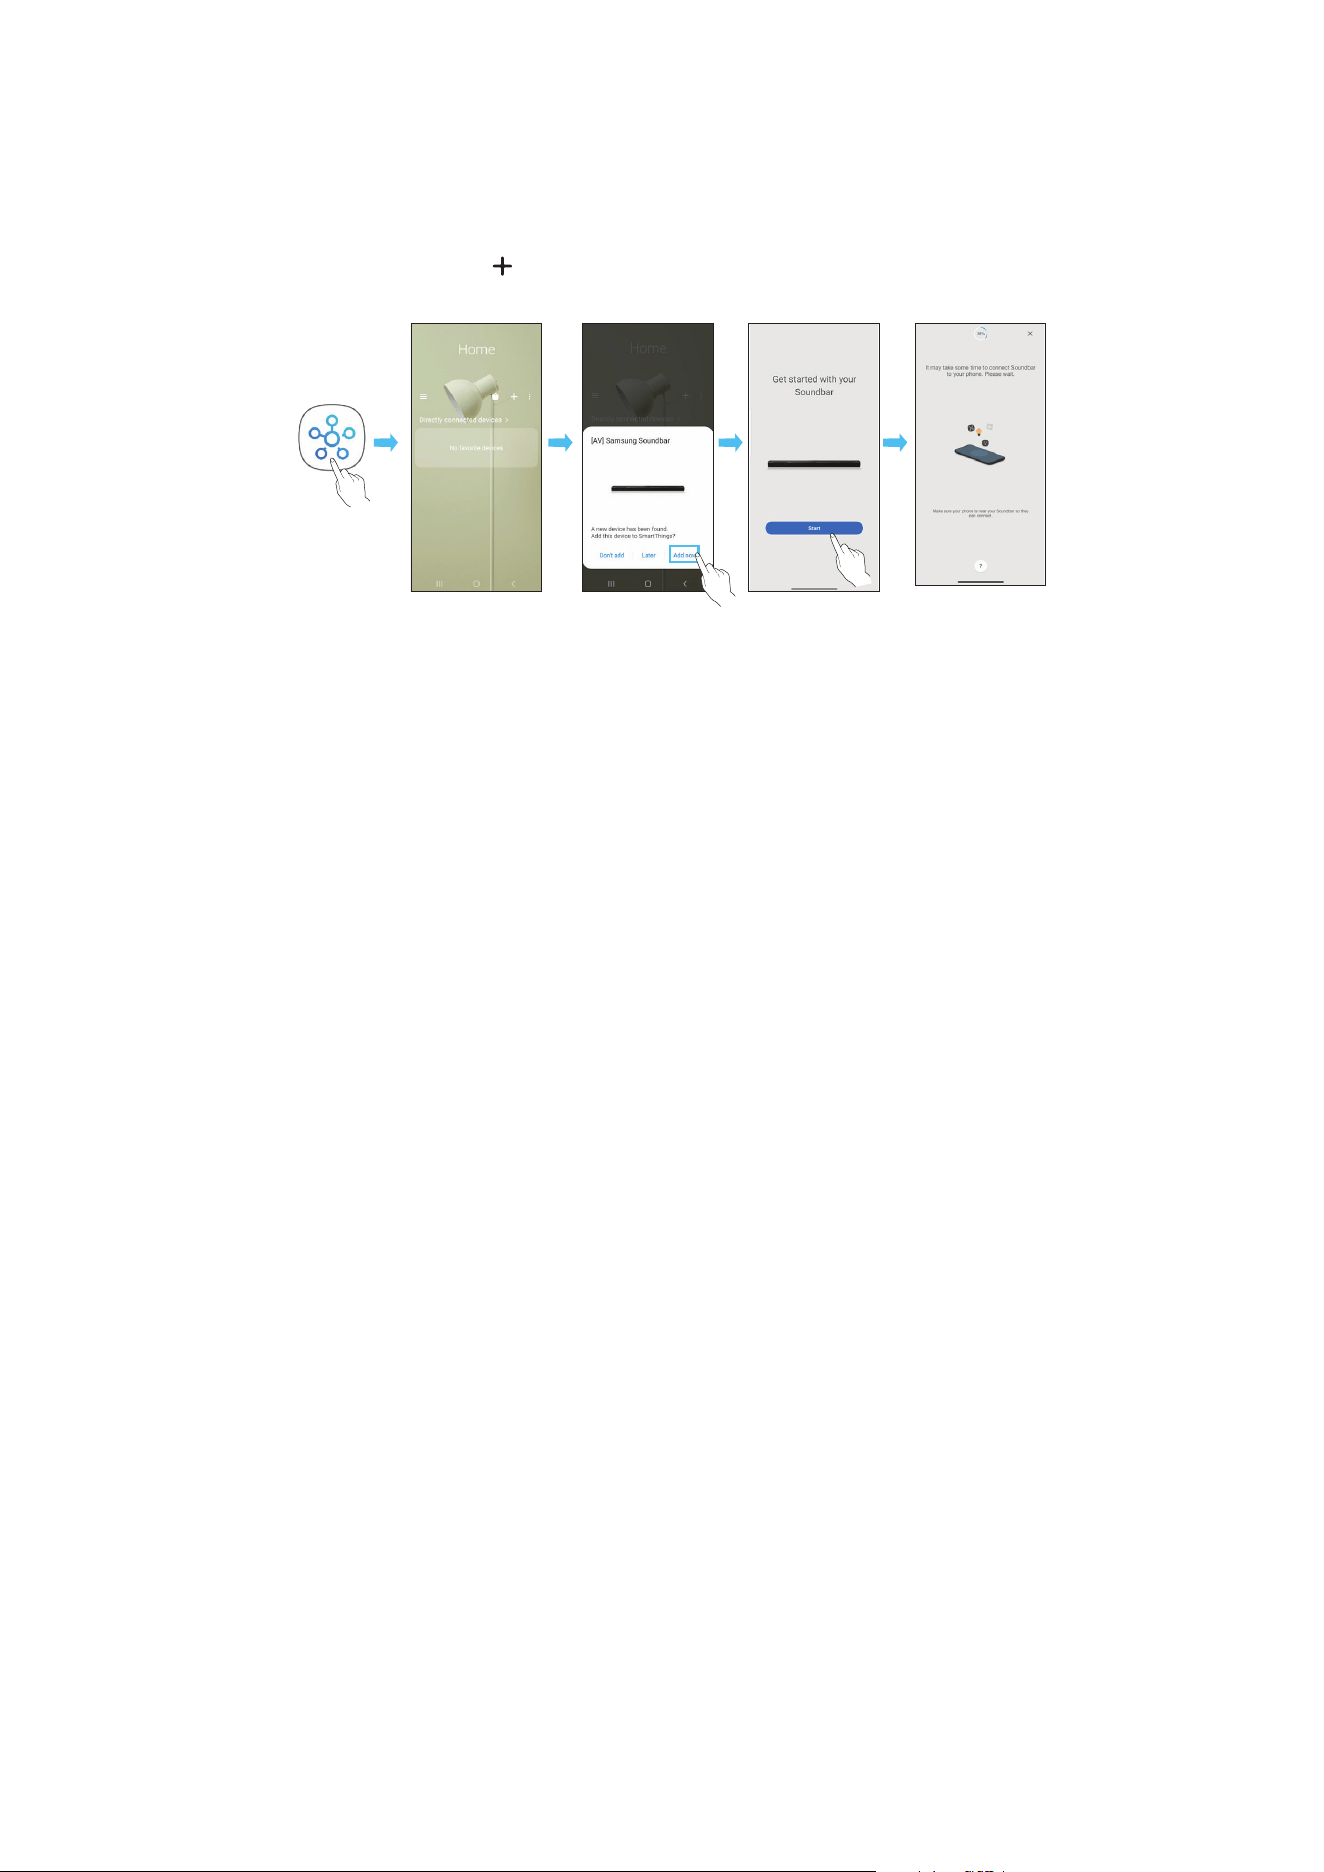
Method 2. Connecting via Wi-Fi (Wireless Network)
To connect a Soundbar to a mobile device via a wireless network (Wi-Fi), the SmartThings app is required.
The initial connection
1. Install and launch the SmartThings app from your mobile device (smartphone or tablet).
2. On the app, follow the screen instructions to add the Soundbar.
• The automatic pop-up (the second screenshot below) may not show on some devices.
If the pop-up window does not appear, press “ ” on the Home screen. The Soundbar is added to the app.
• The illustration below may differ with the app version.
Launch App Auto pop-up Add device
SmartThings
App
ENG - 26
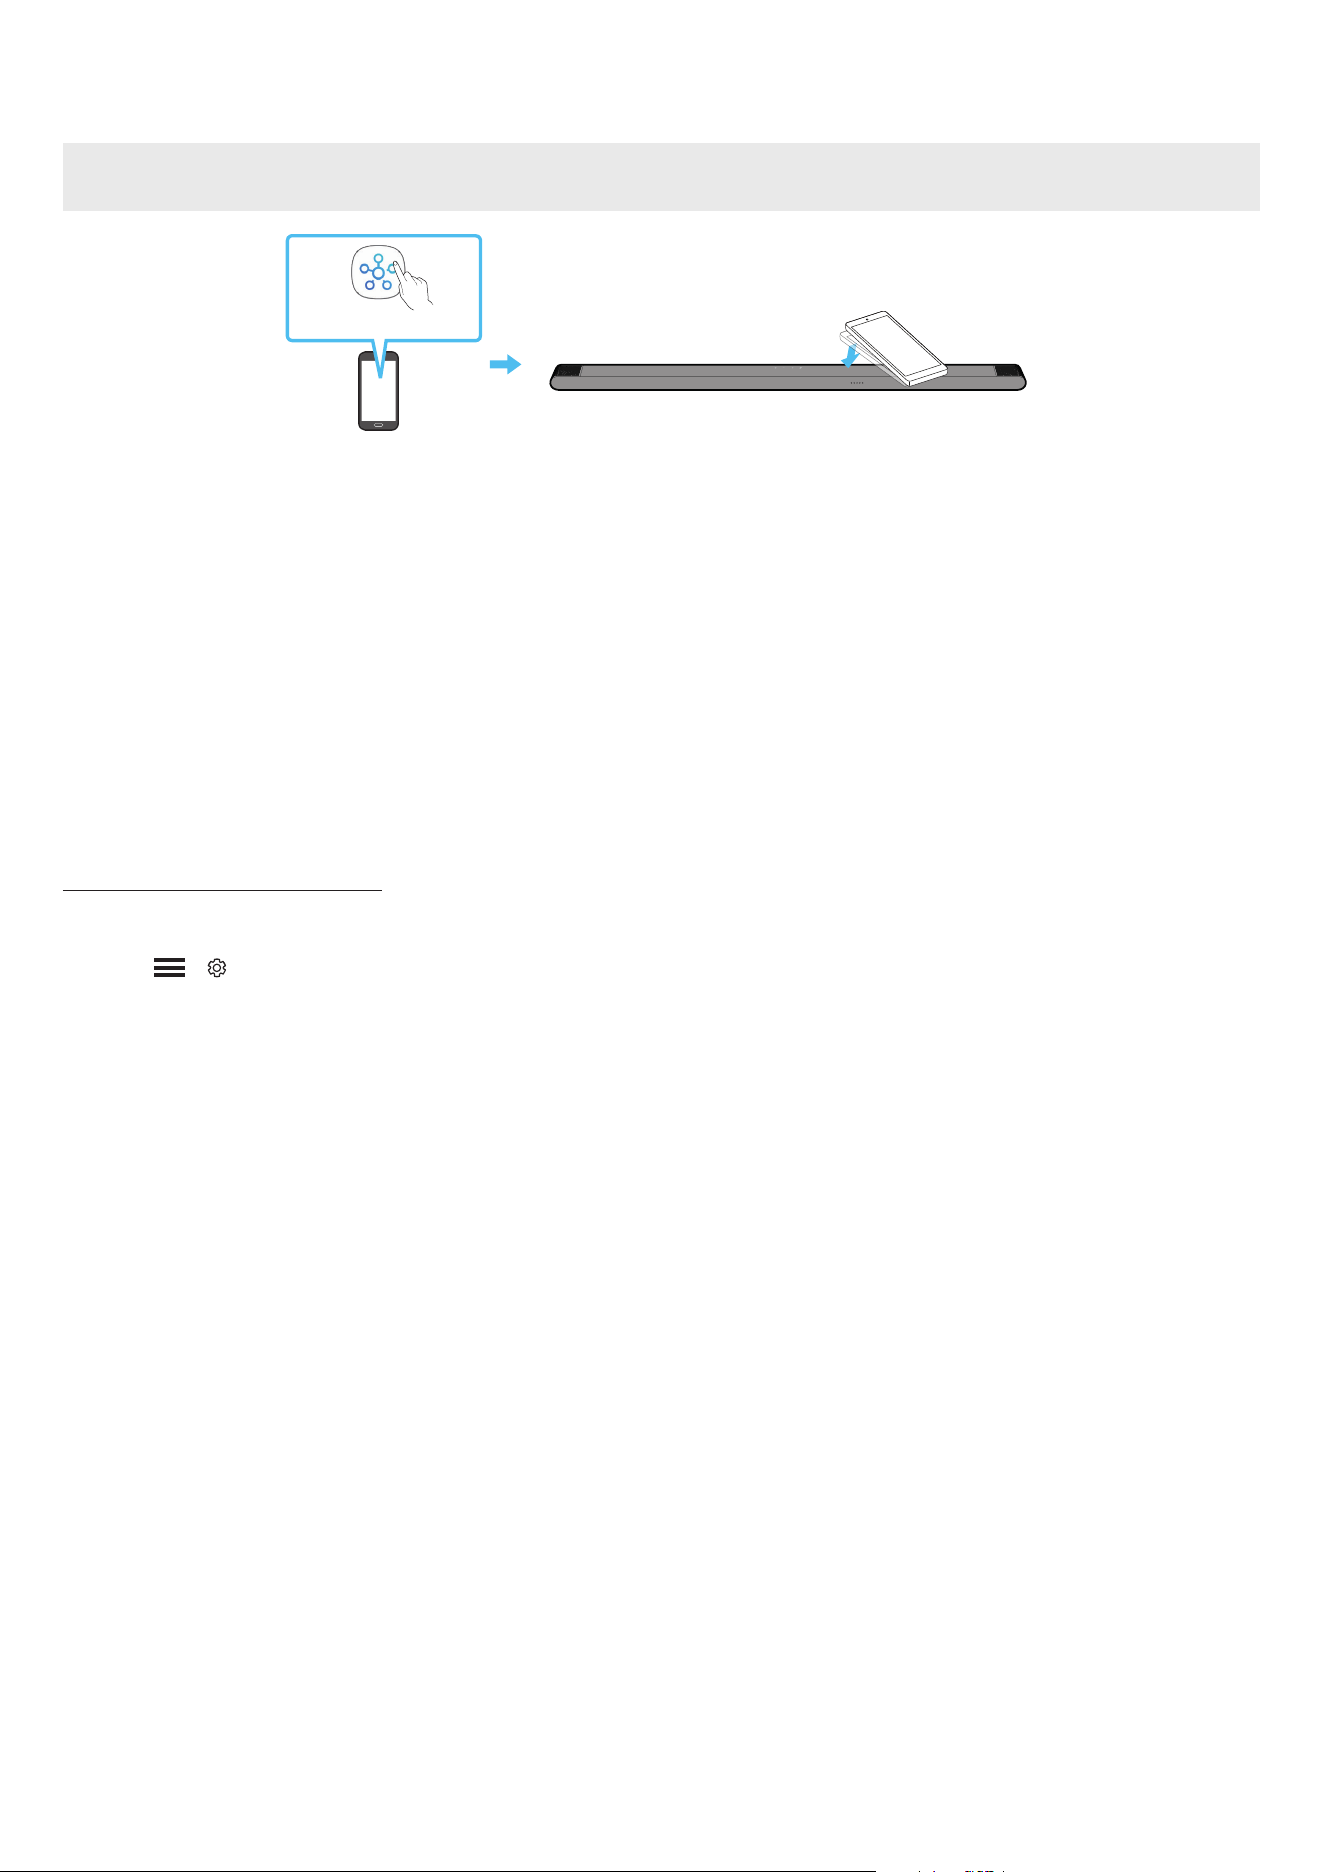
Using the Tap Sound
Tap the Soundbar with your mobile device to play the sound of content on the mobile device through the Soundbar.
• This function may not be supported, depending on the mobile device.
• This function is only compatible with Samsung mobile devices with Android 8.1 or later.
Top of the Soundbar
Mobile device
SmartThings App
1. Turn on the Tap Sound function on your mobile device.
• For details on how to turn on the function, refer to “Setting the Tap Sound function” below.
2. Tap the Soundbar with the mobile device. Select “Start now” in the displayed message window.
A connection is established between the mobile device and Soundbar via Bluetooth.
3. Play the sound of content on the mobile device through the Soundbar.
• This function connects a mobile device to the Soundbar via Bluetooth by detecting vibration that occurs when the device touches the
Soundbar.
• Make sure the mobile device does not tap a sharp corner of the Soundbar. The Soundbar or mobile device may become scratched or
damaged.
• It is recommended that the mobile device be covered with a case. Lightly tap the wide area in the upper portion of the Soundbar, without
using excessive force.
• To use this function, update the SmartThings app to the latest version.
The function may not be supported, depending on the app version.
Setting the Tap Sound function
Use the SmartThings app to turn on the Tap View, Tap Sound function.
1. On the mobile device, run the SmartThings app.
2. Select ( → ) in the SmartThings app screen displayed on the mobile device.
3. Set “Tap View, Tap Sound” to On to allow the function to work when a mobile device moves close to the Soundbar. The function is turned on.
NOTE
• When the mobile device is in power-saving mode, the Tap Sound function does not work.
• The Tap Sound function may not work if there are devices near the Soundbar that cause radio interference such as electric devices. Make sure
devices that may cause radio interference are placed at a sufcient distance away from the Soundbar.

ENG - 27
07 CONNECTING VIA APPLE AIRPLAY 2
• This feature may not be available in some countries.
• This Samsung Soundbar supports AirPlay 2 and requires iOS 11.4 or later.
With AirPlay 2, you can stream music, podcasts, and other audio from your Apple devices to the Samsung Soundbar.
• Make sure the Soundbar is powered on and connected to the same Wi-Fi network as your Apple device.
• Select
from an AirPlay-supported app or Control Centre on your iPhone, iPad, or Mac.
• Select the Soundbar from the list of available devices to play the current audio to.
ENG - 28
08 INSTALLING THE WALL
MOUNT
Installation Precautions
• Install on a vertical wall only.
• Do not install in a place with high temperature or humidity.
• Verify whether the wall is strong enough to support the product’s
weight. If not, reinforce the wall or choose another installation
point.
• Connect cables from the unit to external devices before you install
the Soundbar on the wall.
• Make sure the unit is turned off and unplugged before you install
it. Otherwise, it may cause an electric shock.
Wallmount Components
AH81-15127A-01
A TYPE
:
740mm
B TYPE
:
700mm
Wall Mount Guide
x 2
x 4
(M5 X L55)
Holder-Screw Screw
x 2
x 4
Bracket-Wall Mount Screw Anchor
1. Place the Wall Mount Guide against the wall surface.
• The Wall Mount Guide must be level.
• If your TV is mounted on the wall, install the Soundbar at least
5 cm below the TV.
5 cm or more
2. Align the Wall Mount Guide’s Centre Line with the centre of your
TV (if you are mounting the Soundbar below your TV), and then x
the Wall Mount Guide to the wall using tape.
• If you are not mounting below a TV, place the Centre Line in the
centre of the installation area.
AH81-15127A-01
A TYPE
:
740mm
B TYPE
:
700mm
Centre Line
3. Push a pen tip or sharpened pencil tip through the centre of the
A-TYPE and B-TYPE images on each end of the Guide to mark the
holes for the supporting screws, and then remove the Wall Mount
Guide.
AH81-15127A-01
A TYPE
:
740mm
B TYPE
:
700mm
4. Using an appropriately sized drill bit, drill a hole in the wall at each
marking.
• If the markings do not correspond to the positions of studs,
make sure you insert appropriate anchors or mollies into the
holes before you insert the support screws. If you use anchors
or mollies, make sure the holes you drill are large enough for
the anchors or mollies you use.
5. Push a screw (not supplied) through each Screw, and then screw
each screw rmly into a support screw hole.

ENG - 29
6. Install the 2 Bracket-Wall Mounts in the correct orientation on the
rear of the Soundbar using 2 Holder-screws.
• When assembling, make sure the hanger part of the Bracket-
Wall Mounts are located behind the rear of the Soundbar.
Rear of Soundbar
Right end of Soundbar
7. Install the Soundbar with the attached Bracket-Wall Mounts by
hanging the Bracket-Wall Mounts on the Holder-Screws on the
wall.
8. Slide the Soundbar down as shown below so that the Bracket-Wall
Mounts rest securely on the Holder-Screws.
• Insert the Holder-Screws into the wide (rear) part of the
Bracket-Wall Mounts, and then slide the Bracket-Wall Mounts
down so that the Bracket-Wall Mounts rest securely on the
Holder-Screws.
SERVICE
HDMI
(ARC)
SERVICE
HDMI
(ARC)
SERVICE
HDMI
(ARC)
DC 19V
09 INSTALLING THE
SOUNDBAR IN FRONT OF
TV
Microphones
As illustrated in the image, align the centre of the Soundbar with the
centre of the TV, carefully place the Soundbar onto the TV stand.
At this time, place the microphones at the front of the stand not to
interfere with voice recognition.
Right end of Soundbar
TV
NOTE
• Make sure the Soundbar is placed on a at and solid surface.
• Insufcient gap from the TV may cause voice recognition and
acoustic problems.
• The illustration above differs with the respective model.
ENG - 30
10 SOFTWARE UPDATE
Auto Update
When the Soundbar is connected to the Internet, software updates
automatically occur even when the Soundbar is turned off.
• To use the Auto Update function, the Soundbar must be connected
to the Internet.
The Wi-Fi connection to the Soundbar will be terminated if
the Soundbar’s power cord is disconnected or the power is cut
off. If the power is cut off, when the power comes back on or
you reconnect the power cord, turn on the Soundbar, and then
reconnect it to the Internet.
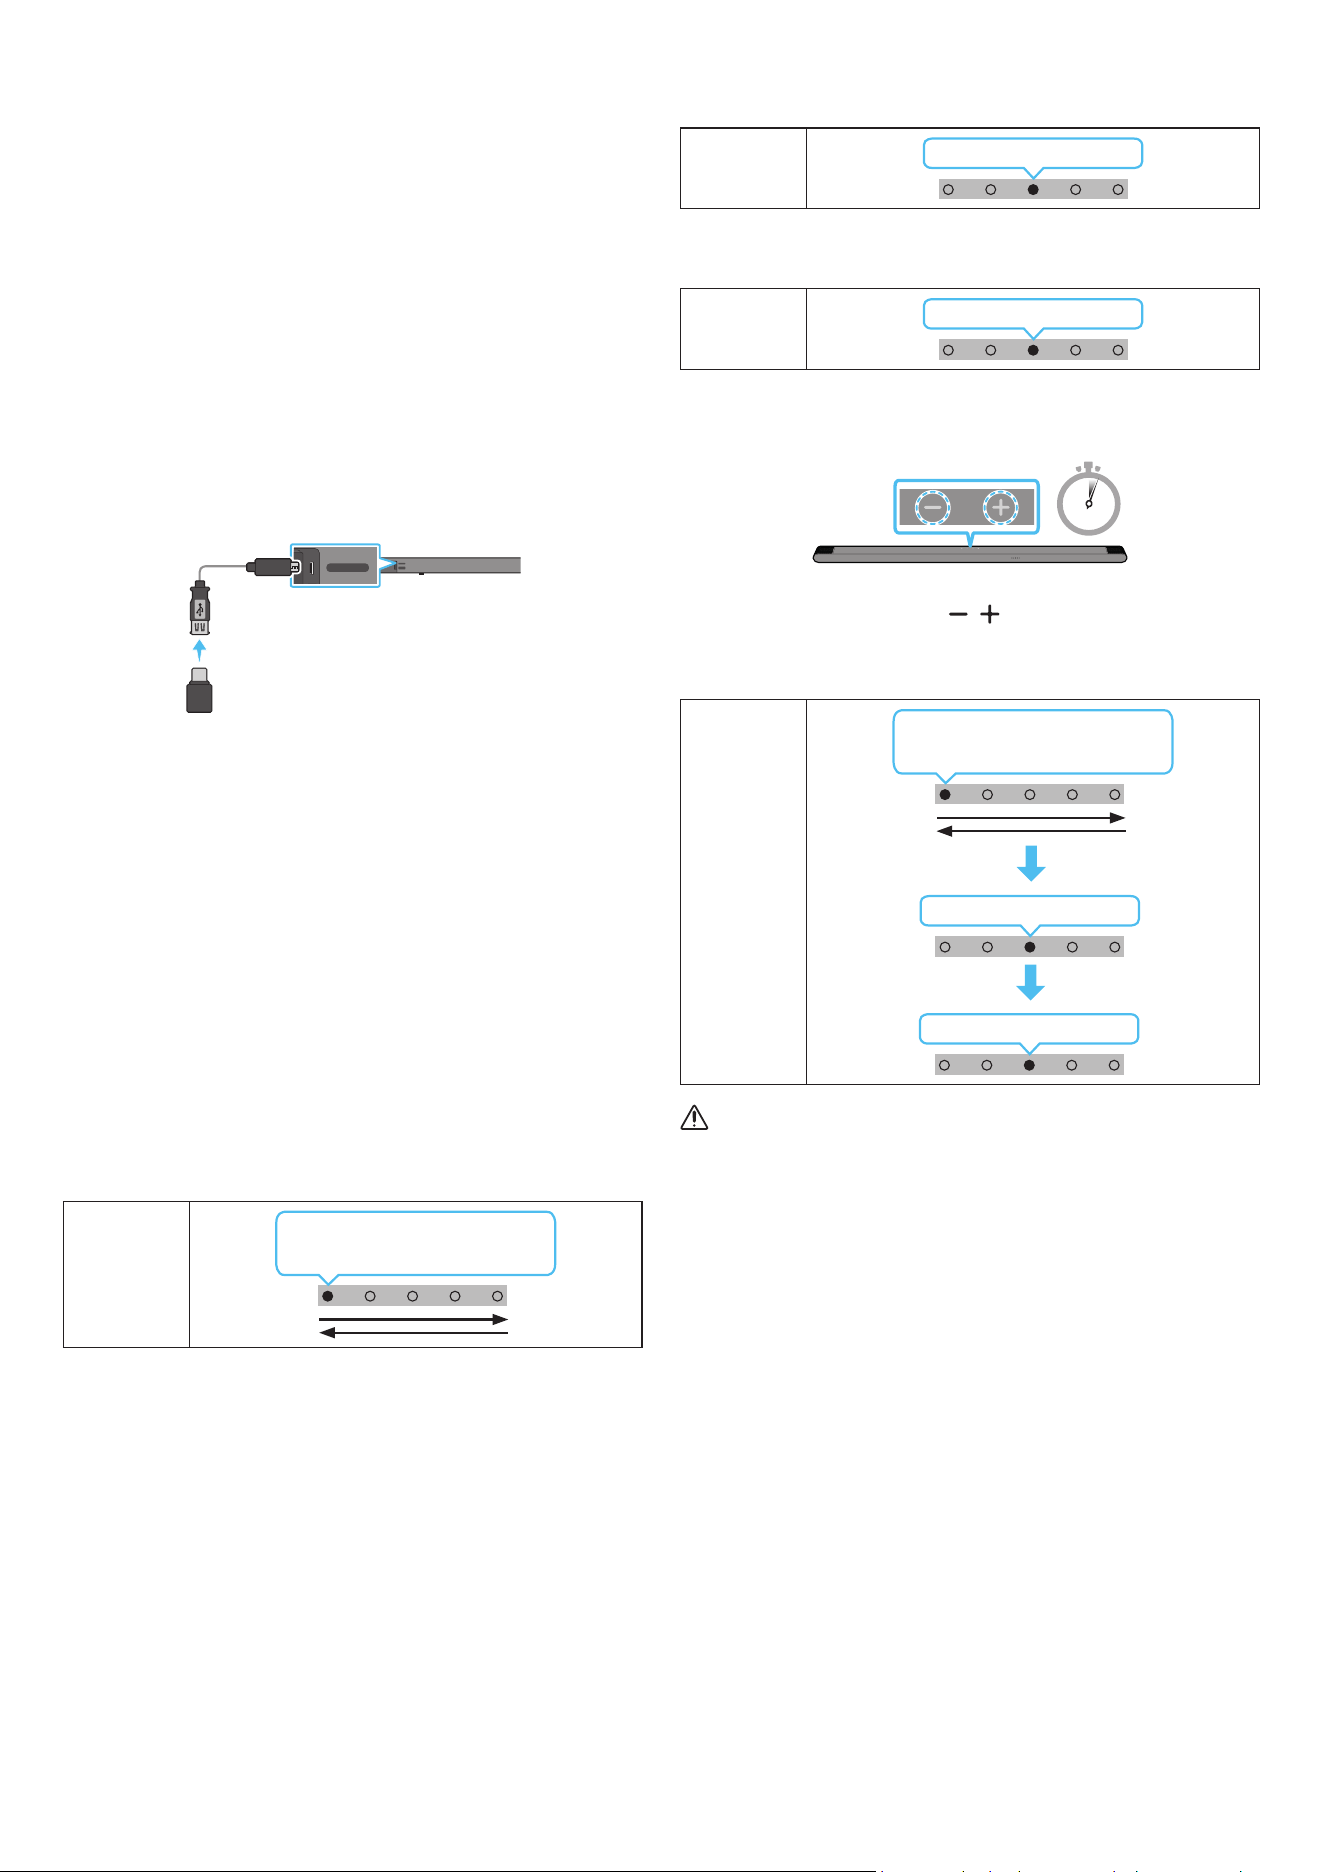
USB Update
Rear of the Soundbar
SERVICE
HDMI
(ARC)
SERVICE
HDMI
(ARC)
Micro USB to USB
adapter Cable
(not supplied)
Samsung may offer updates for the Soundbar’s system rmware in
the future.
When an update is available, you can update the Soundbar by
connecting the USB drive that contains the update rmware to the
SERVICE port of the Soundbar.
1. Go to (www.samsung.com) → search for the model name from the
customer support menu option.
• For more information about update, refer to Upgrade Guide.
2. Download the upgrade le (USB type).
3. Unzip the le to create a folder with the le name.
4. Store the created folder in a USB and then connect it to the
Soundbar.
5. Turn on the Soundbar. Then the product is updated within
3 minutes.
LED
indicator
White moves from left to
right and right to left
• During update, do not turn it off or remove the USB.
• If the yellow LED is on after the software update is completed,
this means that an additional update is in progress. When this
happens, don’t turn off the power or remove the USB.
• If update does not proceed, reconnect the Soundbar power cord.
• When the latest version is installed, no update is performed.
• Depending on the USB type, update may not be supported.
• If there is no update le available, the indicator blinks red
3 times.
LED
indicator
Red Blinks X3
• If the update le is in the same or lower version than the
existing, the indicator blinks cyan 3 times.
LED
indicator
Cyan Blinks X3
Reset
5 Sec
With the Soundbar on, press the (Volume) buttons on the body
at the same time for at least 5 seconds. The LED display changes as
shown below and then the Soundbar is reset.
LED
indicator
Cyan Blinks X3
Red Blinks → Off
White moves from left to
right and right to left
CAUTION
• All the settings of the Soundbar are reset. Be sure to perform
this only when a reset is required.
ENG - 31
11 TROUBLESHOOTING
Before seeking assistance, check the following.
Soundbar does not turn on.
• Check whether the power cord of the Soundbar is correctly
inserted into the outlet.
Soundbar works erratically.
• After removing the power cord, insert it again.
• Power cycle the external device and try again.
• If there is no signal, the Soundbar automatically turns off after a
certain period of time. Turn on the power. (See page 9.)
Remote control does not work
• Point the remote directly at the soundbar.
• Recharge the remote control.
The Soundbar indicator turns solid red.
• The microphone is turned off.
Turn on the microphone. (See page 7.)
Sound is not output from the soundbar.
• The volume of the Soundbar is too low or muted. Adjust the
volume.
• When any external device (STB, Bluetooth device, mobile device,
etc.) is connected, adjust the volume of the external device.
• For sound output of the TV, select Soundbar. (Samsung TV:
Home (
) → Menu → Settings ( ) → All Settings ( ) → Sound
→ Sound Output → Select Soundbar)
• The cable connection to the Soundbar may not be loose. Remove
the cable and connect again.
• Remove the power cord completely, reconnect, and turn the
power on.
• Reset the product and try again. (See page 30.)
Sound is not output from the subwoofer.
• Check whether the LED indicator on the rear of the Subwoofer
is on in blue. Reconnect the Soundbar and Subwoofer if the
indicator is blinking in blue or turned red. (See page 15.)
• You may experience an issue if there is an obstacle between the
Soundbar and Subwoofer. Move devices to an area away from
obstacles.
• Other devices sending radio frequency signals in proximity may
interrupt the connection.
Keep your speaker away from such devices.
• Remove and reconnect the power plug.
In case there is sound jitter, delays, or noise from the Subwoofer
• If there are any objects between the Soundbar and Subwoofer, this
could cause a problem. Please reposition these to a place without
such an object.
• There may be sound jitter or delays when the Subwoofer is far from
the Soundbar. Please place them near the Soundbar.
• There may be sound jitter or delays when the Soundbar is near an
instrument or electrical device that can cause radio interference.
Place the Soundbar far from such devices that can cause radio
interference. (E.g., wireless router)
• Change the TV network connection status from wireless to wired.
The Subwoofer volume is too low
• The original volume of the content you are playing may be low.
Try adjusting the Subwoofer level. (See page 10.)
• Bring the Subwoofer speaker closer to you.
If the TV is not connected via HDMI (ARC).
• Check whether the HDMI cable is correctly connected to the ARC
terminal. (See page 17.)
• Connection may not be possible due to the connected external
device (set-top box, game console, etc.). Directly connect the
Soundbar.
• HDMI-CEC may not be activated on the TV. Turn on the CEC on
the TV menu. (Samsung TV: Home (
) → Menu → Settings ( )
→ All Settings ( ) → Connection → External Device Manager →
Anynet+ (HDMI-CEC) ON)
There is no sound in when connecting to the TV in HDMI (ARC)
mode
• Your device is unable to play the input signal. Change the TV’s
audio output to PCM or Dolby Digital. (For a Samsung TV:
Home (
) → Menu → Settings ( ) → All Settings ( ) → Sound
→ Expert Settings → Digital Output Audio Format)
Soundbar will not connect via Bluetooth.
• When connecting a new device, switch to “Bluetooth Pairing”
for connection. (Press the
PAIR button on the remote control
or press the (Mic On/Off) button on the body for at least
5 seconds.)
• If the Soundbar is connected to another device, disconnect that
device rst to switch the device.
• Reconnect it after removing the Bluetooth speaker list on the
device to connect. (Samsung TV: Home ( ) → Menu →
Settings ( ) → All Settings ( ) → Sound → Sound Output →
Bluetooth Speaker List)
• Remove and reconnect the power plug, then try again.
• Reset the product and try again. (For more information, refer to
“Reset”.)
ENG - 32
Sound drops out when connected via Bluetooth.
• Some devices can cause radio interference if they are located too
close to the Soundbar. e. g. microwaves, wireless routers, etc.
• If your device that is connected via Bluetooth moves too far away
from the soundbar, it may cause the sound to drop out. Move the
device closer to the soundbar.
• If a part of your body is in contact with the Bluetooth transceiver
or the product is installed on metal furniture, the sound may drop
out. Check the installation environment and conditions for use.
Soundbar will not connect to Wi-Fi.
• Check whether your wireless router is on.
• Turn off the router, turn it back on, and then try again.
• The soundbar will not connect if the wireless signal is too weak.
Try moving the router closer to the soundbar, or eliminating
any obstacles that are between the soundbar and the router, if
possible.
• If your wireless router is new, you will need to recongure the
speaker’s network settings.
The soundbar does not turn on automatically with the TV.
• When you turn off the Soundbar while watching TV, power
synchronization with the TV is disabled. First turn off the TV.
The AVA function is not available in the following cases.
• The AVA function will not be available using Q-symphony
function.
• The AVA function will not be available when the microphone is
turned off.
After connecting the TV to the Soundbar, I switched the Soundbar
mode. Then no sound is output from the TV.
• If you connect your Soundbar to a mobile device while the
Soundbar is connected to the TV, the Soundbar outputs sound
from the mobile device while keeping the TV connection. So the
TV sound will not be delivered anywhere.
• Disconnect the mobile device, and the TV sound will be output
from the Soundbar again.
12 LICENCE
Dolby, Dolby Atmos, and the double-D symbol are registered
trademarks of Dolby Laboratories Licensing Corporation.
Manufactured under license from Dolby Laboratories. Condential
unpublished works. Copyright © 2012-2021 Dolby Laboratories. All
rights reserved.
For DTS patents, see http://patents.dts.com. Manufactured under
license from DTS, Inc. (for companies headquartered in the U.S./
Japan/ Taiwan) or under license from DTS Licensing Limited (for
all other companies). DTS, Digital Surround, Virtual:X, and the DTS
logo are registered trademarks or trademarks of DTS, Inc. in the
United States and other countries. © 2021 DTS, Inc. ALL RIGHTS
RESERVED.
The terms HDMI and HDMI High-Denition Multimedia Interface,
and the HDMI Logo are trademarks or registered trademarks of
HDMI Licensing Administrator, Inc. in the United States and other
countries.
• Use your phone, tablet or computer as a remote control for
Spotify. Go to spotify.com/connect to learn how
• The Spotify Software is subject to third party licenses found
here: https://www.spotify.com/connect/third-party-licenses.
* This function may not be supported depending on the model or
geographical area.
• Apple, Airplay, iPhone, iPad, and Mac are trademarks of Apple
Inc., registered in the U.S. and other countries.
• Use of the Works with Apple badge means that an accessory
has been designed to work specically with the technology
identied in the badge and has been certied by the developer
to meet Apple performance standards.

ENG - 33
[ENERGY STAR]
ENERGY STAR qualied model only
• Your Samsung product is ENERGY STAR qualied in its
factory default setting. Change to certain features, settings
and functionality in this product can change the power
consumption, possibly beyond the limits required for ENERGY
STAR qualication.
• Environmental Protection Agency and Department of Energy.
ENERGY STAR is a joint program of the Government agencies,
designed to promote energy efcient products and practices.
Refer to www.energystar.gov for more information of the ENERGY
STAR Program.
ENERGY STAR qualied model only
(Applicable to Thin Client models only)
As an ENERGY STAR® Partner, SAMSUNG has determined that
this product meets the ENERGY STAR® guidelines for energy
efciency.
• The ENERGY STAR Program has been to reduced greenhouse
gas emissions and save energy through voluntary labeling.
• Power management setting of this product have been enabled
by default, and have various timing setting from 1 minutes to
5 hours.
• The product can wake with a button press on the chassis from
sleep mode.
ENERGY STAR qualied model only (The other models)
• As an ENERGY STAR Partner, Samsung has determined that this
product or product models meets the ENERGY STAR guideline
for energy efciency.
13 OPEN SOURCE LICENCE
NOTICE
To send inquiries and requests for questions regarding open sources,
contact Samsung Open Source (http://opensource.samsung.com)
14 IMPORTANT NOTES
ABOUT SERVICE
Figures and illustrations in this User Manual are provided for
reference only and may differ from actual product appearance.
ENG - 34
15 SPECIFICATIONS AND GUIDE
Specications
Model Name HW-S800B / HW-S801B
Weight 1.4 kg
Dimensions (W x H x D) 1160.0 x 38.0 x 39.9 mm
Operating Temperature Range +5°C to +35°C
Operating Humidity Range 10 % ~ 75 %
AMPLIFIER
Rated Output power (20W x 2) + (10W x 2) + (20W x 2) + (10W x 1) + (10W x 2)
Supported play formats
Dolby 5.1ch / Dolby Digital Plus / Dolby ATMOS (Dolby Digital Plus) /
DTS 5.1ch / LPCM 2ch
Subwoofer Name
HW-S800B : PS-WB85D
HW-S801B : PS-WB86D
Weight 6.4 kg
Dimensions (W x H x D) 238.0 x 240.8 x 238.0 mm
AMPLIFIER
Rated Output power 200 W
NOTE
• Samsung Electronics Co., Ltd reserves the right to change the specications without notice.
• Weight and dimensions are approximate.
Precaution : The Soundbar will restart automatically if you turn on/turn off Wi-Fi.
To deactivate Wi-Fi connection:
Press and hold the CH LEVEL button on the remote control of the Soundbar for more
than 30 seconds to turn on or off the Wi-Fi connection.
To deactivate Bluetooth connection:
Press and hold the TONE CONTROL button on the remote control of the Soundbar for
more than 30 seconds to turn on or off the Bluetooth connection.
FRA - 2
INFORMATIONS DE SÉCURITÉ
AVERTISSEMENTS DE SÉCURITÉ
POUR LIMITER LE RISQUE DE CHOC ÉLECTRIQUE, NE RETIREZ PAS LE
CACHE (OU LE DOS).
L’INTÉRIEUR NE CONTIENT AUCUNE PIÈCE RÉPARABLE PAR L’UTILISATEUR.
CONFIEZ TOUTE RÉPARATION AU PERSONNEL D’ENTRETIEN QUALIFIÉ.
Reportez-vous au tableau ci-dessous pour une explication des symboles
pouvant gurer sur votre produit Samsung.
ATTENTION
RISQUE DE CHOC ÉLECTRIQUE. NE PAS OUVRIR.
Ce symbole indique que ce produit est alimenté par haute
tension. Il est dangereux de toucher la moindre pièce située à
l’intérieur de ce produit.
Ce symbole indique qu’une documentation importante
relative au fonctionnement et à l’entretien est fournie avec le
produit.
Produit de classe II : Ce symbole indique qu’aucun
raccordement de sécurité à la terre (prise de terre) n’est
requis.
Si ce symbole n’est pas présent sur un produit avec un cordon
d’alimentation, le produit DOIT avoir une connexion de
protection able à la terre.
Tension CA : La tension nominale indiquée par ce symbole est
une tension CA.
Tension CC : La tension nominale indiquée par ce symbole est
une tension CC.
Attention. Consulter le mode d’emploi : ce symbole avertit
l’utilisateur qu’il doit consulter le manuel utilisateur pour plus
d’informations relatives à la sécurité.
AVERTISSEMENT
• Pour réduire le risque d’incendie ou de choc électrique, n’exposez pas cet
appareil à la pluie ou à l’humidité.
ATTENTION
• AFIN DE PRÉVENIR TOUT RISQUE D'ÉLECTROCUTION, INSÉRER
COMPLÈTEMENT LA FICHE LARGE DE LA PRISE DANS LA FENTE
CORRESPONDANTE.
• Cet appareil doit toujours être branché sur une prise CA disposant d'une
mise à la terre de protection.
• Pour débrancher l'appareil du secteur, la che doit être retirée de la
prise secteur, c'est pourquoi celle-ci doit être facilement accessible.
• N’exposez pas l’appareil aux égouttements ou aux éclaboussures. Ne
posez pas sur l’appareil des objets contenant des liquides, tels que des
vases.
• Pour mettre l’appareil complètement hors tension, vous devez le
débrancher de la prise murale. En conséquence, la prise murale doit être
facilement accessible en permanence.

FRA - 3
PRÉCAUTIONS
1. Vériez que l’alimentation électrique CA de votre logement respecte
les conditions en matière d’alimentation répertoriées sur l’étiquette
d’identication située sur la partie inférieure de votre produit. Installez
le produit horizontalement, sur un support adéquat (meuble), en
laissant sufsamment d'espace autour pour garantir une bonne
ventilation (7 à 10 cm). Vériez que les fentes de ventilation ne sont pas
couvertes. Ne placez pas l'unité sur des haut-parleurs ou sur tout autre
équipement susceptible de devenir chaud. Cette unité a été conçue pour
une utilisation continue.
Pour l'éteindre complètement, débranchez la prise CA de la prise
murale. Débranchez l’appareil si vous envisagez de ne pas l’utiliser
durant une longue période.
2. En cas d’orage, débranchez la prise CA de la prise murale. Les pointes de
tension occasionnées par les éclairs risquent d’endommager l’appareil.
3. N’exposez pas l’unité à la lumière directe du soleil ou à d’autres
sources de chaleur. Cela pourrait entraîner une surchauffe et des
dysfonctionnements.
4. Protégez le produit de l’humidité et de la chaleur excessive (comme
une cheminée) ou de tout équipement capable de créer des champs
magnétiques ou électriques. Débranchez le câble d’alimentation de la
prise murale CA si l’unité présente un dysfonctionnement. Le produit
n'a pas été conçu pour une utilisation industrielle, mais pour une
utilisation personnelle uniquement. De la condensation peut se former
si le produit a été stocké à basse température. Si vous transportez
l'unité en hiver, attendez environ 2 heures, le temps qu'elle atteigne la
température ambiante, avant de l'utiliser.
5. Il existe un risque d'incendie ou d'explosion, pouvant endommager la
télécommande ou entraîner des blessures.
• La télécommande ne doit être soumise à aucun choc.
• Veillez à ne pas laisser des substances étrangères, telles que du
métal, un liquide ou de la poussière, entrer en contact avec les
bornes de recharge de la télécommande.
• Si la télécommande est endommagée ou si vous sentez une odeur de
fumée ou de brûlé, ne l'utilisez plus et faites-la réparer par le Centre
de service Samsung.
• Ne démontez pas la télécommande de manière arbitraire.
• Veillez à ce que les enfants ou les animaux ne mettent pas la
télécommande dans leur bouche et ne la mordent pas. Il existe
un risque d'incendie ou d'explosion, pouvant endommager la
télécommande ou entraîner des blessures.

FRA - 4
CONTENU
01 Vérication des composants 6
02 Vue d'ensemble du produit 7
Panneau supérieur de la Soundbar . . . . . . . . . . . . . . . . . . . . . . . . . . . . . . . . . . . . . . . . . . . . . . . . . . . . . . . . . . . . . . . . . . . . . . . . . . . . . . . . . . . . . . . . . . . . . . . . . . . . . . . . . 7
Panneau arrière de la Soundbar. . . . . . . . . . . . . . . . . . . . . . . . . . . . . . . . . . . . . . . . . . . . . . . . . . . . . . . . . . . . . . . . . . . . . . . . . . . . . . . . . . . . . . . . . . . . . . . . . . . . . . . . . . . . 8
03 Utilisation de la télécommande de la Soundbar 9
À propos de la télécommande . . . . . . . . . . . . . . . . . . . . . . . . . . . . . . . . . . . . . . . . . . . . . . . . . . . . . . . . . . . . . . . . . . . . . . . . . . . . . . . . . . . . . . . . . . . . . . . . . . . . . . . . . . . . . 9
Comment utiliser la télécommande . . . . . . . . . . . . . . . . . . . . . . . . . . . . . . . . . . . . . . . . . . . . . . . . . . . . . . . . . . . . . . . . . . . . . . . . . . . . . . . . . . . . . . . . . . . . . . . . . . . . . . . . 9
Amplicateur Vocal Actif (AVA) . . . . . . . . . . . . . . . . . . . . . . . . . . . . . . . . . . . . . . . . . . . . . . . . . . . . . . . . . . . . . . . . . . . . . . . . . . . . . . . . . . . . . . . . . . . . . . . . . . . . . . . . . . . 11
Utilisation des touches dissimulées (Touches avec plus d'une fonction). . . . . . . . . . . . . . . . . . . . . . . . . . . . . . . . . . . . . . . . . . . . . . . . . . . . . . . . . . . . . . . . . . . . . . 11
Spécications de sortie pour les différents modes d'effets sonore . . . . . . . . . . . . . . . . . . . . . . . . . . . . . . . . . . . . . . . . . . . . . . . . . . . . . . . . . . . . . . . . . . . . . . . . . . . 12
Réglage du volume de la Soundbar avec une télécommande de téléviseur. . . . . . . . . . . . . . . . . . . . . . . . . . . . . . . . . . . . . . . . . . . . . . . . . . . . . . . . . . . . . . . . . . . 13
04 Connexion de la Soundbar 14
Connexion de l'alimentation et des unités . . . . . . . . . . . . . . . . . . . . . . . . . . . . . . . . . . . . . . . . . . . . . . . . . . . . . . . . . . . . . . . . . . . . . . . . . . . . . . . . . . . . . . . . . . . . . . . . . 14
‒ Connexion manuelle du subwoofer . . . . . . . . . . . . . . . . . . . . . . . . . . . . . . . . . . . . . . . . . . . . . . . . . . . . . . . . . . . . . . . . . . . . . . . . . . . . . . . . . . . . . . . . . . . . . . . . . . . . 15
‒ Voyants LED situés à l'arrière du subwoofer . . . . . . . . . . . . . . . . . . . . . . . . . . . . . . . . . . . . . . . . . . . . . . . . . . . . . . . . . . . . . . . . . . . . . . . . . . . . . . . . . . . . . . . . . . . . 16
Connexion d'un kit SWA-9500S (vendu séparément) à votre Soundbar. . . . . . . . . . . . . . . . . . . . . . . . . . . . . . . . . . . . . . . . . . . . . . . . . . . . . . . . . . . . . . . . . . . . . . . 16
05 Connexion à un téléviseur 17
Connexion à un téléviseur qui prend en charge HDMI ARC (canal de retour audio) . . . . . . . . . . . . . . . . . . . . . . . . . . . . . . . . . . . . . . . . . . . . . . . . . . . . . . . . . . . . 17
Connexion via Bluetooth . . . . . . . . . . . . . . . . . . . . . . . . . . . . . . . . . . . . . . . . . . . . . . . . . . . . . . . . . . . . . . . . . . . . . . . . . . . . . . . . . . . . . . . . . . . . . . . . . . . . . . . . . . . . . . . . . 18
Connexion via Wi-Fi. . . . . . . . . . . . . . . . . . . . . . . . . . . . . . . . . . . . . . . . . . . . . . . . . . . . . . . . . . . . . . . . . . . . . . . . . . . . . . . . . . . . . . . . . . . . . . . . . . . . . . . . . . . . . . . . . . . . . . 19
Connexion à un téléviseur qui prend en charge Dolby Atmos . . . . . . . . . . . . . . . . . . . . . . . . . . . . . . . . . . . . . . . . . . . . . . . . . . . . . . . . . . . . . . . . . . . . . . . . . . . . . . . . 20
Utilisation de la fonction Q-Symphony . . . . . . . . . . . . . . . . . . . . . . . . . . . . . . . . . . . . . . . . . . . . . . . . . . . . . . . . . . . . . . . . . . . . . . . . . . . . . . . . . . . . . . . . . . . . . . . . . . . . 21
Utilisation du son Spacet. . . . . . . . . . . . . . . . . . . . . . . . . . . . . . . . . . . . . . . . . . . . . . . . . . . . . . . . . . . . . . . . . . . . . . . . . . . . . . . . . . . . . . . . . . . . . . . . . . . . . . . . . . . . . . . . 22
06 Connexion d'un appareil mobile 23
Méthode 1. Connexion via Bluetooth . . . . . . . . . . . . . . . . . . . . . . . . . . . . . . . . . . . . . . . . . . . . . . . . . . . . . . . . . . . . . . . . . . . . . . . . . . . . . . . . . . . . . . . . . . . . . . . . . . . . . . 23
Méthode 2. Connexion via Wi-Fi (Réseau sans l). . . . . . . . . . . . . . . . . . . . . . . . . . . . . . . . . . . . . . . . . . . . . . . . . . . . . . . . . . . . . . . . . . . . . . . . . . . . . . . . . . . . . . . . . . . 25
Utilisation de la fonction Tap Sound. . . . . . . . . . . . . . . . . . . . . . . . . . . . . . . . . . . . . . . . . . . . . . . . . . . . . . . . . . . . . . . . . . . . . . . . . . . . . . . . . . . . . . . . . . . . . . . . . . . . . . . 26
07 Connexion via Apple AirPlay 2 27
08 Installation de la xation murale 28
Précautions d'installation . . . . . . . . . . . . . . . . . . . . . . . . . . . . . . . . . . . . . . . . . . . . . . . . . . . . . . . . . . . . . . . . . . . . . . . . . . . . . . . . . . . . . . . . . . . . . . . . . . . . . . . . . . . . . . . . 28
Composants de xation murale . . . . . . . . . . . . . . . . . . . . . . . . . . . . . . . . . . . . . . . . . . . . . . . . . . . . . . . . . . . . . . . . . . . . . . . . . . . . . . . . . . . . . . . . . . . . . . . . . . . . . . . . . . . 28
09 Installation de la Soundbar devant le téléviseur 29

FRA - 5
10 Mise à jour du logiciel 30
Mise à jour automatique. . . . . . . . . . . . . . . . . . . . . . . . . . . . . . . . . . . . . . . . . . . . . . . . . . . . . . . . . . . . . . . . . . . . . . . . . . . . . . . . . . . . . . . . . . . . . . . . . . . . . . . . . . . . . . . . . .30
Mise à jour par USB . . . . . . . . . . . . . . . . . . . . . . . . . . . . . . . . . . . . . . . . . . . . . . . . . . . . . . . . . . . . . . . . . . . . . . . . . . . . . . . . . . . . . . . . . . . . . . . . . . . . . . . . . . . . . . . . . . . . . .30
Réinitialisation . . . . . . . . . . . . . . . . . . . . . . . . . . . . . . . . . . . . . . . . . . . . . . . . . . . . . . . . . . . . . . . . . . . . . . . . . . . . . . . . . . . . . . . . . . . . . . . . . . . . . . . . . . . . . . . . . . . . . . . . . .30
11 Dépannage 31
12 Licence 32
13 Avis concernant les licences libres 33
14 Remarques importantes relatives au service 33
15 Caractéristiques techniques et guide 34
Caractéristiques techniques . . . . . . . . . . . . . . . . . . . . . . . . . . . . . . . . . . . . . . . . . . . . . . . . . . . . . . . . . . . . . . . . . . . . . . . . . . . . . . . . . . . . . . . . . . . . . . . . . . . . . . . . . . . . . . 34
FRA - 6
01 VÉRIFICATION DES COMPOSANTS
Unité principale Soundbar Télécommande de la Soundbar Subwoofer
x 2
Adaptateur CA/CC (Soundbar)
Cordon d'alimentation
(caisson de basse, Soundbar)
Câble HDMI vers Micro HDMI
AH81-15127A-01
A TYPE
:
740mm
B TYPE
:
700mm
x 2
x 2
Guide de xation murale Support de xation murale Vis de xation
x 4
(M5 X L55)
x 4
Vis Vis d'ancrage
• Pour plus d'informations sur l'alimentation et la consommation électriques, reportez-vous à l'étiquette collée sur le produit. (Étiquette : située au bas de
l'unité principale Soundbar)
• Pour acheter des câbles en option ou des composants supplémentaires, contactez un Centre de service Samsung ou le Service client de Samsung.
• Pour plus d'informations au sujet de la xation murale ou du pied en caoutchouc, consultez les pages 28 à 29.
• La conception, les spécications et l'écran de l'application sont sujets à changement sans préavis.
• L'apparence des accessoires peut légèrement différer des illustrations ci-dessus.
FRA - 7
02 VUE D'ENSEMBLE DU PRODUIT
Panneau supérieur de la Soundbar
2 4
3
1
1 Voyant LED
Le voyant LED clignote, s'allume ou change de couleur selon le mode sélectionné ou l'état de la Soundbar. La couleur du voyant LED et le nombre
de voyants indiquent le mode actif tel que décrit ci-dessous.
W
LED blanche
W
LED blanche
M
LED multicolore
W
LED blanche
W
LED blanche
• La LED multicolore change en blanc, cyan, vert, rouge et bleu selon le mode ou l'état.
2
Touche
(Multi-fonction)
• En mode veille, appuyez sur la touche (Multi-fonction) pour allumer la Soundbar.
• Appuyez sur la touche (Multi-fonction) pour changer le mode. Lors de chaque changement de mode, la LED s'allume en blanc, puis s'éteint.
Voyant LED
Allumé en blanc → Éteint Allumé en blanc → Éteint Allumé en blanc → Éteint
« TV ARC » « Wi-Fi » « Bluetooth »
3
Touche
(Volume)
Règle le volume.
4
Touche (Micro activé/désactivé)
Appuyez sur la touche pour allumer ou éteindre le microphone.
Lorsque le microphone est éteint, le voyant LED s'allume en rouge.
Voyant LED
Allumé en rouge
« Mic Off » « Mic On »
• Lorsque vous branchez le cordon CA, le bouton d'alimentation commence à fonctionner après 4 à 6 secondes.
• Lorsque vous allumez cette unité, il y a un délai de 4 à 5 secondes avant qu'elle ne produise du son.
• Si vous entendez du son provenant du téléviseur et de la Soundbar, allez dans le menu Paramètres pour l'audio du téléviseur et réglez l'enceinte du
téléviseur sur Enceinte externe.
• Vous pouvez activer et désactiver le commentaire audio via l'application SmartThings. Pour savoir comment utiliser l'application SmartThings, reportez-
vous à la section « Méthode 2. Connexion via Wi-Fi (Réseau sans l) ».
FRA - 8
Panneau arrière de la Soundbar
DC 19V
SERVICE
HDMI
(ARC)
DC 19V
SERVICE
HDMI
(ARC)
DC 19V
SERVICE
HDMI
(ARC)
DC 19V
SERVICE
HDMI
(ARC)
DC 19V
SERVICE
HDMI
(ARC)
DC 19V
SERVICE
HDMI
(ARC)
3
1
2
1 SERVICE
Connectez un appareil de stockage USB pour mettre à jour le logiciel du produit.
2 HDMI (ARC)
Effectuez la connexion au port HDMI (ARC) sur un téléviseur. (Voir page 17)
3 DC 19V
Connectez l'adaptateur d'alimentation CA/CC. (Entrée d'alimentation) (Voir page 14)
• Lorsque vous débranchez le câble d'alimentation de l'adaptateur d'alimentation CA/CC d'une prise de courant murale, retirez la che.
Ne tirez pas sur le câble.
• Ne branchez pas cette unité ou d'autres composants à une prise CA tant que toutes les connexions entre les composants n'ont pas été faites.
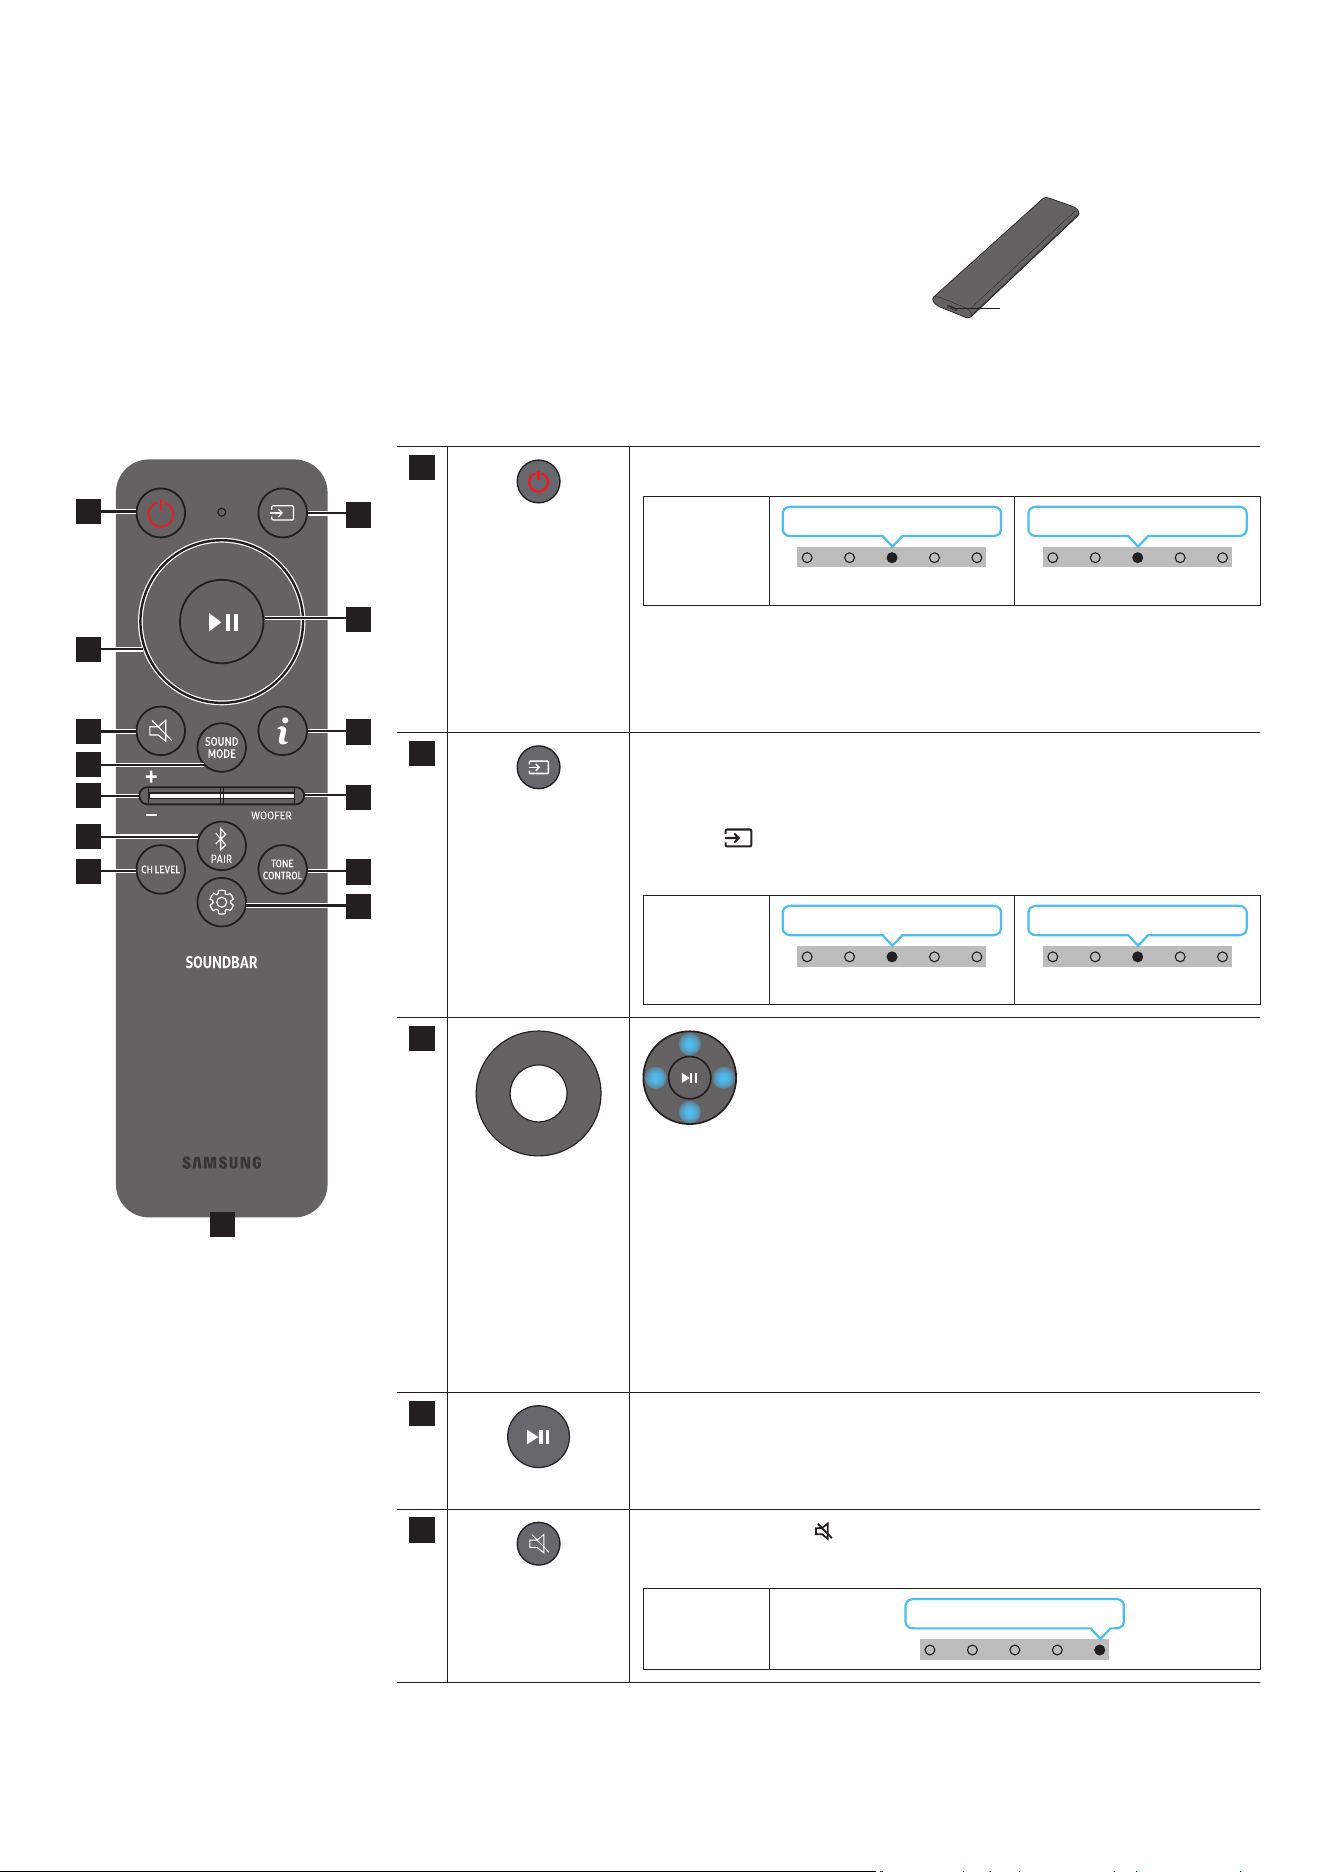
FRA - 9
03 UTILISATION DE LA TÉLÉCOMMANDE DE LA SOUNDBAR
À propos de la télécommande
• Utilisez la télécommande à moins de 6 m du produit. La distance d'utilisation de la télécommande peut
varier selon les conditions de l'environnement sans l.
• Quand la télécommande ne fonctionne pas, parce que la batterie est déchargée, rechargez celle-ci via le port
USB Type-C.
• L'illustration diffère selon le modèle de télécommande utilisé.
Port USB (Type-C)
pour la recharge
Comment utiliser la télécommande
1
3
5
8
11
13
7
10
12
2
4
9
6
14
1
Marche/Arrêt
Active ou désactive la Soundbar.
Voyant LED
Clignote en cyan 1x
Activé
Clignote en rouge 3x
Éteint
• Fonction Auto Power Down
L'appareil s'éteint automatiquement dans les situations suivantes :
• En mode « TV ARC »/« Wi-Fi »/« Bluetooth » en l'absence de signal
audio pendant 18 minutes.
2
Source
Appuyez pour sélectionner une source connectée à la Soundbar.
• Activation/Désactivation du commentaire audio
Vous pouvez activer ou désactiver le commentaire audio. Appuyez sur la
touche
(Source) de la télécommande pendant 5 secondes pendant que
la Soundbar est éteinte (mode veille).
Voyant LED
Clignote en cyan 1x
Activé
Clignote en rouge 1x
Éteint
3
Haut/Bas/Gauche/
Droite
Appuyez sur les zones indiquées pour sélectionner Haut/Bas/
Gauche/Droite.
Appuyez sur Haut/Bas/Gauche/Droite sur la touche pour sélectionner ou
paramétrer les fonctions.
• Changement de titre
Appuyez sur la touche Droite pour sélectionner le titre suivant. Appuyez sur
la touche Gauche pour sélectionner le titre précédent.
• ID SET
Appuyez sur la touche Haut pendant 5 secondes pour terminer l'opération
ID SET (lors de la connexion d'un caisson de basse sans l ou d'enceintes
arrière sans l).
4
Lecture / Pause
Vous pouvez également lire ou mettre en pause la musique en appuyant sur
cette touche.
5
Silence
Appuyez sur la touche
(Silence) pour couper le son.
Appuyez de nouveau sur cette touche pour réactiver le son.
Voyant LED
Clignote plusieurs fois
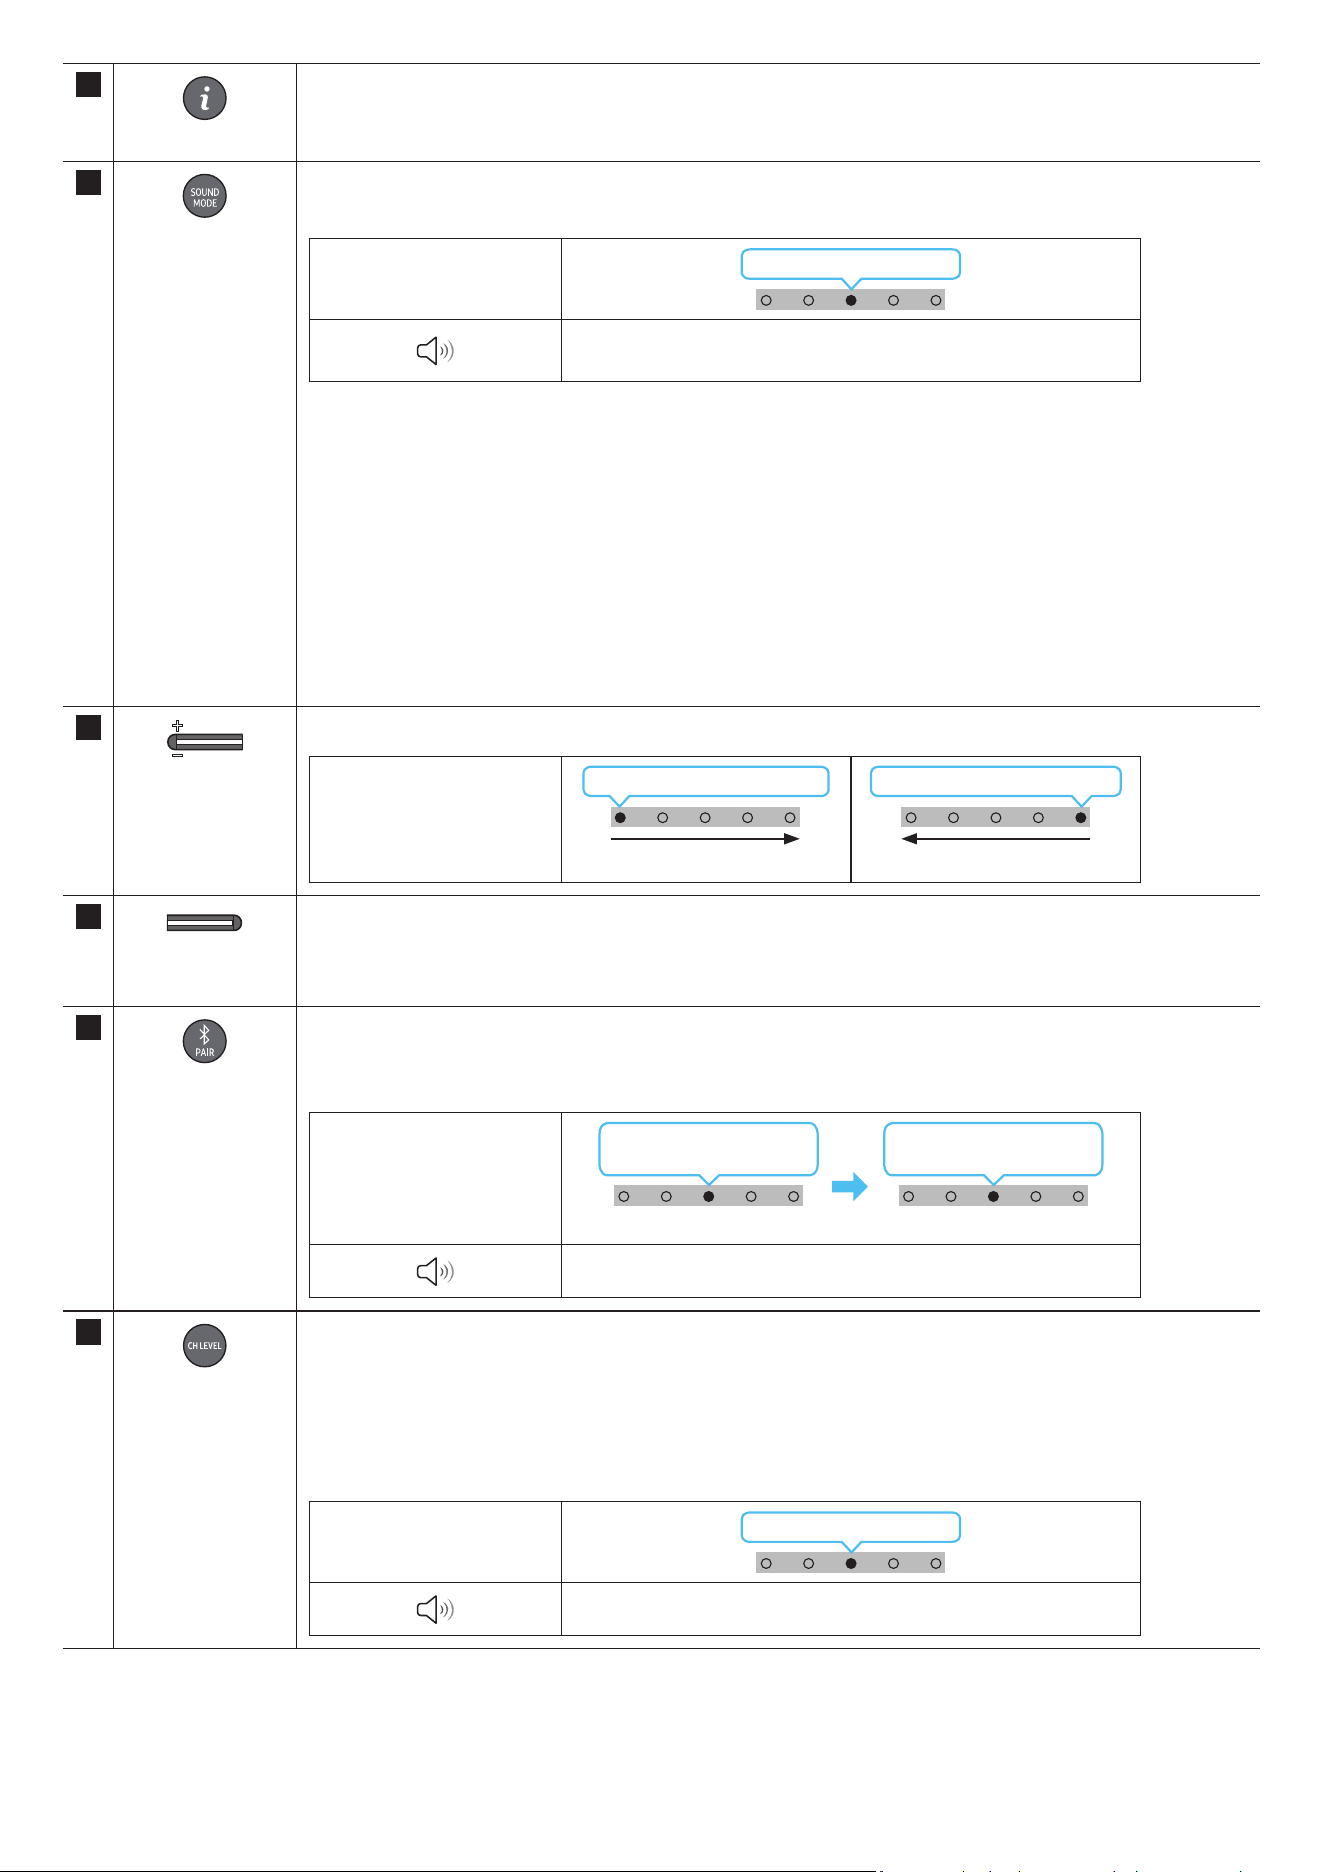
FRA - 10
6
Info
Appuyer sur ce bouton permet d’afcher les informations concernant la fonction actuelle. (Voir page 7)
Si le système Dolby Atmos® est connecté, le voyant LED clignote 3 fois en cyan.
7
SOUND MODE
En appuyant sur ce bouton, vous pouvez sélectionner le mode audio souhaité. À chaque changement de mode, le voyant
LED multicolore clignote en blanc.
Voyant LED
Clignote en blanc 1x
« Surround » → « Jeux » → « Standard » → « Son adaptatif » →
« DTS Virtual:X »
• Surround
Fournit un champ sonore plus large que la norme.
• Game
Fournit un son stéréoscopique vous permettant une immersion dans l'action pendant le jeu.
• Standard
Émet le son original.
• Adaptive Sound
Analyse le contenu en temps réel et fournit automatiquement le champ sonore optimal sur la base des caractéristiques
du contenu.
• DTS Virtual:X
Son 3D immersif à partir de n'importe quel contenu.
8
VOLUME
Appuyez sur les touches haut ou bas pour régler le volume.
Voyant LED
Voyant blanc 1x vers la droite
Augmentation du volume
Voyant blanc 1x vers la gauche
Diminution du volume
9
NIVEAU WOOFER
(BASS)
Appuyez sur le bouton vers le haut ou le bas pour régler le niveau du caisson de basse (graves) sur -12 ou de -6 à +6. Pour
régler le volume du caisson de basse (graves) sur 0, appuyez sur la touche.
10
Bluetooth PAIR
Faites passer la Soundbar en mode de jumelage Bluetooth.
Lorsque vous appuyez sur la touche, l'afchage LED change comme indiqué ci-dessous.
• Jusqu'à ce que le jumelage soit terminé, le voyant LED multicolore change dans l'ordre Rouge → Vert → Bleu.
Voyant LED
Clignote en rouge →
vert → bleu
Jumelage en cours
Clignote en cyan 3x
Connexion terminée
« Prêt pour connexion Bluetooth. »
11
CH LEVEL
Appuyer sur ce bouton permet de régler le volume de chaque enceinte.
• Pour régler le volume de chaque enceinte, sélectionnez « Centre Level » ou « Front Top Level » dans les paramètres
audio, puis réglez le volume entre -6~ et +6 à l'aide des touches Haut/Bas.
• Si les enceintes arrière (vendues séparément) sont connectées, les réglages « Rear Level » et « Rear Top Level » sont
disponibles. Pour régler le volume de « Rear Level » et de « Rear Top Level » entre -6 et +6, utilisez les touches Haut/
Bas.
Voyant LED
Clignote en blanc 1x
« Niveau centre » → « Niveau haut avant »
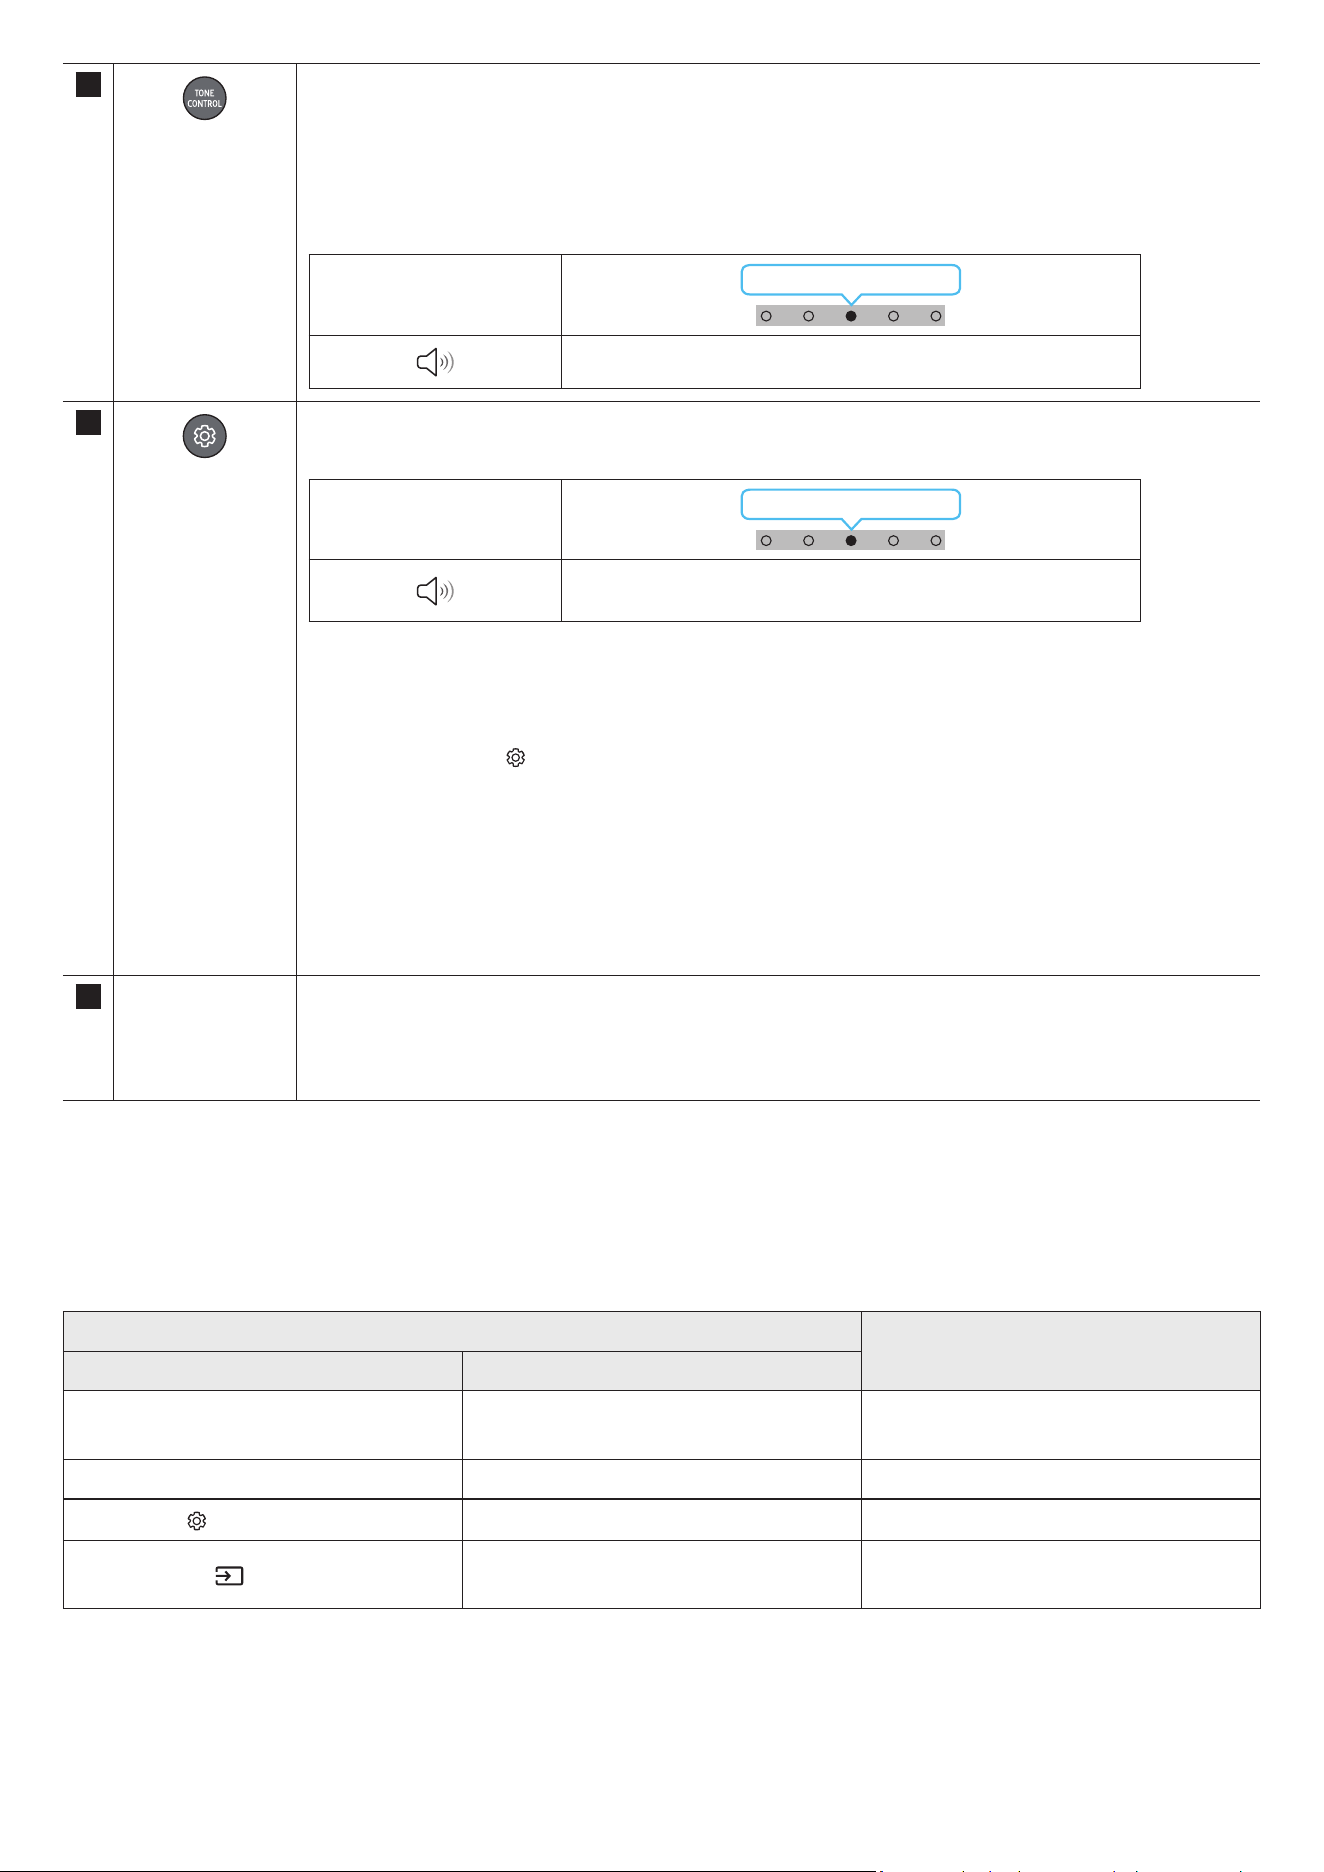
FRA - 11
12
TONE CONTROL
Appuyer sur ce bouton permet de régler le volume des aigus et des graves. Il est possible de régler l'élément souhaité
à l'aide des boutons Haut/Bas. Cette fonction est activée dans le mode Sound, elle n'est pas disponible avec le mode
Standard.
• Pour régler le volume des aigus et des graves, sélectionnez « Treble » ou « Bass » dans les paramètres audio, puis
réglez le volume entre -6~ et +6, à l'aide des touches Haut/Bas.
• Une fois que le niveau des graves est modié, le niveau du caisson de basse s'ajuste en conséquence.
Voyant LED
Clignote en blanc 1x
« Aigus » → « Basses »
13
Réglages audio
Appuyer sur ce bouton permet de paramétrer la fonction audio. Il est possible de régler l'élément souhaité à l'aide des
touches Up/Down (Haut/Bas). À chaque changement de mode, le voyant LED multicolore clignote en blanc.
Voyant LED
Clignote en blanc 1x
« Son SpaceFit » → « Amplicateur vocal actif » → « Amélioration
vocale » → « Mode Nuit » → « Synchroniser » → « Virtuel »
• Voice enhancement permet d'entendre plus facilement les dialogues parlés dans les lms et autres programmes sur le
téléviseur.
• Night Mode est idéal pour le visionnage de nuit, car les réglages sont modiés pour baisser le volume sans nuire à la
clarté des dialogues.
• Appuyez sur la touche
(Réglages audio) pendant environ 5 secondes an de régler le son pour chaque bande de
fréquences. Les fréquences 150 Hz, 300 Hz, 600 Hz, 1,2 kHz, 2,5 kHz, 5 kHz et 10 kHz peuvent être sélectionnées à l'ide
des touches Gauche/Droite et chacune peut être réglée entre -6 et +6 à l'aide des touches Haut/Bas.
(Assurez-vous que le mode son est réglé sur « STANDARD ».)
• Si l'image du téléviseur et le son de la Soundbar ne sont pas synchronisés, sélectionnez « Sync » dans les réglages
audio, puis réglez le décalage audio entre 0~ et 300 millisecondes à l'aide des touches Haut/Bas.
• Le réglage « Sync » n'est pris en charge que pour certaines fonctions.
• La fonction Virtual peut être activée/désactivée à l'aide des touches Haut/Bas.
14 Port USB (Type-C)
pour la recharge
Le voyant LED s'allume pendant la recharge. Quand la recharge est terminée, le voyant LED s'éteint.
• Le câble USB n'est pas fourni.
• Quand la télécommande ne fonctionne pas, parce que la batterie est déchargée, rechargez celle-ci via le port USB
Type-C.
Amplicateur Vocal Actif (AVA)
• Analyse le bruit externe en temps réel lorsque la Soundbar émet du son an que les voix soient toujours clairement audibles.
• L'analyse n'enregistre pas de données.
Utilisation des touches dissimulées (Touches avec plus d'une fonction)
Touche dissimulée
Page de référence
Touche de télécommande Fonction
WOOFER (Haut)
Télécommande du téléviseur activée/désactivée
(Veille)
page 13
Haut ID SET page 9
(Réglages audio)
Égaliseur 7 bandes page 11
(Source)
Activation/Désactivation du commentaire audio
(Veille)
page 9

FRA - 12
Spécications de sortie pour les différents modes d'effets sonore
Effet Entrée
Sortie
Avec le subwoofer uniquement
Avec le kit d'enceintes arrière sans l
et le subwoofer uniquement
Surround
2.0 canaux 3.1.2 canaux 5.1.4 canaux
5.1 canaux 3.1.2 canaux 5.1.4 canaux
Dolby Atmos® 3.1.2 canaux 5.1.4 canaux
Game
2.0 canaux 3.1.2 canaux 5.1.4 canaux
5.1 canaux 3.1.2 canaux 5.1.4 canaux
Dolby Atmos® 3.1.2 canaux 5.1.4 canaux
Standard
2.0 canaux 2.1 canaux 2.1 canaux
5.1 canaux 3.1 canaux 5.1 canaux
Dolby Atmos® 3.1.2 canaux 5.1.4 canaux
Adaptive Sound
2.0 canaux 3.1.2 canaux 5.1.4 canaux
5.1 canaux 3.1.2 canaux 5.1.4 canaux
Dolby Atmos® 3.1.2 canaux 5.1.4 canaux
DTS Virtual:X
2.0 canaux 3.1.2 canaux 5.1.4 canaux
5.1 canaux 3.1.2 canaux 5.1.4 canaux
Dolby Atmos® 3.1.2 canaux 5.1.4 canaux
• Le kit d'enceinte arrière sans l de Samsung peut être acheté séparément. Pour acheter un kit, contactez le vendeur chez qui vous avez acheté la
Soundbar.
• Les enceintes Surround ne produisent pas de son pour 2 canaux de sortie si le mode STANDARD est utilisé. Pour activer le son pour les enceintes
Surround, passez en mode d'effet SURROUND.
• Lorsque la source d'entrée est Dolby Atmos®, la conguration du caisson de basse uniquement offre un canal audio 3.1.2, alors que la conguration
du caisson de basse et du kit d'enceinte arrière sans l offre un canal audio 5.1.4.

FRA - 13
Réglage du volume de la Soundbar avec une télécommande de téléviseur
Réglez le volume de la Soundbar en utilisant la télécommande du téléviseur.
• Cette fonction ne peut être utilisée qu'avec une télécommande à infrarouge. Les télécommandes Bluetooth (qui nécessitent un jumelage) ne sont pas
prises en charge.
• Réglez les enceintes du téléviseur sur Enceinte externe pour utiliser cette fonction.
• Fabricants prenant en charge cette fonction :
Samsung, VIZIO, LG, Sony, Sharp, PHILIPS, PANASONIC, TOSHIBA, Hisense, RCA
1. Éteignez la Soundbar.
2. Poussez vers le haut la touche WOOFER pendant 5 secondes.
Chaque fois que vous poussez la touche WOOFER pendant 5 secondes, le mode change dans l'ordre suivant : « OFF-TV REMOTE » (mode par défaut),
« SAMSUNG-TV REMOTE », « ALL-TV REMOTE ».
Touche de télécommande Voyant LED État
(Mode par défaut)
Clignote en rouge 1x
« Off-TV Remote »
(Mode par défaut)
Désactive la télécommande de téléviseur.
Clignote en cyan 1x
« Samsung-TV Remote »
Active la télécommande à infrarouge d'une TV Samsung.
Clignote en bleu 1x
« All-TV Remote »
Active toute autre télécommande de téléviseur à infrarouge.
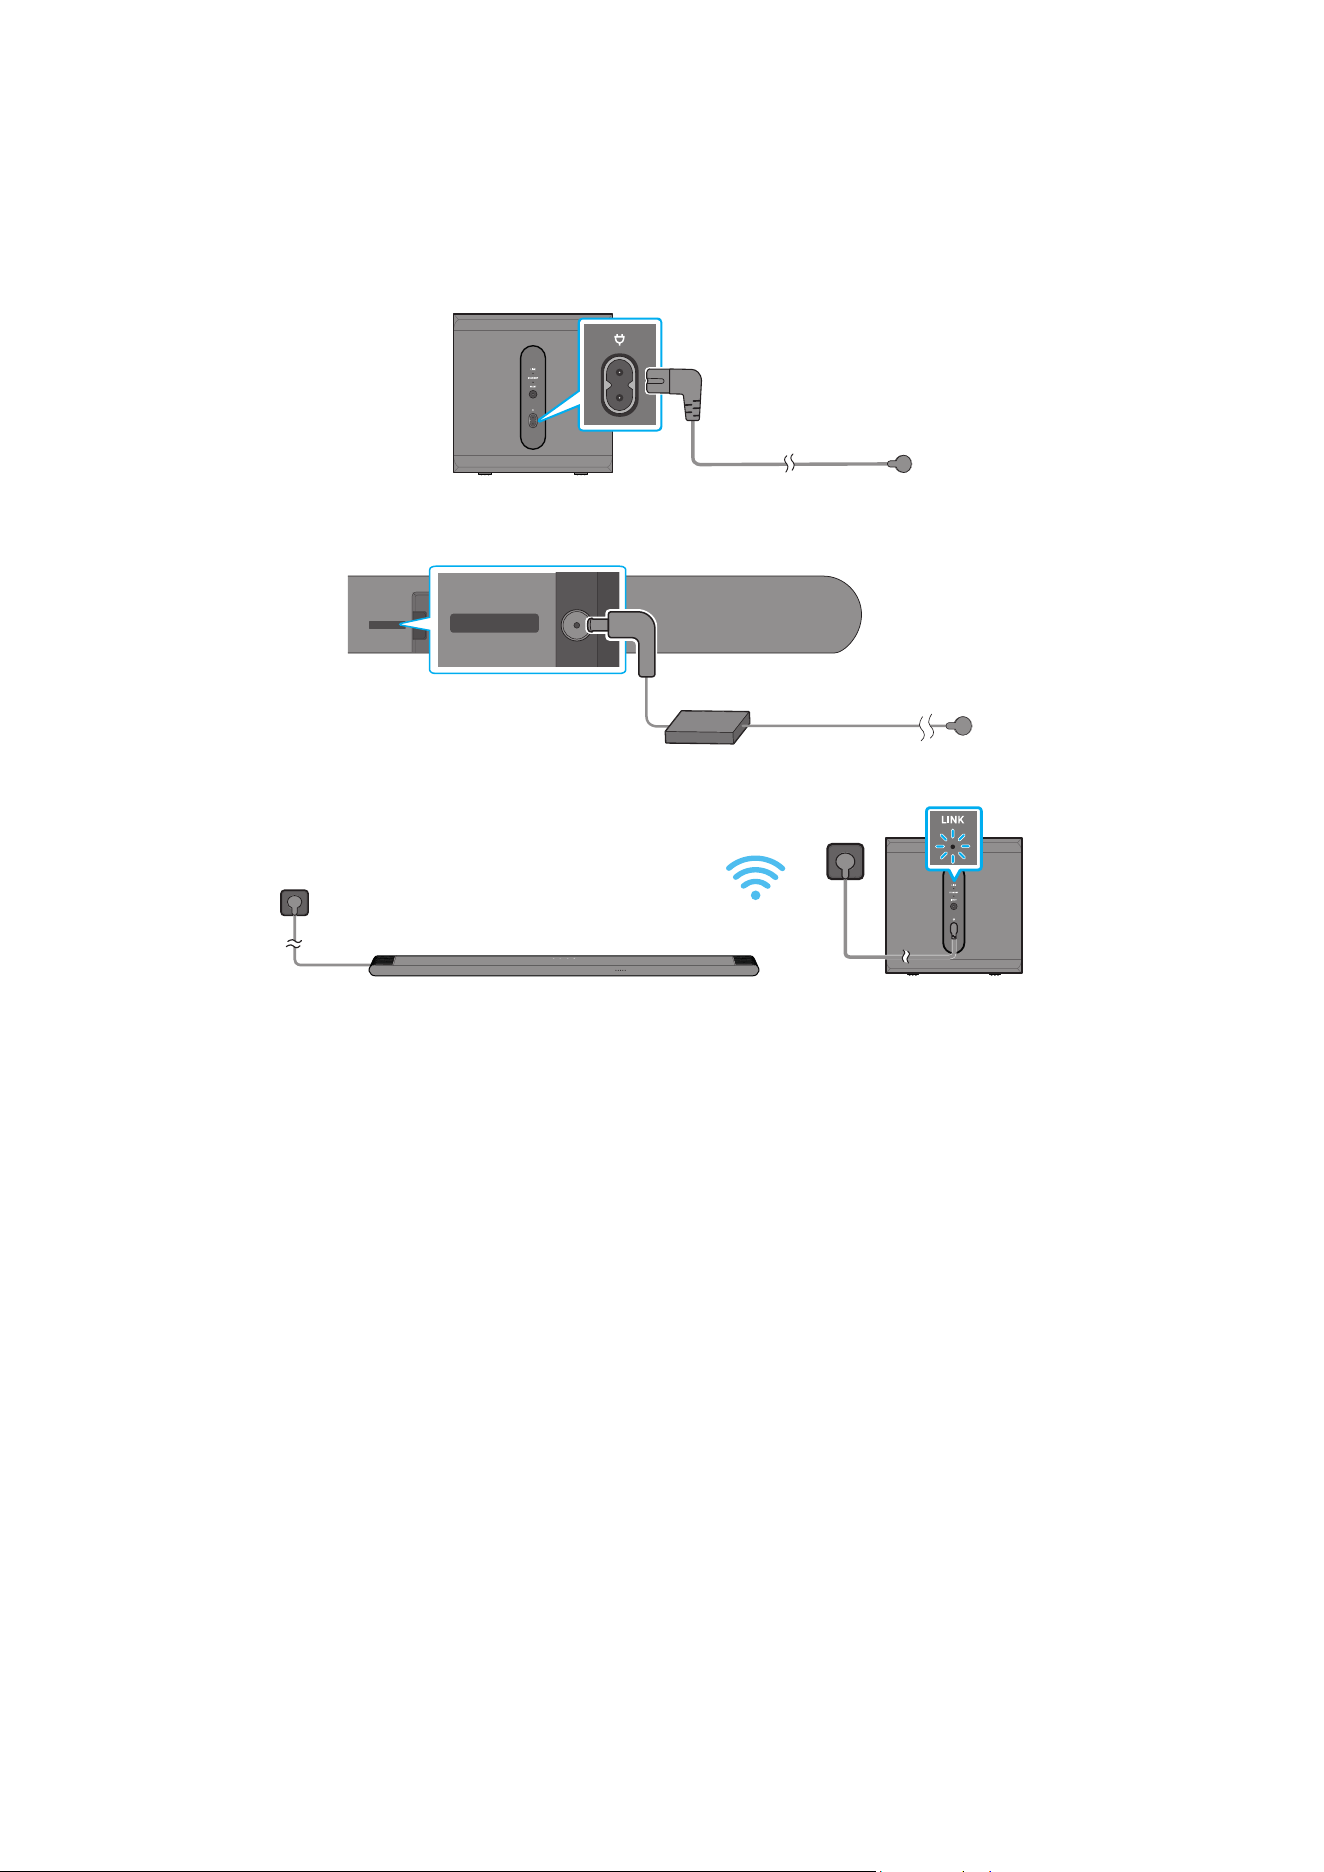
FRA - 14
04 CONNEXION DE LA SOUNDBAR
Connexion de l'alimentation et des unités
Utilisez le cordon d'alimentation pour brancher le caisson de basse et la Soundbar à une prise électrique, dans l'ordre suivant :
• Pour plus d’informations sur l’alimentation électrique requise et la consommation d’énergie, reportez-vous à l’étiquette collée sur le produit. (Étiquette :
située au bas de l'unité principale Soundbar)
1. Connectez un cordon d'alimentation au subwoofer.
Arrière du subwoofer
Cordon
d'alimentation
2. Branchez le cordon d'alimentation à la Soundbar.
Arrière de l'unité principale
de la Soundbar
DC 19V
DC 19V
Cordon
d'alimentation
Adaptateur CA/CC
3. Connectez l'alimentation à la Soundbar et au subwoofer. Le subwoofer est automatiquement connecté lorsque la Soundbar est allumée.
VOYANT LED LINK - Bleu si activé
REMARQUE
• Connectez l'alimentation du subwoofer avant d'établir la connexion avec la Soundbar. Le subwoofer est connecté automatiquement à la Soundbar au
moment où celle-ci est allumée.
• Si vous débranchez, puis rebranchez le cordon d'alimentation alors que le produit est allumé, la Soundbar s'allume automatiquement.
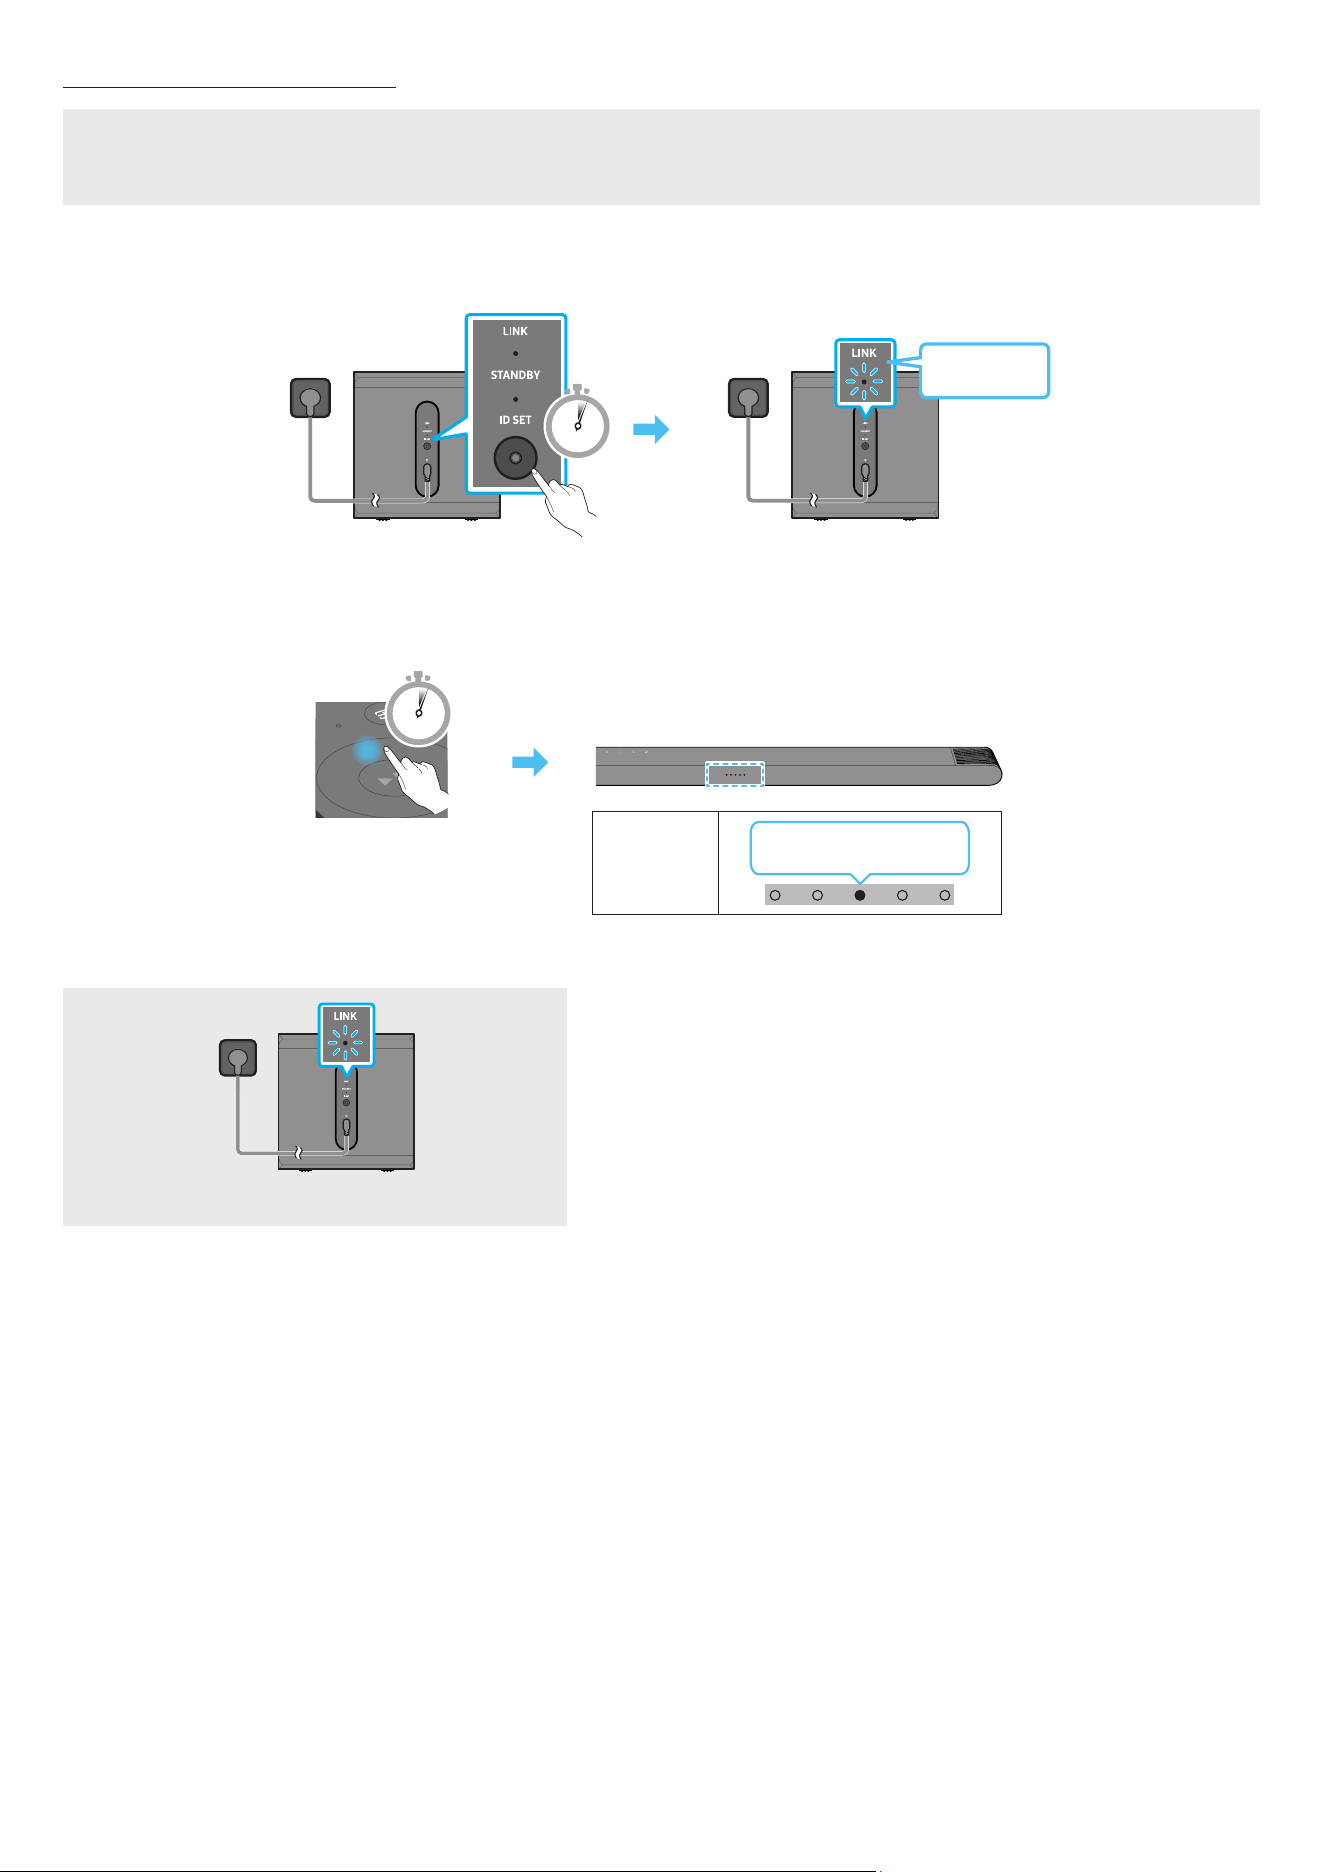
FRA - 15
Connexion manuelle du subwoofer
Avant de réaliser la procédure de connexion manuelle du subwoofer décrite ci-dessous :
• Vériez que les câbles d'alimentation de la Soundbar et du caisson de basse sont correctement connectés.
• Vériez que la Soundbar est éteinte.
1. Éteignez l'unité principale de la Soundbar.
2. Maintenez la touche ID SET située à l'arrière du subwoofer enfoncée pendant au moins 5 secondes.
• L'indicateur rouge à l'arrière de chaque enceinte s'éteint et l'indicateur bleu clignote.
5 Sec
Arrière du subwoofer
Clignotement
rapide en bleu
Arrière du subwoofer
3. Appuyez sur la touche Haut de la télécommande pendant 5 secondes.
• La Soundbar s'allume automatiquement lorsque l'opération ID SET est terminée.
5 Sec
Voyant LED
Clignote en rouge →
vert → bleu
4. Vériez que le voyant LED LINK brille en bleu de manière stable (connexion terminée).
VOYANT LED LINK - Bleu si activé
Le voyant LED LINK arrête de clignoter et s'éclaire en bleu de manière stable
lorsqu'une connexion est établie entre la Soundbar et le subwoofer sans l.
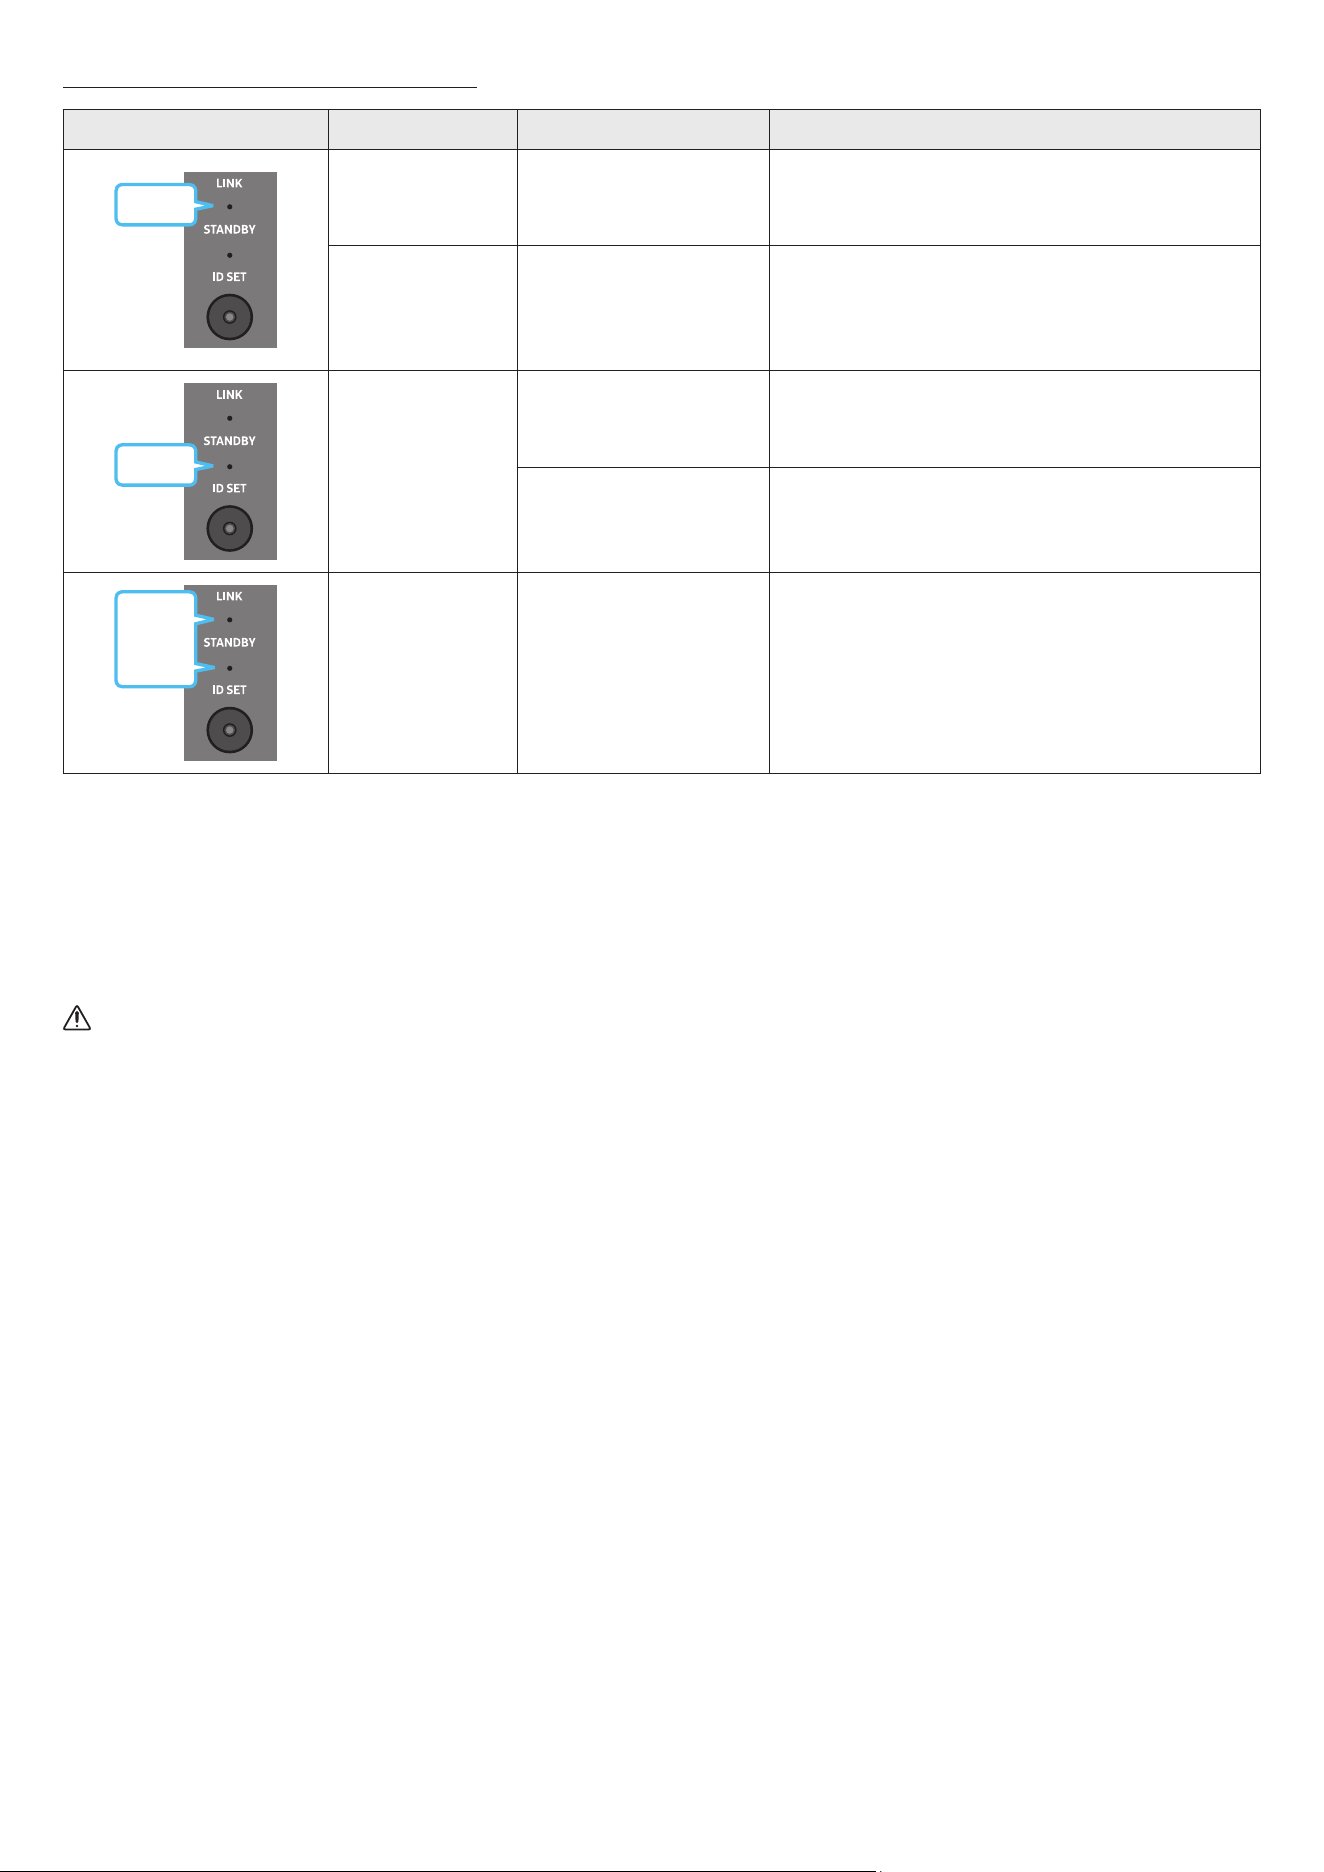
FRA - 16
Voyants LED situés à l'arrière du subwoofer
LED État Description Résolution
Bleu
Allumée
Connexion réussie
(fonctionnement à l'état
normal)
-
Clignote
Récupération de la connexion
en cours
Vériez que le câble d'alimentation xé à l'unité principale
Soundbar est connecté correctement ou attendez environ
5 minutes. Si le clignotement persiste, essayez de connecter
manuellement le subwoofer. Voir page 15.
Rouge
Allumée
Veille (lorsque l'unité
principale Soundbar est
éteinte)
Vériez que le câble d'alimentation xé à l'unité principale
de la Soundbar est connecté correctement.
Échec de la connexion
Rétablissez la connexion. Consultez les instructions relatives
à la connexion manuelle à la page 15.
Rouge
et bleu
Clignote Dysfonctionnement
Consultez les coordonnées du Centre de service Samsung
fournies dans ce manuel.
REMARQUE
• Si l'unité principale est hors tension, le caisson de basse sans l entre en mode veille et le voyant STANDBY à l'arrière du caisson s'allume en rouge après
avoir clignoté en bleu plusieurs fois.
• Si vous utilisez un appareil qui exploite la même fréquence que la Soundbar près de celle-ci, des interférences peuvent provoquer des coupures de son.
• La distance de transmission maximale du signal sans l de l'unité principale est d'environ 10 m, mais peut varier en fonction de votre environnement. Si
un mur en béton armé ou métallique se trouve entre l'unité principale et le caisson de basse sans l, le système risque de ne pas fonctionner du tout car
le signal sans l ne peut pas traverser le métal.
ATTENTION
• Les antennes de réception sans l sont intégrées au subwoofer sans l. N'exposez pas l'appareil à la pluie ni à l'humidité.
• Pour des performances d'écoute optimales, assurez-vous que la zone autour du caisson de basse sans l ne présente pas d'obstacles.
Connexion d'un kit SWA-9500S (vendu séparément) à votre Soundbar
Passez au vrai son surround sans l en connectant votre kit d'enceintes arrière sans l Samsung (SWA-9500S, vendu séparément) à votre Soundbar.
Pour plus d'informations concernant les connexions, veuillez consulter le manuel du Kit d'enceinte arrière sans l Samsung.

FRA - 17
05 CONNEXION À UN TÉLÉVISEUR
Connexion à un téléviseur qui prend en charge HDMI ARC (canal de retour audio)
ATTENTION
• Lors de l'utilisation d'un câble HDMI vers Micro HDMI, veillez à ne pas casser le connecteur du câble.
• Lorsque le câble HDMI est connecté, le signal HDMI est reçu en priorité.
• Pour raccorder le téléviseur et la Soundbar à l'aide du câble HDMI, veillez à utiliser les bornes marquées ARC. Dans le cas contraire, le son du
téléviseur ne sera pas émis.
• Il est recommandé d'utiliser un High Speed HDMI Cable with Ethernet.
HDMI IN
(ARC)
SERVICE
HDMI
(ARC)
Effectuez la connexion au port HDMI IN (ARC)
ou (eARC) de votre téléviseur.
Effectuez la connexion au
port HDMI (ARC) sur l'unité
principale Soundbar.
Câble HDMI vers
Micro HDMI
Arrière de la Soundbar
Dessus de la Soundbar
Voyant LED
Allumé en blanc → Éteint
« TV ARC »
1. Vériez que le téléviseur et la Soundbar sont éteints, plus connectez le câble HDMI comme indiqué sur la gure.
2. Allumez la Soundbar et le téléviseur.
3. Votre téléviseur émettra du son via la Soundbar.
• Si le son du téléviseur n'est pas émis, appuyez sur la touche
(Multi-fonction) située en haut de la Soundbar ou sur la touche (Source) de la
télécommande pour sélectionner le mode « TV ARC ».
• Si le son n'est pas émis, vériez à nouveau la connexion du câble HDMI.
• Utilisez les touches de volume de la télécommande du téléviseur pour changer le volume de la Soundbar.
REMARQUE
• Nous recommandons l'utilisation d'un câble HDMI sans noyau, si possible. Si vous utilisez un câble avec un noyau, choisissez-en un de diamètre inférieur
à 14 mm.
• Cette fonction n'est pas disponible si le câble HDMI ne prend pas en charge ARC.
• Lorsque le son d'un canal de diffusion est encodé en Dolby Digital et que le « Format audio de la sortie numérique » de votre téléviseur est réglé sur
PCM, nous vous recommandons d'ajuster le réglage sur Dolby Digital. Modier ce réglage sur le téléviseur vous permettra d'obtenir un son de meilleure
qualité. (Il est possible que le menu TV utilise différents mots pour Dolby Digital et PCM en fonction du fabricant du téléviseur.)
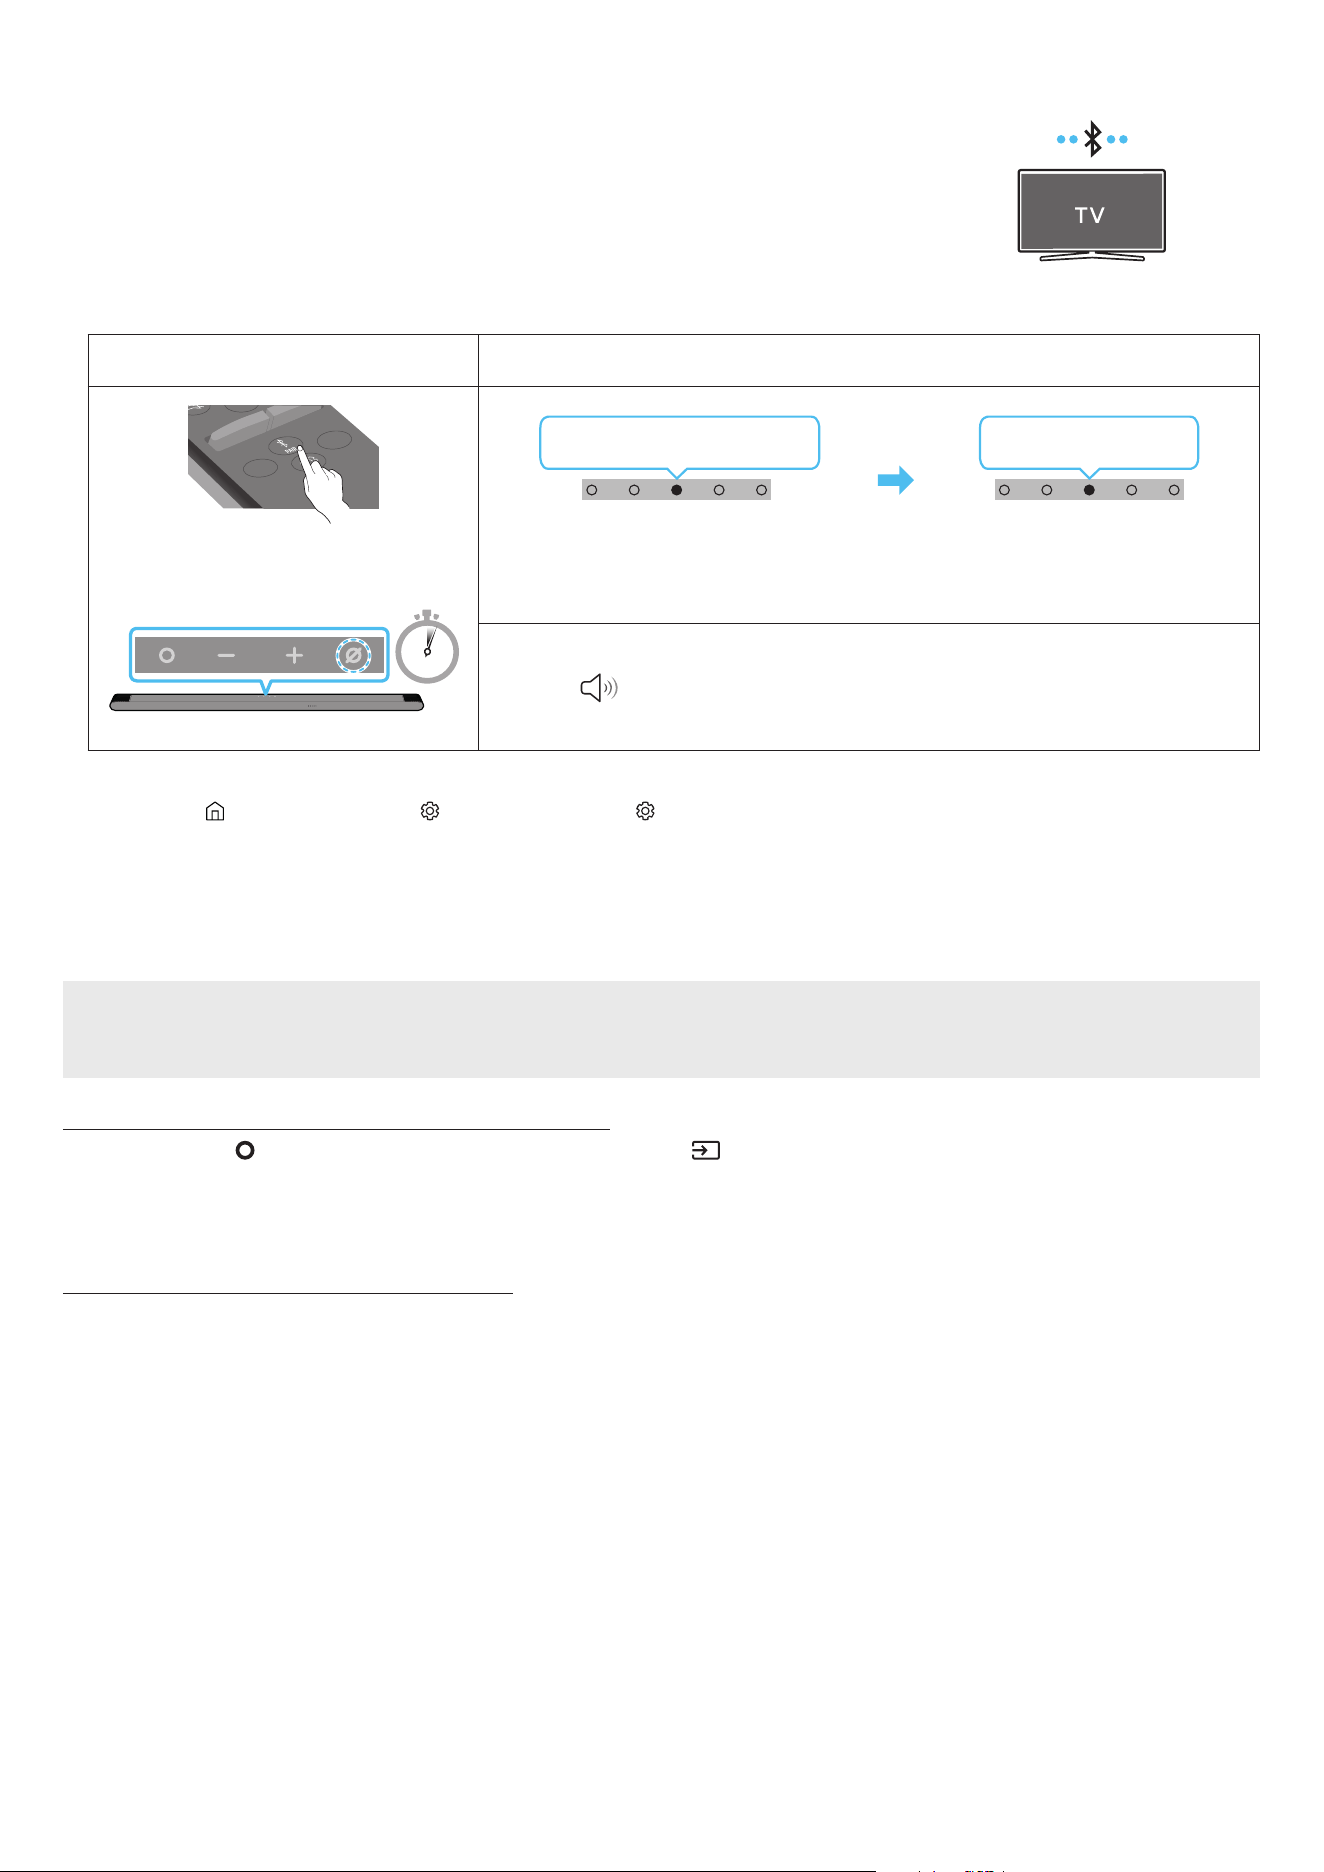
FRA - 18
Connexion via Bluetooth
Lorsqu'un téléviseur Samsung TV est connecté via Bluetooth, vous pouvez proter d'un son stéréo sans le casse-
tête du câblage.
• Seul un téléviseur Samsung TV peut être connecté à la fois.
• Seul un téléviseur Samsung TV prenant en charge la fonction Bluetooth peut être connecté. Vériez les
spécications de votre téléviseur.
Connexion initiale
1.
Touche de jumelage Bluetooth Voyant LED
SOUNDBAR
SOUND
MODE
WOOFER
+
_
CH LEVEL
TONE
CONTROL
(OU)
En mode « Bluetooth »
5 Sec
Clignote en rouge → vert → bleu
Jumelage en cours
Clignote en cyan 3x
Connexion terminée
• Jusqu'à ce que le jumelage soit terminé, le voyant LED multicolore change dans l'ordre Rouge
→ Vert → Bleu.
« Prêt pour connexion Bluetooth. »
1.
2. Sélectionnez le mode Bluetooth sur la TV Samsung.
(p. ex. Accueil ( ) → Menu → Paramètres ( ) → Tous les paramètres ( ) → Son → Sortie son → Liste des haut-parleurs Bluetooth → [AV] Samsung
Soundbar S***B (Bluetooth))
3. Sélectionnez « [AV] Samsung Soundbar S***B » dans la liste à l'écran du téléviseur.
Pour toute Soundbar disponible, le message « Appariement nécessaire » ou « Apparié » apparaît sur la liste des appareils Bluetooth du téléviseur. Pour
connecter le téléviseur Samsung TV à la Soundbar, sélectionnez le message, puis établissez une connexion.
4. Vous pouvez à présent proter du son de la TV Samsung à partir de la Soundbar.
Si la connexion avec l'appareil échoue
• S'il y a déjà une Soundbar (p. ex. [AV] Samsung Soundbar S***B) dans la liste des enceintes afchée à l'écran de la TV Samsung, supprimez-la.
• Ensuite, répétez les étapes 1 à 3.
Déconnexion de la Soundbar et du téléviseur Samsung TV
Appuyez sur la touche (Multi-fonction) en haut de la Soundbar ou sur la touche (Source) de la télécommande pour sélectionner un mode autre que
« Bluetooth ».
• La déconnexion prend un certain temps, car la TV Samsung doit recevoir une réponse de la part de la Soundbar.
(Le temps requis peut varier selon le modèle du téléviseur Samsung TV.)
Remarques concernant la connexion Bluetooth
• Placez un nouvel appareil à une distance inférieure à 1 m de la Soundbar pour établir la connexion par le biais de la communication Bluetooth.
• Si un code d'identication personnel vous est demandé lors de la connexion d'un nouvel appareil Bluetooth, saisissez <0000>.
• La Soundbar s'éteint automatiquement après 18 minutes passées en mode Prêt.
• Il est possible que la Soundbar n'effectue aucune recherche Bluetooth ou n'établisse aucune connexion sous certaines circonstances :
‒ En présence d'un fort champ électromagnétique autour de la Soundbar.
‒ Si plusieurs appareils Bluetooth ou plus sont jumelés simultanément avec la Soundbar.
‒ Si l'appareil Bluetooth est éteint, déplacé ou qu'un dysfonctionnement survient.
• Les appareils électroniques peuvent causer des interférences radio. Les appareils qui génèrent des ondes électromagnétiques doivent être conservés à
distance de l'unité principale Soundbar (par ex. des micro-ondes, des appareils LAN sans l, etc.).

FRA - 19
Connexion via Wi-Fi
Liste de vérications préalables à la connexion
• La connexion Wi-Fi n'est disponible que sur les TV Samsung.
• Vériez si le routeur sans l (Wi-Fi) est activé et si le téléviseur est connecté au routeur.
• Le téléviseur et la Soundbar doivent être connectés au même réseau sans l (Wi-Fi).
• Si votre routeur sans l (Wi-Fi) utilise un canal DFS, vous ne pourrez pas établir de connexion Wi-Fi entre le téléviseur et la Soundbar. Contactez votre
fournisseur de service Internet pour plus de détails.
• Les menus pouvant varier selon l'année de fabrication, reportez-vous au manuel de votre téléviseur.
• Pour connecter le téléviseur à la Soundbar par Wi-Fi, connectez d'abord la Soundbar au routeur sans l. Pour plus de détails sur l'établissement d'une
connexion Wi-Fi, voir page 25.
1. Pour plus d'informations sur la connexion Wi-Fi à la Soundbar, voir page 25, « Méthode 2. Connexion via Wi-Fi (Réseau sans l) ».
2. Changez la source d'entrée du téléviseur en utilisant le menu Audio de la Soundbar.
• TV Samsung sorties en 2017 ou ultérieurement
Son → Sortie son → [AV] Samsung Soundbar S***B (Wi-Fi)

FRA - 20
Connexion à un téléviseur qui prend en charge Dolby Atmos
Liste de vérications préalables à la connexion
• Dolby Atmos® est pris en charge en mode « TV ARC » ou « Wi-Fi ».
• Assurez-vous que le contenu prend en charge Dolby Atmos®.
HDMI IN
(ARC)
SERVICE
HDMI
(ARC)
Connectez au port HDMI IN
(ARC) de votre téléviseur.
Câble HDMI vers
Micro HDMI
Arrière de la Soundbar
Dessus de la Soundbar
Voyant LED
Allumé en blanc → Éteint
« TV ARC »
1. Vériez que le téléviseur et la Soundbar sont éteints, plus connectez le câble HDMI comme indiqué sur la gure.
2. Allumez la Soundbar et le téléviseur.
3. Le son du téléviseur est émis via la Soundbar.
Voyant LED
Allumé en blanc → Éteint
« Wi-Fi »
Menu TV
Wi-Fi
1. Connectez la Soundbar et le téléviseur au même réseau sans l (Wi-Fi).
2. Sélectionnez la Soundbar comme sortie du son du téléviseur.
3. Le son du téléviseur est émis via la Soundbar.
REMARQUE
• Lorsque vous utilisez Dolby Atmos® : Si la source d'entrée est Dolby Atmos®, reportez-vous à la section « Spécications de sortie pour les différents
modes d’effets sonore » page 12.
• Conguration de Dolby Atmos® sur votre lecteur BD ou un autre appareil connecté au téléviseur.
Ouvrez les options de sortie audio dans le menu des paramètres de votre lecteur BD ou autre appareil et assurez-vous que « Pas d'encodage » est
sélectionné pour le ux binaire. Par exemple, sur un lecteur BD Samsung, allez dans Accueil → Son → Sortie numérique, puis sélectionnez Bitstream
(non traité).
• Cette fonction est disponible sur certaines TV Samsung et certains modèles de Soundbar.
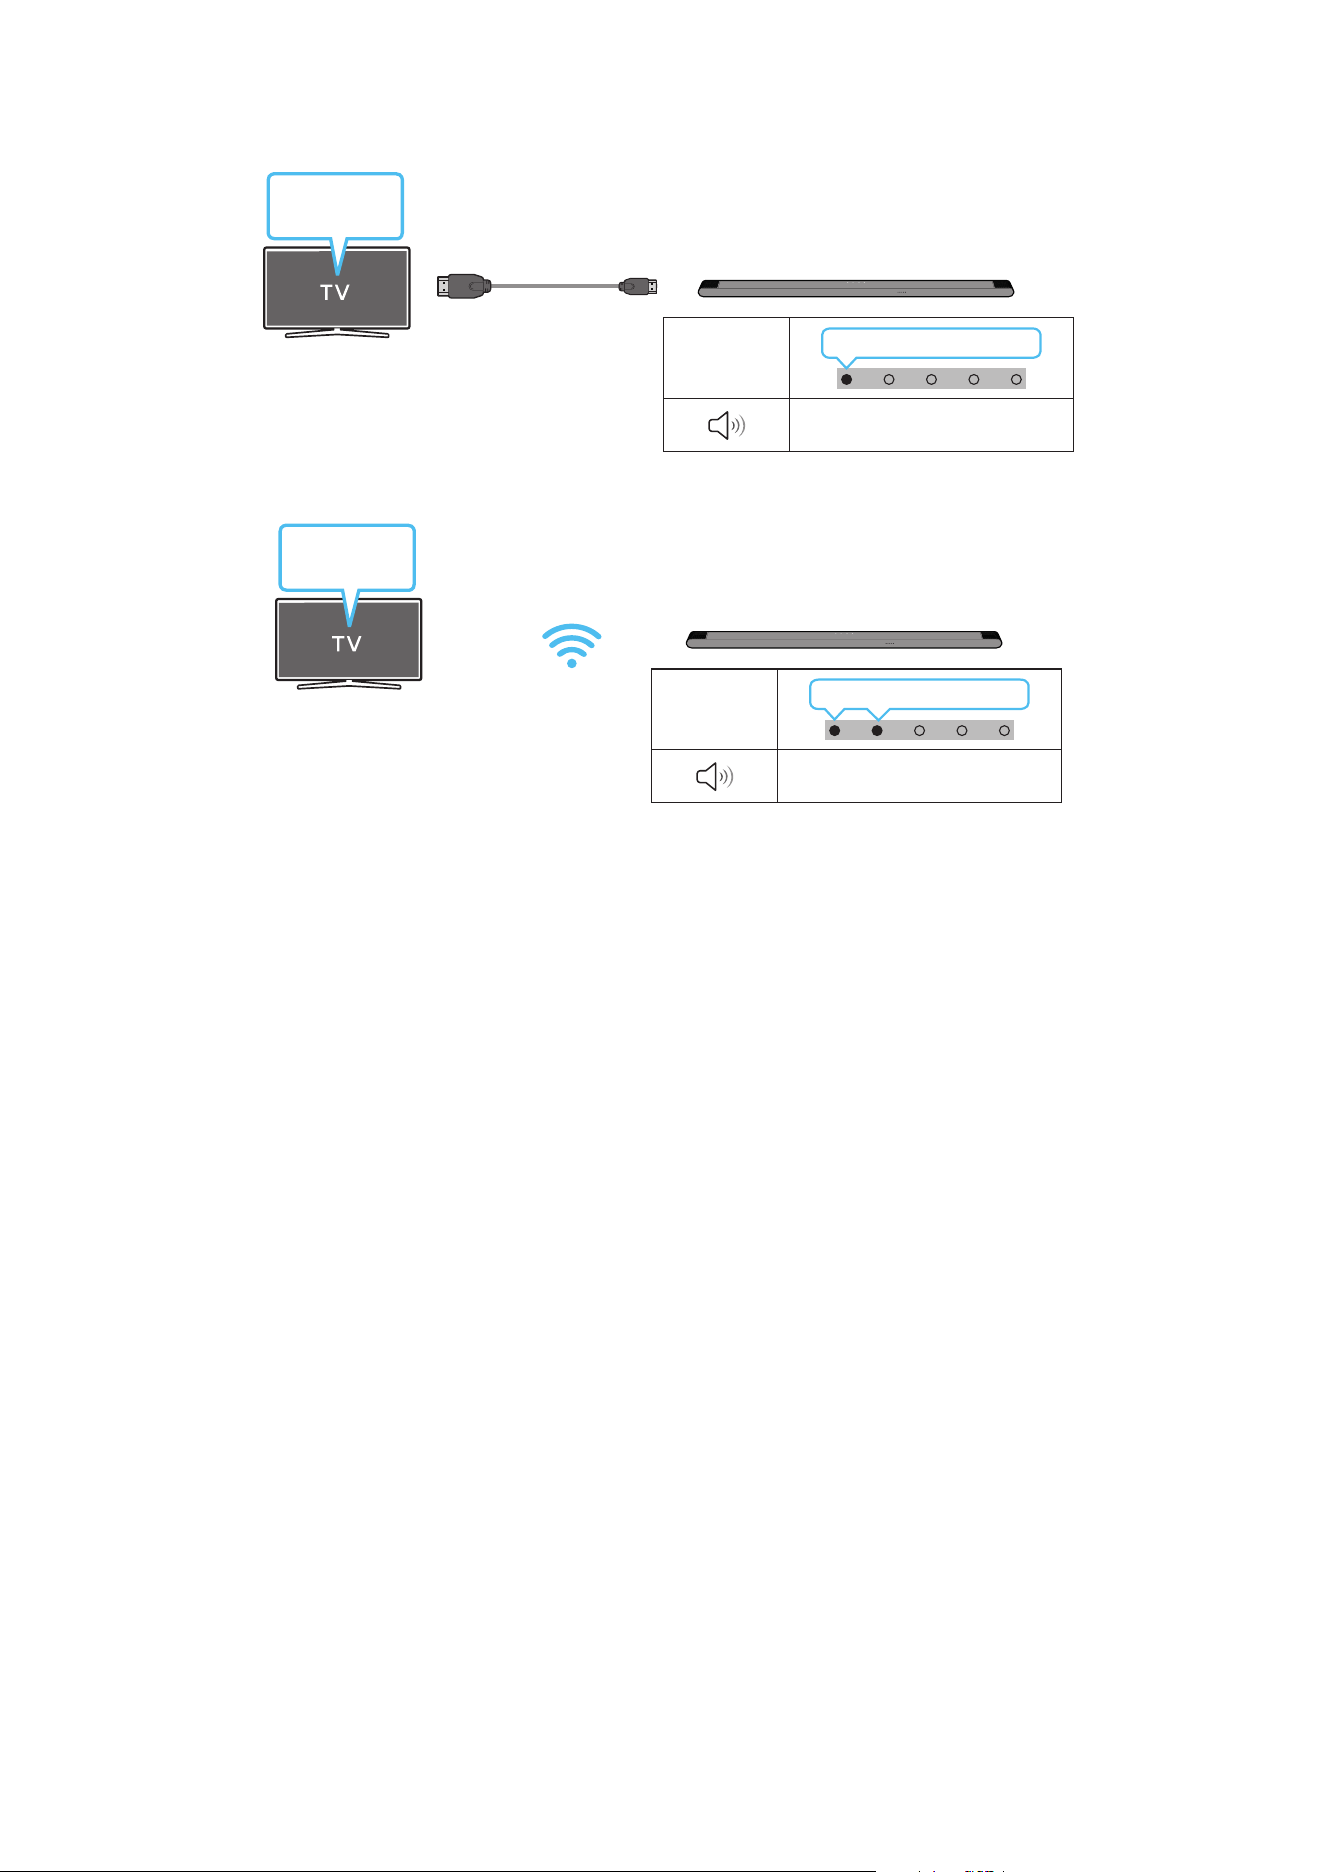
FRA - 21
Utilisation de la fonction Q-Symphony
Avec la fonction Q-Symphony, la Soundbar se synchronise avec une TV Samsung pour diffuser le son via deux périphériques pour un effet surround optimal.
Quand la Soundbar est connectée, le menu « TV+Soundbar » apparaît dans le menu Sortie son du téléviseur. Sélectionnez le menu correspondant.
Menu TV
Câble HDMI vers Micro HDMI
Voyant LED
Allumé en blanc → Éteint
« TV ARC »
• Exemple de menu TV : TV + [AV] Nom de série de la Soundbar (HDMI)
Voyant LED
Allumé en blanc → Éteint
« Wi-Fi »
Menu TV
Wi-Fi
• Exemple de menu TV : Nom de série TV + [AV] Soundbar (Wi-Fi)
REMARQUE
• Le produit peut fonctionner selon le Codec pris en charge par le téléviseur.
• Cette fonction n’est prise en charge que lorsque le câble HDMI ou le Wi-Fi est connecté.
• Assurez-vous que votre téléviseur et votre Soundbar sont connectés au même routeur sans l/à la même fréquence.
• Cette fonction est disponible sur certaines TV Samsung et certains modèles de Soundbar.

FRA - 22
Utilisation du son Spacet
Offre une qualité sonore optimisée en analysant les espaces d'écoute.
Méthode 1. Connexion via la Soundbar
Pour activer cette fonction, activez le mode SpaceFit Sound avec la télécommande de la Soundbar.
( (Réglages audio) → « Désactiver SpaceFit Sound » → ( Haut ) → « Activer SpaceFit Sound »)
• Cette méthode est disponible dans tous les modes audio.
Méthode 2. Connexion via un téléviseur
Pour activer cette fonction, activez le mode Son adaptatif+ via le menu de votre TV Samsung.
(Accueil ( ) → Menu → Paramètres ( ) → Tous les paramètres ( ) → General → Paramètres du mode Intelligent → Son adaptatif+)
• Le mode sonore sur votre Soundbar passe automatiquement sur Son adaptatif+ si vous activez le mode Son adaptatif+ sur votre téléviseur.
REMARQUE
Cette fonction est active si la Soundbar se connecte à certaines TV Samsung.
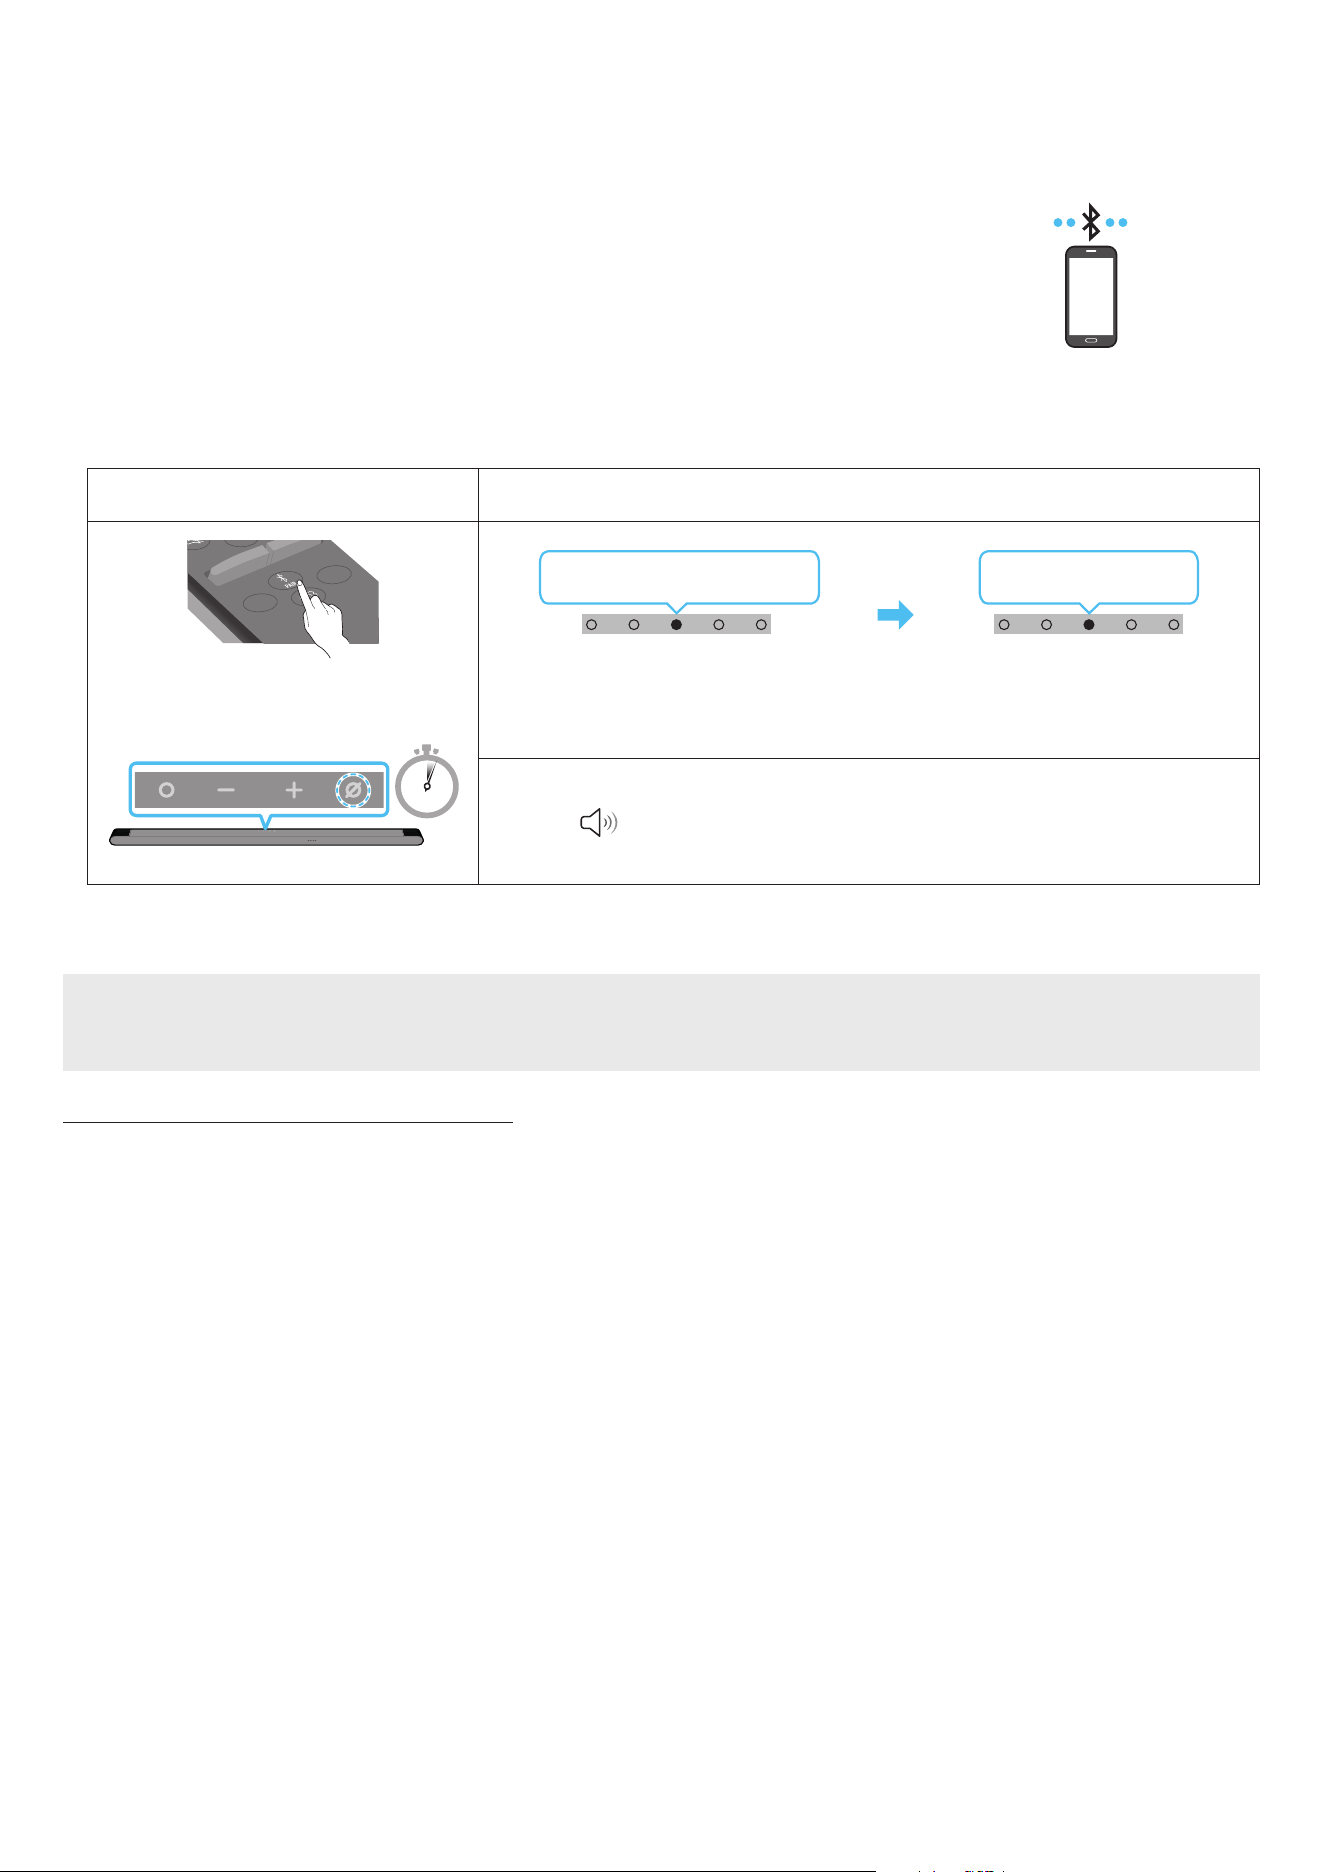
FRA - 23
06 CONNEXION D'UN APPAREIL MOBILE
Méthode 1. Connexion via Bluetooth
Lorsqu'un appareil mobile est connecté via Bluetooth, vous pouvez proter d'un son stéréo sans le casse-tête
du câblage.
• Lorsque vous connectez un appareil Bluetooth déjà jumelé et que la Soundbar est éteinte, celle-ci s'allume
automatiquement.
Appareil mobile
Connexion initiale
Lorsque vous établissez la connexion avec un nouvel appareil Bluetooth, veillez à ce que l'appareil soit à une distance inférieure à 1 m de la Soundbar.
1.
Touche de jumelage Bluetooth Voyant LED
SOUNDBAR
SOUND
MODE
WOOFER
+
_
CH LEVEL
TONE
CONTROL
(OU)
En mode « Bluetooth »
5 Sec
Clignote en rouge → vert → bleu
Jumelage en cours
Clignote en cyan 3x
Connexion terminée
• Jusqu'à ce que le jumelage soit terminé, le voyant LED multicolore change dans l'ordre Rouge
→ Vert → Bleu.
« Prêt pour connexion Bluetooth. »
1.
2. Sur votre appareil, sélectionnez « [AV] Samsung Soundbar S***B » dans la liste qui s'afche.
3. Lisez des chiers musicaux sur l'appareil connecté via Bluetooth à partir de la Soundbar.
Si la connexion avec l'appareil échoue
• S'il y a déjà une Soundbar, (p. ex. « [AV] Samsung Soundbar S***B) ») dans la liste des enceintes afchée à l'écran de l'appareil mobile, supprimez-la.
• Répétez les étapes 1 et 2.
Remarques concernant la connexion Bluetooth
• Placez un nouvel appareil à une distance inférieure à 1 m de la Soundbar pour établir la connexion par le biais de la communication Bluetooth.
• Si un code d'identication personnel vous est demandé lors de la connexion d'un nouvel appareil Bluetooth, saisissez <0000>.
• La Soundbar s'éteint automatiquement après 18 minutes passées en mode Prêt.
• Il est possible que la Soundbar n'effectue aucune recherche Bluetooth ou n'établisse aucune connexion sous certaines circonstances :
‒ En présence d'un fort champ électromagnétique autour de la Soundbar.
‒ Si plusieurs appareils Bluetooth ou plus sont jumelés simultanément avec la Soundbar.
‒ Si l'appareil Bluetooth est éteint, déplacé ou qu'un dysfonctionnement survient.
• Les appareils électroniques peuvent causer des interférences radio. Les appareils qui génèrent des ondes électromagnétiques doivent être conservés à
distance de l'unité principale Soundbar (par ex. des micro-ondes, des appareils LAN sans l, etc.).
• La Soundbar prend en charge les données SBC (44,1 kHz, 48 kHz).
• Ne connectez qu'un appareil Bluetooth prenant en charge la fonction A2DP (AV).
• Vous ne pouvez pas connecter la Soundbar à un appareil Bluetooth ne prenant en charge que la fonction HF (mains libres).
• Lorsque vous connectez la Soundbar à un appareil Bluetooth, placez-les le plus près possible l'un de l'autre.
• Plus la Soundbar et l'appareil Bluetooth sont éloignés, plus la qualité du son sera mauvaise.
La connexion Bluetooth peut se rompre lorsque les appareils sont hors de portée.
• La connexion Bluetooth peut ne pas fonctionner comme prévu dans les zones où la réception est mauvaise.

FRA - 24
• Un appareil Bluetooth peut produire du bruit ou connaître un dysfonctionnement dans les conditions suivantes :
‒ Quand le corps est en contact avec l'émetteur-récepteur de signaux de l'appareil Bluetooth ou de la Soundbar
‒ Dans les coins ou lorsqu'il y a un obstacle à proximité, tel qu'un mur ou une cloison, où des changements électriques peuvent se produire.
‒ Lorsqu'il est exposé à des interférences radio par d'autres produits fonctionnant sur les mêmes plages de fréquences, tels que des équipements
médicaux, des fours à micro-ondes et des dispositifs LAN sans l.
‒ Des obstacles tels que des portes et des murs peuvent aussi avoir un impact sur la qualité du son même lorsque les appareils se trouvent à portée
effective.
• Notez que la Soundbar ne peut pas être jumelée avec d'autres appareils Bluetooth pendant l'utilisation de l'option Bluetooth.
• Cet appareil sans l peut causer des interférences électriques lors de son fonctionnement.
Déconnexion de l'appareil Bluetooth de la Soundbar
Vous pouvez déconnecter un appareil Bluetooth de la Soundbar. Pour les instructions, consultez le manuel utilisateur de l'appareil Bluetooth.
• La Soundbar se déconnecte.
• Si la Soundbar est déconnectée de l'appareil Bluetooth, le voyant LED multicolore de la Soundbar clignote en « rouge » trois fois.
Déconnexion de la Soundbar de l’appareil Bluetooth
Appuyez sur la touche (Multi-fonction) en haut de la Soundbar ou sur la touche (Source) de la télécommande pour quitter le mode « Bluetooth ».
• La déconnexion prend un certain temps l'appareil Bluetooth doit recevoir une réponse de la part de la Soundbar. (Le délai de déconnexion peut varier
selon l'appareil Bluetooth)
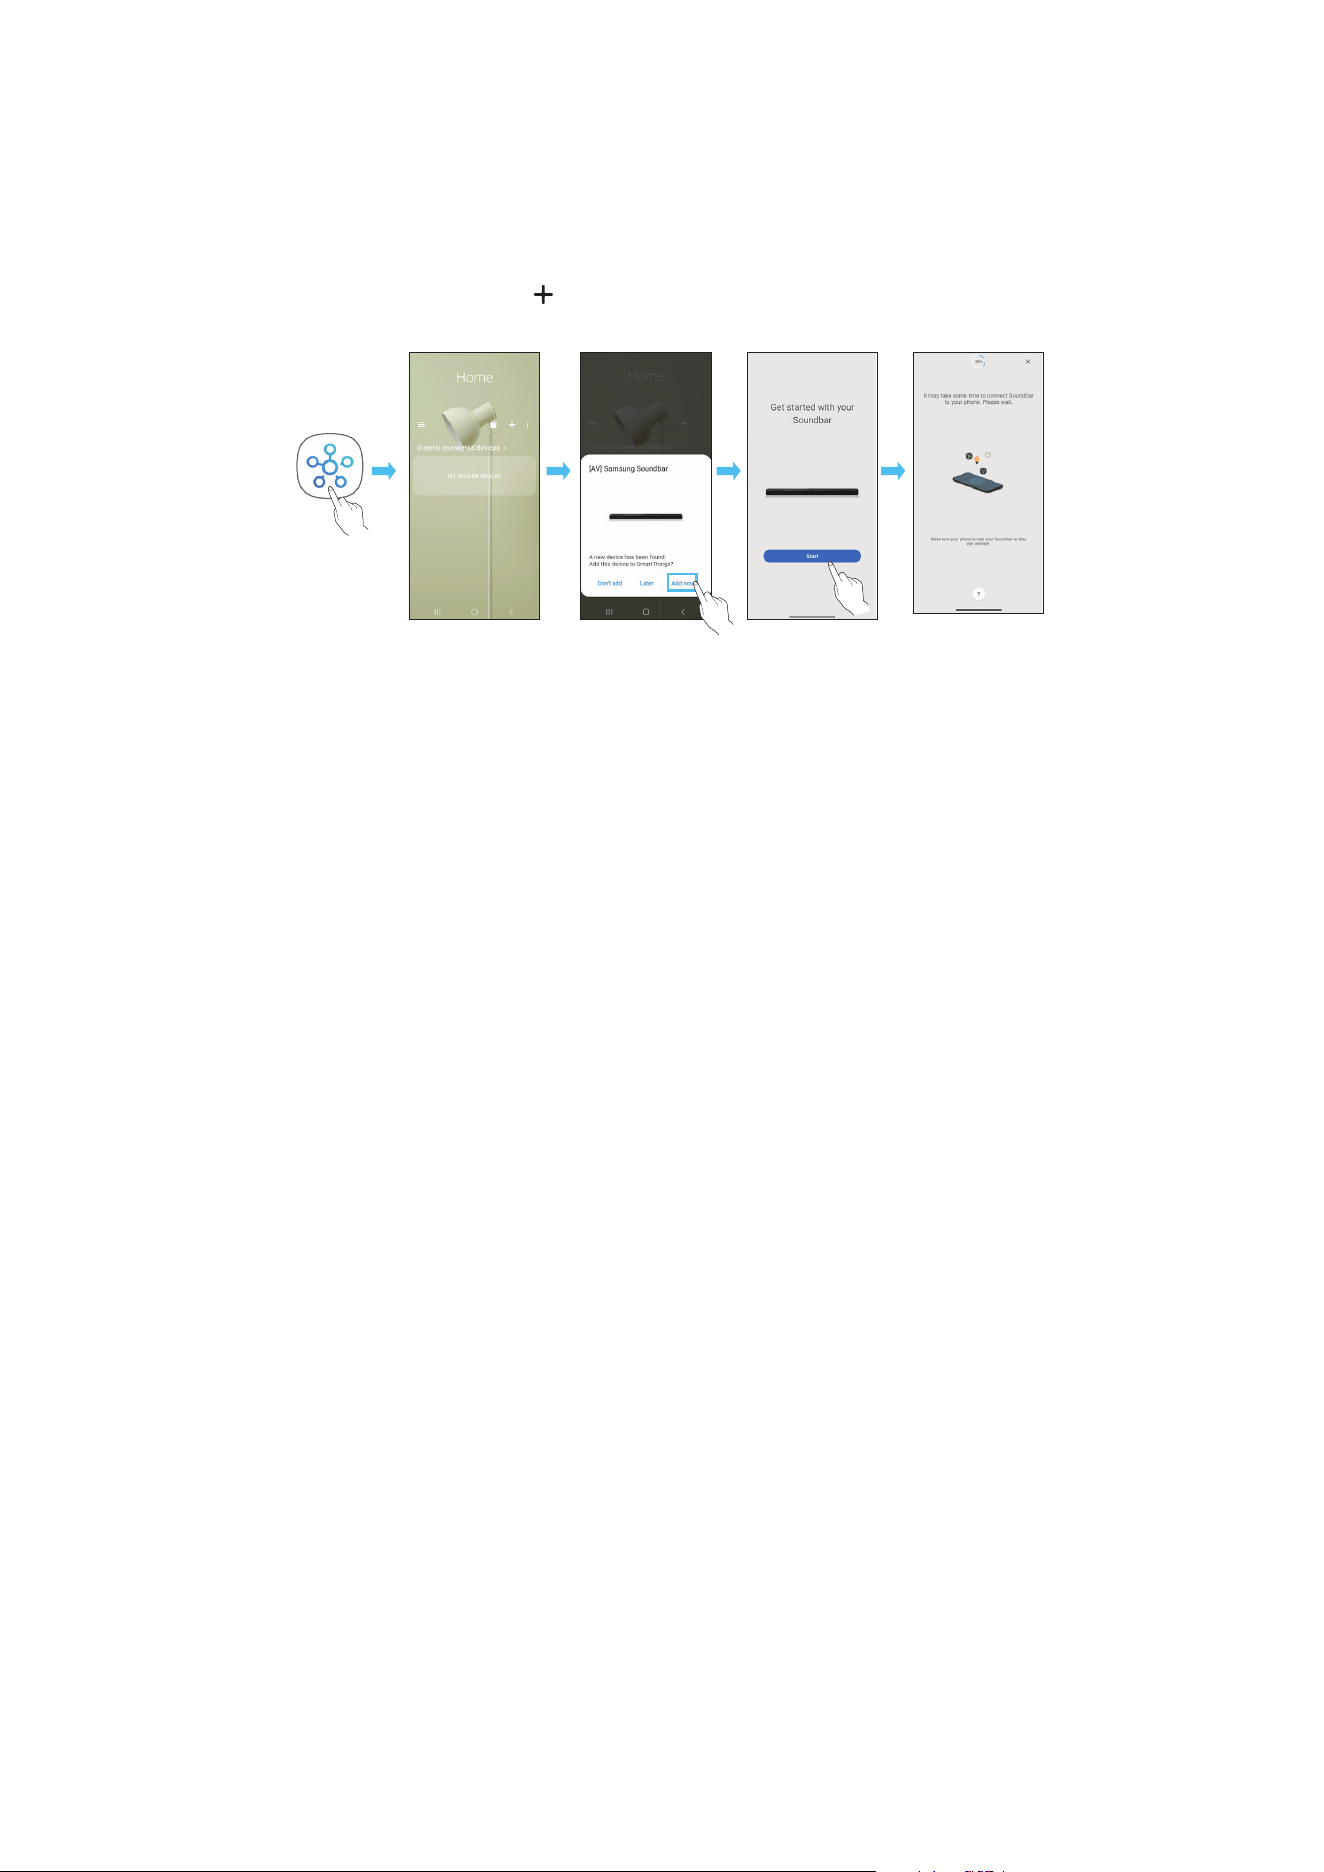
FRA - 25
Méthode 2. Connexion via Wi-Fi (Réseau sans l)
Pour connecter une Soundbar à un appareil mobile via un réseau sans l (Wi-Fi), il est nécessaire de disposer de l'application SmartThings.
Connexion initiale
1. Installez et lancez l'application SmartThings sur votre appareil mobile (smartphone ou tablette).
2. Sur l'application, suivez les instructions à l'écran pour ajouter la Soundbar.
• Le message contextuel automatique (deuxième illustration ci-dessous) peut ne pas s'afcher sur certains appareils.
Si la fenêtre contextuelle n'apparaît pas, appuyez sur « » dans l'écran Home. La Soundbar est ajoutée à l'application.
• L'illustration ci-dessous peut différer selon la version de l'application.
Lancer
l'application
Message
contextuel
automatique
Ajouter
l'appareil
Application
SmartThings

FRA - 26
Utilisation de la fonction Tap Sound
Appuyez sur la Soundbar avec votre appareil mobile pour lire le son du contenu de l'appareil mobile via la Soundbar.
• Il se peut que cette fonction ne soit pas prise en charge, selon l'appareil mobile.
• Cette fonction est uniquement compatible avec les appareils mobiles Samsung sous Android 8.1 ou supérieur.
Dessus de la Soundbar
Appareil mobile
Application SmartThings
1. Activez la fonction Tap Sound sur votre appareil mobile.
• Pour des détails sur l'activation de la fonction, reportez-vous à la section « Conguration de la fonction Tap Sound » ci-après.
2. Appuyez sur la Soundbar avec votre appareil mobile. Sélectionnez « Start now » dans la fenêtre de message afchée.
Une connexion est établie entre l'appareil mobile et la Soundbar via Bluetooth.
3. Lisez le son du contenu de l'appareil mobile via la Soundbar.
• Cette fonction permet de connecter un appareil mobile à la Soundbar via Bluetooth en détectant les vibrations qui se produisent lorsque l'appareil
touche la Soundbar.
• Assurez-vous que l'appareil mobile ne touche pas un angle saillant de la Soundbar. La Soundbar ou l'appareil mobile risquerait d'être rayé ou
endommagé.
• Il est recommandé de recouvrir l'appareil mobile d'une housse protectrice. Appuyez légèrement sur la zone large de la partie supérieure de la
Soundbar, sans forcer.
• Pour utiliser cette fonction, mettez à jour l'application SmartThings à la dernière version.
Il se peut que cette fonction ne soit pas prise en charge, selon la version de l'application.
Conguration de la fonction Tap Sound
Utilisez l'application SmartThings pour activer la fonction Tap View, Tap Sound.
1. Sur l'appareil mobile, exécutez l'application SmartThings.
2. Sélectionnez ( → ) sur l'écran de l'application SmartThings qui s'afche sur l'appareil mobile.
3. Placez « Tap View, Tap Sound » sur Activé pour permettre à la fonction de se mettre en marche lorsqu'un appareil mobile est en mouvement à proximité
de la Soundbar. La fonction est activée.
REMARQUE
• Lorsque l'appareil mobile est en mode d'économie d'énergie, la fonction Tap Sound ne se met pas en marche.
• La fonction Tap Sound pourrait ne pas fonctionner si des appareils situés à proximité de la Soundbar provoquent des interférences radio, comme par
exemple, des appareils électriques. Assurez-vous que les appareils susceptibles de provoquer des interférences radio sont placés à une distance
sufsante de la Soundbar.

FRA - 27
07 CONNEXION VIA APPLE AIRPLAY 2
• Cette fonctionnalité peut ne pas être disponible dans certains pays.
• Cette Soundbar Samsung prend en charge AirPlay 2 et nécessite iOS 11.4 ou version ultérieure.
Avec AirPlay 2, vous pouvez écouter de la musique, des podcasts et d'autres contenus audio en streaming sur vos appareils Apple via la Soundbar Samsung.
• Assurez-vous que la Soundbar est allumée et connectée au même réseau Wi-Fi que votre appareil Apple.
• Sélectionnez
à partir d'une application prise en charge par AirPlay ou du Control Centre sur votre iPhone, iPad ou Mac.
• Sélectionnez la Soundbar dans la liste des appareils disponibles pour lire le son.

FRA - 28
08 INSTALLATION DE LA
FIXATION MURALE
Précautions d'installation
• Installez uniquement la Soundbar sur un mur vertical.
• N'installez pas la Soundbar dans un endroit chaud ou humide.
• Vériez que le mur est assez résistant pour soutenir le poids du produit.
Si ce n'est pas le cas, consolidez le mur ou choisissez un autre point
d'installation.
• Branchez les câbles de l'unité aux appareils externes avant de procéder
à l'installation murale de la Soundbar.
• Veillez à ce que l'unité soit éteinte et débranchée avant de procéder à
l'installation. Dans le cas contraire, il existe un risque d'électrocution.
Composants de xation murale
AH81-15127A-01
A TYPE
:
740mm
B TYPE
:
700mm
Guide de xation murale
x 2
x 4
(M5 X L55)
Vis de xation Vis
x 2
x 4
Support de xation murale Vis d'ancrage
1. Placez le guide de xation murale contre le mur.
• Le guide de xation murale doit être de niveau.
• Si votre téléviseur est xé au mur, installez la Soundbar au moins
5 cm sous celui-ci.
5 cm ou plus
2. Alignez la ligne centrale du guide de xation murale avec le centre de
votre téléviseur (si vous xez la Soundbar sous votre téléviseur), puis
xez le guide de xation murale au mur avec du ruban adhésif.
• Si vous ne xez pas la Soundbar sous un téléviseur, placez la ligne
centrale au centre de la zone d'installation.
AH81-15127A-01
A TYPE
:
740mm
B TYPE
:
700mm
Ligne centrale
3. Appuyez avec la pointe d'un stylo ou d'un crayon bien taillé au centre
des images A-TYPE et B-TYPE à chaque extrémité du guide pour
marquer les trous des vis de xation, puis retirez le guide de xation
murale.
AH81-15127A-01
A TYPE
:
740mm
B TYPE
:
700mm
4. À l'aide d'une mèche appropriée, faites un trou dans le mur au niveau de
chaque marque.
• Si les marques ne correspondent pas aux positions des poteaux
muraux, veillez à insérer les ancrages ou les chevilles à expansion
approprié(e)s dans les trous avant d'insérer les vis de xation. Si vous
utilisez des ancrages ou des chevilles Molly, pensez à percer des
trous sufsamment larges pour les accueillir.
5. Enfoncez une vis (non fournie) dans chaque trou de xation, puis vissez
fermement chaque vis dans le trou correspondant.
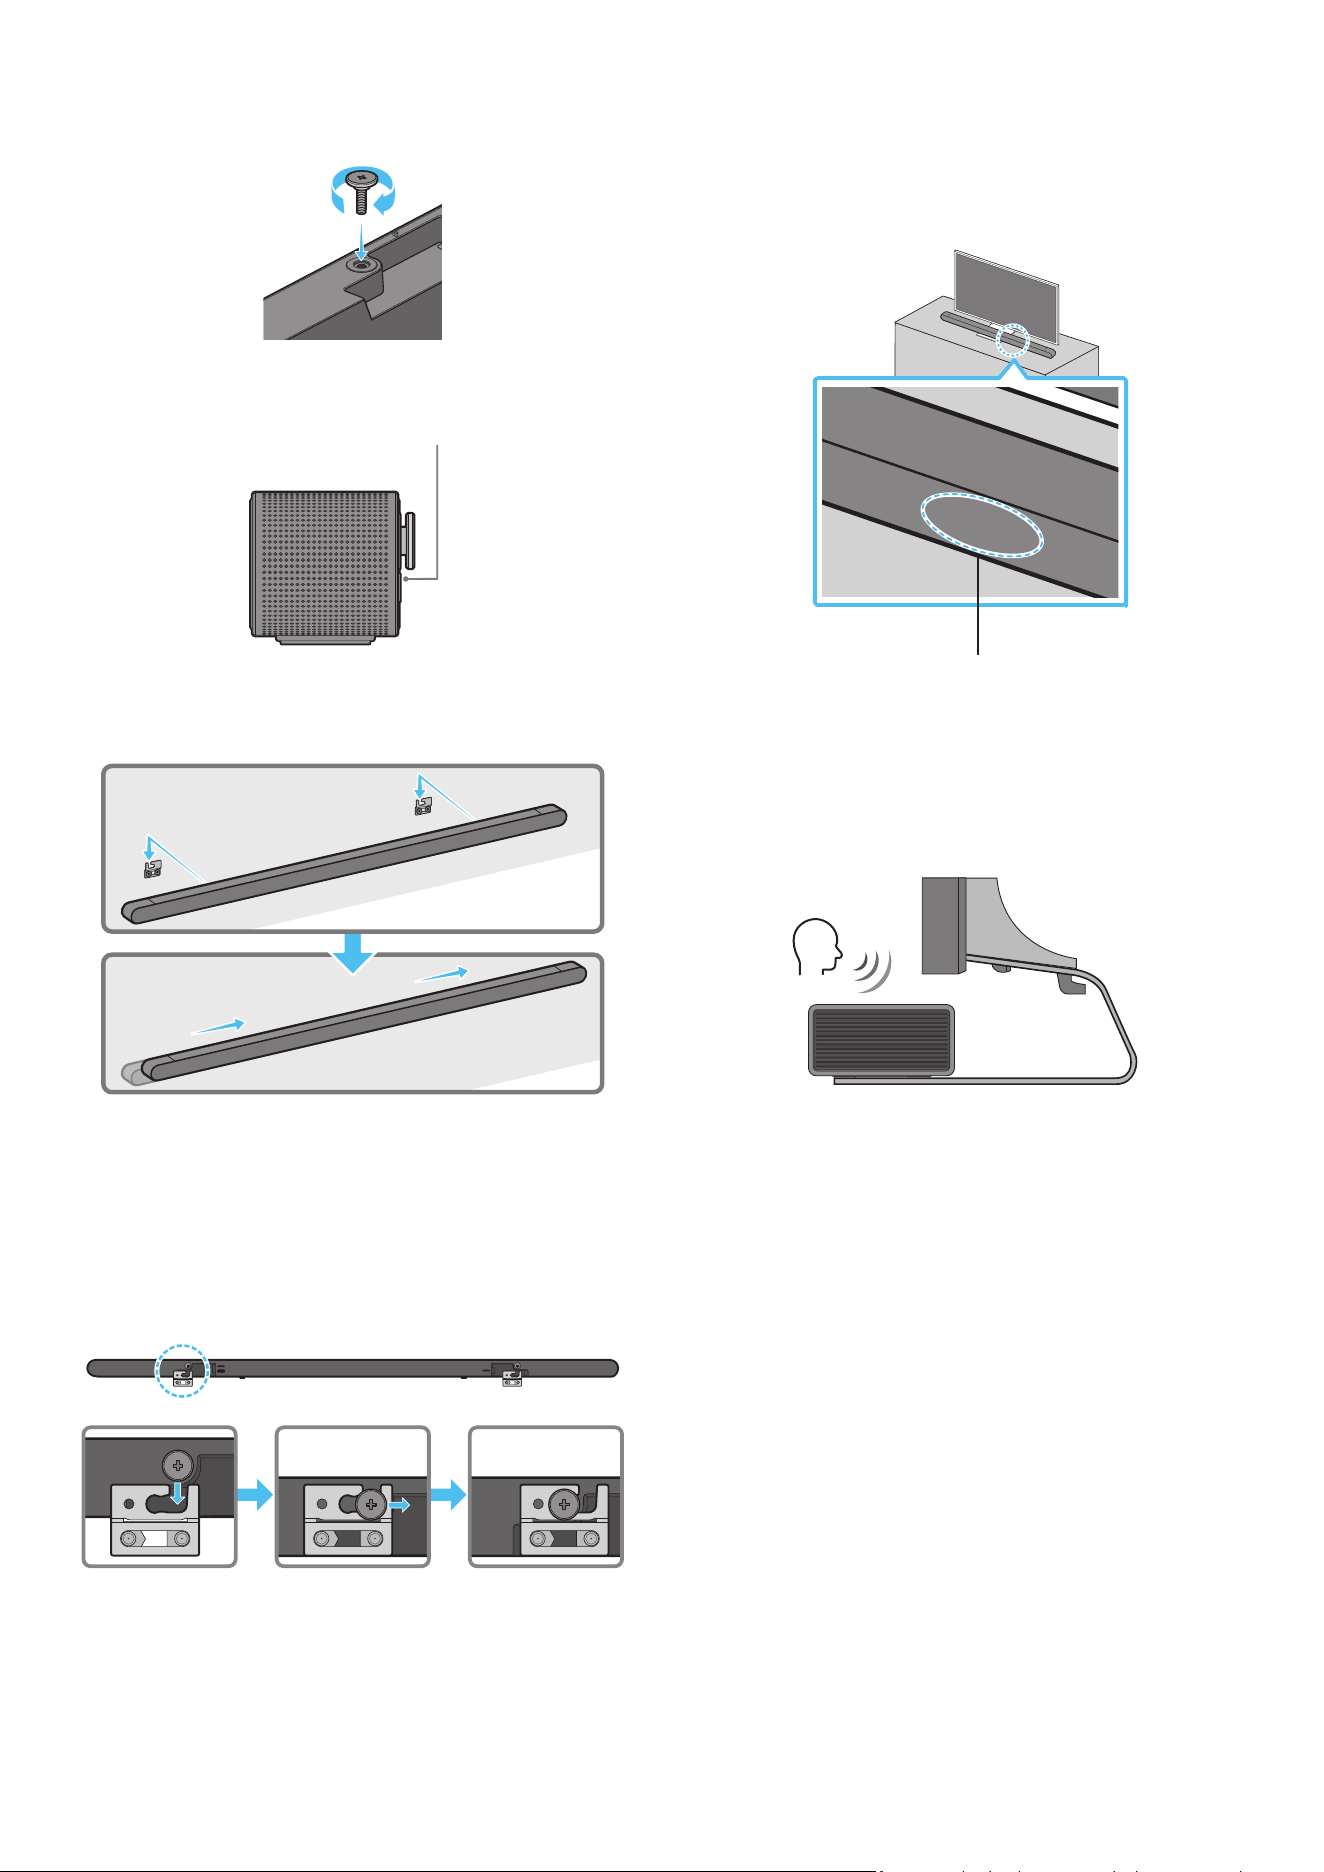
FRA - 29
6. Installez les 2 crochets de xation murale sur la partie arrière de la
Soundbar, en veillant à bien les positionner, en utilisant 2 bagues-
supports.
• Lors du montage, veillez à ce que la partie verticale des crochets de
xation murale se trouve derrière l'arrière de la Soundbar.
Arrière de la Soundbar
Extrémité droite de la Soundbar
7. Installez la Soundbar sur laquelle sont xés les crochets de xation
murale en accrochant ces crochets sur les bagues-supports au mur.
8. Faites glisser la Soundbar vers le bas, comme indiqué ci-dessous, an
que les crochets de xation murale reposent fermement sur les bagues-
supports.
• Insérez les bagues-supports dans la partie large (arrière) des
crochets de xation murale, puis faites glisser les crochets de
xation murale vers le bas an qu'ils reposent fermement sur les
bagues-supports.
SERVICE
HDMI
(ARC)
SERVICE
HDMI
(ARC)
SERVICE
HDMI
(ARC)
DC 19V
09 INSTALLATION DE LA
SOUNDBAR DEVANT LE
TÉLÉVISEUR
Microphones
Comme indiqué sur l'illustration, alignez le centre de la Soundbar avec le
centre du téléviseur, en plaçant avec précaution la Soundbar sur le socle du
téléviseur.
Ensuite, placez les microphones sur la partie avant du socle an qu'il n'y ait
pas d'interférence avec la reconnaissance vocale.
Extrémité droite de la Soundbar
TV
REMARQUE
• Veillez à ce que la Soundbar soit placée sur une surface plane et stable.
• Un écart insufsant avec le téléviseur peut entraîner des problèmes
d'acoustique et de reconnaissance vocale.
• L'illustration ci-dessus diffère selon le modèle utilisé.
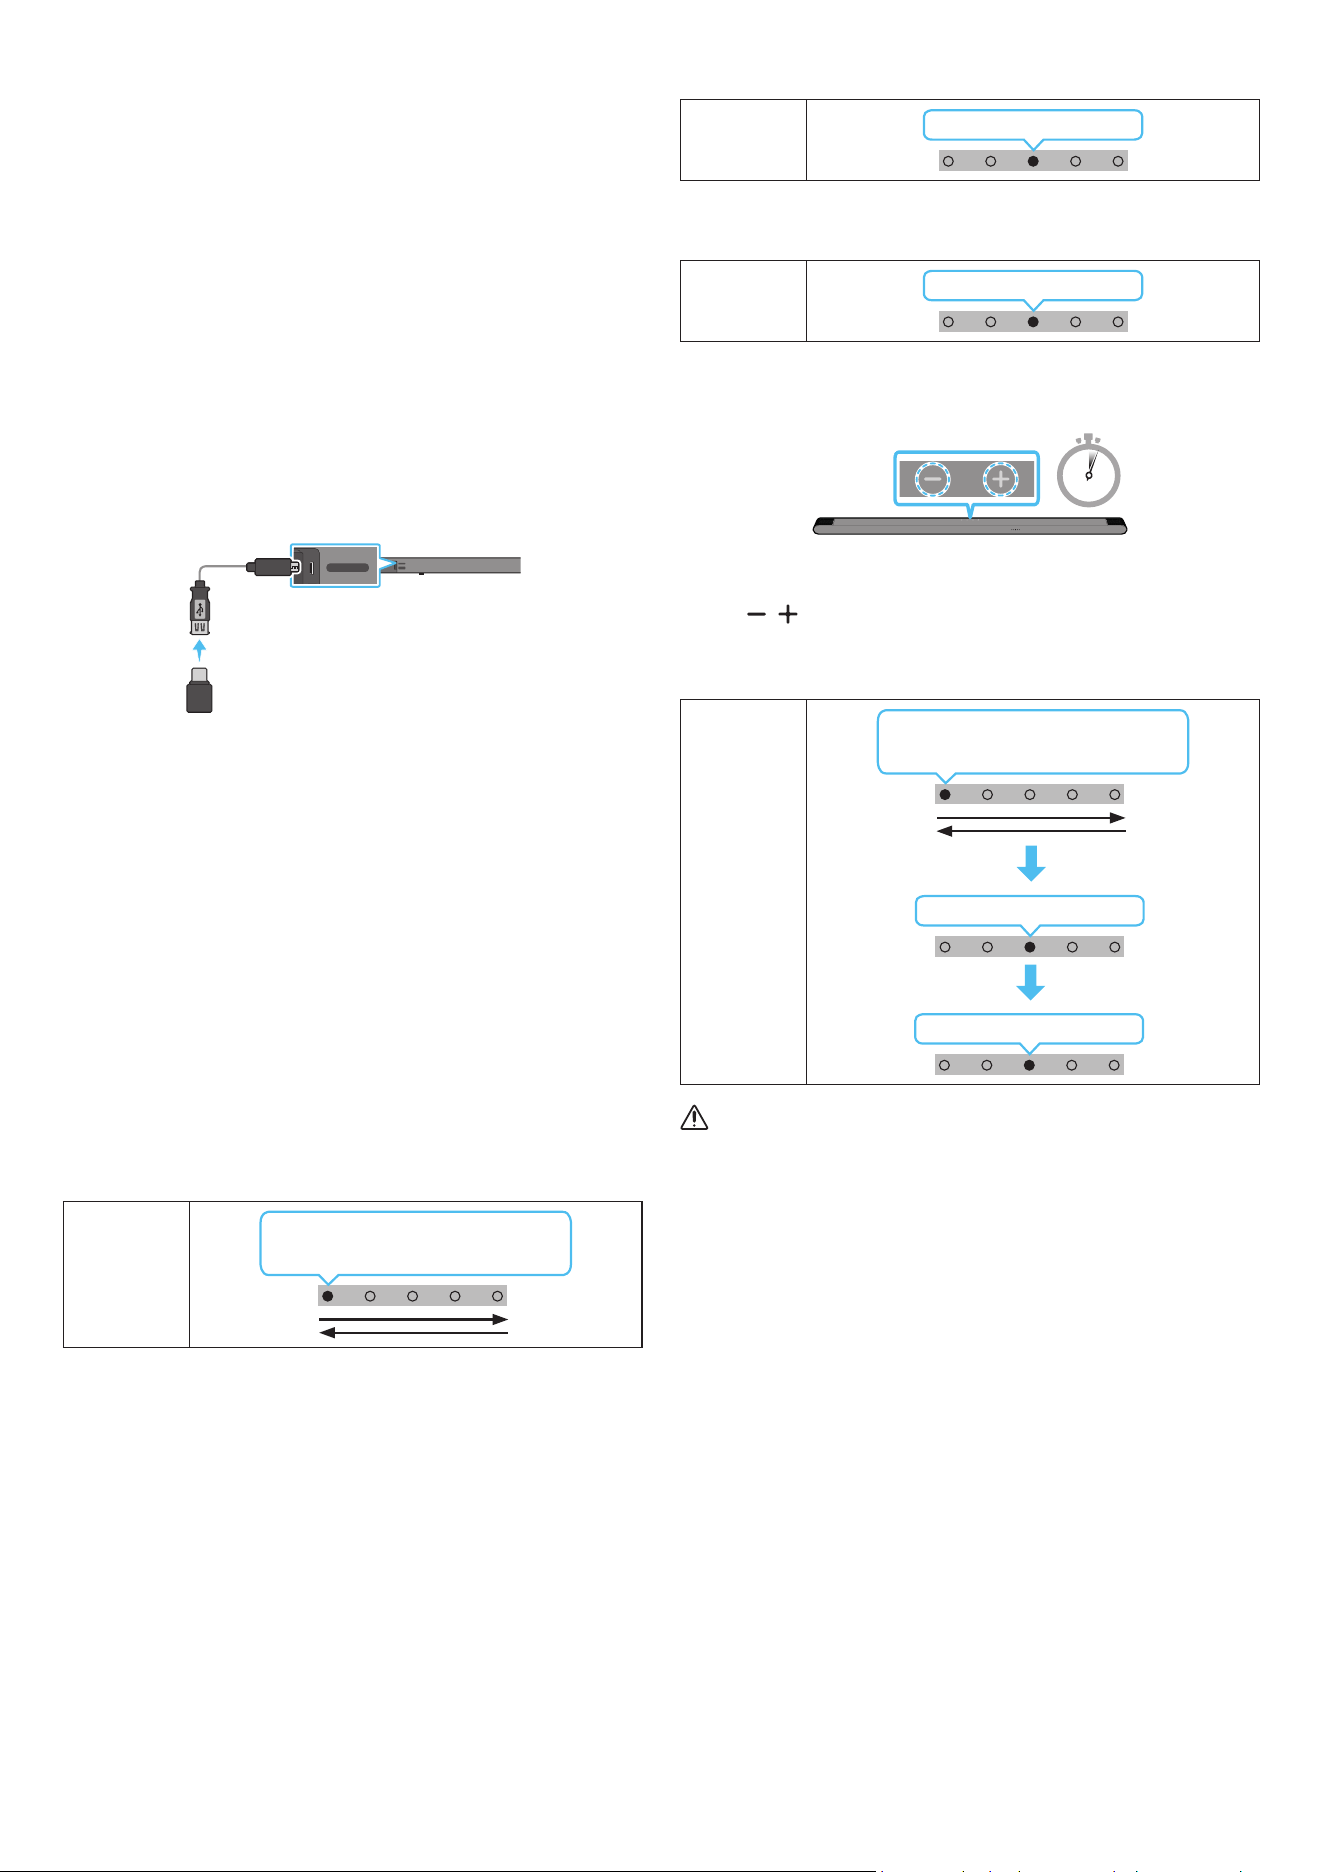
FRA - 30
10 MISE À JOUR DU LOGICIEL
Mise à jour automatique
Lorsque la Soundbar est connectée à internet, le logiciel est
automatiquement mis à jour, même lorsque la Soundbar est éteinte.
• Pour utiliser la fonction de mise à jour automatique, la Soundbar doit
être connectée à internet.
La connexion Wi-Fi à la Soundbar prend n si le cordon d'alimentation
de la Soundbar est débranché ou si l'alimentation est coupée. Si
l'alimentation a été coupée, lorsque l'alimentation revient ou quand
vous rebranchez le cordon d'alimentation, allumez la Soundbar, puis
reconnectez-la à internet.
Mise à jour par USB
Arrière de la Soundbar
SERVICE
HDMI
(ARC)
SERVICE
HDMI
(ARC)
Câble adaptateur
Micro-USB vers USB
(non fourni)
Il est possible qu'à l'avenir, Samsung propose des mises à jour du
micrologiciel du système de la Soundbar.
Lorsqu'une mise à jour est disponible, vous pouvez mettre à jour la
Soundbar en connectant un lecteur USB contenant la mise à jour du
micrologiciel au port SERVICE de la Soundbar.
1. Rendez-vous sur le site www.samsung.com → recherchez le nom du
modèle à partir de l'option de menu d'assistance client.
• Pour plus d'informations sur les mises à jour, reportez-vous au guide
des mises à jour.
2. Téléchargez le chier de mise à jour (type USB).
3. Décompressez le chier pour créer un dossier avec le nom du chier.
4. Stockez le chier créé dans une clé USB puis connectez-la à la Soundbar.
5. Allumez la Soundbar. Ensuite, le produit est mis à jour dans les
3 minutes.
Voyant LED
Le voyant blanc se déplace de gauche
à droite et de droite à gauche
• Pendant la mise à jour, n'éteignez pas l'appareil et ne retirez pas la
clé USB.
• Si le voyant LED jaune est allumé après la mise à jour du logiciel,
cela signie qu'une mise à jour supplémentaire est en cours. Le cas
échéant, veuillez ne pas mettre l'équipement hors tension ni retirer
le périphérique USB.
• Si la mise à jour ne s'effectue pas, rebranchez le cordon
d'alimentation de la Soundbar.
• Lorsque la dernière version est installée, aucune mise à jour n'est
effectuée.
• Selon le type de clé USB utilisée, la mise à jour peut ne pas être prise
en charge.
• Si aucune mise à jour n'est disponible, le voyant rouge clignote 3 fois.
Voyant LED
Clignote en rouge 3x
• Si la version du chier de mise à jour est identique ou inférieure à
celle déjà existante, le voyant cyan clignote 3 fois.
Voyant LED
Clignote en cyan 3x
Réinitialisation
5 Sec
Alors que la Soundbar est allumée, appuyez simultanément sur les
boutons (Volume) situés sur le boîtier pendant au moins 5 secondes.
L'afchage LED change comme indiqué ci-dessous, puis la Soundbar est
réinitialisée.
Voyant LED
Clignote en cyan 3x
Clignote en rouge → Éteint
Le voyant blanc se déplace de gauche
à droite et de droite à gauche
ATTENTION
• Tous les réglages de la Soundbar sont réinitialisés. Veillez à
n'effectuer cette opération que lorsqu'une réinitialisation est
nécessaire.
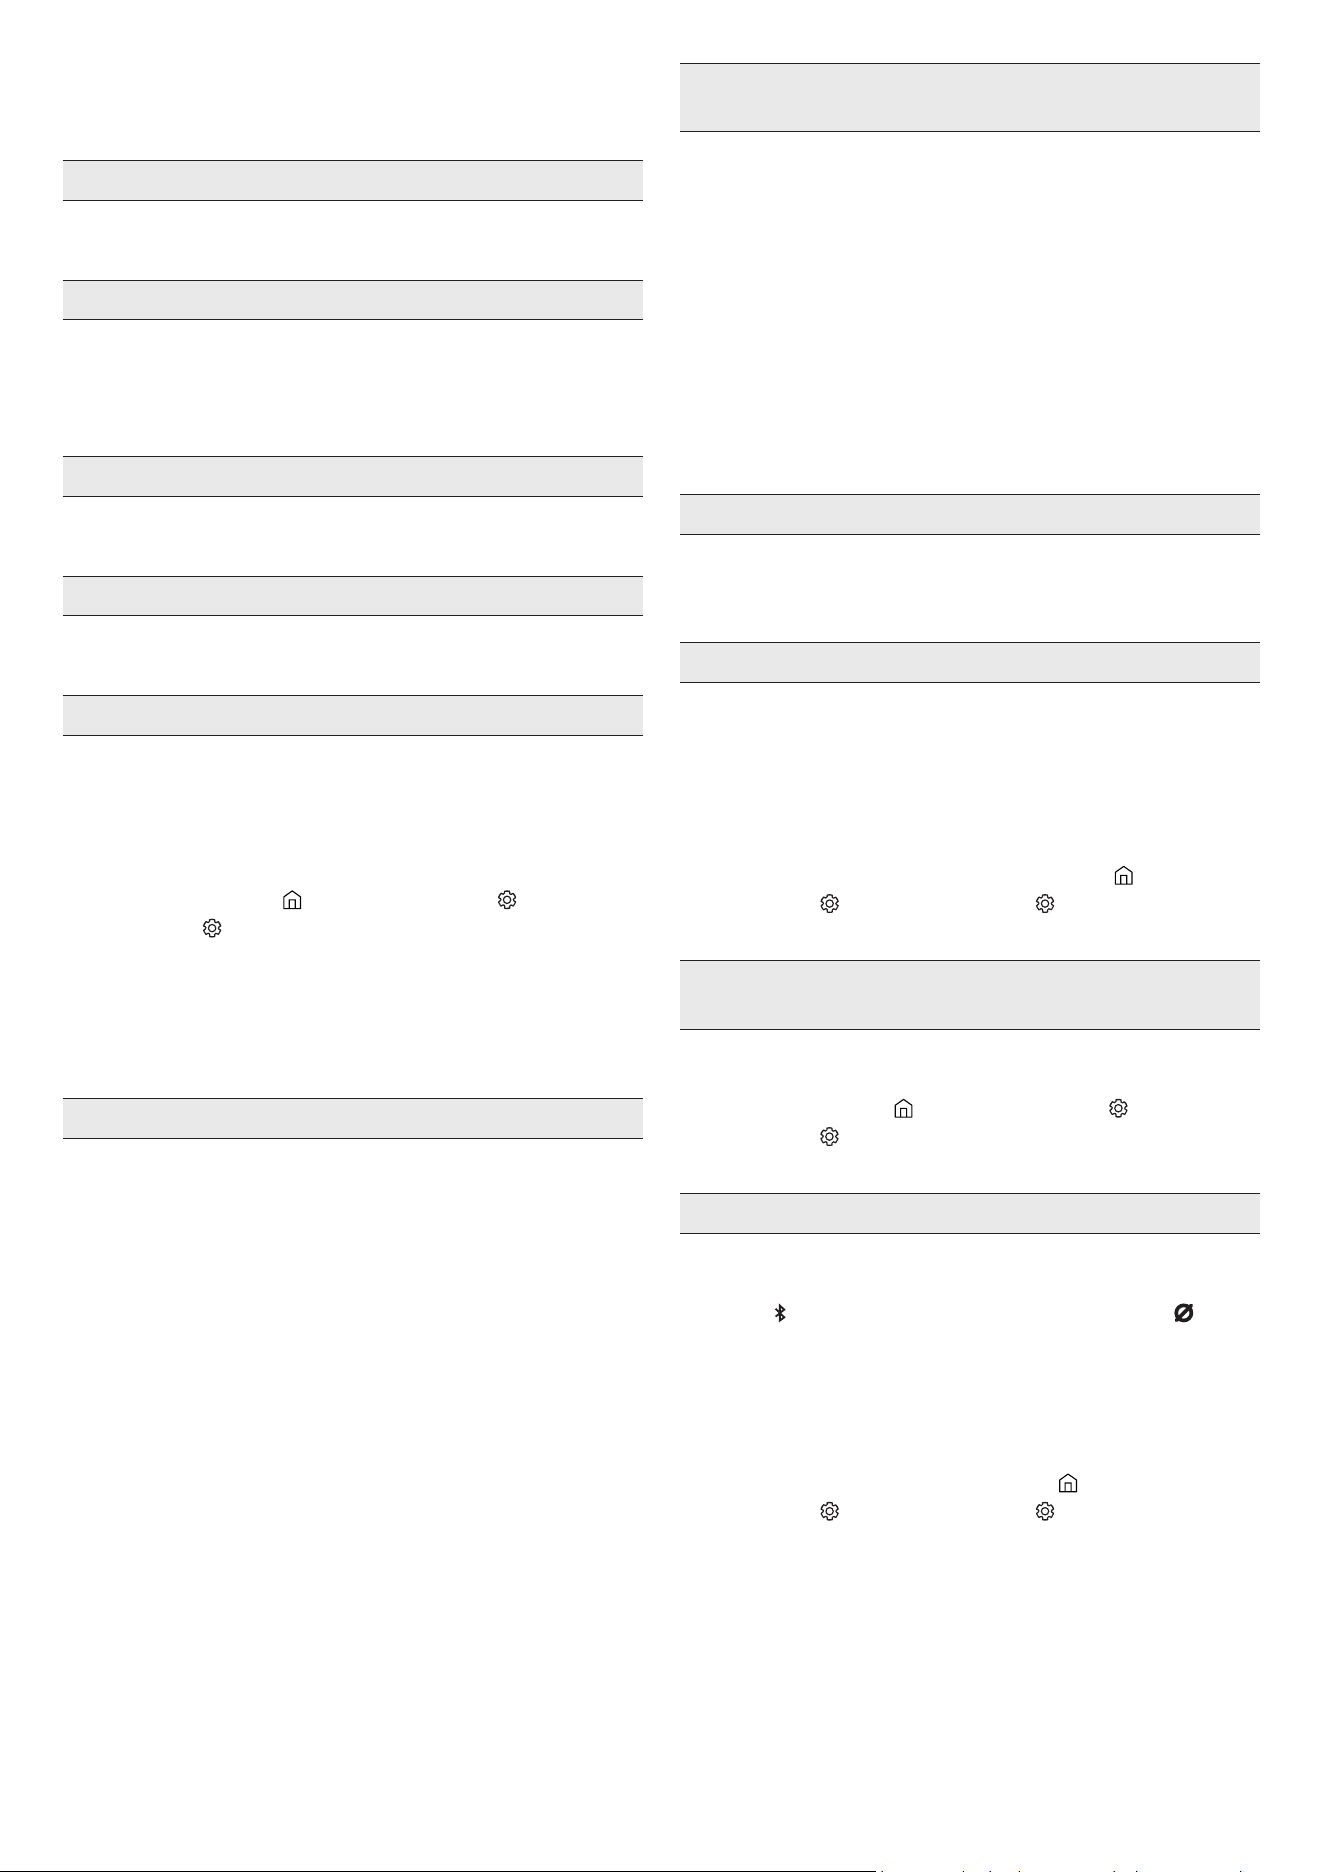
FRA - 31
11 DÉPANNAGE
Avant de contacter l'assistance, vériez les éléments suivants.
La Soundbar ne s'allume pas.
• Vériez que le cordon d'alimentation de la Soundbar est correctement
inséré dans la prise.
La Soundbar fonctionne par intermittence.
• Retirez le cordon d'alimentation, puis insérez-le à nouveau.
• Mettez l'appareil externe hors tension, puis sous tension, et réessayez.
• En l’absence de signal, la Soundbar s’éteint automatiquement après un
certain temps. Activez l'alimentation. (Voir page 9.)
La télécommande ne fonctionne pas.
• Pointez la télécommande directement vers la Soundbar.
• Rechargez la télécommande.
Le voyant de la Soundbar reste allumé en rouge.
• Le microphone est éteint.
Allumez le microphone. (Voir page 7.)
Le son n'est pas émis par la Soundbar.
• Le volume de la Soundbar est trop bas ou a été mis en sourdine. Réglez
le volume.
• Si un appareil externe (STB, appareil Bluetooth, appareil mobile, etc.)
est connecté, réglez le volume de l'appareil externe.
• Sélectionnez la Soundbar comme sortie du son du téléviseur.
(TV Samsung : Accueil (
) → Menu → Paramètres ( ) → Tous les
paramètres ( ) → Son → Sortie son → Select Soundbar)
• La connexion du câble à la Soundbar peut ne pas être desserrée.
Débranchez le câble et connectez-le de nouveau.
• Débranchez complètement le cordon d'alimentation, reconnectez-le,
puis allumez l'alimentation.
• Réinitialisez l'appareil et réessayez. (Voir page 30.)
Le son n'est pas émis par le caisson de basse.
• Vériez si le voyant LED situé à l'arrière du caisson de basse est allumé
en bleu. Reconnectez la Soundbar et le caisson de basse si le voyant
clignote en bleu ou devient rouge. (Voir page 15.)
• Vous pouvez rencontrer un problème s'il y a un obstacle entre la
Soundbar et le subwoofer. Déplacez les appareils vers une zone sans
obstacle.
• Les signaux de fréquence radio envoyés par d'autres appareils à
proximité peuvent interrompre la connexion.
Gardez l'enceinte éloignée de ces appareils.
• Débranchez puis reconnectez la che d'alimentation.
Le son du caisson de basse est dénaturé par une instabilité, des
décalages ou des parasites
• La présence d'objets entre la Soundbar et le caisson de basse peut
causer ce type de problème. Veuillez repositionner votre équipement
vers un endroit sans objet susceptible d'interférer.
• Si le caisson de basse est éloigné de la Soundbar, le son peut subir
une instabilité ou des décalages. Veuillez les placer à proximité de la
Soundbar.
• Des instabilités ou des décalages peuvent se produire lorsque la
Soundbar se trouve à proximité d'un instrument ou d'un appareil
électrique susceptible de causer des interférences radio. Veuillez
éloigner la Soundbar de tels appareils (ex : routeur sans l).
• Passez le statut de la connexion réseau du téléviseur de « sans l » à
« laire ».
Le volume du subwoofer est trop faible
• Le volume original du contenu que vous écoutez peut être faible.
Essayez de régler le niveau du subwoofer. (Voir page 10.)
• Rapprochez l'enceinte subwoofer de vous.
Si le téléviseur n'est pas connecté via HDMI (ARC).
• Vériez si le câble HDMI est correctement connecté à la borne ARC.
(Voir page 17.)
• La connexion peut être rendue impossible par l'appareil externe
connecté (décodeur, console de jeu, etc.). Connectez directement la
Soundbar.
• Il est possible que HDMI-CEC ne soit pas activé sur le téléviseur.
Activez CEC sur le menu TV. (TV Samsung : Accueil (
) → Menu →
Paramètres ( ) → Tous les paramètres ( ) → Connexion → External
Device Manager → Anynet+ (HDMI-CEC) ON)
Il n'y a aucun son lors de la connexion au téléviseur en mode HDMI
(ARC)
• Votre appareil est incapable de lire le signal d'entrée. Changez
la sortie audio du téléviseur sur PCM ou Dolby Digital. (Pour une
TV Samsung : Accueil (
) → Menu → Paramètres ( ) → Tous les
paramètres ( ) → Son → Réglages expert→ Format audio de la sortie
numérique)
La Soundbar ne se connecte pas en Bluetooth.
• Lors de la connexion d'un nouvel appareil, passez en mode
« jumelage Bluetooth » pour établir la connexion. (Appuyez sur la
touche
PAIR de la télécommande ou maintenez la touche (Micro
activé/désactivé) située sur le boîtier de la Soundbar enfoncée
pendant au moins 5 secondes.)
• Si la Soundbar est connectée à un autre appareil, déconnectez d'abord
cet appareil pour changer d'appareil.
• Supprimez la liste des enceintes Bluetooth sur l’appareil à connecter,
puis reconnectez-le. (TV Samsung : Accueil ( ) → Menu →
Paramètres ( ) → Tous les paramètres ( ) → Son → Sortie son →
Liste des haut-parleurs Bluetooth)
• Débranchez puis reconnectez la che d'alimentation, et réessayez.
• Réinitialisez l'appareil et réessayez. (Pour plus d’informations,
reportez-vous à la section « Réinitialisation »).
FRA - 32
Le son se coupe lors d'une connexion via Bluetooth.
• Certains appareils peuvent générer des interférences radio s'ils sont
placés trop très de la Soundbar (p. ex. les micro-ondes, les routeurs
sans l, etc.).
• Si votre appareil connecté via Bluetooth est trop éloigné de la
Soundbar, il est possible que le son soit coupé. Rapprochez l'appareil
de la Soundbar.
• Si une partie de votre corps est en contact avec l'émetteur-récepteur
Bluetooth ou si le produit est installé sur un meuble en métal, il se
peut que le son coupe. Vériez l'environnement d'installation et les
conditions d'utilisation.
La Soundbar ne se connecte pas en Wi-Fi.
• Vériez si votre routeur sans l est allumé.
• Éteignez le routeur, rallumez-le, puis réessayez.
• La Soundbar ne peut pas se connecter si le signal sans l est trop
faible. Placez le routeur plus près de la Soundbar ou éliminez tout
obstacle entre celle-ci et le routeur, dans la mesure du possible.
• Si votre routeur sans l est neuf, vous devrez congurer de nouveau les
paramètres réseau de l'enceinte.
La Soundbar ne s'allume pas automatiquement avec le téléviseur.
• Éteindre la Soundbar alors que vous regardez le téléviseur entraîne la
désactivation de la synchronisation de l'alimentation du téléviseur et
de la Soundbar. Commencez par éteindre le téléviseur.
La fonction AVA n'est pas disponible dans les cas suivants.
• La fonction AVA n'est pas disponible lors de l'utilisation de la fonction
Q-symphony.
• La fonction AVA n'est pas disponible lorsque le microphone est éteint.
Après avoir connecté le téléviseur à la Soundbar, j'ai activé le mode
Soundbar. Aucun son n'est émis par le téléviseur.
• Si vous connectez la Soundbar à un appareil mobile alors que la
Soundbar est connectée au téléviseur, la Soundbar émet du son
provenant de l'appareil mobile tout en conservant la connexion au
téléviseur. Par conséquent, le son du téléviseur ne sera pas émis.
• Déconnectez l'appareil mobile et le son du téléviseur sera émis de
nouveau à partir de la Soundbar.
12 LICENCE
Dolby, Dolby Atmos, and the double-D symbol are registered
trademarks of Dolby Laboratories Licensing Corporation. Manufactured
under license from Dolby Laboratories. Condential unpublished works.
Copyright © 2012-2021 Dolby Laboratories. All rights reserved.
For DTS patents, see http://patents.dts.com. Manufactured under license
from DTS, Inc. (for companies headquartered in the U.S./Japan/ Taiwan)
or under license from DTS Licensing Limited (for all other companies).
DTS, Digital Surround, Virtual:X, and the DTS logo are registered
trademarks or trademarks of DTS, Inc. in the United States and other
countries. © 2021 DTS, Inc. ALL RIGHTS RESERVED.
The terms HDMI and HDMI High-Denition Multimedia Interface,
and the HDMI Logo are trademarks or registered trademarks of HDMI
Licensing Administrator, Inc. in the United States and other countries.
• Utilisez votre téléphone, votre tablette ou votre ordinateur comme
une télécommande pour contrôler Spotify. Accédez à spotify.com/
connect pour en savoir plus.
• Le logiciel Spotify est soumis à des licences tierces disponibles ici :
https://www.spotify.com/connect/third-party-licenses.
* Cette fonction peut ne pas être prise en charge suivant le modèle et la
région.
• Apple, Airplay, iPhone, iPad, and Mac are trademarks of Apple Inc.,
registered in the U.S. and other countries.
• Use of the Works with Apple badge means that an accessory has
been designed to work specically with the technology identied
in the badge and has been certied by the developer to meet Apple
performance standards.

FRA - 33
[ENERGY STAR]
Modèle homologué ENERGY STAR uniquement
• Votre produit Samsung est homologué ENERGY STAR dans sa
conguration d'usine par défaut. Changer certains réglages et
fonctions de ce produit peut modier la consommation électrique,
qui peut alors dépasser les limites exigées par l'homologation
ENERGY STAR.
• Agence de protection de l'environnement et Département de
l'énergie. ENERGY STAR est un programme conjoint d'agences
gouvernementales des États-Unis conçu pour promouvoir les
produits et pratiques économes en énergie.
Visitez le site www.energystar.gov pour plus d'informations sur le
programme ENERGY STAR.
Modèle homologué ENERGY STAR uniquement
(S'applique aux modèles Thin Client uniquement)
En tant que partenaire d'ENERGY STAR®, SAMSUNG a déterminé que ce
produit répond aux exigences d'ENERGY STAR® en matière d'efcacité
énergétique.
• Le programme ENERGY STAR a été créé pour réduire les émissions
de gaz à effet de serre et économiser l'énergie via un label basé sur
le volontariat.
• Le réglage de gestion de l'énergie de ce produit a été activé par
défaut et il dispose de temporisations différentes entre 1 minute et
5 heures.
• Le produit peut sortir de veille en appuyant sur un bouton situé sur
le boîtier.
Modèle homologué ENERGY STAR uniquement (Autres modèles)
• En tant que partenaire d'ENERGY STAR, Samsung a déterminé que
ce produit ou ses modèles de produit répondent aux exigences
d'ENERGY STAR® en matière d'efcacité énergétique.
13 AVIS CONCERNANT LES
LICENCES LIBRES
Pour toute demande ou question liée aux logiciels libres, contactez
Samsung Open Source (http://opensource.samsung.com)
14 REMARQUES IMPORTANTES
RELATIVES AU SERVICE
Les gures et les illustrations de ce manuel utilisateur sont fournies à
titre de référence uniquement et ne constituent pas nécessairement une
représentation dèle du produit.

FRA - 34
15 CARACTÉRISTIQUES TECHNIQUES ET GUIDE
Caractéristiques techniques
Nom du modèle HW-S800B / HW-S801B
Poids 1,4 kg
Dimensions (L x H x P) 1160,0 x 38,0 x 39,9 mm
Plage de température de fonctionnement +5 °C à +35 °C
Plage d’humidité de fonctionnement 10 % ~ 75 %
HAUTS-PARLEURS
Puissance nominale de sortie (20W x 2) + (10W x 2) + (20W x 2) + (10W x 1) + (10W x 2)
Formats de lecture pris en charge
Dolby 5.1ch / Dolby Digital Plus / Dolby ATMOS (Dolby Digital Plus) /
DTS 5.1ch / LPCM 2ch
Nom du subwoofer
HW-S800B : PS-WB85D
HW-S801B : PS-WB86D
Poids 6,4 kg
Dimensions (L x H x P) 238,0 x 240,8 x 238,0 mm
HAUTS-PARLEURS
Puissance nominale de sortie 200 W
REMARQUE
• Samsung Electronics Co., Ltd se réserve le droit de modier les caractéristiques techniques sans préavis.
• Le poids et les dimensions sont donnés à titre approximatif.
Précaution : La Soundbar redémarre automatiquement si vous activez/désactivez le Wi-Fi.
Pour désactiver la connexion Wi-Fi :
Maintenez enfoncé le bouton CH LEVEL sur la télécommande de la Soundbar pendant plus de
30 secondes pour activer ou désactiver la connexion Wi-Fi.
Pour désactiver la connexion Bluetooth :
Maintenez enfoncé le bouton TONE CONTROL sur la télécommande de la Soundbar pendant
plus de 30 secondes pour activer ou désactiver la connexion Bluetooth.
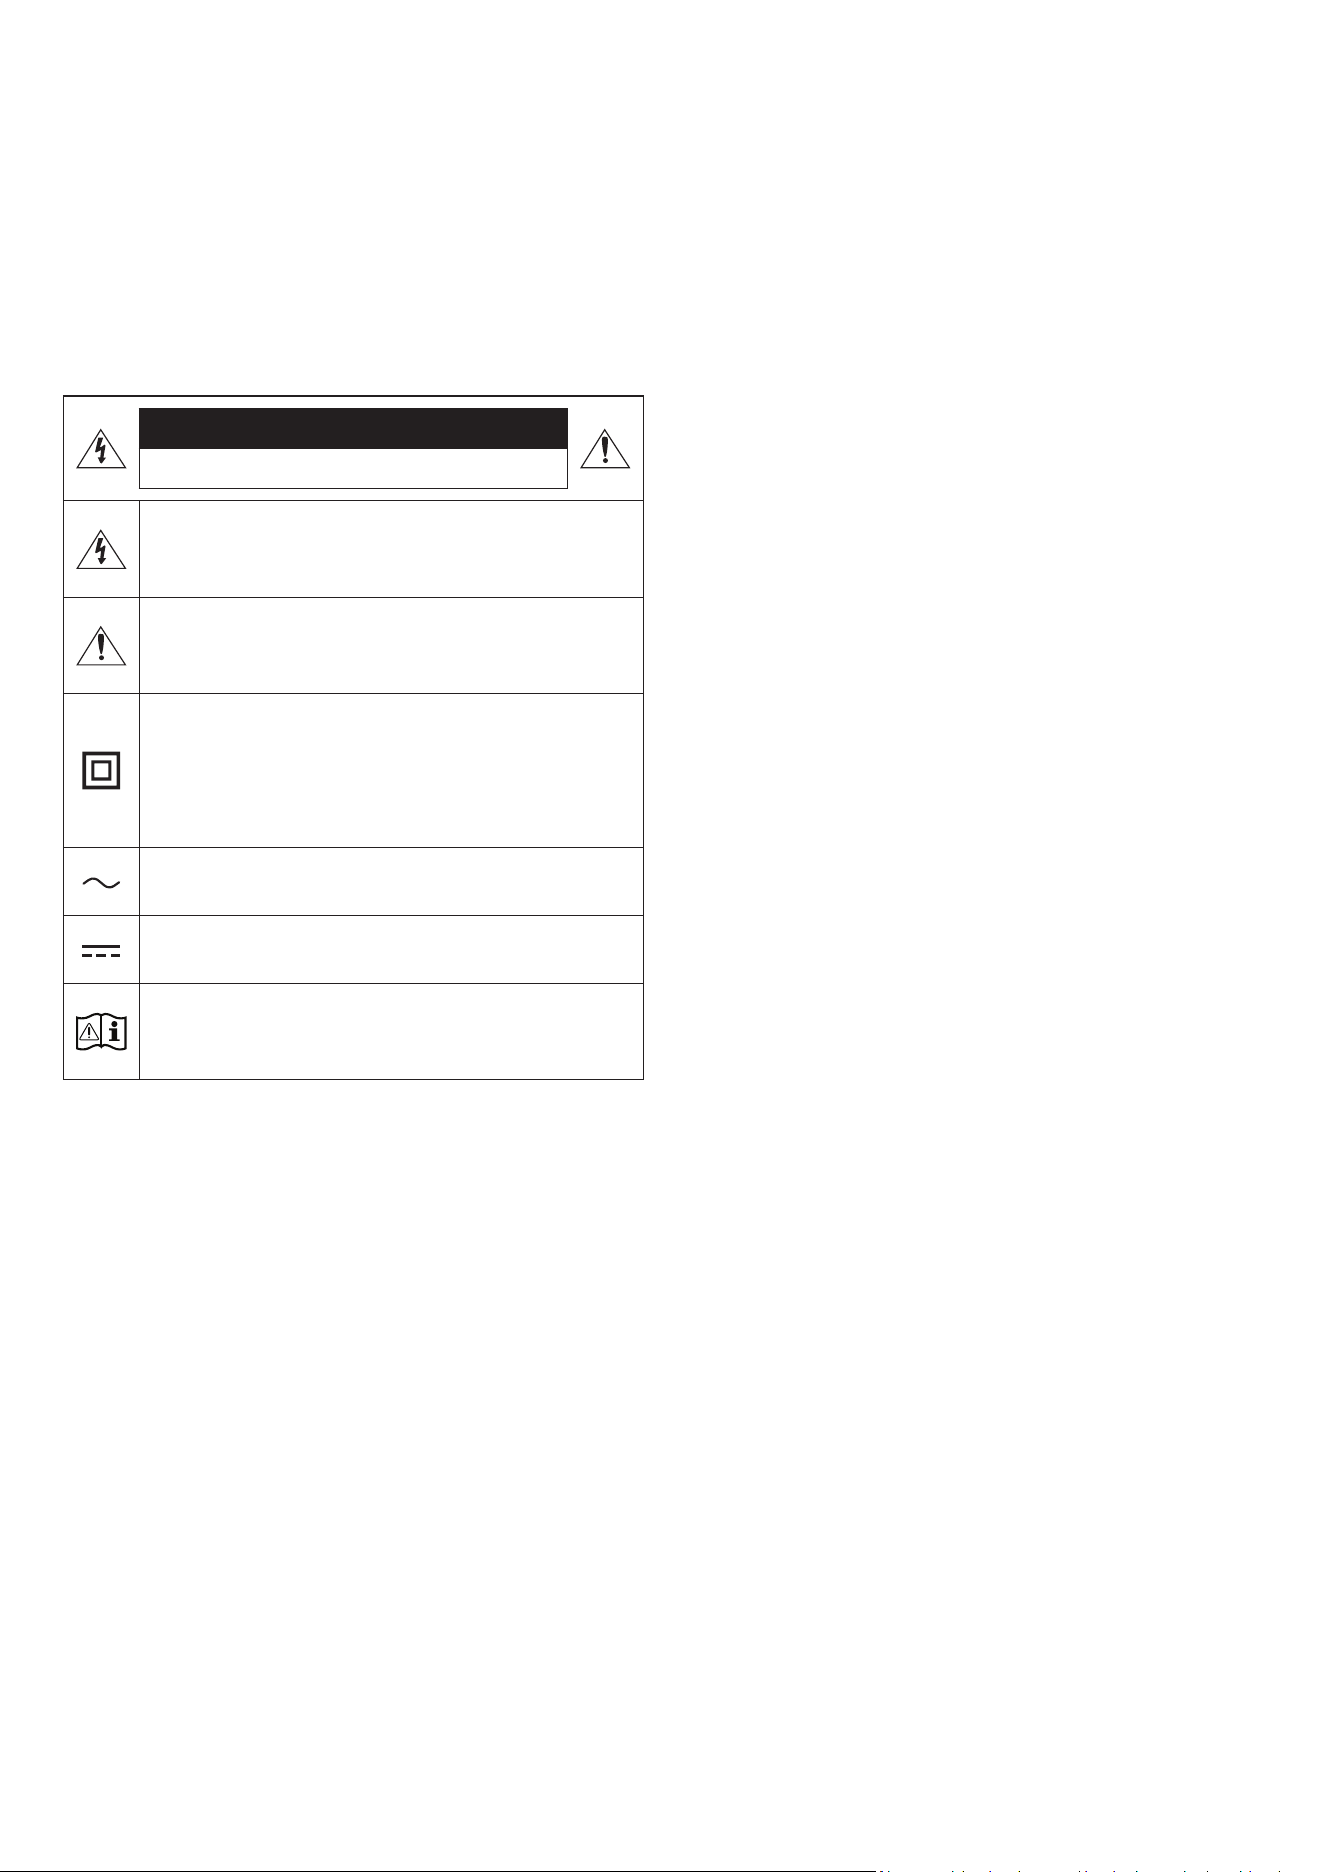
POR - 2
INFORMAÇÕES DE SEGURANÇA
AVISOS DE SEGURANÇA
PARA REDUZIR O RISCO DE CHOQUE ELÉTRICO, NÃO RETIRAR A TAMPA
(OU A PARTE POSTERIOR).
NÃO EXISTEM PEÇAS NO INTERIOR QUE POSSAM SER REPARARAS PELO
UTILIZADOR. A MANUTENÇÃO DEVE SER DEIXADA A CARGO DE PESSOAL
QUALIFICADO DE SERVIÇOS DE ASSISTÊNCIA.
Consulte a tabela abaixo para uma explicação dos símbolos que poderão
estar no seu produto Samsung.
CUIDADO
RISCO DE CHOQUE ELÉTRICO. NÃO ABRIR.
Este símbolo indica a presença de alta tensão no interior do
produto. É perigoso estabelecer qualquer tipo de contacto
com as peças existentes no interior do produto.
Este símbolo indica a existência de documentação importante
relativa ao funcionamento e manutenção deste produto
(fornecida com o mesmo).
Produto de classe II: este símbolo indica que não é necessária
uma ligação elétrica à terra de segurança.
Se este símbolo não se encontrar num produto com um cabo
de alimentação, o produto DEVERÁ possuir uma ligação de
proteção segura à terra.
Tensão CA: a tensão nominal indicada por este símbolo
corresponde à tensão CA.
Tensão CC: a tensão nominal indicada por este símbolo
corresponde à tensão CC.
Cuidado. Consultar as instruções de utilização: este símbolo
aconselha o utilizador a consultar o manual do utilizador
quanto a informações de segurança.
AVISO
• Para reduzir o risco de incêndio ou choque elétrico, não exponha este
aparelho a chuva ou humidade.
CUIDADO
• PARA PREVENIR CHOQUES ELÉTRICOS, INSIRA TOTALMENTE A FICHA
FAZENDO CORRESPONDER O PINO MAIS LARGO COM O ORIFÍCIO MAIS
LARGO.
• Este aparelho deve estar sempre ligado a uma cha CA com uma ligação
de proteção à terra.
• Para desligar o aparelho da rede elétrica, puxe a cha da tomada, por
isso, a tomada deve estar facilmente acessível.
• Não exponha o aparelho a gotas ou salpicos. Não coloque objetos com
líquidos, como jarros, sobre o aparelho.
• Para desligar completamente este aparelho, tem de retirar a cha da
tomada. Por isso, a tomada deve estar sempre fácil e prontamente
acessível.

POR - 3
PRECAUÇÕES
1. Certique-se de que a fonte de alimentação CA da sua residência está
em conformidade com os requisitos elétricos indicados no autocolante
de caraterísticas na parte inferior do produto. Instale o produto na
horizontal, numa base adequada (mobília), com espaço suciente à
volta para ventilação (7 a 10 cm). Certique-se de que as ranhuras
de ventilação não estão cobertas. Não coloque a unidade sobre
amplicadores ou outro equipamento que possa car quente. A unidade
foi concebida para utilização contínua.
Para desligar a unidade completamente, desligue a cha CA da tomada
de parede. Se não pretender utilizar a unidade durante um longo
período de tempo, desligue-a retirando a respetiva cha da tomada.
2. Durante tempestades, desligue a cha CA da tomada. Os picos de
tensão provocados pela trovoada podem danicar a unidade.
3. Não exponha a unidade a luz solar direta ou outras fontes de calor. Isto
pode originar sobreaquecimento e provocar avaria na unidade.
4. Proteja o produto da humidade (ou seja, jarros) e do calor excessivo (por
ex., uma lareira) ou de equipamentos que criem campos magnéticos
ou elétricos fortes. Se a unidade se avariar, desligue o cabo de
alimentação da tomada de parede CA. O produto não foi concebido para
utilização industrial. É apenas para utilização pessoal. Se o produto for
armazenado a baixas temperaturas, poderá ocorrer condensação. Se
transportar a unidade durante o inverno, espere aproximadamente 2
horas, até a unidade ter alcançado a temperatura ambiente, antes de a
utilizar.
5. Podem ocorrer incêndios ou explosões, resultando em danos do
telecomando ou ferimentos.
• Permita que o telecomando sofra impactos.
• Tenha atenção para não permitir que substâncias desconhecidas
como metal, líquido ou pó entrem em contacto com o terminal de
carga do telecomando.
• Quando o telecomando car danicado, cheirar a queimado ou deitar
fumo, deixe imediatamente de o utilizar e repare-o no Centro de
Assistência Samsung.
• Não desmonte o telecomando de forma arbitrária.
• Tenha atenção para não permitir que crianças ou animais de
companhia ponham o telecomando na boca. Podem ocorrer
incêndios ou explosões, resultando em danos do telecomando ou
ferimentos.

POR - 4
ÍNDICE
01 Vericar os componentes 6
02 Descrição geral do produto 7
Painel superior do Soundbar. . . . . . . . . . . . . . . . . . . . . . . . . . . . . . . . . . . . . . . . . . . . . . . . . . . . . . . . . . . . . . . . . . . . . . . . . . . . . . . . . . . . . . . . . . . . . . . . . . . . . . . . . . . . . . . 7
Painel traseiro do Soundbar . . . . . . . . . . . . . . . . . . . . . . . . . . . . . . . . . . . . . . . . . . . . . . . . . . . . . . . . . . . . . . . . . . . . . . . . . . . . . . . . . . . . . . . . . . . . . . . . . . . . . . . . . . . . . . . 8
03 Utilizar o controlo remoto do Soundbar 9
Acerca do Controlo remoto . . . . . . . . . . . . . . . . . . . . . . . . . . . . . . . . . . . . . . . . . . . . . . . . . . . . . . . . . . . . . . . . . . . . . . . . . . . . . . . . . . . . . . . . . . . . . . . . . . . . . . . . . . . . . . . . 9
Como utilizar o controlo remoto . . . . . . . . . . . . . . . . . . . . . . . . . . . . . . . . . . . . . . . . . . . . . . . . . . . . . . . . . . . . . . . . . . . . . . . . . . . . . . . . . . . . . . . . . . . . . . . . . . . . . . . . . . . 9
Active Voice Amplier (AVA). . . . . . . . . . . . . . . . . . . . . . . . . . . . . . . . . . . . . . . . . . . . . . . . . . . . . . . . . . . . . . . . . . . . . . . . . . . . . . . . . . . . . . . . . . . . . . . . . . . . . . . . . . . . . . 11
Utilizar os botões escondidos (botões com mais de uma função) . . . . . . . . . . . . . . . . . . . . . . . . . . . . . . . . . . . . . . . . . . . . . . . . . . . . . . . . . . . . . . . . . . . . . . . . . . . . 11
Especicações de saída para os diferentes modos de efeitos sonoros . . . . . . . . . . . . . . . . . . . . . . . . . . . . . . . . . . . . . . . . . . . . . . . . . . . . . . . . . . . . . . . . . . . . . . . . 12
Ajustar o volume do Soundbar com o telecomando de uma TV . . . . . . . . . . . . . . . . . . . . . . . . . . . . . . . . . . . . . . . . . . . . . . . . . . . . . . . . . . . . . . . . . . . . . . . . . . . . . . 13
04 Ligar o Soundbar 14
Ligar a alimentação e as unidades . . . . . . . . . . . . . . . . . . . . . . . . . . . . . . . . . . . . . . . . . . . . . . . . . . . . . . . . . . . . . . . . . . . . . . . . . . . . . . . . . . . . . . . . . . . . . . . . . . . . . . . . 14
‒ Ligar o Subwoofer manualmente . . . . . . . . . . . . . . . . . . . . . . . . . . . . . . . . . . . . . . . . . . . . . . . . . . . . . . . . . . . . . . . . . . . . . . . . . . . . . . . . . . . . . . . . . . . . . . . . . . . . . . 15
‒ Indicadores LED na parte de trás do Subwoofer . . . . . . . . . . . . . . . . . . . . . . . . . . . . . . . . . . . . . . . . . . . . . . . . . . . . . . . . . . . . . . . . . . . . . . . . . . . . . . . . . . . . . . . . . 16
Ligar um SWA-9500S (vendido em separado) ao Soundbar. . . . . . . . . . . . . . . . . . . . . . . . . . . . . . . . . . . . . . . . . . . . . . . . . . . . . . . . . . . . . . . . . . . . . . . . . . . . . . . . . . 16
05 Ligar a uma TV 17
Ligar uma TV compatível com HDMI ARC (canal de retorno de áudio) . . . . . . . . . . . . . . . . . . . . . . . . . . . . . . . . . . . . . . . . . . . . . . . . . . . . . . . . . . . . . . . . . . . . . . . . 17
Ligar via Bluetooth. . . . . . . . . . . . . . . . . . . . . . . . . . . . . . . . . . . . . . . . . . . . . . . . . . . . . . . . . . . . . . . . . . . . . . . . . . . . . . . . . . . . . . . . . . . . . . . . . . . . . . . . . . . . . . . . . . . . . . . 18
Ligar através de Wi-Fi . . . . . . . . . . . . . . . . . . . . . . . . . . . . . . . . . . . . . . . . . . . . . . . . . . . . . . . . . . . . . . . . . . . . . . . . . . . . . . . . . . . . . . . . . . . . . . . . . . . . . . . . . . . . . . . . . . . . 19
Ligar a uma TV que suporte Dolby Atmos . . . . . . . . . . . . . . . . . . . . . . . . . . . . . . . . . . . . . . . . . . . . . . . . . . . . . . . . . . . . . . . . . . . . . . . . . . . . . . . . . . . . . . . . . . . . . . . . . .20
Utilizar a função Q-Symphony . . . . . . . . . . . . . . . . . . . . . . . . . . . . . . . . . . . . . . . . . . . . . . . . . . . . . . . . . . . . . . . . . . . . . . . . . . . . . . . . . . . . . . . . . . . . . . . . . . . . . . . . . . . . 21
Utilizar o som Spacet . . . . . . . . . . . . . . . . . . . . . . . . . . . . . . . . . . . . . . . . . . . . . . . . . . . . . . . . . . . . . . . . . . . . . . . . . . . . . . . . . . . . . . . . . . . . . . . . . . . . . . . . . . . . . . . . . . . 22
06 Ligar a um dispositivo móvel 23
Método 1. Ligar através de Bluetooth. . . . . . . . . . . . . . . . . . . . . . . . . . . . . . . . . . . . . . . . . . . . . . . . . . . . . . . . . . . . . . . . . . . . . . . . . . . . . . . . . . . . . . . . . . . . . . . . . . . . . . 23
Método 2. Ligar através de Wi-Fi (Rede sem os) . . . . . . . . . . . . . . . . . . . . . . . . . . . . . . . . . . . . . . . . . . . . . . . . . . . . . . . . . . . . . . . . . . . . . . . . . . . . . . . . . . . . . . . . . . . 25
Utilizar o Tap Sound. . . . . . . . . . . . . . . . . . . . . . . . . . . . . . . . . . . . . . . . . . . . . . . . . . . . . . . . . . . . . . . . . . . . . . . . . . . . . . . . . . . . . . . . . . . . . . . . . . . . . . . . . . . . . . . . . . . . . . 26
07 Ligar através do Apple AirPlay 2 27
08 Instalar o suporte de parede 28
Precauções de instalação. . . . . . . . . . . . . . . . . . . . . . . . . . . . . . . . . . . . . . . . . . . . . . . . . . . . . . . . . . . . . . . . . . . . . . . . . . . . . . . . . . . . . . . . . . . . . . . . . . . . . . . . . . . . . . . . . 28
Componentes do suporte de parede. . . . . . . . . . . . . . . . . . . . . . . . . . . . . . . . . . . . . . . . . . . . . . . . . . . . . . . . . . . . . . . . . . . . . . . . . . . . . . . . . . . . . . . . . . . . . . . . . . . . . . . 28
09 Instalar o Soundbar em frente à TV 29

POR - 5
10 Atualização do Software 30
Atualização automática . . . . . . . . . . . . . . . . . . . . . . . . . . . . . . . . . . . . . . . . . . . . . . . . . . . . . . . . . . . . . . . . . . . . . . . . . . . . . . . . . . . . . . . . . . . . . . . . . . . . . . . . . . . . . . . . . .30
Atualização por USB . . . . . . . . . . . . . . . . . . . . . . . . . . . . . . . . . . . . . . . . . . . . . . . . . . . . . . . . . . . . . . . . . . . . . . . . . . . . . . . . . . . . . . . . . . . . . . . . . . . . . . . . . . . . . . . . . . . . .30
Reposição. . . . . . . . . . . . . . . . . . . . . . . . . . . . . . . . . . . . . . . . . . . . . . . . . . . . . . . . . . . . . . . . . . . . . . . . . . . . . . . . . . . . . . . . . . . . . . . . . . . . . . . . . . . . . . . . . . . . . . . . . . . . . . .30
11 Resolução de problemas 31
12 Licença 32
13 Aviso de licença de código aberto 33
14 Notas importantes sobre a assistência 33
15 Especicações e guia 34
Características técnicas . . . . . . . . . . . . . . . . . . . . . . . . . . . . . . . . . . . . . . . . . . . . . . . . . . . . . . . . . . . . . . . . . . . . . . . . . . . . . . . . . . . . . . . . . . . . . . . . . . . . . . . . . . . . . . . . . . 34

POR - 6
01 VERIFICAR OS COMPONENTES
Unidade principal do Soundbar Controlo remoto do Soundbar Subwoofer
X 2
Transformador de CA/CC (Soundbar) Cabo de alimentação (Subwoofer, Soundbar) Cabo HDMI para Micro HDMI
AH81-15127A-01
A TYPE
:
740mm
B TYPE
:
700mm
X 2
X 2
Guia do suporte de parede Suporte de parede Parafuso de xação
X 4
(M5 X L55)
X 4
Parafuso Âncora de Parafuso
• Para obter mais informações sobre a fonte de alimentação e o consumo de energia, consulte a etiqueta no produto. (Etiqueta: Parte inferior da unidade
principal do Soundbar)
• Para adquirir componentes adicionais ou cabos opcionais, entre em contacto com o Centro de assistência ou com o Atendimento ao cliente da Samsung.
• Para mais informações sobre o suporte de parede ou a borracha de base, consulte as páginas 28~29.
• A conceção, as especicações e o ecrã da aplicação estão sujeitos a alteração sem aviso prévio.
• O aspeto dos acessórios pode ser ligeiramente diferente das ilustrações acima.
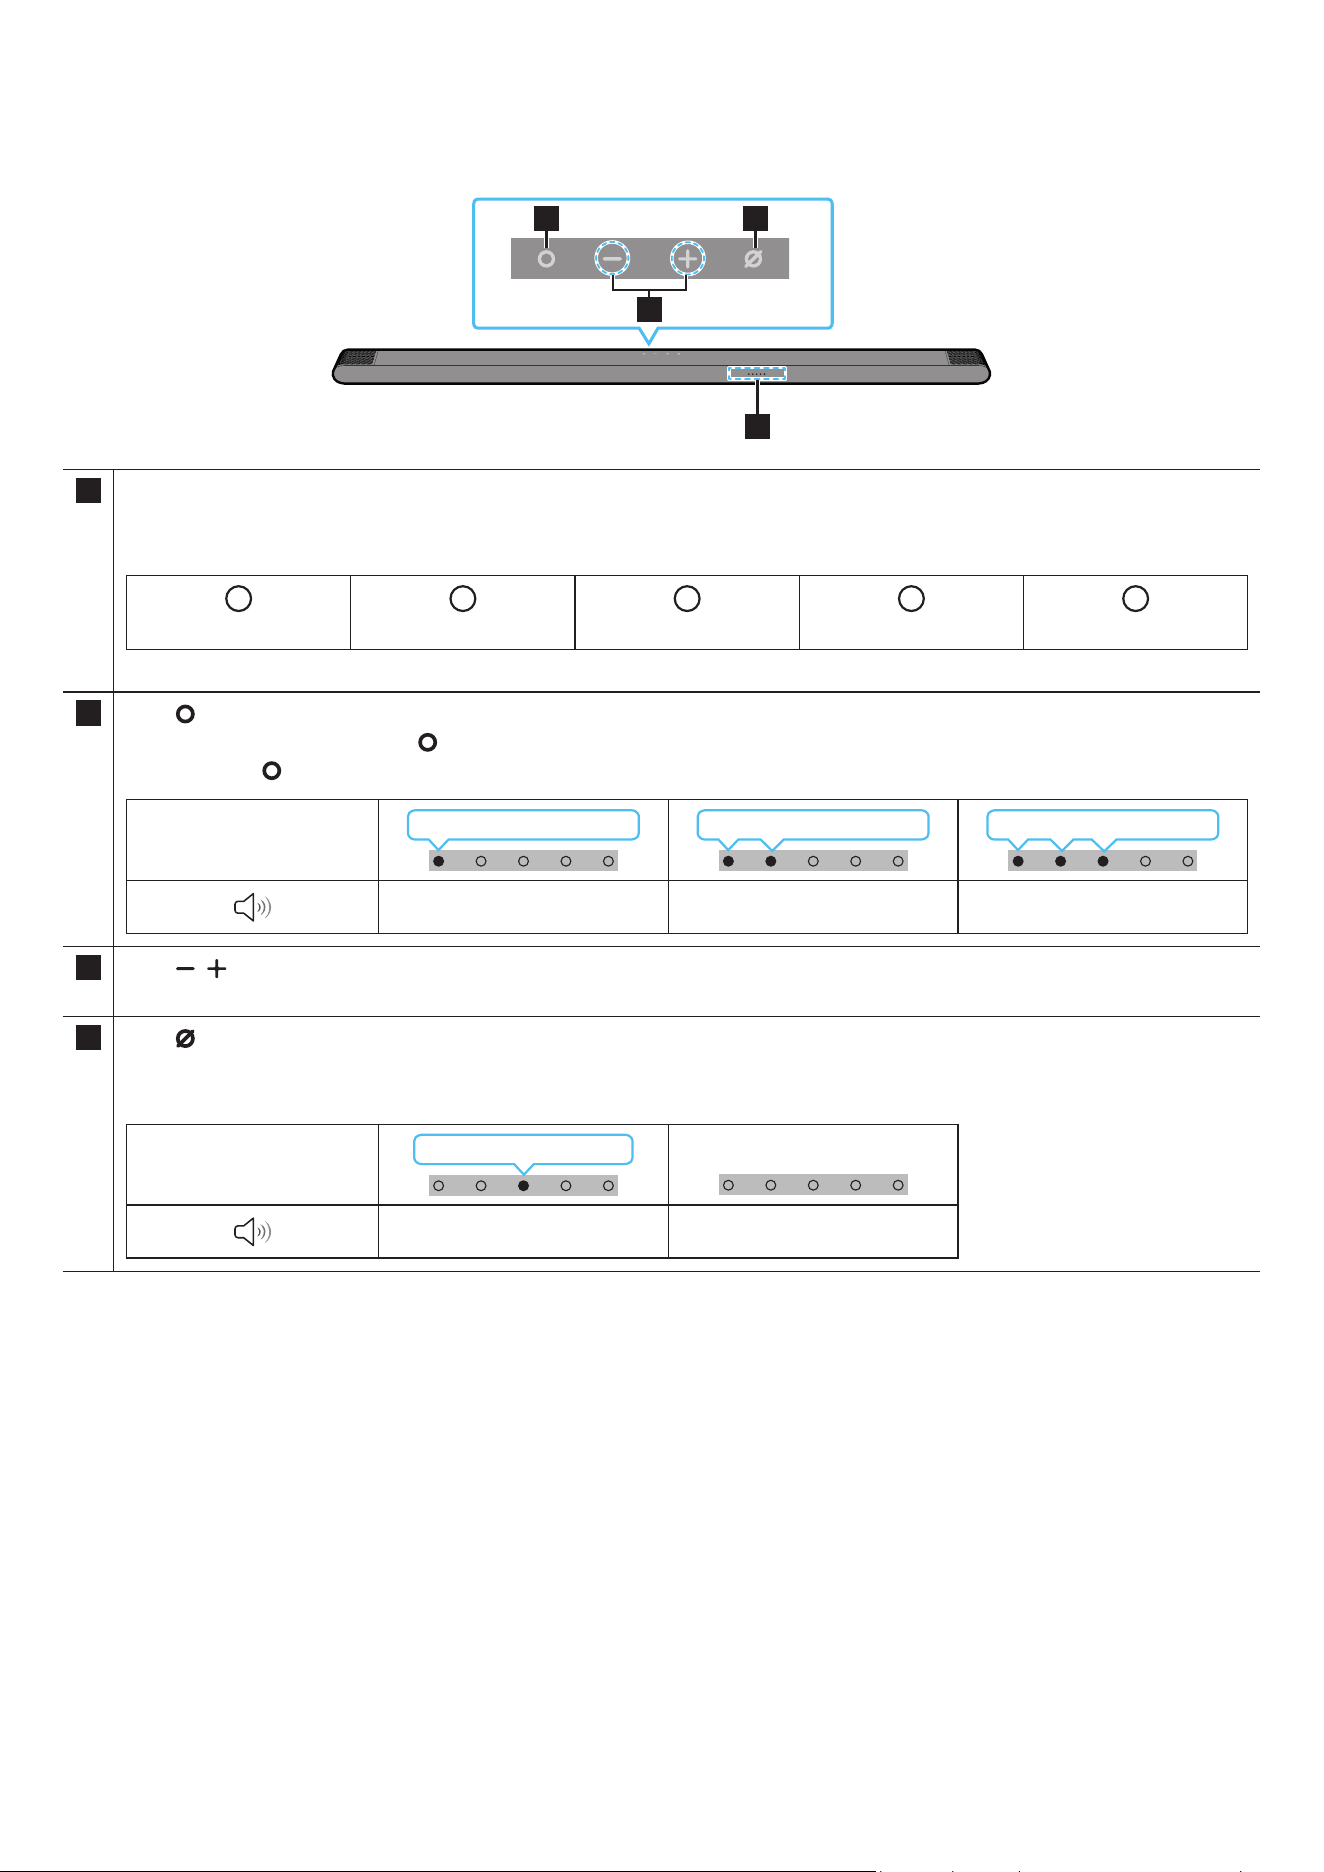
POR - 7
02 DESCRIÇÃO GERAL DO PRODUTO
Painel superior do Soundbar
2 4
3
1
1 Indicador LED
O indicador LED pisca, ca aceso ou muda de cor dependendo do modo ou estado atual do Soundbar. A cor do indicador LED e o número de luzes
indicam o modo ativo como descrito abaixo.
W
LED branco
W
LED branco
M
LED multicolor
W
LED branco
W
LED branco
• O LED multicolor muda para Branco, Ciano, Verde, Vermelho e Azul, dependendo do modo ou estado.
2
Botão
(Multifunções)
• No modo de espera, prima o botão (Multifunções) para ligar o Soundbar.
• Prima o botão (Multifunções) para alterar o modo. Sempre que alterar o modo, o LED ca branco e, em seguida, desliga-se.
Indicador LED
Branco Ligado → Desligado Branco Ligado → Desligado Branco Ligado → Desligado
“TV ARC” “Wi-Fi” “Bluetooth”
3
Botão
(Volume)
Ajusta o volume.
4
Botão
(Microfone Ligado/Desligado)
Prima o botão para ligar ou desligar o microfone.
Quando o microfone está desligado, o indicador LED ca vermelho.
Indicador LED
Vermelho Ligado
“Mic Off” “Mic On”
• Ao ligar o cabo CA, o botão Ligar/Desligar começa a funcionar dentro de 4 a 6 segundos.
• Ao ligar esta unidade, há um atraso de 4 a 5 segundos antes de esta reproduzir som.
• Se ouvir sons provenientes da TV e do Soundbar, aceda ao menu Denições para o áudio da TV e mude o altifalante da TV para Altifalante externo.
• Pode ligar e desligar o feedback de áudio com a aplicação SmartThings. Para mais informações sobre como utilizar a aplicação SmartThings, consulte
“Método 2. Ligar através de Wi-Fi (Rede sem os)”.

POR - 8
Painel traseiro do Soundbar
DC 19V
SERVICE
HDMI
(ARC)
DC 19V
SERVICE
HDMI
(ARC)
DC 19V
SERVICE
HDMI
(ARC)
DC 19V
SERVICE
HDMI
(ARC)
DC 19V
SERVICE
HDMI
(ARC)
DC 19V
SERVICE
HDMI
(ARC)
3
1
2
1 SERVICE
Ligue um dispositivo de armazenamento USB para atualizar o software do produto.
2 HDMI (ARC)
Ligue à porta HDMI (ARC) numa TV. (Consulte a página 17)
3 DC 19V
Ligue o transformador de CA/CC. (Entrada da fonte de alimentação) (Consulte a página 14)
• Ao desligar o cabo de alimentação do transformador de CA/CC de uma tomada elétrica, puxe a cha.
Não puxe o cabo.
• Não ligue esta unidade ou outros componentes a uma tomada de CA até que todas as ligações entre os componentes estejam concluídas.
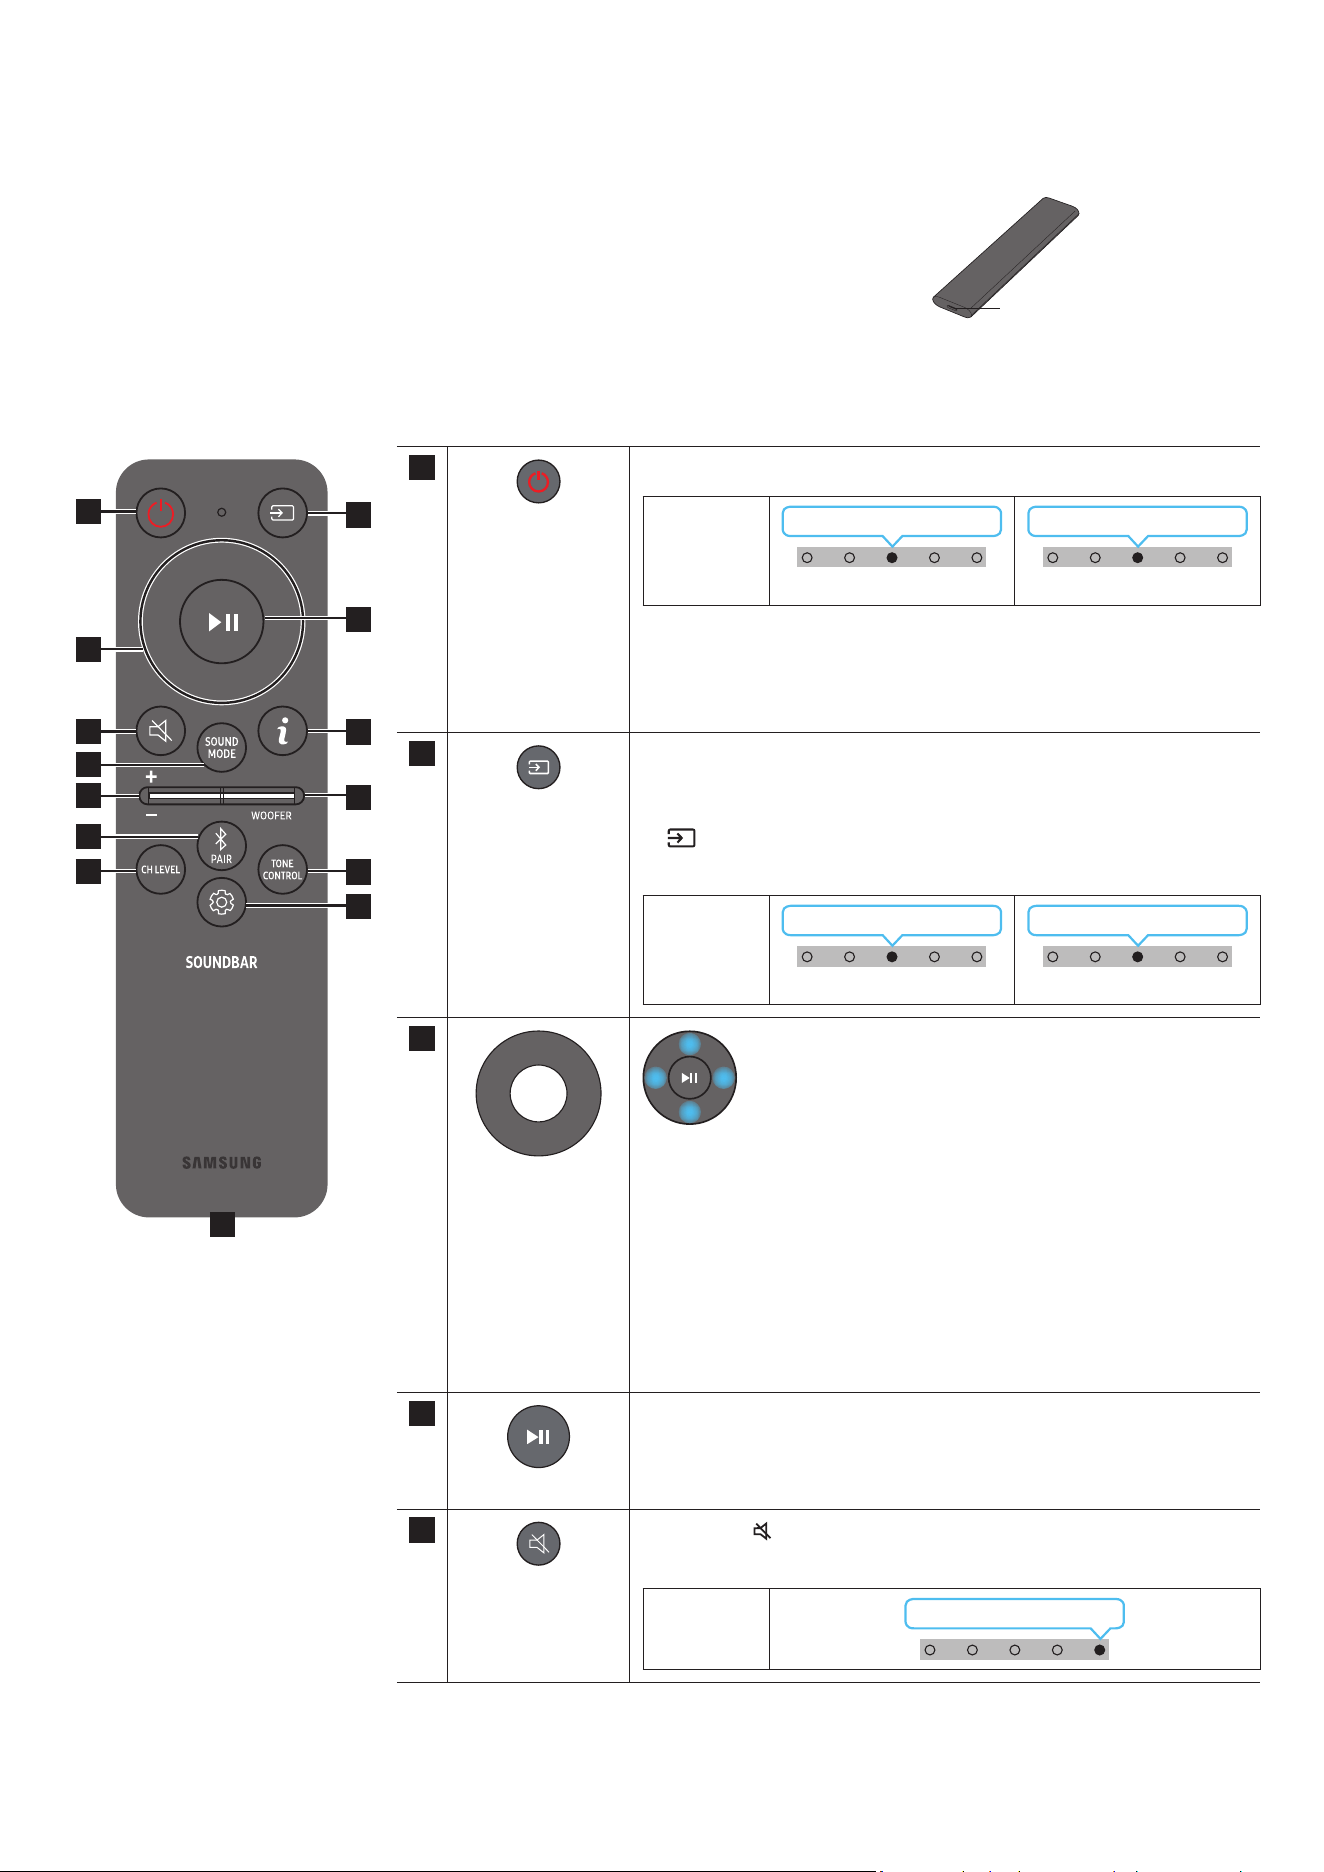
POR - 9
03 UTILIZAR O CONTROLO REMOTO DO SOUNDBAR
Acerca do Controlo remoto
• Utilize o Controlo remoto a uma distância máxima de 6 metros do produto. A distância de utilização pode
variar consoante as condições ambientais sem os.
• Quando o telecomando não funciona porque a bateria está fraca, carregue-o utilizando a porta do USB-C
type.
• A ilustração difere consoante o respetivo modelo de Controlo remoto.
Porta USB (C-type)
para carregar
Como utilizar o controlo remoto
1
3
5
8
11
13
7
10
12
2
4
9
6
14
1
Ligar/Desligar
Liga e desliga o Soundbar.
Indicador
LED
Ciano pisca 1 vez
Ligado
Vermelho pisca três vezes
Desligado
• Função Desligar automático
Esta unidade desliga-se automaticamente nas seguintes situações:
• No modo “TV ARC”/“Wi-Fi”/“Bluetooth” se não existir sinal de áudio
durante 18 minutos.
2
Fonte
Prima para selecionar uma fonte ligada ao Soundbar.
• Feedback de Áudio Ligado/Desligado
Pode ligar ou desligar o Feedback de Áudio. Mantenha premido o botão
(Fonte) no controlo remoto durante 5 segundos enquanto o Soundbar
está desligado (modo de espera).
Indicador
LED
Ciano pisca 1 vez
Ligado
Vermelho pisca 1 vez
Desligado
3
Cima/Baixo/
Esquerda/Direita
Prima as áreas indicadas para selecionar Cima/Baixo/Esquerda/
Direita.
Prima Cima/Baixo/Esquerda/Direita no botão para selecionar ou denir
funções.
• Saltar música
Prima o botão Direito para selecionar o cheiro de música seguinte. Prima
o botão Esquerdo para selecionar o cheiro de música anterior.
• ID SET
Mantenha premido o botão Cima durante 5 segundos para concluir o
processo ID SET (ao ligar a um subwoofer sem os ou altifalantes traseiros
sem os).
4
(Reproduzir/Pausar)
Pode também reproduzir ou pausar música premindo o botão.
5
Sem som
Prima o botão
(Sem som) para colocar no silêncio.
Prima-o novamente para repor o som.
Indicador
LED
Pisca X repetidamente

POR - 10
6
Informações
Prima o botão para apresentar informações sobre a função atual. (Consulte a página 7)
Quando ligado ao Dolby Atmos®, o indicador LED ciano pisca 3 vezes.
7
SOUND MODE
Ao premir o botão, pode selecionar o modo de áudio desejado. Sempre que o modo for alterado, o LED multicolor pisca
uma luz branca.
Indicador LED
Branco pisca 1 vez
“Surround” → “Jogo” → “Padrão” → “Som Adaptativo” →
“DTS Virtual:X”
• Surround
Oferece um campo sonoro mais amplo do que o padrão.
• Game
Oferece som estereoscópico para mergulhar na ação durante os videojogos.
• Standard
Emite o som original.
• Adaptive Sound
Analisa o conteúdo em tempo real e fornece automaticamente o campo sonoro ótimo com base nas características do
conteúdo.
• DTS Virtual:X
Som 3D imersivo de qualquer conteúdo.
8
VOLUME
Prima o botão para cima ou para baixo para ajustar o volume.
Indicador LED
Branco move-se para a direita 1 vez
Aumentar Volume
Branco move-se para a esquerda 1 vez
Diminuir Volume
9
NÍVEL DO WOOFER
(BASS)
Prima o botão para cima ou para baixo para ajustar o nível do woofer (graves) para -12 ou entre -6 e +6. Para denir o
volume do woofer (graves) para 0 (padrão), prima o botão.
10
Bluetooth PAIR
Mude o Soundbar para modo de emparelhamento por Bluetooth.
Ao premir o botão, o LED mostra as alterações como ilustrado abaixo.
• Até o emparelhamento estar concluído, o LED multicolor muda para Vermelho → Verde → Azul à vez.
Indicador LED
Vermelho → Verde →
Azul pisca
Emparelhamento
Ciano pisca três vezes
A ligação foi estabelecida
“Pronto para ligar via Bluetooth.”
11
CH LEVEL
Ao premir o botão, pode ajustar o volume de cada altifalante.
• Para controlar o volume de cada altifalante, selecione “Centre Level” ou “Front Top Level” nas Denições de som e
dena o nível entre -6 e +6 com os botões Cima/Baixo.
• Se os Altifalantes traseiros (vendidos em separado) estiverem ligados, a denição “Rear Level” e “Rear Top Level” é
suportada. Para ajustar o volume do “Rear Level” e “Rear Top Level” entre -6 e +6, utilize os botões Cima/Baixo.
Indicador LED
Branco pisca 1 vez
“Nível Central” → “Nível Frontal Superior”
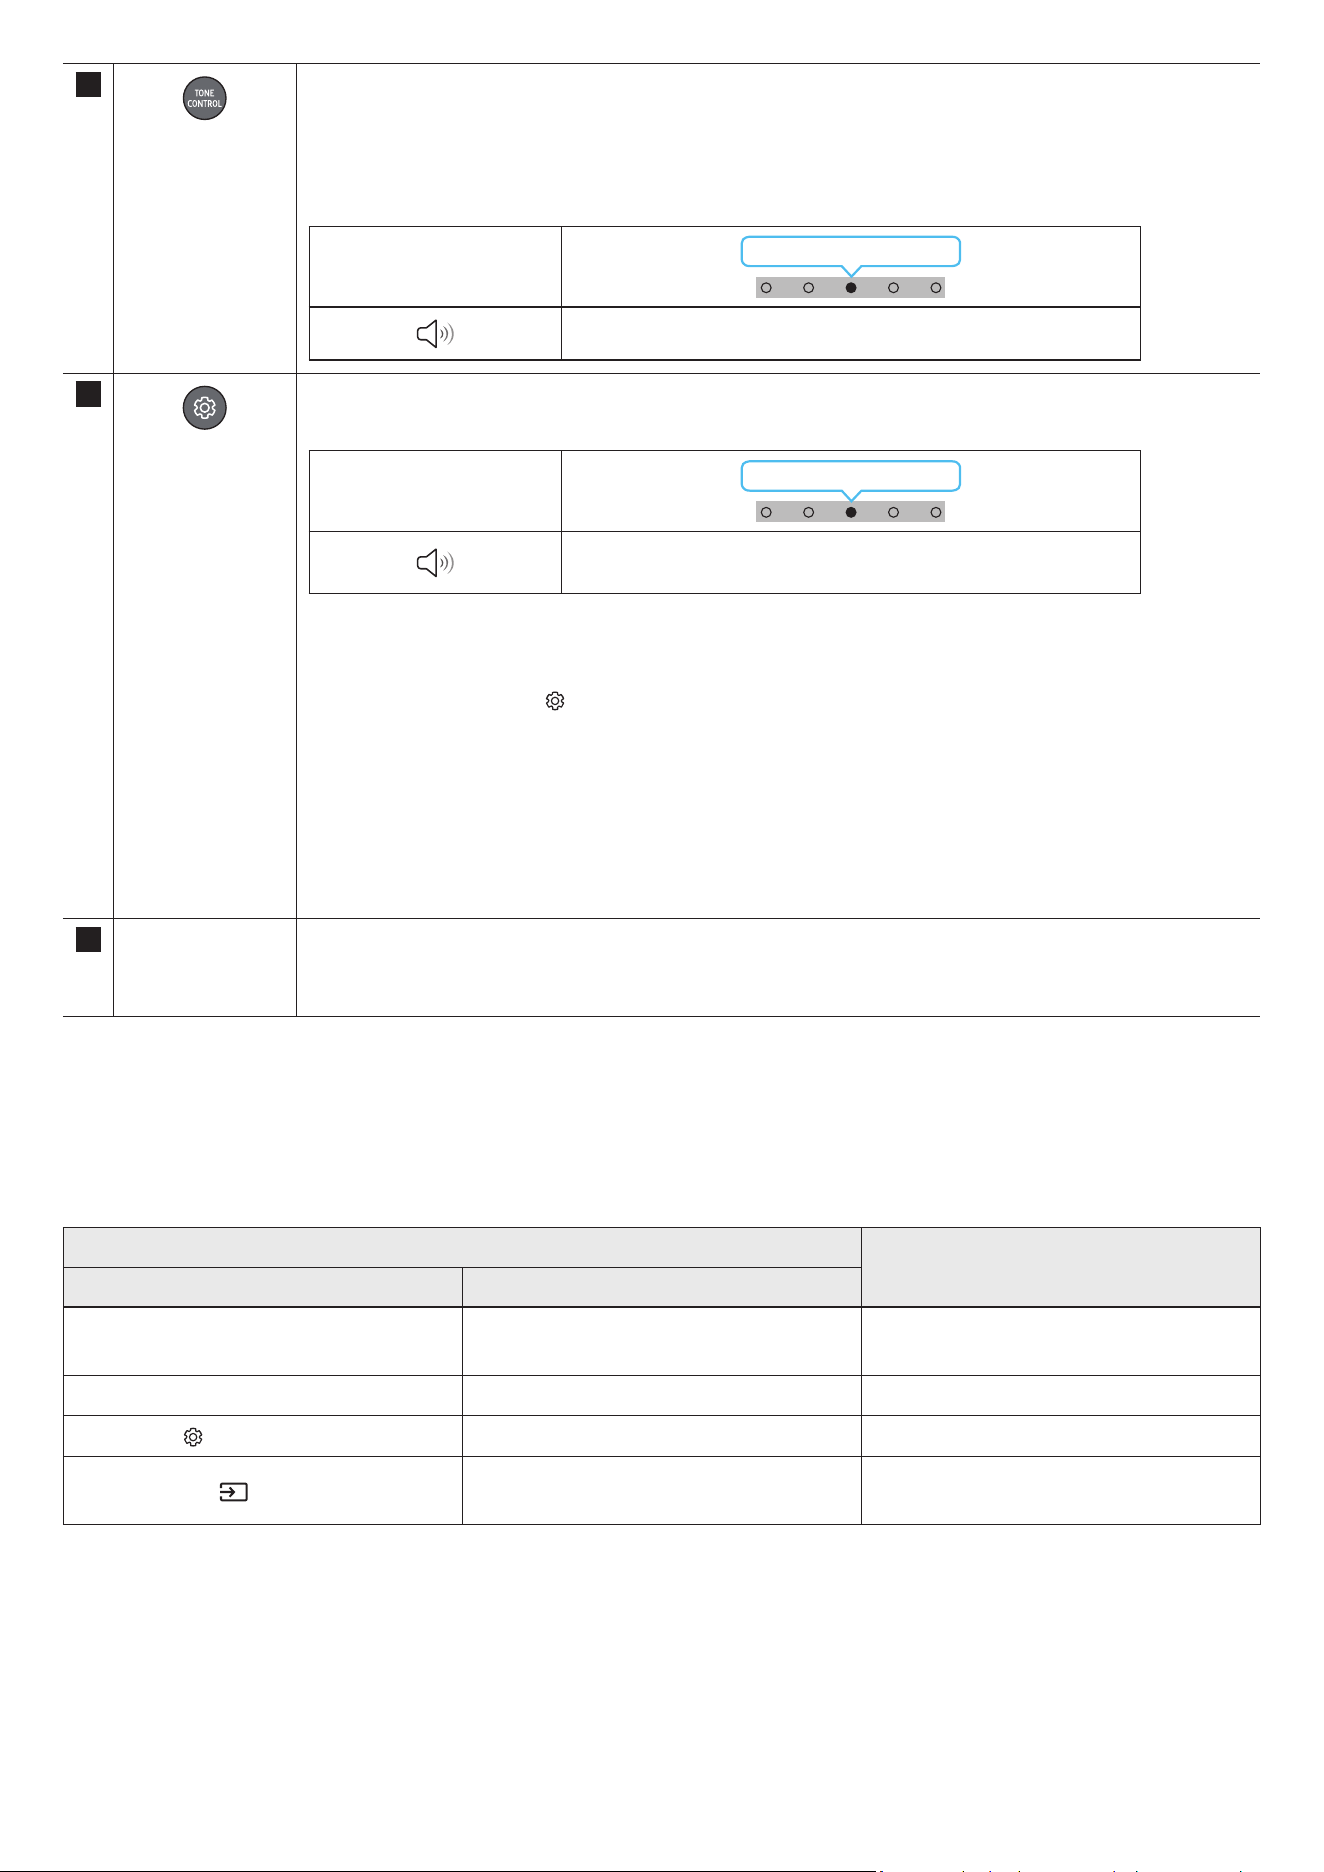
POR - 11
12
TONE CONTROL
Ao premir o botão, pode ajustar o volume de sons agudos ou graves. Pode ajustar o item desejado ao usar os botões Cima/
Baixo. Esta função é ativada no modo de som, com a exclusão no modo Standard.
• Para controlar o volume de sons agudos ou graves, selecione “Treble” ou “Bass” em Denições de som e dena o nível
entre -6 e +6 com os botões Cima/Baixo.
• Quando o nível de graves for alterado, o nível do woofer será também ajustado em conformidade.
Indicador LED
Branco pisca 1 vez
“Agudos” → “Graves”
13
Controlo de som
Ao premir o botão, pode denir a função de áudio. Pode ajustar o item desejado ao usar os botões Cima/Baixo. Sempre que
o modo for alterado, o LED multicolor pisca uma luz branca.
Indicador LED
Branco pisca 1 vez
“Som SpaceFit” → “Amplicador de Voz Ativo” → “Otimização de voz” →
“Modo Noturno” → “Sincronizar” → “Virtual”
• A opção Voice enhancement permite ouvir mais facilmente diálogos em lmes e na TV.
• O Night Mode está otimizado para visualização noturna com as denições ajustadas para diminuir o volume, mas
manter os diálogos percetíveis.
• Mantenha premido o botão
(Controlo de som) durante cerca de 5 segundos para ajustar o som a cada banda de
frequência. Pode selecionar 150 Hz, 300 Hz, 600 Hz, 1,2 kHz, 2,5 kHz, 5 kHz e 10 kHz com os botões Esquerdo/Direito e
cada opção pode ser ajustada para uma denição entre -6 e +6 com os botões Cima/Baixo.
(Certique-se de que o modo de som está denido como “STANDARD”.)
• Se o vídeo na TV e o áudio no Soundbar não estiverem sincronizados, selecione “Sync” em Controlo de som e dena o
atraso de áudio para um valor entre 0 e 300 milissegundos com os botões Cima/Baixo.
• “Sync” só é suportado em algumas funções.
• A função Virtual pode ser ligada ou desligada (On/Off) com os botões Cima/Baixo.
14 Porta USB (C-type)
para carregar
O LED acende-se ao carregar. Quando está totalmente carregada, o LED apaga-se.
• O cabo USB não é fornecido.
• Quando o telecomando não funciona porque a bateria está fraca, carregue-o utilizando a porta do USB-C type.
Active Voice Amplier (AVA)
• Analisa o ruído externo em tempo real enquanto o Soundbar está em reprodução, para que o áudio de voz possa ser sempre ouvido com nitidez.
• Não são guardados quaisquer dados durante a análise.
Utilizar os botões escondidos (botões com mais de uma função)
Botão escondido
Página de referência
Botão do controlo remoto Função
WOOFER (Cima)
Ligar/desligar (em espera) do controlo remoto
do televisor
página 13
Cima ID SET página 9
(Controlo de som)
7 Band EQ página 11
(Fonte)
Ligar/desligar Feedback de Áudio
(modo de espera)
página 9
POR - 12
Especicações de saída para os diferentes modos de efeitos sonoros
Efeito Entrada
Potência
Apenas com o Subwoofer
Com Subwoofer e kit de colunas
traseiras sem os
Surround
2.0 canais 3.1.2 canais 5.1.4 canais
5.1 canais 3.1.2 canais 5.1.4 canais
Dolby Atmos® 3.1.2 canais 5.1.4 canais
Game
2.0 canais 3.1.2 canais 5.1.4 canais
5.1 canais 3.1.2 canais 5.1.4 canais
Dolby Atmos® 3.1.2 canais 5.1.4 canais
Standard
2.0 canais 2.1 canais 2.1 canais
5.1 canais 3.1 canais 5.1 canais
Dolby Atmos® 3.1.2 canais 5.1.4 canais
Adaptive Sound
2.0 canais 3.1.2 canais 5.1.4 canais
5.1 canais 3.1.2 canais 5.1.4 canais
Dolby Atmos® 3.1.2 canais 5.1.4 canais
DTS Virtual:X
2.0 canais 3.1.2 canais 5.1.4 canais
5.1 canais 3.1.2 canais 5.1.4 canais
Dolby Atmos® 3.1.2 canais 5.1.4 canais
• O Kit de altifalantes traseiros sem os Samsung pode ser comprado em separado. Para comprar um Kit, contacte o fornecedor onde comprou o
Soundbar.
• Os Altifalantes Surround não emitem qualquer som para saídas de 2 canais enquanto o modo STANDARD estiver a ser utilizado. Para ativar o som dos
Altifalantes Surround, altere o modo de efeitos para SURROUND.
• Se a fonte de entrada for Dolby Atmos®, a conguração Apenas Subwoofer fornece um áudio de 3.1.2 canais, enquanto a conguração Subwoofer e Kit
de altifalantes traseiros sem os fornece um áudio de 5.1.4 canais.

POR - 13
Ajustar o volume do Soundbar com o telecomando de uma TV
Ajuste o volume do Soundbar com o controlo remoto do televisor.
• Esta função só pode ser utilizada com telecomandos por infravermelhos. Os controlos remotos Bluetooth (controlos remotos que requerem
emparelhamento) não são suportados.
• Dena o altifalante da TV para Altifalante externo para utilizar esta função.
• Fabricantes que suportam esta função:
Samsung, VIZIO, LG, Sony, Sharp, PHILIPS, PANASONIC, TOSHIBA, Hisense, RCA
1. Desligue o Soundbar.
2. Mantenha premido o botão WOOFER durante 5 segundos.
Cada vez que mantiver premido o botão WOOFER durante 5 segundos, o modo muda pela seguinte ordem: “OFF-TV REMOTE” (Modo predenido),
“SAMSUNG-TV REMOTE”, “ALL-TV REMOTE”.
Botão do controlo remoto Indicador LED Estado
(Modo predenido)
Vermelho pisca 1 vez
“Off-TV Remote”
(Modo predenido)
Desative o controlo remoto do televisor.
Ciano pisca 1 vez
“Samsung-TV Remote”
Ative o controlo remoto por infravermelhos de um televisor
Samsung.
Azul pisca 1 vez
“All-TV Remote”
Ative o controlo remoto por infravermelhos de um televisor
de terceiros.
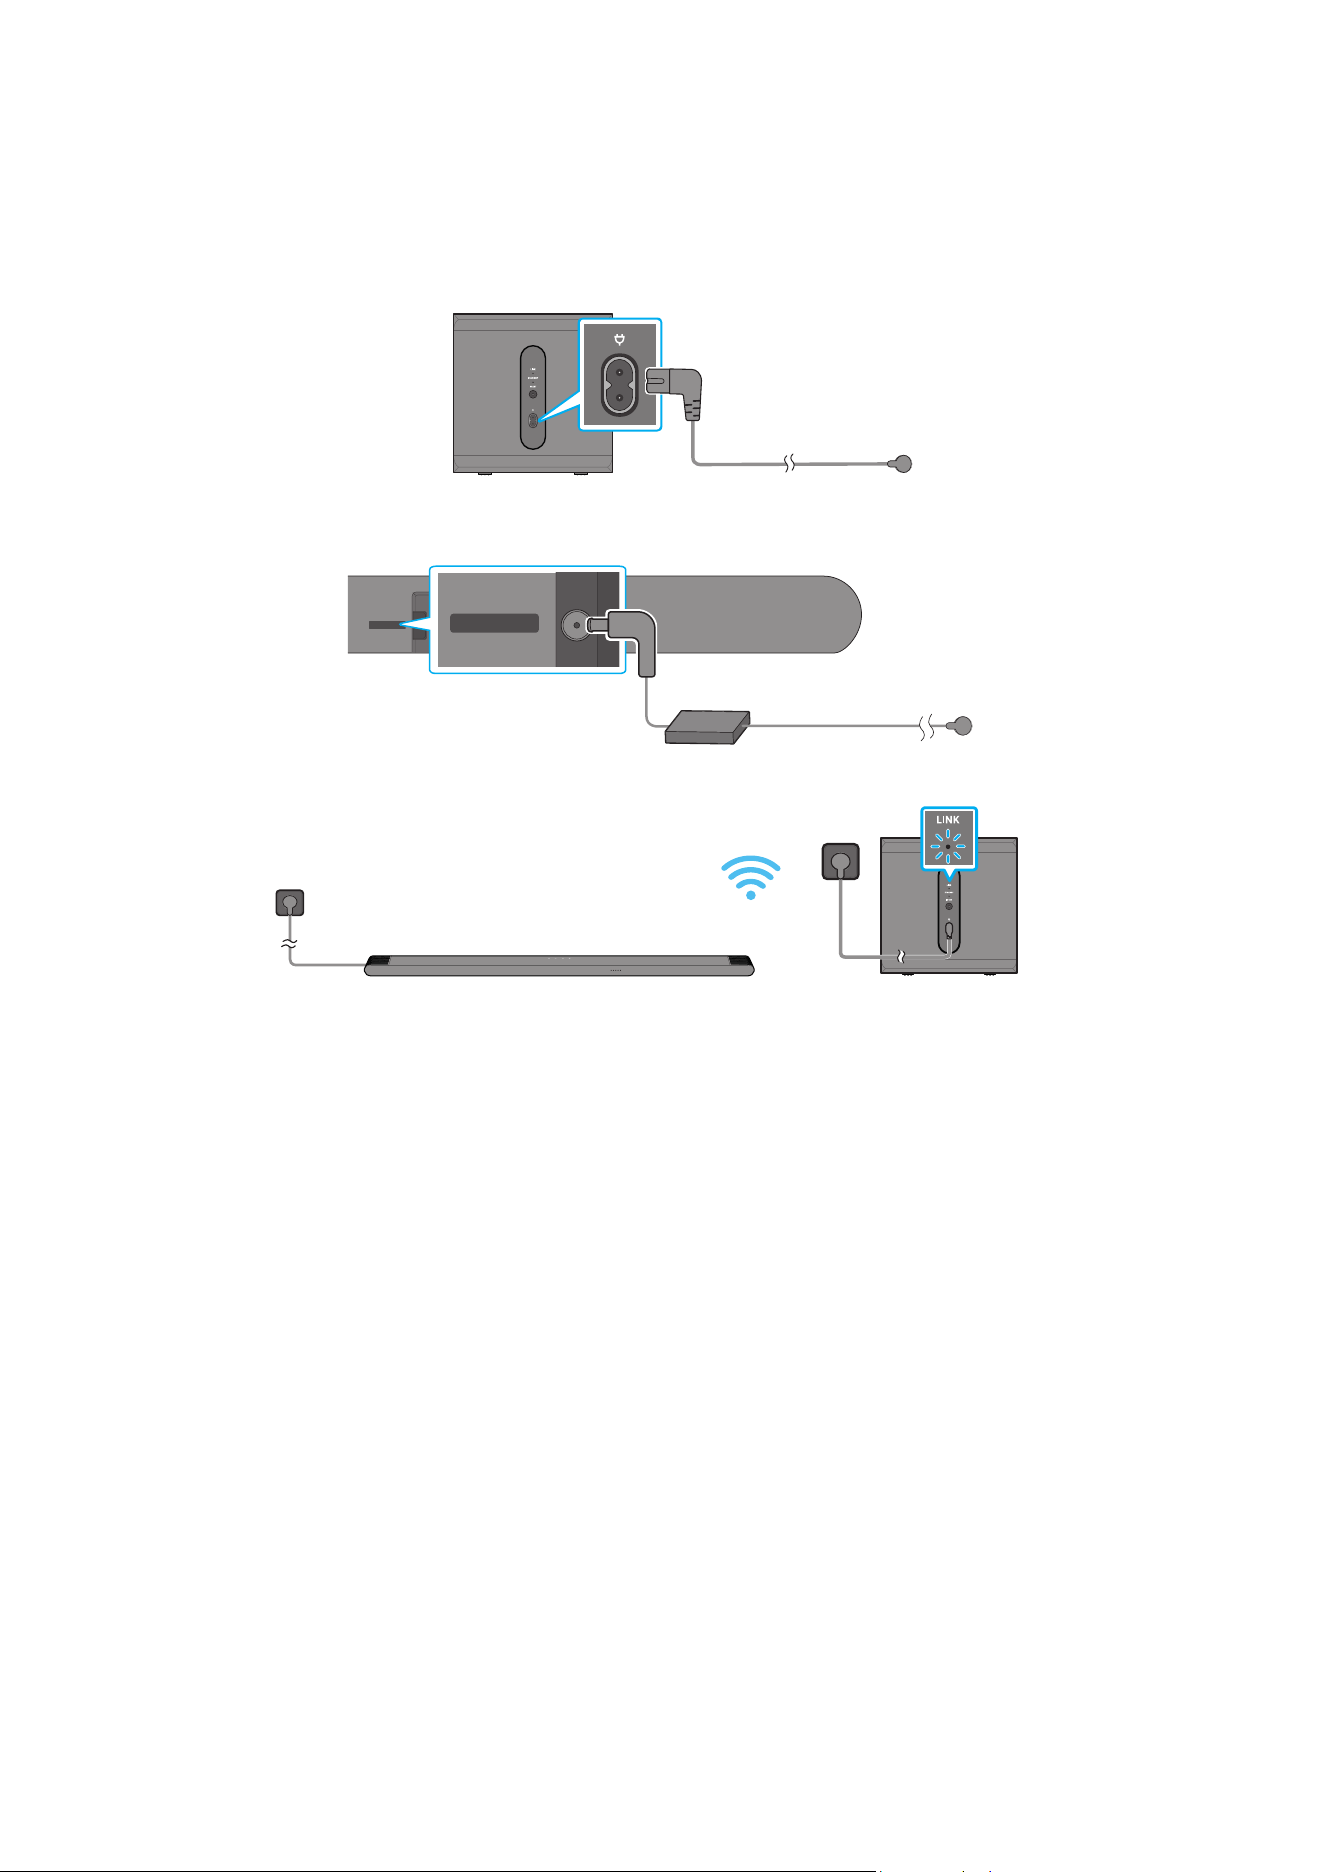
POR - 14
04 LIGAR O SOUNDBAR
Ligar a alimentação e as unidades
Utilize o cabo de alimentação para ligar o Subwoofer e a Soundbar a uma tomada elétrica pela seguinte ordem:
• Para mais informações sobre a potência elétrica necessária e o consumo de energia, consulte a etiqueta no produto. (Etiqueta: Parte inferior da unidade
principal do Soundbar)
1. Ligue o cabo de alimentação ao Subwoofer.
Parte traseira do Subwoofer
Cabo de alimentação
2. Ligue o cabo de alimentação à Soundbar.
Traseira da unidade
principal do Soundbar
DC 19V
DC 19V
Cabo de alimentação
Transformador de
CA/CC
3. Ligue a alimentação ao Soundbar e ao Subwoofer. O Subwoofer é automaticamente ligado quando o Soundbar é ligado.
LED DE LINK - Azul signica ativado
NOTA
• Ligue o Subwoofer antes de o ligar ao Soundbar. O Subwoofer será automaticamente ligado quando ligar o Soundbar.
• Se desligar e voltar a ligar o cabo de alimentação quando o produto estiver ligado, o Soundbar liga-se automaticamente.
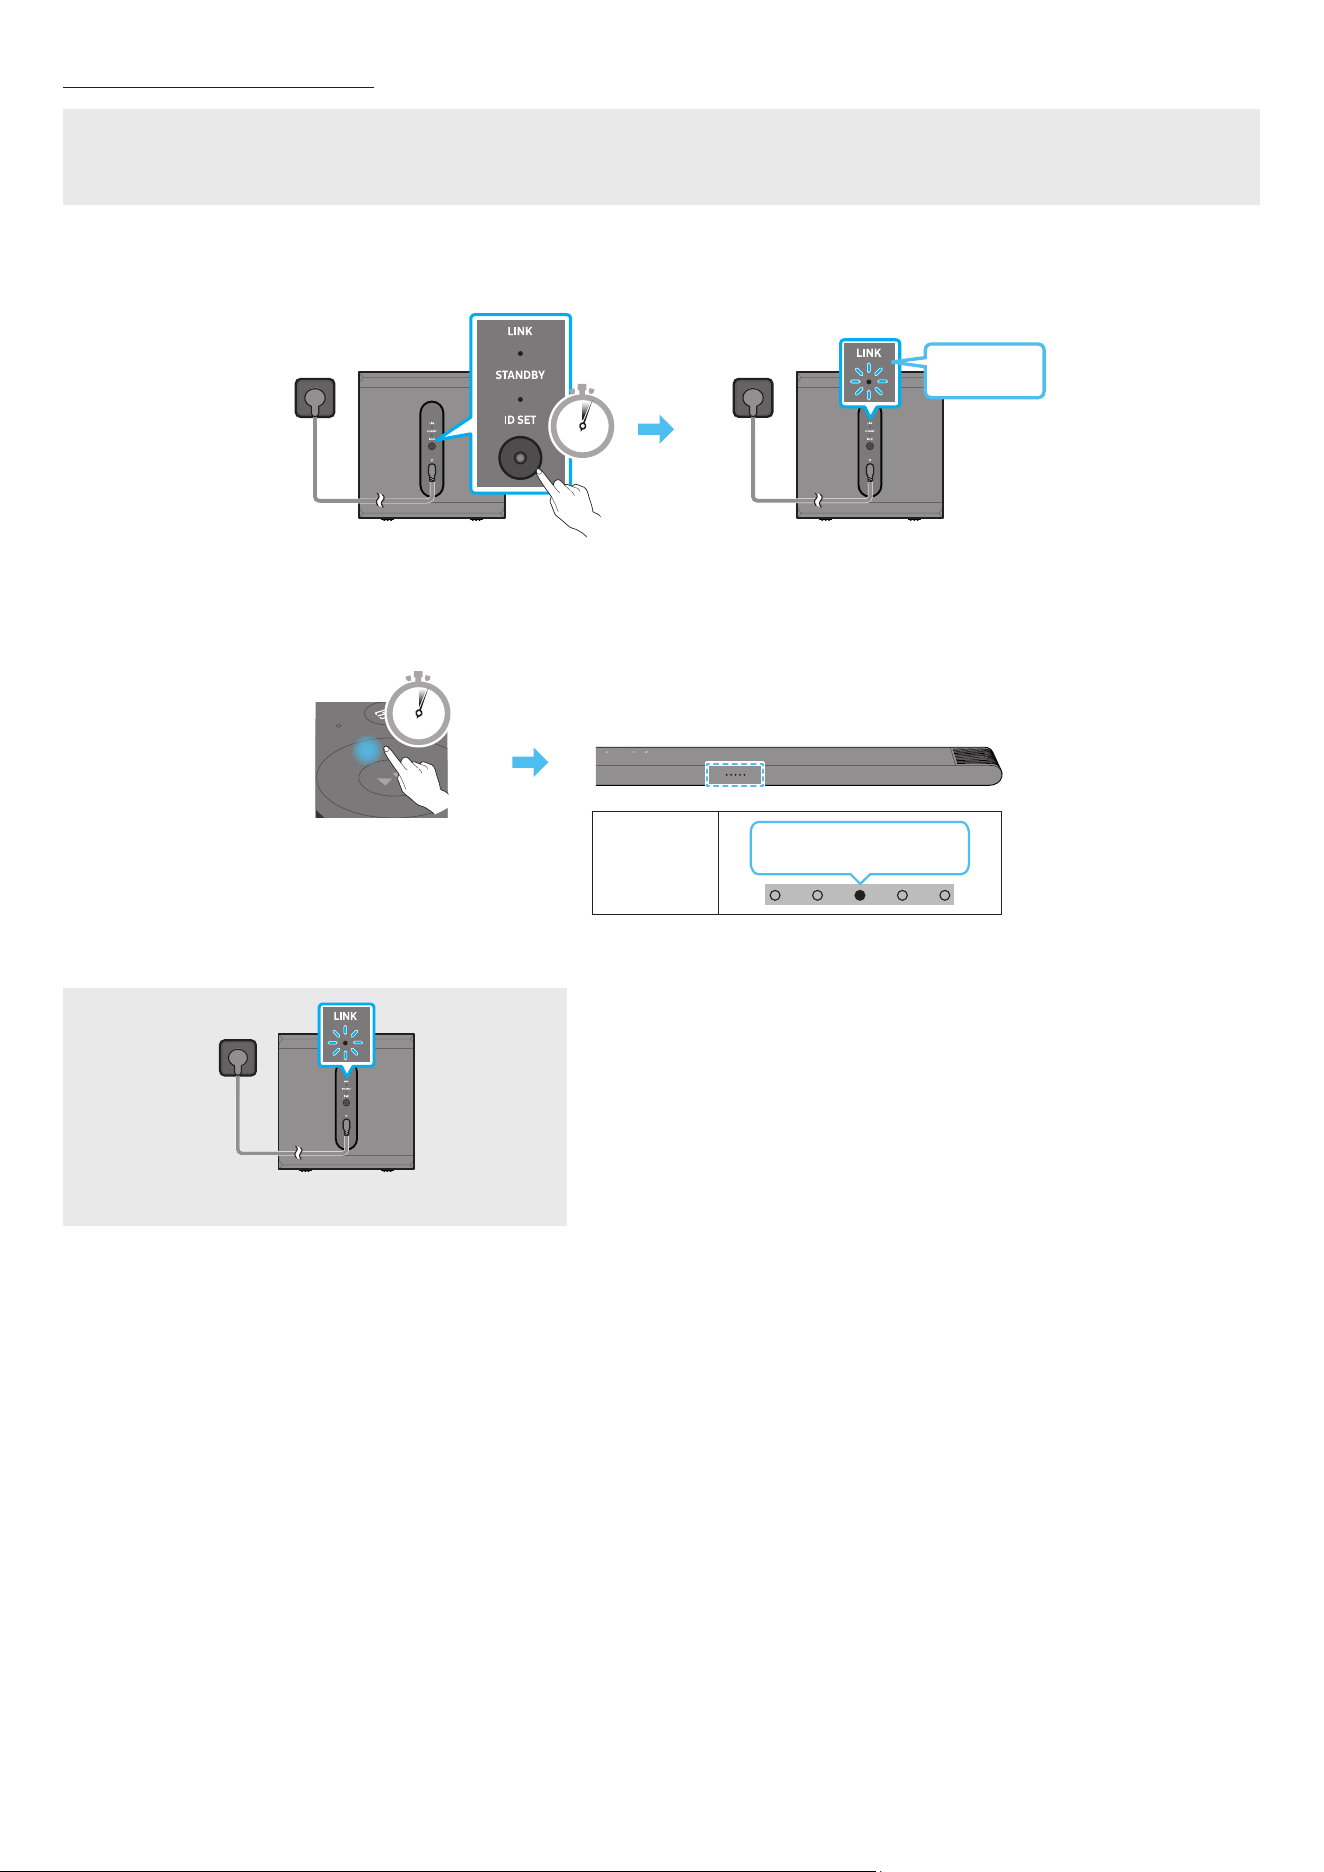
POR - 15
Ligar o Subwoofer manualmente
Antes de executar o procedimento de ligação manual em baixo:
• verique se os cabos de alimentação do Soundbar e do subwoofer estão devidamente ligados.
• Certique-se de que o Soundbar está desligado.
1. Desligue a unidade principal do Soundbar.
2. Mantenha premido o botão ID SET na parte de trás do subwoofer durante pelo menos 5 segundos.
• O indicador vermelho na parte de trás de cada coluna apaga-se e o indicador azul pisca.
5 Sec
Parte traseira do Subwoofer
Azul a piscar
rápido
Parte traseira do Subwoofer
3. Mantenha o botão Cima do telecomando premido durante 5 segundos.
• O Soundbar liga-se automaticamente quando a ID SET estiver concluída.
5 Sec
Indicador
LED
Vermelho → Verde →
Azul pisca
4. Verique se o LED LINK está aceso continuamente a azul (ligação concluída).
LED DE LINK - Azul signica ativado
O indicador LED DE LINK para de piscar e ca aceso continuamente a azul quando se
estabelece uma ligação entre o Soundbar e o Subwoofer sem os.
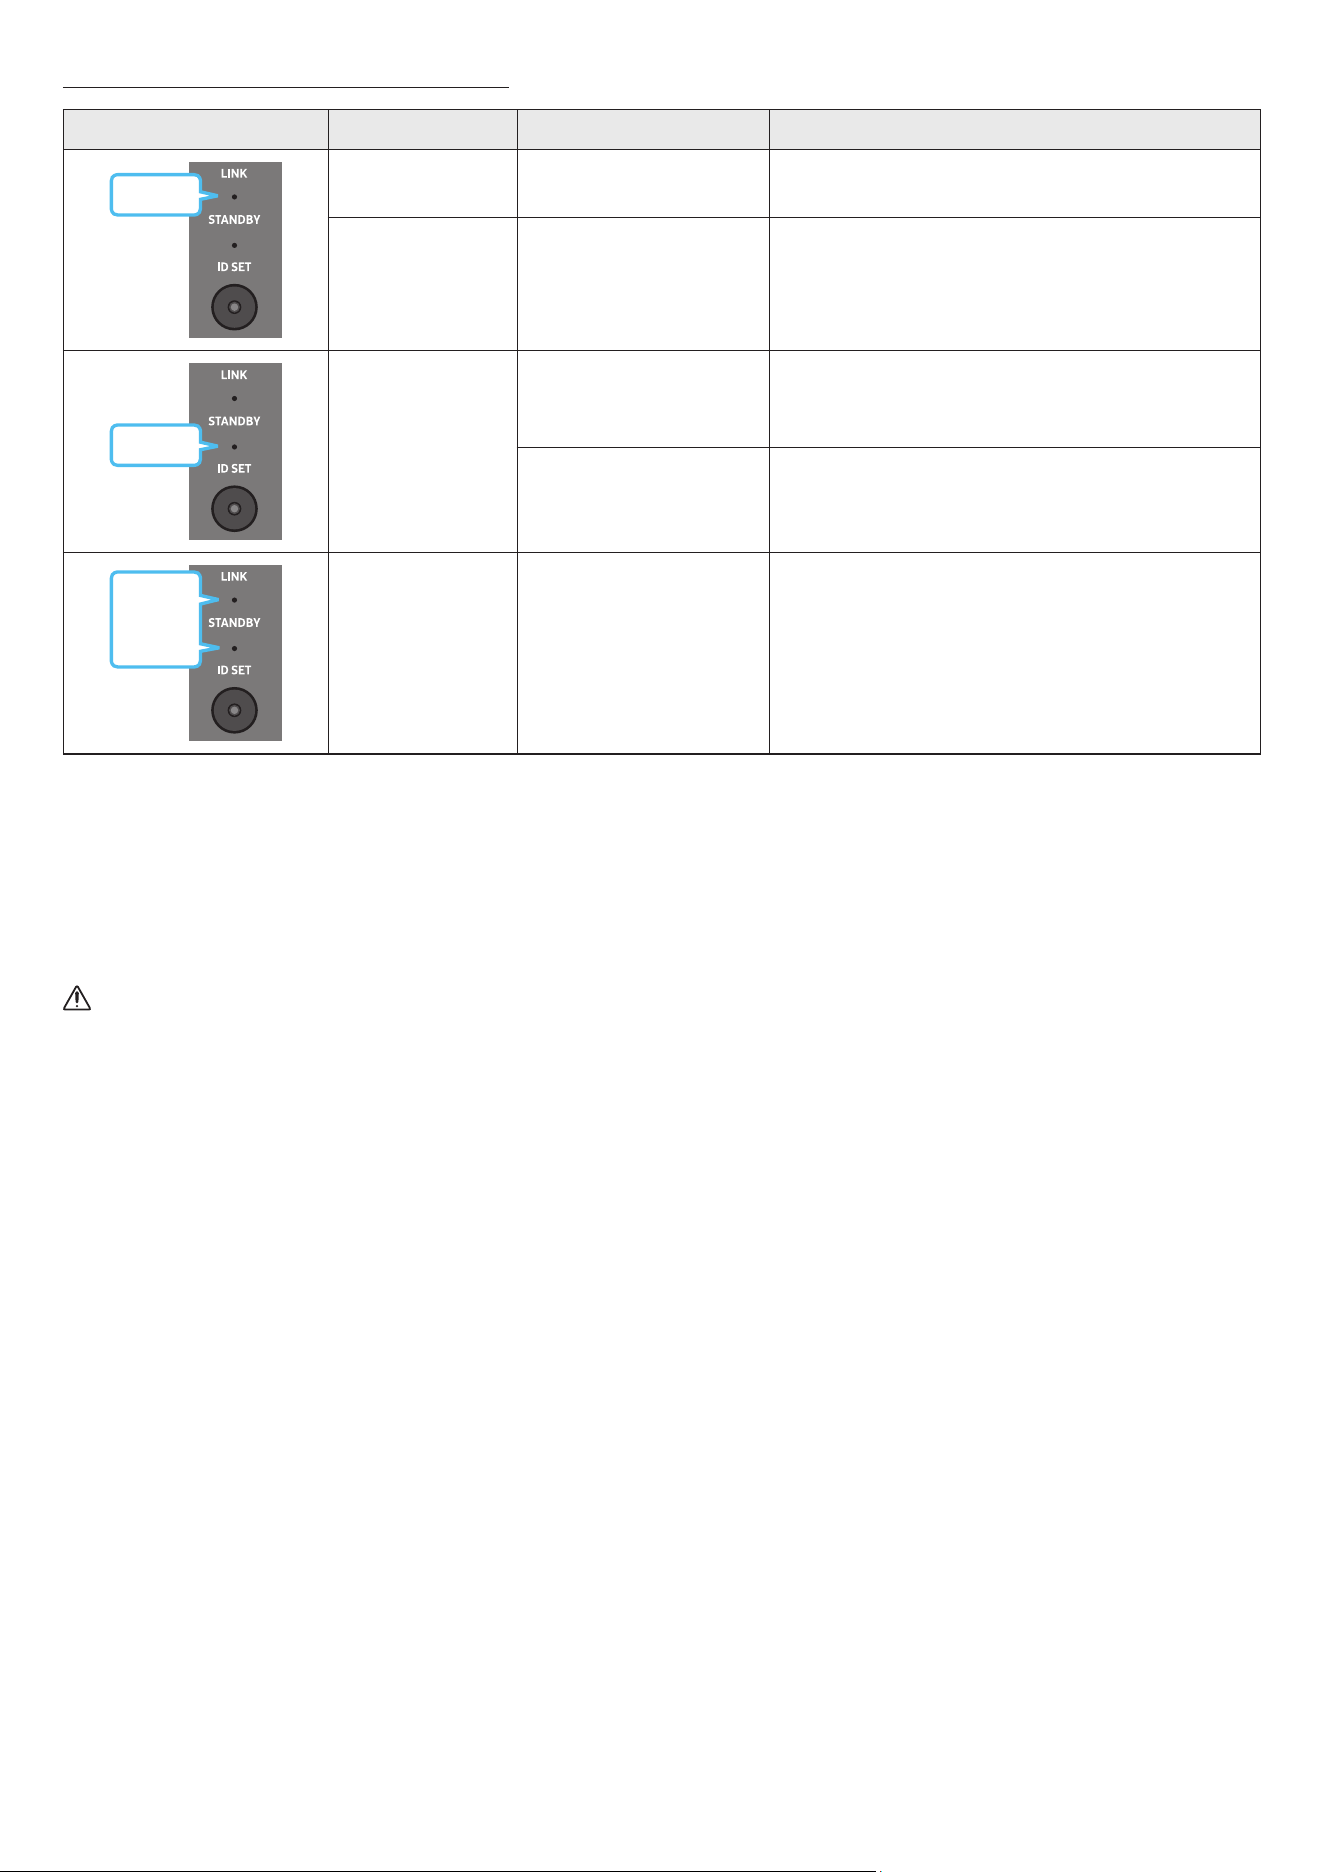
POR - 16
Indicadores LED na parte de trás do Subwoofer
LED Estado Descrição Resolução
Azul
Ligado
Ligado com sucesso
(funcionamento normal)
-
A piscar A recuperar a ligação
Verique se o cabo de alimentação está devidamente
ligado à unidade principal do Soundbar ou aguarde cerca
de 5 minutos. Se o indicador continuar a piscar, tente ligar o
subwoofer manualmente. Consulte a página 15.
Vermelho
Ligado
Modo de espera (com
a unidade principal do
Soundbar desligada)
Verique se o cabo de alimentação está devidamente ligado
à unidade principal do Soundbar.
Falha ao ligar
Estabeleça uma nova ligação. Consulte as instruções
relativas à ligação manual na página 15.
Vermelho
e azul
A piscar Ocorreu uma avaria
Consulte as informações de contacto do Centro de
Assistência Samsung presentes neste manual.
NOTA
• Se a unidade principal estiver desligada, o subwoofer sem os entrará em modo de espera e o LED STANDBY na parte traseira do subwoofer cará
vermelho após piscar a azul várias vezes.
• Se utilizar um dispositivo que utilize a mesma frequência do Soundbar perto deste, as interferências podem causar algumas interrupções de som.
• A distância de transmissão máxima do sinal sem os da unidade principal é de cerca de 10 m, mas pode variar consoante o ambiente de funcionamento.
Se existir uma parede de aço e betão ou uma parede metálica entre a unidade principal e o subwoofer sem os, o sistema pode não funcionar de todo
porque o sinal sem os não consegue penetrar metal.
CUIDADO
• Estão integradas antenas recetoras sem os no subwoofer sem os. Mantenha a unidade longe da água e da humidade.
• Para um desempenho de audição otimizado, certique-se de que a área em torno do local do subwoofer sem os está livre de quaisquer obstáculos.
Ligar um SWA-9500S (vendido em separado) ao Soundbar
Obtenha um verdadeiro som surround sem os ligando o Kit de altifalantes traseiros sem os (SWA-9500S, vendido em separado) ao Soundbar.
Para obter informações detalhadas sobre as ligações, consulte o manual do Kit de altifalantes traseiros sem os Samsung.

POR - 17
05 LIGAR A UMA TV
Ligar uma TV compatível com HDMI ARC (canal de retorno de áudio)
CUIDADO
• Quando utilizar um cabo HDMI para Micro HDMI, cuidado para não partir o terminal do cabo.
• Quando o cabo HDMI está ligado, o sinal HDMI é recebido primeiro.
• Para ligar o cabo HDMI entre o televisor e o Soundbar, certique-se de que liga os terminais assinalados com ARC. Caso contrário, o som do televisor
pode não reproduzir.
• O cabo recomendado é um High Speed HDMI Cable with Ethernet.
HDMI IN
(ARC)
SERVICE
HDMI
(ARC)
Ligue à porta HDMI IN (ARC) ou
(eARC) da TV.
Ligue à porta HDMI (ARC)
da unidade principal do
Soundbar.
Cabo HDMI para
Micro HDMI
Traseira do Soundbar
Parte superior do Soundbar
Indicador LED
Branco Ligado → Desligado
“TV ARC”
1. Com o Soundbar e o televisor desligados, ligue o cabo HDMI conforme indicado na gura.
2. Ligue o Soundbar e o televisor.
3. A TV vai emitir som através do Soundbar.
• Quando a TV não emitir som, prima o botão
(Multifunções) na parte superior do Soundbar ou o botão (Fonte) no controlo remoto para
selecionar o modo “TV ARC”.
• Quando o som não for emitido, verique novamente a ligação do cabo HDMI.
• Utilize os botões do volume no controlo remoto do televisor para mudar o volume no Soundbar.
NOTA
• Recomendamos que utilize um cabo HDMI sem núcleo, se possível. Se utilizar um cabo HDMI com núcleo, utilize um cujo diâmetro seja inferior a 14 mm.
• Esta função não está disponível se o cabo HDMI não suportar ARC.
• Se o áudio numa emissão estiver codicado como Dolby Digital e o “Formato de saída de áudio digital” do televisor estiver denido como PCM,
recomendamos que altere a denição para Dolby Digital. Se a conguração do televisor for alterada, terá uma melhor qualidade de som. (O menu do
televisor poderá utilizar expressões diferentes para Dolby Digital e PCM em função do fabricante do televisor.)
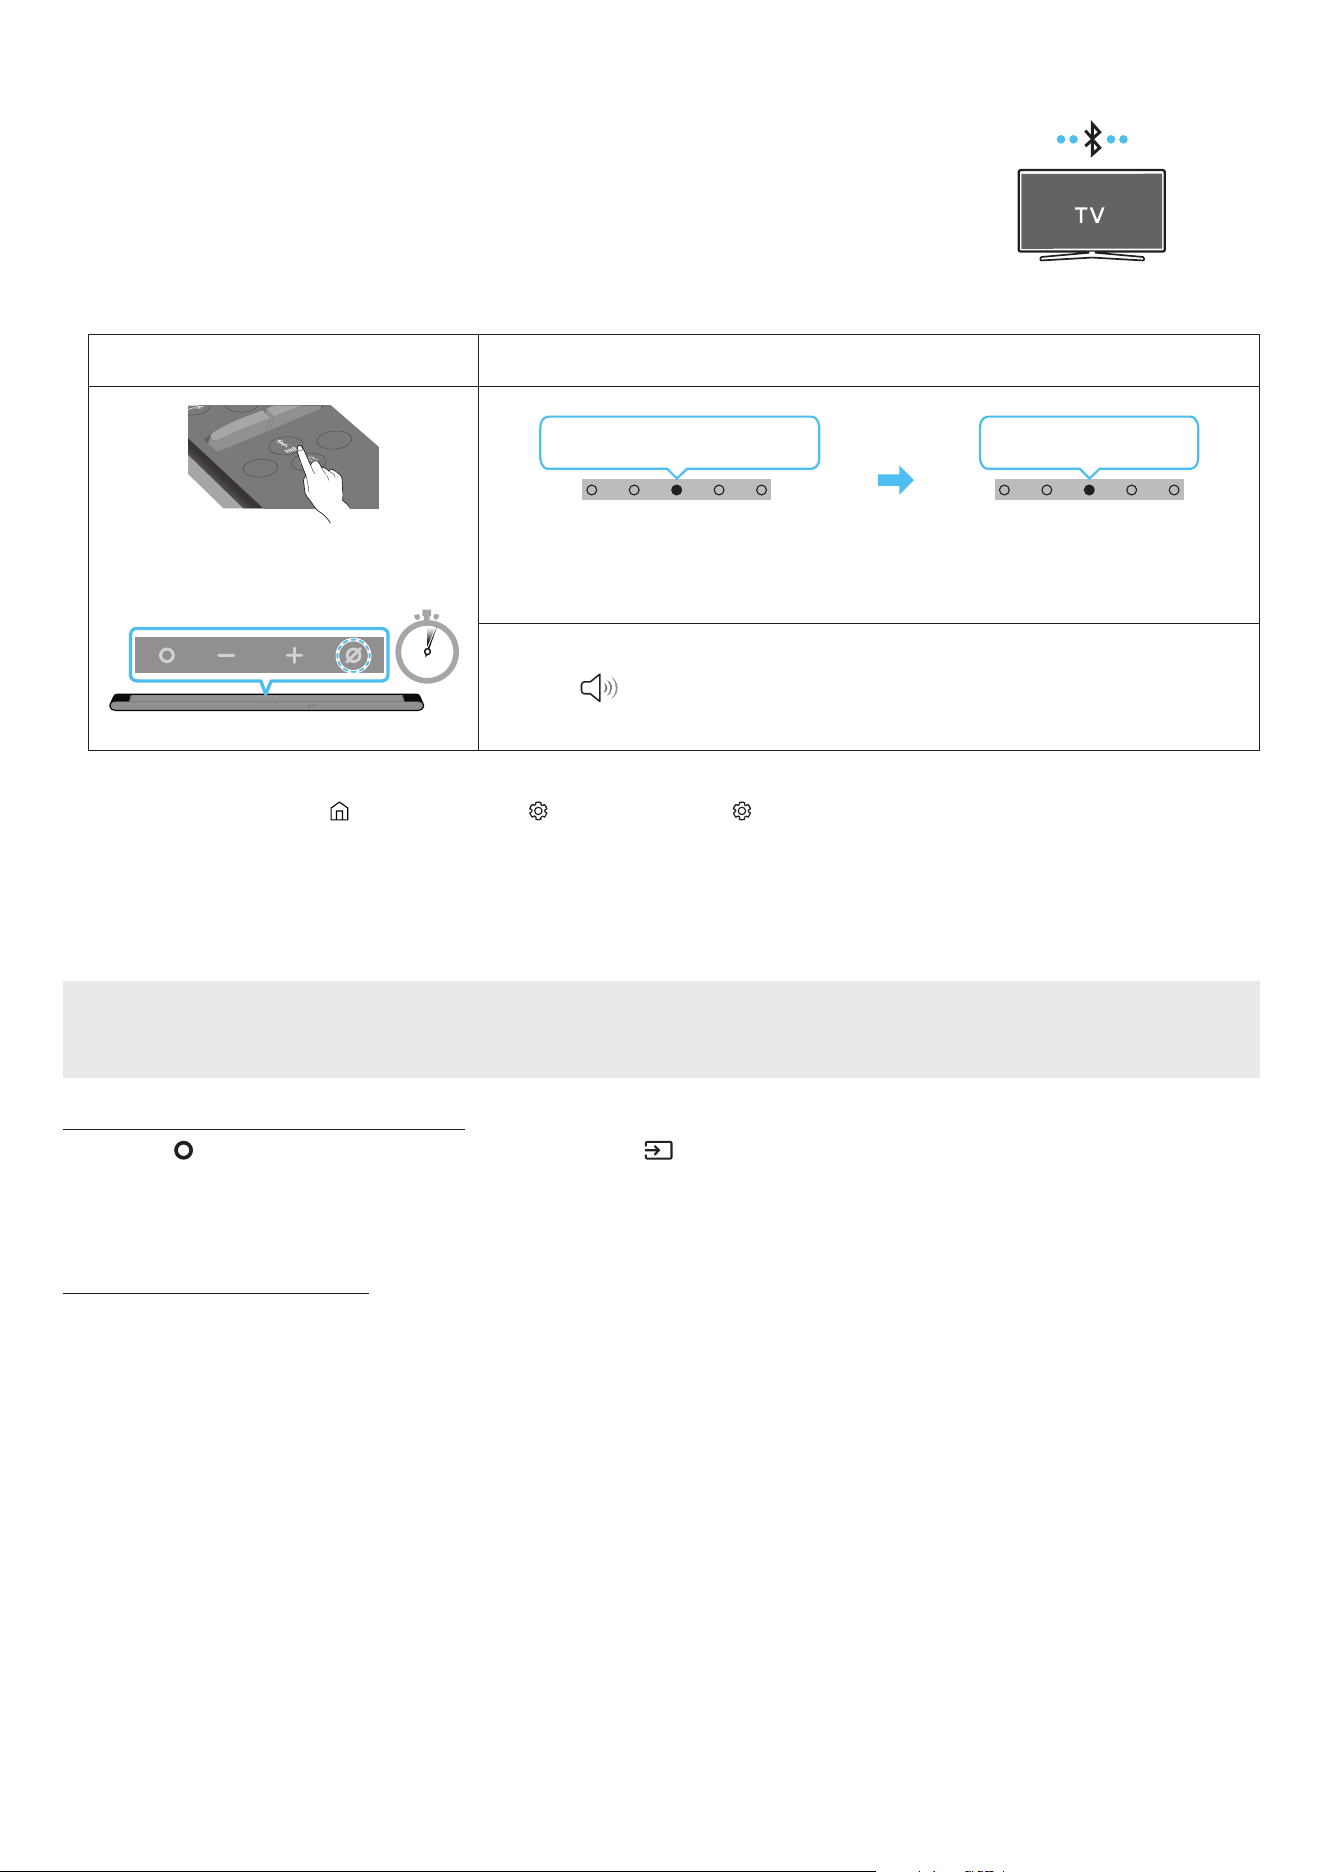
POR - 18
Ligar via Bluetooth
Quando um televisor Samsung é ligado através de Bluetooth, pode ouvir som estéreo sem ter de utilizar cabos
incómodos.
• Apenas pode ser ligado um televisor Samsung de cada vez.
• Pode ser ligado um televisor Samsung que suporte Bluetooth. Verique as especicações do seu televisor.
A ligação inicial
1.
Botão Emparelhamento por Bluetooth Indicador LED
SOUNDBAR
SOUND
MODE
WOOFER
+
_
CH LEVEL
TONE
CONTROL
(OU)
Quando em modo “Bluetooth”
5 Sec
Vermelho → Verde → Azul pisca
Emparelhamento
Ciano pisca três vezes
A ligação foi estabelecida
• Até o emparelhamento estar concluído, o LED multicolor muda para Vermelho → Verde → Azul
à vez.
“Pronto para ligar via Bluetooth.”
1.
2. Selecione o modo Bluetooth no televisor Samsung.
(por exemplo, Página Principal ( ) → Menu → Denições ( ) → Todas as Denições ( ) → Som → Saída de Som → Lista de Altifalantes Bluetooth → [AV]
Samsung Soundbar S***B (Bluetooth))
3. Selecione “[AV] Samsung Soundbar S***B” a partir da lista apresentada no ecrã da TV.
Os Soundbars disponíveis são identicados pela mensagem “Need Pairing” ou “Paired” na lista de dispositivos Bluetooth do televisor. Para ligar o
televisor Samsung ao Soundbar, selecione a mensagem e estabeleça uma ligação.
4. Poderá então ouvir o som do televisor Samsung a partir do Soundbar.
Se ocorrer uma falha ao ligar o dispositivo
• Se já tiver um Soundbar (por exemplo, [AV] Samsung Soundbar S***B) na lista de altifalantes da TV Samsung, elimine-o.
• Depois, repita os passos 1 a 3.
Desligar o Soundbar do televisor Samsung
Prima o botão (Multifunções) na parte superior do Soundbar ou no botão (Fonte) no controlo remoto para selecionar outro modo que não o modo
“Bluetooth”.
• Desligar demora algum tempo porque o televisor Samsung tem de receber uma resposta do Soundbar.
(O tempo necessário para tal poderá variar em função do modelo do televisor Samsung.)
Notas sobre a ligação Bluetooth
• Localize um novo dispositivo ao alcance de 1 m para ligar via comunicação Bluetooth.
• Se lhe for pedido para introduzir um código PIN quando estiver a ligar um dispositivo Bluetooth, introduza <0000>.
• O Soundbar desliga-se automaticamente após 18 minutos quando está no modo Bluetooth Pronto.
• O Soundbar poderá não realizar corretamente a pesquisa ou a ligação Bluetooth nas seguintes circunstâncias:
‒ se existir um campo elétrico forte em redor do Soundbar.
‒ Se forem emparelhados vários dispositivos Bluetooth em simultâneo com o Soundbar.
‒ Se o dispositivo Bluetooth estiver desligado, não estiver no devido lugar ou não funcionar corretamente.
• Os dispositivos eletrónicos podem provocar interferências rádio. Os dispositivos que geram ondas eletromagnéticas devem ser mantidos afastados da
unidade principal do Soundbar - por exemplo, micro-ondas, dispositivos LAN sem os, etc.

POR - 19
Ligar através de Wi-Fi
Lista de vericação pré-ligação
• Apenas a TV Samsung tem ligações Wi-Fi disponíveis.
• Verique se o router sem os (Wi-Fi) está ligado e se a TV está ligada ao router.
• A TV e o Soundbar têm de estar ligados à mesma rede sem os (Wi-Fi).
• Se o router sem os (Wi-Fi) utilizar um canal DFS, não conseguirá estabelecer uma ligação Wi-Fi entre a TV e o Soundbar. Contacte o seu fornecedor de
serviços de Internet para obter mais detalhes.
• Dado que os menus podem variar consoante o ano de fabrico, consulte o manual da TV.
• Para ligar a TV ao Soundbar através de Wi-Fi, ligue primeiro o Soundbar ao router sem os. Consulte a página 25 para obter mais informações sobre
como estabelecer uma ligação Wi-Fi.
1. Para obter mais informações sobre a ligação Wi-Fi ao Soundbar, consulte a página 25, “Método 2. Ligar através de Wi-Fi (Rede sem os)”.
2. Mude a fonte de entrada da TV, utilizando o menu Áudio para Soundbar.
• TVs Samsung lançadas em 2017 ou depois
Som → Saída de Som → [AV] Samsung Soundbar S***B (Wi-Fi)
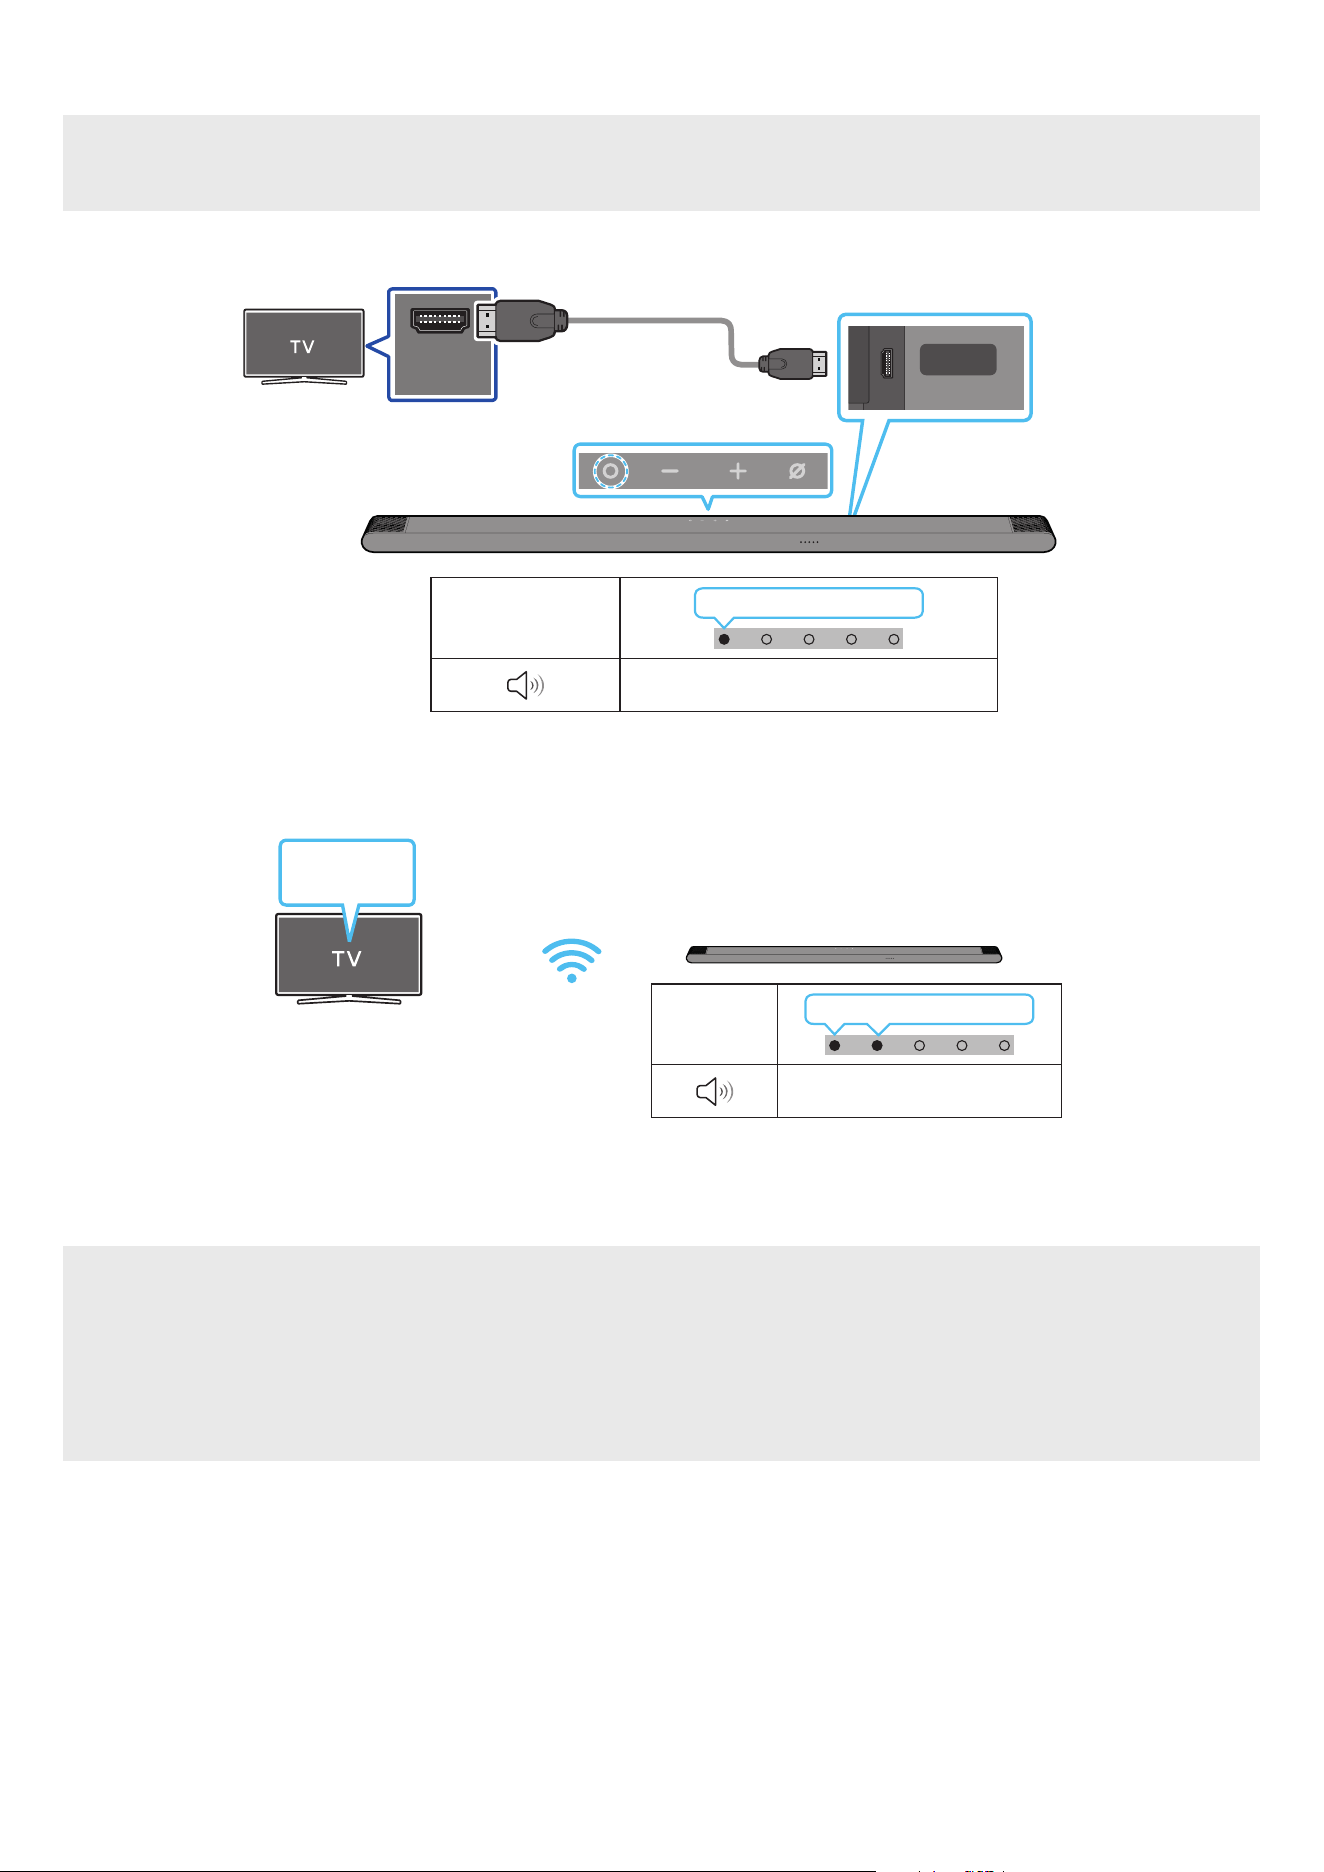
POR - 20
Ligar a uma TV que suporte Dolby Atmos
Lista de vericação pré-ligação
• O Dolby Atmos® é suportado no modo “TV ARC” ou “Wi-Fi”.
• Certique-se de que o conteúdo suporta Dolby Atmos®.
HDMI IN
(ARC)
SERVICE
HDMI
(ARC)
Ligue à porta HDMI IN (ARC)
do seu televisor.
Cabo HDMI para
Micro HDMI
Traseira do Soundbar
Parte superior do Soundbar
Indicador LED
Branco Ligado → Desligado
“TV ARC”
1. Com o Soundbar e o televisor desligados, ligue o cabo HDMI conforme indicado na gura.
2. Ligue o Soundbar e o televisor.
3. O som da TV é emitido a partir do Soundbar.
Indicador
LED
Branco Ligado → Desligado
“Wi-Fi”
Menu da TV
Wi-Fi
1. Ligue o Soundbar e a TV à mesma rede sem os (Wi-Fi).
2. Para aceder à saída de som no televisor, selecione Soundbar.
3. O som da TV é emitido a partir do Soundbar.
NOTA
• Quando utiliza o Dolby Atmos®: Se a fonte de entrada for Dolby Atmos®, consulte “Especicações de saída para os diferentes modos de efeitos
sonoros” na página 12.
• Congurar o Dolby Atmos® no leitor BD ou noutro dispositivo ligado à TV.
Abra as opções de saída áudio no menu de denições do leitor Blu-Ray, ou outro dispositivo, e certique-se de que “Sem Codicação” está selecionado
para o uxo de bits. Por exemplo, num leitor Blu-Ray Samsung, vá até Menu inicial → Áudio → Saída digital e selecione Bitstream (não processado).
• Esta função está disponível em algumas TV Samsung e em alguns modelos de Soundbar.

POR - 21
Utilizar a função Q-Symphony
Para a Q-Symphony, o Soundbar sincroniza com a TV Samsung para a saída de som através de dois dispositivos para um ótimo efeito surround. Quando o
Soundbar está ligado, o menu, “TV+Soundbar” aparece por baixo do menu Saída de Som da TV. Selecione o menu correspondente.
Menu da TV
Cabo HDMI para Micro HDMI
Indicador
LED
Branco Ligado → Desligado
“TV ARC”
• Exemplo do menu da TV: TV + [AV] Nome de série do Soundbar (HDMI)
Indicador
LED
Branco Ligado → Desligado
“Wi-Fi”
Menu da TV
Wi-Fi
• Exemplo do menu da TV: TV + [AV] Nome de série do Soundbar (Wi-Fi)
NOTA
• Pode funcionar conforme o Codec suportado pela TV.
• Esta função é suportada apenas quando o cabo HDMI ou o Wi-Fi estiver ligado.
• Certique-se de que a TV e o Soundbar estão ligados ao mesmo router sem os/frequência.
• Esta função está disponível em algumas TV Samsung e em alguns modelos de Soundbar.

POR - 22
Utilizar o som Spacet
Fornece uma qualidade de som otimizada ao analisar os espaços de escuta.
Método 1. Ligar através do Soundbar
Para ativar esta função, ative o modo SpaceFit Sound com o controlo remoto do Soundbar.
( (Controlo de som) → “SpaceFit Sound Off” → ( Cima ) → “SpaceFit Sound On”)
• Está disponível em todos os modos de som.
Método 2. Ligar através da TV
Para ativar esta função, ative o modo Som Adaptativo+ no menu da TV Samsung.
(Página Principal ( ) → Menu → Denições ( ) → Todas as Denições ( ) → General → Denições de Modo Inteligente → Som Adaptativo+)
• O modo de som do Soundbar será automaticamente alterado para Som Adaptativo+ se ativar o modo Som Adaptativo+ na TV.
NOTA
Esta função funciona quando o Soundbar estabelece ligação com alguma das suas TV Samsung.

POR - 23
06 LIGAR A UM DISPOSITIVO MÓVEL
Método 1. Ligar através de Bluetooth
Quando um dispositivo móvel é ligado através de Bluetooth, pode ouvir som estéreo sem ter de utilizar cabos
incómodos.
• Quando liga um dispositivo Bluetooth emparelhado com o Soundbar desligado, o Soundbar liga-se
automaticamente.
Dispositivo móvel
A ligação inicial
Quando ligar a um novo dispositivo Bluetooth, certique-se de que o dispositivo está a menos de 1 m de distância.
1.
Botão Emparelhamento por Bluetooth Indicador LED
SOUNDBAR
SOUND
MODE
WOOFER
+
_
CH LEVEL
TONE
CONTROL
(OU)
Quando em modo “Bluetooth”
5 Sec
Vermelho → Verde → Azul pisca
Emparelhamento
Ciano pisca três vezes
A ligação foi estabelecida
• Até o emparelhamento estar concluído, o LED multicolor muda para Vermelho → Verde → Azul
à vez.
“Pronto para ligar via Bluetooth.”
1.
2. No dispositivo, selecione “[AV] Samsung Soundbar S***B” na lista apresentada.
3. Reproduza os cheiros de música a partir do dispositivo que está ligado via Bluetooth através do Soundbar.
Se ocorrer uma falha ao ligar o dispositivo
• Se já tiver um Soundbar (por exemplo, “[AV] Samsung Soundbar S***B”) na lista de altifalantes do dispositivo móvel, elimine-o.
• Repita os passos 1 e 2.
Notas sobre a ligação Bluetooth
• Localize um novo dispositivo ao alcance de 1 m para ligar via comunicação Bluetooth.
• Se lhe for pedido para introduzir um código PIN quando estiver a ligar um dispositivo Bluetooth, introduza <0000>.
• O Soundbar desliga-se automaticamente após 18 minutos quando está no modo Bluetooth Pronto.
• O Soundbar poderá não realizar corretamente a pesquisa ou a ligação Bluetooth nas seguintes circunstâncias:
‒ se existir um campo elétrico forte em redor do Soundbar.
‒ Se forem emparelhados vários dispositivos Bluetooth em simultâneo com o Soundbar.
‒ Se o dispositivo Bluetooth estiver desligado, não estiver no devido lugar ou não funcionar corretamente.
• Os dispositivos eletrónicos podem provocar interferências rádio. Os dispositivos que geram ondas eletromagnéticas devem ser mantidos afastados da
unidade principal do Soundbar - por exemplo, micro-ondas, dispositivos LAN sem os, etc.
• O Soundbar suporta dados SBC (44,1 kHz, 48 kHz).
• Ligue apenas a um dispositivo Bluetooth que suporte a função A2DP (AV).
• Não poderá ligar o Soundbar a um dispositivo Bluetooth que apenas suporte a função HF (mãos livres).
• Ao ligar o Soundbar a um dispositivo Bluetooth, coloque-os o mais perto possível um do outro.
• Quanto maior a distância entre o Soundbar e o dispositivo Bluetooth, menor será a qualidade do som.
A ligação Bluetooth poderá ser quebrada se os dispositivos estiverem fora do alcance.
• A ligação Bluetooth poderá não funcionar conforme pretendido em áreas com má receção.

POR - 24
• Um dispositivo Bluetooth poderá experienciar ruído ou uma avaria sob as seguintes condições:
‒ Quando o corpo está em contacto com o transmissor de sinal no dispositivo Bluetooth ou Soundbar
‒ Em cantos ou quando existe um obstáculo nas proximidades, tais como uma parede ou uma divisória, onde possam ocorrer alterações elétricas.
‒ Quando exposto a interferências por rádio por outros produtos em funcionamento nas mesmas gamas de frequências, como equipamentos médicos,
micro-ondas e dispositivos LAN sem os.
‒ Obstáculos como portas e paredes poderão ainda inuenciar a qualidade do som, mesmo que os dispositivos se encontrem dentro do alcance.
• Tenha em consideração que se a opção de Bluetooth estiver a ser utilizada, não é possível emparelhar o Soundbar com outro dispositivo Bluetooth.
• Este dispositivo sem os pode causar interferência elétrica durante a utilização.
Desligar o dispositivo Bluetooth de um Soundbar
Pode desligar um dispositivo Bluetooth de um Soundbar. Para obter instruções, consulte o manual do utilizar do dispositivo Bluetooth.
• O Soundbar será desligado.
• Se o Soundbar estiver desligado do dispositivo Bluetooth, o indicador LED multicolor no Soundbar pisca três vezes “Vermelho”.
Desligar o Soundbar do dispositivo Bluetooth
Prima o botão (Multifunções) na parte superior do Soundbar ou o botão (Fonte) no controlo remoto para mudar do modo “Bluetooth”.
• Desligar demora algum tempo porque o dispositivo Bluetooth tem de receber uma resposta do Soundbar. (O tempo necessário para desligar poderá
variar em função do dispositivo Bluetooth)
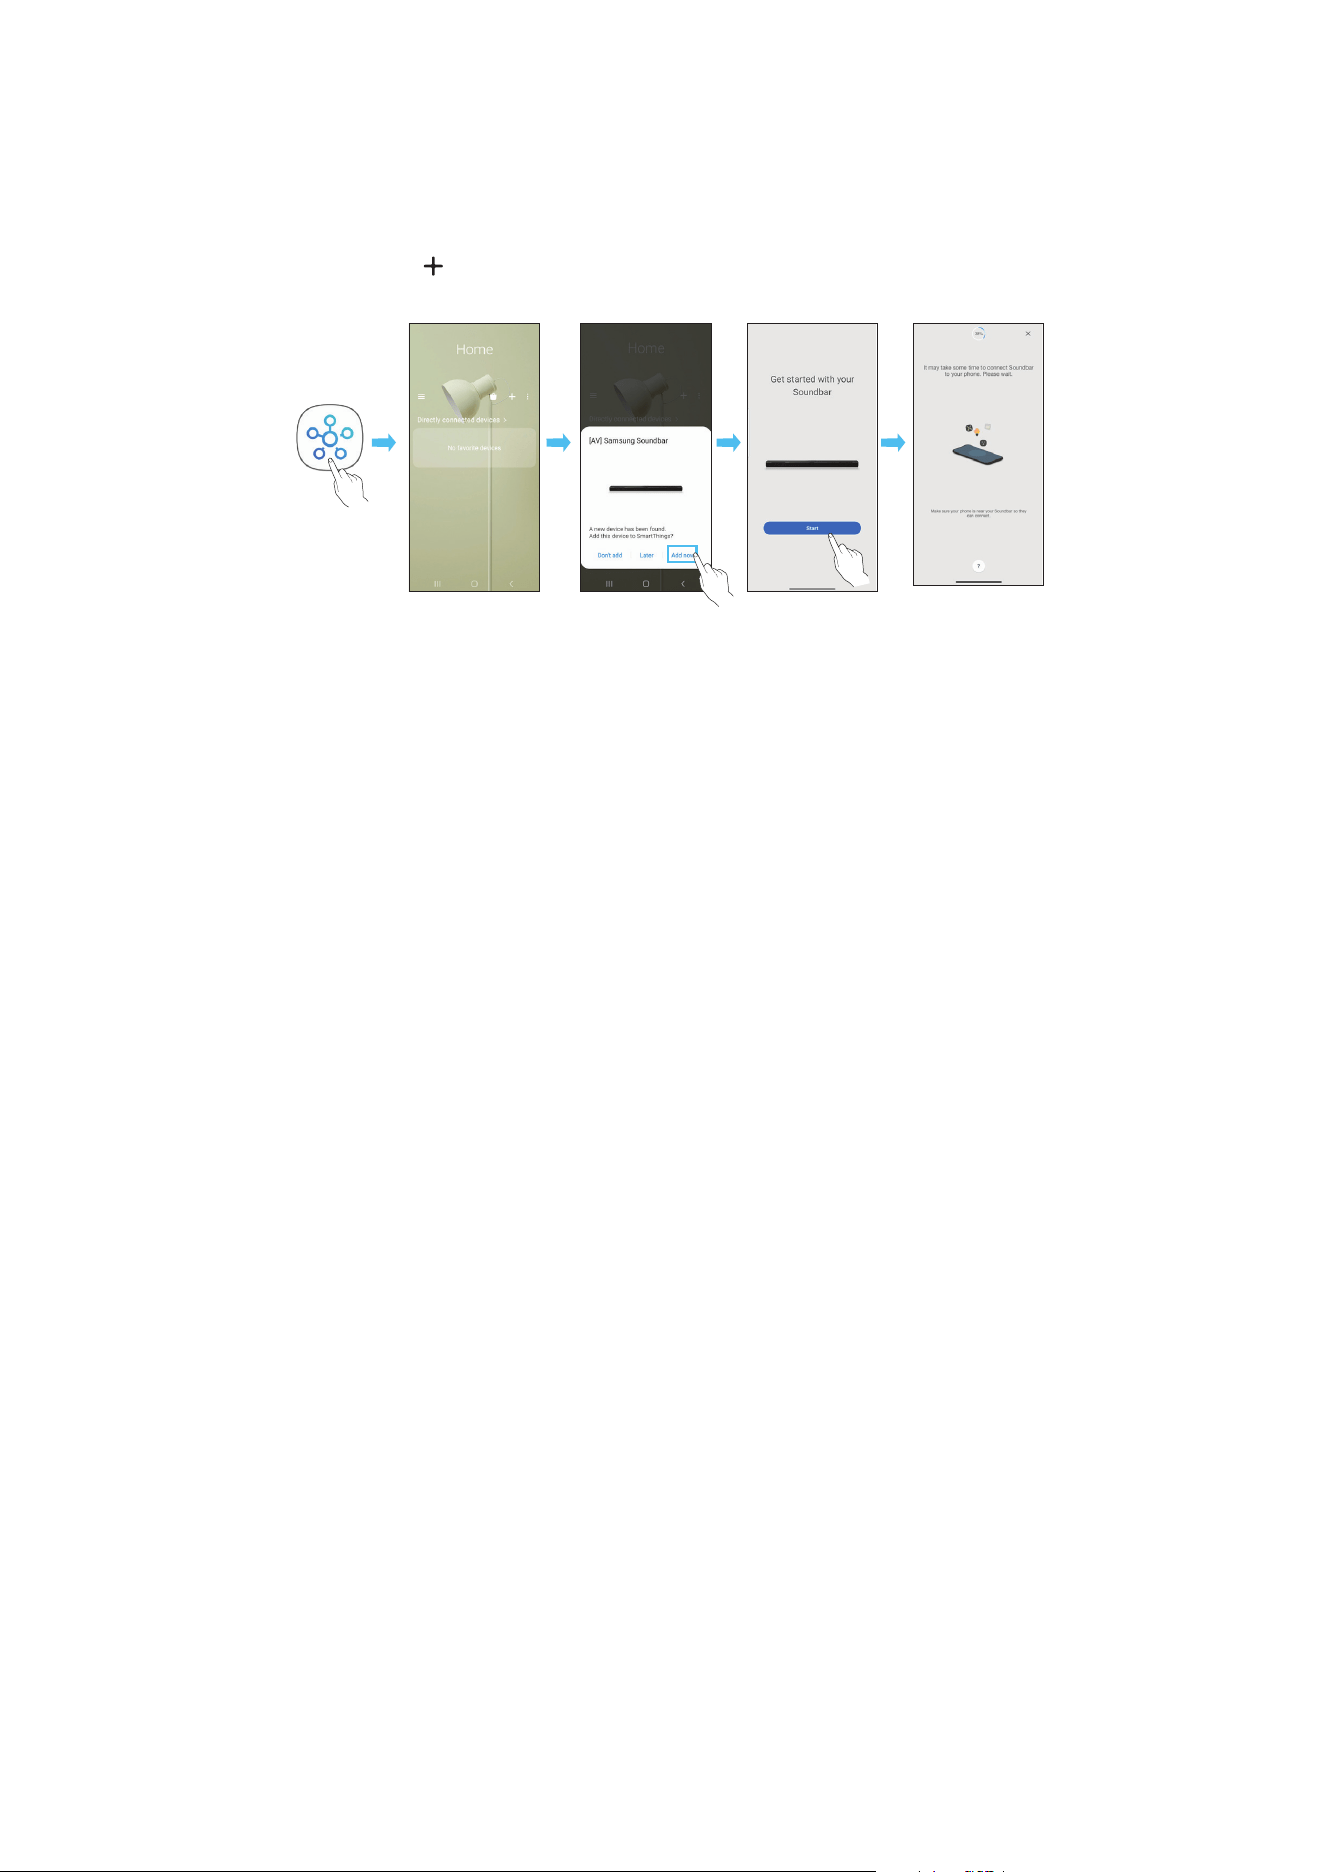
POR - 25
Método 2. Ligar através de Wi-Fi (Rede sem os)
Para ligar o Soundbar a um dispositivo móvel através da rede sem os (Wi-Fi), precisa da aplicação SmartThings.
A ligação inicial
1. Instale e inicie a aplicação SmartThings a partir do dispositivo móvel (smartphone ou tablet).
2. Na aplicação, siga as instruções no ecrã para adicionar o Soundbar.
• O pop-up automático (a segunda captura de ecrã abaixo) poderá não aparecer em alguns dispositivos móveis.
Se a janela pop-up não aparecer, prima “ ” no ecrã Home. O Soundbar é adicionado à aplicação.
• A ilustração abaixo pode ser diferente consoante a versão da aplicação.
Iniciar aplicação Pop-up
automático
Adicionar
dispositivo
Aplicação
SmartThings
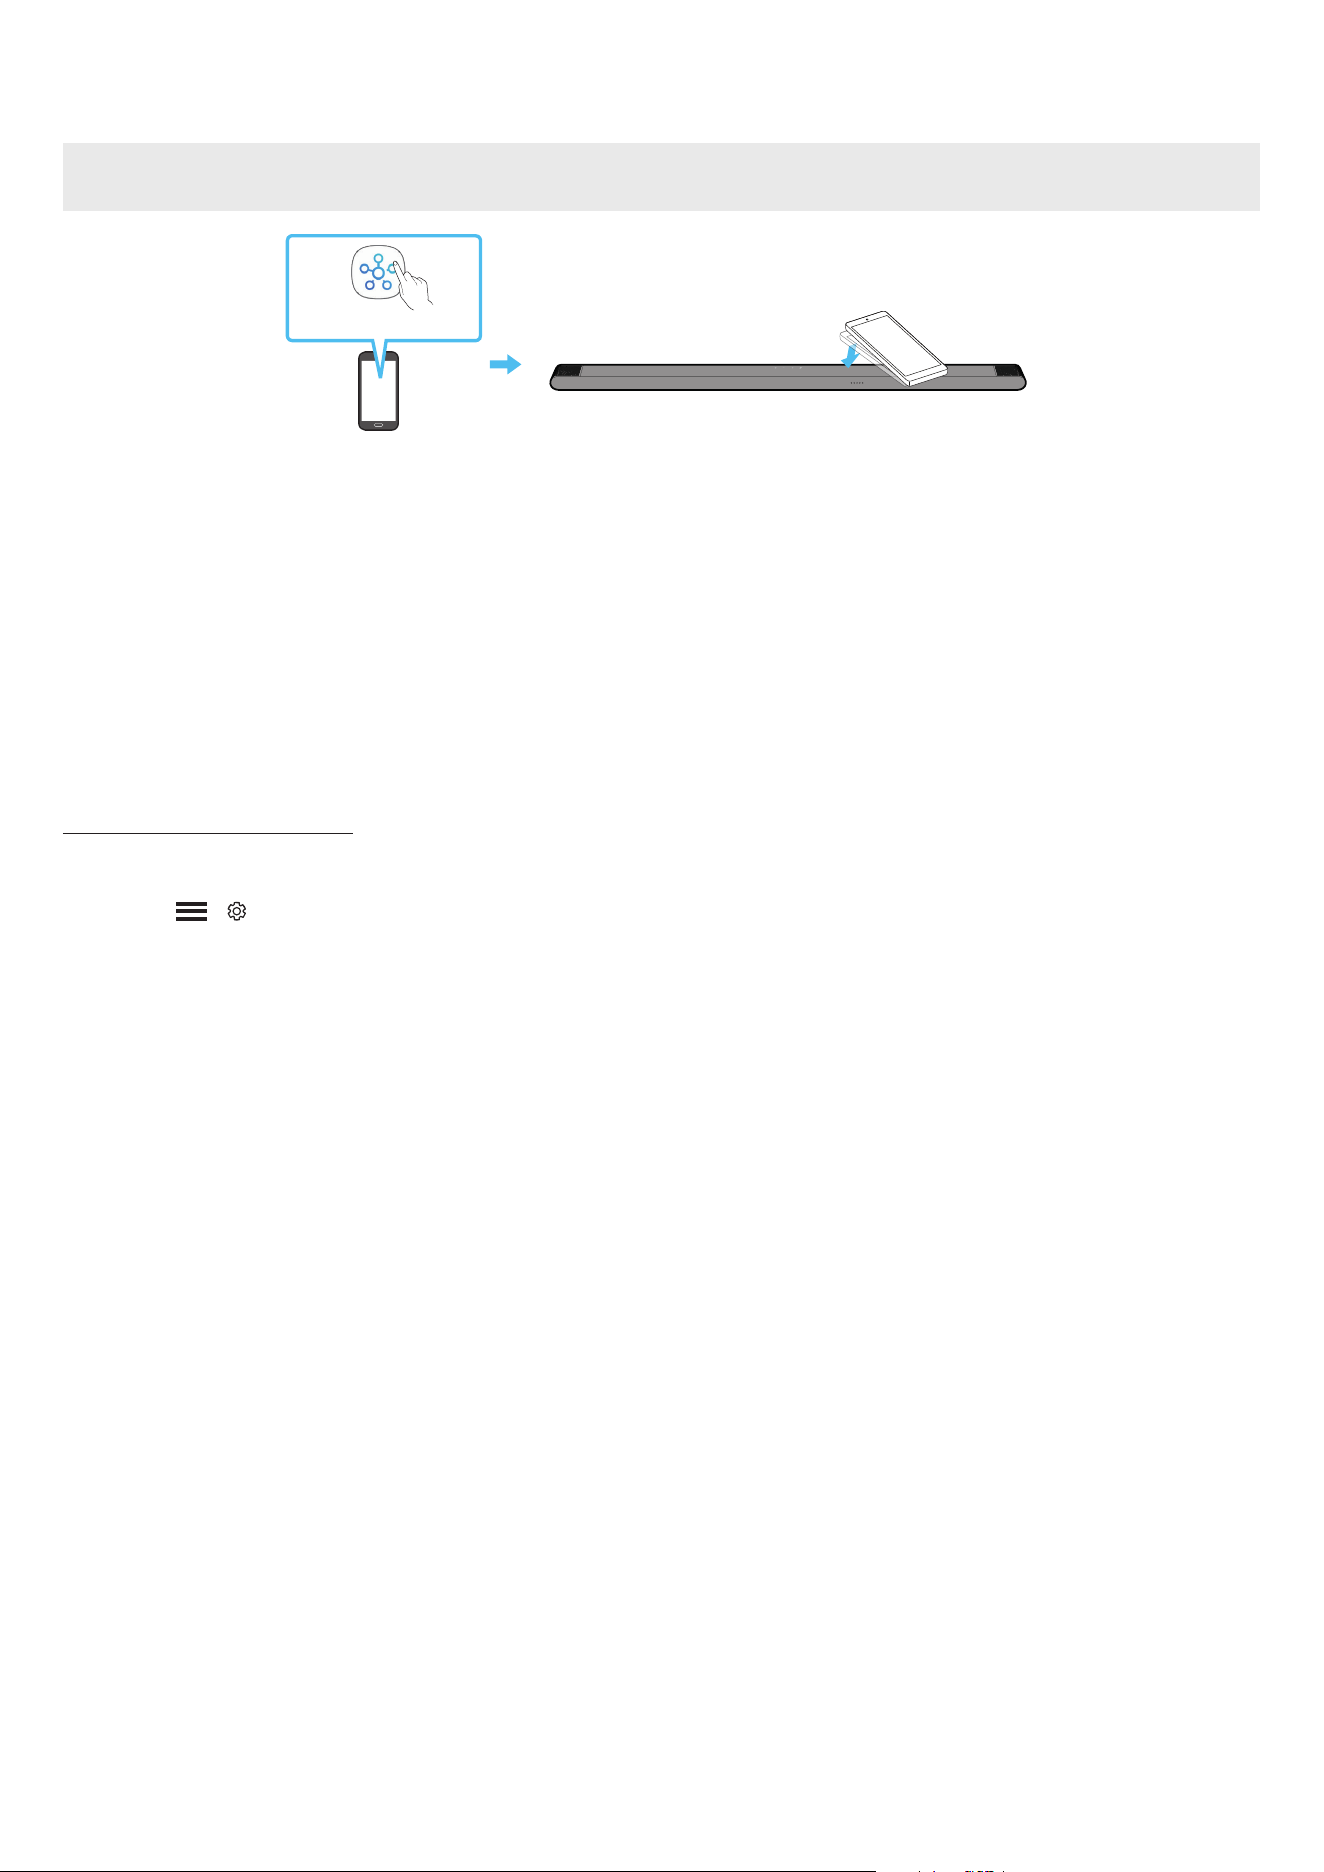
POR - 26
Utilizar o Tap Sound
Toque no Soundbar com o seu dispositivo móvel para reproduzir o som do conteúdo do dispositivo móvel no Soundbar.
• Dependendo do dispositivo móvel utilizado, esta função poderá não ser suportada.
• Esta função só é compatível com dispositivos móveis Samsung com Android 8.1 ou posterior.
Parte superior do Soundbar
Dispositivo móvel
Aplicação SmartThings
1. Ative a função Tap Sound no seu dispositivo móvel.
• Para obter detalhes sobre como ativar a função, consulte “Congurar a função Tap Sound” abaixo.
2. Toque no Soundbar com o dispositivo móvel. Selecione “Start now” na janela da mensagem que é apresentada.
É estabelecida uma ligação via Bluetooth entre o dispositivo móvel e o Soundbar.
3. Reproduza o som do conteúdo do dispositivo móvel através do Soundbar.
• Esta função liga um dispositivo móvel ao Soundbar através de Bluetooth ao detetar a vibração que ocorre quando o dispositivo toca no Soundbar.
• Tenha cuidado para que o dispositivo não toque nas arestas do Soundbar. Poderá riscar ou danicar o Soundbar ou o dispositivo móvel.
• Recomendamos que o dispositivo móvel seja protegido com uma capa. Toque ligeiramente na parte plana da parte superior do Soundbar, sem utilizar
força excessiva.
• Para utilizar esta função, atualize a aplicação SmartThings com a versão mais recente.
Dependendo da versão da aplicação, esta função poderá não ser suportada.
Congurar a função Tap Sound
Utilize a aplicação SmartThings para ativar a função Tap View, Tap Sound.
1. Execute a aplicação SmartThings no dispositivo móvel.
2. Selecione ( → ) no ecrã da aplicação SmartThings apresentada no dispositivo móvel.
3. Ative “Tap View, Tap Sound” para ativar a função quando um dispositivo móvel se aproximar do Soundbar. A função é ativada.
NOTA
• A função Tap Sound não funciona se o dispositivo móvel estive no modo de poupança de energia.
• A função Tap Sound poderá não funcionar se houver dispositivos que causem interferências rádio, tais como dispositivos elétricos, perto do Soundbar.
Certique-se de que os dispositivos que podem causar interferência rádio são colocados a uma distância adequada do Soundbar.

POR - 27
07 LIGAR ATRAVÉS DO APPLE AIRPLAY 2
• Esta funcionalidade pode não estar disponível em alguns países.
• Este Soundbar da Samsung é compatível com o AirPlay 2 e requer o iOS 11.4 ou posterior.
Com o AirPlay 2, pode fazer o streaming de música, podcasts e de outros conteúdos de áudio dos seus dispositivos Apple para o Samsung Soundbar.
• Certique-se de que o Soundbar está ligado à corrente e ligado à mesma rede Wi-Fi do dispositivo Apple.
• Selecione
a partir de uma aplicação compatível com AirPlay ou na Central de controlo no iPhone, iPad ou Mac.
• Selecione o Soundbar a partir da lista de dispositivos disponíveis onde reproduzir o áudio atual.
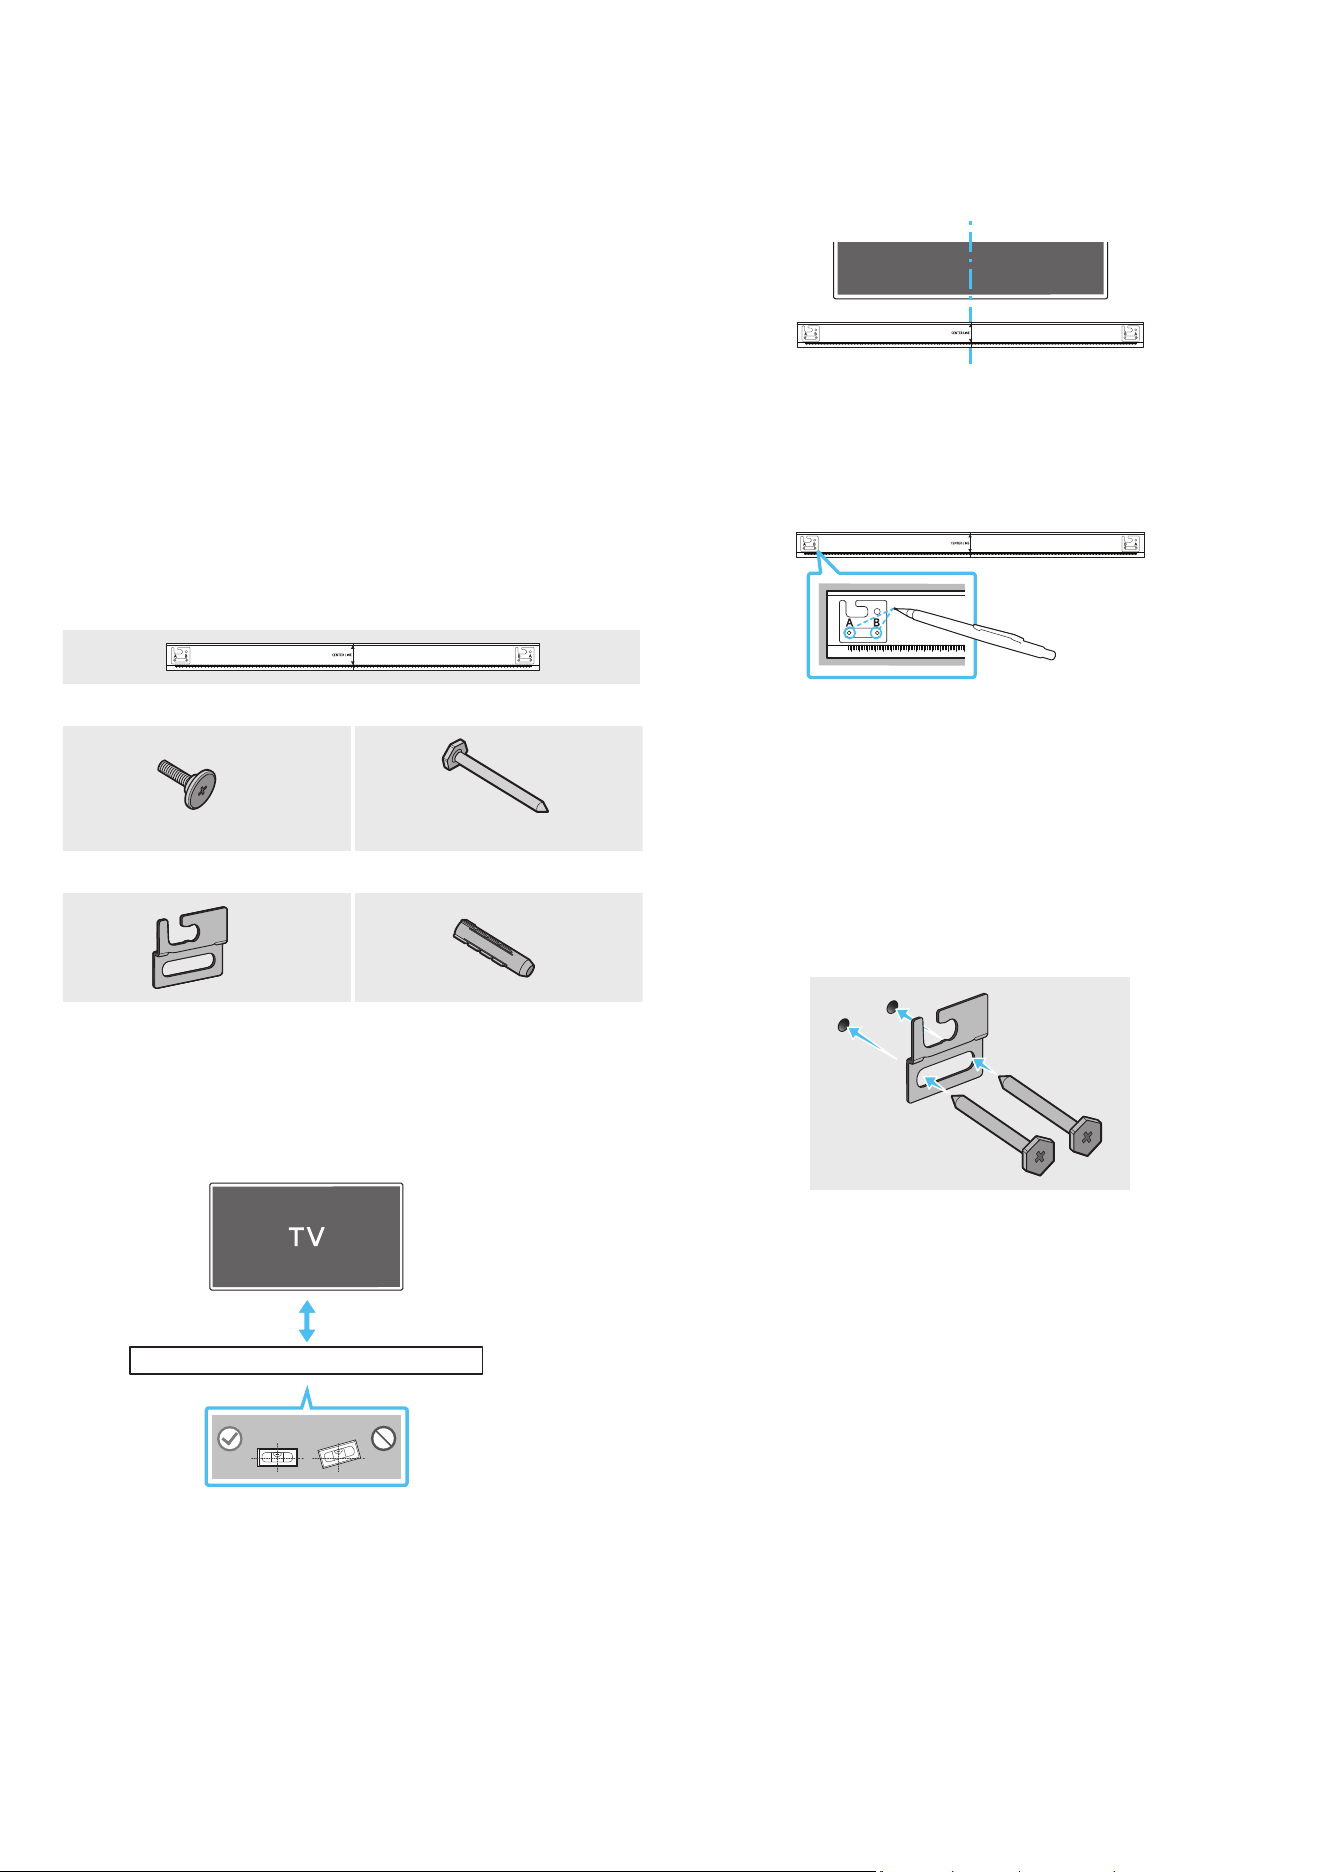
POR - 28
08 INSTALAR O SUPORTE DE
PAREDE
Precauções de instalação
• Instale apenas em paredes verticais.
• Não instale em locais expostos a altas temperaturas ou a uma elevada
percentagem de humidade.
• Verique se a parede é sucientemente resistente para suportar o peso
do produto. Caso não seja, deve reforçar a parede ou optar por outro
local para instalar o produto.
• Ligue os cabos da unidade aos dispositivos externos antes de instalar o
Soundbar na parede.
• Antes da instalação, deve garantir que a unidade está desligada e que
a respetiva cha está desligada da tomada. Caso contrário, esta poderá
provocar um choque elétrico.
Componentes do suporte de parede
AH81-15127A-01
A TYPE
:
740mm
B TYPE
:
700mm
Guia do suporte de parede
X 2
X 4
(M5 X L55)
Parafuso de xação Parafuso
X 2
X 4
Suporte de parede Âncora de Parafuso
1. Coloque o Guia de suporte de parede encostado à superfície da parede.
• O Guia de suporte de parede deve car nivelado.
• Se a TV estiver montada na parede, instale o Soundbar, pelo menos,
5 cm abaixo da TV.
5 cm ou mais
2. Alinhe a Linha central do guia de suporte de parede com o centro da TV
(se estiver a montar o Soundbar por baixo da TV) e, em seguida, xe o
Guia de suporte de parede à parede com ta adesiva.
• Se não estiver a montar por baixo da TV, coloque a Linha central no
centro da área de instalação.
AH81-15127A-01
A TYPE
:
740mm
B TYPE
:
700mm
Linha central
3. Utilize a ponta de uma caneta ou um lápis aado para furar o centro das
imagens A-TYPE e B-TYPE em cada extremidade do Guia para assinalar
os orifícios dos parafusos de suporte e, em seguida, remova o Guia de
suporte de parede.
AH81-15127A-01
A TYPE
:
740mm
B TYPE
:
700mm
4. Faça um orifício na parede em cada marca com uma ferramenta de
perfuração de dimensão apropriada.
• Se as marcações não corresponderem às posições dos pinos,
certique-se de que insere os suportes ou parafusos Molly nos
orifícios antes de inserir os parafusos de suporte. Certique-se de
que a dimensão dos orifícios perfurados corresponde às buchas e
parafusos Molly a utilizar.
5. Coloque um parafuso (não fornecido) em cada Parafuso e aperte cada
um rmemente nos orifícios do parafuso de suporte.
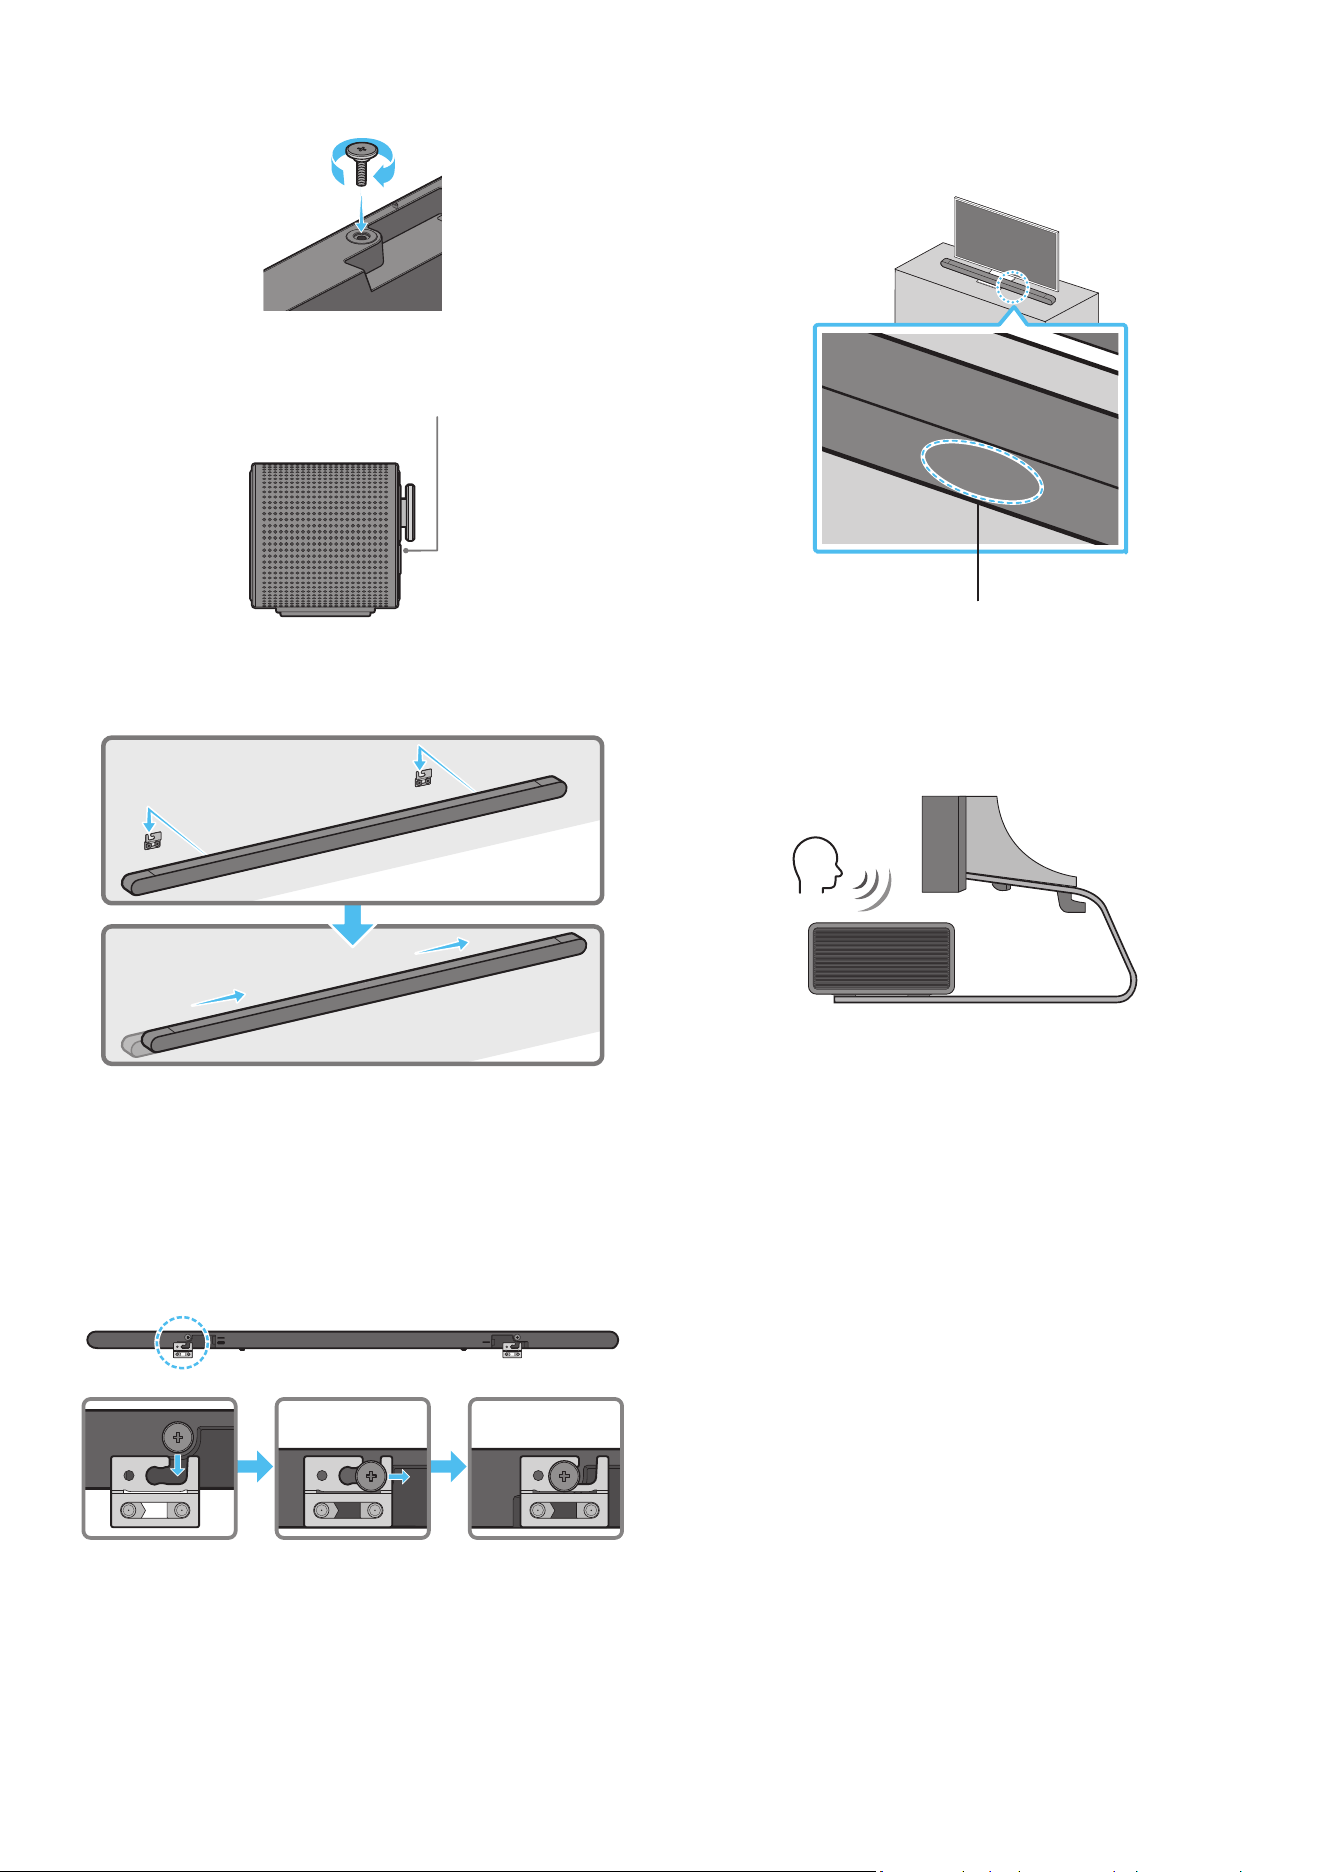
POR - 29
6. Instale os 2 suportes de parede na orientação correta na parte traseira
do Soundbar utilizando 2 parafusos de suporte.
• Durante a montagem, certique-se de que a parte de suporte dos
Suportes de parede está localizada na parte de trás do Soundbar.
Parte de trás do Soundbar
Extremidade direita do Soundbar
7. Instale o Soundbar com os Suportes de parede ao pendurar os Suportes
de parede nos Parafusos de suporte na parede.
8. Deslize o Soundbar para baixo, tal como indicado abaixo, para que os
Suportes de Parede quem apoiados de forma segura nos Parafusos de
Suporte.
• Introduza os Parafusos de suporte na parte larga (traseira) dos
Suportes de parede e, em seguida, deslize os Suportes de parede
para baixo de forma a xar os Suportes de parede rmemente nos
Parafusos de suporte.
SERVICE
HDMI
(ARC)
SERVICE
HDMI
(ARC)
SERVICE
HDMI
(ARC)
DC 19V
09 INSTALAR O SOUNDBAR EM
FRENTE À TV
Microfones
Alinhe o centro do Soundbar com o centro da TV, conforme ilustrado na
imagem, e coloque cuidadosamente o Soundbar no suporte da TV.
Neste momento, coloque os microfones na parte da frente do suporte para
que não haja interferência com o reconhecimento de voz.
Extremidade direita do Soundbar
TV
NOTA
• Certique-se de que o Soundbar é colocado sobre uma superfície plana
e sólida.
• Caso não esteja sucientemente afastado da TV, podem ocorrer
problemas acústicos e de reconhecimento de voz.
• A ilustração acima difere consoante o respetivo modelo.
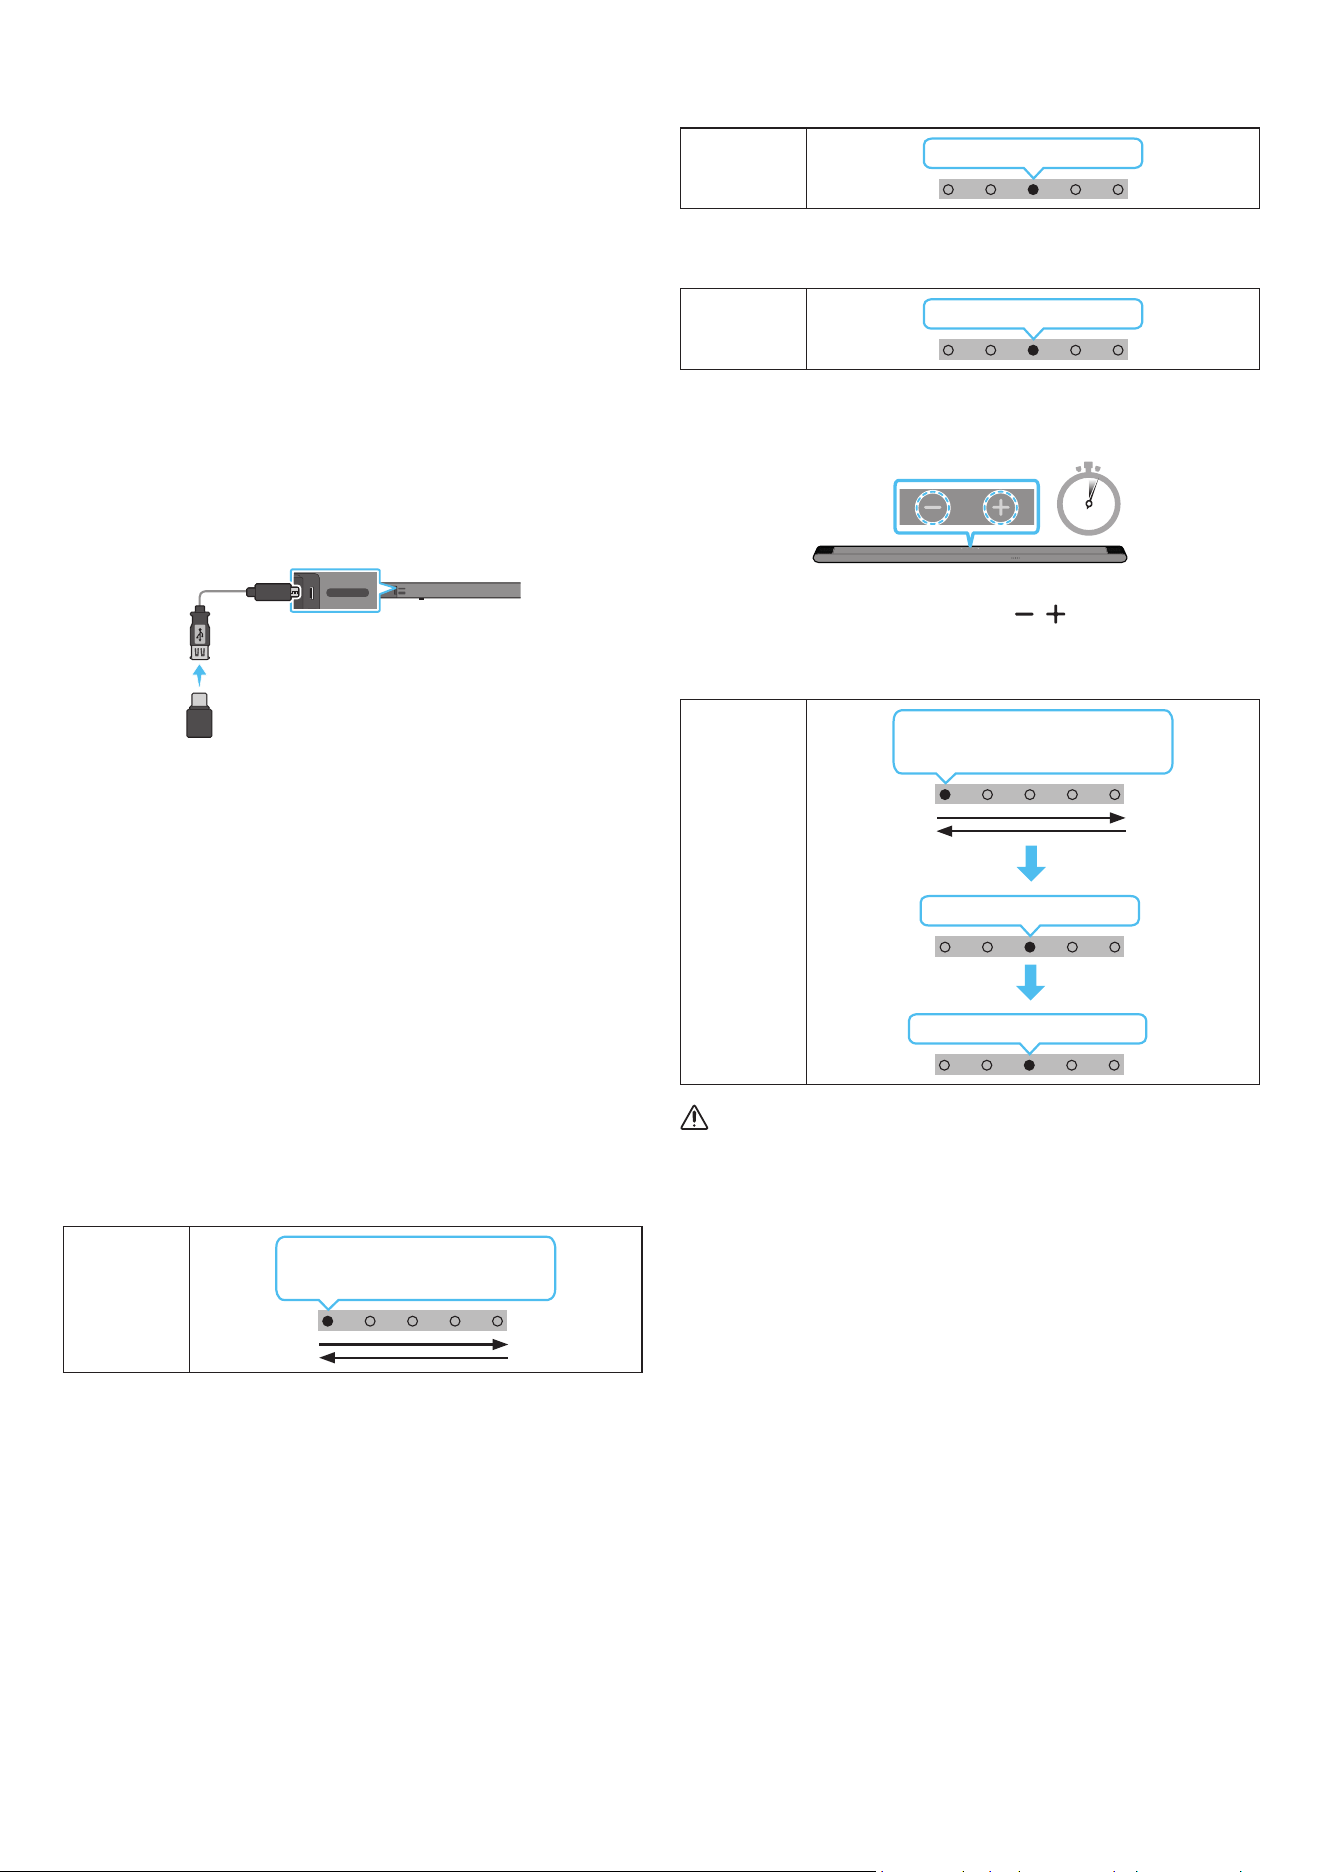
POR - 30
10 ATUALIZAÇÃO DO
SOFTWARE
Atualização automática
Quando o Soundbar está ligado à Internet o software é atualizado
automaticamente, mesmo quando o Soundbar está desligado.
• Para utilizar a função de atualização automática, o Soundbar tem de
estar ligado à Internet.
A ligação Wi-Fi do Soundbar é cortada se o cabo de alimentação do
Soundbar for desligado ou se houver uma falha de energia. Se ocorrer
uma falha de energia, quando a energia voltar ou quando voltar a ligar o
cabo de alimentação, ligue o Soundbar e volte a ligá-lo à Internet.
Atualização por USB
Traseira do Soundbar
SERVICE
HDMI
(ARC)
SERVICE
HDMI
(ARC)
Cabo adaptador
Micro USB para USB
(não fornecido)
A Samsung poderá disponibilizar atualizações do rmware do sistema do
Soundbar no futuro.
Quando uma atualização estiver disponível, pode atualizar o Soundbar
ao ligar a unidade USB que contém o rmware da atualização à porta de
SERVICE do Soundbar.
1. Aceda a (www.samsung.com) → procure o nome do modelo a partir da
opção do menu de apoio ao cliente.
• Para mais informações sobre a atualização, consulte o Guia de
Atualizações.
2. Transra o cheiro de atualização (tipo USB).
3. Extraia o cheiro para criar uma pasta com o nome do cheiro.
4. Guarde a pasta criada num dispositivo USB e, em seguida, ligue-o ao
Soundbar.
5. Ligue o Soundbar. Em seguida, o produto é atualizado em 3 minutos.
Indicador
LED
A luz branca move-se da esquerda
para a direita e vice-versa
• Durante a atualização, não o desligue nem remova o dispositivo USB.
• Se o LED amarelo estiver ligado depois de a atualização de software
estar concluída, isso signica que uma atualização adicional está em
curso. Quando isso acontecer, não desligue da corrente nem remova
o USB.
• Se a atualização não for concluída, volte a ligar o cabo de
alimentação do Soundbar.
• Se estiver instalada a versão mais recente, não é realizada nenhuma
atualização.
• A atualização poderá não ser suportada, dependendo do tipo de USB.
• Se não existir um cheiro de atualização disponível, o indicador pisca
3 vezes a vermelho.
Indicador
LED
Vermelho pisca três vezes
• Se o cheiro de atualização for de uma versão inferior ou igual à
existente, o indicador pisca 3 vezes a ciano.
Indicador
LED
Ciano pisca três vezes
Reposição
5 Sec
Com o Soundbar ligado, prima os botões de (Volume) no corpo,
simultaneamente, durante pelo menos 5 segundos. A apresentação dos
LED muda conforme ilustrado abaixo e, em seguida, o Soundbar é reposto.
Indicador
LED
Ciano pisca três vezes
Vermelho pisca → desligado
A luz branca move-se da esquerda
para a direita e vice-versa
CUIDADO
• Todas as denições do Soundbar são repostas. Certique-se de que
só efetua esta ação quando for necessário efetuar uma reposição.
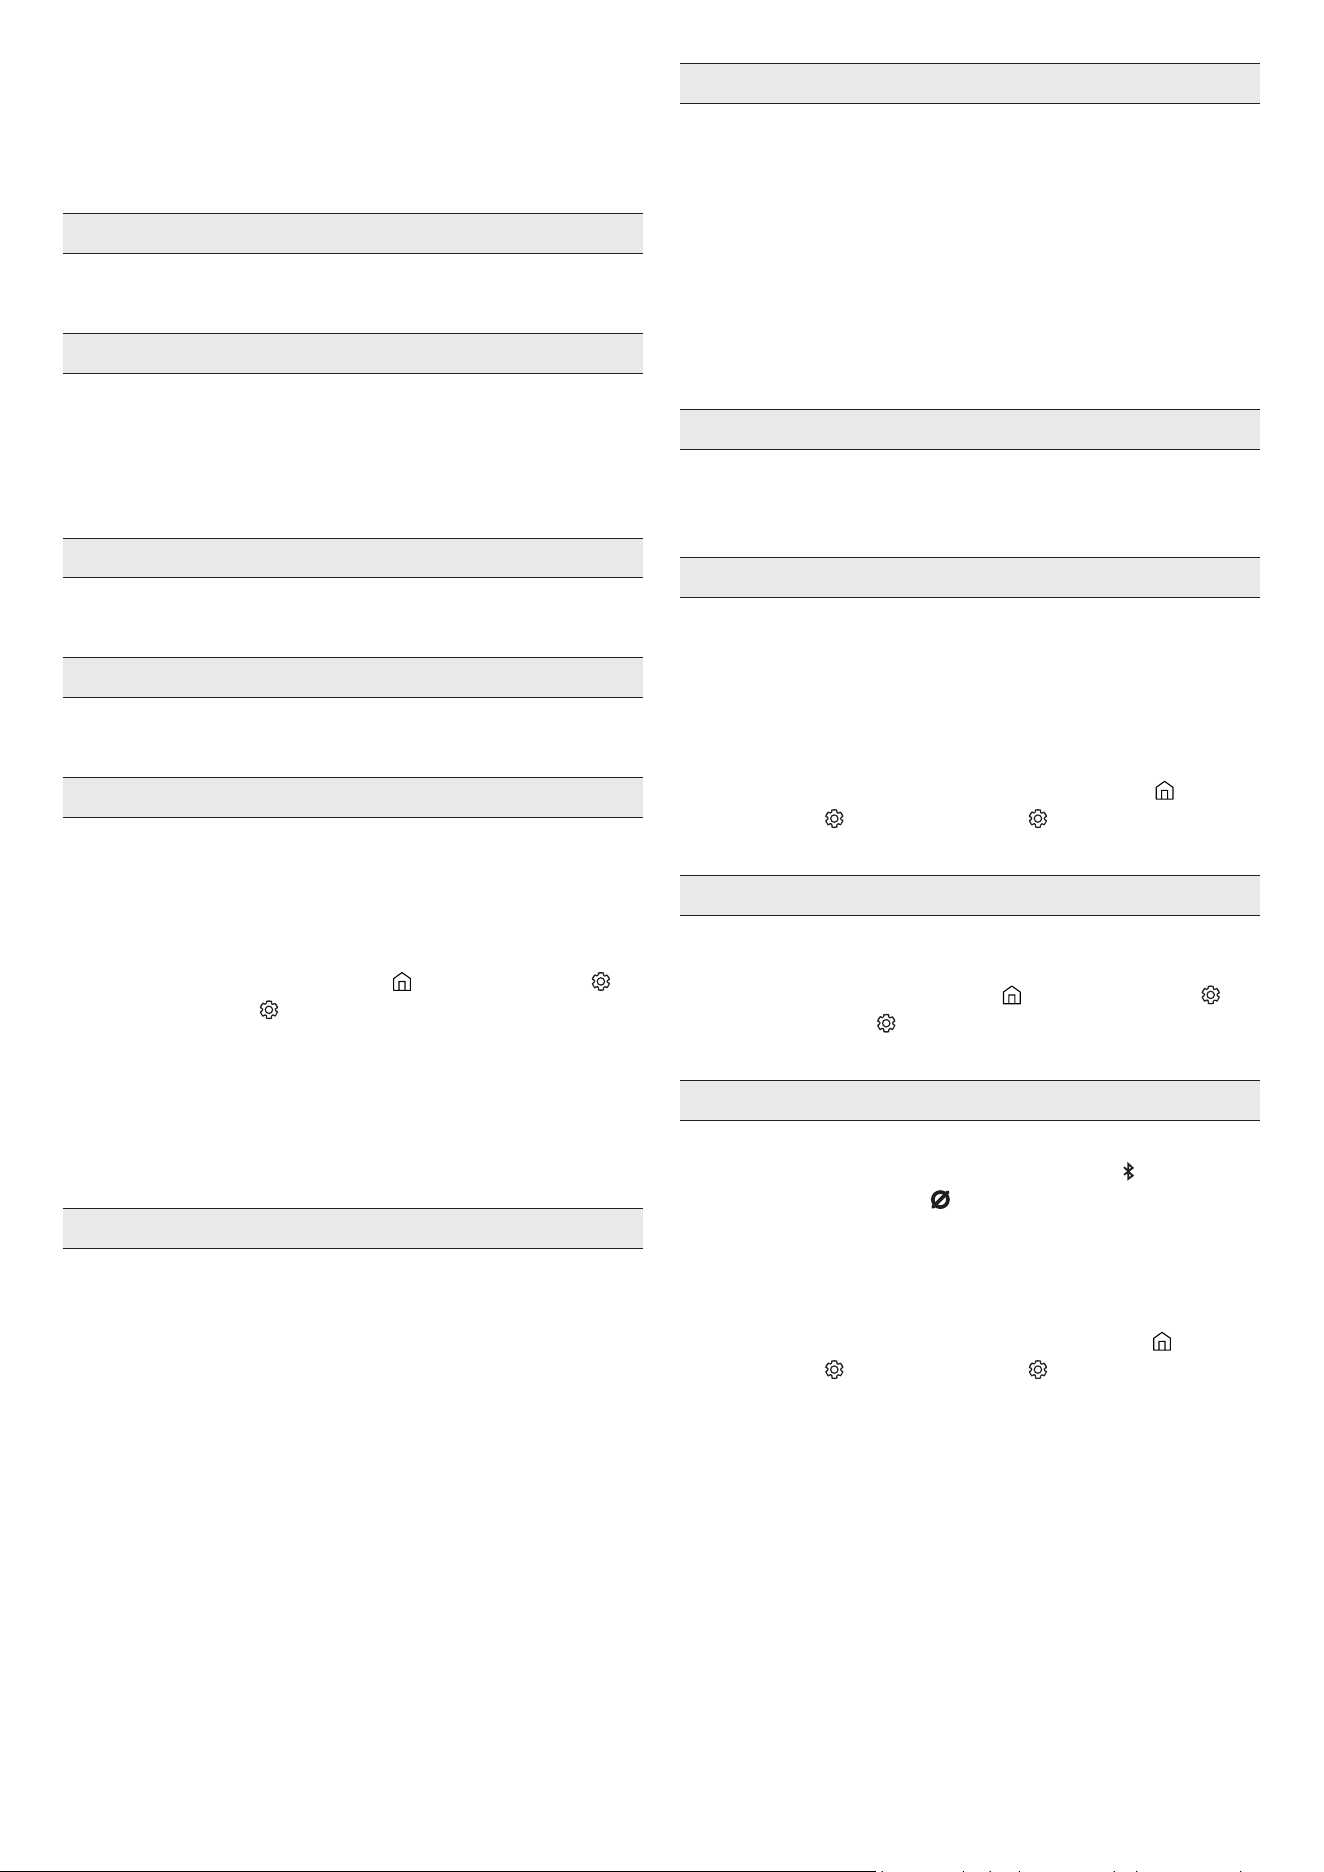
POR - 31
11 RESOLUÇÃO DE
PROBLEMAS
Antes de solicitar assistência, verique o seguinte.
A Soundbar não se liga.
• Verique se o cabo de alimentação do Soundbar está corretamente
inserido na tomada.
A Soundbar funciona de forma errática.
• Após remover o cabo de alimentação, insira-o de novo.
• Desligue e volte a ligar o dispositivo externo e tente novamente.
• Se não existir sinal, o Soundbar desliga-se automaticamente após um
determinado período de tempo. Ligue o Ligar/Desligar. (Consulte a
página 9.)
O telecomando não funciona
• Aponte o telecomando diretamente para o Soundbar.
• Recarregue o telecomando.
O indicador do Soundbar ca vermelho sólido.
• O microfone está desligado.
Ligue o microfone. (Consulte a página 7.)
O Soundbar não emite som.
• O volume do Soundbar está demasiado baixo ou em silêncio. Ajuste o
volume.
• Quando ligar qualquer dispositivo externo (STB, dispositivo Bluetooth,
dispositivo móvel, etc.), ajuste o volume do mesmo.
• Para aceder à saída de som no televisor, selecione Soundbar.
(Televisor Samsung: Página Principal (
) → Menu → Denições ( ) →
Todas as Denições ( ) → Som → Saída de Som → Selecionar
Soundbar)
• A ligação dos cabos ao Soundbar não pode estar solta. Desligue o cabo
e volte a ligá-lo.
• Remova completamente o cabo de alimentação, volte a ligá-lo e ligue
a alimentação.
• Reponha o produto e tente novamente. (Consulte a página 30.)
O subwoofer não emite som.
• Verique se o indicador LED na parte posterior do Subwoofer está
ligado a azul. Volte a ligar o Soundbar e o Subwoofer se o indicador
estiver a piscar a azul ou se tiver passado para vermelho. (Consulte a
página 15.)
• Poderá ter problemas se houver um obstáculo entre o Soundbar e o
Subwoofer. Coloque os dispositivos numa zona afastada de obstáculos.
• A ligação pode ser interrompida por outros dispositivos que se
encontrem a emitir sinais de radiofrequência nas proximidades.
Mantenha a sua coluna afastada desses dispositivos.
• Remova o cabo de alimentação e volte a ligá-lo.
Em caso de instabilidade do som, atrasos ou ruído do Subwoofer
• Se existirem objetos entre o Soundbar e o Subwoofer, isso pode provocar
um problema. Reposicione-os num local sem esse objeto.
• Se o Subwoofer estiver afastado do Soundbar, pode ocorrer instabilidade
do som ou atrasos. Coloque-os perto do Soundbar.
• Pode ocorrer instabilidade do som ou atrasos quando o Soundbar
está próximo de um instrumento ou dispositivo elétrico que pode
provocar interferências radioelétricas. Mantenha o Soundbar afastado
de dispositivos que possam provocar interferências radioelétricas. (por
exemplo, router sem os)
• Altere o estado de ligação de rede da TV de "sem os" para "com os".
O volume do Subwoofer está demasiado baixo
• O volume original do conteúdo que está a reproduzir pode ser baixo.
Tente ajustar o nível do Subwoofer. (Consulte a página 10.)
• Aproxime a coluna do Subwoofer de si.
Se a TV não estiver ligada via HDMI (ARC).
• Verique se o cabo HDMI está corretamente ligado ao terminal ARC.
(Consulte a página 17.)
• A ligação pode não ser estabelecida devido à ligação do dispositivo
externo (decodicador, consola de jogos, etc.). Ligue diretamente o
Soundbar.
• O modo HDMI-CEC pode não estar ativado no televisor. Ligue o CEC no
menu do televisor. (Televisor Samsung: Página Principal (
) → Menu
→ Denições ( ) → Todas as Denições ( ) → Ligação → External
Device Manager → Anynet+ (HDMI-CEC) ON)
Não há som ao ligar à TV no modo HDMI (ARC)
• O seu dispositivo não consegue reproduzir o sinal de entrada. Altere
a saída de áudio do televisor para PCM ou Dolby Digital. (Para um
televisor Samsung: Página Principal (
) → Menu → Denições ( ) →
Todas as Denições ( ) → Som → Denições Especializadas → Digital
Output Audio Format)
O Soundbar não estabelece ligação através de Bluetooth.
• Ao ligar um novo dispositivo, mude para “Emparelhamento por
Bluetooth” para estabelecer ligação. (Prima o botão
PAIR no
controlo remoto ou o botão (Microne Ligado/Desligado) no corpo
durante pelo menos 5 segundos.)
• Se o Soundbar estiver ligado a outro dispositivo, desligue esse
dispositivo primeiro para trocar de dispositivo.
• Ligue-o novamente após remover a lista de altifalantes Bluetooth no
dispositivo a ligar. (Televisor Samsung: Página Principal ( ) → Menu
→ Denições ( ) → Todas as Denições ( ) → Som → Saída de Som →
Lista de Altifalantes Bluetooth)
• Remova o cabo de alimentação, volte a ligá-lo e, em seguida, tente
novamente.
• Reponha o produto e tente novamente. (Para obter mais informações,
consulte “Reposição”.)
POR - 32
O som é cortado quando ligado através de Bluetooth.
• Alguns dispositivos podem provocar interferências de rádio se
estiverem demasiado perto do Soundbar, como acontece com micro-
ondas, routers sem os, etc.
• Se o seu dispositivo ligado através de Bluetooth se afastar demasiado
do Soundbar, poderá fazer com que o som seja cortado. Aproxime o
dispositivo do Soundbar.
• Se uma parte do seu corpo estiver em contacto com o transmissor de
Bluetooth ou se o produto for instalado em móveis de metal, o som
pode ser cortado. Verique o ambiente de instalação e as condições
para a utilização.
O Soundbar não estabelece ligação através Wi-Fi.
• Verique se o router sem os está ligado.
• Desligue o router, volte a ligá-lo e, em seguida, tente novamente.
• Não será possível ligar o Soundbar se o sinal sem os for demasiado
fraco. Experimente deslocar o router para um local mais próximo
do Soundbar ou eliminar quaisquer obstáculos que estejam entre o
Soundbar e o router, se possível.
• Se o seu router sem os for novo, será necessário recongurar as
denições de rede da coluna.
O Soundbar não se liga automaticamente em conjunto com a TV.
• Quando desliga o Soundbar enquanto vê televisão, a sincronização da
energia com o televisor é desativada. Primeiro, desligue o televisor.
A função AVA não se encontra disponível nos seguintes casos.
• A função AVA não estará disponível utilizando a função Q-symphony.
• A função AVA não estará disponível quando o microfone estiver
desligado.
Depois de ligar a TV ao Soundbar, ativei o modo Soundbar. Assim, a TV
não emite qualquer som.
• Se ligar o Soundbar a um dispositivo móvel enquanto o Soundbar
estiver ligado à TV, o Soundbar emite som a partir do dispositivo móvel
enquanto mantém a ligação à TV. Assim, o som da TV não é emitido.
• Desligue o dispositivo móvel e o som da TV será emitido novamente a
partir do Soundbar.
12 LICENÇA
Dolby, Dolby Atmos, and the double-D symbol are registered
trademarks of Dolby Laboratories Licensing Corporation. Manufactured
under license from Dolby Laboratories. Condential unpublished works.
Copyright © 2012-2021 Dolby Laboratories. All rights reserved.
For DTS patents, see http://patents.dts.com. Manufactured under license
from DTS, Inc. (for companies headquartered in the U.S./Japan/ Taiwan)
or under license from DTS Licensing Limited (for all other companies).
DTS, Digital Surround, Virtual:X, and the DTS logo are registered
trademarks or trademarks of DTS, Inc. in the United States and other
countries. © 2021 DTS, Inc. ALL RIGHTS RESERVED.
The terms HDMI and HDMI High-Denition Multimedia Interface,
and the HDMI Logo are trademarks or registered trademarks of HDMI
Licensing Administrator, Inc. in the United States and other countries.
• Apple, Airplay, iPhone, iPad, and Mac are trademarks of Apple Inc.,
registered in the U.S. and other countries.
• Use of the Works with Apple badge means that an accessory has
been designed to work specically with the technology identied
in the badge and has been certied by the developer to meet Apple
performance standards.

POR - 33
[ENERGY STAR]
Apenas modelo com a qualicação ENERGY STAR
• O seu produto Samsung tem a qualicação ENERGY STAR na
respetiva predenição de fábrica. Alterações a determinadas
características, denições e funcionalidades deste produto podem
mudar o consumo de energia, possivelmente para lá dos limites
exigidos pela qualicação ENERGY STAR.
• Agência de Proteção Ambiental e Departamento de Energia dos
EUA. O ENERGY STAR é um programa conjunto das agências
governamentais dos EUA, concebido para promover práticas e
produtos ecientes em termos energéticos.
Consulte www.energystar.gov para mais informações sobre o programa
ENERGY STAR.
Apenas modelo com a qualicação ENERGY STAR
(aplicável apenas a modelos Thin Client)
Como parceiro ENERGY STAR®, a SAMSUNG determinou que este
produto cumpre as diretrizes ENERGY STAR® para eciência energética.
• O programa ENERGY STAR foi criado para reduzir as emissões
de gases com efeito de estufa e poupar energia através da
etiquetagem voluntária.
• A denição de gestão de energia deste produto foi ativada por
predenição, com várias denições de temporização, entre 1
minuto e 5 horas.
• O produto pode ser ativado com o toque de um botão no chassis
em modo de suspensão.
Apenas modelo com a qualicação ENERGY STAR (os outros modelos)
• Como parceiro ENERGY STAR, a Samsung determinou que este
produto ou modelos do produto cumprem a diretriz ENERGY STAR®
para eciência energética.
13 AVISO DE LICENÇA DE
CÓDIGO ABERTO
Para enviar dúvidas ou pedidos para questões relacionadas com código
aberto, contacte a Samsung Open Source (http://opensource.samsung.com)
14 NOTAS IMPORTANTES
SOBRE A ASSISTÊNCIA
As guras e as ilustrações deste Manual do utilizador são fornecidas
apenas para referência e podem ser diferentes do aspeto real do produto.

POR - 34
15 ESPECIFICAÇÕES E GUIA
Características técnicas
Nome do modelo HW-S800B/HW-S801B
Peso 1,4 kg
Dimensões (L x A x P) 1160,0 x 38,0 x 39,9 mm
Intervalo de temperatura de funcionamento +5°C a +35°C
Intervalo de humidade de funcionamento 10 % ~ 75 %
AMPLIFICADOR
Potência de saída nominal (20W x 2) + (10W x 2) + (20W x 2) + (10W x 1) + (10W x 2)
Formatos de reprodução suportados
Dolby 5.1ch/Dolby Digital Plus/Dolby ATMOS (Dolby Digital Plus)/
DTS 5.1ch/LPCM 2ch
Nome do Subwoofer
HW-S800B: PS-WB85D
HW-S801B: PS-WB86D
Peso 6,4 kg
Dimensões (L x A x P) 238,0 x 240,8 x 238,0 mm
AMPLIFICADOR
Potência de saída nominal 200 W
NOTA
• A Samsung Electronics Co., Ltd reserva-se o direito de alterar as especicações sem aviso prévio.
• Os valores do peso e das dimensões são aproximados.
Precaução: O Soundbar irá reiniciar automaticamente se ligar/desligar o Wi-Fi.
Para desativar a ligação Wi-Fi:
Mantenha premido o botão CH LEVEL no telecomando do Soundbar durante mais de 30
segundos para ativar ou desativar a ligação Wi-Fi.
Para desativar a ligação Bluetooth:
Mantenha premido o botão TONE CONTROL no telecomando do Soundbar durante mais de 30
segundos para ativar ou desativar a ligação Bluetooth.
© 2022 Samsung Electronics Co., Ltd. All rights reserved.
Contact SAMSUNG WORLD WIDE
If you have any questions or comments relating to Samsung products, please contact the SAMSUNG customer care Centre.
Country Samsung Service Centre
Web Site
EGYPT
08000-7267864
16580
WhatsApp 010 000 16580
www.samsung.com/eg/support
IRAN
021-8255 [CE]
021-42132 [HHP]
www.samsung.com/iran/support
Israel *6963 www.samsung.com/il/support/
Palestine 1800-792447 www.samsung.com/ps/support/
SAUDI ARABIA
8002474357 (800 24/7 HELP) From Inside Saudi Arabia
+966112614718 From outside Saudi Arabia
(May Call Charges will be applied)
www.samsung.com/sa_en/support (English)
www.samsung.com/sa/support (Arabic)
PAKISTAN 0800-Samsung (7267864) www.samsung.com/pk/support
U.A.E 800-SAMSUNG (800 - 726 7864)
www.samsung.com/ae/support (English)
www.samsung.com/ae_ar/support (Arabic)
OMAN 800-SAM CS (800-72627)
KUWAIT 183-CALL (183-2255)
BAHRAIN 8000-GSAM (8000-4726)
QATAR 800-CALL (800-2255)
TURKEY 444 77 11 www.samsung.com/tr/support
JORDAN
0800-22273
06-577-7444
WhatsApp +962-79-777-7421
www.samsung.com/levant/support
Lebanon
1598
WhatsApp +962-79-777-7421
Iraq
80010080
WhatsApp +962-79-777-7421
ALGERIA 3004
www.samsung.com/n_africa/supportTUNISIA 80 100 012
MOROCCO 080 100 22 55
SOUTH AFRICA 0860 SAMSUNG (726 7864) www.samsung.com/za/support
NAMIBIA 08 197 267 864 www.samsung.com/africa_en/support
ZAMBIA 3434 www.samsung.com/africa_en/support
MAURITIUS 800 5050 www.samsung.com/africa_en/support
REUNION 0262 50 88 80 www.samsung.com/africa_fr/support
MOZAMBIQUE 84 726 7864 www.samsung.com/africa_pt/support
NIGERIA 0800 726 7864 www.samsung.com/africa_en/support
Ghana 0800 100 077 www.samsung.com/africa_en/support
Cote D’Ivoire 8000 0077 www.samsung.com/africa_fr/support
SENEGAL 800 00 0077 www.samsung.com/africa_fr/support
CAMEROON 67095 0077 www.samsung.com/africa_fr/support
KENYA 0800 545 545 www.samsung.com/africa_en/support
UGANDA 0800 300 300 www.samsung.com/africa_en/support
TANZANIA 0800 780 089 www.samsung.com/africa_en/support
SUDAN 1969 www.samsung.com/eg/support

لماكلا ليلدلا
HW-S801B / HW-S800B
تامتحا ليخت
.اذه Samsung جتنم كئال ا
ً
ركش
ع كجتنم ليجست ىجر
ُ
ي ،
ً
امتكا كأ ةمدخ ع لوصحلل
www.samsung.com/register
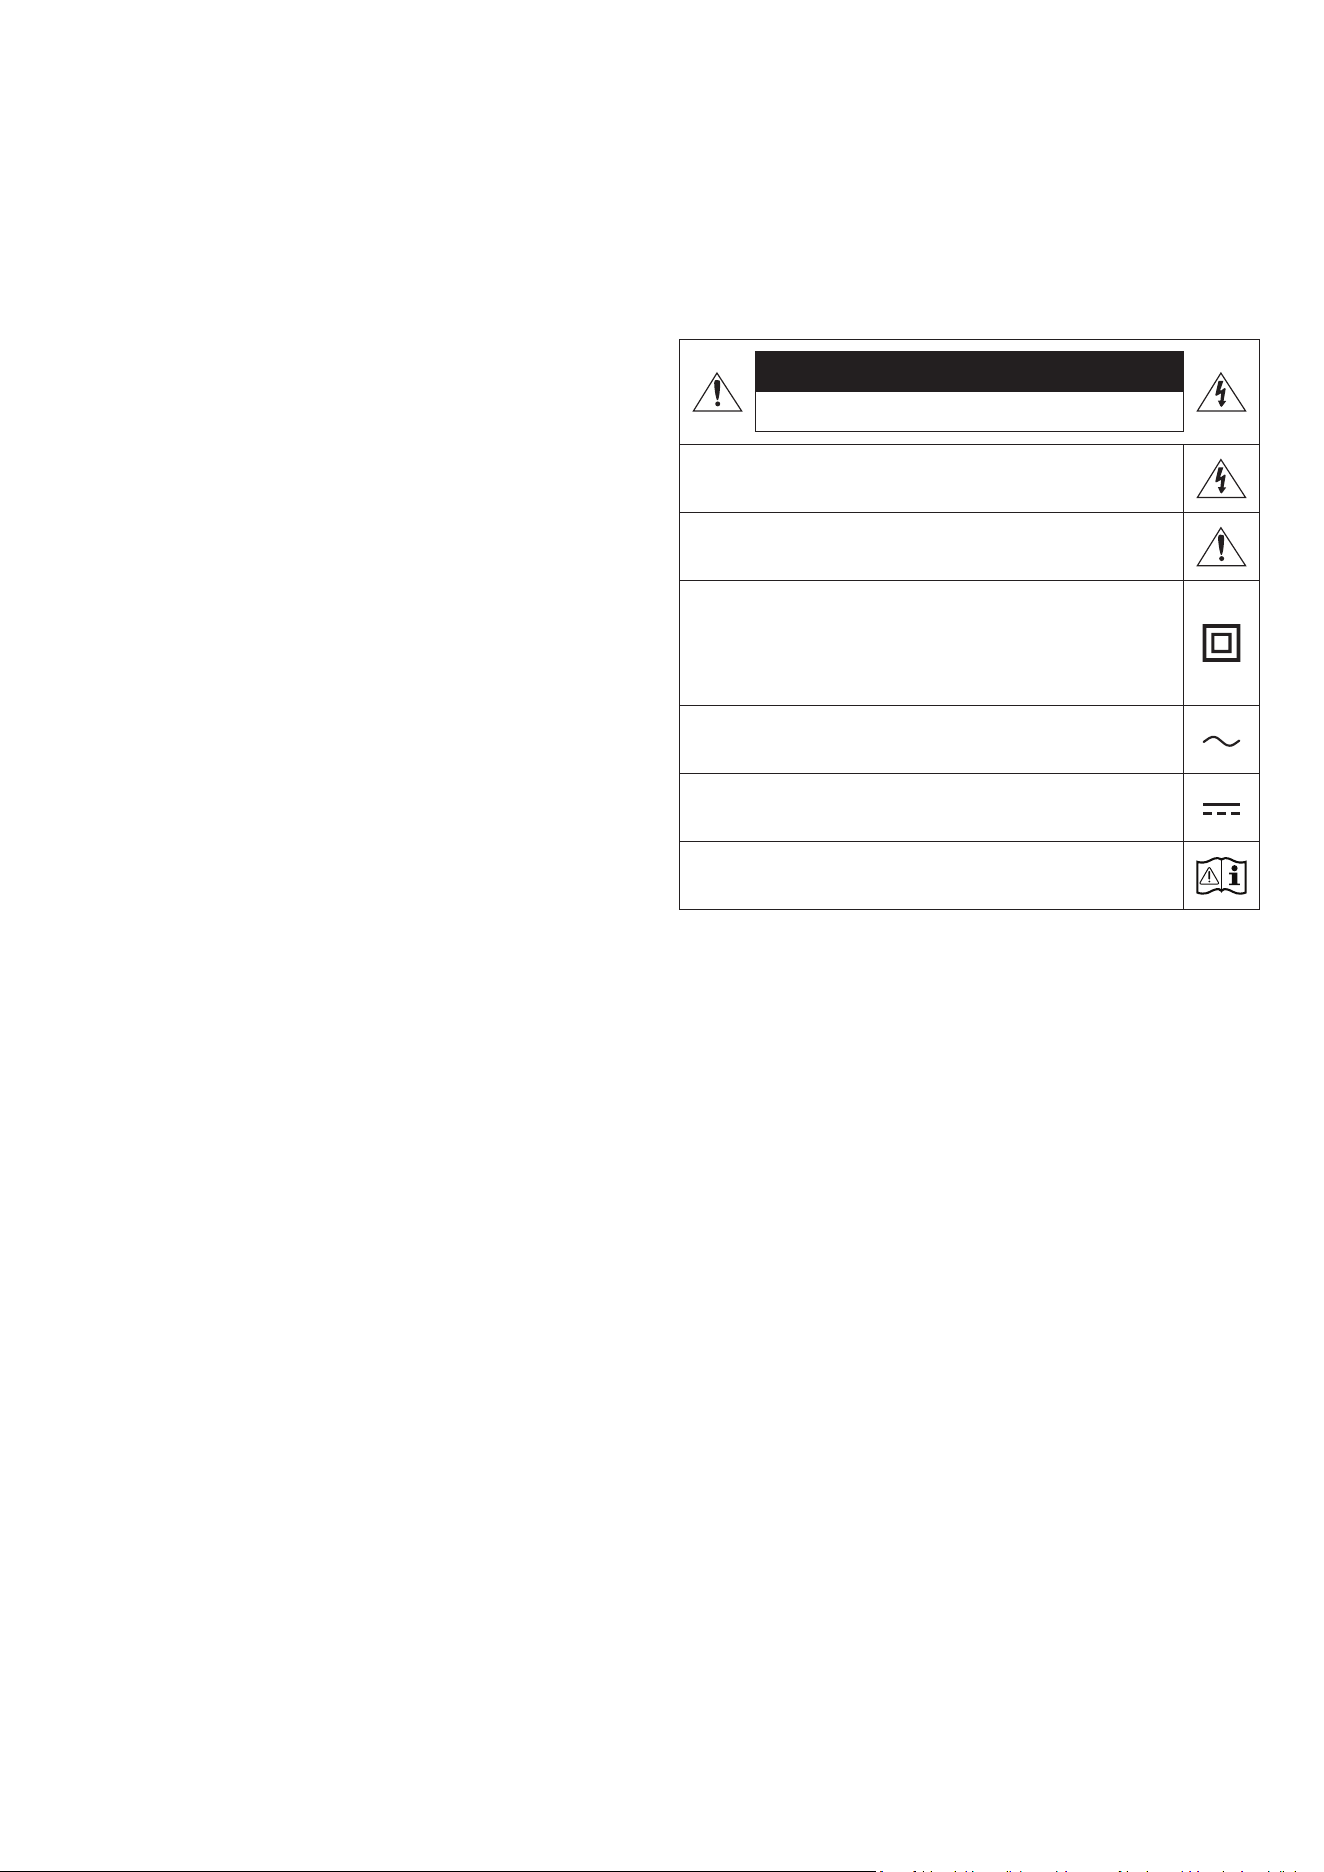
2 - ARA
ةمسلا تامولعم
ةمسلا تاريذحت
.)يفلخلا ءزجلا وأ( ءاطغلا ةلازإب مقت ،ةيئابرهك ةمدصل ضرعتلا رطخ نم دحلل
لهؤا دارفا نم بلطا .مدختسا لبِق نم ةنايصلل ةلباق ةيلخاد ءازجأ دجوت
.ةنايصلا لامعأ عيمجب مايقلا
نم كجتنم ع ةدوجوم نوكت دق لا زومرلا حيضوتل هاندأ حضوا لودجلا عجار
.Samsung
هيبنت
.هحتفت .ةيئابرهك ةمدصل ضرعتلا رطخ
يأ سمت نأ رطخلا نمف .لخادلاب
ٍ
لاع دهج دوجو إ زمرلا اذه شي
.لاكشا نم لكش يأب جتنا اذهب خاد ءزج
ليغشتلاب قلعتت ةمهم تاداشرإ مضت مت دق هنأ إ زمرلا اذه شي
.جتنا اذه عم ةنايصلاو
اًنمآ اصتا بلطتي هنأ إ زمرلا اذه شي :ةيناثلا ةجردلا نم جتنم
.)ضيرأتلا( ضراب ءابرهكلل
نأ بجيف ،ابرهك رايت كلسب د
وزم جتنم ع دوجوم غ زمرلا اذه ناك اذإ
.)ضيرأت( ةيقاو ضرأب نومأم لاصتاب جتنا عتمتي
رايتلا دهج وه زمرلا اذهب موسوا قا دهجلا :ددا رايتلا دهج
.ددا
رايتلا دهج وه زمرلا اذهب موسوا قا دهجلا :رمتسا رايتلا دهج
.رمتسا
مدختسا ليلد ةءارق إ زمرلا اذه شي :مادختسا تاميلعت عجار .هيبنت
.ةمسلاب ةقلعتا تامولعا نم ديز
ريذحت
وأ رطملل زاهجلا اذه ضرع
ُ
ت ،ةيئابرهك ةمدص وأ قيرح بوشن رطاخم ليلقتل
.ةبوطرلا
هيبنت
ةحتفلا عم ةضيرعلا سبقا ةرفش ةقباطمب مق ،ةيئابرهك ةمدص ثودح عن
.لماكلاب اهلخدأ ،ةضيرعلا
.ةيقاو ضيرأت ةلصو عم ددم رايت ذخأمب ا
ً
مئاد زاهجلا اذه ليصوت بجي
يئرلا ردصا سبقم نم سباقلا ةلازإ بجي ،يئرلا ردصاب زاهجلا لاصتا عطقل
.ليغشتلل لباق يئرلا ردصا سباق نوكي ثيحب
،لئاوسلاب ةءولمم
ً
ءايشأ عضت .اهب هشر وأ لئاوسلا تارطقل زاهجلا اذه ض
ّ
رعت
.زاهجلا ع ،تايرهزا لثم
،اذل .طئاحلا سبقم نم ابرهكلا رايتلا سباق بحس بجي ،ا
ً
يلك زاهجلا اذه ءافط
.تاقوا عيمج هيلإ لوصولا لهس ابرهكلا رايتلا سباق نوكي نأ بجي

3 - ARA
تاطايتحا
1 . ةجرد
ُ
ا ةقاطلا تابلطتم عم قفاوتي كلم ددا رايتلا ةقاط ردصم نأ دكأت
ع ،ا
ً
يقفأ كب صاخلا جتنا بيكب مق .جتنا لفسأ دوجوا فيرعتلا قصلمب
10 إ 7 نم( ةيوهتلل هلوح ةيفاك ةحاسم دوجو ةاعارم عم ،ةبسانم )ثاثأ( ةدعاق
وأ توص تاكم ع ةدحولا عضت .ةيوهتلا ذفانم ةيطغت مدع نم دكأت .)مس
.رمتسا مادختسل ةدحولا هذه تمم
ُ
ص .ةنخاس حبصت دق ىرخأ تادعم
لزنا .طئاحلا ذخأم نم ددا رايتلا سبقم لصفا ،لماكلاب ةدحولا ليغشت فاقي
نم ةليوط ةفل مادختسا نود هكرت يونت تنك اذإ جتناب صاخلا رهكلا رايتلا لبك
.نمزلا
2 . يدؤي نأ نكمي .ةيدعرلا فصاوعلا ءانثأ ،.طئاحلا ذخأم نم ددا رايتلا سبقم لصفا
.جتنا فلت إ قلا ببسب هتورذل رهكلا دهجلا لوصو
3 . رداصم نم اهغل وأ ةابا سمشلا ةعش ض
ّ
رعم ناكم ةدحولا عضت
.لطعلل اهضرعتو ةدحولا ةنوخس ةدايز إ يدؤي دق اذهف .ةرارحلا
4 . تادعا وأ )دقوا لثم( ةدئازلا ةرارحلاو )تايرهزا لثم( ةبوطرلا نم جتنا
ِ
محا
سبقم نم ابرهكلا رايتلا لبك لصفا .ةيوق ةيئابرهك وأ ةيسيطانغم تاجم د
لو
ُ
ت لا
مادختسل دع
ُ
م غ كب صاخلا جتنا اذه .ةدحولا تلطعت اذإ طئاحلاب ددا رايتلا
جتنا نيزخت لاح ف
ّ
ثكت ثدحي دق .طقف خشلا مادختسل وهف .يعانصلا
ح ا
ً
بيرقت تعاس رظتناف ،ءاتشلا لصف ءانثأ ةدحولا لقن مت اذإ .ةدراب ةرارح تاجرد
.مادختسا لبق ةفرغلا ةرارح ةجردل ةدحولا لصت
5 . ةباصإ ثودح وأ دع
ُ
ب نع مكحتلا ةدحو فلت إ يدؤي امم ،راجفنا وأ قيرح ثدحي دق
.ةيصخش
.دع
ُ
ب نع مكحتلا ةدحول ةمدص يأ هيجوت بنجت
فرطل ةبرتا وأ لئاوسلا وأ نداعا لثم ةبيرغلا داوا ةسمم مدع ع صرحا
.دع
ُ
ب نع مكحتلا ةدحوب صاخلا نحشلا
ا
ً
روف فقوت ،ةرخبأ قاحا وأ ناخد ةحئار مش وأ دع
ُ
ب نع مكحتلا ةدحو فلت ةلاح
.Samsung ةمدخ زكرم هحصإب مق مث ليغشتلا نع
.ببس نود دع
ُ
ب نع مكحتلا ةدحو كفب مقت
ةدحو ضع وأ صمب ةفيلا تاناويحلا وأ لافطل حامسلا مدع ع صرحا
نع مكحتلا ةدحو فلت إ يدؤي امم ،راجفنا وأ قيرح ثدحي دق .دع
ُ
ب نع مكحتلا
.ةيصخش ةباصإ ثودح وأ دع
ُ
ب

4 - ARA
تايوتحا
01 6 تانوكا نم ققحتلا
02 7 جتنا نع ةماع ةرظن
7 . . . . . . . . . . . . . . . . . . . . . . . . . . . . . . . . . . . . . . . . . . . . . . . . . . . . . . . . . . . . . . . . . . . . . . . . . . . . . . . . . . . . . . . . . . . . . . . . . . .Soundbar زاهج نم ةيولعلا ةحوللا
8. . . . . . . . . . . . . . . . . . . . . . . . . . . . . . . . . . . . . . . . . . . . . . . . . . . . . . . . . . . . . . . . . . . . . . . . . . . . . . . . . . . . . . . . . . . . . . . . . . . . .Soundbar زاهجل ةيفلخلا ةحوللا
03 9 Soundbar زاهج دع
ُ
ب نع مكحتلا زاهج مادختسا
9 . . . . . . . . . . . . . . . . . . . . . . . . . . . . . . . . . . . . . . . . . . . . . . . . . . . . . . . . . . . . . . . . . . . . . . . . . . . . . . . . . . . . . . . . . . . . . . . . . . . . . . . .دع
ُ
ب نع مكحتلا ةدحو نع ةذبن
9 . . . . . . . . . . . . . . . . . . . . . . . . . . . . . . . . . . . . . . . . . . . . . . . . . . . . . . . . . . . . . . . . . . . . . . . . . . . . . . . . . . . . . . . . . . . . . . . . . . .دع
ُ
ب نع مكحتلا زاهج مادختسا ةيفيك
11 . . . . . . . . . . . . . . . . . . . . . . . . . . . . . . . . . . . . . . . . . . . . . . . . . . . . . . . . . . . . . . . . . . . . . . . . . . . . . . . . . . . . . . . . . . . . . . . . . . . . . . . . )AVA( طشنلا توصلا كم
11 . . . . . . . . . . . . . . . . . . . . . . . . . . . . . . . . . . . . . . . . . . . . . . . . . . . . . . . . . . . . . . . . . . . . . . . . . . . . . . . . . . . . . . . . .)ةفيظو نم كأ اهل رارزأ( ةيفخا رازا مادختسا
12 . . . . . . . . . . . . . . . . . . . . . . . . . . . . . . . . . . . . . . . . . . . . . . . . . . . . . . . . . . . . . . . . . . . . . . . . . . . . . . . . . . . . . . . . .ةفلتخا وصلا ثأتلا عاضو ذفنا تافصاوم
13 . . . . . . . . . . . . . . . . . . . . . . . . . . . . . . . . . . . . . . . . . . . . . . . . . . . . . . . . . . .نويزفلتلاب صاخلا دعب دنع مكحتلا زاهج مادختساب Soundbar زاهج توص ىوتسم طبض
04 14 Soundbar زاهج ليصوت
14 . . . . . . . . . . . . . . . . . . . . . . . . . . . . . . . . . . . . . . . . . . . . . . . . . . . . . . . . . . . . . . . . . . . . . . . . . . . . . . . . . . . . . . . . . . . . . . . . . . . . . تادحولاو ابرهكلا رايتلا ليصوت
‒ 15 . . . . . . . . . . . . . . . . . . . . . . . . . . . . . . . . . . . . . . . . . . . . . . . . . . . . . . . . . . . . . . . . . . . . . . . . . . . . . . . . . . . . . . . . . . . . . . . . . . . . . ا
ً
يودي توصلا مخضم ليصوت
‒ 16 . . . . . . . . . . . . . . . . . . . . . . . . . . . . . . . . . . . . . . . . . . . . . . . . . . . . . . . . . . . . . . مسجا توصلا تاكم وأ توصلا مخضم فلخ ةدوجوا LED تاؤم ءاوضأ
16 . . . . . . . . . . . . . . . . . . . . . . . . . . . . . . . . . . . . . . . . . . . . . . . . . . . . . . . . . . . . . . . . . . . . . كب صاخلا Soundbar زاهجب )لصفنم لكشب عاب
ُ
ي( SWA-9500S ليصوت
05 17 نويزفلتب لاصتا
17 . . . . . . . . . . . . . . . . . . . . . . . . . . . . . . . . . . . . . . . . . . . . . . . . . . . . . . . . . . . . . . . . . . . . . . . . . . . . . . .)توصلا عاجرإ ةانق( HDMI ARC معدي يذلا نويزفلتلا ليصوت
18 . . . . . . . . . . . . . . . . . . . . . . . . . . . . . . . . . . . . . . . . . . . . . . . . . . . . . . . . . . . . . . . . . . . . . . . . . . . . . . . . . . . . . . . . . . . . . . . . . . . . . . Bluetooth ةينقت ع لاصتا
19 . . . . . . . . . . . . . . . . . . . . . . . . . . . . . . . . . . . . . . . . . . . . . . . . . . . . . . . . . . . . . . . . . . . . . . . . . . . . . . . . . . . . . . . . . . . . . . . . . . . . . . . . . .Wi-Fi لخ نم ليصوتلا
20. . . . . . . . . . . . . . . . . . . . . . . . . . . . . . . . . . . . . . . . . . . . . . . . . . . . . . . . . . . . . . . . . . . . . . . . . . . . . . . . . . . . . . . . . . . Dolby Atmos معدي نويزفلت زاهجب ليصوتلا
21 . . . . . . . . . . . . . . . . . . . . . . . . . . . . . . . . . . . . . . . . . . . . . . . . . . . . . . . . . . . . . . . . . . . . . . . . . . . . . . . . . . . . . . . . . . . . . . . . . . . . Q-Symphony ةفيظو مادختسا
22 . . . . . . . . . . . . . . . . . . . . . . . . . . . . . . . . . . . . . . . . . . . . . . . . . . . . . . . . . . . . . . . . . . . . . . . . . . . . . . . . . . . . . . . . . . . . . . . . . . . . . . . . . Spacet توص مادختسا
06 23 لومحم زاهج ليصوت
23. . . . . . . . . . . . . . . . . . . . . . . . . . . . . . . . . . . . . . . . . . . . . . . . . . . . . . . . . . . . . . . . . . . . . . . . . . . . . . . . . . . . . . . . . . . . . .Bluetooth ةينقت ع لاصتا .1 ةقيرطلا
25. . . . . . . . . . . . . . . . . . . . . . . . . . . . . . . . . . . . . . . . . . . . . . . . . . . . . . . . . . . . . . . . . . . . . . . . . . . . . . . . . . . . . . . .)ةيكلسلا ةكبشلا( Wi-Fi ع لاصتا .2 ةقيرطلا
26 . . . . . . . . . . . . . . . . . . . . . . . . . . . . . . . . . . . . . . . . . . . . . . . . . . . . . . . . . . . . . . . . . . . . . . . . . . . . . . . . . . . . . . . . . . . . . . . . . . . . . . . . . . . . Tap Sound مادختسا
07 27 Apple Airplay 2 ةينقتب لاصتا
08 28 طئاحلا ع تيبثتلا مقط بيكرت
28. . . . . . . . . . . . . . . . . . . . . . . . . . . . . . . . . . . . . . . . . . . . . . . . . . . . . . . . . . . . . . . . . . . . . . . . . . . . . . . . . . . . . . . . . . . . . . . . . . . . . . . . . . . . . . . .بيكلا تاطايتحا
28. . . . . . . . . . . . . . . . . . . . . . . . . . . . . . . . . . . . . . . . . . . . . . . . . . . . . . . . . . . . . . . . . . . . . . . . . . . . . . . . . . . . . . . . . . . . . . . . . . . . طئاحلا ع تيبثتلا مقط تانوكم
09 29 نويزفلتلا مامأ Soundbar زاهج بيكرت

5 - ARA
10 30 جمانلا ثيدحت
30. . . . . . . . . . . . . . . . . . . . . . . . . . . . . . . . . . . . . . . . . . . . . . . . . . . . . . . . . . . . . . . . . . . . . . . . . . . . . . . . . . . . . . . . . . . . . . . . . . . . . . . . . . . . . . . . . اقلتلا ثيدحتلا
30. . . . . . . . . . . . . . . . . . . . . . . . . . . . . . . . . . . . . . . . . . . . . . . . . . . . . . . . . . . . . . . . . . . . . . . . . . . . . . . . . . . . . . . . . . . . . . . . . . . . . . . . . . . . . . . . . . . USB ثيدحت
30. . . . . . . . . . . . . . . . . . . . . . . . . . . . . . . . . . . . . . . . . . . . . . . . . . . . . . . . . . . . . . . . . . . . . . . . . . . . . . . . . . . . . . . . . . . . . . . . . . . . . . . . . . . . . . . . . . . .طبضلا ةداعإ
11 31 اهحصإو لاطعا فاشكتسا
12 32 صيخالا
13 33 ةحوتفم رداصا صيخرت راعشإ
14 33 ةمدخلا لوح ةمهم تاظحم
15 34 ليلدلاو تافصاوا
34. . . . . . . . . . . . . . . . . . . . . . . . . . . . . . . . . . . . . . . . . . . . . . . . . . . . . . . . . . . . . . . . . . . . . . . . . . . . . . . . . . . . . . . . . . . . . . . . . . . . . . . . . . . . . . . . . . . . تافصاوا
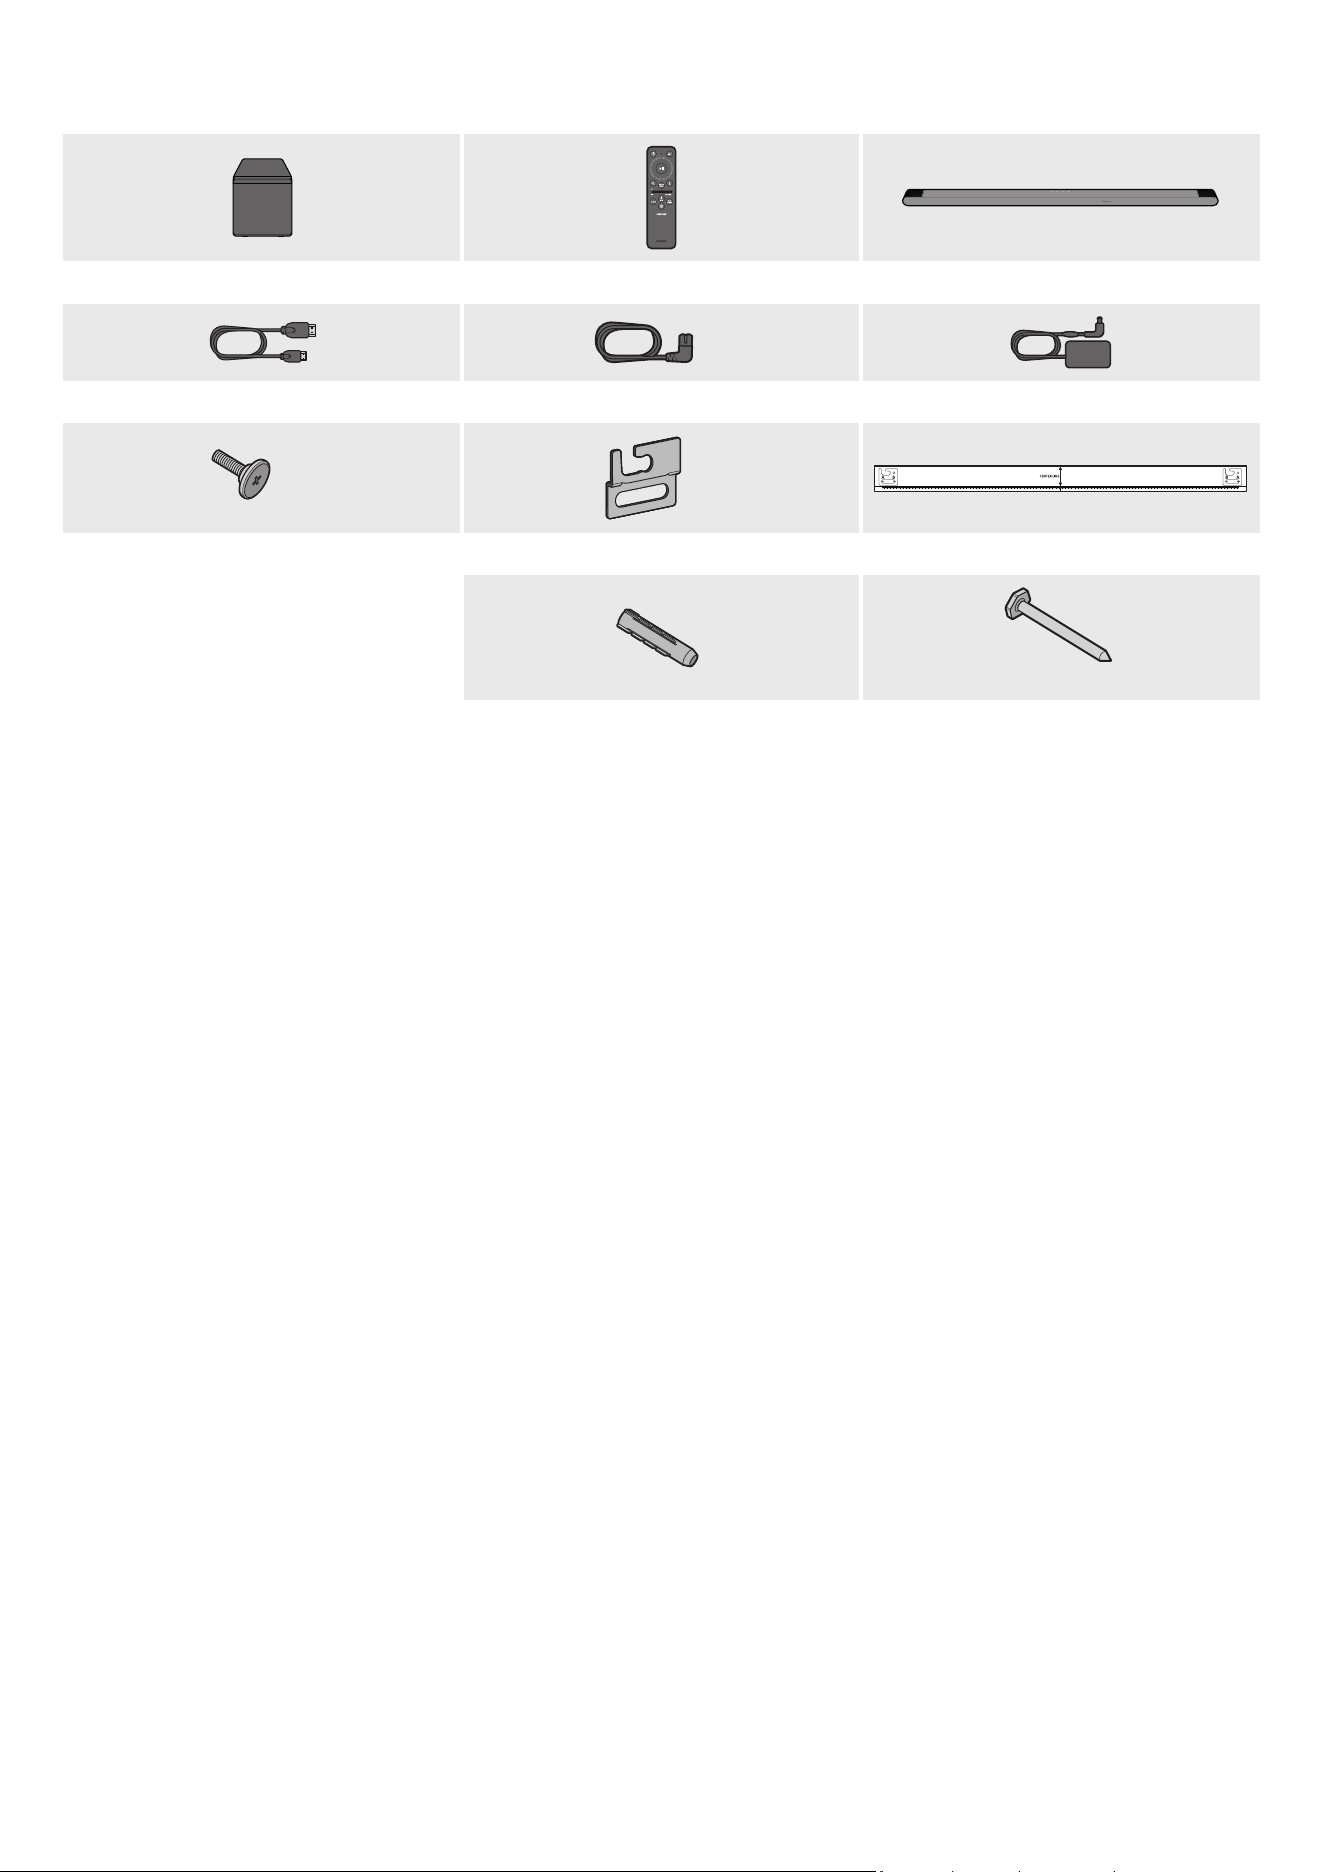
6 - ARA
01 تانوكا نم ققحتلا
ةيساسا Soundbar ةدحوSoundbar زاهج دع
ُ
ب نع مكحتلا ةدحوتوصلا مخضم
x 2
)Soundbar زاهج( رمتسا رايتلا/ددا رايتلا لوحم)Soundbar زاهج ،توصلا مخضم( ةقاطلا كلس Micro HDMI إ HDMI لبك
AH81-15127A-01
A TYPE
:
740mm
B TYPE
:
700mm
x 2
x 2
طئاحلا ع تيبثتلا ليلدطئاحلا ع تيبثتلا ةماعدلماحلا رامسم
x 4
)L55 X M5(
x 4
رامسمتيبثتلا يغارب
)ةيساسا Soundbar ةدحو نم فسلا ءزجلا :قصلا( .جتنا عم قفرا قصلا عجار ،اهكهتساو ةقاطلا ردصم نع تامولعا نم ديز
.Samsung ءمع ةمدخ وأ Samsung ةمدخ زكرمب لصتا ،ةيرايتخا تبكلا وأ ةيفاضا تانوكا ءال
.29~28 تاحفصلا عجار ،ةيطاطا قاسلا وأ طئاحلا ع تيبثتلا لماح نع تامولعا نم ديز
.قبسم راعشإ نود يغتلل ةضرع قيبطتلا ةشاشو تافصاواو ميمصتلا
.هعأ ةيحيضوتلا روصلا نع
ً
يلق تاقحلا لكش فلتخي دق
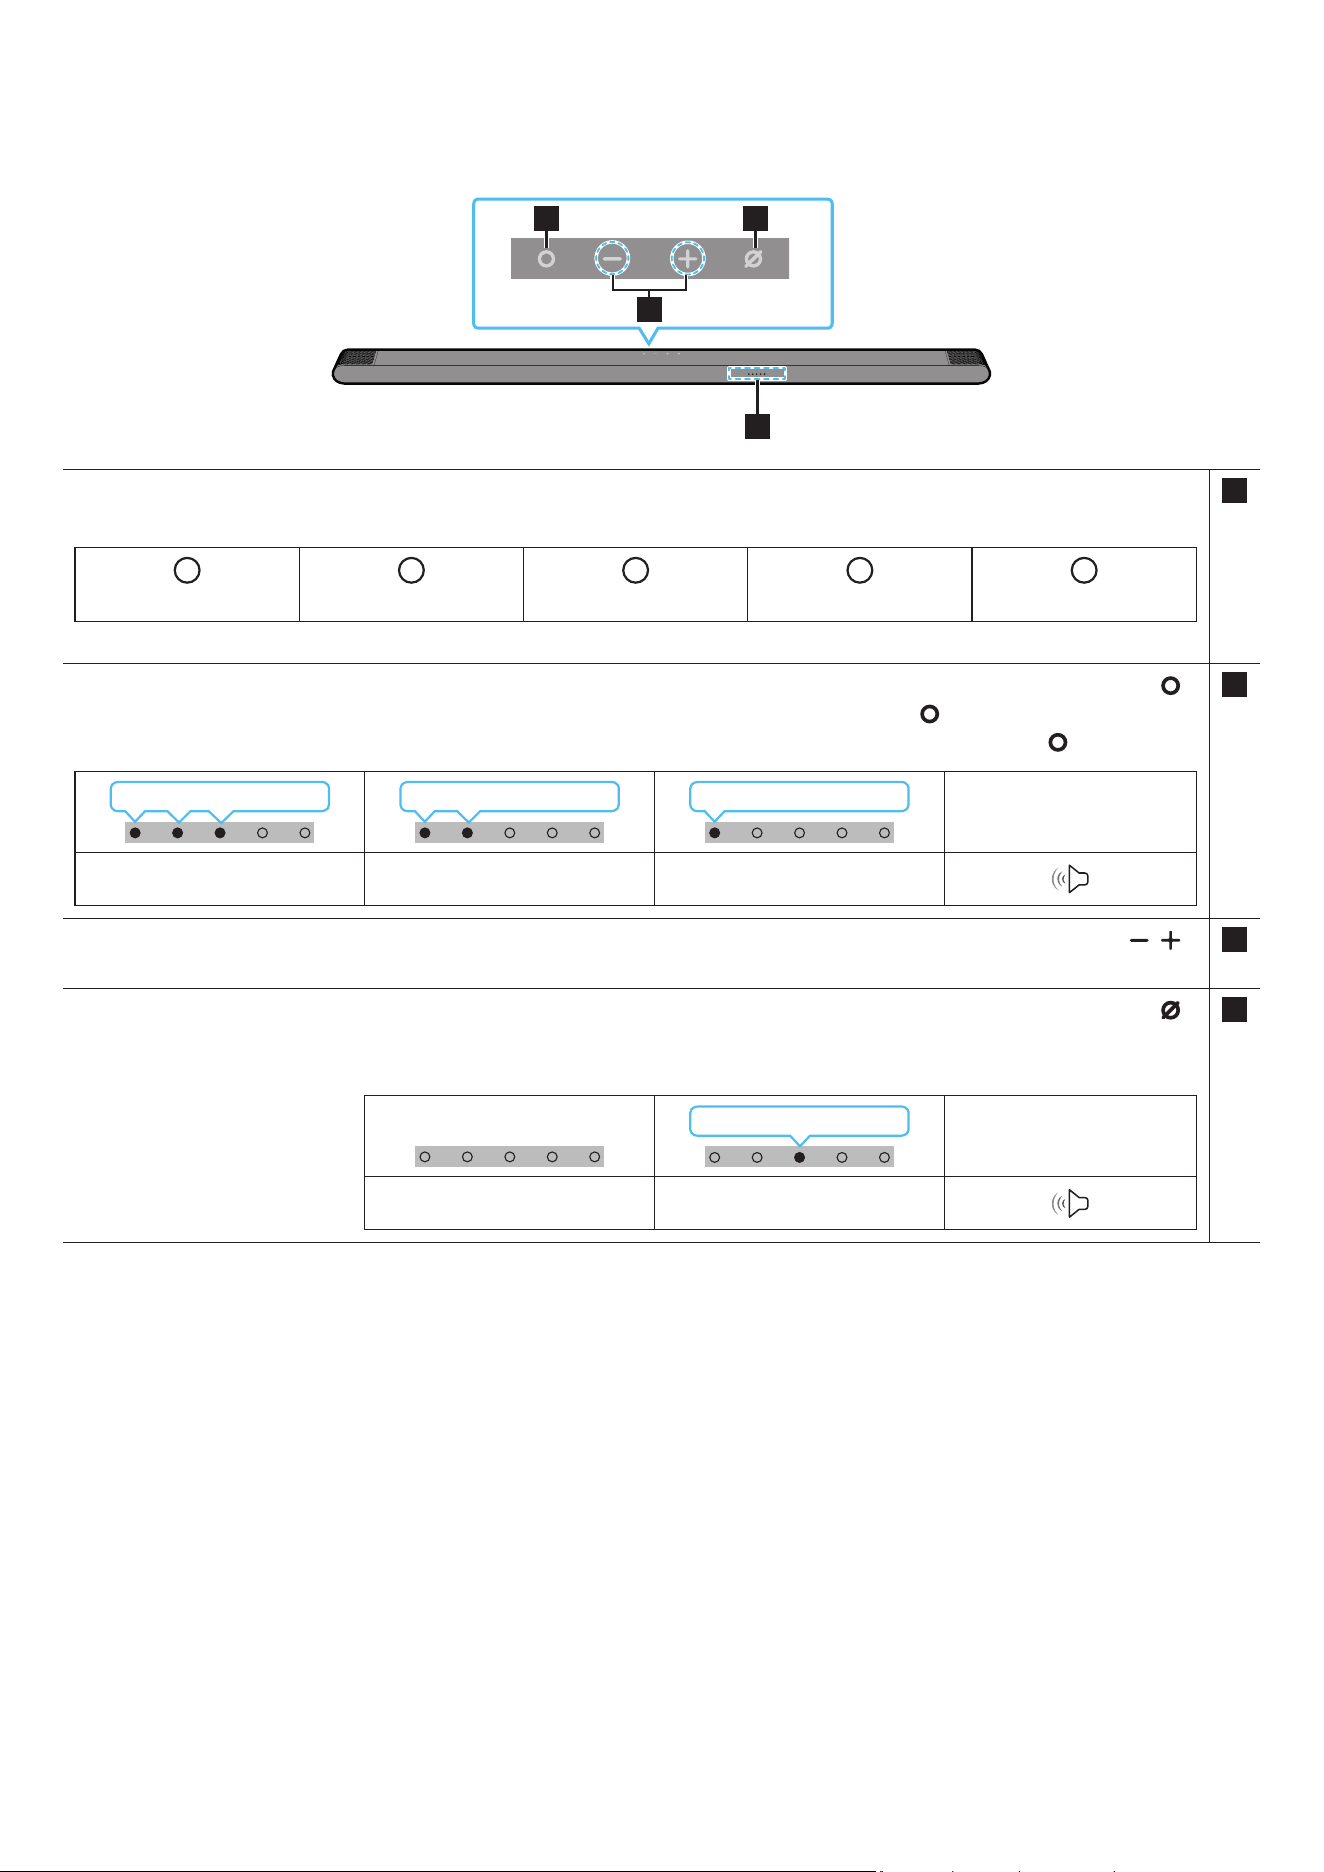
7 - ARA
02 جتنا نع ةماع ةرظن
Soundbar زاهج نم ةيولعلا ةحوللا
2 4
3
1
1LED ةءاضإ ؤم
.هاندأ حضوم وه ام طشنلا عضولا إ ءاوضا ددعو LED ؤم نول شي .ةيلاحلا هتلاح وأ Soundbar زاهج عضو بسح هنول غ
ُ
ي وأ ء
ُ
ي وأ LED ؤم ضموي
W
ضيبا LED ؤم
W
ضيبا LED ؤم
M
ناولا ددعتم LED ؤم
W
ضيبا LED ؤم
W
ضيبا LED ؤم
.ةلاحلا وأ عضولا بسح قرزاو ،رمحاو ،خاو ،يوامسلا قرزاو ،ضيبا إ ناولا ددعتم LED ؤم غتي
2
)ةددعتا فئاظولا(
رز
.Soundbar زاهج ليغشتل )ةددعتا فئاظولا( رزلا ع طغضا ،دادعتسا عضو
.ئفطني مث ،ضيبا نوللاب LED حابصم ءي ،ةرم لك عضولا يغت دنع .لاخدا ردصم يغتل )ةددعتا فئاظولا( رزلا ع طغضا
LED ةءاضإ ؤم
ضيبا فاقيإ ← ليغشتضيبا فاقيإ ← ليغشتضيبا فاقيإ ← ليغشت
”TV ARC“”Wi-Fi“”Bluetooth“
3
)توصلا ىوتسم(
رز
.توصلا ىوتسم طبضل
4
)نوفوركيا ليغشت فاقيإ/ليغشت ءدب(
رز
.هليغشت فاقيإ وأ نوفوركيا ليغشتل رزلا ع طغضا
.رمحا نوللاب LED ؤم ءيس ،نوفوركيا ليغشت فاقيإ دنع
LED ةءاضإ ؤم
ليغشتلا ديق رمحا ءوضلا
”Mic Off“”Mic On“
.
ٍ
ناوث 6 إ 4 لخ لمعلا ةقاطلا رز أدبيس ،ددا رايتلا كلس ليصوت دنع
.ا
ً
توص ردصت نأ لبق ناوث 5 إ 4 نم رخأتتس ،ةدحولا هذه ليغشت دنع
.ةيجراخلا ةعامسلا إ نويزفلتلا تاعامس يغتلو نويزفلتلا توصل تادادعا ةمئاق إ لقتنا ،Soundbarو نويزفلتلا نم تاوصأ تعمس اذإ
عجار ،SmartThings قيبطت مادختسا لوح ديزا ةفرع .SmartThings قيبطت مادختساب ةيتوصلا تاقيلعتلا فاقيإو ليغشت كنكمي
.”)ةيكلسلا ةكبشلا( Wi-Fi ع لاصتا .2 ةقيرطلا
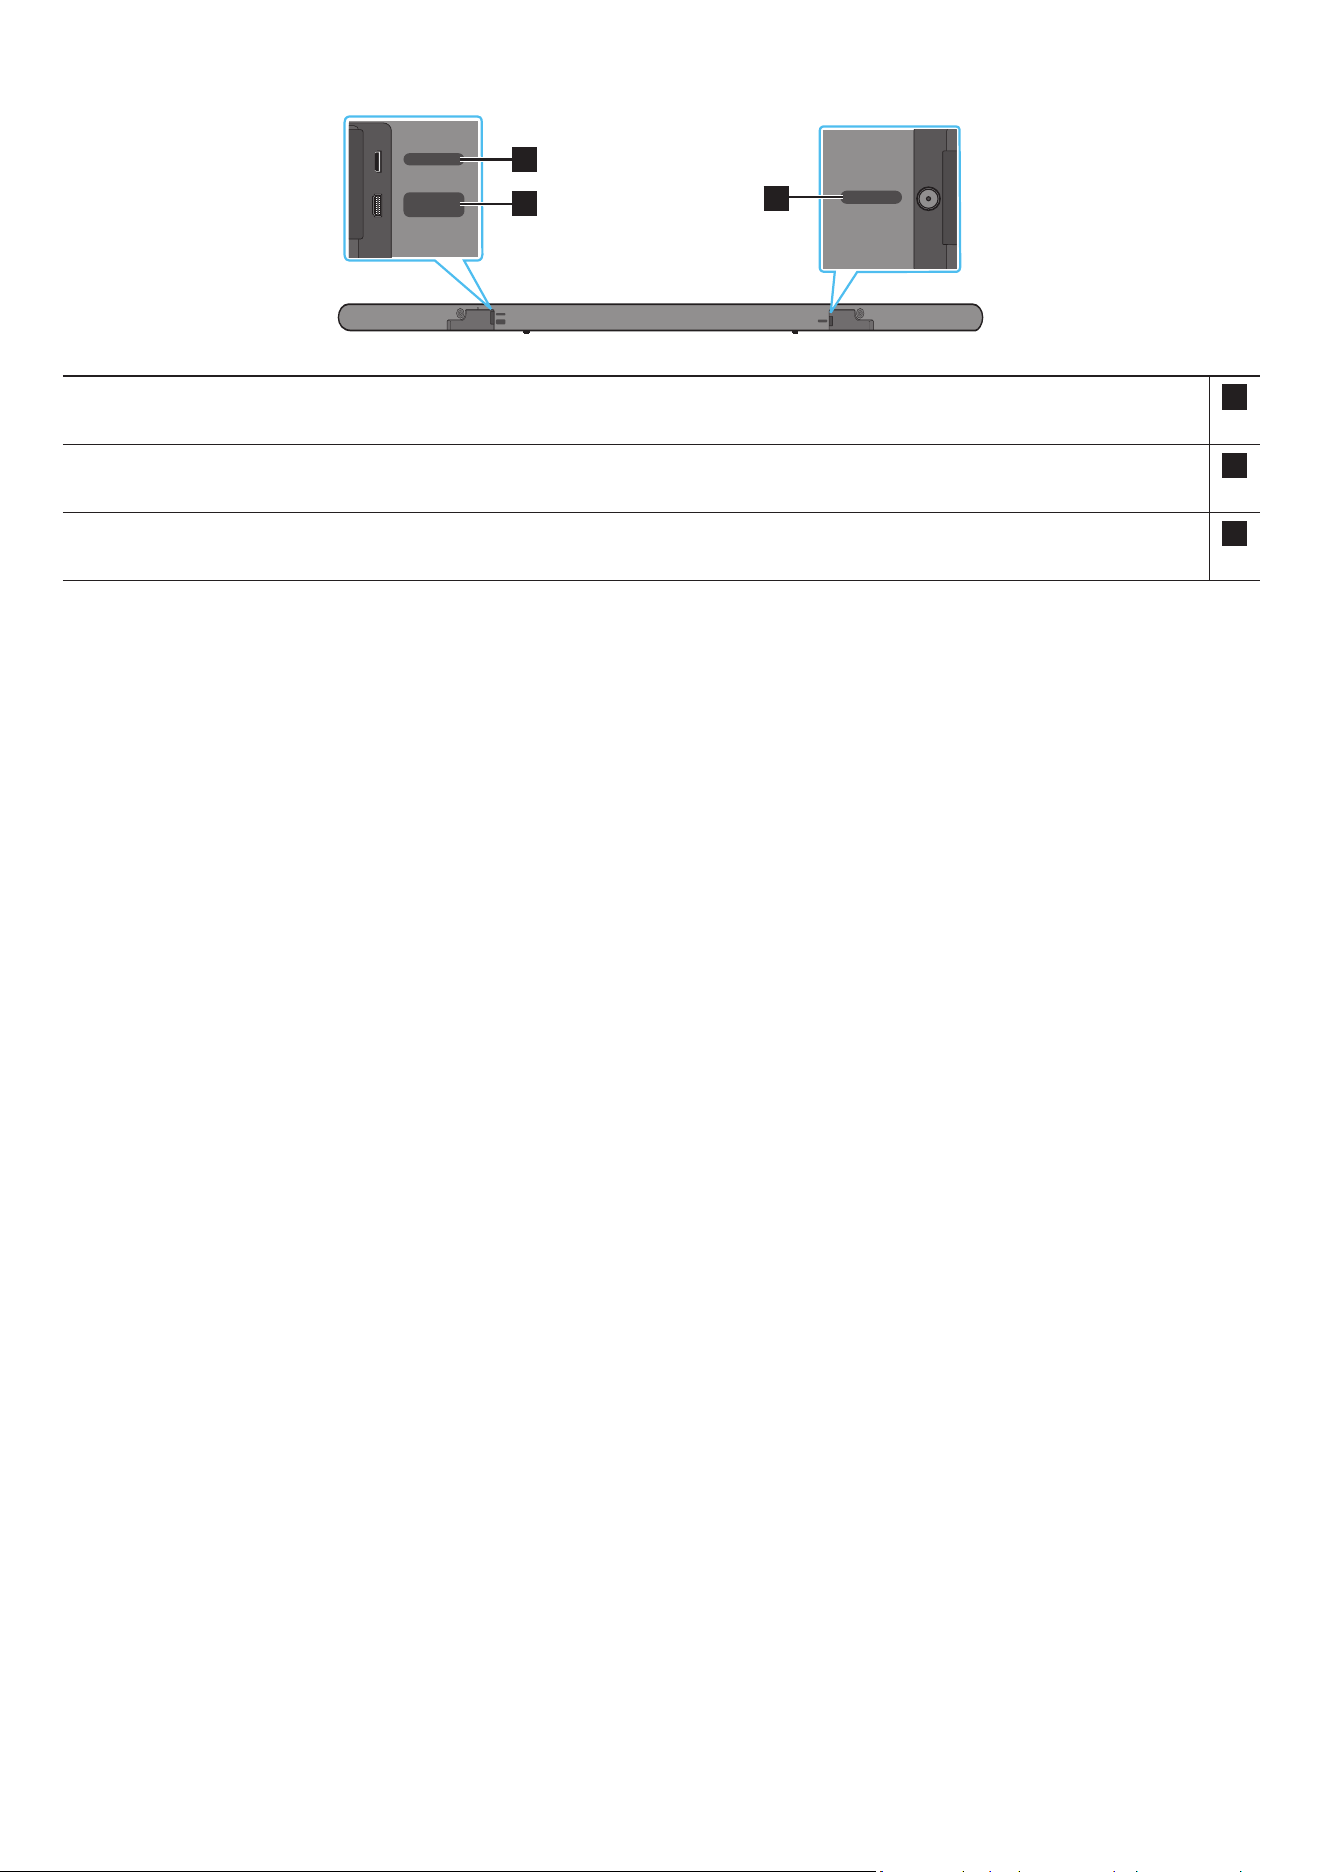
8 - ARA
Soundbar زاهجل ةيفلخلا ةحوللا
DC 19V
SERVICE
HDMI
(ARC)
DC 19V
SERVICE
HDMI
(ARC)
DC 19V
SERVICE
HDMI
(ARC)
DC 19V
SERVICE
HDMI
(ARC)
DC 19V
SERVICE
HDMI
(ARC)
DC 19V
SERVICE
HDMI
(ARC)
3
1
2
1SERVICE
.جتنا جمانرب ةيقل US B نيزخت زاهج ل
صو
2HDMI )ARC(
)17 ةحفص عجار( .نويزفلتلا زاهج ع HDMI )ARC( ذفنمب ليصوتلل
3DC 19V
)14 ةحفص عجار( )ةقاطلا دوزم ردصم لخدم( .رمتسا رايتلا/ددا رايتلل ءابرهكلا لوحم ل
صو
.طئاحلاب دوجوا رهكلا رايتلا ذفنم نم ددا رايتلا/رمتسا رايتلا لوح رهكلا رايتلا لبك لصف دنع سبقا بحسا
.لبكلا بحس بنجت
.تانوكا ب تيصوتلا ةفاك لمتكت ح ددا رايتلا ذفنمب تانوكم ةيأ وأ ةدحولا هذه ليصوتب مقت
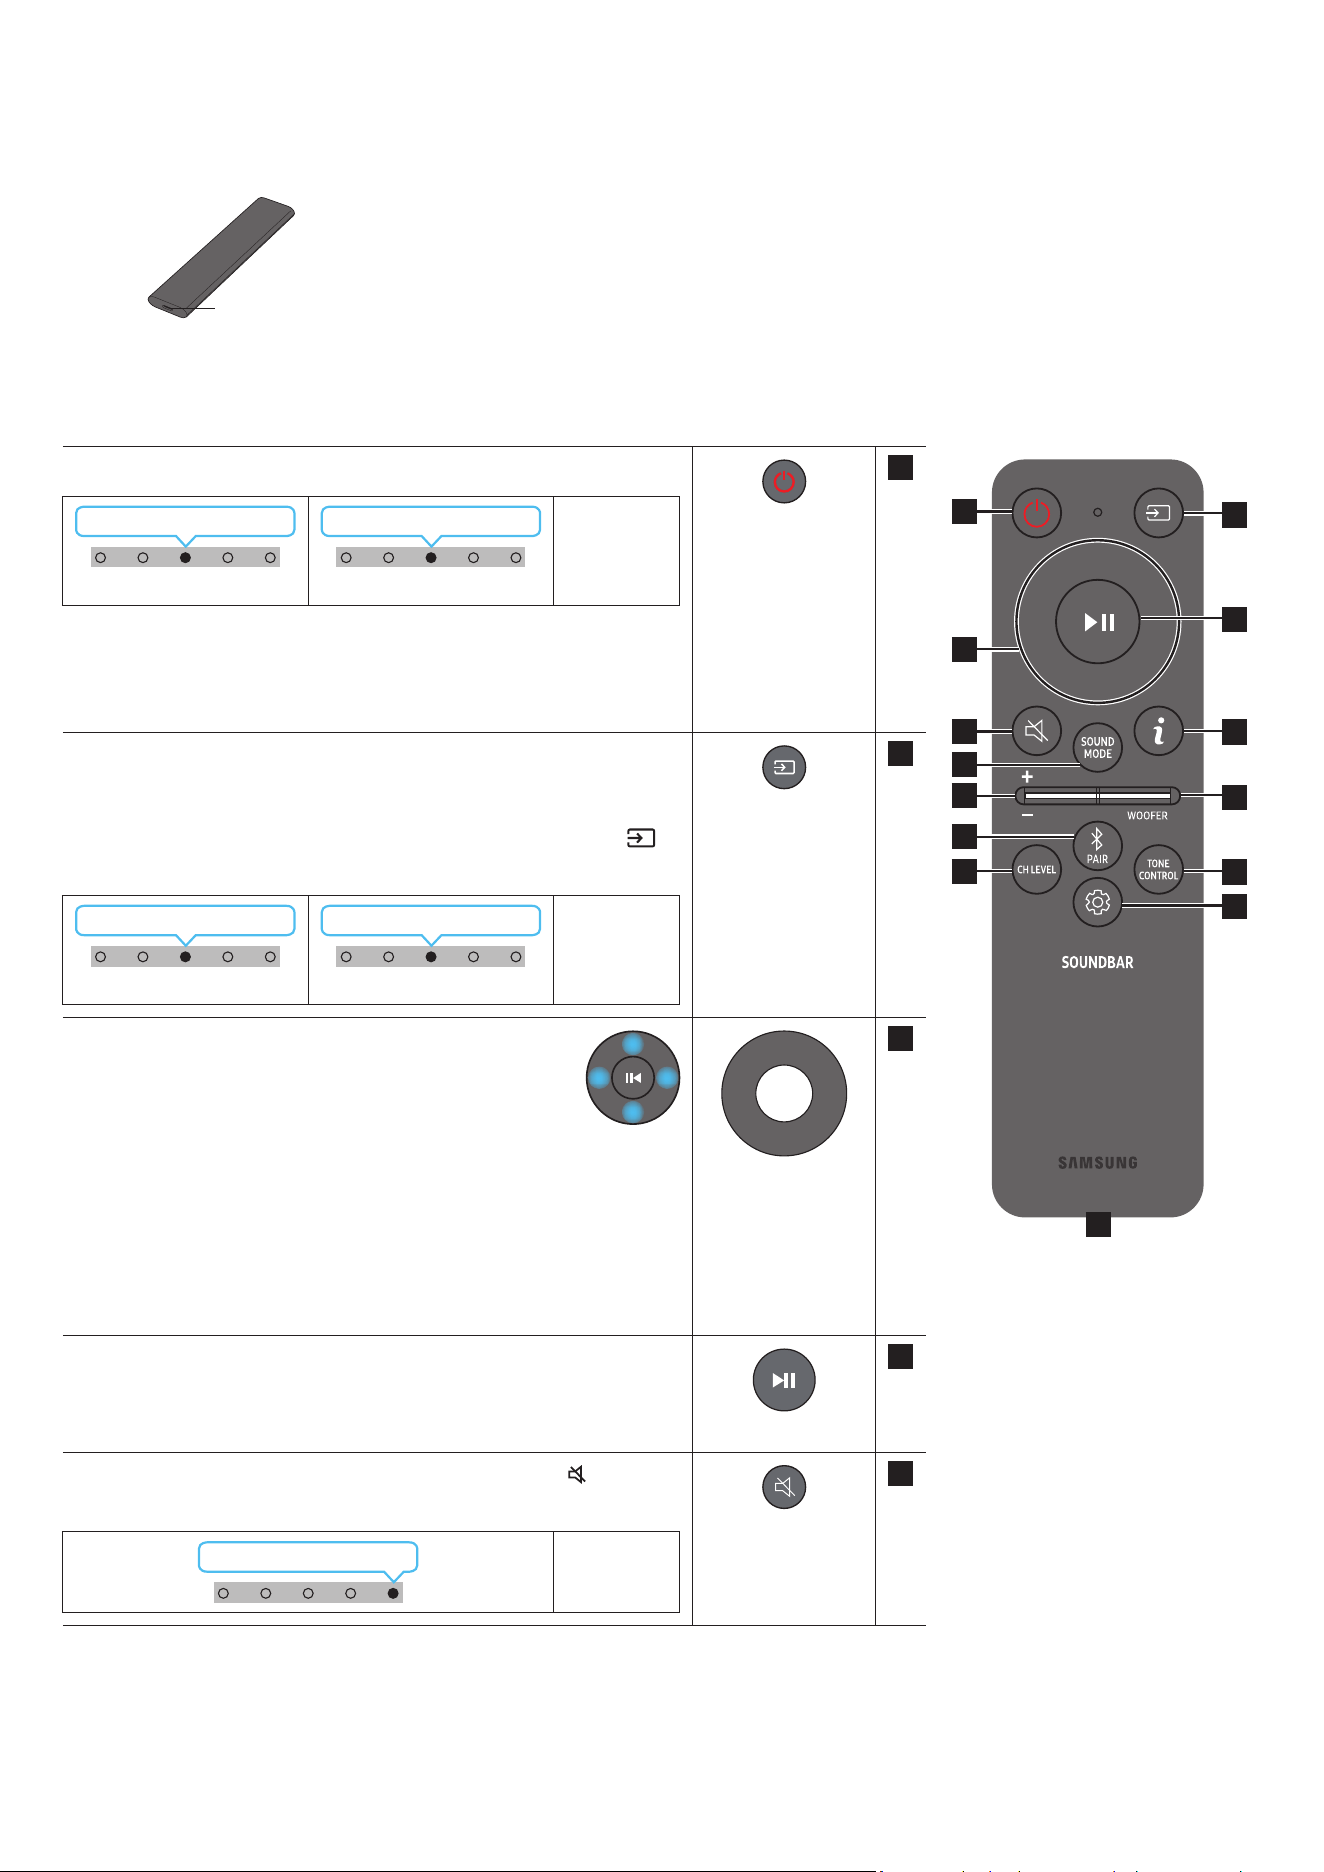
9 - ARA
03 SOUNDBAR زاهج دع
ُ
ب نع مكحتلا زاهج مادختسا
دع
ُ
ب نع مكحتلا ةدحو نع ةذبن
اهع زاهجلا مادختسا كنكمي لا ةفاسا فلتخت دق .جتنا نم راتمأ 6 نع لقت ةفاسم ع دع
ُ
ب نع مكحتلا ةدحو مدختسا
.لسلا لاصتل ةيئيبلا فورظلا فتخاب
.USB-C عون ذفنم مادختساب هنحشب مق ،ةيراطبلا ضافخنا ببسب دع
ُ
ب نع مكحتلا ةدحو لمعت امدنع
.دع
ُ
ب نع مكحتلا ةدحو زارط بسح ةيحيضوتلا ةروصلا فلتخت
)C عون( USB ذفنم
نحشلل
دع
ُ
ب نع مكحتلا زاهج مادختسا ةيفيك
1
3
5
8
11
13
7
10
12
2
4
9
6
14
1
ةقاطلا
.هليغشت فاقيإو Soundbar زاهج ليغشتب موقي
ةءاضإ ؤم
LED
1X ضموي يوامسلا قرزا
ليغشت
3X ضموي رمحا
ليغشتلا فاقيإ
•ا
ً
يئاقلت ليغشتلا فاقيإ ةفيظو
:ةيلاتلا تاحلا ا
ً
يئاقلت ةدحولا ليغشت فاقيإ متي
ةيتوص ةراشإ دوجو مدع ةلاح ”Bluetooth“ / ”Wi-Fi“ / ”TV ARC“ عاضوا
.ةقيقد 18 ةد
2
ردصا
.Soundbar زاهجب لصتم ردصم ديدحتل طغضا
•ةيتوصلا تاقيلعتلا ليغشت فاقيإ/ليغشت
رز ع رارمتسا عم طغضا .اهليغشت فاقيإ وأ ةيتوصلا تاقيلعتلا ليغشت كنكمي
زاهج ليغشت فاقيإ ءانثأ
ٍ
ناوث 5 ةد دع
ُ
ب نع مكحتلا ةدحو ع )ردصا(
.)دادعتسا عضو( Soundbar
ةءاضإ ؤم
LED
1X ضموي يوامسلا قرزا
ليغشت
1X ضموي رمحا
ليغشتلا فاقيإ
3
/راسي/لفسأ/عأ
مي
/راسيلل/لفس/ع هاجتا ديدحتل اهيلإ راش
ُ
ا قطانا ع طغضا
.ميلل
.اهطبض وأ فئاظولا ديدحتل رزلا ع ميلا/راسيلا/لفسا/عا هاجتاب طغضا
•يقيسوا عطقا زواجت
فلم ديدحتل راسيلا رزلا ع طغضا .اتلا ىقيسوا فلم ديدحتل ميلا رزلا ع طغضا
.قباسلا ىقيسوا
•ID SET
مخضم ليصوت دنع( ID SET لامك
ٍ
ناوث 5 ةد ع رزلا ع رارمتسا عم طغضا
.)ةيكلسلا ةيفلخلا تاعامسلا وأ لس توص
4
اًتقؤم فاقيا / ليغشتلا
.رزلا ع طغضلاب اًتقؤم اهفاقيإ وأ ىقيسوا ليغشت ا
ً
ضيأ كنكمي
5
توصلا متك
.توصلا متكل )توصلا متك(
رز ع طغضا
.توصلا متك ءاغل ا
ً
ددجم طغضا
ةءاضإ ؤم
LED
رركتم لكشب ضموي
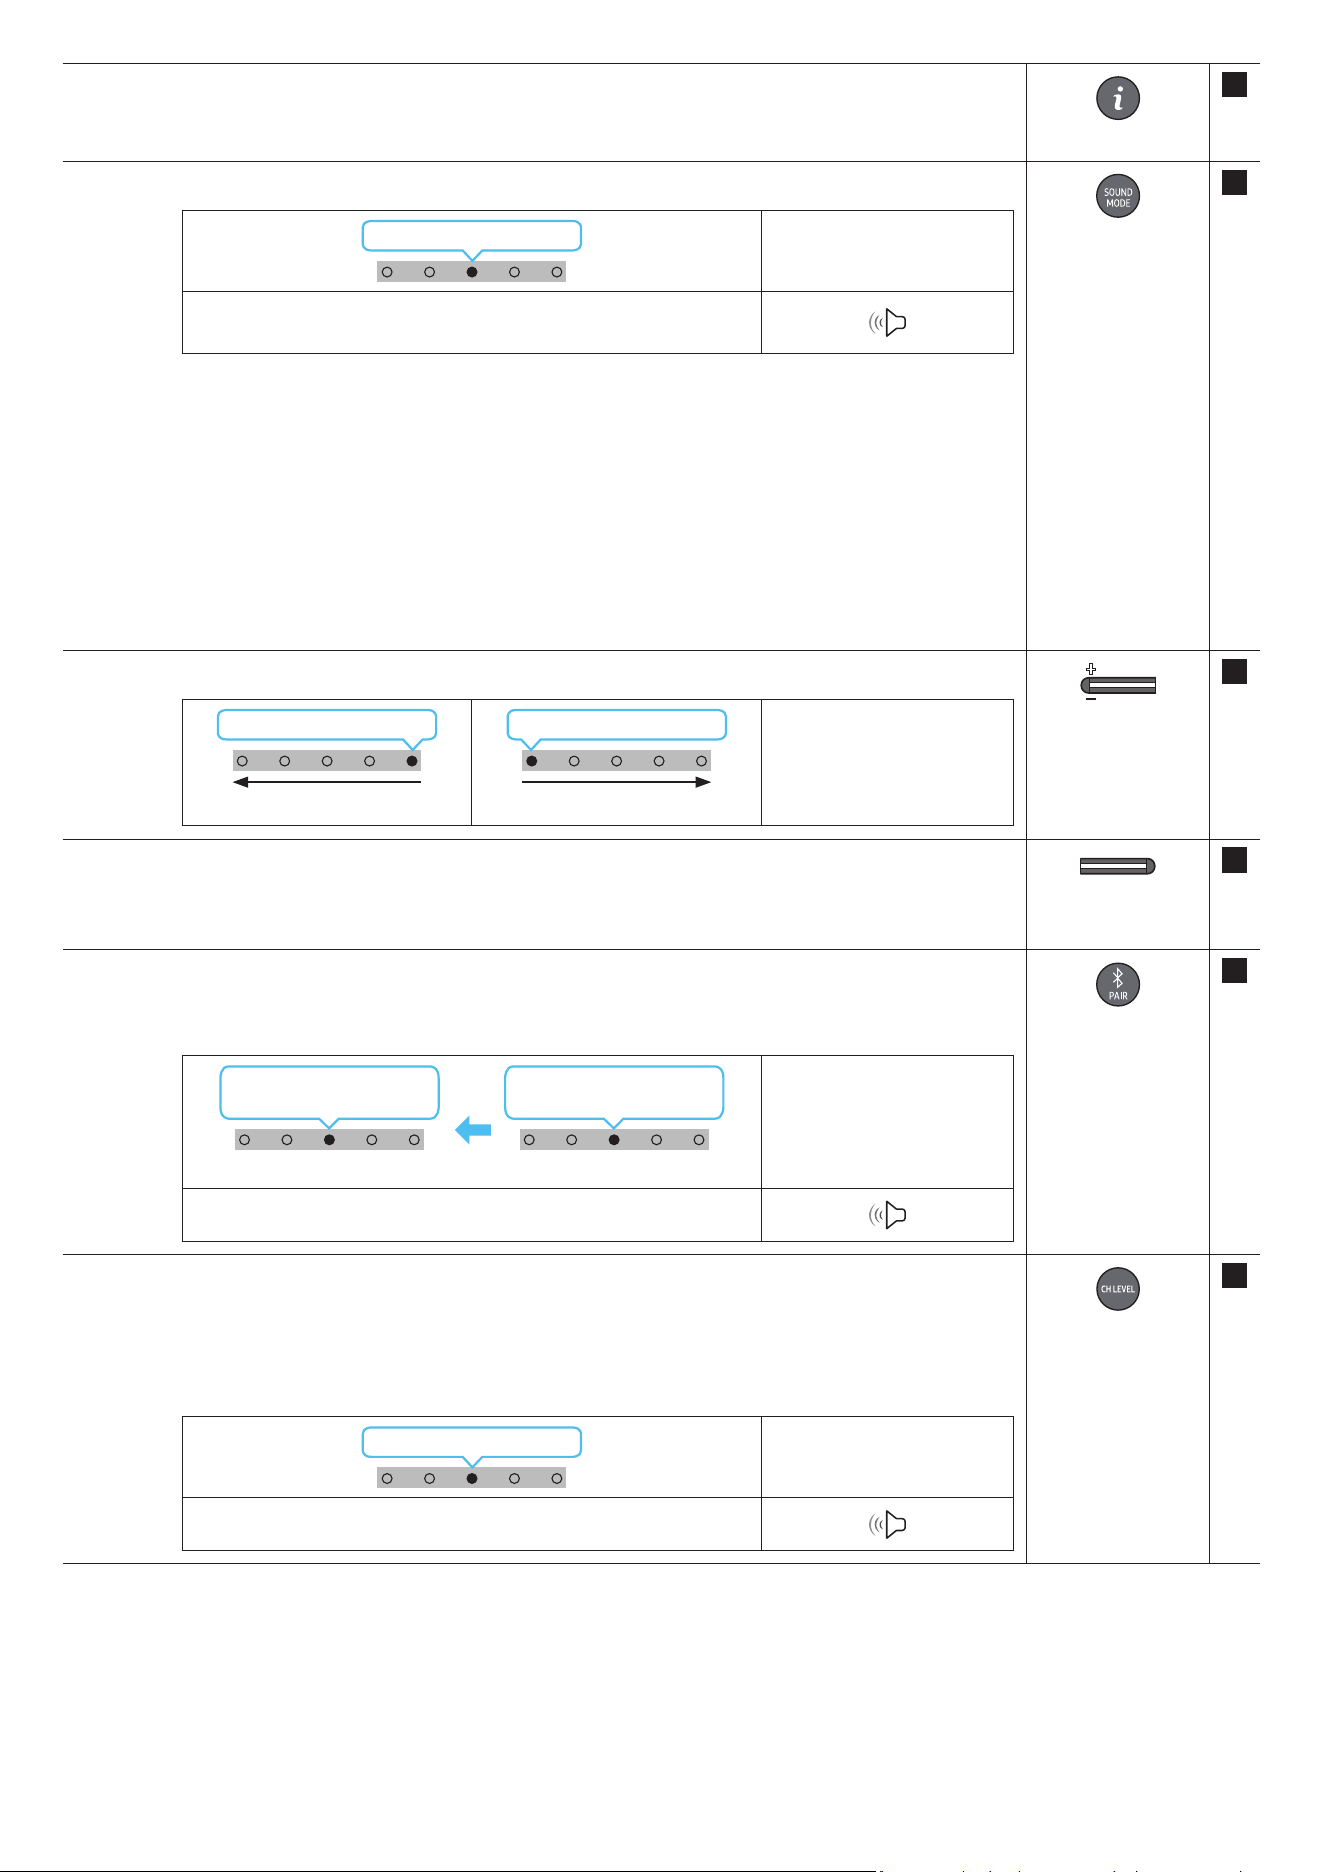
10 - ARA
6
تامولعم
)7 ةحفص عجار( .ةيلاحلا ةفيظولا لوح تامولعم ضرعل رزلا ع طغضا
.تارم 3 يوامسلا قرزا نوللاب LED ؤم ضموي ،Dolby Atmos® ـب لاصتا دنع
7
SOUND MODE
.ضيباب ناولا ددعتا LED ؤم ضموي ،عضولا غتي ةرم لك .بوغرا توصلا عضو ديدحت كنكمي رزلا ع طغضلاب
LED ةءاضإ ؤم
1X ضموي ضيبا
← ”Adaptive Sound“ ← ”Standard“ ← ”Game“ ← ”Surround“
”DTS Virtual:X“
•Surround
.داتعا نم عسوأ ا
ً
يتوص
ً
اجم رفوي
•Game
.ةبعللا ءاوجأ سمغنتل ا
ً
مسجم ا
ً
توص رفوي
•Standard
.صا توصلا جارخإب موقي
•Adaptive Sound
.ىوتحا صئاصخ ع
ً
ءانب لثما توصلا لاجم ا
ً
يئاقلت رفويو عفلا تقولا ىوتحا للحي
•DTS Virtual:X
.ىوتحم يأ نم داعبا ث رماغ توص
8
توصلا ىوتسم
.توصلا ىوتسم طبضل لفسل وأ عل رزلا عفدا
LED ةءاضإ ؤم
1X ميلا إ ضيبا كرحتي
توصلا ىوتسم عافترا
1X راسيلا إ ضيبا كرحتي
توصلا ىوتسم ضافخنا
9
WOOFER )BASS(
LEVEL
توصلا مخضم توص ىوتسم طبضل .+6 إ -6 ب وأ -12 ع )هجلا( توصلا مخضم توص ىوتسم طبضل لفسل وأ عل رزلا عفدا
.رزلا ع طغضا ،)افا دادعا( 0 إ )هجلا(
10
Bluetooth PAIR
.Bluetoothـب ناقا عضو إ Soundbar زاهج ليوحت
.هاندأ ضورعم وه امك LED ةءاضا ؤم غتي ،رزلا ع طغضت امدنع
.قرزأ ← خأ ← رمحأ نوكيل هرودب ناولا ددعتا LED ؤم غتي ناقا لامتكا ح
LED ةءاضإ ؤم
← رمحا ضموي
قرزا ← خا
ناقا
يوامسلا قرزا
3X ضموي
ليصوتلا لمتكا
”Ready to connect via Bluetooth.“
11
CH LEVEL
.ةعامس لك توص ىوتسم طبض كنكمي ،رزلا ع طغضلاب
توصلا ىوتسم طبضا مث ،توصلا تادادعإ "Front Top Level" وأ "Centre Level" ددح ،توص كم لكل توصلا ىوتسم مكحتلل
.لفس/ع نيرزلا دحأ مادختساب +6و -6 ب
ـل توصلا ىوتسم طبضل .”Rear Top Level“ و ”Rear Level“ دادعا معد متي )لصفنم لكشب عاب
ُ
ت( ةيفلخلا تاعامسلا ليصوت دنع
.لفس/ع رارزا مادختساب +6 إ -6 ب "Rear Top Level" و "Rear Level"
LED ةءاضإ ؤم
1X ضموي ضيبا
”Front Top Level“ ← ”Centre Level“
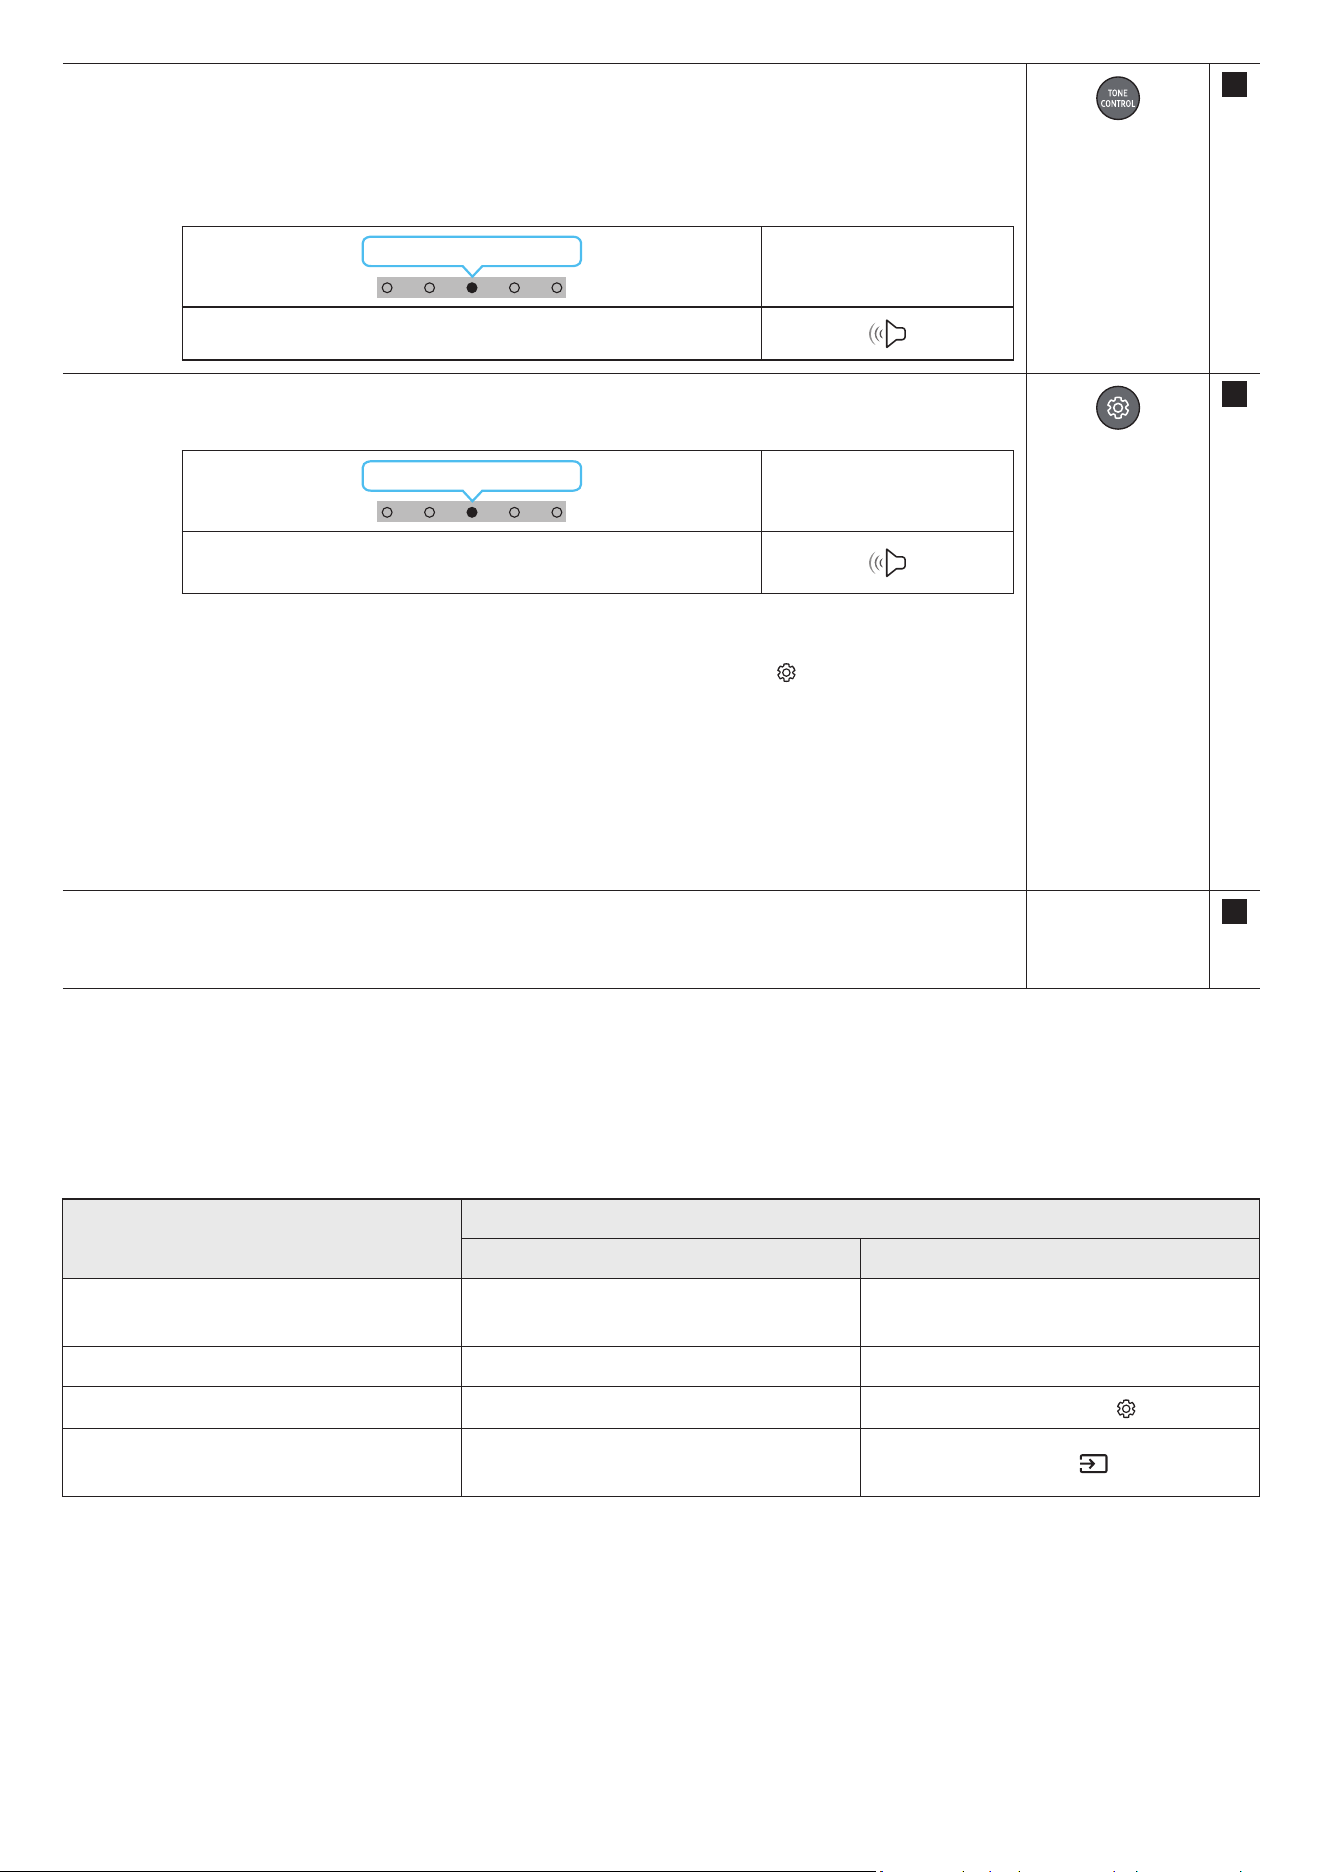
11 - ARA
12
TONE CONTROL
هذه كمت متي .لفس/ع نيرزلا مادختساب بوغرا نعلا طبض نكميو .هجلا وأ ثلا توصلا ىوتسم طبض كنكمي ،رزلا ع طغضلاب
.Standard عضولا ءانثتساب توصلا عضو ةفيظولا
+6 ~ -6 ب توصلا ىوتسم طبضا مث ،توصلا تادادعإ "Bass" وأ "Treble" ددح ،هجلا وأ ثلا توصلا ىوتسم مكحتلل
.لفس/ع رارزا مادختساب
.كلذل ا
ً
قفو توصلا كم ىوتسم طبض ا
ً
ضيأ متيس ،هجلا ىوتسم يغت درجمب
LED ةءاضإ ؤم
1X ضموي ضيبا
”Bass“ ← ”Treble“
13
توصلا مكحتلا
ضموي ،عضولا غتي ةرم لك .لفس/ع نيرزلا مادختساب بوغرا نعلا طبض نكميو .توصلا ةفيظو طبض كنكمي ،رزلا ع طغضلاب
.ضيباب ناولا ددعتا LED ؤم
LED ةءاضإ ؤم
1X ضموي ضيبا
← ”Active Voice Amplier“ ← ”SpaceFit Sound“
”Virtual“ ← ”Sync“ ← ”Night Mode“ ← ”Voice enhancement“
.نويزفلتلاو مفا قوطنا راوحلا عامس عضولا Voice enhancement عضو لهس
ُ
ي
.ا
ً
حضاو راوحلا ءاقبإ عم توصلا ىوتسم ضفخل تادادعا طبض عم Night Mode عضو سحت مت
300و ،زتره 150 ديدحت نكمي .ددرت قاطن لكل توصلا طبضل ناوث 5 نم ب
ُ
رقي ا )توصلا مكحتلا(
رزلا ع رارمتسا عم طغضا
اهنم ةدحاو لك طبض نكميو مي/راسي نيرزلا دحأ مادختساب زتره وليك 10و ،زتره وليك 5و ،زتره وليك 2.5و ،زتره وليك 1.2و ،زتره 600 و ،زتره
.لفس/ع نيرزلا دحأ مادختساب +6 إ -6 ب ام دادعإ إ
).”STANDARD“ إ توصلا عضو يعت نم دكأت(
300 ~ 0 ب توصلا خأت طبضا مث ،توصلا مكحتلا "Sync" ددحف ، Soundbar نم توصلاو نويزفلتلا ع ويديفلا نماي مل اذإ
.لفس/ع نيرزلا دحأ مادختساب ةيناث لم
.طقف فئاظولا ضعب "Sync" ةيصاخ معدت
.لفس/ع نيرزلا دحأ مادختساب Virtual ةفيظو ليغشت فاقيإ/ليغشت نكمي
14 )C عون( USB ذفنم
نحشلل
.LED ؤم ئفطني ،نحشلا لامتكا دنع .نحشلا ءانثأ LED ؤم ءي
.رفوتم غ USB لبك
.USB-C عون ذفنم مادختساب هنحشب مق ،ةيراطبلا ضافخنا ببسب دع
ُ
ب نع مكحتلا ةدحو لمعت امدنع
)AVA( طشنلا توصلا كم
.ا
ً
مئاد حوضوب توصلا عامس نكمي ثيحب ،soundbar زاهج ليغشت ءانثأ عفلا تقولا ةيجراخلا ءاضوضلا للحي
.ليلحتلا ءانثأ تانايب يأ ظفح متي
)ةفيظو نم كأ اهل رارزأ( ةيفخا رازا مادختسا
يفخا رزلا
عجرا ةحفص
دع
ُ
ب نع مكحتلا ةدحو رزةفيظولا
)عأ( توصلا مخضم
نويزفلتلا دع
ُ
ب نع مكحتلا زاهج ليغشت فاقيإ/ليغشت
)دادعتسا(
13 ةحفص
عأID SET9 ةحفص
)توصلا مكحتلا(
تاقاطن 7 نم توصلا لداعم 11 ةحفص
)ردصا(
ةيتوصلا تاقيلعتلا ليغشت فاقيإ/ليغشت
)دادعتسا عضو(
9 ةحفص
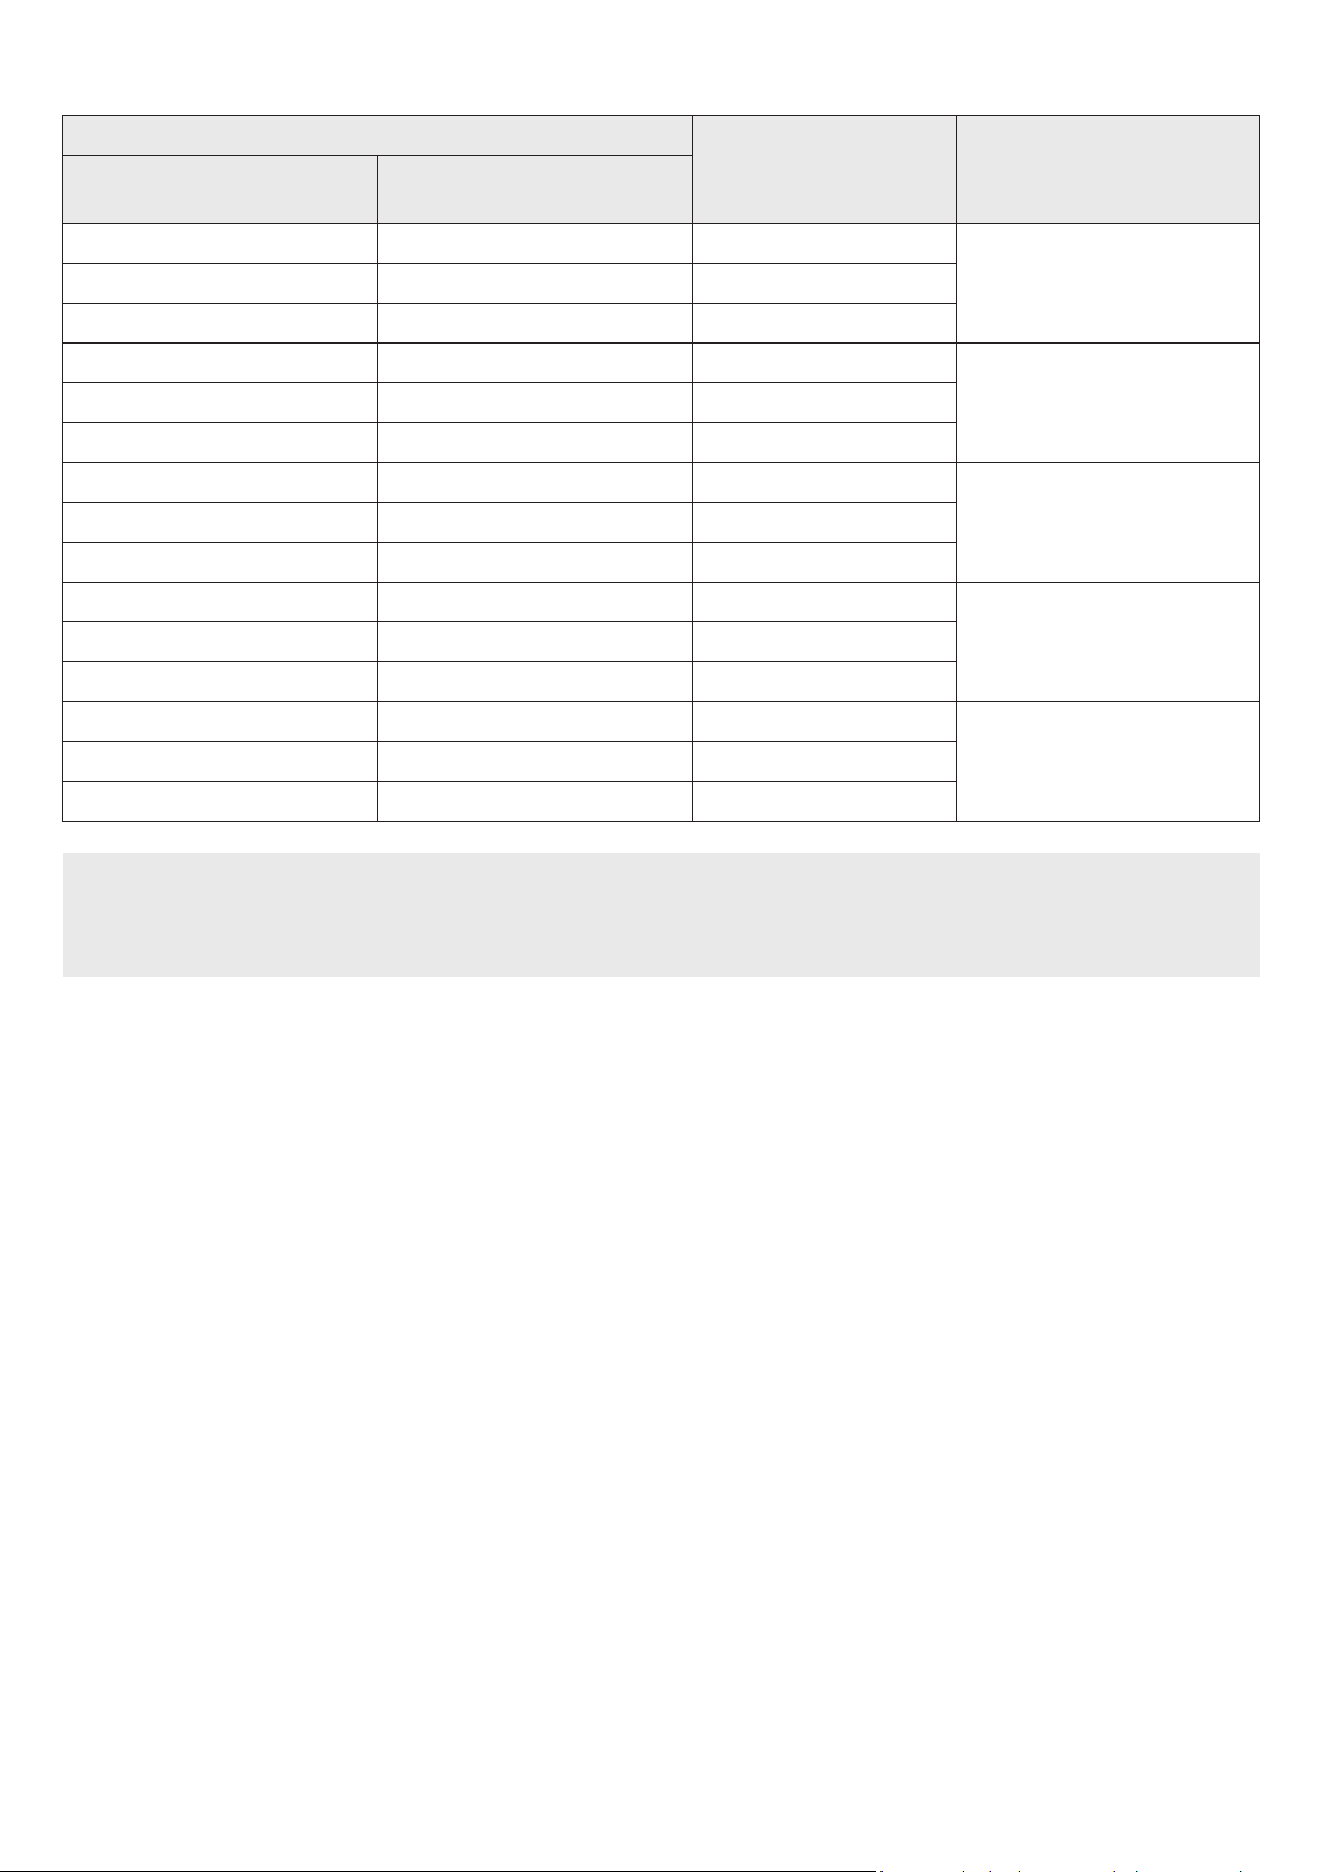
12 - ARA
ةفلتخا وصلا ثأتلا عاضو ذفنا تافصاوم
ثأتلاخدإ
جرخلا
طقف لسلا توصلا مخضمب
ةيفلخلا تاعامسلاو توص مخضم مقطب
ةيكلسلا
Surround
ةانق 2.0ةانق 3.1.2ةانق 5.1.4
ةانق 5.1ةانق 3.1.2ةانق 5.1.4
Dolby Atmos®ةانق 3.1.2ةانق 5.1.4
Game
ةانق 2.0ةانق 3.1.2ةانق 5.1.4
ةانق 5.1ةانق 3.1.2ةانق 5.1.4
Dolby Atmos®ةانق 3.1.2ةانق 5.1.4
Standard
ةانق 2.0ةانق 2.1ةانق 2.1
ةانق 5.1ةانق 3.1ةانق 5.1
Dolby Atmos®ةانق 3.1.2ةانق 5.1.4
Adaptive Sound
ةانق 2.0ةانق 3.1.2ةانق 5.1.4
ةانق 5.1ةانق 3.1.2ةانق 5.1.4
Dolby Atmos®ةانق 3.1.2ةانق 5.1.4
DTS Virtual:X
ةانق 2.0ةانق 3.1.2ةانق 5.1.4
ةانق 5.1ةانق 3.1.2ةانق 5.1.4
Dolby Atmos®ةانق 3.1.2ةانق 5.1.4
.هنم Soundbar زاهج ءاب تمق يذلا عئابلا عم لصاوت ،مقط ءال .لصفنم لكشب ةيكلسلا ةيفلخلا ةعامسلا تاودأ ةعومجم ءا نكمي
.SURROUND إ ثأتلا عضو يغتب مق ،يطيحا توصلا تاكم كمتل .STANDARD عضولا مادختسا ءانثأ تانق جارخ ا
ً
تاوصأ ةيطيحا توصلا تاكم ردصت نل
ةيكلسلا ةيفلخلا تاعامسلاو توصلا مخضم مقط دادعإ رفوي امنيب ،ةانق توص 3,1,2 طقف توصلا مخضم دادعإ رفوي ،Dolby Atmos® وه لاخدا ردصم نوكي امدنع
.ةانق توص 5.1.4
13 - ARA
نويزفلتلاب صاخلا دعب دنع مكحتلا زاهج مادختساب Soundbar زاهج توص ىوتسم طبض
.نويزفلتلاب صاخلا دعب دنع مكحتلا زاهج مادختساب Soundbar توص ىوتسم طبض
.ةموعدم غ )نارقا بلطتت لا مكحتلا ةزهجأ( ثوتولبلاب دعب نع مكحتلا ةزهجأ .طقف ءارمحلا تحت ةعشاب دع
ُ
ب نع مكحتلا ةزهجأ عم ةفيظولا هذه مادختسا نكمي
.ةفيظولا هذه مادختس ةيجراخلا ةعامسلا ع نويزفلتلا توص كم طبضا
:يه ةفيظولا هذه معدت لا ةعّنصا تاكلا
RCAو Hisenseو TOSHIBAو PANASONICو PHILIPSو Sharpو Sonyو LGو VIZIOو Samsung
1 ..Soundbar ليغشت فاقيإب مق
2 ..ناوث 5 ةد WOOFER رزلا ع رارمتسا عم طغضا
,”SAMSUNG-TV REMOTE“ ,)افا عضو( ”OFF-TV REMOTE“ :اتلا بيتلاب عضولا لدبتي ،ناوث 5 ةد رارمتسا عم ع WOOFER رزلا عفدت ةرم لك
.”ALL-TV REMOTE“
دع
ُ
ب نع مكحتلا ةدحو رزLED ةءاضإ ؤمةلاحلا
)افا عضولا(
1X ضموي رمحا
"Off-TV Remote"
)افا عضولا(
.نويزفلتلاب صاخلا دعب نع مكحتلا زاهج ليطعتب مق
1X ضموي يوامسلا قرزا
"Samsung-TV Remote"
نويزفلتب صاخلا ءارمحلا تحت ةعشاب دعب دنع مكحتلا زاهج ليعفتب مق
.Samsung
1X ضموي قرزا
"All-TV Remote"
نويزفلتب صاخلا ءارمحلا تحت ةعشاب دعب دنع مكحتلا زاهج ليعفتب مق
.ىرخا ةهج جاتنإ نم
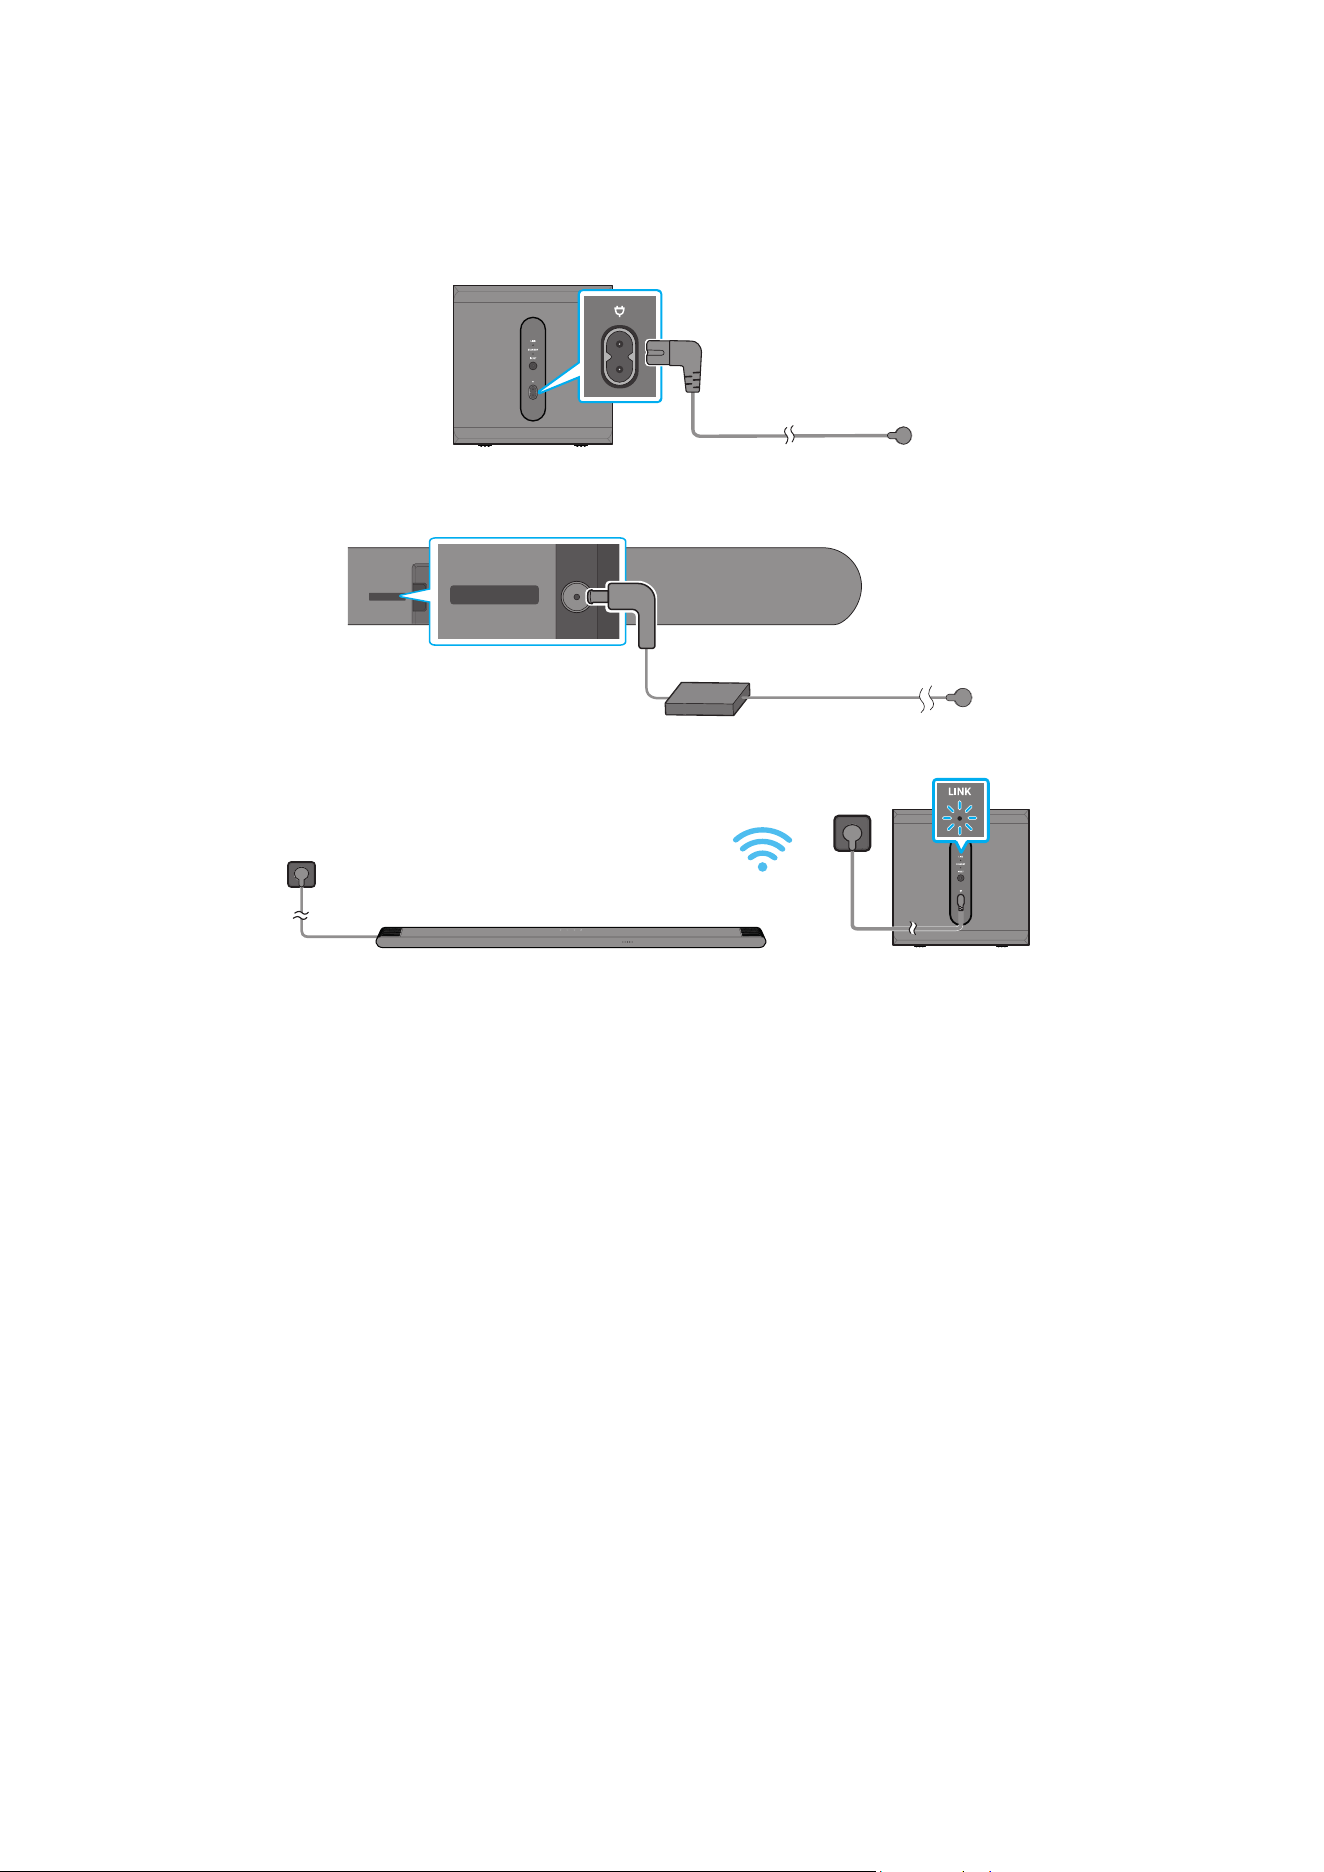
14 - ARA
04 SOUNDBAR زاهج ليصوت
تادحولاو ابرهكلا رايتلا ليصوت
:اتلا بيتلاب ابرهك ذخأمب Soundbarو توصلا مخضم ليصوتل ةقاطلا كلس مدختسا
)ةيساسا Soundbar ةدحو نم فسلا ءزجلا :قصلا( .جتنا عم قفرا قصلا عجار ،ةقاطلا كهتساو ةبولطا ةيئابرهكلا ةقاطلا نع تامولعا نم ديز
1 ..توصلا مخضمب ءابرهكلا كلس ليصوتب مق
توصلا مخض يفلخلا ءزجلا
ابرهك رايت كلس
2 ..Soundbar ـب ةقاطلا كلس ليصوتب مق
زاهج ةدحول يفلخلا بناج
ةيساسا Soundbar
DC 19V
DC 19V
ابرهك رايت كلس
/رمتسا رايتلا لوحم
ددا رايتلا
3 . .Soundbar ليغشت دنع ا
ً
يئاقلت توصلا مخضم ليصوت متي .توصلا مخضمو Soundbar زاهجب ابرهكلا رايتلا ليصوتب مق
ديق قرزا ءوضلا - LINK LED
ليغشتلا
ةظحم
.Soundbar زاهج ليغشت دنع ا
ً
يئاقلت توصلا مخضم ليصوت متيس .Soundbar زاهجب هليصوت لبق توصلا مخضم ةقاط ل
صو
.ا
ً
يئاقلت Soundbar زاهج ليغشت متيس ،جتنا ليغشت دنع هليصوت ةداعإو ءابرهكلا كلس لصفب تمق اذإ
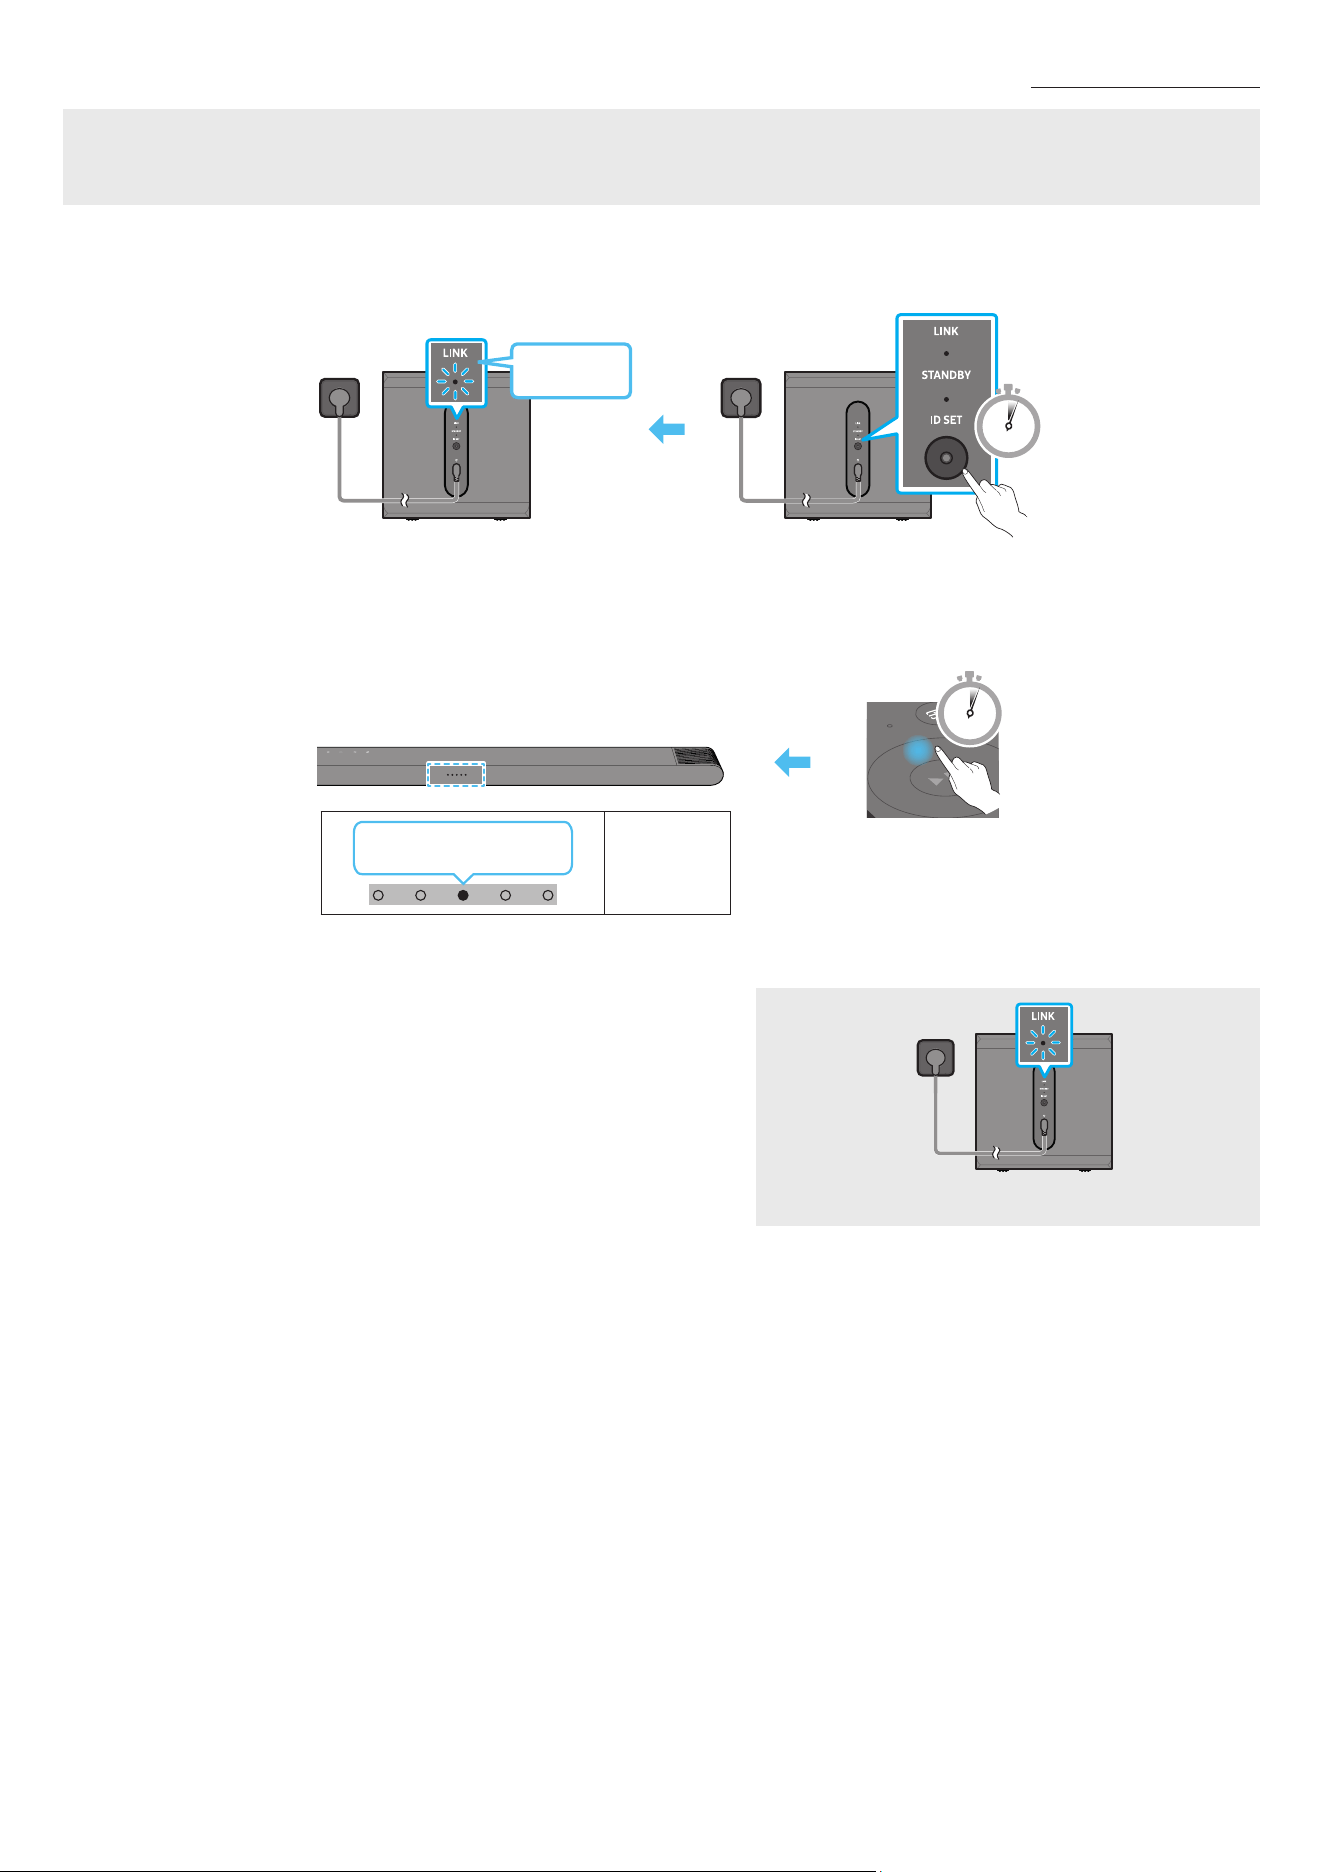
15 - ARA
ا
ً
يودي توصلا مخضم ليصوت
:هاندأ دراولا يوديلا ليصوتلا ءارجإ ذيفنت لبق
.حيحص لكشب توصلا مخضمو Soundbar زاهجب صاخلا ةقاطلا بك ليصوت نم ققحت
.Soundbar زاهج ليغشت فاقيإ نم دكأت
1 ..ةيساسا Soundbar ةدحو ليغشت فقوأ
2 . .لقا ع
ٍ
ناوث 5 ةد توصلا مخضم نم يفلخلا ءزجلا ع ID SET ع رارمتسا عم طغضا
.قرزا نوللاب ما ؤا ضمويسو توصلل كم لك فلخ دوجوا رمحا نوللاب ما ؤا ةءاضا نع فقوتيس
5 Sec
توصلا مخض يفلخلا ءزجلا
ةعب ضموي
قرزا نوللاب
توصلا مخض يفلخلا ءزجلا
3 ..
ٍ
ناوث 5 ةد دع
ُ
ب نع مكحتلا زاهج ع رزلا ع طغضا
. ID SET لامتكا دنع ا
ً
يئاقلت Soundbar زاهج لمعيس
5 Sec
ةءاضإ ؤم
LED
← رمحا ضموي
قرزا ← خا
4 ..)ليصوتلا لمتكا( تباث قرزأ نولب طابترا LED ؤم نأ ققحت
ليغشتلا ديق قرزا ءوضلا - LINK LED
زاهج ب لاصتا ءاشنإ دنع تباثلا قرزا نوللاب ءيو ضيمولا نع طابترا LED ؤم فقوتي
.لسلا توصلا مخضمو Soundbar
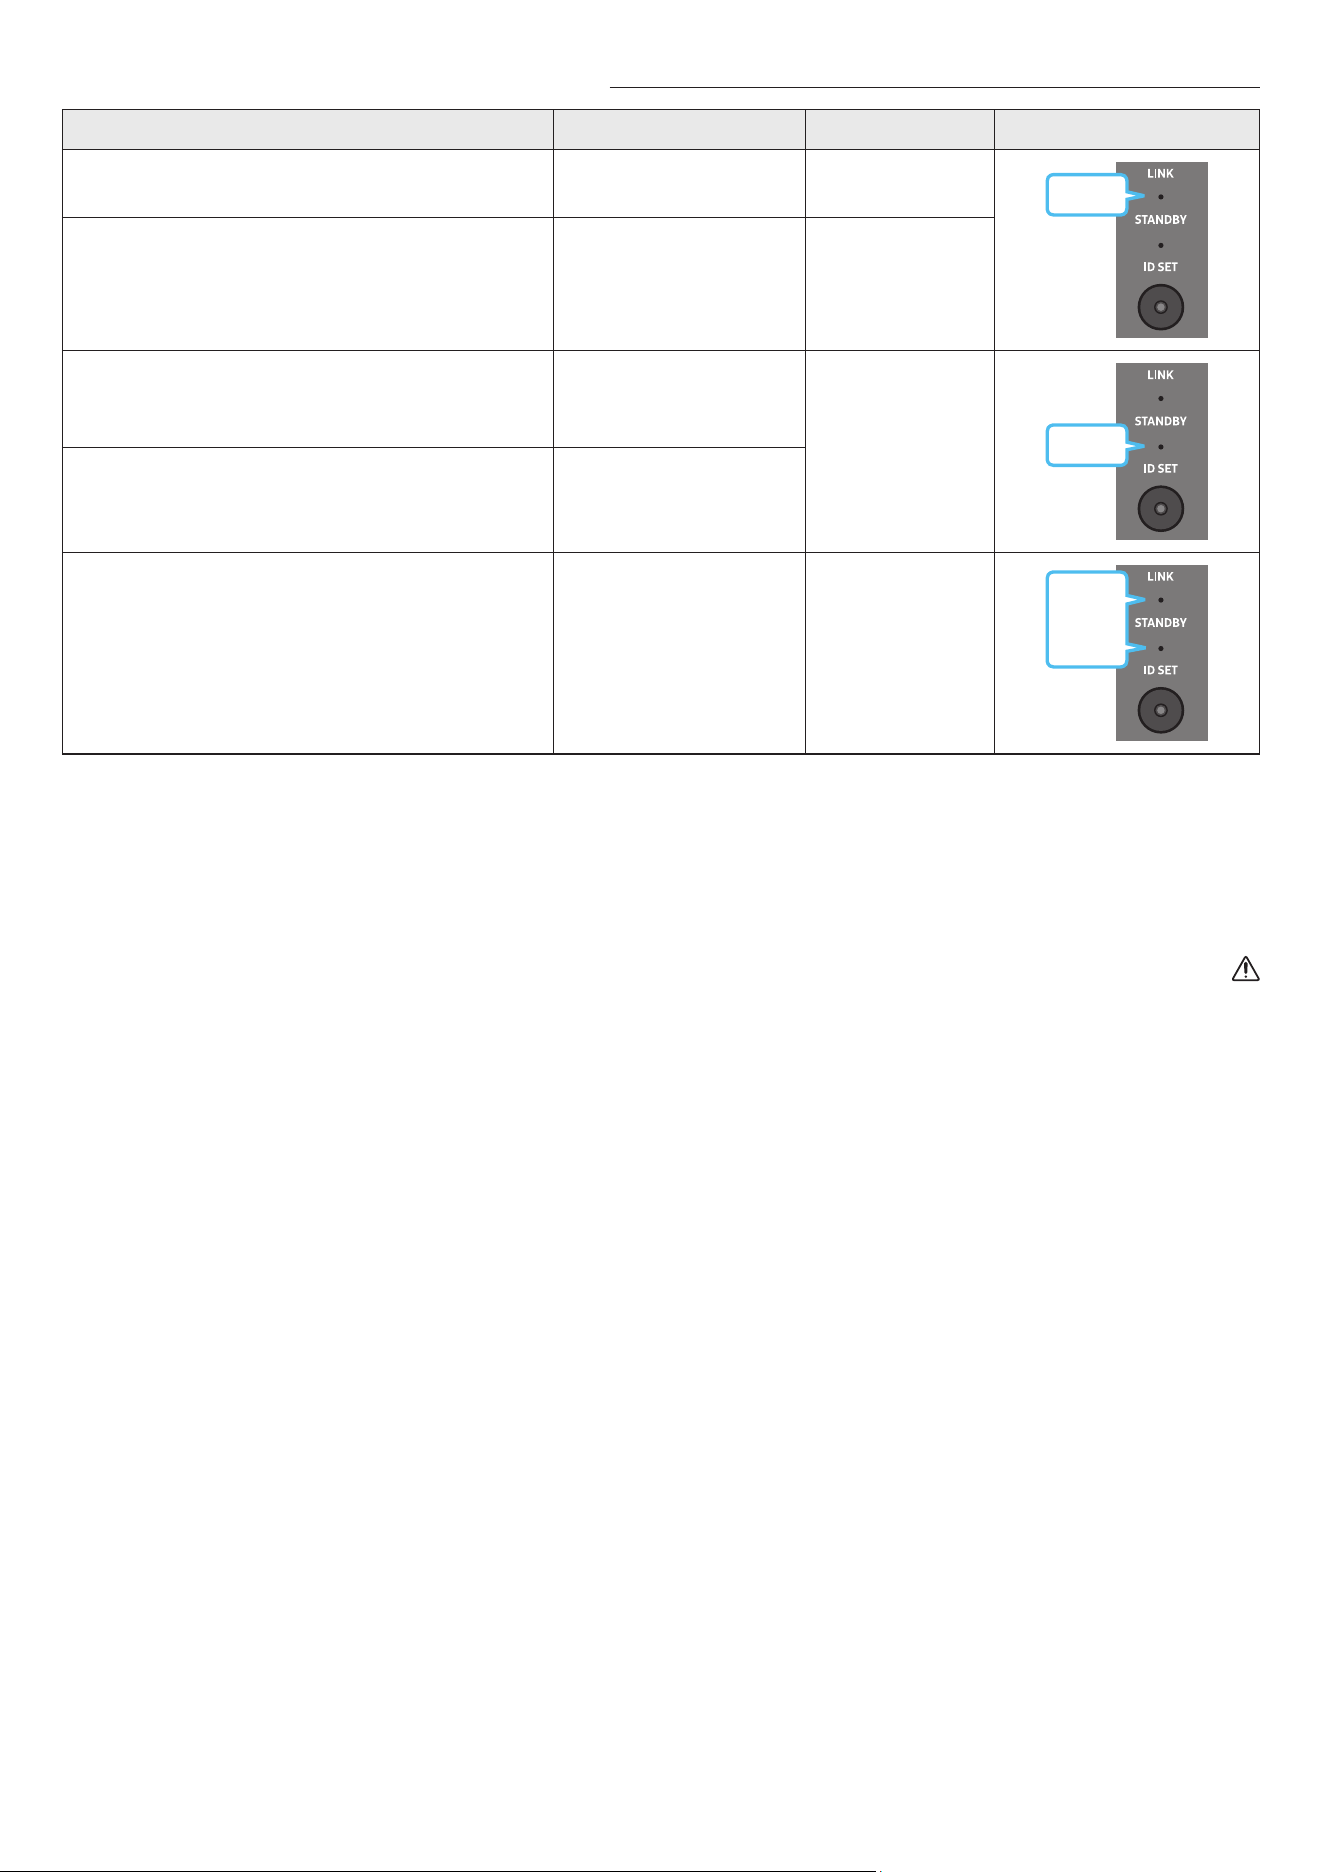
16 - ARA
مسجا توصلا تاكم وأ توصلا مخضم فلخ ةدوجوا LED تاؤم ءاوضأ
LED ؤمةلاحلافصولاةقدلا
قرزأ
ليغشت
حاجنب لصتم
)ةيداع ليغشت ةيلمع(
-
ضيموليصوتلا ةداعتسا
ةيساسا Soundbar زاهج ةدحوب ةقاطلا لبك ليصوت نم ققحت
،ضيمولا رارمتسا ةلاح .ا
ً
بيرقت قئاقد 5 ةد رظتنا وأ حيحص لكشب
.15 ةحفص عجار .ا
ً
يودي توصلا مخضم ليصوت لواح
رمحأ
ليغشت
ليغشت فاقيإ عم( دادعتسا
زاهجل ةيسيئرلا ةدحولا
)Soundbar
ةيساسا Soundbar زاهج ةدحوب ةقاطلا لبك ليصوت نم ققحت
.حيحص لكشب
ليصوتلا لشف
ةدراولا يوديلا ليصوتلا تاميلعت عجار .ىرخأ ةرم ليصوتلاب مق
.15 ةحفص
رمحأ
قرزأو
ضيموللخ.ليلدلا اذه ةدراولا Samsung ةمدخ زكرمب لاصتا تامولعم عجار
ةظحم
توصلا كم نم يفلخلا ءزجلا دوجواو دادعتسا عضول وضلا ؤا لوحتيو دادعتسا عضو إ لسلا توصلا مخضم لقتنيس ،ةيساسا ةدحولا ليغشت فاقيإ مت اذإ
.تارم ةدع قرزا نوللاب ضيمو دعب رمحا نوللا إ يعرفلا
.توصلاب عاطقنا ثودح لخادتلا ببستي دقف ،Soundbar زاهج نم برقلاب Soundbar زاهج لثم ددلا سفن مدختسي ا
ً
زاهج مدختست تنك اذإ
ب دعم رادج وأ يذوف اسرخ رادج دوجو ةلاح .كب ةصاخلا ليغشتلا ةئيبل ا
ً
عبت فلتخت دق اهنكلو ،ا
ً
م 10 اوح ةيسيئرلا ةدحولل ةيكلسلا ةراشل لاسرإ ةفاسم قأ غلبت
.ندعا قاخا اهنكمي ةيكلسلا ةراشا ن قطا ع ماظنلا لمعي دقف ،لسلا توصلا مخضمو ةيسيئرلا ةدحولا
هيبنت
.ةبوطرلاو ءاا نع ةدحولا دعبأ .لسلا توصلا مخضم ةيكلسلا لابقتسا تايئاوه مضت متي
.قئاوع ةيأ نم لسلا توصلا مخضمب ةطيحا ةقطنا ولخ نم دكأت ،اثم عامتسا ءادأ ع لوصحلل
كب صاخلا Soundbar زاهجب )لصفنم لكشب عاب
ُ
ي( SWA-9500S ليصوت
Soundbar زاهجب )لصفنم لكشب عاب
ُ
ت - ,SWA-9500S( ةيكلسلا ةيفلخلا Samsung تاعامس مقط ليصوت قيرط نع ا
ً
يقيقح حبصيل لسلا يطيحا توصلا زيزعت كنكمي
.كب صاخلا
.Samsung نم ةيكلسلا ةيفلخلا تاعامسلا مقط ليلد عجار تيصوتلا لوح ةيليصفتلا تامولعا نم ديزا ع لوصحلل
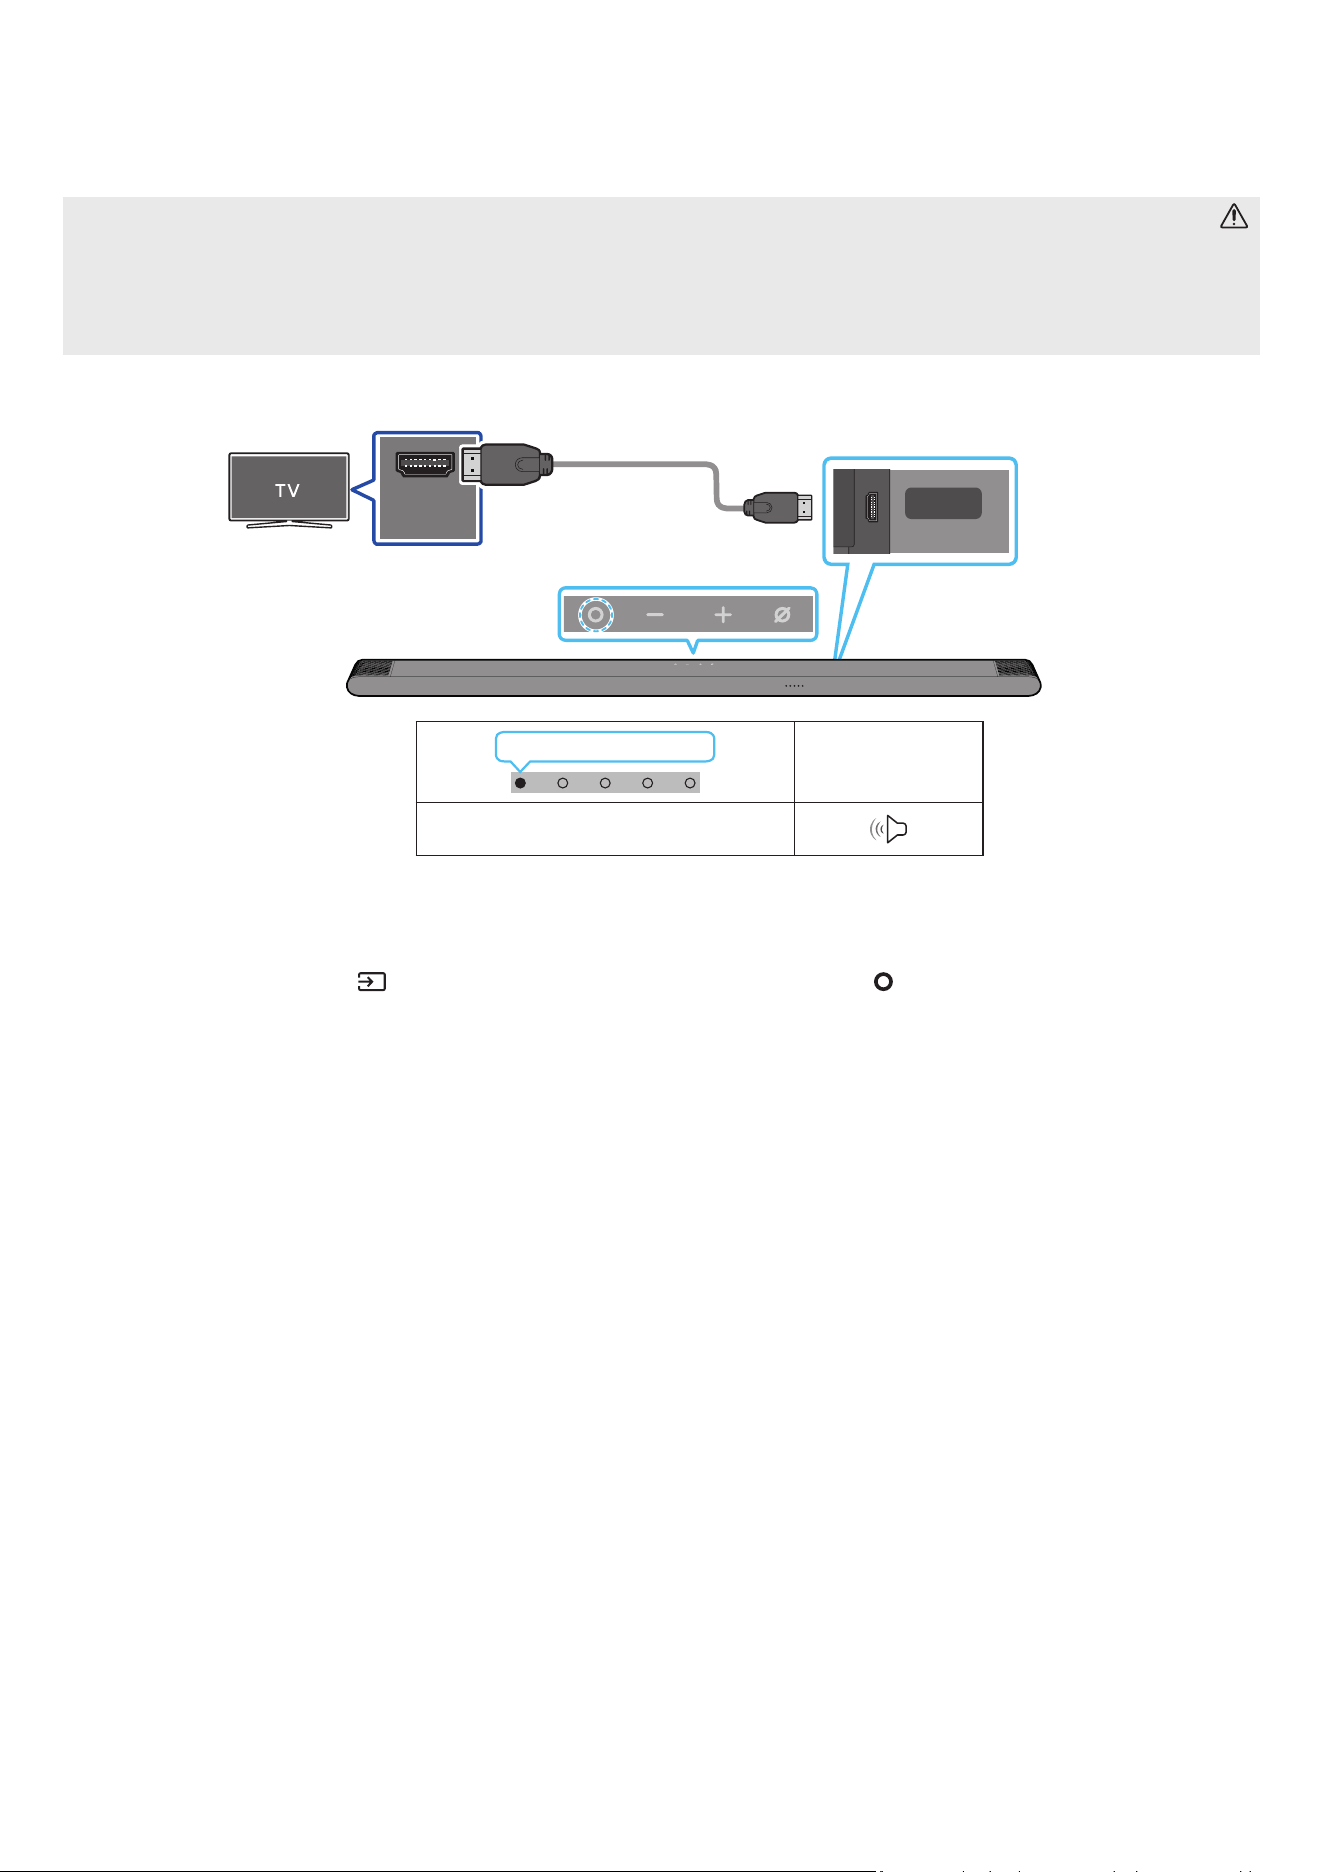
17 - ARA
05 نويزفلتب لاصتا
)توصلا عاجرإ ةانق( HDMI ARC معدي يذلا نويزفلتلا ليصوت
هيبنت
.لبكلا فرط ك نم رذحا ،Micro HDMI إ HDMI لبك مادختسا دنع
.
ً
وأ HDMI لبك ةراشإ متسا متي ،HDMI لبك ليصوت دنع
.نويزفلتلا توص جارخإ متي دق ،إو .ARC فرحاب ةما فارطا ليصوت نم دكأت ،Soundbar زاهجو نويزفلتلا ب HDMI لبك ليصوتل
.High Speed HDMI Cable with Ethernet وه هب وا لبكلا
HDMI IN
(ARC)
SERVICE
HDMI
(ARC)
وأ HDMI IN )ARC( ذفنمب ل
صو
.نويزفلتلا زاهجب دوجوا )eARC(
ةدحوب HDMI )ARC( ذفنمب ل
صو
.ةيساسا Soundbar
إ HDMI لبك
Micro HDMI
Soundbar زاهجل يفلخلا بناجلا
Soundbar زاهج نم يولعلا ءزجلا
LED ةءاضإ ؤم
ضيبا فاقيإ ← ليغشت
”TV ARC“
1 ..لكشلا حضوم وه امك HDMI لبك ل
صو ،نويزفلتلاو Soundbar زاهج ليغشت فاقيإ دنع
2 ..نويزفلتلاو Soundbar زاهج ل
غش
3 ..Soundbar زاهج ةطساوب توصلا نويزفلتلا زاهج جرخ
ُ
يس
ديدحتل دع
ُ
بلا نع مكحتلا ةدحوب )ردصا(
رز وأ Soundbar زاهج نم يولعلا ءزجلا دوجوا )ةددعتا فئاظولا( رزلا ع طغضا ،نويزفلتلا توص جورخ مدع دنع
.TV ARC عضو
.ىرخأ ةرم HDMI لبك ليصوت نم ققحت ،توصلا جورخ مدع دنع
.Soundbar زاهج توصلا ىوتسم يغتل نويزفلتلا دع
ُ
ب نع مكحتلا زاهجب نيدوجوا توصلا ىوتسم طبض يرز مدختسا
ةظحم
.مم 14 نع هرطق لقي
ً
بك مدختسا ،موم HDMI لبك مدختست تنك اذإف .نكمأ نإ موم غ HDMI لبك مادختساب كيصون
.)توصلا عاجرإ ةانق( ARC معدي HDMI لبك ناك اذإ ةفيظولا هذه رفوتت
دنعو .Dolby Digital إ دادعا يغتب ون ،PCM ع نويزفلتلا زاهج ع "يمقرلا توصلا جارخإ قيسنت" طبضو Dolby Digital ةينقت مادختساب ام ثب توصلا فشت دنع
).نويزفلتلل ةعنصا ةكلا بسح PCMو Dolby Digital ةينقتل ةفلتخم تاملك نويزفلتلا ةمئاق مدختست دق( .لضفأ توص ةدوجب عتمتتس ،نويزفلتلا ع دادعا يغت
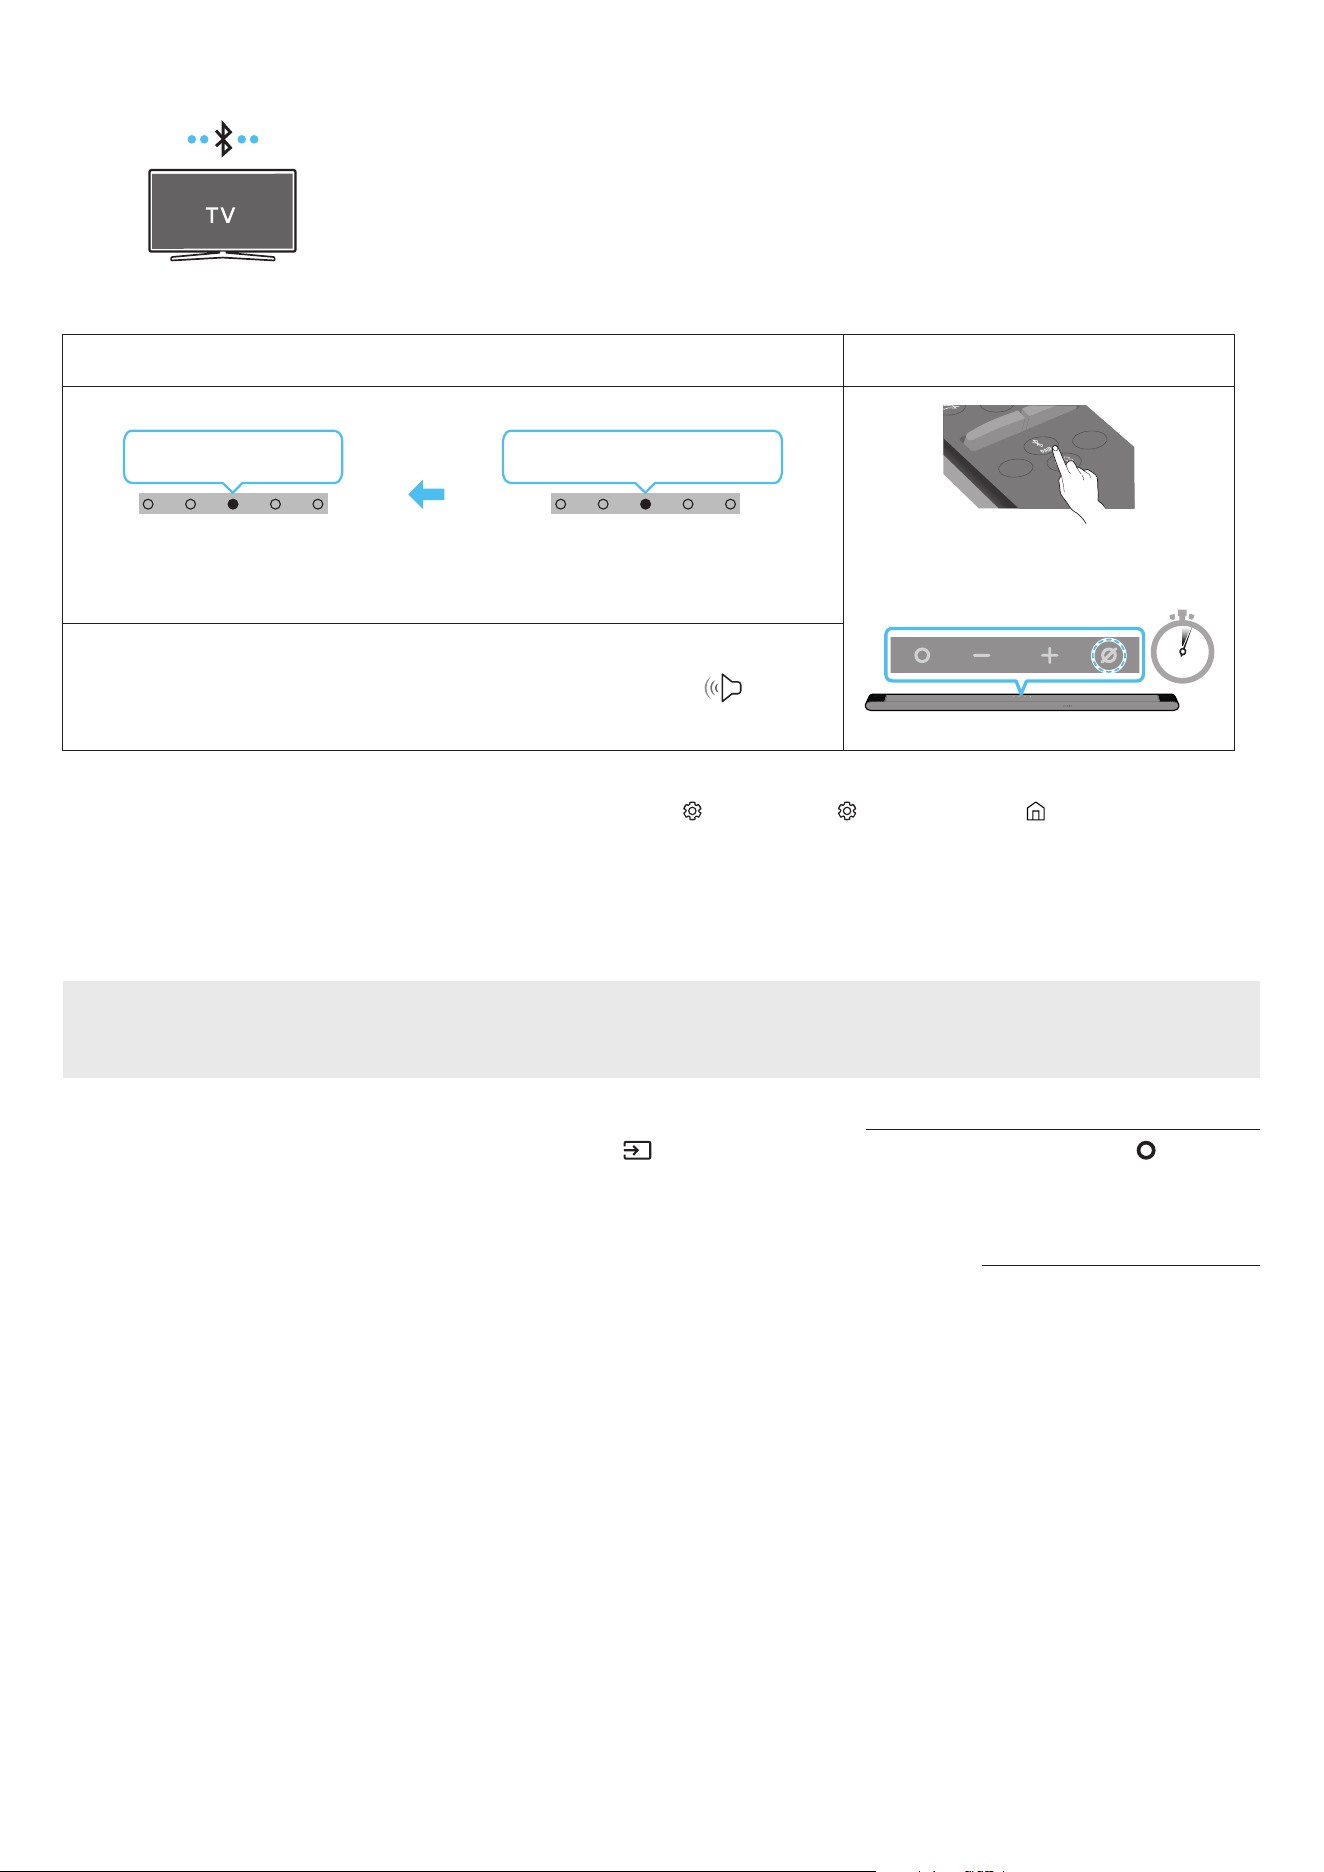
18 - ARA
Bluetooth ةينقت ع لاصتا
.تبكلا كباشت بعاتم نود ويستوص عامس كنكمي ،Bluetooth ةينقت مادختساب Samsung نويزفلت ليصوت دنع
.ةدحاولا ةرا دحاو Samsung نويزفلت ىوس ليصوت نكمي
.كنويزفلت تافصاوم نم ققحت .Bluetooth ةينقت معدي يذلا Samsung نويزفلت ليصوت نكمي
وا ليصوتلا
.1
Bluetooth ناقا رزLED ةءاضإ ؤم
SOUNDBAR
SOUND
MODE
WOOFER
+
_
CH LEVEL
TONE
CONTROL
وأ
”Bluetooth“ عضو ةلاح
5 Sec
قرزا ← خا ← رمحا ضموي
ناقا
يوامسلا قرزا
3X ضموي
ليصوتلا لمتكا
.قرزأ ← خأ ← رمحأ نوكيل هرودب ناولا ددعتا LED ؤم غتي ناقا لامتكا ح
”Ready to connect via Bluetooth.“
1 .
2 ..Samsung نويزفلت ع )ثوتولبلا( Bluetooth عضو ددح
← تاعامسلا ةمئاق Bluetooth ← توصلا جرخم ← توصلا ← ) ( تادادعا لك ← ) ( تادادعا ← ةمئاق ← ) ( ةيسيئر :لاثا ليبس ع(
)[AV] Samsung Soundbar S***B )Bluetooth(
3 ..نويزفلتلا ةشاش ع ةرهاظلا ةمئاقلا نم ”[AV] Samsung Soundbar S***B“ ددح
،ةلاسرلا ددح ،Soundbar زاهجب Samsung نويزفلت ليصوتل .نويزفلتلاب ةصاخلا Bluetooth ةزهجأ ةمئاق "نقم" وأ "ناقا إ ةجاحلا" ـب حاتا Soundbar زاهج إ راش
ُ
ي
.لاصتا ءاشنإب مق مث
4 ..Soundbar زاهج نم Samsung نويزفلت توص عامس نا كنكمي
زاهجلا لاصتا لشف ةلاح
.هفذحا ،Samsung نويزفلت ع توصلا تاكم ةمئاق )[AV] Samsung Soundbar S***B ،لاثا ليبس ع( Soundbar زاهج كيدل ناك اذإ
.3 إ 1 نم تاوطخلا ررك مث
Samsung نويزفلت نم Soundbar زاهج لصف
.”Bluetooth“ عضولا غ عضو ديدحتل دع
ُ
ب نع مكحتلا ةدحوب )ردصا( رزلا وأ Soundbar زاهج نم يولعلا ءزجلاب دوجوا )ةددعتا فئاظولا( رزلا ع طغضا
.Soundbar زاهج نم ةباجتسا Samsung نويزفلت لبقتسي نأ بجي هن ا
ً
رظن تقولا ضعب لصفلا ةيلمع قرغتست
).Samsung نويزفلت زارط بسح ق
َ
رغتسا تقولا فلتخي دق(
Bluetooth لاصتا نع تاظحم
.Bluetooth لاصتا ع لاصتل م 1 قاطن ديدج زاهج عقوم ددح
.>0000< ل ِخدأ ،Bluetooth زاهج ليصوت دنع PIN زمر كنم بل
ُ
ط اذإ
.دادعتسا ةلاح ةقيقد 18 دعب ا
ً
يئاقلت Soundbar زاهج ليغشت فاقيإ متي
:ةيلاتلا فورظلا لظ حيحص لكشب
ً
اصتا وأ Bluetooth ثحب Soundbar زاهج يرج
ُ
ي دق
‒ .Soundbar زاهج لوح يوق ابرهك لاجم دوجو ةلاح
‒ .دحاو
ٍ
نآ Soundbar زاهجب Bluetooth ةزهجأ ةدع ناقا ةلاح
‒ .لاطعأ دوجو وأ هناكم هدوجو مدع وأ ،Bluetooth زاهج ليغشت فاقيإ ةلاح
ةزهجأو فيوركياا ةزهجأ ،لاثم ،ةيساسا Soundbar ةدحو نع ةيسيطانغمورهك تاجوم د
ّ
لوت لا ةزهجا داعبإ عتي .ويدارلا تاجوم لخادت ةينوكلا ةزهجا ببستت دق
.كلذ إ امو ةيكلسلا LAN

19 - ARA
Wi-Fi لخ نم ليصوتلا
ليصوتلا لبق صحفلا ةمئاق
.طقف Samsung نويزفلت ع Wi-Fi لاصتا رفوتي
.هجواب نويزفلتلا ليصوت نمو )Wi-Fi( لسلا هجوا ليغشت نم ققحت
.)Wi-Fi( ةيكلسلا ةكبشلا سفنب Soundbarو نويزفلتلا ليصوت بجي
ع لوصحلل كيدل تننا ةمدخ رفومب لصتا .Soundbarو نويزفلتلا ب Wi-Fi لاصتا ءاشنإ نم نكمتت نلف ،DFS ةانق مدختسي )Wi-Fi( لسلا هجوا ناك اذإ
.ليصافتلا
.كب صاخلا نويزفلتلا ليلد عجار ،عينصتلا ةنس بسح فلتخت دق مئاوقلا ن
ً
ارظن
.Wi-Fi لاصتا ءاشنإ ةيفيك لوح ليصافت ةفرع ،25 ةحفصلا عجار .
ً
وأ لسلا هجواب Soundbar ليصوتب مق ،Wi-Fi ع Soundbar ـب نويزفلتلا ليصوتل
1 ..")ةيكلسلا ةكبشلا( Wi-Fi ع لاصتا .2 ةقيرطلا" ،25 ةحفصلا عجار ،Soundbar ـب Wi-Fi لاصتا لوح تامولعا نم ديز
2 ..Soundbar إ توصلا ةمئاق مادختسا قيرط نع نويزفلتلا لخد ردصم يغتب مق
ا
ً
قح وأ 2017 ماع اهرادصإ مت لا Samsung تانويزفلت
[AV] Samsung Soundbar S***B )Wi-Fi( ← توصلا جرخم ← توصلا
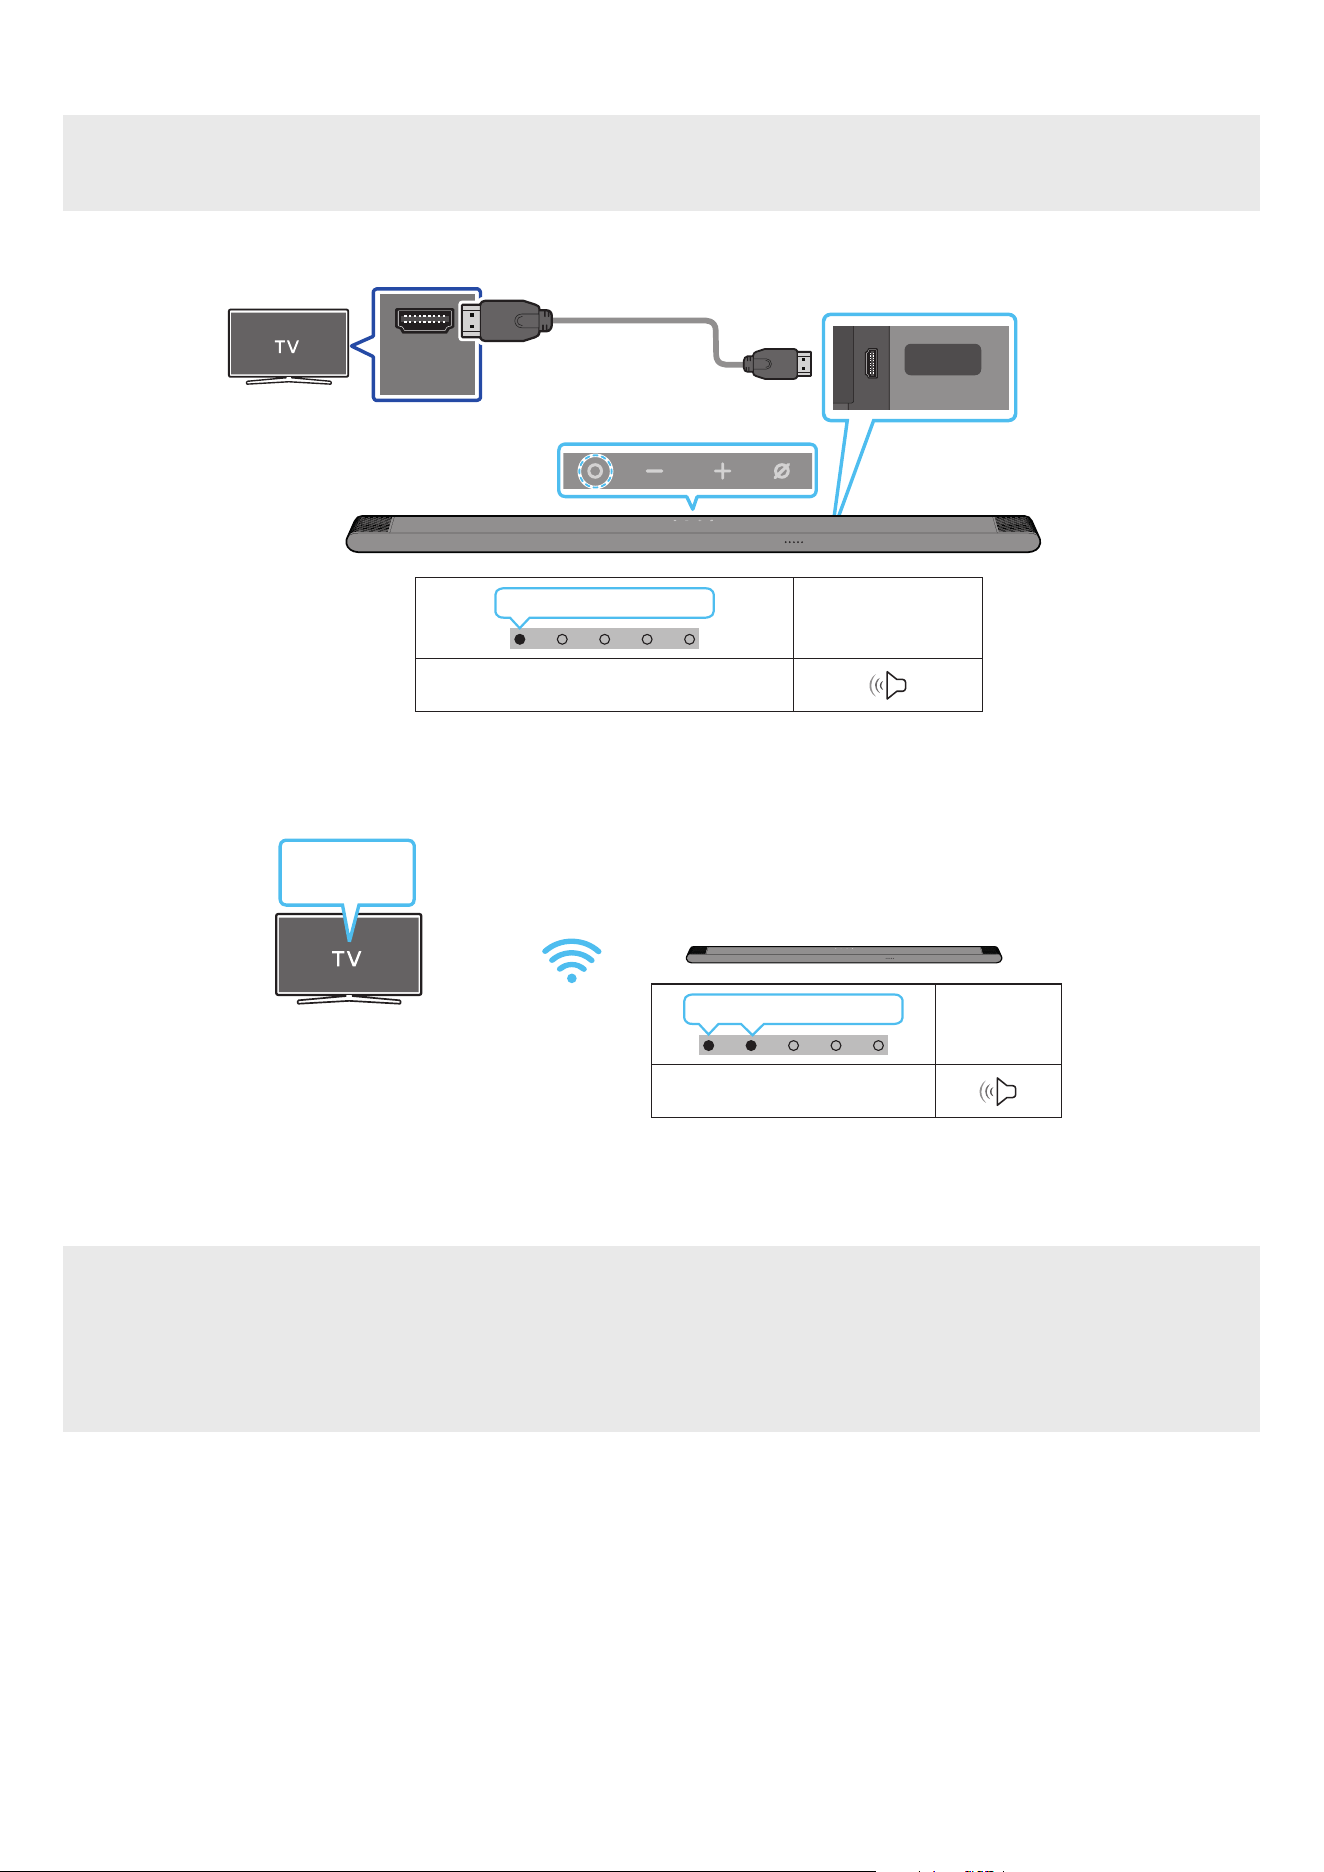
20 - ARA
Dolby Atmos معدي نويزفلت زاهجب ليصوتلا
ليصوتلا لبق صحفلا ةمئاق
”Wi-Fi“ عضولا وأ ”TV ARC“ عضولا Dolby Atmos® ةينقت معد
ُ
ت
.Dolby Atmos® ةينقت معدي ىوتحا نأ نم دكأت
HDMI IN
(ARC)
SERVICE
HDMI
(ARC)
HDMI IN )ARC( ذفنمب ل
صو
.نويزفلتلا زاهجب دوجوا
إ HDMI لبك
Micro HDMI
Soundbar زاهجل يفلخلا بناجلا
Soundbar زاهج نم يولعلا ءزجلا
LED ةءاضإ ؤم
ضيبا فاقيإ ← ليغشت
”TV ARC“
1 ..لكشلا حضوم وه امك HDMI لبك ل
صو ،نويزفلتلاو Soundbar زاهج ليغشت فاقيإ دنع
2 ..نويزفلتلاو Soundbar زاهج ل
غش
3 ..Soundbar زاهج نم نويزفلتلا توص جارخإ متي
ةءاضإ ؤم
LED
ضيبا فاقيإ ← ليغشت
”Wi-Fi“
ةمئاق
نويزفلتلا
Wi-Fi
1 ..)Wi-Fi( ةيكلسلا ةكبشلا سفنب Soundbarو نويزفلتلا ليصوت بجي
2 ..Soundbar زاهج ددح ،نويزفلتلا نم توصلا جارخ
3 ..Soundbar زاهج نم نويزفلتلا توص جارخإ متي
ةظحم
.12 ةحفص »ةفلتخا وصلا ثأتلا عاضو ذفنا تافصاوم« إ عجراف ،Dolby Atmos® وه لاخدا ردصم ناك اذإ : Dolby Atmos® مدختست م
.نويزفلتلا زاهجب لصتم رخآ زاهج يأ وأ ،BD ل
ّ
غش
ُ
م ع Dolby Atmos® ةينقت نيوكت
إ لقتنا ،Samsung نم BD ل
ّ
غش
ُ
م ،لثم .تبلا قفدل "مرت نود" ديدحت نم دكأتو رخآ زاهج يأ وأ كتصاخ BD ل
ّ
غش
ُ
تادادعا ةمئاق نم توصلا جارخإ تارايخ حتفا
.)ج
َ
لاعم غ( تبلا قفد ددح مث ةيمقر تاجرخم ← توصلا ← ةيسيئرلا ةمئاقلا
.Soundbar زرط ضعبو Samsung نويزفلت ةزهجأ ضعب ةفيظولا هذه رفوتت
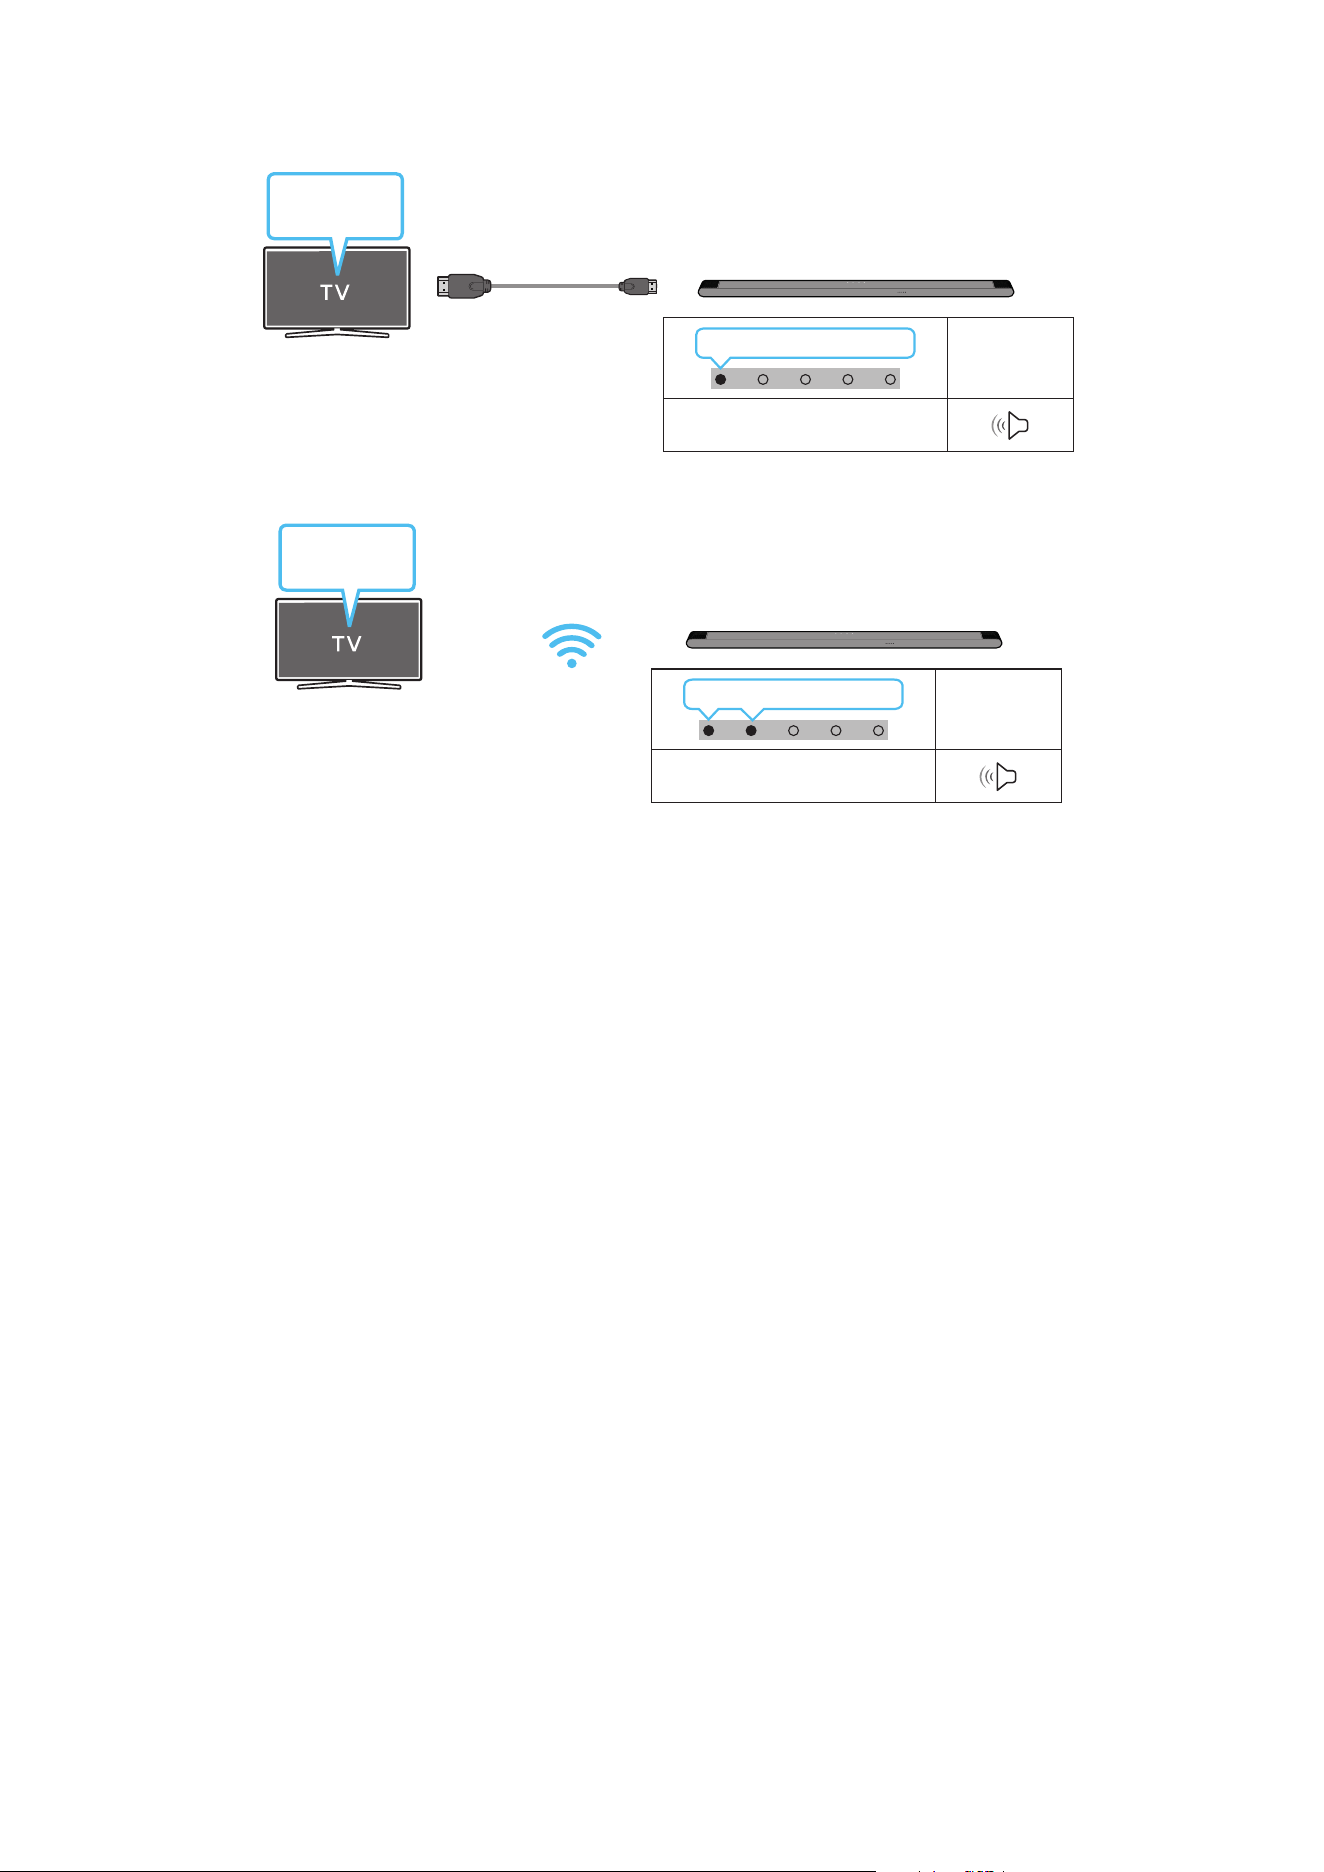
21 - ARA
Q-Symphony ةفيظو مادختسا
نمض "TV+Soundbar" ليصوت دنع .يطيحم ثأت لضفأ ع لوصحلل نيزاهج لخ نم توصلا جارخ Samsung نويزفلت عم Soundbar نماي ،Q-Symphony إ ةبسنلاب
.ةلباقا ةمئاقلا ددح .نويزفيلتلا توصلا جرخم ةمئاق
ةمئاق
نويزفلتلا
Micro HDMI إ HDMI لبك
ةءاضإ ؤم
LED
ضيبا فاقيإ ← ليغشت
”TV ARC“
)HDMI( Soundbar ةلسلس مسا + TV :نويزفلتلا ةمئاق ع لاثم
ةءاضإ ؤم
LED
ضيبا فاقيإ ← ليغشت
”Wi-Fi“
ةمئاق
نويزفلتلا
Wi-Fi
)Wi-Fi( Soundbar ةلسلس مسا + TV :نويزفلتلا ةمئاق ع لاثم
ةظحم
.نويزفلتلا ةطساوب موعدا ملا جمانل ا
ً
قفو هليغشت نكمي
.Wi-Fi لبك وأ HDMI لبك ليصوت دنع طقف ةفيظولا هذه معد
ُ
ت
.ددلا / لسلا هجوا سفنب Soundbar زاهجو نويزفلتلا ليصوت نم دكأت
.Soundbar زرط ضعبو Samsung نويزفلت ةزهجأ ضعب ةفيظولا هذه رفوتت

22 - ARA
Spacet توص مادختسا
.عامتسا تاحاسم ليلحت لخ نم ةنسحم توص ةدوج رفوي
Soundbar زاهج ع ليصوتلا .1 ةقيرطلا
.Soundbar دع
ُ
ب نع مكحتلا ةدحو ع SpaceFit توص عضو ليغشتب مق ،ةفيظولا هذه كمتل
)”Spacet sound On“ ← ) ع ( ← ”Spacet sound Off“ ← )توصلا مكحتلا( (
.توصلا عاضوأ عيمج ةحاتم ةا هذه
نويزفلتلا ع ليصوتلا .2 ةقيرطلا
.Samsung نويزفيلت ةمئاق دوجوا +يقفاوت توص عضو ليغشتب مق ،ةفيظولا هذه كمتل
)+يقفاوت توص ← ذلا عضولا تادادعإ ← General ←
) ( تادادعا لك ← ) ( تادادعا ← ةمئاق ← ) ( ةيسيئر
(
.كزافلت ع +يقفاوت توص عضو كمتل +يقفاوت توص إ ا
ً
يئاقلت Soundbar ع توصلا عضو يغت متي فوس
ةظحم
.Samsung نويزفلت ةزهجأ ضعبب Soundbar لاصتا ةلاح ةفيظولا هذه لمعت
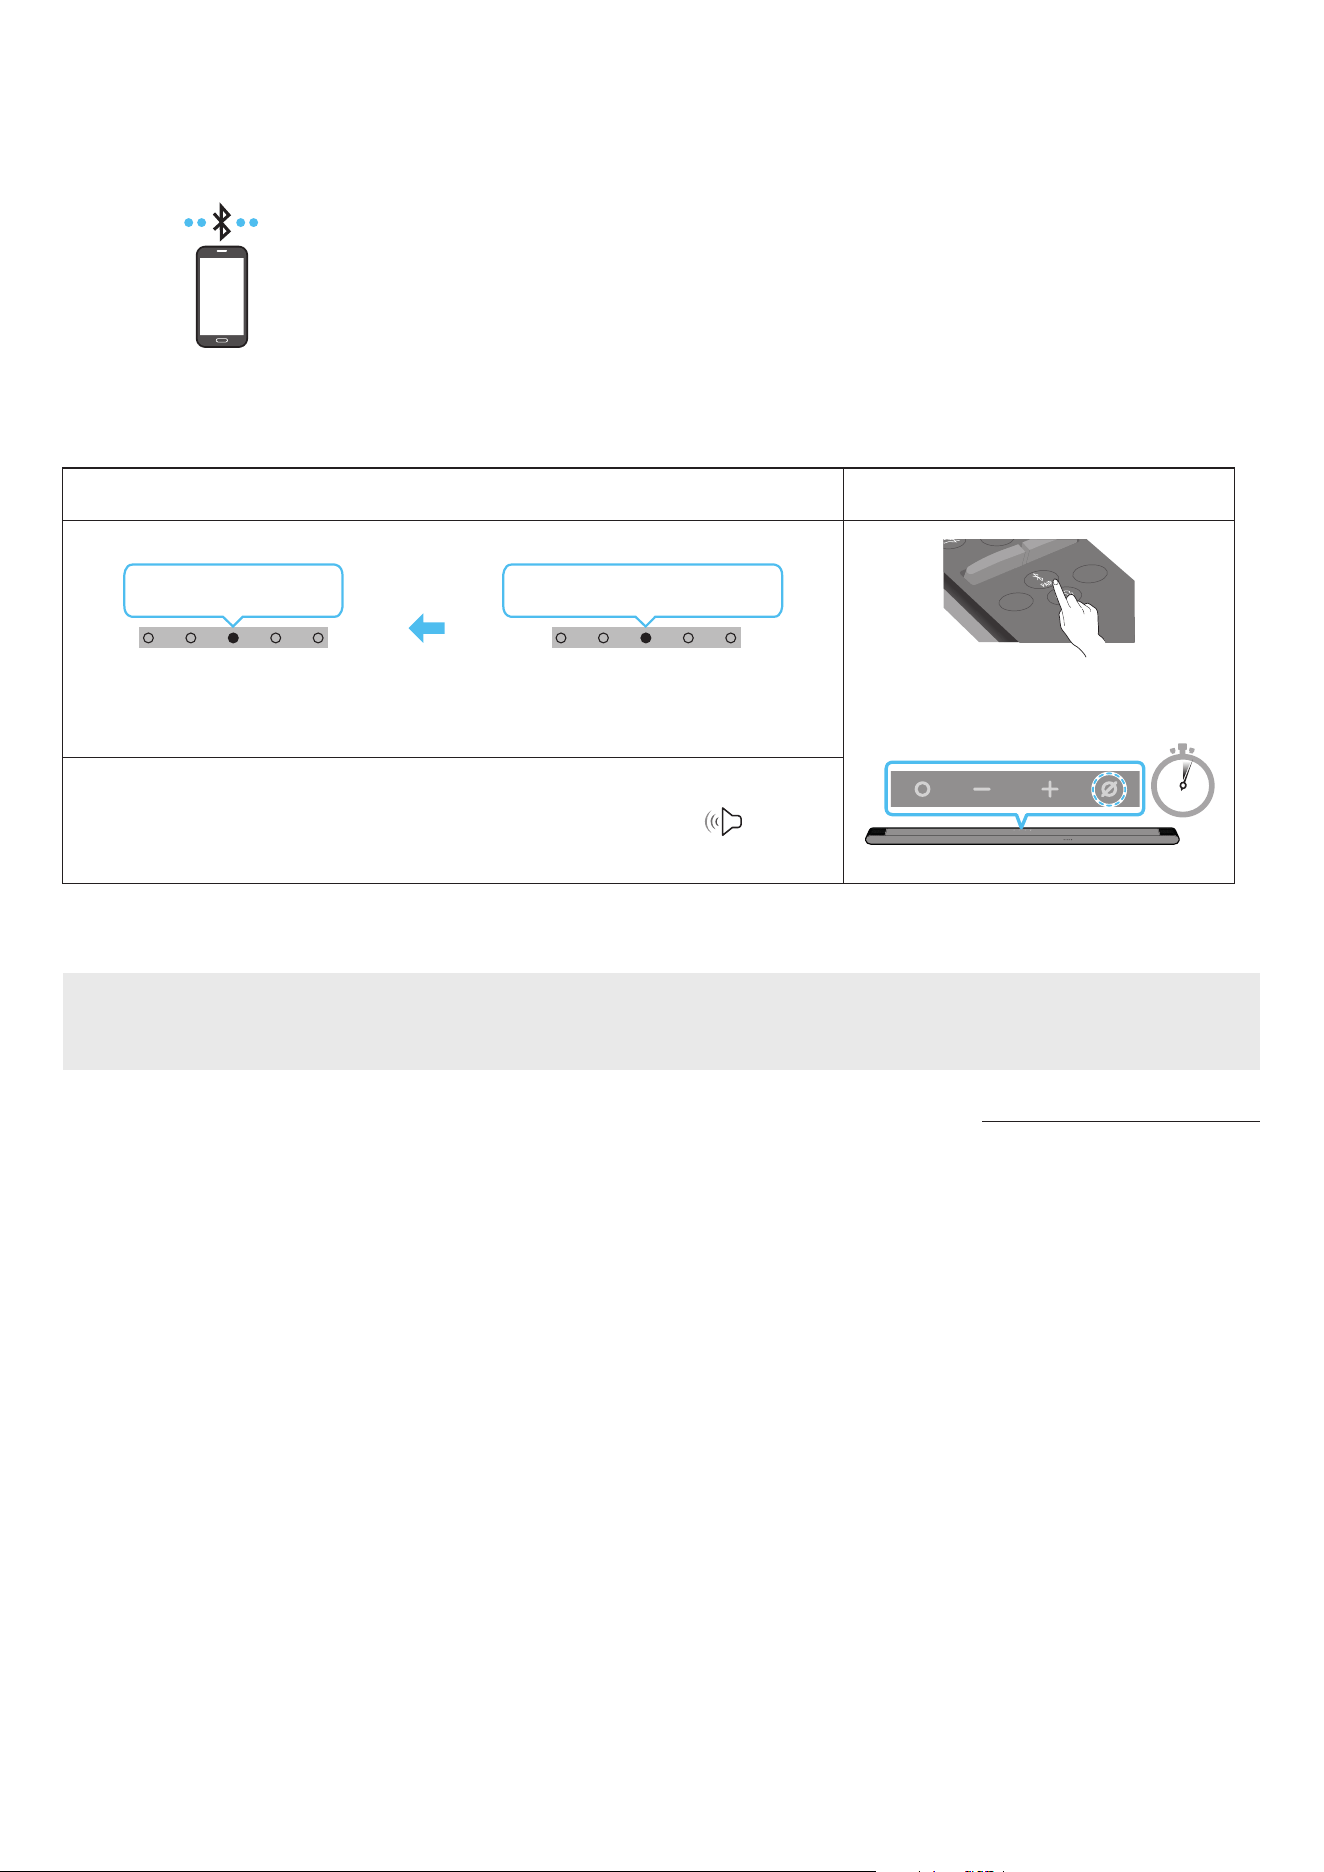
23 - ARA
06 لومحم زاهج ليصوت
Bluetooth ةينقت ع لاصتا .1 ةقيرطلا
.تبكلا كباشت بعاتم نود ويستوص عامس كنكمي ،Bluetooth ةينقت مادختساب لومحم زاهج ليصوت دنع
.ا
ً
يئاقلت Soundbar زاهج ليغشت متي ،ليغشتلا فاقيإ ديق Soundbar زاهجو نقم Bluetooth زاهج ليصوت دنع
لومحم زاهج
وا ليصوتلا
.م 1 ةفاسم قاطن زاهجلا دوجو نم دكأت ،ديدج Bluetooth زاهجب لاصتا دنع
.1
Bluetooth ناقا رزLED ةءاضإ ؤم
SOUNDBAR
SOUND
MODE
WOOFER
+
_
CH LEVEL
TONE
CONTROL
وأ
”Bluetooth“ عضو ةلاح
5 Sec
قرزا ← خا ← رمحا ضموي
ناقا
يوامسلا قرزا
3X ضموي
ليصوتلا لمتكا
.قرزأ ← خأ ← رمحأ نوكيل هرودب ناولا ددعتا LED ؤم غتي ناقا لامتكا ح
”Ready to connect via Bluetooth.“
1 .
2 ..رهظت لا ةمئاقلا نم ”[AV] Samsung Soundbar S***B“ ددح ،كزاهج ع
3 ..Soundbar زاهج لخ نم Bluetooth ع لصتا زاهجلا نم يقيسوا تافلم ل
غش
زاهجلا لاصتا لشف ةلاح
.هفذحا ،لومحا زاهجلا ع توصلا تاكم ةمئاق )”[AV] Samsung Soundbar S***B ،لاثا ليبس ع( Soundbar زاهج كيدل ناك اذإ
. 2 و 1 توطخلا ررك
Bluetooth لاصتا نع تاظحم
.Bluetooth لاصتا ع لاصتل م 1 قاطن ديدج زاهج عقوم ددح
.>0000< ل ِخدأ ،Bluetooth زاهج ليصوت دنع PIN زمر كنم بل
ُ
ط اذإ
.دادعتسا ةلاح ةقيقد 18 دعب ا
ً
يئاقلت Soundbar زاهج ليغشت فاقيإ متي
:ةيلاتلا فورظلا لظ حيحص لكشب
ً
اصتا وأ Bluetooth ثحب Soundbar زاهج يرج
ُ
ي دق
‒ .Soundbar زاهج لوح يوق ابرهك لاجم دوجو ةلاح
‒ .دحاو
ٍ
نآ Soundbar زاهجب Bluetooth ةزهجأ ةدع ناقا ةلاح
‒ .لاطعأ دوجو وأ هناكم هدوجو مدع وأ ،Bluetooth زاهج ليغشت فاقيإ ةلاح
ةزهجأو فيوركياا ةزهجأ ،لاثم ،ةيساسا Soundbar ةدحو نع ةيسيطانغمورهك تاجوم د
ّ
لوت لا ةزهجا داعبإ عتي .ويدارلا تاجوم لخادت ةينوكلا ةزهجا ببستت دق
.كلذ إ امو ةيكلسلا LAN
.)زترهوليك 48و زترهوليك 44,1( SBC تانايب Soundbar معدي
.A2DP )AV( ةفيظو معدي Bluetooth زاهجب طقف لاصتاب مق
.طقف نيديلا رح ةفيظو معدي Bluetooth زاهجب Soundbar ليصوت كنكمي
.ناكما ردق ضعبلا مهضعب نم مهبرق ،Bluetooth زاهجب Soundbar ليصوت دنع
.توصلا ةدوج تضفخنا ،ضعبلا امهضعب نع نيديعب Bluetooth زاهجو Soundbar ناك املك
.لاعفلا يدا جراخ ةزهجا نوكت امدنع Bluetooth لاصتا عطقني دق
.فيعضلا لابقتسا تاذ قطانا بولطا لكشلاب Bluetooth لاصتا لمعي دق

24 - ARA
:ةيلاتلا تاحلا لطع هب ثدحي وأ ءاضوض Bluetooth زاهج ردص
ُ
ي دق
‒ Soundbar وأ Bluetooth زاهج ع دوجوا ةراشا لابقتساو لاسرإ زاهجب لصتم مسجلا نوكي امدنع
‒ .ةيئابرهك تايغت ثدحت دق ثيح ،رادج وأ طئاح لثم ،بيرق قئاع كانه نوكي امدنع وأ اياوزلا
‒ LAN تاكبشب لمعت لا ةزهجاو فيووركيا نارفأو ةيبطلا ةزهجا لثم ،ددلا تاقاطن سفن لمعت ىرخأ تاجتنم ةطساوب ويدارلا تاجوم لخادتل زاهجلا ضرعت دنع وأ
.ةيكلسلا
‒ .لاعفلا ىدا نمض ةزهجا نوكت امدنع ح توصلا ةدوج ع طئاوحلاو باوبا لثم تابقعلا رثؤت دق
.Bluetooth رايخ مادختسا ءانثأ ىرخأ Bluetooth ةزهجأب ناقا Soundbar ـل نكمي هنأ ظح
.هليغشت ءانثأ ابرهك لخادت ثودح لسلا زاهجلا اذه ببسي دق
Soundbar ةدحو نم Bluetooth زاهج لاصتا عطق
.Bluetooth زاهجب صاخلا مدختسا ليلد عجار ،تاميلعتلا ع عطل .Soundbar ةدحو نم Blutooth زاهج عطق كنكمي
.Soundbar زاهج لاصتا عطق متي فوس
.تارم ثث "Red" نوللاب ضموي Soundbar زاهج دوجوا ناولا ددعتا LED ؤم نإف ،Bluetooth زاهجب لصتم غ Soundbar زاهج ناك اذإ
Bluetooth زاهجب Soundbar لاصتا عطق
.Bluetooth" نم عضولا ليدبتل دع
ُ
ب نع مكحتلا ةدحو )ردصا( رز وأ Soundbar نم يولعلا ءزجلا )ةددعتا فئاظولا( رزلا ع طغضا
)Bluetooth زاهج زارط بسح ق
َ
رغتسا تقولا فلتخي دق( .Soundbar نم
ً
ةباجتسا Bluetooth ـلا زاهج يقلت بوجول ا
ً
رظن اًتقو لاصتا عطق قرغتسي
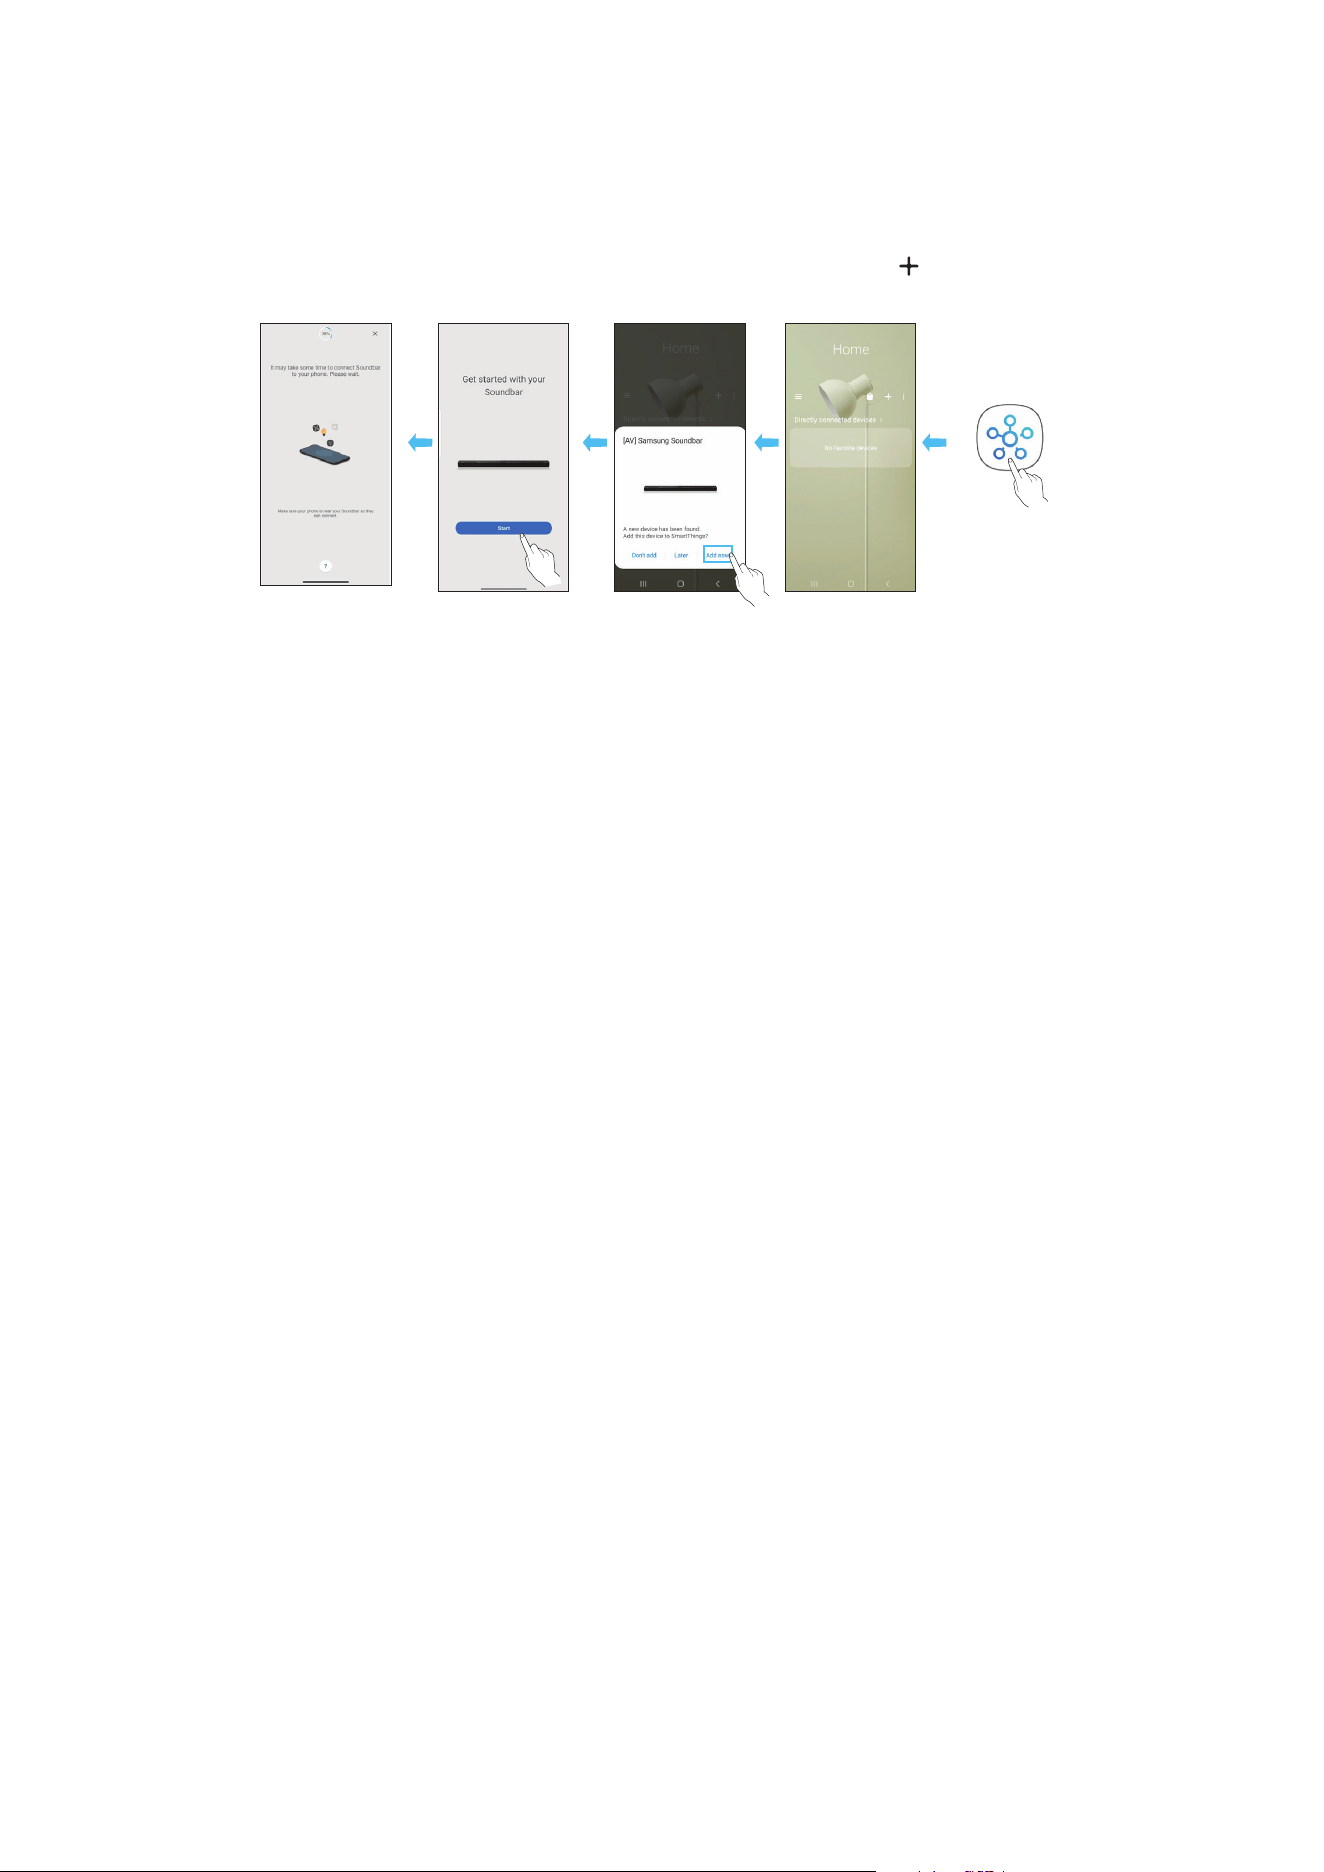
25 - ARA
)ةيكلسلا ةكبشلا( Wi-Fi ع لاصتا .2 ةقيرطلا
. SmartThings قيبطت رفاوت مزلي ،)Wi-Fi( ةيكلس ةكبش ع لومحم زاهجب Soundbar زاهج ليصوتل
وا ليصوتلا
1 ..)يحول زاهج وأ ذ فتاه( لومحا كزاهج نم SmartThings قيبطت تيبثتب مق
2 ..Soundbar ةفاض ةشاشلا ع ةرهاظلا تاميلعتلا عبتا ،قيبطتلا ع
.ةزهجا ضعب ع )هاندأ ةيناثلا ةشاشلا ةطقل( ةيئاقلتلا ةقثبنا ذفاونلا رفوتت دق
.قيبطتلا ع ا
ً
فاضم Soundbar نوكيسو .Home ةشاشلا دوجوا " " رز ع طغضا ،ةقثبنا ةذفانلا رهظت مل اذإ
.قيبطتلا رادصإ فتخاب لفساب ةدوجوا ةيحيضوتلا ةروصلا فلتخت دق
ليغشتب مق
قيبطتلا
ةذفان رهظتس
ا
ً
يئاقلت ةقثبنم
زاهج ةفاضإ
قيبطت
SmartThings
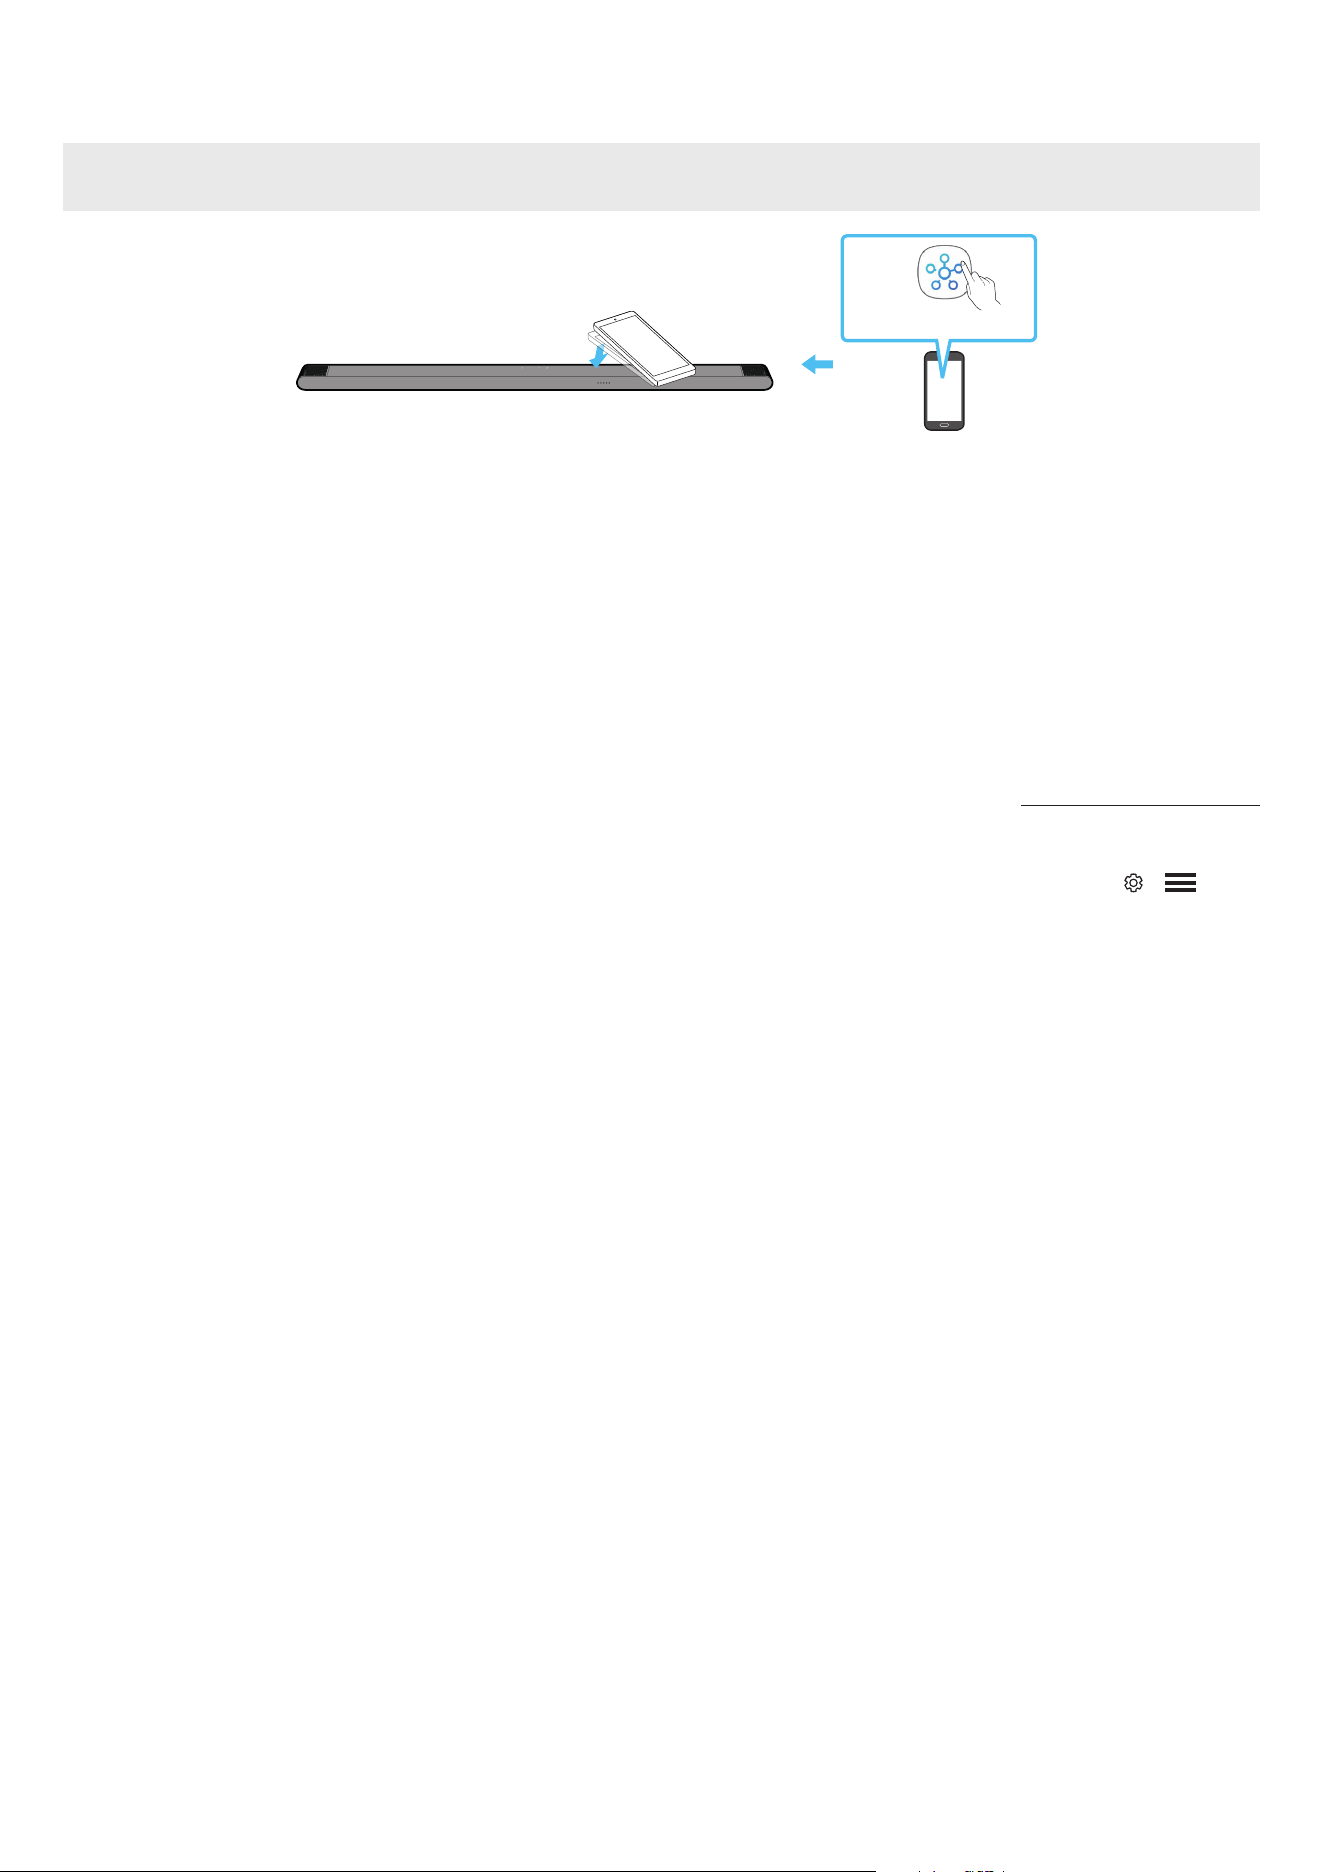
26 - ARA
Tap Sound مادختسا
.Soundbar لخ نم لومحا زاهجلا ع ىوتحا توص ليغشتل لومحا كزاهج مادختساب Soundbar ع طغضا
.لومحا زاهجلا ع
ً
ءانب ةفيظولا هذه معد متي امبر
.ثدحأ وأ 8.1 رادصإ Android ماظنب لمعت لا Samsung لومحم ةزهجأ عم طقف ةقفاوتم ةفيظولا هذه
زاهج نم يولعلا ءزجلا
Soundbar
لومحم زاهج
SmartThings قيبطت
1 ..لومحا كزاهج ع ةدوجوا Tap Sound ةفيظو ليغشتب مق
.هاندأ "Tap Sound ةفيظو تادادعإ" عجار ،ةفيظولا ليغشت ةيفيك نع ليصافت ةفرع
2 ..ةضورعا لئاسرلا ةذفان ةدوجوا "Start now" ددح .لومحم زاهج مادختساب Soundbar ع طغضا
.Bluetooth ع Soundbarو لومحا زاهجلا ب لاصتا ءاشنإ مت
3 ..Soundbar لخ نم لومحا زاهجلا ع ىوتحا توص ليغشتب مق
.Soundbar زاهجلا سملي امدنع ثدحي يذلا زاها نع فشكلا لخ نم Bluetooth ع Soundbar زاهجب لومحم زاهج ليصوتب ةفيظولا هذه موقت
.لومحا زاهج وأ Soundbar فلت
ُ
ي وأ شدخ
ُ
ي دق .ةداحلا Soundbar ةيواز ع طغضي لومحا زاهج نأ نم دكأت
.ةطرفم ةوق مادختسا نود Soundbar نم يولعلا ءزجلا ةدوجوا ةعساولا ةقطنا ع قفرب طغضا .بارجب لومحا زاهج ةيطغتب وي
.رادصإ ثدح SmartThings قيبطت ثيدحتب مق ،ةفيظولا هذه مادختس
.قيبطتلا رادصإ ع
ً
ءانب ةفيظولا هذه معد متي امبر
Tap Sound ةفيظو تادادعإ
.Tap Sound ,Tap View ةفيظو ليغشتل SmartThings قيبطت مدختسا
1 ..لومحا زاهجلا ع SmartThings قيبطت ليغشتب مق
2 ..لومحا زاهجلا ع ةضورعا SmartThing قيبطت ةشاش ) ← ( ددح
3 ..ةفيظولا ليغشت مت .Soundbar نم لومحم زاهج بقي امدنع لمعلاب ةفيظولل حامسلل ليغشت ع "Tap Sound ,Tap View" طبضا
ةظحم
.ةقاطلا ظفح عضو لومحا زاهجلا نوكي امدنع Tap Sound ةفيظو لمعت
لخادت ثودح ببستت دق لا ةزهجا نأ نم دكأت .ةيئابرهكلا ةزهجا لثم ا
يكلس
ً
خادت ببست Soundbar نم ةبيرق ةزهجأ كانه ناك اذإ Tap Sound ةفيظو لمعت امبر
.Soundbar نع ا
ً
ديعب ةيفاك ةفاسم ع اهعضو مت لس

27 - ARA
07 APPLE AIRPLAY 2 ةينقتب لاصتا
.لودلا ضعب ةرفوتم ةفيظولا هذه نوكت دق
.ثدحأ وأ iOS 11.4 ماظن بلطتيو AirPlay 2 ةينقت Samsung Soundbar زاهج معدي
.Samsung نم Soundbar زاهج إ كب ةصاخلا Apple ةزهجأ نم تاوصا نم كلذ غو تساكدوبلاو ىقيسوا قفد كنكمي ،AirPlay 2 مادختساب
.Apple زاهج اهب لصتا Wi-Fi ةكبش سفنب هلاصتاو Soundbar زاهج ليغشت نم ققحت
.Mac وأ iPad وأ iPhone ةزهجأ ع مكحتلا زكرم نم وأ AirPlay معدي يذلا قيبطتلا نم
ديدحتب مق
.اهيلع احلا توصلا ليغشتل ةحاتا ةزهجا ةمئاق نم Soundbar ددح
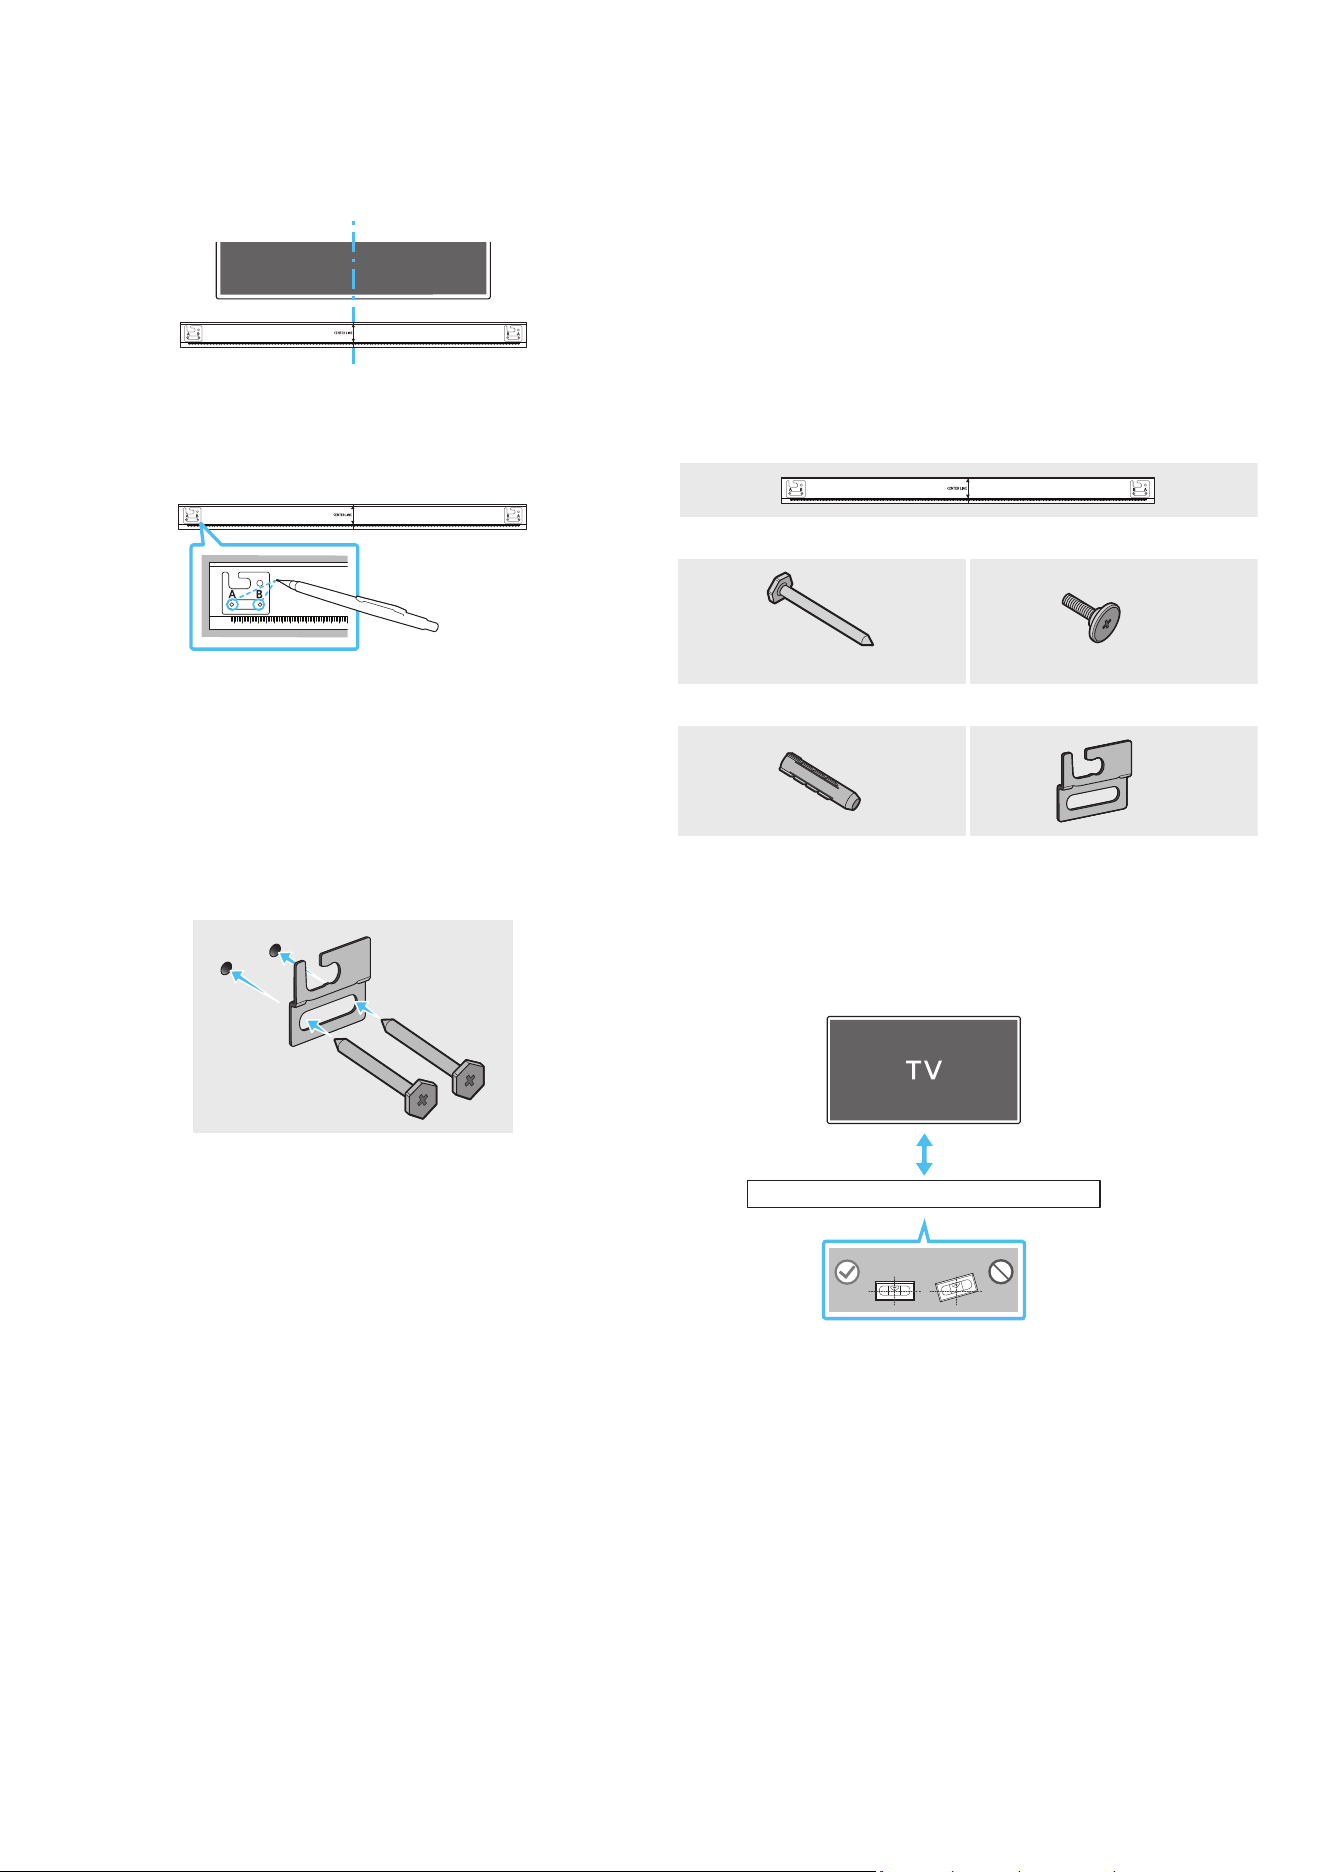
28 - ARA
08 طئاحلا ع تيبثتلا مقط بيكرت
بيكلا تاطايتحا
.أر رادج ع ىوس تيبثتلاب مقت
.ةيلاع ةبوطر وأ ةيلاع ةرارح ةجرد وذ ناكم تيبثتلا بنجت
،كلذك نكي مل اذإو .جتنا نزو لمحتل اك لكشب ا
ً
يوق طئاحلا ناك اذإ امم ققحت
.ىرخأ تيبثت ةطقن رايتخا وأ طئاحلا زيزعتب مقف
.طئاحلا ع Soundbar زاهج تيبثت لبق ةيجراخ ةزهجأب ةدحولا نم تبكلا ل
صو
كضرعت كلذ ببستي دق ،إو .اهتيبثت لبق اهلصفو ةدحولا ليغشت فاقيإ نم دكأت
.ةيئابرهك ةمدصل
طئاحلا ع تيبثتلا مقط تانوكم
AH81-15127A-01
A TYPE
:
740mm
B TYPE
:
700mm
طئاحلا ع تيبثتلا ليلد
x 2
x 4
)L55 X M5(
لماحلا رامسمرامسم
x 2
x 4
طئاحلا ع تيبثتلا ةماعدتيبثتلا يغارب
1 ..طئاحلا حطس ةهجاوم طئاحلا ع تيبثتلا ةماعد عض
.ةيوتسم طئاحلا ع تيبثتلا ةماعد نوكت نأ بجي
5 ةفاسم ع Soundbar زاهج بيكب مقف ،طئاحلا ع اًت
َ
بثم نويزفلتلا ناك اذإ
.نويزفلتلا لفسأ لقا ع مس
كأ وأ مس 5
2 . ( نويزفلتلا زاهج فصتنمب طئاحلا ع تيبثتلا ةماعد فصتنم طخ ةاذاحمب مق
طئاحلا ع تيبثتلا ةماعد تيبثتب مق مث ،)نويزفلتلا لفسأ Soundbar تيبثت ةلاح
.طي مادختساب
فصتنا طخ عضوم ددح ،نويزفلتلا زاهج لفسأ Soundbar تيبثت ةلاح و
.تيبثتلا ةقطنم طسو
AH81-15127A-01
A TYPE
:
740mm
B TYPE
:
700mm
فصتنا طخ
3 . B-TYPE و A-TYPE ةروص فصتنم إ ببدم صاصر ملق وأ فاج ملق سأر عفدا
،معدلا ماسم تيبثتل ةصصخا بوقثلا ناكم ديدحتل ةماعدلا فارطأ نم فرط لك
.طئاحلا ع تيبثتلا ةماعد ةلازإب مق مث
AH81-15127A-01
A TYPE
:
740mm
B TYPE
:
700mm
4 . تامع نم ةمع لك دنع طئاحلا ا
ً
بقث رفحا ،بسانم مجحب باقثم ةشير مادختساب
.ماسا تيبثت
لاخدإ نم دكأتف ،ماسا تيبثت عضاوم عم ةقفاوتم غ تامعلا تناك اذإ
اذإو .معدلا ماسم لاخدإ لبق بوقثلا لخاد ةبسانم تيبثت تاودأ وأ فيطاطخ
ةجردب ةبك اهترفح لا بوقثلا نأ دكأتف ،تيبثت تاودأ وأ فيطاطخ مدختست تنك
.تيبثتلا تاودأ وأ فيطاطخلا مادختساب حمست ةيفاك
5 . بقث ماكحإب رامسم لك طبرا مث رامسم لك )د
وزم غ( تيبثت رامسم عفدا
.معدلا رامسم
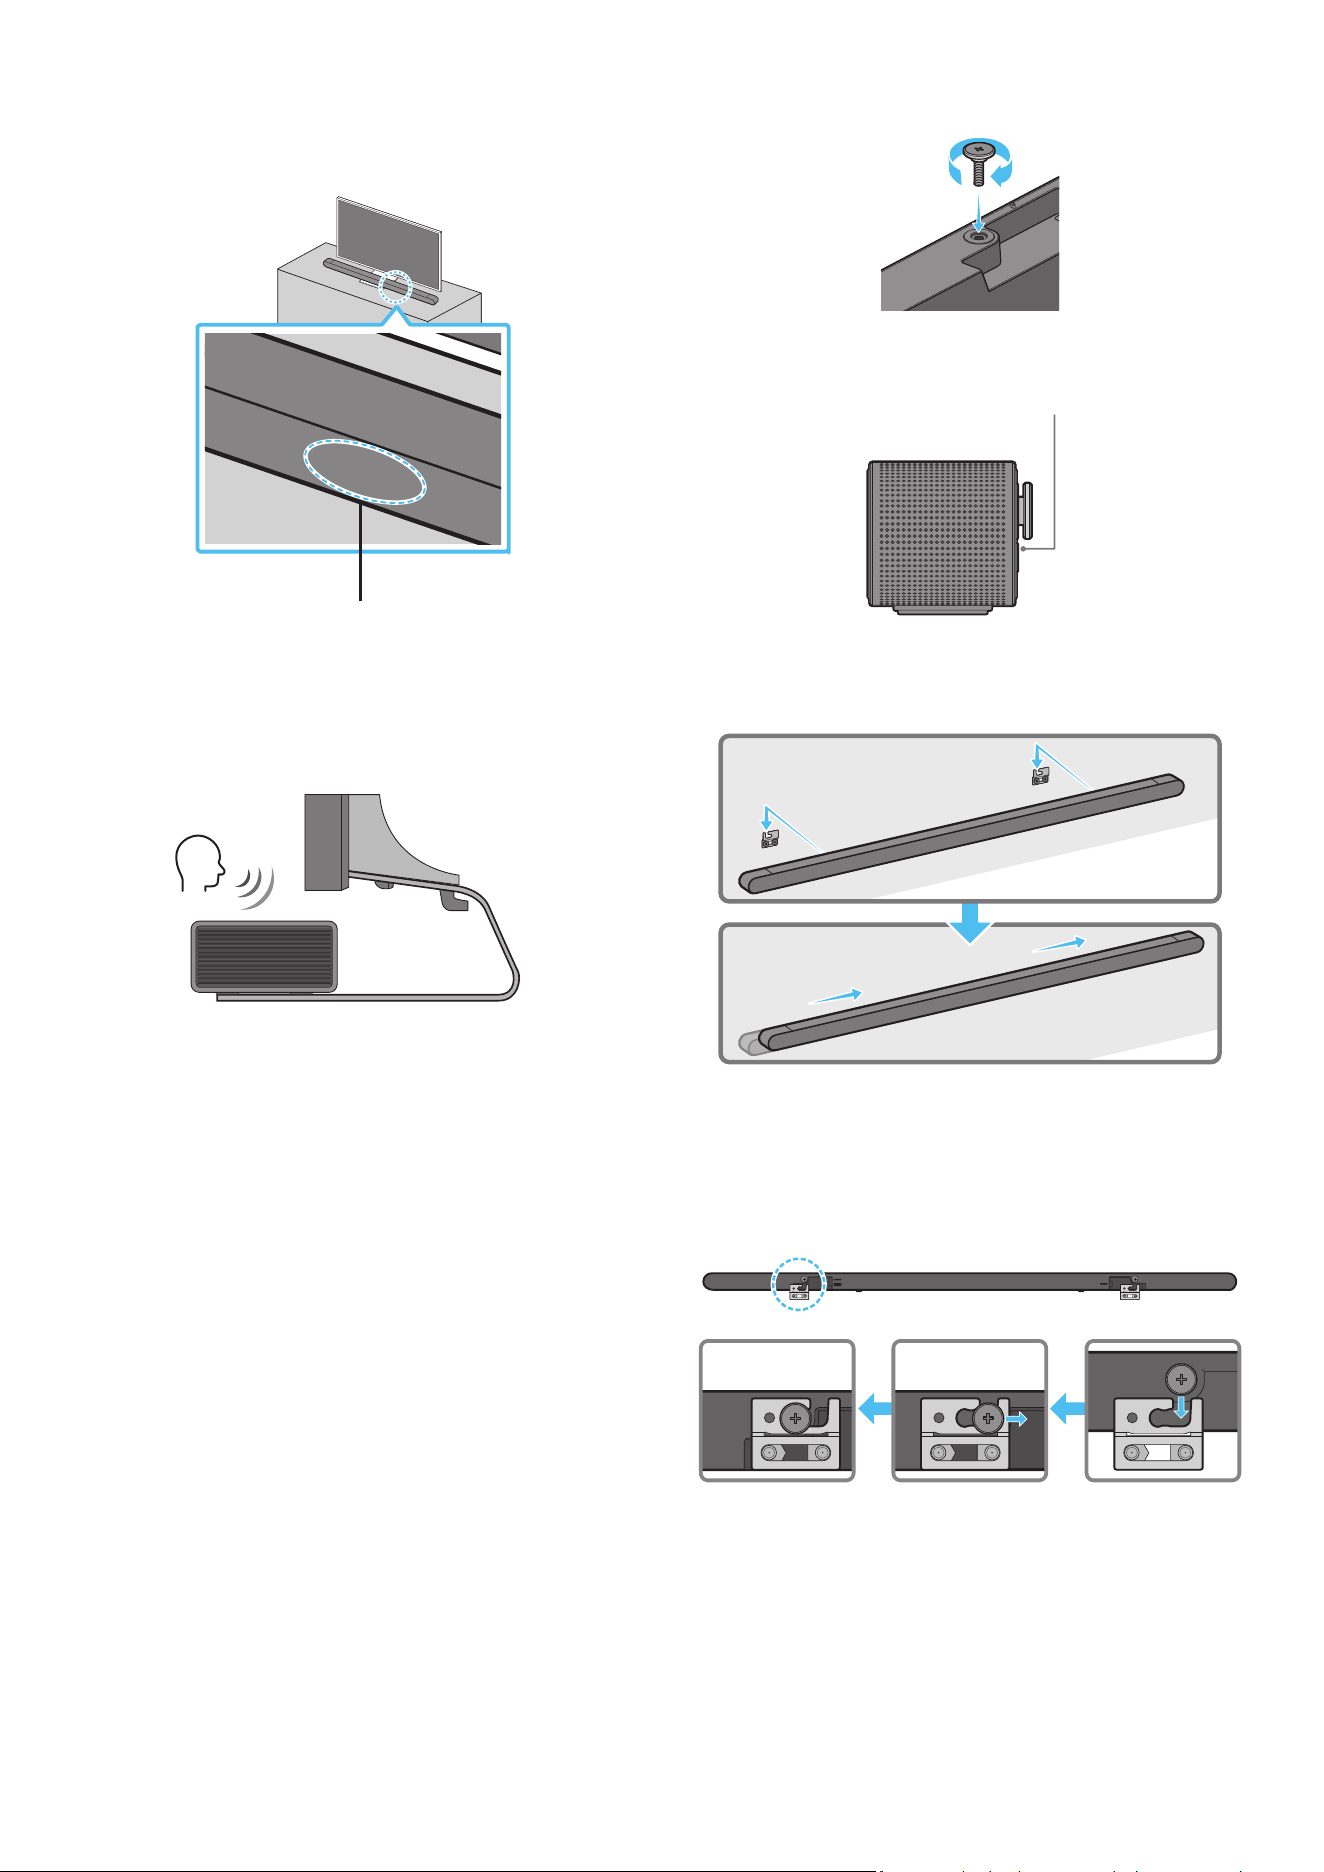
29 - ARA
6 . ،Soundbar زاهج فلخ حيحصلا هاجتا طئاحلا ع بيكلا لماوح نم نثا بكر
.ماسا نم نثا مادختساب كلذو
فلخ طئاحلا ع بيكلا لماوح ـب صاخلا قيلعتلا ءزج دوجو نم دكأت ،طبرلا دنع
.Soundbar ةدحول يفلخلا ءزجلا
Soundbar زاهج نم يفلخلا ءزجلا
Soundbar نم نميا فرطلا
7 . قيرط نع طئاحلا ع تيبثتلا تاماعد مادختساب Soundbar ـلا ةدحو بيكب مق
.طئاحلا ع لماحلا ماسم ع طئاحلا ع تيبثتلا تاماعد قيلعت
8 . بيكلا لماوح رقتست ح هاندأ حضوم وه امك لفسل قلي Soundbar لعجا
.لماحلا ماسم ع ةنمآ ةروصبطئاحلا ع
مث ،طئاحلا ع بيكلا لماوح نم )يفلخلا( ءزجلا لماحلا ماسم لخدا
ع بيكلا لماوح رقتست ح لفس قلت طئاحلا ع بيكلا لماوح لعجا
.لماحلا ماسم ع ةنمآ ةروصبطئاحلا
SERVICE
HDMI
(ARC)
SERVICE
HDMI
(ARC)
SERVICE
HDMI
(ARC)
SERVICE
HDMI
(ARC)
DC 19V
09 مامأ SOUNDBAR زاهج بيكرت
نويزفلتلا
تانوفوركيا
،نويزفلتلا فصتنم عم Soundbar زاهج فصتنم ةاذاحمب مق ،ةروصلا حضوم وه امك
.نويزفلتلا لماح ع رذحب Soundbar زاهج عض مث
ع فرعتلا ةفيظو عم لخادتي ح لماحلا ةمدقم نوفوركيا عض ،تقولا اذه
.توصلا
Soundbar نم نميا فرطلا
نويزفلتلا
ةظحم
.بلصو وتسم
ٍ
حطس ع Soundbar زاهج عضو نم دكأت
ةفيظوو توصلاب قلعتت تكشم ثودح إ نويزفلتلا نم اكلا غ دع
ُ
بلا يدؤي دق
.توصلا ع فرعتلا
.زارطلا بسح عاب ةيحيضوتلا ةروصلا فلتخت
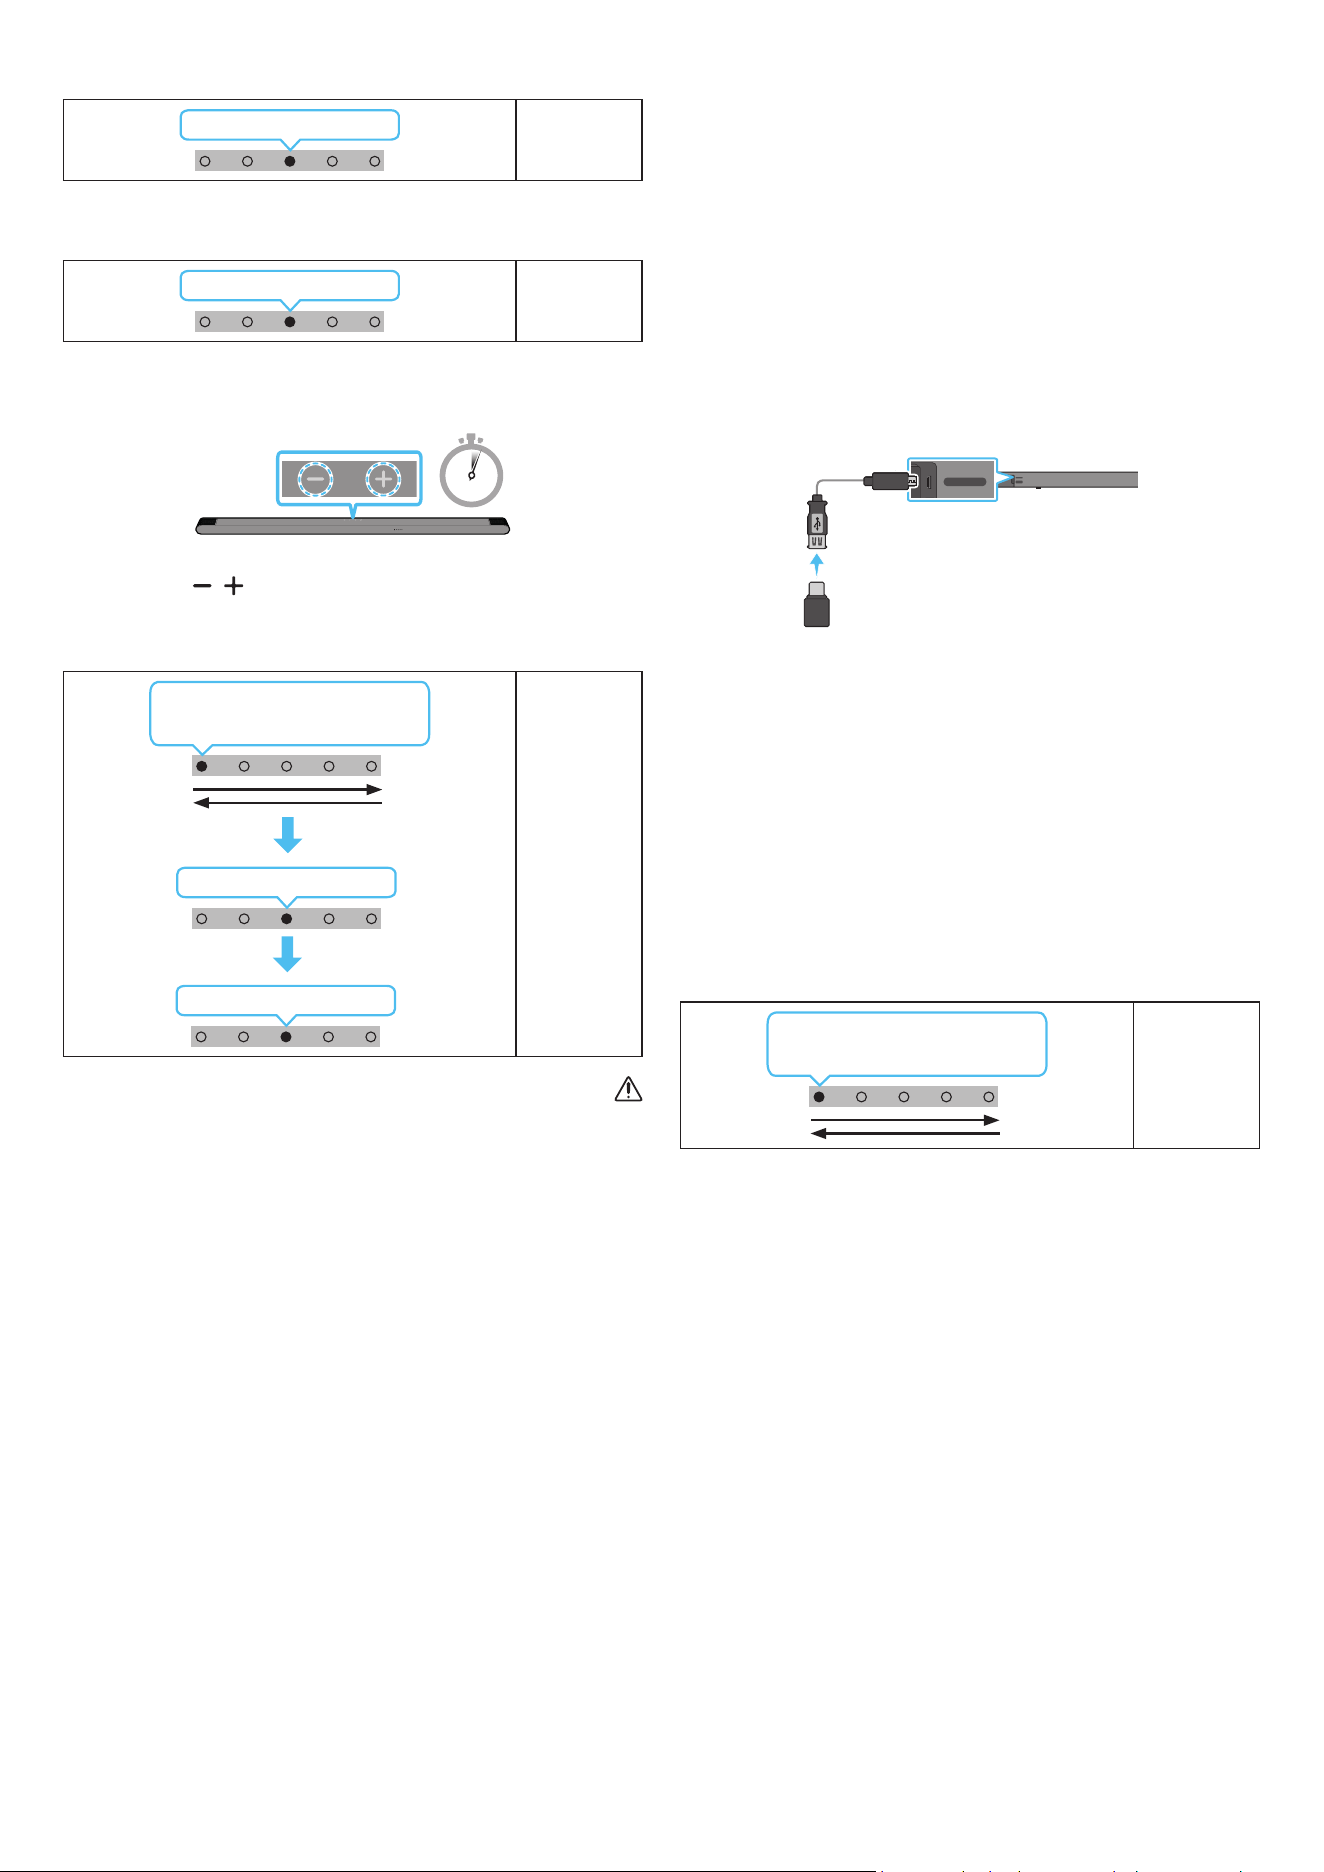
30 - ARA
10 جمانلا ثيدحت
اقلتلا ثيدحتلا
فاقيإ دنع ح ا
ً
يئاقلت جمانلا تاثيدحت تيبثت متي ،تنناب Soundbar زاهج لاصتا دنع
.Soundbar زاهج ليغشت
.تنناب Soundbar زاهج لاصتا بجي ،اقلتلا ثيدحتلا ةفيظو مادختس
زاهج ءابرهك كلس لصف ةلاح Soundbar زاهجب Wi-Fi ةكبش لاصتا ءاهنإ متيسو
زاهج ل
غش ،ابرهكلا رايتلا عاطقنا ةلاح .ابرهكلا رايتلا عاطقنا وأ Soundbar
.تنناب هليصوت د ِعأ مث ءابرهكلا كلس ليصوت دِعأ وأ هتدوع دنع Soundbar
USB ثيدحت
Soundbar زاهجل يفلخلا بناجلا
SERVICE
HDMI
(ARC)
SERVICE
HDMI
(ARC)
Micro USB ل
وحم لبك
USB إ
)قفرم غ(
.لبقتسا Soundbar زاهج ماظنل تباثلا جمانلل تاثيدحت Samsung رفوت دق
صارقأ كرحم ليصوت قيرط نع Soundbar زاهج ثيدحت كنكمي ،ام ثيدحت رفوتي امدنع
.Soundbar زاهج SERVICE ذفنمب ثيدحتلل تباثلا جمانلا ع يوتحي يذلا USB
1 . ةمئاق رايخ نم زارطلا مسا نع ثحباو ← )www.samsung.com( عقوم إ لقتنا
.ءمعلا معد
.ةيقلا ليلد عجار ،ثيدحتلا لوح تامولعا نم ديز
2 ..)USB عون نم( ةيقلا فلم ليتب مق
3 ..فلا مساب دلجم ءاشن فلا طغض كف
4 ..Soundbar ـب لصتا مث USB هؤاشنإ مت يذلا دلجا نزخ
5 ..جتنا ثيدحت متي ،قئاقد 3 لخ .Soundbar ليغشتب مق
ةءاضإ ؤم
LED
ميلا إ راسيلا نم كرحتي ضيبا
راسيلا إ ميلا نمو
.USB ةلصو عت وأ جتنا ليغشت فقوت ،ثيدحتلا ةيلمع لخ
نأ عي اذه ،جمانلا ثيدحت لامتكا دعب رفصا LED ؤم ليغشت ةلاح
ةلازإ وأ ةقاطلا ليغشت فاقيإب مقت ،كلذ ثودح دنع .مدقتلا ديق اضإ ثيدحت
.USB
.Soundbar ـب ةقاطلا كلس ليصوت ةداعإب مق ،ثيدحتلا عاطقنا ةلاح
.ثيدحت يأ ىرجي نل ،رادصإ ثدحأ تيبثت دنع
.USB عونل ا
ً
قفو ،ثيدحتلا معد
ُ
ي دق
.تارم 3 رمحا نوللاب ؤا ضموي ،ثيدحت فلم رفوت مدع ةلاح
ةءاضإ ؤم
LED
3X ضموي رمحا
ضموي ،احلا رادصا نم لقأ رادصإ وأ رادصا سفن ثيدحتلا فلم ناك اذإ
.تارم 3 يوامسلا نوللاب ؤا
ةءاضإ ؤم
LED
3X ضموي يوامسلا قرزا
طبضلا ةداعإ
5 Sec
)توصلا ىوتسم( يرز ع طغضا ،ليغشتلا ديق Soundbar زاهج نوكي امدنع
ضورعم وه امك LED ةءاضا ؤم غتي .
ٍ
ناوث 5 ةد دحاو نآ زاهجلا لكيه ع
.Soundbar زاهج طبض ةداعإ متي مث هاندأ
ةءاضإ ؤم
LED
3X ضموي يوامسلا قرزا
ليغشتلا فاقيإ ←ضموي رمحا
ميلا إ راسيلا نم كرحتي ضيبا
راسيلا إ ميلا نمو
هيبنت
ىوس كلذ ءارجإ مدع نم دكأت .Soundbar زاهج تادادعإ عيمج طبض ةداعإ متي
.طبضلا ةداعإ بلطت ةلاح
31 - ARA
11 اهحصإو لاطعا فاشكتسا
.ي ام عجار ،ةدعاسا نع ثحبلا لبق
.لمعي Soundbar زاهج
حيحص لكشب هلاخدإ مت Soundbar زاهج ءابرهك كلس ناك اذإ امم ققحت
.ذفنا
.عطقتم لكشب لمعي Soundbar زاهج
.ىرخأ ةرم هلخدأ ،ءابرهكلا كلس ةلازإ دعب
.ا
ً
ددجم لواحو يجراخلا زاهجلا نع ءابرهكلا كلس دعبأ
ةف دعب ا
ً
يئاقلت Soundbar زاهج ليغشت فاقيإ متي ،ةراشإ دوجو مدع ةلاح
).9 ةحفص عجار( .ةقاطلا ل
غش .ةددحم ةينمز
.لمعي دع
ُ
ب نع ذلا مكحتلا زاهج
.ةابم دع
ُ
ب نع مكحتلا زاهج إ Soundbar زاهج ه
جو
.دع
ُ
ب نع مكحتلا ةدحو نحش دعأ
.تباثلا رمحا نوللاب Soundbar زاهج ؤم رهظيس
.نوفوركيا ليغشت فاقيإ مت
).7 ةحفص عجار( .نوفوركيا ليغشتب مق
.Soundbar زاهج نم توصلا جارخإ متي
ىوتسم طبضا .تماص وأ ةياغلل ضفخنم Soundbar زاهج توص ىوتسم
.توصلا
ام وأ لومحم زاهج وأ Bluetooth زاهج وأ STB( يجراخ زاهج يأ ليصوت دنع
.يجراخلا زاهجلا توص ىوتسم طبضا ،)كلذ إ
:Samsung نويزفلت( .Soundbar زاهج ددح ،نويزفلتلا نم توصلا جارخ
توصلا ← )
( تادادعا لك ← ) ( تادادعا ← ةمئاق ← ) ( ةيسيئر
)Select Soundbar ← توصلا جرخم ←
لبكلا لصفا .ةمكحم غ Soundbar زاهجب ةلصتا لبكلا ةلصو نوكت دق
.ىرخأ ةرم هليصوتب مقو
.ةقاطلا لغش مث ،هليصوت دعأو ،ا
ً
مامت ءابرهكلا كلس لصفا
).30 ةحفص عجار( .ا
ً
ددجم لواح مث جتنا طبض دعأ
.توصلا مخضم نم توصلا جارخإ متي
لمعي توصلا مخضم نم يفلخلا ءزجلا LED ؤم ناك اذإ امم ققحت
ضموي ؤا ناك اذإ توصلا مخضمو Soundbar ليصوت دعأ .قرزا نوللاب
).15 ةحفص عجار( .رمحا نوللا إ هؤض لوحت وأ قرزا نوللاب
لقنا .توصلا مخضمو Soundbar ب قئاع كانه ناك اذإ ةلكشم كهجاوت دق
.قئاوعلا نع ا
ً
ديعب ناكم إ ةزهجا
عطق لس ددرت تاراشإ لسرت لا ىرخا ةبيرقلا ةزهجا ببستت دق
.لاصتا
.ةزهجا هذه لثم نع تاعامسلا دعبأ
.ىرخا ةرم هليصوت دعأو ابرهكلا رايتلا سباق لصفا
توصلا مخضم نم ءاضوض وأ ،تاخأت وأ ،توصلا هيوشت دوجو ةلاح
.ةلكشم اذه ببس
ُ
ي دق ،توصلا مخضمو Soundbar ب ماسجأ يأ دوجو ةلاح
.مسجلا اذه نودب اهعضول ةزهجا هذه عضوم يغت ىجري
نع ا
ً
ديعب توصلا مخضم نوكي امدنع تاخأت وأ توصلا هيوشت دجوي دق
.Soundbar نم برقلاب اهعضو ىجري .Soundbar
وأ ةادأ نم برقلاب Soundbar نوكي امدنع تاخأت وأ توصلا هيوشت كانه نوكي دق
ةزهجا هذه نع ا
ً
ديعب Soundbar عض .ا
ً
يكلس
ً
خادت ببس
ُ
ي نأ نكمي ابرهك زاهج
)لس هجوم ،لاثا ليبس ع( .ا
ً
يكلس
ً
خادت ببست نأ نكمي لا
.لس إ لس نم نويزفلتلا ةكبش لاصتا ةلاح يغتب مق
ا
ً
دج ضفخنم توصلا مخضم توص ىوتسم
لواح .ا
ً
ضفخنم هليغشتب موقت يذلا ىوتحملل ا توصلا ىوتسم نوكي دق
).10 ةحفص عجار( .توصلا مخضم ىوتسم طبض
.كنم برقلاب توصلا مخضم تاعامس حا
.HDMI )ARC( ع لصوم غ نويزفلتلا ناك اذإ
.ARC فرطب حيحص لكشب
ً
صتم HDMI لبك ناك اذإ امم ققحت
).17 ةحفص عجار(
،فشتلا كف زاهج( لصتا يجراخلا زاهجلا ببسب اًنكمم لاصتا نوكي دق
.ةابم Soundbar زاهج ل
صو .)كلذ إ امو ،باعلا مكحتلا ةدحو
.نويزفلتلا ةمئاق CEC ل
غش .نويزفلتلا ع HDMI-CEC طيشنت متي دق
← )
( تادادعا ← ةمئاق ← ) ( ةيسيئر :Samsung نويزفلت(
← External Device Manager ← لاصتا ← ) ( تادادعا لك
)Anynet+ )HDMI-CEC( ON
HDMI )ARC( عضو نويزفلتلاب لاصتا دنع توص دجوي
إ نويزفلتلا توص جرخ يغتب مق .لاخدا ةراشإ ليغشت ع رداق غ كزاهج
:Samsung نويزفلتل ةبسنلاب( .Dolby Digital وأ PCM
توصلا ← )
( تادادعا لك ← ) ( تادادعا ← ةمئاق ← ) ( ةيسيئر
)Digital Output Audio Format ← Expert Settings ←
.Bluetooth ع لصتي Soundbar زاهج
.لاصتل ”Bluetooth ناقا“ إ ليدبتلاب مق ،ديدج زاهج ليصوت دنع
/ليغشت(
رز ع طغضا وأ دع
ُ
ب نع مكحتلا زاهجب PAIR رز ع طغضا(
).لقا ع
ٍ
ناوث 5 ةد زاهجلا لكيهب )نوفوركيا ليغشت فاقيإ
ليدبتل
ً
وأ زاهجلا اذه لصفا ،رخآ زاهجب لصتم Soundbar زاهج ناك اذإ
.زاهجلا
.لاصتل زاهجلا ع Bluetooth توص كم ةمئاق ةلازإ دعب هليصوت دعأ
← ) ( تادادعا ← ةمئاق ← ) ( ةيسيئر :Samsung نويزفلت(
← توصلا جرخم ← توصلا ← ) ( تادادعا لك
)تاعامسلا ةمئاق Bluetooth
.ا
ً
ددجم لواح مث هليصوت دعأو ابرهكلا رايتلا سباق لصفا
عجار ،تامولعا نم ديز( .ا
ً
ددجم لواح مث جتنا طبض دعأ
).”طبضلا ةداعإ“
32 - ARA
.Bluetooth ع لاصتا دنع توصلا عطقني
نم ا
ً
دج ةبيرق تناك اذإ لس لخادت ثودح ةزهجا ضعب ببستت نأ نكمي
ةيكلسلا تاهجواو فيوركياا ةزهجأ لاثا ليبس ع Soundbar زاهج
.كلذ غو
،Soundbar زاهج نع ا
ً
دج ا
ً
ديعب Bluetooth ع لصتا كزاهج كرحت اذإ
.Soundbar زاهج نم برقأ زاهجلا لقنا .توصلا عاطقنا كلذ ببستي دقف
لاسرا زاهجل كمسج نم ءزج ةسمم ةلاح توصلا عطقت ثدحي دق
ثاثأ ع جتنا تيبثت مت وأ Bluetooth ةينقتب لمعي يذلا لابقتساو
.مادختسا طوو تيبثتلا ةئيب نم ققحت .دعم
.Wi-Fi ع لصتي Soundbar زاهج
.لسلا هجوا لمع نم ققحت
.ا
ً
ددجم لواح مث ىرخا ةرم هلغشو هجوا ليغشت فقوأ
لواح .ةياغلل ةفيعض لسلا ةراشإ تناك اذإ Soundbar زاهج لصتي نل
Soundbar زاهج ب قئاوع يأ ةلازإ وأ Soundbar زاهج نم ه
جوا بيرقت
.نكمأ نإ ه
جواو
ةكبش تادادعإ نيوكت ةداعإ إ جاتحتسف ،ديدج لسلا هجوا ناك اذإ
.ةعامسلا
.نويزفلتلا عم ا
ً
يئاقلت Soundbar زاهج ليغشت متي
ليطعت متي ،نويزفلتلا ةدهاشم ءانثأ Soundbar زاهج ليغشت فاقيإ دنع
.
ً
وأ نويزفلتلا ليغشت فقوأ .نويزفلتلا عم ةقاطلا ةنمازم
.ةيلاتلا تاحلا ةحاتم غ AVA ةفيظو
.Q-symphony ةفيظو مادختساب AVA ةفيظو رفوتت
.نوفوركيا ليغشت فاقيإ دنع AVA ةفيظو رفوتت
متي مل .Soundbar عضو ليوحتب
ُ
تمق ،Soundbar زاهجب نويزفلتلا ليصوت دعب
.نويزفلتلا زاهج نم نويزفلتلا توص جارخإ
Soundbar ليصوت ءانثأ لومحم زاهجب Soundbar زاهج ليصوتب تمق اذإ
ظافحلا عم لومحا زاهجلا نم توصلا جرخي Soundbar نإف ،نويزفلتلاب
.ناكم يأ نويزفلتلا توص ليصوت متي نل كلذل .نويزفلتلا لاصتا ع
زاهج نم نويزفلتلا زاهج توص جرخيس اهدعب ،لومحا زاهجلا لصفب مق
.ا
ً
ددجم Soundbar
12 صيخالا
Dolby, Dolby Atmos, and the double-D symbol are registered
trademarks of Dolby Laboratories Licensing Corporation.
Manufactured under license from Dolby Laboratories. Condential
unpublished works.
Copyright © 2012-2021 Dolby Laboratories. All rights reserved.
For DTS patents, see http://patents.dts.com. Manufactured under
license from DTS, Inc. )for companies headquartered in the U.S./
Japan/ Taiwan( or under license from DTS Licensing Limited )for
all other companies(. DTS, Digital Surround, Virtual:X, and the DTS
logo are registered trademarks or trademarks of DTS, Inc. in the
United States and other countries. © 2021 DTS, Inc. ALL RIGHTS
RESERVED.
The terms HDMI and HDMI High-Denition Multimedia Interface,
and the HDMI Logo are trademarks or registered trademarks of
HDMI Licensing Administrator, Inc. in the United States and other
countries.
دع
ُ
ب نع مكحت ةدحوك رتويبمكلا زاهج وأ يحوللا رتويبمكلا وأ كفتاه مدختسا
مايقلا ةيفيك ع فرعتلل spotify.com/connect إ لقتنا .Spotify قيبطتل
كلذب
انه اهيلع روثعلا كنكميو ،ةيجراخ تاهج صيخارت إ Spotify تايجمرب عضخت
.https://www.spotify.com/connect/third-party-licenses
ةقطنا وأ زاهجلا زارط بسح كلذو ،ةموعدم غ ةفيظولا هذه نوكت دق *
.ةيفارغجلا
Apple, Airplay, iPhone, iPad, and Mac are trademarks of Apple
Inc., registered in the U.S. and other countries.
Use of the Works with Apple badge means that an accessory
has been designed to work specically with the technology
identied in the badge and has been certied by the developer
to meet Apple performance standards.

33 - ARA
[ENERGY STAR]
طقف ENERGY STAR جمانل لثتمم زارط
عنصا دادعإ ENERGY STAR جمانل لثتمي كب صاخلا Samsung جتنم
اذه ةنيعم فئاظوو تادادعإو تام يغتلا يدؤي نأ نكمي .افا
ةبولطا دودحلا زواجت إ كلذ يدؤي دقو ،ةقاطلا كهتسا يغت إ جتنا
.ENERGY STAR جمانل لاثتمل
ب كشم جمانرب وه ENERGY STAR .ةقاطلا ةرادإو ةئيبلا ةيامح ةلاكو
.ةقاطلل ةرفوا تاسراماو تاجتنا زيزعتل ممص
ُ
م ،ةيموكحلا تاكولا
تامولعا نم ديزم ع لوصحلل www.energystar.gov عقوا ةرايزب لضفت
.ENERGY STAR جمانرب لوح
طقف ENERGY STAR جمانل لثتمم زارط
)طقف Thin Client زر
ُ
ط عم ةقفاوتم(
جتنا اذه نأ Samsung ةك تررق ،ENERGY STAR® ءاك دحأ اهتفصب
.ةقاطلا ةءافكب ةصاخلا ENERGY STAR® جمانرب تاداشرإ عم قفاوتي
يرارحلا سابتحا تازاغ تاثاعبنا ليلقت إ ENERGY STAR جمانرب فدهي
.ةيعوطلا تامعلا عضو لخ نم ةقاطلا فوتو
دادعإ ع لمتشيو ،ا
ً
يضافا جتنا اذهل ةقاطلا ةرادإ دادعإ كمت مت
.تاعاس 5 إ ةدحاو ةقيقد نم فلتخم تيقوت
.نوكسلا عضو نم لكيهلا ع رز ةطغضب ظقيتسي نأ جتنملل نكمي
)ىرخا زر
ُ
طلا( طقف ENERGY STAR جمانل لثتمم زارط
جتنا اذه نأ Samsung ةك تررق ،ENERGY STAR ءاك دحأ اهتفصب
ةءافكب ةصاخلا ENERGY STAR جمانرب تاداشرإ عم قفاوتت ىرخا زر
ُ
طلا وأ
.ةقاطلا
13 ةحوتفم رداصا صيخرت راعشإ
ـب لصتا ،ةحوتفا رداصاب ةقلعتا ةلئسا تابلطو تاراسفتسا لاسر
)http://opensource.samsung.com( Samsung Open Source
14 ةمدخلا لوح ةمهم تاظحم
طقف عجرمك اذه مدختسا ليلد اذه ةدراولا ةيحيضوتلا موسرلاو لاكشا فوت متي
.عفلا جتنا رهظم نع فلتخت دقو
34 - ARA
15 ليلدلاو تافصاوا
تافصاوا
ليدوا مساHW-S801B / HW-S800B
نزولامجك 1,4
)قمعلا x عافترا x ضرعلا( داعبامم 39,9 × 38,0 × 1160,0
ليغشتلا ةرارح ةجرد قاطنةيوئم ةجرد +35 إ ةيوئم ةجرد +5 نم
ليغشتلا ةبوطر ةبسن قاطن75 % ~ 10 %
كا
ق
ُ
ا جرخلا ةقاط)2 × تاو 10( + )1 × تاو 10( + )2 × تاو 20( + )2 × تاو 10( + )2 × تاو 20(
ةموعدا ليغشتلا تاقيسنت
/ Dolby ATMOS )Dolby Digital Plus( / Dolby Digital Plus / Dolby 5.1ch
LPCM 2ch / DTS 5.1ch
توصلا مخضم مسا
PS-WB85D : HW-S800B
PS-WB86D : HW-S801B
نزولامجك 6,4
)قمعلا x عافترا x ضرعلا( داعبامم 238,0 × 240,8 × 238,0
كا
ق
ُ
ا جرخلا ةقاطتاو 200
ةظحم
.راعشإ نود تافصاوا يغت قحلاب Samsung Electronics Co.، Ltd ظفتحت
.ةيبيرقت داعباو نزولا
.هليغشت فاقيإ وأ Wi-Fi ليغشتب تمق اذإ
ً
ايئاقلت Soundbar زاهج ليغشت ةداعإ متتس تاطايتحا
:Wi-Fi لاصتا طيشنت ءاغل
ديزت ةد وأ Soundbar زاهجل دع
ُ
ب نع مكحتلا ةدحو ع دوجوا CH LEVEL رزلا ع رارمتسا عم طغضا
.هليغشت فاقيإ وأ Wi-Fi لاصتا ليغشتل ناوث 30 نع
:Bluetooth لاصتا طيشنت ءاغل
وأ Soundbar زاهجل دع
ُ
ب نع مكحتلا ةدحو ع دوجوا TONE CONTROL رزلا ع رارمتسا عم طغضا
.هليغشت فاقيإ وأ Bluetooth لاصتا ليغشتل ناوث 30 نع ديزت ةد
.Samsung Electronics Co., Ltd. All rights reserved 2022 ©
ملاعلا لوح SAMSUNG ـب لاصتا
.SAMSUNG ـل عباتلا ءمعلا ةمدخ زكرمب لاصتا ىجري ،Samsung تاجتنمب قلعتت تاظحم وأ تاراسفتسا ةيأ كيدل ناك اذإ
دلبلا
Samsung ةمدخ زكرمبيولا عقوم
EGYPT
08000-7267864
16580
WhatsApp 010 000 16580
www.samsung.com/eg/support
IRAN
021-8255 [CE]
021-42132 [HHP]
www.samsung.com/iran/support
Israel*6963 www.samsung.com/il/support/
Palestine1800-792447 www.samsung.com/ps/support/
SAUDI ARABIA
8002474357 (800 24/7 HELP) From Inside Saudi Arabia
+966112614718 From outside Saudi Arabia
(May Call Charges will be applied)
www.samsung.com/sa_en/support (English)
www.samsung.com/sa/support (Arabic)
PAKISTAN 0800-Samsung (7267864) www.samsung.com/pk/support
U.A.E800-SAMSUNG (800 - 726 7864)
www.samsung.com/ae/support (English)
www.samsung.com/ae_ar/support (Arabic)
OMAN800-SAM CS (800-72627)
KUWAIT183-CALL (183-2255)
BAHRAIN8000-GSAM (8000-4726)
QATAR 800-CALL (800-2255)
TURKEY444 77 11 www.samsung.com/tr/support
JORDAN
0800-22273
06-577-7444
WhatsApp +962-79-777-7421
www.samsung.com/levant/support
Lebanon
1598
WhatsApp +962-79-777-7421
Iraq
80010080
WhatsApp +962-79-777-7421
ALGERIA3004
www.samsung.com/n_africa/support TUNISIA80 100 012
MOROCCO080 100 22 55
SOUTH AFRICA0860 SAMSUNG (726 7864) www.samsung.com/za/support
NAMIBIA08 197 267 864 www.samsung.com/africa_en/support
ZAMBIA3434 www.samsung.com/africa_en/support
MAURITIUS800 5050 www.samsung.com/africa_en/support
REUNION0262 50 88 80 www.samsung.com/africa_fr/support
MOZAMBIQUE84 726 7864 www.samsung.com/africa_pt/support
NIGERIA0800 726 7864 www.samsung.com/africa_en/support
Ghana0800 100 077 www.samsung.com/africa_en/support
Cote D’Ivoire8000 0077 www.samsung.com/africa_fr/support
SENEGAL800 00 0077 www.samsung.com/africa_fr/support
CAMEROON67095 0077 www.samsung.com/africa_fr/support
KENYA0800 545 545 www.samsung.com/africa_en/support
UGANDA0800 300 300 www.samsung.com/africa_en/support
TANZANIA0800 780 089 www.samsung.com/africa_en/support
SUDAN1969 www.samsung.com/eg/support