MULTI-FUNCTIONAL
COFFEE MAKER
3 IN 1
NEED HELP ? CONTACT US!
CUSTOMER SUPPORT
Email: support@sifene.com
Web: https://sifene.com/
USER MANUAL
KC101A

COFFEE.
SMILE.
LAUGH.
REPEAT
Questions
or
Concerns?
Contact Us!
SiFENE supports free replacement for any
problems or refund for any dissatisfaction
under warranty.
Email: support@sifene.com
Web: https://sifene.com/

01
Important Safeguards
Coffee Maker Overview
Control Panel
Brewing Coffee Instructions
Cleaning And Maintenance
Troubleshooting
Warranty
01
04
05
07
12
14
17
To avoid injury, read and understand the entire
owner's manual before using this appliance.
Table Of Contents
Important
Important Safeguards
When using electrical appliances, basic safety precautions should
always be taken to reduce the risk of fire, electric shock and/or injury
to persons, including the following:
1.READ ALL INSTRUCTIONS.
2.Do not touch hot surface. Use top cover and/or button only.
3.To protect against electric shock, do not place cord, plug, or base unit
in water or other liquids.
4.This appliance should not be used by or near children or individuals
with certain disabilities
5.Always unplug from outlet when not in use and before cleaning. Allow
to cool before putting on or taking off parts and before cleaning the
appliance.
6.Do not operate any appliance with a damaged cord or plug, or after
the appliance malfunctions, or has been damaged in any manner.
7. The use of accessory attachments not recommended by SiFENE may
cause injuries.
8.Do not use in outdoors.
9.Do not let cord hang over edge of table or counter, or touch hot
surfaces.
10.Do not place on or near a hot gas or electric burner, or in a heated
oven.
11.Always fill water water tank first, then plug cord into the wall outlet.
To disconnect, push the Off button, then remove plug from wall outlet.
12.Do not use appliance for other than its intended use.
13.Make sure top lid snaps into place with its Left and Right latches.
14.Scalding may occur if the lid is removed during the brewing cycle.
15.Do not open the lid of the Coffeemaker while brewing is in progress.
16.Do not overfill the water water tank with water.
Use ONLY WATER in this appliance! Do not put any other liquids or
foods in the water water tank except as instructed in the cleaning

This appliance has a polarized plug (one blade is wider than the
other). To reduce the risk of electric shock, this plug will fit into a
polarized outlet only one way. If the plug does not fit fully into the
outlet, reverse the plug. If it still does not fit, contact a qualified
electrician. Do not modify the plug in any way.
A short power-supply cord is provided to reduce the risks resulting
from becoming entangled in or tripping over a longer cord.
Longer extension cords may be used if care is exercised. If a long
extension cord is used, the marked electrical rating of the exten-
sion cord must be at least as great as the electrical rating of the
appliance, and the longer cord should be arranged so that it will
not drape over the countertop or tabletop, where it can be pulled
on by children or tripped over.
0302
instructions in this guide.
17.WARNING: TO REDUCE THE RISK OF FIRE OR ELECTRIC SHOCK,
DO NOT REMOVE THE BASE PANEL. NO USER-SERVICEABLE PARTS
ARE INSIDE. REPAIR SHOULD BE DONE ONLY BY AUTHORIZED
PERSONNEL.
18.DO NOT place cloth or otherwise restrict airflow beneath Coffee-
maker.
19.Use only the Filter provided by SiFENE with this unit.
OTHER FILTERS MAY CAUSE THE COFFEE MAKER TO OVERFLOW.
20.Do not operate your appliance in an appliance garage or under a
wall cabinet. When storing in an appliance garage always unplug the
unit from the electrical outlet. Not doing so could create a risk of fire,
especially if the appliance touches the walls of the garage or the door
touches the unit as it closes.
21.DO NOT use fine or espresso ground coffee! It May cause overflow
or spray if the coffee is too finely.Medium-grind coffee is recommend-
ed.
22.DO NOT add coffee powder exceeding max level!
23.DO NOT tamp the grounds with spoon,It May cause overflow or
spray if compress the coffee powder. Max fill is about 20 grams(4
scoops).
Caution: There are two sharp needles in the brewing chamber that
puncture the capsule, one above and one below. To avoid risk of injury,
do not put your fingers in the brewing chamber.
Notice
Save These
Instructions
For Household Use
Only
Special Cord Set Instructions
Temperature Cup Capacity
Standard Strong
0504
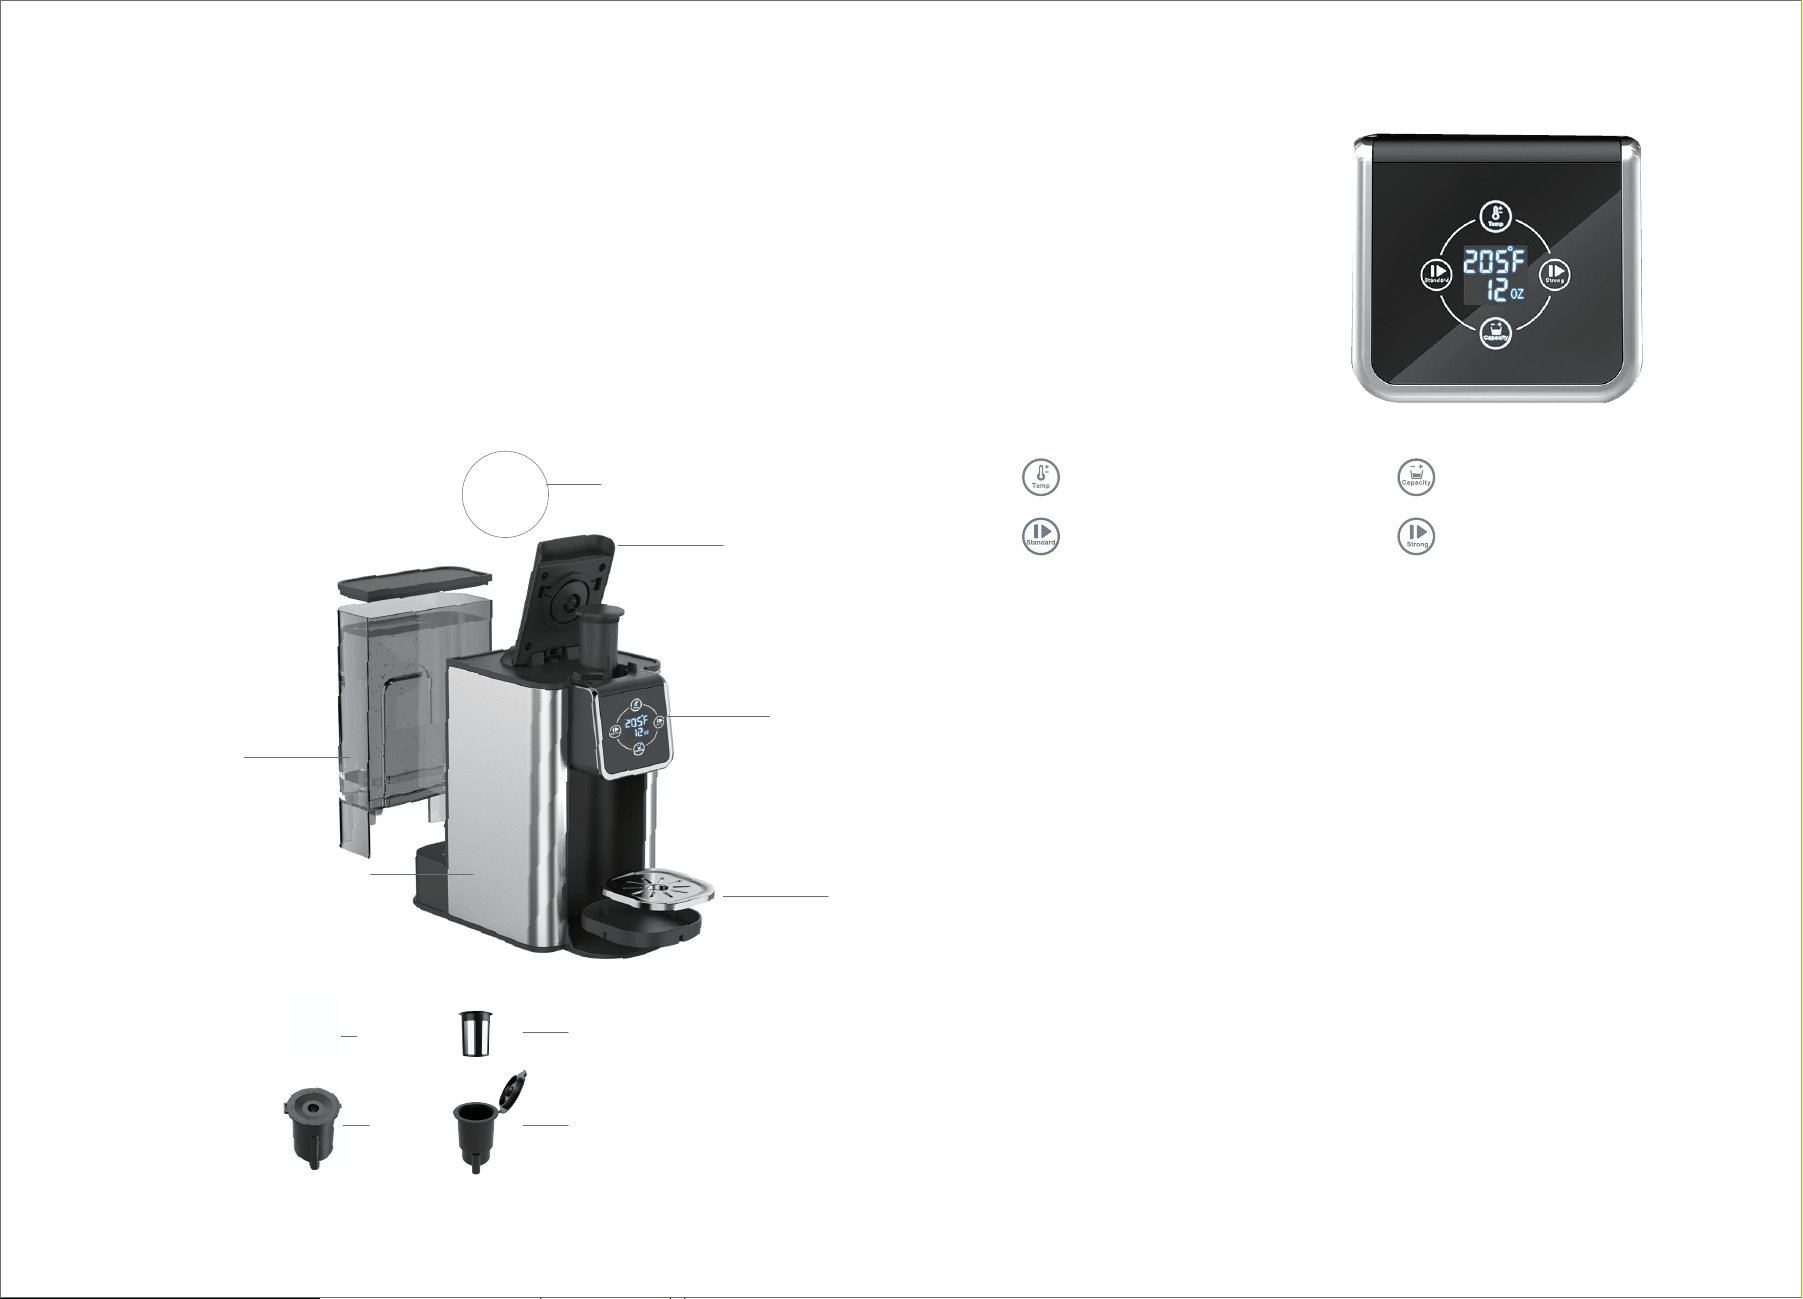
Coffee Maker
Overview
If the electrical circuit is overloaded with other appliances, your appliance
may not operate properly. It should be operated on a separate electrical
circuit from other appliances.
1.Brew head Button
2.K-pod coffee pods (not include)
3.Removable Capsule Holder × 1pc
4.Filter × 2pcs
5.Filter holder × 2pcs
6.Brew head
7.IMD control panel
8.Removable Drip
9.Water tank
10.Machine body
2
3 5
One in the water tank
One in the brew head
In the water tank
Control panel function buttons:
see the picture
Control panel
9
7
6
1
8
10
This appliance has a polarized plug (one blade is wider than the
other). To reduce the risk of electric shock, this plug will fit into a
polarized outlet only one way. If the plug does not fit fully into the
outlet, reverse the plug. If it still does not fit, contact a qualified
electrician. Do not modify the plug in any way.
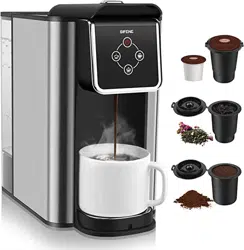
Temperature: After the power is turned on, the temperature button
indicator lights up, the digital screen turns on, and the initial
temperature is displayed at 205°F. There are a total of 5 temperature
levels: 170°F, 180°F, 195°F, 205°F, and 212°F. Press the "Tempera-
ture" button once to increase the level by 1, and after reaching 212°F,
the next level is 170°F, and this cycle continues. When the button is
held down, the numbers cycle through and increase, and when it is
released, the number stops at the current temperature. After a power
outage, when power is restored or the device is turned back on, it will
display the initial temperature of 205°F, and a beep sound will be
heard when the button is lightly pressed.
Cup Capacity: After the power is turned on, the cup capacity button
indicator lights up, and the digital screen displays the cup capacity
that was set during the previous use (the initial display is 6oz). There
are a total of four levels: 6oz, 8oz, 10oz, and 12oz. Press the "Cup
Capacity" button once to increase the level by 1, and after reaching
12oz, it will loop back to 6oz and continue cycling through. When the
button is held down, the level continuously increases until it is
released, and the current cup capacity is displayed.
4
Perform an initial cleaning before making your first beverage. Follow
these instructions, without adding coffee.
1.
2. Make sure cup is in place.
3. If you haven’t already, plug the power cord into an independent outlet.
Power on unit by pressing the ON/OFF switch on top of the unit control
panel.
4. Tap the large cup button to brew and allow brew cycle to run.
5. The one-time cleaning process is complete. Discard hot water. Your
Coffeemaker is ready to use.
Fill the water tank to the Max level line.
BEFORE USING FOR THE FIRST TIME
0706
1. Remove water tank to fill with water and replace on unit. Do not past
the max indicator.
2. Place mug on the drip tray.
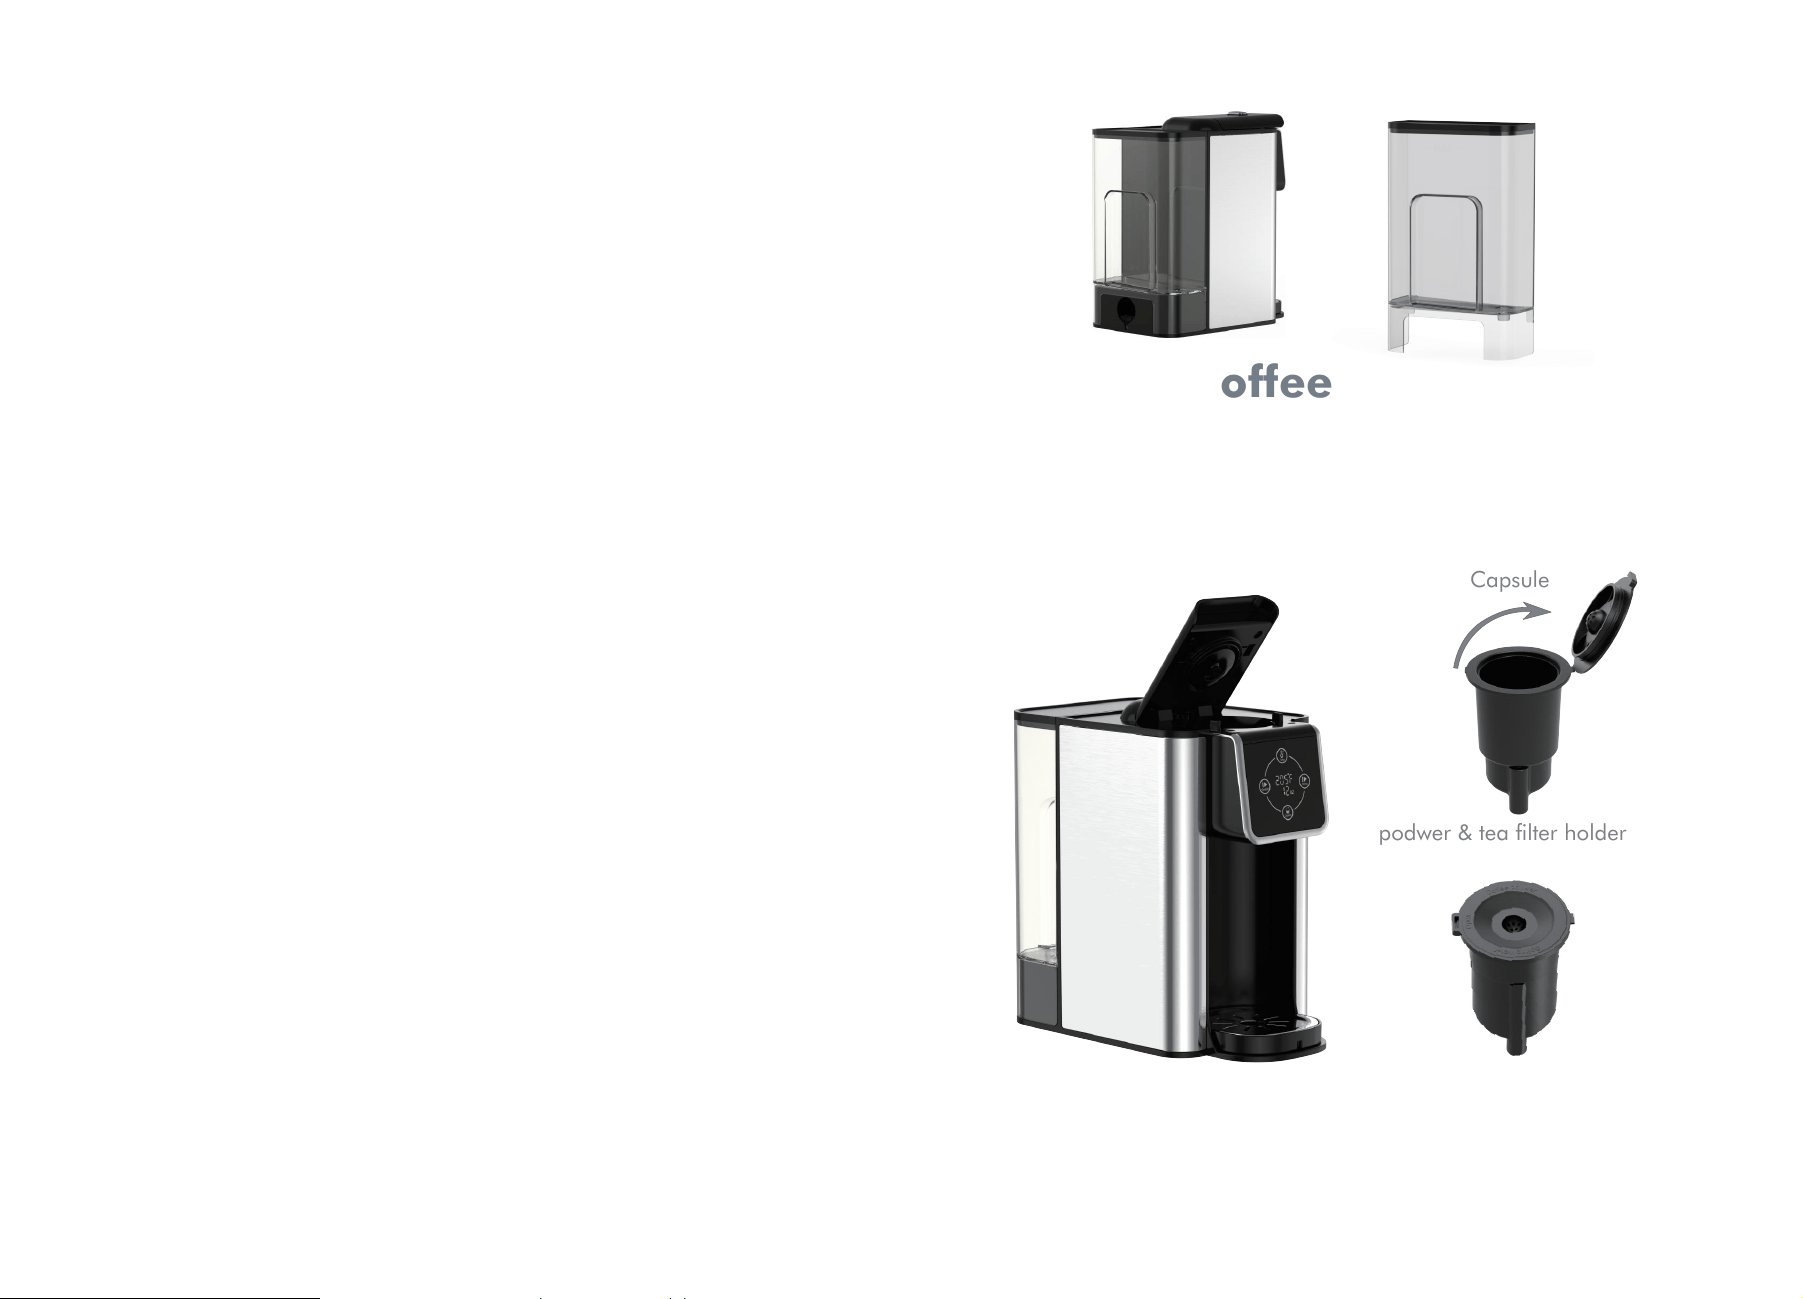
This is a multifunctional low-pressure coffee machine that supports the
use of American K- POD capsules, coffee powder and tea. Each filter is
individually matched with different drinks, please use the correct filter in
brewing your beverage.
Brewing Coffee
Instructions
Capsule
podwer & tea filter holder
Standard Button: After setting the cup capacity and temperature, press the
Standard button lightly. The beep sound will be heard, and the Standard
button will stay lit while the temperature and cup capacity indicators turn off.
The product will begin to operate. After 10 seconds of operation, the
Standard button indicator will turn off and enter standby mode (the
temperature and cup capacity indicators will turn on), and the beep sound
will be heard three times. During the operation, press this button again
lightly to stop the product.
Strong Button: After setting the cup capacity and temperature, press the
Strong button lightly. The beep sound will be heard, and the Strong button
will stay lit while the temperature and cup capacity indicators turn off. The
product will begin to operate. After 10 seconds of operation, the Strong
button indicator will turn off and enter standby mode (the temperature and
cup capacity indicators will turn on), and the beep sound will be heard three
times. During the operation, press this button again lightly to stop the
product.
Note: The coffee grounds will absorb some of the water that is brewed;
this will cause slight variability in brew volumes. If it's big variability,
please read TROUBLESHOOTING.
0908
A. Add water to the water tank without exceeding the -MAX- water level
mark. When the water level falls below the -MIN- mark, water must be
added. When placing the water tank onto the product, make sure to
press the tank down firmly into place.
B. Plug the power cord into an AC power outlet that matches the rated
voltage. The machine will enter standby mode (the temperature/cup
capacity indicators and display screen will turn on).
C. Press the button to open the top cover, then insert the capsule (refer to
C-1), or put in the coffee powder (refer to C-2), or put in the tea leaves
(refer to C-3). Close the top cover afterwards.
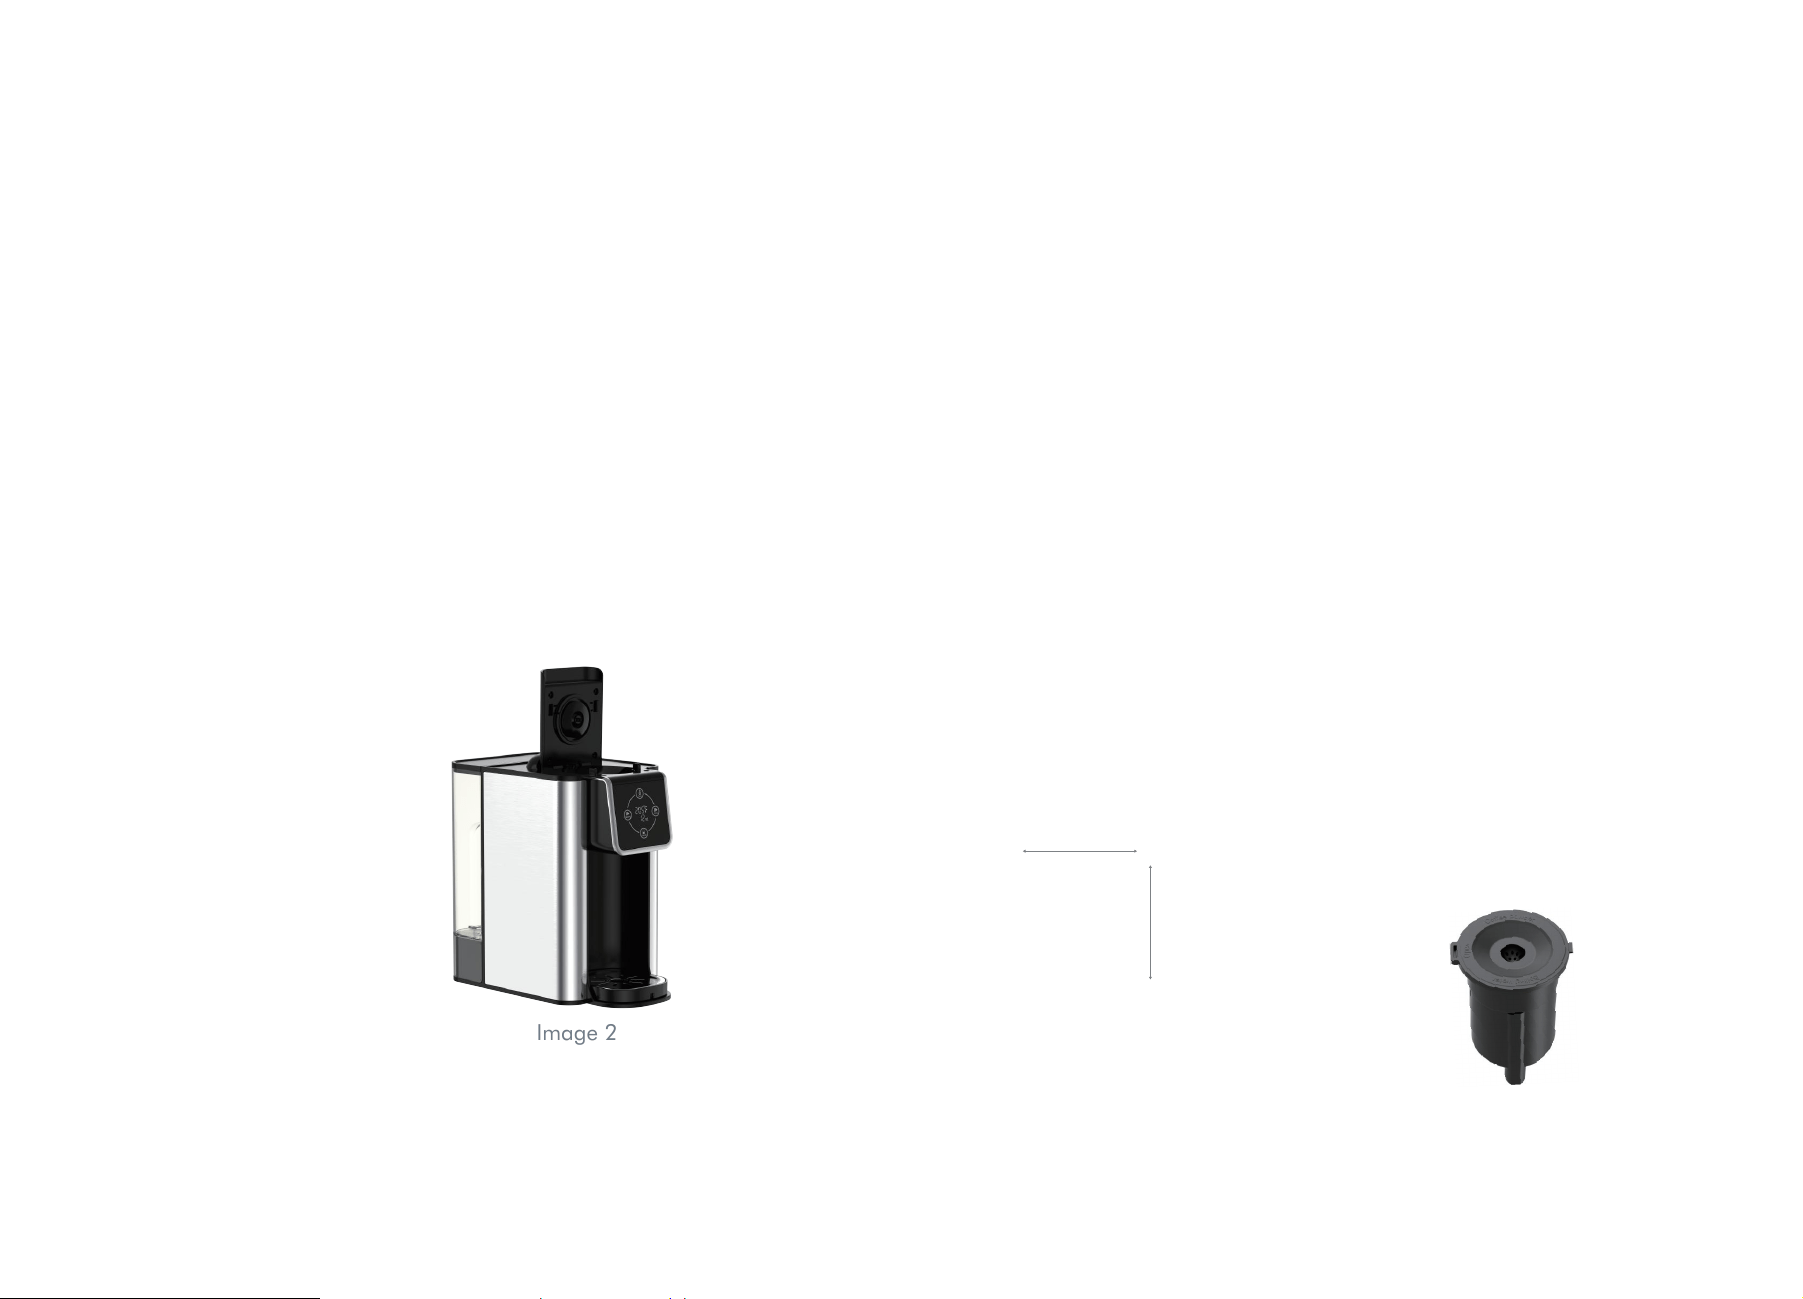
To open the top cover, please refer to the following images (Image 1
and Image 2): Use your index finger to press the button down, and then
use your thumb to lift the top cover, and the top cover will open.
C-1: American K-Pod Capsules:
The size of the American K-Pod Capsules is Ø50.5*44mm, as shown in
the image:
Press the button to open the top cover, take out the capsule box, and
press the capsule into the bottom of the capsule box. Install the capsule
box (refer to Image 5): Use both hands to press the capsule into the
capsule box on both sides, making sure that the capsule is flat and even
with the opening of the capsule box. Place the prepared capsule box into
the product and close the top cover.
To close the top cover, press down the middle part of the cover
(Image 3), or press down both sides at the same time (Image 4) to
ensure that the top cover is closed evenly and under equal pressure.
Image 5
Image 3
Image 4
Image 1 Image 2
50
44

1110
C-2: Coffee Powder:
Press the button to open the top cover. Take out the capsule box (or tea
box) and replace it with the powder box. Add an appropriate amount of
coffee powder to the powder box. The coffee powder cannot be too fine
(suitable for American drip coffee powder) and should not exceed the
"-MAX-" mark (as shown in Image 4). Lightly place the coffee powder into
the box, without pressing it down, and cover the powder box. When
closing the powder box cover, make sure to press it down evenly (as
shown in Image 5): press the cover downwards to make sure it clicks into
place with the powder box. Place the prepared powder box into the
product and close the top cover. The steps for adding coffee powder to
the powder box are shown in the following image:
C-3: Tea:
Press the button to open the top cover. Take out the capsule box (or
powder box) and replace it with the tea box. Add an appropriate amount
of tea leaves to the tea box (adjust the amount according to different
types of tea leaves) and close the top cover. The steps for adding tea
leaves to the tea box are shown in the following image:
D. Check the display screen data and use the "Cup Capacity" and
"Temperature" keys to select the desired cup size and temperature. Touch
the keys lightly, and the buzzer will sound once, while the display window
shows the corresponding cup size and temperature. If the temperature
and cup size are correct, there is no need to set them.
E. Choose the desired concentration by using the two "Work" keys on the
left and right sides: "Standard" and "Strong" (only one of these two keys
can be selected at a time and cannot be pressed at the same time). Press
it lightly once and the product will start to work. The corresponding key
and display screen window lights up, while the cup size and temperature
lights go out. The cup size and temperature keys have different opera-
tions.

Cleaning The Reusable Capsule Filter
Simply dispose of coffee grounds, then hand-wash both the filter and
filter holer, or clean on top rack of dishwasher.
Cleaning the Water Tank
It is normal over time for discoloration, spotting or staining to appear in
the water tank.
Results will vary depending on the mineral content of the water used, but
will not affect the operation of the brewer. However, be sure to clean the
Cleaning And Maintenance
1312
Descaling the Coffeemaker
Mineral content in water varies from place to place. Depending on the
mineral content of the water in your area, calcium deposits or scale
may build up in your Coffeemaker. Though scale is nontoxic, it can
hinder Coffeemaker performance. Descaling your Coffeemaker will
help maintain the heating element and other parts that come in contact
with water.
For optimal performance, descale your Coffeemaker every 3 to 6
months. It is possible for calcium deposits to build up faster, making it
necessary to descale more often.
To begin, you will need the following:
• 17 oz. of distilled white vinegar
• 34 oz. of water
• 16 oz. ceramic mug or container(do not use paper cup)
• Access to a sink
Step 1: First Vinegar Rinse
1. Fill water water tank with 17 oz. of white vinegar and 34 oz. of
water.
2. Place the ceramic mug or container on the drip tray.
3. Press lager cup buttons to brew for descaling.
4. Repeat for six times.
water water tank regularly to minimize buildup.Clean inside the water
water tank with a damp, lint-free cloth as necessary.
Step 2: Fresh Water Rinse
1. Repeat Step 1 three times, using fresh water in place of vinegar.
2. This will clean the Coffeemaker plumbing and remove any residual
vinegar taste.
F. After the work is completed, the buzzer will sound three times, and the
indicator light of the start button will go out from being constantly on,
returning the product to the standby state.
G. During the working process, press the lit "Work" key to stop the
product from working, and the "Work" key indicator light goes out, while
the power indicator light stays on, and the product enters standby mode.
H. In standby mode, if there is no operation for 10 minutes, the screen
will automatically turn off, that is, all lights will go out. Touch any key to
wake up the panel, and the product enters standby mode.
I. After the work is completed, do not immediately open the top cover to
avoid scalding. Wait for 5 minutes before opening it.
Note: If the temperature unit on the display screen is "℃", press the
"Standard" and "Temperature" keys at the same time for 2 seconds to
switch to "°F".

1.Medium-grind coffee is
recommended.
2.Do not fill past the max
indicator and tamp the
grounds.
3.Making sure filter
holder lid snaps into
place.
4.Making sure Coffee
maker's lid snaps into
place with its Left and
Right latches.
5. Filter holder cover will
be hot during and after
brewing. Wait at least 1
minute before opening.
Overflow when
brewing
Spray coffee
grounds
when open
the lid of unit
All buttons
lights flash
and beep
1 .The bottom of the filter
holder may be
clogged.This can happen
with finely ground coffee
or too many coffee
grounds in the filter.
2.The filter holder lid not
snaps in place.
3.Coffee maker's lid is not
in place.
4.Excessive pressure on
coffee powder.
5.Open the lid immediate-
ly after three beeps,or
open the lid during
brewing.
The small cup,
medium cup
and large cup
button lights
flash and beep
at the same
time
Unplug and replug, and
then press on/off button
to brew coffee.
Please pay attention to the
impurities entering the
water tank when using,
and clean the water tank
frequently.
The motor running
power is too high due
to impurities in the
brew water pipe.
Fill the water tank with
water and press on/off
button, you can start to
brew coffee.
1514
Coffee cup can
not put in the
unit
Size of cup is too big.
Size of cup is within 3.7L x
3.7W x 5.5H/inch
There's
sediment in my
coffee.
If using the filter, this may
be due to using finely
ground coffee.
To reduce the amount of
sediment in the brewed
coffee, use a slightly
coarser grind
Coffee is too
weak
1.Too little ground coffee.
2. Ground coffee is too
coarse.
3.The coffee is not hot.
1.Add ground coffee up to
max level mark.
2.For an even bolder
flavor, you can add more
ground coffee to the
filter.DO NOT use fine or
espresso ground coffee!
3.Use small or medium
cup mode.
4.If coffee is not hot, read
the "Quick Start Guide".
Small amount
of coffee
1.Finely ground coffee or
too many coffee grounds
in the filter.
2.The coffee grounds will
absorb some of the water
that is brewed; this will
cause slight variability in
brew volumes.
3.Too much scale in the
water boiler system.
1.Medium-grind coffee is
recommended.
2.Do not fill past the Max
level.
3.Do not tamp the
grounds.
4.Descale according to
descaling instructions.
Problem Potential Causes Solution
Problem Potential Causes Solution
Troubleshooting
No water in the water
tank.
2
ON/OFF
button light
flash and
beep
The thermostat for
controlling coffee
temperature is dam-
aged.
Unplug and replug,and
if the alarm is still not
cleared, please contact
customer service.
1716
2 Years Limited Warranty.
• With lifelong technical support and
24/7 customer service
Your purchase comes with a 100% satisfaction guarantee from SiFENE.
SiFENE supports free replacement for any problems or refund for any
dissatisfaction under warranty. We will take care of all quality-related
issues with a replacement or full refund including any return shipping
costs. If your product is defective and under warranty, please contact us at
Email: support@sifene.com
More SiFENE Products
If you’re happy with this juicer, the line doesn’t stop here. Check out
https://sifene.com/ for a line of all our beautiful and thoughtfully
designed appliances. They might be right at home in your kitchen, too!
Warranty
2
Problem Potential Causes Solution