

Operator's Manual
EN p. 2
Read all safety rules and instructions carefully before operating this tool.
Distributed By
Suzhou Cleva Electric Appliance Co., Ltd. NO.8 Ting Rong Street 215122 Suzhou - China

2
Section Page
TABLE OF CONTENTS
TABLE OF CONTENTS 2
SPECIFICATIONS 3
IMPORTANT SAFETY INSTRUCTIONS 4-8
SYMBOLS 9-10
KNOW YOUR SCARIFIER/DETHATCHER 11
ASSEMBLY 12-15
OPERATION 16-19
MAINTENANCE 20-21
TROUBLESHOOTING 22-23
WARRANTY 24
EXPLODED VIEW 25
PARTS LIST 26
NOTES 27

3
Voltage 120 V ~ 60 Hz
Current 13 A
Motor Speed 3700 RPM
Deck Width 15 inch (380 mm)
Cutting Width 14 inch (350 mm)
Height Adjustment 19 positions: 0.39 - 0.19 inch ( 10 - 5 mm) for Scarifier Cylinder
19 positions: 0.19 - 0.39 inch ( 5 - 10 mm) for Dethatcher Cylinder
Collection Bag Capacity 10.5 gallon (40 liters)
Wheel Size 3.15 inch (80 mm) / 6.7 inch (170 mm)
SPECIFICATIONS
serious personal injury.
This symbol indicates important safety instructions. If these instructions are not followed, it could
endanger the personal safety and/or property of the operator and others. Read and understand all
these instructions may result in personal injury.
This product has many features for making its use more pleasant and enjoyable.
Safety, performance, and dependability have been given top priority in the design of this product making
it easy to maintain and operate.
Read this Operator’s Manual carefully in its entirety before attempting to assemble this tool. Read,
understand, and follow all instructions on the tool and in the manual before operating it. Keep this
manual in a safe place for future and regular reference and for ordering replacement parts.
capable to operate the tool.
and attachment(s) if anyone enters the working area.
footwear.
rubber gloves and footwear is recommended when working outdoors.
Clear the operating area of any objects which could be thrown by or interfere with operation of the tool.
could slide even if the wheels are stopped.
which it is intended.
cord only one way.
IMPORTANT SAFETY INSTRUCTIONS
WARNING
WARNING
5
IMPORTANT SAFETY INSTRUCTIONS
use one heavy enough to carry the current your product will draw. For lengths less than 50 feet, a
resulting in loss of power and overheating.
and locked-up place-out of reach of children.
discharge opening at all times.
cause operator to lose their balance or footing.
obstruction. Material may ricochet back toward the operator.
They are NOT safety glasses. Following this rule will reduce the risk of eye injury. Use a face mask
if operation is dusty.
operating this tool.
before and while backing.
Always be sure the cylinder has stopped after releasing switch lever and unplugging before removing
turns slowly and gradually.
you are tired.
Keep cord away from heat, oil, sharp edges, or moving parts. Replace damaged cords immediately.
Damaged cords increase the risk of electric shock.
personal injury.
bones, and other foreign objects.
6
IMPORTANT SAFETY INSTRUCTIONS
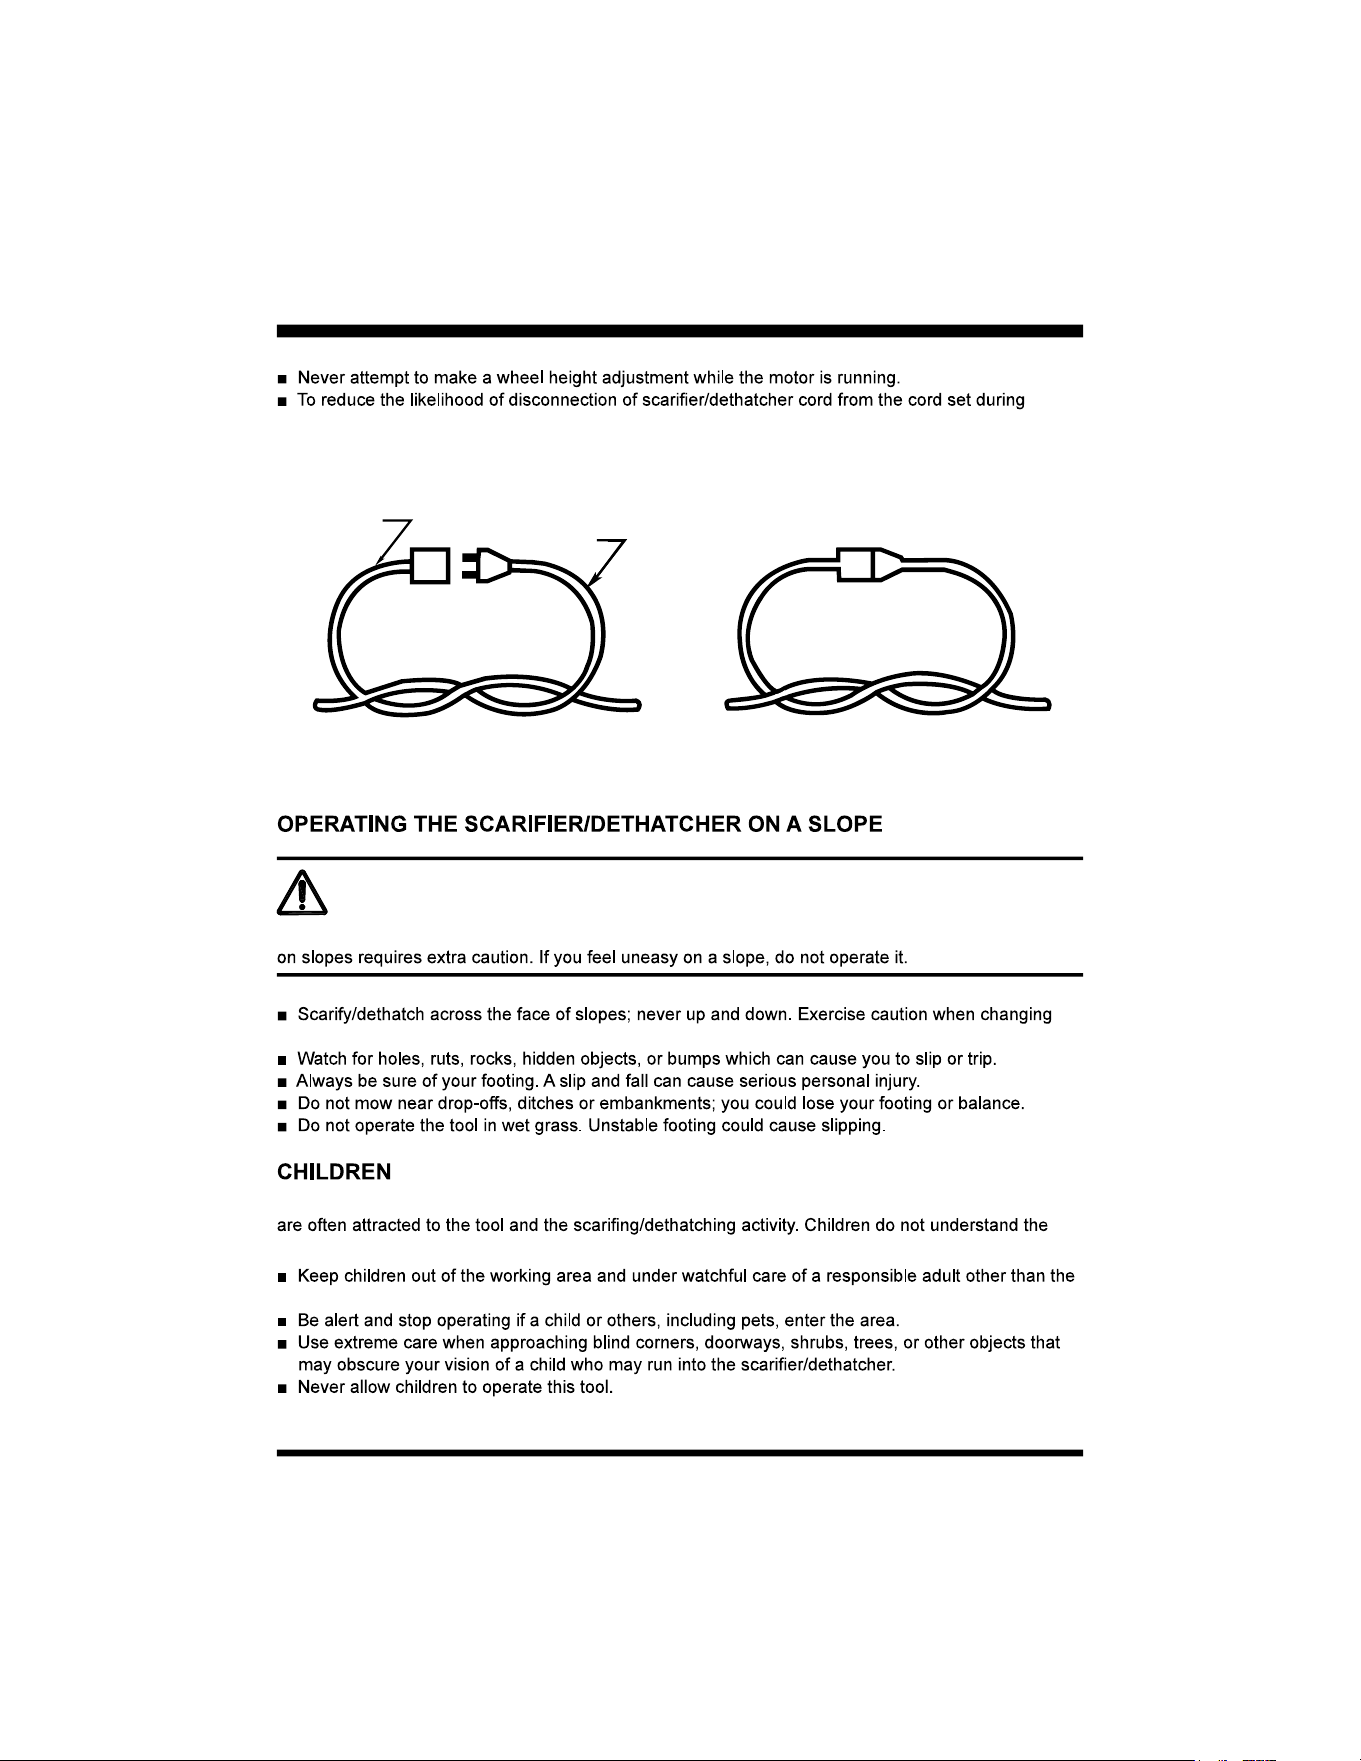
operating, make a knot as shown below, or use one of the plug-receptacle retaining straps or
connectors described in this manual.
Slopes are a major factor related to slip and fall accidents, which can result in severe injury. Operation
direction on slopes.
Tragic accidents can occur if the operator is not alert in the presence of small children. Children
dangers. Never assume that children will remain where you last saw them.
operator.
S1036A
Method of securing cord set
CORD SET
(A) TIE CORD AS SHOWN (B) CONNECT PLUG AND RECEPTACLE
APPLIANCE
CORD
CAUTION
7
IMPORTANT SAFETY INSTRUCTIONS
thickness of
isolated from the internal metal motor components with protective insulation.
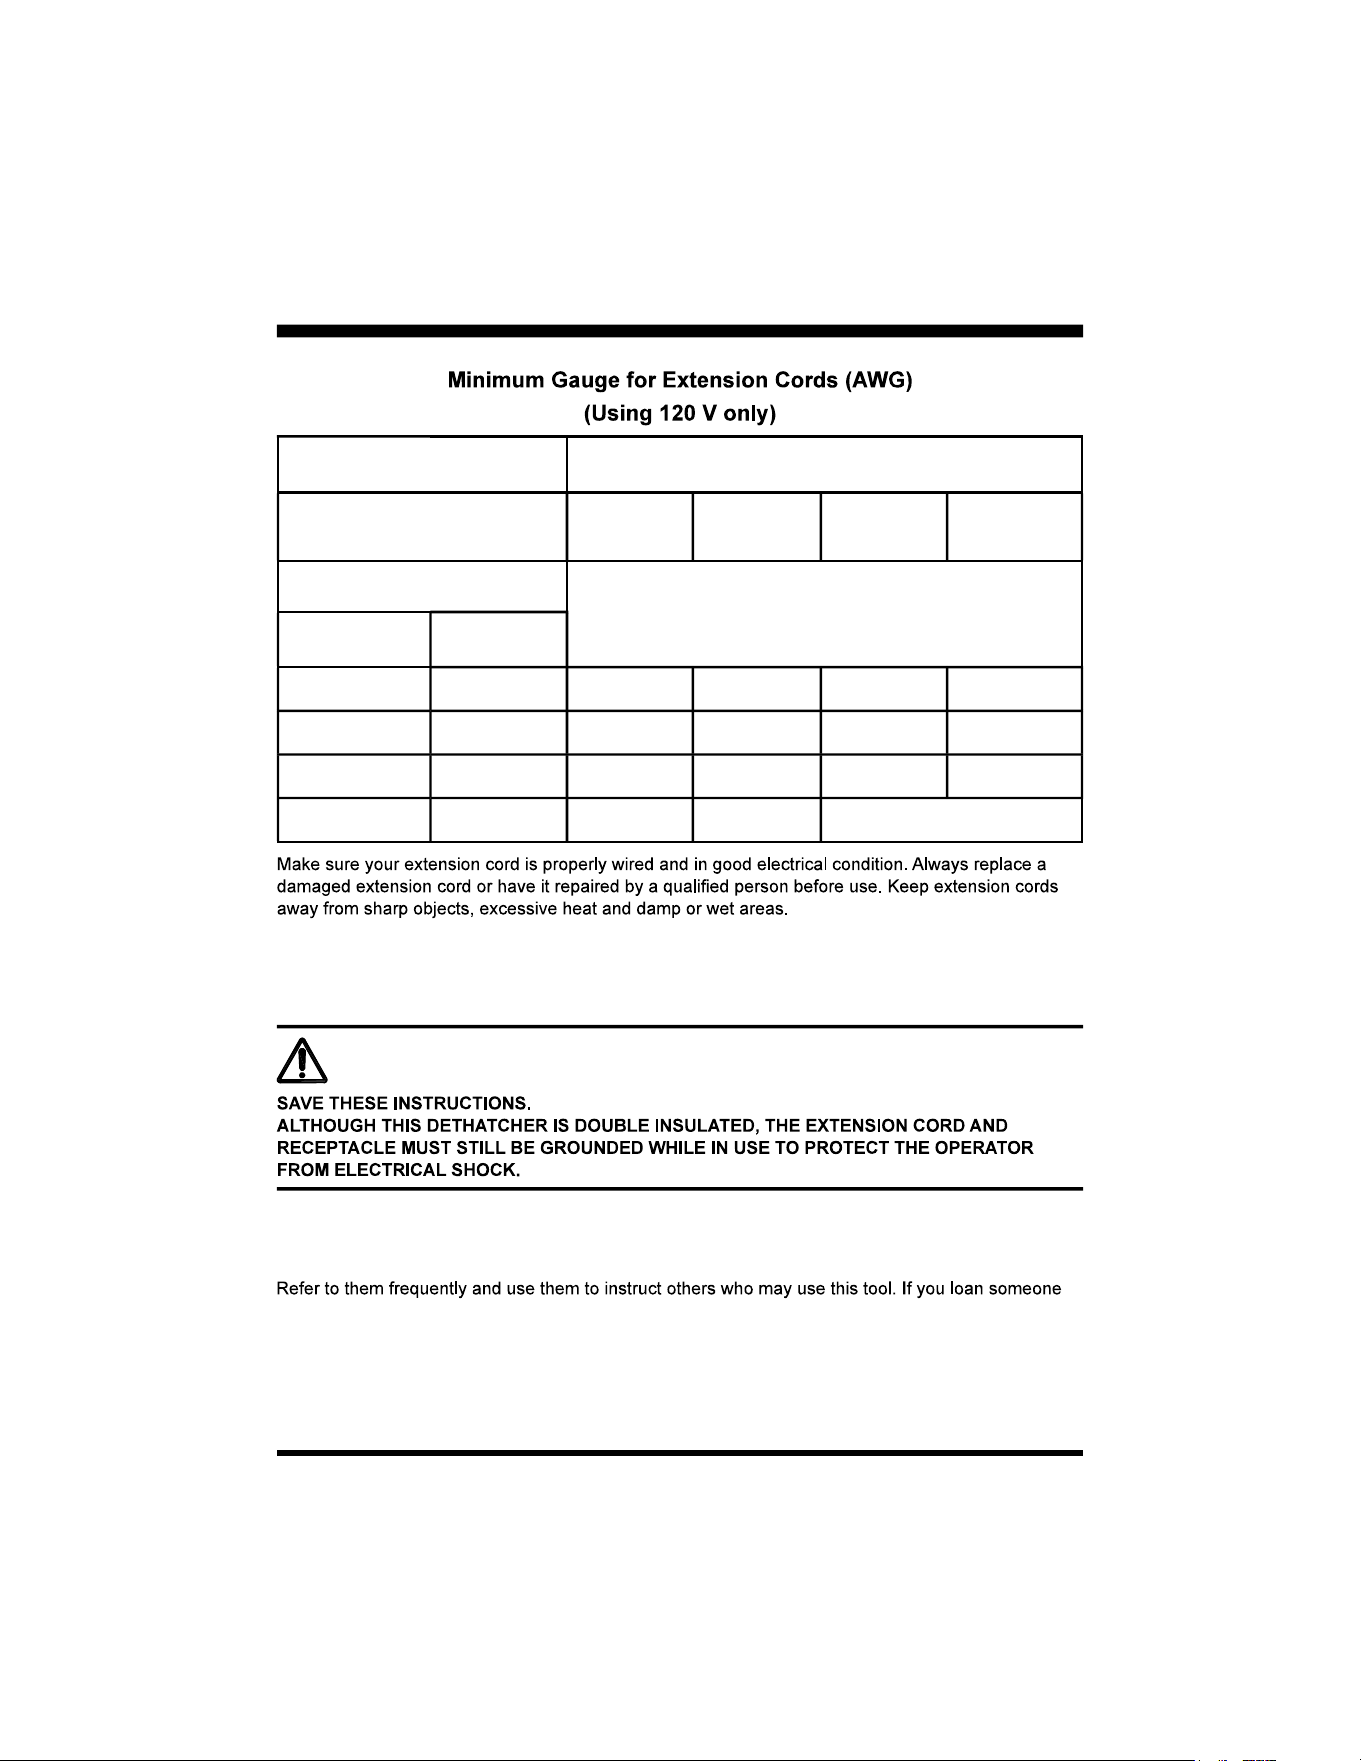
An undersized cord will cause overheating. The table below shows the correct size to use depending
gauge number, the heavier the cord.
WARNING
WARNING
WARNING
CAUTION
8
IMPORTANT SAFETY INSTRUCTIONS
Total Length of Cord in Feet (meters)
120V
25ft
(7.62m)
50ft
(15.24m)
100ft
(30.48m)
150ft
(45.72m)
Ampere Rating
AWG
More Than
Not More
Than
0 6 18 16 16 14
6 10 18 16 14 12
10 12 16 16 14 12
12 16 14 12 Not Recommended
Use a separate electrical circuit for your tools. This circuit should comprise a wire of at least 12 gauge
and should be protected with a 15 A time-delayed fuse. Before connecting the motor to the power line,
make sure the switch is in the OFF position and the electric current is identical to that stamped on the
motor nameplate. Running at a lower voltage will damage the motor.
WARNING
SAVE THESE INSTRUCTIONS
this tool, loan them these instructions also.
9
SYMBOLS
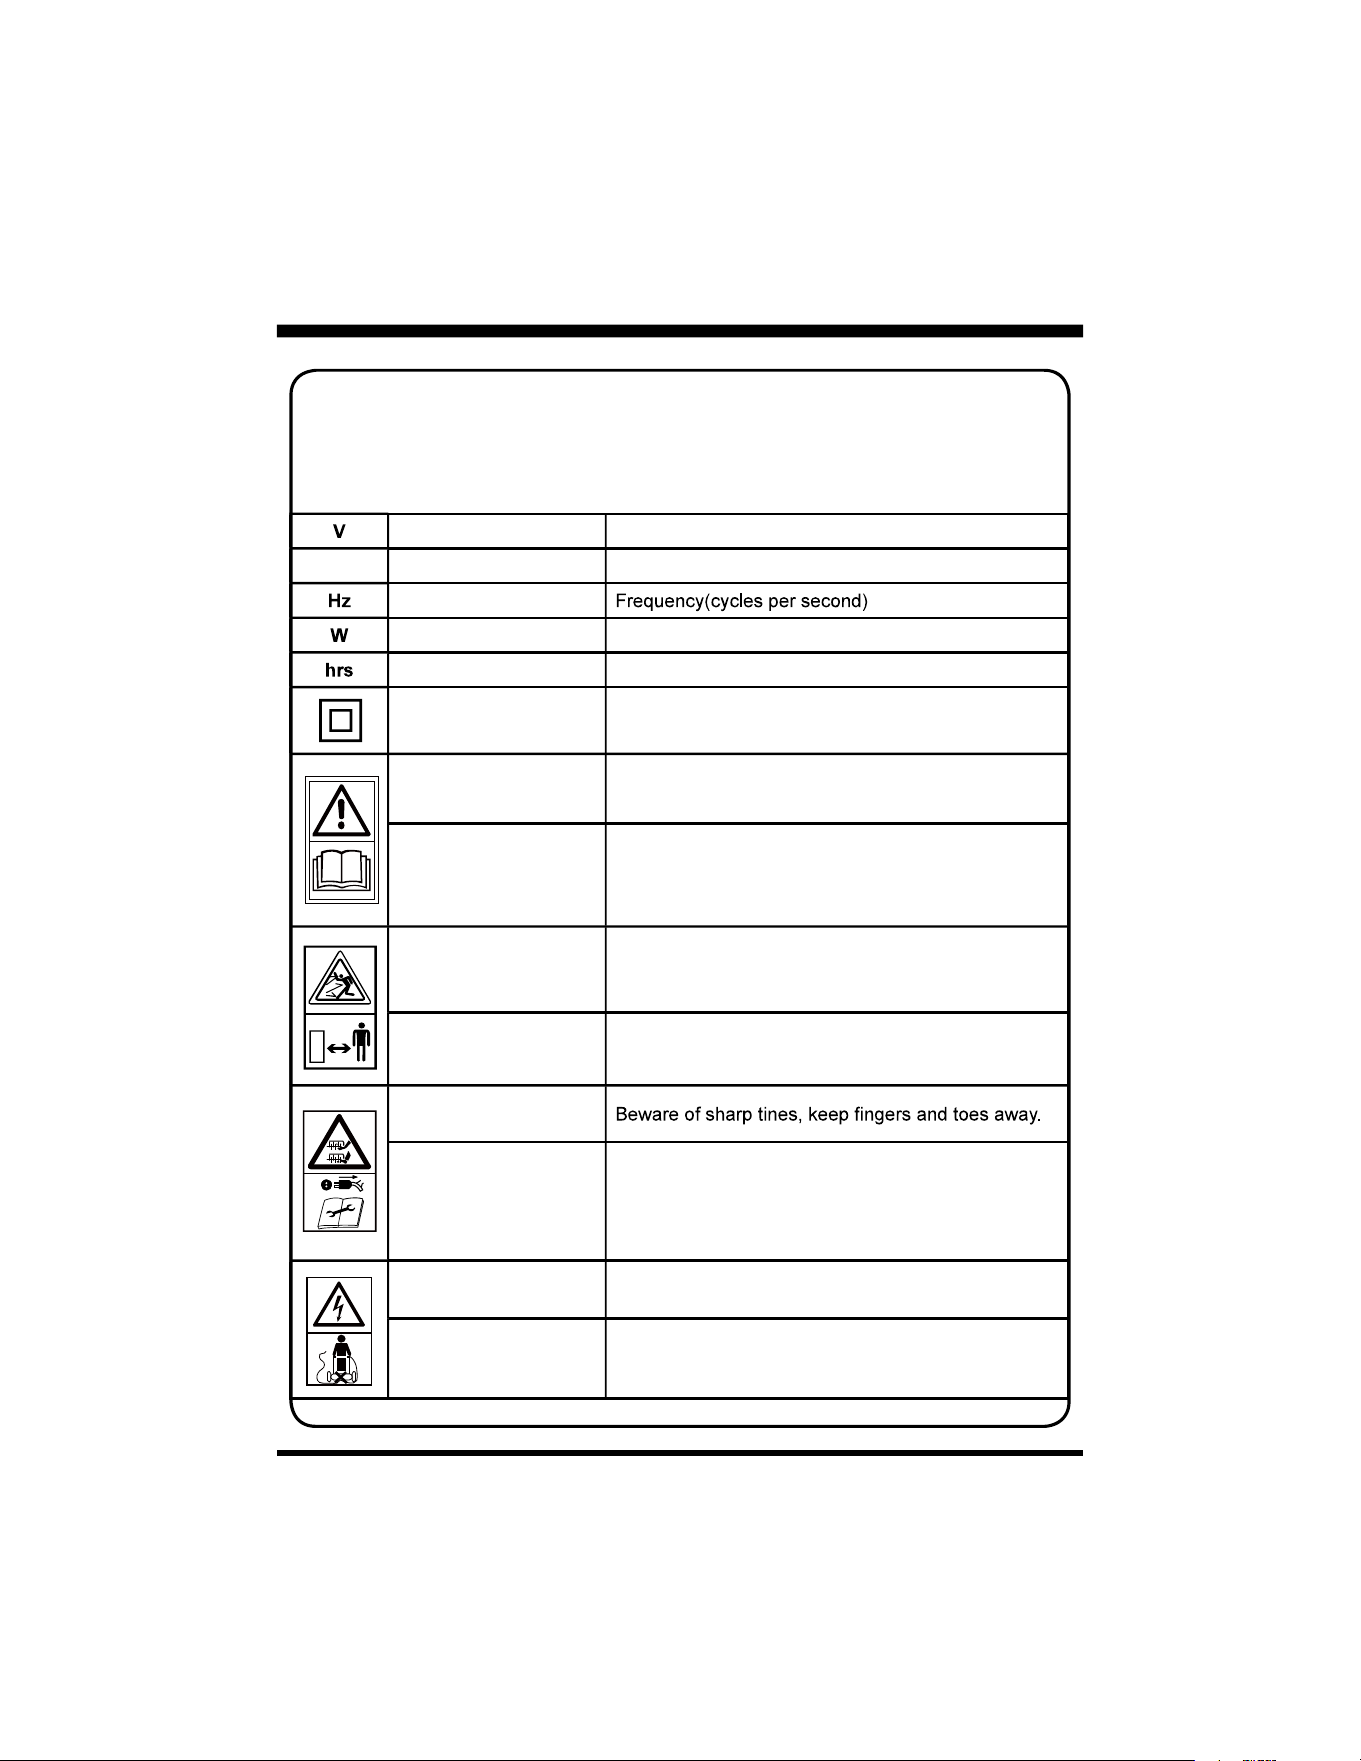
Volts Voltage
A Amperes Current
Hertz
Watt Power
Hours Time
Class II Construction Double-insulated construction
Safety Alert Precautions that involve your safety
Read The Operator’s
Manual
To reduce the risk of injury, user must read and
understand Operator’s Manual before using this
product.
Ricochet
Pay attention that bystanders are not injured by
objects or debris thrown out from the tool.
Keep Bystanders Away Keep bystanders a safe distance away from the tool.
Sharp Tines Alert
Remove Plug
From Mains Before
Maintenance
Remove plug from mains before maintenance,
adjusting, cleaning or if the cord is entangled or
damaged. Tines continue to rotate after the motor is
switched off.
Electric Shocks Beware of electric shocks.
Keep power cord away Keep power cord away from tines.
Some of the following symbols may be used on this product. Please study them and learn
their meaning. Proper interpretation of these symbols will allow you to operate the product
better and safer.
SYMBOL
NAME DESIGNATION/EXPLANATION
10
SYMBOLS
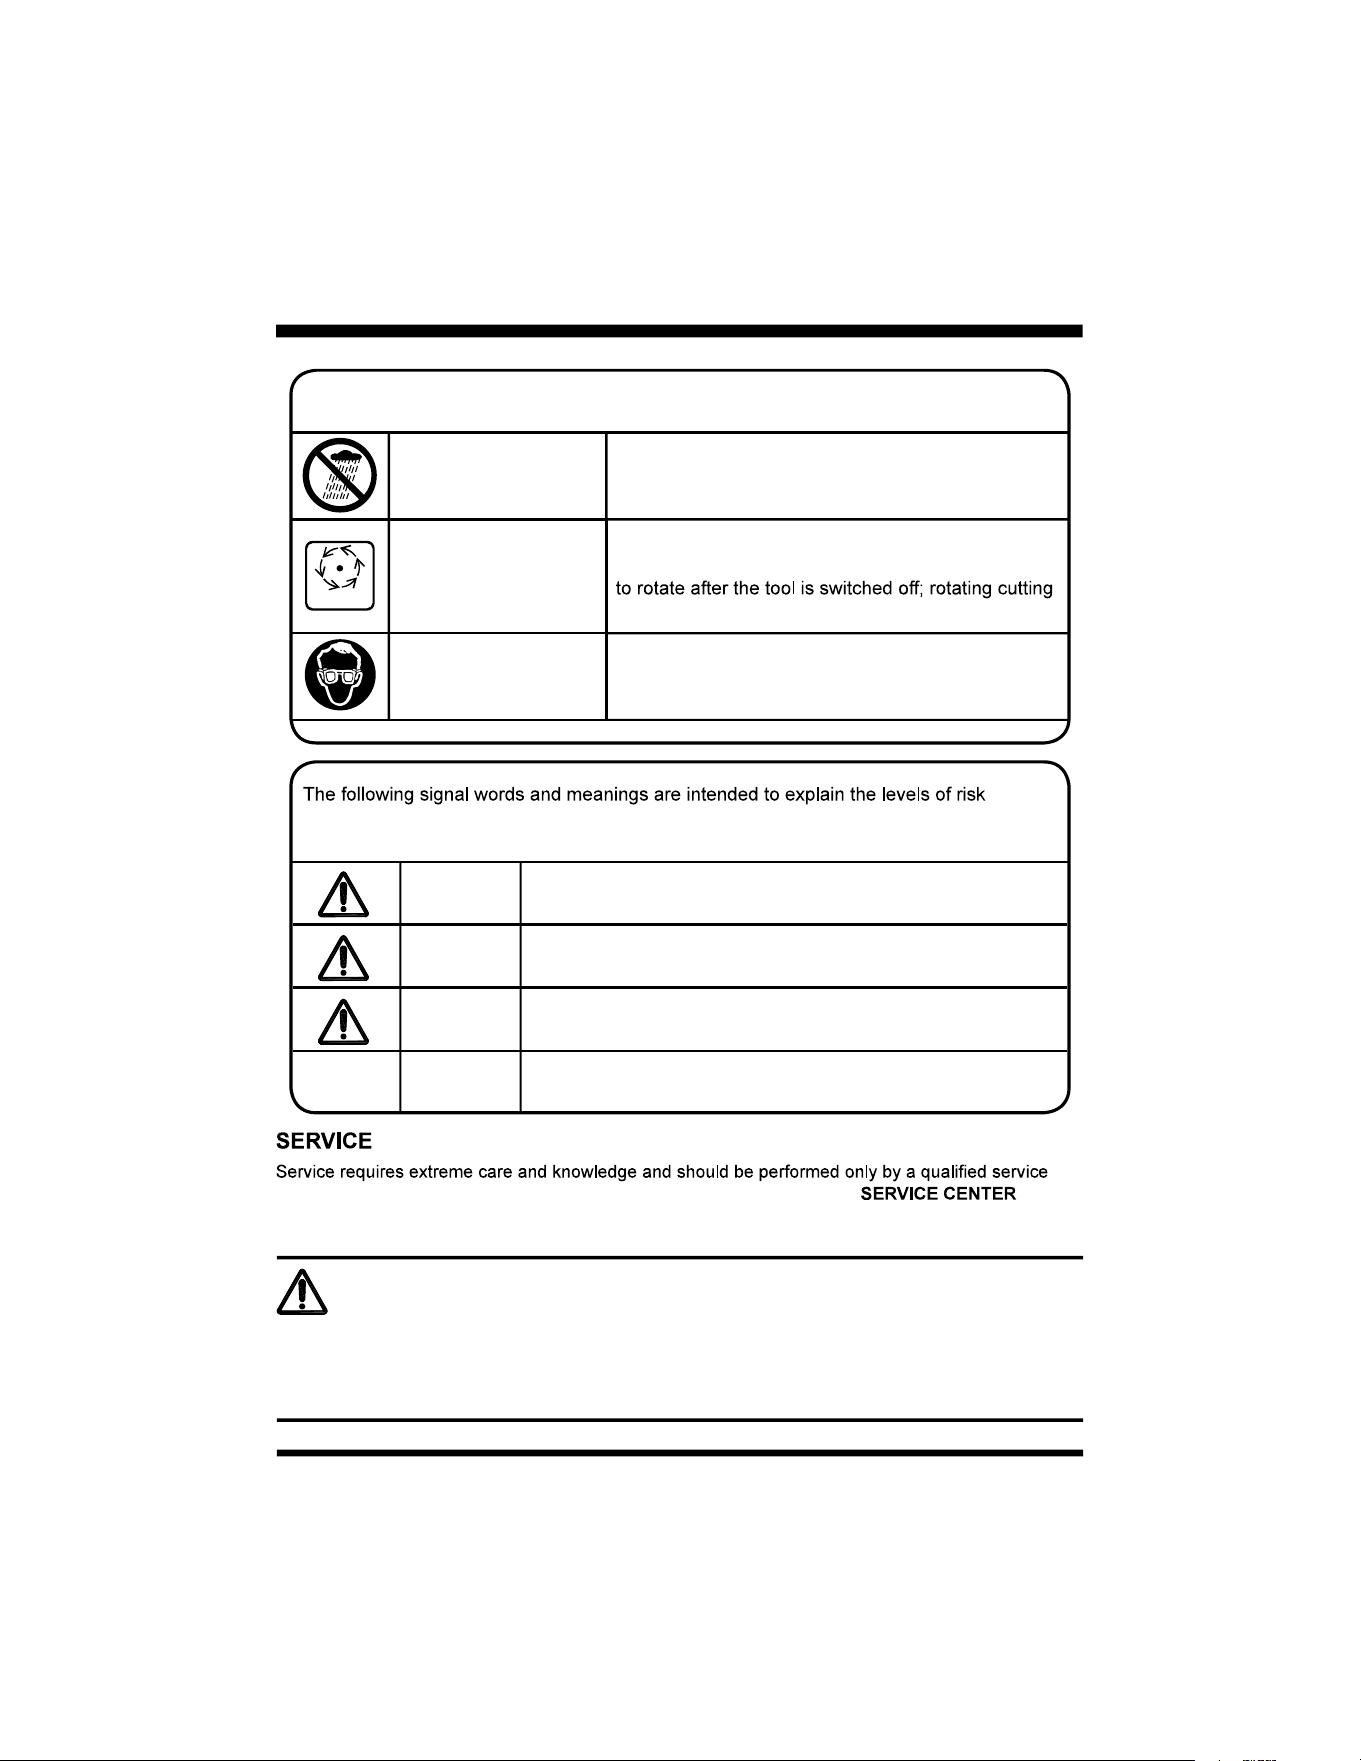
Wet Conditions Alert
Do not use the tool or leave it outdoors when it is
raining.
Wait Until All Moving
Parts Completely Stop
Wait until all moving parts have stopped completely
before touching them. The cutting tools may continue
tools can cause injury.
Eye and Hearing
Protection
Wear eye and ear protection (PPE).
DANGER
Indicates an imminently hazardous situation, which, if not
avoided, will result in death or serious injury.
WARNING
Indicates a potentially hazardous situation, which, if not
avoided, could result in death or serious injury.
CAUTION
Indicates a potentially hazardous situation, which, if not
avoided, may result in minor or moderate injury.
NOTICE
(Without Safety Alert Symbol) Indicates a situation that may
result in property damage.
associated with this product.
STOP
technician. For service, we suggest you return the product to your nearest for
repair or call Customer Service at 866-384-8432. When servicing, use only identical replacement
parts.
To avoid serious personal injury, do not attempt to use this product until you read thoroughly and understand
completely the Operator’s Manual.
If you do not understand the warnings and instructions in the Operator’s Manual, do not use this product.
Call Customer Service for assistance (Toll free number 866-384-8432).
WARNING
SYMBOL
SYMBOL
SIGNAL
NAME
MEANING
DESIGNATION/EXPLANATION
11
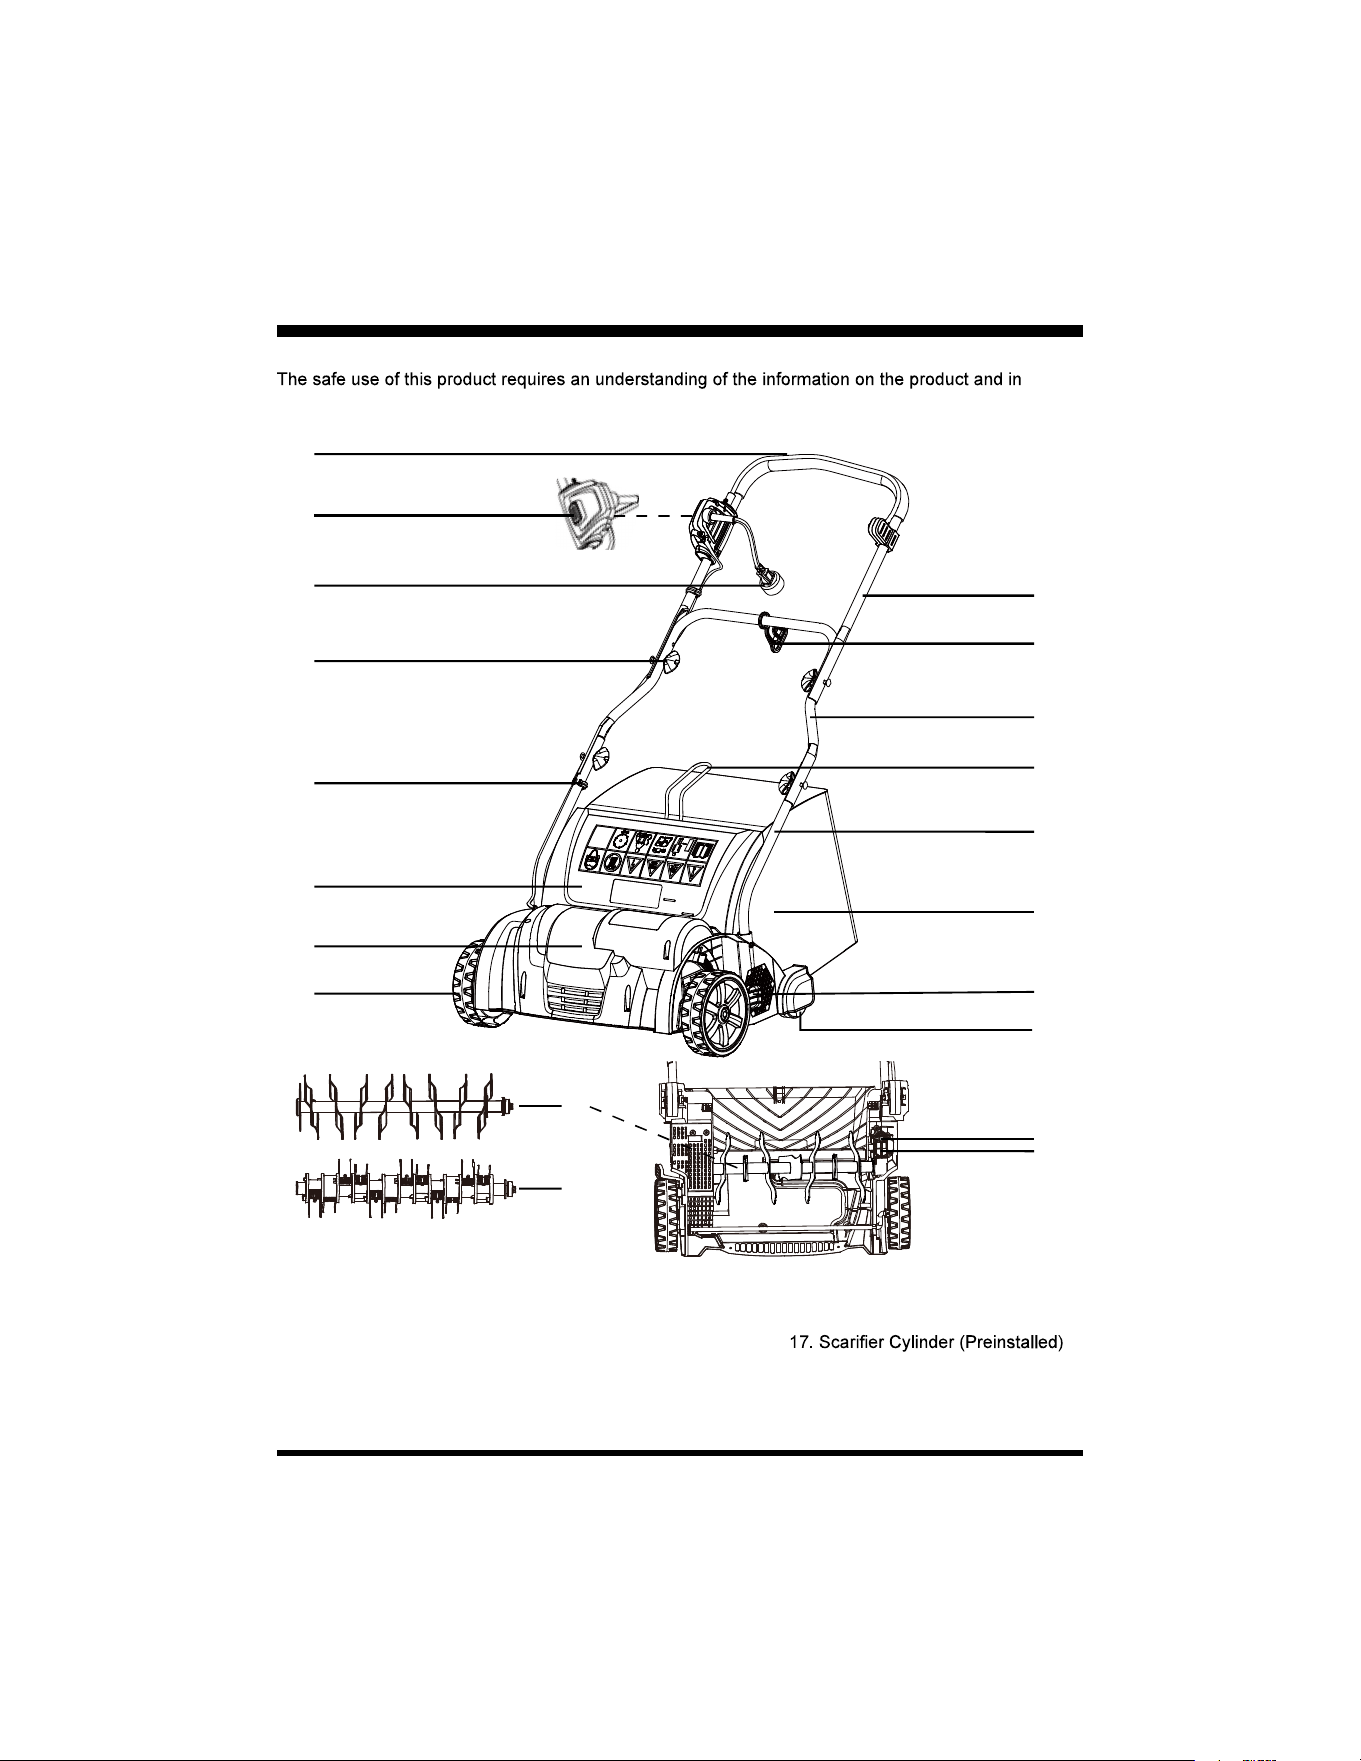
KNOW YOUR SCARIFIER/DETHATCHER
this Operator’s Manual as well as a knowledge of the project you are attempting. Before use of this
product, familiarize yourself with all operating features and safety rules.
Components
1. Start/Stop Bale Switch
2. Safety Switch Button
3. Power Cord
4. Carriage Bolts & Wing
Nuts (X4)
5. Cable Clip (X2)
6. Safety Guard Flap
1
2
3
4
5
6
7
8
16
15
14
13
12
11
10
19
17
18
9
20
7. Motor Cover
8. Front Wheel
9. Rear Wheel
10. Height Adjustment Lever
11. Collection Bag
12. Lower Handle
13. Collection Bag Handle
14. Middle Handle
15. Cord Retainer
16. Upper Handle
18. Dethatcher Cylinder
19. Mounting Bolt
20. Bearing Cover
12
ASSEMBLY
WARNING
WARNING
WARNING
If any parts are damaged or missing do not operate this product until the parts are replaced. Failure to
heed this warning could result in serious personal injury.
Do not attempt to modify this product or create accessories not recommended for use with this
leading to possible serious personal injury, and will void the warranty.
Do not connect power supply until assembly is complete. Failure to comply could result in accidental
starting and possible serious personal injury.
the packing list are included.
the product.
384-8432).
(1) Upper Handle
(1) Middle Handle
(2) Lower Handles
(2) Screws
(4) Carriage Bolts
(4) Wing Nuts
(2) Cable Clips
(1) Cord Retainer
(1) Collection Bag Assembly (Bag & Collection Bag Rods)
(1) Dethatcher Cylinder
(1) Operator’s Manual
13
WARNING
Never operate the tool without the proper safety devices in place and working. Never operate the tool
with damaged safety devices. Failure to heed this warning can result in serious personal injury.
Fig. 1
Fig. 4
Fig. 2
Fig. 5
Fig. 3
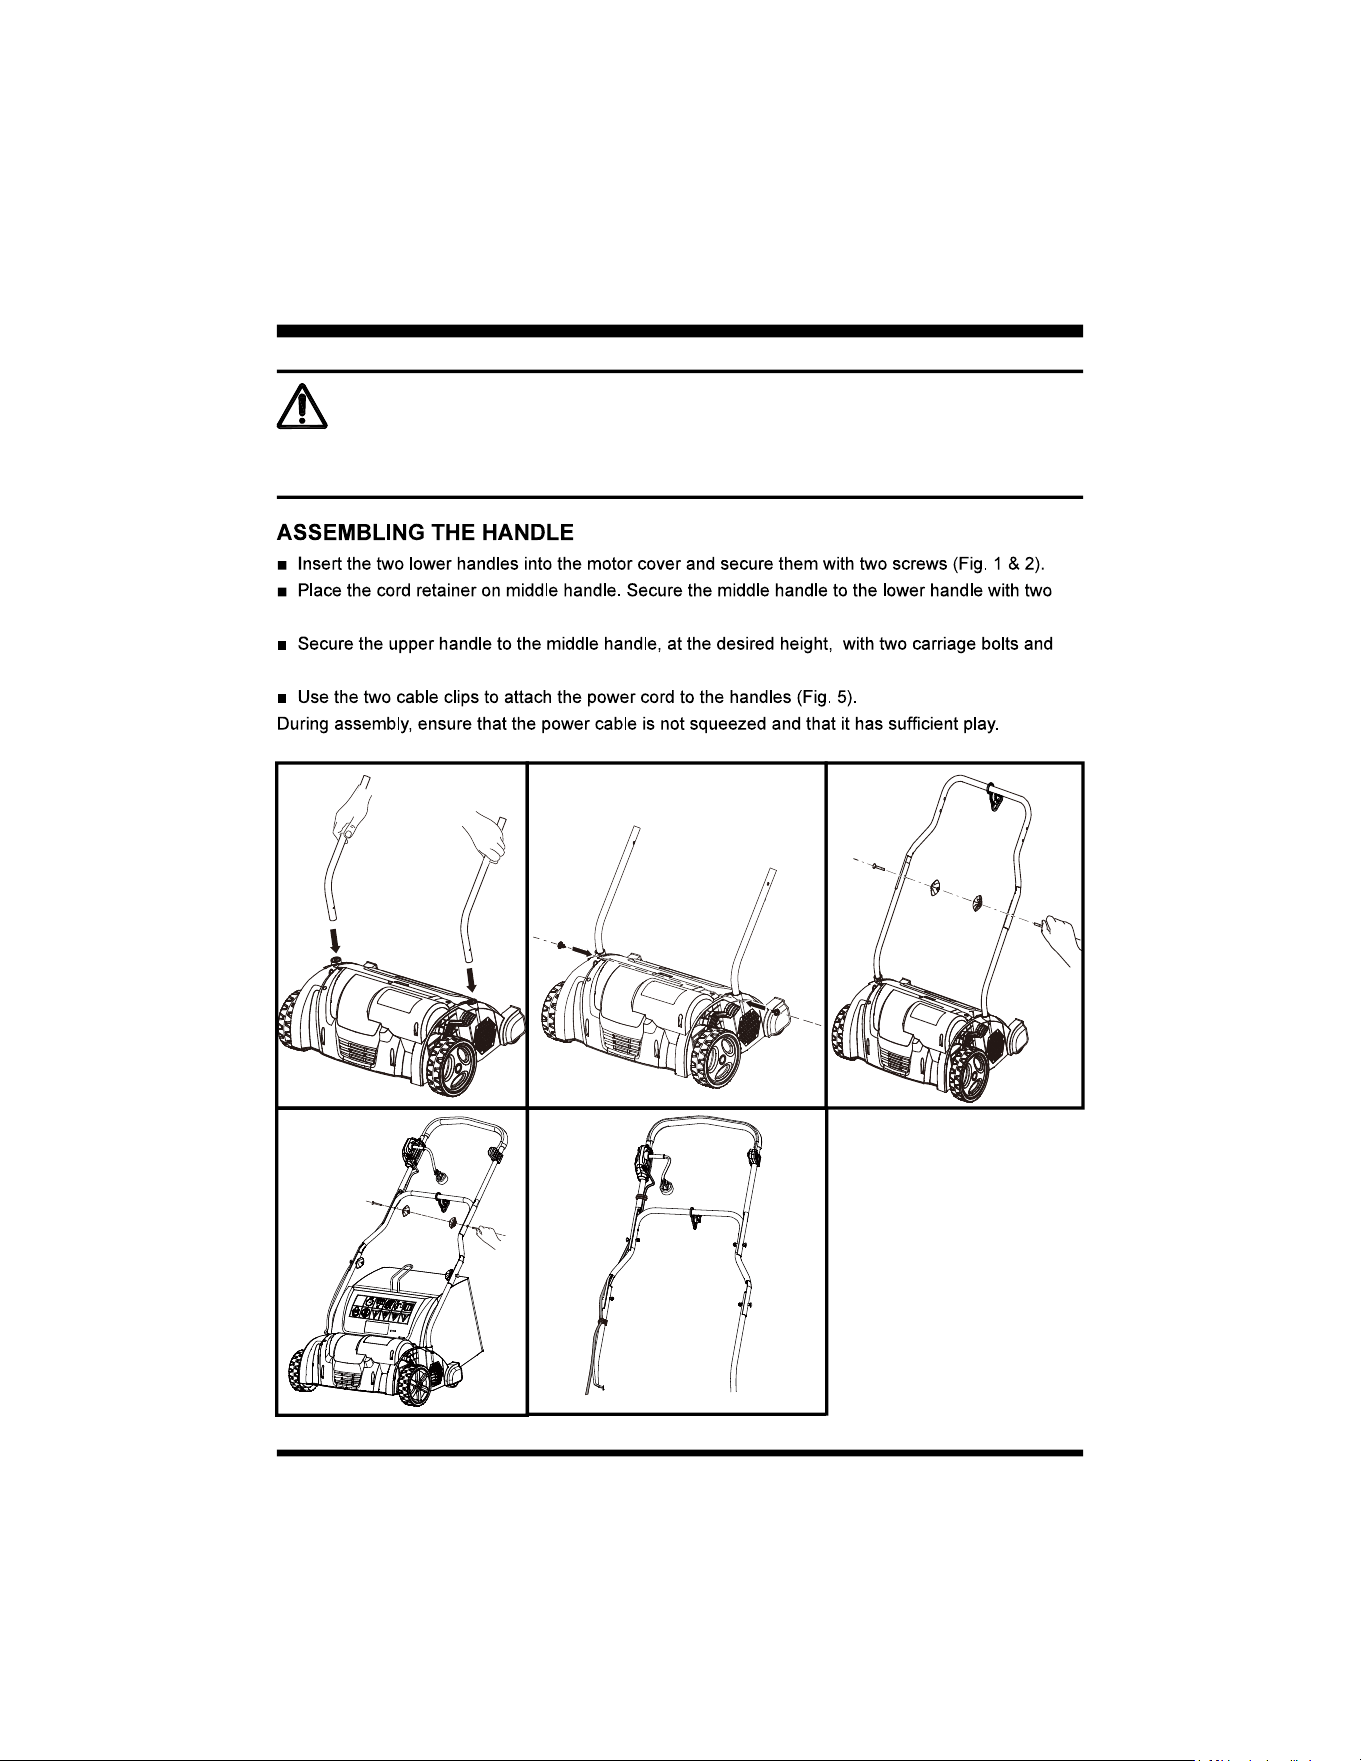
ASSEMBLY
(See Figs. 1-6)
carriage bolts and two wing nuts (Fig. 3).
two wing nuts (Fig. 4).
ASSEMBLY
avoid personal injury.
Recommendation: Work with the collection bag for dethatching and without the collection bag for
scarifying.
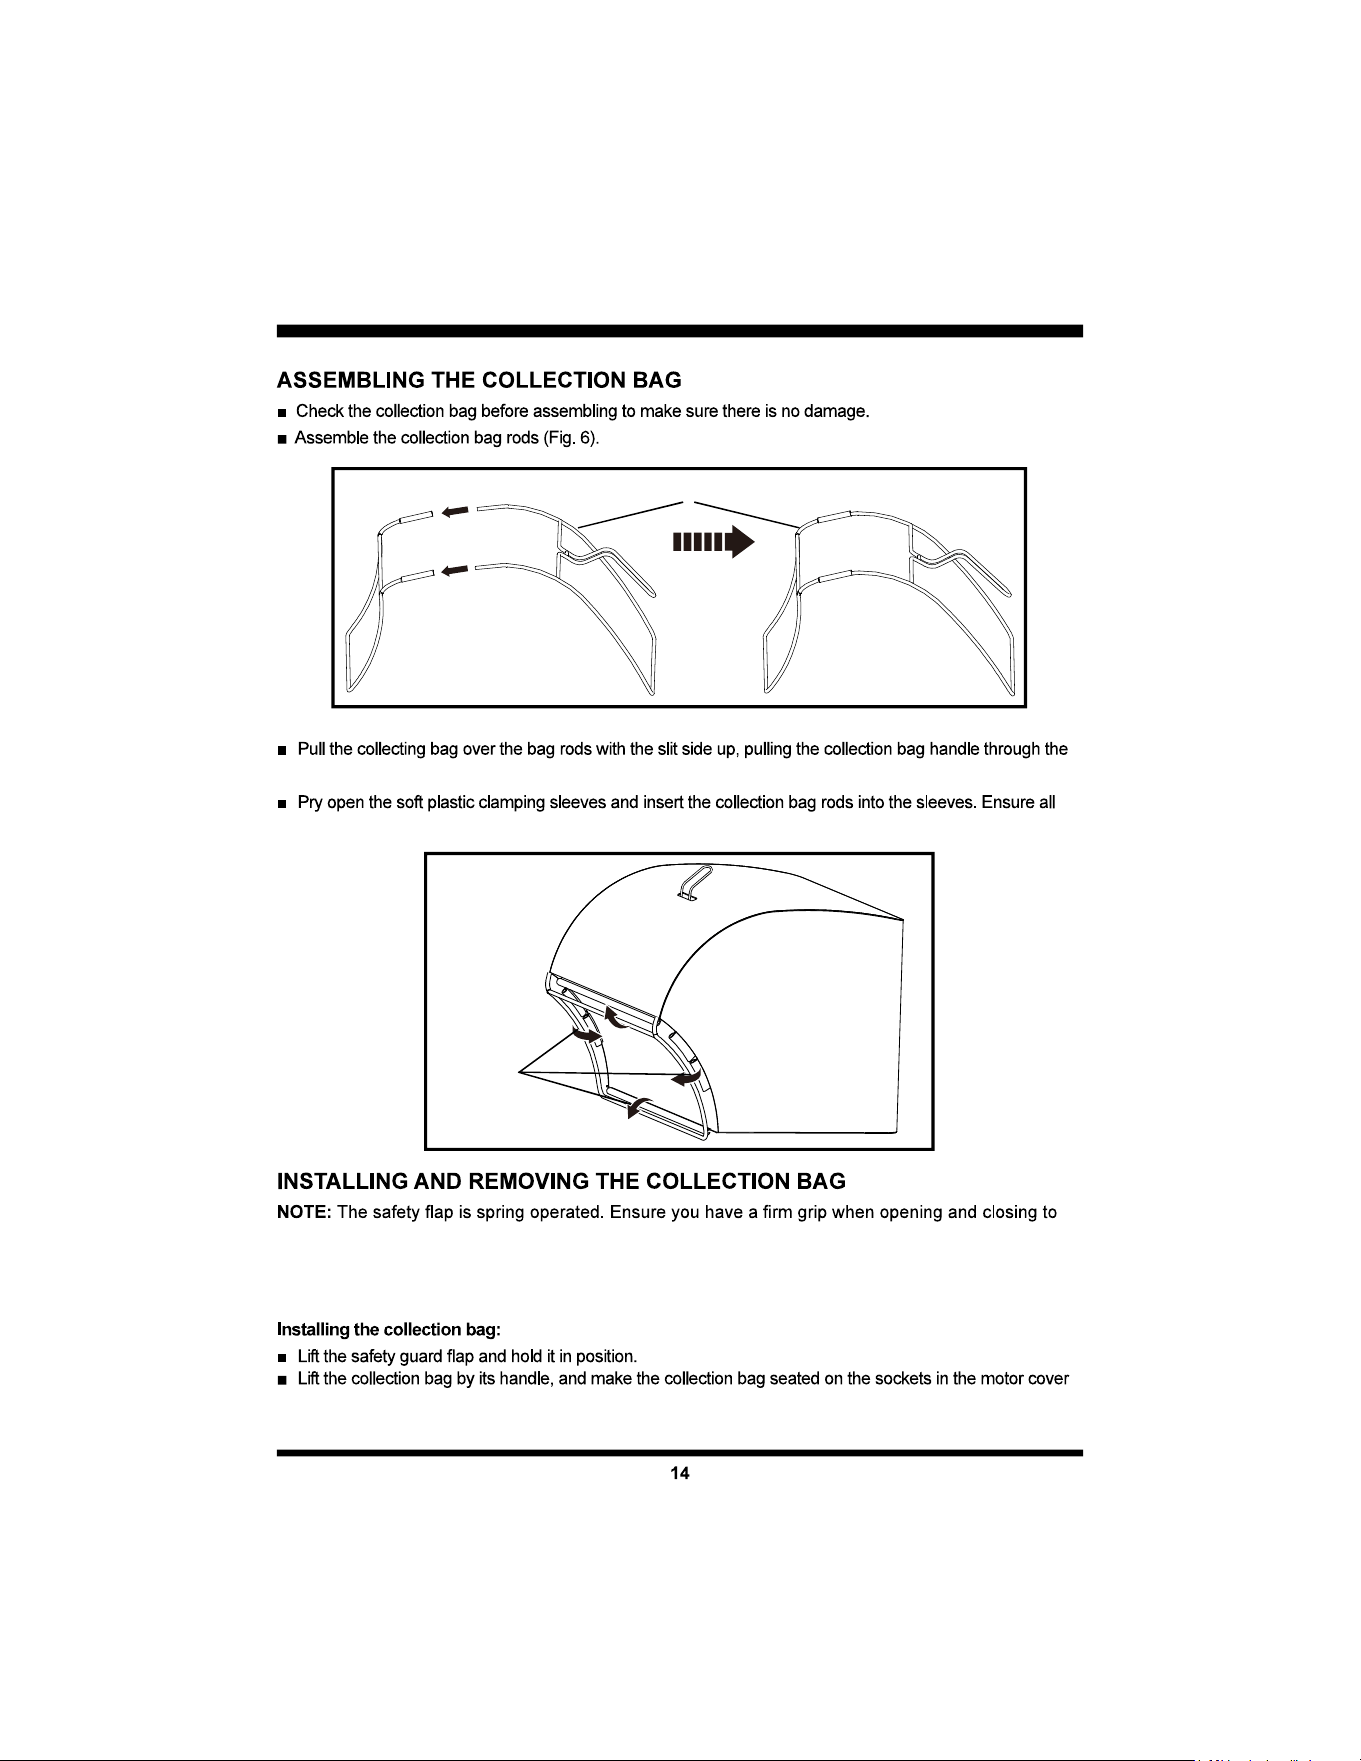
(Fig. 8).
slit opening.
sleeves are properly clamped on the rods (Fig. 7).
Collection Bag Rods
Fig. 6
Fig. 7
Soft Plastic
Clamping
Sleeves
15
signs of wear or deterioration.
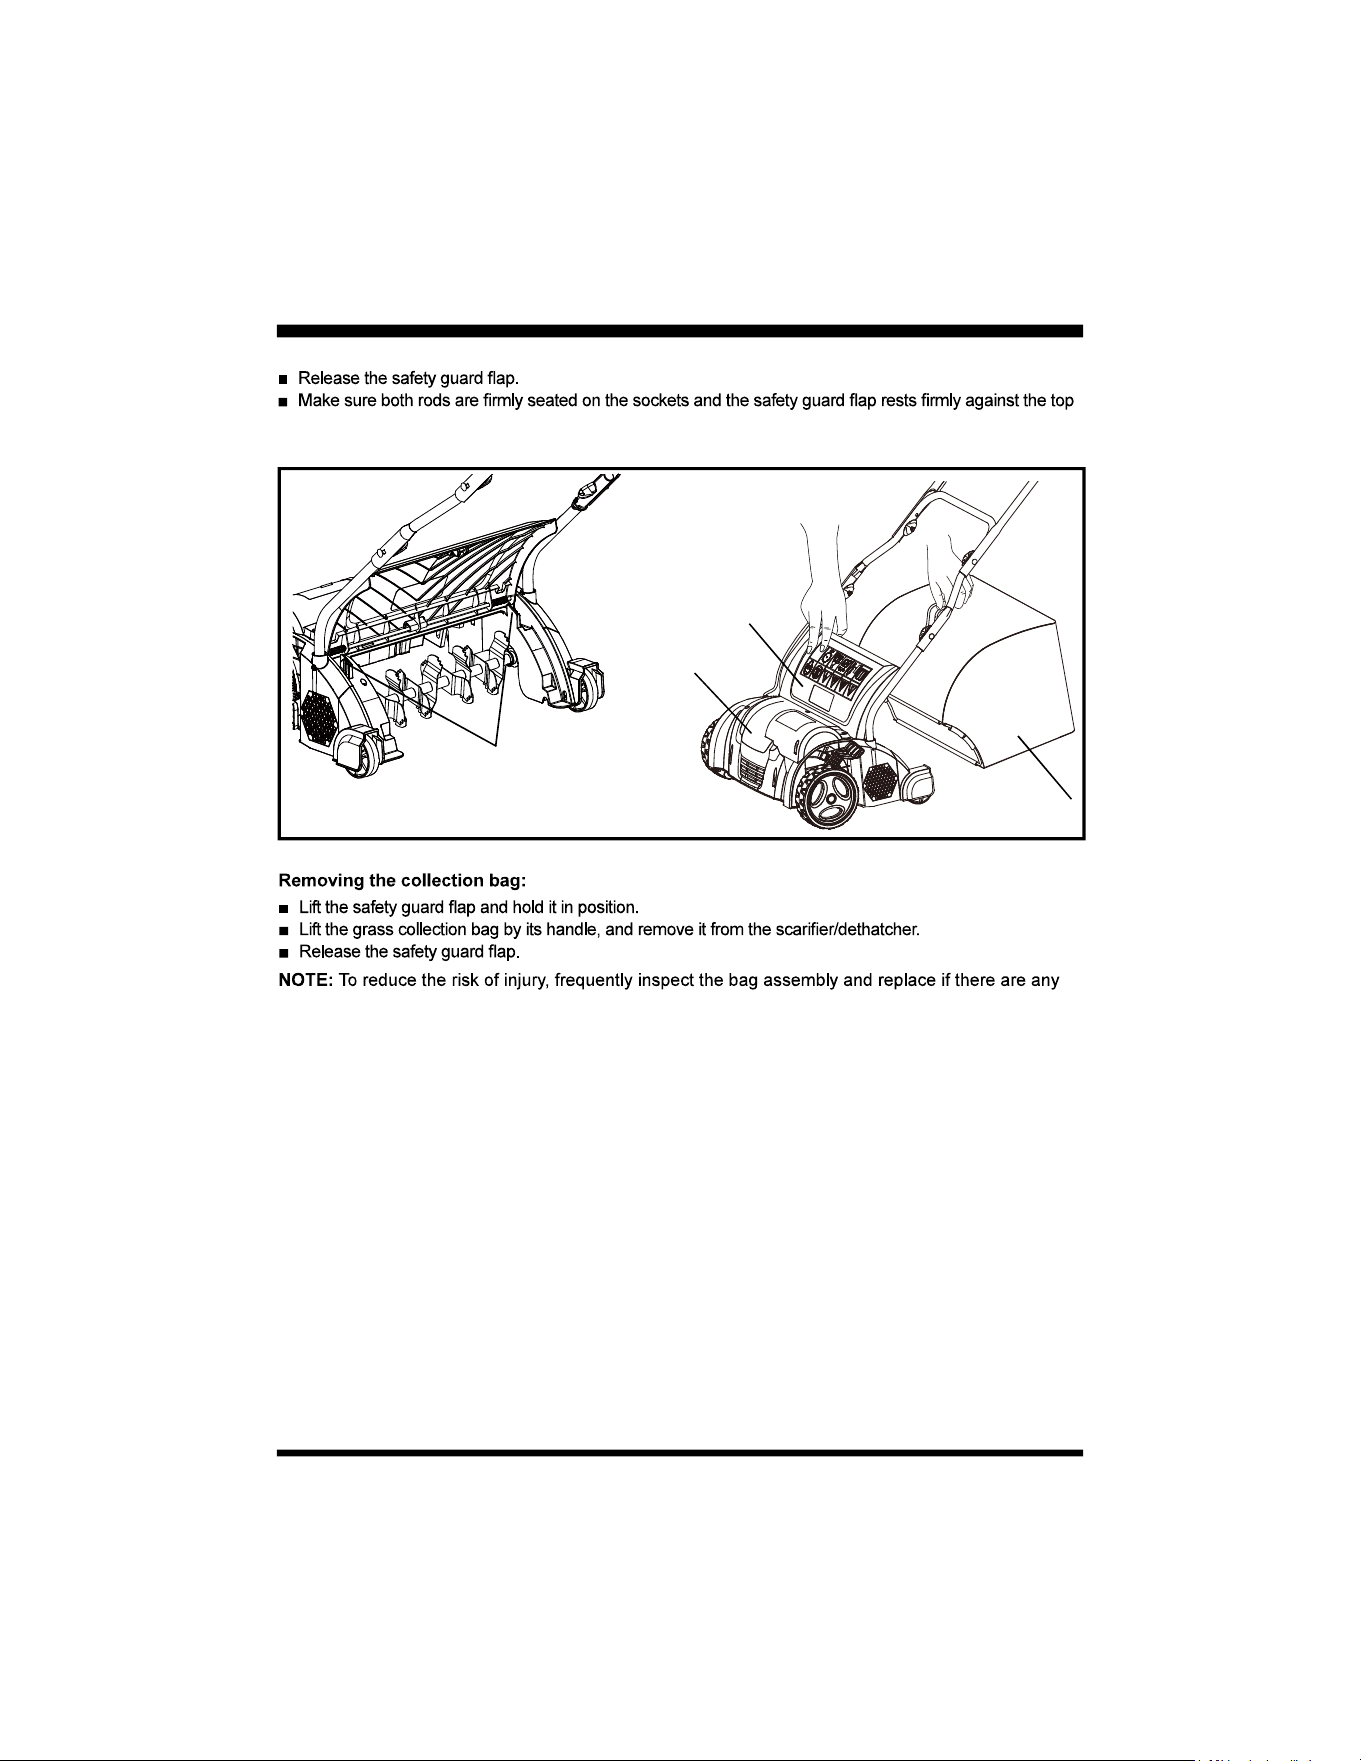
ASSEMBLY
Fig. 8
Safety Guard Flap
Motor Cover
Collection Bag
Socket
of the grass collection bag.
16
snap in (Fig.9).
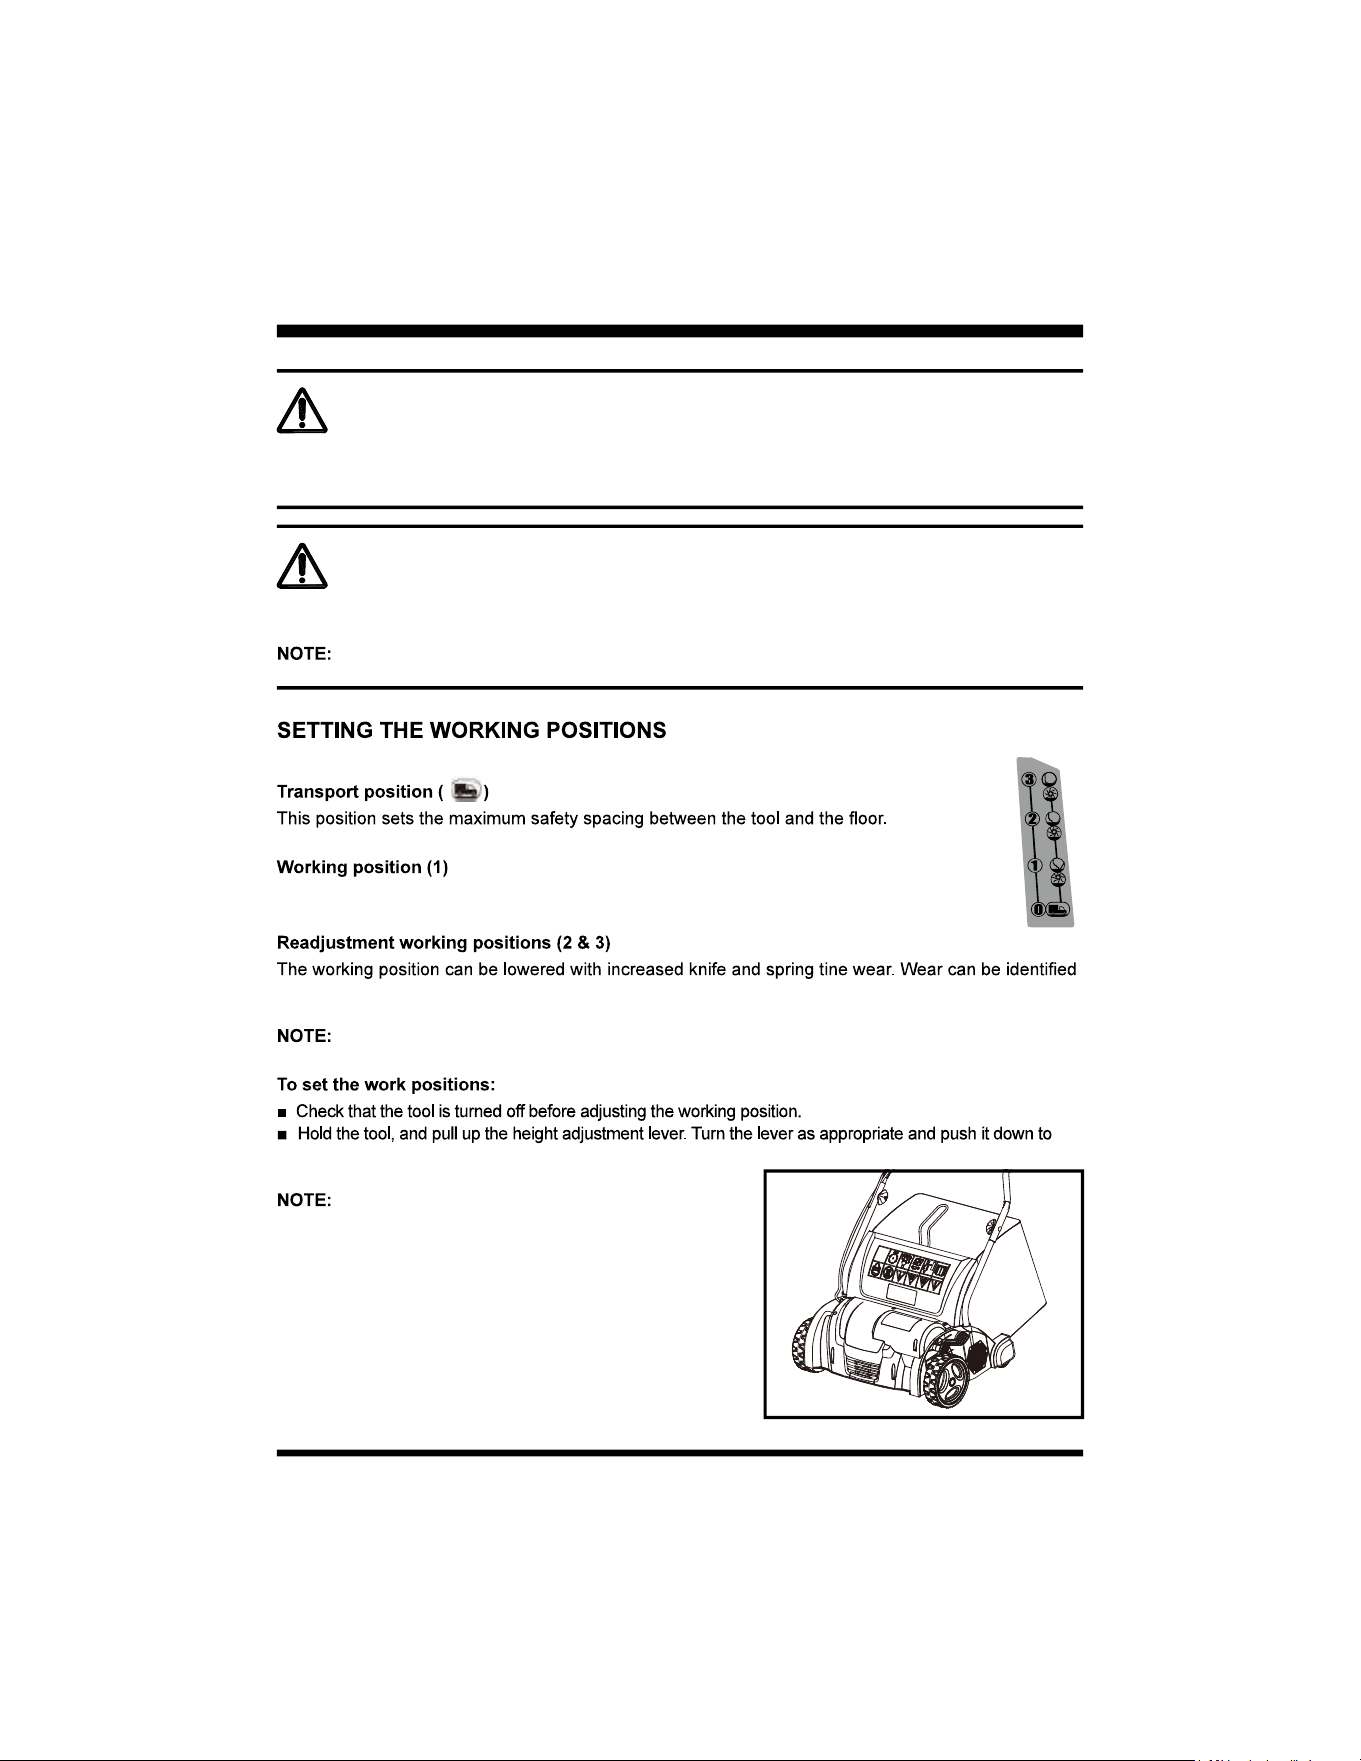
The height adjustment lever is not intended for
height adjustment but rather to compensate for wear.
Selection of a readjustment position without the
corresponding wear can overload the motor and damage
the cylinder.
OPERATION
WARNING
WARNING
Do not use any attachments or accessories not recommended by the manufacturer of this product.
The use of attachments or accessories not recommended can result in serious personal injury.
Do not switch on the tool until it has been completely assembled. Before switching on the tool, always
check the power cord for signs of damage. Only use an undamaged power cord.
A damaged power cord is highly dangerous!
The tool has 4 principal position settings:
Set this position when working with a new tool.
from an increasingly poor result.
When the tool is delivered, it will be set in in the transport position.
Fig. 9
17
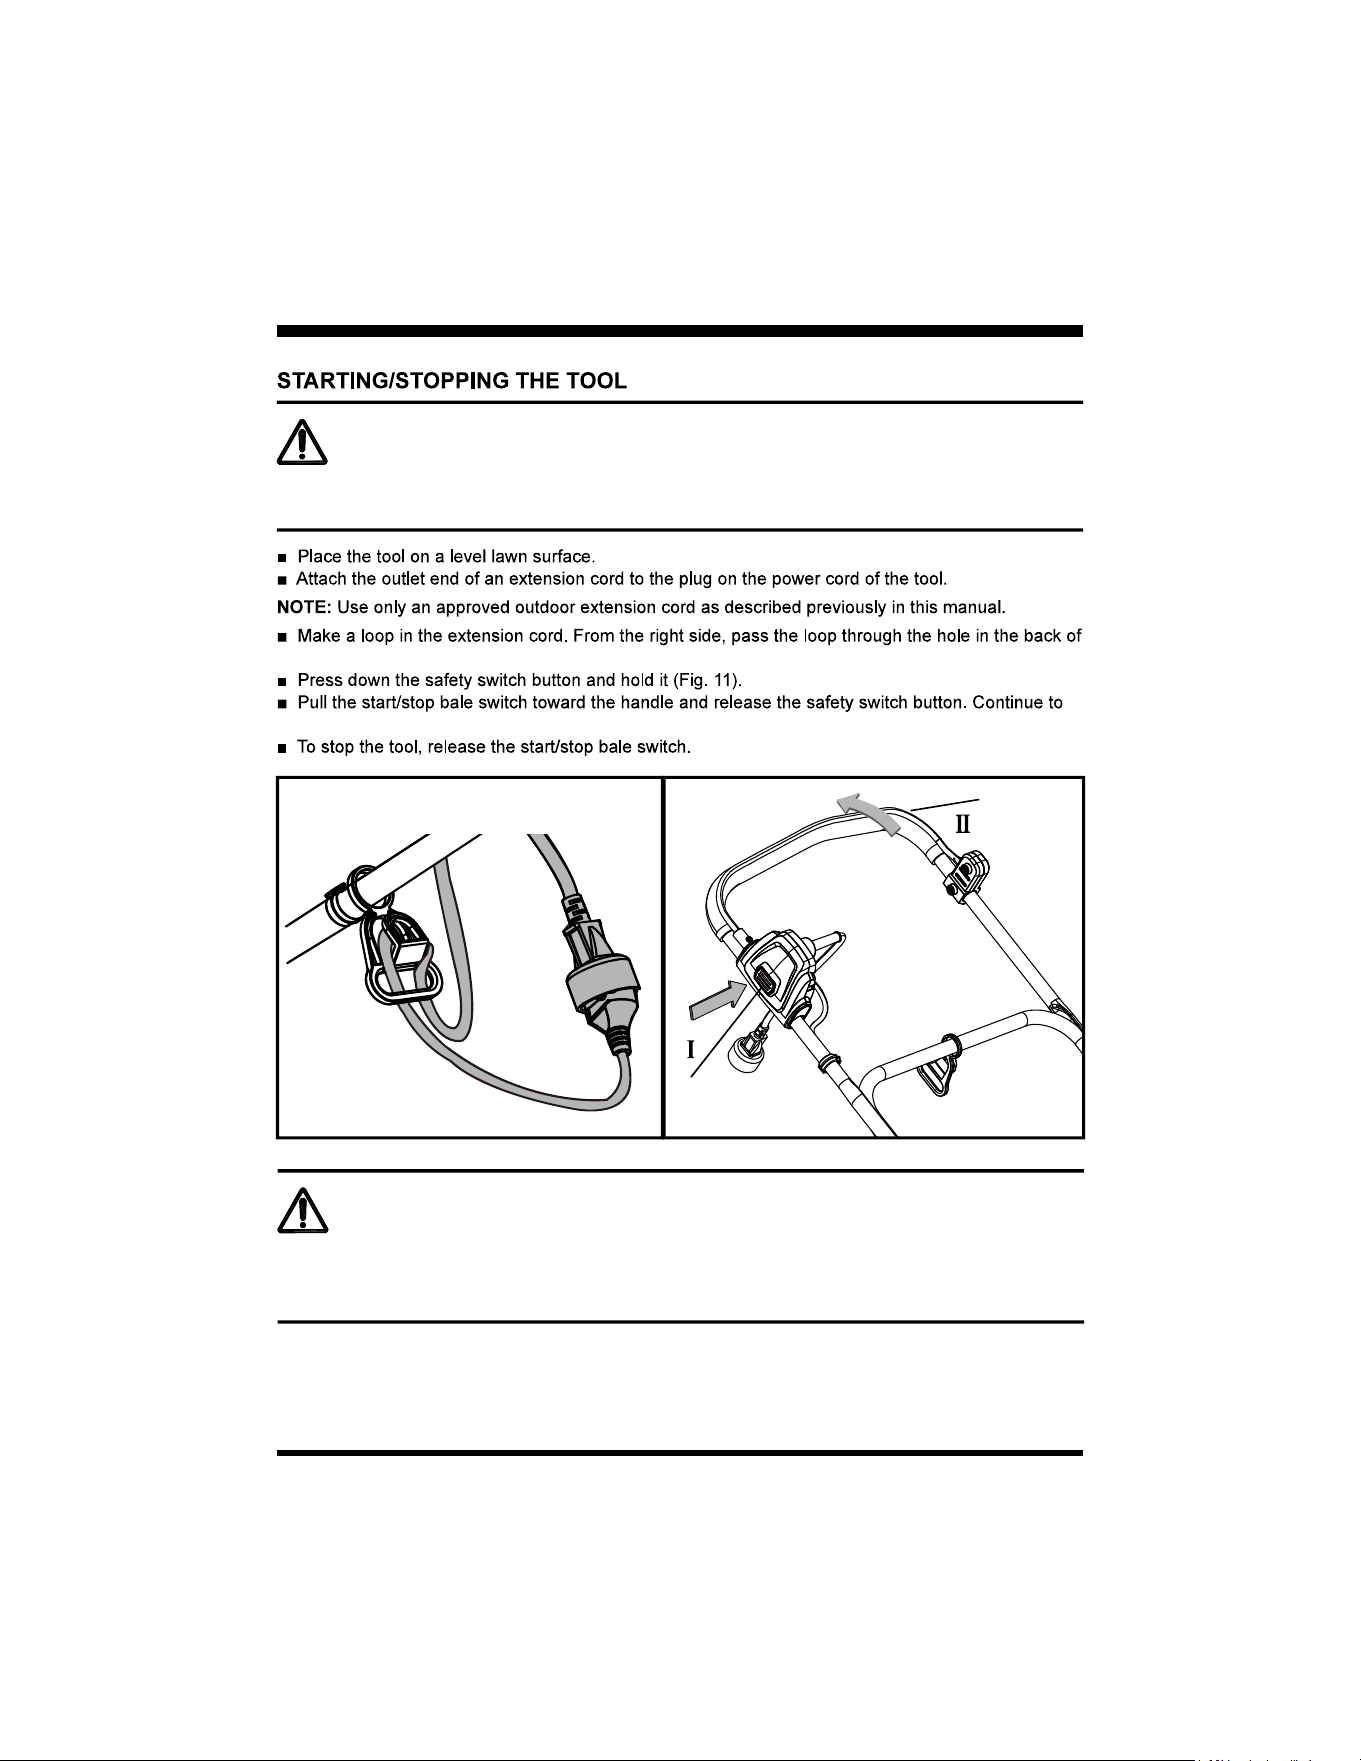
cord retainer and place it around the hook (Fig. 10).
hold the start/stop bale switch against the handle as you operate (Fig. 11).
WARNING
WARNING
Before switching on the tool ensure that it is not in contact with any objects. Keep your feet and hands
well away from the cylinder and the ejector opening. There is possible danger of injury!
The cylinder continues to run for a brief period after the tool has been switched off. Do not tilt or carry
the tool while the motor is still running and do not touch the cylinder while it is still rotating. There is
possible danger of injury!
OPERATION
Fig. 11Fig. 10
Safety
Switch Button
Start/Stop
Bale Switch
18
OPERATION
some force initially.
To maintain a well-cared for lawn it should be dethatched every 4 to 6 weeks.
Scarifying with the blade cylinder is a more intensive treatment than dethatching and should only be
over grassroots are loosened up. The lawn will start to breathe again and assimilate nourishing
grass is dormant.
WARNING
WARNING
Switch off the tool, disconnect the mains plug and wait until the cylinder is standing still.
Always wear gloves when handling the cylinder.
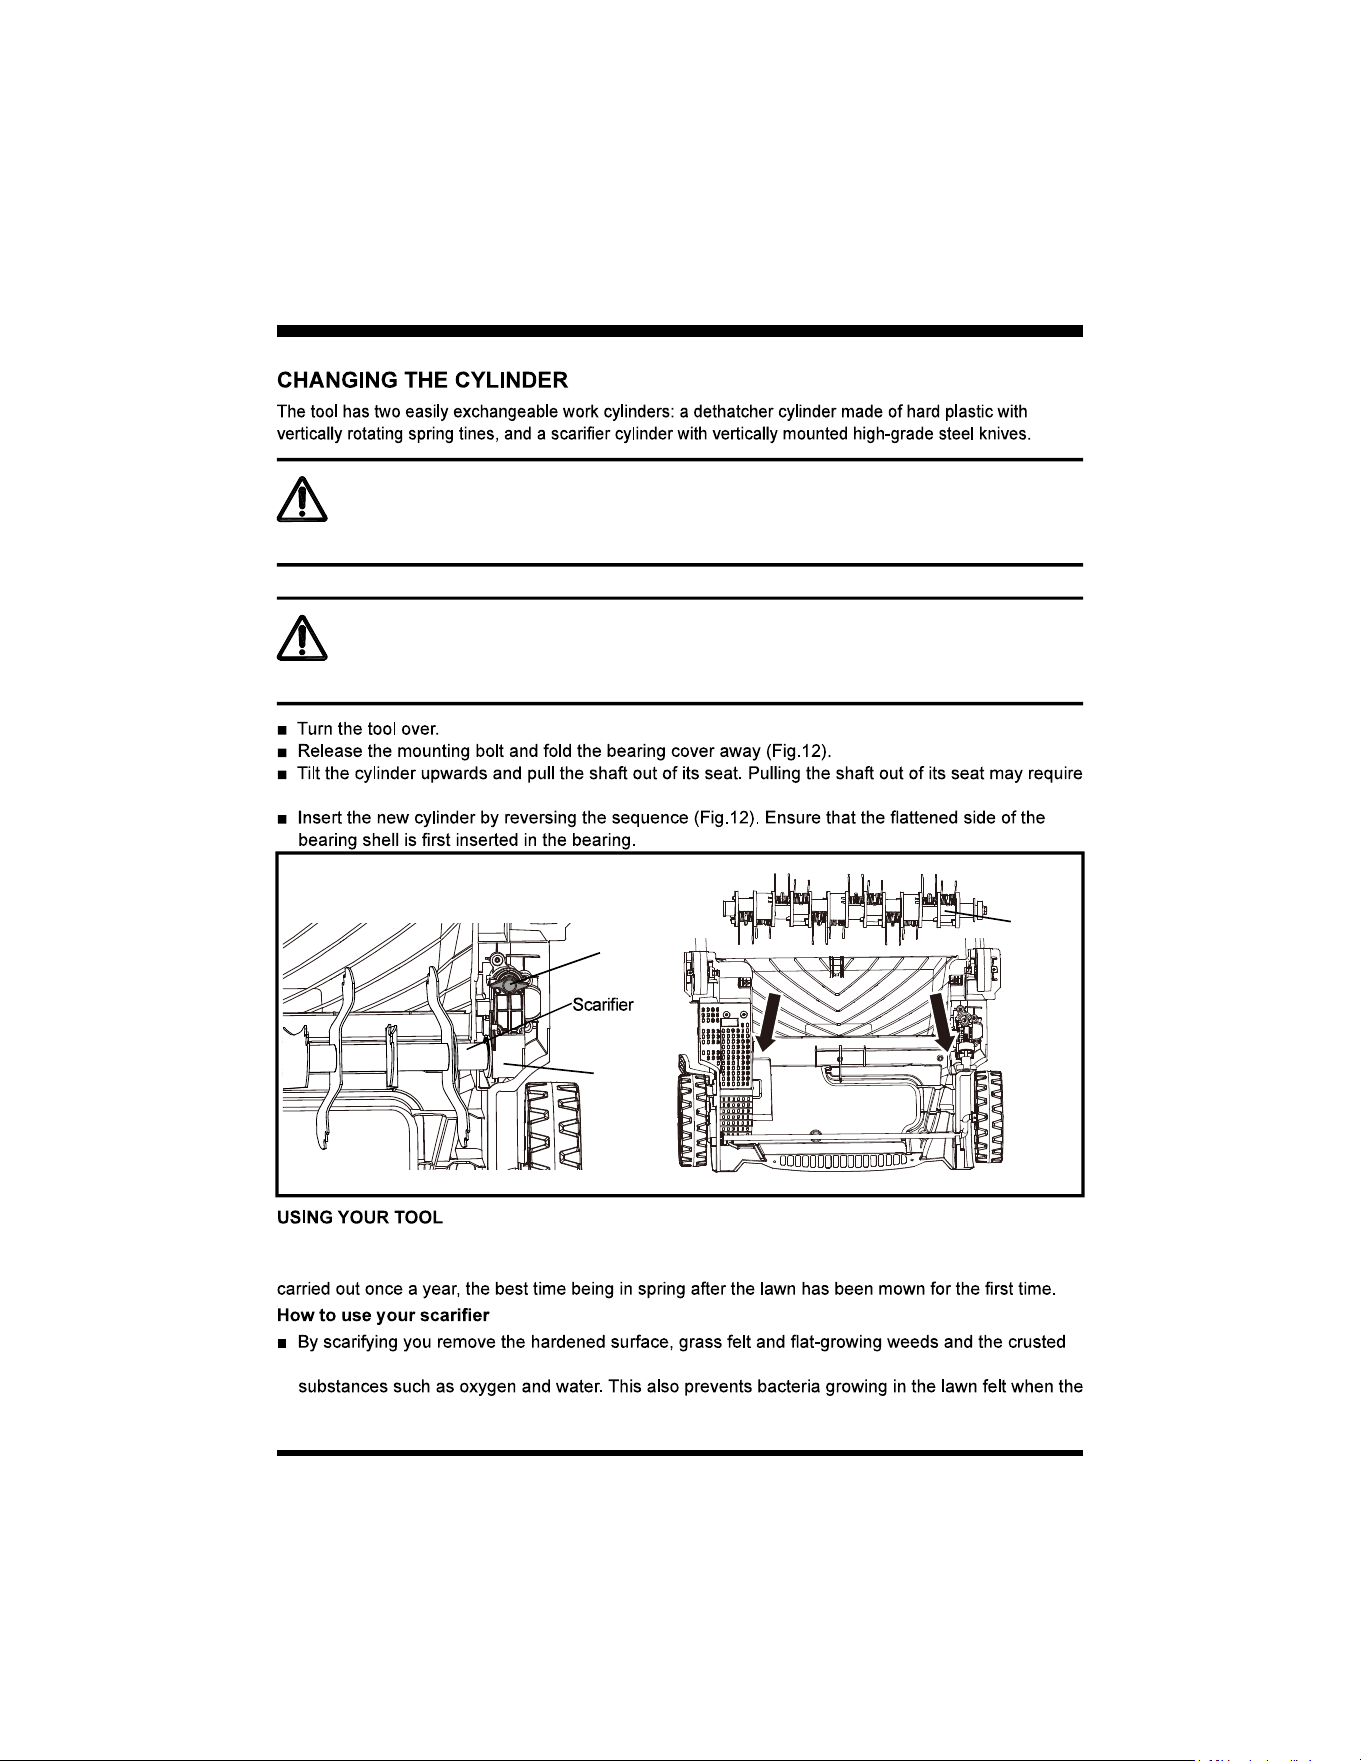
Fig. 12
Mounting Bolt
Cylinder
Dethatcher
Cylinder
Bearing
Cover
19
using the tool. The best time for scarifying is any time during the vegetative season, from end of
April through to September. Scarify it at least once a year. We recommend using a fertilizer straight
after airing if you want a healthy lawn.
ground.
be dry when using the tool. It’s recommended that your dethacther is used at the beginning and the
end of each grass cutting season to give your lawn a thorough raking. Your dethacther should also
be used after each mowing to remove any grass clippings that may be left by your tool.
When working on slopes always proceed across the slope. Be particularly careful when walking
backwards and pulling the tool. There is possible danger of stumbling.
The shorter the grass, the better the lawn can be treated. Furthermore, the load on the tool is
less and the service life of the cylinder is prolonged.
OPERATION
Recommendation: Work with the collection bag for dethatching and without the collection bag for
scarifying.
the safety guard springs and/or the housing. When working without the bag, check that the safety
damage to the tool.
tool is not overloaded.
already been treated.
uninterrupted scarifying/dethatching the individual lanes should always overlap by 2 to 3 inches.
Dwelling too long at the same place while the tool is running can damage the lawn.
cable strain release on the bar always faces the side that has been treated.
After work and to transport the tool, disconnect the power plug and wait until the cylinder is standing still.
Adjust the position to the transport position (0 setting) (see Setting the Working Position) when
transporting the tool .
WARNING
20
Do not use any attachments or accessories not recommended by the manufacturer of this product. The
use of attachments or accessories not recommended can result in serious personal injury.
wheels, inside the ventilation opening, the grass ejector opening and the cylinder. Do not use hard
or pointed objects for this purpose as they could damage the tool.
the safety guard springs and/or the housing.
MAINTENANCE
WARNING
WARNING
WARNING
WARNING
WARNING
When servicing, use only identical replacement parts. Use of any other parts may create a hazard or
cause product damage.
Always wear gloves when handling the cylinder.
Prior to all maintenance and cleaning work always switch off the tool, disconnect the plug from the
power socket and wait until the cylinder is standing still.
an electric shock and the tool could be damaged.
21
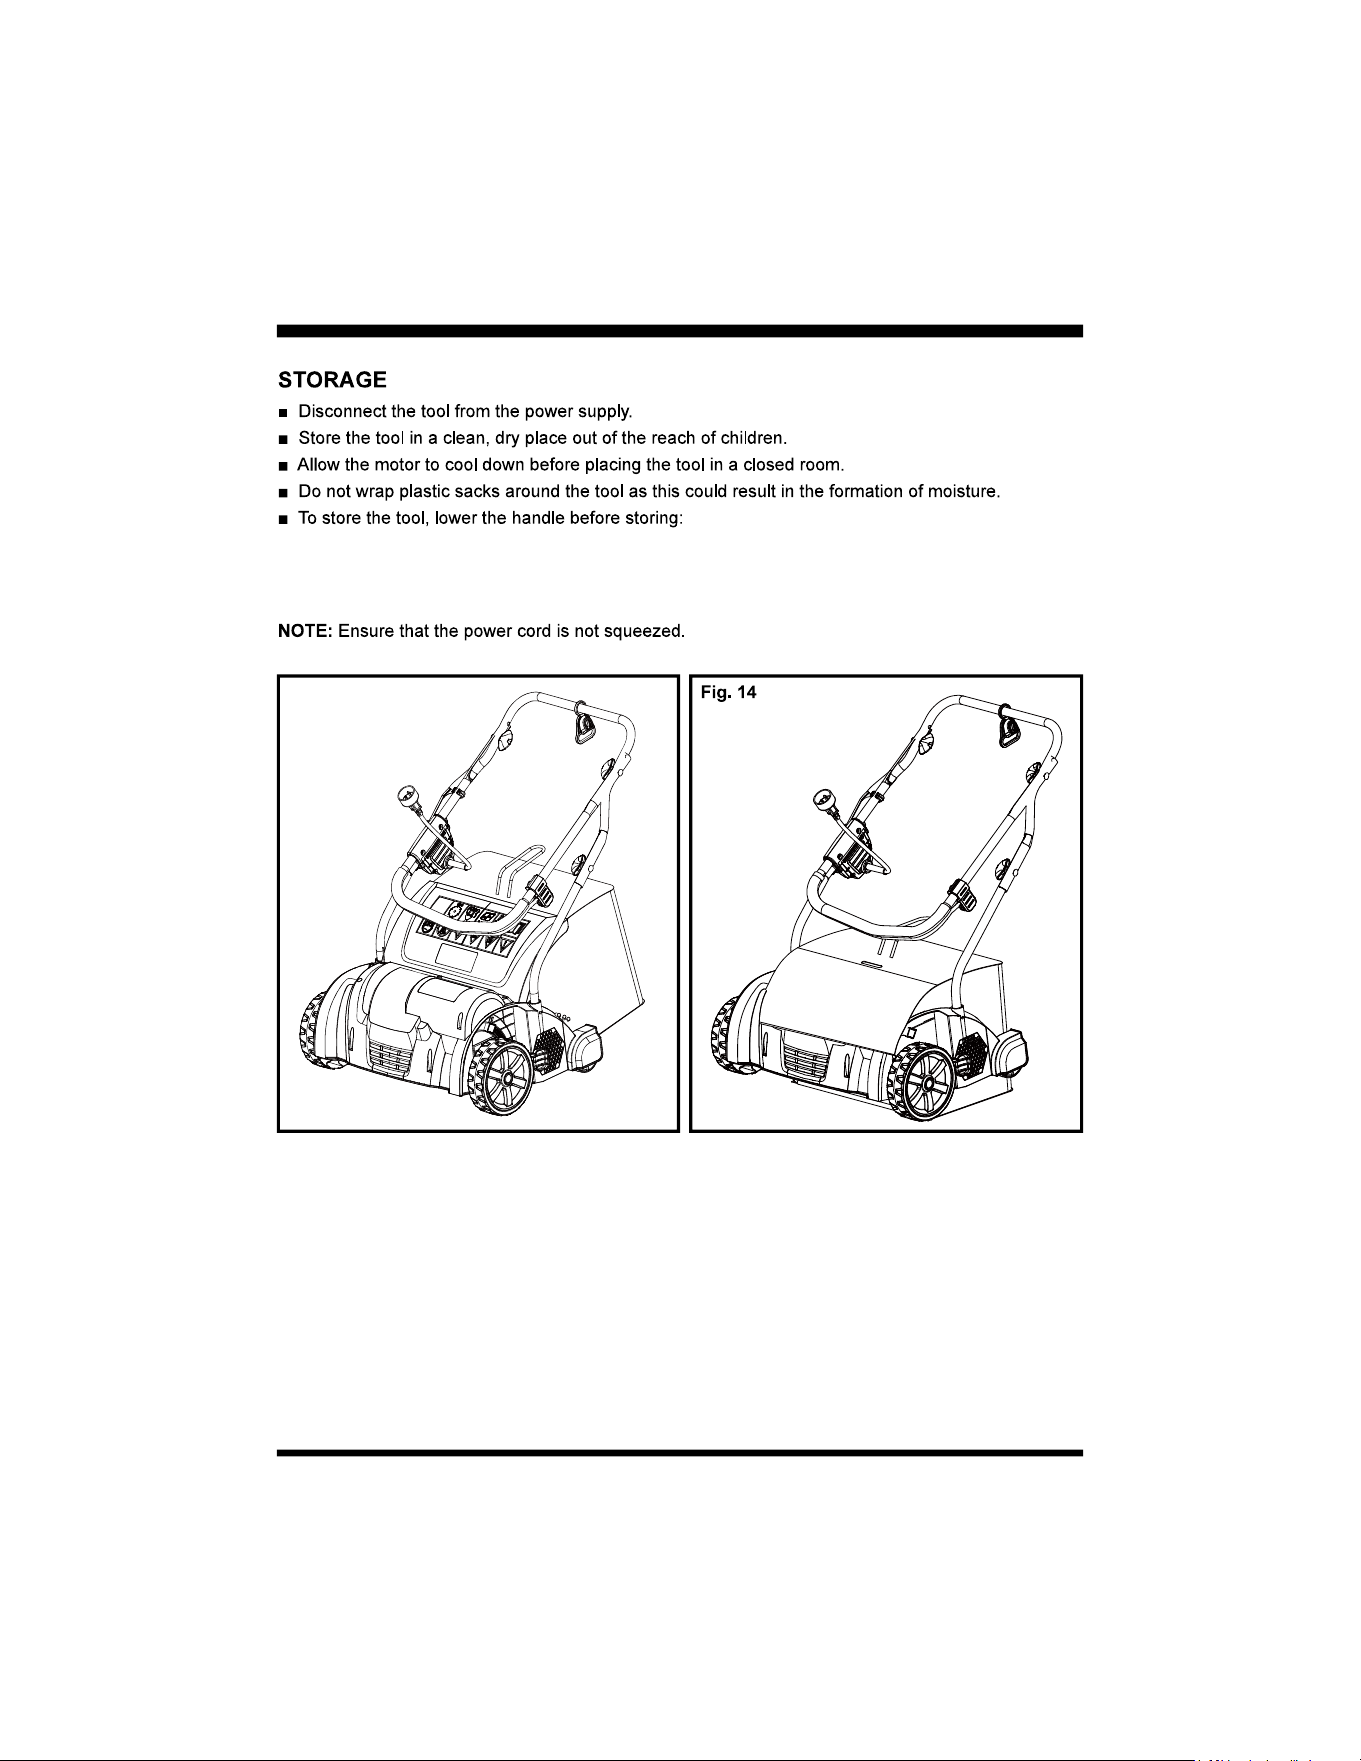
MAINTENANCE
- Remove and clean the collection bag.
- Fully loosen the wing nuts on the sides of the upper handle and fold the upper handle down (Fig. 13).
- To save the space, the collection bag can be put on the tool (Fig. 14).
Fig. 13
22
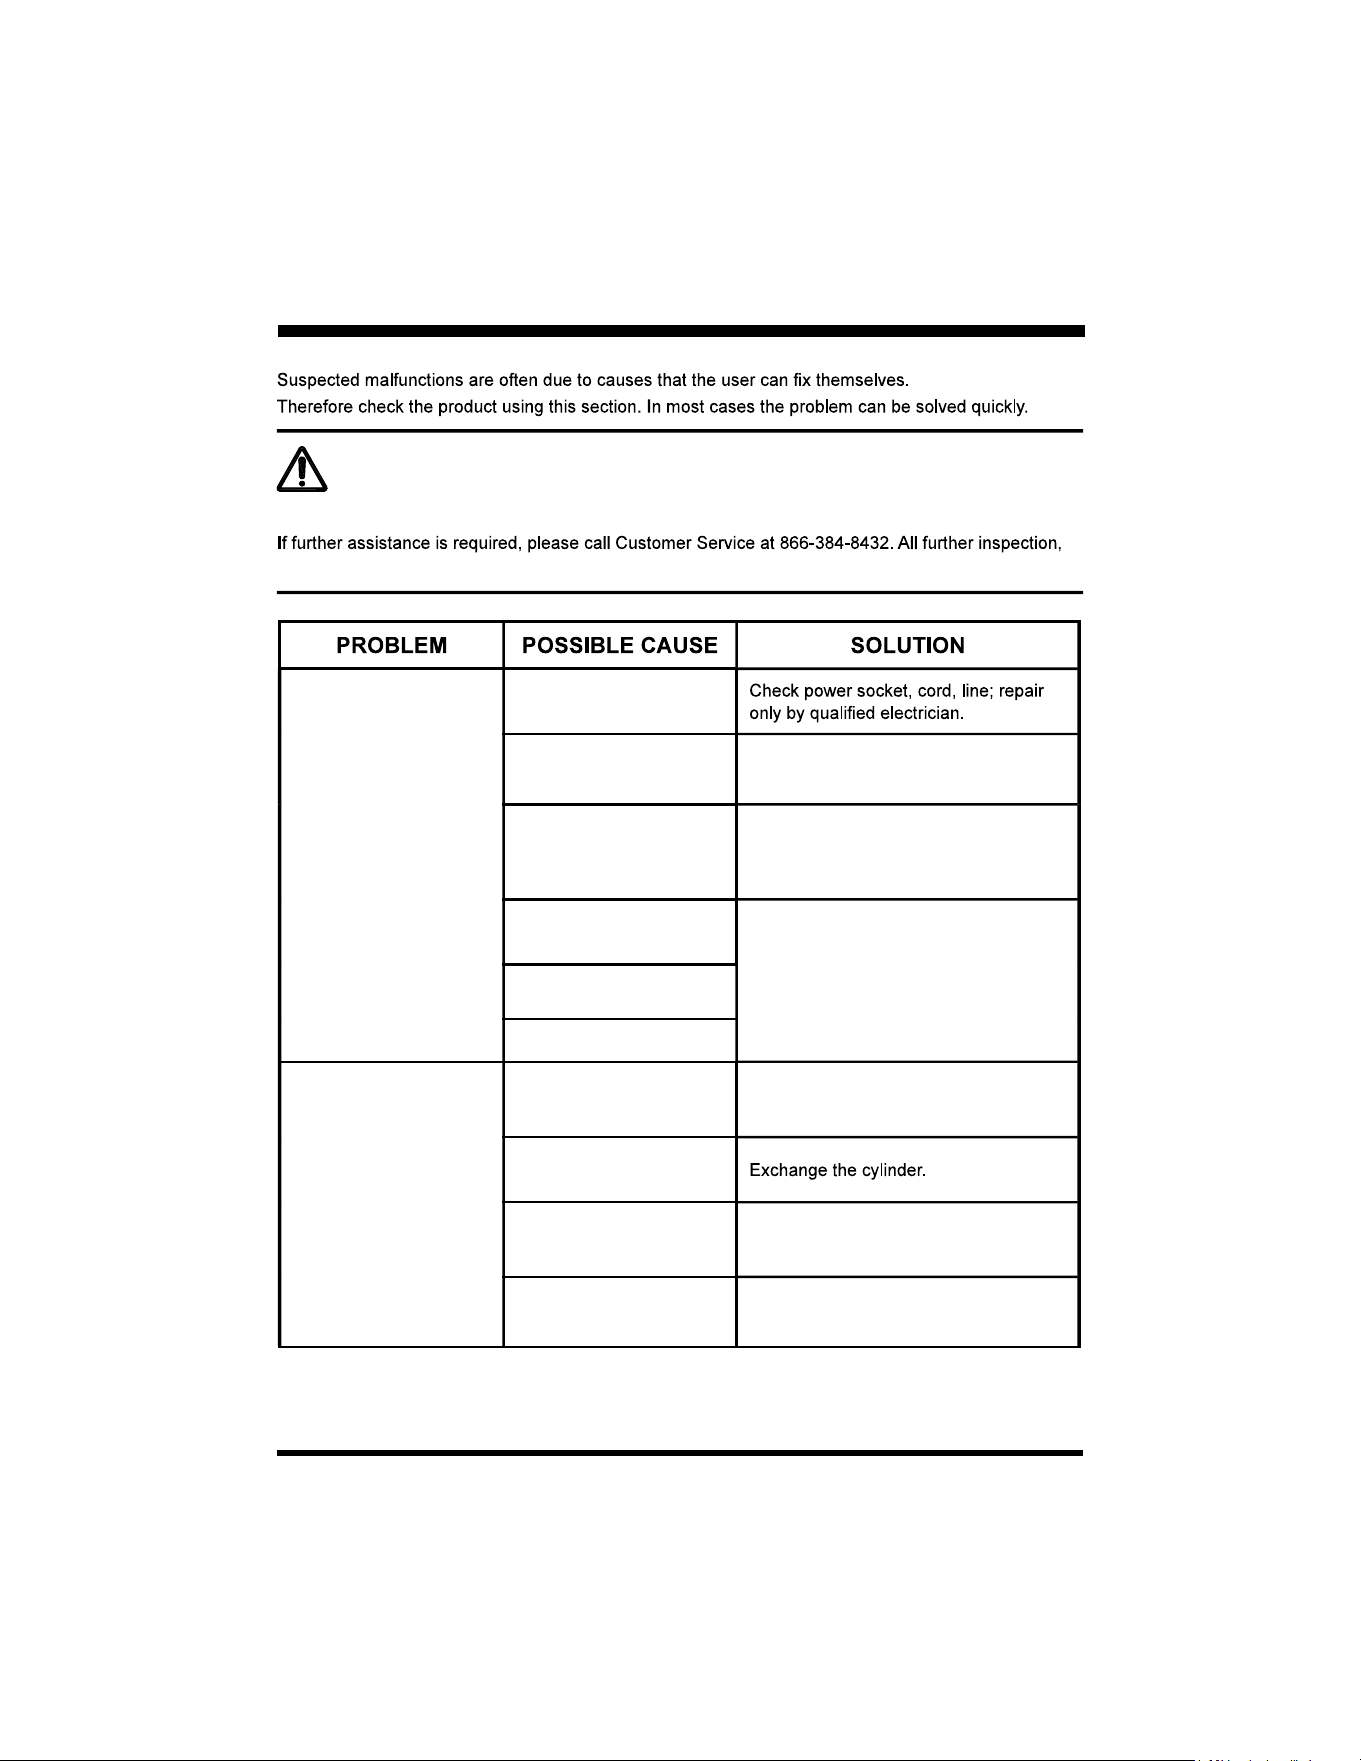
TROUBLESHOOTING
WARNING
Only perform the steps described within these instructions!
maintenance and repair work must be performed by an authorized service center.
Tool does not start.
No power.
Defective power cord.
Call Customer Service for assistance (Toll
free number 866-384-8432).
Safety switch button is not
pressed.
Press and hold the safety switch button.
Pull the start/stop bale switch toward the
handle and release the safety switch button.
Start/stop bale switch
defective.
Call Customer Service for assistance
(Toll free number 866-384-8432).
Carbon brushes worn out.
Motor defective.
Abnormal noises, clatter
or vibrations.
Foreign object in the
cylinder.
Remove the foreign object .
Damaged spring tines or
cylinder knives.
Cylinder incorrectly
mounted.
Install the cylinder correctly. See
Changing the Cylinder on page 18.
Toothed-belt slip.
Call Customer Service for assistance
(Toll free number 866-384-8432).

23
TROUBLESHOOTING
Motor fails.
Blocked by a foreign
object.
Remove the foreign object.
Grass is too long.
Mow beforehand. See Operation on
page 19.
Clogged by debris. Clean debris.
Work result is not
satisfactory.
Spring tines of dethatcher
cylinder worn out.
blunt or damaged.
Toothed-belt defective.
Call Customer Service for assistance
(Toll free number 866-384-8432).
Transport position or
incorrect working position
selected.
Select working position 1 or readjust
position 2-3. See Setting the Working
Positions on page 16.
Grass is too long.
Mow beforehand. See Operation on
page 19.
circumstances:
1. If the cutting device is wrapped by a build-up of debris.
3. Where there is too much resistance against the cutting device.
When the circuit breaker has been activated, switch off the product and disconnect it from the power
supply. Let the product cool down and clear the problem before restart it.
®
product carries a limited
two (2) year warranty against defects in workmanship and materials from date of purchase under normal
household use. If product is to be used for commercial, industrial or rental use,a 30 day limited warranty
will apply. Warranty does not apply to defects due to direct or indirect abuse, negligence, misuse,
accidents, repairs or alterations and lack of maintenance. Please keep your receipt/packing list as proof
from state to state. For product service call Customer Service at (866)384-8432.
Items not covered by warranty:
1. Any part that has become inoperative due to misuse, commercial use, abuse, neglect, accident,
attachment are the responsibility of the purchaser. It is the purchaser's responsibility to pay transportation
writing by LawnMaster.
WARRANTY
25
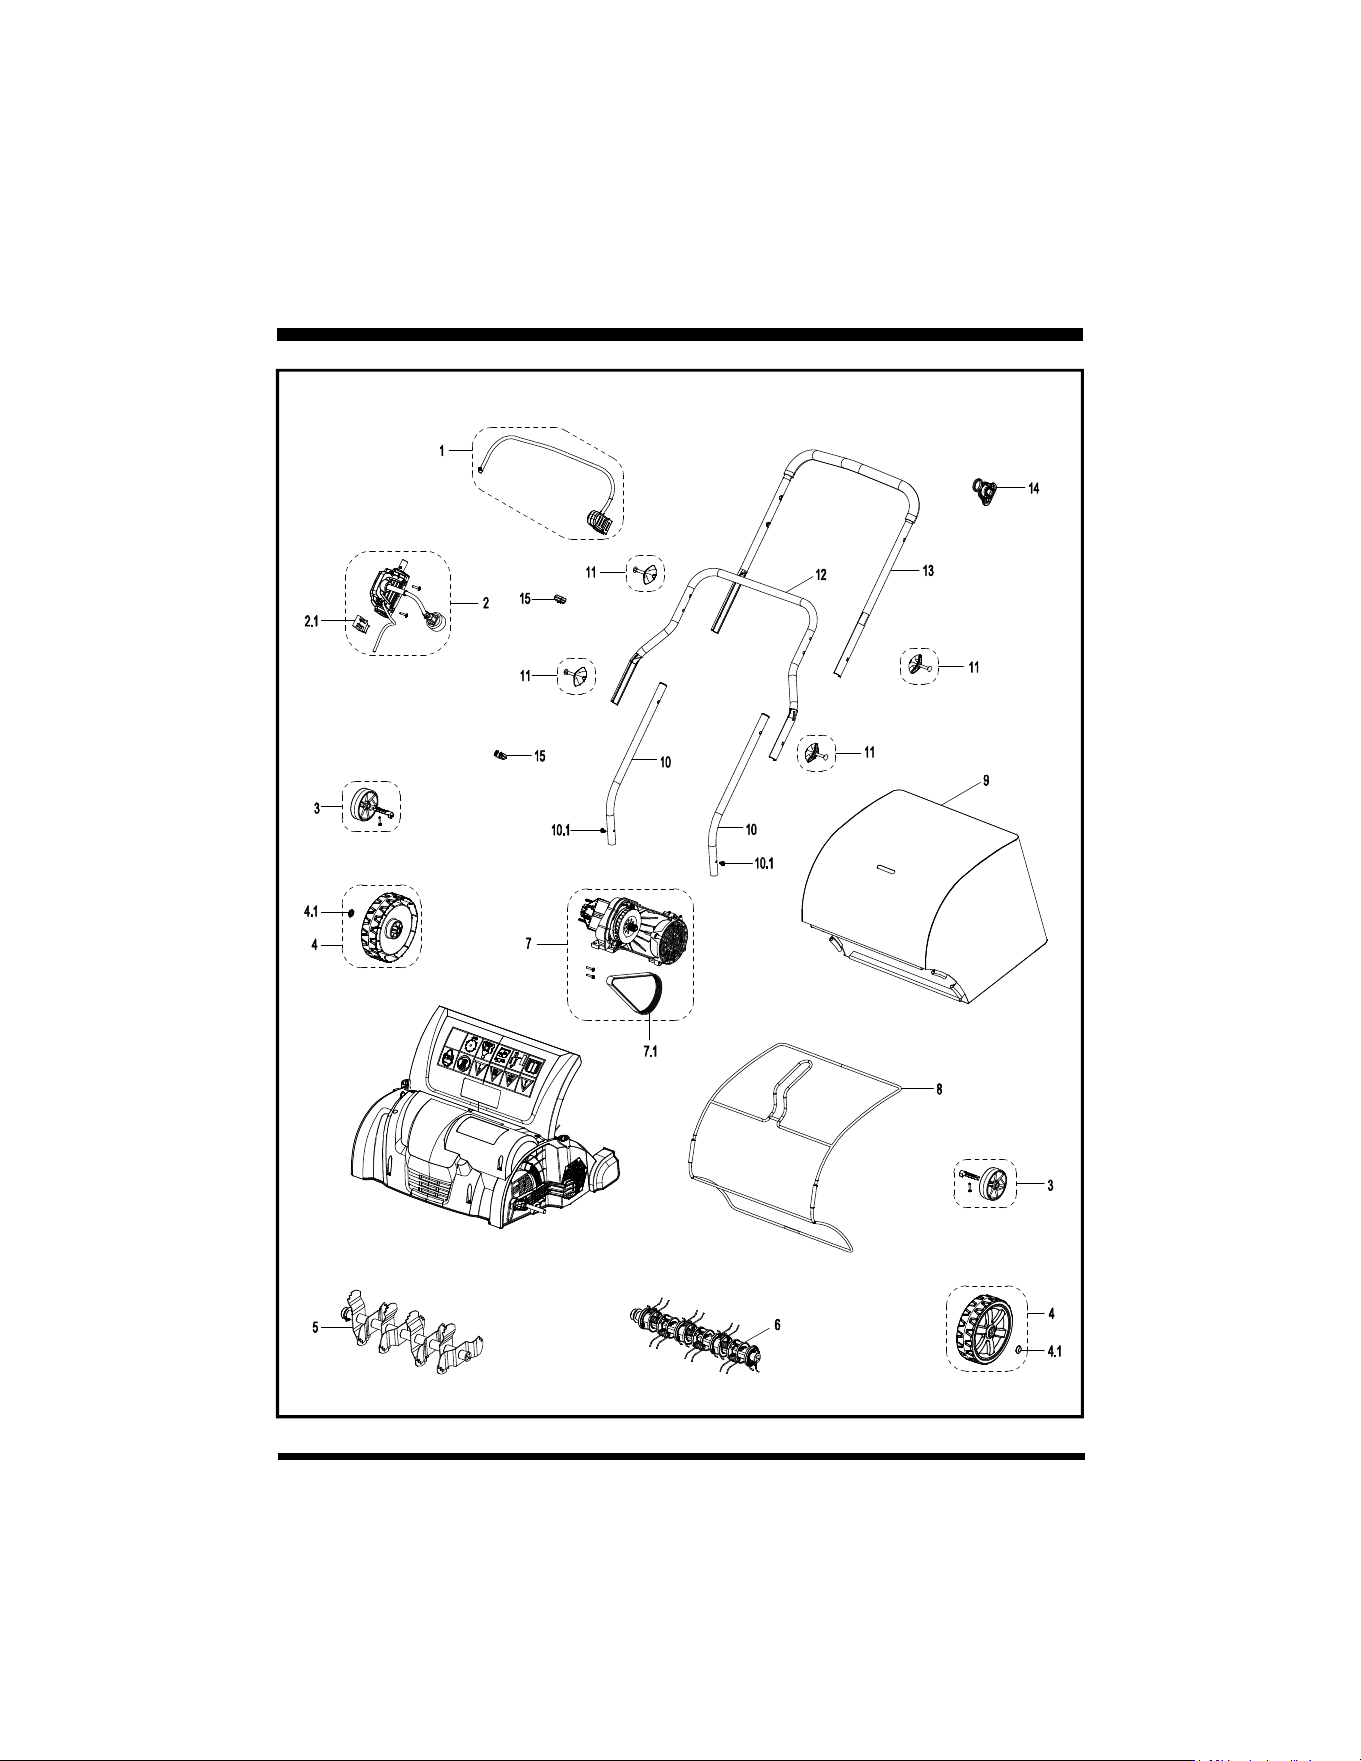
EXPLODED VIEW
GV1314 EXPLODED VIEW

26
PARTS LIST
1 Start/stop bale switch 1
2 Safety switch assembly 1
2.1 Safety switch button 1
3 191005103 Rear wheel assembly 2
4 111308104 Front wheel assembly (170mm) 2
4.1 111005107 Cap 2
5 191005122 1
6 191021103 Dethatcher cylinder 1
7 Motor assembly 1
7.1 Drive belt 1
8 191021109 Collection bag rod assembly 1
9 191021110 Collection bag 1
10 Lower handle 2
10.1 211002128 Screw ST4.8*12 2
11 191021107 Wing nut assembly 4
12 Middle handle 1
13 Upper handle 1
14 Cord Retainer 1
15 Cable Clip 2
Replacement parts highlighted in grey are available for after sales purchase. Replacement of repair or
service dealer or Customer Service at 866-384-8432.

27
NOTES