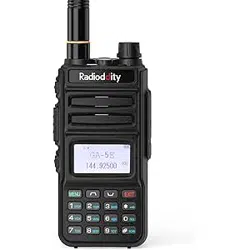

GT-82

Table of Contents
Chapter1. Ge�ng Started 5.3 Making a call 13
1.1 Regula�ons and Safety Warnings 01 5.4 Channel selec�on 13
1.2 Content of the packaging 04 5.5 Frequency (VFO) mode 13
1.3 Main features 04 5.6 Channel (MR) mode 14
Chapter2. Charging the Ba�ery Chapter6. Advanced Features
2.1 Charging the Ba�ery Pack 05 6.1 Frequency scanning 14
2.2 Charger Supplied 05
6.2 Channel scanning 14
2.3 Use Cau�on with the Li-ion Ba�ery 05 6.3 CTCSS scanning 15
2.4 How to Charge 06 6.4 DCS scanning 16
2.5 LED Indicator 06 6.5 Cursor▼▲Conversion (A/B) 17
6.6 High/low power fast selec�on 17
Chapter3. Installa�on of Accessories 6.7 Keypad lock 17
3.1 Installing / Removing the Antenna 07 6.91000Hz, 1450Hz, 1750Hz Tone-burst 18
3.2 Installing the
belt clip 07 6.10 Manual Programming (Channels Memory) 18
3.3 Installing the ba�ery pack 08 6.11 Repeaters Programming 18
3.4 Addi�onal Speaker/Microphone (Op�onal) 08 Chapter7. Working the MENU System
Chapter4. Radio Overview 7.1 Basic use 22
4.1 Bu�ons and controls of the radio 09 7.2 Using short-cuts 22
4.2 Display of the radio 10 7.3 Func�ons and opera�ons 22
4.3 Status
Indica�ons 11 Appendix A. - Technical Specifica�ons 23
4.4 Main keypad controls 11 Appendix B. - Trouble shoo�ng guide 24
Chapter5. Basic Opera�ons Appendix C. - Shortcut Menu opera�ons 25
5.1 Power on the radio 12
5.2 Adjus�ng the volume 12

1
Chapter1. Getting Started
1.1 Regulations and Safety Warnings
EU Regulatory Conformance
As certified by the qualified laboratory, the product is in compliance with the essential requirements and other relevant provisions of
the Directive 2014/53/EU. All applicable EU regulations are regarded (2006/66/EC, 2011/65/EU, (EU)2015/863, 2012/19/EU).
NOTE: It can be operating under 2000m.
WARNING!
European Users should note that operation of this unit in Transmit mode requires the operator to have a valid Amateur
Radio License from their respective Countries Amateur Radio Licensing Authority for the Frequencies and Transmitter Power levels
that this Radio transmits on. Failure to comply may be unlawful and liable for prosecution. At this subject, refer to the “EU”
specification guide 2014/53/EU.
Please note that the above information is applicable to EU countries only.
Compliance with RF Exposure Standards
The radio complies with the following RF energy exposure standards and guidelines:
• United States Federal Communications Commission, Code of Federal Regulations; 47 CFR § 1.1307, 1.1310 and 2.1093
• American National Standards Institute (ANSI) / Institute of Electrical and Electronic Engineers (IEEE) C95.1:2005; Canada RSS102
Issue 5 March 2015
• Institute of Electrical and Electronic Engineers (IEEE) C95.1:2005 Edition
RF Exposure Compliance and Control
Guidelines and Opera
ting Instructions
To control your exposure and ensure compliance with the occupational/ controlled environmental exposure limits, always adhere to
the following procedures.
Guidelines:
• Do not remove the RF Exposure Label from the device.

2
• User awareness instructions should accompany device when transferred to other users.
• Do not use this device if the operational requirements described herein are not met.
Operating Instructions:
• Transmit no more than the rated duty factor of 50% of the time. To transmit (talk), press the Push-to-Talk (PTT) key. To receive calls,
release the [PTT] key. Transmitting 50% of the time, or less, is important because the radio generates measurable RF energy only
when tr
ansmitting (in terms of measuring for standards compliance).
• Keep the radio unit at least 2.5cm away from the face. Keeping the radio at the proper distance is important as RF exposure
decreases with distance from the antenna. The antenna should be kept away from the face and eyes.
• When worn on the body, always place the radio in an approved holder, holster, case, or body harness or by use of the correct clip for
this product. Use of non-approved accessories may result in exposure leve
ls which exceed the FCC's occupational/ controlled
environmental RF exposure limits.
• Use of non-approved antennas, batteries, and accessories causes the radio to exceed the FCC RF exposure guidelines.
• Contact your local dealer for the product's optional accessories.
■Precautions for Portable Terminals
Operating Prohibitions
To protect you against any property loss, bodily injury or even death, be sure to observe the following safety instructions:
1. Do not operate the product in
a location containing fuels, chemicals, explosive atmospheres and other flammable or explosive
materials. In such location, only an approved Ex-protection model is allowed for use, but any attempt to assemble or disassemble
it is strictly prohibited.
2. Do not operate the product near or in any blasting area.
3. Do not operate the product near any medical or electronic equipment that is vulnerable to RF signals.
4. Do not hold the product while driving.
5. Do not operate the product
in any area where use of wireless communication equipment is completely prohibited.
Important Tips
To help you make better use of the product, be sure to observe the following instructions:
1. Do not use any unauthorized or damaged accessory.
2. Keep the product at least 2.5 centimeters away from your body during transmission.

3
3. Do not keep the product receiving at high volume for a long time.
4. For vehicles with an air bag, do not place the product in the area over the air bag or in the air bag deployment area.
5. Keep the product and its accessories out of reach of children and pets.
6. Please operate the product within the specified temperature range.
7. Continuous transmission for a long time may lead to heat accumulation within the product. In this case, please keep it at a proper
location for cooling.
8. Handle t
he product with care.
9. Do not disassemble, modify or repair the product and its accessories without authorization.
■Precautions for Batteries
Charging Prohibitions
To protect you against any property loss, bodily injury or even death, be sure to observe the following safety instructions:
1. Do not charge or replace your battery in a location containing fuels, chemicals, explosive atmospheres and other flammable or
explosive materials.
2. Do not charge your battery that
is wet. Please dry it with a soft and clean cloth prior to charge.
3. Do not charge your battery suffering deformation, leakage and overheat.
4. Do not charge your battery with an unauthorized charger.
5. Do not charge your battery in a location where strong radiation is present.
6. Overcharge shall always be prohibited for it may shorten the life of your battery.
Maintenance Instructions
To help your battery work normally or prolong its life, be sure to observe the following instructions:
1. Accumulated dust on charging connector may affect normal charging. Please use a clean and dry cloth to wipe it on a regular
basis.
2. It is recommended to charge the battery under 5℃~40℃. Violation of the said limit may cause battery life reduction or even
battery leakage.
3. To charge a battery attached to the product, turn it off to ensure a full charge.
4. Do not remove the battery or unplug the power cord during charging to ensure a smooth charging process.
5. Do not dispose of the batt
ery in fire.
6. Do not expose the battery to direct sunlight for a long time nor place it close to other heating sources.

4
7. Do not squeeze and penetrate the battery, nor remove its housing.
Transportation Instructions
1. Damaged batteries must not be transported.
2. To avoid short circuit, separate the battery from metal pars or from each other if two or more batteries are transported in one
packaging.
3. The radio must be switched off and secured against switch-on, if the battery is attached.
The content of the shipment must be declared in the shipping documents and by a Battery Shipping Label on the packaging. Contact
your
hauler for the local regulations and further information.
1.2 Content of the packaging
• 1 GT-82 Radio • 1 Li-Ion battery pack
• 1 Fast desktop charger • 1 Wall adaptor
• 1 Antenna • 1 Belt clip
If any item is missing, please verify with your dealer.
1.3 Main features
• Frequency band: VHF/UHF (Frequency limited) • VHF and UHF bands and channel name displayed
• Up to 128 memory channels • Squelch adjustable in 9 levels
• 50 CTCSS tones and 210 DCS cod
es • 1750Hz tone for repeaters
• SOS Emergency function • LCD display with backlight adjustable in 3 colors
• FM radio receiver (87.5-108MHz) • VOX, Scan, Dual Watch functions
• Channel or frequency mode selection • Power Save
• TOT (Time out timer) • DTMF function
• Reverse function • Alarm function
• CTCSS and DCS codes research • Setting and storing of channel names
• Busy Channel Lockout function (BCL) • High/low power
selection
• Frequency step: 2.5/5/6.25/10/12.5/25KHz • Frequency offset (adjustable): 0-69.990MHz
• Repeater shift • 2pin Kenwood accessory jack
• VOICE: vocal indication of the function selected • Keypad lock
• Li-Ion battery pack • Battery allows direct charging from the DC port

5
Chapter2. Battery Information
2.1 Charging the Battery Pack
The Li-ion battery pack is not charged at the factory; please charge it before use. Charging the battery pack for the first time after
purchase or extended storage (more than 2 months) may not bring the battery pack to its normal maximum operating capacity. Best
operation will require fully charging/ discharging the battery two or three times before the operating capacity will reach its best
performance. T
he battery pack life may be depleted when it’s operating time decreases even though it has been fully and correctly
charged. If this is the case, replace the battery pack.
2.2 Charger Supplied
Please use the specified charger provided by Radioddity. Other models may cause explosion and personal injury. After installing
t
he
battery pack,
and if the radio displays low battery with a voice prompt,
please charge the battery.
2.3 Use Caution with the Li-ion Battery
a. Do not short the battery terminals or throw the battery into a fire. Never attempt to remove the casing from the battery pack, as
Radioddity
canno
t
be held responsible for any accident
caused by modifying the battery.
b. The ambient temperature should be between 5℃-40℃ (40˚F - 105˚F) while charging the battery. Charging outside this range may
not fully charge the battery.
c. Please turn off the radio before inserting it into the charger. It may otherwise interfere with correct charging.
d. To avoid int
erfering with the charging cycle, please do not cut off the power or remove the battery during charging until the green
light is on.
e. Do not recharge the battery pack if it is fully charged. This may shorten the life of the battery pack or damage the battery pack.
f. Do not charge the battery or the radio if it is damp. Dry it before charging to avoid damage.
WARNING
!
When keys, ornamental chain or other electric metals contact the battery terminal, the battery may become damage or
injure a human. If the battery terminals are short circuited it will generate a lot of heat. Take care when carrying and using
the battery. Remember to put the battery or radio into an insulated container. Do not put it into a metal container.

6
2.4 How to Charge
a. Plug the AC adaptor into the AC outlet, and then plug the cable of the AC adaptor into the DC jack located on the back of the
charger. The indicator light blinks orange and is then ready to charge a battery.
b. Plug the battery or the radio into the charger. Make sure the battery terminals are good in contact with charging terminals. The
indicator light turns to red--- charging begins.
c. It takes approximately 2-5 hours to fully charge the battery. When the
lamp lights green, the charging is completed. Remove the
battery or the radio unit with its battery from socket.
When charging a radio (with battery) the indicating lamp will not turn into green to show the fully charged status if the radio
is powered on. Only when the radio is switched off will the lamp indicate normal operation. The radio consumes energy
when it is power-on, and the charger cannot detect the correct battery voltage when the battery has been fully charged. So
the charger
will charge the battery in constant voltage mode and fail to indicate correctly when the battery has been fully
charged.
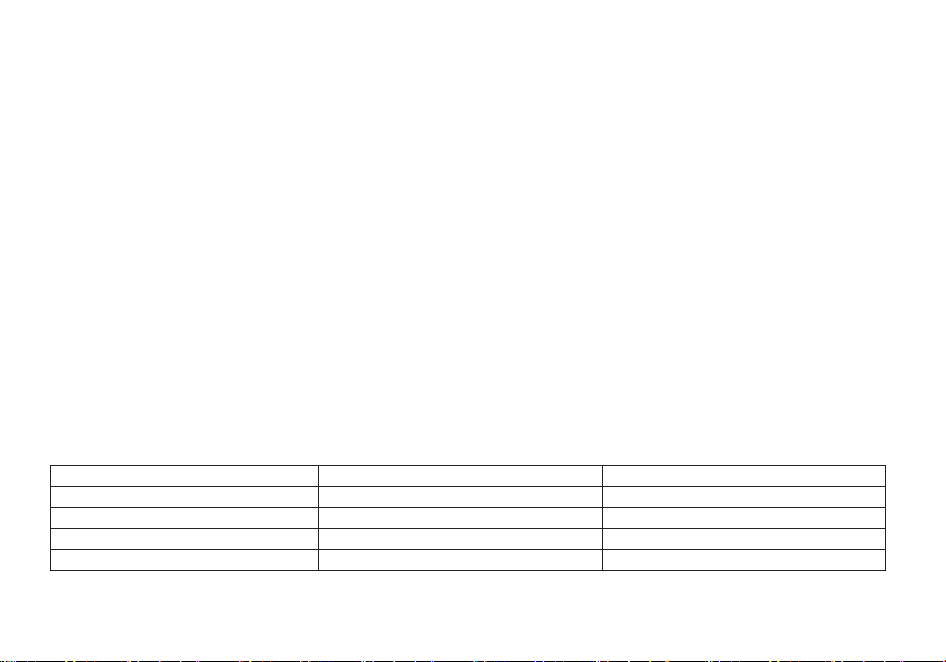
2.5 LED Indicator
NOTE
:
Trouble means battery too warm, battery short-circuited or charger
short-circuited.
STATUS
LED
No Battery
Green and red alternately flashing
Charge Normally
Red
Fully Charged
Green
Trouble
Red blinks fast for a long time

7
Chapter3. Installation of Accessories
Before the radio is ready for use we need to a�ach the antenna and ba�ery pack, as well as charge the ba�ery.
3.1 Installing/ Removing the Antenna
a. Installing the Antenna: Screw the antenna into the connector on the top of the transceiver by holding the antenna at its
base and turning it clockwise un�l secure.
b. Removing the Antenna: Turn the antenna counter-clockwise to re
move it.
3.2 Installing the belt clip
a. At the back of the radio there are two parallel screws mounted above the ba�ery, remove these and thread them through
the holes on the belt clip as you screw them back into the radio body.
b. Removing the Belt Clip: Unscrew counter-clockwise to remove the belt clip.
3.3 Installing the ba�ery pack
Before a�aching or removing the ba�ery make sure your radio is tu
rned off by turning the power/volume knob all the way
counter-clockwise.
a. Make sure the ba�ery is aligned in parallel with the radio body with the lower edge of the ba�ery about 1-2cm below

8
the edge of the radio.
b. Once aligned with the guide-rails, slide the ba�ery upward un�l you hear a click as the ba�ery locks in place.
Remove the ba�ery pack
To remove the ba�ery, press the ba�ery release above the ba�ery pack, as you slide the ba�ery downward.
3.4 Installing the Addi�onal Speaker/Microphone (Op�onal)
Pry open the rubber MIC-Headset jack cover and then insert the Speaker / Microphone
plug into the double jack.
9
Chapter4. Radio Overview
4.1 Buttons and controls of the radio
1. Antenna
6. Keypad
11. Speaker and microphone
2. LED flashlight
7. Monitor key
12. Ba�ery release latch
3. Power / Volume knob
8. FM/SOS key
13. Accessory jack
4. Status LED
9. PTT B - Push to talk B
14. Ba�ery pack
5. Two-line LCD
10. PTT A - Push to talk A
10
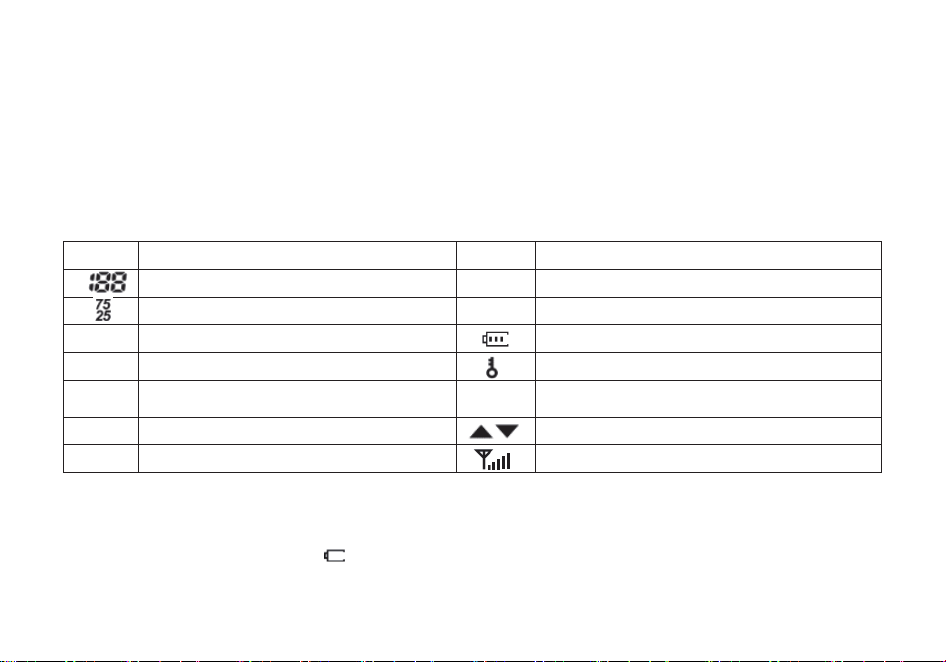
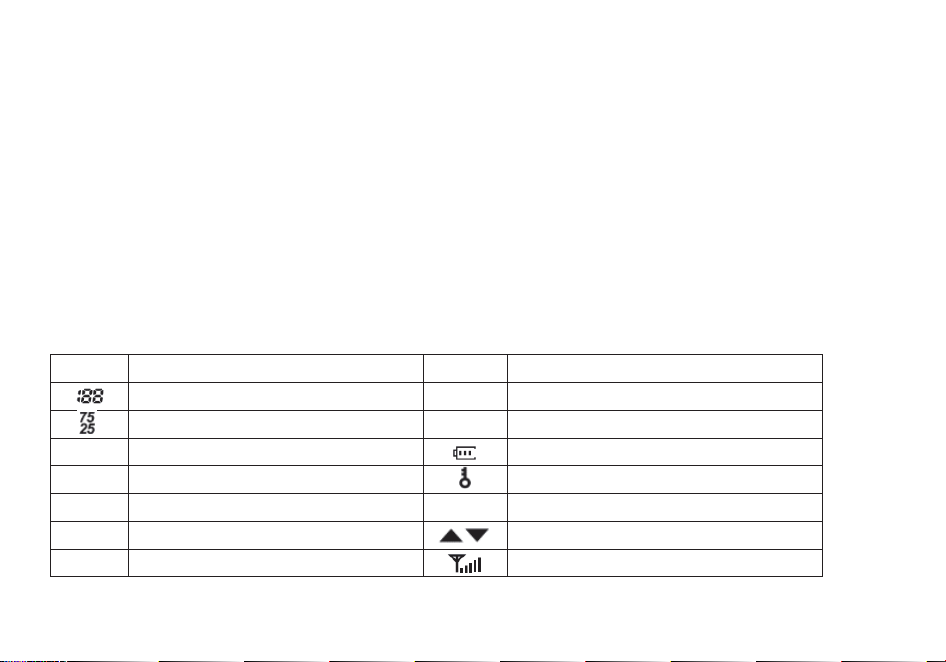
4.2 Main controls and parts of the radio
LCD Display
Icon
Descrip�on
Icon
Descrip�on
Memory channel
R
Reverse func�on enabled
Least significant modifiers.
N
Narrowband enabled
CT
CTCSS enabled
Ba�ery level indicator
DCS
DCS enabled
Keypad lock enabled
+-
Frequency shi� direc�on if enabled in VFO
H,L
Transmit power level indicator
According to Power (High, Low)
S
Dual watch enabled
Indicates ac�ve band or channel
VOX
VOX enabled
Squelch Open/ Close Indicator
Note: Even though it is a seven character by two-line display, channel memories are only configurable to
six character names.
Ba�ery Level Indicator
When the ba�ery level indicator reads
the ba�ery is depleted. At this point the radio will start beeping periodically as
well as flash the backlight of the display and when voice prompts are enabled, a "Low Voltage" announcement will be heard,
indicating that you need to change your ba�ery or put your radio in the charger.
11
4.3 Status Indications
The status LED has a very simple and tradi�onal design. When you receive a signal it turns green, when you transmit it turns
red, and it's off in standby.
LED Indicator
Radio Status
Constant Red
Transmi�ng.
Constant Green
Receiving.
4.4 Main keypad controls
• [F/SOS] key: Press it for a short �me to turn on the FM radio. Press it again to turn it off.
If you press it for a long �me you will ac�vate the alarm func�on. Press it again to turn off this feature.
• [M/LAMP] key: Press it for a short �me to light up the flashlight. If you push this bu�on again, the flashlight will light up to
strobe mode. Press [MONI] a third �me to turn off the flashl
ight.
To ac�vate the Monitor func�on presses the bu�on for a long �me.
• [MENU] key: It is used for ac�va�ng the MENU, choose each MENU selec�on and confirm the parameter.
The radio turns off, press and hold the [MENU] key to turn on the radio to switches between Frequency (VFO) mode and
Memory (MR) mode.
Memory mode is somemes also referred to as Channel mode.
To save frequencies to channel memory you must be in
Frequency (VFO) mode.
• [▲
] key: Press it for more than 2 seconds, the channel and frequency will move upwards rapidly; in SCAN mode, press [▲]
to move the scanning upwards.
• [▼] key: Keep it pressed it for more than 2 seconds, the channel and frequency will move downwards rapidly; in SCAN
mode, press this control to move the scanning downwards.
• [EXIT/AB] key: push this bu�on to exit the func�ons and se�ngs.
Press it for switches between A (upper) and B (lower) displays. The frequency or channel on the selected display becomes
the ac�ve listening and
transmit frequency or channel.
To save frequencies to channel memory you must be on the A display.
When listening to broadcast FM, the [EXIT/AB] key switches between 65-75 MHz and 76-108 MHz band

12
• Numeric keypad
With these keys you can input the informa�on or your selec�ons on the radio.
In tx mode, push the number keys to send a corresponding DTMF code.
• *SCAN Key
A short momentary press of the key enables the reverse func�on.
When listening to broadcast FM a momentary press will start the scanning.
Scanning in broadcast FM will stop as soon as an ac�ve sta�on is found,
regardless of scanner resume method.
To
enable the scanner, press and hold the [*SCAN] key for about two seconds.
• Zero 0 Key
The
Radioddity GT-82 features a ba�ery voltage meter that the current voltage of the ba�ery on
the
display.
To see the voltage displayed, press and hold the [0SQL] key for about two seconds.
• #
key
If you press shortly [#
] you will switch to High or Low output power.
If you press this bu�on for more than 2 seconds you will lock/unlock the keypad.
Chapter5. Basic Operations
5.1 Power on the radio
To turn the unit on, simply rotate the Volume/Power knob clockwise un�l you hear a "click". If your radio powers on
correctly there should be an audible double beep a�er about one second and the display will show a message or flash the
LCD depend
ing on se�ngs for about one second. Then it will display a frequency or channel. If the Voice prompt is enabled,
the voice will announce "frequency mode" or "channel mode".
Turn the Volu
me/Power knob counter-clock wise all the way un�l you hear a "click". The unit is now off.
5.2 Adjusting the volume
To turn up the volume, turn the Volume/Power knob clock-wise. To turn the volume down, turn the Volume/Power knob

13
counter-clock-wise. Be careful not to turn it too far, as you may inadvertently turn your radio off.
5.3 Making a call
NOTE: Press the [EXIT/AB] key to switch the main channel to the other channel if there is 2 channels shown on the display.
Turn off the radio and press and hold the [MENU] key to turn on the radio to switch between VFO and channel mode display.
• Channel mode call: A�er selec�ng a channel, hold
down the [PTT] key to ini�ate a call to the current channel. Speak into
the microphone with normal tone. Ini�ate a call, the red LED is on.
• Frequency mode call: Turn off the radio and press and hold the [MENU] key to turn on the radio to switch to frequency
mode, the frequency range allowed entering, press the [PTT] key, a call to the current channel. Speak into the microphone
with normal tone. Ini�ate a call, the red
LED is on.
• Receive a call: When you release the [PTT] key, you can answer it without any ac�on.
When receiving a call, the green LED is on.
NOTE: To ensure the best recepon volume, keep the distance between the microphone and the mouth at the me of
transmission from 2.5 cm to 5 cm.
5.4 Channel selection
There are two modes of opera�on: Frequency (VFO) mode, and Channel or Memory (MR) mode.
For everyday use, Channel
(MR) mode is going to be a whole lot more prac�cal than Frequency (VFO) mode. However,
Frequency (VFO) mode is very handy for experimenta�on out in the field. Frequency (VFO) mode is also used for
programming channels into memory.
In Channel (MR) mode you can navigate up and down the channel by using the ▲ and ▼ keys.
Ul�mately which mode you end up using will depend en�rely on your use case.
5.5 Frequency (VFO) mo
de
In Frequency (VFO) mode you can navigate up and down the band by using the ▲ and ▼ keys. Each press will increment or
decrement your frequency according to the frequency step you've set your transceiver to.
You can also input frequencies directly on your numeric keypad with kilohertz accuracy.
The following example assumes the use of a 12.5 kHz frequency step.
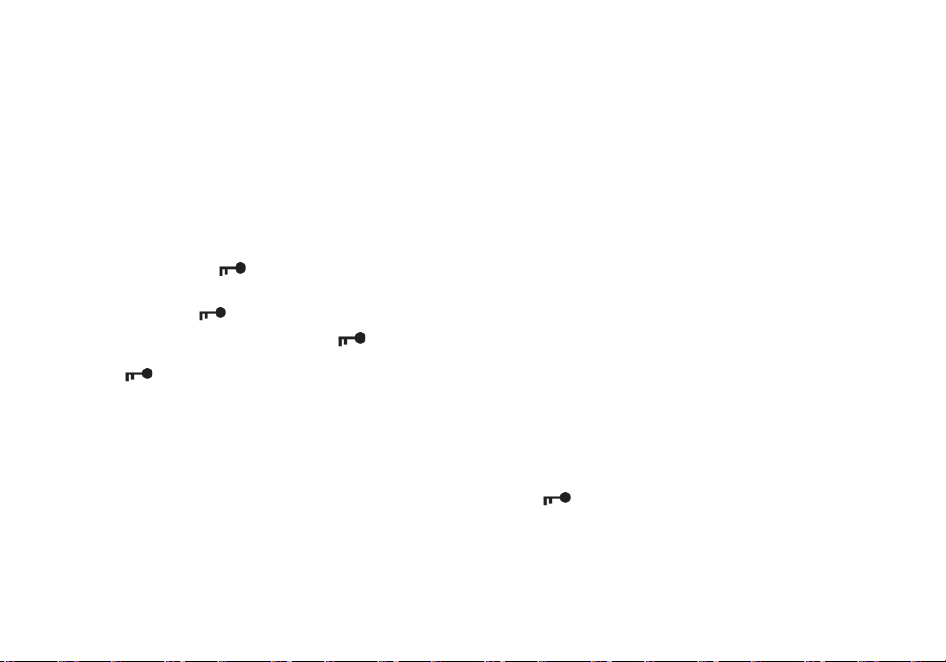
Example. Entering the frequency 432.6125 MHz on dis
play A
a. Turn off the radio and press and hold the [MENU] key to turn on the radio to switch to frequency mode,

14
b. Press [EXIT/AB] un�l the icon appears next to the upper display.
c. Enter [4][3][2][6][1][2][5] on the numeric keypad.
WARNING!
Just because you can program in a channel does not mean you're automacally authorized to use that
frequency. You may be tempted to use PMR446, FRS, GMRS and MURS (in USA) frequencies. Do note however
that there are restricons on these bands that make this transceiver illegal for use. Contact your local
regulatory body for furthe
r informaon on what laws, rules and regulaons apply to your area.
5.6 Channel (MR) mode
The use of Channel (MR) mode is dependent on actually having programmed in some channels to use.
Once you have channels programmed and ready, you can use the ▲ and ▼ keys to navigate between channels.
Note: If you have channels programmed with Transmit power set to Low, you can use the [#
] key to
momentarily switch over to mid or high power if you're having trouble getting through.
Chapter6. Advanced Features
6.1 Frequency scanning
This func�on can scan the frequency.
a. In frequency mode, press [*/scan] key for more than 2 seconds. The radio will start scanning the frequency according to
the set frequency step.
b. You can change the scanning direc�on with the ▲ and ▼ keys.
c. Press any key to stop the
scanning.
Note: for Scan mode, see Menu No.18.
6.2 Channel scanning
This func�on can scan the channels.
a. In channels mode, press [*scan] key for more than 2 seconds. The radio will start scanning according to the channel you
set.

15
b. You can change the scanning direc�on with the ▲and ▼ keys.
c. Press any key to stop scanning.
Note: for Scan mode, see Menu No.18.
6.3 Tone Scanning
Scanning for CTCSS and DCS Tones/Codes
Scanning for a CTCSS tone or DCS code can be done while Frequency Mode (VFO) or Channel Mode (MR) is selected. Only
when VFO mode is selected, can the detected tone/code be saved to menu 11/10.
CTCSS tone and DCS code scanning mo
de can be accessed with or without a signal being present. The scanning process itself
only occurs while a signal is being received.
Not all repeaters requiring a CTCSS tone or DCS code for access will transmit one back. In that case, the transmier of a
staon that can access the repeater would need to be scanned. In other words: this would be done by listening to staons on
the repeater's input freq
uency.
• Scanning for CTCSS Tone
1. Press the [MENU] [1] [1] to come to Menu 11: R-CTCS
2. Press the [MENU] key to select. Insure you have a tone ac�vated (and it is not off)
3. Press the [*SCAN] to begin CTCSS scanning
A flashing "CT" will be in the le� status display to indicate the radio is in CTCSS scanning mode. In this mode, whenever the
radio is receiving an RF signal on the selected MR channel or VFO fre
quency, the lower display will cycle through the CTCSS
tones as they are being tested. Once the frequency of the received CTCSS tone is determined, the "CT" indicator will stop
flashing.
Press the [MENU] key to save the scanned tone into memory (VFO Mode Only) then press the [EXIT/AB] key to exit the
menu.
Don't forget to set VFO menu 11 back to OFF when the CTCSS tone is no longer required.
• Scanning for a DCS tone
1. Press the [MENU] [1] [0] to come to Menu 10: R-DCS
2. Press the [MENU] key to select. Insure you have a tone ac�vated (and it is not off)

16
3. Press the [*SCAN] to begin DCS scanning
A flashing "DCS" will be in the le� status display to indicate the radio is in DCS scanning mode. In this mode, whenever the
radio is receiving an RF signal on the selected MR channel or VFO frequency, the lower display will cycle through the DCS
codes as they are being tested. Once the bits of the received DCS code are determined, the "DCS" indicator will stop
flashing.
Pres
s the [MENU] key to save the scanned tone into memory (VFO Mode Only) then press the [EXIT/AB] key to exit the
menu.
Don't forget to set VFO menu 10 back to OFF when the DCS tone is no longer require
d.
6.4 Dual Watch
The
Radioddity GT-82 features Dual Watch func�onality (single receiver) with the ability to lock the transmit
f
requency
to
one of the two channels it monitors.
• Enabling or disabling Dual Watch mode
1. Press
the [MENU] [7] to get to MENU 7: TDR.
2. Press [MENU] key to select.
3
. Use the ▲and ▼ keys to enable or disable.
4. Press the [MENU] key to confirm.
5. Press th
e [EXIT/AB] key to exit the menu.
Due to the way the
Radioddity GT-82 is constructed , whenever one of the A or B Frequencies (VFO/MR) goes ac�ve, it will
default to transmit on that channel. This behavior can be inconvenient, especially if when monitoring
a
frequency,
you
should
not
transmit
on
.
There
is
a
menu
op�on
available
to
lock
the
transmi�er
to
one
of
the
A
or
B
channels.
• Locking the Dual Watch transmit channel
1. Press the [MENU] [3][4] to get to MENU 34: TDR-AB.
2. Press [MENU] key to select.
3. Use the ▲and ▼ keys to select A (upper) or B (lower) display.
4. Press the [MENU] key to confirm.

17
5. Press the [EXIT/AB] key to exit the menu.
If you want to momentarily override the lock without having to seng the menu opon to OFF, you can do so by pressing
the [EXIT/AB] key an instant before pressing the PTT.
Another opon is to disable menu [7] (TDR) to override the lock. Then re-enable TDR when you want the lock resumed
6.5 Cursor▼▲Conversion (A/B)
Directly press [EXIT/AB] key to move the cursor up and down. Then
, you can modify or confirm the parameters indicated by
the cursor.
Important1:
GT-82 has a dual-frequency display func�on. In frequency mode, you will see on the display two diff
erent
receiving and transmi�ng frequencies; while in channel mode the two different channels will be displayed.
Important2: In frequency or channel mode, press the [EXIT/AB] key to shi� between the main channel A and the
sub-channel B
▲ on
the display indicates on which channel (main channel A or sub channel B) you are opera�ng.
▼ is displayed next to the channel.
6.6 High/low power fast selection
In channel mode, press [#
] key to shi� between high and low power.
6.7 Keypad lock
This func�on locks the keypad to prevent accidental pressure of the controls.
To unlock the keypad, press [#
] for more than 2 seconds.
6.8 FM Radio (FM)
The frequency ranges to listen to the radio is 65-108MHz. When listening to broadcast FM, press [EXIT/AB] key switches
between 65-75 MHz and 76-108 MHz band.
a. In frequency or channel mode, Press [F/SOS] to turn on the radio.
b. Select the desired radio frequency with the ▲ or ▼ keys or input the frequency. or
• Press [* SCAN] to automa�cally search a radio sta�on.

18
c. Press [F/SOS] to exit FM radio.
Note: while you are listening to the radio, the frequency or channel of A / B receiving signal will automatically switch
to the frequency or channel mode for normal transmitting and receiving.
When
the signal disappears the radio will automatically switch again to FM radio mode.
6.9 Flashlight
This func�on is very useful for night illumina�on.
To turn it on press [MON/LAMP]; push it again, the flash light will
be strobe; push it again: it will turn off.
6.10 1000Hz, 1450Hz, 1750Hz Tone-burst
To send out a tone-burst (selectable by MENU 41); press the [F/SOS] key while holding down the [PTT].
A common tone burst frequency used by many amateur radio systems in Europe is 1750 Hz.
you can select
from 2100, 1750,1450, or 1000Hz Tone Burst Op�ons. These op�ons are found on the Menu 41(R-TONE).
6.11 Manual Programming (Channels Memory)
Memo
ry channels are an easy way to store commonly used frequencies so that they can easily be retrieved at a later date.
The
Radioddity GT-82 features 128 memory channels that each can hold: Receive and transmit frequencies, transmit
power,
group
signaling
informa�on,
bandwidth,
ANI/
PTT-ID
se�ngs
and
a
six-character
alphanumeric
iden�fier
or
channel
name
1.
Frequency
Mode
vs.
Channel
Mode
Switch
between
modes
by
using
holding
th
e
[MUNU]
bu�on
during
a
power
cycle
of
the
GT-82 EU
(volume
knob
off/on
)
.
These
two
modes
have
different
func�ons
and
are
o�en
confused.
Frequency
Mode
(VFO):
Used
for
a
temporary
frequency
assignment,
such
as
a
test
frequency
or
quick
field
programming
if
permi�ed.
Channel
Mode
(MR):
Used
for
selec�ng
preprogrammed
channels.
Ex
1.
Programming
a
Channel
Repeater
Offset
with
CTCSS
Tone
EXAMPLE
New
memory
in
C
hannel
10:
RX
=
432.000
MHz
TX
=
437.000
MHz
(This
is
a
(+
5)
Offset)

19
TX CTCSS tone 123.0
a. Change from Menu to Menu by pressing the [EXIT/AB] key.
b. Turn off the radio, then press and hold the [MENU] key to turn on the radio and set it to VFO mode.
Channel number at the right will disappear.
c. [MENU] [2][8] [MENU] [1] [0] [MENU] [EXIT/AB] Deletes Prior Data in channel (Ex. 10)
d. [MENU] [1][3] [MENU] 123.0 [MENU] [EXIT/AB] Selects desired TX encode tone
e. Enter RX frequ
ency (Ex. 432000)
f. [MENU] [2][7] [MENU] [1][0] [MENU] Enter the desired channel (Ex 10)
-->>[EXIT/AB] RX has been added
g. Enter TX frequency (Ex. 437000)
h. [MENU] [2][7] [MENU] [1][0] [MENU] Enter the same channel (Ex 10)
-->> [EXIT/AB] TX has been added
i. Turn off the radio, then press and hold the [MENU] key to turn on the radio and set it to MR Mode. Channel number will
re-appear.
Ex 2. Programmin
g a Simplex Channel with CTCSS tone
EXAMPLE New memory in Channel 10:
RX = 436.000 MHz
TX CTCSS tone 123.0
a. Change from Menu to Menu by pressing the [EXIT/AB] bu�on.
b. Turn off the radio, then press and hold the [MENU] key to turn on the radio and set it to VFO mode.
Channel number at the right will disappear.
c. [MENU] [2][8] [MENU] [1] [0] [MENU] [EXIT/AB] Deletes Prior Data in channel (Ex. 10)
d. [MEN
U] [1][3] [MENU] 123.0 [MENU] [EXIT/AB] Select desired TX encode tone (Ex 123 CTCSS)
-->>Use [EXIT/AB] to select Upper display
e. Enter RX frequency (Ex. 436000)
f. [MENU] [2][7] [MENU] [1][0] [MENU] Enter the desired channel (Ex 10)
-->> [EXIT/AB] Channel has been added
g. Turn off the radio, then press and hold the [MENU] key to turn on the radio and set it to MR Mode. Channel number will
re-appear.

20
6.12 Repeaters Programming
The following instruc�ons assume that you know what transmit and receive frequencies your repeater employs, and that
you're authorized to use it.
a. Turn off the radio, then press and hold th
e [MENU] key to turn on the radio and set it to VFO mode.
b. Enter the repeater’s output (your receiving) frequency by either using the ▲ a
nd ▼ keys, or by entering it directly on the
numerical keyp
ad.
c. Press the [MENU] key to enter the menu.
d. Enter [2][6] on the numeric keypad to get to frequency offset.
e. Press [MENU] key to select.
f. Use the numerical keypad to enter the specified frequency offset
. See the sec�on called “26 OFFSET - Frequency shi�
amount” for details.
g. Press [MENU] to confirm and save.
h. Enter [2][5] on the numeric keypad to get to offset direc�on.
i. Use th
e ▲/▼ keys to select +
(posi�ve) or - (nega�ve) offset.
j. Press [MENU] to confirm and save.
k. Op�onal:
a). Save to memory, see the sec�on called “Manual programming” for details.
b). Set up CTCSS; see the sec�on called “CTCSS” for details.
l. Press [EXIT/AB] to exit the menu. If everything went well, you should be able to make a test call through the repeater.
NOTE:
If you're experiencing problems making a connection to the repeater, check your settings and/or go through the procedure again.
Certain Amateur Radio repeaters (especially in Europe) use a 1750Hz tone burs
t to open up the repeater. To see how this is done
with
the Radioddity GT-82, see the section called “1750Hz Tone-burst”.
If you're still unable to make a connection, contact the person in charge of the radio system with your employer or your local amateur
radio club, as the case may be.
If you for some reason want to listen to the repeater's input frequency instead, press [*/SCAN] key
momentarily and you'll reverse
your transmit and receive frequencies.
This is indicated in the LCD on the radio with an R in the top row, next to the + and - for the offset direction.

21
6.13 DTMF
DTMF is an in-band signaling method using dual sinusoidal signals for any given code. Originally developed for telephony
systems, it has proved a very versa�le tool in many other areas.
In two-way radio systems, DTMF is most commonly used for automa�on systems and remote control. A common example
would be in amateur radio repeaters where some repeaters are ac�vated by sending out a DTMF sequence (usually
a simple
single-digit sequence).
The Radioddity GT-82 EU has a full implementa�on of DTMF, including the A, B, C and D codes. The numerical keys, as
well
as the [
*SCAN], and [# ]
,
keys
correspond
to
the
matching
DTMF
codes
as
you
would
expect.
The
A,
B,
C
and
D
codes
are
located
in
th
e
[MENU],
[▲],[▼]and
[EXIT/AB]
keys
respec�vely
(†).
To send DTMF codes, press the key(s) corresponding to the message you want to send while holding down the PTT key.
If you have the keypad lock enabled on your radio, you can sll send DTMF tones the regular way without having t
o
unlock your radio.
Chapter7. Working the MENU System
For a complete reference on available menu items and parameters, see Appendix C, Shortcut Menu opera�ons.
Note: in channel mode, the se�ng of these features is not possible: CTCSS/ DCS tones, wide/narrow bandwidth, PTT-ID,
Busy channel lock out, channel name edit.

22
7.1 Basic use
Using the menu with arrow keys
a. Press the [MENU] key to enter the menu.
b. Use the [▲] and [▼] keys to navigate between menu items.
c. Once you find the desired menu item, press [MENU] again to select that menu item.
d. Use the [▲] and [▼] keys to select the desired parameter.
e. When you've selected the parameter you want to set for a given menu item;
a). To confirm your selec�on, press [MENU
] and it will save your se�ng and bring you back to the main menu.
b). To cancel your changes, press [EXIT/AB] and it will reset that menu item and bring you out of the menu en�rely.
f. To exit out of the menu at any �me, press the [EXIT/AB] key.
7.2 Using short-cuts
As you may have no�ced if you looked at Appendix C, Shortcut Menu opera�ons, every menu item has a numerical value
associated with it. These numbers can
be used for direct access of any given menu item.
The parameters also have a number associated with them, see Appendix C, Shortcut Menu opera�ons for details.
Using the menu with short-cuts
a. Press the [MENU] key to enter the menu.
b. Use the numerical keypad to enter the number of the menu item.
c. To enter the menu item, press the [MENU] key.
d. For entering the desired parameter you have two op�ons:
a). Use the arrow keys as we did in the previous sec�on; or
b). Use the numerical keypad to enter the numerical short-cut code.
e. And just as in the previous sec�on;
a). To confirm your selec�on, press [MENU] and it will save your se�ng and bring you back to the main menu.
23
b). To cancel your changes, press [EXIT/AB] and it will reset that menu item and bring you out of the menu en�rely.
f. To exit out of the menu at any �me, press the [EXIT/AB] key.
g. All further examples and procedures in this manual will use the numerical menu short- cuts.
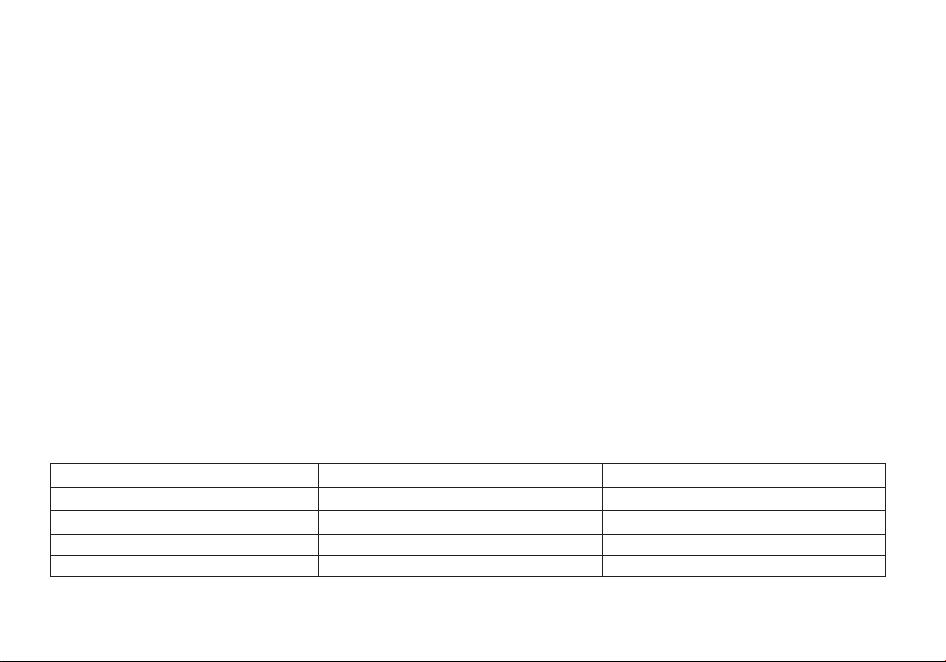
Appendix A. – Trouble shoo�ng guide
Phenomena
Analysis
Solu�on
You cannot turn on the radio.
The ba�ery may be installed improperly.
Remove and rea�ach the ba�ery.
The ba�ery power may run out.
Recharge or replace the ba�ery.
The ba�ery may suffer from poor contact caused by dirty or damaged
ba�ery contacts.
Clean the ba�ery contacts or replace the ba�ery.
During receiving, the voice is
weak or intermi�ent.
The ba�ery voltage maybe low.
Recharge or replace the ba�ery.
The volume level may be low.
Increase the volume.
The antenna maybe loose or maybe installed incorrectly.
Turnoff the radio, and then remove and rea�ach
the antenna.
The speaker maybe blocked.
Clean the surface of the speaker.
You cannot communicate with
other group members.
The frequency or signaling type maybe inconsistent with that of other
members.
Verify that your TX/RX frequency and signaling
type are correct.
You may be too far away from other members.
Move towards other members.
You hear unknown voices or
noise.
You may be interrupted by radios using the same frequency.
Change the frequency, or adjust the squelch level.
The radio in analog mode maybe set with no signaling.
Request your dealer to set signaling for the
current channel to avoid interference
You are unable to hear anyone
because of too much noise
and hiss.
You may be too far away from other members.
Move towards other members.
You may be in an unfavorable posi�on. For example, your
communica�on may be blocked by high buildings or blocked in an
underground area.
Move to an open and flat area, restart the radio,
and try again.
It may be the result of external disturbance (such as electromagne�c
interference).
Stay away from equipment that may cause
interference.
The radio keeps transmi�ng.
VOX may be turned on or the headset is not installed in place
Turn off the VOX func�on. Check that the
headphones are in place.
NOTE: If the above soluons cannot fix your problems, or you may have some other queries, please contact your dealer for
more technical support.

24
Appendix B. - Technical Specifica�ons
Frequency band
144-146MHz & 430-440MHz (Rx / Tx)
Memory channels
128
Power supply
ba�eria Li-Ion da 7.4V/2000 mAh
(
BL-8
)
Opera�ng temperature
-10°C to + 45°C
Working mode
monoband/dualband
Output power
VHF: 5W / UHF:4W
Modula�on
F3E(FM)
Max. frequency devia�on
≤ ±5KHz
Spurious radia�on
< -60dB
Frequency stability
±2.5 ppm
Rx sensi�vity
< 0.2uV
Audio output power
≥ 500mW
Dimensions
62x131x34mm (LxAxP)
Weight
230g
Specificaons are subject to change without noce.
WARNING. Direct plug-in ac/dc power supply must be used for disconnecng the transceiver from the mains; the
desktop charger must be posioned close to the unit and easily accessible.

25
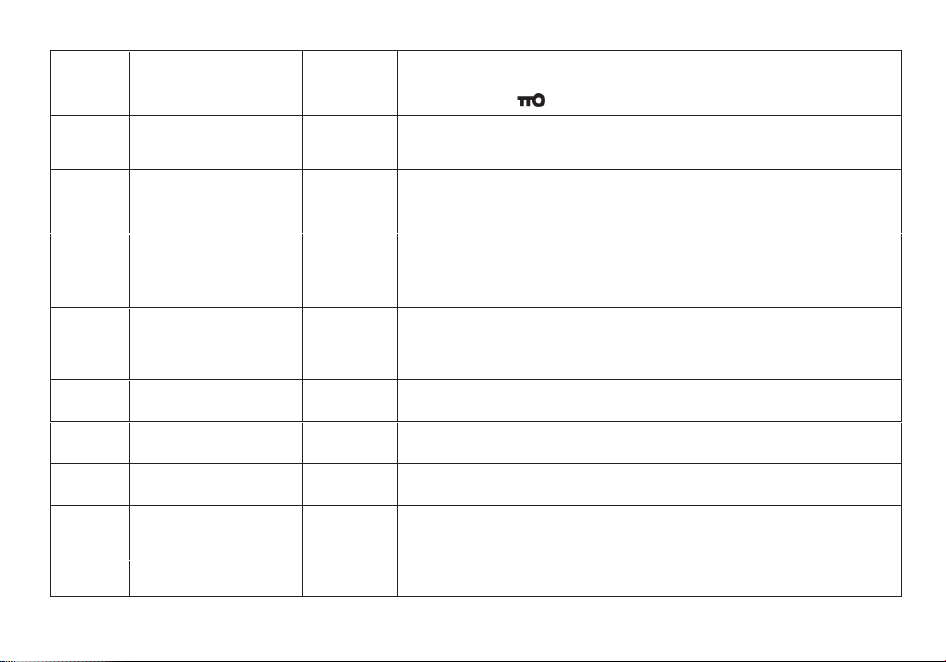
Appendix C. - Shortcut Menu opera�ons
MENU
No.
Name
(Full Name)
Enter item Select able
0 SQL - Squelch Level MENU+0
0-9 Levels
0:Lowest
9:Highest
1
STEP –Step
Frequency
MENU+1
2.5K/5.0K/6.25K/10.0K
12.5K/20.0K/25.0K/50.0K
2 TXP – Transmit Power MENU+2
HIGH:5W(VHF) 4W(UHF)*
Low:2W
3
SAVE - Battery
Saving
MENU+3
OFF:
1:1 2:2
3:3 4:4
4 VOX - VOX MENU+4
OFF, 1-9 OFF: off
1: Highest Sensitivity
9: Highest Sensitivity
5 WN-Wide/Narrow MENU+5
WIDE:25.0K
NARR:12.5K
6 ABR –Auto Backlight MENU+6
OFF/1,2,3…8,9,10
*Time-out for the LCD backlight. (seconds)
7
TDR – Dual Watch
Operation
MENU+7
OFF ON
*Monitor [A] and [B] at the same time. The display with the most
recent activity ([A] or [B]) becomes the selected display.
8 BEEP - Keypad Beep MENU+8
OFF ON
*Allows audible confirmation of a key press.

26
9 TOT- Time-Out-Timer MENU+9
15,30…600S
*This feature provides a safety switch that limits transmission time to
a programmed value. This will promote battery conservation by not
allowing you to make excessively long transmissions, and in the
event of a stuck PTT switch it can prevent interference to other users
as well as battery depletion
10
R-DCS - Receiver
DCS
MENU+10
OFF
D023N…D754N D023I …D754I
*Mutes the speaker of the transceiver in the absence of a specific
low-level digital signal. If the station you are listening to does not
transmit this specific signal, you will not hear anything.
11
R-CTCS - Receiver
CTCSS
MENU+11
OFF 67.0HZ…254.1HZ
*Mutes the speaker of the transceiver in the absence of a specific and
continuous sub-audible signal. If the station you are
Listening to does not transmit this specific and continuous signal,
you will not hear anything.
12
T-DCS -Transmitter
DCS
MENU+12
OFF
D023N…D754N D023I …D754I
*Transmits a specific low-level digital signal to unlock the squelch of
a distant receiver (usually a repeater).
13
T-CTCS - Transmitter
CTCSS
MENU+13
OFF
67.0HZ…254.1HZ
*Transmits a specific and continuous sub audible signal to unlock
the squelch of a distant receiver (usually a repeater).
14
VOICE - Voice
Reminding
MENU+14
OFF
CHI ENG
*Allows audible voice confirmation of a key press.
15
ANI-ID -ANI-ID
MENU+15
It can be programmed by software

27
16 DTMFST - DTMFST MENU+16
OFF: No DTMF Side Tones are heard
DT-ST : Side Tones are heard only from manually keyed DTMF codes
ANI-ST: Side Tones are heard only from automatically keyed DTMF codes
DT+ANI : All DTMF Side Tones are heard
17
S-CODE - Signal Code
MENU+17
1,…,15
18
SC-REV - Scanner
Resume Method
MENU+18
TO : Time Operation - scanning will resume after a fixed time has passed
CO : Carrier Operation -scanning will resume after the signal disappears
SE : Search Operation -scanning will not resume
19 PTT-ID - PTT-ID MENU+19
OFF: No ID is sent
BOT: The selected S-CODE is sent at the beginning
EOT: The selected S-CODE is sent at the ending
BOTH : The selected S-CODE is sent at the beginning and ending
20 PTT-LT – PTT ID delay MENU+20
0,1,2…,50ms
*PTT-ID Delay (milliseconds)
21
MDF-A - Channel A
Display Mode
MENU+21
FREQ: Displays programmed Frequency
CH: Displays the channel number
NAME: Displays the channel name
*Note: Names must be entered using software.
22
MDF-B - Channel B
Display Mode
MENU+22
FREQ: Displays programmed Frequency
CH: Displays the channel number
NAME: Displays the channel name
*Note: Names must be entered using software.
23
BCL – Busy Channel
Lock-out
MENU+23
OFF ON
*Disables the [PTT] button on a channel that is already in use. The
transceiver will sound a beep tone and will not transmit if the [PTT]
button is pressed when a channel is already in use.
28
24
AUTOLK –Automatic
Keypad Lock
MENU+24
OFF ON
*When ON, the keypad will be locked if not used in 8 seconds.
Pressing the [# ] key for 2 seconds will unlock the keypad.
25
SFT-D – Frequency
Offset Direction
MENU+25
OFF: TX = RX (simplex)
+: TX will be shifted higher in frequency than RX
- : TX will be shifted lower in frequency than RX
26
OFFSET -Frequency
shift amount
MENU+26
00.000…69.990
*Specifies the difference between the TX and RX frequencies
27
MEM-CH - Store a
Memory Channel
MENU+27
000…127
*This menu is used to either create new or modify existing channels
(0 through 127) so that they can be accessed from
MR/Channel Mode
28
DEL-CH - Delete a
memory channel
MENU+28
000…127
*This menu is used to delete the programmed information from the
specified channel (0 through 127) so that it can either be programmed
again or be left empty.
29
WT-LED- Standby
Backlight
MENU+29 OFF/ BLUE/ ORANGE/ PURPLE
30
RX-LED- Receive
Backlight
MENU+30 OFF/ BLUE/ ORANGE/ PURPLE
31
TX-LED- Transmit
Backlight
MENU+31 OFF/ BLUE/ ORANGE/ PURPLE
32 AL-MOD - Alarm Mode MENU+32
SITE: Sounds alarm through your radio speaker only
TONE: Sending alarm tone
CODE: Sending alarm code
34
TDR-AB - Transmit
selection while in Dual
MENU+34
OFF
A band transmit (Upper row frequency)

29
Watch mode B band transmit (Bottom row frequency)
*When enabled, priority is returned to selected display once the
signal in the other display disappears.
35
STE - Squelch Tail
Elimination
MENU+35
ON
OFF
*This function is used eliminate squelch tail noise between
Radioddity
handhelds
that
are
communicating
directly
(n
o
repeater
).
Reception
of
a
55
Hz
or
134.4
Hz
tone
burst
mutes
the
audio
long
enough
to
prevent
hearing
any
squelch
tail
noise.
36
RP-STE-Squelch Tail
Elimination
MENU+36
OFF/ 1,2,3…10
*This function is used eliminate squelch tail noise when
communicating through a repeater.
37
RPT-RL - Delay the
squelch tail of
repeater
MENU+37
OFF/ 1,2,3…10
*Delay the Tail Tone of Repeater (X100 milliseconds)
38
PONMSG-Power On
Message
MENU+38
FULL: Performs an LCD screen test at power-on
MSG: Displays a 2-line power on message
*Controls the behavior of the display when the transceiver is turned
on.
39 ROGER - Roger Beep MENU+39
OFF
ON
*Sends an end-of-transmission tone to indicate to other stations that
the transmission has ended.
40
RESET – Restore
defaults
MENU+40
VFO: Menu initialization
ALL: Menu and channel initialization
*Resets the radio to factory defaults, with some exceptions.
41
R-TONE-
Repeater Tone
MENU+41
The R-TONE frequency is transmitted by Pressing the [F] side key while
the [PTT] key is also pressed.
A common tone burst frequency used by many amateur radio systems in
Europe is 1750Hz

30
Manuel d'u�lisa�on de la radio
bidirec�onnelle en Français
(Two-way Radio User Manual in French)
Table des ma�ères
1. Assemblage 31
2. Charge et maintenance de la ba�erie
32
3. Apprendre à connaître votre radio
33
4. U�lisa�on de base
37
5. Fonc�onnement du système
40
6. Fonc�on<<scanner>>
41
7. Double veille
43
8. DTMF
44
9. Appel sélec�f
44
10. Personnalisa�on
46
11. Programma�on
48

31
Assemblage
Antenne
Cet émetteur-récepteur est équipé d'un connecteur SMA mâle. Pour monter votre antenne (connecteur SMA
femelle), alignez les deux connecteurs et tournez dans le sens des aiguilles d’une montre jusqu'à la butée.
Agraphe (clip) de ceinture
A l’arrière de l’émetteur-récepteur, il y a deux vis parallèles, retirez-les, passez-les dans les trous du clip
prévus à cet effet puis revissez-les dans le corps de l’appareil.
N'ajoutez pas de colle pour
fixer les vis sur
le clip de la batterie.
Les solvants contenus dans la colle peuven
t endommager le boîtier de la batterie.
Batterie
L’appareil doit être éteint avant d'installer ou de retirer la batterie. Vous pouvez tourner le bouton
d'alimentation/volume à fond dans le sens inverse des aiguilles d'une montre pour vous assurer qu'il a
bien été mis hors
tension.
Installation
: poussez lentement la batterie en parallèle avec le corps de la radio, le bord inférieur de la
batterie étan
t à environ 1-2 cm en
dessous de
l’extrémité inférieure de l’appareil.
Une
fois alignée avec les rails de guidage, faites glisser la batterie vers le haut jusqu'à ce que vous
entendiez un clic qui indique le verrouillage de la batterie en place.
Retrai
t: pour retirer la pile, appuyez sur le bouton « PUSH » situé au milieu de la partie supérieure (voir
Figure 2.1, « Poste Radioddity GT-82, vue d'ensemble »), pendant que vous faites glisser la batterie vers
le
bas.
32
Charge et maintenance de la batterie
Charge
La batterie doit être complètement chargée avant la première utilisation. L'efficacité optimale de la batterie sera atteinte après les
trois premiers cycles de charge et de décharge.
Comment brancher et utiliser correctement le chargeur:
1. La radio doit être mise hors tension pendant le cycle de charge.
2. Branchez le connecteur de l'adaptateur d'alimentation sur le socle du
chargeur.
3. Branchez la prise 220 V de l
'adaptateur d'alimentation principal dans une
prise de courant murale.
4. Placez le poste dans le socle du chargeur.
5. Assurez-vous que les connecteurs arrière de l’appareil soient bien en contact
avec ceux du chargeur.
Lorsque le voyant rouge est allumé, votre émetteur-récepteur est en charge.
7. La batterie est complètement chargée une fois que le voyant LED est passé
au vert. Merci d’ôter le poste du chargeur pour éviter toute surcharge de la batterie.
LED rouge
LED verte
Etat
Clignotante
Allumée en permanence
Attente (chargeur vide)
Allumée
Eteinte
Batterie en charge
Eteinte
Allumée
Charge complète de la batterie
Allumée en permanence
Clignotante
Erreur
Entretien de la batterie
La batterie est livrée déchargée; merci de la charger pendant au moins quatre à cinq heures avant de commencer à utiliser le poste.
1. Utilisez uniquement des batteries approuvées par le fabricant d'origine.
2. Ne tentez jamais de démonter la batterie.
3. N’exposez pas les batteries au feu ou à une chaleur intense
33
4. Éliminez les batteries conformément à la législation et à la réglementation de votre pays.
Ne jetez pas les batteries dans votre poubelle!
Stockage
1. Afin d'éviter tout dommage dû à une décharge excessive, la batterie doit être conservée avec une charge minimum. Cet appareil
utilise une batterie au lithium et une charge de maintien de 40% de la charge nominale est recommandée. Ce niveau réduit au
minimum la perte de capacité liée à l'âge tout en maintenant la batterie en état de fonctionnement et
en permettant l'autodécharge.
2. Pour éviter une grave dégradation de la capacité de votre batterie pendant le stockage à long terme, veuillez l’utiliser au moins
tous les six (6) mois.
3. Stockez vos batteries dans un endroit frais et sec, jamais au-dessus de la température ambiante normale.
Apprendre à connaître votre radio
L'écran principal
Symbol
Beschreibung
Symbol
Beschreibung
Canal mémorisé
R
Fonction d'inversion activée
Indications les moins importantes
N
NBFM activée (Narrow)
CT
CTCSS activé
Indicateur de niveau de batterie
DCS
DCS activé
Verrouillage du clavier activé
+-
Indication de décalage de fréquence E/R
L
Indicateur de puissance d’émission
S
Double veille activée 10. VOX activé
Bande ou canal actif
VOX
Funktion 'VOX' aktiviert
Indicateur de squelch ouvert / fermé
34
Boutons et commandes de la radio
1. Antenne
6. Clavier
11. Haut-parleur et microphone
2. Lampe de poche
7. Touche de moniteur
12. Loquet de verrouillage de la batterie
3. Bouton de mise en route / volume
8. Touche Radio FM ou d'alarme
13. Prise accessoires
4. Voyant de fonctionnement
9.
Touche PTT B (« Appuyer pour parler »)
14. Batterie
5. Ecran LCD à deux lignes
10.
Touche PTT A (« Appuyer pour parler »)

35
Indicateur de niveau de batterie
Cet indicateur informe sur le niveau de décharge de la batterie de l’appareil. Lorsque la batterie est déchargée, le poste commences
à émettre des bips de manière régulière, associée à un clignotement du rétro-éclairage de l’écran. Lorsque les fonctions vocales sont
activées, l’annonce « Low Votage » peut être entendue, ce qui indique que vous devez changer la batterie ou insérer votre appareil
dans le bloc-chargeur.
Indicateur d’émission-réception à LED
Le mode de fonctionnement du voyant à LED « émission-réception » est classique. Lorsque vous recevez un signal, il est vert,
lorsque vous transmettez, il passe au rouge, et il est éteint en mode veille.
Touche latérale n°1 - « F/Alarm» (réception de la radiodiffusion FM et alarme)
Appuyez bièvement sur [F] pour démarrer la réception de la radiodiffusion FM. Une seconde pression brève met le récepteur FM à
l’arrêt. Si, pendant que vous écoutez la FM, un signal est reçu sur le canal d’émission-récep
tion sur lequel vous êtes, le squelch sera
déclenché (si le « scan » est actif) et y restera jusqu'à ce que le signal disparaisse, le poste revenant automatiquement sur la
fréquence de radiodiffusion FM.
Maintenez la touche [F/Alarm] pour activer la fonction d'alarme. Appuyez brièvement sur la touche [F/Alarm] une seconde fois pour
désactiver cette fonction.
Touche latérale n°2 - « MONI » (moniteur et lampe de poche)
Appuyez brièvement sur [MONI] pour activer la fonction « lampe de poche ». Une seconde pression brève fait clignoter la LED. Une
troisième pression brève met la lampe de poche hors tension.
Maintenez la touche [MONI] pour ouvrir le squelch afin d’écouter un signal faible ou non filtré.
Touche « MENU »
Permet d'activer le MENU, de sélectionner chaque option du MENU et de valider les paramètres.
Après avoir éteint la radio, maintenez enfoncée la touche [MENU] pour allumer la radio et sélectionner la fonction « VFO » ou la
fonction « Mémoire/Canaux »
. Le mode mémoire est parfois appelé mode canal. Pour mémoriser une fréquence sur un canal, vous
devez être en mode « VFO ».
36
Touche « EXIT/AB »
Cete touche permet de basculer de la gamme « A » (partie supérieure de l’écran) à la gamme « B » (partie inférieure de l’écran). La
sélection indique la fréquence ou le canal actif en émission / réception.
Il es
t nécessaire de sélectionner la gamme « A » pour pouvoir enregistrer la fréquence affichée en mémoire.
Clavier numérique
L'émetteur-récepteur portatif Radioddity GT-82 est livré en standard avec
un
clavier
numérique complet.
Des
fonctions secondaires, indiquées
en caractères plus petits, son
t accessibles par
les touches numériques. Elles permettent également d’accéder à des fonctions de
raccourci du menu décrites au Chapitre 4 (Description e
t fonctionnement du menu).
Les
touches [*SCAN] et [# ] ont également une fonction secondaire donnant accès
à des raccourcis (« Scan » et verrouillage du clavie
r).
Touche « dièse » #
En mode « Mémoire », la touche « dièse » [# ] sert également de touche de
changement de puissance d'émission. En mode « Mémoire », appuyez brièvement sur
la
touche [#
] pour passer de la puissance d'émission « haute » à la puissance d'émission « basse ». Notez que cela ne modifie
pas la puissance d'émission stockée en mémoire pour ce canal
, cela n'affectant que la session en cours. Le passage à un autre
canal ou à un autre mode de
fonctionnement (y compris la radiodiffusion FM) réinitialise l’appareil à la puissance d'émission
mémorisée sur le canal.
Verrouillage du clavier
Le Radioddity GT-82 dispose d'un dispositif de verrouillage du claviercomplet. Les trois touches latérales ne sont pas
concernées .
Pour activer ou désactiver le verrouillage du clavier
,
appuyez sur la touche [# ]
et
maintenez-la
enfoncée
pendan
t
environ
deux
secondes.
Vous pouvez égalemen
t activer cette fonction pour que l’appareil verrouille automatiquement le clavier au bout de dix secondes, à
partir du menu (voir Chapitre 4
, Utilisation du système de menus).
Touche « étoile« [*SCAN]

37
Une pression brève sur la touche [*SCAN] permet d'activer la fonction inverse (voir Chapitre 11, Relais). Lors de l'écoute d'une
émission de radiodoffusion FM, une pression brève sur la touche [*SCAN] lancera le balayage (fonction « scanner »). Le balayage
s'arrêtera dès qu'une station active sera trouvée, quelle que soit la méthode de reprise du balayage.
Pour activer le scanner
, appuyez sur la touche [* SCAN] et maintenez-la enfoncée pendant environ deux secondes. Reportez-vous
au Chapitre 5
, Fonction scanner pour
plus de détails.
Touches de menus et de fonctions
La touche [MENU] est utilisée pour accéder au menu et valider les options de celui-ci.
Les touches [▲] et [▼] permettent de naviguer dans les menus ainsi que de sélectionner les canaux comme de monter ou
descendre en
fréquence (selon le mode de fonctionnement choisi).
La
touche [EXIT/AB] permet de quitter le menu et d'annuler ses options.
Pour une explication plus détaillée du
fonctionnement des menus, voir Chapitre 4, Utilisation du système de menus.
Prise « accessoires »
La prise « accessoires » du Radioddity GT-82 est un modèle à deux (2) broches, compatible Kenwood.
1
. Pour conecter des accessoires tels que des casques d'écouteurs, des écouteurs-micros ou des câbles de programmation, alignez
convenablemen
t les jacks dans les prises prévues à cet effet et enfoncez-les complètement.
2. L'ajustement n'est pas toujours parfait sur les câbles et connecteurs bon marché et il peut être nécessaire de forcer légèrement
pour les enfoncer parfaitemen
t.
3
. As
surez-vous que le poste es
t éteint avant de connecter quelque accessoire que ce soit.
Utilisation de base
Puissance et volume
Avant de mettre l'appareil sous tension, assurez-vous d'avoir connecté la batterie et l'antenne comme décrit au chapitre 1.
Mise sous tension de l'appareil
Pour allumer la radio, tournez simplement le bouton de volume/puissance dans le sens horaire jusqu'à ce que vous entendiez un «
clic ». Si votre radio s'allume correctement, un double bip sonore devr
ait retentir après environ une seconde. Il ensuite affichera une
fréquence ou un canal.

38
Si l'invitation vocale est activée, une voix annoncera « frequency mode » (« mode fréquence ») ou « channel mode » (« mode canal
»).
Mise hors tension de l'appareil
Tournez le bouton de volume/puissance dans le sens inverse des aiguilles d'une montre jusqu'à ce que vous entendiez un « clic ».
La radio sera éteinte.
Réglage du volume sonore
Pour augmenter le volume, tournez le bouton volume/puissance dans le sens des aiguilles d'une montre.
Pour diminuer le volume, tournez
le bouton de volume/puissance dans le sens inverse des aiguilles d'une montre. Faites attention de
ne pas trop le diminuer, car vous risqueriez d'éteindre votre radio par inadvertance.
Remarque: en utilisant la fonction « moniteur » activée par la touche [MONI] située sous le bouton « PTT », vous pourrez régler le
volume de réception plus facilement, le squelch (« silencieux ») étant déconnecté.
Passer un appel
Appuyez et maintenez enfoncé le bouton « PTT » sur le côté du poste pour émettre. Pendant l’émission, parlez à environ 3-5 cm du
microphone. Lorsque vous relâchez le bouton « PTT », votre émetteur-récepteur revient en mode réception.
VFO/MR- Comment changer
Pour passer votre radio en mode Fréquence (VFO); vous éteignez la radio, puis appuyez et maintenez le bouton [MENU] tout en
allumant
Pour enregistrer les fréquences dans la mémoire des canaux, vous devez être en mode Fréquence (VFO).
Sélection du canal
Il existe deux modes de fonctionnement: Fréquence (VFO) et canal/mémoire (MR).
Pour une utilisation quotidienne, le mode « Canal » (MR) sera beaucoup plus pratique que le mode « Fréquence » (VFO). Cependant,
le mode Fréquence (VFO) est très pratique pour les expérimentations de terrain. Le mode Fréquence (VFO) est également utilisé
pour la programmation des canaux en mémoire.
Le mode que vous utiliserez dépendra entièrement des cas d'utilisation.

39
Mode fréquence (VFO)
En mode Fréquence (VFO), vous pouvez naviguer en haut et en bas de la bande en utilisant les touches [▲] et [▼]. Chaque
pression incrémentera ou décrémentera la fréquence en fonction du pas de fréquence sur lequel vous aurez réglé votre
émetteur-récepteur.
Vous pouvez également entrer directement les fréquences au clavier numérique avec une précision d’un kilohertz. En d'autres
termes, lorsque vous entrez des fréquences avec une résolution supérieure à 1 kHz (comme 145,6875 MHz dans
l'exemple
ci-dessous), arrondissez toujours votre entrée au chiffre supérieur.
L'exemple suivant suppose l'utilisation d'un pas de fréquence de 12,5 kHz.
Exemple 3.1. Entrée de la fréquence 145,6875 MHz sur l'afficheur A
1. Après avoir éteint la radio, appuyez longuement sur [MENU] pour allumer la radio et entrer dans le mode Fréquence (VFO).
2. Appuyez sur la touche [EXIT/AB] pour que le petit triangle apparaisse sur la ligne supérieure de l’affichage.
3. Entrez [1] [4] [5] sur les touches du pavé numérique,
cela devrait ressembler à ceci:
Note: Ce n'est pas parce que vous pouvez programmer un canal sur une fréquence
quelconque que vous êtes automatiquement autorisé à utiliser cette fréquence.
Transmettre sur des fréquences sur lesquelles vous n'êtes pas autorisé à opérer est illégal et
constitue une infraction grave pour es juridictions de nombreu pays. Si vous vous faites
prendre en train de transmettre sans licence, vous pouvez être passible d'une amende et, dans
le pire des cas, d
'une peine d'emprisonnement.
Cependant, dans la plupart des juridictions, il n’est pas illégal d'écouter. Renseignez-vous
auprès des services compétents pour obtenir de plus amples renseignements sur les lois,
règles et règlements qui s'appliquent à votre région (en France, l’Agence Nationale des
Fréquences – ANFR https://www.anfr.fr).
Mode canal (MR)
L'utilisation du mode Canal (MR) dépend du fait d'avoir mémorisé préalablement l'utilisation de certaines fréquences. Pour en savoir
plus sur la prog
rammation des canaux, reportez-vous au chapitre 10, Programmation.
Une fois cette programmation réalisée, vous pouvez utiliser les touches [▲] et [▼] pour naviguer entre les canaux.
Remarque: Si vous avez programmé des canaux avec la puissance d'émission réglée sur « Low » (« Petite Puissance »), vous
pouvez utiliser la touche [#
] pour passer momentanément à une puissance plus élevée (« High ») si la liaison a des difficultés à
passer.

40
Fonctionnement du système
Utilisation de base
Procédure 1. Utilisation du menu avec les touches fléchées
- Appuyez sur la touche [MENU] pour accéder au menu.
- Utilisez les
touches [▲] et [▼] pour naviguer entre les rubriques du menu.
- Une fois que vous avez trouvé la rubrique désirée, appuyez à nouveau sur [MENU] pour sélectionner celle-ci.
- Utilisez les
touches [▲] et [▼] pour sélectionner le paramètre souhaité.
- Lorsque vous avez sélectionné le paramètre souhaité
pour un élémen
t de menu donné:
a) Pour confirmer votre sélection
, appuyez sur la touche [MENU] pour sauvegarder votre réglage et revenir au menu principal.
b) Pour annuler vos modifications
, appuyez sur la touche [MENU]. La rubrique sera rénitialisée et vous sortirez du menu.
c) Pour quitter le menu à
tout moment, appuyez sur la touche [MENU].
Utilisation de raccourcis
Comme vous l'avez peut-être remarqué en consultant l'annexe B, Définitions du menu, chaque rubrique de menu a une valeur
numérique qui lu
i est associée. Ces numéros peuvent être utilisés pour l'accès direct à un élément de menu donné.
Le menu est également organisé de manière à ce que les dix fonctions les plus courantes se trouvent en premier choix, et comme on
peu
t le voir dans la Figure 2.3, « Clavier du Radioddity GT-82 », elles sont également imprimées sur le clavier pour que vous n'
ayez
pas à les mémoriser.
Les paramètres son
t également associés à un numéro, voir Annexe B, Définitions des menus pour plus de dé
tails.
Procédure 2. Utilisation du menu avec des raccourcis clavier
- Appuyez sur la touche [MENU] pour y accéder.
- Entrer le numéro de l'élémen
t de menu à l'aide du pavé numérique.
- Pour accéder à la rubrique concernée
, appuyez sur la touche [MENU].
- Pour saisir le paramètre souhaité
, vous disposez de deux options:
a) Utilisez les
touches fléchées comme nous l'avons fait dans la section précédente; ou
b) Entrer le code de raccourci numérique à l'aide du pavé numérique.
- Et comme dans la section précédente;

41
a) Pour confirmer votre sélection, appuyez sur [MENU], le réglage sera sauvegardé et vous reviendrez au menu principal.
b) Pour annuler vos modifications, appuyez sur la touche [EXIT/AB] et cet élément de menu sera réinitialisé et vous sortira
entièrement du menu.
- Pour quitter le menu à tout moment, appuyez sur la touche [EXIT/AB].
- Tous les autres exemples et procédures de ce manuel utilisent les raccourcis du menu numérique.
Fonction « scanner »
Le Radioddity GT-82 dispose d'un scanner intégré pour les bandes VHF et UHF. En mode Fréquence (VFO), le balayage se fait par
créneaux en fonction du pas de fréquence que vous avez réglé .
En mode Channel (MR),
il balaie les fréquences stockées en
mémoire.
La double veille est inhibée pendant la numérisation
Pour activer le scanner, appuyez sur la touche [*SCAN] et maintenez-la enfoncée pendant environ deux secondes. Appuyez sur
n'importe quelle touche pour quitter le mode de balayage.
Modes de balayage
Le scanner est configurable selon l'un des trois modes de fonctionnement: pause, porteuse ou recherche, dont chacun est expliqué
plus en détail dans leur section respective ci-après.
Procédure 5.1. Réglage du mode scanner
1. Appuyez sur la touche [MENU] pour accéder au menu.
2
. Entrez [1] [8] sur le pavé numérique pour passer en mode balayage.
3
. Appuyez sur la touche [MENU] pour effectuer la sélection.
4
. Utilisez les touches [▲] et [▼] pour sélectionner le mode de balayage.
5
. Appuyez sur la touche [MENU] pour valider le choix effectué.
6
. Appuy
ez sur la
touche [EXIT/AB] pour quitter le menu.
Fonctionnement en mode « Pause »
En mode « Time Operation » (TO) (« Pause »), le scanner s'arrête lorsqu'il détecte un signal et il reprend le balayage, après un délai
préréglé en usine.

42
Fonctionnement en mode « Porteuse »
En mode « Carrier Operation » (CO) (« Porteuse »), le scanner s'arrête lorsqu'il détecte un signal, et après un temps prédéfini en
usine sans signal, il reprend le balayage.
Fonctionnement en mode « Recherche automatique »
En mode « Recherche automatique » (SE), le scanner s'arrête lorsqu'il détecte un signal.
Pour reprendre la numérisation, vous devez appuyer à nouveau sur la touche [*SCAN] et la maintenir enfoncée.
Recherche automatique de tonalité CTCSS et de code DCS
Note:
La recherche d'une tonalité CTCSS ou d'un code DCS peut être effectuée en mode « Fréquence » (VFO) ou en mode Channel (MR).
Ce n'est que lorsque le mode VFO est sélectionné que le ton/code détecté peut être sauvegardé dans le menu 11/10.
La tonalité CTCSS et le mode de balayage de code DCS sont accessibles avec ou sans signal. Le processus de balayage lui-même
n'a lieu que lorsqu'un signal est reçu.
Ce ne sont pas tous les répéteurs qui ont besoin d'une tonalité CT
CSS ou d'un code DCS pour yaccéder.
Dans ce cas, la fréquence de l’émetteur d'une station qui peut accéder au répéteur doit être balayée.
En d'autres termes: cela se ferait en écoutant les stations sur la fréquence d'entrée du répéteur.
Recherche d'une tonalité CTCSS
1. Appuyez sur la touche [MENU] pour accéder au menu.
2. Entrer [1] et [1] sur votre clavier numérique pour accéder au menu 11: R-CTCS
3. Appuyez sur la touche [MENU] pour effectuer la sélection.
4. Appuyez sur [* SCAN] pour lan
cer la recherche automatique d’une tonalité CTCSS.
Un « CT » clignotant apparaît sur la partie gauche de l’écran pour indiquer que le poste est en mode de « MR » ou la fréquence «
VFO » sélectionnés, la zone inférieure de l’affichage fait défiler les tonalités CTCSS pendant le test. Une fois que la tonalité CTCSS
est déterminée, l'indicateur « CT » cesse de clignoter.
Appuyez sur la touche [MENU] pour mettre la tonalité en mémoire (mode VFO uniquement), puis appuyez sur la touche [MENU] pour
quitter le menu.

43
Recherche d'une tonalité DCS
1. Appuyez sur la touche [MENU] pour y accéder.
2. Appuyer sur les touches [1] et [0] du clavier numérique pour accéder au menu 11: R-DCS.
3. Appuyez sur la touche [MENU] pour effectuer la sélection.
4. Appuyez sur [*SCAN] pour lancer la numérisation DCS.
Un « DCS » clignotant apparaît sur la partie gauche de l’écran pour indiquer que le poste est en mode de recherche automatique de
DCS. Dans ce mode, chaque fois que la radio reçoit un signal sur le canal « MR » ou la fréquence « VFO » sélectionnés, la zone
inférieure de l’affichage fait défiler les tonalités DCS pendant le test. Une fois que la tonalité DCS est déterminée, l'indicateur « DCS
» cesse de clignoter.
Appuyez sur la touche [MENU] pour mettre la tonalité en mémoire (mode VFO uniquement), puis appuyez sur la touche [MENU] pour
quitter le menu.
Double veille
Dans certaines situations, la possibilité de surveiller deux canaux simultanément peut être un atout précieux. Le
Radioddity GT-82 dispose de la fonction « Dual Watch » (« Double
veille
»)
avec
la
possibilité
de
balayer
deux fréquences
à
intervalles
fixes
tout
en
verrouillant
la fréquence
d'émission
sur
l'un
des
deux
canaux
surveillés.
Procédure 1. Activation ou désactivation du mode Double veille
1. Appuyez sur la touche [MENU] pour accéder au menu.
2
. Entrer [7] sur le pavé numérique pour accéder à la double veille.
3
. Appuyez sur [MENU] pour effectuer la sélection.
4
. Utilisez les touches [▲] et [▼] pour activer ou désactiver la fonction.
5
. Appuyez sur
la
touche [MENU] pour valider.
6
. Appuyez sur la touche [EXIT/AB] pour quitter le menu.
En raison de la conception du
Radioddity GT-82, chaque fois que l’une des gammes A ou B (VFO/MR) sera active, l’GT-82 émettra par
défau
t
sur la fréquence concernée .
Ce fonctionnement
peut
être gênant,
surtout
si,
lors de la surveillance d'une fréquence , vous ne
devez pas
transmettre sur celle-ci.
Une option de menu permet
de verrouiller l'émetteur sur l'une des gammes A ou B.
Procédure 2. Verrouillage du canal de transmission de la double veille
1. Appuyez sur la touche [MENU] pour accéder au menu.

44
2. Taper [3] et [4] sur le pavé numérique pour accéder au TDR-AB.
3. Appuyez sur [MENU] pour valider.
4. Utilisez les touches [▲] et [▼] pour sélectionner l'affichage A (haut) ou B (bas).
5. Appuyez sur la touche [MENU] pour confirmer.
6. Appuyez sur la touche [EXIT/AB] pour quitter le menu.
Remarque: Si vous souhaitez désactiver momentanément le verrouillage sans avoir à mettre l'option de menu sur OFF, vous
pouvez le faire en appuyant sur la touche [EXIT/AB] un instant avant d'appuyer sur le bouton PTT.
DTMF
DTMF est une méthode de signalisation dans la bande utilisant des signaux
sinusoïdaux doubles pour un code donné. Développé à l'origine pour les systèmes
de téléphonie, il s'est avéré un outil très polyvalent dans de nombreux autres
domaines.
Dans les systèmes radio bidirectionnels, le DTMF est le plus souvent utilisé pour
les systèmes d'automatisation et de contrôle à distance. Un exemple courant serait
celui des relais radioamateurs où certains relais sont activés en envoyant une
séquence DTMF (géné
ralement une simple séquence à un chiffre).
Le
Radioddity GT-82 donne un accès complet au DTMF, y compris les codes A, B, C et D.
Les
touches numériques, ainsi que les touches [*SCAN] et [#
] amettent en oeuvre les codes DTMF correspondants, comme on
peu
t s'y attendre. Les codes A, B, C et D se trouvent respectivement sur les touches [MENU], [▲] , [▼] et [EXIT/AB] (+).
Pour envoyer des codes DTM
F, appuyez sur la ou les touches correspondant au code que vous souhaitez envoyer, tout en
maintenan
t la touche PTT enfoncée.
Remarque: Si le verrouillage du clavier es
t activé sur votre poste, vous pouvez toujours envoyer des tonalités DTMF de la manière
habituelle
, sans avoir à déverrouiller le clavier.
Appel sélectif
Parfois, lorsque vous travaillez avec des groupes importants de correspondants utilisant le même canal, la communication peut
devenir très encombrée voire désordonnée. Afin de minimiser ce problème, plusieurs méthodes ont été mises au point pour bloquer
les émissions indésirables sur la fréquence que vous utilisez.
En général, il existe deux formes d'appel sélectif dans les systèmes radio bidirectionnels: l’appel de groupe et l’appel privé.

45
L'appel de groupe, comme son nom l'indique, est une forme de communication s’adressant à un ou plusieurs correspondants.
Toutes les radios du groupe sont configurées de la même manière et chaque émetteurrécepteur pourra contacter toutes les autres
radios du groupe.
L'appel indivilduel, parfois aussi connu sous le nom de télé-avertissement (« paging »), est une forme de communication privative
entre deux correspondants.
Chaque appareil es
t programmé avec un code d'identification unique. Et ce n'est qu'en envoyant le code correspondant que vous
pouvez
faire
en sorte que
l’autre poste reçoive vos émissions.
Le
Radioddity GT-82 offre trois modalités d’appel de goupe:
1. CTCSS
2
. DCS
3
. Tonalité d’accès (1000Hz, 1450Hz, 1750Hz, 2100Hz)
Le Radioddity GT-82 ne comporte aucun dispositif d'appel privatif.
Le CTCSS et la tonalité à 1750Hz sont également des méthodes populaires parmi les radioamateurs pour déclencher les relais et les
répéteurs.
CTCSS et DCS
Le CTCSS se règle par l’intermédiaire des menus 11 R-CTCS (pour la réception) et 13 T-CTCS (pour l’émission). Le DCS est réglé
avec les menus 10 R-DCS (pour la réception) et 12 T-DCS (pour l’émission).
Pour une liste complète des codes CTCSS disponibles e
t des fréquences des sous-tonalités correspondantes, voir le tableau C.2, «
Fréquences CTCSS » à l'annexe C
, « Spécifications techniques ».
Procédure 1. Comment configurer le CTCSS
1. Appuyez sur la touche [MENU] pour accéder au menu.
2
. Appuyer sur les touches [1] et [1] pour le CTCSS du récepteur et sur les touches [1] et [0] pour le DCS du récepteur.
3
. Appuyez sur [MENU] pour valider.
4
. Entrez la fréquence de sous-tonalité CTCSS souhaitée, en hertz, sur le pavé numérique.
5
. Appuyez sur [MENU] pour confirmer et enregistrer.
6
. Entrer les touches [1] et [3] pour le CTCSS de l’émetteur et sur les touches [1] et [2] pour le DCS de l’émetteur.
7
. Appuyez sur [MENU] pour valider.
8
. Entrez la fréquence de sous-tonalité CTCSS souhaitée en hertz sur le pavé numérique.
Assurez-vous que c'es
t la même fréquence CTCSS que celle que vous avez entrée pour le récep
teur.

46
9. Appuyez sur [MENU] pour confirmer et enregistrer.
10. Appuyez sur [EXIT/AB] pour quitter le menu système.
Pour désactiver le CTCSS, suivez la même procédure, mais désactivez-le avec la touche [0 SQL] au lieu de sélectionner une
fréquence de sous-tonalité CTCSS.
Pour désactiver le DCS, suivez la même procédure, mais désactivez-le avec la touche [0 SQL] au lieu de sélectionner un code DCS.
Éclat de tonalité (Tone-burst) 1000Hz, 1450Hz, 1750Hz, 2100Hz
Pour envoyer une rafale de tonalité (sélectionnable par MENU 41); appuyez sur la touche [F/SOS] tout en maintenant le PTT
enfoncé.
Une fréquence de rafale de tonalité commune utilisée par de nombreux systèmes de radio amateur en Europe est de 1750 Hz.
vous pouvez choisir parmi 2100, 1750, 1450 ou 1000 Hz Tone Burst Options. Ces options se trouvent dans le Menu 41(R-TONE).
Personnalisation
Le Radioddity GT-82 permet de personnaliser à la fois le message de mise sous tension (programmable par ordinateur
uniquement
)
ainsi que la couleur du rétroéclairage
des trois
états
de
l'émetteur-récepteur
(émission,
réception
et
veille).
Écran d'affichage
L'écran LCD du RadioddityGT-82 est rétro-éclairé par des LED multicolores, dont la couleur peut être préréglée à partir du
menu
système dans une variété de couleurs.
Pour modifier les couleurs
, procédez comme suit:
Procédure 1. Changer la couleur du rétroéclairage
1. Appuyez sur la touche [MENU] pour accéder au menu.
2
. Entrez l'une des données suivantes sur votre clavier numérique
a)
Touches [2] et [9] pour changer la couleur du mode veille.
b)
Touches [3] et [0] pour changer la couleur du mode réception.
c)
Touches [3] et [1] pour changer la couleur du mode émission.
3
. Appuyez sur la touche [MENU] pour sélectionner celui-ci.
4
. Utilisez les touches [▲] et [▼] pour choisir la couleur désirée.
5
. Appuyez sur [MENU] pour confirmer et enregistrer.
6
. Appuyez sur [EXIT/AB] pour quitter le menu.

47
Pour modifier la durée du rétroéclairage de l'écran LCD, procédez comme suit:
Procédure 2. Réglage du délai d'expiration du rétroéclairage
1. Appuyez sur la touche [MENU] pour accéder au menu.
2
. Appuyez sur la touche [6] de votre pavé numérique pour passer à la temporisation du rétroéclairage.
3
. Appuyez sur la touche [MENU] pour sélectionner celui-ci.
4. Utilisez les
touches [▲] et [▼] pour sélectionner le délai souhaité.
5
. Appuyer sur la touche [MENU] pour confirmer et enr
egistrer.
6
. Appuyez sur la touche [EXIT/AB] pour quitter le menu.
Message de mise sous tension
Le message de mise sous tension ne peut être réglé que par l’intermédiaire d’un ordinateur, voir le chapitre Programmation par
ordinateur pour plus de détails sur la procédure à utiliser.
Les instructions suivantes supposen
t que vous avez déjà établi une connexion à l'aide du logiciel Radioddity avec un
ordinateu
r
fonctionnant
sous Windows,
le logiciel Radioddity ayant
été installé au préalable et
son fonctionnement
vérifié.
Procédure
3.
Réglage
du
message
de
mise
sous
tension
1.
Cliquez
sur
«
Other
»
dans
la
barre
de
menu;
une
boîte
de
dialogue
intitulée
«
Other
»
doit
apparaître.
2
.
Dans
la
boîte
de
dialogue
intitulée
«
Power
on
Message
»
(«
Message
de
mise
sous tension
»),
il
y
a
deux
champs
de texte
représentan
t
les
deux
lignes
de
votre
écran
LCD.
Saisissez
le texte
souhaité
dans
les
zones
concernées.
3
.
Cliquez
sur
«
Write
»
(«
Écrire
»)
pour transférer
les
données
modifiées,
de
l’ordi
nateur
vers
la
radio.
Note
:
Même
si
le
logiciel
a
un
texte
de
huit
(8)
caractères
de
largeur
pour
le
message
de
mise
sous tension,
sachez
que
l'écran
du GT-82
ne
peu
t
afficher
qu'un
maximum
de
sept
(7)
caractères.
Assurez-vous
que
l'élément
de
menu
38
est
réglé
sur
«
MSG
»,
sinon
votre
message
ne
s'affichera
pas.
Voir
Chapitre
4
Utilisation
du
système
de
menus
pour
plus
de
détails
sur
la
navigation
dans
le
menu
.
Parfois,
il faut
plus
d'un
essai
pour
que
le
logiciel
Radioddity
se
connecte
à
votre
radio.
Si
vous
voyez
apparaître
une
boîte
de
dialogue
indiquant
que
la
connexion
a
échoué,
fermez
la
boîte
de
dialogue
et
cliquez
sur
lire
ou
écrire
à
nouveau.

48
Programmation
Les mémoires sont un moyen facile de stocker les fréquences couramment utilisées afin qu'elles puissent être facilement récupérées
à une date ultérieure.
Le
Radioddity GT-82 dispose de 128 canaux mémoirisant les éléments suivants: Fréquences de réception et d'émission,
puissance
d'émission, informations de signalisation de groupe,
largeur de bande, réglages ANI/PTT-ID et un identificateur
alphanumérique
à
six
caractères (canal n°1).
Programmation manuelle
Par manque d’habitude, la programmation manuelle peut sembler, au départ, un peu difficile surtout lorsque vous programmez des
canaux duplex. Notez que les identifiants ANI S-CODE ne peuvent être définis qu'à partir d'un ordinateur. Lors de la programmation
des canaux, il est important de se rappeler que vous ne pouvez sauvegarder les canaux que lorsque vous travaillez sur la ligne
supérieure de l'écran, et ce en mode VFO.
Pour créer un nouveau canal
, éteignez d'abord la radio, puis maintenez enfoncée la touche [MENU] pour allumer la
radio e
t mettre
votre radio en mode "Fréquence"
(VFO). Toujours dans ce mode, sélectionnez ensuite la fréquence de réception souhaitée à l'aide
du pavé numérique
. Ensuite, utilisez le système de menu pour configurer les détails plus fins du canal que vous voulez programmer
en mémoire, (puissance d’émission, bande passante, CTCSS, DCS etc.).
Canaux simplex
Les étapes suivantes supposent que vous êtes en mode Fréquence {VFO) et que vous avez entré la fréquence désirée à stocker en
mémoire.
1
. Appuyez su
r la
touche [MENU] pour accéder au menu.
2
. Entrer les touches [2] et [7] sur le clavier numérique pour accéder à MEM-CH.
3
. Appuyez sur la touche [MENU] pour sélectionner ce dernier.
4
. Utilisez les touches [▲] et [▼] pour sélectionner un canal de mémoire vide ou saisissez-le directement sur le clavier numérique.
5
. Appuyez sur la touche [MENU] pour valider.
6
. Appuyez sur la touche [EXIT/AB] pour quitter le menu.
Après avoir étein
t la radio, maintenez enfoncée la touche [MENU] pour allume
r la radio e
t entrez dans le mode canal (MR) pour
tester votre nouveau canal. Si vous souhaitez lui donner un nom, vous devrez le faire à partir d'un ordinateur. Voir plus d'informations
à ce suje
t dans la section « Programmation informatique ».
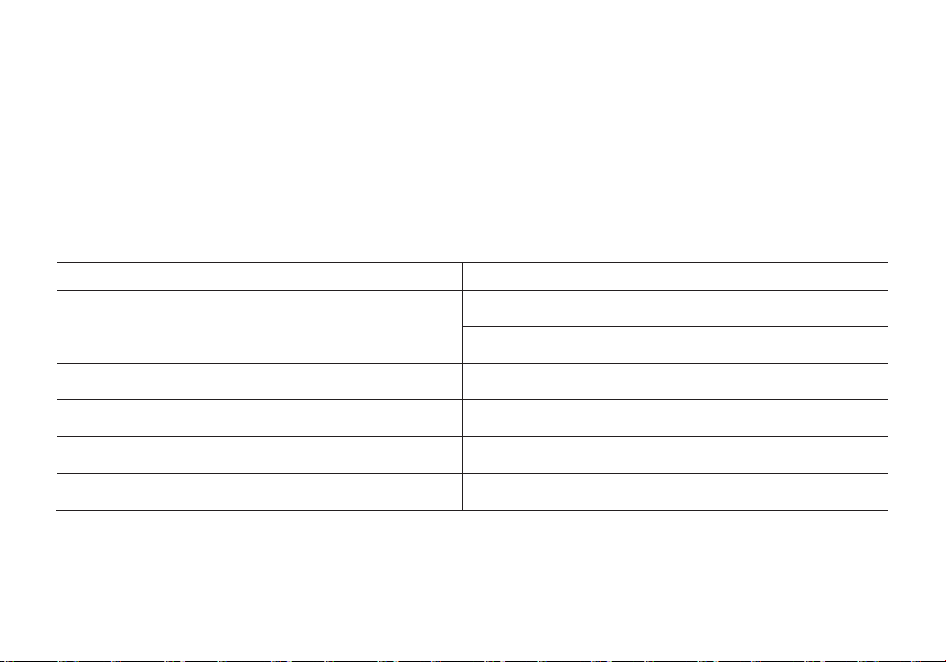
49
Canaux duplex
Ce qui suit suppose que vous avez configuré un canal duplex en mode VFO sur la ligne supérieure de l'écran, comme décrit au
Chapitre 11, Relais, et que vous êtes toujours en mode VFO.
1. Sauvegardez comme vous le feriez pour un canal simplex, comme décrit dans la section précédente.
2. Appuyez sur [* SCAN] pour activer la fonction inverse
3. Sauvegardez de nouveau cela dans le même canal de mémoire qu'à la première étape (1).
Passez en mode Channel (MR) avec la touche E3 pour
tester votre nouveau canal. Si vous souhaitez lui donner un nom, vous
devrez le faire à partir d'un ordinateur. Voir plus d'informations à ce sujet dans la section « Programmation informatique ».
Dépannage
PROBLEME
SOLUTION
La radio ne s’allume pas
La batterie peut être épuisée. Rechargez-la.
Installation incorrecte. Réinstallez-la.
La batterie ne dure pas longtemps
La batterie est morte. Remplacez-la par une neuve. La batterie
n’était pas complètement chargée.
La led de réception s’allume mais aucun son n’est entendu
Assurez-vous que le volume n’est pas trop bas. Assurez-vous
d’avoir les mêmes codes CTCSS et DCS que votre groupe.
Le clavier ne fonctionne pas La fonction de verrouillage du clavier est peut être activée
Réception d’un signal d’un autre groupe lors de la transmission
Changez les CTCSS / DCS de votre groupe.

50
Caractéristiques techniques
Fréquences
144-146MHz & 430-440MHz (Rx / Tx)
Canaux mémorisables
128
Alimentation
Li-Ion 7.4V /2000 mAh (BL-8)
Température de travail
-10°C to + 45°C
Mode de fonctionnement
monoband/dualband
Puissance en sortie
VHF: 5W / UHF:4W
Modulation
F3E(FM)
Déviation de fréquence maximale
≤ ±5KHz
Émissions parasites
< -60dB
Stabilité de fréquence
±2.5 ppm
Sensibilité Rx
< 0.2uV
Puissance de sortie audio
≥ 500mW
Dimensions
62x131x34mm
Poids
230g
Les spécifications sont sujettes à changement sans préavis.
ATTENTION: L’alimentation AC/DC doit être utilisée pour déconnecter l’émetteur-récepteur du secteur; le chargeur de bureau doit
être placé près du secteur et être facilement accessible.

51
GT-82
Bedienungsanleitung des Funkgeräts in deutscher Sprache
(Two-way Radio User Manual in German)
INHALT
1.-SICHERHEITSINFORMATIONEN 52
2.-EIGENSCHAFTEN UND FUNKTIONEN 53
3.- ZUBEHÖR ANBRINGEN 54
4.-BATTERIE LADEN 55
5. -BATTERIE INFORMATION: 56
6.-TEILE; KONTROLLE UND TASTEN 57
7.-'LCD' DISPLAY 60
8.- 1750 Hz TON FÜR DEN ZUGANG ZUM VERSTÄRKER 60
9.- GRUNDEINSTELLUNGEN 61
10.- ERWEITERTE EINSTELLUNGEN 61

52
1.-SICHERHEITSINFORMATIONEN:
Die folgenden Sicherheitsinformatioen sollten Sie während des Betriebes, des Service oder der Reparatur immer beachten.
• Das Gerät soll nur von qualifiziertem Personal überprüft werden.
• Bauen Sie das Gerät nicht um.
• Nutzen Sie nur
Radioddity oder hierdurch ausgewiesene Batterien und Ladegeräte
.
• Nutzen Sie das Gerät niemals mit einer defekten Antenne. Wenn eine defekte Antenne mit ihrer Haut in Berührung kommt, kann es
zu Verbrennungen kommen.
• Schalten Sie das Gerät ab, wenn Sie leicht entzündliche oder explosive Gegenden betreten oder in die Nähe von solchem Material
kommen.
• Laden Sie die Batterie nicht an leicht entzündlichen oder explosiven Orten.
• Um elektromagnetische Störungen zu vermeiden, benutzen Sie das Gerät nicht an Orten, an denen es verboten ist.
• Schalten Sie das Gerät vor dem Besteigen eines Flugzeuges aus. Jede Benutzung des Gerätes muss in Übereinstimmung mit den
Regelungen und dem Personal geschehen.
• Schalten Sie das Gerät
in Sprengzonen aus.
• Platzieren Sie das Gerät nicht in der unmittelbaren Nähe von Airbags oder deren Wirkunsgbereichen.
• Setzen Sie das Gerät keiner direkten Sonneneinstrahlung über eine längere Zeit oder heißen Quellen aus.
• Wenn Sie mit dem Gerät senden, halten Sie es aufrecht, mit dem Mikrofon in 3 bis 4 cm Abstand zu den Lippen. Halten Sie die
Antenne mindestens 25 cm von ihrem Körper entfernt, wenn Sie senden.
ACHTUNG: Wenn Sie das Gerät an ihrem Körper tragen, halten Sie die Antenne mindestens 25
cm weg, wenn Sie senden!

53
2.-EIGENSCHAFTEN UND FUNKTIONEN
- Tragbarer Dual-band Übermittler mit LCD Display Menüführung und Anzeige.
- DTMF codiert.
- Lithium-ionen Batterie mit hoher Kapazität.
- gewerblicher Empfänger (65 MHz ~ 108 MHz).
- Enthält 105 DCS Codes und 50 private, programmierbare CTCSS Codes.
- "VOX" Funktion (sprachbetriebene Übermittlung).
- Alarmfunktion.
- Bis zu 128 speicherbare Kanäle.
- Breitband (weit) / Nahband (nah) wählbar.
- Displaybleuchtung und programmierbare Tasten.
- Beep-Funk
tion auf den Tasten, Tastentöne.
- Dual Senden und Empfangen
- Wählbare Frequenz in 12,5/25 kHz Schritten.
- Funktion "OFFSET" (Frequenzeinstellung zum Verstärker / Funkmast).
- Batterieschutz und weniger Verbrauch: "SAVE".
- Zeitversetzte Übertragung "TOT" programmierbar.
- Scan Modus wählbar.
- Funktion Kanal besetzt "BCLO".
- Eingebauter CTCSS/DCS Scan.
- Eingebaute Taschenlampe.
- Per PC programmierbar.
- Schwellenwerte "Squelch" (Geräuschunterdrückung) einstellbar von 0 bis
9.
- Crossband - Empfang.
- Ton beim Übertragungsende.
- Eingebaute Tastensperre.

54
3.- ZUBEHÖR ANBRINGEN
3.1.- DIE ANTENNE ANBRINGEN
Bringen Sie die Antenne an, wie es abgebildet ist. Drehen Sie sie hierzu im Uhrzeigersinn, bis sie fest ist.
ACHTUNG:
- Wenn Sie die Antenne anbringen, halten und drehen Sie sie nicht an der Spitze, sondern unten.
- Wenn Sie eine externe Antenne benutzen, stellen Sie sicher, dass sie einen SWR Wert von 1.5:1 oder
weniger aufweist, um Schäden am Gerät und dessen Transistoren zu vermeiden.
- Halten Sie die Antenne nicht mit ihren Händen fest oder wickeln Sie
sie ein, um schlechten Empfang zu
vermeiden.
- Betreiben Sie das Gerät nie ohne Antenne.
3.2.- DEN GÜRTELCLIP ANBRINGEN
Bringen Sie, wenn nötig, den Gürtelclip an. Befestigen Sie diesen hierzu, wie abgebildet, am
Batterieschacht.
ACHTUNG:
- Nutzen Sie keinen Leim, um den Gürtelclip oder dessen Schrauben zu befestigen. Dies
könnte das Batteriege- häuse beschädigen.
3.3.- MICRO-HEADSET ANSCHLIEßEN
Stecken Sie das Headset in die dafür vorgesehene Buchse "SP / MIC".
Die Abbildung
zeigt wie.
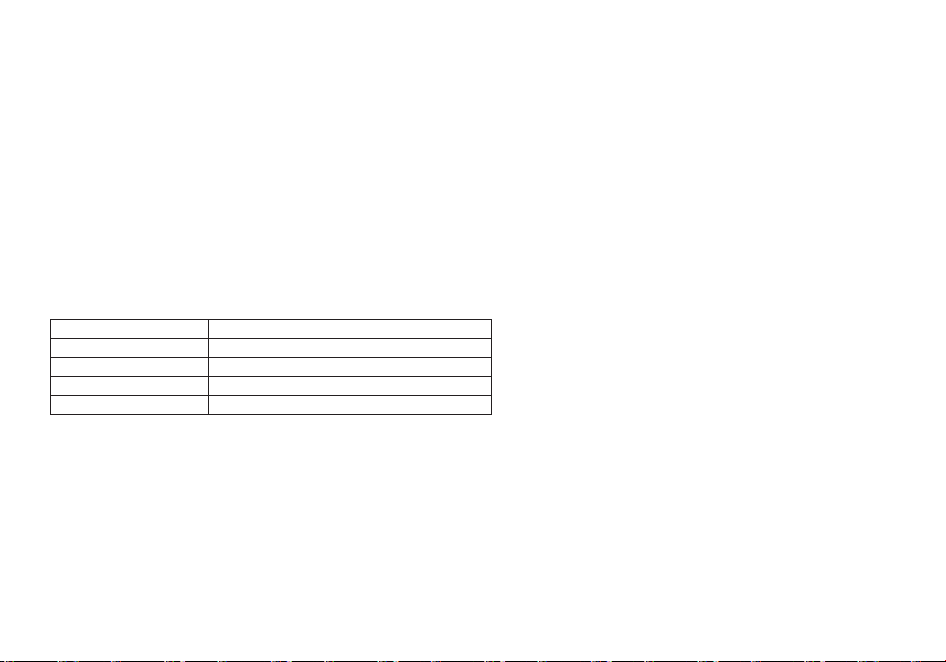
55
3.4.- BATTERIE EINLEGEN:
- Wenn Sie die Batterie einlegen, stellen Sie sicher, dass sie richtig im Aluminiumgehäuse sitzt. Das
untere Ende der Batterie sitzt etwa 2 bis 3 cm über dem unteren Rand des Gerätes.
- Setzen Sie die Batterie in die Führungsschienen und schieben Sie sie hoch, bis Sie ein "Klick"
hören.
- Am unteren Ende wird sie verriegelt.
- Schalten Sie das Gerät aus, bevor Sie die Batterie entfernen.
- Ziehen Sie die Batterie nach unten aus dem Gerät herau
s, wie es der Pfeil auf der Abbildung zeigt.
- Schieben Sie die Batterie etwa 1 bis 2 cm nach oben, um sie aus dem Gehäuse entfernen zu
können.
4.-BATTERIE LADEN:
Nutzen Sie nur das mitgelieferte Ladegerät. Die LED zeigt den Ladezustand an.
LADESTATUS:
LED ANZEIGE:
Standby (lädt nicht)
Rote LED blinkt und grüne LED leuchtet
Laden
Rote LED leuchtet
Voll geladen
Grüne LED leuchtet
Fehler
Rote LED blinkt und grüne LED leuchtet
Befolgen Sie folgende Schritte:
1. Stecken Sie das Ladekabel in den Adapter.
2. Stecken Sie den Stecker in die Steckdose.
3. Stecken Sie den DC Connector in die Buchse des Ladegerätes.
4. Platzieren Sie das Gerät mit Batterie oder die Batterie allein im
Ladegerät.
5. Stellen Sie sicher, dass die Batterie guten Kontakt zum Ladegerät hat. Der Ladevorgang beginnt, wenn die rote LED
leuchtet.
6. Die grüne LED blinkt ca. 4 Stunden später. Dies zeigt an, dass der Ladevorgang abgeschlossen ist.
Entfernen Sie das Gerät mit Batterie oder die einzelne Batterie aus der Ladestation.

56
5. -BATTERIE INFORMATION:
5.1.-ERSTE BENUTZUNG
Die Batterie verlässt die Fabrik ungeladen. Laden Sie sie erst einmal 5 Stunden, bevor Sie das Gerät erstmalig benutzen.
Die maximale Batteriekapazität wird etwa nach drei kompletten Entlade- und Ladezyklen erreicht. Wenn Sie bemerken,
dass die Kapazität nachlässt, laden Sie die Batterie.
ACHTUNG:
- um das Verletzungsrisiko zu minimieren, laden Sie nur die Batterie des Herstellers. Andere Batterien könnten
Sie verletzen oder zu Schäden führen.
- Um körperliche Schäden zu vermeiden, setzen Sie die Batterie keinem Feuer aus!
- Entsorgen Sie die Batterie nach den landesüblichen Vorschriften. Batterien gehören nicht in den Haus- oder Restmüll.
- Zerlegen Sie die Batterie niemals.
5.2.-BATTERIE TIPS:
1. Laden Sie die Batterie bei einer Temperatur von etwa 5 - 40° C. Alles darunter oder darüber könnte die Batterie beschädigen
2. Wenn Sie die Batterie mit dem Gerät laden, ste
llen Sie es aus.
3. Unterbrechen Sie nicht die Stromzufuhr oder entfernen die Batterie, während das Gerät lädt.
4. Laden Sie niemals eine feuchte Batterie. Trocknen Sie sie vor dem Laden ab.
5. Die Batterie ist ein Verschleißteil. Wenn Sie bemerken, dass sich die Sprech- oder Funkzeit verkürzt, ist es Zeit für einen Ersatz.
5.3.-VERLÄNGERN DER BATTERIENUTZUNG
1. Die Batterieleistung vermindert sich bei Temperaturen unter 0° C bedeutend. Bei diesen Temperaturen ist eine Ersatzbatterie von
Vorteil oder notwendig. Eine Batterie die hier nicht funktioniert, kann bei Raumtemperatur wieder funktionieren, also heben Sie sie
auf für eine spätere Nutzung.
2. Schmutz auf den Kontakten kann dazu führen, dass die Batterie nicht richtig geladen wird oder arbeitet. Nutzen Sie ein sauberes,
trockenes Tuch, um den Schmutz abzuwischen, bevor Sie die Batterie einsetzen.
5.4.-BATTERIELAGERUNG:
1. Laden Sie die Batterie vollständig auf, bevor Sie sie verräumen, um Schäden an der Batterie zu vermeiden.
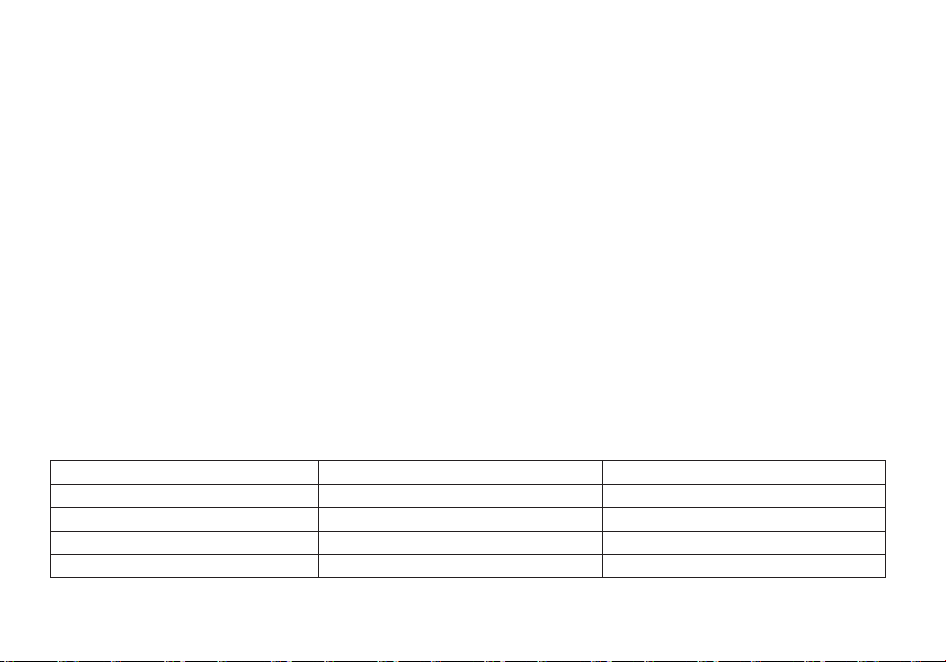
57
2. Laden Sie die Batterie nach ca. 6 Monaten erneut auf, um eine Reduzierung der Kapazität zu vermeiden.
3. Lagern Sie die Batterie an einem trockenen Ort bei Raumtemperatur.
6.-TEILE; KONTROLLE UND TASTEN:
6.1.-GERÄTEÜBERSICHT
1. Antenne
6. Eingabetasten
11. SP & MIC Lautsprecher und Mikrofon
2. Taschenlampe
7. SK - Seitentaste 2 (Lampe, Abhören)
12.Knopf zum Herausnehmen der Ba�erie
3. An / Aus / Lautstärke Knopf
8. SK - Seitentaste 1 (Funk, Alarm)
13. Zubehörbuchse
4. LED Anzeige
9. PTT B - Push to talk Funk�on
14. Ba�eriepack
5. LCD Anzeige
10. PTT A - Push to talk Funk�on

58
6.2.- TASTENBELEGUNG:
• [PTT] (PUSH-TO-TALK):
Drücken und halten Sie den Knopf [PTT], um zu senden. Lassen Sie ihn los, um zu empfangen.
•
SK- Seitentaste 1 [F/Alarm]:
- Drücken Sie die [F/Alarm] Taste, um den FM Empfänger zu aktivieren; drücken Sie sie erneut, um ihn zu deaktivieren.
- Drücken und halten Sie die [
F/Alarm] Taste, um den Alarm zu aktivieren. Drücken und halten Sie die Taste ein weiteres Mal, um
den Alarm zu deaktivieren.
•
SK-Seitentaste 2 [M/Lampe]:
- Drücken Sie die [M/Lampe] Taste, um die Taschenlampe zu aktivieren. Drücken Sie sie nochnmals, damit die Lampe aus geht.
Drücken und halten Sie die Taste [
M/Lampe], um das Signal zu empfangen.
•
[*SCAN] Taste
- Drücken Sie die Taste [*SCAN], um die Reverse Funktion einzuschalten. Hiermit können Sie eine spezielle Sende- und
Empfangsfrequenz austauschen. Drücken Sie die Taste [*SCAN] 2 Sekunden lang, um die Frequenzsuche zu starten. Während
des Radiobtriebes bewirkt das Drücken der Tast
e [*SCAN] die Sendersuche.
- Im Menü RX CTCSS/DCS, bewirkt die Taste [*SCAN] den Suchlauf für RX CTCSS/DCS.
•
[ # ] Taste
- Im Kanalmodus schalten Sie mit derTaste [# ] zwischen hoher und niedriger Üertragungsrate.
- Drücken Sie die Taste 2 Sekunden lang für die Tastensperre.
FUNKTION DES TASTENFELDES
• [MENU] Taste
- Wird verwendet, um das MENÜ zu aktivieren, jede MENÜ-Option auszuwählen und die Parameter zu bestätigen.
- Wenn das Radio ausgeschaltet ist, können Sie zwischen dem Frequenzmodus (VFO) und dem Speichermodus (MR) wechseln,
indem Sie beim Einschalten die Taste [MENU] gedrückt halten.

59
• [▲] und [▼] Taste
[AUF] und [AB] Tasten
- Drücken und halten Sie die AUF und AB Tasten, um die Frequenz schnell umzuschalten.
- Drücken Sie die Taste in die entgegengesetzte Richtung, um den Suchlauf in die andere Richtung zu starten.
•
[EXIT/AB] Taste
- Mit ihr brechen Sie eine Aktion ab oder gelangen zum vorherigen Menü.
- Drücken Sie die [EXIT/AB] Tasten, um die Frequenzanzeige zu wechseln.
•
NUMMERNTASTEN:
- werden benutzt, um nicht standard CTCSS und Frequenzin
formationen einzugeben. Außerdem für Radiosender.
- Im Übertragungsmodus werden die Tasten für das Senden des Signalcodes benutzt. (Diese sollten mit der PC Software eingesetzt
werden)
•
ZUBEHÖRBUCHSE:
- Die Buchse wird benutzt, um Zubehör anzuschließen - wie Audiozubehör oder das Programmierkabel.
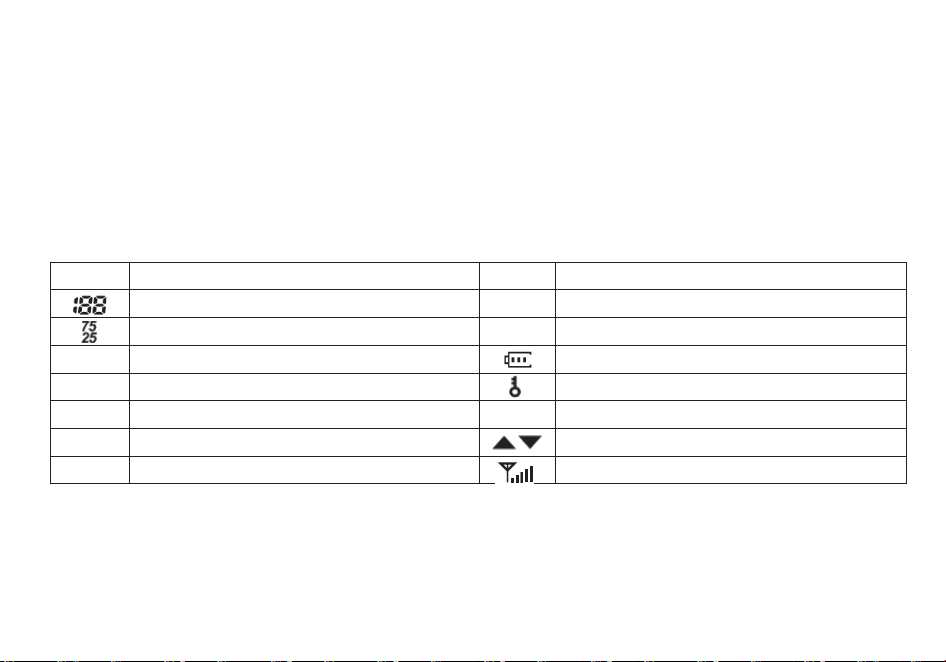
60
7.-'LCD' DISPLAY:
Die Displaysymbole erscheinen je nach spezifischer Anwendung. Spezielle Anwendungen lassen ein Symbol erscheinen.
Symbol Beschreibung Symbol Beschreibung
Arbeitskanal
R
Reversefunktion aktiviert
Arbeitsfrequenz
N
Breitband gewählt
CT
'CTCSS' aktiviert Batterieanzeige
DCS
'DCS' aktiviert
Tastensperre ein
+-
Richtung der Offset Frequenz für den Verstärker
L
geringe Übertragungsenergie
S
Dualanzeige / Dualempfang aktiviert
Arbeitsfrequenz auf / ab
VOX
Funktion 'VOX' aktiviert Signalstärkeanzeige
8.- 1750 Hz TON FÜR DEN ZUGANG ZUM VERSTÄRKER
Zum Senden eines Tonbursts (wählbar über MENÜ 41); Drücken Sie die Taste [F/Alarm], während Sie die PTT-Taste gedrückt halten.
Eine gängige Tonburst-Frequenz, die von vielen Amateurfunksystemen in Europa verwendet wird, beträgt 1750 Hz.
Sie können zwischen 2100, 1750, 1450 oder 1000 Hz Tone Burst-Op�onen wählen. Diese Op�onen finden Sie im Menü 41 (R-TONE).
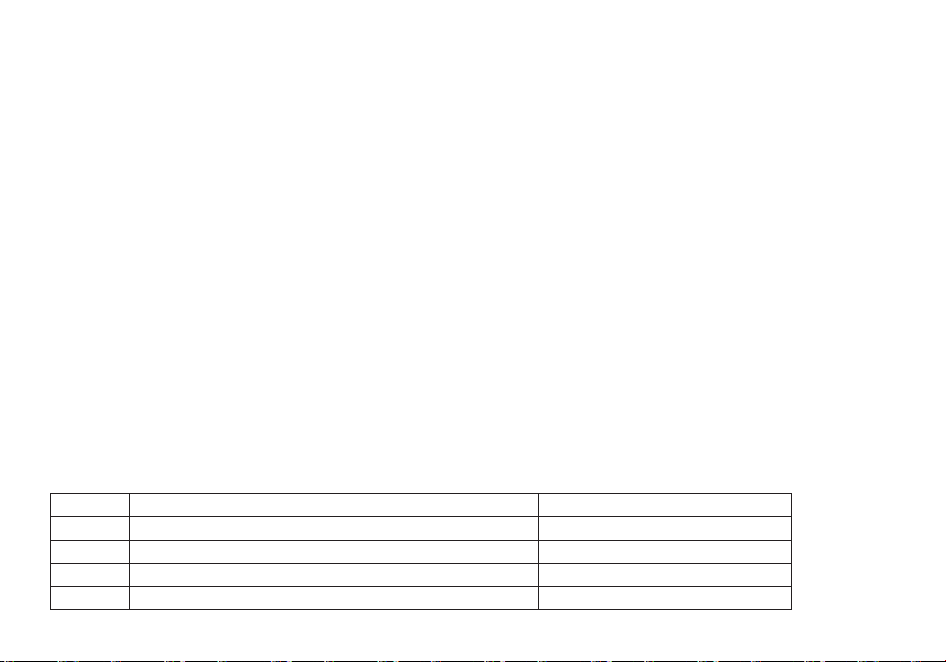
61
9.- GRUNDEINSTELLUNGEN
9.1.- AN / AUS LAUTSTÄRKEREGELUNG:
- Stellen Sie sicher, dass die geladene Ba�erie ordnungsgemäß eingesetzt ist. Drehen Sie den Knopf im Uhrzeigersinn, um das Gerät
anzuschalten. Drehen Sie den Knopf entgegen den Uhrzeigersinn, bis Sie ein "Klick" hören, um das Gerät auszuschalten. Drehen Sie den Knopf
langsam in eine Richtung, um die Lautstärke zu erhöhen oder zu verringern.
9.2.- EINE FREQUENZ ODER EINEN KANAL WÄHLEN:
-Drücken Sie die Tasten [▲] oder [▼], um die Frequenz und den Kanal zu wählen. Dies wird im Display angezeigt.
- Drücken und halten Sie die [▲] oder [▼] Taste, um die Frequenz schnell zu wählen.
ACHTUNG: - Sie können keinen Kanal wählen, der nicht vorher gespeichert wurde.
VFO/MR-UMSCHALTUNG
Um Ihr Radio in den Frequenzmodus (VFO) zu schalten; Sie schalten das Radio aus und halten dann die [MENU]-Taste gedrückt, während Sie es
einschalten
Um Frequenzen im Kanalspeicher zu speichern, müssen Sie sich im Frequenzmodus (VFO) befinden.
10: ERWEITERTE EINSTELLUNGEN
Sie können das Gerät im Set-Up Menü an ihre eigenen Bedürfnisse anpassen.
10.1.- MENÜ EINSTELLUNG - BESCHREIBUNG:
Menü
Funktion/Beschreibung
Verfügbare Einstellungen
0
SQL (Squelch level)
0-9
1
STEP (Frequenz Schritte)
2.5/5/6.25/10/12.5/25kHz
2
TXP (Übertragungsenergie)
HIGH/LOW
3
SAVE (Batterie sparen,1:1/1:2/1:3/1:4)
AUS/1/2/3/4

62
4
VOX (sprachgesteuerte Übertragung)
AUS/0-10
5
W/N (Weitband / Nahband)
WEIT / NAH
6
ABR (Displaybeleuchtung)
AUS/1/2/3/4/5sek
7
TDR(Dual Überwachung / dual Empfang)
AUS/AN
8
BEEP (Tastenton beep)
AUS/AN
9
TOT (Übertragungstimer)
15/30/45/60.../585/600 Sekunden
10
R-DCS (R-DCS Code)
AUS/D023N...D754I
11
R-CTS (dauerhaft R-CTS Code Empfang)
67.0Hz...254.1Hz
12
T-DCS (T- DCS Code)
AUS/D023N...D754I
13
T-CTS (dauerhaft T-CTS Empfang)
67.0Hz...254.1Hz
14
VOICE (Sprachmeldung/Eingabe)
AUS/AN
15
ANI (Automatische Identifikation, nur per PC)
16
DTMFST (Der DTMF Ton des Übertragungscodes)
AUS/DT-ST/ANI-ST/DT+ANI
17
S-CODE (Signalcode, nur per PC)
1,...,15 Gruppen
18
SC-REV (Scanmethode)
TO/CO/SE
19
PTT-ID (Drücken oder loslassen = Code senden)
AUS/BOT/EOT/BEIDES
20
PTT-LT (Verzögern der Code-Sendung)
0,...,30ms
21
MDF-A (im Kanalmodus, A zeigt den Kanal an. Achtung:
Kanalname nur per PC einsetzbar)
FREQ/CH/NAME
22
MDF-B (im Kanalmodus, B zeigt den Kanal an, Achtung:
Kanalname nur per PC einsetzbar)
FREQ/CH/NAME
23
BCL (Kanal besetzt Sperre)
AUS/AN
24
AUTOLK (Tastensperre automatisch)
AUS/AN
25
SFT-D (Richtung der Frequenzverschiebung)
AUS/+/-
26
OFFSET (Frequenzverschiebung)
00.000...69.990

63
27
MEMCH (Kanal speichern)
000, ...127
28
DELCH (Kanal im Speicher löschen)
000, ...127
29
WT-LED (Standby Displaybeleuchtung)
AUS/BLAU/ORANGE/LILA
30
RX-LED (Empfang Displaybeleuchtung)
AUS/BLAU/ORANGE/LILA
31
TX-LED (Senden Displaybeleuchtung)
AUS/BLAU/ORANGE/LILA
32
AL-MOD (Alarmmodus)
SITE/TONE/CODE
33
BAND (Band wählen)
VHF/UHF
34
TX-AB (Sendemodus in dual watch / Empfangen)
AUS/AN
35
STE (Abschlusston beim Senden)
AUS/AN
36
RP_STE (Abschlusston deaktivieren bei Kommunikation via
Verstärker)
AUS/1,2,3...10
37
RPT_RL (Verzögerung Abschlusston bei Verstärker)
AUS/1,2,3...10
38
PONMGS (Bootdisplay)
FULL/MGS
39
ROGER (Ton bei Übertragungsende)
AN/AUS
40
RESET (Werkseinstellung)
VFO/ALL
41
R-TON (Repeater-Ton)
2100/1750/1450/1000
10.2.- KURZE MENÜFÜHRUNG:
1.-Drücken Sie MENU, dann drücken Sie [▲] oder [▼] für das gewünschte Menü.
2.-Drücken Sie nochmals MENU für die Parameter Einstellungen.
3.-Drücken Sie [▲] oder [▼] , um die Parameter einzustellen.
4.-Drücken Sie MENU, um zu bestätigen und speichern. Drücken Sie [EXIT], um abzubrechen oder die Eingabe zu löschen.

64
ACHTUNG:
1.Im Kanalmodus sind die folgenden Einstellungen nicht verfügbar: CTCSS, DCS, W/N, PTT-ID, BCL, SCAN ADD TO,
S-CODE, CHANNEL NAME. Nur die H/L Übertragung ist wählbar.
2.OFFSET Frequenz (TX/RX) kann in jedem Kanal gespeichert werden. Im Menü 27 einstellbar. Erste Bestätigung für RX,
Zweite für TX.
10.3.-"SQL" (Geräuschunterdrückung):
- Dies stellt den Lautsprecher stumm, wenn nichts empfangen wird. Mit der richtigen Einstellung hören Sie keine Nebengeräusche,
sondern nur den Empfang. Die Batterie
entlädt langsamer. Level 5 wird empfohlen.
10.4.- FUNKTION "VOX" (SPRACHGESTEUERTE ÜBERMITTLUNG)
- Bei dieser Funktion handelt es sich nicht um PTT. Die Übertragung wird automatisch aktiviert, wenn das Gerät eine Stimme erkennt.
Wenn Sie zu Ende gesprochen haben, wird automatisch übertragen und es wird automatisch empfangen. Stellen Sie sicher, dass
Sie das VOX-Level sensibel genug einstellen, um eine ordentliche Übertragung zu erhalten.
10.5.- NAH- ODER WEITBAND "W/N":
In Gegenden, wo die RF Kanäle überfüllt sind, müssen Sie das Nahband wählen, um Interferenzen in oder von angrenzenden
Frequenzen zu vermeiden.
10.6.- TDR DUAL WATCH/DUAL EMPFANG
In dieser Einstellung können Sie zwischen den Frequenzen A und B wechseln. Das Gerät überprüft regelmäßig, auf welchem Kanal
gesendet wird. Wenn das Gerät auf einer Frequenz empfängt, verbleibt es solange in ihr, bis das Signal endet.
10.7.- TOT (ÜBERTRAGUNGS - TIMER):
Bei dieser Funktion wird die Übertragungszeit beim Drücken der PTT Taste festgesetzt. Diese Funktion ist sinnvoll, um die
Transistoren des Gerätes vor Überhitzung zu schützen. Nach der vorgegebenen Zeit wird die Übertragung automatisch beendet.
10.8.-CTCSS/DCS:
Wenn Sie nur an einen bestimmten Personenkreis, an eine bestimmte Frequenz oder einen bestimmten Kanal senden wollen,
benötigen Sie diese Funktion.

65
Die Geräuschunterdrückung "squelch" startet nur, wenn die Frequenz mit den bestimmten "CTCSS" oder "DCS" Codes oder den im
Gerät programmierten Codes übereinstimmt. Wenn die empfangene Frequenz hiervon abweicht, wird sich die
Geräuschunterdrückung nicht aktivieren. Sie werden dann das empfangene Signal ohne dies hören.
Achtung:
- Die Benutzung von "CTCSS" oder "DCS" in einem Gespräch garantiert keine verschlüsselte Kommunikation.
10.9.- ANI (AUTOMATISCHE NUMMERIDENTIFIKATION)
-ANI (Automatische Nummeridentifikation) - auch bekannt als PTT ID, weil eine ID bei der PTT Funktion mit übermittelt wird, wenn
der PTT Knopf gedrückt oder losgelassen wird. Diese ID zeigt dem Verteiler, welches Gerät geloggt wird. Dies kann nur am PC, per
Software eingestellt werden.
10.10.- DTMFST (DTMF TON DES ÜBERTRAGUNGSCODES):
Sie sollten zuerst die PTT-ID auf BOT/EOT/BOTH stellen.
• "OFF" Im Übertragungsmodus können Sie den DTMF Ton nicht hören, wenn Sie die Taste zur Übertragung drücken oder bei
auto
matischer Übertragung.
• "DT-ST" Im Übertragungsmodus können Sie den Ton hören, wenn Sie die Übertragungstaste drücken.
• "ANI-ST" Im Übertragungsmodus können Sie den Ton hören, bei automatischer Übermittlung.
• "DT-ANI" Im Übertragungsmodus können Sie den Ton sowohl beim Drücken der Übermittlungstaste, als auch bei automatischer
Übermittlung hören.
10.11.- SC-REV (SCANMETHODE)
Diese Funktion erlaubt es Ihnen, gespeicherte Kanäle, das ganze Band oder Teile der Bandbreite zu scannen. Wenn das Gerät eine
Kommunika
tion erkennt, stoppt der Suchlauf automatisch.
Achtung:
- "TO" (Time Betrieb):
Der Suchlauf wird stoppen, wenn ein aktives Signal erkannt wird. Der Scan stopt bei jedem Kanal oder jeder aktiven Fequenz für
eine kurze Zeit. Nach dieser Zeit wird der Suchlauf fortgesetzt.
- "CO" (Carrier Betrieb)
Der Suchlauf hält bei jedem aktiven Signal an und verbleibt solange in dieser Frequenz, bis das Signal verschwindet.
- "SE"(Search - Betrieb)

66
Der Suchlauf hält bei einer aktiven Frequenz an und verbleibt in ihr.
10.12.- PTT-ID:
- Die Funktion zeigt an, wer Sie anfunkt.
-"OFF"- Code wird mit Drücken des PTT Knopfes nicht übertragen.
-"BOT"-T Code wird mit Drücken des PTT Knopfes gesendet (Code kann nur am PC gesetzt werden)
-"EOT"-T Code wird beim Loslassen der PTT Taste gesendet.
-"BOTH"-T Code wird beim Drücken und Loslassen der PTT Taste gesendet.
10.13.- BCL (KANAL BESETZT):
Die BCL Funktion verhindert, dass das Gerät von einem Signal erfasst wird, welches stark genug ist, um die Geräuschunterdrückung
zu durchbrechen. Auf Frequenzen, die verschiedene CTCSS oder DCS Codes benutzen, sollte diese Funktion aktiviert sein. BCL
verhindert, dass die dortige Kommunikation versehentlich unterbrochen wird. Ihr Gerät könnte nämlich vom eigenen Ton-Detektor
stumm geschalten sein.
10.14.- SFT-D (RICHTUNG DER FREQUENZVERSCHIEBUNG)
Die „SFT" Funktion ist die Differenz zwischen der Sende- und Empfangsfrequenz und zu Verstärkern bzw. Funkmasten. Stellen Sie
die OFFSET Funktion auf den Funkmast ein, über den Sie kommunizieren wollen.
10.15.- OFFSET(FREQUENZVERSCHIEBUNG)
Bei der Kommunikation über einen Verstärker, sollte die Frequenzverschiebung am Gerät mit der des Funkmastes abgeglichen
werden, wenn die Sendefrequenz höher oder niedriger ist, als die Empfangsfrequenz.
Beispiel:
Wenn eine Kommunikation über einen Verstärker stattfinden soll, dessen Eingangsfrequenz bei 145000 MHz liegt, und bei 145600
MHz Ausgangsfrequenz - wählen Sie „OFFSET", stellen 0600 ein
und bei der Richtung auf [-]. Das Gerät wird dann bei 145600 MHz
empfangen und beim Drücken der PTT Taste wird die Frequenz automatisch zu 145000 MHz wechseln.
10.16.- STE (END-TON ABSCHALTUNG)
Mit dieser Funktion schalten Sie den End-Ton zu oder ab. Nicht zu verwenden bei einer Kommunikation über einen Verstärker. Dort
muss der Ton deaktiviert werden.

67
11.-DCS TABELLE:
No
Code
No
Code
No
Code
No
Code
No
Code
1
D023N
22
D131N
43
D251N
64
D371N
85
D532N
2
D025N
23
D132N
44
D252N
65
D411N
86
D546N
3
D026N
24
D134N
45
D255N
66
D412N
87
D565N
4
D031N
25
D143N
46
D261N
67
D413N
88
D606N
5
D032N
26
D145N
47
D263N
68
D423N
89
D612N
6
D036N
27
D152N
48
D265N
69
D431N
90
D624N
7
D043N
28
D155N
49
D266N
70
D432N
91
D627N
8
D047N
29
D156N
50
D271N
71
D445N
92
D631N
9
D051N
30
D162N
51
D274N
72
D446N
93
D632N
10
D053N
31
D165N
52
D306N
73
D452N
94
D645N
11
D054N
32
D172N
53
D311N
74
D454N
95
D654N
12
D065N
33
D174N
54
D315N
75
D455N
96
D662N
13
D071N
34
D205N
55
D325N
76
D462N
97
D664N
14
D072N
35
D212N
56
D331N
77
D464N
98
D703N
15
D073N
36
D223N
57
D332N
78
D465N
99
D712N
16
D074N
37
D225N
58
D343N
79
D466N
100
D723N
17
D114N
38
D226N
59
D346N
80
D503N
101
D731N
18
D115N
39
D243N
60
D351N
81
D506N
102
D732N
19
D116N
40
D244N
61
D356N
82
D516N
103
D734N
20
D122N
41
D245N
62
D364N
83
D523N
104
D743N
21
D125N
42
D246N
63
D365N
84
D526N
105
D754N
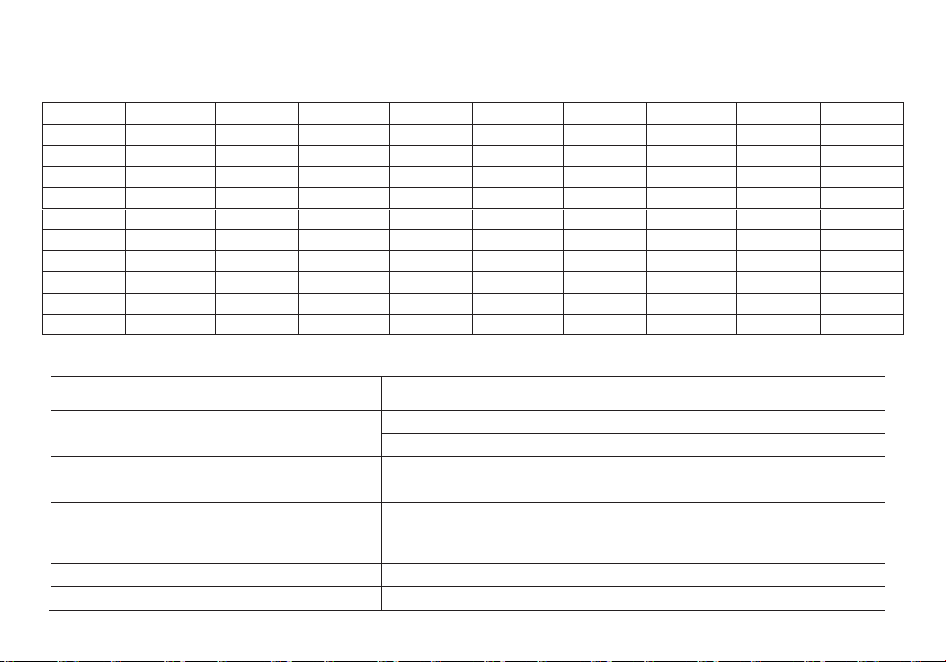
68
12.-CTCSS TABELLE:
No
Tone(Hz)
No
Tone(Hz)
No
Tone(Hz)
No
Tone(Hz)
No
Tone(Hz)
1
67.0
11
94.8
21
131.8
31
171.3
41
203.5
2
69.3
12
97.4
22
136.5
32
173.8
42
206.5
3
71.9
13
100.0
23
141.3
33
177.3
43
210.7
4
74.4
14
103.5
24
146.2
34
179.9
44
218.1
5
77.0
15
107.2
25
151.4
35
183.5
45
225.7
6
79.7
16
110.9
26
156.7
36
186.2
46
229.1
7
82.5
17
114.8
27
159.8
37
189.9
47
233.6
8
85.4
18
118.8
28
162.2
38
192.8
48
241.8
9
88.5
19
123.0
29
165.5
39
196.6
49
250.3
10
91.5
20
127.3
3
167.9
40
199.5
50
254.1
13.-PROBLEMLÖSUNG:
PROBLEM LÖSUNGSVORSCHLAG
Das Funkgerät lässt sich nicht
einschalten
Das Batteriepack ist erschöpft. Laden Sie sie auf.
Batteriepack falsch eingesetzt. Richtig einsetzen.
Kurze Nutzungsdauer des Akkupacks
Das Batteriepack wurde nicht vollständig aufgeladen, oder ist
verbraucht und muss ersetzt werden.
Die Empfangs-LED leuchtet auf, aber es
ist kein Ton hörbar
Vergewissern Sie sich, dass die Lautstärke nicht zu niedrig ist.
Vergewissern Sie sich, dass Sie den gleichen CTCSS- bzw.
DCS-Code wie Ihre Gruppe eingestellt haben.
Die Tasten funktionieren nicht
Die Tastensperre ist aktiviert.
Empfang von Signalen fremder Gruppen
Wählen Sie andere CTCSS/DCS für Ihre Gruppe.

69
14.-TECHNISCHE ANGABEN:
Frequenzbereiche
144-146MHz & 430-440MHz (Rx / Tx)
Speicherbare Kanäle
128
Stromversorgung
Li-Ionen Akkupack 7,4 V /2000 mAh (BL-8)
Betriebstemperatur
-10°C bis + 45°C
Betriebsarten
Monoband/Dualband
Sendeleistung
VHF: 5W / UHF:4W
Modulation
F3E(FM)
Max. Frequenzhub
≤ ±5KHz
Störstrahlung
< -60dB
Frequenzstabilität
±2.5 ppm
Empfangsempfindlichkeit
< 0.2uV
Audio-Ausgangsleistung
≥ 500mW
Abmessungen
62x131x34mm (BxHxT)
Gewicht
230g
Änderungen der technischen Daten vorbehalten.
WARNUNG. Das Netzteil muss von der Steckdose abgezogen werden, um das Ladegerät vollständig vom Stromnetz zu
trennen. Das Ladegerät soll sich in der Nähe des Gerätes befinden und muss jederzeit frei zugänglich sein.

70
GT-82
Manual de usuario de radio bidireccional en español
(Two-way Radio User Manual in Spanish)
ÍNDICE DE CONTENIDO
1. INSTALACION DE ACCESORIOS 71
2. CARGA DE LA BATERÍA 72
3. INFORMACION DE LAS BATERIAS 73
4. CONSEJOS PARA LAS BATERIAS 73
5. PARTES, CONTROLES Y TECLAS 75
6. OPERACIONES BASICAS 77
7. OPERACIONES AVANZADAS 78

71
INSTALACION DE ACCESORIOS
INSTALACION DE LA ANTENA
Instalar la antena como indica la imagen y girarla en el sentido de las agujas del reloj hasta que no se pueda roscar
más.
Nota:
Cuando instale la antena, no gire ésta por la parte superior, hágalo por la base.
Si utiliza una antena externa, asegúrese de que el “SWR” es 1.5/ 1 o menos, para evitar daños en los
transistores finales del equipo.
No sostenga la antena o envuelva la punta con la mano para evitar un mal funcionamiento del transceptor.
Nunca transmi
ta sin antena.
INSTALACION DEL CLIP DE CINTURON
Si lo necesita, instale el clip de cinturón en la parte trasera de la carcasa de la batería como se muestra
en la imagen.
Nota:
No use ningún tipo de pegamento para fijar los tornillos del clip de cinturón. El disolvente del pegamento puede dañar la
carcasa de la batería.
INSTALACION DE LOS MICROAURICULARES EXTERNOS
Enchufar el “jack” del microauricular externo de altavoz y micro “sp & Mic” en el aparato como indica la figura.
72
INSTALACION DE LA BATERÍA
Al colocar la batería, asegúrese de que la batería esté paralela y en contacto con el chasis de aluminio.
El fondo de la batería debe estar de 1 a 2 centímetros por debajo de la parte inferior del cuerpo de la
radio.
Alinee la batería con los rieles de guía sobre el chasis de aluminio y deslícela hacia arriba hasta que se
oiga un “click”.
Cuando la batería se alinee con el aparato, se bloquea automáticamente.
DESINSTALACION DE LA BATERÍA
Apagar la radio antes de retirar la batería.
Presione el pestillo de la batería, en la parte superior del aparato, en la dirección indicada por la flecha.
Deslice hacia abajo la batería hasta que sobresalga aproximadamente 1 a 2 centímetros y luego
retirarla cuerpo de la radio.
Usar exclusivamente la batería especificada por el fabricante. La luz led indicará el progreso de carga de la batería.
CARGA DE LA BATERÍA
Usar exclusivamente la batería especificada por el fabricante. La luz led indicará el progreso de carga de la batería.
ESTADO DE LA CARGA
Standby (sin carga)
Cargando
Cargada totalmente
Error
INDICACION DEL LED
El led rojo parpadea mientras que el verde se enciende
El led rojo se ilumina sólidamente
El led verde se ilumina sólidamente
El led verde parpadea mientras que el rojo se enciende
Siga estos pasos:
1. Enchufe el cable de alimentación en el adaptador.
2. Enchufe el conector de Corriente Alterna “AC” del adaptador en la toma de corriente
“AC”.
3. Enchufe el conector de Corriente Continua “DC” del adaptador a la toma de corriente en la parte posterior del cargador.
4. Coloque la radio con la batería conectada, o la batería sola, en el cargador.

73
5. Asegúrese de que la batería hace buen contacto con los terminales de carga.
El proceso de carga se inicia cuando el led rojo se enciende.
6. El led verde enciende aproximadamente después de 4 horas indicando que la batería está completamente cargada. Entonces
retire la radio con la batería conectada o la batería sola de el cargador.
INFORMACION DE LAS BATERIAS
USO INICIAL
Las baterías nuevas vienen descargadas completamente de fábrica. Cargar una batería nueva durante 5 horas antes del uso inicial.
La capacidad máxima de la batería y el rendimiento se consigue después de tres ciclos completos de carga/ descarga. Si usted nota
que la batería está baja, por favor recargue la batería.
ADVERTENCIA:
Para reducir el riesgo de lesiones, cargue sólo la batería especificada por el fabricante. Otras baterías pueden explotar, causando
lesiones corporales o daños materiales. Para evitar el riesgo de lesiones personales, no tire las baterías al fuego. D
eseche las
baterías según regulación local (p. e. recíclelas).
No las deseche como residuos domésticos. Nunca intente desarmar una batería.
CONSEJOS PARA LAS BATERIAS
Siga estos pasos:
1. Cuando cargue la batería, manténgala a una temperatura entre 5 ºC – 40 ºC. Las temperaturas fuera de estos límites, pueden
causar fugas o daños.
2. Cuando se carga una batería instalada en la radio, apague la radio para asegurar una carga completa.
3. No corte el suministro eléctrico o ex
traiga la batería cuando se está cargando.
4. Nunca cargue una batería cuando esté mojada. Por favor, séquela con un paño suave antes de cargarla.
5. La batería se gastará eventualmente. Cuando el tiempo de funcionamiento (tiempo de transmisión y espera) es mucho más corto
que lo normal, es hora de comprar una batería nueva.
PROLONGAR LA VIDA DE LAS BATERIAS
1. El rendimiento de la batería se reducirá enormemente a una temperatura por debajo de 0 ºC.
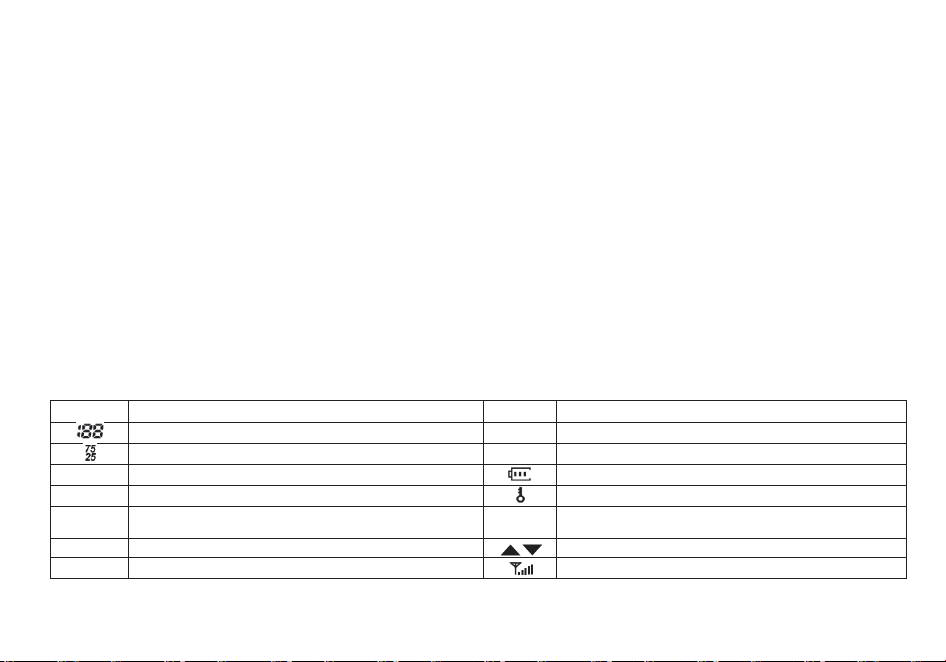
74
En condiciones de frío extremo es necesaria una batería de repuesto. La batería fría, incapaz de trabajar en esta situación, puede
trabajar en condiciones de temperatura ambiente, mantenerla así para su uso posterior.
2. El polvo en los contactos de la batería puede provocar que la batería no pueda trabajar o cargar.
Utilice un paño limpio y seco para limpiar antes de conectar la batería a la radio.
ALMACENAMIENTO DE LAS BATERIAS
1. Para evitar daños a la batería debido a sobre-descarga, cargue la batería completamente antes de guardarla durante mucho
tiempo.
2. Recargar una batería después de un almacenamiento de varios meses (baterías de iones de litio:
6 meses), para evitar la reducción de la capacidad de la batería debido a la sobre-descarga.
3. Almacene la batería en un lugar fresco, seco y por debajo de la temperatura ambiente, para reducir la auto-descarga.
PANTALLA LCD:
Los iconos de la pantalla aparecen cuando se seleccionan ciertas operaciones o ciertas características.
Symbol
Beschreibung
Symbol
Beschreibung
Canal de operación
R
Fonción reserva ac�vada
Frecuencia de operación
N
Selector del ancho de banda
CT
Ac�vación de código CTCSS
Indicador del nivel de batería
DCS
Ac�vación de código DCS
Función de bloqueo de teclado ac�vada
+-
Dirección de desplazamiento de frecuencia para acceder
a repe�dores
H/L
Transmición en baja potencia
S
Ac�vación de la función Espera Dual / Recepcion Dual
Frecuencia de Operacion
VOX
Función VOX encencida
Nivel de recepción de señal
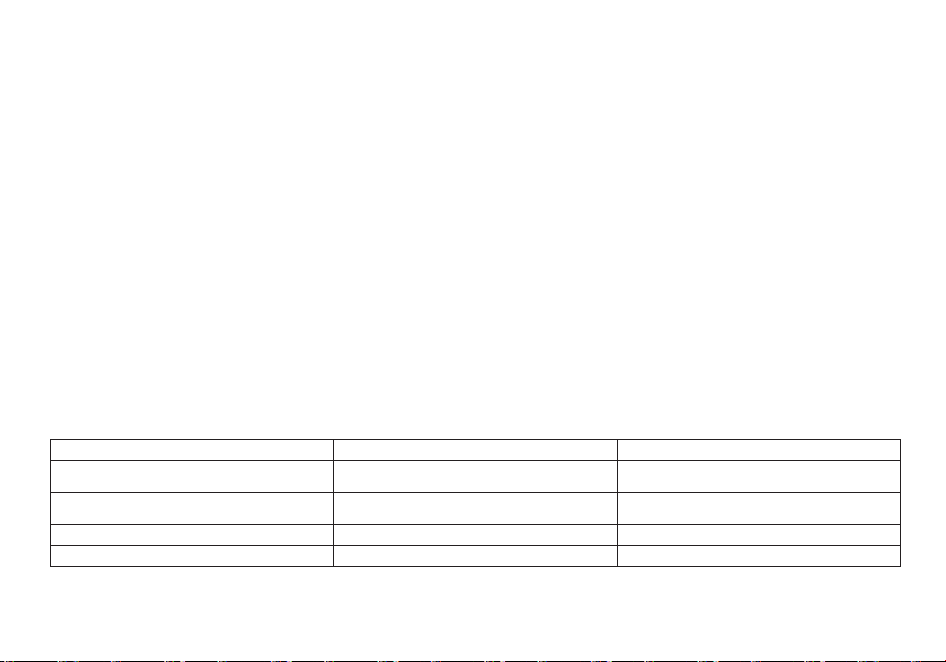
75
PARTES, CONTROLES Y TECLAS
1. antena
6. teclado
11. SP.&MIC (micrófono)
2. luz led flash
7. tecla lateral 2 (side key 2)/ monitor MONI
flashlight monitor
12. botón para reemplazo de la batería
3.interruptor(encendido/apagado/volumen)
8. tecla lateral 1 (side key 1)/ llamada F
radioalarma (alarm)
13. toma jack para accesorios
4. indicador LED
9. tecla para hablar PTT B (push to talk)
14. batería
5. pantalla LCD
10. tecla para hablar PTT A (push to talk)

76
DEFINICION DE LAS TECLAS Y COMANDOS
• [PTT] (PUSH-TO-TALK) {pulsar para hablar}: Presione y mantenga pulsado el botón [PTT] para transmitir; suéltelo para recibir.
• [F/Alarm] {llamada}: Pulse el botón [F/Alarm], para activar la Radio FM; Púlselo de nuevo para desactivar la Radio FM.
Pulse y mantenga pulsado el [F/Alarm] para activar la función de alarma. Presione y sostenga nuevamente pulsado el botón para
desactivar la función de alarma
• [MONI] {Monitor}: Presione la tecla [MONI]
para encender la luz de linterna. Púlselo otra vez para apagarla. Pulse y mantenga
pulsado el botón [MONI], para supervisar la señal.
• [* SCAN] {ESCANEO}: Pulse la tecla [* SCAN] para activar la función inversa, esto separará la frecuencia de emisión de la de
transmisión. Presione la tecla [* SCAN] durante 2 segundos para iniciar el escaneo de frecuencia / canal.
Mientras la radio FM está activada presione la tecla [* SCAN] para buscar estaciones de radio.
Mientras esté activada
la recepción de RX CTCSS/DCS, pulse la tecla [* SCAN] para analizar la recepción de RX CTCSS/DCS.
• [
# ]: En el modo canal, presione [# ] para cambiar la potencia de emisión de High (alta) a Low (baja).
Presionar la tecla [
# ] durante 2 segundos para bloquear/ desbloquear las teclas del equipo.
TECLADO DE FUNCION:
• [MENU]: Se utiliza para activar el MENÚ, seleccionar cada opción del MENÚ y confirmar los parámetros.
Cuando la radio está apagada, puede cambiar entre el modo de frecuencia (VFO) y el modo de memoria (MR) presionando y
manteniendo presionada la tecla [MENU] cuando está encendida.
• [▲] o [▼]: Presionar y mantener presionada las teclas [▲] o [▼] para subir la frecuencia o bajarla rápido.
Presionar las tecl
as [▲] o [▼] y el escáner cambiará de sentido.
• [EXIT / AB]:
Se utiliza para salir del menú y cancelar las opciones del menú.
El botón [EXIT / AB] también puede cambiar entre las visualizaciones A (arriba) y B (abajo).
La frecuencia o canal en la pantalla seleccionada se convierte en la frecuencia o canal de escucha y transmisión activa.
Al escuchar radio FM, la tecla [EXIT / AB] cambia entre la banda de frecuencia de 65-75MHz y 76-108MHz.

77
TECLADO NUMERICO:
Uselo para introducir la información para programar la lista de radio y los CTCSS no
estándares.
En el modo transmisión, presione el teclado numérico para enviar las señales de
código (el código debe ser introducido mediante el software del PC).
TOMAS DE AURICULAR:
Las tomas de auricular se usan para conectar accesorios de audio u otros accesorios
como el cable de programación por USB.
TONO 1750 Hz PARA ACCEDER A LOS REPETIDORES:
Para enviar una ráfaga de tonos (seleccionable por el MENÚ 41); presione la tecla [F / SOS] mientras mantiene presionado el PTT.
Una frecuencia de ráfaga de tono común utilizada por muchos sistemas de radioaficionados en Europa es 1750 Hz.
puede seleccionar entre 2100, 1750, 1450 o 1000 Hz Tone Burst Options. Estas opciones se encuentran en el Menú 41 (R-TONE).
VFO / MR-Cómo cambiar
Para cambiar su radio al modo de Frecuencia (VFO); apaga la radio, luego presione y mantenga presionado el botón [MENU]
mientras enciende
Para guardar fr
ecuencias en la memoria del canal, debe estar en modo Frecuencia (VFO).
OPERACIONES BASICAS
ENCENDIDO – APAGADO (ON-OFF) / CONTROL DE VOLUMEN:
Asegúrese de que la antena y la batería están instalados correctamente y la batería está cargada.
Gire la perilla en sentido horario para encender la radio y gire la perilla completamente a la izquierda hasta oír un 'clic' para apagar la
radio. Gire la perilla en sentido horario para aumentar el volumen, o en sentido antihorario para
disminuir el volumen.
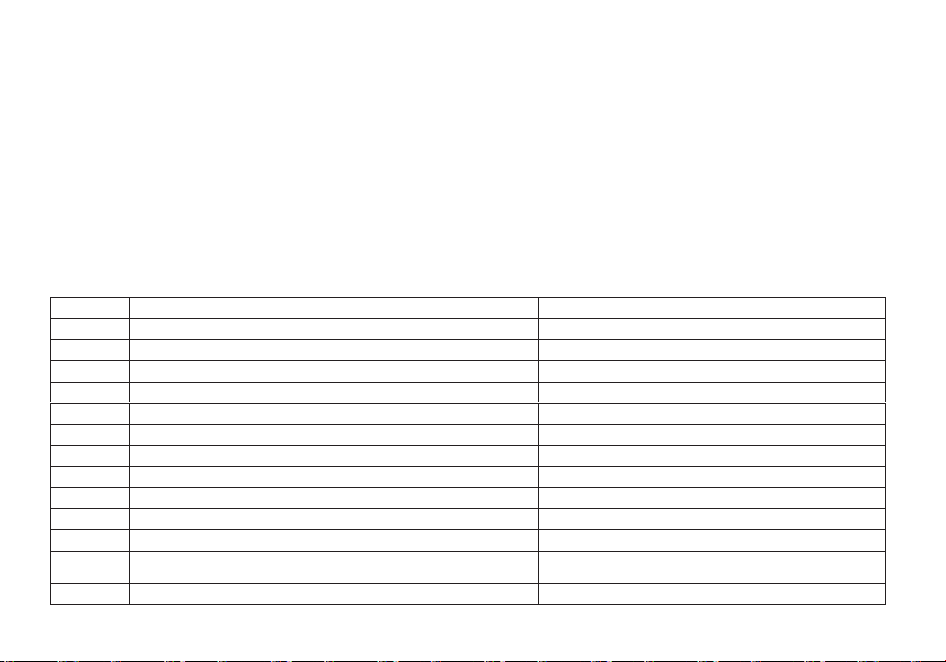
78
SELECCIONAR UNA FRECUENCIA O CANAL:
Pulse la tecla [▲] o [▼] para seleccionar la frecuencia/ canal deseado. La pantalla muestra la frecuencia / canal seleccionado.
Pulse y mantenga pulsada la tecla [▲] o [▼] para llevar la frecuencia hacia arriba o hacia abajo rápidamente.
Nota: No es posible seleccionar un canal si no ha sido previamente grabado.
OPERACIONES AVANZADAS
Se puede programar el funcionamiento del transceptor en el menú de configuración para adaptarse a las necesidades o
preferencias.
DESCRIPCION DEL MENU:
Menú
Función / Descripción
Configuraciones posibles
0
SQL (Nivel de silenciador de ruido de fondo)
0-9
1
STEP (Saltos de frecuencia)
2.5/5/6.25/10/12.5/25kHz
2
TXP (Potencia de transmisión)
HIGH/ LOW (ALTA/ BAJA)
3
SAVE (Ahorro de batería)
OFF/ 1/ 2/ 3/ 4
4
VOX (Transmisión operada por voz)
OFF/0 - 10
5
W/ N (Banda ancha/ banda estrecha)
WIDE/ NARR
6
ABR (Iluminación de pantalla)
OFF/ 1 /2 /3/ 4/ 5 segundos
7
TDR (Escucha dual/ recepción dual)
OFF/ ON
8
BEEP (Sonido del teclado)
OFF/ ON
9
TOT (Control tiempo de transmisión)
15/ 30/ 45/ 60… /585/ 600 segundos
10
R - DCS (Silenciador de recepción digital codificada DCS)
OFF/ D023N… D754I
11
R - CTS (Silenciador de recepción de tono continuo
codificado CTCSS)
67.0 Hz… 254.1 Hz
12
T - DCS (Silenciador de transmisión digital codificada DCS)
OFF/ D023N… D754I

79
13
T - CTS (Silenciador de transmisión de tono continuo
codificado CTCSS)
67.0 Hz… 254.1 Hz
14
VOICE (Mensaje de voz)
OFF/ ON
15
ANI (Identificación automática del número de la radio,
sólo ajustable por software del PC)
16
DTMFST (Tono de transmisión codificada)
OFF/ DT – ST/ ANI – ST/ DT + ANI
17
S - CODE (Codificación de señal, sólo ajustable por
software del PC)
1, …, 15 grupos
18
SC - REV (Tipo de exploración)
TO/ CO /SE
19
PTT - ID (Pulsar o soltar el botón PTT para transmitir la
codificación de señal)
OFF/ BOT/ EOT /BOTH
20
PTT - LT (Retraso en el envío de la codificación de señal)
0, …, 30 milisegundos
21
MDF - A (En modo canal, lo que mostrará la pantalla en
A, sólo ajustable por software del PC)
FREQ/ CH/ NAME
22
MDF - B (En modo canal, lo que mostrará la pantalla en
B, sólo ajustable por software del PC)
FREQ/ CH/ NAME
23
BCL (Bloqueo de canal ocupado)
OFF/ ON
24
AUTOLK (Bloqueo automático de teclado)
OFF/ ON
25
SFT - D (Dirección de desplazamiento de la frecuencia)
OFF/ +/ -
26
OFFSET (desplazamiento de la frecuencia de acceso del
repetidor)
00.000… 69.990
27
MEMCH (Introducir los canales en la memoria)
000, …, 127
28
DELCH (Borrar los canales en la memoria)
000, …, 127
29
WT - LED (Color de iluminación de la pantalla en espera)
OFF/ BLUE/ ORANGE/ PURPLE (APAGADO/
AZUL/ NARANJA/ ROJO)
30
RX - LED (Color de iluminación de la pantalla en recepción)
OFF/ BLUE/ ORANGE/ PURPLE (APAGADO/
AZUL/ NARANJA/ ROJO)
31
TX – LED (Color de iluminación de la pantalla en
transmisión)
OFF/ BLUE/ ORANGE/ PURPLE (APAGADO/
AZUL/ NARANJA/ ROJO)
32
AL – MOD (Tipo de alarma)
SITE/ TONE/ CODE
33
BAND (Selección de banda de operación)
VHF/ UHF
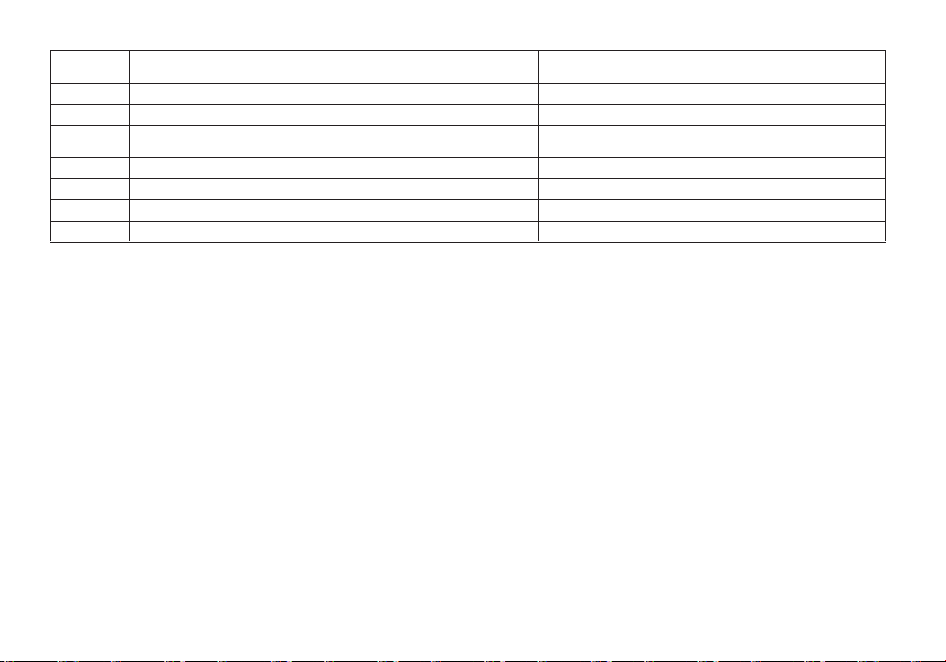
80
34
TDR – AB (Canal A o B que transmitirá mientras se estéen
escucha dual)
OFF/ A/ B
35
STE (Eliminación de tono de cola)
OFF/ ON
36
RP_STE (Eliminación de tono de cola cuando se trabaja
OFF/ 1,2, 3…, 10
37
RPT _ RL (Retraso en el envío del tono de cola
del repetidor)
OFF/ 1,2, 3…, 10
38
PONMGS (Pantalla de inicio)
FULL/ MGS
39
ROGER (Sonido de final de transmisión “Roger”)
ON/ OFF
40
RESET (Restaurar valores predeterminados)
VFO/ ALL
41
R-TONE (Tono repetidor)
2100/1750/1450/1000
ATAJOS PARA OPERAR EL MENU:
1.- Pulse la tecla [MENU], después pulse la tecla [▲] o [▼] para seleccionar el menú deseado.
2.- Pulse la tecla [MENU] de nuevo para llegar a la introducción de parámetros.
3.- Pulse la tecla [▲] o [▼] para seleccionar el parámetro deseado.
4.- Pulse la tecla [MENU] para confirmar y grabar, después pulse la tecla [EXIT/AB] para salir o borrar.
Nota:
Las siguientes opciones del menú son inválidas en el modo canal: CTCSS, DCS, W/ N, PTT - ID, BCL,
SCAN AD TO, S - CODE, CHANNEL NAME. Solamente se podrá cambiar la potencia de emisión H/ L.
SQL (NIVEL DE SILENCIADOR DE RUIDO DE FONDO):
El silenciador de ruido de fondo “squelch” silencia el altavoz de la radio cuando no se recibe ninguna señal.

81
Con el nivel de “squelch” correctamente ajustado, oirá sólo cuando se estén recibiendo señales y además reduce significativamente
el consumo de la batería. Se recomienda situarlo en el nivel 5.
FUNCION “VOX” (TRANSMISIÓN OPERADA POR VOZ):
Con esta función no es necesario pulsar la tecla [PTT] para transmitir. La transmisión se realiza automáticamente cuando el aparato
detecta la voz. Cuando se termina de hablar, la transmisión termina automáticamente y el transceptor vuelve a
el estado de
recepción. Asegúrese de adaptar el nivel de ganancia para permitir la activación con su voz.
SELECCIÓN DE BANDA ANCHA O ESTRECHA “W/N”:
Es posible transmitir en banda estrecha “N”, para evitar interferencias en canales adyacentes, en áreas donde la señal de recepción
esté muy saturada.
TDR (ESCUCHA DUAL/ RECEPCIÓN DUAL):
Esta característica permite operar entre la frecuencia A y la B paulatinamente. Periódicamente el equipo comprueba si hay señal en
la otra frecuencia
que le hemos definido. Si encuentra actividad en dicha frecuencia el equipo se para hasta que deje de escuchar la
señal.
TOT (CONTROL TIEMPO DE TRANSMISIÓN):
Con esta opción podemos controlar automáticamente el tiempo que podemos transmitir cada vez que preservar los transistores
finales de transmisión. El transceptor desconectará automáticamente la transmisión una vez finalizado el tiempo programado.
CTCSS/ DCS (SILENCIADOR DE RECEPCIÓN DE TONO CONTINUO CODIFICADO/ SILENCIADOR DE
RECEPCIÓN DIGITAL CODIFICADA):
En algunos casos se desea establecer comunicaciones en un grupo cerrado de usuarios exclusivamente y en una determinada
frecuencia o canal, para ello se utilizan los códigos “CTCSS” o "DCS". El "squelch" sólo se abre cuando se recibe una frecuencia con
códigos “CTCSS” o "DCS" la misma que se ha programado en el aparato emisor. Si los códigos de la señal recibida difieren de los
programados en el transceptor, el "squelch" no se abre y por
lo tanto no se oye la señal.

82
Nota:
El uso de los códigos “CTCSS” o "DCS" en las comunicaciones no garantizan completamente la confidencialidad de la
comunicación.
ANI (IDENTIFICACIÓN AUTOMÁTICA DEL NÚMERO DE LA RADIO):
“ANI” (Identificación automática del número de la radio) es también conocido como “PTT - ID” puesto que se transmite una
identificación “ID” cada vez que se presiona o se suelta el botón de transmisión [PTT].
Esta identificación “ID” comunica al receptor cuál equipo se está utilizando.
S
ólo puede ajustarse mediante el software del PC.
DTMFST (TONO DE TRANSMISIÓN CODIFICADA):
Para poder utilizar este código, antes hay que seleccionar el “PTT – ID” como “BOT/ EOT/ BOTH” (ver más adelante).
• “OFF”: Cuando se está transmitiendo no se oye el tono “DTMF”.
• “DT - ST”: Cuando se está transmitiendo se oye el tono “DTMF”.
• “ANI - ST”: Cuando se está transmitiendo se oye el tono “DTMF” cuando este se transmite automáticamente.
• “DT - ANI”: Cuando se está transmitiendo se oye el tono “DTMF” cuando este se transmite manual o automáticamente.
SC - REV (TIPO DE EXPLORACIÓN):
Este aparato permite escanear los canales memorizados, todas las bandas o parte de las bandas.
El escaneo se para automáticamente cuando el transceptor detecta una comunicación.
Nota:
• “TO” (Operación por tiempo): El escaneo se para cuando detecta una señal. Esta parada se hace por el tiempo previamente
determinado, después del cual el escaneo se reanuda automáticamente.
• “CO” (Operación por portador): El escaneo se para cuando detecta una señal y permanece en la frecuencia o el canal mientras
dure la señal.
• “SE” (Operación por búsqueda): El escaneo se para y permanece en la frecuencia cuando detecta una señal.

83
PTT - ID (PULSAR O SOLTAR EL BOTÓN PTT PARA TRANSMITIR LA CODIFICACIÓN DE SEÑAL):
Esta característica permite identificar la persona que nos llama.
• “OFF”: No se transmite el “ID” cuando se pulsa el botón [PTT].
• “BOT”: El “ID” se transmite cuando se pulsa el [PTT].
• “EOT”: El “ID” se transmite cuando se suelta el [PTT].
• “BOTH”: El “ID” se transmite cuando se pulsa o se suelta el [PTT].
El “ID” sólo puede ajustarse mediante el software del PC.
BCL (BLOQUEO DE CANAL OCUPADO):
La característica “BCLO” impide que el transmisor de la radio se active si hay una señal lo suficientemente fuerte como para superar
el “squelch”. Esto se puede activar en una frecuencia donde se están utilizando diferentes códigos “CTCSS” o “DCS”, “BCLO” le
impide interrumpir las comunicaciones accidentalmente (porque su radio podría estar silenciada por su propio decodificador de
tono).
SFT - D (DIRECCIÓN DE DESPLAZAMIENTO DE LA FRECUENCIA DE ACCESO AL REPETIDOR):
El “OFFSET” es la diferencia entre la frecuencia de recepción y la frecuencia de transmisión para acceder a los repetidores de radio
amateur. Establecer el “OFFSET” de acuerdo con el repetidor amateur al que se quiera conectar.
OFFSET (DESPLAZAMIENTO DE LA FRECUENCIA DE ACCESO AL REPETIDOR):
Cuando se establece comunicación vía repetidor, la dirección de desplazamiento de la frecuencia debe ser programada al contrario
que el desplazamiento de la frecuencia
del repetidor.
Ejemplo: Si queremos mantener comunicación vía un repetidor cuya frecuencia de entrada es de 145.000 MHz y de salida 145.600
MHz, tenemos que seleccionar el “OFFSET” en 0600 y la dirección de desplazamiento “SHIFT” en negativo (-), así el transceptor
recibirá en la frecuencia de salida del repetidor de 145.600 MHz y cuando se pulse [PTT] emitirá automáticamente en la frecuencia
de entrada del repetidor de 145.000 MHz.
STE (ELIMINACIÓN DE TONO DE COLA):

84
Esta opción se utiliza para eliminar el sonido de la portadora después de finalizar la transmisión. Esto solamente se puede hacer en
comunicaciones en directo, ya que en comunicaciones vía repetidor, esta opción debe de estar desactivada.
DCS TABELLE
No
Code
No
Code
No
Code
No
Code
No
Code
1
D023N
22
D131N
43
D251N
64
D371N
85
D532N
2
D025N
23
D132N
44
D252N
65
D411N
86
D546N
3
D026N
24
D134N
45
D255N
66
D412N
87
D565N
4
D031N
25
D143N
46
D261N
67
D413N
88
D606N
5
D032N
26
D145N
47
D263N
68
D423N
89
D612N
6
D036N
27
D152N
48
D265N
69
D431N
90
D624N
7
D043N
28
D155N
49
D266N
70
D432N
91
D627N
8
D047N
29
D156N
50
D271N
71
D445N
92
D631N
9
D051N
30
D162N
51
D274N
72
D446N
93
D632N
10
D053N
31
D165N
52
D306N
73
D452N
94
D645N
11
D054N
32
D172N
53
D311N
74
D454N
95
D654N
12
D065N
33
D174N
54
D315N
75
D455N
96
D662N
13
D071N
34
D205N
55
D325N
76
D462N
97
D664N
14
D072N
35
D212N
56
D331N
77
D464N
98
D703N
15
D073N
36
D223N
57
D332N
78
D465N
99
D712N
16
D074N
37
D225N
58
D343N
79
D466N
100
D723N
17
D114N
38
D226N
59
D346N
80
D503N
101
D731N
18
D115N
39
D243N
60
D351N
81
D506N
102
D732N
19
D116N
40
D244N
61
D356N
82
D516N
103
D734N
20
D122N
41
D245N
62
D364N
83
D523N
104
D743N
21
D125N
42
D246N
63
D365N
84
D526N
105
D754N
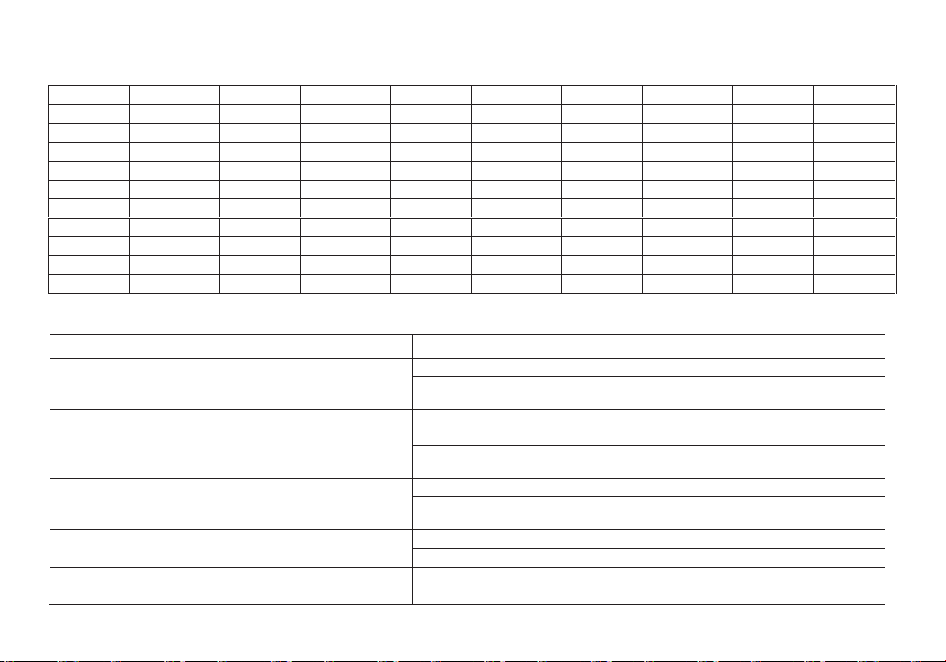
85
CTCSS TABELLE
No
Tone(Hz)
No
Tone(Hz)
No
Tone(Hz)
No
Tone(Hz)
No
Tone(Hz)
1
67.0
11
94.8
21
131.8
31
171.3
41
203.5
2
69.3
12
97.4
22
136.5
32
173.8
42
206.5
3
71.9
13
100.0
23
141.3
33
177.3
43
210.7
4
74.4
14
103.5
24
146.2
34
179.9
44
218.1
5
77.0
15
107.2
25
151.4
35
183.5
45
225.7
6
79.7
16
110.9
26
156.7
36
186.2
46
229.1
7
82.5
17
114.8
27
159.8
37
189.9
47
233.6
8
85.4
18
118.8
28
162.2
38
192.8
48
241.8
9
88.5
19
123.0
29
165.5
39
196.6
49
250.3
10
91.5
20
127.3
3
167.9
40
199.5
50
254.1
Solución de problemas
PROBLEMA
SOLUCIÓN
La radio no se enciende
Bateria baja. Póngala a cargar
La batería no se ha instalado correctamente. Colóquela
correctamente.
La batería se agota rápidamente
La duración de la batería está llegando a su fin. Reemplácela por
una nueva
La batería no está completamente cargada. Asegúrese de que la
carga se ha completado.
El LED se ilumina pero no se escucha señal
acús�ca
Asegúrese de que el nivel de volumen no es demasiado bajo.
Asegúrese de que los subtonos CTCSS y códigos DCS son los
mismos para otros usuarios de su grupo.
El teclado no funciona
Puede que esté ac�vada la función de bloqueo de teclado
Asegúrese de que no haya pulsado cualquier otro botón
Durante una conversación en curso con un grupo,
se reciben interferencias con otro grupo
Cambie el subtono CTCSS o código DCS de su grupo.
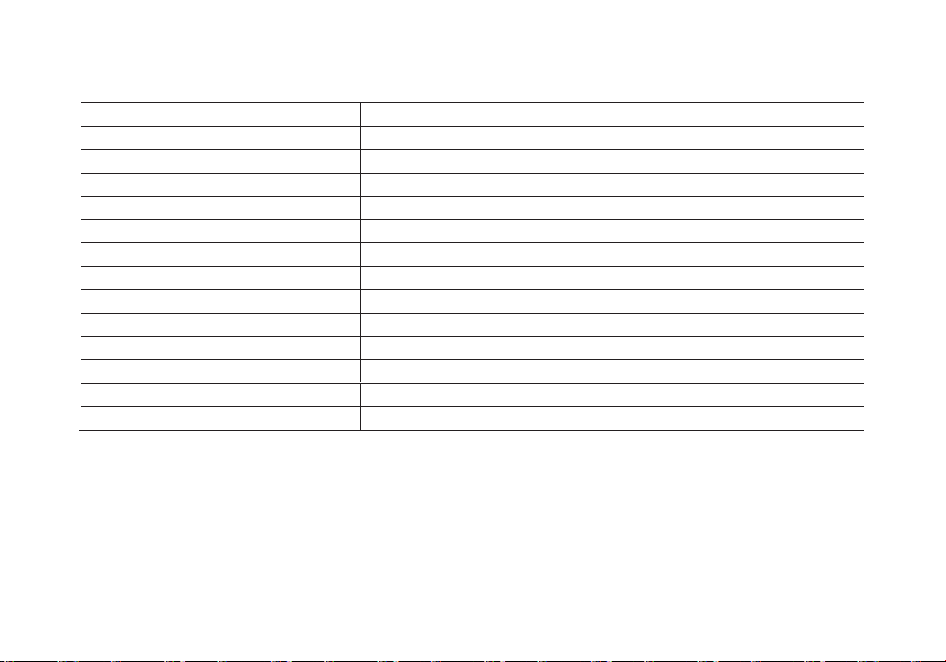
86
Especificaciones técnicas
Banda de frecuencia
144-146MHz & 430-440MHz (Rx / Tx)
Canales memorizables
128
Alimentación
Batería Li-Ion de 7.4V /2000 mAh (BL-8)
Temperatura de funcionamiento
-10°C to + 45°C
Modo de funcionamiento
monoband/dual band
Potencia de salida
VHF: 5W / UHF:4W
Modulación
F3E(FM)
Deviazione max di frequenza
≤ ±5KHz
Impedancia de la antena
< -60dB
Estabilidad de frecuenciaa
±2.5 ppm
Sensibilidad de recepción
< 0.2uV
Potencia de salida de audio
≥ 500mW
Dimensiones
62x131x34mm (LxAxP)
Peso
230g
Las especificaciones están sujetas a cambios sin previo aviso.
Atención: El adaptador del cargador es el disposivo de conexión a la red del equipo; la base de carga de la red debe estar
cerca del equipo y ser fácilmente accesible.

87
EGT-82 U
Radio Ricetrasmi�ente Manuale Utente in Italiano
(Two-way Radio User Manual in Italian)
Indice dei Contenu�
1. Assemblaggio 88
2. Ricarica e manutenzione della ba�eria 89
3. Conoscere la radio 90
4. U�lizzo base 94
5. U�lizzare il so�ware della radio
96
6. Scansione 98
7. Dual watch 100
8. DTMF
101
9. Chiamata sele�va 102
10. Personalizzazione 103
11. Programmazione 105

88
Assemblaggio
Antenna
Questa radio ricetrasmittente ha un connettore SMA Maschio per l’antenna. Per installare l’antenna (che presenta il
corrispettivo connettore SMA Femmina), allineare i due connettori ed avvitare l’antenna in senso orario fino a
quando arriva alla fine, fermandosi.
Aggancio per la cinta
Ci sono due viti parallele montate sul retro del corpo della radio; rimuoverle, inserirle attraverso i fori
presenti nell’aggancio per la cinta ed avvitare nuovamente le viti al corpo dell
a radio.
Non aggiungere alcun tipo di colla per fissare le viti all’aggancio per la cinta. I solventi contenuti nella colla
potrebbero danneggiare l’involucro esterno della batteria.
Batteria
La radio deve essere spenta prima di inserire o rimuovere la batteria. È possibile spegnere la radio
ruotando la ghiera di accensione/volume fino in fondo in senso antiorario per assicurarsi che la radio sia
spenta.
Installazione: Posizionare e spingere la batteria lentamente e parallelam
ente lungo il retro del corpo della
radio. Una volta allineata la batteria sulle linee guida della radio, spingere lentamente verso l'alto fino a
sentire un ‘click’ che indica che la batteria è stata installata correttamente.
Rimozione: Per rimuovere la batteria, premere sulla levetta 'PUSH' sulla parte inferiore della batteria e allo
stesso tempo sfilare la batteria verso il basso.
89
Ricarica e manutenzione della batteria
Ricarica
La batteria deve essere ricaricata completamente prima di iniziare ad utilizzare la radio.
L’efficienza ottimale della batteria viene raggiunta mediamente dopo 3 cicli di ricarica completa.
Come collegare e utilizzare il caricabatterie correttamente:
1. La radio deve essere spenta prima di iniziare la ricarica della batteria della radio.
2. Collegare il connettore DC dell’alimentatore nel connettore corrispondente sul ret
ro della basetta di ricarica.
3. Collegare la spina dell’alimentatore da muro in una presa di corrente.
4. Posizionare la radio sulla basetta di ricarica.
5. Assicurarsi che la radio faccia un buon contatto con i contatti della basetta di ricarica.
Quando il LED di stato Rosso si accende e rimane fisso, la radio sta caricando correttamente.
6. La ricarica della batteria è completata quando il LED di Stato della basetta diventa Verde e rimane fisso.
Si prega, quindi, di rimuo
vere la radio dalla basetta di ricarica per evitare di sovraccaricare la batteria della radio.
LED Rosso
LED Verde
Stato
Lampeggiante
Spento
fisso
Fisso
Spento fisso
Standby (caricatore vuoto)
Errore (caricatore con la radio
posizionata) Ricarica in corso.
Ricarica completata.
Manutenzione della batteria.
La batteria della radio arriva per metà scarica direttamente dalla fabbrica; si
prega di ricaricare la batteria per almeno 4-5 ore prima di iniziare ad utilizzarla con la radio.
1. Utilizzare esclusivamente le batterie approvate dal produttore originario.
2. Non tentare mai di smontare ed aprire la batteria.
3. Non esporre le batterie a fiamme libere o a fonti di calore intenso.
4. Smaltire le batterie in conformità con le normati
ve locali sul riciclaggio. Le batterie non vanno gettate nel cestino della spazzatura!
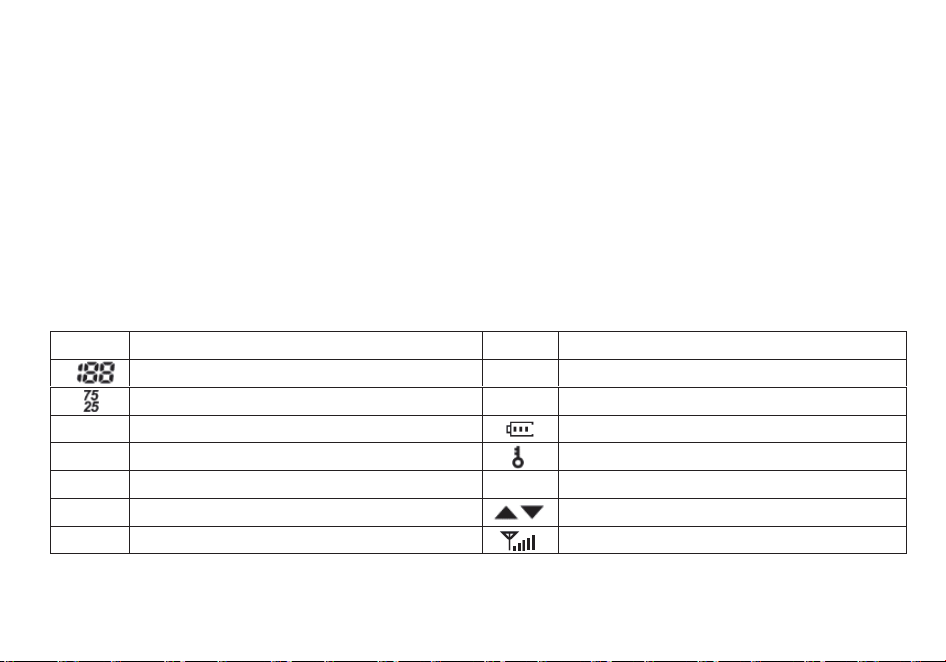
90
Conservazione
1. Per prevenire danni da scaricamento eccessivo, la batteria deve essere conservata con un minimo di alimentazione residua.
Questa radio utilizza una batteria a base di Litio, quindi si consiglia una carica minima rimanente del 40% prima di lasciare la radio
inutilizzata per un lungo periodo di tempo. Ciò minimizza la perdita di capacità dovuta al passare del tempo.
2. Per evitare gravi perdite di capacità della batteria durante un periodo di inutilizzo, si consi
glia di ricaricare le batterie almeno ogni 6
mesi.
3. Conservare le batterie in un luogo fresco e asciutto, mai ad una temperatura superiore a temperatura ambiente.
Conoscere la radio
Display principale
Symbol
Beschreibung
Symbol
Beschreibung
Numero del canale memorizzato
R
Funzione Reverse attivata
Cifre meno significative della frequenza
N
Banda stretta attivata
CT
CTCSS attivato
Indicatore del livello della batteria
DCS
DCS attivato
Blocco tastierino numerico attivato
+-
Offset della frequenza per accedere ai ripetitori
L
Indicatore del livello della potenza di trasmissione
S
Dual watch attivato
Indicatore della banda o canale attivo
VOX
VOX attivato
Indicatore Squelch Aperto/Chiuso
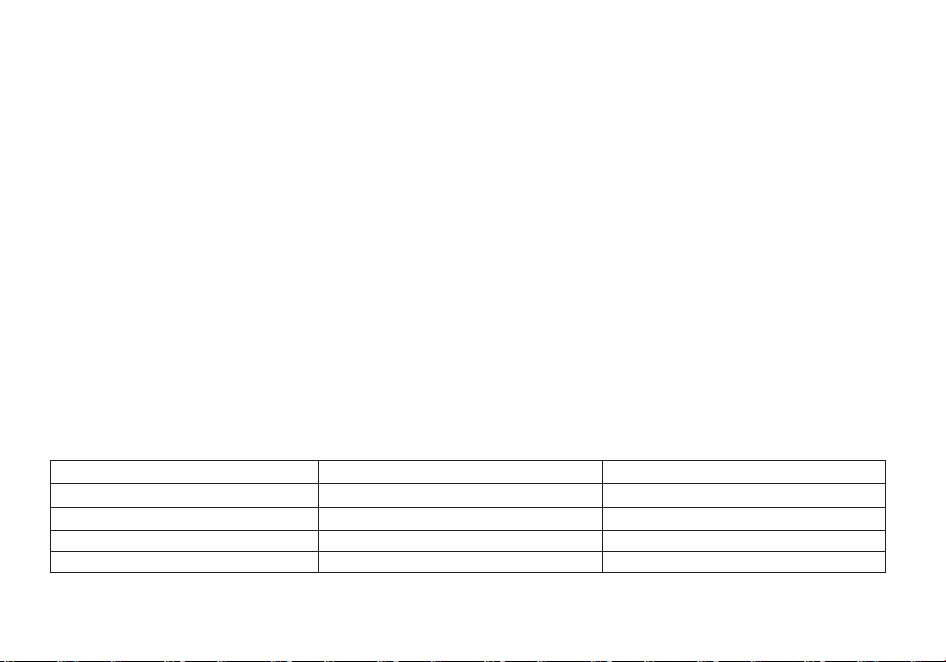
91
Pulsanti e comandi della radio
1. Antenna
6. Tastierino numerico
11. Altoparlante e microfono
2. Torcia
7. Pulsante Monitor
12. Pulsante di rimozione della batteria
3. Ghiera Accensione/Volume
8. Radio FM/ Pulsante CALL Allarme
13. Jack per gli accessori
4. Indicatore LED
9. Pulsante PTT B
14. Batteria
5. Display LCD a 2 linee
10. Pulsante PTT A

92
Indicatore del livello della batteria
Quando il livello della batteria raggiunge il livello minimo, la radio inizierà ad emettere periodicamente dei suoni oltre alla
retroilluminazione della radio che inizierà a lampeggiare.
Se il “Voice Prompt” è attivato, sarà possibile udire un avviso “Low Voltage”, indicando di sostituire la batteria o ricaricare la radio.
LED di stato
Il LED di stato ha un design molto semplice e tradizionale. Quando la radio riceve un segnale si illumina di Verde, quando si inizia a
trasmettere si illumina di Rosso, mentre in Standby rimane spento.
Tasto laterale 1 - F (Radio Commerciale FM e Allarme)
Premere momentaneamente il pulsante [F] per ascoltare la radio commerciale FM.
Un’altra pressione veloce del tasto disattiva la radio FM. Se la radio riceve un segnale sulla frequenza inserita o sul canale
selezionato quando si ascolta la radio commerciale FM, lo squelch sarà attivato sulla frequenza (come quando si scansiona) e
la
radio rimarrà sintonizzata su quella frequenza finché il segnale finisce; successivamente ritornerà nuovamente sulla radio
commerciale FM.
Premere a lungo il tasto [F] per attivare la funzione di allarme. Premere momentaneamente il tasto [F] per disattivare l’allarme.
Tasto laterale 2 - M (Monitor e Torcia)
Premere momentaneamente il tasto [M] per accendere la torcia LED. Un altra pressione veloce del tasto spegne la torcia LED.
Premere a lungo il tasto [M] per attivare la
modalità Monitor ed aprire
momentaneamente lo squelch.
Blocco del Tastierino Numerico
La radio ricetrasmittente Radioddity GT-82 è dotata di una tastiera
numerica
standar
d
completa.
I tasti numerici hanno funzioni secondarie stampate sopra di essi. Il tasto
[*SCAN] e
[#
], d’altra parte, ha effettivamente delle funzioni secondarie,
rispettivamente
la funzione scansione e il blocco del tastierino numerico.
La
Radioddity GT-82 è caratterizzata da un blocco per il tastierino numerico che
blocca
tutti i
tasti ad eccezione dei tre tasti laterali.
Per attivare o disattivare il
blocco
del

93
tastierino, premere a lungo il tasto [# ] per circa due secondi. È anche possibile impostare il blocco automatico del tastierino
direttamente all’accensione dal menù della radio, dopo 10 secondi dall’accensione.
Tasto Asterisco [*SCAN]
Un click veloce del tasto attiva la funzione Reverse (vedi Capitolo 11, Ripetitori). Quando si ascolta la radio commerciale FM, se si
preme momentaneamente il tasto [*SCAN] si attiva la scansione delle stazioni trasmittenti.
La scansione delle frequenze FM commerciali si interromperà non appena viene trovat
a una stazione attiva, qualunque sia il metodo
impostato per la scansione. Per attivare lo scanner, premere a lungo il tasto [*SCAN] per circa due secondi. Vedi il Capitolo 5,
Scansione per ulteriori dettagli.
Tasto Zero 0
L'GT-82 dispones di un misuratore di tensione della batteria che la tensione attuale della batteria sul display.
Per vedere la
tensione visualizzata,
premere e tenere premuto il tasto per circa due secondi.
Tasto Cancelletto [#]
In modalità canale, funge anche da tasto power shift di trasmissione. In modalità canale, premere momentaneamente per cambiare
tra la potenza di trasmissione alta e bassa. Si noti che questo non altera la potenza di trasmissione memorizzata per quel canale;
interessa solo la sessione corrente. Il passaggio a un altro canale oa un'altra modalità operativa (inclusa la trasmissione FM)
ripristinerà la potenza di trasmissione a ciò che è memorizzato nella memoria del canale.
Per abilitare o disabilitare il blocco tastiera, tenere premuto il ta
sto per circa due secondi.
Tasti Menù e funzione
- Il tasto [MENU] è utilizzato per entrare nel menù della radio e confermare le opzioni del menù.
Spegnere la radio e tenere premuto il tasto [MENU] quando si accende la radio per passare dalla modalità Frequenza (VFO) alla
modalità Canale (MR).
- I tasti [▲] e [▼] sono utilizzati per navigare tra le opzioni del menù, oltre a selezionare i canali e cambiare la frequenza (in base alla
modalità selezionata).
- Il tasto [EXIT/AB] serve per uscire dai
menù e per cancellare le opzioni del menù.
Il pulsante [EXIT/AB] può anche commutare tra i display A (su) e B (giù). La frequenza o il canale sul display selezionato diventa la
frequenza o il canale di ascolto e trasmissione attivo.
Quando si ascolta la radio FM, il tasto [EXIT/AB] commuta tra la banda di frequenza 65-75 MHz e 76-108 MHz.

94
Jack per gli Accessori
Il Jack per gli accessori della Radioddity GT-82 è basato sul design standard Kenwood a 2-pin.
1
. Per collegare un accessorio, come ad esempio un auricolare, un altoparlante esterno o il cavo di programmazione, allineare i
connettori corrispondenti e spingere con decisione.
2
. L’aggancio dei connettori non è sempre perfetto con i cavi molto economici o clonati e non originali, i quali potrebbero richiedere
uno sforzo maggiore per entrare completamente e correttamente nel
connettore della radio.
3
. Assicurarsi che la radio sia spenta prima di collegare qualsiasi accessorio alla radio.
Utilizzo base
Alimentazione e Volume
Prima di accendere la radio, assicurarsi di aver installato correttamente la batteria e l’antenna alla radio, come descritto nel Capitolo 1.
Accendere l’apparato
Per accendere la radio, ruotare semplicemente la ghiera di accensione e volume in senso orario, fino a sentire un lieve ‘click’. Se la
radio s
i accende correttamente dovrebbe sentirsi un doppio ‘bip’ dopo circa un secondo dall’accensione. Successivamente, la radio
mostrerà una frequenza o un canale. Se il “Voice Prompt” è attivo, la voce annuncerà “Frequency Mode” o “Channel Mode”.
Spegnere l’apparato
Ruotare la ghiera di accensione/volume in senso antiorario fino in fondo, quando si udirà un lieve ‘click’.
La radio sarà stata spenta con successo.
Regolare il volume
Per alzare il volume, ruotare la ghiera del volume in senso orario.
Per abbassare il volume
, invece, ruotare la stessa ghiera del volume in senso antiorario. Fare attenzione a non ruotarla del tutto,
altrimenti si potrebbe spegnere inavvertitamente la radio.
Note
: Utilizzando la funzione Monitor, attivata tramite il tasto [MONI] posto sotto al tasto PTT, è possibile regolare il volume
aggiustandolo in base al rumore di
fondo statico dello squelch aperto.
Effettuare una trasmissione

95
Premere a lungo il tasto PTT sul lato della radio per trasmettere. Quando si trasmette, parlare a una distanza di circa 3-5 centimetri
dal microfono. Se si lascia il tasto PTT, la radio ricetrasmittente ritornerà nella modalità di ricezione.
Selezione del canale
Ci sono due modalità operative: Modalità Frequenza (VFO) e Modalità Canale o Memoria (MR).
Per l’utilizzo quotidiano, la modalità Canale (MR) risulterà di gran lunga più pratica e comoda rispetto alla modalità Frequenza (VFO).
In ogni caso, la modalità Frequenza (VFO) è molto utile per sperimentare con la radio. La modalità Frequenza è anche utilizzata per
memorizzare le frequenze in canali nella memoria della radio. In definitiva, la modalità che si sceglie dipenderà interamente
dall’utilizzo che se ne fa della radio.
VFO/MR-Come cambiare
Per commutare la radio in modalità Frequenza (VFO); si spegne la radio, quindi premere e tenere premuto il pulsante [MENU]
durante l'accensione
Per salvare le frequenze nella memori
a del canale è necessario essere in modalità Frequenza (VFO).
Modalità Frequenza (VFO)
Nella modalità Frequenza (VFO) è possibile navigare su e giù nella banda utilizzando i tasti [▲] e [▼].
Ogni pressione dei tasti incrementerà o decrementerà la frequenza in base allo step impostato nella radio.
È anche possibile inserire direttamente le frequenze tramite il tastierino numerico con una precisione fino al kilohertz. Comunque, la
radio selezionerà la frequenza corrispondente più vicina a quella in
serita in base allo step configurato. In altre parole, se si inserisce
una frequenza con una risoluzione più grande di 1kHz (ad esempio 145.6875 come nell’esempio riportato di sotto), essa verrà
sempre arrotondata.
Il seguente esempio presuppone un utilizzo della radio con uno step di 12.5kHz.
Esempio 1. Inserire la frequenza 145.6875MHz sul display A
1. Tenere premuto il tasto [MENU] quando si accende la radio e impostarla in modalità
Frequenza.
2. Premere il tasto [EXIT/AB] fino a che il displa
y selezionato risulta quello A (display o slot
superiore)
3. Inserire [1] [4] [5] dal tastierino numerico. Dovrebbe assomigliare a qualcosa di simile:
4. Ora le ultime quattro cifre. Si noti che è possibile immettere solo tre cifre decimali sulla tastiera.

96
Se si digita 687, la frequenza inserita non verrà accettata. Come si fa, dunque, ad inserire la
quarta ed ultima cifra (ad es. ‘5’ nella foto di esempio qui sotto)? Basterà semplicemente
arrotondare la frequenza da 145.6875MHz a 145.6880MHz oppure inserire, in alternativa,
145.675MHz e premere subito dopo il tasto [▲] per cambiare la frequenza in 145.6875Mhz.
Premere i tasti [6] [8] [8] sul tastierino numerico. Se tutto è andato bene, il display dovrebbe
mostrare qualcosa di simile:
N
ote:
Semplicemente per il fatto che sia possibile programmare un canale o una frequenza nella radio non significa che si è autorizzati ad
utilizzarla per trasmettere.
Trasmettere su frequenze sui cui non si è autorizzati ad operare è illegale e, nella maggior parte delle giurisdizioni, si tratta di un
reato grave. Se si viene sorpresi a trasmettere senza essere possessori di una patente da radioamatore, si incorrerà in multe o, nel
peggiore dei casi, si rischia la prigione.
Tuttavia, è legale, nella maggior parte delle giurisdizioni, ricevere ed ascoltare le trasmissioni.
Contattare l'ente normativo locale per ulteriori informazioni al riguardo.
Modalità Canale (MR)
L'uso della modalità Canale (MR) dipende dalla programmazione effettiva di alcuni canali nella radio da poter utilizzare. Per saperne
di più su come programmare i canali, leggere il Capitolo 10, Programmazione.
Una volta che i canali sono stati programmati con successo e pron
ti all’uso, è possibile utilizzare i tasti [▲] e [▼] per navigare tra i
canali.
Note:
Se si hanno dei canali programmati con la potenza di trasmissione impostata su Low, è possibile utilizzare il tasto [
# ] per
passare momentaneamente all’impostazione di potenza High se si hanno problemi con la trasmissione a lunga distanza.
Utilizzare il software della radio
Utilizzo base
Procedura 1. Utilizzare il menù con i tasti freccia
1. Premere il tasto [MENU] per accedere al menù.
2. Utilizzare i tasti freccia [▲] e [▼] per navigare tra i menù.

97
3. Una volta trovato la voce del menù desiderata, premere il tasto [MENU] per confermare e selezionare quella voce.
4
. Usare i tasti [▲] e [▼] per selezionare il parametro voluto.
5
. Una volta selezionato il parametro voluto per una determinata impostazione del menù:
a
. Per confermare la selezione, premere il tasto [MENU] e le impostazioni verranno salvate e si ritornerà al menù principale.
b. Per cancellare le modifiche al menù, premere il tasto [MENU] che resette
rà e cancellerà le impostazioni di quella voce del menù,
ritornando
fuori al menù.
c
. Per uscire completamente dal menù in qualsiasi momento, premere il tasto [EXIT/AB].
Utilizzare le scorciatoie
Come si può notare, se si legge l’Appendice B, Definizioni del menù, ogni voce del menù ha un valore numerico associato ad esso.
Questi numeri possono essere utilizzati per l'accesso diretto a qualsiasi voce di menù.
Il menu è organizzato in modo
tale che le dieci funzioni più comuni
siano
in
cima
e, come
si
può
vedere
nella Figura
2.3, “
Radioddity
GT-82, tastierino
numerico”,
queste
sono
anche
stampate
sulla tastiera
così
da
non
doverle
ricordare tutte.
Ai
parametri
è
associato
anche
un
numero
,
vedere
Appendice
B,
Definizioni
del
menù
per
i
dettagli.
Procedura
2. Usare
il
menù
con
le
scorciatoie
1.
Premere
il tasto [MENU]
per
accedere
al
menù.
2.
Usare
il tastierino
numerico
per
inserire
il
numero
della
voce
del
menù.
3
.
Per
entrare
nella
voce
del
menù,
preme
re
il
tasto [MENU].
4
.
Per
inserire
il
parametro
desiderato,
ci
sono
due
modalità
disponibili:
a
.
Utilizzare
i tasti freccia,
come
per
la
sezione
precedente;
b
.
Utilizzare
il tastierino
numerico
per
inserire
il
codice
numerico
della
scorciatoia.
5
.
Proprio
come
visto
nella
sezione
precedente:
a
.
Per
confermare
la
selezione,
premere [MENU]
per
salvare
le
impostazioni
ed
uscire
dal
menù
principale.
b
.
Per
annullare
le
modifiche,
premere
il
tasto [EXIT/AB]
per
cancellare
le
impostaz
ioni
di
quella
voce
del
menù
ed
uscire
fuori
dal
menù.
5
.
Per
uscire
dal
menù
in
qualsiasi
momento,
premere
il tasto [EXIT/AB].
6
. In tutti
i
successivi
esempi
e
procedure
in
questo
manuale
verranno
utilizzate
le
scorciatoie
numeriche
del
menù.

98
Scansione
La Radioddity GT-82 presenta uno scanner integrato per le bande VHF e UHF . Quando ci si trova nella modalità Frequenza (VFO),
essa scansionerà automaticamente le frequenze in base allo step impostato nella radio . In modalità Canale (MR ), verranno
scansionate le
frequenze salvate tra i canali della radio.
Dual Watch disattivato durante la scansione
Per attivare lo scanner, premere a lungo il tasto [*SCAN] per circa due secondi. Premere qualsiasi altro tasto per uscire dalla
modalità
scansione.
Modalità scansione
Lo scanner è configurabile secondo una delle seguenti tre modalità operative: Time, Carrier o Search, ognuna delle quali verrà
spiegata più dettagliatamente nella loro rispettiva sezione più avanti.
Procedura 1. Impostare la modalità di scansione
1. Premere il tasto [MENU] per accedere al menù.
2. Premere i tasti [1] e [8] sul tastierino numerico per trovare la funzione scansione.
3
. Premere il tasto [MENU] per confermare.
4. Usare i tasti [▲] e [▼] per selezionare
la modalità di scansione.
5
. Premere il tasto [MENU] per confermare e salvare.
6
. Premere il tasto [EXIT/AB] per uscire dal menù.
Time operation
In modalità Time Operation (TO), la scansione verrà interrotta quando viene riscontrato un segnale in ricezione, e dopo un certo
periodo di tempo predefinito, la radio continuerà la scansione.
Carrier operation
In modalità Carrier Operation (CO), la scansione verrà interrotta quando viene riscontrato un segnale in ricezione e dopo un tempo
predefinito
in cui il segnale non viene più ricevuto, la radio continuerà la scansione.
Search operation

99
In modalità Search Operation (SE), la scansione verrà interrotta quando viene riscontrato un segnale in ricezione. Per continuare la
scansione bisogna premere nuovamente il tasto [*SCAN].
Scansione del Tono
Scansione dei toni/codici CTCSS e DCS
Note:
La scansione di un tono CTCSS o di un codice DCS può essere eseguita in modalità Frequenza (VFO) oppure in modalità Canale
(MR). Solo quando è selezionata la modalità Frequenza (VFO) il codice o il tono scansionati possono essere salvati nella voce 11/10
de
l menù.
La modalità scansione del tono CTCSS e del codice DCS può essere attivata con o senza un segnale in ricezione. La scansione del
codice o del tono si attiverà automaticamente solo quando viene ricevuto un segnale.
Non tutti i ripetitori che richiedono un tono CTCSS o un codice DCS per accedere potrebbero ritrasmettere un codice in ricezione. In
quel caso, il trasmettitore di una stazione che può accedere al ripetitore necessiterà di essere scansionato. In altre parole, questo
può essere fatto asc
oltando le stazioni sulla frequenza in ricezione del ripetitore.
Scansionare un tono CTCSS
1. Premere il tasto [MENU] per accedere al menù.
2. Premere i tasti [1] e [1] sul tastierino numerico per accedere alla voce 11: R-CTCSS del menù.
3. Premere il tasto [MENU] per confermare.
4. Premere il tasto [*SCAN] per iniziare a scansionare il tono CTCSS.
Una scritta lampeggiante “CT” apparirà sulla parte sinistra del display per indicare che la radio è in modalità scansione CTCSS. In
questa
modalità, quando la radio riceve un segnale sul canale o frequenza selezionati, il display inferiore (B) scansionerà tra i vari
toni CTCSS, controllandone la compatibilità con quello del segnale ricevuto. Una volta che il tono CTCSS della frequenza inserita
verrà identificato, l’indicatore “CT” sulla sinistra dello schermo smetterà di lampeggiare.
Premere il tasto [MENU] per salvare il tono appena scansionato in memoria (solo se si è in modalità VFO), successivamente
premere il tasto [MENU] per usc
ire dal menù.
Scansionare un codice DCS
1. Premere il tasto [MENU] per accedere al menù.

100
2. Premere i tasti [1] e [0] sul tastierino numerico per accedere alla voce 11: R-DCS del menù.
3. Premere il tasto [MENU] per confermare.
4. Premere il tasto [*SCAN] per iniziare a scansionare il codice DCS.
Una scritta lampeggiante “CT” apparirà sulla parte sinistra del display per indicare che la radio è in modalità scansione DCS. In
questa modalità, quando la radio riceve un segnale sul canale o frequenza selezionati, il display inferiore (B) scansionerà tra i vari
codici DCS, c
ontrollandone la compatibilità con quello del segnale ricevuto. Una volta che il codice DCS della frequenza inserita
verrà identificato, l’indicatore “CT” sulla sinistra dello schermo smetterà di lampeggiare.
Premere il tasto [MENU] per salvare il codice appena scansionato in memoria (solo se si è in modalità VFO), successivamente
premere il tasto [MENU] per uscire dal menù.
Dual watch
In alcune situazioni, la possibilità di monitorare ed ascoltare due canali o frequenze simultaneamente può risultare molto utile.
La
Radioddity GT-82 ha la funzione del Dual Watch, capace dunque di scansionare e monitorare due frequenze ad intervalli
f
issi
ed
impostare la frequenza di trasmissione su uno dei due canali che si stanno monitorando.
Procedura 1. Attivare o disattivare la modalità Dual Watch
1. Premere il tasto [MENU] per accedere al menù.
2
. Premere il tasto [7] sul tastierino numerico per accedere alla voce Dual Watch nel menù.
3
. Premere il tasto [MENU] per confermare.
4
. Usare i tasti [▲]
e [▼] per attivare o disattivare la
funzione.
5
. Premere il tasto [MENU] per confermare.
6
. Premere il tasto [EXIT/AB] per uscire dal menù.
A causa del modo in cui la
Radioddity GT-82 è costruita, ogni volta che una delle frequenze A o B (VFO/MR) diventa attiva,
per
impostazione predefinita,
essa trasmetterà su quel canale.
Questa modalità potrebbe risultare sconveniente,
specialmente
se
durante
il
monitoraggio
di
una
frequenza
non
è
permesso trasmettere
su
quella frequenza
o
canale.
All’interno
del menù è
presente
un’opzione
per
impedire
la
trasmissione
su
uno
dei
canali
A
o
B.
Procedura 2. Bloccare la trasmissione su un canale durante il Dual Watch
1. Premere il tasto [MENU] per accedere al menù.
2
. Premere i tasti [3] e [4] sul tastierino numerico per accedere alla voce TDR-AB nel menù.

101
3. Premere il tasto [MENU] per confermare.
4. Usare i tasti [▲] e [▼] per selezionare il display superiore A oppure quello inferiore B.
5. Premere il tasto [MENU] per confermare.
6. Premere il tasto [EXIT/AB] per uscire dal menù.
Note:
Se si desidera momentaneamente sovrascrivere il blocco senza doverlo impostare attraverso l'opzione del menu è possibile farlo
premendo il tasto [EXIT/AB] un istante prima di premere il tasto PTT.
DTMF
DTMF è un metodo di segnalazione in banda che utilizza segnali
sinusoidali doppi per ogni codice.
Originariamente sviluppato per sistemi telefonici, si è dimostrato
uno strumento davvero versatile in molti altri campi ed applicazioni.
Nei sistemi di radio ricetrasmittenti, il DTMF è più comunemente
utilizzato per sistemi di automazione e controllo da remoto. Un
esempio comune potrebbe essere quello dei ponti radio o ripetitori, i
quali possono essere spesso attivati trasmettendo una sequenza
DTMF (di solito una semplice sequenza ad una cifra
sola).
La
Radioddity GT-82 ha la piena implementazione dei codici DTMF, inclusi i codici A, B, C e D.
I tasti numerici, così come i tasti [*SCAN] e [
# ], corrispondono ai corrispettivi codici DTMF, proprio come ci si aspetterebbe. I
codici A,
B, C e D corrispondono rispettivamente ai tasti [MENU], [▲] , [▼] e [EXIT/AB].
Per inviare codici DTM
F, premere il tasto o i tasti corrispondenti al messaggio che si desidera inviare, mentre si tiene premuto il tasto
P
TT.
Nota
:
Se il blocco della
tastiera è attivo sulla radio, è comunque possibile trasmettere i toni DTMF regolarmente senza dover sbloccare la
radio.

102
Chiamata selettiva
A volte quando si lavora con numerosi gruppi di persone che utilizzano lo stesso canale, la comunicazione può facilmente risultare
affollata e disordinata. Per minimizzare questo problema sono stati sviluppati numerosi metodi per bloccare le trasmissioni
indesiderate su una determinata frequenza. In generale ci sono due tipologie di chiamata selettiva nei sistemi: chiamata di gruppo e
chiamata individuale.
La chiamata di gruppo
, come suggerisce il nome, è una forma di comunicazione collettiva. Ogni radio all’interno del gruppo è
configurata allo stesso modo, ed ogni radio sarà in grado di contattare qualunque altra radio nel gruppo.
La chiamata individuale
, nota anche come paging, è una forma di comunicazione individuale tra due utenti.
Ogni radio viene programmata con un codice ID identificativo unico, e solamente se si trasmette con lo stesso codice si sarà in grado
di
trasmettere con successo all’altra radio e far sì che l’altro
utente possa ricevere la
trasmissione.
La
Radioddity GT-82 presenta 3 diverse modalità di chiamate di gruppo:
1
. CTCSS
2
. DCS
3
. Tone-burst (1000Hz, 1450HZ, 1750Hz)
La
Radioddity GT-82 non presenta alcuna forma di chiamata individuale. I toni CTCSS e 1750Hz sono spesso conosciuti
ed
utilizzati
dai radioamatori per agganciare i ripetitori ed i ponti ripetitori, i quali richiedono un codice in entrata per
accedervi.
CTCSS
e
DCS
Il tono
CTCSS
viene
impostato
dalle
opzioni
menù
11
R-CTCS
e
13
T-CTCS. Il
codice
DCS
viene
impostato
dalle
opzioni
menù
10
R-DCS
e
12
T-DCS.
Per
una
lista
completa
dei
toni
CTCSS
e
le
corrispondenti
frequenze
sub-tono,
dare
un’occhiata
alla
Tavola
C.2,
“Frequenze
CTCS
S”
ne
ll’Appendice
C,
Specifiche tecniche.
Procedura
1.
Come
impostare
un
tono
CTCSS
1.
Premere
il tasto [MENU]
per
accedere
al
menù.
2
.
Premere I tasti [1]
e [1]
per
accedere
alla
voce
CTCSS
in
ricezione
ed
premere
i tasti [1]
e [0]
per
la
voc
DCS
in
ricezione.
3
.
Premere
il tasto [MENU]
per
confermare.
4
. Inserire
la frequenza
sub-tono
desiderata
in
Hz tramite
il tastierino
numerico.
5
.
Premere
il tasto [MENU]
per
confermare
e
salvare.

103
6. Premere i tasti [1] e [3] per accedere alla voce CTCSS in trasmissione e premere i tasti [1] e [2] per la voce DCS in trasmissione.
7. Premere il tasto [MENU] per confermare.
8. Inserire la frequenza sub-tono desiderata in Hz tramite il tastierino numerico. Assicurarsi di inserire la stessa frequenza inserita
nell’opzione in ricezione.
9. Premere il tasto [MENU] per confermare e salvare.
10. Premere il tasto [EXIT/AB] per uscire dal menù.
Per disattivare il tono CTCSS, seguire
la stessa procedura, ma impostarlo su OFF con il tasto [0] o [SQL] invece di selezionare una
frequenza sub-tono CTCSS.
Per disattivare il codice DCS, seguire la stessa procedura, ma disattivarla con il tasto [0] o [SQL] invece di selezionare un codice
DCS.
1000Hz, 1450HZ, 1750HZ Tone Burst
Per inviare un tone-burst (selezionabile da MENU 41); premere il tasto [F/SOS] tenendo premuto il PTT.
Una frequenza di burst di toni comune utilizzata da molti sistemi radioamatoriali in Europa è 1750 Hz
.
Èpossibile selezionare tra le opzioni Tone Burst 2100, 1750,1450 o 1000Hz. Queste opzioni si trovano nel Menu 41(R-TONE).
Personalizzazione
La Radioddity GT-82 permette di personalizzare sia il messaggio all’accensione della radio (solamente tramite software
su
compute
r)
che il colore del display durante i tre stati della ricetrasmittente (Trasmissione, Ricezione e Standby).
Display
Il display LCD sulla Radioddity GT-82 è retroilluminato da LED multicolore, i cui colori possono essere impostati
dal
menù.
Per cambiare i colori
,
seguire le seguenti istruzioni:
Procedura 1. Cambiare il colore della retroilluminazione
1. Premere il tasto [MENU] per accedere al menù.
2
. Premere I seguenti tasti sul tastierino:
a
. [2] e [9] per cambiare il colore in Standby.
b
. [3] e [0] per cambiare il colore in Ricezione.
c
. [3] e [1] per cambiare il colore in Trasmissione

104
3. Premere il tasto [MENU] per confermare.
4
. Usare i tasti [▲] e [▼] per selezionare il colore desiderato.
5
. Premere il tasto[MENU] per confermare e salvare.
6
. Premere il tasto [EXIT/AB] per uscire dal menù.
Per cambiare la durata in secondi della retroilluminazione
, seguire le seguenti istruzioni:
Procedura 2. Impostare la durata in secondi della retroilluminazione
1. Premere il tasto [MENU] per accedere al menù.
2. Premere il tasto [6] sul tastierino numerico per ac
cedere alla voce del menù riguardante il
tempo di retroilluminazione.
3
. Premere il tasto [MENU] per confermare.
4
. Usare i tasti [▲] e [▼] per scegliere il tempo desiderato.
5
. Premere il tasto [MENU] per confermare e salvare.
6
. Premere il tasto [EXIT/AB] per uscire dal menù.
Messaggio all’accensione
Il messaggio all’accensione può essere impostato solo tramite il computer, vedere la sezione chiamata “Programmazione al
computer” per dettagli su come effettuare il collegamento della radi
o con il computer.
Le seguenti istruzioni presuppongono che si abbia già stabilito un collegamento utilizzando il software
Radioddity da un
computer
che
esegue
Windows,
e che il software Radioddity sia già installato e in esecuzione.
Procedura 3. Impostare il messaggio all’accensione
1. Premere “Other” nella barra del menù; una finestra di dialogo "Other" dovrebbe essere apparsa sullo schermo.
2. Nella casella intitolata "Power on Message” (Messaggio a
ll’accensione), ci sono due campi di testo che rappresentano le du
e linee
sul display LCD
. Inserire il testo desiderato nei campi corrispondenti.
3
. Fare clic su “Write” per scrivere le modifiche sulla radio.
Note
:
Anche se il software dispone di un
testo di otto (8) caratteri per il messaggio all’accensione, tenere presente che il display di
GT-82 può visualizzare solo un massimo di sette (7) caratteri per riga.
Assicurarsi che la voce 38 del menù sia impostata su “MSG”
, altrimenti il messaggio non verrà visualizzato all’accensione. Vedere il
C
apitolo 4
, Utilizzare il software della radio per i dettagli su come navigare nel menù.

105
A volte il software Radioddity potrebbe richiedere più di un tentativo per connettersi alla radio. Se viene visualizzata una
f
inestra
di
dialogo con un messaggio di errore di connessione, chiudere la finestra di dialogo e fare clic su “Read and write
again”.
Programmazione
I canali in memoria sono un modo semplice per memorizzare le frequenze utilizzate di frequente in modo che possano essere
facilmente recuperate ed utilizzate in un secondo momento.
La
Radioddity GT-82 dispone di 128 canali di memoria, e ciascuno può contenere: frequenza
di
ricezione
e trasmissione, potenza
di
trasmissione,
informazioni
di
chiamate
di
gruppo,
larghezza
di
banda,
impostazioni
AN
I/PTT-ID
e
un
identificatore
alfanumerico
di
sei
caratteri
o
nome
del
canale.
Programmazione manuale
La programmazione manuale potrebbe risultare difficile finché non ci si abitua, specialmente quando si programmano in canali in
duplex. Si noti che gli ANI S-CODE ID possono essere impostati solo con l’utilizzo
di computer
. Quando si programmano i canali, è importante
ricordare che è possibile salvare solo i canali di memoria quando si
lavora sul display superiore (
A) in modalità Frequenza (VFO).
Per creare un nuovo canale
, tenere premuto il tasto [MENU] mentre si accende la radio per impostare la radio in modalità Frequenza
(VFO). Quando si è in modalità Frequenza (VFO), selezionare la frequenza di ricezione desiderata tramite il tastierino numerico.
Successivamente
, utilizzare il menù per configurare i dettagli ulteriori del canale che si desidera p
rogrammare in memoria
, come la
potenza di
trasmissione, la larghezza di banda, i toni CTCSS o codici DCS e molto altro.
Canali Simplex
Le seguenti istruzioni presumono che la radio sia in modalità Frequenza (VFO) e che si abbia già inserito la frequenza desiderata da
salvare in memoria.
1
. Premere il tasto [MENU] per accedere al menù.
2
. Premere i tasti [2] e [7] sul tastierino numerico per accedere alla MEM-CH.
3
. Premere il tasto [MENU] per confermare.
4
. Premere i t
asti [▲] e [▼] per selezionare un canale di memoria vuoto, o inserirlo direttamente sul tastierino numerico.
5
. Premere il tasto [MENU] per confermare.
6
. premere il tasto [EXIT/AB] per uscire dal menù.
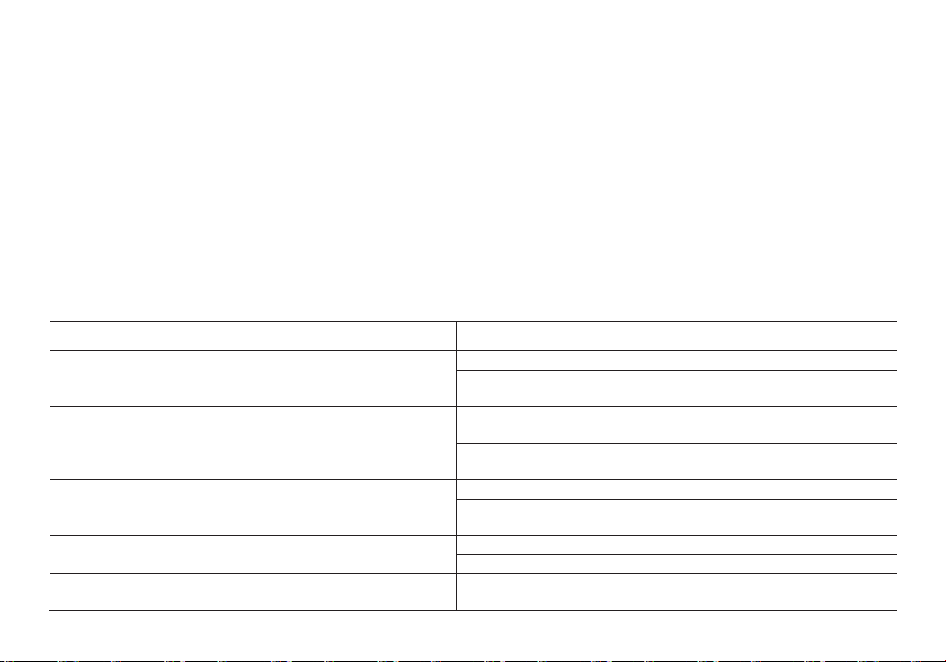
106
Spegnere la radio, quindi tenere premuto il tasto [MENU] per accendere la radio e passare alla modalità canale (MR) per testare il
nuovo canale. Se si decide di assegnare un nome al canale salvato, bisognerà farlo da un computer. Maggiori informazioni al
riguardo nella sezione “Programmazione da computer”.
Canali duplex
Le seguenti istruzioni presumono che si abbia impostato un canale duplex in modalità VFO sul display superiore (A), come descritto
in Capitolo 11, Ripetitori, e che ci si trovi
ancora in modalità VFO.
1. Salvare la frequenza come si farebbe con un normale canale simplex, come descritto nella sezione precedente.
2. Premere il tasto [*SCAN] per entrare momentaneamente in modalità Reverse.
3. Salvare nuovamente il canale in memoria come nel passaggio 1.
Spegnere la radio, quindi tenere premuto il tasto [MENU] per accendere la radio e passare alla modalità canale (MR) per testare il
nuovo canale. Se si decide di assegnare un nome al canale salvato, bisognerà farlo da un
computer. Maggiori informazioni al
riguardo nella sezione “Programmazione da computer”.
Soluzione dei problemi
PROBLEMA
SOLUZIONE
La radio non si accende
Ba�eria scarica. Procedere alla ricarica
Ba�eria non installata corre�amente. Riposizionarla in modo
corre�o
La ba�eria si scarica rapidamente
La vita della ba�eria è arrivata alla fine. Sos�tuirla con una
nuova.
La ba�eria non è totalmente carica. Assicurarsi che la carica
si comple�.
Il led indicatore di ricezione si illumina ma non si sente
niente
Assicurarsi che il livello del volume non sia troppo basso.
Assicurarsi che i sub-toni CTCSS e i codici DCS siano gli stessi
degli altri uten� del vostro gruppo.
La tas�era non funziona
É a�va la funzione di Blocco tas�era
Assicurarsi di non aver premuto qualche altro pulsante
Mentre è in corso una conversazione con il proprio
gruppo, si ricevono interferenze da altri gruppi
Cambiare il tono CTCSS o il codice DCS del vostro gruppo.

107
Specifiche tecniche
Banda di frequenza
144-146MHz & 430-440MHz (Rx / Tx)
Canali memorizzabili
128
Alimentazione
ba�eria Li-Ion da 7.4V/2000 mAh (BL-8)
Temperature di funzionamento
-10°C to + 45°C
Modalità di funzionamento
monoband/dualband
Potenza d’uscita
VHF: 5W / UHF:4W
Modulazione
F3E(FM)
Deviazione max di frequenza
≤ ±5KHz
Emissione spurie
< -60dB
Stabilità di frequenza
±2.5 ppm
Sensibilità di ricezione
< 0.2uV
Potenza d’uscita audio
≥ 500mW
Dimensioni
62x131x34mm (LxAxP)
Peso
230g
Le specifiche sono soggette a modifiche senza preavviso.
ATTENZIONE: L’adattatore di alimentazione è il dispositivo di disconnessione dell’apparato; la base di carica della
corrente deve restare vicino all’apparato e facilmente accessibile.

GT-82
(Two-way Radio User Manual in Poland)
1.-INFORMACJE DOTYCZĄCE BEZPIECZEŃSTWA:
Podczas obsługi, serwisowania lub napraw należy zawsze przestrzegać następujących wskazówek
dotyczącychbezpieczeństwa.
• Urządzenie powinno być sprawdzane wyłącznie przez wykwalifikowany personel.
• Nie modyfikuj urządzenia.
• Używaj wyłącznie baterii i ładowarek wyznaczonych przez Radioddity lub
• Nigdy nie używaj urządzenia z uszkodzoną anteną. Jeśli uszkodzona antena zetknie się ze skórą, może
spowodować oparzenia.
• Wyłącz urządzenie, gdy wchodzisz lub zbliżasz się do obszarów łatwopalnych lub wybuchowych
przychodzić.
• Nie ładuj akumulatora w miejscach łatwopalnych lub wybuchowych.
• Abyuniknąćzakłóceń elektromagnetycznych,nieużywajurządzeniawmiejscach,wktórychjesttozabronione.
Radioddity.

• Wyłącz urządzenie przed wejściem na pokład samolotu. Każde użycie urządzenia musi być zgodne z
przepisy i personel się zdarzają.
• Wyłącz urządzenie w obszarach wybuchowych.
• Nie umieszczaj urządzenia w bezpośrednim sąsiedztwie poduszek powietrznych lub obszarów ich wyzwalania.
• Nie wystawiaj urządzenia na długotrwałe bezpośrednie działanie promieni słonecznych ani gorących źródeł.
• Podczas nadawania za pomocą urządzenia trzymaj je pionowo z mikrofonem w odległości 3 do 4 cm od ust.
trzymaj
Podczas nadawania antena powinna znajdować się w odległości co najmniej 25 cm od ciała.
UWAGA: Jeśli nosisz urządzenie na ciele, trzymaj antenę w odległości co najmniej 25 cm podczas nadawania!
52
2.-CECHY I FUNKCJE
- Przenośny nadajnik dwuzakresowy z nawigacją i wyświetlaniem menu na wyświetlaczu LCD.
- kodowane DTMF.
- Akumulator litowo-jonowy o dużej pojemności.
- odbiornik komercyjny (65MHz ~ 108MHz).
- Zawiera 105 kodów DCS i 50 prywatnych, programowalnych kodów CTCSS.

- Funkcja „VOX” (transmisja głosowa).
- Funkcja alarmu.
- Do 128 zapisanych kanałów.
- Szerokopasmowy (szeroki) / Bliski (bliski) do wyboru.
- Podświetlenie wyświetlacza i programowalne klawisze.
- Funkcja Beep na klawiszach, dźwięki klawiszy.
- Podwójne wysyłanie i odbieranie
- Możliwość wyboru częstotliwości w krokach co 12,5/25 kHz.
- Funkcja "OFFSET" (dopasowanie częstotliwości do wzmacniacza / masztu radiowego).
- Ochrona baterii i mniejsze zużycie: „SAVE”.
- Opóźniona transmisja „TOT” programowalna.
- Możliwość wyboru trybu skanowania.
- Kanał funkcyjny zajęty „BCLO”.
- Wbudowane skanowanie CTCSS/DCS.
- Wbudowana latarka.
- Programowalny przez PC.

- Progi „Squelch” (redukcja szumów) regulowane w zakresie od 0 do 9.
- Odbiór poprzeczny.
- Dźwięk na koniec transmisji.
- Wbudowany zamek na klucz.
53
3.- DOŁĄCZ AKCESORIA
3.1.- ZAINSTALUJ ANTENĘ
Podłącz antenę zgodnie z ilustracją. Aby to zrobić, obróć go zgodnie z ruchem wskazówek zegara, aż będzie
szczelny.
NIEBEZPIECZEŃSTWO:
- Podczas mocowania anteny nie trzymaj i nie przekręcaj jej od góry, ale od dołu.
- Jeśli używasz anteny zewnętrznej, upewnij się, że jej współczynnik SWR wynosi 1,5:1 lub
mniej, aby uniknąć uszkodzenia urządzenia i jego tranzystorów.
- Nie trzymaj ani nie owijaj anteny rękoma, aby zapobiec słabemu odbiorowi
unikać.
- Nigdy nie używaj urządzenia bez anteny.

3.2.- ZAMOCUJ ZACISK DO PASA
W razie potrzeby przymocuj zaczep do paska. Aby to zrobić, zamocuj go w pokazany sposób
komora baterii.
NIEBEZPIECZEŃSTWO:
- Nie używaj kleju do mocowania klipsa do paska ani jego śrub. Ten
może uszkodzić obudowę baterii.
3.3.- PODŁĄCZ MICRO ZESTAW SŁUCHAWKOWY
Podłącz zestaw słuchawkowy do wyznaczonego gniazda
„SP/MIC”.
Ilustracja pokazuje, jak to zrobić.
54
55
3.4.- WŁOŻYĆ BATERIĘ:
- Podczas wkładania baterii upewnij się, że jest ona prawidłowo osadzona w aluminiowej obudowie. The
spód baterii znajduje się około 2 do 3 cm nad dolną krawędzią urządzenia.
- Umieść baterię w prowadnicach i przesuń w górę, aż usłyszysz „kliknięcie”
słyszeć.

- Jest zablokowany na dolnym końcu.
- Wyłącz urządzenie przed wyjęciem baterii.
- Pociągnij baterię w dół i wyjmij ją z urządzenia, jak pokazano strzałką na rysunku.
- Przesuń akumulator w górę o około 1 do 2 cm, aby wyjąć go z obudowy
Móc.
4.-ŁADUJ AKUMULATOR:
Używaj wyłącznie dostarczonej ładowarki. Dioda LED wskazuje stan ładowania.
STAN ŁADOWANIA: WSKAŹNIKI LED:
Tryb czuwania (brak ładowania) Miga czerwona dioda LED i zapala się zielona dioda LED
Ładowanie Czerwona dioda LED świeci
W pełni naładowany Zielona dioda LED świeci
Błąd czerwony LE
Wykonaj poniższe kroki:
D miga i zapala się zielona dioda LED
1. Podłącz kabel ładujący do adaptera.
2. Włóż wtyczkę do gniazdka.

3. Podłącz złącze prądu stałego do gniazda ładowarki.
4. Umieść urządzenie z baterią lub samą baterią w
Ładowarka.
5. Upewnij się, że akumulator ma dobry kontakt z ładowarką. Ładowanie rozpoczyna się, gdy czerwona dioda LED
świeci.
6. Zielona dioda LED zacznie migać po około 4 godzinach. Oznacza to, że ładowanie zostało zako
ńczone.
Dystans

GT-82
(Two-way Radio User Manual in Sweden)
1.-SÄKERHETSINFORMATION:
Följ alltid följande säkerhetsinformation under drift, service eller reparationer.
• Enheten bör endast kontrolleras av kvalificerad personal.
• Modifiera inte enheten.
• Använd endast batterier och laddare avsedda för Radioddity eller Radioddity.
•
Använd aldrig enheten med en defekt antenn. Om en defekt antenn kommer i kontakt med
din hud kan den
orsaka brännskador.
•
Stäng av enheten när du går in i eller nära brandfarliga eller explosiva områden
komma.
• Ladda inte batteriet på brandfarliga eller explosiva platser.
• För att undvika elektromagnetiska störningar, använd inte enheten på platser där det är

förbjudet.
•
Stäng av enheten innan du går ombord på ett flygplan. All användning av enheten måste
ske i enlighet med
föreskrifter och personalen sker.
•
Stäng av enheten i sprängningsområden.
•
Placera inte enheten i omedelbar närhet av krockkuddar eller deras utlösningsområden.
• Utsätt inte enheten för direkt solljus under en längre tid eller för varma källor.
• När du sänder med enheten, håll den upprätt med mikrofonen 3 till 4 cm från dina läppar.
håll
Antenn minst 25 cm från din kropp när du sänder.
OBSERVERA: Om du bär enheten på kroppen, håll antennen på minst 25 cm avstånd när du
sänder!
52
2.-FUNKTIONER OCH FUNKTIONER
- Bärbar dubbelbandssändare med LCD-skärm menynavigering och display.
- DTMF-kodad.

- Litiumjonbatteri med hög kapacitet.
- kommersiell mottagare (65MHz ~ 108MHz).
- Innehåller 105 DCS-koder och 50 privata, programmerbara CTCSS-koder.
- "VOX"-funktion (röststyrd sändning).
- Larmfunktion.
- Upp till 128 lagringsbara kanaler.
- Bredband (bred) / Nearband (nära) valbar.
- Displaybelysning och programmerbara knappar.
- Pipfunktion på knapparna, knapptoner.
- Dubbel sändning och mottagning
- Valbar frekvens i steg om 12,5/25 kHz.
- "OFFSET"-funktion (frekvensjustering till förstärkaren / radiomast).
- Batteriskydd och mindre förbrukning: "SPAR".
- Fördröjd överföring "TOT" programmerbar.
- Valbart skanningsläge.
- Funktionskanal upptagen "BCLO".

- Inbyggd CTCSS/DCS-skanning.
- Inbyggd ficklampa.
- Programmerbar via PC.
- "Squelch"-trösklar (brusreducering) justerbara från 0 till 9.
- Crossbandsmottagning.
- Ljud vid slutet av sändningen.
- Inbyggt nyckellås.
53
3.- FÄSTA TILLBEHÖR
3.1.- INSTALLERA ANTENNEN
Fäst antennen enligt bilden. För att göra detta, vrid den medurs tills den är åtdragen.
FARA:
- När du fäster antennen ska du inte hålla och vrida den i toppen, utan i botten.
- Om du använder en extern antenn, se till att den har en SWR på 1,5:1 eller
mindre för att undvika skador på enheten och dess transistorer.
- Håll eller linda inte antennen med händerna för att förhindra dålig mottagning

undvika.
- Använd aldrig enheten utan antenn.
3.2.- FÄSTA BÄLTKLÄMMEN
Fäst vid behov bältesklämman. För att göra detta, fäst den på som visas
batterifack.
FARA:
- Använd inte lim för att fästa bältesklämman eller dess skruvar. Detta
kan skada batterihöljet.
3.3.- ANSLUT MICRO HEADSET
Anslut headsetet till det avsedda "SP / MIC"-uttaget.
Illustrationen visar hur.
54
55
3.4.- SÄTT I BATTERI:
- När du sätter i batteriet, se till att det sitter ordentligt i aluminiumhöljet. De
undersidan av batteriet sitter cirka 2 till 3 cm ovanför enhetens nedre kant.

- Placera batteriet i styrskenorna och skjut uppåt tills du hör ett "klick"
höra.
– Den är låst i nedre änden.
- Stäng av enheten innan du tar bort batteriet.
- Dra batteriet nedåt och ut ur enheten enligt pilen på bilden.
- Skjut batteriet uppåt cirka 1 till 2 cm för att ta bort det från höljet
burk.
4.-LADA BATTERI:
Använd endast den medföljande laddaren. Lysdioden indikerar laddningsstatus.
LADDNINGSSTATUS: LED INDIKATION:
Standby (laddar ej) Röd lysdiod blinkar och grön lysdiod lyser
Laddning Röd LED lyser
Fulladdad Grön LED lyser
Fel Röd LE
Följ stegen nedan:
D blinkar och grön lysdiod tänds

1. Anslut laddningskabeln till adaptern.
2. Sätt i kontakten i uttaget.
3. Anslut DC-kontakten till laddarens uttag.
4. Placera enheten med batteri eller bara batteriet i
Laddare.
5. Se till att batteriet har god kontakt med laddaren. Laddningen börjar när den röda
lysdioden
lyser.
6. Den gröna lysdioden blinkar ca 4 timmar senare. Detta indikerar att laddningen är klar.
distans

GT-82
(Two-way Radio User Manual in Turkey)
1.-GÜVENLİK BİLGİLERİ:
Çalıştırma, servis veya onarımlar sırasında aşağıdaki güvenlik bilgilerine her zaman
uymalısınız.
• Cihaz sadece kalifiye personel tarafından kontrol edilmelidir.
• Aygıtta değişiklik yapmayın.
• Yalnızca Radioddity veya Radioddity tarafından belirlenmiş pilleri ve şarj
cihazlarını
kullanın.
• Cihazı asla arızalı bir antenle kullanmayın. Arızalı bir anten cildinizle temas ederse,
yanıklara neden olur.
•
Yanıcı veya patlayıcı alanlara girerken veya yakınındayken cihazı kapatın
Gelmek.
• Pili yanıcı veya patlayıcı ortamlarda şarj etmeyin.

• Elektromanyetik paraziti önlemek için cihazı yasak olan yerlerde kullanmayın.
•
Uçağa binmeden önce cihazı kapatın. Cihazın herhangi bir kullanımı aşağıdakilere
uygun olmalıdır:
düzenlemeler ve personel olur.
• Patlatma alanlarında cihazı kapatın.
•
Cihazı hava yastıklarının veya açılma alanlarının yakınına yerleştirmeyin.
•
Cihazı uzun süre doğrudan güneş ışığına veya kaplıcalara maruz bırakmayınız.
• Cihazla iletim yaparken, mikrofonu dudaklarınızdan 3 ila 4 cm uzakta olacak şekilde dik
tutun. şunu tut
İletim yaparken anteni vücudunuzdan en az 25 cm uzakta tutun.
DİKKAT: Cihazı vücudunuza takıyorsanız, iletim yaparken anteni en az 25 cm uzakta tutun!
52
2.-ÖZELLİKLER VE İŞLEVLER
- LCD ekran menü navigasyonu ve ekranı ile taşınabilir çift bantlı verici.
- DTMF kodlu.
- Yüksek kapasiteli lityum-iyon pil.

- ticari alıcı (65MHz ~ 108MHz).
- 105 DCS kodu ve 50 özel, programlanabilir CTCSS kodu içerir.
- "VOX" işlevi (sesle çalışan iletim).
- Alarm fonksiyonu.
- 128 adede kadar saklanabilir kanal.
- Geniş bant (geniş) / Yakın bant (yakın) seçilebilir.
- Ekran aydınlatması ve programlanabilir tuşlar.
- Tuşlarda bip sesi, tuş sesleri.
- Çift gönderme ve alma
- 12,5/25 kHz adımlarla seçilebilir frekans.
- "OFFSET" işlevi (amplifikatöre / radyo direğine frekans ayarı).
- Pil koruması ve daha az tüketim: "SAVE".
- Gecikmeli iletim "TOT" programlanabilir.
- Tarama modu seçilebilir.
- İşlev kanalı meşgul "BCLO".
- Dahili CTCSS/DCS taraması.

- Dahili el feneri.
- PC üzerinden programlanabilir.
- "Susturma" eşikleri (gürültü azaltma) 0 ile 9 arasında ayarlanabilir.
- Çapraz bant alımı.
- İletim sonunda ses.
- Dahili tuş kilidi.
53
3.- BAĞLANTI AKSESUARLARI
3.1.- ANTENİ TAKIN
Anteni gösterildiği gibi takın. Bunu yapmak için, sıkı olana kadar saat yönünde çevirin.
TEHLİKE:
- Anteni takarken üstten değil alttan tutup bükün.
- Harici bir anten kullanıyorsanız, SWR'nin 1,5:1 olduğundan emin olun veya
cihaza ve transistörlerine zarar vermemek için daha az.
- Zayıf alımı önlemek için anteni elinizle tutmayın veya sarmayın.
kaçınmak.

- Cihazı kesinlikle antensiz çalıştırmayınız.
3.2.- KEMER KLİPSİNİ TAKIN
Gerekirse kemer klipsini takın. Bunu yapmak için, gösterildiği gibi takın
pil yuvası.
TEHLİKE:
- Kemer klipsini veya vidalarını takmak için yapıştırıcı kullanmayın. Bu
pil kutusuna zarar verebilir.
3.3.- MİKRO KULAKLIĞI BAĞLAYIN
Kulaklığı belirlenen "SP / MIC" soketine takın.
Resim nasıl olduğunu gösterir.
54
55
3.4.- PİLİ TAKIN:
- Pili taktığınızda, alüminyum kasaya düzgün bir şekilde oturduğundan emin olun. bu
pilin alt kısmı, cihazın alt kenarından yaklaşık 2 ila 3 cm yukarıya oturur.
- Pili kılavuz raylara yerleştirin ve bir "klik" sesi duyana kadar yukarı kaydırın

duymak.
- Alt uçtan kilitlidir.
- Pili çıkarmadan önce cihazı kapatın.
- Resimdeki okla gösterildiği gibi pili aşağı doğru çekerek cihazdan çıkarın.
- Pili kasadan çıkarmak için yaklaşık 1 ila 2 cm yukarı kaydırın
olabilmek.
4.-PİLİ YÜKLEYİN:
Yalnızca birlikte verilen şarj cihazını kullanın. LED, şarj durumunu gösterir.
ŞARJ DURUMU: LED GÖSTERGESİ:
Beklemede (şarj olmuyor) Kırmızı LED yanıp sönüyor ve yeşil LED yanıyor
Şarj oluyor Kırmızı LED yanıyor
Tamamen şarj oldu Yeşil LED yanıyor
Hata Kırmızı LE
Aşağıdaki adımları takip et:
D yanıp söner ve yeşil LED yanar
1. Şarj kablosunu adaptöre takın.

2. Fişi prize takın.
3. DC konektörünü şarj soketine takın.
4. Cihazı pille birlikte veya yalnızca pili yuvaya yerleştirin.
Şarj cihazı.
5. Pilin şarj cihazıyla iyi temas ettiğinden emin olun. Kırmızı LED yandığında şarj başlar
parlar.
6. Yeşil LED yaklaşık 4 saat sonra yanıp söner. Bu, yüklemenin tamamlandığını gösterir.
mesafe

EU Declara�on of Conformity
aRadioddity nd Pofung hereby declares that the radio equipment type listed in Technical Specifica�ons is in compliance with
Direc�ve 2014/53/EU. The full text of the EU Declara�on of Conformity is available at the following link: h�p://www.pofung
.
cn/download.asp?EnBigClassName=EU%20DOC
. Via your local Radioddity helpdesk, your dealer from where
you
purchased
this radio or send an email t
o
Déclara�on de conformité
eRadioddity t Pofung déclarent par la présente que le type d'équipement radio répertorié dans les spécifica�ons techniques
est
conforme à la direc �ve 2014/53/EU. Le texte intégral de la déclara �on de conformité de l'UE est disponible sur le lien
suivant:
h�p://www.pofung.cn/download.asp?EnBigClassName=EU%20DO
C. Via votre service d'assistance Radioddity local,
votre
revendeur chez qui vous avez acheté ce�e radio ou envoyez un e-mail à
Declaración de conformidad
yRadioddity Pofung declaran por la presente que el �po de equipo de radio que figura en las Especificaciones técnicas
cumple
con la Direc�va 2014/53 / EU. El texto completo de la Declaración de conformidad de la UE está disponible en el
siguiente
enlac
e: h�p://www.pofung.cn/download.asp?EnBigClassName=EU%20DOC. A través de su servicio de ayuda
local
d
e
Radioddity, su distribuidor donde compró esta radio o envíe un correo electrónico a [email protected].
Konformitätserklärung
Hiermit erklärt Radioddity und Pofung, dass der in den Technischen Spezifika�onen aufgeführte Funkanlagentyp der
Richtlini
e
2014/53/EU entspricht. Den vollständigen Text der EU-Konformitätserklärung finden Sie unter folgendem Link:
h�p://www.pofung.cn/download.asp?EnBigClassName=EU%20DOC
. Über Ihren örtlichen Radioddity-Helpdesk, Ihren
Händler,
bei dem Sie dieses Radio gekau� haben, oder senden Sie eine E-Mail a
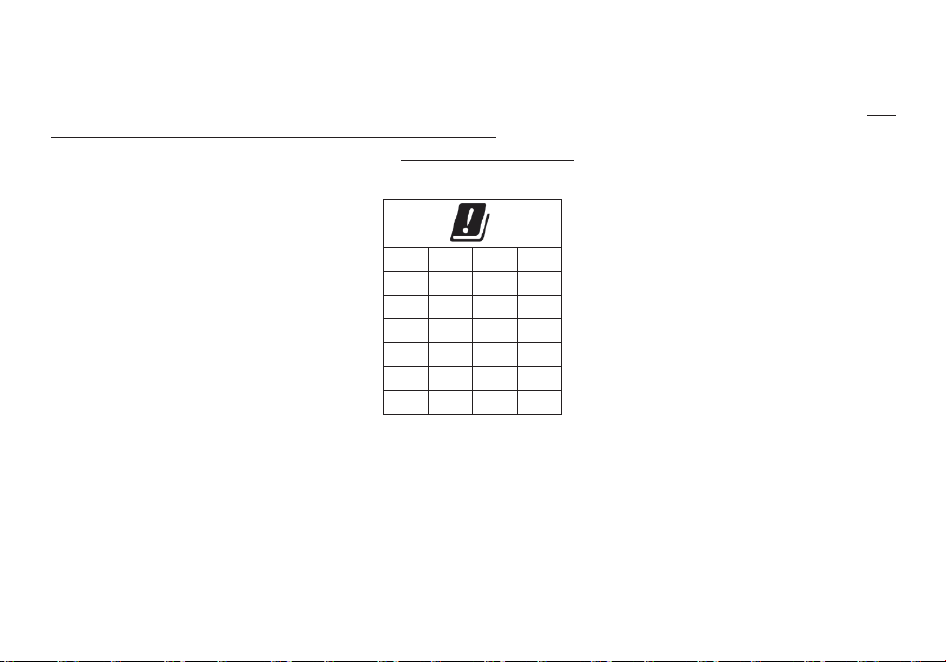
Dichiarazione di conformità
eRadioddity Pofung dichiarano con la presente che il �po di apparecchiatura radio elencato nelle Speci fiche Tecniche è
conforme alla Dire�va 2014/53/EU. Il testo completo della Dichiarazione di Conformità UE è disponibile al seguente link: h�
p
://www.pofung.cn/download.asp?EnBigClassName=EU%20DOC. Tramite il tuo helpdesk Radioddity locale, il tuo rivenditore
da cui hai acquistato questa radio o invia un'e-mail a
ATTENTION: condi�ons of use!
The band of frequencies on which this device operates is administrated by limita�ons and/or permissions for their usage.
Consequently, in the EU Countries men�oned in the sheet, operators must consult the entrusted authori�es. In par�cular,
they must possess a license or a frequency assigned to them by their respec�ve competent authority.
ACHTUNG: Nutzungsbedingungen!
Das Frequenzband, auf dem dieses Gerät betrieben wird, wird durch Beschränkungen und/oder Genehmigungen für deren
Nutzung verwaltet. Folglich müssen die Betreiber in den im Bla� genannten EU-Ländern die betrauten Behörden
FR DE IT NL
BE LU DK IE
GB GR ES PT
FI AT SE PL
HU CZ CY SI
SK LV LT EE
BG RO MT HR

konsul�eren. Sie müssen insbesondere im Besitz einer ihnen von ihrer jeweils zuständigen Behörde zugeteilten Konzession
oder Frequenz sein.
ATTENTION: condi�ons d’u�lisa�on!
La bande de fréquences sur laquelle cet appareil fonc�onne est gérée par des limita�ons et/ou des autorisa�ons pour leur
u�lisa�on. Par conséquent, dans les pays de l'UE men�onnés dans la fiche, les opérateurs doivent consulter les autorités
compétent
es. En par�culier, ils doivent être en possession d'une licence ou d'une fréquence qui leur est a�ribuée par leur
autorité compétente respec�ve.
ATENCIÓN: condiciones de uso!
La banda de frecuencias en la que opera este disposi�vo está administrada por limitaciones y / o permisos para su uso. En
consecuencia, en los países de la UE mencionados en la ficha, los operadores deben consultar a las autoridades encargadas.
En par�cu
lar, deben poseer una licencia o una frecuencia que les asigne su respec�va autoridad competente.
ATTENZIONE: condizioni d'uso!
La banda di frequenze su cui opera questo disposi�vo è amministrata da limitazioni e/o permessi per il loro u�lizzo. Di
conseguenza, nei Paesi UE cita� nella scheda, gli operatori devono consultare le autorità preposte. In par�colare, devono
possedere una licenza o una frequenza assegnata loro dalla r
ispe�va autorità competente.
INFORMAZIONE AGLI UTENTI: Ai sensi dell’art. 13 del decreto legislativo 25 luglio 2005, n.151 “Attuazione delle Direttive
2002/95/CE, 2002/96/CE e 2003/108/CE, relative alla riduzione dell’uso di sostanze pericolose nelle apparecchiature elettriche ed
elettroniche, nonché allo smaltimento dei rifiuti”. Il simbolo del cassonetto barrato riportato sull’apparecchiatura indica che il prodotto
alla fine della propria vita utile deve essere raccolto separ
atamente dagli altri rifiuti. L’utente dovrà, pertanto, conferire
l’apparecchiatura giunta a fine vita agli idonei centri di raccolta differenziata dei rifiuti elettronici ed elettrotecnici, oppure

riconsegnarla al rivenditore al momento dell’acquisto di una nuova apparecchiatura di tipo equivalente, in ragione di uno a uno.
L’adeguata raccolta differenziata per l’avvio successivo dell’apparecchiatura dismessa al riciclaggio, al trattamento e allo
smaltimento ambientalmente compatibile contribuisce ad evitare possibili effetti negativi sull’ambiente e sulla salute e favorisce il
riciclo dei materiali di cui è composta l’apparecchiatura. Lo smaltimento abusivo del prodo
tto da parte dell’utente comporta
l’applicazione delle sanzioni amministrative di cui al dlgs. n.22/1997 (articolo 50 e seguenti del dlgs. n.22/1997).
All articles displaying this symbol on the body, packaging or instruction manual of same, must not be thrown away into normal
disposal bins but brought to specialised waste disposal centres. Here, the various materials will be divided by characteristics and
recycles, thus making an important contribution to environmental protection.
Alle Artikel, die auf der Ve
rpackung oder der Gebrauchanweisung dieses Symbol tragen, dürfen nicht in den normalen Mülltonnen
entsorgt werden, sondern müssen an gesonderten Sammelstellen abgegeben werden. Dort werden die Materialien entsprechend
ihrer Eigenschaften getrennt und, um einen Beitrag zum Umweltschutz zu liefern, wiederverwertet.
Todos los artículos que exhiban este símbolo en el cuerpo del producto, en el embalaje o en el manual de instrucciones del mismo,
no deben ser desechados junto a los residuos urbanos normales sino que
deben ser depositados en los centros de recogida
especializados. En estos centros, los materiales se dividirán en base a sus características y serán reciclados, para así poder
contribuir de manera importante a la protección y conservación del medio ambiente.
Tous les articles présentant ce symbole sur le corps, l'emballage ou le manuel d'utilisation de celui-ci ne doivent pas être jetés dans
des poubelles normales mais être amenés dans des centres de traitement spécialisés. Là, le
s différents matériaux seront séparés
par caractéristiques et recyclés, permettant ainsi de contribuer à la protection de l'environnement.
Όλα τα προϊόντα στα οποία εμφανίζεται το ακόλουθο σύμβολο στο σώμα, τη συσκευασία ή το εγχειρίδιο χρήσης τους, δεν πρέπει να
εναποθέτονται στους κοινούς κάδους απορριμάτων αλλά να προσκομίζονται στα ειδικά κέντρα αποκομιδής. Εκεί, τα διάφορα υλικά
θα πρέπει να διαχωρίζονται ανάλογα με τα χαρακτηριστι
κά και τα ανακυκλούμενα υκλικά, συμμετέχοντας έτσι ουσιαστικά στην
προστασία του

EU Declaration of Conformity
In accordance with EU Directives and Regulations
SAIN3 LLC (DELAWARE LIMITED LIABILITY COMPANY)
Add: 36 Berkley Drive Newark, DE 19702 as the manufacturer, hereby declares under our sole
responsibility that
product(s): Amateur Radio
Model name: G
T
-
82
is in conformity with the essential requirements of the Radio Equipment Directive 2014/53/EU:
Radio
Article 3.2 EN 303 345-1 V1.1.1 (2019-06)
EN 303 345-3 V1.1.1 (2021-06)
EN 301 783 V2.1.1
(2016-01)
EMC EN 55032:2015+A1:2020
Article 3.1(b) EN 55035:2017+A11:2020
EN IEC 61000-3-2:2019+A1:2021
EN 61000-3-3:2013+A2:2021
EN 301 489-1 V2.2.3 (2019-11)
EN 301 489-15 V2.2.1 (2019-04)
Safety
Article 3.1(a) EN IEC 62368-1:2020+A11:2020
Health
Article 3.1(a) EN 50566:2017
The notified body Bay Area Compliance Labs Corp.(BACL) (EU Identification Number: 1313)
performed a conformity assessment according to Annex III, Module B.
Signed on behalf of SAIN3 L
LC (DELAWARE LIMITED LIABILITY COMPANY)
(Signature of authorized person)
Name: Peter Wang
Title: Manager
Date: 2022-05-07

Disclaimer
The accuracy and completeness of the contents are sought in the process of compila�on, but we do not bear any
responsibility for the possible errors or omissions. With the con�nuous development of technology, we reserve the right to
change the design and specifica�on of the product without no�ce. No copy, modifica�on, transla�on and dissemina�on of
this handbook may be made in any form without the prior wri�en aut
horiza�on of our department.
Sain3 LLC
36 Berkley Drive,Newark,DE 19702,United States
Website:www.radioddity.com
E-mail: support@radioddity.com