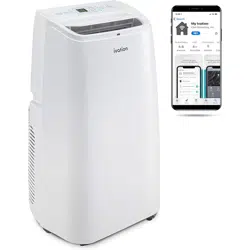
Portable Air Conditioner with Wi-Fi®
User Guide
SKUs: IVAPACWIFI8K / IVAPACWIFI10K / IVAPACWIFI12K / IVAPACWIFI13K

2
INTRODUCTION
INTRODUCTION
Thank you for purchasing the Ivation® Portable Air
Conditioner with Wi-Fi®. This User Guide is intended to
provide you with guidelines to ensure that operation of this
product is safe and does not pose risk to the user. Any use
that does not conform to the guidelines described in this
User Guide may void the limited warranty.
Please read all directions before using the product and
retain this guide for reference. This product is intended for
household use only.
This product is covered by a limited one-year warranty.
Coverage is subject to limits and exclusions. See warranty
for details.
FEATURES
SAFETY PRECAUTIONS
PRODUCT OVERVIEW
INSTALLATION
USAGE
CARE
TROUBLESHOOTING
SPECIFICATIONS
WARRANTY
GET IN TOUCH!
3
4
5
8
9
12
15
16
17
18
TABLE OF CONTENTS

3
FEATURES
FEATURES
• Wi-Fi® connectivity lets you control your air
conditioner from your smartphone
• All-in-one device cools, dehumidifies, and
purifies air
• Air swing function adjusts air outlet direction
• Included remote control for simple operation
• Large, easy-to-read LCD display
• Convenient handles on each side make moving
your air conditioner easy
• Rear hook for safer power cord storage
• High exhaust vent for easy assembly and
better air flow
• Timer switch function allows for automatic
shut o
• Automatic compressor, frost, thermal, and
overflow protection

4
SAFETY PRECAUTIONS
SAFETY PRECAUTIONS
• Keep the air conditioner away from gasoline, flammable
gas, stoves, and other heat sources.
• Do not use insecticide sprays or other flammable
substances near the air conditioner.
• Do not attempt to disassemble, overhaul, or modify the
air conditioner. Doing so can cause machine malfunction,
property damage, or personal injury. In case of malfunction,
contact Ivation® customer service or a qualified professional.
• Do not place liquids or other objects on the air conditioner
to prevent damage from accidental spills.
• Operation and maintenance should only be performed by
adults. Do not allow children to operate or play with the air
conditioner.
• This air conditioner is only suitable for indoor use.
• Do not install or use the air conditioner in bathrooms or
other humid environments.
• Ensure that the air conditioner is properly grounded.
For questions regarding electrical installation, follow the
instructions in this user guide or ask a qualified professional.
• Place the air conditioner in a flat, dry area with at least
20 in. (50 cm) between the air conditioner and walls or
surrounding objects.
• When using the drainage hose, ensure that it is properly
connected with no blockages or bends.
• After installation, ensure that the power plug is intact and
firmly plugged into an appropriate outlet.
• Ensure that the power cord is laid neatly to prevent tripping
or accidently pulling out the power plug.
• Do not power o the air conditioner by pulling out the
power plug.
• Keep the air inlet and outlet free of all obstructions.
• Adjust both wind-guide strips on the air outlet by hand to
avoid damaging them.
• When moving the air conditioner, keep the unit in an upright
position.
• Power o and disconnect the air conditioner before
cleaning or performing maintenance.
• Do not clean the air conditioner with chemical solvents like
gasoline or alcohol.
• Clean the air conditioner with a damp cloth. For deeper
cleaning, use a mild detergent.

5
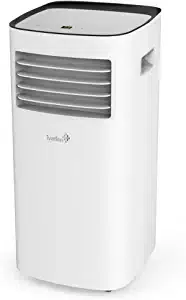
PRODUCT OVERVIEW
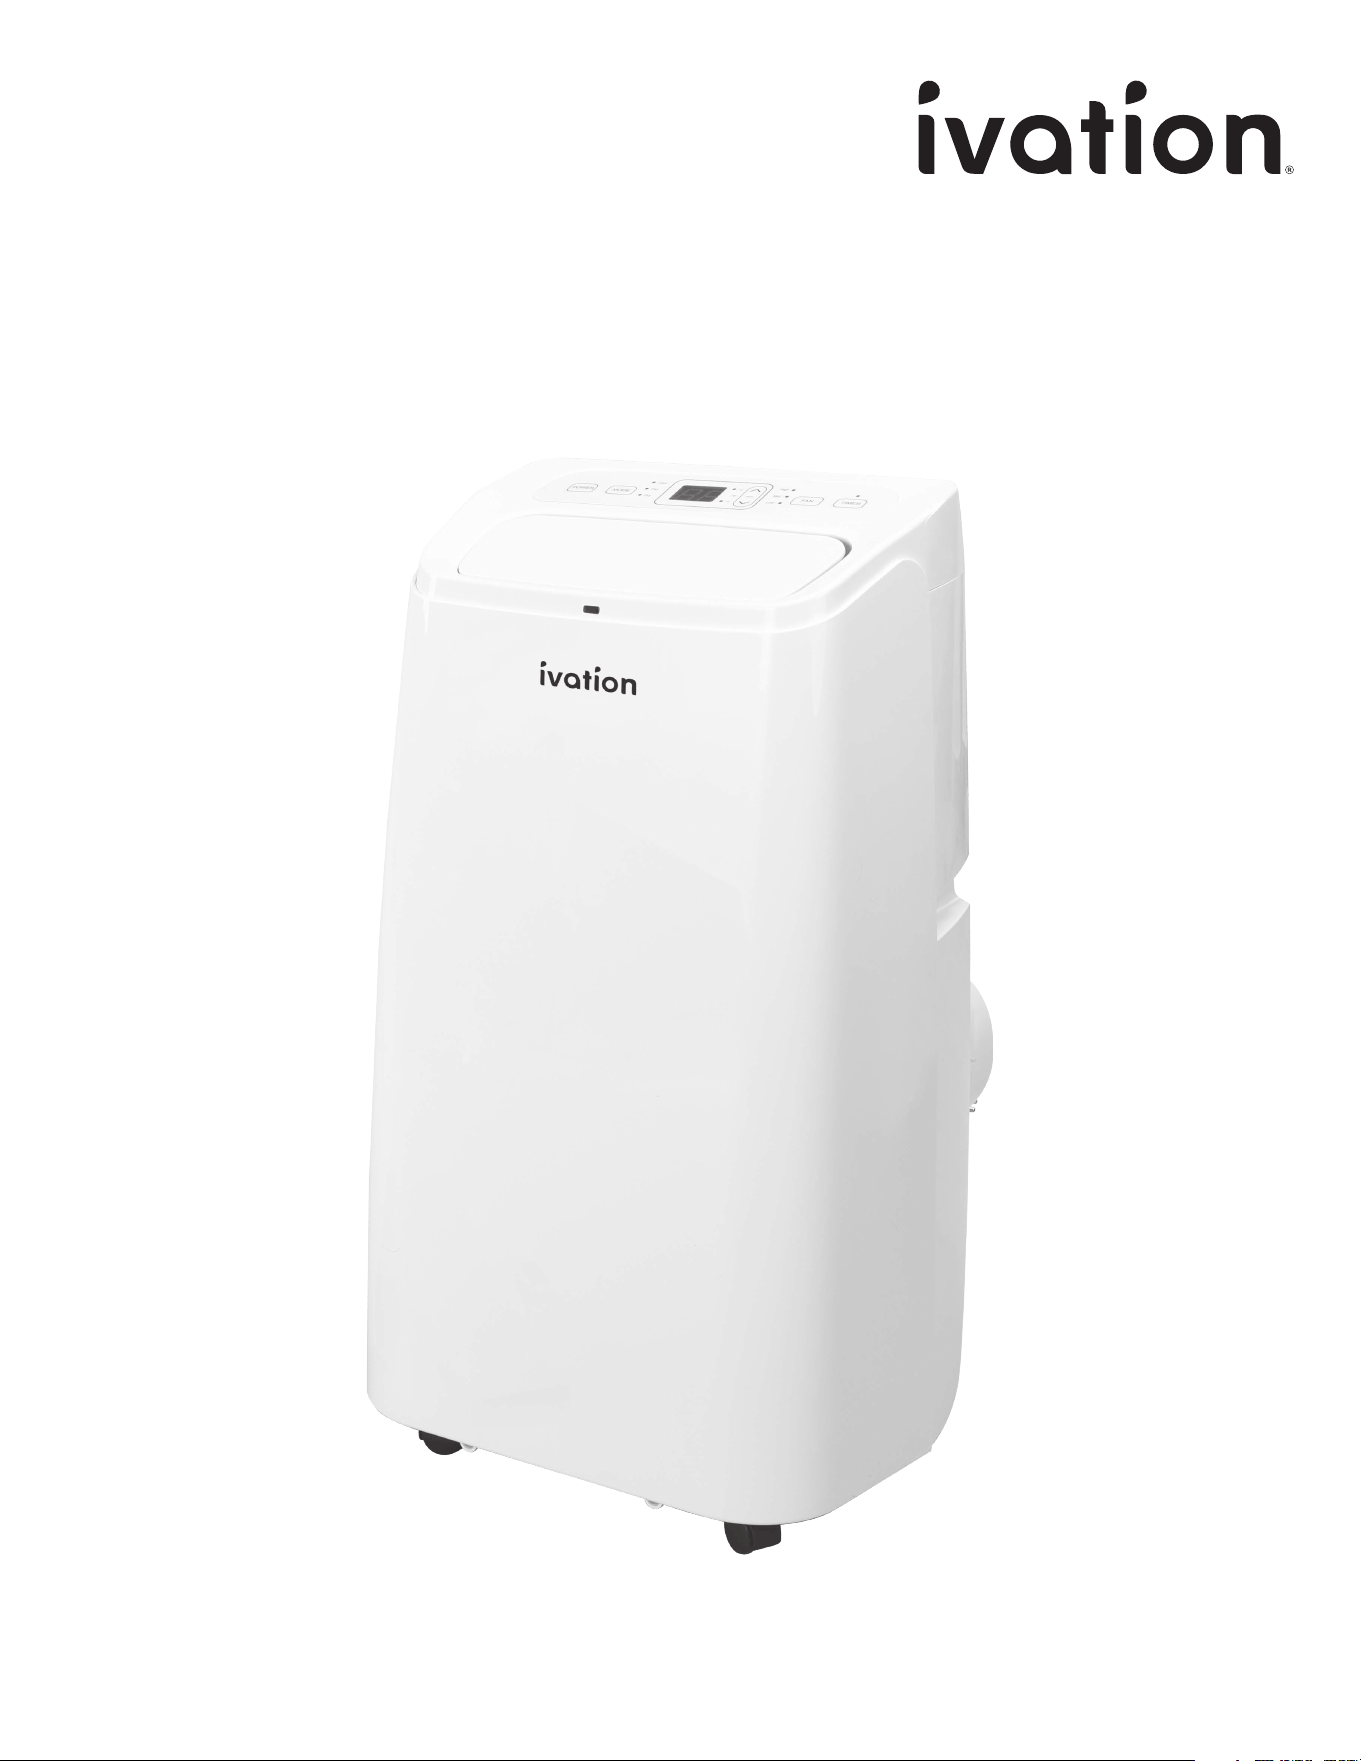
PRODUCT OVERVIEW
1
Control panel
2
Top cover
3
Swing leaf air vent
4
Rear housing
5
Front housing
6
Omni-directional wheel
7
Exhaust hose assembly
8
Window sealing plate assembly
9
Remote control
10
EVA filter housing
11
Power cord hook
12
Handle
13
Exhaust vent
14
Continuous drainage port
15
CON filter
16
Air inlet grill
17
Drainage cover
18
Power cord
19
Power plug
20
Heat preservation sleeve
(not included with all models)
GET TO KNOW YOUR AIR CONDITIONER
1
2
3
4
5
6
7
8
9
10
11
13
15
17
19
20
12
14
16
18

6
PRODUCT OVERVIEW
PRODUCT OVERVIEW
CONTROL PANEL
1
Power button: Power your air conditioner on and o.
2
Mode selection button: When powered on, select between cooling, ventilation,
and dehumidification mode.
3
LCD display: View selected temperature and operating conditions.
4
Down button: Lower your selected temperature or timing value.
5
Up button: Raise your selected temperature or timing value.
a. To switch between Fahrenheit (°F) and Celsius (°C), simultaneously press
both the up and down button.
6
Fan speed button: Toggle between high, medium, and low fan speeds.
NOTE: Fan speed is not selectable in dehumidifying mode.
7
Timer button: Select automated power on and o.
a. When powered o, press the timer button to open the timer menu and use
the up and down buttons to choose when to power on the air conditioner.
b. When powered on, press the timer button to open the timer menu and use
the up and down buttons to choose when to power o the air conditioner.
c. Timing values can be set between 1-24 hour(s) in one-hour increments.
8
Wi-Fi indicator light: Indicates whether or not the air conditioner is connected
to Wi-Fi.
1 2 3 4 8 6 7
5
7
PRODUCT OVERVIEW
PRODUCT OVERVIEW
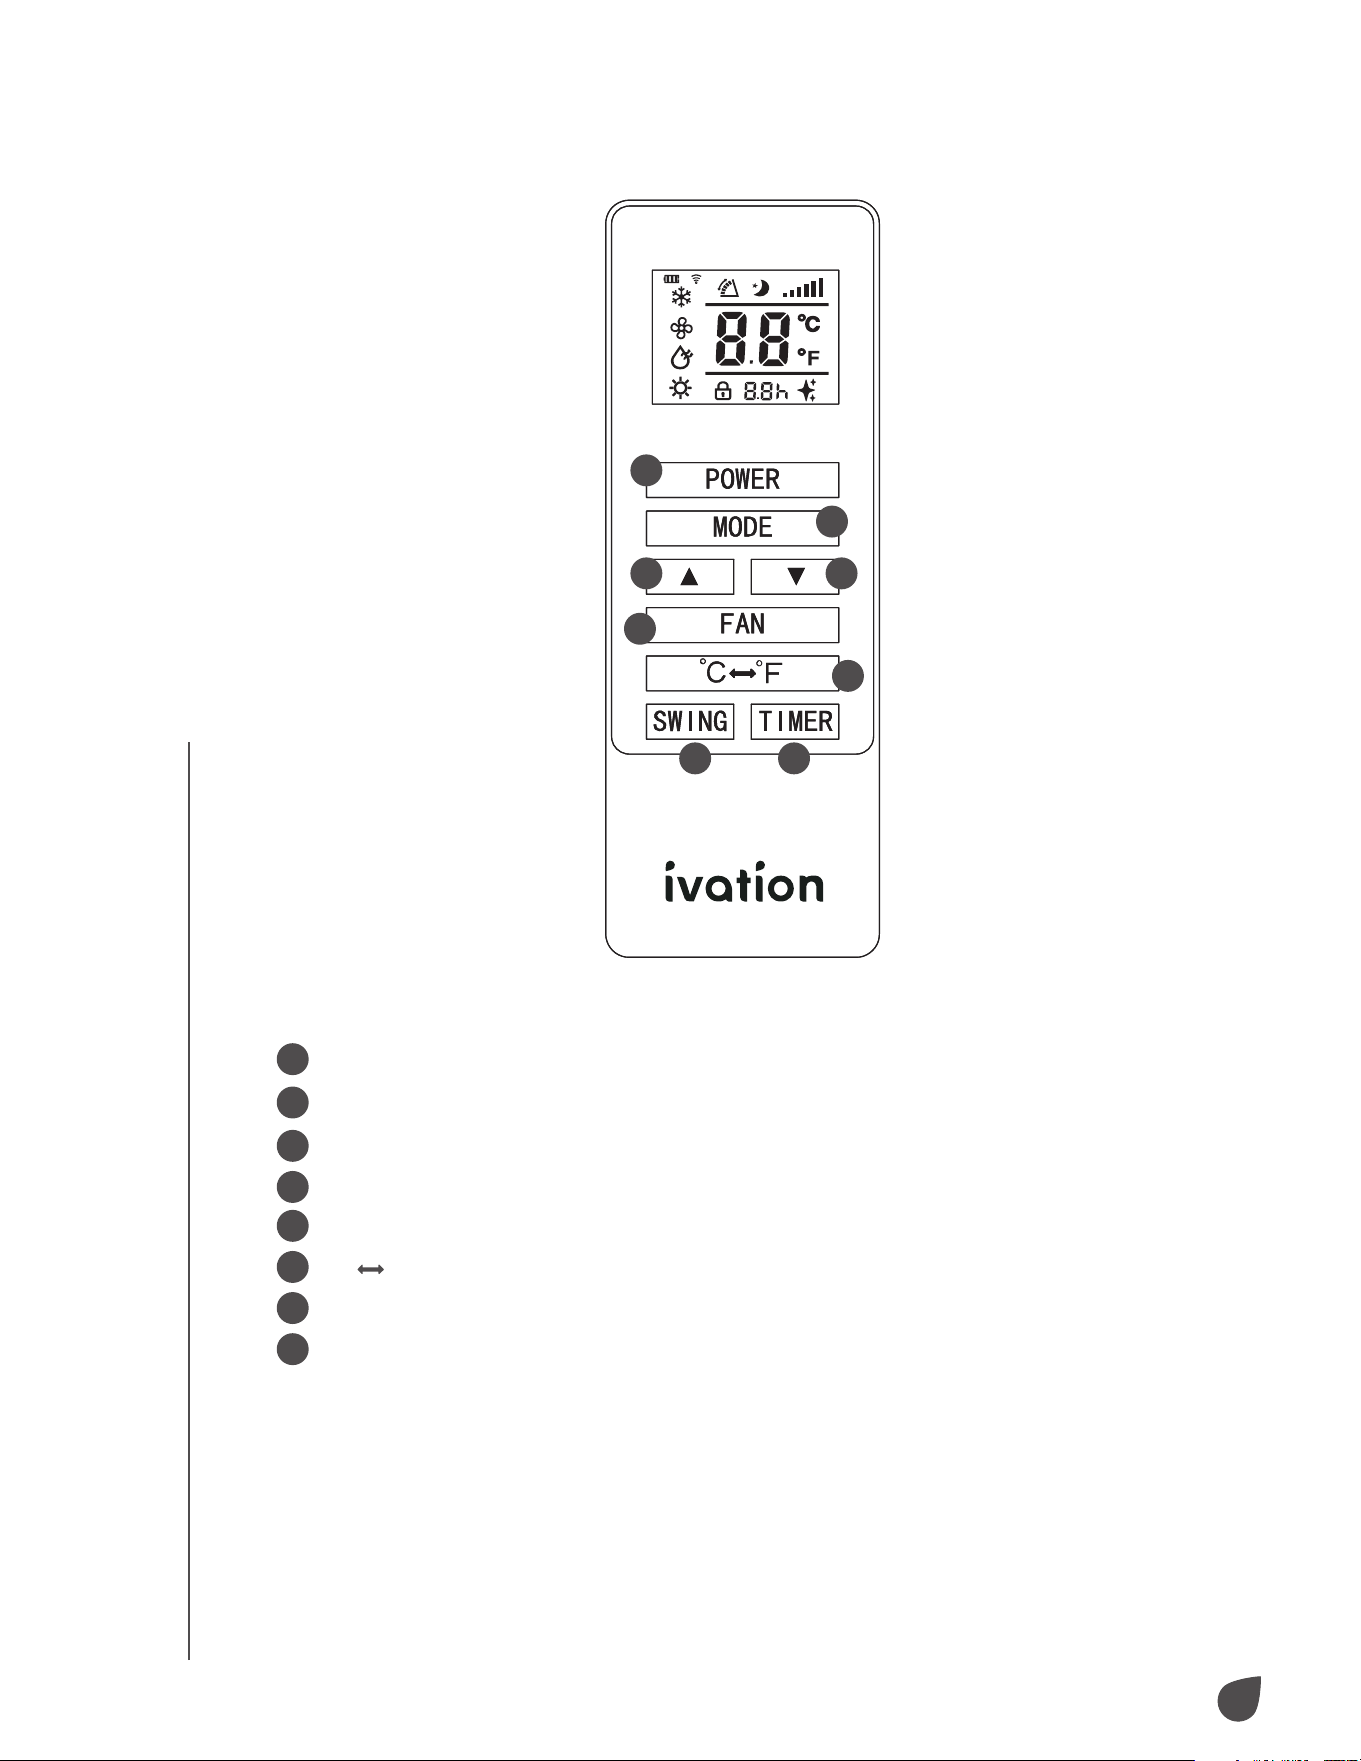
REMOTE CONTROL
1
2
3 4
8
6
7
5
1
Power: Power your air conditioner on and o.
2
Mode: Select between cooling, ventilation, and dehumidification mode.
3
Up: Raise selected temperature or timing value.
4
Down: Lower selected temperature or timing value.
5
Fan: Toggle between high, medium, and low fan speeds.
6
°C
°F: Toggle between Fahrenheit (°F) and Celsius (°C).
7
Swing: Select automated power on and o.
8
Timer: Set the timing value.
8
INSTALLATION
AIR CONDITIONER PLACEMENT
When selecting a place to install your air conditioner, consider the
following:
• Before powering on your air conditioner, let it stand upright for
at least two (2) hours.
• Keep your air conditioner upright whenever you move it.
• Do not install your air conditioner in bathrooms or other humid
environments.
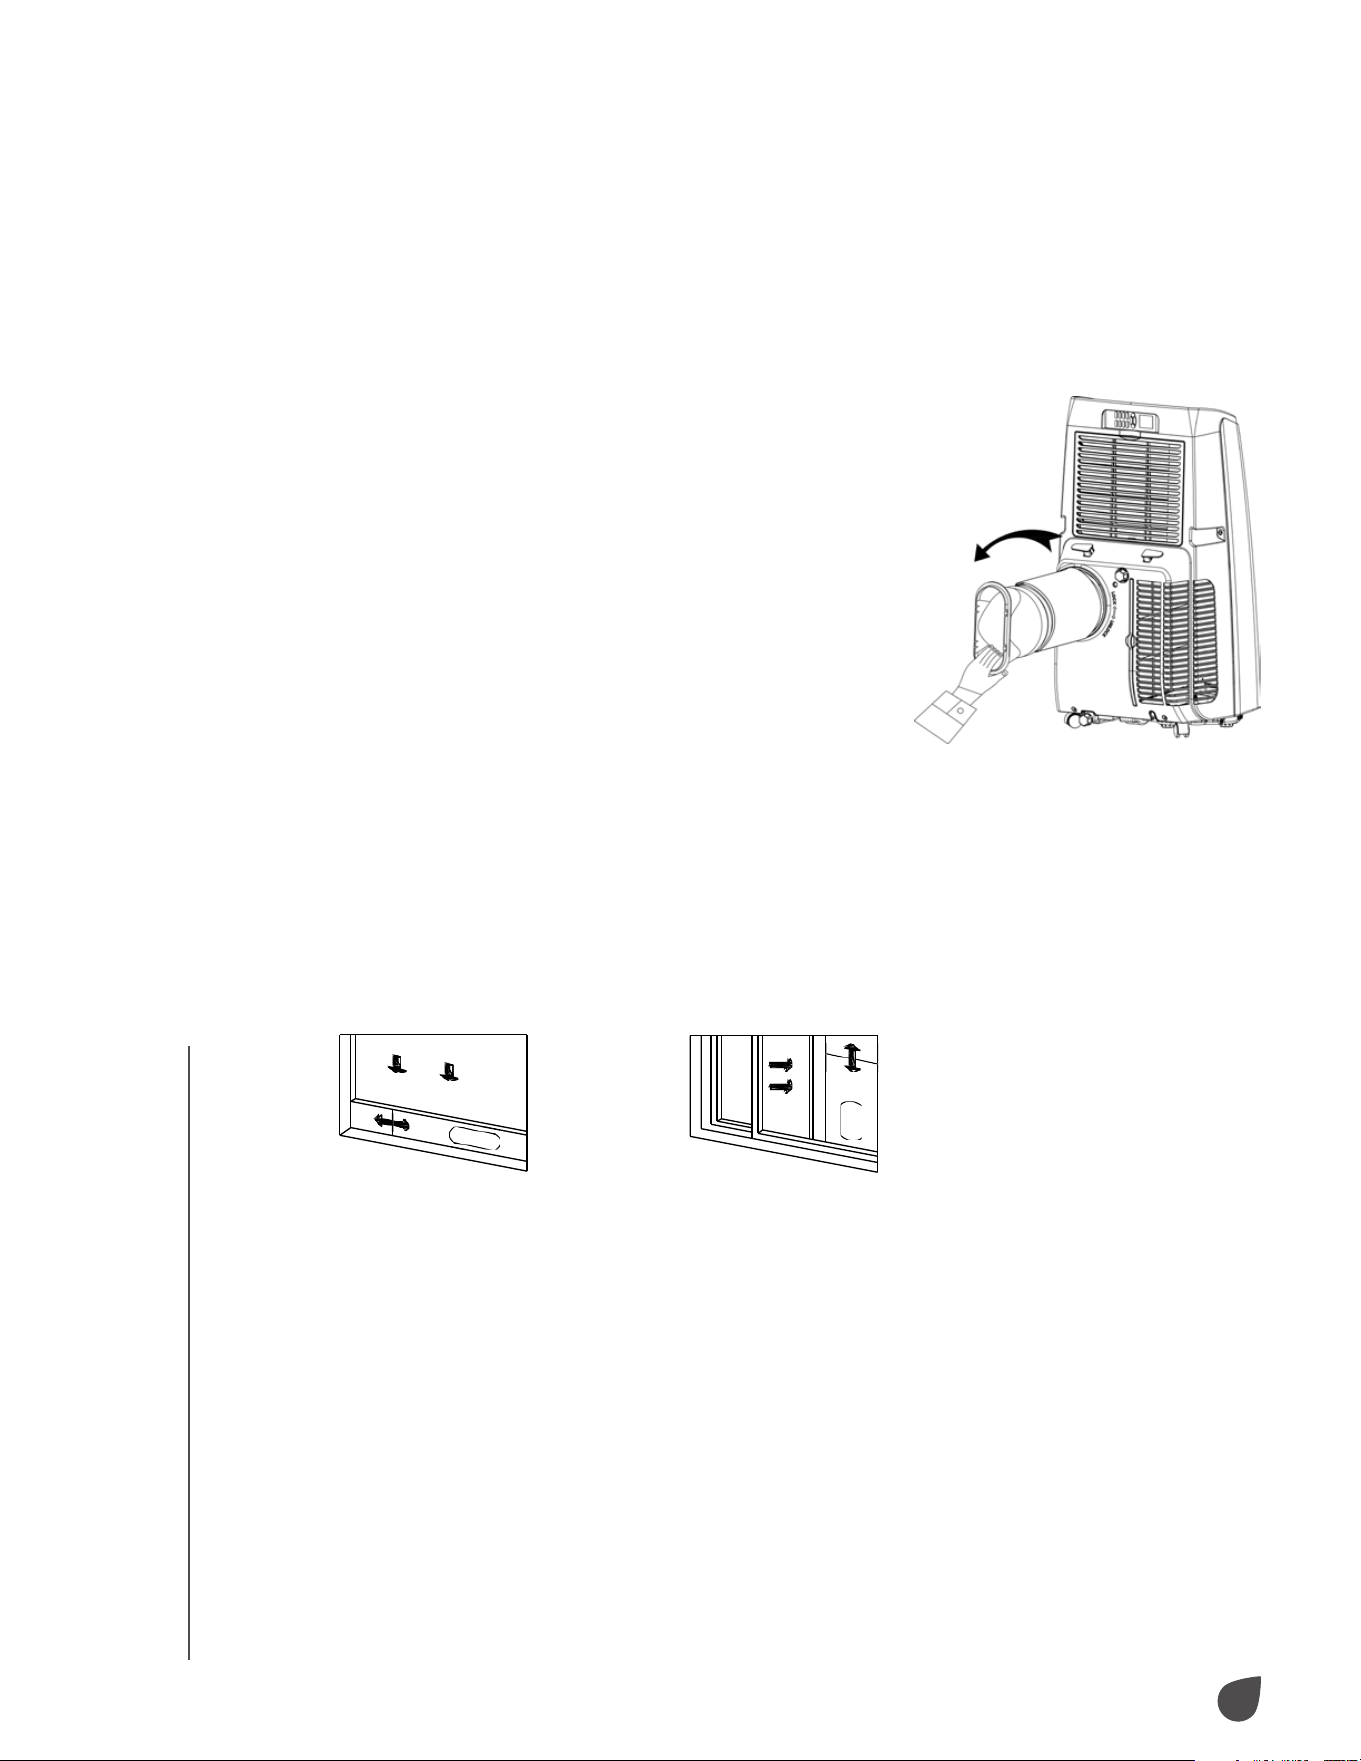
EXHAUST HOSE ASSEMBLY
• If your air conditioner included a heat
preservation sleeve, place it over the exhaust
hose assembly before attaching it to the unit.
• Align the exhaust hose assembly with
the exhaust vent. Screw the exhaust hose
assembly counterclockwise to fasten into
place.
WINDOW SEALING PLATE ASSEMBLY
• Open your selected window halfway and mount the window
sealing plate. The window sealing plate can be installed
horizontally or vertically.
• Slide the window sealing plate assembly open until both ends
are in contact with the window frame. Set in place using the
clips.
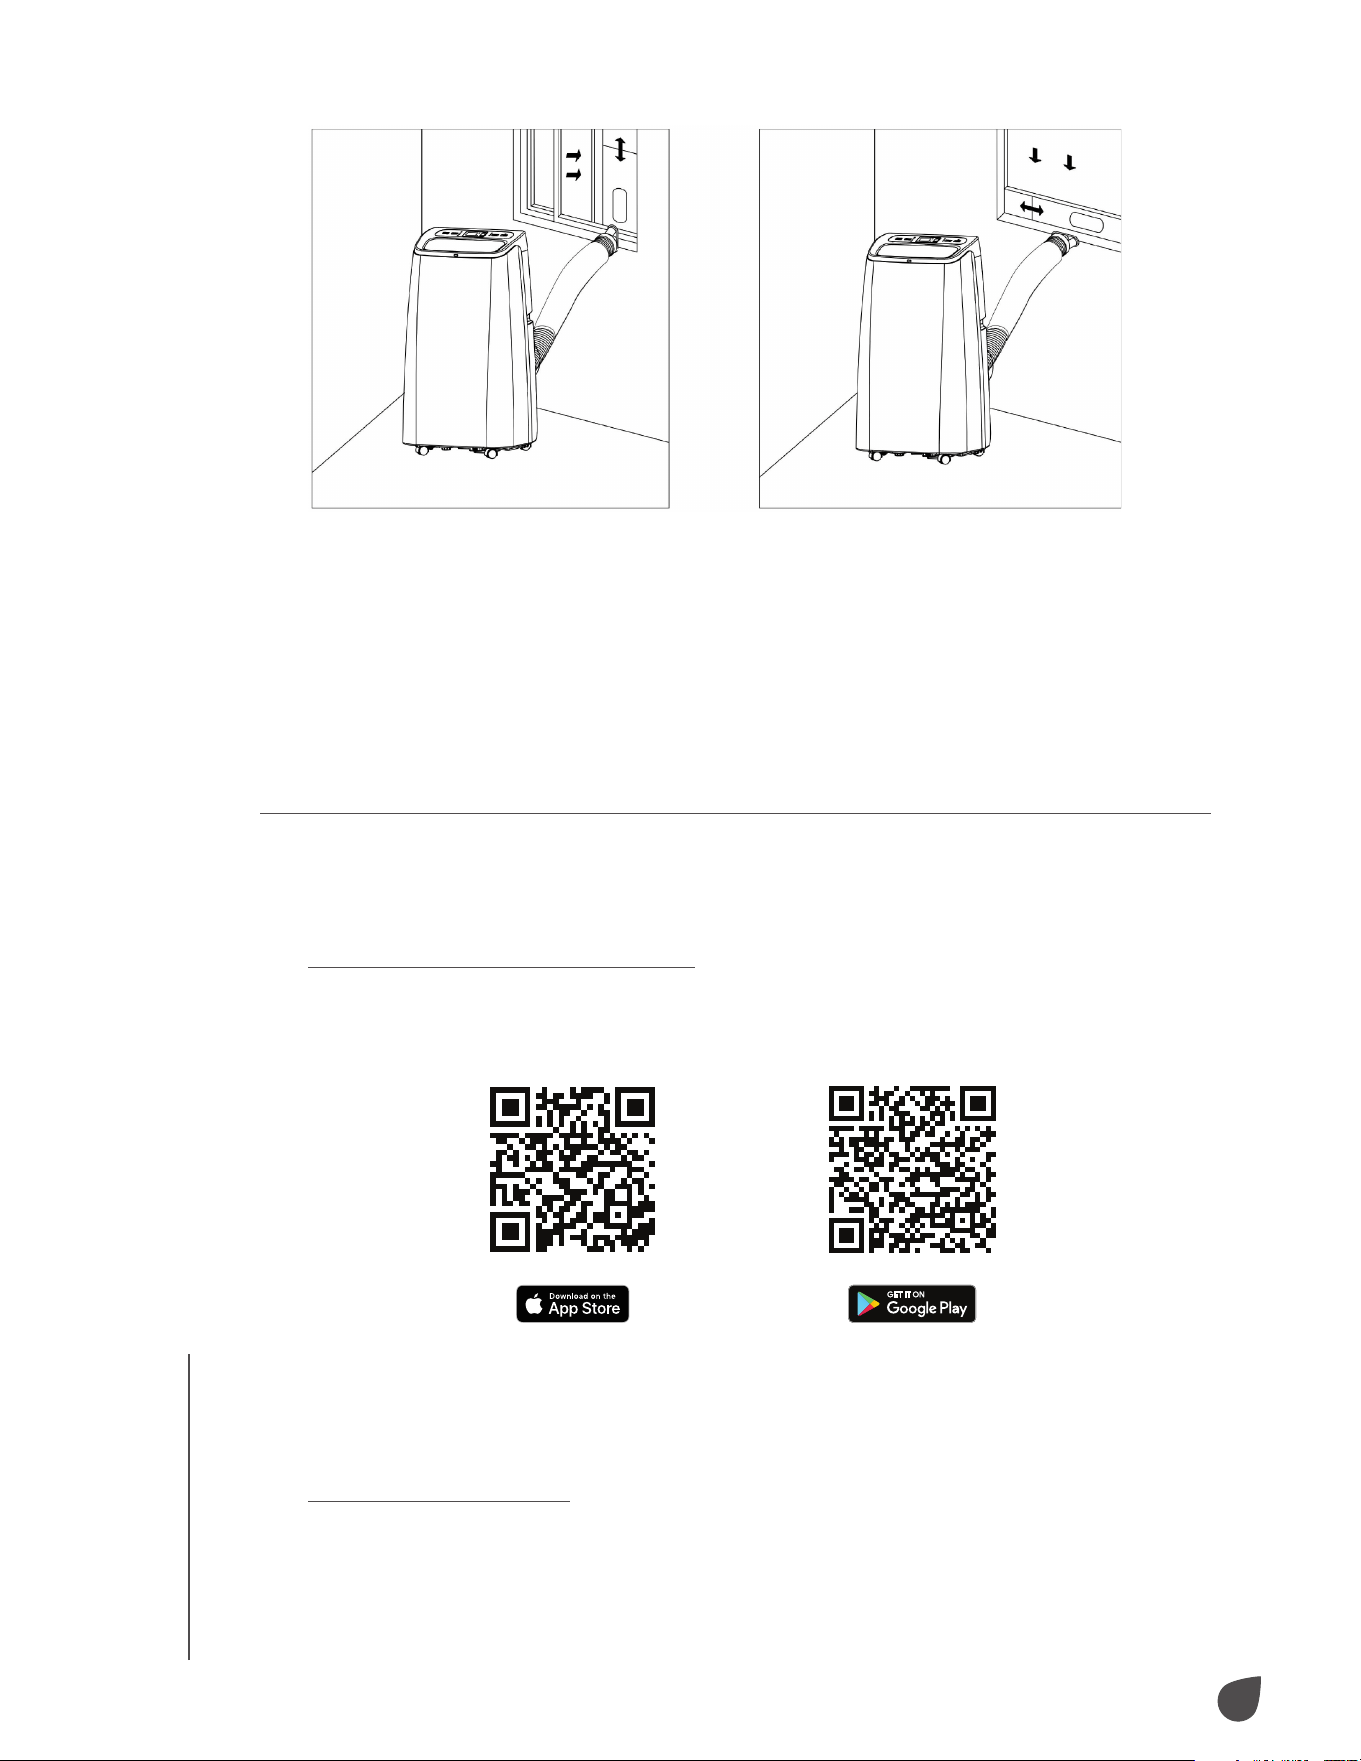
INSTALLING THE AIR CONDITIONER
• Move your air conditioner with the exhaust hose assembly
installed toward the window. Be sure to leave at least 20" (50
cm) between your air conditioner and walls or surrounding
objects.
• Extend the exhaust hose assembly and snap the flat end of the
hose joints into the window sealing plate assembly.
NOTES: The flat end of the hose joints must be snapped into
place.
Make sure the exhaust hose does not have bends or angles
greater than 45 degrees. Keep the ventilation of the hose
unobstructed.
INSTALLATION
9
USAGE
EXHAUST HOSE NOTE
The exhaust hose length must be between 11" – 59" (28 – 150 cm)
based on your specific model. Do not use extension tubes or hoses
other than the one provided in the package. Keep the exhaust hose
unobstructed to prevent overheating.
USING YOUR AIR CONDITIONER WITH WI-FI®
Download the My Ivation® App
Scan the QR Code below with your smartphone to download the My
Ivation® app in the App Store® or Google Play™.
NOTE: Allow the app to access network and location services for best
use.
Create New Account
• Press “Register” and follow the prompts to register your account.
USAGE
10
USAGE
USAGE
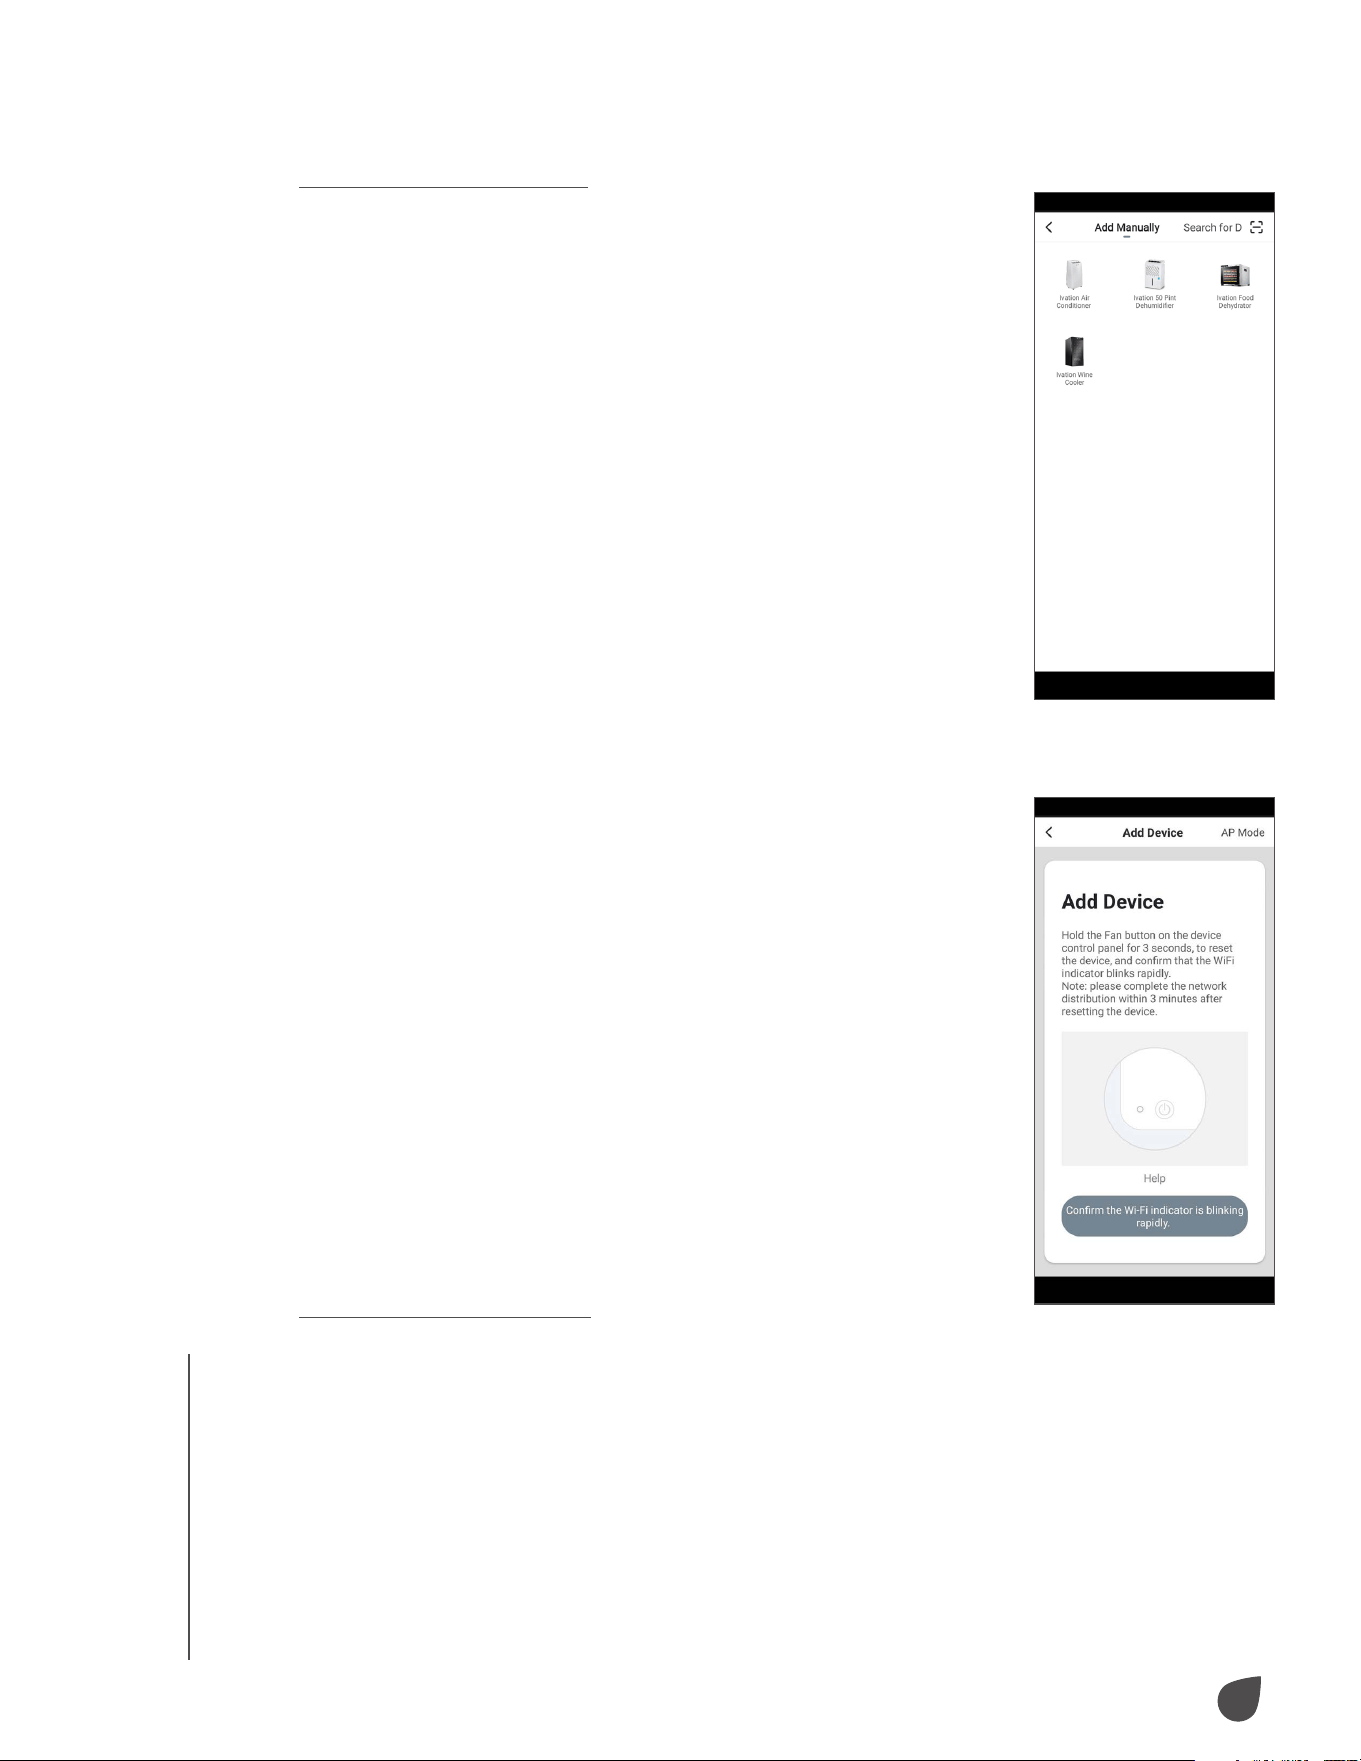
Add Device (EZ Mode)
• Plug the unit into an outlet, but do not power on the
unit. Hold the Fan button for three (3) seconds until
the unit beeps and the indicator light blinks rapidly.
• From the Home Page, press “Add Device” or press +
in the top right corner of the screen. (If you already
have a device added to your account, the “Add
Device” button will not appear.)
• In the app, select your air conditioner model from
the device menu. When the indicator light on the unit
blinks rapidly:
- Press “Confirm”.
- Select your Wi-Fi® network.
- Enter your router password.
NOTE: Connection may take up to 60 seconds.
• Once complete, the indicator light will stop blinking
and remain lit.
• Once the device is added, you can use the menu
of the app to change the name and location of the
device.
• When you are finished, press “Done”.
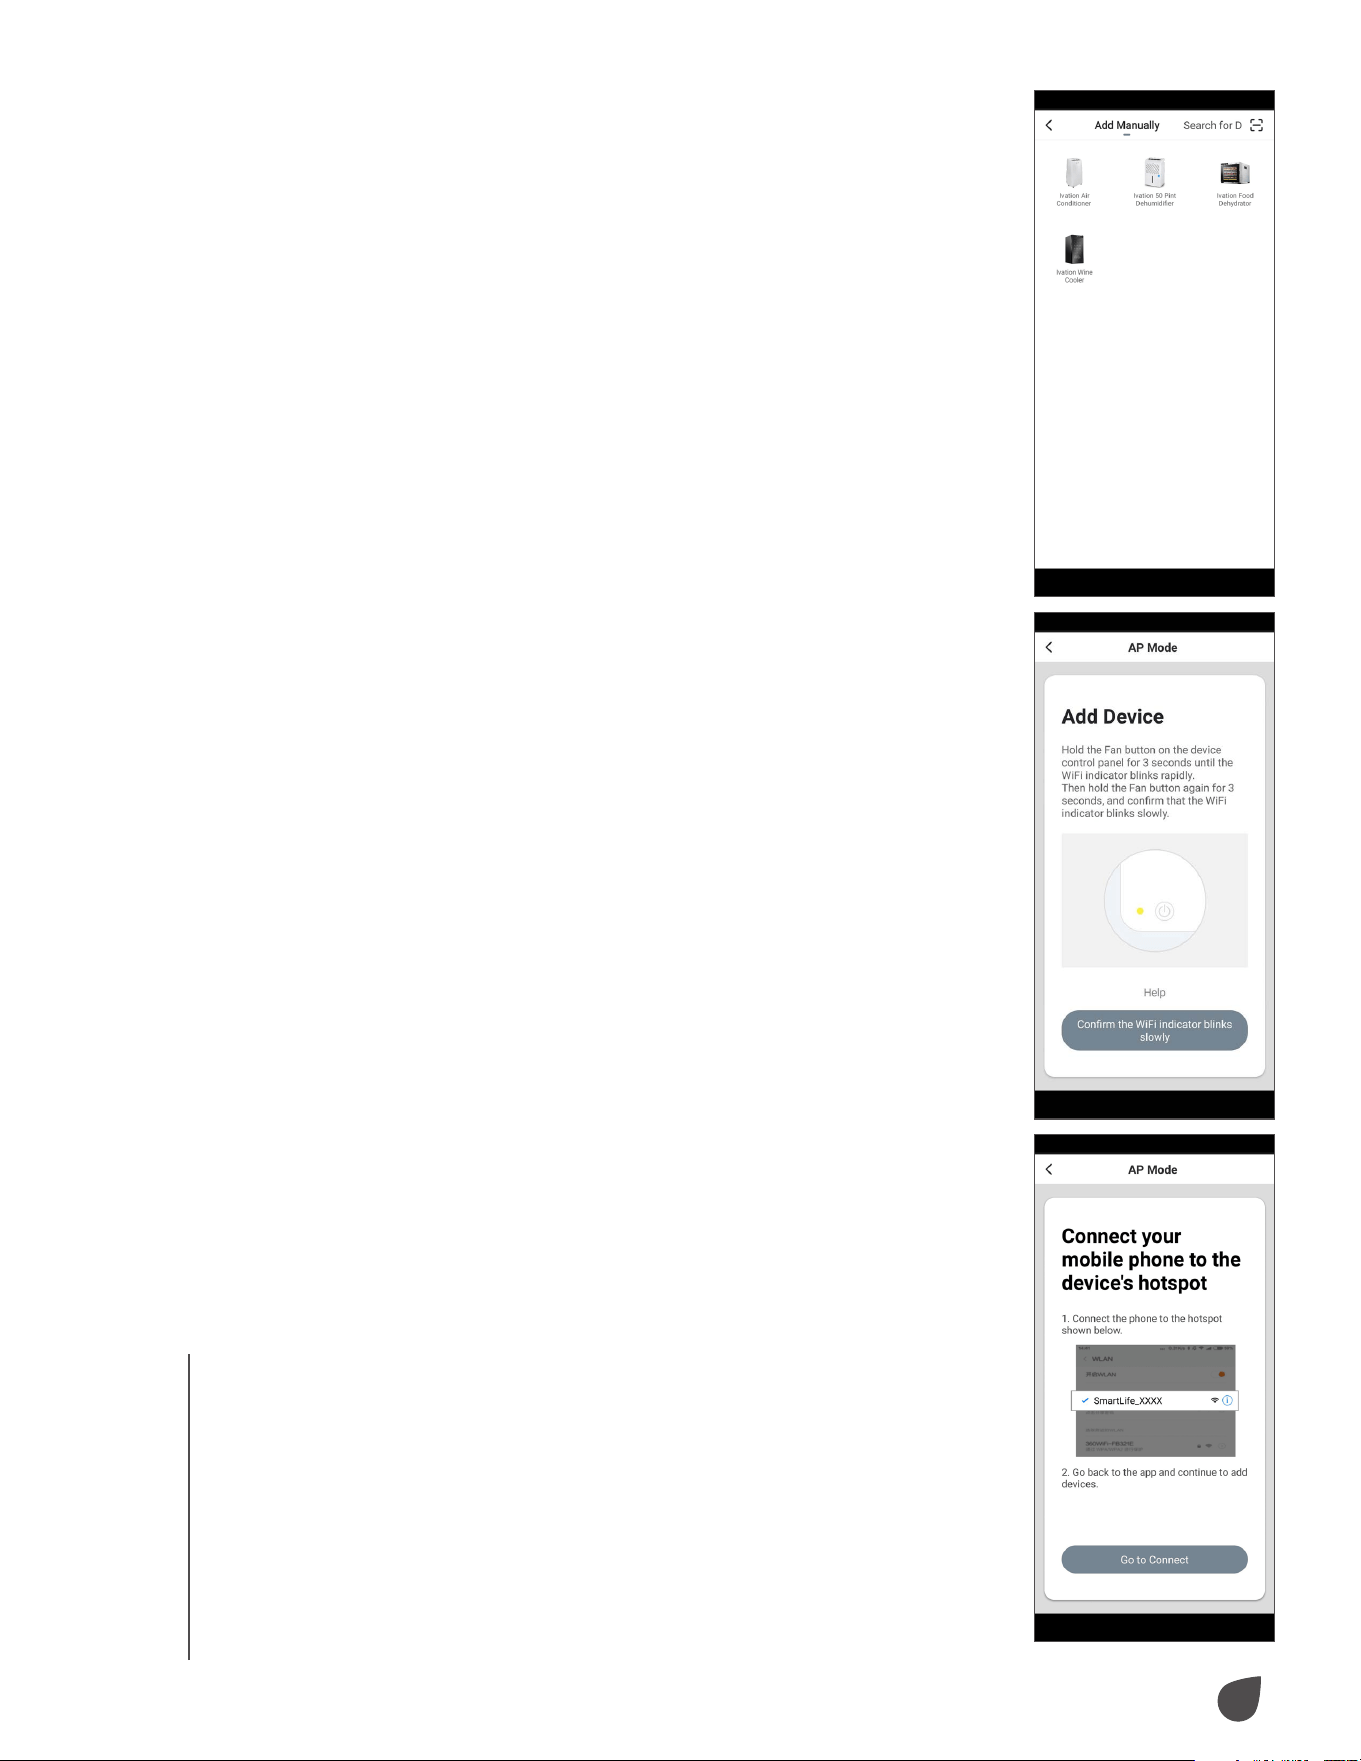
Add Device (AP Mode)
If you are having trouble connecting to your device
using EZ mode, you may connect to it using AP mode by following the
instructions below.
• Plug the unit into an outlet, but do not power on the unit. Hold the Fan
button for three (3) seconds until the unit beeps and the indicator light
blinks rapidly. Hold the Fan button a second time for three (3) seconds
until the indicator light blinks slowly.
11
USAGE
• From the Home Page, press “Add Device” or press +
in the top right corner of the screen. (If you already
have a device added to your account, the “Add
Device” button will not appear.)
• Select your air conditioner model from the device
menu.
• In the app, select “AP Mode” in the top right corner,
then press “Confirm”.
• The next screen will say “Connect your mobile phone
to the device’s hotspot”. Press “Go to connect”.
• Your phone will automatically enter its settings menu
(or Wi-Fi® list for Android™). Select the Wi-Fi network
“SL-Ivation-XXXX”.
• Navigate back to the My Ivation App and press
“Next”. Your phone will initiate connection.
NOTE: Connection may take up to 60 seconds.
• Once complete, the indicator light will stop blinking
and remain lit.
• Once the device is added, you can use the menu to
change the name and location of the device.
• When you are finished, press “Done”.
USAGE
12
USAGE
USAGE
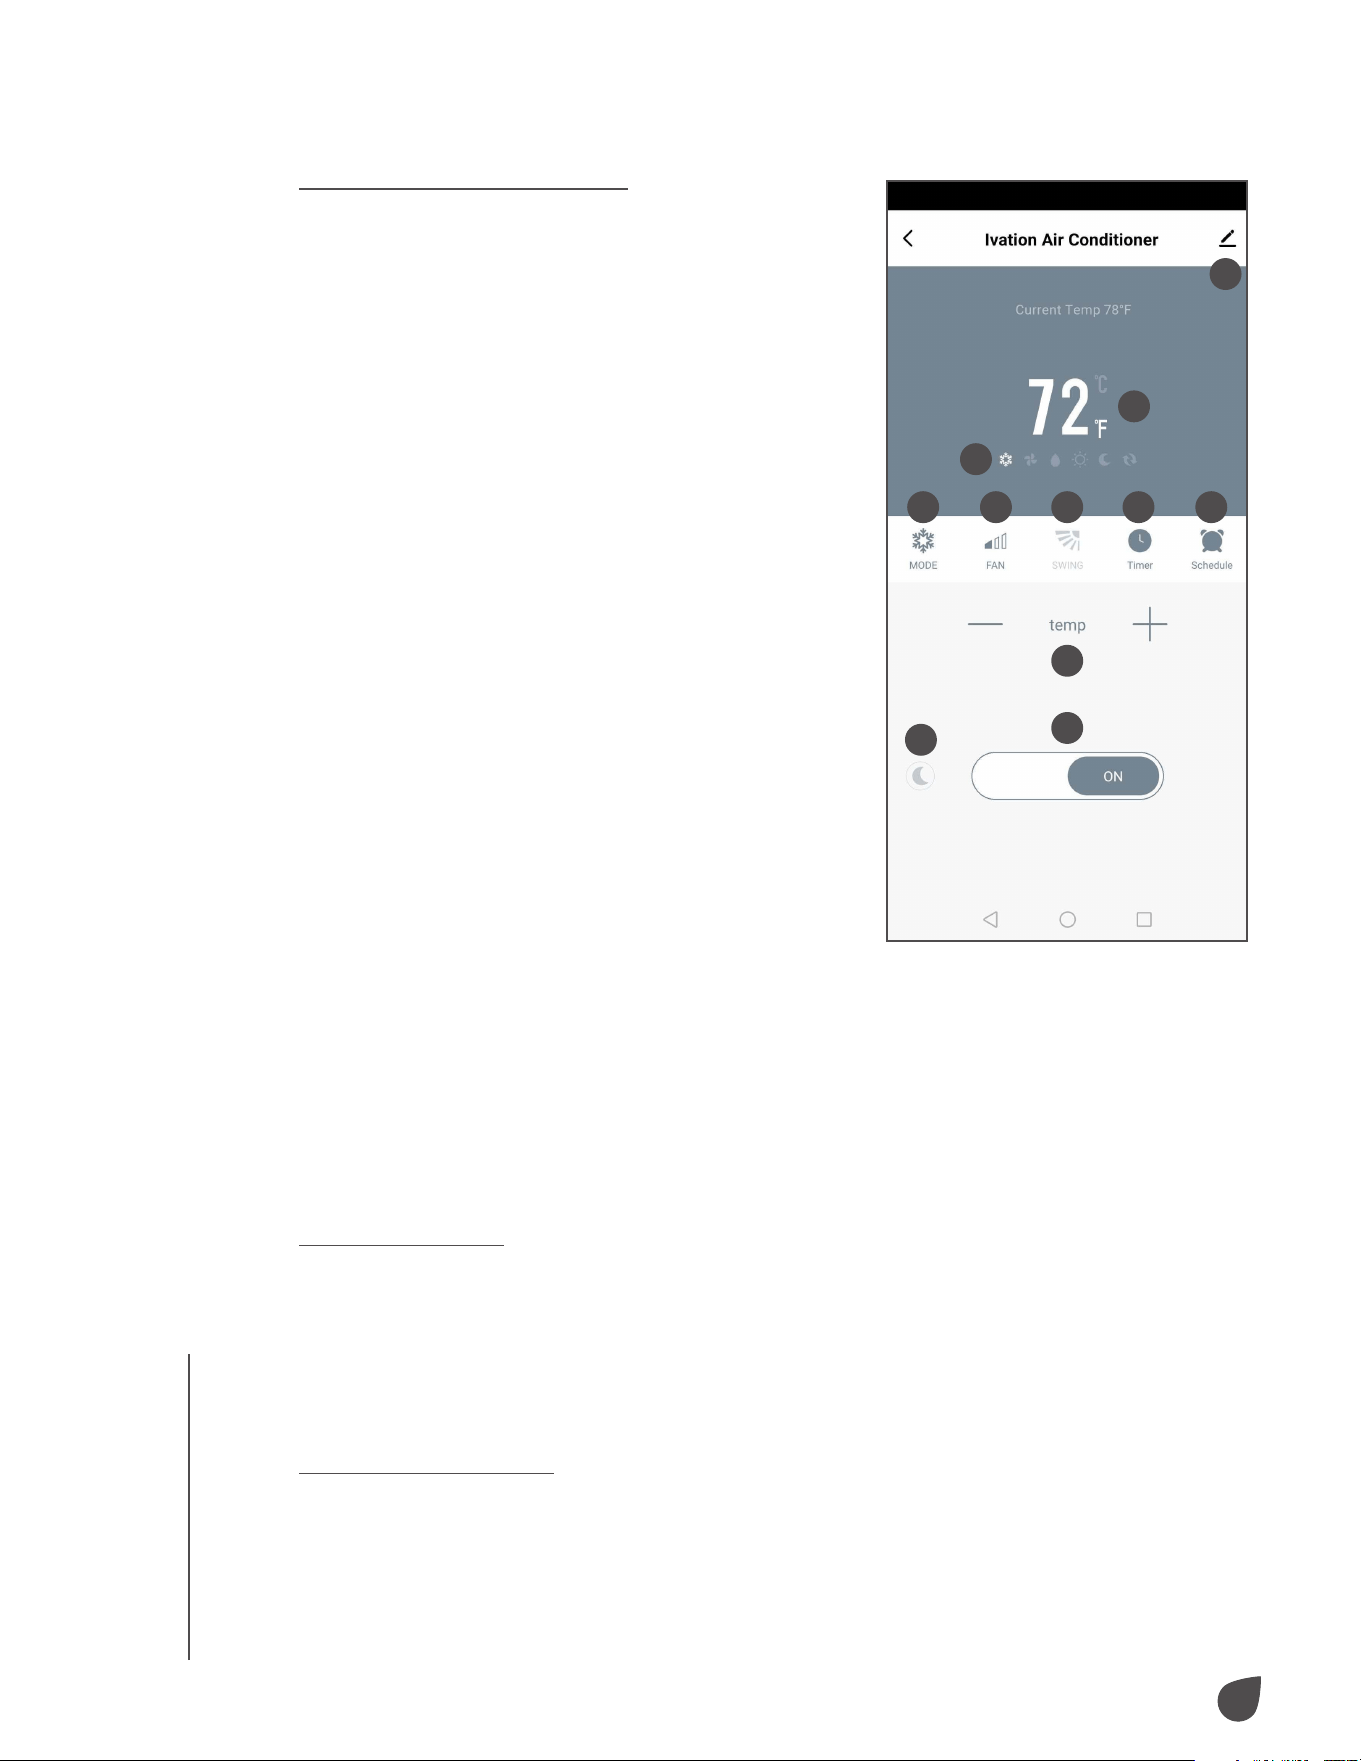
Using the My Ivation® App
1. Device Settings
Access device name, location, and
sharing settings
2. Temperature Display
Toggle between Celsius and Fahrenheit
temperature readings by tapping the °C
or °F next to the number
3. Mode Icons
Displays your device’s current operating
settings
4. Mode
Toggle between cool, fan, and dry
modes
5. Fan
Select the fan speed
6. Swing
Turn the fan swing on and o
7. Timer
Set a timer for when your device turns
on/o
8. Schedule
Set a run schedule for your device
9. Temp
Adjust your temperature setting up or
down
10. On/O
Power your device on or o
11. Night Mode
Toggle Night Mode on and o
AUTOMATED PROTECTION FEATURES
Frost Protection
Should the temperature of the exhaust hose become too low, your air
conditioner will automatically enter frost protection mode. Once the exhaust
hose rises back to a normal operating temperature, your air conditioner
will revert back to normal operation. This feature will only work in cooling,
dehumidification, or power saving modes.
Overflow Protection
If the water level in the reservoir exceeds a certain amount, the air
conditioner will beep and the LCD display will read “FL”. To resume normal
operation, connect a drainage hose or use the water plug to empty the
unit. For more detailed instructions on draining your unit, see the Drainage
Instructions section of this User Guide.
1
2
4 5 6
9
10
11
7 8
3
13
USAGE
Automatic Defrosting
If the air conditioner detects frost buildup, the unit will automatically defrost.
Defrosting is indicating by a heating symbol flashing on the LCD screen.
Automatic Thermal Protection
Should the air conditioner become too hot, the unit will enter automatic
thermal protection. When in this protection, the compressor and lower
motor will stop operating until the unit cools down. Once the air conditioner
is within operating temperatures again, normal operation will resume.
Compressor Protection
To extend the life of your compressor, the compressor will power on after a
three (3) minute delay when the unit is turned o and on again.
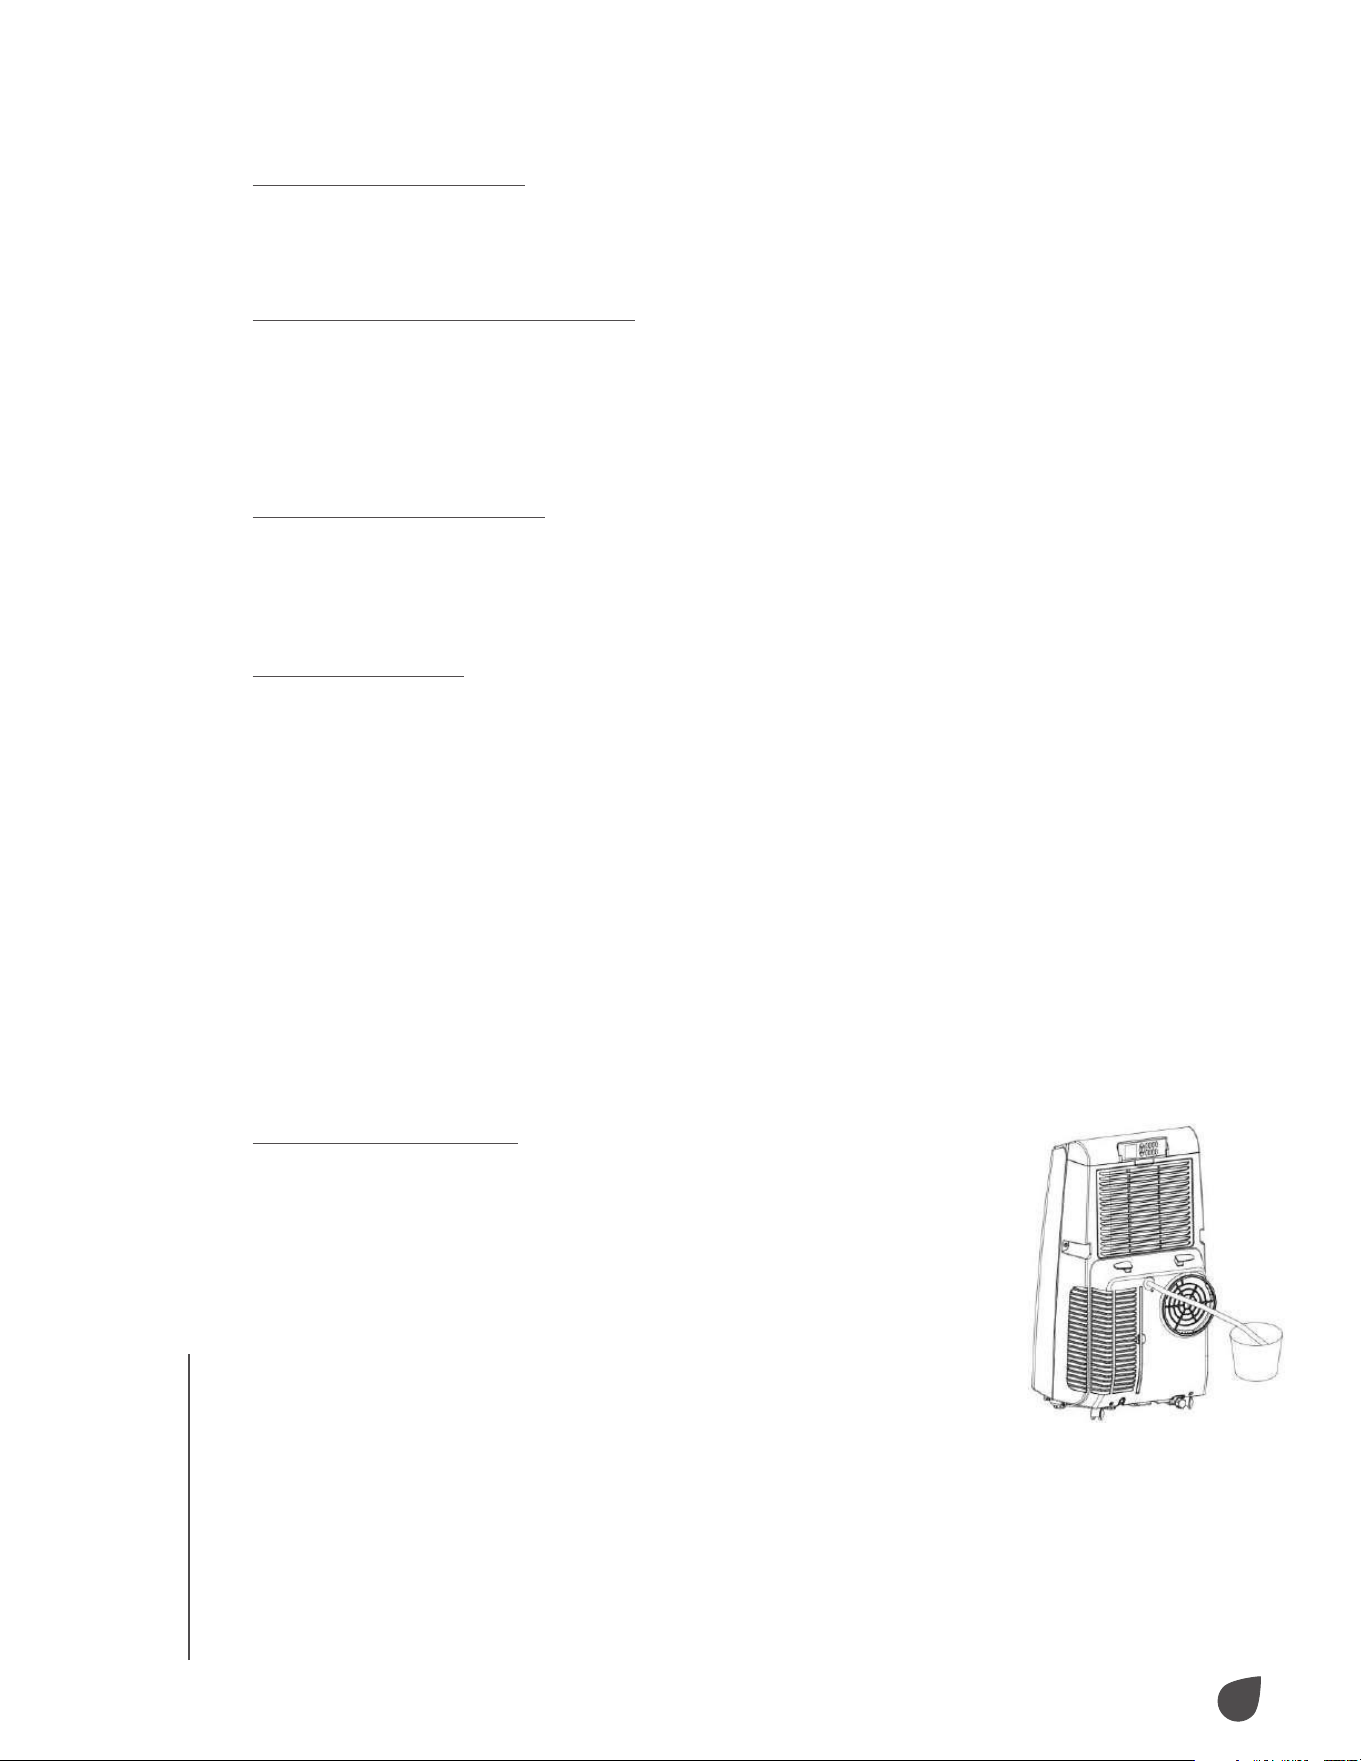
DRAINAGE INSTRUCTIONS
Manual Drainage
• Before manually draining your air conditioner, power o and unplug the
unit.
NOTE: Move the air conditioner carefully to prevent spills.
• Align the water plug with the receptacle you plan to drain the water into.
• Unscrew the water plug and let the water drain out naturally.
NOTES: To ensure complete draining, tip the air conditioner back slightly.
If the receptacle you are draining water into is not large enough, simply
reinsert the water plug to stop draining.
• With the unit drained, reinsert the water plug and tighten the drainage
cover. Make sure each is properly set before restarting the unit.
NOTE: Restart the air conditioner after the water plug and drain cover are
reinstalled to prevent condensation from dripping onto the floor.
Continuous Drainage
• Unscrew the drainage cover and remove the water plug.
• Insert the drainage hose into the water outlet.
• Run the drainage hose to a receptacle.
USAGE

14
CARE
CARE
CARE & MAINTENANCE
Before performing any cleaning or maintenance on your air
conditioner, power o and unplug the unit.
Cleaning the Housing
Clean the front and rear housings with a damp cloth. Do not
use chemicals like benzene or alcohol to avoid damaging the air
conditioner.
Cleaning the Filter Screens
If the filter screen is clogged with dust, the eectiveness of the air
conditioner will be reduced. For best results, clean the filter screen
once every two (2) weeks.
Cleaning the EVA Filter Screen Frame
• Grab the wedging block of the EVA filter screen frame and slide it
downward to remove.
• Remove the four (4) screws that connect the EVA filter screen to
the rear housing to free the screen.
• Remove all lint and dust from the filter with a vacuum cleaner.
• Soak the EVA filter screen in warm water with neutral detergent
(roughly 104 °F/40 °C).
• Rinse the filter screen and let it dry in a shady area before
reinstalling.
Cleaning the CON Filter Screen Frame
• Pull the handle of the CON filter screen frame gently to remove it
from the air conditioner.
• Remove all lint and dust from the filter with a vacuum cleaner.
• Soak the CON filter screen in warm water with neutral detergent
(roughly 104 °F/40 °C).
• Rinse the filter screen and let it dry in a shady area before
reinstalling.
Seasonal Storage Preparations
• Power o the air conditioner, unplug the power plug, and wrap the
power cord around the power cord hook.
• Unscrew the drainage cover and water plug and drain the air
conditioner completely.
• Run the air conditioner on a low fan speed in ventilation mode to
dry out the inside of unit. This will prevent mildew from forming
in storage. Reinstall the water plug and drainage cover once
completely dry.
• Remove the exhaust hose and store it in a safe place.
• Cover the air conditioner and store it in a safe, dry place. Use the
original packaging or a plastic bag to cover the unit.
• Remove the batteries from the remote control to prevent acid
damage.
15
TROUBLESHOOTING
TROUBLESHOOTING
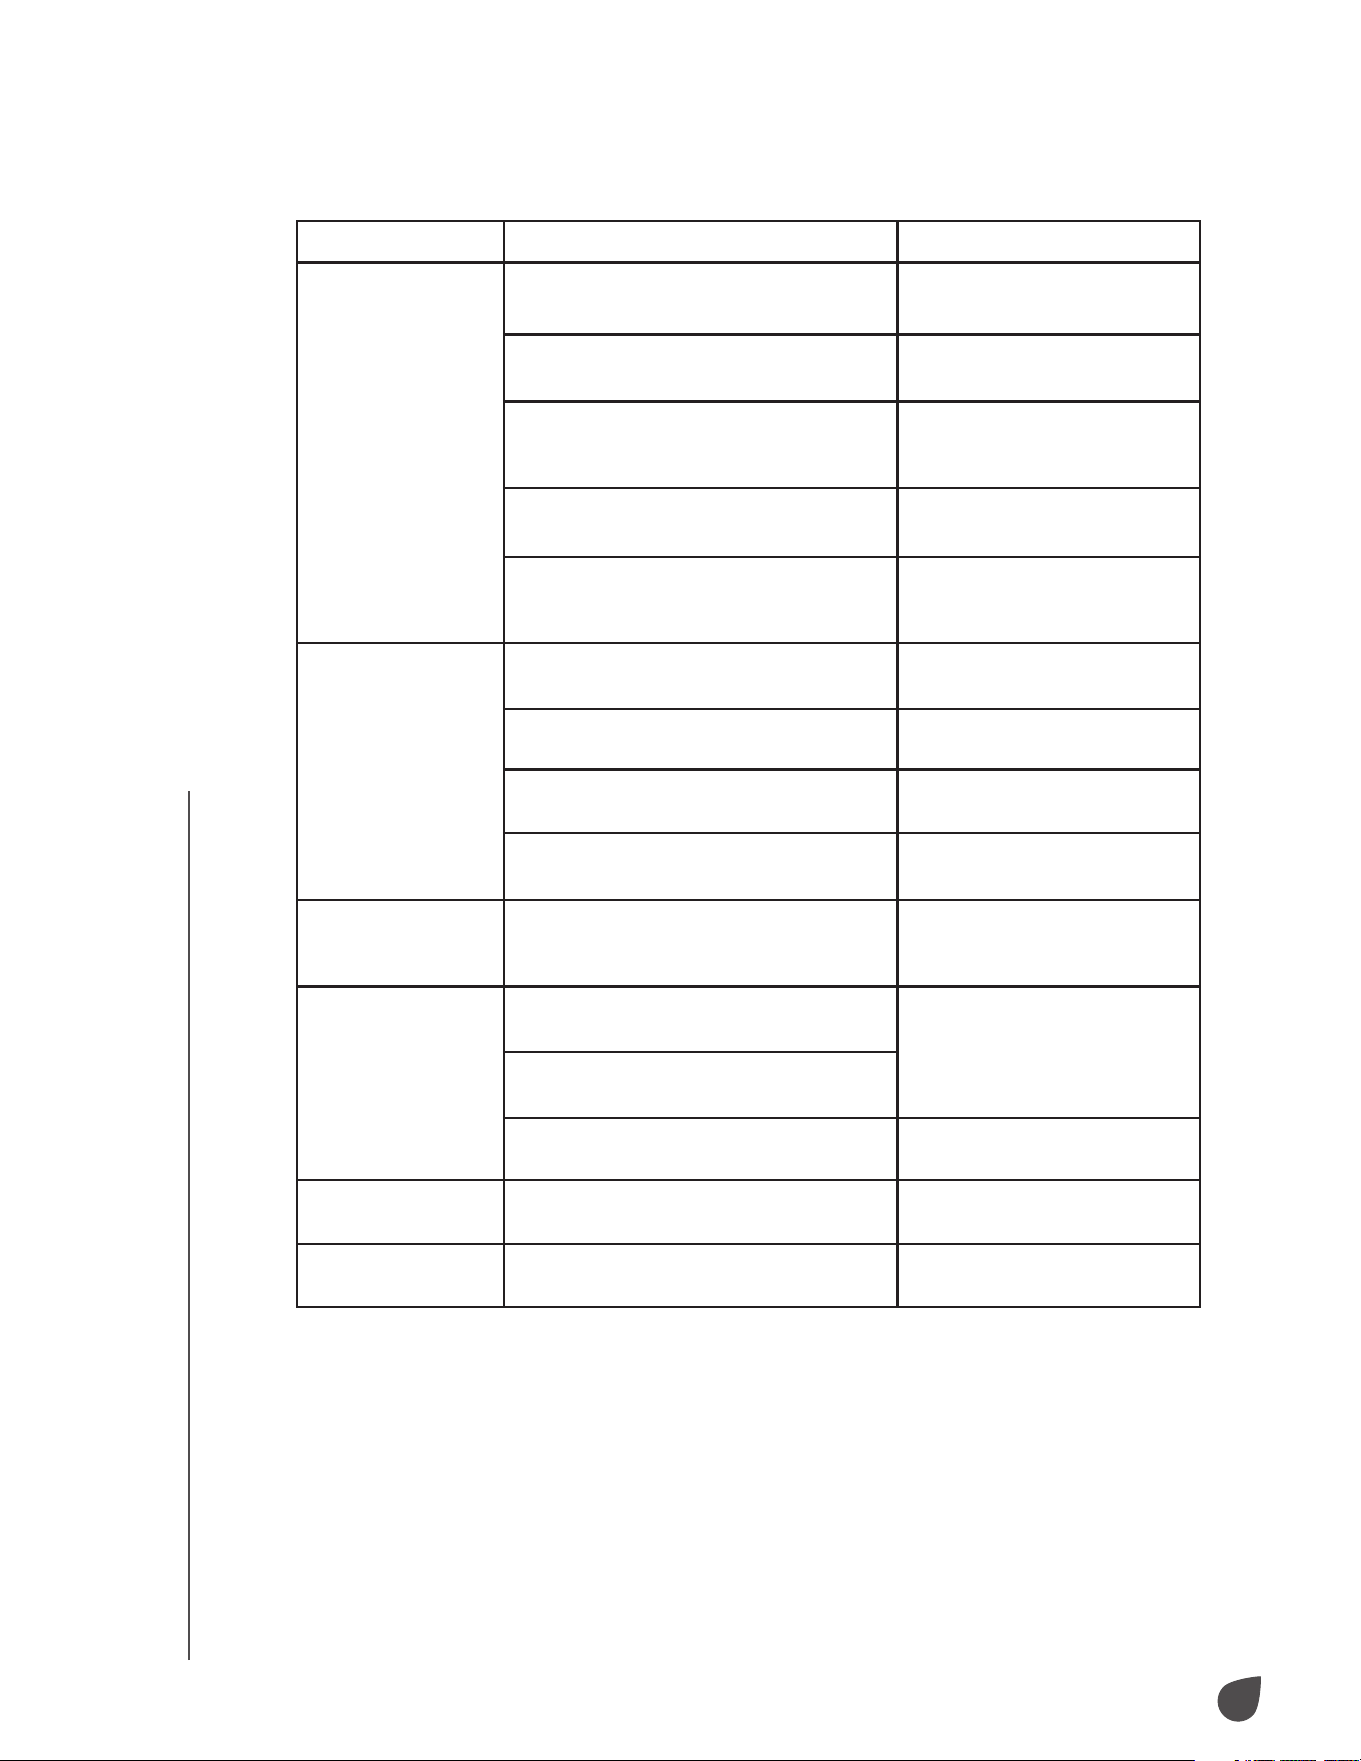
TROUBLESHOOTING
Issues Possible Causes Probable Solutions
The air conditioner
does not operate.
Electricity is not flowing to the air
conditioner.
Connect the air conditioner
to an appropriate outlet.
The reservoir is full, indicated by the LCD
display reading “FL”.
Drain the water from inside
the reservoir.
The ambient temperature is not within
operating range.
Use the unit in temperatures
between 44 °F – 95 °F (7 °C
– 35 °C).
In cooling mode, the room temperature is
lower than the set temperature.
Change the set temperature.
In dehumidification mode, the ambient
temperature is too low.
Place the air conditioner in
a room with a temperature
above 62 °F (17 °C).
The air conditioner
does not cool as it
should.
The air conditioner is in direct sunlight. Move the air conditioner out
of direct sunlight.
Doors and windows may be open, or
other sources of heat are present.
Close all doors and windows
in the room you wish to cool.
The filter screen is dirty. Clean or replace the filter
screen.
The air inlet or outlet is blocked. Clear any obstructions for the
air inlet and outlet.
The air conditioner
is noisy when in
operation.
The air conditioner is not placed on a
level surface.
Move the air conditioner to a
level surface.
The remote control
does not work.
The remote control is too far from the air
conditioner.
Bring the remote control
closer to the air conditioner
and face it directly toward
the receiver.
The remote control is not aligned with
the remote-control receiver.
The batteries in the remote control are
dead.
Replace the batteries.
The LCD display
reads “E1”.
There is an issue with the hose
temperature sensor.
Check the hose temperature
sensor for issues.
The LCD display
reads “E2”.
There is an issue with the room
temperature sensor.
Check the room temperature
sensor for issues.

16
SPECIFICATIONS
SPECIFICATIONS
IVAPACWIFI8K
Cooling Capacity: 8,500 BTU/hr
SACC: 5,500 BTU/hr
Dehumidification: 55 pts/day
Cooling Power Usage: 860 W / 7.5 A
Air Flow: 175 CFM
Power Source: 115 V / 60 Hz
Noise Level: 53 dB
Product Weight: 46.3 lbs. (21 kg)
Operating Temperature: 60 °F – 86 °F (16 °C – 30 °C)
Refrigerant: R-410A
IVAPACWIFI10K
Cooling Capacity: 10,000 BTU/hr
SACC: 6,500 BTU/hr
Dehumidification: 65 pts/day
Cooling Power Usage: 1,090 W / 9.5 A
Air Flow: 210 CFM
Power Source: 115 V / 60 Hz
Noise Level: 55 dB
Product Weight: 58.4 lbs. (26.5 kg)
Operating Temperature: 60 °F – 86 °F (16 °C – 30 °C)
Refrigerant: R-410A
IVAPACWIFI12K
Cooling Capacity: 12,000 BTU/hr
SACC: 8,000 BTU/hr
Dehumidification: 90 pts/day
Cooling Power Usage: 1,150 V / 10 A
Air Flow: 225 CFM
Power Source: 115 V / 60 Hz
Noise Level: 55 dB
Product Weight: 60.6 lbs. (27.5 kg)
Operating Temperature: 60 °F – 86 °F (16 °C – 30 °C)
Refrigerant: R-410A
IVAPACWIFI13K
Cooling Capacity: 13,000 BTU/hr
SACC: 8,500 BTU/hr
Dehumidification: 105 pts/day
Cooling Power Usage: 1,150 V / 10 A
Air Flow: 225 CFM
Power Source: 115 V / 60 Hz
Noise Level: 55 dB
Product Weight: 62.8 lbs. (28.5 kg)
Operating Temperature: 60 °F – 86 °F (16 °C – 30 °C)
Refrigerant: R-410A

17
WARRANTY
WARRANTY
LIMITED WARRANTY TO ORIGINAL CONSUMER
This Ivation® Portable Air Conditioner with Wi-Fi® (“Product”), including any accessories
included in the original packaging, as supplied and distributed new by an authorized retailer
is warranted by C&A Marketing, Inc. (the “Company”) to the original consumer purchaser only,
against certain defects in material and workmanship (“Warranty”) as follows:
To receive Warranty service, the original consumer purchaser must contact the Company or
its authorized service provider for problem determination and service procedures. Proof of
purchase in the form of a bill of sale or receipted invoice, evidencing that the Product is within
the applicable Warranty period(s), MUST be presented to the Company or its authorized service
provider in order to obtain the requested service.
Service options, parts availability, and response times may vary and may change at any time.
In accordance with applicable law, the Company may require that you furnish additional
documents and/or comply with registration requirements before receiving warranty service.
Please contact our customer service for details on obtaining warranty service:
info@myivation.com
866-849-3049
Shipping expenses to the Company’s Return Facility are not covered by this warranty, and must
be paid by the consumer. The consumer likewise bears all risk of loss or further damage to the
Product until delivery to said facility.
EXCLUSIONS AND LIMITATIONS The Company warrants the Product against defects in
materials and workmanship under normal use for a period of ONE (1) YEAR from the date of
retail purchase by the original end-user purchaser (“Warranty Period”). If a hardware defect
arises and a valid claim is received within the Warranty Period, the Company, at its sole option
and to the extent permitted by law, will either (1) repair the Product defect at no charge, using
new or refurbished replacement parts, (2) exchange the Product with a Product that is new or
which has been manufactured from new or serviceable used parts and is at least functionally
equivalent to the original device, or (3) refund the purchase price of the Product.
A replacement Product or part thereof shall enjoy the warranty of the original Product for
the remainder of the Warranty Period, or ninety (90) days from the date of replacement or
repair, whichever provides you longer protection. When a Product or part is exchanged, any
replacement item becomes your property, while the replaced item becomes the Company’s
property. Refunds can only be given if the original Product is returned.
This Warranty does not apply to:
(a) Any non-Ivation® Portable Air Conditioner with Wi-Fi® product, hardware or software, even
if packaged or sold with the Product;
(b) Damage caused by use with non-Ivation® Portable Air Conditioner with Wi-Fi® products;
(c) Damage caused by accident, abuse, misuse, flood, fire, earthquake, or other external causes;
(d) Damage caused by operating the Product outside the permitted or intended uses described
by the Company;
(e) Damage caused by third party services;
(f) A Product or part that has been modified to alter functionality or capability without the
written permission of the Company;
(g) Consumable parts, such as batteries, fuses, and bulbs;
(h) Cosmetic damage; or
(i) If any Ivation® Portable Air Conditioner with Wi-Fi® serial number has been removed or
defaced.
This Warranty is valid only in the country where the consumer purchased the Product, and only
applies to Products purchased and serviced in that country.
The Company does not warrant that the operation of the Product will be uninterrupted or error-
free. The Company is not responsible for damage arising from your failure to follow instructions
relating to its use.
NOTWITHSTANDING ANYTHING TO THE CONTRARY AND TO THE MAXIMUM EXTENT
PERMITTED BY APPLICABLE LAW, THE COMPANY PROVIDES THE PRODUCT “AS-IS” AND
“AS-AVAILABLE” FOR YOUR CONVENIENCE AND THE COMPANY AND ITS LICENSORS
18
GET IN TOUCH!
GET IN TOUCH!
AND SUPPLIERS EXPRESSLY DISCLAIM ALL WARRANTIES AND CONDITIONS, WHETHER
EXPRESSED, IMPLIED, OR STATUTORY, INCLUDING THE WARRANTIES OF MERCHANTABILITY,
FITNESS FOR A PARTICULAR PURPOSE, TITLE, QUIET ENJOYMENT, ACCURACY, AND NON-
INFRINGEMENT OF THIRD-PARTY RIGHTS. THE COMPANY DOES NOT GUARANTEE ANY
SPECIFIC RESULTS FROM THE USE OF THE PRODUCT, OR THAT THE COMPANY WILL
CONTINUE TO OFFER OR MAKE AVAILABLE THE PRODUCT FOR ANY PARTICULAR LENGTH
OF TIME. THE COMPANY FURTHER DISCLAIMS ALL WARRANTIES AFTER THE EXPRESS
WARRANTY PERIOD STATED ABOVE.
YOU USE THE PRODUCT AT YOUR OWN DISCRETION AND RISK. YOU WILL BE SOLELY
RESPONSIBLE FOR (AND THE COMPANY DISCLAIMS) ANY AND ALL LOSS, LIABILITY, OR
DAMAGES RESULTING FROM YOUR USE OF THE PRODUCT.
NO ADVICE OR INFORMATION, WHETHER ORAL OR WRITTEN, OBTAINED BY YOU FROM
THE COMPANY OR THROUGH ITS AUTHORIZED SERVICE PROVIDERS SHALL CREATE ANY
WARRANTY.
IN NO EVENT WILL THE COMPANY’S TOTAL CUMULATIVE LIABILITY ARISING FROM OR
RELATED TO THE PRODUCT, WHETHER IN CONTRACT OR TORT OR OTHERWISE EXCEED
THE FEES ACTUALLY PAID BY YOU TO THE COMPANY OR ANY OF ITS AUTHORIZED
RESELLERS FOR THE PRODUCT AT ISSUE IN THE LAST YEAR FROM YOUR PURCHASE. THIS
LIMITATION IS CUMULATIVE AND WILL NOT BE INCREASED BY THE EXISTENCE OF MORE
THAN ONE INCIDENT OR CLAIM. THE COMPANY DISCLAIMS ALL LIABILITY OF ANY KIND
OF ITS LICENSORS AND SUPPLIERS. IN NO EVENT WILL THE COMPANY OR ITS LICENSORS,
MANUFACTURERS AND SUPPLIERS BE LIABLE FOR ANY INCIDENTAL, DIRECT, INDIRECT,
SPECIAL, PUNITIVE, OR CONSEQUENTIAL DAMAGES (SUCH AS, BUT NOT LIMITED TO,
DAMAGES FOR LOSS OF PROFITS, BUSINESS, SAVINGS, DATA, OR RECORDS) CAUSED BY
THE USE, MISUSE, OR INABILITY TO USE THE PRODUCT.
Nothing in these terms shall attempt to exclude liability that cannot be excluded under
applicable law. Some countries, states, or provinces do not allow the exclusion or limitation of
incidental or consequential damages or allow limitations on warranties, so certain limitations
or exclusions may not apply to you. This warranty gives you specific legal rights, and you may
have other rights that vary from state to state or province to province. Contact your authorized
retailer to determine if another warranty applies.
GET IN TOUCH!
info@myivation.com
1-866-849-3049
IVATION is a trademark of C&A IP Holdings, LLC, in the U.S.
WI-FI is a trademark of Wi-Fi Alliance in the U.S. and/or other countries.
APP STORE is a trademark of Apple, Inc. in the U.S. and other countries.
GOOGLE PLAY is a trademark of Google, LLC.
All other products, brand names, company names, and logos are trademarks of their respective
owners, used merely to identify their respective products, and are not meant to connote any
sponsorship, endorsement, or approval.
Distributed by C&A Marketing, Inc., 114 Tived Lane East, Edison, NJ 08837.
Made in China.
© 2021. C&A IP Holdings, LLC. All Rights Reserved.