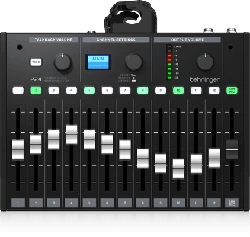
P24
StageConnect Personal Monitor Mixer with
13 Stereo Channels and 60-mm Faders
Quick Start Guide
V 1.0
3 P24 2 P24
Terminals marked with
this symbol carry
electrical current of
sucient magnitude to constitute risk
of electric shock. Use only high-quality
professional speaker cables with ¼" TS
or twist-locking plugs pre-installed.
Allother installation or modication
should be performed only by
qualiedpersonnel.
This symbol, wherever it
appears, alerts you to the
presence of uninsulated
dangerous voltage inside the enclosure
- voltage that may be sucient to
constitute a risk ofshock.
This symbol, wherever it
appears, alerts you to
important operating and
maintenance instructions in the
accompanying literature. Please read
themanual.
Caution
To reduce the risk of
electric shock, do not
remove the top cover (or the rear
section). No user serviceable parts inside.
Refer servicing to qualiedpersonnel.
Caution
To reduce the risk of
re or electric shock, do
not expose this appliance to rain and
moisture. Theapparatus shall not
be exposed to dripping or splashing
liquids and no objects lled with
liquids, such as vases, shall be placed
on the apparatus.
Caution
These service instructions
are for use by qualied
service personnel only. Toreduce
the risk of electric shock do not
perform any servicing other than that
contained in the operation instructions.
Repairshave to be performed by
qualied servicepersonnel.
Warning
Please refer to the
information on the
exterior of bottom enclosure for
electrical and safety information before
installing or operating the device.
1. Please read and follow all
instructions and warnings.
2. Keep the apparatus away from
water (except for outdoor products).
3. Clean only with dry cloth.
4. Do not block ventilation
openings. Do not install in a conned
space. Install only according to
manufacturer's instructions.
5. Protect the power cord from
damage, particularly at plugs and
appliance socket.
6. Do not install near any heat
sources such as radiators, heat
registers, stoves or other apparatus
(including ampliers) that
produce heat.
7. Do not defeat the safety purpose
of the polarized or grounding-type
plug. A polarized plug has two blades
with one wider than the other (only
for USA and Canada). A grounding-
type plug has two blades and a third
grounding prong. The wide blade or
the third prong are provided for your
safety. If the provided plug does not t
into your outlet, consult an electrician
for replacement of the obsolete outlet.
8. Use only attachments and
accessories recommended by
the manufacturer.
9. Use only
specied carts,
stands, tripods,
brackets, or tables.
Use caution to
prevent tip-over
when moving the cart/apparatus
combination.
10. Unplug during storms, or if not in
use for a long period.
11. Only use qualied personnel for
servicing, especially after damage.
12. The apparatus with protective
earthing terminal shall be connected to
a MAINS socket outlet with a protective
earthing connection.
13. Where the MAINS plug or an
appliance coupler is used as the
disconnect device, the disconnect
device shall remain readily operable.
14.
Avoid installing in conned spaces
like bookcases.
15. Do not place naked ame
sources, such as lighted candles,
on the apparatus.
16. Operating temperature range
5° to 45°C (41° to 113°F).
Music Tribe accepts no liability for
any loss which may be suered by
any person who relies either wholly
or in part upon any description,
photograph, or statement contained
herein. Technical specications,
appearances and other information
are subject to change without notice.
All trademarks are the property
of their respective owners. Midas,
Klark Teknik, Lab Gruppen, Lake,
Tannoy, Turbosound, TC Electronic,
TC Helicon, Behringer, Bugera, Aston
Microphones and Coolaudio are
trademarks or registered trademarks
of Music Tribe Global Brands Ltd.
© Music Tribe Global Brands Ltd.
2024 All rights reserved.
For the applicable warranty terms and
conditions and additional information
regarding Music Tribe’s Limited
Warranty, please see complete details
online at community.musictribe.
com/support.
LEGAL DISCLAIMER
Important Safety
Instructions
Las terminales marcadas
con este símbolo
transportan corriente
eléctrica de magnitud suciente como
para constituir un riesgo de descarga
eléctrica. Utilicesolo cables de altavoz
profesionales y de alta calidad con
conectores TS de 6,3 mm o de bayoneta
prejados. Cualquier otra instalación o
modicación debe ser realizada
únicamente por un técnicocualicado.
Este símbolo, siempre que
aparece, leadvierte de la
presencia de voltaje
peligroso sin aislar dentro de la caja;
estevoltaje puede ser suciente para
constituir un riesgo dedescarga.
Este símbolo, siempre que
aparece, leadvierte sobre
instrucciones operativas y
de mantenimiento que aparecen en la
documentación adjunta. Por favor,
leaelmanual.
Atención
Para reducir el riesgo de
descarga eléctrica, no
quite la tapa (olaparte posterior).
Nohay piezas en el interior del equipo
que puedan ser reparadas por el
usuario. Sies necesario, póngase en
contacto con personal cualicado.
Atención
Para reducir el riesgo
de incendio o descarga
eléctrica, no exponga este aparato a la
lluvia, humedad o alguna otra fuente
que pueda salpicar o derramar algún
líquido sobre el aparato. Nocoloque
ningún tipo de recipiente para líquidos
sobre elaparato.
Atención
Las instrucciones
de servicio deben
llevarlas a cabo exclusivamente
personal cualicado. Paraevitar el
riesgo de una descarga eléctrica,
no realice reparaciones que no se
encuentren descritas en el manual de
operaciones. Lasreparaciones deben
ser realizadas exclusivamente por
personalcualicado.
Advertencia
Consulte la información
en el exterior del recinto
inferior para obtener información
eléctrica y de seguridad antes de
instalar u operar el dispositivo.
1. Por favor, lea y siga todas las
instrucciones y advertencias.
2. Mantenga el aparato alejado
del agua (excepto para productos
diseñados para uso en exteriores).
3. Limpie solo con un paño seco.
4. No obstruya las aberturas de
ventilación. No instale en un espacio
connado. Instale solo de acuerdo con
las instrucciones del fabricante.
5. Proteja el cable de alimentación
contra daños, especialmente en
los enchufes y en el tomacorriente
del aparato.
6. No lo instale cerca de fuentes
de calor como radiadores, rejillas de
calefacción, estufas u otros aparatos
(incluyendo amplicadores) que
generen calor.
7. No anule el propósito de
seguridad del enchufe polarizado o del
tipo con toma de tierra. Un enchufe
polarizado tiene dos clavijas, una más
ancha que la otra (solo para EE. UU. y
Canadá). Un enchufe con toma de tierra
tiene dos clavijas y una tercera clavija
de toma de tierra. La clavija ancha o la
tercera clavija se proporcionan para su
seguridad. Si el enchufe suministrado
no encaja en su toma de corriente,
consulte a un electricista para
reemplazar la toma obsoleta.
8. Utilice solo accesorios y accesorios
recomendados por el fabricante.
9. Utilice solo
carritos, soportes,
trípodes, soportes
o mesas
especicados.
Tenga cuidado
para evitar que el carro/ combinación
de aparatos se vuelque al moverlo.
10. Desenchufe durante tormentas
o si no se utiliza durante un largo
período.
11. Solo utilice personal cualicado
para el servicio, especialmente después
de daños.
12. El aparato con terminal de puesta
a tierra protectora debe conectarse
a un tomacorriente de red con una
conexión de puesta a tierra protectora.
13. Cuando se utilice el enchufe
de red o un acoplador de aparatos
como dispositivo de desconexión, el
dispositivo de desconexión debe seguir
siendo fácilmente operable.
14. Evite la instalación en espacios
connados como estanterías.
15. No coloque fuentes de llama
desnuda, como velas encendidas, en
el aparato.
16. Rango de temperatura de
funcionamiento de 5°a 45°C
(41°a 113°F).
Music Tribe no admite ningún tipo
de responsabilidad por cualquier
daño o pérdida que pudiera sufrir
cualquier persona por conar total
o parcialmente en la descripciones,
fotografías o armaciones
contenidas en este documento.
Las especicaciones técnicas,
imágenes y otras informaciones
contenidas en este documento están
sujetas a modicaciones sin previo
aviso. Todas las marcas comerciales
que aparecen aquí son propiedad
de sus respectivos dueños. Midas,
Klark Teknik, Lab Gruppen, Lake,
Tannoy, Turbosound, TC Electronic,
TC Helicon, Behringer, Bugera, Aston
Microphones y Coolaudio son marcas
comerciales o marcas registradas
de Music Tribe Global Brands Ltd.
Instrucciones de
seguridad
LIMITED WARRANTY
NEGACIÓN LEGAL
5 P24 4 P24
© Music Tribe Global Brands Ltd.
2024 Reservados todos los derechos.
Si quiere conocer los detalles y
condiciones aplicables de la garantía
así como información adicional sobre
la Garantía limitada de Music Tribe,
consulte online toda la información
en la web community.musictribe.
com/support.
Les points repérés par ce
symbole portent une
tension électrique
susante pour constituer un risque
d’électrocution. Utilisez uniquement
des câbles d’enceintes professionnels
de haute qualité avec ches Jack mono
6,35 mm ou ches à verrouillages déjà
installées. Touteautre installation ou
modication doit être eectuée
uniquement par un personnel qualié.
Ce symbole avertit de la
présence d’une tension
dangereuse et non isolée à
l’intérieur de l’appareil - elle peut
provoquer des chocs électriques.
Ce symbol signale les
consignes d’utilisation et
d'entretien importantes
dans la documentation fournie. Lisez
les consignes de sécurité du manuel
d’utilisation de l’appareil.
Attention
Pour éviter tout risque
de choc électrique,
ne pas ouvrir le capot de l’appareil
ni démonter le panneau arrière.
L’intérieur de l’appareil ne possède
aucun élément réparable par
l’utilisateur. Laissertoute réparation à
un professionnelqualié.
Attention
Pour réduire les risques
de feu et de choc
électrique, n’exposez pas cet appareil
à la pluie, à la moisissure, auxgouttes
ou aux éclaboussures. Ne posez pas
de récipient contenant un liquide sur
l’appareil (unvase par exemple).
Attention
Ces consignes de
sécurité et d’entretien
sont destinées à un personnel
qualié. Pour éviter tout risque de
choc électrique, n’eectuez aucune
réparation sur l’appareil qui ne soit
décrite par le manuel d’utilisation.
Les éventuelles réparations doivent
être eectuées uniquement par un
technicienspécialisé.
Avertissement
Veuillez vous référer aux
informations situées à
l'extérieur du boîtier inférieur pour
obtenir les renseignements électriques
et de sécurité avant d'installer ou
d'utiliser l'appareil.
1. Veuillez lire et suivre toutes les
instructions et avertissements.
2. Éloignez l'appareil de l'eau (sauf
pour les produits conçus pour une
utilisation en extérieur).
3. Nettoyez uniquement avec un
chion sec.
4. Ne bloquez pas les ouvertures
de ventilation. N'installez pas dans un
espace conné. Installez uniquement
selon les instructions du fabricant.
5. Protégez le cordon d'alimentation
contre les dommages, en particulier
au niveau des ches et de la prise de
l'appareil.
6. N'installez pas près de sources de
chaleur telles que radiateurs, registres
de chaleur, cuisinières ou autres
appareils (y compris les amplicateurs)
qui produisent de la chaleur.
7. Ne contrecarrez pas le but de
sécurité de la che polarisée ou de type
mise à la terre. Une che polarisée a
deux lames, l'une plus large que l'autre
(uniquement pour les États-Unis et le
Canada). Une che de type mise à la
terre a deux lames et une troisième
broche de mise à la terre. La lame large
ou la troisième broche sont fournies
pour votre sécurité. Si la che fournie
ne s'adapte pas à votre prise, consultez
un électricien pour remplacer la prise
obsolète.
8. Utilisez uniquement des
accessoires et des pièces recommandés
par le fabricant.
9. Utilisez
uniquement des
chariots, des
supports, des
trépieds, des
supports ou des
tables spéciés. Faites attention pour
éviter le renversement lors du
déplacement de la combinaison
chariot/appareil.
10.
Débranchez pendant les tempêtes
ou si l'appareil n'est pas utilisé pendant
une longue période.
11.
Utilisez uniquement du personnel
qualié pour l'entretien, surtout après
des dommages.
12. L'appareil avec une borne de mise
à la terre protectrice doit être connecté
à une prise secteur avec une connexion
de mise à la terre protectrice.
13. Lorsque la che secteur ou un
coupleur d'appareil est utilisé comme
dispositif de déconnexion, le dispositif
de déconnexion doit rester facilement
utilisable.
14. Évitez l'installation dans
des espaces connés comme des
bibliothèques.
15. Ne placez pas de sources de
amme nue, telles que des bougies
allumées, sur l'appareil.
16. Plage de température de
fonctionnement de 5°à 45°C
(41°à 113°F).
Music Tribe ne peut être tenu pour
responsable pour toute perte pouvant
être subie par toute personne se
ant en partie ou en totalité à
toute description, photographie
ou armation contenue dans ce
document. Les caractéristiques,
l’apparence et d’autres informations
peuvent faire l’objet de modications
sans notication. Toutes les marques
appartiennent à leurs propriétaires
respectifs. Midas, Klark Teknik,
Lab Gruppen, Lake, Tannoy,
Turbosound, TC Electronic, TC Helicon,
Behringer, Bugera, Aston Microphones
et Coolaudio sont des marques ou
marques déposées de Music Tribe
Global Brands Ltd. © Music Tribe Global
Brands Ltd. 2024 Tous droits réservés.
Pour connaître les termes et conditions
de garantie applicables, ainsi que
les informations supplémentaires et
détaillées sur la Garantie Limitée de
Music Tribe, consultez le site Internet
community.musictribe.com/support.
Die mit dem Symbol
markierten Anschlüsse
führen so viel Spannung,
dassdie Gefahr eines Stromschlags
besteht. Verwenden Sie nur
hochwertige, professionelle
Lautsprecherkabel mit vorinstallierten
6,35 mm MONO-Klinkensteckern oder
Lautsprecherstecker mit
Drehverriegelung. Alle anderen
Installationen oder Modikationen
sollten nur von qualiziertem
Fachpersonal ausgeführt werden.
Dieses Symbol weist Sie
immer dann darauf hin,
wenn es erscheint, dass im
Inneren des Gehäuses gefährliche
unisolierte Spannung vorhanden ist
– eine Spannung, die ausreichend sein
kann, um ein Stromschlagrisiko
darzustellen.
Dieses Symbol weist Sie an
jeder Stelle, an der es
erscheint, auf wichtige
Betriebs- und Wartungsanweisungen in
der beiliegenden Literatur hin. Bitte
lesen Sie die Bedienungsanleitung.
Vorsicht
Um eine Gefährdung
durch Stromschlag
auszuschließen, darf die
Geräteabdeckung bzw.
Geräterückwandnicht abgenommen
werden. ImInnern des Geräts benden
sich keine vom Benutzer reparierbaren
Teile. Reparaturarbeiten dürfen
nur von qualiziertem Personal
ausgeführtwerden.
Vorsicht
Um eine Gefährdung
durch Feuer bzw.
Stromschlag auszuschließen, darf
dieses Gerät weder Regen oder
Feuchtigkeit ausgesetzt werden
noch sollten Spritzwasser oder
tropfende Flüssigkeiten in das Gerät
gelangen können. Stellen Sie keine
mit Flüssigkeit gefüllten Gegenstände,
wie z. B. Vasen, aufdasGerät.
Vorsicht
Die Service-Hinweise sind
nur durch qualiziertes
Personal zu befolgen. Umeine
Gefährdung durch Stromschlag zu
vermeiden, führen Sie bitte keinerlei
Reparaturen an dem Gerät durch,
dienicht in der Bedienungsanleitung
beschrieben sind. Reparaturen
sind nur von qualiziertem
Fachpersonaldurchzuführen.
Warnung
Bitte beachten Sie
die Informationen
auf der Außenseite der unteren
Abdeckung bezüglich elektrischer
und sicherheitstechnischer Hinweise,
bevor Sie das Gerät installieren oder in
Betrieb nehmen.
1. Bitte lesen Sie alle Anweisungen
und Warnhinweise sorgfältig durch
und befolgen Sie diese.
2. Halten Sie das Gerät von Wasser
fern (außer bei Produkten für den
Außenbereich).
3. Reinigen Sie nur mit einem
trockenen Tuch.
4. Blockieren Sie nicht die
Belüftungsönungen. Installieren Sie
das Gerät nicht in einem engen Raum
und nur gemäß den Anweisungen
des Herstellers.
5. Schützen Sie das Netzkabel vor
Beschädigungen, insbesondere an
Steckern und Gerätebuchsen.
6. Installieren Sie das Gerät nicht
in der Nähe von Wärmequellen wie
Heizkörpern, Heizregistern, Öfen
oder anderen Geräten (einschließlich
Verstärkern), die Wärme erzeugen.
7. Heben Sie nicht den
Sicherheitszweck des polarisierten oder
geerdeten Steckers auf. Ein polarisierter
Stecker hat zwei Klingen, von denen
eine breiter ist als die andere (nur für
USA und Kanada). Ein geerdeter Stecker
hat zwei Klingen und einen dritten
Erdungszapfen. Die breite Klinge
oder der dritte Zapfen dienen Ihrer
Sicherheit. Wenn der mitgelieferte
Stecker nicht in Ihre Steckdose passt,
konsultieren Sie einen Elektriker,
um die veraltete Steckdose zu ersetzen.
8.
Verwenden Sie nur vom Hersteller
empfohlene Anbaugeräte und
Zubehörteile.
9. Verwenden
Sie nur
spezizierte
Wagen, Ständer,
Stative,
Halterungen oder
Tische. Achten Sie darauf, dass der
Wagen/Geräte-Kombination beim
Bewegen nicht umkippt.
10. Ziehen Sie bei Gewittern oder bei
längerer Nichtbenutzung den Stecker.
11. Lassen Sie nur qualiziertes
Personal für Wartungsarbeiten
Consignes de sécurité
DÉNI LÉGAL
GARANTIE LIMITÉE
Wichtige
Sicherheitshinweise
GARANTÍA LIMITADA
7 P24 6 P24
arbeiten, besonders nach
Beschädigungen.
12. Das Gerät mit schützendem
Erdungsterminal muss an eine
Steckdose mit schützender
Erdungsverbindung
angeschlossen werden.
13. Wenn der Netzstecker
oder ein Gerätekuppler als
Trennvorrichtung verwendet wird,
muss die Trennvorrichtung leicht
bedienbar bleiben.
14. Vermeiden Sie die Installation in
engen Räumen wie Bücherregalen.
15. Platzieren Sie keine oenen
Flammenquellen, wie brennende
Kerzen, auf dem Gerät.
16. Betriebstemperaturbereich von
5°bis 45°C (41°bis 113°F).
Music Tribe übernimmt keine Haftung
für Verluste, die Personen entstanden
sind, die sich ganz oder teilweise auf
hier enthaltene Beschreibungen,
Fotos oder Aussagen verlassen haben.
Technische Daten, Erscheinungsbild
und andere Informationen können
ohne vorherige Ankündigung geändert
werden. Alle Warenzeichen sind
Eigentum der jeweiligen Inhaber.
Midas, Klark Teknik, Lab Gruppen, Lake,
Tannoy, Turbosound, TC Electronic,
TC Helicon, Behringer, Bugera, Aston
Microphones und Coolaudio sind
Warenzeichen oder eingetragene
Warenzeichen der Music Tribe Global
Brands Ltd. © Music Tribe Global Brands
Ltd. 2024 Alle Rechte vorbehalten.
Die geltenden Garantiebedingungen
und zusätzliche Informationen
bezüglich der von Music Tribe
gewährten beschränkten Garantie
nden Sie online unter community.
musictribe.com/support.
Terminais marcados com o
símbolo carregam
corrente elétrica de
magnitude suciente para constituir
um risco de choque elétrico. Use apenas
cabos de alto-falantes de alta
qualidade com plugues TS de ¼" ou
plugues com trava de torção
pré-instalados. Todas as outras
instalações e modicações devem ser
efetuadas por pessoasqualicadas.
Este símbolo, onde quer
que apareça, alerta para a
presença de tensão
perigosa não isolada dentro do
invólucro - uma tensão que pode ser
suciente para constituir um risco
de choque.
Este símbolo, onde quer
que o encontre, alerta-o
para a leitura das
instruções de manuseamento que
acompanham o equipamento. Por favor
leia o manual deinstruções.
Atenção
De forma a diminuir
o risco de choque
eléctrico, nãoremover a cobertura
(ouasecção de trás). Não existem peças
substituíveis por parte do utilizador no
seu interior. Para esse efeito recorrer a
um técnicoqualicado.
Atenção
Para reduzir o risco de
incêndios ou choques
eléctricos o aparelho não deve ser
exposto à chuva nem à humidade.
Alémdisso, não deve ser sujeito a
salpicos, nem devem ser colocados em
cima do aparelho objectos contendo
líquidos, taiscomojarras.
Atenção
Estas instruções de
operação devem ser
utilizadas, emexclusivo, por técnicos
de assistência qualicados. Para evitar
choques eléctricos não proceda a
reparações ou intervenções, que
não as indicadas nas instruções
de operação, salvo se possuir as
quali-cações necessárias. Para evitar
choques eléctricos não proceda a
reparações ou intervenções, que
não as indicadas nas instruções de
operação. Só o deverá fazer se possuir
as qualicaçõesnecessárias.
Aviso
Consulte as informações
na parte externa
do invólucro inferior para obter
informações elétricas e de segurança
antes de instalar ou operar o
dispositivo.
1. Por favor, leia e siga todas as
instruções e advertências.
2. Mantenha o aparelho longe da
água (exceto para produtos destinados
a uso externo).
3. Limpe apenas com um pano seco.
4. Não obstrua as aberturas de
ventilação. Não instale em espaços
connados. Instale apenas de acordo
com as instruções do fabricante.
5. Proteja o cabo de alimentação
contra danos, especialmente nos plugs
e na tomada do aparelho.
6. Não instale próximo a fontes
de calor, como radiadores, registros
de calor, fogões ou outros aparelhos
(incluindo amplicadores) que
produzam calor.
7. Não desfaça a nalidade de
segurança da tomada polarizada ou do
tipo com aterramento. Uma tomada
polarizada possui duas lâminas, sendo
uma mais larga que a outra (apenas
para EUA e Canadá). Uma tomada com
aterramento possui duas lâminas e
uma terceira ponta de aterramento.
A lâmina larga ou a terceira ponta são
fornecidas para sua segurança. Se o
plug fornecido não se encaixar na sua
tomada, consulte um eletricista para
substituir a tomada obsoleta.
8. Use apenas acessórios e
equipamentos recomendados
pelo fabricante.
9. Use apenas
carrinhos,
suportes, tripés,
suportes ou mesas
especicados.
Tenha cuidado
para evitar tombamentos ao mover a
combinação carrinho/aparelho.
10. Desconecte durante tempestades
ou se não estiver em uso por um longo
período.
11. Use apenas pessoal qualicado
para serviços, especialmente após
danos.
12. O aparelho com terminal de
aterramento protetor deve ser
conectado a uma tomada de corrente
com conexão de aterramento protetor.
13. Quando o plugue de corrente ou
um acoplador de aparelho é usado
como dispositivo de desconexão,
o dispositivo de desconexão deve
permanecer prontamente operável.
14. Evite instalar em espaços
connados, como estantes.
15. Não coloque fontes de chama nua,
como velas acesas, no aparelho.
16. Faixa de temperatura de operação
de 5°a 45°C (41°a 113°F).
O Music Tribe não se responsabiliza
por perda alguma que possa ser
sofrida por qualquer pessoa que
dependa, seja de maneira completa
ou parcial, de qualquer descrição,
fotograa, ou declaração aqui
contidas. Dados técnicos, aparências
e outras informações estão sujeitas
a modicações sem aviso prévio.
Todas as marcas são propriedade
de seus respectivos donos. Midas,
Klark Teknik, Lab Gruppen, Lake, Tannoy,
Turbosound, TC Electronic, TC Helicon,
Behringer, Bugera
, Aston Microphones
e Coolaudio são marcas ou marcas
registradas do Music Tribe Global Brands
Ltd. © Music Tribe Global Brands Ltd.
2024 Todos direitos reservados.
Para obter os termos de garantia
aplicáveis e condições e informações
adicionais a respeito da garantia
limitada do Music Tribe, favor vericar
detalhes na íntegra através do website
community.musictribe.com/support.
I terminali contrassegnati
con il simbolo conducono
una corrente elettrica
suciente a costituire un rischio di
scossa elettrica. Usareunicamente cavi
per altoparlanti (Speaker) d’elevata
qualità con connettori jack TS da
¼"pre-installati. Ognialtra
installazione o modica deve essere
eettuata esclusivamente da personale
tecnico qualicato.
Questo simbolo, ovunque
appaia, avverte della
presenza di una tensione
pericolosa non isolata all'interno dello
chassis, tensione che può essere
suciente per costituire un rischio di
scossa elettrica.
Questo simbolo, ovunque
appaia, segnala
importanti istruzioni
operative e di manutenzione nella
documentazione allegata. Si invita a
leggere il manuale.
Attenzione
Per ridurre il rischio di
scosse elettriche, non
rimuovere il coperchio superiore (o la
sezione posteriore). All'interno non ci
sono parti riparabili dall'utente. Per la
manutenzione rivolgersi a personale
qualicato.
Attenzione
Per ridurre il rischio di
incendi o scosse elettriche,
non esporre questo apparecchio a
pioggia e umidità. L'apparecchio non
deve essere esposto a gocciolio o schizzi
di liquidi e nessun oggetto contenente
liquidi, come vasi, deve essere collocato
sull'apparecchio.
Attenzione
Queste istruzioni di
servizio sono destinate
esclusivamente a personale qualicato.
Per ridurre il rischio di scosse
elettriche non eseguire interventi
di manutenzione diversi da quelli
contenuti nel manuale di istruzioni. Le
riparazioni devono essere eseguite da
personale di assistenza qualicato.
Avvertimento
Consultare le informazioni
sulla parte esterna
dell'involucro inferiore per ottenere
informazioni elettriche e di sicurezza
prima di installare o utilizzare
il dispositivo.
1. Si prega di leggere e seguire tutte
le istruzioni e gli avvertimenti.
2. Mantenere l'apparecchio lontano
dall'acqua (tranne che per i prodotti
destinati all'uso all'aperto).
3. Pulire solo con un panno asciutto.
4. Non ostruire le aperture di
ventilazione. Non installare in spazi
ristretti. Installare solo secondo le
istruzioni del produttore.
5. Proteggere il cavo di
alimentazione dai danni,
soprattutto alle spine e alla presa
dell'elettrodomestico.
6. Non installare vicino a fonti di
calore come termosifoni, bocchette
di calore, fornelli o altri apparecchi
(compresi gli amplicatori) che
producono calore.
7. Non eludere lo scopo di sicurezza
della spina polarizzata o della spina con
messa a terra. Una spina polarizzata ha
due lame di cui una più larga dell'altra
(solo per USA e Canada). Una spina con
messa a terra ha due lame e una terza
spina di messa a terra. La lama larga o
la terza spina sono fornite per la vostra
sicurezza. Se la spina fornita non si
adatta alla vostra presa, consultare un
elettricista per la sostituzione della
presa obsoleta.
HAFTUNGSAUSSCHLUSS
Instruções de
Segurança Importantes
BESCHRÄNKTE GARANTIE
GARANTIA LIMITADA
LEGAL RENUNCIANTE
Informazioni importanti
9 P24 8 P24
8. Utilizzare solo accessori e
attrezzature raccomandati dal
produttore.
9. Utilizzare
solo carrelli,
supporti,
treppiedi, stae o
tavoli specicati.
Prestare
attenzione per evitare il ribaltamento
durante lo spostamento della
combinazione carrello/apparecchio.
10. Scollegare durante le tempeste
o se non viene utilizzato per un lungo
periodo.
11. Utilizzare solo personale
qualicato per la manutenzione,
specialmente dopo danni.
12. L'apparecchio con terminale di
messa a terra protettiva deve essere
collegato a una presa di corrente
con connessione di messa a terra
protettiva.
13. Se la spina di rete o un
accoppiatore dell'elettrodomestico
viene utilizzato come dispositivo
di disconnessione, il dispositivo
di disconnessione deve rimanere
facilmente utilizzabile.
14. Evitare l'installazione in spazi
ristretti come librerie.
15. Non posizionare fonti di
amma nuda, come candele accese,
sull'apparecchio.
16. Intervallo di temperatura di
funzionamento da 5°a 45°C
(da 41°a 113°F).
Music Tribe non si assume alcuna
responsabilità per eventuali danni
che possono essere subiti da chiunque
si adi in tutto o in parte a qualsiasi
descrizione, fotograa o dichiarazione
contenuta qui. Speciche tecniche,
aspetti e altre informazioni sono
soggette a modiche senza preavviso.
Tutti i marchi sono di proprietà
dei rispettivi titolari. Midas, Klark
Teknik, Lab Gruppen, Lake, Tannoy,
Turbosound, TC Electronic, TC Helicon,
Behringer, Bugera, Aston Microphones
e Coolaudio sono marchi o marchi
registrati di Music Tribe Global Brands
Ltd. © Music Tribe Global Brands Ltd.
2024 Tutti i diritti riservati.
Per i termini e le condizioni di garanzia
applicabili e le informazioni aggiuntive
relative alla garanzia limitata di Music
Tribe, consultare online i dettagli
completi su community.musictribe.
com/support.
Aansluitingen die
gemerkt zijn met het
symbool voeren een
zodanig hoge spanning dat ze een
risico vormen voor elektrische
schokken. Gebruikuitsluitend
kwalitatief hoogwaardige, in de handel
verkrijgbare luidsprekerkabels die
voorzien zijn van ¼"TS stekkers.
Laatuitsluitend gekwaliceerd
personeel alleoverige installatie- of
modicatiehandelingenuitvoeren.
Dit symbool waarschuwt
u, waar het ook verschijnt,
voor de aanwezigheid van
ongeïsoleerde gevaarlijke spanning
binnenin de behuizing - spanning die
voldoende kan zijn om een risico op
elektrische schokken te vormen.
Dit symbool wijst u
altijd op belangrijke
bedienings - en
onderhoudsvoorschriften in de
bijbehorende documenten. Wijvragen
u dringend de handleiding te lezen.
Attentie
Verwijder in geen
geval de bovenste
afdekking (vanhet achterste gedeelte)
anders bestaat er gevaar voor een
elektrische schok. Hetapparaat bevat
geen te onderhouden onderdelen.
Reparatiewerkzaamheden mogen
uitsluitend door gekwaliceerd
personeel uitgevoerdworden.
Attentie
Om het risico op brand
of elektrische schokken
te beperken, dient u te voorkomen
dat dit apparaat wordt blootgesteld
aan regen en vocht. Hetapparaat
mag niet worden blootgesteld aan
neerdruppelend of opspattend water
en er mogen geen met water gevulde
voorwerpen – zoals een vaas – op het
apparaat wordengezet.
Attentie
Deze
onderhoudsinstructies
zijn uitsluitend bedoeld voor
gekwaliceerd onderhoudspersoneel.
Omelektrische schokken te
voorkomen, mag u geen andere
onderhoudshandelingen
verrichten dan in de
bedieningsinstructies vermeld staan.
Reparatiewerkzaamheden
mogen alleen uitgevoerd worden door
gekwaliceerd onderhoudspersoneel.
Waarschuwing
Raadpleeg de informatie
op de buitenkant van de
onderste behuizing voor elektrische
en veiligheidsinformatie voordat u het
apparaat installeert of bedient.
1. Gelieve alle instructies en
waarschuwingen zorgvuldig te lezen
en op te volgen.
2. Houd het apparaat uit de buurt
van water (behalve voor producten
bedoeld voor gebruik buitenshuis).
3. Reinig alleen met een droge doek.
4. Blokkeer de ventilatieopeningen
niet. Installeer niet in een afgesloten
ruimte. Installeer alleen volgens de
instructies van de fabrikant.
5. Bescherm de voedingskabel
tegen schade, vooral bij stekkers en het
stopcontact van het apparaat.
6. Installeer niet in de buurt van
warmtebronnen zoals radiatoren,
warmte registers, fornuizen of andere
apparaten (inclusief versterkers) die
warmte produceren.
7. Hef het veiligheidsdoel van de
gepolariseerde of geaarde stekker
niet op. Een gepolariseerde stekker
heeft twee pennen waarvan één
breder is dan de andere (alleen
voor de VS en Canada). Een geaarde
stekker heeft twee pennen en een
derde aardingspen. De brede pen of
de derde pen zijn voor uw veiligheid.
Als de meegeleverde stekker niet in
uw stopcontact past, raadpleeg dan
een elektricien om het verouderde
stopcontact te vervangen.
8. Gebruik alleen accessoires en
apparatuur die door de fabrikant
worden aanbevolen.
9. Gebruik
alleen
gespeciceerde
karren, stands,
statieven, beugels
of tafels. Wees
voorzichtig om kantelen te voorkomen
bij het verplaatsen van de kar/
apparaatcombinatie.
10. Trek de stekker uit tijdens stormen
of als het apparaat gedurende lange
tijd niet wordt gebruikt.
11. Gebruik alleen gekwaliceerd
personeel voor onderhoud, vooral na
schade.
12. Het apparaat met een
beschermende aardingsaansluiting
moet worden aangesloten op een
stopcontact met een beschermende
aardingsverbinding.
13. Als de stekker van het stopcontact
of een apparaatkoppeling als het
ontkoppelingsapparaat wordt gebruikt,
moet het ontkoppelingsapparaat
gemakkelijk bedienbaar blijven.
14. Vermijd installatie in afgesloten
ruimtes zoals boekenkasten.
15. Plaats geen open vlambronnen,
zoals brandende kaarsen, op
het apparaat.
16. Bedrijfstemperatuurbereik van
5°tot 45°C (41°tot 113°F).
Music Tribe aanvaardt geen
aansprakelijkheid voor enig verlies
dat kan worden geleden door een
persoon die geheel of gedeeltelijk
vertrouwt op enige beschrijving,
foto of verklaring hierin. Technische
specicaties, verschijningen en
andere informatie kunnen zonder
voorafgaande kennisgeving worden
gewijzigd. Alle handelsmerken zijn
eigendom van hun respectievelijke
eigenaren. Midas, Klark Teknik, Lab
Gruppen, Lake, Tannoy, Turbosound,
TC Electronic, TC Helicon, Behringer,
Bugera, Aston Microphones en
Coolaudio zijn handelsmerken of
gedeponeerde handelsmerken
van Music Tribe Global Brands Ltd.
© Music Tribe Global Brands Ltd.
2024 Alle rechten voorbehouden.
Voor de toepasselijke
garantievoorwaarden en aanvullende
informatie met betrekking tot de
beperkte garantie van Music Tribe,
zie de volledige details online op
community.musictribe.com/support.
Uttag markerade med
symbolen leder elektrisk
strömstyrka som är
tillräckligt stark för att utgöra en risk
för elchock. Använd endast
högkvalitativa, kommersiellt
tillgängliga högtalarkablar med
förhandsinstallerade ¼"TS-kontakter.
Allannan installering eller modikation
bör endast utföras av
kompetentpersonal.
Denna symbol, var den än
förekommer, varnar för
närvaron av farlig,
oisolerad spänning inuti höljet -
spänning som kan vara tillräcklig för att
utgöra en risk för stöt.
Den här symbolen
hänvisar till viktiga
punkter om användning
och underhåll i den medfölljande
dokumentationen. Varvänlig och läs
bruksanvisningen.
Försiktighet
Minska risken för
elektriska stötar genom
att aldrig ta av höljet upptill på
apparaten (ellerta av baksidan).
Inuti apparaten nns det inga delar
som kan repareras av användaren.
Endastkvalicerad personal får
genomföra reparationer.
Försiktighet
För att minska risken
för brand och elektriska
stötar ska apparaten skyddas mot
regn och fukt. Apparaten går inte
utsättas för dropp eller spill och
inga vattenbehållare som vaser etc.
fårplaceras på den.
Försiktighet
Serviceinstruktionen
är enbart avsedd
för kvalicerad servicepersonal.
Föratt undvika risker genom
elektriska stötar, genomför inga
reparationer på apparaten, vilka inte
är beskrivna i bruksanvisningen.
Endast kvalicerad fackpersonal får
genomförareparationerna.
Varning
Vänligen se informationen
på utsidan av bottenhöljet
för elektrisk och säkerhetsinformation
innan du installerar eller använder
enheten.
1. Vänligen läs och följ alla
instruktioner och varningar noggrant.
2. Håll apparaten borta från vatten
(utom för utomhusprodukter).
3. Rengör endast med en torr trasa.
4. Blockera inte
ventilationsöppningarna. Installera
inte i trånga utrymmen. Installera
endast enligt tillverkarens anvisningar.
5. Skydda nätkabeln från
skador, särskilt vid kontakter och
apparatkontakten.
6. Installera inte nära värme källor
som element, värmeregistrar, spisar
DISCLAIMER LEGALE
GARANZIA LIMITATA
Belangrijke
veiligheidsvoorschriften
WETTELIJKE ONTKENNING
Viktiga
säkerhetsanvisningar
BEPERKTE GARANTIE
11 P24 10 P24
eller andra apparater (inklusive
förstärkare) som producerar värme.
7. Förstör inte säkerhetsfunktionen
hos den polariserade eller jordade
kontakten. En polariserad kontakt har
två blad varav ett är bredare än det
andra (endast för USA och Kanada).
En jordad kontakt har två blad och
en tredje jordningsstift. Det breda
bladet eller det tredje stiftet är till för
din säkerhet. Om den medföljande
kontakten inte passar i ditt uttag,
kontakta en elektriker för att byta ut
det föråldrade uttaget.
8. Använd endast tillbehör och
tillbehör som rekommenderas av
tillverkaren.
9. Använd
endast
specicerade
vagnar, ställ, stativ,
fästen eller bord.
Var försiktig för att
förhindra vältningsrisk när du yttar
vagnen/apparatkombinationen.
10. Koppla ur under åskväder eller
om enheten inte används under en
längre tid.
11. Använd endast kvalicerad
personal för service, särskilt efter
skador.
12. Apparaten med
skyddsjordanslutning ska
anslutas till ett vägguttag med
skyddsjordanslutning.
13. Om nätkontakten eller en
apparatkoppling används som
frånkopplingsanordning måste
frånkopplingsanordningen vara lätt
åtkomlig.
14. Undvik installation i trånga
utrymmen som bokhyllor.
15. Placera inte öppna lågor, som
tända ljus, på apparaten.
16. Driftstemperaturområde 5° till
45°C (41° till 113°F).
Music Tribe tar inget ansvar för någon
förlust som kan drabbas av någon
person som helt eller delvis förlitar
sig på någon beskrivning, fotogra
eller uttalande som nns här.
Tekniska specikationer, utseenden
och annan information kan ändras
utan föregående meddelande. Alla
varumärken tillhör respektive ägare.
Midas, Klark Teknik, Lab Gruppen,
Lake, Tannoy, Turbosound, TC
Electronic, TC Helicon, Behringer,
Bugera, Aston Microphones och
Coolaudio är varumärken eller
registrerade varumärken som tillhör
Music Tribe Global Brands Ltd.
© Music Tribe Global Brands Ltd.
2024 Alla Rättigheter reserverade.
För tillämpliga garantivillkor och
ytterligare information om Music
Tribes begränsade garanti, se
fullständig information online på
community.musictribe.com/support.
Terminale oznaczone
symbolem przenoszą
wystarczająco wysokie
napięcie elektryczne, aby stworzyć
ryzyko porażenia prądem. Używaj
wyłącznie wysokiej jakości fabrycznie
przygotowanych kabli z
zainstalowanymi wtyczkami ¼"TS.
Wszystkie inne instalacje lub
modykacje powinny być wykonywane
wyłącznie przez wykwalikowany
personel techniczny.
Ten symbol, gdziekolwiek
się pojawi, informuje Cię o
obecności nieizolowanego
niebezpiecznego napięcia wewnątrz
obudowy - napięcia, które może
stanowić ryzyko porażenia.
Ten symbol informuje o
ważnych wskazówkach
dotyczących obsługi i
konserwacji urządzenia w dołączonej
dokumentacji. Proszę przeczytać
stosowne informacje w instrukcji
obsługi.
Uwaga
W celu wyeliminowania
zagrożenia porażenia
prądem zabrania się zdejmowania
obudowy lub tylnej ścianki urządzenia.
Elementyznajdujące się we wnętrzu
urządzenia nie mogą być naprawiane
przez użytkownika. Naprawymogą
być wykonywane jedynie przez
wykwalikowanypersonel.
Uwaga
W celu wyeliminowania
zagrożenia porażenia
prądem lub zapalenia się urządzenia
nie wolno wystawiać go na działanie
deszczu i wilgotności oraz dopuszczać
do tego, aby do wnętrza dostała się
woda lub inna ciecz. Nie należy stawiać
na urządzeniu napełnionych cieczą
przedmiotów takich jak np. wazony
lub szklanki.
Uwaga
Prace serwisowe mogą
być wykonywane jedynie
przez wykwalikowany personel.
Wcelu uniknięcia zagrożenia porażenia
prądem nie należy wykonywać
żadnych manipulacji, które nie
są opisane w instrukcji obsługi.
Naprawywykonywane mogą być
jedynie przez wykwalikowany
personeltechniczny.
Ostrzeżenie
Przed zainstalowaniem
lub uruchomieniem
urządzenia prosimy zajrzeć do
informacji umieszczonej na
zewnętrznej części dolnej obudowy
dotyczącej informacji elektrycznych i
bezpieczeństwa.
1. Proszę przeczytać i ścisłe
przestrzegać wszystkich instrukcji i
ostrzeżeń.
2. Trzymaj urządzenie z dala
od wody (z wyjątkiem produktów
przeznaczonych do użytku na
zewnątrz).
3. Czyść tylko suchą szmatką.
4. Nie blokuj otworów
wentylacyjnych. Nie instaluj w
zamkniętym miejscu. Instaluj tylko
zgodnie z instrukcjami producenta.
5. Zabezpiecz przewód zasilający
przed uszkodzeniem, zwłaszcza przy
wtyczkach i gnieździe urządzenia.
6. Nie instaluj w pobliżu
źródeł ciepła, takich jak grzejniki,
rejestratory ciepła, kuchenki lub inne
urządzenia (w tym wzmacniacze),
które generują ciepło.
7. Nie unieważniaj celu
bezpieczeństwa wtyczki
spolaryzowanej lub wtyczki z
uziemieniem. Wtyczka spolaryzowana
ma dwie wtyczki, z których jedna
jest szersza niż druga (tylko dla USA
i Kanady). Wtyczka z uziemieniem
ma dwie wtyczki i trzeci bolc
uziemiający. Szeroka wtyczka lub
trzeci bolc są dostarczone dla Twojego
bezpieczeństwa. Jeśli dostarczona
wtyczka nie pasuje do Twojej
gniazdka, skonsultuj się z elektrykiem
w celu wymiany przestarzałego
gniazdka.
8. Używaj tylko akcesoriów
i dodatków zalecanych przez
producenta.
9. Używaj
tylko określonych
wózków, stojaków,
statywów,
uchwytów lub
stolików. Uważaj,
aby uniknąć przewrócenia wózka/
kombinacji urządzenia podczas
przemieszczania.
10. Odłączaj w czasie burz lub jeśli
urządzenie nie jest używane przez
długi okres.
11. Korzystaj tylko z
kwalikowanego personelu do
serwisowania, zwłaszcza po
uszkodzeniach.
12. Urządzenie z zabezpieczonym
terminalem uziemiającym powinno
być podłączone do gniazdka
sieciowego z połączeniem
ochronnym.
13. Jeśli wtyczka sieciowa lub
złącze urządzenia jest używane jako
urządzenie odłączające, urządzenie
odłączające powinno pozostać łatwo
dostępne.
14. Unikaj instalacji w zamkniętych
miejscach, takich jak biblioteczki.
15. Nie umieszczaj źródeł otwartego
ognia, takich jak palące się świeczki,
na urządzeniu.
16. Zakres temperatury pracy od 5°
do 45°C (od 41° do 113°F).
Music Tribe nie ponosi
odpowiedzialności za jakiekolwiek
straty, które mogą ponieść osoby,
które polegają w całości lub w
części na jakimkolwiek opisie,
fotograi lub oświadczeniu
zawartym w niniejszym dokumencie.
Specykacje techniczne, wygląd i
inne informacje mogą ulec zmianie
bez powiadomienia. Wszystkie
znaki towarowe są własnością ich
odpowiednich właścicieli. Midas,
Klark Teknik, Lab Gruppen, Lake,
Tannoy, Turbosound, TC Electronic,
TC Helicon, Behringer, Bugera, Aston
Microphones i Coolaudio są znakami
towarowymi lub zastrzeżonymi
znakami towarowymi rmy Music
Tribe Global Brands Ltd. © Music Tribe
Global Brands Ltd. 2024 Wszystkie
prawa zastrzeżone.
Aby zapoznać się z obowiązującymi
warunkami gwarancji i dodatkowymi
informacjami dotyczącymi
ograniczonej gwarancji Music Tribe,
zapoznaj się ze wszystkimi szczegółami
w trybie online pod adresem
community.musictribe.com/support.
感電の.恐れがあり
ますので、カバーや
その他の部品を取り
外したり、開けたりしないで
ください。高品質なプロ用ス
ピーカーケーブル (¼" TS 標準
ケーブルおよびツイスト ロッ
キング プラグケーブル) を使
用してください。
このシンボルは、ど
こに現れても、筐体
内部に絶縁のない危
険な電圧が存在しており、こ
れは感電の危険性を構成する
可能性があることを示してい
ます。
火事および感電の危
険を防ぐため、
本装置を水分や湿気
のあるところには設置しない
で下さい。装置には決して水
分がかからないように注意
し、花瓶など水分を含んだも
のは、装置の上には置かない
ようにしてください。
注意
このマークが表示さ
れている箇所には、内部に高圧
電流が生じています。手を触れ
ると感電の恐れがあります。
注意
取り扱いとお手入れ
の方法についての重要な説明
が付属の取扱説明書に記載さ
れています。ご使用の前に良
くお読みください。
注意
これらのサービス指
示は、有資格のサー
ビス担当者のみが使用するた
めのものです。操作説明書に
含まれているもの以外のサー
BEGRÄNSAD GARANTI
FRISKRIVNINGSKLAUSUL
Ważne informacje o
bezpieczeństwie
ZASTRZEŻENIA PRAWNE
OGRANICZONA GWARANCJA
安全にお使いいただく
ために
13 P24 12 P24
ビスを行わないでください。
修理は有資格のサービス担当
者によって行われなければな
りません。
警告
デバイスの取り付け
または操作を行う前
に、電気および安全に関する
情報については、底部の外装
に記載されている情報を参照
してください。
1. すべての指示と警告を
注意深く読み、従ってくだ
さい。
2. 装 置 を 水 から離してくださ
い( 屋 外 用 の 製 品 を 除 く ) 。
3. 乾いた布でしか清掃しない
でください。
4. 換気口を塞がないでくだ
さ い 。密 閉 さ れ た ス ペ ー ス に は
取 り 付 け な い で く だ さ い 。必 ず
製 造 元 の 指 示に 従って 取り付 け
てください 。
5. 電 源コードを特にプラグや
アプライアンスの差込口で損傷
から守 ってください 。
6. 暖 房 器 、ヒ ー タ ー 、ス ト ー
ブ 、ア ン プ な ど 発 熱 す る 機 器
の近くには 取り付けないでく
ださい。
7. 偏光または接地型プラグ
の安 全目的を妨げないでくださ
い 。偏 光 プ ラ グ は 片 方 が も う 一
方 よ り 幅 が 広 い も の で す( ア メ
リカとカナダ専用)。接地型プラ
グは 二本 の刃と三 本目のアース
プ ラ グ が つ い て い ま す。幅 の 広
い刃または三本目のプラグは安
全のために設けられています。
提供されたプラグがコンセント
に合わない場合は、電気技師に
相 談して陳 腐化したコン セント
を交 換してください 。
8. 製 造 元 が推 奨するアタッチ
メントやアクセサリーだけを使
用してください 。
9. 指定され
たカート、スタ
ン ド 、三 脚 、ブ
ラ ケ ッ ト 、ま た
はテーブルだけ
を 使 用してくだ
さい。カート/装置の組み合わ
せを移動する際には倒れないよ
うに 注 意してください 。
10. 嵐時や長期間使用しな
い場合はプラグを抜いてくだ
さい。
11. 特 に 損 傷 後 は 、修 理 に は
資 格 のあ る専 門 家を 利 用してく
ださい。
12. 保 護アース 端 子のある装
置 は 、保 護 ア ー ス 接 続 の あ る メ
インの電源コンセントに接続し
てください 。
13. メインプラグまたはアプ
ライアンスコプラが切断装置
と し て 使 用 さ れ る 場 合 、切 断 装
置は操作可能でなければなり
ません。
14. 書棚などの密閉された空
間には設 置しないでください。
15. ろうそくなどの明火を装置
に置かないでください。
16. 動作温度範囲は 5° から
45°C までです (41° から 113°F)。
ここに含まれる記述、写真、
意見の全体または一部に依拠
して、いかなる人が損害を生じ
させた場合にも、
Music Tribe は
一切の賠償責任を負いませ
ん。技術仕様、外観およびそ
の他の情報は予告なく変更
になる場合があります。商
標はすべて、それぞれの所有
者に帰属します。Midas、Klark
Teknik
、 Lab Gruppen、Lake、Tannoy、
Turbosound、TC Electronic、TC Helicon、
Behringer、Bugera、Aston Microphones
および Coolaudio は Music Tribe
Global Brands Ltd.
の商標または‑登
録商標です。© Music Tribe Global
Brands Ltd. 2024
無断転用禁止。
適用される保証条件と
Music Tribe の限定保証に関する
概 要 に つ い て は 、オ ン ラ イ ン 上
community.musictribe.com/support
にて詳 細をご確認ください。
产品输出端子带有此
标志表示此端子具有
大电流, 存在触电危
险。 仅限使用带有 ¼" TS 或扭锁
式插头的高品质专业扬声器线。
与这些端子连接的外部导线需
要由经过指导的人员来安装和
使用厂家提供的导线或指定的
导线。
此标志提醒您, 产品
内存在未绝缘的危险
电压,
有触电危险。
此标志提醒您查阅所
附的重要的使用及维
修说明。 请阅读有关
手册。
小心
为避免着火或触电危
险, 请勿将此产品置
于雨淋或潮湿中。 此产品也不可
受液体滴溅, 盛有液体的容器也
不可置于其上, 如花瓶等。
小心
维修说明仅是给合格
的专业维修人员使用
的。 为避免触电危险, 除了使用
说明书提到的以外, 请勿进行任
何其他维修。 所有维修均须由合
格的专业人员进行操作。
1. 请阅读, 保存, 遵守所有的
说明, 注意所有的警示。
2. 请勿在靠近水的地方使用
本产品。
3. 请用干布清洁本产品。
4. 请勿堵塞通风孔, 安装本产
品时请遵照厂家的说明, 通风孔
不要覆盖诸如报纸, 桌布和窗帘
等物品而妨碍通风。
5. 请勿将本产品安装在热源附
近, 如暖气片, 炉子或其它产生
热量的设备 (包括功放器)。 产品
上不要放置裸露的火焰源, 如点
燃的蜡烛。
6. 如果产品附带接地插头, 请
勿移除接地插头的安全装置, 接
地插头是由火线和零线两个插
片及一个接地插片构成。 如随货
提供的插头不适合您的插座, 请
找电工更换一个合适的插座。
7. 妥善保护电源线, 使其不被
践踏或刺破, 尤其注意电源插头,
多用途插座接设备连接处。
8. 请只使用厂家指定的附属设
备和配件。
9. 请只使用厂
家指定的或随
货销售的手推
车, 架子, 三角
架, 支架和桌子
等。 若使用手推
车来搬运设备, 请注意安全放置
设备, 以避免手推车和设备倾倒
而受伤。
10. 遇闪电雷鸣或长期不使用本
设备时, 请拔出电源插头。
11. 如果电源线或电源插头受
损, 液体流入或异物落入设备内,
设备遭雨淋或受潮, 设备不能正
常运作或被摔坏等, 设备受损需
进行维修时, 所有维修均须由合
格的维修人员进行维修。
12. 如果产品附带接地插头, 本
产品应当连接到带保护接地连
接的电网电源输出插座上, 确
保连接电源时一定有可靠的接
地保护。
13. 若电源插头或器具耦合器
用作为断路装置, 应当保证它们
处于随时可方便操作状态。
14. 本产品仅适合
用于海拔 2000 米以
下和非热带气候条
件下的地区。
对于任何因在此说明书提到
的全部或部份描述、 图片或
声明而造成的损失,
Music Tribe
不负任何责任。 技术参数和外
观若有更改, 恕不另行通知。
所有的商标均为其各自所有者
的财产。 Midas, Klark Teknik, Lab
Gruppen, Lake, Tannoy, Turbosound,
TC Electronic, TC Helicon, Behringer,
Bugera, Aston Microphones
和
Coolaudio
是 Music Tribe Global
Brands Ltd.
公司的商标或注册商
标。 © Music Tribe Global Brands Ltd.
2024
版权所有。
有关音乐集团保修的适用条
款及其它相关信息, 请登陆
community.musictribe.com/support
网站查看完整的详细信息。
法的放棄
限定保証
重要的安全须知
法律声明
保修条款

15 P24 14 P24
1. Introduction
Monitoring and communication are vital for the musicians to feel comfortable performing on stage. Behringer’s new P24 monitoring
system is designed to solve common problems for on-stage performers like “I need more me” or “the vocal is too loud” by giving them
direct and easy-to-operate control of their own monitoring mixes. It also allows Talkback communication between musicians on-stage
and engineers.
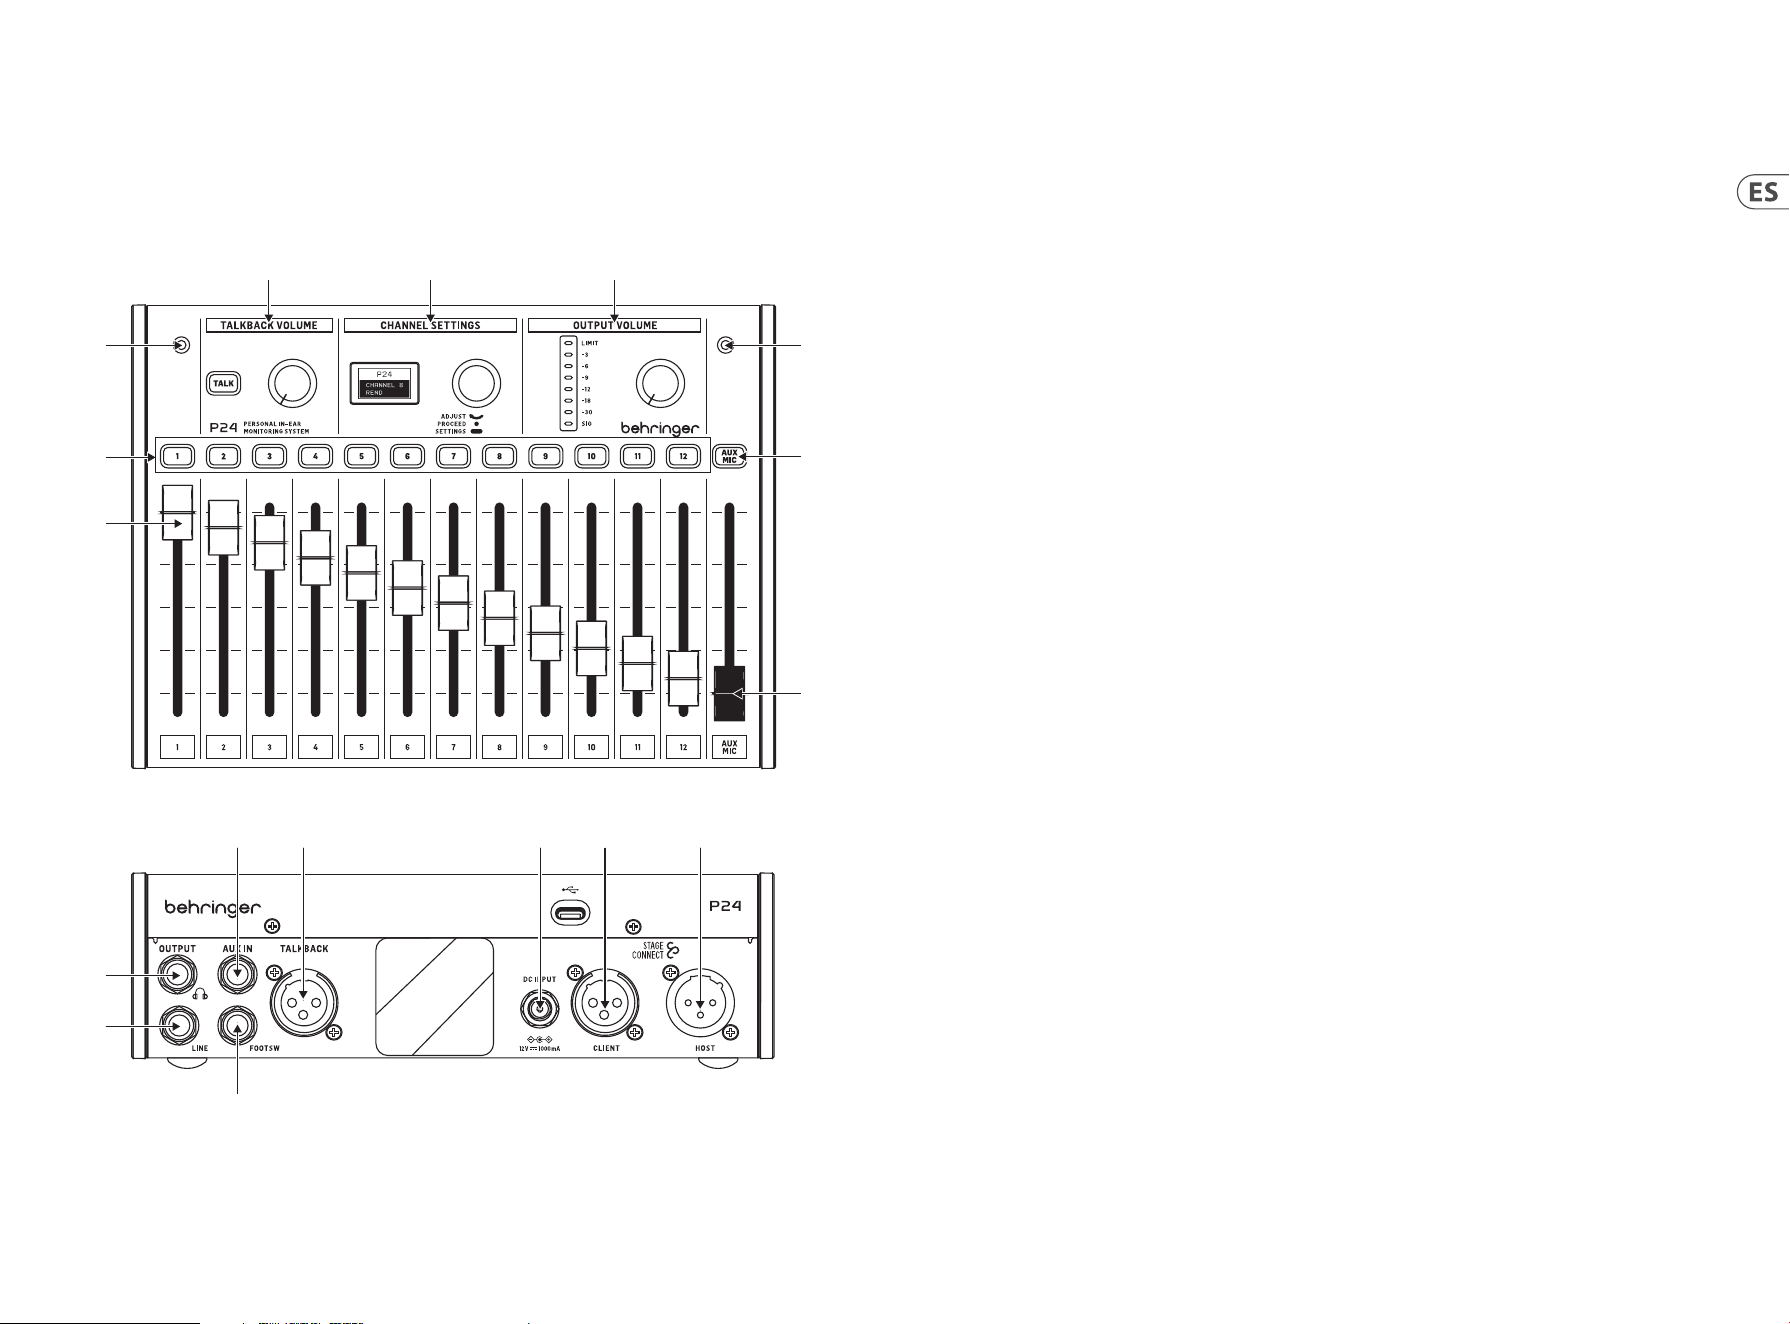
2. Top and rear panel
(3)
(1)
(3)
(7)
(8)
(2)
(4) (5) (6)
(11)
(10)
(12) (13) (14) (15) (16)
(9)
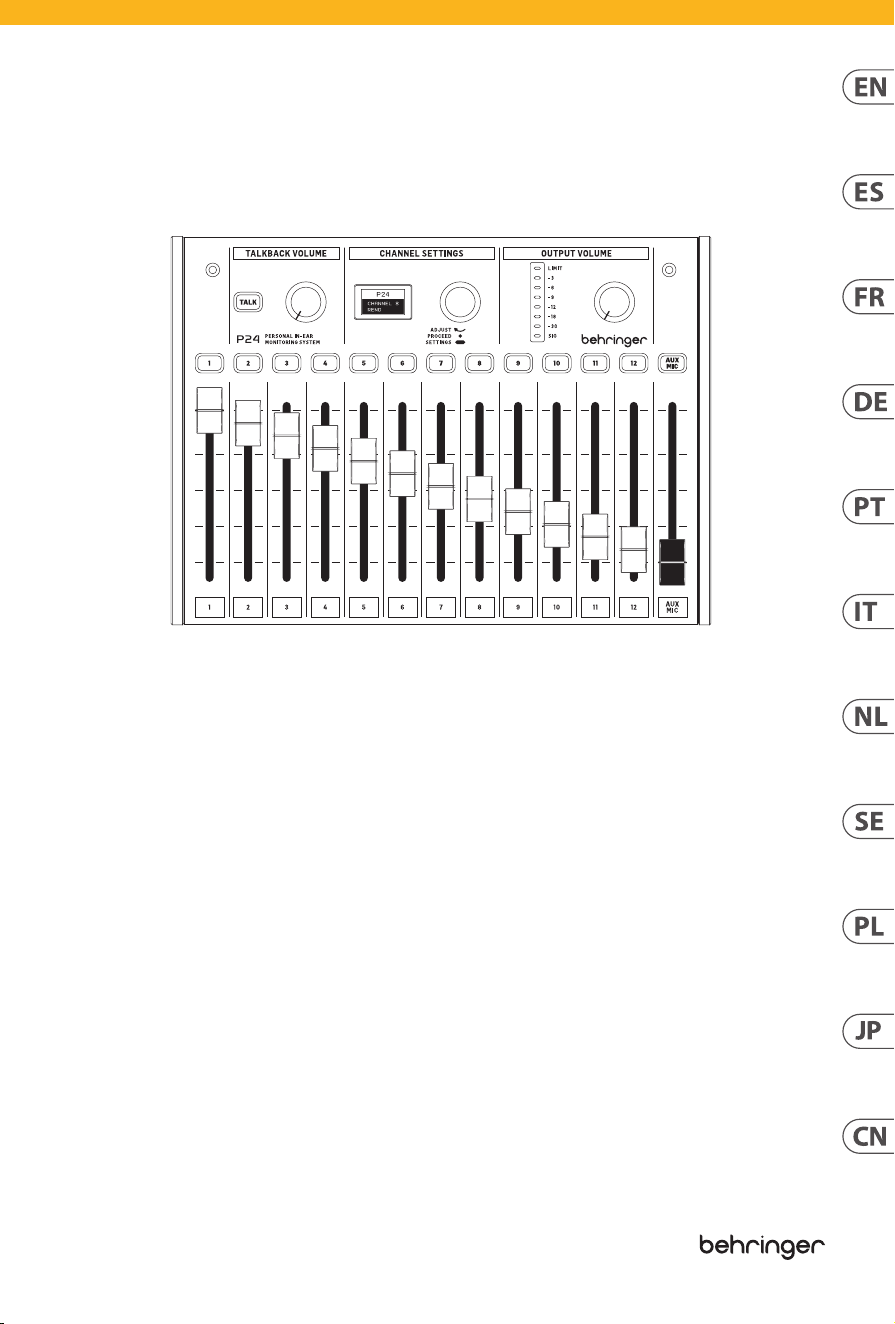
1. Channel faders control the volume of the stereo channels.
Please also refer to the P24HUB Quick Start Guide for
routing details.
2. The channel selection buttons light green when audio is
going through the corresponding channel, and red when it
is clipping. When a channel selection button is pressed, it
turns amber, and the corresponding channel can be edited
on the CHANNEL SETTINGS section.
3. Two internal microphones can be used either for talkback
or to capture the ambience sound and feed it into the
in-ear monitors, which results in a more natural-sounding
monitoring mix.
4. Hold down the TALK button to send the talkback signal
upstream to the previous P24 in the chain or to the
P24HUB. The button lights when talkback is being
received. The knob next to the TALK button controls the
volume of the incoming talkback.
5. Multiple channel adjustments can be made in CHANNEL
SETTINGS both for the main (monitoring) mix and
individual channels. See section 3 for details.
6. The knob in the OUTPUT VOLUME section adjusts the
headphone level that is indicated on the meter. The top
LED is lit when the limiter is applying gain reduction.
The LED meter shows the level of the currently selected
channel. When no channel is selected, the main output
level is shown (post-knob).
7. AUX/MIC button allows adjusting the gain for the stereo
AUX IN, and the internal and external microphones.
8. The AUX/MIC fader controls the level of both the AUX IN
and the internal or external microphones.
9. A momentary footswitch can be connected to the
FOOTSW port to activate Talkback of the internal and
external mics to other devices in the StageConnect
system. It has the same function as pressing the TALK
button on the control surface.
10. LINE OUTPUT is a mono copy of the main mix. It can be
used for active wedge monitors. Connecting a cable to this
port disables the ow of the internal and external mics to
the main mix to avoid a feedback loop.
Note: use a balanced TRS cable to connect the LINE OUTPUT to the
active wedge monitor input. This impedance balanced connection
avoids ground loops and unwanted noise.
11. A headphone output with the main mix post-limiter is
available on ¼" TRS jack. A very high-quality headphone
amplier provides ample power even for low-impedance
headphones and in-ears.
Note: Please consider that listening to loud sounds for extended
periods of time leads to hearing loss. You can adjust the Limiter
from maximum down to -30 dB, to ensure staying in a safe
output range.
12. AUX IN receives a stereo or mono line level signal and
sends it to the main mix bus.
13. An external microphone can be connected to the
TALKBACK XLR connector. This is useful for giving cues to
other band members, for example.
14. If the unit is not being powered via StageConnect CLIENT/
Slave, the 12 V/1000 mA DC adapter can be connected to
the DC INPUT. This can be useful for using P24 as a simple
headphone amplier for signals fed to the AUX IN.
15. StageConnect CLIENT/Slave connector for communication
with an upstream P24 or P24HUB, and for receiving
remote power.
16. StageConnect HOST/Master for daisy chaining
communication and power to a downstream P24.

17 P24 16 P24
3. Channel settings
3.1. Stereo Channel Settings
When a channel selection button is pressed, multiple options
are available for the input and talkback channels on the CHANNEL
SETTINGS section.
Navigating the menu layers and parameters can be done by:
• Pressing the channel selection button to access the
corresponding channel’s settings and holding it down to
alternate between the performance parameter layer and
the channel settings layer. When pressing the same channel
selection button twice, the channel is unselected, and the
CHANNEL SETTINGS section will control the headphone main
mix settings.
• Pressing the CHANNEL SETTINGS encoder once to toggle
between parameters
• Turning the CHANNEL SETTINGS encoder to adjust
the parameter
The Channel Performance Parameters Layer (white
backlight) is activated by pressing the channel selection button
and contains the following:
• BALANCE: left/right panning when in stereo mode, or
balance between the two channels when in dual mode.
• TONE: +/-12dB tilt EQ
• FX SEND: ON/OFF, sends the channel to the onboard reverb
eect. The reverb level can be set in the headphone mix
performance parameters layer (see Section 3.3)
The Channel Settings Layer (green backlight) is accessed
by holding down the channel selection button and contains
the following:
• MODE:
• Stereo: two adjacent input channels are panned
hard left/right. BALANCE controls the volume of
each channel.
• Mono: two adjacent input channels are panned to the
center. BALANCE controls the stereo position of the
sum of both input channels.
• Dual: two adjacent input channels are panned to
the center. BALANCE controls the volume ratio
between both channels, while keeping them panned
to the center. This is useful, for example, when a
bass drum and snare signal are delivered on two
consecutive channels.
• NAME: choose from many preset channel names.
3.2. AUX / MIC Stereo Shannel Settings
The Channel Performance Parameters Layer
(white backlight) is activated by pressing the AUX MIC channel
selection button and contains the following:
• AUX TRIM: adjusts the level of the AUX IN gain
(OFF, -59dB to +20dB)
• MIC TRIM: adjusts the level of the internal or external mic
gain (OFF, -59dB to +20dB)
The Channel Settings Layer (green backlight) is accessed by
holding down the AUX MIC channel selection button and selects the
internal or external microphone (MIC SEL: INT or EXT, respectively)
3.3. Headphone Main Mix Settings
When no stereo channel is selected, processing options for the
main monitoring mix are available.
The Headphone Mix Performance Parameters Layer (light blue
backlight) is active by default and contains the following:
• BALANCE: left/right panning
• TONE: +/-12dB tilt EQ
• REVERB: sets the overall reverb level (OFF, -59dB to +20dB).
While on this screen, pressing a channel selection button
toggles the corresponding FX SEND ON/OFF (also found in
the channel performance parameters layer)
The Settings Layer (blue backlight) is activated by holding down
the CHANNEL SETTINGS encoder and contains the following:
• LIMITER: threshold from 0dB to -20dB
• MID GAIN: -12dB to +6dB gain of the mid frequency band
• MID FREQUENCY: center frequency of the mid band (100Hz
to 9500Hz)
• TALKBACK: selects if you are listening to the A, B or
both A and B talkback channels coming through the
StageConnect system.
• TB DIM: sets the amount of attenuation applied to the
headphone mix while the talkback is active.
• LIGHT: controls the screen’s and buttons’ backlight intensity.
• CONT: controls the screen’s contrast.
• REMOTE: enables or disables the remote control of the P24
from a console or other P24s.
• INIT P24: sets all the P24’s parameters back to default values.
Alternatively, hold down the TALK button while powering on
the unit to initialize the P24’s settings.
• SND CFG: this option allows sending the conguration
of any P24 connected to ports 1.1, 2.1, 3.1 or 4.1 to all
other P24s connected to the same hub and to the other
daisy-chained hubs.
Note: The limiter is located after the volume control in the signal
ow to protect your hearing against sudden peaks. Adjust it
consciously and remain within safe hearing levels in the heat of
the performance!
4. Remote control
Channel name information is received by the P24HUB through
either AES50 A or StageConnect CLIENT/Slave ports. This channel
name information is then transmitted through the 4 front
StageConnect ports; allowing the individual P24 personal mixers
to display the channel information and congure its 12 channels
to mono, stereo or dual mono respectively. To do so, enable
REMOTE in the Settings Layer and congure the routing and
naming as follows:
• Mono:
• 1 channel + 1 empty channel (or vice versa)
• Stereo:
• Left and right channels with names ending in
“L” and “R”
• Left and right channels with the same name
• Dual:
• Any other setup not classied as Mono or Stereo
5. Firmware update
1. To update the P24 rmware, download the SimplyPUT
update tool from behringer.com.
2. Open the SimplyPUT tool.
3. Connect the P24 to the computer via USB.
4. Connect the P24 to the power outlet while holding down
the Channel Settings encoder.
5. SimplyPUT will automatically detect and update the P24.
In case it doesn’t or if you want to install an older rmware
version, download the desired rmware. In SimplyPUT, go
to File>Local File and load the desired rmware.
19 P24 18 P24
1. Introducción
La monitorización y la comunicación son vitales para que los músicos se sientan cómodos actuando en el escenario. El nuevo sistema de
monitorización P24 de Behringer está diseñado para resolver problemas comunes para los artistas en el escenario como “necesito más yo”
o “la voz está demasiado alta” al darles un control directo y fácil de operar de sus propias mezclas de monitorización. También permite la
comunicación Talkback entre los músicos en el escenario y los ingenieros.
2. Panel superior y trasero
(3)
(1)
(3)
(7)
(8)
(2)
(4) (5) (6)
(11)
(10)
(12) (13) (14) (15) (16)
(9)
1. Los faders de canal controlan el volumen los canales
estéreo. Por favor, consulte también la guía de
inicio rápido de P24HUB para obtener detalles sobre
el enrutamiento.
2. Los botones de selección de canal se iluminan
verde cuando el audio está pasando por el canal
correspondiente, y rojo cuando está saturando. Cuanto
un botón de selección de canal se presiona, se ilumina
ámbar y el canal correspondiente puede ser editado con la
sección CHANNEL SETTINGS.
3. Dos micrófonos internos pueden utilizarse ya sea para
talkback o para capturar el sonido ambiente y alimentarlo
a los monitores in-ear, lo que resulta en una mezcla de
monitorización más natural.
4. Mantén pulsado el botón TALK para enviar la señal de
talkback aguas arriba al P24 anterior en la cadena o al
P24HUB. El botón se ilumina cuando se recibe el talkback.
La perilla junto al botón TALK controla el volumen del
talkback entrante.
5. Se pueden hacer ajustes de canal múltiples en CHANNEL
SETTINGS tanto para la mezcla principal (monitorización)
como para los canales individuales. Consulta la sección 3
para obtener más detalles.
6. La perilla en la sección OUTPUT VOLUME ajusta el nivel de
los auriculares que se indica en el medidor. El LED superior
se ilumina cuando el limitador está aplicando reducción
de ganancia. El medidor LED muestra el nivel del canal
actualmente seleccionado. Cuando no se selecciona
ningún canal, se muestra el nivel de salida principal
(después del control).
7. El botón AUX/MIC permite ajustar la ganancia para el AUX
IN estéreo, y los micrófonos internos y externos.
8. El fader AUX/MIC controla el nivel tanto del AUX IN como
de los micrófonos internos o externos.
9. Un interruptor de pie momentáneo puede conectarse al
puerto FOOTSW para activar el Talkback de los micrófonos
internos y externos a otros dispositivos en el sistema
StageConnect. Tiene la misma función que presionar el
botón TALK en la supercie de control.
10. LINE OUTPUT es una copia mono de la mezcla principal.
Puede ser utilizado para monitores de cuña activos.
Conectar un cable a este puerto desactiva el ujo de los
micrófonos internos y externos a la mezcla principal para
evitar un bucle de retroalimentación.
Nota: utiliza un cable TRS balanceado para conectar la salida LINE
OUTPUT a la entrada del monitor de cuña activo. Esta conexión
balanceada de impedancia evita bucles de tierra y ruido no deseado.
11. Una salida de auriculares con la mezcla principal
post-limitador está disponible en jack TRS de ¼".
Un amplicador de auriculares de muy alta calidad
proporciona potencia suciente incluso para auriculares e
in-ears de baja impedancia.
Nota: Por favor, ten en cuenta que escuchar sonidos fuertes
durante períodos prolongados de tiempo conduce a la pérdida de
audición. Puedes ajustar el Limitador desde el máximo hasta -30
dB, para asegurarte de permanecer en un rango de salida seguro.
12. AUX IN recibe una señal de nivel de línea estéreo o mono y
la envía al bus de la mezcla principal.
13. Un micrófono externo puede conectarse al conector
TALKBACK XLR. Esto es útil para dar indicaciones a otros
miembros de la banda, por ejemplo.
14. Si la unidad no está siendo alimentada a través de
StageConnect CLIENT/Slave, el adaptador DC de 12 V/1000
mA puede conectarse a la entrada DC INPUT. Esto puede
ser útil para usar el P24 como un simple amplicador de
auriculares para señales alimentadas al AUX IN.
15. Conector StageConnect CLIENT/Slave para la comunicación
con un P24 o P24HUB aguas arriba, y para recibir
energía remota.
16. StageConnect HOST/Master para encadenar la
comunicación y la energía a un P24 aguas abajo.

21 P24 20 P24
3. Conguración de canales
3.1. Conguración de canales estéreo
Cuando se presiona un botón de selección de canal, están
disponibles múltiples opciones para los canales de entrada y
talkback en la sección CHANNEL SETTINGS.
Los menús se navegan de la siguiente manera:
• Presionando el botón de selección de canal para acceder a la
conguración del canal correspondiente y manteniéndolo
presionado para alternar entre la capa de parámetros
de interpretación y la capa de conguración del canal.
Al presionar el mismo botón de selección de canal dos
veces, se deselecciona el canal y la sección CHANNEL
SETTINGS controlará la conguración de la mezcla principal
de auriculares.
• Presionando una vez la perilla de CHANNEL SETTINGS para
alternar entre parámetros.
• Girando la perilla de CHANNEL SETTINGS para ajustar
el parámetro.
La capa de parámetros de interpretación del canal
(retroiluminación blanca) se activa presionando el botón de
selección de canal y contiene lo siguiente:
• BALANCE: paneo izquierda/derecha en modo estéreo, o
balance entre los dos canales en modo dual.
• TONE: EQ de inclinación de +/-12dB
• FX SEND: ON/OFF, envía el canal al efecto de reverberación
integrado. El nivel de reverberación se puede ajustar en la
capa de parámetros de rendimiento de mezcla de auriculares
(ver sección 3.3)
La capa de conguración del canal (retroiluminación verde) se
accede manteniendo presionado el botón de selección de canal y
contiene lo siguiente:
• MODE:
• Stereo: dos canales de entrada adyacentes se
panoramizan totalmente a la izquierda/derecha.
BALANCE controla el volumen de cada canal.
• Mono: dos canales de entrada adyacentes se
panoramizan al centro. BALANCE controla la posición
estéreo de la suma de ambos canales de entrada.
• Dual: dos canales de entrada adyacentes se
panoramizan al centro. BALANCE controla la relación
de volumen entre ambos canales, manteniéndolos
panoramizados al centro. Esto es útil, por ejemplo,
cuando una señal de bombo y caja se transmiten a
través de dos canales consecutivos.
• NAME: elige entre múltiples nombres de canales
preestablecidos.
3.2. Conguración de canales estéreo
AUX / MIC
La capa de parámetros de interpretación del canal
(retroiluminación blanca) se activa presionando el botón de
selección del canal AUX MIC y contiene lo siguiente:
• AUX TRIM: ajusta el nivel de ganancia AUX IN
(OFF, -59dB a +20dB)
• MIC TRIM: ajusta el nivel de ganancia del micrófono interno
o externo (OFF, -59dB a +20dB)
La capa de conguración del canal (retroiluminación verde) se
accede manteniendo presionado el botón de selección del canal
AUX MIC y selecciona el micrófono interno o externo (MIC SEL: INT
o EXT, respectivamente)
3.3. Conguración de la mezcla
principal de auriculares
Cuando no se selecciona ningún canal estéreo, están
disponibles las opciones de procesamiento para la mezcla de
monitoreo principal.
La capa de parámetros de interpretación de mezcla de auriculares
(retroiluminación azul claro) está activa por defecto y contiene
lo siguiente:
• BALANCE: paneo izquierda/derecha
• TONE: EQ de inclinación de +/-12dB
• REVERB: establece el nivel general de reverberación
(OFF, -59dB a +20dB). En esta pantalla, presionar un botón
de selección de canal activa o desactiva el envío de ese canal
hacia el efecto (también es posible hacerlo en la capa de
parámetros de rendimiento del canal)
La capa de conguración (retroiluminación azul) se activa
manteniendo presionado la perilla de CHANNEL SETTINGS y
contiene lo siguiente:
• LIMITER: umbral de 0dB a -20dB
• MID GAIN: ganancia de la banda de frecuencia media de
-12dB a +6dB
• MID FREQUENCY: frecuencia central de la banda media
(100Hz a 9500Hz)
• TALKBACK: selecciona si se escucha los canales de talkback A,
B o ambos A y B a través del sistema StageConnect.
• TB DIM: establece la cantidad de atenuación aplicada a la
mezcla de auriculares mientras el talkback está activo.
• LIGHT: controla la intensidad de la retroiluminación de la
pantalla y los botones.
• CONT: controla el contraste de la pantalla.
• REMOTE: habilita o deshabilita el control remoto del P24
desde una consola u otros P24.
• INIT P24: restablece todos los parámetros del P24 a los
valores predeterminados.
• SND CFG: esta opción permite enviar la conguración de
cualquier P24 conectado a los puertos 1.1, 2.1, 3.1 o 4.1 a
todos los demás P24 conectados al mismo hub y a otros hubs
en cadena.
Nota: El limitador está ubicado después del control de volumen en
el ujo de señal para proteger su audición contra picos repentinos.
Ajústelo conscientemente y manténgase dentro de niveles de
audición seguros durante la ejecución.
4. Control remoto
La información del nombre del canal es recibida por el P24HUB a
través de los puertos AES50 A o StageConnect CLIENT/Slave. Esta
información del nombre del canal se transmite luego a través
de los 4 puertos StageConnect frontales; permitiendo que cada
uno de los mezcladores personales P24 muestren la información
del canal y conguren sus 12 canales como mono, estéreo o
dual mono, respectivamente. Para hacerlo, active REMOTE en la
conguración de mezcla principal de auriculares y congure el
ruteo y los nombres de la siguiente manera:
• Mono:
• 1 canal + 1 canal vacío (o viceversa)
• Stereo:
• Canales izquierda y derecha con el mismo nombre, pero
con terminación en “L” y “R”
• Canales izquierda y derecha con el mismo nombre
• Dual:
• Cualquier otra conguración que no sea clasicada como
Mono o Stereo
5. Actualización de rmware
1. Para actualizar el rmware del P24, descargue
la herramienta de actualización SimplyPUT de
behringer.com.
2. Abra la herramienta SimplyPUT.
3. Conecte el P24 a la computadora a través de USB.
4. Conecte el P24 a la toma de corriente mientras mantiene
presionado el codicador de conguración de canal.
5. 5. SimplyPUT detectará y actualizará automáticamente
el P24. En caso de que no lo haga o si desea instalar una
versión anterior del rmware, descargue el rmware
deseado. En SimplyPUT, ve a File>Local File y carga el
rmware deseado.
23 P24 22 P24
1. Introduction
Moniteur et communication sont essentielles pour que les musiciens se sentent à l’aise sur la scène. Le nouveau système mixeur personnel
P24 de Behringer est conçu pour résoudre les problèmes courants des artistes sur scène comme “J’ai besoin de plus de moi” ou “la voix
est trop forte” en leur donnant un contrôle direct et facile de leurs propres mixages personnel. Il permet également la communication
Talkback entre les musiciens sur scène et les ingénieurs.
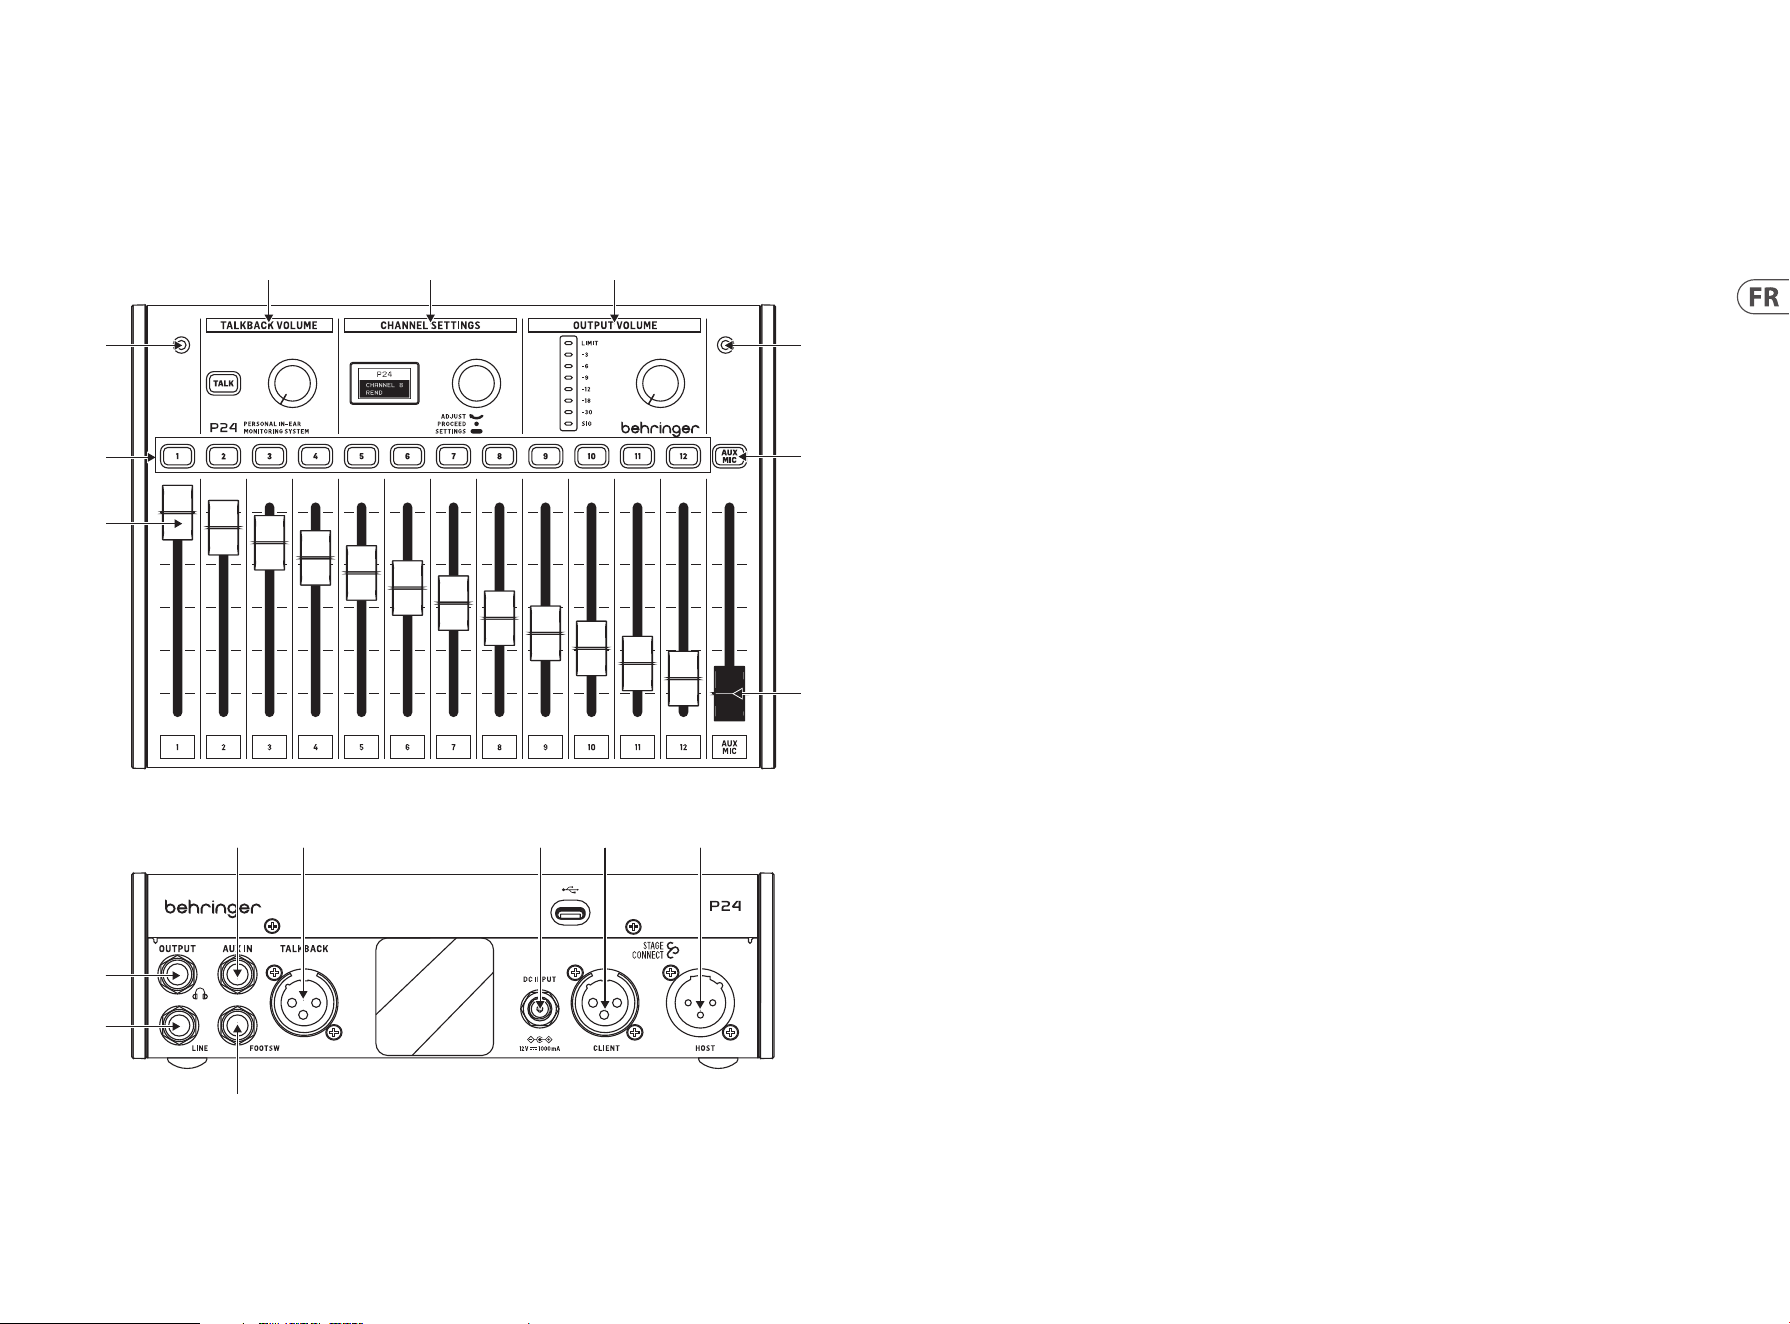
2. Panneau supérieur et arrière
(3)
(1)
(3)
(7)
(8)
(2)
(4) (5) (6)
(11)
(10)
(12) (13) (14) (15) (16)
(9)
1. Les faders de canal contrôlent le volume des signaux
attribués à chaque canal. Veuillez vous référer au Guide de
démarrage rapide P24HUB pour les détails du routage.
2. Les boutons de sélection de canal s’allument lorsque
l’audio passe par le canal correspondant. Lorsqu’on appuie
sur un bouton de canal, ses paramètres peuvent être
ajustés dans la section CHANNEL SETTINGS.
3. Deux microphones internes peuvent être utilisés soit
pour le talkback, soit pour capter le son d’ambiance et
le diuser dans les moniteurs intra-auriculaires, ce qui
donne un mixage de personnel plus naturel.
4. Maintenez le bouton TALK enfoncé pour envoyer le signal
de talkback en amont vers le P24 précédent dans la chaîne
ou vers le P24HUB. Le bouton s’allume lorsque le talkback
est reçu. Le bouton à côté du bouton TALK contrôle le
volume du talkback entrant.
5. Plusieurs ajustements de canal peuvent être eectués
dans CHANNEL SETTINGS à la fois pour le mix principal
(moniteur) et les canaux individuels. Voir la section 3 pour
plus de détails.
6. Le bouton dans la section OUTPUT VOLUME ajuste le
niveau du casque qui est indiqué sur le compteur. La LED
supérieure est allumée lorsque le limiteur applique une
réduction de gain. Le compteur LED indique le niveau
du canal actuellement sélectionné. Lorsqu’aucun canal
n’est sélectionné, le niveau de sortie principal est aché
(après le bouton).
7. Le bouton AUX/MIC permet d’ajuster le gain pour le AUX IN
stéréo, et les microphones internes et externes.
8. Le fader AUX/MIC contrôle le niveau à la fois du AUX IN et
des microphones internes ou externes.
9. Une pédale momentanée peut être connectée au port
FOOTSW pour activer le Talkback des micros internes et
externes vers d’autres appareils du système StageConnect.
Elle a la même fonction que l’appui sur le bouton TALK sur
la surface de contrôle.
10. LINE OUTPUT est une copie mono du mix principal. Il
peut être utilisé pour les moniteurs de retour actifs. La
connexion d’un câble à ce port désactive le ux des micros
internes et externes vers le mix principal pour éviter une
boucle de feedback.
Note : utilisez un câble TRS équilibré pour connecter la LINE OUTPUT
à l’entrée du moniteur de retour actif. Cette connexion équilibrée
par impédance évite les boucles de terre et les bruits indésirables.
11. Une sortie casque avec le mix principal post-limiteur
est disponible sur une prise TRS de ¼". Un amplicateur
de casque de très haute qualité fournit une puissance
susante même pour les casques et les intra-auriculaires
de faible impédance.
Note: Veuillez considérer que l’écoute de sons forts pendant de
longues périodes de temps entraîne une perte auditive. Vous
pouvez ajuster le Limiteur de maximum à -30 dB, pour rester dans
une plage de sortie sûre.
12. AUX IN reçoit un signal de niveau ligne stéréo ou mono et
l'envoie au bus de mix principal.
13. Un microphone externe peut être connecté au connecteur
TALKBACK XLR. Cela est utile pour donner des indications
aux autres membres du groupe, par exemple.
14. Si l'unité n'est pas alimentée via StageConnect CLIENT/
Slave, l'adaptateur DC 12 V/1000 mA peut être connecté à
l'entrée DC. Cela peut être utile pour utiliser le P24 comme
un simple amplicateur de casque pour les signaux
envoyés à l'AUX IN.
15. Connecteur StageConnect CLIENT/Slave pour la
communication avec un P24 ou P24HUB en amont, et pour
recevoir l'alimentation à distance.
16. StageConnect HOST/Master pour la communication en
chaîne et l'alimentation vers un P24 en aval.

25 P24 24 P24
3. Réglages des canaux
3.1. Réglages du canal stéréo
Lorsqu’un bouton de sélection de canal est enfoncé, des options
de traitement sont disponibles pour tous les canaux d’entrée et de
talkback dans la section CHANNEL SETTINGS.
Le menu est navigué par :
• Tourner le bouton pour ajuster le paramètre
• Appuyer une fois sur le bouton pour basculer entre
les paramètres
• Maintenir le bouton enfoncé pour alterner entre la couche de
paramètres de performance et la couche de réglages
La première couche (rétroéclairage orange) contient les
paramètres de performance du canal BALANCE et TONE pour des
ajustements rapides du canal sélectionné.
• BALANCE : panoramique gauche/droite
• TONE : EQ d'inclinaison +/-12 dB
La deuxième couche (rétroéclairage vert) est accessible en
maintenant le bouton enfoncé. Cette couche contient les réglages
MODE et NAME du canal sélectionné.
• MODE :
• Stéréo : les canaux gauche et droit sont séparés, et le
contrôle de balance ajuste le volume du signal gauche
et droit.
• Mono : les canaux gauche et droit sont les mêmes
panoramiques à gauche, au centre ou à droite, utiles
pour les signaux d'instruments mono.
• Dual : les signaux des deux canaux d'entrée sont
présents sur les côtés gauche et droit. Le contrôle
BALANCE ajuste le rapport de volume entre les deux
signaux d'entrée. Par exemple, lorsqu'un signal de
grosse caisse et de caisse claire est livré comme un
canal stéréo, puis tous les deux panoramiques au
centre, leur équilibre de niveau peut être ajusté, plutôt
que la position gauche-droite.
• NAME : choisissez parmi de nombreux noms de
canaux prédénis.
3.2. Réglages du canal stéréo AUX / MIC
La première couche (rétroéclairage orange) contient les éléments
suivants :
• AUX LEVEL : Ajuste le niveau du signal AUX IN
• MIC LEVEL : Ajuste le niveau du micro interne ou externe.
La deuxième couche (rétroéclairage vert) est accessible en
maintenant le bouton enfoncé. Cette couche bascule entre les
micros internes et le micro externe connecté au port XLR arrière :
• MIC INT
• MIC EXT
3.3. Réglages du mix principal du casque
Lorsqu’aucun canal stéréo n’est sélectionné, des options de
traitement pour le mix principal de moniteur sont disponibles.
La première couche (rétroéclairage blanc) contient les paramètres
de performance du mix du casque : balance, tonalité, et
réverbération.
• BALANCE : panoramique gauche/droite
• TONE : EQ d'inclinaison +/-12 dB
• REVERB : niveau de retour d'eet global de -59 dB à 0 dB.
• Appuyez sur le bouton de sélection de canal pour envoyer
des canaux spéciques à la réverbération.
Maintenir le bouton enfoncé active la couche de réglages
(rétroéclairage bleu) avec :
• LIMITER: seuil de -80 dB à 0 dB.
• MID GAIN: gain de +/-12 dB de la bande de
fréquences médianes
• MID FREQUENCY: fréquence centrale de la bande médiane
(500 Hz, 1 kHz, 3 kHz)
• TALKBACK: sélectionne si vous écoutez les canaux
de talkback A, B ou les deux A+B qui passent par le
système StageConnect.
• LIGHT: contrôle l'intensité du rétroéclairage de l'écran et
des boutons.
• CONT: contrôle le contraste de l’écran.
• REMOTE: active ou désactive le contrôle à distance du P24
depuis une console ou d’autres P24.
• INIT P24: réinitialise tous les paramètres du P24 aux valeurs
par défaut. Vous pouvez également maintenir le bouton
TALK enfoncé lors de la mise sous tension de l’appareil pour
initialiser les paramètres du P24.
• SND CFG: cette option permet d’envoyer la conguration
de tout P24 connecté aux ports 1.1, 2.1, 3.1 ou 4.1 à tous les
autres P24 connectés au même hub ainsi qu’aux autres hubs
en chaîne.
Note: Le limiteur est situé après le contrôle du volume dans le ux
de signal pour protéger votre audition contre les pics soudains.
Ajustez-le consciemment et restez dans des niveaux d’écoute sûrs
en pleine performance!
4. Télécommande
Les informations de nom de chaîne sont reçues par le P24HUB via
les ports AES50 A ou StageConnect CLIENT/Slave. Ces informations
de nom de chaîne sont ensuite transmises via les 4 ports
StageConnect avant, permettant aux mélangeurs personnels P24
individuels d'acher les informations de chaîne et de congurer
leurs 12 canaux en mono, stéréo ou double mono respectivement.
Pour ce faire, activez REMOTE dans la couche des paramètres et
congurez le routage et le nommage comme suit :
• Mono :
• 1 canal + 1 canal vide (ou inversement)
• Stéréo :
• Canaux gauche et droit avec des noms se terminant par
“L” et “R”
• Canaux gauche et droit portant le même nom
• Double:
• Toute autre conguration non classée comme Mono
ou Stéréo
5. Mise à jour du rmware
1. Pour mettre à jour le rmware du P24, téléchargez l'outil
de mise à jour SimplyPUT sur behringer.com.
2. Ouvrez l'outil SimplyPUT.
3. Connectez le P24 à l'ordinateur via USB.
4. Connectez le P24 à la prise de courant tout en maintenant
le bouton dans la section Réglages du canal.
5. SimplyPUT détectera automatiquement et mettra à jour
le P24. Si cela ne fonctionne pas ou si vous souhaitez
installer une version antérieure du rmware, téléchargez
le rmware désiré. Dans SimplyPUT, allez à Fichier>Fichier
local et chargez le rmware désiré.
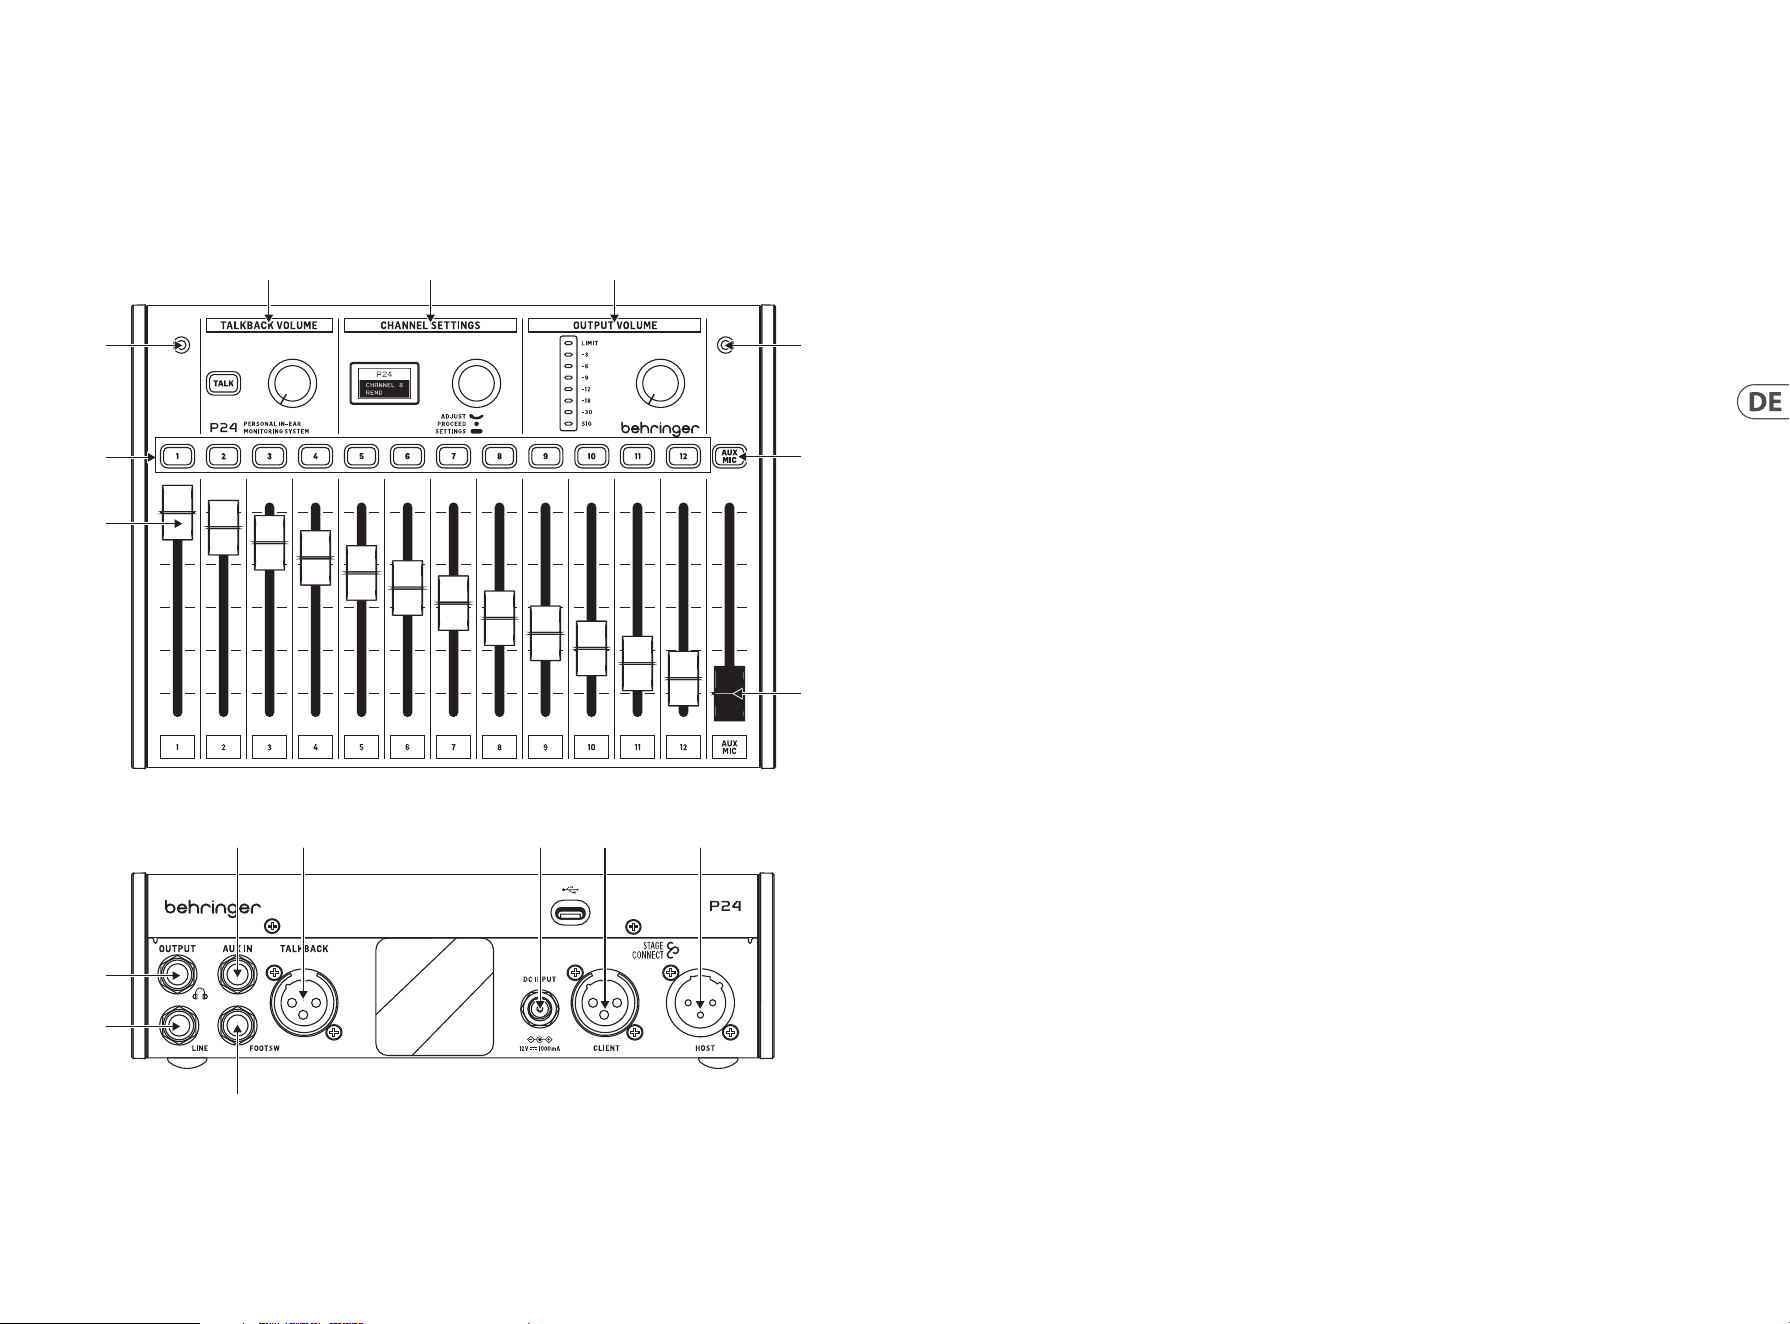
27 P24 26 P24
1. Channel-Fader steuern die Lautstärke der Stereokanäle.
Weitere Informationen zum Routing nden Sie in der
Kurzanleitung des P24HUB.
2. Die Kanalauswahl-Tasten leuchten grün, wenn Audio
durch den entsprechenden Kanal ießt, und rot, wenn das
Signal verzerrt. Wenn eine Kanalauswahl-Taste gedrückt
wird, wird sie orange, und der entsprechende Kanal kann
im Abschnitt CHANNEL SETTINGS bearbeitet werden.
3. Zwei interne Mikrofone können entweder für Talkback
verwendet werden oder um den Raumklang aufzunehmen
und ihn ins In-Ear-Monitoring einzuspeisen, was zu einem
natürlicher klingenden Monitoring-Mix führt.
4. Halten Sie die TALK-Taste gedrückt, um das Talkback-
Signal upstream zum vorherigen P24 in der Kette oder
zum P24HUB zu senden. Die Taste leuchtet, wenn Talkback
empfangen wird. Der Knopf neben der TALK-Taste regelt
die Lautstärke des eingehenden Talkbacks.
5. Mehrere Kanalanpassungen können sowohl für den
Haupt-Mix (Monitoring-Mix) als auch für einzelne Kanäle
in den CHANNEL SETTINGS vorgenommen werden. Siehe
Abschnitt 3 für Details.
6. Der Knopf im OUTPUT VOLUME-Bereich passt den
Kopfhörerpegel an, der auf dem Meter angezeigt wird.
Die obere LED leuchtet, wenn der Limiter eine Gain-
Reduzierung anwendet. Das LED-Meter zeigt den Pegel
des aktuell ausgewählten Kanals an. Wenn kein Kanal
ausgewählt ist, wird der Hauptausgangspegel angezeigt
(nach dem Knopf).
7. AUX/MIC-Taste ermöglicht die Anpassung des
Gains für den Stereo AUX IN und die internen und
externen Mikrofone.
8. Der AUX/MIC-Fader regelt die Lautstärke sowohl des AUX
IN als auch der internen oder externen Mikrofone.
9. Ein momentaner Fußschalter kann an den FOOTSW-Port
angeschlossen werden, um das Talkback der internen und
externen Mikrofone zu anderen Geräten im StageConnect-
System zu aktivieren. Es hat die gleiche Funktion wie das
Drücken der TALK-Taste auf der Bedienoberäche.
10. LINE OUTPUT ist eine Mono-Kopie des Monitoring-Mixes.
Es kann für aktive Wedge-Monitore verwendet werden.
Das Anschließen eines Kabels an diesen Port deaktiviert
den Fluss der internen und externen Mikrofone zum
Monitoring-Mix, um eine Feedback-Loop zu vermeiden.
Hinweis: Verwenden Sie ein ausgewogenes TRS-Kabel, um den
LINE OUTPUT mit dem Eingang des aktiven Wedge-Monitors zu
verbinden. Diese Impedanz ausgeglichene Verbindung vermeidet
Erdschleifen und unerwünschte Geräusche.
11. Ein Kopfhörerausgang mit dem Monitoring-Mix nach dem
Limiter ist auf einer ¼" TRS-Buchse verfügbar. Ein sehr
hochwertiger Kopfhörerverstärker liefert ausreichend
Leistung auch für niederohmige Kopfhörer und In-Ears.
Hinweis: Bitte bedenken Sie, dass das Hören von lauten
Geräuschen über längere Zeiträume zu Hörverlust führt. Sie
können den Limiter von maximal bis -30 dB einstellen, um in
einem sicheren Ausgangsbereich zu bleiben.
12. AUX IN empfängt ein Stereo- oder Mono-
Leitungspegelsignal und sendet es an den Hauptmixbus.
13. Ein externes Mikrofon kann an den TALKBACK XLR-
Anschluss angeschlossen werden. Dies ist nützlich,
um anderen Bandmitgliedern Hinweise zu geben,
zum Beispiel.
14. Wenn das Gerät nicht über StageConnect CLIENT/Slave mit
Strom versorgt wird, kann das 12 V/1000 mA DC-Netzteil
an den DC INPUT angeschlossen werden. Dies kann
nützlich sein, um P24 als einfachen Kopfhörerverstärker
für Signale zu verwenden, die an den AUX IN
gesendet werden.
15. StageConnect CLIENT/Slave-Anschluss zur Kommunikation
mit einem stromaufwärts gelegenen P24 oder P24HUB
und zum Empfang von Fernstrom.
16. StageConnect HOST/MASTER zur Daisy-Chain-
Kommunikation und Stromversorgung eines
stromabwärts gelegenen P24.
1. Einführung
Monitoring und Kommunikation sind für Musiker unerlässlich, um sich auf der Bühne wohl zu fühlen. Behringers neues P24 Monitoring-
System ist darauf ausgelegt, gängige Probleme von Bühnenkünstlern wie “Ich brauche mehr von mir” oder “die Stimme ist zu laut” zu
lösen, indem es ihnen eine direkte und leicht zu bedienende Kontrolle über ihre eigenen Monitoring-Mixes bietet. Es ermöglicht auch
Talkback-Kommunikation zwischen den Musikern auf der Bühne und den Technikern.
2. Ober- und Rückseite
(3)
(1)
(3)
(7)
(8)
(2)
(4) (5) (6)
(11)
(10)
(12) (13) (14) (15) (16)
(9)

29 P24 28 P24
3. Kanaleinstellungen
3.1. Stereo-Kanaleinstellungen
Wenn eine Kanalauswahltaste gedrückt wird, stehen im Abschnitt
CHANNEL SETTINGS mehrere Optionen für die Eingangs- und
Talkback-Kanäle zur Verfügung.
Die Menüs werden wie folgt navigiert:
• Drücken der Kanalauswahltaste, um die Einstellungen des
entsprechenden Kanals aufzurufen, und Halten der Taste,
um zwischen der Performance-Parameter-Schicht und der
Kanaleinstellungen-Schicht zu wechseln. Wenn dieselbe
Kanalauswahltaste zweimal gedrückt wird, wird der Kanal
abgewählt und der Abschnitt CHANNEL SETTINGS steuert die
Köpfhorer Hauptmischung Eintstellungen.
• Einmaliges Drücken des CHANNEL SETTINGS-Drehreglers,
um zwischen den Parametern zu wechseln.
• Drehen des CHANNEL SETTINGS-Drehreglers, um den
Parameter anzupassen.
Die Performance-Parameters-Schicht des Kanals
(weiße Hintergrundbeleuchtung) wird durch Drücken der
Kanalauswahltaste aktiviert und enthält Folgendes:
• BALANCE: Links/Rechts-Panning im Stereo-Modus oder
Balance zwischen den beiden Kanälen im Dual-Modus.
• TONE: ±12 dB Tilt EQ
• FX SEND: ON/OFF, sendet den Kanal zum Onboard-
Hall-Eekt. Der Hallpegel kann in der Performance
Parameter-Schicht des Kopfhörermixes eingestellt werden
(sieheAbschnitt 3.3)
Die Kanaleinstellungen-Schicht
(grüneHintergrundbeleuchtung) wird durch Halten der
Kanalauswahltaste aufgerufen und enthältFolgendes:
• MODE:
• Stereo: Zwei benachbarte Eingangskanäle sind hart
links/rechts gepannt. BALANCE steuert die Lautstärke
jedes Kanals.
• Mono: Zwei benachbarte Eingangskanäle sind in der
Mitte gepannt. BALANCE steuert die Stereo-Position
der Summe beider Eingangskanäle.
• Dual: Zwei benachbarte Eingangskanäle sind
in der Mitte gepannt. BALANCE steuert das
Lautstärkeverhältnis zwischen beiden Kanälen,
während sie in der Mitte bleiben. Dies ist
beispielsweise nützlich, wenn ein Bassdrum- und
Snare-Signal auf zwei aufeinanderfolgenden Kanälen
geliefert wird.
• NAME: Auswahl aus mehreren voreingestellten Kanalnamen.
3.2. AUX / MIC Stereo-
Kanaleinstellungen
Die Performance-Parameters-Schicht des Kanals (weiße
Hintergrundbeleuchtung) wird durch Drücken der AUX MIC-
Kanalauswahltaste aktiviert und enthält Folgendes:
• AUX TRIM: Passt den Pegel des AUX IN-Gains an (AUS, -59 dB
bis +20 dB).
• MIC TRIM: Passt den Pegel des internen oder externen
Mikrofon-Gains an (AUS, -59 dB bis +20 dB).
Die Kanaleinstellungen-Schicht (grüne
Hintergrundbeleuchtung) wird durch Halten der AUX MIC-
Kanalauswahltaste aufgerufen und wählt das interne oder
externe Mikrofon aus (MIC SEL: INT oder EXT).
3.3. Haupthöreinstellungen
Wenn kein Stereo-Kanal ausgewählt ist, stehen Optionen zur
Verarbeitung des Hauptüberwachungsmixes zur Verfügung.
Die Performance-Parameters-Schicht des Kopfhörermixes
(hellblaue Hintergrundbeleuchtung) ist standardmäßig aktiv und
enthält Folgendes:
• BALANCE: Links/Rechts-Panning
• TONE: ± 12 dB Tilt EQ
• REVERB: Stellt den gesamten Hallpegel ein (AUS, -59 dB
bis +20 dB). In diesem Bildschirm schaltet das Drücken
einer Kanalauswahltaste das entsprechende FX SEND ON/
OFF (ebenfalls in der Leistungsebenen-Schicht des Kanals
zunden).
Die Einstellungs-Schicht (blaue Hintergrundbeleuchtung) wird
durch Halten des CHANNEL SETTINGS-Drehreglers aktiviert und
enthält Folgendes:
• LIMITER: Schwellenwert von 0 dB bis -20 dB
• MID GAIN: -12 dB bis +6 dB Gain des mittleren Bandes
• MID FREQUENCY: Mittenfrequenz des Mittelbands
(100Hzbis 9500 Hz)
• TALKBACK: Wählt aus, ob Sie die A-, B- oder beide
A- und B-Talkback-Kanäle hören, die über das
StageConnect-System kommen.
• TB DIM: Stellt die Dämpfung des Kopfhörermixes ein,
während das Talkback aktiv ist.
• LIGHT: Steuert die Hintergrundbeleuchtungsintensität des
Bildschirms und der Tasten.
• CONT: Steuert den Kontrast des Bildschirms.
• REMOTE: aktiviert oder deaktiviert die Fernsteuerung des
P24 von einer Konsole oder anderen P24s.
• INIT P24: Setzt alle Parameter des P24 auf die
Standardwerte zurück.
• SND CFG: diese Option ermöglicht es, die Konguration eines
an die Ports 1.1, 2.1, 3.1 oder 4.1 angeschlossenen P24 an alle
anderen P24s, die an denselben Hub und an andere in Reihe
geschaltete Hubs angeschlossen sind, zu senden.
Hinweis: Der Limiter bendet sich im Signalpfad hinter der
Lautstärkeregelung, um Ihr Gehör vor plötzlichen Spitzen zu
schützen. Passen Sie ihn bewusst an und bleiben Sie im Rahmen
sicherer Lautstärke während der Performance!
4. Fernsteuerung
Die Kanalnamen werden vom P24HUB entweder über AES50
A- oder StageConnect CLIENT/Slave-Ports empfangen. Die
Kanalnamen werden dann über die 4 vorderen StageConnect-
Ports übertragen; wodurch die einzelnen P24 Personal Mixer
die Kanalnamen anzeigen und ihre 12 Kanäle jeweils auf Mono,
Stereo oder Dual Mono kongurieren können. Um dies zu
schaen, aktivieren Sie REMOTE in der Einstellungen-Schicht und
kongurieren sie die Namen und Routing wie folgt:
• Mono:
• 1 Kanal + 1 leerer Kanal (oder umgekehrt)
• Stereo:
• Linke und rechte Kanäle mit Namen die auf
“L“ und “R“ enden
• Linke und rechte Kanäle mit dem gleichen Namen
• Dual:
• Alle andere Kongurationen die nicht als Mono oder
Stereo klassiziert werden.
5. Firmware-Update
1. Um die P24-Firmware zu aktualisieren, laden Sie das
SimplyPUT-Update-Tool von behringer.com herunter.
2. Önen Sie das SimplyPUT-Tool.
3. Verbinden Sie den P24 über USB mit dem Computer.
4. Schließen Sie den P24 an die Steckdose an, während
Sie den Drehregler im CHANNEL SETTINGS Abschnitt
gedrückt halten.
5. SimplyPUT erkennt und aktualisiert den P24 automatisch.
Falls dies nicht der Fall ist oder wenn Sie eine ältere
Firmware-Version installieren möchten, laden Sie die
gewünschte Firmware herunter. Gehen Sie in SimplyPUT
zu File>Local File und laden Sie die gewünschte Firmware.
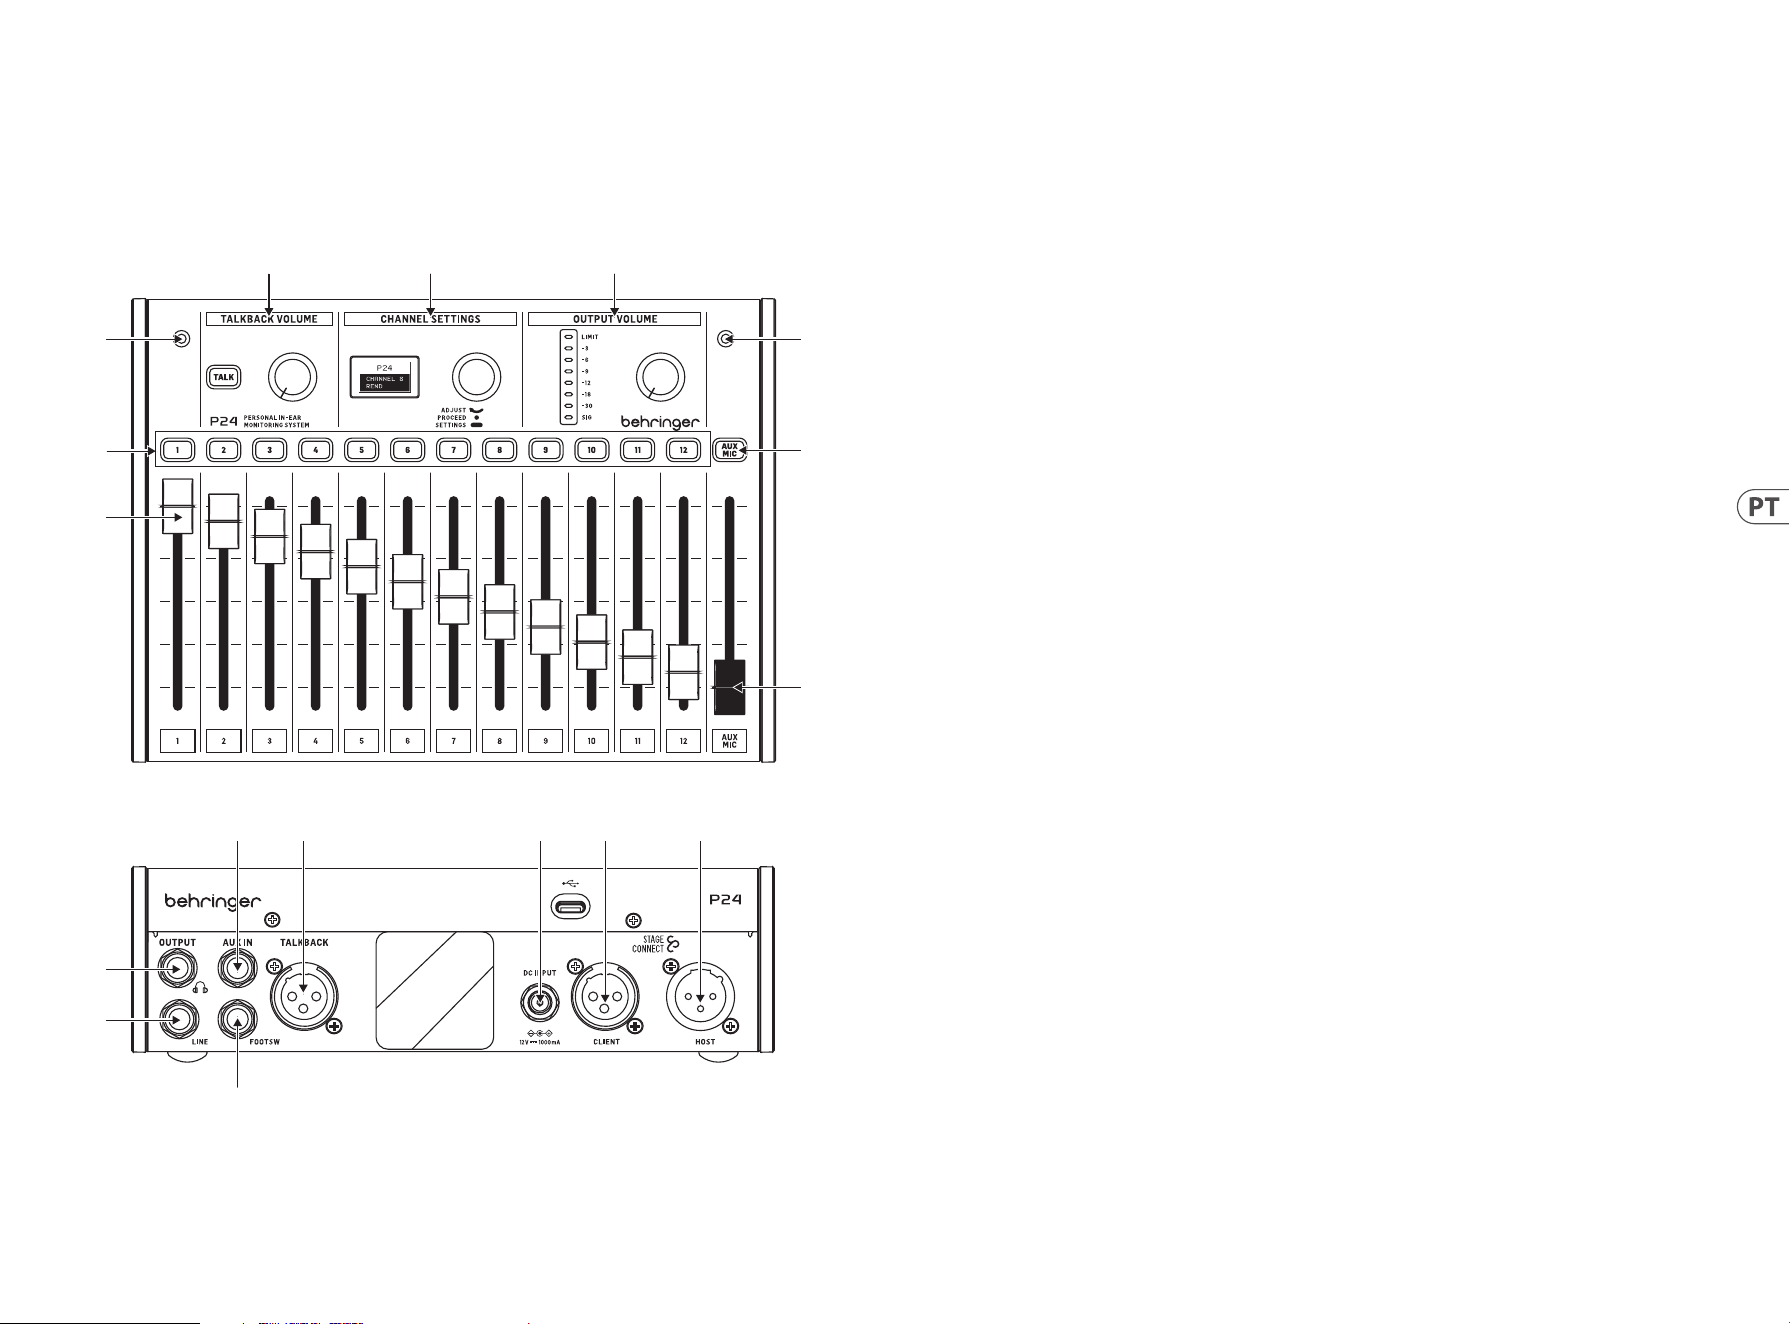
31 P24 30 P24
1. Introdução
Monitoramento e comunicação são vitais para que os músicos se sintam confortáveis ao se apresentar no palco. O novo sistema de
monitoramento P24 da Behringer foi projetado para resolver problemas comuns para artistas no palco, como “preciso de mais de mim” ou
“o vocal está muito alto”, dando a eles controle direto e fácil de operar de suas próprias mixagens de monitoramento. Ele também permite
comunicação Talkback entre músicos no palco e engenheiros.
2. Painel superior e traseiro
(3)
(1)
(3)
(7)
(8)
(2)
(4) (5) (6)
(11)
(10)
(12) (13) (14) (15) (16)
(9)
1. Os faders de canal controlam o volume dos sinais
atribuídos a cada canal. Consulte o Guia de Início Rápido
do P24HUB para detalhes de roteamento.
2. Os botões de seleção de canal acendem quando o áudio
está passando pelo canal correspondente. Ao pressionar
um botão de canal, seus parâmetros podem ser ajustados
na seção CHANNEL SETTINGS.
3. Dois microfones internos podem ser usados para talkback
ou para capturar o som ambiente e alimentá-lo nos
monitores in-ear, o que resulta em uma mixagem de
monitoramento com som mais natural.
4. Mantenha pressionado o botão TALK para enviar o sinal de
talkback a montante para o P24 anterior na cadeia ou para
o P24HUB. O botão acende quando o talkback está sendo
recebido. O botão ao lado do botão TALK controla o volume
do talkback recebido.
5. Vários ajustes de canal podem ser feitos em
CHANNEL SETTINGS tanto para a mixagem principal
(monitoramento) quanto para canais individuais. Veja a
seção 3 para detalhes.
6. O botão na seção OUTPUT VOLUME ajusta o nível do fone
de ouvido que é indicado no medidor. O LED superior
acende quando o limitador está aplicando redução de
ganho. O medidor LED mostra o nível do canal atualmente
selecionado. Quando nenhum canal está selecionado, o
nível de saída principal é exibido (após o botão).
7. O botão AUX/MIC permite ajustar o ganho para o AUX IN
estéreo e os microfones internos e externos.
8. O fader AUX/MIC controla o nível do AUX IN e dos
microfones internos ou externos.
9. Um footswitch momentâneo pode ser conectado à
porta FOOTSW para ativar o Talkback dos microfones
internos e externos para outros dispositivos no sistema
StageConnect. Ele tem a mesma função que pressionar o
botão TALK na superfície de controle.
10. LINE OUTPUT é uma cópia mono da mixagem principal.
Pode ser usado para monitores de cunha ativos. Conectar
um cabo a esta porta desativa o uxo dos microfones
internos e externos para a mixagem principal para evitar
um loop de feedback.
Nota: use um cabo TRS balanceado para conectar o LINE OUTPUT
à entrada do monitor de cunha ativo. Esta conexão balanceada de
impedância evita loops de terra e ruído indesejado.
11. Uma saída de fone de ouvido com a mixagem principal
pós-limitador está disponível na tomada TRS de ¼". Um
amplicador de fone de ouvido de alta qualidade fornece
energia suciente mesmo para fones de ouvido e in-ears
de baixa impedância.
Nota: Por favor, considere que ouvir sons altos por períodos
prolongados de tempo leva à perda auditiva. Você pode ajustar o
Limitador de máximo até -30 dB, para garantir que permaneça em
uma faixa de saída segura.
12. AUX IN recebe um sinal de nível de linha estéreo ou mono
e o envia para o barramento de mixagem principal.
13. Um microfone externo pode ser conectado ao conector
TALKBACK XLR.Isso é útil para dar dicas a outros membros
da banda, por exemplo.
14. Se a unidade não estiver sendo alimentada via
StageConnect CLIENT/Slave, o adaptador DC de 12 V/1000
mA pode ser conectado à entrada DC INPUT. Isso pode
ser útil para usar o P24 como um simples amplicador de
fones de ouvido para sinais alimentados para o AUX IN.
15. Conector StageConnect CLIENT/Slave para comunicação
com um P24 ou P24HUB a montante, e para receber
energia remota.
16. StageConnect HOST/Master para encadear comunicação e
energia para um P24 a jusante.

33 P24 32 P24
3. Congurações de canal
3.1. Congurações de canal estéreo
Quando um botão de seleção de canal é pressionado, as opções de
processamento estão disponíveis para todos os canais de entrada
e talkback na seção CHANNEL SETTINGS.
O menu é navegado por:
• Girar o botão para ajustar o parâmetro
• Pressionar o botão uma vez para alternar entre os parâmetros
• Manter o botão pressionado para alternar entre a camada de
parâmetros de desempenho e a camada de congurações
A primeira camada (luz de fundo laranja) contém os parâmetros
de desempenho do canal BALANCE e TONE para ajustes rápidos do
canal selecionado.
• BALANCE: panorâmica esquerda/direita
• TONE: EQ de inclinação de +/-12 dB
A segunda camada (luz de fundo verde) é acessada mantendo o
botão pressionado. Esta camada contém as congurações MODE e
NAME do canal selecionado.
• MODE:
• Stereo: os canais esquerdo e direito são separados, e o
controle de balanceamento está ajustando o volume
do sinal esquerdo e direito.
• Mono: os canais esquerdo e direito são os mesmos
panoramizados para o lado esquerdo, centro ou direito,
útil para sinais de instrumentos mono.
• Dual: ambos os sinais do canal de entrada estão
presentes no lado esquerdo e direito. O controle
BALANCE ajusta a relação de volume entre ambos
os sinais de entrada. Por exemplo, quando um sinal
de bumbo e caixa são entregues como um canal
estéreo, então ambos panoramizados para o centro,
e seu equilíbrio de nível pode ser ajustado, em vez da
posição esquerda-direita.
• NAME: escolha entre muitos nomes de canal predenidos.
3.2. Congurações de canal estéreo
AUX / MIC
A primeira camada (luz de fundo laranja) contém o seguinte:
• AUX LEVEL: Ajusta o nível do sinal AUX IN
• MIC LEVEL: Ajusta o nível do microfone interno ou externo.
A segunda camada (luz de fundo verde) é acessada mantendo
o botão pressionado. Esta camada alterna entre os microfones
internos e o microfone externo conectado à porta XLR traseira:
• MIC INT
• MIC EXT
3.3. Congurações da mixagem principal
de fones de ouvido
Quando nenhum canal estéreo está selecionado, as opções de
processamento para a mixagem principal de monitoramento
estão disponíveis.
A primeira camada (luz de fundo branca) contém parâmetros de
desempenho da mixagem de fones de ouvido: balanceamento,
tom e reverberação.
• BALANCE: panorâmica esquerda/direita
• TONE: EQ de inclinação de +/-12 dB
• REVERB: nível de retorno do efeito geral de -50 dB a +20dB.
Pressione o botão de seleção de canal para enviar canais
especícos para a reverberação.
Manter o botão pressionado ativa a camada de congurações (luz
de fundo azul) com:
• LIMITER: limiar de -80 dB a 0 dB.
• MID GAIN: ganho de +/-12 dB da banda de frequência média
• MID FREQUENCY: frequência central da banda média
(500 Hz, 1 kHz, 3 kHz)
• TALKBACK: seleciona se você está ouvindo os canais
de talkback A, B ou ambos A+B que vêm através do
sistema StageConnect.
• LIGHT: controla a intensidade da luz de fundo da tela e
dos botões.
• CONT: controla o contraste da tela.
• REMOTE: ativa ou desativa o controle remoto do P24 a partir
de um console ou de outros P24s.
• INIT P24: redene todos os parâmetros do P24 para os
valores padrão. Alternativamente, mantenha pressionado
o botão TALK enquanto liga o aparelho para inicializar as
congurações do P24.
• SND CFG: esta opção permite enviar a conguração de
qualquer P24 conectado às portas 1.1, 2.1, 3.1 ou 4.1 para
todos os outros P24s conectados ao mesmo hub e a outros
hubs em cadeia.
Nota: O limitador está localizado após o controle de volume no
uxo de sinal para proteger sua audição contra picos repentinos.
Ajuste-o conscientemente e permaneça dentro de níveis seguros
de audição no calor da performance!
4. Controle remoto
As informações do nome do canal são recebidas pelo P24HUB
através das portas AES50 A ou StageConnect CLIENT/Slave. Essas
informações de nome de canal são então transmitidas através das
4 portas StageConnect frontais, permitindo que os mixers pessoais
P24 individuais exibam as informações do canal e congurem seus
12 canais como mono, estéreo ou dual mono, respectivamente.
Para fazer isso, habilite REMOTE na camada de congurações e
congure o roteamento e nomeação como segue:
• Mono:
• 1 canal + 1 canal vazio (ou vice-versa)
• Estéreo:
• Canais esquerdo e direito com nomes terminando em
“L” e “R”
• Canais esquerdo e direito com o mesmo nome
• Dual:
• Qualquer outra conguração não classicada como
Mono ou Estéreo
5. Atualização de rmware
1. Para atualizar o rmware do P24, baixe a ferramenta de
atualização SimplyPUT em behringer.com.
2. Abra a ferramenta SimplyPUT.
3. Conecte o P24 ao computador via USB.
4. Conecte o P24 à tomada elétrica enquanto segura o botão
na seção de Congurações de Canal.
5. SimplyPUT detectará automaticamente e atualizará o P24.
Caso não o faça ou se você desejar instalar uma versão
mais antiga do rmware, baixe o rmware desejado. No
SimplyPUT, vá para Arquivo>Arquivo Local e carregue o
rmware desejado.
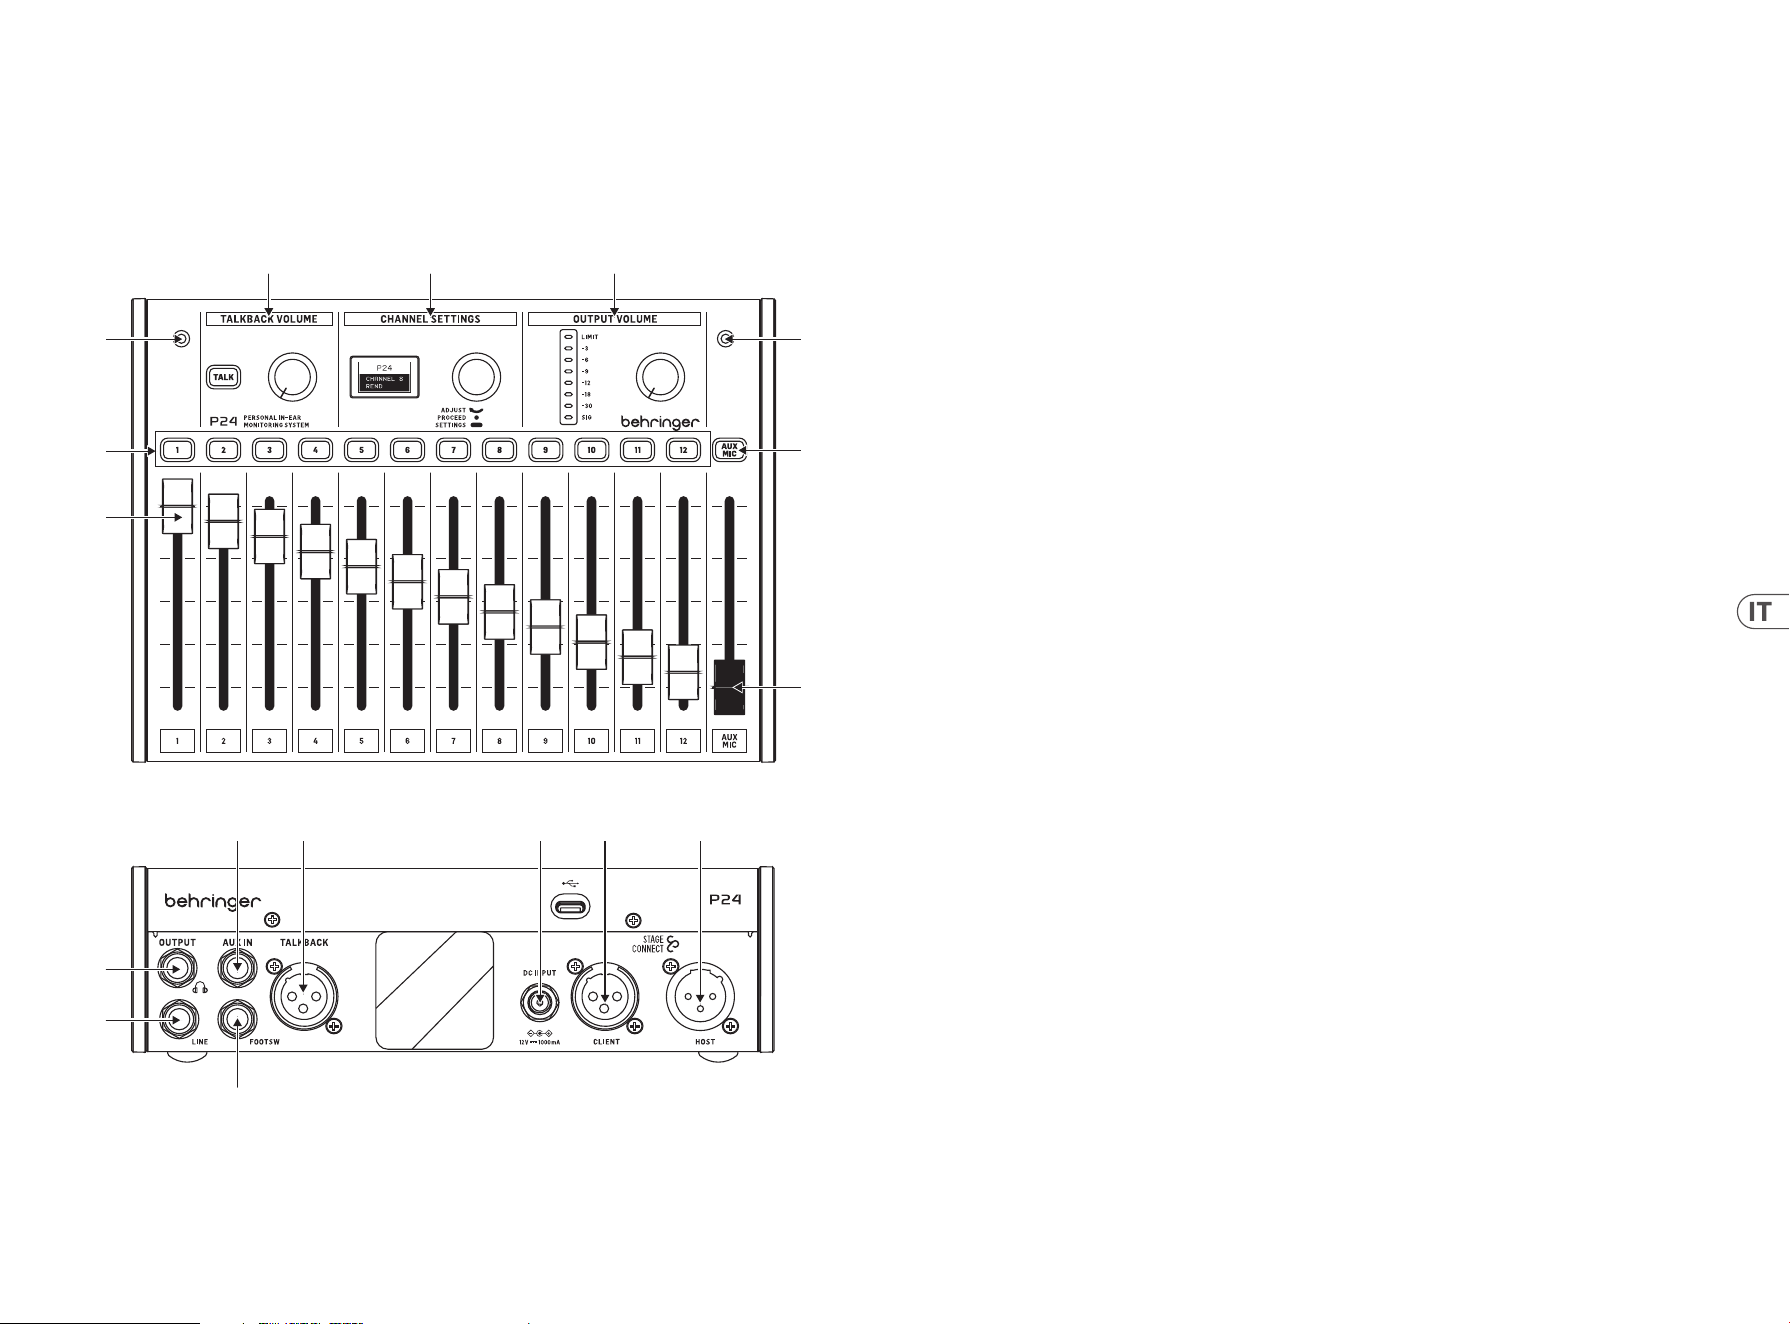
35 P24 34 P24
1. Introduzione
Il monitoraggio e la comunicazione sono fondamentali per i musicisti per sentirsi a proprio agio durante le esibizioni sul palco. Il nuovo
sistema di monitoraggio P24 di Behringer è progettato per risolvere problemi comuni per i performer sul palco, come “ho bisogno di più
me” o “il cantato è troppo forte”, dando loro un controllo diretto e facile da usare delle proprie miscele di monitoraggio. Consente anche la
comunicazione Talkback tra i musicisti sul palco e gli ingegneri.
2. Pannello superiore e posteriore
(3)
(1)
(3)
(7)
(8)
(2)
(4) (5) (6)
(11)
(10)
(12) (13) (14) (15) (16)
(9)
1. I fader dei canali controllano il volume dei segnali
assegnati a ciascun canale. Fare riferimento alla Guida
rapida all’uso del P24HUB per i dettagli sul routing.
2. I pulsanti di selezione del canale si illuminano quando
l’audio passa attraverso il canale corrispondente.
Premendo un pulsante del canale, è possibile regolare i
parametri nella sezione IMPOSTAZIONI DEL CANALE.
3. Due microfoni interni possono essere utilizzati sia per
il talkback che per catturare il suono dell’ambiente e
inviarlo agli in-ear monitor, ottenendo così una miscela di
monitoraggio più naturale.
4. Tenere premuto il pulsante TALK per inviare il segnale
di talkback a monte al P24 precedente nella catena o al
P24HUB. Il pulsante si illumina quando viene ricevuto il
talkback. La manopola accanto al pulsante TALK regola il
volume del talkback in ingresso.
5. È possibile apportare molteplici regolazioni dei canali
nella sezione IMPOSTAZIONI DEL CANALE sia per la miscela
principale (di monitoraggio) che per i singoli canali.
Vedere la sezione 3 per i dettagli.
6. La manopola nella sezione VOLUME DI USCITA regola il
livello delle cue indicato sul metro. Il LED superiore
si illumina quando il limitatore applica la riduzione del
guadagno. Il misuratore LED mostra il livello del canale
attualmente selezionato. Quando nessun canale è
selezionato, viene mostrato il livello di uscita principale
(dopo il controllo).
7. Il pulsante AUX/MIC consente di regolare il guadagno per
l’AUX IN stereo e i microfoni interni ed esterni.
8. Il fader AUX/MIC controlla il livello sia dell’AUX IN che dei
microfoni interni o esterni.
9. Un footswitch momentaneo può essere collegato alla
porta FOOTSW per attivare il talkback dei microfoni interni
ed esterni verso altri dispositivi nel sistema StageConnect.
Ha la stessa funzione della pressione del pulsante TALK
sulla supercie di controllo.
10. L’uscita LINE è una copia mono della miscela principale.
Può essere utilizzata per i monitor a cuneo attivi.
Collegando un cavo a questa porta si disabilita il usso
dei microfoni interni ed esterni alla miscela principale per
evitare un ciclo di feedback.
Nota: utilizzare un cavo bilanciato TRS per collegare l’uscita
LINE all’ingresso del monitor a cuneo attivo. Questa connessione
bilanciata di impedenza evita i loop di massa e i rumori indesiderati.
11. Un'uscita per cue con la miscela principale post-
limitatore è disponibile su jack TRS da ¼". Un amplicatore
per cue di altissima qualità fornisce potenza suciente
anche per le cue a bassa impedenza e gli in-ear.
Nota: Si prega di considerare che l’ascolto di suoni ad alto volume
per periodi prolungati porta a perdita dell’udito. È possibile
regolare il limitatore da un massimo di -30 dB a -30 dB per
garantire di rimanere in un intervallo di uscita sicuro.
12. L'AUX IN riceve un segnale di livello di linea stereo o mono
e lo invia al bus della miscela principale.
13. Un microfono esterno può essere collegato al connettore
XLR TALKBACK. Questo è utile per dare indicazioni agli altri
membri della band, ad esempio.
14. Se l’unità non è alimentata tramite StageConnect CLIENT/
Slave, l’adattatore DC da 12 V/1000 mA può essere
collegato all’ingresso DC. Questo può essere utile per
utilizzare il P24 come un semplice amplicatore per cue
per i segnali inviati all’AUX IN.
15. Connettore StageConnect CLIENT/Slave per la
comunicazione con un P24 o P24HUB a monte e per
ricevere alimentazione remota.
16. Connettore StageConnect HOST/Master per concatenare la
comunicazione e l’alimentazione a valle di un P24.

37 P24 36 P24
3. Impostazioni del canale
3.1. Impostazioni del canale stereo
Quando si preme un pulsante di selezione del canale, sono
disponibili opzioni di elaborazione per tutti i canali di ingresso e di
talkback nella sezione IMPOSTAZIONI DEL CANALE.
Il menu viene navigato tramite:
• Ruotare la manopola per regolare il parametro
• Premere la manopola una volta per passare tra i parametri
• Tenere premuta la manopola per alternare tra il livello dei
parametri di performance e il livello delle impostazioni
La prima livello (con retroilluminazione arancione) contiene
i parametri di performance del canale BALANCE e TONE per
regolazioni rapide del canale selezionato.
• BALANCE: panoramica sinistra/destra
• TONE: EQ di inclinazione +/-12 dB
Il secondo livello (con retroilluminazione verde) viene attivato
tenendo premuta la manopola. Questo livello contiene le
impostazioni MODE e NAME del canale selezionato.
• MODE:
• Stereo: i canali sinistro e destro sono separati e il
controllo del bilanciamento regola il volume del
segnale sinistro e destro.
• Mono: i canali sinistro e destro sono gli stessi, spostati
a sinistra, al centro o a destra, utile per i segnali
strumentali mono.
• Dual: entrambi i segnali dei canali di ingresso
sono presenti a sinistra e a destra. Il controllo del
**BALANCE** regola il rapporto di volume tra i due
segnali di ingresso. Ad esempio, quando un segnale di
grancassa e rullante viene consegnato come un canale
stereo, entrambi vengono spostati al centro e il loro
bilanciamento di livello può essere regolato, anziché la
posizione sinistra-destra.
• NAME: scegli tra molti nomi di canale preimpostati.
3.2. Impostazioni del canale stereo
AUX / MIC
Il primo livello (con retroilluminazione arancione) contiene
quanto segue:
• AUX LEVEL: regola il livello del segnale AUX IN
• MIC LEVEL: regola il livello del microfono interno o esterno.
Il secondo livello (con retroilluminazione verde) viene attivato
tenendo premuta la manopola. Questo livello alterna tra i microfoni
interni e il microfono esterno collegato alla porta XLR posteriore:
• MIC INT
• MIC EXT
3.3. Impostazioni del mix principale
delle cue
Quando nessun canale stereo è selezionato, sono disponibili
opzioni di elaborazione per la miscela principale di monitoraggio.
Il primo livello (con retroilluminazione bianca) contiene i
parametri di performance del mix delle cue: BALANCE,
TONE e REVERB.
• BALANCE: panoramica sinistra/destra
• TONE: EQ di inclinazione +/-12 dB
• REVERB: livello di ritorno complessivo dell'eetto da
-59 dB a +20 dB.
Premere il pulsante di selezione del canale per inviare specici
canali all’eetto di riverbero.
Tenendo premuta la manopola, si attiva il livello delle
impostazioni (con retroilluminazione blu) con:
• LIMITER: soglia da -80 dB a 0 dB.
• MID GAIN: guadagno +/-12 dB della banda di frequenza
media
• MID FREQUENCY: frequenza centrale della banda media (500
Hz, 1 kHz, 3 kHz)
• TALKBACK: seleziona se stai ascoltando i canali di talkback A,
B o entrambi A+B attraverso il sistema StageConnect.
• LIGHT: controlla l’intensità della retroilluminazione dello
schermo e dei pulsanti.
• CONT: controlla il contrasto dello schermo.
• REMOTE: abilita o disabilita il controllo remoto del P24 da
una console o da altri P24.
• INIT P24: ripristina tutti i parametri del P24 ai valori predeniti.
In alternativa, tieni premuto il pulsante TALK mentre accendi
l’unità per inizializzare le impostazioni del P24.
• SND CFG: questa opzione consente di inviare la
congurazione di qualsiasi P24 collegato alle porte 1.1, 2.1,
3.1 o 4.1 a tutti gli altri P24 collegati allo stesso hub e agli
altri hub collegati in cascata.
Nota: Il limitatore si trova dopo il controllo del volume nel usso
del segnale per proteggere l’udito da picchi improvvisi. Regolalo
consapevolmente e mantieniti entro livelli di ascolto sicuri
durante l’ardore della performance!
4. Telecomando
Le informazioni sui nomi dei canali vengono ricevute dal
P24HUB tramite le porte AES50 A o StageConnect CLIENT/Slave.
Queste informazioni sui nomi dei canali vengono poi trasmesse
attraverso le 4 porte frontali StageConnect, consentendo ai
singoli mixer personali P24 di visualizzare le informazioni sui
canali e congurare i suoi 12 canali rispettivamente in mono,
stereo o doppio mono. Per fare ciò, abilita REMOTE nel livello delle
impostazioni e congura l'instradamento e la denominazione
come segue:
• Mono:
• 1 canale + 1 canale vuoto (o viceversa)
• Stereo:
• Canali sinistro e destro con nomi che terminano in
“L” e “R”
• Canali sinistro e destro con lo stesso nome
• Dual:
• Qualsiasi altra congurazione non classicata come
Mono o Stereo
5. Aggiornamento rmware
1. Per aggiornare il rmware del P24, scarica lo strumento di
aggiornamento SimplyPUT da behringer.com.
2. Apri lo strumento SimplyPUT.
3. Collega il P24 al computer tramite USB.
4. Collega il P24 alla presa di corrente tenendo premuto il
pulsante nella sezione delle Impostazioni del Canale.
5. SimplyPUT rileverà automaticamente e aggiornerà il P24.
Nel caso in cui non funzioni o se desideri installare una
versione precedente del rmware, scarica il rmware
desiderato. In SimplyPUT, vai a File>File Locale e carica il
rmware desiderato.
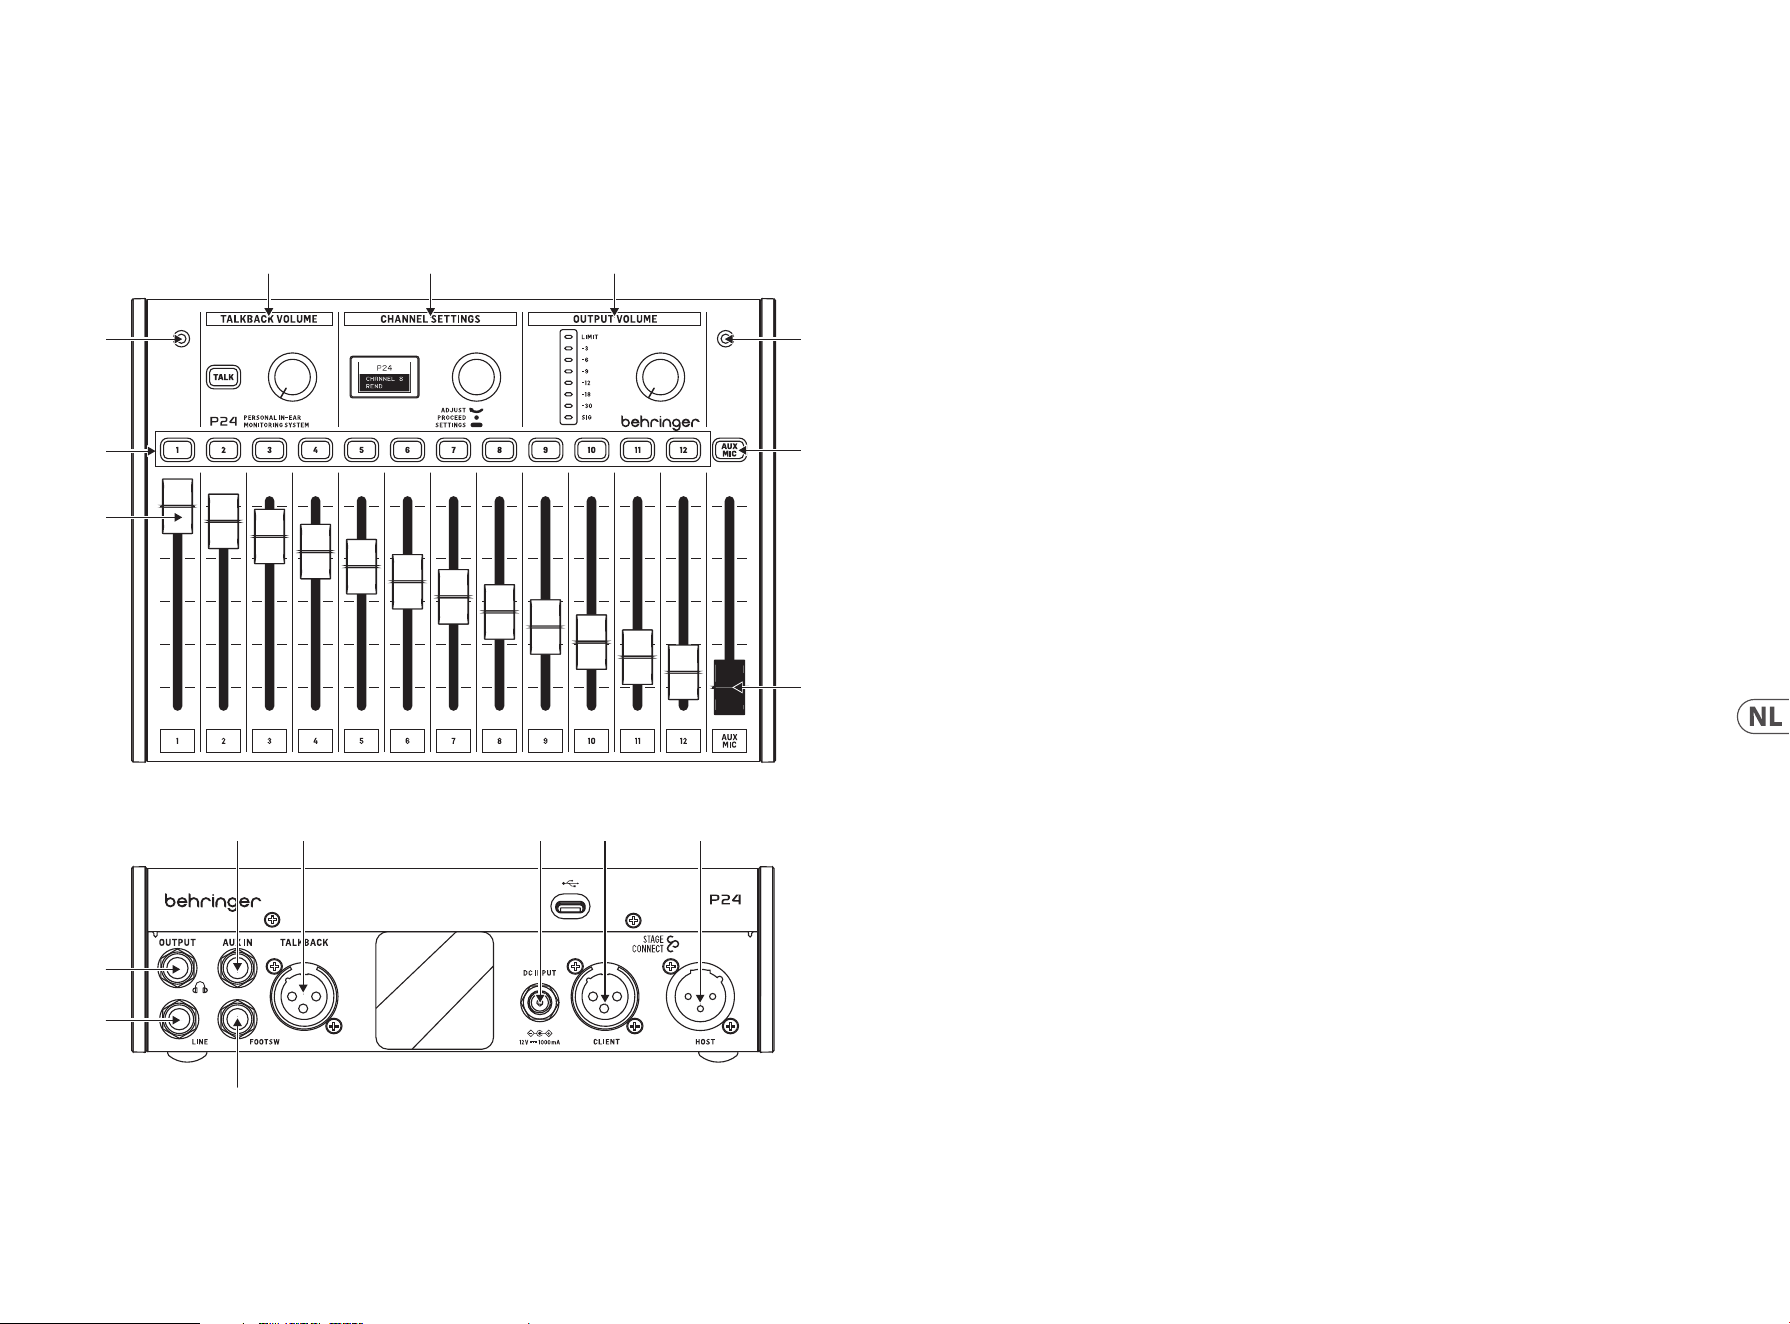
39 P24 38 P24
1. Inleiding
Monitoring en communicatie zijn essentieel voor de muzikanten om zich comfortabel te voelen bij het optreden op het podium.
Behringer’s nieuwe P24 monitoring systeem is ontworpen om veelvoorkomende problemen voor podiumartiesten zoals “Ik heb meer
van mij nodig” of “de zang is te luid” op te lossen door hen directe en eenvoudig te bedienen controle over hun eigen monitoringmixen te
geven. Het maakt ook Talkback communicatie mogelijk tussen muzikanten op het podium en technici.
2. Top and rear panel Boven- en achterpaneel
(3)
(1)
(3)
(7)
(8)
(2)
(4) (5) (6)
(11)
(10)
(12) (13) (14) (15) (16)
(9)
1. Channel faders regelen het volume van de signalen die
aan elk kanaal zijn toegewezen. Raadpleeg de P24HUB
Snelstartgids voor routing details.
2. De kanaalselectieknoppen lichten op wanneer er audio
door het overeenkomstige kanaal gaat. Bij het indrukken
van een kanaalknop kunnen de parameters ervan worden
aangepast in de CHANNEL SETTINGS sectie.
3. Twee interne microfoons kunnen worden gebruikt voor
talkback of om het omgevingsgeluid op te vangen en het
naar de in-ear monitors te voeden, wat resulteert in een
natuurlijker klinkende monitoringmix.
4. Houd de TALK-knop ingedrukt om het talkback-signaal
stroomopwaarts te sturen naar de vorige P24 in de keten
of naar de P24HUB. De knop licht op wanneer talkback
wordt ontvangen. De knop naast de TALK-knop regelt het
volume van de binnenkomende talkback.
5. Meerdere kanaalaanpassingen kunnen worden gemaakt
in CHANNEL SETTINGS voor zowel de hoofd- (monitoring)
mix als individuele kanalen. Zie sectie 3 voor details.
6. De knop in de OUTPUT VOLUME sectie past het
hoofdtelefoon niveau aan dat op de meter wordt
aangegeven. De bovenste LED is verlicht wanneer
de limiter gain reductie toepast. De LED-meter
toont het niveau van het momenteel geselecteerde
kanaal. Als er geen kanaal is geselecteerd, wordt het
hoofduitgangsniveau weergegeven (na-knop).
7. AUX/MIC knop maakt het mogelijk om de gain voor de
stereo AUX IN, en de interne en externe microfoons aan
te passen.
8. De AUX/MIC fader regelt het niveau van zowel de AUX IN
als de interne of externe microfoons.
9. Een momentary footswitch kan worden aangesloten op
de FOOTSW poort om Talkback van de interne en externe
microfoons naar andere apparaten in het StageConnect
systeem te activeren. Het heeft dezelfde functie als het
indrukken van de TALK-knop op het bedieningsoppervlak.
10. LINE OUTPUT is een mono kopie van de hoofdmix. Het
kan worden gebruikt voor actieve wedge monitors. Het
aansluiten van een kabel op deze poort schakelt de stroom
van de interne en externe microfoons naar de hoofdmix
uit om een feedback loop te voorkomen.
Opmerking: gebruik een gebalanceerde TRS-kabel om de
LINE OUTPUT aan te sluiten op de ingang van de actieve wedge
monitor. Deze impedantie gebalanceerde verbinding voorkomt
aardlussen en ongewenste ruis.
11. Een hoofdtelefoonuitgang met de hoofdmix post-limiter
is beschikbaar op ¼" TRS jack. Een zeer hoogwaardige
hoofdtelefoonversterker levert ruim voldoende vermogen,
zelfs voor laag-impedantie hoofdtelefoons en in-ears.
Opmerking: Houd er rekening mee dat het luisteren naar harde
geluiden gedurende langere tijd leidt tot gehoorverlies. U kunt de
Limiter aanpassen van maximaal tot -30 dB, om ervoor te zorgen
dat u binnen een veilig uitgangsbereik blijft.
12. AUX IN ontvangt een stereo of mono line level signaal en
stuurt het naar de hoofdmix bus.
13. Een externe microfoon kan worden aangesloten op de
TALKBACK XLR connector. Dit is handig voor het geven van
aanwijzingen aan andere bandleden, bijvoorbeeld.
14. Als de eenheid niet wordt gevoed via StageConnect
CLIENT/Slave, kan de 12 V/1000 mA DC adapter
worden aangesloten op de DC INPUT. Dit kan handig
zijn voor het gebruik van P24 als een eenvoudige
hoofdtelefoonversterker voor signalen die naar de AUX IN
worden gevoed.
15. StageConnect CLIENT/Slave connector voor communicatie
met een stroomopwaartse P24 of P24HUB, en voor het
ontvangen van externe voeding.
16. StageConnect HOST/Master voor het in serie schakelen van
communicatie en stroom naar een stroomafwaartse P24.

41 P24 40 P24
3. Kanaalinstellingen
3.1. Stereo kanaalinstellingen
Wanneer een kanaalselectieknop wordt ingedrukt, zijn
verwerkingsopties beschikbaar voor alle invoer- en
talkbackkanalen in de CHANNEL SETTINGS sectie.
Het menu wordt genavigeerd door:
• Aan de knop te draaien om de parameter aan te passen
• Eenmaal op de knop te drukken om te wisselen tussen
parameters
• De knop ingedrukt te houden om te wisselen tussen
De eerste laag (oranje achtergrondverlichting) bevat de BALANCE
en TONE kanaalprestatieparameters voor snelle aanpassingen van
het geselecteerde kanaal.
• BALANCE: links/rechts panning
• TONE: +/-12 dB tilt EQ
De tweede laag (groene achtergrondverlichting) wordt geopend
door aan de knop te draaien. Deze laag bevat de MODE en NAME
instellingen van het geselecteerde kanaal.
• MODE:
• Stereo: de linker- en rechterkanalen zijn gescheiden,
en de balance controle past het volume van het linker-
en rechtersignaal aan.
• Mono: de linker- en rechterkanalen zijn hetzelfde
gepand naar links, midden of rechts, nuttig voor
mono-instrument signalen.
• Dual: beide ingangskanaalsignalen zijn aanwezig
aan de linker- en rechterkant. De BALANCE controle
past de volumeverhouding aan tussen beide
ingangssignalen. Bijvoorbeeld, wanneer een basdrum
en snare signaal worden geleverd als één stereo
kanaal, dan beide gepand naar het midden, en hun
niveau balans kan worden aangepast, in plaats van de
links-rechts positie.
• NAME: kies uit vele vooringestelde kanaalnamen.
3.2. AUX / MIC stereo kanaalinstellingen
De eerste laag (oranje achtergrondverlichting) bevat het volgende:
• AUX LEVEL: Past het niveau van het AUX IN signaal aan
• MIC LEVEL: Past het niveau van de interne of externe
microfoon aan.
De tweede laag (groene achtergrondverlichting) wordt geopend
door aan de knop te draaien. Deze laag schakelt tussen de interne
microfoons en de externe microfoon aangesloten op de achterste
XLR-poort:
• MIC INT
• MIC EXT
3.3. Headphone hoofdmix instellingen
Wanneer geen stereo kanaal is geselecteerd, zijn
verwerkingsmogelijkheden voor de hoofdmonitoringmix
beschikbaar.
De eerste laag (witte achtergrondverlichting) bevat
hoofdtelefoonmix prestatieparameters: balance, tone, en reverb.
• BALANCE: links/rechts panning
• TONE: +/-12 dB tilt EQ
• REVERB: OFF, -59 dB tot 20 dB eect totaal retour niveau.
Druk op de channel selection button om specieke kanalen naar
de reverb te sturen.
Het ingedrukt houden van de knop activeert de instellingenlaag
(blauwe achtergrondverlichting) met:
• LIMITER: drempel van -80 dB tot 0 dB.
• MID GAIN: +/-12 dB versterking van de
middenfrequentieband
• MID FREQUENCY: middenfrequentie van de middenband
(500 Hz, 1 kHz, 3 kHz)
• TALKBACK: selecteert of je luistert naar de A, B of beide A+B
talkback kanalen die door het StageConnect systeem komen.
• LIGHT: regelt de intensiteit van de scherm- en
knoppenachtergrondverlichting.
• CONT: regelt het contrast van het scherm.
• REMOTE: schakelt de afstandsbediening van de P24 vanaf
een console of andere P24s in of uit.
• INIT P24: herstelt alle parameters van de P24 naar de
standaardwaarden. Als alternatief kunt u de TALK-knop
ingedrukt houden tijdens het inschakelen van het apparaat
om de instellingen van de P24 te initialiseren.
• SND CFG: deze optie maakt het mogelijk de conguratie
van een P24 die is aangesloten op poorten 1.1, 2.1, 3.1 of 4.1
te verzenden naar alle andere P24s die op dezelfde hub en
andere daisy-chain hubs zijn aangesloten.
Opmerking: De limiter bevindt zich na de volumeregeling in de
signaalstroom om je gehoor te beschermen tegen plotselinge
pieken. Stel het bewust in en blijf binnen veilige gehoorniveaus in
de hitte van de uitvoering!
4. Afstandsbediening
Kanaalnaam informatie wordt door de P24HUB ontvangen via
ofwel de AES50 A of StageConnect CLIENT/Slave poorten. Deze
kanaalnaam informatie wordt vervolgens doorgegeven via de
4 voorste StageConnect poorten, waardoor de individuele P24
personal mixers de kanaalinformatie kunnen weergeven en
hun 12 kanalen kunnen congureren als mono, stereo of dual
mono respectievelijk. Om dit te doen, schakel REMOTE in op de
instellingenlaag en congureer de routering en naamgeving
als volgt:
• Mono:
• 1 kanaal + 1 leeg kanaal (of andersom)
• Stereo:
• Linker- en rechterkanalen met namen die eindigen
op “L” en “R”
• Linker- en rechterkanalen met dezelfde naam
• Dual:
• Elke andere opstelling die niet geclassiceerd is als
Mono of Stereo
5. Firmware-update
1. Om de P24-rmware bij te werken, download je het
SimplyPUT-updateprogramma van behringer.com.
2. Open het SimplyPUT-programma.
3. Sluit de P24 via USB aan op de computer.
4. Sluit de P24 aan op het stopcontact terwijl je de knop in
het gedeelte Kanaalinstellingen ingedrukt houdt.
5. SimplyPUT zal automatisch de P24 detecteren
en bijwerken. Als dit niet gebeurt of als je een
oudere rmwareversie wilt installeren, download
dan de gewenste rmware. Ga in SimplyPUT naar
Bestand>Lokaal bestand en laad de gewenste rmware.
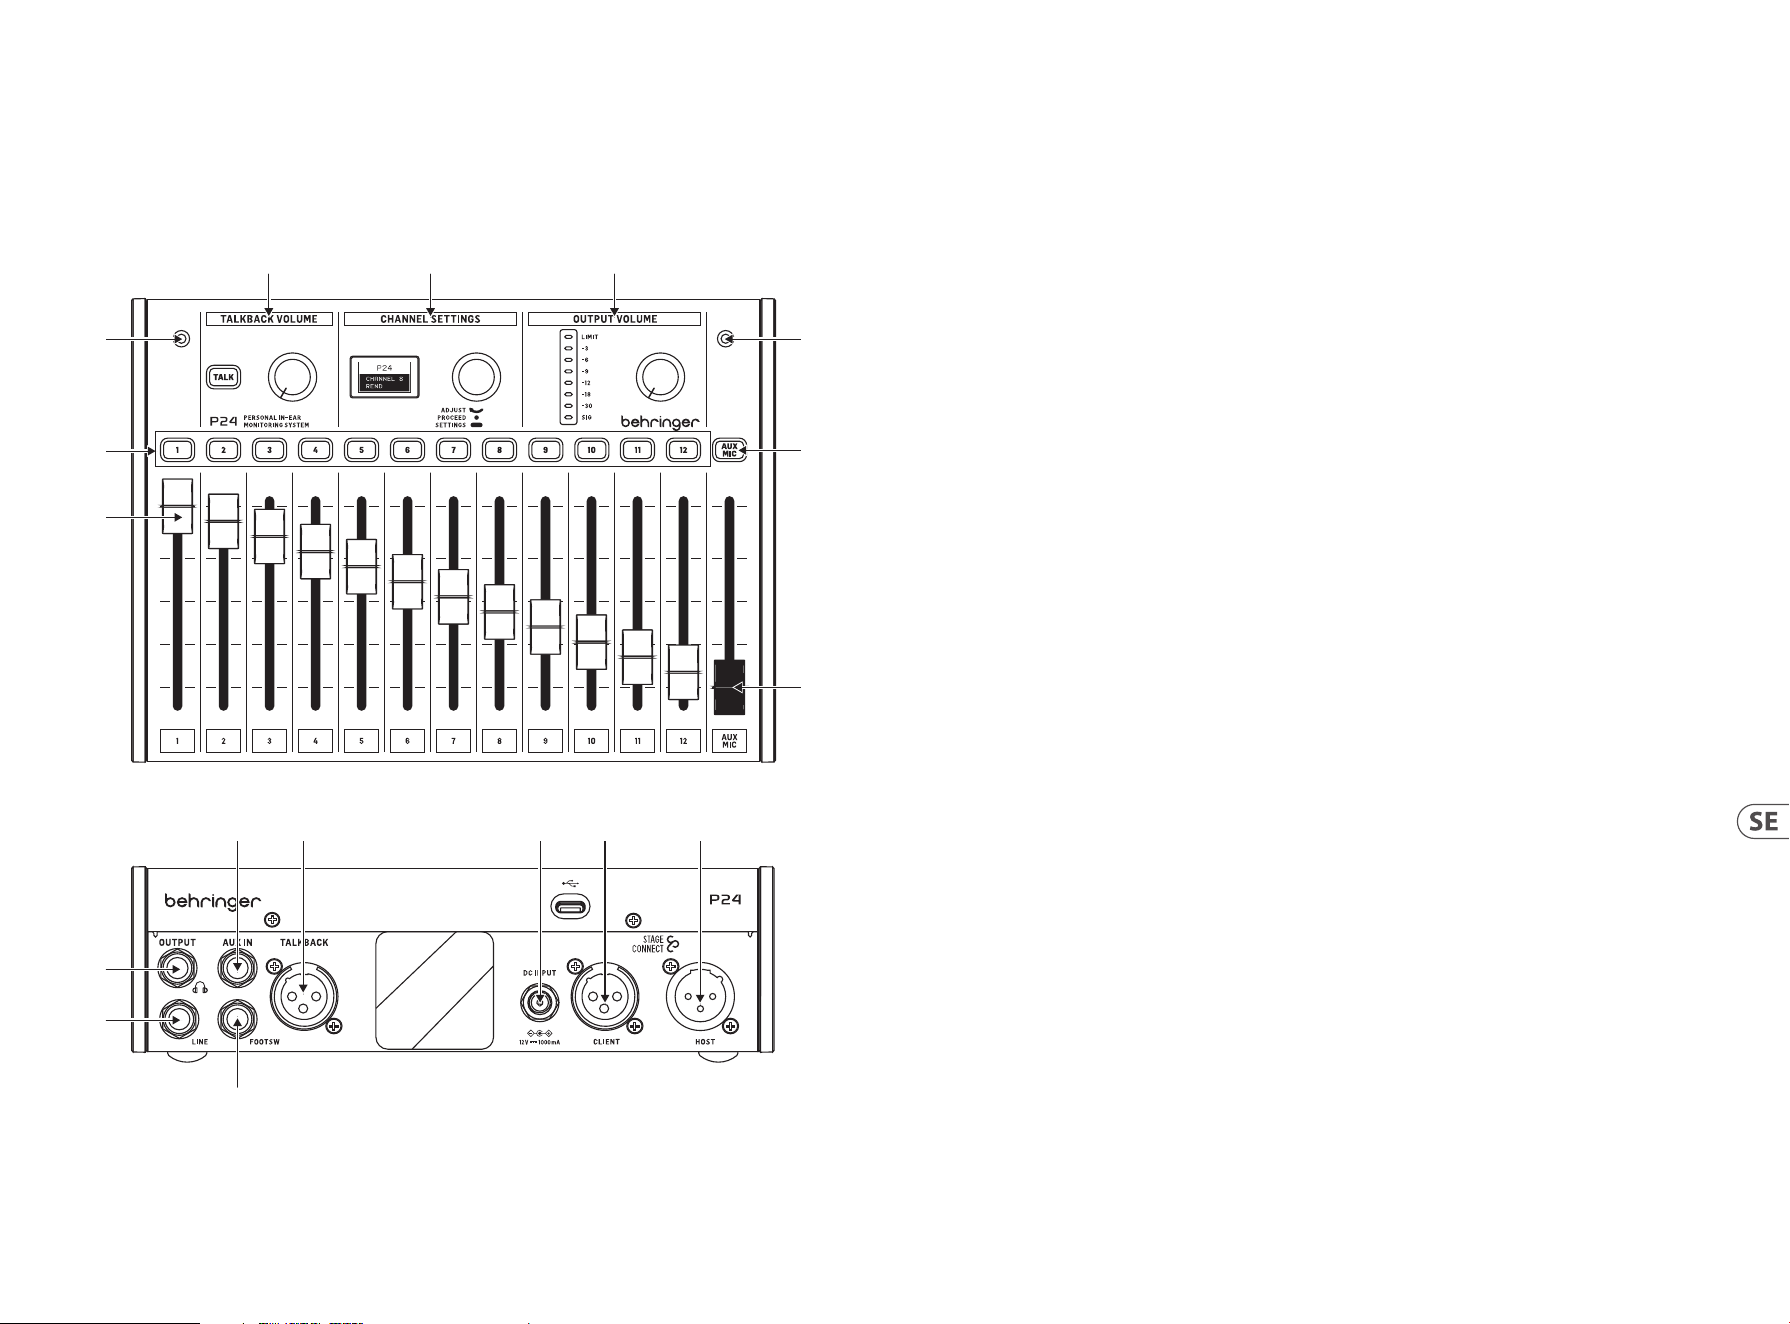
43 P24 42 P24
1. Kanalfaderna styr volymen på signalerna som
tilldelats varje kanal. Vänligen hänvisa till P24HUB
Snabbstartsguide för routingdetaljer.
2. Kanalvalsknapparna lyser när ljud går genom
motsvarande kanal. När du trycker på en kanalknapp kan
dess parametrar justeras i CHANNEL SETTINGS-avsnittet.
3. Två interna mikrofoner kan användas antingen för
talkback eller för att fånga upp omgivningsljudet och
mata det in i in-ear-monitorerna, vilket resulterar i en mer
naturligt ljudande övervakningsmix.
4. Håll ner TALK-knappen för att skicka talkback-signalen
uppströms till föregående P24 i kedjan eller till P24HUB.
Knappen lyser när talkback tas emot. Ratten bredvid TALK-
knappen styr volymen på den inkommande talkbacken.
5. Flera kanaljusteringar kan göras i CHANNEL SETTINGS både
för huvudmixen (övervakning) och enskilda kanaler. Se
avsnitt 3 för detaljer.
6. Ratten i OUTPUT VOLUME-avsnittet justerar hörlursnivån
som visas på mätaren. Den översta LED-lampan tänds när
begränsaren applicerar gainreduktion. LED-mätaren visar
nivån för den för närvarande valda kanalen. Om ingen
kanal är vald visas huvudutgångsnivån (efter reglaget).
7. AUX/MIC-knappen tillåter justering av gain för stereo AUX
IN, och de interna och externa mikrofonerna.
8. AUX/MIC-fadern styr nivån på både AUX IN och de interna
eller externa mikrofonerna.
9. En momentan fotbrytare kan anslutas till FOOTSW-porten
för att aktivera Talkback av de interna och externa
mikrofonerna till andra enheter i StageConnect-systemet.
Det har samma funktion som att trycka på TALK-knappen
på kontrollpanelen.
10. LINE OUTPUT är en mono-kopia av huvudmixen. Den kan
användas för aktiva wedge-monitorer. Anslutning av en
kabel till denna port inaktiverar ödet av de interna och
externa mikrofonerna till huvudmixen för att undvika en
feedback-loop.
Obs: använd en balanserad TRS-kabel för att ansluta LINE
OUTPUT till ingången på den aktiva wedge-monitorn. Denna
impedansbalanserade anslutning undviker jordslingor och
oönskat brus.
11. En hörlursutgång med huvudmixen post-limiter nns
tillgänglig på ¼" TRS-uttag. En mycket högkvalitativ
hörlursförstärkare ger gott om kraft även för
lågimpedanshörlurar och in-ears.
Obs: Tänk på att lyssna på höga ljud under längre perioder leder
till hörselnedsättning. Du kan justera Limiter från maximalt ner
till -30 dB, för att säkerställa att du håller dig inom ett säkert
utgångsområde.
12. AUX IN tar emot en stereo- eller monolinjenivåsignal och
skickar den till huvudmixbussen.
13. En extern mikrofon kan anslutas till TALKBACK XLR-
kontakten. Detta är användbart för att ge signaler till
andra bandmedlemmar, till exempel.
14. Om enheten inte drivs via StageConnect CLIENT/Slave kan
12 V/1000 mA DC-adaptern anslutas till DC INPUT. Detta
kan vara användbart för att använda P24 som en enkel
hörlursförstärkare för signaler som matas till AUX IN.
15. StageConnect CLIENT/Slave-kontakt för kommunikation
med en uppströms P24 eller P24HUB, och för att ta
emot ärrström.
16. StageConnect HOST/Master för att kedjekoppla
kommunikation och ström till en nedströms P24.
1. Introduktion
Övervakning och kommunikation är avgörande för att musiker ska känna sig bekväma på scen. Behringers nya P24 övervakningssystem är
utformat för att lösa vanliga problem för scenframträdanden som “jag behöver mer av mig” eller “sången är för hög” genom att ge dem
direkt och lätt att använda kontroll över sina egna övervakningsmixar. Det möjliggör också Talkback-kommunikation mellan musiker på
scen och tekniker.
2. Övre och bakre panelen
(3)
(1)
(3)
(7)
(8)
(2)
(4) (5) (6)
(11)
(10)
(12) (13) (14) (15) (16)
(9)

45 P24 44 P24
3. Kanalinställningar
3.1. Stereo kanalinställningar
När en kanalvalsknapp trycks in är bearbetningsalternativ
tillgängliga för alla ingångs- och talkback-kanaler i CHANNEL
SETTINGS-avsnittet.
Menyn navigeras genom att:
• Vrida på ratten för att justera parametern
• Trycka på ratten en gång
Menyn navigeras genom att:
• Vrida på knoppen för att justera parametern
• Trycka på knoppen en gång för att växla mellan parametrar
• Hålla ner knoppen för att växla mellan
prestandaparameterlagret och inställningslagret
Det första lagret (orange bakgrundsbelysning) innehåller
BALANCE och TONE kanalprestandaparametrar för snabba
justeringar av den valda kanalen.
• BALANCE: vänster/höger panorering
• TONE: +/-12 dB tilt EQ
Det andra lagret (grön bakgrundsbelysning) nås genom att hålla
ner knoppen. Detta lager innehåller MODE och NAME inställningar
för den valda kanalen.
• MODE:
• Stereo: de vänstra och högra kanalerna är separata,
och balanskontrollen justerar volymen på den vänstra
och högra signalen.
• Mono: de vänstra och högra kanalerna är samma
och panoreras till vänster, mitten eller höger sida,
användbart för mono-instrument-signaler.
• Dual: båda ingångskanalsignalerna nns på vänster
och höger sida. BALANCE-kontrollen justerar
volymförhållandet mellan båda ingångssignalerna. Till
exempel, när en bas trum- och virvelsignal levereras
som en stereo kanal, då båda panoreras till mitten,
och deras nivåbalans kan justeras, snarare än vänster-
höger position.
• NAME: välj från många förinställda kanalnamn.
3.2. AUX / MIC stereo kanalinställningar
Det första lagret (orange bakgrundsbelysning)
innehåller följande:
• AUX LEVEL: Justerar nivån på AUX IN-signalen
• MIC LEVEL: Justerar nivån på den interna eller
externa mikrofonen.
Det andra lagret (grön bakgrundsbelysning) nås genom att hålla
ner knoppen. Detta lager växlar mellan de interna mikrofonerna
och den externa mikrofonen ansluten till den bakre XLR-porten:
• MIC INT
• MIC EXT
3.3. Hörlurs huvudmix inställningar
När ingen stereo kanal är vald, nns bearbetningsalternativ för
huvudövervakningsmixen tillgängliga.
Det första lagret (vit bakgrundsbelysning) innehåller hörlursmix
prestandaparametrar: balans, ton och reverb.
• BALANCE: vänster/höger panorering
• TONE: +/-12 dB tilt EQ
• REVERB: -50 dB till +20 dB eekt total retur nivå.
Tryck på kanalvalsknappen för att skicka specika kanaler
till reverb.
Hålla ner knoppen aktiverar inställningslagret (blå
bakgrundsbelysning) med:
• LIMITER: tröskel från -80 dB till 0 dB.
• MID GAIN: +/-12 dB förstärkning av mittfrekvensbandet
• MID FREQUENCY: centerfrekvens för mittbandet (500 Hz, 1
kHz, 3 kHz)
• TALKBACK: väljer om du lyssnar på A, B eller både A+B
talkback kanaler som kommer genom StageConnect
systemet.
• LIGHT: kontrollerar skärmens och knapparnas
bakgrundsbelysningsintensitet.
• CONT: styr skärmens kontrast.
• REMOTE: aktiverar eller inaktiverar ärrstyrning av P24 från
en konsol eller andra P24-enheter.
• INIT P24: återställer alla P24:s parametrar till
standardvärden. Alternativt kan du hålla ned TALK-knappen
medan enheten slås på för att initiera P24:s inställningar.
• SND CFG: detta alternativ gör det möjligt att skicka
kongurationen av en P24 som är ansluten till portar 1.1, 2.1,
3.1 eller 4.1 till alla andra P24-enheter som är anslutna till
samma hubb och till andra seriekopplade hubbar.
Obs: Begränsaren är placerad efter volymkontrollen i
signalödet för att skydda din hörsel mot plötsliga toppar.
Justera den medvetet och håll dig inom säkra hörselnivåer i
hettan av framförandet!
4. Fjärrkontroll
Kanalnamnsinformation tas emot av P24HUB via antingen
AES50 A eller StageConnect CLIENT/Slave-portarna. Denna
kanalnamnsinformation överförs sedan genom de 4 främre
StageConnect-portarna, vilket gör att de individuella P24-
personmixerna kan visa kanalinformationen och kongurera sina
12 kanaler till mono, stereo eller dual mono. För att göra detta,
aktivera REMOTE i inställningslagret och kongurera routning och
namngivning enligt följande:
• Mono:
• 1 kanal + 1 tom kanal (eller vice versa)
• Stereo:
• Vänster och höger kanaler med namn som slutar på
"L" och "R"
• Vänster och höger kanaler med samma namn
• Dual:
• Alla andra inställningar som inte klassiceras som
Mono eller Stereo
5. Firmware-uppdatering
1. För att uppdatera P24-rmware, ladda ner SimplyPUT-
uppdateringsverktyget från behringer.com.
2. Öppna SimplyPUT-verktyget.
3. Anslut P24 till datorn via USB.
4. Anslut P24 till eluttaget samtidigt som du håller ner
knappen i kanalinställningsavsnittet.
5. SimplyPUT kommer automatiskt att upptäcka och
uppdatera P24. Om det inte gör det eller om du vill
installera en äldre rmwareversion, ladda ner önskad
rmware. I SimplyPUT, gå till Fil>Lokal l och ladda
önskad rmware.
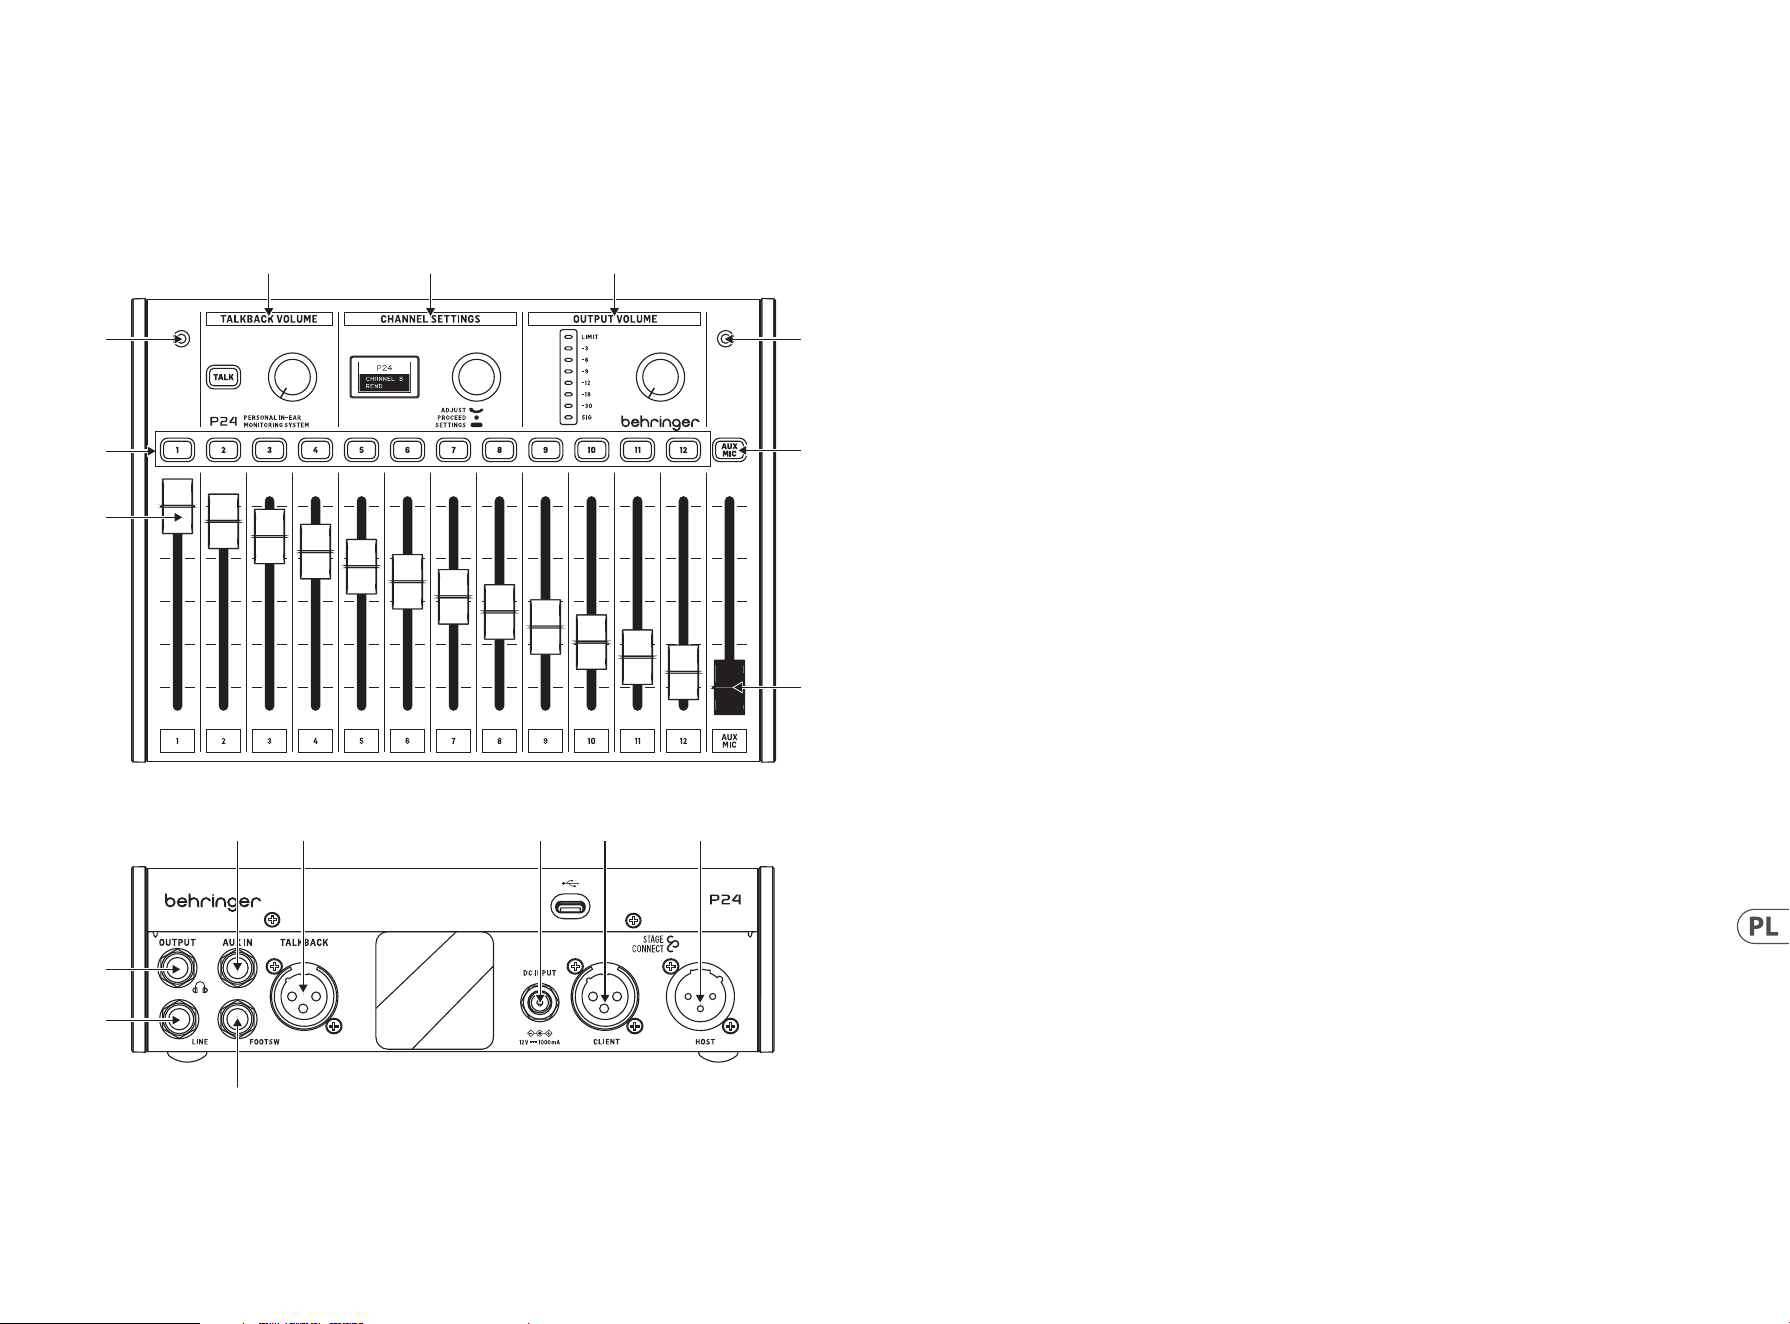
47 P24 46 P24
1. Wprowadzenie
Monitorowanie i komunikacja są niezbędne, aby muzycy czuli się komfortowo podczas występu na scenie. Nowy system monitorowania
P24 rmy Behringer został zaprojektowany, aby rozwiązać typowe problemy występujące na scenie, takie jak “potrzebuję więcej mnie”
lub “wokal jest zbyt głośny”, dając im bezpośrednią i łatwą do obsługi kontrolę nad ich własnymi miksem monitoringu. Umożliwia
również komunikację Talkback pomiędzy muzykami na scenie a inżynierami.
2. Górny i tylny panel
(3)
(1)
(3)
(7)
(8)
(2)
(4) (5) (6)
(11)
(10)
(12) (13) (14) (15) (16)
(9)
1. Suwaki kanałów kontrolują głośność sygnałów
przypisanych do każdego kanału. Szczegóły dotyczące
routingu można znaleźć w Instrukcji Szybkiego
Startu P24HUB.
2. Przyciski wyboru kanału świecą, gdy dźwięk przechodzi
przez odpowiadający im kanał. Po naciśnięciu przycisku
kanału, jego parametry można dostosować w sekcji
CHANNEL SETTINGS.
3. Dwa wbudowane mikrofony mogą być używane albo
do komunikacji talkback, albo do przechwytywania
dźwięku otoczenia i kierowania go do słuchawek
dousznych, co skutkuje bardziej naturalnie brzmiącym
miksem monitoringu.
4. Przytrzymaj przycisk TALK, aby wysłać sygnał talkback
do poprzedniego P24 w łańcuchu lub do P24HUB.
Przycisk świeci, gdy odbierany jest sygnał talkback.
Pokrętło obok przycisku TALK kontroluje głośność
przychodzącego talkbacku.
5. Wielokrotne regulacje kanałów można dokonać w
CHANNEL SETTINGS zarówno dla głównego (monitoringu)
miksu, jak i poszczególnych kanałów. Zobacz sekcję 3, aby
uzyskać szczegółowe informacje.
6. Pokrętło w sekcji OUTPUT VOLUME reguluje poziom
słuchawek, który jest wskazywany na mierniku.
Górna dioda LED świeci, gdy limiter stosuje redukcję
wzmocnienia. Miernik LED pokazuje poziom aktualnie
wybranego kanału. Gdy żaden kanał nie jest wybrany,
wyświetlany jest główny poziom wyjściowy (za gałką).
7. Przycisk AUX/MIC pozwala na regulację
wzmocnienia dla stereo AUX IN oraz wbudowanych i
zewnętrznych mikrofonów.
8. Suwak AUX/MIC kontroluje poziom zarówno AUX IN, jak i
wbudowanych lub zewnętrznych mikrofonów.
9. Do portu FOOTSW można podłączyć przełącznik
nożny, aby aktywować talkback wbudowanych i
zewnętrznych mikrofonów do innych urządzeń w systemie
StageConnect. Ma taką samą funkcję, jak naciśnięcie
przycisku TALK na powierzchni kontrolnej.
10. LINE OUTPUT to mono kopia głównego miksu. Może
być używany do aktywnych monitorów klinowych.
Podłączenie kabla do tego portu wyłącza przepływ
mikrofonów wbudowanych i zewnętrznych do głównego
miksu, aby uniknąć pętli sprzężenia zwrotnego.
Uwaga: użyj zbalansowanego kabla TRS do podłączenia
LINE OUTPUT do wejścia aktywnego monitora klinowego. To
zbalansowane połączenie impedancyjne unika pętli masowych i
niechcianych szumów.
11. Wyjście słuchawkowe z głównym miksem po ograniczniku
jest dostępne na gnieździe TRS ¼". Bardzo wysokiej jakości
wzmacniacz słuchawkowy dostarcza wystarczającą moc
nawet dla słuchawek i wkładek o niskiej impedancji.
Uwaga: Proszę pamiętać, że słuchanie głośnych dźwięków przez
dłuższy czas prowadzi do utraty słuchu. Możesz dostosować
Limiter od maksimum do -30 dB, aby zapewnić bezpieczny
zakres wyjściowy.
12. AUX IN odbiera sygnał na poziomie linii stereo lub mono i
wysyła go do głównego magistrali miksu.
13. Zewnętrzny mikrofon można podłączyć do złącza
TALKBACK XLR. Jest to przydatne na przykład do
podawania sygnałów innym członkom zespołu.
14. Jeśli urządzenie nie jest zasilane przez StageConnect
CLIENT/Slave, do DC INPUT można podłączyć zasilacz 12
V/1000 mA DC. Może to być przydatne do korzystania z P24
jako prostego wzmacniacza słuchawkowego dla sygnałów
podawanych do AUX IN.
15. Złącze StageConnect CLIENT/Slave do komunikacji
z wcześniejszym P24 lub P24HUB i do odbierania
zasilania zdalnego.
16. StageConnect HOST/Master do łączenia w łańcuch
komunikacji i zasilania do P24 znajdującego się w
dół strumienia.

49 P24 48 P24
3. Ustawienia kanałów
3.1. Ustawienia kanału stereo
Gdy naciśnięty jest przycisk wyboru kanału, dostępne są opcje
przetwarzania dla wszystkich kanałów wejściowych i talkback na
sekcji CHANNEL SETTINGS.
Menu jest nawigowane przez:
• Obracanie pokrętła do regulacji parametru
• Naciśnięcie pokrętła raz, aby przełączyć między
parametrami
• Przytrzymanie pokrętła, aby przełączyć między warstwą
parametrów wydajności a warstwą ustawień
Pierwsza warstwa (podświetlenie pomarańczowe) zawiera
parametry wydajności kanału BALANCE i TONE do szybkich
regulacji wybranego kanału.
• BALANCE: balans lewo/prawo
• TONE: +/-12 dB tilt EQ
Druga warstwa (podświetlenie zielone) jest dostępna po
przytrzymaniu pokrętła. Ta warstwa zawiera ustawienia MODE i
NAME wybranego kanału.
• MODE:
• Stereo: kanały lewy i prawy są oddzielne, a kontrola
balansu reguluje głośność sygnału lewego i prawego.
• Mono: kanały lewy i prawy są takie same, skierowane
do lewej, środkowej lub prawej strony, przydatne dla
sygnałów mono instrumentów.
• Dual: oba sygnały kanału wejściowego są obecne po
lewej i prawej stronie. Kontrola BALANCE reguluje
stosunek głośności między oboma sygnałami
wejściowymi. Na przykład, gdy sygnał bębna
basowego i werbla jest dostarczany jako jeden kanał
stereo, a następnie oba są skierowane do środka, ich
równowaga poziomu może być regulowana, a nie
pozycja lewo-prawo.
• NAME: wybierz spośród wielu predeniowanych
nazw kanałów.
3.2. Ustawienia kanału stereo AUX / MIC
Pierwsza warstwa (podświetlenie pomarańczowe) zawiera
następujące elementy:
• AUX LEVEL: Reguluje poziom sygnału AUX IN
• MIC LEVEL: Reguluje poziom mikrofonu wewnętrznego lub
zewnętrznego.
Druga warstwa (podświetlenie zielone) jest dostępna po
przytrzymaniu pokrętła. Ta warstwa przełącza między
mikrofonami wewnętrznymi a mikrofonem zewnętrznym
podłączonym do tylnego portu XLR:
• MIC INT
• MIC EXT
3.3. Ustawienia głównego miksu
słuchawkowego
Gdy nie jest wybrany żaden kanał stereo, dostępne są opcje
przetwarzania dla głównego miksu monitoringu.
Pierwsza warstwa (podświetlenie białe) zawiera parametry
wydajności miksu słuchawkowego: balans, ton i reverb.
• BALANCE: balans lewo/prawo
• TONE: +/-12 dB tilt EQ
• REVERB: -59 dB do +20 dB efekt ogólnego poziomu zwrotu.
Naciśnij przycisk wyboru kanału, aby wysłać określone kanały
do reverb.
Przytrzymanie pokrętła aktywuje warstwę ustawień
(podświetlenie niebieskie) z:
• LIMITER: próg od -80 dB do 0 dB.
• MID GAIN: +/-12 dB wzmocnienie pasma średniego
• MID FREQUENCY: częstotliwość środkowa pasma
środkowego (500 Hz, 1 kHz, 3 kHz)
• TALKBACK: wybiera, czy słuchasz kanałów talkback A, B lub
obu A+B przesyłanych przez system StageConnect.
• LIGHT: kontroluje intensywność podświetlenia ekranu i
przycisków.
• CONT: reguluje kontrast ekranu.
• REMOTE: włącza lub wyłącza zdalne sterowanie P24 z
konsoli lub innych P24.
• INIT P24: przywraca wszystkie parametry P24 do wartości
domyślnych. Alternatywnie, przytrzymaj przycisk
TALK podczas włączania urządzenia, aby zainicjować
ustawienia P24.
• SND CFG: ta opcja pozwala na przesłanie konguracji
dowolnego P24 podłączonego do portów 1.1, 2.1, 3.1 lub 4.1
do wszystkich innych P24 podłączonych do tego samego
huba i innych hubów połączonych łańcuchowo.
Uwaga: Ogranicznik jest umieszczony po kontroli głośności
w przepływie sygnału, aby chronić Twój słuch przed nagłymi
szczytami. Dostosuj go świadomie i utrzymuj bezpieczne poziomy
słuchu w gorącu występu!
4. Pilot zdalnego sterowania
Informacje o nazwach kanałów są odbierane przez P24HUB przez
porty AES50 A lub StageConnect CLIENT/Slave. Informacje te są
następnie przesyłane przez 4 przednie porty StageConnect, co
umożliwia indywidualnym mikserom osobistym P24 wyświetlanie
informacji o kanałach i kongurowanie 12 kanałów jako mono,
stereo lub podwójne mono. Aby to zrobić, włącz REMOTE w
warstwie ustawień i skonguruj trasowanie i nazewnictwo w
następujący sposób:
• Mono:
• 1 kanał + 1 pusty kanał (lub odwrotnie)
• Stereo:
• Lewy i prawy kanał z nazwami kończącymi się na
”L” i ”R”
• Lewy i prawy kanał o tej samej nazwie
• Podwójny:
• Jakakolwiek inna konguracja nie sklasykowana jako
Mono lub Stereo
5. Aktualizacja oprogramowania
układowego
1. Aby zaktualizować rmware P24, pobierz narzędzie
SimplyPUT ze strony behringer.com.
2. Otwórz narzędzie SimplyPUT.
3. Podłącz P24 do komputera za pomocą USB.
4. Podłącz P24 do gniazdka elektrycznego, przytrzymując
pokrętło w sekcji Ustawienia Kanału.
5. SimplyPUT automatycznie wykryje i zaktualizuje P24.
Jeśli tego nie zrobi lub chcesz zainstalować starszą
wersję rmware, pobierz żądane oprogramowanie.
W SimplyPUT przejdź do Plik>Plik lokalny i załaduj
żądane oprogramowanie.
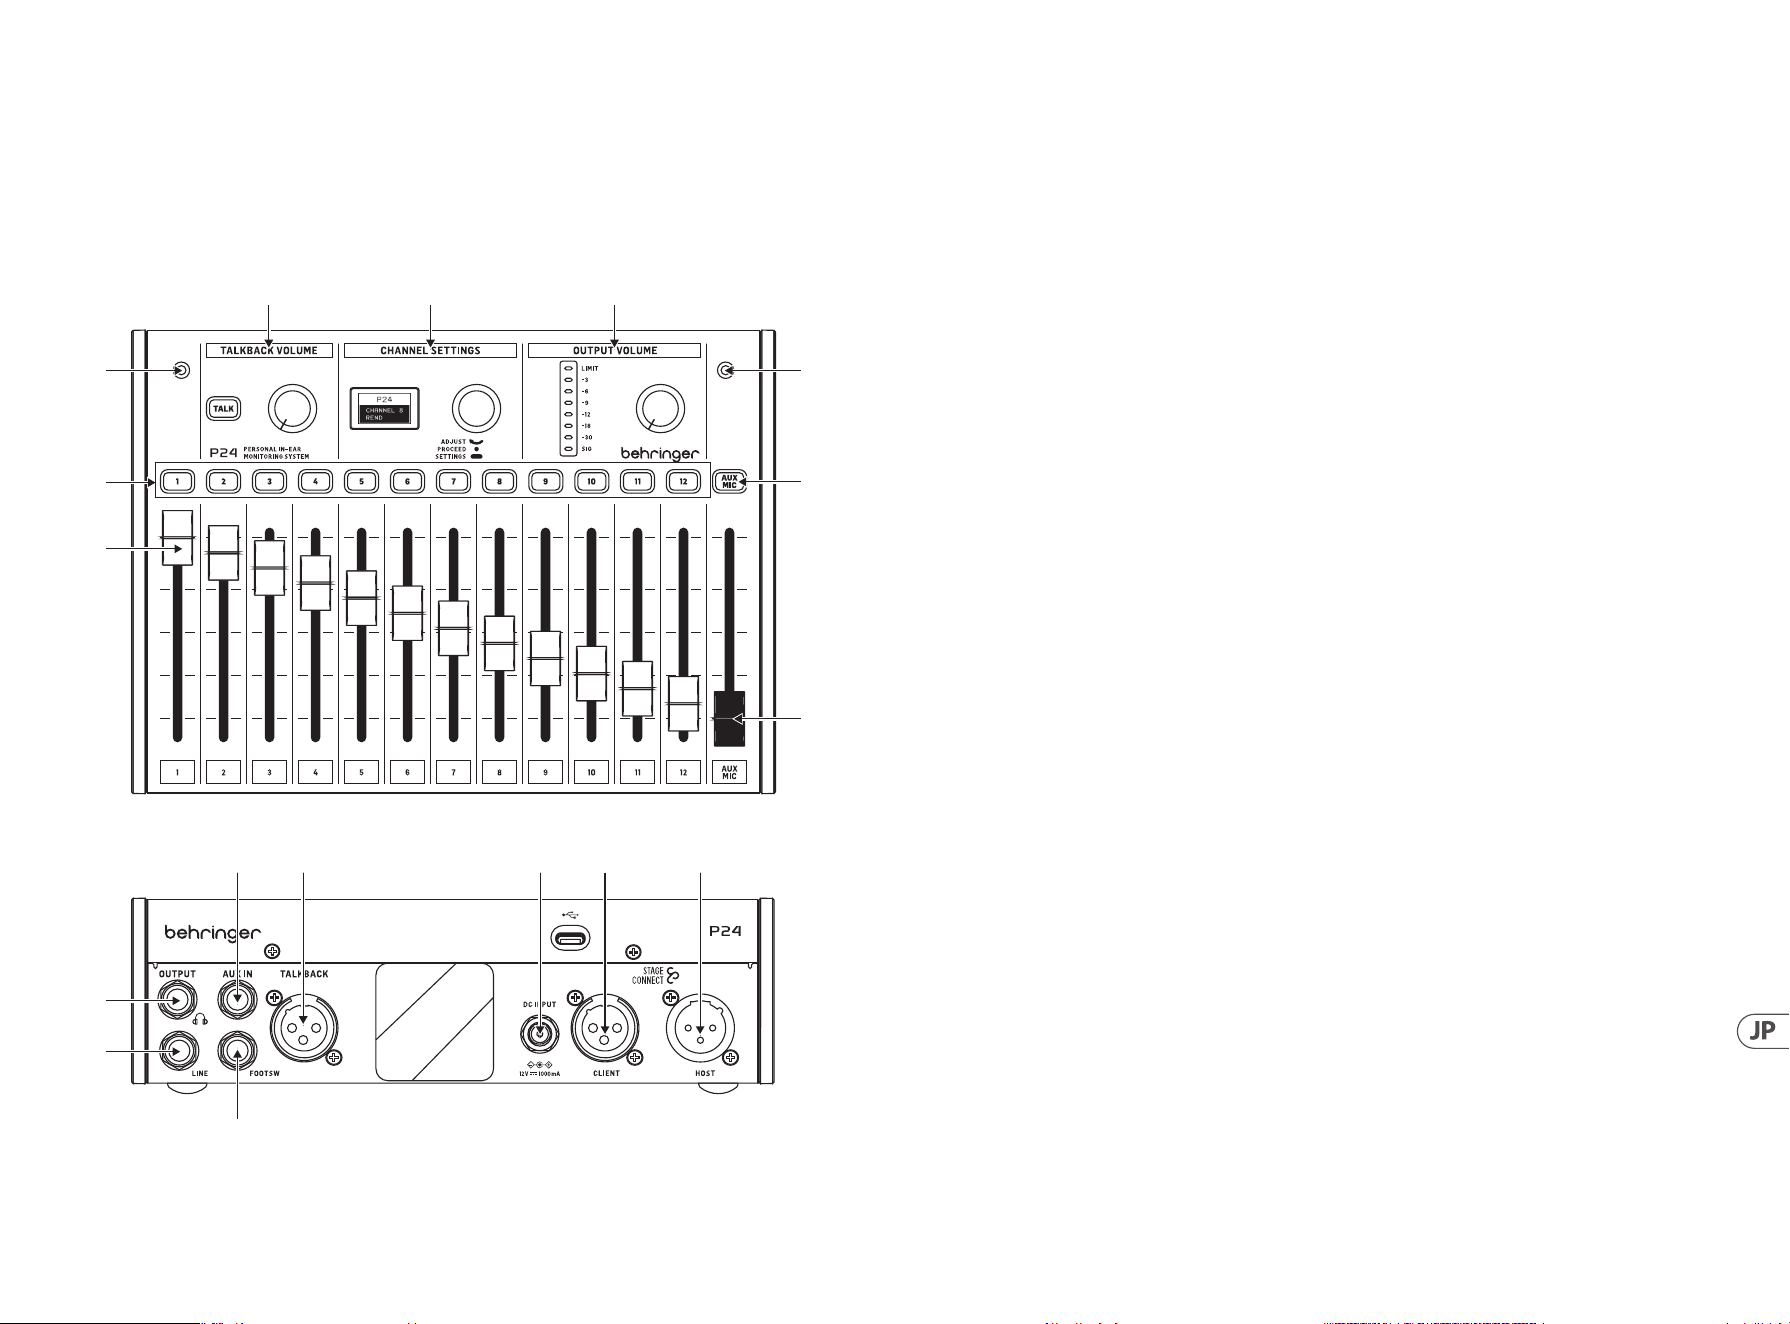
51 P24 50 P24
1. はじめに
モニタリングとコミュニケーションは 、ミュージシャンがステージ上で 快 適に演 奏するために重 要で
す。Behringer の新しい P24 モニタリングシステムは、「もっと自分の音が欲しい」や「ボーカルが大きすぎる」といっ
たステージ上のパフォーマーがよく抱える問題を解決するために設計されています。それは彼ら自身のモニタリング
ミックスの直接的で簡単に操 作できるコントロールを提 供します。また、ステージ上のミュージシャンとエンジニア
間の Talkback 通 信も可 能 にします。
2. トップとリアパ ネル
(3)
(1)
(3)
(7)
(8)
(2)
(4) (5) (6)
(11)
(10)
(12) (13) (14) (15) (16)
(9)
1. チャンネ ルフェー ダー は ステレオチャンネル の
音量を制御します。ルーティングの詳細につい
ては、P24HUB クイックスタートガ イド も 参 照して
ください。
2. チャンネル選択ボタンは、音声が対応するチャ
ン ネ ル を 通 過 す る と 緑 色 に 点 灯 し 、ク リ ッ ピ ン グ
が 発 生 す る と 赤 色 に 点 灯 し ま す 。チ ャ ン ネ ル 選
択 ボ タ ン を 押 す と 、琥 珀 色 に 変 わ り 、対 応 す る チ
ャンネル を CHANNEL SETTINGS セクションで 編集
できます。
3. 2 つ の内 蔵 マイクは 、Talkback 用に使用するか、
または周囲の音をキャプチャしてインイヤーモ
ニターにフィードするために使 用できます。これ
により、モニタリングミックス がより自然な音に
なります。
4. TALK ボタンを押し続けると、Talkback 信号がチ
ェーン内の前の P24 または P24HUB に送信され
ます。Talkback が受 信されているときにボタン
が点 灯しま す。TALK ボタンの隣のノブは、着信
Talkbackの 音 量を制 御しま す。
5. CHANNEL SETTINGS では、メイン(モニタリング)ミ
ックスと個々のチャンネルの両方に対して複 数の
チャンネル調整を行うことができます。詳細につ
い て は 、セ ク シ ョ ン 3 を 参 照してください 。
6. OUTPUT VOLUME セクションのノブは、メーターに
表示されるヘッドフォンレベルを調整します。
リミッター が ゲイン 低 減を 適 用しているときに、
上部のLEDが点 灯しま す。LED メ ー タ ー は 、現 在 選
択されているチャンネルのレベルを表示します。
チャンネルが選択されていない場合は、メイン出
力 レ ベ ル が 表 示 さ れ ま す( ポ ス トノ ブ )。
7. AUX/MIC ボ タ ン は 、ス テ レ オ AUX IN と内部および
外部マイクのゲインを調整することができます。
8. AUX/MIC フェーダーは、AUX INと内部または外部
マイクの両方のレベルを制御します。
9. 瞬 間 的 なフットスイッチ を FOOTSW ポートに接
続すると、内部および外部マイクの Talkbackを
StageConnectシステム内の他のデバイスにアクテ
ィベートできます。これは、コントロールサーフ
ェス上のTALKボタンを押すのと同じ機能を持っ
ていま す。
10. LINE OUTPUT は 、メ イ ン ミ ッ ク ス の モ ノ コ ピ ー で
す 。こ れ は 、ア ク テ ィ ブ ウ ェ ッ ジ モ ニ タ ー に 使 用
することができます。このポートにケーブルを接
続 す る と 、フ ィ ー ド バ ッ ク ル ー プ を 避 け る た め に 、
内部および 外部マイクの流 れがメインミックスに
対して無効になります。
注: LINE OUTPUT をアクティブウェッジ モニター入 力に 接
続 す る た め に は 、バ ラ ン ス の 取 れ た TRS ケーブル を 使 用
してください 。このインピーダンスバランス接続は、グ
ラウンドル ープと 不 要 な ノイズ を 避 け ま す。
11. メインミックスのポ ストリミッター が 利 用 可 能 な
ヘ ッド フ ォン 出 力 は 、¼ " TRS ジャックにありま
す。非常に高品質のヘッドフォンアンプは、低イ
ンピー ダンスの ヘッド フォン やインイヤー にも十
分な 電力を提 供しま す。
注: 長 時 間 に わ た っ て 大 音 量 で 音 を 聞 く と 、聴 力 が 低
下することを 考 慮してください 。リミッターは 最 大 か ら
-30 dB まで調整できますので、安全な出力範囲内に留
まるようにしてください。
12. AUX IN はステレオまたはモノラインレベル信号
を受け取り、それをメインミックスバスに送り
ます。
13. 外 部 マイク を TALKBACK XLR コネクタに接 続する
ことができます。これは、例えば他のバンドメン
バーにキューを出すのに便利です。
14. ユ ニットが StageConnect CLIENT/SLAVE 経由で電
源供給されていない場合、12 V/1000 mA DC ア
ダプターを DC INPUT に接続することができま
す 。こ れ は 、AUX IN に供給される信号に対して
P24 を単純なヘッドフォンアンプとして使用する
のに便 利です。
15. StageConnect CLIENT/SLAVE コネクタは、上流の
P24 または P24HUB と の 通 信 、お よ び リ モ ー ト 電
源の 受 信に使 用します。
16. StageConnect HOST/MASTER は 、通 信 と 電 源 を 下 流
の P24 にデイジーチェーン接続します。

53 P24 52 P24
3. チャンネル 設 定
3.1. ステレオチャンネル 設 定
チャンネ ル 選 択 ボタンを 押 すと、CHANNEL SETTINGS
セクションで入力チャンネルとトークバックチャンネル
の複 数のオプション が 利 用可能になります。
メニュー の 操 作 方 法 は 次 のとおりで す:
• • チャンネル 選 択 ボタンを 押して 対応 するチャン
ネ ル の 設 定 に ア ク セ ス し 、押 し 続 け る こ と で パ
フォーマンスパラメータレイヤーとチャンネル設
定レイヤーを切り替えます。同じチャンネル選
択ボタンを2回押すと、チャンネルが選択解除さ
れ、CHANNEL SETTINGS セクションはヘッド フォンメイ
ンミックス 設 定 を 制 御します。
• • CHANNEL SETTINGS エンコーダーを一度押してパラメ
ータを 切り替えます。
• • CHANNEL SETTINGS エンコーダーを回してパラメータ
を調整します。
チャンネルパフォーマンス パラメータレイヤー(白色 バ
ッ ク ラ イ ト )は 、チ ャ ン ネ ル 選 択 ボ タ ン を 押 し て ア ク テ ィ
ブになり、以下を含みます:
• • BALANCE:ス テ レ オ モ ー ド で は 左 右 の パ ン ニ ン グ 、デ
ュアルモードでは2つの チャンネル 間のバランス 。
• • TONE:± 12 dB ティルト EQ
• • FX SEND: オン/オフ、チャンネルをオンボードリバー
ブエフェクトに 送ります。リバーブレベルはヘッドフ
ォンミックスパフォーマンスパラメータレイヤーで
設 定 で き ま す( 3.3 節 参 照 )。
チャンネル設定レイヤー(緑 色バックライト)は、チャ
ン ネ ル 選 択 ボ タ ン を 押 し 続 け る こ と で ア ク セ ス で き 、以
下 を 含 み ま す:
• • MODE:
• • ステレオ: 2つの隣接する入力チャンネルが左
右に パニングされ ま す。BALANCE は 各 チャンネ
ル の 音 量を制 御しま す。
• • モノ: 2 つの隣接する入力チャンネルが中央に
パニングされます。BALANCE は両方の入力チャ
ンネルの合計のステレオ位置を制御します。
• • デュ アル:2 つの隣接する入力チャンネルが中
央にパニングされます。BALANCE は 両 チャンネ
ル間の音量比率を制御し、中央にパニングさ
れ た ま ま に し ま す 。例 え ば 、バ ス ド ラ ム と ス ネ
ア信号が連続する2つの チ ャンネルで 送ら れ る
場 合に便 利 で す。
• • NAME: 多くのプリセットチャンネル名から選択し
ます。
3.2. AUX / MIC ステレオチャンネル 設 定
AUX MIC チャンネル選択ボタンを押してアクティブにな
るチャンネルパフォーマンス パラメータレイヤー (白色
バックライト) には以下が含まれます:
• • AUX TRIM:AUX IN ゲインのレベルを調整します
( オ フ 、- 59 dB から+ 20 dB)。
• • MIC TRIM: 内蔵または外部マイクのゲインレベルを
調整します (オフ、-59 dB から+20d B)。
AUX MIC チャンネル 選 択ボタンを押し続 けることで アク
セスできるチャンネル設定レイヤー (緑 色バックライト)
は、内蔵または外部マイクを選択します (MIC SEL:INT ま
たは EXT)。
3.3. ヘッドフォンメインミックス 設 定
ステレオチャンネルが選択されていない場合、メインモ
ニタリングミックスの処 理 オプションが 利 用可能 です。
ヘッドフォンミックスパフォーマンスパラメータ (ライト
ブルーバックライト) はデフォルトでアクティブであり、
以下を含みます:
• • BALANCE:左 右のパ ンニング
• • TONE:± 12 dB ティルト EQ
• • REVERB: 全体のリバーブレベルを設定します(オ
フ 、- 59 dB から +20 dB)。この画面では、チャンネ
ル 選 択 ボタンを押すと対応する FX SEND がオン/オ
フに切り替わります (チャンネルパフォーマンスパ
ラメータレイヤーにもあります)。
CHANNEL SETTINGS エンコーダーを押し続けることでア
クティブになる設定レイヤー (青色バックライト) は、
以下を含みます:
• • LIMITER: 0 dB から -20 dB のしきい値。
• • MID GAIN: 中周波帯域のゲイン -12 dB から +6 dB。
• • MID FREQUENCY: 中帯域の中心周波数
(100 H zから 9500 Hz)。
• • TALKBACK: StageConnect システムを介して A、B また
は A と B 両方のトークバックチャンネルを聴くか
を選 択します。
• • TB DIM: トー クバックが アクティブ な 間 にヘッドフォ
ンミックスに 適 用され る減 衰 量を設 定します。
• • LIGHT: 画 面とボタンのバックライトの強さを調 整
します。
• • CONT: 画 面のコントラストを調 整します。
• • REMOTE:コン ソ ー ル や 他 の P24 から P24 のリモート
制御を有効または無効にします。
• • INIT P24:P24 のすべてのパラメータを初 期 設定値 に
リセットしま す。また は 、ユニットの 電 源 を 入 れ る
際に TALK ボタンを押し続けることで、P24 の設定
を初 期 化することもで きます。
• • SND CFG: このオプションは、ポート 1.1、2.1、3.1、ま
たは 4.1 に接続されている任意の P24 の設定を、
同じハブ および デイジー チェーン 接 続 された 他 の
ハブに接続されているすべての他の P24 に送信す
ることを可 能 にしま す。
• • ールから P24 のリモートコントロールを有効または
無 効 にします。
• • INIT P24: P24 のすべてのパラメータをデフォルト値
に戻しま す。
注意: リミッターは音 量 制 御 後 の 信 号フロ ー に位 置して
お り 、突 然 の ピ ー ク か ら あ な た の 聴 覚 を 保 護 し ま す 。意
識して調整し、パフォーマンスの熱中の中でも安全な聴
覚レベルを維持してください!
4. リモ ートコントロール
チャネル 名 情 報 は 、AES50A または StageConnect デバ
イス/スレーブポートを 介して P24HUB によって 受 信
さ れ ま す 。こ の チ ャ ン ネ ル 名 情 報 は 、4 つのフロント
StageConnect CLIENT/SLAVE ポートを 介して送 信されます。
個々の P24 パーソナルミキサーがチャンネル情報を表示
し 、そ の 12 チャンネルをそれぞれモノラル、ステレオ、
またはデュアルモノに構成できるようにします。これを
行 う に は 、設 定 レ イ ヤ ー で REMOTE を有効にし 、ルーテ
ィングと命 名を次のように構 成しま す。
• モ ノ:
• 1 チ ャンネル +1 空 の チャンネル
(またはその逆)
• ステレオ:
• 名前が L と R で終わる左右のチャンネル
• 同じ名 前 の左 右 の チャンネル
• デュアル:
• モノラルまたはステレオとして分類されていな
いその他のセットアップ
5. ファームウェアの更 新
1. P24 のファームウェアを更新するには、
behringer.com から SimplyPUT アップ デートツール
をダウンロ ードします。
2. SimplyPUT ツール を開きます。
3. USB 経由で P24 をコンピュータに接 続します。
4. Channel Settings エンコーダーを押し続けながら
P24を 電 源コン セントに 接 続します。
5. SimplyPUT は P24 を自動 的に 検 出して更 新し
ます。検出され ない場合や古いファームウェ
アバージョンをインストールしたい場合は、希
望するファームウェアをダウンロードします。
SimplyPUT でFile>Local File に 移 動 し 、希 望 す る フ ァ
ームウェアを読み込みます。

55 P24 54 P24
1. 简介
监听和对讲对于音乐家在舞台上放松的表演至关重要。 Behringer 的新 P24 监听系统旨在解决舞台表演者常见的问
题, 如 ”我需要更多的我” 或 ”人声太大声”, 通过给他们直接和易于操作的自己的监听混音的控制。 它还允许舞台上的
音乐家和调音师之间的 Talkback 对讲。
2. 顶部和后面板
(3)
(1)
(3)
(7)
(8)
(2)
(4) (5) (6)
(11)
(10)
(12) (13) (14) (15) (16)
(9)
1. 通道滑杆控制立体声通道的音量。 请参考 P24HUB
快速入门指南以获取路由详细信息。
2. 通道选择按钮在音频通过相应通道时将变为
浅绿色, 当音频过载时变为红色。 按下通道选择
按钮时, 它会变为琥珀色, 并且相应通道可以在
”CHANNEL SETTINGS” 部分进行编辑。
3. 两个内部麦克风可以用于对讲或捕捉环境声音,
并将其输入入耳监听器, 从而获得更自然的监
听混音。
4. 按住 TALK 按钮向链路中的前一个 P24 或 P24HUB
发送 talkback 信号。当接收到 talkback 时, 按钮会
亮起。 TALK 按钮旁边的旋钮控制进入 talkback 的
音量。
5. 可以在 CHANNEL SETTINGS 中对主 (监听) 混音通道
和单个通道进行多个通道的调整。详见第 3 节。
6. OUTPUT VOLUME 部分的旋钮调整耳机通道电平信
号大小。 当限制效果器工作时, 顶部 LED 会亮起。
LED 显示屏显示当前选定通道的电平。 当未选择
通道时, 显示主输出电平 (后旋钮)。
7. AUX/MIC 按钮允许调整立体声 AUX IN, 以及内部和
外部麦克风的增益。
8. AUX/MIC fader 控制 AUX IN 和内部或外部麦克风
的电平。
9. 普通的脚踏板可以连接到 FOOTSW 端口,以激活内
部和外部麦克风的 Talkback 到 StageConnect 系统
中的其他设备。 它与在控制面板上按下 TALK 按钮
的功能相同。
10. LINE OUTPUT 是主混音的单声道输出通道。 它可以
用于连接舞台返听。 连接线缆到此接口到舞台返
听后会禁用内部和外部麦克风到主混音的信号通
道, 以避免啸叫产生。
注意: 使用平衡 TRS 电缆将 LINE OUTPUT 连接到有源楔
形监视器输入。 这种阻抗平衡连接避免了地线环路和
不必要的噪音。
11. 在 ¼" TRS 插孔上提供了带有推子后限制器的耳
机输出。 非常高质量的耳机放大器即使对低阻抗
的耳机和入耳式耳机也提供了充足的功率。
注意: 请考虑长时间听大声音会导致听力丧失。 您可以
将限制器从最大调整到 -30 dB, 以确保保持在安全的
输出范围内。
12. AUX IN 接收立体声或单声道线路电平信号,并将其
发送到主混音总线。
13. 外部麦克风可以连接到 TALKBACK XLR 连接器。这
对于给其他乐队成员发出提示, 非常有用。
14. 如果该单元没有通过 StageConnect CLIENT/SLAVE
供电,那么可以将 12 V/1000 mA DC 适配器连接到
DC INPUT。 此时可以将P24作为简单的耳机放大器
来使用。
15. StageConnect CLIENT/SLAVE 连接器用于与上游的
P24 或 P24HUB 通信, 并接收远程供电。
16. StageConnect HOST/MASTER 用于串联信号和电源到
下游的 P24。

57 P24 56 P24
3. 通道设置
3.1. 立体声通道设置
当按下通道选择按钮时, CHANNEL SETTINGS 部分会为输
入和对讲通道提供多种选项。
菜单导航如下:
• • 按下通道选择按钮访问相应通道的设置, 按住以
在性能参数层和通道设置层之间切换。 按两次通
道选择按钮 (CHANNEL SETTINGS) 将取消选择通道,
CHANNEL SETTINGS 部分将控制耳机主混音设置。
• • 按一次 CHANNEL SETTINGS 编码器在参数之间切换。
• • - 转动 CHANNEL SETTINGS 编码器调整参数。
通过按下通道选择按钮 (CHANNEL SETTINGS) 激活通道性
能参数层 (白色背光), 包括以下内容:
• • BALANCE: 在立体声模式下左右声道平衡, 或在双声
道模式下平衡两个通道。
• • TONE: +/-12 dB 均衡器
• • FX SEND: 开/关, 将通道发送到混响效果。 混响级别
可以在耳机混音性能参数层中设置 (参见第3.3节)。
• • 通过按住通道选择按钮访问通道设置层 (
绿色背光), 包括以下内容:
• • MODE:
• • 立体声: 两个相邻输入通道左右声道硬平移。
BALANCE 控制每个通道的音量。
• • 单声道: 两个相邻输入通道平移到中央。
BALANCE 控制两个输入通道总和的立体声位置。
• • 双声道: 两个相邻输入通道平移到中央。
BALANCE 控制两个通道之间的音量比率,
同时保持它们平移到中央。 这在例如低音鼓和
军鼓信号通过两个连续通道传送时很有用。
• • NAME: 选择多个预设通道名称。
3.2. AUX / MIC 立体声通道设置
通过按下 AUX MIC 通道选择按钮激活通道性能参数层
(白色背光), 包括以下内容:
• • AUX TRIM: 调整AUX IN 增益级别 (关, -59 dB 到 +20 dB)。
• • MIC TRIM: 调整内置或外部麦克风增益级别 (
关,-59 dB 到 +20 dB)。
通过按住 AUX MIC 通道选择按钮访问通道设置层 (绿色
背光), 选择内置或外部麦克风 (MIC SEL: INT或EXT)。
3.3. 耳机主混音设置
当未选择立体声通道时, 可用主监控混音的处理选项。
耳机混音性能参数 (淡蓝色背光) 默认激活, 包括以下
内容:
• • BALANCE: 左右声道平衡
• • TONE: +/- 12 dB 斜率均衡器
• • REVERB: 设置整体混响级别 (关,- 59 dB 到 +20 dB)。
在此屏幕上, 按下通道选择按钮切换相应的 FX SEND
开/关 (也可在通道性能参数层中找到)。
通过按住 CHANNEL SETTINGS 编码器激活设置层
(蓝色背光), 包括以下内容:
• • LIMITER: 阈值从 0 dB 到 -20 dB。
• • MID GAIN: 中频段的增益 -12 dB 到 +6 dB。
• • MID FREQUENCY: 中频段的中心频率
(100 Hz 到 9500H z)。
• • TALKBACK: 选择通过 StageConnect 系统监听 A、B 或
A 和 B 两个对讲通道。
• • TB DIM: 设置对讲激活时应用于耳机混音的衰减量。
• • LIGHT: 控制屏幕和按钮的背光强度。
• • CONT: 控制屏幕的对比度。
• • REMOTE: 启用或禁用从控制台或其他
P24 对 P24 的远程控制。
• • INIT P24: 将 P24 的所有参数恢复到默认值。
• • SND CFG: 此选项允许将连接到端口 1.1、 2.1、 3.1 或
4.1 的任何 P24 的配置发送到连接到同一集线器的
所有其他 P24 以及其他菊花链连接的集线器。
注意: 限制器位于信号流中的音量控制之后, 以保护您
的听力免受突如其来的峰值影响。 请仔细的地调整它,
在表演中保持在安全的信号电平内!
4. 遥控
通道名称信息由 P24HUB 通过 AES50 A 或 StageConnect
CLIENT/SLAVE 从端口接收。 然后, 此通道名称信息通过
4 个前 StageConnect 端口传输; 允许单个 P24 个人 混 音 器
显示频道信息,并将其 12 个频道分别配置为单声道、立
体声或双单声道。为此,请在设置层中启用 REMOTE, 并按
如下方式配置路由和命名:
• • 单:
• • 1 个通道 + 1 个空通道 (反之亦然)
• • 立体声:
• • 名称以 ”L” 和 ”R” 结尾的左声道和右声道
• • 同名的左右声道
• • 对偶:
• • 未归类为单声道或立体声的任何其他设置
5. 固件更新
1. 要更新 P24 固件, 请从 behringer.com 下载 SimplyPU
T更新工具。
2. 打开 SimplyPUT 工具。
3. 通过 USB 将 P24 连接到计算机。
4. 按住 Channel Settings 编码器, 将 P24 连接到电源
插座。
5. SimplyPUT 将自动检测并更新 P24。 如果没有
或您想安装旧版固件, 请下载所需的固件。 在
SimplyPUT 中, 转到 File>Local File 并加载所需的
固件。
59 P24 58 P24
Connections
StageConnect HOST/Master 1 x male
StageConnect CLIENT/Slave 1 x female
Phones ¼" TRS, stereo
Line out ¼" TRS, mono
Aux in ¼" TRS, stereo
Footswitch ¼" TS
Talkback XLR female
Controls
Tone ±12 dB tilt EQ
Headphone Mix Parameters
Tone ±12 dB tilt EQ
Reverb OFF, -59 dB to +20 dB
Limiter Threshold: 0 dB to -20 dB
Mid gain -12 dB to +6 dB, semi-parametric
Mid frequency (Hz)
100, 125, 160, 200, 250, 310, 400, 500, 630, 800, 1000, 1250, 1600, 2000,
2500, 3100, 4000, 5000, 6300, 8000, 9500
Power
Power consumption 9 W
Mains connection Phantom power over StageConnect or external power supply
Dimensions/Weight
Dimensions (H x W x D) 77 x 214 x 185 mm (3.0 x 8.4 x 7.3")
Weight 1.08 kg (2.38 lbs)
Specications
连接
StageConnect HOST/Master 1 x 公头
StageConnect CLIENT/Slave 1 x 母头
Phones ¼" TRS, 立体声
Line out ¼" TRS,单声道
Aux in ¼" TRS,立体声
Footswitch ¼" TS
Talkback XLR 母头
控制
Tone ±12 dB 斜率均衡器
耳机混音参数
Tone ±12 dB 斜率均衡器
Reverb 关, -59 dB 到 +20 dB
Limiter 阈值 :0 dB 到 -20 dB
Mid gain -12 dB 到 +6 dB, 半参数
Mid frequency (Hz)
100, 125, 160, 200, 250, 310, 400, 500, 630, 800, 1000, 1250, 1600,
2000, 2500, 3100, 4000, 5000, 6300, 8000, 9500
电源
功耗
9 瓦
电源连接
通过 StageConnect 的幻象电源或外部电源
尺寸/重量
尺寸 (H x W x D) 77 x 214 x 185 毫米 (3.0 x 8.4 x 7.3”)
重量
1.08 公斤 (2.38 磅)
规格
61 P24 60 P24
Other important information
1. Register online.
Pleaseregister your new Music Tribe
equipment right after you purchase it by
visiting musictribe.com. Registeringyour
purchase using our simple online
form helps us to process your repair
claims more quickly and eciently.
Also, read the terms and conditions of
our warranty, ifapplicable.
2. Malfunction. Should your
Music Tribe Authorized Reseller not be
located in your vicinity, you may contact
the Music Tribe Authorized Fulller for
your country listed under “Support” at
musictribe.com. Shouldyour country
not be listed, pleasecheck if your
problem can be dealt with by our
“OnlineSupport” which may also be
found under “Support” at musictribe.
com. Alternatively, please submit an
online warranty claim at musictribe.com
BEFORE returning theproduct.
3. Power Connections.
Beforeplugging the unit into a power
socket, please make sure you are using
the correct mains voltage for your
particular model. Faulty fuses must be
replaced with fuses of the same type and
rating withoutexception.
1. Registro online.
Lerecomendamos que registre su nuevo
aparato Music Tribe justo después de
su compra accediendo a la página web
musictribe.com. Elregistro de su compra
a través de nuestro sencillo sistema
online nos ayudará a resolver cualquier
incidencia que se presente a la mayor
brevedad posible. Además,aproveche
para leer los términos y condiciones
de nuestra garantía, siesaplicable en
sucaso.
2. Averías. En el caso de que
no exista un distribuidor Music Tribe
en las inmediaciones, puede ponerse
en contacto con el distribuidor Music
Tribe de su país, queencontrará dentro
del apartado “Support” de nuestra
página web musictribe.com. En caso
de que su país no aparezca en ese
listado, acceda a la sección “Online
Support” (quetambiénencontrará
dentro del apartado “Support” de
nuestra páginaweb) y compruebe si su
problema aparece descrito y solucionado
allí. Deforma alternativa, envíenos a
través de la página web una solicitud
online de soporte en periodo de garantía
ANTES de devolvernoselaparato.
3. Conexiones de
corriente. Antes de enchufar este
aparato a una salida de corriente,
asegúrese de que dicha salida sea
del voltaje adecuado para su modelo
concreto. En caso de que deba sustituir
un fusible quemado, deberáhacerlo
por otro de idénticas especicaciones,
sinexcepción.
1. Enregistrez-vous
enligne. Prenezle temps
d’enregistrer votre produit Music Tribe
aussi vite que possible sur le site Internet
musictribe.com. Lefait d’enregistrer le
produit en ligne nous permet de gérer
les réparations plus rapidement et plus
ecacement. Prenezégalement le
temps de lire les termes et conditions de
notregarantie.
2. Dysfonctionnement. Si
vous n’avez pas de revendeur Music
Tribe près de chez vous, contactez le
distributeur Music Tribe de votre pays:
consultez la liste des distributeurs de
votre pays dans la page “Support” de
notre site Internet musictribe.com.
Si votre pays n’est pas dans la liste,
essayez de résoudre votre problème
avec notre “aideen ligne” que vous
trouverez également dans la section
“Support” du site musictribe.com.
Vouspouvez également nous faire
parvenir directement votre demande de
réparation sous garantie par Internet sur
le site musictribe.com AVANT de nous
renvoyer leproduit.
3. Raccordement au
secteur. Avant de relier cet
équipement au secteur, assurez-vous
que la tension secteur de votre région
soit compatible avec l’appareil. Veillez à
remplacer les fusibles uniquement par
des modèles exactement de même taille
et de même valeur électrique — sans
aucuneexception.
Important information Aspectos importantes
Informations importantes
1. Online registrieren.
Bitteregistrieren Sie Ihr neues
Music Tribe-Gerät direkt nach dem
Kauf auf der Website musictribe.com.
WennSie Ihren Kauf mit unserem
einfachen online Formular registrieren,
könnenwir Ihre Reparaturansprüche
schneller und ezienter bearbeiten.
Lesen Sie bitte auch unsere
Garantiebedingungen, fallszutreend.
2. Funktionsfehler. Sollte sich
kein Music Tribe Händler in Ihrer Nähe
benden, können Sie den Music Tribe
Vertrieb Ihres Landes kontaktieren, der
auf musictribe.com unter „Support“
aufgeführt ist. Sollte Ihr Land nicht
aufgelistet sein, prüfen Sie bitte, ob Ihr
Problem von unserem „Online Support“
gelöst werden kann, den Sie ebenfalls
auf musictribe.com unter „Support“
nden. Alternativ reichen Sie bitte
Ihren Garantieanspruch online auf
musictribe.com ein, BEVOR Sie das
Produktzurücksenden.
3. Stromanschluss. Bevor
Sie das Gerät an eine Netzsteckdose
anschließen, prüfen Sie bitte, obSie die
korrekte Netzspannung für Ihr spezielles
Modell verwenden. Fehlerhafte
Sicherungen müssen ausnahmslos durch
Sicherungen des gleichen Typs und
Nennwerts ersetztwerden.
1. Registre-se online.
Porfavor, registreseu novo
equipamento Music Tribe logo após
a compra visitando o site musictribe.
com Registrar sua compra usando nosso
simples formulário online nos ajuda
a processar seus pedidos de reparos
com maior rapidez e eciência. Além
disso, leia nossos termos e condições de
garantia, caso sejanecessário.
2. Funcionamento
Defeituoso. Casoseufornecedor
Music Tribe não esteja localizado nas
proximidades, vocêpode contatar
um distribuidor Music Tribe para o
seu país listado abaixo de “Suporte”
emmusictribe.com. Se seu país não
estiver na lista, favor checar se seu
problema pode ser resolvido com o
nosso “SuporteOnline” que também
pode ser achado abaixo de “Suporte”em
musictribe.com. Alternativamente,
favorenviar uma solicitação de garantia
online em musictribe.com ANTES da
devolução doproduto.
3. Ligações. Antes de ligar a
unidade à tomada, assegure-se de
que está a utilizar a voltagem correcta
para o modelo em questão. Osfusíveis
com defeito terão de ser substituídos,
sem qualquer excepção, porfusíveis do
mesmo tipo e correntenominal.
1. Registratevi online.
Vi invitiamo a registrare il nuovo
apparecchio Music Tribe subito
dopo averlo acquistato visitando
musictribe.com. La registrazione
dell'acquisto tramite il nostro semplice
modulo online ci consente di elaborare
le richieste di riparazione in modo più
rapido ed eciente. Leggete anche
i termini e le condizioni della nostra
garanzia, qualora applicabile.
2. Malfunzionamento.
Nel caso in cui il rivenditore autorizzato
Music Tribe non si trovi nelle vostre
vicinanze, potete contattare il Music
Tribe Authorized Fulller per il vostro
paese, elencato in “Support” @
musictribe.com. Se la vostra nazione non
è elencata, controllate se il problema
può essere risolto tramite il nostro
“Online Support”che può anche essere
trovato sotto “Support” @ musictribe.
com. In alternativa, inviate una richiesta
di garanzia online su musictribe.com
PRIMA di restituire il prodotto.
3. Collegamento
all'alimentazione. Prima di
collegare l'unità a una presa di corrente,
assicuratevi di utilizzare la tensione di
rete corretta per il modello specico.
I fusibili guasti devono essere sostituiti,
senza eccezioni, con fusibili dello stesso
tipo e valore nominale.
Weitere wichtige
Informationen
Outras Informações
Importantes
Informazioni importanti
63 P24 62 P24
Other important information
1. Registreer online.
Registreer uw nieuwe Music Tribe-
apparatuur direct nadat u deze hebt
gekocht door naar musictribe.com te
gaan. Door uw aankoop te registreren
via ons eenvoudige online formulier,
kunnen wij uw reparatieclaims sneller
en eciënter verwerken. Lees ook de
voorwaarden van onze garantie, indien
van toepassing.
2. Storing. Mocht uw
door Music Tribe geautoriseerde
wederverkoper niet bij u in de buurt zijn
gevestigd, dan kunt u contact opnemen
met de door Music Tribe Authorized
Fulller voor uw land vermeld onder
“Support” op musictribe.com. Als uw
land niet in de lijst staat, controleer dan
of uw probleem kan worden opgelost
door onze "Online Support", die u
ook kunt vinden onder "Support" op
musictribe.com. U kunt ook een online
garantieclaim indienen op musictribe.
com VOORDAT u het product retourneert.
3. Stroomaansluitingen.
Voordat u het apparaat op een
stopcontact aansluit, moet u ervoor
zorgen dat u de juiste netspanning voor
uw specieke model gebruikt. Defecte
zekeringen moeten zonder uitzondering
worden vervangen door zekeringen van
hetzelfde type en dezelfde waarde.
1. Registrera online.
Registrera din nya Music Tribe-
utrustning direkt efter att du köpt den
genom att besöka musictribe.com.
Att registrera ditt köp med vårt enkla
onlineformulär hjälper oss att behandla
dina reparationsanspråk snabbare och
mer eektivt. Läs också villkoren i vår
garanti, om tillämpligt.
2. Fel. Om din Music Tribe-
auktoriserade återförsäljare inte nns i
din närhet kan du kontakta Music Tribe
Authorized Fulller för ditt land listat
under “Support” på musictribe.com.
Om ditt land inte är listat, kontrollera
om ditt problem kan hanteras av
vår “Onlinesupport” som också nns
under “Support” på musictribe.com.
Alternativt kan du skicka in ett online-
garantianspråk på musictribe.com
INNAN du returnerar produkten.
3. Strömanslutningar. Innan
du ansluter enheten till ett eluttag, se till
att du använder rätt nätspänning för just
din modell. Felaktiga säkringar måste
bytas ut mot säkringar av samma typ
och märkning utan undantag.
1. Zarejestrować online.
Zarejestruj swój nowy sprzęt Music Tribe
zaraz po zakupie na stronie musictribe.
com. Zarejestrowanie zakupu za pomocą
naszego prostego formularza online
pomaga nam szybciej i efektywniej
rozpatrywać roszczenia dotyczące
naprawy. Przeczytaj również warunki
naszej gwarancji, jeśli dotyczy.
2. Awaria. Jeśli Twój
autoryzowany sprzedawca Music Tribe
nie znajduje się w pobliżu, możesz
skontaktować się z autoryzowanym
dostawcą Music Tribe dla swojego kraju,
wymienionym w sekcji „Wsparcie” na
stronie musictribe.com. Jeśli Twojego
kraju nie ma na liście, sprawdź, czy Twój
problem może zostać rozwiązany przez
nasze „Wsparcie online”, które można
również znaleźć w sekcji „Wsparcie” na
stronie musictribe.com. Alternatywnie,
prześlij zgłoszenie gwarancyjne
online na musictribe.com PRZED
zwrotem produktu.
3. Połączenia zasilania.
Przed podłączeniem urządzenia do
gniazdka sieciowego upewnij się, że
używasz odpowiedniego napięcia
sieciowego dla danego modelu.
Wadliwe bezpieczniki należy bez
wyjątku wymienić na bezpieczniki tego
samego typu i wartości.
Belangrijke informatie Viktig information Ważna informacja
1. 登録。新しい Music Tribe
機器をご購入後、すぐに
musictribe.com にアクセスして
オンライン登録を行ってくだ
さい。シンプルなオンライン
フォームでの登録は、修理請
求の処理をより迅速かつ効率
的に行うために役立ちます。
また、適用される場合は、
保証の利用規約をお読みくだ
さい。
2. 故障。お近くに Music
Tribe 認定販売店がない場合
は、musictribe.com の "サポート"
セクションに記載されている
国別の Music Tribe 認定代理店
にお問い合わせください。
お住まいの国がリストにない
場合は、"オンラインサポート"
から問題が解決できるか確
認してください。こちらも
"サポート" セクションにござ
います。あるいは、製品を返
品する前に、musictribe.com でオ
ンライン保証請求を提出して
ください。
3. 電源接続。ユニットを電源
コンセントに差し込む前に、
モデルに適した正しい電圧を
使用していることを確認して
ください。ヒューズが故障し
た場合は、必ず同じ種類と定
格のヒューズに交換してくだ
さい。
1. 在线注册。 购买后, 请访问我
们的网站立即注册新的 Music Tribe
设备。 使用我们简单的在线表
格注册您的购买信息有助于我
们更快, 更有效地处理您的维修
索赔。 另外, 请阅读我们保修的
条款和条件 (如适用)。
2. 无法正常工作。 如果您所在
地区没有 Music Tribe 授权的经销
商, 您可以联系您所在国家/地区
的 Music Tribe 授权履行者, 其联系
方式在 musictribe.com 的 “支持”
部分列出。 如果您的国家/地区
未列出, 请检查您的问题是否可
以通过我们的 “在线支持” 解决,
该选项也可以在 musictribe.com 的
“支持” 部分找到。 或者, 您也可
以在退回产品之前在 musictribe.com
提交在线保修索赔。
3. 电源连接。 将本设备连接电
源前, 请确保使用的电压正确。
保险丝需要更换时, 必须使用相
同型号及定额的保险丝。
その他の重要な情報
其他的重要信息
65 P24 64 P24
FEDERAL COMMUNICATIONS
COMMISSION COMPLIANCE
INFORMATION
Behringer
P24
Responsible Party Name: Music Tribe Commercial NV Inc.
Address: 122 E. 42nd St.1,
8th Floor NY, NY 10168,
United States
Email Address: [email protected]
P24
This equipment has been tested and found to comply with
the limits for a Class B digital device, pursuant to part
15 of the FCC Rules. These limits are designed to provide
reasonable protection against harmful interference in
a residential installation. This equipment generates,
uses and can radiate radio frequency energy and, if not installed
and used in accordance with the instructions, may cause harmful
interference to radio communications. However, there is no
guarantee that interference will not occur in a particular installation.
If this equipment does cause harmful interference to radio or
television reception, which can be determined by turning the
equipment o and on, the user is encouraged to try to correct the
interference by one or more of the following measures:
• • Reorient or relocate the receiving antenna.
• • Increase the separation between the equipment and receiver.
• • Connect the equipment into an outlet on a circuit dierent
from that to which the receiver is connected.
• • Consult the dealer or an experienced
radio/TV technician for help.
This equipment complies with Part 15 of the FCC rules. Operation
is subject to the following two conditions:
(1) this device may not cause harmful interference, and
(2) this device must accept any interference received, including
interference that may cause undesired operation.
Important information:
Changes or modications to the equipment not expressly
approved by Music Tribe can void the user’s authority to
use the equipment.
Hereby, Music Tribe declares that this product is in compliance with
Directive 2014/35/EU,Directive 2014/30/EU, Directive 2011/65/EU and
Amendment 2015/863/EU, Directive 2012/19/EU, Regulation 519/2012
REACH SVHC and Directive 1907/2006/EC.
Full text of EU DoC is available at https://community.musictribe.com/
EU Representative: Music Tribe Brands DK A/S
Address: Gammel Strand 44, DK-1202 København K, Denmark
UK Representative: Music Tribe Brands UK Ltd.
Address: 8
th
Floor, 20 Farringdon Street London EC4A 4AB,
United Kingdom
Correct disposal of this product: This symbol indicates
that this product must not be disposed of with
household waste, according to the WEEE Directive
(2012/19/EU) and your national law. This product
should be taken to a collection center licensed for the
recycling of waste electrical and electronic
equipment (EEE). The mishandling of this type of
waste could have a possible negative impact on the environment and
human health due to potentially hazardous substances that are
generally associated with EEE. At the same time, your cooperation in
the correct disposal of this product will contribute to the ecient use
of natural resources. For more information about where you can take
your waste equipment for recycling, please contact your local city
oce, or your household waste collection service.

We Hear You

