

Technical Support and E-Warranty Certificate www.vevor.com/support
TWO-IN-ONE
BONE SAW MEAT GRINDERUSER
MANUAL
MODEL: SJY- F250BE
We continue to be committed to provide you tools with competitive price.
"Save Half", "Half Price" or any other similar expressions used by us only represents an
estimate of savings you might benefit from buying certain tools with us compared to the major
top brands and doses not necessarily mean to cover all categories of tools offered by us. You
are kindly reminded to verify carefully when you are placing an order with us if you are
actually saving half in comparison with the top major brands.


- 1 -
SJY- F250BE
Have product questions? Need technical support? Please feel free to
contact us:
CustomerService@vevor.com
NEED HELP? CONTACT US!
This is the original instruction, please read all manual instructions
carefully before operating. VEVOR reserves a clear interpretation of our
user manual. The appearance of the product shall be subject to the
product you received. Please forgive us that we won't inform you again if
there are any technology or software updates on our product.
TWO-IN-ONE
BONE SAW MEAT GRINDER

- 2 -
Instruction Manual
Read this manual carefully before use!
IMPORTANT
As with all power tools, a certain amount of hazard is involved with the operator
and his use of the tool. Using the tool with the respect and caution demanded as
far as precautions are concerned will considerably lessen the possibility of
personal injury. However, if standard safety precautions are overlooked or
completely ignored, personal injury to the operator can result.
SAFETY RULES
1.Read the instruction manual carefully before operating the machine.
2.Wear proper apparel and no loose clothing, gloves, neckties, or jewelry that will
get caught in moving parts.
3.Keep the blade sharp. The Saw blade should be replaced when it gets blunt. If
iron nails or other metal items are included in the cut items, it will cause jagged
cracks or damage. So, please pay attention to the cutting surface during operation
to ensure work safety.
4.Hold the item being sawed securely with both hands while the blade is in
motion.
5.Keep the work area clean. Cluttered surroundings invite accidents.
6.It must be placed on the horizontal plane to avoid danger from shaking back and
forth during use.
7.Because the chain saw rotates at high speed, it is also necessary to develop the
habit of turning off the switch when the operation is suspended. Do not plug the
power cord into the socket when not in use. Please unplug the power cord after
use and before cleaning or maintenance.
8.Please unplug the power of the machine before cleaning, assembling or
disassembling.
9.Do not place the product within reach of children. Children should be supervised

- 3 -
to ensure they do not play with the appliance.
10.This appliance can be used by children aged from 8 years and above and
persons with reduced physical, sensory or mental capabilities or lack of
experience and knowledge if they have been given supervision or instruction
concerning use of the appliance in a safe way and understand the hazards
involved. Children shall not play with the appliance. Cleaning and user
maintenance shall not be made by children without supervision.
11.Don't unplug the machine before it stops operation.
12.If the supply cord is damaged, it must be replaced by the manufacturer, its
service agent or similarly qualified persons in order to avoid a hazard.
13.Electric Shock Danger! Non-professional personnel is forbidden to repair the
products. Otherwise, it may result in electrical shock. When failures happen, they
should be fixed by qualified maintenance personnel.
14.WARNING! Putting the main body into the water to clean is strictly prohibited.
It only can be scrubbed with a wet towel. The machine must be thoroughly cooled
before cleaning.
15.Please check that the specified supply voltage in the product is consistent with
the supply voltage(AC only).
16.Avoid power cord damage. Do not squeeze, bend, or friction; keep it away
from heat sources and open fires. The power cord does not touch the blade.
17.Power cord should be laid fiat. Do not pull the power cord and make the
product fall, which may cause damage.
18.Do not use the product on wet ground. Do not touch the product or power cord
plug with wet hands.
19.Do not disassemble the product at will. Also, do not let something enter or
insert into the product, which may cause damage.
20.Only accessories the seller or manufacturer provides can be used for the
product. We will not be responsible for any failure caused by using accessories
from other manufacturers not covered by warranty.
21.Do not use the product on uneven, damp, not heat-resistant surfaces to avoid
damage or failure.
22.Do not place the product directly on the fire or near the source of the fire.
Otherwise, the product will be damaged or even result in danger.

- 4 -
23.When the plug is plugged into the socket, it must be plugged into the end.
Otherwise, it will cause the components to overheat and burn due to poor contact.
24.Do not leave the product to work with no one watching. If the machine is
overheating, please stop working immediately and unplug the power.
25. Once part of the product is on fire, do not directly use water to extinguish the
fire. Use a wet cloth to cover the fire site.
26.Please store the plastic bags and not allow children to play with them to
prevent a risk of suffocation.
27.Putting the main body of the machine and the power cord into any liquid is
prohibited.
28.DO NOT open the case door; the hands are strictly forbidden from touching the
saw blade while the machine operates.
SAVE THESE INSTRUCTIONS
CLEANING
• Before use, clean the inside of the body.
Right after use, clean the inside of the machine, as well as fences, table, blade,
and grinder, to prevent meat dregs inside of machine from becoming putrid. Then,
clean the machine with a brush or damp cloth. Do not use a water hose to clean
the machine.
-Keep children away the machine.
-Avoid contacting moving parts.
-Never feed food by hand.
-Always use food pusher.
SAW BLADE GUARD COVER
- 5 -
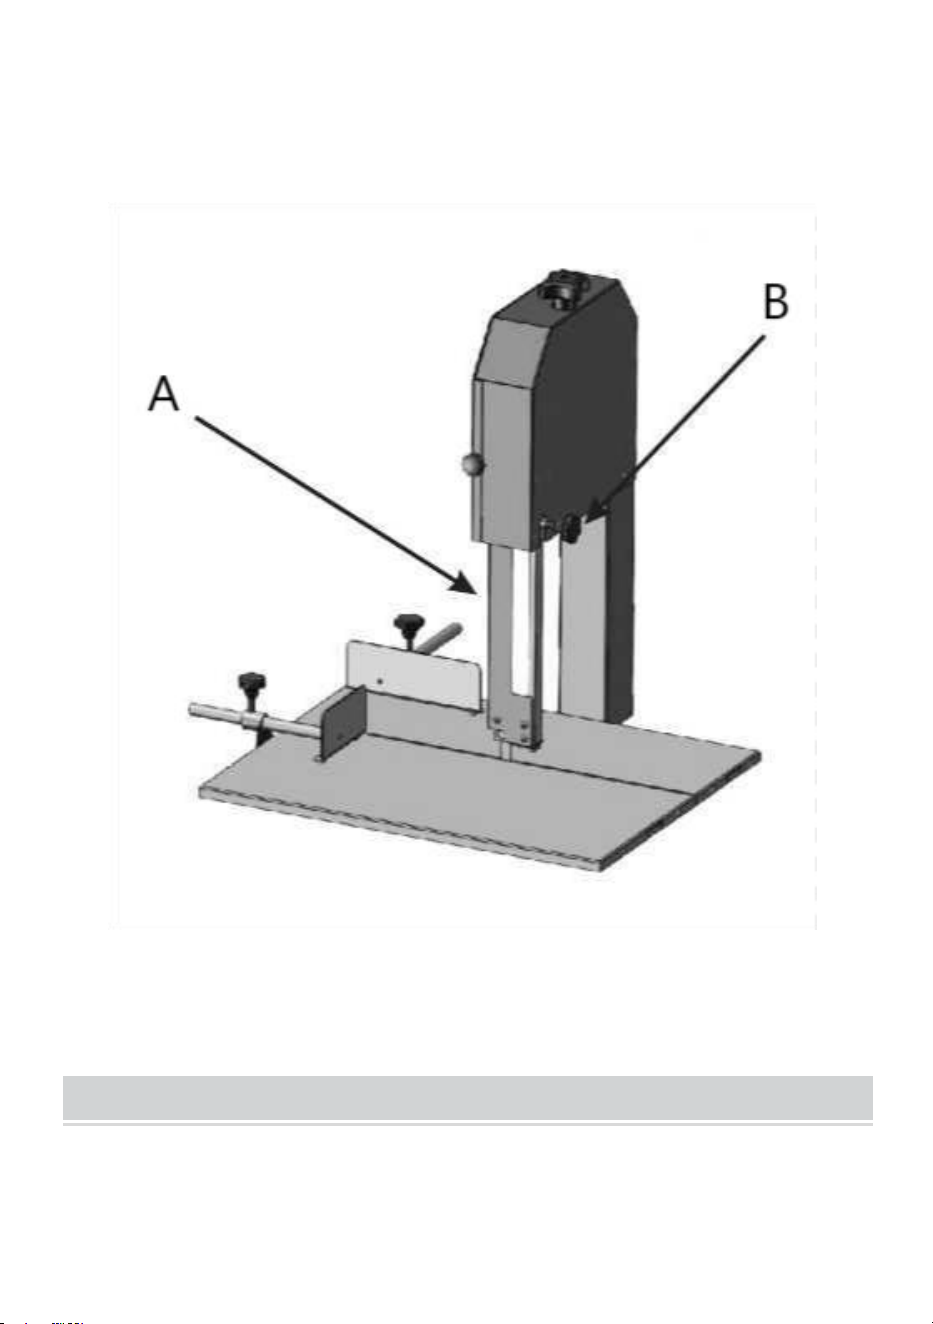
Guard cover (Fig.IB) can be moved up and down depending on the thickness of
the meat. Using the knob(A) to adjust the sawing space. Pull down the cover
when sawing thin meat. Pull up the cover when sawing thick meat. It will prevent
hands from being injured.
Figure 1
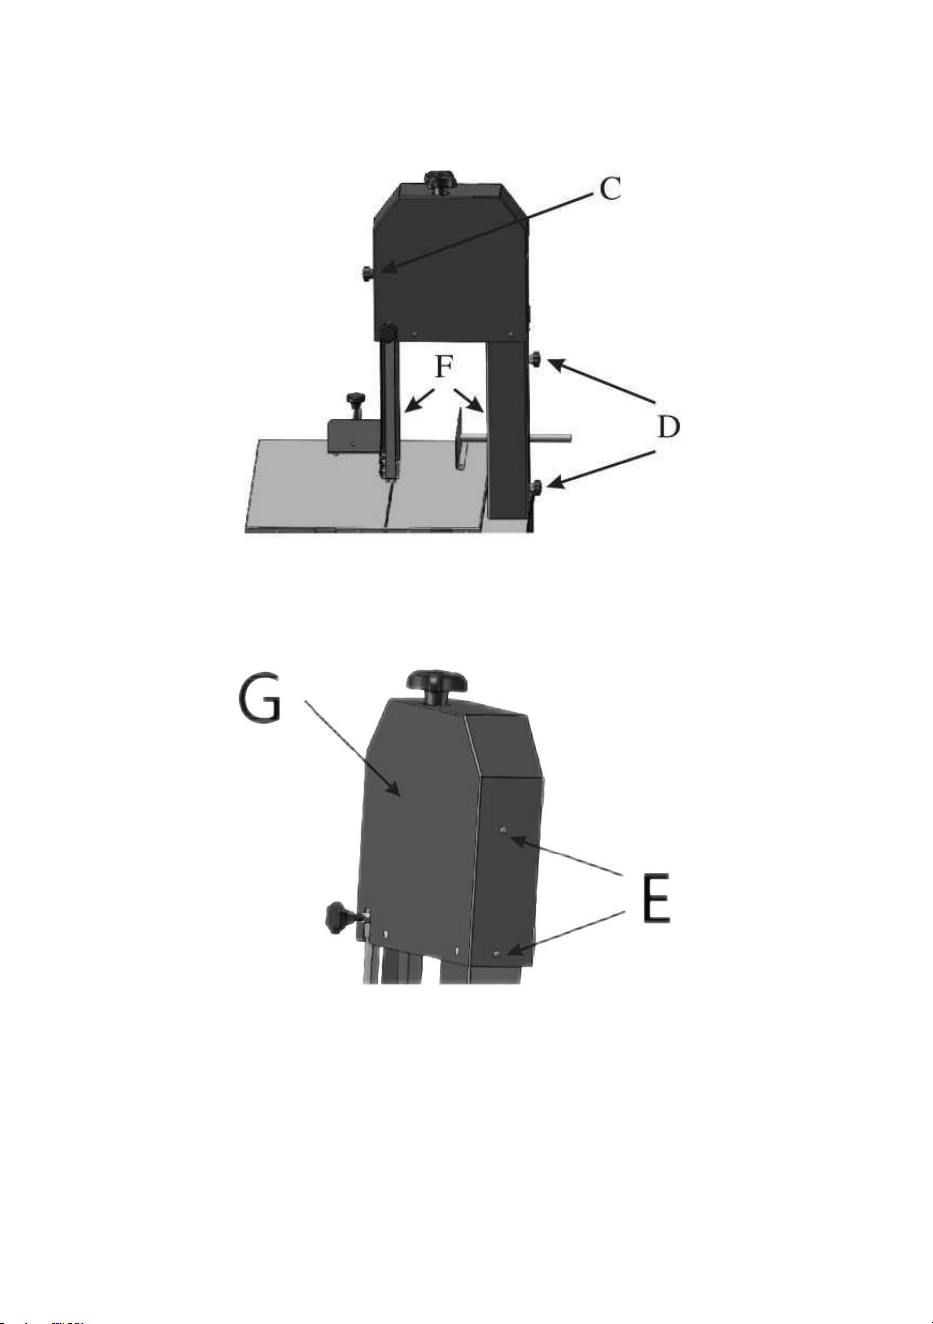
REMOVING THE GUARD COVER
Loosen the screw on the front cover. Fig.2C.
2. Loosen the four screws on the two sides of girder.
- 6 -
(Fig 2D) Remove the cover. (Fig2F).
3 .Loosen the two screws on rear cover. Fig 3E
4. Remove the guard cover. Fig 3G.
Figure 2
Figure 3
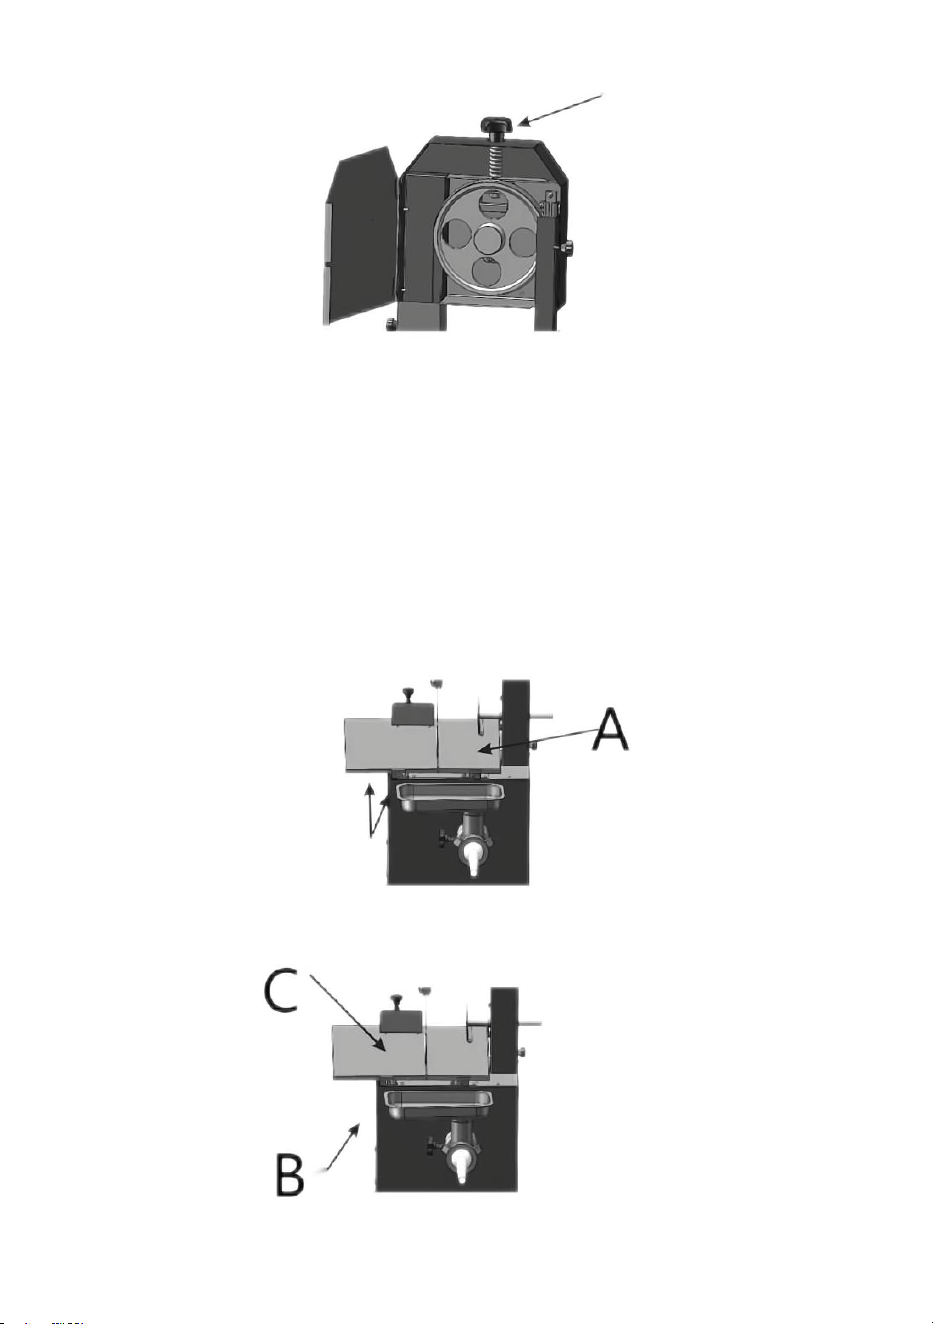
REPLACING OR ADJUSTING SAW BLADE
Loosen the nut as shown in the Fig 4A, then replace or adjust the saw blade.
- 7 -
Figure 4
WORKING TABLE
To remove the table:
1. Loosen the 4 screws on the table side. Fig 5A
2. Take away the fix plate. Fig 6B
3.Slide the table and take off it. Fig. 6C
Figure 5
Figure 6
A
- 8 -
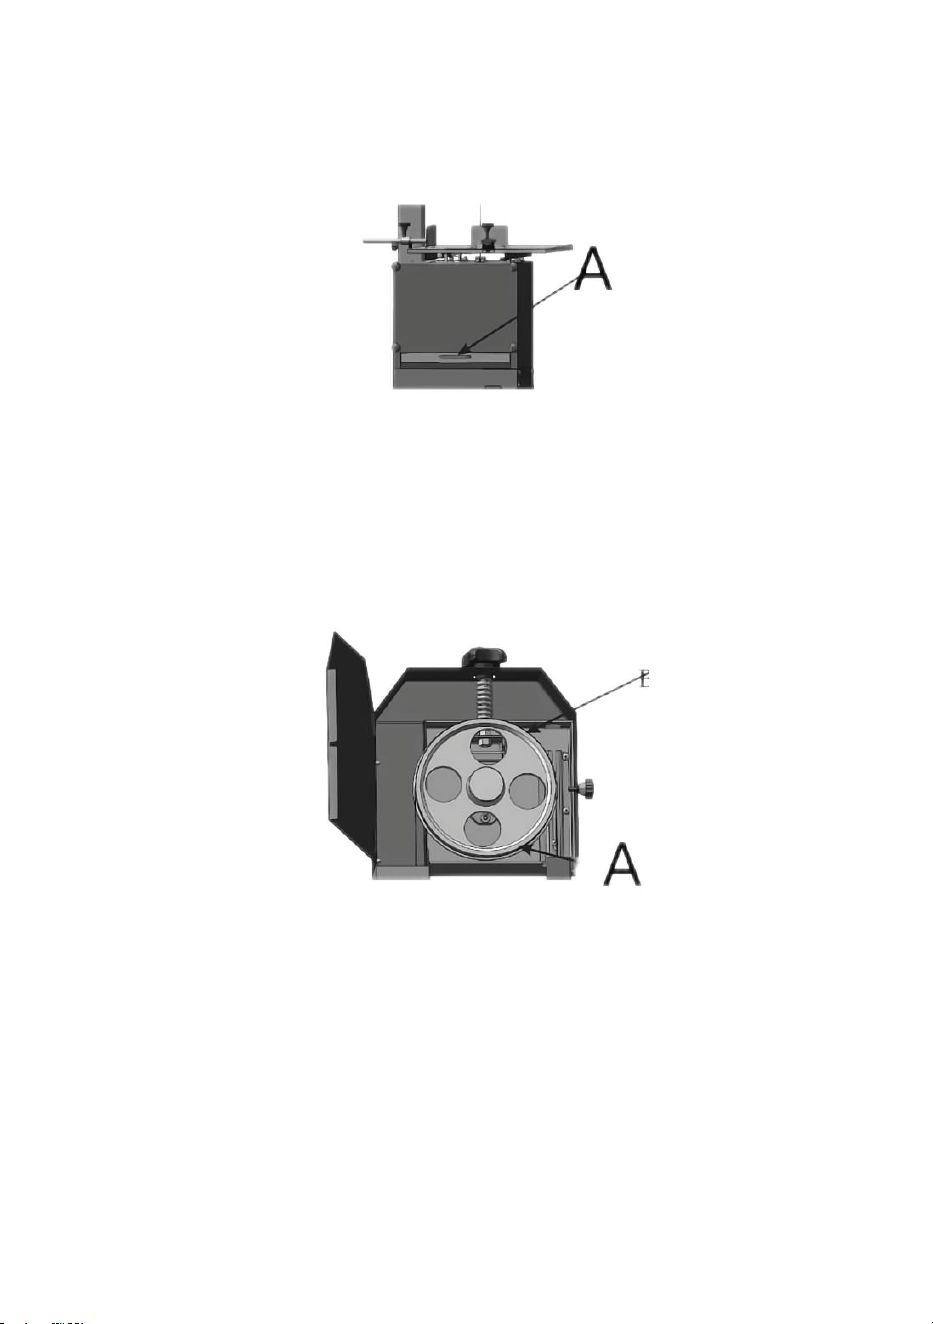
PUSH BUTTON
Push the red button (Fig.7A), open the door to clean, inspect, or maintain after the
use of meat chopper.
Figure 7
BLADE CENTERING ON WHEEL
1.Loosen the screw. Fig 8A.
2.Adjust the two nuts (Fig 8B) until blade tracks on the wheel center.
3. Fasten the screws Fig8A.
Figure 8
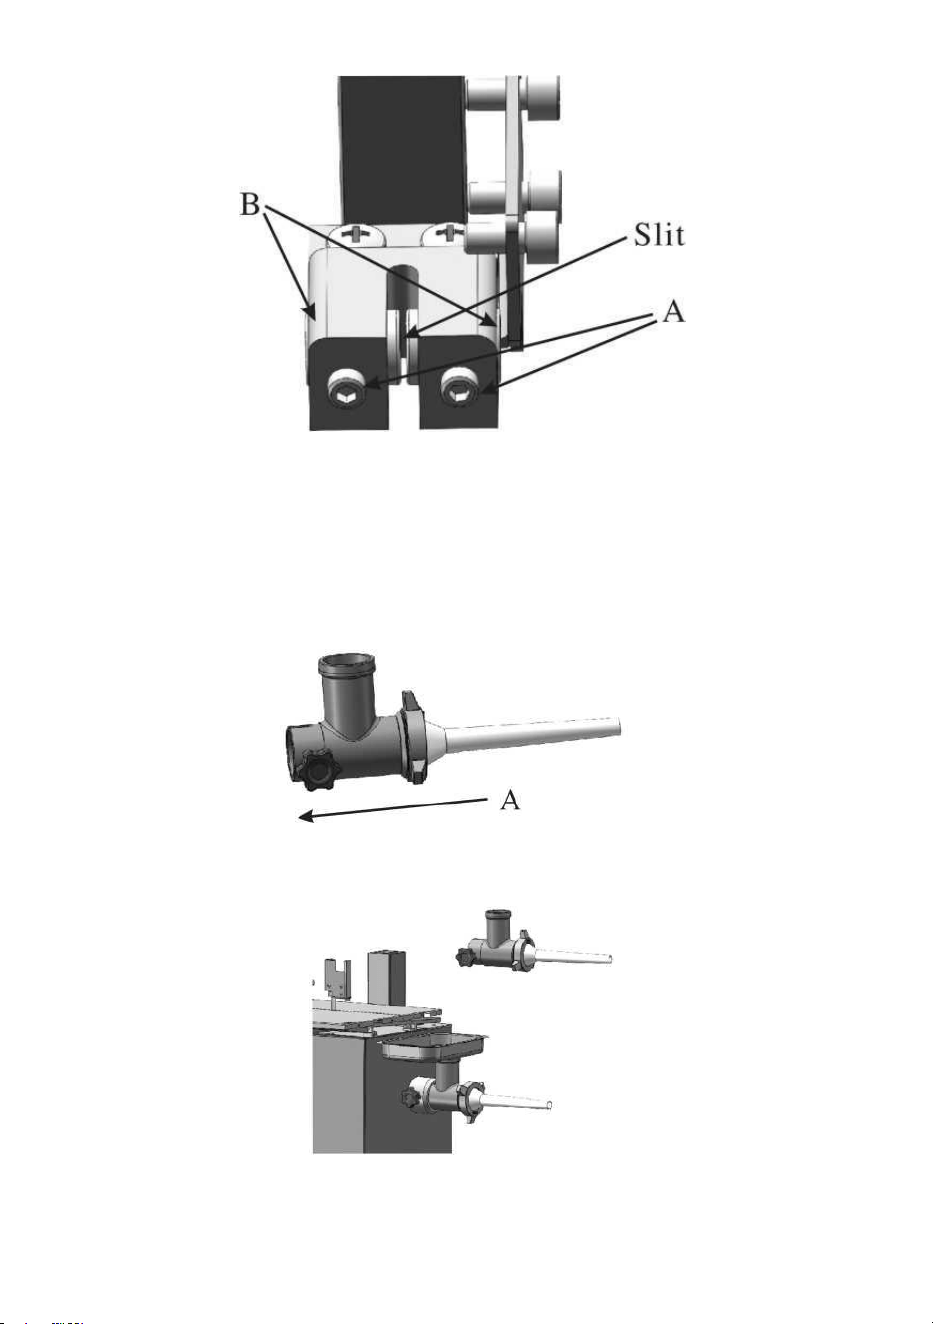
UPPER BLADE FIXED SEAT
After blade is vertically adjusted:
1.Loosen two screws (Fig 9A), and move the two inserts (Fig 9B)to make a certain
space to put the saw blade into the slit of upper blade fixed seat.
2.Tighten the screw.(Fig 9A)
- 9 -
Figure 9
ASSEMBLE THE MEAT CHOPPER
1Loosen the handle. (Fig 13 A)
2Put the body of the grinder into the seat and tighten the handle.(Fig. 14)
Figure 13
Figure 14
- 10 -
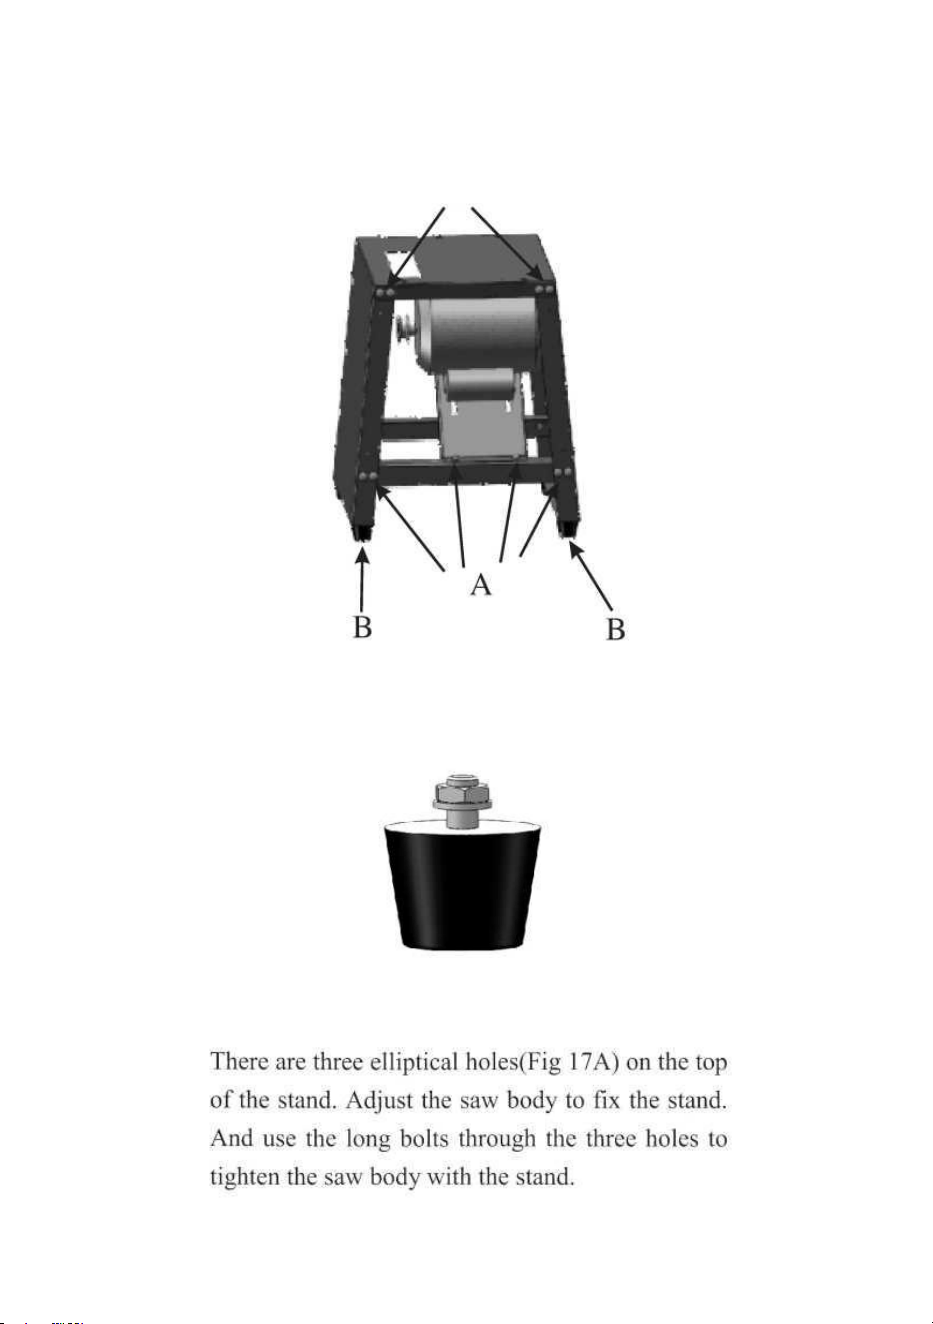
ASSEMBLE MACHINE TO STAND
Using the screws(Fig 15 A) to assemble the stand as Fig 15. And fix the motor into
the stand.
A
Figure 15
Assemble the four rubber pads (Figl6) onto the four comers(Figl5B) of the stand in
order to reduce the vibration.
Figure 16
- 11 -
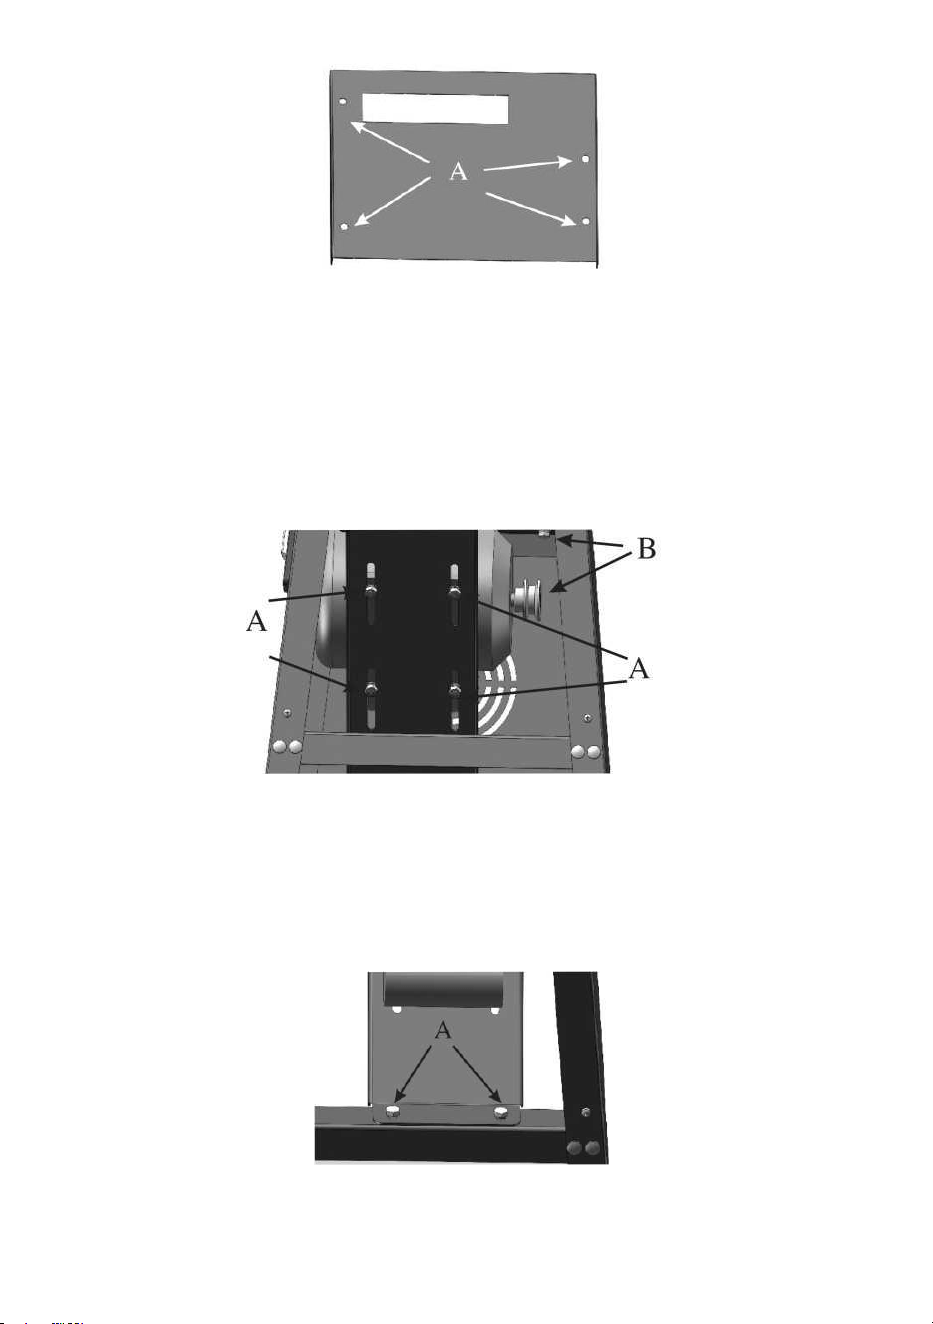
Figure 17
ADJUST V-BELT
(I) Adjusting V-Belt tension.
1.Put the V-Belt into the two pulleys.(Fig 18B)
2.Loosen the four screws. (Fig 18A)
3.Adjust the motors to the proper position.
4.Fasten the four screws.
Figure 18
(II) Adjusting V-Belt vertical
In case the V-belt is not vertical, (pulleys not aligned), loosen the two screws(Fig
19A) to adjust the motor fixed plate. Then fasten them again.
Figure 19
- 12 -
After adjusting, assemble the protection fences (Fig 20A) on the stand.
Figure 20
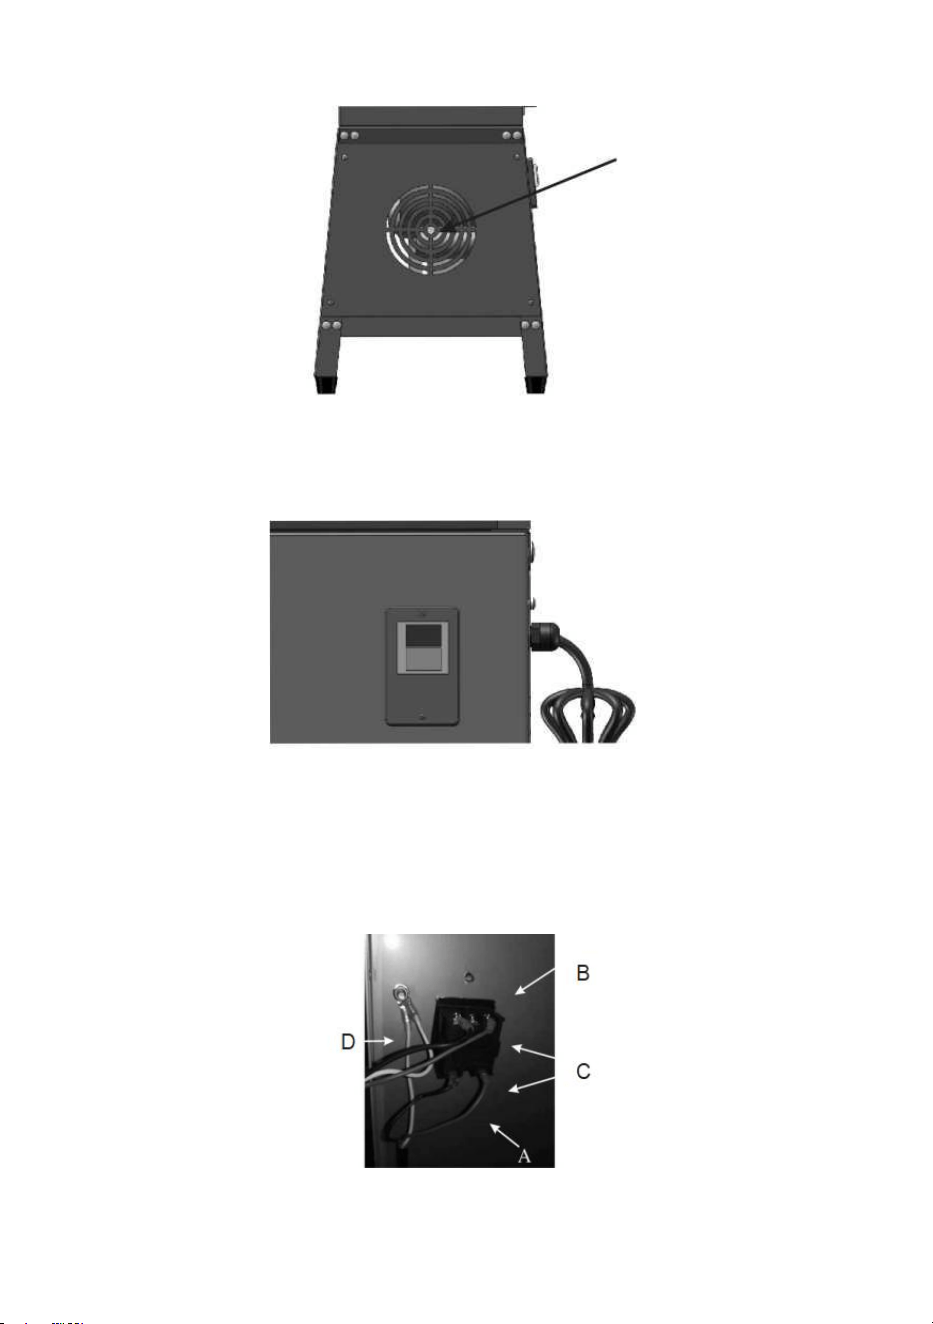
START SWITCH
The star switch is located on the upper side of the steel stand (Fig.21)
Figure 21
ASSEMBLING THE SWITCH
Fig22A shows the ground wires, it's fixed to the stand by two screws(Fig 22B).
Fig22C shows the power source wires. Fig22D shows the motor power wire.
Figure 22
- 13 -
After connected the wires into the switch, fix the switch box to cover the switch on
the stand by the two screws.(Fig.23D)
Figure 23
After fixed the switch box, please fasten the cable clamp by turn the cap.
(Fig.23E)
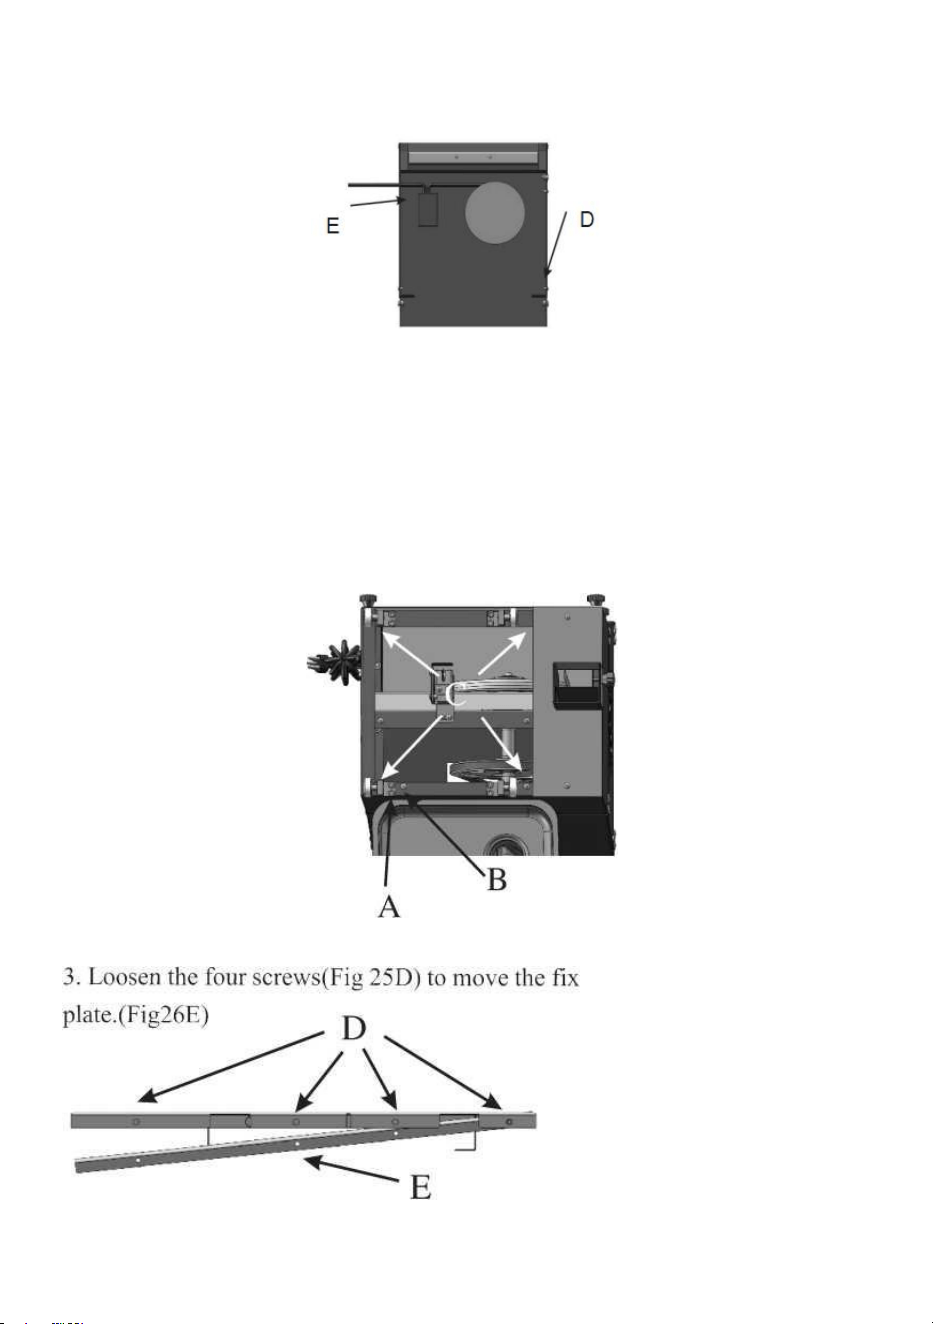
ASSEMBLY OF GUIDE WHEELS AND TABLE
1.Use the hex-screws(Fig 24A) to fix the four guide wheels(Fig 24C).
2.Loose the bolt(Fig 24B) to adjust the wheel position.
Figure 24
Figure 25
- 14 -
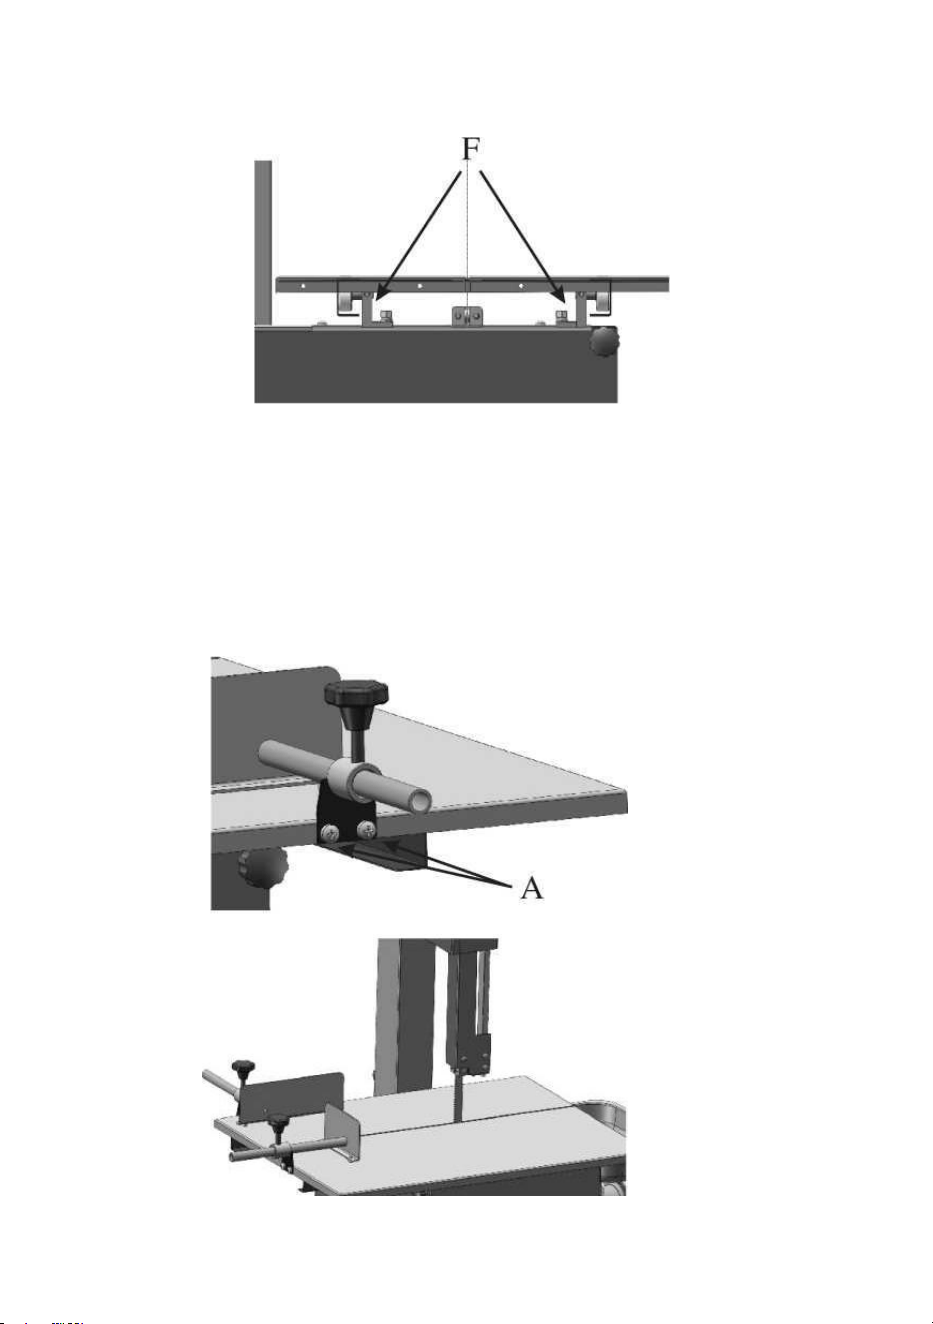
4. Under the working table, there are two rails(Fig 26F). Along the rails, sliding the
table, make the rail move on the four guide wheels.
Figure 26
5.Use the four screws to assemble the fix plate into the table. (Fig 5A)
ASSEMBLY OF FENCE AND PUSHER
Using Fig 27 & Fig28 as a reference pictures to mount the two brackets with
screws.(Fig27 A) onto the working table.
Figure 27
Figure 28

- 15 -
DISASSEMBLY OF MEAT CHOPPER
Figure 29 shows the meat chopper.
Figure 29
MAINTENANCE & DAILY CLEANING
Clean the blade, table, and mincer with water after using the machine. Open the
guard cover for cleaning if necessary. Feeding oil on those parts that will easily
become rusty to avoid developing rust. Keep the machine clean and observe the
working environment to prevent accidents.
THANK YOU VERY MUCH FOR USING OUR PRODUCTS
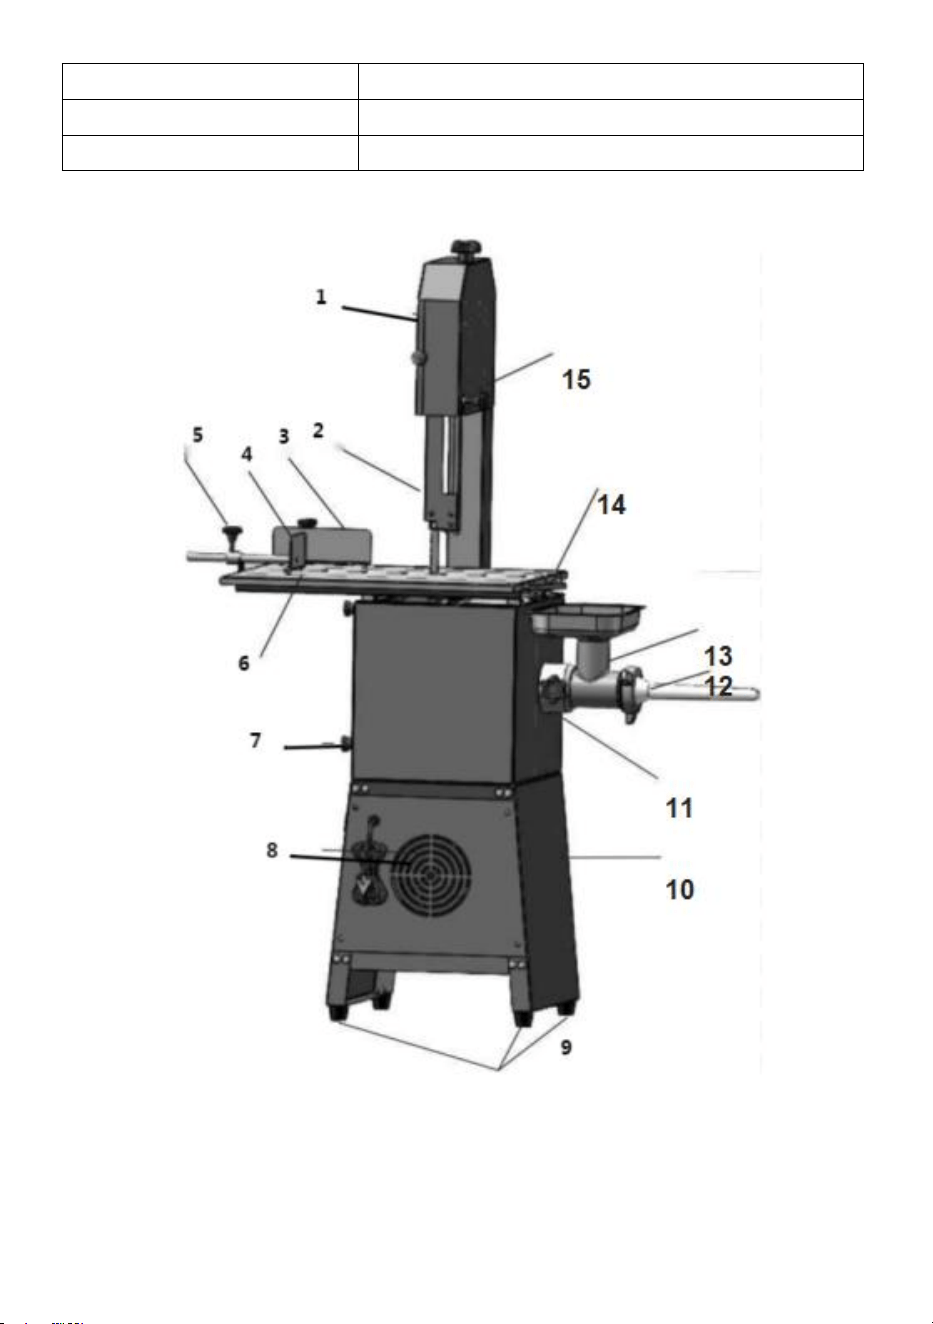
Main parts and description
Part
Description
1
Cover
2
Blade Guard
3
Fence
4
Pusher
5
Pusher Locking Knob
6
Sliding Stainless Steel Table
7
Front Access Door
8
Front Motor Access Panel
9
Rubber Feet
10
Steel Stand
11
Meat Grinder Assembly Locking Handle
12
Tube Connector
- 16 -
13
Meat Grinder Intake
14
Staffer Tool
15
Blade Guard Adjustment Knob
- 17 -
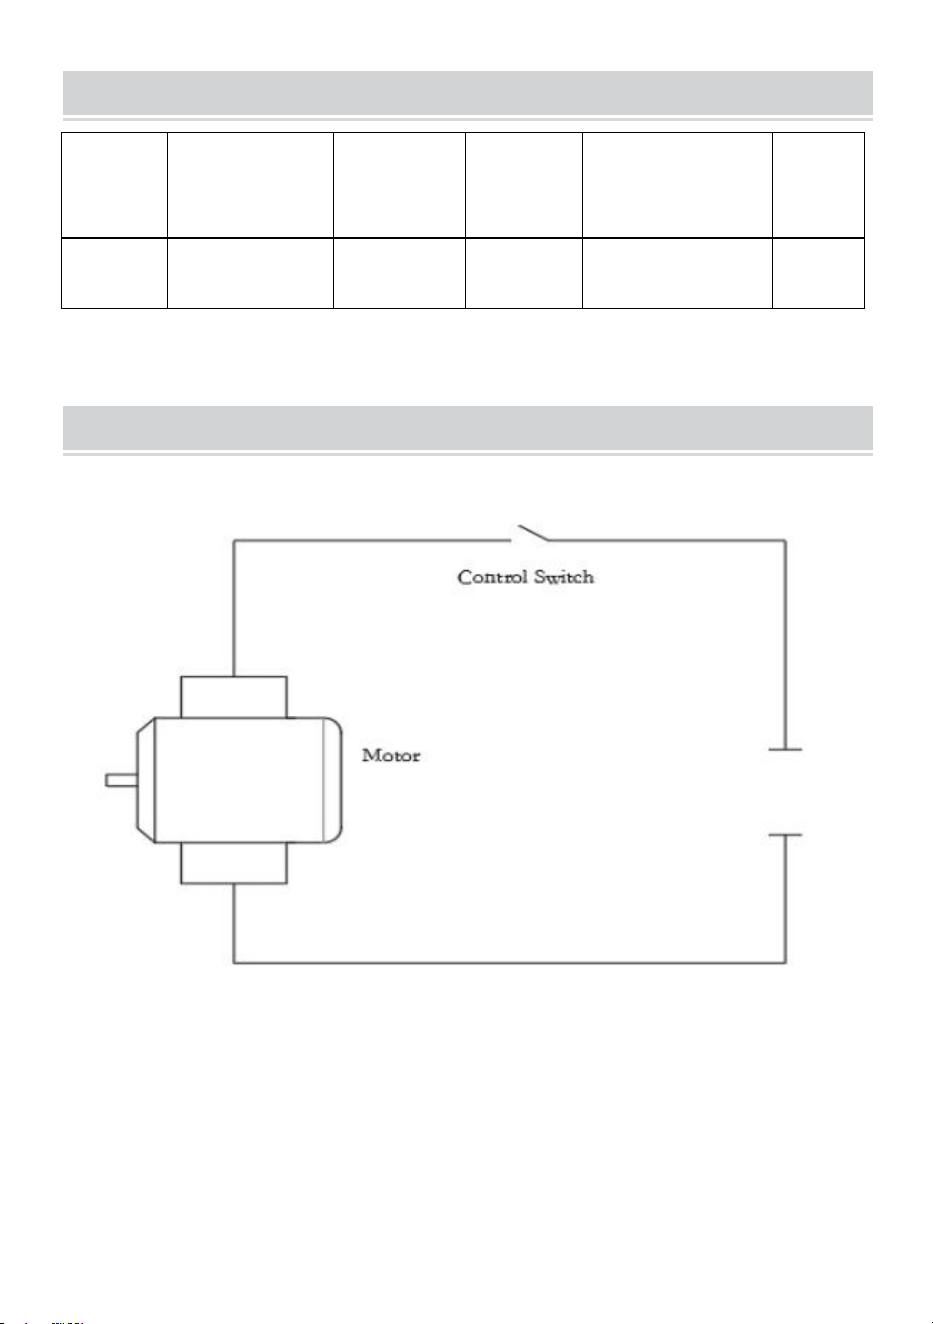
Technical Parameters
Model
Voltage
Power(W)
Pulley
Diameter
(mm)
Saw Blade
Linear
Velocity(m/s)
PLUG
TYPE
SJY-
F250BE
AC110-120V/
60Hz
850
250
15
USA
Technical Parameters
AC110-120V/60Hz