WHAT'S IN THE BOX
Floodlight Cam E340
Model: T8425
USB Cable
(For Quick Setup Only)
Mounting Bracket
(Pre-installed on
Camera)
Positioning
Sticker
Installation
Hook*
Wall Screws
(Bag A)
Base Screws
(Bag B)
Bracket and
Earth Screws
(Bag C)
Quick Start
Guide
*Optional accessory, depending on the package you receive.
WHAT YOU NEED (Not Provided)
#2 or #1 Phillips
Crosshead
Screwdriver
5V/1A USB
Power Adapter
Ladder
(If necessary)
AT A GLANCE
⑩
⑧
⑦
④
⑪
①
②
③
⑤
⑥
⑫
⑨
SYNC
①
Floodlight
⑧
Power Input (For Quick Setup)
②
Speaker
⑨
SYNC Button
③
Motion Sensor Component
⑩
microSD Card Slot
④
System Indicator
Insert a microSD card* (not provided) to
store recordings
⑤
Telephoto Camera
⑥
Wide Angle Camera
⑪
Mounting Bracket
⑦
Infrared Component
⑫
Mounting Base
*Use at least a Class 10 microSD card with a maximum of 128 GB.
SETTING UP THE SYSTEM
1. Download and install the eufy Security app, then sign in or create an account.
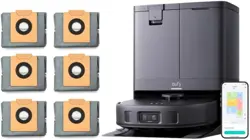
2. Power on the floodlight camera by using the USB-C charging cable and a power adapter (5V/1A, not provided).
SYNC
To avoid scratching the floodlight camera, do not peel o the protective film for the time being.
The floodlights will only light up when in wired power mode. The USB-powered connection is used for setting
up the camera safely inside your home.
Make sure you can stream video from your floodlight camera BEFORE INSTALLATION.
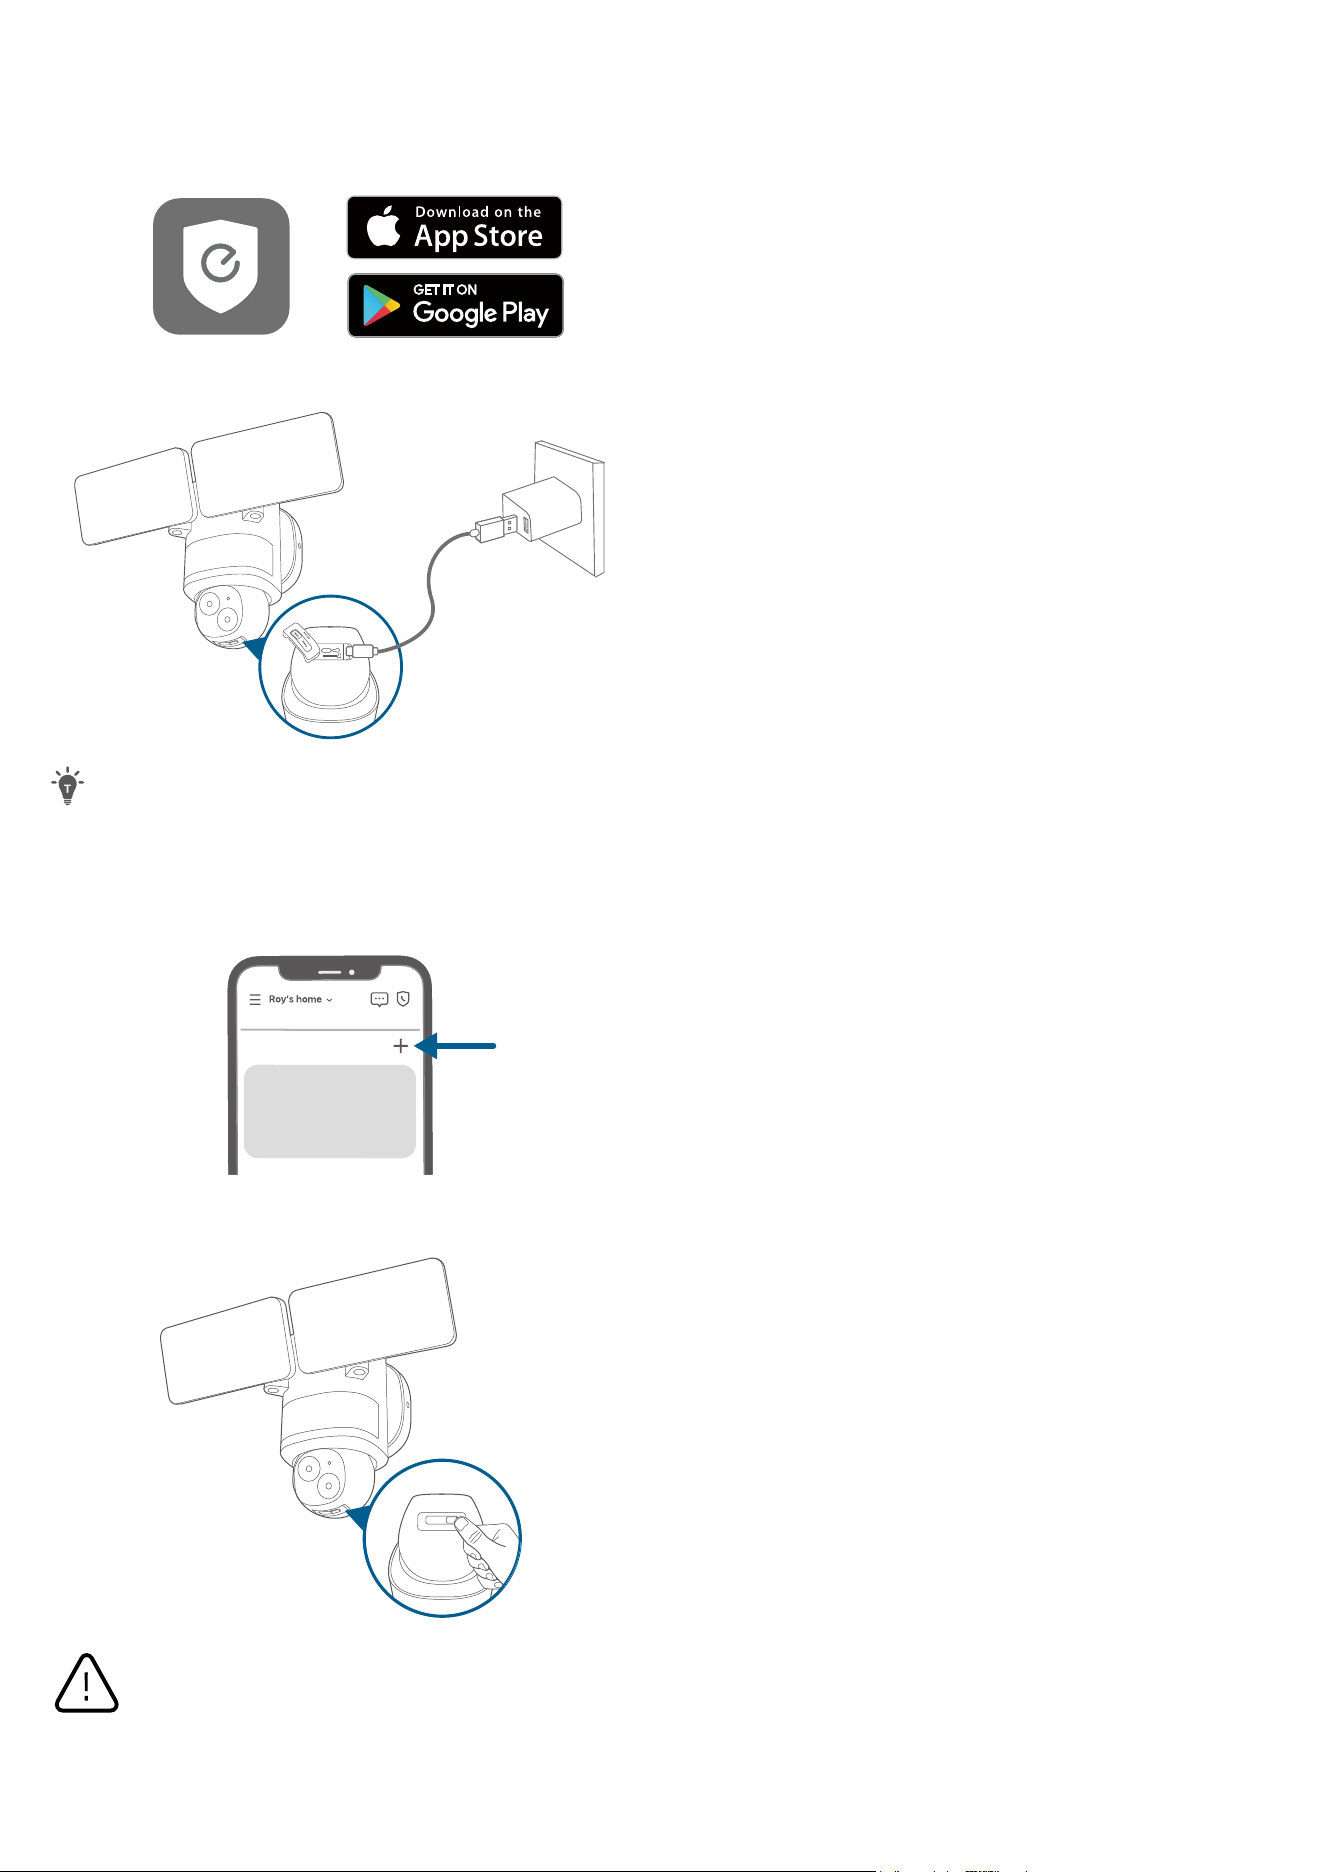
3. Tap + in the app and follow the in-app instructions to add the camera.
My Devices
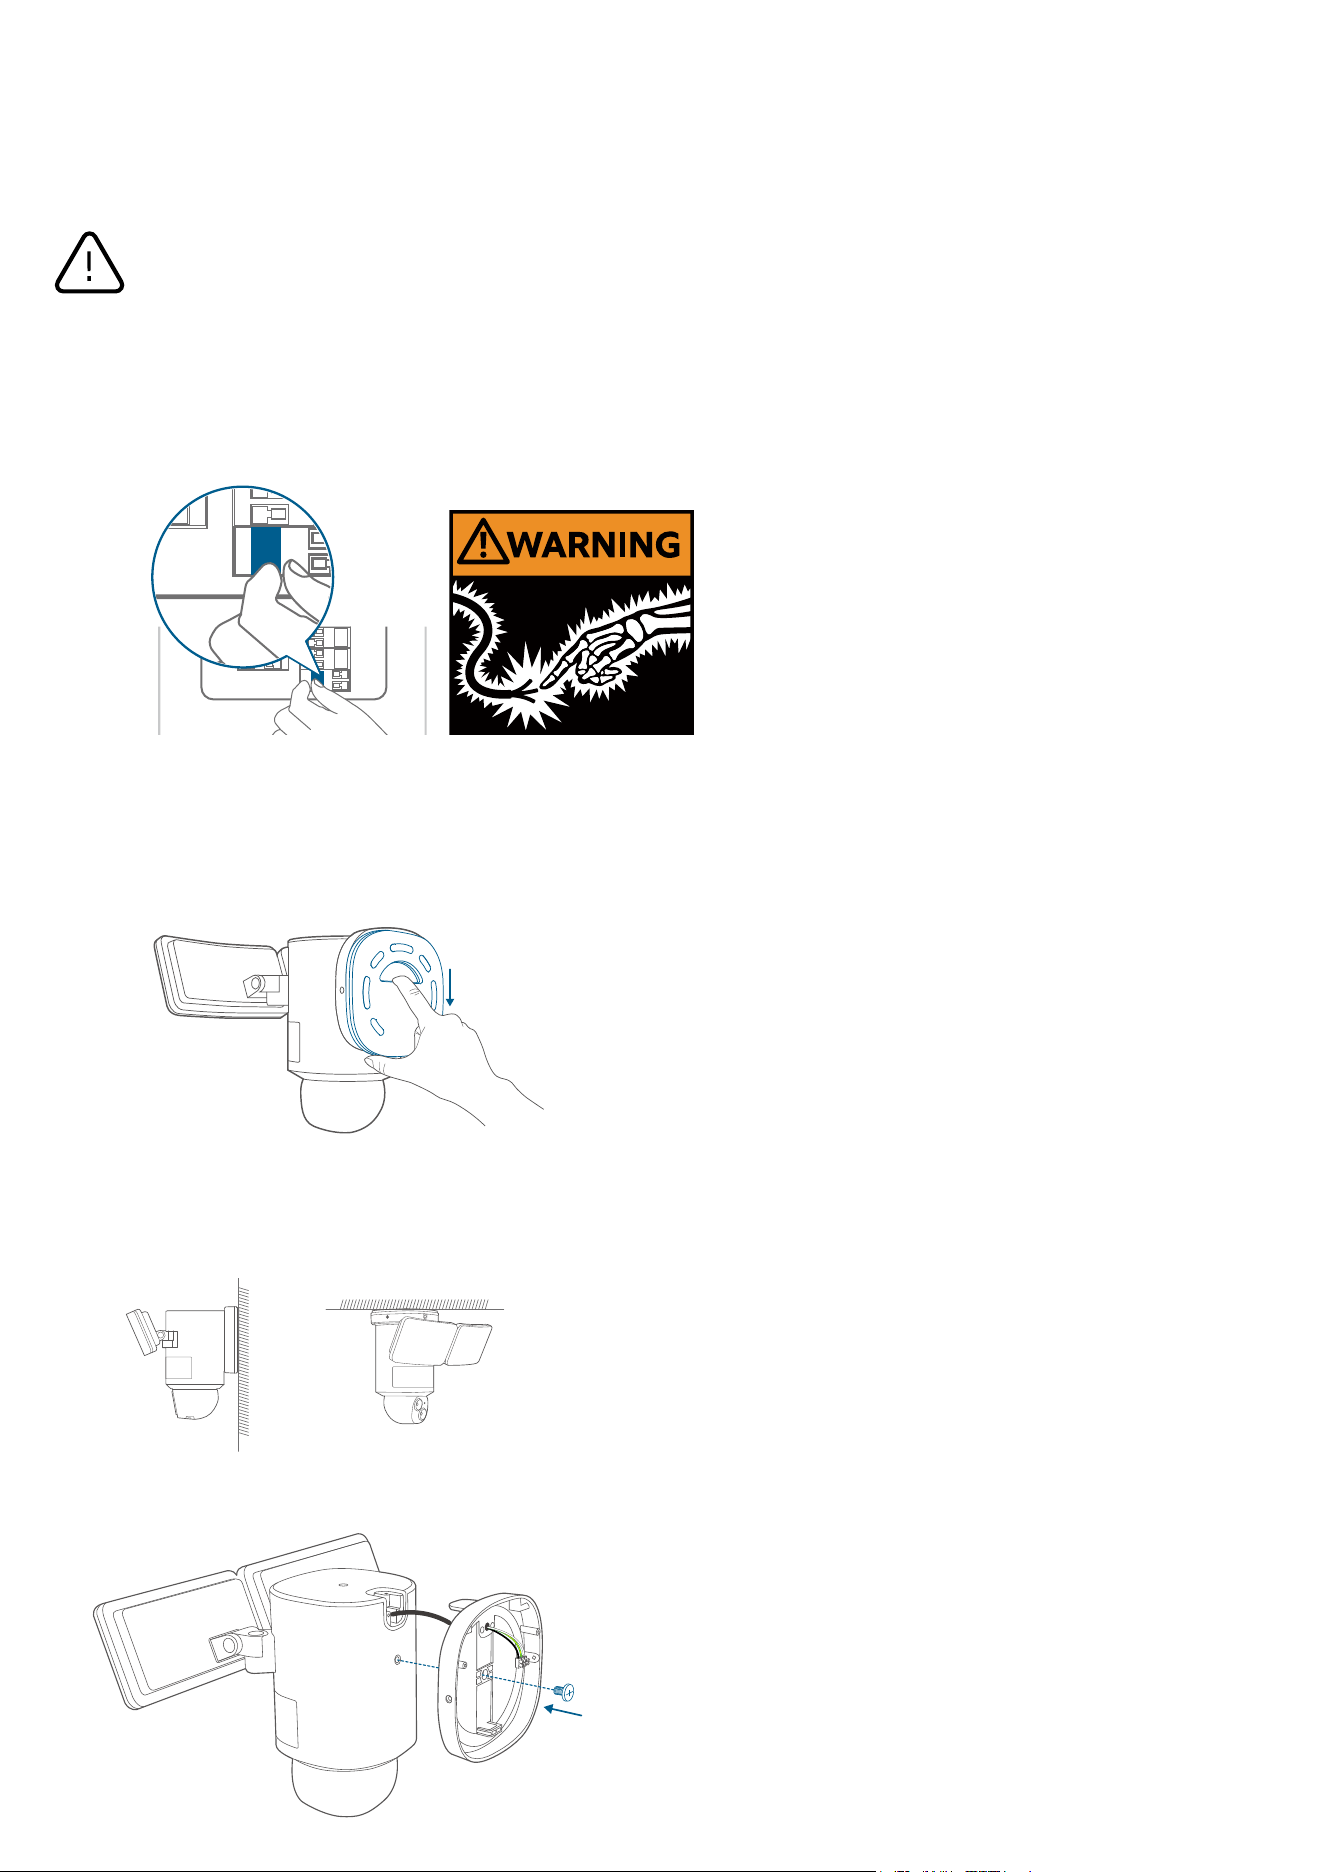
4. Disconnect from the power adapter, then close the USB port cover.
SYNCPower
SD Card
Shut power off at the
breaker
If you don’t know where your
breaker is or how to turn off
power to your floodlight circuit,
consult with a licensed electrician.
The USB port cover must be closed to prevent water from entering the floodlight camera.
PREPARING FOR INSTALLATION (IMPORTANT)
Check local laws for installation
If you are outside of North America, installation and wiring must be performed by a licensed electrician. Always
follow code standards when installing wired connections.
Shut Power O at the Breaker
Risk of Electrical Shock
• Turn off the power at your circuit breaker or fuse box before continuing, consult with a licensed
electrician if needed.
• Switch on/o the lights to make sure the electricity to the installation area is shut o.
• Verify that the power supply is a 100~240 VAC 50/60 Hz power source.
• Keep the breaker o at any time during the installation process.
NOTE: Do not use a dimmer switch or timer for this product.
OFF
OFF
WARNING:
electrical shock
•
•
• Properly ground fixture.
• Always follow code standards when installing wired
connections.
• If you are outside of North America, installation and
wiring must be performed by a licensed electrician.
Shut power off at the
If you don’t know where your
breaker is or how to turn off
power to your floodlight circuit,
consult with a licensed electrician.
INSTALLING YOUR FLOODLIGHT CAMERA
Separate the Mounting Bracket
Separate the mounting bracket from the camera and set it aside for later installation.
Select a Location
You can mount the floodlight camera vertically on a wall or hang it from a ceiling. With the power o at the breaker,
remove the existing floodlight if you have one.
WARNING: Risk of
electrical shock
Disconnect power at the
fuse or circuit breaker
before installing.
Verify that the supply
voltage is correct.
Connect fixture to a 100
VAC~240 VAC 50/60 Hz
power source.
Always follow code standards when installing wired
If you are outside of North America, installation and
wiring must be performed by a licensed electrician.
Wall Mounting
Overhang Mounting
For overhang mounting, reinstall the mounting base first.

Recommended Height
We recommend mounting the camera 8 ft (2.44 m) above the ground to achieve up to 40 ft (12 m) of motion detection range.
Up to 40 ft (12 m)
8 ft (2.44 m)
Install the Mounting Bracket
1. Run the existing wires through the hole of the junction box.
2. Hold the mounting bracket onto the junction box, align the screw holes, remove the foam from the holes, then secure the
mounting bracket on the wall or ceiling with the Bracket Screws (Bag C).
Wall Mounting
UP
Overhang Mounting
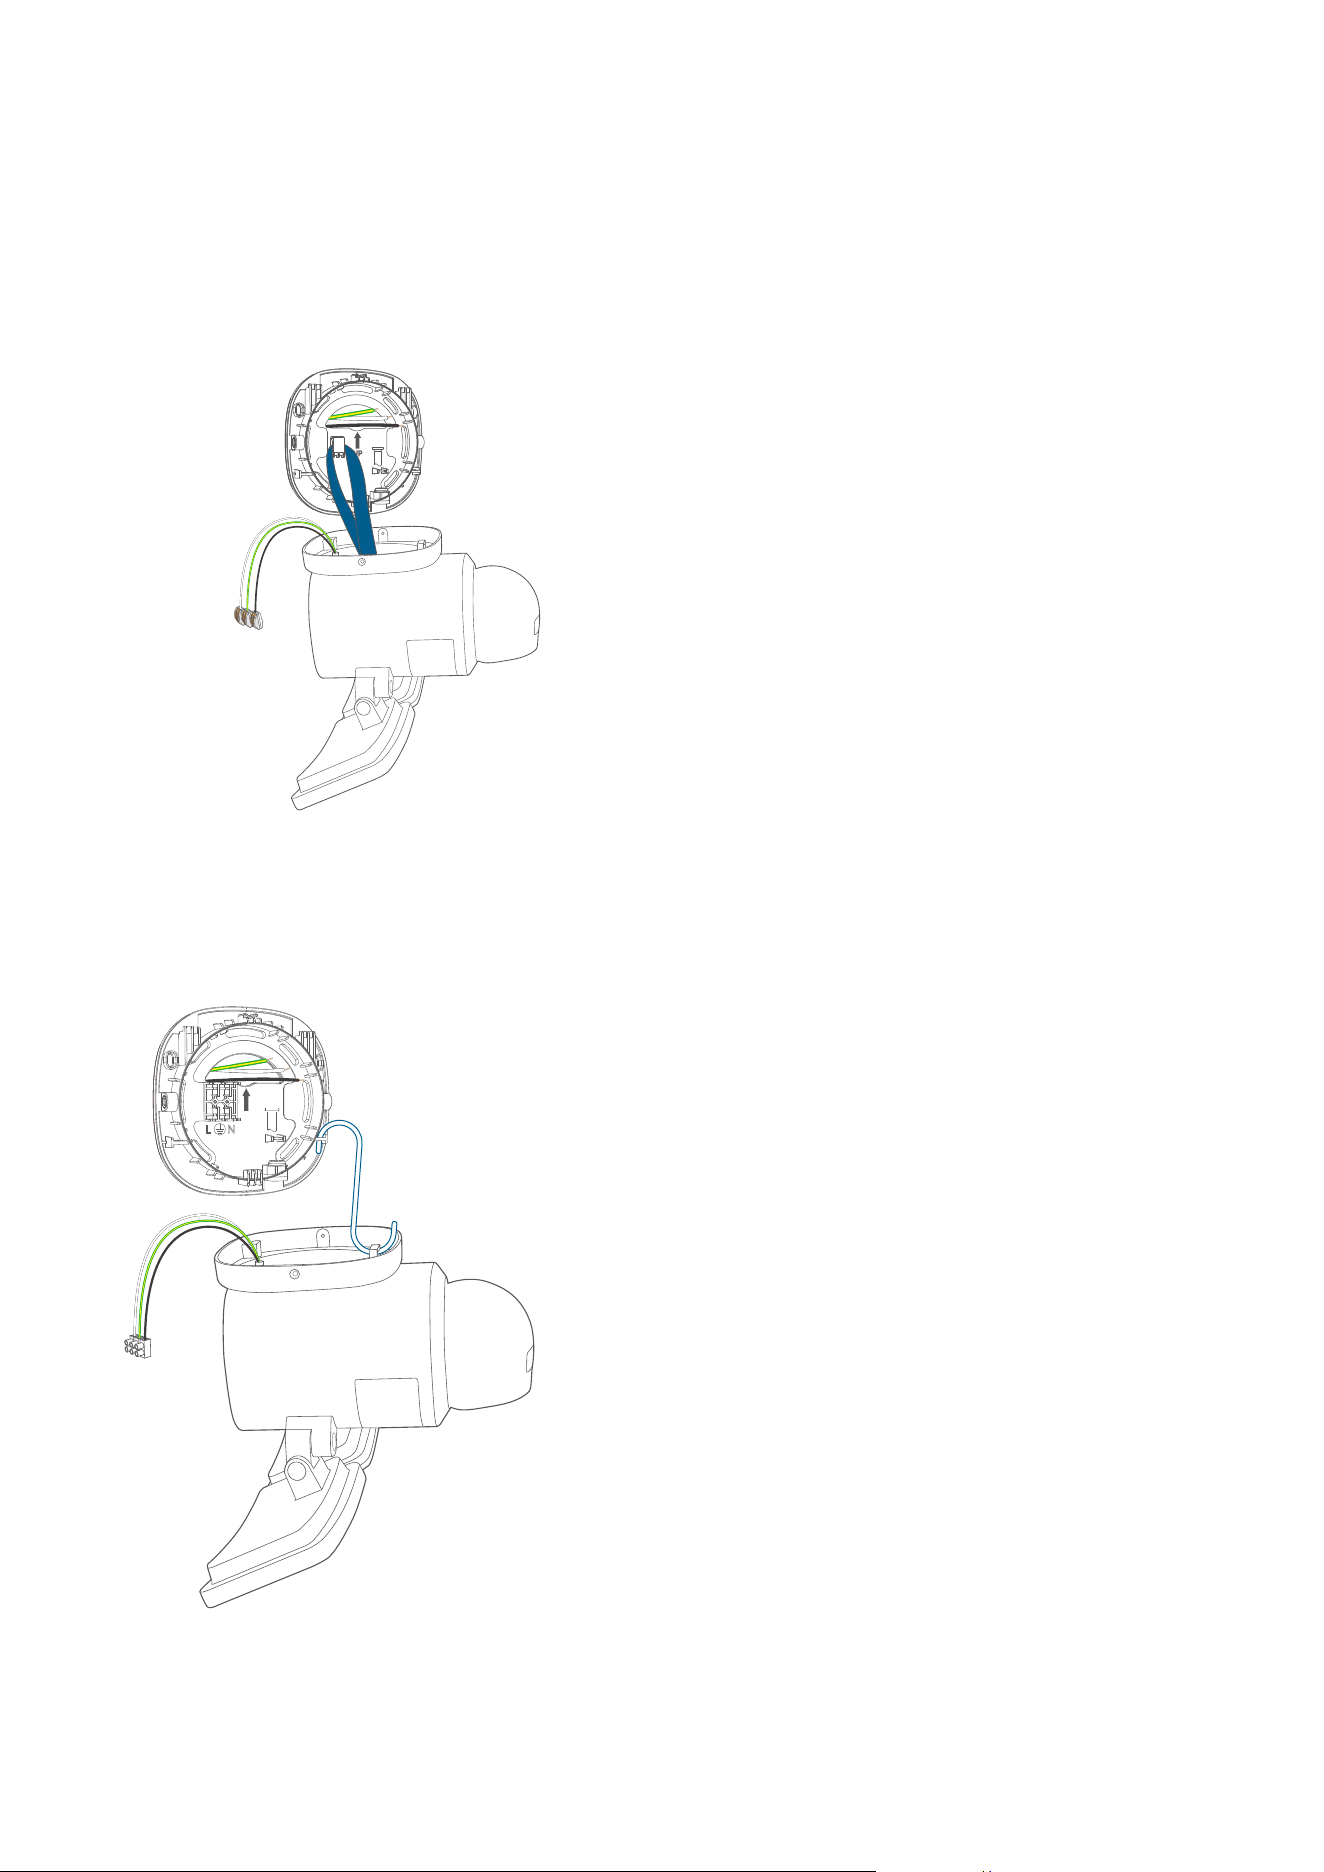
Connect Wires
1. Check if there is a hanging strap on the camera.
If so, follow option A to connect the wires.
If not, follow option B.
Option A
Hang your camera on the bracket with the hanging strap while connecting the wires.
Option B
Hang your camera on the bracket with the provided hook while connecting the wires.
UP
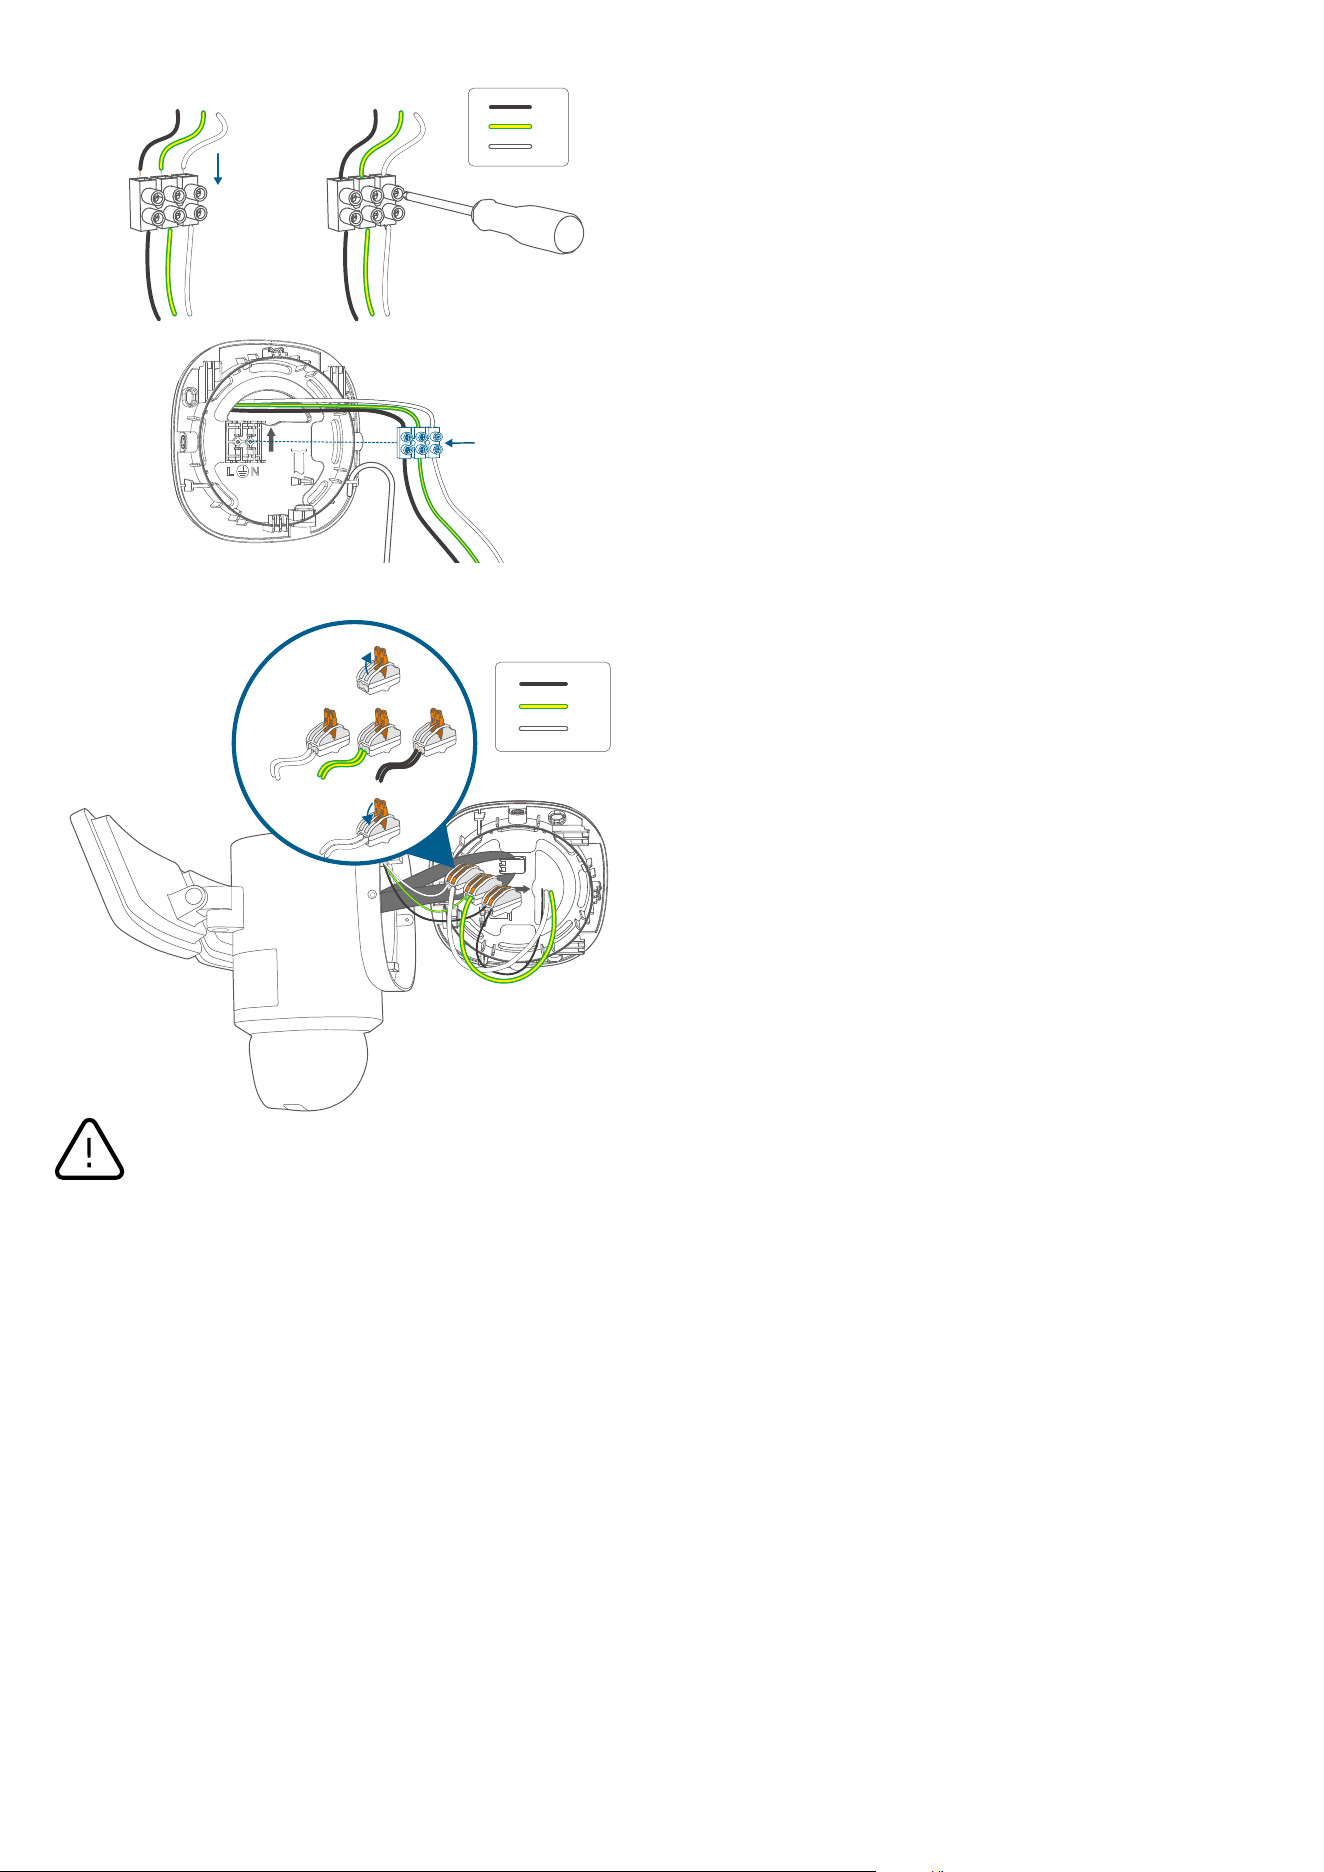
2. Check the type of connectors your camera have. Follow the instructions below to complete the connection.
Separately connect the junction box's ground wire (bare copper / green / green & yellow), live wire (black), and neutral wire
(white) to the floodlight camera's ground wire (green & yellow), live wire (black), and neutral wire (white) using wire connectors,
then secure the connections with a screwdriver or with your hands.
If the existing ground wire has been connected to the junction box, or if there is no ground wire, connect the floodlight
camera's ground wire directly to the junction box or mounting plate.
Option A
UP
①②
③
L
G
N
Option B
L
G
N
②
①
③
Never cross-connect. The wires must be connected with matching colors.
If you have problems with the proper operation of the floodlight camera, consult a licensed technician.
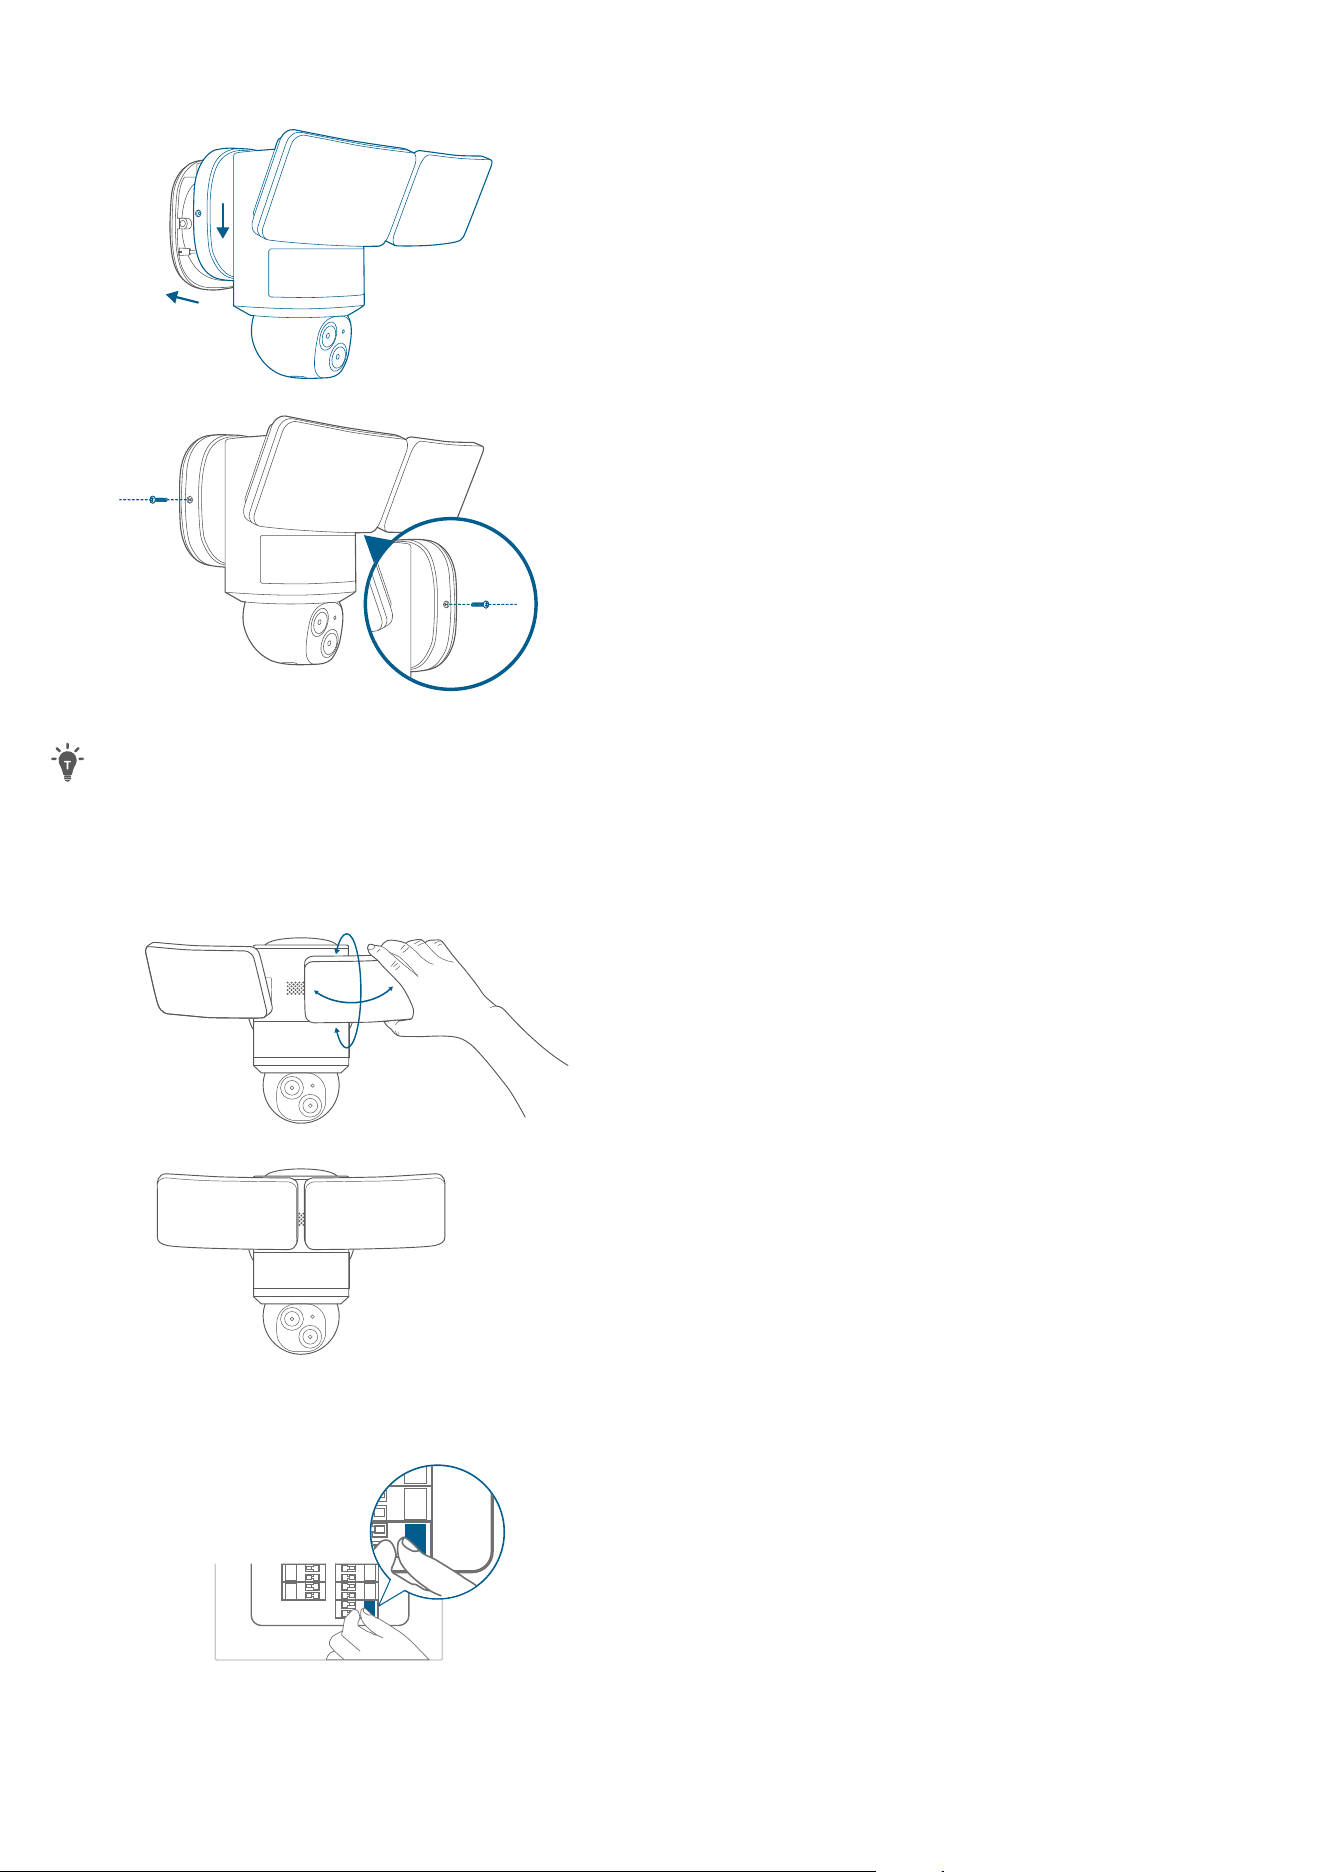
Place the Camera on the Mounting Bracket
1. Remove the hook (if there is one), snap the mounting base onto the mounting bracket, align the holes, and secure it with 2
Base Screws (Bag B).
②
①
②
①
2. Remove the label and protective film from the floodlight.
Clean the camera with a lens cleaning cloth.
ADJUSTING THE LIGHTING ANGLE
Manually pull up and down or left and right to adjust the floodlight vertically or horizontally.
RESTORING POWER
1. Switch on the main circuit breaker in the house.
ON
ON
In case the floodlight camera is not powered on, switch o the circuit breaker before checking the wiring of the floodlight
camera.
2. Now you can access various features and change settings in the eufy Security app.
For troubleshooting, check the Help section in the eufy Security app.

LED LIGHT GUIDE
Solid Violet System is initializing
Solid Blue Working normally or ready for setup
Blinking Red Not connected to the internet
Solid Red Recording or the live stream is being viewed
Flashing Blue and Red
Firmware upgrade in progress
Note: Keep the camera connected to a power source