
Technical Support and E-Warranty Certificate
www.vevor.com/support
VACUUM PACKING MACHINE
USER MANUAL
Model:DZ-260C-V1,DZ-260C-V2,DZ-260C-V3
We continue to be committed to provide you tools with competitive price.
"Save Half", "Half Price" or any other similar expressions used by us only represents an
estimate of savings you might benefit from buying certain tools with us compared to the major
top brands and does not necessarily mean to cover all categories of tools offered by us. You
are kindly reminded to verify carefully when you are placing an order with us if you are
actually saving half in comparison with the top major brands.

- 1 -
Model: DZ-260C-V1, DZ-260C-V2, DZ-260C-V3
Have product questions? Need technical support? Please feel free to
contact us:
Technical Support and E-Warranty Certificate
www.vevor.com/support
NEED HELP? CONTACT US!
This is the original instruction, please read all manual instructions
carefully before operating. VEVOR reserves a clear interpretation of our
user manual. The appearance of the product shall be subject to the
product you received. Please forgive us that we won't inform you again if
there are any technology or software updates on our product.
VACUUM PACKING MACHINE

- 2 -
1. Read carefully and understand all ASSEMBLY AND OPERATION
INSTRUCTIONS before operating.
2. Failure to follow the safety rules and other basic safety precautions may
result in serious personal injury.
GENERAL SAFETY RULES
Please read the entire operating instructions before using the products for
the first time; They contain important information about the correct
operation.
The guarantee/warranty will be void if damage is incurred resulting from
non-compliance with the operating instructions.Liability for any and all
consequential damage is excluded!
We do not assume any liability for damage to property or personal injury
caused by improper use or the failure to observe the safety instructions! In
such cases the guarantee/warranty will be void
The unauthorized conversion,modification of disassembly of the products
is inadmissible because of safety and approval reasons (CE).
The product is not a toy and must be kept out of the reach of children.
Particular care must therefore be exercised if children are present.
The product must not get damp or wet,it is only intended for use in dry,
indoor locations(not bathrooms or similarly damp areas).There is a risk of a
fatal electric shock.
Do not expose the product or its accessories to damp or extremely high or
low temperatures.
Do not leave packing materials unattended.They may become dangerous
playing material for children.

- 3 -
Dropping,falling,pressure or tensile forces could destroy or at least limit the
function of the product.
Never position the device in the vicinity of combustible or easily
inflammable materials.
Always make sure that the rotary table on which the object is placed is
located in the center of the housing!
This machine uses plastic film or plastic aluminum film as materials to
vacuum package paste foods, fruits, sauce vegetables, chemicals,
pharmaceuticals, electronic components, precision instruments, rare
metals, and other items. Products packaged under vacuum are not easily
oxidized or moldy. Especially suitable for industries such as tea, food, and
medicine.
If you have reason to assume that safe operation is no longer
possible,disconnect the device immediately and secure it against
inadvertent operation.
It can be assumed that safe operation is no longer possible if:
- the device shows visible signs of damage,
- the device no longer functions,
- after a longer period of storage under unfavourable conditions,
- following heavy stress during transportation.
SAVE THESE INSTRUCTIONS

- 4 -
MODEL AND PARAMETERS
Model
DZ-260C-V1
DZ-260C-V2
DZ-260C-V3
Seal Length
320mm
320mm
320mm
Chamber
Dimensions
355*340*70mm
355*340*70mm
355*340*70mm
Vacuum Pump
Type
Oil Pump
Oil Pump
Oil Pump
Pumping Speed of
Vacuum Pump
6.5m³/h
6.5m³/h
6.5m³/h
Voltage
AC 120V 60Hz
AC 230V 50Hz
AC 230V 50Hz
Max. Power
1700W
1700W
1700W
Vacuum Pump
Power
180W
180W
180W
Machine Material
201 Stainless
Steel
201 Stainless
Steel
201 Stainless
Steel
- 5 -
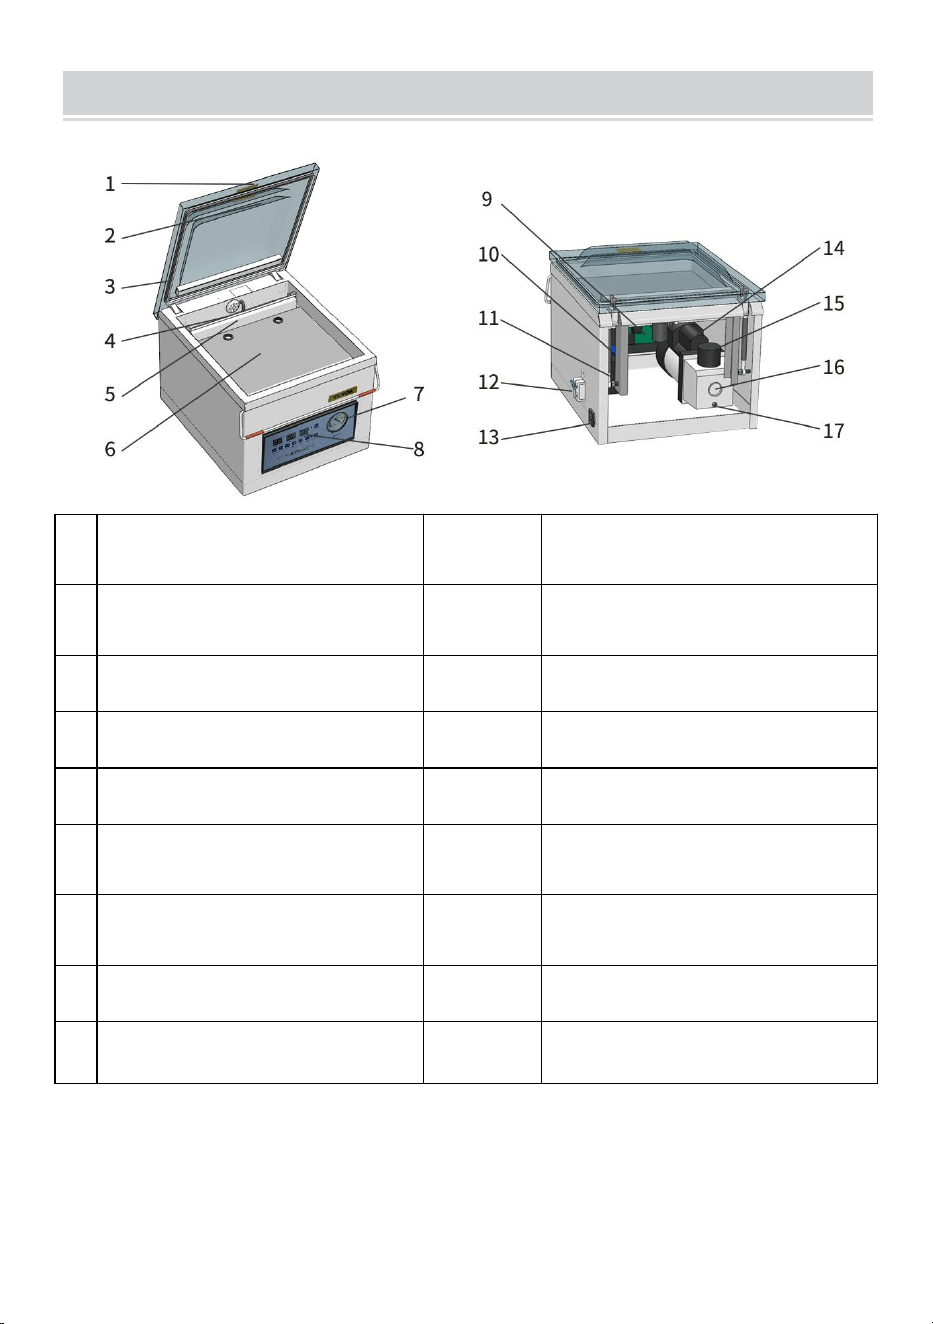
STRUCTURE DIAGRAM
1
Vacuum cover
10
Heating transformer
2
Silicone strip
11
Vacuum pump solenoid
valve
3
Vacuum sealing bar
12
Power switch
4
Sealing heating strip
13
Power plug
5
Bag pressing rod
14
Vacuum pump
6
Base plate
15
Oil injection port
7
Indicator
16
Oil level observation window
8
Vacuum gauge
17
Oil drain screw
9
Circuit board

- 6 -
PARTS LIST
DZ-260C-V1
DZ-260C-V2
DZ-260C-V3
Heating Wire
×2
×2
×2
Teflon Cloth
×2
×2
×2
Filler Board
×1
×1
×1
Vacuum Pump Oil
×1
×1
×1
Allen Key
×1
×1
×1
Vacuum Bag
×30
×30
×30
Chamber Sealing
Strip
×1
×1
×1
Power Cord
×1
×1
×1
User Manual
×1
×1
×1
Model
Parts

- 7 -
OPERATING INSTRUCTIONS
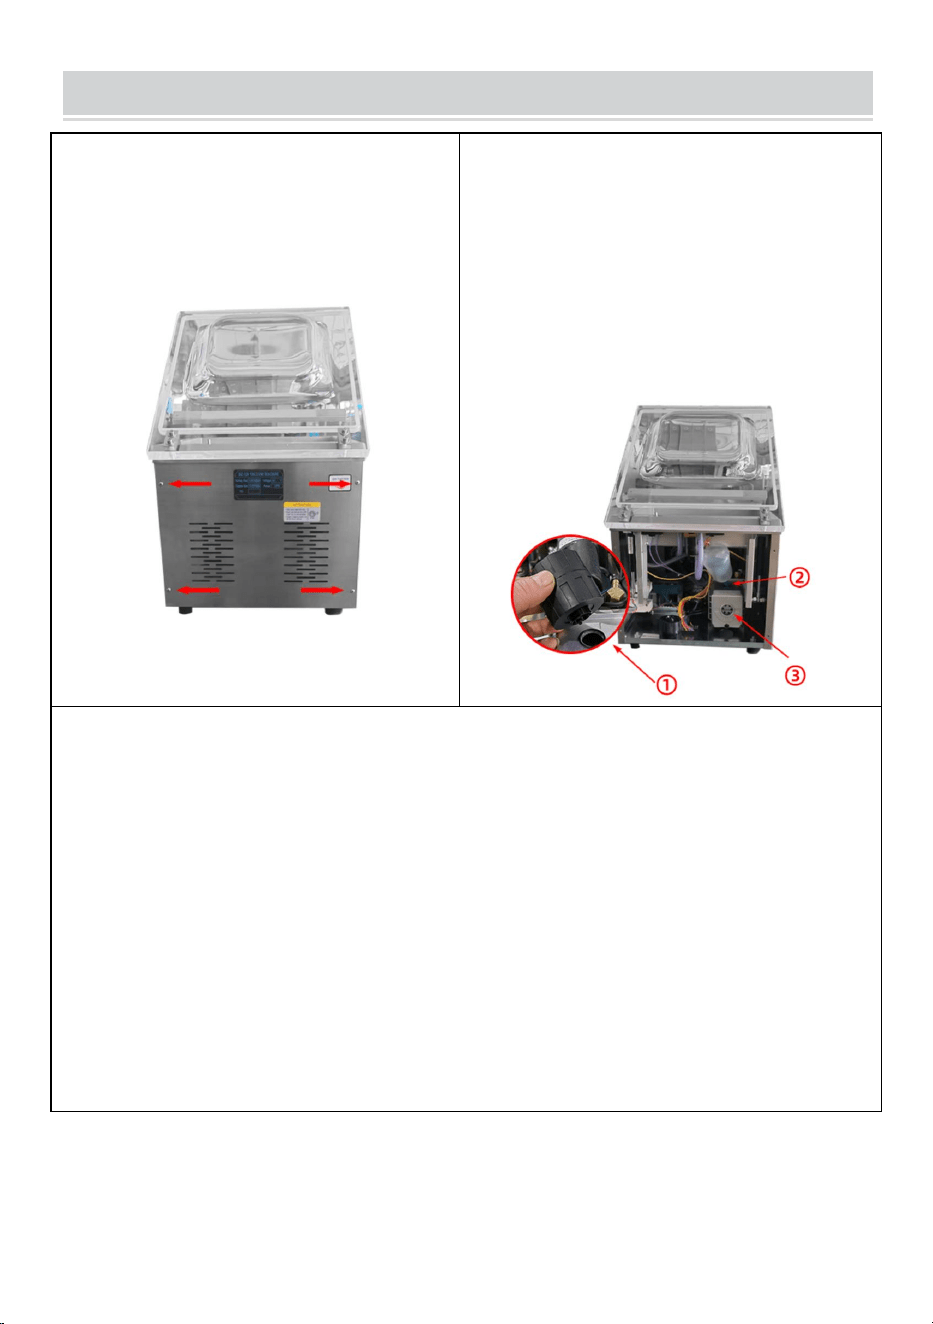
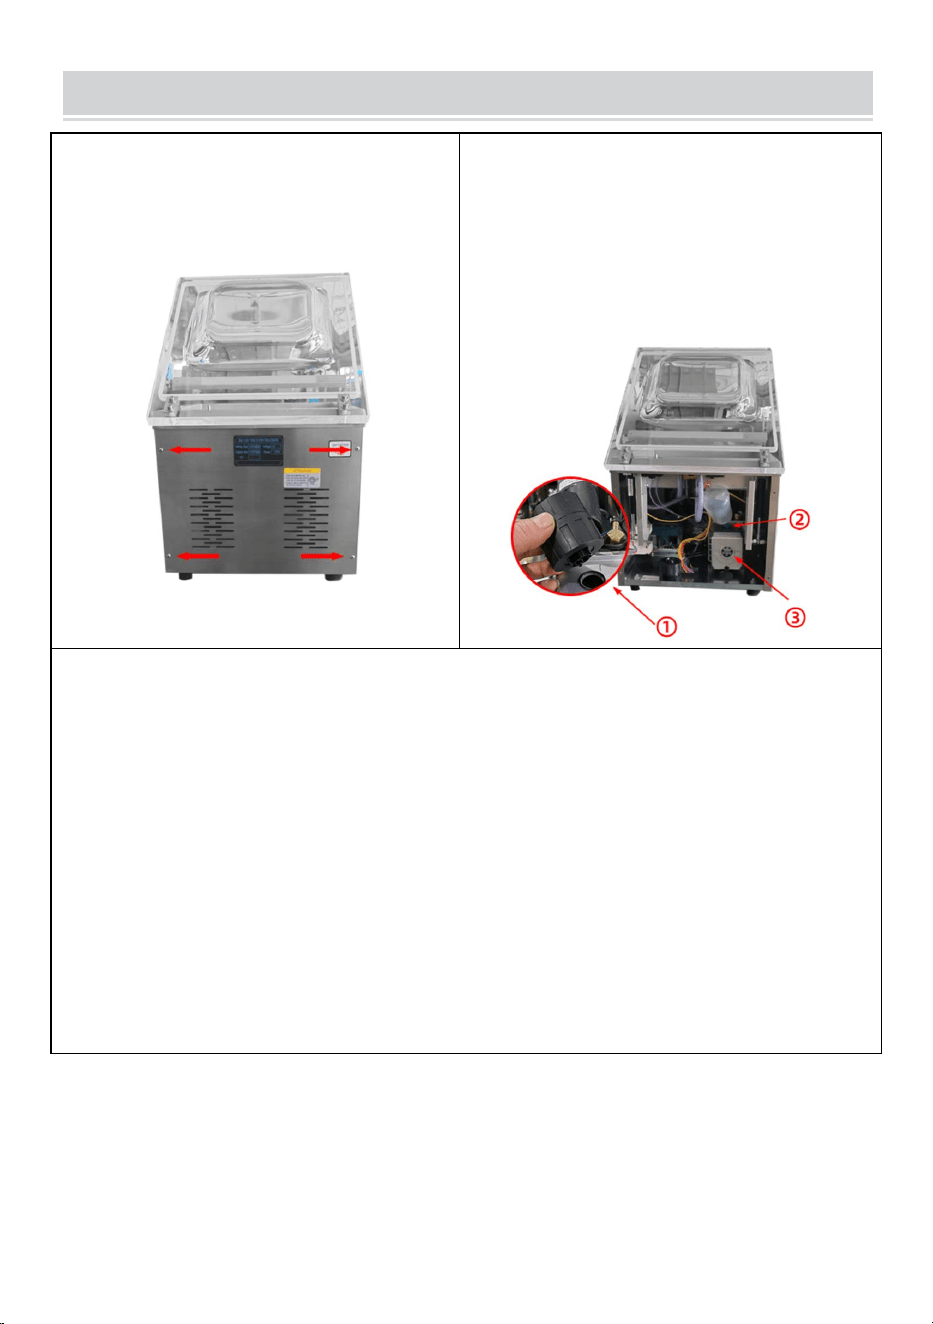
1.Unscrew the rear cover plate.
2.①.Take out the oil mist filter;
②.Add vacuum pump oil;
③.Oil level between 1/2-3/4 of the
observation hole(do not fill);
After adding the oil,screw back the oil
mist filter, close the back cover.
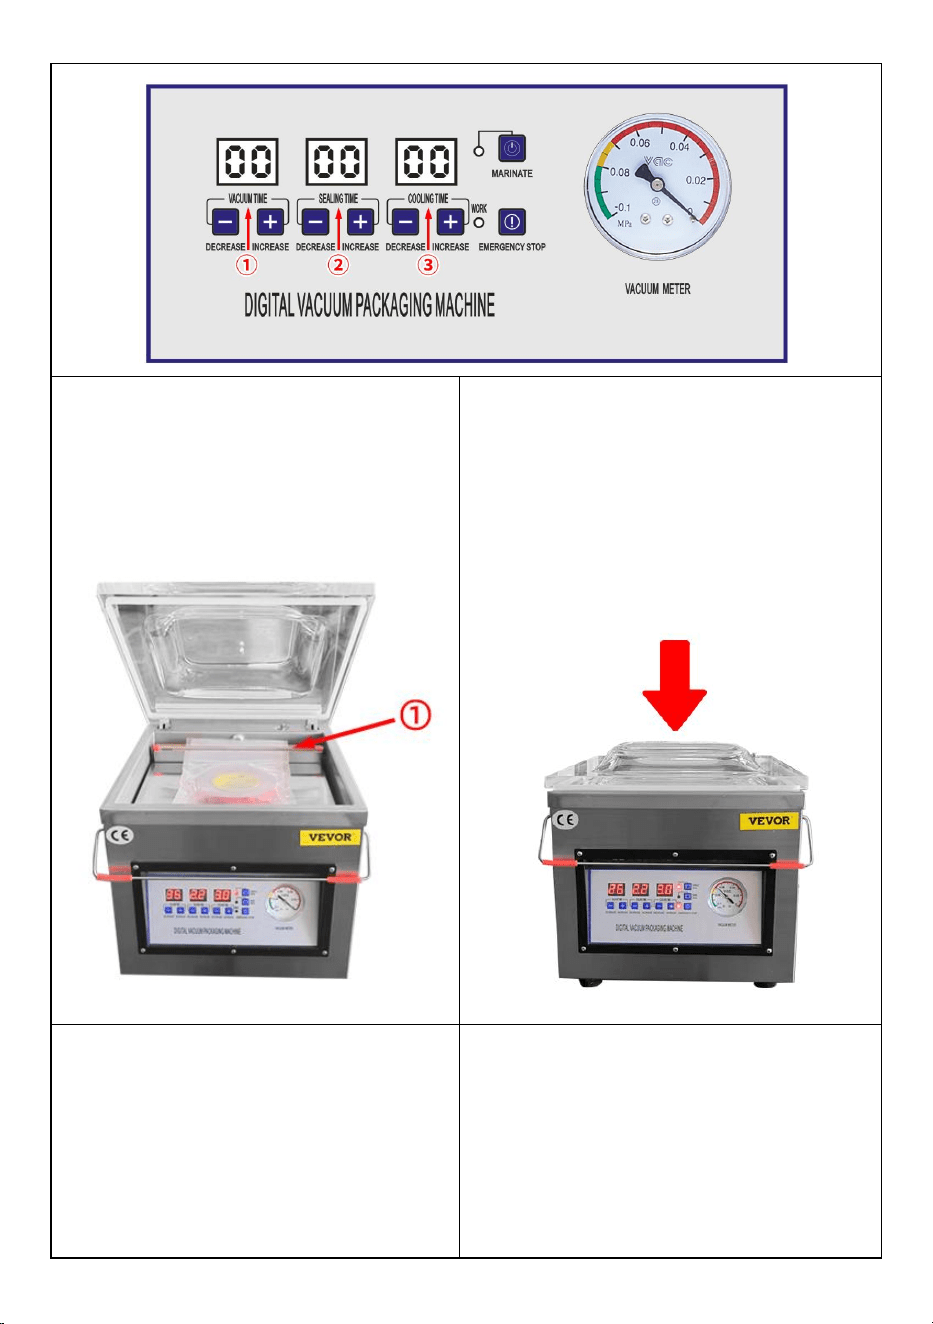
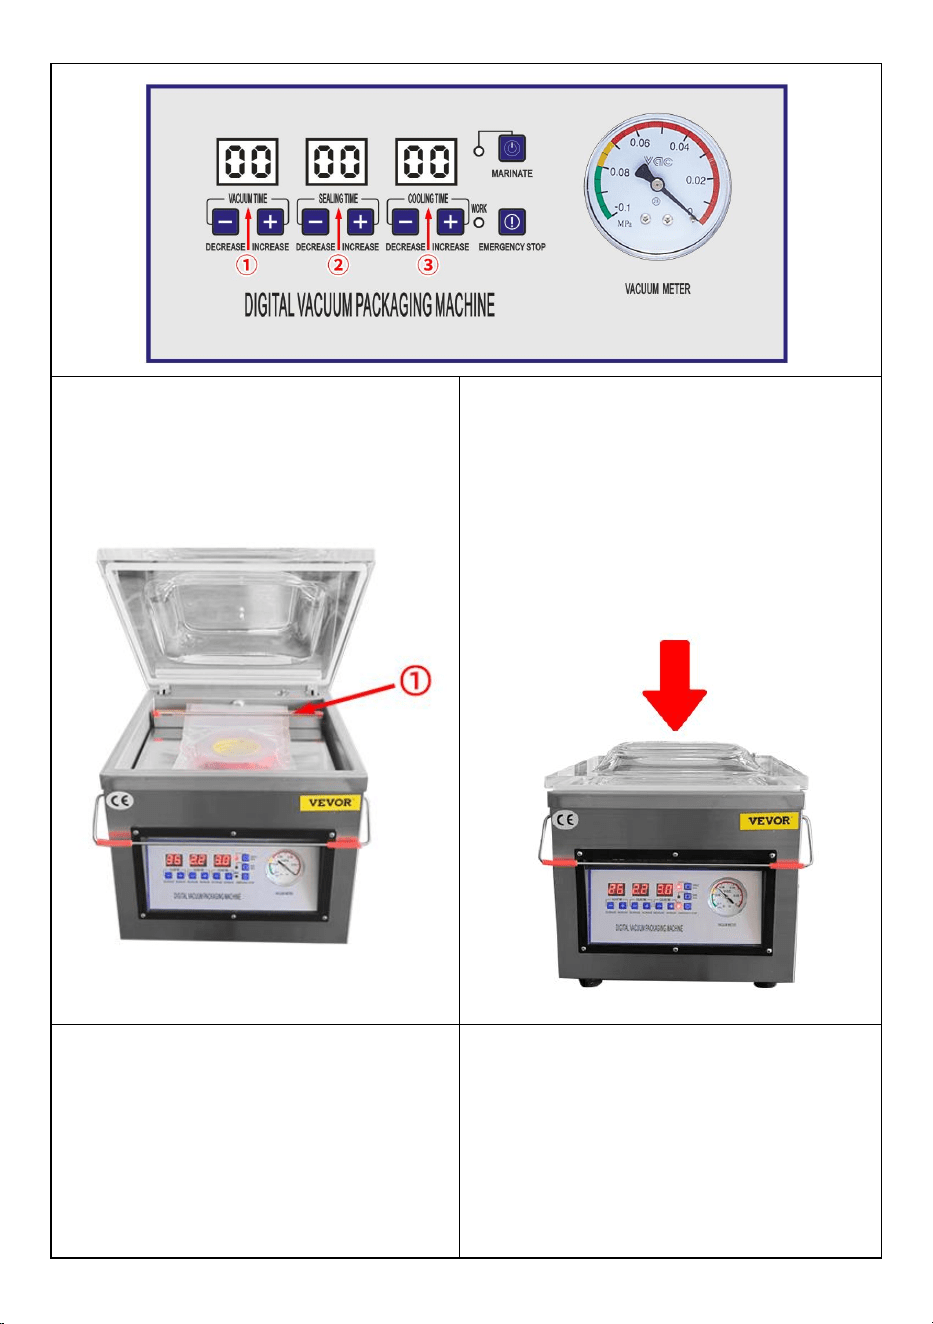
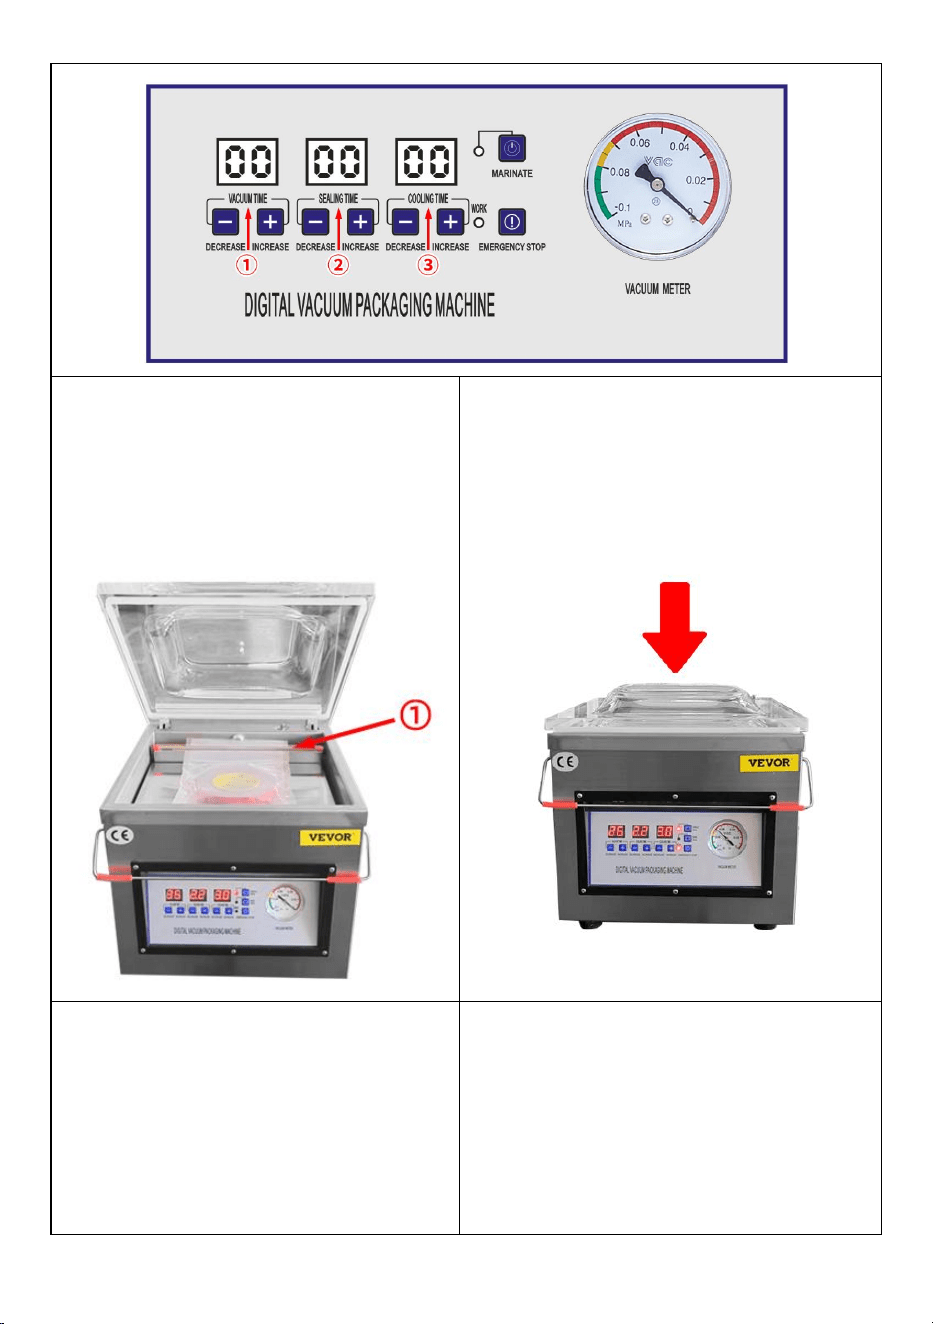
3 .PANEL USAGE INSTRUCTIONS
Step 1:Connect the matching power supply
Step 2:Open AIR SWITCH
Step 3: ①VACUUM TIME : In the standby state, click the DECREASE or
INCREASE button to set the ideal vacuum time,general items are set for 30-40s.
Step 4: ②SEALING TIME: Click the DECREASE or INCREASE button to set the
time, and the sealing time is generally set to 2-2.2s. The sealing time is set
according to the thickness of the vacuum bag. It is strictly prohibited to set the
sealing time too long or burn out the sealing heating strip.
Step 5: ③COOLING TIME : In the standby state, click the DECREASE or
INCREASE button to set the ideal cooling time,general items are set for 3-5s.

- 8 -
4.①Put your product in it, the vacuum
bag seal is placed on the heating
strip.Press the bag strip to flatten the
product.
5.Hold the front of the cover with both
hands and firmly press down on the
cover. The machine starts to work,after
the vacuum meter pointer starts to run,
loosen the hands, the machine
automatically completes the packaging.
6.MARINATE: Click the marinate
button in the upper right corner of the
control panel, the marinate indicator
light will light up, adjust the pumping
time, and start the marinate work. At
this time, the machine is in a vacuum
only state without sealing.
7.When the machine needs to change
oil or is not used for a long time, loosen
the screw under the oil window and
drain the vacuum pump oil. Suggest
replacing the vacuum pump oil after the
machine has been working continuously
for 800 hours.

- 9 -
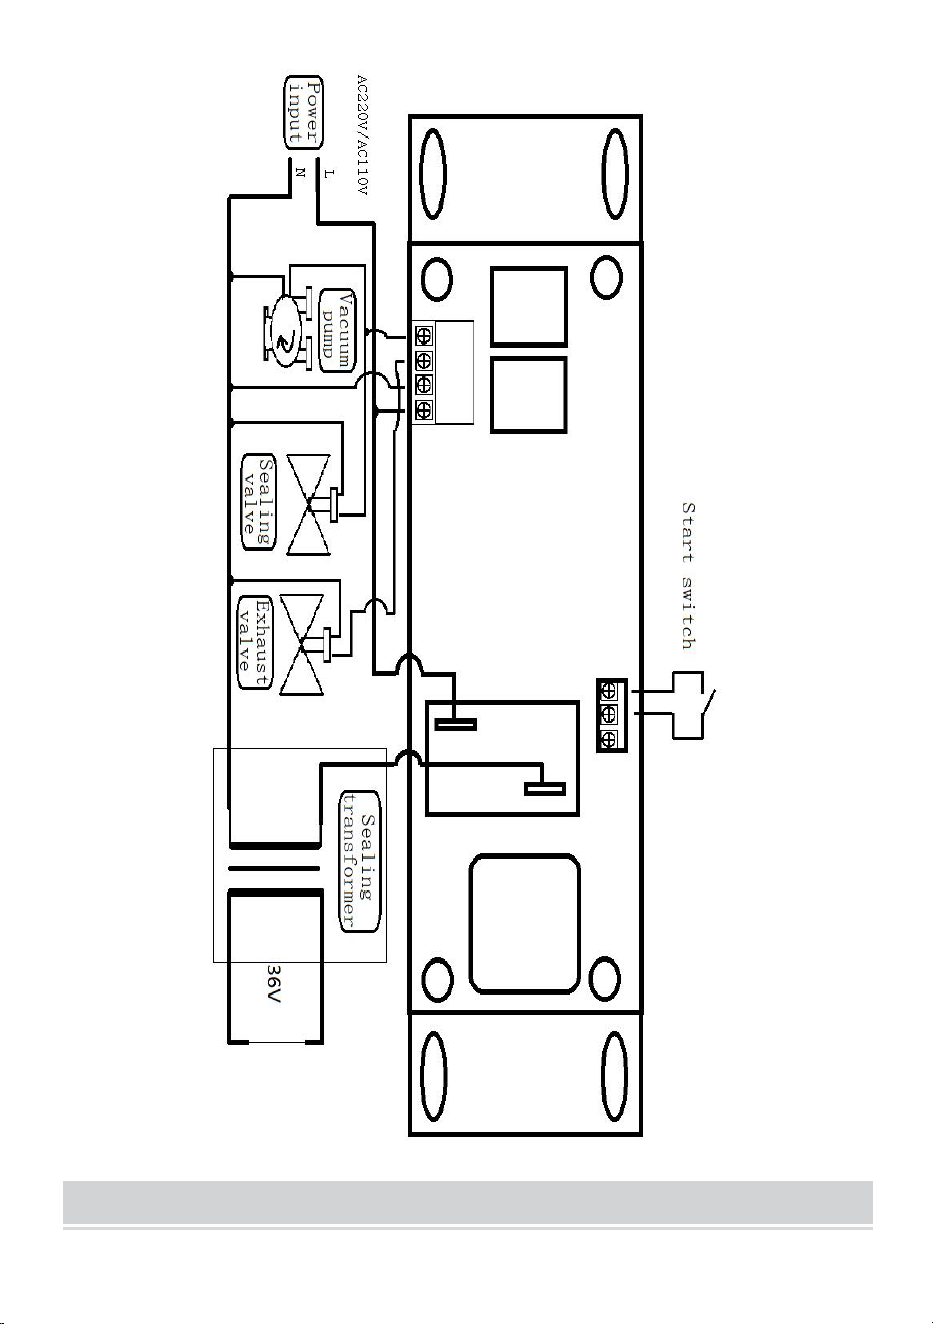
CIRCUIT DIAGRAM

- 10 -
MAINTENANCE
1. After using , the surface of the machine should be cleaned and residual
materials inside the machine should be removed.
2. When storing, keep in a clean, dry, and safe location away from children.
3. All maintenance, service, and repairs not discussed in the manual should
only be performed by qualified service technicians.
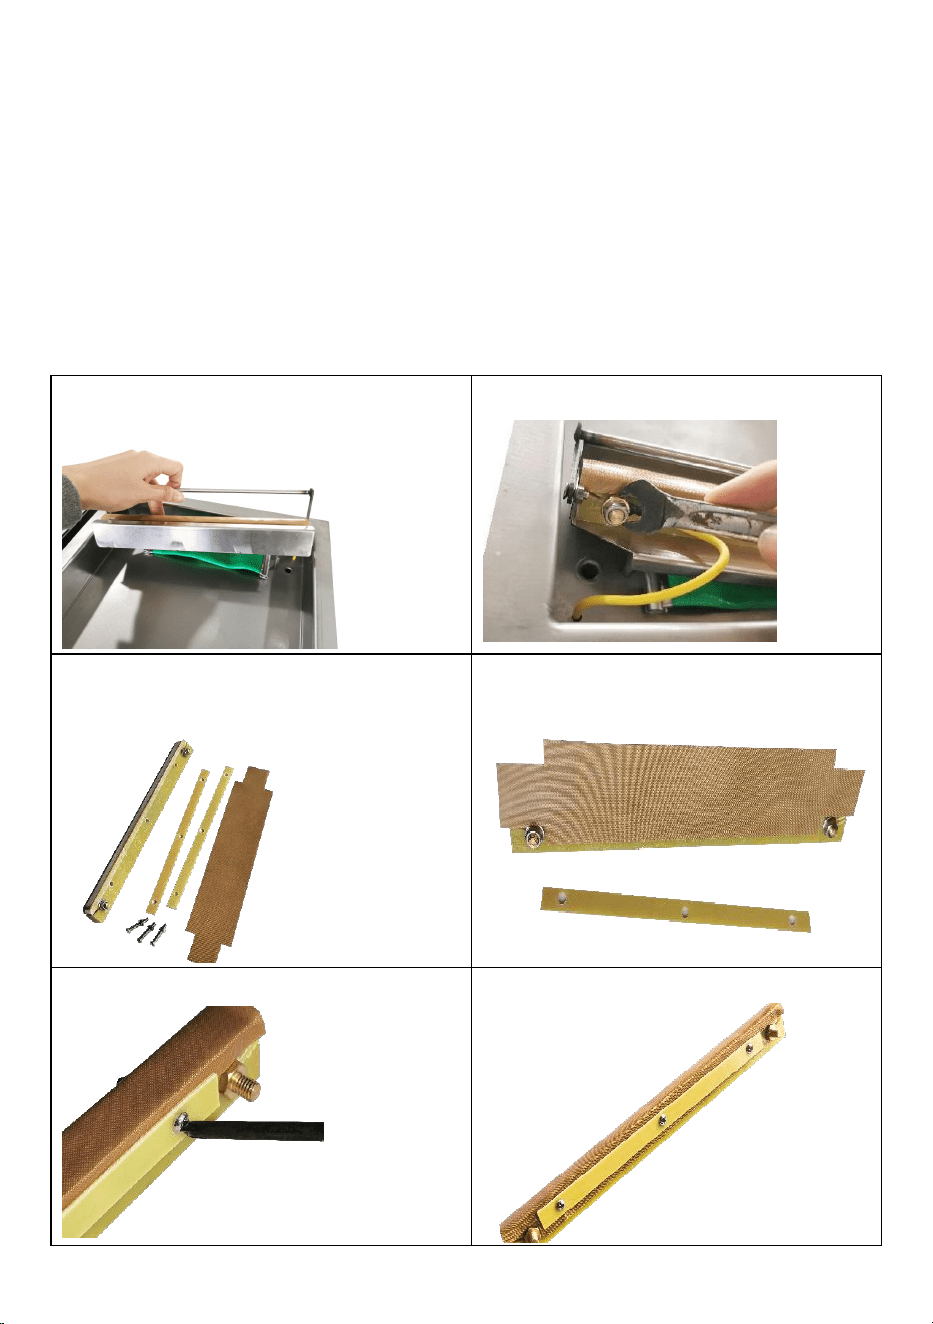
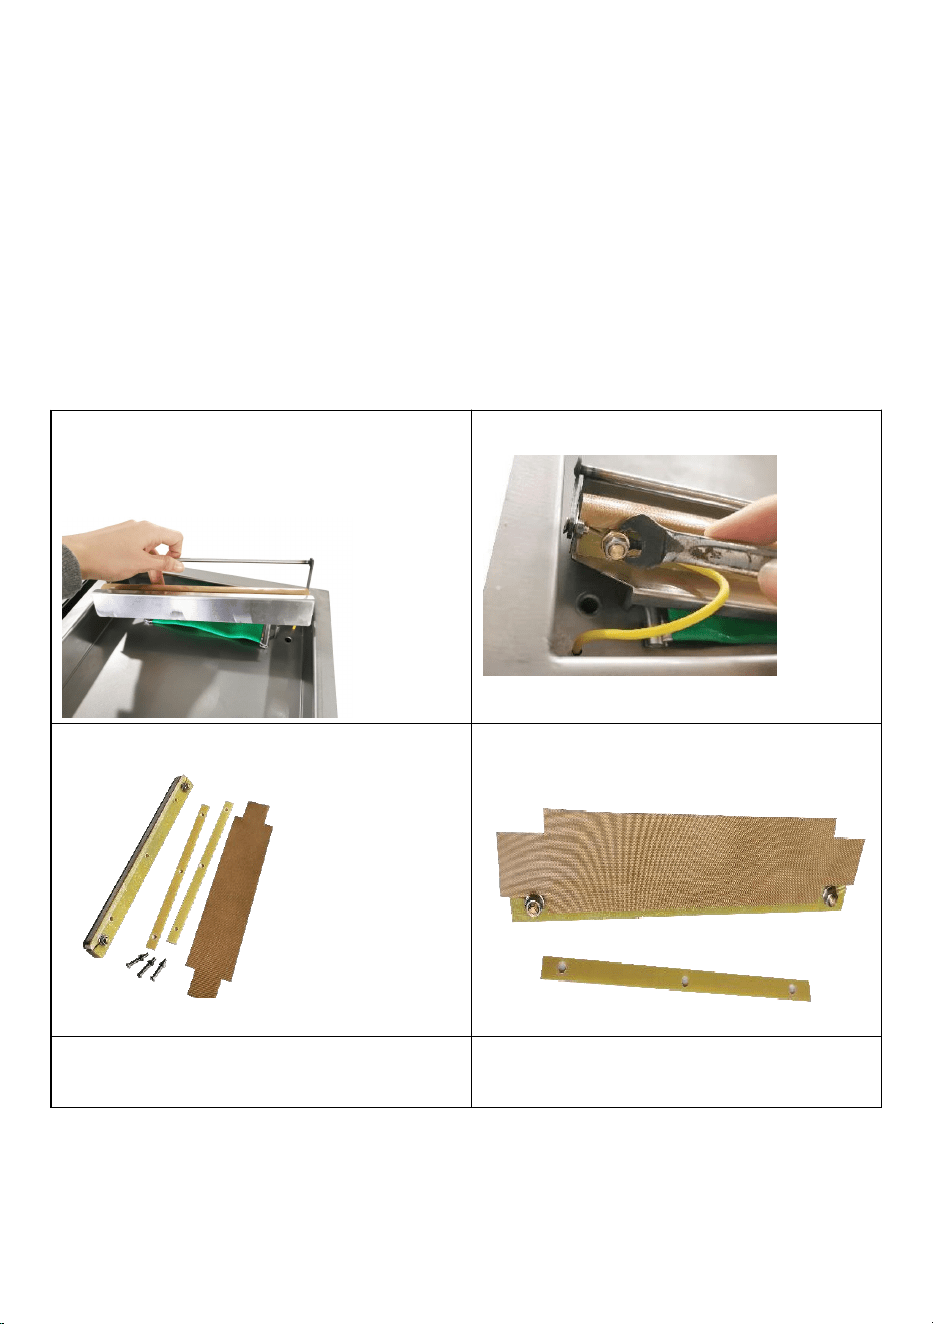
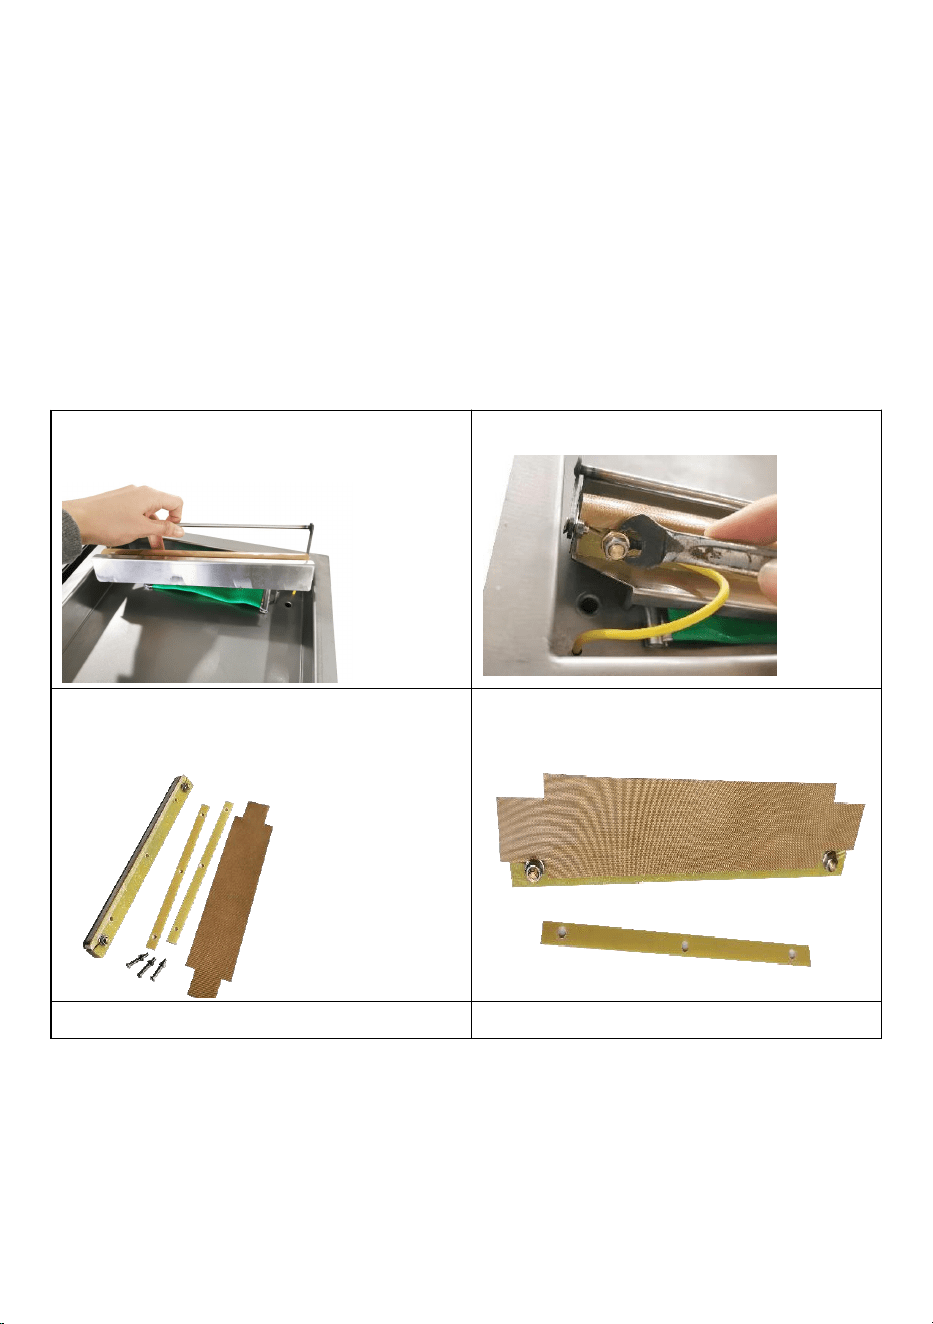
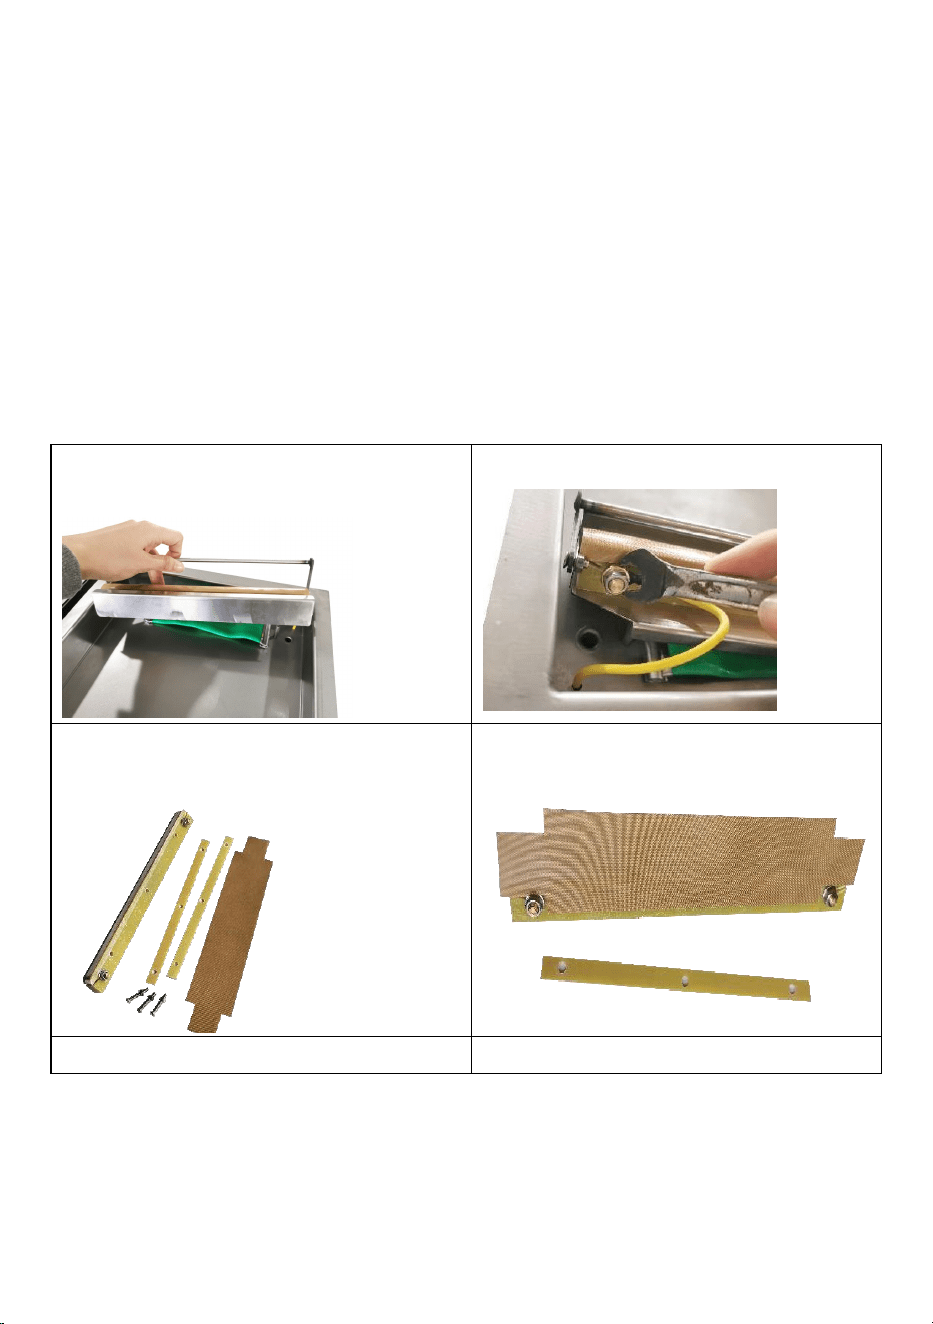
Replace the high temperature cloth(Teflon Cloth)
1. Remove the screws on both sides of the
tray, and then pick up the whole tray.
2. Remove the upper screws .
3. Remove the old high-temperature cloth.
4.Apply new high temperature cloth.
5.Reinstall the original screws
6.Completing the Installation.
- 11 -
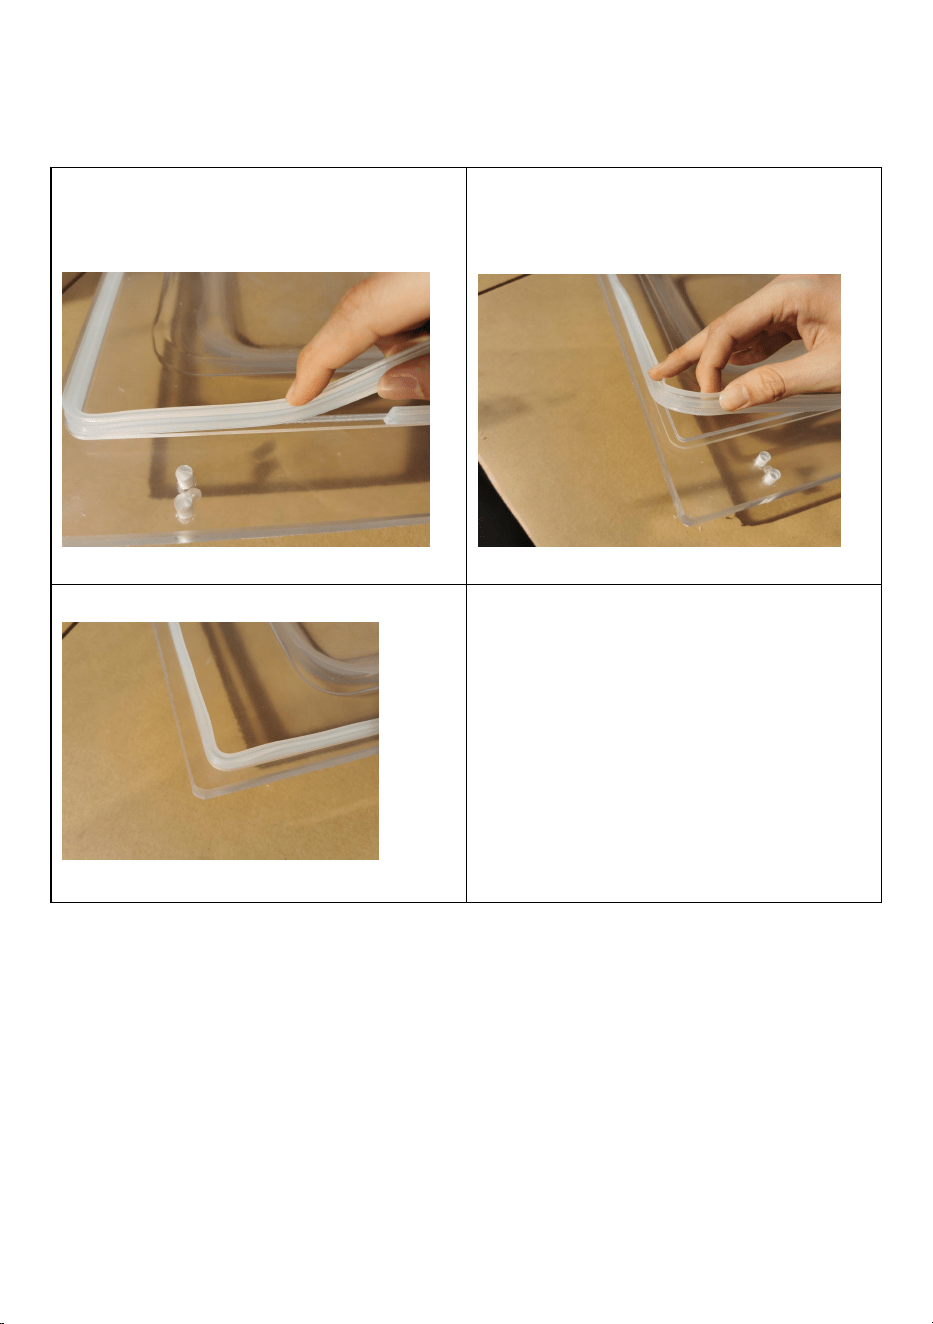
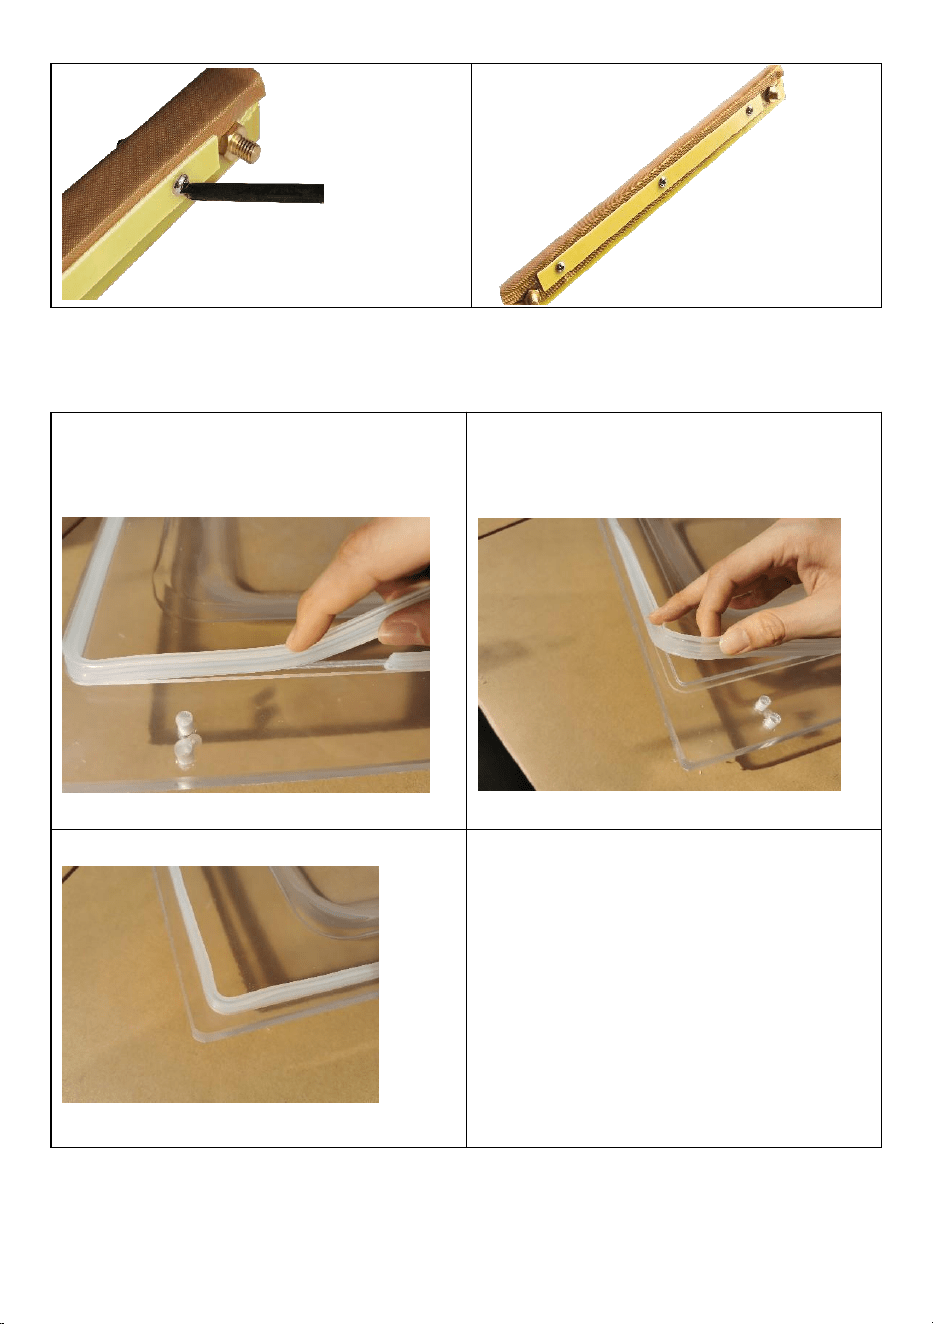
Replace the Chamber Sealing Strip
1. Remove the Chamber Sealing
Strip.
2. Replace the Chamber Sealing
Strip with a new one
3.Completing the Installation

- 12 -
TROUBLESHOOTING AND SOLUTIONS
Problem
Possible Cause
Solution
The machine doesn't
work and the control
panel shows nothing.
1.No connection of the
power supply.
2.The contact of the power
switch looses.
1.Check whether the plug
and socket are effectively
connected.
2.Check whether the wiring
of the power input part
inside the machine is loose
or detached.
The control panel
startup,but the
machine doesn't work.
The parameter is being
set.
Complete the parameter
setting.
The best vacuum state
can’t be achieved.The
vacuum pumping
speed is slow。
1.Short vacuumizing time.
2.The oil in the vacuum
pump is not enough or the
oil is not clean.
3.Air leakage and wear of
the sealing ring.
1.Extend the vacuum time.
2.Check the oil level, refuel
or change the oil (pay
attention to the oil type
(vacuum oil 46#,68#) and
oil quantity.
3.Replace the sealing ring.
Sealing failure or
poor sealing.
1.The bags are not
correctly placed on the
heating plates.
2.Too long/short sealing
time.
3.Inappropriate heating
temperature..
4.Silicon strip damaged or
with impurity.
5.Damage of electric
heating wire.
1.Place the bags on the
plate in order.
2.Shorten/prolong the
sealing time.
3.Choose proper
temperature.
4.Clean or replace the
silicon rubber.
5.Change electric heating
wire.

- 13 -
CORRECT DISPOSAL
This product is subject to the provision of European Directive
2012/19/EC. The symbol showing a wheelie bin crossed through
indicates that the product requires separate refuse collection in
the European Union. This applies to the product and all
accessories marked with this symbol. Products marked as such may not
be discarded with normal domestic waste, but must be taken to a collection
point for recycling electrical and electronic devices
Manufacturer: Shanghaimuxinmuyeyouxiangongsi
Address: Baoshanqu Shuangchenglu 803long 11hao 1602A-1609shi
Shanghai
EC REP: SHUNSHUN GmbH.
Römeräcker 9 Z2021,76351 Linkenheim-Hochstetten, Germany
Tel: +49 1727041930 euvertreter@gmail.com
UK REP: Pooledas Group Ltd.
Unit 5 Albert Edward House, The Pavilions Preston, United Kingdom
Imported to AUS: SIHAO PTY LTD.
1 ROKEVA STREETEASTWOOD NSW 2122 Australia
Imported to USA: Sanven Technology Ltd.
Suite 250, 9166 Anaheim Place, Rancho Cucamonga, CA 91730
Made In China


Assistance technique et certificat de garantie électronique
www.vevor.com/support
MACHINE D'EMBALLAGE SOUS VIDE
MANUEL DE L'UTILISATEUR
Modèle : DZ-260C -V1, DZ-260C -V2, DZ-260C -V3
We continue to be committed to provide you tools with competitive price.
"Save Half", "Half Price" or any other similar expressions used by us only represents an
estimate of savings you might benefit from buying certain tools with us compared to the major
top brands and does not necessarily mean to cover all categories of tools offered by us. You
are kindly reminded to verify carefully when you are placing an order with us if you are
actually saving half in comparison with the top major brands.

- 1 -
Modèle: DZ-260C -V1, DZ-260C -V2, DZ-260C -V3
Have product questions? Need technical support? Please feel free to
contact us:
Technical Support and E-Warranty Certificate
www.vevor.com/support
NEED HELP? CONTACT US!
This is the original instruction, please read all manual instructions
carefully before operating. VEVOR reserves a clear interpretation of our
user manual. The appearance of the product shall be subject to the
product you received. Please forgive us that we won't inform you again if
there are any technology or software updates on our product.
VACUUM PACKING MACHINE

- 2 -
3. Lisez attentivement et comprenez toutes les INSTRUCTIONS
D'ASSEMBLAGE ET D'UTILISATION avant d'utiliser l'appareil.
4. Le non-respect des règles de sécurité et des autres précautions de
sécurité de base peut entraîner des blessures graves.
GENERAL SAFETY RULES
Veuillez lire l'intégralité des instructions d' utilisation avant d'utiliser les
produits pour la première fois ; Ils contiennent des informations
importantes sur le fonctionnement correct .
La garantie sera annulée en cas de dommages résultant du non - respect
des instructions d' utilisation . La responsabilité pour tous les dommages
consécutifs est exclue !
Nous n'assumons aucune responsabilité pour les dommages matériels ou
corporels causés par une utilisation inappropriée ou le non-respect des
consignes de sécurité ! Dans de tels cas, la garantie sera nulle
La transformation, la modification ou le démontage non autorisé des
produits est inadmissible pour des raisons de sécurité et d'homologation
( CE).
Le produit n'est pas un jouet et doit être tenu hors de portée des enfants.
donc d'être particulièrement vigilant en cas de présence d'enfants.
Le produit ne doit pas être humide ou mouillé, il est uniquement destiné à
être utilisé dans des endroits secs et intérieurs (pas de salles de bains ou
de zones tout aussi humides). Il existe un risque de choc électrique mortel.
N'exposez pas le produit ou ses accessoires à des températures humides
ou extrêmement élevées ou basses.
Ne laissez pas les matériaux d'emballage sans surveillance . Ils peuvent

- 3 -
devenir un matériel de jeu dangereux pour les enfants.
Une chute, une chute, une pression ou des forces de traction pourraient
détruire ou au moins limiter la fonction du produit.
Ne placez jamais l' appareil à proximité de matières combustibles ou
facilement matériaux inflammables .
Assurez-vous toujours que la table rotative sur laquelle l'objet est posé se
trouve au centre du boîtier !
Cette machine utilise un film plastique ou un film plastique d'aluminium
comme matériaux pour emballer sous vide les aliments en pâte, les fruits,
les légumes en sauce, les produits chimiques, les produits
pharmaceutiques, les composants électroniques, les instruments de
précision, les métaux rares et d'autres articles. Les produits emballés sous
vide ne s’oxydent pas facilement ou ne moisissent pas. Particulièrement
adapté aux industries telles que le thé, l’alimentation et la médecine.
Si vous avez des raisons de penser qu'un fonctionnement sûr n'est plus
possible, débranchez immédiatement l'appareil et protégez-le contre toute
utilisation involontaire .
On peut supposer qu'un fonctionnement sûr n'est plus possible si :
- l'appareil présente des signes visibles de dommages,
- l' appareil ne fonctionne plus ,
- après une période de stockage plus longue dans des conditions
défavorables ,
- suite à de fortes sollicitations lors du transport .
CONSERVEZ LES INSTRUCTIONS SE

- 4 -
MODEL AND PARAMETERS
Modèle
DZ-260C-V1
DZ-260C-V2
DZ-260C-V3
Longueur du joint
320mm
320mm
320mm
Dimensions de la
chambre
355*340*70mm
355*340*70mm
355*340*70mm
Type de pompe à
vide
La pompe à
huile
La pompe à
huile
La pompe à
huile
Vitesse de
pompage de la
pompe à vide
6,5 m³/heure
6,5 m³/heure
6,5 m³/heure
Tension
C.A. 120 V 60
Hz
C.A. 230 V 50
Hz
C.A. 230 V 50
Hz
Max. Pouvoir
1 7 00W
1 7 00W
1 7 00W
Puissance de la
pompe à vide
180W
180W
180W
Matériel de
machine
Acier
inoxydable 201
Acier
inoxydable 201
Acier
inoxydable 201

- 5 -
STRUCTURE DIAGRAM
1
Housse sous vide
dix
Transformateur de
chauffage
2
Bande de silicone
11
Électrovanne de pompe à
vide
3
Barre de mise sous vide
12
Interrupteur
4
Bande chauffante
d'étanchéité
13
Fiche d'alimentation
5
Tige de pressage de sacs
14
Pompe à vide
6
Plaque de base
15
Port d'injection d'huile
7
Indicateur
16
Fenêtre d'observation du
niveau d'huile
8
Jauge à vide
17
Vis de vidange d'huile
9
Circuit imprimé

- 6 -
PARTS LIST
DZ-260C-V1
DZ-260C-V2
DZ-260C-V3
Fil chauffant
×2
×2
×2
Tissu en téflon
×2
×2
×2
Panneau de
remplissage
×1
×1
×1
Huile de pompe à
vide
×1
×1
×1
Clé Allen
×1
×1
×1
Sac d'aspirateur
×30
×30
×30
Bande d'étanchéité
de chambre
×1
×1
×1
Cordon
d'alimentation
× 1
×1
×1
Manuel de
l'Utilisateur
×1
×1
×1
Model
Parts

- 7 -
OPERATING INSTRUCTIONS
1. Dévissez la plaque de recouvrement
arrière.
2. ①. Retirez le filtre à brouillard
d'huile ;
②. Ajoutez de l'huile de pompe à
vide ;
③. Niveau d'huile entre 1/2 et 3/4 du
trou d'observation (ne pas remplir) ;
Après avoir ajouté l'huile, revissez le
filtre à brouillard d'huile, fermez le
couvercle arrière.
3 . INSTRUCTIONS D'UTILISATION DU PANNEAU
Étape 1 : connectez l’alimentation correspondante
Étape 2 : À ciel ouvert CHANGER
Étape 3: ① TEMPS DE VIDE : en état de veille, cliquez sur le bouton DIMINUER
ou AUGMENTER pour définir le temps de vide idéal , les articles généraux sont
réglés sur 30 à 40 secondes.
Étape 4: ② TEMPS DE SCELLAGE : cliquez sur le bouton DIMINUER ou
AUGMENTER pour régler le temps, et le temps de scellage est généralement
réglé sur 2-2,2 s. Le temps de soudure est réglé en fonction de l'épaisseur du sac
sous vide. Il est strictement interdit de régler le temps de scellage trop longtemps
ou de brûler la bande chauffante de scellage.
Étape 5 : ③ TEMPS DE REFROIDISSEMENT : En état de veille, cliquez sur le
bouton DIMINUER ou AUGMENTER pour définir le temps de refroidissement
idéal. Les éléments généraux sont définis sur 3 à 5 secondes.
- 8 -
4.① Mettez votre produit dedans, le
joint du sac sous vide est placé sur la
bande chauffante. Appuyez sur la
bande du sac pour aplatir le produit.
5. Tenez l'avant du couvercle avec les
deux mains et appuyez fermement sur la
couverture. La machine commence à
fonctionner, après le vacuomètre le
pointeur commence à fonctionner,
desserrez les mains, la machine
complète automatiquement l'emballage.
6. MARINER : Cliquez sur le bouton de
marinade dans le coin supérieur droit
du panneau de commande, le voyant
de marinade s'allumera, ajustera le
temps de pompage et démarrera le
travail de marinade . À ce moment-là,
la machine est uniquement sous vide,
sans scellement.
7. Lorsque la machine doit changer
l'huile ou n'est pas utilisée pendant une
longue période, desserrez la vis sous la
fenêtre d'huile et vidangez l'huile de la
pompe à vide. Il est conseillé de
remplacer l'huile de la pompe à vide
après que la machine a fonctionné en
continu pendant 800 heures .

- 9 -
CIRCUIT DIAGRAM
- 10 -
MAINTENANCE
- 11 -
4. Après utilisation , la surface de la machine doit être nettoyée et les
matériaux résiduels à l'intérieur de la machine doivent être éliminés.
5. Lors du stockage, conserver dans un endroit propre, sec et sûr , hors de
portée des enfants.
6. Tous les entretiens, réparations et réparations non abordés dans le manuel
doivent être effectués uniquement par un technicien de service qualifié .
Remplace le tissu haute température (tissu en téflon)
4. Retirez les vis des deux côtés du plateau,
puis récupérez l'ensemble du plateau .
5. Retirez les vis supérieures .
6. Supprimer l'ancien tissu haute
température .
4. Appliquez un nouveau chiffon haute
température .
5. Réinstallez les vis d'origine
6. Fin de l'installation .

- 12 -
Remplace le Bande d'étanchéité de chambre
3. Retirez la bande d'étanchéité de
la chambre .
4. Remplace le Bande d'étanchéité
de chambre avec une nouvelle
3. Compléter le Installation

- 13 -
TROUBLESHOOTING AND SOLUTIONS
Problème
Cause possible
Solution
La machine ne
fonctionne pas et le
panneau de
commande n'affiche
rien.
1. Aucune connexion de l’
alimentation électrique.
2. Le contact de l’
interrupteur d’
alimentation se desserre.
1. Vérifiez si la fiche et la
prise sont correctement
connectées.
2. Vérifiez si le câblage de
la partie d'entrée
d'alimentation à l'intérieur
de la machine est desserré
ou détaché.
Le contrôle panneau
démarrage, mais la
machine ça ne marche
pas.
Le paramètre est en cours
de définition.
Terminez le paramétrage.
Le meilleur état de vide
ne peut pas être
atteint . La vitesse de
pompage sous vide est
lente.
1. Temps de mise sous
vide court.
2. L’huile dans la pompe à
vide n’est pas suffisante
ou l’huile n’est pas propre.
3. Fuite d'air et usure de la
bague d'étanchéité.
1. Prolongez le temps de
vide.
2. Vérifiez le niveau d'huile,
faites le plein ou changez
l'huile (faites attention au
type d'huile (huile sous
vide 46#,68#) et à la
quantité d'huile.
3. Remplacez la bague
d'étanchéité.
Défaillance de
l'étanchéité ou
mauvaise étanchéité.
1. Les sacs ne sont pas
correctement placés sur
les plaques chauffantes.
2. Temps de scellage trop
long/court.
3. Température de
chauffage inappropriée .
4. Bande de silicium
1. Placez les sacs sur
l'assiette dans l'ordre.
2.
Raccourcissez/prolongez
le temps de scellage.
3. Choisissez la bonne
température.
4. Nettoyez ou remplacez

- 14 -
endommagée ou
contenant des impuretés.
5. Dommages au fil
chauffant électrique .
le silicone caoutchouc.
5. Changez le fil chauffant
électrique.
CORRECT DISPOSAL
Ce produit est soumis aux dispositions de la directive
européenne 2012/19/CE. Le symbole représentant une poubelle
barrée indique que le produit nécessite une collecte sélective
des déchets dans l'Union européenne. Ceci s'applique au
produit et à tous les accessoires marqués de ce symbole. Les produits
marqués comme tels ne peuvent pas être jetés avec les ordures
ménagères normales, mais doivent être déposés dans un point de collecte
pour le recyclage des appareils électriques et électroniques.
Fabricant : Shanghaimuxinmuyeyouxiangongsi
Adresse : Baoshanqu Shuangchenglu 803long 11hao 1602A-1609shi
Shanghai
REPRÉSENTANT CE : SHUNSHUN GmbH .
Römeräcker 9 Z2021,76351 Linkenheim-Hochstetten, Allemagne
REPRÉSENTANT DU ROYAUME-UNI : Pooledas Group Ltd.
Unité 5 Albert Edward House, The Pavilions Preston, Royaume-Uni
Importé en Australie : SIHAO PTY LTD.
1 ROKEVA STREETASTWOOD NSW 2122 Australie
Importé aux États-Unis : Sanven Technology Ltd.
Bureau 250, 9166 Anaheim Place, Rancho Cucamonga, CA 91730
Fabriqué en Chine

- 15 -


Zertifikat für technischen Support und E-Garantie
www.vevor.com/support
VAKUUMVERPACKUNGSMASCHINE
BENUTZERHANDBUCH
Modell: DZ-260C -V1, DZ-260C -V2, DZ-260C -V3
We continue to be committed to provide you tools with competitive price.
"Save Half", "Half Price" or any other similar expressions used by us only represents an
estimate of savings you might benefit from buying certain tools with us compared to the major
top brands and does not necessarily mean to cover all categories of tools offered by us. You
are kindly reminded to verify carefully when you are placing an order with us if you are
actually saving half in comparison with the top major brands.

- 1 -
Modell: DZ-260C -V1, DZ-260C -V2, DZ-260C -V3
Have product questions? Need technical support? Please feel free to
contact us:
Technical Support and E-Warranty Certificate
www.vevor.com/support
NEED HELP? CONTACT US!
This is the original instruction, please read all manual instructions
carefully before operating. VEVOR reserves a clear interpretation of our
user manual. The appearance of the product shall be subject to the
product you received. Please forgive us that we won't inform you again if
there are any technology or software updates on our product.
VACUUM PACKING MACHINE

- 2 -
5. Lesen Sie alle MONTAGE- UND BETRIEBSANWEISUNGEN sorgfältig
durch und verstehen Sie sie, bevor Sie das Gerät in Betrieb nehmen.
6. Die Nichtbeachtung der Sicherheitsregeln und anderer grundlegender
Sicherheitsvorkehrungen kann zu schweren Verletzungen führen.
GENERAL SAFETY RULES
Bitte lesen Sie die gesamte Bedienungsanleitung durch , bevor Sie die
Produkte zum ersten Mal verwenden . Sie enthalten wichtige Hinweise zur
korrekten Bedienung .
Die Garantie/Gewährleistung erlischt, wenn ein Schaden entsteht, der auf
die Nichtbeachtung der Bedienungsanleitung zurückzuführen ist . Eine
Haftung für sämtliche Folgeschäden ist ausgeschlossen !
Sach- und Personenschäden, die durch unsachgemäßen Gebrauch oder
die Nichtbeachtung der Sicherheitshinweise entstehen, übernehmen wir
keine Haftung ! In solchen Fällen erlischt der
Garantie-/Gewährleistungsanspruch
Das eigenmächtige Umbauen, Verändern oder Demontieren der Produkte
ist aus Sicherheits- und Zulassungsgründen ( CE) unzulässig.
Das Produkt ist kein Spielzeug und muss außerhalb der Reichweite von
Kindern aufbewahrt werden.
Bei Anwesenheit von Kindern ist daher besondere Vorsicht geboten.
Das Produkt darf nicht feucht oder nass werden, es ist nur für die
Verwendung in trockenen Innenräumen bestimmt (nicht in Badezimmern
oder ähnlich feuchten Bereichen). Es besteht die Gefahr eines tödlichen
Stromschlags.
Setzen Sie das Produkt oder dessen Zubehör keiner Feuchtigkeit oder
extrem hohen oder niedrigen Temperaturen aus.

- 3 -
Lassen Sie das Verpackungsmaterial nicht unbeaufsichtigt . Es kann zu
gefährlichem Spielmaterial für Kinder werden.
Stürze, Stürze, Druck- oder Zugkräfte können die Funktion des Produkts
zerstören oder zumindest einschränken .
Sie das Gerät niemals in der Nähe von brennbaren oder leicht brennbaren
Stoffen auf brennbare Materialien .
Achten Sie immer darauf, dass sich der Drehtisch, auf dem das Objekt
platziert wird, in der Mitte des Gehäuses befindet !
Diese Maschine verwendet Kunststofffolie oder Kunststoffaluminiumfolie
als Materialien zum Vakuumverpacken von pastösen Lebensmitteln, Obst,
Soßengemüse, Chemikalien, Pharmazeutika, elektronischen Bauteilen,
Präzisionsinstrumenten, seltenen Metallen und anderen Gegenständen.
Unter Vakuum verpackte Produkte oxidieren oder schimmeln nicht so
leicht. Besonders geeignet für Branchen wie Tee, Lebensmittel und
Medizin.
Wenn Sie Grund zu der Annahme haben, dass ein sicherer Betrieb nicht
mehr möglich ist, schalten Sie das Gerät sofort ab und sichern Sie es
gegen unbeabsichtigten Betrieb .
Es ist davon auszugehen, dass ein sicherer Betrieb nicht mehr möglich ist,
wenn:
- das Gerät sichtbare Beschädigungen aufweist,
- das Gerät nicht mehr funktioniert ,
- nach längerer Lagerung unter ungünstigen Bedingungen ,
- nach starker Beanspruchung beim Transport .
ANLEITUNG AUFBEWAHREN _

- 4 -
MODEL AND PARAMETERS
Modell
DZ-260C-V1
DZ-260C-V2
DZ-260C-V3
Dichtungslänge
320mm
320mm
320mm
Kammerabmessu
ngen
355*340*70mm
355*340*70mm
355*340*70mm
Vakuumpumpenty
p
Ölpumpe
Ölpumpe
Ölpumpe
Pumpgeschwindig
keit der
Vakuumpumpe
6,5m³/h
6,5m³/h
6,5m³/h
Stromspannung
Wechselstrom
120 V 60 Hz
Wechselstrom
230 V 50 Hz
Wechselstrom
230 V 50 Hz
Max. Leistung
1 7 00W
1 7 00W
1 7 00W
Vakuumpumpenlei
stung _ _ _ _ _
180W
180W
180W
Maschinenmateria
l
201 Edelstahl
201 Edelstahl
201 Edelstahl

- 5 -
STRUCTURE DIAGRAM
1
Vakuumabdeckung
10
Heiztransformator
2
Silikonstreifen
11
Magnetventil der
Vakuumpumpe
3
Vakuumierbalken
12
Stromschalter
4
Abdichtendes Heizband
13
Netzstecker
5
Beutelpressstange
14
Vakuumpumpe
6
Grundplatte
15
Öleinspritzöffnung
7
Indikator
16
Sichtfenster zur
Beobachtung des Ölstands
8
Vakuummessgerät
17
Ölablassschraube
9
Leiterplatte

- 6 -
PARTS LIST
DZ-260C-V1
DZ-260C-V2
DZ-260C-V3
Heizdraht
×2
×2
×2
Teflontuch
×2
×2
×2
Füllbrett
×1
×1
×1
Vakuumpumpenöl
×1
×1
×1
Inbusschlüssel
×1
×1
×1
Staubsaugerbeutel
×30
×30
×30
Kammerdichtband
×1
×1
×1
Netzkabel
× 1
×1
×1
Benutzerhandbuch
×1
×1
×1
Model
Parts

- 7 -
OPERATING INSTRUCTIONS
1. Schrauben Sie die hintere
Abdeckplatte ab.
2. ①. Nehmen Sie den Ölnebelfilter
heraus;
②. Vakuumpumpenöl hinzufügen;
③. Ölstand zwischen 1/2 und 3/4 des
Beobachtungslochs (nicht füllen);
Schrauben Sie nach dem Einfüllen
des Öls den Ölnebelfilter wieder fest
und schließen Sie die hintere
Abdeckung.
3 . ANWEISUNGEN ZUR PANEL-NUTZUNG
Schritt 1: Schließen Sie das passende Netzteil an
Schritt 2: Open AIR SCHALTEN
Schritt 3: ① VAKUUMZEIT : Klicken Sie im Standby-Zustand auf die Schaltfläche
VERRINGERN oder ERHÖHEN , um die ideale Vakuumzeit einzustellen . Die
allgemeinen Einstellungen sind auf 30–40 Sekunden eingestellt.
Schritt 4: ② SIEGELZEIT : Klicken Sie auf die Schaltfläche VERRINGERN oder
ERHÖHEN , um die Zeit einzustellen. Die Siegelzeit ist im Allgemeinen auf 2 bis
2,2 Sekunden eingestellt. Die Siegelzeit wird entsprechend der Dicke des
Vakuumbeutels eingestellt. Es ist strengstens untersagt, die Siegelzeit zu lang
einzustellen oder den Siegelheizstreifen durchzubrennen.
Schritt 5: ③ KÜHLZEIT: Klicken Sie im Standby-Modus auf die Schaltfläche
„VERRINGERN“ oder „ERHÖHEN“, um die ideale Kühlzeit einzustellen. Die
allgemeinen Einstellungen sind auf 3–5 Sekunden eingestellt.

- 8 -
4.① Legen Sie Ihr Produkt hinein, die
Vakuumbeutelversiegelung wird auf
den Heizstreifen gelegt. Drücken Sie
auf den Beutelstreifen, um das Produkt
flach zu machen.
5. Halten Sie die Vorderseite der
Abdeckung mit beiden Händen fest und
fest andrücken auf dem Cover. Die
Maschine beginnt nach dem
Vakuummeter zu arbeiten Zeiger
beginnt zu laufen, lösen Sie die Zeiger,
die Maschine Vervollständigt die
Verpackung automatisch.
6. MARINIEREN : Klicken Sie auf die
Schaltfläche „Marinieren“ in der
oberen rechten Ecke des Bedienfelds.
Die Marinierungsanzeige leuchtet auf.
Passen Sie die Pumpzeit an und
beginnen Sie mit dem Marinieren . Zu
diesem Zeitpunkt befindet sich die
Maschine nur im Vakuumzustand ohne
7. Wenn die Maschine das Öl wechseln
muss oder längere Zeit nicht verwendet
wird, lösen Sie die Schraube unter dem
Ölfenster und lassen Sie das Öl der
Vakuumpumpe ab. Wir empfehlen, das
Vakuumpumpenöl auszutauschen,
nachdem die Maschine 800 Stunden
ununterbrochen in Betrieb war .

- 9 -
Abdichtung.
CIRCUIT DIAGRAM

- 10 -
MAINTENANCE
- 11 -
7. Nach dem Gebrauch sollte die Oberfläche der Maschine gereinigt und
Rückstände im Inneren der Maschine entfernt werden.
8. Bewahren Sie das Gerät bei der Lagerung an einem sauberen, trockenen
und sicheren Ort außerhalb der Reichweite von Kindern auf.
9. Alle Wartungs-, Service- und Reparaturarbeiten, die nicht im Handbuch
beschrieben sind, sollten nur von qualifizierten Servicetechnikern durchgeführt
werden .
Ersetze das Hochtemperaturtuch (Teflontuch)
7. Entfernen Sie die Schrauben auf beiden
Seiten des Fachs und nehmen Sie dann das
gesamte Fach hoch .
8. Entfernen Sie die oberen Schrauben .
9. Sie das Alte Hochtemperatur-Tuch .
4. Tragen Sie ein neues
Hochtemperaturtuch auf .
5. Bringen Sie die Originalschrauben wieder
an
6. Abschluss der Installation .
- 12 -
Ersetze das Kammerdichtband
5. Entfernen Sie den
Kammerdichtungsstreifen .
6. Ersetze das Kammerdichtband
durch ein neues ersetzen
3. Abschluss des Installation

- 13 -
TROUBLESHOOTING AND SOLUTIONS
Problem
Mögliche Ursache
Lösung
Die Maschine funktioniert
nicht und das Bedienfeld
zeigt nichts an.
1.Kein Anschluss der
Stromversorgung.
2. Der Kontakt des
Netzschalters verliert
sich.
1. Prüfen Sie, ob
Stecker und Steckdose
ordnungsgemäß
verbunden sind.
2. Überprüfen Sie, ob
die Verkabelung des
Stromeingangsteils im
Inneren der Maschine
locker oder gelöst ist.
Der Kontrolle Panel Startup,
aber die Maschine
funktioniert nicht.
Der Parameter wird
eingestellt.
Schließen Sie die
Parametereinstellung
ab.
Der beste Vakuumzustand
kann nicht erreicht werden .
Die
Vakuumpumpgeschwindigkeit
ist langsam.
1. Kurze
Vakuumierzeit.
2. Das Öl in der
Vakuumpumpe reicht
nicht aus oder das Öl
ist nicht sauber.
3. Luftleckage und
Verschleiß des
Dichtrings.
1. Verlängern Sie die
Vakuumzeit.
2.Überprüfen Sie den
Ölstand, tanken Sie
nach oder wechseln Sie
das Öl (achten Sie auf
die Ölsorte (Vakuumöl
46#,68#) und die
Ölmenge).
3.Ersetzen Sie den
Dichtungsring.
Dichtungsfehler oder
1.Die Beutel sind nicht
1. Legen Sie die Beutel

- 14 -
schlechte Abdichtung.
richtig auf den
Heizplatten platziert.
2. Zu lange/kurze
Siegelzeit.
3. Ungeeignete
Heiztemperatur.
4.Silikonstreifen
beschädigt oder mit
Verunreinigungen.
5. Beschädigung des
elektrischen
Heizkabels .
der Reihe nach auf den
Teller.
2. Siegelzeit
verkürzen/verlängern.
3. Wählen Sie die
richtige Temperatur.
4. Reinigen oder
ersetzen Sie das Silikon
Gummi.
5. Elektrisches
Heizkabel wechseln.
CORRECT DISPOSAL
Dieses Produkt unterliegt den Bestimmungen der europäischen
Richtlinie 2012/19/EG. Das Symbol einer durchgestrichenen
Mülltonne weist darauf hin, dass das Produkt in der
Europäischen Union einer getrennten Müllsammlung bedarf.
Dies gilt für das Produkt und alle Zubehörteile, die mit diesem Symbol
gekennzeichnet sind. Als solche gekennzeichnete Produkte dürfen nicht
über den normalen Hausmüll entsorgt werden, sondern müssen an einer
Sammelstelle für das Recycling von Elektro- und Elektronikgeräten
abgegeben werden
Hersteller: Shanghaimuxinmuyeyouxiangongsi
Adresse: Baoshanqu Shuangchenglu 803long 11hao 1602A-1609shi
Shanghai
EK-VERTRETER: SHUNSHUN GmbH .
Römeräcker 9 Z2021,76351 Linkenheim-Hochstetten, Deutschland
Tel: +49 1727041930 euvertreter@gmail.com

- 15 -
Britischer Vertreter: Pooledas Group Ltd.
Einheit 5 Albert Edward House, The Pavilions Preston, Vereinigtes
Königreich
Tel: 01772418127 pooledas123@gmail.com
Importiert nach AUS: SIHAO PTY LTD.
1 ROKEVA STREETEASTWOOD NSW 2122 Australien
Importiert in die USA: Sanven Technology Ltd.
Suite 250, 9166 Anaheim Place, Rancho Cucamonga, CA 91730
In China hergestellt


Supporto tecnico e certificato di garanzia elettronica
www.vevor.com/support
CONFEZIONATRICE SOTTOVUOTO
MANUALE D'USO
Modello: DZ-260C -V1, DZ-260C -V2, DZ-260C -V3
We continue to be committed to provide you tools with competitive price.
"Save Half", "Half Price" or any other similar expressions used by us only represents an
estimate of savings you might benefit from buying certain tools with us compared to the major
top brands and does not necessarily mean to cover all categories of tools offered by us. You
are kindly reminded to verify carefully when you are placing an order with us if you are
actually saving half in comparison with the top major brands.

- 1 -
Modello: DZ-260C -V1, DZ-260C -V2, DZ-260C -V3
Have product questions? Need technical support? Please feel free to
contact us:
Technical Support and E-Warranty Certificate
www.vevor.com/support
NEED HELP? CONTACT US!
This is the original instruction, please read all manual instructions
carefully before operating. VEVOR reserves a clear interpretation of our
user manual. The appearance of the product shall be subject to the
product you received. Please forgive us that we won't inform you again if
there are any technology or software updates on our product.
VACUUM PACKING MACHINE

- 2 -
7. Leggere attentamente e comprendere tutte le ISTRUZIONI DI
MONTAGGIO E DI FUNZIONAMENTO prima dell'uso.
8. La mancata osservanza delle norme di sicurezza e di altre precauzioni
di sicurezza di base può provocare gravi lesioni personali.
GENERAL SAFETY RULES
Si prega di leggere tutte le istruzioni per l' uso prima di utilizzare i prodotti
per la prima volta ; Contengono informazioni importanti sul corretto
funzionamento .
La garanzia decade se si verificano danni derivanti dal mancato rispetto
delle istruzioni per l'uso . La responsabilità per qualsiasi danno
consequenziale è esclusa!
Non ci assumiamo alcuna responsabilità per danni materiali o lesioni
personali causati da un uso improprio o dalla mancata osservanza delle
istruzioni di sicurezza ! In tali casi la garanzia/garanzia sarà nulla
La conversione non autorizzata , la modifica o lo smontaggio dei prodotti è
inammissibile per motivi di sicurezza e di approvazione ( CE).
Il prodotto non è un giocattolo e deve essere tenuto fuori dalla portata dei
bambini.
particolare attenzione in caso di presenza di bambini.
Il prodotto non deve inumidirsi o bagnarsi, è destinato esclusivamente
all'uso in ambienti interni asciutti (non bagni o aree simili umide). Pericolo
di scossa elettrica mortale.
Non esporre il prodotto o i suoi accessori all'umidità o a temperature
estremamente alte o basse.
Non lasciare integri i materiali di imballaggio . Potrebbero diventare

- 3 -
pericolosi materiali di gioco per i bambini.
Cadute, cadute, pressioni o forze di trazione potrebbero distruggere o
almeno limitare il funzionamento del prodotto.
Non posizionare mai il dispositivo in prossimità di sostanze combustibili o
facilmente materiali infiammabili .
Assicurarsi sempre che la tavola rotante su cui è posizionato l'oggetto si
trovi al centro dell'alloggiamento!
Questa macchina utilizza pellicola di plastica o pellicola di plastica di
alluminio come materiale per confezionare sottovuoto alimenti in pasta,
frutta, salse vegetali, prodotti chimici, prodotti farmaceutici, componenti
elettronici, strumenti di precisione, metalli rari e altri articoli. I prodotti
confezionati sotto vuoto non si ossidano né ammuffiscono facilmente.
Particolarmente adatto per settori quali tè, alimenti e medicinali.
Se avete motivo di ritenere che non sia più possibile un funzionamento
sicuro , scollegate immediatamente l'apparecchio e assicuratelo contro un
utilizzo involontario .
Si può presumere che un funzionamento sicuro non sia più possibile se:
- il dispositivo presenta segni visibili di danneggiamento,
- il dispositivo non funziona più ,
- dopo un lungo periodo di immagazzinamento in condizioni sfavorevoli ,
- a seguito di forti sollecitazioni durante il trasporto .
CONSERVARE LE SE ISTRUZIONI

- 4 -
MODEL AND PARAMETERS
Modello
DZ-260C-V1
DZ-260C-V2
DZ-260C-V3
Lunghezza della
guarnizione
320mm
320mm
320mm
Dimensioni della
camera
355*340*70mm
355*340*70mm
355*340*70mm
Tipo di pompa a
vuoto
Pompa dell'olio
Pompa dell'olio
Pompa dell'olio
Velocità di
pompaggio della
pompa a vuoto
6,5 m³/h
6,5 m³/h
6,5 m³/ora
Voltaggio
CA 120 V 60 Hz
CA 230 V 50 Hz
CA 230 V 50 Hz
Massimo. Energia
1700 W _
1700 W _
1700W _ _
P otenza della
pompa per vuoto
180 W
180 W
180 W
Materiale della
macchina
201 Acciaio
inossidabile
201 Acciaio
inossidabile
201 Acciaio
inossidabile

- 5 -
STRUCTURE DIAGRAM
1
Copertura sottovuoto
10
Trasformatore di
riscaldamento
2
Striscia in silicone
11
Elettrovalvola della pompa
del vuoto
3
Barra saldante sottovuoto
12
Interruttore di alimentazione
4
Striscia riscaldante
sigillante
13
Spina di alimentazione
5
Asta premisacco
14
Pompa a vuoto
6
Piastra di base
15
Porta di iniezione dell'olio
7
Indicatore
16
Finestra di osservazione del
livello dell'olio
8
Vacuometro
17
Vite di scarico dell'olio
9
Scheda di circuito

- 6 -
PARTS LIST
DZ-260C-V1
DZ-260C-V2
DZ-260C-V3
Filo riscaldante
×2
×2
×2
Panno in teflon
×2
×2
×2
Scheda di
riempimento
×1
×1
×1
Olio per pompe a
vuoto
×1
×1
×1
Chiave a brugola
×1
×1
×1
Sacco sottovuoto
×30
×30
×30
Striscia di tenuta
della camera
×1
×1
×1
Cavo di
alimentazione
× 1
×1
×1
Manuale d'uso
×1
×1
×1
Model
Parts

- 7 -
OPERATING INSTRUCTIONS
1. Svitare la piastra di copertura
posteriore.
2. ①. Estrarre il filtro della nebbia d'olio;
②. Aggiungere olio per pompa a
vuoto;
③. Livello dell'olio compreso tra 1/2 e
3/4 del foro di osservazione (non
riempire);
Dopo aver aggiunto l'olio, riavvitare il
filtro della nebbia d'olio e chiudere il
coperchio posteriore.
3 . ISTRUZIONI PER L'USO DEL PANNELLO
Passaggio 1: collegare l'alimentatore corrispondente
Passaggio 2: aprire AIR INTERRUTTORE
Passaggio 3: ① TEMPO DI ASPIRAZIONE : nello stato di standby, fare clic sul
pulsante DIMINUISCI o AUMENTA per impostare il tempo di aspirazione ideale ;
le voci generali sono impostate per 30-40 secondi.
Passaggio 4: ② TEMPO DI SIGILLATURA : fare clic sul pulsante DIMINUISCI o
AUMENTA per impostare l'ora e il tempo di sigillatura è generalmente impostato
su 2-2,2 secondi. Il tempo di saldatura viene impostato in base allo spessore del
sacchetto sottovuoto. È severamente vietato impostare un tempo di saldatura
troppo lungo o bruciare la striscia riscaldante di saldatura.
Passaggio 5: ③ TEMPO DI RAFFREDDAMENTO: Nello stato di standby, fare
clic sul pulsante DIMINUISCI o AUMENTA per impostare il tempo di
raffreddamento ideale, le voci generali sono impostate per 3-5 secondi.
- 8 -
4.① Inserisci il prodotto al suo interno,
il sigillo del sacchetto sottovuoto è
posizionato sulla striscia riscaldante.
Premi la striscia del sacchetto per
appiattire il prodotto.
5. Tenere la parte anteriore del
coperchio con entrambe le mani e
premere con forza verso il basso sulla
copertina. La macchina inizia a
funzionare, dopo il vuotometro il
puntatore inizia a funzionare, allenta le
mani, la macchina completa
automaticamente l'imballaggio.
6.MARINAZIONE : fare clic sul
pulsante marinatura nell'angolo in alto
a destra del pannello di controllo, la
spia della marinatura si accenderà,
regolerà il tempo di pompaggio e
inizierà il lavoro di marinatura . In
questo momento, la macchina si trova
solo in uno stato di vuoto senza
7. Quando la macchina deve cambiare
l'olio o non viene utilizzata per un lungo
periodo, allentare la vite sotto la finestra
dell'olio e scaricare l'olio della pompa a
vuoto. Si consiglia di sostituire l'olio della
pompa del vuoto dopo che la macchina
ha funzionato ininterrottamente per 800
ore .

- 9 -
sigillatura.
CIRCUIT DIAGRAM

- 10 -
MAINTENANCE

- 11 -
10. Dopo l' uso , la superficie della macchina deve essere pulita e i materiali
residui all'interno della macchina devono essere rimossi.
11. Durante la conservazione, conservare in un luogo pulito, asciutto e sicuro,
lontano dalla portata dei bambini.
12. Tutti gli interventi di manutenzione, assistenza e riparazione non descritti
nel manuale devono essere eseguiti esclusivamente da tecnici di assistenza
qualificati .
Sostituisci il panno per alte temperature (panno in teflon)
10. Rimuovere le viti su entrambi i lati del
vassoio, quindi sollevare l'intero vassoio .
11. Rimuovere le viti superiori .
12. Rimuovi il vecchio panno ad alta
temperatura .
4. Applicare un nuovo panno per alte
temperature .
5. Reinstallare le viti originali
6. Completamento dell'installazione .

- 12 -
Sostituisci il Striscia di tenuta della camera
7. Rimuovere la striscia di tenuta
della camera .
8. Sostituisci il Striscia di tenuta
della camera con una nuova
3. Completamento del Installazione

- 13 -
TROUBLESHOOTING AND SOLUTIONS
Problema
Causa possibile
Soluzione
La macchina non
funziona e il pannello
di controllo non
visualizza nulla.
1.Nessun collegamento
all'alimentazione.
2.Il contatto
dell'interruttore di
alimentazione si allenta.
1. Controllare se la spina e
la presa sono collegate
correttamente.
2. Controllare se il
cablaggio della parte di
ingresso alimentazione
all'interno della macchina è
allentato o staccato.
IL controllo pannello
avvio, ma la macchina
non funziona.
Il parametro è in fase di
impostazione.
Completare l'impostazione
dei parametri.
Non è possibile
ottenere il miglior stato
di vuoto . La velocità di
pompaggio del vuoto è
lenta.
1. Breve tempo di
aspirazione.
2. L'olio nella pompa del
vuoto non è sufficiente
oppure l'olio non è pulito.
3. Perdite d'aria e usura
dell'anello di tenuta.
1. Prolungare il tempo di
vuoto.
2.Controllare il livello
dell'olio, fare rifornimento o
cambiare l'olio (prestare
attenzione al tipo di olio
(olio per aspirazione
46#,68#) e alla quantità di
olio.
3.Sostituire l'anello di
tenuta.
Guasto alla tenuta o
scarsa tenuta.
1.I sacchetti non sono
posizionati correttamente
1. Disporre i sacchetti sul
piatto in ordine.

- 14 -
sulle piastre riscaldanti.
2. Tempo di saldatura
troppo lungo/breve.
3. Temperatura di
riscaldamento
inappropriata .
4. Striscia di silicone
danneggiata o con
impurità.
5. Danni al filo del
riscaldamento elettrico .
2. Ridurre/prolungare il
tempo di sigillatura.
3. Scegli la temperatura
adeguata.
4. Pulire o sostituire il
silicone gomma.
5.Sostituire il filo del
riscaldamento elettrico.
CORRECT DISPOSAL
Questo prodotto è soggetto alle disposizioni della Direttiva
Europea 2012/19/CE. Il simbolo del bidone della spazzatura
barrato indica che nell'Unione Europea il prodotto richiede la
raccolta differenziata dei rifiuti. Ciò vale per il prodotto e tutti gli
accessori contrassegnati da questo simbolo. I prodotti contrassegnati
come tali non possono essere smaltiti con i normali rifiuti domestici, ma
devono essere portati in un punto di raccolta per il riciclaggio di dispositivi
elettrici ed elettronici
Produttore: Shanghaimuxinmuyeyouxiangongsi
Indirizzo: Baoshanqu Shuangchenglu 803long 11hao 1602A-1609shi
Shanghai
RAPPRESENTANTE CE: SHUNSHUN GmbH .
Römeräcker 9 Z2021,76351 Linkenheim-Hochstetten, Germania
Tel: +49 1727041930 euvertreter@gmail.com
REP. DEL REGNO UNITO: Pooledas Group Ltd.
Unità 5 Albert Edward House, The Pavilions Preston, Regno Unito

- 15 -
Tel: 01772418127 pooledas123@gmail.com
Importato in AUS: SIHAO PTY LTD.
1 ROKEVA STREETEASTWOOD NSW 2122 Australia
Importato negli Stati Uniti: Sanven Technology Ltd.
Suite 250, 9166 Anaheim Place, Rancho Cucamonga, CA 91730
Made in China


Soporte técnico y certificado de garantía electrónica
www.vevor.com/support
MÁQUINA DE ENVASADO AL VACÍO
MANUAL DE USUARIO
Modelo: DZ-260C -V1, DZ-260C -V2, DZ-260C -V3
We continue to be committed to provide you tools with competitive price.
"Save Half", "Half Price" or any other similar expressions used by us only represents an
estimate of savings you might benefit from buying certain tools with us compared to the major
top brands and does not necessarily mean to cover all categories of tools offered by us. You
are kindly reminded to verify carefully when you are placing an order with us if you are
actually saving half in comparison with the top major brands.

- 1 -
Modelo: DZ-260C -V1, DZ-260C -V2, DZ-260C -V3
Have product questions? Need technical support? Please feel free to
contact us:
Technical Support and E-Warranty Certificate
www.vevor.com/support
NEED HELP? CONTACT US!
This is the original instruction, please read all manual instructions
carefully before operating. VEVOR reserves a clear interpretation of our
user manual. The appearance of the product shall be subject to the
product you received. Please forgive us that we won't inform you again if
there are any technology or software updates on our product.
VACUUM PACKING MACHINE

- 2 -
9. L ea atentamente y comprenda todas las INSTRUCCIONES DE
MONTAJE Y OPERACIÓN antes de operar.
10. El incumplimiento de las reglas de seguridad y otras precauciones
básicas de seguridad puede provocar lesiones personales graves.
GENERAL SAFETY RULES
Lea todas las instrucciones de funcionamiento antes de utilizar los
productos por primera vez ; Contienen información importante sobre el
funcionamiento correcto .
La garantía quedará anulada si se producen daños como resultado del
incumplimiento de las instrucciones de funcionamiento. ¡ Se excluye la
responsabilidad por todos los daños consiguientes !
¡No asumimos ninguna responsabilidad por daños a la propiedad o
lesiones personales causados por un uso inadecuado o por el
incumplimiento de las instrucciones de seguridad ! En tales casos la
garantía quedará anulada.
La conversión no autorizada , la modificación o el desmontaje de los
productos son inadmisibles por razones de seguridad y aprobación ( CE).
El producto no es un juguete y debe mantenerse fuera del alcance de los
niños.
Por lo tanto , se debe tener especial cuidado si hay niños presentes.
El producto no debe humedecerse ni mojarse, solo está diseñado para su
uso en lugares interiores secos (no baños ni áreas similarmente húmedas).
Existe riesgo de descarga eléctrica fatal.
No exponga el producto ni sus accesorios a humedad ni a temperaturas
extremadamente altas o bajas.

- 3 -
No deje los materiales de embalaje sin supervisar . Pueden convertirse en
material de juego peligroso para los niños.
Las caídas, las fuerzas de presión o de tracción podrían destruir o al
menos limitar el funcionamiento del producto.
Nunca coloque el dispositivo cerca de fuentes combustibles o fácilmente
materiales inflamables .
¡Asegúrese siempre de que la mesa giratoria sobre la que se coloca el
objeto esté situada en el centro de la carcasa!
Esta máquina utiliza película plástica o película plástica de aluminio como
material para envasar al vacío alimentos en pasta, frutas, verduras en
salsa, productos químicos, productos farmacéuticos, componentes
electrónicos, instrumentos de precisión, metales raros y otros artículos.
Los productos envasados al vacío no se oxidan ni se enmohecen
fácilmente. Especialmente indicado para industrias como la del té, la
alimentaria y la medicinal.
Si tiene motivos para suponer que ya no es posible un funcionamiento
seguro, desconecte el dispositivo inmediatamente y asegúrelo contra un
funcionamiento involuntario .
Se puede suponer que ya no es posible un funcionamiento seguro si :
- el dispositivo presenta signos visibles de daños,
- el dispositivo ya no funciona ,
- después de un largo período de almacenamiento en condiciones
desfavorables ,
- después de un estrés intenso durante el transporte .
GUARDA ESTAS INSTRUCCIONES

- 4 -
MODEL AND PARAMETERS
Modelo
DZ-260C-V1
DZ-260C-V2
DZ-260C-V3
Longitud del sello
320 mm
320 mm
320 mm
Dimensiones de la
cámara
355*340*70mm
355*340*70mm
355*340*70mm
Tipo de bomba de
vacío
Bomba de
aceite
Bomba de
aceite
Bomba de
aceite
Velocidad de
bombeo de la
bomba de vacío
6,5 m³/h
6,5 m³/h
6,5 m³/h
Voltaje
CA 120 V 60
Hz.
CA 230 V 50 Hz
CA 230 V 50 Hz
Máx. Fuerza
1 7 00W
1 7 00W
1 7 00W
Potencia de la
bomba de vacío
180W
180W
180W
Material de la
máquina
Acero
inoxidable 201
Acero
inoxidable 201
Acero
inoxidable 201
- 5 -
STRUCTURE DIAGRAM
1
Tapa de vacío
10
Transformador de
calefacción
2
tira de silicona
11
Electroválvula de bomba de
vacío
3
Barra de sellado al vacío
12
Interruptor de alimentación
4
Tira calefactora de sellado
13
Enchufe
5
Varilla para prensar bolsas
14
Bomba aspiradora
6
Plato base
15
Puerto de inyección de
aceite
7
Indicador
dieciséis
Ventana de observación del
nivel de aceite
8
Indicador de vacio
17
Tornillo de drenaje de aceite
9
Placa de circuito

- 6 -
PARTS LIST
DZ-260C-V1
DZ-260C-V2
DZ-260C-V3
Cable calefactor
×2
×2
×2
Paño de teflón
×2
×2
×2
Tablero de relleno
×1
×1
×1
Aceite de bomba de
vacío
×1
×1
×1
Llave Allen
×1
×1
×1
Bolsa de vacío
×30
×30
×30
Tira de sellado de
cámara
×1
×1
×1
Cable de
alimentación
× 1
×1
×1
Manual de usuario
×1
×1
×1
Model
Parts
- 7 -
OPERATING INSTRUCTIONS
1. Desatornille la placa de la cubierta
trasera.
2. ①. Saque el filtro de neblina de
aceite;
②. Agregue aceite para la bomba de
vacío;
③. Nivel de aceite entre 1/2-3/4 del
orificio de observación (no llenar);
Después de agregar el aceite, vuelva
a atornillar el filtro de neblina de
aceite y cierre la tapa trasera.
3 . INSTRUCCIONES DE USO DEL PANEL
Paso 1: conecte la fuente de alimentación correspondiente
Paso 2:AIRE ABIERTO CAMBIAR
Paso 3: ① TIEMPO DE VACÍO : en el estado de espera, haga clic en el botón
DISMINUIR o AUMENTAR para configurar el tiempo de vacío ideal . Los
elementos generales están configurados para 30-40 segundos.
Etapa 4: ② TIEMPO DE SELLADO : haga clic en el botón DISMINUIR o
AUMENTAR para configurar el tiempo, y el tiempo de sellado generalmente se
establece en 2-2,2 s. El tiempo de sellado se establece en función del grosor de la
bolsa de vacío. Está estrictamente prohibido establecer el tiempo de sellado
demasiado largo o quemar la tira calefactora de sellado.
Paso 5: ③ TIEMPO DE ENFRIAMIENTO: En el estado de espera, haga clic en el
botón DISMINUIR o AUMENTAR para configurar el tiempo de enfriamiento ideal;
los elementos generales están configurados para 3-5 segundos.
- 8 -
4.① Coloque su producto en él, el
sello de la bolsa de vacío se coloca en
la tira calefactora. Presione la tira de la
bolsa para aplanar el producto.
5. Sostenga el frente de la cubierta con
ambas manos. y presione firmemente
hacia abajo en la portada. La máquina
comienza a funcionar, después del
medidor de vacío. El puntero comienza
a funcionar, afloje las manos, la
máquina. completa automáticamente el
embalaje.
6.MARINAR : Haga clic en el botón
marinar en la esquina superior derecha
del panel de control, la luz indicadora
de marinar se iluminará, ajustará el
tiempo de bombeo y comenzará el
trabajo de marinado . En este
momento, la máquina está en estado
de vacío únicamente sin sellado.
7. Cuando la máquina necesite cambiar
el aceite o no se utilice durante un
período prolongado, afloje el tornillo
debajo de la ventana de aceite y drene
el aceite de la bomba de vacío.
Sugerimos reemplazar el aceite de la
bomba de vacío después de que la
máquina haya estado funcionando

- 9 -
continuamente durante 800 horas .
CIRCUIT DIAGRAM

- 10 -
MAINTENANCE
- 11 -
13. Después de su uso , se debe limpiar la superficie de la máquina y se
deben eliminar los materiales residuales dentro de la máquina.
14. Cuando lo guarde, manténgalo en un lugar limpio, seco y seguro , lejos
del alcance de los niños.
15. Todo el mantenimiento, servicio y reparaciones no mencionados en el
manual deben ser realizados únicamente por técnicos de servicio calificados .
Reemplace la Paño para altas temperaturas (Paño de
teflón)
13. Retire los tornillos a ambos lados de la
bandeja y luego levante toda la bandeja .
14. Retire los tornillos superiores .
15. Quitar lo viejo paño de alta
temperatura .
4. Aplique un paño nuevo para alta
temperatura .
5. Vuelva a instalar los tornillos originales.
6. Completar la instalación .

- 12 -
Reemplace la Tira de sellado de cámara
9. Retire la tira selladora de la
cámara .
10.Reemplace la Tira de sellado de
cámara con una nueva
3. Completar el Instalación

- 13 -
TROUBLESHOOTING AND SOLUTIONS
Problema
Causa posible
Solución
La máquina no
funciona y el panel de
control no muestra
nada.
1.No hay conexión de la
fuente de alimentación.
2.El contacto del
interruptor de encendido
se suelta.
1. Compruebe si el
enchufe y el enchufe están
conectados correctamente.
2. Verifique si el cableado
de la parte de entrada de
energía dentro de la
máquina está suelto o
desconectado.
El control panel inicio,
pero la máquina no
funciona.
El parámetro se está
configurando.
Complete la configuración
de parámetros.
No se puede lograr el
mejor estado de
vacío . La velocidad de
bombeo de vacío es
lenta.
1. Corto tiempo de
aspiración.
2. El aceite de la bomba
de vacío no es suficiente o
el aceite no está limpio.
3. Fuga de aire y desgaste
del anillo de sellado.
1.Ampliar el tiempo de
vacío.
2.Compruebe el nivel de
aceite, reposte o cambie el
aceite (preste atención al
tipo de aceite (aceite de
vacío 46#,68#) y a la
cantidad de aceite.
3.Reemplace el anillo de
sellado.
Fallo de sellado o
mal sellado.
1.Las bolsas no están
correctamente colocadas
sobre las placas
1. Coloca las bolsas en el
plato en orden.
2. Acortar/prolongar el

- 14 -
calefactoras.
2. Tiempo de sellado
demasiado largo/corto.
3. Temperatura de
calentamiento
inadecuada .
4.Tira de silicona dañada
o con impurezas.
5. Daño del cable
calefactor eléctrico .
tiempo de sellado.
3. Elija la temperatura
adecuada.
4. Limpiar o reemplazar la
silicona. goma.
5.Cambie el cable
calefactor eléctrico.
CORRECT DISPOSAL
Este producto está sujeto a las disposiciones de la Directiva
Europea 2012/19/CE. El símbolo que muestra un contenedor
con ruedas tachado indica que el producto requiere recogida
selectiva de basura en la Unión Europea. Esto se aplica al
producto y a todos los accesorios marcados con este símbolo. Los
productos marcados como tales no podrán desecharse con la basura
doméstica normal, sino que deberán llevarse a un punto de recogida para
el reciclaje de aparatos eléctricos y electrónicos.
Fabricante: Shanghaimuxinmuyeyouxiangongsi
Dirección: Baoshanqu Shuangchenglu 803long 11hao 1602A-1609shi
Shanghai
REPRESENTANTE CE: SHUNSHUN GmbH .
Römeräcker 9 Z2021,76351 Linkenheim-Hochstetten, Alemania
Tel: +49 1727041930 euvertreter@gmail.com
REPRESENTANTE DEL REINO UNIDO: Pooledas Group Ltd.
Unidad 5 Albert Edward House, The Pavilions Preston, Reino Unido
Tel: 01772418127 pooledas123@gmail.com

- 15 -
Importado a AUS: SIHAO PTY LTD.
1 ROKEVA STREET ASTWOOD NSW 2122 Australia
Importado a EE. UU.: Sanven Technology Ltd.
Suite 250, 9166 Anaheim Place, Rancho Cucamonga, CA 91730
Hecho en china


Wsparcie techniczne i certyfikat e-gwarancji
www.vevor.com/support
MASZYNA DO PAKOWANIA PRÓŻNIOWEGO
INSTRUKCJA OBSŁUGI
Model: DZ-260C -V1, DZ-260C -V2, DZ-260C -V3
We continue to be committed to provide you tools with competitive price.
"Save Half", "Half Price" or any other similar expressions used by us only represents an
estimate of savings you might benefit from buying certain tools with us compared to the major
top brands and does not necessarily mean to cover all categories of tools offered by us. You
are kindly reminded to verify carefully when you are placing an order with us if you are
actually saving half in comparison with the top major brands.

- 1 -
Model: DZ-260C -V1, DZ-260C -V2, DZ-260C -V3
Have product questions? Need technical support? Please feel free to
contact us:
Technical Support and E-Warranty Certificate
www.vevor.com/support
NEED HELP? CONTACT US!
This is the original instruction, please read all manual instructions
carefully before operating. VEVOR reserves a clear interpretation of our
user manual. The appearance of the product shall be subject to the
product you received. Please forgive us that we won't inform you again if
there are any technology or software updates on our product.
VACUUM PACKING MACHINE

- 2 -
11. przeczytaj uważnie i zrozum całą INSTRUKCJĘ MONTAŻU I
OBSŁUGI .
12. Nieprzestrzeganie zasad bezpieczeństwa i innych podstawowych
środków ostrożności może skutkować poważnymi obrażeniami ciała.
GENERAL SAFETY RULES
pierwszym użyciem produktów prosimy o przeczytanie całej instrukcji
obsługi ; Zawierają ważne informacje dotyczące prawidłowej obsługi .
Gwarancja/rękojmia traci ważność w przypadku powstania szkód
wynikających z nieprzestrzegania instrukcji obsługi . Wykluczona jest
odpowiedzialność za jakiekolwiek szkody następcze !
Nie ponosimy żadnej odpowiedzialności za szkody materialne lub
obrażenia ciała spowodowane niewłaściwym użytkowaniem lub
nieprzestrzeganiem wskazówek bezpieczeństwa ! W takich przypadkach
gwarancja/rękojmia traci ważność
Nieautoryzowane przeróbki, modyfikacje lub demontaż produktów są
niedopuszczalne ze względów bezpieczeństwa i homologacji ( CE ).
Produkt nie jest zabawką i należy go przechowywać w miejscu
niedostępnym dla dzieci.
Dlatego w obecności dzieci należy zachować szczególną ostrożność .
Produkt nie może zostać zawilgocony ani zamoczony. Jest przeznaczony
wyłącznie do użytku w suchych, zamkniętych pomieszczeniach (nie w
łazienkach ani miejscach o podobnej wilgotności). Istnieje ryzyko
śmiertelnego porażenia prądem elektrycznym.
Nie narażaj produktu ani jego akcesoriów na działanie wilgoci lub bardzo
wysokich lub niskich temperatur.

- 3 -
Nie pozostawiaj materiałów opakowaniowych bez końca . Mogą stać się
niebezpiecznym materiałem do zabawy dla dzieci.
Upuszczenie, upadek, nacisk lub siły rozciągające mogą zniszczyć lub
przynajmniej ograniczyć funkcjonalność produktu .
Nigdy nie umieszczaj urządzenia w pobliżu materiałów łatwopalnych lub
łatwopalnych materiały łatwopalne .
Zawsze należy zwracać uwagę, aby stół obrotowy, na którym stawiany jest
przedmiot, znajdował się na środku obudowy!
Ta maszyna wykorzystuje folię z tworzywa sztucznego lub plastikową folię
aluminiową jako materiały do pakowania próżniowego żywności w formie
pasty, owoców, warzyw w sosie, chemikaliów, farmaceutyków,
komponentów elektronicznych, instrumentów precyzyjnych, metali
rzadkich i innych przedmiotów. Produkty pakowane próżniowo nie ulegają
łatwo utlenieniu i spleśnieniu. Szczególnie nadaje się do branż takich jak
herbata, żywność i medycyna.
Jeżeli masz podstawy przypuszczać, że bezpieczna praca nie jest już
możliwa, należy natychmiast odłączyć urządzenie i zabezpieczyć je przed
przypadkowym uruchomieniem .
Można założyć, że bezpieczna eksploatacja nie jest już możliwa, jeżeli:
- urządzenie nosi widoczne ślady uszkodzeń,
- urządzenie przestało działać ,
- po dłuższym okresie przechowywania w niekorzystnych warunkach ,
- po dużym obciążeniu podczas transportu .
ZACHOWAJ INSTRUKCJĘ SE

- 4 -
MODEL AND PARAMETERS
Model
DZ-260C-V1
DZ-260C-V2
DZ-260C-V3
Długość uszczelki
320mm
320mm
320mm
Wymiary komory
355*340*70mm
355*340*70mm
355*340*70mm
Typ pompy
próżniowej
Pompa olejowa
Pompa olejowa
Pompa olejowa
Prędkość
pompowania
pompy próżniowej
6,5m3/godz
6,5m3/godz
6,5m3/godz
Napięcie
AC 120 V 60 Hz
AC 230 V 50 Hz
AC 230 V 50 Hz
Maks. Moc
1 7 00 W
1 7 00 W
1 7 00 W
Moc pompy
próżniowej _ _ _
180 W
180 W
180 W
Materiał maszyny
Stal nierdzewna
201
Stal nierdzewna
201
Stal nierdzewna
201

- 5 -
STRUCTURE DIAGRAM
1
Osłona próżniowa
10
Transformator grzewczy
2
Pasek silikonowy
11
Zawór elektromagnetyczny
pompy próżniowej
3
Pasek zgrzewający
próżniowy
12
Przycisk zasilania
4
Uszczelniająca listwa
grzejna
13
Wtyczka zasilająca
5
Pręt dociskowy worka
14
Pompa próżniowa
6
Płyta podstawowa
15
Port wtrysku oleju
7
Wskaźnik
16
Okno obserwacji poziomu
oleju
8
Wakuometr
17
Śruba spustowa oleju
9
Płytka drukowana

- 6 -
PARTS LIST
DZ-260C-V1
DZ-260C-V2
DZ-260C-V3
Drut grzejny
×2
×2
×2
Tkanina teflonowa
×2
×2
×2
Płyta wypełniająca
×1
×1
×1
Olej do pompy
próżniowej
×1
×1
×1
Klucz imbusowy
×1
×1
×1
Worek do
odkurzacza
×30
×30
×30
Pasek
Uszczelniający
Komorę
×1
×1
×1
Kabel zasilający
× 1
×1
×1
Instrukcja obsługi
×1
×1
×1
Model
Parts
- 7 -
OPERATING INSTRUCTIONS
1. Odkręcić tylną pokrywę.
2. ①. Wyjmij filtr mgły olejowej;
②. Dodaj olej do pompy próżniowej;
③. Poziom oleju pomiędzy 1/2-3/4
otworu obserwacyjnego (nie
napełniać);
Po dodaniu oleju zakręć filtr mgły
olejowej i zamknij tylną pokrywę.
3. INSTRUKCJA UŻYTKOWANIA PANELU
Krok 1: Podłącz odpowiedni zasilacz
Krok 2: Otwarte POWIETRZE PRZEŁĄCZNIK
Krok 3: ① CZAS PRÓŻNI : W stanie gotowości kliknij przycisk ZMNIEJSZ lub
ZWIĘKSZ , aby ustawić idealny czas próżni . Ogólne ustawienia są ustawione na
30–40 sekund.
Krok 4: ② CZAS ZGRZEWANIA : Kliknij przycisk ZMNIEJSZ lub ZWIĘKSZ , aby
ustawić czas. Czas zgrzewania jest zazwyczaj ustawiony na 2-2,2 s. Czas
zgrzewania ustalany jest w zależności od grubości worka próżniowego. Surowo
zabrania się ustawiania zbyt długiego czasu zgrzewania lub przepalania
zgrzewającej listwy grzejnej.
Krok 5: ③ CZAS CHŁODZENIA: W stanie gotowości kliknij przycisk ZMNIEJSZ
lub ZWIĘKSZ, aby ustawić idealny czas chłodzenia. Ogólne ustawienia są
ustawione na 3-5 sekund.
- 8 -
4.① Umieść w nim produkt, uszczelka
worka próżniowego zostanie
umieszczona na pasku grzejnym.
Naciśnij pasek worka, aby spłaszczyć
produkt.
5. Przytrzymaj przód pokrywy obiema
rękami i mocno dociśnij na okładce.
Maszyna zaczyna pracować, po
podciśnieniu wskaźnik zaczyna biec,
rozluźnij ręce, maszyna automatycznie
uzupełnia opakowanie.
6. MARYNOWANIE : Kliknij przycisk
marynowania w prawym górnym rogu
panelu sterowania, zaświeci się
kontrolka marynowania , ustaw czas
pompowania i rozpocznij
marynowanie . W tym momencie
maszyna znajduje się w stanie
wyłącznie próżniowym, bez
7. Gdy maszyna wymaga wymiany oleju
lub nie jest używana przez dłuższy czas,
należy poluzować śrubę znajdującą się
pod wziernikiem oleju i spuścić olej z
pompy próżniowej. Sugeruj wymianę
oleju w pompie próżniowej po tym, jak
maszyna pracowała nieprzerwanie
przez 800 godzin .

- 9 -
uszczelnienia.
CIRCUIT DIAGRAM

- 10 -
MAINTENANCE
- 11 -
16. Po użyciu należy oczyścić powierzchnię maszyny i usunąć pozostałości
materiałów znajdujących się wewnątrz maszyny.
17. Podczas przechowywania należy przechowywać go w czystym, suchym i
bezpiecznym miejscu , z dala od dzieci.
18. Wszelkie prace konserwacyjne, serwisowe i naprawy nie omówione w
instrukcji powinny być wykonywane wyłącznie przez wykwalifikowanego
technika serwisu .
Zastąp ściereczka odporna na wysoką temperaturę
(tkanina teflonowa)
16. Usuń śruby po obu stronach tacy, a
następnie podnieś całą tacę .
17. Wykręć górne śruby .
18. Usuń stare ściereczka odporna na
wysoką temperaturę .
4. Nałóż nową szmatkę
wysokotemperaturową .
5. Zainstaluj ponownie oryginalne śruby
6. Zakończenie instalacji .

- 12 -
Zastąp Pasek Uszczelniający Komorę
11.Zdjąć pasek uszczelniający
komorę .
12.Zastąp Listwa uszczelniająca
komorę na nową
3. Uko
ń
czenie Instalacja

- 13 -
TROUBLESHOOTING AND SOLUTIONS
Problem
Możliwa przyczyna
Rozwiązanie
Maszyna nie działa, a
panel sterowania nic
nie pokazuje.
1.Brak podłączenia
zasilania.
2. Styk wyłącznika
zasilania ulega
poluzowaniu.
1. Sprawdź, czy wtyczka i
gniazdo są skutecznie
podłączone.
2. Sprawdź, czy
okablowanie części
wejściowej zasilania
wewnątrz maszyny jest
poluzowane lub odłączone.
The kontrola płyta
uruchomienie, ale
maszyna nie działa.
Parametr jest ustawiany.
Zakończ ustawianie
parametrów.
Nie można osiągnąć
najlepszego stanu
próżni . Prędkość
pompowania próżni
jest niska.
1.Krótki czas odkurzania.
2. Oleju w pompie
próżniowej jest za mało
lub olej nie jest czysty.
3. Wyciek powietrza i
zużycie pierścienia
uszczelniającego.
1. Wydłuż czas próżni.
2.Sprawdź poziom oleju,
zatankuj lub wymień olej
(zwróć uwagę na rodzaj
oleju (olej próżniowy
46#,68#) i ilość oleju.
3.Wymień pierścień
uszczelniający.
Uszkodzenie
uszczelnienia lub
słabe uszczelnienie.
1. Worki nie są prawidłowo
umieszczone na płytach
grzewczych.
2. Zbyt długi/krótki czas
zgrzewania.
1. Ułóż torby na talerzu w
odpowiedniej kolejności.
2. Skróć/wydłuż czas
zgrzewania.
3. Wybierz odpowiednią

- 14 -
3. Niewłaściwa
temperatura ogrzewania..
4.Pasek silikonowy
uszkodzony lub
zanieczyszczony.
5. Uszkodzenie
elektrycznego przewodu
grzejnego .
temperaturę.
4. Oczyść lub wymień
silikon guma.
5.Wymień elektryczny
przewód grzejny.
CORRECT DISPOSAL
Ten produkt podlega przepisom Dyrektywy Europejskiej
2012/19/EC. Symbol przekreślonego kosza na śmieci oznacza,
że produkt wymaga selektywnej zbiórki śmieci na terenie Unii
Europejskiej. Dotyczy to produktu i wszystkich akcesoriów
oznaczonych tym symbolem. Produktów oznaczonych jako takie nie
można wyrzucać razem ze zwykłymi odpadami domowymi, lecz należy je
oddać do punktu zbiórki w celu recyklingu urządzeń elektrycznych i
elektronicznych
Producent: Shanghaimuxinmuyeyouxiangongsi
Adres: Baoshanqu Shuangchenglu 803long 11hao 1602A-1609shi
Szanghaj
Przedstawiciel WE: SHUNSHUN GmbH .
Römeräcker 9 Z2021,76351 Linkenheim-Hochstetten, Niemcy
Tel: +49 1727041930 euvertreter@gmail.com
REPUBLIKA WIELKIEJ BRYTANII: Pooledas Group Ltd.
Jednostka 5 Albert Edward House, The Pavilions Preston, Wielka Brytania
Tel: 01772418127pooleda[email protected]
Import do AUS: SIHAO PTY LTD.
1 ROKEVA STREETEASTWOOD NSW 2122 Australia

- 15 -
Import do USA: Sanven Technology Ltd.
Apartament 250, 9166 Anaheim Place, Rancho Cucamonga, Kalifornia
91730
Wyprodukowano w Chinach


Technische ondersteuning en e-garantiecertificaat
www.vevor.com/support
VACUÜMVERPAKKINGSMACHINE
HANDLEIDING
Modellen: DZ-260C -V1, DZ-260C -V2, DZ-260C -V3
We continue to be committed to provide you tools with competitive price.
"Save Half", "Half Price" or any other similar expressions used by us only represents an
estimate of savings you might benefit from buying certain tools with us compared to the major
top brands and does not necessarily mean to cover all categories of tools offered by us. You
are kindly reminded to verify carefully when you are placing an order with us if you are
actually saving half in comparison with the top major brands.

- 1 -
Model: DZ-260C -V1, DZ-260C -V2, DZ-260C -V3
Have product questions? Need technical support? Please feel free to
contact us:
Technical Support and E-Warranty Certificate
www.vevor.com/support
NEED HELP? CONTACT US!
This is the original instruction, please read all manual instructions
carefully before operating. VEVOR reserves a clear interpretation of our
user manual. The appearance of the product shall be subject to the
product you received. Please forgive us that we won't inform you again if
there are any technology or software updates on our product.
VACUUM PACKING MACHINE

- 2 -
13. Lees zorgvuldig alle MONTAGE- EN BEDIENINGSINSTRUCTIES
voordat u ermee aan de slag gaat.
14. Het niet naleven van de veiligheidsregels en andere elementaire
veiligheidsmaatregelen kan leiden tot ernstig persoonlijk letsel.
GENERAL SAFETY RULES
Lees de volledige gebruiksaanwijzing voordat u de producten voor de
eerste keer gebruikt ; Ze bevatten belangrijke informatie over de juiste
bediening .
De garantie vervalt indien er schade ontstaat als gevolg van het niet
naleven van de gebruiksaanwijzing . Aansprakelijkheid voor alle
gevolgschade is uitgesloten!
Wij aanvaarden geen aansprakelijkheid voor schade aan eigendommen of
persoonlijk letsel veroorzaakt door oneigenlijk gebruik of het niet in acht
nemen van de veiligheidsinstructies ! In dergelijke gevallen vervalt de
garantie/garantie
Het ongeoorloofd ombouwen, wijzigen of demonteren van de producten is
vanwege veiligheids- en goedkeuringsredenen ( CE) niet toegestaan.
Het product is geen speelgoed en moet buiten het bereik van kinderen
worden bewaard.
bijzondere voorzichtigheid worden betracht als er kinderen aanwezig zijn.
Het product mag niet vochtig of nat worden. Het is uitsluitend bedoeld voor
gebruik op droge, binnenlocaties (niet in badkamers of soortgelijke
vochtige ruimtes). Er bestaat een risico op een dodelijke elektrische schok.
Stel het product en de accessoires niet bloot aan vocht of extreem hoge of
lage temperaturen.

- 3 -
Laat het verpakkingsmateriaal niet ongebruikt liggen. Het kan gevaarlijk
speelmateriaal voor kinderen worden.
werking van het product vernietigen of op zijn minst beperken .
Plaats het apparaat nooit in de buurt van brandbare of gemakkelijk
ontvlambare materialen brandbare materialen .
Zorg er altijd voor dat de draaitafel waarop het object wordt geplaatst zich
in het midden van de behuizing bevindt !
Deze machine gebruikt plastic folie of plastic aluminiumfolie als materiaal
voor het vacuümverpakken van pastavoedsel, fruit, sausgroenten,
chemicaliën, farmaceutische producten, elektronische componenten,
precisie-instrumenten, zeldzame metalen en andere items. Producten die
onder vacuüm zijn verpakt, oxideren of beschimmelen niet gemakkelijk.
Vooral geschikt voor industrieën zoals thee, voeding en medicijnen.
Als u reden heeft om aan te nemen dat veilig gebruik niet langer mogelijk is,
koppel het apparaat dan onmiddellijk los en beveilig het tegen onbedoeld
gebruik .
Er kan van worden uitgegaan dat veilig gebruik niet meer mogelijk is als:
- het apparaat zichtbare tekenen van schade vertoont,
- het apparaat functioneert niet meer ,
- na een langere opslagperiode onder ongunstige omstandigheden ,
- na zware belasting tijdens transport .
BEWAAR DE SE- INSTRUCTIES

- 4 -
MODEL AND PARAMETERS
Model
DZ-260C-V1
DZ-260C-V2
DZ-260C-V3
Verbindingslengte
320 mm
320 mm
320 mm
Kamerafmetingen
355*340*70mm
355*340*70mm
355*340*70mm
Type
vacuümpomp
Oliepomp
Oliepomp
Oliepomp
Pompsnelheid van
vacuümpomp
6,5 m³/u
6,5 m³/u
6,5 m³/u
Spanning
Wisselstroom
120 V 60 Hz
Wisselstroom
230 V 50 Hz
Wisselstroom
230 V 50 Hz
Max. Stroom
1 7 00W
1 7 00W
1 7 00W
Vacuümpompver
mogen _ _ _ _ _
180W
180W
180W
Machinemateriaal
201 roestvrij
staal
201 roestvrij
staal
201 roestvrij
staal

- 5 -
STRUCTURE DIAGRAM
1
Vacuüm deksel
10
Verwarmingstransformator
2
Siliconen strip
11
Magneetventiel
vacuümpomp
3
Vacuüm sealbalk
12
Aan/uit-schakelaar
4
Afdichtende
verwarmingsstrip
13
Stekker
5
Zakpersstang
14
Vacuum pomp
6
Basisplaat
15
Olie-injectiepoort
7
Indicator
16
Observatievenster voor het
oliepeil
8
Vacuümmeter
17
Olieaftapschroef
9
Printplaat

- 6 -
PARTS LIST
DZ-260C-V1
DZ-260C-V2
DZ-260C-V3
Verwarmingsdraad
×2
×2
×2
Teflon-doek
×2
×2
×2
Vulbord
×1
×1
×1
Vacuümpompolie
×1
×1
×1
Inbussleutel
×1
×1
×1
Vacuum zak
×30
×30
×30
Kamerafdichtstrip
×1
×1
×1
Stroomdraad
× 1
×1
×1
Handleiding
×1
×1
×1
Model
Parts

- 7 -
OPERATING INSTRUCTIONS
1. Schroef de achterste afdekplaat los.
2. ①. Haal het olienevelfilter eruit;
②. Voeg vacuümpompolie toe;
③. Oliepeil tussen 1/2-3/4 van het
observatiegat (niet vullen);
Nadat u de olie hebt toegevoegd,
schroeft u het olienevelfilter terug en
sluit u de achterklep.
3. GEBRUIKSINSTRUCTIES VOOR HET PANEEL
Stap 1: Sluit de bijpassende voeding aan
Stap 2: Open LUCHT SCHAKELAAR
Stap 3: ① VACUÜMTIJD : klik in de stand-bymodus op de knop VERLAGEN of
VERHOGEN om de ideale vacuümtijd in te stellen . Algemene items zijn ingesteld
op 30-40 seconden.
Stap 4: ② SEALTIJD : Klik op de knop VERLAGEN of VERHOGEN om de tijd in
te stellen. De sealtijd wordt doorgaans ingesteld op 2-2,2s. De sealtijd wordt
ingesteld afhankelijk van de dikte van de vacuümzak. Het is ten strengste
verboden om de sealtijd te lang in te stellen of de sealverwarmingsstrip door te
branden.
Stap 5: ③ KOELTIJD: Klik in de stand-bymodus op de knop VERLAGEN of
VERHOGEN om de ideale koeltijd in te stellen. Algemene items zijn ingesteld op
3-5 seconden.

- 8 -
4.① Plaats uw product erin, de
vacuümzakafdichting wordt op de
verwarmingsstrip geplaatst. Druk op de
zakstrip om het product plat te maken.
5. Houd de voorkant van de cover met
beide handen vast en druk stevig naar
beneden op de cover. De machine
begint te werken, na de vacuümmeter
wijzer begint te lopen, maak de handen
los, de machine voltooit automatisch de
verpakking.
6. MARINEREN : Klik op de
marineerknop in de rechterbovenhoek
van het bedieningspaneel, het
marineerindicatielampje gaat branden,
pas de pomptijd aan en start het
marineerwerk . Op dit moment bevindt
de machine zich in een
vacuümtoestand zonder afdichting.
7. Wanneer de machine olie moet
verversen of langere tijd niet wordt
gebruikt, draait u de schroef onder het
olievenster los en tapt u de
vacuümpompolie af. Wij raden u aan de
vacuümpompolie te vervangen nadat de
machine 800 uur onafgebroken heeft
gewerkt .

- 9 -
CIRCUIT DIAGRAM

- 10 -
MAINTENANCE
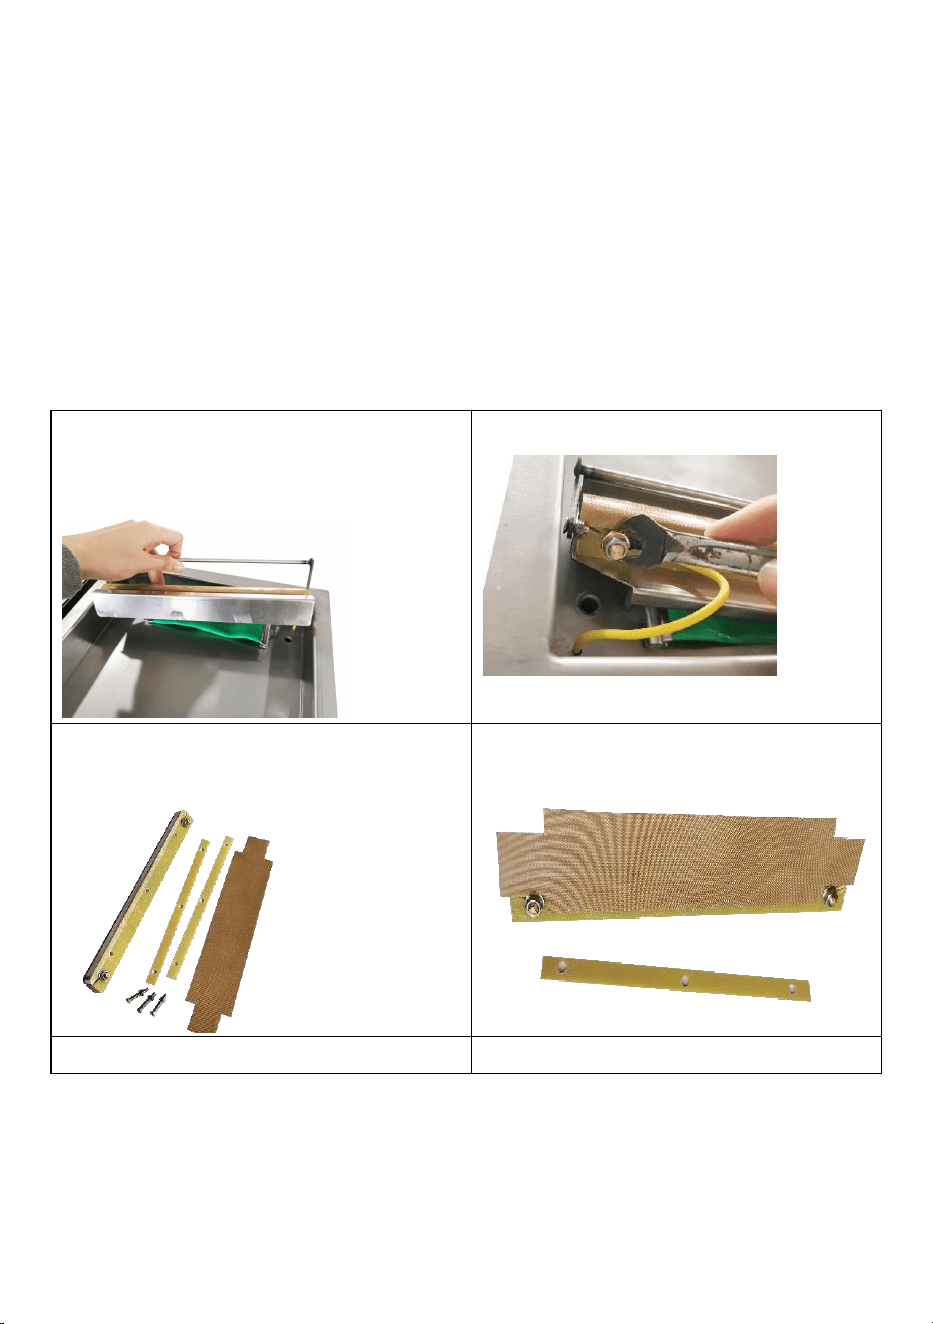
- 11 -
19. Na gebruik moet het oppervlak van de machine worden gereinigd en
moeten de resterende materialen in de machine worden verwijderd.
20. Bewaar het apparaat tijdens het opbergen op een schone, droge en
veilige plaats, uit de buurt van kinderen.
21. Alle onderhoud, service en reparaties die niet in de handleiding worden
besproken, mogen alleen worden uitgevoerd door gekwalificeerde
servicemonteurs .
Vervang de hoge temperatuurdoek (teflondoek)
19. Verwijder de schroeven aan beide zijden
van de lade en pak vervolgens de hele lade
op .
20. Verwijder de bovenste schroeven .
21. Verwijder het oude hoge temperatuur
doek .
4. Breng een nieuwe hittebestendige doek
aan .
5. Plaats de originele schroeven terug
6. De installatie voltooien .
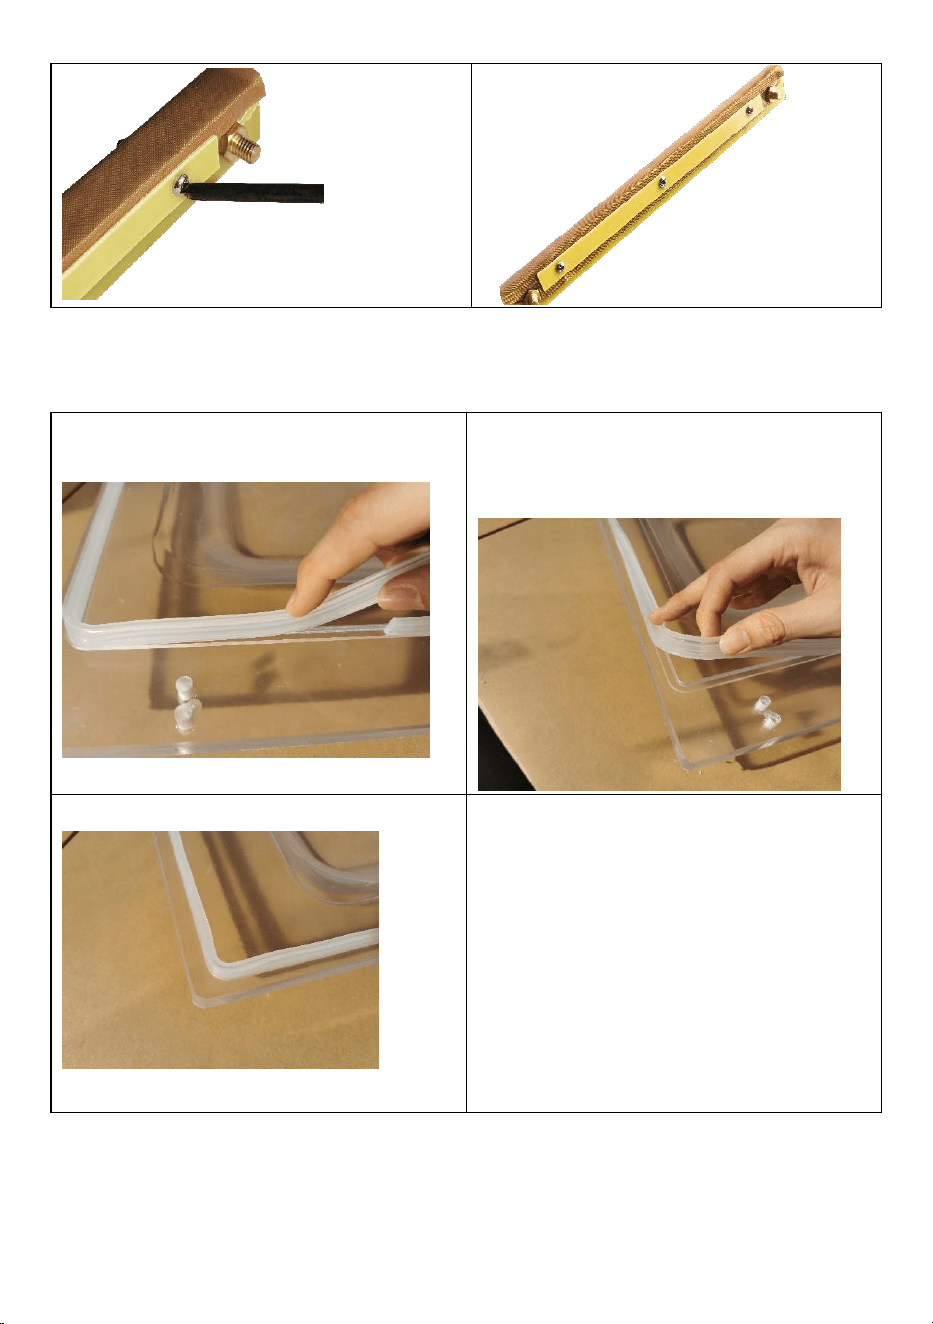
- 12 -
Vervang de Kamerafdichtstrip
13.Verwijder de kamerafdichtstrip .
14.Vervang de Kamerafdichtstrip
door een nieuwe
3. Het voltooien van de Installatie

- 13 -
TROUBLESHOOTING AND SOLUTIONS
Probleem
Mogelijke oorzaak
Oplossing
De machine werkt niet
en op het
bedieningspaneel
verschijnt niets.
1. Geen aansluiting van de
voeding.
2.Het contact van de
aan/uit-schakelaar raakt
los.
1. Controleer of de stekker
en het stopcontact goed
zijn aangesloten.
2. Controleer of de
bedrading van het
voedingsingangsgedeelte
in de machine los zit of los
zit.
De controle paneel
opstarten, maar de
machine werkt niet.
De parameter wordt
ingesteld.
Voltooi de
parameterinstelling.
De beste
vacuümtoestand kan
niet worden bereikt .
De
vacuümpompsnelheid
is laag.
1. Korte vacumtijd.
2. De olie in de
vacuümpomp is niet
voldoende of de olie is niet
schoon.
3. Luchtlekkage en slijtage
van de afdichtring.
1. Verleng de vacuümtijd.
2. Controleer het oliepeil,
tank olie bij of ververs de
olie (let op het olietype
(vacuümolie 46#,68#) en
de oliehoeveelheid.
3. Vervang de afdichtring.
Afdichtingsfout of
slechte afdichting.
1. De zakken zijn niet
correct op de
verwarmingsplaten
geplaatst.
2. Te lange/korte sealtijd.
3. Onjuiste
verwarmingstemperatuur..
1. Plaats de zakken op
volgorde op het bord.
2. Verkort/verleng de
sealtijd.
3. Kies de juiste
temperatuur.
4. Reinig of vervang het

- 14 -
4.Siliconenstrip
beschadigd of met
onzuiverheid.
5. Beschadiging van
elektrische
verwarmingsdraad .
silicium rubber.
5. Vervang de elektrische
verwarmingsdraad.
CORRECT DISPOSAL
Dit product valt onder de bepalingen van de Europese richtlijn
2012/19/EG. Het symbool met een doorgestreepte
afvalcontainer geeft aan dat het product in de Europese Unie
een aparte afvalinzameling vereist. Dit geldt voor het product en
alle accessoires die met dit symbool zijn gemarkeerd. Producten die als
zodanig gemarkeerd zijn, mogen niet met het normale huisvuil worden
weggegooid, maar moeten naar een inzamelpunt voor recycling van
elektrische en elektronische apparaten worden gebracht
Fabrikant: Shanghaimuxinmuyeyouxiangongsi
Adres: Baoshanqu Shuangchenglu 803long 11hao 1602A-1609shi
Shanghai
EG-REP: SHUNSHUN GmbH .
Römeräcker 9 Z2021,76351 Linkenheim-Hochstetten, Duitsland
Tel: +49 1727041930 euvertreter@gmail.com
VK REP: Pooledas Group Ltd.
Eenheid 5 Albert Edward House, The Pavilions Preston, Verenigd
Koninkrijk
Tel: 01772418127 pooledas123@gmail.com
Geïmporteerd naar AUS: SIHAO PTY LTD.
1 ROKEVA STREETEASTWOOD NSW 2122 Australië
Geïmporteerd naar de VS: Sanven Technology Ltd.

- 15 -
Suite 250, 9166 Anaheim Place, Rancho Cucamonga, CA 91730
Gemaakt in China


Teknisk support och e-garanticertifikat
www.vevor.com/support
VAKUUMPACKNINGMASKIN
ANVÄNDARMANUAL
Modell: DZ-260C -V1, DZ-260C -V2, DZ-260C -V3
We continue to be committed to provide you tools with competitive price.
"Save Half", "Half Price" or any other similar expressions used by us only represents an
estimate of savings you might benefit from buying certain tools with us compared to the major
top brands and does not necessarily mean to cover all categories of tools offered by us. You
are kindly reminded to verify carefully when you are placing an order with us if you are
actually saving half in comparison with the top major brands.

- 1 -
Modell: DZ-260C -V1, DZ-260C -V2, DZ-260C -V3
Have product questions? Need technical support? Please feel free to
contact us:
Technical Support and E-Warranty Certificate
www.vevor.com/support
NEED HELP? CONTACT US!
This is the original instruction, please read all manual instructions
carefully before operating. VEVOR reserves a clear interpretation of our
user manual. The appearance of the product shall be subject to the
product you received. Please forgive us that we won't inform you again if
there are any technology or software updates on our product.
VACUUM PACKING MACHINE

- 2 -
15. Läs noggrant och förstå alla MONTERINGS- OCH
DRIFTINSTRUKTIONER innan användning.
16. Underlåtenhet att följa säkerhetsreglerna och andra grundläggande
säkerhetsåtgärder kan resultera i allvarliga personskador.
GENERAL SAFETY RULES
Vänligen läs bruksanvisningen innan du använder produkterna för första
gången ; De innehåller viktig information om rätt operation .
Garantin/garantin upphör att gälla om skada uppstår till följd av bristande
efterlevnad av bruksanvisningen. Ansvar för alla följdskador är uteslutet !
Vi tar inget ansvar för skador på egendom eller personskador orsakade av
felaktig användning eller underlåtenhet att följa säkerhetsanvisningarna ! I
sådana fall upphör garantin/garantin
Den otillåtna omvandlingen, modifieringen av demonteringen av
produkterna är otillåten på grund av säkerhets- och godkännandeskäl
( CE ).
Produkten är inte en leksak och måste förvaras utom räckhåll för barn.
Särskild försiktighet måste därför iakttas om barn är närvarande.
Produkten får inte bli fuktig eller blöt, den är endast avsedd för användning
i torra, inomhusplatser (inte badrum eller liknande fuktiga utrymmen). Det
finns risk för dödlig elektrisk stöt.
Utsätt inte produkten eller dess tillbehör för fukt eller extremt höga eller
låga temperaturer.
Lämna inte förpackningsmaterial utan slut . Det kan bli farligt lekmaterial
för barn.

- 3 -
Fall, fall, tryck eller dragkrafter kan förstöra eller åtminstone begränsa
produktens funktion .
Placera aldrig enheten i närheten av brännbart eller lätt brandfarliga
material .
Se alltid till att det roterande bordet som föremålet placeras på är placerat i
mitten av huset!
Denna maskin använder plastfilm eller plastaluminiumfilm som material för
att vakuumförpacka pastaprodukter, frukter, såsgrönsaker, kemikalier,
läkemedel, elektroniska komponenter, precisionsinstrument, sällsynta
metaller och andra föremål. Produkter som förpackas under vakuum är inte
lätt oxiderade eller mögliga. Särskilt lämplig för industrier som te, mat och
medicin.
Om du har anledning att anta att säker användning inte längre är möjlig,
koppla ur enheten omedelbart och säkra den mot oavsiktlig användning .
Det kan antas att säker drift inte längre är möjlig om:
- enheten visar synliga tecken på skada,
- enheten fungerar inte längre ,
- efter en längre lagringstid under ogynnsamma förhållanden ,
- efter kraftig påfrestning under transport .
SPARA SE- INSTRUKTIONERNA

- 4 -
MODEL AND PARAMETERS
Modell
DZ-260C-V1
DZ-260C-V2
DZ-260C-V3
Tätningslängd
320 mm
320 mm
320 mm
Kammarmått
355*340*70mm
355*340*70mm
355*340*70mm
Vakuumpump typ
Oljepump
Oljepump
Oljepump
Pumphastighet för
vakuumpump
6,5 m³/h
6,5 m³/h
6,5 m³/h
Spänning
AC 120V 60Hz
AC 230V 50Hz
AC 230V 50Hz
Max. Kraft
1 7 00W
1 7 00W
1 7 00W
Vakuumpumpkraft
_ _ _ _ _
180W
180W
180W
Maskinmaterial
201 rostfritt stål
201 rostfritt stål
201 rostfritt stål

- 5 -
STRUCTURE DIAGRAM
1
Vakuumlock
10
Värmetransformator
2
Silikonremsa
11
Vakuumpumpens
magnetventil
3
Vakuumförseglingsstång
12
Strömbrytare
4
Tätande värmelist
13
Strömkontakt
5
Pås pressstav
14
Vakuumpump
6
Basplatta
15
Oljeinsprutningsport
7
Indikator
16
Fönster för observation av
oljenivån
8
Vakuummätare
17
Oljeavtappningsskruv
9
Kretskort

- 6 -
PARTS LIST
DZ-260C-V1
DZ-260C-V2
DZ-260C-V3
Värmtråd
×2
×2
×2
Teflontyg
×2
×2
×2
Utfyllnadstavla
×1
×1
×1
Vakuumpump olja
×1
×1
×1
Insexnyckel
×1
×1
×1
Dammsugarpåse
×30
×30
×30
Kammartätningsre
msa
×1
×1
×1
Strömsladd
× 1
×1
×1
Användarmanual
×1
×1
×1
Model
Parts
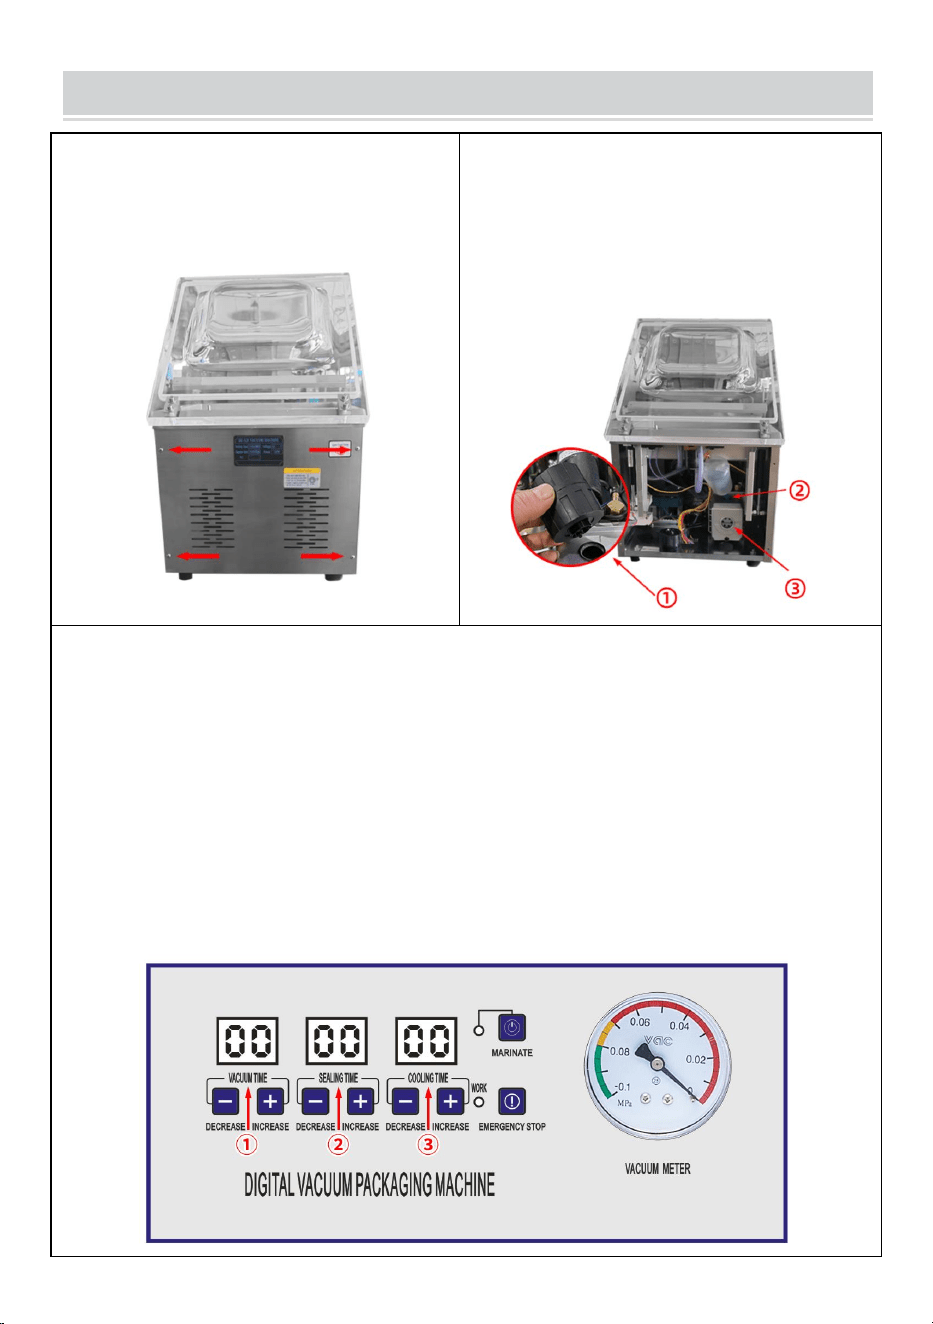
- 7 -
OPERATING INSTRUCTIONS
1. Skruva loss den bakre täckplåten.
2. ①. Ta ut oljedimmafiltret;
②. Tillsätt vakuumpumpolja;
③. Oljenivå mellan 1/2-3/4 av
observationshålet (fyll inte på);
Efter att ha tillsatt olja, skruva tillbaka
oljedimmafiltret, stäng bakstycket.
3 . ANVÄNDNINGSINSTRUKTIONER FÖR PANELEN
Steg 1: Anslut den matchande strömförsörjningen
Steg 2: Open AIR VÄXLA
Steg 3: ① VAKUUMTID : I standby-läge, klicka på MINSKA eller ÖKA- knappen
för att ställa in den ideala vakuumtiden .
Steg 4: ② FÖRSEGLINGSTID : Klicka på knappen MINSKA eller ÖKA för att
ställa in tiden, och förseglingstiden är vanligtvis inställd på 2-2,2 s.
Förseglingstiden ställs in efter tjockleken på vakuumpåsen. Det är strängt
förbjudet att ställa in tätningstiden för lång eller bränna ut tätningsvärmebandet.
Steg 5: ③ KYLTID: I standby-läge, klicka på MINSKA eller ÖKA-knappen för att
ställa in den idealiska kyltiden, allmänna artiklar är inställda på 3-5 s.
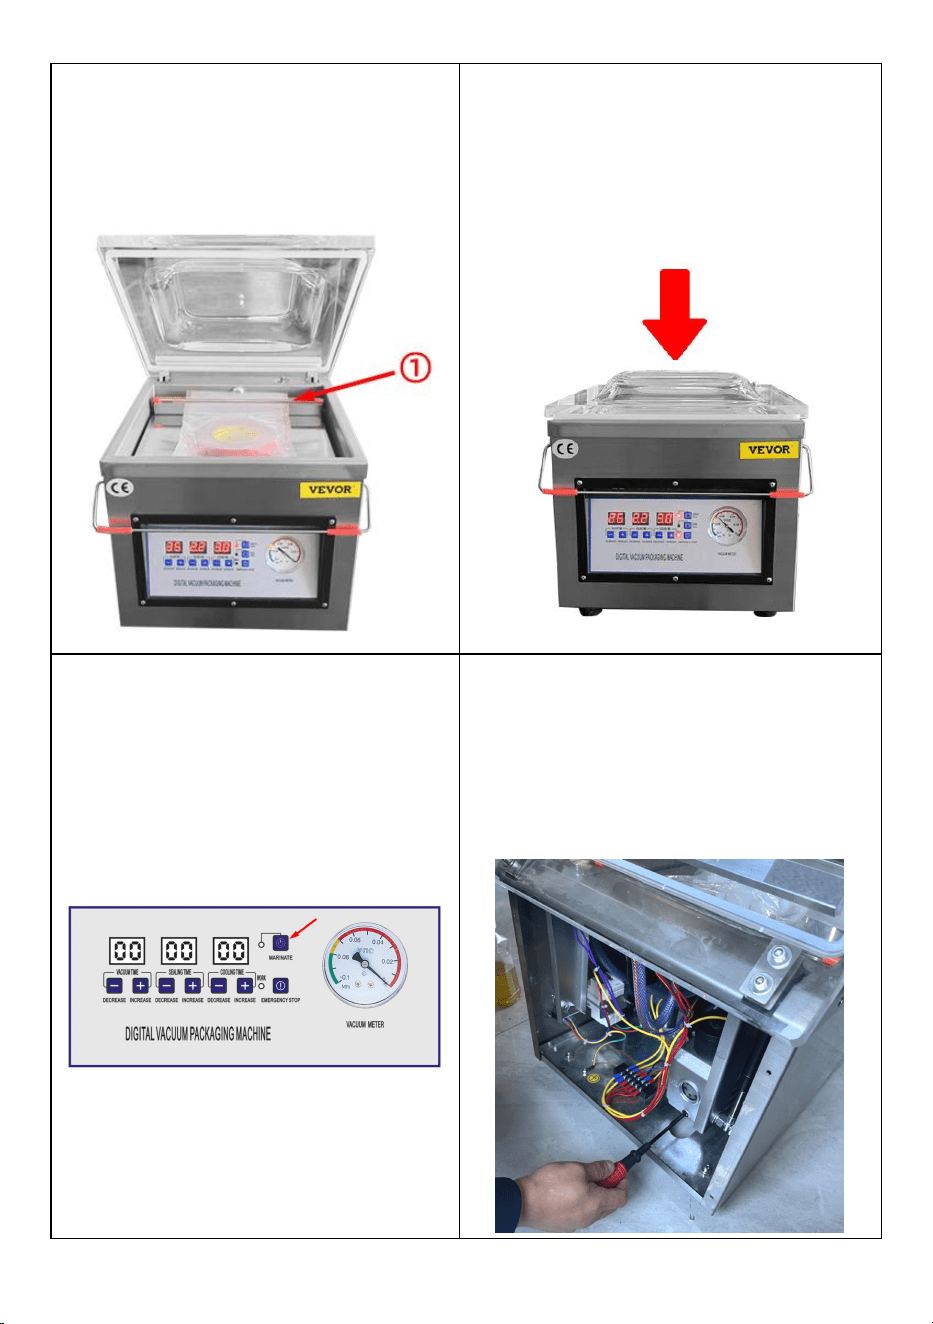
- 8 -
4.① Lägg din produkt i den,
vakuumpåsens tätning placeras på
värmeremsan. Tryck på påsremsan för
att platta till produkten.
5. Håll i framsidan av locket med båda
händerna och tryck ner ordentligt på
omslaget. Maskinen börjar fungera efter
vakuummätaren pekaren börjar springa,
lossa händerna, maskinen fyller
automatiskt i förpackningen.
6. MARINERA : Klicka på knappen för
marinering i det övre högra hörnet av
kontrollpanelen, marineringsindikatorn
tänds, justera pumptiden och påbörja
marineringsarbetet . Vid denna
tidpunkt är maskinen endast i vakuum
utan tätning.
7. När maskinen behöver byta olja eller
inte används under en längre tid, lossa
skruven under oljefönstret och töm oljan
från vakuumpumpen. Föreslå att du
byter ut vakuumpumpoljan efter att
maskinen har arbetat kontinuerligt i 800
timmar .
- 9 -
CIRCUIT DIAGRAM
- 10 -
MAINTENANCE
22. Efter användning ska maskinens yta rengöras och restmaterial inuti
maskinen tas bort.
23. Vid förvaring, förvara på en ren, torr och säker plats borta från barn.
24. Allt underhåll, service och reparationer som inte diskuteras i manualen bör
endast utföras av kvalificerad servicetekniker .
Ersätt högtemperaturduk (Teflonduk)
22. Ta bort skruvarna på båda sidor av
brickan och plocka sedan upp hela brickan .
23. Ta bort de övre skruvarna .
24. Ta bort det gamla högtemperaturduk .
4. Applicera en ny högtemperaturduk .
5. Sätt tillbaka de ursprungliga skruvarna
6. Slutföra installationen .

- 11 -
Ersätt Kammartätningsremsa
15.Ta bort kammarens
tätningsremsa .
16.Ersätt Kammartätningsremsa
med en ny
3. Slutföra Installation

- 12 -
TROUBLESHOOTING AND SOLUTIONS
Problem
Möjlig orsak
Lösning
Maskinen fungerar inte och
kontrollpanelen visar
ingenting.
1.Ingen anslutning av
strömförsörjningen.
2. Strömbrytarens
kontakt tappas.
1. Kontrollera om
stickkontakten och
uttaget är korrekt
anslutna.
2. Kontrollera om
kablaget till
strömingångsdelen
inuti maskinen är löst
eller lossnat.
De kontrollera panel uppstart,
men maskinen fungerar inte.
Parametern ställs in.
Slutför
parameterinställninge
n.
Det bästa vakuumtillståndet
kan inte uppnås .
Vakuumpumpningshastighet
en är låg.
1.Kort dammsugningstid.
2. Oljan i
vakuumpumpen räcker
inte till eller oljan är inte
ren.
3. Luftläckage och
slitage på tätningsringen.
1. Förläng
vakuumtiden.
2.Kontrollera
oljenivån, tanka eller
byt olja (var
uppmärksam på
oljetyp (vakuumolja
46#,68#) och
oljemängd.
3. Byt ut
tätningsringen.
Tätningsfel eller
dålig tätning.
1. Påsarna är inte
korrekt placerade på
värmeplattorna.
2. För lång/kort
tätningstid.
3. Olämplig
uppvärmningstemperatur
1. Lägg påsarna på
tallriken i ordning.
2. Förkorta/förlänga
tätningstiden.
3. Välj rätt temperatur.
4. Rengör eller byt ut
silikonen sudd.

- 13 -
..
4. Silikonremsan skadad
eller med förorening.
5. Skador på
elvärmetråd .
5.Byt elvärmetråd.
CORRECT DISPOSAL
Denna produkt omfattas av bestämmelserna i det europeiska
direktivet 2012/19/EC. Symbolen som visar en soptunna korsad
anger att produkten kräver separat sophämtning i EU. Detta
gäller för produkten och alla tillbehör märkta med denna symbol.
Produkter märkta som sådana får inte slängas tillsammans med vanligt
hushållsavfall, utan måste lämnas till en insamlingsplats för återvinning av
elektriska och elektroniska apparater
Tillverkare: Shanghaimuxinmuyeyouxiangongsi
Adress: Baoshanqu Shuangchenglu 803long 11hao 1602A-1609shi
Shanghai
EC REP: SHUNSHUN GmbH .
Römeräcker 9 Z2021,76351 Linkenheim-Hochstetten, Tyskland
Tel: +49 1727041930 euvertreter@gmail.com
UK REP: Pooledas Group Ltd.
Enhet 5 Albert Edward House, The Pavilions Preston, Storbritannien
Tel: 01772418127 pooledas123@gmail.com
Importerad till AUS: SIHAO PTY LTD.
1 ROKEVA STREETEASTWOOD NSW 2122 Australien
Importerad till USA: Sanven Technology Ltd.
Suite 250, 9166 Anaheim Place, Rancho Cucamonga, CA 91730
Tillverkad i Kina

- 14 -