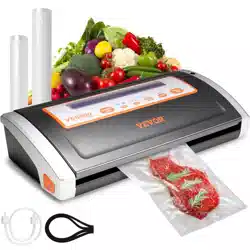

INSTRUCTIONS
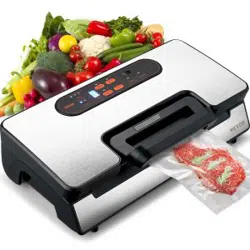
VS5500 VACUUM SEALER
Have product questions? Need technical suppo? Please feel free to contact us:
CustomerSe[email protected]
NEED HELP? CONTACT US!
This is the original instruction, please read all manual instructions carefully before
operating. VEVOR resees a clear interpretation of our user manual. The appear-
ance of the product shall be subject to the product you received. Please forgive us
that we won't inform you again if there are any technology or software updates
on our product.
VS5500 VACUUM
SEALER
01

02
CONTENTS
IMPORTANT SAFEGUARDS---------------------------------------------------------3
CONSTRUCTION AND FUNCTIONS-------------------------------------------------4
OPERATING INSTRUCTIONS--------------------------------------------------------7
HINTS FOR BEST VACUUMING PERFORMANCE -----------------------------------11
GENERAL RULES FOR FOOD SAFETY ---------------------------------------------13
CLEANING AND MAINTENANCE--------------------------------------------------14
TROUBLESHOOTING-------------------------------------------------------------15
DISPOSAL OF THE DEVICE-------------------------------------------------------17
TECHNICAL DATA----------------------------------------------------------------18

03
READ ALL INSTRUCTIONS
1.Carefully read all of the instructions before using this appliance and save for future
reference.
2.Before plugging cord into wall outlet, or disconnecting, make sure that the cover
of the machine is in unlocked condition, and unplug from outlet when not in use or
before cleaning.
2. This appliance is not a toy, when used by or near children, close attention is
necessa, and store this appliance to a safe place, out of the reach of children.
3.Do not use any bags or attachments not recommended or appointed, and don’t
use this appliance for other purpose except its intended use.
4.Stop using the machine immediately if the cord is damaged and have it replaced
by a professional.
5.Keep away from moving pas.
6.Do not contact the hot sealing element located on edge of the top cover of this
machine. It is hot and may get burn.
7.Do not t to repair this appliance by yourself.
8.Don't use the appliance if it has fallen or appeared to be damaged.
9.Avoid to do the following: pull or car by the cord, use cord as a handle, close a
door on cord, or pull cord around sharp edges or corners. Do not operate appliance
over cord or cord / plug is wet.
10.Keep away from hot gas, heated oven, electric burner or any other hot suaces.
Do not use this appliance on wet or hot suace or near a heat source.
11.It’s better not to use an extension cord with this unit. However, if one is used, it
must have a rating equal to or exceeding the fating of this appliance.
12.When disconnect, to avoid any inju, please unplug by grasp the plug, not the
cord.
13.Before plugging appliance in or operating, make sure your hands are d and safe
to do the actions.
14.When it In “ON” or working position, always be on a stable suace, such as table
or counter.
15.It’s no need to use any lubricant, such as lubricating oils or water, on this appli-
ance.
16.Do not immerse any pa of this appliance, power cord or plug in water or any
other liquid.
When using this electrical appliance, safety precautions should always be
obseed, including the following:
IMPORTANT SAFEGUARDS

04
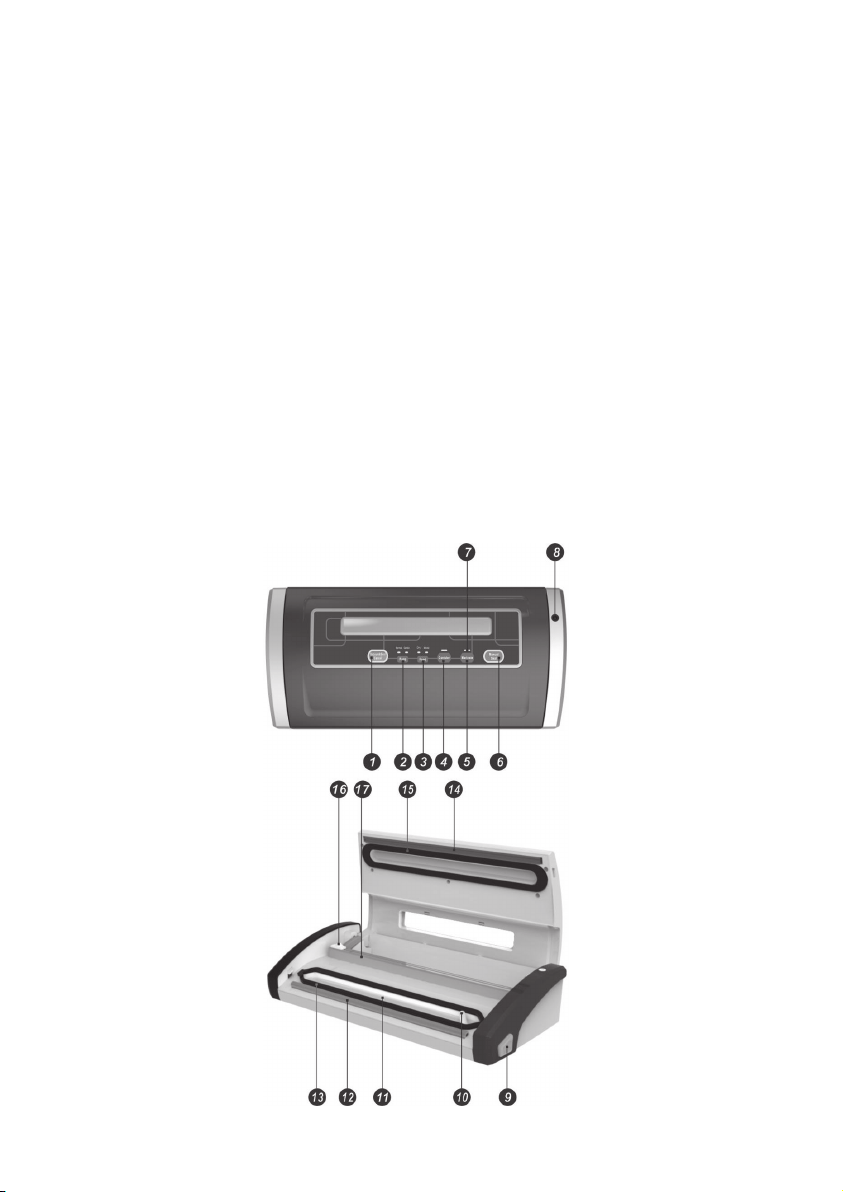
CONSTRUCTION AND FUNCTIONS
CAUTION:
SAVE THESE INSTRUCTIONS
FOR HOUSEHOLD USE ONLY
AB:1MIN PER CYCLE
17.Do not use this appliance outdoors or on a wet suace, it’s recommended for
household, indoor use only.
18.This appliance is not intended for use by persons (including children) with
reduced physical, senso or mental capabilities, or lack of experience and knowl-
edge, unless they have been given supeision or instruction concerning use of the
appliance by a person responsible for their safety.
19.Close supeision is required when this product is used near children.
20.If the supply cord is damaged, It must be replaced by the manufacturer, its
seice agent or similarly qualied persons in order to avoid a hazard.
21.Avoid touching the heating wire when hot.
22.CAUTION: To reduce the risk of electric shock, this product has a polarized plug
(one blade is wider than the other). This plug is intended to t in a polarized outlet
only one way. When the plug does not t fully in outlet, reverse the plug. When it
still does not t, contact a qualied electrician to install the proper outlet. Do not
change the plug in any way.
1.Vacuum & seal / Cancel:
This button has two functions depending on the machine status:
·At stand-by condition, it stas the automatic operation of vacuuming the bag
and then automatically seals the bag when vacuum is complete;
·At working (vacuuming or sealing operations) condition, it stops the machine.
2. Pressure: For choice of dierent vacuum pressure:
·Normal Setting: for regular items storage in normal vacuum pressure ;
·Gentle Setting: for some soft & crushable items storage where less vacuum
pressure is desired.
·Default setting is normal and high vacuum pressure.
05
3. Food: Used for choosing the best bag seal time
·D setting : for d bags and items without moisture, with a shoer heat sealing
time;
·Moist setting: for wet bags or foods with moisture, with an extended heat sealing
time.
Default setting is for d bags and normal sealing time
4. Pulse / Canister:
If press this button eetly, the device stas vacuuming and will stop automatically.
It is used for vacuuming canisters, jar lids, wine stoppers through a hose. If press this
button continuously, the machine keeps vacuuming, undo, it will stop. The process
can be repeated. It is used for vacuuming a bag to desired pressure.
5. Marinate:
Press this button to marinate food in a marinating bowl.

06
6. Manual Seal:
This button provides two functions:
·To seal the open end of a bag without vacuuming air suction, used to make a bag
from a bag roll;
·When the automatic “Vacuum &seal” function is in operation, this button stops the
motor pump and immediately stas to seal the bag so that less vacuum pressure
inside the bag can be controlled by the operator to avoid crushing for delicate items.
7. LED Indicators:
Indicates the status of vacuum or seal process, and the status of the machine
settings.
8.Hose po:
To inse the hose for canister and wine stopper before “marinates” or “canister”
operations.
9. Release Button:
Two provided. Press both sides simutaniously to open the cover. And release the
vacuum pressure inside the machine.
10. Air intake:
Air intake connecting vacuum chamber and pump. Do not cover this intake when
placing bag for vacuum&Seal operations.
11.Vacuum chamber:
Position the open end of the bag inside the chamber, draws air out of bag and
catches any liquid ovelow from the bag.
12. Sealing strip: Place the bag to be sealed over this strip.
13. Lower gasket:
Keep air away by forming vacuum chamber with upper gasket in the vacuum
chamber. Clean and d or replace it when it is distoed or broken.
14. Sealing element: Teon-coated heating element which is hot and seals the bag.
15. Upper gasket: Keep air away by forming vacuum chamber with lower gasket.
Clean and d or replace it when distoed or broken.
16.Bag Cutter: Press and slide in one direction or another to cut bags of a desired
size.
17. Cutter rack: Suppo the cutter to slide along

07
OPERATING INSTRUCTIONS
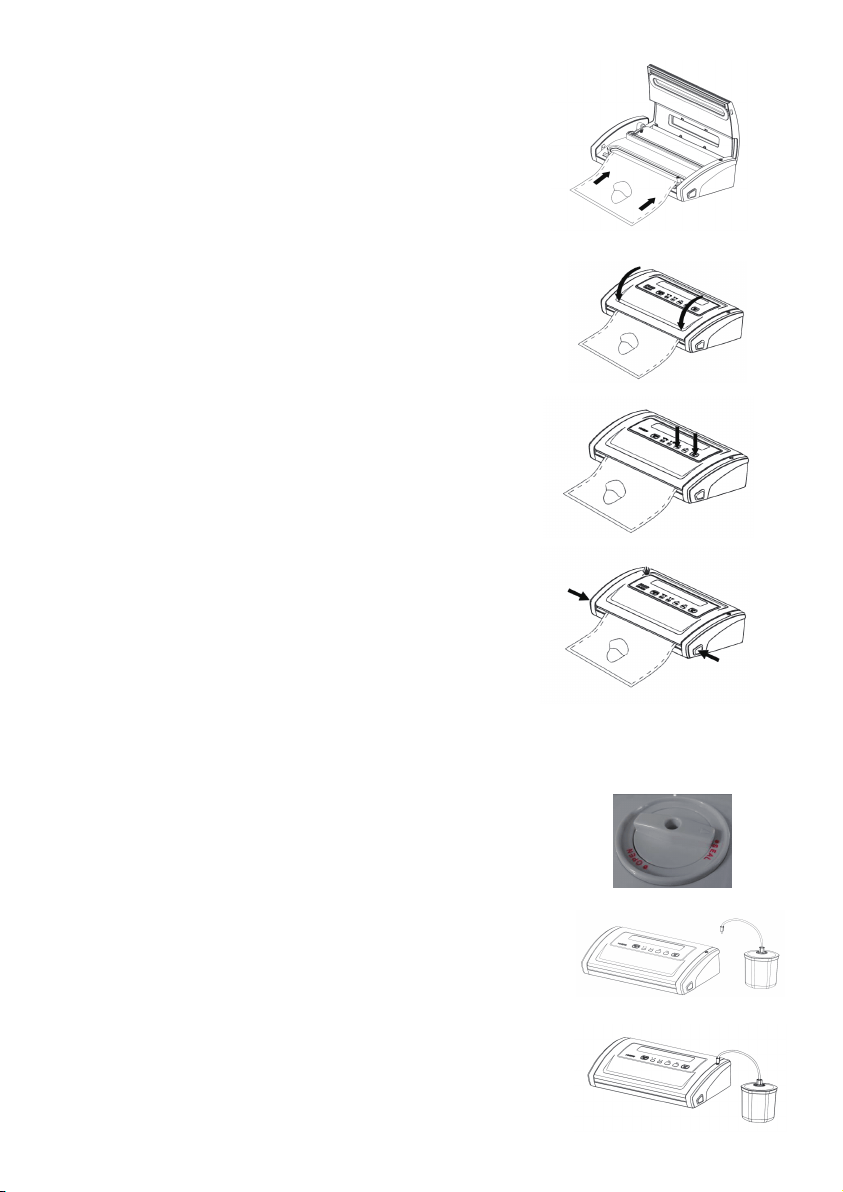
I. Making a bag with bag roll
1. Plug the unit into a power source;
2. Open the top cover.
3.Make sure the bag cutter is on one end of the
cutter rack, Then put the cutter rack to the back–
Fig.1
4. Pull out the bag material to the suitable
length you want– Fig.2
5.Put down the cutter rack and make sure it is on the
right place of the bags, then slide the cutter from
one end to the other end to cut the bag– Fig.3
6. Put one end of the bag on top of the sealing
strip, but not enter the vacuum chamber– Fig.4
7. Close the upper lid and press tightly till you
hear it click in place on both sides– Fig.5
9. Press Manual Seal button to sta sealing the
bags -Fig.6
10.Press the release button to open the cover
and take the bag out of the machine. the bag is
then done and is ready for vacuum sealing -Fig.7
II. Vacuum packaging with a bag
1.Put the items inside the bag. Use only the
special designed vacuum bags supplied by
us with vacuum channels.
2. Clean and straighten the open end of
the bag, make sure no dust, wrinkle or ripples.
3. Place the open end of the bag within the
vacuum chamber area. Make sure the air intake
is not covered by the bag. – Fig. 1
Fig.1
Fig.2
Fig.3
Fig.4
Fig.5
Fig.6
Fig.7
Fig.1
Fig.2
Fig.3

08
4. Press the cover down on both sides using both
hands until click sounds are heard on both sides- Fig.2
5. Check the LED status of “FOOD” button and
the “Pressure” button to conrm sealing
time depending on the moisture status of packed
items (moist or d) and desired vacuum pressure
(Normal/Gentle) according to the type of food;
Fig.4
6. Then press Vacuum & Seal button, the unit sta to vacuum and will seal the bag
automatically – Fig. 3
NOTE: This product provides ve high vacuum pressure during vacuum packaging
with a bag, in order to avoid crushing of the delicate item by the high vacuum
pressure, obsee the status of the vacuum pressure inside the back and switch the “
SEAL” button immediately when the desired vacuum pressure is achieved. The
machine will then stop the pump and change to heat-seal the bag.
7. The vacuum packaging is done. Press the release buttons on the both side of the
machine simultaneously to open the cover and take out the packed bags – Fig. 4
NOTE:
·For best sealing eect, it is better to let the appliance cool down for 1 minute before
using it again. Wipe out any excess liquid or food residue in the vacuum chamber
after each bag packaged.
·Do not seal one after another continuously to avoid overheat of the sealing element.
The machine will reject if this “seal” button is activated within 15 seconds of the last
activation.
·Your appliance can work only on the specic bags provided by us. Do not attempt to
use other bags not intended for vacuum packaging.
·Cut the bag straight across with scissors to open a sealed bag.
09
Ⅲ. PULSE VACUUM FOOD WITH A BAG
1. Put the items inside the bag. Use only the specially
designed vacuum bags supplied by us with vacuum
channels.
2. Clean and straighten the open end of the bag, make
sure no dust, wrinkle or ripples. Place the open end of the
bag within the trough area. –Fig.1
3. Press the cover down on both sides to close the lid
–Fig.2
4. Press the Pulse button continuously, the unit stas to
vacuum – Fig.3
5. obsee the status of the vacuum pressure inside the
bag. If the pressure is satisfying, release the Pulse button
to stop the pump and press the “Manual Seal” button to
seal the bag – Fig.3
6. Push the release buttons to open the lid and take out
the packed bags – Fig. 4
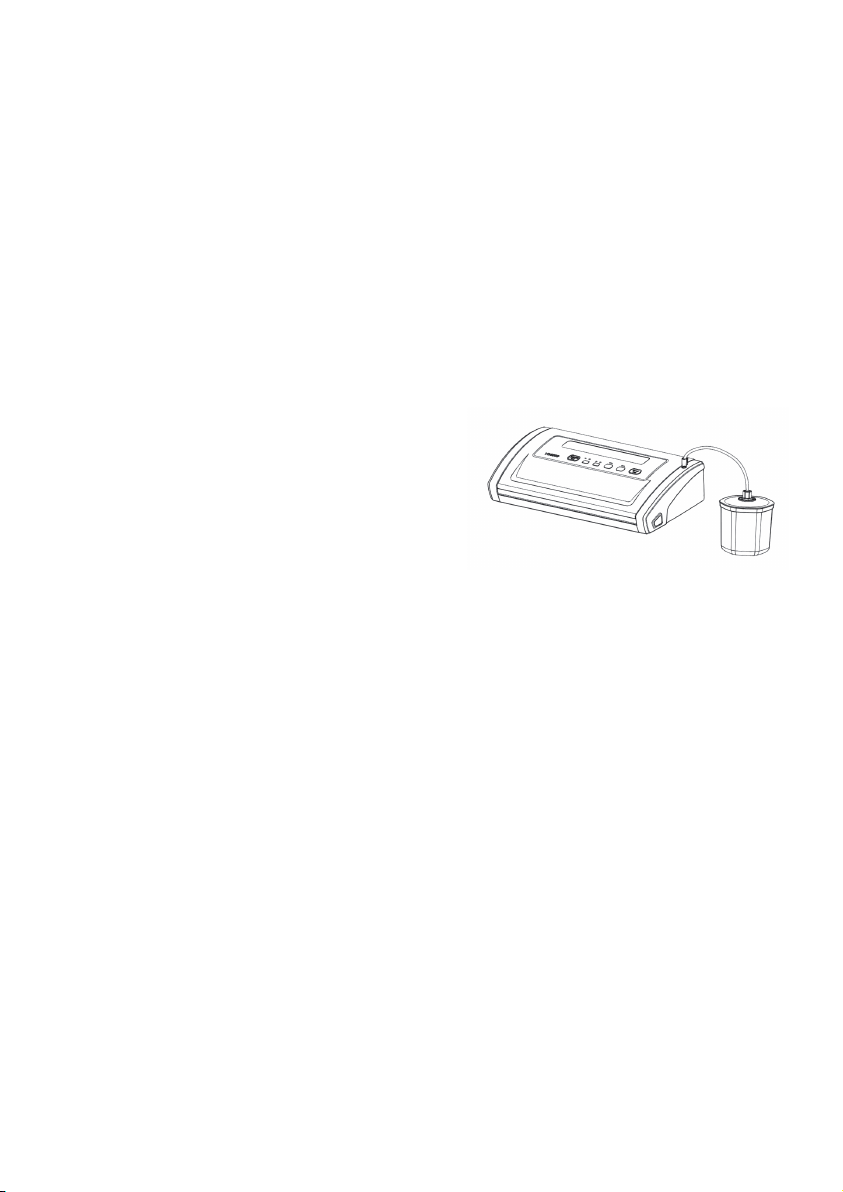
Ⅳ. VACUUM PACKAGE WITH CANISTER
STEP1: Take out the hose accesso, inse it into the
canister po on unit and the knob of canister cover.
Rotate the knob to SEAL position.
STEP 2: Press the canister button eetly to sta working.
STEP3: When the motor stops automatically, the process is
complete and pressure is achieved. Pull o the hose
accesso from canister po and canister cover.
Fig.1
Fig.2
Fig.3
Fig.4
10
Ⅴ. MARINATE MEAT WITH A MARINATE
BOWL
1. Take out the hose accesso, inse it into the
canister po on unit and the center hole of
canister cover– Fig. 1
2. Press Marinate button to sta working. The
indicator light glints during the course. It will
release air automatically after nished vacuum and
rest for a while, this is for 1 working cycle, this
machine will total working for 5 cycles. It takes
about 7 minutes to nish the process.
3. When the indicator light crush out, the marinate
process is completed. Pull o the hose accesso
from canister po and canister cover.
Note:
·At the beginning of the vacuum packaging in a canister or a vacuum bowl, slightly
press down the cover or on the hose adaptor to ensure no loose of the hose and to
avoid air leaking through the gap between the cover and the canister top rim for a
few seconds.
·To test vacuum, simply tug on the cover. It shall not move;
·Dierent canisters are available in the market . The operation procedure will be a
little dierent. Please refer to the individual manual for the specic canister.
Fig.1
Note:
·At the beginning of the vacuum packaging in a canister, slightly press down the
canister cover or on the hose adaptor to ensure no loose of the hose and to avoid air
leaking through the gap between the cover and the canister top rim for a few
seconds.
·To test vacuum, simply tug on the cover. It shall not move;
·Do not press any button to inteere with the whole proces

11
HINTS FOR BEST VACUUMING PERFORMANCE
Ⅵ.CORD STORAGE BOX
1. Put the power cord into the storage box when not use the machine which is in the
back of the machine. Do not wrap the cord around the appliance.
1.Do not put too much stu inside the bag: leave enough empty space in the open
end of the bag so that the bag can be placed in the vacuum chamber area without
creating wrinkles or ripples;
2.Do not wet the open end of the bag. Wet bags will cause diculty to heat-seal
tightly. If the food has moisture, or the bag is wet, you can choose the 'Moist'
function which is designed for a longer sealing time and seals better for wet bags.
3.Clean and straighten the open end of the bag before sealing. Make sure nothing is
left on the open area of the bag, no wrinkle or creased lines should appear on the
open panel, foreign objects or creased bag may cause dicult to seal tightly.
4.Do not leave too much air inside the bag. Press the bag to allow extra air to escape
from the bag before vacuuming it. Too much air inside the bag increases the vacuum
pump loading and may cause the motor insucient power to draw away all the air
inside the bag.
5.Do not vacuum packaging objects with sharp points like sh bones and hard shells!
Sharp points may penetrate and tear the bag! You may want to use a container
instead of a bag to store such stu.
6.Suggest to vacuum seal one bag within 1 minute, to let the appliance resume
enough.
7.If it’s not reach the required vacuum for some unknowable reason, the vacuum
system will shut automatically after 60 seconds, in this
situation, please check if the bag is leak, or not placed properly or any other
reasons.
8.Make sure there is no crack or deformation, or small paicles resting on the foam
gaskets around the vacuum chamber. When this happens, take it out and wash and
d it thoroughly, or replace with a new one.
9.During bag vacuum packaging process, small amounts of liquids, crumbs or food
paicles can be inadveently pull into the vacuum chamber, clogging the pump and
damaging your appliance. To avoid this, freeze moist and juicy foods rst before
sealing bags or place a folded paper towel near the inside top of the bag. For
powde or ne-grained foods, avoid oveilling bags. You may also place a coee
lter inside before vacuum packaging.

12
10.Pre-freeze fruits and blanch vegetables before vacuum packaging for best results.
11.Liquids need to be cooled before vacuum packing. Hot liquids will bubble up and
over the top of the jar when vacuum packed. Note: A jar attachment is necessa for
sealing jars.
12.Store perishable foods in the freezer or refrigerator. Vacuum packing extend the
shelf life of foods, but do not presee them.
13.Fill a bag about 2/3 full with water, seal the end (don't vacuum). Freeze the bag
and use for ice in the cooler, or ice packs for spos injuries.
14.Many foods are sold pre-packed in commercial vacuum bags such as cheese and
deli meats. Now, you can maintain the taste and freshness of these foods, by
re-packaging with the vacuum sealer bags after the commercially packed bags have
been opened.
15.Panty items such as our, rice, mixed for cakes and pancakes, all stay fresher
longer when vacuum packed. Nuts and condiments maintain their avor while
rancidity is kept out.
16.For objects with sharp points and edges, such as bones or dried pasta, pad the
edges with paper towels to keep them from puncturing the bag.
17.There are many non-food uses for vacuum packing. Keep camping supplies such
as matches, rst aid kits and clothing, clean and d. Keep ares for auto emergen-
cies ready. Keep silver and collectibles untarnished. 1. The main function of this
appliance is to store a wide kind of foods for freshness, longer, avor and conve-
nience. In general, vacuum packaging keeps food fresh up to three times as long as
other traditional food storage methods. Once this appliance as an indispensable pa
of your life, it will less food spoilage and save more money.
a)Cook in advance to vacuum seal and store individual poions or entire meals. This
vacuum bag is not recommended for microwave or boil-in-bag cooking, please use
the general cooking method to re-heat the vacuum-sealed foods.
b)Prepare foods in advance for picnics and camping trips or barbecues.
c)Eliminate freezer burn.
d)Package foods, such as meat, sh, poult, seafood and vegetables to freeze or
refrigerate.
e)Package d foods, such as beans, nuts, and cereals to store longer.

13
GENERAL RULES FOR FOOD SAFETY
18.It’s ideal to prepackage ingredients as well as individual poions for the
health-conscious, such as weight-conscious or those on diets or nutritional regimes
with special requirements.
19.This system can also be used to store and protect other items: valuable items,
such as photos, impoant documents, stamp collections, book collections, jewelle,
cards, comics etc.; hardware items, such as screws, nails, studs and bolts; medicines,
band-aids and other rst-aid items, etc..
Note:
After nished the vacuum work, please always let the machine cover open, don’t
fasten the cover, it will deform the foam gaskets and aect the machine function.
Food safety rules are based on scientic study as well as common sense. The
following rules and impoant food safety and optimal food storage.
1.Once you have heated, defrosted or un-refrigerated perishable foods, consume
them immediately.
2.After opening canned food or commercially vacuum packed foods, they can be
re-vacuumed packed. Follow the instructions to refrigerate after opening and store
re-vacuumed packages properly.
3.Don't defrost foods in hot water or via other heat sources. It doesn't matter
whether they are vacuum packed or not.
4.Don't consume foods if they are perishable and have been left out at room
temperature for more than a few hours. This is especially impoant if they have been
prepared with a thick sauce, in a vacuum package, or in a low oxygen environment.
5.Spread vacuum packages evenly throughout the refrigerator or freezer to cool
down food temperature quickly.

14
CLEANING AND MAINTENANCE
Vacuum sealer
1.Always unplug the unit before cleaning.
2.Do not immerse in water or any other liquid.
3.Avoid using abrasive products or material to clean the unit, for they will scratch
the suace.
4.Use a mild dishwashing soap and a warm, damp cloth to wipe away food residue
or around components.
5.D thoroughly before using again.
Note: The foam gaskets around the vacuum chamber should be dried thoroughly
before re-assembling, when re-assembling, is careful to prevent any damage, and
assemble as original position to ensure no vacuum leaking.
Vacuum bags
1.Wash bags in warm water with a mild dishwashing soap
2.When wash bags in dishwasher, turn bags inside out and spread them over top
rack of dishwasher, so entire suace is exposed to the washing water.
3.D thoroughly before reusing.
IMPORTANT: To avoid possible illness, do not reuse bags after storing raw meats,
raw sh or greasy foods. Do not reuse bags that have been microwaved or boiled.
Accessories
Washing all vacuum accessories in warm water with a mild dishwashing soap, But do
not immerse cover in water.
1.Canister bases (not lids) are top rack dishwasher safe. But canister cover should be
wiping down with a damp cloth.
2.Ensure the accessories to be d thoroughly before reusing.
3.Canister and cover is not allowed to use in microwave or freezer.
Storing Your Vacuum Sealer:
1.-Keep the unit in a at and safe place, out of the reach of children.
2.Do remember to make sure the lid of appliance is unlocked when not in use and in
storage. Keep the cover locked will disto the foam gaskets causing leaking.

15
TROUBLE SHOOTING
Nothing happens when I t to vacuum package
1. Check power cord to see if it is rmly plugged into electrical outlet.
2. Examine power cord for any damages.
3. See if electrical outlet is operative by plugging in another appliance.
4. If your appliance has a mode switch, make sure it is set to the correct mode.
Refer to the above operating instructions
5. Make sure bag is placed correctly inside Vacuum chamber and beneath the air
intake.
Air is not removed from the bag completely:
1. To seal properly, open end of bag should be resting entirely inside vacuum
chamber area.
2. Check sealing strip and the foam gasket beneath the lid for debris and
position. Make sure no breaking or distoion of the foam seal gaskets on both the
cover and on the base around the vacuum chamber. Wipe clean and smooth them
back into place.
3. Vacuum bag may have a leak. To test, seal the bag with some air in it,
submerge in water, and apply pressure. Bubbles indicate a leak. Reseal or use
another bag.
4. Uses only the specic vacuum bag with vacuum channels provided by the
manufacturer.
5. Leaks along the seal which can be caused by wrinkles, debriscrumbs, grease or
liquids. Reopen bag, wipe the top inside of the bag and smooth it out along the
sealing strip before resealing.
The machine does not turn to seal after vacuuming:
1. There is a vacuum pressure sensor built in this machine. The machine will not
turn to seal automatically if the vacuum pressure inside the bag is not able to reach
to the predetermined vacuum pressure. Check sealing strip and the foam gasket
beneath the lid for debris and correct position. Wipe clean and smooth them back
into place, and t again.
2. Make sure no breaking or distoion of the foam seal gaskets on both the
cover and on the base around the vacuum chamber. Take it out from the groove,
wash and d it thoroughly; or replace with a new foam gasket (get it from where
you brought or your nearest seice center).
3. Vacuum bag may have a leak. To test, seal the bag with some air in it,
submerge in water, and apply pressure. Bubbles indicate a leak. re-seal or use
another bag.
4. Leaks along the seal which can be caused by wrinkles, debris crumbs, grease or
liquidsfrom the bag. Reopen bag, wipe the top inside of the bag and smooth it out
along the sealing strip before resealing.

16
Air has re-entered into the bag after being sealed.
1. Leaks along the seal which can be caused by wrinkles, debris crumbs, grease or
liquids. Reopen bag, wipe the top inside of the bag and smooth it out along the
sealing strip before resealing.
2. The release of natural gases or fermentation form foods (such as fresh fruits
and vegetables) may occur. Open bag, if you think food has begun to spoil, and
discard food. Lack of refrigerator or uctuating temperatures in the refrigerator can
cause food to spoil. If the food which is not spoil. Consume food immediately.
3. Check the bag for a puncture or hole which may have released the vacuum. Do
not vacuum packaging hard items with sharp points (like bones or cracks of nut
shell). Cushion sharp edges in the contents of the bag with paper towels.
The bag melts:
Should sealing strip or sealing element be overheat and melt the bag, it may be
necessa to lift the lid and allow sealing strip or heating element to cool for a few
minutes.
The canister will not vacuum:
1.Make sure the adaptor was well connected both to the appliance and the canister
rmly.
2.Check if the knob of the canister was on the position of “seal”.
3.Press the lids OR on the hose adaptor at the ve beginning of vacuuming to avoid
leaking from the cover seal...
4.Check if there are signicant damages or smashes, if yes, change it for a new one.
5.Check the function of the vacuum sealer.
6.Make sure the rim of the canister is clean enough. If all the above situations are
excluded, please contact with the appointed seice agency.

17
PROTECTION OF THE ENVIRONMENT
At the end of the life of your product, it should go to a specially adapted waste-re-
cycling centre.
ENVIRONMENT PROTECTION FIRST
1. The symbol on the product or on its packaging indicates that this product
may not be treated as household waste. Instead it should be handed over to the
applicable. Collection point for the recycling of electrical and electronic equipment.
2. By ensuring this product is disposed of correctly, you will help prevent potential
negative consequences for the environment and human health, which could other-
wise be caused by inappropriate waste handling of this product .For more detailed
information about the recycling of this product, Please contact your local council
oce or your household waste disposal seice.
DISPOSAL OF THE DEVICE

18
TECHNICAL DATA
Model
Rated Voltage(V~)
Rated Frequence (Hz)
Rated Power(W)
Dimensions(mm)
Manufacturer
Address
VS5500
120V~
60Hz
130W
Length: 370mm Width: 145 mm Height: 74 mm
Bigland Electric Appliance Co., Ltd.
Hengli Village, Wang Niu Dun Town, Dongguan city,
Guangdong, China

E-mail: CustomerSeice@vevor.com