Diagram
Top:
Front:
1
1
2 3 4 5
2 3 4 5 6 7
8 9 11
10
8
9
10
11
12
6
7
Back:
Right:
13
14
15
18
Bottom:
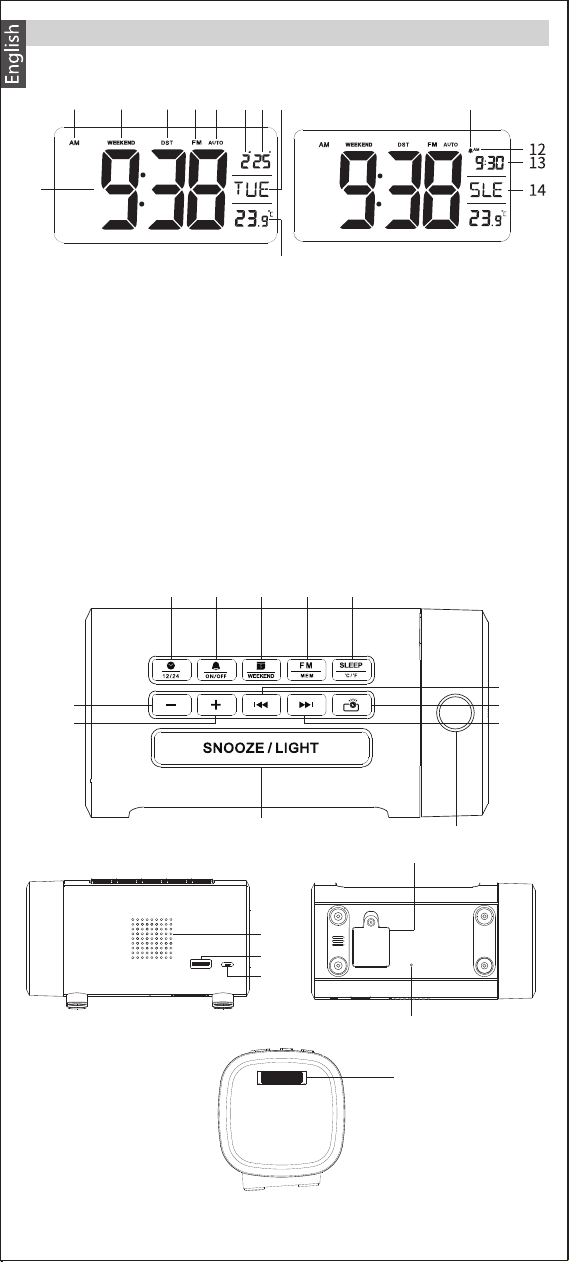
1. Time
2. AM / PM( 12-hour format )
3. Weekend mode
4. Daylight saving time
5. FM
6. Auto mode
7. Month
8. Day
9. Day of the week
10. Temperature
11. Alarm clock icon
12. AM / PM( 12-hour format )
alarm time
13. Alarm time
14. FM radio sleep timer icon /
radio station storage
16
17
EN-1
Set time / 12-Hour and 24-
Hour display conversion
Set alarm
Set date
FM radio
Timer of radio / °C / °F
adjustment
Time & volume adjustment
Time & volume adjustment
Ringtone & radio station
adjustment
Projection button
1.
2.
3.
4.
5.
6.
7.
8.
9.
Ringtone & radio station
adjustment
Snooze / adjust screen
brightness / switch
display color
Projection lens
Speaker
USB charging port
Micro USB port
Battery compartment
Antenna
Projection focusing knob
10.
11.
12.
13.
14.
15.
16.
17.
18.
12. AM / PM( 12-hour format )
Connect the USB cable to the product and adapter, and plug the
adapter into a power outlet.
kcab neht dna mrfinoc ot” “sserp trohs ,gnittes retfA
to time display.
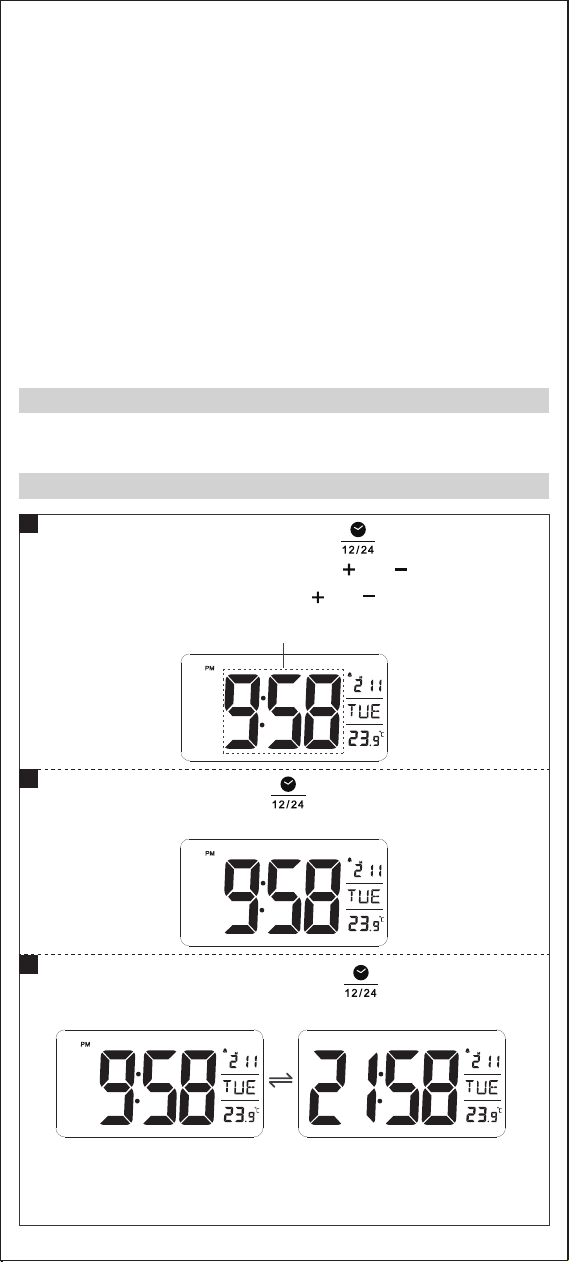
Power On
Time Setting
1
In time display mode, short press“ ”button to switch
12-hour and 24-hour format
Note: If you choose the 12-hour format, the“ AM ”shows on
the display in the forenoon, and“ PM ”shows on the
display in the afternoon.
D
2
3
retne ot nottub” “sserp gnol ,edom yalpsid emit nI
ro esaercni ot” “ro” “sserp trohs neht dna ,gnittes emit
tes ylkciuq ot” “ro” “sserp gnoL .tigid eht esaerced
minute and hour.
D D
D
Flicker
EN-2
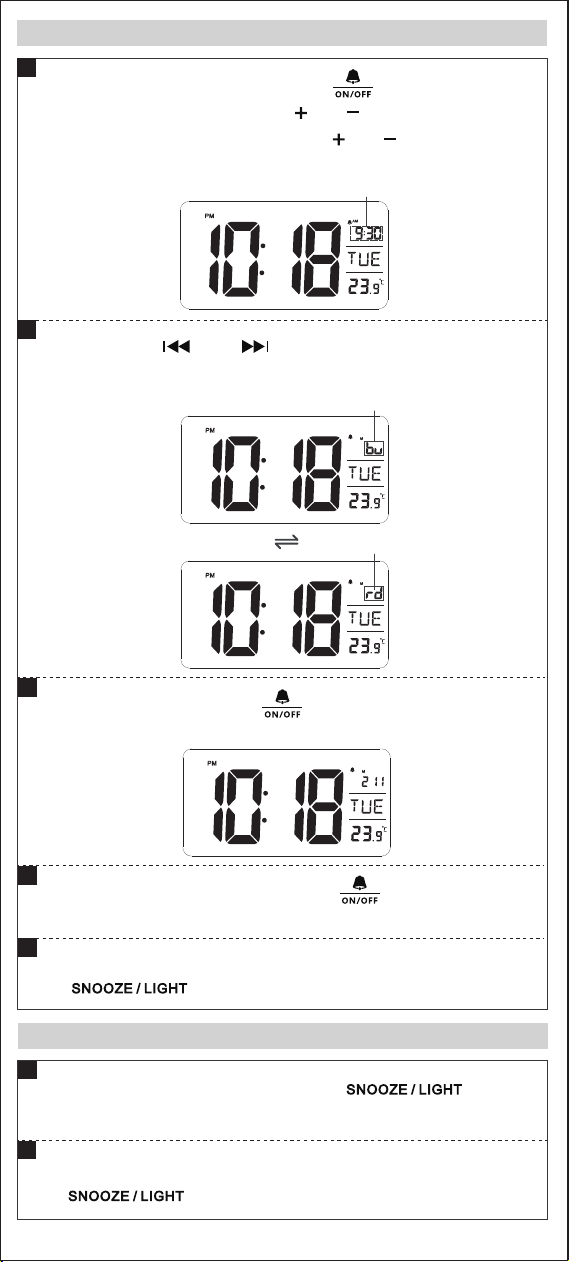
Snooze Setting
4
5
When the alarm rings, press any button other than
“ ”to turn off the alarm.
nrut ot” “sserp trohs ,sgnir mrala eht nehW
off the alarm briefly, and it will alarm again after 9 minutes.
During snooze, press any button other than
“ ”to turn off the snooze.
1
2
ffo ro no nrut ot” “sserp trohs ,edom yalpsid emit nI
the alarm.
D
D
In time display mode, long press“ ”to enter the alarm
setting and then short press ” “ro” “ to increase or
decrease the minute. Long press ” “ro” “ to quickly set
the minute and hour.
Alarm Setting and Choice of Alarm Ringtones
1
2
si” ub “ .senotgnir esoohc ot” “ro” “sserp trohS
.enotgnir sa oidar eht si” dr “ ,dnuos mrala lamron eht
After setting, short press“ ”to confirm the setting and
back to time display.
3
Flicker
Flicker
Flicker
D
EN-3
In time display mode, long press“ ” to enter the date
setting, then short press ” “ro” “ to set Year. (Long press
for quick setting)
Appears
D
Appears
D
Listen to the Radio
In time display mode, short press“ ”to turn on the
radio and the display shows radio channel.
,ylpets noitats eht hcraes ot” “ro” “sserp trohS
noitats eht hcraes ylkciuq ot” “ro” “sserp gnol
and tune to the current station.
ot )nim( 00L morf emulov tsujda ot” “ro” “sserp trohS
L15 (max). The default volume is L06.
1
2
3
D
Flicker
Date Setting
lliw htnom ehT .etad eht tes ot niaga” “sserp trohS
change with the date.
1
2
etad tiuq dna mrfinoc ot” “sserp trohs ,gnittes retfA
setting.
3
ffo ro no nrut ot” “sserp trohs,edom yalpsid emit nI
weekend mode.
4
D
Flicker
EN-4

Save the Station
Tune to Saved Stations
In radio mode, short press“ ”, then the“ 01 ”appears,
and tune to the station saved.
1
sraeppa” 10 “dna” MEM “litnu” “sserp gnol ,edoM oidaR nI
ehT .noitats oidar eht evas ot” “sserp neht ,yalpsid eht no
station is saved from“ 01 ”in order. The number of saved radio
stations is up to 15.
D
Appears
D
Short press “ ”to turn off the radio.
4
Appears
D
neeb evah taht snoitats hctiws ot niaga” “ sserp trohS
saved. Unsaved stations do not display "station number".
2
Appears
D
Appears
Appears
D
Radio Timing
,edom gnittes peels retne ot” “sserp trohs ,edom oidar nI
” “sserp trohs neht dna ,yalpsid eht no swohs ”50“dna”ELS“
to choose sleep time: 5→15→30→45→60→75→90→OFF.
ecalp eht ta deyalpsid syawla si ” ELS “ ,edom peels nI :etoN
where shows the day of week.
EN-5
D D
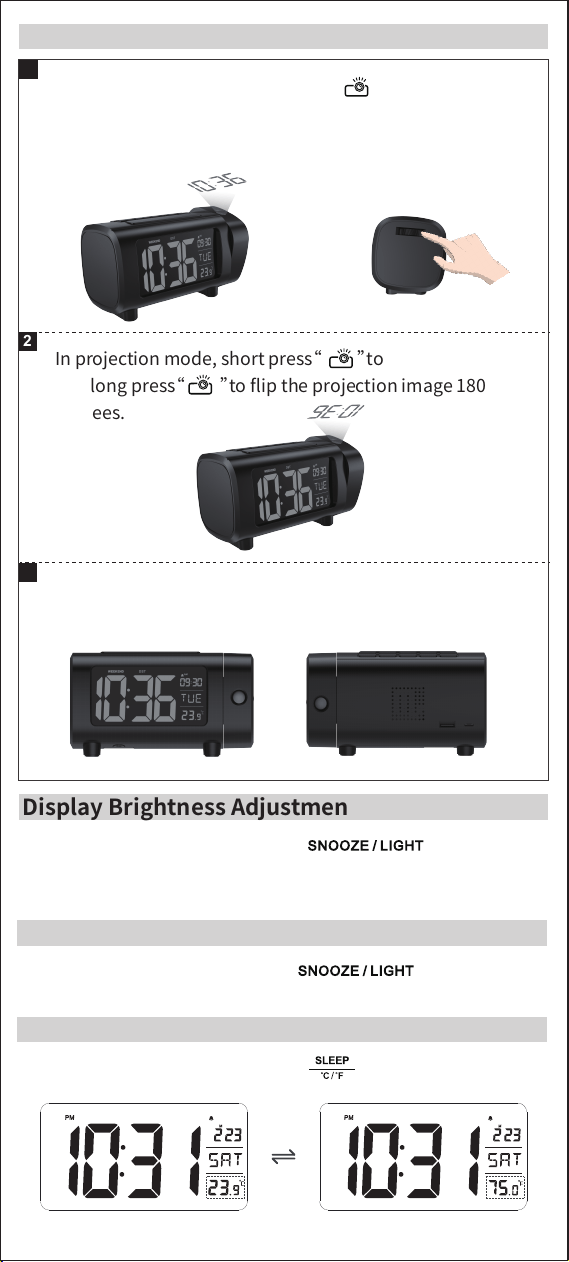
Display Color Conversion
In time display mode, long press“ ”to switch the
display color from blue and white.
Temperature Unit Conversion:
In time display mode, short press “ ”to switch ℃ and ℉.
”
In time display mode, short press“ ”to adjust
brightness of display. Low light → medium light → high light →
Off (4-level).
ssenthgirb tsujda ot” “sserp trohs ,edom noitcejorp nI
081 egami noitcejorp eht pifl ot” “sserp gnol dna
degrees.
2
In projection mode, the projection can be rotated 90
degrees forward or backward.
3
eht no nrut ot” “sserp trohs ,edom yalpsid emit nI
projector, and turn the focusing knob until the time is
clearly projected on the wall.
1
Projection Setting
Display Brightness Adjustment
EN-6
Appears
D
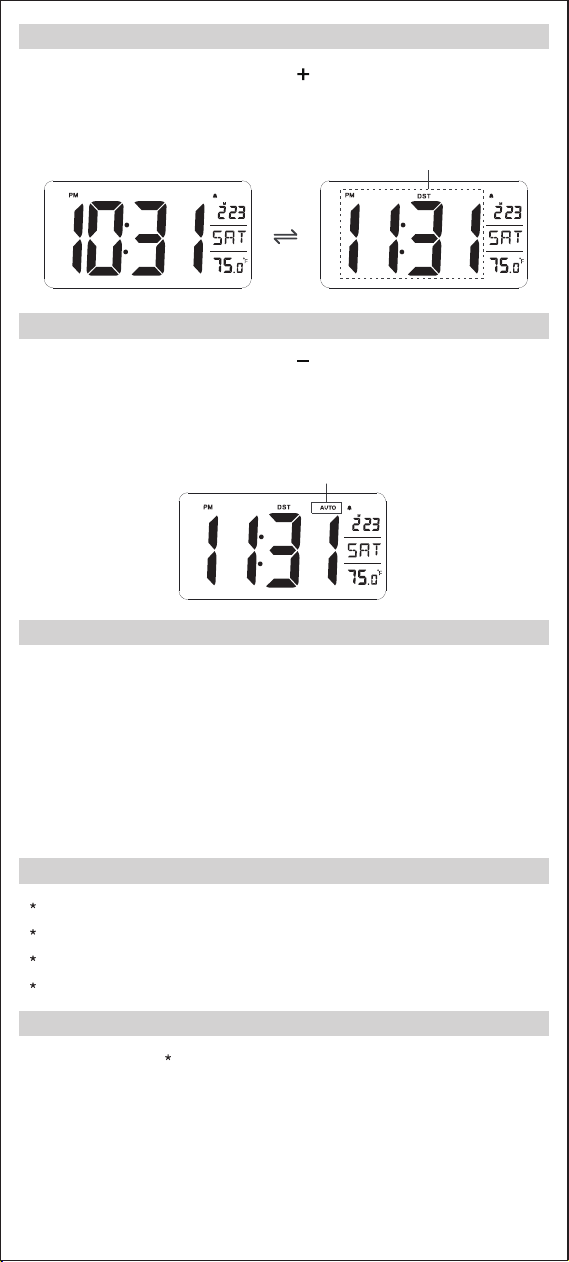
Automatic Mode Setting
citamotua ffo ro no nrut ot” “sserp gnol ,edom yalpsid emit nI
mode. The automatic mode is turned on when the“ AUTO ”shows
on the screen. The display turns to the highest brightness and the
projection turns off automatically after turning off the alarm.
1. Connect the USB port of this product with USB cable to charge
the mobile phone and other devices.
2. Please use the original USB cable of the mobile phone and
other devices to charge.
3. Please power the product with the original adapter supplied.
Note: Output voltage: DC5V, current: 1.2A ( MAX )
USB Charging Function
1 Projection Clock
1 Micro USB Cable
1 Adapter
1 User Manual
Package Contents
Backup Battery: 1 CR2032
Housing Material: ABS
Adapter Input: AC100-240V, 50 / 60Hz
Specifications
D D
Daylight Saving Time Setting
thgilyad ffo ro no nrut ot” “sserp gnol ,edom yalpsid emit nI
” TSD “,edom emit gnivas thgilyad eht no nruT .edom emit gnivas
shows on the screen, and the time will automatically increase 1
hour.
Appears
EN-7

mode. The automatic mode is turned on when the“ AUTO ”shows
on the screen. The display turns to the highest brightness and the
1. Connect the USB port of this product with USB cable to charge
1. Please do not place the projection clock at place where is in a
high temperature, wet or under direct sunlight.
2. When the projection clock is placed on the furniture, please
separate it from the furniture with cloth or other protective
materials.
3. Clean the clock with a lint-free cloth which is dampened with
soapy water if necessary. Make sure that the product is not
connected to the power before cleaning.
4. Can only use the included adapter.
5. If it is not used for a long time, please take out the backup
battery to avoid corrosion of the product.If the battery
compartment is corroded or dirty, please clean it and replace a
new battery.
6. Please do not disassemble the product or touch any
components and parts.
Precautions
Operation is subject to the following two conditions:
(1) This device may not cause harmful interference, and
(2) This device must accept any interference received, including
interference that may cause undesired operation.
Note:
• Reorient or relocate the receiving antenna.
• Increase the separation between the equipment and receiver.
• Connect the equipment into an outlet on a circuit different
from that to which the receiver is connected.
• Consult the dealer or an experienced radio/TV technician for help.
This equipment has been tested and found to comply
with the limits for a Class B digital device, pursuant to part
15 of the FCC Rules. These limits are designed to provide
reasonable protection against harmful interference in a
residential installation. This equipment generates, uses and
can radiate radio frequency energy and, if not installed and
used in accordance with the instructions, may cause
harmful interference to radio communications. However,
there is no guarantee that interference will not occur in a
particular installation. If this equipment does cause harmful
interference to radio or television reception, which can be
determined by turning the equipment off and on, the user
is encouraged to try to correct the interference by one or
more of the following measures:
FCC Statement
”
EN-8