
00176651
SMART CAMERA
G Operating Instructions D Bedienungsanleitung
1
G Operating Instructions
1. Introduction ............................................................3
1.1 Explanation of warning symbols and notes.........................................4
1.2 Explanation of symbols used on the product label ...................................4
2. Packaging contents ......................................................4
3. Safety instructions .......................................................5
4. Installing the Hama Smart Home app ........................................6
5. Product properties .......................................................7
6. Installation .............................................................7
7. Integrating devices into the Hama Smart Home ................................8
8. Setting options .........................................................10
9.
Extended usage options with scenarios......................................11
10. Technical data..........................................................12
11. Care and maintenance ...................................................12
12. Warranty disclaimer .....................................................12
13. Declaration of conformity. . . . . . . . . . . . . . . . . . . . . . . . . . . . . . . . . . . . . . . . . . . . . . . . .12
14. Specications according to Regulation (EU) 2023/826 ..........................12
1. Einführung . . . . . . . . . . . . . . . . . . . . . . . . . . . . . . . . . . . . . . . . . . . . . . . . . . . . . . . . . . . . 13
1.1 Erklärung von Warnsymbolen und Hinweisen . . . . . . . . . . . . . . . . . . . . . . . . . . . . . . . . . . . . . . 14
1.2 Erklärung von Symbolen der Produktkennzeichnung . . . . . . . . . . . . . . . . . . . . . . . . . . . . . . . . . 14
2.
Verpackungsinhalt . . . . . . . . . . . . . . . . . . . . . . . . . . . . . . . . . . . . . . . . . . . . . . . . . . . . . . 14
3. Sicherheitshinweise . . . . . . . . . . . . . . . . . . . . . . . . . . . . . . . . . . . . . . . . . . . . . . . . . . . . . 15
4.
Installation der App Hama Smart Home . . . . . . . . . . . . . . . . . . . . . . . . . . . . . . . . . . . . . 16
5. Produkteigenschaften. . . . . . . . . . . . . . . . . . . . . . . . . . . . . . . . . . . . . . . . . . . . . . . . . . . . 17
6. Montage . . . . . . . . . . . . . . . . . . . . . . . . . . . . . . . . . . . . . . . . . . . . . . . . . . . . . . . . . . . . . . 17
7. Einbinden von Geräten in die Hama Smart Home . . . . . . . . . . . . . . . . . . . . . . . . . . . . . . 18
8. Einstellungsmöglichkeiten . . . . . . . . . . . . . . . . . . . . . . . . . . . . . . . . . . . . . . . . . . . . . . . . 20
9. Erweiterte Nutzungsmöglichkeiten durch Szenen . . . . . . . . . . . . . . . . . . . . . . . . . . . . . . 21
10. Technische Daten . . . . . . . . . . . . . . . . . . . . . . . . . . . . . . . . . . . . . . . . . . . . . . . . . . . . . . . 22
11. Wartung und Pege . . . . . . . . . . . . . . . . . . . . . . . . . . . . . . . . . . . . . . . . . . . . . . . . . . . . . 22
12.
Haftungsausschluss . . . . . . . . . . . . . . . . . . . . . . . . . . . . . . . . . . . . . . . . . . . . . . . . . . . . . 22
13. Konformitätserklärung . . . . . . . . . . . . . . . . . . . . . . . . . . . . . . . . . . . . . . . . . . . . . . . . . . . 22
14. Angaben nach Verordnung (EU) 2023/826. . . . . . . . . . . . . . . . . . . . . . . . . . . . . . . . . . . . 22
D Bedienungsanleitung
INTRoDUCTIoN
3
1.
Introduction
Thank you for choosing a Hama product.
Take your time and read the following instructions and information completely.
Please keep these operating instructions in a safe place for future reference. If you sell the device, please
pass these operating instructions on to the new owner.
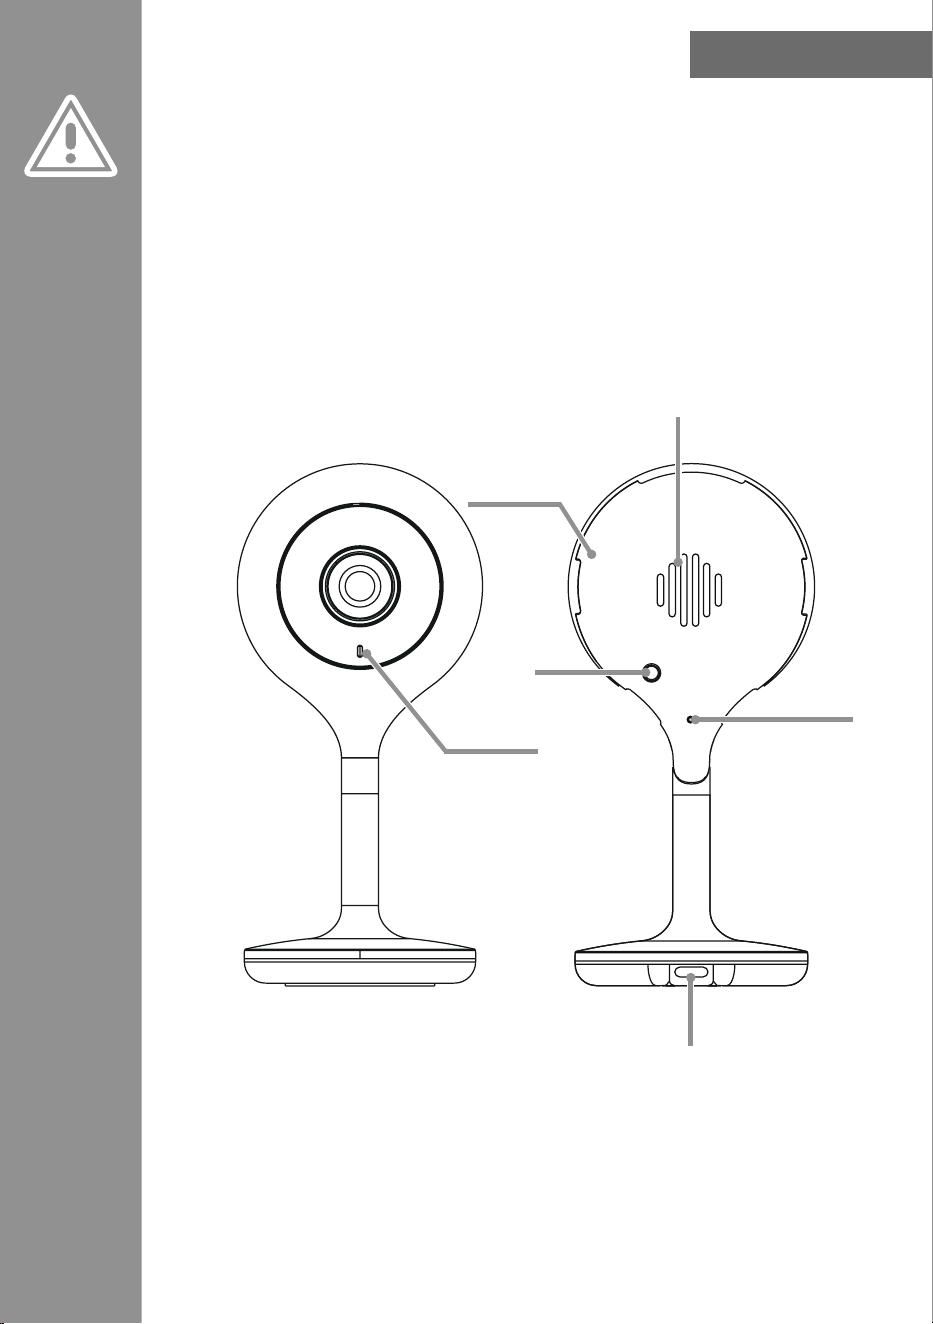
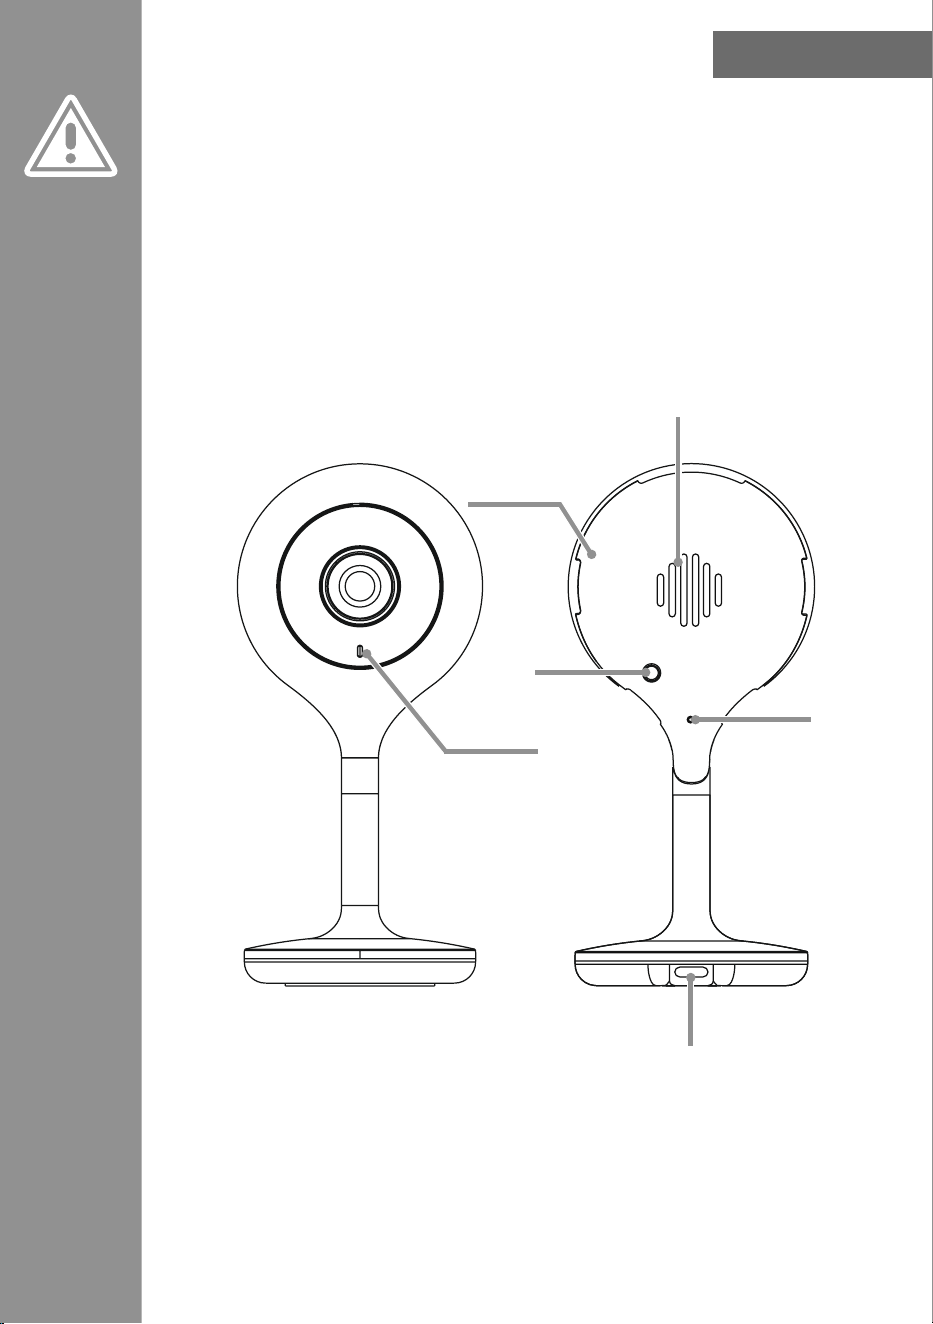
G Operating Instructions
RESET
MICRO SD
Reset
Microphone
Status LED
SD card slot
Loudspeaker
USB-C
PACKAGING CoNTENTS
4
1.1
Explanation of warning symbols and notes
Risk of electric shock
This symbol indicates a risk of electric shock from touching uninsulated product parts that may carry
hazardous voltage.
Warning
This symbol is used to indicate safety instructions or to draw your attention to specic hazards and risks.
Note
This symbol is used to indicate additional information or important notes.
1.2 Explanation of symbols used on the product label
The product is intended only for indoor use.
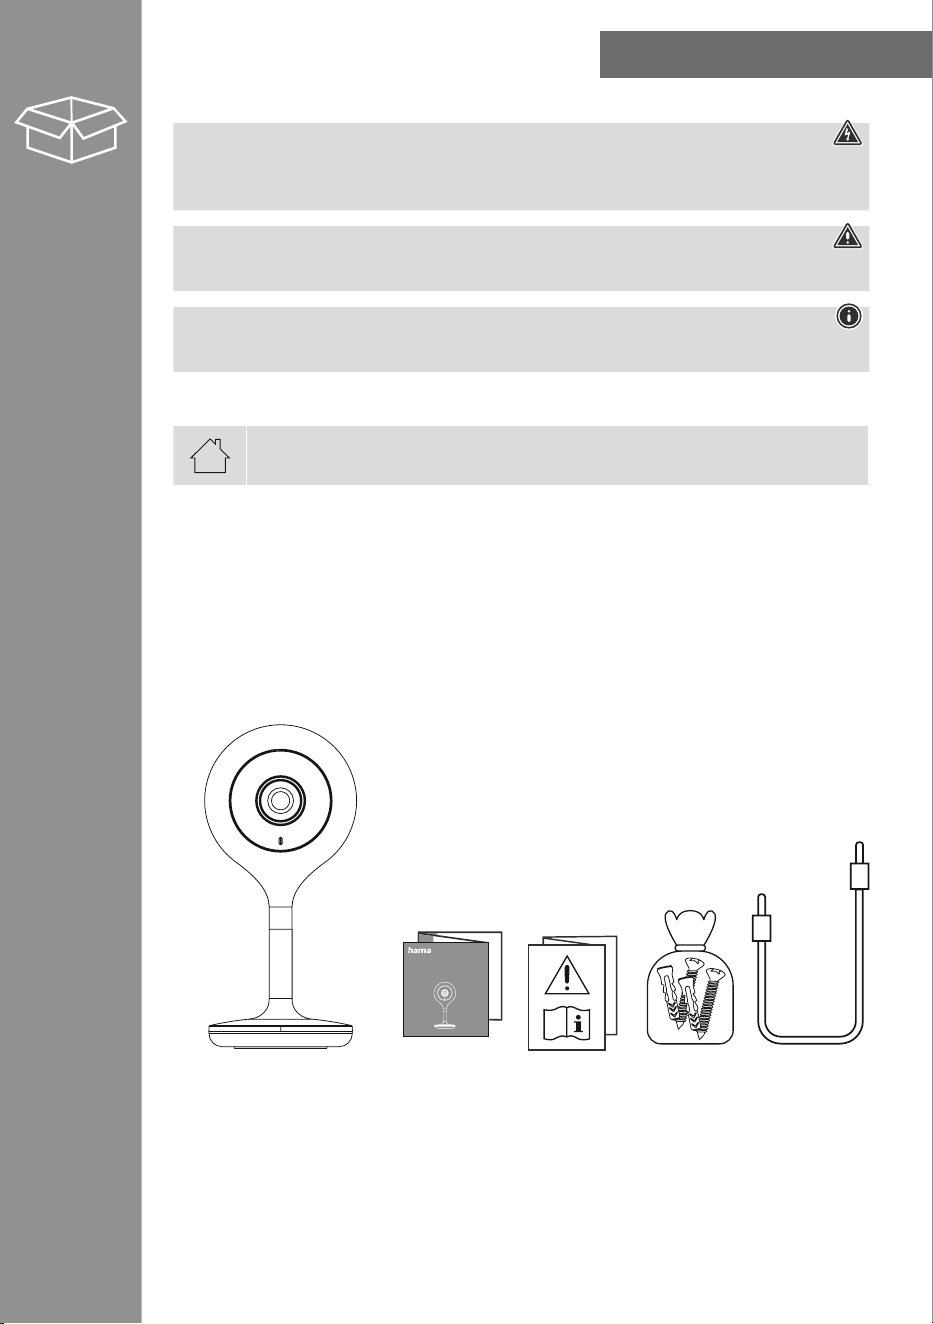
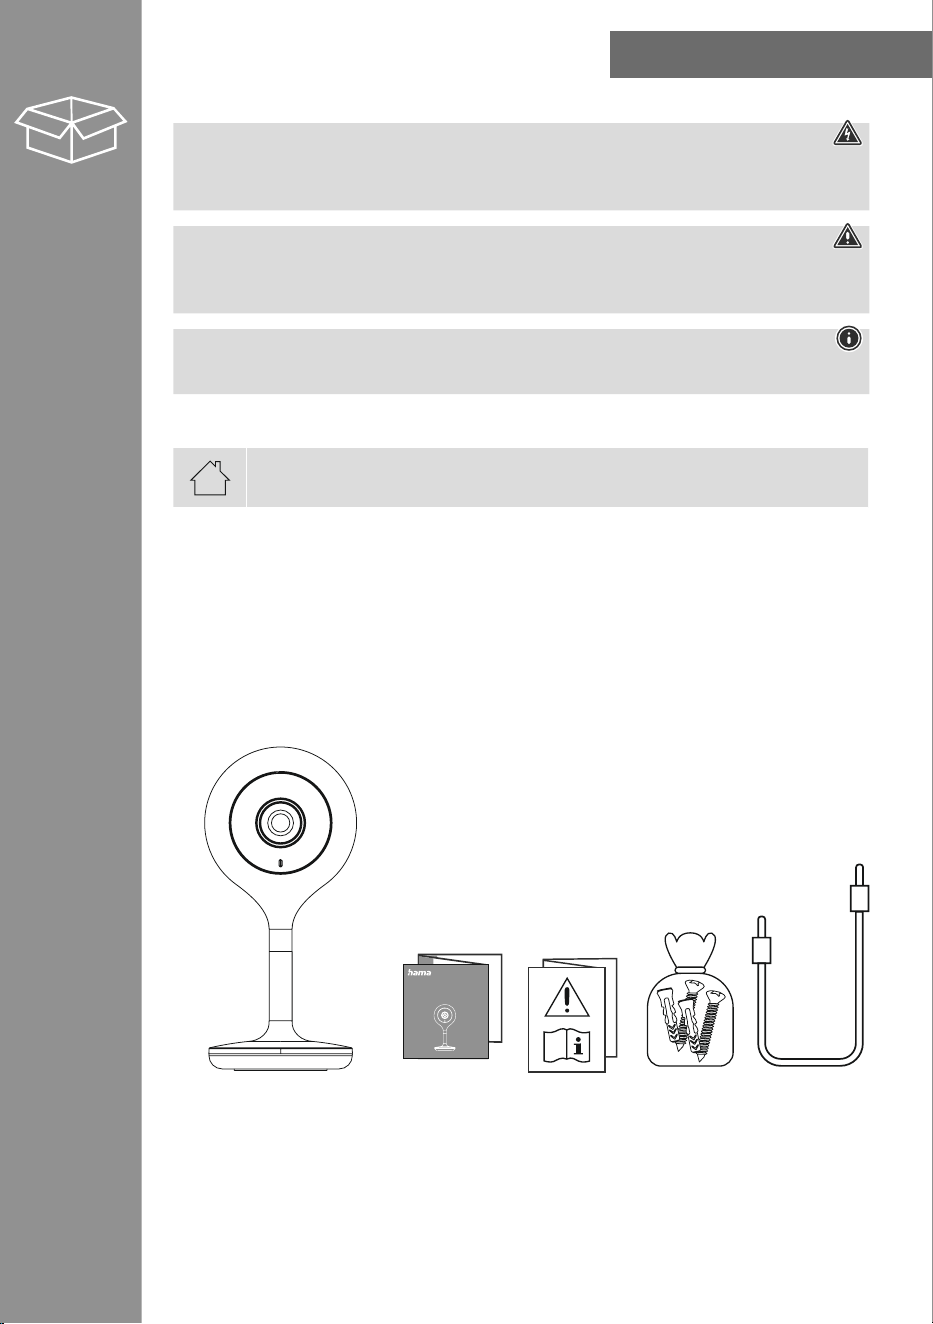
2. Packaging contents
1x smart camera
1x USB-C cable
1x mounting kit
1x quick guide
1x warning and safety instructions
00176651
SMART CAMERA
SAfETy INSTRUCTIoNS
5
3.
Safety instructions
Risk of electric shock
• Do not open the device or continue to operate it if it becomes damaged.
• Do not use the product if the
AC adapter, the adapter cable or the mains cable are damaged.
• Do not attempt to service or repair the product yourself. Leave any and all service work to qualied
experts.
• Protect the product from dirt, moisture and overheating and use it in dry environments only.
• This product is intended for private, non-commercial use only.
• Use the product only for the intended purpose.
• Do not use the product in the immediate vicinity of heaters, other heat sources or in direct sunlight.
• Do not use the product in areas in which electronic products are not permitted.
• Do not drop the product and do not expose it to any major shocks.
• Do not modify the product in any way. Doing so voids the warranty.
• Keep the packaging material out of the reach of children due to the risk of suffocation.
• Dispose of packaging material immediately in accordance with the locally applicable regulations.
• Do not operate the product outside the power limits given in the specications.
• Only use the article under moderate climatic conditions.
• Do not mount the product above locations where persons might sit or stand.
• Before mounting, check that the wall you have chosen is suitable for the weight to be mounted. Also
make sure that there are no electric, water, gas or other lines running through the wall at the mounting
site.
• Pay attention to the applicable data protection regulations before installing and using the product.
• Respect the personal and property rights of others. Do not make recordings of other people with the
camera.
• Observe the right to one’s own image and spoken word when recording.
• As with all electrical products, this device should be kept out of the reach of children.
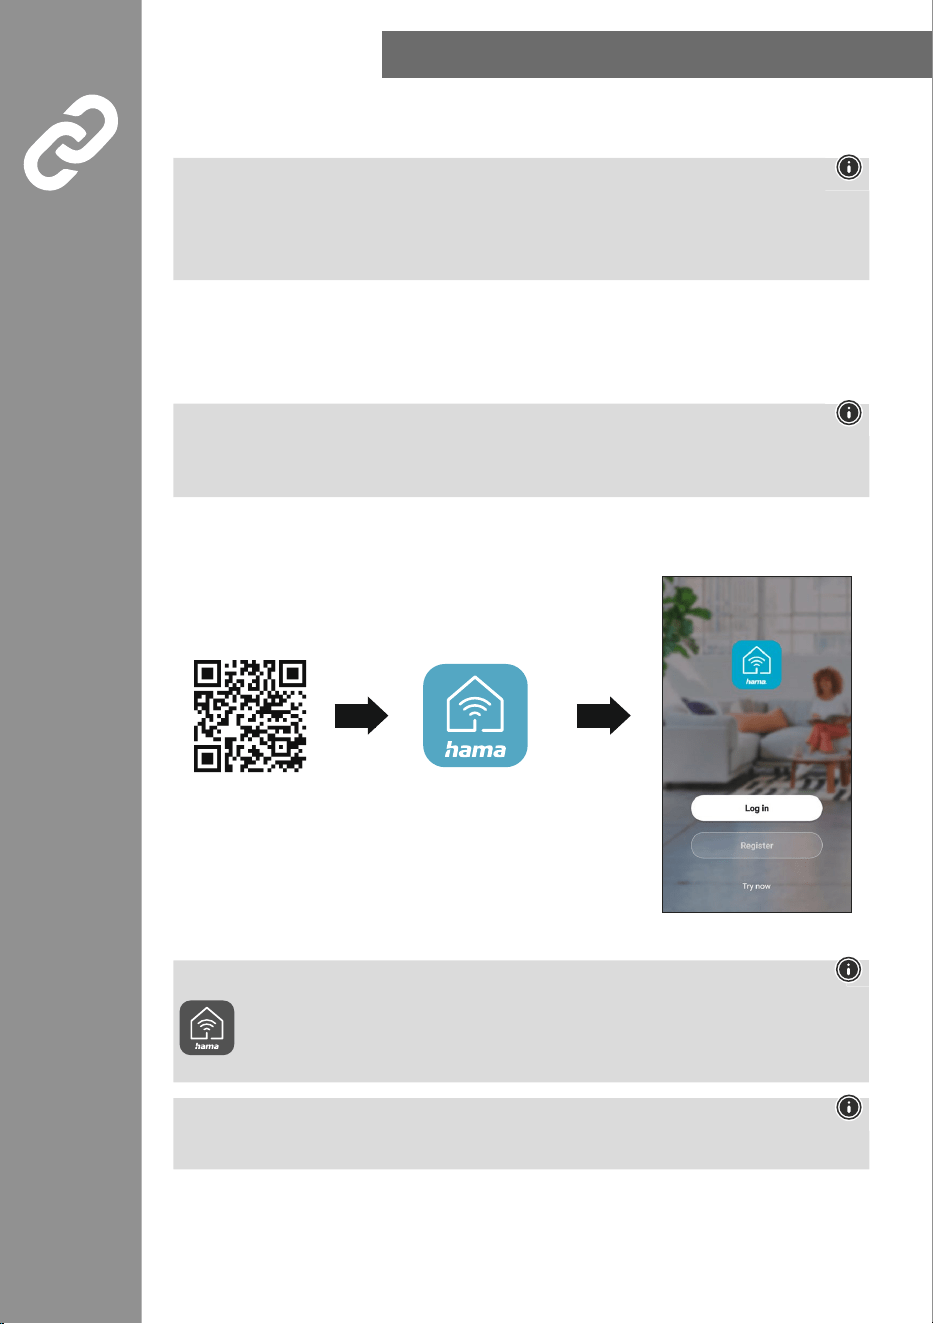
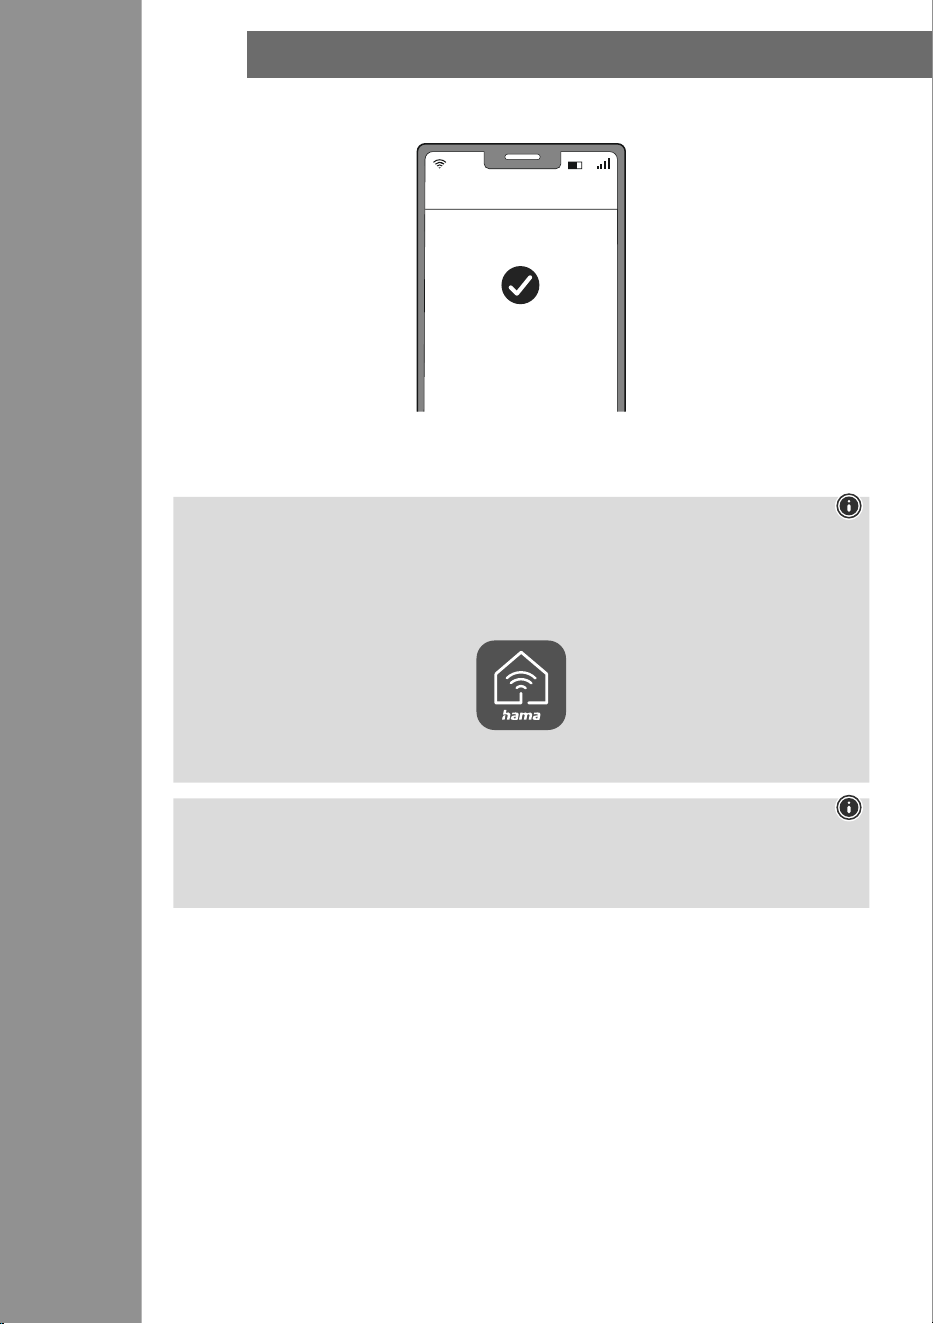
INSTALLING THE HAMA SMART HoME APP
6
4.
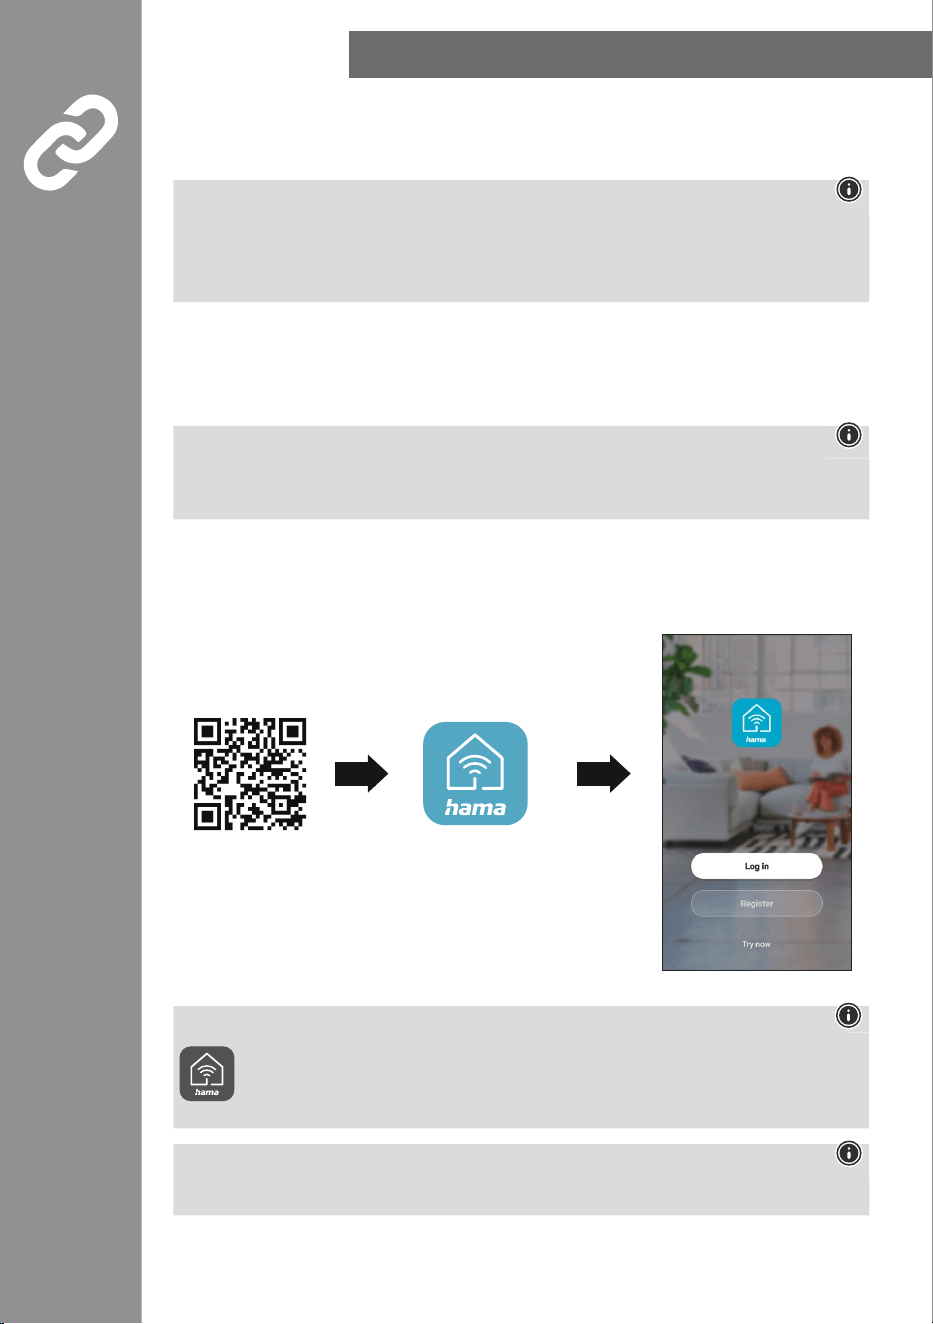
Installing the Hama Smart Home app
To use all the functions of the device, you need a smartphone/tablet and the Hama Smart Home app.
Note
• The following operating systems are supported:
• iOS 16.3 or later
• Android 6.0 or later
• Download the Hama Smart Home app from the App Store (iOS) or from Google Play (Android) to your
smartphone/tablet.
• To install the app, follow the instructions on your smartphone/tablet.
• Open the app on your smartphone/tablet.
Note
• While setting up the app, you will be asked whether the app has permission to access the functions
of your smartphone/tablet. Say yes to these prompts for the full functionality of the device.
• Register to create a new account. Alternatively, log in with the access data of your existing account.
• Follow the instructions for setting up the app until you can add a new device.
Note
A detailed description of the
Hama Smart Home
app and all of its functions can be found
in our app guide at:
support.hama.com/00176651
Note
Ensure that you are using the latest version of the Hama Smart Home app.
https://link.hama.com/
app/smart-home
PRoDUCT PRoPERTIES
7
5.
Product properties
The following steps are required to commission the device:
• Connect the device to a properly installed and easily accessible mains socket.
• Put the device in pairing mode by holding the button for around 5 seconds. The LED starts to ash
quickly.
6.
Installation
• You can secure the camera into place using the adhesive pads or mounting kit supplied.
Warning - installation with adhesive
• Be aware that the intended mounting surface must be free from dust and grease. Use a suitable
cleaner from a specialist retailer for this.
• Be aware that the adhesive pads are intended to be permanent. Carefully pull the adhesive pad off
the mounting surface to remove it.
• Various environmental inuences, such as moisture in the air, sunlight, cold, etc., can impair the
long-term stickiness of the adhesive pads.
• Possible residue on the mounting surface after removal of the adhesive pads cannot be ruled out!
Warning - mounting kit
• Do not mount the product above locations where persons might sit or stand.
• Before mounting, check that the wall you have chosen is suitable for the weight to be mounted.
Also make sure that there are no electric, water, gas or other lines running through the wall at the
mounting site.
INTEGRATING DEVICES INTo THE HAMA SMART HoME
8
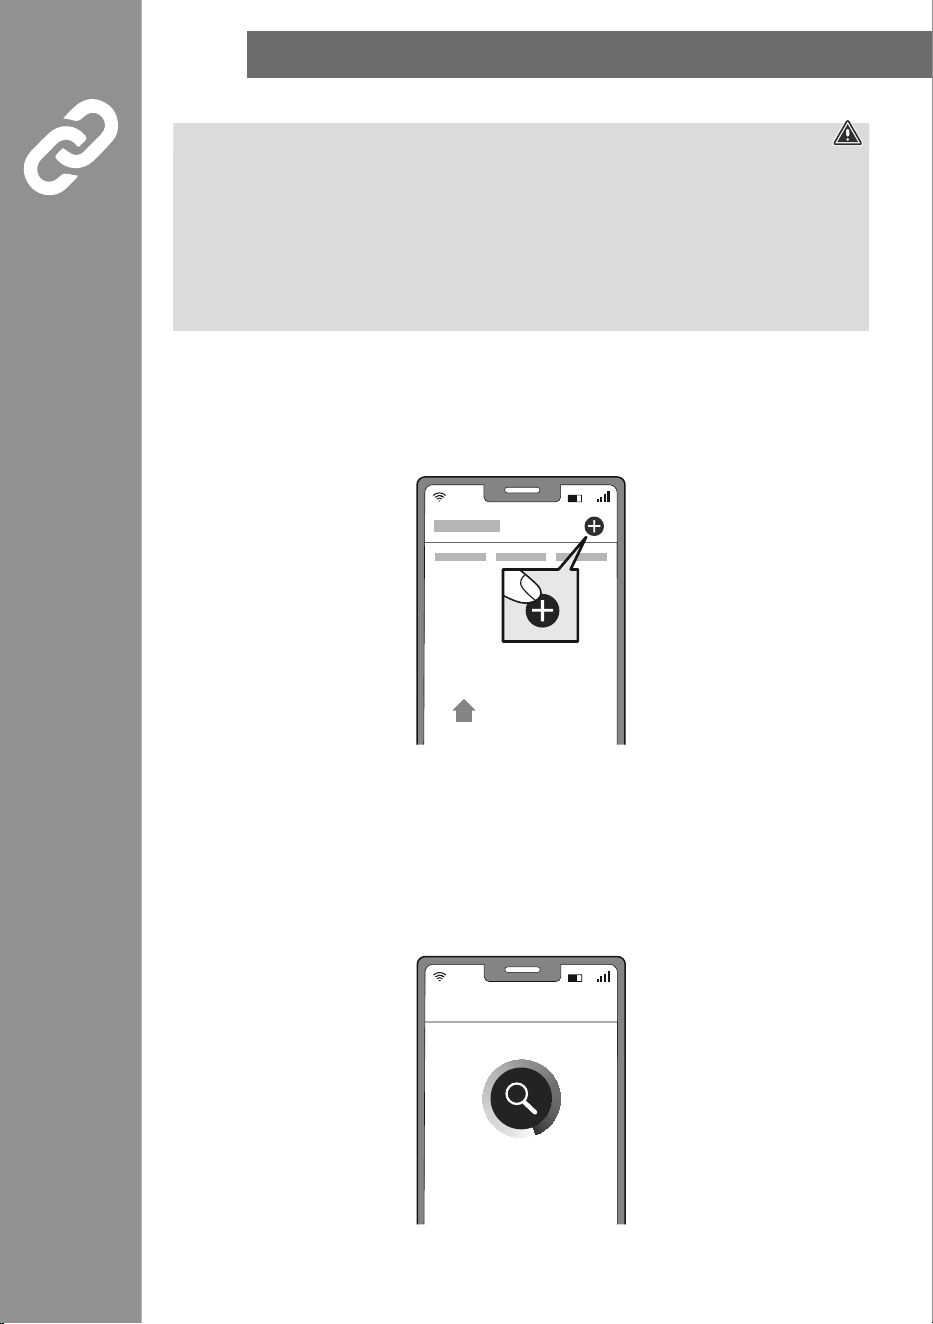
7.
Integrating devices into the Hama Smart Home
Warning
• Only operate the product from an approved socket that is connected to the public power supply. The
socket must be installed close to the product and must be easily accessible.
• Disconnect the product from the power supply using the On/Off switch – if this is not available,
unplug the power cord from the socket.
• If using a multi-socket power strip, make sure that the total power consumption of all connected
devices does not exceed the socket strip's maximum throughput rating.
• If you will not be using the product for a prolonged period, disconnect it from mains power.
• Connect the camera to a suitable power supply unit and a properly installed socket.
• The LED on the camera starts to ash quickly. If it does not, press and hold the Reset button (4) on the
camera for around 5 seconds.
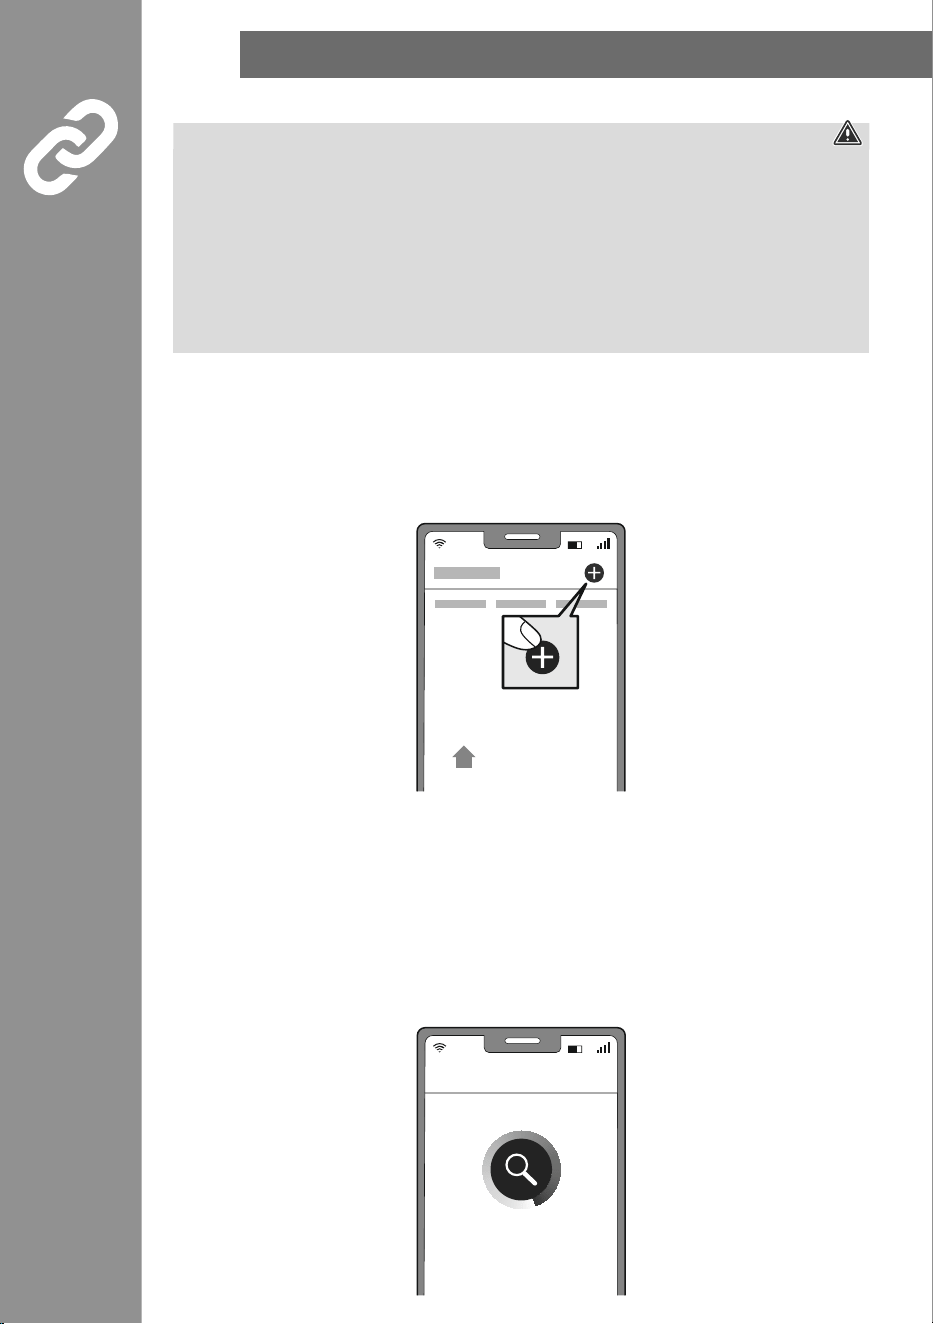
• Open the app and sign in.
• Press the + in the top right-hand corner to add a new device.
• Choose Cameras from the list.
• Now conrm that the camera's LED is ashing quickly by ticking "Next step" and clicking on "Next".
Ensure that the QR code is at the top right.
• Next enter your WiFi password and
conrm with NEXT.
Now scan the QR code with the camera from a distance of around 15 - 20 cm.
• As soon as you hear a signal sound, click "Signal sound heard".
• Your camera is now connected.
Mein Zu-
hause
Gerät hinzufügen
INTEGRATING DEVICES INTo THE HAMA SMART HoME
9
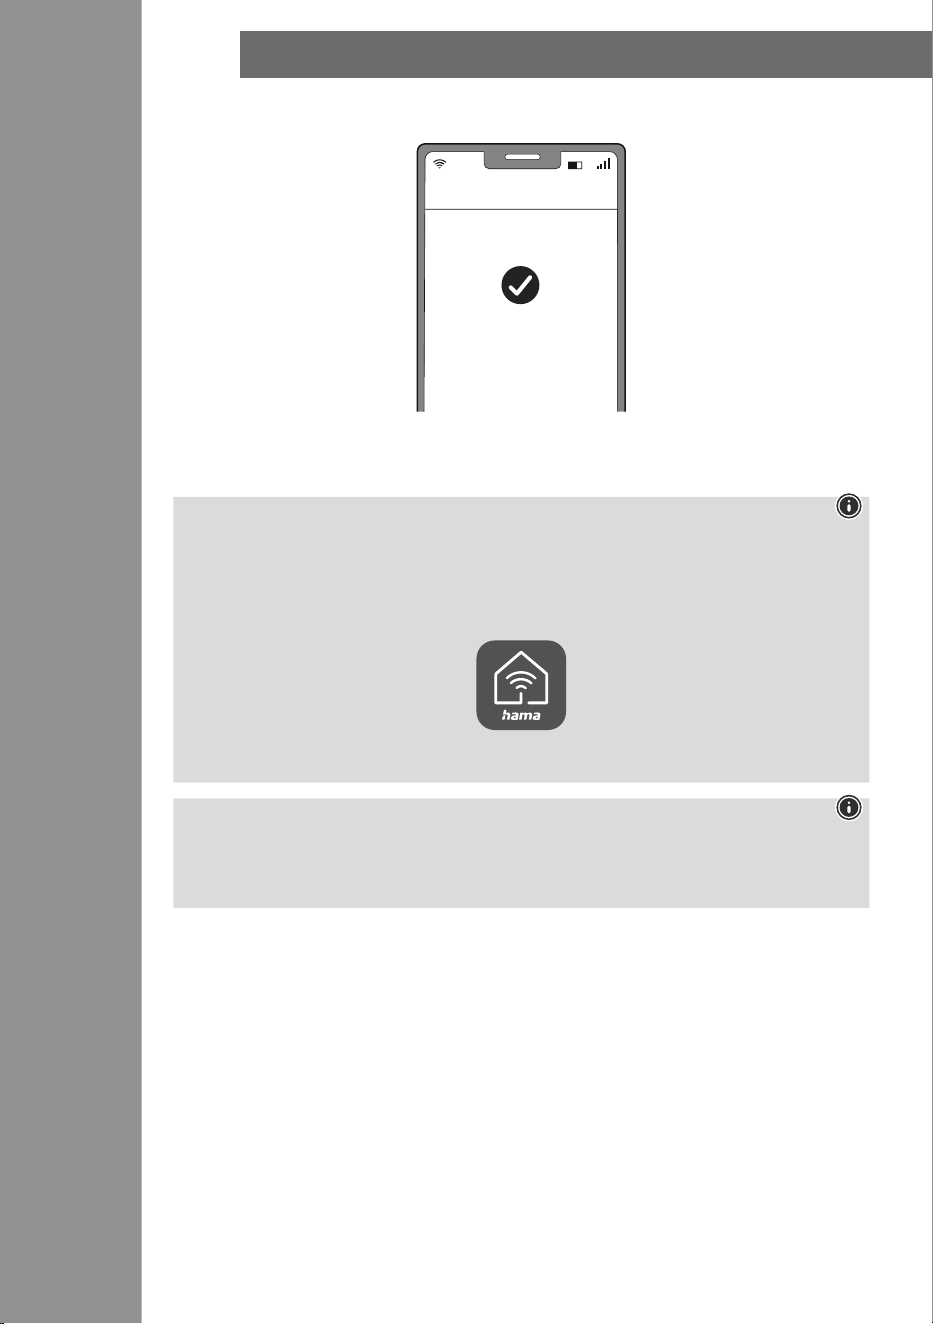
• Once the connection is successful, the LED stops ashing quickly and the app conrms that your
camera is connected. You can now assign it a different name if you wish.
• Click finish to end the process.
• You can now operate and congure the camera.
Note
A detailed description of the
Hama Smart Home app
and its full scope of functions can be found in our
App Guide at:
support.hama.com
Note: Pairing restart
First remove the rubber protector on one side of the camera. Now press the Reset button with a needle
or another thin object until a signal sound is heard. As soon as the LED starts to ash red, you can start
a further pairing attempt.
Erfolgreich hinzugefügt
Erledigt
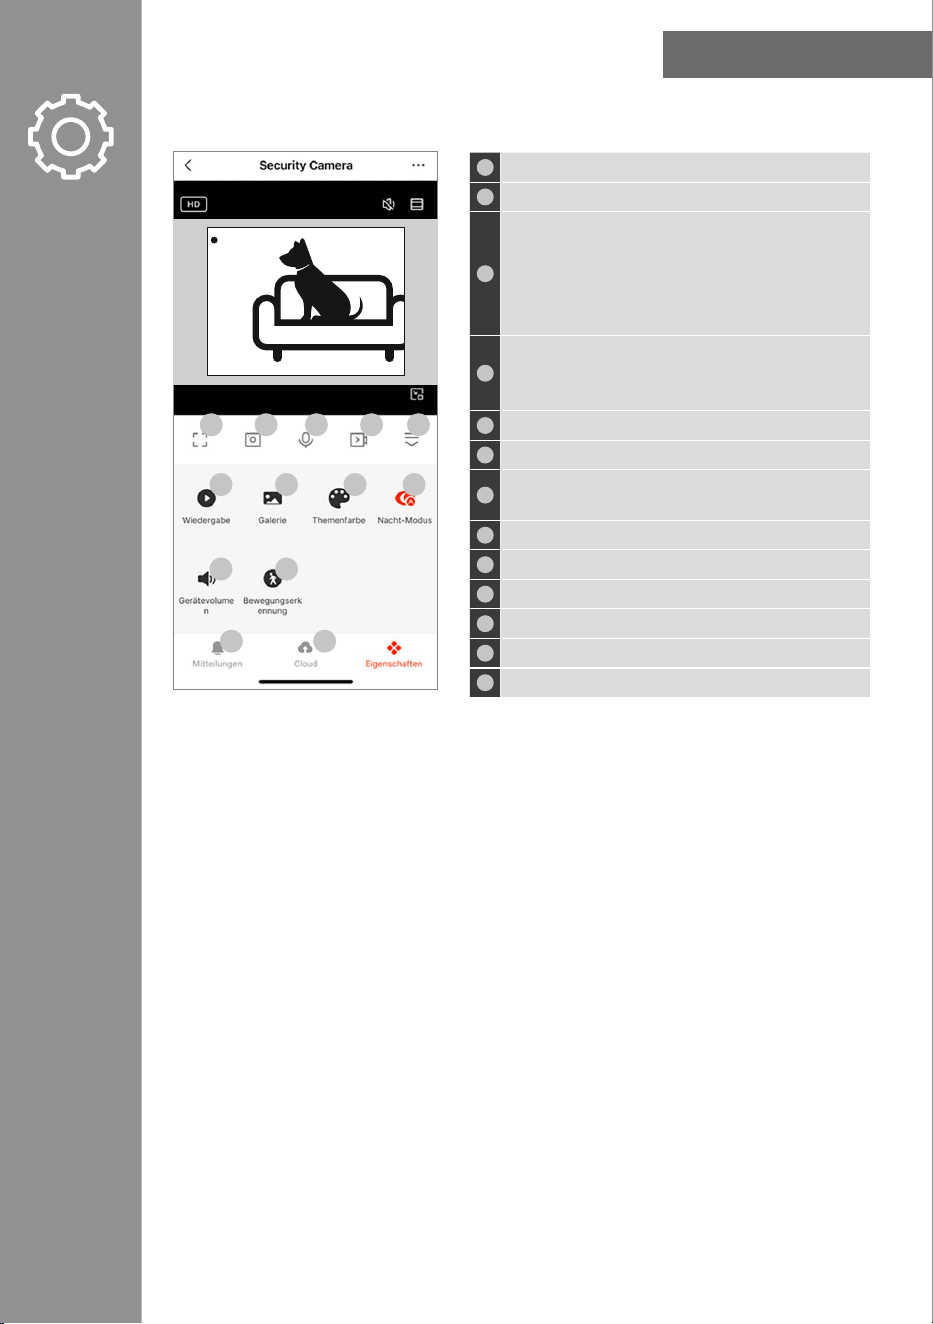
SETTING oPTIoNS
10
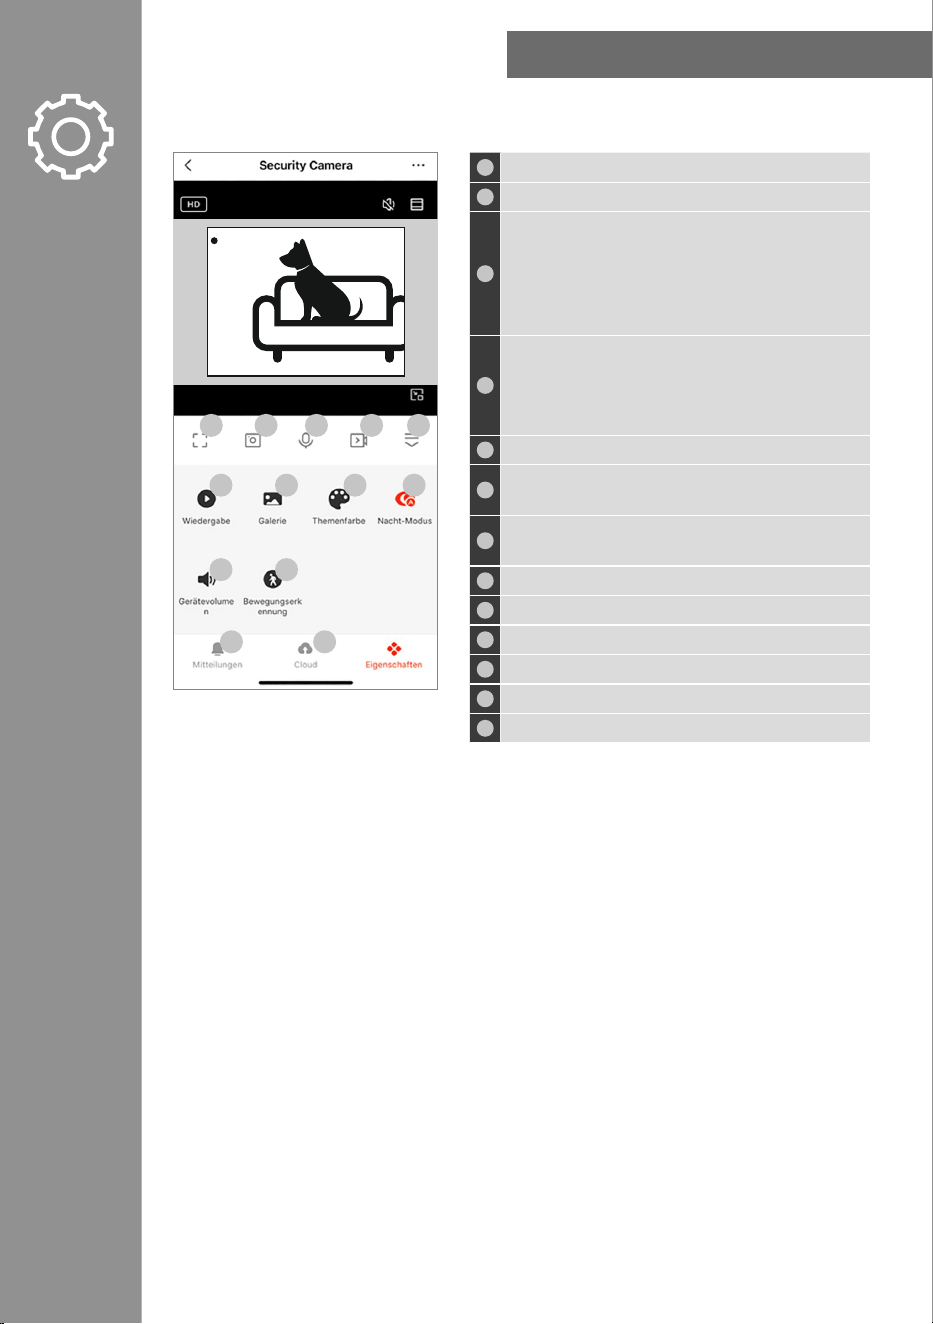
8.
Setting options
The following settings can be made in the app:
1
Activate full-screen mode.
2
Take a picture of the current live recording here.
3
Talk to the other party:
One-way audio: You can speak, but you will not be
able to hear the other party.
Two-way audio: Both parties are able to speak and
hear each other.
4
Record a video recording of the current activities.
(A cloud connection or the presence of a memory card
is required here).
5
You can display and hide the functions
6
Play back video recordings from your gallery.
7
Open the photo album and view all of the images
captured.
8
Activate light or dark mode.
9
Control the night mode function.
10
Adjust the device volume.
11
Activate motion detection.
12
Retrieve messages and alarms on this device.
13
Call up the data from your cloud storage here.
For extended usage options, scenarios can be created in the app. (See Section 9 and App Guide)
Live
6
10
7
11
8 9
1 2 3 4 5
12 13
Live
Live
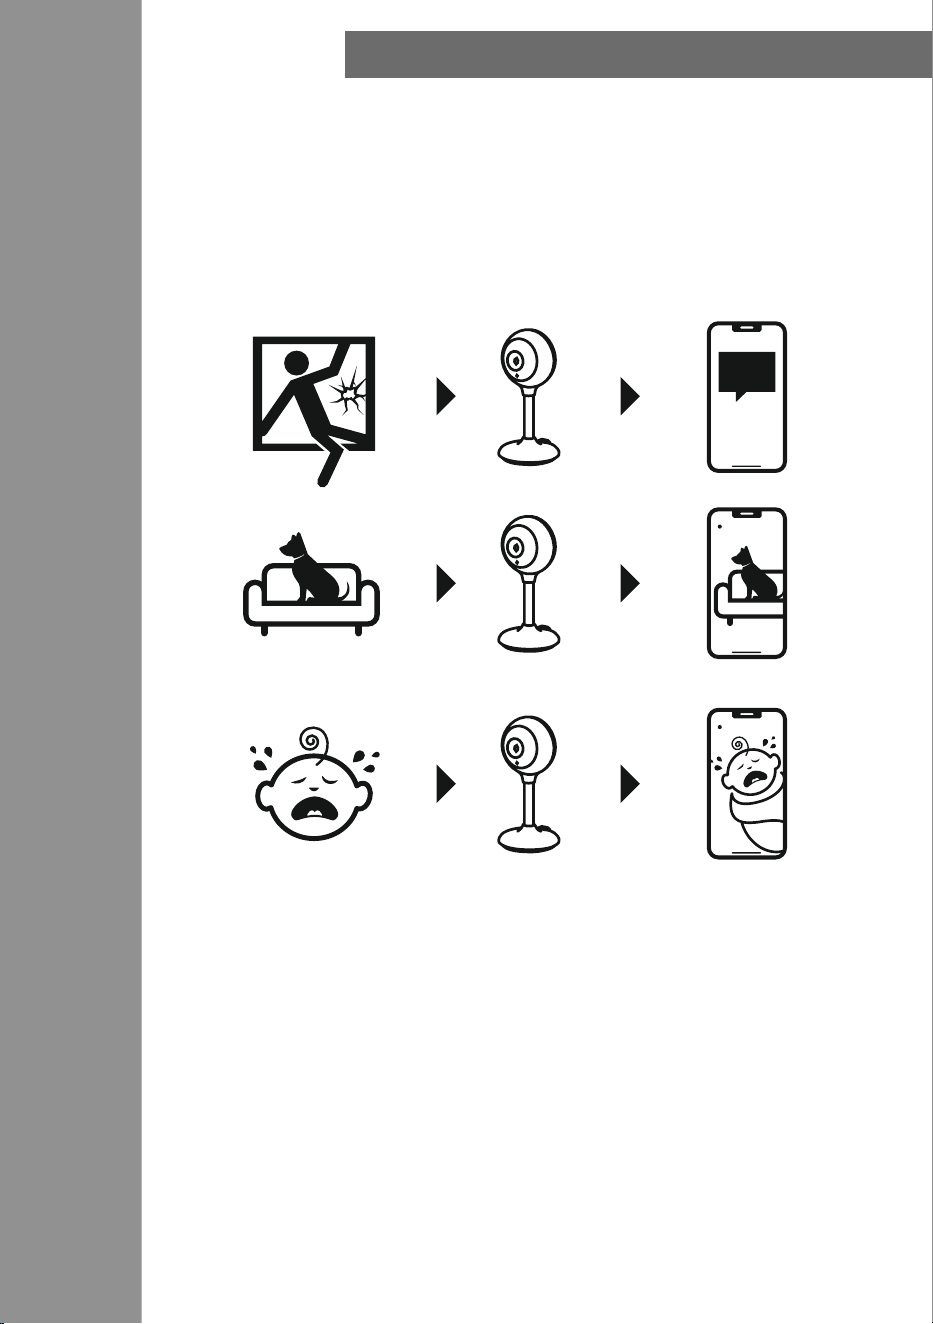
ExTENDED USAGE oPTIoNS WITH SCENARIoS
11
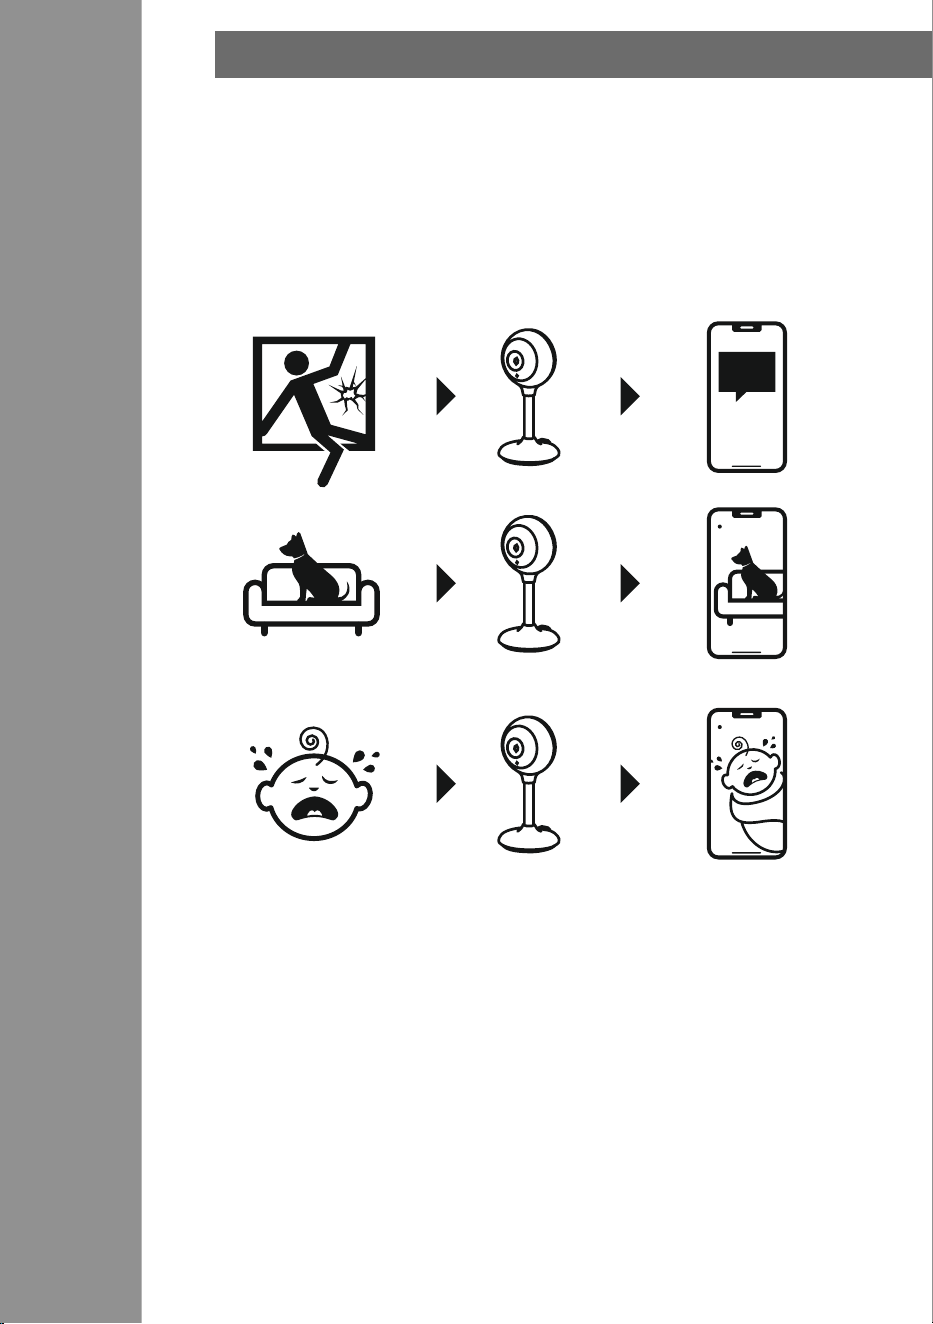
9.
Extended usage options with scenarios
Scenarios and automated sequences that can be created in the app allow various combination
options and usage options for these products, depending on the SmartHome products in your home.
Programming is always via the app (see Section 4 of the App Guide) and will be offered / suggested to
you on an individual basis.
Standard usage option
TECHNICAL DATA
12
10.
Technical data
Maximum radio-frequency power transmitted 5 V DC
frequency band 2.4 GHz
Maximum radio-frequency power transmitted < 100 mW
11.Care and maintenance
Note
Disconnect the device from the mains before cleaning and during prolonged periods of non-use.
Only clean this product with a slightly damp, lint-free cloth and do not use
aggressive cleaning products.
Ensure that no water is able to enter the product.
12.Warranty disclaimer
Hama GmbH & Co KG assumes no liability and provides no warranty for damage resulting from improper
installation/mounting, improper use of the product or from failure to observe the use instructions and/or
safety notes.
13.Declaration of conformity
Hama GmbH & Co KG hereby declares that the radio equipment type [00176651] is in
compliance with Directive 2014/53/EU. The full text of the EU declaration of conformity is
available at the following Internet address:
https://support.hama.com/00176651
To limit exposure to electromagnetic elds
This device is intended for use at a distance of at least 20 cm from the body of the user or persons
nearby. This device must not be worn or carried on the body.
14.Specifications according to Regulation (EU) 2023/826
Information regarding energy consumption can be found at:
https://support.hama.com/00176651
EINfüHRUNG
13
1.
Einführung
Vielen Dank, dass Sie sich für ein Hama Produkt entschieden haben!
Nehmen Sie sich Zeit und lesen Sie die folgenden Anweisungen und Hinweise zunächst vollständig durch.
Bewahren Sie diese Bedienungsanleitung anschließend an einem sicheren Ort auf, um darin
nachschlagen zu können. Falls Sie das Gerät veräußern, geben Sie diese Bedienungsanleitung an den
neuen Eigentümer weiter.
D Bedienungsanleitung
RESET
MICRO SD
Reset
Mikrofon
Status LED
SD Kartenslot
Lautsprecher
USB-C
VERPACKUNGSINHALT
14
1.1
Erklärung von Warnsymbolen und Hinweisen
Gefahr eines elektrischen Schlags
Dieses Symbol weist auf eine Berührungsgefahr mit nicht isolierten Teilen des Produkts hin, die eine
gefährliche Spannung von solcher Höhe führen, dass die Gefahr eines elektrischen Schlags besteht.
Warnung
Wird verwendet, um Sicherheitshinweise zu kennzeichnen oder um Aufmerksamkeit auf besondere
Gefahren und Risiken zu lenken.
Hinweis
Wird verwendet, um zusätzlich Informationen oder wichtige Hinweise zu kennzeichnen.
1.2 Erklärung von Symbolen der Produktkennzeichnung
Das Produkt ist nur für den Gebrauch in Innenräumen vorgesehen.
2. Verpackungsinhalt
1x Smarte Kamera
1x USB-C Kabel
1x Montageset
1x Kurzanleitung
1x Warn- und Sicherheitshinweise
00176651
SMART CAMERA

SICHERHEITSHINWEISE
15
3.
Sicherheitshinweise
Gefahr eines elektrischen Schlages
• Öffnen Sie das Produkt nicht und betreiben Sie es bei Beschädigungen nicht weiter.
• Verwenden Sie das Produkt nicht, wenn der
AC-Adapter, das Adapterkabel oder die Netzleitung beschädigt sind.
• Versuchen Sie nicht, das Produkt selbst zu warten oder zu reparieren. Überlassen Sie jegliche
Wartungsarbeit dem zuständigen Fachpersonal.
• Schützen Sie das Produkt vor Schmutz, Feuchtigkeit und Überhitzung und verwenden Sie es nur in
trockenen Umgebungen.
• Das Produkt ist für den privaten, nicht-gewerblichen Gebrauch vorgesehen.
• Verwenden Sie das Produkt ausschließlich für den dazu vorgesehenen Zweck.
• Betreiben Sie das Produkt nicht in unmittelbarer Nähe der Heizung, anderer Hitzequellen oder in
direkter Sonneneinstrahlung.
• Benutzen Sie das Produkt nicht in Bereichen, in denen elektronische Produkte nicht erlaubt sind.
• Lassen Sie das Produkt nicht fallen und setzen Sie es keinen heftigen Erschütterungen aus.
• Nehmen Sie keine Veränderungen am Produkt vor. Dadurch verlieren Sie jegliche
Gewährleistungsansprüche.
• Halten Sie Kinder unbedingt von dem Verpackungsmaterial fern, es besteht Erstickungsgefahr.
• Entsorgen Sie das Verpackungsmaterial sofort gemäß den örtlich gültigen Entsorgungsvorschriften.
• Betreiben Sie das Produkt nicht außerhalb seiner in den technischen Daten angegebenen
Leistungsgrenzen.
• Verwenden Sie den Artikel nur unter moderaten klimatischen Bedingungen.
• Montieren Sie das Produkt nicht an Orten, unter denen sich Personen aufhalten könnten.
• Prüfen Sie vor Montage die Eignung der vorgesehenen Wand für das anzubringende Gewicht und
vergewissern Sie sich, dass sich an der Montagestelle in der Wand keine elektrischen Leitungen,
Wasser-, Gas- oder sonstige Leitungen benden.
• Beachten Sie vor Installation und Einsatz des Produktes die geltenden Vorschriften des Datenschutzes.
• Respektieren Sie die Persönlichkeits- und Eigentumsrechte Anderer. Machen Sie mit der Kamera keine
Aufnahmen anderer Personen.
• Beachten Sie bei Aufnahmen das Recht am eigenen Bild und gesprochenem Wort.
• Dieses Produkt gehört, wie alle elektrischen Produkte, nicht in Kinderhände!
INSTALLATIoN DER APP HAMA SMART HoME
16
4.
Installation der App Hama Smart Home
Zur Verwendung aller Funktionen des Gerätes benötigen Sie ein Smartphone/Tablet und die App Hama
Smart Home.
Hinweis
• Es werden die folgenden Betriebssysteme unterstützt:
• iOS 16.3 oder höher
• Android 6.0 oder höher
• Laden Sie die App Hama Smart Home aus dem App Store (iOS) oder von Google Play (Android) auf
Ihr Smartphone/Tablet herunter.
• Zur Installation der App folgen Sie den Anweisungen auf Ihrem Smartphone/Tablet.
• Öffnen Sie die App auf Ihrem Smartphone/Tablet.
Hinweis
• Während der Einrichtung der App erfolgen Abfragen, ob die App auf Funktionen Ihres Smartphones/
Tablets zugreifen darf. Erlauben Sie diese Abfragen für den vollen Funktionsumfang des Gerätes.
• Registrieren Sie sich, um ein neues Konto anzulegen. Alternativ melden Sie sich mit den Zugangsdaten
Ihres bestehenden Kontos an.
• Folgen Sie den Anweisungen zur Einrichtung der App, bis Sie ein neues Gerät hinzufügen können.
Hinweis
Eine ausführliche Beschreibung der App
Hama Smart Home
und des vollen
Funktionsumfangs nden Sie in unserem App-Guide unter:
support.hama.com/00176651
Hinweis
Achten Sie darauf, dass Sie die aktuellste Version der Hama Smart Home App benutzen.
https://link.hama.com/
app/smart-home
PRoDUKTEIGENSCHAfTEN
17
5.
Produkteigenschaften
Die folgenden Schritte sind zur Inbetriebnahme des Gerätes erforderlich:
• Verbinden Sie das Gerät mit einer ordnungsgemäß installierten und leicht zugänglichen Netzsteckdose.
• Setzen Sie das Gerät in den Pairing-Modus, indem Sie den Taster für ca. 5 Sekunden halten. Die LED
beginnt schnell zu blinken.
6.
Montage
• Sie können die Kamera mit Hilfe von Klebepads oder des beiliegenden Montagesets befestigen.
Warnung - Klebemontage
• Beachten Sie, dass die gewünschte Montageäche staub- und fettfrei sein muss. Verwenden Sie dazu
einen geeigneten Reiniger aus dem Fachhandel.
• Beachten Sie, dass die Befestigung des Klebepads dauerhaft ist. Ziehen Sie das Klebepad vorsichtig
von der Montageäche ab, um dieses zu entfernen.
• Diverse Umwelteinüsse wie z.B. Luftfeuchtigkeit, Sonneneinstrahlung, Kälte, etc. können die
Dauerhaftigkeit des Klebepads beeinträchtigen.
• Mögliche Rückstände auf der Montageäche nach Entfernung des Klebepads können nicht
ausgeschlossen werden!
Warnung - Montageset
• Montieren Sie das Produkt nicht an Orten, unter denen sich Personen aufhalten könnten.
• Prüfen Sie vor Montage die Eignung der vorgesehenen Wand für das anzubringende Gewicht und
vergewissern Sie sich, dass sich an der Montagestelle in der Wand keine elektrischen Leitungen,
Wasser-, Gas- oder sonstige Leitungen benden.
EINBINDEN VoN GERäTEN IN DIE HAMA SMART HoME
18
7.
Einbinden von Geräten in die Hama Smart Home
Warnung
• Betreiben Sie das Produkt nur an einer dafür zugelassenen und mit dem öffentlichen Stromnetz
verbundenen Steckdose. Die Steckdose muss in der Nähe des Produktes angebracht und leicht
zugänglich sein.
• Trennen Sie das Produkt mittels des Ein-/Ausschalters vom Netz – wenn dieser nicht vorhanden ist,
ziehen Sie die Netzleitung aus der Steckdose.
• Achten Sie bei Mehrfachsteckdosen darauf, dass die angeschlossenen Verbraucher die zulässige
Gesamtleistungsaufnahme nicht überschreiten.
• Trennen Sie das Produkt vom Netz, wenn Sie es längere Zeit nicht benutzen.
• Verbinden Sie die Kamera mit einem geeigneten Netzteil und einer ordnungsgemäß installierten
Steckdose.
• Die LED an der Kamera fängt schnell an zu blinken. Sollte dies nicht der Fall sein, drücken und halten
Sie den Reset Knopf (4) an der Kamera für ca. 5 Sekunden.
• Öffnen Sie die App und melden Sie sich an.
• Drücken Sie oben rechts in der Ecke +, um ein neues Gerät hinzuzufügen.
• Wählen Sie in der Liste Kameras.
• Bestätigen Sie nun, dass die LED an der Kamera schnell blinkt, indem Sie den Haken bei "Nächster
Schritt" setzen und auf "Weiter" klicken.
Achten Sie darauf, dass rechts oben QR-Code steht.
• Geben Sie als nächstes Ihr WiFi Passwort ein und
bestätigen Sie mit WEITER.
Scannen Sie jetzt den QR-Code mit der Kamera etwa aus einer Entfernung von 15-20 cm.
• Sobald Sie einen Signalton hören klicken Sie auf "Signalton gehört".
• Ihre Kamera wird nun verbunden.
Mein Zu-
hause
Gerät hinzufügen
EINBINDEN VoN GERäTEN IN DIE HAMA SMART HoME
19
• Bei erfolgreicher Verbindung hört die LED auf schnell zu blinken und die App bestätigt, dass Ihre
Kamera verbunden wurde. Nun können Sie ihr noch einen eigenen Namen geben.
• Mit einem Klick auf Erledigt schließen Sie den Vorgang ab.
• Jetzt können Sie die Kamera bedienen und kongurieren.
Hinweis
Eine ausführliche Beschreibung der
Hama Smart Home App
und des vollen Funktionsumfangs nden
Sie in unserem App-Guide unter:
support.hama.com
Hinweis: Pairing-Neustart
Entfernen Sie zuerst den Gummi-Schutz auf einer Seite der Kamera. Drücken Sie nun den Reset-Knopf
mit einer Nadel oder einem anderen dünnen Gegenstand solange, bis ein Signalton ertönt. Sobald die
LED anfängt rot zu blinken, können Sie einen weiteren Pairing-Versuch starten.
Erfolgreich hinzugefügt
Erledigt
EINSTELLUNGSMöGLICHKEITEN
20
8.
Einstellungsmöglichkeiten
Folgende Einstellungen können in der App gemacht werden:
1
Aktivieren Sie den Vollbildschirm-Modus.
2
Machen Sie hier ein Bild der aktuellen Live-Aufnahme.
3
Sprechen Sie mit Ihrem Gegenüber:
Ein-Wege-Audio: Sie können sprechen, hören aber
Ihren Gesprächspartner nicht.
Zwei-Wege-Audio: Beide Parteien können sprechen
und sich gegenseitig hören.
4
Zeichnen Sie hier eine Videoaufnahme des aktuellen
Geschehens auf.
(Eine Cloud-Anbindung oder das Vorhandensein einer
Speicherkarte werden hier vorausgesetzt.)
5
Sie können Die Funktionen ein- und ausblenden
6
Geben Sie vorhandene Videoaufnahmen aus Ihrer
Galerie wieder.
7
Öffnen Sie das Fotoalbum und sehen Sie sich alle
getätigten Bildaufnahmen an.
8
Aktivieren Sie den hellen oder den dunklen Modus.
9
Steuern Sie die Nacht-Modus Funktion.
10
Passen Sie das Gerätevolumen an.
11
Aktivieren Sie die Bewegungserkennung.
12
Rufen Sie Mitteilungen und Alarme dieses Geräts ab.
13
Rufen Sie hier die Daten aus Ihrem Cloud-Speicher ab.
Für erweiterte Nutzungsmöglichkeiten können Szenen in der App angelegt werden. (siehe Kapitel 9 und
AppGuide)
Live
6
10
7
11
8 9
1 2 3 4 5
12 13
Live
Live
ERWEITERTE NUTzUNGSMöGLICHKEITEN DURCH SzENEN
21
9.
Erweiterte Nutzungsmöglichkeiten durch Szenen
Durch Szenen und Automationen, die in der App angelegt werden können, ergeben sich je nach
vorhandenen SmartHome Produkten in Ihrem Zuhause viele Kombinations- und Nutzungsmöglichkeiten
dieser Produkte. Die Programmierung erfolgt immer über die App (siehe Kapitel 4 des App Guide) und
wird Ihnen individuell angeboten/vorgeschlagen.
Standard Nutzungsmöglichkeit
TECHNISCHE DATEN
22
10.
Technische Daten
Abgestrahlte maximale Sendeleistung 5 V DC
frequenzband 2,4 GHz
Abgestrahlte maximale Sendeleistung < 100mW
11.Wartung und Pflege
Hinweis
Trennen Sie das Gerät vor der Reinigung und bei längerem Nichtgebrauch vom Netz.
Reinigen Sie dieses Produkt nur mit einem fusselfreien, leicht feuchten Tuch und verwenden Sie keine
aggressiven Reiniger.
Achten Sie darauf, dass kein Wasser in das Produkt eindringt.
12.Haftungsausschluss
Die Hama GmbH & Co KG übernimmt keine Haftung oder Gewährleistung für Schäden, die aus
unsachgemäßer Installation, Montage und unsachgemäßem Gebrauch des Produkts oder einer
Nichtbeachtung der Bedienungsanleitung und/oder der Sicherheitshinweise resultieren.
13.Konformitätserklärung
Hiermit erklärt die Hama GmbH & Co KG, dass der Funkanlagentyp [00176651] der Richtlinie
2014/53/EU entspricht. Der vollständige Text der EU-Konformitätserklärung ist unter der
folgenden Internetadresse verfügbar:
https://support.hama.com/00176651
zur Begrenzung der Exposition gegen elektromagnetische felder
Dieses Gerät ist vorgesehen für die Verwendung in einem Abstand von mindestens 20 cm zum Körper
des Benutzers oder Personen in der Nähe. Dieses Gerät darf nicht am Körper getragen werden.
14.Angaben nach Verordnung (EU) 2023/826
Informationen zum Energieverbrauch nden Sie unter:
https://support.hama.com/00176651
00176651/09.24
All listed brands are trademarks of the corresponding companies. Errors and omissions excepted,
and subject to technical changes. Our general terms of delivery and payment are applied.
The Bluetooth
®
word mark and logos are registered trademarks owned by Bluetooth SIG, Inc. and
any use of such marks by Hama GmbH & Co. KG is under license. Other trademarks and trade names
are those of their respective owners.
Hama GmbH & Co KG
86652 Monheim
/ Germany
Service & Support
support.hama.com/00176651
+49 9091 502-0
DG