
ESSENTIALS FOR LIFE
User
Manual
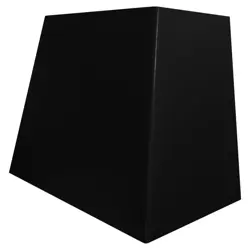
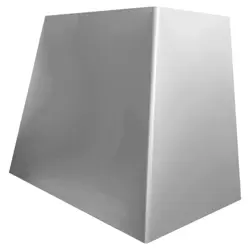
MODEL: SCH52SI
V 1.0 | 1224
52cm Canopy
Extractor Hood
Silver
Welcome Congratulations on purchasing
your new extractor hood!
The Sôlt brand is now also proudly
distributed within the UK.
Please refer to the warranty card at the rear of this manual
for information regarding your product’s parts and labour
warranty, or visit us online at
wwwwww..solt.house
At Sôlt Brand, we are customer obsessed and our Support
Team are there to ensure you get the most out of your
appliance. Should you want to learn more about your
cooker's features, and importantly taking care of your
appliance when cleaning, our Support Team are here to
help.
You can use our online job booking service anytime, by
visiting www.appliancesupport.co.uk/solt or by emailing
It is important that you read through the following use and
care manual thoroughly to familiarise yourself with the
installation and operation requirements of your appliance to
ensure optimum performance.
Again, thank you for choosing an Sôlt appliance
and we look
forward to being of service to you.
Kind Regards,
The Solt Team
Sôlt
—
Online Job Booking.
www.appliancesupport.co.uk/solt
_
Instagram.
/solt.house
—
Facebook.
/solt.appliances
1 Introduction
Congratulations on the purchase of your new product. You have bought a high quality
product. These instructions are part of this product. They contain important information
regarding safety, use and disposal for the installer and user of the product. Please familiarise
yourself with all information prior to using your product. Use the product only as described
and for the specified applications. When transferring the product to a third party make sure
to also supply all instructions and other relevant documents.
If you have any questions, require further information or wish to order more copies of these
installation and operating instructions, please contact:
1.1 Intended use
This product is intended to be used as a domestic appliance to extract vapours and remove
odours from cooking environments. This product is intended for private, non-commercial
use. The product may only be used in domestic or similar working and residential
environments. This product is not intended for outdoor use. The product must be used in
accordance with the instructions provided in this manual. All uses other than those
described in this manual shall be considered inappropriate uses.
In these user instructions the cooker hood is also called the ‘appliance’.
1.2 Safety symbols used in this manual
DANGER!
This symbol is used to indicate an
imminently hazardous situation which, if
not avoided, will result in death or
serious injury.
WARNING!
This symbol is used to indicate a
potentially hazardous situation which, if
not avoided, could result in death or
serious injury.
CAUTION!
This symbol is used to indicate a
potentially hazardous situation which, if
not avoided, could result in minor or
moderate injury.
NOTICE
This symbol is used to indicate a
situation which, if not avoided, could
result in damage to the appliance.
1

• Always check the power level selected on the cooker hood before turning on the
appliance. If possible, always use the cooker hood with the switch in the “I”
position. This setting is generally sufficient in the majority of cooking situations.
• Make sure you switch off the cooker hood after use.
• Clean the mesh filters frequently and according to the instructions. Replace the
active carbon filters frequently and according to the instructions. Heavily soiled
filters have a negative impact on performance and efficiency.
• Make sure the ducting has no bends sharper than 90 degrees as this will reduce
the efficiency of the cooker hood.
• Switch on the cooker before you start the cooking, so the air flow has time to
establish itself.
• When the cooker hood is used in recirculation mode (with active carbon filter),
keep the hood switched on until the filter is dry.
2

3 Safety instructions
Please take the time and read these general safety instructions carefully. Follow all the
instructions. This will help you avoid the risk of fire, explosions, electric shocks or other
hazards that may result in damage to property and/or severe or fatal injuries. Please ensure
that everyone who uses the appliance has read and followed these warnings and
instructions.
• Please read all the safety information and the instructions. The manufacturer
accepts no liability for any material damage or personal injury caused by
incorrect handling or non-compliance with the safety instructions. In such
cases, the warranty will be voided.
• Keep all safety information and instructions for future reference and pass
them on to subsequent users of the appliance.
• The appliance is intended for domestic and indoor use only. Never use
outdoors.
• Keep the appliance away from moisture.
• Use the appliance within the specified performance limits.
• Be vigilant at all times, and always be aware of what you are doing. Do
not use electrical equipment whenever your concentration or awareness is poor or
you are under the influence of drugs, alcohol or medication. Even a moment of
inattentiveness can lead to serious accidents and injuries when using electrical
equipment.
• This appliance is not intended for use by persons (including children)
with restricted physical, sensory or intellectual capabilities or a lack of experience
and/or knowledge, unless they are supervised by a person who
is responsible for
their safety or provides them with instructions on how to use the appliance.
Children should be supervised in order to ensure that they do not play with the
appliance.
• Never leave children unattended with the packaging material. The
packaging material represents a danger of suffocation. Children frequently
underestimate the dangers. Always keep children away from the packaging
material.
3
• Protect the mains adapter from use by third parties (particularly children). Keep
the mains adapter in a dry, elevated or locked location away from children.
• The appliance may only be installed by a qualified and trained electrician.
• Check the appliance and cable for any damage before installation. If
there is any visible damage, a strong odour or excessive overheating of
components, unplug all the connections immediately and stop using the
appliance.
• Connect the appliance to a suitable, properly installed and easily
accessible mains power socket. Make sure the appliance can be
disconnected from the mains at all times.
• Prior to connecting to the mains, make sure your local mains voltage
matches the rating indicated on the appliance.
• The appliance must be connected to a permanent and earthed AC wall
socket.
• Protect the mains cord from being damaged, pinched or buckled and
position it in a way that people cannot trip over the cord. It is particularly
important to ensure that damage is avoided to the plug and at the point where
the cord exits from the appliance.
• Unplug all connections before installing the appliance.
• The appliance has sharp edges. Pay attention to these, especially during
installation and cleaning.
• Do not install the appliance above a cooker with
a high level grill.
• When the appliance is installed above a cooking
appliance, the minimum distance between the
supporting surface of the cooking appliance and the
lowest part of the cooker hood should be:
o
Gas cookers:
65 cm
o
Electric cookers:
60 cm
o
Coal or oil cookers: 60 cm
• Use only original screws. Failure to do so may be
associated with a risk of electrocution.
60-65 cm
4
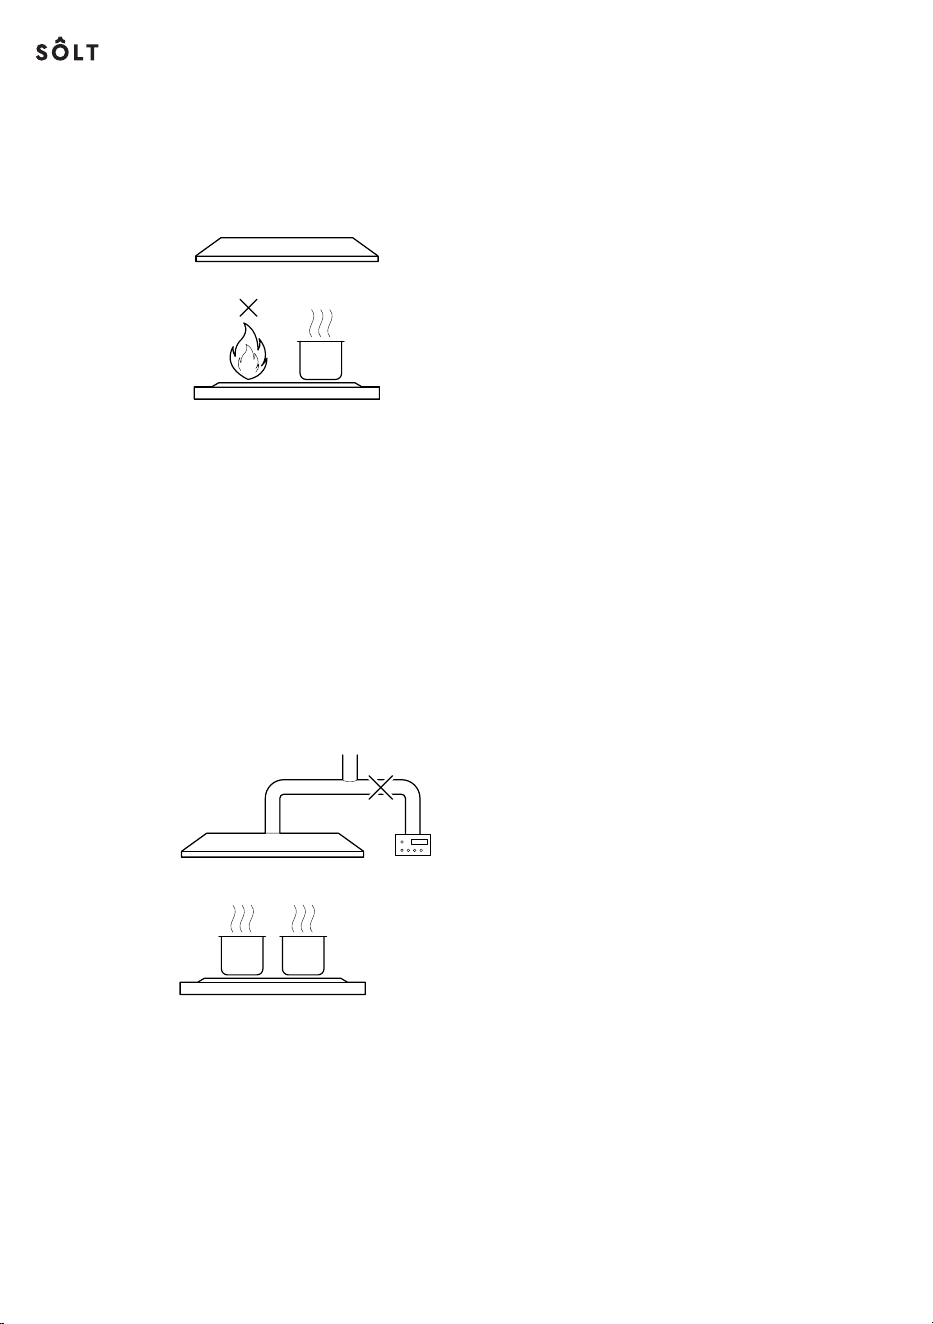
• Never leave naked flames under the cooker hood to avoid
overheating.
• Always put lids on pots and pans when cooking on a gas cooker.
70-80 cm
• Do not use the cooker hood without the filters or when the filters are
excessively greasy.
• When the appliance is in extraction mode, air in the room will be removed by the
cooker hood. Make sure that proper ventilation measures are taken.
• Make sure there is sufficient ventilation in the room for the cooker hood, but also
for other appliances that need ventilation, such as appliances burning gas or other
fuels.
• The air may not be discharged into a flue that is used for exhaust fumes from
appliances burning gas or other fuels. Ensure compliance with local regulations
on the discharge of air.
70-80 cm
• Do not leave frying pans unattended during use because overheated fats or oils
could catch fire.
• The appliance and its accessible parts can become hot during operation. Be
careful and avoid touching hot surfaces.
• Do not flambé under the cooker hood.
5

• Make sure the ducting has no bends sharper than 90 degrees as this will reduce
the efficiency of the cooker hood.
• When the cooker hood and other appliances supplied with energy other than
electricity are simultaneously in operation, the negative pressure in the room may
not exceed 4 Pa (4 x 10⁻⁵ bar).
• After each use the appliance should be disconnected from the mains to ensure
that it does not represent a risk to humans and domestic animals.
• Always grasp the plug, not the cord itself. Never touch a mains plug with wet
hands.
• Unplug all power connections before cleaning the appliance or before
replacing a lamp.
• Do not use wipes or chemicals as these could damage the surface. Wipe the
housing with a damp cloth. Electrical/electronic parts should not be cleaned.
• Maintenance and inspection should be undertaken on a frequent basis. If there
is any visible damage, a strong odour or excessive overheating of components,
stop using the appliance.
• Clean the appliance in accordance with instructions. Failure to do so may result
in a risk of fire.
• Do not attempt to open, modify or repair the appliance. Do not drop,
puncture, break or expose to high pressure.
• Before obtaining access to terminals, all power circuits must be
disconnected.
• Alterations to the appliance and technical modifications are not permitted.
• If the power cord is damaged, the repair must be undertaken by a qualified
electrician. All local regulations must be followed.
6

4 Installation
• The appliance may only be installed by a qualified and trained electrician.
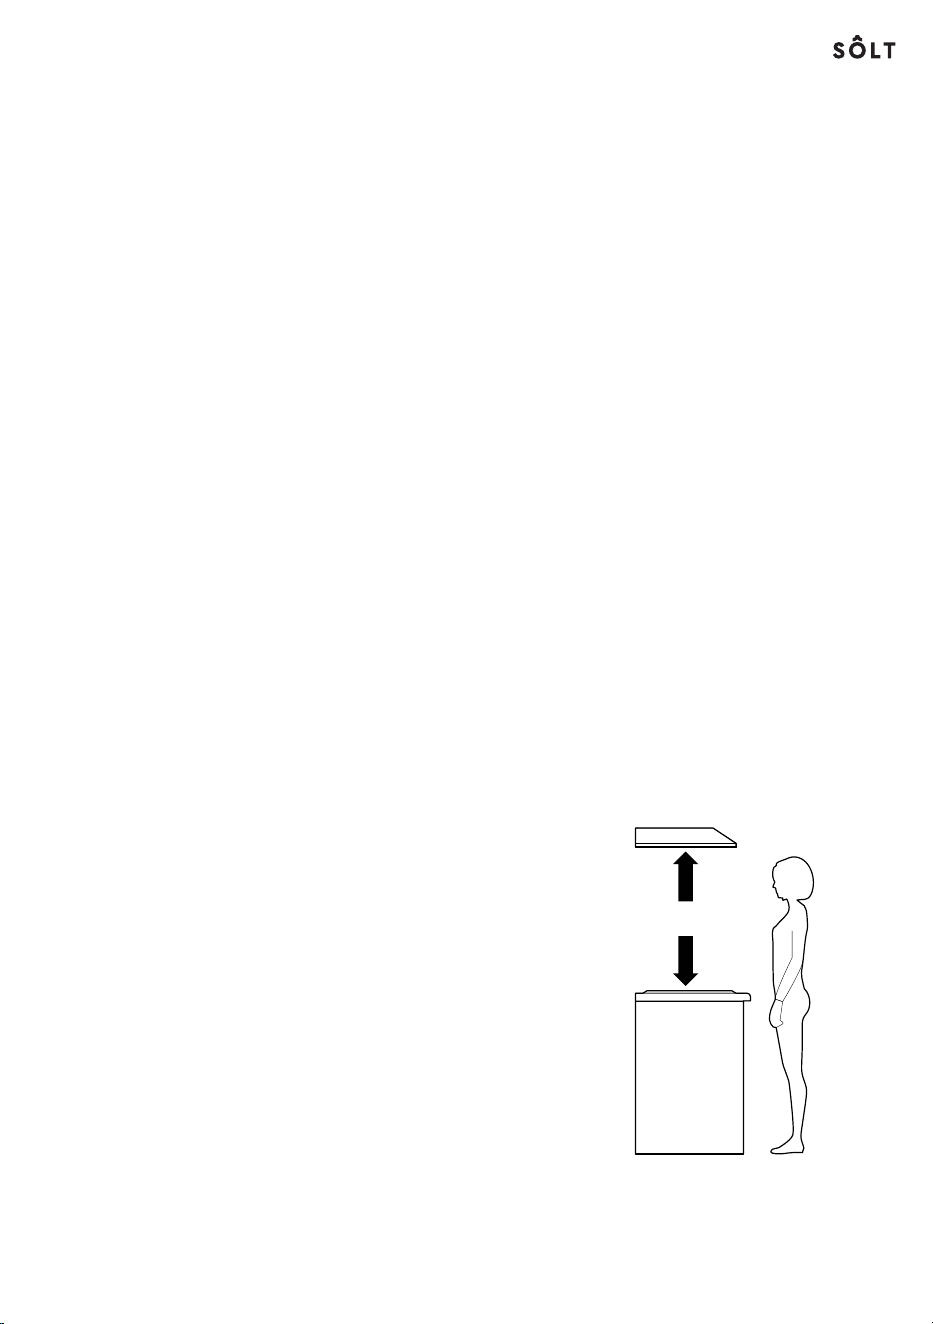
• Before you install the appliance, you should check it for damage. If
damage has occurred during transport, please inform the manufacturer
immediately. The appliance has been tested to ensure proper functioning before
delivery.
• Use only original screws. Failure to do so may be associated with a risk of
electrocution.
4.1 How to install the product
Tools required:
• Pencil
• Drill (8mm)
• Crosshead screwdriver
• Self-retracting metal tape measure
• Spirit level
Must to check before install
1. Make sure that the power cable is disconnected from the wall socket.
2. Attach the two air flaps to the one-way valve on the cooker hood.
3. Place the hanging board against the ceiling. Determine the position of the
twelve holes for the plugs and the hole for the expansion pipe. WARNING!Make sure
that the ceiling can bear at least 120kg and that the thickness of the ceiling is at least
30mm.
4. If you have an outlet, drill or saw a hole with a diameter of 160mm in the ceiling.
7

Drawing for the hood
Cut out size
8
INSTALLATION
9
They typical installation method for your undermount rangehood is into a
purpose built overhead/wall cabinet.
Important: Do not connect the power cable until the installation is complete!
Recommends installing in a team of at least two people to avoid injuries.
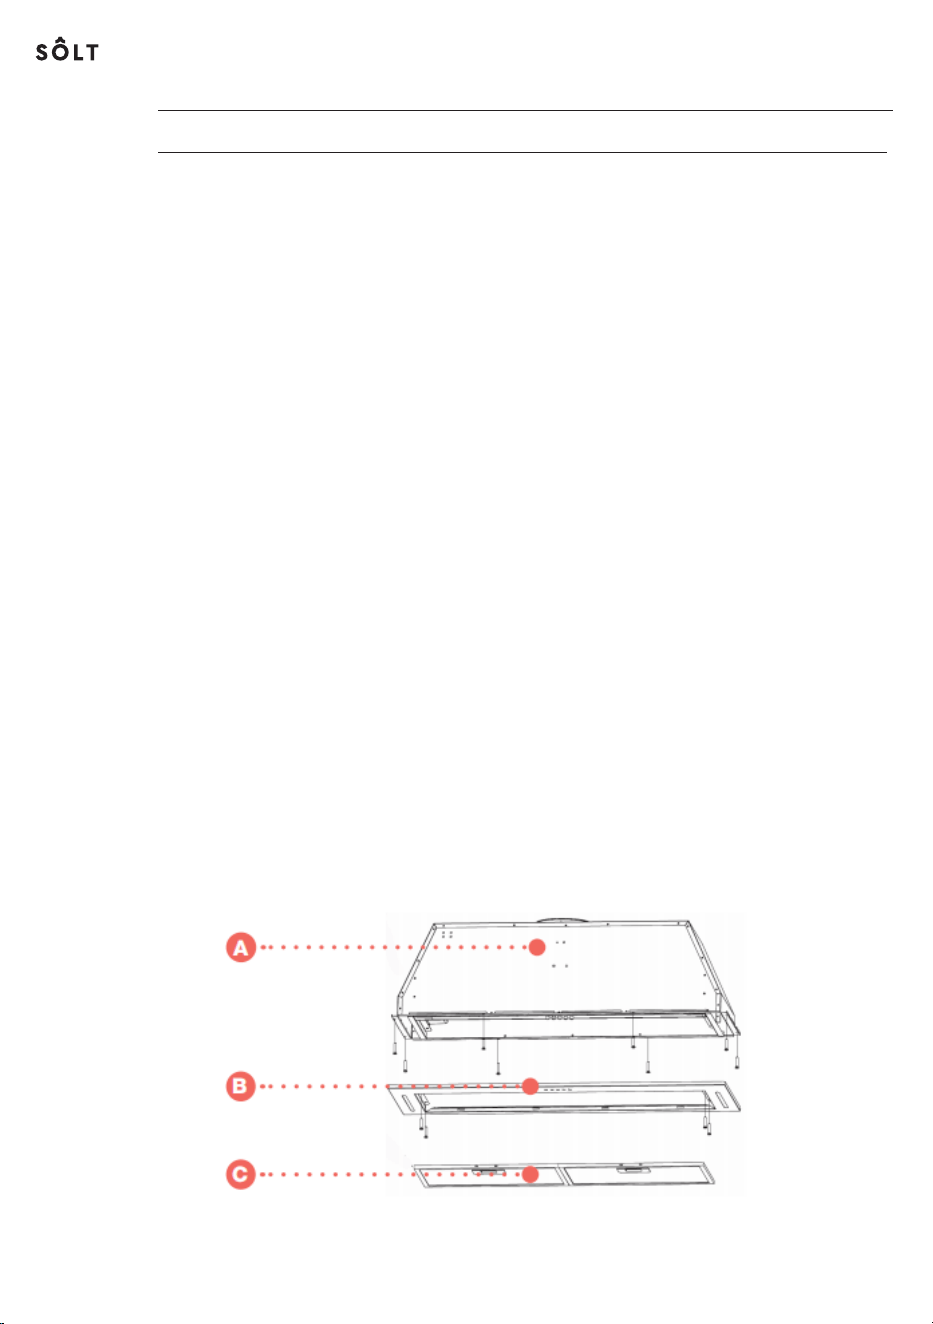
1.
Carefully remove the grease filter/s(C), in the interim placing them onto a
soft towel to avoid scratches.
2.
Using a jigsaw, carefully create the required cut-out for your undermount
rangehoo, as per the measurement dimensions in the table. Always
ensure the cut-out is at least 35mm from the cabinet edge.
3.
Drill a hole into the cabinet, which will later serve as a guide for the power
cord.
4.
Remove the screws on the frame(B) and unscrew the two globes, Ensure
that the two clips on both sides of the rangehood are suitable for the
thickness of the area where the rangehood is installed. If this is not the
case, adjust the clips accordingly using the screws.
5.
Insert the rangehood into the cabinet, then pass the power cord through
the opening drilled in step 3.
6.
Slide the rangehood completely into the opening in the wall cabinet. If
you want to connect the rangehood to a pipe leading outwards, attach
the connecting pipe at the top of the round air outlet of the rangehood.
7.
While one person is holding the rangehood, the other person should
tighten the screws through the holes in the hood frame(A).
8.
Screw the fan frame(B) back into place and tighten the two globes,
followed by reinstalling the grease filter/s.
Remark: Below pic for 90cm, 52cm just have one filter
10
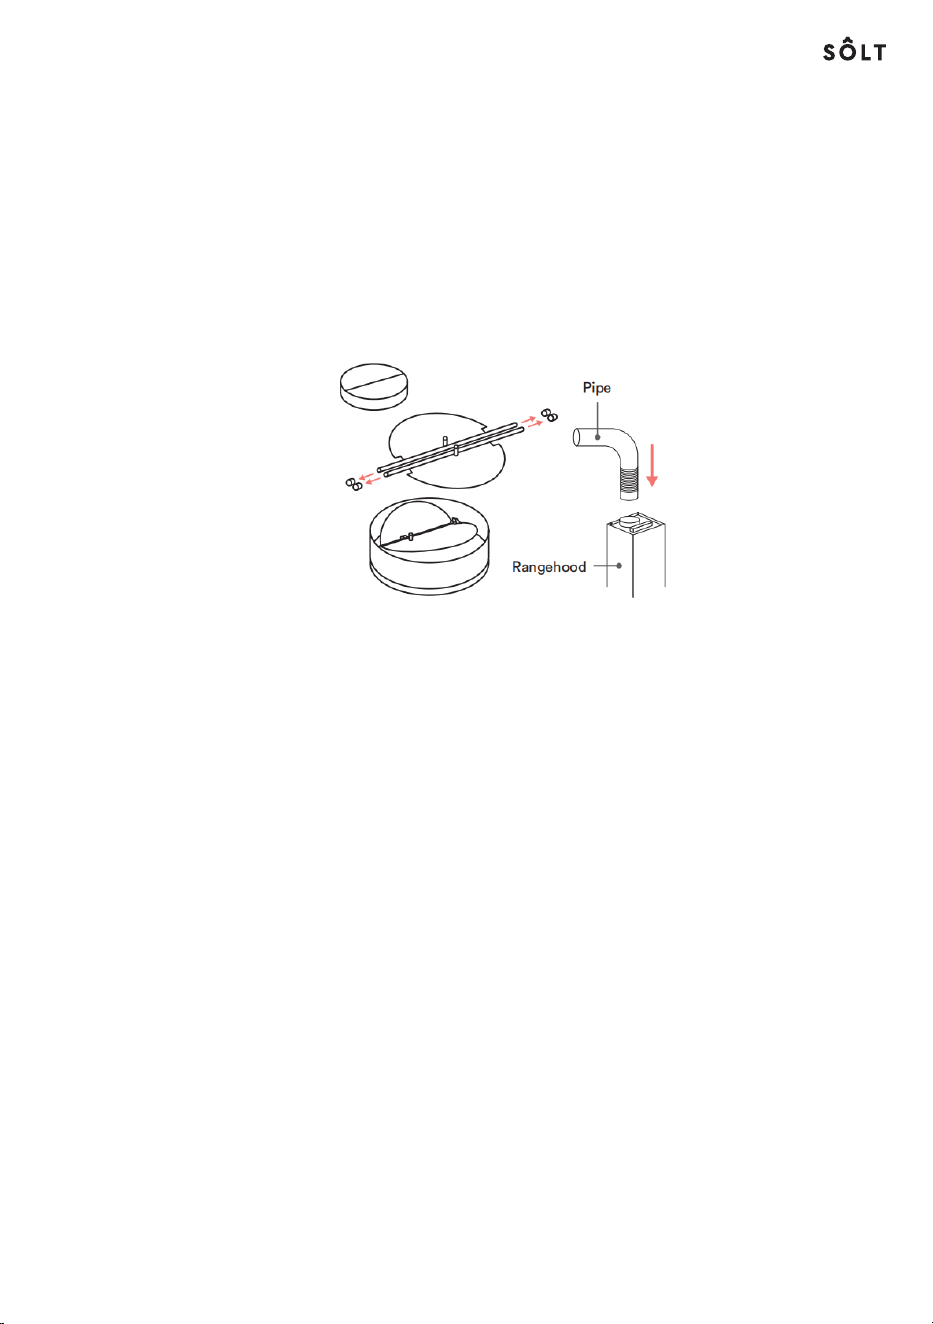
9. Fix the one-way valve to the air outlet of the rangehood. Then attached the
exhaust pipe onto the one-way-valve as shown below.
Remark: The pipe is not included.
The hood with inside recycle, just install the one-way-valve & charcoal filter is
ok.
The hoow if with outer recycle, it need to buy an extra exhaust pipe, after
install the one-way-valve, you need to install the exhuaust pipe on it, as below
pic.
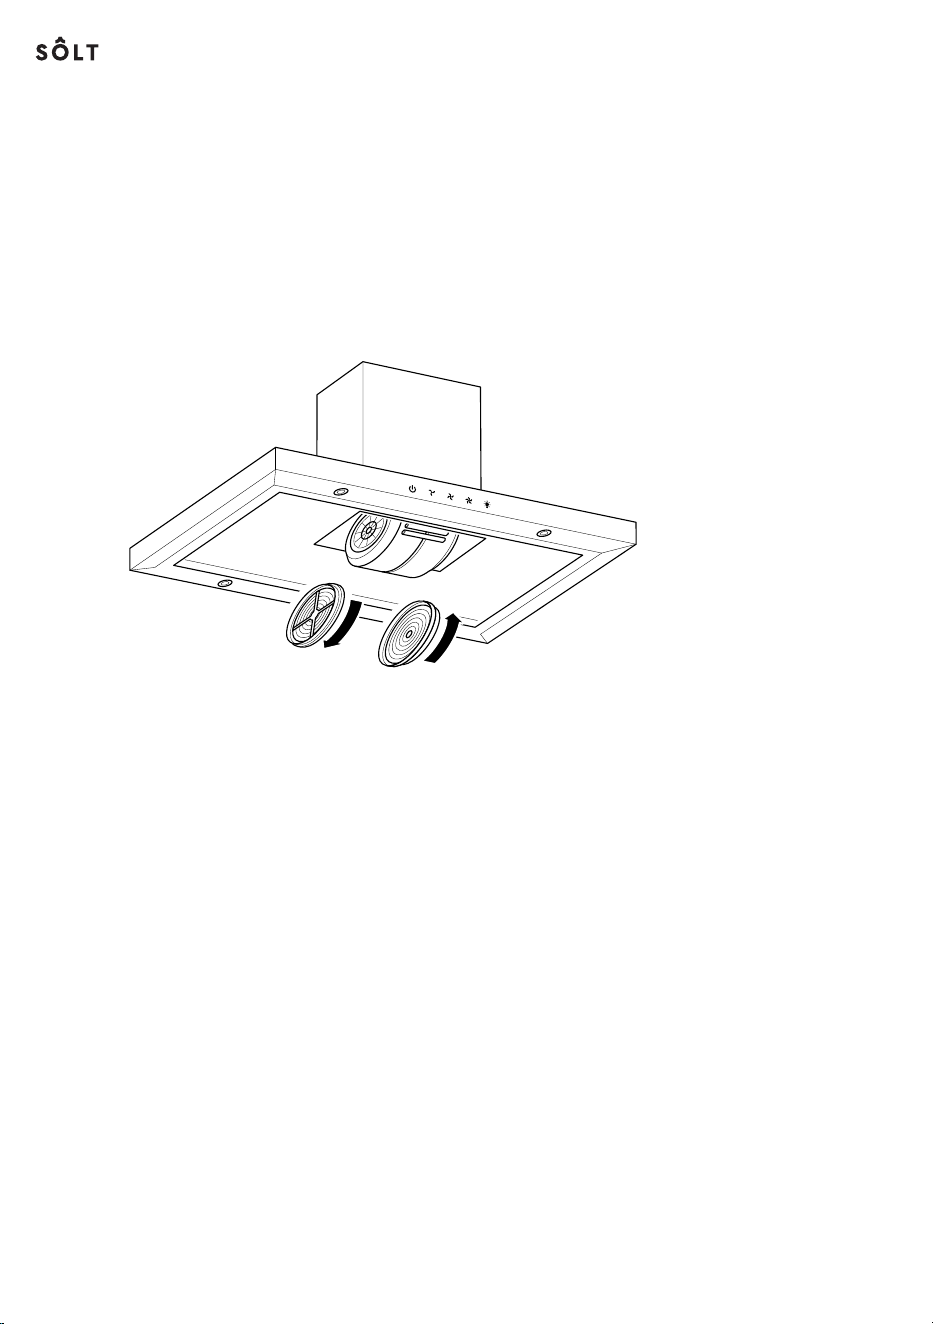
5 Using the cooker hood
• Do not touch the light within 30 minutes after using the appliance.
• Do not cover the lamp with thermal insulation or other materials.
1. Make sure that the power plug is connected to an earthed wall socket.
2. Press the symbol. The light will turn on. NOTICE Only switch on the lights
when operating the appliance. Do not switch on the lights to lighten up the room.
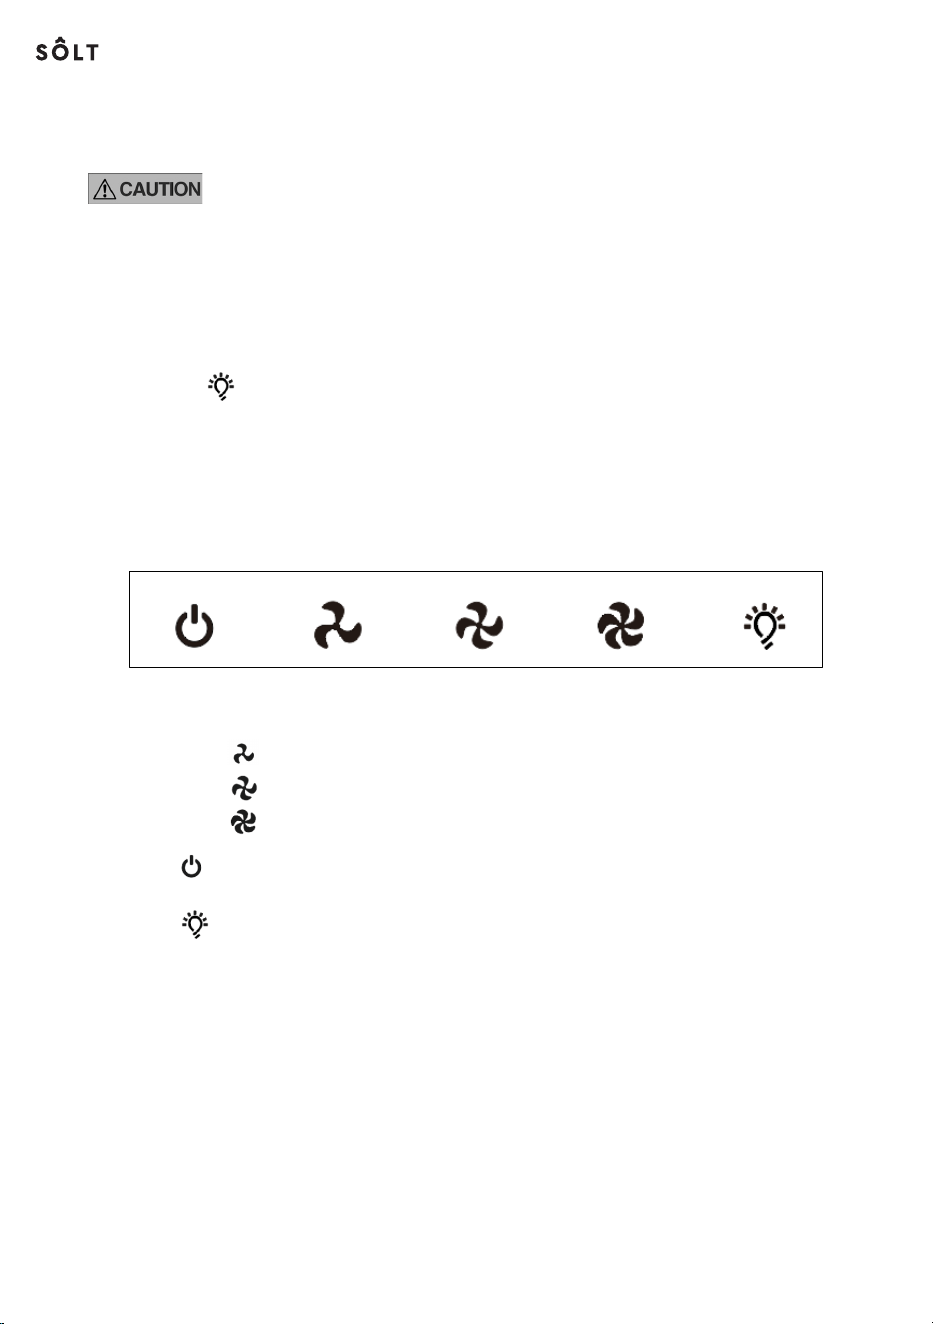
1. To start the cooker hood.
•
•
•
Pres s
Pres s
Pres s
for low speed.
for m edium speed.
for high speed.
2. Press to turn off the cooker hood.
3. Press to turn on/off the light.
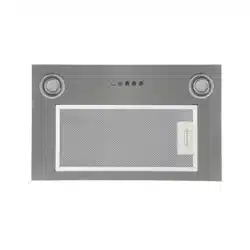
Control for SCH52SI
11
PRODUCT FICHE
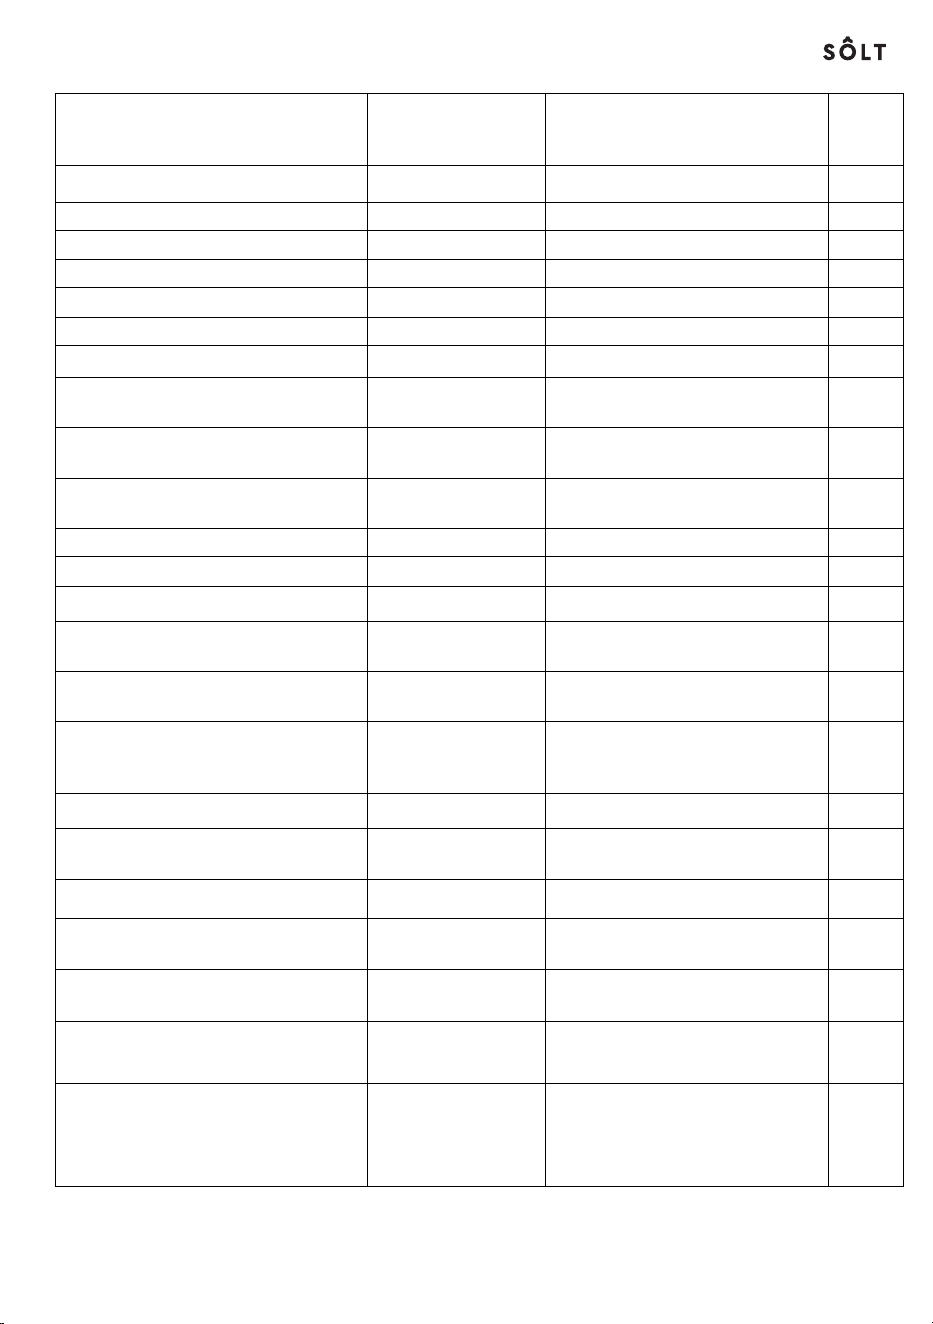
Symbol Value Unit
Model identification
SCH52SI
Annual Energy Consumption
AEC
hood
33.7 kWh/a
Time increase factor f
1.7
Fluid Dynamic Efficiency FDE
hood
8.9
Fluid Dynamic Efficiency class
Class E
Energy Efficiency Index EEI
hood
75.1
Energy Efficiency class
Class C
Measured airflow rate at the best
efficiency
Q
BEP
143.6
m
3
/h
Measured air pressure at the best
efficiency point
P
BEP
113 Pa
Maximum airflow boost setting -
m
3
/h
Maximum airflow Q
max
268.3
m
3
/h
Minimum airflow Q
min
182
m
3
/h
Maximum airflow in normal use - 260.3
Measured electric power input at the
best efficiency point
W
BEP
50.8 W
Nominal power of the lighting system
W
L
0.5 (x2) W
Average illumination of the lighting
system on the cooking surface
E
middle
60 lux
Lighting Efficiency LE
hood
40 lux/W
Lighting efficiency class - Class A -
Grease Filtering Efficiency GFE
hood
66.7
-
Grease Filtering Efficiency
Class
- Class D -
Measured power consumption on
off mode
P
O
0.00 W
Measured power consumption on
standby mode
P
S
- W
Sound power level L
WA
Highest Normal setting: 58
Lowest setting: 49
dB
N/A
12
6 Maintenance and cleaning
6.1 Cleaning the appliance
• Make sure you switch off the appliance.
• Unplug the power supply before cleaning the appliance.
• Always let the appliance and its components cool down before cleaning
them.
• Do not use wipes, chemicals or alcohol as these could damage the
surface. Electrical/electronic parts may not be cleaned.
• Do not use any acrid or corrosive detergents. Do not use any abrasive
detergents or any alkaline dishwasher detergents! (ph more than 7).
• Maintenance and inspection should be undertaken on a frequent basis. If
there is any visible damage, a strong odour or excessive overheating of
components, stop using the appliance.
• Clean the appliance in accordance with instructions. Failure to do so may
resultinariskofre.
• Do not use a steam cleaner. RISK OF ELECTRIC SHOCK!
Task Frequency
Clean the stainless steel surface with a soft
clothandlukewarmwater.Acleaninguid
suitable for stainless steel should be used.
NOTICE Ensure that you wipe along the
grain of the stainless steel to prevent any
unsightly criss-cross scratch damage.
Weekly
Clean the control panel with a soft cloth and
warm water Make sure that the cloth is clean
and not too wet before cleaning. Use a dry
soft cloth to remove any excess moisture.
Weekly
13

Cleanthemeshlters. Monthly (see Cleaning the
mesh lters)
Cleantheactivecarbonlter. Every 3 to 6 months (see
Replacing the active
carbon lter)
6.2 Cleaning the mesh lter
To clean the mesh lters:
1. Removeameshlter.
2. Tocleanthelter,dooneofthefollowing:
• Cleaningmanually(max.30°C):
a. Soak the filter for about 3 minutes in water with a mild non-corrosive
grease-removing detergent. NOTICE It is advisable not to use rinse
aids. Wash the filter separately from crockery and kitchen utensils.
Brush the filter gently with a soft brush. NOTICE Do not apply too
much pressure to avoid damaging the filter. The filter might fade grey.
This is normal and is not included in the warranty.
• Cleaninginthedishwasher(max.30°C):
a. Place the filter in the dishwasher and run a program with a mild non-
corrosive grease-removing detergent. NOTICE It is advisable not to
use rinse aids. Wash the filter separately from crockery and kitchen
utensils. The filter might fade grey. This is normal and is not included
in the warranty.
6.3 Replacing the active carbon lter
Anactivecarbonlterisusedtoremoveodourswhentheconnectionofthecooker
hood to an exhaust pipe is not possible. NOTICECarbonltersshouldnotbe
washedorcleaned.Replacethecarbonlterevery3to6months.
14
To replace the active carbon lter:
1. Disconnect the power supply from the wall socket.
2. Removethemeshlter(s).
3. Replace the active carbon lters on both sides of the motor. NOTICE Turn left
toremoveapreviouslyinstalledcarbonlter.Turnrighttoplaceacarbonlter
onthemotor.Turnthelterslightlytotheleftorpullitcarefullyuntilthelteris
installed properly.
4. Matchthebracketsofthelterwiththeholdingmechanismofthemotorand
pullcarefullyuntilthelterlocks.
5. Placethemeshlter.
6. Connect the power supply to the wall socket.
15
7 Troubleshooting
7.1 Problem nding
• Onlyaqualiedelectricianmaycarryoutanyelectricalrepairs.Alllocal
regulations must be followed. Contact the manufacturer in case of any
doubts.
• Unplug all power connections before opening the appliance.
Error
Cause
Solution
The light can be
switched on but the
motor does not work
Fan switch turned off Put the on/off switch in the
“I” or “II” position
Fan switch broken Contact service centre
Motor broken Contact service centre
Both the light and
motor do not work
Fuse is broken Reset/Replace fuse
Power supply loose or
disconnected
Connect power supply to
wall socket
Oil is leaking The one-way valve and
the exhaust pipe are not
tightly sealed
Disassemble the one-way
valve and seal with sealant
There is leakage between
section and cover
Disassemble the section and
seal with sealant
The light is not working The lamp is broken Replace the lamp (see 7.2
Replacing the lamp)
Thereisinsufcient
suction power/air is not
taken up adequately
The distance between
the cooker hood and the
cooking appliance is too
large
Make sure the distance
between the cooker hood
and the cooking appliance
does not exceed 70 - 80cm
The cooker hood is no
longer in a horizontal
position
The screws or not tight
enough
Tighten the screws and level
the cooker in a horizontal
position
16

7.2 Replacing the lamp
• Onlyaqualiedelectricianmayreplacethelamp.
• Unplug all power connections before opening the appliance.
• Risk of burning! Always let the lamp cool down before replacing it.
• Always use gloves or a cloth to avoid direct contact with your hands. Direct
contact may reduce the lifespan of the lamp.
To replace the lamp:
1. Make sure to switch off the appliance.
2. Disconnect the power supply from the wall socket.
3. Pressthelterlockandremovethelter.
4. Remote the screws of the light panel on two sides.
5. Take out the light panel.
6. Disconnect the light panel from the hood.
7. Remove the screws and support kit.
8. Remove the light.
9. Replace the light.
10. Attach the support kit with the screws.
11. Connect the light panel to the hood.
12. Mount the light panel into the hood.
13. Attach the light panel with the screws.
14. Attachthelter.
17
8 NOTES ON ENVIRONMENTAL PROTECTION
-During cooking, make sure that there is sufficient air supply so that the
cooker hood can operate efficiently and with low operating noise.
-Adjust the fan speed to the amount of steam produced during cooking. Use
the intensive mode only when necessary. The lower the fan speed, the less
energy is consumed.
- If large amounts steam are produced during cooking, select a higher fan
speed in good time. If the cooking steam has already dispersed in the
kitchen, the cooker hood must be operated longer.
- Switch off the cooker hood when you no longer need it.
- Switch off the lighting when you no longer need it.
- Clean the filter at regular intervals and replace it if necessary to increase
the effectiveness of the ventilation system and prevent fire hazards.
- Always put the lid on when cooking to reduce cooking steam and
condensation.
18
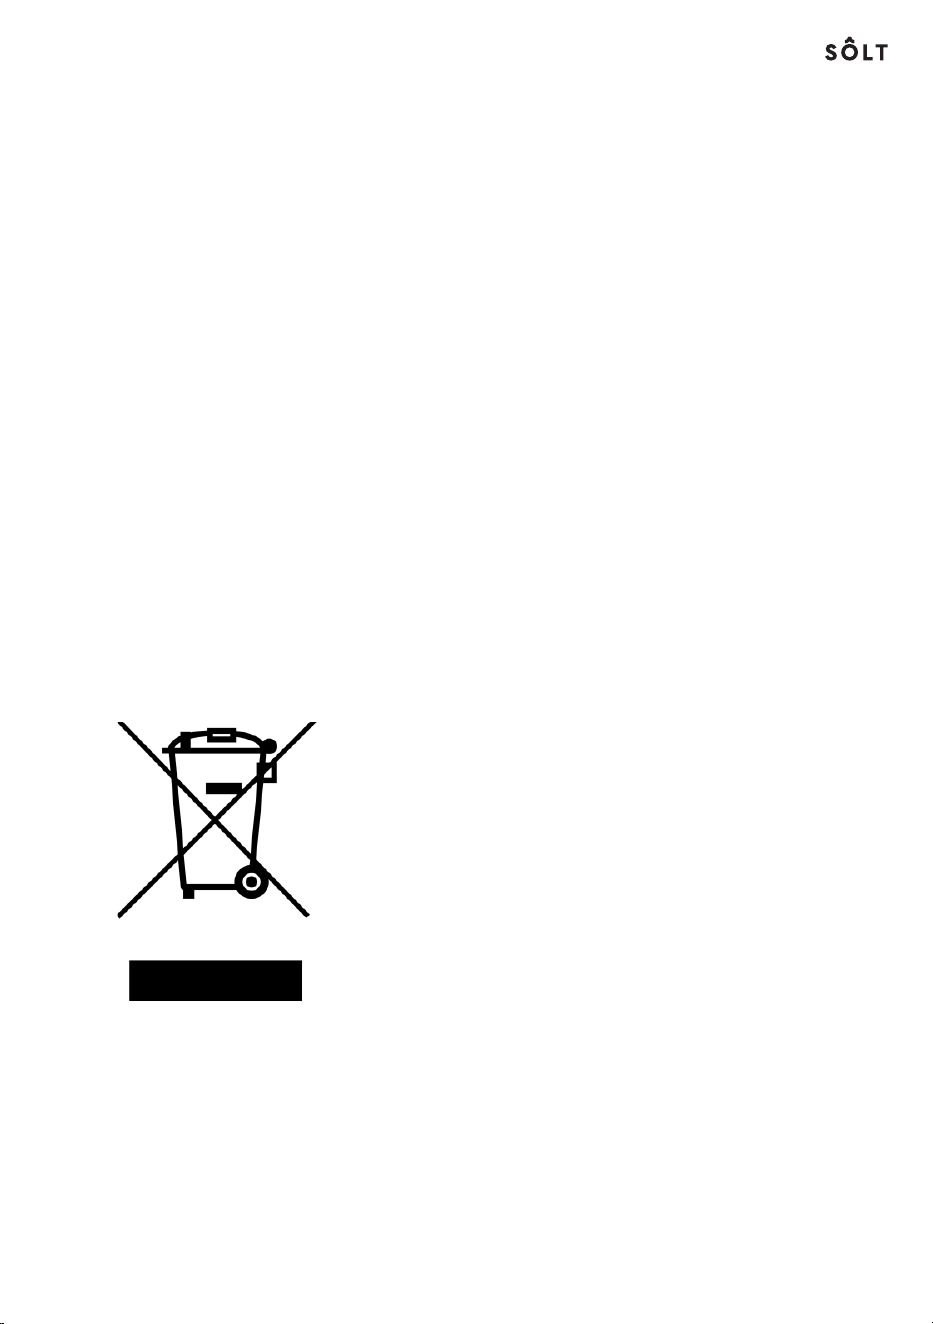
9 DISPOSAL CONSIDERATIONS
If there is a legal regulaation for the disposal of electrical
and electronic devices in your country, this symbol on the
product or onn the packaging indicates that this product
must not be disposed of with household waste. Instead, it
must be taken to a collection point for the recycling of
electrical and electronic equipment. By disposing of it in
accordance with the rules, you are protecting the
environment and the health of your fellow human beings
from negative consequences. For information about the
recycling and disposal of this product, please contact your
local authority or your household waste disposal service.

16
T. 01759 48 78 26
E. admin@appliancesupport.co.uk
Online. www.appliancesupport.co.uk/solt
ESSENTIALS FOR LIFE
Solt Service:
www.solt.house