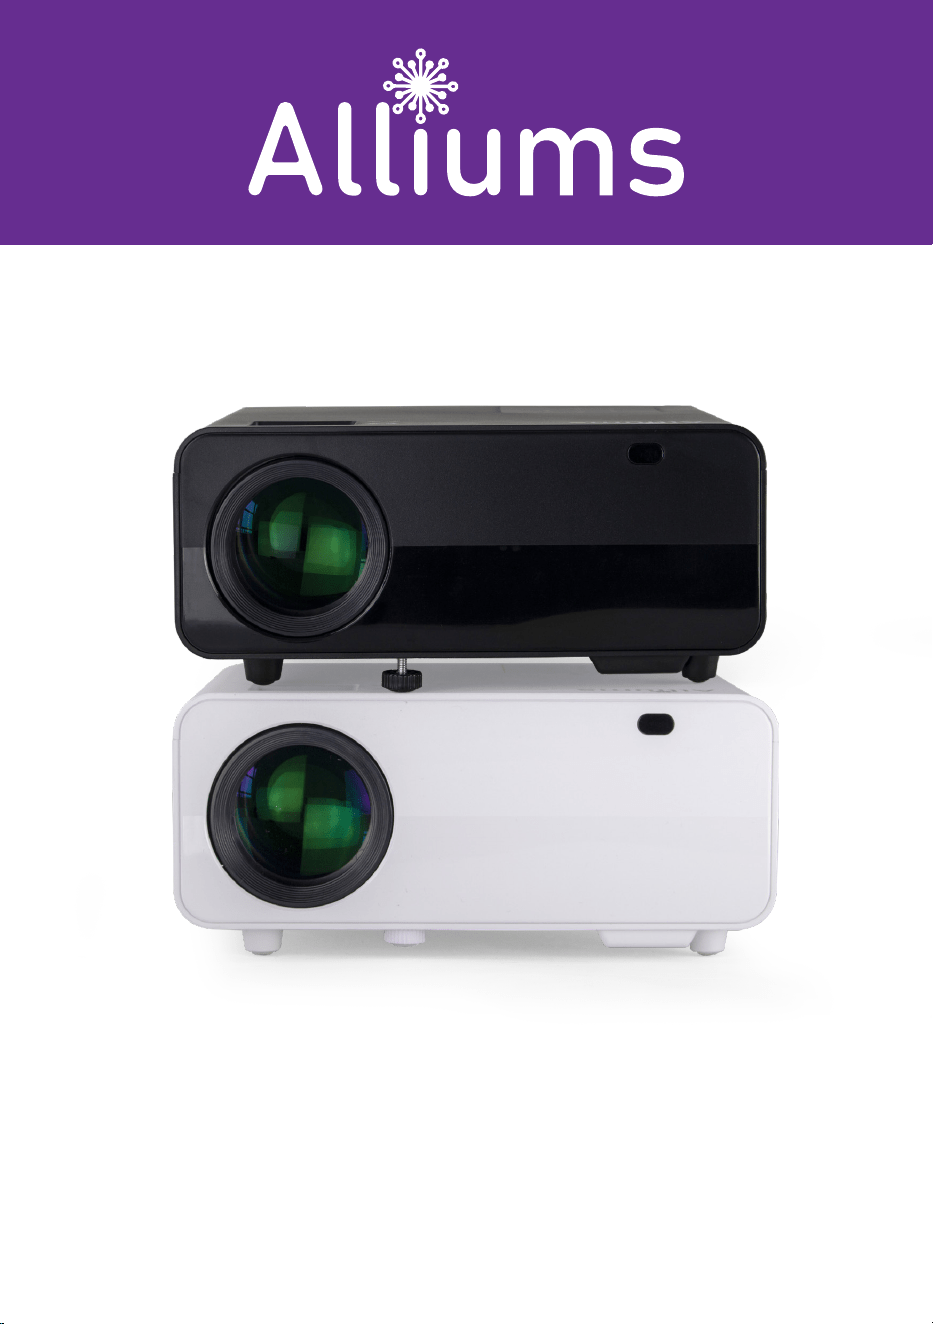
PORTABLE 4K PROJECTOR WITH Wi-Fi & BLUETOOTH
MODEL: AP-025 / AP-025B
USER MANUAL

Copyright © 2023, Alliums, Australia. All Rights Reserved.

CONTENTS
IMPORTANT SAFETY INSTRUCTIONS 4
PRODUCT OVERVIEW 5
REMOTE CONTROL 6
PROJECTOR INSTALLATION METHOD 7
CONNECTING 8
FOCUS 8
KEYSTONE CORRECTION 8
SELECT SIGNAL SOURCE 9
CONNECT AN IPHONE/IPAD SCREEN MIRRORING 10
CONNECT AN ANDROID PHONE/TABLET 11
CONNECT A WINDOWS DEVICE 11
WIRELESS WIFI CONNECTION-WIFI TRANSFER 13
CONNECT AN IPHONE/IPAD 13
CONNECT AN ANDROID PHONE/TAPLET 13
MORE TIPS ABOUT NETFLIX, PRIME VIDEO, HULU, ETC 16
USB DRIVE CONNECTION 17
CONNECT HDMI DEVICES 21
CONNECT AV VIDEO DEVICES 21
CONNECT 3.5MM AUDIO DEVICES 21
USING BLUETOOTH PLAYBACK 21
PROJECTOR SETTING 24
MAINTENANCE 26
TROUBLESHOOTING GUIDE 27
DEFECTIVE PRODUCTS & RETURNS 28
PLEASE READ THROUGH THIS USER’S MANUAL
FOR PROPER USE OF THIS PRODUCT.

Do not look directly into the lens while the projector runs, as solid light may
damage your eye.
Do not block the air outlet to prevent the projector from cooling down
because internal electronics are damaged.
Keep the projector and accessories out of the reach of children.
Please ensure that the projector's working environment is dry and
ventilated.
Do not place the projector in a place that is too hot or cold, which will
shorten the life of the device.” The recommended working environment is
5.C - 35.C.
Do not press hard on the projector, as it may damage the product.
Do not throw, hit, or shake the projector to avoid damaging the circuit
board.
If you have any questions after receiving the projector, please get in touch
with us through Amazon Support; we will quickly and correctly solve your
problem within 24 hours and give you a satisfactory answer.
IMPORTANT SAFETY INSTRUCTIONS
●
●
●
●
●
●
●
●
●
4
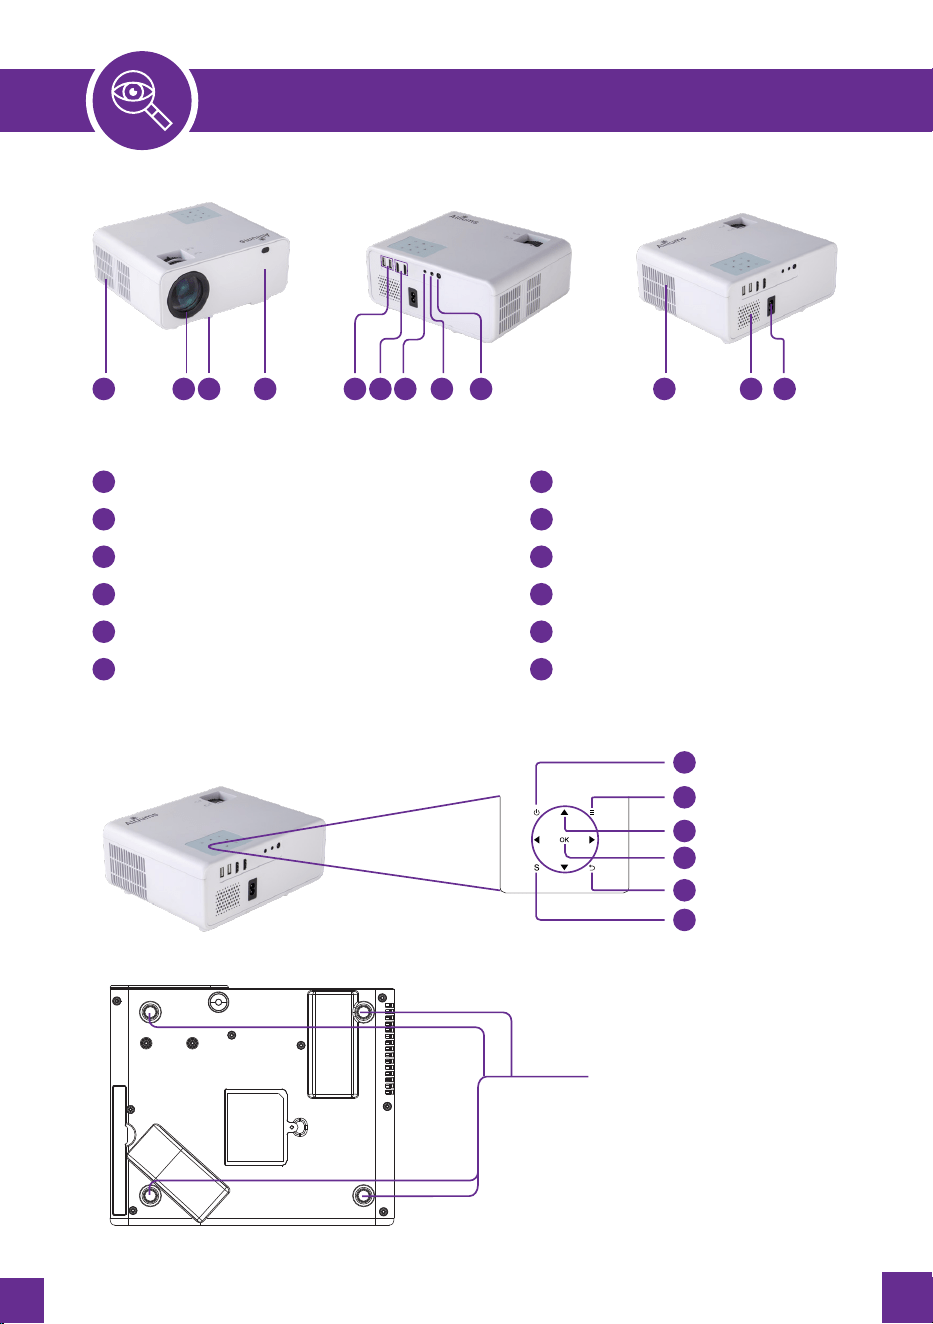
1 2 3 4 1110 12
7
8
9
10
11
12
1
2
3
4
5
6
Detachable Dust Screen
Focus Len
Level-Stand Adjustment
IR Receiver
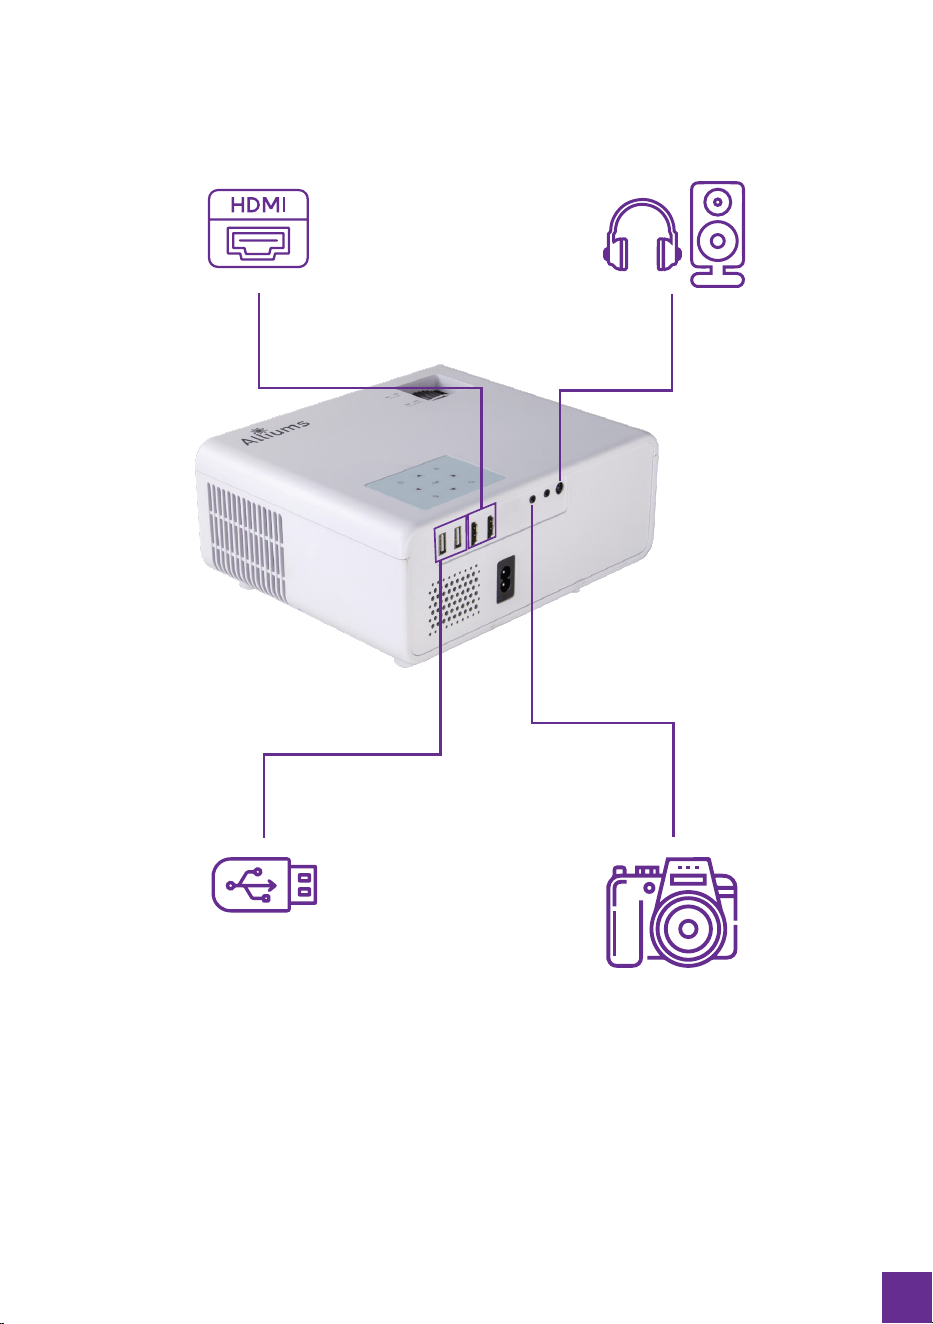
USB Port
HDMI Port
5 7 8 96
AV Port
3.5mm Port for Audio Output
IR for Remote Contro
Cooling Window
Speaker
Power Input (110-240V)
PRODUCT OVERVIEW
2
1
3
4
5
6
Power
Arrow Keys
OK
Input Source Key
Return
Menu
Ceiling Mount
Hole of Projector
(can be used by removing
the footpad, the ceiling
mount hole size is M5)
5
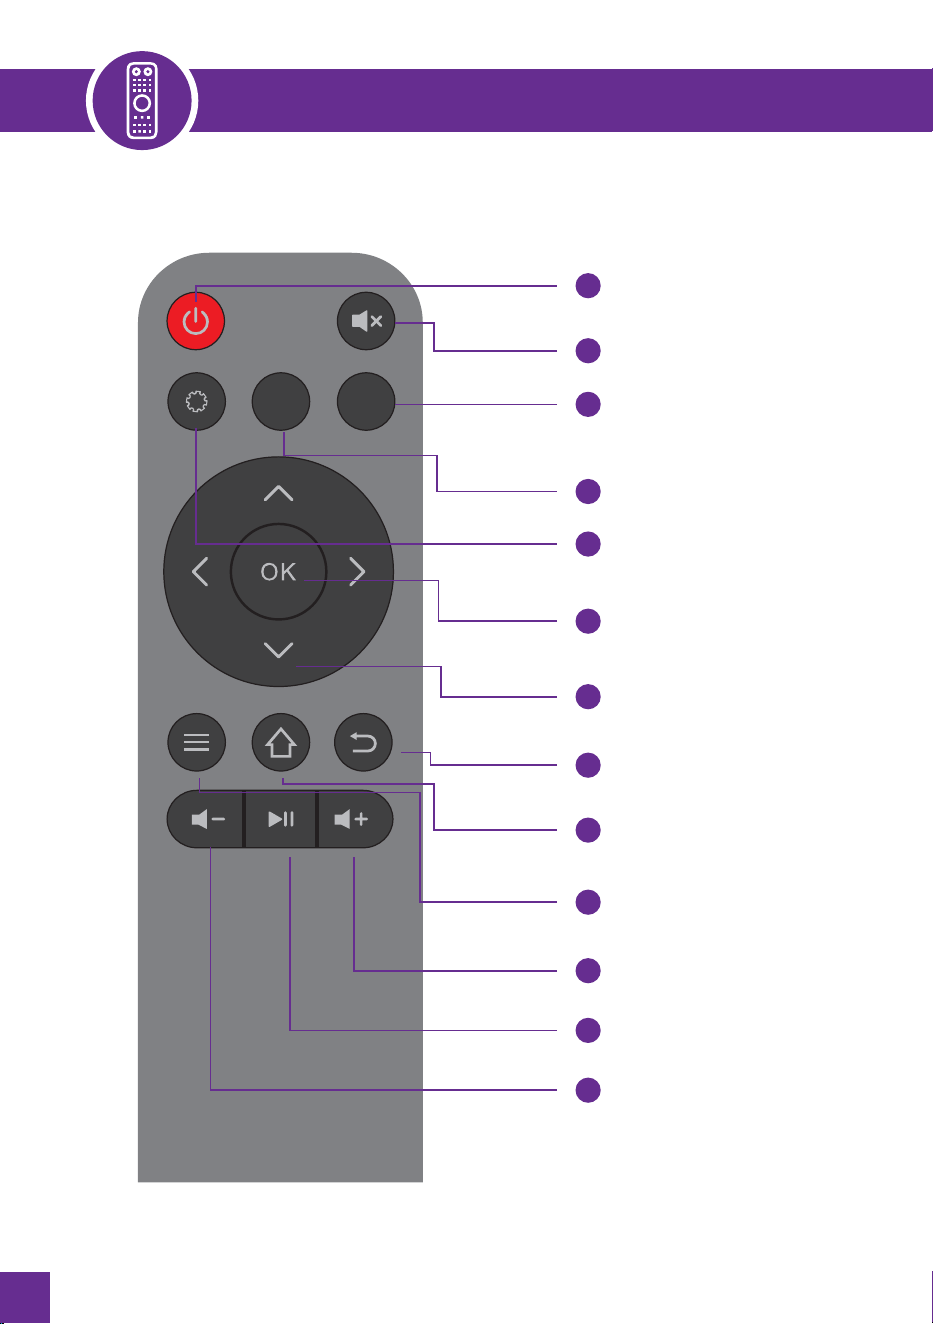
REMOTE CONTROL
M
S
1
2
4
6
7
8
9
10
11
12
13
Power
5
Set
Mute
3
Input Source Key
Menu
Ok
Arrow Keys
Return
Home
All Round Menu Key
Volume Up
Play Pause Key
Volume Down
6
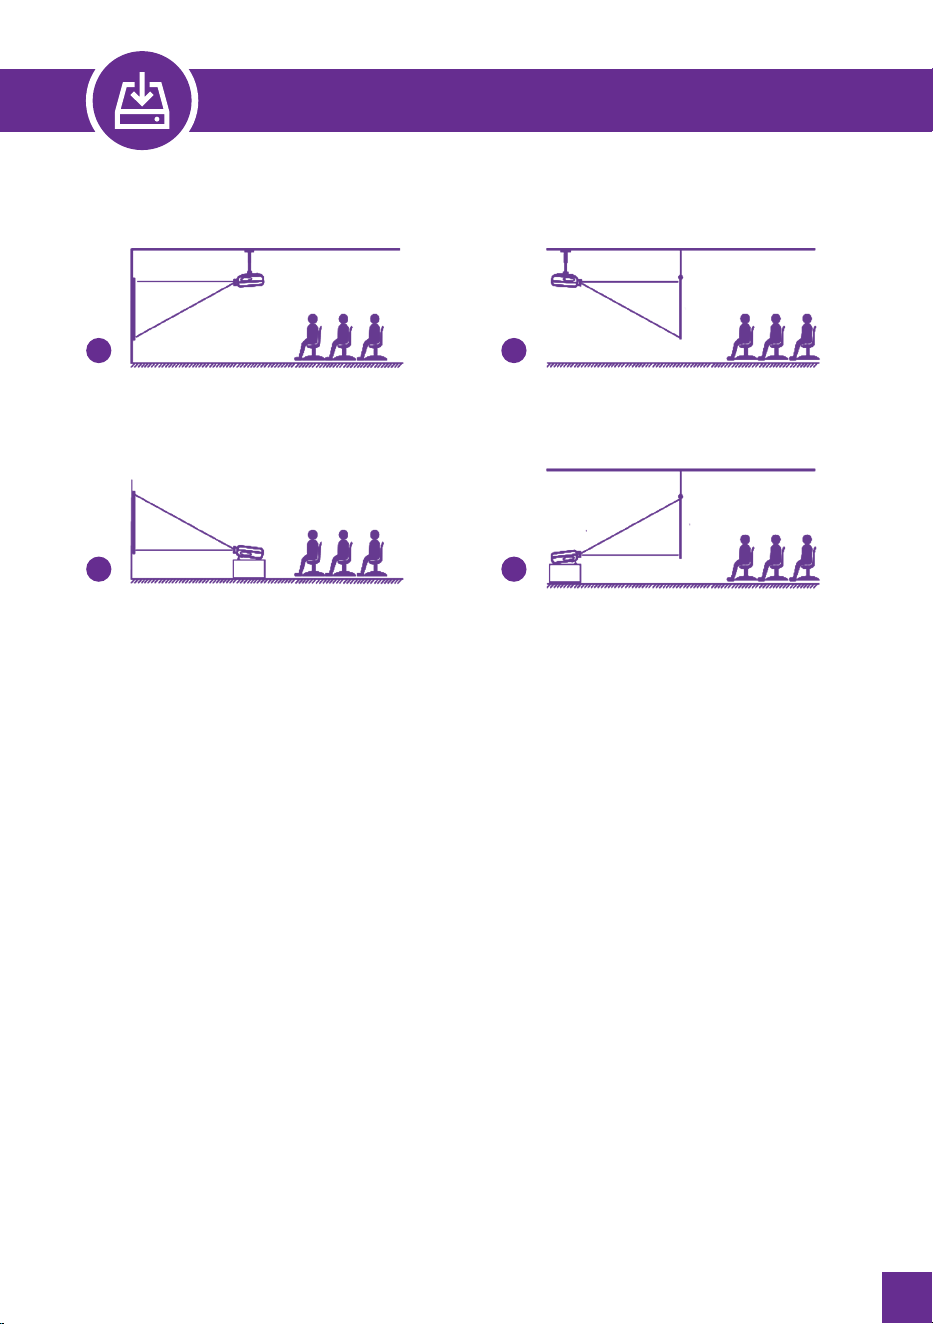
PROJECTOR INSTALLATION METHOD
1
3
2
4
WARM TIPS
When using the ceiling mount method, the projector cannot be higher than
the upper edge of the screen. Otherwise, it will affect the image effect or
keystone correction.
Please install the projector on the symmetrical axis of the screen to avoid
trapezoidal distortion of the left and right images.
The installed projector should be well-ventilated to avoid damage, and no
objects should cover or block the projector’s vents.
Please disconnect the power during installation to avoid electric shock
or projector circuit failure.
For the newly installed projector, you need to set “Image Flip” and “Image
Correction” when you turn it on the first time.
●
●
●
●
●
7
CONNECTING
KEYSTONE CORRECTION
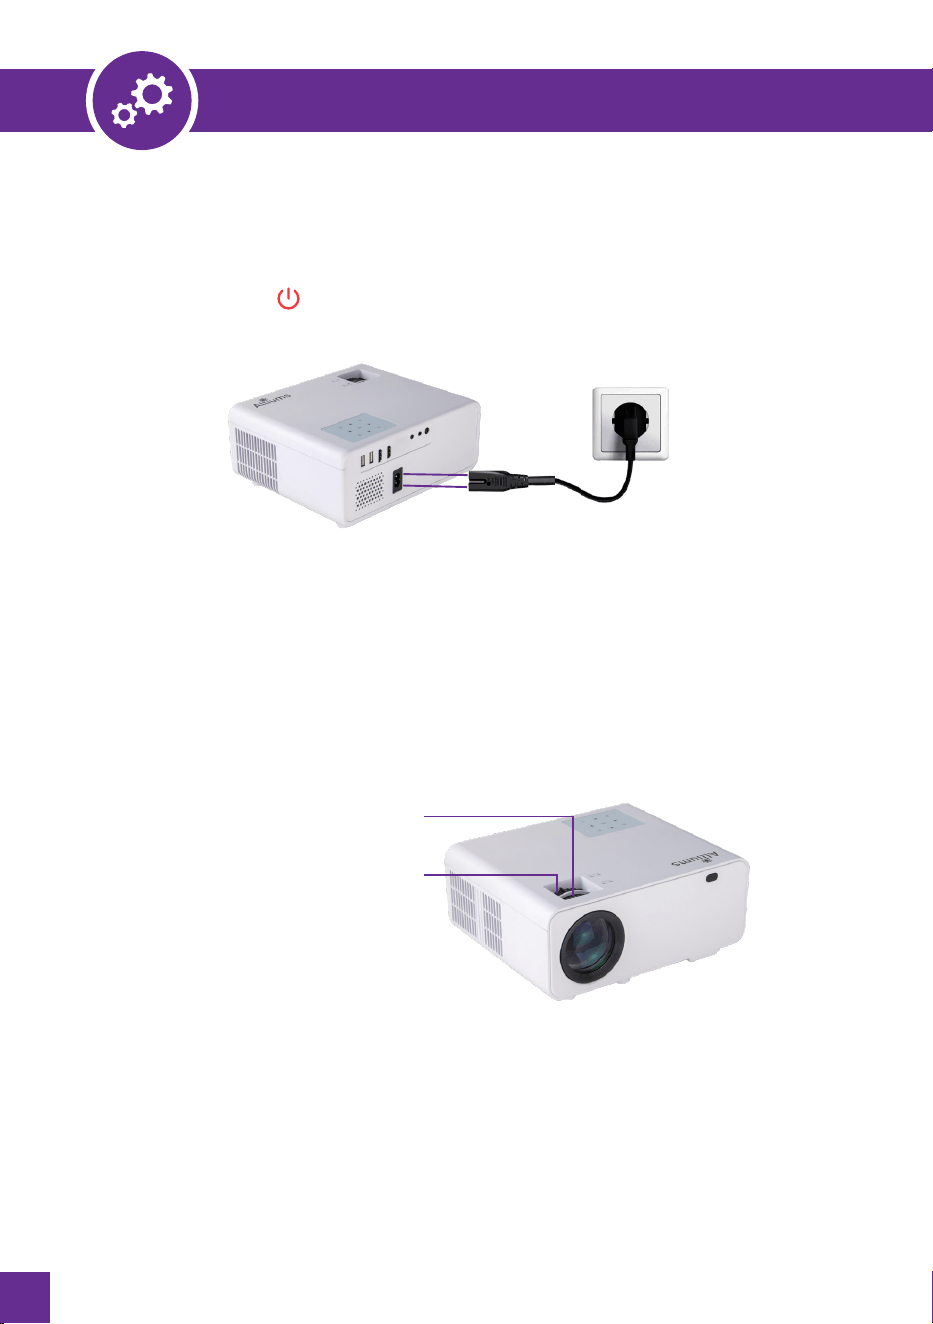
FOCUS
Let the projector be perpendicular to the wall, with the focusing button to make the
picture clear. When focusing, you can broadcast programs to help you finish focus.
At a different angle, you put the projector, and the projection will Deform like a
trapezoid; use the keystone correction to make it correctly.
FOCUSING
KEYSTONE CORRECTION
1. Plug the power cord into a power outlet; the projector enters standby.
2. Press the button” “on the project or on the remote control.
8
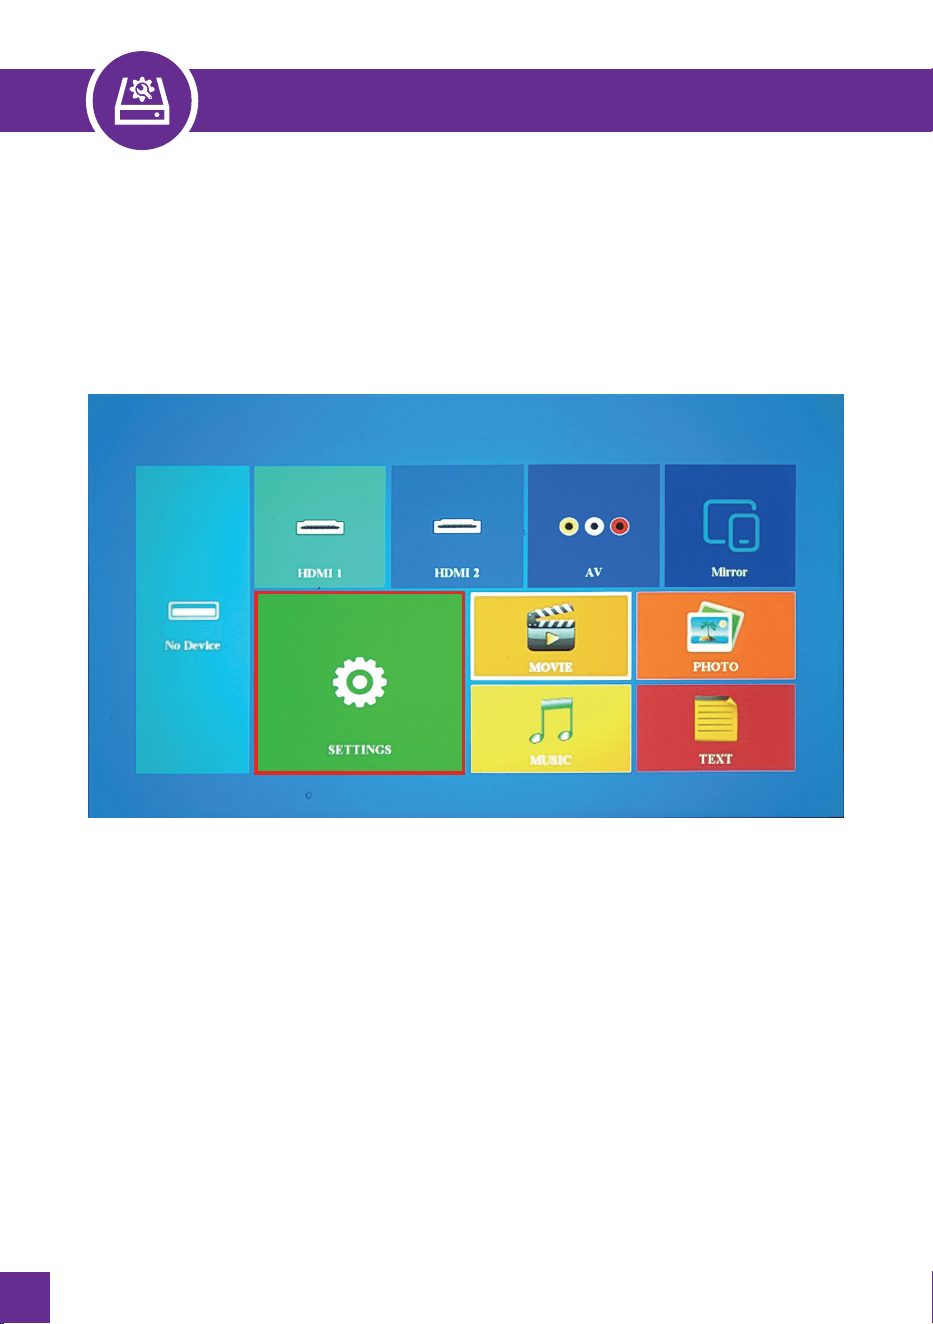
SELECT SIGNAL SOURCE
Press the desired source option on the homepage or the remote's input source key
(S). Select the preferred signal source.
9

WIRED SCREEN MIRRORING CONNECTION
CONNECT AN IPHONE/IPAD
Press the projector or remote control's signal source key "S"and select "Mirror."
Plug an original USB charging cable into the USB 1 port of this projector.
Please select “Trust this device” when the iPhone asks “Trust” or “Don’t
trust,” and enter the Your iPhone password to connect. Plug an original USB
charging cable into the USB 1 port of this projector.
1.
2.
3.
Imput Source
AV
HDMI 1
HDMI2
Mirror
USB
Enter
Imput Source
AV
HDMI 1
HDMI2
Mirror
USB
Enter
1.
2.
3.
4.
Press the projector or remote control's signal source key "S "and select
"Mirror."
Click “One-step Direct Connection” and follow the picture guide below.
Slide the phone interface from the bottom up to enter the control center.
Full-screen phones slide down from above, and those with the home
button slide up from below.
Open Control Center and find "Screen Mirroring," search and click
"CLcast_****," and enter PIN code "9999" to complete connecting.
WIRELESS SCREEN MIRRORING CONNECTION
REQUIRES CELLULAR DATA TRAFFIC TRANSFER
CONNECT AN IPHONE/IPAD
10

CONNECT AN ANDROID PHONE/TABLET
CONNECT A WINDOWS DEVICE
Press the projector or remote control's signal source key" S "and select" Mirror."
Open the Windows device settings interface and find the “Connections” icon.
Search and select the projector device: CLcast-**** and click Connect”.
1.
2.
3.
Press the projector or remote control's signal source key" S "and select"
Mirror."
Click “One-step Direct Connection” and follow the picture guide below.
Slide the phone interface from the bottom up to enter the control center.
Full-screen phones slide down from above, and those with the home
button slide up from below.
Open Control Center, find "Screen Mirroring"/"Screen Sharing"/"Cast."
Then, search and click "CLcast-****" to complete connecting.
(Since different brands of Android phones have different settings, find
the screen share and connect the projector. Samsung phones find "Smart
View," Huawei phones find "multi-screen.")
1.
2.
3.
4.
11
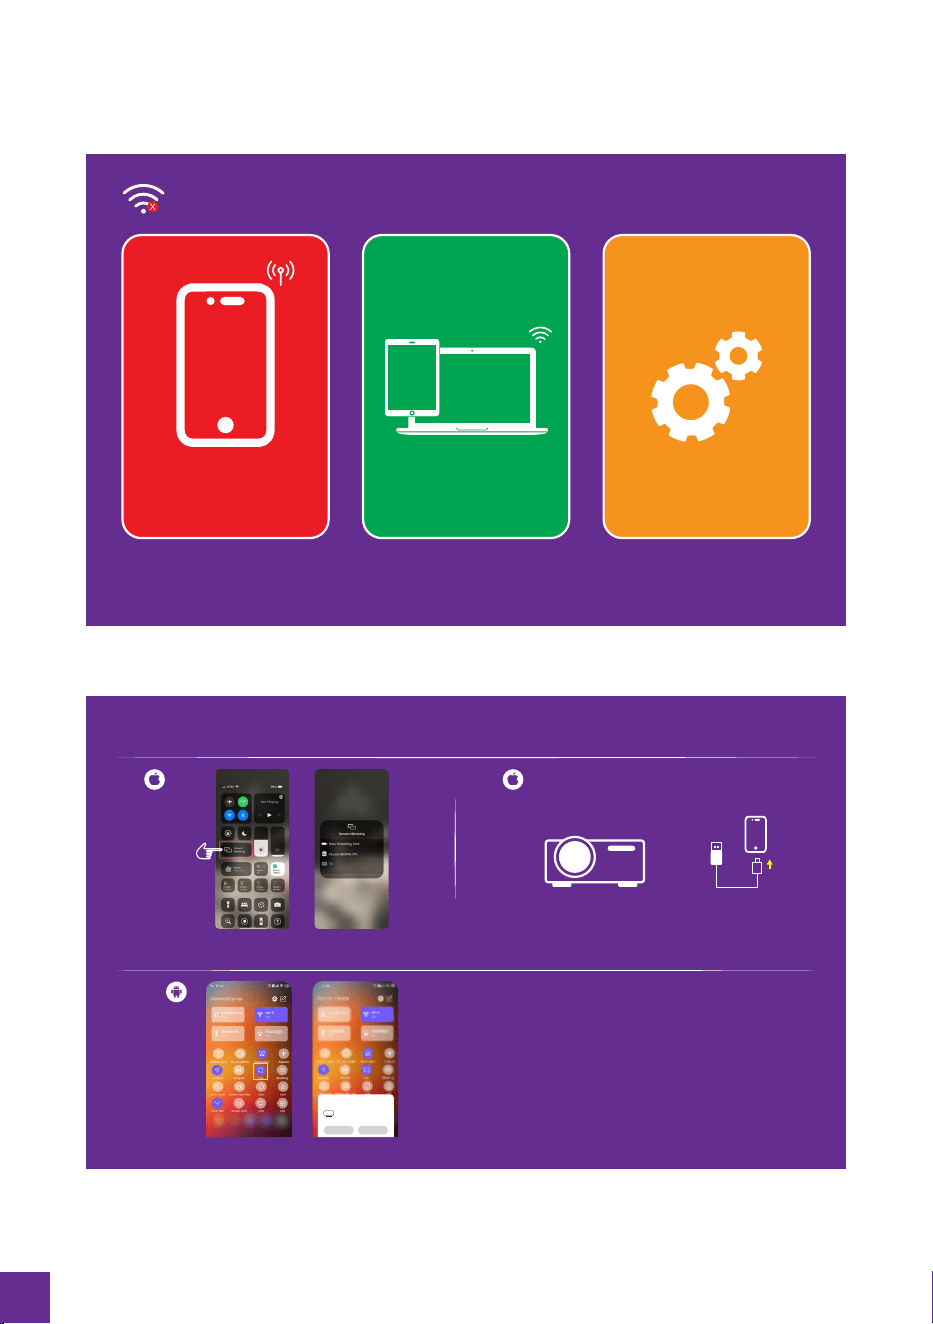
No Network Connection
One-Step Direct
Connection
One-step direct connection for
smartphone with no need to
connect to WiFi for projectors
The device needs to be
connect to the same
network as the projector
WI-FI Connection Settings
Version: 8 .02.71
One-Step Direct Connection
IOS
Android
IOS
Wired Connection
Connect the projector and iPhone with the original cable, select trust,
and then enter your phone password to complete the screen mirroring
Open control center and find “Screen Mirroting”, search and click
“CLcast-****”, and enter PIN code “9999” to complete connecting
Open control center and find “Screen Mirroting”/”Screen Sharing”/”Cast”,
search and click “CLcast-****”, to complete connecting
Wired connection only available for IOS
CLcast-903045
Select Devices (1)
Cancel Help
12

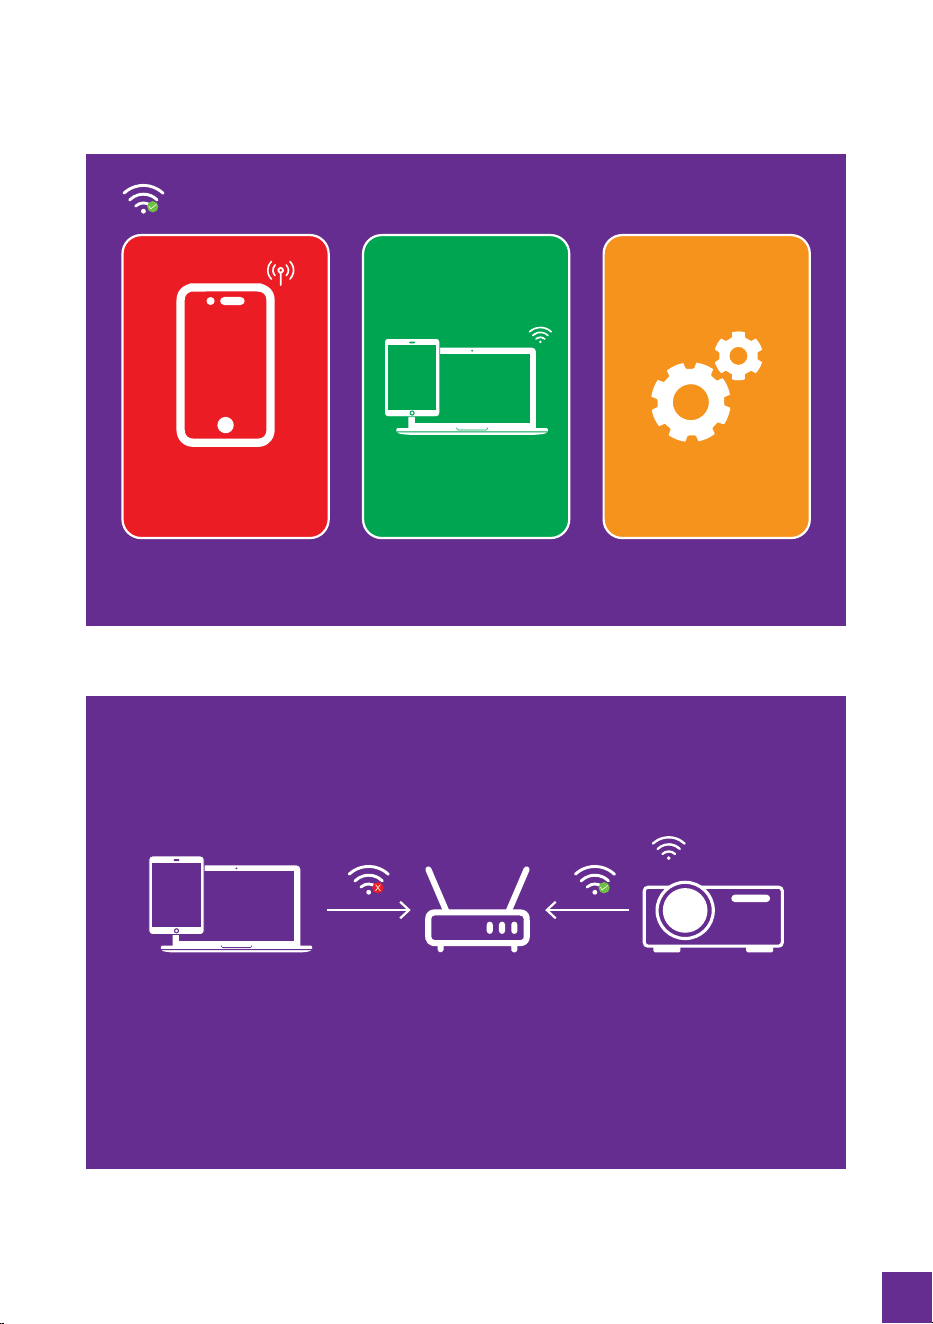
Press the projector or remote control's signal source key "S" and select"Mirror."
Click “Wi-Fi Connection,” click “Settings,” click “Wi-Fi,” select your home
wireless network in the projector display interface, and enter the password.
Click “Wi-Fi Connection”. Turn on Wi-Fi on your device, search, and
connect to Wi-Fi (connected to the same Wi-Fi network as the projector)
Slide the phone interface from the bottom up to enter the control center.
Full screen phones slide down from above, those with home button slide up
from below.
Open Control Center, find "Screen Mirroring"/"Screen Sharing"/"Cast." Then,
search and click "CLcast-****" to complete connecting.
(Since different brands of Android phones have different settings, find
the screen share and connect the projector. Samsung phones find
"Smart View," Huawei phones find "Multi-screen.")
1.
2.
3.
4.
5.
WIRELESS WiFi CONNECTION-WiFi TRANSFER
CONNECT AN IPHONE/IPAD
Press the projector or remote control's signal source key "S" and select "Mirror."
Click “WI-FI Connection,” click “Settings,” click “Wi-Fi,” select your home
wireless network in the projector display interface, and enter the password.
Click “Wi-Fi Connection”. Turn on Wi-Fi on your device, search, and connect
to Wi-Fi (connected to the same Wi-Fi network as the projector)
Slide the phone interface from the bottom up to enter the control center.
Full-screen phones slide down from above, and those with the home button
slide up from below.
Open Control Center and find Screen Mirroring, search, and click
"CLcast-****" to complete the screen mirroring.
1.
2.
3.
4.
5.
CONNECT AN ANDROID PHONE/TABLET
13

No Network Connection
One-Step Direct
Connection
One-step direct connection for
smartphone with no need to
connect to WiFi for projectors
The device needs to be
connect to the same
network as the projector
WI-FI Connection Settings
Version: 8 .02.71
Please connect Wi-Fi first
CancelNext
System Setup
WiFi
Reset
OTA
Mirror Setting
14
FLQ_856
One-Step Direct
Connection
One-step direct connection for
smartphone with no need to
connect to WiFi for projectors
The device needs to be
connect to the same
network as the projector
WI-FI Connection Settings
Version: 8 .02.71
WI-FI Connection
192.168.123.217
FLQ_856
CLcast-10E8
Waiting for
connection....
• Turn on WiFi on your device, search and connect to WiFi (connected to the same WiFi network as the projector)
• Open control center and find screen mirroring, search and click “CLcast-****”, to complete the screen mirroring
15

MORE TIPS ABOUT NETFLIX, PRIME VIDEO, HULU, ETC
It works with YouTube, chrome, safari, and facetime when you connect it
to a smartphone directly.
And it doesn’t support play-protected video when you connect it to your
smartphone directly. (Netflix, Prime Video, Hulu, etc) Due to these videos
having an encryption protocol, the projector has no right to recognize when
it is connected directly to the phone via the USB interface.
But it works with Netflix, Amazon Prime Video, or any other copyright videos
when connecting this projector to a laptop, Fire TV stick, Roku, or Chromecast.
The Firestick or other HDMI device can play Netflix because the HDMI
interface encryption protocol includes Netflix.
Last but not least. This projector does not support Dolby sound. So there will
be no sound when you play doubly sound videos (Amazon Fire Stick, Netflix,
Blu-ray movies, and so on). In this case, please kindly turn off the Dolby
sound on your device or apps.
The instruction for your reference is to turn off the Dolby Sound (Settings >
Display & Sounds > Audio > Dolby Digital Output > and then turn Dolby Digital
(OFF).
CONNECTING
16

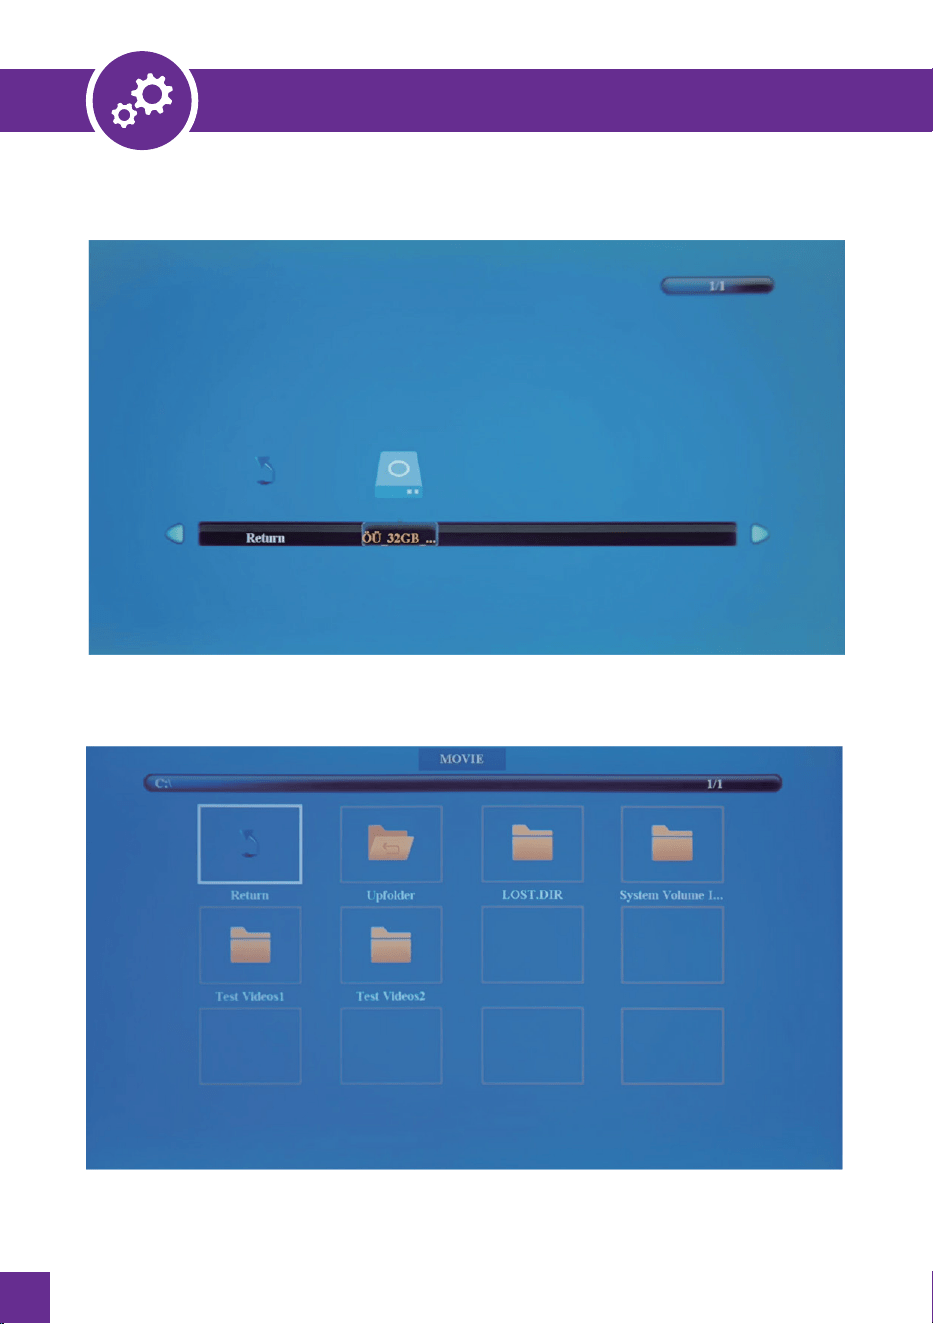
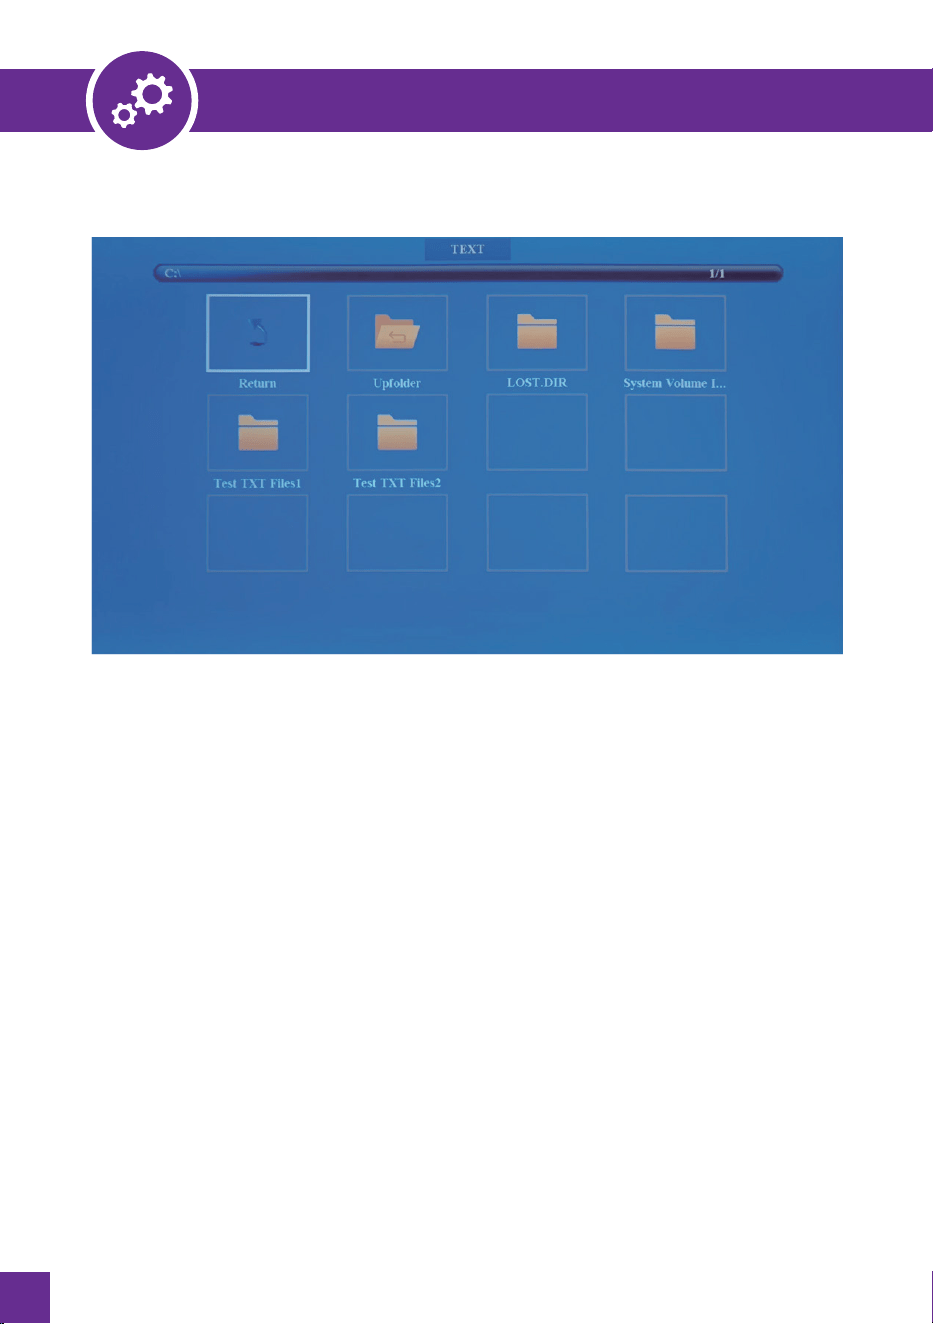
USB DRIVE CONNECTION
The chip of this projector is not compatible with files stored in a USB stick in
PPT format.
If you want to play PPT, please store the PPT document on your mobile
phone or laptop, then connect this projector to them.
1.
2.
Video Format
Audio Format
Photo Format
File Format TXT
BMP/JPG/PNG/JPEG
MP3/AAC/FLAC/ WMA/ PCM
AVI/FLV/MKV/MP4/MPG/WMV/RMVB/RM/MOV
NOTE
CONNECTING
Unlike other devices, when you connect a USB drive via USB 2 Port, a USB
icon will pop up in the upper right corner of the main menu to indicate that
the device is successfully connected. You don’t need to click ”S” to select
the USB signal source; you can directly choose the file you want to play on
the main menu.
To play a video stored in a USB Drive, select ”MOVIE” on the
main menu and press “OK.”
To play a picture, music, or text stored in a USB drive, Select”
Photo/Music/Text” on the main menu and press the “OK.
1.
2.
3.
17
CONNECTING
18

CONNECTING
MUSIC
19
CONNECTING
20

CONNECT HDMI DEVICES
HDMI interface can be connected to the computer or other device with the
HDMI output interface.
Press “S “ to choose the media signal channel: “HDMl1” or “HDMl2”.
1.
2.
If your laptop has no HDMI port, you need an HDMI adapter.
CONNECT AV VIDEO DEVICES
Use the 3 in 1 video cable (included in the package) to connect with AV.
Press “S “ to choose the media signal channel: “AV”.
1.
2.
CONNECT 3.5MM AUDIO DEVICES
It supports 3.5mm earphones and other cable sound devices.
CONNECTING
NOTE
NOTE
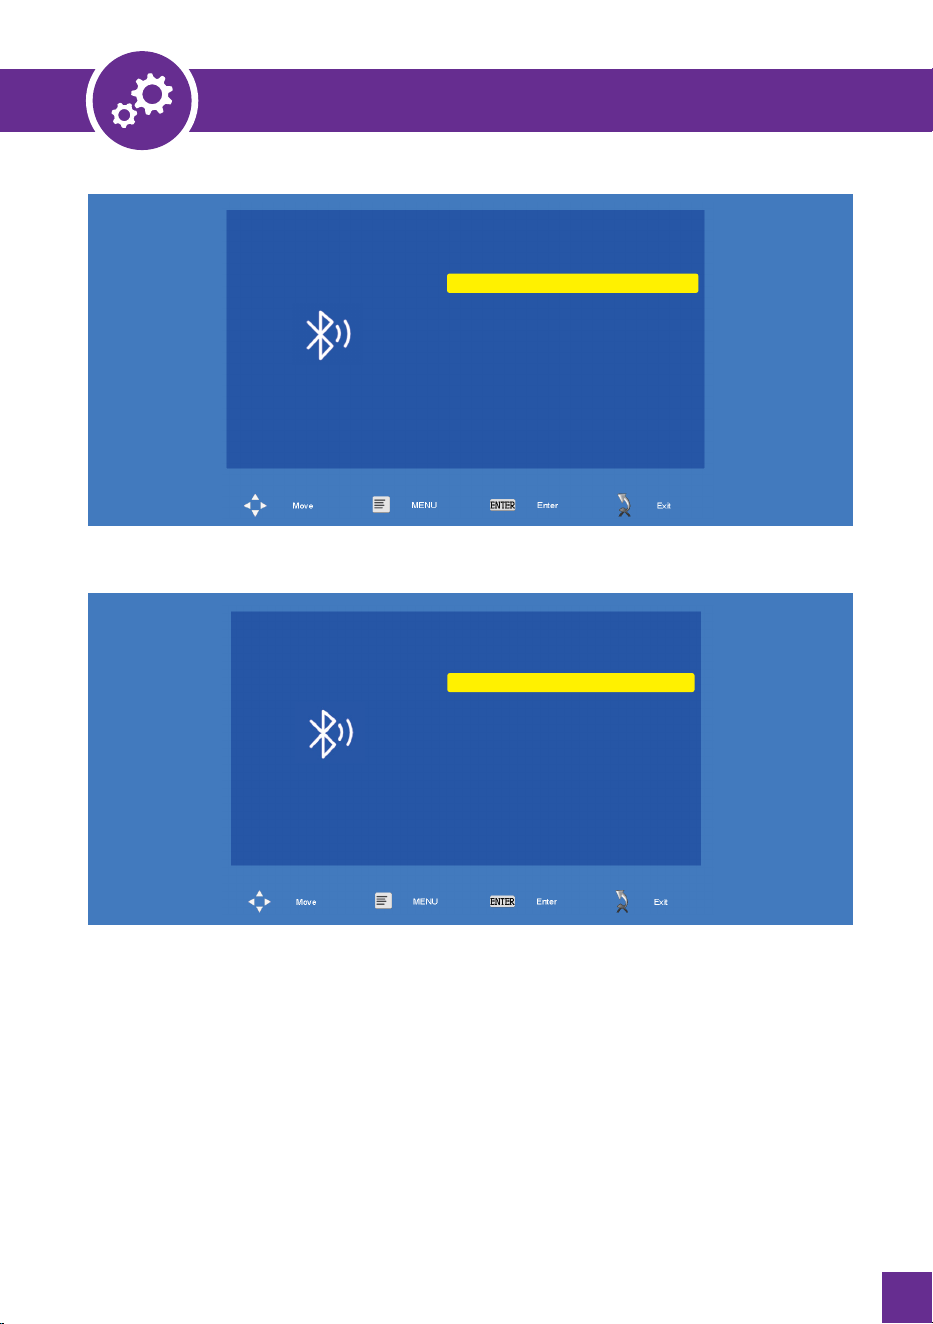
USING BLUETOOTH PLAYBACK
Pairing to Bluetooth Wireless Speakers or Sound Bar.
Bluetooth is OFF by default. Bluetooth can be turned ON or OFF from the “
Setting”-” OPTIONS Menu when the projector powers ON.
Enable Bluetooth on the receiver (external speakers, sound bar, etc.) to
connect devices such as smartphones, tablets, or computers. These are
not Bluetooth receivers and will not connect to the projector. To ensure
clarity, you should disable Bluetooth on all receivers you wish to avoid
connecting. The Bluetooth pairing list is unacceptable; it needs to show the
steps to turn on the projector and show the picture in the manual.
1.
21

CONNECTING
NOTE
Power on the projector and ensure the projector’s Bluetooth is on and in
pairing mode (see the note above). Press the Menu key from the
re mote>>>s el e c t O PT I O N >>>s e l ec t BT S et ti n g>>>S e l e c t th e BT M o d e>>>p res s
the navigation >l<to turn on the Bluetooth>>>Select Search BT to press the OK
key from the remote when the Scan shows on the screen, press the OK key
again>>>When the screen shows “Searching, pl.…”>>>the Bluetooth devices
name will be shown on the screen select it and press the OK key to connect it.
When successfully paired, it will show” Bluetooth Connected” on the menu.
Exit the menu; the sound will come out from the Bluetooth speaker. The
paired device will be listed in “Available Device.
It can connect the last Bluetooth speaker automatically when the unit is
Powered on again.
2.
3.
4.
It needs to power on the last connected Bluetooth speaker first, then turn on the
projector. If it can’t connect the previous devices automatically, please repeat
steps 2~3.
After the initial pairing, the projector and the Bluetooth speakers will stay paired
unless unpaired manually by the user or erased due to a reset of either device. If
this occurs, or you find either unit is unable to connect. Repeat the following steps.
OPTION
OSD Language English
HDMI Link
BT Setting
Reset
Software Update(USB)
22
CONNECTING
BT Setging
BT Mode Off
Search BT
Available Devtce List:
BT Setging
BT Mode On
Search BT
Available Devtce List:
23
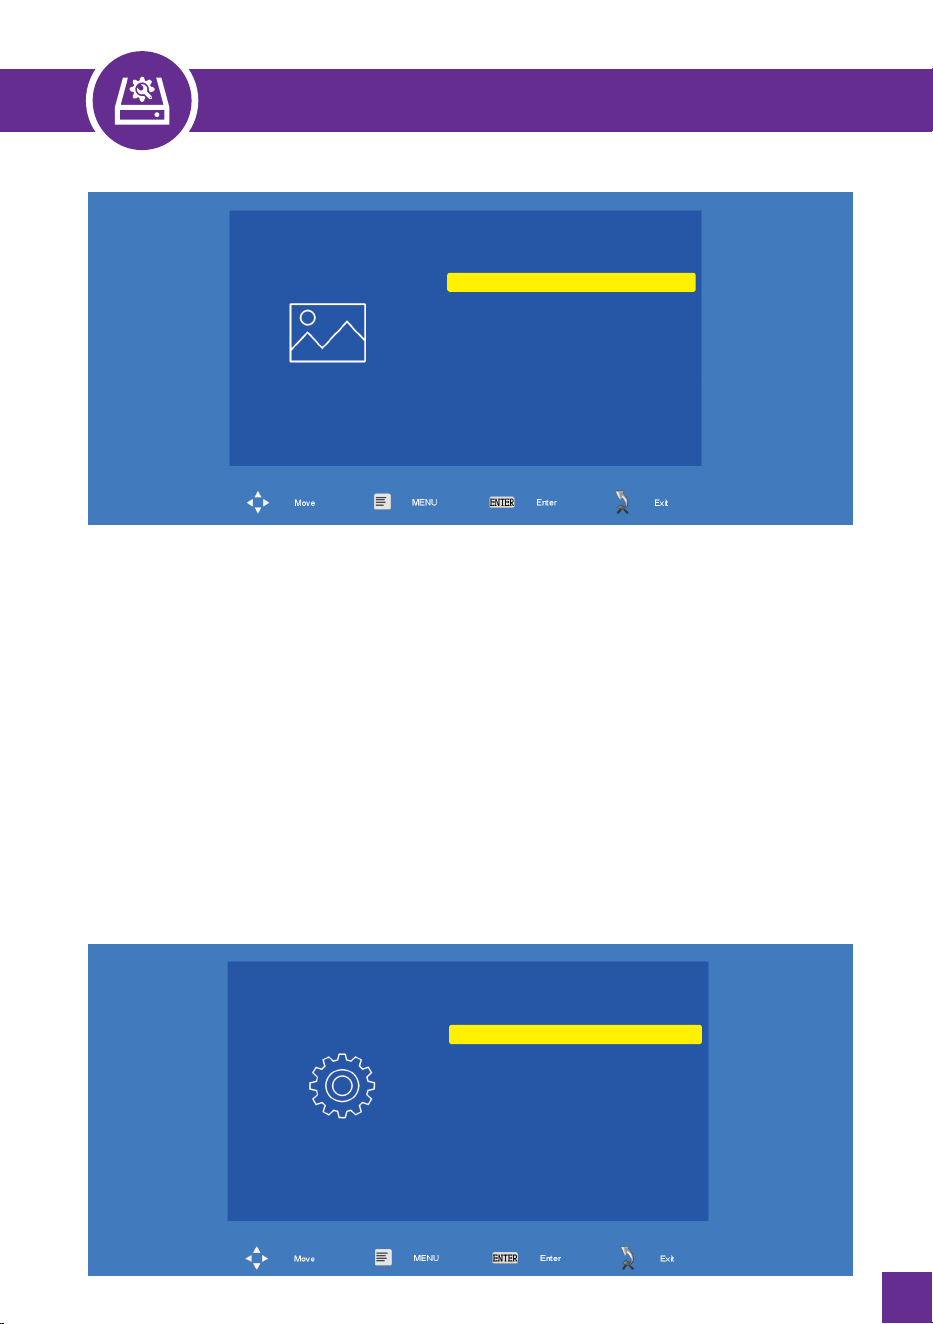
PROJECTOR SETTING
Click “Setting” of the projector menu.
PICTURE” /”SOUND”/”TIME”/”OPTION” can be set manually. After you
select the properties (PICTURE/SOUND/TIME/OPTION) you want to set,
please press the arrow keys on the operation panel to select the setting
range of the properties.
1.
2.
OPTIONS RELATED TO “PICTURE”ARE SET ON THIS SCREEN
Picture Mode: “User,” “Standard,” “Dynamic,” “Mild,” and other image
modes default to fit a variety of projections.
Color Temperature: “Cool,”” Medium,” “Warm,” and other multiple color
temperature modes are the default for different color preferences.
Noise Reduction: Set the noise reduction strength.” Off,” Low,”” Middle,”
and” High” are default.
Projection Mode: “Front,” “Celling Front,” “Rear,” and “Celling Rear” are
the default for different installation modes.
1.
2.
3.
4.
24
PROJECTOR SETTING
PICTURE
Picture Mode Standard
Color Temperature Medium
Aspect Ratio 16:9
X_ZOOM
Y_ZOOM
Noise Redution Middle
Projection mode Front
OPTION
OSD Language English
HDMI Link
BT Setting
Reset
Software Update(USB)
OPTIONS RELATED TO “OPTION”ARE SET ON THIS SCREEN
OSD Language: Set the language in the system with English as default.
HDMI Link:” Enable HDMI Link,” Auto Power On,” Device Auto Standby,”
CEC Function.
BT Setting:” BT Mode,”” BT Name,”” Search BT,”” Available Device.”
Reset: Restore the factory default setting.
Software Update (USB): Update the system version (USB storage device
with the correct software upgrading package needs to be inserted).
1.
2.
3.
4.
5.
25

MAINTENANCE
Dust prevention: Excessive dust will affect the heat dissipation of the
projector. It is suggested to clean its dust filter every one or a half
month according to the actual environment.
Ventilation: As the projector integrates sound & photo-electricity, the
optical source will produce heat during operation. Therefore, it shall be
ensured that no objects around will block the air inlet and outlet of the
projector to improve its working stability and service life.
Lens maintenance: The Lens, as the core component of the projector, is
directly related to the picture definition. The dirty lens shall be wiped with
a soft cotton cloth for the glass lens surface. Stiff cloth or abrasives shall
not be used.
Cleaning: Excessive dust on the projector surface shall be cleaned
promptly, as it will affect heat dissipation.
Moisture protection: The projector is vulnerable to the damp air. Its
operating humidity is about 45%- 60%.
Vibration prevention: The projector shall be strictly protected from strong
impact, extrusion, and vibration. Try not to move and knock the projector
during its regular operation, which will cause internal circuit faults.
1.
2.
3.
4.
5.
6.
26

TROUBLESHOOTING GUIDE
Adjust the focus ring/keystone.
The projector and screen/wall must be ineffective distance.
·
·
BLURRY IMAGE
Make sure the remote points at the IR receiver directly.
Do not cover the IR receiver.
Try a new pair of AAA batteries.
·
·
·
REMOTE UNRESPONSIVE
The projector does not support the video format.
Encryption is applied to the videos or media player that holds the video.
The light is defective if the projector's lamp is off with only audio playing.
·
·
·
WHY IS THE AUDIO OF THE PROJECTOR AVAILABLE
BUTWITHOUT DISPLAY?
Go to Menu>TIME> Auto On/Auto Off and set the time to automatically.
Turn on/off the projector.
Go to Menu>TIME>Sleep Time to adjust the period before the
projector automatically turns off.
·
·
AUTO ON/OFF
Go to Menu > OPTION > Factory Reset to store factory settings as needed.·
FACTORY RESET
Go to Menu > OPTION > OSD Language to select the language.·
LANGUAGE SETTINGS
Turn off the Dolby Sound on your device or apps: Settings > Display &
Sounds > Audio > Dolby Digital Output > Turn Dolby Digital OFF.
·
DOLBY SOUND
Go to Menu>Picture>Projection mode to flip the projection image.·
UPSIDE DOWN IMAGES
27

DEFECTIVE PRODUCTS & RETURNS
DISPOSAL
Proved defective products meeting the specified warranty period should be contacted
by customer support via www.alliums.com.au addressing your order number.
Make sure not to dispose of your product before contacting us. Once our customer
support team has approved your request, please return the unit with its order number.
To prevent possible environmental or human health harm from uncontrolled
waste disposal.
Ask your local council where to
dispose of your projector and its accessories.
It would help if you did not dispose of your appliance and its related accessories
away with the daily regular household.
ALLIUMS CUSTOMER SUPPORT
Feel free to contact our helpful customer support team with any questions
regarding your product!
Your satisfaction is our priority.
www.alliums.com.au
support@alliums.com.au
Please provide your order number when you contact our customer support services.
28

Copyright © 2023, Alliums, Australia. All Rights Reserved.

Questions or Concerns?
support@alliums.com.au