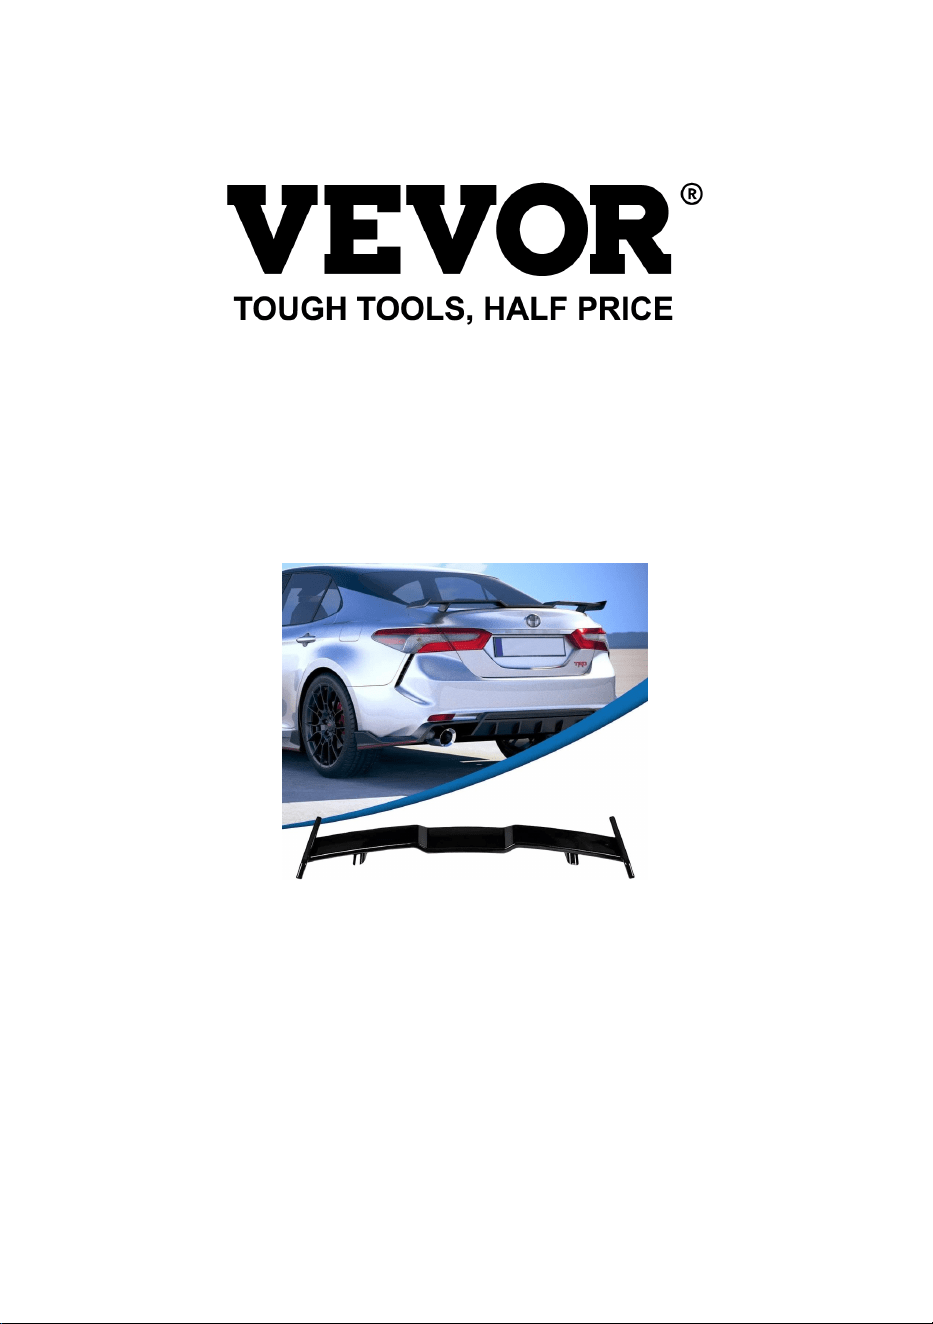
Technical Support and E-Warranty Certificate www.vevor.com/support
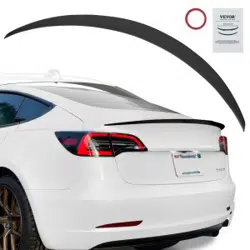
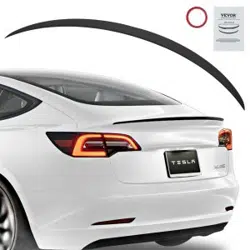
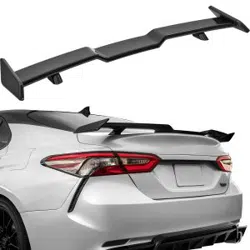
WING SPOILER
MODEL:AR-TOYOTA-007
We continue to be committed to provide you tools with competitive price.
"Save Half", "Half Price" or any other similar expressions used by us only represents an
estimate of savings you might benefit from buying certain tools with us compared to the major
top brands and does not necessarily mean to cover all categories of tools offered by us. You
are kindly reminded to verify carefully when you are placing an order with us if you are
actually saving half in comparison with the top major brands.

Have product questions? Need technical support? Please feel free to
contact us:
Technical Support and E-Warranty Certificate
www.vevor.com/support
NEED HELP? CONTACT US!
This is the original instruction, please read all manual instructions carefully
before operating. VEVOR reserves a clear interpretation of our user manual.
The appearance of the product shall be subject to the product you received.
Please forgive us that we won't inform you again if there are any technology or
software updates on our product.
IMPORTANT SAFEGUARDS
WARNING: Read and understand this entire manual before
operating or servicing this product. Failure to follow these warnings
and instructions can cause personal injury or damage to valuable
property.
Avoid children using the product. And this product is not a toy.
Do not allow children to play.
ASSEMBLY PRECAUTIONS
1. Assemble only according to these instructions. Improper assembly can
create hazards.
2. Keep the assembly area clean and well-lit.
3. Keep bystanders out of the area during assembly.
SAVE THESE INSTRUCTIONS
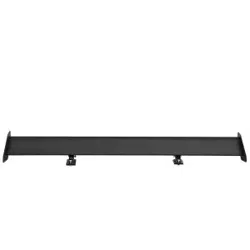
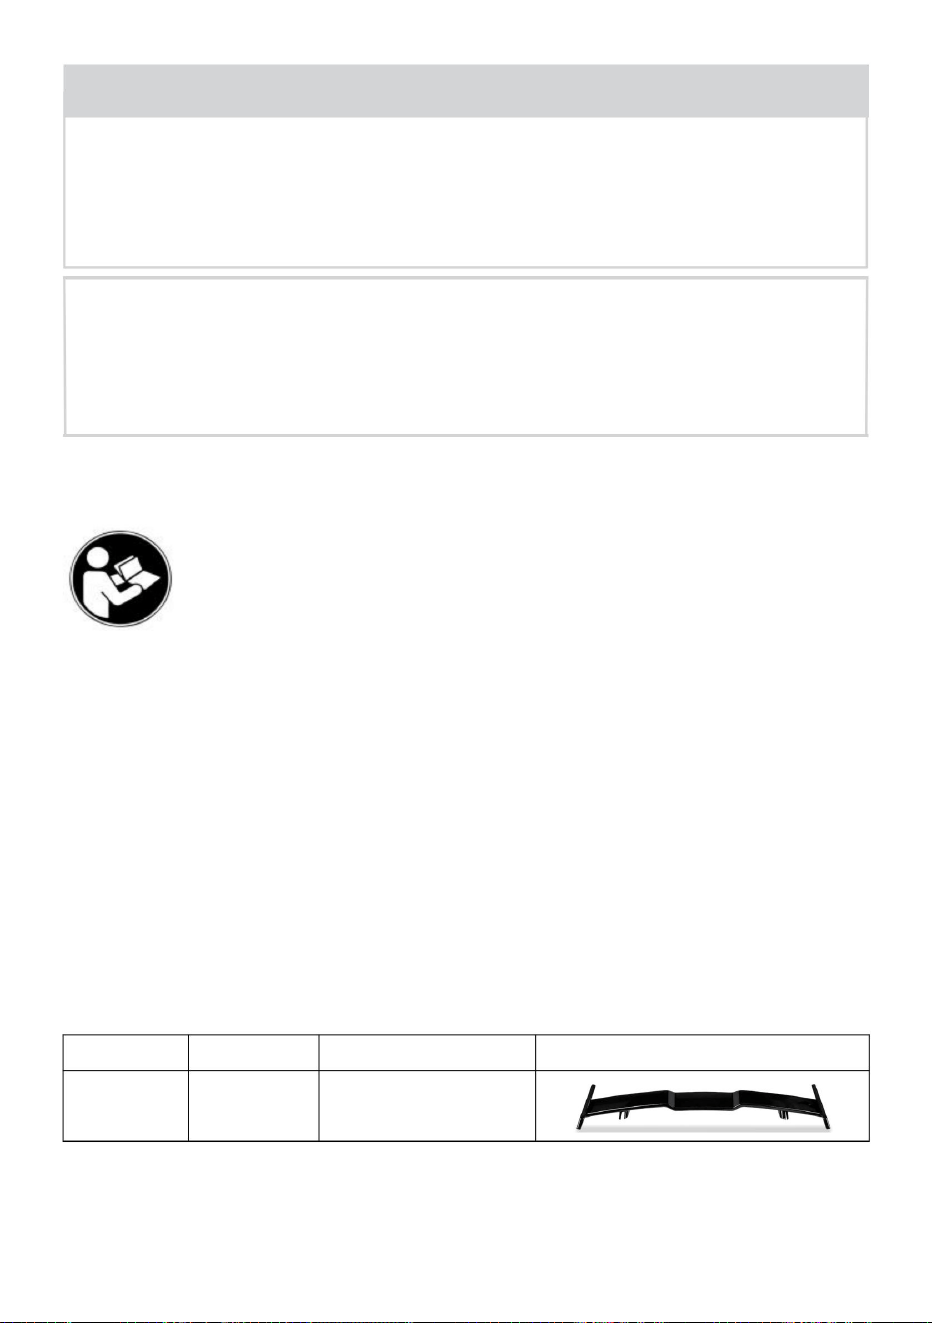
SPECIFICATION
Material
Color
Length(mm)
Picture
ABS
Black
1470
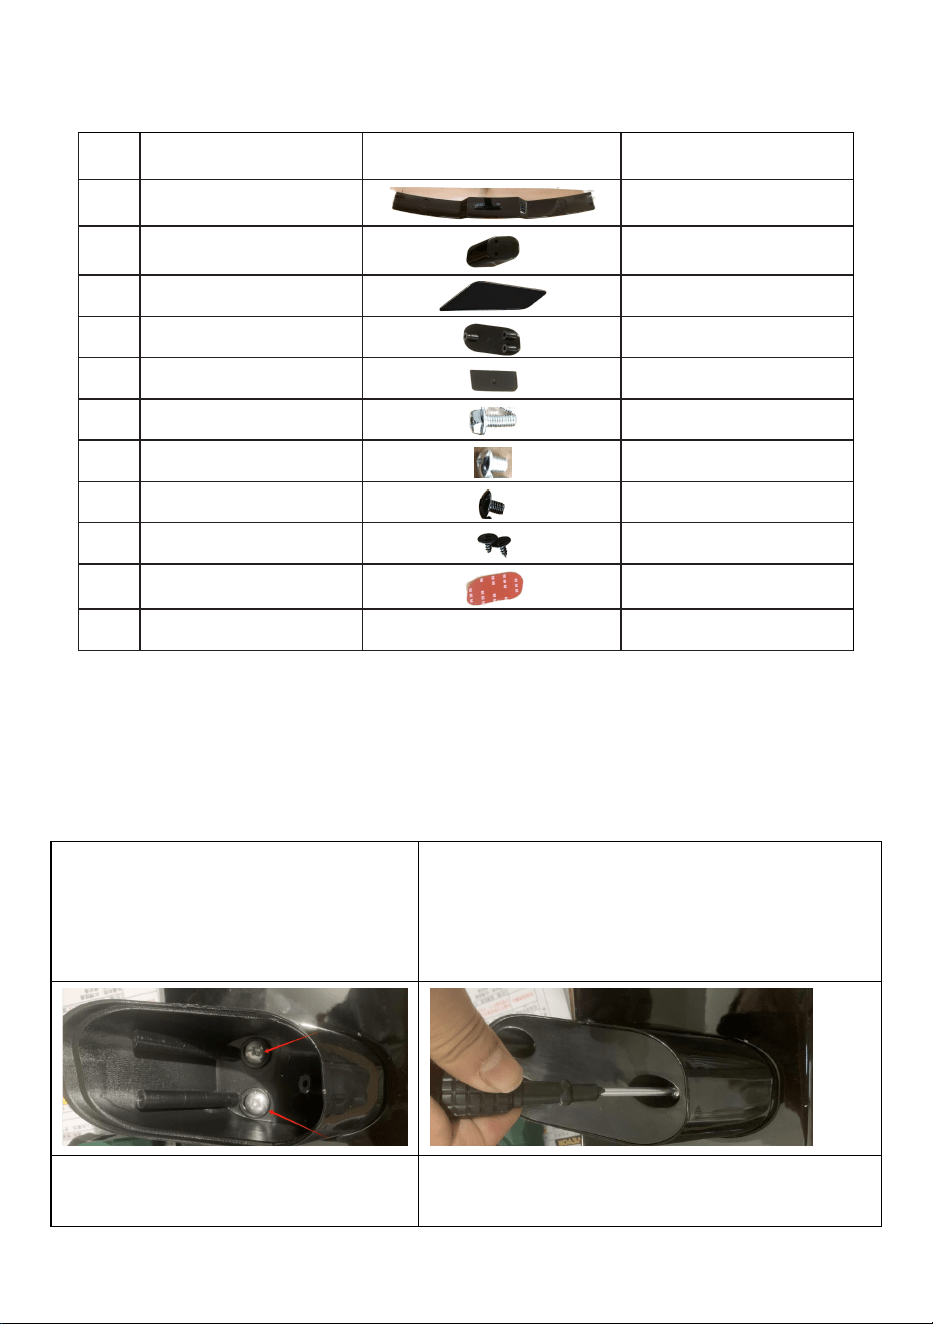
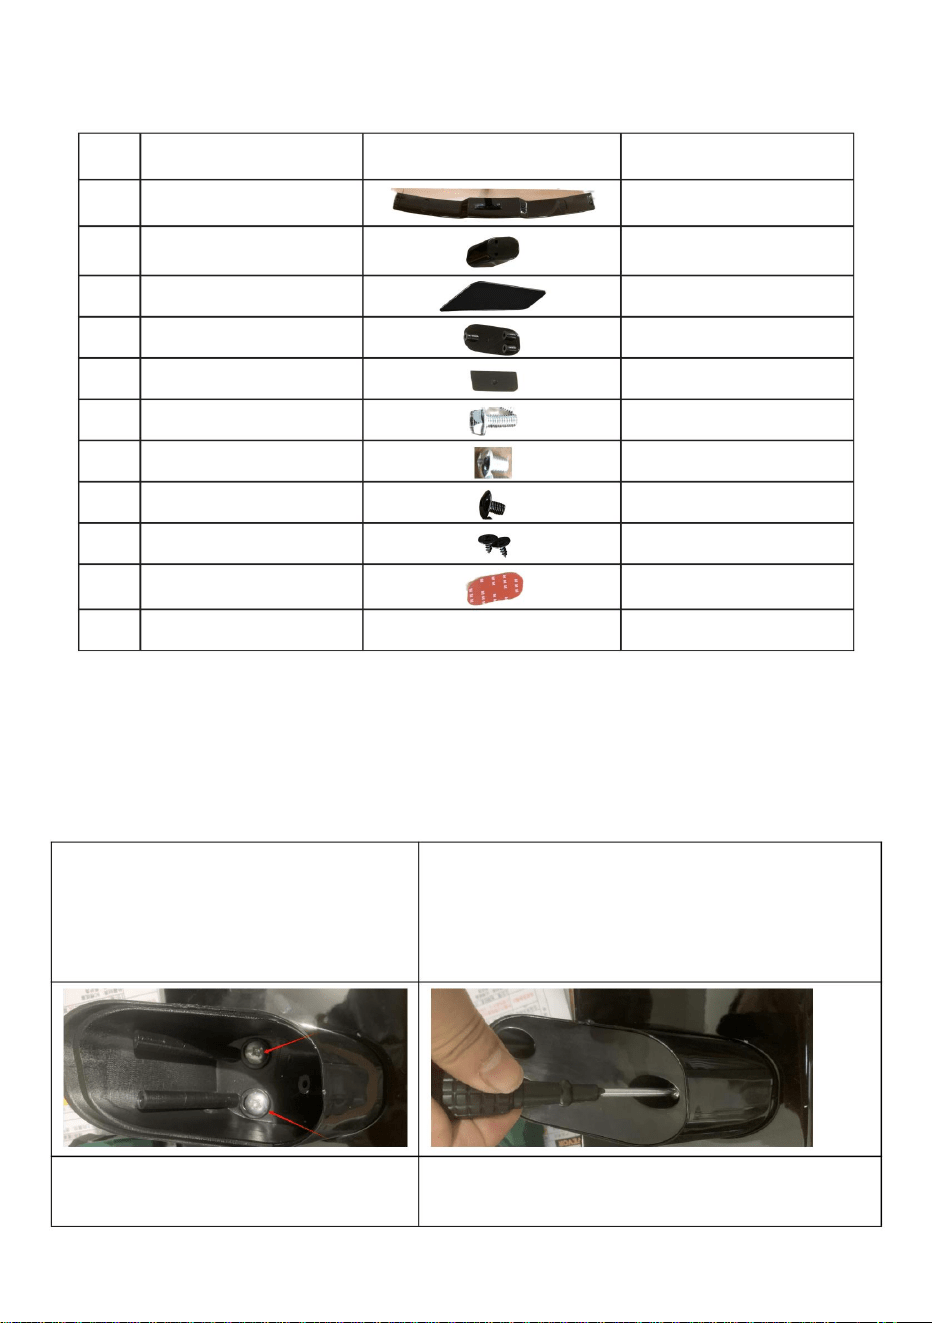
PACKAGE LIST
No.
Name
Picture
QTY
1
Wing Spoiler
1
2
Support
2
3
Flank
2
4
Bottom cap
2
5
Side cover
2
6
Screw(M6*15)
4
7
Screw(M6*8)
4
8
Screw(M6*8,black)
2
9
Screw(ST4.2*10)
6
10
Double-sided tape
2
11
Manual
1
INSTALLATION
Caution: Avoid humid weather and installation done in temperatures
of 72 F/22 C or above is recommended.
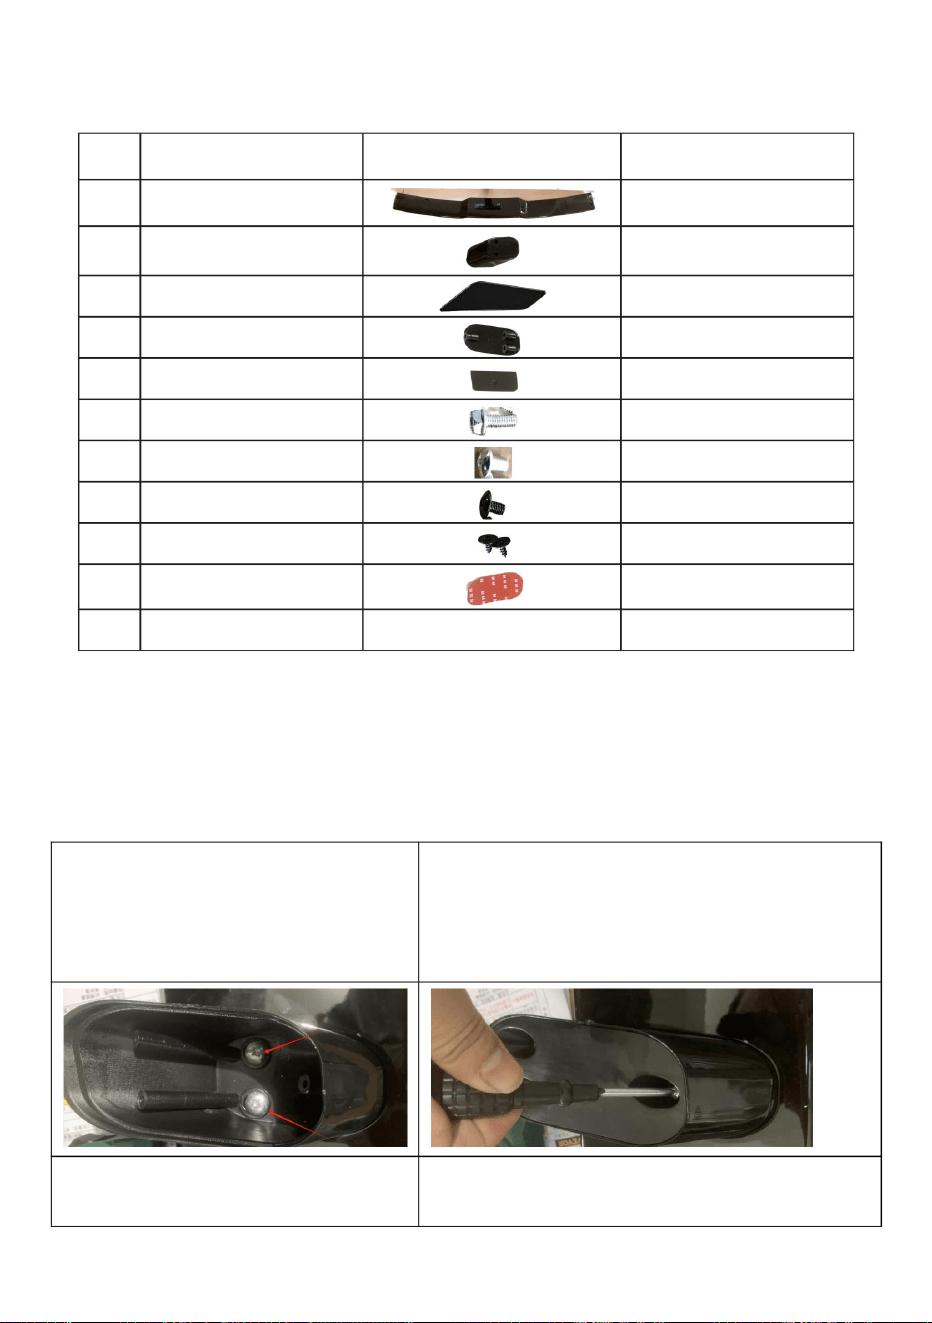
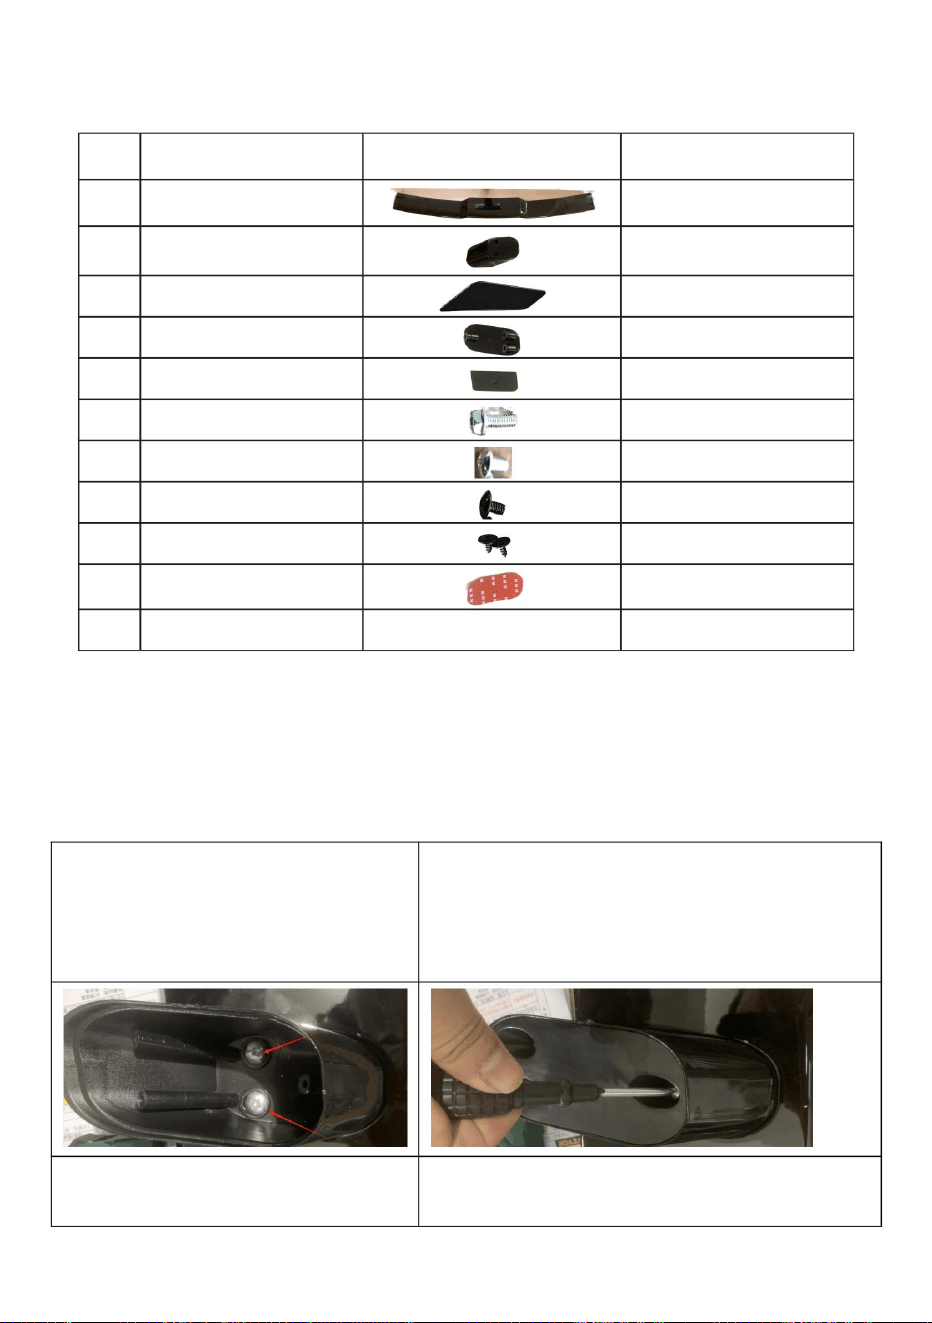
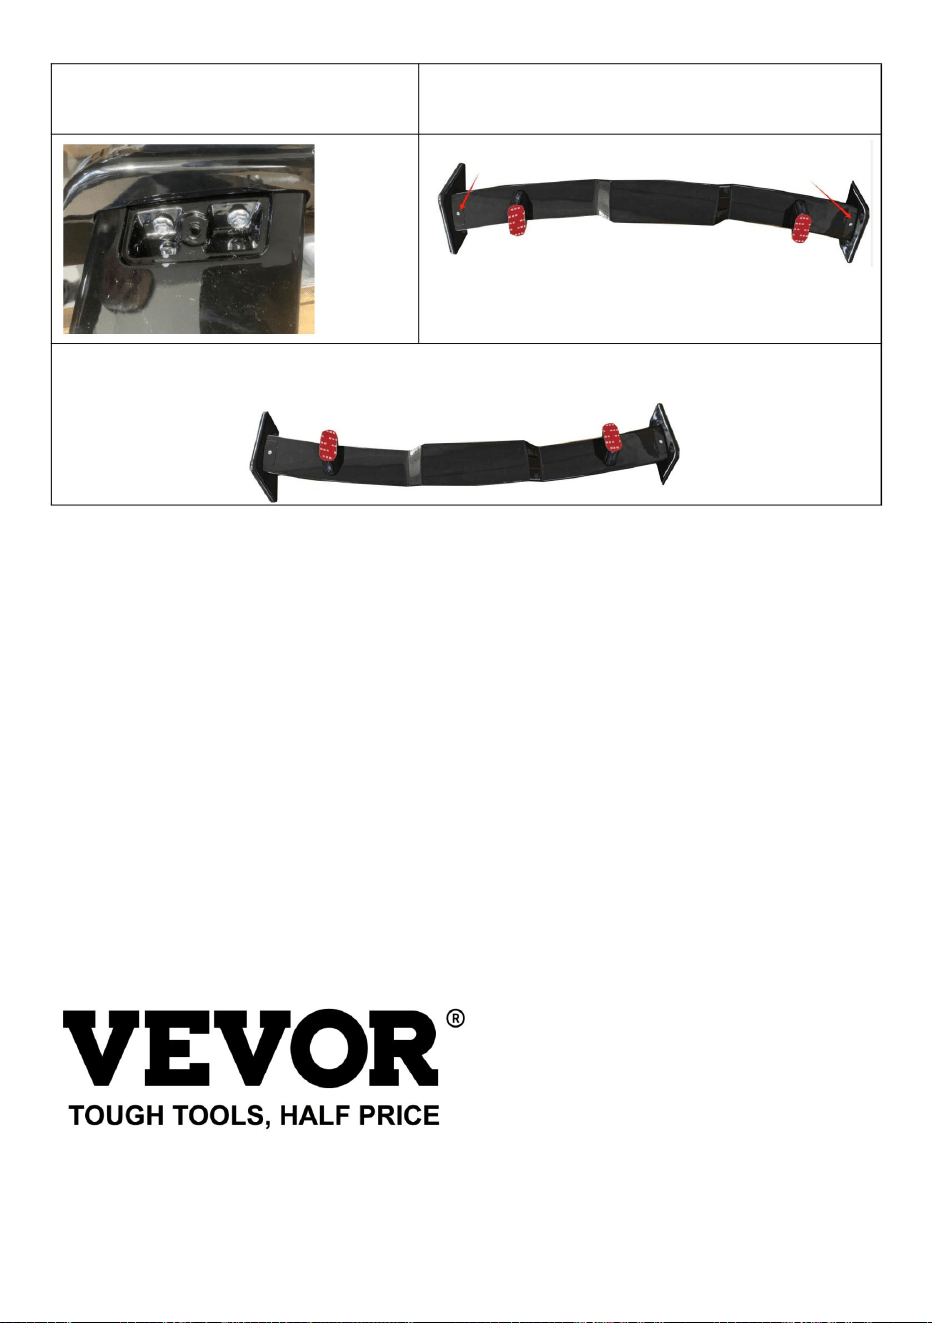
STEP1: Mounting of bracket components
(1). Align the support with the
installation area on both sides,
align the holes, and secure the
support using screws (No.7).
(2). Align the bottom cover with the
support, align the mounting hole, and secure
the bottom cover with screws (No. 9).
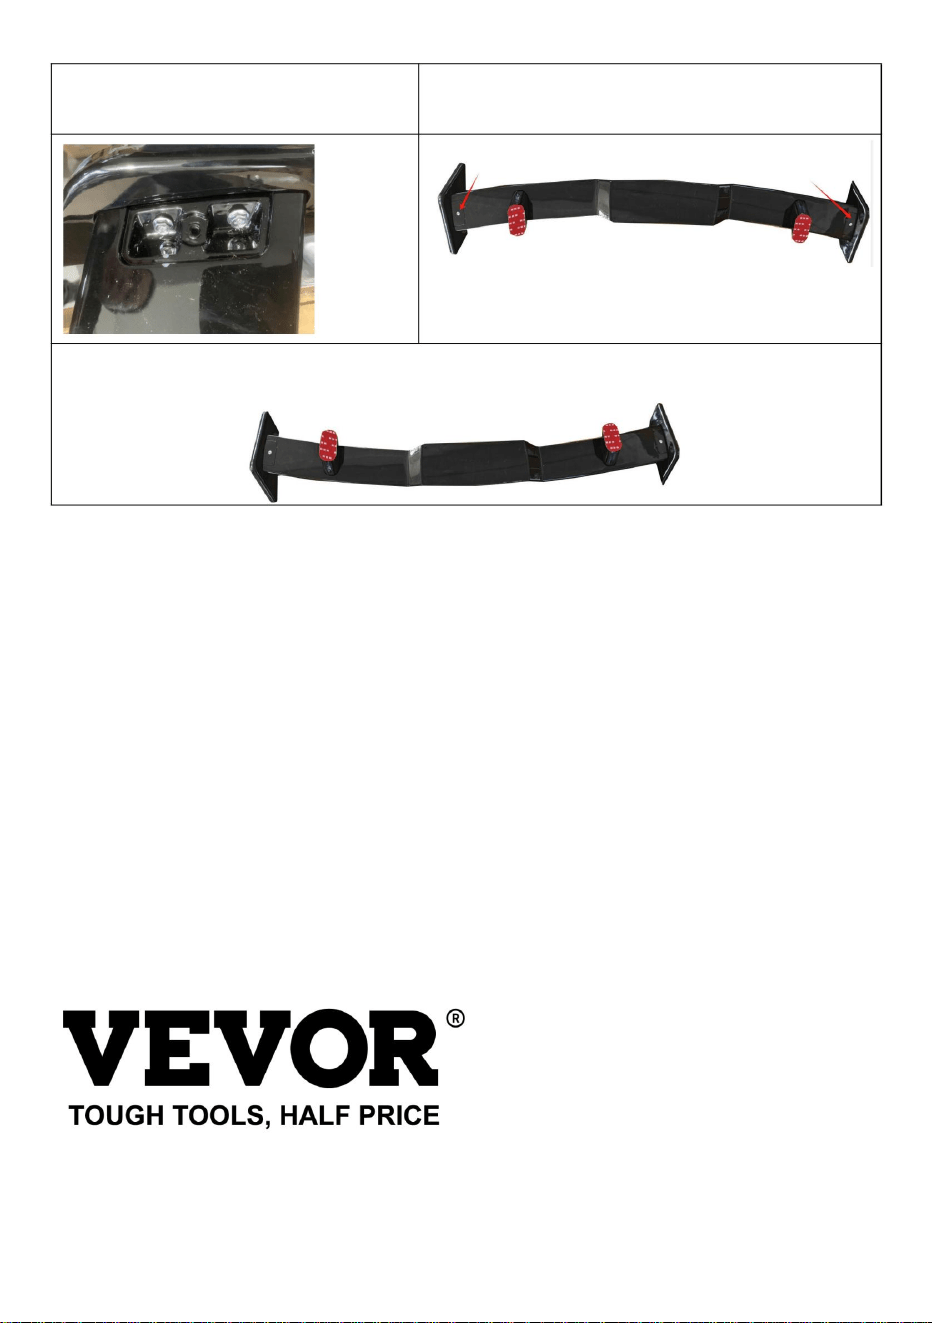
(3). Align the flanks with both
ends of the spoiler, align the
(4). Align the side cover with the sealing
plate area at both ends of the spoiler, align it

mounting holes, and secure the
flanks with screws (No. 6).
with the mounting holes, and secure it with
screws (No. 8).
(5). Attach double-sided tape to the mounting area on the bottom of the bracket.
Caution:Do a dry fit before removing the tape to make sure the positions are
proper.
STEP2: Clean the car surface and make sure it's clean and oil-free. Apply
adhesion promoter(Not included) on the install area.
STEP3: Use a hair dryer to warm up the tape and car surface. And then tear off the
double-sided tape at support.
STEP4: Gently install the spoiler in the proper area and tear off the rest of the
tape.
STEP5: Press two sides of the spoiler evenly when you finish the installation.
(please press on the upper position of the bracket.)
Caution:
It is highly recommended to press the position of the spoiler bracket with an
appropriate weight for more than 12 hours and keep the vehicle remain
undisturbed.
Technical Support and E-Warranty Certificate
www.vevor.com/support
Made in china

SPOILERD'AILE
"Économisezlamoitié","Moitiéprix"outouteautreexpressionsimilairequenousutilisonsnereprésente
qu'uneestimationdeséconomiesdontvouspourriezbénéficierenachetantcertainsoutilscheznousparrapport
auxgrandesmarquesetnesignifiepasnécessairementcouvrirtouteslescatégoriesd'outilsproposés.parnous.
Nousvousrappelonsdebienvouloirvérifierattentivementlorsquevouspassezunecommandechez
noussivouséconomisezréellementlamoitiéparrapportauxgrandesmarques.
Nouscontinuonsànousengageràvousfournirdesoutilsàdesprixcompétitifs.
Modèle:ARTOYOTA007
Assistancetechniqueetcertificatdegarantieélectroniquewww.vevor.com/support
Machine Translated by Google

misesàjourlogiciellessurnotreproduit.
AVERTISSEMENT:Lisezetcomprenezl'intégralitédecemanuelavant
Veuilleznouspardonnerquenousnevousinformeronspluss'ilexisteunetechnologieou
propriété.
Évitezquelesenfantsutilisentleproduit.Etceproduitn'estpasunjouet.
avantdefonctionner.VEVORseréserveuneinterprétationclairedenotremanueld’utilisation.
utiliserouentretenirceproduit.Nonrespectdecesavertissements
L'apparenceduproduitdépendduproduitquevousavezreçu.
Ceciestl'instructionoriginale,veuillezlireattentivementtouteslesinstructionsdumanuel
Nelaissezpaslesenfantsjouer.
etlesinstructionspeuventprovoquerdesblessuresouendommagerdesobjetsdevaleur.
CONSERVEZCESINSTRUCTIONS
PRÉCAUTIONSDEMONTAGE
GARANTIESIMPORTANTES
SPÉCIFICATION
Assistancetechniqueetcertificatdegarantieélectronique
1470
Image
www.vevor.com/support
Matériel Couleur
abdos
1.Assemblezuniquementseloncesinstructions.Unassemblageincorrectpeut
Noir
Vousavezdesquestionssurlesproduits?Besoind'uneassistancetechnique?N'hésitezpasà
créerdesdangers.
Longueur(mm)
Contacteznous:
3.Gardezlesspectateurshorsdelazonependantl'assemblage.
2.Gardezlazonedemontagepropreetbienéclairée.
BESOIND'AIDE?CONTACTEZNOUS!
Machine Translated by Google

Attention:évitezlestempshumidesetl'installationeffectuéeàdestempératuresélevées.
ÉTAPE1:Montagedescomposantsdusupport
de72F/22Couplusestrecommandé.
11
4
supportàl'aidedesvis(n°7).
1
Couverclelatéral
zonedelaplaqueauxdeuxextrémitésduspoiler,alignezla
Image
Capuchoninférieur
Vis(ST4.2*10)
2
(1).Alignezlesupportavecle
2
1
1
8vis(M6*8,noir)
Flanc
extrémitésduspoiler,alignezles
2
7
6
lecouvercleinférieuraveclesvis(n°9).
4
(2).Alignezlecapotinférieuravecle
Ailerond'aile
6
Manuel
5
10Rubanadhésifdoubleface
2
QTÉ
zoned'installationdesdeuxcôtés,
alignezlestrousetfixezle
(4).Alignezlecouverclelatéralaveclejoint
Nom
4
9
2
Vis(M6*8)
2
(3).Alignezlesflancsaveclesdeux
Non.
3
support,alignezletroudemontageetfixez
Soutien
Vis(M6*15)
2
LISTEDESCOLIS
INSTALLATION
Machine Translated by Google
vis(n°8).
rubanadhésif.
www.vevor.com/support
(5).Fixezdurubanadhésifdoublefacesurlazonedemontageaubasdusupport.
ÉTAPE5:Appuyezuniformémentsurlesdeuxcôtésduspoilerlorsquevousavezterminé
l'installation.(veuillezappuyersurlapositionsupérieuredusupport.)
Prudence:
Attention:effectuezunajustementàsecavantderetirerlerubanadhésifpourvousassurerquelespositionssont
approprié.
Ilestfortementrecommandéd'appuyersurlapositiondusupportduspoileravecun
ÉTAPE2:Nettoyezlasurfacedelavoitureetassurezvousqu'elleestpropreetsanshuile.Appliquer
poidsappropriépendantplusde12heuresetlaissezlevéhiculerester
trousdemontageetfixezle
promoteurd'adhérence(noninclus)surlazoned'installation.
paisible.
flancsavecvis(n°6).
ÉTAPE3:Utilisezunsèchecheveuxpourréchaufferlerubanadhésifetlasurfacedelavoiture.Etpuisarrachezle
rubanadhésifdoublefaceauniveaudusupport.
aveclestrousdemontageetfixezleavec
ÉTAPE4:installezdélicatementlespoilerdanslazoneappropriéeetdéchirezlerestedu
Assistancetechniqueetcertificatdegarantieélectronique
FabriquéenChine
Machine Translated by Google

MODELL:AR-TOYOTA-007
WING SPOILER
Technischer Support und E-Garantiezertifikat www.vevor.com/support
„Sparen Sie die Hälfte“, „Halber Preis“ oder andere ähnliche von uns verwendete Ausdrücke stellen lediglich
eine Schätzung der Einsparungen dar, die Sie durch den Kauf bestimmter Werkzeuge bei uns im Vergleich zu den
großen Top-Marken erzielen könnten, und bedeuten nicht unbedingt, dass alle angebotenen Werkzeugkategorien
abgedeckt werden von uns. Bitte prüfen Sie bei Ihrer Bestellung sorgfältig, ob Sie im Vergleich zu den Top-
Marken tatsächlich die Hälfte sparen.
Wir sind weiterhin bestrebt, Ihnen Werkzeuge zu wettbewerbsfähigen Preisen anzubieten.
Machine Translated by Google

Software-Updates für unser Produkt.
WARNUNG: Lesen und verstehen Sie vorher dieses gesamte Handbuch
Bedienung oder Wartung dieses Produkts. Nichtbeachtung dieser Warnungen
Eigentum. ÿ
Vermeiden Sie die Verwendung des Produkts durch Kinder. Und dieses Produkt ist kein Spielzeug.
Das Aussehen des Produkts hängt von dem Produkt ab, das Sie erhalten haben.
Bitte verzeihen Sie uns, dass wir Sie nicht erneut informieren, wenn es zu technischen oder technischen Problemen kommt
vor dem Betrieb. VEVOR behält sich eine klare Auslegung unserer Bedienungsanleitung vor.
Dies ist die Originalanleitung. Bitte lesen Sie alle manuellen Anweisungen sorgfältig durch
Lassen Sie Kinder nicht spielen.
und Anweisungen können zu Verletzungen oder Sachschäden führen
www.vevor.com/support
Länge (mm)
Zertifikat für technischen Support und E-Garantie
BildFarbeMaterial
1. Montieren Sie das Gerät nur gemäß dieser Anleitung. Eine unsachgemäße Montage kann
SchwarzAbs
kontaktiere uns:
3. Halten Sie während der Montage unbeteiligte Personen aus dem Bereich fern.
2. Halten Sie den Montagebereich sauber und gut beleuchtet.
1470
Haben Sie Fragen zum Produkt? Benötigen Sie technische Unterstützung? Bitte zögern Sie nicht
Gefahren schaffen.
BRAUCHEN SIE HILFE? KONTAKTIERE UNS!
ANLEITUNG AUFBEWAHREN
SPEZIFIKATION
VORSICHTSMASSNAHMEN BEI DER MONTAGE
WICHTIGE SICHERHEITSMASSNAHMEN
Machine Translated by Google
Achtung: Vermeiden Sie feuchte Witterung und die Installation bei hohen Temperaturen
Name
4
2
1
Flanke
7
8 Schrauben (M6*8, schwarz)
2
6
die untere Abdeckung mit Schrauben (Nr. 9).
6
Flügelspoiler
Handbuch
4
1
Seitenabdeckung
Halterung mit Schrauben (Nr.7) befestigen.
11
4
(2). Richten Sie die untere Abdeckung an der aus
Plattenbereich an beiden Enden des Spoilers ausrichten
2
Bild
Untere Kappe
Schraube (ST4,2*10)
2
1
2
Schraube (M6*8)
(1). Richten Sie die Stütze an der aus
(3). Richten Sie die Flanken an beiden aus
Enden des Spoilers ausrichten
3
NEIN.
2
Unterstützung
Schraube (M6*15)
Stütze, richten Sie das Montageloch aus und befestigen Sie es
MENGE
Installationsbereich auf beiden Seiten,
richten Sie die Löcher aus und befestigen Sie die
5
10 Doppelseitiges Klebeband
2
(4). Richten Sie die Seitenabdeckung an der Dichtung aus
9
INSTALLATION
PAKETLISTE
SCHRITT 1: Montage der Halterungskomponenten
Es wird eine Temperatur von 72 F/22 C oder mehr empfohlen.
Machine Translated by Google

In China hergestellt
(5). Bringen Sie doppelseitiges Klebeband im Montagebereich an der Unterseite der Halterung an.
doppelseitiges Klebeband am Träger.
SCHRITT 5: Drücken Sie nach Abschluss der Installation gleichmäßig auf zwei Seiten des Spoilers. (Bitte
drücken Sie auf die obere Position der Halterung.)
Zertifikat für technischen Support und E-Garantie
Schrauben (Nr. 8).
Band.
richtig.
Vorsicht:
Es wird dringend empfohlen, die Position der Spoilerhalterung mit einem zu drücken
Achtung: Führen Sie vor dem Entfernen des Klebebands eine Trockenpassung durch, um sicherzustellen, dass die Positionen übereinstimmen
Befestigungslöcher und sichern Sie die
Haftvermittler (nicht im Lieferumfang enthalten) auf den Installationsbereich auftragen.
ungestört.
SCHRITT 2: Reinigen Sie die Fahrzeugoberfläche und stellen Sie sicher, dass sie sauber und ölfrei ist. Anwenden
Fahrzeug länger als 12 Stunden mit entsprechendem Gewicht belasten und belassen
mit den Befestigungslöchern und befestigen Sie es mit
SCHRITT 4: Bringen Sie den Spoiler vorsichtig an der richtigen Stelle an und reißen Sie den Rest ab
www.vevor.com/support
Flanken mit Schrauben (Nr. 6).
SCHRITT 3: Erwärmen Sie das Klebeband und die Fahrzeugoberfläche mit einem Haartrockner. Und dann abreißen
Machine Translated by Google

MODELLO:AR-TOYOTA-007
SPOILER ALA
Supporto tecnico e certificato di garanzia elettronica www.vevor.com/support
"Risparmia la metà", "Metà prezzo" o qualsiasi altra espressione simile da noi utilizzata rappresenta
solo una stima del risparmio che potresti trarre dall'acquistare determinati strumenti con noi rispetto ai
principali marchi più importanti e non significa necessariamente coprire tutte le categorie di strumenti
offerti da noi. Ti ricordiamo di verificare attentamente quando effettui un ordine con noi se stai
effettivamente risparmiando la metà rispetto ai migliori marchi principali.
Continuiamo a impegnarci per fornirvi strumenti a prezzi competitivi.
Machine Translated by Google

ATTENZIONE: leggere e comprendere l'intero manuale prima
funzionamento o manutenzione di questo prodotto. Mancato rispetto di questi avvertimenti
aggiornamenti software sul nostro prodotto.
e le istruzioni possono causare lesioni personali o danni a cose di valore
L'aspetto del prodotto sarà soggetto al prodotto ricevuto.
Per favore perdonaci se non ti informeremo più se ci sono tecnologie o
prima di operare. VEVOR si riserva una chiara interpretazione del nostro manuale d'uso.
Questa è l'istruzione originale, si prega di leggere attentamente tutte le istruzioni del manuale
proprietà.
ÿ Evitare che i bambini utilizzino il prodotto. E questo prodotto non è un giocattolo.
Non permettere ai bambini di giocare.
Contattaci:
3. Tenere gli astanti lontani dall'area durante l'assemblaggio.
2. Mantenere l'area di assemblaggio pulita e ben illuminata.
1470
Hai domande sul prodotto? Hai bisogno di supporto tecnico? Sentiti libero di
creare pericoli.
Lunghezza (mm)
1. Assemblare solo secondo queste istruzioni. Un assemblaggio improprio può
Neroaddominali
ColoreMateriale
www.vevor.com/support
Supporto tecnico e certificato di garanzia elettronica
Immagine
HO BISOGNO DI AIUTO? CONTATTACI!
CONSERVA QUESTE ISTRUZIONI
SPECIFICA
PRECAUZIONI DI MONTAGGIO
TUTELA IMPORTANTE
Machine Translated by Google
Attenzione: evitare il clima umido e l'installazione eseguita a temperature elevate
1
11
Coperchio laterale
4
supporto utilizzando le viti (N.7).
piastra su entrambe le estremità dello spoiler, allinearlo
Immagine
2
2
Tappo inferiore
Vite (ST4.2*10)
1
(1). Allineare il supporto con
estremità dello spoiler, allineare le
1
Fianco
8 viti (M6*8, nere)
2
7
6
il coperchio inferiore con le viti (n. 9).
Spoiler dell'ala
6
Manuale
4
(2). Allineare il coperchio inferiore con
QUANTITÀ
5
10 Nastro biadesivo
2
area di installazione su entrambi i lati,
allineare i fori e fissare il
(4). Allineare il coperchio laterale con la guarnizione
Nome
2
Vite (M6*8)
9
4
2
(3). Allinea i fianchi con entrambi
NO.
3
Supporto
Vite (M6*15)
2
supporto, allineare il foro di montaggio e fissarlo
INSTALLAZIONE
ELENCO PACCHETTI
STEP1: Montaggio dei componenti della staffa
si consiglia una temperatura di 72 F/22 C o superiore.
Machine Translated by Google

Made in China
PASSO 4: installa delicatamente lo spoiler nell'area corretta e strappa il resto dello spoiler
con i fori di montaggio e fissarlo con
www.vevor.com/support
fianchi con viti (n. 6).
nastro biadesivo al supporto.
FASE 3: utilizzare un asciugacapelli per riscaldare il nastro e la superficie dell'auto. E poi strappare il
fori di montaggio e fissare il
Supporto tecnico e certificato di garanzia elettronica
promotore di adesione (non incluso) sull'area di installazione.
indisturbato.
peso adeguato per più di 12 ore e mantenere il veicolo fermo
PASSO 2: pulire la superficie dell'auto e assicurarsi che sia pulita e priva di olio. Fare domanda a
corretto.
Si consiglia vivamente di premere la posizione della staffa dello spoiler con un
Attenzione:
Attenzione: eseguire un montaggio a secco prima di rimuovere il nastro per assicurarsi che le posizioni siano corrette
(5). Attaccare il nastro biadesivo all'area di montaggio sul fondo della staffa.
PASSO 5: premere uniformemente due lati dello spoiler al termine dell'installazione. (premere
sulla posizione superiore della staffa.)
viti (n. 8).
nastro.
Machine Translated by Google

MODELO:ARTOYOTA007
SPOILERDEALA
Soportetécnicoycertificadodegarantíaelectrónicawww.vevor.com/support
Seguimoscomprometidosaproporcionarleherramientasaprecioscompetitivos.
"Ahorreamitaddeprecio","Amitaddeprecio"ocualquierotraexpresiónsimilarutilizadapornosotrossolo
representaunaestimacióndelosahorrosquepodríabeneficiarsealcomprarciertasherramientasconnosotrosen
comparaciónconlasprincipalesmarcasynosignificanecesariamentecubrirtodaslascategoríasdeherramientas
ofrecidas.pornosotros.Lerecordamosque,cuandorealiceunpedidoconnosotros,verifiquecuidadosamente
sirealmenteestáahorrandolamitadencomparaciónconlasprincipalesmarcas.
Machine Translated by Google

actualizacionesdesoftwaredenuestroproducto.
ADVERTENCIA:Leaycomprendaestemanualcompletoantes
operarodarservicioaesteproducto.Noseguirestasadvertencias
Nopermitaquelosniñosjueguen.
Laaparienciadelproductoestarásujetaalproductoquerecibió.
Porfavor,perdónanospornovolverainformartesihayalgunatecnologíao
antesdeoperar.VEVORsereservaunainterpretaciónclaradenuestromanualdeusuario.
Estassonlasinstruccionesoriginales,leaatentamentetodaslasinstruccionesdelmanual.
einstruccionespuedencausarlesionespersonalesodañosaobjetosvaliosos.
propiedad.
Evitequelosniñosutilicenelproducto.Yesteproductonoesunjuguete.
crearpeligros.
www.vevor.com/support
Longitud(mm)
Soportetécnicoycertificadodegarantíaelectrónica
ImagenColorMaterial
Negro
1.Ensambleúnicamentedeacuerdoconestasinstrucciones.Unmontajeinadecuadopuede
abdominales
3.Mantengaalaspersonastranseúntesfueradeláreaduranteelmontaje.
Contáctenos:
2.Mantengaeláreademontajelimpiaybieniluminada.
¿Tienepreguntassobreelproducto?¿Necesitasoportetécnico?Porfavor,siéntaselibrede
1470
¿NECESITASAYUDA?¡CONTÁCTENOS!
GUARDAESTASINSTRUCCIONES
ESPECIFICACIÓN
PRECAUCIONESDEMONTAJE
CONSIDERACIONESIMPORTANTES
Machine Translated by Google
Precaución:Eviteelclimahúmedoylainstalaciónrealizadaentemperaturas
soportemediantetornillos(N°7).
11
1
Cubiertalateral
4
áreadelaplacaenambosextremosdelspoiler,alinéela
2
Imagen
Tapainferior
Tornillo(ST4.2*10)
(1).Alinearelsoporteconel
extremosdelspoiler,alineelos
2
Flanco
1
8tornillos(M6*8,negro)
1
6
2
7
lacubiertainferiorcontornillos(No.9).
4
6
Aleróndeala
Manual
(2).Alineelacubiertainferiorconla
áreadeinstalaciónenamboslados,
alineelosorificiosyasegureel
5
10cintadedoblecara
CANTIDAD
2
(4).Alineelacubiertalateralconlajunta
9
Nombre
4
2
2
Tornillo(M6*8)
No.
3
(3).Alinearlosflancosconambos.
soporte,alineeelorificiodemontajeyasegure
2
Apoyo
Tornillo(M6*15)
LISTADEPAQUETES
INSTALACIÓN
PASO1:Montajedeloscomponentesdelsoporte
Serecomiendaunatemperaturade72F/22Cosuperior.
Machine Translated by Google

Hechoenchina
(5).Coloquecintaadhesivadedoblecaraeneláreademontajeenlaparteinferiordelsoporte.
cintadedoblecaraenelsoporte.
PASO5:Presionedosladosdelalerónuniformementecuandoterminelainstalación.(presioneen
laposiciónsuperiordelsoporte).
Soportetécnicoycertificadodegarantíaelectrónica
tornillos(Nº8).
cinta.
adecuado.
Precaución:
Esmuyrecomendablepresionarlaposicióndelsoportedelspoilerconun
Precaución:Realiceunajusteensecoantesderetirarlacintaparaasegurarsedequelasposicionesseancorrectas.
orificiosdemontajeyasegureel
promotordeadhesión(noincluido)eneláreadeinstalación.
imperturbable.
PASO2:Limpielasuperficiedelautomóvilyasegúresedequeestélimpiaysinaceite.Aplicar
pesoapropiadodurantemásde12horasymantengaelvehículoen
conlosorificiosdemontajeyasegúrelocon
PASO4:Instalesuavementeelspoilereneláreaadecuadayretireelrestodel
www.vevor.com/support
flancoscontornillos(Nº6).
PASO3:Utiliceunsecadordepeloparacalentarlacintaylasuperficiedelcoche.Yluegoarrancael
Machine Translated by Google

MODEL: AR-TOYOTA-007
„Zaoszczędź o połowę”, „o połowę ceny” lub inne podobne wyrażenia używane przez nas przedstawiają jedynie
szacunkową oszczędność, jaką możesz zyskać kupując u nas określone narzędzia w porównaniu z głównymi najlepszymi
markami i niekoniecznie oznaczają uwzględnienie wszystkich kategorii oferowanych narzędzi przez nas. Przypominamy,
aby podczas składania zamówienia u nas dokładnie sprawdzić, czy faktycznie oszczędzasz połowę w porównaniu
z czołowymi markami.
Nadal dokładamy wszelkich starań, aby zapewnić Państwu narzędzia w konkurencyjnej cenie.
SPOILER SKRZYDŁA
Wsparcie techniczne i certyfikat e-gwarancji www.vevor.com/support
Machine Translated by Google

obsługi lub serwisowania tego produktu. Niezastosowanie się do tych ostrzeżeń
Proszę, wybacz nam, że nie będziemy Cię ponownie informować, jeśli istnieją jakieś technologie lub
OSTRZEŻENIE: Przeczytaj i zrozum wcześniej całą niniejszą instrukcję
nieruchomość. Należy unikać używania produktu przez dzieci. A ten produkt nie jest zabawką.
Wygląd produktu zależy od produktu, który otrzymałeś.
aktualizacje oprogramowania naszego produktu.
przed operacją. VEVOR zastrzega sobie jasną interpretację naszej instrukcji obsługi.
To jest oryginalna instrukcja. Prosimy uważnie przeczytać wszystkie instrukcje zawarte w instrukcji
Nie pozwalaj dzieciom bawić się.
i instrukcje mogą spowodować obrażenia ciała lub uszkodzenie przedmiotów wartościowych
ZACHOWAJ TE INSTRUKCJE
SPECYFIKACJA
ŚRODKI OSTROŻNOŚCI PRZY MONTAŻU
WAŻNI OCHRONIARZE
Skontaktuj się z nami:
1470
Zdjęcie
Wsparcie techniczne i certyfikat e-gwarancji
www.vevor.com/support
Materiał Kolor
ABS Czarny
1. Montaż wyłącznie zgodnie z niniejszą instrukcją. Nieprawidłowy montaż może
stwarzać zagrożenia.
Masz pytania dotyczące produktu? Potrzebujesz wsparcia technicznego? Proszę, czuj się swobodnie by
Długość (mm)
2. Utrzymuj miejsce zbiórki w czystości i dobrze oświetlone.
3. Podczas montażu trzymaj osoby postronne z dala od obszaru.
POTRZEBUJĘ POMOCY? SKONTAKTUJ SIĘ Z NAMI!
Machine Translated by Google

Uwaga: Unikaj wilgotnej pogody i montażu w temperaturach
zaleca się temperaturę 72 F/22 C lub wyższą.
KROK 1: Montaż elementów wspornika
4
(2). Wyrównaj dolną pokrywę z
ILOŚĆ
obszarze instalacji po obu stronach,
wyrównaj otwory i zabezpiecz
5
10 Taśma dwustronna
2
(4). Wyrównaj pokrywę boczną z uszczelką
9
Nazwa
4
2
Śruba (M6*8)
2
(3). Wyrównaj boki z obydwoma
NIE.
3
2
Wsparcie
Śruba (M6*15)
wspornik, wyrównaj otwór montażowy i zabezpiecz
1
Boczna okładka
podeprzeć za pomocą śrub (nr 7).
11
4
obszarze płytek na obu końcach spojlera, wyrównaj je
2
Zdjęcie
Dolna czapka
2
Śruba (ST4.2*10)
1
(1). Dopasuj wspornik do
końce spoilera, wyrównaj
8 śrub (M6*8, czarny)
1
Skrzydło
2
7
6
dolną pokrywę za pomocą śrub (nr 9).
6
Spoiler skrzydłowy
podręcznik
INSTALACJA
LISTA PAKIETÓW
Machine Translated by Google

z otworami montażowymi i zabezpiecz go za pomocą
śruby (nr 8).
taśma.
(5). Przymocuj taśmę dwustronną do obszaru montażowego na spodzie wspornika .
Uwaga: Przed usunięciem taśmy wykonaj dopasowanie na sucho, aby upewnić się, że pozycje są prawidłowe
KROK 5: Po zakończeniu montażu równomiernie dociśnij obie strony spoilera. (proszę nacisnąć
górną pozycję wspornika.)
Ostrożność:
właściwy.
Zdecydowanie zaleca się dociśnięcie położenia wspornika spojlera za pomocą
odpowiednią wagę przez ponad 12 godzin i pozostawić pojazd w miejscu
KROK 2: Oczyść powierzchnię samochodu i upewnij się, że jest czysta i wolna od oleju. Stosować
promotor przyczepności (brak w zestawie) na obszarze instalacji.
otwory montażowe i zabezpiecz
spokojny.
KROK 3: Użyj suszarki do włosów, aby ogrzać taśmę i powierzchnię samochodu. A następnie oderwij
boki śrubami (nr 6).
taśma dwustronna na wsporniku.
Wsparcie techniczne i certyfikat e-gwarancji
www.vevor.com/support
KROK 4: Delikatnie zamontuj spoiler w odpowiednim miejscu i oderwij resztę
Wyprodukowano w Chinach
Machine Translated by Google

VLEUGEL SPOILER
We blijven ons inzetten om u gereedschap tegen een concurrerende prijs te bieden.
'Bespaar de helft', 'Halve prijs' of andere soortgelijke uitdrukkingen die door ons worden gebruikt vertegenwoordigen
slechts een schatting van de besparingen die u zou kunnen profiteren als u bepaalde gereedschappen bij ons koopt in
vergelijking met de grote topmerken en betekenen niet noodzakelijkerwijs dat ze alle categorieën van aangeboden
gereedschappen dekken. door ons. Wij verzoeken u vriendelijk om bij het plaatsen van een bestelling bij ons
goed na te gaan of u daadwerkelijk de helft bespaart in vergelijking met de grote topmerken.
MODEL: AR-TOYOTA-007
Technische ondersteuning en e-garantiecertificaat www.vevor.com/support
Machine Translated by Google
software-updates op ons product.
WAARSCHUWING: Lees en begrijp eerst deze handleiding in zijn geheel
Vergeef ons alstublieft dat we u niet opnieuw zullen informeren als er sprake is van technologie of
en instructies kunnen persoonlijk letsel of schade aan waardevolle voorwerpen veroorzaken
Het uiterlijk van het product is afhankelijk van het product dat u heeft ontvangen.
bedienen of onderhouden van dit product. Het niet opvolgen van deze waarschuwingen
voordat u gaat werken. VEVOR behoudt zich een duidelijke interpretatie van onze gebruikershandleiding voor.
Dit is de originele instructie. Lees alle handleidingen aandachtig door
Laat kinderen niet spelen.
eigendom.
ÿ Vermijd dat kinderen het product gebruiken. En dit product is geen speelgoed.
BEWAAR DEZE INSTRUCTIES
MONTAGEVOORZORGSMAATREGELEN
BELANGRIJKE VEILIGHEIDSMAATREGELEN
SPECIFICATIE
Technische ondersteuning en e-garantiecertificaat
1470
Afbeelding
www.vevor.com/support
Materiaal Kleur
buikspieren
1. Monteer uitsluitend volgens deze instructies. Onjuiste montage kan
Zwart
Heeft u productvragen? Technische ondersteuning nodig? Voel je vrij om
gevaren creëren.
Lengte (mm)
Neem contact met ons op:
3. Houd omstanders tijdens de montage uit de buurt.
2. Houd de verzamelplaats schoon en goed verlicht.
HULP NODIG? NEEM CONTACT MET ONS OP!
Machine Translated by Google

Let op: Vermijd vochtig weer en installatie bij temperaturen
STAP1: Montage van beugelcomponenten
van 72 F/22 C of hoger wordt aanbevolen.
11
4
ondersteunen met behulp van schroeven (nr. 7).
1
Zijdeksel
plaatgebied aan beide uiteinden van de spoiler, lijn deze uit
Afbeelding
Onderkap
Schroef (ST4.2*10)
2
(1). Lijn de steun uit met de
2
1
1
8 schroeven (M6*8, zwart)
Flank
uiteinden van de spoiler, lijn de
2
7
6
de bodemafdekking met schroeven (nr. 9).
4
(2). Lijn de onderklep uit met de
Vleugelspoiler
6
Handmatig
5
10 Dubbelzijdig plakband
2
AANTAL
installatiegebied aan beide zijden, lijn
de gaten uit en zet het vast
(4). Lijn de zijafdekking uit met de afdichting
Naam
4
9
2
Schroef (M6*8)
2
(3). Lijn de flanken uit met beide
Nee.
3
steun, lijn het montagegat uit en zet het vast
Steun
Schroef (M6*15)
2
INSTALLATIE
PAKKETLIJST
Machine Translated by Google
Gemaakt in China
schroeven (nr. 8).
plakband.
www.vevor.com/support
(5). Bevestig dubbelzijdige tape op het montagegebied aan de onderkant van de beugel.
STAP5: Druk beide zijden van de spoiler gelijkmatig aan als u klaar bent met de installatie. (druk
op de bovenste positie van de beugel.)
Voorzichtigheid:
Let op: Voer een droge pasvorm uit voordat u de tape verwijdert, om er zeker van te zijn dat de posities correct zijn
juist.
Het wordt ten zeerste aanbevolen om de positie van de spoilerbeugel aan te drukken met een
STAP2: Maak het oppervlak van de auto schoon en zorg ervoor dat het schoon en olievrij is. Toepassen
het juiste gewicht langer dan 12 uur vasthouden en het voertuig laten staan
montagegaten en zet deze vast
Hechtingspromotor (niet inbegrepen) op het installatiegebied.
ongestoord.
flanken met schroeven (nr. 6).
STAP3: Gebruik een föhn om de tape en het auto-oppervlak op te warmen. En scheur dan de
dubbelzijdige tape ter ondersteuning.
met de montagegaten en zet deze vast met
STAP4: Installeer de spoiler voorzichtig op de juiste plek en scheur de rest eraf
Technische ondersteuning en e-garantiecertificaat
Machine Translated by Google

VINGSPOILER
"Spara hälften", "halva priset" eller andra liknande uttryck som används av oss representerar
bara en uppskattning av besparingar du kan dra nytta av att köpa vissa verktyg hos oss jämfört med
de stora toppmärkena och betyder inte nödvändigtvis att täcka alla kategorier av verktyg som erbjuds
av oss. Du påminns vänligen om att noggrant kontrollera när du gör en beställning hos oss om
du faktiskt sparar hälften i jämförelse med de främsta stora varumärkena.
Vi fortsätter att vara engagerade i att ge dig verktyg till konkurrenskraftiga priser.
MODELL:AR-TOYOTA-007
Teknisk support och e-garanticertifikat www.vevor.com/support
Machine Translated by Google

Teknisk support och e-garanticertifikat
1470
Bild
www.vevor.com/support
Material Färg
magmuskler
1. Montera endast enligt dessa instruktioner. Felaktig montering kan
Svart
Har du produktfrågor? Behöver du teknisk support? Du får gärna
skapa faror.
Längd (mm)
kontakta oss:
3. Håll åskådare borta från området under monteringen.
2. Håll monteringsområdet rent och väl upplyst.
SPARA DESSA INSTRUKTIONER
FÖRSIKTIGHETSÅTGÄRDER FÖR MONTERING
VIKTIGA SÄKERHETSÅTGÄRDER
SPECIFIKATION
mjukvaruuppdateringar på vår produkt.
VARNING: Läs och förstå hela denna manual innan
Förlåt oss att vi inte kommer att informera dig igen om det finns någon teknik eller
Låt inte barn leka.
Utseendet på produkten är beroende av den produkt du fått.
använda eller serva denna produkt. Underlåtenhet att följa dessa varningar
före drift. VEVOR reserverar sig för en tydlig tolkning av vår användarmanual.
Detta är originalinstruktionen, vänligen läs alla bruksanvisningar noggrant
fast
egendom. ÿ Undvik att barn använder produkten. Och den här produkten är inte en leksak.
och instruktioner kan orsaka personskada eller skada på värdefulla föremål
BEHÖVS HJÄLP? KONTAKTA OSS!
Machine Translated by Google

11
4
stöd med skruvar (nr 7).
1
Sidoskydd
plåtområdet i båda ändarna av spoilern, rikta in den
Bild
Bottenlock
Skruv (ST4.2*10)
2
(1). Rikta in stödet med
2
1
1
8 skruv (M6*8, svart)
Flank
spoilerns ändar, rikta in spoilern
2
7
6
bottenkåpan med skruvar (nr 9).
4
(2). Rikta in bottenkåpan med
Vingspoiler
6
Manuell
5
10 Dubbelhäftande tejp
2
ANTAL
installationsområdet på båda sidor,
rikta in hålen och fäst
(4). Rikta in sidokåpan med tätningen
namn
4
9
2
Skruv (M6*8)
2
(3). Rikta in flankerna med båda
Nej.
3
stödja, rikta in monteringshålet och säkra
Stöd
Skruv (M6*15)
2
STEG1: Montering av konsolkomponenter
72 F/22 C eller högre rekommenderas.
Varning: Undvik fuktigt väder och installation vid temperaturer
INSTALLATION
PAKETLISTA
Machine Translated by Google

Tillverkad i Kina
skruvar (nr 8).
tejp.
www.vevor.com/support
(5). Fäst dubbelhäftande tejp på monteringsområdet på undersidan av fästet.
STEG 5: Pressa två sidor av spoilern jämnt när du är klar med installationen. (vänligen tryck på
fästets övre position.)
Varning:
Varning: Gör en torrpassning innan du tar bort tejpen för att se till att positionerna är
rätt.
Det rekommenderas starkt att trycka på positionen för spoilerfästet med en
STEG 2: Rengör bilens yta och se till att den är ren och oljefri. Tillämpa
lämplig vikt i mer än 12 timmar och håll fordonet kvar
monteringshål och säkra
adhesionspromotor (ingår ej) på installationsområdet.
ostörd.
flanker med skruvar (nr 6).
dubbelhäftande tejp vid stöd.
STEG 3: Använd en hårtork för att värma upp tejpen och bilytan. Och sedan riva av
med monteringshålen och fäst den med
STEG 4: Installera försiktigt spoilern i rätt område och riv av resten av spoilern
Teknisk support och e-garanticertifikat
Machine Translated by Google