Technical Support and E-Warranty Certificate
www.vevor.com/support
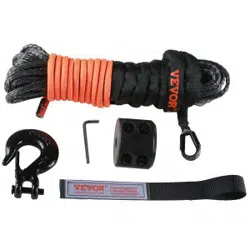
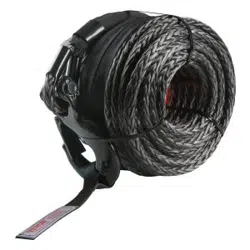
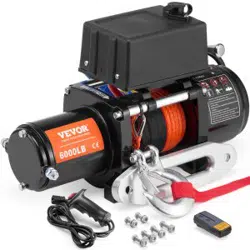
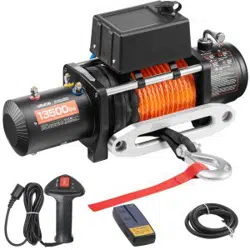
WINCH CABLE
We continue to be committed to provide you tools with competitive price.
"Save Half", "Half Price" or any other similar expressions used by us only represents an
estimate of savings you might benefit from buying certain tools with us compared to the major
top brands and does not necessarily mean to cover all categories of tools offered by us. You
are kindly reminded to verify carefully when you are placing an order with us if you are
actually saving half in comparison with the top major brands.

- 1 -
JLGS9.5-15
JLGS9.5-23
JLGS9.5-30
Have product questions? Need technical support? Please feel free to
contact us:
Technical Support and E-Warranty Certificate
www.vevor.com/support
NEED HELP? CONTACT US!
This is the original instruction, please read all manual instructions
carefully before operating. VEVOR reserves a clear interpretation of our
user manual. The appearance of the product shall be subject to the
product you received. Please forgive us that we won't inform you again if
there are any technology or software updates on our product.
JLWR12-28
JLWR9.5-30
JLWR9.5-26
JLWR6-15
JLWR5-15
Winch Cable
- 2 -
IMPORTANT SAFETY INSTRUCTIONS
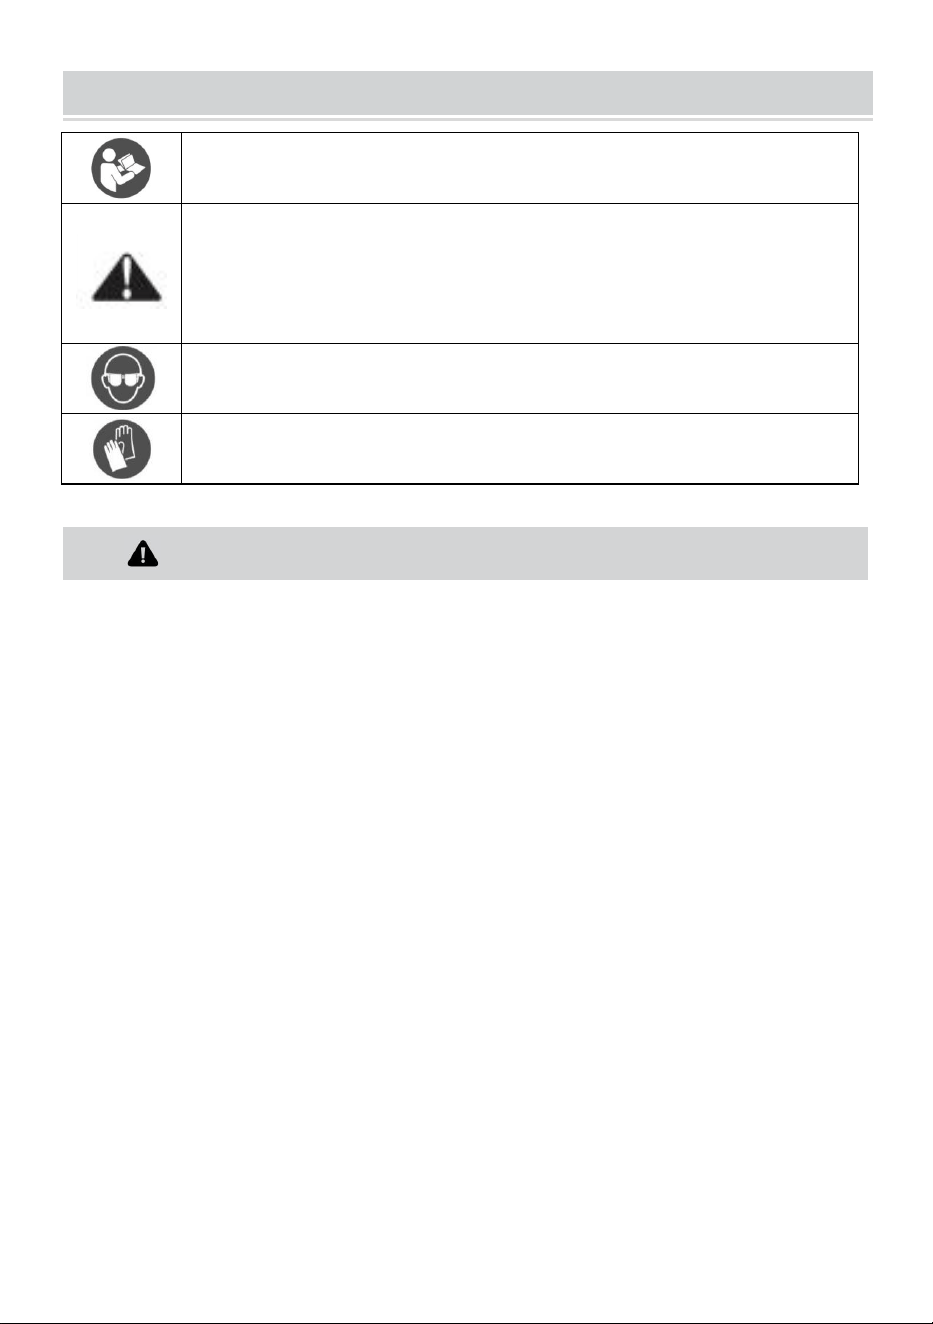
Warning - To reduce the risk of injury, user must read instructions
manual carefully.
This symbol, placed before a safety comment, indicates a kind of
precaution, warning, or danger. Ignoring this warning may lead to
an accident. To reduce the risk of injury, fire, or electrocution,
please always follow the recommendations shown below.
Warning- Be sure to wear eye protectors when using this product.
Warning- Be sure to wear gloves when using this product.
1. WARNING!
Prior to using the winch rope, please read and understand all instructions
and safety warnings. Improper use may result in serious injury or property
damage.
1. Always wear appropriate personal protective equipment before
operating the winch rope, including but not limited to protective gloves,
safety goggles, and anti-slip footwear.
2. Ensure all operators are properly trained and understand the correct
usage of the winch rope.
3. Regularly inspect the integrity of the winch rope and winch; any signs of
wear, damage, or corrosion should be addressed immediately.
4. Do not exceed the safe load Capacity limit of the winch rope.
5. Ensure the winch rope does not wrap around any sharp or hot objects
during use.
6. Keep the area around the winch rope clear and free of obstacles when
in use.
SAVE THESE INSTRUCTIONS

- 3 -
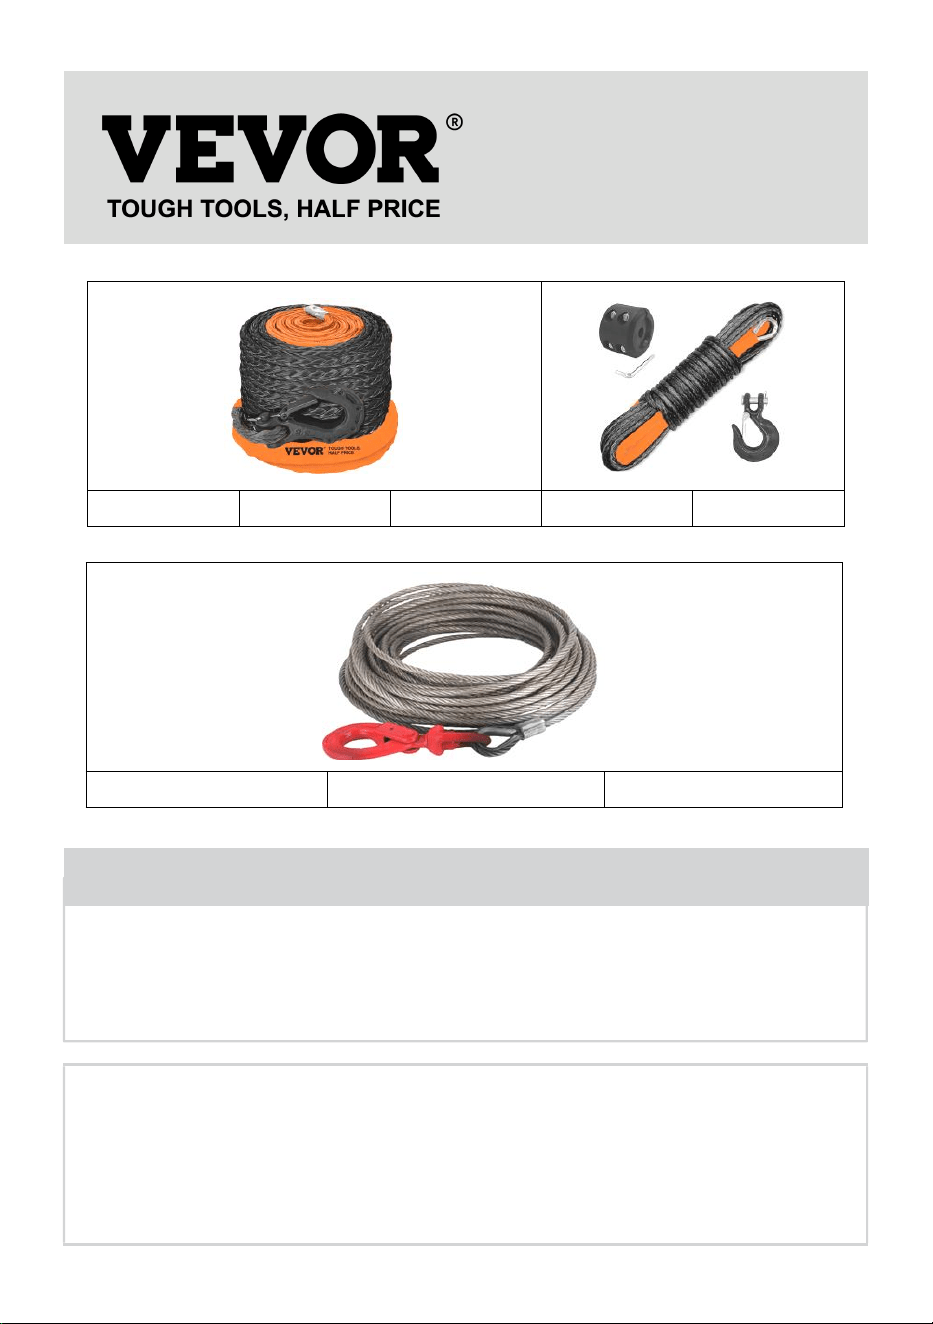
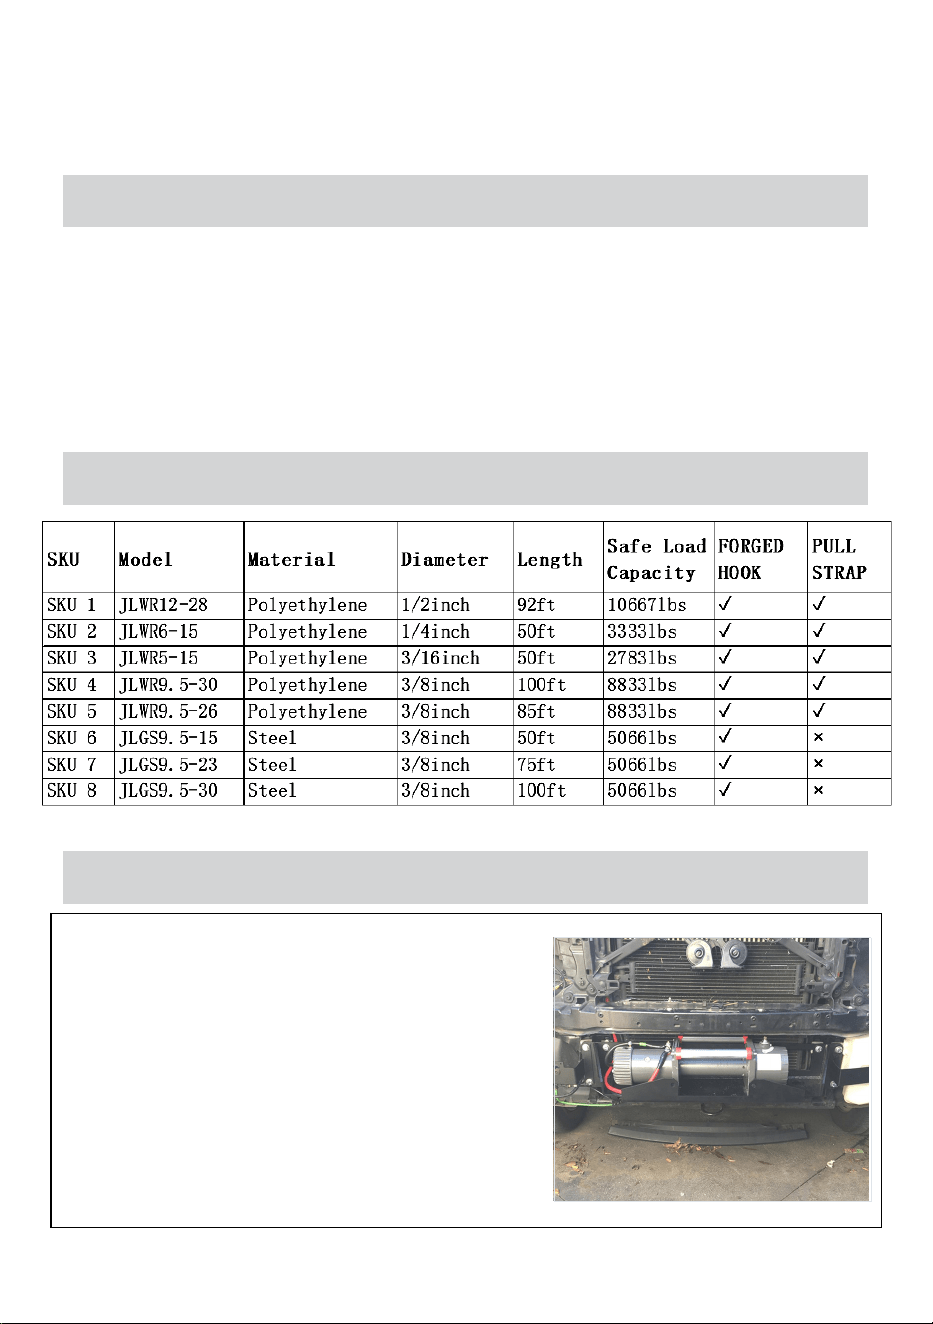
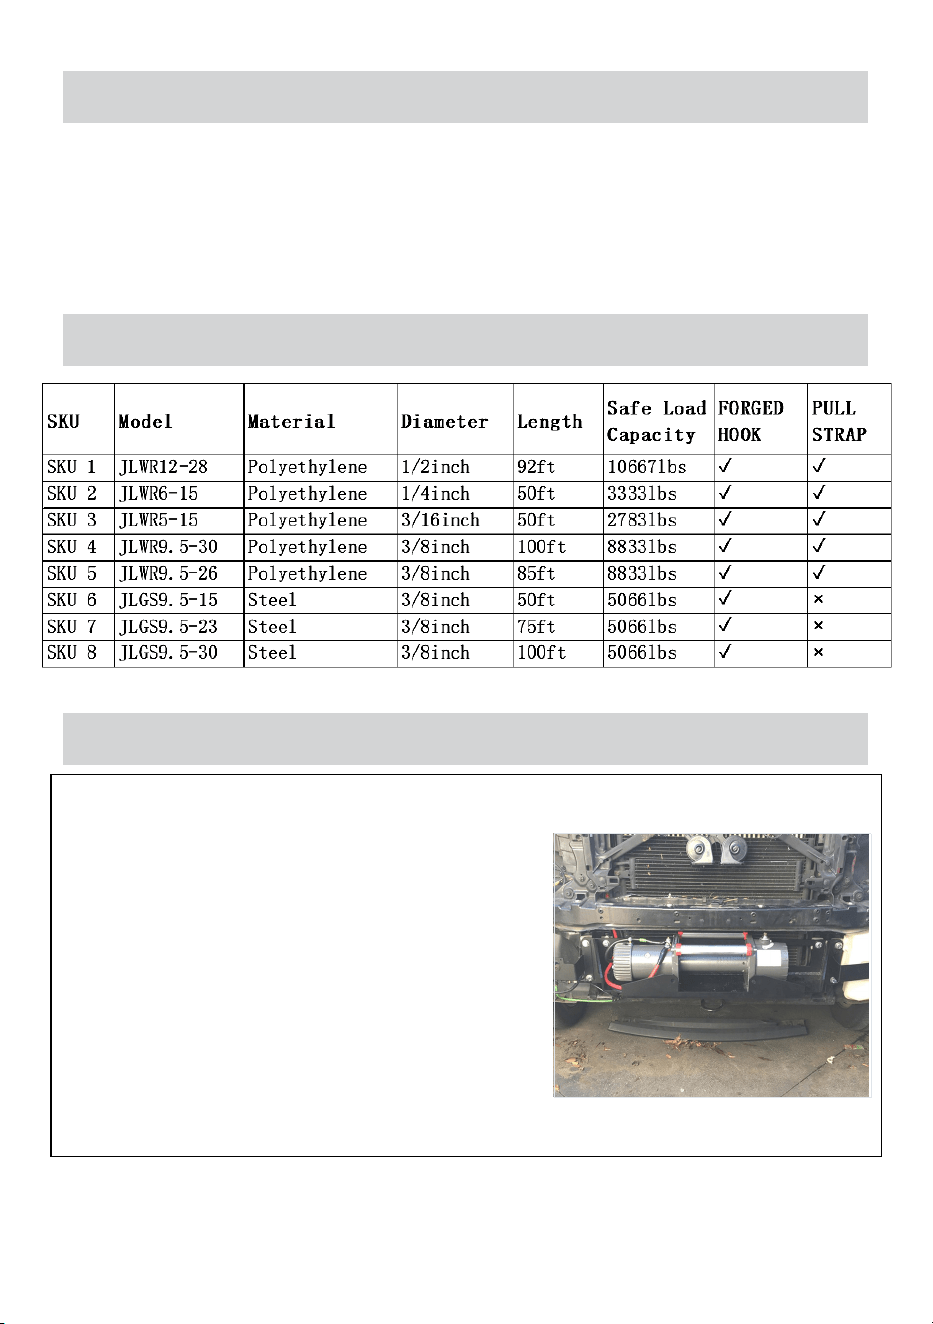
2. Product Description
Our winch cables are crafted from steel or high-strength Polyethylene ,
designed to provide a reliable solution for a variety of lifting and towing
needs. This manual explains how to properly install a synthetic winch cable
on a winch. Proper installation ensures that your winch cable will perform
at its best and will keep the winch cable.
3. Product Parameter
4. Assembly Methods on a winch
STEP 1: WINCH INSPECTION
After you have removed the steel cable and
roller fairlead from your winch, it is a good
idea to inspect the drum to make sure there
is nothing sharp that can damage the rope
after it gets put on. Make sure the drum
does not have any sharp burrs or gouges
as steel wire rope has been known to
damage the drum. If so, file/sand down any
sharp edges until the drum surface is.
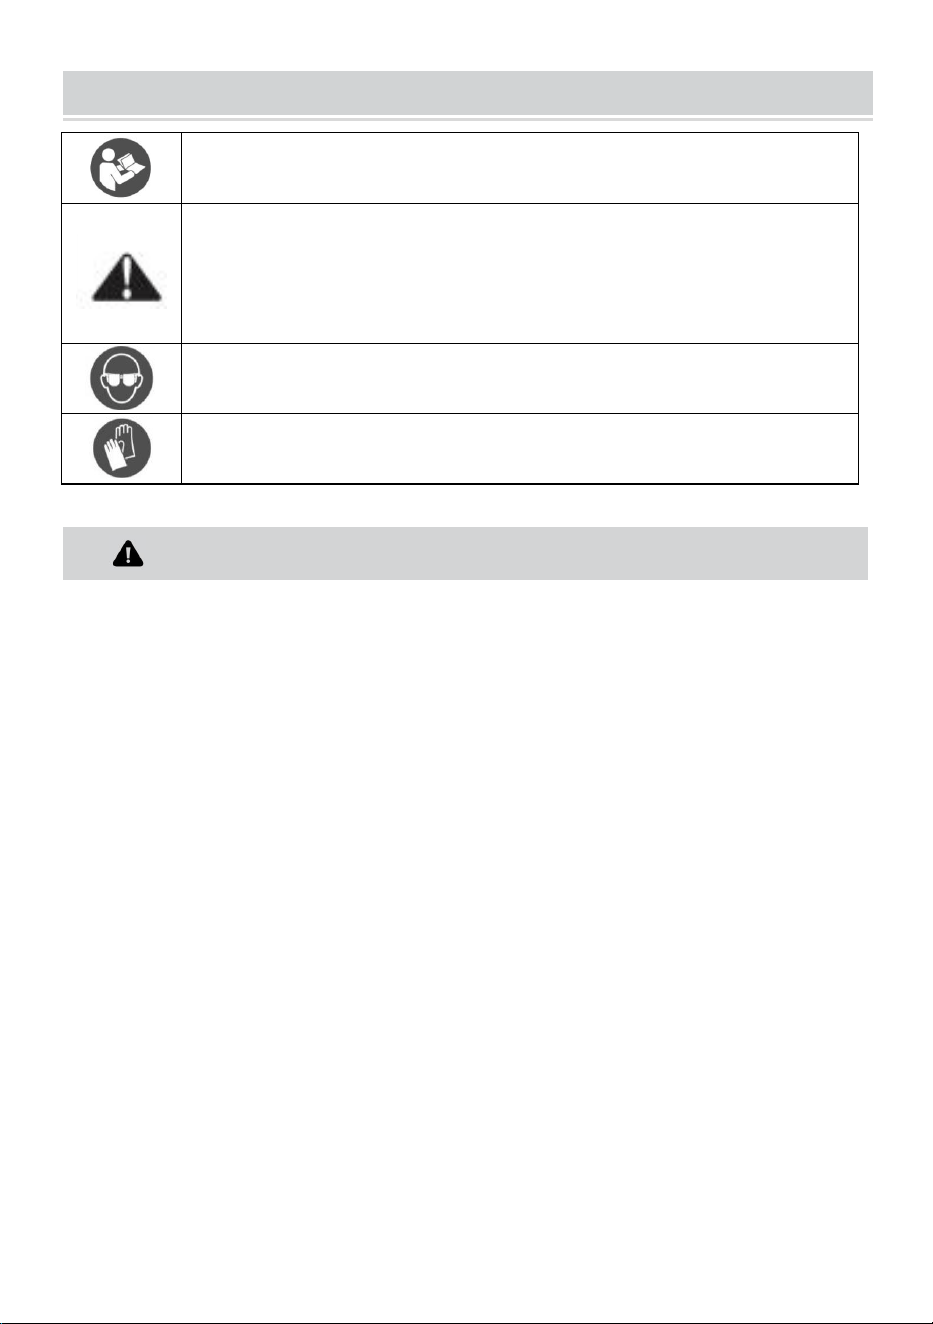
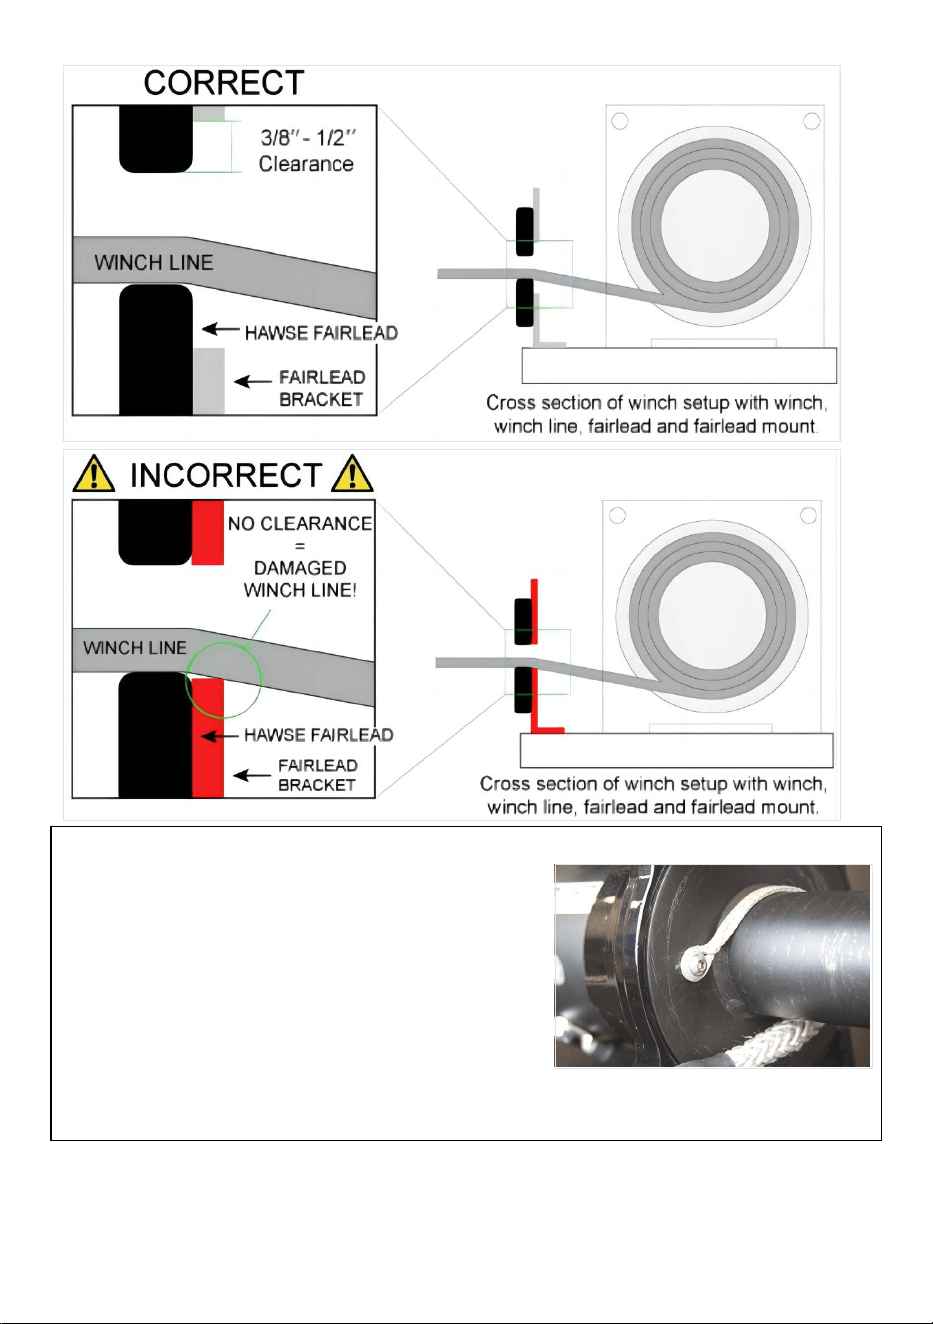
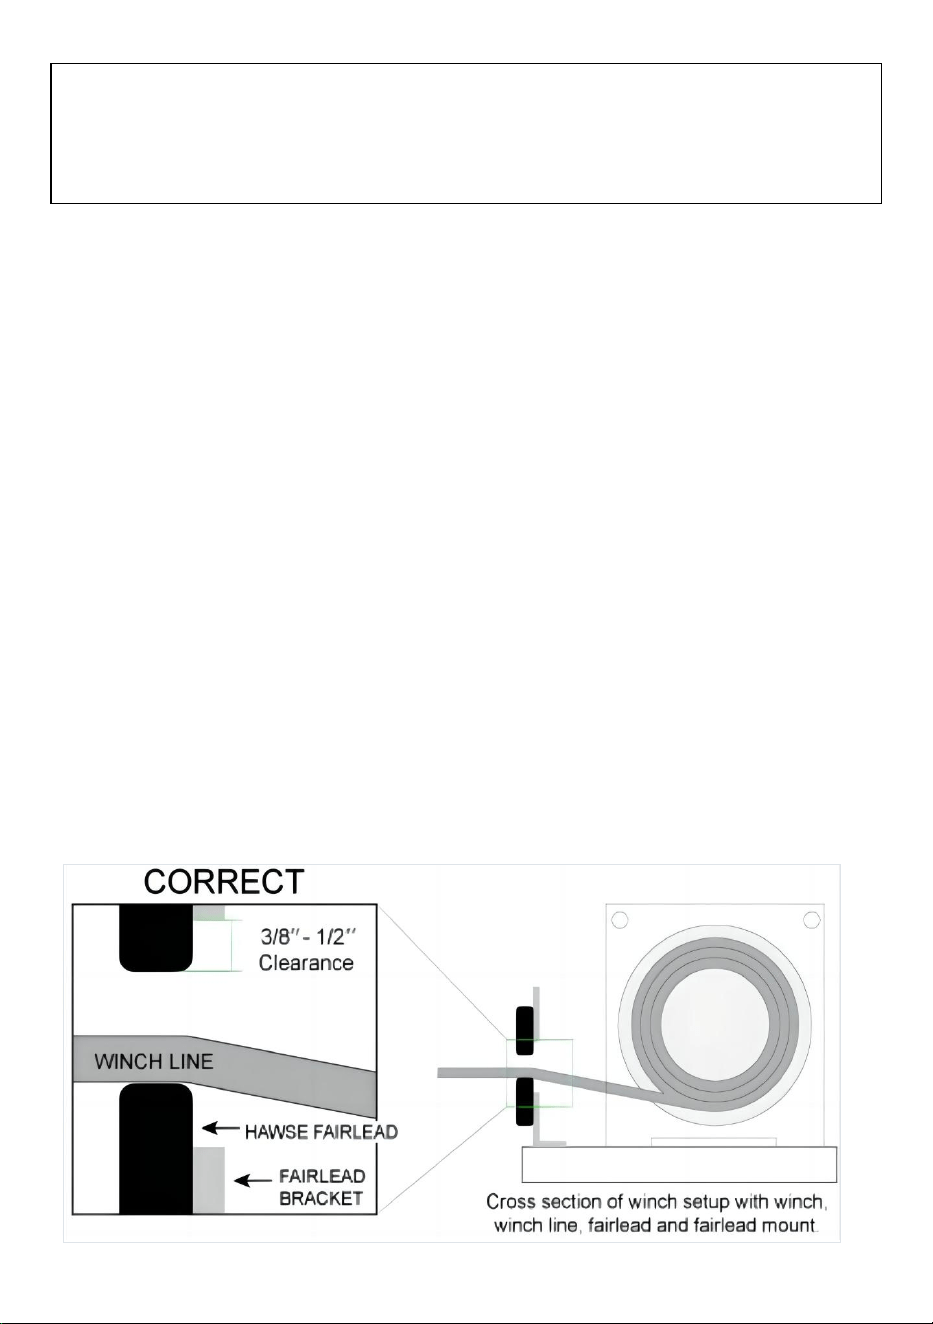
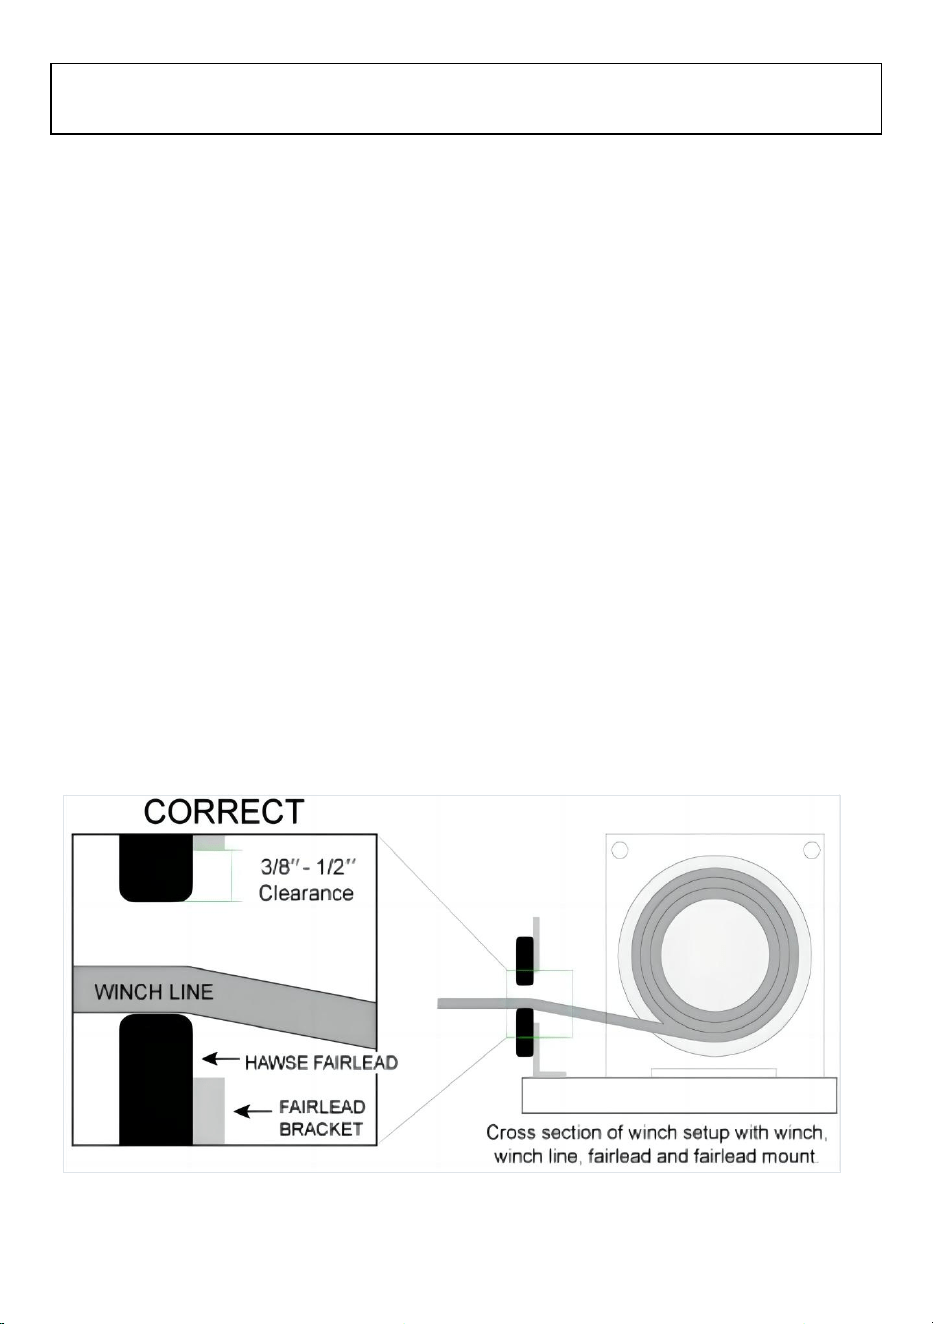
STEP 2: INSPECT FAIRLEAD
Installing a new fairlead needs to be completed before spooling the rope on.
Aluminum hawse fairleads work very well with synthetic winch lines as they

- 4 -
provide a smooth surface that will not damage the rope. Many cast steel
hawse fairleads do not have a smooth enough surface for synthetic rope
and are not recommended. Steel roller fairleads are perfectly fine to use;
just make sure that the rollers are smooth and not burred or gouged. Also
make sure that the rollers overlap each other as some older roller fairleads
do not have overlapping rollers and have a gap in the corner of the fairlead.
A winch line could get caught in this gap during use and get damaged.
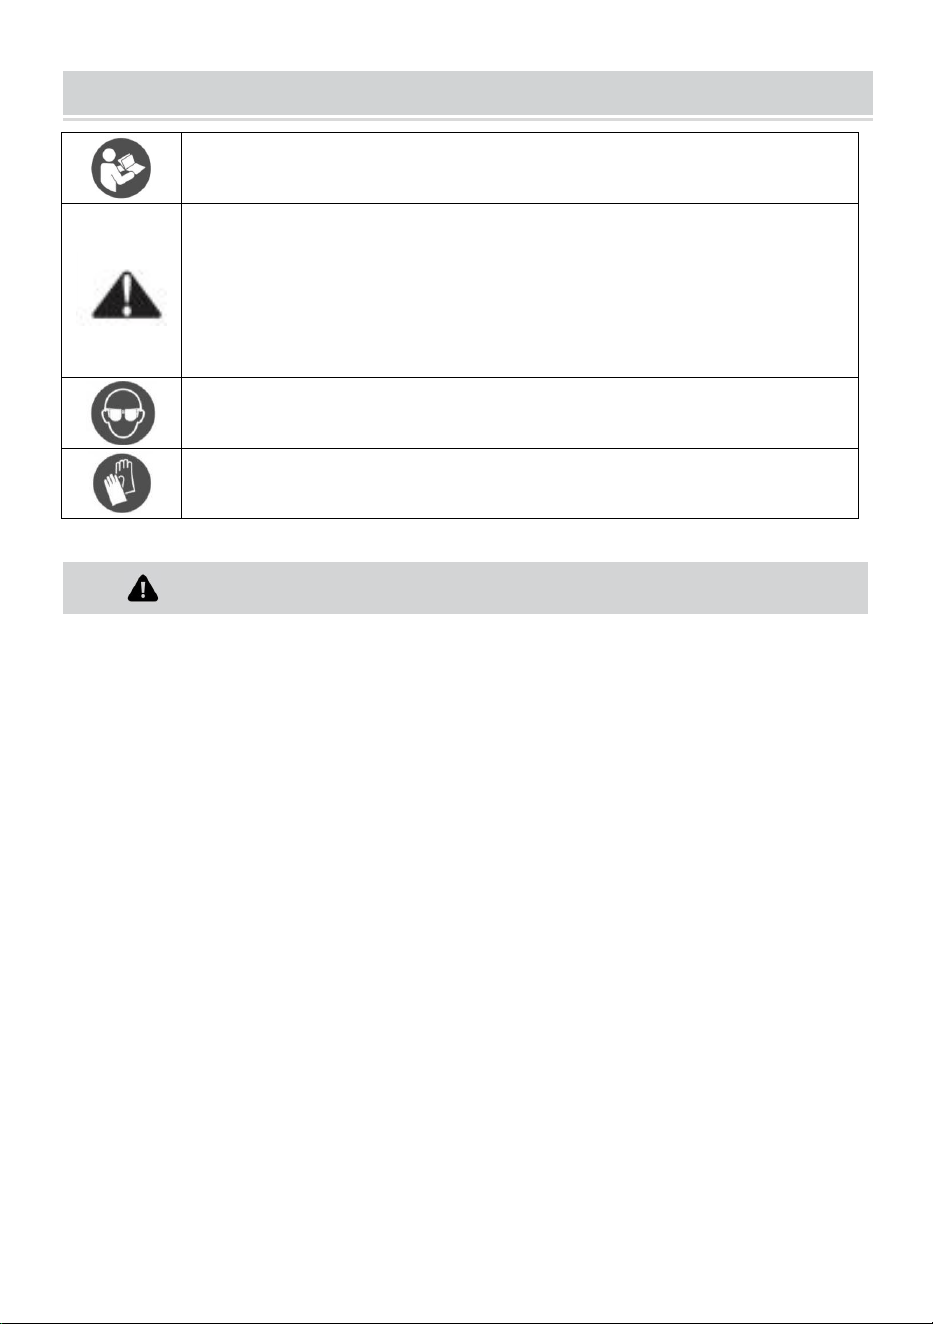
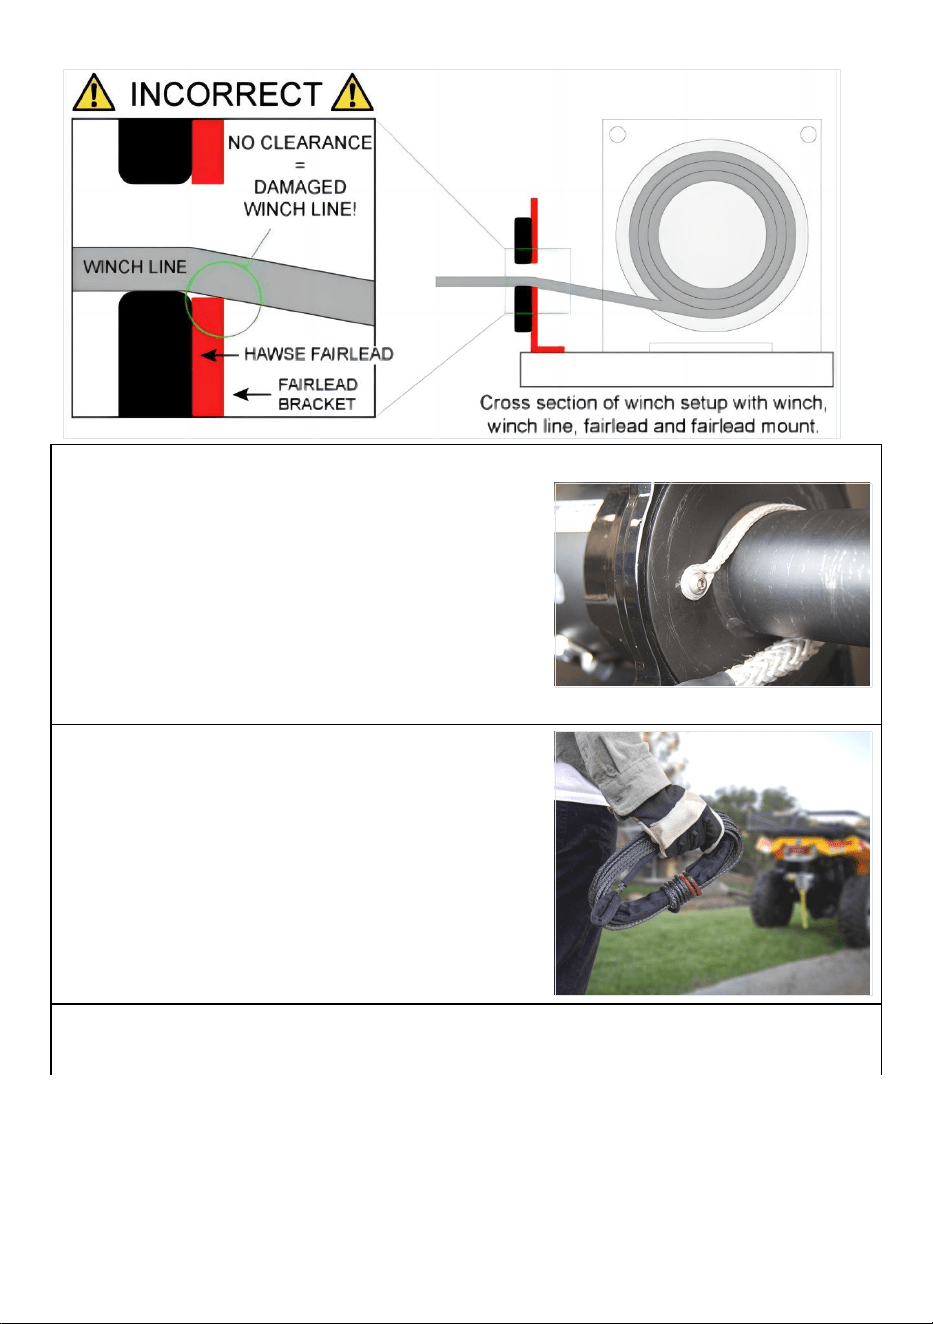
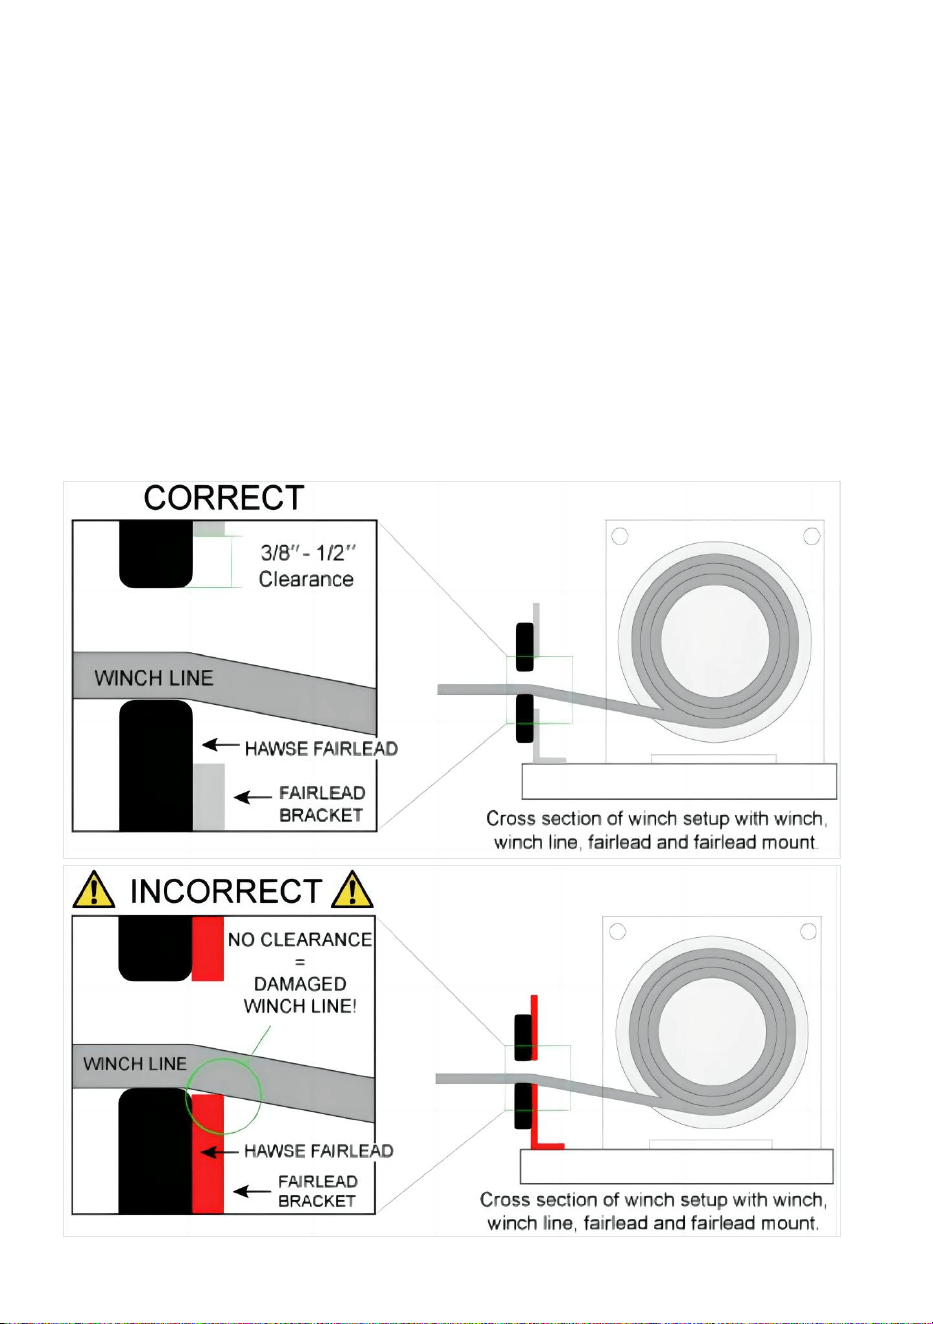
Regardless of the fairlead type, you want to ensure that there is enough
clearance between the opening of the fairlead and the edges of the
mounting plate. As shown in the diagrams above, we recommend at least
3/8" to 1/2" of clearance. Without this, the winch line can get cut on the
sharp edge of the fairlead plate.

- 5 -
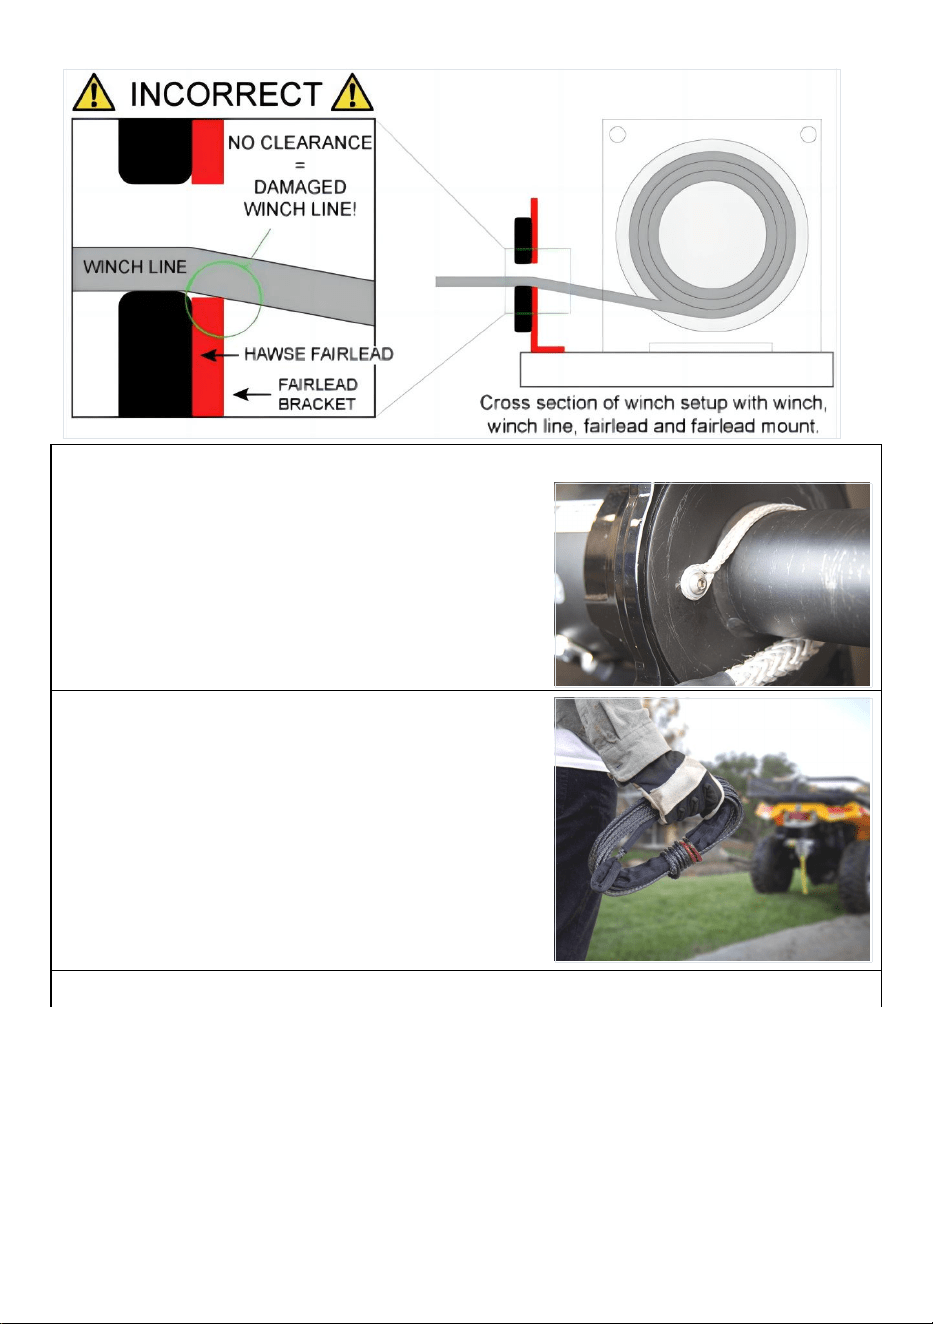
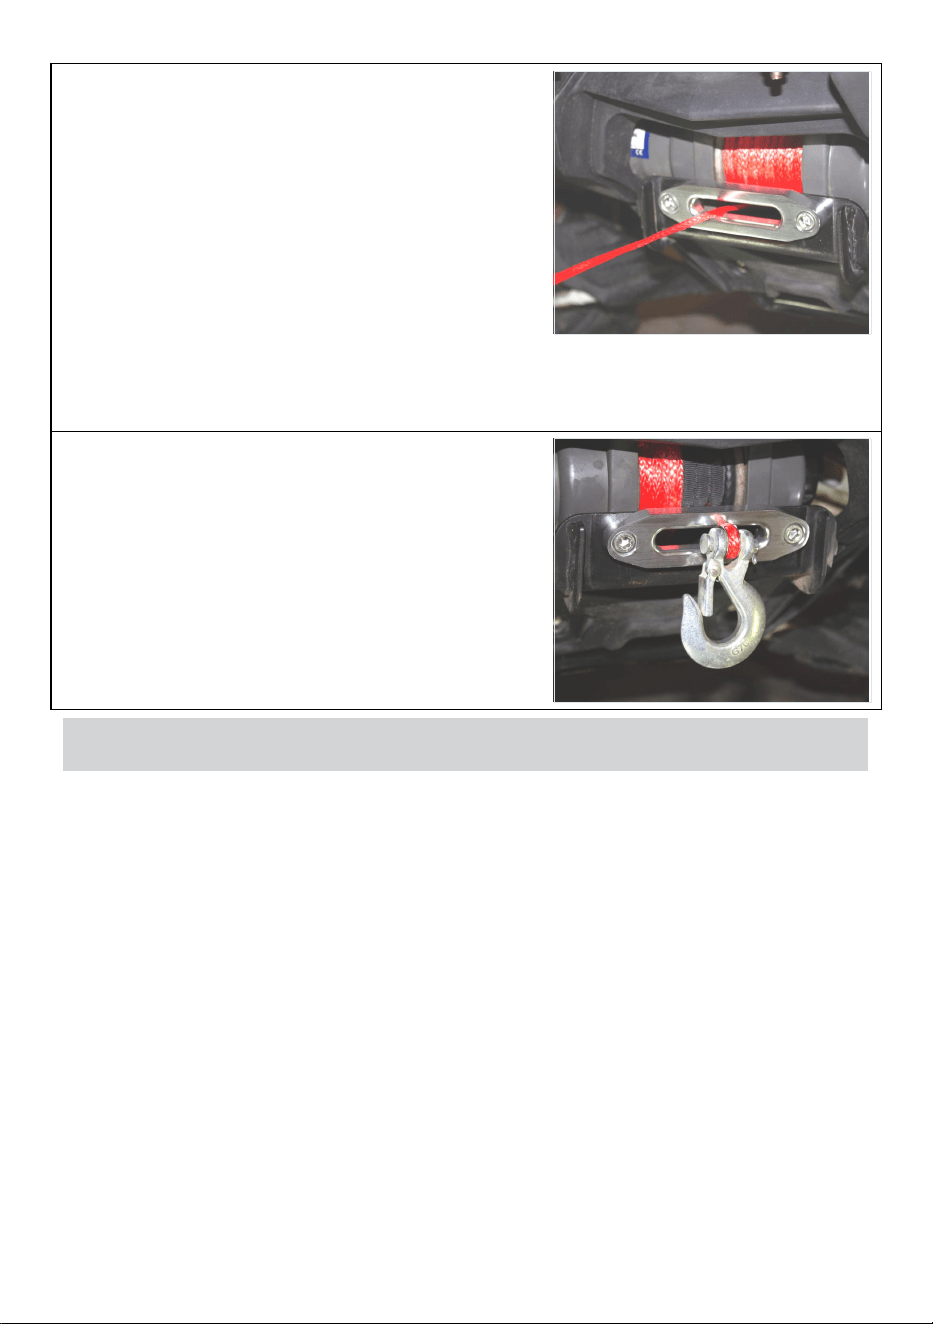
STEP 3: CHECK DRUM ATTACHMENT TYPE
Before removing the old line from your winch,
take a look at how it was attached to the drum.
Most off-road winches will have a threaded hole
on the drum flange that you attach a wire rope
or synthetic winch line with a button head Allen
bolt.
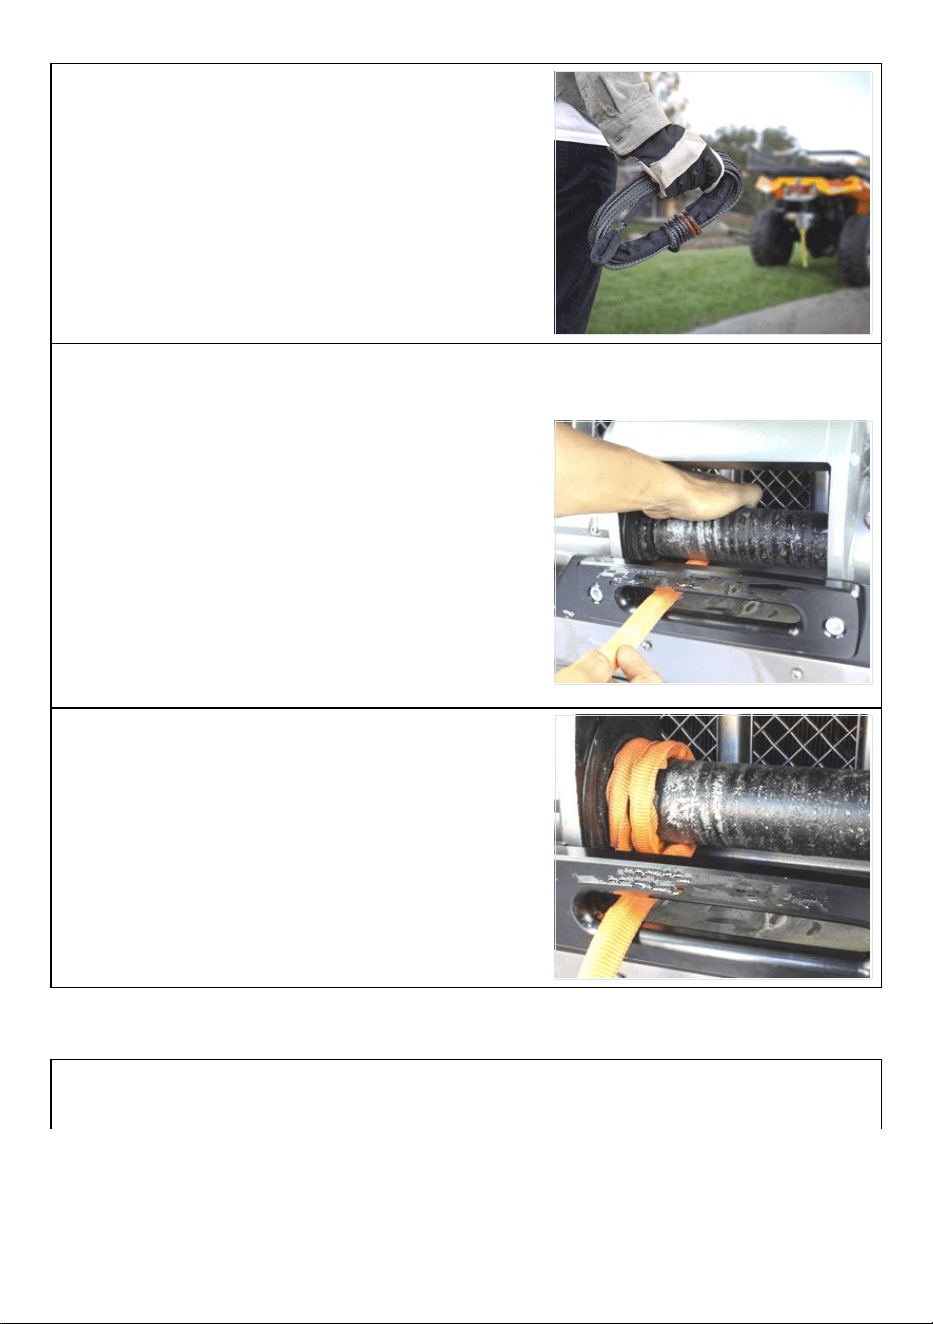
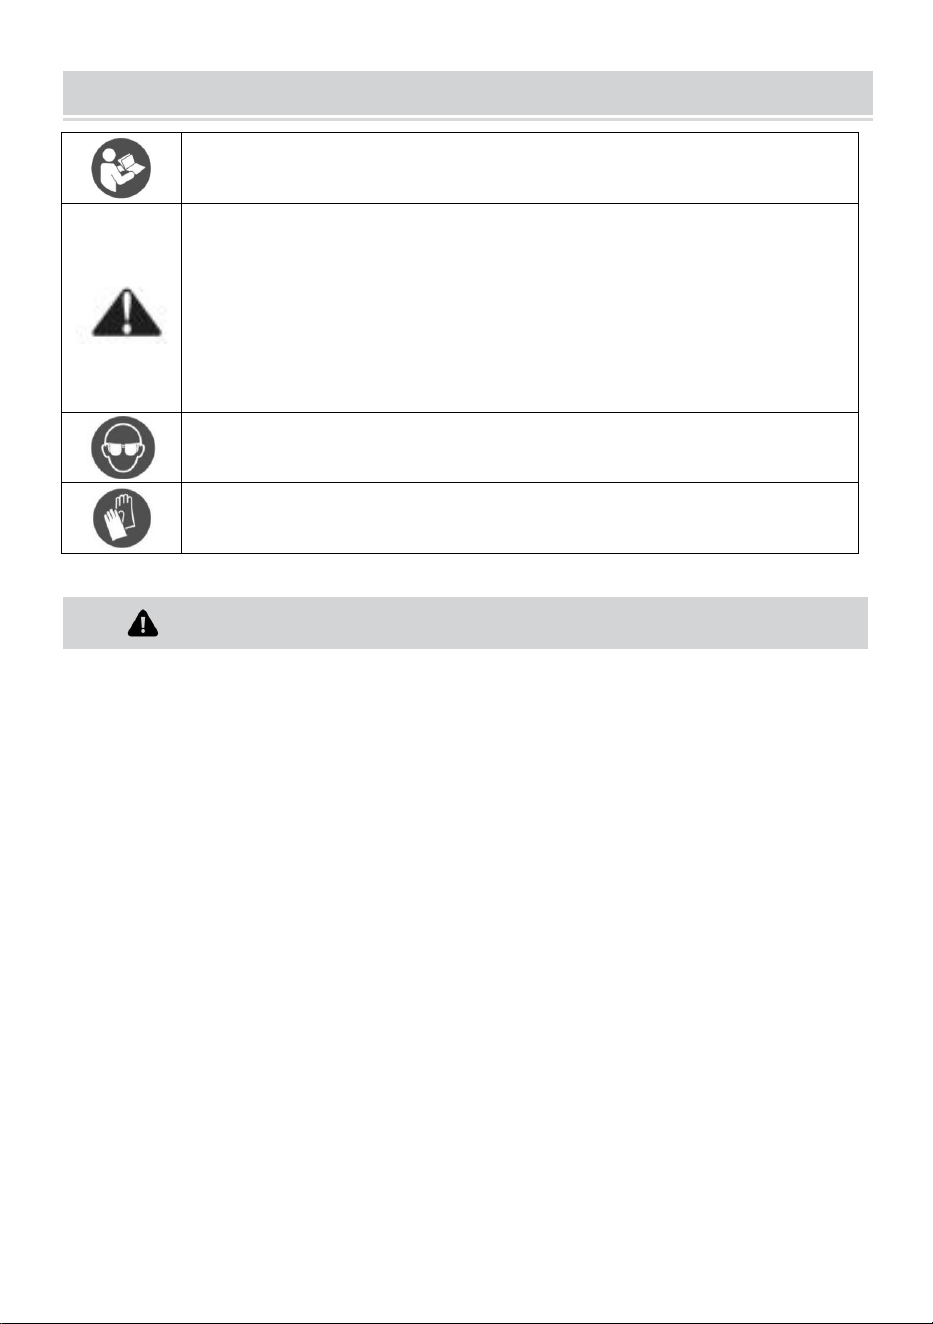
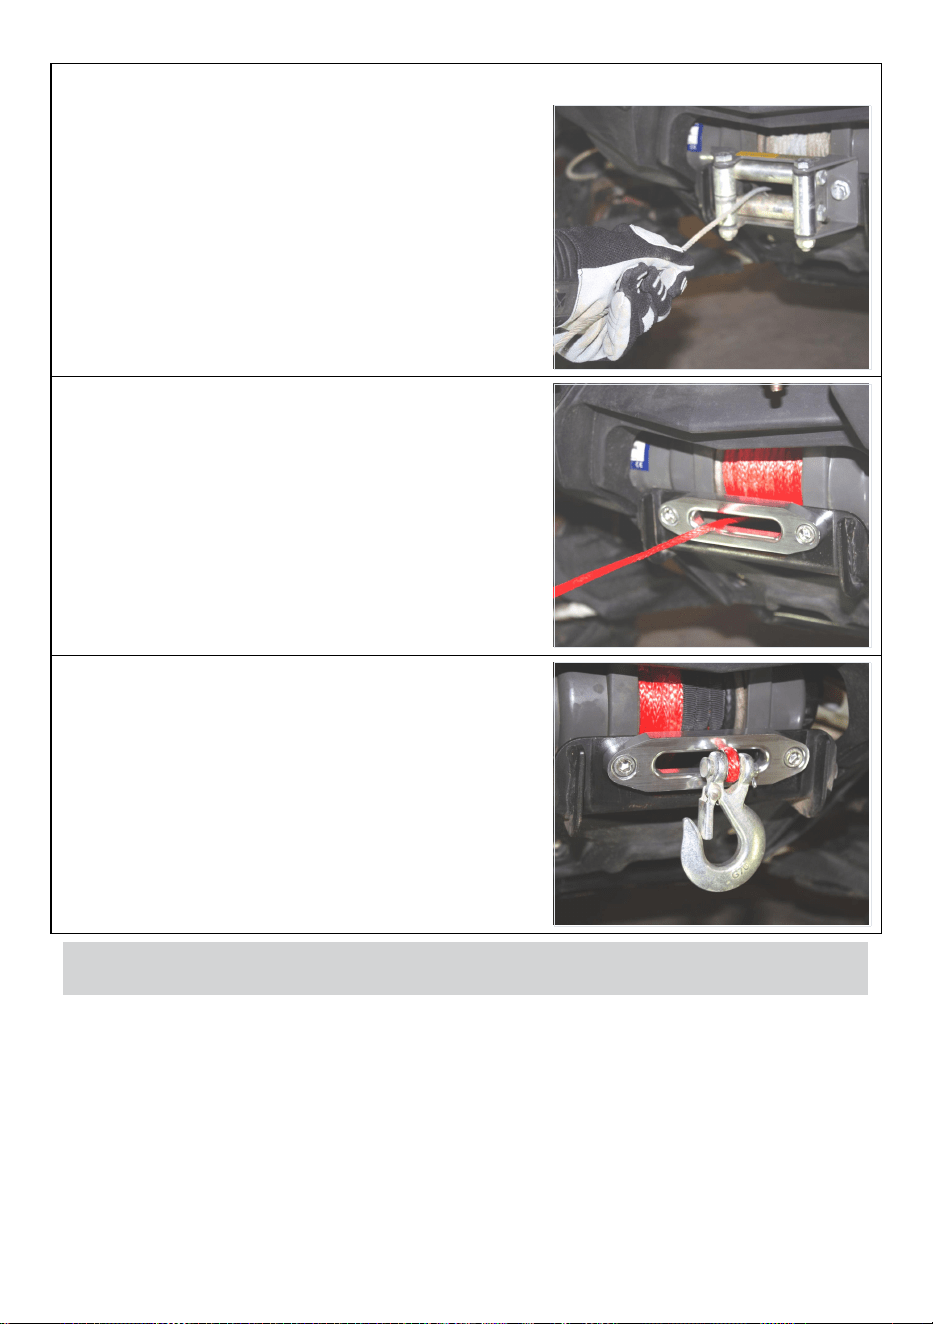
STEP 4: LAY OUT WINCH LINE
Before you begin to spool the winch cable
onto the winch it is a good idea to uncoil it
and lay it out on the ground. This makes it
easier to spool the line on.
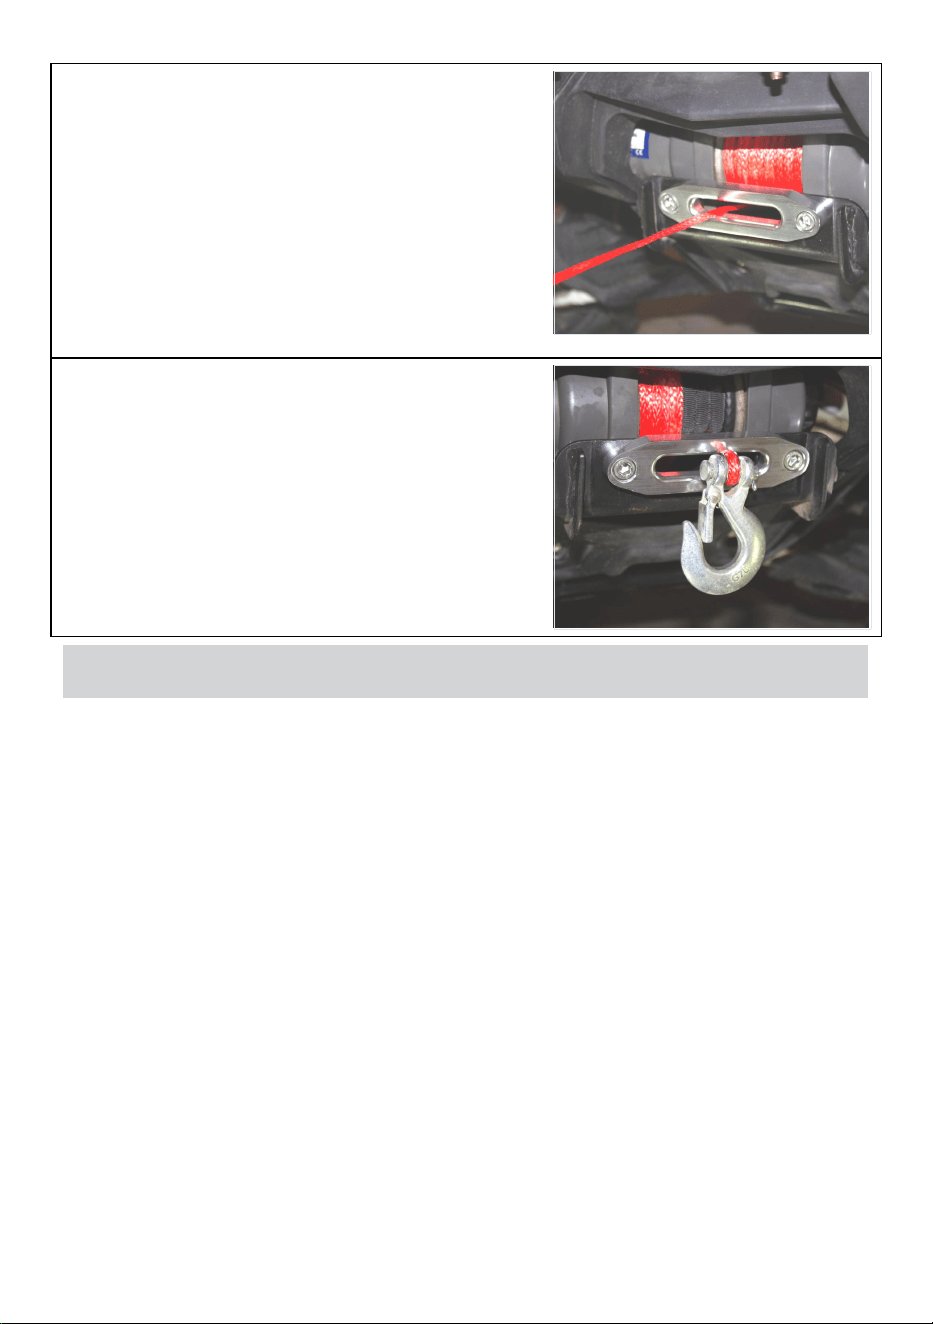
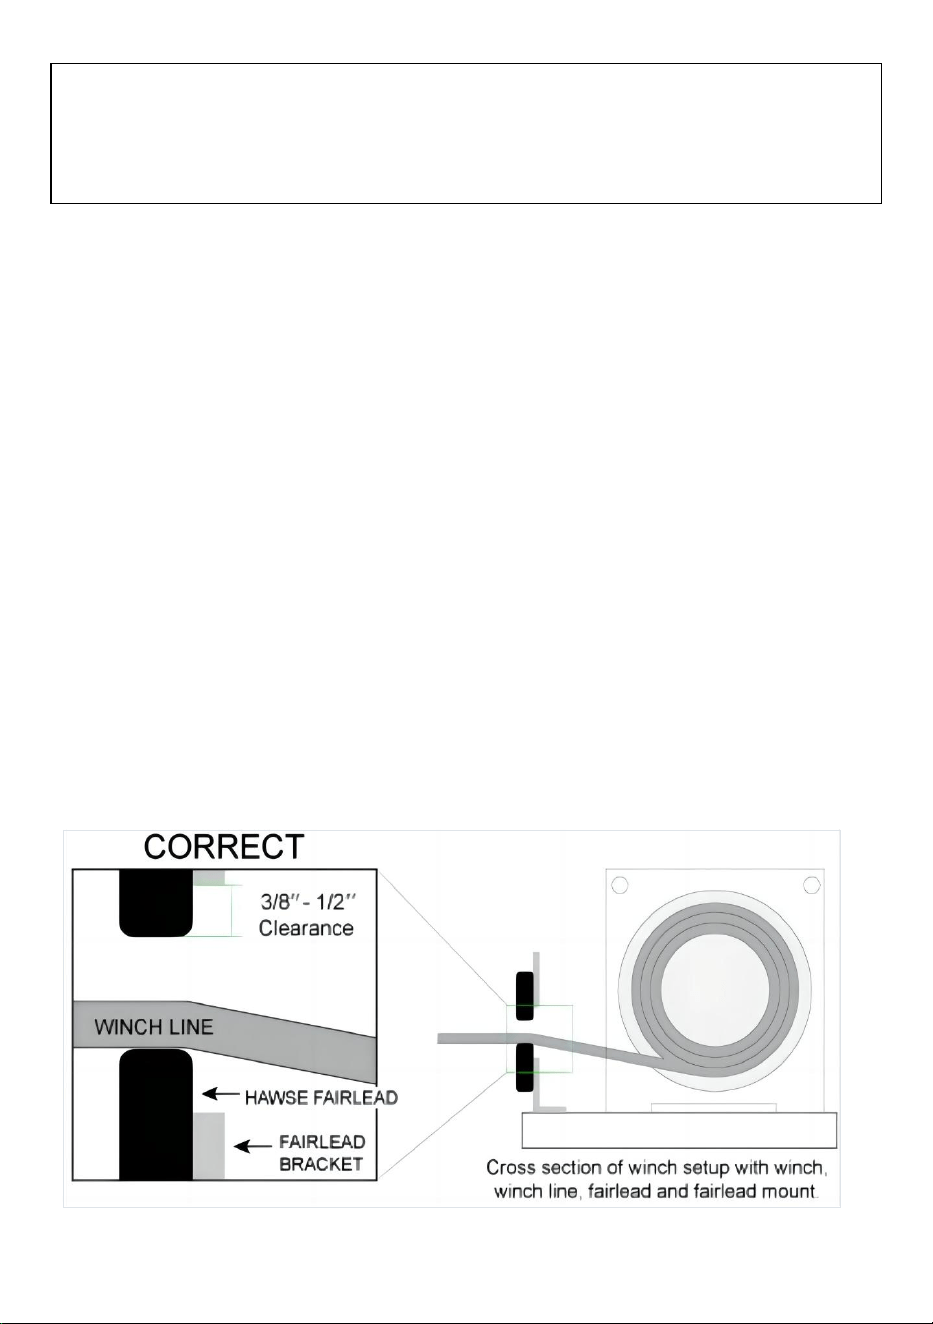
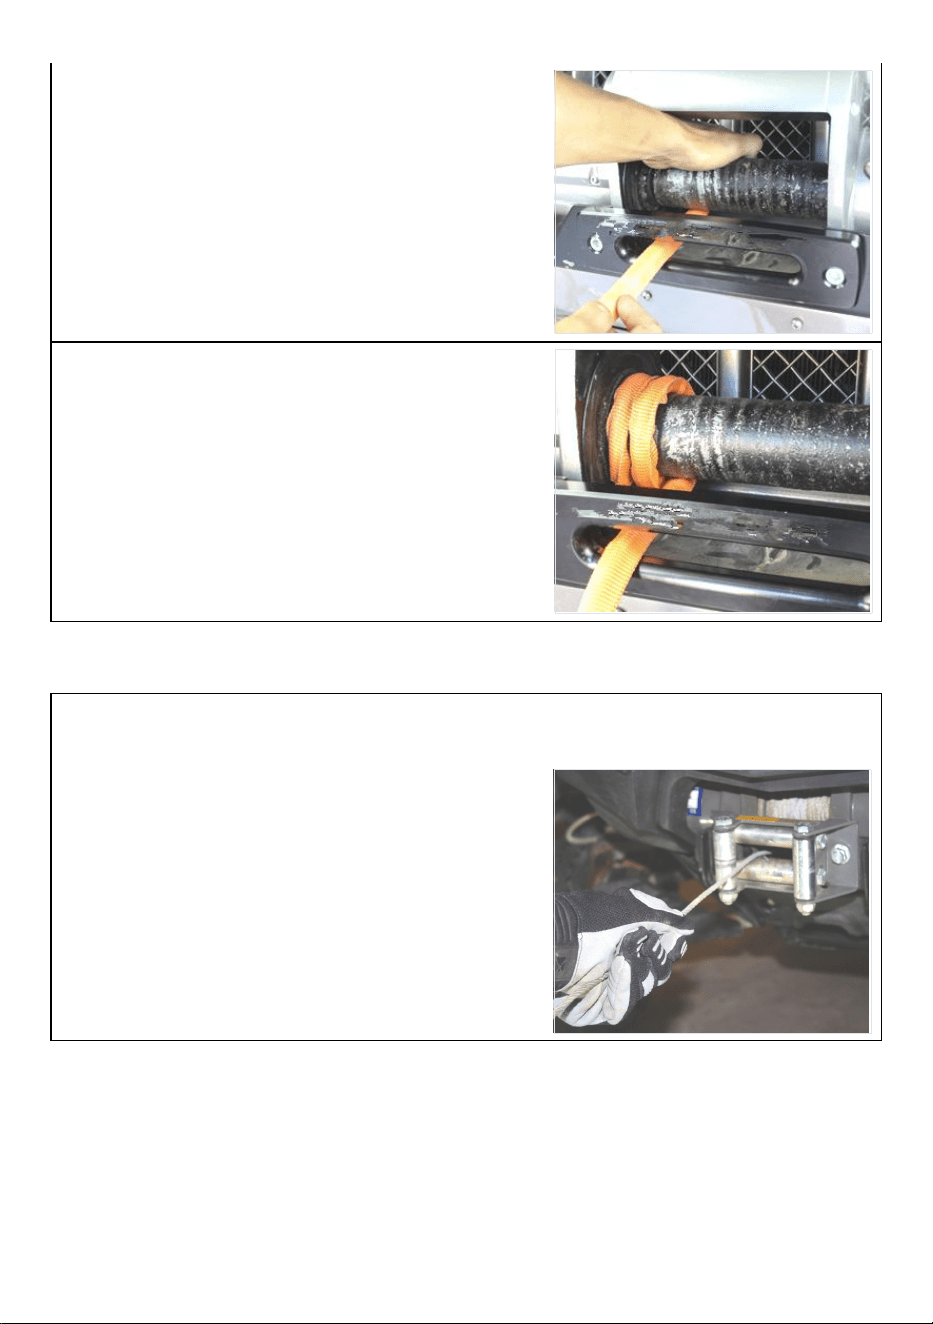
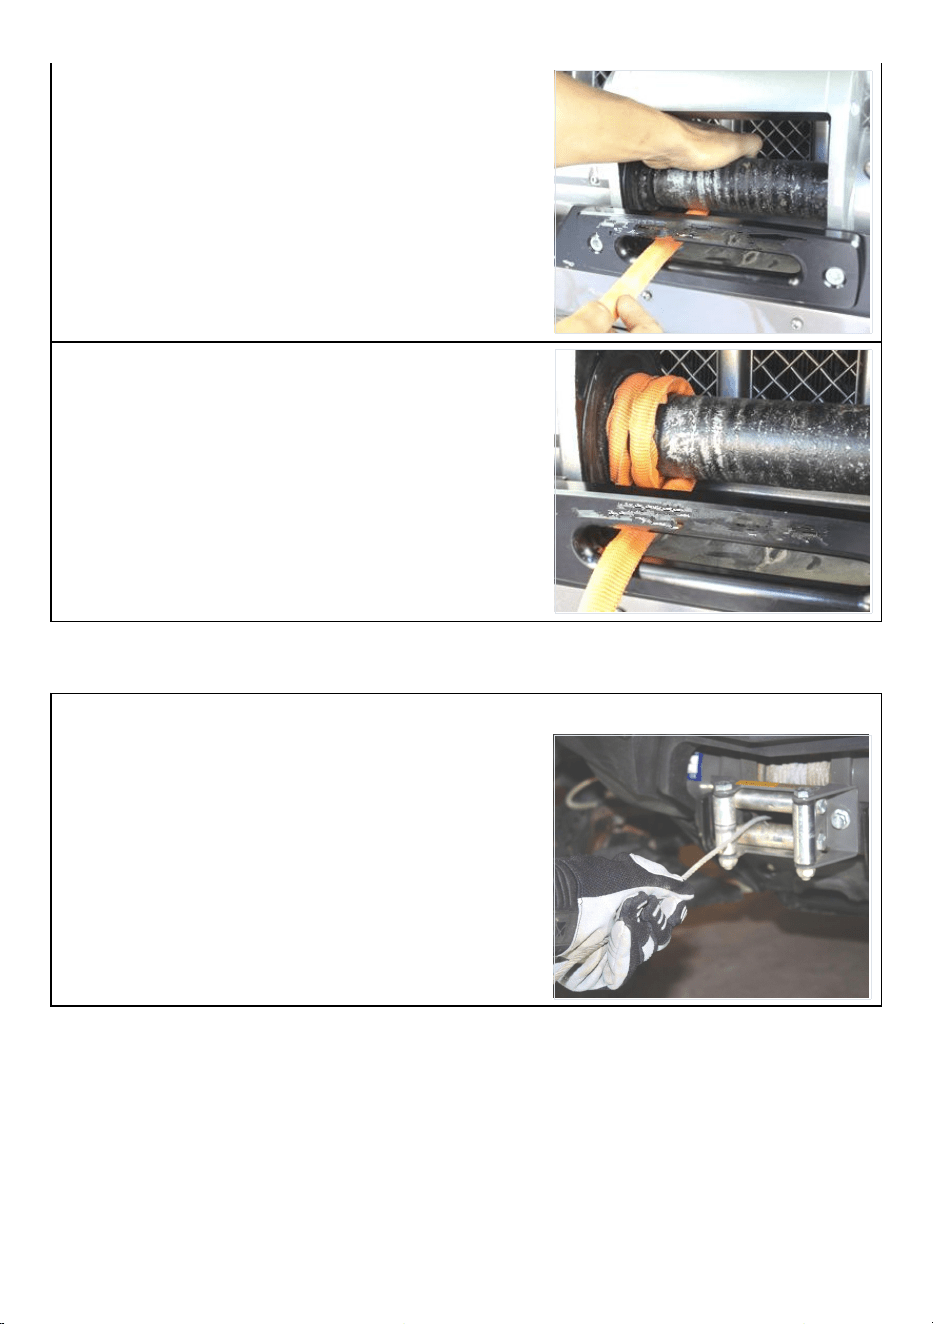
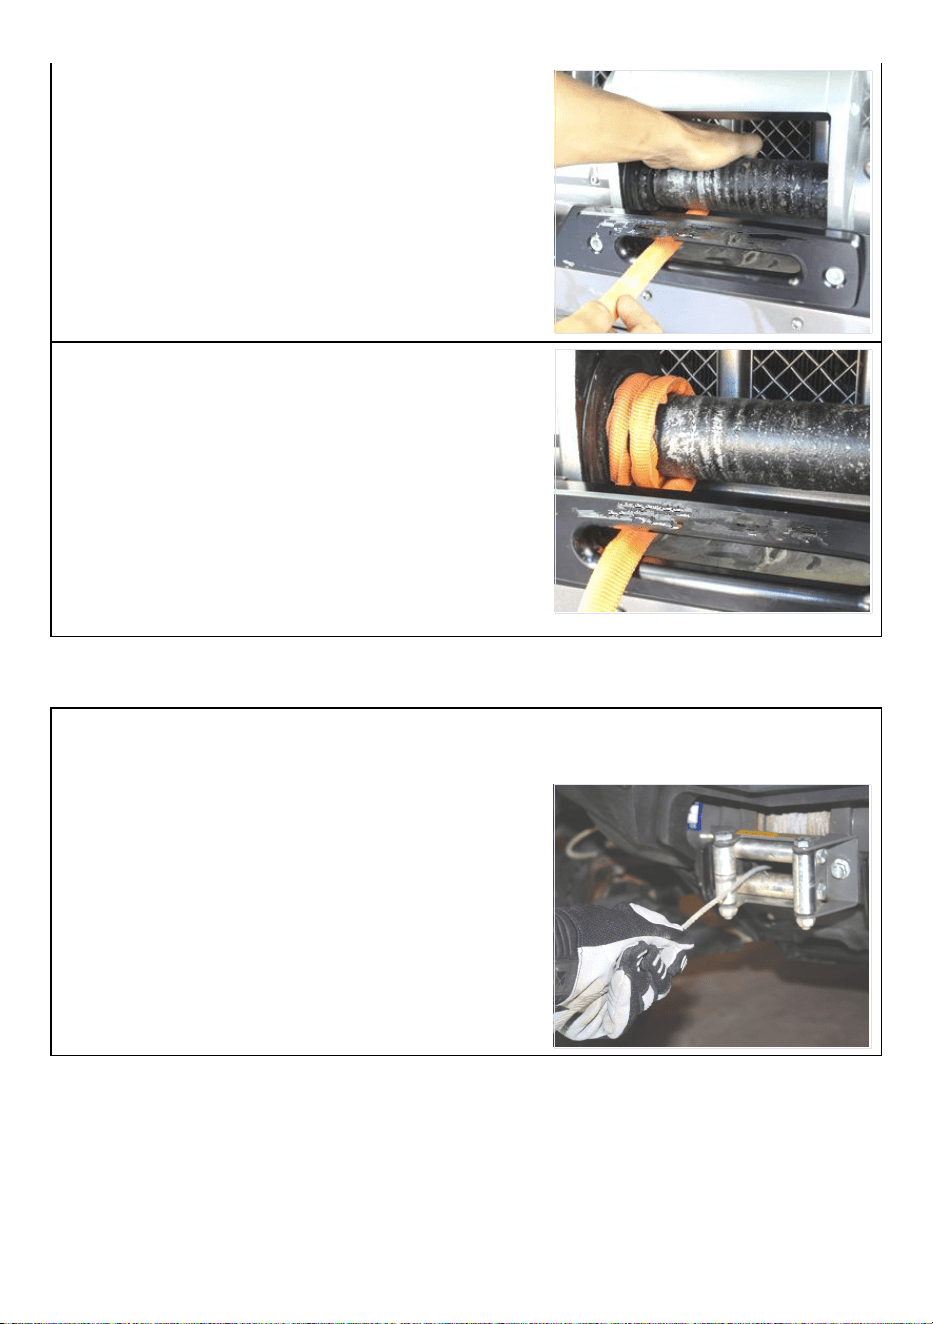
STEP 5:ATTACH WINCH LINE TO WINCH DRUM
5.1 Insert the terminal end of the winch line
through the fairlead and feed the winch line
underneath the drum and over the top to
the mounting point. Using the correct
method above, attach your winch line to
your winch drum.
5.2 All Master Pull winch lines come with a
heat guard that covers the rope on the first
drum wrap. It is important to use this guard
on the first wrap around the drum as it
protects against abrasion and potential
heat from the drum.

- 6 -
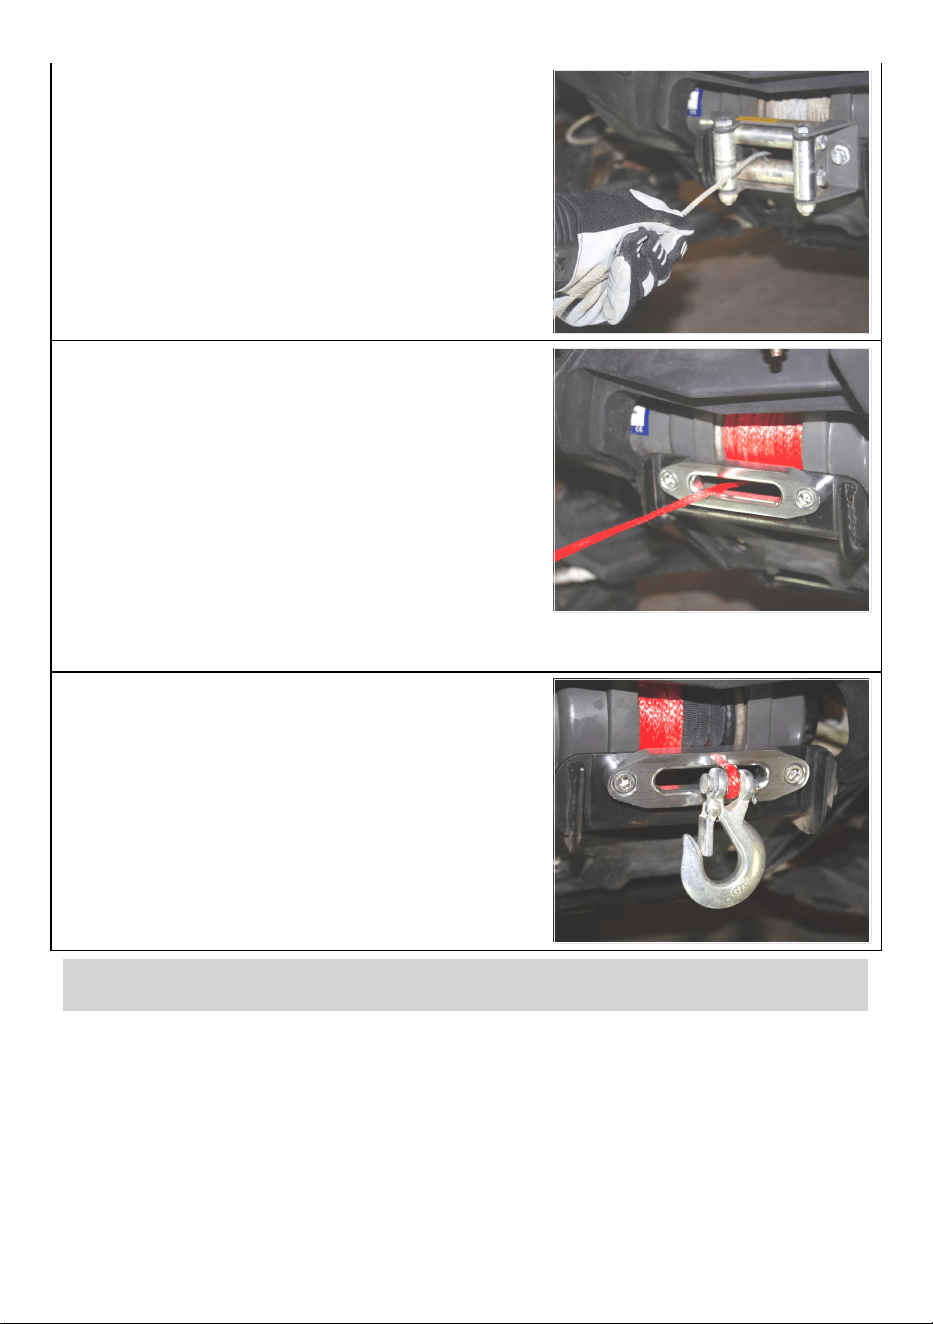
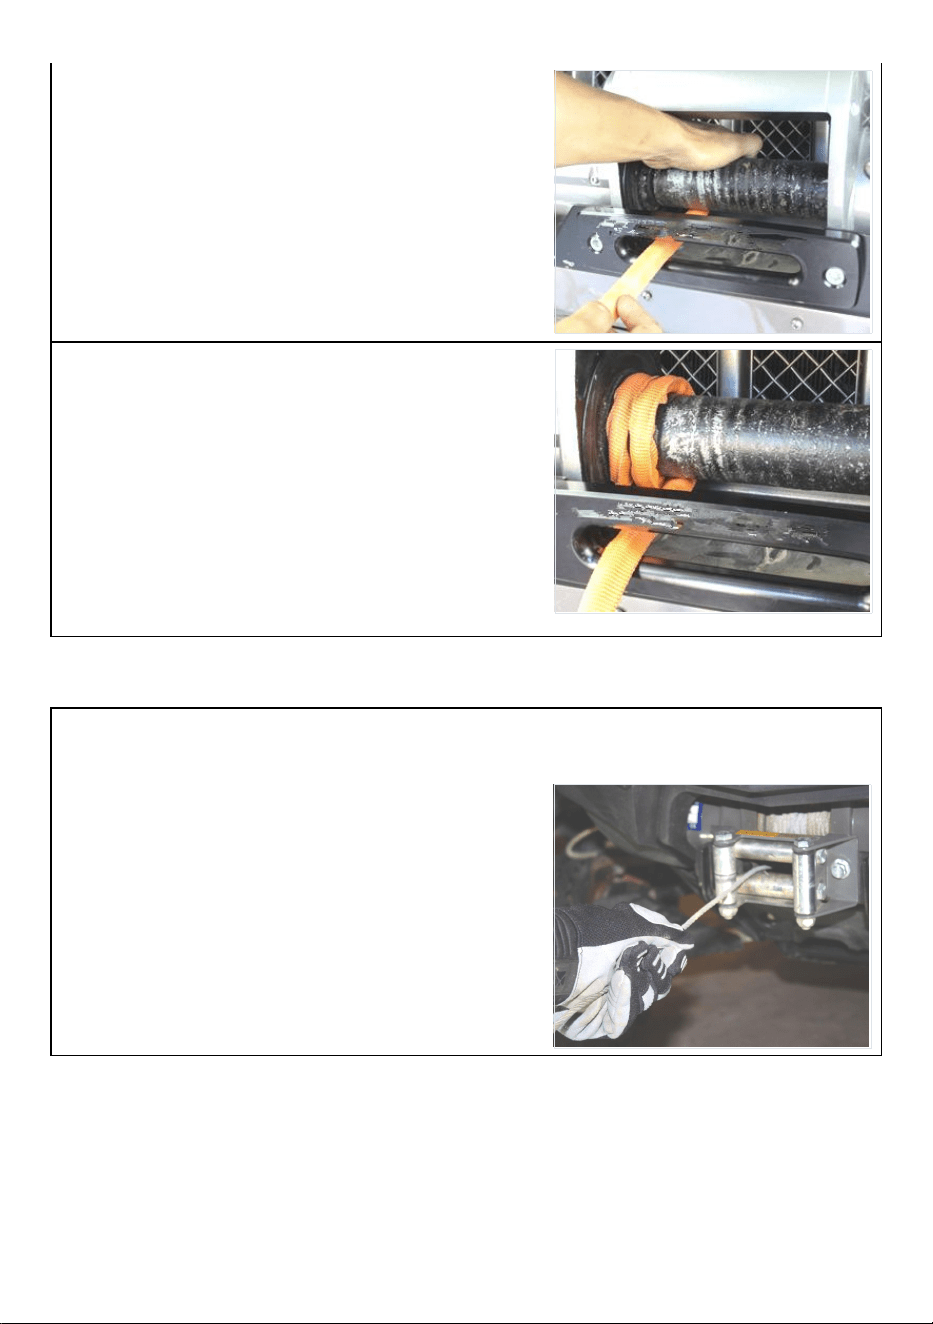
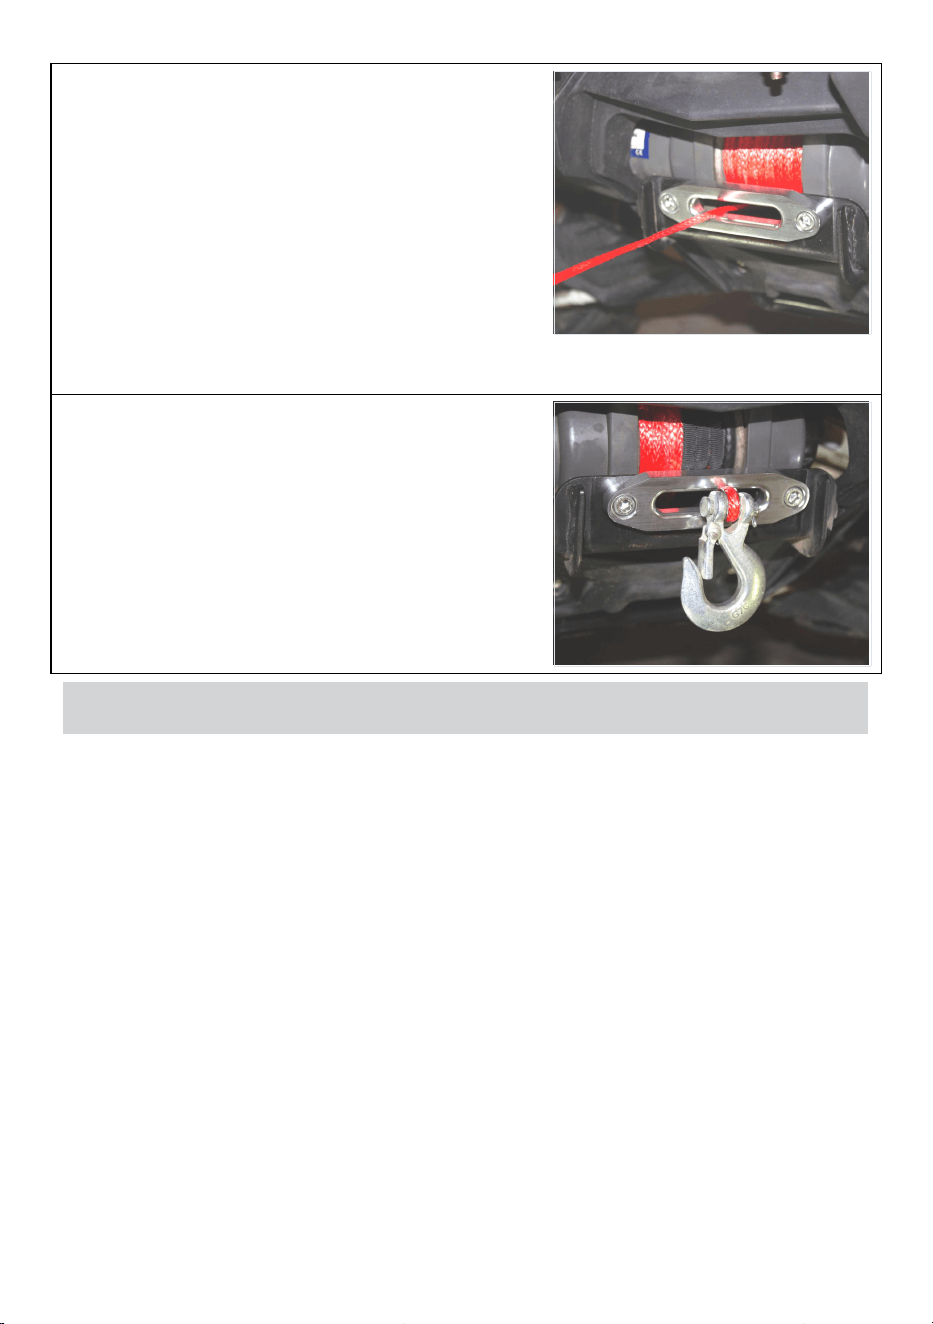
STEP6: START SPOOLING WINCH LINE ON DRUM
6.1 Keeping your hands clear of the
winch, guide the rope in making sure the
wraps are neat and tight. It is helpful to
have two people at this point, one to guide
the rope in and one to work the winch
controls.
6.2 The orange heat covering should go all
the way across the drum and it is very
important to always have a full layer of rope
on the winch drum while winching to
ensure the winch line stays attached to the
winch. The friction from the wraps is what
keeps the rope attached to the winch.
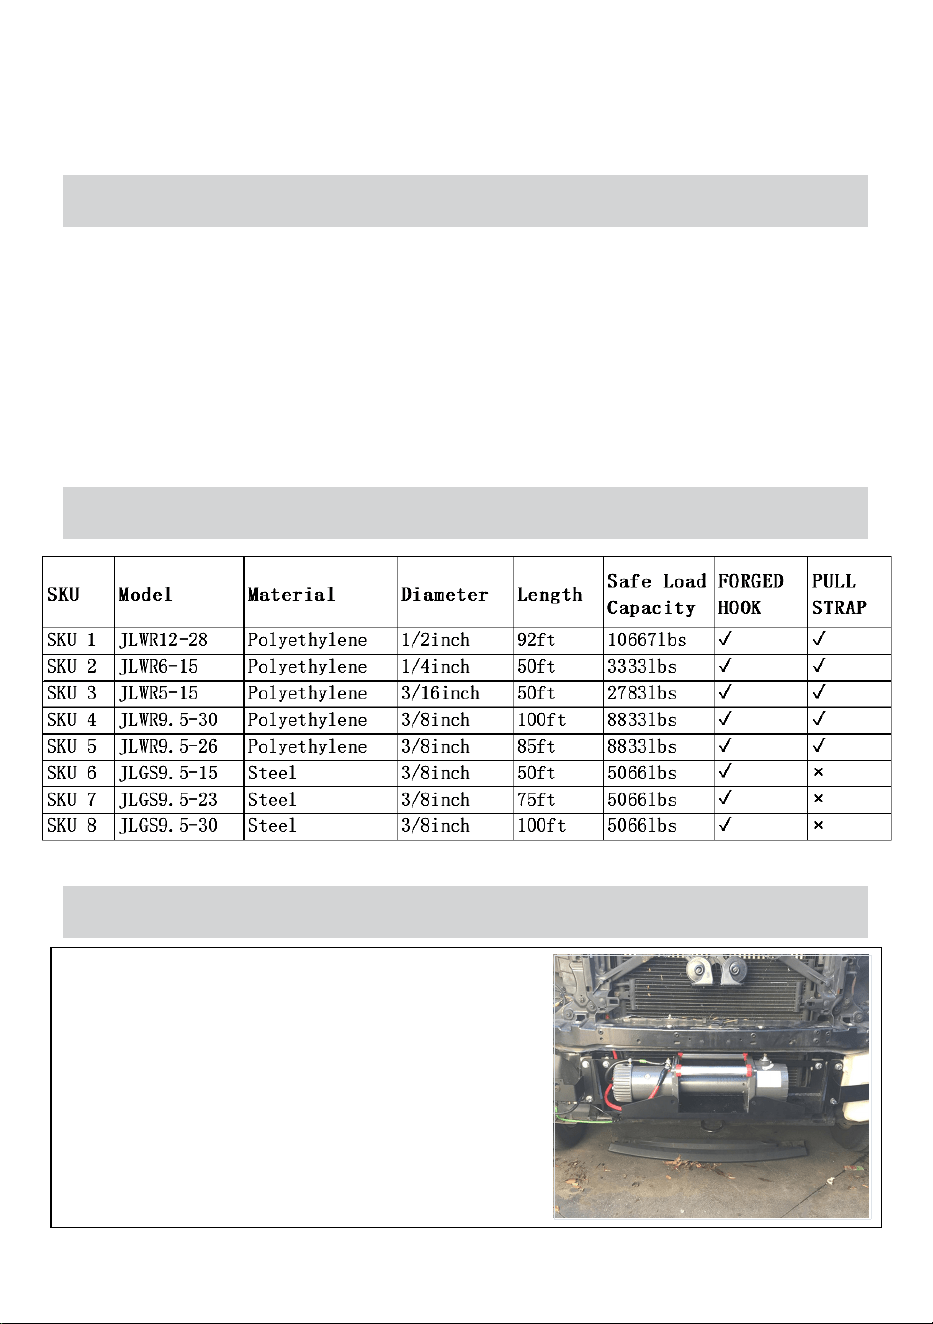
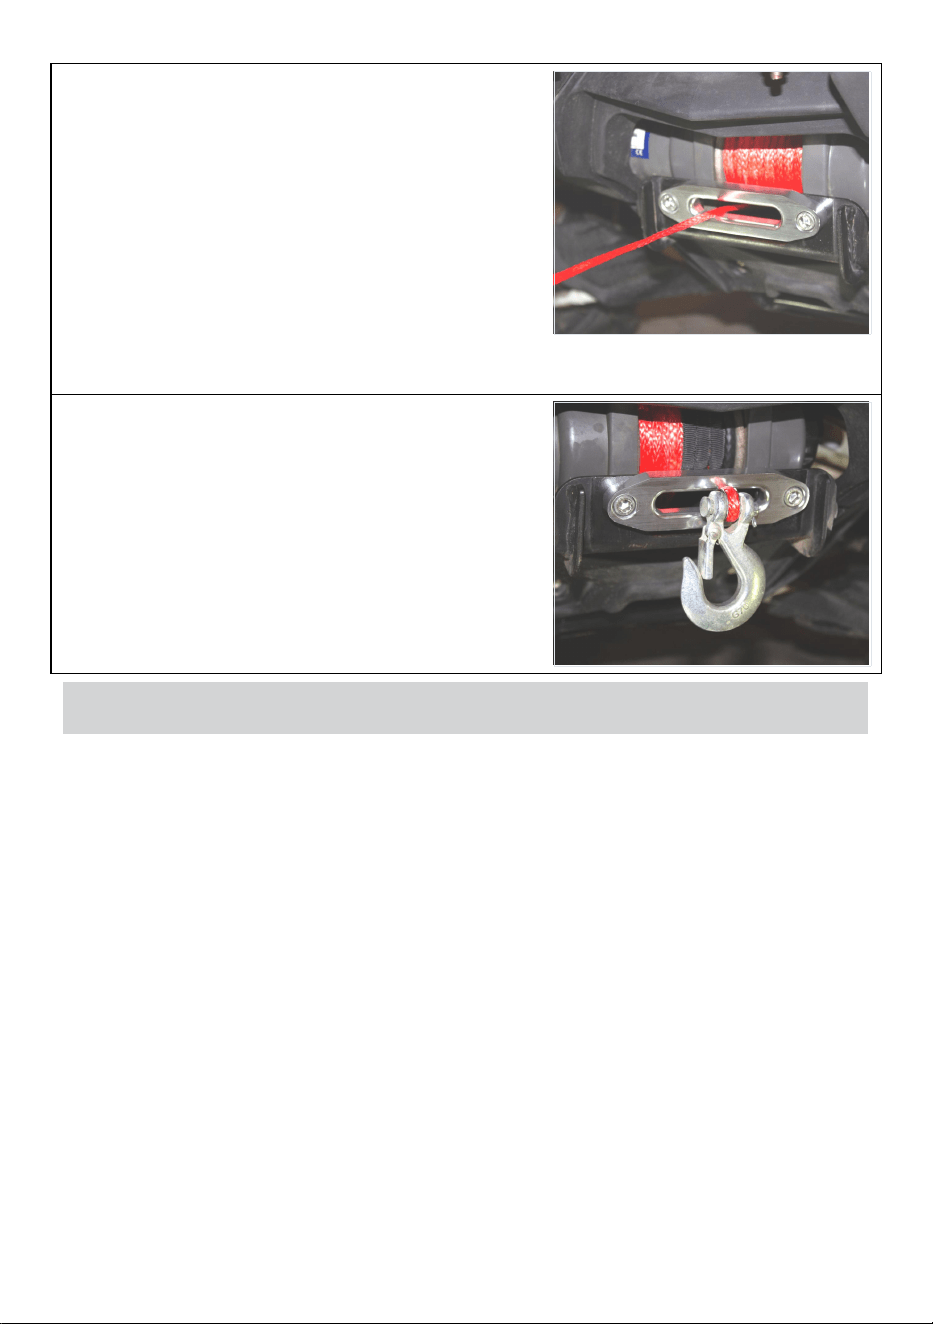
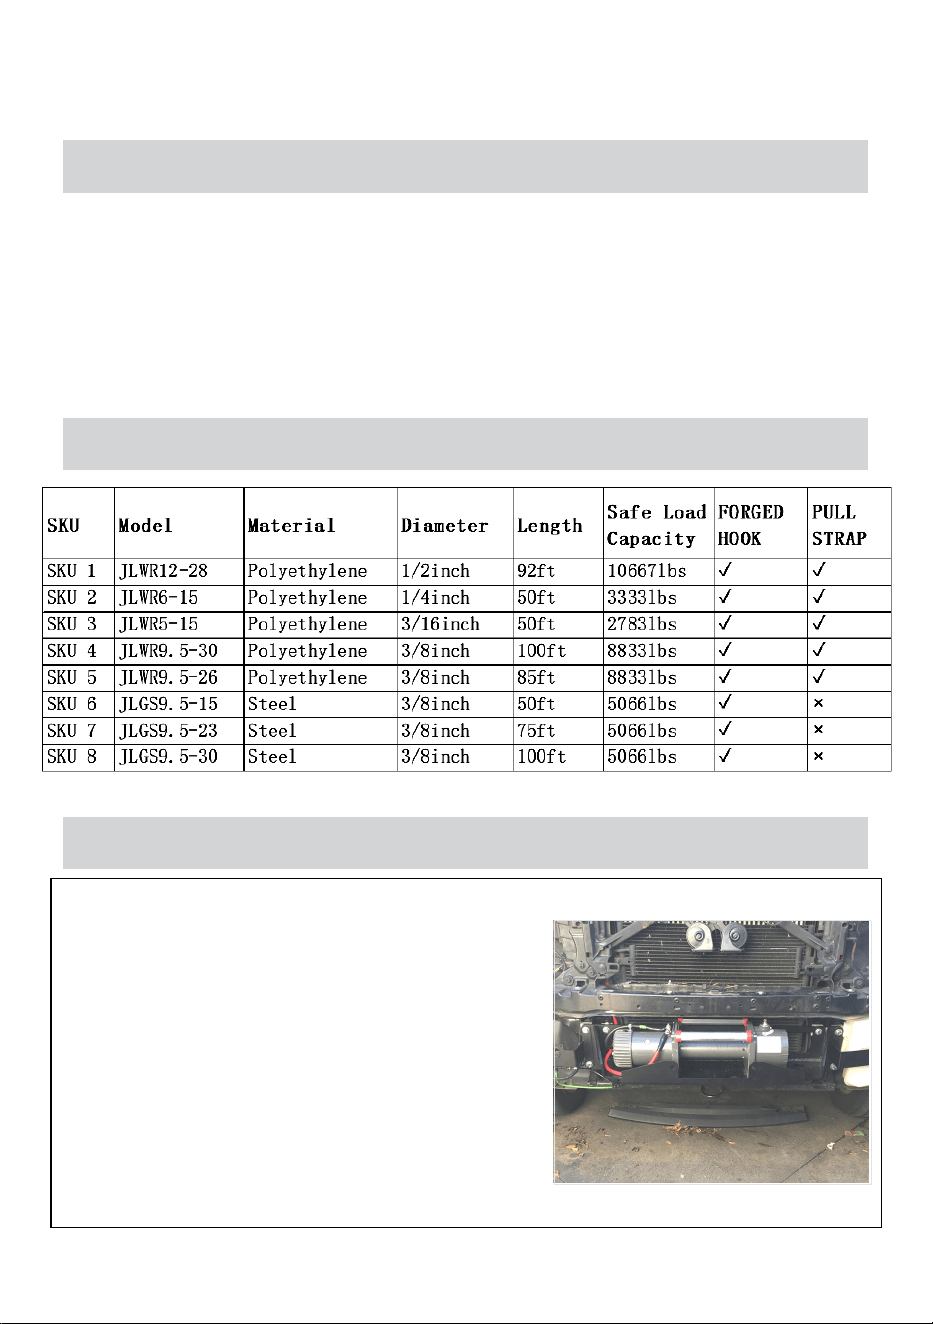
STEP7: FINISHED!
Here you can see the finished product. It is
a good practice to unspool the entire winch
line after every use and respool it properly.
5. Maintenance and Trouble shooting
1. Cleaning: Regularly clean the winch rope to remove dirt and debris.
2. Inspection: Check the winch rope for any signs of wear or damage
before and after each use.
3. Storage: When not in use, store the winch rope in a dry, clean place out
of direct sunlight.
4. Replacement: Replace the winch rope immediately if significant wear
or damage is discovered.


- 2 -
Technique Assistance et certificat de garantie électronique
www.vevor.com/support
CÂBLE DE TREUIL
We continue to be committed to provide you tools with competitive price.
"Save Half", "Half Price" or any other similar expressions used by us only represents an
estimate of savings you might benefit from buying certain tools with us compared to the major
top brands and does not necessarily mean to cover all categories of tools offered by us. You
are kindly reminded to verify carefully when you are placing an order with us if you are
actually saving half in comparison with the top major brands.

- 1 -
JLGS9.5-15
JLGS9.5-23
JLGS9.5-30
Have product questions? Need technical support? Please feel free to
contact us:
Technical Support and E-Warranty Certificate
www.vevor.com/support
NEED HELP? CONTACT US!
This is the original instruction, please read all manual instructions
carefully before operating. VEVOR reserves a clear interpretation of our
user manual. The appearance of the product shall be subject to the
product you received. Please forgive us that we won't inform you again if
there are any technology or software updates on our product.
JLWR12-28
JLWR9.5-30
JLWR9.5-26
JLWR6-15
JLWR5-15
Winch Cable

- 2 -
IMPORTANT SAFETY INSTRUCTIONS
Avertissement - Pour réduire le risque de blessure, l'utilisateur doit
lire attentivement le manuel d'instructions.
Ce symbole, placé avant un commentaire de sécurité, indique une
sorte de précaution, d'avertissement ou de danger. Ignorer cet
avertissement peut entraîner un accident. Pour réduire le risque de
blessure, d'incendie ou d'électrocution, veuillez toujours suivre les
recommandations indiquées ci-dessous.
Avertissement - Assurez-vous de porter des protections oculaires
lorsque vous utilisez ce produit.
Avertissement - Assurez-vous de porter des gants lorsque vous
utilisez ce produit.
6. WARNING!
Avant d'utiliser le câble du treuil, veuillez lire et comprendre toutes les
instructions et avertissements de sécurité. Une mauvaise utilisation peut
entraîner des blessures graves ou des dommages matériels.
7. Portez toujours un équipement de protection individuelle approprié
avant d'utiliser le câble du treuil, y compris, mais sans s'y limiter, des gants
de protection, des lunettes de sécurité et des chaussures antidérapantes.
8. Assurez-vous que tous les opérateurs sont correctement formés et
comprennent l’utilisation correcte du câble du treuil.
9. Inspecter régulièrement l'intégrité du câble du treuil et du treuil ; tout
signe d’usure, de dommage ou de corrosion doit être traité
immédiatement.
10. Ne dépassez pas la limite de capacité de charge sûre du câble du
treuil.
11. Assurez-vous que la corde du treuil ne s'enroule pas autour d'objets
pointus ou chauds pendant l'utilisation.
12. Gardez la zone autour du câble du treuil dégagée et exempte
d'obstacles lors de son utilisation.

- 3 -
CONSERVEZ CES INSTRUCTIONS
7. Product Description
Nos câbles de treuil sont fabriqués en acier ou en polyéthylène haute
résistance , conçu pour fournir une solution fiable pour une variété de
besoins de levage et de remorquage. Ce manuel explique comment
installer correctement un câble de treuil synthétique sur un treuil. Une
installation correcte garantit que votre câble de treuil fonctionnera au
mieux et conservera le câble de treuil.
8. Product Parameter
9. Assembly Methods on a winch
ÉTAPE 1 : INSPECTION DU TREUIL
Après avoir retiré le câble d'acier et le
guide-câble à rouleaux de votre treuil, c'est
une bonne idée d'inspecter le tambour pour
vous assurer qu'il n'y a rien de pointu qui
puisse endommager le câble une fois mis
en place. Assurez-vous que le tambour ne
présente pas de bavures ou de rainures
pointues, car il est connu que les câbles en

- 4 -
acier endommagent le tambour. Si c'est le
cas, limez/poncez les bords tranchants
jusqu'à ce que la surface du tambour le
soit.
ÉTAPE 2 : INSPECTER LE CHAUMOIR
L'installation d'un nouveau guide-câble doit être terminée avant d'enrouler
la corde. Les guide-câbles en aluminium fonctionnent très bien avec les
lignes de treuil synthétiques car ils offrent une surface lisse qui
n'endommagera pas la corde. De nombreux guide-câbles en acier moulé
n'ont pas une surface suffisamment lisse pour une corde synthétique et ne
sont pas recommandés. Les chaumards à rouleaux en acier sont
parfaitement adaptés à l'utilisation ; assurez-vous simplement que les
rouleaux sont lisses et non ébavurés ou creusés. Assurez-vous également
que les rouleaux se chevauchent, car certains chaumards à rouleaux plus
anciens n'ont pas de rouleaux qui se chevauchent et ont un espace dans le
coin du chaumard. Une corde de treuil pourrait se coincer dans cet espace
pendant son utilisation et être endommagée.
Quel que soit le type de guide-câble, vous devez vous assurer qu'il y a
suffisamment d'espace entre l'ouverture du guide-câble et les bords de la
plaque de montage. Comme le montrent les schémas ci-dessus, nous
recommandons un dégagement d'au moins 3/8" à 1/2". Sans cela, la ligne
du treuil peut être coupée sur le bord tranchant de la plaque de chaumard.
- 5 -
ÉTAPE 3 : VÉRIFIER LE TYPE DE FIXATION DU TAMBOUR
Avant de retirer l'ancienne ligne de votre treuil,
regardez comment elle était fixée au tambour.
La plupart des treuils tout-terrain auront un trou
fileté sur la bride du tambour auquel vous fixez
un câble métallique ou une ligne de treuil
synthétique avec un boulon Allen à tête ronde.
ÉTAPE 4 : DISPOSER LA LIGNE DE
TREUIL
Avant de commencer à enrouler le câble du
treuil sur le treuil, c'est une bonne idée de
le dérouler et de l'étendre sur le sol. Cela
facilite l'enroulement de la ligne.
ÉTAPE 5 : FIXER LA LIGNE DU TREUIL AU TAMBOUR DU TREUIL

- 6 -
5.1 Insérez l'extrémité terminale de la ligne
de treuil à travers le guide-câble et faites
passer la ligne de treuil sous le tambour et
par-dessus jusqu'au point de montage. En
utilisant la méthode correcte ci-dessus,
attachez votre ligne de treuil à votre
tambour de treuil.
5.2 Toutes les lignes de treuil Master Pull
sont livrées avec une protection thermique
qui recouvre la corde sur le premier
enroulement du tambour. Il est important
d'utiliser cette protection lors du premier
enroulement autour du tambour car elle
protège contre l'abrasion et la chaleur
potentielle du tambour.
ÉTAPE 6 : COMMENCER À ENROULER LA LIGNE DE TREUIL SUR LE
TAMBOUR
12.1 En gardant vos mains éloignées du
treuil, guidez la corde en vous assurant
que les enroulements sont bien serrés. Il
est utile d'avoir deux personnes à ce stade,
une pour guider la corde et une pour faire
fonctionner les commandes du treuil.
- 7 -
12.2 Le revêtement thermique orange doit
traverser tout le tambour et il est très
important de toujours avoir une couche
complète de corde sur le tambour du treuil
pendant le treuillage pour garantir que la
ligne du treuil reste attachée au treuil. La
friction des enveloppes est ce qui maintient
la corde attachée au treuil.
ÉTAPE 7 : TERMINÉ !
Ici vous pouvez voir le produit fini. C'est
une bonne pratique de dérouler toute la
ligne du treuil après chaque utilisation et de
la réenrouler correctement.
10. Maintenance and Trouble shooting
5. Nettoyage : Nettoyez régulièrement la corde du treuil pour éliminer la
saleté et les débris.
6. Inspection : Vérifiez le câble du treuil pour déceler tout signe d'usure
ou de dommage avant et après chaque utilisation.
7. Stockage : Lorsqu'il n'est pas utilisé, rangez le câble du treuil dans un
endroit sec et propre, à l'abri de la lumière directe du soleil.
8. Remplacement : remplacez immédiatement le câble du treuil si une
usure ou des dommages importants sont découverts.


- 2 -
Technisch Support- und E-Garantiezertifikat
www.vevor.com/support
WINDENKABEL
We continue to be committed to provide you tools with competitive price.
"Save Half", "Half Price" or any other similar expressions used by us only represents an
estimate of savings you might benefit from buying certain tools with us compared to the major
top brands and does not necessarily mean to cover all categories of tools offered by us. You
are kindly reminded to verify carefully when you are placing an order with us if you are
actually saving half in comparison with the top major brands.

- 1 -
JLGS9.5-15
JLGS9.5-23
JLGS9.5-30
Have product questions? Need technical support? Please feel free to
contact us:
Technical Support and E-Warranty Certificate
www.vevor.com/support
NEED HELP? CONTACT US!
This is the original instruction, please read all manual instructions
carefully before operating. VEVOR reserves a clear interpretation of our
user manual. The appearance of the product shall be subject to the
product you received. Please forgive us that we won't inform you again if
there are any technology or software updates on our product.
JLWR12-28
JLWR9,5-30
JLWR9,5-26
JLWR6-15
JLWR5-15
Winch Cable

- 2 -
IMPORTANT SAFETY INSTRUCTIONS
Warnung – Um das Verletzungsrisiko zu verringern, muss der
Benutzer die Bedienungsanleitung sorgfältig lesen.
Dieses Symbol vor einem Sicherheitshinweis weist auf eine Art
Vorsichtsmaßnahme, Warnung oder Gefahr hin. Das Ignorieren
dieser Warnung kann zu einem Unfall führen. Um das Risiko von
Verletzungen, Bränden oder Stromschlägen zu verringern,
befolgen Sie bitte immer die unten aufgeführten Empfehlungen .
Warnung: Tragen Sie bei der Verwendung dieses Produkts
unbedingt einen Augenschutz.
Warnung: Tragen Sie bei der Verwendung dieses Produkts
unbedingt Handschuhe.
11. WARNING!
Bitte lesen und verstehen Sie vor der Verwendung des Windenseils alle
Anweisungen und Sicherheitswarnungen. Eine unsachgemäße
Verwendung kann zu schweren Verletzungen oder Sachschäden führen.
13. Tragen Sie vor dem Betrieb des Windenseils immer geeignete
persönliche Schutzausrüstung, einschließlich, aber nicht beschränkt auf,
Schutzhandschuhe, Schutzbrille und rutschfestes Schuhwerk.
14. Stellen Sie sicher, dass alle Bediener ordnungsgemäß geschult sind
und die korrekte Verwendung des Windenseils verstehen.
15. Überprüfen Sie regelmäßig die Unversehrtheit des Windenseils und
der Winde; Jegliche Anzeichen von Abnutzung, Beschädigung oder
Korrosion sollten sofort behoben werden.
16. Überschreiten Sie nicht die sichere Tragfähigkeitsgrenze des
Windenseils .
17. Stellen Sie sicher, dass sich das Windenseil während des Gebrauchs
nicht um scharfe oder heiße Gegenstände wickelt.
18. Halten Sie den Bereich um das Windenseil während des Betriebs frei
und frei von Hindernissen.
- 3 -
ANLEITUNG AUFBEWAHREN
12. Product Description
Unsere Windenkabel s sind aus Stahl oder hochfestem Polyethylen
gefertigt , entwickelt, um eine zuverlässige Lösung für eine Vielzahl von
Hebe- und Schleppanforderungen zu bieten. In dieser Anleitung wird
erläutert, wie ein synthetisches Windenkabel ordnungsgemäß an einer
Winde installiert wird. Eine ordnungsgemäße Installation stellt sicher, dass
Ihr Windenkabel seine beste Leistung erbringt und dass das Windenkabel
lange hält.
13. Product Parameter
14. Assembly Methods on a winch
SCHRITT 1: WINDENINSPEKTION
Nachdem Sie das Stahlseil und die
Rollenführung von Ihrer Winde entfernt
haben, ist es eine gute Idee, die Trommel
zu überprüfen, um sicherzustellen, dass
nichts Scharfes vorhanden ist, das das Seil
nach dem Aufziehen beschädigen könnte.
Stellen Sie sicher, dass die Trommel keine

- 4 -
scharfen Grate oder Rillen aufweist, da
Stahldrahtseile bekanntermaßen die
Trommel beschädigen können. Wenn ja,
feilen/schleifen Sie alle scharfen Kanten
ab, bis die Trommeloberfläche glatt ist.
SCHRITT 2: FAIR LEAD PRÜFEN
Die Installation einer neuen Seilführung muss abgeschlossen sein, bevor
das Seil aufgespult wird. Aluminium-Klüssleinen funktionieren sehr gut mit
synthetischen Windenleinen, da sie eine glatte Oberfläche bieten, die das
Seil nicht beschädigt. Viele Klüsenklüsen aus Gussstahl haben keine
ausreichend glatte Oberfläche für synthetische Seile und werden daher
nicht empfohlen. Rollenführungen aus Stahl sind völlig in Ordnung; Achten
Sie lediglich darauf, dass die Rollen glatt und nicht gratig oder eingekerbt
sind. Stellen Sie außerdem sicher, dass die Rollen einander überlappen,
da einige ältere Rollenführungen keine überlappenden Rollen haben und
eine Lücke in der Ecke der Führung aufweisen. In diesem Spalt könnte
sich beim Einsatz eine Windenleine verfangen und beschädigt werden.
Unabhängig von der Art der Kabelführung müssen Sie sicherstellen, dass
zwischen der Öffnung der Kabelführung und den Kanten der
Montageplatte genügend Abstand vorhanden ist. Wie in den Diagrammen
oben gezeigt, empfehlen wir einen Abstand von mindestens 3/8" bis 1/2".
Andernfalls kann die Windenleine an der scharfen Kante der
Seilführungsplatte zerschnitten werden.
- 5 -
SCHRITT 3: PRÜFEN SIE DEN TROMMELBEFESTIGUNGSTYP
Bevor Sie das alte Seil von Ihrer Winde
entfernen, schauen Sie sich an, wie es an der
Trommel befestigt wurde. Die meisten
Offroad-Winden verfügen über ein
Gewindeloch am Trommelflansch, an dem Sie
ein Drahtseil oder eine synthetische
Windenleine mit einer Innensechskantschraube
mit Halbrundkopf befestigen können .
- 6 -
SCHRITT 4: WINDENLINIE AUSLEGEN
Bevor Sie beginnen, das Windenseil auf
die Winde aufzuwickeln, empfiehlt es sich,
es abzuwickeln und auf dem Boden
auszulegen. Dies erleichtert das Aufspulen
der Schnur.
SCHRITT 5: BEFESTIGEN SIE DAS WINDENSEIL AN DER
WINDENTROMMEL
5.1 Führen Sie das Endende der
Windenleine durch die Seilführung und
führen Sie die Windenleine unter der
Trommel und über die Oberseite zum
Montagepunkt. Befestigen Sie Ihr
Windenseil mit der oben beschriebenen
korrekten Methode an Ihrer
Windentrommel.
5.2 Alle Windenleinen von Master Pull sind
mit einem Hitzeschutz ausgestattet, der
das Seil bei der ersten Trommelwicklung
abdeckt. Es ist wichtig, diesen Schutz beim
ersten Umwickeln der Trommel zu
verwenden, da er vor Abrieb und möglicher
Hitze der Trommel schützt.
SCHRITT 6: Beginnen Sie mit dem Aufspulen des Windenseils auf die
Trommel
- 7 -
18.1 Halten Sie Ihre Hände von der Winde
fern und führen Sie das Seil hinein, um
sicherzustellen, dass die Wicklungen
sauber und fest sind. Es ist hilfreich, an
dieser Stelle zwei Personen zu haben, eine
zum Einführen des Seils und eine zum
Bedienen der Windensteuerung.
18.2 Die orangefarbene Wärmeabdeckung
sollte sich über die gesamte Trommel
erstrecken. Es ist sehr wichtig, dass beim
Windenbetrieb immer eine volle Lage Seil
auf der Windentrommel liegt, um
sicherzustellen, dass das Windenseil an
der Winde befestigt bleibt. Die Reibung der
Windungen sorgt dafür, dass das Seil an
der Winde befestigt bleibt.
SCHRITT 7: FERTIG!
Hier können Sie das fertige Produkt sehen.
Es empfiehlt sich, die gesamte
Windenleine nach jedem Gebrauch
abzuwickeln und ordnungsgemäß wieder
aufzuspulen.
15. Maintenance and Trouble shooting
9. Reinigung: Reinigen Sie das Windenseil regelmäßig, um Schmutz und
Ablagerungen zu entfernen.
10. Inspektion: Überprüfen Sie das Windenseil vor und nach jedem
Gebrauch auf Anzeichen von Abnutzung oder Beschädigung.
11. Lagerung: Bewahren Sie das Windenseil bei Nichtgebrauch an einem
trockenen, sauberen Ort ohne direkte Sonneneinstrahlung auf.
12. Austausch: Ersetzen Sie das Windenseil sofort, wenn Sie einen

- 8 -
erheblichen Verschleiß oder eine Beschädigung feststellen.


- 2 -
Tecnico Supporto e certificato di garanzia elettronica
www.vevor.com/support
CAVO DELL'ARGANO
We continue to be committed to provide you tools with competitive price.
"Save Half", "Half Price" or any other similar expressions used by us only represents an
estimate of savings you might benefit from buying certain tools with us compared to the major
top brands and does not necessarily mean to cover all categories of tools offered by us. You
are kindly reminded to verify carefully when you are placing an order with us if you are
actually saving half in comparison with the top major brands.
- 1 -
JLGS9.5-15
JLGS9.5-23
JLGS9.5-30
Have product questions? Need technical support? Please feel free to
contact us:
Technical Support and E-Warranty Certificate
www.vevor.com/support
NEED HELP? CONTACT US!
This is the original instruction, please read all manual instructions
carefully before operating. VEVOR reserves a clear interpretation of our
user manual. The appearance of the product shall be subject to the
product you received. Please forgive us that we won't inform you again if
there are any technology or software updates on our product.
JLWR12-28
JLWR9.5-30
JLWR9.5-26
JLWR6-15
JLWR5-15
Winch Cable
- 2 -
IMPORTANT SAFETY INSTRUCTIONS
Avvertenza - Per ridurre il rischio di lesioni, l'utente deve leggere
attentamente il manuale di istruzioni.
Questo simbolo, posto prima di un commento sulla sicurezza,
indica un tipo di precauzione, avvertenza o pericolo. Ignorare
questo avvertimento potrebbe provocare un incidente. Per ridurre il
rischio di lesioni, incendio o elettrocuzione, seguire sempre le
raccomandazioni riportate di seguito.
Avvertenza: assicurarsi di indossare protezioni per gli occhi
quando si utilizza questo prodotto.
Avvertenza: assicurarsi di indossare guanti quando si utilizza
questo prodotto.
16. WARNING!
Prima di utilizzare la fune del verricello, leggere e comprendere tutte le
istruzioni e le avvertenze di sicurezza. L'uso improprio può provocare
lesioni gravi o danni materiali.
19. Indossare sempre adeguati dispositivi di protezione individuale prima
di azionare la fune del verricello, inclusi ma non limitati a guanti protettivi,
occhiali di sicurezza e calzature antiscivolo.
20. Assicurarsi che tutti gli operatori siano adeguatamente addestrati e
comprendano il corretto utilizzo della fune del verricello.
21. Ispezionare regolarmente l'integrità della fune e del verricello;
qualsiasi segno di usura, danno o corrosione deve essere risolto
immediatamente.
22. Non superare il limite di capacità di carico sicuro della fune del
verricello.
23. Assicurarsi che la fune del verricello non si avvolga attorno a oggetti
taglienti o caldi durante l'uso.
24. Mantenere l'area intorno alla fune del verricello libera e priva di
ostacoli durante l'uso.

- 3 -
CONSERVA QUESTE ISTRUZIONI
17. Product Description
cavo del verricello s sono realizzati in acciaio o polietilene ad alta
resistenza , progettato per fornire una soluzione affidabile per una varietà
di esigenze di sollevamento e traino. Questo manuale spiega come
installare correttamente un cavo sintetico su un verricello. Una corretta
installazione garantisce che il cavo del verricello funzionerà al meglio e
manterrà il cavo del verricello.
18. Product Parameter
19. Assembly Methods on a winch
FASE 1: ISPEZIONE DEL VERRICELLO
Dopo aver rimosso il cavo d'acciaio e il
passacavo a rullo dal verricello, è una
buona idea ispezionare il tamburo per
assicurarsi che non vi sia nulla di tagliente
che possa danneggiare la fune dopo averla
inserita. Assicurarsi che il tamburo non
presenti sbavature o sgorbie taglienti
poiché è noto che la fune metallica di
- 4 -
acciaio danneggia il tamburo. In tal caso,
limare/carteggiare eventuali bordi taglienti
fino a quando la superficie del tamburo non
è liscia.
FASE 2: ISPEZIONARE IL PASSACAVO
È necessario completare l'installazione di un nuovo passacavo prima di
avvolgere la fune. I passacavi in alluminio funzionano molto bene con le
linee sintetiche del verricello poiché forniscono una superficie liscia che
non danneggia la fune. Molti passacavi in acciaio fuso non hanno una
superficie sufficientemente liscia per la corda sintetica e non sono
consigliati. I passacavi a rulli in acciaio sono perfetti da usare; assicurati
solo che i rulli siano lisci e non sbavati o sgorbiati. Assicurarsi inoltre che i
rulli si sovrappongano tra loro poiché alcuni passacavi a rulli più vecchi non
hanno rulli sovrapposti e presentano uno spazio nell'angolo del passacavo.
La fune del verricello potrebbe impigliarsi in questa fessura durante l'uso e
danneggiarsi.
Indipendentemente dal tipo di passacavo, è necessario assicurarsi che ci
sia spazio sufficiente tra l'apertura del passacavo e i bordi della piastra di
montaggio. Come mostrato nei diagrammi precedenti, si consiglia uno
spazio libero compreso tra 3/8" e 1/2". Senza questo, la fune del verricello
potrebbe tagliarsi sul bordo affilato della piastra del passacavo.

- 5 -
FASE 3: VERIFICARE IL TIPO DI ATTACCO DEL TAMBURO
Prima di rimuovere la vecchia fune dal
verricello, dai un'occhiata a come era fissata al
tamburo. La maggior parte dei verricelli
fuoristrada avrà un foro filettato sulla flangia del
tamburo a cui collegare una fune metallica o
una linea sintetica del verricello con un bullone
a brugola con testa a bottone .
FASE 4: DISPOSIZIONE DELLA LINEA
DEL VERRICELLO
Prima di iniziare ad avvolgere il cavo del
verricello sul verricello è una buona idea
svolgerlo e stenderlo a terra. Ciò semplifica
l'avvolgimento del filo.
FASE 5: COLLEGARE LA LINEA DEL VERRICELLO AL TAMBURO
DEL VERRICELLO
- 6 -
5.1 Inserire l'estremità terminale della fune
del verricello attraverso il passacavo e far
passare la fune del verricello sotto il
tamburo e sopra fino al punto di montaggio.
Utilizzando il metodo corretto sopra,
collega la fune del verricello al tamburo del
verricello.
5.2 Tutte le linee del verricello Master Pull
sono dotate di una protezione termica che
copre la fune sul primo avvolgimento del
tamburo. È importante utilizzare questa
protezione sul primo avvolgimento attorno
al tamburo poiché protegge dall'abrasione
e dal potenziale calore proveniente dal
tamburo.
PASSO 6: INIZIARE L'AVVOLGIMENTO DELLA LINEA DEL
VERRICELLO SUL TAMBURO
24.1 Tenendo le mani lontane dal
verricello, guidare la fune assicurandosi
che gli avvolgimenti siano puliti e stretti. A
questo punto è utile avere due persone,
una che guida la fune e l'altra che aziona i
comandi del verricello.
- 7 -
24.2 La copertura termica arancione
dovrebbe attraversare tutto il tamburo ed è
molto importante avere sempre uno strato
completo di corda sul tamburo del
verricello durante il sollevamento del
verricello per garantire che la fune del
verricello rimanga attaccata al verricello.
L'attrito degli avvolgimenti è ciò che
mantiene la fune attaccata al verricello.
PASSO 7: FINITO!
Qui potete vedere il prodotto finito. È
buona norma svolgere l'intera fune del
verricello dopo ogni utilizzo e riavvolgerla
correttamente.
20. Maintenance and Trouble shooting
13. Pulizia: pulire regolarmente la fune del verricello per rimuovere sporco
e detriti.
14. Ispezione: controllare la fune del verricello per eventuali segni di
usura o danni prima e dopo ogni utilizzo.
15. Conservazione: quando non in uso, conservare la fune del verricello
in un luogo asciutto e pulito, lontano dalla luce solare diretta.
16. Sostituzione: Sostituire immediatamente la fune del verricello se si
riscontrano segni di usura o danni significativi.


- 2 -
Técnico Certificado de soporte y garantía electrónica
www.vevor.com/support
CABLE DEL CABRESTANTE
We continue to be committed to provide you tools with competitive price.
"Save Half", "Half Price" or any other similar expressions used by us only represents an
estimate of savings you might benefit from buying certain tools with us compared to the major
top brands and does not necessarily mean to cover all categories of tools offered by us. You
are kindly reminded to verify carefully when you are placing an order with us if you are
actually saving half in comparison with the top major brands.

- 1 -
JLGS9.5-15
JLGS9.5-23
JLGS9.5-30
Have product questions? Need technical support? Please feel free to
contact us:
Technical Support and E-Warranty Certificate
www.vevor.com/support
NEED HELP? CONTACT US!
This is the original instruction, please read all manual instructions
carefully before operating. VEVOR reserves a clear interpretation of our
user manual. The appearance of the product shall be subject to the
product you received. Please forgive us that we won't inform you again if
there are any technology or software updates on our product.
JLWR12-28
JLWR9.5-30
JLWR9.5-26
JLWR6-15
JLWR5-15
Winch Cable
- 2 -
IMPORTANT SAFETY INSTRUCTIONS
Advertencia: para reducir el riesgo de lesiones, el usuario debe
leer atentamente el manual de instrucciones.
Este símbolo, colocado antes de un comentario de seguridad,
indica un tipo de precaución, advertencia o peligro. Ignorar esta
advertencia puede provocar un accidente. Para reducir el riesgo
de lesiones, incendio o electrocución, siga siempre las
recomendaciones que se muestran a continuación.
Advertencia: asegúrese de usar protectores para los ojos cuando
utilice este producto.
Advertencia: asegúrese de usar guantes cuando utilice este
producto.
21. WARNING!
Antes de utilizar la cuerda del cabrestante, lea y comprenda todas las
instrucciones y advertencias de seguridad. El uso inadecuado puede
provocar lesiones graves o daños a la propiedad.
25. Utilice siempre equipo de protección personal adecuado antes de
operar el cable del cabrestante, incluidos, entre otros, guantes protectores,
gafas de seguridad y calzado antideslizante.
26. Asegúrese de que todos los operadores estén capacitados
adecuadamente y comprendan el uso correcto del cable del cabrestante.
27. Inspeccione periódicamente la integridad del cable del cabrestante y
del cabrestante; cualquier signo de desgaste, daño o corrosión debe
abordarse de inmediato.
28. No exceda el límite de capacidad de carga segura del cable del
cabrestante.
29. Asegúrese de que la cuerda del cabrestante no se enrolle alrededor
de ningún objeto afilado o caliente durante el uso.
30. Mantenga el área alrededor del cable del cabrestante despejada y
libre de obstáculos cuando esté en uso.
- 3 -
GUARDA ESTAS INSTRUCCIONES
22. Product Description
Nuestros cables de cabrestante Están fabricados en acero o polietileno de
alta resistencia. , diseñado para proporcionar una solución confiable para
una variedad de necesidades de elevación y remolque. Este manual
explica cómo instalar correctamente un cable de cabrestante sintético en
un cabrestante. La instalación adecuada garantiza que el cable del
cabrestante funcionará al máximo y mantendrá el cable del cabrestante.
23. Product Parameter
24. Assembly Methods on a winch
PASO 1: INSPECCIÓN DEL
CABRESTANTE
Después de haber quitado el cable de
acero y el pasacables del cabrestante, es
una buena idea inspeccionar el tambor
para asegurarse de que no haya nada
afilado que pueda dañar la cuerda después
de colocarla. Asegúrese de que el tambor
no tenga rebabas ni hendiduras afiladas,
- 4 -
ya que se sabe que el cable de acero daña
el tambor. Si es así, lime/lije los bordes
afilados hasta que la superficie del tambor
esté limpia.
PASO 2: INSPECCIONE EL PASO
Es necesario completar la instalación de un nuevo pasacables antes de
enrollar la cuerda. Los pasacables de aluminio funcionan muy bien con
líneas de cabrestante sintéticas, ya que proporcionan una superficie lisa
que no daña la cuerda. Muchos pasacables de acero fundido no tienen
una superficie lo suficientemente lisa para cuerdas sintéticas y no se
recomiendan. Las guías de rodillos de acero se pueden usar
perfectamente; solo asegúrese de que los rodillos estén lisos y sin
rebabas ni ranuras. También asegúrese de que los rodillos se
superpongan entre sí, ya que algunos pasacables de rodillos más antiguos
no tienen rodillos superpuestos y tienen un espacio en la esquina del
pasacables. Un cable de cabrestante podría quedar atrapado en este
espacio durante el uso y dañarse.
Independientemente del tipo de guía, usted debe asegurarse de que haya
suficiente espacio entre la abertura de la guía y los bordes de la placa de
montaje. Como se muestra en los diagramas anteriores, recomendamos
un espacio libre de al menos 3/8" a 1/2". Sin esto, la línea del cabrestante
puede cortarse en el borde afilado de la placa del pasacables.
- 5 -
PASO 3: VERIFICAR EL TIPO DE ACCESORIO DEL TAMBOR
Antes de quitar la línea vieja de su cabrestante,
observe cómo estaba unida al tambor. La
mayoría de los cabrestantes todoterreno
tendrán un orificio roscado en la brida del
tambor al que se fija un cable metálico o una
línea de cabrestante sintética con un perno
Allen con cabeza de botón .
PASO 4: DISEÑAR LA LÍNEA DEL
CABRESTANTE
Antes de comenzar a enrollar el cable del
cabrestante, es una buena idea
desenrollarlo y colocarlo en el suelo. Esto
hace que sea más fácil enrollar el hilo.
PASO 5: CONECTE LA LÍNEA DEL CABRESTANTE AL TAMBOR DEL
CABRESTANTE
- 6 -
5.1 Inserte el extremo terminal de la línea
del cabrestante a través del pasacables y
pase la línea del cabrestante por debajo
del tambor y por encima hasta el punto de
montaje. Usando el método correcto
anterior, conecte la línea del cabrestante al
tambor del cabrestante.
5.2 Todas las líneas de cabrestante Master
Pull vienen con un protector térmico que
cubre el cable en la primera envoltura del
tambor. Es importante utilizar este
protector en la primera vuelta alrededor del
tambor, ya que protege contra la abrasión y
el calor potencial del tambor.
PASO 6: COMIENCE A ENROLLAR LA LÍNEA DEL CABRESTANTE EN
EL TAMBOR
30.1 Manteniendo las manos alejadas del
cabrestante, guíe la cuerda asegurándose
de que las vueltas estén limpias y
apretadas. Es útil tener dos personas en
este punto, una para guiar la cuerda hacia
adentro y otra para manejar los controles
del cabrestante.
- 7 -
30.2 La cubierta térmica naranja debe
atravesar todo el tambor y es muy
importante tener siempre una capa
completa de cuerda en el tambor del
cabrestante mientras se acciona el
cabrestante para garantizar que la línea
del cabrestante permanezca unida al
cabrestante. La fricción de las vueltas es lo
que mantiene la cuerda unida al
cabrestante.
PASO 7: ¡TERMINADO!
Aquí puedes ver el producto terminado. Es
una buena práctica desenrollar toda la
línea del cabrestante después de cada uso
y volver a enrollarla correctamente.
25. Maintenance and Trouble shooting
17. Limpieza: Limpie periódicamente el cable del cabrestante para
eliminar la suciedad y los residuos.
18. Inspección: revise el cable del cabrestante para detectar signos de
desgaste o daños antes y después de cada uso.
19. Almacenamiento: Cuando no esté en uso, guarde la cuerda del
cabrestante en un lugar seco y limpio, alejado de la luz solar directa.
20. Reemplazo: Reemplace el cable del cabrestante inmediatamente si
descubre un desgaste o daño significativo.


- 2 -
Techniczny Certyfikat wsparcia i e-gwarancji
www.vevor.com/support
KABEL WYCIĄGARKI
We continue to be committed to provide you tools with competitive price.
"Save Half", "Half Price" or any other similar expressions used by us only represents an
estimate of savings you might benefit from buying certain tools with us compared to the major
top brands and does not necessarily mean to cover all categories of tools offered by us. You
are kindly reminded to verify carefully when you are placing an order with us if you are
actually saving half in comparison with the top major brands.

- 1 -
JLGS9.5-15
JLGS9.5-23
JLGS9.5-30
Have product questions? Need technical support? Please feel free to
contact us:
Technical Support and E-Warranty Certificate
www.vevor.com/support
NEED HELP? CONTACT US!
This is the original instruction, please read all manual instructions
carefully before operating. VEVOR reserves a clear interpretation of our
user manual. The appearance of the product shall be subject to the
product you received. Please forgive us that we won't inform you again if
there are any technology or software updates on our product.
JLWR12-28
JLWR9.5-30
JLWR9.5-26
JLWR6-15
JLWR5-15
Winch Cable
- 2 -
IMPORTANT SAFETY INSTRUCTIONS
Ostrzeżenie — aby zmniejszyć ryzyko obrażeń, użytkownik musi
uważnie przeczytać instrukcję obsługi.
Ten symbol, umieszczony przed uwagą dotyczącą
bezpieczeństwa, oznacza rodzaj środka ostrożności, ostrzeżenia
lub niebezpieczeństwa. Zignorowanie tego ostrzeżenia może
prowadzić do wypadku. Aby zmniejszyć ryzyko obrażeń, pożaru
lub porażenia prądem, należy zawsze przestrzegać zaleceń
przedstawionych poniżej.
Ostrzeżenie — podczas korzystania z tego produktu należy nosić
okulary ochronne.
Ostrzeżenie — podczas korzystania z tego produktu należy nosić
rękawiczki.
26. WARNING!
Przed użyciem liny wyciągarki należy przeczytać i zrozumieć wszystkie
instrukcje i ostrzeżenia dotyczące bezpieczeństwa. Niewłaściwe użycie
może spowodować poważne obrażenia lub uszkodzenie mienia.
31. Przed przystąpieniem do obsługi liny wciągarki należy zawsze nosić
odpowiedni sprzęt ochrony osobistej, w tym między innymi rękawice
ochronne, okulary ochronne i obuwie antypoślizgowe.
32. Upewnij się, że wszyscy operatorzy są odpowiednio przeszkoleni i
rozumieją prawidłowe użycie liny wciągarki.
33. Regularnie sprawdzaj integralność liny wciągarki i wciągarki; należy
natychmiast usunąć wszelkie oznaki zużycia, uszkodzenia lub korozji.
34. Nie przekraczaj dopuszczalnego obciążenia liny wciągarki.
35. Upewnij się, że lina wciągarki nie owija się podczas użytkowania wokół
ostrych lub gorących przedmiotów.
36. Podczas użytkowania obszar wokół liny wciągarki powinien być czysty
i wolny od przeszkód.
- 3 -
ZACHOWAJ TE INSTRUKCJE
27. Product Description
Nasza linka do wyciągarki s wykonane są ze stali lub polietylenu o
wysokiej wytrzymałości , zaprojektowany, aby zapewnić niezawodne
rozwiązanie dla różnych potrzeb związanych z podnoszeniem i
holowaniem. Niniejsza instrukcja wyjaśnia, jak prawidłowo zainstalować
syntetyczny kabel wciągarki na wciągarce. Właściwa instalacja gwarantuje,
że lina wciągarki będzie działać najlepiej i utrzyma linę wciągarki.
28. Product Parameter
29. Assembly Methods on a winch
KROK 1: KONTROLA WCIĄGARKI
Po zdjęciu stalowej liny i prowadnicy
rolkowej z wciągarki dobrze jest sprawdzić
bęben, aby upewnić się, że nie ma w nim
żadnych ostrych przedmiotów, które
mogłyby uszkodzić linę po jej założeniu.
Upewnij się, że bęben nie ma żadnych
ostrych zadziorów ani wgłębień, ponieważ
wiadomo, że lina stalowa może uszkodzić
bęben. Jeśli tak, spiłuj/zeszlifuj wszelkie

- 4 -
ostre krawędzie, aż powierzchnia bębna
będzie równa.
KROK 2: SPRAWDŹ SZYBĘ
Montaż nowej liny należy zakończyć przed nawinięciem liny. Aluminiowe
kipy kluzowe bardzo dobrze współpracują z syntetycznymi linkami do
kabestanów, ponieważ zapewniają gładką powierzchnię, która nie
uszkodzi liny. Wiele prowadników ze staliwa nie ma wystarczająco gładkiej
powierzchni dla lin syntetycznych i nie są one zalecane. Stalowe
prowadnice rolkowe doskonale nadają się do użycia; upewnij się tylko, że
rolki są gładkie i nie mają zadziorów ani wybrzuszeń. Upewnij się także, że
rolki zachodzą na siebie, ponieważ niektóre starsze prowadnice rolek nie
mają zachodzących na siebie rolek i mają szczelinę w rogu prowadnicy.
Lina wciągarki może podczas użytkowania zostać wciągnięta w tę
szczelinę i ulec uszkodzeniu.
Niezależnie od rodzaju kipy, należy zadbać o wystarczający prześwit
pomiędzy otworem kipy a krawędziami płyty montażowej. Jak pokazano na
powyższych schematach, zalecamy prześwit wynoszący co najmniej 3/8”
do 1/2”. Bez tego lina wyciągarki może zostać przecięta na ostrej krawędzi
kipy.

- 5 -
KROK 3: SPRAWDŹ TYP MOCOWANIA BĘBNA
Zanim zdejmiesz starą linkę z wyciągarki,
spójrz, jak została przymocowana do bębna.
Większość wciągarek terenowych ma
gwintowany otwór w kołnierzu bębna, do
którego można przymocować linę stalową lub
syntetyczną linkę wciągarki za pomocą śruby z
łbem kulistym A.
KROK 4: UŁOŻENIE LINII WCIĄGARKI
Zanim zaczniesz nawijać linę wyciągarki na
wyciągarkę, dobrze jest ją rozwinąć i
położyć na ziemi. Ułatwia to nawijanie żyłki.
KROK 5: PRZYMOCOWAĆ LINĘ WCIĄGARKI DO BĘBNA WCIĄGARKI
- 6 -
5.1 Przełóż końcowy koniec liny wyciągarki
przez kipę i poprowadź linkę wyciągarki
pod bębnem i od góry do punktu
mocowania. Korzystając z powyższej
prawidłowej metody, przymocuj linę
wciągarki do bębna wciągarki.
5.2 Wszystkie liny wyciągarki Master Pull
są wyposażone w osłonę termiczną, która
zakrywa linę na pierwszym owinięciu
bębna. Ważne jest, aby zastosować tę
osłonę przy pierwszym owinięciu bębna,
ponieważ chroni ona przed ścieraniem i
potencjalnym ciepłem z bębna.
KROK 6: ROZPOCZNIJ NAWIJANIE LINII WCIĄGARKI NA BĘBEN
36.1 Trzymając ręce z dala od wciągarki,
poprowadź linę, upewniając się, że owijki
są schludne i ciasne. Pomocne jest, aby na
tym etapie były dwie osoby, jedna do
prowadzenia liny, a druga do obsługi
elementów sterujących wciągarki.
- 7 -
36.2 Pomarańczowa osłona termiczna
powinna przebiegać przez cały bęben.
Bardzo ważne jest, aby podczas wciągania
zawsze mieć pełną warstwę liny na bębnie
wciągarki, aby mieć pewność, że lina
wciągarki pozostanie przymocowana do
wciągarki. Tarcie powodowane przez owijki
utrzymuje linę przymocowaną do
wciągarki.
KROK 7: GOTOWE!
Tutaj możesz zobaczyć gotowy produkt.
Dobrą praktyką jest odwijanie całej linki
wyciągarki po każdym użyciu i prawidłowe
jej nawijanie.
30. Maintenance and Trouble shooting
21. Czyszczenie: Regularnie czyść linę wciągarki, aby usunąć brud i
zanieczyszczenia.
22. Kontrola: Przed i po każdym użyciu należy sprawdzić linę wciągarki
pod kątem oznak zużycia lub uszkodzenia.
23. Przechowywanie: Kiedy nie używasz wyciągarki, przechowuj linę w
suchym, czystym miejscu, z dala od bezpośredniego światła słonecznego.
24. Wymiana: W przypadku stwierdzenia znacznego zużycia lub
uszkodzenia należy natychmiast wymienić linę wciągarki.


- 2 -
Technisch Ondersteuning en e-garantiecertificaat
www.vevor.com/support
LIER KABEL
We continue to be committed to provide you tools with competitive price.
"Save Half", "Half Price" or any other similar expressions used by us only represents an
estimate of savings you might benefit from buying certain tools with us compared to the major
top brands and does not necessarily mean to cover all categories of tools offered by us. You
are kindly reminded to verify carefully when you are placing an order with us if you are
actually saving half in comparison with the top major brands.

- 1 -
JLGS9.5-15
JLGS9.5-23
JLGS9.5-30
Have product questions? Need technical support? Please feel free to
contact us:
Technical Support and E-Warranty Certificate
www.vevor.com/support
NEED HELP? CONTACT US!
This is the original instruction, please read all manual instructions
carefully before operating. VEVOR reserves a clear interpretation of our
user manual. The appearance of the product shall be subject to the
product you received. Please forgive us that we won't inform you again if
there are any technology or software updates on our product.
JLWR12-28
JLWR9.5-30
JLWR9.5-26
JLWR6-15
JLWR5-15
Winch Cable

- 2 -
IMPORTANT SAFETY INSTRUCTIONS
Waarschuwing - Om het risico op letsel te verminderen, moet de
gebruiker de handleiding zorgvuldig lezen.
Dit symbool, geplaatst vóór een veiligheidsopmerking, duidt op
een soort voorzorgsmaatregel, waarschuwing of gevaar. Het
negeren van deze waarschuwing kan tot een ongeval leiden. Om
het risico op letsel, brand of elektrocutie te verminderen, dient u
altijd de onderstaande aanbevelingen op te volgen.
Waarschuwing- Zorg ervoor dat u oogbeschermers draagt
wanneer u dit product gebruikt.
Waarschuwing- Zorg ervoor dat u handschoenen draagt wanneer
u dit product gebruikt.
31. WARNING!
Voordat u de lierkabel gebruikt, dient u alle instructies en
veiligheidswaarschuwingen te lezen en te begrijpen. Onjuist gebruik kan
leiden tot ernstig letsel of materiële schade.
37. Draag altijd de juiste persoonlijke beschermingsmiddelen voordat u de
lierkabel bedient, inclusief maar niet beperkt tot beschermende
handschoenen, een veiligheidsbril en antislipschoenen.
38. Zorg ervoor dat alle operators goed zijn opgeleid en het juiste gebruik
van de lierkabel begrijpen.
39. Inspecteer regelmatig de integriteit van de lierkabel en de lier;
eventuele tekenen van slijtage, schade of corrosie moeten onmiddellijk
worden aangepakt.
40. de veilige draagkrachtlimiet van de lierkabel niet .
41. Zorg ervoor dat de lierkabel tijdens gebruik niet rond scherpe of hete
voorwerpen wikkelt.
42. Houd het gebied rond de lierkabel tijdens gebruik vrij en vrij van
obstakels.

- 3 -
BEWAAR DEZE INSTRUCTIES
32. Product Description
Onze lierkabels _ zijn vervaardigd uit staal of hoogwaardig polyethyleen ,
ontworpen om een betrouwbare oplossing te bieden voor een
verscheidenheid aan hef- en sleepbehoeften. In deze handleiding wordt
uitgelegd hoe u een kunststof lierkabel op de juiste manier op een lier
installeert. Een juiste installatie zorgt ervoor dat uw lierkabel optimaal
presteert en de lierkabel behoudt.
33. Product Parameter
34. Assembly Methods on a winch
STAP 1: LIERINSPECTIE
Nadat u de staalkabel en de rolgeleider
van uw lier heeft verwijderd, is het een
goed idee om de trommel te inspecteren
om er zeker van te zijn dat er niets scherps
is dat het touw kan beschadigen nadat het
is aangebracht. Zorg ervoor dat de trommel
geen scherpe bramen of groeven heeft,
aangezien het bekend is dat staalkabel de
trommel beschadigt. Als dit het geval is,
- 4 -
vijl/schuur dan eventuele scherpe randen
af tot het trommeloppervlak aanwezig is.
STAP 2: INSPECTEER DE FAIRLEAD
Het installeren van een nieuwe draadleider moet worden voltooid voordat
het touw wordt opgespoeld. Aluminium kabelgeleiders werken heel goed
met synthetische lierlijnen, omdat ze een glad oppervlak bieden dat het
touw niet beschadigt. Veel kabelgeleiders van gegoten staal hebben een
niet glad genoeg oppervlak voor synthetisch touw en worden niet
aanbevolen. Stalen rolgeleiders zijn prima te gebruiken; Zorg er wel voor
dat de rollen glad zijn en niet afgebraamd of ingekerfd. Zorg er ook voor
dat de rollen elkaar overlappen, aangezien sommige oudere rolgeleiders
geen overlappende rollen hebben en een opening in de hoek van de
draadgeleider hebben. Een lierlijn kan tijdens gebruik in deze opening vast
komen te zitten en beschadigd raken.
Ongeacht het type kabelgeleider wilt u ervoor zorgen dat er voldoende
speling is tussen de opening van de kabelgeleider en de randen van de
montageplaat. Zoals weergegeven in de bovenstaande diagrammen,
raden wij een vrije ruimte van ten minste 3/8" tot 1/2" aan. Zonder dit kan
de lierlijn op de scherpe rand van de kabelgeleiderplaat worden
doorgesneden.

- 5 -
STAP 3: CONTROLEER HET TYPE DRUMBEVESTIGING
Voordat u de oude lijn van uw lier verwijdert,
moet u eerst kijken hoe deze aan de trommel is
bevestigd. De meeste offroad-lieren hebben
een gat met schroefdraad op de trommelflens
waaraan u een staalkabel of synthetische lierlijn
bevestigt met een bolkop- inbusbout .
STAP 4: LEERLIJN UITLEGGEN
Voordat u begint met het oprollen van de
lierkabel op de lier, is het een goed idee om
deze af te rollen en op de grond te leggen.
Dit maakt het gemakkelijker om de lijn op te
spoelen.
STAP 5: BEVESTIG DE LIERLIJN AAN DE LIERTROMMEL
- 6 -
5.1 Steek het uiteinde van de lierkabel door
de kabelgeleider en voer de lierkabel onder
de trommel en over de bovenkant naar het
montagepunt. Gebruik de juiste methode
hierboven om uw lierlijn aan uw liertrommel
te bevestigen.
5.2 Alle Master Pull-lierlijnen worden
geleverd met een hittebeschermer die het
touw op de eerste trommelwikkeling
bedekt. Het is belangrijk om deze
beschermkap te gebruiken bij de eerste
wikkeling rond de trommel, omdat deze
beschermt tegen slijtage en mogelijke hitte
van de trommel.
STAP6: START MET HET SPOELEN VAN DE LIERLIJN OP DE
TROMMEL
42.1 Houd uw handen uit de buurt van de
lier en geleid het touw zodat de
wikkelingen netjes en strak zitten. Het is
handig om op dit punt twee mensen te
hebben, één om het touw naar binnen te
leiden en één om de lierbedieningen te
bedienen.

- 7 -
42.2 De oranje hittebekleding moet
helemaal over de trommel lopen en het is
erg belangrijk om tijdens het lieren altijd
een volledige laag touw op de liertrommel
te hebben om ervoor te zorgen dat de
lierlijn aan de lier vast blijft zitten. De
wrijving van de wikkelingen zorgt ervoor
dat het touw aan de lier blijft zitten.
STAP7: KLAAR!
Hier kunt u het eindproduct zien. Het is een
goede gewoonte om na elk gebruik de
gehele lierlijn af te spoelen en op de juiste
manier weer op te spoelen.
35. Maintenance and Trouble shooting
25. Reiniging: Maak de lierkabel regelmatig schoon om vuil en puin te
verwijderen.
26. Inspectie: Controleer de lierkabel voor en na elk gebruik op tekenen
van slijtage of beschadiging.
27. Opslag: Wanneer u de lierkabel niet gebruikt, bewaar deze dan op
een droge, schone plaats en niet in direct zonlicht.
28. Vervanging: Vervang de lierkabel onmiddellijk als er aanzienlijke
slijtage of schade wordt ontdekt.


- 2 -
Teknisk Support och e-garanticertifikat
www.vevor.com/support
VINSCHKABEL
We continue to be committed to provide you tools with competitive price.
"Save Half", "Half Price" or any other similar expressions used by us only represents an
estimate of savings you might benefit from buying certain tools with us compared to the major
top brands and does not necessarily mean to cover all categories of tools offered by us. You
are kindly reminded to verify carefully when you are placing an order with us if you are
actually saving half in comparison with the top major brands.

- 1 -
JLGS9.5-15
JLGS9.5-23
JLGS9.5-30
Have product questions? Need technical support? Please feel free to
contact us:
Technical Support and E-Warranty Certificate
www.vevor.com/support
NEED HELP? CONTACT US!
This is the original instruction, please read all manual instructions
carefully before operating. VEVOR reserves a clear interpretation of our
user manual. The appearance of the product shall be subject to the
product you received. Please forgive us that we won't inform you again if
there are any technology or software updates on our product.
JLWR12-28
JLWR9,5-30
JLWR9,5-26
JLWR6-15
JLWR5-15
Winch Cable
- 2 -
IMPORTANT SAFETY INSTRUCTIONS
Varning - För att minska risken för skada måste användaren läsa
bruksanvisningen noggrant.
Denna symbol, placerad före en säkerhetskommentar, indikerar en
slags försiktighetsåtgärd, varning eller fara. Att ignorera denna
varning kan leda till en olycka. För att minska risken för skada,
brand eller elstöt, följ alltid rekommendationerna nedan .
Varning- Var noga med att bära ögonskydd när du använder
denna produkt.
Varning- Var noga med att bära handskar när du använder denna
produkt.
36. WARNING!
Innan du använder vinschlinan ska du läsa och förstå alla instruktioner och
säkerhetsvarningar. Felaktig användning kan leda till allvarliga skador eller
skador på egendom.
43. Bär alltid lämplig personlig skyddsutrustning innan du använder
vinschlinan, inklusive men inte begränsat till skyddshandskar,
skyddsglasögon och halkskydd.
44. Se till att alla operatörer är ordentligt utbildade och förstår den korrekta
användningen av vinschlinan.
45. Inspektera regelbundet integriteten hos vinschlinan och vinschen; alla
tecken på slitage, skador eller korrosion bör åtgärdas omedelbart.
46. Överskrid inte den säkra lastkapacitetsgränsen för vinschlinan .
47. Se till att vinschlinan inte lindas runt några vassa eller heta föremål
under användning.
48. Håll området runt vinschlinan rent och fritt från hinder när det används.
SPARA DESSA INSTRUKTIONER
- 3 -
37. Product Description
Vår vinschkabel s är tillverkade av stål eller höghållfast polyeten , designad
för att ge en pålitlig lösning för en mängd olika lyft- och bogseringsbehov.
Denna manual förklarar hur man korrekt installerar en syntetisk
vinschkabel på en vinsch. Korrekt installation säkerställer att din
vinschkabel presterar på bästa sätt och behåller vinschkabeln.
38. Product Parameter
39. Assembly Methods on a winch
STEG 1: INSPEKTION AV VINSCH
Efter att du har tagit bort stålvajern och
valsledningen från din vinsch, är det en bra
idé att inspektera trumman för att se till att
det inte finns något vasst som kan skada
repet efter att det sätts på. Se till att
trumman inte har några vassa grader eller
skåror eftersom stållina har varit känt för att
skada trumman. Om så är fallet, fila/slipa
ner eventuella vassa kanter tills trumytan
är.
STEG 2: INSPEKTERA FAIRLEAD
Installationen av en ny ledning måste slutföras innan du spolar på repet.
- 4 -
Aluminum hawse fairleads fungerar mycket bra med syntetiska vinschlinor
eftersom de ger en slät yta som inte skadar repet. Många gjutstål har inte
tillräckligt jämn yta för syntetrep och rekommenderas inte. Stålrullar är
perfekta att använda; Se bara till att rullarna är släta och inte är skurna eller
urgröpta. Se även till att rullarna överlappar varandra eftersom vissa äldre
rullar inte har överlappande rullar och har en glipa i hörnet på rullar. En
vinschlina kan fastna i detta gap under användning och skadas.
Oavsett typ av ledarledning vill du se till att det finns tillräckligt med fritt
utrymme mellan öppningen på linan och kanterna på monteringsplattan.
Som visas i diagrammen ovan rekommenderar vi minst 3/8" till 1/2"
spelrum. Utan detta kan vinschlinan skäras av på den vassa kanten av
blyplattan.

- 5 -
STEG 3: KONTROLLERA TYP FÖR TRUMMANS FÄSTNING
Innan du tar bort den gamla linan från din
vinsch, ta en titt på hur den var fäst vid
trumman. De flesta terrängvinschar kommer att
ha ett gängat hål på trumflänsen som du fäster
en stållina eller syntetisk vinschlina med en
knapphuvud A llen bult.
STEG 4: LÄGG UT VINSCHLINE
Innan du börjar rulla upp vinschvajern på
vinschen är det en bra idé att rulla upp den
och lägga ut den på marken. Detta gör det
lättare att spola linan på.
STEG 5: FÄSTA VINSCHLINAN PÅ VINSCHTRUMMA
5.1 För in ändänden av vinschlinan genom
linan och mata vinschlinan under trumman
och över toppen till monteringspunkten.
Använd rätt metod ovan, fäst din vinschlina
på din vinschtrumma.
5.2 Alla Master Pull vinschlinor kommer
med ett värmeskydd som täcker repet på
den första trumlindningen. Det är viktigt att
använda detta skydd på den första
lindningen runt trumman eftersom det
skyddar mot nötning och potentiell värme
från trumman.
- 6 -
STEG 6: BÖRJA SPOLLA VINSCHLINAN PÅ trumman
48.1 Håll händerna borta från vinschen,
styr repet för att se till att omslagen är
snygga och täta. Det är bra att ha två
personer vid denna tidpunkt, en för att
styra in repet och en för att styra
vinschreglagen.
48.2 Den orange värmebeläggningen ska
gå hela vägen över trumman och det är
mycket viktigt att alltid ha ett helt lager rep
på vinschtrumman under vinschningen för
att säkerställa att vinschlinan förblir fäst vid
vinschen. Friktionen från lindningarna är
det som håller repet fäst vid vinschen.
STEG 7: FÄRDIG!
Här kan du se den färdiga produkten. Det
är en god praxis att spola upp hela
vinschlinan efter varje användning och
spola om den ordentligt.
40. Maintenance and Trouble shooting
29. Rengöring: Rengör regelbundet vinschrepet för att ta bort smuts och
skräp.
30. Inspektion: Kontrollera vinschlinan för tecken på slitage eller skador
före och efter varje användning.
31. Förvaring: När den inte används, förvara vinschlinan på en torr, ren
plats utom direkt solljus.
32. Byte: Byt ut vinschlinan omedelbart om betydande slitage eller skador

- 7 -
upptäcks.