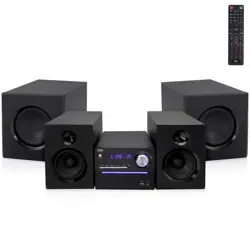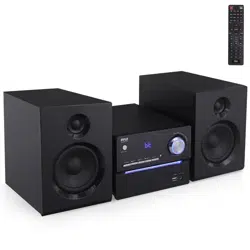
3-Piece Wireless BT Streaming
Stereo System
PHSKR20
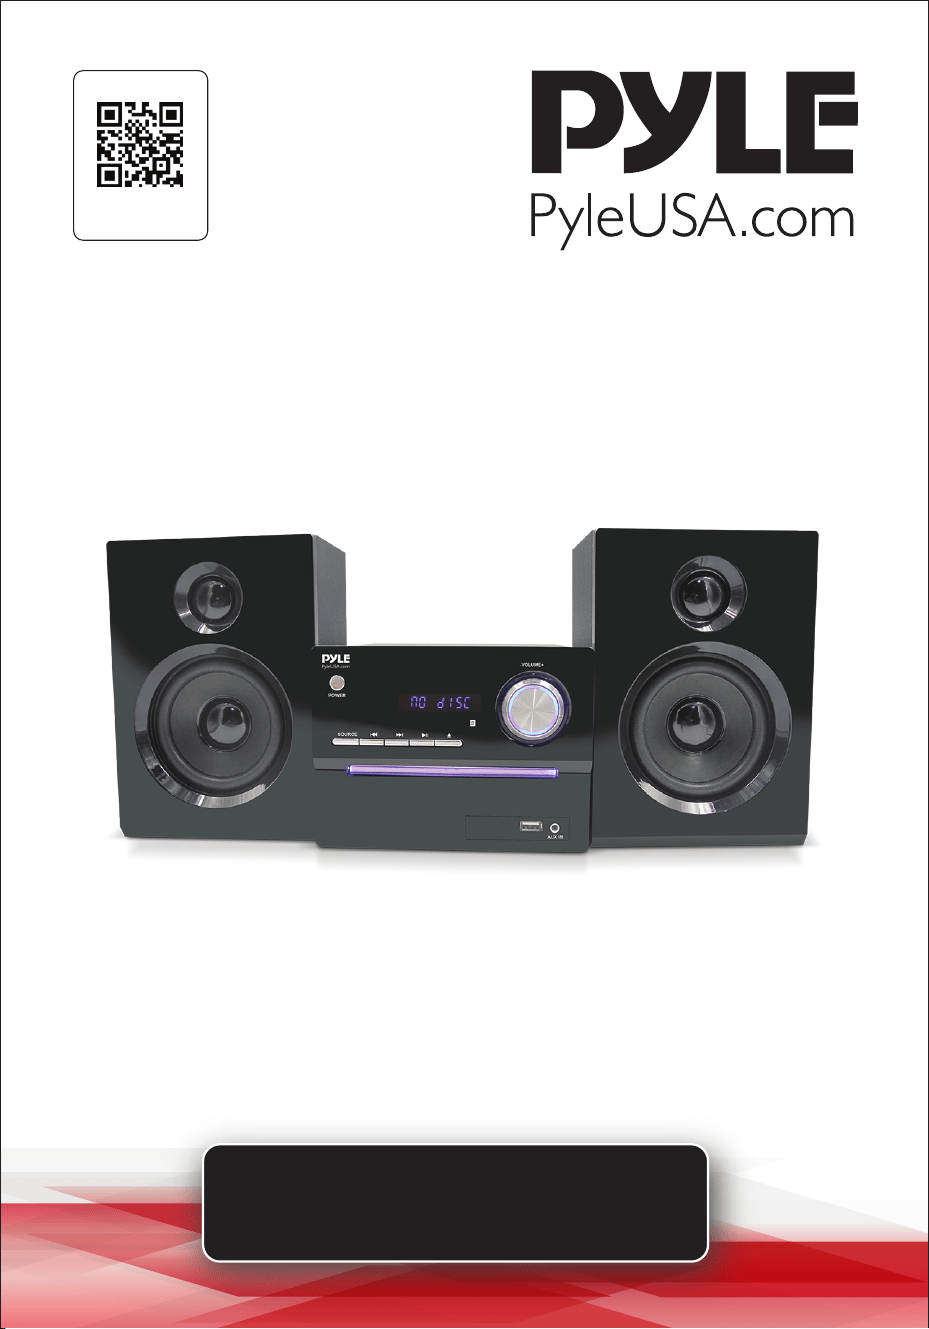
Visit Our Website
SCAN ME
PyleUSA.com
USER GUIDE
www.PyleUSA.com
2
READ ALL INSTRUCTIONS CAREFULLY BEFORE USING THIS PRODUCT.
RETAIN THIS OWNER’S MANUAL FOR FUTURE REFERENCE.
TABLE OF CONTENTS
FEATURES AND TECHNICAL SPECS
SAFETY INSTRUCTIONS
REMOTE CONTROL
FRONT PANEL
REAR PANEL
CONNECTIONS
SYSTEM SETUP FOR DVD MODE
REMOTE FUNCTIONS
HOW TO SEARCH
SYSTEM SETUP
TROUBLESHOOTING
COMMON OPERATION
REGISTER PRODUCT
California Prop 65 Warning
WARNING:
This product contains Nickel Carbonate which is known to the
state of California to cause cancer birth defects and
other reproductive harm. Do not ingest.
For more info go to: www.P65warnings.ca.gov
3
4
6
9
10
11
12
13
15
16
17
18
19

www.PyleUSA.com
3
Features:
•
Compatible with DIVX / MPEG4/ DVD/DVD-R/DVD+R/DVD+RW/CD/VCD/
SVCD/MP3/CD-R/CD-RW/JPEG
•Built-in FM Radio with USB Line in
•Digital Amplier IC for Strong Sound
•Produce Instant Boost Bass and Max Volume Performance
•With Bluetooth Function and HDMI Port With Bluetooth Function and HDMI Port
•Includes Two Stereo Speakers and a Subwoofer
•Compatible with Bluetooth-Enabled Devices
•Sleek and Modern Design with LED Indicator
•Featured with Equalizer Eects such as (Jazz, Class, Rock, Flat, and Pop)
•Two Microphone Inputs and Guitar Inputs
•Clear and Powerful Sound
•Convenient Control Unit with Remote Control
•Allows Easy Access to Volume, Bass, and Treble Controls
•Includes 3.5mm Aux-in and RCA Input
•Compact Size for Easy Placement
•Two-Way Wooden Speaker Box
Technical Specs:
•
Constructional Material: Plastic Front Body+Wooden Cabinet
•Power Output: 100 RMS - 400W P.M.P.O
•Impedance: 6 Ohm
•Frequency Response: 87.5-108Mhz
•Sensitivity (1w/1m): 650mV
•Signal Noise Ratio: 52dB
•T.H.D.: <10%
•Low Frequency: 120Hz-4KHz
•High Frequency: 4KHz-15KHz
•Wireless Microphone Range: Up to 60’ ft.
•Remote Control Battery Operated, Requires (2) x 'AAA' Batteries (not Included)
•Battery Type: UM-4 1.5V Dry Battery
•Maximum USB Flash Support: 32GB
•Power Supply: 110/220V
•Product Dimensions (L x W x H): 11.6’’ x 11’’ x 28’’ –inches

www.PyleUSA.com
4
Wireless Bluetooth Connectivity:
•
Hassle-Free Pairing, Simple Music Streaming
•Compatible with All of Today’s Latest Bluetooth Devices
(Smartphones, Tablets, Laptops, Computers, etc.)
•Bluetooth Version: 5.0V
•Bluetooth Network Name: ‘PyleUSA’
•Wireless Bluetooth Range: Up to 30.0’ ft.
What's in the Box:
•
BT Stereo System
•Remote Control
•AV Connection Cable
•Two Wireless Microphones
•Power Cord
FCC STATEMENT
This equipment has been tested and complies with the limits for a Class B digital device, per part
15 of the FCC Rules. These limits are designed to provide reasonable protection against harmful
interference in a residential installation. This equipment generates, uses, and can radiate radio
frequency energy, and if not installed and used per the instructions, may cause harmful
interference to radio communications. However, there is no guarantee that interference will not
occur in a specic installation. If this equipment does cause harmful interference to radio or
television reception, determined by turning the equipment o and on, the user is encouraged to
correct the interference with one or more of the following measures:
Reorient or relocate the receiving antenna.
Increase the distance between the equipment and the receiver. Connect the equipment to an
outlet on a dierent circuit from the one the receiver is connected to. Consult the dealer or an
experienced radio/TV technician for help.
Caution: Changes or modications not explicitly approved by the manufacturer could void your
authority to operate this equipment.
Compliance: This device complies with part 15 of the FCC Rules. Operation is subject to the
following conditions: (1) This device must not cause harmful interference, and (2) this device must
accept any interference received, including interference that may cause undesired operation.
RF Exposure Information:
The device meets general RF exposure requirements and can be used safely.
Safety Instructions
Basic Safety Requirements
1. Unplug the unit during lightning storms or when you do not intend to use it
for a long period of time.
2. To remove the plug from the electrical outlet, do not pull on the supply cable.
Grasp the plug rmly and pull to remove.

www.PyleUSA.com
5
3. If the supply cord is damaged in any way, it must be replaced by the
manufacturer, its service agent, or a similarly qualied person in order to
avoid a hazard.
4. Place the unit where there is good ventilation. Place it on a at, hard, and
stable surface.
5. Do not place the unit on a bed, sofa, rug, or similar surface as this may block
the ventilation openings.
6. Do not expose the unit to direct sunlight or place it in an abnormally hot
location.
7. Do not place the unit under a heavy object or in an unventilated place.
8. This product has no user-serviceable parts. Do not attempt to repair this
product yourself. Only qualied service personnel may service, repair, or
maintain this product. Take the unit to an authorized service center for
inspection and repair.
9. Due to the high risk of re or electric shock, do not expose this unit to rain or
moisture. Do not open the cabinet as dangerous high voltages are present
inside the enclosure. Only authorized service personnel may attempt to open
the cabinet.
10. There is a laser system inside this unit classied as CLASS 1 LASER PRODUCT.
Do not stare directly into the beam as this may harm your eyes.
11. If it is very cold, please place the unit in a warm room and turn the power
on for about an hour before using.
12. Always ensure that the product is unplugged from the electrical outlet
before moving or cleaning. Clean it with a soft cloth slightly moistened with
a mild detergent. Do not use any abrasive pads, scouring powder, or solvents
such as alcohol as they will damage the surface of the unit.
13. Do not use discs with scratches and/or deformities.
As a disc is rotated at a high speed, it is dangerous to play a broken or
deformed disc. Do not apply any tape or glue to the disc as this could lead
to damage to the player. Should there be a strange noise or vibration while
playing, if the picture or sound skips, or if the picture is distorted, stop the
player immediately.
Cracked Broken Deformed

www.PyleUSA.com
6
Remote Control Function Keys
Note: Use 2 x 'AAA' batteries (Not included). Keep away from children.
1. Standby/Power on/o switch: Press to open/close
the unit power. In this mode, the unit is still
consuming a small amount of power.
OPEN/CLOSE: Open/Close the disc tray.
2. Mute: Press to mute or unmute the sound
Zoom: Magnies/Shrinks the screen image size
Angle: Choose dierent angles in the same image
(Only supports multi-angle discs)
Mode: Press to choose DVD/USB/FM/Line in (AUX)/
BT modes
3. SUB/COPY: Press subtitle button to display subtitles
in DVD mode (Only supports multi-subtitle discs)
Copy: Copy music contents from loaded CD disc to
inserted USB drive
PROGRAM: First, press PROG to enter program
status. Then, press to select the item.
Press 0 to 9 to specify the 2-digit order (To reset,
press clear). Press to select Start, press OK
to start programmed playback. Press STOP twice
to clear the whole program.
TREBLE: Treble adjustment
Step 1: Press Treble button.
Step 2: Turn Volume+/- knob
BASS: Bass adjustment
Step 1: Press Bass button.
Step 2: Turn Volume+/- knob
1
2
3
4
5
6
7
8

www.PyleUSA.com
7
4. Return: After pressing "Menu" (In 'ON' mode), choose a program then press
"Return" to top menu (Only for VCD/SVCD/DVD discs).
LANGUAGE: Choose dierent languages in DVD discs (Only supports multi-
language discs).
OSD: Press OSD on the remote control to display single elapsed time, single
remaining time, total elapsed time, total remaining time, and other
information about the disc.
L/R: Press to set: Stereo, Mono L, Mono R, Auto L, Auto R in SVCD, VCD, or
CD format.
5. Repeat:
Repeat 1, Repeat ALL, RANDOM, RANDOM OFF (Only for USB/VCD/CD discs)
Repeat chapter, Repeat Title, Repeat ALL, Repeat o (Only for DVD discs)
In USB mode: Includes Repeat directly
In FM/Line in/BT mode: Does not work
A-B Repeat: Species the parts you want to play repeatedly.
1. During playback, press A-B REPEAT to specify the starting point (point A).
2. When you reach the ending point (point B), press it again.
Vol-/Vol+: Decrease/increase the audio volume.
6. SET UP: Enter or exit the system setup menu.
RESET: Restore default settings.
: Selects items, input position, etc.
For moving the display position of enlarged images.
For rotating JPEG images.

www.PyleUSA.com
8
Enter: Conrm menu selection
Menu/PBC: Display the menu. Sets PBC of VCD equipped with Playback
Control (PBC) Function to On/O.
Top Menu: Displays the top menu
7. FM-/FM+ (REV/FWD)
In FM mode: Short press to next/previous channel
Press and hold for manual search (Unit will stop at the current scanning
channel automatically)
In DVD/USB mode:
Forward/Backward (x2, x4, x8, x20)
Line in/BT: Does not work
PLAY/PAUSE/SCAN: Play or pause track.
Auto scanning the stations in FM mode.
STOP: Stop playback
CH-/CH+ (PREV/NEXT):
In FM/DVD/USB/BT mode: Previous/Next track
Line in/BT mode: Does not work
8. 1-10+: To select title/chapter/track numbers, etc.
e.g., 5: 5
15: 10+5 or 15
GO-TO: Species the point of time where you would like to start playback.
www.PyleUSA.com
9
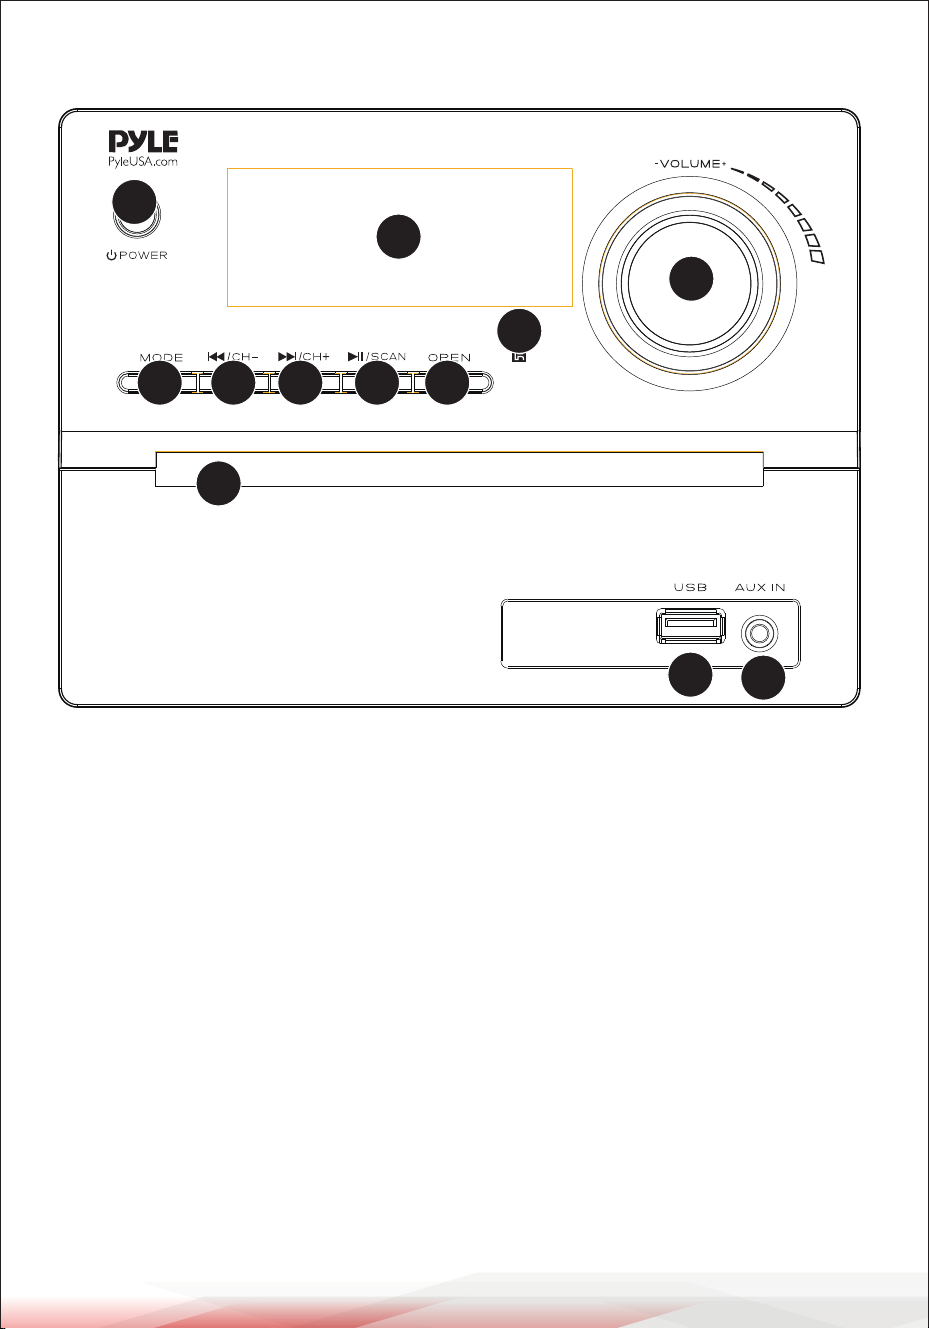
Front Panel
1
2
3
4
5
6
7
8
9
10
11
12
1. POWER BUTTON
2. REMOTE CONTROL SENSOR
3. MODE (DVD/USB/FM/AUX/BT)
4. PREV/CH-
5. NEXT/CH+
6. PLAY/PAUSE BUTTON
7. OPEN/CLOSE BUTTON
8. DISC TRAY
9. USB PORT
10. AUX INPUT
11. VOL+/VOL-
12. DISPLAY WINDOW
www.PyleUSA.com
10
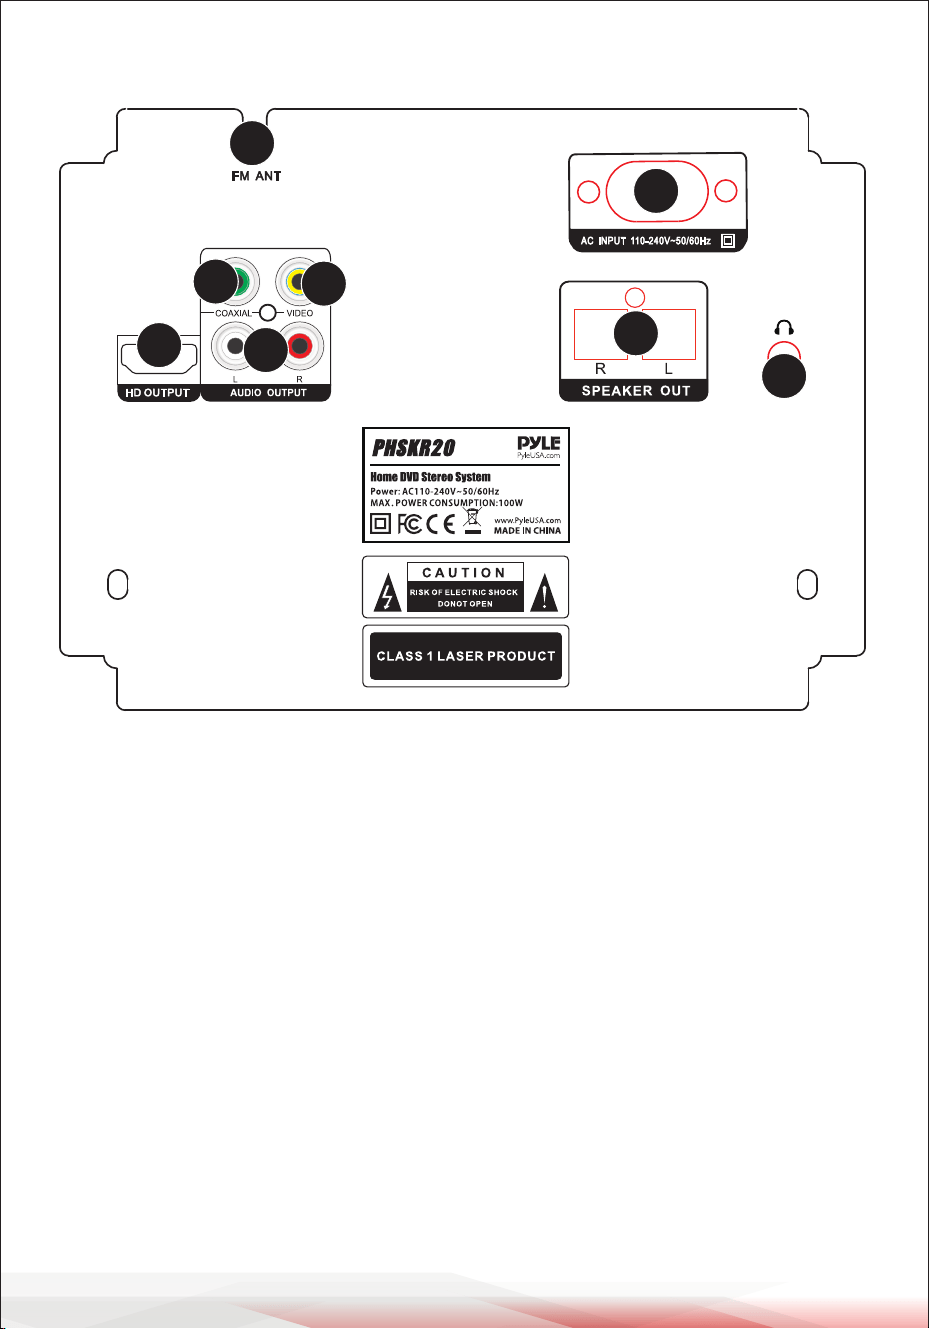
Rear Panel
1. COAXIAL
2. VIDEO OUT
3. L/R
4. HD OUT
5. L/R SPEAKER OUT
6. HEADPHONE JACK
7. AC/DC POWER CORD
8. FM/ANT
1
2
3
8
4
7
5
6
www.PyleUSA.com
11
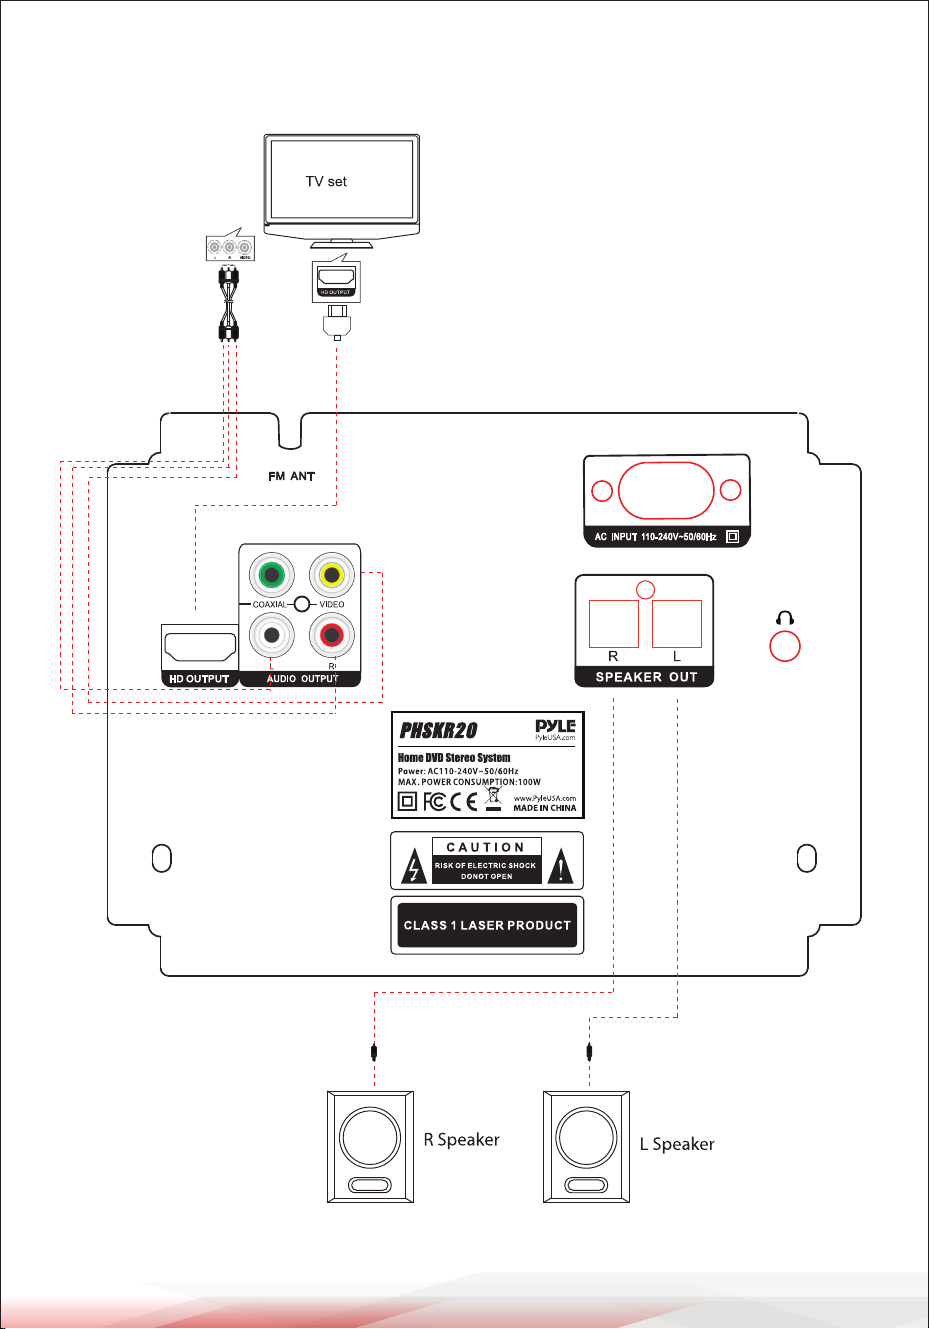
CONNECTIONS
Connecting to a TV Set
www.PyleUSA.com
12
SYSTEM SETUP FOR DVD MODE
Setup
Follow the steps below to check the connection:
1. Turn ON the TV and shift to “VIDEO INPUT”.
2. Turn ON other units such as an audio system or VCR if they are connected.
Turning the Unit ON:
1. Press the POWER button on the panel. The DVD player will automatically read
a disc if it has already been inserted in the player.
2. Press the OPEN/CLOSE button to open the disc tray to insert or replace a disc.
3. Insert a disc onto the disc tray and press the OPEN/CLOSE button again to
close the disc tray. The screen will display the disc type.
4. The DVD player will select the state of playback.
Note: PBC is the abbreviation for PLAYBACK CONTROL. If a disc has PBC, it means
that it has a menu from where you are able to choose a track, chapter, or other
instruction at the beginning of playback.
Playing a Disc
Turning the Unit OFF
Press the STOP button, then press the OPEN/CLOSE button to open the disc tray.
Remove the disc and close the disc tray by pressing the OPEN/CLOSE button
again. Then press the POWER button to turn o the player. It is recommended
that discs are removed before the player is turned o. Remove the plug from
the outlet on the wall if the player will not be used for a long time.
DIS C FO RMAT STATE OF PLAY
CD/ MP3 First track.
VCD/SVCD with PBC
From the menu screen, press the PBC button
on the panel or on the remote control to play
back from the beginning.
VCD/SVCD without PBC Automatically plays from the beginning.
ACTION BUTTON ON PANEL KEY ON REMOTE CONTROL
Play
PLAY/PAUSE PLAY
Pause
PLAY/PAUSE PAUSE
Next track or chapter
NEXT NEXT
Previous track or chapter
PREV PREV
Stop
STOP STOP
www.PyleUSA.com
13
REMOTE FUNCTIONS
NO OPERATION DISC INSTRUCTION
1
2
3
4
5
6
7
8
9
10
11
STOP/
RESUME
FAST
FORWARD
REWIND
REPEAT
A-B
REPEAT
ZOOM
RETURN
PBC
PLAYBACK
CONTROL
MENU
DIRECTION
& ENTER
LANGUAGE/
SUBTITLE
ALL
FORMATS
VCD,
SVCD, DVD
DVD,
SVCD, VCD
DVD
ALL
DVD,
SVCD
DVD, SVCD,
VCD2.0
SVCD,
VCD2.0
DVD
ALL
FORMATS
DVD
Press STOP button to enter Stop mode. The TV screen
will display the starter logo. With certain disc types, such
as DVD, the player can resume playback from the point
where it was stopped. Press RESUME to resume playback
from the location where playback was stopped or from
the beginning of the disc. Please note: The player will go
into SCREEN SAVE MODE if there is no activity within one
minute. Press any key to return to NORMAL mode.
Press FWD button to fast forward through the disc. Each
time the FWD button is pressed, the fast forward motion
speed changes. Press PLAY to resume normal playback.
Press REV button to rewind through the disc.
Each time the REV button is pressed, the rewind motion
speed changes. Press PLAY to resume normal playback.
To repeat a chapter, DVD title, or the whole DVD content,
please see below:
- Press REPEAT once to repeat the contents of the chapter.
- Press it twice to repeat the contents of the title.
- Press it three times to repeat the contents of the DVD disc.
- Press it four times to cancel the repeat mode.
To repeat a specic section of the DVD content, please
follow the steps below:
- Press the A-B key to set Point A as the starting point.
- Press the key again to set Point B as the end point.
The part between A and B will be played repeatedly.
- Press A-B key a third time to cancel this function.
Press the "ZOOM" button continuously to increase the
size of the picture by X1, X2, or X4. Use the "UP", "DOWN",
"LEFT," and "RIGHT" buttons to move the picture.
Press this key to return to the main menu.
The PBC allows the user to play Video CDs interactively.
If PBC is ON, the user can use the digit buttons to select
a track but only from the menu. If PBC is OFF, the user
can select the track directly.
Press this key to play the selected menu.
Press this key to choose the selected column you want,
and then press “ENTER” to conrm.
Press this key to shift from one language (subtitle) to
another (needs disc support).
www.PyleUSA.com
14
REMOTE FUNCTIONS
NO OPERATION DISC INSTRUCTION
12
13
14
15
16
17
L/R
MUTE
VOLUME
+/-
OSD
PROG
SETUP
DVD,
SVCD, VCD
ALL
FORMATS
ALL
FORMATS
DVD,
SVCD,
VCD
SVCD,
VCD,
CD
ALL
FORMATS
Continuously press this key to select left
channel, right channel, or stereo. You should
rst choose audio output as 2 CH in the setup
menu.
Press “MUTE” to turn o sound and press again
to turn on.
Press “VOLUME” to increase and decrease the
sound.
On Screen Display (OSD). Users can select the
whole setup menu and on-screen display
language.
Press the PROG button to set up the playback
sequence manually, i.e., if you want to playback
track 2, 11, and 102, do the following:
1. Press 2,
2. Press +10, 1,
3. Press +10 ten times, then 2.
Finally, press “PLAY” to go to your chosen track.
Press the "SETUP" button to select the various
functions of your player, for example, audio
output, parental control, etc. Refer to chapter
6 for further details.

www.PyleUSA.com
15
HOW TO SEARCH
DISC OPERATION TV SCREEN
DVD
DVD
SVCD
VCD
CD
MP3
TITLE: 01/06CH
CHAPTER: 001/002
TITLE: 2/2
Press the GO-TO button once to display
the Screen Search menu. Press it twice to
cancel. In the Search Menu, you can use
the UP/DOWN cursor buttons to select an
item. Then press PLAY to conrm.
•To play Title 2, press GO-TO on the
remote control, then press 2 and then
PLAY.
•To play Title 1, Chapter 5, press GO-TO
on the remote control, press RIGHT,
then press 5 and PLAY.
Press “GO-TO" again to directly input a
specic time. For example:
•If you want to play the DVD at the
1:23:45 point (one hour, twenty-third
minute, and forty-fth second), input 1,
2, 3, 4, 5 and press PLAY.
•If you want to play the DVD at the
00:23:45 point (twenty-third minute and
forty-fth second), input 2,3,4,5 and
press PLAY.
Press “GO-TO” to directly input the time.
Please note:
1. Turn o PBC for SVCD and VCD 2.0
before using the search function.
2. CD: You may directly input the track
number you want to listen to. In other
words, you do not need to use the
search function.
The search function is not available when
playing MP3 discs.
www.PyleUSA.com
16
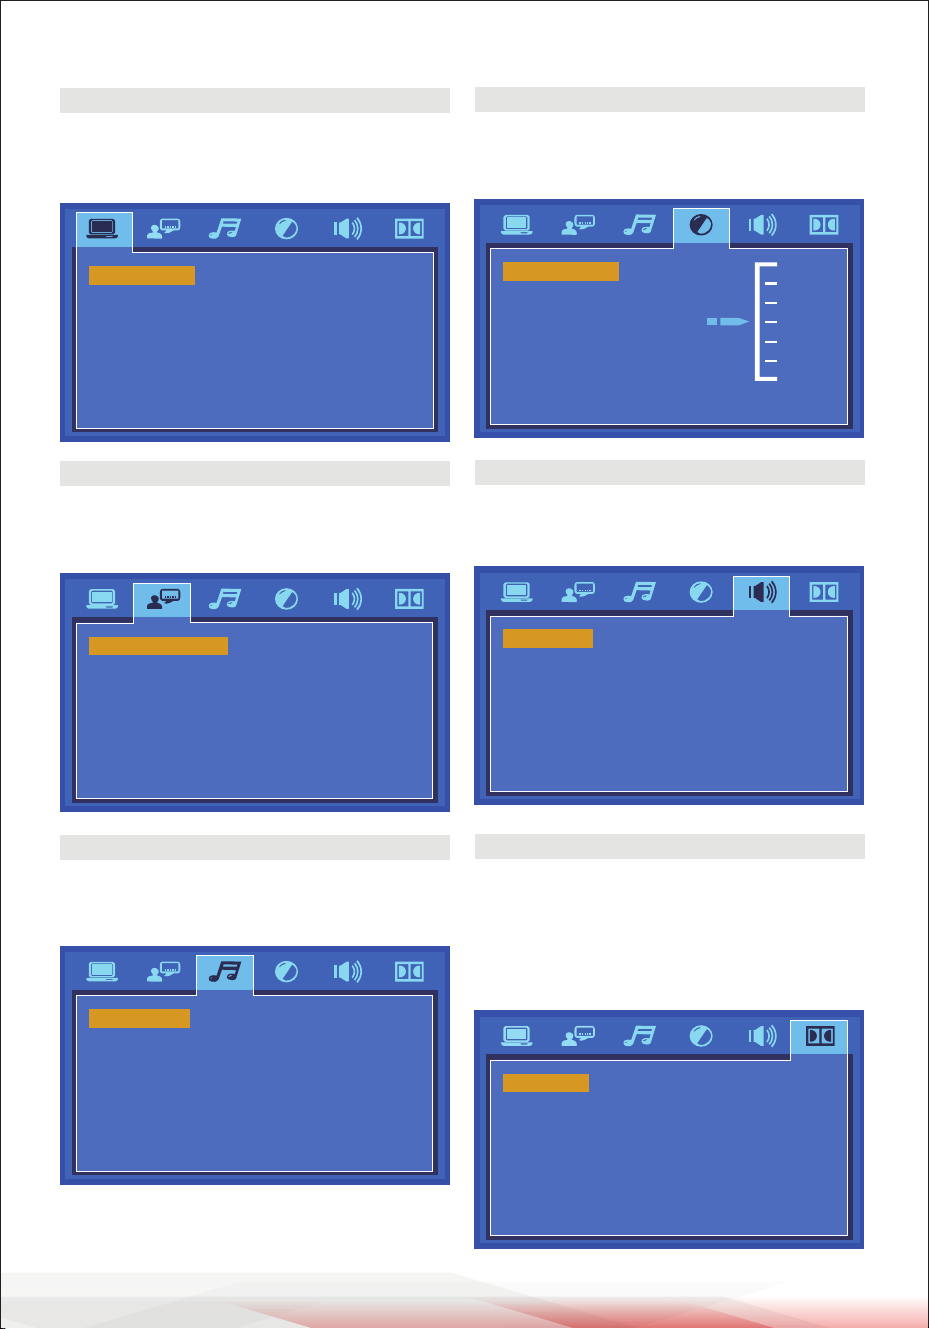
SYSTEM SETUP
TV SYSTEM
AUTO PLAY
HD OUTPUT
NTSC
PAL
AUTO
VIDEO
TV TYPE
PASSWORD
RATING
NEXT PAGE
OSD LANGUAGE
AUDIO LANG
SUBTITLE LANG
ENGLISH
GERMAN
SPANISH
MENU LANG FRENCH
DUTCH
AUDIO OUT
KEY
PCM
BRIGHTNESS
CONTRAST
10
12
8
6
4
2
0
HUE
SATURATION
SHARPNESS
DOWNMIX LT / RT
STEREO
OP MODE
DYNAMIC RANGE
DUAL MONO
LINE OUT
RF REMOD
TV SYSTEM
Europe: PAL
USA: NTSC
LANGUAGE SETUP
Select dierent on- Screen Display
(OSD) language.
AUDIO SETUP
Use this menu to select your audio
output.
BRIGHTNESS
Use UP/Down arrows to adjust the
brightness.
DOWNMIX
If two channels are required, select
the stereo option.
OP MODE
For night time playing, select LINE OUT
to set volume at lower level.
For daytime playing, select RF REMOD
to set volume at a higher level.
www.PyleUSA.com
17
TROUBLESHOOTING
Before repairing, please take a look at the following problems and possible
solutions rst.
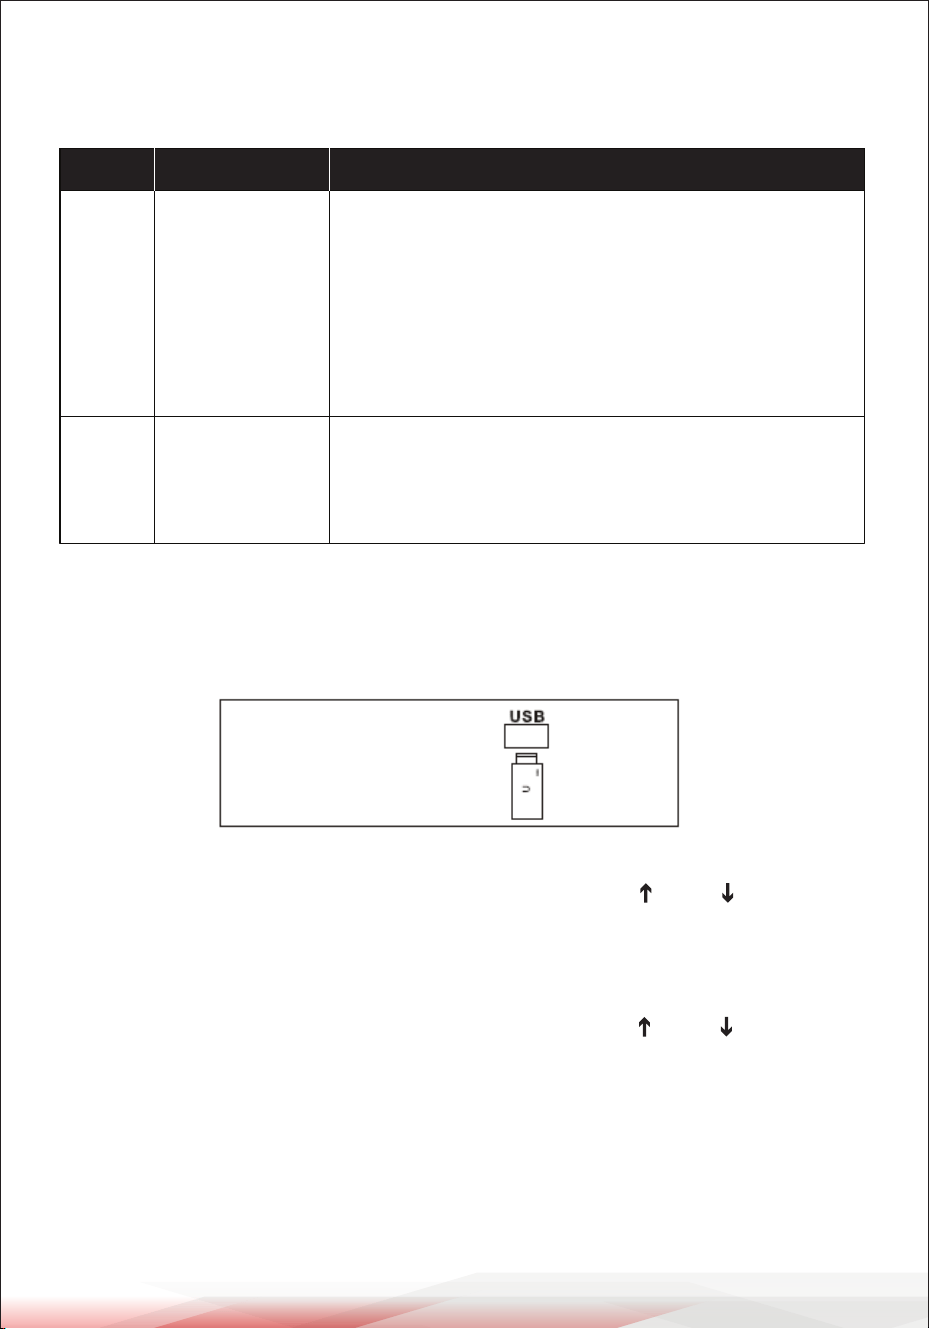
USB COPY
1. The USB storage capacity range must not exceed 16GB.
2. Only insert a USB where there is no disc in the tray.
3. Press "MODE" button on the unit or “SOURCE” on the remote control:
DVD and USB will appear on the TV screen. Please use “ ” and “ ” buttons to
select USB. Then press “ENTER” for the USB to be read.
Please note: If a disc needs to be read after a USB has been read, please press
“MODE” on the unit or“ SOURCE” on the control and use “ ” and “ ” buttons to
select DVD.
To Copy an MP3 File:
When playing an MP3 disc, press the "COPY" button on the remote to enter the
copy selection interface. The content that can be copied are the tracks of the
current disc being played.
1
"No Disc"
2
No sound
NO. PROBLEM SOLUTION
If you place the disc on the tray and the player
displays "No Disc" once loaded:
1. Check whether the disc is placed correctly
(label side up).
2. Check the format of the disc.
3. Check whether the disc is dirty or damaged.
4. Clean the lens - this usually needs to be done after
20 hours of playback.
1. Set to current connecting channel.
2. Replace audio connection or connect correctly.
3. Ensure connected unit works properly or turn
volume up.

www.PyleUSA.com
18
Selecting a Program to Copy:
Move the Direction cursor over the program to be copied. If only part of the
program is to be copied, move the cursor over the upper program selection,
then press Conrm to cancel the selection. Use the Direction buttons on the
remote control to select the program to be copied, then press the Conrm
button.
Copy: Move the highlight bar to the "START" option. At this time, the informa-
tion about this copy will be shown on the right-hand side (TOTAL TRACKS,
TOTAL TIME, and TOTAL SIZE). Press the "ENTER" key to start copying, and the
system will write the CD in MP3 format onto the designated USB. When copy-
ing at normal speed, you can listen to the content being copied at the same
time; when selecting 4 times speed, it will be mute.
Note: When you press the "ENTER" key to switch speeds, there will be a slight
sound which continues for a few seconds.
Cancel Copy: During copying, you can move the highlight bar to the "CANCEL"
option and press the "ENTER" key to conrm.
Return from Copying Screen: Move the highlight bar to the "RETURN" option
and press the "ENTER" key to conrm return.
Note: Before copying, ensure that the available space on the USB is enough for
the size of the le(s) to be copied.
COMMON OPERATION
Wireless Bluetooth Connectivity:
•Hassle-Free Pairing, Simple Music Streaming
•Compatible with All of Today’s Latest Bluetooth Devices
(Smartphones, Tablets, Laptops, Computers, etc.)
•Bluetooth Version: 5.0V
•Bluetooth Network Name: ‘PyleUSA’
•Wireless Bluetooth Range: Up to 30.0’ ft.

www.PyleUSA.com
19
To connect an external device to this unit via BT:
1. Press "MODE" on the remote control or on the panel to select the BT function.
The corresponding screen will then display "BT," indicating that the BT
function is on.
2. Ensure the BT function is on on the external device and search for Pyle USA.
Once found, click on it and pair. Some devices may need a pin code to
connect; try 0000 or 1234. Once connected, you will hear a signal indicating
that the connection is successful.
Aux In Function Operation:
Switch on the unit. Press the MODE button to switch to AUX IN mode.
Connect the external music player using the cable. The unit will start playing
the selected music on the external player. Using the remote control, play,
pause, or stop the music being played. Please note that in Line Input mode,
some functions may not be available.
FM Radio Function Operation:
Switch on the unit. Press the MODE key to switch to FM mode, then press the
SCAN key to automatically search and store radio channels.
When the search is complete, the unit will play the rst stored channel.
Press the NEXT or PREV button to select the next or previous radio station.
If the signal is not good, you can adjust the signal by pressing the REV or FWD
button.
Register Product
Thank you for choosing PyleUSA. By registering your product,
you ensure that you receive the full benets of our exclusive
warranty and personalized customer support.
Complete the form to access expert support and to keep your
PyleUSA purchase in perfect condition.
PyleUSA.com/register

Questions or Comments?
We are here to help!
Phone: 1.718.535.1800
PyleUSA.com/ContactUs