HW-C450
FULL MANUAL
Imagine the possibilities
Thank you for purchasing this Samsung product.
To receive more complete service, please register
your product at www.samsung.com/register
ENG - 2
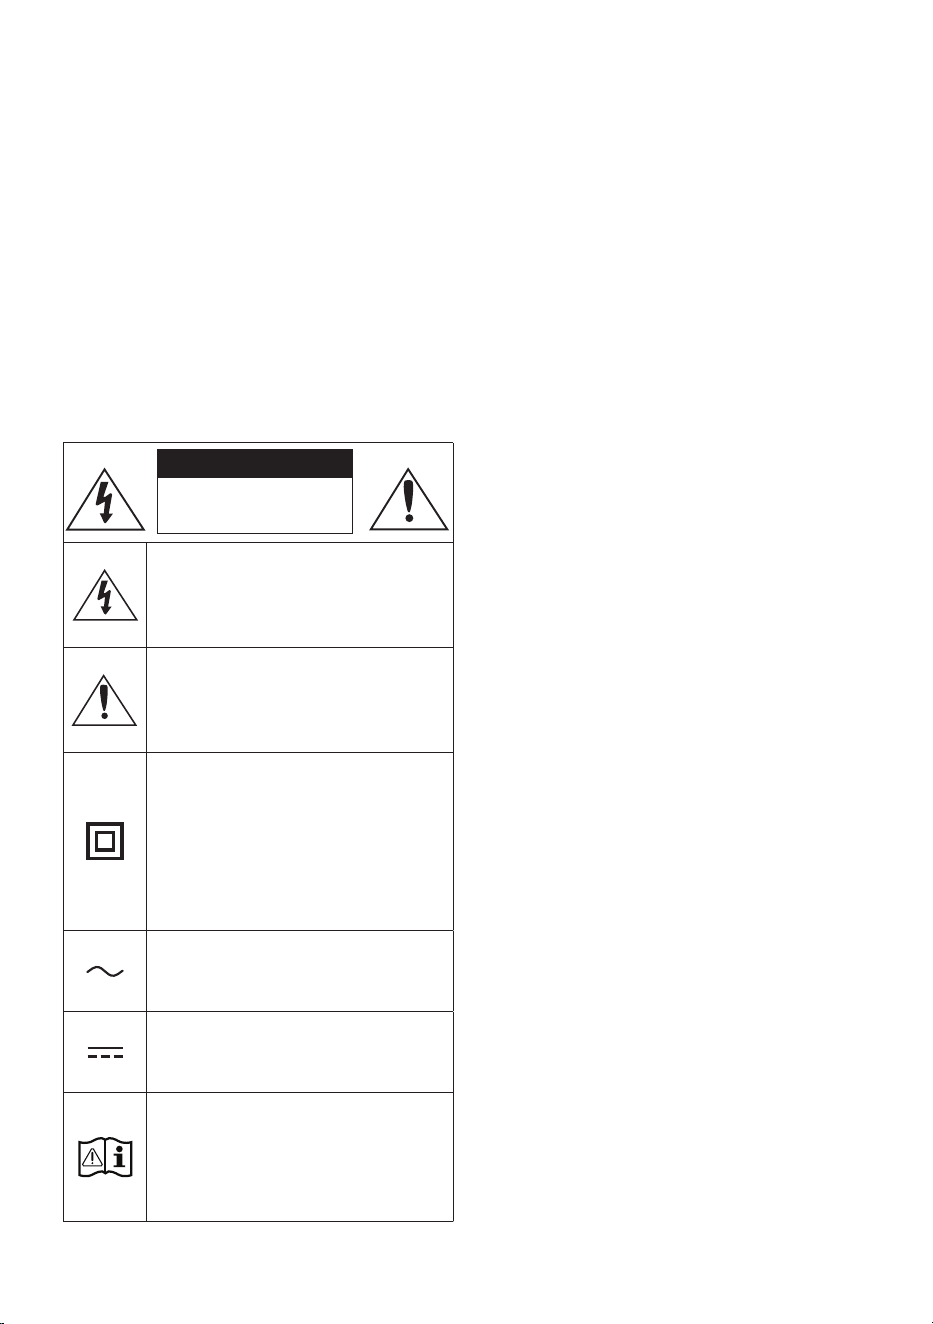
SAFETY INFORMATION
SAFETY WARNINGS
TO REDUCE THE RISK OF ELECTRIC SHOCK, DO
NOT REMOVE THE COVER (OR BACK).
NO USER-SERVICEABLE PARTS ARE INSIDE.
REFER SERVICING TO QUALIFIED SERVICE
PERSONNEL.
Refer to the table below for an explanation of
symbols which may be on your Samsung product.
CAUTION
RISK OF ELECTRIC SHOCK.
DO NOT OPEN.
This symbol indicates that high voltage
is present inside. It is dangerous to
make any kind of contact with any
internal part of this product.
This symbol indicates that this product
has included important literature
concerning operation and maintenance.
Class II product : This symbol indicates
that it does not require a safety
connection to electrical earth (ground).
If this symbol is not present on a
product with a power cord, the product
MUST have a reliable connection to
protective earth (ground).
AC voltage : This symbol indicates that
the rated voltage marked with the
symbol is AC voltage.
DC voltage : This symbol indicates that
the rated voltage marked with the
symbol is DC voltage.
Caution, Consult instructions for use :
This symbol instructs the user to
consult the user manual for further
safety related information.
WARNING
• To reduce the risk of re or electric shock, do
not expose this appliance to rain or moisture.
CAUTION
• TO PREVENT ELECTRIC SHOCK, MATCH WIDE
BLADE OF PLUG TO WIDE SLOT, FULLY INSERT.
• This apparatus shall always be connected to a
AC outlet with a protective grounding
connection.
• To disconnect the apparatus from the mains,
the plug must be pulled out from the mains
socket, therefore the mains plug shall be
readily operable.
• Do not expose this apparatus to dripping or
splashing. Do not put objects lled with
liquids, such as vases on the apparatus.
• To turn this apparatus off completely, you
must pull the power plug out of the wall
socket. Consequently, the power plug must
be easily and readily accessible at all times.

ENG - 3
PRECAUTIONS
1. Ensure that the AC power supply in your
house complies with the power
requirements listed on the identication
sticker located on the bottom of your
product. Install your product horizontally, on
a suitable base (furniture), with enough
space around it for ventilation (7~10 cm).
Make sure the ventilation slots are not
covered. Do not place the unit on ampliers
or other equipment which may become hot.
This unit is designed for continuous use. To
fully turn off the unit, disconnect the AC plug
from the wall outlet. Unplug the unit if you
intend to leave it unused for a long period of
time.
2. During thunderstorms, disconnect the AC
plug from the wall outlet. Voltage peaks due
to lightning could damage the unit.
3. Do not expose the unit to direct sunlight or
other heat sources. This could lead to
overheating and cause the unit to
malfunction.
4. Protect the product from moisture (i.e.
vases), and excess heat (e.g. a replace) or
equipment creating strong magnetic or
electric elds. Unplug the power cable from
the AC wall socket if the unit malfunctions.
Your product is not intended for industrial
use. It is for personal use only. Condensation
may occur if your product has been stored in
cold temperatures. If transporting the unit
during the winter, wait approximately
2 hours or until the unit has reached room
temperature before using.
5. The battery used with this product contains
chemicals that are harmful to the
environment. Do not dispose of the battery
in the general household trash. Do not
expose the battery to excess heat, direct
sunlight, or re. Do not short circuit,
disassemble, or overheat the battery.
CAUTION : Danger of explosion if the battery
is replaced incorrectly. Replace only with the
same or equivalent type.

ENG - 4
CONTENTS
01 Checking the Components 6
02 Product Overview 7
Front Panel / Top Panel of the Soundbar ------------------------- 7
Bottom Panel of the Soundbar ------------------------- 8
03 Using the Remote Control 9
Inserting Batteries before using the Remote Control (AAA batteries X 2) ------------------------- 9
How to Use the Remote Control
-------------------------
9
Using the Hidden Buttons (Buttons with more than one function)
-------------------------
13
Output specications for the different sound effect modes
-------------------------
13
Adjusting the Soundbar volume with a TV remote control ------------------------- 14
04 Connecting the Soundbar 15
Connecting Electrical Power
-------------------------
15
Connecting the Soundbar to the Subwoofer
-------------------------
16
Connecting the Samsung Wireless Rear Kit to your Soundbar
-------------------------
18
05 Using a wired connection to the TV 19
Connecting using an Optical Cable
-------------------------
19
06 Using a wireless connection to the TV 20
Connecting a TV via Bluetooth
-------------------------
20

ENG - 5
07 Connecting an External Device 22
Connecting using an Optical Cable
-------------------------
22
08 Connecting a USB Storage Device 23
09 Connecting a Mobile Device 25
Connecting via Bluetooth
-------------------------
25
10 Installing the Wall Mount 28
Installation Precautions
-------------------------
28
Wallmount Components
-------------------------
28
11 Placing the Soundbar on a TV stand 30
12 Software Update 31
Update Procedure
-------------------------
31
If UPDATE is not displayed
-------------------------
32
13 Troubleshooting 33
14 Licence 34
15 Open Source Licence Notice 35
16 Important Notes About Service 35
17 SpecicationsandGuide 36
Specications
-------------------------
36
ENG - 6
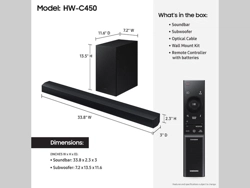
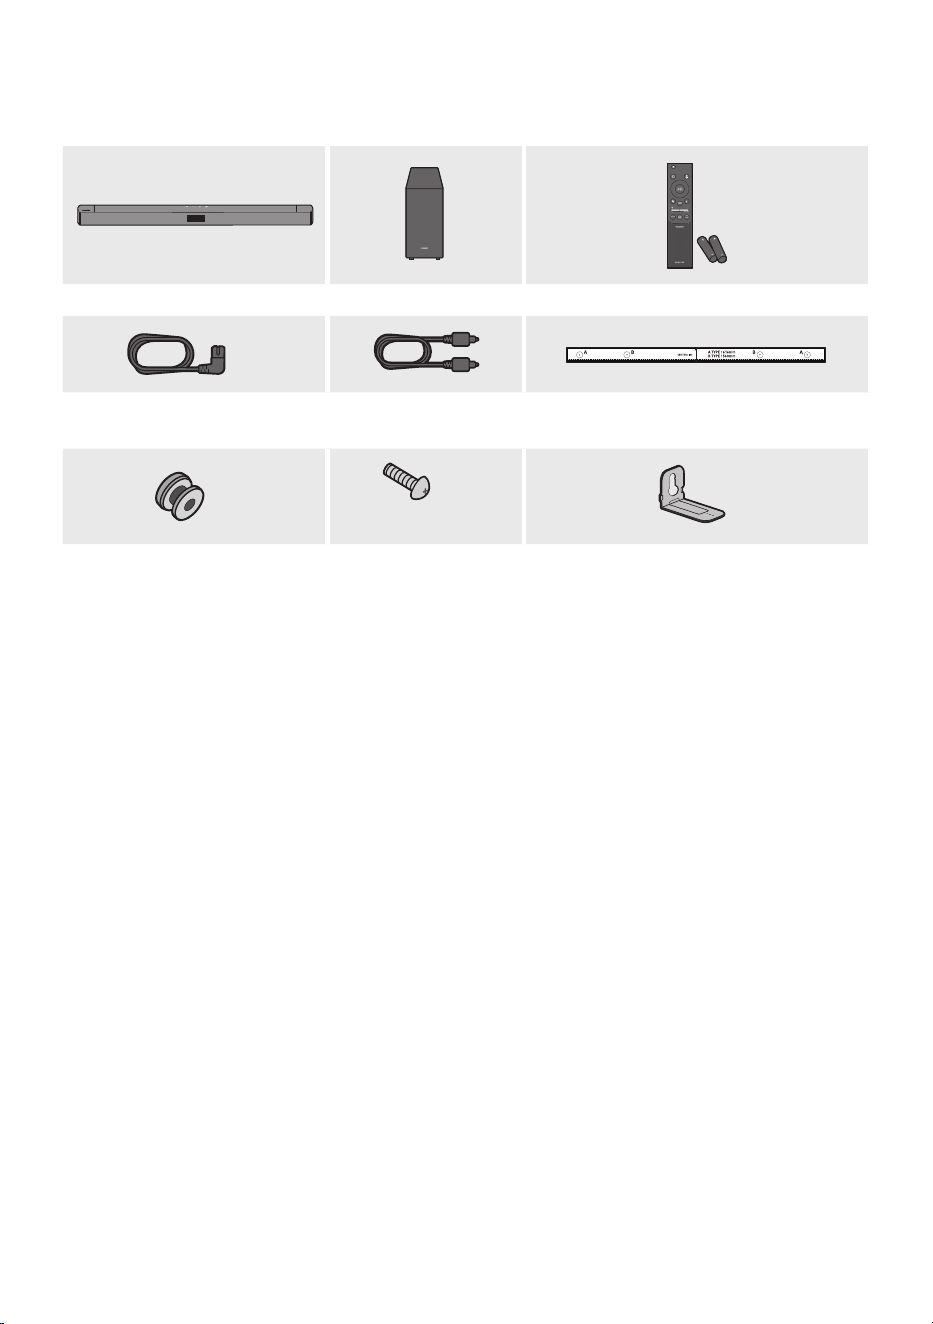
01 CHECKING THE COMPONENTS
SOUND
MODE
WOOFER
TONE
CONTROL
CH LEVEL
Soundbar Main Unit Subwoofer Remote Control / Batteries
x 2
Power Cord
(Subwoofer, Soundbar)
Optical Cable Wall Mount Guide
x 2
(M4 x L10)
x 2
x 2
Holder-Screw Screw
Bracket-Wall Mount
• For more information about the power supply and power consumption, refer to the label attached
to the product. (Label: Bottom of the Soundbar Main Unit)
• To purchase additional components or optional cables, contact a Samsung Service Centre or
Samsung Customer Care.
• The appearance of the accessories may differ slightly from the illustrations above.
• Design and specications are subject to change without prior notice.
ENG - 7
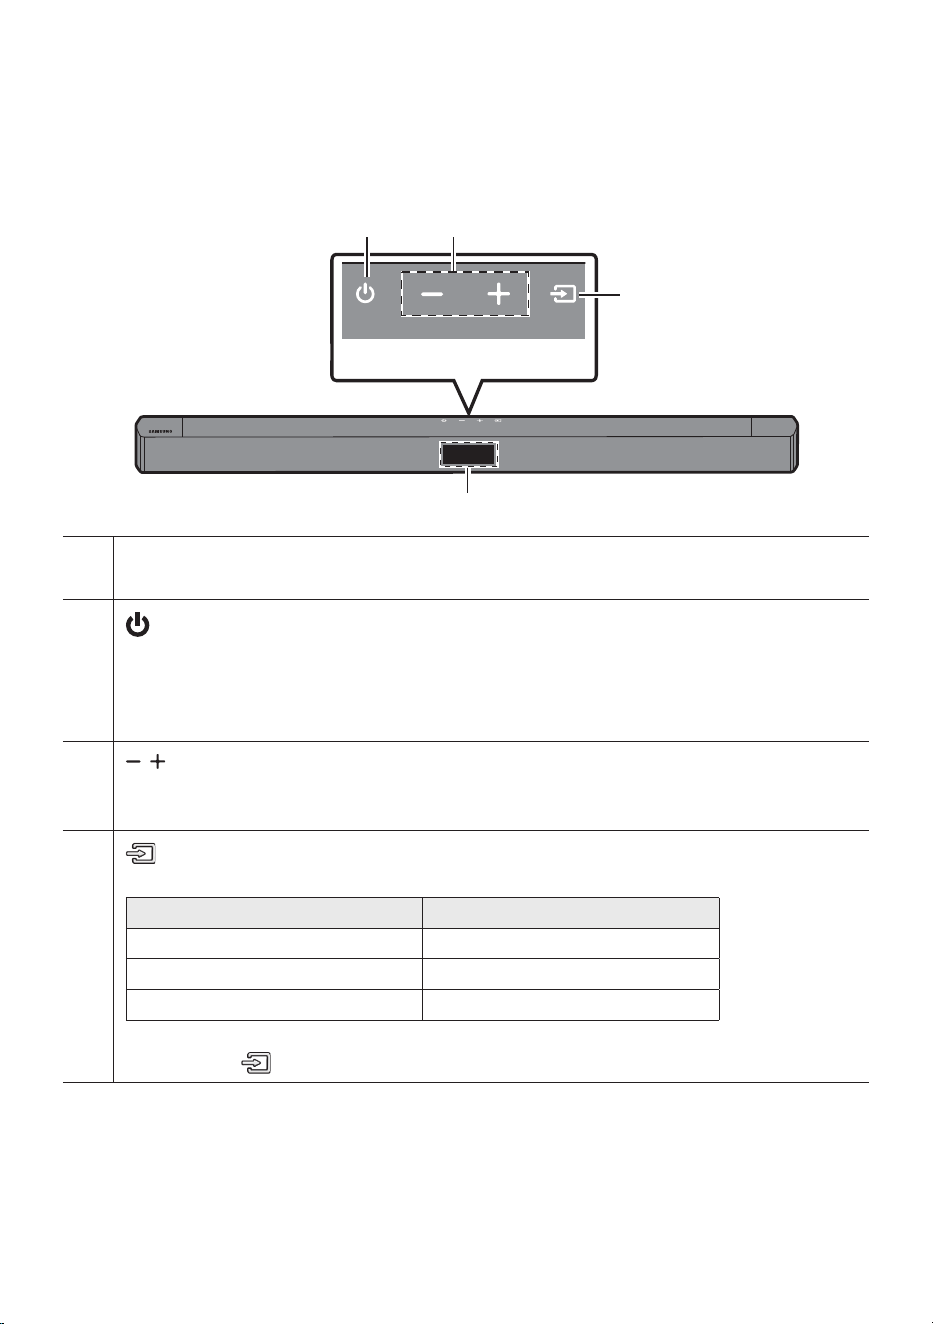
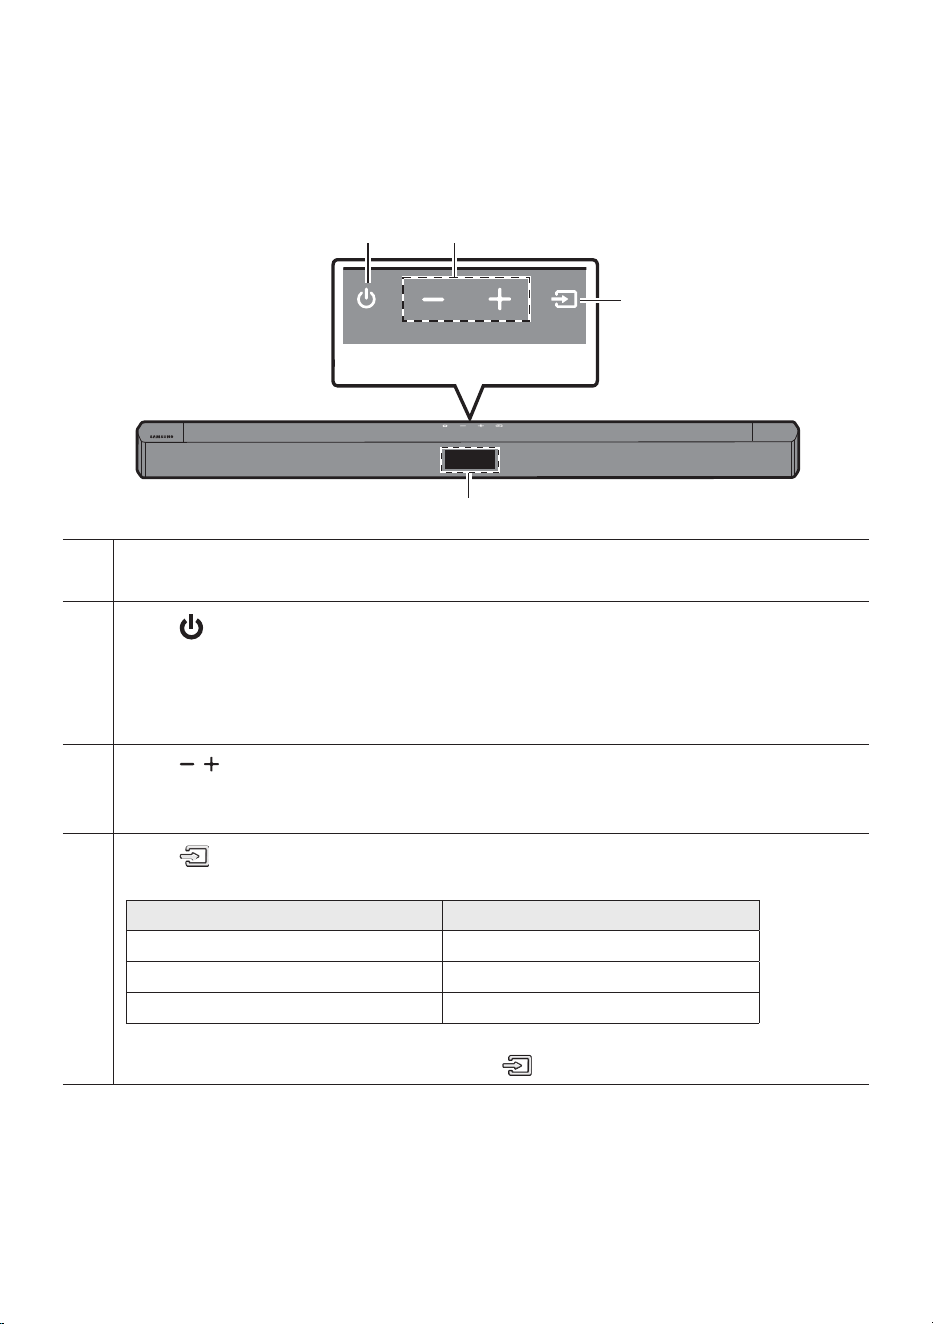
02 PRODUCT OVERVIEW
Front Panel / Top Panel of the Soundbar
Top Panel
Display
Displays the product’s status and current mode.
(Power) Button
Turns the power on and off.
• Auto Power Down Function
The unit turns off automatically in the following situations:
– In D.IN / BT / USB Mode : If there is no audio signal for 18 minutes.
(Volume) Button
Adjusts the volume.
• When adjusted, the volume level appears on the Soundbar’s front display.
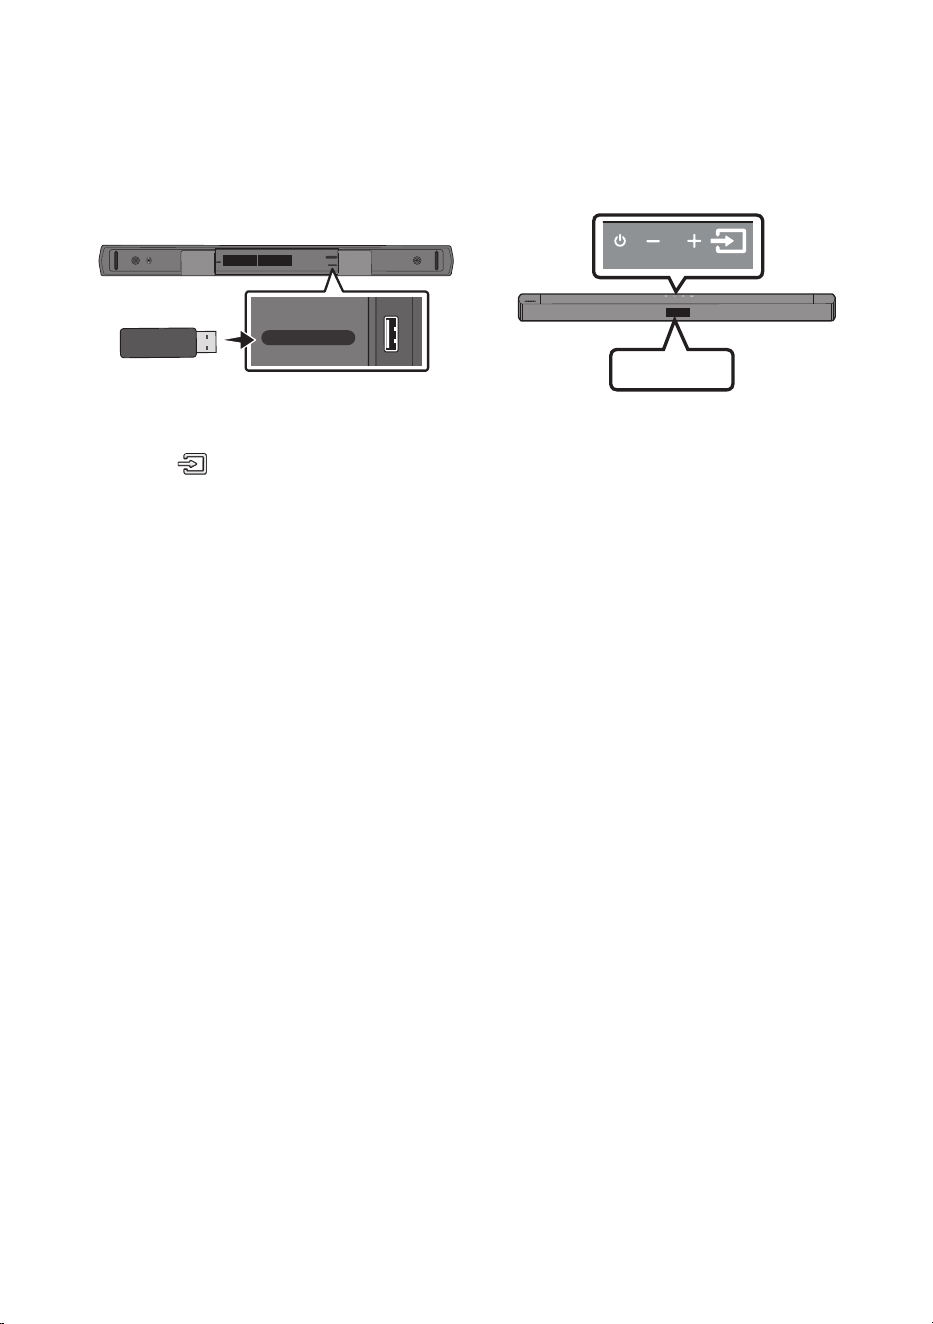
(Source) Button
Selects the source input mode.
Input mode Display
Optical Digital input D.IN
BLUETOOTH mode BT
USB mode USB
• To turn on “BT PAIRING” mode, change the source to “BT” mode in “BT READY” state and then press
and hold the (Source) button for more than 5 seconds.
• When you plug in the AC cord, the power button will begin working in 4 to 6 seconds.
• When you turn on this unit, there will be a 4 to 5 second delay before it produces sound.
• If you want to enjoy sound only from the Soundbar, you must turn off the TV’s speakers in the Audio
Setup menu of your TV. Refer to the owner’s manual supplied with your TV.
ENG - 8
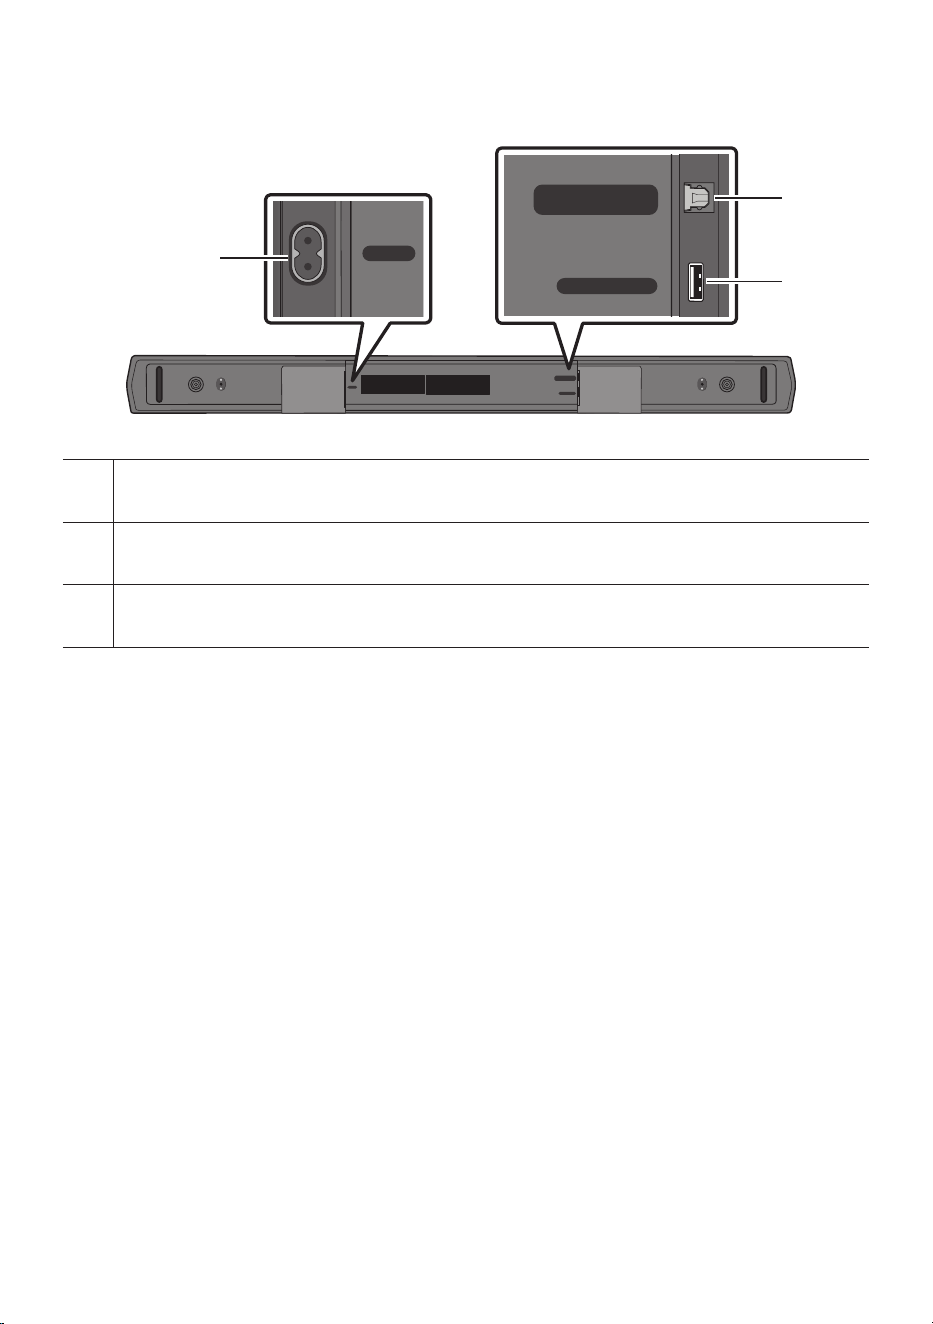
Bottom Panel of the Soundbar
POWER
USB (5V 0.5A)
DIGITAL AUDIO IN
(OPTICAL)
POWER
USB (5V 0.5A)
DIGITAL AUDIO IN
(OPTICAL)
POWER
Connect the Soundbar's AC power cable.
DIGITAL AUDIO IN (OPTICAL)
Connect to the digital (optical) output of an external device.
USB (5V 0.5A)
Connect a USB device here to play music les stored on the USB device through the Soundbar.
• When disconnecting the power cord from a wall outlet, pull the plug. Do not pull the cable.
• Do not connect this unit or other components to an AC outlet until all connections between
components are complete.
ENG - 9
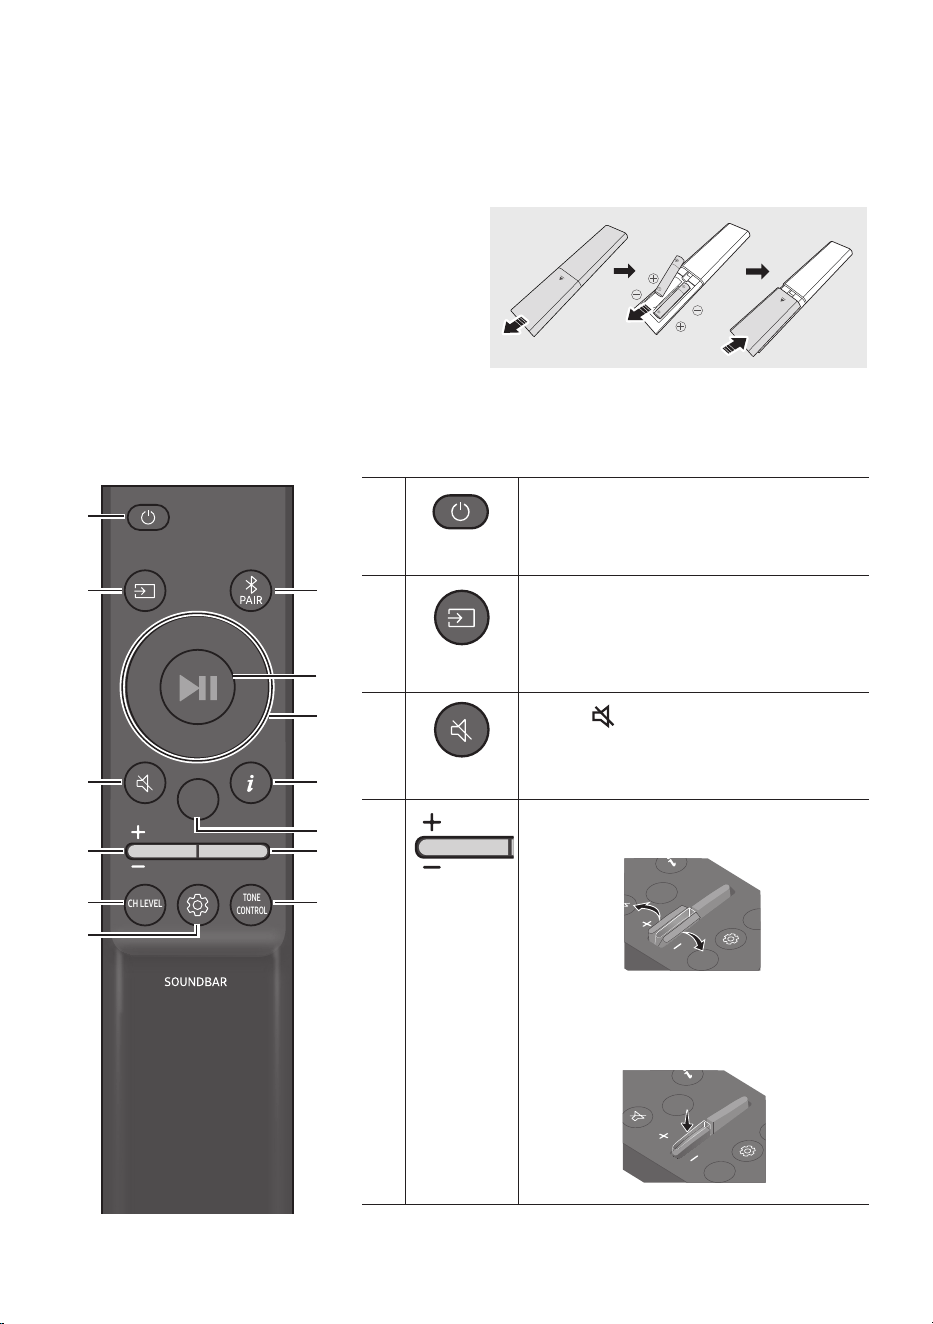
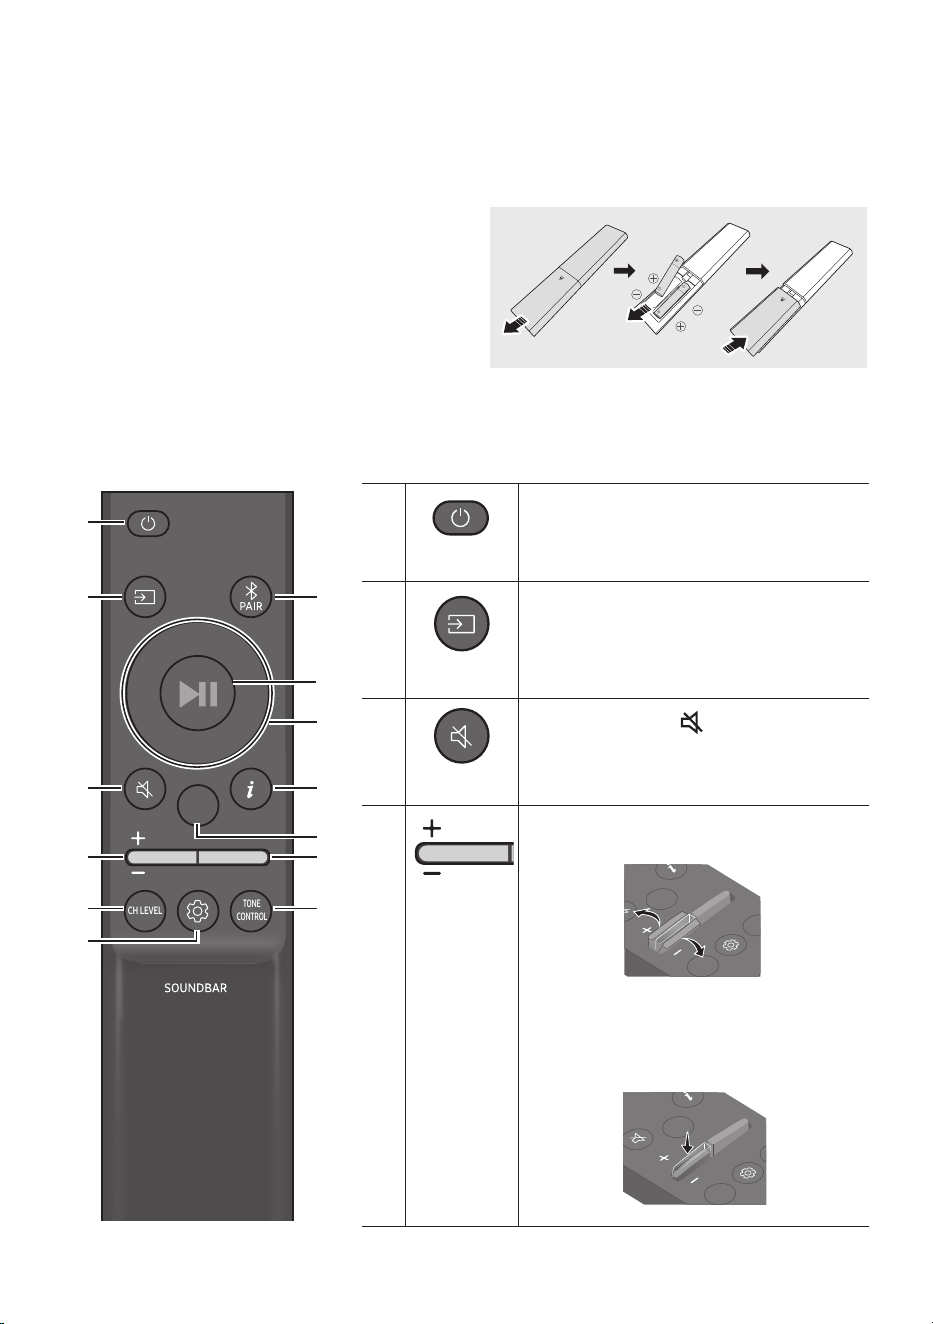
03 USING THE REMOTE CONTROL
Inserting Batteries before using the Remote Control (AAA batteries X 2)
Slide the back cover in the direction of the arrow
until it is completely removed.
Insert 2 AAA batteries (1.5V) so that their
orientation is correct. Slide the back cover back into
position.
How to Use the Remote Control
SOUND
MODE
WOOFER
TONE
CONTROL
CH LEVEL
SOUND
MODE
WOOFER
TONE
CONTROL
CH LEVEL
Power
Turns the Soundbar on and off.
SOUND
MODE
WOOFER
TONE
CONTROL
CH LEVEL
Source
Press to select a source connected to the
Soundbar.
SOUND
MODE
WOOFER
TONE
CONTROL
CH LEVEL
Mute
Press the (Mute) button to mute the sound.
Press it again to unmute the sound.
SOUND
MODE
WOOFER
TONE
CONTROL
CH LEVEL
Volume
Push the button up or down to adjust the
volume.
CH LEVEL
TONE
CONTROL
WOOFER
SOUND
MODE
CH LEVEL
TONE
CONTROL
WOOFER
SOUND
MODE
CH LEVEL
TONE
CONTROL
WOOFER
SOUND
MODE
CH LEVEL
TONE
CONTROL
WOOFER
SOUND
MODE
• Mute
Press the Volume button in to mute the
sound. Press it in again to unmute the sound.
CH LEVEL
TONE
CONTROL
WOOFER
SOUND
MODE
CH LEVEL
TONE
CONTROL
WOOFER
SOUND
MODE
CH LEVEL
TONE
CONTROL
WOOFER
SOUND
MODE
CH LEVEL
TONE
CONTROL
WOOFER
SOUND
MODE

ENG - 10
SOUND
MODE
WOOFER
TONE
CONTROL
CH LEVEL
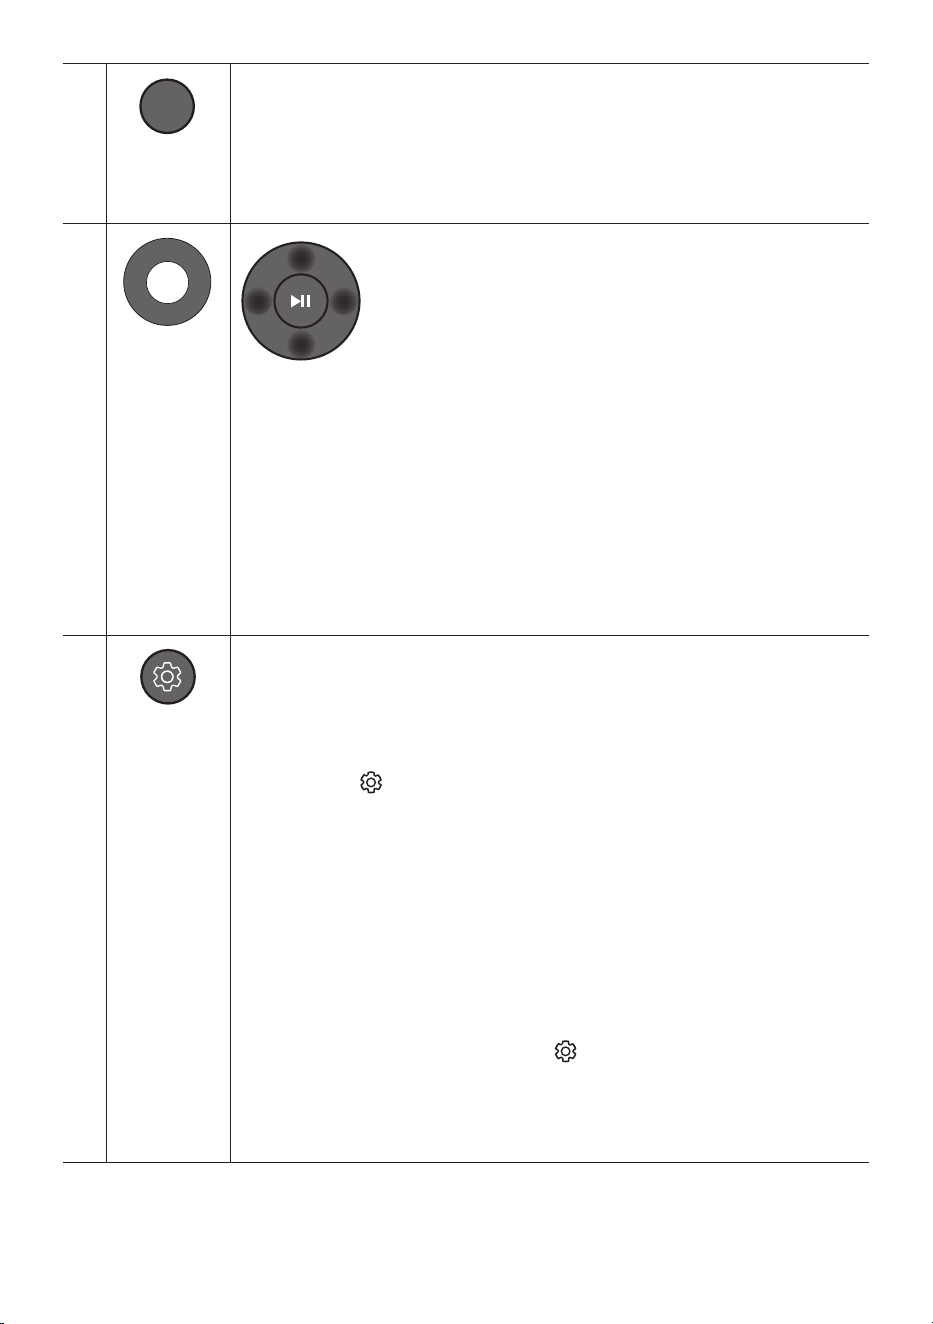
CH LEVEL
By pressing the button, you can adjust the volume of each speaker.
• Press the button to select VIRTUAL CENTER LEVEL and then adjust the volume
between -6~+6 by using the Up/Down buttons.
• If the Rear Speakers (sold separately) are connected, the setting REAR LEVEL is
supported. To adjust the volume of the REAR LEVEL between -6 to +6 by using the Up/
Down buttons.
VOL WOOFER
SOUND
MODE
PAIR
Up/Down/
Left/Right
Press the indicated areas to select Up/Down/Left/Right.
Press Up/Down/Left/Right on the button to select or set functions.
• Repeat
To use the Repeat function in “USB” mode, press the Up button.
• Music Skip
Press the Right button to select the next music le. Press the Left button to select the
previous music le.
• ID SET
Press and hold the Up button for 5 seconds to complete ID SET (when connecting to a
wireless subwoofer or wireless rear speakers).
SOUND
MODE
WOOFER
TONE
CONTROL
CH LEVEL
Sound Control
By pressing the button, you can set the audio function. The desired settings can be
adjusted using the Up/Down buttons.
AUDIO SYNC VOICE ENHANCE ON/OFF NIGHT MODE ON/OFF
– AUDIO SYNC
If the video on the TV and audio from the Soundbar are not synchronised, press the
(Sound Control) button to select AUDIO SYNC and then set the audio delay
between 0~300 milliseconds by using the Up/Down buttons. (Not available in “USB”
or “BT” mode.)
– VOICE ENHANCE ON/OFF
This mode is makes it easier to hear spoken dialog in movies and TV.
– NIGHT MODE ON/OFF
This mode is optimized for nighttime viewing with the settings adjusted to bring the
volume down but keep the dialog clear.
• The VOICE ENHANCE, and NIGHT MODE audio function can be turned ON/OFF by
using the Up/Down buttons.
• Press and hold the (Sound Control) button for about 5 seconds to adjust the sound
for each frequency band. 150Hz, 300Hz, 600Hz, 1.2kHz, 2.5kHz, 5kHz, and 10kHz are
selectable using the Left/Right buttons and each can be adjusted to a setting between
-6 to +6 using the Up/Down buttons.
(Make sure the Sound mode is set to “STANDARD”.)
ENG - 11
SOUND
MODE
WOOFER
TONE
CONTROL
CH LEVEL
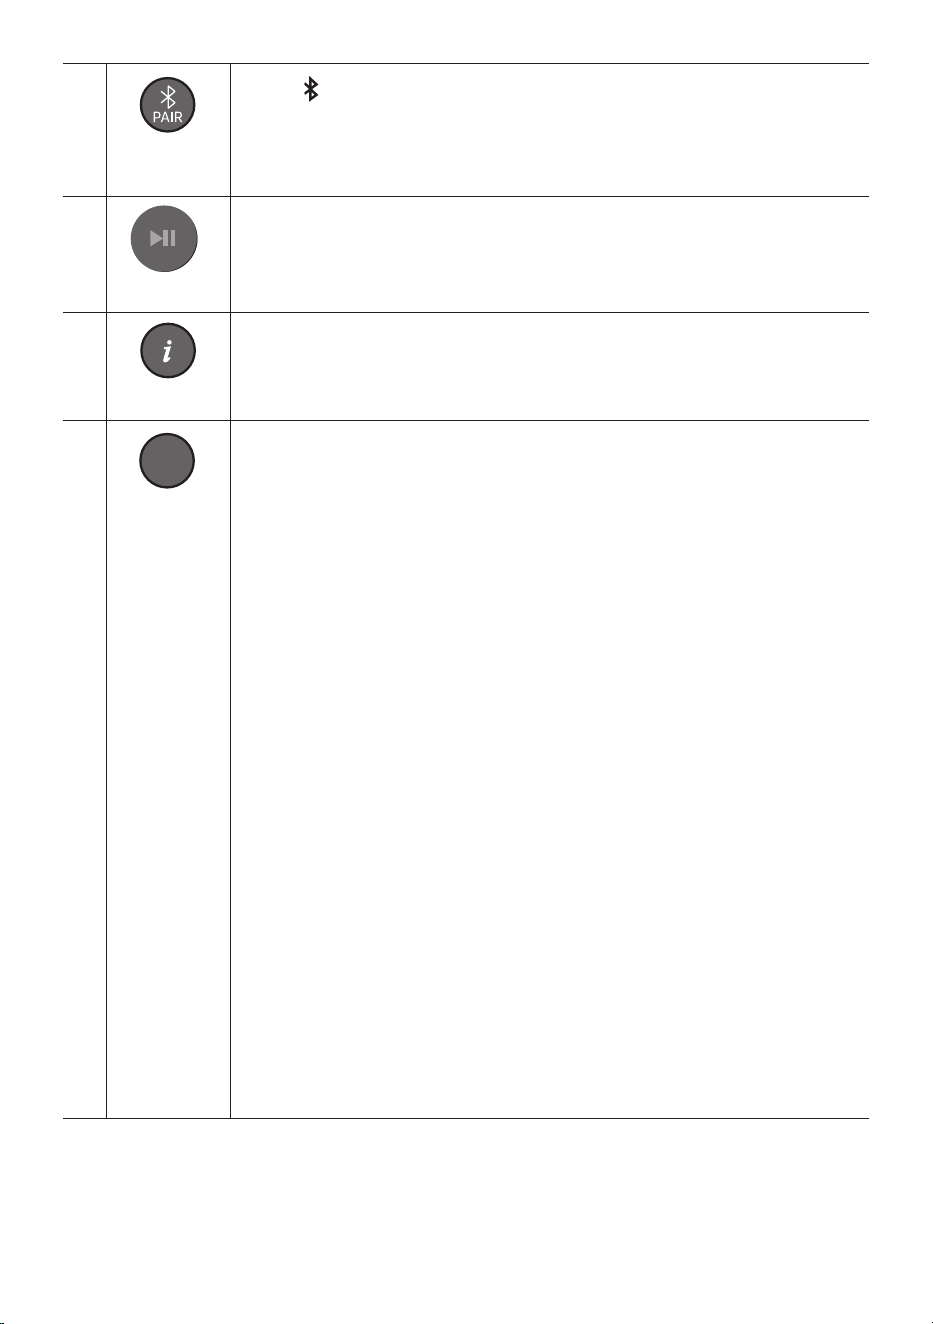
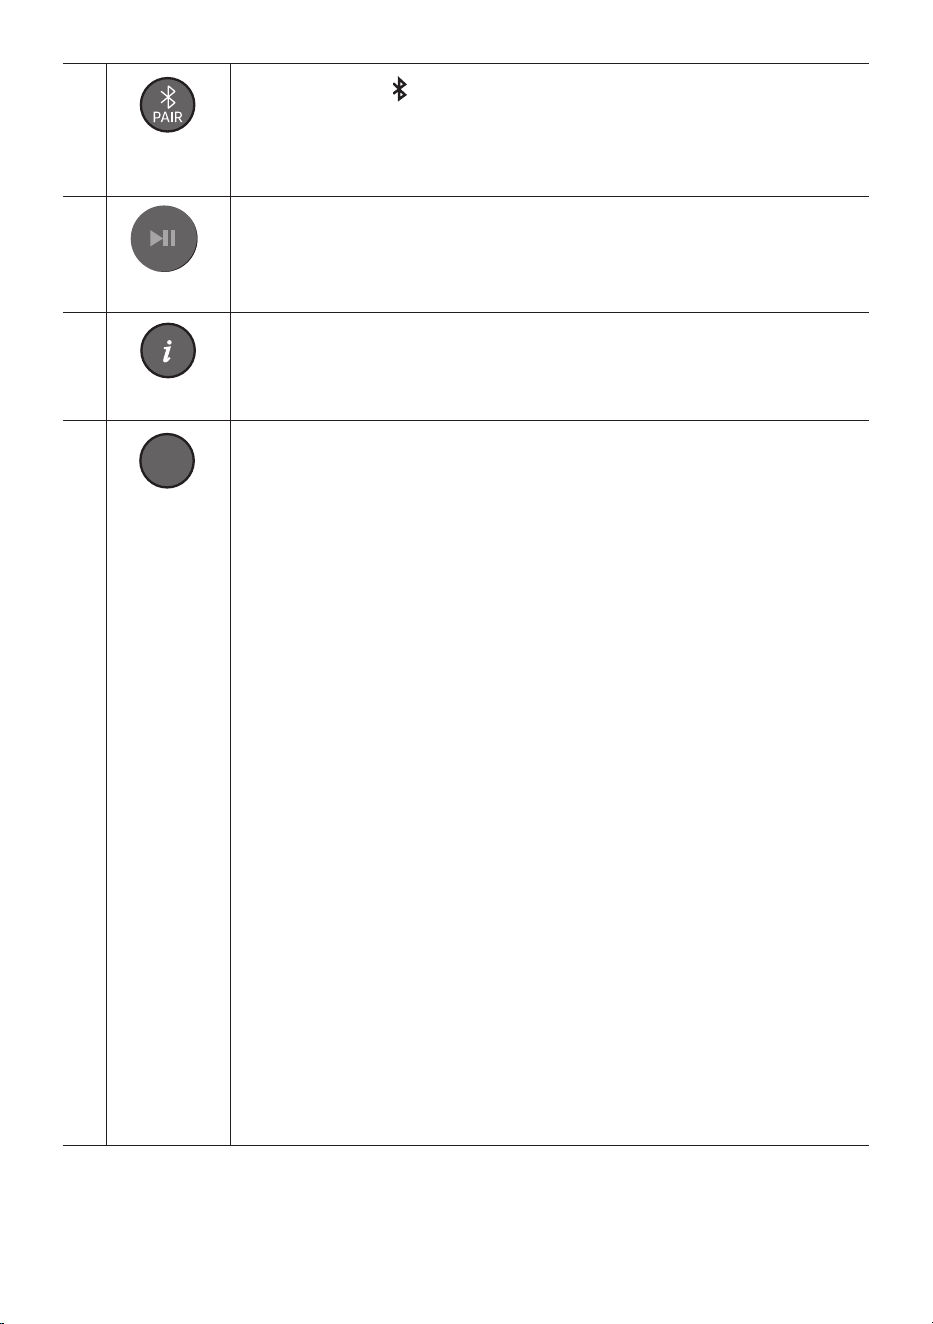
Bluetooth
PAIR
Press the PAIR button. “BT PAIRING” appears in the Soundbar’s display.
You can connect the Soundbar to a new Bluetooth device in this mode by selecting the
Soundbar from the Bluetooth device's search list.
Play / Pause
VOL WOOFER
SOUND
MODE
PAIR
Press the p button to pause a music le temporarily.
When you press the button again, the music le will resume playing.
SOUND
MODE
WOOFER
TONE
CONTROL
CH LEVEL
Info
Press the button to display information about the current function. (See page 7.)
SOUND
MODE
WOOFER
TONE
CONTROL
CH LEVEL
SOUND MODE
By pressing the button, you can select the desired sound mode.
SURROUND SOUND GAME ADAPTIVE DTS VIRTUAL:X BASS BOOST
STANDARD
– SURROUND SOUND
Provides a wider sound eld than standard.
– GAME
Provides stereoscopic sound to immerse you in the action while gaming.
– ADAPTIVE
Analyzes the content in real time and automatically provides an optimal sound eld
based on the characteristics of the content.
– DTS VIRTUAL:X
Immersive 3D sound from any content.
– BASS BOOST
Sound eld mode with emphasis on bass sound.
– STANDARD
Outputs the original sound.
• DRC (Dynamic Range Control)
Lets you apply dynamic range control to Dolby Digital tracks. Press and hold the
SOUND MODE button for more than 5seconds while the Soundbar is powered off to
turn DRC (Dynamic Range Control) on or off. With the DRC turned on, loud sound is
reduced. (The sound may be distorted.)
• Bluetooth Power
This feature automatically turns the Soundbar on when it receives a connection
request from a previously connected TV or Bluetooth device. The setting is On by
default.
– Press and hold the SOUND MODE button for more than 5 seconds while the
soundbar is powered on to turn off the Bluetooth Power function.

ENG - 12
SOUND
MODE
WOOFER
TONE
CONTROL
CH LEVEL
WOOFER
(BASS) LEVEL
CH LEVEL
TONE
CONTROL
WOOFER
SOUND
MODE
CH LEVEL
TONE
CONTROL
WOOFER
SOUND
MODE
CH LEVEL
TONE
CONTROL
WOOFER
SOUND
MODE
CH LEVEL
TONE
CONTROL
WOOFER
SOUND
MODE
Push the button up or down to adjust the level of the woofer (bass) to -12 or between -6 to
+6. To set the woofer (bass) volume level to 0 (Default), press the button.
SOUND
MODE
WOOFER
TONE
CONTROL
CH LEVEL
TONE
CONTROL
By pressing the button, you can adjust the volume of the treble or bass sound.
• Press the button to select TREBLE or BASS and then adjust the volume between -6~+6
by using the Up/Down buttons.
ENG - 13
Using the Hidden Buttons (Buttons with more than one function)
Hidden Button
Reference page
Remote Control Button Function
WOOFER (Up) TV remote control On/Off (Standby) page 14
Left TV Connect On/Off (BT Ready) page 21
Up ID SET page 10
(Sound Control)
7 Band EQ (Press and hold 5 seconds) page 10
Reset (Press and hold 10 seconds) page 31
SOUND MODE
DRC ON/OFF (Standby) page 11
Bluetooth Power page 11
Outputspecicationsforthedifferentsoundeffectmodes
Effect Input
Output
Without Wireless Rear
Speaker Kit
With Wireless Rear
Speaker Kit
SOUND MODE
Surround
VOL WOOFER
SOUND
MODE
Bluetooth
POWER
SURROUND
SOUND
2.0 ch
2.1 ch 4.1 ch
5.1 ch 2.1 ch 4.1 ch
GAME
2.0 ch
2.1 ch 4.1 ch
5.1 ch 2.1 ch 4.1 ch
ADAPTIVE
2.0 ch
2.1 ch 4.1 ch
5.1 ch 2.1 ch 4.1 ch
DTS VIRTUAL:X
2.0 ch
2.1 ch 4.1 ch
5.1 ch 2.1 ch 4.1 ch
BASS BOOST
2.0 ch
2.1 ch 4.1 ch
5.1 ch 2.1 ch 4.1 ch
STANDARD
2.0 ch
2.1 ch 2.1 ch
5.1 ch 2.1 ch 2.1 ch
• The Samsung Wireless Rear Speaker Kit can be purchased separately. To purchase a Kit, contact the
vendor you purchased the Soundbar from.

ENG - 14
Adjusting the Soundbar volume with a TV remote control
Adjust the Soundbar volume using the TV’s remote control.
• This function can be used with IR remote controls only. Bluetooth remote controls (remote
controls that require pairing) are not supported.
• Set the TV speaker to External Speaker to use this function.
• Manufacturers supporting this function:
Samsung, VIZIO, LG, Sony, Sharp, PHILIPS, PANASONIC, TOSHIBA, Hisense, RCA
1. Turn Off the Soundbar.
2. Push up and hold the WOOFER button for 5 seconds.
Each time you push the WOOFER button up and hold it for 5 seconds, the mode switches in the
following order: “OFF-TV REMOTE” (Default mode), “SAMSUNG-TV REMOTE”, “ALL-TV REMOTE”.
Remote Control Button Display Status
SOUND
MODE
WOOFER
CH LEVEL
TONE
CONTROL
5 Sec
(Default mode)
OFF-TV REMOTE
Disable the TV remote control.
SOUND
MODE
WOOFER
CH LEVEL
TONE
CONTROL
5 Sec
SAMSUNG-TV REMOTE
Enable a Samsung TV’s IR remote
control.
SOUND
MODE
WOOFER
CH LEVEL
TONE
CONTROL
5 Sec
ALL-TV REMOTE
Enable a third-party TV’s IR remote
control.
ENG - 15
04 CONNECTING THE SOUNDBAR
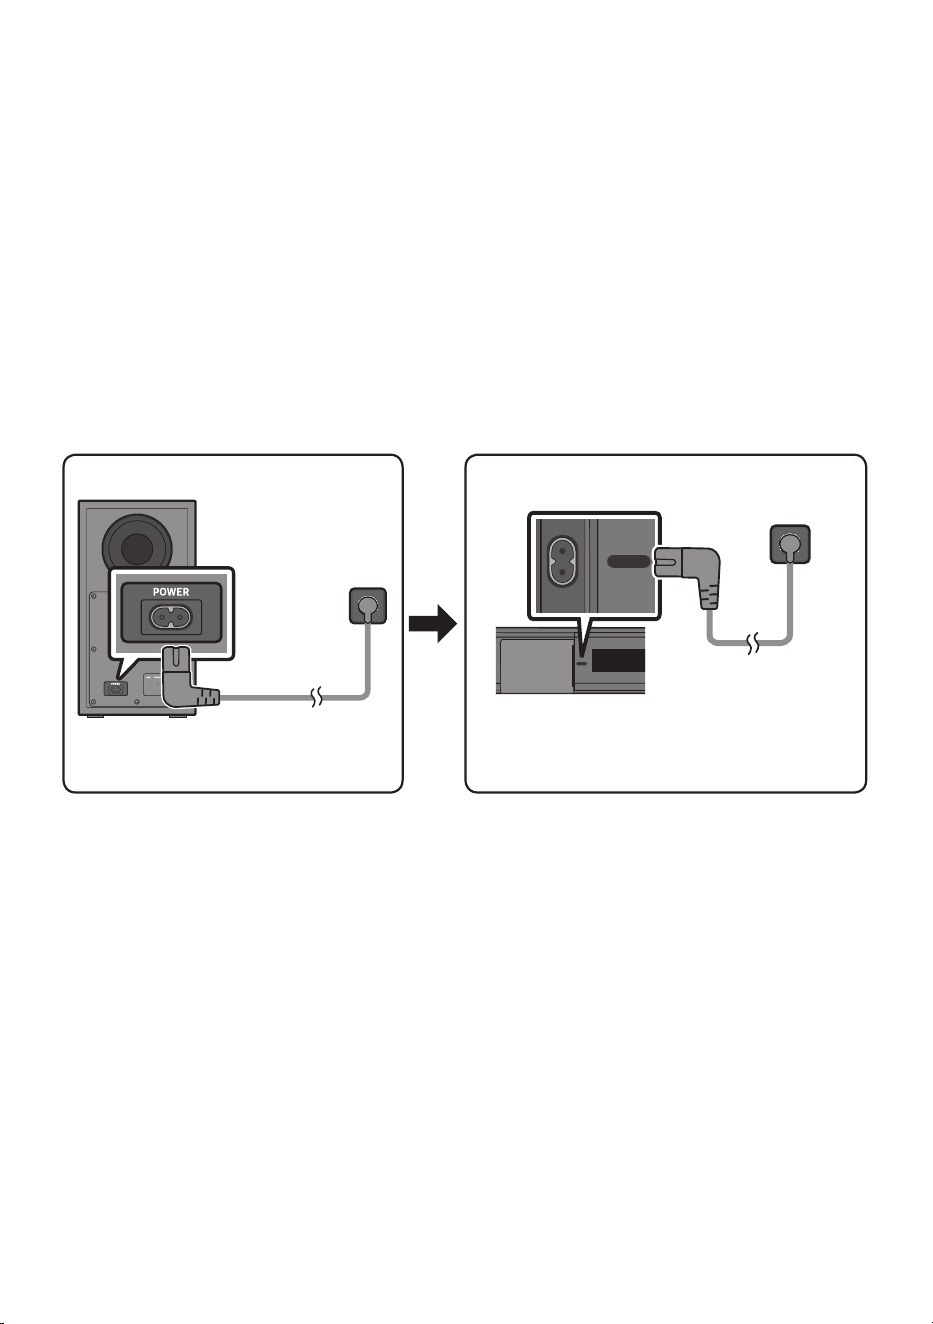
Connecting Electrical Power
Use the power components to connect the Subwoofer and Soundbar to an electrical outlet in the following
order:
1. Connect the power cord to the Subwoofer.
2. Connect the power cord to the Soundbar.
See the illustrations below.
• For more information about the required electrical power and power consumption, refer to the
label attached to the product. (Label: Bottom of the Soundbar Main Unit)
Rear of Subwoofer
Power Cord
Connecting
Electrical Power
Bottom of the
Soundbar Main Unit
Connecting
Electrical Power
Power Cord
POWER
POWER
USB (5V 0.5A)
DIGITAL AUDIO IN
(OPTICAL)
USB (5V 0.5A)
DIGITAL AUDIO IN
(OPTICAL)
POWER
POWER
USB (5V 0.5A)
DIGITAL AUDIO IN
(OPTICAL)
USB (5V 0.5A)
DIGITAL AUDIO IN
(OPTICAL)
ENG - 16
Connecting the Soundbar to the Subwoofer
When the subwoofer is connected, you can enjoy rich bass sound.
Automatic connection between the Subwoofer and the Soundbar
When you turn the power on after connecting the power cables to the Soundbar and subwoofer, the
subwoofer is automatically connected to the Soundbar.
• When auto pairing is complete, the blue indicators at the rear of the subwoofer turn on.
LED Indicator Lights on the Rear of Subwoofer
LED Status Description Resolution
Blue
On
Successfully connected
(normal operation)
-
Blinking
Recovering the
connection
Check if the power cable attached
to the main Soundbar unit is
connected properly or wait about
5 minutes. If blinking persists, try
manually connecting the
subwoofer. See page 17.
Red
On
Standby (with the
Soundbar main unit
turned off)
Check if the power cable attached
to the main Soundbar unit is
connected properly.
Connection failed
Connect again. See the
instructions for manual
connection on page 17.
Red and blue
Blinking Malfunction
See the contact information for
the Samsung Service Centre in
this manual.
ENG - 17
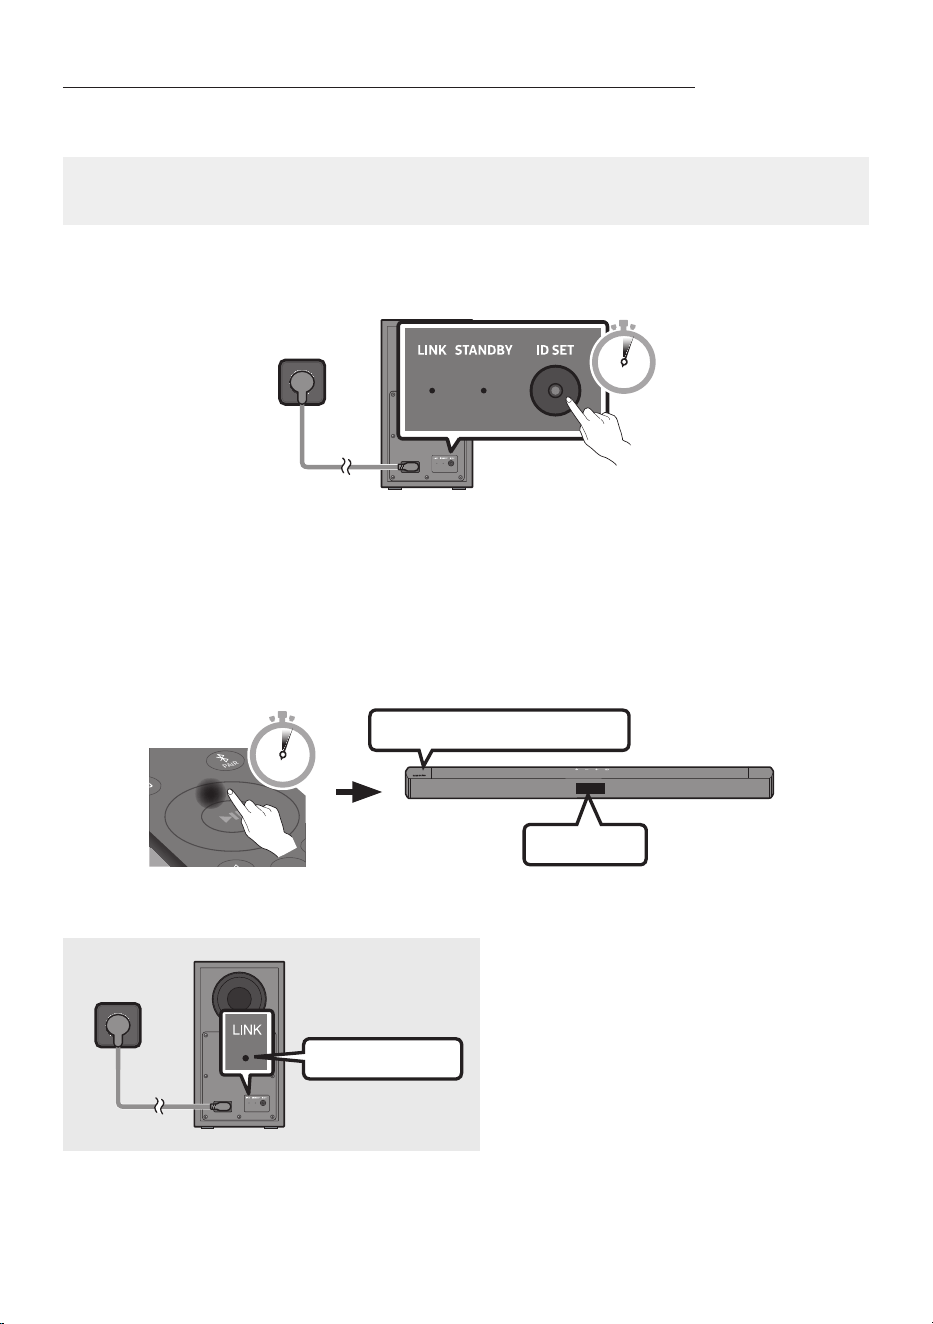
Manually connecting the Subwoofer if automatic connection fails
Before performing the manual connection procedure below:
• Check whether the power cables for the Soundbar and subwoofer are connected properly.
• Make sure that the Soundbar is turned on.
1. Press and hold ID SET on the rear of the subwoofer for at least 5 seconds.
• The red indicator on the rear of the subwoofer turns off and the blue indicator blinks.
5 Sec
Rear of Subwoofer
2. First, press the button on the remote control to turn on the display.
Press and hold the Up button on the remote control for at least 5 seconds.
• The ID SET message appears on the display of the Soundbar for a moment, and then it
disappears.
• The Soundbar will automatically power on when ID SET is complete.
SOUND
MODE
PAIR
5 Sec
ID SET
SAMSUNG logo is on the top
3. Check if the LINK LED is solid blue (connection complete).
Blue is On
The LINK LED indicator stops blinking and
glows a solid blue when a connection is
established between the Soundbar and the
Wireless Subwoofer.

ENG - 18
NOTES
• Do not connect the power cord of this product or your TV to a wall outlet until all connections
between components are complete.
• Before moving or installing this product, be sure to turn off the power and disconnect the power cord.
• If the main unit is powered off, the wireless subwoofer will go into stand-by mode and the
STANDBY LED on the rear of the sub-woofer will turn red after blinking blue several times.
• If you use a device that uses the same frequency (Morocco, Tunisia, Egypt : 5.2GHz, Other Countries :
5.8GHz) as the Soundbar near the Soundbar, interference may cause some sound interruption.
• The maximum transmission distance of the main unit’s wireless signal is about 10 m, but may vary
depending on your operating environment. If a steel-concrete or metallic wall is between the main
unit and the wireless subwoofer, the system may not operate at all because the wireless signal
cannot penetrate metal.
PRECAUTIONS
• Wireless receiving antennas are built into the wireless subwoofer. Keep the unit away from water
and moisture.
• For optimal listening performance, make sure that the area around the wireless subwoofer and the
Wireless Receiver Module (sold separately) is clear of any obstructions.
Connecting the Samsung Wireless Rear Kit to your Soundbar
Expand to true wireless surround sound by connecting the Samsung Wireless Rear Speaker Kit
(SWA-9200S sold separately) to your Soundbar.
For detailed information on connections, see the Samsung Wireless Rear Speaker Kit manual.
ENG - 19
05 USING A WIRED CONNECTION TO THE TV
Hear TV sound from your Soundbar through wired or wireless connections.
• When the Soundbar is connected to selected Samsung TVs, the Soundbar can be controlled using
the TV’s remote control.
– This feature is supported by 2017 and later Samsung Smart TVs that support Bluetooth when
you connect the Soundbar to the TV using an optical cable.
– This function also allows you to use the TV menu to adjust the sound eld and various settings
as well as the volume and mute.
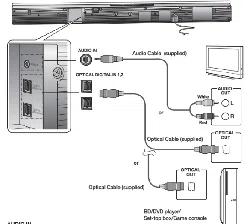
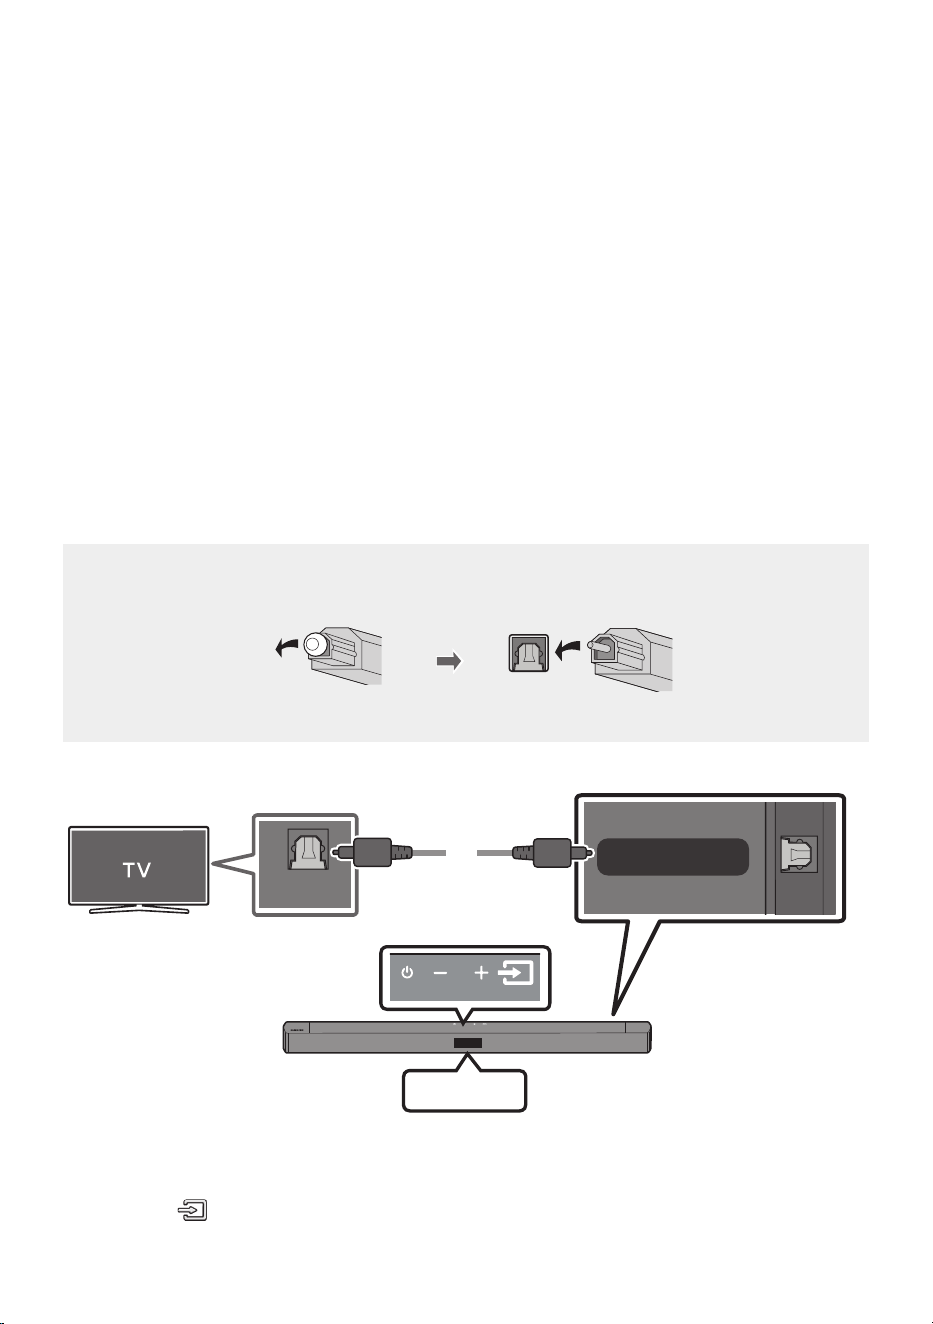
Connecting using an Optical Cable
When the audio in a broadcast is encoded in Dolby Digital and the “Digital Output Audio Format” on
your TV is set to PCM, we recommend that you change the setting to Dolby Digital. When the setting on
the TV is changed, you will experience better sound quality. (The TV menu may use different words for
Dolby Digital and PCM depending on the TV manufacturer.)
Pre-connection Checklist
• When you use an optical cable and the terminals have covers, be sure to remove the covers.
• When using an optical cable, it must be set to “D.IN” mode.
USB (5V 0.5A)
DIGITAL AUDIO IN
(OPTICAL)
OPTICAL OUT
Top of the Soundbar
D.IN
Optical Cable
Bottom of the Soundbar
1. Connect the DIGITAL AUDIO IN (OPTICAL) port on the Soundbar to the OPTICAL OUT port of the
TV with a digital optical cable.
2. Press the (Source) button on the top panel or remote control, and then select the “D.IN” mode.
ENG - 20
06 USING A WIRELESS CONNECTION TO THE TV
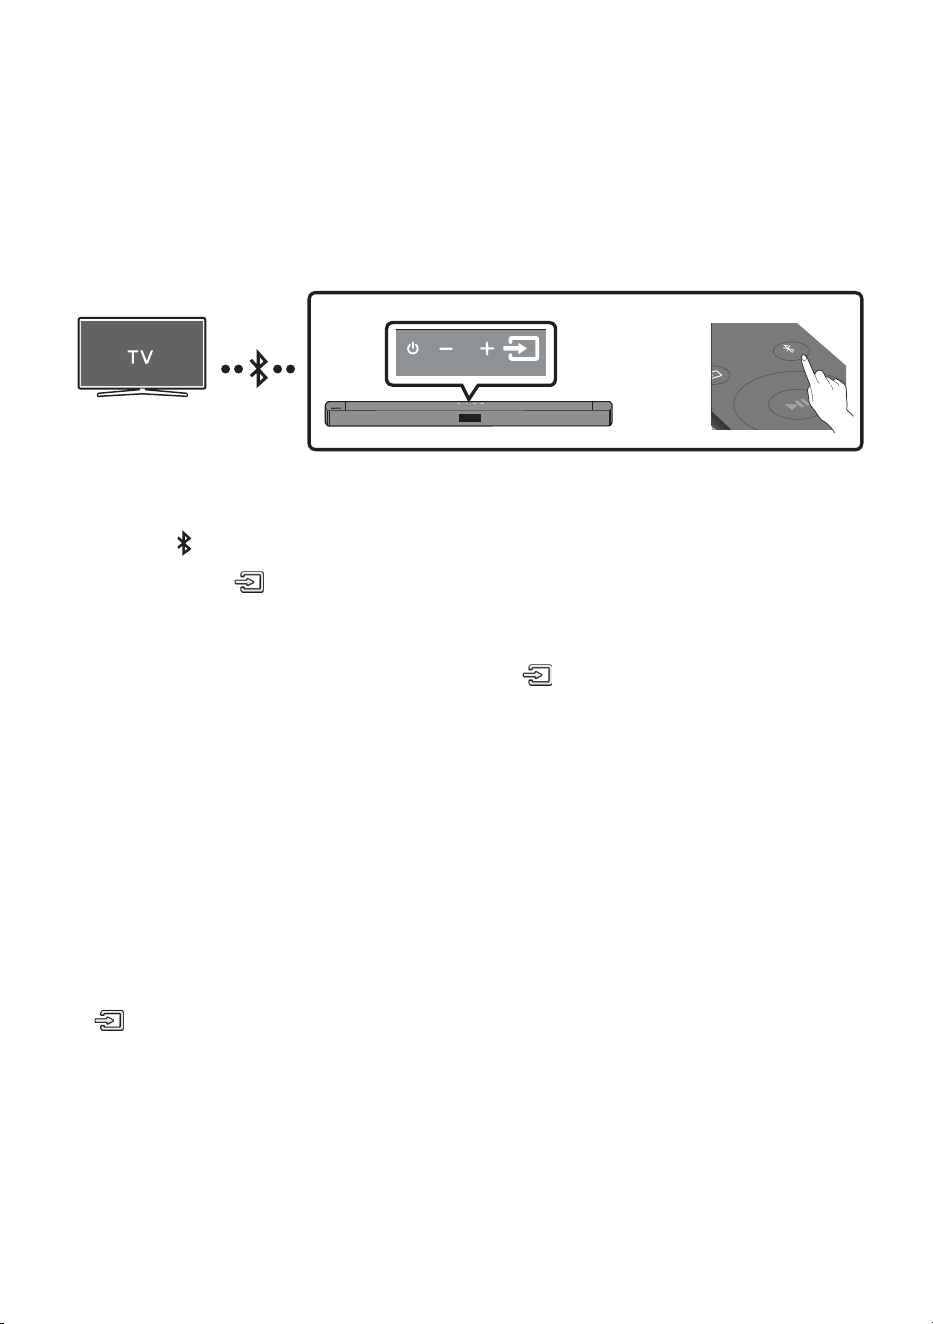
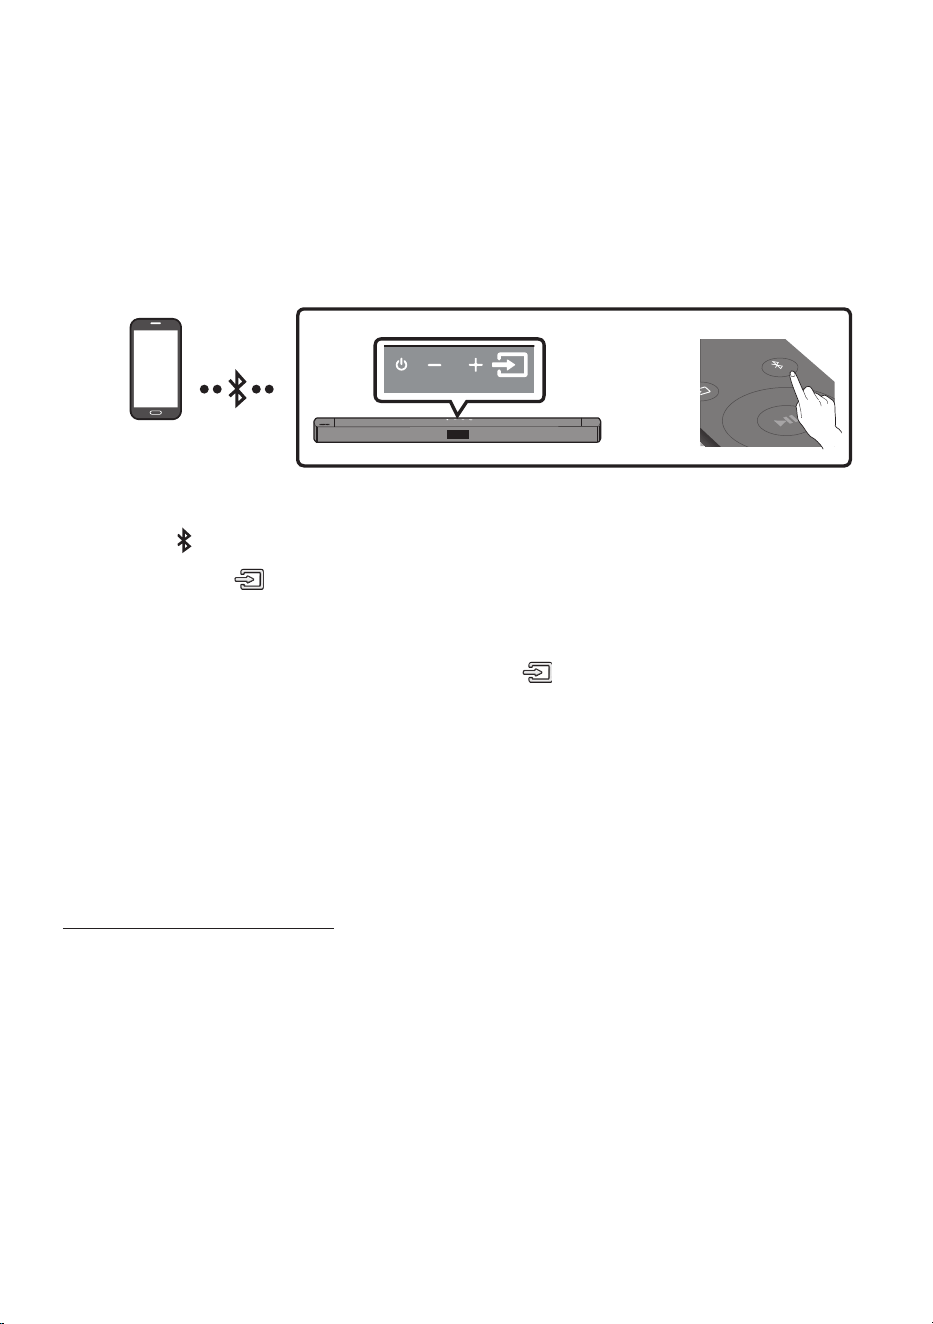
Connecting a TV via Bluetooth
When a TV is connected using Bluetooth, you can hear stereo sound without the hassle of cabling.
• Only one TV can be connected at a time.
SOUND
MODE
PAIR
OR
The initial connection
1. Press the PAIR button on the remote control to enter the “BT PAIRING” mode.
(OR)
a. Press the (Source) button on the top panel and then select “BT”.
“BT” changes to “BT PAIRING” in a few seconds automatically or changes to “BT READY” if
there is a connect record.
b. When “BT READY” appears, press and hold the (Source) button on the top panel of the
Soundbar for more than 5 seconds to display “BT PAIRING”.
2. Select Bluetooth mode on the TV. (For more information, see the TV’s manual.)
3. Select “[AV] Samsung Soundbar C4-Series” or “[AV] Soundbar C4-Series” from the list on TV’s
screen.
An available Soundbar is indicated with “Needs Pairing” or “Paired” on the TV’s Bluetooth device
list. To connect the TV to the Soundbar, select the message, and then establish a connection.
• When the TV is connected, [TV Name] → “BT” appears on the Soundbar’s front display.
4. You can now hear TV sound from the Soundbar.
If the Soundbar is not found by the TV
• Connect the TV and Soundbar with an optical cable, and select the “D.IN” mode by pressing
(Source) button on the top of the Soundbar. See if the audio output works normally, and
proceed with the step 2 and 3.

ENG - 21
If the device fails to connect
• If a previously connected Soundbar listing (e.g. “[AV] Samsung Soundbar C4-Series” or “[AV]
Soundbar C4-Series”) appears in the list, delete it.
• Then repeat steps 1 through 3.
NOTE
• After you have connected the Soundbar to your TV the rst time, use the “BT READY” mode to
reconnect.
Disconnecting the Soundbar from the TV
Press the (Source) button on the top panel or on the remote control and switch to any mode but “BT”.
• Disconnecting takes time because the TV must receive a response from the Soundbar.
(The time required may differ, depending on the TV model.)
• To cancel the automatic Bluetooth connection between the Soundbar and TV, press the
Left button
on the remote control for 5 seconds with the Soundbar in “BT READY” status. (
TV Connect On/Off
)
What is the difference between BT READY and BT PAIRING?
• BT READY : In this mode, you can search for previously connected TVs or connect a previously
connected mobile device to the Soundbar.
• BT PAIRING : In this mode, you can connect a new device to the Soundbar. (Press the PAIR button
on the remote control or press and hold the (Source) button on the top of the Soundbar for
more than 5 seconds while the Soundbar is in “BT” mode and in “BT READY” state.)
NOTES
• If asked for a PIN code when connecting a Bluetooth device, enter <0000>.
• In Bluetooth connection mode, the Bluetooth connection will be lost if the distance between the
Soundbar and the Bluetooth device exceeds 10 m.
• The Soundbar automatically turns off after 18 minutes in the Ready state.
• The Soundbar may not perform Bluetooth search or connection correctly under the following
circumstances:
– If there is a strong electrical eld around the Soundbar.
– If several Bluetooth devices are simultaneously paired with the Soundbar.
– If the Bluetooth device is turned off, not in place, or malfunctions.
• Electronic devices may cause radio interference. Devices that generate electromagnetic waves
must be kept away from the Soundbar main unit - e.g., microwaves, wireless LAN devices, etc.
ENG - 22
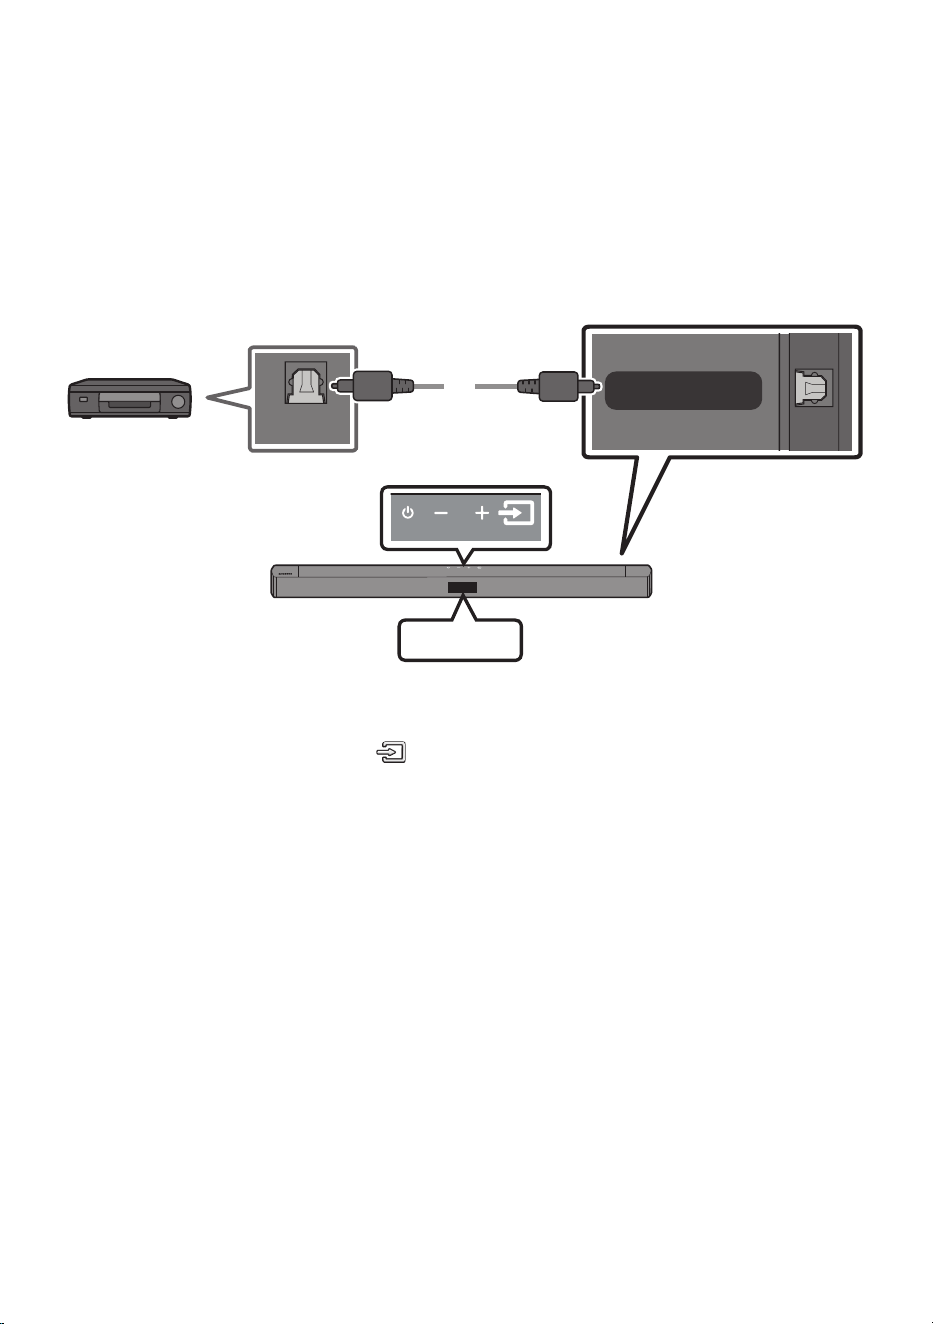
07 CONNECTING AN EXTERNAL DEVICE
Connect to an external device via a wired connection or Bluetooth connection to play the external
device’s sound through the Soundbar.
Connecting using an Optical Cable
USB (5V 0.5A)
DIGITAL AUDIO IN
(OPTICAL)
OPTICAL OUT
Top of the Soundbar
D.IN
Optical Cable
Bottom of the Soundbar
BD / DVD player /
Set-top box /
Game console
1. Connect DIGITAL AUDIO IN (OPTICAL) on the main unit to the OPTICAL OUT port of the Source
Device using a digital optical cable.
2. Select “D.IN” mode by pressing the (Source) button on the top panel or on the remote control.
ENG - 23
08 CONNECTING A USB STORAGE DEVICE
You can play music les located on USB storage devices through the Soundbar.
USB
POWER
USB (5V 0.5A)
DIGITAL AUDIO IN
(OPTICAL)
USB (5V 0.5A)
DIGITAL AUDIO IN
(OPTICAL)
USB port
1. Connect the USB device to the USB port on the bottom of the product.
2. Press the (Source) button on the top panel or on the remote control, and then select “USB”.
3. “USB” appears in the display screen.
4. Play music les from the USB storage device through the Soundbar.
• The Soundbar automatically turns off (Auto Power Down) if no USB device has been connected
for more than 18 minutes.
ENG - 24
File Format Type Compatibility list
Extension Codec Sampling Rate Bitrate
*.mp3 MPEG 1 Layer2 32kHz ~ 48kHz 32kbps~320kbps
MPEG 1 Layer3 32kHz ~ 48kHz 32kbps~320kbps
MPEG 2 Layer3 16kHz ~ 24kHz 8kbps~160kbps
MPEG 2.5 Layer3 8kHz ~ 12kHz 8kbps~160kbps
*.wma WMA7/8/9 32kHz ~ 48kHz 32kbps~320kbps
*.ogg Vorbis 32kHz ~ 48kHz 45kbps~500kbps
*.aac
*.m4a
*.mp4
(Audio Only)
AAC-LC (MPEG2,/
MPEG4)
32kHz ~ 48kHz 32kbps~320kbps
*.wav LPCM 32kHz ~ 192kHz 1,024kbps~9,216kbps
*.ac FLAC 32kHz ~ 192kHz 162kbps~8,100kbps
*.aiff AIFF 32kHz ~ 192kHz 1,024kbps~9,216kbps
• If there are too many folders (about 256) and les (about 999) stored on the USB device, it may take
the Soundbar some time to access and play les.
• Supported USB le system : FAT16, FAT32, NTFS
ENG - 25
09 CONNECTING A MOBILE DEVICE
Connecting via Bluetooth
When a mobile device is connected using Bluetooth, you can hear stereo sound without the hassle of
cabling.
• You cannot connect more than one Bluetooth device at a time.
SOUND
MODE
PAIR
OR
Bluetooth device
The initial connection
1. Press the PAIR button on the remote control to enter the “BT PAIRING” mode.
(OR)
a. Press the (Source) button on the top panel and then select “BT”.
“BT” changes to “BT PAIRING” in a few seconds automatically or changes to “BT READY” if
there is a connect record.
b. When “BT READY” appears, press and hold the (Source) button on the top panel of the
Soundbar for more than 5 seconds to display “BT PAIRING”.
2. On your device, select “[AV] Samsung Soundbar C4-Series” or “[AV] Soundbar C4-Series” from
the list that appears.
• When the Soundbar is connected to the Bluetooth device, [Bluetooth Device Name] → “BT”
appears in the front display.
3. Play music les from the device connected via Bluetooth through the Soundbar.
If the device fails to connect
• If a previously connected Soundbar listing (e.g. “[AV] Samsung Soundbar C4-Series” or “[AV]
Soundbar C4-Series”) appears in the list, delete it.
• Then repeat steps 1 and 2.
NOTE
• After you have connected the Soundbar to your mobile device the rst time, use the “BT READY”
mode to reconnect.

ENG - 26
What is the difference between BT READY and BT PAIRING?
• BT READY : In this mode, you can search for previously connected TVs or connect a previously
connected mobile device to the Soundbar.
• BT PAIRING : In this mode, you can connect a new device to the Soundbar. (Press the PAIR button
on the remote control or press and hold the (Source) button on the top of the Soundbar for
more than 5 seconds while the Soundbar is in “BT” mode and in “BT READY” state.)
NOTES
• If asked for a PIN code when connecting a Bluetooth device, enter <0000>.
• In Bluetooth connection mode, the Bluetooth connection will be lost if the distance between the
Soundbar and the Bluetooth device exceeds 10 m.
• The Soundbar automatically turns off after 18 minutes in the Ready state.
• The Soundbar may not perform Bluetooth search or connection correctly under the following
circumstances:
– If there is a strong electrical eld around the Soundbar.
– If several Bluetooth devices are simultaneously paired with the Soundbar.
– If the Bluetooth device is turned off, not in place, or malfunctions.
• Electronic devices may cause radio interference. Devices that generate electromagnetic waves
must be kept away from the Soundbar main unit - e.g., microwaves, wireless LAN devices, etc.
• The Soundbar supports SBC data (44.1kHz, 48kHz).
• Connect only to a Bluetooth device that supports the A2DP (AV) function.
• You cannot connect the Soundbar to a Bluetooth device that supports only the HF (Hands Free)
function.
• Once you have paired the Soundbar to a Bluetooth device, selecting “[AV] Samsung Soundbar
C4-Series” or “[AV] Soundbar C4-Series” from the device’s scanned devices list will automatically
change the Soundbar to “BT” mode.
– Available only if the Soundbar is listed among the Bluetooth device’s paired devices.
(The Bluetooth device and the Soundbar must have been previously paired at least once.)
• The Soundbar will appear in the Bluetooth device’s searched devices list only when the Soundbar is
displaying “BT READY”.
• The Soundbar cannot be paired to another Bluetooth device if already in Bluetooth mode and
paired to a Bluetooth device.
Bluetooth Power On (SOUND MODE)
If a previously paired Bluetooth device tries to pair with the Soundbar when the Bluetooth Power On
function is on and the Soundbar is turned off, the Soundbar turns on automatically.
1. Press and hold the SOUND MODE button for more than 5 seconds on the remote while the
Soundbar is turned on.
2. “ON-BLUETOOTH POWER” appears on the Soundbar’s display.

ENG - 27
Disconnecting the Bluetooth device from a Soundbar
You can disconnect a Bluetooth device from the Soundbar. For instructions, see the Bluetooth device’s
user manual.
• The Soundbar will be disconnected.
• When the Soundbar is disconnected from the Bluetooth device, the Soundbar will display
“BT DISCONNECTED” on the front display.
Disconnecting the Soundbar from the Bluetooth device
Press the (Source) button on the top panel or on the remote control, and then change to any mode
except “BT”.
• Disconnecting takes time because the Bluetooth device must receive a response from the
Soundbar. (Disconnection time may differ, depending on the Bluetooth device)
• When the Soundbar is disconnected from the Bluetooth device, the Soundbar will display
“BT DISCONNECTED” on the front display.
NOTES
• In Bluetooth connection mode, the Bluetooth connection will be lost if the distance between the
Soundbar and the Bluetooth device exceeds 10 m.
• The Soundbar automatically turns off after 18 minutes in the Ready state.
More About Bluetooth
Bluetooth is a technology that enables Bluetooth-compliant devices to interconnect easily with each
other using a short wireless connection.
• A Bluetooth device may cause noise or malfunction, depending on usage, if:
– A part of your body is in contact with the receiving/transmitting system of the Bluetooth
device or the Soundbar.
– It is subject to electrical variation from obstructions caused by a wall, corner, or ofce partition.
– It is exposed to electrical interference from same frequency-band devices including medical
equipment, microwave ovens, and wireless LANs.
• Pair the Soundbar with the Bluetooth device while they are close together.
• The further the distance between the Soundbar and Bluetooth device, the worse the quality is.
If the distance exceeds the Bluetooth operational range, the connection is lost.
• In poor reception areas, the Bluetooth connection may not work properly.
• The Bluetooth connection only works when it is close to the unit. The connection will be
automatically cut off if the Bluetooth device is out of range. Even within range, the sound quality
may be degraded by obstacles such as walls or doors.
• This wireless device may cause electric interference during its operation.
ENG - 28
10 INSTALLING THE
WALL MOUNT
Installation Precautions
• Install on a vertical wall only.
• Do not install in a place with high
temperature or humidity.
• Verify whether the wall is strong enough to
support the product’s weight. If not, reinforce
the wall or choose another installation point.
• Purchase and use the xing screws or
anchors appropriate for the kind of wall you
have (plaster board, iron board, wood, etc.). If
possible, x the support screws into wall
studs.
• Purchase wall mounting screws according to
the type and thickness of the wall you want to
mount the Soundbar on.
– Diameter: M5
– Length: 35 mm or longer recommended.
• Connect cables from the unit to external
devices before you install the Soundbar on
the wall.
• Make sure the unit is turned off and
unplugged from the power source before you
install it. Otherwise, it may cause an electric
shock.
Wallmount Components
Wall Mount Guide
x 2
(M4 x L10)
x 2
Holder-Screw Screw
x 2
Bracket-Wall Mount
1. Place the Wall Mount Guide against the wall
surface.
• The Wall Mount Guide must be level.
• If your TV is mounted on the wall, install
the Soundbar at least 5 cm below the TV.
5 cm or more
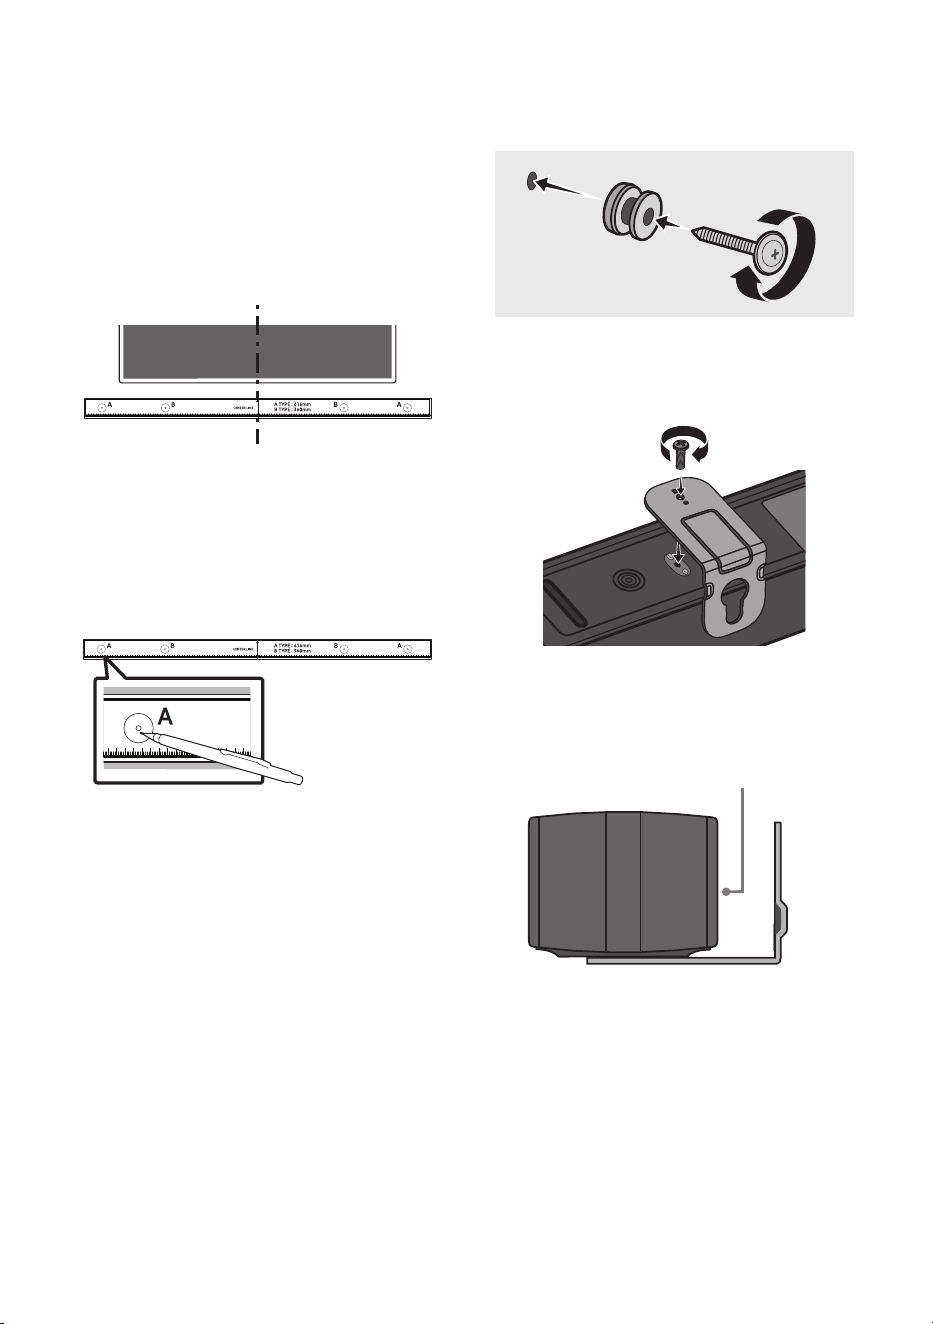
ENG - 29
2. Align the Wall Mount Guide’s Centre Line
with the centre of your TV (if you are
mounting the Soundbar below your TV), and
then x the Wall Mount Guide to the wall
using tape.
• If you are not mounting below a TV, place
the Centre Line in the centre of the
installation area.
Centre Line
3. Push a pen tip or sharpened pencil tip
through the centre of the A-TYPE images on
each end of the Guide to mark the holes for
the supporting screws, and then remove the
Wall Mount Guide.
4. Using an appropriately sized drill bit, drill a
hole in the wall at each marking.
• If the markings do not correspond to the
positions of studs, make sure you insert
appropriate anchors into the holes before
you insert the support screws. If you use
anchors, make sure the holes you drill are
large enough for the anchors you use.
5. Push a screw (not supplied) through each
Holder-Screw, and then screw each screw
rmly into a support screw hole.
(Not supplied)
6. Install the 2 Bracket-Wall Mounts in the
correct orientation on the bottom of the
Soundbar using 2 Screws.
POWER
• When assembling, make sure the hanger
part of the Bracket-Wall Mounts are
located behind the rear of the Soundbar.
Rear of Soundbar
Right end of Soundbar
ENG - 30
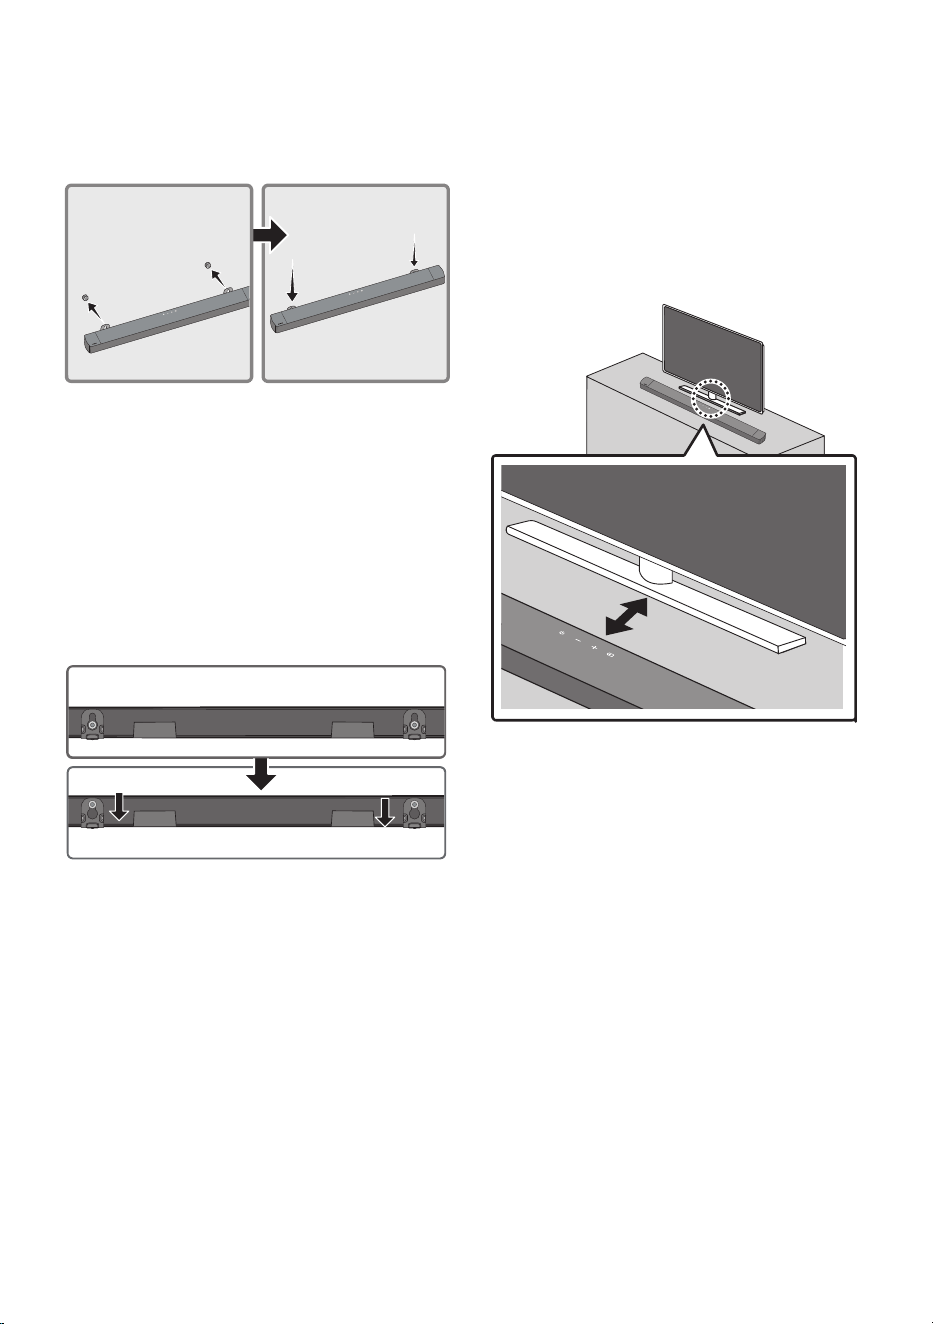
7. Install the Soundbar with the attached
Bracket-Wall Mounts by hanging the
Bracket-Wall Mounts on the Holder-Screws
on the wall.
8. Slide the Soundbar down as shown below so
that the Bracket-Wall Mounts rest securely
on the Holder-Screws.
• Insert the Holder-Screws into the wide
(bottom) part of the Bracket-Wall
Mounts, and then slide the Bracket-Wall
Mounts down so that the Bracket-Wall
Mounts rest securely on the
Holder-Screws.
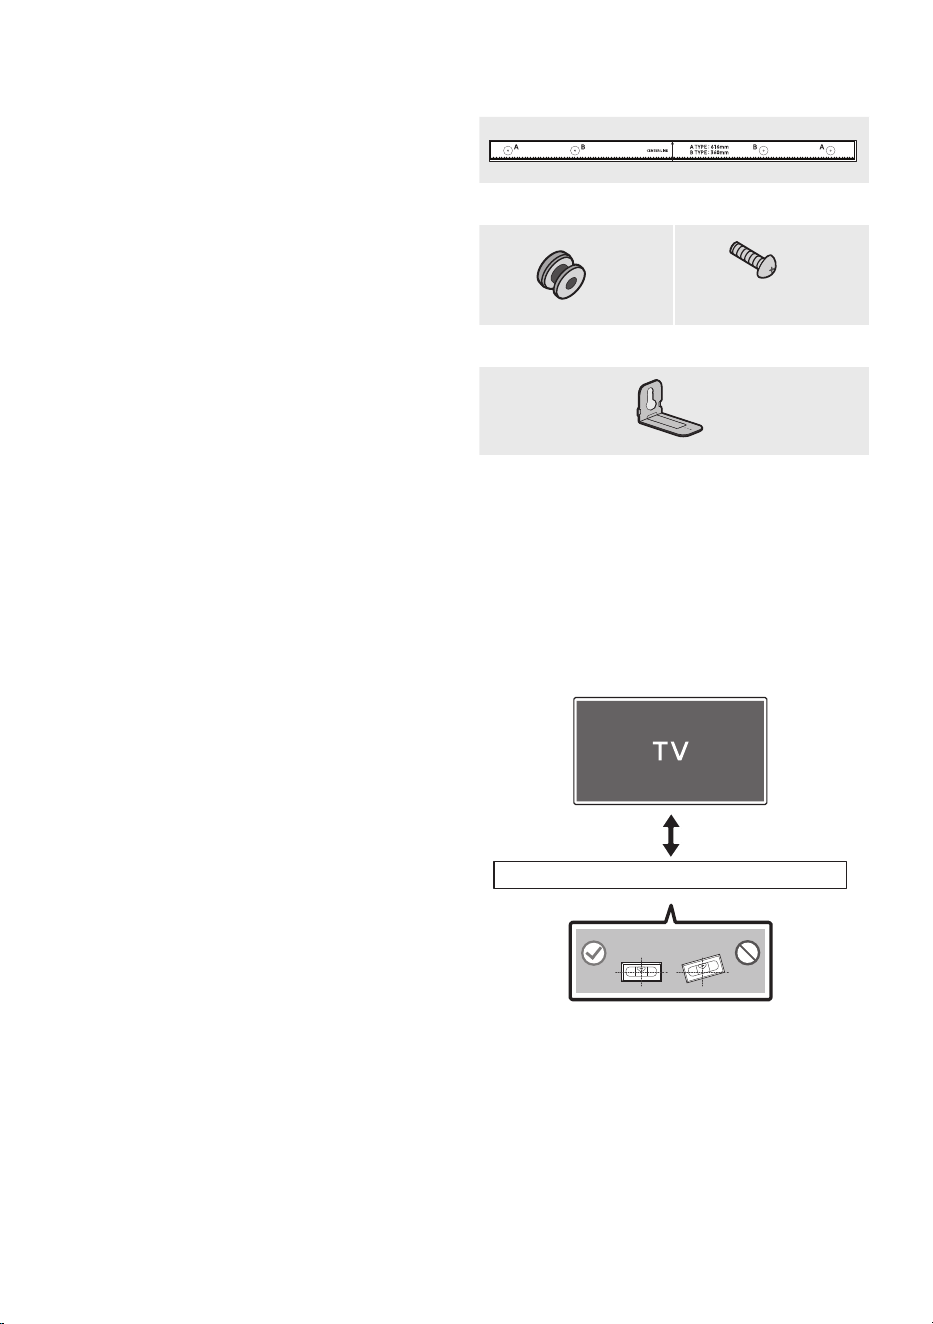
11 PLACING THE
SOUNDBAR ON A
TV STAND
Place the Soundbar on a TV stand.
3cm or more
As illustrated in the image, align the centre of the
Soundbar with the centre of the TV, carefully
place the Soundbar onto the TV stand.
For optimal sound quality, position the Soundbar
at least 3cm away from the TV front.
NOTE
• Make sure the Soundbar is placed on a at
and solid surface.

ENG - 31
12 SOFTWARE
UPDATE
Samsung may offer updates for the Soundbar’s
systemrmwareinthefuture.
POWER
USB (5V 0.5A)
DIGITAL AUDIO IN
(OPTICAL)
USB (5V 0.5A)
DIGITAL AUDIO IN
(OPTICAL)
USB port
If an update is offered, you can update the
rmware by connecting a USB device with the
rmware update stored on it to the USB port on
your Soundbar. For more information about how
to download update les, go to the Samsung
website at www.samsung.com
Support.
Then, select the product type or enter the model
number of your Soundbar, select the Software &
Apps option, and then Downloads. Note that the
option names can vary.
Update Procedure
Important: The update function erases all user
settings. We recommend you write down your
settings so that you can easily reset them after
the update. Note that updating the rmware
resets the subwoofer connection too.
1. Connect a USB thumb drive to the USB port
on your computer.
Important: Make sure there are no music
les on the USB thumb drive. This may cause
the rmware update to fail.
2. Go to (samsung.com)
select Enter Model
Number and enter the model of your
Soundbar. Select manuals and downloads
and download the latest software le.
3. Save the downloaded software to a USB
stick and select “Extract Here” to unzip the
folder.
4. Turn off the Soundbar and connect the USB
stick containing the software update to the
USB port.
5. Turn on the Soundbar and change the source
to “USB” mode. Within 3 minutes, “UPDATE”
is displayed and the update begins.
6. When the update is complete, the Soundbar
turns off. Turn on the Soundbar and then
press the (Volume) button on the top
panel for 5 seconds. “INIT OK” appears on the
display and the Soundbar is reset.
• This product has a DUAL BOOT function.
If the rmware fails to update, you can
update the rmware again. Soundbar AC
code on when USB in with update le.
Then update again but VFD no show
anything, It will update nish after 2min.
7. Restore your settings on the Soundbar.

ENG - 32
If UPDATE is not displayed
1. Turn off the Soundbar, disconnect and then
reconnect the USB storage device that
contains the update les to the Soundbar’s
USB port.
2. Disconnect the Soundbar’s power cord,
reconnect it, and then turn on the Soundbar.
NOTES
• The rmware update may not work properly
if audio les supported by the Soundbar are
stored in the USB storage device.
• Do not disconnect the power or remove the
USB device while updates are being applied.
• After the update is completed, the user setup
in the Soundbar maybe will be initialized. So
we recommend you write down your settings
so that you can easily reset them after the
update. Note that updating rmware resets
the subwoofer connection too.
If the connection to the subwoofer is not
re-established automatically after the
update, refer to page 16.
If the software update fails, check if the USB
stick is defective.
• Mac OS users should use MS-DOS (FAT) as the
USB format.
• Updating via USB may not be available,
depending on the USB storage device
manufacturer.
ENG - 33
13 TROUBLESHOOTING
Before seeking assistance, check the following.
Soundbar does not turn on.
; Check whether the power cord of the
Soundbar is correctly inserted into the
outlet.
Soundbar works erratically.
; After removing the power cord, insert it
again.
; Power the external device off/on and try
again.
; If there is no signal, the Soundbar
automatically turns off after a certain
period of time. Turn on the power.
(See page 7.)
If the remote control does not work.
; Point the remote directly at the Soundbar.
; Replace the batteries with new ones.
Soundbar does not output any sound.
; The volume of the Soundbar is too low or
muted. Adjust the volume.
; When any external device (STB, Bluetooth
device, mobile device, etc.) is connected,
adjust the volume of the external device.
; For sound output of the TV, select
Soundbar. (Samsung TV: Home ( ) →
Menu → Settings ( ) → All Settings ( )
→ Sound → Sound Output → Select
Soundbar)
; The cable connection to the Soundbar may
be loose. Remove the cable and connect
again.
; Remove the power cord completely,
reconnect, and turn the power on.
; Reset the product and try again.
(See page 31.)
Subwoofer does not output any sound.
; Check whether the LED indicator on the
rear of the Subwoofer is on in blue.
Reconnect the Soundbar and Subwoofer if
the indicator is blinking slowly in blue or
turned red. (See page 17.)
; You may experience an issue if there is an
obstacle between the Soundbar and
Subwoofer. Move devices to an area away
from obstacles.
; Other devices sending radio frequency
signals in proximity may interrupt the
connection. Keep your speaker away from
such devices.
; Remove and reconnect the power plug.
The Subwoofer volume is too low.
; The original volume of the content you are
playing may be low. Try adjusting the
Subwoofer level. (See page 12.)
; Bring the Subwoofer speaker closer to you.
Soundbar does not appear on the Bluetooth
device list of the TV.
; Disconnect the power cord of the Soundbar
completely and reconnect, and then try
searching again. (See page 20.)
; Connect the TV and Soundbar with an
optical cable, and select the “D.IN” mode by
pressing the (Source) button on the
top of the Soundbar. See if the audio output
works normally, and try searching again.
(See page 20.)
ENG - 34
Soundbar does not connect via Bluetooth.
; When connecting a new device, switch to
“BT PAIRING” for connection. (Press the
PAIR button on the remote control or
press the (Source) button on the top of
the soundbar for at least 5 seconds.)
; If the Soundbar is connected to another
device, disconnect that device rst to
switch the device.
; Reconnect it after removing the Bluetooth
speaker list on the device to connect.
(Samsung TV: Home ( ) → Menu →
Settings ( ) → All Settings ( ) → Sound
→ Sound Output → Bluetooth Speaker List)
; Remove and reconnect the power plug,
then try again.
; Reset the product and try again.
(See page 31.)
Sound drops out when connected via
Bluetooth.
; Some devices can cause radio interference
if they are located too close to the
Soundbar. e. g. microwaves, wireless
routers, etc.
; If your device that is connected via
Bluetooth moves too far away from the
Soundbar, it may cause the sound to drop
out. Move the device closer to the
Soundbar.
; If a part of your body is in contact with the
Bluetooth transceiver or the product is
installed on metal furniture, sound may
drop out. Check the installation
environment and conditions for use.
Soundbar does not turn on automatically with
the TV.
; When you turn off the Soundbar while
watching TV, power synchronization with
the TV is disabled. First turn off the TV.
14 LICENCE
Manufactured under license from Dolby
Laboratories. Dolby, Dolby Audio, and the
double-D symbol are trademarks of Dolby
Laboratories Licensing Corporation. Condential
unpublished works. Copyright 1992-2019 Dolby
Laboratories. All rights reserved.
For DTS patents, see http://patents.dts.com.
Manufactured under license from DTS
Licensing Limited. DTS, Digital Surround,
Virtual:X, and the DTS logo are registered
trademarks or trademarks of DTS, Inc. in the
United States and other countries. © 2021 DTS,
Inc. ALL RIGHTS RESERVED.
The Bluetooth® word mark and logos are
registered trademarks owned by Bluetooth SIG,
Inc. and any use of such marks by Samsung
Electronics Co., Ltd. is under license. Other
trademarks and trade names are those of their
respective owners.

ENG - 35
[ENERGY STAR]
ENERGYSTARqualiedmodelonly
– Your Samsung product is ENERGY STAR
qualied in its factory default setting.
Change to certain features, settings and
functionality in this product can change the
power consumption, possibly beyond the
limits required for ENERGY STAR
qualication.
– Environmental Protection Agency and
Department of Energy. ENERGY STAR is a
joint program of the Government agencies,
designed to promote energy efcient
products and practices.
Refer to www.energystar.gov for more
information of the ENERGY STAR Program.
ENERGYSTARqualiedmodelonly
(Applicable to Thin Client models only)
As an ENERGY STAR® Partner, SAMSUNG has
determined that this product meets the
ENERGY STAR® guidelines for energy
efciency.
– The ENERGY STAR Program has been to
reduced greenhouse gas emissions and
save energy through voluntary labeling.
– Power management setting of this product
have been enabled by default, and have
various timing setting from 1 minutes to 5
hours.
– The product can wake with a button press
on the chassis from sleep mode.
ENERGYSTARqualiedmodelonly(Theother
models)
– As an ENERGY STAR Partner, Samsung has
determined that this product or product
models meets the ENERGY STAR guideline
for energy efciency.
15 OPEN SOURCE
LICENCE NOTICE
To send inquiries and requests for questions
regarding open sources, contact Samsung Open
Source (http://opensource.samsung.com)
16 IMPORTANT
NOTES ABOUT
SERVICE
Figures and illustrations in this User Manual are
provided for reference only and may differ from
actual product appearance.

ENG - 36
17 SPECIFICATIONS AND GUIDE
Specications
Model Name HW-C450
USB 5V/0.5A
Weight 1.4 kg
Dimensions (W x H x D) 858.8 x 59.0 x 75.0 mm
Operating Temperature Range +5°C to +35°C
Operating Humidity Range 10 % ~ 75 %
AMPLIFIER
Rated Output power
40W x 2, 6 ohm
Supported play formats
(DTS 2.0 sound is played in DTS format.)
LPCM 2ch, Dolby Audio™
(supporting Dolby® Digital), DTS
Subwoofer Name PS-WC45T
Weight 4.5 kg
Dimensions (W x H x D) 184.0 x 343.0 x 295.0 mm
AMPLIFIER
Rated Output power
220W
NOTES
• Samsung Electronics Co., Ltd reserves the right to change the specications without notice.
• Weight and dimensions are approximate.
FRA - 2
INFORMATIONS RELATIVES À LA SÉCURITÉ
AVERTISSEMENTS
POUR ÉVITER LES RISQUES DE CHOC
ÉLECTRIQUE, NE DÉMONTEZ PAS LE CAPOT.
L’APPAREIL NE CONTIENT PAS DE PIÈCES
RÉPARABLES PAR L’UTILISATEUR ; S’ADRESSER
À UN SERVICE APRÈS-VENTE QUALIFIÉ.
Reportez-vous au tableau ci-dessous pour une
explication des symboles pouvant gurer sur
votre produit Samsung.
ATTENTION
RISQUE DE CHOC
ÉLECTRIQUE. NE PAS
OUVRIR
Ce symbole indique que ce produit est
alimenté par haute tension. Il est
dangereux de toucher la moindre pièce
située à l'intérieur de ce produit.
Ce symbole indique qu'une
documentation importante relative au
fonctionnement et à l'entretien est
fournie avec le produit.
Produit de classeII: ce symbole indique
qu'aucun branchement de sécurité à la
terre (prise de terre) n'est requis.
Si ce symbole n'est pas présent sur un
produit avec un cordon d'alimentation,
le produit DOIT avoir une connexion de
protection able à la terre.
Tension CA: ce symbole indique que la
tension nominale indiquée par le
symbole est une tension CA.
Tension CC: ce symbole indique que la
tension nominale indiquée par le
symbole est une tension CC.
Mise en garde, Consulter le mode
d'emploi: ce symbole avertit l'utilisateur
qu'il doit consulter le manuel
d'utilisation pour en savoir plus sur les
informations relatives à la sécurité.
AVERTISSEMENT
• An de diminuer les risques d’incendie ou de
choc électrique, n’exposez pas cet appareil à
la pluie ou à l’ humidité.
ATTENTION
• POUR PRÉVENIR LES CHOCS ÉLECTRIQUES,
BRANCHEZ LA FICHE AU FOND, EN
PRENANT SOIN D’INSÉRER LA TIGE LARGE
DANS LA FENTE LARGE.
• Cet appareil doit toujours être branché à une
prise terre.
• Pour déconnecter l’appareil du circuit
principal, la prise doit être débranchée de la
prise principale ; il est de ce fait nécessaire
que la prise principale soit facile d’accès.
• Évitez toute projection d’eau sur l’appareil.
Ne posez jamais d’objet contenant un liquide
(ex : un vase) dessus.
• Pour éteindre complètement l’appareil, vous
devez retirer le cordon d’alimentation de la
prise murale. Par conséquent, le cordon
d’alimentation doit être facilement accessible
à tout moment.

FRA - 3
PRÉCAUTIONS
1. Vériez que l’alimentation électrique CA de
votre domicile respecte les conditions en
matière d’alimentation répertoriées sur
l’étiquette d’identication située au bas de
votre produit. Posez votre produit à plat sur
un meuble stable en veillant à laisser un
espace de 7 à 10 cm autour de l’appareil an
d’assurer une ventilation correcte de celui-ci.
Faites attention à ne pas obstruer les orices
de ventilation. Ne posez pas l’ensemble sur
un amplicateur ou un autre appareil
susceptible de chauffer. Cet ensemble est
conçu pour une utilisation en continu. Pour
entièrement éteindre l’appareil, débranchez
la che CA de la prise murale. Débranchez
l’appareil si vous envisagez de ne pas l’utiliser
durant une longue période.
2. En cas d’orage, débranchez la che de
l’appareil de la prise murale. Les surtensions
occasionnées par l’orage pourraient
endommager votre appareil.
3. N’exposez pas l’ensemble aux rayons directs
du soleil ou à toute autre source de chaleur.
Ceci pourrait entraîner une surchauffe et un
dysfonctionnement de l’appareil.
4. Protégez le produit de l’humidité (comme les
vases) et d’une chaleur excessive (comme
une cheminée) ou de tout équipement
capable de créer des champs magnétiques
ou électriques. Débranchez le câble
d’alimentation en cas de dysfonctionnement.
Votre produit n’est pas prévu pour un usage
industriel. Ce produit ne peut être utilisé qu’à
des ns personnelles. Une condensation
peut se former si le produit ou un disque a
été stocké à basse température.
Si vous devez transporter l’ensemble
pendant l’hiver, attendez environ 2 heures
que l’appareil ait atteint la température de la
pièce avant de l’utiliser.
5. Les piles utilisées dans ce produit peuvent
contenir des produits ch miques dangereux
pour l’environnement. Ne jetez pas les piles
dans votre poubelle habituelle. Ne vous
débarrassez pas des piles en les faisant
brûler. Ne court-circuitez pas, ne
désassemblez pas ni ne faites pas surchauffer
les batteries. ATTENTION : Le remplacement
incorrect de la batterie entraîne un risque
d’explosion. Ne la remplacez que par une
batterie du même type.

FRA - 4
SOMMAIRE
01 Contrôle des Composants 6
02 Présentation du Produit 7
Panneau frontal/supérieur de la Soundbar ------------------------- 7
Panneau inférieur de la Soundbar ------------------------- 8
03 Utilisation de la télécommande 9
Insertion des piles avant l’utilisation de la télécommande (Piles AAA X 2) ------------------------- 9
Comment utiliser la télécommande
-------------------------
9
Utilisation des touches dissimulées (Touches avec plus d’une fonction)
-------------------------
13
Spécications de sortie pour les différents modes d’effets sonores
-------------------------
13
Réglage du volume de la Soundbar avec une télécommande de téléviseur
------------------------- 14
04 Connexion de la Soundbar 15
Connexion de l’alimentation électrique
-------------------------
15
Connexion de la Soundbar au Caisson de basse
-------------------------
16
Connexion du kit arrière sans l Samsung à votre Soundbar
-------------------------
18
05 ConnexionlaireavecleTéléviseur 19
Connexion à l’aide d’un câble optique
-------------------------
19
06 ConnexionsanslavecleTéléviseur 20
Connexion à un téléviseur via Bluetooth
-------------------------
20

FRA - 5
07 Connexion à un Appareil Externe 22
Connexion à l’aide d’un câble optique
-------------------------
22
08 Connexion d’un périphérique de stockage USB 23
09 Connexion à un Appareil Mobile 25
Connexion via Bluetooth
-------------------------
25
10 Installation du Support Mural 28
Précautions d’installation
-------------------------
28
Composants de xation au mur
-------------------------
28
11 Installation de la Soundbar sur un socle de
téléviseur 30
12 Mise à jour du Logiciel 31
Procédure de mise à jour
-------------------------
31
Si UPDATE ne s’afche pas
-------------------------
32
13 Dépannage 33
14 Licence 34
15 AvisdeLicenceLibre 35
16 RemarqueImportanteàProposduService 35
17 SpécicationsetGuide 36
Spécications
-------------------------
36

FRA - 6
01 CONTRÔLE DES COMPOSANTS
SOUND
MODE
WOOFER
TONE
CONTROL
CH LEVEL
Unité principale Soundbar Caisson de basse Télécommande/Piles
x 2
Cordon d’alimentation
(Caisson de basse, Soundbar)
Câble optique Guidedexationmurale
x 2
(M4 x L10)
x 2
x 2
Visdexation Vis
Supportdexationmurale
• Pour plus d’informations sur l’alimentation et la consommation électriques, reportez-vous à
l’étiquette collée sur le produit. (Étiquette : Bas de l’Unité Principale Soundbar)
• Pour acheter des composants supplémentaires ou des câbles optionnels, contactez un Centre de
service Samsung ou le Service client de Samsung.
• L’aspect des accessoires peut légèrement différer des illustrations ci-dessus.
• La présentation et les spécications peuvent faire l’objet de modications sans préavis.
FRA - 7
02
PRÉSENTATION DU PRODUIT
Panneau frontal/supérieur de la Soundbar
Panneau supérieur
Afchage
Afche l'état et le mode actuel du produit.
Touche (Alimentation)
Allume et éteint l'appareil.
• Fonction Auto Power Down
L’appareil s’éteint automatiquement dans les situations suivantes.
– Mode D.IN / BT / USB : S’il n’y a pas de signal audio pendant 18 minutes.
Touche (Volume)
Règle le volume.
• Une fois ajusté, le niveau de volume apparaît sur l’afchage avant de la Soundbar.
Touche (Source)
Sélectionne le mode d'entrée de la source.
Mode d’entrée Afchage
Entrée numérique optique D.IN
Mode BLUETOOTH BT
Mode USB USB
• Pour activer le mode «BTPAIRING», passez la source sur le mode «BT» dans l’état «BT READY», puis
appuyez pendant plus de 5secondes sur le bouton (Source).
• Lorsque vous branchez le cordon CA, la touche Marche/Arrêt fonctionne pendant 4 à 6 secondes.
• Lorsque vous mettez l’unité sous tension, il faut compter 4 ou 5 secondes de retard avant le
déclenchement du son.
• Si vous souhaitez bénécier du son du Soundbar uniquement, vous devrez éteindre les enceintes du
téléviseur depuis le menu Audio Setup de votre téléviseur. Reportezvous au manuel fourni avec
votre téléviseur.

FRA - 8
Panneau inférieur de la Soundbar
POWER
USB (5V 0.5A)
DIGITAL AUDIO IN
(OPTICAL)
POWER
USB (5V 0.5A)
DIGITAL AUDIO IN
(OPTICAL)
POWER
Connectez le câble d'alimentation secteur de la Soundbar.
DIGITALAUDIOIN(OPTICAL)
Permet de connecter la sortie numérique (optique) d'un appareil externe.
USB (5V 0.5A)
Permet de connecter un périphérique USB pour lire des chiers musicaux sur le périphérique USB via la
Soundbar.
• Lorsque vous débranchez le cordon d’alimentation d’une prise de courant murale, tirez la che. Ne
tirez pas le câble.
• Ne branchez pas cette unité ou d’autres composants à une prise CA tant que toutes les connexions
entre les composants ne sont pas terminées.
FRA - 9
03 UTILISATION DE LA TÉLÉCOMMANDE
Insertiondespilesavantl’utilisationdelatélécommande(PilesAAAX2)
Faites glisser le couvercle arrière dans la direction
de la èche jusqu’à ce qu’il soit complètement
retiré. Insérez 2piles AAA (1,5V) en respectant leur
polarité. Remettez le couvercle arrière en le faisant
glisser dans sa position.
Comment utiliser la télécommande
SOUND
MODE
WOOFER
TONE
CONTROL
CH LEVEL
SOUND
MODE
WOOFER
TONE
CONTROL
CH LEVEL
Alimentation
Allume et éteint la Soundbar.
SOUND
MODE
WOOFER
TONE
CONTROL
CH LEVEL
Source
Appuyez pour sélectionner une source
connectée à la Soundbar.
SOUND
MODE
WOOFER
TONE
CONTROL
CH LEVEL
Coupure de son
Appuyez sur la touche (Coupure de son) pour
couper le son. Appuyez de nouveau sur cette
touche pour activer le son.
SOUND
MODE
WOOFER
TONE
CONTROL
CH LEVEL
Volume
Appuyez sur les touches haut ou bas pour régler
le volume.
CH LEVEL
TONE
CONTROL
WOOFER
SOUND
MODE
CH LEVEL
TONE
CONTROL
WOOFER
SOUND
MODE
CH LEVEL
TONE
CONTROL
WOOFER
SOUND
MODE
CH LEVEL
TONE
CONTROL
WOOFER
SOUND
MODE
• Sourdine
Appuyez sur la touche Volume pour couper
le son. Appuyez de nouveau sur cette touche
pour réactiver le son.
CH LEVEL
TONE
CONTROL
WOOFER
SOUND
MODE
CH LEVEL
TONE
CONTROL
WOOFER
SOUND
MODE
CH LEVEL
TONE
CONTROL
WOOFER
SOUND
MODE
CH LEVEL
TONE
CONTROL
WOOFER
SOUND
MODE
FRA - 10
SOUND
MODE
WOOFER
TONE
CONTROL
CH LEVEL
CH LEVEL
Appuyer sur cette touche permet de régler le volume de chaque enceinte.
• Appuyez sur cette touche pour sélectionner VIRTUAL CENTER LEVEL puis réglez le
volume entre -6~ et +6 à l’aide des touches Haut/Bas.
• Si les enceintes arrière (vendues séparément) sont connectées, le réglage REAR LEVEL
est disponible. Pour régler le volume REAR LEVEL entre -6 et +6, utilisez les touches
Haut/Bas.
VOL WOOFER
SOUND
MODE
PAIR
Haut/Bas/
Gauche/
Droite
Appuyez sur les zones indiquées pour sélectionner Haut/Bas/
Gauche/Droite.
Appuyez sur Haut/Bas/Gauche/Droite sur la touche pour sélectionner ou paramétrer les
fonctions.
• Répétition
Pour utiliser la fonction de répétition en mode «USB», appuyez sur la touche Haut.
• Sautdechiermusical
Appuyez sur la touche Droite pour sélectionner le chier musical suivant.
Appuyez sur la touche Gauche pour sélectionner le chier musical précédent.
• ID SET
Appuyez et maintenez enfoncée la touche Haut pendant 5 secondes pour terminer
ID SET (lors de la connexion d’un caisson de basse sans l ou d’enceintes arrière sans
l).
SOUND
MODE
WOOFER
TONE
CONTROL
CH LEVEL
Commande
sonore
Appuyer sur cette touche permet de paramétrer la fonction audio. Il est possible de
modier chaque réglage à l'aide des touches Haut/Bas.
AUDIO SYNC VOICE ENHANCE ON/OFF NIGHTMODEON/OF
– AUDIO SYNC
Si l’image sur le téléviseur et le son de la Soundbar ne sont pas synchronisés, appuyez
sur la touche (Commande sonore) pour sélectionner AUDIO SYNC puis réglez le
décalage audio de 0 à 300 millisecondes à l’aide des touches Haut/Bas. (Non
disponible en mode «USB» ou «BT»)
– VOICE ENHANCE ON/OFF
Ce mode permet d’entendre plus facilement les dialogues parlés dans les lms et sur
le téléviseur.
– NIGHTMODEON/OFF
Ce mode est idéal pour le visionnage de nuit, car les réglages sont modiés pour
baisser le volume sans nuire à la clarté des dialogues.
• Les fonctions audio VOICE ENHANCE et NIGHTMODE peuvent être activées ou
désactivées ON/OFF à l’aide des touches Haut/Bas.
• Appuyez et maintenez enfoncée la touche (Commande sonore) pendant environ
5 secondes pour ajuster le son pour chaque bande de fréquence. 150 Hz, 300 Hz,
600 Hz, 1,2 kHz, 2,5 kHz, 5 kHz et 10 kHz peuvent être sélectionnés à l’aide des touches
Gauche/Droite et chaque réglage peut être déni entre -6 et +6 à l’aide des touches
Haut/Bas. (Assurez-vous que le mode son est réglé sur «STANDARD».)
FRA - 11
SOUND
MODE
WOOFER
TONE
CONTROL
CH LEVEL
Bluetooth
PAIR
Appuyez sur la touche PAIR. «BTPAIRING» s'afche sur l'écran de la Soundbar.
Vous pouvez connecter la Soundbar à un nouvel appareil Bluetooth dans ce mode en
sélectionnant la Soundbar dans la liste de recherche d'appareils Bluetooth.
Lecture / Pause
VOL WOOFER
SOUND
MODE
PAIR
Appuyez sur la touche p pour mettre le chier musical temporairement en pause.
Si vous appuyez à nouveau dessus, la lecture du chier audio reprend.
SOUND
MODE
WOOFER
TONE
CONTROL
CH LEVEL
Info
Lorsque vous appuyez sur cette touche, les informations relatives à chaque mode
apparaissent. (Voir page 7.)
SOUND
MODE
WOOFER
TONE
CONTROL
CH LEVEL
SOUND MODE
En appuyant sur cette touche, vous pouvez sélectionner le mode son souhaité.
SURROUND SOUND GAME ADAPTIVE DTSVIRTUAL:X BASS BOOST
STANDARD
– SURROUND SOUND
Fournit un champ sonore plus large que la norme.
– GAME
Fournit un son stéréoscopique vous permettant une immersion dans l’action pendant
le jeu.
– ADAPTIVE
Analyse le contenu en temps réel et fournit automatiquement le champ sonore
optimal sur la base des caractéristiques du contenu.
– DTSVIRTUAL:X
Son 3D immersif à partir de n’importe quel contenu.
– BASS BOOST
Mode champ sonore mettant l’accent sur les graves.
– STANDARD
Émet le son original.
• DRC (Dynamic Range Control)
Vous permet d’appliquer un contrôle de plage dynamique aux pistes Dolby Digital.
Appuyez sur le bouton SOUND MODE pendant plus de 5secondes tandis que la
Soundbar est hors tension pour activer ou désactiver la fonction DRC (Dynamic Range
Control). Quand la fonction DRC est activée, les sons forts sont atténués. (Il peut se
produire une distorsion du son.)
• Bluetooth Power
Cette fonction allume automatiquement la Soundbar à la réception d’une demande de
connexion d’un téléviseur ou d’un appareil Bluetooth connecté précédemment. Le
réglage est activé par défaut.
– Appuyez pendant plus de 5secondes sur le bouton SOUND MODE alors que la
Soundbar est sous tension pour désactiver la fonction Bluetooth Power.

FRA - 12
SOUND
MODE
WOOFER
TONE
CONTROL
CH LEVEL
NIVEAU DU
WOOFER
(GRAVES)
CH LEVEL
TONE
CONTROL
WOOFER
SOUND
MODE
CH LEVEL
TONE
CONTROL
WOOFER
SOUND
MODE
CH LEVEL
TONE
CONTROL
WOOFER
SOUND
MODE
CH LEVEL
TONE
CONTROL
WOOFER
SOUND
MODE
Appuyez sur les touches haut ou bas pour régler le niveau du woofer (graves) sur -12 ou de
-6 à +6. Pour dénir le niveau de volume du woofer (graves) sur 0 (Défaut), appuyez sur la
touche.
SOUND
MODE
WOOFER
TONE
CONTROL
CH LEVEL
TONE
CONTROL
Appuyer sur cette touche permet de régler le volume des aigus et des graves.
• Appuyez sur cette touche pour sélectionner TREBLE ou BASS , puis réglez le volume
entre -6~ et +6 à l’aide des touches Haut/Bas.
FRA - 13
Utilisationdestouchesdissimulées(Touchesavecplusd’une
fonction)
Touche dissimulée
Page de référence
Touche de télécommande Fonction
WOOFER (Haut)
Télécommande de votre téléviseur
Activer/Désactiver (Veille)
page 14
Gauche
Activation/Désactivation de la connexion
au téléviseur (BT prêt)
page 21
Haut ID SET page 10
(Commande sonore)
Égaliseur 7bandes (maintenir enfoncé
5secondes)
page 10
Réinitialisation (maintenir enfoncé
10secondes)
page 31
SOUND MODE
DRC ON/OFF (Veille) page 11
Bluetooth Power page 11
Spécicationsdesortiepourlesdifférentsmodesd’effetssonores
Effet Entrée
Sortie
Sans kit d’enceintes
arrièresansl
Aveckitd’enceintesarrière
sansl
SOUND MODE
Surround
VOL WOOFER
SOUND
MODE
Bluetooth
POWER
SURROUND
SOUND
2.0 canaux
2.1 canaux 4.1 canaux
5.1 canaux 2.1 canaux 4.1 canaux
GAME
2.0 canaux
2.1 canaux 4.1 canaux
5.1 canaux 2.1 canaux 4.1 canaux
ADAPTIVE
2.0 canaux
2.1 canaux 4.1 canaux
5.1 canaux 2.1 canaux 4.1 canaux
DTS VIRTUAL:X
2.0 canaux
2.1 canaux 4.1 canaux
5.1 canaux 2.1 canaux 4.1 canaux
BASS BOOST
2.0 canaux
2.1 canaux 4.1 canaux
5.1 canaux 2.1 canaux 4.1 canaux
STANDARD
2.0 canaux
2.1 canaux 2.1 canaux
5.1 canaux 2.1 canaux 2.1 canaux
• Le kit d’enceintes arrière sans l Samsung peut être acheté séparément. Pour acheter un kit,
contactez le vendeur chez qui vous avez acheté la Soundbar.

FRA - 14
RéglageduvolumedelaSoundbaravecunetélécommandede
téléviseur
Réglez le volume de la Soundbar en utilisant la télécommande du téléviseur.
• Cette fonction ne peut être utilisée qu’avec une télécommande à infrarouge. Les
télécommandes Bluetooth (qui nécessitent un jumelage) ne sont pas prises en charge.
• Réglez les enceintes du téléviseur sur Hautparleur ext pour utiliser cette fonction.
• Fabricants prenant en charge cette fonction :
Samsung, VIZIO, LG, Sony, Sharp, PHILIPS, PANASONIC, TOSHIBA, Hisense, RCA
1. Éteignez la Soundbar.
2. Appuyez et maintenez enfoncée la touche WOOFER pendant 5 secondes.
Chaque fois que vous appuyez sur la touche WOOFER et la maintenez pendant 5 secondes, le mode
change dans l’ordre suivant : «OFF-TV REMOTE» (Mode par défaut), «SAMSUNG-TVREMOTE»,
«ALL-TV REMOTE».
Touche de télécommande Écran État
SOUND
MODE
WOOFER
CH LEVEL
TONE
CONTROL
5 Sec
(Mode par défaut)
OFF-TV REMOTE
Désactive la télécommande de
téléviseur.
SOUND
MODE
WOOFER
CH LEVEL
TONE
CONTROL
5 Sec
SAMSUNG-TVREMOTE
Active une télécommande de
téléviseur à infrarouge Samsung.
SOUND
MODE
WOOFER
CH LEVEL
TONE
CONTROL
5 Sec
ALL-TV REMOTE
Active toute autre télécommande de
téléviseur à infrarouge.

FRA - 15
04 CONNEXIONDELASOUNDBAR
Connexion de l’alimentation électrique
Utilisez les composants d’alimentation pour connecter le Caisson de basse et la Soundbar à une prise
électrique dans l’ordre suivant :
1. Connectez le cordon d’alimentation au Caisson de basse.
2. Connectez le cordon d’alimentation à la Soundbar.
Reportez-vous aux illustrations ci-dessous.
• Pour plus d’informations sur l’alimentation et la consommation électriques requises, reportez-vous
à l’étiquette collée sur le produit. (Étiquette : Partie inférieure de l’unité principale Soundbar)
Arrière du
Caisson de basse
Cordon
d’alimentation
Connexion de
l’alimentation
électrique
Partie inférieure de
l’unité principale
Soundbar
Connexion de
l’alimentation
électrique
Cordon
d’alimentation
POWER
POWER
USB (5V 0.5A)
DIGITAL AUDIO IN
(OPTICAL)
USB (5V 0.5A)
DIGITAL AUDIO IN
(OPTICAL)
POWER
POWER
USB (5V 0.5A)
DIGITAL AUDIO IN
(OPTICAL)
USB (5V 0.5A)
DIGITAL AUDIO IN
(OPTICAL)
FRA - 16
Connexion de la Soundbar au Caisson de basse
Lorsque le Caisson de basse est connecté, vous pouvez proter de la puissance sonore des graves.
Connexion automatique entre le Caisson de basse et la Soundbar
Lorsque vous mettez l’appareil sous tension après avoir connecté les câbles d’alimentation à la
Soundbar et au Caisson de basse, le Caisson de basse est automatiquement connecté à la Soundbar.
• Une fois l’appariement automatique effectué, l’indicateur bleu situé à l’arrière du caisson de basse
s’allume.
Témoins indicateurs LED sur l’arrière du Caisson de basse
LED État Description Résolution
Bleu
Activé
Connexion réussie
(fonctionnement
normal)
-
Clignotement
Récupération de la
connexion
Vériez si le câble d’alimentation
xé à l’unité principale Soundbar
est connecté correctement ou
attendez environ 5 minutes. Si le
clignotement continue, essayez
de connecter manuellement le
caisson de basse. Voir page 17.
Rouge
Activé
En veille (avec l’unité
principale de la
Soundbar éteinte)
Vériez que le câble
d’alimentation sur l’unité
principale Soundbar est connecté
correctement.
Échec de la
connexion
Reconnectez. Reportez-vous aux
instructions sur la connexion
manuelle à la page 17.
Rouge et bleu
Clignotement Dysfonctionnement
Reportez-vous aux informations
de contact du Centre de service
Samsung dans le manuel.
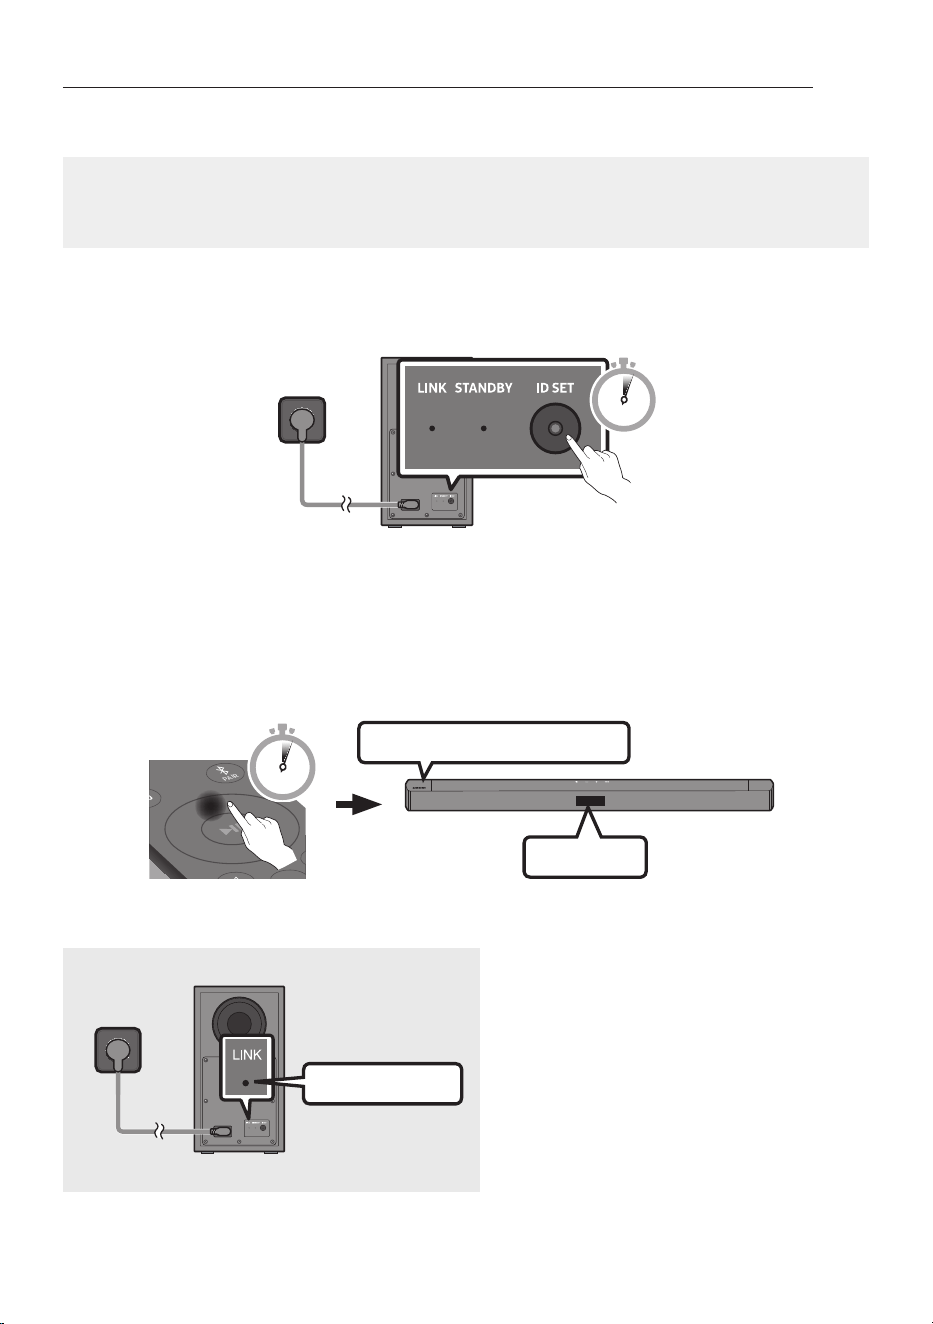
FRA - 17
Connexion manuelle du Caisson de basse si la connexion automatique échoue
Avantd’effectuerlaprocéduredeconnexionmanuelleci-dessous:
• Vériez que les câbles d’alimentation pour la Soundbar et le Caisson de basse sont connectés
correctement.
• Assurez-vous que la Soundbar est allumée.
1. Appuyez sur la touche ID SET à l’arrière du Caisson de basse, et maintenez-la enfoncée pendant au
moins 5 secondes.
• L’indicateur rouge à l’arrière du Caisson de basse s’éteint et l’indicateur bleu clignote.
5 Sec
Arrière du Caisson de basse
2. Appuyez d’abord sur le bouton de la télécommande pour allumer l’écran.
Appuyez sur la touche Haut de la télécommande, et maintenez-la enfoncée pendant au moins
5 secondes.
• Le message ID SET s’afche un moment sur l’écran de la Soundbar, avant de disparaître.
• La Soundbar est automatiquement mise sous tension lorsque ID SET est terminé.
SOUND
MODE
PAIR
5 Sec
ID SET
LelogoSAMSUNGestsurledessus
3. Vériez que le voyant LED LINK s’éclaire en bleu en continu (connexion établie).
Allumé en bleu
Le voyant LED LINK arrête de clignoter et
s’éclaire en bleu en continu lorsqu’une
connexion est établie entre la Soundbar et le
Caisson de basse sans l.

FRA - 18
REMARQUES
• Ne branchez pas le cordon d’alimentation de ce produit ou votre téléviseur à une prise de courant
murale tant que toutes les connexions entre les composants ne sont pas terminées.
• Avant de déplacer ou d’installer ce produit, assurez-vous de le mettre hors tension et de
débrancher le cordon d’alimentation.
• Si l’unité principale est hors tension, le subwoofer sans l entrera en mode veille et la LED de
STANDBY à l’arrière s’allumera en rouge après avoir clignoté en bleu plusieurs fois.
• Si vous vous servez d’un appareil qui utilise la même fréquence (Maroc, Tunisie, Égypte : 5,2 GHz ;
autres pays : 5,8 GHz) que le Soundbar près de ce dernier, des interférences peuvent donner lieu à
des interruptions du son.
• La distance de transmission maximale du signal sans l de l’unité principale est d’environ 10 mètres,
mais peut varier en fonction de votre environnement d’exploitation. Si un mur en béton armé ou
métallique se trouve entre l’unité principale et le subwoofer sans l, le système risque de ne pas
fonctionner du tout, car le signal sans l ne peut pas passer à travers le métal.
PRÉCAUTIONS
• Les antennes de réception sans l sont intégrées au subwoofer sans l. Gardez les unités à l’abri de
l’eau et de l’humidité.
• Pour des performances d’écoute optimales, assurez-vous que la zone autour de l’emplacement du
subwoofer sans l et du module de réception sans l (vendu séparément) ne présente pas
d’obstacles.
ConnexiondukitarrièresanslSamsungàvotreSoundbar
Passez au son surround véritablement sans l en connectant votre kit d’enceintes arrière sans l
Samsung (SWA-9200S, vendu séparément) à votre Soundbar.
Pour plus d’informations concernant les connexions, veuillez consulter le manuel du kit d’enceintes
arrière sans l Samsung.
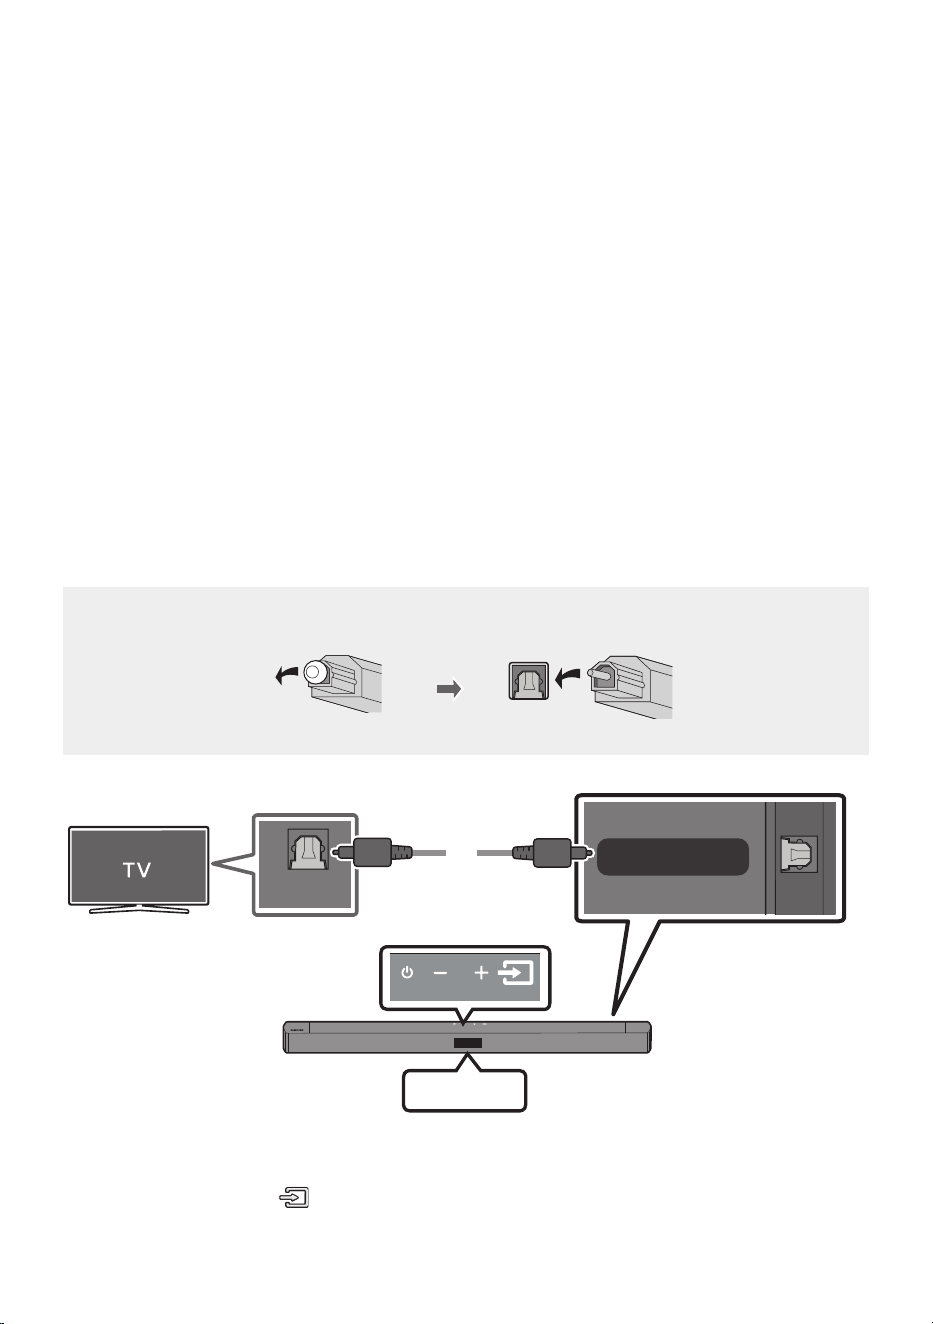
FRA - 19
05 CONNEXIONFILAIREAVECLE
TÉLÉVISEUR
Écoutez le son du téléviseur depuis la Soundbar via des connexions câblées ou sans l.
• Lorsque la Soundbar est connectée à un téléviseur Samsung TV sélectionné, la Soundbar peut être
contrôlée à l’aide de la télécommande du téléviseur.
– Cette fonction est prise en charge par les téléviseurs Samsung Smart TV sortis en 2017 et
ultérieurement, et qui prennent en charge le Bluetooth lorsque vous connectez la Soundbar au
téléviseur à l’aide d’un câble optique.
– Cette fonction vous permet également d’utiliser le menu du téléviseur pour ajuster le champ
sonore et de nombreux réglages ainsi que le volume et la coupure du son.
Connexion à l’aide d’un câble optique
Lorsque les signaux de diffusion sont Dolby Digital et le réglage «Format audio de sortie numérique»
est PCM sur votre téléviseur, il est recommandé de modier le réglage sur Dolby Digital. Une fois le
réglage modié, vous pouvez proter d’une meilleure qualité sonore. (Il se peut que le menu du
téléviseur utilise des mots différents pour Dolby Digital et PCM en fonction du fabricant.)
Listedevéricationspréalablesàlaconnexion
• Lorsque vous utilisez un câble optique et que les bornes sont dotées d’un cache, veillez à retirer les caches.
• Si vous utilisez un câble optique, le mode «D.IN» doit être sélectionné.
USB (5V 0.5A)
DIGITAL AUDIO IN
(OPTICAL)
OPTICAL OUT
Partie supérieure de la
Soundbar
D.IN
Câble optique
Partie inférieure de la Soundbar
1. Raccordez la prise DIGITALAUDIOIN(OPTICAL) de la Soundbar à la prise OPTICAL OUT du
téléviseur à l’aide d’un câble optique numérique.
2. Appuyez sur le bouton (Source) du panneau supérieur ou de la télécommande, puis
sélectionnez le mode «D.IN».
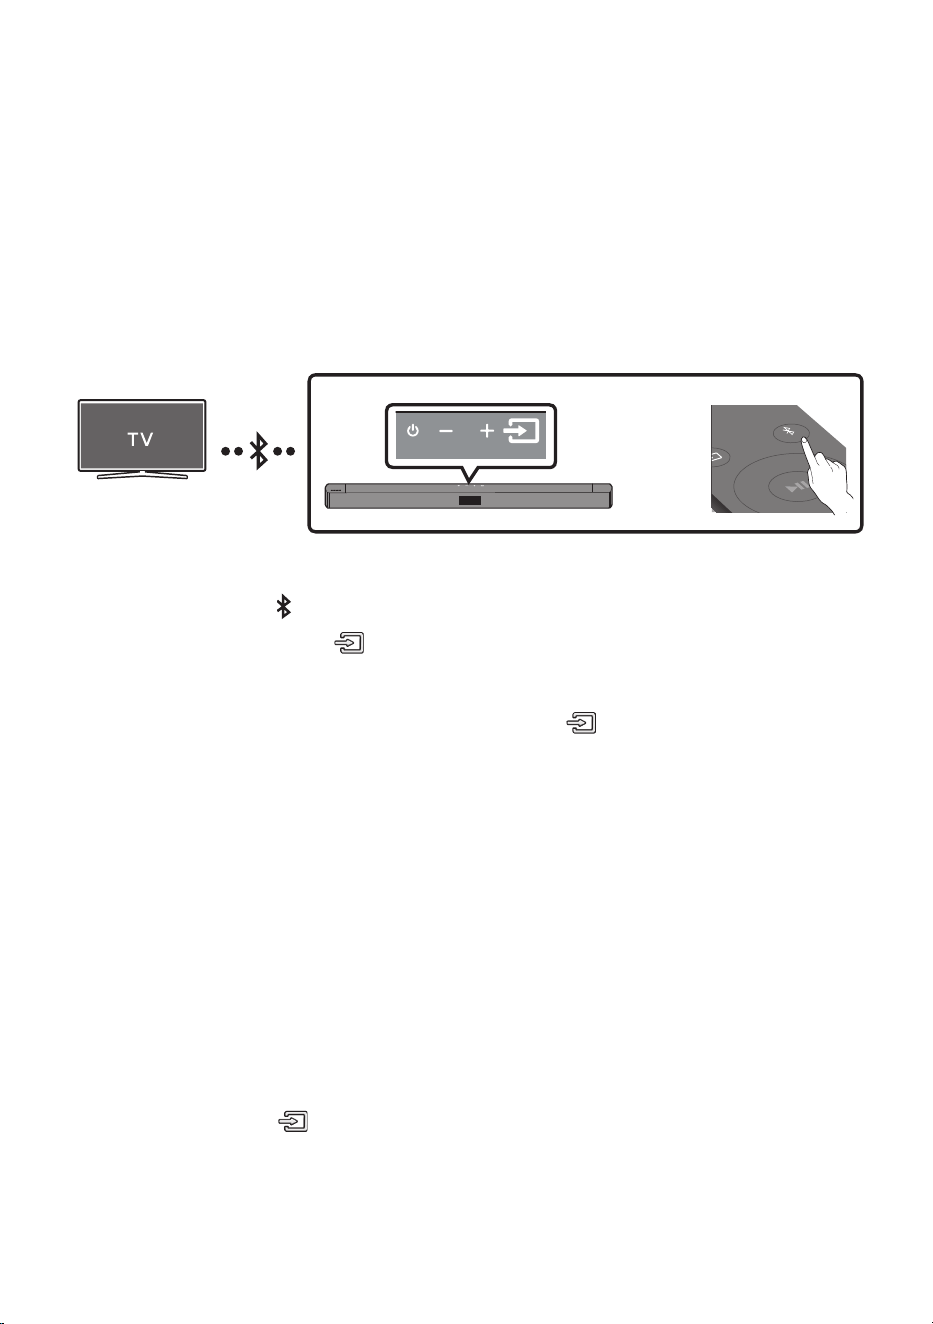
FRA - 20
06 CONNEXIONSANSFILAVECLE
TÉLÉVISEUR
ConnexionàuntéléviseurviaBluetooth
Lorsqu’un téléviseur est connecté à l’aide de Bluetooth, vous pouvez écouter le son stéréo sans tracas
de câblage.
• Seul un téléviseur à la fois peut être connecté.
SOUND
MODE
PAIR
OU
Connexion initiale
1. Appuyez sur la touche PAIR de la télécommande pour passer au mode «BTPAIRING».
(OU)
a. Appuyez sur le bouton (Source) situé sur le panneau supérieur, puis sélectionnez «BT».
«BT» passe automatiquement en «BTPAIRING» en quelques secondes ou en «BT READY»
en cas de connexion enregistrée.
b. Lorsque «BT READY» apparaît, maintenez le bouton (Source) enfoncé sur le panneau
supérieur de la Soundbar pendant plus de 5 secondes pour afcher «BTPAIRING».
2. Sélectionnez le mode Bluetooth sur le téléviseur. (Pour plus d’informations, reportez-vous au
manuel du téléviseur.)
3. Sélectionnez «[AV] Samsung Soundbar C4-Series» ou «[AV] Soundbar C4-Series» dans la liste
sur l’écran du téléviseur.
Une Soundbar disponible est indiquée «Needs Pairing» ou «Paired» dans la liste des appareils
Bluetooth sur le téléviseur. Pour connecter la Soundbar, sélectionnez le message et établissez la
connexion.
• Lorsque le téléviseur est connecté, [Nomdutéléviseur]→ «BT» apparaît sur l’afchage avant de
la Soundbar.
4. Vous pouvez maintenant entendre le son du téléviseur depuis la Soundbar.
SiletéléviseurnedétectepaslaSoundbar
• Connectez le téléviseur et la Soundbar avec un câble optique, puis sélectionnez le mode «D.IN» en
appuyant sur le bouton (Source) en haut de la Soundbar. Testez si la sortie audio fonctionne
normalement, puis passez aux étapes2 et 3.

FRA - 21
Si la connexion de l’appareil échoue
• Si la liste de Soundbar connectées précédemment (par ex. «[AV] Samsung Soundbar C4-Series»
ou «[AV] Soundbar C4-Series» apparaît dans la liste, supprimez-la.
• Ensuite, répétez les étapes 1 à 3.
REMARQUE
• Après avoir connecté la Soundbar au téléviseur pour la première fois, utilisez le mode «BT READY»
pour la reconnexion.
DéconnexiondelaSoundbaràpartirdutéléviseur
Appuyez sur le bouton (Source) du panneau supérieur ou de la télécommande et activez l’un des
modes, à l’exception du mode «BT».
• La déconnexion prend du temps parce que le téléviseur doit recevoir une réponse de la Soundbar.
(Le temps requis peut varier selon le modèle de téléviseur.)
• Pour annuler la connexion Bluetooth automatique entre la Soundbar et le téléviseur, appuyez sur la
touche Gauche sur la télécommande pendant 5 secondes avec la Soundbar en mode «BT READY».
(Activation/Désactivation de la connexion au téléviseur)
QuelleestladifférenceentreBTREADYetBTPAIRING?
• BT READY : Dans ce mode, vous pouvez rechercher les téléviseurs connectés précédemment ou
connecter un appareil mobile connecté précédemment à la Soundbar.
• BTPAIRING : Dans ce mode, vous pouvez connecter un nouvel appareil à la Soundbar.
(Appuyez sur le bouton PAIR de la télécommande ou le bouton (Source) sur le dessus de la
Soundbar pendant plus de 5secondes alors que celle-ci est en mode «BT» et dans l’état «BT READY».)
REMARQUES
• Si un code PIN est demandé lors de la connexion d’un appareil Bluetooth, saisissez <0000>.
• En mode de connexion Bluetooth, la connexion Bluetooth sera perdue si la distance entre la
Soundbar et l’appareil Bluetooth dépasse 10 m.
• La Soundbar s’éteint automatiquement après 18 minutes en état Prêt.
• Il se peut que la Soundbar ne puisse pas effectuer correctement la recherche Bluetooth ou la
connexion dans les circonstances suivantes:
– En cas de champ électrique puissant autour de la Soundbar.
– Si deux appareils Bluetooth ou plus sont appariés simultanément avec la Soundbar.
– Si l’appareil Bluetooth est éteint, non installé, ou présente un dysfonctionnement.
• Les appareils qui génèrent des ondes électromagnétiques doivent être conservés à distance de
l’unité principale Soundbar - par ex. des micro-ondes, des appareils LAN sans l, etc.
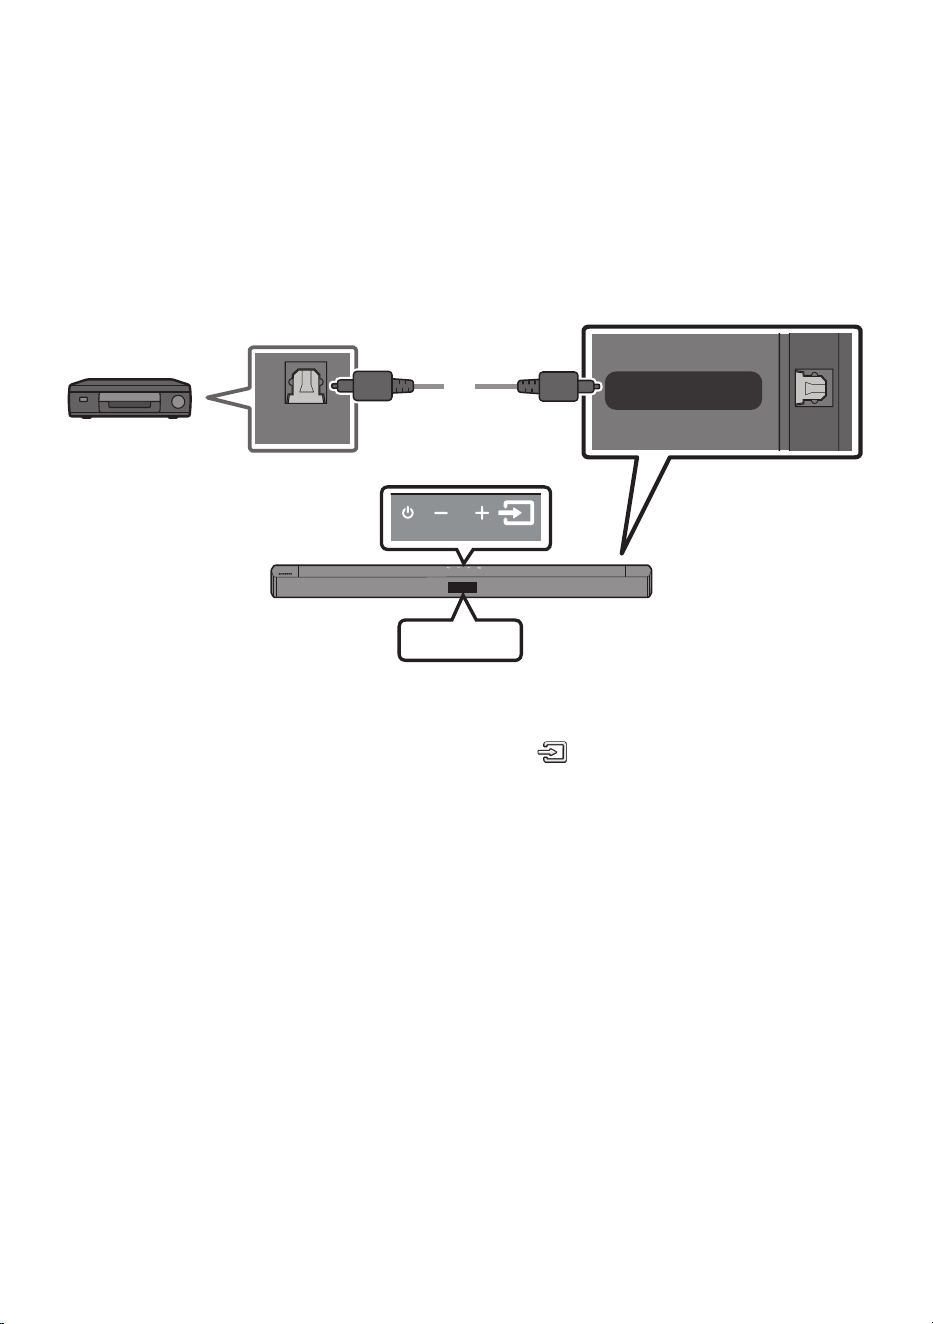
FRA - 22
07 CONNEXIONÀUNAPPAREILEXTERNE
Raccordez un appareil externe via une connexion câblée ou une connexion Bluetooth pour écouter le
son de l’appareil externe via la Soundbar.
Connexion à l’aide d’un câble optique
USB (5V 0.5A)
DIGITAL AUDIO IN
(OPTICAL)
OPTICAL OUT
Partie supérieure de la
Soundbar
D.IN
Câble optique
Partie inférieure de la Soundbar
Lecteur BD/DVD /
Boîtier décodeur /
Console de jeu
1. Raccordez DIGITALAUDIOIN(OPTICAL) de l’unité principale à la prise OPTICAL OUT de l’appareil
source à l’aide d’un câble optique numérique.
2. Sélectionnez le mode «D.IN» en appuyant sur le bouton (Source) situé sur le panneau frontal
ou sur la télécommande.
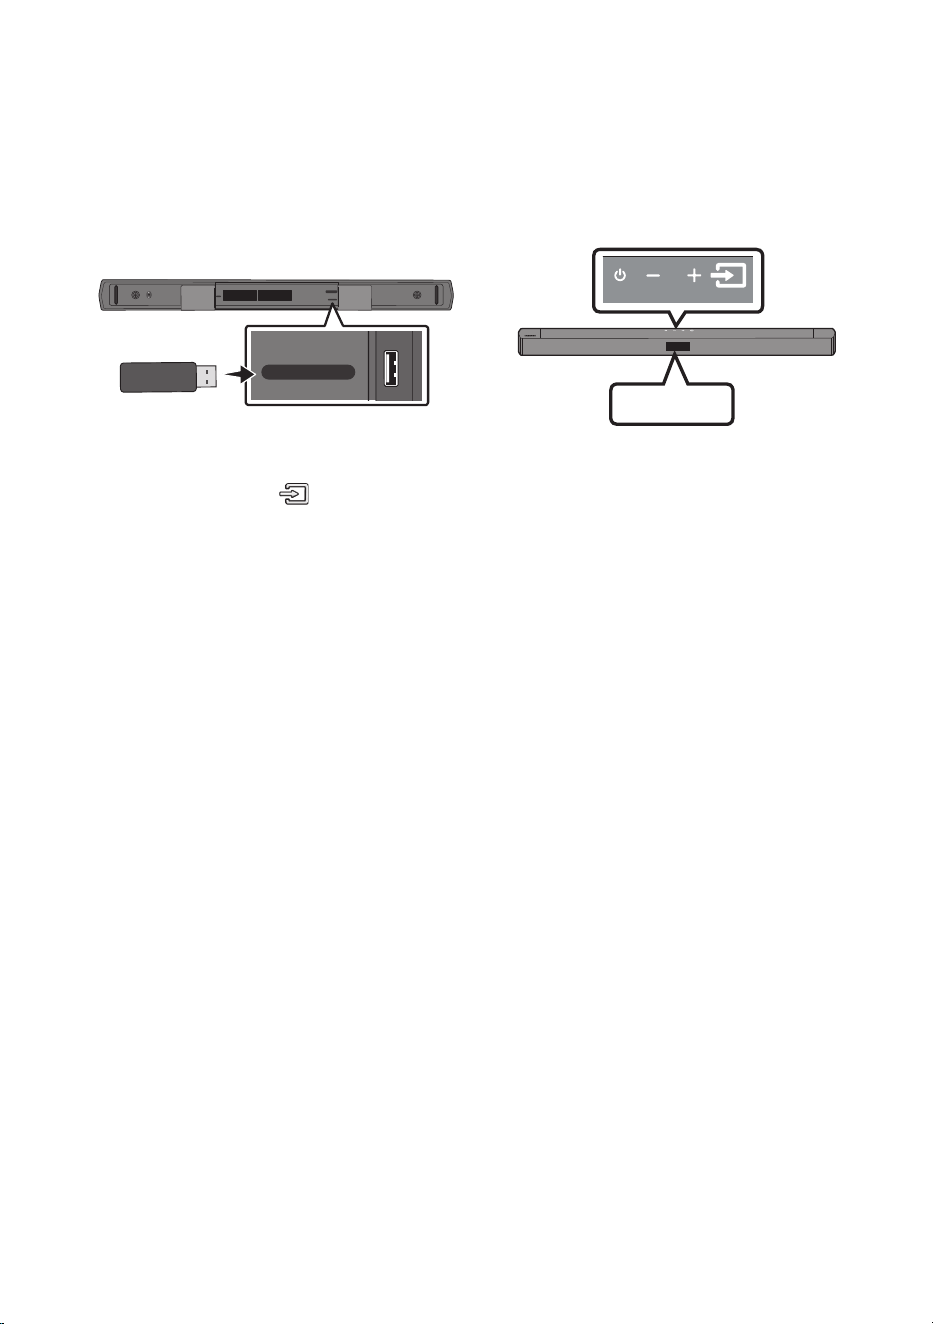
FRA - 23
08 CONNEXIOND’UNPÉRIPHÉRIQUEDE
STOCKAGEUSB
Vous pouvez lire des chiers musicaux situés sur les périphériques de stockage USB via la Soundbar.
USB
POWER
USB (5V 0.5A)
DIGITAL AUDIO IN
(OPTICAL)
USB (5V 0.5A)
DIGITAL AUDIO IN
(OPTICAL)
Port USB
1. Connectez l’appareil USB au port USB situé sur la partie inférieure du produit.
2. Appuyez sur le bouton (Source) du panneau supérieur ou de la télécommande, puis
sélectionnez «USB».
3. «USB» apparaît sur l’écran d’afchage.
4. Lisez des chiers musicaux depuis le périphérique de stockage USB via la Soundbar.
• La Soundbar s’éteint automatiquement (Auto Power Down) si aucun périphérique USB n’a été
connecté pendant plus de 18 minutes.

FRA - 24
Liste de compatibilités
Extension Codec Débit d'échantillonnage Débit binaire
*.mp3 MPEG 1 Layer2 32 ~ 48 kHz 32 ~ 320 kbps
MPEG 1 Layer3 32 ~ 48 kHz 32 ~ 320 kbps
MPEG 2 Layer3 16 ~ 24 kHz 8 ~ 160 kbps
MPEG 2.5 Layer3 8 ~ 12 kHz 8 ~ 160 kbps
*.wma WMA7/8/9 32 ~ 48 kHz 32 ~ 320 kbps
*.ogg Vorbis 32 ~ 48 kHz 45 ~ 500kbps
*.aac
*.m4a
*.mp4
(audio
uniquement)
AAC-LC (MPEG2,/
MPEG4)
32 ~ 48 kHz 32 ~ 320kbps
*.wav LPCM 32 ~ 192 kHz 1024 ~ 9216kbps
*.ac FLAC 32 ~ 192 kHz 162 ~ 8100kbps
*.aiff AIFF 32 ~ 192 kHz 1024 ~ 9216kbps
• Si votre périphérique USB contient trop de dossiers (environ 256) et de chiers (environ 999), la
Soundbar mettra peut-être du temps à accéder à vos chiers et à les lancer.
• Systèmes de chiers pris en charge sur support USB: FAT16, FAT32, NTFS
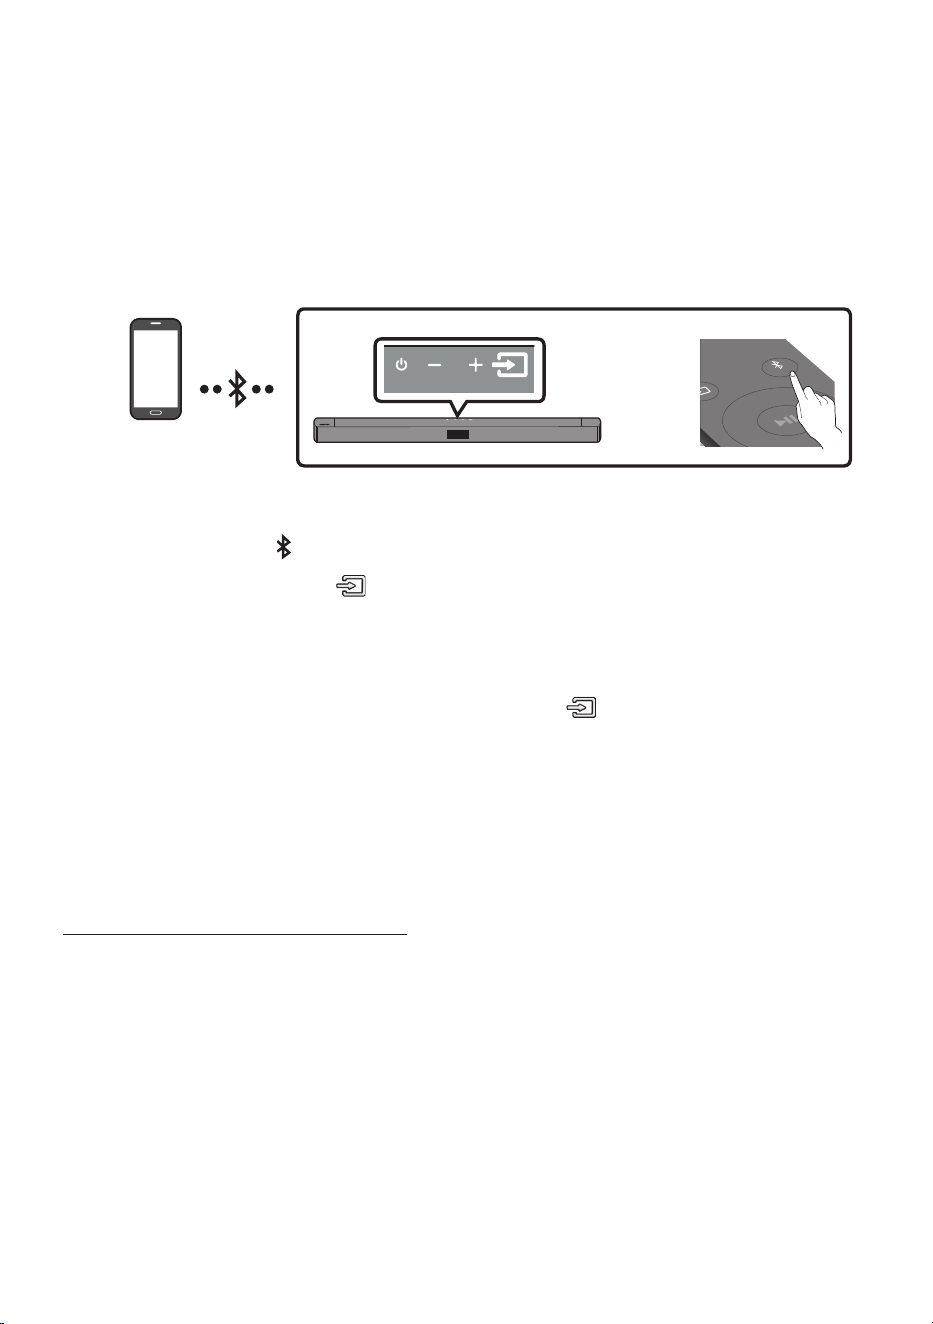
FRA - 25
09 CONNEXIONÀUNAPPAREILMOBILE
ConnexionviaBluetooth
Lorsqu’un appareil est connecté à l’aide de Bluetooth, vous pouvez écouter le son stéréo sans tracas de
câblage.
• Vous ne pouvez pas connecter plus d’un appareil Bluetooth en même temps.
SOUND
MODE
PAIR
OU
Appareil Bluetooth
Connexion initiale
1. Appuyez sur la touche PAIR de la télécommande pour passer au mode «BTPAIRING».
(OU)
a. Appuyez sur le bouton (Source) situé sur le panneau supérieur, puis sélectionnez
«BT».
«BT» passe automatiquement en «BTPAIRING» en quelques secondes ou en «BT READY»
en cas de connexion enregistrée.
b. Lorsque «BT READY» apparaît, maintenez le bouton (Source) enfoncé sur le panneau
supérieur de la Soundbar pendant plus de 5 secondes pour afcher «BTPAIRING».
2. Sélectionnez «[AV] Samsung Soundbar C4-Series» ou «[AV] Soundbar C4-Series» dans la liste.
• Lorsqu’une Soundbar est connectée à l’appareil Bluetooth, [Nom de l’appareil Bluetooth] →
«BT» apparaît sur l’afchage avant.
3. Lisez des chiers musicaux à partir de l’appareil, connecté via Bluetooth, via la Soundbar.
Si la connexion de l’appareil échoue
• Si la liste de Soundbar connectées précédemment (par ex. «[AV] Samsung Soundbar C4-Series»
ou «[AV] Soundbar C4-Series» apparaît dans la liste, supprimez-la.
• Ensuite, répétez les étapes 1 et 2.
REMARQUE
• Après avoir connecté la Soundbar au appareil mobile pour la première fois, utilisez le mode «BT
READY» pour la reconnexion.

FRA - 26
QuelleestladifférenceentreBTREADYetBTPAIRING?
• BT READY : Dans ce mode, vous pouvez rechercher les téléviseurs connectés précédemment ou
connecter un appareil mobile connecté précédemment à la Soundbar.
• BTPAIRING : Dans ce mode, vous pouvez connecter un nouvel appareil à la Soundbar.
(Appuyez sur le bouton PAIR de la télécommande ou le bouton (Source) sur le dessus de la
Soundbar pendant plus de 5secondes alors que celle-ci est en mode «BT» et dans l’état «BT READY».)
REMARQUES
• Si un code PIN est demandé lors de la connexion d’un appareil Bluetooth, saisissez <0000>.
• En mode de connexion Bluetooth, la connexion Bluetooth sera perdue si la distance entre la
Soundbar et l’appareil Bluetooth dépasse 10 m.
• La Soundbar s’éteint automatiquement après 18 minutes en état Prêt.
• Il se peut que la Soundbar ne puisse pas effectuer correctement la recherche Bluetooth ou la
connexion dans les circonstances suivantes:
– En cas de champ électrique puissant autour de la Soundbar.
– En cas d’appariement simultané de plusieurs appareils Bluetooth avec la Soundbar.
– Si l’appareil Bluetooth est éteint, non installé, ou présente un dysfonctionnement.
• Les appareils qui génèrent des ondes électromagnétiques doivent être conservés à distance de
l’unité principale Soundbar - par ex. des micro-ondes, des appareils LAN sans l, etc.
• Le Soundbar prend en charge les données SBC (44,1 kHz, 48 kHz).
• Effectuez uniquement la connexion à un périphérique Bluetooth qui prend en charge la fonction A2DP (AV).
• Vous ne pouvez pas connecter le Soundbar à un périphérique Bluetooth qui prend en charge
uniquement la fonction HF (Hands Free).
• Lorsque vous avez apparié la barre audio à un périphérique Bluetooth, sélectionner «[AV] Samsung
Soundbar C4-Series» ou «[AV] Soundbar C4-Series» parmi la liste des périphériques connectés à
ce périphérique placera automatiquement la barre audio en mode «BT».
– Disponible uniquement si le Soundbar est listé dans les périphériques appariés du périphérique
Bluetooth. (Le périphérique Bluetooth et le Soundbar doivent être appariés au préalable au
moins une fois)
• Le Soundbar apparaîtra dans la liste des périphériques recherchés du périphérique Bluetooth
uniquement lorsque le Soundbar afche «BT READY».
• La Soundbar ne peut pas être appariée à un autre appareil Bluetooth si elle est déjà en mode
Bluetooth et appariée à un appareil Bluetooth.
BluetoothPowerActivé(SOUNDMODE)
Lorsque la fonction Bluetooth Power Activé est activée et que le Soundbar est désactivé, si un
périphérique Bluetooth précédemment associé essaye de se connecter au Soundbar, le Soundbar
s’active automatiquement.
1. Appuyez sur la touche SOUND MODE et maintenez-la enfoncée pendant plus de 5 secondes sur la
télécommande pendant que la Soundbar est sous tension.
2. «ON-BLUETOOTH POWER» s’afche sur l’écran de la Soundbar.

FRA - 27
Déconnexion de l’appareil Bluetooth d’une Soundbar
Vous pouvez déconnecter le périphérique Bluetooth du système Soundbar. Pour les instructions,
reportez-vous au manuel d’utilisation de ce périphérique.
• Le système Soundbar sera déconnecté.
• Lorsque la Soundbar est déconnectée de l’appareil Bluetooth, la Soundbar afchera
«BT DISCONNECTED» sur l’afchage avant.
Déconnexion de la Soundbar à partir de l’appareil Bluetooth
Appuyez sur le bouton (Source) situé sur le panneau supérieur ou la télécommande , puis passez
dans n’importe lequel des modes, à l’exception du mode «BT».
• La déconnexion prend du temps parce que l’appareil Bluetooth doit recevoir une réponse de la
Soundbar. (La durée de déconnexion peut varier selon l’appareil Bluetooth)
• Lorsque la Soundbar est déconnectée de l’appareil Bluetooth, la Soundbar afchera
«BT DISCONNECTED» sur l’afchage avant.
REMARQUES
• En mode Bluetooth, la connexion sera perdue si la distance entre le système Soundbar et le
périphérique Bluetooth dépasse 10 m.
• Le système Soundbar s’éteint après 18 minutes en état Prêt.
À propos du Bluetooth
Le système Bluetooth est une technologie qui permet de connecter facilement entre eux des
périphériques compatibles Bluetooth à l’aide d’une liaison sans l courte distance.
• Ce périphérique Bluetooth peut générer du bruit ou créer des dysfonctionnements en fonction des
conditions d’utilisation lorsque:
– Une partie du corps de l’appareil est en contact avec le système de réception/transmission du
périphérique Bluetooth ou du système Soundbar.
– Il est soumis à des variations électriques provenant d’obstructions provoquées par un mur, un
coin ou des cloisonnements de bureaux.
– Il est exposé à des interférences électriques provenant d’appareils utilisant la même bande de
fréquences (exemple : équipements médicaux, fours à micro-ondes et réseaux LAN sans l).
• Associer le système Soundbar et le périphérique Bluetooth tout en maintenant une faible distance.
• Plus la distance est grande entre l’Soundbar et le périphérique Bluetooth, plus la qualité de la
transmission se dégrade. Si la distance excède la plage opérationnelle Bluetooth, la connexion est perdue.
• Dans les zones où la réception est faible, la connexion Bluetooth peut ne pas fonctionner
correctement.
• La connexion Bluetooth ne fonctionne que lorsqu’elle est proche de l’appareil. La connexion
s’interrompt automatiquement lorsque cette plage est dépassée. Même si la distance est
respectée, il est possible que la qualité sonore soit détériorée par des obstacles (ex. : murs, portes).
• Cet appareil sans l peut causer des interférences électriques lors de son fonctionnement.
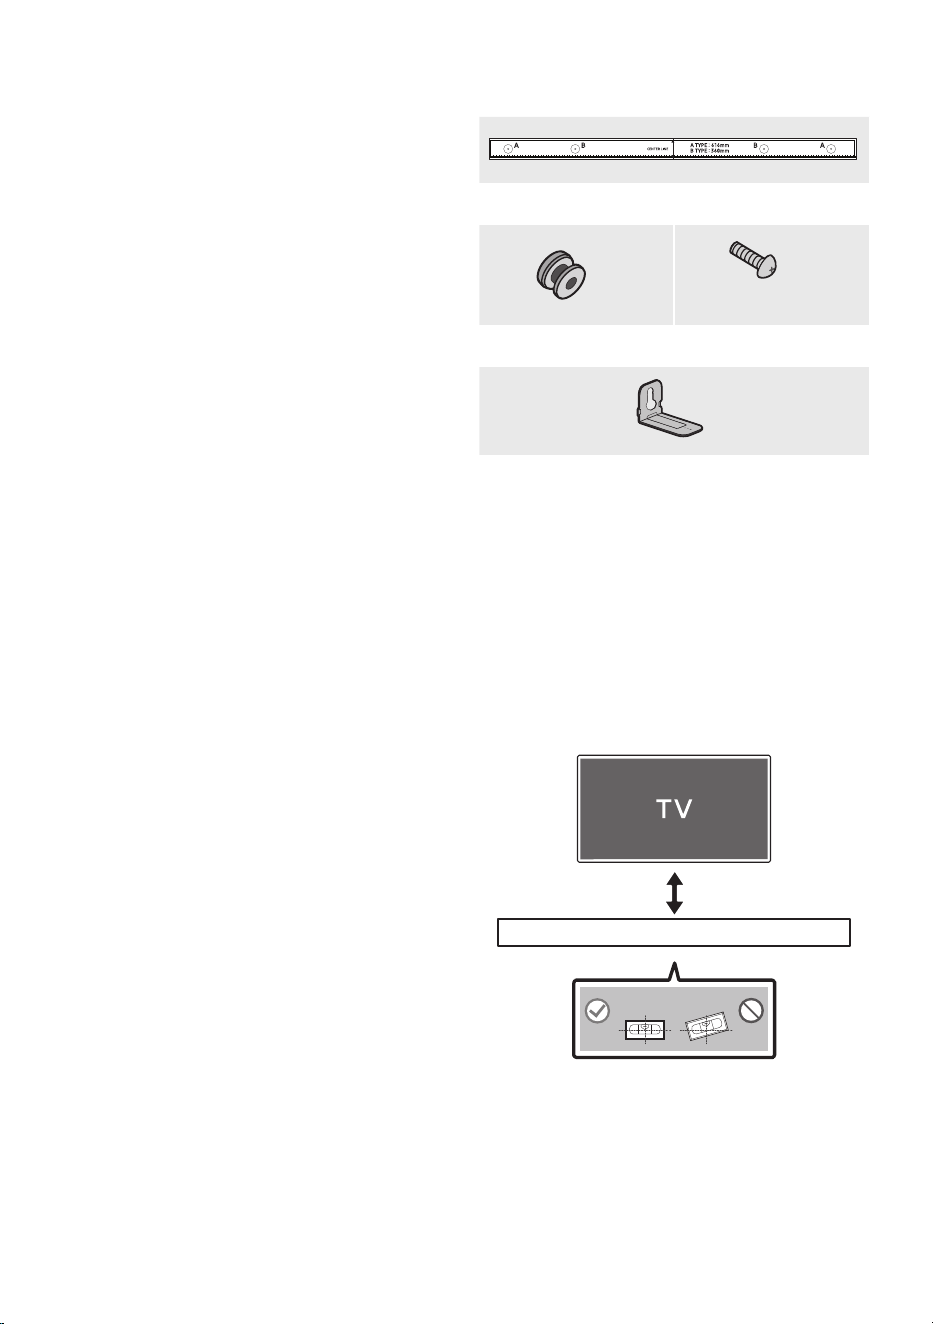
FRA - 28
10 INSTALLATION
DU SUPPORT
MURAL
Précautions d’installation
• Installez sur un mur vertical uniquement.
• N’installez pas dans un endroit à température
élevée ou humide.
• Vériez si le mur est sufsamment robuste
pour supporter le poids du produit.
Sinon, renforcez le mur ou choisissez un autre
point d’installation.
• Achetez et utilisez les vis de xation ou les
ancrages appropriés pour le type de mur dont
vous disposez (plaque de plâtre, plaque
métallique, bois, etc.). Si possible, xez les vis
portantes dans les poteaux.
• Achetez les vis de support mural selon le type
et l’épaisseur du mur sur lequel vous
souhaitez monter la Soundbar.
– Diamètre: M5
– Longueur: 35 mm ou plus recommandés.
• Connectez les câbles depuis l’unité aux
appareils externes avant d’installer la
Soundbar sur le mur.
• Veillez à ce que l’unité soit éteinte et
débranchée de la source d’alimentation avant
de procéder à l’installation. Dans le cas
contraire, il existe un risque d’électrocution.
Composantsdexationaumur
Guidedexationmurale
x 2
(M4 x L10)
x 2
Visdexation Vis
x 2
Supportdexationmurale
1. Placez le Guidedexationmurale contre le
mur.
• Le Guidedexationmurale doit être de
niveau.
• Si votre téléviseur est monté sur le mur,
installez la Soundbar à au moins 5 cm
sous le téléviseur.
5 cm minimum
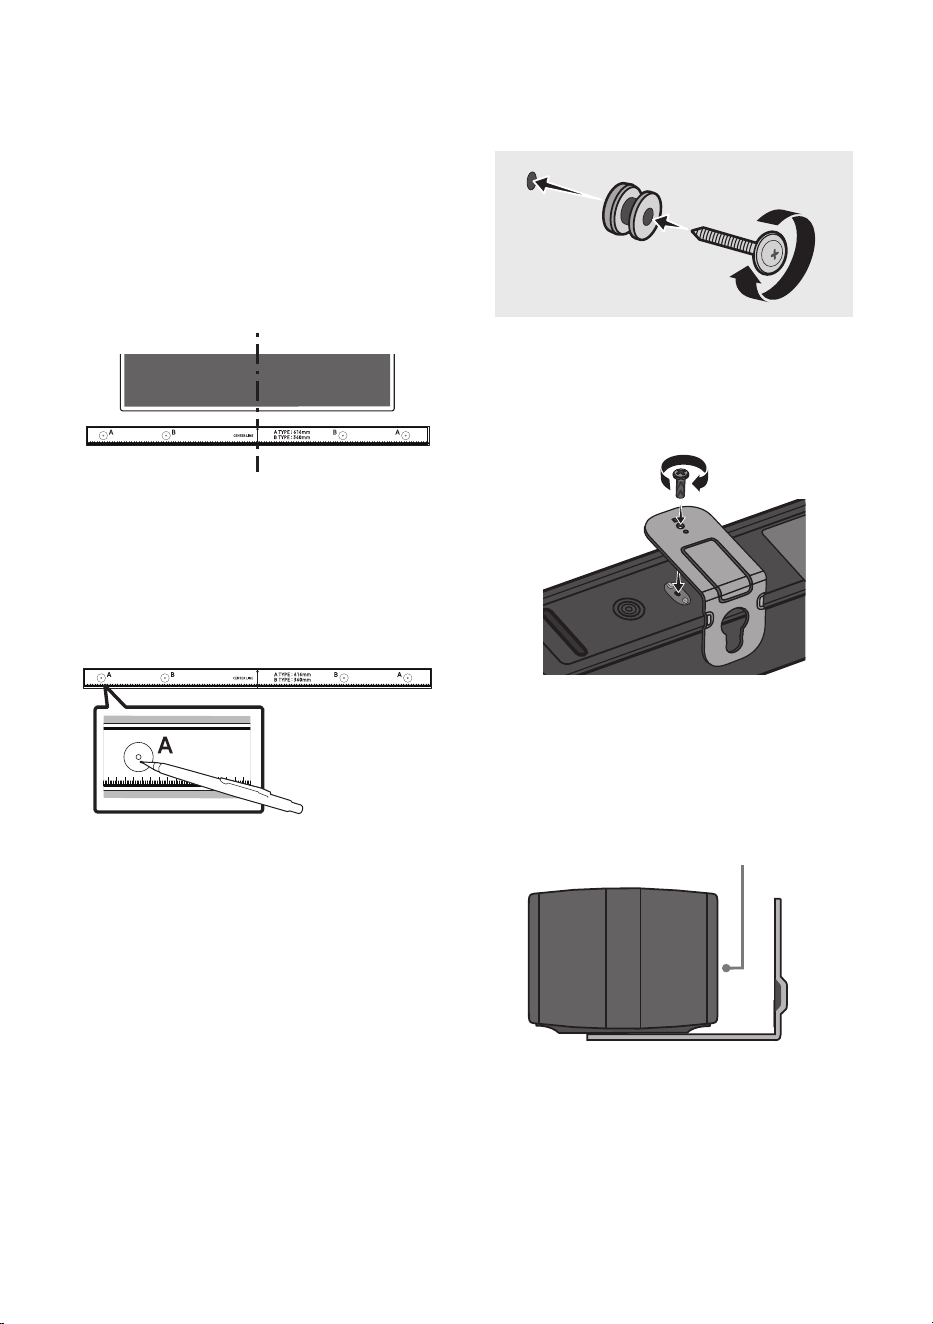
FRA - 29
2. Alignez la LignecentraleduGuidede
xationmurale avec le centre de votre
téléviseur (si vous xez la Soundbar sous
votre téléviseur), puis xez le Guidede
xationmurale au mur avec du ruban
adhésif.
• Si vous ne xez pas la Soundbar sous un
téléviseur, placez la Ligne centrale au
centre de la zone d’installation.
Ligne centrale
3. Appuyez avec la pointe d’un stylo ou d’un
crayon bien taillé au centre des images
A-TYPE à chaque extrémité du guide pour
marquer les trous des vis portantes, puis
retirez le Guidedexationmurale.
4. À l’aide d’une mèche appropriée, faites un
trou dans le mur au niveau de chaque
marque.
• Si les marques ne correspondent pas aux
positions des poteaux muraux, veillez à
insérer les ancrages appropriés dans les
trous avant d’insérer les vis portantes. Si
vous utilisez des ancrages, pensez à percer
des trous sufsamment larges pour les
accueillir.
5. Enfoncez une vis (non fournie) dans chaque
Visdexation, puis vissez fermement
chaque vis dans un trou pour vis portante.
(Non fournie)
6. Installez les Supportdexationmurale sur
la partie inférieure de la Soundbar, en
veillant à les positionner correctement, en
utilisant 2 Vis.
POWER
• Lors de l’assemblage, veillez à ce que
l’accroche des Supportdexation
murale se trouve sur l’arrière de la
Soundbar.
Arrière de la Soundbar
Extrémité droite de la Soundbar
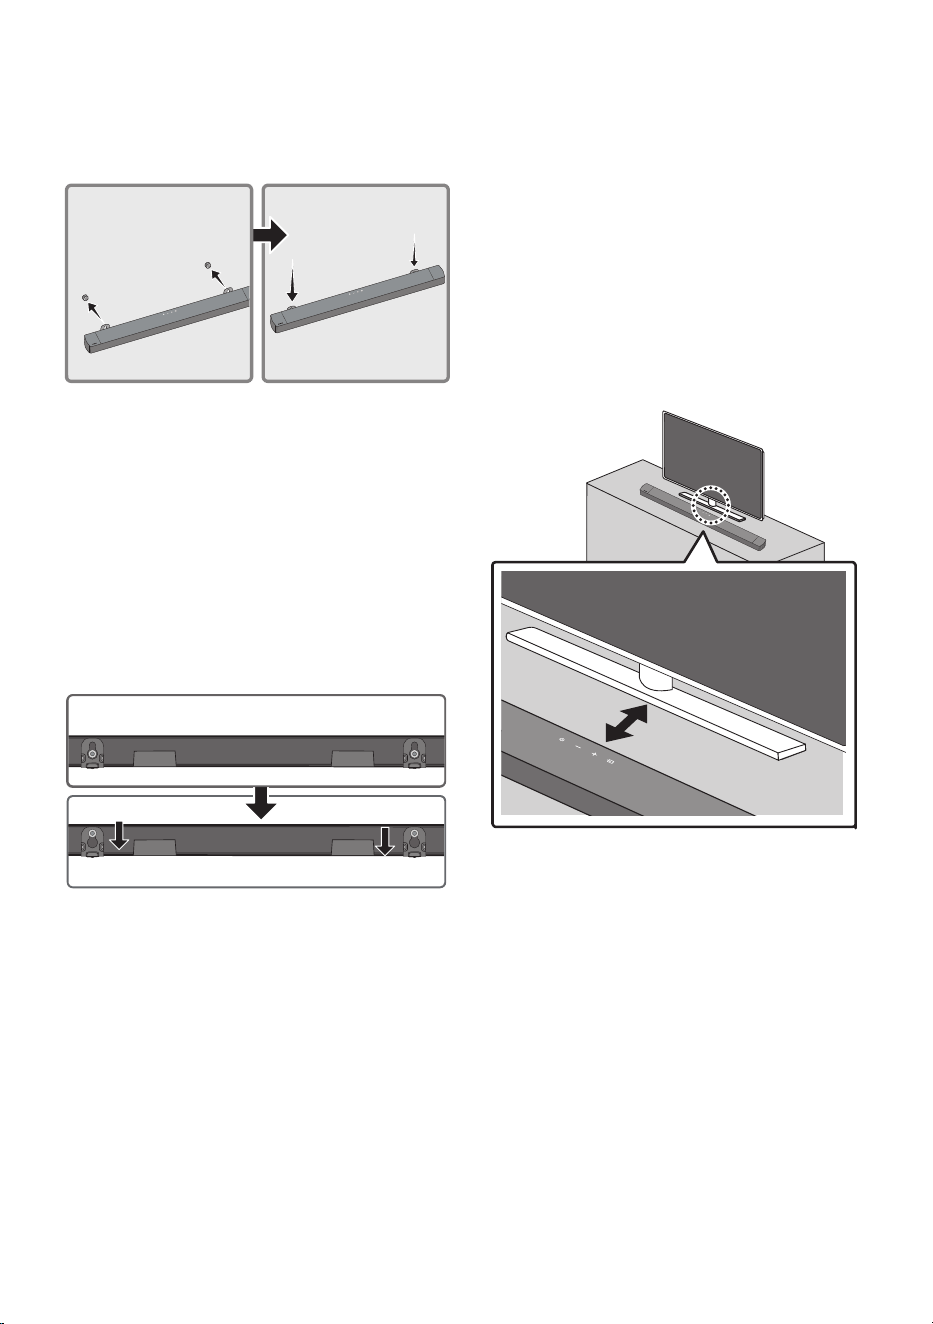
FRA - 30
7. Installez la Soundbar, sur laquelle sont xés
les Supportsdexationmurale, en
accrochant les Supportsdexationmurale
sur les Visdexation sur le mur.
8. Faites glisser la Soundbar vers le bas, comme
indiqué ci-dessous, an que les Support de
xationmurale reposent de manière sûre
sur les Visdexation.
• Insérez les Visdexation dans la partie
large (inférieure) des Supportdexation
murale, puis faites glisser les Support de
xationmurale vers le bas an que les
Supportdexationmurale reposent de
manière sûre sur les Visdexation.
11 INSTALLATION
DE LA
SOUNDBAR SUR
UN SOCLE DE
TÉLÉVISEUR
Placez la Soundbar sur un socle de téléviseur.
3 cm ou plus
Comme indiqué sur l’illustration, alignez le centre
de la Soundbar avec le centre du téléviseur, en
insérant avec précaution la Soundbar dans le
socle du téléviseur.
Pour obtenir une qualité sonore optimale,
positionnez la Soundbar à une distance d’au
moins 3 cm de la partie avant du téléviseur.
REMARQUE
• Veillez à ce que la Soundbar soit placée sur
une surface plane et stable.
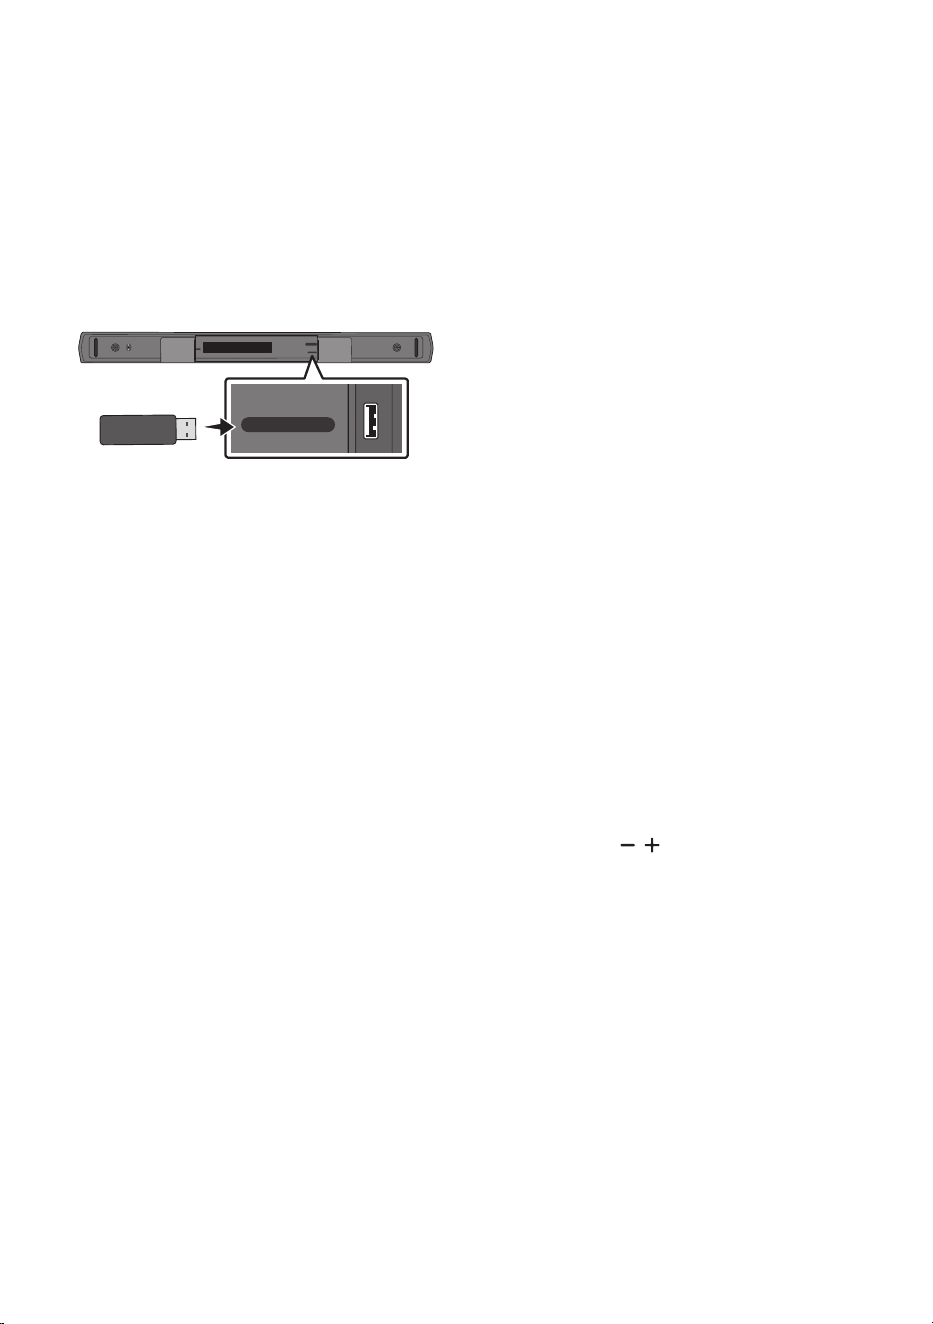
FRA - 31
12 MISE À JOUR DU
LOGICIEL
Samsung peut proposer des mises à jour pour le
microprogramme du système de la Soundbar
prochainement.
POWER
USB (5V 0.5A)
DIGITAL AUDIO IN
(OPTICAL)
USB (5V 0.5A)
DIGITAL AUDIO IN
(OPTICAL)
Port USB
Si une mise à jour est proposée, vous pouvez
mettre à jour le microprogramme en connectant
le périphérique USB contenant la mise à jour du
microprogramme enregistré au port USB de votre
Soundbar. Pour plus d’informations sur comment
télécharger des chiers de mise à jour, rendez-
vous sur le site Samsung
(www.samsung.com
Support).
Ensuite, sélectionnez le type de produit ou entrez
le modèle de votre Soundbar, sélectionnez
l’option Logiciels et applications, puis
Téléchargements. Notez que les noms d’option
peuvent varier.
Procédure de mise à jour
Important : La fonction de mise à jour efface tous
les paramètres utilisateur. Nous vous
recommandons d’écrire vos paramètres pour
pouvoir les rétablir après la mise à jour. Notez que
la mise à jour du micrologiciel réinitialise
également la connexion du subwoofer.
1. Connectez une clé USB au port USB de votre
ordinateur.
Important: Assurez-vous qu’il n’y a pas de
chiers musicaux sur la clé USB. Cela peut
entraîner l’échec de la mise à jour du
micrologiciel.
2. Accédez au site (samsung.com) sélectionnez
Entrez le numéro de modèle, puis saisissez le
modèle de votre Soundbar. Sélectionnez
manuels et téléchargements, puis téléchargez
le dernier chier de mise à jour.
3. Sauvegardez le logiciel téléchargé sur une
clé USB et sélectionnez «Extraire ici» pour
dézipper le chier.
4. Éteignez la Soundbar et connectez la clé USB
contenant la mise à jour logicielle au port USB.
5. Allumez la Soundbar et changez la source sur
le mode «USB». Dans les 3 minutes, «UPDATE»
s’afche et la mise à jour commence.
6. Une fois la mise à jour terminée, la Soundbar
s’éteint. Allumez la Soundbar, puis appuyez
sur la touche
(Volume)
sur le panneau
supérieur pendant 5secondes. «INIT OK»
s’afche à l’écran, puis la Soundbar est
réinitialisée.
• Ce produit dispose de la fonction DUAL
BOOT. Si la mise à jour du micrologiciel
échoue, vous pouvez réessayer. Le cordon
d’alimentation de la Soundbar doit être
branché quand le périphérique USB
contenant le chier de mise à jour est inséré.
La mise à jour redémarre alors, tandis que
l’afcheur uorescent sous vide n’afche
rien, et elle se termine au bout de 2minutes.
7. Restaurez vos paramètres sur la Soundbar.

FRA - 32
SiUPDATEnes’afchepas
1. Éteignez la Soundbar, déconnectez et ensuite
reconnectez le périphérique de stockage qui
contient le chier de mise à jour au port USB
de la Soundbar.
2. Débranchez le cordon d’alimentation de la
Soundbar, rebranchez-le, puis allumez la
Soundbar.
REMARQUES
• La mise à jour du micrologiciel peut ne pas se
faire correctement si les chiers audio
reconnus par la Soundbar sont stockés dans
le périphérique de stockage.
• N’éteignez pas l’appareil et ne retirez pas le
périphérique USB lorsque les mises à jour
sont en train d’être appliquées.
• Une fois la mise à jour terminée, il se peut que
la conguration de l’utilisateur soit réinitialisée
dans la Soundbar. Nous vous recommandons
donc de noter vos paramètres pour pouvoir les
rétablir après la mise à jour.
Notez que la mise
à jour du micrologiciel réinitialise également
la connexion du subwoofer.
Si la connexion au subwoofer n’est pas
rétablie automatiquement après la mise à
jour, reportez-vous à la page 16.
Si la mise à jour du logiciel échoue, contrôlez
si la clé USB est défectueuse.
• Les utilisateurs de Mac OS doivent utiliser
MS-DOS (FAT) comme format USB.
• L’exécution de la mise à jour via USB peut ne
pas être possible en fonction du fabricant du
périphérique de stockage.
FRA - 33
La Soundbar ne s’allume pas.
; Vériez que le cordon d'alimentation de la
Soundbar est correctement inséré dans la prise.
La Soundbar fonctionne par intermittence.
; Retirez le cordon d’alimentation, puis
insérez-le à nouveau.
; Mettez l’appareil externe hors tension, puis
sous tension, et réessayez.
; En l’absence de signal, la Soundbar s’éteint
automatiquement après un certain temps.
Activez l’alimentation. (Voir page 7.)
Si la télécommande ne fonctionne pas.
; Pointez la télécommande directement vers
la Soundbar.
; Remplacez les piles de la télécommande
par des piles neuves.
La Soundbar n'émet aucun son.
; Le volume de la Soundbar est trop bas ou a
été mis en sourdine. Réglez le volume.
; Si un appareil externe (STB, appareil
Bluetooth, appareil mobile, etc.) est
connecté, réglez le volume de l’appareil
externe.
; Sélectionnez la Soundbar comme sortie du
son du téléviseur. (Téléviseur Samsung:
Accueil ( ) → Menu → Paramètres ( ) →
Tous les paramètres ( ) → Son → Sortie
son → Sélectionnez la Soundbar)
; Il y a peut-être du jeu dans le branchement
du câble sur la Soundbar. Débranchez le
câble et connectez-le de nouveau.
; Débranchez complètement le cordon
d’alimentation, reconnectez-le, puis
allumez l’alimentation.
; Initialisez l’appareil et réessayez.
(Voir page 31.)
Le caisson de basse n’émet aucun son.
; Vériez si le voyant LED situé à l’arrière du
caisson de basse est allumé en bleu.
Reconnectez la Soundbar et le caisson de
basse si le voyant clignote lentement en
bleu ou devient rouge.
(Voir page 17.)
; Vous pouvez rencontrer un problème s’il y a
un obstacle entre la Soundbar et le
subwoofer. Déplacez les appareils vers une
zone sans obstacle.
; Les signaux de fréquence radio envoyés par
d’autres appareils à proximité peuvent
interrompre la connexion.
Gardez l’enceinte éloignée de ces appareils.
; Débranchez puis reconnectez la che
d’alimentation.
Levolumedusubwooferesttropfaible.
; Le volume original du contenu que vous
écoutez peut être faible. Essayez de régler
le niveau du subwoofer. (Voir page 12.)
; Rapprochez l’enceinte subwoofer de vous.
La Soundbar n’apparaît pas dans la liste des
appareilsBluetoothdutéléviseur.
; Débranchez totalement le cordon
d’alimentation de la Soundbar, rebranchez-
le, puis relancez une recherche.
(Voir page 20.)
; Connectez le téléviseur et la Soundbar avec
un câble optique, puis sélectionnez le mode
«D.IN» en appuyant sur le bouton
(Source) en haut de la Soundbar. Testez
si la sortie audio fonctionne normalement
et relancez une recherche.
(Voir page 20.)
13 DÉPANNAGE
Avant de contacter l’assistance, veuillez lire ce qui suit.
FRA - 34
LaSoundbarneseconnectepasviaBluetooth.
; Lors de la connexion d’un nouvel appareil,
passez en mode «BTPAIRING» pour
établir la connexion. (Appuyez sur le
bouton PAIR de la télécommande ou le
bouton (Source) sur le dessus de la
Soundbar pendant au moins 5secondes.)
; Si la Soundbar est connectée à un autre
appareil, déconnectez d’abord cet appareil
pour changer d’appareil.
; Supprimez la liste des enceintes Bluetooth
sur l’appareil à connecter, puis reconnectez-
le. (Téléviseur Samsung: Accueil ( ) →
Menu → Paramètres ( ) → Tous les
paramètres ( ) → Son → Sortie son →
Liste des haut-parleurs Bluetooth)
; Débranchez puis reconnectez la che
d’alimentation, et réessayez.
; Initialisez l’appareil et réessayez.
(Voir page 31.)
Lesonsecoupelorsd’uneconnexionviaBluetooth.
; Certains appareils peuvent créer des
interférences radio s’ils sont placés trop
proches de la Soundbar (p. ex. les micro-
ondes, les routeurs sans l, etc.).
; Si votre appareil connecté via Bluetooth se
situe à une distance trop importante de la
Soundbar, il est possible que le son soit
coupé. Rapprochez l’appareil de la
Soundbar.
; Si une partie du corps entre en contact
avec l’émetteur Bluetooth ou que le produit
est installé sur un meuble en métal, il est
possible que le son émis soit coupé.
Vériez l’environnement d’installation et
les conditions d’utilisation.
La Soundbar ne s’allume pas automatiquement
avecletéléviseur.
; Éteindre la Soundbar alors que vous regardez
le téléviseur entraîne la désactivation de la
synchronisation de l'alimentation du
téléviseur et de la Soundbar. Commencez par
éteindre le téléviseur.
14 LICENCE
Manufactured under license from Dolby
Laboratories. Dolby, Dolby Audio, and the
double-D symbol are trademarks of Dolby
Laboratories Licensing Corporation. Condential
unpublished works. Copyright 1992-2019 Dolby
Laboratories. All rights reserved.
For DTS patents, see http://patents.dts.com.
Manufactured under license from DTS
Licensing Limited. DTS, Digital Surround,
Virtual:X, and the DTS logo are registered
trademarks or trademarks of DTS, Inc. in the
United States and other countries. © 2021 DTS,
Inc. ALL RIGHTS RESERVED.
The Bluetooth® word mark and logos are
registered trademarks owned by Bluetooth SIG,
Inc. and any use of such marks by Samsung
Electronics Co., Ltd. is under license. Other
trademarks and trade names are those of their
respective owners.

FRA - 35
[ENERGYSTAR]
ENERGYSTARqualiedmodelonly
– Your Samsung product is ENERGY STAR
qualied in its factory default setting. Change
to certain features, settings and functionality
in this product can change the power
consumption, possibly beyond the limits
required for ENERGY STAR qualication.
– Environmental Protection Agency and
Department of Energy. ENERGY STAR is a
joint program of the Government agencies,
designed to promote energy efcient
products and practices.
Refer to www.energystar.gov for more
information of the ENERGY STAR Program.
ENERGYSTARqualiedmodelonly
(Applicable to Thin Client models only)
As an ENERGY STAR® Partner, SAMSUNG has
determined that this product meets the
ENERGY STAR® guidelines for energy
efciency.
– The ENERGY STAR Program has been to
reduced greenhouse gas emissions and
save energy through voluntary labeling.
– Power management setting of this product
have been enabled by default, and have
various timing setting from 1 minutes to 5
hours.
– The product can wake with a button press
on the chassis from sleep mode.
ENERGYSTARqualiedmodelonly(Theother
models)
– As an ENERGY STAR Partner, Samsung has
determined that this product or product
models meets the ENERGY STAR guideline
for energy efciency.
15 AVIS DE LICENCE
LIBRE
Pour envoyer des questions et des demandes
concernant des logiciels libres, contactez
Samsung Open Source
(http://opensource.samsung.com)
16 REMARQUE
IMPORTANTE À
PROPOS DU
SERVICE
Les gures et les illustrations du présent Manuel
d’utilisation sont fournies à titre de référence
uniquement et peuvent différer de l’apparence du
produit réel.

FRA - 36
17 SPÉCIFICATIONSETGUIDE
Spécications
Nom du modèle HW-C450
USB 5V/0,5A
Poids 1,4 kg
Dimensions (L x H x P) 858,8 x 59,0 x 75,0 mm
Plage de températures en fonctionnement +5°C à +35°C
Plage d’humidité en fonctionnement 10 % ~ 75 %
AMPLIFICATEUR
Puissance de sortie nominale
40W x 2, 6 ohm
Formats de lecture pris en charge
(Le son DTS 2.0 est lu au format DTS.)
LPCM 2ch, Dolby Audio™
(prise en charge de Dolby® Digital), DTS
Nom du caisson de basse PS-WC45T
Poids 4,5 kg
Dimensions (L x H x P) 184,0 x 343,0 x 295,0 mm
AMPLIFICATEUR
Puissance de sortie nominale
220W
REMARQUES
• Samsung Electronics Co., Ltd se réserve le droit de modier les caractéristiques sans préavis.
• Le poids et les dimensions sont approximatifs.
POR - 2
INFORMAÇÕES DE SEGURANÇA
COMPONENTES
INCLUÍDOSAVISOS DE
SEGURANÇA
PARA REDUZIR O RISCO DE CHOQUES
ELÉCTRICOS, NÃO RETIRE A TAMPA POSTERIOR.
O INTERIOR NÃO CONTÉM PEÇAS PASSÍVEIS DE
REPARAÇÃO PELO UTILIZADOR.
A MANUTENÇÃO DEVE SER EFECTUADA POR
PESSOAL TÉCNICO QUALIFICADO.
Consulte a tabela abaixo para uma explicação dos
símbolos que poderão estar no seu produto Samsung.
CUIDADO
RISCO DE CHOQUE
ELÉCTRICO.NÃO ABRIR.
Este símbolo indica a presença de alta
tensão no interior do produto.
É perigoso estabelecer qualquer tipo de
contacto com as peças existentes no
interior do produto.
Este símbolo indica a existência de
documentação importante relativa ao
funcionamento e manutenção deste
produto (fornecida com o mesmo).
Produto de classe II: Este símbolo indica
que não é necessária uma ligação
eléctrica de segurança à terra.
Se este símbolo não se encontrar num
produto com o de ligação à rede, o
produto DEVERÁ possuir uma ligação
de proteção segura à terra.
Tensão CA: Este símbolo indica que a
tensão nominal é CA.
Tensão CC: Este símbolo indica que a
tensão nominal é CC.
Cuidado, consulte as instruções de
utilização: Este símbolo aconselha o
utilizador a consultar o manual do
utilizador quanto a informações de
segurança.
AVISO
• Para reduzir o risco de fogo ou de choque
elétrico, não exponha este aparelho à chuva
ou à humidade.
CUIDADO
• PARA EVITAR CHOQUES ELÉCTRICOS, INSIRA
TOTALMENTE A PARTE LARGA DA FICHA NA
RANHURA LARGA.
• Este aparelho deve ser sempre ligado a uma
tomada com ligação à terra.
• Para desligar o aparelho da corrente, tem de
retirar a cha da tomada eléctrica, pelo que a
cha tem de estar facilmente acessível.
• Não exponha o aparelho a gotas ou salpicos.
Não coloque objectos com líquidos, tais como
vasos, em cima do aparelho.
• Para desligar completamente o aparelho, tem
de desligar o cabo de alimentação da tomada
de parede. Por este motivo, o cabo de
alimentação tem de estar sempre facilmente
acessível.

POR - 3
PRECAUÇÕES
1. Certique-se de que a fonte de alimentação
CA da sua residência está em conformidade
com os requisitos elétricos indicados no
autocolante de características na parte
inferior do produto. Instale o produto na
horizontal, sobre uma base adequada
(móvel), com espaço suciente para permitir
a ventilação 7~10 cm. Certique-se de que os
orifícios de ventilação não estão tapados.
Não coloque a unidade sobre amplicadores
ou sobre outro tipo de equipamento que
possa aquecer. Esta unidade foi concebida
para uma utilização contínua. Para desligar
completamente a unidade, desligue a cha
CA da tomada de parede. Desligue a unidade
quando não tencionar utilizá-la durante
muito tempo.
2. Durante trovoadas, desligue a cha de
corrente da rede eléctrica. Os picos de
tensão durante uma trovoada podem
danicar a unidade.
3. Não exponha a unidade à luz solar directa
nem a outras fontes de calor. A unidade
poderá sobreaquecer e car danicada.
4. Proteja o produto da humidade (por exemplo,
vasos) e de calor (por exemplo, uma lareira)
ou de equipamento que crie campos
magnéticos ou eléctricos fortes. Desligue o
cabo de alimentação da tomada eléctrica se
a unidade não funcionar correctamente.
O produto não se destina a utilização
industrial. Utilize este produto apenas para
ns pessoais. Pode ocorrer condensação se o
produto ou o disco tiverem sido arm zenados
em temperaturas baixas. Se transportar a
unidade no Inverno, aguarde
aproximadamente 2 horas para que a
unidade que à temper tura ambiente, antes
de utilizar.
5. As pilhas utilizadas neste produto contêm
químicos nocivos para o ambiente. Não deite
as pilhas no lixo doméstico. Não elimine as
pilhas através de fogo. Não provoque curto-
circuito, não desmonte nem sobreaqueça as
pilhas. CUIDADO : Pode provocar uma
explosão, se substituir as pilhas
incorrectamente. Substitua-as apenas pelo
mesmo tipo de pilhas ou por um tipo
equivalente.

POR - 4
CONTEÚDOS
01 VericaçãodosComponentes 6
02 DescriçãogeraldoProduto 7
Painel Frontal/Painel Superior do Soundbar ------------------------- 7
Painel inferior do Soundbar ------------------------- 8
03 UtilizaçãodoControloRemoto 9
Inserção das pilhas antes de utilizar o controlo remoto (2 pilhas AAA) ------------------------- 9
Como utilizar o controlo remoto
-------------------------
9
Utilizar os botões escondidos (botões com mais de uma função)
-------------------------
13
Especicações de saída para diferentes modos de efeitos sonoros
-------------------------
13
Ajuste do volume do Soundbar com o controlo remoto de um televisor ------------------------- 14
04 LigaroSoundbar 15
Ligar à corrente elétrica
-------------------------
15
Ligar o Soundbar ao Subwoofer
-------------------------
16
Ligar o Kit de altifalantes traseiros sem os Samsung ao Soundbar
-------------------------
18
05 UtilizarumaligaçãocomosàTV 19
Ligar com cabo ótico
-------------------------
19
06 UtilizarumaligaçãosemosàTV 20
Ligar uma TV através Bluetooth
-------------------------
20

POR - 5
07 LigarumDispositivoExterno 22
Ligar através de um cabo ótico
-------------------------
22
08 LigarumdispositivodearmazenamentoUSB 23
09 LigarumDispositivoMóvel 25
Ligar através de Bluetooth
-------------------------
25
10 InstalaçãodoSuportedeParede 28
Precauções para a instalação
-------------------------
28
Componentes do suporte de parede
-------------------------
28
11
InstalaroSoundbarsobreosuportedotelevisor
30
12 AtualizaçãodoSoftware 31
Procedimento de atualização
-------------------------
31
Se não for apresentada a mensagem UPDATE
-------------------------
32
13 ResoluçãodeProblemas 33
14 Licenças 34
15 AvisodeLicençadeOpenSource 35
16 NotaImportantesobreoServiço 35
17 EspecicaçõeseGuia 36
Especicações
-------------------------
36
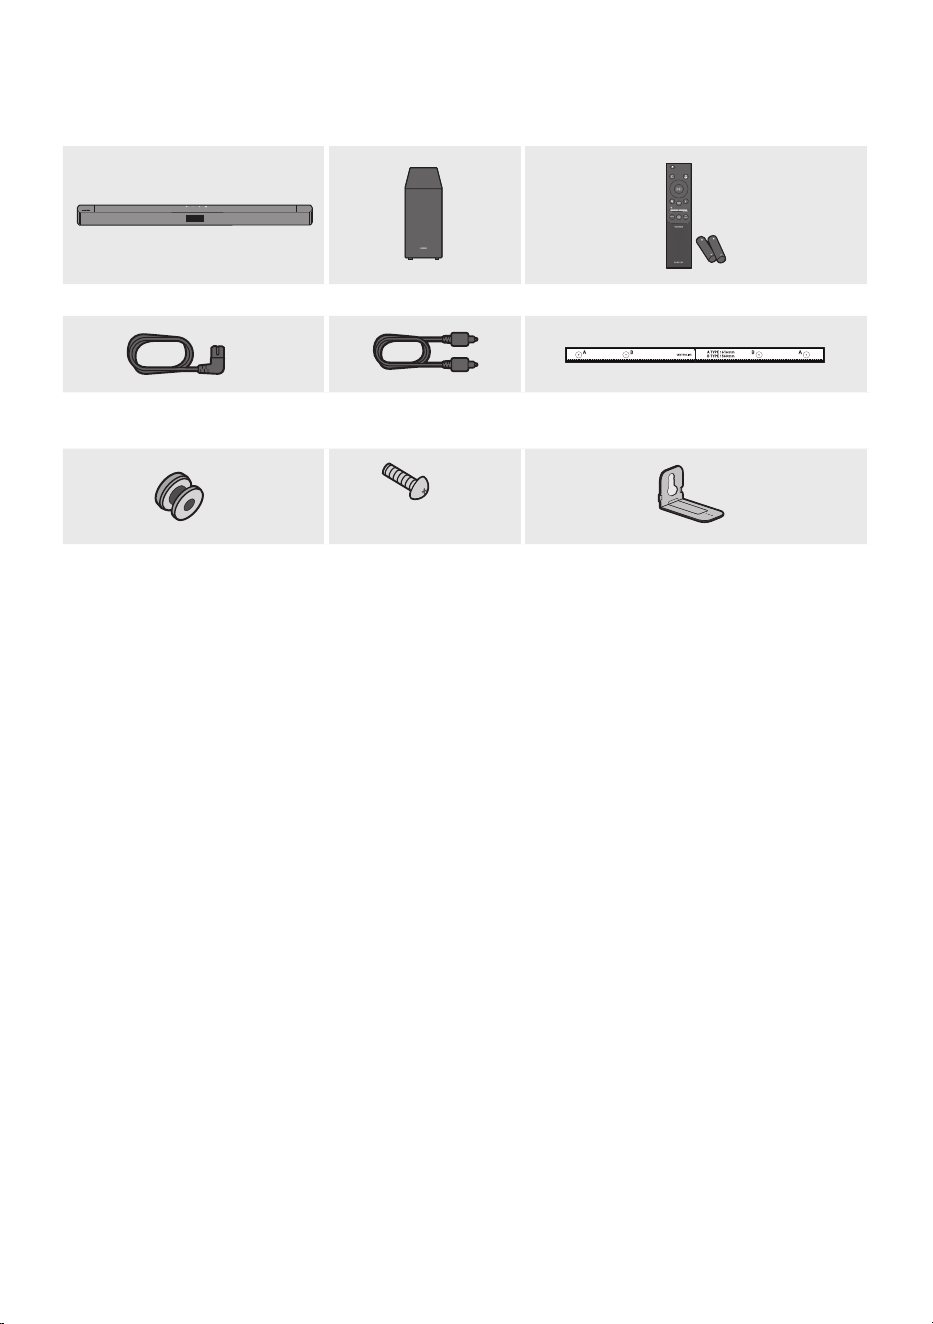
POR - 6
01 VERIFICAÇÃO DOS COMPONENTES
SOUND
MODE
WOOFER
TONE
CONTROL
CH LEVEL
UnidadeprincipaldoSoundbar Subwoofer Controloremoto/pilhas
x 2
Cabodealimentação
(Subwoofer,Soundbar)
Caboótico Guiadesuportedeparede
x 2
(M4 x L10)
x 2
x 2
Parafusodexação Parafuso
Suportedeparede
• Para obter mais informação sobre a fonte de alimentação e o consumo de energia, consulte a
etiqueta no produto. (Etiqueta : Parte inferior da unidade principal do Soundbar)
• Para adquirir componentes adicionais ou cabos opcionais, entre em contacto com o centro de
assistência técnica ou o atendimento ao cliente da Samsung.
• O aspecto real dos acessórios poderá ser ligeiramente diferente das seguintes ilustrações.
• A conceção e as especicações estão sujeitas a alteração sem aviso prévio.
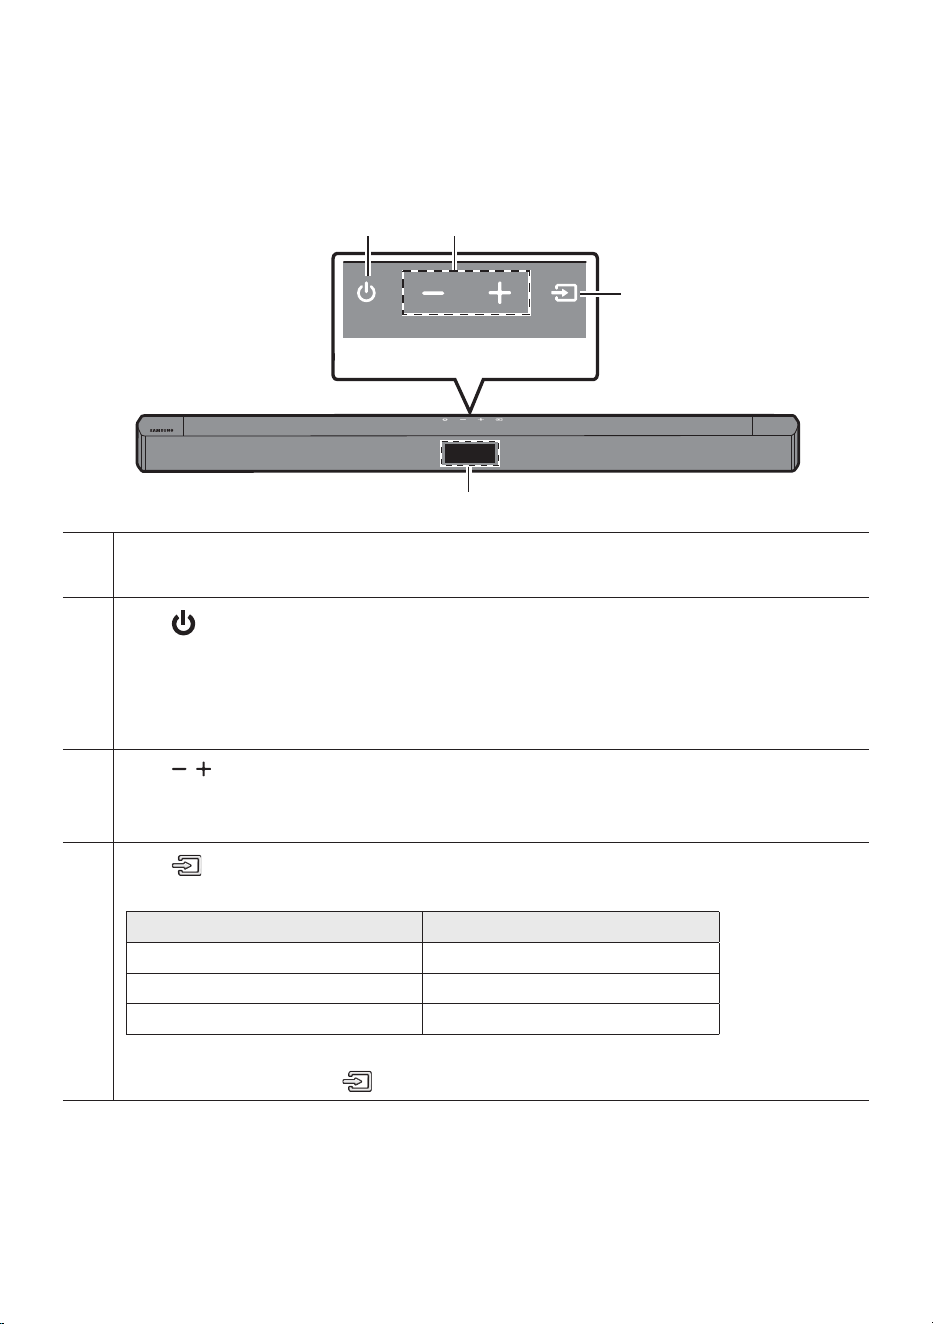
POR - 7
02
DESCRIÇÃO GERAL DO PRODUTO
PainelFrontal/PainelSuperiordoSoundbar
PainelSuperior
Ecrã
Exibe o estado e o modo atual do produto.
Botão (Ligar/Desligar)
Permite ligar e desligar o Soundbar.
• FunçãoAutoPowerDown
Esta unidade desliga-se automaticamente nas situações seguintes:
– Modo D.IN / BT / USB: Se não existir sinal de áudio durante 18 minutos.
Botão (Volume)
Permite ajustar o volume.
• Quando ajustado, o nível do volume é exibido no ecrã frontal do Soundbar.
Botão (Origem)
Permite selecionar o modo de entrada da origem.
Mododeentrada Ecrã
Entrada digital ótica D.IN
Modo BLUETOOTH BT
Modo USB USB
• Para ligar o modo “BT PAIRING”, altere a origem para modo “BT” em estado “BT READY” e, em
seguida, mantenha o botão (Origem)premido durante mais de 5 segundos.
• Quando liga o cabo de CA, poderá utilizar o botão de ligar após 4 a 6 segundos.
• Sempre que liga esta unidade, terá de aguardar 4 a 5 segundos até que seja possível reproduzir som.
• Se pretender desfrutar de som apenas a partir do Soundbar, é necessário desligar as colunas do televisor
no menu de Conguração de áudio do seu televisor. Consulte o manual fornecido com o televisor.
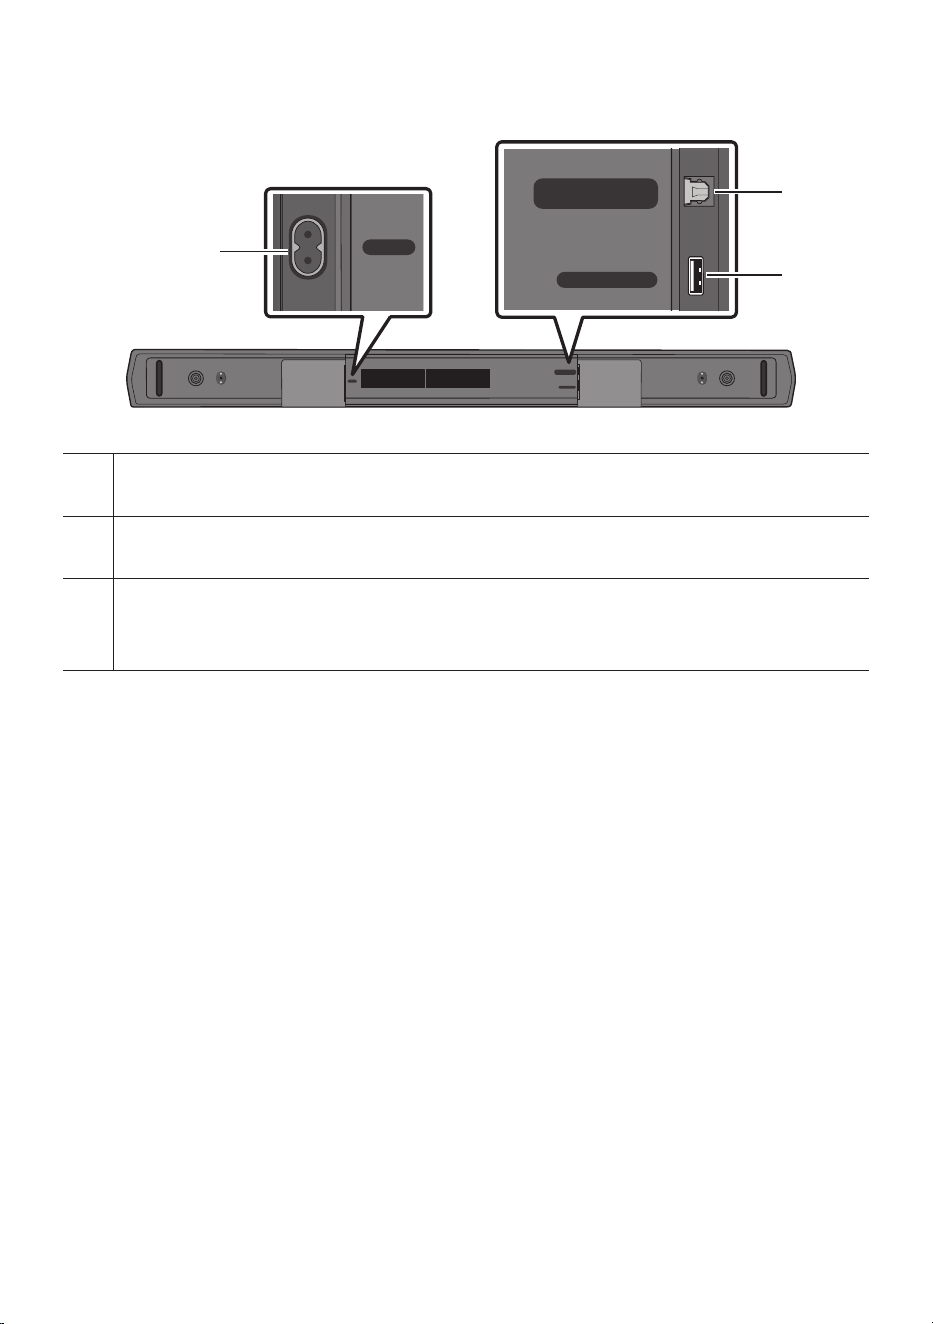
POR - 8
PainelinferiordoSoundbar
POWER
USB (5V 0.5A)
DIGITAL AUDIO IN
(OPTICAL)
POWER
USB (5V 0.5A)
DIGITAL AUDIO IN
(OPTICAL)
POWER
Ligue o cabo de alimentação CA do Soundbar.
DIGITALAUDIOIN(OPTICAL)
Permite ligar a uma saída (ótica) digital de um dispositivo externo.
USB(5V0.5A)
Permite ligar a um dispositivo USB para que possa reproduzir cheiros de música contidos no dispositivo
USB através do Soundbar.
• Quando desligar o cabo de alimentação da tomada de parede, puxe a cha. Não puxe o cabo.
• Não ligue esta unidade ou outros componentes a uma tomada de CA até que todas as ligações entre
os componentes estejam concluídas.
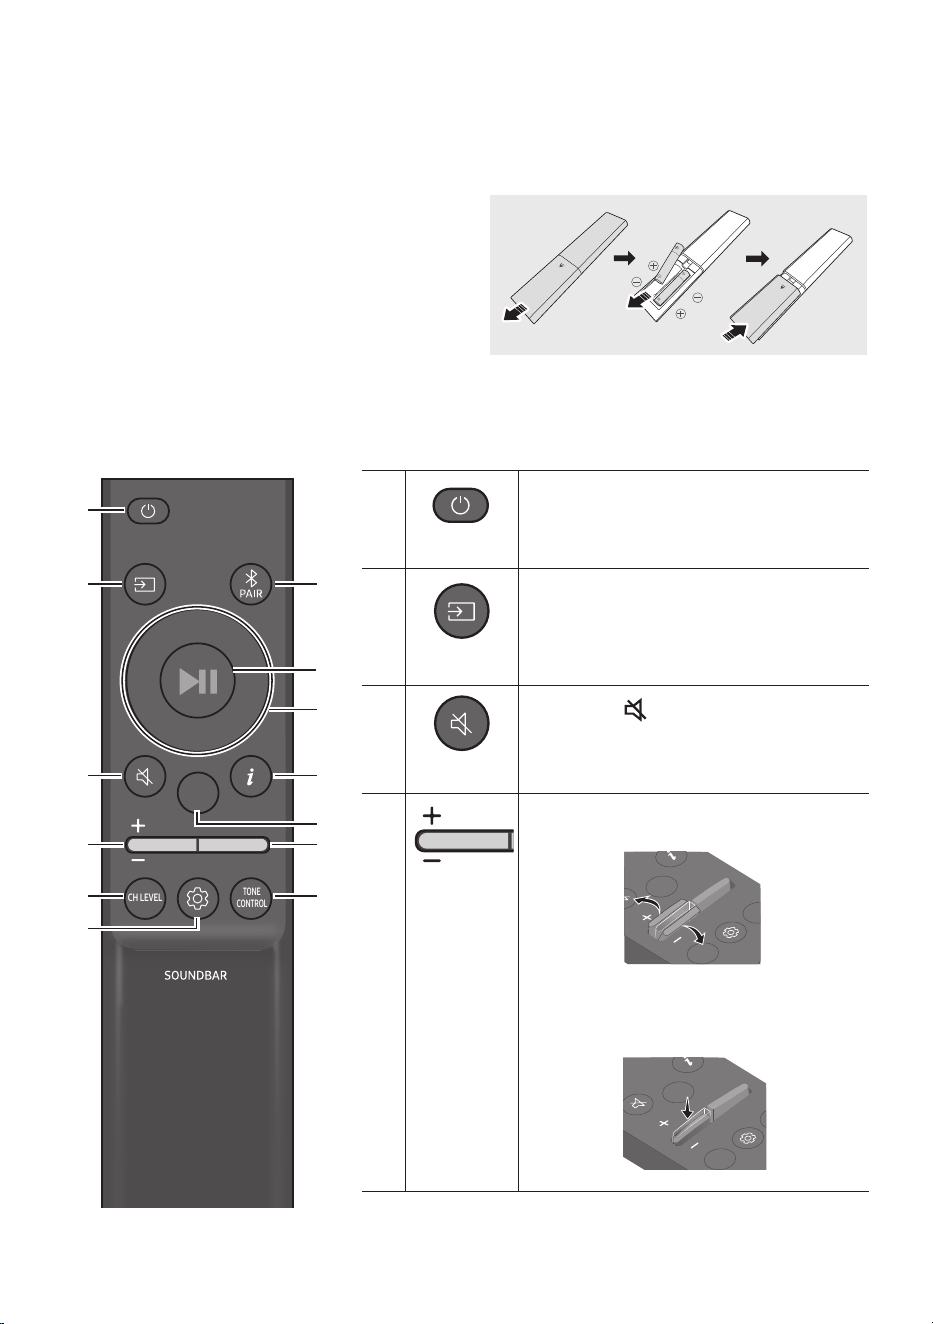
POR - 9
03 UTILIZAÇÃO DO CONTROLO REMOTO
Inserçãodaspilhasantesdeutilizarocontroloremoto(2pilhasAAA)
Deslize a tampa traseira na direção da seta até ser
totalmente removida. Insira 2 pilhas AAA (1,5 V) na
posição correta. Coloque novamente a tampa
traseira deslizando-a.
Comoutilizarocontroloremoto
SOUND
MODE
WOOFER
TONE
CONTROL
CH LEVEL
SOUND
MODE
WOOFER
TONE
CONTROL
CH LEVEL
Ligar/Desligar
Permite ligar e desligar o Soundbar.
SOUND
MODE
WOOFER
TONE
CONTROL
CH LEVEL
Origem
Prima este botão para selecionar uma fonte
ligada ao Soundbar.
SOUND
MODE
WOOFER
TONE
CONTROL
CH LEVEL
Semsom
Prima o botão (Semsom) para desativar o
som. Prima-o novamente para repor o som.
SOUND
MODE
WOOFER
TONE
CONTROL
CH LEVEL
Volume
Prima o botão para cima ou para baixo para
ajustar o volume.
CH LEVEL
TONE
CONTROL
WOOFER
SOUND
MODE
CH LEVEL
TONE
CONTROL
WOOFER
SOUND
MODE
CH LEVEL
TONE
CONTROL
WOOFER
SOUND
MODE
CH LEVEL
TONE
CONTROL
WOOFER
SOUND
MODE
• Semsom
Prima o botão Volume para desativar o som.
Prima-o novamente para repor o som.
CH LEVEL
TONE
CONTROL
WOOFER
SOUND
MODE
CH LEVEL
TONE
CONTROL
WOOFER
SOUND
MODE
CH LEVEL
TONE
CONTROL
WOOFER
SOUND
MODE
CH LEVEL
TONE
CONTROL
WOOFER
SOUND
MODE

POR - 10
SOUND
MODE
WOOFER
TONE
CONTROL
CH LEVEL
CH LEVEL
Ao premir o botão, pode ajustar o volume de cada altifalante.
• Prima o botão para selecionar VIRTUAL CENTER LEVEL e ajuste o volume entre -6 e +6
com os botões Cima/Baixo.
• Se os Altifalantes traseiros (vendidos em separado) estiverem ligados, a denição
REAR LEVEL é compatível. Para ajustar o volume do REAR LEVEL entre -6 e +6, utilize
os botões Cima/Baixo.
VOL WOOFER
SOUND
MODE
PAIR
Cima/Baixo/
Esquerda/
Direita
PrimaasáreasindicadasparaselecionarCima/Baixo/
Esquerda/Direita.
Prima Cima/Baixo/Esquerda/Direita no botão para selecionar ou denir funções.
• Repetir
Para utilizar a função Repetir no modo “USB”, prima o botão Cima.
• SaltarMúsica
Prima o botão Direitapara selecionar o próximo cheiro de música. Prima o botão
Esquerda para selecionar o cheiro de música anterior.
• ID SET
Mantenha premido o botão Cima durante 5 segundos até ID SET estar concluído (ao
ligar um subwoofer sem os ou altifalantes traseiros sem os).
SOUND
MODE
WOOFER
TONE
CONTROL
CH LEVEL
Controlode
Som
Ao premir o botão, pode denir a função de áudio. Pode ajustar as denições pretendidas
ao usar os botões Cima/Baixo.
AUDIO SYNC VOICEENHANCEON/OFFNIGHTMODEON/OFF
– AUDIO SYNC
Se o vídeo no televisor e o áudio no Soundbar não estiverem sincronizados, prima o
botão (ControlodeSom) para selecionar AUDIO SYNC e depois dena o atraso de
áudio para um valor entre 0 e 300 milissegundos com os botões Cima/Baixo. (Não
disponível nos modos “USB” ou “BT”.)
– VOICEENHANCEON/OFF
Com este modo é mais fácil ouvir diálogos nos lmes e na TV.
– NIGHTMODEON/OFF
Este modo está otimizado para visualização noturna, com denições ajustadas para
diminuir o volume, mas manter os diálogos percetíveis.
• O VOICE ENHANC NIGHT MODE e a função de áudio NIGHT MODE podem ser
colocados em ON/OFF com os botões Cima/Baixo.
• Prima e mantenha premido o botão (ControlodeSom) durante cerca de
5 segundos para ajustar o som a cada banda de frequência. Pode selecionar 150 Hz,
300 Hz, 600 Hz, 1,2 kHz, 2,5 kHz, 5 kHz e 10 kHz com os botões Esquerda/Direita e
cada opção pode ser ajustada para uma denição entre -6 e +6 com os botões Cima/
Baixo. (Certique-se de que o modo de som está denido como “STANDARD”.)
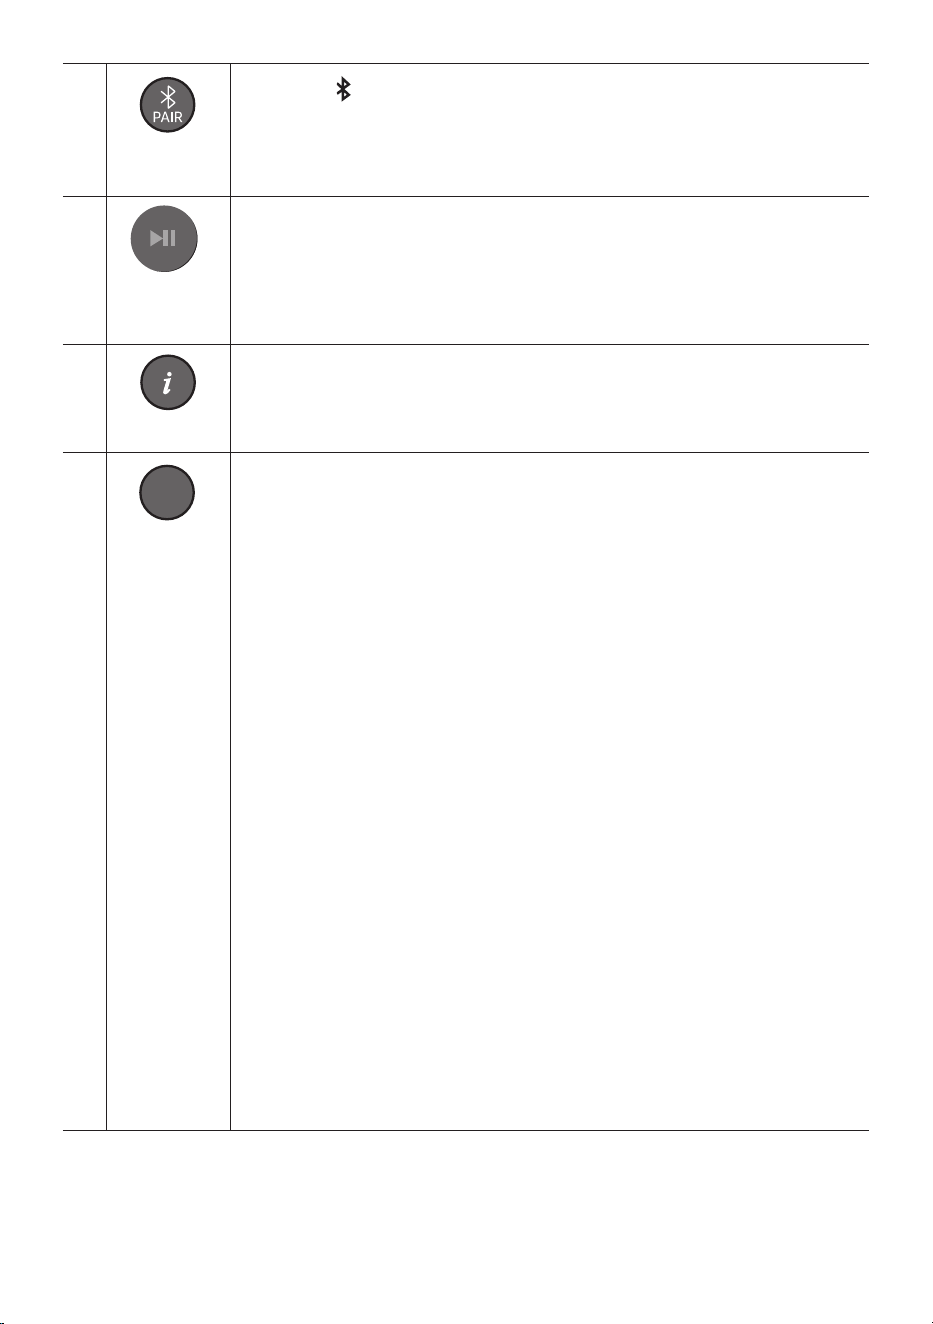
POR - 11
SOUND
MODE
WOOFER
TONE
CONTROL
CH LEVEL
Bluetooth
PAIR
Prima o botão PAIR. “BT PAIRING” aparece no ecrã do Soundbar.
Pode ligar o Soundbar a um novo dispositivo Bluetooth neste modo se selecionar o
Soundbar na lista de pesquisa do dispositivo Bluetooth.
Reproduzir/
Pausa
VOL WOOFER
SOUND
MODE
PAIR
Prima o botão p para por temporariamente um cheiro de música em pausa.
Quando voltar a premir o botão, o cheiro de música continuará a ser reproduzido.
SOUND
MODE
WOOFER
TONE
CONTROL
CH LEVEL
Informações
Quando premido, são apresentadas as informações de cada modo. (Consulte a página 7.)
SOUND
MODE
WOOFER
TONE
CONTROL
CH LEVEL
SOUND MODE
Ao premir o botão, pode selecionar o modo de som desejado.
SURROUND SOUND GAME ADAPTIVE DTS VIRTUAL:X BASS BOOST
STANDARD
– SURROUND SOUND
Oferece um campo sonoro mais amplo do que o padrão.
– GAME
Oferece som estereoscópico para mergulhar na ação durante os videojogos.
– ADAPTIVE
Analisa o conteúdo em tempo real e fornece automaticamente o campo sonoro ótimo
com base nas características do conteúdo.
– DTS VIRTUAL:X
Som 3D imersivo de qualquer conteúdo.
– BASS BOOST
Modo de campo sonoro com ênfase nos graves.
– STANDARD
Emite o som original.
• DRC(DynamicRangeControl)
Permite-lhe aplicar o controlo de intervalo dinâmico às faixas Dolby Digital. Mantenha
o botão SOUND MODE premido durante mais de 5segundos enquanto o Soundbar
está desligado para ligar ou desligar a função DRC (Dynamic Range Control). Com o
DRC ligado, o som alto é reduzido. (O som pode ser distorcido.)
• BluetoothPower
Esta funcionalidade liga automaticamente o Soundbar quando recebe um pedido de
ligação de um televisor ou dispositivo Bluetooth ligado anteriormente. A denição está
em Ligada por predenição.
– Mantenha o botão SOUND MODE premido durante mais de 5segundos enquanto
o Soundbar está ligado para desligar a função Bluetooth Power.
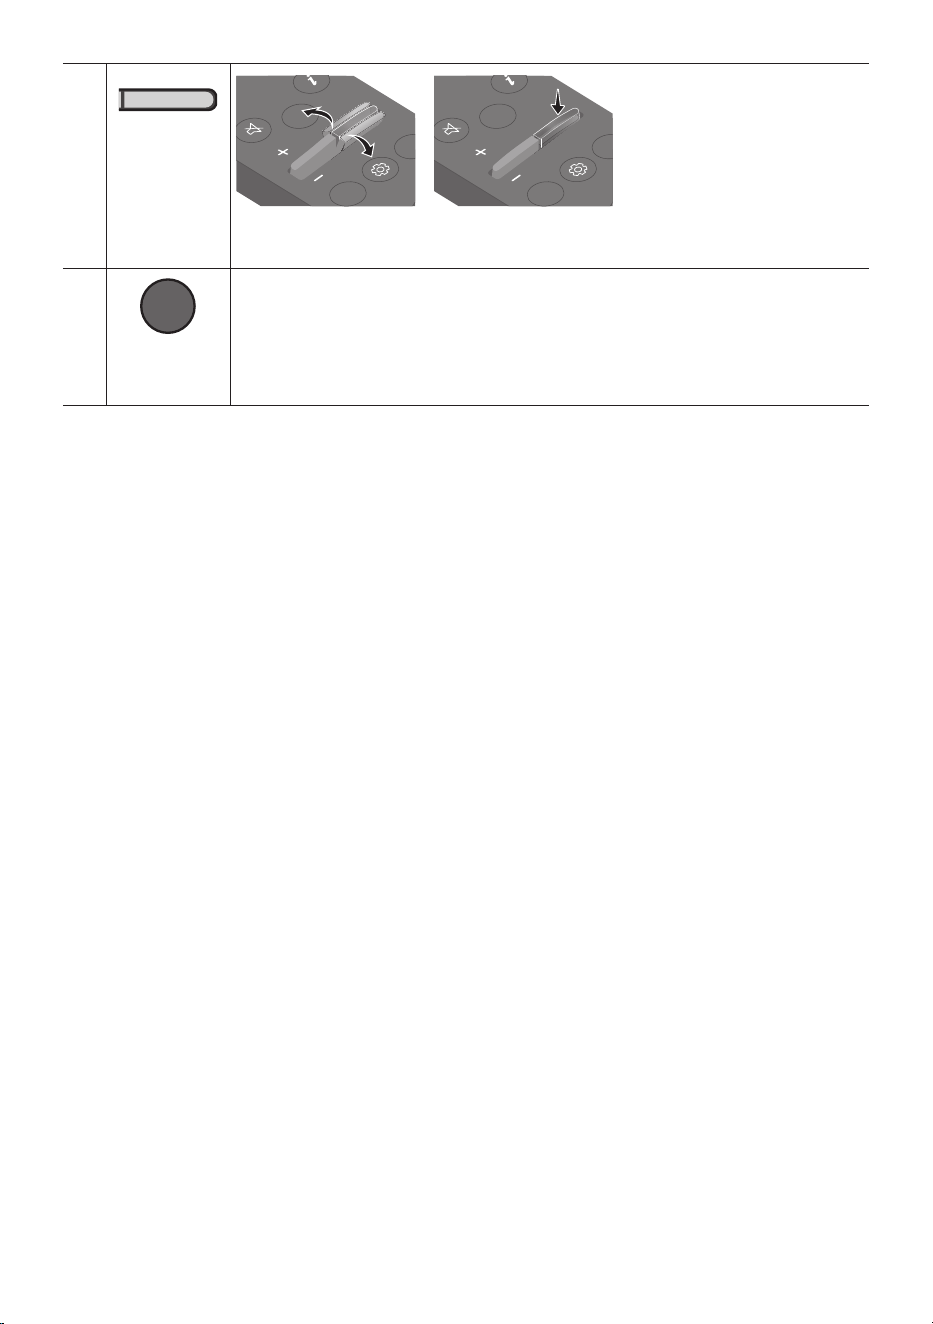
POR - 12
SOUND
MODE
WOOFER
TONE
CONTROL
CH LEVEL
NIVELACAO
DE WOOFER
(GRAVES)
CH LEVEL
TONE
CONTROL
WOOFER
SOUND
MODE
CH LEVEL
TONE
CONTROL
WOOFER
SOUND
MODE
CH LEVEL
TONE
CONTROL
WOOFER
SOUND
MODE
CH LEVEL
TONE
CONTROL
WOOFER
SOUND
MODE
Prima o botão para cima ou para baixo para ajustar o volume do woofer (graves) para -12
ou entre -6 e +6. Para denir o volume do woofer (graves) para 0 (padrão), prima o botão.
SOUND
MODE
WOOFER
TONE
CONTROL
CH LEVEL
TONE
CONTROL
Ao premir o botão, pode ajustar o volume de sons agudos ou graves.
• Prima o botão para selecionar TREBLE ou BASS e ajuste o volume entre -6 e +6 com os
botões Cima/Baixo.
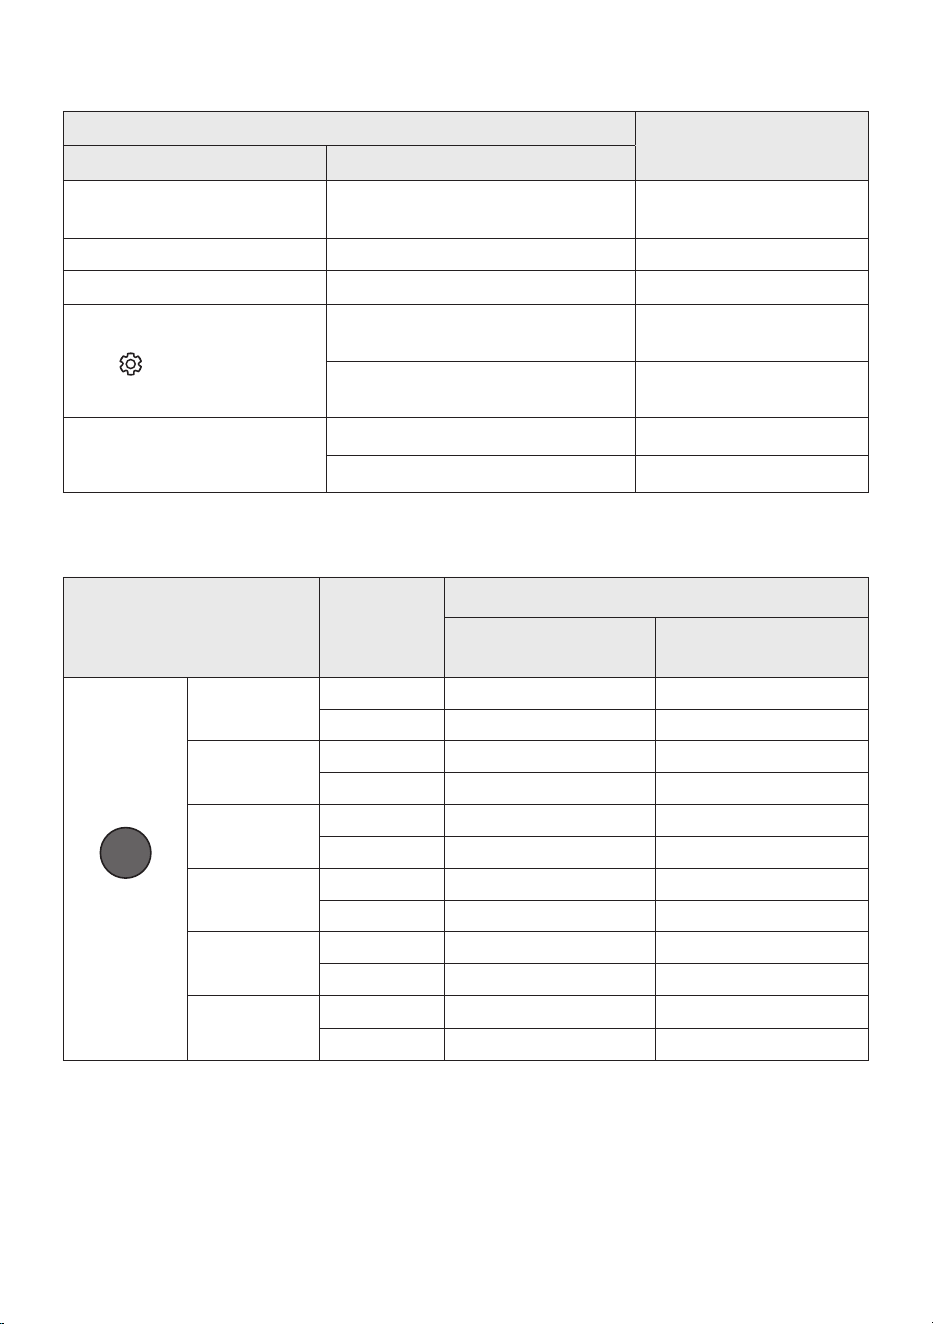
POR - 13
Utilizarosbotõesescondidos(botõescommaisdeumafunção)
Botãoescondido
Páginadereferência
Botãodocontroloremoto Função
WOOFER (Cima)
Controlo remoto do televisor Ligar/Desligar
(em espera)
Página 14
Esquerda Ligar/desligar ligação da TV (BT pronto) Página 21
Cima ID SET Página 10
(Controlo de Som)
7 Band EQ (Manter premido durante
5segundos)
Página 10
Repor (Manter premido durante
10segundos)
Página 31
SOUND MODE
DRC ON/OFF (em espera) Página 11
Bluetooth Power Página 11
Especicaçõesdesaídaparadiferentesmodosdeefeitossonoros
Efeito Entrada
Potência
SemoKitdecolunas
traseirassemos
ComoKitdecolunas
traseirassemos
SOUND MODE
Surround
VOL WOOFER
SOUND
MODE
Bluetooth
POWER
SURROUND
SOUND
2.0 canais
2.1 canais 4.1 canais
5.1 canais 2.1 canais 4.1 canais
GAME
2.0 canais
2.1 canais 4.1 canais
5.1 canais 2.1 canais 4.1 canais
ADAPTIVE
2.0 canais
2.1 canais 4.1 canais
5.1 canais 2.1 canais 4.1 canais
DTS VIRTUAL:X
2.0 canais
2.1 canais 4.1 canais
5.1 canais 2.1 canais 4.1 canais
BASS BOOST
2.0 canais
2.1 canais 4.1 canais
5.1 canais 2.1 canais 4.1 canais
STANDARD
2.0 canais
2.1 canais 2.1 canais
5.1 canais 2.1 canais 2.1 canais
• O Kit de colunas traseiras sem os da Samsung pode ser comprado em separado. Para comprar o
Kit, contacte o fornecedor onde comprou o Soundbar.
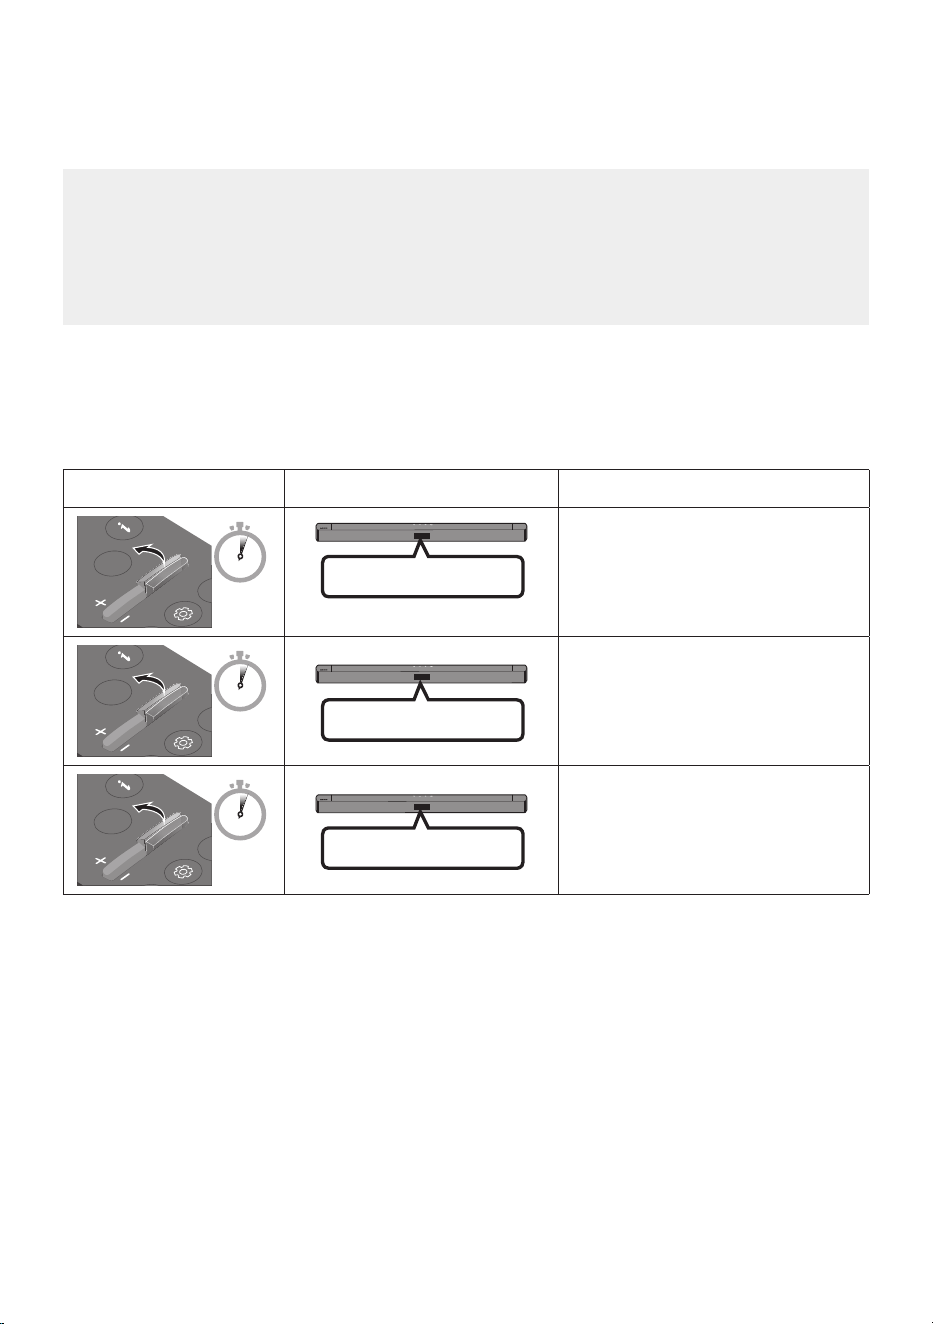
POR - 14
AjustedovolumedoSoundbarcomocontroloremotodeum
televisor
Ajuste o volume do Soundbar com o controlo remoto do televisor.
• Esta função só pode ser utilizada com controlos remotos por infravermelhos. Os controlos
remotos Bluetooth (controlos remotos que requerem emparelhamento) não são suportados.
• Dena o altifalante do televisor para AltifalanteExter. para utilizar esta função.
• Fabricantes que suportam esta função:
Samsung, VIZIO, LG, Sony, Sharp, PHILIPS, PANASONIC, TOSHIBA, Hisense, RCA
1. Desligue o Soundbar.
2. Mantenha premido o botão WOOFER durante 5 segundos.
Cada vez que mantiver premido o botão WOOFER durante 5 segundos, o modo muda pela seguinte
ordem: “OFF-TV REMOTE” (modo predenido), “SAMSUNG-TV REMOTE”, “ALL-TV REMOTE”.
Botãodocontroloremoto Ecrã Estado
SOUND
MODE
WOOFER
CH LEVEL
TONE
CONTROL
5 Sec
(modo predenido)
OFF-TV REMOTE
Desative o controlo remoto do
televisor.
SOUND
MODE
WOOFER
CH LEVEL
TONE
CONTROL
5 Sec
SAMSUNG-TV REMOTE
Ative o controlo remoto por
infravermelhos de um televisor
Samsung.
SOUND
MODE
WOOFER
CH LEVEL
TONE
CONTROL
5 Sec
ALL-TV REMOTE
Ative o controlo remoto por
infravermelhos de um televisor de
terceiros.

POR - 15
04 LIGAR O SOUNDBAR
Ligaràcorrenteelétrica
Utilize os componentes elétricos para ligar o Subwoofer e o Soundbar a uma tomada elétrica pela
seguinte ordem:
1. Ligue o cabo de alimentação ao Subwoofer.
2. Ligue o cabo de alimentação ao Soundbar.
Consulte as ilustrações abaixo.
• Para obter mais informações sobre a potência elétrica necessária e o consumo de energia, consulte
a etiqueta no produto. (Etiqueta: parte inferior da unidade principal do Soundbar)
Partedetrásdo
Subwoofer
Cabode
alimentação
Ligaràcorrente
elétrica
Parteinferiordaunidade
principaldoSoundbar
Ligaràcorrente
elétrica
Cabode
alimentação
POWER
POWER
USB (5V 0.5A)
DIGITAL AUDIO IN
(OPTICAL)
USB (5V 0.5A)
DIGITAL AUDIO IN
(OPTICAL)
POWER
POWER
USB (5V 0.5A)
DIGITAL AUDIO IN
(OPTICAL)
USB (5V 0.5A)
DIGITAL AUDIO IN
(OPTICAL)
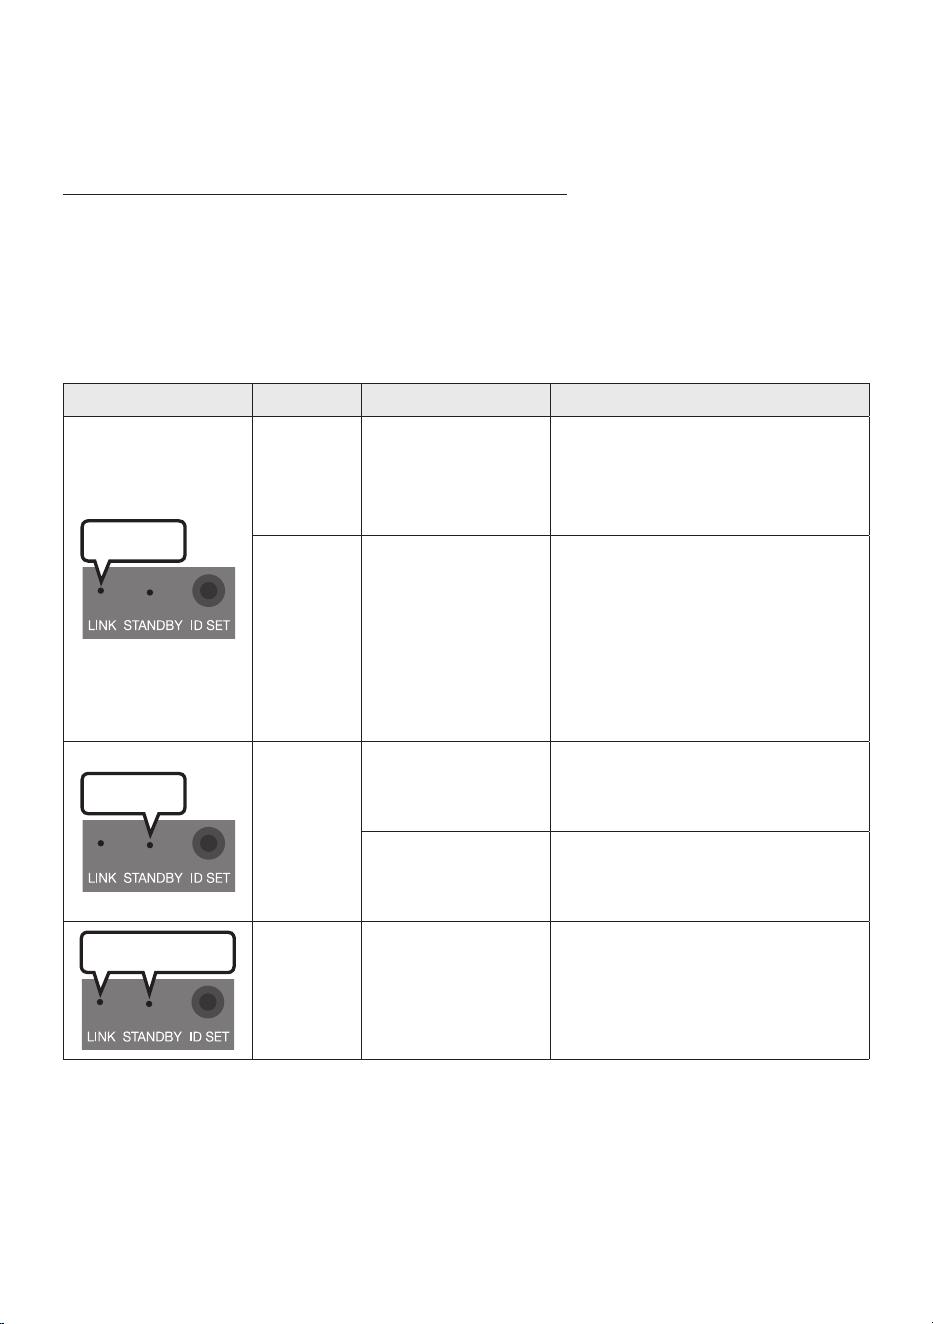
POR - 16
LigaroSoundbaraoSubwoofer
Se o subwoofer estiver ligado, poderá desfrutar de um som grave rico.
LigaçãoautomáticaentreosubwoofereoSoundbar
Quando ligar os aparelhos após a ligação dos cabos de alimentação ao Soundbar e ao subwoofer, este
último liga-se automaticamente ao Soundbar.
• Quando o emparelhamento automático estiver concluído, o indicador azul na parte de trás do
subwoofer acende-se.
IndicadoresLEDnapartedetrásdosubwoofer
LED Estado Descrição Resolução
Azul
Aceso
A ligação foi bem-
sucedida
(funcionamento
normal)
-
A piscar A recuperar a ligação
Verique se o cabo de alimentação
está devidamente ligado à unidade
principal do Soundbar ou aguarde
cerca de 5 minutos. Se o indicador
continuar a piscar, tente ligar o
subwoofer manualmente. Consulte a
página 17.
Vermelho
Aceso
Modo de espera (com
a unidade principal do
Soundbar desligada)
Verique se o cabo de alimentação
está devidamente ligado à unidade
principal do Soundbar.
A ligação falhou
Estabeleça uma nova ligação.
Consulte as instruções relativas à
ligação manual na página 17.
Vermelhoeazul
A piscar Ocorreu uma avaria
Consulte as informações de contacto
do centro de assistência técnica da
Samsung contidas no manual.
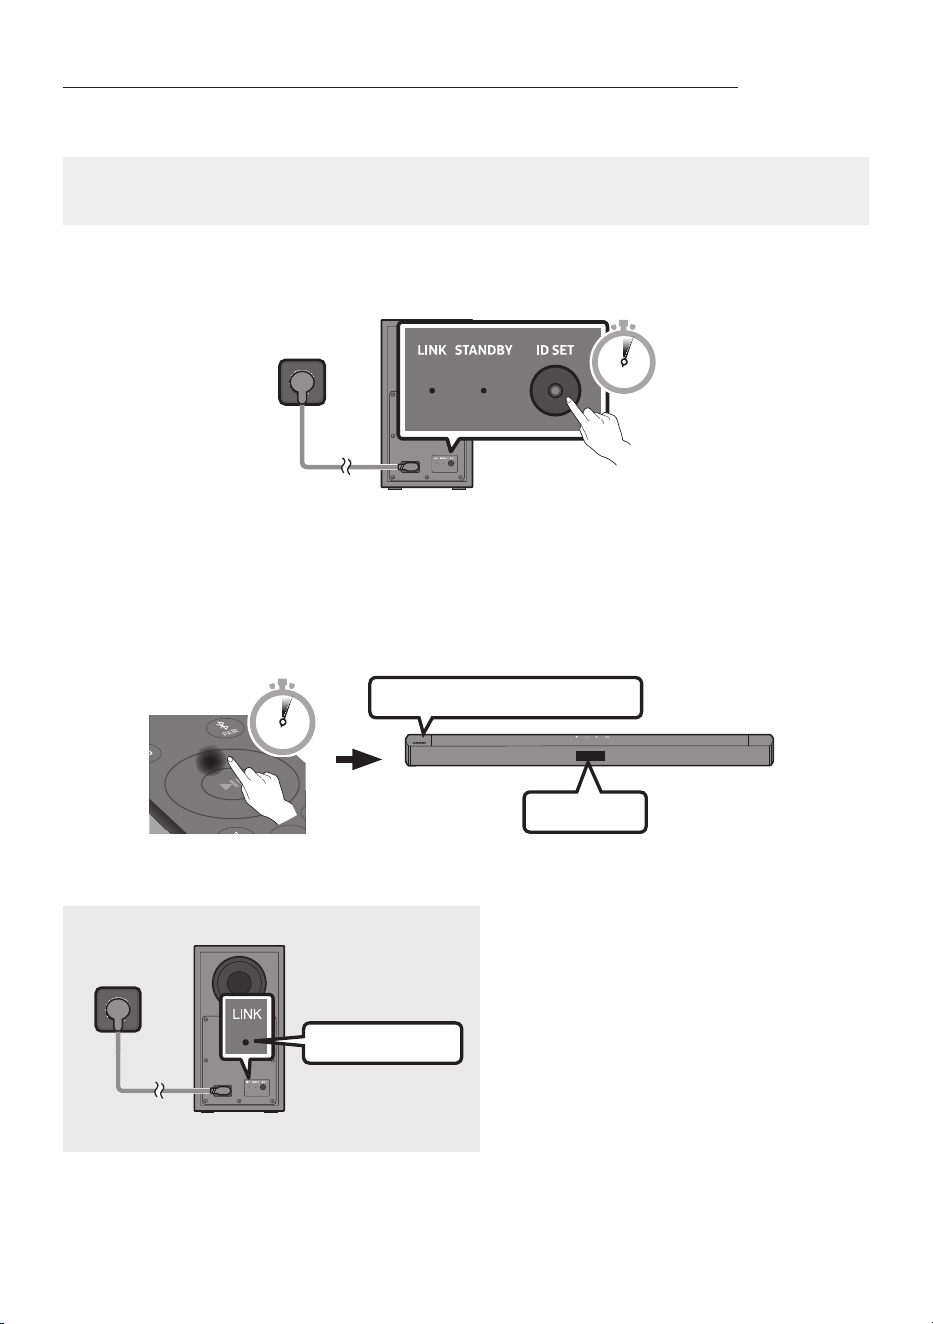
POR - 17
Ligaçãomanualdosubwooferemcasodefalhadaligaçãoautomática
Antesdeexecutaroprocedimentodeligaçãomanualembaixo:
• Verique se os cabos de alimentação do Soundbar e do subwoofer estão devidamente ligados.
• Certique-se de que o Soundbar está ligado.
1. Mantenha premido ID SET na parte de trás do subwoofer durante pelo menos 5 segundos.
• O indicador vermelho na parte de trás do subwoofer apaga-se e o indicador azul pisca.
5 Sec
PartedetrásdoSubwoofer
2. Primeiro, prima o botão no telecomando para ligar o ecrã.
Mantenha premido o botão para Cima no controlo remoto durante mais de 5 segundos.
• A mensagem ID SET surge no ecrã do Soundbar brevemente e depois desaparece.
• O Soundbar liga-se automaticamente quando ID SET estiver concluído.
SOUND
MODE
PAIR
5 Sec
ID SET
LogótipoSAMSUNGestáparacima
3. Verique se o LED LINK está aceso continuamente a azul (ligação concluída).
Acesoaazul
O indicador LED LINK para de piscar e ca
aceso continuamente a azul quando se
estabelece uma ligação entre o Soundbar e o
subwoofer sem os.

POR - 18
NOTAS
• Não ligue o cabo de alimentação deste produto ou do seu televisor a uma tomada elétrica até que
todas as ligações entre os componentes estejam concluídas.
• Antes de mover ou instalar este produto, certique-se de que desliga a alimentação e o cabo de
alimentação da tomada.
• Se a unidade principal estiver desligada, o subwoofer sem os entrará em modo de espera e o LED
STANDBY na parte traseira cará vermelho após piscar a azul várias vezes.
• Se utilizar um dispositivo com a mesma frequência (Marrocos, Tunísia, Egito: 5,2 GHz, Outros países:
5,8 GHz) do Soundbar perto deste, as interferências podem causar algumas interrupções de som.
• A distância de transmissão máxima do sinal sem os da unidade principal é de cerca de 10 metros,
mas pode variar consoante o ambiente de funcionamento. Se existir uma parede de aço e de betão
ou uma parede metálica entre a unidade principal e o subwoofer sem os, o sistema pode não
funcionar de todo porque o sinal sem os não consegue penetrar metal.
PRECAUÇÕES
• Estão integradas antenas recetoras sem os no subwoofer sem os. Mantenha as unidades
protegidas de água e de humidade.
• Para um desempenho de audição otimizado, certique-se de que a área em torno do subwoofer
sem os e do módulo de recetor sem os (vendido em separado) está livre de quaisquer obstáculos.
LigaroKitdealtifalantestraseirossemosSamsungaoSoundbar
Obtenha um verdadeiro som surround sem os ligando o Kit de altifalantes traseiros sem os Samsung
(SWA-9200S, vendido em separado) ao Soundbar.
Para obter informações detalhadas sobre as ligações, consulte o manual do Kit de altifalantes traseiros
sem os Samsung.
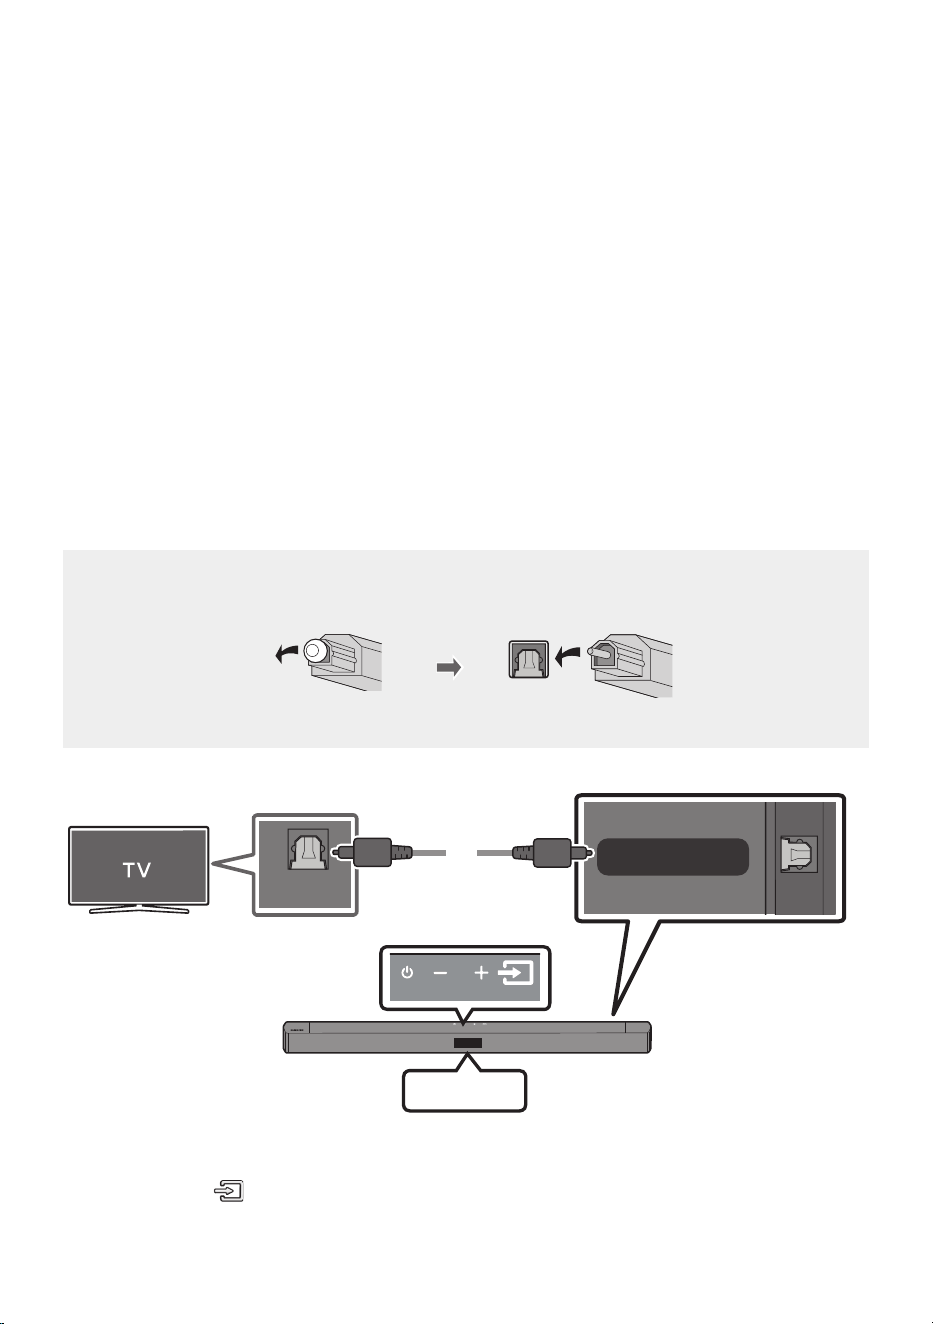
POR - 19
05 UTILIZAR UMA LIGAÇÃO COM FIOS À TV
Ouça o som do televisor a partir do seu Soundbar através de ligações com ou sem os.
• Quando o Soundbar está ligado a determinados televisores da Samsung, é possível controlá-lo
através do controlo remoto do televisor.
– Esta função é suportada por televisores Samsung Smart TV de 2017 e posteriores que
suportam Bluetooth quando o Soundbar é ligado ao televisor com um cabo ótico.
– Esta função também permite utilizar o menu do televisor para ajustar o campo sonoro, várias
denições, o volume e o modo sem som.
Ligarcomcaboótico
Se os sinais de emissão forem Dolby Digital e a denição de “Formato de Saída de Áudio Digital” for
PCM no televisor, recomenda-se que altere a denição para Dolby Digital. Se a denição for alterada,
pode apreciar melhor de qualidade de som. (O menu do televisor poderá utilizar expressões diferentes
para Dolby Digital e PCM em função do fabricante do televisor.)
Listadevericaçãopré-ligação
• Quando utilizar um cabo ótico e os terminais estiverem tapados, certique-se de que remove as tampas.
• Quando utilizar um cabo ótico, deverá estar denido com o modo “D.IN”.
USB (5V 0.5A)
DIGITAL AUDIO IN
(OPTICAL)
OPTICAL OUT
PartesuperiordoSoundbar
D.IN
Caboótico
ParteinferiordoSoundbar
1. Ligue a tomada fêmea DIGITALAUDIOIN(OPTICAL) no Soundbar à tomada fêmea de OPTICAL
OUT do televisor com um cabo ótico digital.
2. Prima o botão (Origem) no painel superior ou no controlo remoto e, em seguida, selecione o
modo “D.IN”.
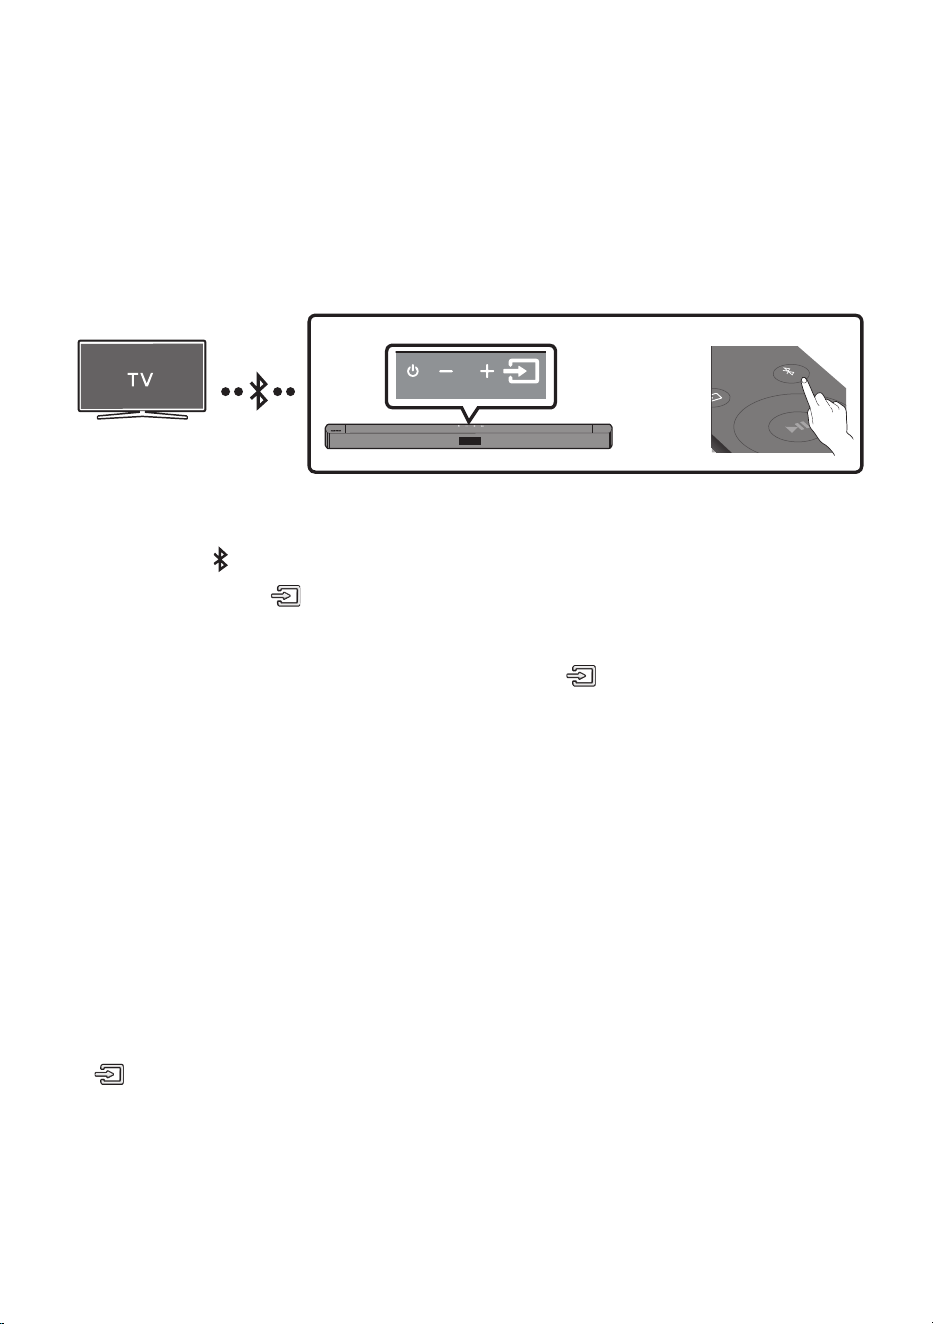
POR - 20
06 UTILIZAR UMA LIGAÇÃO SEM FIOS À TV
LigarumaTVatravésBluetooth
Quando um televisor é ligado através de Bluetooth, pode ouvir som estéreo sem ter de utilizar cabos
incómodos.
• Só pode ligar um televisor de cada vez.
SOUND
MODE
PAIR
OU
Aligaçãoinicial
1. Prima o botão PAIR no controlo remoto para entrar no modo “BT PAIRING”.
(OU)
a. Prima o botão (Origem) no painel superior e selecione “BT”.
“BT” muda para “BT PAIRING” em alguns segundos automaticamente ou muda para “BT
READY” se existir um registo de ligação.
b. Quando aparece “BT READY”, prima sem soltar o botão (Origem) no painel superior do
Soundbar durante mais de 5 segundos, para que seja exibida a mensagem “BT PAIRING”.
2. Selecione o modo Bluetooth no televisor. (Para obter mais informações, consulte o manual do
televisor.)
3. Selecione “[AV]SamsungSoundbarC4-Series” ou “[AV]SoundbarC4-Series” na lista exibida no
ecrã do televisor.
Os Soundbars disponíveis são identicados pela mensagem “NeedsPairing” ou “Paired” na lista de
dispositivos Bluetooth do televisor. Para ligar ao Soundbar, selecione a mensagem e estabeleça
uma ligação.
• Quando o televisor estiver ligado, a mensagem [Nomedotelevisor] → “BT” surgirá no ecrã
frontal do Soundbar.
4. Poderá então ouvir o som do televisor a partir do Soundbar.
SeoSoundbarnãoforencontradopelaTV
• Ligue a TV e o Soundbar com um cabo ótico e selecione o modo “D.IN”, premindo a botão
(Origem) na parte superior do Soundbar. Verique se a saída de áudio funciona normalmente e
continue com o passo 2 e 3.

POR - 21
Seocorrerumafalhaaoligarodispositivo
• Se um Soundbar anteriormente ligado (por exemplo,”[AV]SamsungSoundbarC4-Series” ou “[AV]
SoundbarC4-Series”) surgir na lista, elimine-o.
• Repita os passos 1 a 3.
NOTA
• Após ligar o Soundbar ao televisor pela primeira vez, utilize o modo “BT READY” para voltar a ligar.
DesligaroSoundbardotelevisor
Prima o botão (Origem) no painel superior ou no controlo remoto e mude para qualquer modo exceto
“BT”.
• Desligar o Soundbar do televisor demora algum tempo porque o televisor tem de receber uma
resposta do Soundbar.
(O tempo necessário para tal poderá variar em função do modelo do televisor.)
• Para cancelar a ligação automática de Bluetooth entre o Soundbar e o televisor, prima o botão
Esquerda no controlo remoto durante 5 segundos com o Soundbar no estado “BT READY”.
(Ligar/desligar ligação da TV)
QualéadiferençaentreBTREADYeBTPAIRING?
• BT READY : neste modo, pode pesquisar televisores anteriormente ligados ou ligar um dispositivo
móvel anteriormente ligado ao Soundbar.
• BT PAIRING : neste modo, pode ligar um novo dispositivo ao Soundbar. (Prima o botão PAIR no
telecomando ou mantenha premido o botão
(Origem)
na parte superior do Soundbar durante
mais de 5segundos enquanto o Soundbar está no modo “BT” e no estado “BT READY”.)
NOTAS
• Se lhe for pedido para introduzir um código PIN quando estiver a ligar um dispositivo Bluetooth,
introduza <0000>.
• No modo de ligação Bluetooth, a ligação Bluetooth perder-se-á se a distância entre o Soundbar e o
dispositivo Bluetooth exceder 10 metros.
• O Soundbar desliga-se automaticamente após 18 minutos quando está no modo BT Pronto.
• O Soundbar poderá não realizar corretamente a pesquisa ou a ligação Bluetooth nas seguintes
circunstâncias:
– Se existir um campo elétrico forte em redor do Soundbar.
– Se existirem dois ou mais dispositivos Bluetooth emparelhados em simultâneo com o
Soundbar.
– Se o dispositivo Bluetooth estiver desligado, não estiver no devido lugar ou não funcionar
corretamente.
• Os dispositivos eletrónicos podem provocar interferências rádio. Os dispositivos que geram ondas
eletromagnéticas devem ser mantidos afastados da unidade principal do Soundbar - por exemplo,
micro-ondas, dispositivos LAN sem os, etc.
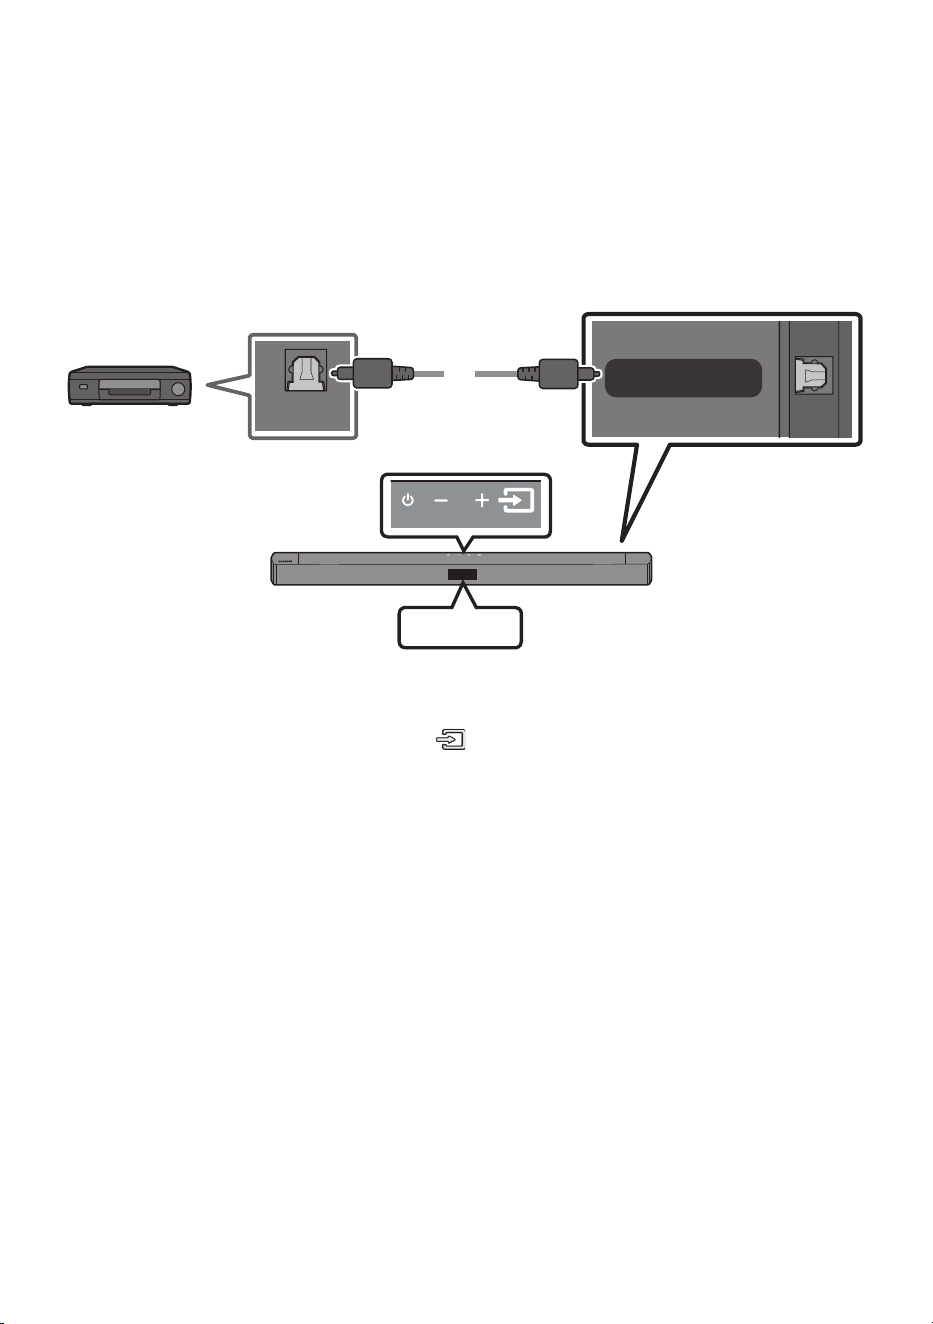
POR - 22
07 LIGAR UM DISPOSITIVO EXTERNO
Ligue-se a um dispositivo externo através de uma ligação com os ou de uma ligação Bluetooth para
reproduzir o som do dispositivo externo através do Soundbar.
Ligaratravésdeumcaboótico
USB (5V 0.5A)
DIGITAL AUDIO IN
(OPTICAL)
OPTICAL OUT
PartesuperiordoSoundbar
D.IN
Caboótico
ParteinferiordoSoundbar
LeitordeDVDou
Blu-ray/
descodicador/
consoladejogos
1. Ligue a DIGITALAUDIOIN(OPTICAL) na unidade principal à tomada fêmea OPTICAL OUT do
dispositivo de origem com um cabo ótico digital.
2. Selecione o modo “D.IN” premindo o botão (Origem) no painel superior ou no controlo remoto.
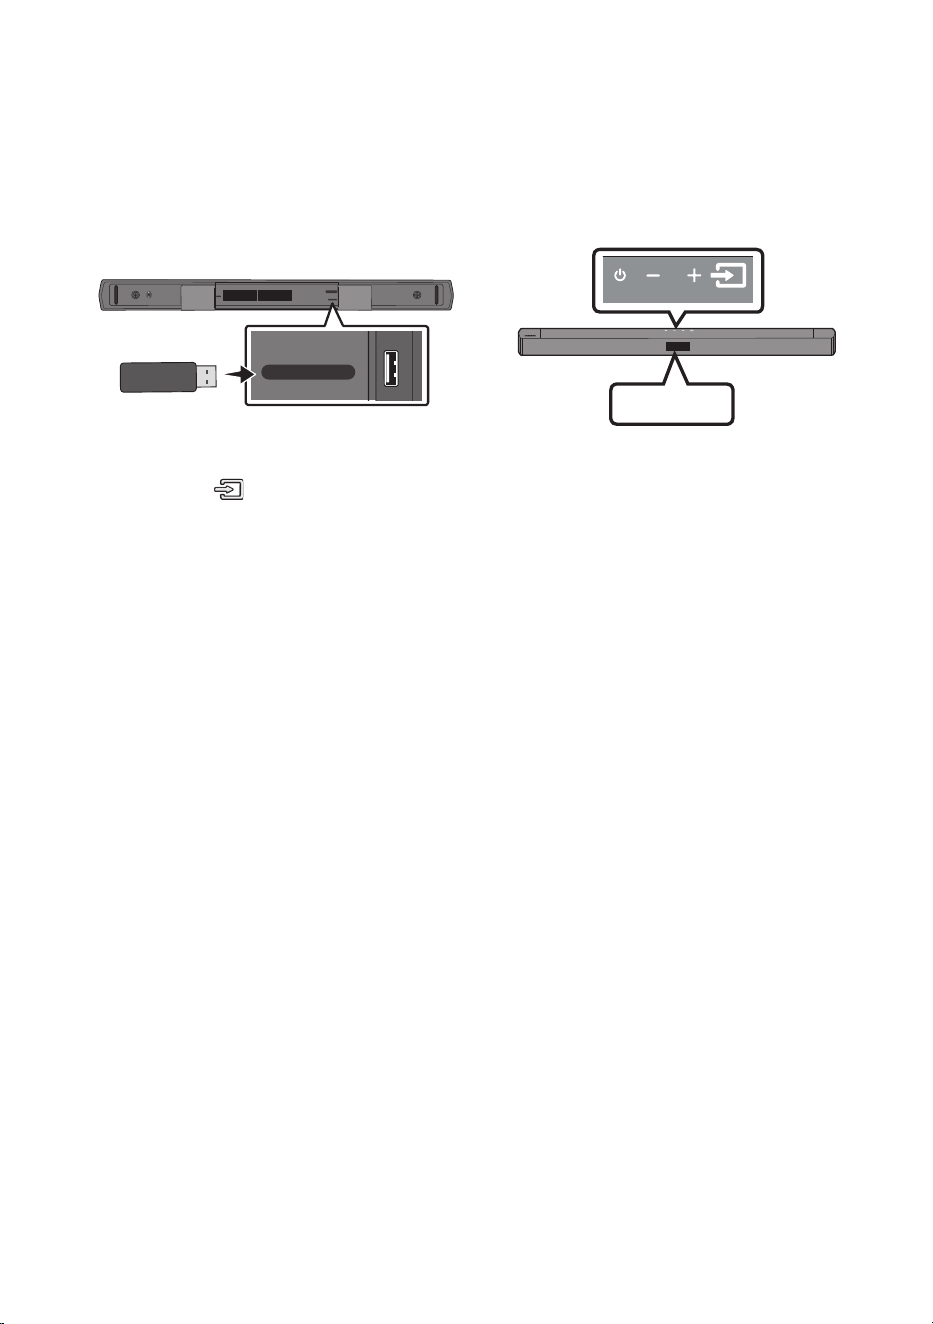
POR - 23
08 LIGAR UM DISPOSITIVO DE
ARMAZENAMENTO USB
Pode reproduzir cheiros de música contidos em dispositivos de armazenamento através do Soundbar.
USB
POWER
USB (5V 0.5A)
DIGITAL AUDIO IN
(OPTICAL)
USB (5V 0.5A)
DIGITAL AUDIO IN
(OPTICAL)
PortaUSB
1. Ligue o dispositivo USB à porta USB na parte inferior do produto.
2. Prima o botão (Origem) no painel superior ou no controlo remoto e, em seguida, selecione
“USB”.
3. A mensagem “USB” surge no ecrã.
4. Reproduza cheiros de música contidos no dispositivo de armazenamento através do Soundbar.
• O Soundbar desliga-se automaticamente (Auto Power Down) se nenhum dispositivo de
armazenamento for ligado após mais de 18 minutos.
POR - 24
Listadecompatibilidade
Extensão Codec Frequênciadeamostragem Velocidadede
transmissão
*.mp3 MPEG 1 Layer2 32 kHz ~ 48 kHz 32 ~ 320 kbps
MPEG 1 Layer3 32 kHz ~ 48 kHz 32 ~ 320 kbps
MPEG 2 Layer3 16 kHz ~ 24 kHz 8 ~ 160 kbps
MPEG 2.5 Layer3 8 kHz ~ 12 kHz 8 ~ 160 kbps
*.wma WMA7/8/9 32 kHz ~ 48 kHz 32 ~ 320 kbps
*.ogg Vorbis 32 kHz ~ 48 kHz 45 ~ 500 kbps
*.aac
*.m4a
*.mp4
(ApenasÁudio)
AAC-LC (MPEG2,/
MPEG4)
32 kHz ~ 48 kHz 32 ~ 320 kbps
*.wav LPCM 32 kHz ~ 192 kHz 1024 ~ 9216 kbps
*.ac FLAC 32 kHz ~ 192 kHz 162 ~ 8100 kbps
*.aiff AIFF 32 kHz ~ 192 kHz 1024 ~ 9216 kbps
• O Soundbar poderá demorar algum tempo a aceder e a reproduzir cheiros se existirem muitas
pastas (cerca de 256) e cheiros (cerca de 999) armazenados no dispositivo USB.
• Sistema de cheiros USB suportado: FAT16, FAT32, NTFS
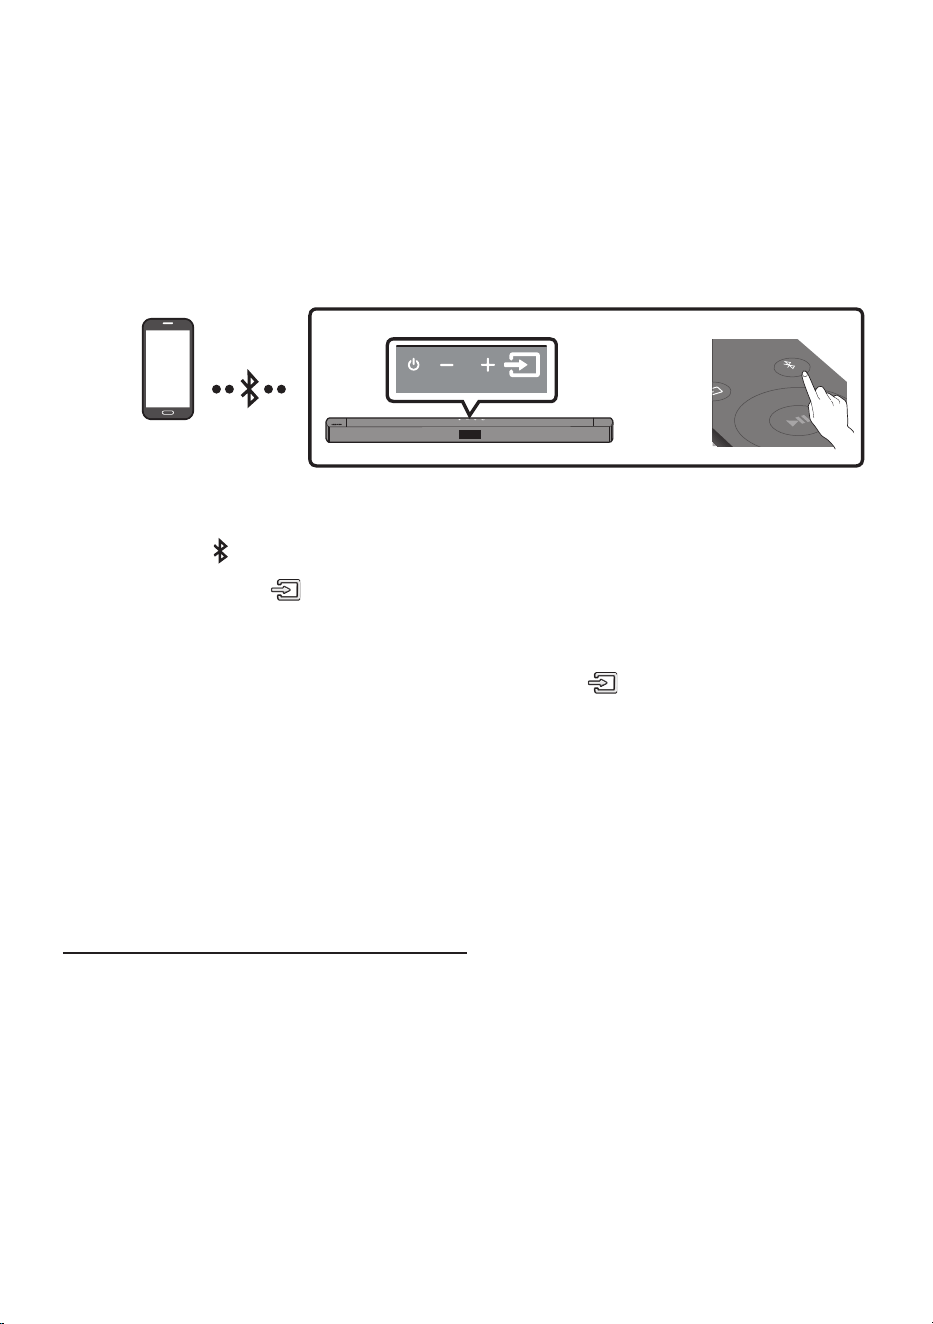
POR - 25
09 LIGAR UM DISPOSITIVO MÓVEL
LigaratravésdeBluetooth
Quando um dispositivo móvel é ligado através de Bluetooth, pode ouvir som estéreo sem ter de utilizar
cabos incómodos.
• Só pode ligar um dispositivo Bluetooth de cada vez.
SOUND
MODE
PAIR
OU
DispositivoBluetooth
Aligaçãoinicial
1. Prima o botão PAIR no controlo remoto para entrar no modo “BT PAIRING”.
(OU)
a. Prima o botão (Origem) no painel superior e selecione “BT”.
“BT” muda para “BT PAIRING” em alguns segundos automaticamente ou muda para “BT
READY” se existir um registo de ligação.
b. Quando aparece “BT READY”, prima sem soltar o botão (Origem) no painel superior
do Soundbar durante mais de 5 segundos, para que seja exibida a mensagem “BT
PAIRING”.
2. Selecione”[AV]SamsungSoundbarC4-Series” ou “[AV]SoundbarC4-Series” na lista.
• Quando um Soundbar estiver ligado ao dispositivo Bluetooth, a mensagem
[NomedoDispositivoBluetooth] → “BT” surgirá no ecrã frontal.
3. Reproduza os cheiros de música contidos no dispositivo que está ligado através de Bluetooth
através do Soundbar.
Seocorrerumafalhaaoligarodispositivo
• Se um Soundbar anteriormente ligado (por exemplo, “[AV]SamsungSoundbarC4-Series” ou
“[AV]SoundbarC4-Series”) surgir na lista, elimine-o.
• Em seguida, repita os passos 1 e 2.
NOTA
• Após ligar o Soundbar ao dispositivo móvel pela primeira vez, utilize o modo “BT READY” para
voltar a ligar.

POR - 26
QualéadiferençaentreBTREADYeBTPAIRING?
• BT READY : neste modo, pode pesquisar televisores anteriormente ligados ou ligar um dispositivo
móvel anteriormente ligado ao Soundbar.
• BT PAIRING : neste modo, pode ligar um novo dispositivo ao Soundbar. (Prima o botão PAIR no
telecomando ou mantenha premido o botão
(Origem)
na parte superior do Soundbar durante
mais de 5segundos enquanto o Soundbar está no modo “BT” e no estado “BT READY”.)
NOTAS
• Se lhe for pedido para introduzir um código PIN quando estiver a ligar um dispositivo Bluetooth,
introduza <0000>.
• No modo de ligação Bluetooth, a ligação Bluetooth perder-se-á se a distância entre o Soundbar e o
dispositivo Bluetooth exceder 10 metros.
• O Soundbar desliga-se automaticamente após 18 minutos quando está no modo BT Pronto.
• O Soundbar poderá não realizar corretamente a pesquisa ou a ligação Bluetooth nas seguintes
circunstâncias:
– Se existir um campo elétrico forte em redor do Soundbar,
– Se forem emparelhados vários dispositivos Bluetooth em simultâneo com o Soundbar,
– Se o dispositivo Bluetooth estiver desligado, não estiver no devido lugar ou não funcionar
corretamente.
• Os dispositivos eletrónicos podem provocar interferências rádio. Os dispositivos que geram ondas
eletromagnéticas devem ser mantidos afastados da unidade principal do Soundbar - por exemplo,
micro-ondas, dispositivos LAN sem os, etc.
• O Soundbar suporta dados SBC (44,1kHz, 48kHz).
• Estabeleça ligação apenas a um dispositivo Bluetooth que suporte a função A2DP (AV).
• Não é possível ligar o Soundbar a um dispositivo Bluetooth que apenas suporte a função mãos-livres.
• Após sincronizar o Soundbar com um dispositivo Bluetooth, seleccionar “[AV]SamsungSoundbar
C4-Series” ou “[AV]SoundbarC4-Series” na lista de dispositivos identicados pelo dispositivo irá
mudar automaticamente o Soundbar para o modo “BT”.
– Disponível apenas se o Soundbar constar da lista de dispositivos Bluetooth sincronizados.
(É necessário que o dispositivo Bluetooth e o Soundbar tenham sido sincronizados
previamente, pelo menos uma vez.)
• O Soundbar é apresentado na lista de procura de dispositivos do dispositivo Bluetooth apenas
quando o Soundbar apresenta “BT READY”.
• Não é possível emparelhar o Soundbar a outro dispositivo Bluetooth se o Soundbar estiver no modo
Bluetooth e já estiver emparelhado a um dispositivo Bluetooth.
BluetoothPowerligada(SOUNDMODE)
Quando a função Bluetooth Power ligada e o Soundbar está desligado, se um dispositivo Bluetooth
sincronizado anteriormente tentar sincronizar com o Soundbar, o Soundbar liga automaticamente.
1. Mantenha o botão SOUND MODE premido no controlo remoto durante mais de 5 segundos
enquanto o Soundbar estiver ligado.
2. É apresentada a indicação “ON-BLUETOOTH POWER” no visor do Soundbar.

POR - 27
DesligarodispositivoBluetoothdeumSoundbar
Pode desligar o dispositivo Bluetooth do Soundbar. Para obter instruções, consulte o manual do
utilizador do dispositivo Bluetooth.
• O Soundbar será desligado.
• Quando o Soundbar for desligado do dispositivo Bluetooth, exibirá a mensagem
“BT DISCONNECTED” no ecrã frontal.
DesligaroSoundbardodispositivoBluetooth
Prima o botão (Origem) no painel superior ou no controlo remoto e, em seguida, mude para
qualquer modo exceto “BT”.
• Desligar o Soundbar do dispositivo Bluetooth demora algum tempo porque o dispositivo Bluetooth
tem de receber uma resposta do Soundbar. (O tempo necessário para tal poderá variar em função
do dispositivo Bluetooth.)
• Quando o Soundbar for desligado do dispositivo Bluetooth, exibirá a mensagem
“BT DISCONNECTED” no ecrã frontal.
NOTAS
• No modo de ligação Bluetooth, a ligação Bluetooth será desactivada se a distância entre o sistema
Soundbar e o dispositivo Bluetooth for superior a 10 m.
• O Soundbar desliga-se automaticamente ao m de 18 minutos no estado Ready.
MaissobreBluetooth
O Bluetooth é uma tecnologia que permite aos dispositivos compatíveis com Bluetooth serem
facilmente interligados, através de uma ligação sem os de curta distância.
• Um dispositivo Bluetooth pode emitir ruído ou apresentar um funcionamento incorrecto, conforme
a respectiva utilização, quando:
– Uma parte do aparelho está em contacto com o sistema receptor/transmissor do dispositivo
Bluetooth ou do Soundbar.
– Sujeito a variações de corrente resultantes de obstruções provocadas por paredes, esquinas ou
divisórias.
– Exposto a interferências eléctricas de dispositivos com a mesma banda de frequência,
incluindo equipamento médico, fornos micro-ondas e redes sem os.
• Emparelhe o Soundbar com o dispositivo Bluetooth, mantendo uma distância curta.
• Quanto maior for a distância entre o Soundbar e o dispositivo Bluetooth, pior é a qualidade.
Se a distância ultrapassar o limite de funcionamento do Bluetooth, a ligação perde-se.
• Em áreas de fraca receptividade, a ligação Bluetooth poderá não funcionar correctamente.
• A ligação Bluetooth funciona apenas quando está próxima do dispositivo. A ligação será
automaticamente cortada se a distância for superior a este limite. Mesmo respeitando este limite, a
qualidade de som poderá ser inferior na presença de obstáculos como paredes ou portas.
• Este dispositivo sem os pode causar interferência elétrica durante a utilização.
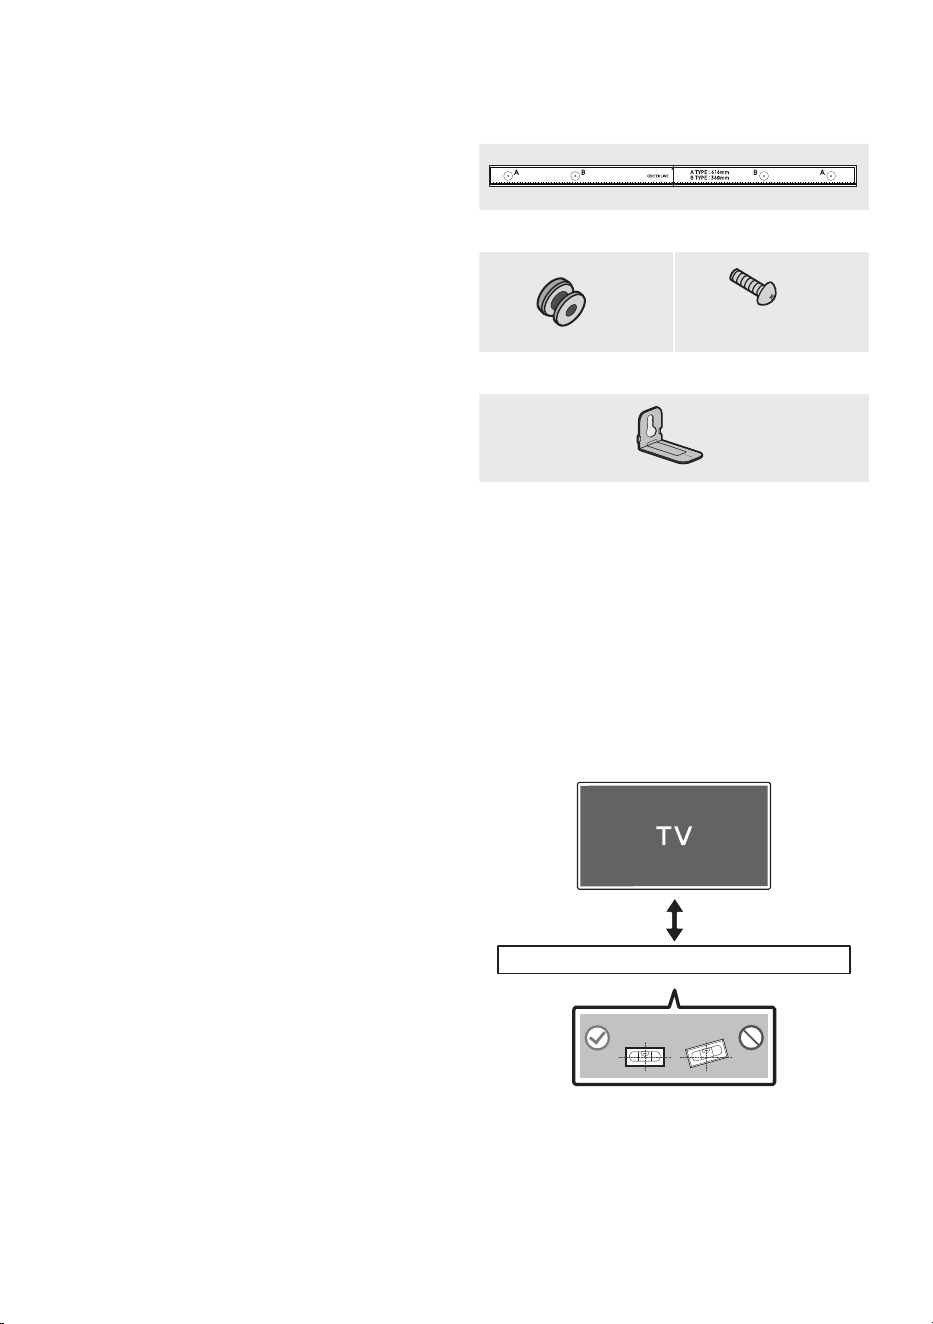
POR - 28
10 INSTALAÇÃO DO
SUPORTE DE
PAREDE
Precauçõesparaainstalação
• Instale apenas em paredes verticais.
• Não instale em locais expostos a altas
temperaturas ou a uma elevada percentagem
de humidade.
• Verique se a parede é sucientemente
resistente para suportar o peso do produto.
Caso não seja, deve reforçar-se a parede ou
optar-se por outro local para instalar o
produto.
• Compre e utilize os parafusos de xação ou
buchas adequados para o tipo de parede em
questão (pladur, placa de ferro, madeira, etc.).
Caso seja possível, devem xar-se os
parafusos de suporte em montantes de
parede.
• Comprar parafusos próprios para montagem
em parede de acordo com o tipo e com a
espessura da parede onde se pretende
instalar o Soundbar.
– Diâmetro: M5
– Comprimento: recomenda-se comprar
parafusos com um comprimento igual ou
superior a 35 mm.
• Ligue os cabos da unidade aos dispositivos
externos antes de instalar o Soundbar na
parede.
• Antes da instalação, deve garantir que a
unidade está desligada e que a respetiva cha
está desligada da tomada. Caso contrário,
esta poderá provocar um choque elétrico.
Componentesdosuportede
parede
Guiadesuportedeparede
x 2
(M4 x L10)
x 2
Parafusodexação Parafuso
x 2
Suportedeparede
1. Coloque o Guiadesuportedeparede
encostado à superfície da parede.
• O Guiadesuportedeparede deve car
nivelado.
• Se o seu televisor estiver montado na
parede, instale o Soundbar, pelo menos,
5 cm abaixo do mesmo.
5cmoumais
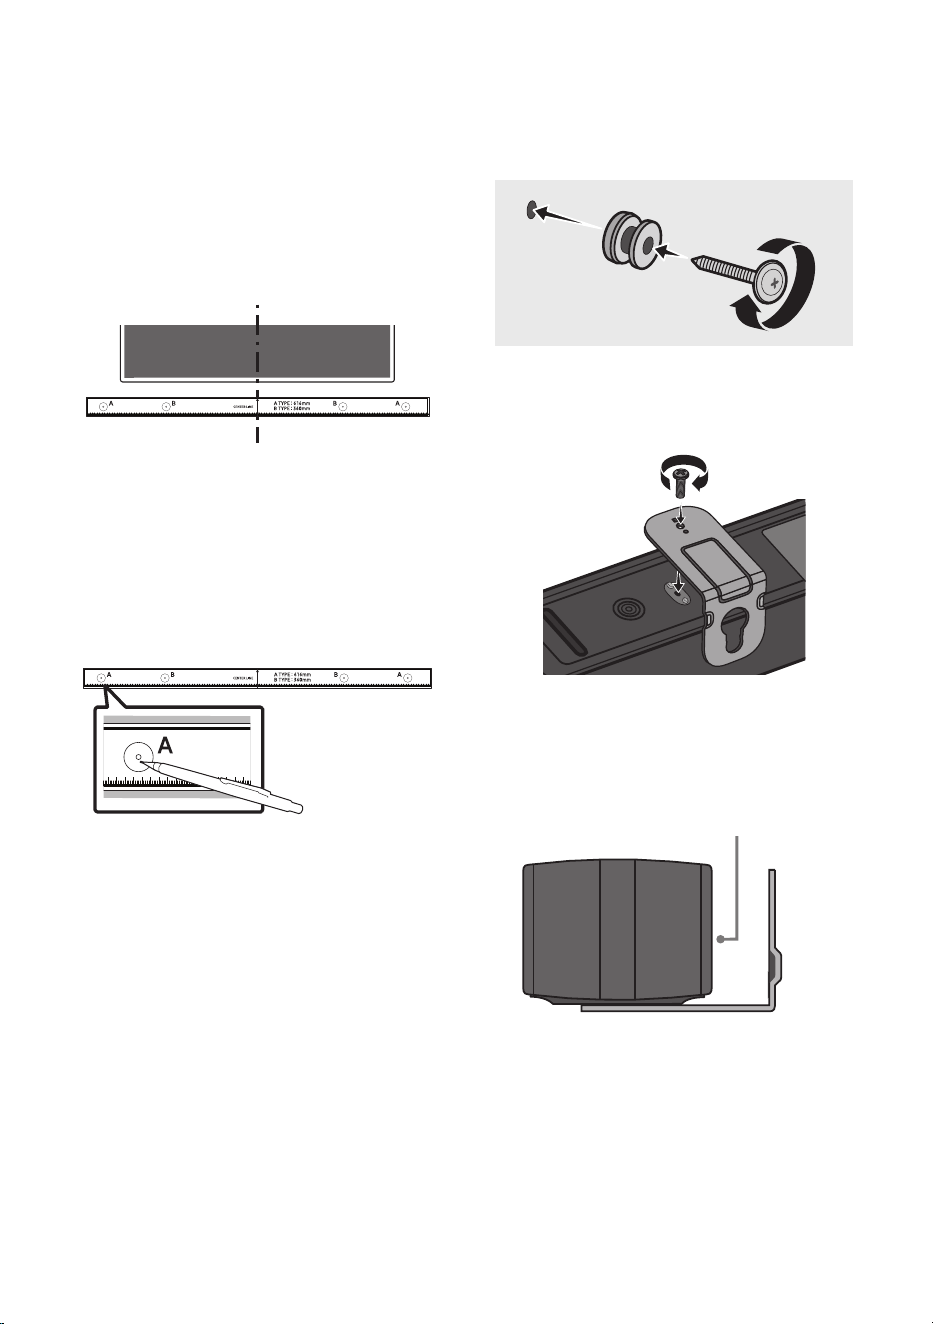
POR - 29
2. Alinhe a LinhacentraldoGuiadesuportede
parede com o centro do televisor (se estiver
a montar o Soundbar por baixo do televisor)
e, em seguida, xe o Guiadesuportede
parede à parede com ta adesiva.
• Se não estiver a montar debaixo do
televisor, coloque a Linhacentral no
centro da área de instalação.
Linhacentral
3. Utilize a ponta de uma caneta ou um lápis
aado para furar o centro das imagens de
A-TYPE, em cada extremidade do Guia, para
assinalar os orifícios dos parafusos de
suporte e remova o Guiadesuportede
parede.
4. Faça um orifício na parede em cada marca
com uma ferramenta de perfuração de
dimensão apropriada.
• Se a parede não tiver qualquer suporte
adicional no local das marcas, certique-se
de que insere as buchas nos orifícios antes
de inserir os parafusos de suporte.
Certique-se de que a dimensão dos
orifícios perfurados corresponde às buchas
a utilizar.
5. Coloque um parafuso (não fornecido) em
cada Parafusodexação e aperte cada um
rmemente nos orifícios de parafuso de
suporte.
(Nãofornecido)
6. Instale os 2 Suportedeparede na orientação
correta na parte inferior do Soundbar,
utilizando 2 Parafusos.
POWER
• Ao montar, certique-se de que a parte
de suporte dos Suportesdeparede está
localizada na parte de trás do Soundbar.
PartedetrásdoSoundbar
ExtremidadedireitadoSoundbar
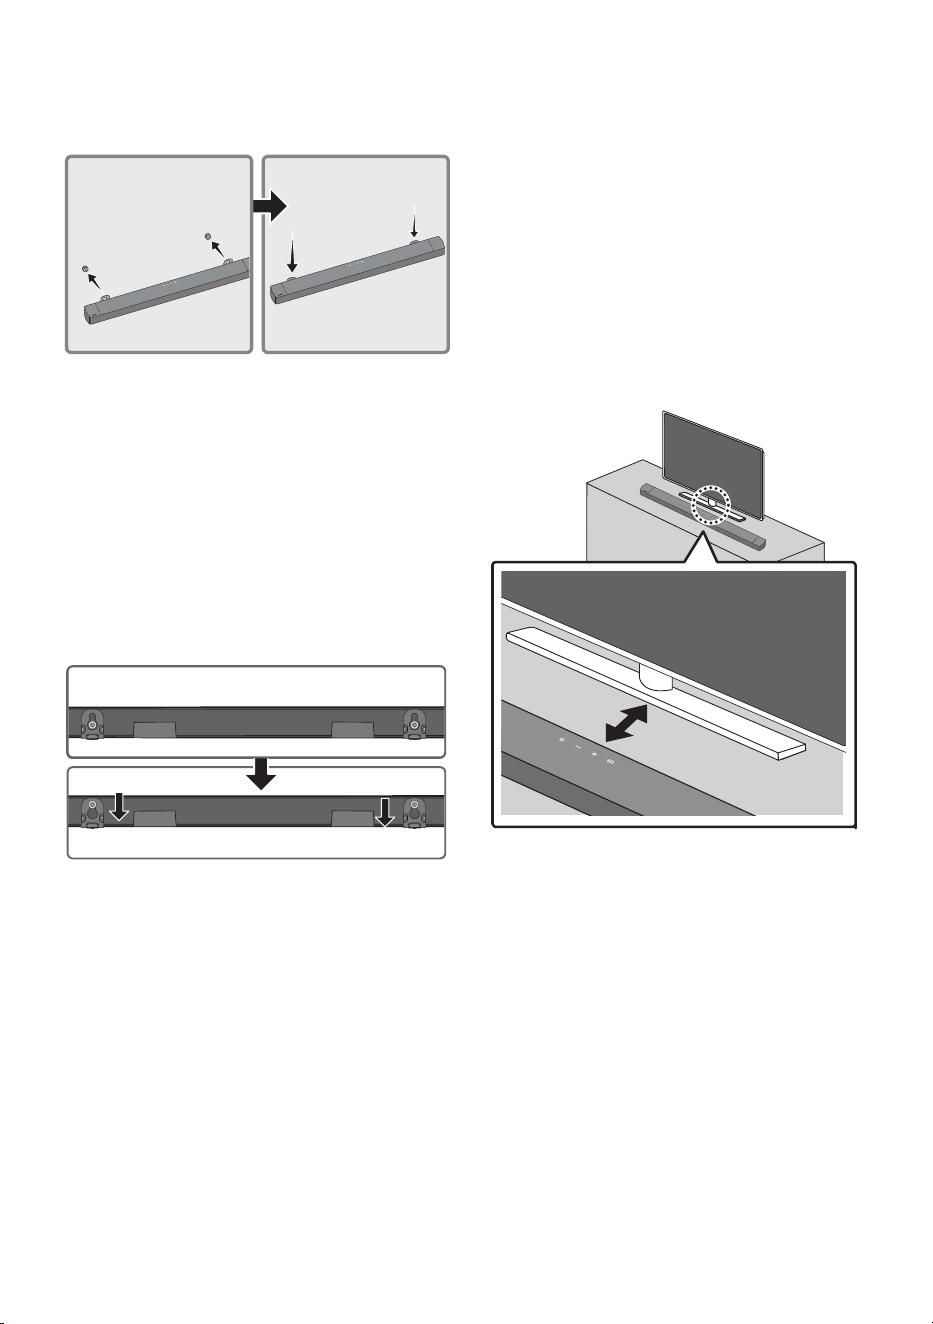
POR - 30
7. Depois de xar os Suportesdeparede ao
Soundbar, instale os Suportesdeparedenos
Parafusosdesuporte.
8. Deslize o Soundbar para baixo, tal como
mostrado abaixo, para que os Suportede
parede quem rmemente apoiados nos
Parafusodexação.
• Introduza os Parafusodexação na parte
larga (inferior) dos Suportedeparede e,
em seguida, deslize os Suportedeparede
para baixo de forma a xar os Suportede
parede rmemente nos Parafusode
xação.
11 INSTALAR O
SOUNDBAR
SOBRE O
SUPORTE DO
TELEVISOR
Coloque o Soundbar sobre o suporte do televisor.
3cmoumais
Alinhe o centro do Soundbar com o centro do
televisor, conforme ilustrado na imagem, e
coloque cuidadosamente o Soundbar no suporte
do televisor.
Para uma melhor qualidade sonora, posicione o
Soundbar a, pelo menos, 3 cm da frente do
televisor.
NOTA
• Certique-se de que o Soundbar é colocado
sobre uma superfície plana e sólida.

POR - 31
12 ATUALIZAÇÃO
DO SOFTWARE
ASamsungpoderádisponibilizaratualizaçõesdo
rmwaredosistemadoSoundbarnofuturo.
POWER
USB (5V 0.5A)
DIGITAL AUDIO IN
(OPTICAL)
USB (5V 0.5A)
DIGITAL AUDIO IN
(OPTICAL)
PortaUSB
Se for disponibilizada uma atualização, pode
atualizar o rmaware ligando um dispositivo USB
com a atualização do rmware armazenada nele à
porta USB do Soundbar. Para obter mais
informações sobre como pode transferir cheiros
de atualização, aceda ao website da Samsung em
(www.samsung.com
Support).
Em seguida, selecione o tipo de produto ou
introduza o número do modelo do seu Soundbar,
selecione a opção Software e Aplicações e, em
seguida, selecione Transferências. Tenha em
atenção que os nomes das opções podem variar.
Procedimentodeatualização
Importante:A função de atualização apaga todas
as denições de utilizador. Recomendamos que
anote as suas denições para que possa redeni-
las facilmente após a atualização. Tenha em
atenção que a atualização de rmware também
repõe a ligação ao subwoofer.
1. Insira uma pen USB na porta USB do seu
computador.
Importante: Certique-se de que não
existem cheiros de música na pen USB. Tal
poderá causar a falha da atualização do
rmware.
2. Aceda a (samsung.com)
selecione
Introduza número do modelo e introduza o
modelo do Soundbar. Selecione Manuais e
Transferências e transra o cheiro de
software mais recente.
3. Guarde o software transferido numa pen
USB e selecione “Extrair aqui” para
descompactar a pasta.
4. Desligue o Soundbar e ligue a pen USB que
contém a atualização do software à porta
USB.
5. Ligue o Soundbar e altere a origem para o
modo “USB”. Aguarde 3 minutos, “UPDATE” é
apresentado e a atualização é iniciada.
6. Quando a atualização estiver concluída, o
Soundbar desliga-se. Ligue o Soundbar e
prima o botão
(Volume)
no painel
superior durante 5 segundos. A mensagem
“INITOK”
aparece no ecrã e, em seguida, o
Soundbar é reposto.
• Este produto tem uma função DUAL BOOT.
Se ocorrer uma falha na atualização do
rmware, pode atualizar novamente o
rmware. O cabo de alimentação do
Soundbar tem de estar ligado quando o
USB com o cheiro de atualização é
introduzido. A atualização é novamente
iniciada enquanto VFD não mostra
qualquer indicação e será concluída após
2minutos.
7. Restaure as denições do Soundbar.

POR - 32
Senãoforapresentadaa
mensagemUPDATE
1. Desligue o Soundbar, desligue e volte a ligar
o dispositivo de armazenamento USB que
contém os cheiros de atualização à porta
USB do Soundbar.
2. Desligue e ligue o cabo de alimentação do
Soundbar e ligue o Soundbar.
NOTAS
• A atualização de rmware pode não funcionar
corretamente se estiverem armazenados
cheiros de áudio suportados pelo Soundbar
no dispositivo de armazenamento USB.
• Não desligue a alimentação nem remova o
dispositivo USB enquanto as atualizações
estão a ser efetuadas.
• Após a atualização estar concluída, a
conguração do utilizador no Soundbar
poderá ser inicializada. Assim, recomendamos
que anote as suas denições para que possa
redeni-las facilmente após a atualização.
Tenha em atenção que a atualização de
rmware também repõe a ligação ao
subwoofer. Se a ligação ao subwoofer não for
restabelecida automaticamente após a
atualização, consulte a página 16.
Se ocorrer uma falha na atualização de
software, verique se existe uma avaria na
pen USB.
• Os utilizadores de Mac OS devem utilizar
MS-DOS (FAT) como formato USB.
• A atualização através de USB pode não estar
disponível, dependendo do fabricante do
dispositivo de armazenamento USB.
POR - 33
ASoundbarnãoseliga.
; Verique se o cabo de alimentação do
Soundbar está corretamente inserido na
tomada.
ASoundbarfuncionadeformaerrática.
; Após remover o cabo de alimentação,
insira-o de novo.
; Desligue e volte a ligar o dispositivo
externo e tente novamente.
; Se não existir sinal, o Soundbar desliga-se
automaticamente após um determinado
período de tempo. Ligue o Ligar/Desligar.
(Consulte a página 7.)
Seotelecomandonãofuncionar.
; Aponte o telecomando diretamente à
Soundbar.
; Troque as pilhas por umas novas.
ASoundbarnãoemitequalquersom.
; O volume do Soundbar está demasiado
baixo ou em silêncio. Ajuste o volume.
; Quando ligar qualquer dispositivo externo
(STB, dispositivo Bluetooth, dispositivo
móvel, etc.), ajuste o volume do mesmo.
; Para aceder à saída de som no televisor,
selecione Soundbar. (Televisor Samsung:
Página Principal ( ) → Menu → Denições
( ) → Todas as Denições ( ) → Som →
Saída de Som → Selecione o Soundbar)
; A ligação dos cabos ao Soundbar poderá
estar solta. Desligue o cabo e volte a ligá-lo.
;
Remova completamente o cabo de
alimentação, volte a ligá-lo e ligue a
alimentação.
; Inicie o produto e tente novamente.
(Consulte a página 31.)
Osubwoofernãoemitequalquersom.
; Verique se o indicador LED na parte posterior
do Subwoofer está ligado a azul. Volte a ligar o
Soundbar e o Subwoofer se o indicador estiver
a piscar lentamente a azul ou se tiver passado
para vermelho. (Consulte a página 17.)
; Poderá ter problemas se houver um obstáculo
entre o Soundbar e o Subwoofer. Coloque os
dispositivos numa zona afastada de obstáculos.
; A ligação pode ser interrompida por outros
dispositivos que se encontrem a emitir sinais
de radiofrequência nas proximidades.
Mantenha a sua coluna afastada desses
dispositivos.
; Remova o cabo de alimentação e volte a ligá-lo.
OvolumedoSubwooferestádemasiadobaixo.
; O volume original do conteúdo que está a
reproduzir pode ser baixo. Tente ajustar o
nível do Subwoofer. (Consulte a página 12.)
; Aproxime a coluna do Subwoofer de si.
OSoundbarnãoaparecenalistade
dispositivosBluetoothdaTV.
; Desligue completamente o cabo de
alimentação do Soundbar, volte a ligar e, em
seguida, tente procurar novamente.
(Consulte a página 20.)
; Ligue a TV e o Soundbar com um cabo ótico e
selecione o modo “D.IN”, premindo a botão
(Origem)
na parte superior do Soundbar.
Verique se a saída de áudio funciona
normalmente e tente procurar novamente.
(Consulte a página 20.)
13 RESOLUÇÃO DE PROBLEMAS
Antes de solicitar assistência, verique o seguinte.
POR - 34
ASoundbarnãoligaatravésdeBluetooth.
; Ao ligar um novo dispositivo, mude para
“BT PAIRING ” para estabelecer a ligação.
(Prima o botão PAIR no telecomando ou o
botão (Origem) na parte superior do
Soundbar durante, pelo menos, 5segundos.)
; Se o Soundbar estiver ligado a outro
dispositivo, desligue esse dispositivo
primeiro para trocar de dispositivo.
; Ligue-o novamente após remover a lista de
colunas do Bluetooth no dispositivo a ligar.
(Televisor Samsung: Página Principal ( )
→ Menu → Denições ( ) → Todas as
Denições ( ) → Som → Saída de Som →
Lista de Altifalantes Bluetooth).
; Remova o cabo de alimentação, volte a
ligá-lo e, em seguida, tente novamente.
; Inicie o produto e tente novamente.
(Consulte a página 31.)
Osomécortadoquandoligadoatravésde
Bluetooth.
; Alguns dispositivos podem provocar
interferências de rádio se estiverem
demasiado perto da Soundbar, como
acontece com micro-ondas, routers sem
os, etc.
; Se o seu dispositivo ligado através de
Bluetooth se afastar demasiado da
Soundbar, poderá fazer com que o som seja
cortado. Aproxime o dispositivo da
Soundbar.
; Se uma parte do seu corpo estiver em
contacto com o transmissor de Bluetooth
ou se o produto for instalado em móveis de
metal, o som pode ser cortado. Verique o
ambiente de instalação e as condições para
a utilização.
ASoundbarnãoseligaautomaticamentecom
aTV.
; Quando desliga o Soundbar enquanto vê
televisão, a sincronização da energia com o
televisor é desativada. Primeiro, desligue o
televisor.
14 LICENÇAS
Manufactured under license from Dolby
Laboratories. Dolby, Dolby Audio, and the
double-D symbol are trademarks of Dolby
Laboratories Licensing Corporation. Condential
unpublished works. Copyright 1992-2019 Dolby
Laboratories. All rights reserved.
For DTS patents, see http://patents.dts.com.
Manufactured under license from DTS
Licensing Limited. DTS, Digital Surround,
Virtual:X, and the DTS logo are registered
trademarks or trademarks of DTS, Inc. in the
United States and other countries. © 2021 DTS,
Inc. ALL RIGHTS RESERVED.
The Bluetooth® word mark and logos are
registered trademarks owned by Bluetooth SIG,
Inc. and any use of such marks by Samsung
Electronics Co., Ltd. is under license. Other
trademarks and trade names are those of their
respective owners.

POR - 35
[ENERGY STAR]
ENERGYSTARqualiedmodelonly
– Your Samsung product is ENERGY STAR
qualied in its factory default setting.
Change to certain features, settings and
functionality in this product can change the
power consumption, possibly beyond the
limits required for ENERGY STAR
qualication.
– Environmental Protection Agency and
Department of Energy. ENERGY STAR is a
joint program of the Government agencies,
designed to promote energy efcient
products and practices.
Refer to www.energystar.gov for more
information of the ENERGY STAR Program.
ENERGYSTARqualiedmodelonly
(ApplicabletoThinClientmodelsonly)
As an ENERGY STAR® Partner, SAMSUNG has
determined that this product meets the
ENERGY STAR® guidelines for energy
efciency.
– The ENERGY STAR Program has been to
reduced greenhouse gas emissions and
save energy through voluntary labeling.
– Power management setting of this product
have been enabled by default, and have
various timing setting from 1 minutes to 5
hours.
– The product can wake with a button press
on the chassis from sleep mode.
ENERGYSTARqualiedmodelonly(Theother
models)
– As an ENERGY STAR Partner, Samsung has
determined that this product or product
models meets the ENERGY STAR guideline
for energy efciency.
15 AVISO DE
LICENÇA DE
OPEN SOURCE
Para enviar perguntas e pedidos de
esclarecimento relativamente a fontes abertas,
contacte a Samsung Open Source por e-mail
(http://opensource.samsung.com)
16 NOTA
IMPORTANTE
SOBRE O
SERVIÇO
As imagens e ilustrações neste Manual do
Utilizador são fornecidas apenas para referência,
podendo ser diferentes do produto real.
POR - 36
17 ESPECIFICAÇÕES E GUIA
Especicações
Nome do modelo HW-C450
USB 5V/0,5A
Peso 1,4 kg
Dimensões (L x A x P) 858,8 x 59,0 x 75,0 mm
Limites da temperatura de funcionamento +5°C a +35°C
Limites de humidade de funcionamento 10 % ~ 75 %
AMPLIFICADOR
Potência nominal de saída
40W x 2, 6 ohm
Formatos de reprodução suportados
(O som DTS 2.0 é reproduzido em formato DTS.)
LPCM 2ch, Dolby Audio™
(suporta Dolby® Digital), DTS
Nome do subwoofer PS-WC45T
Peso 4,5 kg
Dimensões (L x A x P) 184,0 x 343,0 x 295,0 mm
AMPLIFICADOR
Potência nominal de saída
220W
NOTAS
• A Samsung Electronics Co., Ltd reserva-se ao direito de alterar as especicações sem aviso prévio.
• O peso e as dimensões indicados são aproximados.
2 - ARA
ةمسلا تامولعم
ةمسلا تاريذحت
ةلازإب مقت ،ةيبرهك ةمدصل ضرعتلا رطاخم ليلقتل
.)يفلخلا ءاطغلا وأ( ءاطغلا
امنإو .لخادلاب اهتنايص مدختسملل نكمي ءازجأ دجوت ف
.نيلهؤملا ةنايصلا يفظومل ةنايصلا ةيلمع كرت ىجر
ُ
ي
نوكت دق يتلا زومرلا حيضوتل هاندأ حضوملا لودجلا عجار
.Samsung نم كجتنم ع ةدوجوم
هيبنت
ةيبرهك ةمدصب ةباصا رطخ
.حتفت
ژاتلو هک دهد یم ناشن امش هب تمع نیا
رطخلا نمف .دراد دوجو هاگتسد لخاد رد اب
يأب جتنملا اذهب يلخاد ءزج يأ سمت نأ
.لاكشا نم لكش
نيمضت مت دق هنأ إ زمرلا اذه ريشي
ةنايصلاو ليغشتلاب قلعتت ةمهم تاداشرإ
.جتنملا اذه عم
هنأ إ زمرلا اذه ريشي :II ةئفلا نم جتنم
ضراب ءابرهكلل نمآ لاصتا بلطتي
.)ضيرأتلا(
د
وزم جتنم ع دوجوم ريغ زمرلا اذه ناك اذإ
جتنملا عتمتي نأ بجيف ،يئابرهك رايت كلسب
.)ضيرأت( ةيقاو ضرأب نومأم لاصتاب
نأ إ زمرلا اذه ريشي :ددرتملا رايتلا دهج
وه زمرلاب موسوملا ددحملا دهجلا رادقم
.ددرتم رايت دهج
نأ إ زمرلا اذه ريشي :رمتسملا رايتلا دهج
وه زمرلاب موسوملا ددحملا دهجلا رادقم
.رمتسم رايت دهج
اذه دشري :مادختسا تاداشرإ عجار ،هيبنت
مادختسا ليلد إ عوجرلل مدختسملا زمرلا
.ةمسلاب ةقلعتملا تامولعلا نم ديزمل
ريذحت
• ةمدصل ضرعتلا وأ قيرحلا بوشن رطخ نم دحلل
.ةبوطرلا وأ راطمل زاهجلا اذه ضرعت ،ةيبرهك
هيبنت
• مق ،ةيبرهكلا تامدصلا عوقو نود ةلوليحلل
ةحتفلا عم سباقلل ةضيرعلا ةرفشلا ةقباطمب
.اهلاخدإ مكحأ مث ةضيرعلا
• رايتلا ذخأمب ا
ً
مود
ً
صتم زاهجلا اذه نوكي نأ يغبني
.ةيقاو
ٍ
ضرأ ةلصو دوجو عم ددرتملا
• بجي ،يسيئرلا يبرهكلا رايتلا نع زاهجلا لصفل
يسيئرلا يبرهكلا رايتلا سبقم نم سباقلا بحس
يسيئرلا يبرهكلا رايتلا سباق نوكي نأ يغبني اذلو
.ليغشتلل ا
ً
زهاج
• .اهرثانت وأ لئاوسلا تارطقل زاهجلا اذه ضرع
ُ
ت
.زاهجلا ع روهزلا ةينآك ،لئاوسلاب ةئيلم ءايشأ عضت
• سباق بحس بجي ،ا
ً
مامت زاهجلا اذه ليغشت فاقي
نأ بجي ،اذهلو .يرادجلا سبقملا نم يبرهكلا رايتلا
ا
ً
حاتمو
ً
هس يبرهكلا رايتلا سباق إ لوصولا نوكي
.ا
ً
مئاد

3 - ARA
تاطايتحا
1 . كلزنم يف ددرتملا رايتلا ةقاط ردصم نأ دكأت
قصلمب ةجرد
ُ
ملا ةقاطلا تابلطتم عم قفاوتي
.كجتنمل يلفسلا بناجلاب دوجوملا فيرعتلا
حطس ع ،يقفأ لكشب جتنملا بيكرتب مق
ريفوتل هلوح ةيفاك ةحاسم كرت عم ،)ثاثأ( بسانم
تاحتف ةيطغت مدع نم دكأت .مس 10 إ 7 ةيوهتلا
نم اهريغ وأ تاربكملا ع ةدحولا عضت .ةيوهتلا
ميمصت مت اهترارح ةجرد عفترت امبر يتلا ةزهجا
فاقي .رمتسم لكشب مادختسل ةدحولا هذه
رايتلا سباق لصفا ،لماك لكشب ةدحولا ليغشت
.طئاحلاب دوجوملا يبرهكلا رايتلا ذفنم نم ددرتملا
يف ةبغرلا ةلاح يف ةدحولا نع يبرهكلا رايتلا لصفا
.ةليوط ةرتفل اهمادختسا مدع
2 . رايتلا سباق لصفا ،ةيدعرلا فصاوعلا بوبه دنع
نم .طئاحلاب دوجوملا ءابرهكلا ذفنم نم ددرتملا
فتإ إ يبرهكلا دهجلا عافترا يدؤي نأ نكمملا
.ةدحولا
3 . ريغ وأ رشابملا سمشلا ءوض إ ةدحولا ضرعت
كلذ يدؤي نأ نكمملا نم .ةرارحلا رداصم نم كلذ
ببستي دق امم ريبك لكشب ةرارحلا ةجرد ةدايز إ
.ةدحولا لطعت يف
4 . ،)روهزلا ةينآ( ةبوطرلا نم جتنملل ةيامحلا رفو
ردصت يتلا تادعملا وأ )ةأفدملا( ةدئازلا ةرارحلاو
لبك لصفا .ةيوق ةيبرهك وأ ةيسيطانغم تاجم
ةلاح يف ددرتملا رايتلا ردصم نم يبرهكلا رايتلا
.زاهجلا لطعت
مادختسل ممصم ريغ كب صاخلا جتنملا
ضارغل جتنملا اذه مادختسا متي .يعانصلا
يف فثاكت ثدحي نأ نكمملا نم .طقف ةيصخشلا
يف .ةضفخنم ةرارح تاجرد يف جتنملا نيزخت ةلاح
ةدمل رظتنا ،ءاتشلا لصف لخ ةدحولا لقن ةلاح
إ ةدحولا ةرارح ةجرد لصت ىتح ا
ً
بيرقت نيتعاس
.مادختسا لبق ةفرغلا ةرارح ةجرد
5 . ع جتنملا اذه عم ةمدختسملا تايراطبلا يوتحت
نم صلختت .ةئيبلاب ةرضم ةيئايميك داوم
ةيلزنملا تمهملا ةلس يف اهئاقلإب تايراطبلا
قيرط نع تايراطبلا نم صلختلا رظحي .ةيداعلا
وأ كفلا وأ رصق رئاودل تايراطبلا ضرعت .اهقرح
.ةدئازلا ةرارحلا
لادبتسا مت اذإ راجفنا ثودحب لامتحا كانه : هيبنت
اهلادبتساب مق .ةحيحص ريغ ةقيرطب ةيراطبلا
.لثامم عون نم وأ عونلا سفن نم تايراطبب

4 - ARA
تايوتحملا
6 تانوكملا نم ققحتلا 01
7 جتنملا لوح ةماع ةرظن 02
7 ------------------------- Soundbar زاهجل ةيولعلا ةحوللا / ةيماما ةحوللا
8 ------------------------- Soundbar نم يلفسلا حوللا
9 دع
ُ
ب يف مكحتلا مادختسا 03
9 ------------------------- )AAA مجحب ناتيراطب( دع
ُ
ب نع مكحتلا ةدحو مادختسا لبق تايراطبلا لاخدإ
9
-------------------------
دع
ُ
ب نع مكحتلا مادختسا ةيفيك
13
-------------------------
)ةدحاو ةفيظو نم رثكأ اهل رارزأ( ةيفخملا رارزا مادختسا
13
-------------------------
ةفلتخملا ةيتوصلا تارثؤملا عاضو جرخلا تافصاوم
14 -------------------------
نويزفلتلاب صاخلا دعب دنع مكحتلا زاهج مادختساب Soundbar توص ىوتسم طبض
15 So undb ar ليصوت 04
15
-------------------------
ةيئابرهكلا ةقاطلا ليصوت
16
-------------------------
توصلا مخضمب Soundbar زاهج ليصوت
18
-------------------------
Soundbar زاهجب Samsung نم ةيكلسلا ةيفلخلا تاعامسلا مقط ليصوت
19 نويزفلتلاب يكلسلا ليصوتلا مادختسا 05
19
-------------------------
يرصب لبك مادختساب ليصوتلا
20 نويزفلتلاب يكلسلا لاصتا مادختسا 06
20
-------------------------
Bluetooth ربع نويزفلت زاهج ليصوت

5 - ARA
22 يجراخ زاهجب ليصوتلا 07
22
-------------------------
يرصب لبك مادختساب ليصوتلا
23 U SB نيزخت زاهج ليصوت 08
25 لومحم زاهجب ليصوتلا 09
25
-------------------------
Bluetooth ةينقت ربع ليصوتلا
28 طئاحلاب تيبثتلا لماح بيكرت 10
28
-------------------------
بيكرتلا تاطايتحا
28
-------------------------
رادج ع قيلعتلا تانوكم
30 نويزفلت لماح قوف Soundbar زاهج عضو 11
31 جمانربلا ثيدحت 12
31
-------------------------
ثيدحتلا ءارجإ
32
-------------------------
UPDATE ضرع مدع لاح يف
33 اهحصإو لكاشملا فاشكتسا 13
34 صيخارتلا 14
35 حوتفملا ردصملا صيخرت راعشإ 15
35 ةمدخلا نع ةماه ةظحم 16
36 ليلدلاو تافصاوملا 17
36
-------------------------
تافصاوملا
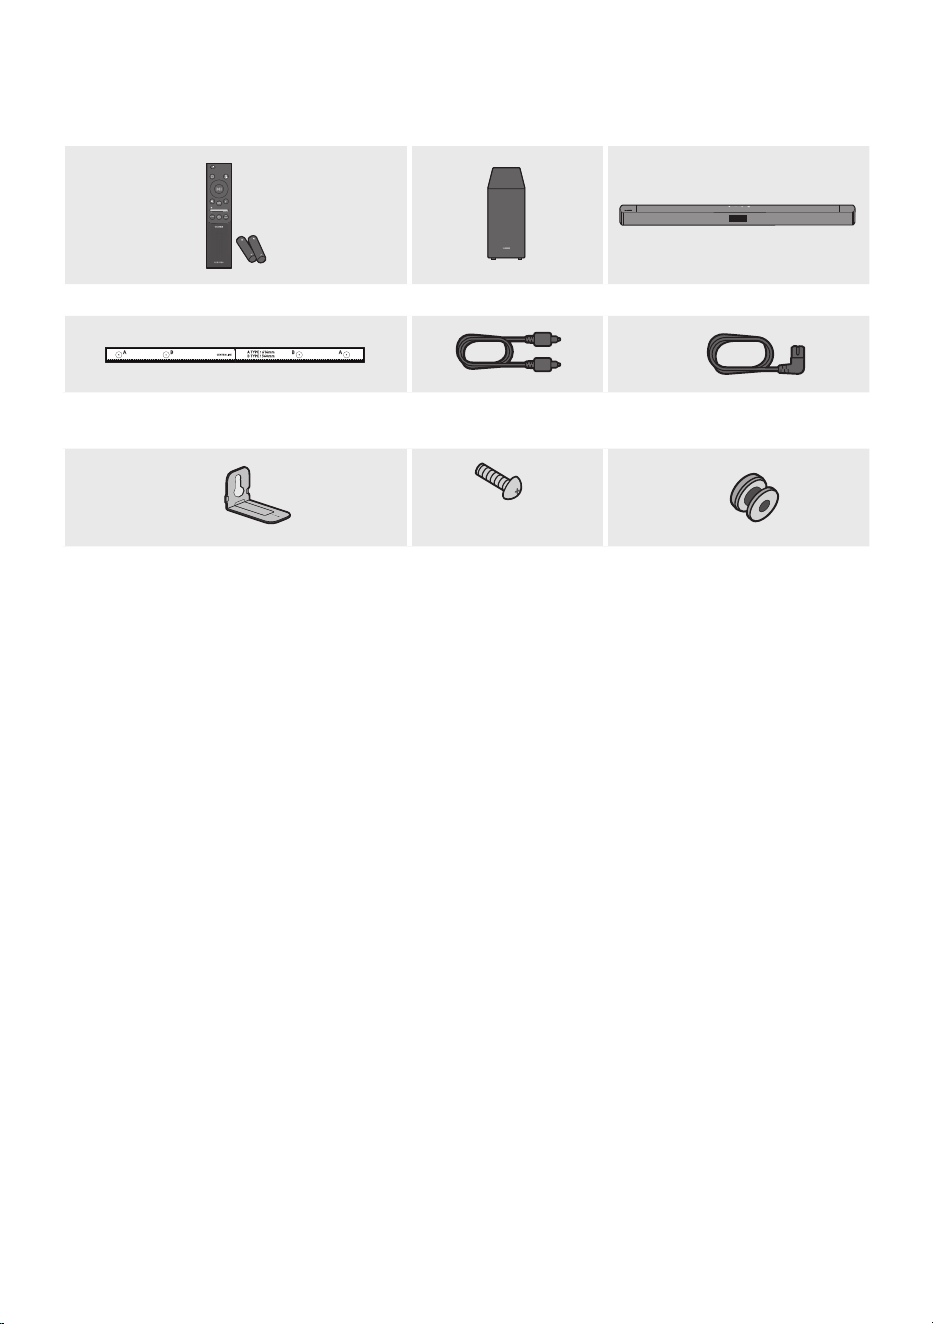
6 - ARA
01 تانوكملا نم ققحتلا
SOUND
MODE
WOOFER
TONE
CONTROL
CH LEVEL
ةيساسا Soundbar ةدحوتوصلا مخضمتايراطبلا / دع
ُ
ب نع مكحتلا ةدحو
2 x
ةقاطلا لبك
)Soundbar ,توصلا مخضم(
يرصب لبكطئاحلاب تيبثتلا ةماعد
2 x
)L10 × M4(
2 ×
2 x
يغاربلا لماحي غار ب
طئاحلا ع تيبثتلا ةماعد
• .جتنملا عم قفرملا قصلملا عجار ،ةقاطلا كهتساو ةقاطلا ردصم ع عطل
)ةيساسا Soundbar ةدحو نم يلفسلا ءزجلا :قصلملا(
• .Samsung ءمع ةمدخ وأ Samsung ةمدخ زكرمب لصتا ،ةيرايتخا تبكلا وأ ةيفاضا تانوكملا ءارشل
• .هعأ ةحضوملا روصلا نع
ً
يلق تاقحلملا لكش فلتخي امبر
• .قبسم راعشإ نود رييغتلل ةضرع تافصاوملاو ميمصتلا

7 - ARA
02 جتنملا لوح ةماع ةرظن
Soundbar زاهجل ةيولعلا ةحوللا / ةيماما ةحوللا
ةيولعلا ةحوللا
ةشاشلا
.يلاحلا عضولاو جتنملا ةلاح ضرعت
)ةقاطلا( رز
.ليغشتلا فاقيإ/ليغشتلا
• Auto Power Down ةفيظو
.ةيلاتلا تاحلا يف ا
ً
يئاقلت ةدحولا ليغشت فاقيإ متي
– .قئاقد 18 ةدمل توص ةراشإ دوجو مدع لاح يف :USB / BT / D.IN عضو
)توصلا ىوتسم( رز
.توصلا ىوتسم ليدعت
• .Soundbar يف ةيماما ةشاشلا ع توصلا ىوتسم رهظيس ،هليدعت دعب
)ردصملا( رز
.ردصملا لخدم عضو رايتخا
لخدملا عضوةشاشلا
يرصب يمقر لاخدإD.IN
BLUETOOTH عضوBT
USB عضوUSB
• ع رارمتسا عم طغضا مث "BT READY" ة لا ح ي ف "BT" عضو إ ردصملا رييغتب مق ،"BT PAIRING" عضو ليغشتل
.
ٍ
ناو ث 5 نع ديزت ةدمل )ردصملا( رز
• .
ٍ
ناو ث 6 إ 4 نوضغ يف ليغشتلا حاتفم لمعيس ،ددرتملا رايتلا كلس ليصوتب موقت امدنع
• .توصلا رودص لبق ناوث 5 إ 4 ةدمل ريخأت ةرتف كانه نوكيس ،ةدحولا هذه ليغشتب موقت امدنع
• نويزفلتلا توص تاربكم ليغشت فاقيإ كيلع بجيف ،Soundbar نم طقف توصلاب عاتمتسا يف بغرت تنك اذإ
.كب صاخلا نويزفلتلا عم قفرملا كلاملا ليلد إ عجرا .نويزفلتلاب ةصاخلا توصلا دادعإ ةمئاق يف

8 - ARA
Soundbar نم يلفسلا حوللا
POWER
USB (5V 0.5A)
DIGITAL AUDIO IN
(OPTICAL)
POWER
USB (5V 0.5A)
DIGITAL AUDIO IN
(OPTICAL)
POWER
.Soundbar زاهجل ددرتملا رايتلا لباك ليصوتب مق
DIGITAL AUDIO IN )OPTICAL(
.يجراخلا زاهجلا نم يمقرلا )يرصبلا( جرخملاب ليصوتلا
USB )5V 0.5A(
.Soundbar قيرط نع USB زاهج ع ىقيسوملا تافلم ليغشتل USB زاهج ليصوت
• .لبكلا بحس بنجت .سباقلا بحسا ،طئاحلا ذخأم نم يئابرهكلا رايتلا كلس لصف دنع
• .تانوكملا نيب تيصوتلا لك نم ءاهتنا ىتح AC جرخمب ىرخا تانوكملا وأ ةدحولا هذه ليصوتب مقت

9 - ARA
03 دع
ُ
ب يف مكحتلا مادختسا
)AAA مجحب ناتيراطب( دع
ُ
ب نع مكحتلا ةدحو مادختسا لبق تايراطبلا لاخدإ
.ا
ً
مامت هتلازإ متي ىتح مهسلا هاجتاب يفلخلا فغلا بحسا
هاجتا يف )تلوف 1.5 ةوقب( AAA نيتيراطبلا لخدأ
يف حبصي ىتح ءارولل يفلخلا فغلا بحسا .حيحصلا
.هناكم
دع
ُ
ب نع مكحتلا مادختسا ةيفيك
SOUND
MODE
WOOFER
TONE
CONTROL
CH LEVEL
.هليغشت فاقيإو Soundbar ليغشت
SOUND
MODE
WOOFER
TONE
CONTROL
CH LEVEL
ليغشتلا
زاهجب هليصوت دارملا ردصملا ديدحتل طغضا
.Soundbar
SOUND
MODE
WOOFER
TONE
CONTROL
CH LEVEL
ردصملا
.توصلا متكل )توصلا متك( رزلا ع طغضا
.توصلا متك ءاغل ا
ً
ددجم هيلع طغضا
SOUND
MODE
WOOFER
TONE
CONTROL
CH LEVEL
توصلا متك
.توصلا ىوتسم طبضل لفسل وأ عل رزلا عفدا
CH LEVEL
TONE
CONTROL
WOOFER
SOUND
MODE
CH LEVEL
TONE
CONTROL
WOOFER
SOUND
MODE
CH LEVEL
TONE
CONTROL
WOOFER
SOUND
MODE
CH LEVEL
TONE
CONTROL
WOOFER
SOUND
MODE
• توصلا متك
طغضا .توصلا متكل توصلا ىوتسم رز ع طغضا
.توصلا متك ءاغل ىرخأ ةرم هيلع
CH LEVEL
TONE
CONTROL
WOOFER
SOUND
MODE
CH LEVEL
TONE
CONTROL
WOOFER
SOUND
MODE
CH LEVEL
TONE
CONTROL
WOOFER
SOUND
MODE
CH LEVEL
TONE
CONTROL
WOOFER
SOUND
MODE
SOUND
MODE
WOOFER
TONE
CONTROL
CH LEVEL
توصلا ىوتسم
10 - ARA
SOUND
MODE
WOOFER
TONE
CONTROL
CH LEVEL
CH LEVEL
.ةعامس لك توص ىوتسم طبض كنكمي ،رزلا ع طغضلاب
• مادختساب +6 إ -6 نيب توصلا ىوتسم طبضا مث VIRTUAL CENTER LEVEL رزلا ع طغضا
.لفس/ع رارزا
• طبضل .REAR LEVEL دادعا معد متي )لصفنم لكشب عاب
ُ
ت( ةيفلخلا تاعامسلا ليصوت دنع
.لفسأ/عأ رارزا مادختساب +6 إ -6 نيب REAR LEVEL توصلا ىوتسم
VOL BASS
SOUND
MODE
PAIR
/لفسأ/عأ
نيمي/راسي
.نيمي/راسي/لفسأ/عأ هاجتا ديدحتل اهيلإ راش
ُ
ملا قطانملا ع طغضا
.اهطبض وأ فئاظولا ديدحتل رزلا يف نيمي/راسي/لفسأ/عأ هاجتاب طغضا
• رار ك ت
.عأ طغضا "USB" عضو يف راركتلا رز مادختس
• ىقيسوملا يطخت
ىقيسوملا فلم ديدحتل راسي رز ع طغضا .يلاتلا ىقيسوملا فلم ديدحتل نيمي رز ع طغضا
.قباسلا
• ID SET
توص مخضم ليصوت دنع(
ID SET نم ءاهتنل ناوث 5 ةدمل عأ رزلا ع رارمتسا عم طغضا
.)ةيكلسلا ةيفلخلا تاعامسلا وأ يكلس
SOUND
MODE
WOOFER
TONE
CONTROL
CH LEVEL
يف مكحتلا
توصلا
.توصلا ةفيظو طبض كنكمي ،رزلا ع طغضلاب
.لفسأ/عأ نيرزلا مادختساب ةدارملا تادادعا طبض نكميو
NIGHT MODE ON/OFF
VOICE ENHANCE ON/OFF
AUDIO SYNC
– AUDIO SYNC
رزلا ع طغضاف ،نينمازتم ريغ Soundbar نم توصلاو نويزفلتلا نم ويديفلا ناك اذإ
300 إ 0 نيب توصلا ريخأت طبضا مث AUDIO SYNC ديدحتل )توصلا يف مكحتلا(
)."BT" وأ "USB" عضولا يف رفوتم ريغ( .لفسأ/عأ نيرزلا مادختساب ةيناث يللم
– VOICE ENHANCE ON/OFF
.نويزفلتلاو مفا يف قوطنملا راوحلا عامس عضولا اذه لهس
ُ
ي
– NIGHT MODE ON/OFF
عم توصلا ىوتسم ضفخل تادادعا طبض عم يليللا ضرعلل عضولا اذه نيسحت مت
.ا
ً
حضاو راوحلا ءاقبإ
• نيرزلا دحأ مادختساب NIGHT MODEو VOICE ENHANCE نم لكل توصلا ةفيظو ON/OFF نكمي
. لفسأ/عأ
• قاطن لك توص طبضل ا
ً
بيرقت
ٍ
ناوث 5 ةدمل )توصلا يف مكحتلا( رزلا ع رارمتسا عم طغضا
نيرزلا مادختساب 10kHzو 5kHzو 2.5kHzو 1.2kHzو 600Hzو 300Hzو 150Hz ديدحت نكمي .يددرت
.لفسأ/عأ نيرزلا مادختساب +6و -6 نيب ام دادعإ إ امهنم دحاو لك طبض نكميو نيمي/راسي
)."STANDARD" إ توصلا عضو نييعت نم دكأت(
11 - ARA
SOUND
MODE
WOOFER
TONE
CONTROL
CH LEVEL
Bluetooth
PAIR
.Soundbar ةشاش ع "BT PAIRING" رهظت . PAIR رزلا ع طغضا
ن م Soundbar ديدحت لخ نم عضولا اذه يف ديدج ثوتولب زاهجب Soundbar زاهج ليصوت كنكم
ُ
ي
.Bluetooth زاهج ثحب ةمئاق
ليغشت
ليغشتلا فاقيإ /
VOL WOOFER
SOUND
MODE
PAIR
.ا
ً
تقؤم ىقيسوملا ليغشت فاقي p رزلا ع طغضا
.هلمع ىقيسوملا فلم فنأتسي ،ىرخأ ةرم رزلا ع طغضت امدنع
SOUND
MODE
WOOFER
TONE
CONTROL
CH LEVEL
تامولعم
).7 ةحفص عجار( .عضو لكب ةصاخلا تامولعملا رهظت ،رزلا اذه ع طغضلا دنع
SOUND MODE
VOL BASS
SOUND
MODE
PAIR
.بوغرملا توصلا عضو ديدحت كنكمي رزلا ع طغضلاب
BASS BOOST
DTS VIRTUAL:X
ADAPTIVE
GAME SURROUND SOUND
STANDARD
– SURROUND SOUND
.يسايقلا نم عسوأ توص لقح رفوي
– GAME
.بعللا يف سمغنت كلعجيل ا
ً
مسجم ا
ً
توص مدقي
– ADAPTIVE
.ىوتحملا صئاصخ إ ا
ً
دانتسا يتوص لقح لضفأ رفويو يلعفلا تقولا يف ىوتحملا ليلحتب موقي
– DTS VIRTUAL:X
.ىوتحم يأ نم داعبا يثث رماغ توص
– BASS BOOST
.ريهجلا توص ع زيكرتلا عم توصلا لاجم عضو
– STANDARD
.يلصا توصلا جارخإب موقي
• )Dynamic Range Control( DRC
Dolby ةينقتب ةصاخلا تاراسملا ع يكيمانيدلا قاطنلا يف مكحتلا قيبطت ةفيظولا هذه كل حيتت
زاهج ليغشت فاقيإ ءانثأ
ٍ
ناوث 5 نم رثك SOUND MODE رزلا ع رارمتسا عم طغضا .Digital
ءانثأ .اهليغشت فاقيإ وأ )يكيمانيدلا قاطنلا يف مكحتلا( DRC ةفيظو ليغشتل Soundbar
).
ً
اهوشم توصلا نوكي دق( .يلاعلا توصلا ليلقت متي ،DRC ةفيظو ليغشت
• Bluetooth Power
وأ نويزفلت زاهج نم لاصتا بلط يقلت دنع ا
ً
يئاقلت Soundbar ليغشتب ةزيملا هذه موقت
.ا
ً
يضارتفا On دادعا نوكي .ا
ً
قباس هليصوت مت Bluetooth
– زاهج ليغشت ءانثأ
ٍ
ناوث 5 ن م رث ك SOUND MODE رزلا ع رارمتسا عم طغضا
.Bluetooth Power ةفيظو ليغشت فاقي Soundbar
12 - ARA
SOUND
MODE
WOOFER
TONE
CONTROL
CH LEVEL
ىوتسم
WOOFER
)ريهجلا(
CH LEVEL
TONE
CONTROL
WOOFER
SOUND
MODE
CH LEVEL
TONE
CONTROL
WOOFER
SOUND
MODE
CH LEVEL
TONE
CONTROL
WOOFER
SOUND
MODE
CH LEVEL
TONE
CONTROL
WOOFER
SOUND
MODE
CH LEVEL
TONE
CONTROL
WOOFER
SOUND
MODE
CH LEVEL
TONE
CONTROL
WOOFER
SOUND
MODE
CH LEVEL
TONE
CONTROL
WOOFER
SOUND
MODE
CH LEVEL
TONE
CONTROL
WOOFER
SOUND
MODE
.+6 إ -6 ن ي ب وأ -12 ع )ريهجلا( توصلا مخضم توص ىوتسم طبضل لفسل وأ عل رزلا عفدا
.رزلا ع طغضا ،)يضارتفا دادعا( 0 إ )ريهجلا( توصلا مخضم توص ىوتسم طبضل
SOUND
MODE
WOOFER
TONE
CONTROL
CH LEVEL
TONE
CONTROL
.ريهجلا وأ يثثلا توصلا ىوتسم طبض كنكمي ،رزلا ع طغضلاب
• /عأ رارزا مادختساب +6 إ -6 نيب توصلا ىوتسم طبضا مث BASS وأ TREBLE رزلا ع طغضا
.لفسأ
13 - ARA
)ةدحاو ةفيظو نم رثكأ اهل رارزأ( ةيفخملا رارزا مادختسا
يفخملا رزلا
عجرملا ةحفص
د ع
ُ
ب نع مك حت لا ةد حو رزةفيظولا
) عأ( WOOFER
مكحتلا ةدح نويزفلتلا ليغشت فاقيإ/ليغشت
)دادعتسا( دعب نع
14 ةحفصلا
راسي
TV Connect ليغشت فاقيإ/ليغشت
).زهاج BT(
21 ةحفصلا
عأID SET10 ةحفصلا
)توصلا يف مكحتلا(
تاقاطن 7 نم توصلا لداعم
)
ٍ
ناو ث 5 ةدمل رارمتسا عم طغضا(
10 ةحفصلا
طبضلا ةداعإ
)
ٍ
ناو ث 10 ةدمل رارمتسا عم طغضا(
31 ةحفصلا
SOUND MODE
)دادعتسا( DRC ON/OFF11 ةحفصلا
Bluetooth Power 11 ةحفصلا
ةفلتخملا ةيتوصلا تارثؤملا عاضو جرخلا تافصاوم
ريثأتلاخدإ
جرخلا
تو ص لا تار ب ك م م ق ط نود ب
ةيكلسلا ةيفلخلا
توصلا تاربكم مقط عم
ةيكلسلا ةيفلخلا
SOUND MODE
Surround
VOL WOOFER
SOUND
MODE
Bluetooth
POWER
SURROUND
SOUND
قناة
2.0
ةانق 2.1ةانق 4.1
ةانق 5.1ةان ق 2.1ةانق 4.1
GAME
قناة
2.0
ةان ق 2.1ةانق 4.1
ةانق 5.1ةان ق 2.1ةانق 4.1
ADAPTIVE
قناة
2.0
ةان ق 2.1ةانق 4.1
ةانق 5.1ةان ق 2.1ةانق 4.1
DTS VIRTUAL:X
قناة
2.0
ةان ق 2.1ةانق 4.1
ةانق 5.1ةان ق 2.1ةانق 4.1
BASS BOOST
قناة
2.0
ةانق 2.1ةانق 4.1
ةانق 5.1ةانق 2.1ةانق 4.1
STANDARD
قناة
2.0
ةان ق 2.1ةانق 2.1
ةانق 5.1ةان ق 2.1ةانق 2.1
• عئابلاب لصتا ،مقط ءارشل .لصفنم لكشب Samsung نم ةيكلسلا ةيفلخلا توصلا تاربكم مقط ءارش نكمي
.Soundbar ةعامس هنم تيرتشا يذلا
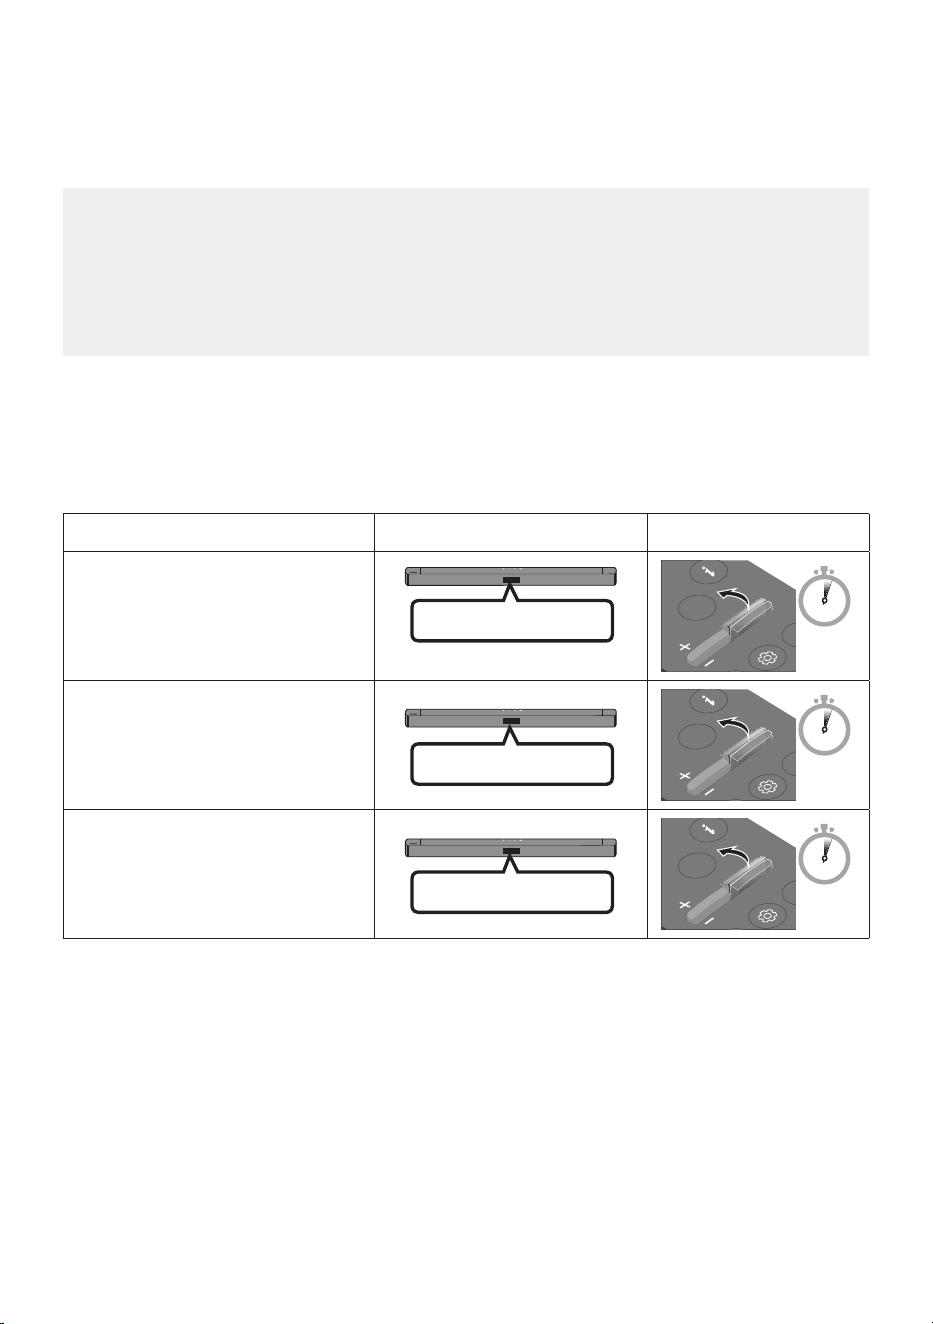
14 - ARA
صاخلا دعب دنع مكحتلا زاهج مادختساب Soundbar توص ىوتسم طبض
نويزفلتلاب
.نويزفلتلاب صاخلا دعب دنع مكحتلا زاهج مادختساب Soundbar توص ىوتسم طبض
• دعب نع مكحتلا ةزهجأ .ءارمحلا تحت ةعشاب دعب نع مكحتلا ةزهجأ عم طقف ةفيظولا هذه مادختسا نكمي
.ةموعدم ريغ )نارقا بلطتت يتلا مكحتلا ةزهجأ( ثوتولبلاب
• .ةيجراخ تاعامس ع نويزفلتلا ةعامس طبضا ،ةفيظولا هذه مادختس
• :يه ةفيظولا هذه معدت يتلا ةع
ّ
نصملا تاكرشلا
RCAو Hisenseو TOSHIBAو PANASONICو PHILIPSو Sharpو Sonyو LGو VIZIOو Samsung
1 ..Soundbar ليغشت فاقيإب مق
2 . .ناوث 5 ةدمل WOOFER رزلا ع رارمتسا عم طغضا
:يلاتلا بيترتلاب عضولا لدبتي ،ناوث 5 ةدمل رارمتسا عم ع WOOFER رزلا عفدت ةرم لك يف
."ALL-TV REMOTE", "SAMSUNG-TV REMOTE" ,)يضارتفا عضولا( "OFF-TV REMOTE"
د ع
ُ
ب نع مك حت لا ةد حو رزضرعلا ةشاشةلا ح
SOUND
MODE
WOOFER
CH LEVEL
TONE
CONTROL
5 Sec
)يضارتفا عضولا(
OFF-TV REMOTE
صاخلا دعب نع مكحتلا زاهج ليطعتب مق
.نويزفلتلاب
SOUND
MODE
WOOFER
CH LEVEL
TONE
CONTROL
5 Sec
SAMSUNG-TV REMOTE
ةعشاب دعب دنع مكحتلا زاهج ليعفتب مق
.Samsung نويزفلتب صاخلا ءارمحلا تحت
SOUND
MODE
WOOFER
CH LEVEL
TONE
CONTROL
5 Sec
ALL-TV REMOTE
ةعشاب دعب دنع مكحتلا زاهج ليعفتب مق
جاتنإ نم نويزفلتب صاخلا ءارمحلا تحت
.ىرخا ةهج
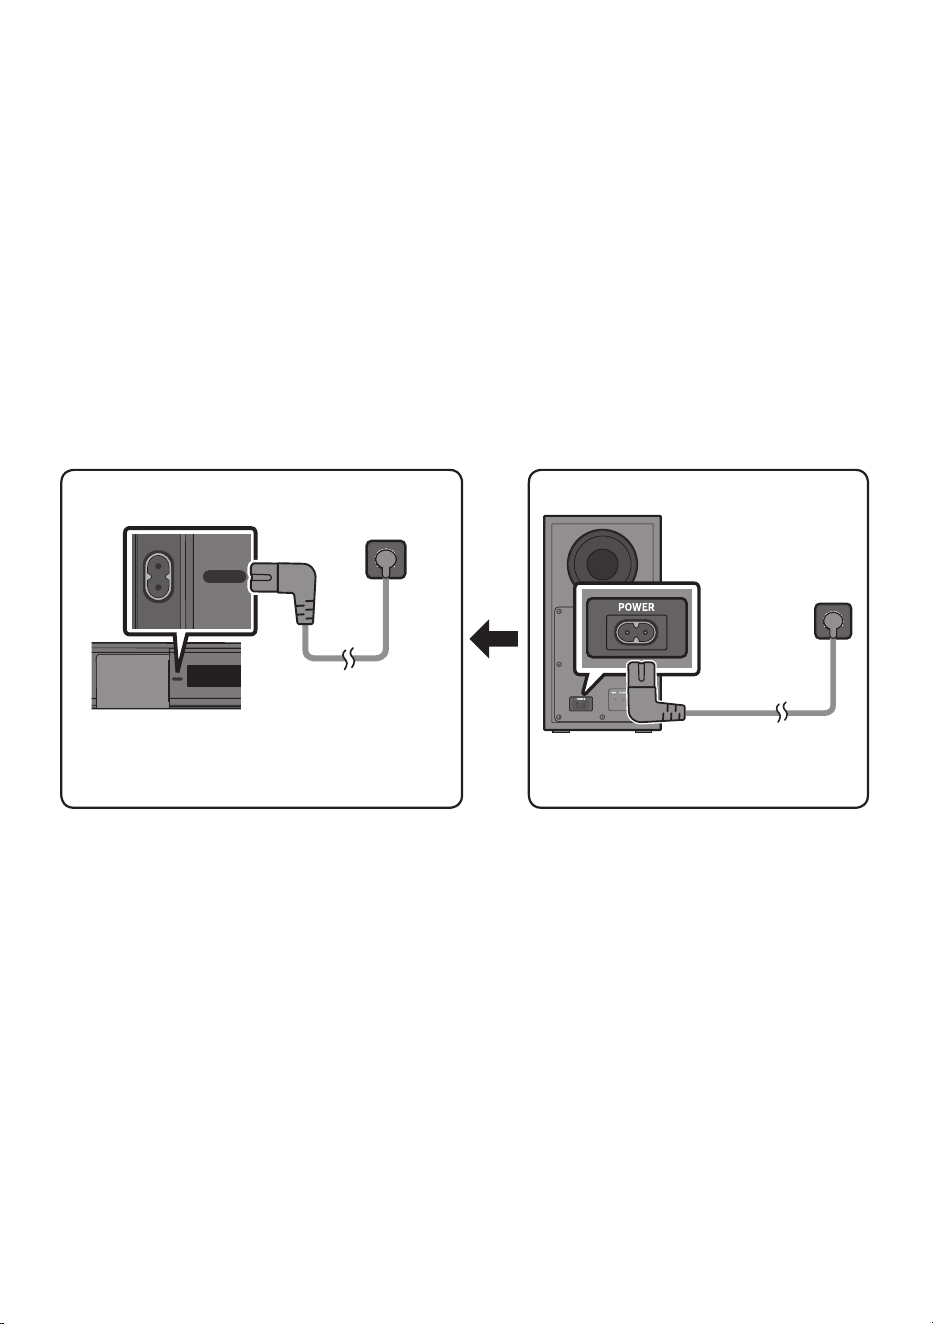
15 - ARA
04 SOUNDBAR ليصوت
ةيئابرهكلا ةقاطلا ليصوت
:يلاتلا بيترتلا بسح يئابرهك رايت ذخآمب Soundbar زاهجو توصلا مخضم ليصوتل ةقاطلا تانوكم مدختسا
1 ..توصلا مخضمب يئابرهكلا رايتلا كلس ليصوتب مق
2 ..Soundbar زاهجب ءابرهكلا كلس ليصوتب مق
.هاندأ ةيحيضوتلا روصلا رظنا
• .جتنملا عم قفرملا قصلملا عجار ،ةقاطلا كهتساو بولطملا ةقاطلا ردصم نع تامولعملا نم ديزمل
)ةيساسا Soundbar ةدحو نم يلفسلا ءزجلا :قصلملا(
مخضمل يفلخلا ءزجلا
توصلا
ةقاطلا لبك
ةقاطلاب ليصوتلا
ةيئابرهكلا
ةدحو نم يلفسلا ءزجلا
ةيسيئرلا Soundbar
ةقاطلاب ليصوتلا
ةيئابرهكلا
ةقاطلا لبك
POWER
POWER
USB (5V 0.5A)
DIGITAL AUDIO IN
(OPTICAL)
USB (5V 0.5A)
DIGITAL AUDIO IN
(OPTICAL)
POWER
POWER
USB (5V 0.5A)
DIGITAL AUDIO IN
(OPTICAL)
USB (5V 0.5A)
DIGITAL AUDIO IN
(OPTICAL)
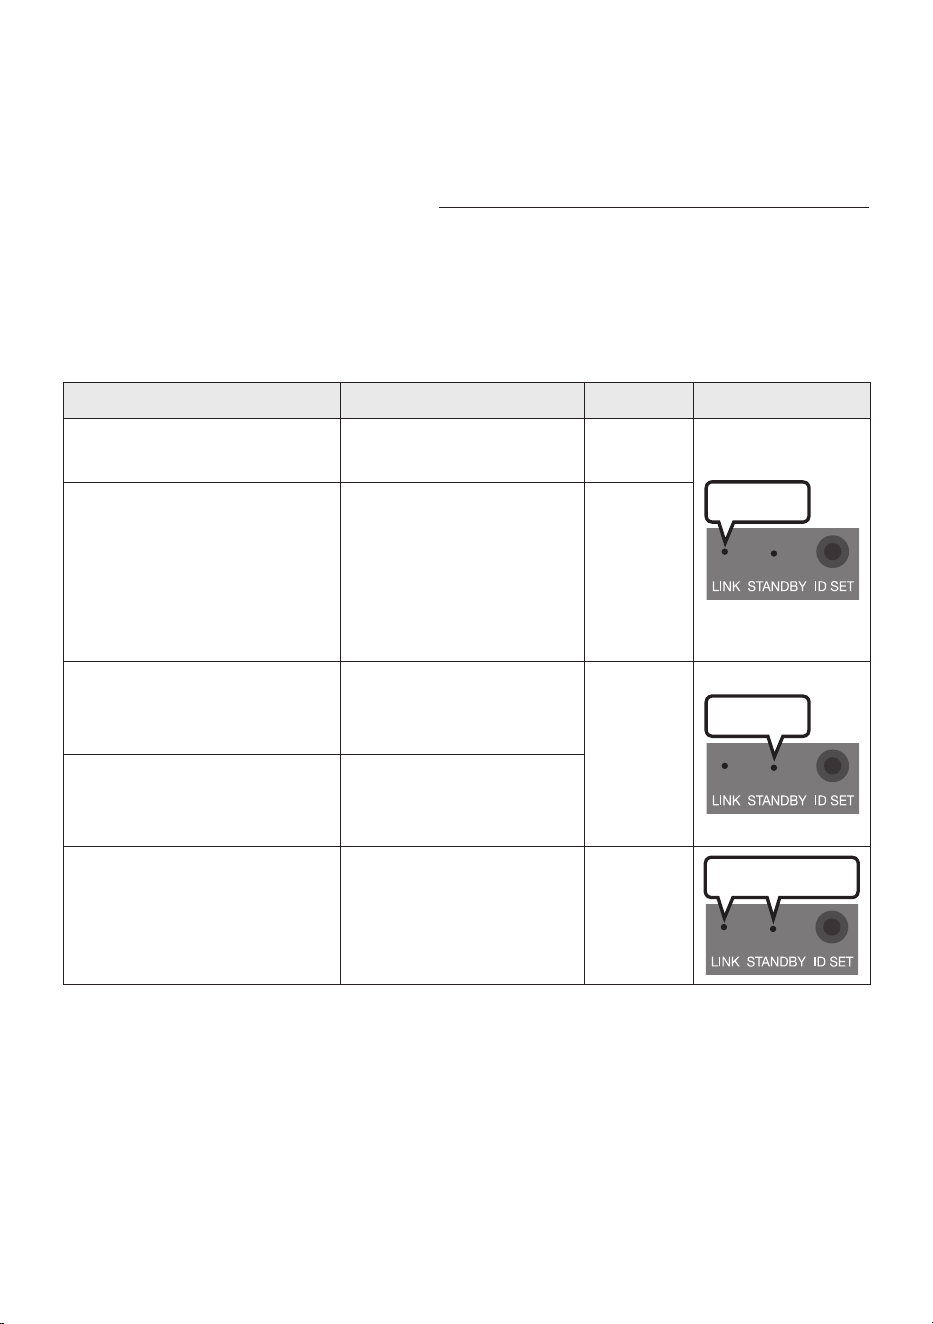
16 - ARA
توصلا مخضمب Soundbar زاهج ليصوت
.يوق قيمع توصب عاتمتسا كنكمي ،توصلا مخضم ليصوت دنع
تو ص لا م خ ض مو Soun d bar نيب يئاقلتلا ليصوتلا
ا
ً
يئاقلت توصلا مخضم ليصوت متي ،توصلا مخضمو Soundbar ةدحوب ةقاطلا تبك ليصوت دعب ليغشتلا دنع
.Soundbar ةدحوب
• .توصلا مخضم فلخ ةدوجوملا قرزا نوللاب ةزيمملا رشؤملا ئيضيس ،يئاقلتلا نارتقا ةيلمع مامتإ دنع
توصلا مخضم نم يفلخلا ءزجلاب دوجوملا LED رشؤم ءاوضأ
LED ءوضةلاحلافصولاةقدلا
قرزا
ليغشت
ليغشتلا( حاجنب ليصوتلا مت
)يعيبط لكشب
-
ضيمولالاصتا دادرتسا
رايتلا لبك ليصوت مت اذإ امم ققحت
Soundbar زاهج ةدحوب يئابرهكلا
5 رظتنا وأ ،حيحص
ٍ
لكشب ةيساسا
،ضيمولا رمتسا اذإ .ا
ً
بيرقت قئاقد
.ا
ً
يودي توصلا مخضم ليصوت لواحف
.17 ةحفص رظنا
رمحا
ليغشت
ليغشت فاقيإ ةلاح يف( دادعتسا
)ةيسيئرلا Soundbar ةدحو
ع
ً
صتم ةقاطلا لبك اذإ ام صحفا
Soundbar ةدحوب ميلس وحن
.ةيسيئرلا
ليصوتلا لشف
ةءارقل .ىرخأ ةرم ليصوتلا ةلواحم دعأ
رظنا ،يوديلا ليصوتلا تاميلعت
.17 ةحفص
قرزاو رمحا
ضيمولالاطعا
زكرمل لاصتا ةهج تامولعم رظنا
.ليلدلا يف Samsung ءمع ةمدخ
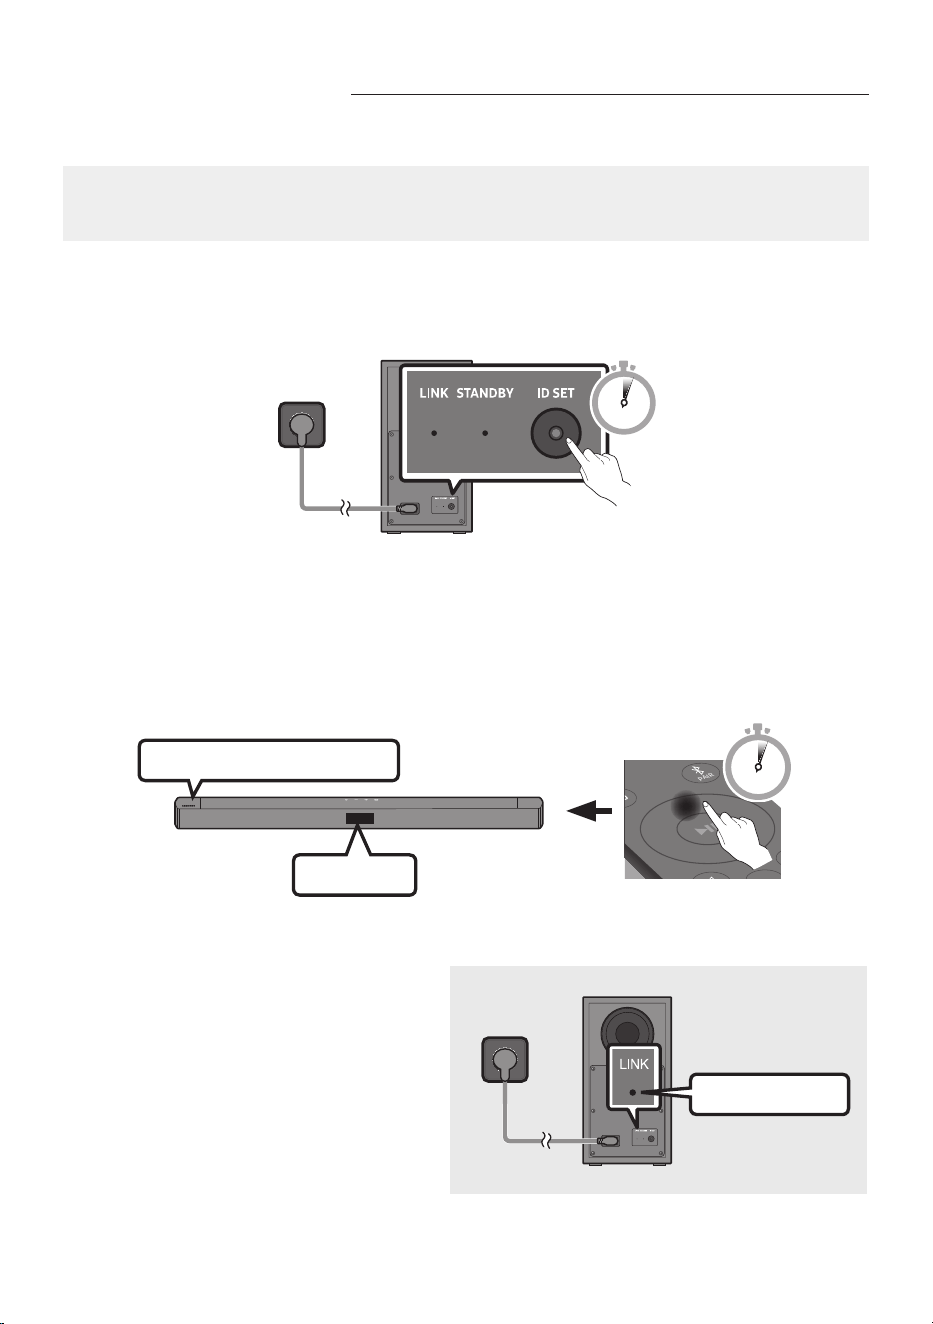
17 - ARA
يئاقلتلا ليصوتلا لشف ةلاح يف ا
ً
يودي توصلا مخضم ليصوت
:ةيلاتلا تاءارجا عبتت ،يوديلا ليصوتلا ءارجإ لبق
• .حيحص لكشب ةلصتم توصلا مخضمو Soundbar ةدحول ةقاطلا تربك تناك اذإ ام ققحت
• .ليغتشلا ديق Soundbar نأ دكأت
1 . .ناوث 5 ةدمل توصلا مخضمل فلخلا ءزجلا ع دوجوملا ID SET ع رارمتساب طغضا
• رشؤملا ضمويسو ةءاضا نع فقوتيس توصلا تامخضم فلخ دوجوملا رمحا نوللاب زيمملا رشؤملا
.قرزا نوللاب زيمملا
5 Sec
توصلا مخضمل يفلخلا ءزجلا
2 ..ةشاشلا ليغشتل دع
ُ
ب نع مكحتلا زاهج يف رزلا ع طغضا ،
ً
وأ
.ل قا ع
ٍ
ناو ث 5 ةدمل دع
ُ
ب نع مكحتلا ةدحوب دوجوملا عأ رزلا ع رارمتسا عم طغضا
• .يفتخت مث ،ةريصق ةينمز ةدمل Soundbar زاهج ةشاش ع ID SET ةلاسرلا رهظت
• .ID SET نم ءاهتنا دنع ا
ً
يئاقلت Soundbar زاهج لمعيس
SOUND
MODE
PAIR
5 Sec
ID SET
عاب دوجوم SAMSUNG راعش
3 ..)لاصتا لامتكا( قرزا نوللاب LINK ـب صاخلا LED رشؤم ةءاضإ رارمتسا نم ققحت
ءيضم قرزا نوللا
،ضيمولا نع LINK ـب صاخلا LED رشؤم فقوتي
زاهج نيب لاصتا ءاشنإ دنع قرزا نوللاب ءيضيو
.يكلسلا توصلا مخضمو Soundbar

18 - ARA
تاظحم
• تيصوتلا لك نم ءاهتنا ىتح طئاحلا سبقمب كب صاخلا نويزفلتلا وأ جتنملا اذه ةقاط كلس ليصوتب مقت
.تانوكملا نيب
• .ةقاطلا كلس لصفو ةقاطلا ليغشت فاقيإ نم دكأت ،جتنملا بيكرت وأ لقن لبق
• رشؤملا لوحتيو دادعتسا عضو إ يكلسلا توصلا مخضم لقتنيس ،ةيساسا ةدحولا ليغشت فاقيإ مت اذإ
.قرزأ نولب تارم ةدع ضيمولا دعب رمحا ءوضلا إ فلخلا يف دوجوملاو STANDBY عضول يئوضلا
• ،زترهاغيغ 5.2 :رصمو سنوتو برغملا( هسفن ددرتلاب لمعت يتلا ةزهجا دحأ مادختسا ةلاح يف
لخادتلا ببسي دق ،رخآ Soundbar زاهج نم برقلاب Soundbar زاهج نوكي امدنع )زترهاغيغ 5.8 :ىرخا لودلا
.توصلا يف عاطقنا ضعب
• ع
ً
ءانب فلتخت دق اهنأ إ ،ا
ً
بيرقت رتم 10 يه ةيساسا ةدحولا نم ةرداصلا ةيكلسلا ةراشل لاسرإ ةفاسم ىصقأ
توصلا مخضمو ةيساسا ةدحولا نيب يندعم طئاح وأ ةحلسم ةناسرخ كانه ناك اذإ .كب ةصاخلا ليغشتلا ةئيب
.ندعملا قارتخا ةيكلسلا ةراشل نكمي هن ،قطا ع ماظنلا لمعي دقف ،يكلسلا
تاطايتحا
• .ةبوطرلاو ءاملا نع تادحولا دعبأ .يكلسلا توصلا مخضم يف ةجمدم ةيكلسلا لابقتسا تايئاوه
• ةدحوو يكلسلا توصلا م
خضم عقومب ةطيحملا ةقطنملا نأ نم دكأت ،عامتسا ءانثأ ءادأ لضفأ ع لوصحلل
.قئاوعلا نم ةيلاخ )ةلصفنم عاب
ُ
ت( ةيكلسلا لابقتسا
Soundbar زاهجب Samsung نم ةيكلسلا ةيفلخلا تاعامسلا مقط ليصوت
ةيفلخلا Samsung تاعامس مقط ليصوت قيرط نع ا
ً
يقيقح حبصيل يكلسلا يطيحملا توصلا زيزعت كنكمي
.كب صاخلا Soundbar زاهجب )لصفنم لكشب عاب
ُ
ت - SWA-9200S( ةيكلسلا
نم ةيكلسلا ةيفلخلا تاعامسلا مقط ليلد عجار تيصوتلا لوح ةيليصفتلا تامولعملا نم ديزملا ع لوصحلل
.Samsung
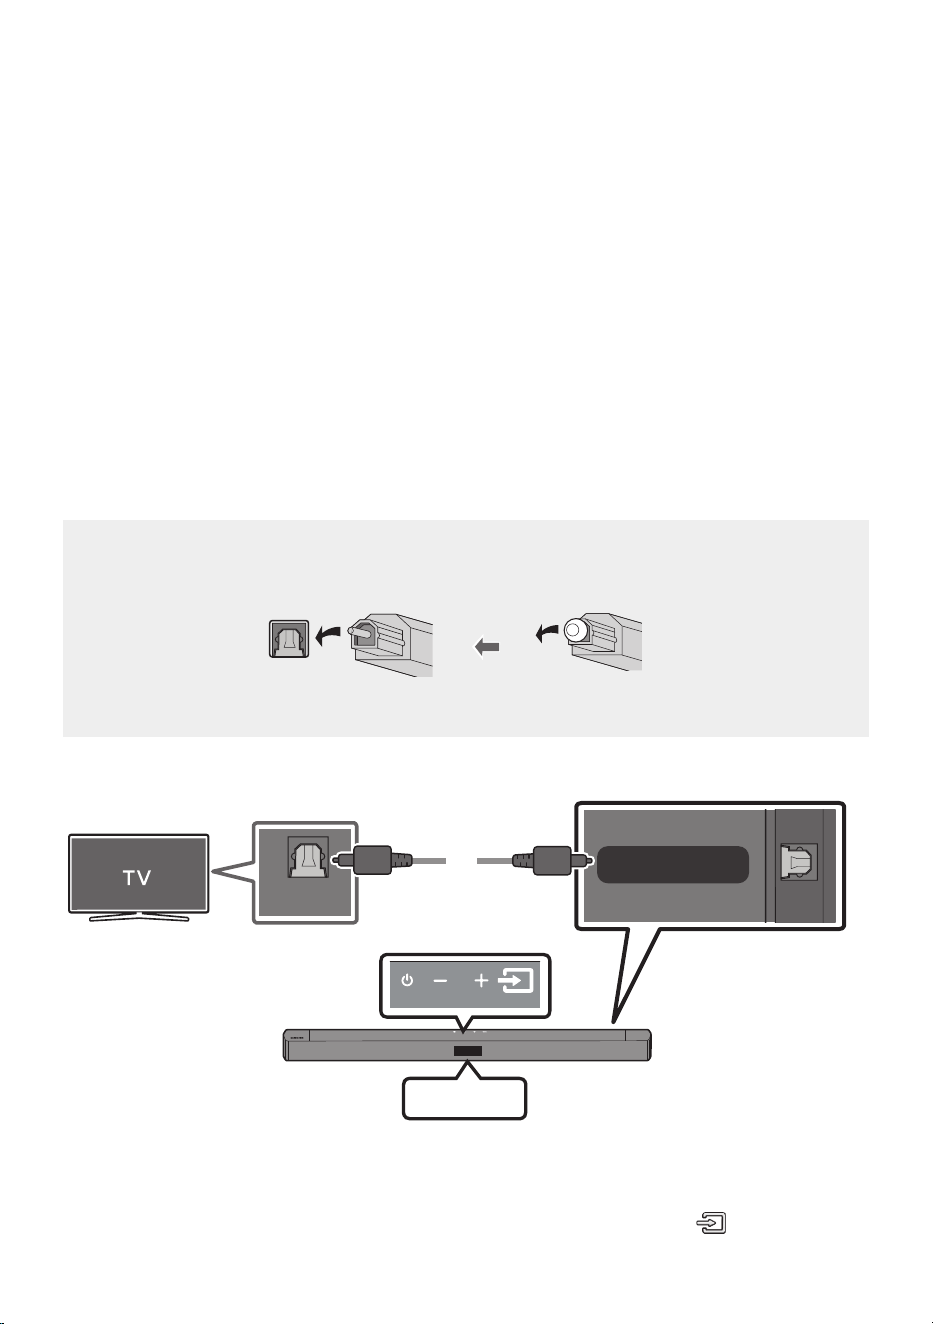
19 - ARA
05 نويزفلتلاب يكلسلا ليصوتلا مادختسا
.ةيكلسو ةيكلس تيصوت قيرط نع Soundbar نم نويزفلتلا توص إ عمتسا
• مادختساب نم تاعامسلا يف مكحتلا نكمي ،Samsung نم د
دحم نويزفلت زاهجب ةلصتم ةعامسلا نوكت امدنع
.نويزفلتلاب صاخلا دع
ُ
ب نع مكحتلا زاهج
– معد
ُ
ت يتلا اهنم ثدحاو 2017 راد صإ Samsung Smart TV نويزفلت ةزهجأ ةطساوب ةزيملا هذه معد متي
.يرصب لبك مادختساب نويزفلتلاب Soundbar كليصوت دنع Bluetooth
– ىوتسمو ةفلتخملا تادادعاو يتوصلا لاجملا ليدعتل نويزفلتلا ةمئاق مادختساب ةفيظولا هذه كل حمست
.توصلا متكو توصلا
يرصب لبك مادختساب ليصوتلا
،PCM إ كب صاخلا نويزفلتلا يف "يمقرلا توصلا جرخ قيسنت" نييعتو Dolby Digital يف ثب يف توصلا زيمرت دنع
دق ( .توصلا ةدوج نسحتتس ،نويزفلتلا يف دادعا رييغت دنع .Dolby Digital إ دادعا رييغت نسحتسملا نم
ةع
نصملا ةكرشلا ع رما فقوتي ثيح PCMو Dolby Digital نم لكل ةفلتخم تاملك نويزفلتلا ةمئاق مدختست
).نويزفلتلل
ليصوتلا لبق صحفلا ةمئاق
• .ةيطغا ةلازإ نم دكأت ،فارطا ع ةيطغأ دجوتو ا
ً
يرصب
ً
بك مدختست امدنع
• ."D.IN" عضو نييعت كيلعف ،يرصب لبك مادختسا دنع
USB (5V 0.5A)
DIGITAL AUDIO IN
(OPTICAL)
OPTICAL OUT
زاهج نم يولعلا ءزجلا
Soundbar
D.IN
يرصب لبك
Soundbar نم يلفسلا ءزجلا
1 . OPTICAL OUT سبقمب Soundbar يف دوجوملا DIGITAL AUDIO IN )OPTICAL( سبقم ليصوتب مق
. يمقر ) د
وزم ريغ ( يرصب لبك مادختساب نويزفلتلاب
2 .."D.IN" عضولا ددح مث ،دع
ُ
ب نع مكحتلا زاهج يف وأ ةيولعلا ةحوللا يف
)ردصملا(
رزلا ع طغضا
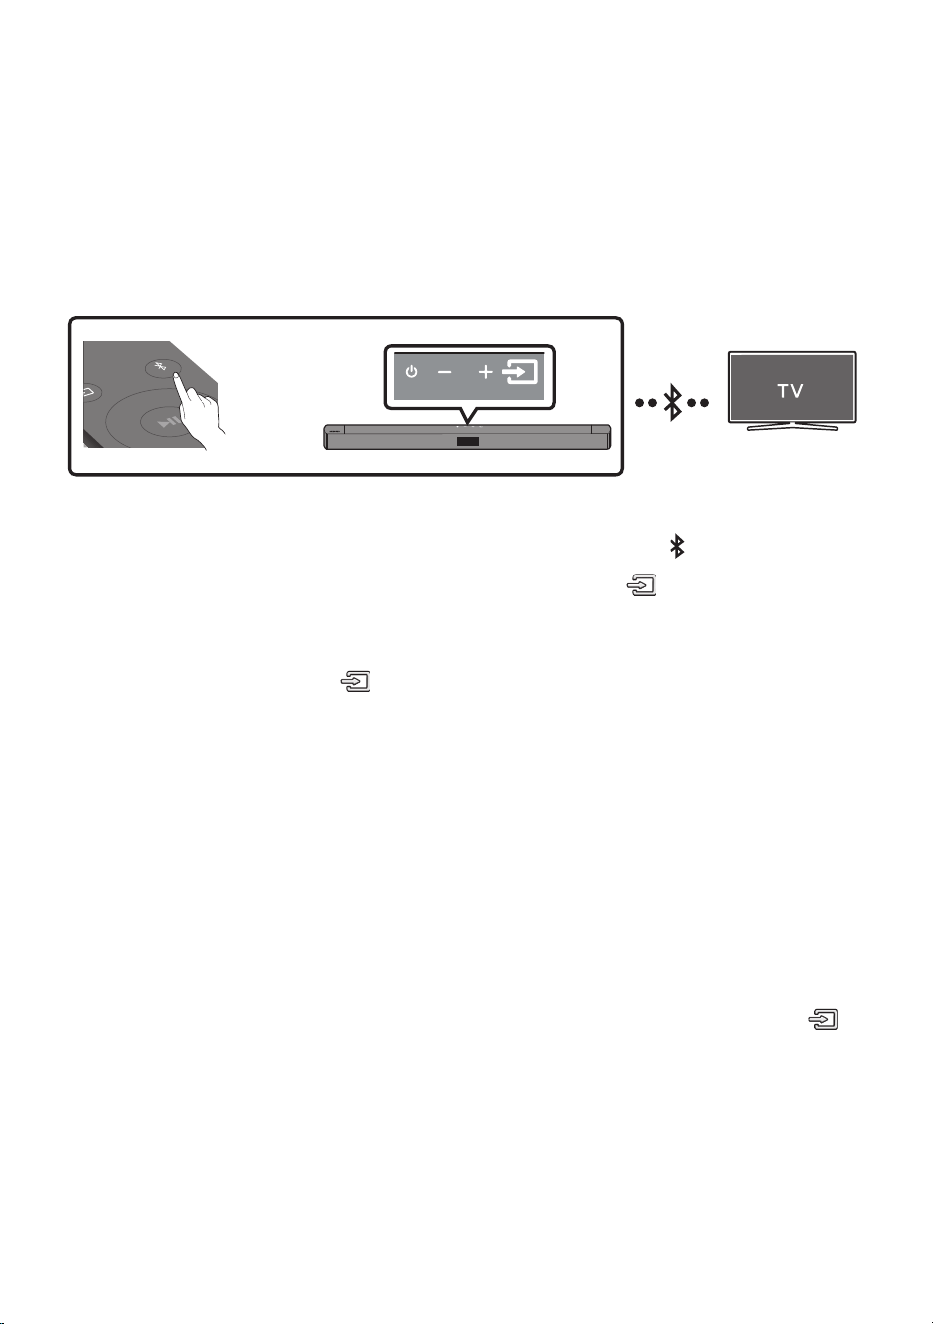
20 - ARA
06 نويزفلتلاب يكلسلا لاصتا مادختسا
Bluetooth ربع نويزفلت زاهج ليصوت
.تبكلا نم جاعزا نود ويرتسا توص عامس كنكمي ،Bluetooth مادختساب نويزفلتلا ليصوت دنع
• .تقولا سفن يف دحاو نويزفلت ىوس ليصوت نكمي
SOUND
MODE
PAIR
وأ
يلوا ليصوتلا
1 .."BT PAIRING" عضولا لاخد دع
ُ
ب نع مكحتلا زاهج يف PAIR رزلا ع طغضا
)وأ(
a .."BT" ددح مث ةيولعلا ةحوللا يف
)ردصملا(
رزلا ع طغضا
نا ك اذإ "BT READY" إ ريغتي وأ ناوث ةدع دعب ا
ً
يئاقلت "BT PAIRING“ ع ضو لا إ ”BT" عضولا ريغتي
.لاصتا لجس كانه
b . نم ةيولعلا ةحوللا يف
)ردصملا(
رز ع رارمتسا عم طغضا "BT READY“ رهظي امدنع .ب
."BT PAIRING" ضرعل ناو ث 5 نم رثك Soundbar زاهج
2 .).نويزفلتلا ليلد عجار ،تامولعملا نم ديزمل( .نويزفلتلاب Bluetooth عضو ددح
3 . ع ةضورعملا ةمئاقلا نم "[AV] Soundbar C4-Series" وأ "[AV] Samsung Soundbar C4-Series" دد ح
نويزفلتلا ةزهجأ ةمئاق ع "Paired" وأ "Needs Pairing" زاهجلاب حاتملا Soundbar إ راش
ُ
ي .نويزفلتلا ةشاش
.ليصوتلا ءارجإب أدباو ةلاسرلا ددح ،Soundbar زاهج ليصوتل .Bluetooth ةينقت معدت يتلا
• .Soundbar ةدحول ةيسيئرلا ةشاشلا ع ”BT“ ← ]نويزفلتلا مسا[ رهظيس ،
ً
صتم نويزفلتلا نوكي امدنع
4 ..Soundbar نم نويزفلتلا توص عامس نا كنكمي
So undbar زاهج ع نويزفلتلا رثعي مل اذإ
• رزلا ع طغضلاب "D.IN" عضو ددحو ،يرصب لبك مادختساب Soundbar زاهجو نويزفلتلا ليصوتب مق
عباتو ،يعيبط لكشب لمعي توصلا جارخإ ناك اذإ امم ققحت .Soundbar زاهج عأ دوجوملا
)ردصملا(
.3و 2 ةوطخلا

21 - ARA
لاصتا يف زاهجلا لشف اذإ
• وأ "[AV] Samsung Soundbar C4-Series" لثم( لبق نم ةلصتملا Soundbar ةمئاق ترهظ اذإ
.اهفذحب مقف ،ةمئاقلا يف )"[AV] Soundbar C4-Series"
• .3 إ 1 نم تاوطخلا ررك ،كلذ دعب
ةظحم
• .ليصوتلا ةداع ،" BT READY" عضولا مدختسا ،وا ةرملل كتصاخ نويزفلتلاب Soundbar ليصوت دعب
نويزفلتلا نم Soundbar لصف
."BT" فخب عضو يأ إ ليدبتلاب مقو دع
ُ
ب نع مكحتلا زاهج يف وأ ةيولعلا ةحوللا يف
)ردصملا(
رزلا ع طغضا
• بسح بولطملا تقولا فلتخي دق( .Soundbar نم ةباجتسا لبقتسي نأ بجي نويزفلتلا ن ا
ً
تقو لصفلا قرغتسي
).نويزفلتلا زارط
• 5 ةدمل دع
ُ
ب نع مكحتلا ةدحوب
راسي
رزلا ع طغضا ،نويزفلتلاو Soundbar زاهج نيب يئاقلتلا Bluetooth لاصتا ءاغل
)TV Connect ليغشت فاقيإ/ليغشت( .BT READY ةلاحلا يف Soundbar زاهج نوكي امدنع ناوث
؟ BT PAIRINGو BT READY نيب قرفلا ام
• لومحم فتاه ليصوت وأ ا
ً
قباس اهليصوت مت يتلا نويزفلتلا ةزهجأ نع ثحبلا كنكمي ،عضولا اذه يف : BT READY
.Soundbar زاهجب ا
ً
قباس هليصوت مت
• زاهجب PAIR رزلا ع طغضا( .Soundbar زاهجب ديدج زاهج ليصوت كنكمي ،عضولا اذه يف : BT PAIRING
امل Soundbar زاهج نم يولعلا ءزجلا يف دوجوملا )ردصملا( رزلا ع رارمتسا عم طغضا وأ دع
ُ
ب نع مكحتلا
)."BT READY" ةلا ح يفو "BT" عضو يف زاهجلا نوكي امدنع
ٍ
ناوث 5 نع ديزي
تاظحم
• .>0000< لا خدإ ى جر
ُ
ي ،Bluetooth معدي زاهج ليصوت دنع يصخشلا فيرعتلا مقر زمر لاخدإب كتبلاطم ةلاح يف
• .راتمأ 10 Bluetooth زا هج و Soundbar نيب ةفاسملا تزواجت اذإ اهدقف متيس ،Bluetooth ربع ليصوتلا عضو يف
• .دادعتسا ةلاح يف قئاقد 18 رورم دعب ا
ً
يئاقلت Soundbar ليغشت فاقيإ بجي
• :ةيلاتلا تاحلا يف حيحص لكشب ليصوتلا مدع وأ Bluetooth ربع ثحبلا ةفيظو لمعت دق
– .Soundbar لوح يوق يئابرهك لقح دوجو ةلاح يف
– .دحاو
ٍ
نآ يف Soundbar زاهجب رثكأ وأ Bluetooth يزاهج نرتقا اذإ
– .لا ط عأ هب وأ دجو ي وأ Bluetooth ةينقت ليغشت فاقيإ ةلاح يف
• ةيسيطانغمورهك تاجوم د
ّ
لوت يتلا ةزهجا داعبإ نيعتي .ويدارلا تاجوم لخادت يف ةينورتكلا ةزهجا ببستت دق
.كلذ إ امو ةيكلسلا LAN ةزهجأو فيوركياملا ةزهجأ ،لاثم ،ةيساسا Soundbar ةدحو نع
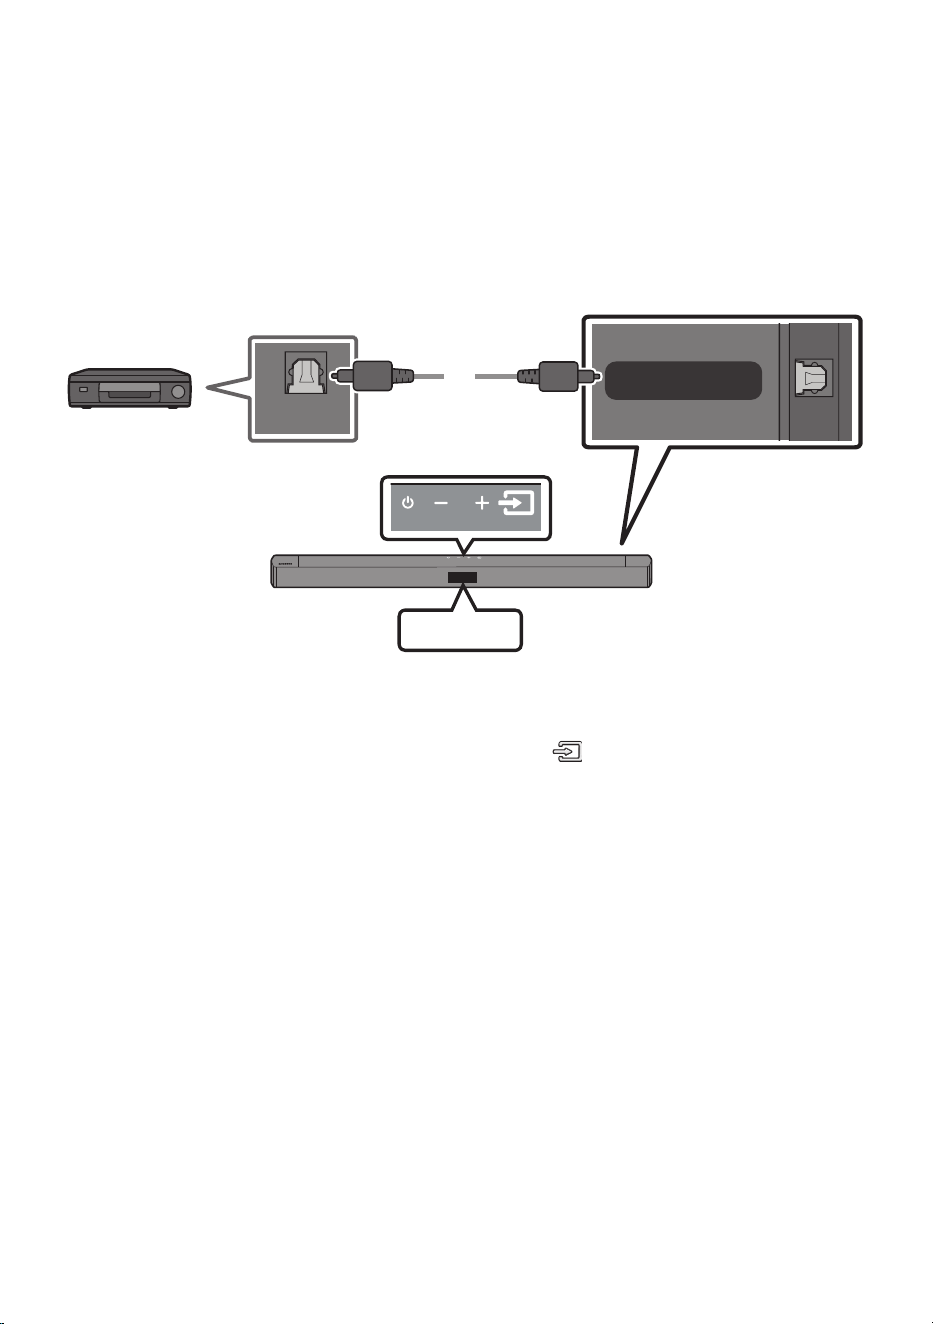
22 - ARA
07 يجراخ زاهجب ليصوتلا
.Soundbar ربع يجراخلا زاهجلا توص ليغشتل Bluetooth لاصتا وأ يكلس لاصتا قيرط نع يجراخ زاهجب ليصوتلا
يرصب لبك مادختساب ليصوتلا
USB (5V 0.5A)
DIGITAL AUDIO IN
(OPTICAL)
OPTICAL OUT
زاهج نم يولعلا ءزجلا
Soundbar
D.IN
يرصب لبك
Soundbar نم يلفسلا ءزجلا
ل غش م / BD لغشم
/ DVD
/ لابقتسا زاهج
باعلل لوسنوك زاهج
1 . ردصملا زاهجب OPTICAL OUT سبقمل ةيسيئرلا ةدحولا يف DIGITAL AUDIO IN )OPTICAL( لبك ليصوتب مق
.يمقر ) د
وزم ريغ ( يرصب لبك مادختساب
2 ..دع
ُ
ب نع مكحتلا زاهج يف وأ ةيولعلا ةحوللا يف )ردصملا( رزلا ع طغضلاب "D.IN" عضولا ددح
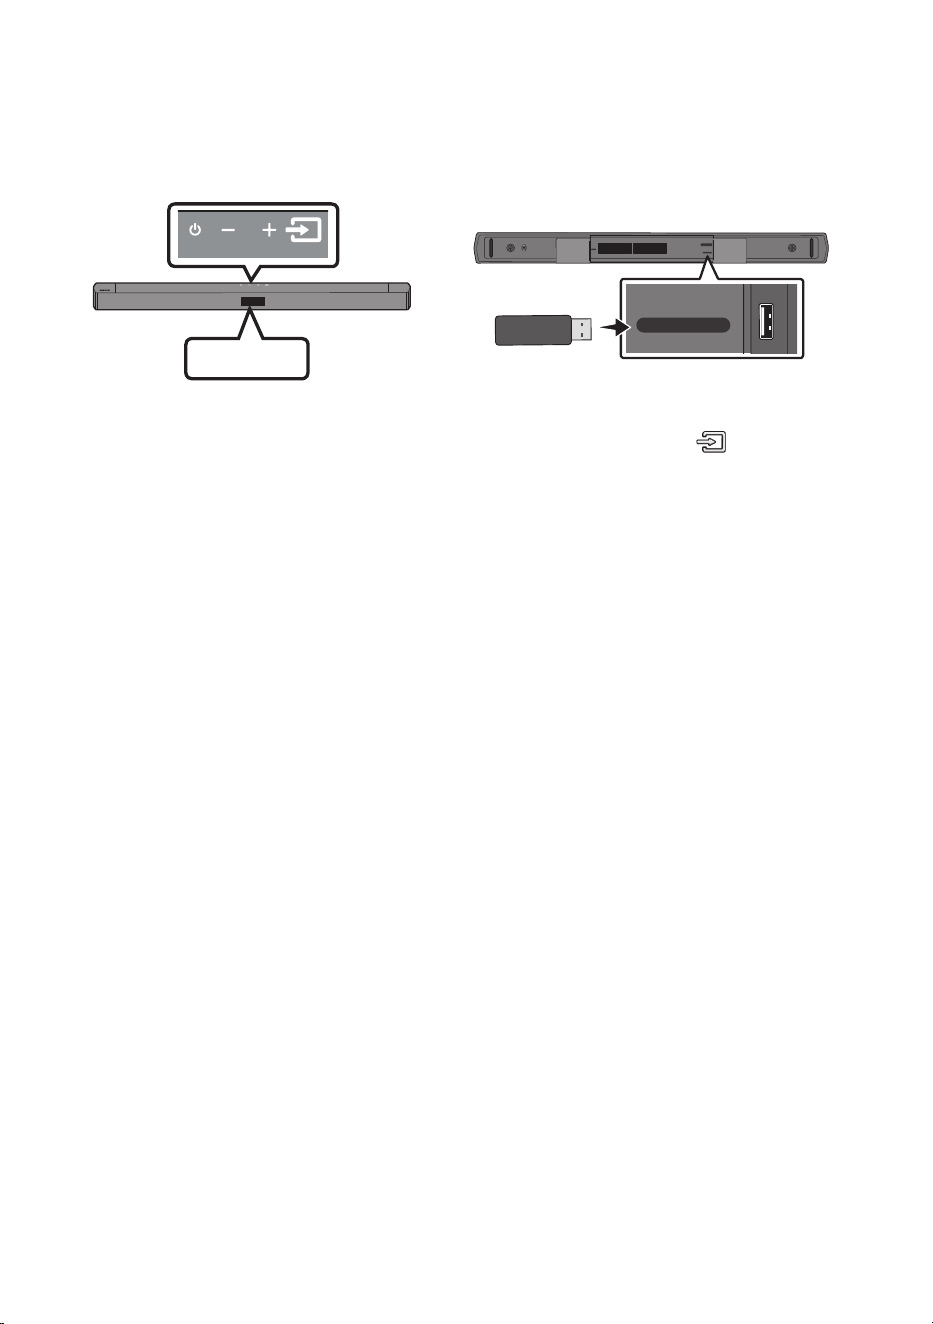
23 - ARA
08 USB نيزخت زاهج ليصوت
.Soundbar قيرط نع USB نيزخت ةزهجأ يف ىقيسوملا تافلم ليغشت نكمي
USB
POWER
USB (5V 0.5A)
DIGITAL AUDIO IN
(OPTICAL)
USB (5V 0.5A)
DIGITAL AUDIO IN
(OPTICAL)
USB ذفنم
1 ..جتنملا لفسأ يف دوجوملا USB ذفنمب USB زاهج ليصوتب مق
2 .."USB" ددح مث ،دع
ُ
ب نع مكحتلا زاهج يف وأ ةيولعلا ةحوللا يف )ردصملا( رزلا ع طغضا
3 ..ةشاشلا ع رهظت "USB"
4 ..Soundbar قيرط نع USB نيزخت ةزهجأ يف ىقيسوملا تافلم ليغشت
• .قئاقد 18 ةدمل USB ليصوت متي مل اذإ )Auto Power Down( ا
ً
يئاقلت Soundbar ليغشت فاقيإ متي
24 - ARA
قفاوتلا ةمئاق
دادتمازيمرتلا ماظنتانيعلا لدعمتبلا لدعم
mp3.*MPEG 1 Layer232kHz ~ 48kHzةيناثلا يف تياب وليك 320 ~ 32
MPEG 1 Layer332kHz ~ 48kHzةيناثلا يف تياب وليك 320 ~ 32
MPEG 2 Layer316kHz ~ 24kHzةيناثلا يف تياب وليك 160 ~ 8
MPEG 2.5 Layer38kHz ~ 12kHzةيناثلا يف تياب وليك 160 ~ 8
wma.*WMA7/8/932kHz ~ 48kHzةيناثلا يف تياب وليك 320 ~ 32
ogg.*Vorbis32kHz ~ 48kHzةيناثلا يف تياب وليك 500 ~ 45
aac.*
m4a.*
mp4.*
)طقف توص(
AAC-LC )MPEG2,/
)MPEG4
32kHz ~ 48kHzةيناثلا يف تياب وليك 320 ~ 32
wav.*LPCM32kHz ~ 192kHz
يف تياب وليك 9, 216 ~ 1,024
ةيناثلا
ac.*FLAC32kHz ~ 192kHz
يف تياب وليك 8,100 ~ 162
ةيناثلا
aiff.*AIFF32kHz ~ 192kHz
يف تياب وليك 9, 216 ~ 1,024
ةيناثلا
• Soundbar قرغتسي دق ،USB زاهج ع ةنزخم )ا
ً
بيرقت 999( تافلمو )ا
ً
بيرقت 256( تادلجم ةدع دوجو ةلاح يف
.اهليغشتو تافلملا إ لوصولل تقولا ضعب
• NTFSو FAT32و FAT16 :ةموعدملا USB تافلم ماظن
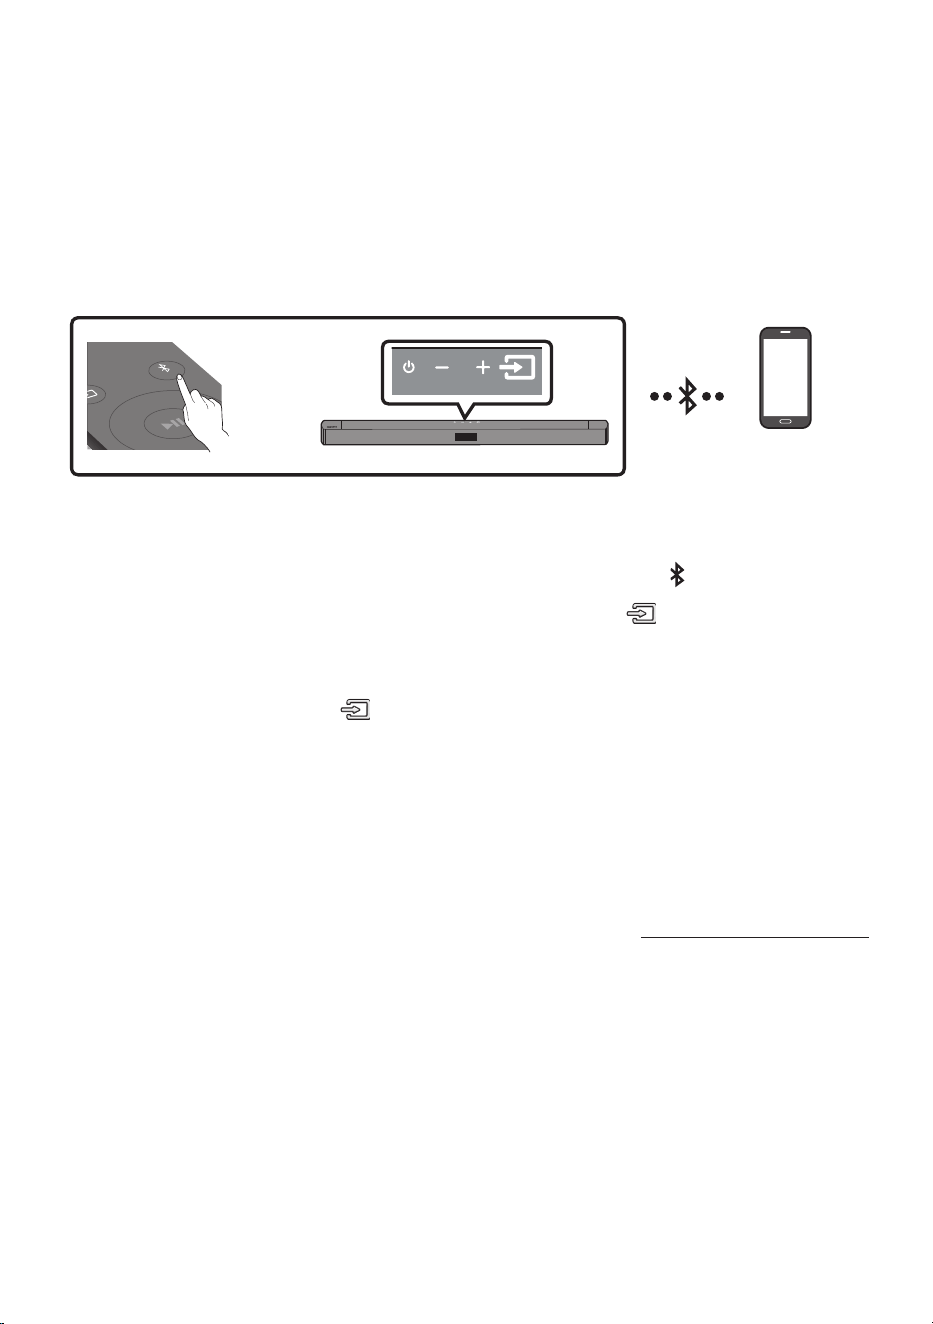
25 - ARA
09 لومحم زاهجب ليصوتلا
Bluetooth ةينقت ربع ليصوتلا
.تبكلا نم جاعزا نود ويرتسا توص عامس كنكمي ،Bluetooth مادختساب لومحملا زاهج ليصوت دنع
• .د حاو تقو يف دحاو Bluetooth زاهج نم رثكأ ليصوت كنكمي
SOUND
MODE
PAIR
وأ
Bluetooth زاهج
يلوا ليصوتلا
1 .."BT PAIRING" عضولا لاخد دع
ُ
ب نع مكحتلا زاهج يف PAIR رزلا ع طغضا
)وأ(
a .."BT" ددح مث ةيولعلا ةحوللا يف
)ردصملا(
رزلا ع طغضا
نا ك اذإ "BT READY" إ ريغتي وأ ناوث ةدع دعب ا
ً
يئاقلت "BT PAIRING“ ع ضو لا إ ”BT" عضولا ريغتي
.لاصتا لجس كانه
b . نم ةيولعلا ةحوللا يف
)ردصملا(
رز ع رارمتسا عم طغضا "BT READY“ رهظي امدنع .ب
."BT PAIRING" ضرعل ناو ث 5 نم رثك Soundbar زاهج
2 ..ةمئاقلا نم "[AV] Soundbar C4-Series" وأ "[AV] Samsung Soundbar C4-Series" ددح
• .”BT“ ← ]ثوتولبلا زاهج مسا[ ةيماما ةشاشلا ع رهظيس ،Bluetooth زاهجب Soundbar ليصوت دنع
3 ..Soundbar قيرط نع Bluetooth ةينقت ربع لبصتم زاهجلا نم ىقيسوملا تافلم ليغشت
لاصتا يف زاهجلا لشف اذإ
• وأ "[AV] Samsung Soundbar C4-Series" لثم( لبق نم ةلصتملا Soundbar ةمئاق ترهظ اذإ
.اهفذحب مقف ،ةمئاقلا يف )"[AV] Soundbar C4-Series"
• . 2و 1 نيتوطخلا ررك مث
ةظحم
• .ليصوتلا ةداع ”BT READY“ عضولا مدختسا ،ةرم لو لومحملا كزاهجب Soundbar زاهج ليصوت دعب

26 - ARA
؟ BT PAIRINGو BT READY نيب قرفلا ام
• لومحم فتاه ليصوت وأ ا
ً
قباس اهليصوت مت يتلا نويزفلتلا ةزهجأ نع ثحبلا كنكمي ،عضولا اذه يف : BT READY
.Soundbar زاهجب ا
ً
قباس هليصوت مت
• زاهجب PAIR رزلا ع طغضا( .Soundbar زاهجب ديدج زاهج ليصوت كنكمي ،عضولا اذه يف : BT PAIRING
امل Soundbar زاهج نم يولعلا ءزجلا يف دوجوملا )ردصملا( رزلا ع رارمتسا عم طغضا وأ دع
ُ
ب نع مكحتلا
)."BT READY" ةلا ح يفو "BT" عضو يف زاهجلا نوكي امدنع
ٍ
ناوث 5 نع ديزي
تاظحم
• .>0000< لا خدإ ى جر
ُ
ي ،Bluetooth معدي زاهج ليصوت دنع يصخشلا فيرعتلا مقر زمر لاخدإب كتبلاطم ةلاح يف
• .راتمأ 10 Bluetooth زا هج و Soundbar نيب ةفاسملا تزواجت اذإ اهدقف متيس ،Bluetooth ربع ليصوتلا عضو يف
• .دادعتسا ةلاح يف قئاقد 18 رورم دعب ا
ً
يئاقلت Soundbar ليغشت فاقيإ بجي
• :ةيلاتلا تاحلا يف حيحص لكشب ليصوتلا مدع وأ Bluetooth ربع ثحبلا ةفيظو لمعت دق
– .Soundbar لوح يوق يئابرهك لقح دوجو ةلاح يف
– .Soundbar ع م دحاو نآ يف Bluetooth ةينقت معدي زاهج نم رثكأ نارتقا ةلاح يف
– .لا ط عأ هب وأ دجو ي وأ Bluetooth ةينقت ليغشت فاقيإ ةلاح يف
• ةيسيطانغمورهك تاجوم د
ّ
لوت يتلا ةزهجا داعبإ نيعتي .ويدارلا تاجوم لخادت يف ةينورتكلا ةزهجا ببستت دق
.كلذ إ امو ةيكلسلا LAN ةزهجأو فيوركياملا ةزهجأ ،لاثم ،ةيساسا Soundbar ةدحو نع
• .)زتره وليك 48 ،زتره وليك 44.1( SBC تانايب Soundbar ماظن معدي
• .)ةروصلاو توصلا( A2DP ةفيظو معدي ثوتولب زاهجب طقف ليصوتلاب مق
• .)Hands Free( HF ةفيظو طقف معدي Bluetooth زاهجب Soundbar زاهج ليصوت كنكمي
• وأ "[AV] Samsung Soundbar C4-Series" ديدحت يدؤي ،Bluetooth زاهجب Soundbar زاهج نارقإ درجمب
عضو إ ا
ً
يئاقلت Soundbar زاهج ليوحت إ اهصحف مت يتلا ةزهجا ةمئاق نم "[AV] Soundbar C4-Series"
."BT"
– ماظن نارتقا بجي( .ثوتولبلا زاهجب ةنرتقملا ةزهجا ةمئاق يف جردم Soundbar ماظن ناك اذإ طقف رفوتت
).تقولا كلذ لبق لقا ع ةدحاو ةرمل ثوتولبلا زاهجو Soundbar
• Soundbar ماظن ضرعي امدنع طقف ثوتولبلا زاهج يف ةزهجا نع ثحبلا ةمئاق يف Soundbar ماظن رهظيس
."BT READY" ةلا سر
• زاهجب نرتقمو Bluetooth عضولا يف لعفلاب ناك اذإ رخآ Bluetooth زاهجب نارتقا Soundbar ع رذعتي
.Bluetooth
)SOUND MODE( Bluetooth Power ليغشت
فاقيإو Bluetooth Power ةفيظو ليغشت دنع Soundbar ـب نارتقا ا
ً
قبسم نرتقم Bluetooth زاهج لواح اذإ
.ا
ً
يئاقلت Soundbar ليغشت متي فوسف ،Soundbar ليغشت
1 . ليغشت ءانثأ
ٍ
ناوث 5 نع ديزت ةدمل دع
ُ
ب نع مكحتلا زاهج يف SOUND MODE رز ع رارمتسا عم طغضا
.Soundbar
2 ..Soundbar ةشاش ع "ON-BLUETOOTH POWER" ةراشا رهظت

27 - ARA
Soundb ar نع Bluetooth زاهج لصف
زاهجب صاخلا مدختسملا ليلد عجار ،تاميلعتلا ع عطل .Soundbar ماظن نم ثوتولبلا زاهج لصف كنكمي
.ثوتولبلا
• .Soundbar ماظن لصف متيس
• .Soundbar "BT DISCONNECTED" زاهجب ةيماما ةشاشلا ع رهظتس ،Bluetooth زاهج نم Soundbar لصف دنع
Bluetooth زا هج ن م Soun d bar زاهجب ليصوتلا
ءانثتساب عضو يأ إ رييغتلاب مق مث ،دعب نع مكحتلا زاهج يف وأ ةيولعلا ةحوللا يف )ردصملا( رزلا ع طغضا
."BT"
• .Soundbar نم ةباجتسا لبقتسي نأ بجي Bluetooth زاهج ن ا
ً
تقو لصفلا قرغتسي
)Bluetooth زاهج عون بسح لاصتا عطق فلتخي دق(
• .Soundbar "BT DISCONNECTED" زاهجب ةيماما ةشاشلا ع رهظتس ،Bluetooth زاهج نم Soundbar لصف دنع
تاظحم
• زاهجو Soundbar ماظن نيب ةفاسملا تطخت لاح يف ثوتولبلاب لاصتا عطقنيس ،ثوتولبلا ليصوت عضو يف
.راتمأ 10 ثوتولبلا
• .بهأتلا ةلاح يف ةقيقد 18 دعب ا
ً
يئاقلت Soundbar ماظن ليغشت فاقيإ متي
Bluetooth لوح ديزملا
لاصتا لخ نم ضعبلا اهضعب عم ةلوهسب ثوتولبلا عم ةقفاوتملا ةزهجا طبر ةيناكمإ حيتت ةينقت ثوتولبلا ربتعي
.ىدملا ريصق يكلس
• :ةلاح يف ،مادختسل ا
ً
قفو ،لطع وأ شيوشت ثادحإ يف ثوتولبلا زاهج ببستي امبر
– .Soundbar ماظن وأ ثوتولبلا زاهجب صاخلا لاسرا/لابقتسا ماظنل ا
ً
سمم كدسج نم ءزج
– .ةيبتكم لصاوف وأ ،ةيواز ،طئاح دوجو نع ةجتانلا قئاوعلا نم يبرهكلا ددرتلل رما عضخي
– نارفأ ،ةيبطلا ةزهجا كلذ يف امب قاطنلا ددرت سفن مدختست ةزهجأ نم يبرهك لخادتل ضرعتلا
.ةيكلسلا LAN تصوو ،فيووركيملا
• .امهضعب نم نيبيرق نانوكي امدنع ثوتولبلا زاهج عم Soundbar ماظن نارقإب مق
• .ةدوجلا تضفخنا املك ،ثوتولبلا زاهجو Soundbar ماظن نيب ةفاسملا تداز املك
.لاصتا عطقني ،ثوتولبلل يليغشتلا قاطنلل ةفاسملا يطخت ةلاح يف
• .بسانملا لكشلاب ثوتولبلا لمعي امبر ،لابقتسا ةيساسح فعضب مستت يتلا قطانملا يف
• ةفاسملا تطخت لاح يف ا
ً
يئاقلت لاصتا عطق متي .ةعومجملا نم ا
ً
بيرق نوكي امدنع طقف ثوتولبلا لاصتا لمعي
.باوبا وأ طئاوحلا يف ةلثمتملا قئاوعلا ببسب توصلا ةدوج رثأتت امبر ،قاطنلا اذه نمض ىتح .قاطنلا اذه
• .هليغشت ءانثأ يئابرهك لخادت ثودح يكلسلا زاهجلا اذه ببسي دق
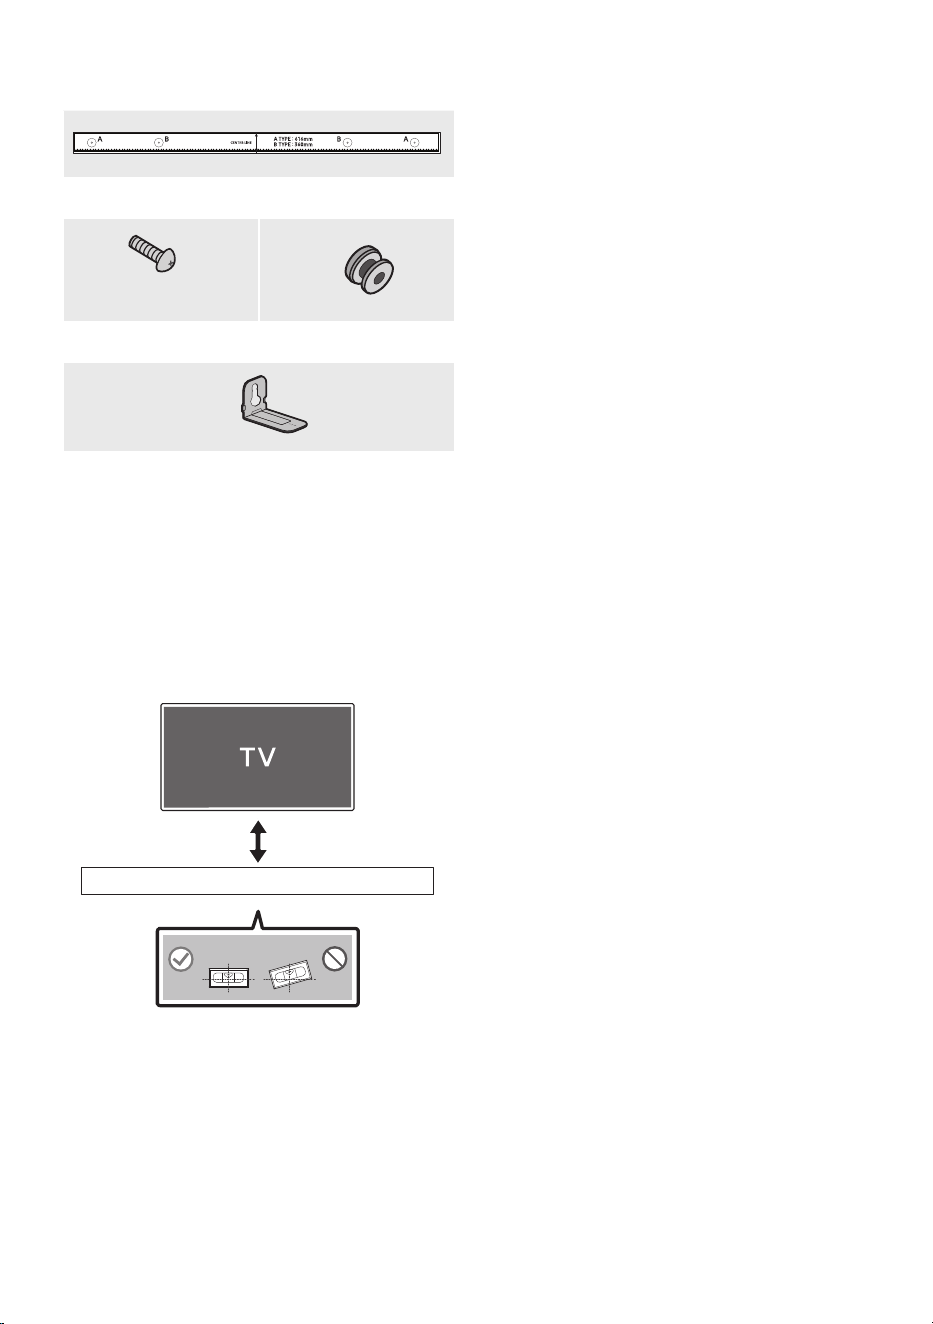
28 - ARA
10 تيبثتلا لماح بيكرت
طئاحلاب
بيكرتلا تاطايتحا
• .طقف يدومع عضو يف ع بيكرتلا
• ةرارحلا تاجرد تاذ نكاما يف زاهجلا بيكرتب مقت
.ةبوطرلا وأ ةيلاعلا
• نزو معدل فاكلا ردقلاب ىوق رادجلا ناك اذإ ام ققحتلا
رايتخا وأ طئاحلا ميعدتب مق ،كلذ ريغ ناك اذإ .جتنملا
.ىرخأ بيكرت ةطقن
• طئاحلا عونل ةمئملا تاماعدلا وأ وشح يغارب ءارش
)كلذ ريغو ،بشخ ،يديدح حول ،سبج حول(
يف معد يغارب مادختسا نكمأ اذإو .اهمادختساو
.طئاحلا تاماعد
• تيبثت بغرت يذلا طئاحلاب تيبثتلا يغارب ءارش متي
.هكم
ُ
سو طئاحلا عونل ا
ً
قفو هيلع Soundbar
– م 5 :رطقلا
– .تايصوتلا بسح لوطأ وأ مم 35 :لوطلا
• ةيجراخلا ةزهجا إ ةدحولا نم تبكلا ليصوتب مق
.طئاحلا ع Soundbar تيبثت لبق
• ردصم نم اهلصفو ةدحولا ليغشت فاقيإ نم دكأت
كضرعت يف كلذ ببستي دق ،إو .اهتيبثت لبق ةقاطلا
.ةيئابرهك ةمدصل
رادج ع قيلعتلا تانوكم
طئاحلاب تيبثتلا ةماعد
2 x
)L10 × M4(
2 ×
يغاربلا لماحيغارب
2 x
طئاحلا ع تيبثتلا ةماعد
1 . حطس ةهجاوم يف طئاحلاب تيبثتلا ةماعد عض
.طئاحلا
• .ةيوتسم طئاحلاب تيبثتلا ةماعد نوكت نأ بجي
• تيبثت مقف ،طئاحلا ع نويزفلتلا ناك اذإ
لفسأ لقا ع مس 5 ةفاسم ع Soundbar
.نويزفلتلا
رثكأ وأ مس 5
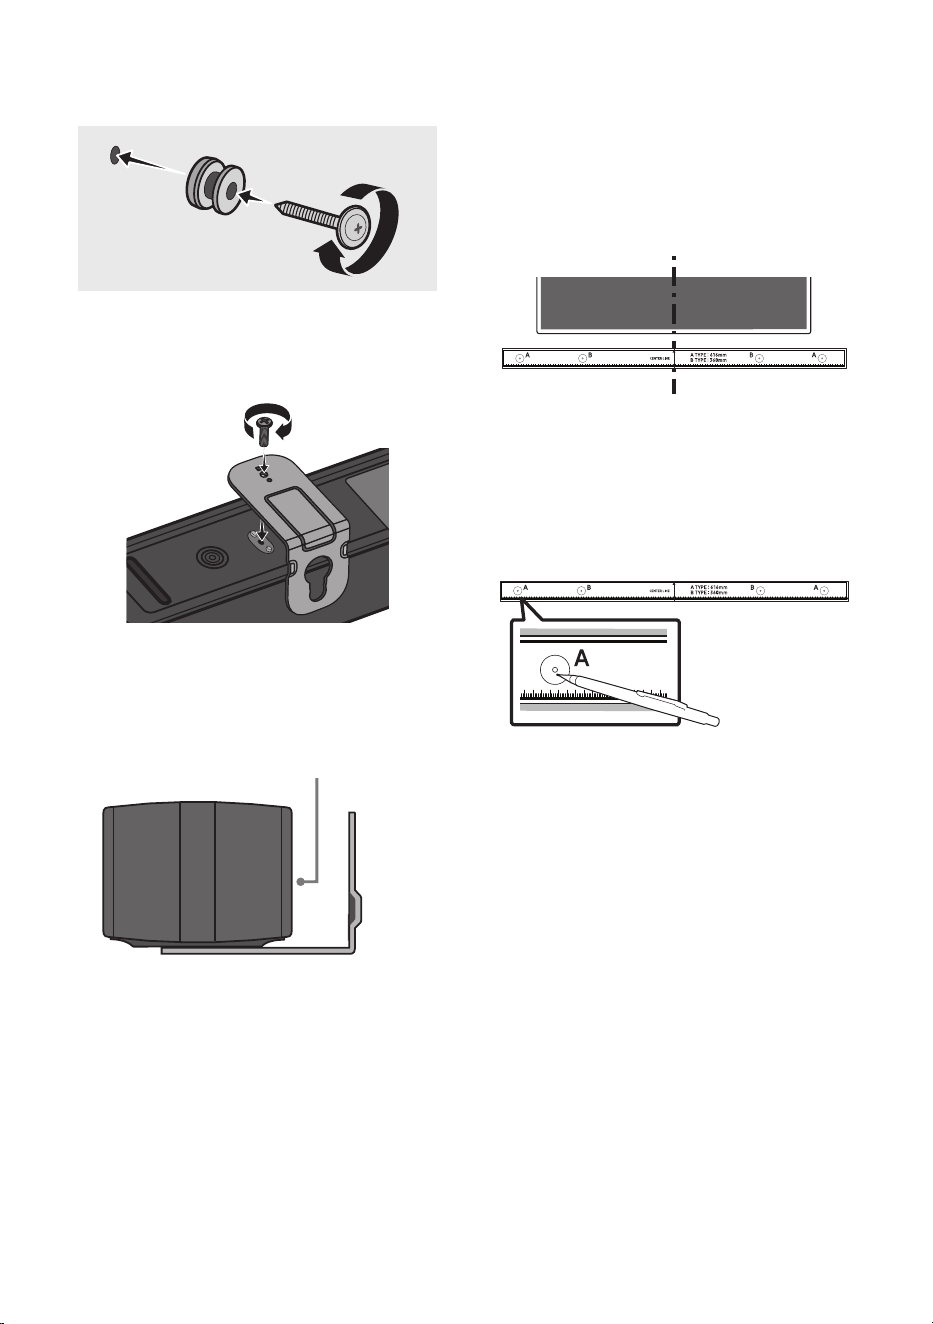
29 - ARA
2 . ع تيبثتلا ةماعدل فصتنملا طخ ةاذاحمب مق
تيبثت ةلاح يف( نويزفلتلا زاهج فصتنم عم طئاحلا
ةماعد بيكرتب مق مث ،)نويزفلتلا لفسأ Soundbar
.طيرش مادختساب طئاحلا يف طئاحلاب تيبثتلا
• طخ عض ،نويزفلتلا لفسأ سيل تيبثتلا ناك اذإ
.بيكرتلا ةقطنم زكرم يف فصتنملا
فصتنملا طخ
3 . إ ببدم صاصر ملق وأ فاج ملق سأر عفدا
ةماعدلا نم فرط لك يف A-TYPE ةروص فصتنم
ريماسم تيبثتل ةصصخملا بوقثلا ناكم ديدحتل
.طئاحلاب تيبثتلا ةماعد ةلازإب مق مث ،معدلا
4 . ا
ً
بقث رفحا ،بسانم مجحب باقثم ةشير مادختساب
تيبثت تامع نم ةمع لك دنع طئاحلا يف
.يغاربلا
• تيبثت عضاوم عم ةقفاوتم ريغ تامعلا تناك اذإ
لخاد ةبسانم فيطاطخ لاخدإ نم دكأتف ،ريماسملا
مدختست تنك اذإو .معدلا ريماسم لاخدإ لبق بوقثلا
ةجردب ةريبك اهترفح يتلا بوقثلا نأ دكأتف ،فيطاطخ
.فيطاطخلا مادختساب حمست ةيفاك
5 . م ث يغاربلا لماح لك يف )ةد
وزملا ريغ( يغاربلا عض
.يغاربلا ةحتف يف ماكحإب يغاربلا طبرب مق
)ةد
وزملا ريغ(
6 . هاجتا يف طئاحلا ع تيبثتلل لماح 2 ددع بيكرت
Soundbar نم يلفسلا ءزجلا ع حيحصلا
.يغرب 2 ددع مادختساب
POWER
• ةصاخلا قيلعتلا ءازجأ دوجو نم دكأت ،طبرلا دنع
ءزجلا فلخ طئاحلا ع بيكرتلا لماوح ـب
.Soundbar ـل يفلخلا
Soundbar نم يفلخلا ءزجلا
Soundbar نم نميا فرطلا
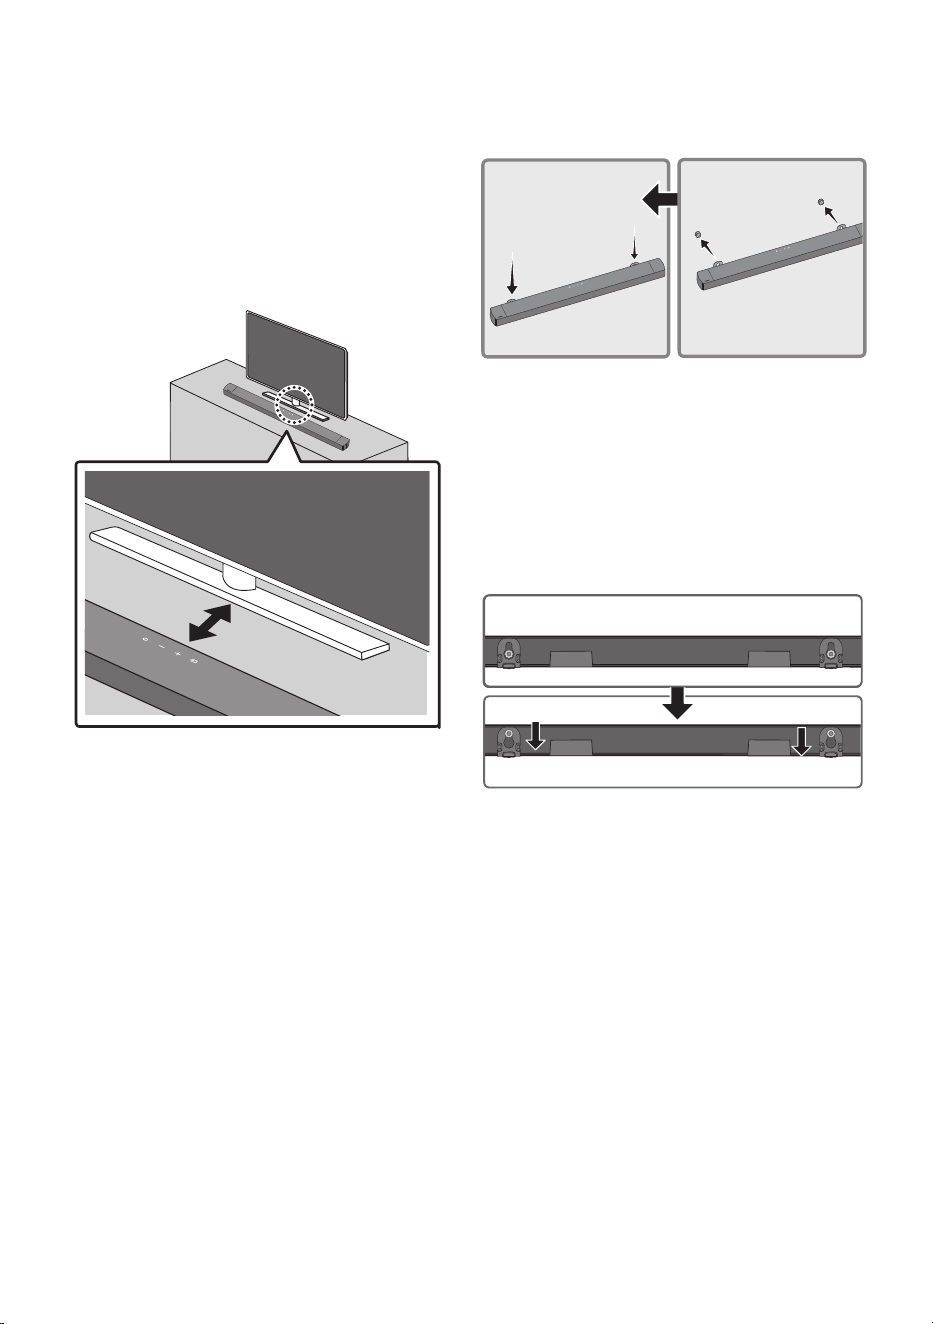
30 - ARA
7 . ع تيبثتلا ةماعد ـ ب Soundbar بيكرتب مق
تيبثتلا ةماعد قيلعت قيرط نع ةقفرملا طئاحلا
.طئاحلا علماحلا يغارب ع طئاحلا ع
8 . لماوح عضوت ىتح لفسل قلزني Soundbar لعجا
.لماحلا يغارب ع ماكحإب طئاحلا ع بيكرتلا
• )يلفسلا( ءزجلا يف لماحلا يغارب لخدأ
ع بيكرتلا لماوح ع دوجوملا ضيرعلا
ع بيكرتلا لماوح لع جا م ث ن مو ، طئاحلا
لماوح رقتست ىتح لفس قلزنت طئاحلا
.لماحلا يغارب ع طئاحلا ع بيكرتلا
11 زاهج عضو
قوف SOUNDBAR
نويزفلت لماح
.نويزفلت لماح ع sound bar عض
رثكأ وأ مس 3
زاهج فصتنم ةاذاحمب مق ،ةروصلا يف حضوم وه امك
زاهج عض مث ،نويزفلتلا فصتنم عمSoundbar
.نويزفلتلا لماح ع رذحب Soundbar
Soundbar زاهج عض ،توصلل ةدوج لضفأ ع لوصحلل
.م س 3 ةفاسمب نويزفلتلا ةمدقم نع ا
ً
ديعب
ةظحم
• وتسم
ٍ
حطس ع Soundbar زاهج عضو نم دكأت
.بل صو
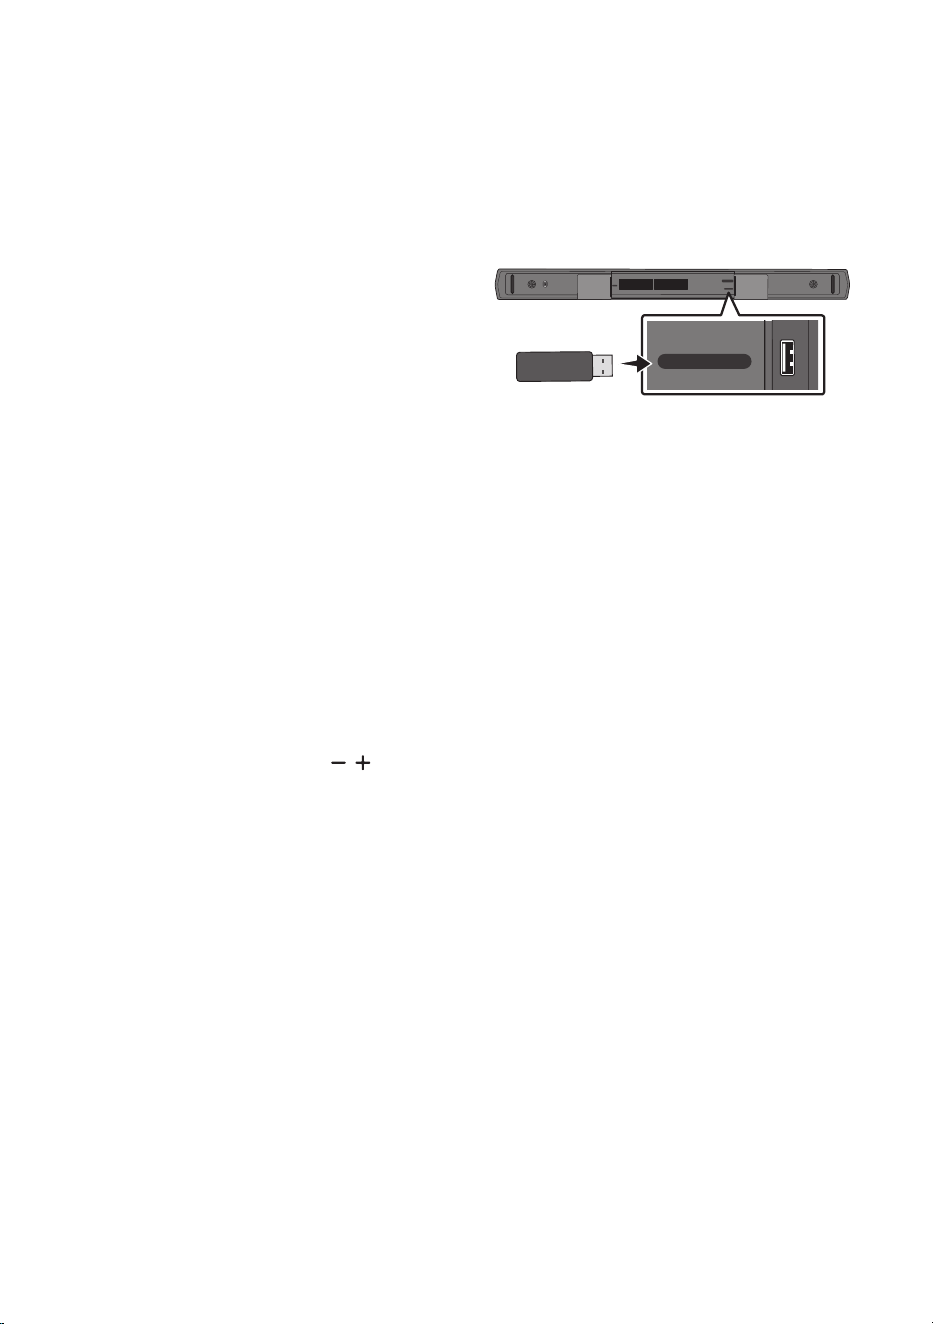
31 - ARA
12 جمانربلا ثيدحت
ماظنل ةتباثلا جماربلا تاثيدحت Samsung ةكرش مدقت دق
.لبقتسملا يف Soundbar
POWER
USB (5V 0.5A)
DIGITAL AUDIO IN
(OPTICAL)
USB (5V 0.5A)
DIGITAL AUDIO IN
(OPTICAL)
USB ذفنم
نع تباثلا جمانربلا ثيدحت كنكمي ،ثيدحت رفوت ةلاح يف
نزخملا تباثلا جمانربلا ثيدحتب USB زاهجب ليصوتلا
.Soundbar زاهجب USB ذفنم إ هيلع
،ثيدحتلا تافلم ليزنت ةيفيك لوح تامولعملا نم ديزمل
Samsung Electronics ينورتكلا عقوملا إ بهذا
.)Support
www.samsung.com(
،Soundbar زاهجل زارطلا مقر لخدأ وأ جتنملا عون ددح مث
ظح ."تيزنتلا" مث "تاقيبطتلاو جماربلا" رايخلا ددحو
.رايخلا مسا فلتخي دق هنأ
ثيدحتلا ءارجإ
تادادعإ لك فذح إ ثيدحتلا ةفيظو يدؤت :ماه
ةداعإ كنكميل كتادادعإ نيودتب كحصنن .مدختسملا
جمانربلا ثيدحت نأ ظح .ثيدحتلا دعب ةلوهسب اهنييعت
.ا
ً
ضيأ توصلا مخضم لاصتا نييعت ديعي
1 . رتويبمكلا يف USB ذفنمب USB كرحم ليصوتب مق
.كب صاخلا
ع ىقيسوم تافلم دوجو مدع نم دكأت :ماه
.جمانربلا ثيدحت لشف إ يدؤي دق اذه .USB كرحم
2 . مقر لا خدإ" د
دح )samsung.com( إ لقتنا
ةلدا دد ح .Soundbar زاهج زارط لخدأو "زارطلا
.جمانرب فلم ثدحأ ليزنتب مقو تيزنتلاو
3 . رتخاو USB ةركاذ ع اهليزنت مت يتلا جماربلا ظفحا
.دلجملا طغض كفل "انه جارختسا"
4 . ليصوتب مقو.Soundbar زاهج ليغشت فاقيإب مق
ذفنمب جمانربلا ثيدحت ع ةيوتحملا USB ةقاقر
.USB
5 . عضو إ ردصملا رييغتو.Soundbar ليغشتب مق
أدبيو "UPDATE" ضرع مت ي ,ناوث 3 لخ ."USB"
.ثيدحتلا
6 . ليغشت فاقيإ متي ،ثيدحتلا لامتكا دنع
طغضا مث Soundbar ليغشتب مق .Soundbar
ةيولعلا ةحوللا يف )توصلا ىوتسم( رز ع
مث ةشاشلا ع "INIT OK" رهظتس .
ٍ
ناوث 5 ةدمل
.Soundbar زاهج طبض ةداعإ أدبتس
• ي ف .DUAL BOOT ةفيظو جتنملا اذه نمضتي
كنكمي ،تباثلا جمانربلا تيدحت لشف ةلاح
رايتلا كلس ليصوت بجي .ىرخأ ةرم هثيدحت
Soundbar ـب صاخلا )ةقاطلا كلس وأ( ددرتملا
أدبي مث .ثيدحتلا فلم عم USB لاخدإ دنع
VFD ةشاش رهظت امنيب ىرخأ ةرم ثيدحتلا
نكل ،ا
ً
ئيش )ةيغارفلا تنسرولفلا ةشاش(
.نيتقيقد دعب يهتنيس ثيدحتلا
7 . زاهج ع كب ةصاخلا تادادعا ةداعتساب مق
.Soundbar

32 - ARA
UPDATE ضرع مدع لاح يف
1 . USB زاهج لصفاو Soundbar ليغشت فاقيإب مق
ـ ب USB ذفنم نم ثيدحتلا تافلم ع يوتحملا
.هب هليصوت دعأ مث Soundbar
2 . Soundbarـب صاخلا يئابرهكلا رايتلا كلس لصفا
.Soundbar ليغشتب مق مث هليصوت دعأو
تاظحم
• اذإ حيحص لكشب ةتباثلا جماربلا ثيدحت لمعي دق
ةنزخم Soundbar اهمعدي يتلا توصلا تافلم تناك
.USB زاهج يف
• قيبطت ءانثأ USB زاهج ةلازإب مقت وأ ةقاطلا لصفت
.تاثيدحتلا
• يف مدختسملا دادعإ ليغشت أدبي ،ثيدحتلا لامتكا دعب
كنكميل كتادادعإ نيودتب كحصنن اذل .Soundbar زاهج
ثيدحت نأ ركذت .ثيدحتلا دعب ةلوهسب اهنييعت ةداعإ
.كلذك توصلا مخضم لاصتا طبض ديعي ةتباثلا جماربلا
توصلا مخضمب لاصتا ءاشنإ ةداعإ مدع لاح يف
.16 ةحفصلا عجار ،ثيدحتلا دعب ا
ً
يئاقلت
ةركاذ تناك ام اذإ ققحتف ،جماربلا ثيدحت لشف اذإ
. مأ ةبيعم USB
• Mac OS ليغشتلا ماظن يمدختسم ع يغبني
.USBـلل قيسنتك )FAT( MS-DOS مادختسا
• ةهج ع
ً
ءانب ،USB قيرط نع ثيدحتلا رفوتي دف
.USB زاهج عينصت
33 - ARA
13 اهحصإو لكاشملا فاشكتسا
.يلي ام عجار ،ةدعاسملا نع ثحبلا لبق
.لمعي Soundbar زاهج
: زاهج ءابرهك كلس ناك اذإ امم ققحت
يف حيحص لكشب هلاخدإ مت Soundbar
.ذفنملا
.عطقتم لكشب لمعي Soundb ar زاهج
: .ىرخأ ةرم هلخدأ ،ءابرهكلا كلس ةلازإ دعب
: يجراخلا زاهجلا ليغشت فاقيإ/ليغشتب مق
.ا
ً
ددجم لواحو
: ليغشت فاقيإ متي ،ةراشإ دوجو مدع ةلاح يف
ةينمز ةرتف دعب ا
ً
يئاقلت Soundbar زاهج
).7 ةحفص عجار( .ةقاطلا ل
غش .ةددحم
.لمعي دع
ُ
ب نع مكحتلا زاهج ناك اذإ
: نع مكحتلا زاهج إ Soundbar زاهج ه
جو
.ةرشابم دع
ُ
ب
: .ةديدج ىرخأ تايراطبب تايراطبلا لدبتسا
.Soundbar زاهج نم توص يأ جرخي
: ضفخنم Soundbar زاهج توص ىوتسم
.توصلا ىوتسم طبضا .تماص وأ ةياغلل
: زا ه ج وأ STB( يجراخ زاهج يأ ليصوت دنع
،)ك لذ إ ام وأ لو م حم زاه ج وأ Bluetooth
.يجراخلا زاهجلا توص ىوتسم طبضا
: زاهج ددح ،نويزفلتلا نم توصلا جارخ
) ( ةيسيئر :Samsung نويزفلت( .Soundbar
← ) ( تادادعا ← ةمئاق ←
تو صلا جرخم ← تو ص لا ← ) ( تادادعا لك
)Soundbar زاهج ددح ←
: زاهجب ةلصتملا لبكلا ةلصو نوكت دق
مقو لبكلا لصفا .ةمكحم ريغ Soundbar
.ىرخأ ةرم هليصوتب
: مث ،هليصوت دعأو ،ا
ً
مامت ءابرهكلا كلس لصفا
.ةقاطلا لغش
: .ا
ً
ددجم لواح مث جتنملا نحش ةئيهتب مق
).31 ةحفص عجار(
.توصلا مخضم نم توص يأ جرخي
: ءزجلا يف LED رشؤم ناك اذإ امم ققحت
نوللاب لمعي توصلا مخضم نم يفلخلا
مخضمو Soundbar ليصوت دعأ .قرزا
قرزا نوللاب ضموي رشؤملا ناك اذإ توصلا
.رمحا نوللا إ ءطبب هئوض لوحت وأ
).17 ةحفص عجار(
: نيب قئاع كانه ناك اذإ ةلكشم كهجاوت دق
إ ةزهجا لقنا .توصلا مخضمو Soundbar
.قئاوعلا نع ا
ً
ديعب ناكم
: لسرت يتلا ىرخا ةبيرقلا ةزهجا ببستت دق
دعبأ .لاصتا عطق يف يكلس ددرت تاراشإ
.ةزهجا هذه لثم نع تاعامسلا
: هليصوت دعأو يئابرهكلا رايتلا سباق لصفا
.ىرخا ةرم
.ا
ً
دج ضفخنم توصلا مخضم توص ىوتسم
: ىوتحملل صا توصلا ىوتسم نوكي دق
طبض لواح .ا
ً
ضفخنم هليغشتب موقت يذلا
).12 ةحفص عجار( .توصلا مخضم ىوتسم
: .كنم برقلاب توصلا مخضم تاعامس رضحا
Bluetooth ةزهجأ ةمئاق يف Soundbar زاهج رهظي
.نويزفلتلا يف
: زاهجب صاخلا ةقاطلا كلس لصفا
لواح مث ،هليصوت دعأو ا
ً
مامت Soundbar
).20 ةحفص عجار( .ىرخأ ةرم ثحبلا
: Soundbar زاهجو نويزفلتلا ليصوتب مق
"D.IN" عضو ددحو ،يرصب لبك مادختساب
دوجوملا )ردصملا( رزلا ع طغضلاب
ناك اذإ امم ققحت .Soundbar زاهج عأ
لواحو ،يعيبط لكشب لمعي توصلا جارخإ
).20 ةحفص عجار( .ىرخأ ةرم ثحبلا
34 - ARA
.Bluetooth ربع لصت
ُ
م ريغ Soundbar زاهج
: إ ليدبتلاب مق ،ديدج زاهج ليصوت دنع
رز ع طغضا( .لاصتل "BT PAIRING"
طغضا وأ دع
ُ
ب نع مكحتلا زاهج يف PAIR
زاهجلا عأ دوجوملا )ردصملا( رز ع
).ل قا ع
ٍ
ناو ث 5 ةدمل
: ،رخآ زاهجب لصتم Soundbar زاهج ناك اذإ
.زاهجلا ليدبتل
ً
وأ زاهجلا اذه لصفا
: توص ربكم ةمئاق ةلازإ دعب هليصوت دعأ
نويزفلت( .لاصتل زاهجلا ع Bluetooth
← ة مئا ق ← ) ( ةيسيئر :Samsung
← ) ( تادادعا لك ← ) ( تادادعا
Bluetooth ← توصلا جرخم ← توصلا
)تاعامسلا ةمئاق
: مث هليصوت دعأو يئابرهكلا رايتلا سباق لصفا
.ا
ً
ددجم لواح
: .ا
ً
ددجم لواح مث جتنملا نحش ةئيهتب مق
).31 ةحفص عجار(
.Bluetooth ربع لاصتا دنع توصلا عطقني
: ثودح يف ةزهجا ضعب ببستت نأ نكمي
زاهج نم ا
ً
دج ةبيرق تناك اذإ يكلس لخادت
ةزهجأ لاثملا ليبس ع Soundbar
ريغو ةيكلسلا تاهجوملاو فيوركياملا
.كلذ
: Bluetooth ربع لصتملا كزاهج كرحت اذإ
ببستي دقف ،Soundbar زاهج نع ا
ً
دج ا
ً
ديعب
برقأ زاهجلا لقنا .توصلا عاطقنا يف كلذ
.Soundbar زاهج نم
: ةلاح يف توصلا يف عطقت ثدحي دق
لاسرا زاهجل كمسج نم ءزج ةسمم
وأ Bluetooth ةينقتب لمعي يذلا لابقتساو
نم ققحت .يندعم ثاثأ ع جتنملا تيبثت مت
.مادختسا طورشو تيبثتلا ةئيب
ليغشت درجمب Soundbar زاهج ليغشت مدع ةلاح يف
نويزفلتلا
: ءانثأ Soundbar زاهج ليغشت فاقيإ دنع
ةنمازم ليطعت متي ،نويزفلتلا ةدهاشم
ليغشت فقوأ .نويزفلتلا عم ةقاطلا
.
ً
وأ نويزفلتلا
14 صيخارتلا
Manufactured under license from Dolby
Laboratories. Dolby, Dolby Audio, and the
double-D symbol are trademarks of Dolby
Laboratories Licensing Corporation.
Condential unpublished works. Copyright
1992-2019 Dolby Laboratories. All rights
reserved.
For DTS patents, see http://patents.dts.com.
Manufactured under license from DTS
Licensing Limited. DTS, Digital Surround,
Virtual:X, and the DTS logo are registered
trademarks or trademarks of DTS, Inc. in the
United States and other countries. © 2021 DTS,
Inc. ALL RIGHTS RESERVED.
The Bluetooth® word mark and logos are
registered trademarks owned by Bluetooth
SIG, Inc. and any use of such marks by
Samsung Electronics Co., Ltd. is under license.
Other trademarks and trade names are those
of their respective owners.

35 - ARA
]ENERGY STAR[
ENERGY STAR qualied model only
– Your Samsung product is ENERGY STAR
qualied in its factory default setting.
Change to certain features, settings and
functionality in this product can change
the power consumption, possibly beyond
the limits required for ENERGY STAR
qualication.
– Environmental Protection Agency and
Department of Energy. ENERGY STAR is a
joint program of the Government agencies,
designed to promote energy efcient
products and practices.
Refer to www.energystar.gov for more
information of the ENERGY STAR Program.
ENERGY STAR qualied model only
)Applicable to Thin Client models only(
As an ENERGY STAR® Partner, SAMSUNG has
determined that this product meets the
ENERGY STAR® guidelines for energy
efciency.
– The ENERGY STAR Program has been to
reduced greenhouse gas emissions and
save energy through voluntary labeling.
– Power management setting of this
product have been enabled by default, and
have various timing setting from 1 minutes
to 5 hours.
– The product can wake with a button press
on the chassis from sleep mode.
ENERGY STAR qualied model only (The other
models)
– As an ENERGY STAR Partner, Samsung has
determined that this product or product
models meets the ENERGY STAR guideline
for energy efciency.
15 صيخرت راعشإ
حوتفملا ردصملا
رداصملاب ةقلعتملا ةلئسا تابلطو تاراسفتسا لاسر
Samsung Open Source ـب لصتا ،ةحوتفملا
)http://opensource.samsung.com(
16 نع ةماه ةظحم
ةمدخلا
ليلد يف ةيحيضوتلا تاموسرلاو لاكشا ريفوت مت
تاموسرلا هذه فلتخت دقو طقف عجرمك اذه مدختسملا
.يلعفلا جتنملا رهظم نع

36 - ARA
17 ليلدلاو تافصاوملا
تافصاوملا
زارطلا مساHW-C450
USB5V/0.5A
نزولامجك 1.4
)قمعلا × عافترا × ضرعلا( داعباملم 75.0 x 59.0 x 858.8
ليغشتلل ةبسانملا ةرارحلا ةجرد
ةيوئم ةجرد +35 إ ةيوئم تاجرد +5 نم
ليغشتلل ةبسانملا ةبوطرلا ةجرد75 % إ 10 %
ربكملا
جرخلا ةقاط لدعم
موأ 6 ،2 x تاو 40
ةموعدملا ليغشتلا غيص
).DTS ةغيصب DTS 2.0 توصلا ماظن ليغشت(
Dolby Audio™ ،LPCM 2ch
DTS ،)Dolby® Digital ماظن معدي(
توصلا مخضم مساPS-WC45T
نزولامجك 4.5
)قمعلا × عافترا × ضرعلا( داعباملم 295.0 x 343.0 x 184.0
ربكملا
جرخلا ةقاط لدعم
تاو 220
تاظحم
• .راطخإ نود تافصاوملا ليدعت يف قحلاب ةدودحملا سكينورتكلإ جنوسماس ةكرش ظفتحت
• .ةيبيرقت داعباو نزولا ميق
© 2023 Samsung Electronics Co., Ltd. All rights reserved.
Contact SAMSUNG WORLD WIDE
If you have any questions or comments relating to Samsung products, please contact the SAMSUNG customer
care Centre.
Country
Samsung Service Centre
Web Site
`
Middle East
EGYPT
08000-7267864
16580
WHATSAPP 010 000 16580
www.samsung.com/eg/
support
IRAN
021-8255 [CE]
021-42132 [HHP]
www.samsung.com/iran/
support
ISRAEL
*6963
www.samsung.com/il/
support/
PALESTINE
1800-792447
www.samsung.com/ps/
support/
SAUDI
ARABIA
8002474357 (08:00 ~ 20:00
HELP) From Inside Saudi Arabia
+966112614718 From outside
Saudi Arabia (Call charges may be
applied )
Digital services (24/7 HELP)
www.samsung.com/
sa_en/support (English)
www.samsung.com/sa/
support (Arabic)
PAKISTAN
0800-SAMSUNG (7267864)
www.samsung.com/pk/
support
U.A.E
800-SAMSUNG
(800 - 726 7864)
www.samsung.com/ae/
support (English)
www.samsung.com/
ae_ar/support (Arabic)
OMAN 800-SAM CS (800-72627)
KUWAIT 183-CALL (183-2255)
BAHRAIN 8000-GSAM (8000-4726)
QATAR 800-CALL (800-2255)
TÜRKİYE 444 77 11
www.samsung.com/tr/
support
JORDAN
0800-22273
06-577-7444
WHATSAPP +962-79-777-7421
www.samsung.com/
levant/supportLEBANON
1598
WHATSAPP +962-79-777-7421
IRAQ
80010080
WHATSAPP +962-79-777-7421
ALGERIA
3004
www.samsung.com/n_
africa/support
TUNISIA
80 100 012
MOROCCO 080 100 22 55
Country
Samsung Service Centre
Web Site
`
Africa
SOUTH AFRICA 0860 SAMSUNG (726 7864)
www.samsung.com/za/
support
NAMIBIA 08197267864
www.samsung.com/
africa_en/support
MAURITIUS 800 5050
REUNION 0262 50 88 80
www.samsung.com/
africa_fr/support
MOZAMBIQUE 847267864
www.samsung.com/
africa_pt/support
NIGERIA 0800-726-7864
www.samsung.com/
africa_en/support
GHANA 0800-100-077
COTE D’IVOIRE 8000-00-77
www.samsung.com/
africa_fr/support
SENEGAL 800-00-0077
CAMEROON 67095-0077
KENYA 0800 545 545
www.samsung.com/
africa_en/support
UGANDA 0800 300 300
TANZANIA 0800 780 089
SUDAN 1969
www.samsung.com/eg/
support