Installation & Owners Manual
Model 1137
Humidifier
GFI #5137
Read and Save These Instructions
• Installationbyanyoneotherthanaqualiedcontractorvoidsthewarranty.
• Productdesignedforresidentialinstallationonly.Commercialinstallationvoidswarranty.
• Modicationoralterationofproduct,parts,installationinstructionsorlocalsafetycodesvoidswarranty.
• Readourfullwarrantypolicyattheendofthisdocument.
®
®
Canadian General Filters, Ltd.
400 Midwest Rd.
Toronto, ON M1P3A9 Canada
Toll Free: (888) 216-9184
www.generalaireiaq.ca
General Filters, Inc.
43800 Grand River Avenue
Novi, Michigan 48375
Toll Free: (866) 476-5101
www.generalaire.com

2
Model 1137 Humidier Installation Manual
Breathe Healthier! Residential Whole House Indoor Air Quality
Subject Page #
Specications 3
Unit Location 3
Additional Materials That May Be Necessary 3
Installation 3
Installation Cont. 4
Saddle Valve / Solenoid Valve Installation 4
Installation Cont. 5
Installing / Wiring The Control 5-6
Installation Cont. 7
How the Humidier Works 7
Maintenance 8
Parts Drawing 8
Trouble Shooting 9
FAQ’s 10
Warranty Registration 11
Limited Warranty 11-12
1137 Table of Contents
WARNING!
This symbol indicates: IMPORTANT INSTRUCTIONS!
Failure to heed them can result in serious injury or death.
CAUTION!
This symbol indicates: IMPORTANT INSTRUCTIONS!
Failure to heed them can result in serious injury or material property damage.
!
!
3
www.generallters.com
Model 1137 Humidier Installation Manual
®
®
Unit Location
• WARNING: Disconnect electrical power before beginning installation.
• Do not install where temperatures fall below 32° F or where plenum temperatures exceed 200° F. When wiring
into a multi-speed blower circuit see Step 7D.
• INSTALLATION: For maximum evaporative capacity, install this humidier on the warm air supply plenum.
When wiring into a two-speed blower circuit see Step 6C & 6D.
Additional Materials That May Be Necessary
1. 1/4" diameter plastic supply tubing or 1/4" copper supply tubing for hot water applications
2. Air pressure switch Model #12500 (GFI #7021) suggested
3. Current sensing relay Model #GA50 (GFI #7026) suggested
4. Junction box, 115 V. grounding outlet, cover and wire
5. 5/8" Drain tubing. 1099-16 (GFI #7046) suggested
Specifications
• Model: 1137 Fan-Assist Evaporative Humidier (GFI #5137)
• Type: Fan-Assist Evaporative
• GPD: 18 Based on 120° F Plenum Temperature
• Warranty: 5 Years
• Replacement Vapor Pad
®
: 990-13 (GFI#7002)
(Replace 1-2 times per season)
• Dimensions: 14” H x 16” W x 11” D
• Weight: 19 Lbs.
• Home Size: To 3,000 Sq. Ft.
• Installation: Warm Air Plenum
• Plenum Opening: 15” W X 9-3/4” H
• Bypass Duct: 6”
• Pallet Qty: 21
• Cabinet Construction: UV-Stable Automotive Grade Plastic
• Humidistat: Models: MHX3C (Included)
• Voltage: 120V
• In Box: Humidier, humidistat, Installation Instructions, Vapor Pad
®
, Parts Kit, Water
Tube Kit, Humidistat Wire, Drain Pan, Power Supply Cord, Water Distribution Trough.
!
!
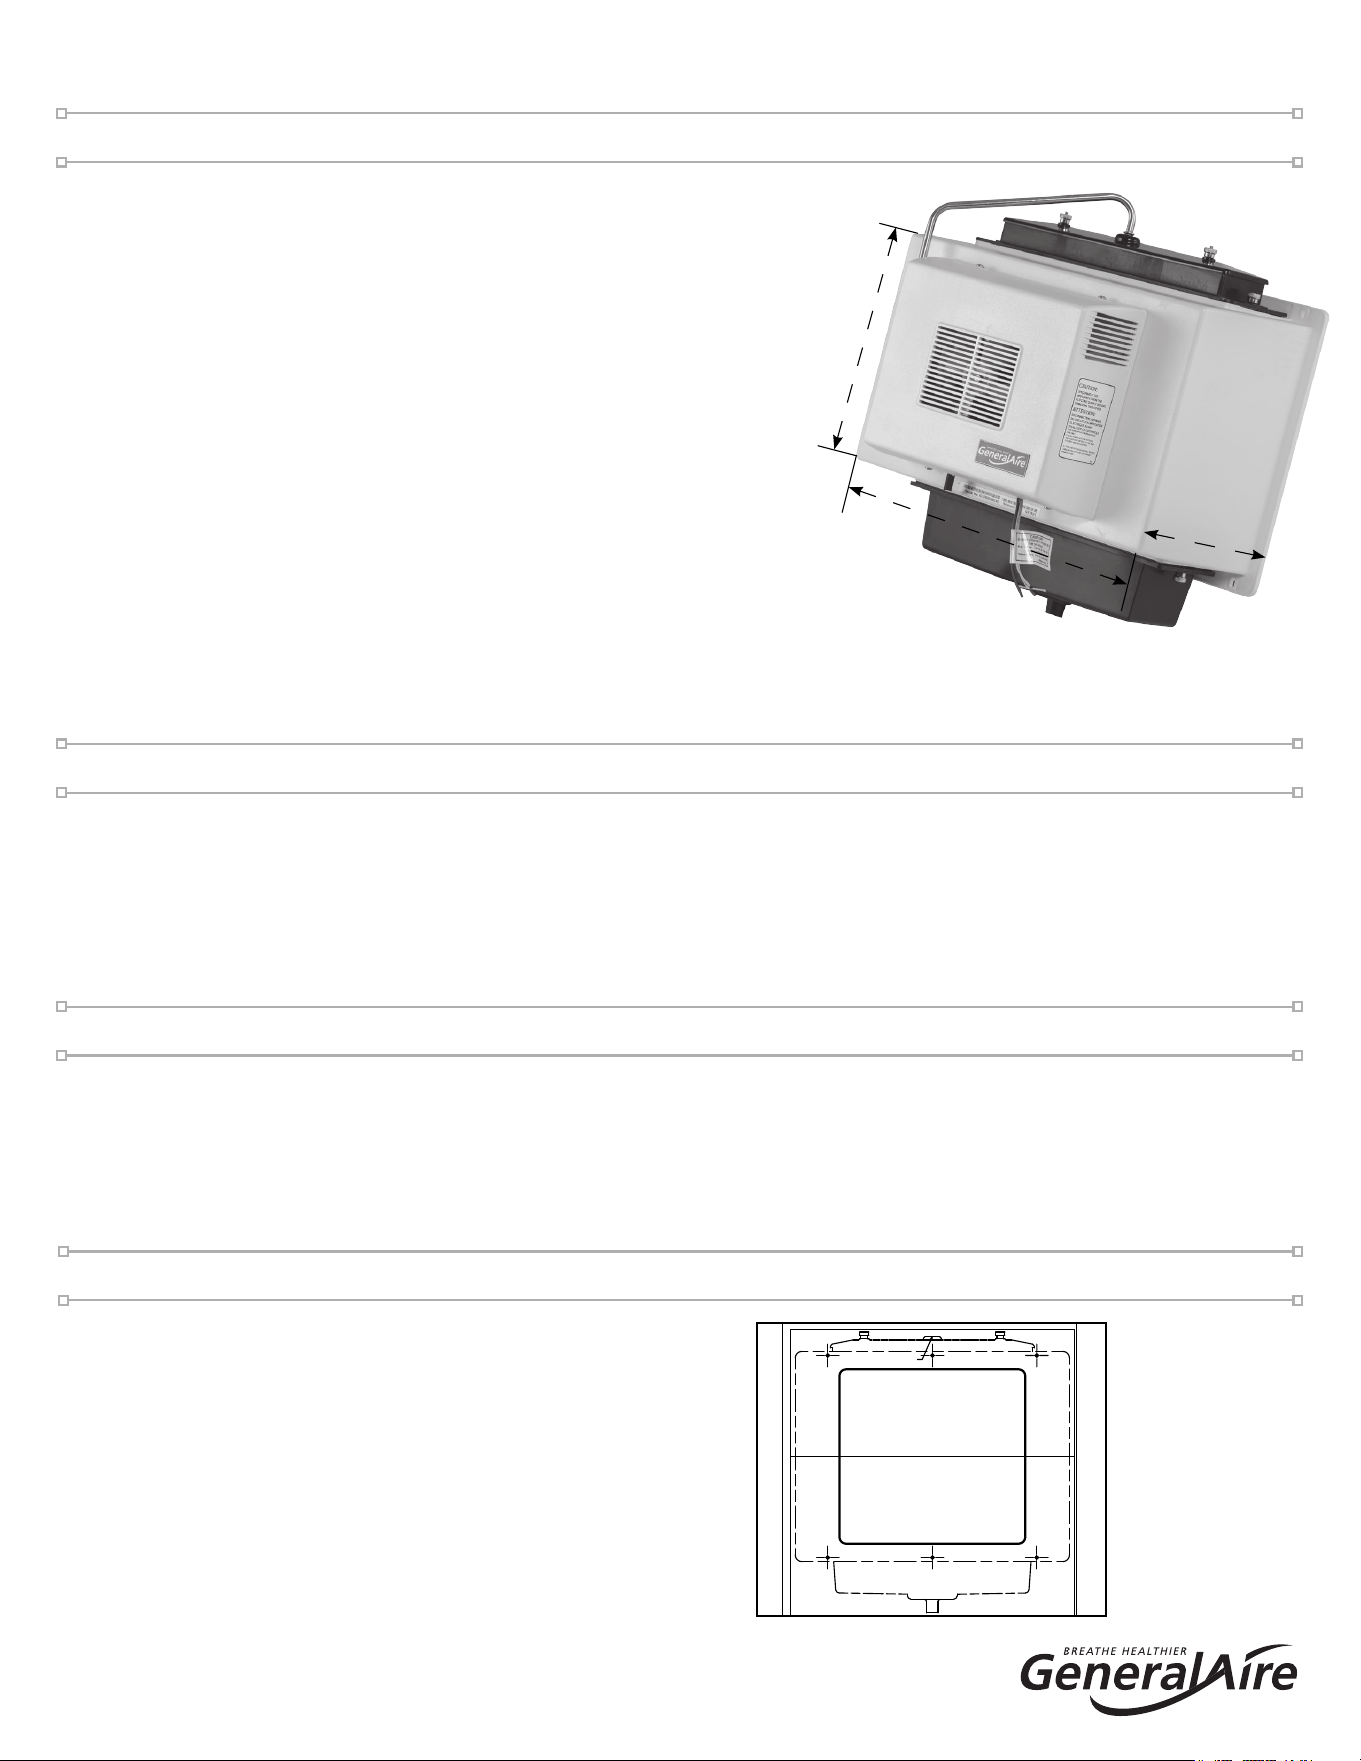
16” W
14” H
11” D
Top Of Template
TEMPLATE FOR INSTALLING
POWER HUMIDIFIER
4. TIGHTEN SCREWS ANDADJUST HUMIDIFIER UNT IL LEVEL.
5. REMARK FOUR REMAINING HOLES IF NECESSARY.
6. REMOVE HUMIDIFIER, DRILL REMAINING HOLES AND CUT OUT CENTER SECTION OF
TEMPLATE.
WHEN INSTALLING ON BASEMENTTYPE FURNACE, EXTEN DTHIS LINE
FOR LOCATING HOLE ONADJACENT PLENUM
IF FURNACE JACKET EXTENDS MORET HAN 3" OUTWARD FROM THE PLENUM SURFACE
ALLOW 4" CLEARANCE BELOW THIS LINE FOR EASYA CCESS TO DRAIN HOSE CONNECTION.
CUT ON THIS LINE
TEMPLATE NO. 1137
ALLOW 2 1/2 INCHES CLEARANCE
ABOVE THIS SURFACE FOR SERVICING
FOLLOW INSTRUCTIONS PACKED WITH HUMIDIFIER
1. REMOVE PROTECTIVE PAPER FROM BACK OF TEMPLATEAND STICK IN LEVEL POSITION.
2. CENTER PUNCH AND DRILLTHE FOUR SIDE MOUNTING HOLES WITH A 1/8 " DIA. DRILL.
3. HANG HUMIDIFIER FROM FOUR SIDE SCREWS AND INSTALL DRAIN PAN, EVAPORATOR
PADAND DISTRIBUTORT ROUGH.
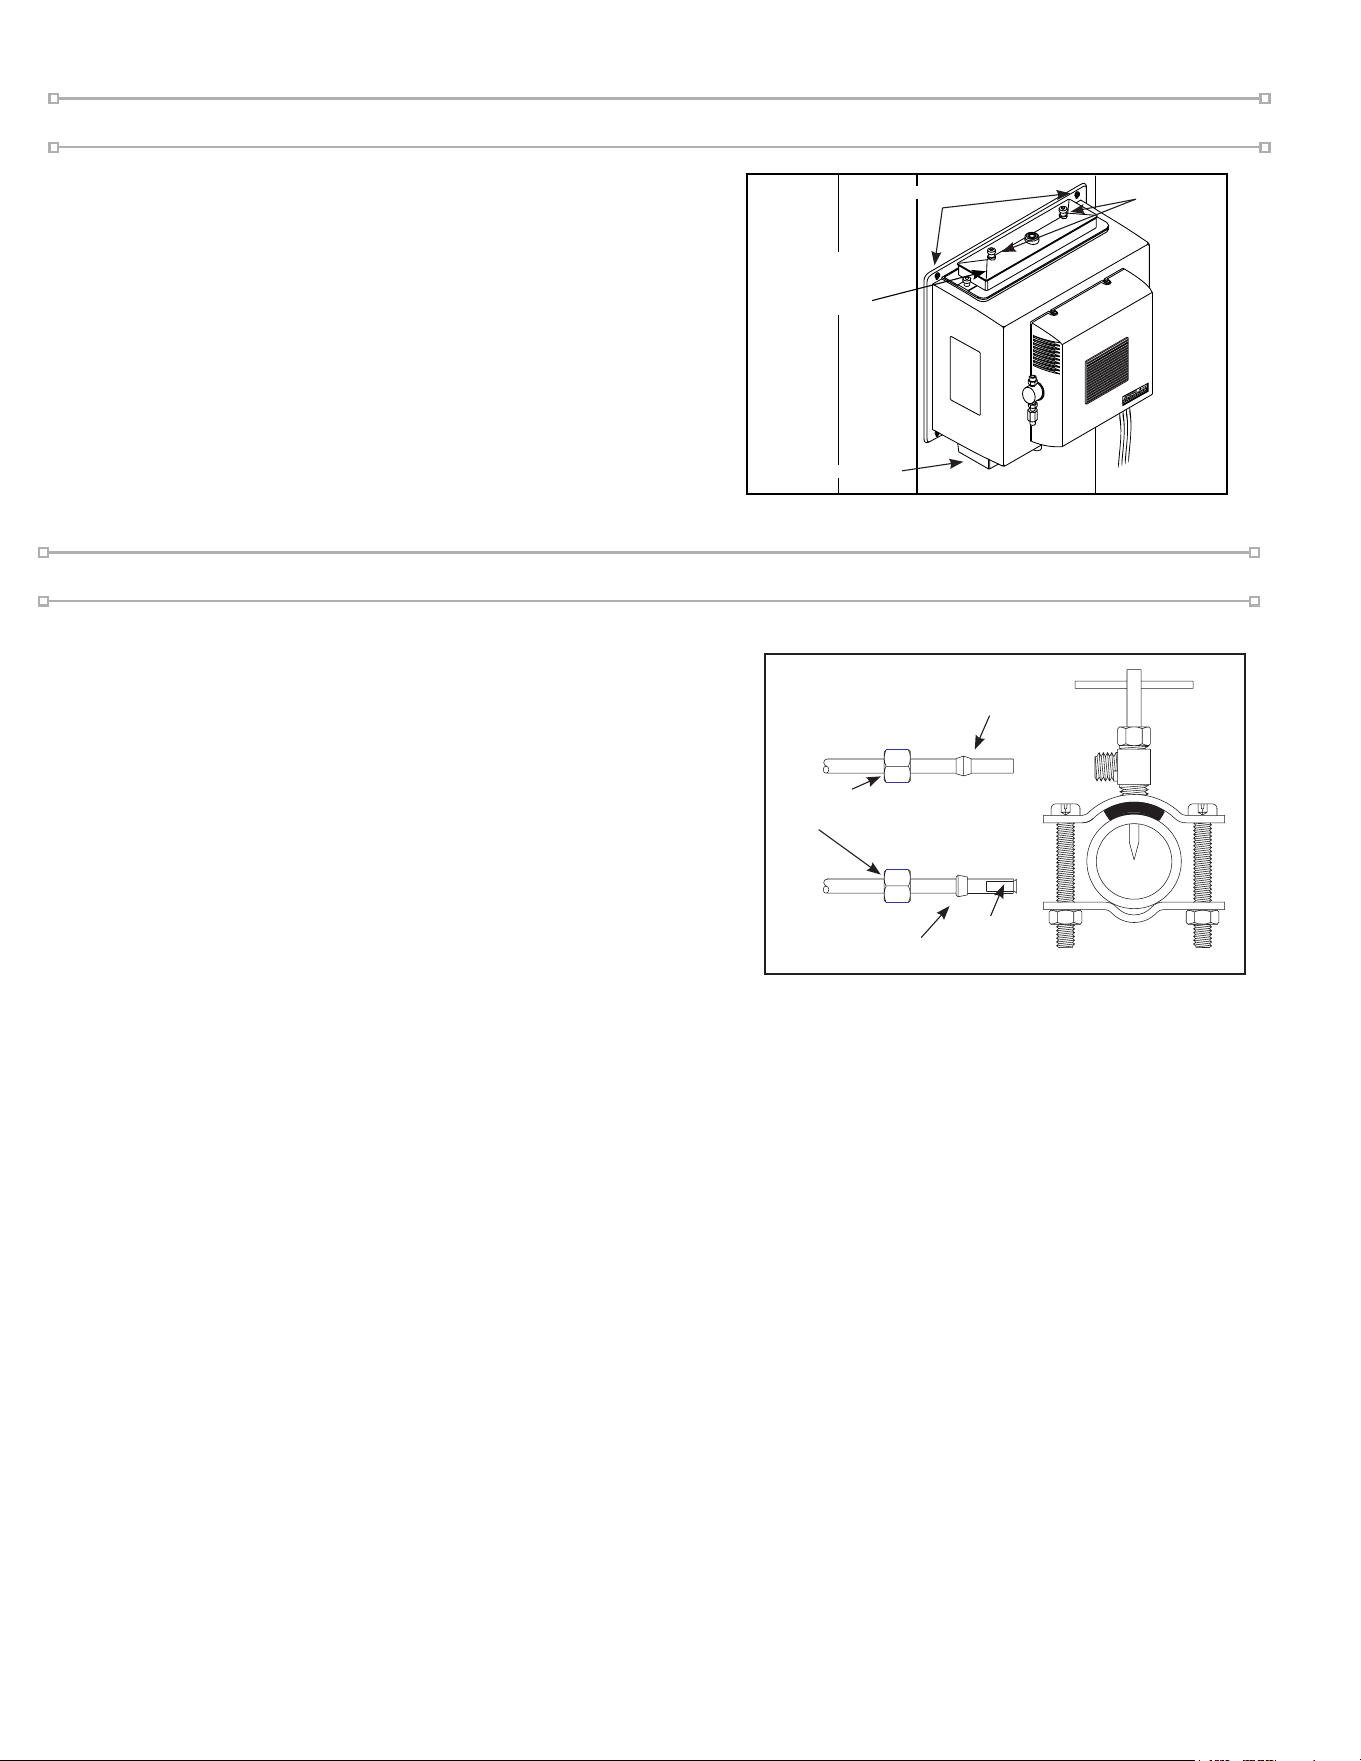
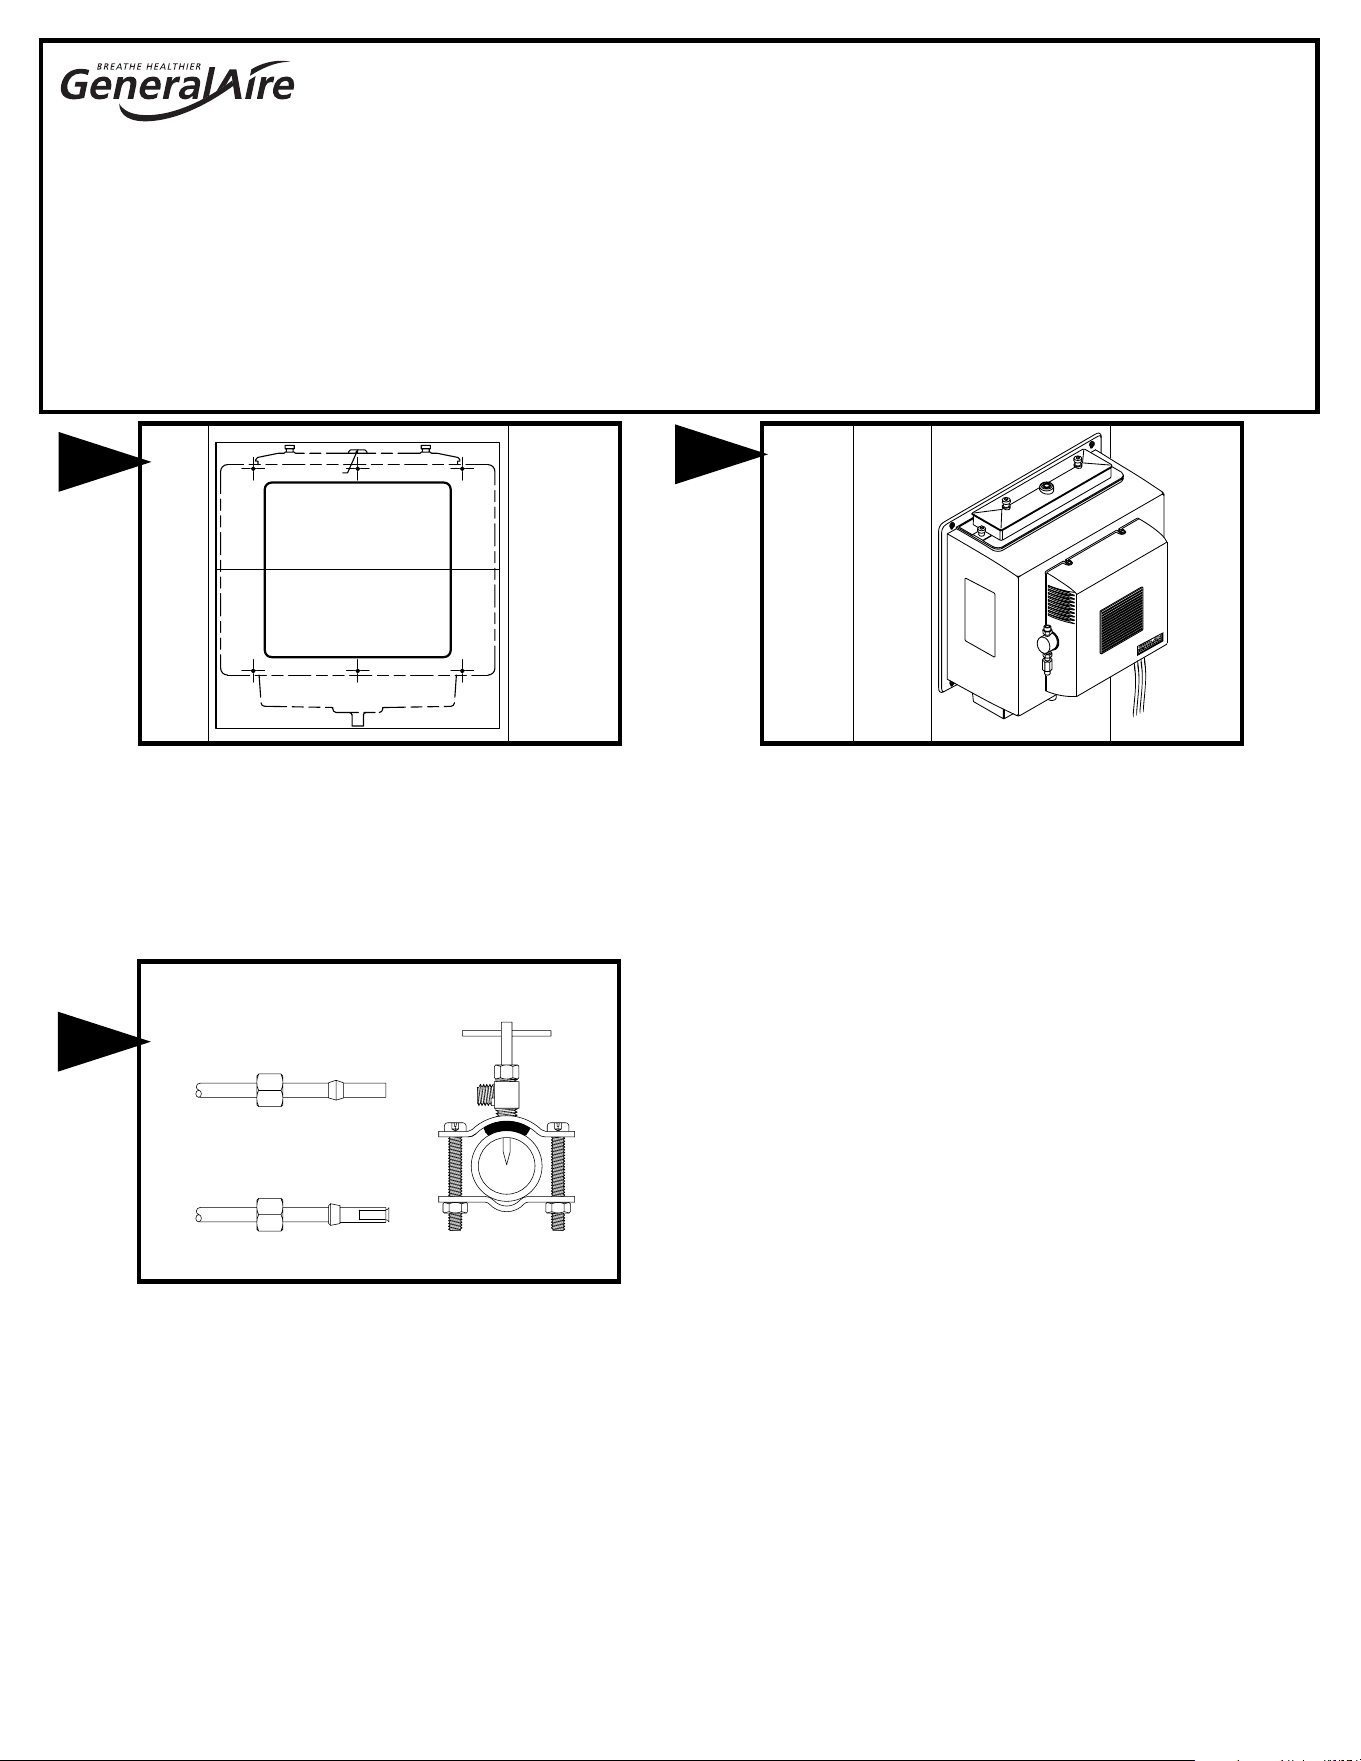
1. Select location on vertical surface of warm air plenum for
mounting humidier. Stick mounting template in place
making sure the template is level.
CAUTION: Do not install humidier where the blanked off
ends of a cooling coil will restrict air ow to the humidier.
Installation
4
Model 1137 Humidier Installation Manual
Breathe Healthier! Residential Whole House Indoor Air Quality
Installation Cont.
2. Cut out center section. Install one cabinet retaining clip in
each of the two top holes to assist holding cabinet while
installing six cabinet screws. Install drain pan, evaporator
pad and distributor trough using thumb nuts provided.
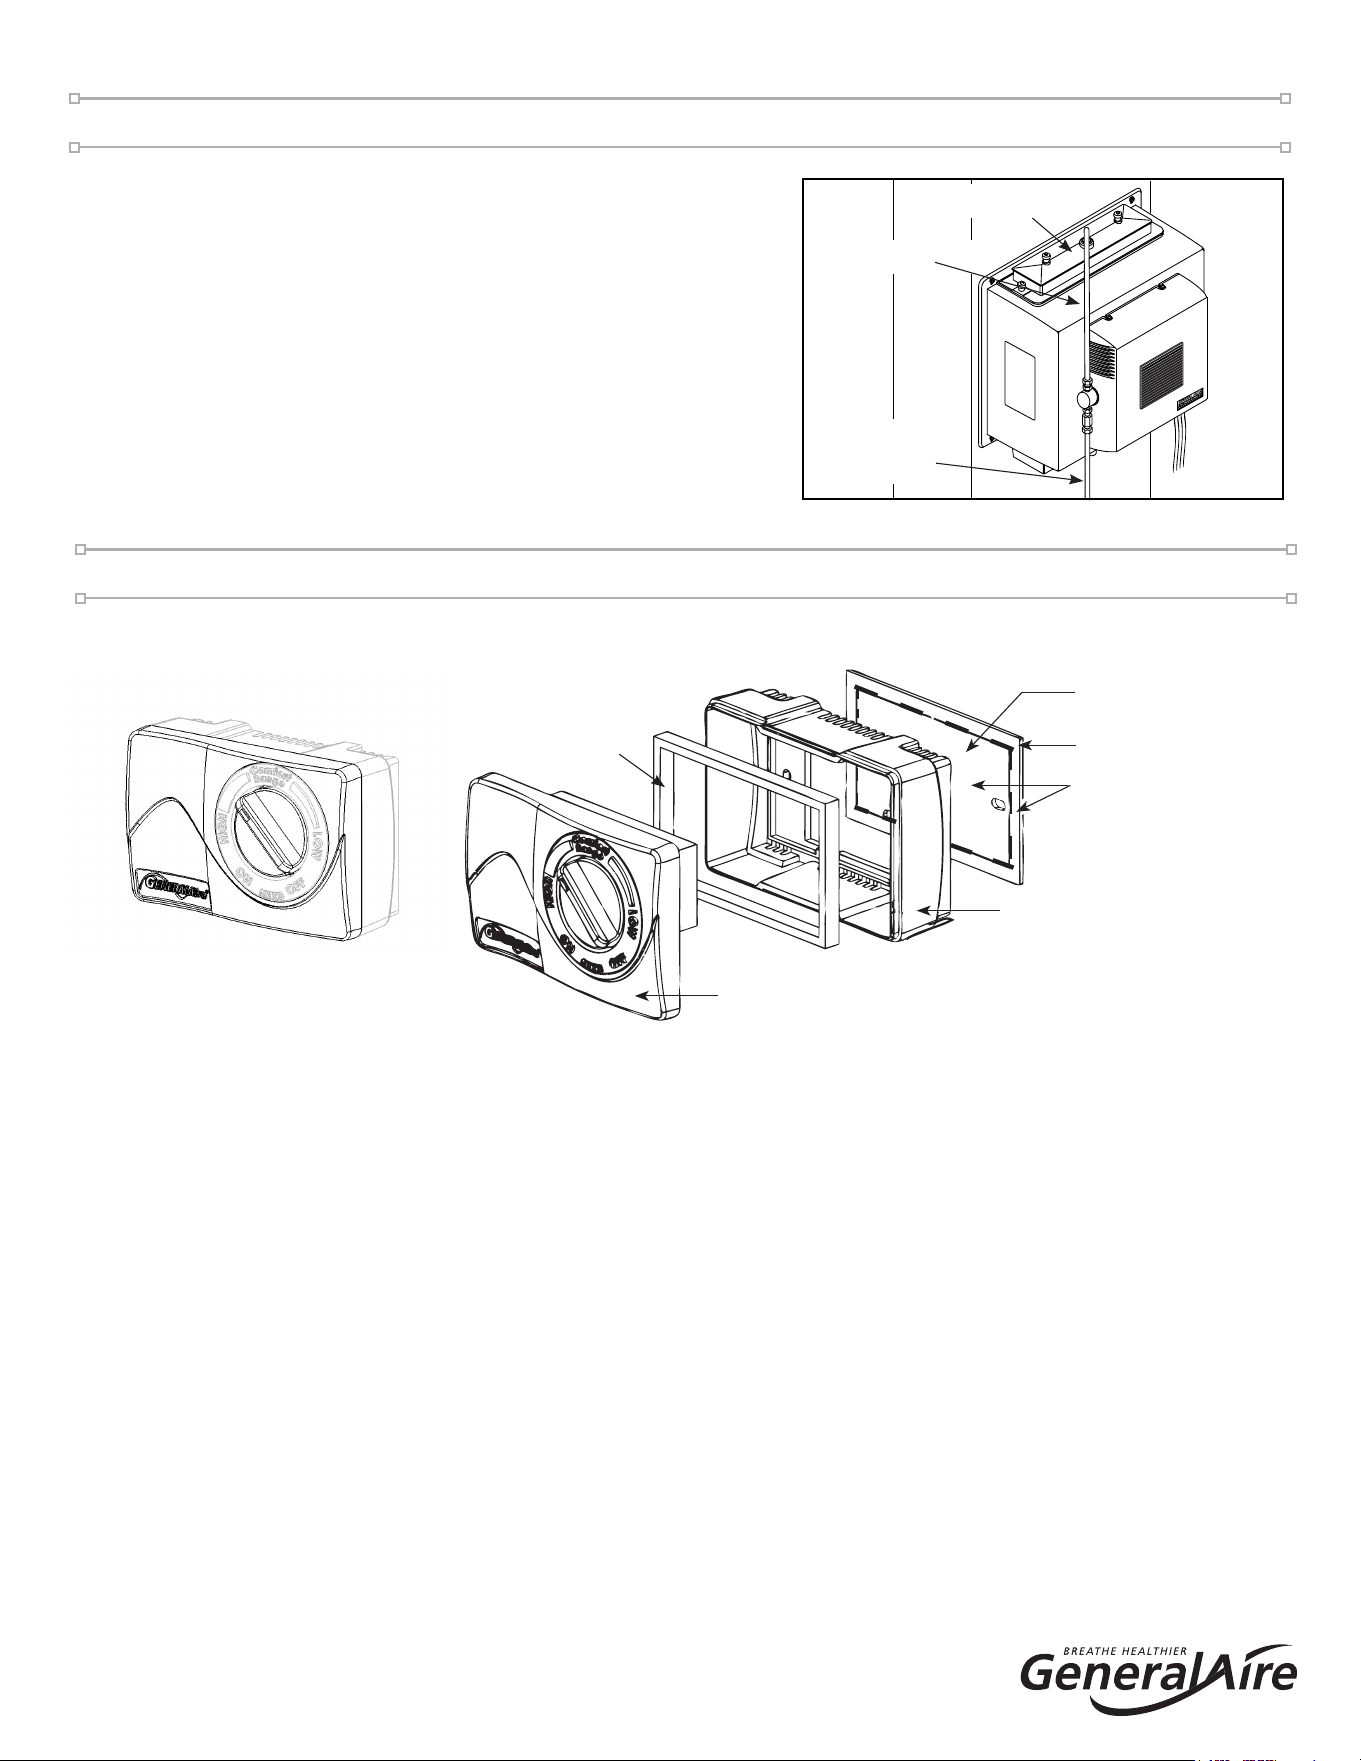
3. Mount the self tapping saddle valve on either a cold or hot
water pipe. A side or top mount is best to avoid clogging from
pipe sediment. Connect 1/4" O.D. tubing to the saddle valve.
Copper tubing requires a brass compression nut and brass
sleeve. Plastic tubing requires a brass insert inside the tubing,
a plastic sleeve on the outside with a brass compression nut.
!
Saddle Valve / Solenoid Valve Installation
Copper Pipe:
1. Retract piercing pin into valve body by turning handle
counterclockwise.
2. Screw valve body into upper bracket and tighten.
3. Place rubber gasket over piercing pin.
4. Assemble saddle valve over copper pipe using enclosed screws,
nuts and lower bracket.
5. Tighten screws evenly and firmly. Brackets should be parallel.
6. Complete compression connection to saddle valve outlet.
7. Turn handle clockwise to pierce tubing and close saddle valve.
8. Turn handle counterclockwise to open saddle valve, leave open
for several seconds to flush dirt from pipe and tubing.
Steel, Brass & Hard Plastic Pipe:
1. Shut off water supply and drain pipe.
2. Turn handle clockwise to expose piercing pin and close
saddle valve.
3. Place rubber gasket over piercing pin.
4. Drill 1/8" hole in pipe.
5. Assemble saddle valve over steel, brass or hard plastic
pipe using enclosed
screws, nuts and lower bracket.
6. Tighten screws evenly and firmly. Brackets should be
parallel.
7. Complete compression connection to saddle valve outlet.
8. Turn handle counterclockwise to open saddle valve,
leave open for several seconds to flush dirt from pipe
and tubing.
Threaded Pipe Fittings:
1. Turn handle clockwise to expose piercing pin and close
saddle valve.
2. Seal valve body threads using pipe tape or sealant.
3. Install valve into 1/8" NPT fitting.
4. Complete compression connection to saddle valve outlet.
5. Turn handle counterclockwise to open saddle valve, leave
open for several seconds to flush dirt from pipe and tubing.
Cabinet Screws
Thumb Nuts
Drain Pan
Distributor
Trough &
Cover
CAUTION: Turn off water supply.
CAUTION: Do not use plastic tubing on hot water or in
contact with any hot plenum surface or duct. Installation
of this saddle valve must meet or exceed local codes and
ordinances.
!
COPPER
TUBING
PLASTIC
TUBING
Plastic
Sleeve
Brass
Insert
Brass
Sleeve
Compression
Nut
5
www.generallters.com
Model 1137 Humidier Installation Manual
®
®
Installation Cont.
4. Assemble distributor tube so that it is directed into the
center opening of the distributor trough cover.
5. Connect 1/4" water supply tube to brass lter at inlet of
solenoid.
CAUTION: Do not use plastic tubing in contact with any
hot plenum surface or duct. If using plastic tubing, use
tube support provided.
!
Installing / Wiring The Control
Distributor Tube
(Metal)
Water
Supply
Tube
Distributor
Trough Cover
!
WARNING: ALL WIRING SHOULD COMPLY WITH LOCAL ELECTRICAL CODES.
Thin Gasket
Face
FIG. 1
WALL MOUNT: Use
Outer & Inner Portions
DUCT MOUNT: Use
ONLY Outer Portion
Mounting
Base
Thick Gasket
DUCT MOUNT ONLY
1. Locate the humidistat at least 24" upstream of the
humidier or bypass on the return air duct. Avoid areas
of direct radiation like secondary heat exchangers in the
fan compartment.
2. Place template using level. Cut sensor hole as shown on
template. Drill four 3/32” holes (not shown).
3. Remove the housing from the base by prying with a
small screwdriver at the notch in the side of the housing.
4. Gaskets: Place the outer portion ONLY of the thin foam
gasket on the humidistat base and mount the base
with four screws. Place the thick gasket inside the wall
mount base to seal off air entering through the vents.
Low voltage wire may enter the humidistat under the
foam seal.
5. Connect wires to screw terminals on the control
assembly as shown in wiring diagram. Replace housing.
6. MHX3C: DUCT Mounting (Return Air Duct)
CAUTION: Do not install the humidistat on the warm air duct.
6. MHX3C: WALL Mounting Instructions
1. Choose a location for the humidistat about ve feet
above the oor on an inside wall with average room
temperature and humidity conditions.
2. Drill a small hole in the wall and run low voltage wiring
to the location chosen. Pull about 6” of wire through the
hole. Plug the opening to prevent drafts from affecting
the humidistat operation. Remove the housing from the
base by prying with a small screwdriver at the notch in
the side of the housing.
3. Gaskets: Place the entire outer and inner portions of the
gasket on the base as shown. Do NOT install the thick
gasket inside the base.
4. Mount the base horizontally over the wires using level.
Attach directly to the wall, using four screws provided.
5. Connect wires to screw terminals on the control assembly
as shown in wiring diagram. Replace housing.
!
6
Model 1137 Humidier Installation Manual
Breathe Healthier! Residential Whole House Indoor Air Quality
FIG. 6B WITH WITH CONSTANT POWER TO HUMIDIFIER
Use with mechanical humidistat only. Mount a junction
box and 115 volt grounded outlet. Connect the on-off
switch in series with the hot or black wire. Install a eld
supplied 24 volt relay and attach to HUM and C on the
furnace control board. Install humidistat and connect one
side to one yellow wire on humidier. Connect the other
side of the humidistat to one end of switch side of the
relay. Connect the other switch side of the relay to the
remaining yellow wire on humidier.
CAUTION: Red humidifier leads are not used
for this wiring method. Do not touch red wires
together. Damage to the humidifier will result.
6.
!
AC L
AC N
HUM
SNSR
L1
(HOT)
L2
115v.
60CY.
HUMIDIFIER CONTROL LEADS
(YELLOW WIRES)
FAN CONTROL
ON-OFF
SWITCH
SINGLE SPEED
BLOWER MOTOR
ACC
EAC
(HOT)
C
115v.
60CY.
ON-OFF
SWITCH
6A
6C
6B
GRD
HUMIDIFIER
120v. OUTLET
HUMIDIFIER
COMMON LEAD
120v. OUTLET
C
HI
LO
GA50 CURRENT
SENSING RELAY
MULTI
SPEED
BLOWER
MOTOR
6D
12500 AIR
PRESSURE
SWITCH
NO
C
L1
(HOT)
L2
115v.
60CY.
ON-OFF
SWITCH
GRD
HUMIDIFIER
120v. OUTLET
L1
(HOT)
L2
115v.
60CY.
ON-OFF
SWITCH
GRD
HUMIDIFIER
120v. OUTLET
GRD
FIG. 6A WITH FURNACE CIRCUIT BOARD
On furnaces with output terminals ACC, or EAC
check output voltage to determine that termi-
nals are 115V. Connect on-off switch in series
with the hot wire.
!
WARNING: ALL WIRING SHOULD COMPLY WITH LOCAL ELECTRICAL CODES.
FIG. 6C AIR PRESSURE SWITCH WITH TWO
SPEED BLOWER MOTOR
On furnaces with a two speed blower, the
humidier and a Model 12500 Air Pressure
Switch may be wired from a continuous 115
volt power source. Install the on/off switch
and Air Pressure Switch in series with the hot
or black wire. The Air Pressure Switch will
detect furnace operation and supply power to
the humidier accordingly.
CIRCUIT DESCRIPTION
The humidier is connected to the 120 volt AC circuit through a control relay. The secondary coil of an
isolation transformer, a diode and resistor supply 24 volts DC for the control circuit which also includes the
humidistat and relay coil. When the control circuit is completed by the humidistat, the relay closes, supplying
120 volts to the fan motor and 24 volts to the solenoid valve.
FIG. 6D CURRENT SENSING RELAY WITH TWO-SPEED
BLOWER MOTOR
On furnaces with a two speed blower, the humidier
may be wired from a continuous 115 volt power source.
Install the on/off switch in series with the hot or black
wire. Install the GA50 (GFI #7026) Current Sensing Relay
in series with the humidistat circuit. The Current Sensing
Relay will detect furnace operation and supply power to
the humidier accordingly.
Installing / Wiring Your Control Cont.
6B
(HOT)
C
115v.
60CY.
ON-OFF
SWITCH
HUMIDIFIER
120v. OUTLET
GRD
L1
YELLOW WIRES
FROM HUMIDIFIER
FURNACE
CONTROL BOARD
60CY.
24V.
C
HUM
FIELD SUPPLIED
RELAY 24V COIL, N.O.
HUMIDISTAT
C
NO
NC
6B
7
www.generallters.com
Model 1137 Humidier Installation Manual
®
®
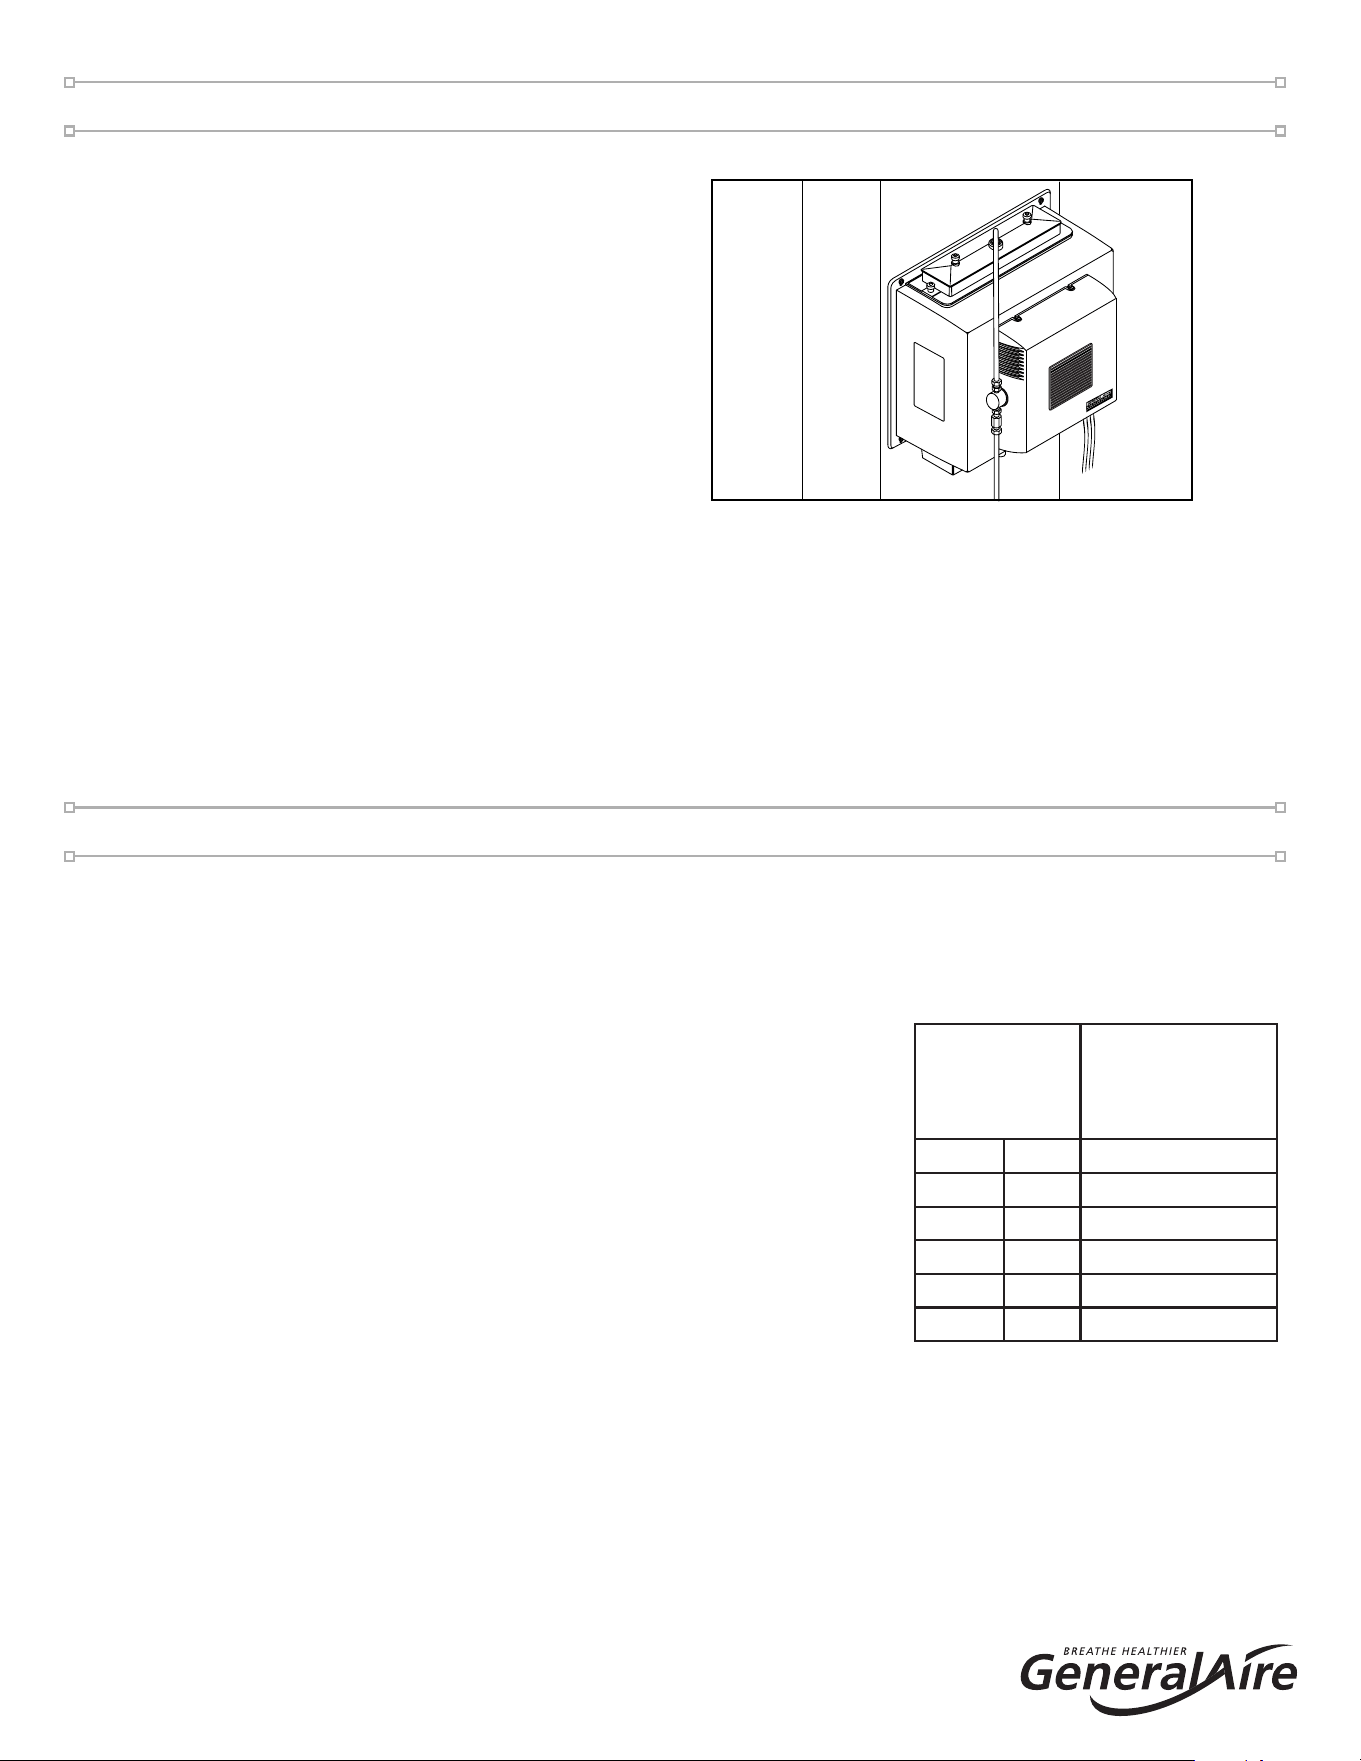
7. Connect drain hose to 5/8" spout on humidier
cabinet using hose clamp provided. Run 5/8"
hose to suitable drain such as oor drain, sewer
or laundry sink. Be sure hose has continuous
slope and is not kinked at any point.
8 Turn on water supply and plug in power cord to check operation of humidier. Set humidistat to a
demand setting. With the furnace off, the solenoid valve should be closed and the humidier fan not
running. Start the furnace, the solenoid valve should open and the humidier fan run when the blower
or burner circuit is energized. Check ow of water through distributor trough and evaporator pad. The
standard 990-16-76 orice will supply approximately 3.5 GPH of water at a line water pressure of 60
psi. For low water pressures (20-40 psi) a larger orice 990-16-75 is available to provide the same ow.
Leave humidistat set at the recommended setting.
Installation Cont.
• The operating principle of the humidier is based on the most efcient and economical means of evaporating
water to the air. The heat necessary for evaporating water is produced by the furnace.
• The water supply to the humidier is controlled by the electric solenoid valve. The solenoid valve and
humidier fan are controlled by a humidistat connected through an
isolation relay. The humidistat is designed for wall mounting in the
living area or surface mounting on the return air duct.
• Water ows through a strainer, is metered through an orice to provide
the proper amount of water, and is supplied to the evaporator pad by
the distributor trough. Air from the warm air plenum is pulled through
the wetted evaporator pad by the humidier fan and returned to the
warm air plenum to be circulated through the living area. Moisture is
evaporated to the air passing through the evaporator pad.
• Minerals are not blown into the air stream as occurs in atomizing
humidiers; they are left on the evaporator pad where a high
percentage is carried off with the waste water.
• When the humidier is installed and operating, no adjustments are
necessary other than setting the control knob on the humidistat to the desired level of humidication.
• To turn the humidier off, close water supply valve, switch electrical power off and turn humidistat off.
• CAUTION: Do not set relative humidity too high during cold weather. Excessive humidity may cause
condensation on windows or in walls. Refer to recommended settings as described in the humidistat owners
manual.
How the Humidifier Works
At Outside
Temperature
Recommended
Setting
-20°F -29°C 15%
-10°F -23°C 20%
0°F -18°F 25%
+10°F -12°C 30%
+20°F -7°C 35%
+30°F -1°C 40%
!
8
Model 1137 Humidier Installation Manual
Breathe Healthier! Residential Whole House Indoor Air Quality
Maintenance
Your Humidier is engineered to give helpful and trouble-free humidication. For maximum efciency the following
cleaning procedures should be carried out at the end of each heating season:
1. Turn off water supply and electrical power to humidier.
2. Remove water distributor tube, distributor trough, used Vapor Pad
®
and drain pan. The Vapor Pad
®
may be removed
from either the top or bottom of the humidier. Clean excessive mineral deposits from the distributor trough, drain
pan and humidier cabinet. A solution of 1/2 vinegar & 1/2 water will help loosen mineral deposits.
3. Insert a new 990-13 (GFI #7002) Vapor Pad
®
(black notch on top). Install trough and drain pan. Replace the
distributor tube to proper position over the distributor trough. Replace Vapor Pad
®
yearly for peak performance.
4. In heavy mineral areas, or if the solenoid valve fails to function, disconnect the 1/4” water supply line from the
solenoid valve. Remove the brass strainer body from the solenoid valve. Carefully pull the strainer screen 990-17
(GFI #7005) from the orice tting. Clean the mineral deposits from all parts. If the orice is clogged, it may be
opened by inserting a small needle. Reinsert the lter into the orice tting and screw the brass strainer body into
the solenoid valve.
5. Reconnect the 1/4” water line to the solenoid valve if necessary. Turn on the water supply and check all points for
leakage. The operation of the unit may be checked by starting the furnace. The humidier operates only when the
furnace blower is running or the burner circuit is energized. The humidier is now ready for operation.
6. During the summer, turn off water supply and electrical power to humidier. Close air damper.
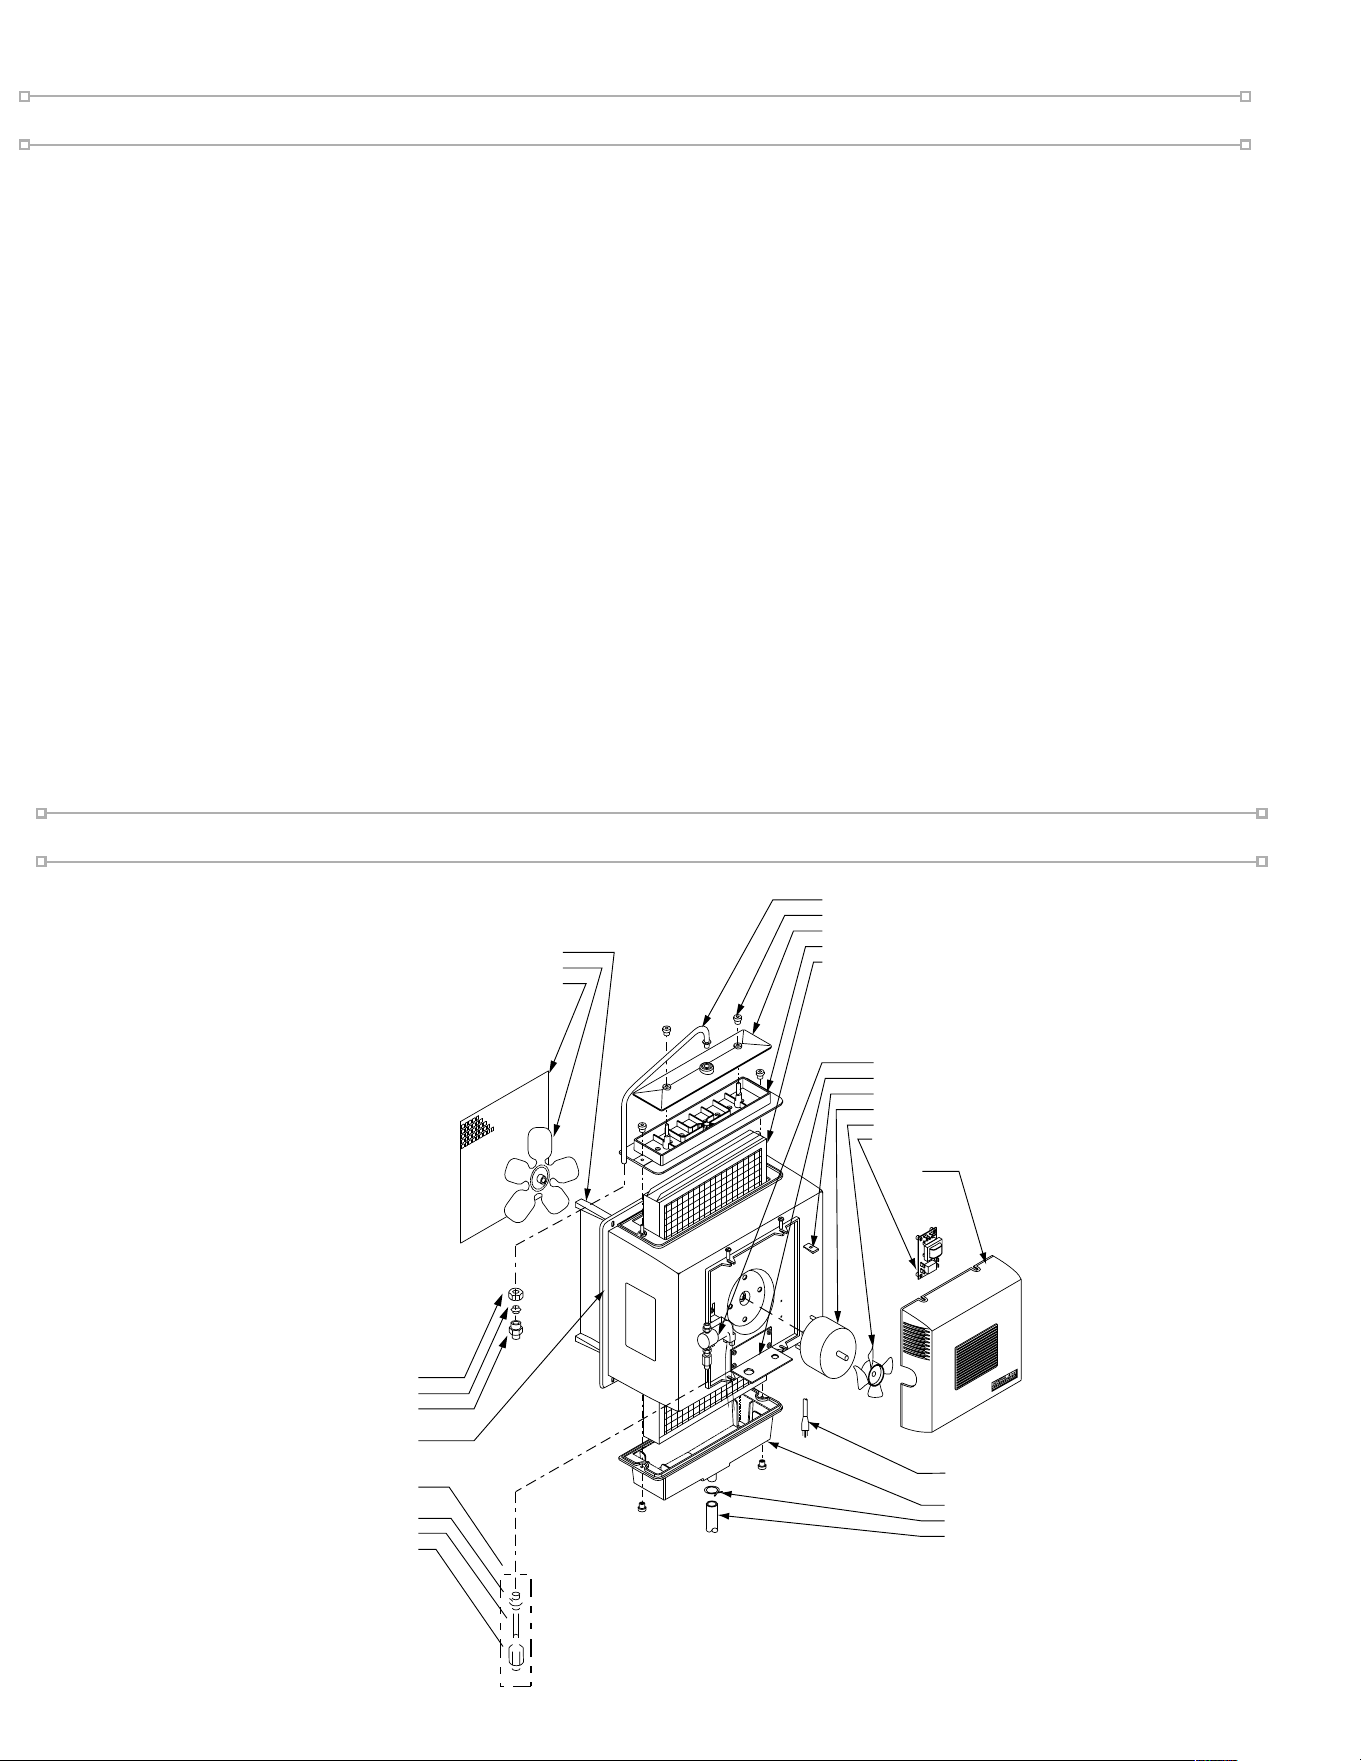
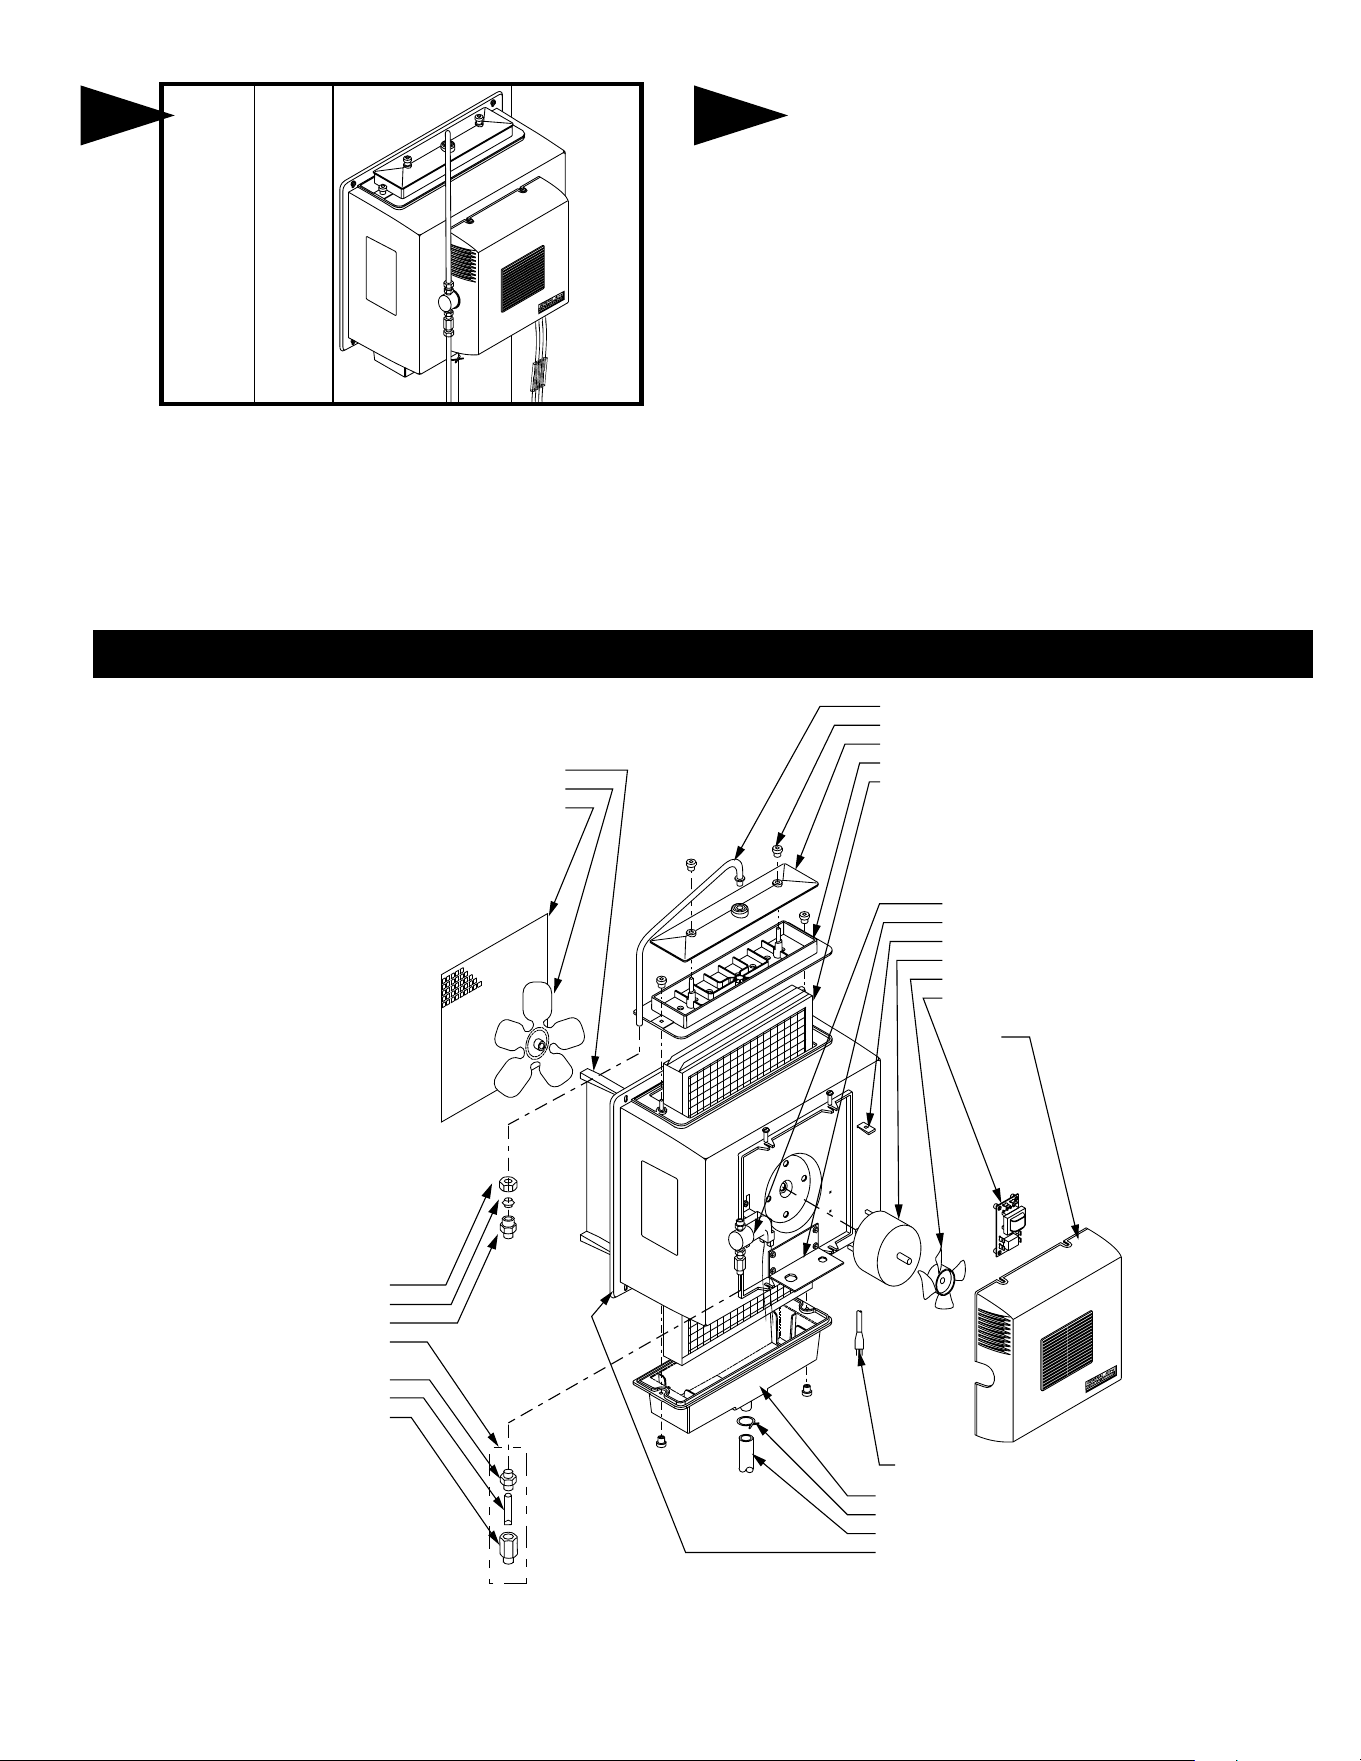
Parts Drawing
SOLENOIDVALVE
ASS'Y 990-53
1137-7 WIRING BRACKET
40-7 TINNERMAN NUT
1137-8 MOTOR
1137-50 COOLING FAN
GA4238 RELAY ASS'Y (FORMERLY 1137-26)
1137-39 FRONT COVER
ASS'Y
1137-3 DRAIN PAN
P-163 HOSE CLAMP
1099-16 DRAINTUBE
P-103 COMPRESSION NUT
P-104 COMPRESSION SLEEVE
P-111 CONNECTOR
1137-38 CABINET ASSEMBLY
990-37-76 ORIFICE & STRAINER
ASSEMBLY
990-16-76 ORIFICE FITTING
990-17 STRAINER SCREEN
990-18 STRAINER BODY
1137-2 FAN SHROUD
1137-9 FAN BLADE
1137-20FAN GUARD
1137-24 DISTRIBUTOR TUBE
1099-9 THUMB NUT
1137-35 TROUGH COVER
1137-4 DISTRIBUTOR TROUGH
990-13 EVAPORATOR PAD
1137-31 POWER SUPPLY CORD

9
www.generallters.com
Model 1137 Humidier Installation Manual
®
®
Troubleshooting
1. My humidifier continues to run.
Check for the following:
• The valve might be stuck in the "open" position.
• Check for wiring errors.
• Is the unit sized properly for your home? If it is rated for a smaller-sized home than the home in which it is
installed, it will work "overtime" to reach the humidication levels desired.
• Check the Vapor Pad
®
. If it is clogged, the pad will reduce the humidier efciency. Replace if necessary.
2. My solenoid valve is making a "chatter" noise.
This can be caused by any of the following:
• The power to the valve is less than 18V AC.
• The solenoid is causing a "water hammer condition" thru the water pipes (valve closes quickly and shuts off
water ow, which in turn creates pressure behind the valve that has no avenue of relief). You may want to install
a water hammering device with your plumbing, or contact your local plumber to determine the best solution.
• The humidistat is located too close to the humidier or the by-pass pipe. Your humidistat should be a min. of
1.5' away or greater.
• The humidistat could have a buildup of dust, causing a faulty reading.
• The solenoid valve might be dirty. Remove, inspect and clean if necessary.
• Water supply pressure going to the valve may be too low.
• The hold down nut on top of the solenoid, as it may be loose.
3. The humidifier is not raising the humidity levels in my home.
Check for the following:
• Ensure you have changed / replaced your Vapor Pad
®
at the proper intervals (once per year) to ensure the
greatest production of moisture.
• Check the setting of your humidistat to ensure it is set higher than current humidity levels in your home (when
in doubt, turn it all the way to the right at maximum production). If you don't know what your current humidity
level is, use an instrument called a thermohygrometer (Model 610; GFI #7065 suggested) to measure both heat
and humidity levels in your home.
• Calculate your humidity load (Gallons Per Day - GPD) via our humidity calculator (www.generallters.com/
Support Center). Check to see that your humidier model is designed to produce the amount of moisture (GPD)
you need.
• Have you recently installed hardwood oors? Have you recently remodeled and added on to your home? These
can both increase your home's demand for humidity. Options include connecting your humidier to the hot
water supply (which can increase output by as much as 30%), or installing a new humidier model that can
generate more humidity.
• The unit is not recommended for heat pumps or plenum temperatures < 120° F.
4. My humidifier will not turn on.
The following might be occurring:
• Check to see your humidier is plugged in, that the breaker is engaged, and that power to other items from the
same source is working.
• Check the on/off switch to be sure it is in the O (Open / Summer) position.
• Ensure a fuse has not blown.
• Check that connectors are properly inserted in the terminal block.
• Make sure the furnace is operating in the heat mode.
To ensure your safety and the longevity of your unit, we recommend
contacting a licensed contractor to perform any repairs or maintenance.
!

10
Model 1137 Humidier Installation Manual
Breathe Healthier! Residential Whole House Indoor Air Quality
FAQ’s
1. How does a humidifier help with my allergies?
Dry air can lead to a host of problems for allergy and asthma sufferers. Dry climates, winter air, and articial
heat all contribute to the discomfort by drying out your skin, throat and delicate sinus passages and airways
(which can contribute to sinusitis). Winter is an especially bad time for dry air as home heating systems,
especially forced-air systems, reduce the amount of moisture in the air while humidity levels outdoors typically
dip as well.
2. What range of humidity is ideal?
Research shows that 40-60% relative humidity is ideal. Outside this range, your risk of being adversely affected
increases.
3. How often should I change my Vapor Pad
®
?
We recommend replacing your Vapor Pad
®
at least once per year. Minerals build up on the vapor pad over
time, which in turn:
• Reduces the pad's ability to absorb water.
• Prevents the warm air from owing through the pad (Warm air moving though the water-soaked pad
causes the water in the pad to evaporate. It is this process that delivers moisture throughout your home
via the home's duct system).
4. Can't I simply clean my Vapor Pad
®
instead of replacing it?
At the factory we put a coating on the Vapor Pad
®
that helps it absorb water and control water ow. This
coating is very efcient, however, it is also fragile. The coating is similar in composition to the minerals
that accumulate on the pad. If you subject the Vapor Pad
®
to cleaning, you usually remove much of the
coating and the pad becomes ineffective. This reduces the output of the humidier and increases water
consumption.
Instead we recommend the Vapor Pad
®
be replaced each year.
5. Why would I want to install a humidifier?
For many reasons:
1. Since the air in your home is always trying to reach its saturation point, it will absorb water wherever
it can; from the bodies of you and your children, your pets, your furniture and even your house plants.
As a result your skin, throat and nasal passages dry out, leaving you more susceptible to physical
discomfort, colds, u and even infection. Allergy and asthma sufferers can be especially affected by air
that's too dry.
2. Dry air causes dry, itchy skin.
3. Dry air cracks expensive woodwork, oors, musical instruments, artwork and furnishings.
4. Annoying static electricity (caused by dry air) can damage computers, VCR’s and other electronic
equipment, requiring expensive repair.
5. Dry air can cause harm to expensive musical instruments like pianos and violins.
6. Dry air causes gaps in window & door frames, letting cold outdoor air in; causing you to turn up the heat
and increasing your heating bills! Controlled humidity from a GeneralAire
®
Humidier allows you the
luxury of dialing the thermostat back & reducing annual heating bills. For example, 68° at 40% relative
humidity feels just as warm as 74° at 20% humidity. Setting your thermostat back by as little as three
degrees can reduce annual heating bills by as much as 5%.

11
www.generallters.com
Model 1137 Humidier Installation Manual
®
®
Limited Warranty
What is Covered
• Five Years: The 1137, if properly registered by the return of the warranty registration card to the manufacturer, is
warranted by General Filters, Inc. (“Company”) for a period of ve (5) years from the date of the original installation,
when installed in residential applications only (“Limited Warranty Period”).
• The humidistat is warranted for a period of one (1) year from date of original installation.
• This Limited Warranty runs to the original purchaser of the Product(s) who owns, and resides in, the residential
property for which it is installed and maintained.
• The Limited Warranty coverage begins upon the date the Product(s) is installed.
• This Limited Warranty is valid only for the original customer purchasing from Company, and is not transferable.
What is Not Covered
• The following components are not covered by this warranty: Vapor Pads, sleeves or plates, wiring, water strainers or
metering orices.
• This product is designed for residential installation only, therefore, commercial or industrial installations are not
covered under this warranty.
• Failure to install the 1137 in accordance with these instructions, local codes or ordinances voids the warranty.
• Modications, changes or alterations to equipment.
• Failure to perform regular maintenance as described in this document voids the warranty.
• This Limited Warranty is valid only for the original customer purchasing from Company, and is not transferable.
• Damage caused by misuse, neglect, re, wind, mold, damage in transit, or other casualty, contact with corrosive
materials (chlorine, ourine, salt, urine, fertilizers, recycled waste water, or other damaging substances), damage
caused during installation, or any cause beyond General Filters, Inc. control is not covered under this Limited
Warranty.
• Labor involved in diagnostic calls or in removing, repairing, servicing or replacing parts is not covered under this
Limited Warranty.
• Shipping charges are not covered by this Limited Warranty.
• Agreements made by third parties that are not listed in this Limited Warranty.
What is Not Covered, Cont.
• Liability for special, incidental, direct, indirect, collateral and consequential damages is excluded. Some states do
not allow limitation of incidental damages, so the limitations or exclusions may not apply to you. General Filters,
Inc. will not pay electricity or fuel costs, or increases in electricity or fuel costs, for any reason whatsoever, including
additional or unusual use of supplemental electric heat. This warranty does not cover lodging expenses or labor
charges. General Filters, Inc. shall not be liable for any default or delay in performance under this warranty caused
by any contingency beyond its control. This warranty gives you specic legal rights, and you may also have other
rights which vary from state to state.
To Make a Warranty Claim / Obtain Service
• Owner must submit a warranty registration within 30 days after installation of Product(s).
• The Owner must complete our online Return Merchandise Authorization (RMA) Form (www.generallters.com/
returns), to arrange for applicable Limited Warranty service, within the warranty period. Owner must also provide
complete model and serial number, proof of required periodic maintenance, installation date and location and an
accurate, detailed description of the problem.
• Owner shall be solely responsible for properly packaging the Covered or Extended Coverage Equipment, for all
freight charges, and for all risk of loss associated with shipment.
• Owner is responsible for obtaining a licensed contractor to perform any repairs, maintenance or other work on unit.
• If during the Limited or Extended Warranty Period, Covered or Extended Coverage Equipment fails because of
a manufacturing defect, Company will provide a free replacement part to the Owner through a licensed service
contractor.

FORM NO. 1137 _ 47_ REV J
(5-2021)
12
Model 1137 Humidier Installation Manual
®
®
Limitations of Liability
• General Filters, Inc. makes no express warranties other than the warranty specied above.
• The implied warranties of merchantability and tness for a particular purpose are limited to the duration listed.
• The manufacturer assumes no liability in connection with the installation or use of the product, except as stated in
this Limited Warranty.
• The manufacturer will in no event be liable for incidental or consequential damages.
• This limited warranty gives you specic legal rights, and you may also have other rights which vary from state
to state. Some states do not allow either limitations on implied warranties, or exclusions from incidental or
consequential damages, so the above exclusion and limitation may not apply to you.
Questions
• Any questions pertaining to this limited warranty should be addressed to the manufacturer. (U.S.A.: The
manufacturer has elected not to make available the informal dispute settlement mechanism which is specied in the
Magnuson-Moss Warranty Act.)
Limited Warranty, Cont.
The rest of this page left intentionally blank.
3
TUYAUX EN
CUIVRE
TUYAUX EN
PLASTIQUE
Monter le robinet-vanne à étrier autotaraudeur sur un tuyau d'eau
chaude ou d'eau froide. Un montage latéral ou sur le dessus est idéal
pour éviter un engorgement causé par les sédiments du tuyau.
Connecter un tuyau d'un diam. ext. de 6 mm (1/4 po) au robinet-vanne à
étrier. Les tuyaux en cuivre exigent un écrou à compression et un
manchon en laiton. Les tuyaux en plastique exigent un insert en laiton à
l'intérieur des tuyaux et un manchon en plastique à l'extérieur avec un
écrou à compression.
REMARQUE : NE PAS UTILISER DE TUYAUX EN PLASTIQUE AVEC
DE L'EAU CHAUDE OU SUR UNE SURFACE DE CONTACT
CHAUDE DE PLÉNUM OU DE CONDUIT. L'INSTALLATION DE CE
ROBINET-VANNE À ÉTRIER DOIT RESPECTER OU DÉPASSER LES
EXIGENCES DES CODES LOCAUX ET AUTRES ORDONNANCES.
1
2
Choisir un emplacement sur la surface verticale du plénum d'air chaud
avant de monter l'humidificateur. Mettre la matrice de montage en place
en s'assurant qu'elle soit à niveau. Ne pas installer l'humidificateur dans
un endroit ou les bouts bouchés d'un serpentin refroidisseur entraveront le
débit d'air vers l'humidificateur.
Découper la partie du centre. Installer une attache de retenue de
boîtier dans chacun des deux trous supérieurs pour aider à tenir le
cabinet lors de l'installation des 6 vis de boîtier. Installer le bac
d'évaporateur, le bloc évaporateur et la goulotte du distributeur à
l'aide des écrous à ailettes fournis.
Top Of Template
TEMPLATE FOR INSTALLING
POWER HUMIDIFIER
4. TIGHTEN SCREWS AND ADJUST HUMIDIFIER UNTIL LEVEL.
5. REMARK FOUR REMAINING HOLES IF NECESSARY.
6. REMOVE HUMIDIFIER, DRILL REMAINING HOLES AND CUT OUT CENTER SECTION OF
TEMPLATE.
WHEN INSTALLING ON BASEMENT TYPE FURNACE, EXTEND THIS LINE
FOR LOCATING HOLE ON ADJACENT PLENUM
IF FURNACE JACKET EXTENDS MORE THAN 3" OUTWARD FROM THE PLENUM SURFACE
ALLOW 4" CLEARANCE BELOW THIS LINE FOR EASY ACCESS TO DRAIN HOSE CONNECTION.
CUT ON THIS LINE
TEMPLATE NO. 1137
ALLOW 2 1/2 INCHES CLEARANCE
ABOVE THIS SURFACE FOR SERVICING
FOLLOW INSTRUCTIONS PACKED WITH HUMIDIFIER
1. REMOVE PROTECTIVE PAPER FROM BACK OF TEMPLATE AND STICK IN LEVEL POSITION.
2. CENTER PUNCH AND DRILL THE FOUR SIDE MOUNTING HOLES WITH A 1/8 " DIA. DRILL.
3. HANG HUMIDIFIER FROM FOUR SIDE SCREWS AND INSTALL DRAIN PAN, EVAPORATOR
PAD AND DISTRIBUTOR TROUGH.
INSTRUCTIONS D'INSTALLATION POUR LE ROBINET-VANNE À ÉTRIER
Tuyau en cuivre
1. Rétracter la tige à perforation dans le corps de la vanne en tournant la poignée dans
le sens horaire.
2. Visser le corps de la vanne dans le support supérieur et serrer.
3. Placer le joint d'étanchéité en caoutchouc par-dessus la tige de perforation.
4. Assembler le robinet-vanne à étrier par-dessus le tuyau en cuivre en utilisant les vis
écrous et supports inférieurs fournis.
5. Serrer les vis de façon égale et ferme. Les supports doivent être parallèles.
6. Terminer la connexion de compression vers la sortie du robinet-vanne à étrier.
7. Tourner la poignée dans le sens horaire pour percer le tuyau et fermer le
robinet-vanne à étrier.
8. Tourner la poignée dans le sens antihoraire pour ouvrir le robinet-vanne à étrier et le
laisser ouvert pendant quelques secondes pour évacuer la saleté du tuyau et de la
tuyauterie.
Tuyau en acier, en laiton ou en plastique dur.
1. Fermer l'alimentation en eau et vidanger le tuyau.
2. Tourner la poignée dans le sens horaire pour exposer la tige de perforation et fermer
le robinet-vanne à étrier.
3. Placer le joint d'étanchéité en caoutchouc par-dessus la tige de perforation.
4. Percer un trou de 3 mm (1/8 po) avec une perceuse à manivelle pour éviter les
risques de choc électrique.
5. Assembler le robinet-vanne à étrier par-dessus le tuyau en acier, laiton ou plastique
dur en utilisant les vis, écrous et supports inférieurs fournis.
6. Serrer les vis de façon égale et ferme. Les supports doivent être parallèles.
7. Terminer la connexion de compression vers la sortie du robinet-vanne à étrier.
8. Tourner la poignée dans le sens antihoraire pour ouvrir le robinet-vanne à étrier et le
laisser ouvert pendant quelques secondes pour évacuer la saleté du tuyau et de la
tuyauterie.
Raccords de tuyau filetés
1. Tourner la poignée dans le sens horaire pour exposer la tige de perforation et fermer
le robinet-vanne à étrier.
2. Sceller le filetage du corps de la vanne avec un scellant ou du ruban adhésif.
3. Installer la vanne dans un raccord NPT de 3 mm (1/8 po).
4. Terminer la connexion de compression vers la sortie du robinet-vanne à étrier.
5. Tourner la poignée dans le sens antihoraire pour ouvrir le robinet-vanne à étrier et le
laisser ouvert pendant quelques secondes pour évacuer la saleté du tuyau et de la
tuyauterie.
POUR L'INSTALLATION SUR UNE
SURFACE VERTICALE DU PLÉNUM À
AIR CHAUD DE N'IMPORTE QUELLE
CHAUDIÈRE À AIR PULSÉ
MATÉRIAUX ADDITIONNELS POUVANT ÊTRE REQUIS :
1. Tube d'alimentation en plastique de 1/4 po de diamètre ou tube d'alimentation en cuivre
de 1/4 po pour les applications pour eau chaude
2. Commutateur de pression d'air (G.F. modèle n° 12500 suggéré)
3. Relais Ampèremétrique (G.F. modèle n° GA50 suggéré)
4. Boîte de connexion, prise de 115 V avec terre, couvercle et fil
INSTALLATEUR : VEUILLEZ REMPLIR ET POSTER LA CARTE DE GARANTIE UNE FOIS L'INSTALLATION
TERMINÉE. LAISSER LES DIRECTIVES D'INSTALLATION AU PROPRIÉTAIRE DE LA MAISON.
1137 SÉRIES
HUMIDIFICATEUR PUISSANT
À CIRCULATION DIRECTE
PRÉCAUTION : L'installateur doit être un technicien qualifié et expérimenté. Couper l'alimentation électrique
avant de commencer l'installation. Ne pas installer l'appareil dans un endroit où la température peut descendre
sous 0 °C (32 °F) ou si la température du plénum dépasse 93 °C (200 °F). Pour maximiser la capacité
d'évaporation, installer l'humidificateur sur le plénum d'alimentation en air chaud. Lors d'un branchement à un
circuit de ventilateur à plusieurs vitesses, voir l'étape 6C & 6D.
Fresh Indoor Air Quality
®
®
4
Monter le tuyau du distributeur de façon qu'il se dirige vers l'ouverture
centrale du couvercle du bac de distributeur. Raccorder le tuyau
d'alimentation d'eau de 1/4 po au filtre en laiton de l'entrée du solénoïde.
AUCUN TUYAU EN PLASTIQUE NE DOIT ENTRER EN CONTACT
AVEC DES CONDUITS OU DES SURFACES DE PLÉNUM CHAUDS.
POUR LES TUYAUX EN PLASTIQUE, UTILISER LE SUPPORT DE
TUYAU FOURNI.
INSTRUCTIONS FOR WIRING HUMIDIFIER
VÉRIFIER AVEC LES AUTORITÉS LOCALES POUR VOUS
INFORMER DE LA RÉGLEMENTATION.
FIG. 6A
AVEC CARTE DE CIRCUIT IMPRIMÉ
Sur les chaudières avec des bornes de sortie ACC (accessoire) ou
EAC (purificateur d’air électronique), vérifier la tension de sortie pour
s’assurer que les bornes sont à 115V.
REMARQUE : TOUT LE CÂBLAGE DOIT RESPECTER LES CODES
ÉLECTRIQUES LOCAUX.
FIG. 6B AVEC MOTEUR DE VENTILATEUR À VITESSE UNIQUE
Sur les chaudières avec ventilateurs à vitesse unique, installer une
boîte de jonction et une prise 115V mise à la terre branchée en
parallèle avec le circuit du ventilateur. Raccorder l’interrupteur
Marche/Arrêt en série avec le fil sous tension ou noir.
FIG. 6C AVEC MOTEUR DE VENTILATEUR À DEUX VITESSES
Sur les fournaises équipées d'un ventilateur à deux vitesses,
l'humidificateur et un pressostat d'air modèle 12500 peuvent être
raccordés à une source d'alimentation électrique continue de 115 volts.
Installer l’interrupteur Marche/Arrêt et le pressostat d’air en série avec le fil
sous tension ou noir. Le pressostat d'air détectera le fonctionnement de la
fournaise et fournira l'alimentation électrique nécessaire à l'humidificateur.
FIG. 6D AVEC MOTEUR DE VENTILATEUR À DEUX VITESSES
Sur les chaudières munies d’un ventilateur deux vitesses, l’humidificateur
peut être branché sur une source d’alimentation continue 115volts.
Installer l’interrupteur Marche/Arrêt en série avec le fil sous tension ou
noir. Installer le relais ampèremétrique GA50 en série avec le circuit de
l’humidostat. Le relais ampèremétrique détectera le fonctionnement de la
chaufferette et fournira l’alimentation à l'humidificateur en conséquence.
DESCRIPTION DU CIRCUIT
L'humidificateur est connecté au circuit de 120 V ca par un relais de
commande. Le bobinage secondaire d'un transformateur d'isolement, une
diode et une résistance fournissent une tension de 24 volts cc pour le
circuit de
commande qui comprend également l'humidistat et le bobinage
de relais. Une fois le circuit de commande complété par l’humidostat, le
relais se ferme et fournit 120 volts au moteur du ventilateur et 24 volts à
l'électrovalve.
6
5
E SÉRIE HUMIDOSTAT
24V OUTPUT FROM HUMIDIFIER (RED WIRES) OR
727-58 24V. TRANSFORMER SWITCHED WITH FURNACE OR
OR 24VAC POWER SUPPLY SWITCHED WITH FURNACE.
HUMIDIFIER CONTROL LEADS
(YELLOW WIRES)
OUTDOOR TEMP. SENSOR
(NOT USED IN MANUAL MODE)
AC L
AC N
HUM
SNSR
PRESSOSTAT
D'AIR MODÉLE
12500
(ÉLECTRIFIER)
FILS CONDUCTEURS
JAUNES DE L’HUMIDISTAT
COMMANDE DE VENTILATEUR
BOUTON
VENTILATUR UNE
SEULE VITESSE
ACC
EAC
(ÉLECTRIFIER)
C
115v.
60CY.
BOUTON
6A
6C
TERRE
120v. PRISE
120v. PRISE
120v. PRISE
120v. PRISE
NEUTRON
MOTEUR
DE
VENTILATEUR
À VITESSES
MULTIPLES
NO
C
L1
(ÉLECTRIFIER)
L2
115v.
60CY.
BOUTON
TERRE
(ÉLECTRIFIER)
BOUTON
TERRE
TERRE
AC L
AC N
HUM
SNSR
L1
L2
115v.
60CY.
6B
C
HI
LO
RELAIS
AMPÈREMÉTRIQUE
GA50
6D
L1
L2
115v.
60CY.
24V SORTIE DE HUMIDIFICATIUR. ROUGE FILS.
NON UTILISÉ, SEPARATE CAP OU
INDIVIDUELLEMENT.
HUMIDIFICATEUR FILS DE CONTRÔLE. JAUNE FILS.
CONNECT TO HUMIDOSTAT.
M SÉRIE HUMIDOSTAT
OU D’AUTRES HUMIDOSTAT MANUAL
FORMULAIRE N° 1137-47 (DOSSIER 12625)
LISTE DES PIÈCES POUR L'HUMIDIFICATEUR
990-53 VANNE
ÉLECTROMAGNÉTIQUE
1137-7 SUPPORT DE CÂBLAGE
40-7 ÉCROU TINNERMAN
1137-8 MOTEUR DU VENTILATEUR
1137-50 VENTILATEUR DE REFROIDISSEMENT
GA4238 ENSEMBLE DE RELAIS (1137-26)
1137-39 ENSEMBLE DU COUVERCLE
AVANT
1137-3 BAC DE RÉCUPÉRATION
P-163 COLLIER DE SERRAGE
1099-16 TUYAU D'ÉVACUATION
1137-38 ASSEMBLAGE DU BOÎTIER
P-103 ÉCROU À COMPRESSION
P-104 MANCHON À COMPRESSION
P-111 RACCORD
990-37-76 ASSEMBLAGE
ORIFICE ET TAMIS
990-16-76 GRANITURE DE L'ORIFICE
990-17 FILTRE À EAU
990-18 CORPS DU TAMIS
1137-2 TUYÈRE DU VENTILATEUR
1137-9 PALE DE VENTILATEUR
1137-20 GRILLE DE PROTECTION DU VENTILATEUR
1137-24 TUYAU DU DISTRIBUTEUR
1099-9 ÉCROU À AILETTES
1137-35 COUVERCLE DU BAC
1137-4 GOULOTTE DU DISTRIBUTEUR
990-13 BLOC ÉVAPORATEUR
1137-31 CORDON D'ALIMENTATION
Lithographie aux É.-U.
Raccorder le boyau de vidange au bec de 5/8 po sur l'humidificateur
à l'aide du collier de durite fourni. Acheminer un boyau d'un diam.
int. de 1,6 cm (5/8 po) vers un drain adéquat, comme un drain de sol,
d'égout ou d'évier de lavage. S'assurer que le boyau est en pente
continue et n'est déformé en aucun point.
7
Ouvrir l'eau et brancher le cordon d'alimentation pour vérifier le
fonctionnement de l'humidificateur. Régler l'humidistat en mode de
demande. Lorsque la chaudière n'est pas en marche, l'électrovanne
devrait être fermée et le ventilateur de l'humidificateur doit être immobile.
Démarrer la chaudière, l'électrovanne devrait être ouverte et le ventilateur
de l'humidificateur devrait être en marche lorsque le circuit de soufflerie
ou le brûleur sont alimentés en courant. Vérifier le débit d'eau passant
par la goulotte du distributeur et le bloc évaporateur. L'orifice standard
990-16-76 fournira environ 3,5 gal/h d'eau à une pression de ligne d'eau
de 60 psi. Pour des pressions d'eau basses (20 à 40 psi) un plus grand
orifice 990-16-75 est disponible pour fournir le même débit. Laisser
l'humidistat au réglage recommandé.
8

Votre humidificateur est conçu pour fournir une humidification d'appoint sans problèmes. Pour bénéficier d'un fonctionnement maximum, suivre les
étapes de nettoyage ci-dessous à la fin de chaque saison froide !
1. Fermer l'alimentation en eau et en électricité de l'humidificateur.
2. Retirer le tuyau de distribution d'eau, le bac du distributeur, le tampon d'évaporateur et le bac de récupération. Le tampon
d'évaporateur peut être enlevé du haut ou du bas de l'humidificateur. Nettoyer les dépôts excessifs de minéraux dans le bac du
distributeur, le couvercle, le bac de récupération, et le boîtier du distributeur. Une solution moitié vinaigre, moitié eau aide à déloger les
dépôts de minéraux.
3. Si le bloc évaporateur contient trop de dépôts de minéraux, le remplacer par un neuf " 990-13 ". Replacer le couvercle et le tuyau du
distributeur à la position adéquate par dessus le bac du distributeur.
4. Dans les endroits riches en minéraux ou si la vanne électromagnétique est défaillante, déconnecter la ligne d'alimentation en eau de 6
mm (1/4 po) de la vanne électromagnétique. Retirer le corps de tamis en laiton (P.N. 990-18) de l'électrovanne . Retirer soigneusement
le filtre à tamis (P.N. 990-17) du raccord de l'orifice (P.N. 990-16). Nettoyer les dépôts de minéraux de toutes les pièces. Si l'orifice est
bloqué, on peut l'ouvrir en y insérant une petite aiguille. Réinsérer le filtre dans le raccord de l'orifice et visser le corps de tamis en laiton
dans l'électrovanne.
5. Raccorder la conduite d'eau de 6 mm (1/4 po) à la vanne électromagnétique au besoin. Ouvrir l'alimentation en eau et vérifier tous les
points de fuite. Le fonctionnement de l'appareil peut être vérifié en démarrant la fournaise. L'humidificateur fonctionne uniquement
lorsque le ventilateur de la fournaise est en marche ou que le circuit du brûleur est activé. L'humidificateur est maintenant prêt à
fonctionner.
6. Pendant la période d'été, fermer l'alimentation en eau et en électricité de l'humidificateur. Fermer l'amortisseur à air.
SOINS ET ENTRETIEN
FONCTIONNEMENT DE L'HUMIDIFICATEUR
GARANTIE LIMITÉE
CANADIAN GENERAL FILTERS, LTD.
SCARBOROUGH, ONTARIO M1R3B7
WWW.CGFPRODUCTS.COM
Cet humidificateur, s'il est enregistré correctement en retournant la carte d'enregistrement de la garantie au fabriquant, est garanti au consommateur
contre tout défaut de matériaux et de main d'œuvre pour une période de cinq ans à partir de la date d'installation. Garnitures de vaporisateur, écrans de
tamis de l'eau ou orifices régulateurs ne sont pas couverts par cette garantie limitée ou par toute autre garantie. Toute autre pièce défectueuse sera
réparée sans frais, hormis les coûts de désinstallation, de réinstallation et de transport. Pour obtenir un service de réparation avec cette garantie limitée,
le consommateur doit envoyer la pièce défectueuse ou l'humidificateur au complet au fabricant.
IL N'Y A AUCUNE GARANTIE EXPRESSE COUVRANT CE PURIFICATEUR D'AIR EN DEHORS DES DISPOSITIONS STIPULÉES CI-DESSUS, LES
GARANTIES TACITES QUANT À LA QUALITÉ MARCHANDE ET À L'APTITUDE À UN EMPLOI PARTICULIER SONT EXPRESSÉMENT EXCLUES. LE
FABRICANT NE PEUT ÊTRE TENU RESPONSABLE POUR L'INSTALLATION OU L'UTILISATION DE CE PRODUIT, SAUF DE LA MANIÈRE
INDIQUÉE DANS LA PRÉSENTE GARANTIE LIMITÉE. LE FABRICANT NE PEUT EN AUCUN CAS ÊTRE TENU RESPONSABLE POUR DES
DOMMAGES ACCESSOIRES OU INDIRECTS.
Cette garantie limitée vous donne des droits légaux spécifiques et vous pouvez jouir d'autres droits qui varient d'une juridiction à l'autre. Certaines
juridictions ne permettent pas de limites sur les garanties implicites ou d'exclusions pour les dommages accessoires ou indirects; les exclusions sus
mentionnées peuvent donc ne pas s'appliquer dans votre cas.
Toute question relative à cette garantie limitée doit être soumise au fabriquant. (É.-U. : Le fabricant à choisi de ne pas divulguer les termes de l'accord
spécifiés dans le " Magnuson-Moss Waranty Act ".)
GENERAL FILTERS, INC.
NOVI, MICHIGAN 48375-1115
WWW.GENERALAIRE.COM
Le principe de fonctionnement de l'humidificateur est basé sur la façon la plus efficace et la plus économique
d'évaporer l'eau dans l'air. La chaleur nécessaire pour l'évaporation de l'eau est produite par la fournaise.
L'alimentation en eau vers l'humidificateur est contrôlée par la vanne électromagnétique. L’électrovalve et le
ventilateur de l’humidificateur sont commandés par un humidostat branché via un relais d’isolation. Cet
hygrostat est conçu pour un montage mural dans l’aire de séjour ou un montage en surface sur la gaine de
reprise. CARACTÉRISTIQUES ÉLECTRIQUES : 24 V c.a. / 60 Hz. NE PAS RÉGLER L'HUMIDITÉ
RELATIVE TROP HAUT PENDANT LA PÉRIODE HIVERNALE. TROP D'HUMIDITÉ PEUT ENTRAÎNER DE
LA CONDENSATION SUR LES VITRES OU SUR LES MURS. CONSULTER LES RÉGLAGES
RECOMMANDÉS, INDIQUÉS DANS LE MANUEL DU PROPRIÉTAIRE DE L’HYGROSTAT.
L'eau s'écoule par une crépine, est mesurée par un orifice pour fournir la quantité adéquate et alimente le
bloc évaporateur par la goulotte du distributeur. L'air du plénum à air chaud est aspiré à travers le bloc
évaporateur humecté par le ventilateur de l'humidificateur et retourné au plénum à air chaud pour être circulé
dans l'espace habité. L'humidité est évaporée dans l'air en passant par le bloc évaporateur.
Les minéraux ne sont pas soufflés dans le courant d'air, comme c'est le cas avec les humidificateurs à
pulvérisation; ils restent sur le bloc évaporateur où un fort pourcentage est évacué avec les eaux usées.
Lorsque l'humidificateur est installé et fonctionne, aucun réglage n'est nécessaire sauf le réglage du niveau
voulu d'humidification par le bouton de commande sur l'humidistat.
Pour éteindre l'humidificateur, fermer la vanne d'alimentation en eau, mettre hors tension et fermer
l'humidistat.
-20F -29C 15%
-10F -23C 20%
0F -18C 25%
+10F -12C
+20F - 7C
30%
35%
+30F - 1C 40%
À LA
TEMPÉRATURE
EXTÉRIEURE
RÉGLAGE
RECOMMANDÉ