User Manual
Stainless Steel Food Dehydrator Machine
Please read all instructions carefully before operating your
new appliance, and keep it for future reference.
Model NO: YY-FD12TRAY

TABLE OF CONTENTS
Product Introduction---------------------------------------------------- 3
Food Dehydrator Diagram---------------------------------------------- 3
Control Panel-------------------------------------------------------------- 4
Technical Specification------------------------------------------------- 4
Package Contents-------------------------------------------------------- 5
Plug and Cord------------------------------------------------------------- 5
Operating Instructions-------------------------------------------------- 6
Important Safeguards-------------------------------------------------- 7
Cleaning Instructions--------------------------------------------------- 8
Problem-Solving---------------------------------------------------------- 9
Warranty------------------------------------------------------------------ 10
Customer Support------------------------------------------------------ 11
Product Introduction
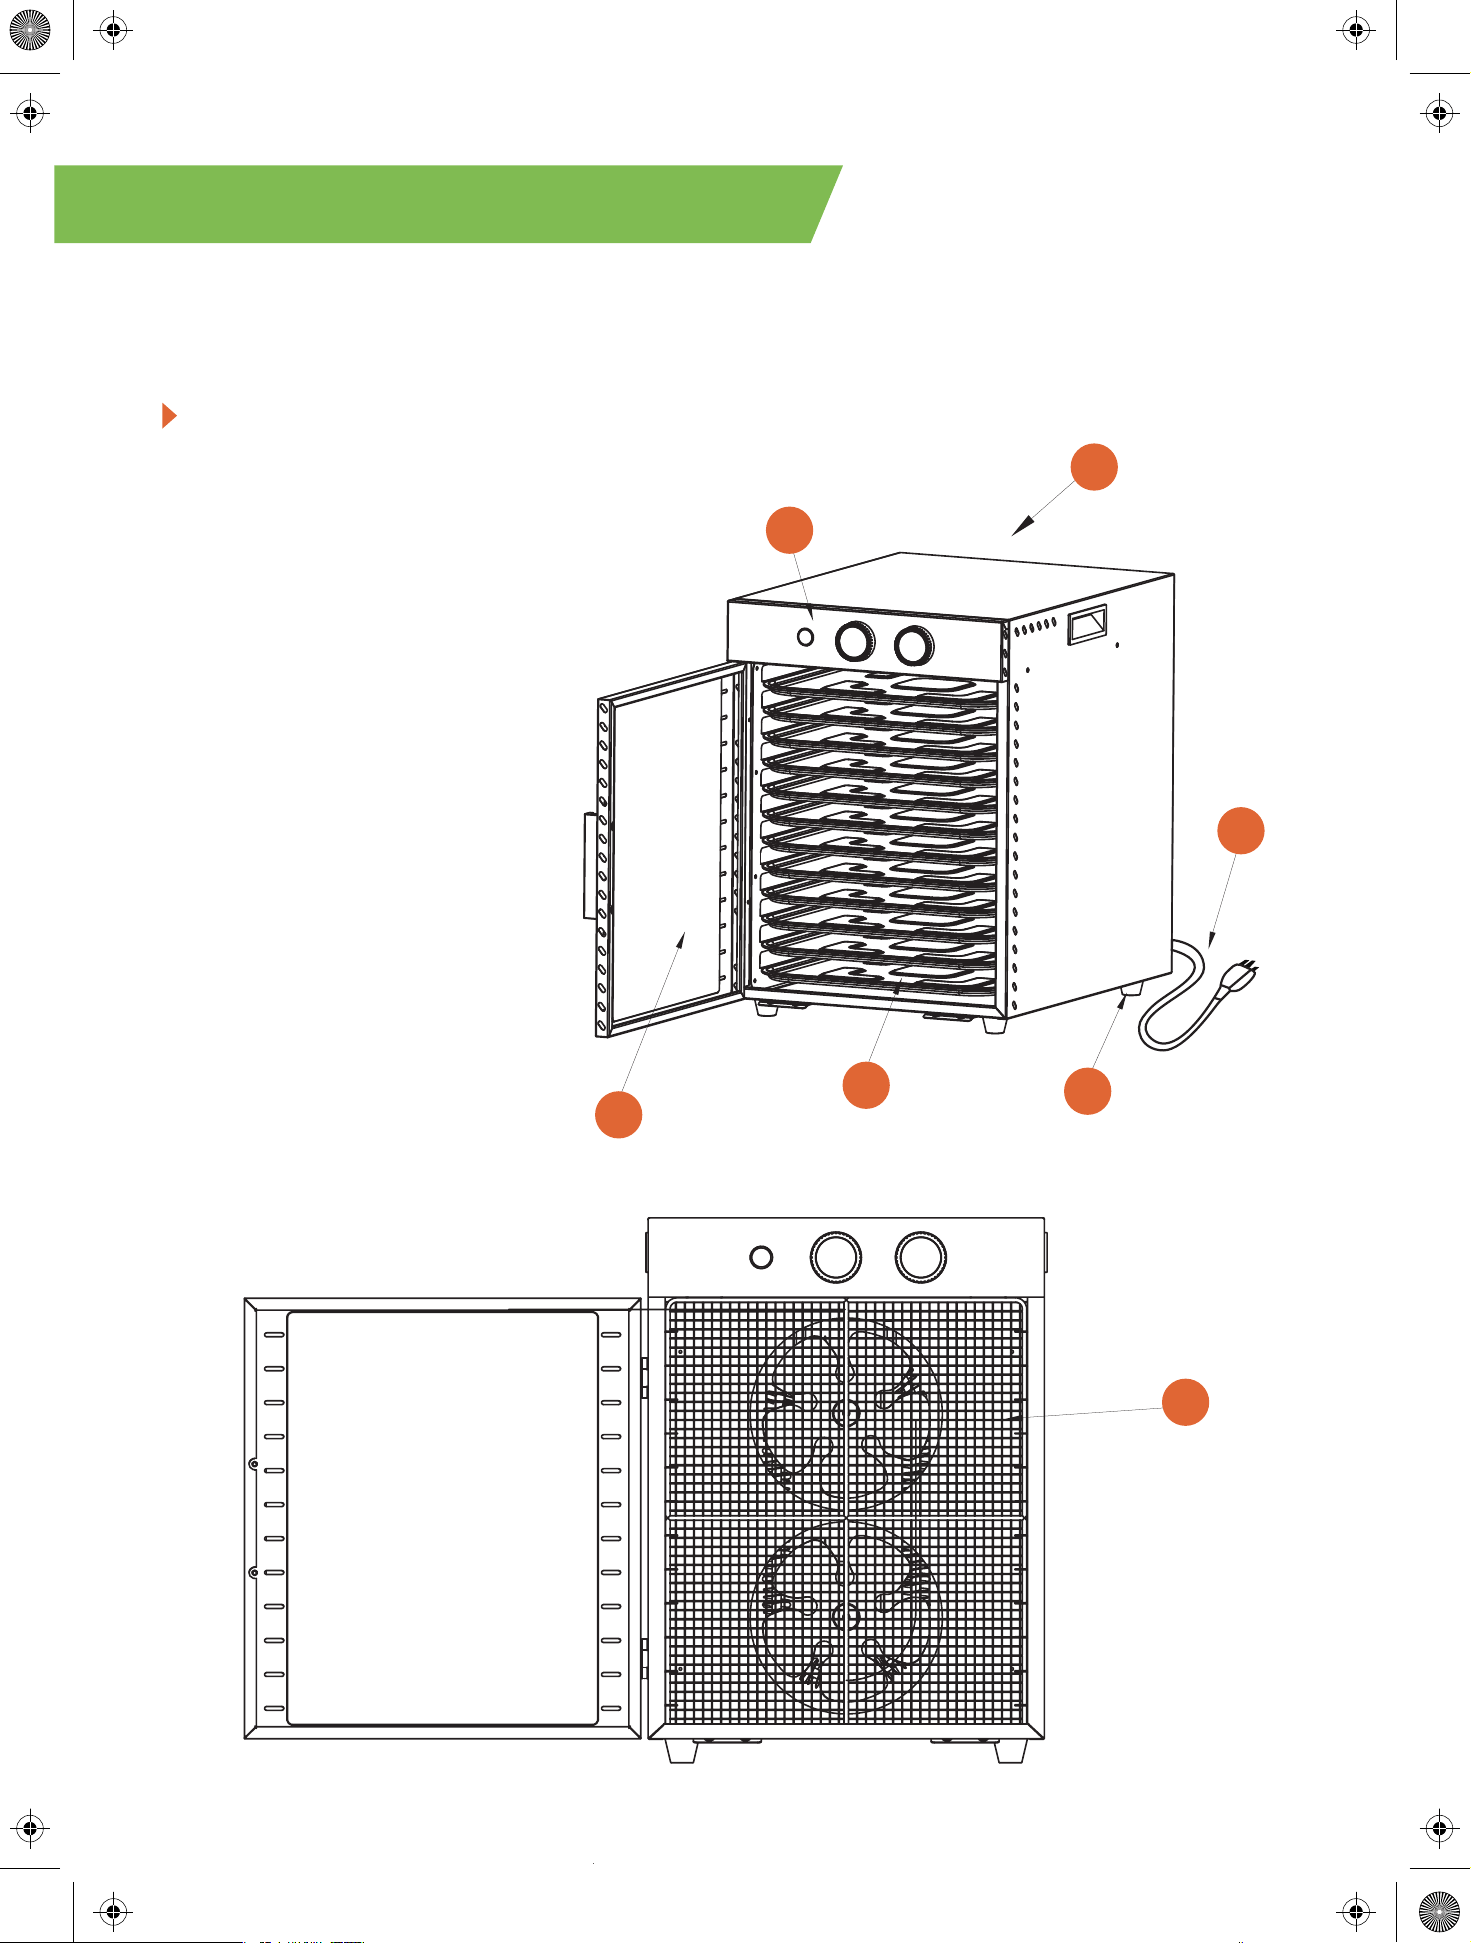
Food Dehydrator Diagram
a. Dehydrator Cabinet
b. Door
c. Control Panel
d. Racks
e. Rubber Feet
f. Power Cord
g. Fan
3
d
a
b
c
e
f
g

Control Panel
4
Technical Specification
Voltage: 120V,60Hz Rated Power: 1000W
Temperature: 70°F-190°F Time: 0-24H
Decibel: 38dB Product Size: 13.7*17.9*19 inch
a. Display Window
b. Power Button
c. Temperature Setting
d. Time Setting
Control
1. Switch Temperature Unit: Press the power bu�on first, then turn the tem-
perature knob counterclockwise for 5 seconds. (At 20
℃ or 70 ℉, turn the tem-
perature knob for 5 seconds)
When switching the temperature, the ini�al temperature is displayed as 20
℃ or
70
℉ (Note: the original temperature unit is Celsius by default.)
2. Change Time/Temperature: Press TEMP/TIME first, then press corresponding
bu�ons to adjust.
3. When the countdown reaches 1 minute before the set �me, the hea�ng pipe
stops hea�ng and the fan con�nues to run.
When the countdown hits zero, the screen will be turned off, all the indicators
will be off except the switch indicator, the switch indicator will flash slowly, the
fan will stop running, the buzzer will give three long beeps, and then the whole
machine will shut down, all the indicators will be off (enter sleep state).
Note: The above process takes 1 minute in total. The first 30 seconds are used
to determine whether there is opera�on, and the next 30 seconds to enter the
shutdown.
b
c
d
a

Package Contents
Plug and Cord
SAVE THESE INSTRUCTIONS!
Refer To Them O�en And Use Them To Instruct Others.
1 x Food Dehydrator 12 x Tray Racks
4 x Silicone Pad 1 x Oven Glove
1 x Recipes 1 x User Manual
•Do not let the cord (or any extension cord) hang over the edge of a table or
counter, or touch hot surfaces.
•This dehydrator has a 3-prong grounding plug, and should only be used with
120V, 60Hz electrical systems in North America. Always plug it into a grounded
electrical outlet. Do not modify the plug in any way.
•Do not use a 220-240V outlet.
•Any extension cord must also be a grounding-type 3-wire cord.
•This dehydrator uses a short power cord to reduce the risk of entanglement or
trip. Be careful when using extension cords.
•The marked electrical ra�ng of an extension cord should be at least as high as
the ra�ng of the dehydrator.
Voltage: 120V,60Hz Voltage: 220-240V
√ ×
caution!
5

6
Operating Instructions
Important! it is important to monitor the dehydrator while in use. Never
leaves the dehydrator una�ended. Read and fully understand all instruc�ons
and warnings prior to using this unit.
1. Operate the dehydrator on a clean, dry surface.
2. Set the power bu�on and the �mer knob to the “OFF” posi�on.
3. Plug the dehydrator into a standard 120-volt, 60Hz wall outlet.
4. Posi�on the dehydrator at least 12"(30.5 cm) from any wall during opera�on
to allow for proper air circula�on. Do not block the air vents at the rear or on
the door of the dehydrator.
5. Remove the racks from the dehydrator. Load the dehydrator racks with the
items to be dried. Posi�on the pieces and make sure they do not overlap or
touch each other. Allow ample space between the product for proper air circula-
�on. Remove any excess water from the food, which may cause the dehydrator
temperature to drop.
6. Turn on the dehydrator and switch "TEMP" or "TIME".
7. Turn the temperature control knob to the desired heat se�ng, using the "Rec-
ipes" as a reference. It is recommended to place an oven thermometer (not
included) into the dehydrator to monitor the temperature se�ng. Adjust the
temperature control knob as necessary.
8. Set the �mer knob to the desired drying �me.
9. Preheat the dehydrator for 5-10 minutes before loading the racks into the
dehydrator.
10. Water droplets may form on the surface of some food while dehydra�ng.
These can be removed by blo�ng the food with a clean towel or paper towel. Be
careful when the temperature rises!
NOTE: Drying �me may vary depending on several factors, including rela�ve
humidity, air temperature and the thickness, temperature, and fat content of
the food.
The actual temperature of the dehydrator is based on the ambient temperature
of 70℉(20℃). If the dehydrator is not used at the ambient temperature of 70℉
(20℃), the temperature indicated on the temperature control knob may not be
reached/may be exceeded.

7
Important Safeguards
ROVRAk takes consumer safety very seriously. Products are designed and
manufactured with our consumers’ safety in mind.
Addi�onally, we ask that you exercise a level of cau�on and follow all
instruc�ons and important safeguards when using any electrical
appliance.
General Safety
1. Check for damaged parts. Before using the Dehydrator, check that all parts
are opera�ng properly and performing their intended func�ons. Check for any
condi�ons that may affect the unit's opera�on. Do not use it if the power cord
is damaged or frayed.
2. To avoid uninten�onal star�ng, make sure the power switch is in the "OFF"
posi�on before connec�ng the dehydrator to the power source.
3. Always disconnect the dehydrator from the power source before servicing,
replacing accessories, or cleaning the unit. Unplug the dehydrator when not in
use.
4. Keep children away. Never leave the appliance una�ended. Monitor the dehy-
drator when it is in use.
5. Electrical repair must be done by an authorized dealer. Use only original parts
and accessories. Modifica�on of the dehydrator voids the warranty. Never open
the rear panel of the dehydrator. Never remove the back screen from the dehy-
drator.
6. Do not pull the power cord to unplug. It is recommended not to use extension
cords with the dehydrator.
7. Be sure that the dehydrator is stable during use. All four feet should be
secured on a level surface. The dehydrator should not be moved during opera-
�on.
8. Do not block the air vents on the door or at the rear of the dehydrator. Keep
the dehydrator at least 12 inches (30.5cm) away from any wall to allow for
proper air circula�on.
9. To prevent electric shock, do not immerse the dehydrator in water or liquid.
Electric shock may cause serious injury, please do not use this machine with wet
hands or bare feet. Do not operate it near running water.

8
10. Disconnect from the power source before cleaning the components of this
machine. Read all direc�ons on how to clean this dehydrator before a�emp�ng
to clean it.
11. A�er cleaning, make sure the dehydrator is completely dry, otherwise recon-
nec�ng the power supply may result in electric shock.
12. Do not operate the dehydrator on a hot stove top or inside an oven. Do not
allow the power cord to drape over the dehydrator or hot surfaces.
13. It may be necessary to put heat-resistant material under the appliance to
avoid possible damage to the surface during use.
14. Edges may be sharp.
15. Do not use while under influence of drugs or alcohol.
Cleaning Instructions
WARNING! Before cleaning or servicing the dehydrator, make sure it is
unplugged and the power switch is set to the "OFF" posi�on.
Clean the tray racks and interior of the cabinet before using the dehydrator for
the first �me and a�er each use.
1. Set the power switch and the �mer knob to the "OFF” posi�on. Disconnect
the electrical cord from the power outlet.
2. Allow the dehydrator to completely cool before cleaning.
3. Remove the tray racks from the dehydrator cabinet.
4. Wipe the dehydrator cabinet (inside and outside) with a damp sponge or
washcloth. Cau�on! Edges may be sharp! Do not splash water onto the hea�ng
element (located behind the screen at the back of the cabinet). Water may
damage the electrical components and increases the risk of electrical shock. Do
not immerse the dehydrator in water.
5. Clean the tray racks with warm, soapy water, then rinse with clean water and
dry immediately.

9
Problem-Solving
Moisture in the container
Cause: Incomplete drying. Food is cut unevenly and therefore is not completely
dried. Dried foods is le� at room temperature too long a�er cooling, and mois-
ture re-enters the foods.
Preven�on: Test food for dryness before removing it from the dehydrator. Cut
foods evenly. Cool the food quickly and package immediately.
Mold on food
Cause: Incomplete drying. Food is not checked for moisture content within a
week. Storage container is not air-�ght. Storage temperature is too high/there
is moisture in food. Surface hardening may have occurred, meaning the food
was dried at too high temperature, and the food was dried on the outside but
not completely dried on the inside.
Preven�on: Test several pieces of food for dryness, check the storage container
within 1 week for moisture. Redry the food if needed, and use air-�ght contain-
ers for storage. Store foods in cool areas at 70℉(20℃) or below. Dry foods at
appropriate temperatures/use the drying guide for reference.
Brown spots on vegetables
Cause: The drying temperature used is too high. Vegetables were over-dried.
Preven�on: Dry foods at appropriate temperatures/use the drying guide for ref-
erence. Check foods o�en for dryness.
Food s�cking to the tray racks
Cause: Food is not turned over.
Preven�on: A�er one hour of dehydra�ng, use a spatula to flip the foods.

10
Warranty
ROVRAk offers a 1-year warranty on all our products. If the food dehy-
drator is defective in manufacturing, parts, or workmanship during the
warranty period, please provide us with the original proof of purchase,
and we will replace any product with a defect due to the manufacturer
based on eligibility. Refunds are available within the first 30 days of
purchase, and only available to the original purchaser of the product.
This warranty only applies to personal use and does not apply to any
products used for commercial, rental or other purposes.
This warranty is non-transferable. ROVRAk is not responsible in any
way for any damages, losses, or inconveniences caused by equipment
failure by user’s negligence, abuse, or use of non-compliance with the
user manual or any additional safety or usage warnings included in the
product packaging and manual.
The warranty does not apply if the damage is caused by other factors, includ-
ing without limita�on of:
(a) Normal wear and tear;
(b) Abuse, mishandling or failure to follow opera�ng instruc�ons;
(c) Modified from its original condi�on;
(d) Connect to peripherals, addi�onal equipment or accessories.
(e) Unsupervised use by children under 18 years of age.
We always urge our customers to contact us with any issue, regardless of war-
ranty terms.

Thanks for trus�ng ROVRAk
which can meet your household and kitchen needs!
We're here to help !
ROVRAk always strives to provide the fastest and easiest shopping experience
possible and has a dedicated customer service team available 24/7.
If you experience an issue with a ROVRAk product,
please contact us at support@rovrakus.com,
and we will do our best to resolve it for you.
Additional 1 -Year Warranty !
Register your product within 14 days of your purchase to get an extra 1-year
warranty!
1. Visit www.rovrakus.com.
2. Go to the registra�on page.
3. Enter your purchase informa�on(including order number) to get your exclu-
sive services.
11
Customer Support

Make Healthy and Delicious Food at Home
Enjoy Energe�c and Exquisite Life at Will
