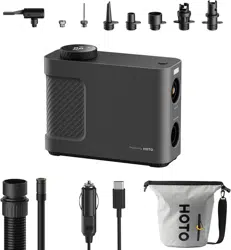
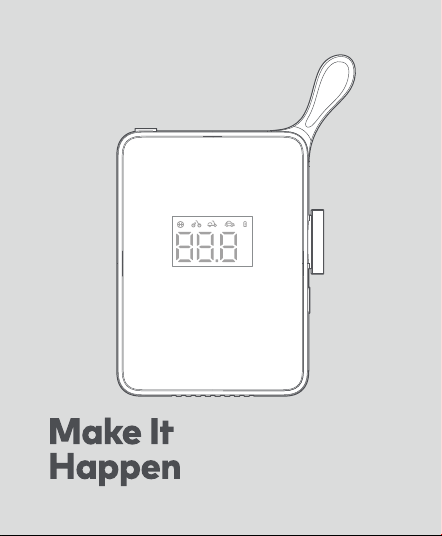
HOTO Air Pump
psi
bar
16
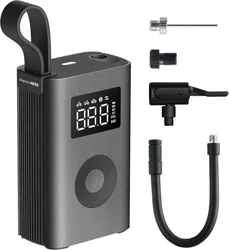
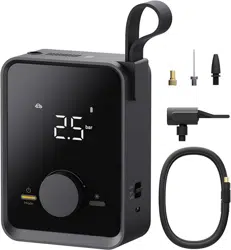
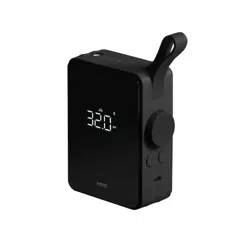
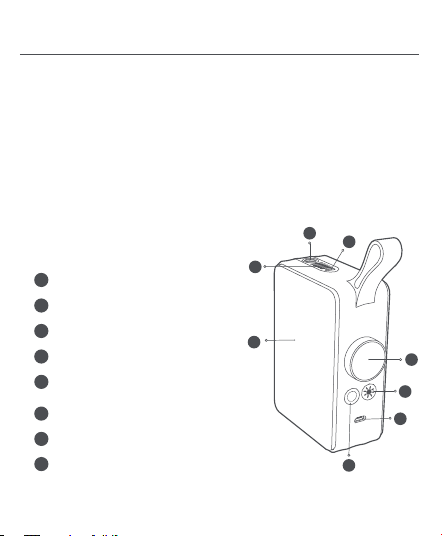
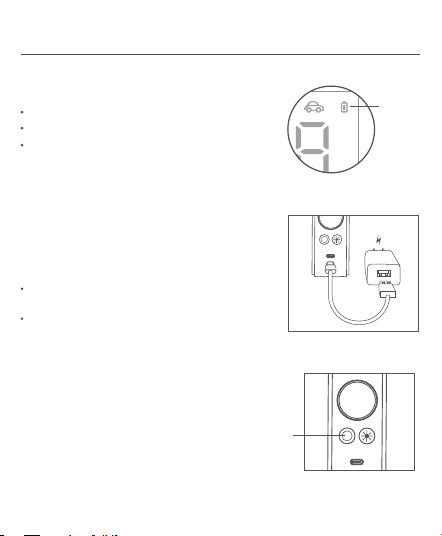
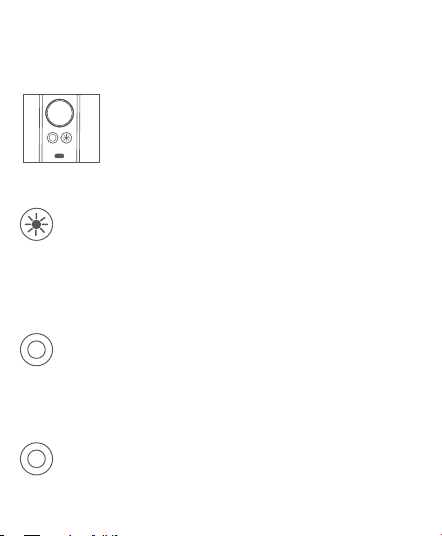
01 Product Overview
Light
2
Display
4
1
Air hose connector
Charging port
8
Power/start-stop key
7
5
Mode key/numeric knob/
unit toggling function key
Heat dissipation vent
3
6
Light On/Off button
Components
Read this manual carefully before use, and retain it for future reference.
Thank you for choosing HOTO Portable Electric Air Compressor.
The air compressor generates an operating noise of 75-80dB. Please take appropriate
precautions to protect your hearing. The air compressor and air hose will get very hot
after running for a long time. Please cool it before use again. This appliance can be
used by children aged from 8 years and above and persons with reduced physical,
sensory or mental capabilities or lack of experience and knowledge if they have been
given supervision or instruction concerning use of the appliance in a safe way and
understand the hazards involved. Children shall not play with the appliance. Cleaning
and user maintenance shall not be made by children without supervision.
This appliance contains batteries that are non-replaceable.
6
7
4
2
1
3
8
5
17
Battery indicator
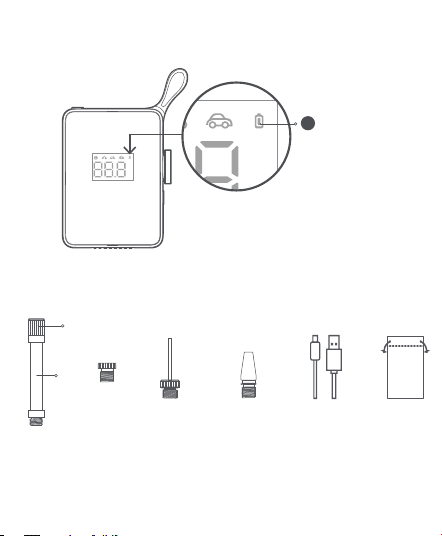
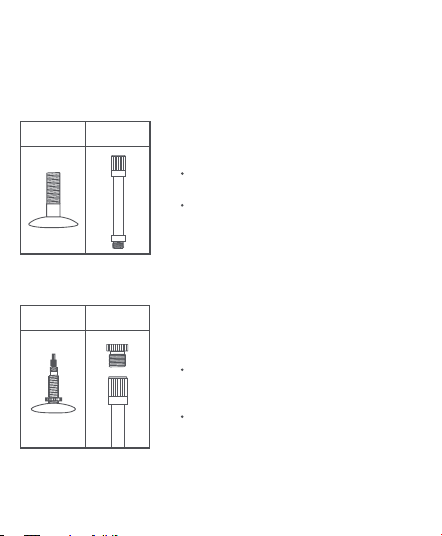
Accessories
Schrader air hose
×1
Presta valve
×1
Schrader valve
Adapting valve
×1
Needle valve adapter
×1
Type-C charging cable
×1
Storage pouch
×1
psi
bar
psi
bar
9
Air hose
18
02 How to Use
Battery Level Indicator & Charging
Turning On
Charging State
White indicator ON (battery capacity ≥60%)
Red indicator flashing (flash every 3 seconds):
charging
White indicator ON: fully charged
Battery Level Indicator
Battery
indicator
Power
button
Fully charge the air compressor before first
use. Connect the charging cable to a 5V USB
charger (sold separately) to charge the HOTO
Portable Electric Air Compressor.
Press the "Power" button for two seconds,
and the air compressor will start inflating
automatically. Short press again and the air
compressor will start working. If the air
compressor is not operated for 3 minutes
after power-on, it will automatically power off.
Battery level indicator while charging
Note: The air compressor cannot be used while
charging.
Orange indicator ON (30%≤battery capacity<60%)
Red indicator ON (battery capacity<30%).
Charging is required.
psi
bar
Connecting the high-pressure air hose to the air valve
Schrader valve
19
Inflate: Directly connect the air compressor
to a "Schrader valve" for inflation.
Deflate: Use an appropriate tool to press the
needle valve adapter inside the air valve for
deflation.
Mountain bicycles, electric bicycles,
motorcycles, and cars will be equipped with a
"Schrader valve".
Presta valve adapter
Inflate: Unscrew the Presta valve, connect the
"Presta valve" for inflation. After inflation,
screw on the valve.
Deflate: Unscrew the Presta valve, and press
the screw for deflation.
Road bicycles and certain mountain bicycles
may use a "Presta valve".
Screw the "Presta valve" onto the "Schrader
valve" and connect the "Presta valve" to the tire.
Valve type
Inflation
adapter
Valve type
Inflation
adapter
20
Detecting Air Pressure
The current air pressure will automatically be displayed after the air hose is
connected to an item while the air compressor is powered on.
Needle valve adapter
Screw the "Presta valve" onto the "Schrader
valve" and connect the "Presta valve" to the tire.
Inflate: Screw the "needle valve adapter"
onto the "Schrader valve", and insert the
needle into the air hole for inflation.
Deflate: Insert the "needle valve adapter" into
the valve of the ball for deflation.
The "needle valve adapter" should be used to
inflate balls like basketballs and footballs.
Valve type
Inflation
adapter
Valve type
Inflation
adapter
0
.
8
b
a
r
1
2
p
s
i
Adapting valve
Swimming ring and other inflatable items
should use a "Adapting valve" when inflating.
3
6
p
s
i
/
2
5
0
k
P
a
/
2
.
5
b
a
r
21
Determining the Correct Air Pressure
To ensure safety and prevent injuries from bursting items due to over-inflation,
always refer to the user manual or relevant directions accompanying the item to
be inflated before inflation, in order to determine the correct air pressure.
Tires
The recommended air pressure of tires for
cars, bicycles, and motorcycles is indicated on
the sidewall of the tire.
The recommended tire pressure for cars is
also indicated on the driver's side door jamb.
For details concerning load carrying capacity
and recommended air pressure, refer to your
vehicle's instructions or manual.
Balls
The recommended air pressure for footballs,
basketballs, volleyballs, and other balls is
indicated near the ball's air valve.
3
6
p
s
i
/
2
5
0
k
P
a
/
2
.
5
b
a
r
0
.
8
b
a
r
1
2
p
s
i
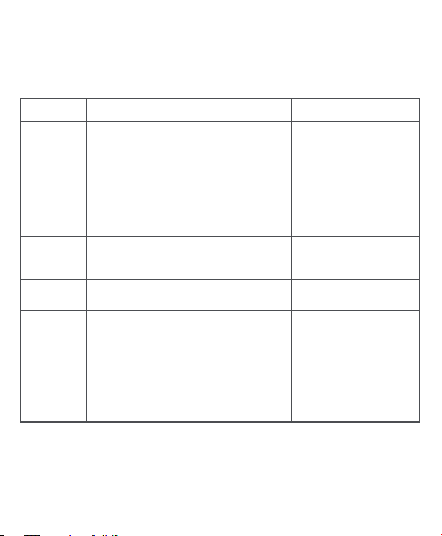
Air Pressure Reference Table
Note: Pressure range values are for reference only. Please refer to the user
manual of the item being inflated. (The data above is from the lab of HOTO.)
Category
Bicycles
Motorcycles
Cars
12-, 14-, and 16-inch bicycle tires
20-, 22-, and 24-inch bicycle tires
26-, 27.5-, and 29-inch mountain
bicycle tires
700c road bicycle clincher tires
700c road bicycle tubular tires
Motorcycle and electric
motorcycle wheels
30-50psi
40-50psi
45-65psi
100-130psi
120-145psi
1.8-3.0bar
2.2-2.8bar
Type
Recommended Pressure
Range
Car tires
Balls
Basketball
Football
Volleyball
Football
7-9psi
8-16psi
4-5psi
12-14psi
22

Presetting Pressure
Mode toggling
Press the “Numeric Knob" to toggle between the five inflation
modes below. Select the preferred air pressure unit beforeinflating.
Press and hold the “Numeric Knob" to toggle between psi and bar.
No mode indicator ON: User-specified pressure presetting
(pressure value and unit will be saved)
Adjustable range: 3-150psi
Indicator ON in ball mode: default 8psi
Adjustable range: 4-16psi
Indicator ON in bicycle mode: default 45psi
Adjustable range: 30-65psi
Indicator ON in motorcycle mode: default 2.4bar
Adjustable range: 1.8-3.0bar
Indicator ON in car mode: default 2.5bar
Adjustable range: 1.8-3.5bar
23
5
Inflating
After power-on, short press the "Power” button to start inflation, and
the digital display will show the real time pressure change during
inflation. When inflating, the air compressor will generate an operating
noise of 75-80dB. Please take appropriate precautions to protect your
hearing.
Start Inflating
Once the preset pressure has been reached, the air compressor will
automatically stop inflating. The air compressor can also be stopped at
any time while inflating by short pressing the “Power key”.
Stop Inflating
After selecting the scenario mode, turn the "Numeric
Knob" clockwise to "+" and counterclockwise to "-" to
adjust the preset pressure value.
When adjusting a preset pressure, the number flashing
indicates the target pressure, and after flashing for 5s, the
number being “ON” indicates the real-time pressure.
Adjusting the Preset Pressure
Short press the “Light ON/OFF”button to turn the air compressor's
light on/off. The light makes it easy to see in the dark when you have
any operations, such as connecting the air compressor to a valve.
Light
24

Removal of Air Hose
The air compressor's air hose may get very hot after inflating. To prevent
injuries, exercise caution when removing it from a valve. Some
air may leak out of the valve when removing the air compressor. To avoid
air leakage, quickly remove the air hose from the valve.
OFF
After power-on, press and hold the power button for about 2
seconds to power off the air compressor.
If the air compressor is not used for 3 minutes, it will automatically
power off.
Items such as balloons, beach balls, and swim rings cannot be automatically
inflated because they have an air pressure requirement below the air
compressor's minimum pressure range . They can not automatically stop
inflating through the preset pressure and should be used with caution.
Caution
The battery of the air compressor will last about 30 minutes on a full charge
running without a load at an ambient temperature of 25 ° C. Using the air
compressor under a heavy load or at higher ambient temperature may reduce
its battery life.
Battery and Battery Life
After selecting the scenario mode, turn the "Numeric
Knob" clockwise to "+" and counterclockwise to "-" to
adjust the preset pressure value.
When adjusting a preset pressure, the number flashing
indicates the target pressure, and after flashing for 5s, the
number being “ON” indicates the real-time pressure.
25

03 Precautions
This appliance can be used by children aged from 8 years and above and
persons with reduced physical, sensory or mental capabilities or lack of
experience and knowledge if they have been given supervision or instruction
concerning use of the appliance in a safe way and understand the hazards
involved. Children shall not play with the appliance. Cleaning and user
maintenance shall not be made by children without supervision.
The air compressor has a built-in non-removable lithium battery and should
never be exposed to fire or improperly disposed of. The exposure of the
lithium battery to extreme heat, impact or water may cause fire, spontaneous
combustion, and even explosion. Do not expose the air compressor's battery
to high temperature conditions, such as leaving it in a car in direct sunlight.
The air compressor should not be stored at temperatures below -10 ° C
or over 45 ° C. Exposure to extreme heat or cold will shorten the air
compressor's service life and damage the built-in battery.
Leaving the air compressor unused for a long time may harm the battery, it is
recommended to charge the air compressor at least once every three months.
The air compressor has a built in DC motor which may produce electrical
sparks when running. Thus, it should never be used in flammable or explosive
environment.
If the air compressor makes an unusual noise while running or starts to
overheat, turn it off immediately.
Always make sure the correct air pressure unit is selected before setting the
air pressure to prevent accidentssuch as tire burst.
Common unit conversion: 1bar=14.5psi, 1bar=100kPa.
Always monitor the air compressor during usage and never leave it unattended
when using it to avoid over-inflating when there is no preset pressure.
Only use the air compressor in a clean and dry environment. Intrusion of dirt
and dust may cause damage to the air compressor. The air compressor is not
waterproof and should never be rinsed with water.
26
27
All products bearing this symbol are waste electrical and electronic
equipment (WEEE as in directive 2012/19/EU) which should not be mixed
with unsorted household waste. Instead, you should protect human
health and the environment by handing over your waste equipment to a
designated collection point for the recycling of waste electrical and electronic
equipment, appointed by the government or local authorities. Correct disposal
and recycling will help prevent potential negative consequences to the
environment and human health. Please contact the installer or local authorities
for more information about the location as well as terms and conditions of such
collection points.
We Shanghai HOTO Technology Co., Ltd., hereby, declares that this
equipment is in compliance with the applicable Directives and
European Norms, and amendments.
This supplier’s declaration of conformity is hereby for
We declare that the above mentioned device has been tested
and found in compliance with CFR 47 Part 15 Regulation.
Product: HOTO Portable Electric Air Compressor
Model Number(s):
QWCQB001
Brand/Trade: HOTO
Federal Communications Commission Supplier’s
Declaration of Conformity

28
This device complies with part 15 of the FCC Rules. Operation is subject to the
following two conditions: (1) This device may not cause harmful interference,
and (2) this device must accept any interference received, including
interference that may cause undesired operation.
Representative of Responsible Party for SDoC
Reorient or relocate the receiving antenna.
Increase the separation between the equipment and receiver.
Connect the equipment into an outlet on a circuit different from that to which
the receiver is connected.
Consult the dealer or an experienced radio/TV technician for help.
Note: This equipment has been tested and found to comply with the limits for a
Class B digital device, pursuant to part 15 of the FCC Rules. These limits are
designed to provide reasonable protection against harmful interference in a
residential installation. This equipment generates, uses and can radiate radio
frequency energy and, if not installed and used in accordance with the
instructions, may cause harmful interference to radio communications. However,
there is no guarantee that interference will not occur in a particular installation. If
this equipment does cause harmful interference to radio or television reception,
which can be determined by turning the equipment off and on, the user is
encouraged to try to correct the interference by one or more of the following
measures:
Company: HOTO (US) TECHNOLOGY CO LTD
Address: 919 North Market Street, Suite 950, Wilmington DE 19801
Country: U.S.A.
Customer Service(US): +1 855-577-2659
Mon-Fri 9:00am-5:00pm(CST)
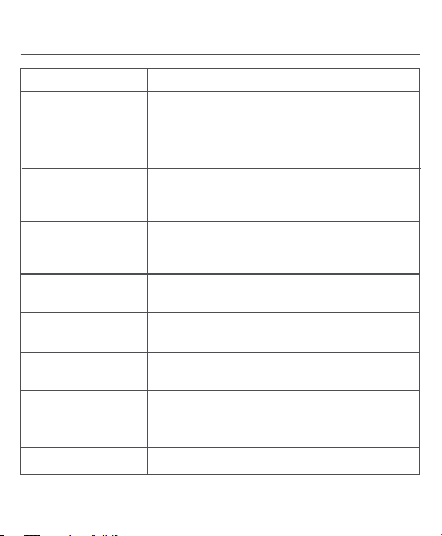
04 Troubleshooting
Error
Slow inflation speed
Inflation failure after
power-on
The display shows E01
1. Check whether the air compressor's battery level is
sufficient.
2. Check whether the air hose is leaking.
3. Check whether both ends of the air hose are securely
connected.
4. Check whether the item that is being inflated is leaking.
1. Check whether the air compressor's battery level is
sufficient.
2. Check whether the current tire pressure exceeds the
preset one.
Solution
Failure to increase or
decrease the preset
pressure
Make sure the air compressor is set to the correct mode.
Select the free mode with no icon ON to adjust the
preset value within a range of 3 - 150 psi.
Normal inflation but
the pressure displays zero
The pressure of low-pressure inflatables including
balloons is too low to be measured.
Air compressor power-off
after connecting the air
hose to a valve
Press and hold the “Power/start-stop key” button to
power on the air compressor again.
Make sure the air hose is securely connected.
Air leakage when
connecting the air hose
The voltage from USB connector is abnormal. Please use a
5V charger.
Different color of the
battery level indicator when
inflating and on standby
The lithium battery's voltage level significantly drops when
discharging power, causing the battery level indicator to
have a different color when inflating compared with
standby state. This is normal.
29

Name: HOTO Portable Electric Air Compressor
Model: QWCQB001
Standard: Q31/0107000203C001-2021
Item Dimensions: 158.5×116×44 mm
Inflation pressure range: 0.2~10.3 bar/3~150 psi
Operating temperature: charging: 0 ℃ ~45 ℃ , discharging: -10 ℃ ~45 ℃
Storage temperature: -10 ℃ ~45 ℃
Dimensions of air hose: air hose length including its valve adapter is 200 mm
(excluding thread)
7.2 V Battery capacity: 2500 mAh
Operating noise level: Less than 80dB at a distance of 1 m
Input: 5 V 2 A
Charging port: Type-C
Charging duration: 3.5 hours
Sensor accuracy: ±2 psi
05 Specifications
30
Manufacturer: Shanghai HOTO Technology Co., Ltd.
Address: Building 45, No.50 Moganshan Road, Shanghai, China