
Instruction Manual
ECOVACS GOAT
A1600 RTK/A3000 RTK

Instruction Manual �������������������������������������������������������������������������������������������EN I P03
Betriebsanleitung ���������������������������������������������������������������������������������������������DE I P35
Manuel d’utilisation ������������������������������������������������������������������������������������������ FR I P67
Manuale di istruzioni ����������������������������������������������������������������������������������������� IT I P99

3 EN
Table of contents
1. Original Instructions ........................................................................................................................................................4
2. Packaging Contents and Component Functions .......................................................................................................10
2�1 What's in The Box ����������������������������������������������������������������������������������������������������������������������������������������������������10
2�2 Parts and Functions �������������������������������������������������������������������������������������������������������������������������������������������������11
3. Installation&Mapping ....................................................................................................................................................15
3�1 Installation ����������������������������������������������������������������������������������������������������������������������������������������������������������������15
3�2 Mapping �������������������������������������������������������������������������������������������������������������������������������������������������������������������19
4. Start Using Your ECOVACS GOAT ............................................................................................................................... 22
4�1 How Your ECOVACS GOAT Works ��������������������������������������������������������������������������������������������������������������������������22
4�2 Tips Before First Mowing ����������������������������������������������������������������������������������������������������������������������������������������25
4�3 Ready For Mowing ���������������������������������������������������������������������������������������������������������������������������������������������������26
5. Touble Shooting ............................................................................................................................................................. 28
6. Maintenance ..................................................................................................................................................................28
6�1 Frequency ����������������������������������������������������������������������������������������������������������������������������������������������������������������28
6�2 Regular Maintenance �����������������������������������������������������������������������������������������������������������������������������������������������29
6�3 Seasonal Maintenance ��������������������������������������������������������������������������������������������������������������������������������������������� 30
6�4 Part Replacement �����������������������������������������������������������������������������������������������������������������������������������������������������31
7. Technical Data ............................................................................................................................................................... 32

4EN
1. Original Instructions
IMPORTANTREAD CAREFULLY
BEFORE USE KEEP FOR FUTURE
REFERENCE
Read the instructions carefully� Make sure you
understand the instructions and be familiar with
the controls and the proper use of the appliance�
Please understand that you can reduce the risk
by following the instructions and warnings in this
manual, but you cannot eliminate all the risks�
Lawn Mowing Robot (hereinafter referred to as
"ECOVACS GOAT") has many built-in safety
sensors, however, safety risks still exist�
All related residual risks have been described or
informed in this manual�
Description of intended use: Intelligent lawn mowers
are mainly used in mowing grass, especially in
parks, private villa yards, and football fields�
For machines used in public areas, that warning
signs shall be placed around the working area of
the machine�
They shall show the substance of the following
text:WARNING! Automatic lawnmower!
Keep away from the machine! Supervise children!
DO NOT modify the mower by yourself�
Modifications could interfere with mower
operations, result in serious injury and/or damage,
or void the Limited Warranty� Use only Ecovacs
approved parts and accessories�
WARNING
Never allow children, persons with reduced
physical, sensory or mental capabilities or lack of
experience and knowledge or people unfamiliar
with these instructions to use the machine, local
regulations may restrict the age of the operator�
To avoid using the machine and its peripherals in
bad weather conditions especially when there is a
risk of lightning�
Before each mowing session, check that all parts
of the mower can function normally�
Periodically inspect the area where the machine
is to be used and remove all stones, sticks, wires,
bones, and other foreign objects�
NEVER allow children to touch the power
supply unit,charging station, blades, the battery
compartment, or any parts with gaps such as the
wheels�

5 EN
WARNING
Never to operate the machine and/or its peripherals
with defective guards or shields, or without safety
devices, or if the cord is damaged or worn�
Keep away from the rotating blades! DO NOT put
hands or feet under or near the rotating blades�
Keep a safe distance from the mower when
operating�
DO NOT overreach� Keep your balance at all
times and always be sure of the footing on slopes�
Walk, never run while operating the machine or its
peripherals�
WARNING
Never allow children to be in the vicinity or play
with the machine when it is operating�
WARNING
DO NOT touch moving hazardous parts before
they have come to a complete stop�
WARNING
For the purposes of recharging the battery, only
use the detachable supply unit provided with this
appliance (CH2491/CH2491A)�
This appliance contains batteries that are only
replaceable by skilled persons�
Safe Usage:
Not to connect a damaged cord to the supply or
touch a damaged cord before it is disconnected
from the supply for the reason that damaged cords
can lead to contact with live parts; keep extension
cords away from moving hazardous parts to avoid
damage to the cords which can lead to contact
with live parts; to connect the machine and/or its
peripherals only to a supply circuit protected by
a residual current device (RCD) with a tripping
current of not more than 30 mA�
Unplug the Power Supply from the power socket
and then untangle when the power cord or the
extension cable is damaged or entangled during
use� During the operation, pull the body of the
plug rather than the cord to avoid the hazard�
Contact Customer Service and let the skilled
professional to repair or replace the cord�
Please use the extension cable manufactured
by ECOVACS�If you have any problem, contact
Customer Service�
If the SUPPLY CORD is damaged, it must be
replaced by the manufacturer, its service agent

6EN
or similarly qualified persons in order to avoid a
hazard�
Press the STOP Button at once when the mower
makes the abnormal sound or raises the alarm�
In case of leakage of electrolyte flush with water
or neutralizing agent, ask for medical help once it
gets contact with the eyes etc�
If there are abnormal vibrations, please restart the
mower� If the problem persists, please Contact
Customer Service�
Instructions to always wear substantial
footwear and long trousers while operating the
machine with a manual controller.
Additionally when using the manual controller
a) Mow only in daylight or in good artificial light�
b) Avoid operating the machine in wet grass�
c) Do not operate the machine when barefoot or
wearing open sandals� Always wear substantial
footwear and long trousers�
d) Always be sure of your footing on slopes�
e) Use extreme caution when reversing the
machine towards you�
f) Always switch on the motor according to
instructions with feet well away from the blade(s)�
Device Update
Typically, some devices are updated bi-monthly,
but not always so specific�
Some devices, especially those that went on sale
more than three years ago, will only be updated if
a critical vulnerability is found and fixed�
7 EN
Information on Disposal for Users of used
batteries
This symbol means that batteries and accumulators,
at their end-of-life, should not be mixed with unsorted
municipal waste� Your participation is an important part
of the effort to minimize the impact of batteries and
accumulators on the environment and on human health�
For proper recycling you can return this product or the
batteries or accumulators it contains to your supplier or
to a designated collection point, which is free of charge�
Disposing of this product correctly will help save valuable
resources and prevent any potential negative effects
on human health and the environment, which could
otherwise arise from inappropriate waste handling�
Penalties may be applicable for incorrect disposal of this
waste, in accordance with your national legislation�
there are separate collection systems for used batteries
and accumulators�
Please, dispose of batteries and accumulators correctly
at your local community waste collection/recycling
center�
European Union Compliance
Statement
Information on Disposal for Users of Waste
Electrical & Electronic Equipment
This symbol on the product or on its packaging indicates
that used electrical and electronic products should not be
mixed with unsorted municipal waste� For proper treatment,
it is your responsibility to dispose of your waste equipment
by arranging to return it to designated collection points�
Disposing of this product correctly will help save valuable
resources and prevent any potential negative effects
on human health and the environment, which could
otherwise arise from inappropriate waste handling�
To return your used device, please use the return and
collection systems or contact the retailer where the product
was purchased, which is free of charge, please contact your
local authority for further details of your nearest designated
collection point�
Penalties may be applicable for incorrect disposal of this
waste, in accordance with your national legislation�
8EN
Europe Authorised Representative:
Ecovacs Home Service Robotics Co�, Ltd�
hereby declares that the product comply with
the essential requirements and other relevant
provisions of the RoHS Directive 2011/65/EU and
amendment Commission Delegated Directive
(EU) 2015/863, the Radio Equipment Directive
2014/53/EU and the Machinery Directive 2006/42/
EC�
The declaration of conformity can be viewed at
the following address: https://www�ecovacs�com/
global/compliance �
Restriction of the use of certain hazardous
substances (RoHS) Directive
Ecovacs Home Service Robotics Co�, Ltd� hereby
declares the whole product including parts
(cables, cords, and so on) meets the requirements
of RoHS Directive 2011/65/EU and amendment
Commission Delegated Directive (EU) 2015/863
on the restriction of the use of certain hazardous
substances in electrical and electronic equipment
("RoHS recast" or "RoHS 2�0")�
Radio Equipment Directive
Ecovacs Home Service Robotics Co�, Ltd� hereby
declares that the product listed in this section
comply with the essential requirements and
other relevant provisions of the Radio Equipment
Directive 2014/53/EU�
Machinery Directive
Ecovacs Home Service Robotics Co�, Ltd� hereby
declares that the product listed in this section
comply with the essential requirements and other
relevant provisions of the Machinery Directive
2006/42/EC�
ECOVACS Europe GmbH
Holzstrasse 2 I D-40221 Düsseldorf I Germany
9 EN
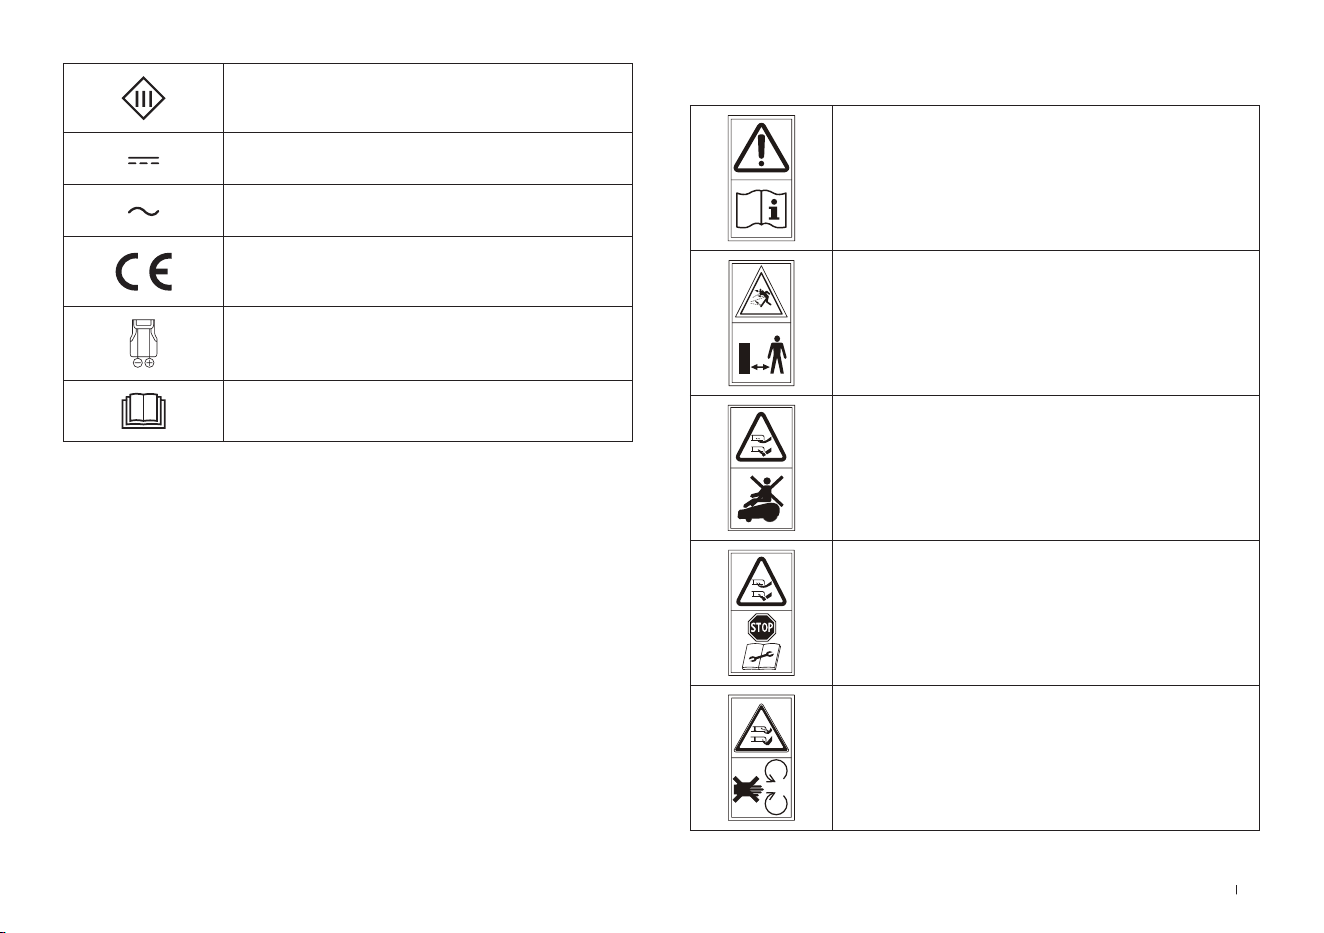
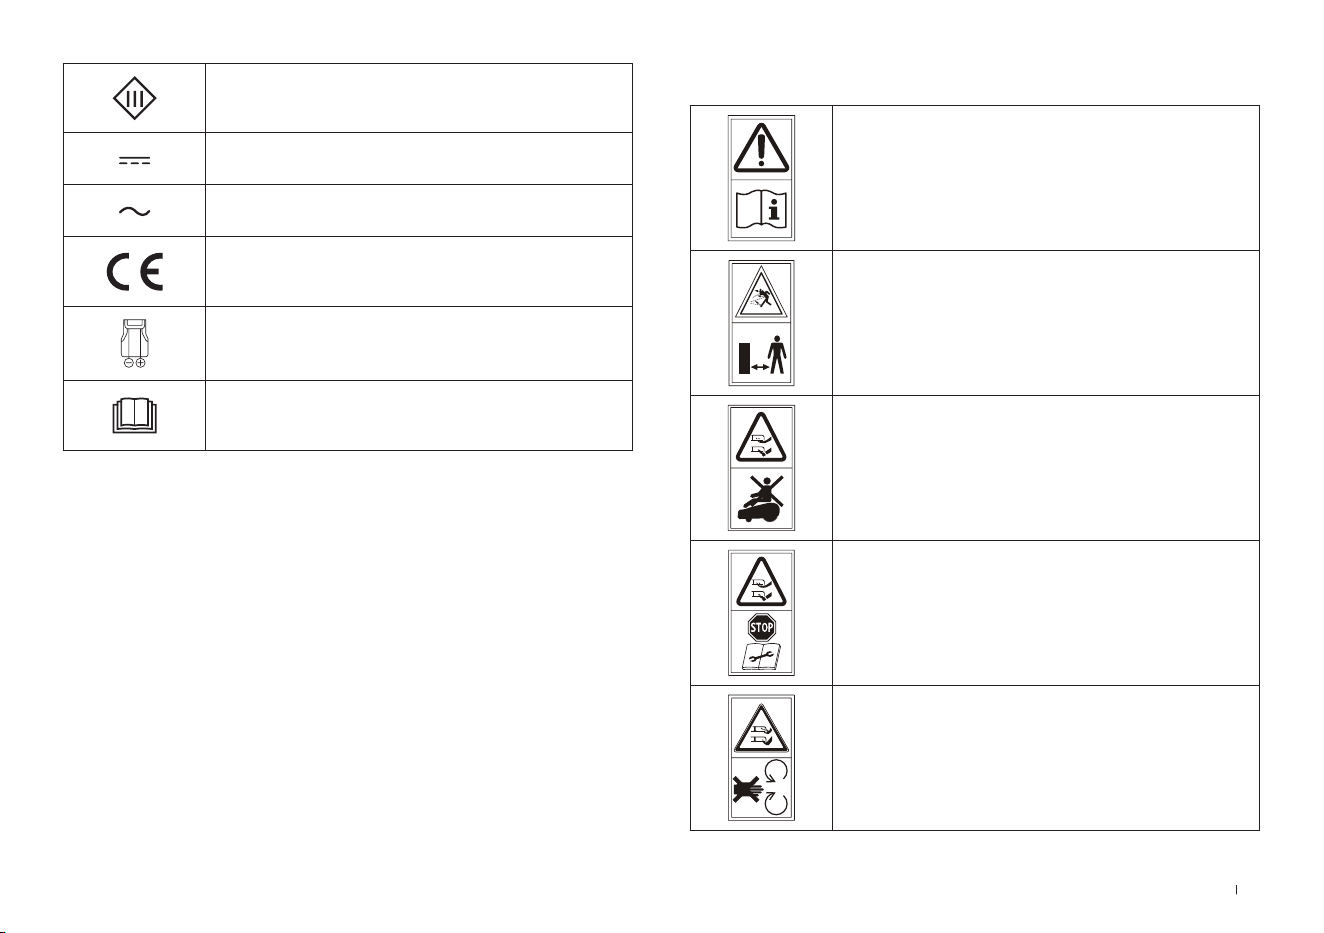
SYMBOLS
WARNING—
Read instruction manual before
operating the machine�
WARNING—
Keep a safe distance from the machine
when operating�
WARNING—
Do not ride on the machine�
WARNING—
Operate the disabling device before
working on or lifting the machine�
CAUTION—
Do not touch rotating blade�
Class III appliance
Direct current
Alternating current
This product conforms to the
applicable EC Directives�
Polarity of the charging port
Before charging, read the instructions�
10EN
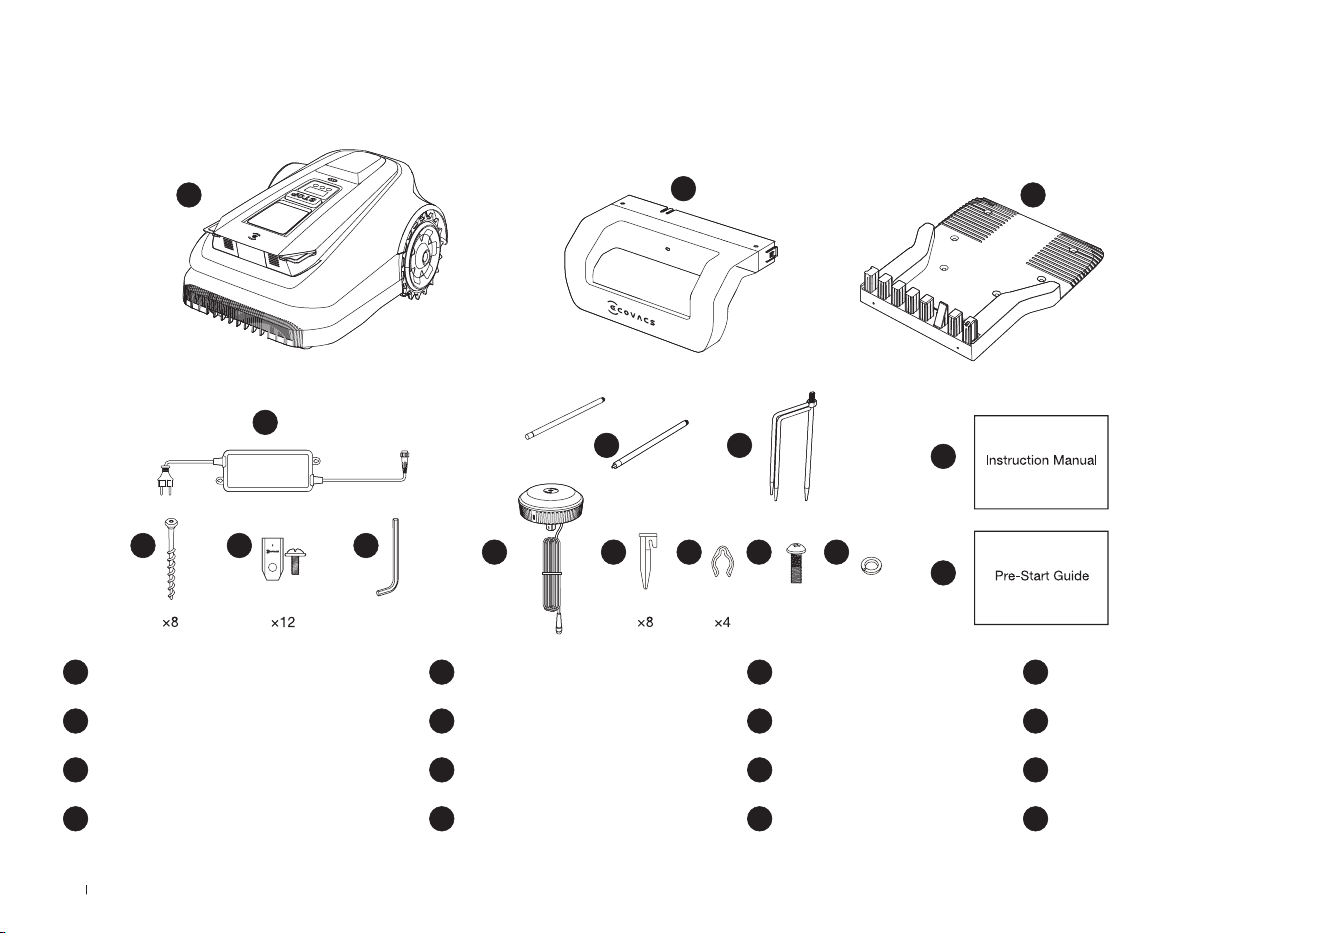
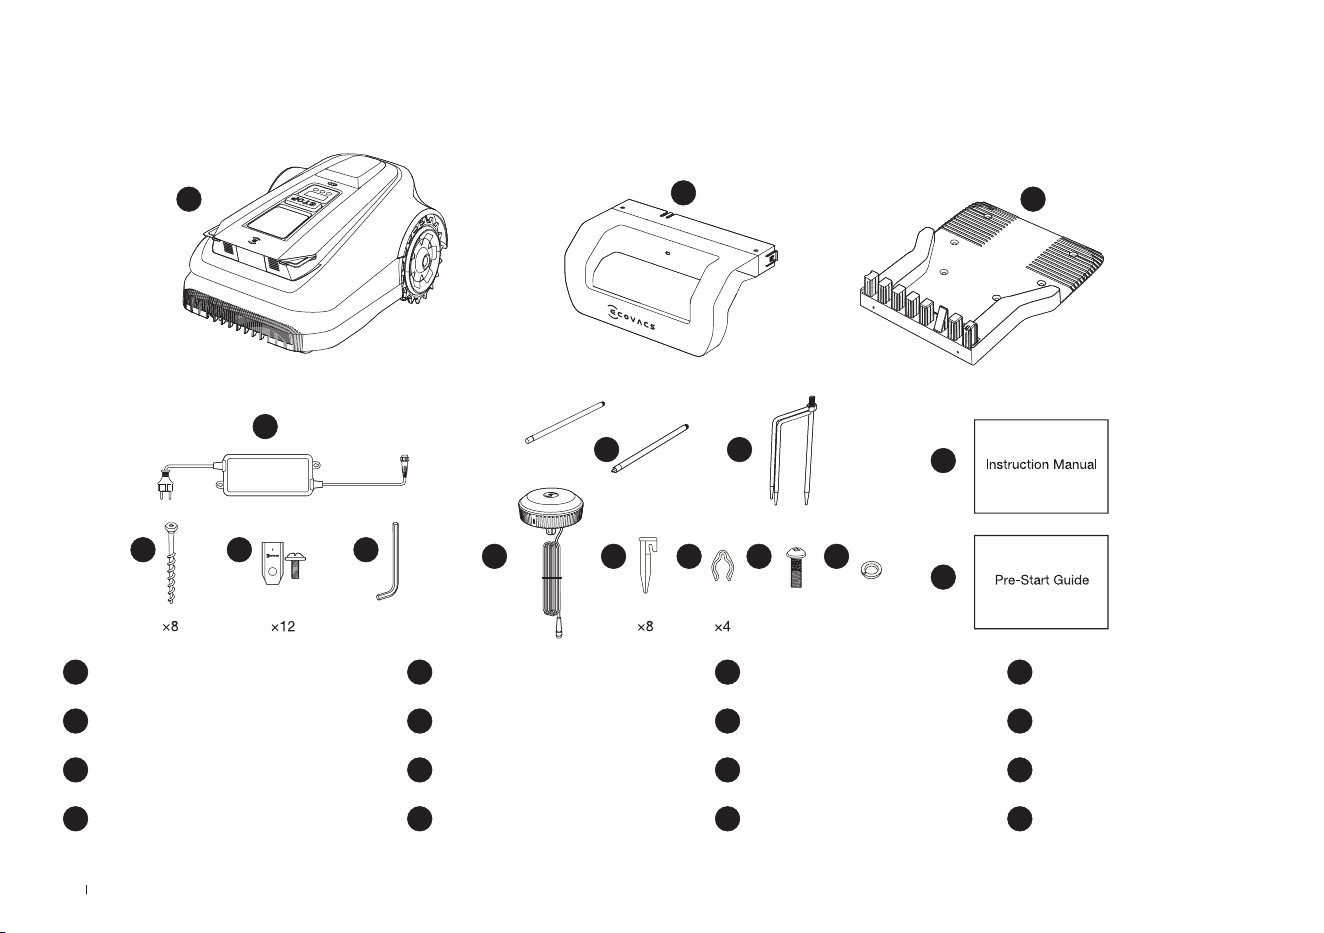
2. Packaging Contents and Component Functions
1 ECOVACS GOAT
5 Allen Key
9 Tripod Peg
13 Screw (For RTK Reference Station)
2 Pile of charging station
6 Spare Blade Kit
10 RTK Reference Station
14 Spring Washer (For Tripod Peg)
3 Base of charging station
7 Screws (For Base)
11 Plastic Garden peg
15 Instruction Manual
4 Power Supply
8 Mounting Pole
12 Cord Tie
16 Pre-Start Guide
2.1 What's in The Box
8
6 5
4
1
2
3
7
9
10
15
16
11 12 13 14
11 EN
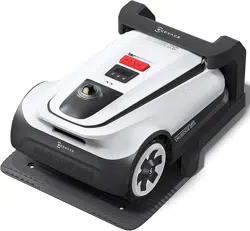
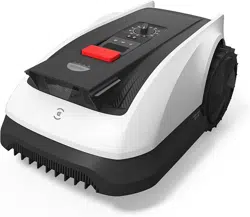
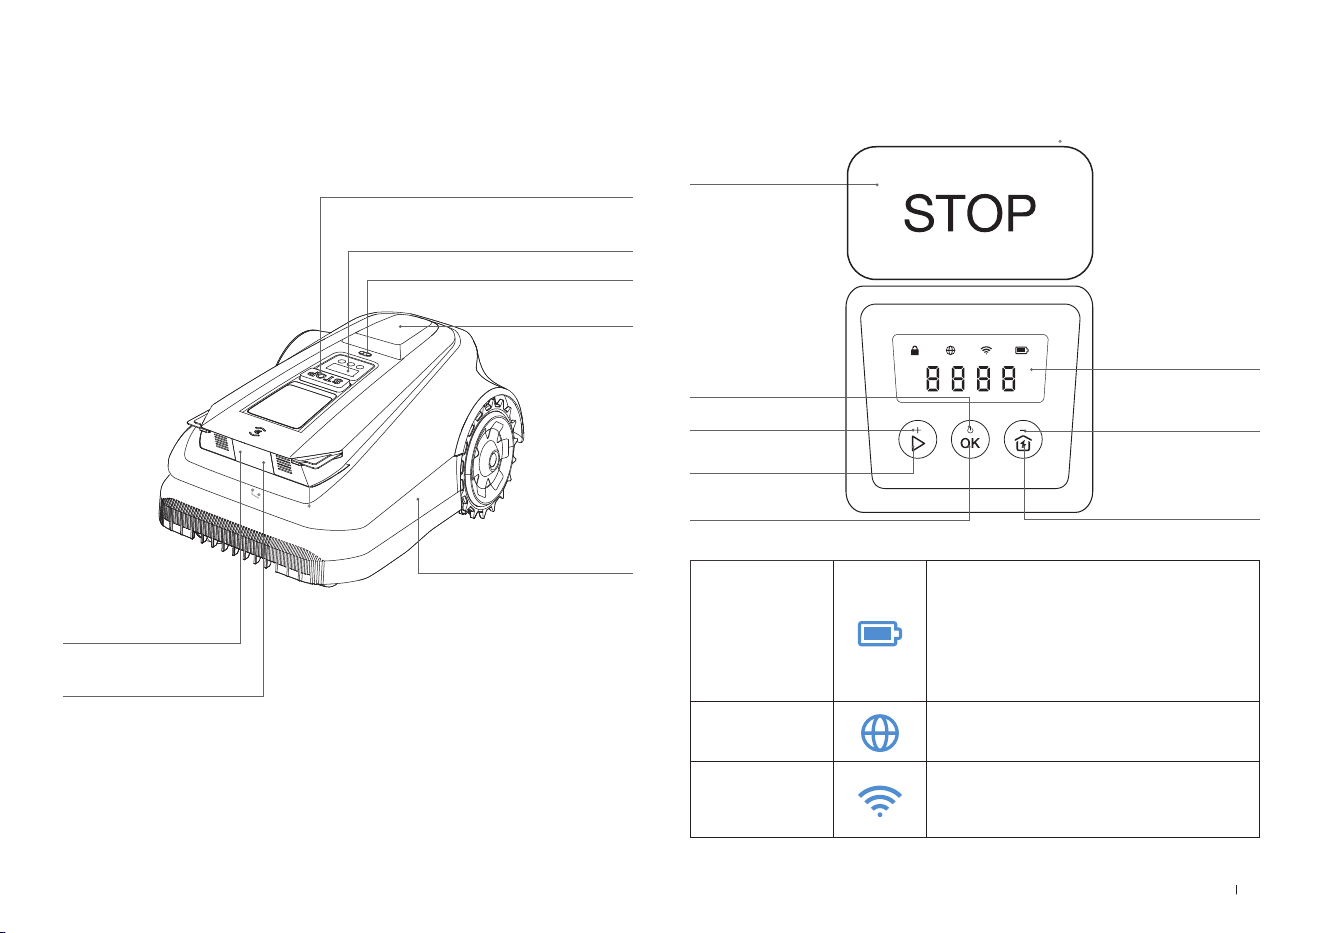
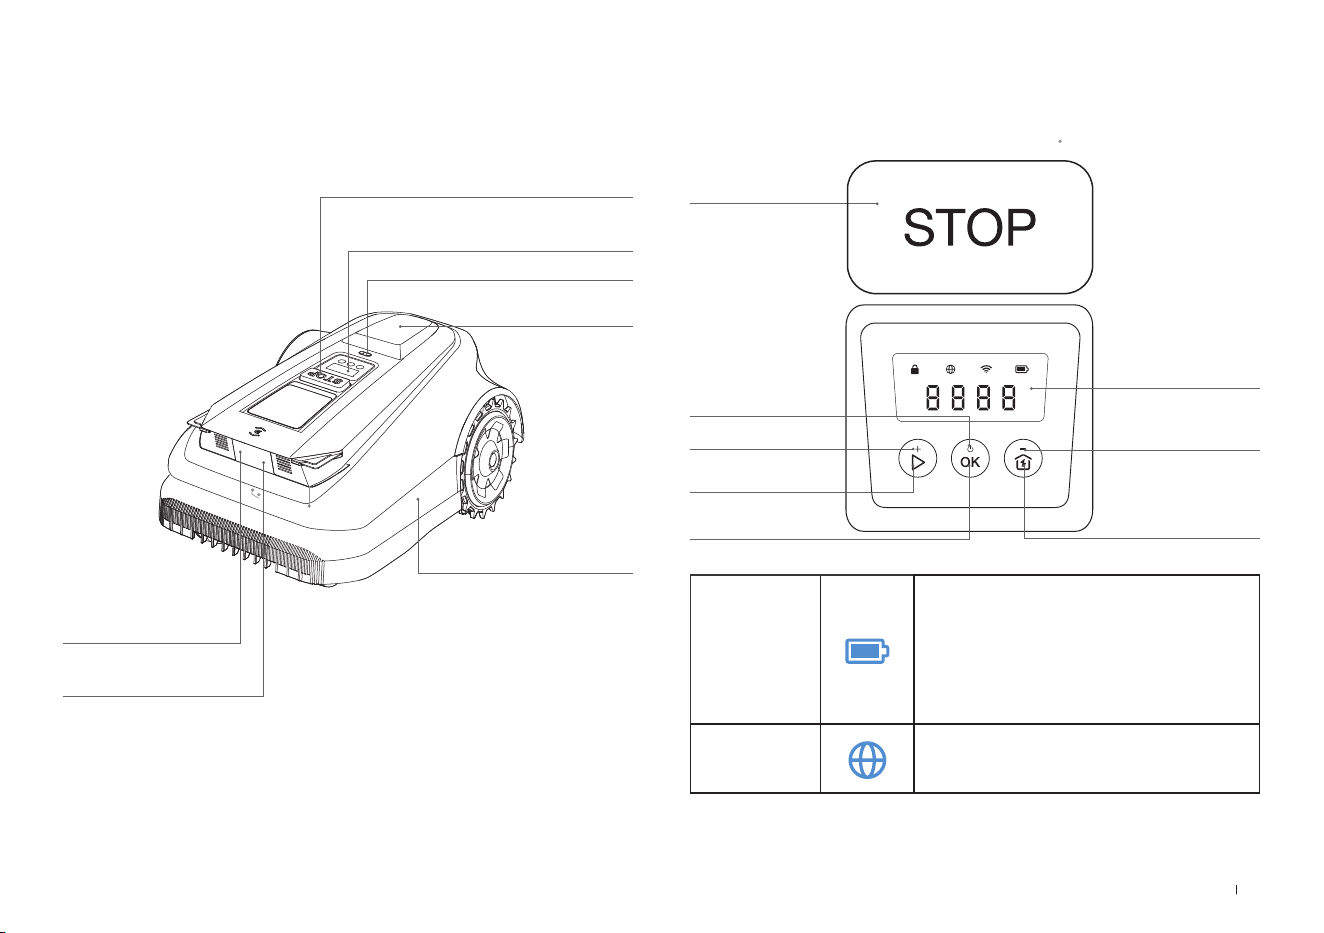
ECOVACS GOAT (Top View)
STOP Button
Control Panel
Rain Sensor
RTK Reference
Station
Bumper
3D-ToF LiDAR
Front AI Camera
2.2 Parts and Functions
Control Panel: The buttons on the control panel can be used for
the basic operations of the ECOVACS GOAT� The digital numbers on
the dashboard display shows mowing progress, battery level, and
ECOVACS GOAT status�
Icon:
Battery
Battery level�
White --- More than 15% charge�
Red --- Less than 15% charge
Flashing indicates charging;
Steady indicates in use or fully
charged�
4G Connection
Lights up when additional Connection
Module is installed with a SIM Card�
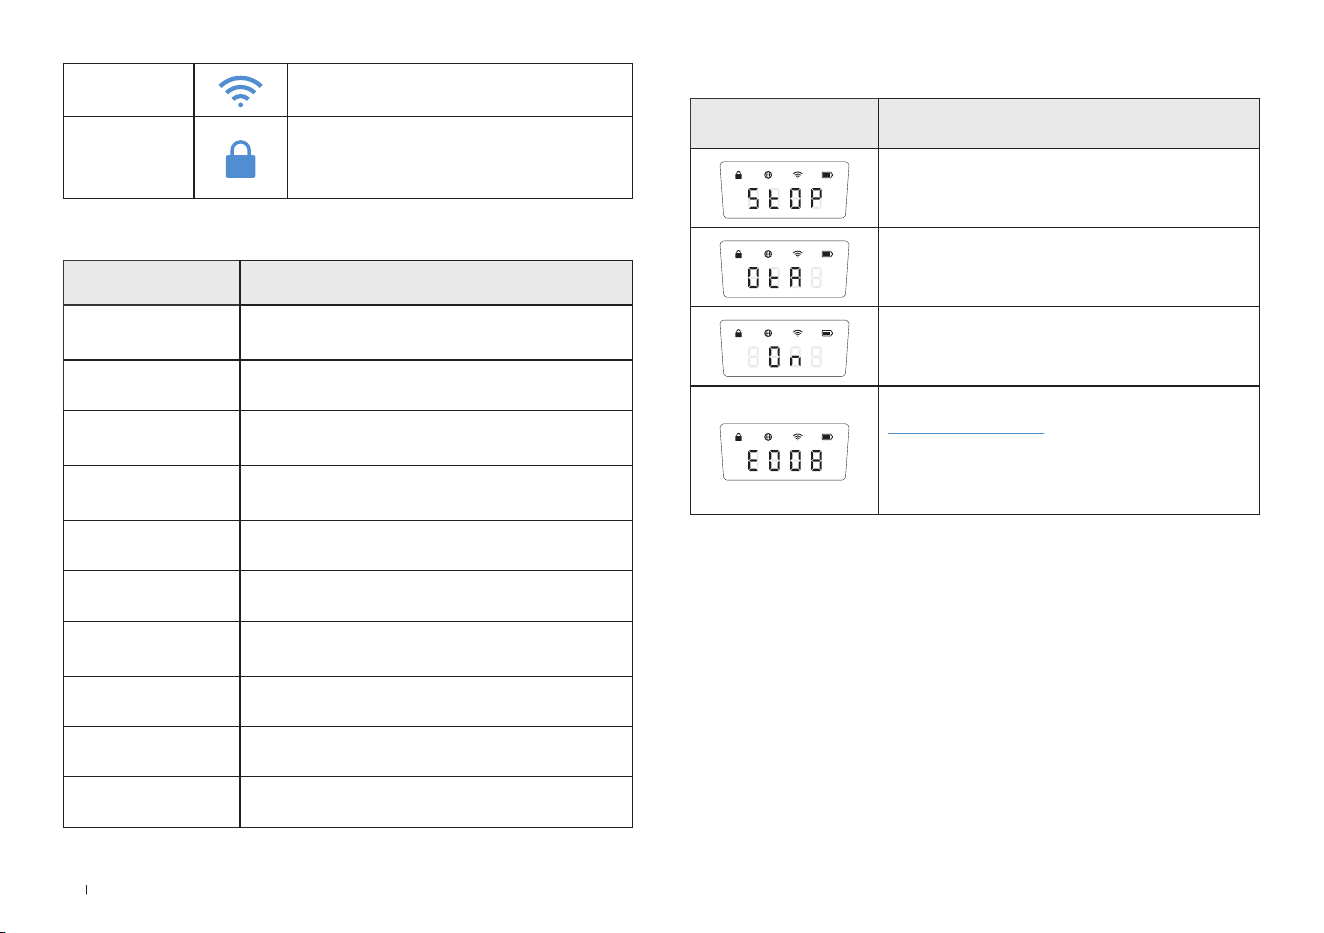
WiFi
Lights up when your ECOVACS GOAT
is Successfully connected with the APP
through Wi�
DISPLAY
START
HOME
SUBTRACT
POWER ON/OFF
ADD
OK
Thu 12:30
OK
to mow
STOP
12EN
Button
Function Buttons Description
START Press 5 times to show the battery level
START-->OK Start mowing/Continue task
OK Press and hold for 3s to power on/off�
HOME
Press and hold for 3s to enter the network
connection mode�
HOME-->OK
Send the ECOVACS GOAT to the charging
station
STOP Stop ECOVACS GOAT operation
START+HOME Press and hold for 5s to reset
ADD+ Increasing the number
SUBTRACT— Decreasing the number
OK Next digit/Conrm
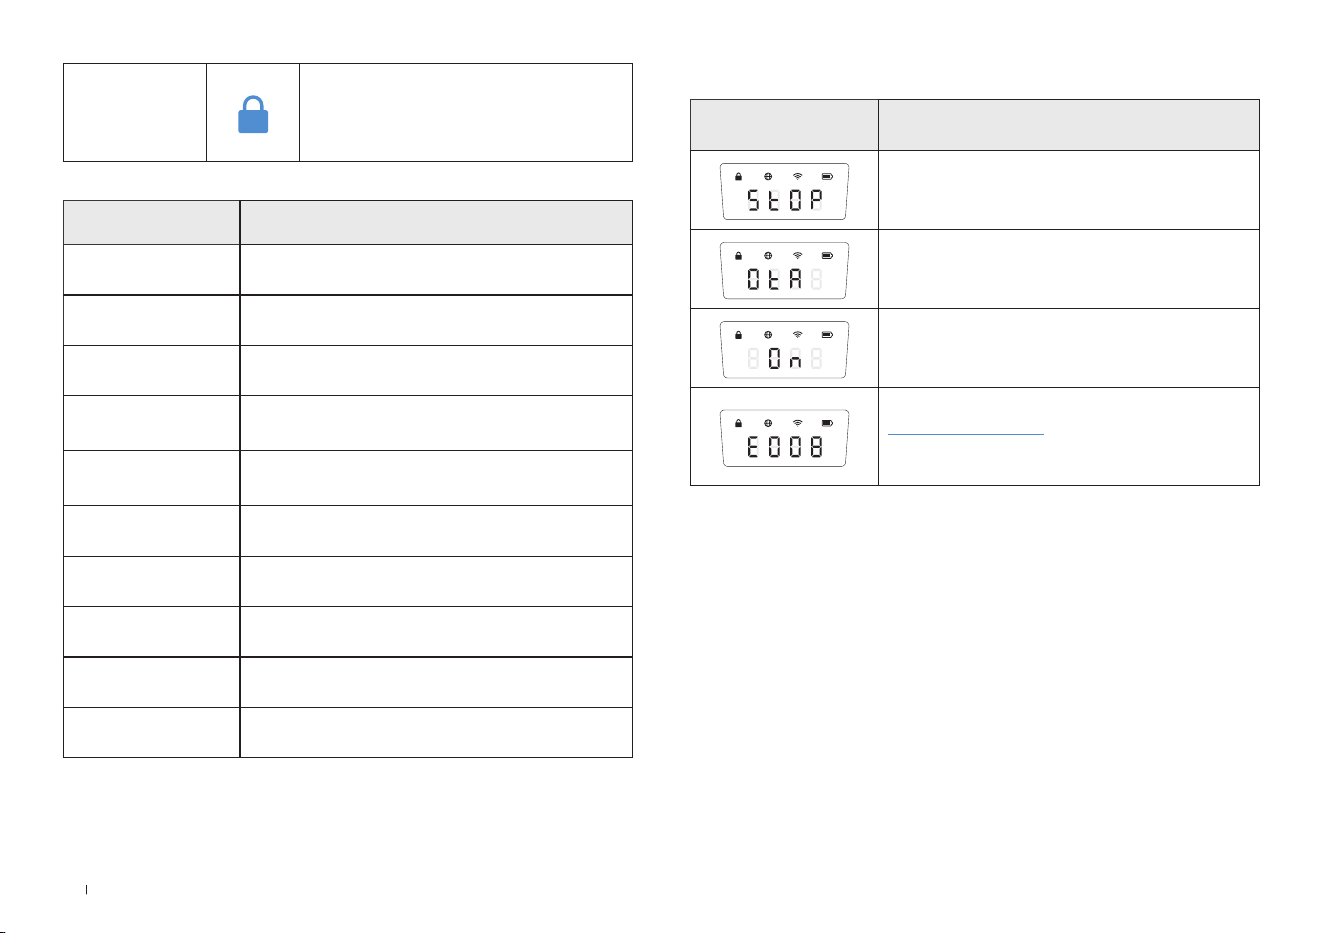
Display Description
ECOVACS GOAT stopped
Ongoing OTA updates
Mowing
Fault Code� For details, please visit
www�ecovacs�com�
If not resolved, the device will automatically
return to the station after 30 minutes�
Display:
Lock
ECOVACS GOAT locked� please enter
PIN code to unlock, otherwise the
ECOVACS GOAT won't be able to
work�

13 EN
SENSORS
Name Description
3D-ToF LiDAR
Perceive obstacle information in front of the robot
and help it actively avoid obstacles�
Range: Detect the longitude and latitude
coordinates of the robot's position�
Horizontal: 90 degrees; Vertical: 70 degrees (what
you see is what you get)
The maximum distance is 3-4 meters�
Front AI
Camera
Perceive the environmental information in front
of the robot, identify special targets, and help the
robot interact intelligently with users�
Horizontal: 150 degrees; Vertical: 80 degrees (what
you see is what you get).
Rain sensor
Detect whether it is raining in the current
environment and to help the robot decide whether
to continue working�
RTK Reference
Station
Help the mobile robot obtain the relative distance
between itself and the Locator Beacon, which
assists the robot in building a home map�
Range: With the Beacon as the center, the effective
range of the signal is within a radius of 140 meters�
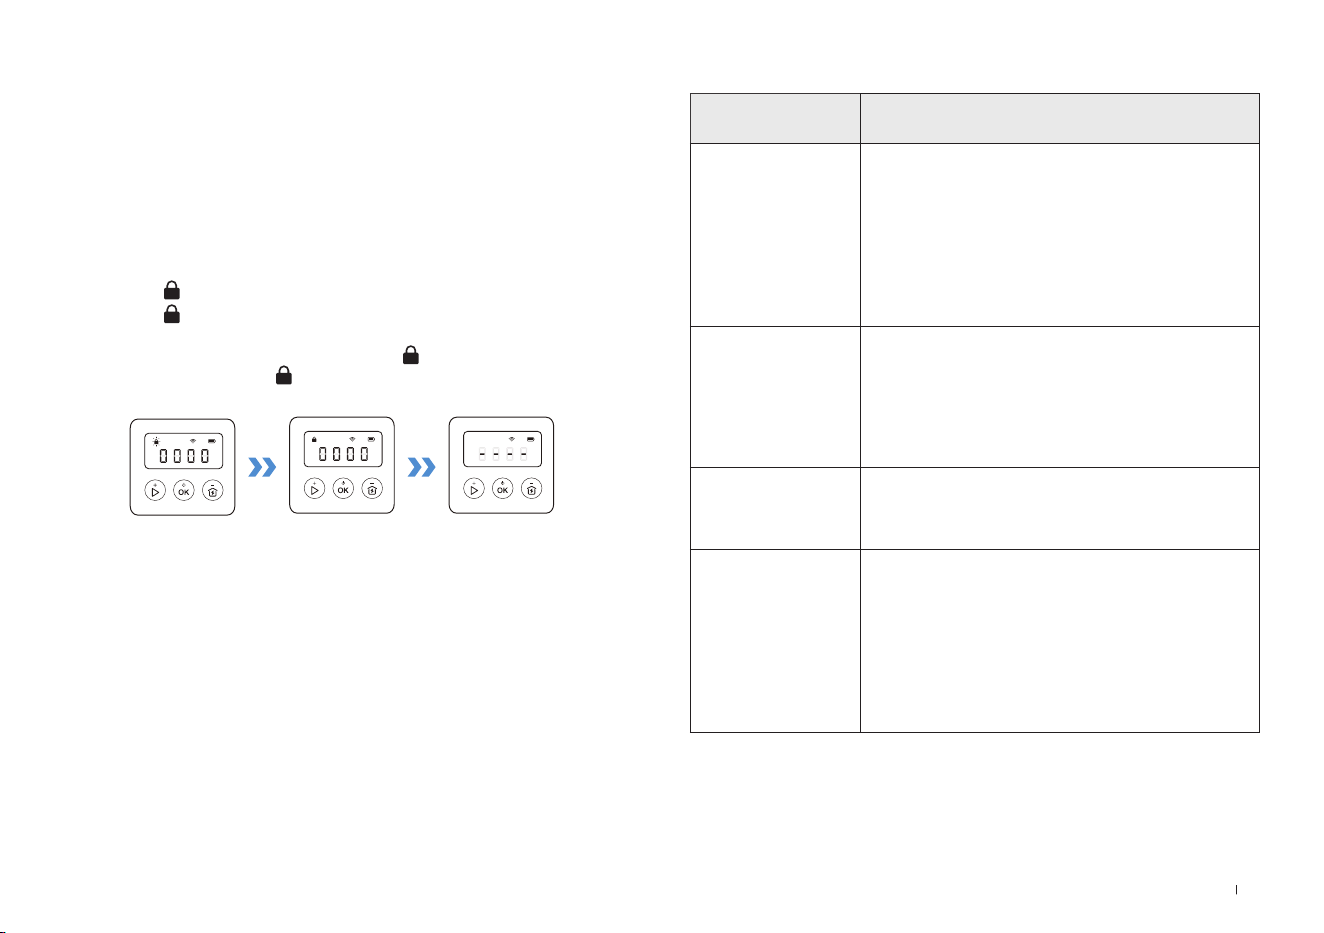
Set PIN Code
When the GOAT is off map or to be powered on or reset, it will
automatically be locked� You can unlock it by entering the right PIN
code�
Set the PIN code when the display shows as below�
Press [+] or [-] to select the PIN code numbers one by one� After the
first digit is decided, press [OK] to comfirm, and the cursor will move to
the next digit�
1� If the is flashing, please set the PIN code�
2� If the is solid, enter the previously set PIN code�
3� Once unlocked, the will disappear� If unlocking fails, the will flash
again, prompting you to reset the PIN code�
Note:
•
0000 is an invalid PIN code�
•
PIN code is to be entered twice to conrm the setting�
•
If you enter the wrong numbers while setting the PIN code, the setting process
will start all over again�
•
You may change the PIN code on the App�

14EN
Station View
RTK Reference Station
RTK Indicator Light
Solid blue : Charging and strong signal
Flashing blue: Poor signal� Please select a new location for installation�
Station Indicator Light
RTK Indicator Light
ECOVACS GOAT (Bottom View)
ECOVACS GOAT (Back View)
Blade Disc
Blades
Front Wheels
Off-road Wheels
Battery Compartment
Handle
15 EN
3. Installation&Mapping
3.1 Installation
1
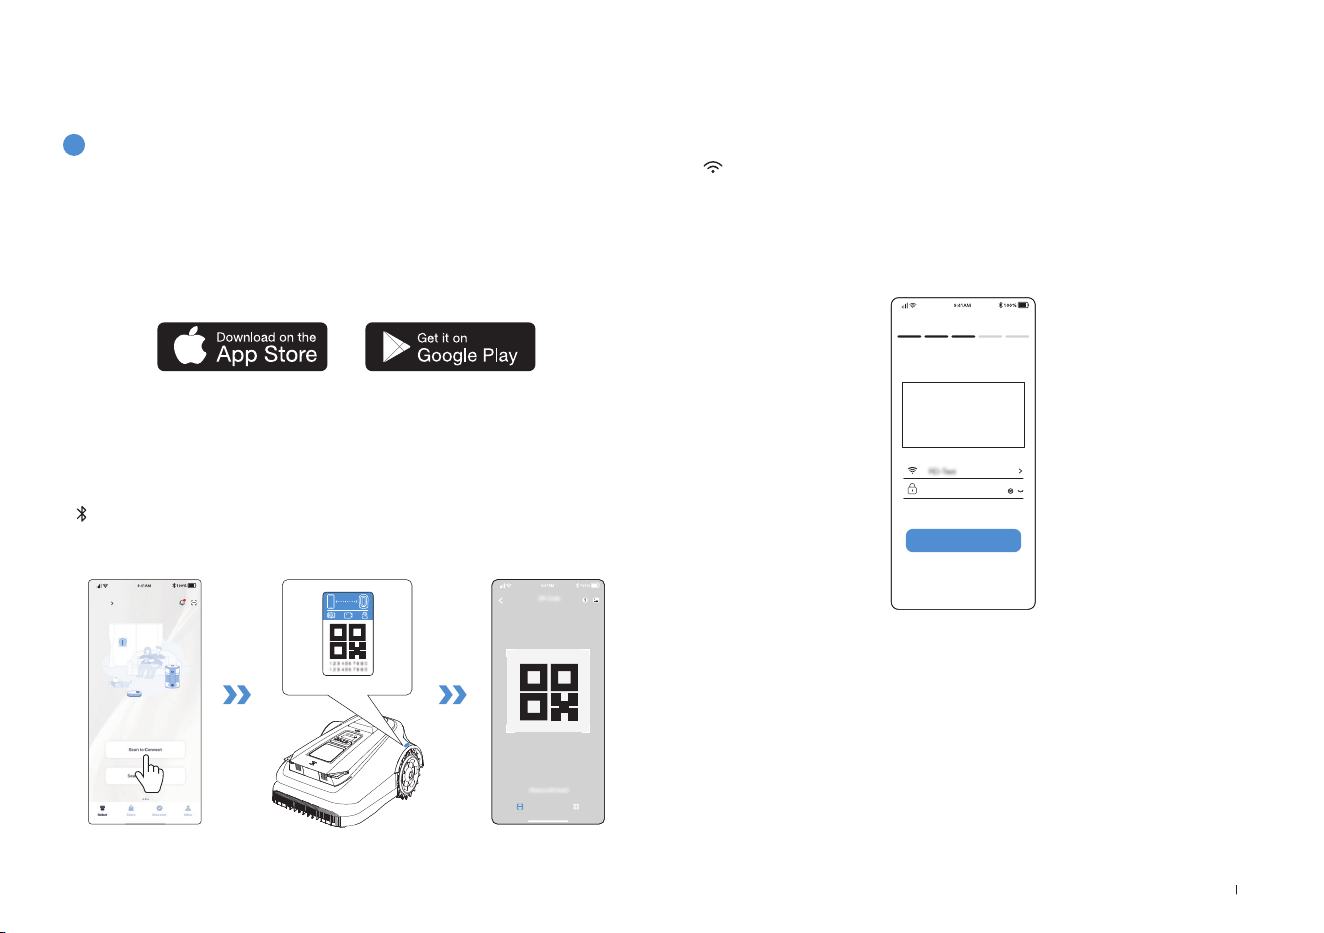
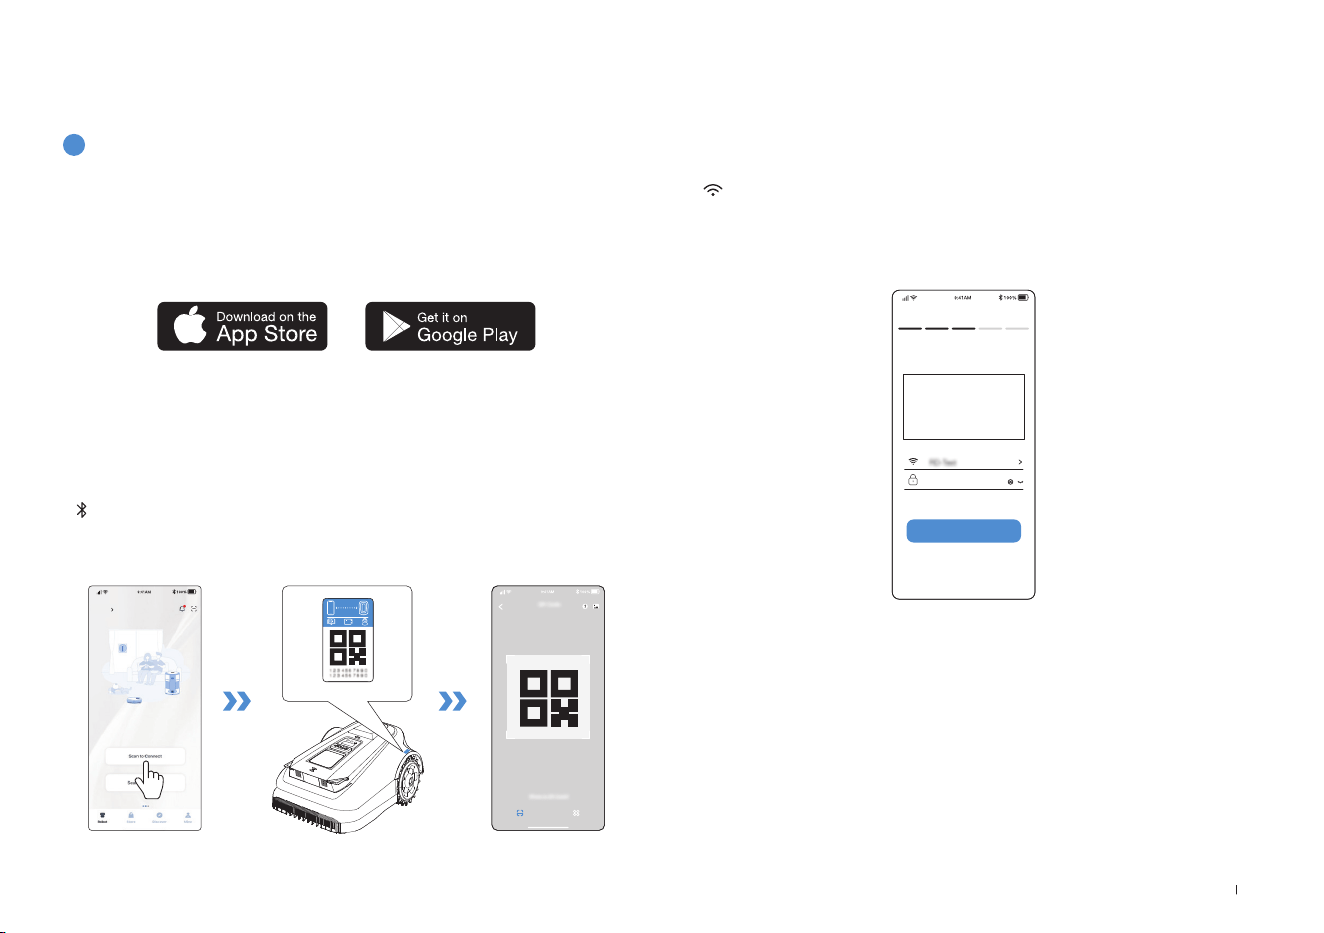
Prepare the APP
Download ECOVACS HOME App
Before you start, make sure that:
Connect ECOVACS GOAT to the Internet
• Your mobile phone is connected to a Wi-Fi network�
• The 2�4GHz band wireless signal is enabled on your router�
1. Bluetooth Connection
• Scan the QR Code on the ECOVACS GOAT or select ECOVACS GOAT
manually via the App�
• Turn on Bluetooth on your phone to connect your ECOVACS GOAT�
•
on the display will light up after successful connection�
Note: After installing ECOVACS HOME App, please complete the registration and
login�
Note: Ensure your phone has Bluetooth function and your ECOVACS GOAT is
within the connectable distance (10 m)�
HOME
Add
Allowing binding to one App account currently, your ECOVACS GOAT
is unable to be bound to another App account before unbinding� You
can unbind your ECOVACS GOAT in the App� Feel assured to take this
operation which would not erase the working data such as schedules
of your ECOVACS GOAT� You also can cancel the account in by clicking
the small triangle next to the ECOVACS GOAT name to delete it�
How to unbind your ECOVACS GOAT?
2. Wi-Fi Connection
• Make sure your ECOVACS GOAT and your phone are in the same
router environment�
• Follow the instructions in the App to complete the connection�
•
on the display will light up after successful connection�
Wi-Fi
****************
Next step
• You also can purchase the additional Connection Module so that
ECOVACS GOAT can be connected even without Wi-Fi�
Note: Please use a 2�4GHz network�
16EN
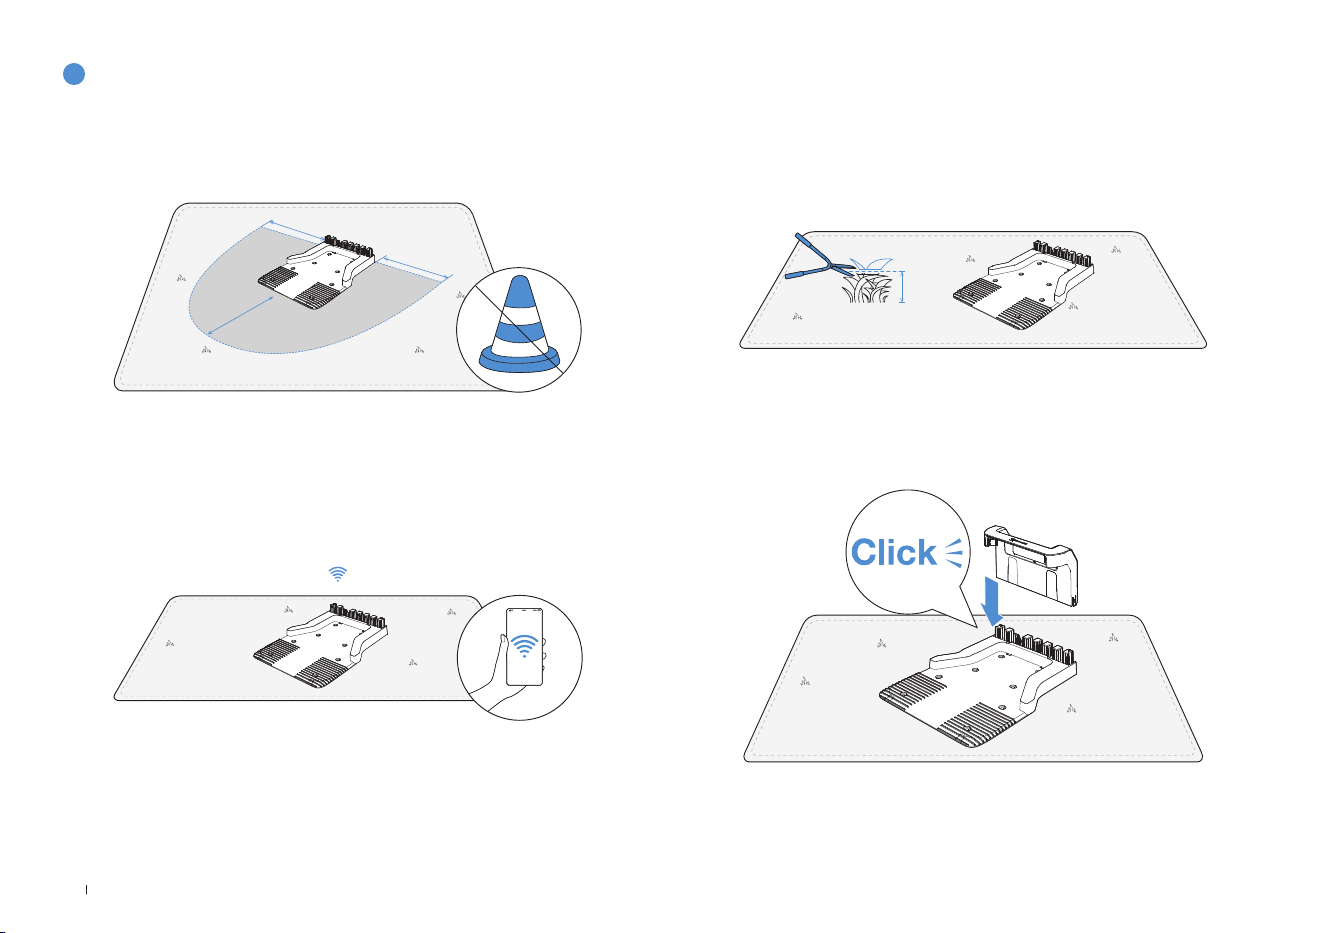
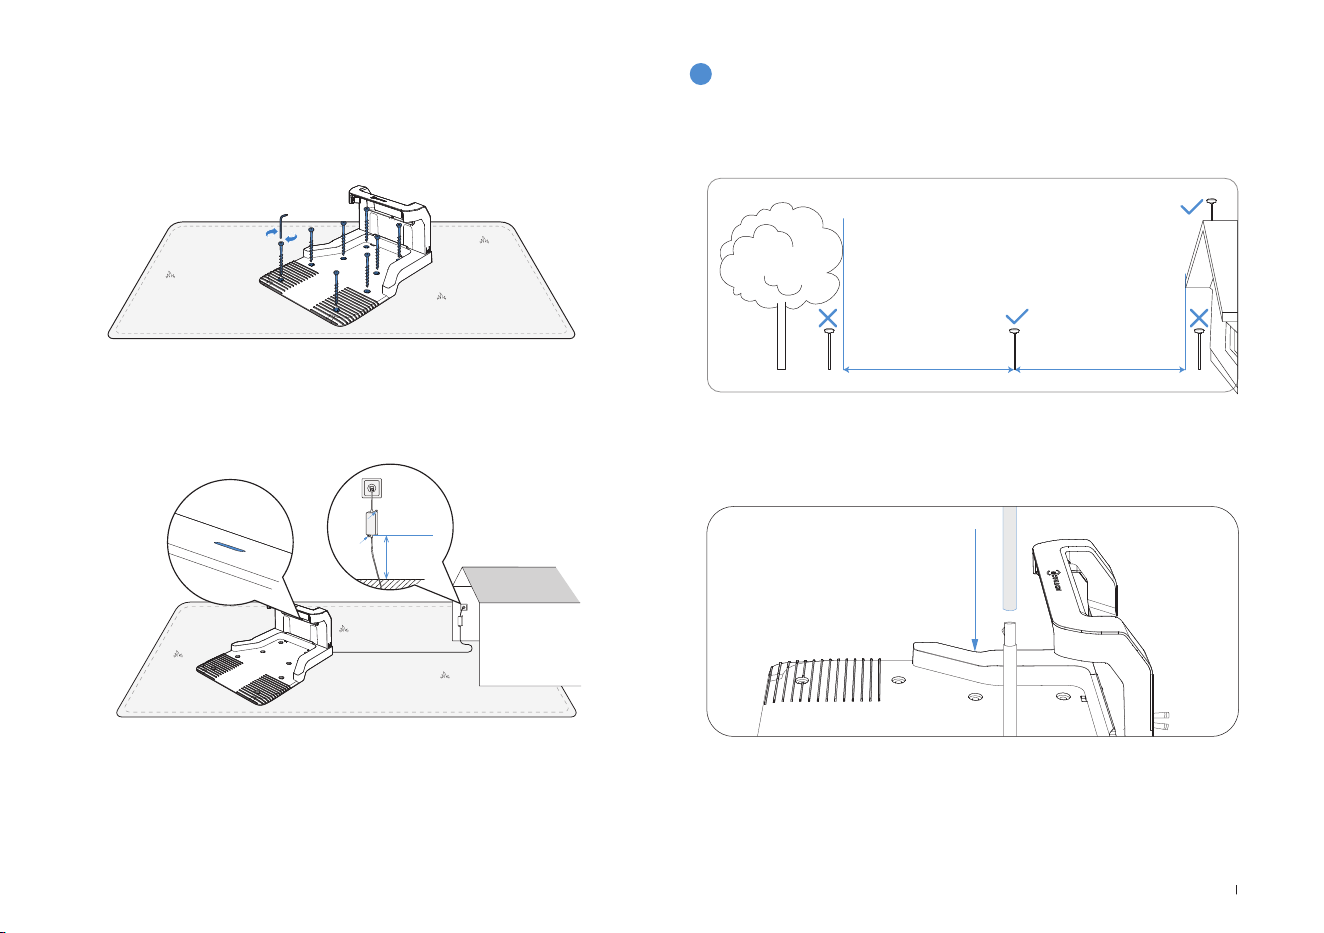
2
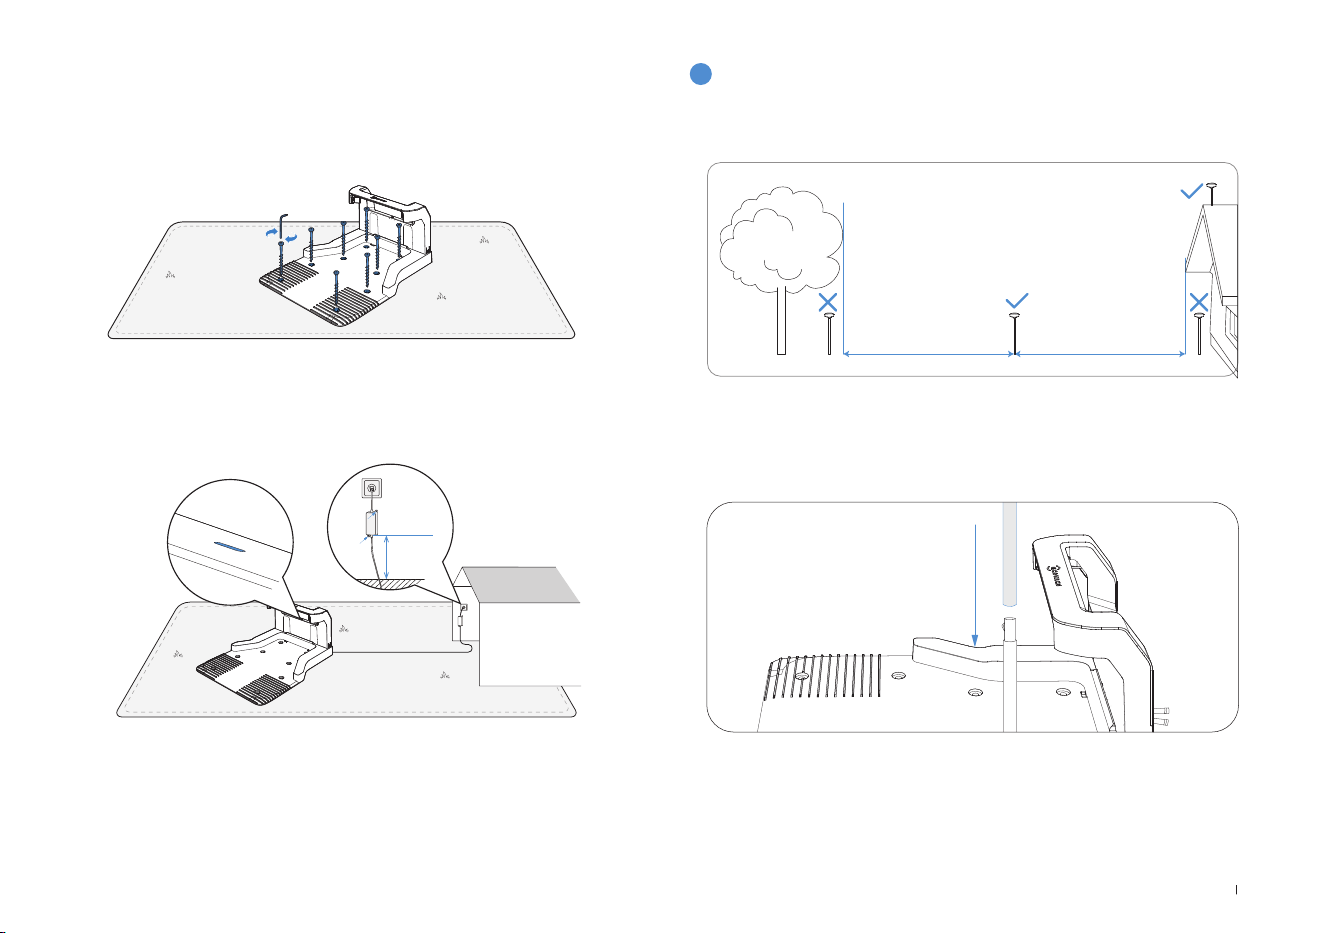
Assemble the Station
1� Place the Station on an open and flat lawn with no slope or rock�
Ensure that there are no objects (e�g� trees, balls or houses) within 2 m
on left and right, and 2 m in front of the Station�
2� If you want to remotely control your ECOVACS GOAT, put the Station
as close as possible to a place with strong Wi-Fi signal�
3� Make sure that the grass around the Station is no longer than 10 cm�
Overgrown grass may affect the recharging�
2m
2m
2m
10cm
4� Insert the Pile into the Base Until you hear a "click"�
17 EN
5� Fix the Station to the ground in the selected area with Pegs, using
the Allen key�
6� Connect the Station Plug to the power supply and ensure the blue
light is on�
Note: Please ensure the power adapter is positioned 30 cm above the ground to
prevent water and moisture damage�
Please plug the device into an indoor outlet or an outdoor waterproof outlet�
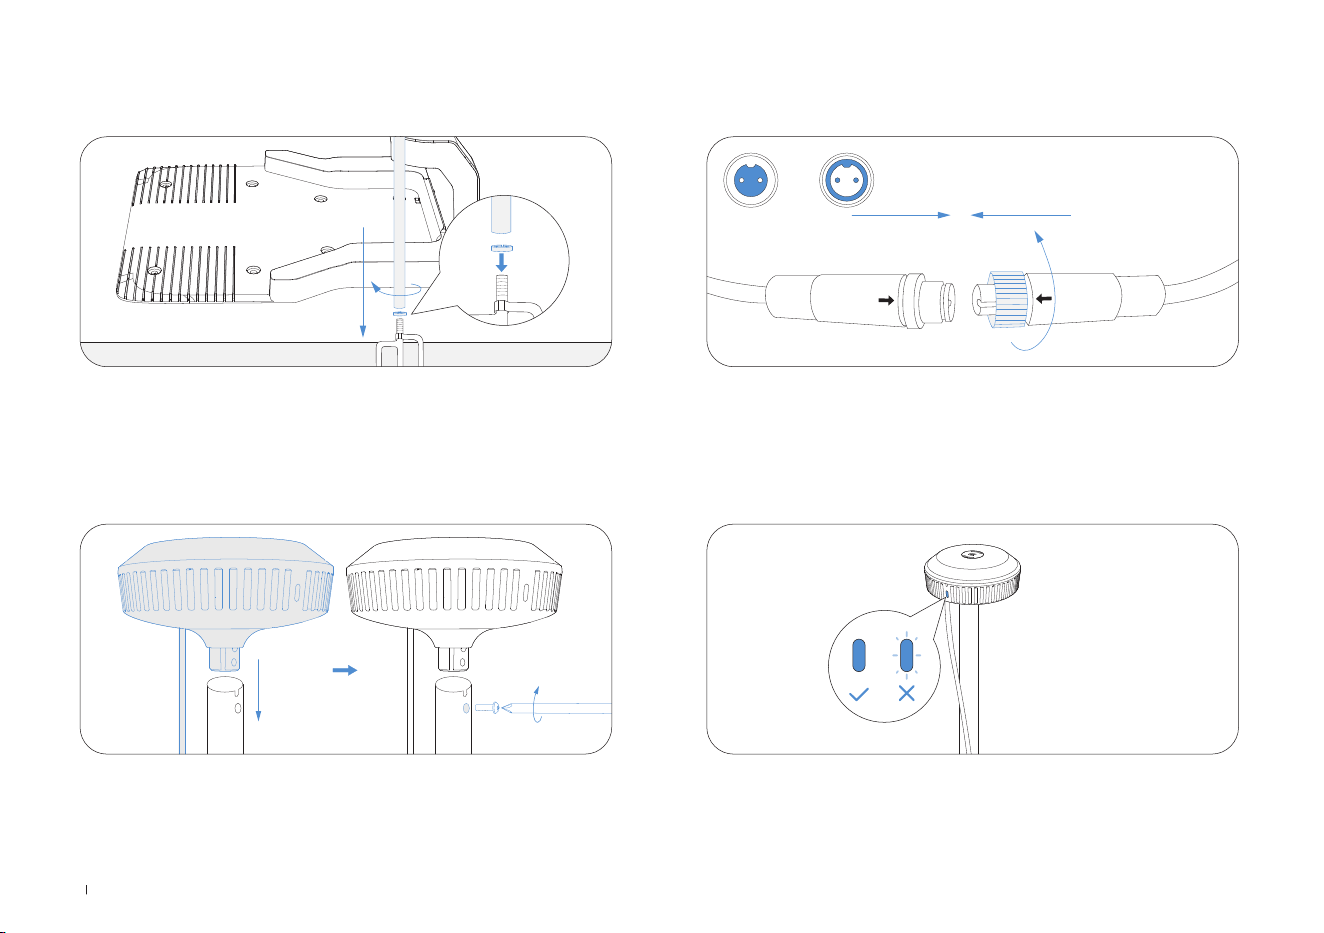
3
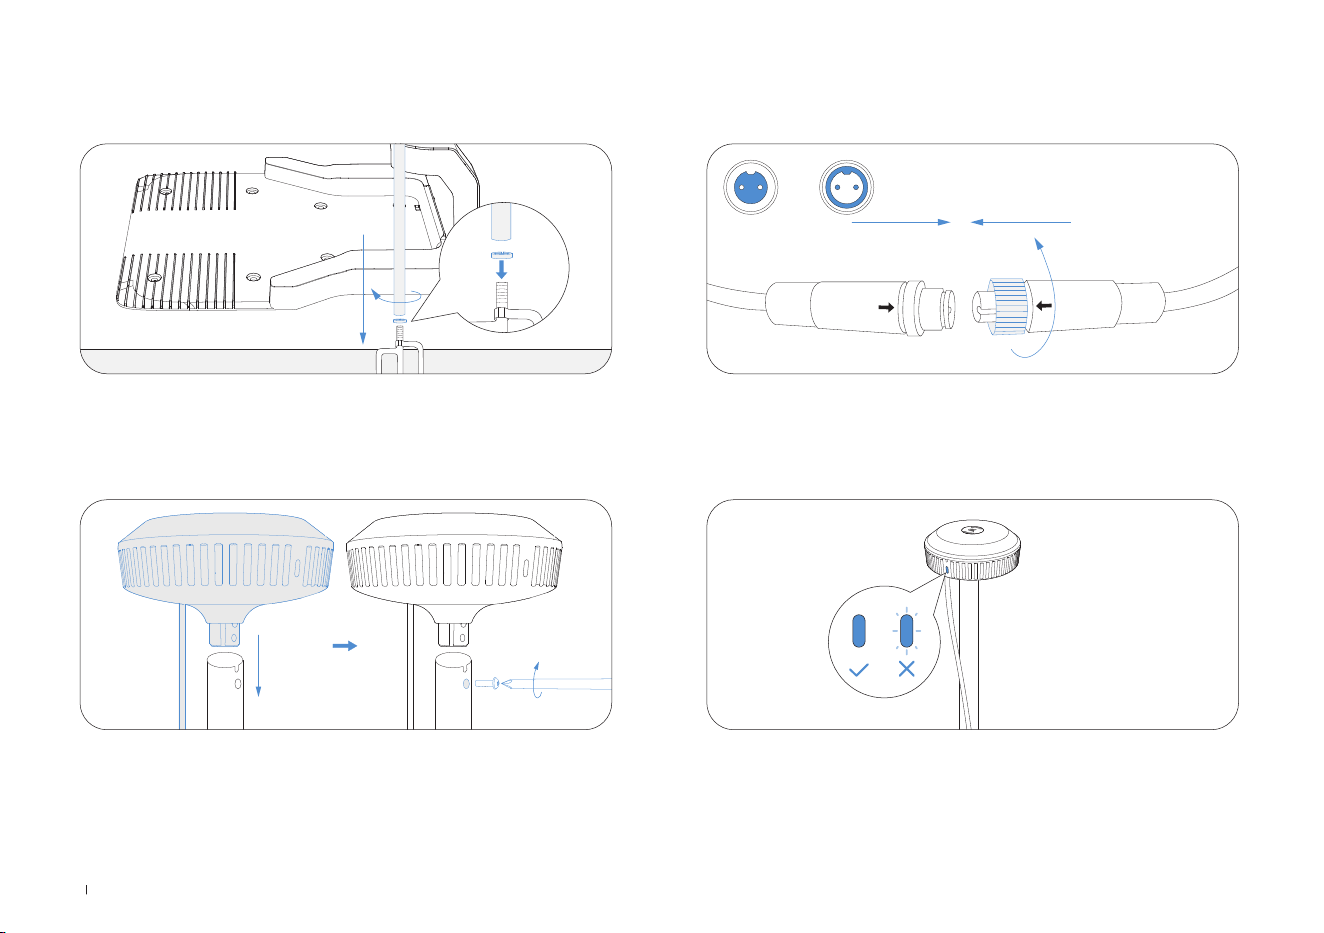
Assemble the RTK Reference Station
Choose an open area at least 2 meters away from buildings and trees
to install the RTK base station�
1� Connect the upper and lower mounting poles, ensuring the buckle
clicks securely into place�
30 cm
18EN
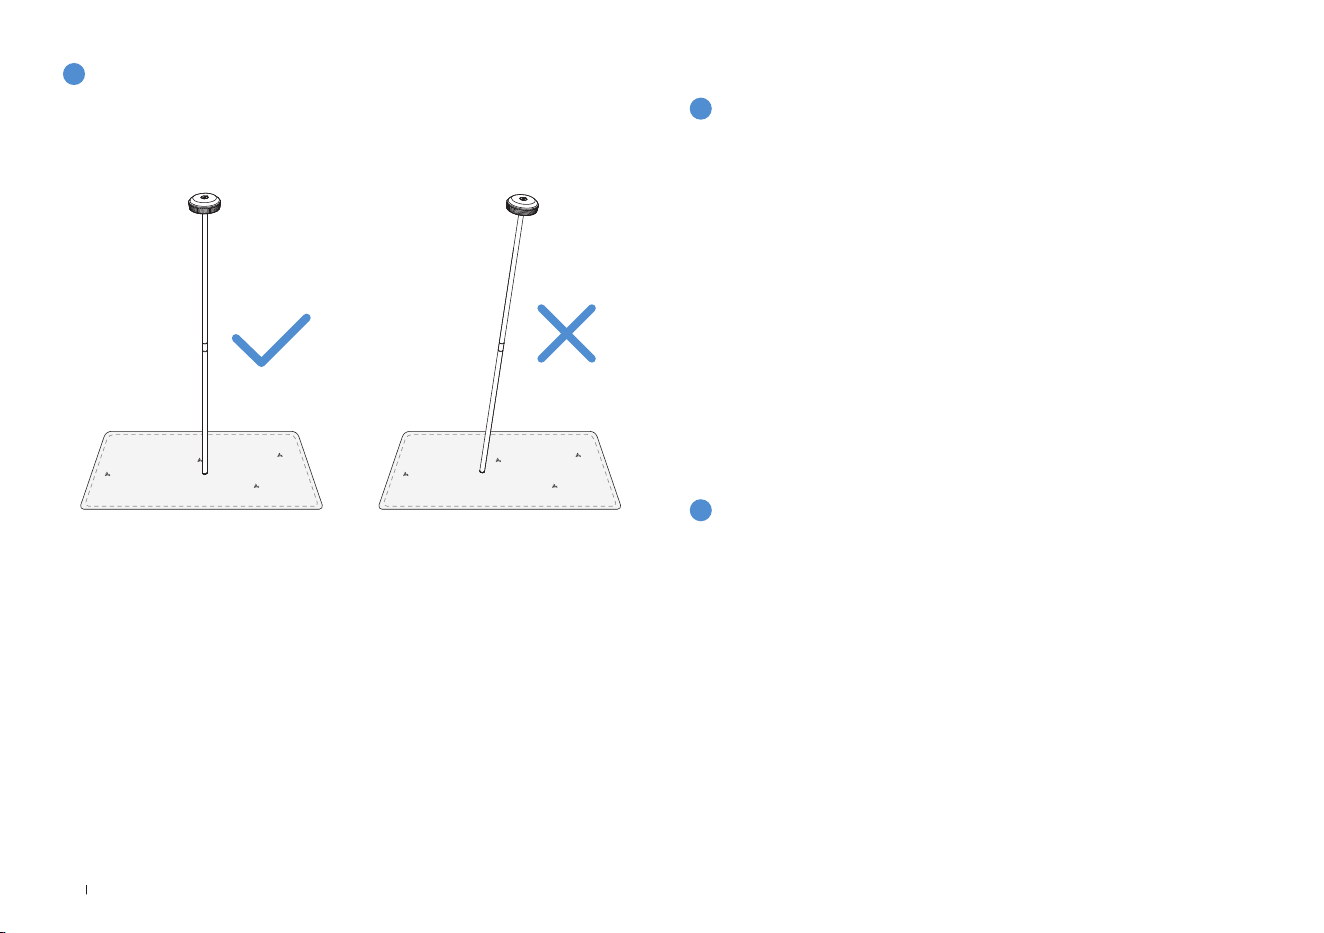
2� Insert the triangular peg into the mounting pole and tighten it securely�
A B
3� Attach the signal head by inserting its raised part into the mounting
pole and tightening the screws with a tool�
4� Connect the RTK power cable to the base station power cable and
tighten the nut�
5� After powering on, if the RTK base station indicator remains steady,
the location is correct; if it flashes, relocate the station�
19 EN
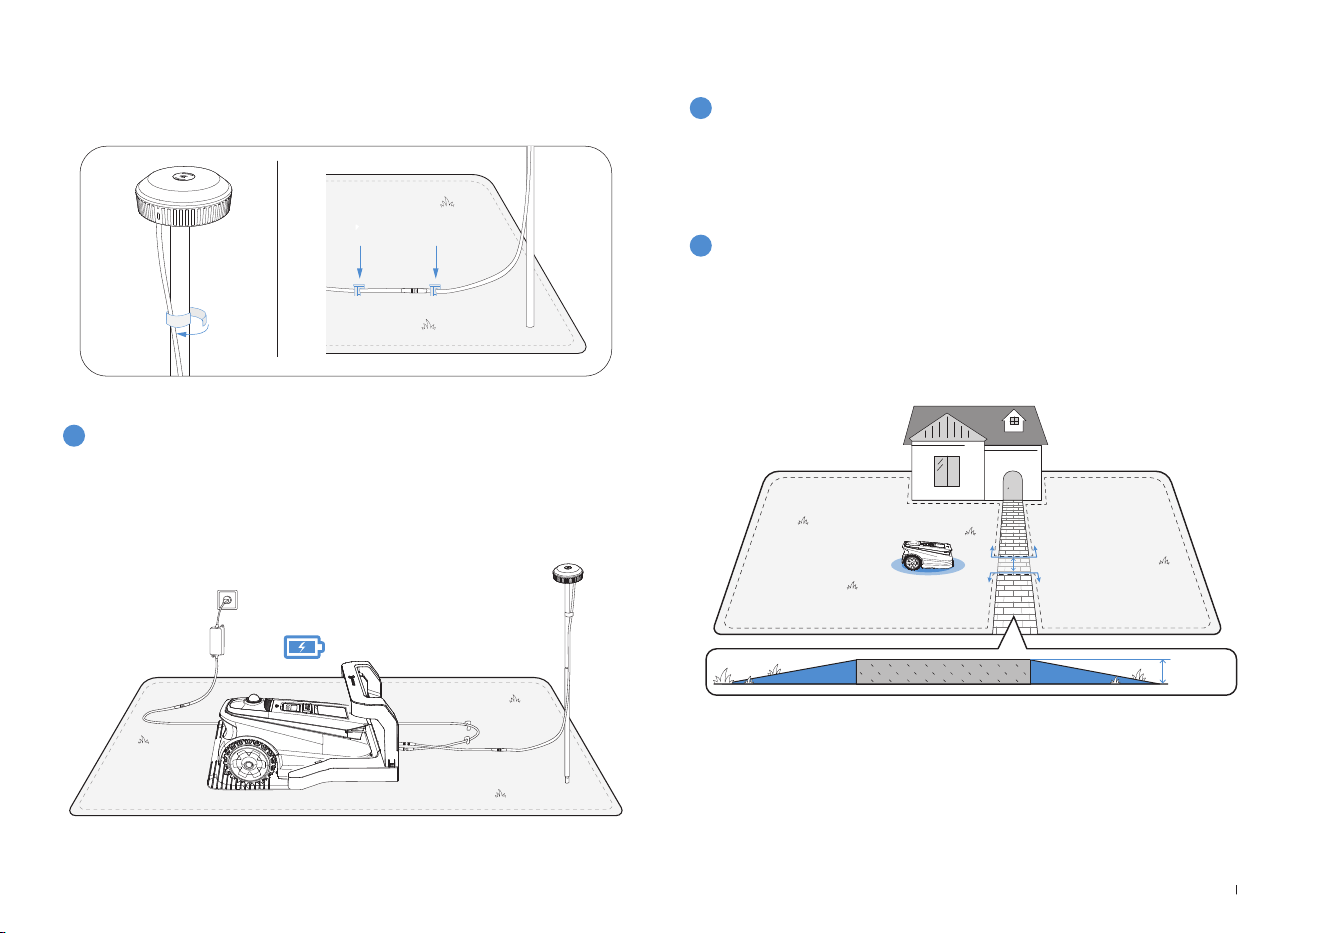
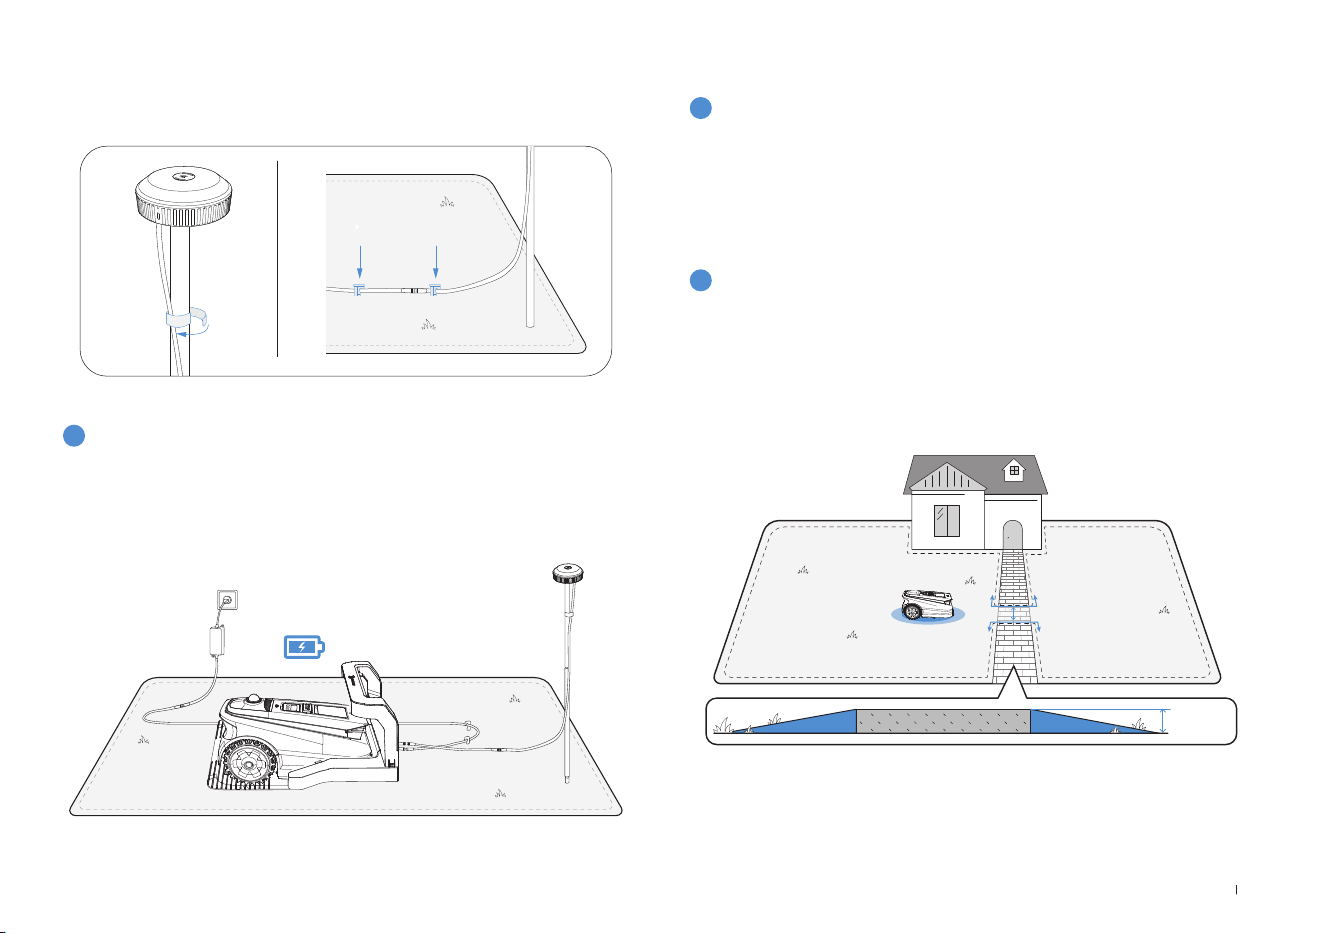
6� Cable Management: Secure the RTK power cable to the mounting
pole with cord ties and use plastic garden pegs to secure other
cables to the ground�
4
Charging the ECOVACS GOAT
Fully charge the ECOVACS GOAT before first use� Place it in the
charging station and ensure the white indicator light is steady or
flashing, indicating successful charging�
2
Mapping
1
Before mapping, the following tips need to be noted:
1. Choose the appropriate mapping mode for your yard.
For lawns with drop-offs greater than 4 cm or narrow paths less than
1 meters, it is recommended to select Manual Mapping� Otherwise, use
the default Automatic Mapping�
• Make sure the ECOVACS GOAT is powered on�
• If the ECOVACS GOAT is stopped, tap START --> OK button on the
ECOVACS GOAT�
• If the ECOVACS GOAT is locked, please enter PIN code�
3.2 Mapping

20EN
4. Start mapping
If the station is on the lawn, simply tap Start Mapping to start mapping�
If the base station is not on the lawn, control the ECOVACS GOAT to
move to the lawn boundary, then start Mapping�
Note: To ensure successful recharging, it's recommended to keep the
base station within 3 meters of the lawn, and no more than 10 meters
away�
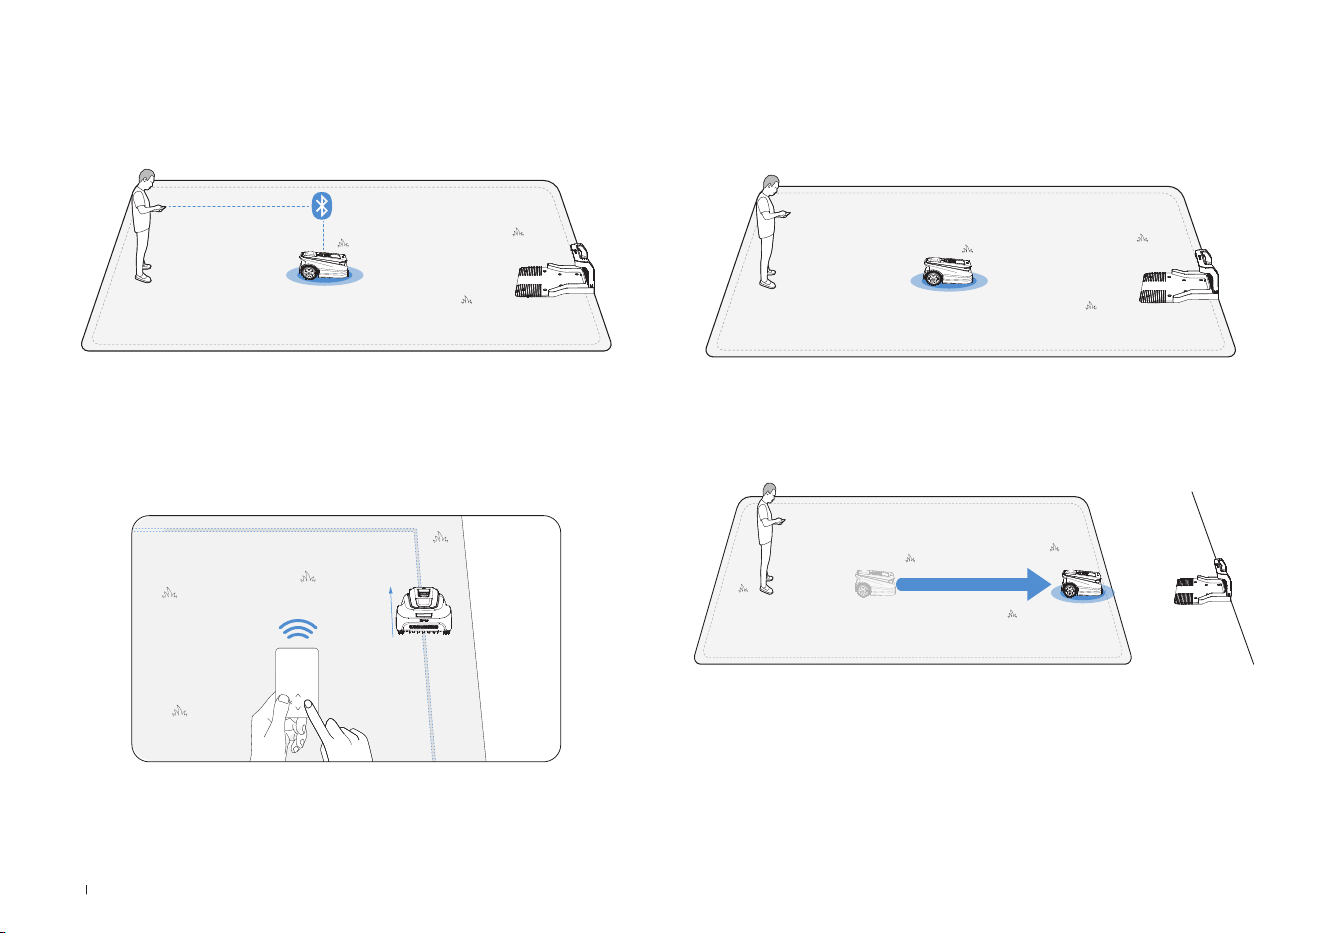
2. Connect the ECOVACS GOAT
With Bluetooth connection, your phone will connect to the ECOVACS
GOAT automatically�
3. Find a starting point
Find a proper starting point along the edge of your lawn� Keep within 6
m from the ECOVACS GOAT during the mapping process�
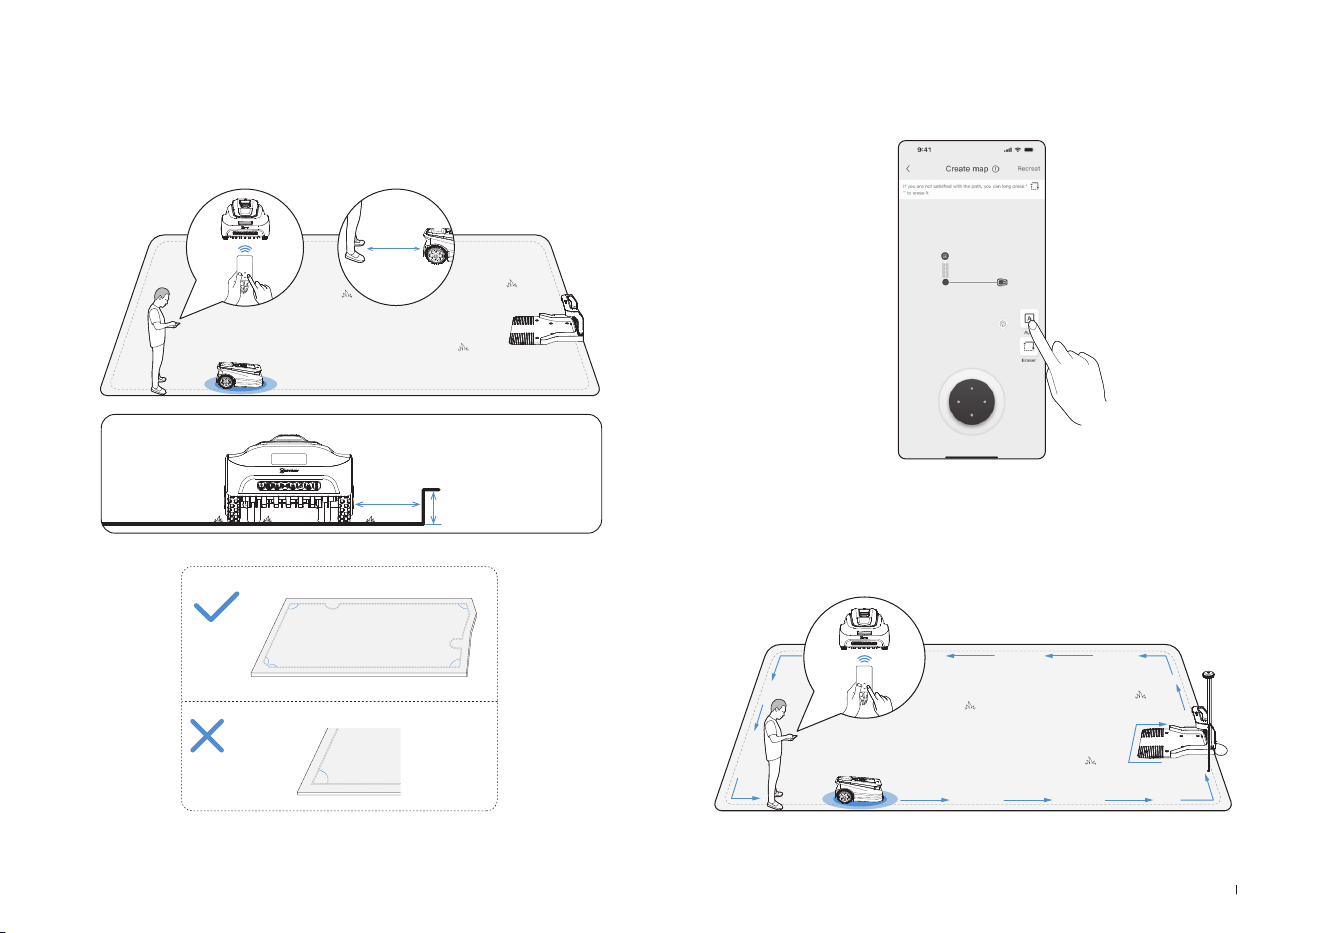
21 EN
Let ECOVACS GOAT start from the Station and follow ECOVACS GOAT
within 6 m� If the height difference is more than 4 cm, please keep your
ECOVACS GOAT at least 10 cm from the edge of the lawn�
Make sure to follow a straight line with a smooth turning angle of no
smaller than 90°�
5. Switch mapping mode
During the mapping process, you can switch between automated and
manual mapping in the app interface�
<90°
>90°
>90°
>90°
>90°
>90°
≤
6m
>
>
10cm
4cm
6. Finish mapping
After tracing the perimeter of the lawn, close the loop at the starting
point to complete the boundary�

22EN
To protect your ECOVACS GOAT, please set up No Entry Zones for
objects you want to protect, such as a flowerbed, a trampoline and a
vegetable plot�
Follow the instructions in the App� Control your ECOVACS GOAT to the
the starting point of the No-Entry Zone� The minimum supported single
side length of the restricted area should be more than 0�5m�
7. Set up A No-Entry Zone
Note: It is recommended to keep ECOVACS GOAT 25 cm away from the
boundaries of extremely dangerous areas such as a pond or cliff�
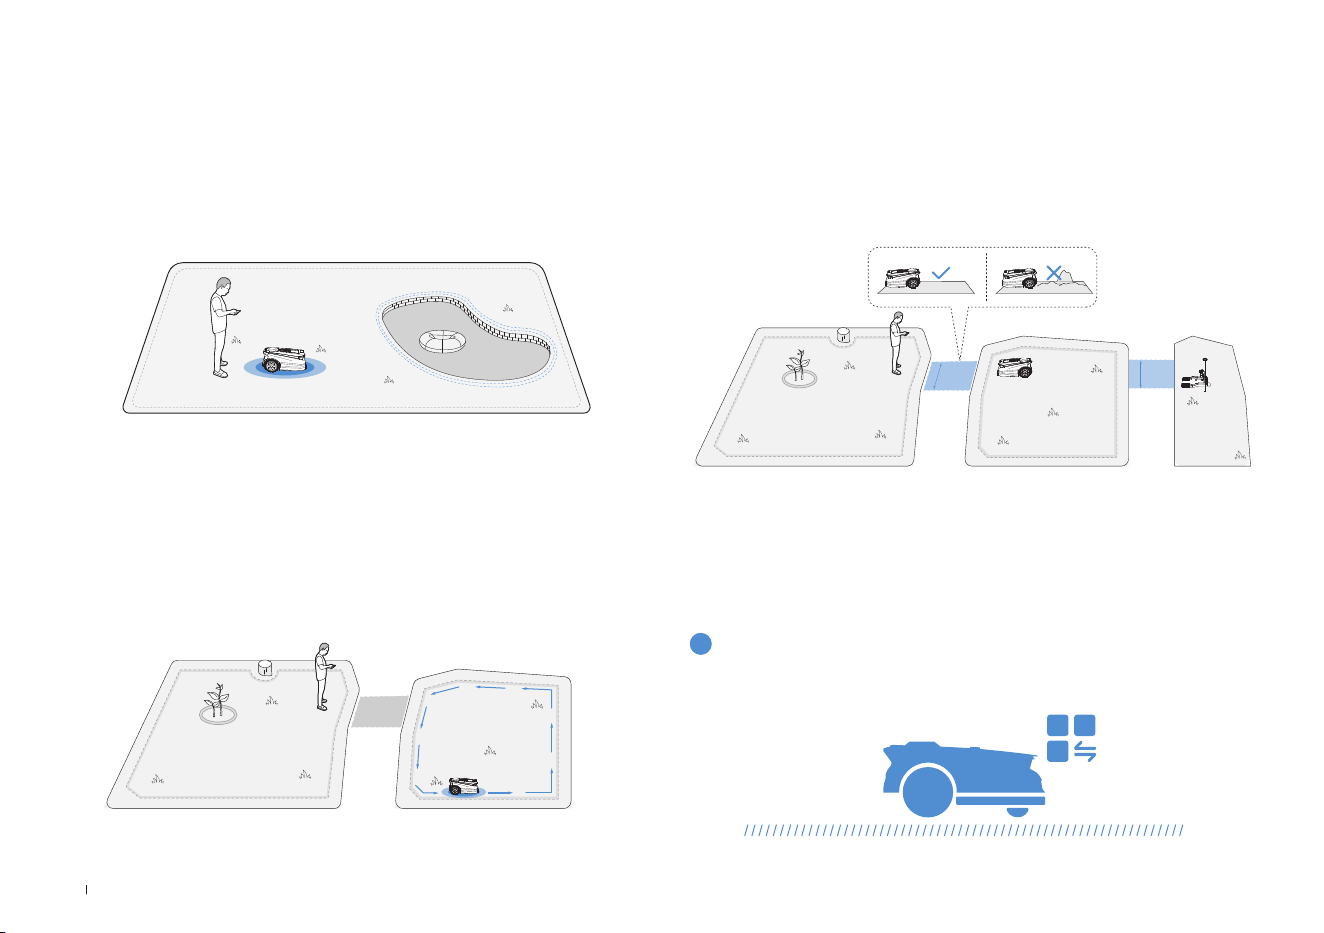
• Start from the station/within the map, and remotely control the
ECOVACS GOAT to the new area to be created�
• Mapping the new area based on the regional environment�
8. Create a New Area
• The path is intended to connect two separate areas or to connect the
edge of a lawn to the charging station�
• The ECOVACS GOAT can automatically generate a path when starting
from inside one path and reaching another path�
• Please ensure that the passable width of the path for the ECOVACS
GOAT is greater than 1 meter�
9. Create a Path
>1m
>1m
The following part will help you know how your ECOVACS GOAT works�
You can switch modes on your ECOVACS GOAT or via the App�
4. Start Using Your ECOVACS GOAT
4.1 How Your ECOVACS GOAT Works
1
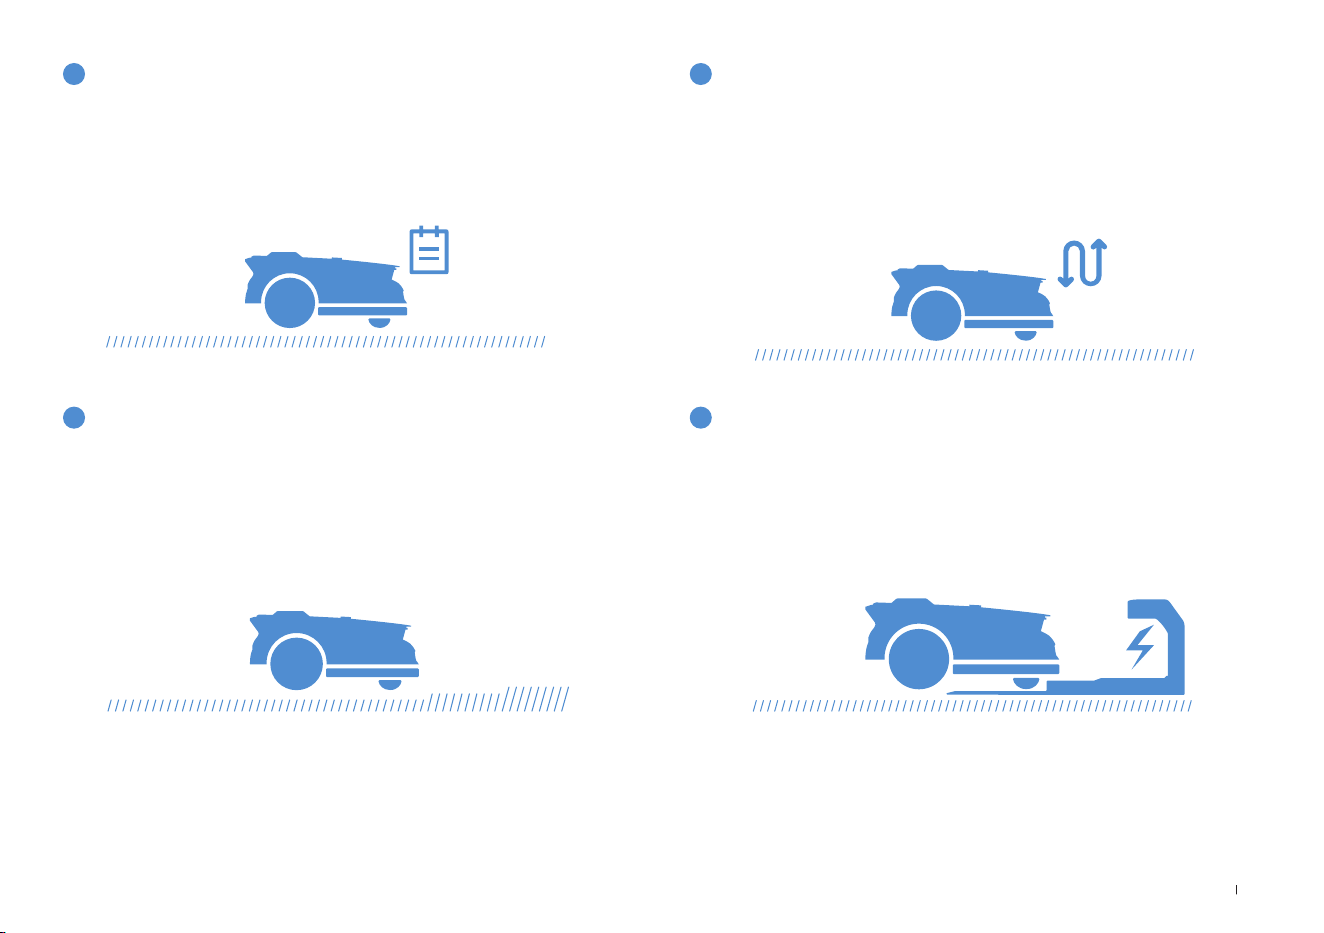
Mowing mode
23 EN
ECOVACS GOAT is a smart robot for maintaining your lawn well� Before
starting, make sure that the grass is no longer than 10 cm� If longer,
cut the grass roughly with a manual lawnECOVACS GOAT� Then your
ECOVACS GOAT will keep the grass nicely clipped within a height of
9 cm�
When the battery is low, your ECOVACS GOAT will pause the task au-
tonomously and go back to the Station to charge itself� When charged
and ready to work, your ECOVACS GOAT will resume the unnished
mowing task of the day�
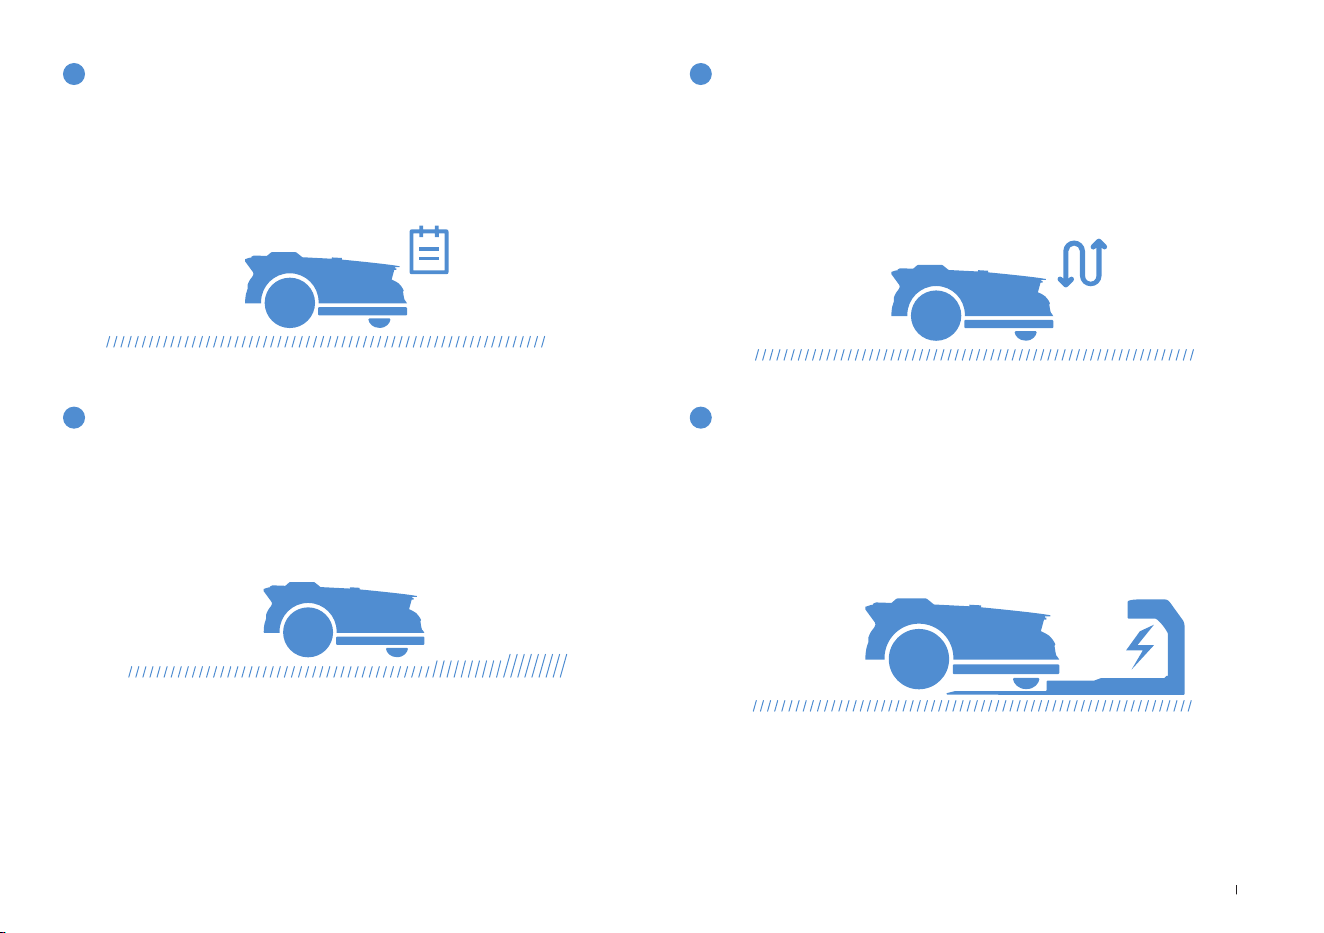
With programmed cutting, your ECOVACS GOAT mows along an
S-shaped path to achieve maximum efciency�
3
Cutting height
5
Auto recharging
4
Programmed cutting
You may set your mowing schedule on the ECOVACS HOME App� Sup-
porting two schedules, ECOVACS GOAT enables you to set and switch
based on different seasons�
2
Schedule

24EN
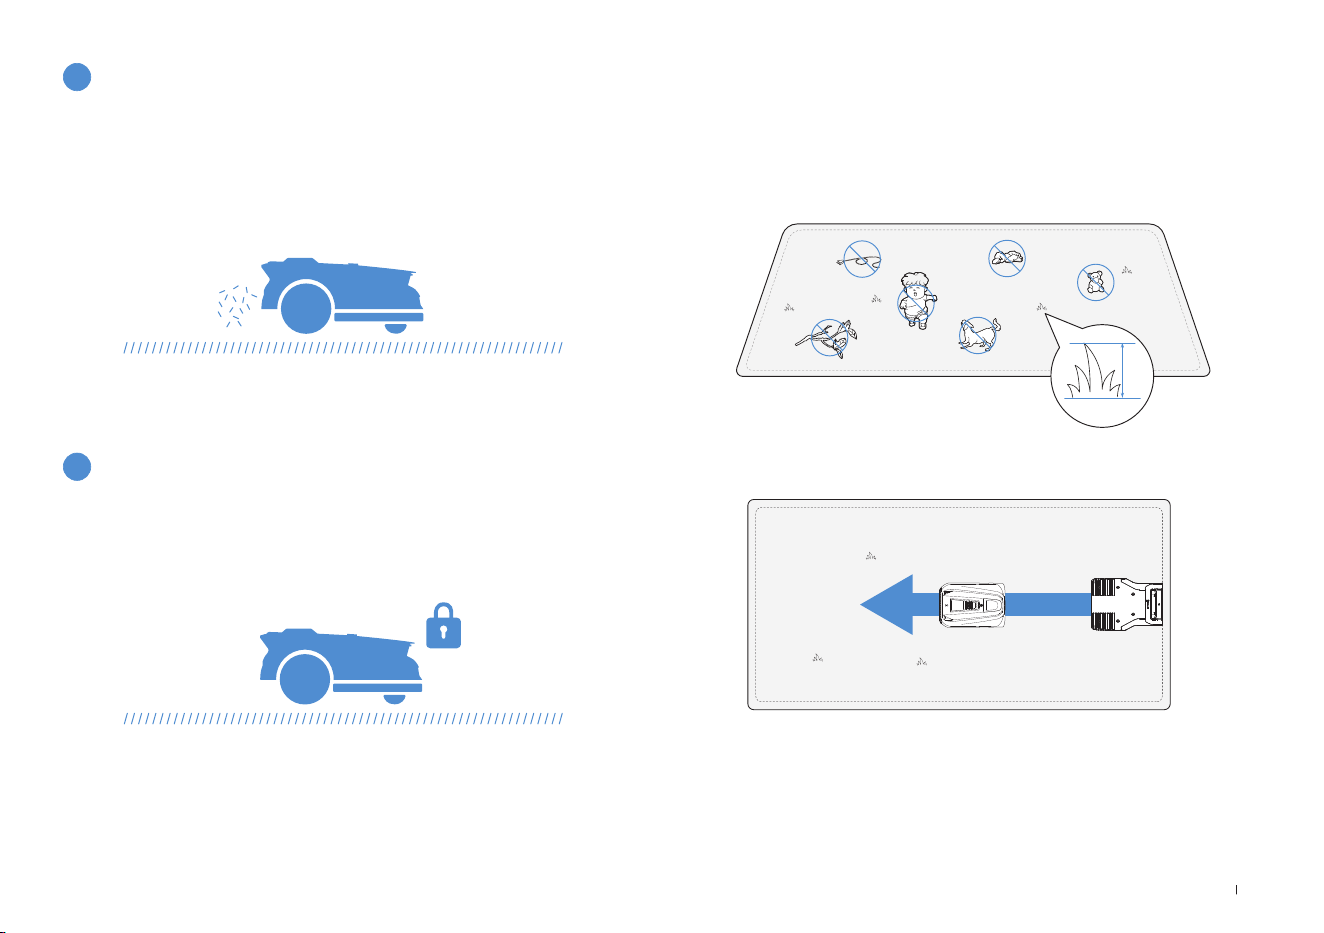
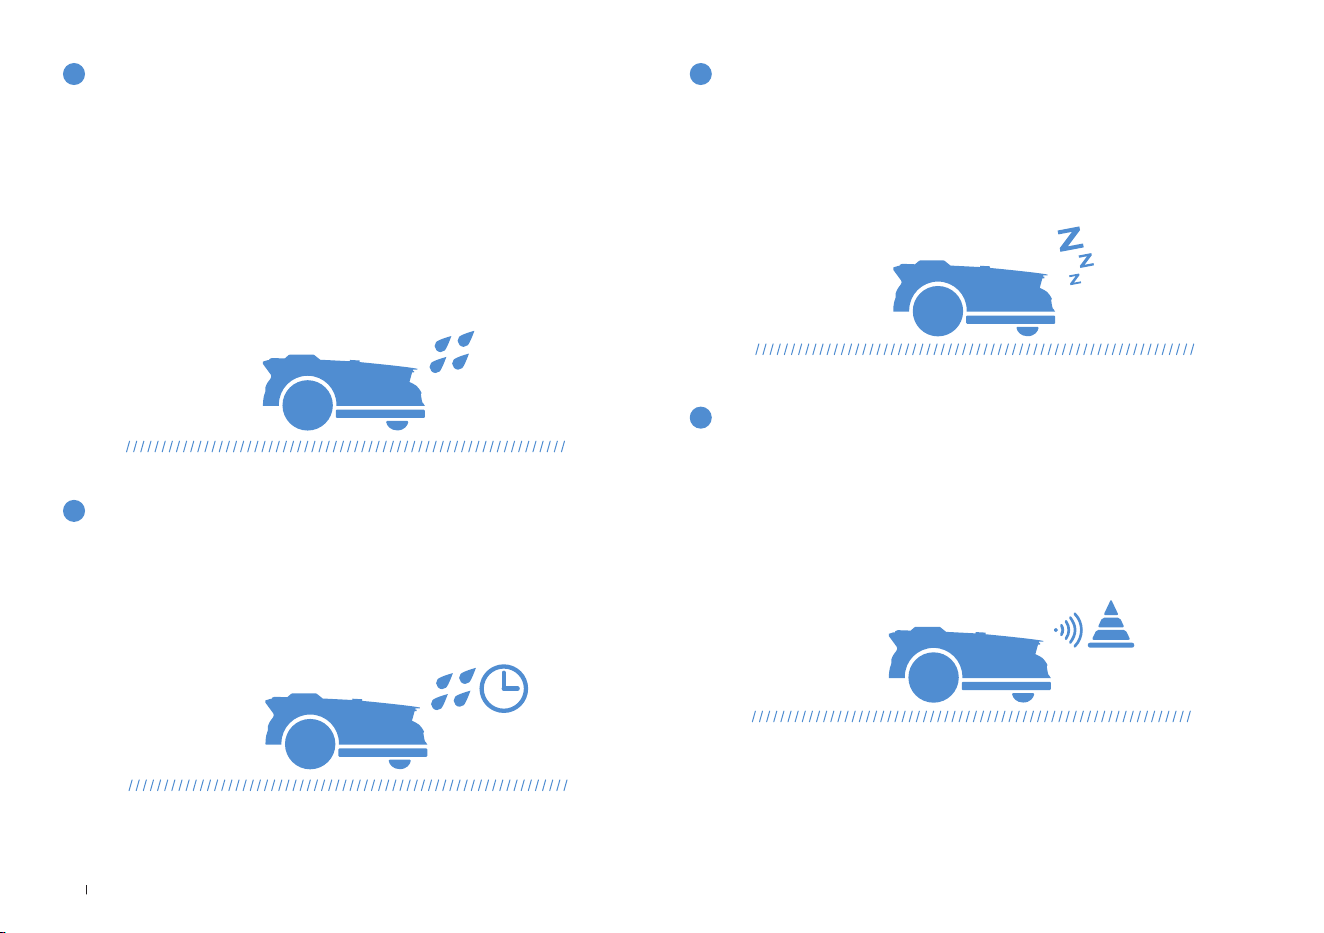
With waterproof level of IPX6, your ECOVACS GOAT will be very
pleased to stay outside� However, mowing under heavy rain will not
bring out the best result� Your ECOVACS GOAT, equipped with the Rain
Sensor, will pause mowing and return to the Station automatically when
a certain amount of rainwater is detected� When the rain stops, ECO-
VACS GOAT will automatically resume the mowing task� It is recom-
mended to mow in dry weather for the best mowing result�
You also can inactivate it on your ECOVACS GOAT or via the App to
mow on rainy days�
6
Rain sensor
The lawn may still be wet after the rain stops� For a better mowing
result, your ECOVACS GOAT will resume mowing 3 hours after the Rain
Sensor detects that the rain has stopped by default� You can change
the rain delay time via the App�
Equipped with 3D-ToF LiDAR, your ECOVACS GOAT can detect objects
and avoid them in advance� The height of obstacles to be avoided can
be set in your ECOVACS HOME App� Moreover, some obstacles can
precisely be avoided by Al recognition�
With the aim to protect nocturnal animals, ECOVACS GOAT will stop
mowing at night�
You also can inactivate it on your ECOVACS GOAT or via the App to
mow at night�
7
Rain delay time
9
Smart obstacle avoidance
8
Animal protection
25 EN
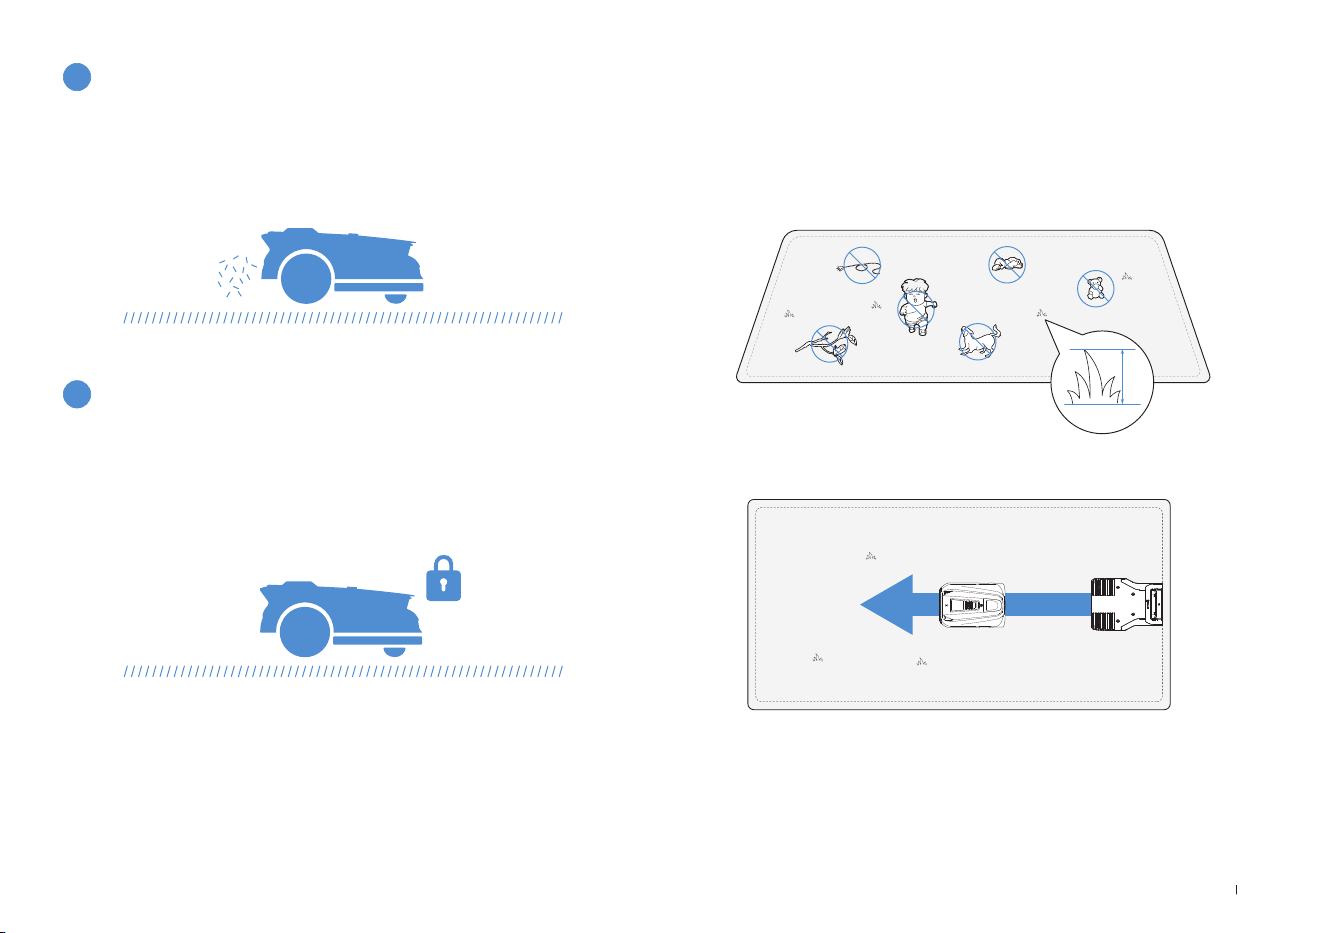
• Cut the grass to a height of no more than 10 cm with your manual
lawnECOVACS GOAT and clear away obstacles including debris, piles
of leaves, toys, wires and stones�
• Do not let your children play on the lawn when your ECOVACS GOAT
is mowing�
• Set the mowing direction you need�
11
Safety and PIN code protection
Note: Your ECOVACS GOAT will adjust its direction after departing from the
Station and go straight forward to mow by default�
4.2 Tips Before First Mowing
≤
10cm
Daily mowing with your ECOVACS GOAT leaves short clippings, which
will be scattered evenly on the lawn as the best fertilizer�
10
No need for disposal of grass clippings
The PIN code you set for your ECOVACS GOAT at the rst startup is
used to prevent being stolen and operated by children� if it locked, you
can unlock it by entering PIN code�
Note:
After ve incorrect attempts, wait 30 minutes before retrying�
You may change the PIN code on the App�
26EN
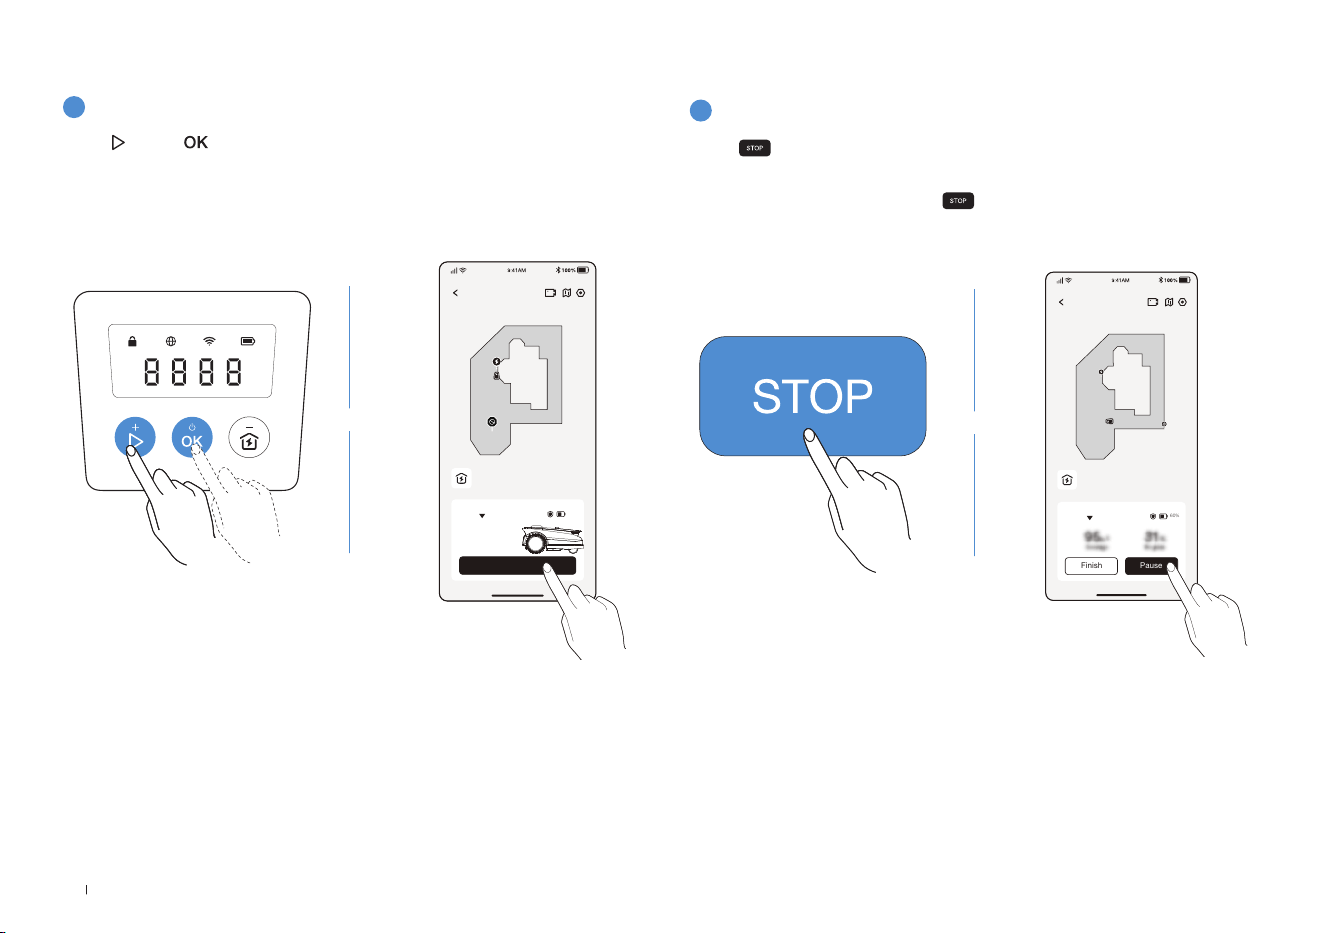
2
Pause Mowing
Press to pause ECOVACS GOAT or pause it via the App�
• For security, your ECOVACS GOAT will be stopped and cannot be
started directly via the App after is pressed� Please press START
then OK on the Control Panel rst�
ECOVACS GOAT
Finish Pause
Auto
60%
Station
OR
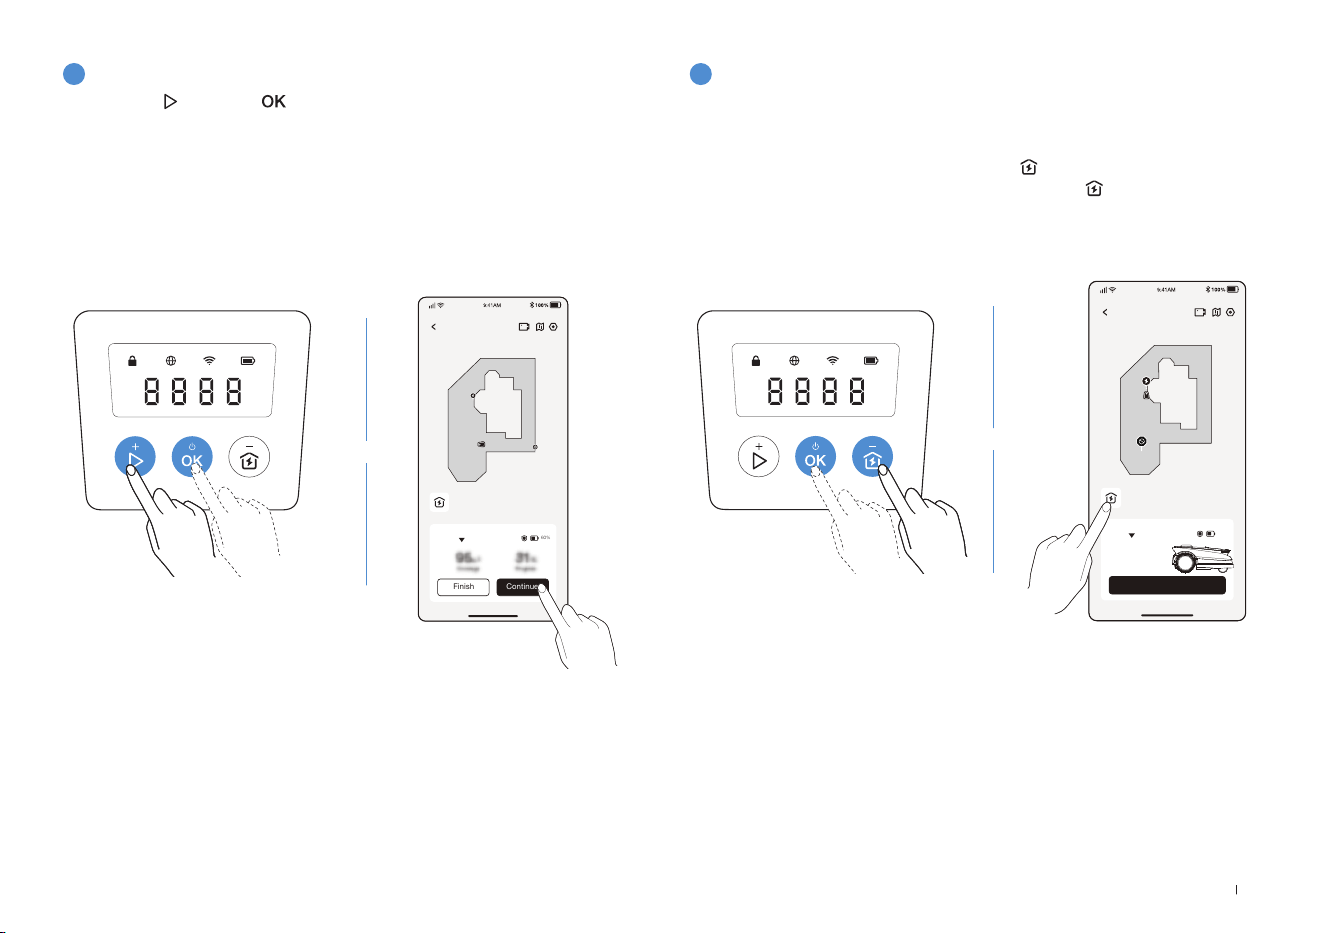
1
Start Mowing
4.3 READY FOR MOWING
Press , then � ECOVACS GOAT will start mowing� Or you can start
mowing via the App�
Note: Make sure the grass has been cut to a height of no more than 10 cm with
your manual lawnECOVACS GOAT
.
ECOVACS GOAT
Start
Auto
Station
60%
OR
27 EN
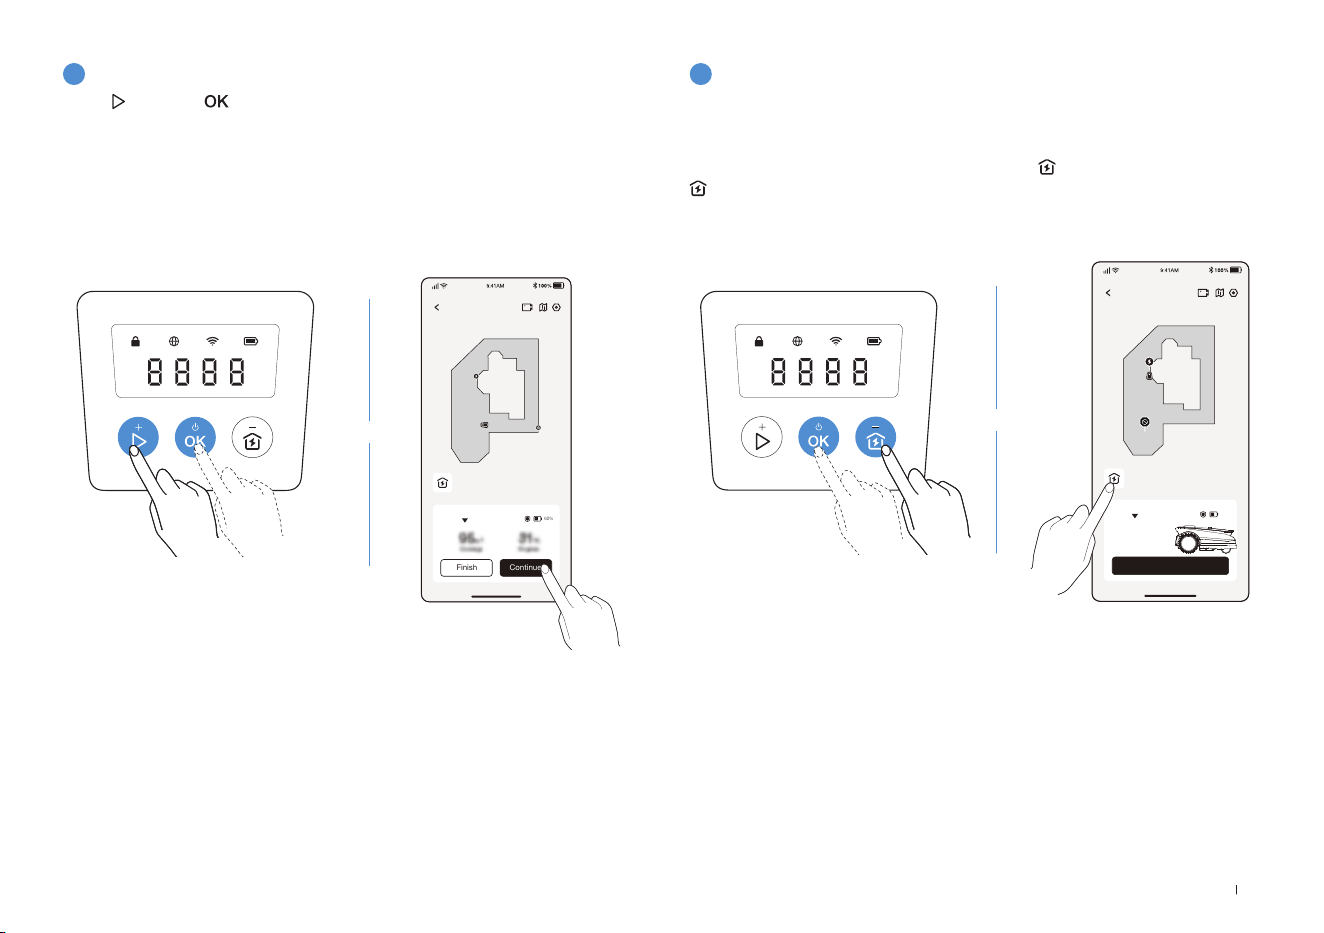
3
Resume Mowing
4
End of Mowing
Press and then on ECOVACS GOAT or tap the button in the App
to resume mowing�
1� After completing the mowing task, ECOVACS GOAT will return to the
Station automatically�
2� When ending the mowing process manually, you need to send
ECOVACS GOAT to the Station by pressing
and then OK, or tapping
on the App�
ECOVACS GOAT
Finish Continue
Auto
60%
Station
ECOVACS GOAT
Start
Auto
Station
60%
OR
OR
28EN
Part
Maintenance Replacment
Front AI Camera 2 to 4 weeks -
Blades - 4 to 6 weeks
If you encounter any problems while using your ECOVACS GOAT, check out the FAQ articles at
https://www�ecovacs�com
or from the
section on the ECOVACS HOME App�
For better performance and longer lifespan of your ECOVACS GOAT, please maintain it and replace any worn parts
properly�
WARNING
• Always power off your ECOVACS GOAT before operation�
• Always wear protective gloves when replacing the Blades�
• Use only the Blades manufactured by ECOVACS and new screws when assembling the Blades�
• Wipe the unwashable components with a clean and dry cloth� Please do not use cleaning sprays or other detergents�
• Gently turn your GOAT over on a soft surface�
5. Touble Shooting
6. Maintenance
6.1 Frequency
29 EN
1
Blade Disc, Chassis, Off-road Wheels, and Front Wheels
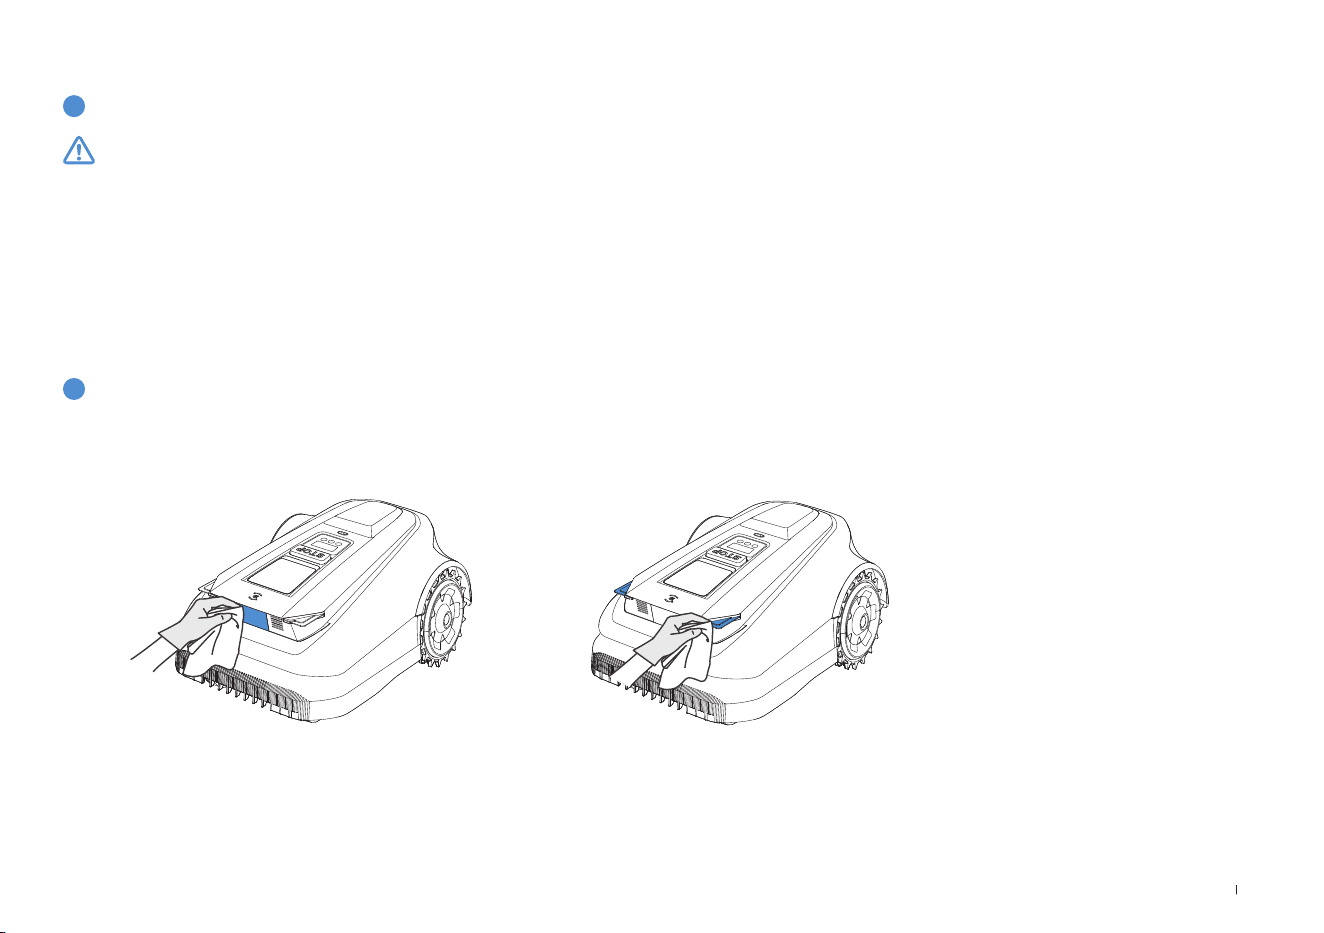
2
Other Components
6.2 Regular Maintenance
WARNING
• ALWAYS wear protective gloves�
• DO NOT use a high pressure sprinkler for high pressure water can enter the sealings and damage electronic and mechanical parts�
STEPS TO CLEAN THE MAIN PARTS
Step 1: Power off ECOVACS GOAT�
Step 2: Gently turn your ECOVACS GOAT over on a soft surface�
Step 3: Clean the Blade Disc and the chassis with a brush�
Step 4: Check that the Blade Disc can rotate freely and Blades can spin freely�
Step 5: Clear the mud from the Off-road Wheels and Front Wheels with a brush�
Wipe the components with a clean, dry cloth� Avoid using cleaning sprays or detergents�
30EN
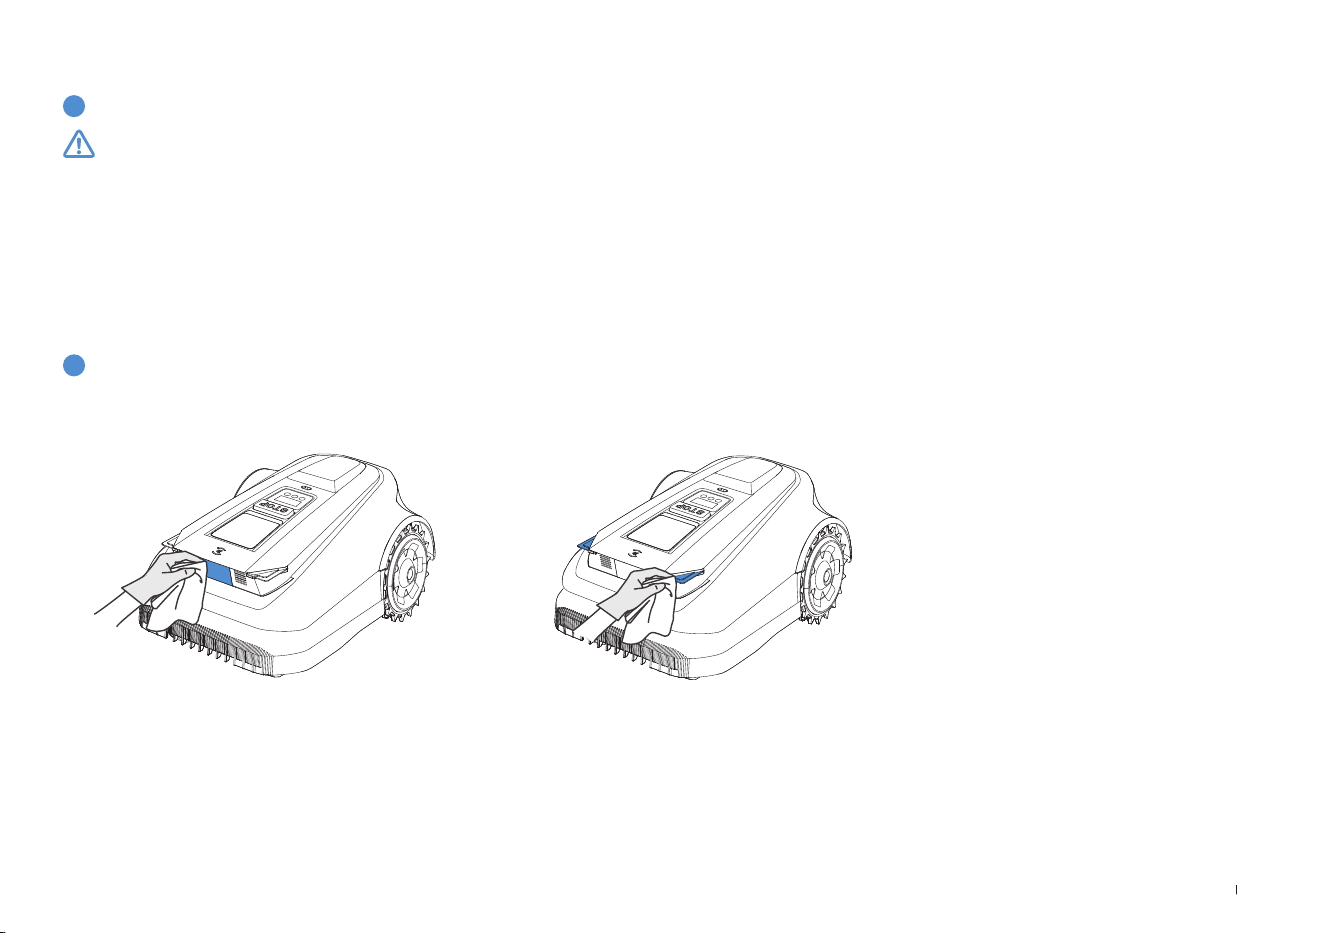
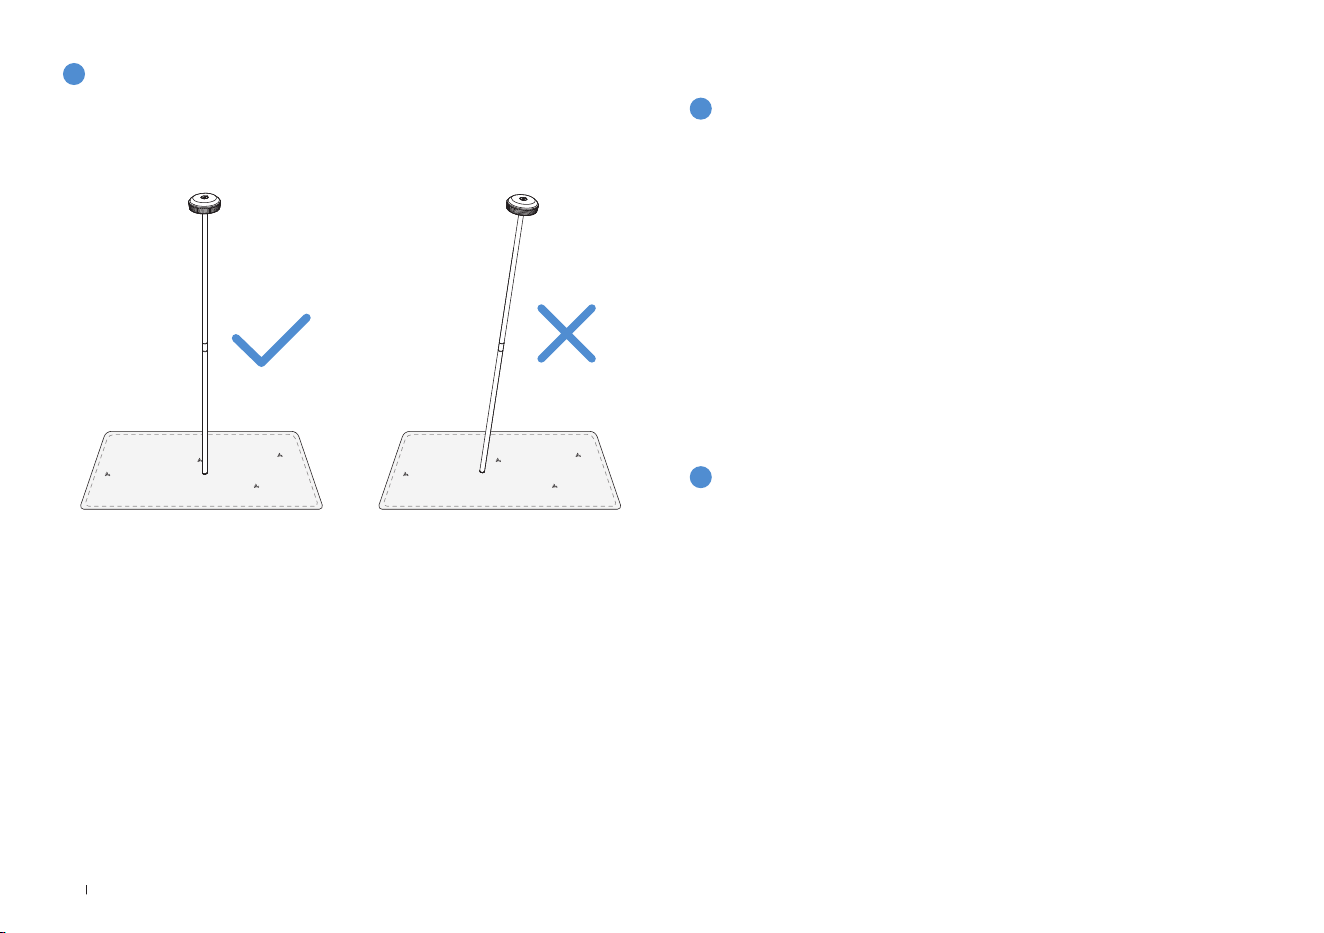
3
RTK Reference Station
1
Storage Over the Winter
If the RTK Reference Station, its mounting pole included, tilts, make
sure it is set properly�
ECOVACS GOAT
• Power off your ECOVACS GOAT after it is fully charged�
• Clean it thoroughly�
• Store it with water-proof and dust-proof coverings in a cool, well-
ventilated, and dry place indoors�
Station
• Unplug the Power Supply from the power socket�
• Disconnect Power Supply from the Station�
• Mark the spot where you set the Station for reference in the new
working season�
• Store the Station and Power Supply in a cool, well-ventilated, and dry
place away from direct sunlight�
6.3 Seasonal Maintenance
Note: It is necessary to put the Station in the original position for working in a new
season� Otherwise, it may lead to location fault and map invalidation�
2
Restart in the Spring
• Remove all coverings from your ECOVACS GOAT and the Station�
• Assemble the Station, putting it back to where it was in the last work-
ing season�
• Check the cables for any damage or breaks and repair as needed�
Connect the cables that are safe and qualied to use�
• Check the Blades for sharpness and replace them if necessary� Refer
to the Maintenance section of this manual for detailed steps and tips�
• Power on your ECOVACS GOAT and test if it is connected to the app
and works properly�
31 EN
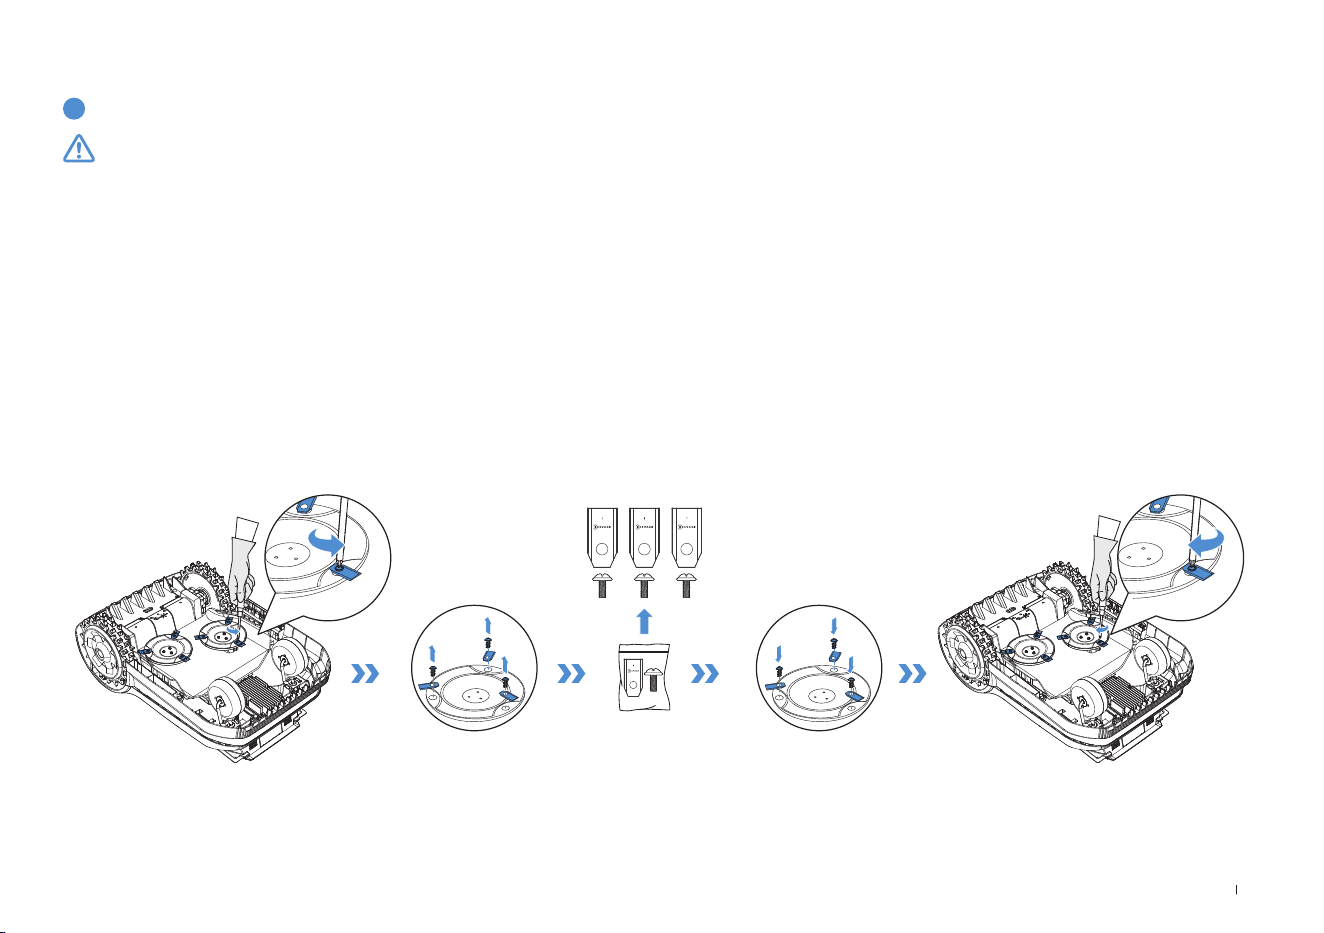
1
Replace the Blades
6.4 Part Replacement
WARNING
• Always power off your ECOVACS GOAT before operation�
• Always wear protective gloves when replacing the Blades�
• Use only the Blades manufactured by ECOVACS and new screws when assembling the Blades�
• Wipe the unwashable components with a clean and dry cloth� Please do not use cleaning sprays or other detergents�
STEPS TO REPLACE THE BLADES
Step 1: Power off ECOVACS GOAT�
Step 2: Gently turn your ECOVACS GOAT over on a soft surface�
Step 3: Loosen the Screws with a screwdriver�
Step 4: Remove the Screws and the Blades�
Step 5: Tighten the new Blades and the Screws�
Step 6: Make sure that the Blades can spin freely�
32EN
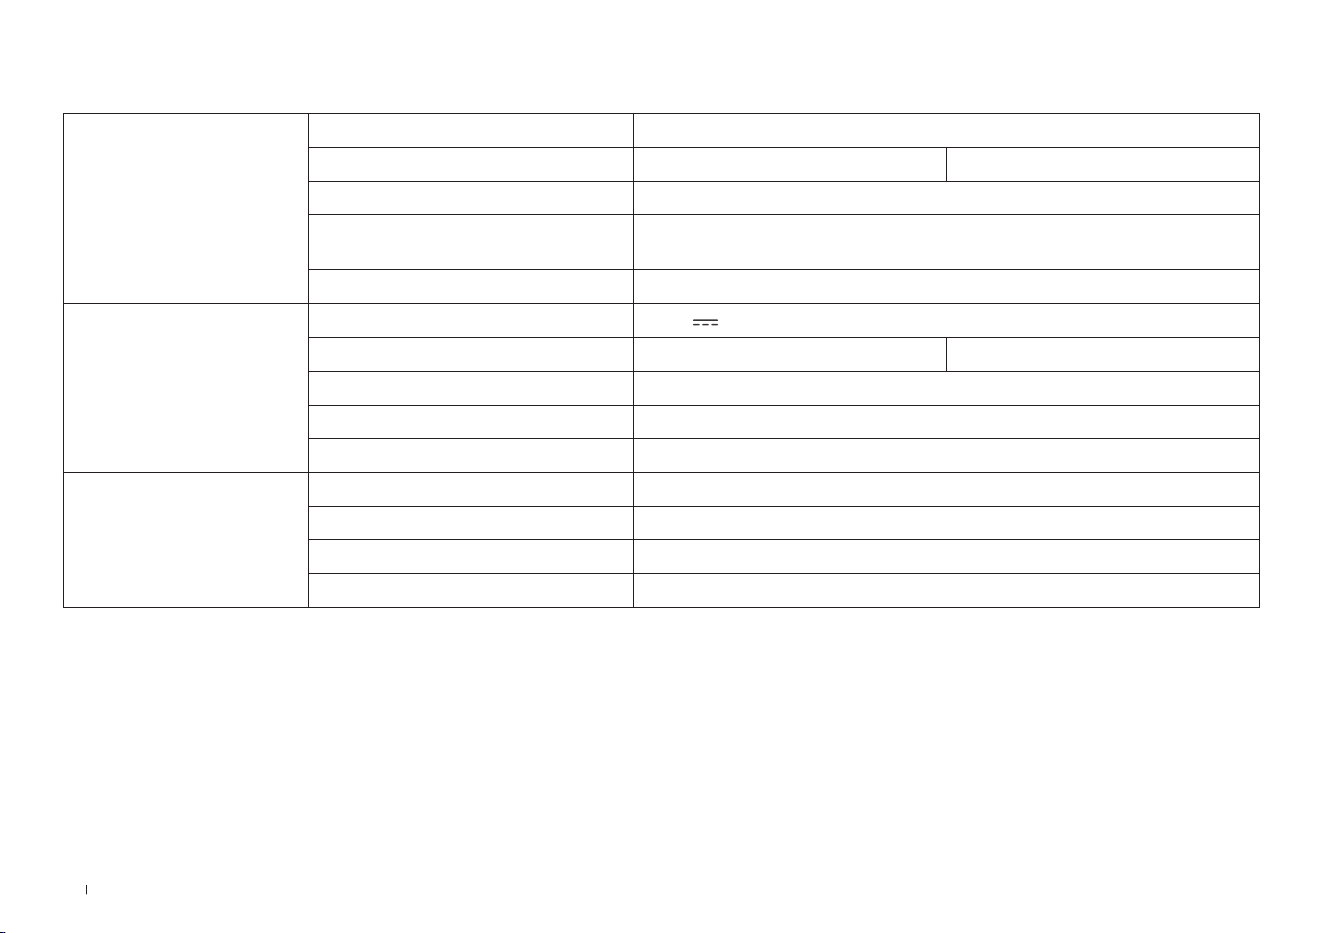
7. Technical Data
Basic Information
Product Name Lawn Mowing Robot
Model GPR11 GPR12
Brand ECOVACS
Dimensions:
Length (mm) × Width (mm) × Height (mm)
680*460*310
Net Weight (kg) (Battery Included) 15�8
ECOVACS GOAT
Parameters
Rated Voltage 37�8V
Working Capacity (㎡)
1600 3000
Cutting Width (cm) 33
Cutting Height (cm) 3-9
Charging Time (min�) 45±5
Noise Emissions
Measured Sound Power Level L
WA 60 dB(A)
Sound Power Uncertainties KWA 3 dB(A)
Sound Pressure Level L
pA 52 dB(A)
Sound Pressure Uncertainties KpA 3 dB(A)

33 EN
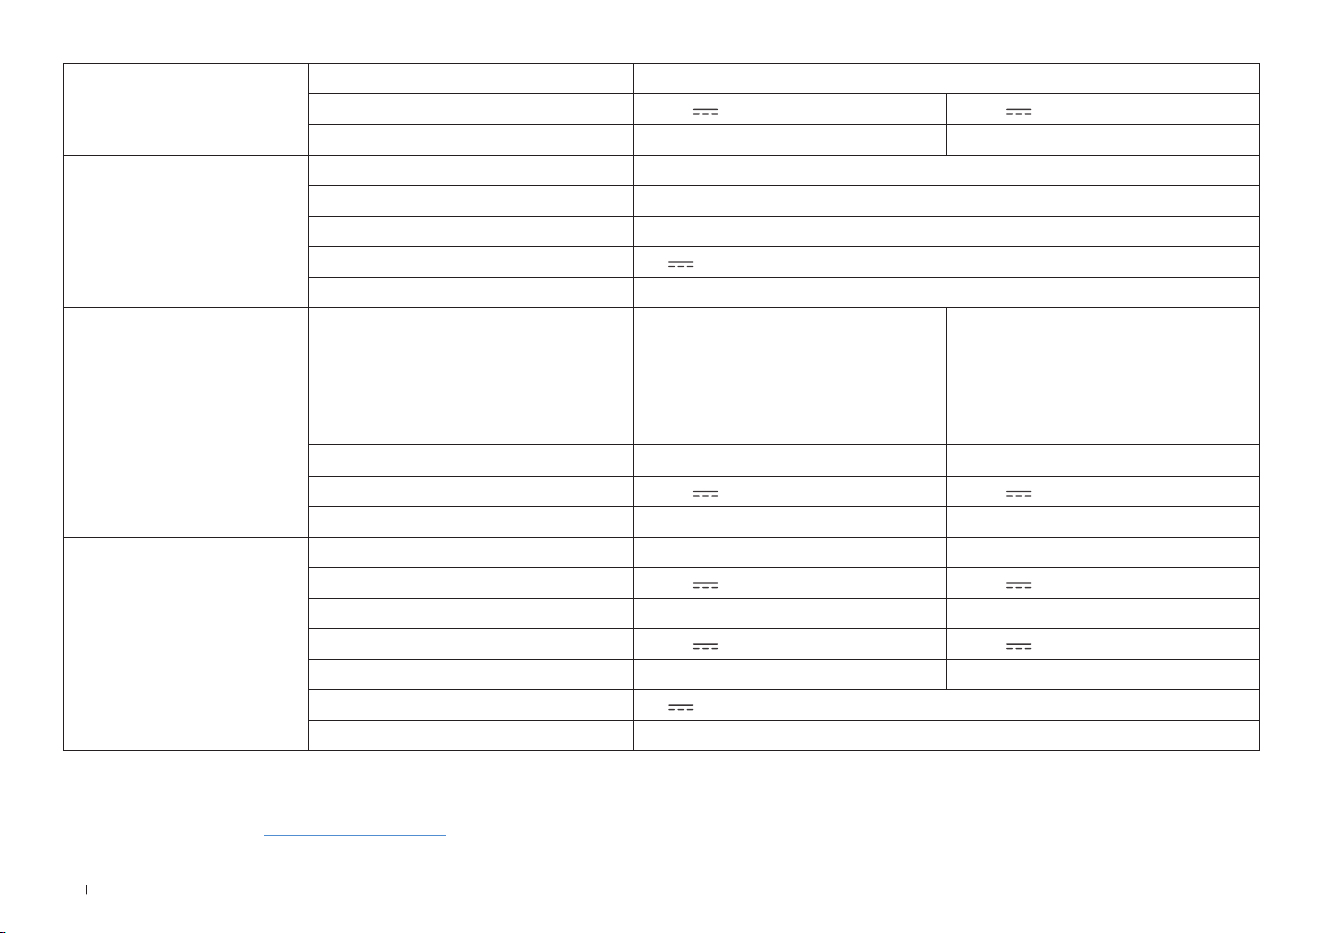
Connectivity
Frequency Range
Bluetooth® 2400MHz ~ 2483�5MHz
Wi-Fi 2400MHz ~ 2483�5MHz
Cellular Network (purchased)
WCDMA: BAND I: Uplink:1920-1980MHz,Downlink:2110-2170MHz
BAND VIII: Uplink:880-915MHz,Downlink:925-960MHz
LTE:E-UTRA
BAND 1: Uplink:1920-1980MHz,Downlink:2110-2170MHzE-UTRA
BAND 3: Uplink:1710-1785MHz,Downlink:1805-1880MHzE-UTRA
BAND 7: Uplink:2500-2570MHz,Downlink:2620-2690MHzE-UTRA
BAND 8: Uplink:880-915MHz,Downlink:925-960MHzE-UTRA
BAND 20: Uplink:832-862MHz,Downlink:791-821MHzE-UTRA
BAND 28: Uplink:703-748MHz,Downlink:758-803MHzE-UTRA
BAND 38: Uplink:2570-2620MHz,Downlink:2570-2620MHzE-UTRA
BAND 40: Uplink:2300-2400MHz,Downlink:2300-2400MHz
Available frequency bands for LTE Band 28 in Europe are
703-736MHz(TX),758-791MHz(RX)
RTK(GNSS) GPS, Beidou, Galileo, GLONASS
RTK(LoRa) 863-870MHz
MAX� radio-frequency
power
Bluetooth® ≤20dBm
Wi-Fi ≤20dBm
Cellular Network (purchased)
WCDMA:+24dBm+1�7/-3�7dB
LTE: E-UTRA Band28:23dBm+2�7/-3�2dB other Bands:23dBm±2�7dB
Lora in RTK ≤14dbm(25mw)
Driving Motor
Rated Speed (r/min)
34�6
Top Speed (r/min)
60�5
Blade Motor Speed (r/min)
3000
34EN
Battery (ECOVACS GOAT)
Battery Type Lithium-ion
Rated Voltage 32�4V 32�4V
Rated Capacity 3000 mAh 5000 mAh
RTK Reference Station
Model FM24A9
Usage Temperature -40~85°C / -40~185°F
Storage Temperature -55~95°C / -67~203°F
Input Voltage 5V
Input Current 1A
Power Supply
Supply Unit Model
GM152-3780300-2DG
GM152-3780300-3DG
GM152-3780300-SDG
BLJ125W378300P-V
BLJ125W378300P-B
GM403-3780500-2DG
GM403-3780500-3DG
GM403-3780500-SDG
BLJ240W378500P-V
BLJ240W378500P-B
Input Voltage
100-240 V ~ 100-240 V ~
Output Voltage 37�8V
37�8V
Output Current 3A 5A
Station
Model CH2491 CH2491A
Input Voltage 37�8V
37�8V
Input Current 3A 5A
Output Voltage for ECOVACS GOAT 37�8V
37�8V
Output Current for ECOVACS GOAT 3A 5A
Output Voltage for RTK 5V
Output Current for RTK 1A
Note: Technical and design specifications may be changed for continuous product improvement�
Explore more accessories at https://www�ecovacs�com�

35 DE
Inhaltsverzeichnis
1. Übersetzung der Originalanleitung ..............................................................................................................................36
2. Packungsinhalt und Komponentenfunktionen ...........................................................................................................42
2�1 Packungsinhalt ��������������������������������������������������������������������������������������������������������������������������������������������������������� 42
2�2 Teile und Funktionen ������������������������������������������������������������������������������������������������������������������������������������������������ 43
3. Installation und Kartierung ........................................................................................................................................... 47
3�1 Installation ����������������������������������������������������������������������������������������������������������������������������������������������������������������47
3�2 Kartierung �����������������������������������������������������������������������������������������������������������������������������������������������������������������51
4. Erste Schritte mit Ihrem ECOVACS GOAT................................................................................................................... 54
4�1 Funktionsweise Ihres ECOVACS GOAT ������������������������������������������������������������������������������������������������������������������� 54
4�2 Tipps vor dem ersten Mähen �����������������������������������������������������������������������������������������������������������������������������������57
4�3 Bereit zum Mähen ����������������������������������������������������������������������������������������������������������������������������������������������������58
5. Fehlerbehebung .............................................................................................................................................................60
6. Wartung .......................................................................................................................................................................... 60
6�1 Häugkeit �����������������������������������������������������������������������������������������������������������������������������������������������������������������60
6�2 Regelmäßige Wartung ���������������������������������������������������������������������������������������������������������������������������������������������� 61
6�3 Saisonale Wartung ��������������������������������������������������������������������������������������������������������������������������������������������������� 62
6�4 Teileaustausch ���������������������������������������������������������������������������������������������������������������������������������������������������������� 63
7. Technische Daten .......................................................................................................................................................... 64

36DE
1. Übersetzung der Originalanleitung
WICHTIG
VOR GEBRAUCH SORGFÄLTIG LESEN
ZUR SPÄTEREN VERWENDUNG
AUFBEWAHREN
Lesen Sie alle Anweisungen sorgfältig� Stellen Sie
sicher, dass Sie die Anweisungen verstehen und mit
den Bedienelementen und der ordnungsgemäßen
Verwendung des Geräts vertraut sind� Bitte vergessen Sie
nicht, dass Sie das Risiko reduzieren können, indem Sie
die Anweisungen und Warnungen in diesem Handbuch
befolgen, aber nicht alle Risiken beseitigen können�
Der Rasenmähroboter (im Folgenden „ECOVACS
GOAT“ genannt) verfügt über verschiedene
integrierte Sicherheitssensoren, die jedoch nicht alle
Sicherheitsrisiken eliminieren können�
Alle damit verbundenen Restrisiken wurden in dieser
Anleitung beschrieben bzw� mitgeteilt�
Beschreibung des Verwendungszwecks: Intelligente
Rasenmäher werden hauptsächlich zum Mähen von Gras
verwendet, insbesondere in Parks, privaten Hausgärten
und auf Fußballplätzen�
Bei Geräten, die in öffentlichen Bereichen eingesetzt
werden, sind um den Arbeitsbereich des Geräts
Warnzeichen aufzustellen� Diese sollten folgenden Text
enthalten: WARNUNG! Automatischer Rasenmäher!
Halten Sie sich von dem Gerät fern! Beaufsichtigen Sie
Kinder!
Führen Sie keinesfalls Modifikationen an dem Mäher
durch� Jegliche Änderung kann den Mähbetrieb
beeinträchtigen, zu schweren Verletzungen und/oder
Schäden sowie zum Erlöschen der Garantie führen�
Verwenden Sie nur von Ecovacs zugelassene Teile und
Zubehörteile�
WARNUNG
Lassen Sie keinesfalls Kinder, Personen mit
eingeschränkten körperlichen, sensorischen oder
geistigen Fähigkeiten oder Mangel an Erfahrung und
Wissen oder Personen, die mit diesen Anweisungen nicht
vertraut sind, die Maschine benutzen� Lokale Vorschriften
können das Alter des Bedieners einschränken�
Vermeiden Sie die Verwendung der Maschine und ihrer
Peripheriegeräte bei schlechten Wetterbedingungen,
insbesondere bei Blitzschlaggefahr�
Überprüfen Sie vor jedem Mähvorgang, ob alle Teile des
Mähers ordnungsgemäß funktionieren�
Überprüfen Sie regelmäßig den Bereich, in dem das
Gerät verwendet wird, und entfernen Sie alle Steine,
Stöcke, Drähte, Knochen und andere Fremdkörper�
Achten Sie darauf, dass Kinder keinesfalls das Netzteil,

37 DE
die Ladestation, die Messer, das Batteriefach oder Teile
mit Lücken wie z�B� die Räder berühren�
WARNUNG
Betreiben Sie das Gerät und/oder die Peripheriegeräte
keinesfalls mit defekten Schutzeinrichtungen oder
Schutzschirmen, ohne Sicherheitsvorrichtungen oder
wenn das Kabel beschädigt oder verschlissen ist�
Halten Sie sich von den rotierenden Messern fern! Legen
Sie keinesfalls Hände oder Füße unter oder in die Nähe
der rotierenden Messer�
Halten Sie beim Betrieb einen sicheren Abstand zum Mäher�
Lehnen Sie sich nicht zu weit nach vorne� Achten Sie
stets auf Ihr Gleichgewicht und achten Sie bei Gefälle auf
einen sicheren Stand� Gehen Sie, rennen Sie keinesfalls
bei Verwendung des Geräts oder der Peripheriegeräte�
WARNUNG
Achten Sie darauf, dass sich Kinder keinesfalls in der
Nähe des Geräts aufhalten oder mit dem Gerät spielen,
wenn dieses in Betrieb ist�
WARNUNG
Berühren Sie keinesfalls bewegliche gefährliche Teile,
bevor diese vollständig zum Stillstand gekommen sind�
WARNUNG
Verwenden Sie zum Aufladen des Akkus nur das
mitgelieferte, abnehmbare Netzteil (
CH2491/
CH2491A
)�
Sichere Verwendung:
Kein beschädigtes Kabel an die Stromversorgung
anschließen und keinesfalls ein beschädigtes
Kabel berühren, bevor es von der Stromversorgung
getrennt wird, da beschädigte Kabel zu Kontakt mit
stromführenden Teilen führen können� Verlängerungskabel
von beweglichen gefährlichen Teilen fernhalten, um
Schäden an den Kabeln zu vermeiden, die zu Kontakt mit
stromführenden Teilen führen können� Anschließen des
Geräts und/oder der Peripheriegeräte nur an einen durch
einen Fehlerstromschutzschalter (RCD) geschützten
Stromkreis mit einem Auslösestrom von maximal 30mA�
Ziehen Sie das Netzteil aus der Steckdose und entwirren
Sie es, wenn das Netzkabel oder das Verlängerungskabel
während des Gebrauchs beschädigt oder verwickelt
ist� Ziehen Sie stets am Stecker, nicht am Kabel, um
diese Gefahren zu vermeiden� Wenden Sie sich an den
Kundendienst und lassen Sie das Kabel durch eine
Fachkraft reparieren oder ersetzen�
Bitte verwenden Sie das Verlängerungskabel von
ECOVACS� Wenden Sie sich bei Problemen an den
Kundendienst�

38DE
Wenn das Netzkabel beschädigt wird, muss es vom
Hersteller, einem Servicepartner des Herstellers oder
ähnlich qualifizierten Personen ausgetauscht werden, um
eine Gefährdung zu vermeiden�
Drücken Sie sofort die STOPP-Taste, wenn der Mäher
ungewöhnliche Geräusche macht oder ein Alarm
ausgelöst wird�
Bei einem Auslaufen von Elektrolyt mit Wasser oder
Neutralisierungsmittel spülen� Suchen Sie bei Kontakt mit
den Augen usw� medizinische Hilfe auf�
Bei ungewöhnlichen Vibrationen starten Sie den Mäher
bitte neu� Falls das Problem weiterhin besteht, wenden
Sie sich bitte an den Kundendienst�
Anweisung, bei der Bedienung der Maschine mit einer
manuellen Steuerung immer festes Schuhwerk und
lange Hosen zu tragen.
Zusätzlich bei Verwendung der manuellen Steuerung:
a) Mähen Sie nur bei Tageslicht oder bei guten
künstlichen Lichtverhältnissen�
b) Setzen Sie die Maschine nicht in nassem Gras ein�
c) Bedienen Sie die Maschine nicht barfuß oder in offenen
Sandalen� Tragen Sie immer festes Schuhwerk und lange
Hosen�
d) Stellen Sie beim Mähen auf abschüssigem Gelände
sicher, dass Sie einen festen Stand haben�
e) Seien Sie besonders vorsichtig, wenn die Maschine
rückwärts auf Sie zufährt�
f) Schalten Sie den Motor immer vorschriftsmäßig ein�
Halten Sie dabei die Füße immer in sicherem Abstand
von der/den Messer(n)�
Geräteaktualisierung
In der Regel werden einige Geräte alle zwei Monate
aktualisiert, aber das muss nicht auf jedes Gerät
zutreffen�
Einige Geräte, insbesondere solche, die vor mehr als drei
Jahren in den Handel kamen, werden nur aktualisiert,
wenn eine kritische Schwachstelle gefunden wurde und
behoben wird�
39 DE
Informationen zur Entsorgung von Altbatterien
Dieses Symbol bedeutet, dass Batterien und Akkus am
Ende ihrer Lebensdauer nicht zusammen mit unsortiertem
Hausmüll entsorgt werden dürfen� Ihre Teilnahme ist ein
wichtiger Teil der Bemühungen, die Auswirkungen von
Batterien und Akkus auf die Umwelt und die menschliche
Gesundheit zu minimieren� Für ein ordnungsgemäßes
Recycling können Sie dieses Produkt oder die darin
enthaltenen Batterien oder Akkus an Ihren Händler oder
an eine dafür vorgesehene Sammelstelle zurücksenden�
Die Rückgabe ist kostenlos�
Die korrekte Entsorgung dieses Produkts trägt dazu
bei, wertvolle Ressourcen zu sparen und mögliche
negative Auswirkungen auf die menschliche Gesundheit
und die Umwelt zu vermeiden, die andernfalls durch
unsachgemäße Abfallbehandlung entstehen könnten�
Für die falsche Entsorgung dieser Abfälle können gemäß
Ihren nationalen Rechtsvorschriften Strafen verhängt
werden�
Es gibt separate Sammelsysteme für gebrauchte
Batterien und Akkus�
Bitte entsorgen Sie Batterien und Akkus ordnungsgemäß
in Ihrem örtlichen Wertstoffhof/Recyclingzentrum�
EU-Konformitätserklärung
Benutzerinformationen zur Entsorgung von Elektro-
und Elektronikaltgeräteabfall
Dieses Symbol auf dem Produkt oder seiner Verpackung
weist darauf hin, dass gebrauchte Elektro- und
Elektronikprodukte nicht mit unsortiertem Hausmüll
vermischt werden dürfen� Für eine ordnungsgemäße
Behandlung liegt es in Ihrer Verantwortung, Ihre
Abfallgeräte zu entsorgen, indem Sie sie an die dafür
vorgesehenen Sammelstellen zurücksenden�
Die korrekte Entsorgung dieses Produkts trägt dazu
bei, wertvolle Ressourcen zu sparen und mögliche
negative Auswirkungen auf die menschliche Gesundheit
und die Umwelt zu vermeiden, die andernfalls durch
unsachgemäße Abfallbehandlung entstehen könnten�
Zur Rückgabe Ihres gebrauchten Gerätes nutzen Sie
bitte die Rückgabe- und Sammelsysteme (weitere
Informationen dazu bei Ihren Behörden vor Ort), oder
wenden Sie sich an den Händler, bei dem Sie das
Produkt gekauft haben� Die Rückgabe ist kostenlos�
Für die falsche Entsorgung dieser Abfälle können gemäß
Ihren nationalen Rechtsvorschriften Strafen verhängt werden�

40DE
Richtlinie zur Beschränkung der Verwendung
bestimmter gefährlicher Stoffe (RoHS)
ECOVACS Europe GmbH erklärt hiermit, dass das
gesamte Produkt einschließlich der Teile (Kabel, Schnüre
usw�) die Anforderungen der RoHS-Richtlinie 2011/65/
EU und der Änderung der Delegierten Richtlinie (EU)
der Kommission 2015/863 über die Beschränkung
der Verwendung bestimmter gefährlicher Stoffe in
elektrischen und elektronischen Geräten ("RoHS-
Neufassung" oder "RoHS 2�0") erfüllt�
Funkanlagenrichtlinie
ECOVACS Europe GmbH erklärt hiermit, dass das in
diesem Abschnitt aufgeführte Produkt den grundlegenden
Anforderungen und anderen relevanten Bestimmungen
der Funkanlagenrichtlinie 2014/53/ EU entspricht�
Maschinenrichtlinie
ECOVACS Europe GmbH erklärt hiermit, dass das in
diesem Abschnitt aufgeführte Produkt den grundlegenden
Anforderungen und anderen relevanten Bestimmungen
der Maschinenrichtlinie 2006/42/EG entspricht�
Bevollmächtigter Vertreter in Europa:
ECOVACS Europe GmbH erklärt hiermit, dass das
Produkt die grundlegenden Anforderungen und andere
relevanten Bestimmungen der RoHS-Richtlinie 2011/65/
EU und der Änderung der Delegierten Richtlinie (EU)
der Kommission 2015/863, die Funkanlagenrichtlinie
2014/53/EU und die Maschinenrichtlinie 2006/42/EG
erfüllt�
Die Konformitätserklärung kann unter folgender Adresse
eingesehen werden: https://www�ecovacs�com/global/
compliance�
ECOVACS Europe GmbH
Holzstrasse 2 I D-40221 Düsseldorf I Deutschland
41 DE
SYMBOLE
WARNUNG—
Lesen Sie die Betriebsanleitung, bevor
Sie das Gerät bedienen�
WARNUNG—
Halten Sie beim Betrieb einen sicheren
Abstand zum Gerät�
WARNUNG—
Setzen Sie sich nicht auf das Gerät�
WARNUNG—
Schalten Sie das Gerät aus, bevor Sie
an dem Gerät arbeiten oder dieses
anheben�
ACHTUNG—
Berühren Sie keinesfalls die rotierenden
Messer�
Klasse III
Gleichstrom
Wechselstrom
Dieses Produkt entspricht den geltenden
EG-Richtlinien�
Polarität des Ladeanschlusses
Lesen Sie vor dem Auaden die
Anleitung�
42DE
2. Packungsinhalt und Komponentenfunktionen
1 ECOVACS GOAT
5 Innensechskantschlüssel
9 Stativstift
13 Schraube (für RTK-Referenzstation)
2 Pfosten der Ladestation
6 Ersatzmessersatz
10 RTK-Referenzstation
14 Federscheibe (für Stativstift)
3 Basis der Ladestation
7 Schrauben (für Basis)
11 Gartenpflock aus Kunststoff
15 Betriebsanleitung
4 Netzteil
8 Montagestange
12 Kabelbinder
16 Anleitung vor dem Betrieb
2.1 Lieferumfang
8
6 5
4
1
2
3
7
9
10
15
16
11 12 13 14
43 DE
ECOVACS GOAT (Draufsicht)
STOPP-Taste
Systemsteuerung
Regensensor
RTK-
Referenzstation
Stoßfänger
3D-ToF LiDAR
KI-Frontkamera
2.2 Teile und Funktionen
Systemsteuerung: Die Tasten auf der Systemsteuerung können für die
grundlegenden Bedienfunktionen des Mähers verwendet werden� Die
digitalen Zahlen auf dem Dashboard-Display zeigen den Mähfortschritt,
den Akkustand und den Mäherstatus an�
Symbol:
Akku
Akkustand�
Weiß --- mehr als 15 % Ladung�
Rot --- Weniger als 15 % Ladung
Blinken zeigt Auaden an;
Durchgehendes Leuchten zeigt „in
Verwendung“
oder „vollständig aufgeladen“ an�
4G-Verbindung
Leuchtet auf, wenn ein zusätzliches
Verbindungsmodul mit einer SIM-Karte
installiert ist�
ANZEIGE
START
HOME
SUBTRAHIEREN
EIN-/
AUSSCHALTEN
ADDIEREN
OK
Thu 12:30
OK
to mow
ANHALTEN
44DE
Taste
Funktionstasten Beschreibung
START
Drücken Sie 5-mal, um den Akkustand
anzuzeigen
START-->OK Mähen starten/Aufgabe fortsetzen
OK
Halten Sie die Taste zum Ein-/Ausschalten 3 s
lang gedrückt�
HOME
Halten Sie die Taste 3 s lang gedrückt, um den
Netzwerkverbindungsmodus aufzurufen�
HOME-->OK Senden Sie den Mäher zur Ladestation
ANHALTEN Halten Sie den Mäherbetrieb an
START+HOME
Halten Sie die Tasten zum Zurücksetzen 5 s
gedrückt
ADDIEREN+ Erhöhen der Zahl
SUBTRAHIEREN— Verringern der Zahl
OK Nächste Stelle/Bestätigen
Display Beschreibung
Mäher gestoppt
Aktuelle OTA-Updates
Mähen
Fehlercode� Details nden Sie unter
www�ecovacs�com�
Wenn das Problem nicht behoben wird, kehrt
das Gerät nach 30 Minuten automatisch zur
Station zurück�
Display:
Wi-Fi
Leuchtet auf, wenn Ihr ECOVACS GOAT
erfolgreich durch Wi-Fi mit der APP verbunden ist�
Sperren
Mäher gesperrt� Geben Sie bitte den PIN-
Code ein zum Entsperren, anderenfalls ist
der Mäher nicht betriebsfähig�
45 DE
SENSOREN
Name Beschreibung
3D-ToF LiDAR
Hindernisinformationen vor dem Roboter
werden wahrgenommen, um ihm dabei zu
helfen, Hindernissen aktiv auszuweichen�
Bereich: Ermitteln Sie die Längen- und
Breitenkoordinaten der Position des Roboters�
Horizontal: 90 Grad; Vertikal: 70 Grad
(WYSIWYG, originalgetreue Darstellung)
Der maximale Abstand beträgt 3-4 Meter�
KI-Frontkamera
Die Umgebungsinformationen vor dem Roboter
wahrnehmen, spezielle Ziele identizieren und
dem Roboter dadurch helfen, intelligent mit den
Benutzern zu interagieren�
Horizontal: 150 Grad; Vertikal: 80 Grad
(WYSIWYG, originalgetreue Darstellung).
Regensensor
Erkennen, ob es in der aktuellen Umgebung
regnet, und dem Roboter helfen, zu
entscheiden, ob er weiterarbeiten soll�
RTK-
Referenzstation
Dem mobilen Roboter helfen, die relative
Distanz zwischen ihm selbst und der Bake
zur Standortbestimmung zu erhalten, sodass
der Roboter beim Erstellen einer Karte der
häuslichen Umgebung unterstützt wird�
Bereich: Mit der Bake als Zentrum liegt die
effektive Signalreichweite innerhalb eines
Radius von 140 m�
PIN-Code festlegen:
Wenn sich der GOAT außerhalb der Karte befindet oder eingeschaltet
oder zurückgesetzt werden soll, wird er automatisch gesperrt� Sie
können ihn entsperren, indem Sie den richtigen PIN-Code eingeben�
Legen Sie den PIN-Code fest, wenn das Display die folgende Abbildung
anzeigt�
Drücken Sie [+] oder [-], um nacheinander die Zahlen des PIN-Codes
auszuwählen� Nachdem Sie sich für die erste Stelle entschieden haben,
bestätigen Sie mit [OK]� Der Cursor bewegt sich dann zur nächsten
Stelle�
1� Wenn das -Symbol blinkt, bitte den PIN-Code eingeben�
2� Wenn das -Symbol dauerhaft leuchtet, den zuvor festgelegten PIN-
Code eingeben�
3� Nach dem Entsperren verschwindet das -Symbol� Schlägt das
Entsperren fehl, blinkt das -Symbol erneut, was darauf hinweist, dass
der PIN-Code zurückgesetzt werden muss�
Hinweis:
• 0000 ist ein ungültiger PIN-Code�
• Zur Bestätigung der Einstellung muss der PIN-Code zweimal eingegeben wer-
den�
•
Wenn Sie beim Festlegen des PIN-Codes falsche Zahlen eingeben, beginnt der
Einstellvorgang wieder von vorn�
•
Sie können den PIN-Code in der App ändern�

46DE
Stationsansicht
RTK-Referenzstation
RTK-Kontrollleuchte
Durchgängig blau: Laden und starkes Signal
Blinkend blau: Schlechtes Signal� Bitte wählen Sie einen neuen Standort
für die Installation�
Station-Kontrollleuchte
RTK-Kontrollleuchte
ECOVACS GOAT (Ansicht von unten)
ECOVACS GOAT (Rückansicht)
Messerscheibe
Messer
Vorderräder
Geländegängige
Räder
Akkufach
Handgriff
47 DE
3. Installation und Kartierung
3.1 Installation
1
APP vorbereiten
Laden Sie die ECOVACS HOME App herunter
Bevor Sie beginnen, stellen Sie Folgendes sicher:
Verbinden Sie den ECOVACS GOAT mit dem Internet
• Ihr Mobiltelefon ist mit einem Wi-Fi-Netzwerk verbunden�
• Das 2,4-GHz-Band-Funksignal ist auf Ihrem Router aktiviert�
1. Bluetooth-Verbindung
• Scannen Sie den QR-Code auf dem ECOVACS GOAT oder wählen
Sie ECOVACS GOAT manuell über die App aus�
•
Schalten Sie Bluetooth auf Ihrem Telefon ein, um Ihren ECOVACS GOAT zu
verbinden�
• auf der Anzeige leuchtet nach erfolgreicher Verbindung auf�
Hinweis: Nach der Installation der ECOVACS HOME App führen Sie bitte die
Registrierung und Anmeldung aus�
Hinweis: Stellen Sie sicher, dass Ihr Telefon über eine Bluetooth-Funktion verfügt
und sich Ihr ECOVACS GOAT in einer Entfernung (10 m) befindet, in der eine
Verbindung möglich ist�
HOME
Add
Wenn Sie die Bindung an ein App-Konto zulassen, kann Ihr ECOVACS
GOAT vor dem Aufheben der Bindung nicht an ein anderes App-Konto
gebunden werden� Sie können die Bindung Ihres ECOVACS GOAT in der
App aufheben� Sie können diesen Vorgang unbesorgt ausführen, da dabei
nicht die Arbeitsdaten wie Zeitpläne Ihres ECOVACS GOAT gelöscht
würden� Sie können das Konto auch durch Klicken auf das kleine Dreieck
neben dem Gerätenamen entfernen, um das Gerät zu löschen�
Wie können Sie die Bindung Ihres ECOVACS GOAT
aufheben?
2. Wi-Fi-Verbindung
• Stellen Sie sicher, dass sich Ihr ECOVACS GOAT und Ihr Telefon in
derselben Router-Umgebung benden�
• Folgen Sie den Anweisungen in der App, um die Verbindung abzu-
schließen�
•
auf der Anzeige leuchtet nach erfolgreicher Verbindung auf�
Wi-Fi
****************
Next step
• Sie können auch das zusätzliche Verbindungsmodul erwerben, damit die
Verbindung mit Ihrem ECOVACS GOAT selbst ohne Wi-Fi möglich ist�
Hinweis: Bitte verwenden Sie ein 2,4-GHz-Netzwerk�

48DE
2
Montieren Sie die Ladestation
1� Stellen Sie die Station auf einen ebenen Rasen mit freier Sicht ohne
Steigungen oder Steine� Stellen Sie sicher, dass es keine Objekte (z� B�
Bäume, Bälle oder Häuser) innerhalb von 2 m links und rechts und 2 m
vor der Station gibt�
2� Wenn Sie Ihren ECOVACS GOAT fernsteuern möchten, bringen Sie
die Station so nah wie möglich an einen Ort mit starkem Wi-Fi-Signal�
3� Achten Sie darauf, dass das Gras um die Station nicht länger als 10
cm ist� Zu hohes Gras kann die Aufladung beeinträchtigen�
2m
2m
2m
10cm
4� Stecken Sie den Pfosten in die Basis, bis Sie ein "Klicken" hören�
49 DE
5� Befestigen Sie die Station am Boden im ausgewählten Bereich mit
Bodenankern mit dem Innensechskantschlüssel
6� Verbinden Sie den Stecker der Station mit dem Netzteil und
vergewissern Sie sich, dass die blaue Leuchte ein ist�
Hinweis: Bitte stellen Sie sicher, dass das Steckernetzteil 30 cm über dem Boden
positioniert ist, um Schäden durch Wasser und Feuchtigkeit zu vermeiden�
Bitte stecken Sie das Gerät in eine Innenraum-Steckdose oder eine wasserdichte
Außen-Steckdose�
3
RTK-Referenzstation zusammenbauen
Wählen Sie einen offenen Bereich in mindestens 2 Metern Entfernung
von Gebäuden und Bäumen für die Installation der RTK-Basisstation
aus�
1� Verbinden Sie die oberen und unteren Montagestangen und
vergewissern Sie sich, dass die Halterung sicher einrastet�
30 cm
50DE
2� Setzen Sie den Dreiecksstift in die Montagestange ein und ziehen Sie
ihn fest�
3� Bringen Sie den Signalkopf an� Setzen Sie zu diesem Zweck dessen
erhöhten Teil in die Montagestange ein und ziehen Sie die Schrauben
mit einem Werkzeug fest�
4� Verbinden Sie das RTK-Stromkabel mit dem Basisstation-Stromkabel
und ziehen Sie die Mutter fest�
5� Wenn nach dem Einschalten die Anzeige an der RTK-Basisstation
kontinuierlich leuchtet, ist der Standort korrekt, wenn die Anzeige
blinkt, müssen Sie den Standort der Station ändern�
A B
51 DE
6� Kabelmanagement: Sichern Sie das RTK-Stromkabel mit
Kabelbindern an der Montagestange und verwenden Sie
Kunststoffpflöcke, um die anderen Kabel auf dem Boden zu sichern�
4
Laden des Mähers
Laden Sie den Mäher vor der ersten Verwendung vollständig auf�
Platzieren Sie ihn in der Ladestation und vergewissern Sie sich, dass die
weiße Anzeigeleuchte ständig leuchtet oder blinkt, was das erfolgreiche
Laden anzeigt�
2
Kartierung
1
Vor der Kartierung sind folgende Hinweise zu beachten:
1. Wählen Sie den geeigneten Kartierungsmodus für Ihren Rasen.
Für Rasenflächen mit Vertiefungen größer als 4 cm oder schmalen
Pfaden mit weniger als 1Meter wird empfohlen, die manuelle Kartierung
auszuwählen� Verwenden Sie anderenfalls die standardmäßige
Automatische Kartierung�
• Stellen Sie sicher, dass der ECOVACS GOAT eingeschaltet ist�
• Wenn der ECOVACS GOAT gestoppt wurde, tippen Sie auf dem
ECOVACS GOATauf die Taste START --> OK�
• Wenn der ECOVACS GOAT gesperrt ist, geben Sie bitte den PIN-
Code ein�
3.2 Kartierung
52DE
4. Kartierung starten
Wenn sich die Station auf dem Rasen befindet, tippen Sie einfach auf
Kartierung starten, um die Kartierung zu starten�
Wenn sich die Basisstation nicht auf dem Rasen befindet, steuern
Sie den ECOVACS GOAT zur Rasenkante und starten Sie dann die
Kartierung�
Hinweis: Um erfolgreiches Aufladen zu gewährleisten, wird empfohlen,
die Basisstation innerhalb von 3 Metern vom Rasen und nicht mehr als
10 Meter weit weg zu platzieren�
2. Verbinden Sie den Mäher
Mit Bluetooth-Verbindung stellt Ihr Telefon automatisch eine Verbindung
mit dem Mäher her�
3. Finden Sie einen Startpunkt
Finden Sie einen passenden Startpunkt entlang der Karte Ihres Rasens�
Bleiben Sie innerhalb von 6 m vom Mäher während des Kartierungsprozesses�

53 DE
Lassen Sie den ECOVACS GOAT von der Station starten und folgen Sie dem
ECOVACS GOAT innerhalb von 6 m� Wenn der Höhenunterschied mehr als
4cm beträgt, halten Sie bitte einen Abstand von 10cm zwischen ECOVACS
GOAT und Rasenkante ein�
Vergewissern Sie sich, dass Sie eine gerade Linie mit einem gleichmäßigen
Drehwinkel von nicht weniger als 90° fahren�
5. Kartierungsmodus umschalten
Während des Kartierungsprozesses können Sie zwischen
automatisierter und manueller Kartierung in der App-Oberfläche
umschalten�
<90°
>90°
>90°
>90°
>90°
>90°
≤
6m
>
>
10cm
4cm
6. Kartierung abschließen
Nachdem der Umriss des Rasens erfasst wurde, schließen Sie den
Kreis am Startpunkt, um die Rasenkante zu vervollständigen�
54DE
Um Ihren ECOVACS GOAT zu schützen, richten Sie bitte
Zufahrtsverbotszonen für Objekte ein, die Sie schützen möchten, wie
beispielsweise ein Blumenbeet, ein Trampolin oder ein Gemüsebeet�
Befolgen Sie die Anweisungen in der App� Steuern Sie Ihren ECOVACS
GOAT zum Startpunkt der Zufahrtsverbotszone� Die minimal
unterstützte einzelne Seitenlänge des eingeschränkten Bereichs sollte
mehr als 0,5m betragen�
7. Zufahrtsverbotszone festlegen
Hinweis: Es wird empfohlen, den ECOVACS GOAT 30 cm von den Grenzen
extrem gefährlicher Bereiche fernzuhalten, z�B� von einem Teich oder einer Klippe�
• Starten Sie von der Station/innerhalb der Karte und steuern Sie
den ECOVACS GOAT mithilfe der Fernsteuerung in den neu zu
erstellenden Bereich�
• Kartierung Der neue Bereich wird auf Grundlage der regionalen
Gegebenheiten geplant�
8. Neuen Bereich erstellen
• Der Pfad soll zwei getrennte Bereiche oder den Rand einer Rasenä-
che mit der Ladestation verbinden�
• Der ECOVACS GOAT kann automatisch einen Pfad generieren, wenn
er innerhalb eines Pfades startet und einen anderen Pfad erreicht�
• Achten Sie darauf, dass die befahrbare Breite des Pfads für den ECO-
VACS GOAT größer als 1 Meter ist�
9. Einen Pfad erstellen
>1m
>1m
Im folgenden Teil erfahren Sie, wie Ihr ECOVACS GOAT funktioniert�
Sie können die Modi auf Ihrem ECOVACS GOAT oder über die App wechseln�
4. Erste Schritte mit Ihrem ECOVACS
GOAT
4.1 Wie Ihr ECOVACS GOAT funktioniert
1
Mähmodus
55 DE
Der ECOVACS GOAT ist ein intelligenter Roboter zur Pege Ihres Ra-
sens� Stellen Sie vor dem Start sicher, dass das Gras nicht länger als
10 cm ist� Wenn es länger ist, schneiden Sie das Gras grob mit einem
manuellen Rasenmäher� Dann hält Ihr ECOVACS GOAT das Gras schön
in einer Höhe von 9 cm�
Wenn der Akku fast leer ist, wird Ihr ECOVACS GOAT die Aufgabe au-
tomatisch unterbrechen und zur Station zurückkehren, um sich aufzula-
den� Nach dem Auaden nimmt Ihr ECOVACS GOAT im betriebsfähigen
Zustand die unvollendete Mähaufgabe des Tages wieder auf�
Mit dem programmierten Schneiden mäht Ihr ECOVACS GOAT auf
einem S-förmigen Weg, um maximale Efzienz zu erzielen�
3
Schnitthöhe
5
Automatisches Aufladen
4
Programmiertes Schneiden
Sie können Ihren Mähplan mit der ECOVACS HOME App festlegen�
Durch die Unterstützung von zwei Zeitplänen ermöglicht der ECOVACS
GOAT Ihnen das Einstellen und Umschalten basierend auf verschiede-
nen Jahreszeiten�
2
Zeitplan
56DE
Mit einer Wasserdichtigkeit von IPX6 kommt Ihr ECOVACS GOAT mit
einem dauerhaften Außenaufenthalt bestens zurecht� Das Mähen bei
starkem Regen bringt jedoch nicht das beste Ergebnis� Ihr ECOVACS
GOAT, der mit einem Regensensor ausgestattet ist, stoppt das Mähen
und kehrt automatisch zur Station zurück, wenn eine bestimmte Menge
Regenwasser erkannt wird� Wenn der Regen aufhört, setzt der ECO-
VACS GOAT die Mähaufgabe automatisch fort� Es wird empfohlen, bei
trockenem Wetter zu mähen, um das beste Mähergebnis zu erzielen�
Sie können es auch auf Ihrem ECOVACS GOAT oder durch die App
deaktivieren, um an regnerischen Tagen zu mähen�
6
Regensensor
Der Rasen kann nach dem Regen noch nass sein� Für ein besseres
Mähergebnis fährt Ihr ECOVACS GOAT standardmäßig 3 Stunden mit
dem Mähen fort, nachdem der Regensensor erkennt, dass der Regen
aufgehört hat� Sie können die Regenverzögerungszeit durch die App
ändern�
Mit dem 3D-ToF LiDAR kann Ihr ECOVACS GOAT Hindernisse erkennen
und im Voraus vermeiden� Die Höhe der zu umfahrenden Hindernisse
kann in der ECOVACS HOME App eingestellt werden� Darüber hinaus
können einige Hindernisse durch KI-Erkennung präzise vermieden wer-
den�
Mit dem Ziel, nachtaktive Tiere zu schützen, wird ECOVACS GOAT
das Mähen nachts einstellen� Sie können diese Funktion auf Ihrem
ECOVACS GOAT oder in der App deaktivieren, um nachts zu mähen�
7
Regenverzögerungszeit
9
Intelligente Hindernisvermeidung
8
Tierschutz
57 DE
• Schneiden Sie das Gras mit Ihrem manuellen Rasenmäher auf eine
Höhe von nicht mehr als 10 cm und beseitigen Sie Hindernisse wie
Schmutz, Laubhaufen, Spielzeug, Drähte und Steine�
• Lassen Sie Ihre Kinder nicht auf dem Rasen spielen, wenn Ihr
ECOVACS GOAT mäht�
• Stellen Sie die gewünschte Mährichtung ein�
11
Sicherheit und PIN-Code-Schutz
Hinweis: Ihr ECOVACS GOAT passt seine Richtung nach dem Verlassen der
Station an und fährt geradeaus, um standardmäßig zu mähen�
4.2 Tipps vor dem ersten Mähen
≤
10cm
Tägliches Mähen mit Ihrem ECOVACS GOAT hinterlässt Schnittgut, das
als bester Dünger gleichmäßig auf dem Rasen verteilt wird�
10
Keine Notwendigkeit zur Entsorgung von Grasschnitt
Der bei der ersten Inbetriebnahme Ihres ECOVACS GOAT festgelegte
PIN-Code dient dazu, Diebstahl und die Bedienung durch Kinder zu
verhindern� Wenn er gesperrt ist, können Sie ihn durch Eingabe des
PIN-Codes entsperren�
Hinweis:
Warten Sie nach fünf Fehlversuchen 30 Minuten, bevor Sie es erneut versuchen�
Sie können den PIN-Code in der App ändern�

58DE
2
Mähen pausieren
Drücken Sie zum Pausieren des ECOVACS GOAT oder pausieren
Sie ihn durch die App�
Aus Sicherheitsgründen wird Ihr ECOVACS GOAT gesperrt und kann
nach dem Drücken von nicht direkt durch die App gestartet werden�
Bitte drücken Sie in der Systemsteuerung zuerst auf START und dann
auf OK�
ECOVACS GOAT
Finish Pause
Auto
60%
Station
ODER
1
Mit dem Mähen beginnen
4.3 BEREIT ZUM MÄHEN
Drücken Sie , dann � Der ECOVACS GOAT wird mit dem Mähen
beginnen� Oder Sie können das Mähen durch die App starten�
Hinweis: Stellen Sie sicher, dass das Gras mit Ihrem manuellen Rasenmäher nicht
mehr als 10 cm hoch geschnitten wurde
.
ECOVACS GOAT
Start
Auto
Station
60%
ODER
59 DE
ODER
ODER
3
Weitermähen
4
Ende des Mähens
Drücken Sie und dann auf dem ECOVACS GOAT oder tippen Sie
auf die Taste in der App, um das Mähen fortzusetzen�
1� Nach Abschluss der Mähaufgabe kehrt der ECOVACS GOAT
automatisch zur Station zurück�
2� Wenn Sie den Mähvorgang manuell beenden möchten, müssen Sie
den ECOVACS GOAT durch Drücken von
zur Station schicken und
dann OK drücken� Alternativ können Sie auch auf in der App tippen�
ECOVACS GOAT
Finish Continue
Auto
60%
Station
ECOVACS GOAT
Start
Auto
Station
60%
60DE
Teil
Wartung Ersatz
KI-Frontkamera 2 bis 4 Wochen -
Messer - 4 bis 6 Wochen
Wenn bei der Verwendung Ihres ECOVACS GOAT Probleme auftreten, lesen Sie die FAQ-Artikel unter
https://www�ecovacs�com
oder im
Abschnitt zur ECOVACS HOME App�
Um eine bessere Leistung und längere Lebensdauer Ihres ECOVACS GOAT zu erzielen, müssen Sie ihn warten und alle
verschlissenen Teile ordnungsgemäß ersetzen�
WARNUNG
• Schalten Sie Ihren ECOVACS GOAT vor den Eingriffen immer aus�
• Beim Austausch der Messer immer Schutzhandschuhe tragen�
• Verwenden Sie beim Zusammenbau der Messer nur die von ECOVACS hergestellten Messer und neue Schrauben�
• Wischen Sie die unwaschbaren Komponenten mit einem sauberen, trockenen Tuch ab� Bitte verwenden Sie keine
Reinigungssprays oder andere Reinigungsmittel�
• Drehen Sie Ihren ECOVACS GOAT vorsichtig auf einer weichen Oberfläche�
5. Fehlerbehebung
6. Wartung
6.1 Häufigkeit
61 DE
1
Messerteller, Fahrgestell, geländegängige Räder und Vorderräder
2
Andere Komponenten
6.2 Regelmäßige Wartung
WARNUNG
• Tragen Sie IMMER Schutzhandschuhe�
• Verwenden Sie KEINEN Hochdruckreiniger, da unter hohem Druck stehendes Wasser in die Dichtungen eindringen und elektronische
und mechanische Teile beschädigen kann�
SCHRITTE ZUM REINIGEN DER HAUPTTEILE
Schritt 1: Schalten Sie den ECOVACS GOAT aus�
Schritt 2: Drehen Sie Ihren ECOVACS GOAT vorsichtig auf einer weichen Oberfläche um�
Schritt 3: Reinigen Sie den Messerteller und das Fahrgestell mit einer Bürste�
Schritt 4: Überprüfen Sie, ob sich der Messerteller frei drehen kann und die Messer frei drehen können�
Schritt 5: Entfernen Sie den Schlamm von den geländegängigen Rädern und Vorderrädern mit einer Bürste�
Wischen Sie die Komponenten mit einem sauberen, trockenen Tuch ab� Vermeiden Sie die Verwendung von Reinigungssprays oder
Reinigungsmitteln�
62DE
3
RTK-Referenzstation
1
Lagerung über den Winter
Wenn die RTK-Referenzstation (einschließlich der Montagestange)
kippt, stellen Sie sicher, dass sie richtig eingestellt ist�
ECOVACS GOAT
• Schalten Sie Ihren ECOVACS GOAT aus, nachdem er vollständig
aufgeladen ist�
• Reinigen Sie ihn gründlich�
• Lagern Sie ihn mit wasser- und staubdichten Abdeckungen an einem
kühlen, gut belüfteten und trockenen Ort im Innenbereich�
Station
• Ziehen Sie das Netzteil aus der Steckdose�
• Netzteil von der Station trennen�
• Markieren Sie die Stelle, an der Sie die Station aufgestellt haben, als
Referenz für die neue Nutzungssaison�
• Bewahren Sie die Station und das Netzteil an einem kühlen, gut belüf-
teten und trockenen Ort fern von direkter Sonneneinstrahlung auf�
6.3 Saisonale Wartung
Hinweis: Es ist notwendig, die Station in die ursprüngliche Position zu versetzen,
um in einer neuen Saison zu arbeiten� Anderenfalls kann es zu Standortfehlern
und ungültigen Karten führen�
2
Neustart im Frühjahr
•
Entfernen Sie sämtliche Abdeckungen von Ihrem ECOVACS GOAT und
der Station�
• Bauen Sie die Station zusammen und stellen Sie sie wieder an der
Stelle auf, wo sie in der letzten Nutzungssaison war�
• Überprüfen Sie die Kabel auf Beschädigungen oder Brüche und re-
parieren Sie sie bei Bedarf� Schließen Sie nur Kabel an, die sicher und
für den Einsatz geeignet sind�
• Überprüfen Sie die Schärfe der Messer und ersetzen Sie diese bei
Bedarf� Detaillierte Schritte und Tipps nden Sie im Abschnitt zur War-
tung dieses Handbuchs�
• Schalten Sie Ihren ECOVACS GOAT ein und testen Sie, ob er mit der
App verbunden ist und ordnungsgemäß funktioniert�

63 DE
1
Ersetzen Sie die Messer
6.4 Teileaustausch
WARNUNG
• Schalten Sie Ihren ECOVACS GOAT vor den Eingriffen immer aus�
• Beim Austausch der Messer immer Schutzhandschuhe tragen�
• Verwenden Sie beim Zusammenbau der Messer nur die von ECOVACS hergestellten Messer und neue Schrauben�
• Wischen Sie die unwaschbaren Komponenten mit einem sauberen und trocken Tuch ab� Bitte verwenden Sie keine Reinigungssprays
oder andere Reinigungsmittel�
SCHRITTE ZUM AUSTAUSCH DER MESSER
Schritt 1: Schalten Sie den ECOVACS GOAT aus�
Schritt 2: Drehen Sie Ihren ECOVACS GOAT vorsichtig auf einer weichen Oberäche um�
Schritt 3: Lösen Sie die Schrauben mit einem Schraubendreher�
Schritt 4: Entfernen Sie die Schrauben und die Messer�
Schritt 5: Ziehen Sie die neuen Messer und Schrauben fest�
Schritt 6: Stellen Sie sicher, dass sich die Messer frei drehen können�

64DE
7. Technische Daten
Basisinformationen
Produktname Rasenmähroboter
Modell GPR11 GPR12
Marke ECOVACS
Abmessungen:
Länge (mm) × Breite (mm) × Höhe (mm)
680*460*310
Nettogewicht (kg) (Akku enthalten) 15,8
Mähparameter
Nennspannung 37�8V
Arbeitskapazität (㎡)
1600 3000
Schnittbreite (cm) 33
Schnitthöhe (cm) 3-9
Ladezeit (min�) 45±5
Lärmemissionen
Gemessener Schallleistungspegel L
WA 60 dB(A)
Schallleistung Unsicherheiten K
WA 3 dB(A)
Schalldruckpegel LpA 52 dB(A)
Schalldruck Unsicherheiten KpA 3 dB(A)

65 DE
Konnektivität
Frequenzbereich
Bluetooth® 2400 MHz ~ 2483,5 MHz
Wi-Fi 2400 MHz ~ 2483,5 MHz
Mobilfunknetz (gekauft)
WCDMA: BAND I: Uplink: 1920–1980 MHz, Downlink: 2110–2170 MHz
BAND VIII: Uplink: 880–915 MHz, Downlink: 925–960 MHz
LTE: E-UTRA
BAND 1: Uplink: 1920–1980MHz, Downlink: 2110–2170MHz E-UTRA
BAND 3: Uplink: 1710–1785 MHz, Downlink: 1805–1880 MHz E-UTRA
BAND 7: Uplink: 2500–2570MHz, Downlink: 2620–2690MHz E-UTRA
BAND 8: Uplink: 880–915 MHz, Downlink: 925–960 MHz E-UTRA
BAND 20: Uplink: 832–862MHz, Downlink: 791–821MHz E-UTRA
BAND 28: Uplink: 703–748 MHz, Downlink: 758–803 MHz E-UTRA
BAND 38: Uplink: 2570–2620MHz, Downlink: 2570–2620MHz E-UTRA
BAND 40: Uplink: 2300–2400 MHz, Downlink: 2300–2400 MHz
Verfügbare Frequenzbänder für LTE Band 28 in Europa sind 703-736 MHz
(TX), 758-791 MHz (RX)�
RTK(GNSS) GPS, Beidou, Galileo, GLONASS
RTK(LoRa) 863-870 MHz
MAX� HF-Leistung
Bluetooth® ≤20dBm
Wi-Fi ≤20dBm
Mobilfunknetz (gekauft)
WCDMA: +24 dBm +1,7/-3,7 dB
LTE: E-UTRA Band 28: 23dBm+2,7/-3,2 dB andere Bänder: 23 dBm± 2,7dB
Lora in RTK ≤14dbm(25mw)
Antriebsmotor
Nenndrehzahl (U/min)
34,6
Maximale Drehzahl (U/min)
60,5
Antriebsmotor Messer Drehzahl (U/min)
3000

66DE
Akku (Mäher)
Akkutyp Lithium-Ionen
Nennspannung 32�4 V 32�4 V
Nennkapazität 3000 mAh 5000 mAh
RTK-Referenzstation
Modell FM24A9
Einsatztemperatur -40~85°C / -40~185°F
Lagertemperatur -55~95°C / -67~203°F
Eingangsspannung 5 V
Eingangsstrom 1 A
Netzteil
Netzteil Modell
GM152-3780300-2DG
GM152-3780300-3DG
GM152-3780300-SDG
BLJ125W378300P-V
BLJ125W378300P-B
GM403-3780500-2DG
GM403-3780500-3DG
GM403-3780500-SDG
BLJ240W378500P-V
BLJ240W378500P-B
Eingangsspannung
100-240 V ~ 100-240 V ~
Ausgangsspannung 37�8V
37�8V
Ausgangsstrom 3A 5A
Station
Modell CH2491 CH2491A
Eingangsspannung 37�8V
37�8V
Eingangsstrom 3A 5A
Ausgangsspannung für ECOVACS GOAT
37�8V 37�8V
Ausgangsstrom für ECOVACS GOAT 3A 5A
Ausgangsspannung für RTK 5V
Ausgangsstrom für RTK 1A
Hinweis: Technische und gestalterische Spezifikationen können aufgrund kontinuierlicher Produktverbesserung geändert werden�
Weiteres Zubehör finden Sie unter https://www�ecovacs�com�

67 FR
Table des matières
1. Instructions d’origine .................................................................................................................................................... 68
2. Contenu de l'emballage et fonctions des composants .............................................................................................74
2�1 Contenu de la boîte �������������������������������������������������������������������������������������������������������������������������������������������������� 74
2�2 Pièces et fonctions ���������������������������������������������������������������������������������������������������������������������������������������������������75
3. Installation et cartographie ..........................................................................................................................................79
3�1 Installation ���������������������������������������������������������������������������������������������������������������������������������������������������������������79
3�2 Cartographie �������������������������������������������������������������������������������������������������������������������������������������������������������������83
4. Commencer à utiliser votre ECOVACS GOAT .............................................................................................................86
4�1 Fonctionnement de votre ECOVACS GOAT ������������������������������������������������������������������������������������������������������������ 86
4�2 Conseils avant la première tonte ����������������������������������������������������������������������������������������������������������������������������� 89
4�3 Prêt pour la tonte ������������������������������������������������������������������������������������������������������������������������������������������������������90
5. Dépannage ..................................................................................................................................................................... 92
6. Entretien ......................................................................................................................................................................... 92
6�1 Fréquence ���������������������������������������������������������������������������������������������������������������������������������������������������������������92
6�2 Entretien régulier ������������������������������������������������������������������������������������������������������������������������������������������������������ 93
6�3 Entretien saisonnier �������������������������������������������������������������������������������������������������������������������������������������������������� 94
6�4 Remplacement des pièces ���������������������������������������������������������������������������������������������������������������������������������������95
7. Données techniques .....................................................................................................................................................96

68FR
1. Instructions d’origine
IMPORTANT
VEUILLEZ LIRE CE MANUEL
ATTENTIVEMENT AVANT UTILISATION
ET CONSERVEZ-LE POUR
RÉFÉRENCE FUTURE
Lisez les instructions attentivement� Assurez-vous
de comprendre les instructions et de connaître les
commandes et l’utilisation correcte de l’appareil�
Vous devez comprendre qu’il est possible de réduire
les risques en respectant les instructions et les
avertissements fournis dans ce manuel, mais qu’il est
impossible de les éliminer en totalité�
Ce robot tondeuse (ci-après dénommé «ECOVACS
GOAT») dispose de nombreux capteurs de sécurité
intégrés, mais il existe cependant toujours des risques�
Tous les risques résiduels liés ont été décris ou
mentionnés dans ce manuel�
Description de l'utilisation prévue : Les tondeuses à
gazon sont principalement utilisées pour tondre la
pelouse, en particulier dans les parcs, les jardins privés
et les terrains de football�
Pour les machines utilisées dans des zones publiques, des
panneaux d’avertissement doivent être placés autour de la
zone de travail de la machine, et doivent indiquer le message
suivant: AVERTISSEMENT! Tondeuse automatique!
Veuillez rester à distance de la machine! Surveillez les
enfants!
NE modifiez PAS la tondeuse vous-même� Les
modifications pourraient interférer avec le fonctionnement
de la tondeuse, et pourraient entraîner des blessures
graves et/ou des dommages sérieux, ou annuler la
garantie limitée� Utilisez uniquement des pièces et
accessoires approuvés par Ecovacs�
AVERTISSEMENT
Ne laissez jamais d’enfants, de personnes aux capacités
physiques, sensorielles ou mentales réduites ou
manquant d’expérience ou de connaissances, ou de
personnes ne connaissant pas ces instructions utiliser
la machine� Les réglementations locales peuvent limiter
l’âge de l’opérateur�
Évitez d’utiliser la machine et ses accessoires
périphériques en cas de mauvaises conditions
météorologiques, en particulier en cas de risque d’orage�
Avant chaque session de tonte, vérifiez que toutes les
pièces de la tondeuse fonctionnent normalement�
Inspectez périodiquement la zone où la machine doit être
utilisée et retirez la totalité des pierres, branches, câbles,
os et autres corps étrangers�

69 FR
Ne laissez JAMAIS un enfant toucher l’unité
d’alimentation électrique, la station de charge, les lames,
le compartiment de la batterie ou toute pièce comportant
des espaces, telles que les roues�
AVERTISSEMENT
N’utilisez jamais la machine et/ou ses accessoires
périphériques si des surveillances ou boucliers sont
endommagés, sans dispositif de sécurité, ou si le cordon
est endommagé ou usé�
Restez à distance des lames en rotation! NE placez PAS
vos mains ou vos pieds sous ou à proximité des lames
en rotation�
Restez à distance de la tondeuse lorsqu’elle fonctionne�
NE vous approchez PAS trop près� Gardez l’équilibre
à tout moment et assurez vos appuis dans les pentes�
Marchez� Ne courez jamais lorsque vous utilisez la
machine ou ses accessoires périphériques�
AVERTISSEMENT
Ne laissez jamais d’enfants s’approcher de la machine ou
jouer avec elle pendant son fonctionnement�
AVERTISSEMENT
NE touchez PAS les pièces mobiles dangereuses avant
leur arrêt complet�
AVERTISSEMENT
Pour recharger la batterie, utilisez uniquement l’unité
d’alimentation amovible fournie avec cet appareil
(CH2491/CH2491A)�
Utilisation sûre:
Ne connectez pas un cordon endommagé à l’alimentation,
et ne touchez pas un cordon endommagé avant de l’avoir
débranché, car il existe un risque de contact avec des
parties sous tension� Tenez les rallonges à distance des
pièces mobiles dangereuses afin d’éviter d’endommager
les cordons, ce qui peut entraîner un contact avec des
parties sous tension� Connectez la machine et/ou ses
accessoires périphériques uniquement à un circuit
d’alimentation protégé par un dispositif à courant résiduel
(DCR) avec un courant de déclenchement de 30mA
maximum�
Si le cordon d’alimentation ou la rallonge devait être
endommagé(e) ou emmêlé(e) pendant l’utilisation,
débranchez l’alimentation électrique de la prise, puis
démêlez le câble� Pendant le fonctionnement, tirez sur le
corps de la fiche plutôt que sur le câble pour éviter tout
risque� Contactez le service client afin que le câble soit
remplacé ou réparé par un professionnel compétent�
Utilisez une rallonge fabriquée par ECOVACS� En cas de
problème, contactez le service client�
Si le CORDON D’ALIMENTATION est endommagé, il doit

70FR
être remplacé par le fabricant, son agent de service ou
une personne qualifiée, afin d’éviter tout risque�
Si la tondeuse fait un bruit anormal ou si l’alarme retentit,
appuyez immédiatement sur le bouton STOP (Arrêt)�
En cas de fuite d’électrolyte, rincez avec de l’eau
ou un agent neutralisant, et contactez un médecin
immédiatement en cas de contact avec les yeux, etc�
En cas de vibrations anormales, redémarrez la tondeuse�
Si le problème persiste, contactez le service client�
Instructions imposant le port systématique de
chaussures solides et de pantalons couvrant les
jambes lors de l’utilisation de la machine avec un
contrôleur manuel.
En outre, lors de l’utilisation du contrôleur manuel
a) Tondez uniquement à la lumière du jour ou sous un
bon éclairage artificiel�
b) Évitez d’utiliser la machine dans l’herbe mouillée�
c) N’utilisez pas la machine pieds nus ou avec des
sandales ouvertes� Portez toujours des chaussures
solides et un pantalon couvrant les jambes�
d) Vérifiez toujours votre stabilité lorsque vous travaillez
sur une pente�
e) Soyez extrêmement prudent(e) lorsque vous reculez la
machine vers vous�
f) Allumez toujours le moteur conformément aux
instructions, et vérifiez que vos pieds sont éloignés des
lames�
Mise à jour de l'appareil
En général, certains appareils sont mis à jour deux fois
par mois, mais ce n'est pas toujours le cas�
Certains appareils, en particulier ceux
commercialisés il y a plus de trois ans, ne seront mis à
jour que si une faille critique est détectée et corrigée�
71 FR
Déclaration de conformité de l’Union
européenne
Informations sur la mise au rebut pour les utilisateurs
d’équipements électriques et électroniques
Ce symbole figurant sur le produit ou son emballage
indique que les produits électriques et électroniques
usagés ne doivent pas être mélangés avec les déchets
municipaux non triés� Pour assurer leur traitement
adéquat, il vous incombe de mettre au rebut vos
équipements usagés en les ramenant à des points de
collecte désignés�
La mise au rebut correcte de ce produit permettra
d’économiser des ressources précieuses et d’éviter
tout effet négatif potentiel pour la santé humaine
et l’environnement, qui pourrait survenir en cas de
traitement inadapté des déchets�
Pour rapporter votre appareil usagé, veuillez utiliser
les systèmes de retour et de collecte ou contacter
gratuitement le détaillant auprès duquel le produit a été
acheté� Vous pouvez également contacter les autorités
locales pour de plus amples informations sur le point de
collecte le plus proche de chez vous�
La mise au rebut incorrecte de ces déchets pourra
entraîner des sanctions, conformément à votre
réglementation nationale�
Informations sur la mise au rebut des batteries
usagées pour les utilisateurs
Ce symbole indique que les batteries et accumulateurs
en fin de vie ne doivent pas être mélangés aux déchets
municipaux non triés� Vous jouez un rôle important
dans l’effort visant à minimiser l’impact des batteries et
accumulateurs sur l’environnement et la santé humaine�
Pour un recyclage adapté, vous pouvez retourner ce
produit ou les batteries et accumulateurs qu’il contient
à votre fournisseur ou à un point de collecte désigné,
gratuitement�
La mise au rebut correcte de ce produit permettra
d’économiser des ressources précieuses et d’éviter
tout effet négatif potentiel pour la santé humaine
et l’environnement, qui pourrait survenir en cas de
traitement inadapté des déchets�
La mise au rebut incorrecte de ces déchets pourra
entraîner des sanctions, conformément à votre
réglementation nationale�
72FR
Il existe des systèmes de collecte distincts pour les
batteries et accumulateurs usagés�
Veuillez mettre au rebut les batteries et accumulateurs
correctement dans votre centre de recyclage ou
déchetterie locaux�
Directive relative à la limitation de l’utilisation de
certaines substances dangereuses (RoHS)
Ecovacs Home Service Robotics Co�, Ltd� déclare par la
présente que l’ensemble du produit, y compris ses pièces
(câbles, cordons, etc�) est conforme à la directive RoHS
2011/65/UE et à l’amendement de la Directive déléguée
de la Commission (UE) 2015/863 relative à la limitation de
l’utilisation de certaines substances dangereuses dans
les équipements électriques et électroniques («RoHS
refondue» ou «RoHS 2�0»)�
Directive relative aux équipements radio
Ecovacs Home Service Robotics Co�, Ltd� déclare par la
présente que les produits répertoriés dans cette section
sont conformes aux exigences essentielles et autres
dispositions pertinentes de la Directive 2014/53/UE
relative aux équipements radio�
Directive relative aux machines
Ecovacs Home Service Robotics Co�, Ltd� déclare par la
présente que les produits répertoriés dans cette section
sont conformes aux exigences essentielles et autres
dispositions pertinentes de la Directive 2006/42/CE
relative aux machines�
Représentant autorisé en Europe:
Ecovacs Home Service Robotics Co�, Ltd� déclare par
la présente que ce produit est conforme aux exigences
essentielles et autres dispositions pertinentes de la
Directive RoHS 2011/65/UE et à l’amendement de la
Directive déléguée de la Commission (UE) 2015/863, la
Directive 2014/53/UE relative aux équipements radio et à
la Directive 2006/42/CE relative aux machines�
La déclaration de conformité est disponible à l’adresse
suivante: https://www�ecovacs�com/global/compliance�
ECOVACS Europe GmbH
Holzstrasse 2 I D-40221 Düsseldorf I Allemagne
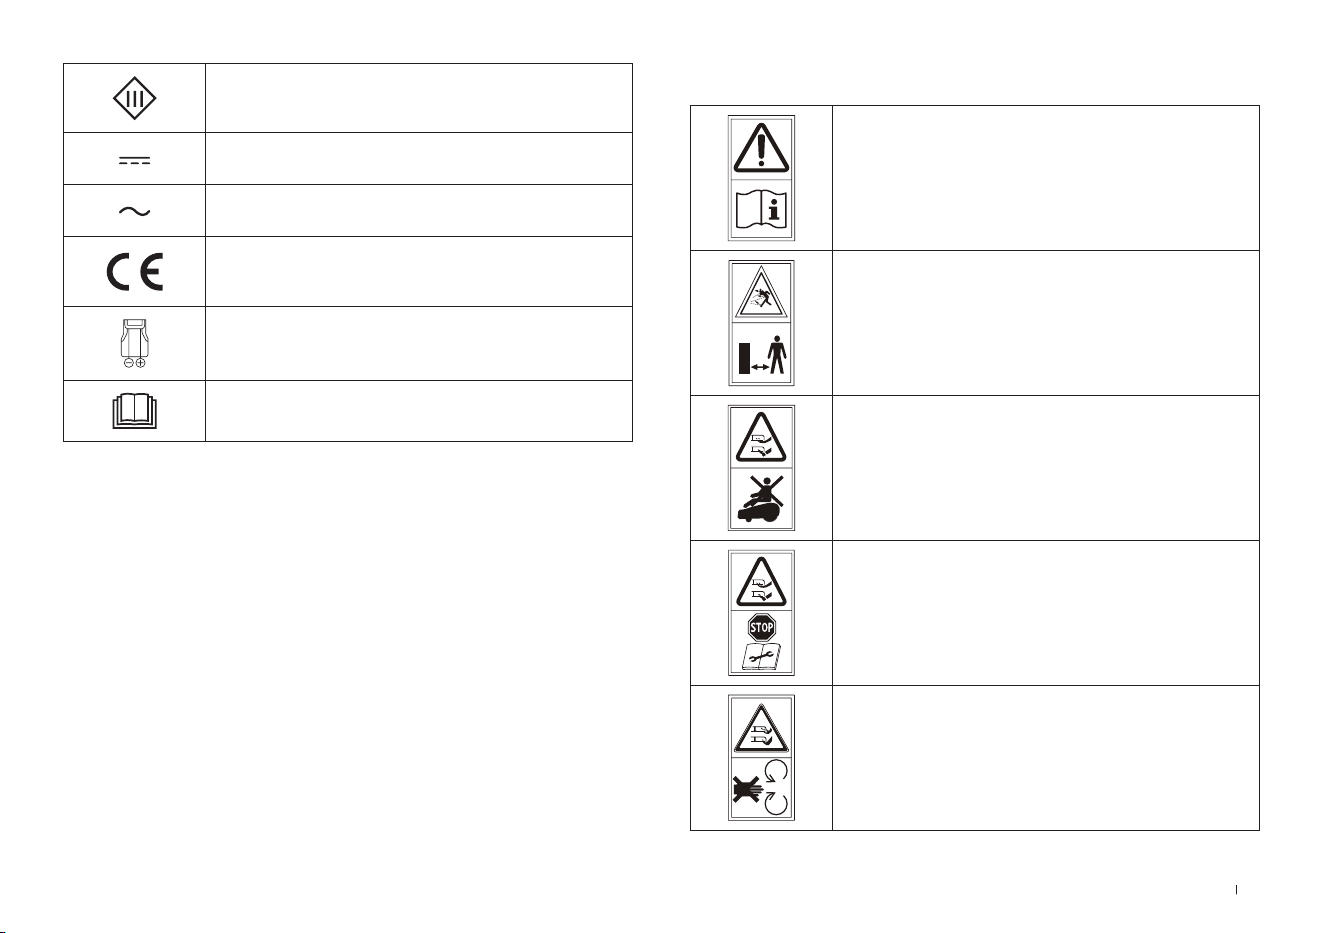
73 FR
SYMBOLES
AVERTISSEMENT—
Lire le manuel d’utilisation avant de faire
fonctionner la machine�
AVERTISSEMENT—
Rester à distance de la machine
lorsqu’elle fonctionne�
AVERTISSEMENT—
Ne pas monter sur la machine�
AVERTISSEMENT—
Actionner le dispositif de désactivation
avant de travailler sur la machine ou de
la soulever�
MISE EN GARDE—
Ne pas toucher la lame en rotation�
Classe III
Courant continu
Courant alternatif
Ce produit est conforme aux Directives
CE en vigueur�
Polarité du port de charge
Lue ohjeet ennen lataamista�
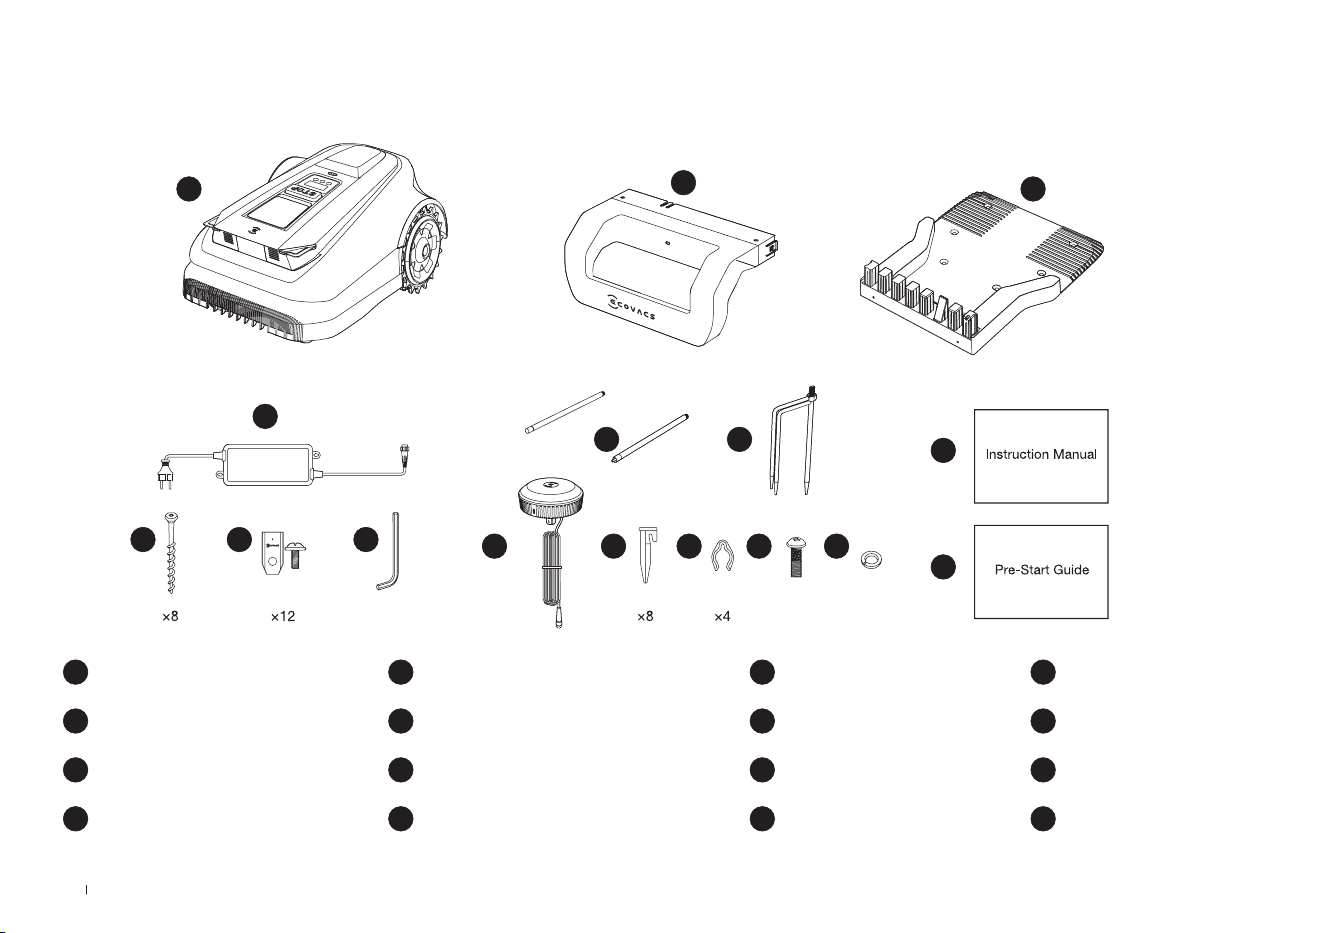
74FR
2. Contenu de l'emballage et fonctions des composants
1 ECOVACS GOAT
5 Clé Allen
9 Piquet trépied
13 Vis (pour station de référence RTK)
2 Montant de Station
6 Kit de lame de rechange
10 Station de référence RTK
14 Rondelle élastique (pour Piquet trépied)
3 Base de Station
7 Vis (pour Base)
11 Piquet de jardin en plastique
15 Manuel d’utilisation
4 Alimentation électrique
8 Poteau de montage
12 Cordon de serrage
16 Guide de prédémarrage
2.1 Contenu de la boîte
8
6 5
4
1
2
3
7
9
10
15
16
11 12 13 14
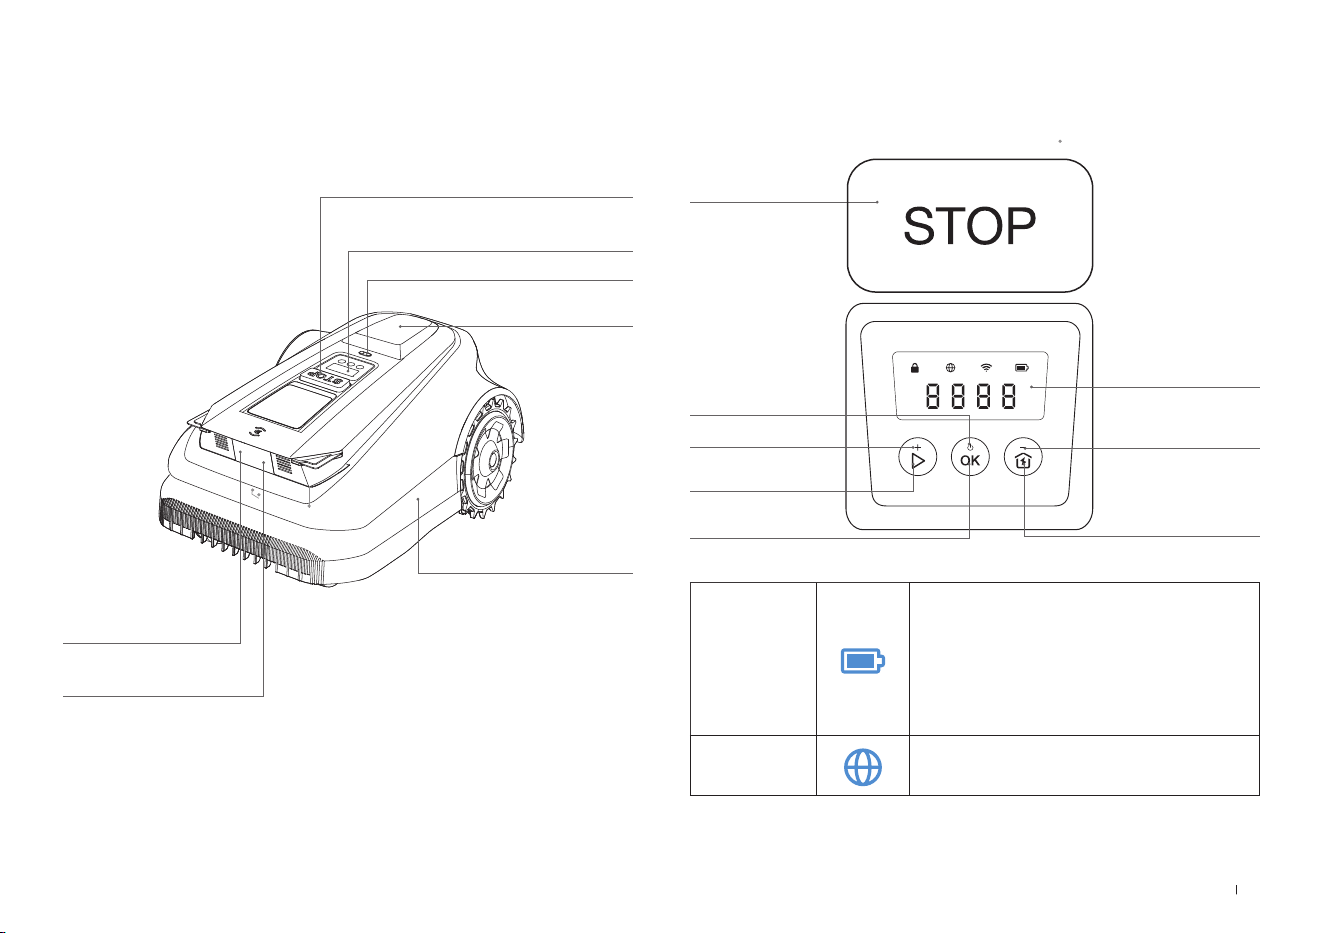
75 FR
ECOVACS GOAT (vue de dessus)
Bouton STOP (Arrêt)
Panneau de commande
Capteur de pluie
Station de
référence RTK
Pare-chocs
3D-ToF LiDAR
Caméra IA avant
2.2 Pièces et fonctions
Panneau de commande: les boutons du panneau de commande
peuvent être utilisés pour les opérations de base de la tondeuse� Les
chiffres digitaux sur l'écran du tableau de bord indiquent la progression
de la tonte, le niveau de la batterie et l'état de la tondeuse�
Icône:
Batterie
Niveau de batterie
Blanc --- Plus de 15 % de charge�
Rouge --- Moins de 15 % de charge
Le clignotement indique la charge ;
Fixe indique qu'il est en cours d'utilisation
ou
complètement chargé�
Connexion 4G
S'allume lorsqu'un module de connexion
supplémentaire est installé avec une carte SIM�
ÉCRAN
DÉMARRAGE
ACCUEIL
SOUSTRAIRE
MARCHE/ARRÊT
AJOUTER
OK
Thu 12:30
OK
to mow
STOP (Arrêt)
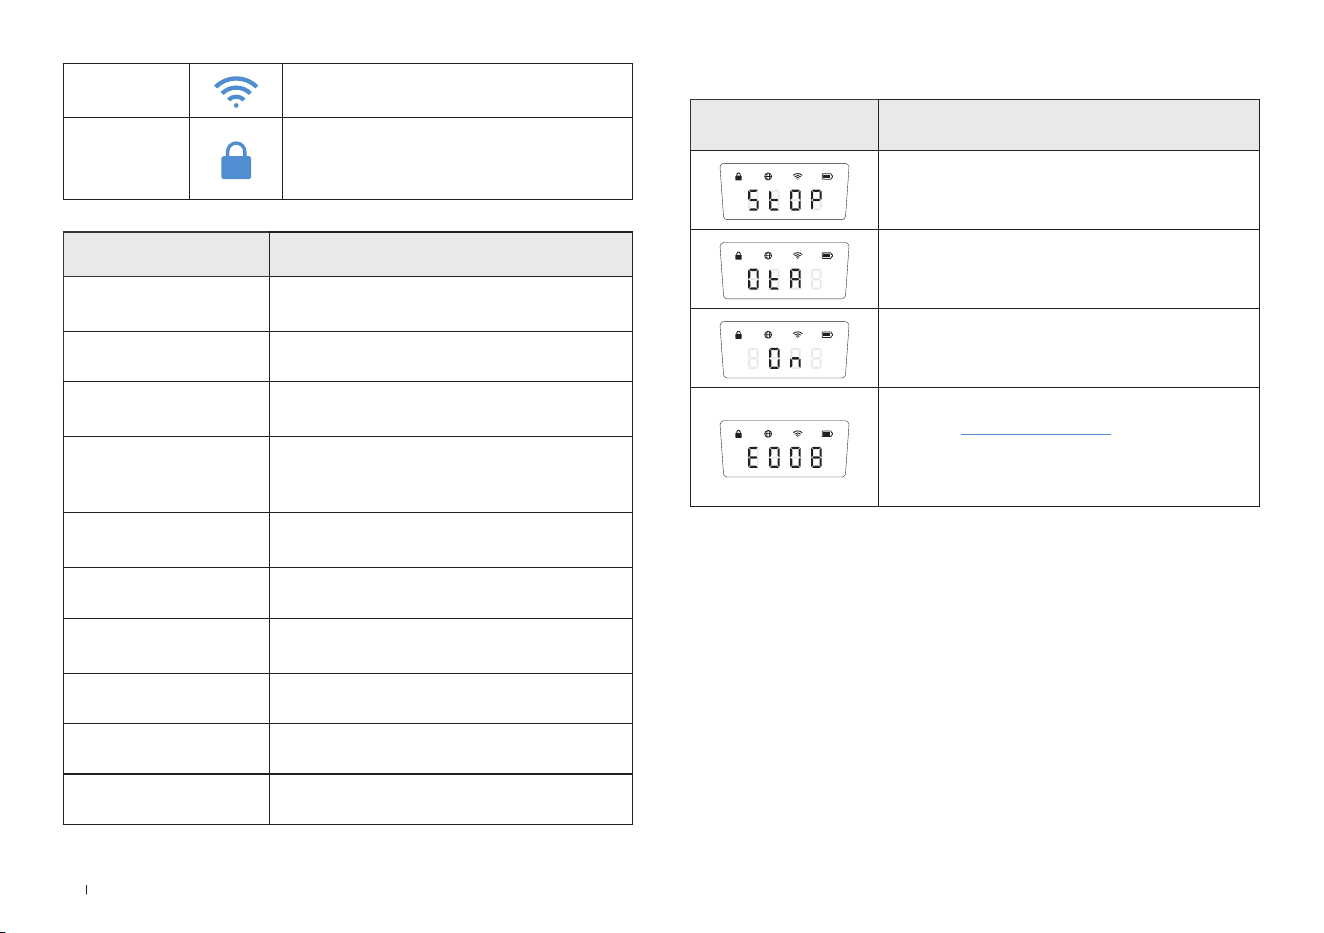
76FR
Bouton
Boutons de fonction Description
DÉMARRAGE
Appuyez 5 fois pour afcher le niveau de
la batterie
DÉMARRAGE-->OK Commencez à tondre/Continuer la tâche
OK
Appuyez et maintenez enfoncé pendant 3 s
pour mettre en marche/arrêter�
ACCUEIL
Appuyez et maintenez enfoncé pendant
3 s pour activer le mode de connexion au
réseau�
ACCUEIL-->OK
Renvoyez la tondeuse à la station de
charge
STOP (Arrêt) Arrêtez le fonctionnement de la tondeuse
DÉMARRAGE+
ACCUEIL
Appuyez et maintenez enfoncé pendant 5 s
pour réinitialiser
AJOUTER+ Augmente le nombre
SOUSTRAIRE— Diminue le nombre
OK Chiffre suivant/Conrmer
Écran Description
La tondeuse s'est arrêtée
Mises à jour OTA en cours
Tonte
Code d’erreur� Pour plus de détails, rendez-
vous sur www�ecovacs�com
Si le problème n'est pas résolu, l'appareil
reviendra automatiquement à la station après
30 minutes�
Écran:
Wi-Fi
S’allume lorsque votre ECOVACS GOAT est
bien connecté à l’APPLICATION via Wi-Fi�
Verrouillage
Tondeuse verrouillée� Veuillez saisir le code
PIN pour déverrouiller, sinon la tondeuse ne
pourra pas fonctionner�
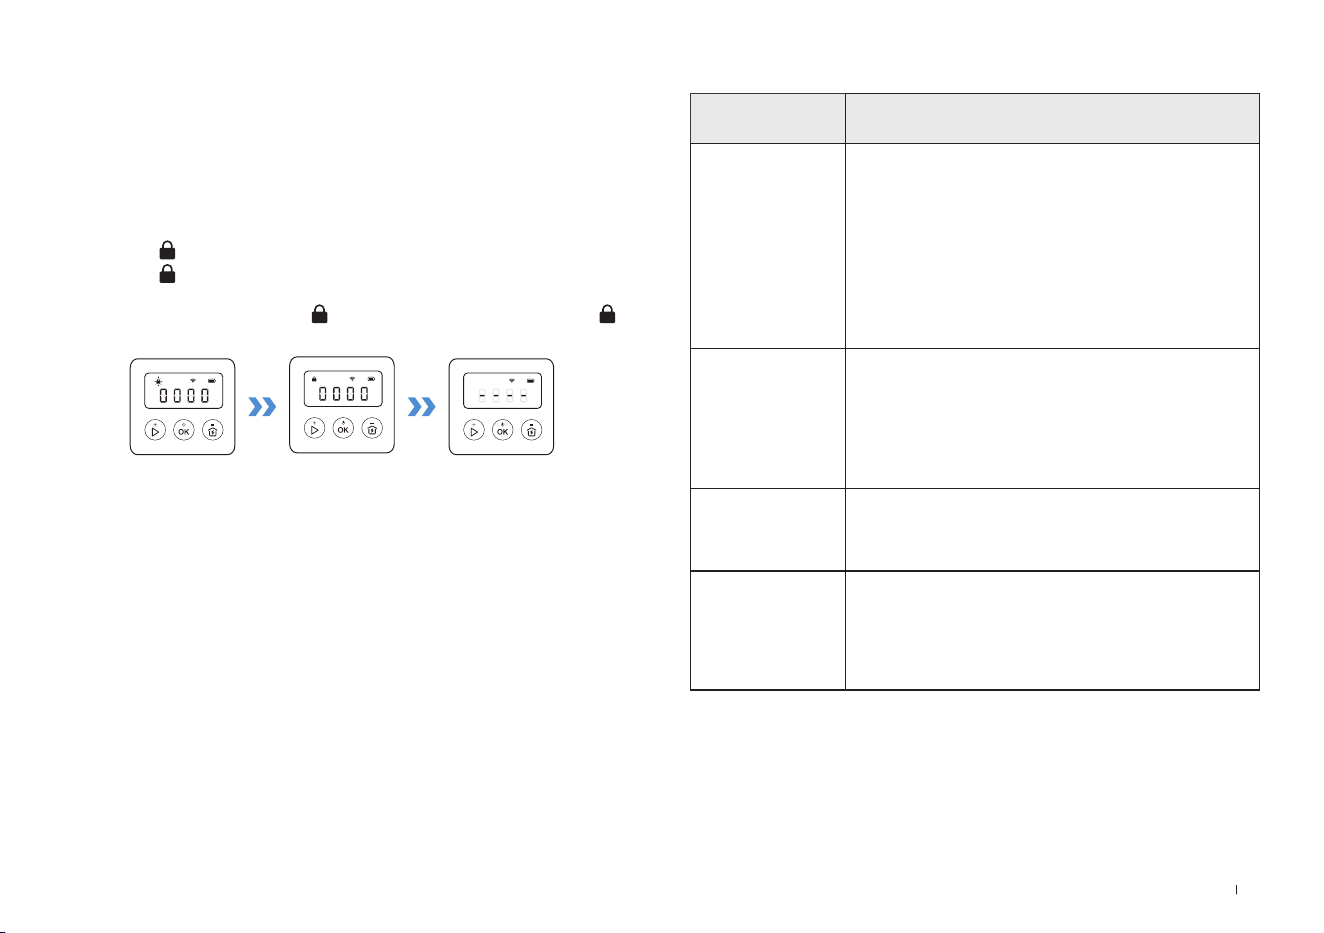
77 FR
CAPTEURS
Nom Description
3D-ToF LiDAR
Perçoit les informations relatives aux obstacles
situés devant le robot et l’aide à les éviter
activement�
Portée : détecte les coordonnées de longitude et
de latitude de la position du robot�
Horizontal : 90 degrés ; Vertical : 70 degrés (ce
que vous voyez est ce que vous obtenez)
La distance maximale est comprise entre 3 et 4
mètres�
Caméra IA avant
Perçoit les informations de l’environnement
devant le robot, identie des cibles spéciales et
aide le robot à interagir intelligemment avec les
utilisateurs�
Horizontal : 150 degrés ; Vertical : 80 degrés (ce
que vous voyez est ce que vous obtenez).
Capteur de pluie
Détecte s’il pleut dans l’environnement actuel et
aide le robot à décider s’il doit ou non continuer
à tondre�
Station de
référence RTK
Aide le robot en mouvement à obtenir la distance
relative qui le sépare de la balise de localisation,
et l’assiste dans la création d’une carte�
Portée : la portée effective du signal est d’un
rayon de 140 mètres autour de la balise�
Définir le code PIN:
Lorsque le GOAT est hors carte ou doit être mis en marche ou
réinitialisé, il est automatiquement verrouillé� Vous pouvez le
déverrouiller en saisissant le code PIN correct�
Définissez le code PIN lorsque l’écran apparaît comme ci-dessous�
Appuyez sur [+] ou [-] pour sélectionner les numéros de code PIN
un par un� Une fois le premier chiffre choisi, appuyez sur [OK] pour
confirmer et le curseur se déplace vers le chiffre suivant�
1� Si l'icône clignote, veuillez définir le code PIN�
2� Si l'icône est allumée en continu, entrez le code PIN
précédemment défini�
3� Une fois déverrouillé, l'icône disparaît� En cas d'échec, l'icône
clignotera à nouveau, indiquant de réinitialiser le code PIN�
Remarque:
•
0000 est un code PIN non valide�
•
Le code PIN doit être saisi deux fois pour que le réglage soit conrmé�
•
Si vous entrez des chiffres erronés lors de la dénition du code PIN, le proces-
sus de réglage recommence depuis le début�
•
Vous pouvez modier le code PIN sur l’application�

78FR
Vue de la station
Station de référence RTK
Voyant lumineux RTK
Bleu fixe: en charge et signal fort
Bleu clignotant: signal faible� Veuillez choisir un nouvel emplacement
pour l’installation�
Voyant lumineux RTK
Voyant lumineux Station
ECOVACS GOAT (vue de dessous)
ECOVACS GOAT (vue arrière)
Disque à lame
Lames
Roues avant
Roues tout terrain
Compartiment de la
batterie
Poignée
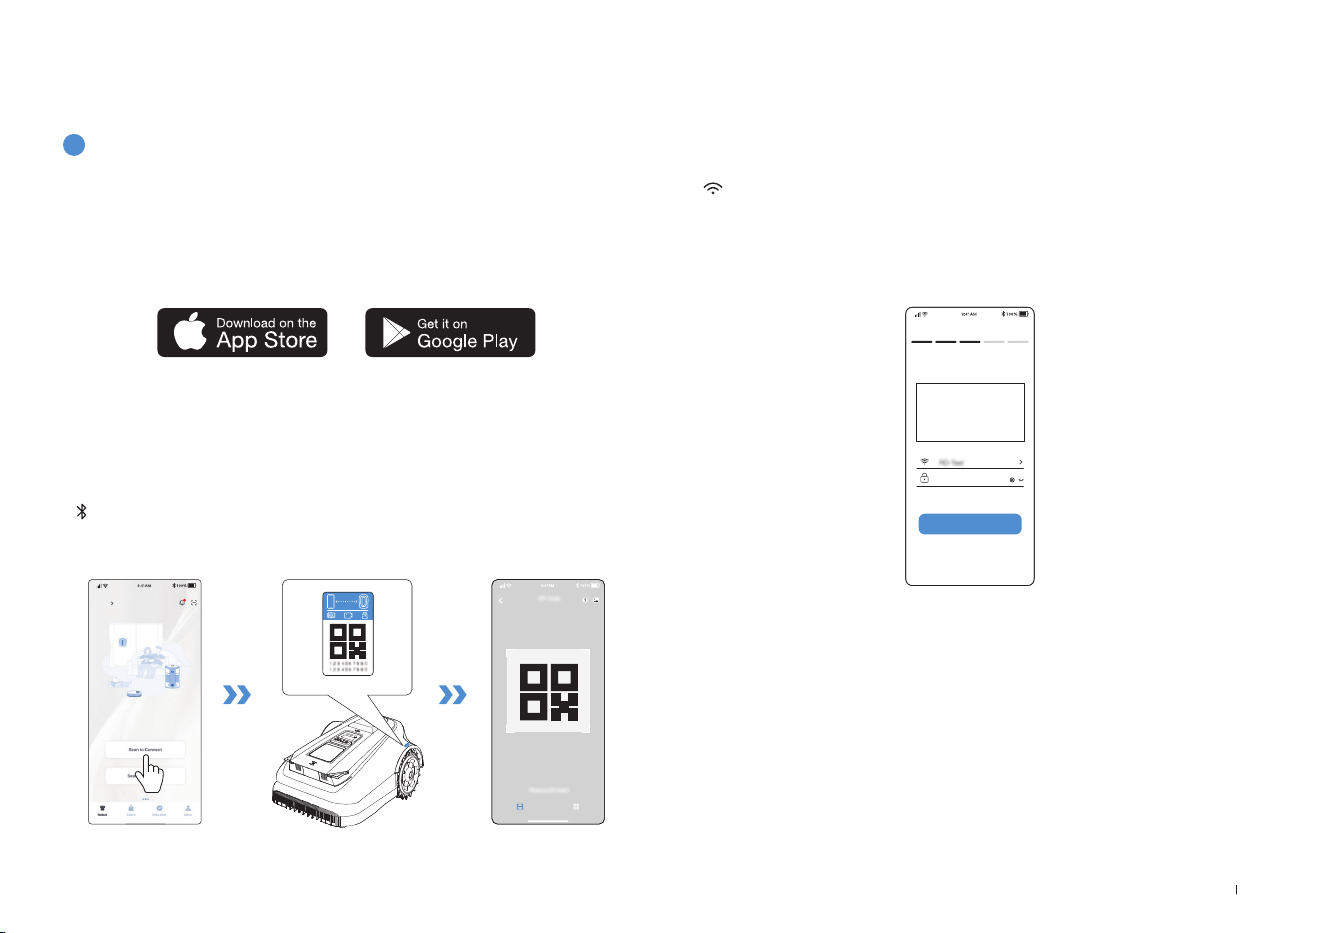
79 FR
3. Installation & cartographie
3.1 Installation
1
Préparation de l’APPLICATION
Téléchargez l’application ECOVACS HOME
Avant de commencer, assurez-vous que:
Connectez ECOVACS GOAT à Internet
• Votre téléphone portable est connecté à un réseau Wi-Fi�
• Le signal sans fil à bande 2,4GHz est activé sur votre routeur�
1. Connexion Bluetooth
• Scannez le code QR sur ECOVACS GOAT ou sélectionnez ECOVACS
GOAT manuellement via l’application�
• Activez le Bluetooth sur votre téléphone pour connecter votre
ECOVACS GOAT�
•
s’allume à l’écran une fois la connexion établie�
Remarque: Après avoir installé l’application ECOVACS HOME, effectuez l’enre-
gistrement, et connectez-vous�
Remarque: Assurez-vous que votre téléphone dispose d’une fonction Bluetooth et
que votre ECOVACS GOAT se trouve suffisamment près pour se connecter (10m)�
HOME
Add
Pour le moment, l’association n’est possible qu’à un seul compte de
l’application� Vous devez donc annuler l’association de votre ECOVACS
GOAT avant de pouvoir l’associer à un autre compte de l’application�
Vous pouvez annuler l’association de votre ECOVACS GOAT depuis
l’application� Ne vous inquiétez pas, cette opération n’effacera pas
les données de travail telles que les planifications de votre ECOVACS
GOAT� Vous pouvez également annuler le compte en cliquant sur le petit
triangle situé à côté du nom de l’appareil pour supprimer la machine�
Comment annuler l’association de votre ECOVACS
GOAT?
2. Connexion Wi-Fi
• Assurez-vous que votre ECOVACS GOAT et votre téléphone se
trouvent dans l’environnement du même routeur�
• Suivez les instructions fournies dans l’application pour effectuer la
connexion�
•
s’allume à l’écran une fois la connexion établie�
Wi-Fi
****************
Next step
• Vous pouvez également acheter le module de connexion supplémen-
taire an que votre ECOVACS GOAT soit connecté même en l’absence
de Wi-Fi�
Remarque: Utilisez un réseau 2,4GHz�
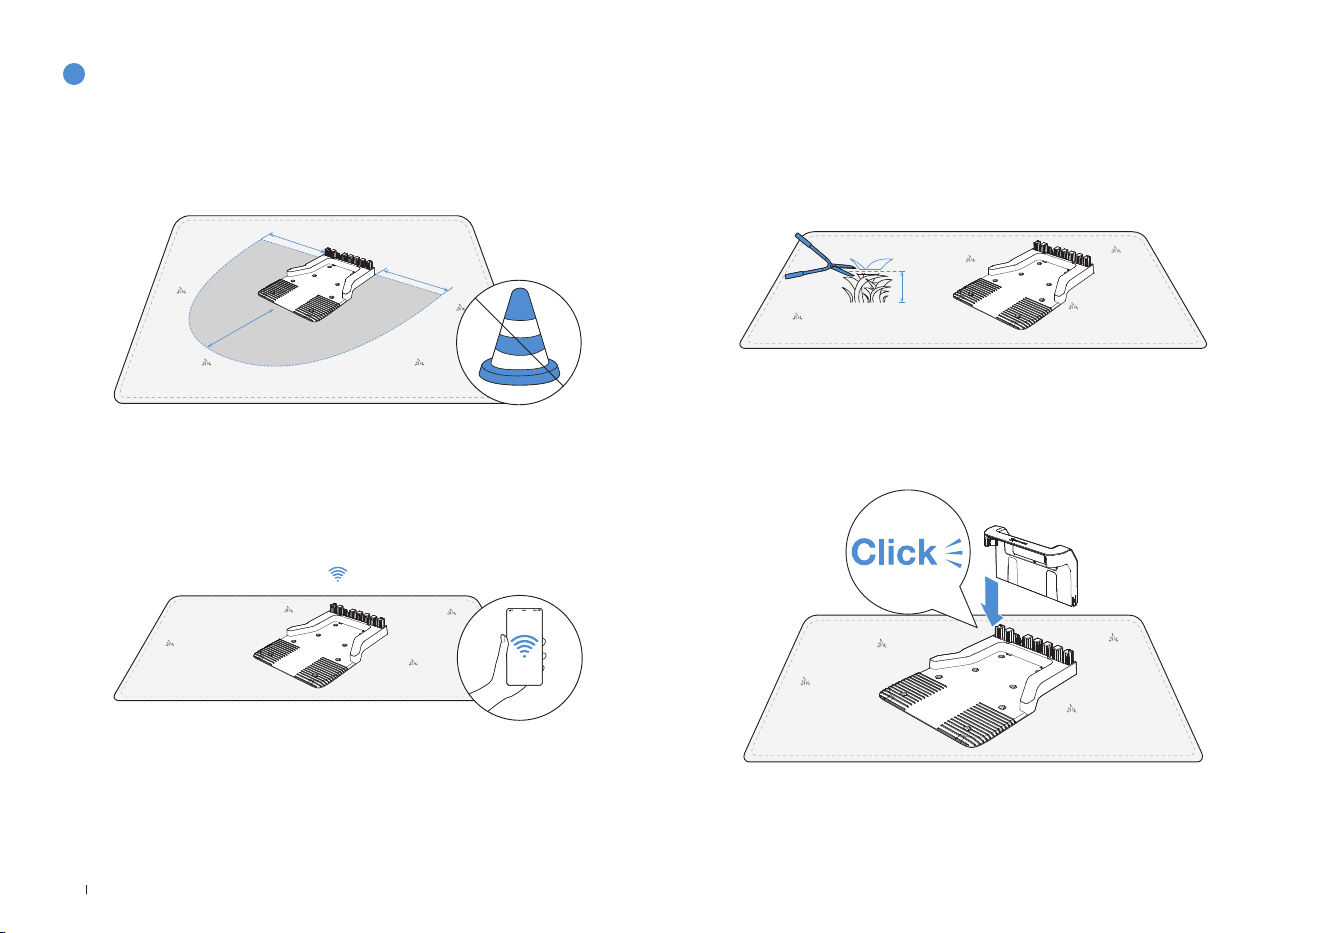
80FR
2
Assemblage de la station
1� Placez la station sur une pelouse ouverte et plane, sans pentes ni
cailloux� Assurez-vous qu’il n’y a pas d’obstacle (p� ex� des arbres, des
ballons ou des maisons) dans un rayon de 2mètres à gauche, à droite
et devant la station�
2� Si vous souhaitez contrôler votre ECOVACS GOAT à distance, placez
la station le plus près possible d’un lieu avec un signal Wi-Fi fort�
3� Assurez-vous que l’herbe autour de la station ne dépasse pas 10cm
de hauteur� Une herbe trop haute risquerait d’affecter la recharge�
2m
2m
2m
10cm
4� Insérez le montant dans la base jusqu’à entendre un «clic»�
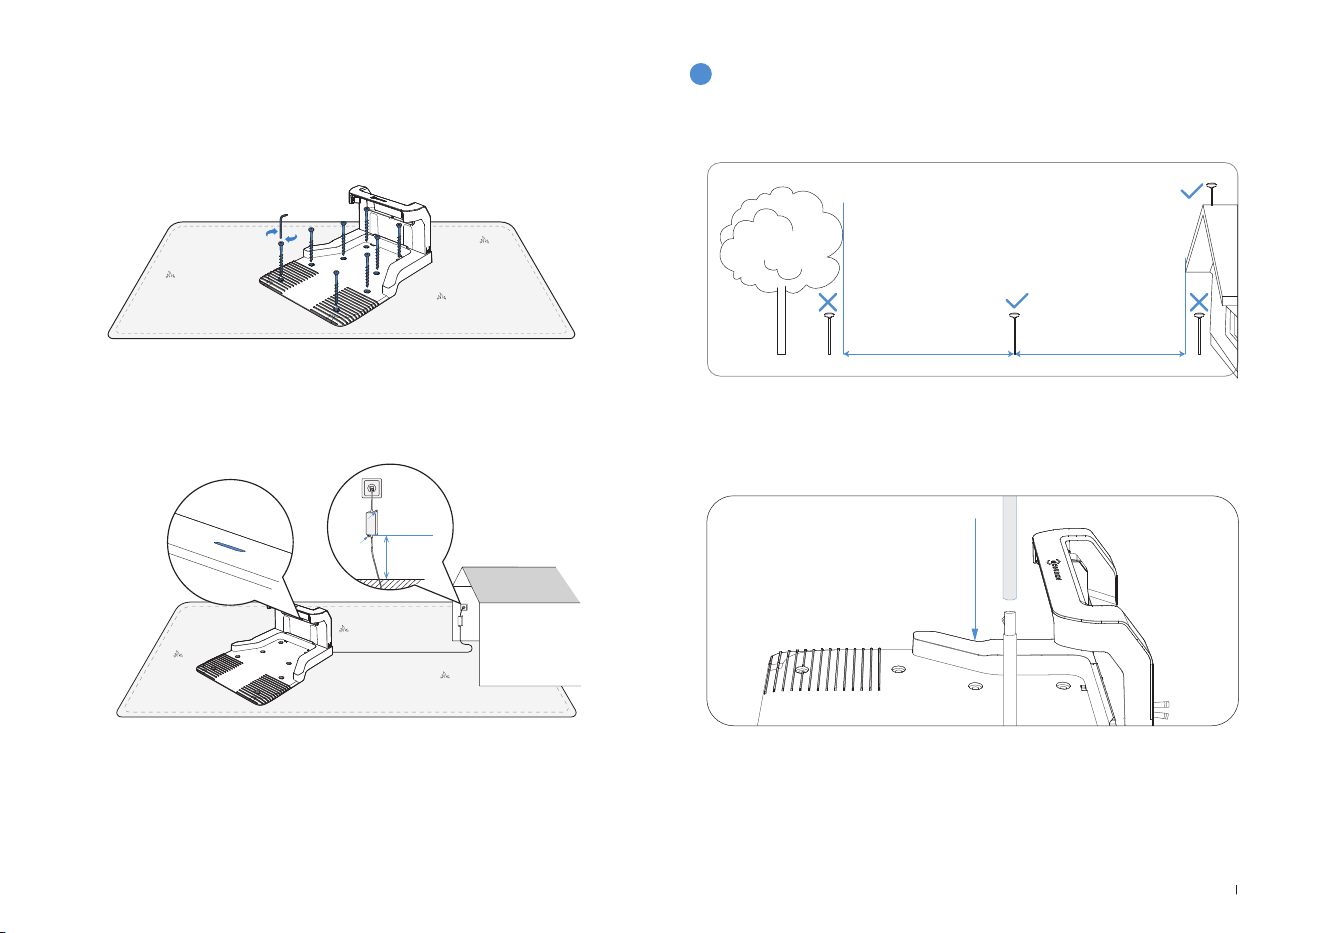
81 FR
5� Fixez la station au sol dans la zone choisie à l’aide des piquets, en
utilisant la clé Allen fournie�
6� Connectez la fiche de la station à la prise de l’alimentation électrique
et assurez-vous que le voyant bleu s’allume�
Remarque: Assurez-vous que l’adaptateur électrique est positionné 30cm au-
dessus du sol afin d’éviter tout dommage lié à l’eau ou l’humidité�
Veuillez brancher l’appareil sur une prise électrique située à l’intérieur ou sur une
prise extérieure étanche�
3
Assemblage de la station de référence RTK
Pour installer la station de base RTK, choisissez une zone ouverte
située à une distance d’au moins 2 mètres de tout bâtiment et arbre�
1� Connectez les poteaux de montage inférieur et supérieur, en vous
assurant que la fixation s’enclenche avec un clic�
30cm
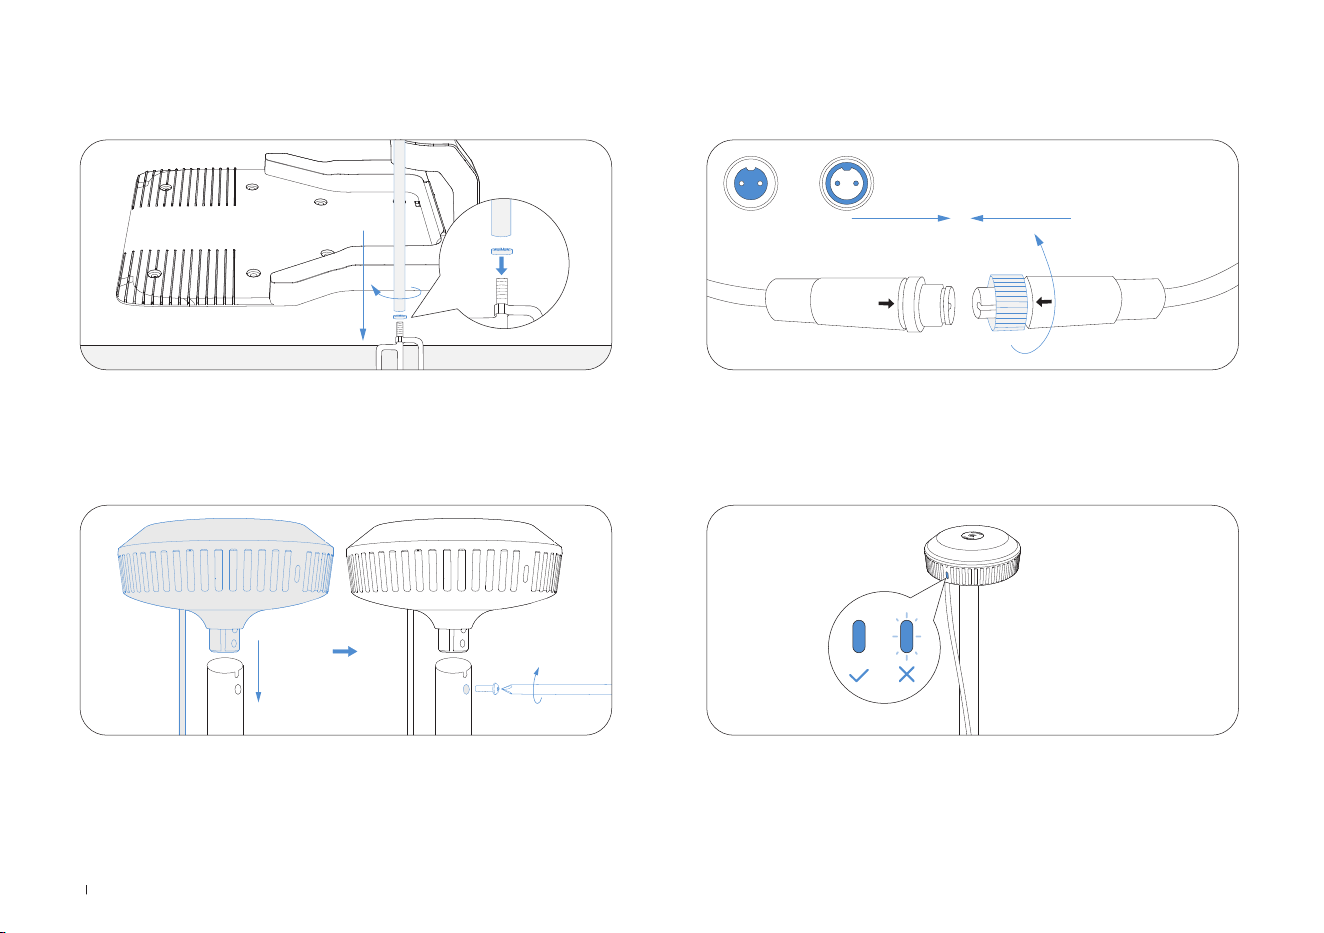
82FR
2� Insérez le piquet triangulaire dans le poteau de montage et fixez-le
solidement�
3� Fixez la tête de la balise en insérant sa partie surélevée dans le
poteau de montage et en serrant les vis avec un outil�
4� Connectez le câble d’alimentation RTK avec le câble d’alimentation
de la station de base et serrez l’écrou�
5� Après la mise sous tension, si le voyant de la station de base
RTK reste fixe, l’emplacement est correct; s’il clignote, modifiez
l’emplacement de la station�
A B

83 FR
6� Gestion du câble: attachez le câble d’alimentation RTK au poteau
de montage avec des cordons de serrage et utilisez des piquets de
jardin en plastique pour fixer les autres câbles au sol�
4
Chargement de la tondeuse
Rechargez entièrement la tondeuse avant la première utilisation� Placez-
la sur la station de charge et assurez-vous que le voyant lumineux blanc
est fixe ou qu’il clignote, indiquant que le chargement est en cours�
2
Cartographie
1
Avant de cartographier, vérifiez ce qui suit:
1. Choisir le mode de cartographie approprié pour votre jardin.
Lorsque les pelouses présentent des marches de plus de 4 cm ou des
passages étroits de moins d’un
mètre, il est recommandé de sélectionner la cartographie manuelle�
Sinon, utilisez la cartographie automatique par défaut�
• Assurez-vous que le ECOVACS GOAT est sous tension�
• Si le ECOVACS GOAT est arrêté, appuyez sur le bouton DÉMARRAGE
--> OK du ECOVACS GOAT�
• Si le ECOVACS GOAT est verrouillé, veuillez saisir le code PIN�
3.2 Cartographie

84FR
4. Commencer la cartographie
Si la station est sur la pelouse, appuyez simplement sur Commencer la
cartographie pour démarrer la cartographie�
Si la station de base n’est pas sur la pelouse, contrôlez le ECOVACS
GOAT pour l’emmener sur une limite de la pelouse, puis commencez la
cartographie�
Remarque: Afin d’assurer la réussite du chargement, il est
recommandé de garder la station de base à moins de 3mètres de la
pelouse, et à une distance maximale de 10 mètres�
2. Connecter la tondeuse
Votre téléphone se connectera automatiquement à votre tondeuse
grâce à la connexion Bluetooth�
3. Trouver un point de départ
Trouvez un point de départ approprié le long d’un côté de votre
pelouse� Restez à moins de 6m de la tondeuse lors du processus de
cartographie�
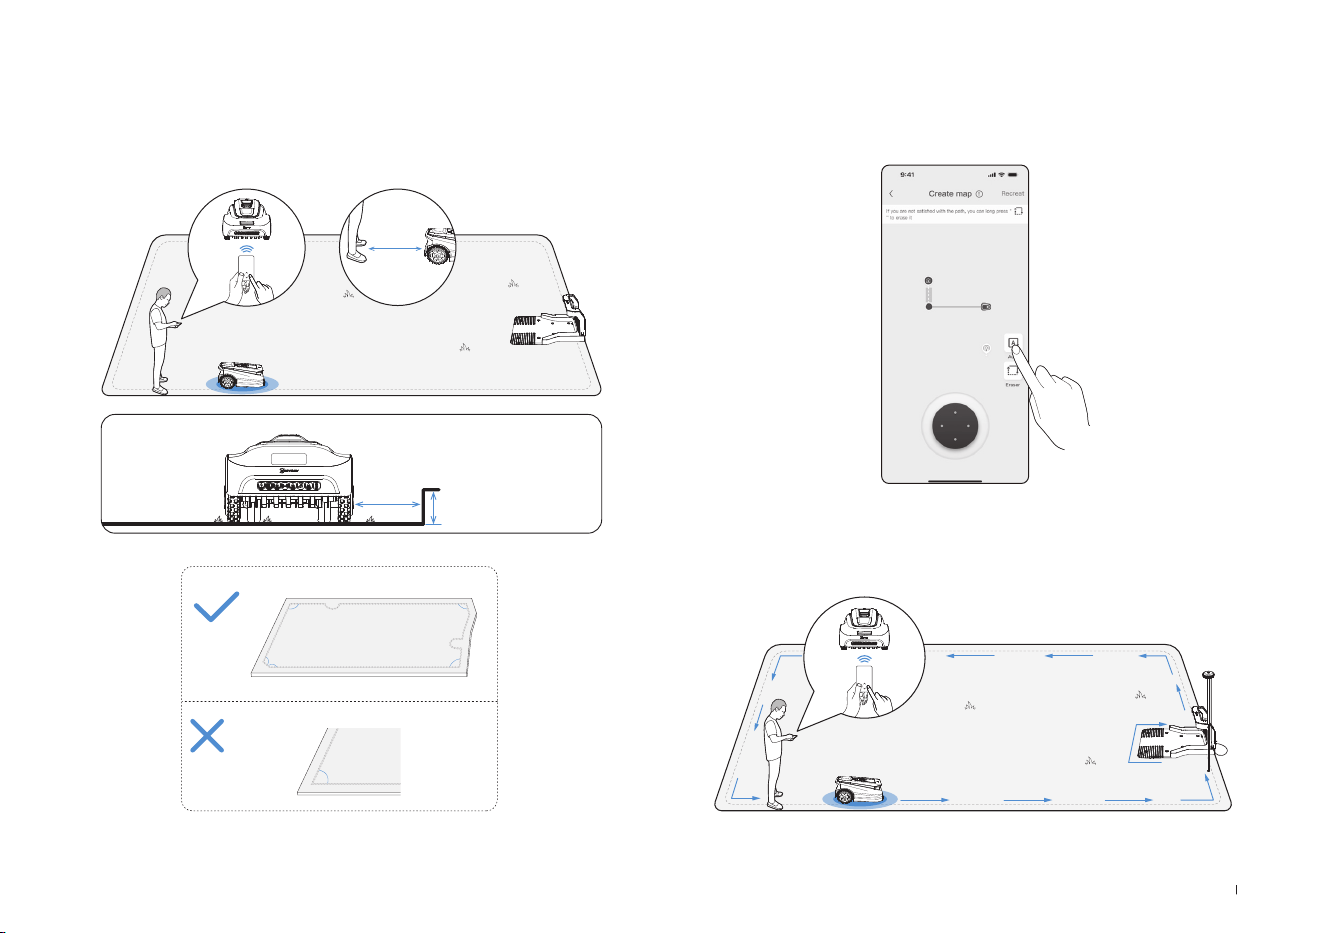
85 FR
Laissez le ECOVACS GOAT démarrer de la station et suivez-le à moins
de 6m de distance� Si la différence de hauteur est supérieure à 4cm,
gardez votre ECOVACS GOAT à au moins 10cm du bord de la pelouse�
Veillez à suivre une ligne droite avec des angles de braquage fluides
supérieurs à 90°�
5. Modifier le mode de cartographie
Au cours du processus de cartographie, vous pouvez passer du mode
de cartographie manuelle à celui de cartographie automatique en
utilisant l’interface de l’application�
<90°
>90°
>90°
>90°
>90°
>90°
≤
6m
>
>
10cm
4cm
6. Terminer la cartographie
Une fois le périmètre de la pelouse délimité, fermez la boucle en
revenant au point de départ afin de terminer la définition des limites�
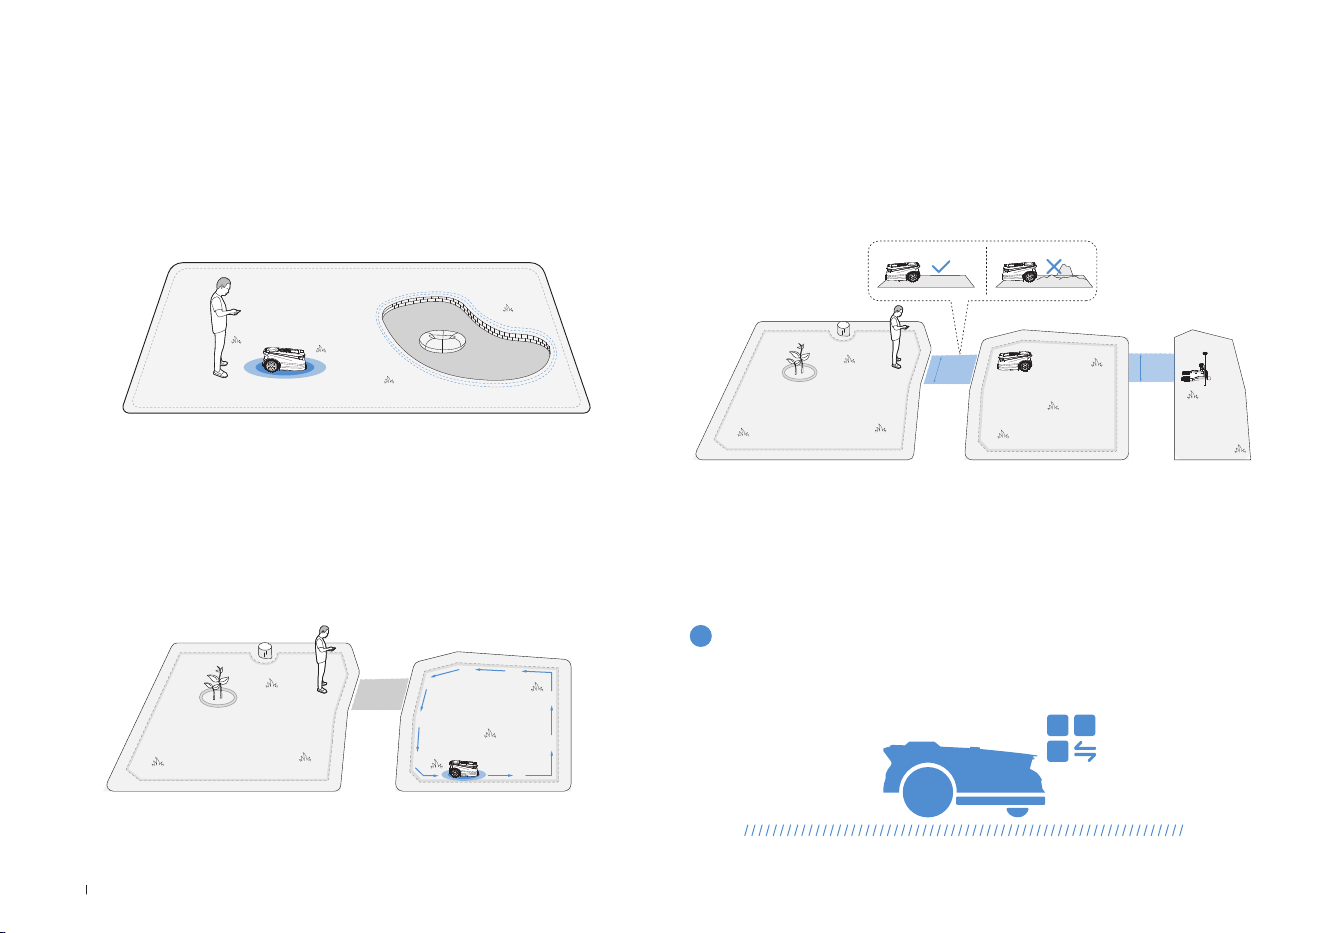
86FR
Pour protéger votre ECOVACS GOAT, veuillez définir des zones
interdites pour les objets que vous souhaitez protéger, comme un
parterre de fleurs, un trampoline et un potager�
Suivez les instructions dans l’application� Contrôlez votre ECOVACS
GOAT jusqu'au point de départ de la zone interdite� La longueur
minimale d'un côté pris en charge de la zone restreinte doit être
supérieure à 0,5 m�
7. Configurer des zones interdites
Remarque: Il est recommandé de maintenir le ECOVACS GOAT à 25cm des
limites de zones extrêmement dangereuses, notamment les étangs ou falaises�
• Commencez depuis la station/dans la carte et contrôlez à distance le
ECOVACS GOAT vers la nouvelle zone à créer�
• Cartographiez la nouvelle zone basée sur l'environnement régional�
8. Créer une nouvelle zone
• Le chemin est destiné à relier deux zones distinctes ou à relier la bor-
dure d’une pelouse à la station de charge�
• Le ECOVACS GOAT peut générer automatiquement un chemin en
partant de l'intérieur d'un chemin et en atteignant un autre chemin�
• Veuillez vous assurer que la largeur praticable du chemin pour le
ECOVACS GOAT est supérieure à 1 mètre�
9. Créer un chemin
>1m
>1m
La section suivante décrit le fonctionnement de votre ECOVACS GOAT�
Vous pouvez changer de mode sur votre ECOVACS GOAT ou via l’application�
4. Commencer à utiliser votre
ECOVACS GOAT
4.1 Fonctionnement de votre ECOVACS GOAT
1
Mode de tonte

87 FR
ECOVACS GOAT est un robot intelligent qui vous permet d’avoir une
pelouse bien entretenue� Avant de commencer, assurez-vous que l’herbe
ne dépasse pas les 10cm� Si elle est plus longue, coupez-la grossière-
ment à l’aide d’une tondeuse manuelle� Ensuite, votre ECOVACS GOAT
gardera votre pelouse bien tondue à une hauteur de 9cm maximum�
Lorsque la batterie est faible, votre ECOVACS GOAT interrompt la tonte
de façon autonome et retourne à la station pour se recharger� Une fois
chargé et prêt à fonctionner, votre ECOVACS GOAT reprend sa tâche
inachevée de la journée�
La tonte programmée permet à votre ECOVACS GOAT de tondre selon
une trajectoire en S pour une efcacité maximale�
3
Hauteur de coupe
5
Recharge automatique
4
Tonte programmée
Vous pouvez dénir votre planication de tonte sur l'application
ECOVACS HOME� ECOVACS GOAT prend en charge deux planications,
ce qui vous permet de les dénir et d’en changer selon les saisons�
2
Planification
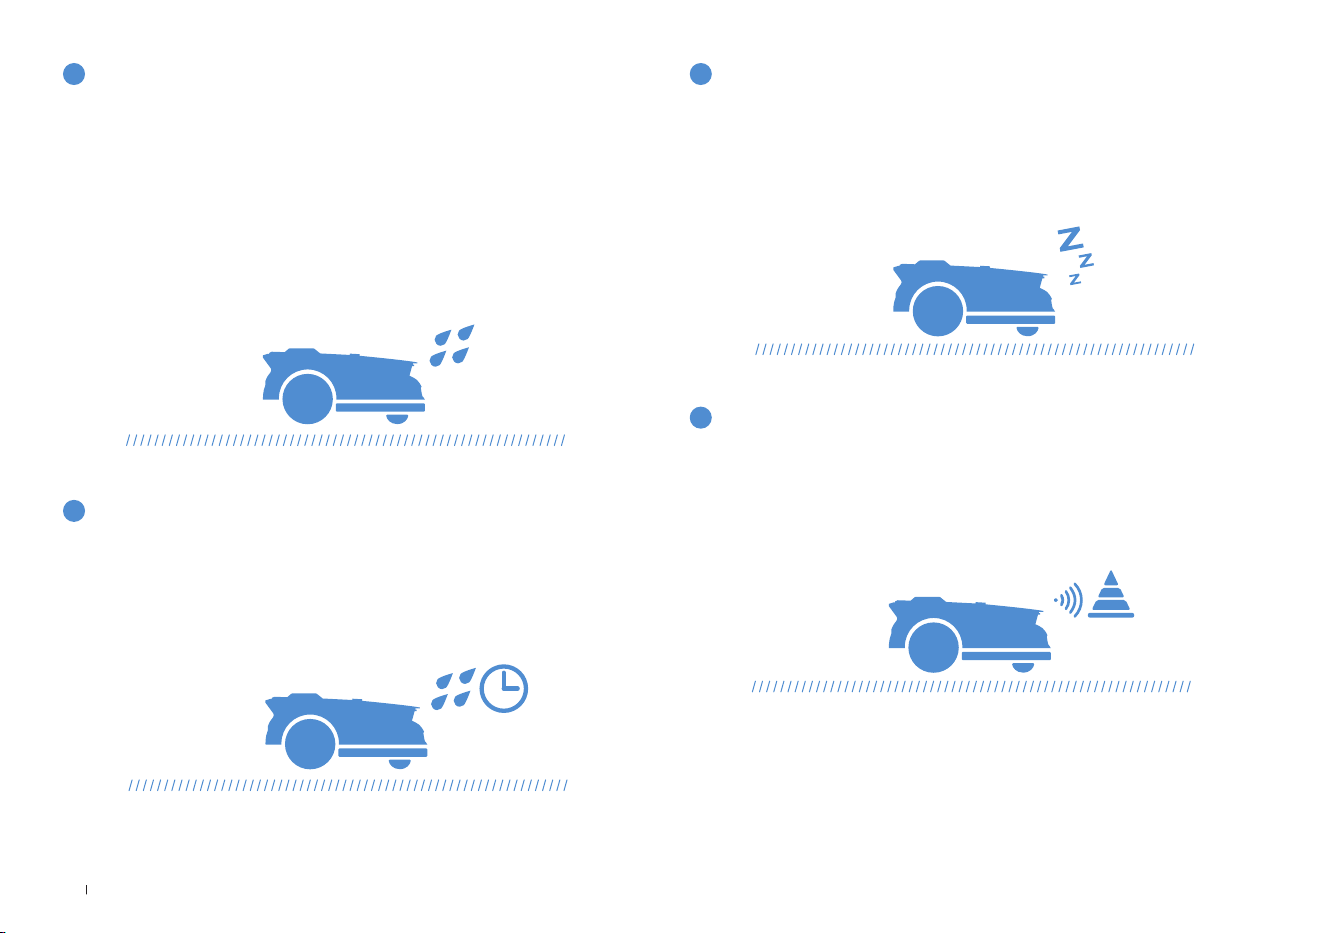
88FR
Avec un niveau d’étanchéité IPX6, votre ECOVACS GOAT peut tout à
fait rester à l’extérieur� Cependant, la tonte sous une forte pluie n’offre
pas les meilleurs résultats� Votre ECOVACS GOAT est équipé d’un
capteur de pluie; il interrompt la tonte et retourne automatiquement à
la station lorsqu’une certaine quantité de pluie est détectée� Lorsque
la pluie s’arrête, ECOVACS GOAT reprend automatiquement la tonte�
Il est recommandé de tondre par temps sec pour obtenir les meilleurs
résultats�
Vous pouvez également désactiver ce capteur sur votre ECOVACS
GOAT ou via l’application pour tondre les jours de pluie�
6
Capteur de pluie
La pelouse reste mouillée après l’arrêt de la pluie� Pour de meilleurs
résultats, votre ECOVACS GOAT reprend la tonte par défaut 3heures
après que le capteur de pluie a détecté l’arrêt de la pluie� Vous pouvez
modier ce délai depuis l’application�
Équipé d’un 3D-ToF LiDAR, votre ECOVACS GOAT peut détecter les
objets et les éviter à l’avance� Vous pouvez dénir la hauteur des obsta-
cles à éviter dans l’appli ECOVACS HOME� Certains obstacles peuvent
également être évités avec précision grâce à la reconnaissance par l’IA�
An de protéger les animaux nocturnes, ECOVACS GOAT cessera de
tondre la nuit� Vous pouvez également désactiver cette option sur votre
ECOVACS GOAT ou via l’application pour tondre la nuit�
7
Délai après la pluie
9
Évitement des obstacles intelligent
8
Protection des animaux
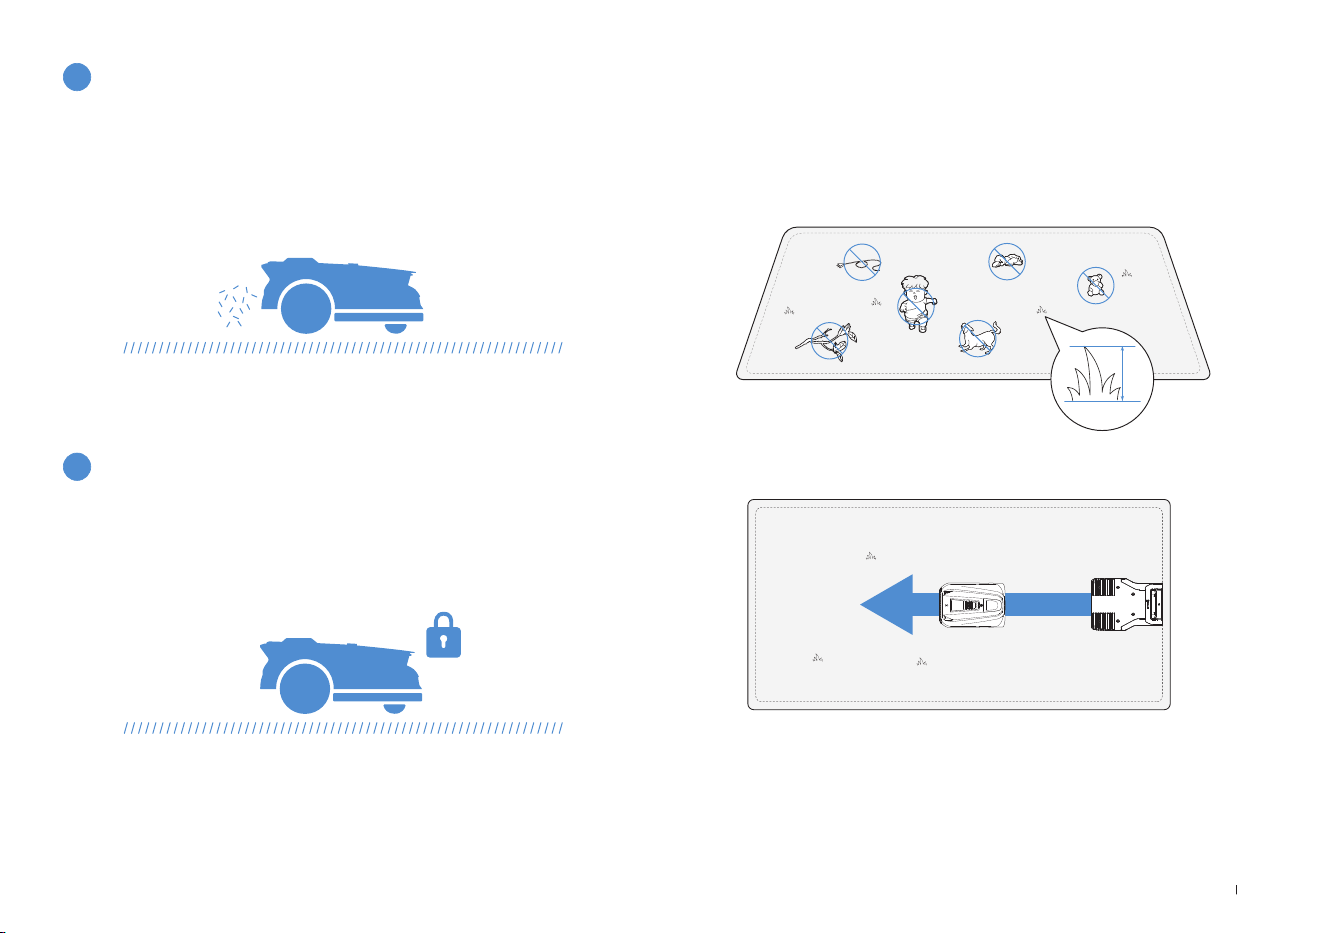
89 FR
• Coupez l’herbe avec votre tondeuse manuelle an qu’elle mesure
moins de 10cm de hauteur, et retirez tous les obstacles tels que les
débris, tas de feuilles, jouets, câbles et cailloux�
• Ne laissez pas vos enfants jouer sur la pelouse lorsque votre
ECOVACS GOAT est en train de tondre�
• Dénissez la direction de la tonte souhaitée�
11
Sécurité et protection par code PIN
Remarque: Votre ECOVACS GOAT ajustera sa direction après avoir quitté la
station, et partira tout droit par défaut�
4.2 Conseils avant la première tonte
≤
10cm
Une tonte quotidienne avec votre ECOVACS GOAT produit de courts
brins d’herbe coupée, qui sont répartis uniformément sur votre pelouse
et font un excellent engrais�
10
Pas besoin de ramasser l’herbe coupée
Le code PIN que vous avez déni lors du premier démarrage de votre
ECOVACS GOAT est utilisé pour empêcher le vol et l’utilisation par des
enfants� S’il est verrouillé, vous pouvez le déverrouiller en saisissant le
code PIN�
Remarque:
Après cinq tentatives incorrectes, patientez 30 minutes avant de réessayer�
Vous pouvez modier le code PIN sur l’application�
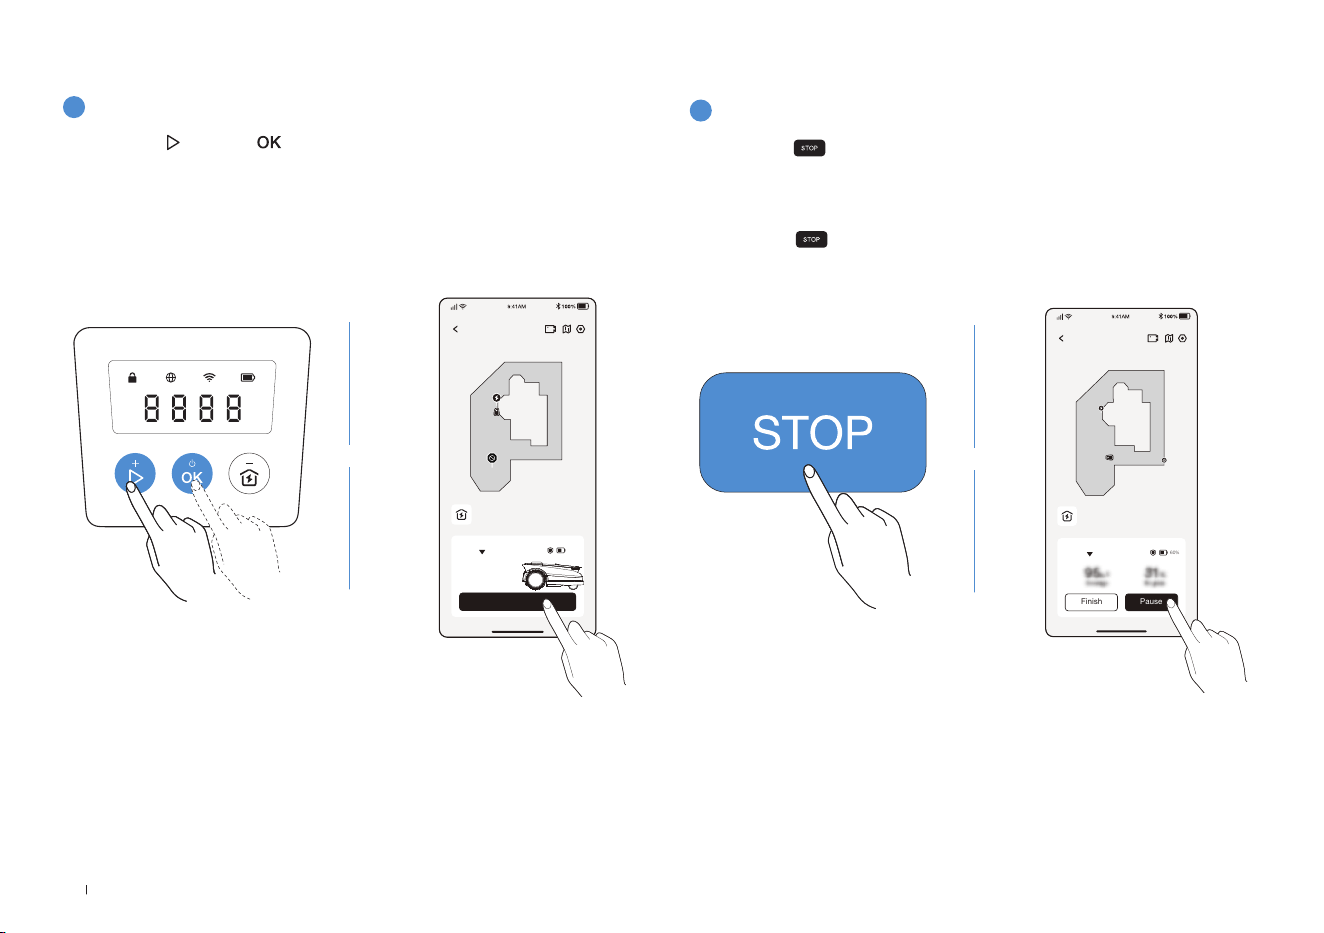
90FR
2
Pause de la tonte
Appuyez sur pour mettre en pause le ECOVACS GOAT ou mettez-
le en pause depuis l’application�
• Pour des raisons de sécurité, votre ECOVACS GOAT est verrouillé et
ne peut pas être démarré directement depuis l’application après avoir
appuyé sur � Appuyez d’abord sur DÉMARRAGE puis sur OK sur
le panneau de commande�
ECOVACS GOAT
Finish Pause
Auto
60%
Station
1
Commencer à tondre
4.3 PRÊT POUR LA TONTE
Appuyez sur , puis sur � ECOVACS GOAT se met en marche� Vous
pouvez également lancer la tonte depuis l’application�
Remarque: Assurez-vous que l’herbe a été coupée avec votre tondeuse
manuelle à une hauteur maximale de 10cm
.
ECOVACS GOAT
Start
Auto
Station
60%
OU OU
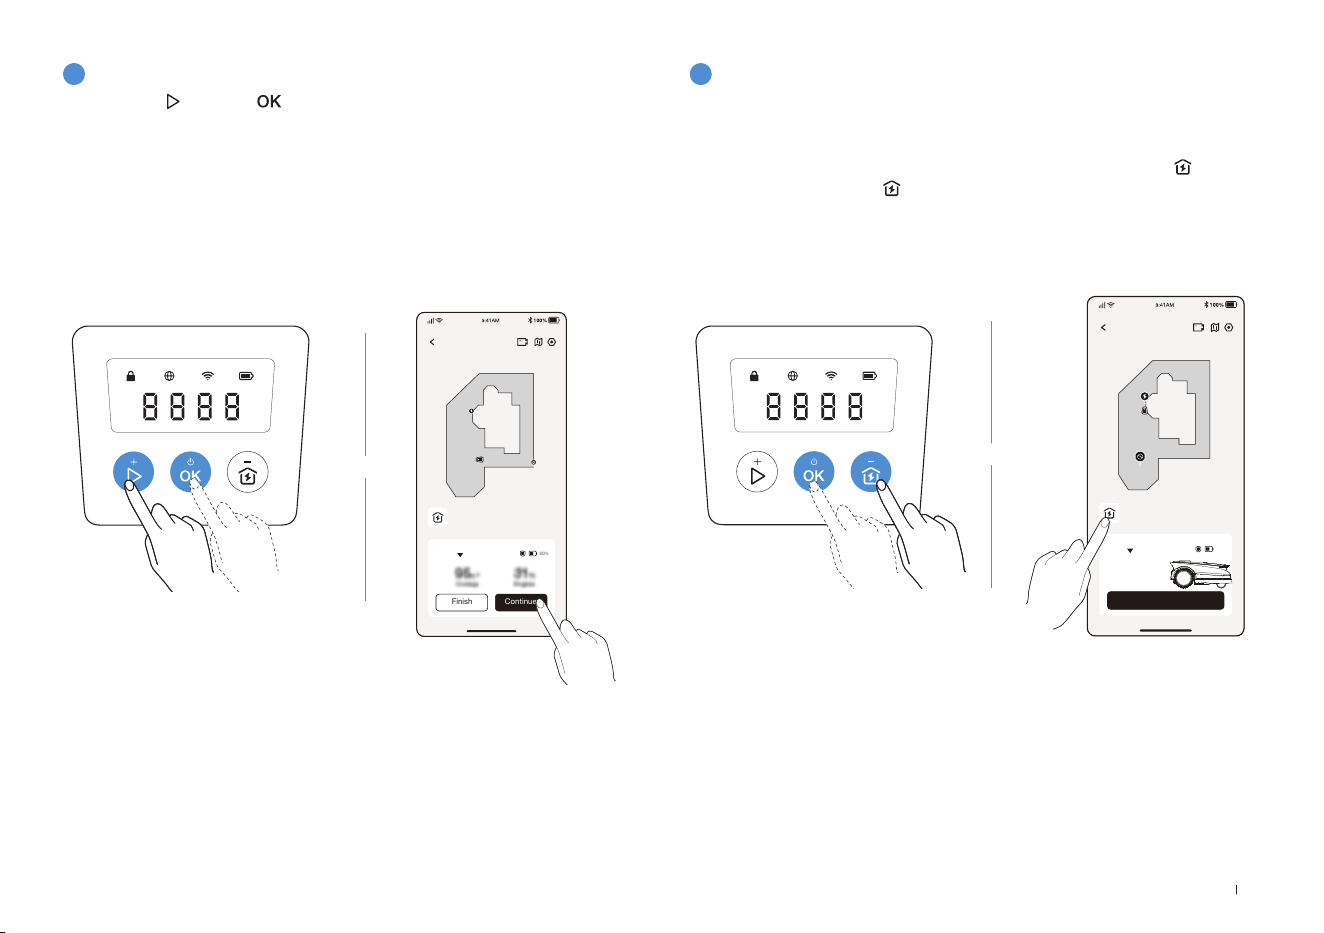
91 FR
3
Reprise de la tonte
4
Fin de la tonte
Appuyez sur , puis sur sur ECOVACS GOAT ou appuyez sur le
bouton dans l’application pour reprendre la tonte�
1� Une fois la tâche de tonte terminée, ECOVACS GOAT reviendra
automatiquement à la station�
2� Lorsque vous terminez le processus de tonte manuellement, vous
devez envoyer ECOVACS GOAT à la station en appuyant sur
puis
OK, ou en appuyant sur dans l'application�
ECOVACS GOAT
Finish Continue
Auto
60%
Station
ECOVACS GOAT
Start
Auto
Station
60%
OU
OU
92FR
Pièce
Entretien Remplacement
Caméra IA avant 2 à 4 semaines -
Lames - 4 à 6 semaines
Si vous rencontrez des problèmes lors de l'utilisation de votre ECOVACS GOAT, consultez les articles FAQ sur
https://www�ecovacs�com
ou depuis la section dans l'application ECOVACS HOME�
Pour de meilleures performances et une durée de vie plus longue de votre ECOVACS GOAT, veuillez l'entretenir et remplacer
correctement toutes les pièces usées�
AVERTISSEMENT
• Éteignez toujours votre ECOVACS GOAT avant toute opération�
• Portez toujours des gants de protection lorsque vous remplacez les lames�
• Utilisez uniquement les lames fabriquées par ECOVACS et des vis neuves lors de l'assemblage des lames�
• Essuyez les composants non lavables avec un chiffon propre et sec� Veuillez ne pas utiliser de sprays nettoyants ou d’autres
détergents�
• Retournez votre ECOVACS GOAT délicatement sur une surface souple�
5. Dépannage
6. Entretien
6.1 Fréquence

93 FR
1
Disque à lame, châssis, roues tout terrain et roues avant
2
Autres composants
6.2 Entretien régulier
AVERTISSEMENT
• Portez TOUJOURS des gants de protection�
• N'utilisez PAS d'arroseur haute pression car l'eau à haute pression peut pénétrer dans les joints et endommager les pièces électroniques
et mécaniques�
ÉTAPES POUR NETTOYER LES PIÈCES PRINCIPALES
Étape 1 : mettez ECOVACS GOAT hors tension�
Étape 2 : retournez délicatement votre ECOVACS GOAT sur une surface souple�
Étape 3 : nettoyez le disque à lame et le châssis avec une brosse�
Étape 4 : vérifiez que le disque à lame et les lames tournent librement�
Étape 5 : nettoyez la boue sur les roues tout terrain et les roues avant à l’aide d’une brosse�
Essuyez les composants avec un chiffon propre et sec� Évitez d’utiliser des sprays nettoyants ou des détergents�
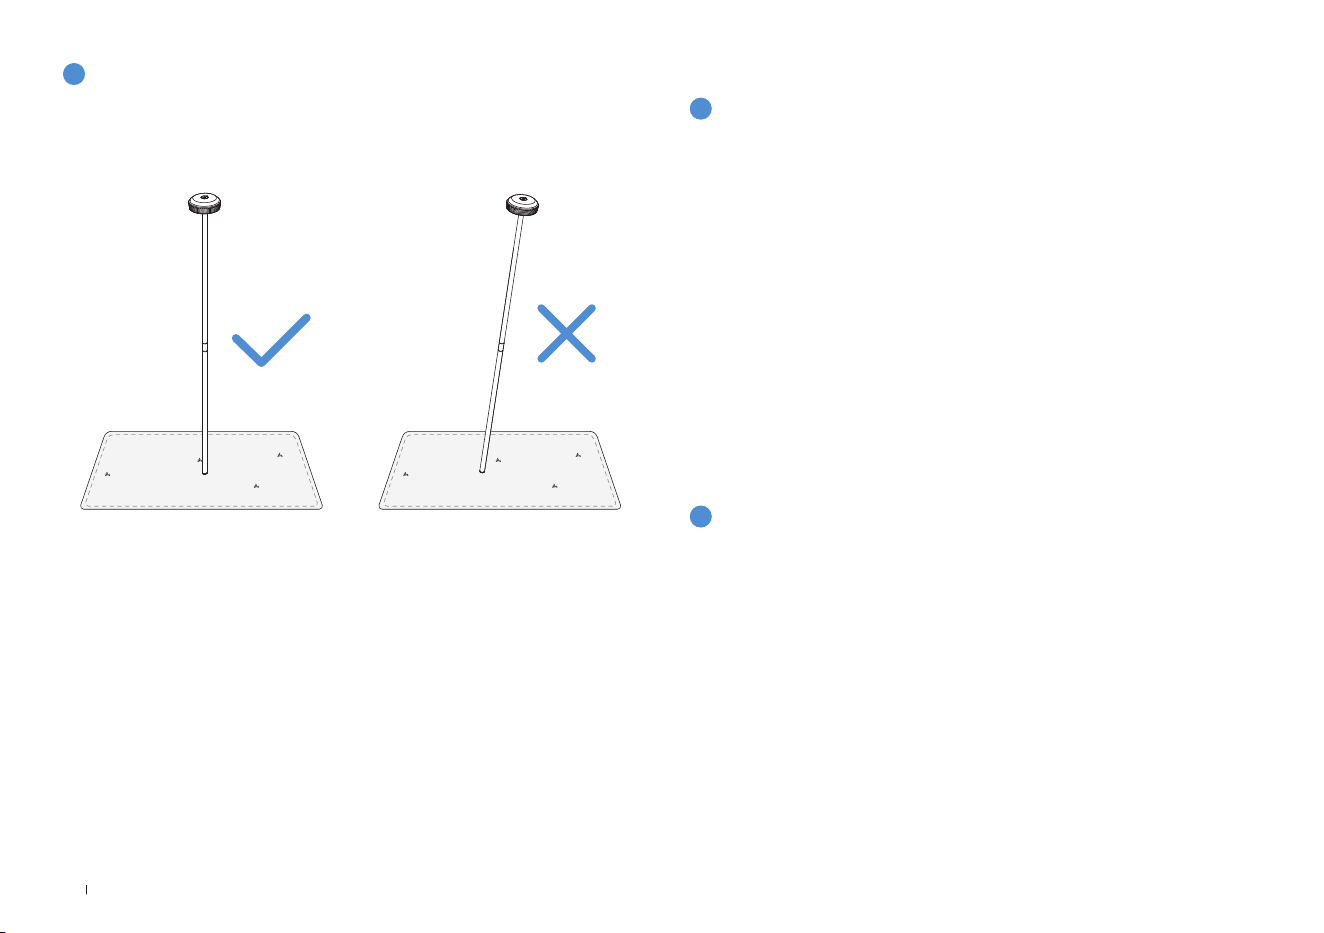
94FR
3
Station de référence RTK
1
Stockage pour l’hiver
Si la station de référence RTK, son poteau de montage inclus, s'incline,
assurez-vous qu'il est correctement réglé�
ECOVACS GOAT
• Mettez votre ECOVACS GOAT hors tension après l’avoir
complètement chargé�
• Nettoyez-le complètement�
• Conservez-le dans un endroit frais, bien ventilé et sec, à l'intérieur,
dans un emballage étanche à l'eau et à la poussière�
Station
• Débranchez l’alimentation électrique de la prise secteur�
• Débranchez l’alimentation électrique de la station�
• Marquez l’endroit où vous avez installé la station pour référence lors
de la nouvelle saison de travail�
• Stockez la station et l’alimentation électrique dans un endroit frais,
sec et bien aéré, à l’abri du soleil�
6.3 Entretien saisonnier
Remarque: Vous devrez replacer la station dans sa position d’origine au retour
des beaux jours� Dans le cas contraire, la localisation ne sera pas correcte et la
carte ne sera pas valide�
2
Redémarrage au printemps
• Retirez tous les emballages ou housses de votre ECOVACS GOAT et de
la station�
• Assemblez la station en la remettant là où elle se trouvait lors de la
dernière saison de travail�
• Vériez que les câbles ne présentent aucun dommage ou rupture
et réparez-les si nécessaire� Connectez les câbles qui sont sûrs et
propres à l’utilisation�
• Vériez le tranchant des lames et remplacez-les si nécessaire� Repor-
tez-vous à la section Entretien de ce manuel pour obtenir des étapes
et des conseils détaillés�
• Allumez votre ECOVACS GOAT et testez s'il est connecté à l'applica-
tion et fonctionne correctement�

95 FR
1
Remplacement des lames
6.4 Remplacement des pièces
AVERTISSEMENT
• Éteignez toujours votre ECOVACS GOAT avant toute opération�
• Portez toujours des gants de protection lorsque vous remplacez les lames�
• Utilisez uniquement les lames fabriquées par ECOVACS et des vis neuves lors de l'assemblage des lames�
• Essuyez les composants non lavables avec un chiffon propre et sec� Veuillez ne pas utiliser de sprays nettoyants ou d’autres détergents�
ÉTAPES POUR REMPLACER LES LAMES
Étape 1 : mettez ECOVACS GOAT hors tension�
Étape 2 : retournez délicatement votre ECOVACS GOAT sur une surface souple�
Étape 3 : desserrez les vis à l’aide d’un tournevis�
Étape 4 : retirez les vis et les lames�
Étape 5 : serrez les nouvelles lames et vis�
Étape 6 : assurez-vous que les lames tournent librement�
96FR
7. Données techniques
Informations de base
Nom du produit Robot tondeuse
Modèle GPR11 GPR12
Marque ECOVACS
Dimensions:
Longueur (mm) × Largeur (mm) ×
Hauteur (mm)
680x460x310
Poids net (kg) (avec la batterie) 15,8
Paramètres de la tondeuse
Tension nominale 37,8 V
Capacité de travail (㎡)
1600 3000
Largeur de coupe (cm) 33
Hauteur de coupe (cm) 3-9
Temps de charge (min�) 45±5
Émissions sonores
Niveau de puissance acoustique
mesuré L
WA
60 dB(A)
Incertitudes relatives à la puissance
acoustique KWA
3 dB(A)
Niveau de pression acoustique L
pA 52 dB(A)
Incertitudes relatives à la pression
acoustique KpA
3 dB(A)

97 FR
Plage de fréquences
de connectivité
Bluetooth® 2400 MHz ~ 2483,5 MHz
Wi-Fi 2400 MHz ~ 2483,5 MHz
Réseau cellulaire (acheté)
WCDMA: BANDE I: liaison montante: 1920-1980MHz, liaison descendante: 2110-
2170MHz
BANDE VIII: liaison montante : 880-915 MHz, liaison descendante : 925-960 MHz
LTE:E-UTRA
BANDE 1 : liaison montante : 1920-1980 MHz, liaison descendante : 2110-2170 MHz E-UTRA
BANDE 3: liaison montante : 1710-1785 MHz, liaison descendante : 1805-1880 MHz E-UTRA
BANDE 7: liaison montante : 2500-2570 MHz, liaison descendante : 2620-2690 MHz E-UTRA
BANDE 8 : liaison montante : 880-915 MHz, liaison descendante : 925-960 MHz E-UTRA
BANDE 20: liaison montante : 832-862 MHz, liaison descendante : 791-821 MHz E-UTRA
BANDE 28: liaison montante : 703-748 MHz, liaison descendante : 758-803 MHzE-UTRA
BANDE 38: liaison montante : 2570-2620 MHz, liaison descendante : 2570-2620 MHz
E-UTRA
BANDE 40: liaison montante : 2300-2400 MHz, liaison descendante : 2300-2400 MHz
Les bandes de fréquences disponibles pour la bande LTE 28 en Europe sont 703-736 MHz (TX),
758-791 MHz (RX)
RTK(GNSS) GPS, Beidou, Galileo, GLONASS
RTK(LoRa) 863-870 MHz
Puissance de
radiofréquence max�
Bluetooth® ≤ 20 dBm
Wi-Fi ≤ 20 dBm
Réseau cellulaire (acheté)
WCDMA: +24dBm +1,7/-3,7dB
LTE: E-UTRA Bande 28: 23dBm +2,7/-3,2dB autres bandes: 23dBm ±2,7dB
Lora en RTK ≤14 dbm(25 mw)
Moteur d’entraînement
Vitesse nominale (tr/min)
34,6
Vitesse max� (tr/min)
60,5
Moteur de la lame Vitesse (tr/min)
3000
98FR
Batterie (tondeuse)
Type de batterie Lithium-ion
Tension nominale 32,4 V 32,4 V
Capacité nominale 3000 mAh 5000 mAh
Station de référence RTK
Modèle FM24A9
Température d'utilisation -40~85°C / -40~185°F
Température de stockage -55~95°C / -67~203°F
Tension d’entrée 5 V
Courant d’entrée 1 A
Alimentation électrique
Modèle d’alimentation
GM152-3780300-2DG
GM152-3780300-3DG
GM152-3780300-SDG
BLJ125W378300P-V
BLJ125W378300P-B
GM403-3780500-2DG
GM403-3780500-3DG
GM403-3780500-SDG
BLJ240W378500P-V
BLJ240W378500P-B
Tension d’entrée
100-240 V ~ 100-240 V ~
Tension de sortie 37,8 V
37,8 V
Courant de sortie 3A 5A
Station
Modèle CH2491 CH2491A
Tension d’entrée 37,8 V
37,8 V
Courant d’entrée 3A 5A
Tension de sortie pour ECOVACS GOAT 37,8 V
37,8 V
Courant de sortie pour ECOVACS GOAT 3A 5A
Tension de sortie pour RTK 5 V
Courant de sortie pour RTK 1 A
Remarque: Les spécifications techniques et de conception peuvent être modifiées pour une amélioration continue du produit�
Découvrez plus d'accessoires sur https://www�ecovacs�com�

99 IT
Indice dei contenuti
1. Istruzioni originali ........................................................................................................................................................ 100
2. Contenuto della confezione e funzioni dei componenti ..........................................................................................106
2�1 Contenuto della confezione������������������������������������������������������������������������������������������������������������������������������������106
2�2 Componenti e funzioni �������������������������������������������������������������������������������������������������������������������������������������������107
3. Installazione e mappatura ..........................................................................................................................................111
3�1 Installazione �����������������������������������������������������������������������������������������������������������������������������������������������������������111
3�2 Mappatura �������������������������������������������������������������������������������������������������������������������������������������������������������������� 115
4. Cominciare a usare ECOVACS GOAT ........................................................................................................................ 118
4�1 Come funziona ECOVACS GOAT �������������������������������������������������������������������������������������������������������������������������� 118
4�2 Suggerimenti prima del primo taglio ���������������������������������������������������������������������������������������������������������������������121
4�3 Pronto per il taglio ��������������������������������������������������������������������������������������������������������������������������������������������������122
5. Risoluzione dei problemi ............................................................................................................................................124
6. Manutenzione ..............................................................................................................................................................124
6�1 Frequenza ��������������������������������������������������������������������������������������������������������������������������������������������������������������124
6�2 Manutenzione ordinaria ������������������������������������������������������������������������������������������������������������������������������������������ 125
6�3 Manutenzione stagionale ���������������������������������������������������������������������������������������������������������������������������������������126
6�4 Ricambi ������������������������������������������������������������������������������������������������������������������������������������������������������������������127
7. Dati tecnici ...................................................................................................................................................................128

100IT
1. Istruzioni originali
IMPORTANTE
LEGGERE CON ATTENZIONE PRIMA
DELL'USO
CONSERVARE PER RIFERIMENTO
FUTURO
Leggere con attenzione le istruzioni� Assicurarsi di aver
compreso le istruzioni e di avere familiarità con i comandi
e l'uso corretto dell'apparecchio� Occorre comprendere
che è possibile ridurre il rischio seguendo le istruzioni
e le avvertenze in questo manuale, ma non è possibile
eliminare tutti i rischi�
Il robot tagliaerba (di seguito denominato "ECOVACS
GOAT") ha molti sensori di sicurezza integrati, tuttavia
esistono ancora rischi per la sicurezza�
In questo manuale sono indicati tutti i relativi rischi residui�
Descrizione dell'uso previsto: i tosaerba intelligenti sono
usati principalmente per falciare l'erba, soprattutto nei
parchi, nei cortili delle ville private e nei campi da calcio�
Per le macchine utilizzate in aree pubbliche, intorno
all'area di lavoro della macchina occorre posizionare
segnali di avvertimento� I segnali devono mostrare la
sostanza del seguente testo: AVVERTENZA! Tagliaerba
automatico�
Tenersi lontani dalla macchina� Sorvegliare i bambini�
NON modificare il tagliaerba da soli� Le modifiche
potrebbero interferire con il funzionamento del tagliaerba,
provocare lesioni gravi e/o danni o invalidare la Garanzia
limitata� Utilizzare solo parti e accessori approvati da
Ecovacs�
AVVERTENZA
Non permettere mai a bambini, persone con ridotte
capacità fisiche, sensoriali o mentali o prive di esperienza
e conoscenza o persone che non hanno familiarità con
queste istruzioni di utilizzare la macchina; le normative
locali possono limitare l'età dell'operatore�
Evitare di utilizzare la macchina e i suoi accessori in
condizioni meteorologiche avverse, soprattutto in
presenza di rischio di fulmini�
Prima di ogni sessione di taglio, controllare che tutte le
parti del tagliaerba funzionino normalmente�
Ispezionare periodicamente l'area in cui deve essere
utilizzata la macchina e rimuovere eventuali pietre,
bastoncini, fili, ossa e altri oggetti estranei�
Non permettere MAI ai bambini di toccare l'alimentatore,
la stazione di ricarica, le lame, il vano batteria o qualsiasi
parte con spazi aperti, come le ruote�

101 IT
AVVERTENZA
Non utilizzare mai la macchina e/o i suoi accessori
con protezioni o schermi difettosi o senza dispositivi
di sicurezza, oppure qualora il cavo sia danneggiato o
usurato�
Tenersi lontani dalle lame in rotazione! NON mettere mani
o piedi sotto o vicino alle lame rotanti�
Mantenere una distanza di sicurezza dal tagliaerba
durante il funzionamento�
NON sbilanciarsi� Mantenere costantemente l'equilibrio
e prestare attenzione quando si cammina su superfici in
pendenza� Camminare, non correre mai mentre si utilizza
la macchina o i suoi accessori�
AVVERTENZA
Non permettere mai ai bambini di trovarsi nelle vicinanze
o di giocare con la macchina quando è in funzione�
AVVERTENZA
NON toccare parti pericolose in movimento prima che si
siano completamente fermate�
AVVERTENZA
Per ricaricare la batteria, utilizzare esclusivamente
l'alimentatore rimovibile fornito con questo apparecchio
(CH2491/CH2491A)�
Uso sicuro:
Non collegare un cavo danneggiato all'alimentazione
né toccare un cavo danneggiato prima che sia stato
scollegato dall'alimentazione, in quanto i cavi danneggiati
possono consentire il contatto con parti in tensione;
tenere le prolunghe lontane dalle parti pericolose in
movimento per evitare danni ai cavi, che potrebbero
consentire il contatto con parti in tensione; collegare
la macchina e/o i suoi accessori solo ad un circuito di
alimentazione protetto da un interruttore differenziale
(RCD) con una corrente di attivazione non superiore a 30 mA�
Scollegare l'alimentatore dalla presa di corrente e districare
quando il cavo di alimentazione o la prolunga siano
danneggiati o si siano aggrovigliati durante l'uso� Durante
l'operazione, tirare il corpo della spina anziché il cavo per
evitare il pericolo� Contattare il Servizio clienti e lasciare
che un professionista qualificato ripari o sostituisca il cavo�
Utilizzare il cavo di prolunga prodotto da ECOVACS� In
caso di problemi, contattare il Servizio clienti�
Qualora il CAVO DI ALIMENTAZIONE sia danneggiato,
deve essere sostituito dal produttore, dal suo agente
di servizio o da persone analogamente qualificate, per
evitare rischi�
Premere immediatamente il pulsante STOP qualora il
tagliaerba emetta un suono anomalo o attivi l'allarme�
In caso di fuoriuscita dell'elettrolita, sciacquare con

102IT
acqua o neutralizzante; richiedere assistenza medica
qualora venga a contatto con gli occhi, ecc�
In caso di vibrazioni anomale, riavviare il tagliaerba� Se il
problema persiste, contattare il Servizio clienti�
Istruzioni per indossare sempre calzature pesanti e
pantaloni lunghi quando si utilizza la macchina con un
controller manuale.
Inoltre, quando si utilizza il controller manuale
a) Falciare solo alla luce del giorno o con una buona
illuminazione artificiale�
b) Evitare di utilizzare la macchina nell’erba bagnata�
c) Non utilizzare la macchina a piedi nudi o indossando
sandali aperti� Indossare sempre calzature pesanti e pantaloni
lunghi�
d) Prestare sempre la massima attenzione quando si cammina
su pendii�
e) Usare estrema cautela quando si fa retromarcia e la
macchina procede verso di sé�
f) Accendere sempre il motore secondo le istruzioni, con i
piedi ben lontani dalla(e) lama(e)�
Aggiornamento del dispositivo
In genere, alcuni dispositivi vengono aggiornati ogni due
mesi, ma l'intervallo non è sempre così specifico�
Alcuni dispositivi, soprattutto quelli in vendita più di tre
anni fa, verranno aggiornati solo se viene individuata e
corretta una vulnerabilità critica�
103 IT
Dichiarazione di conformità per
l'Unione europea
Informazioni sullo smaltimento per gli utenti dei rifiuti
di apparecchiature elettriche ed elettroniche
Questo simbolo sul prodotto o sulla sua confezione
indica che i prodotti elettrici ed elettronici usati non
devono essere smaltiti con i rifiuti urbani indifferenziati�
Per garantire un trattamento adeguato, è responsabilità
dell'utilizzatore smaltire le apparecchiature usate
restituendole ai punti di raccolta designati�
Il corretto smaltimento di questo prodotto consentirà di
risparmiare risorse preziose e di prevenire potenziali effetti
negativi sulla salute umana e sull'ambiente, che potrebbero
altrimenti derivare da una gestione inappropriata dei rifiuti�
Per restituire il dispositivo usato utilizzare i sistemi di
restituzione e ritiro o contattare il rivenditore presso il
quale è stato acquistato il prodotto, che provvederà
gratuitamente al ritiro� Contattare l'autorità locale per
ulteriori dettagli sul punto di raccolta designato più vicino�
Per lo smaltimento non corretto di questi rifiuti potrebbero
essere applicate delle sanzioni, in conformità con la
legislazione nazionale�
Informazioni sullo smaltimento per gli utenti delle
batterie usate
Questo simbolo significa che le batterie e gli accumulatori,
a fine vita, non devono essere smaltiti con i rifiuti urbani
indifferenziati� La vostra collaborazione è una parte
importante dello sforzo per ridurre al minimo l'impatto di
batterie e accumulatori sull'ambiente e sulla salute umana�
Per un corretto riciclo, è possibile restituire questo prodotto
o le batterie o gli accumulatori in esso contenuti al fornitore
o a un punto di raccolta designato, a titolo gratuito�
Il corretto smaltimento di questo prodotto consentirà
di risparmiare risorse preziose e di prevenire potenziali
effetti negativi sulla salute umana e sull'ambiente,
che potrebbero altrimenti derivare da una gestione
inappropriata dei rifiuti�
Per lo smaltimento non corretto di questi rifiuti potrebbero
essere applicate delle sanzioni, in conformità con la
legislazione nazionale�
Esistono sistemi di raccolta differenziata per batterie e
accumulatori usati�
Smaltire correttamente le batterie e gli accumulatori
presso il centro di raccolta/riciclaggio dei rifiuti della
comunità locale�

104IT
Direttiva sulla restrizione dell'uso di determinate
sostanze pericolose (RoHS)
Ecovacs Home Service Robotics Co�, Ltd� dichiara
con la presente che l'intero prodotto, comprese le parti
(fili, cavi, ecc�) soddisfa i requisiti della Direttiva RoHS
2011/65/UE e della modifica della Direttiva delegata della
Commissione (UE) 2015/863 sulla restrizione dell'uso di
determinate sostanze pericolose nelle apparecchiature
elettriche ed elettroniche ("RoHS recast" o "RoHS 2�0")�
Direttiva sulle apparecchiature radio
Ecovacs Home Service Robotics Co�, Ltd� dichiara con
la presente che il prodotto elencato in questa sezione
è conforme ai requisiti essenziali e ad altre disposizioni
pertinenti della Direttiva sulle apparecchiature radio
2014/53/UE�
Direttiva macchine
Ecovacs Home Service Robotics Co�, Ltd� dichiara con
la presente che il prodotto elencato in questa sezione
è conforme ai requisiti essenziali e ad altre disposizioni
pertinenti della Direttiva macchine 2006/42/CE�
Rappresentante autorizzato in Europa:
Ecovacs Home Service Robotics Co�, Ltd� dichiara con la
presente che il prodotto è conforme ai requisiti
ECOVACS Europe GmbH
Holzstrasse 2 I D-40221 Düsseldorf I Germania
essenziali e ad altre disposizioni pertinenti della Direttiva
RoHS 2011/65/UE e alla modifica della Direttiva delegata
della Commissione (UE) 2015/863, alla Direttiva sulle
apparecchiature radio 2014/53/UE e la Direttiva Macchine
2006/42/CE�
La dichiarazione di conformità può essere consultata al
seguente indirizzo: https://www�ecovacs�com/global/
compliance �

105 IT
SIMBOLI
AVVERTENZA—
Leggere il manuale di istruzioni prima di
usare la macchina�
AVVERTENZA—
Mantenere una distanza di sicurezza
dalla macchina durante il funzionamento�
AVVERTENZA—
Non salire sulla macchina�
AVVERTENZA—
Azionare il dispositivo di disabilitazione
prima di intervenire sulla macchina o di
sollevarla�
ATTENZIONE—
Non toccare la lama ruotante�
Classe III
Corrente continua
Corrente alternata
Questo prodotto è conforme alle
Direttive CE applicabili�
Polarità della porta di ricarica
Prima di effettuare la ricarica, leggi le
istruzioni�

106IT
2. Contenuto della confezione e funzioni dei componenti
1 ECOVACS GOAT
5 Chiave esagonale
9 Piolo del treppiede
13 Vite (per stazione di riferimento RTK)
2 Pila di stazione di ricarica
6 Kit lame di ricambio
10 Stazione di riferimento RTK
14 Rondella elastica (per Piolo del treppiede)
3 Base di stazione di ricarica
7 Viti (per il Base)
11 Piolo in plastica
15 Manuale di istruzioni
4 Alimentatore
8 Paletto di montaggio
12 Laccetto di chiusura
16 Guida pre-avvio
2.1 Contenuto della confezione
8
6 5
4
1
2
3
7
9
10
15
16
11 12 13 14
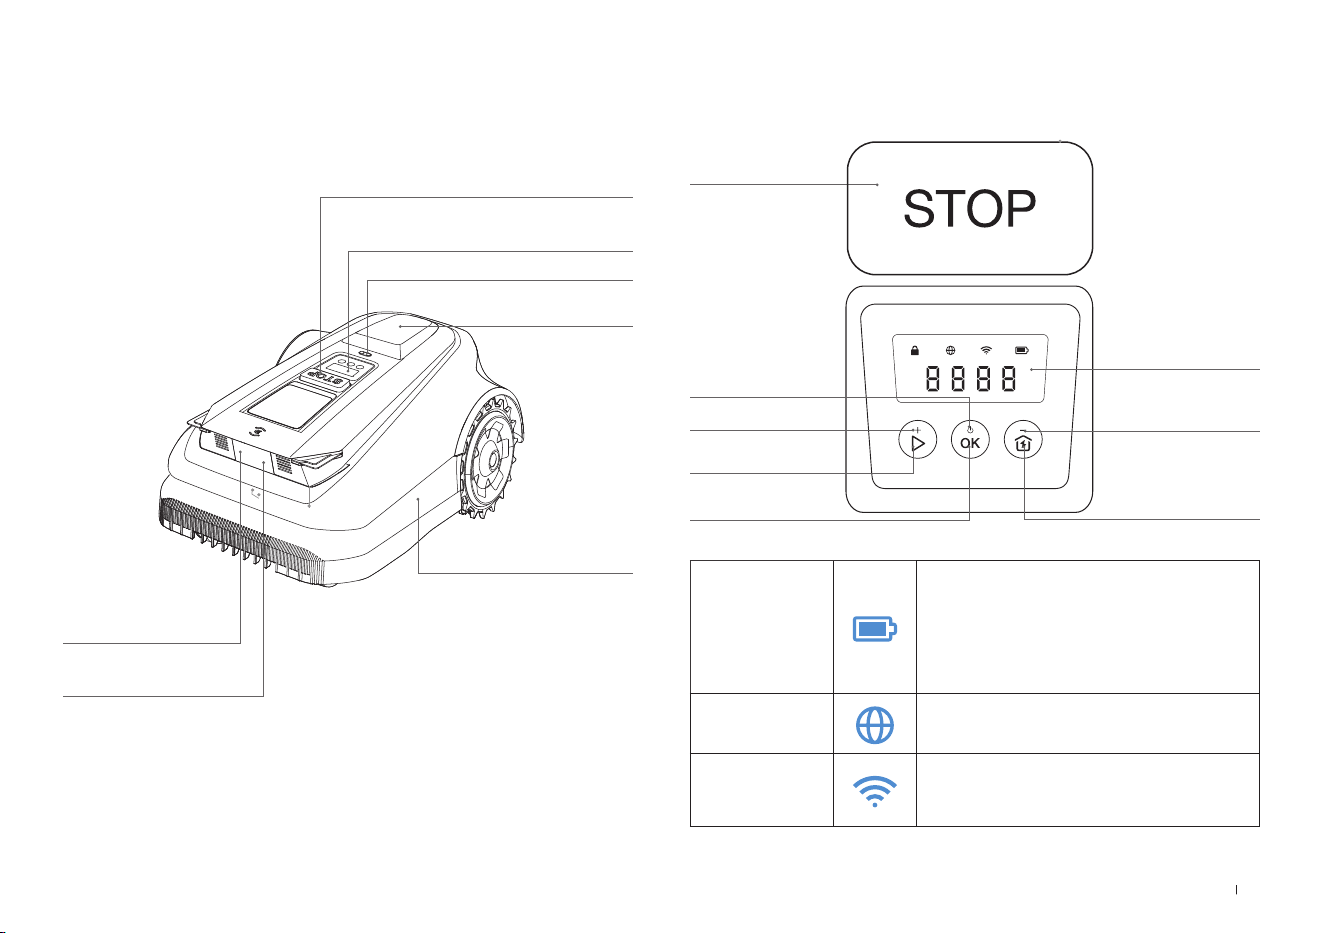
107 IT
ECOVACS GOAT (vista superiore)
Pulsante STOP
Pannello di controllo
Sensore pioggia
Stazione di
riferimento RTK
Paraurti
3D-ToF LiDAR
Videocamera IA
anteriore
2.2 Componenti e funzioni
Pannello di controllo: I pulsanti del pannello di controllo consentono
le operazioni di base del tagliaerba� I numeri visualizzati indicano
l'avanzamento della falciatura, il livello della batteria e lo stato del tagliaerba�
Icona:
Batteria
Livello della batteria�
Bianco: carica superiore al 15%�
Rosso: meno del 15% di carica
Lampeggiante indica la carica;
Fisso indica che la batteria è in uso o
completamente carica�
Connessione 4G
Si accende quando è installato un modulo di
connessione aggiuntivo con una scheda SIM�
Wi-Fi
Si accende quando ECOVACS GOAT è
connesso correttamente all'APP tramite
Wi-Fi�
DISPLAY
AVVIO
HOME
DIMINUISCI
ACCENSIONE/
SPEGNIMENTO
AUMENTA
OK
Thu 12:30
OK
to mow
STOP
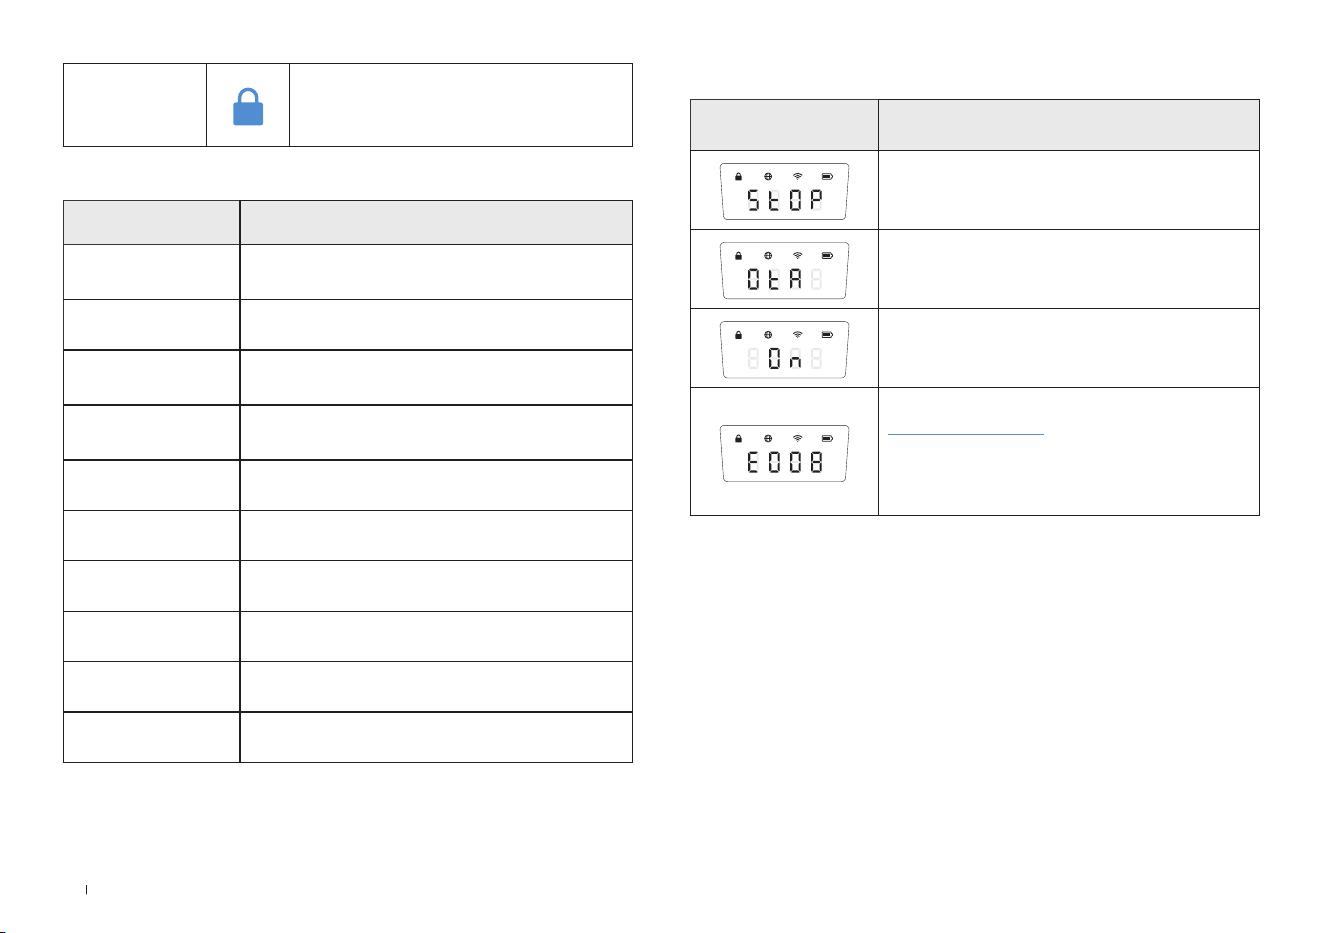
108IT
Pulsante
Pulsanti funzione Descrizione
AVVIO
Premere 5 volte per visualizzare il livello della
batteria
AVVIO-->OK Avvio della falciatura/Continua l'attività
OK
Tenere premuto per 3 secondi per accendere/
spegnere il dispositivo�
HOME
Tenere premuto per 3 secondi per accedere
alla modalità di connessione alla rete�
HOME-->OK Invia il tagliaerba alla stazione di ricarica
STOP Interrompere il funzionamento del tagliaerba
AVVIO+HOME Tenere premuto per 5 secondi per ripristinare
AUMENTA+ Aumenta di un numero
DIMINUISCI– Diminuisce di un numero
OK Numero successiva/Conferma
Display Descrizione
Tagliaerba fermo
Aggiornamenti OTA in corso
Falciatura in corso
Codice di errore� Per i dettagli, visitare il sito
www�ecovacs�com�
Se non viene risolto, il dispositivo tornerà
automaticamente alla stazione dopo 30
minuti�
Display:
Blocca
Tagliaerba bloccato� Inserire il codice
PIN per sbloccare, in caso contrario il
tagliaerba non si avvia�
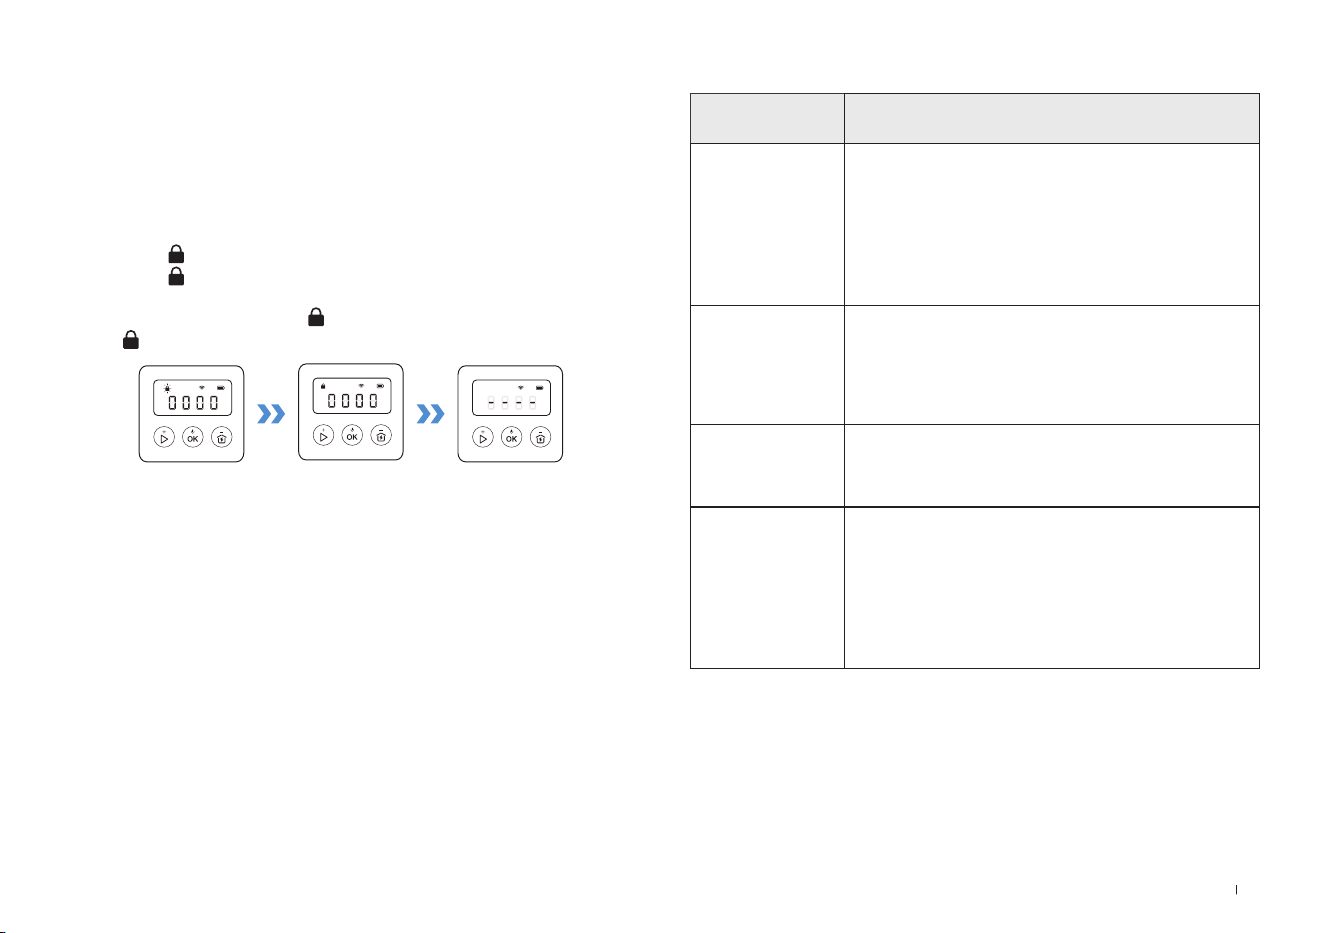
109 IT
SENSORI
Nome Descrizione
3D-ToF LiDAR
Rileva informazioni sugli ostacoli posti davanti al
robot e consente a questo di evitarli�
Portata: Rileva le coordinate di longitudine e
latitudine della posizione del robot�
Orizzontale: 90 gradi; Verticale: 70 gradi
(WYSIWYG)
La distanza massima è di 3-4 metri�
Videocamera IA
anteriore
Rileva informazioni sull'ambiente posto davanti al
robot, identica obiettivi speciali e aiuta il robot a
interagire in modo intelligente con gli utenti�
Orizzontale: 150 gradi; Verticale: 80 gradi
(WYSIWYG).
Sensore pioggia
Rilevare la presenza di pioggia e aiuta il robot a
decidere se continuare l'attività�
Stazione di
riferimento RTK
Consente il calcolo della distanza relativa tra
il robot e il beacon di localizzazione durante
la procedura di mappatura dell'ambiente
circostante�
Portata: La portata effettiva del segnale è
compresa in un raggio di 140 metri con il beacon
al centro�
Impostare il codice PIN:
Quando il GOAT è fuori dalla mappa o deve essere acceso o
reimpostato, verrà automaticamente bloccato� È possibile sbloccarlo
inserendo il codice PIN corretto�
Impostare il codice PIN quando il display mostra quanto indicato sotto�
Premere [+] o [-] per selezionare uno alla volta i numeri del codice
PIN� Dopo aver scelto la prima cifra, premere [OK] per confermare e il
cursore si sposterà sulla cifra successiva�
1� Se l'icona lampeggia, impostare il codice PIN�
2� Se l'icona è fissa, inserire il codice PIN precedentemente
impostato�
3� Una volta sbloccato, l'icona scompare� Se lo sblocco fallisce,
l'icona lampeggia di nuovo, suggerendo di reimpostare il codice PIN�
Nota:
•
0000 è un codice PIN non valido�
•
Per confermare l'impostazione è necessario inserire due volte il codice PIN�
•
Se si inseriscono numeri errati durante l'impostazione del codice PIN, il proces-
so di impostazione ricomincerà dall'inizio�
•
È possibile modicare il codice PIN sull'App�
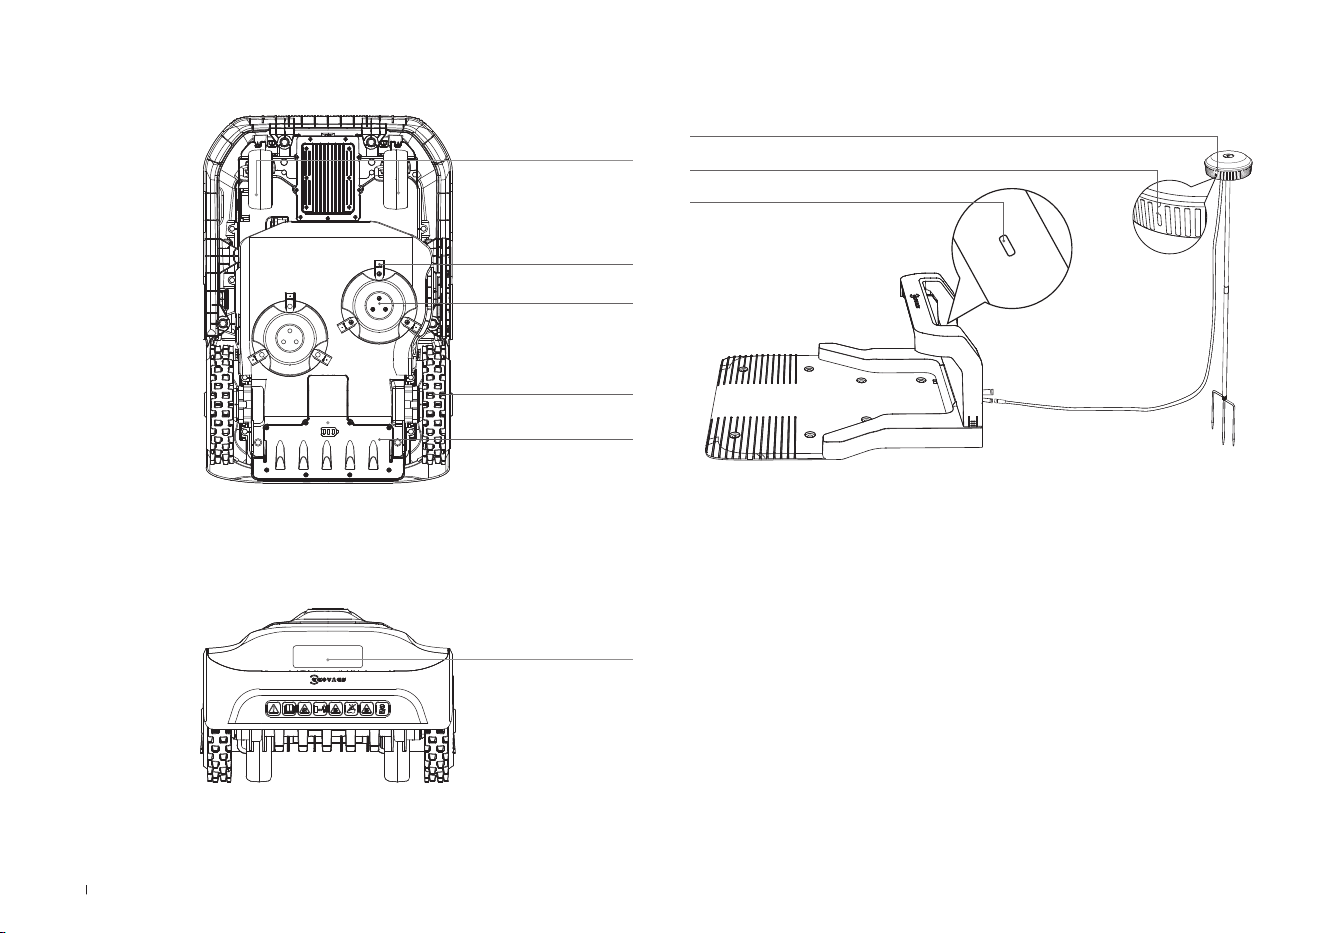
110IT
Vista della stazione
Stazione di riferimento RTK
RTK Spia indicatore
Blu fissa: ricarica e segnale forte
Blu lampeggiante: segnale scarso� Installa il dispositivo in un altro
punto�
Stazione Spia indicatore
RTK Spia indicatore
ECOVACS GOAT (vista inferiore)
ECOVACS GOAT (vista posteriore)
Disco lama
Lame
Ruote anteriori
Ruote fuoristrada
Vano batteria
Maniglia
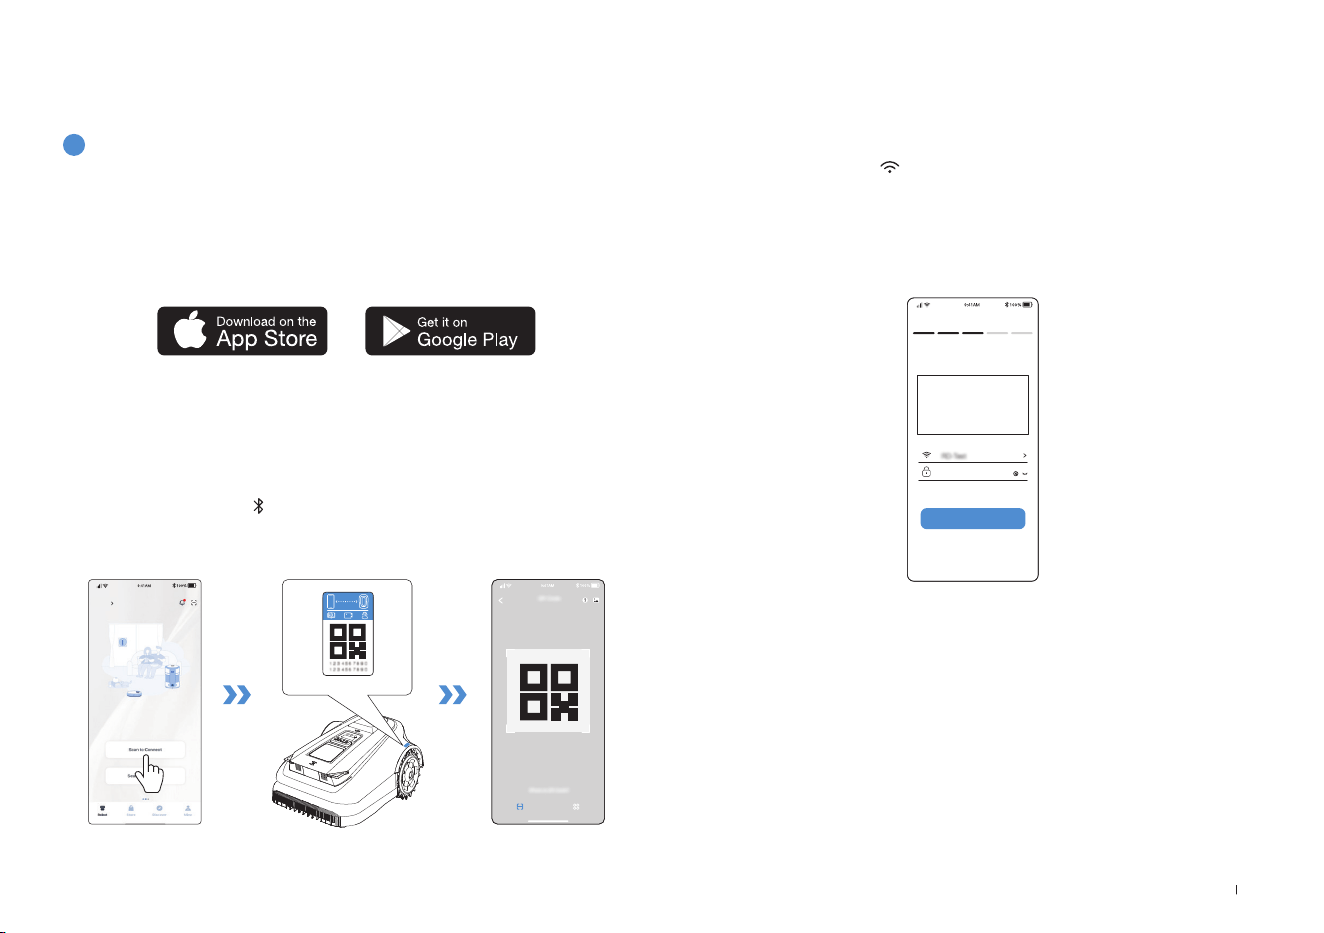
111 IT
3. Installazione e mappatura
3.1 Installazione
1
Preparazione dell'APP
Scaricare l'app ECOVACS HOME
Prima di iniziare, accertarsi che:
Collegare ECOVACS GOAT a internet
• Il cellulare sia connesso a una rete Wi-Fi�
• Sul router sia abilitato il segnale wireless della banda a 2,4 GHz�
1. Connessione Bluetooth
• Scansionare il codice QR sul ECOVACS GOAT o selezionare ECOVACS
GOAT manualmente tramite l'app�
• Attivare il Bluetooth sul telefono per connettere il ECOVACS GOAT�
• Sul display comparirà
dopo una connessione corretta�
Nota: dopo aver installato l'app ECOVACS HOME, completare la registrazione ed
effettuare l'accesso�
Nota: accertarsi che il telefono abbia la funzione Bluetooth e che il ECOVACS
GOAT sia entro la distanza collegabile (10 m)�
HOME
Add
Consentendo attualmente l'associazione a un solo account dell'app, il
ECOVACS GOAT non può essere associato a un altro account dell'app
prima di essere scollegato� Il ECOVACS GOAT può essere scollegato
nell'App� Questa operazione può essere eseguita in sicurezza, in quanto
non cancellerà i dati di lavoro come la programmazione del ECOVACS
GOAT� È possibile cancellare l'account facendo clic sul triangolino
accanto al nome del dispositivo per eliminarlo�
Come scollegare il ECOVACS GOAT?
2. Connessione Wi-Fi
• Accertarsi che ECOVACS GOAT e il telefono si trovino nello stesso
ambiente di router�
• Seguire le istruzioni nell'App per completare la connessione�
• Sul display comparirà
dopo una connessione corretta�
Wi-Fi
****************
Next step
• È inoltre possibile acquistare il modulo di connessione aggiuntivo per
collegare ECOVACS GOAT anche senza segnale Wi-Fi�
Nota: utilizzare una rete a 2,4GHz�
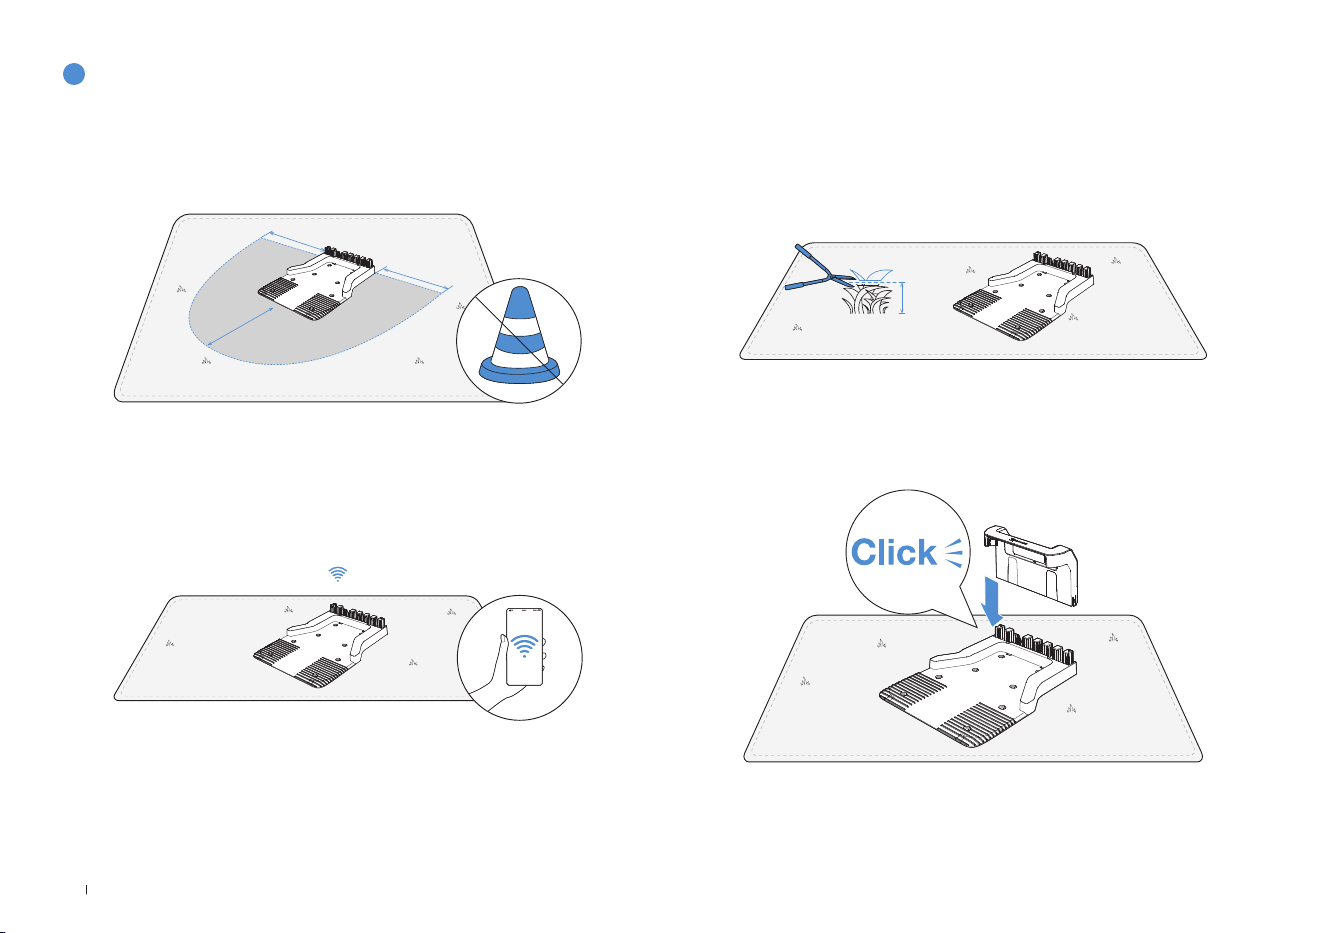
112IT
2
Montaggio della stazione
1� Posizionare la stazione su un'area aperta e pianeggiante, senza
pendenze o rocce� Assicurarsi che non vi siano oggetti (come alberi,
palloni o case) entro 2 metri a sinistra, 2 metri a destra e 2 metri di
fronte alla stazione�
2� Se si desidera controllare ECOVACS GOAT a distanza, collocare la
stazione il più vicino possibile a un luogo con un forte segnale Wi-Fi�
3� Assicurarsi che l'erba intorno alla stazione non sia più lunga di 10 cm�
L'erba troppo alta può influire sulla ricarica�
2m
2m
2m
10cm
4� Inserire la pila nella base fino a che non si sente uno scatto�
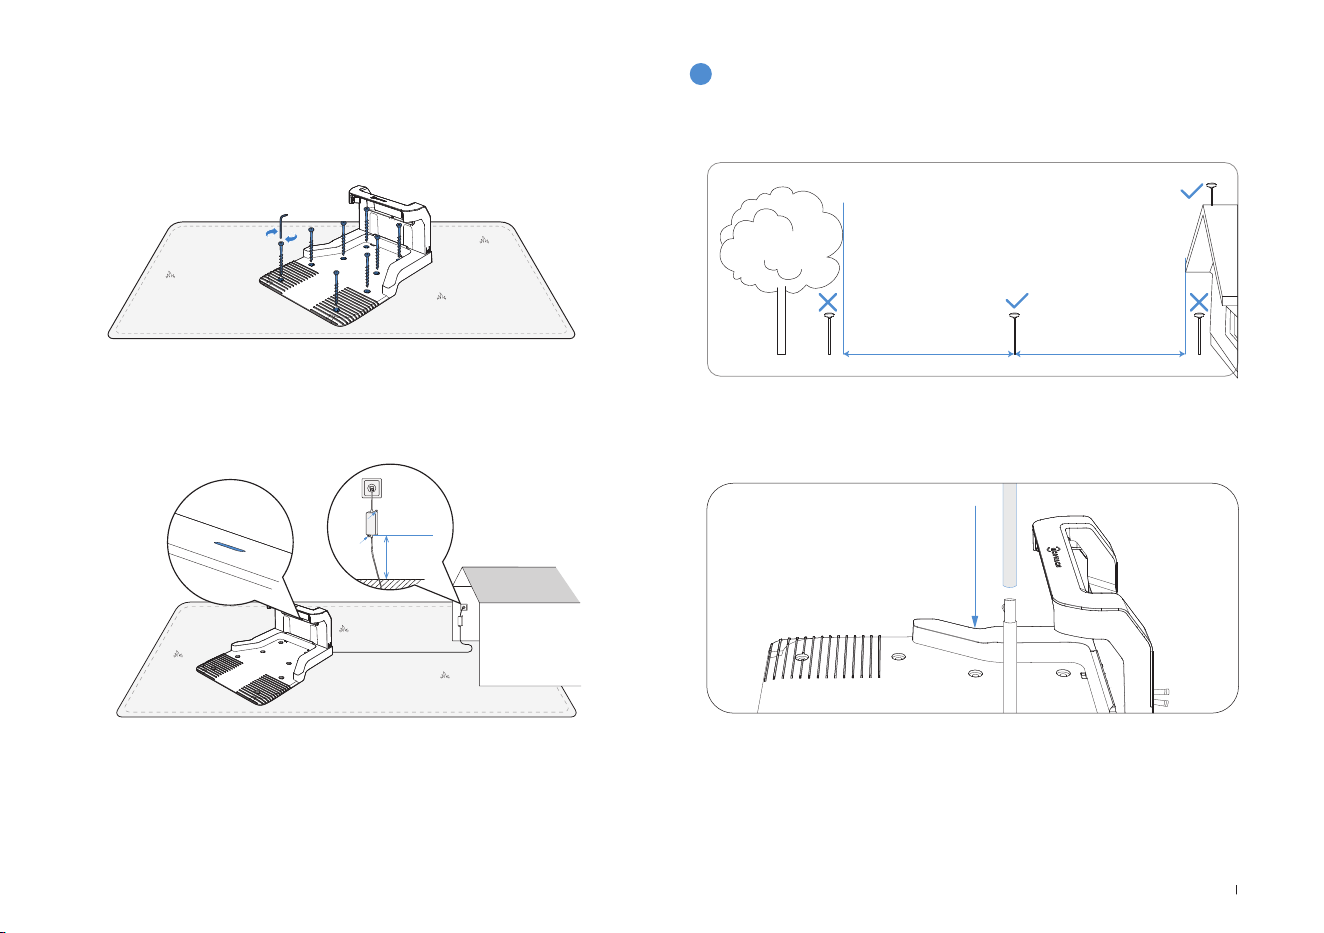
113 IT
5� Fissare la stazione a terra nell'area selezionata con i pioli, usando la
chiave esagonale�
6� Collegare la spina della stazione all'alimentatore e verificare che la
spia luminosa blu sia accesa�
Nota: Posizionare l'adattatore di corrente a 30 cm da terra per evitare il contatto
con acqua e umidità�
Collegare il dispositivo a una presa di corrente interna o a una presa impermeabile
esterna�
3
Montare la stazione di riferimento RTK
Installare la stazione base RTK in un'area all'aperto ad almeno 2 metri
di distanza da edifici e alberi�
1� Collegare i paletti di montaggio superiore e inferiore, facendo scattare
il gancio saldamente in posizione�
30 cm
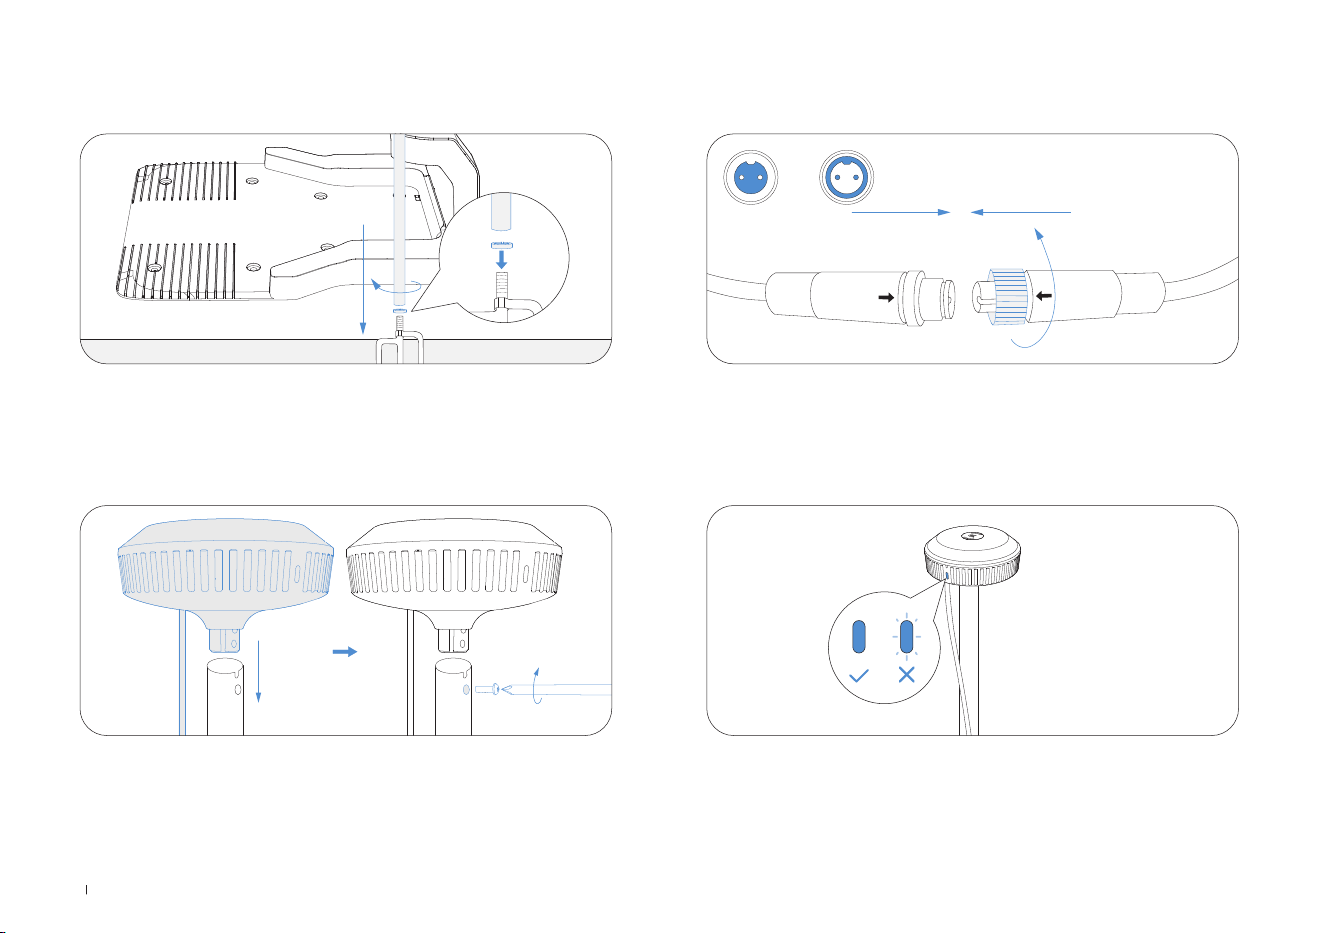
114IT
2� Inserire il piolo triangolare nel paletto di montaggio e serrarlo saldamente�
3� Fissare la testina di segnalazione inserendo la parte rialzata nel
paletto di montaggio e serrando le viti con un utensile�
4� Collegare il cavo di alimentazione dell'RTK al cavo di alimentazione
della stazione base e serrare il dado�
5� Dopo l'accensione, se la spia luminosa della stazione base RTK
rimane fissa, la posizione è corretta; se lampeggia, riposizionare la
stazione�
A B
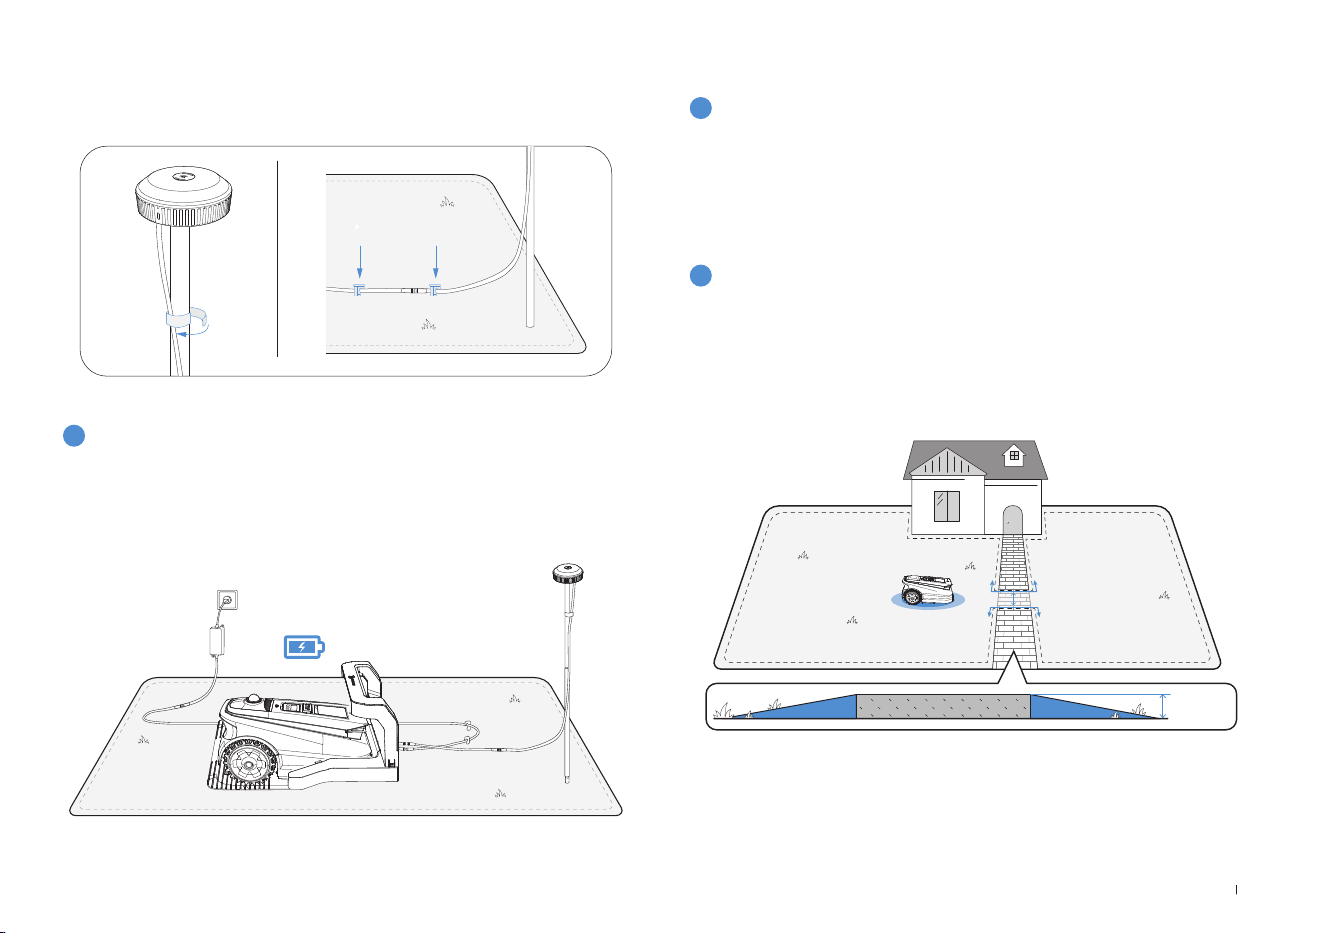
115 IT
6� Gestione dei cavi: Fissare il cavo di alimentazione dell'RTK al paletto
di montaggio con fascette e utilizzare pioli di plastica da giardino per
fissare a terra gli altri cavi�
4
Ricarica del tagliaerba
Caricare completamente il tagliaerba prima del primo utilizzo�
Posizionarlo nella stazione di ricarica� Quando la spia luminosa è bianca
lampeggiante, è in corso la ricarica del dispositivo; quando la spia è
fissa la ricarica è terminata�
2
Mappatura
1
Prima della mappatura è necessario prendere nota
dei seguenti suggerimenti:
1. Scegliere la modalità di mappatura appropriata per il proprio giardino.
Per i prati con dislivelli superiori a 4 cm o per i sentieri stretti inferiori a
1 metro, si consiglia di selezionare la funzione di Mappatura manuale�
Oppure utilizzare la funzione di Mappatura automatica predefinita�
• Accertarsi che ECOVACS GOAT sia acceso�
• Se il ECOVACS GOAT è fermo, toccare il pulsante START --> OK sul
ECOVACS GOAT�
• Se il ECOVACS GOAT è bloccato, inserire il codice PIN�
3.2 Mappatura
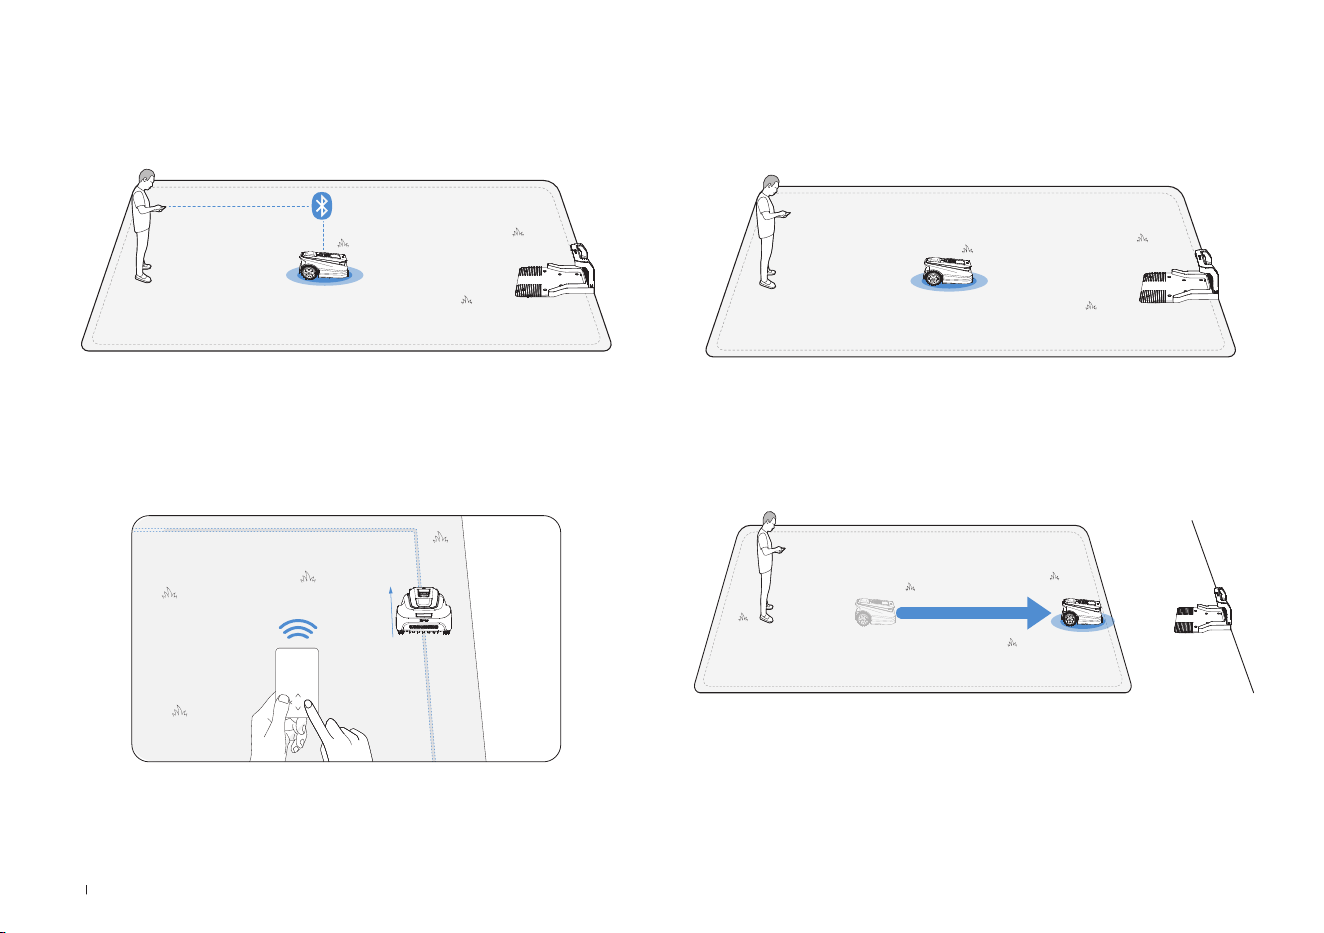
116IT
4. Avvia mappatura
Se la stazione si trova sul prato, è sufficiente toccare Avvia mappatura
per avviare la mappatura�
Se la stazione base non si trova sul prato, spostare ECOVACS GOAT
verso il confine del prato, quindi avviare la Mappatura�
Nota: Per una ricarica efficace, posizionare la stazione base entro
una distanza di 3 metri dal prato, e comunque non oltre una distanza
massima di 10 metri�
2. Connettere il tagliaerba
Con la connessione Bluetooth, il telefono si collega automaticamente al
tagliaerba�
3. Trovare un punto di partenza
Trovate un punto di partenza idoneo lungo il bordo del prato� Durante il
processo di mappatura, tenersi a non più di 6 m dal tagliaerba�
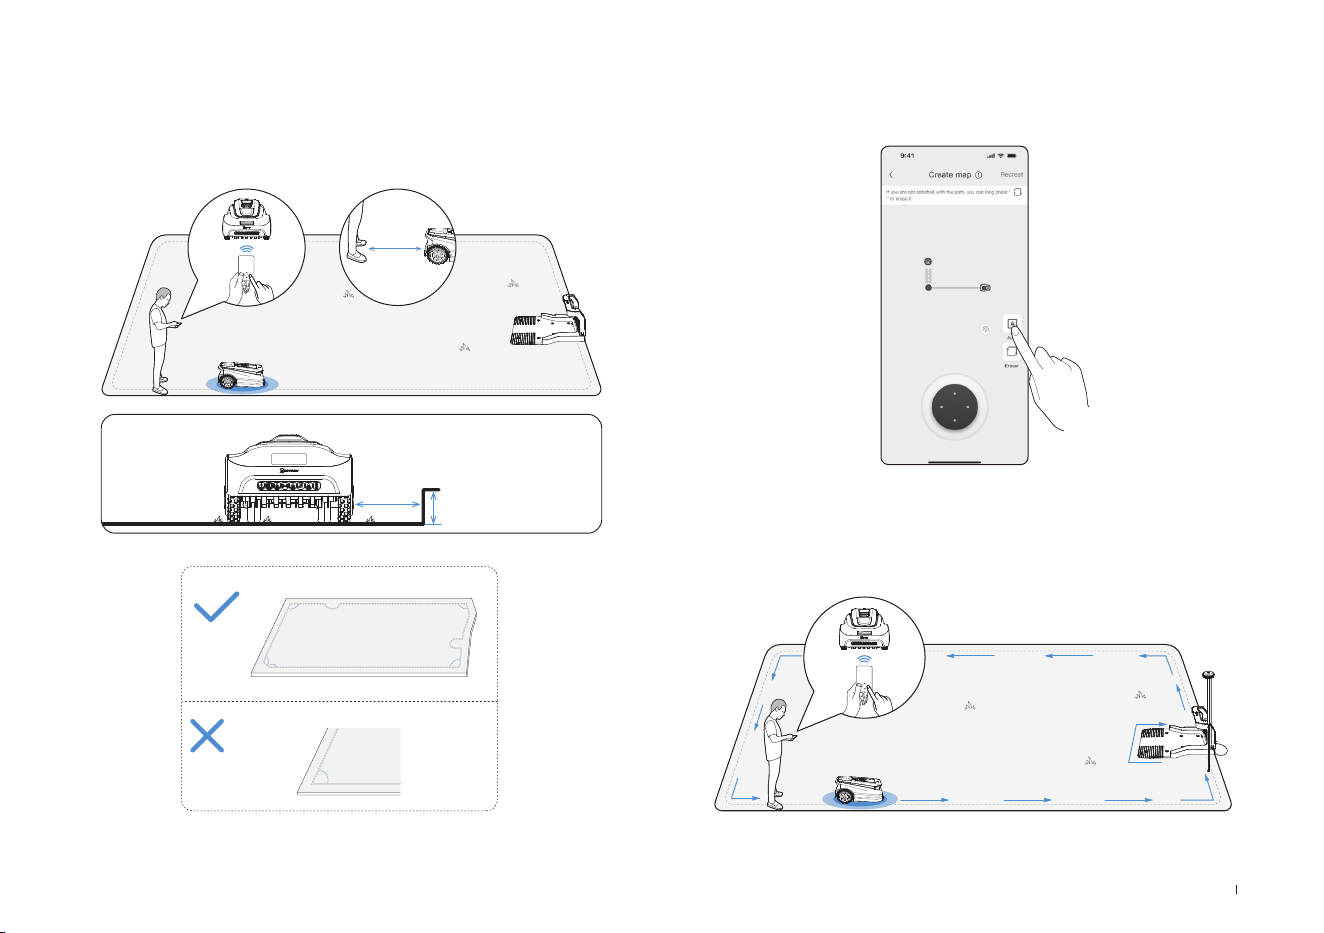
117 IT
Lasciare che ECOVACS GOAT parta dalla stazione e seguirlo entro 6
metri� Se il dislivello è superiore a 4 cm, tenere il dispositivo ad almeno
10 cm dal bordo del prato�
Accertarsi di seguire una linea retta con un angolo di svolta regolare
non inferiore a 90°�
5. Passaggio tra modalità di mappatura
Durante la mappatura, è possibile passare dalla mappatura automatica
a quella manuale nell'interfaccia dell'app�
<90°
>90°
>90°
>90°
>90°
>90°
≤
6m
>
>
10cm
4cm
6. Fine della mappatura
Dopo aver tracciato il perimetro del prato, terminare il circuito al punto
di partenza per completare la definizione dei confini�
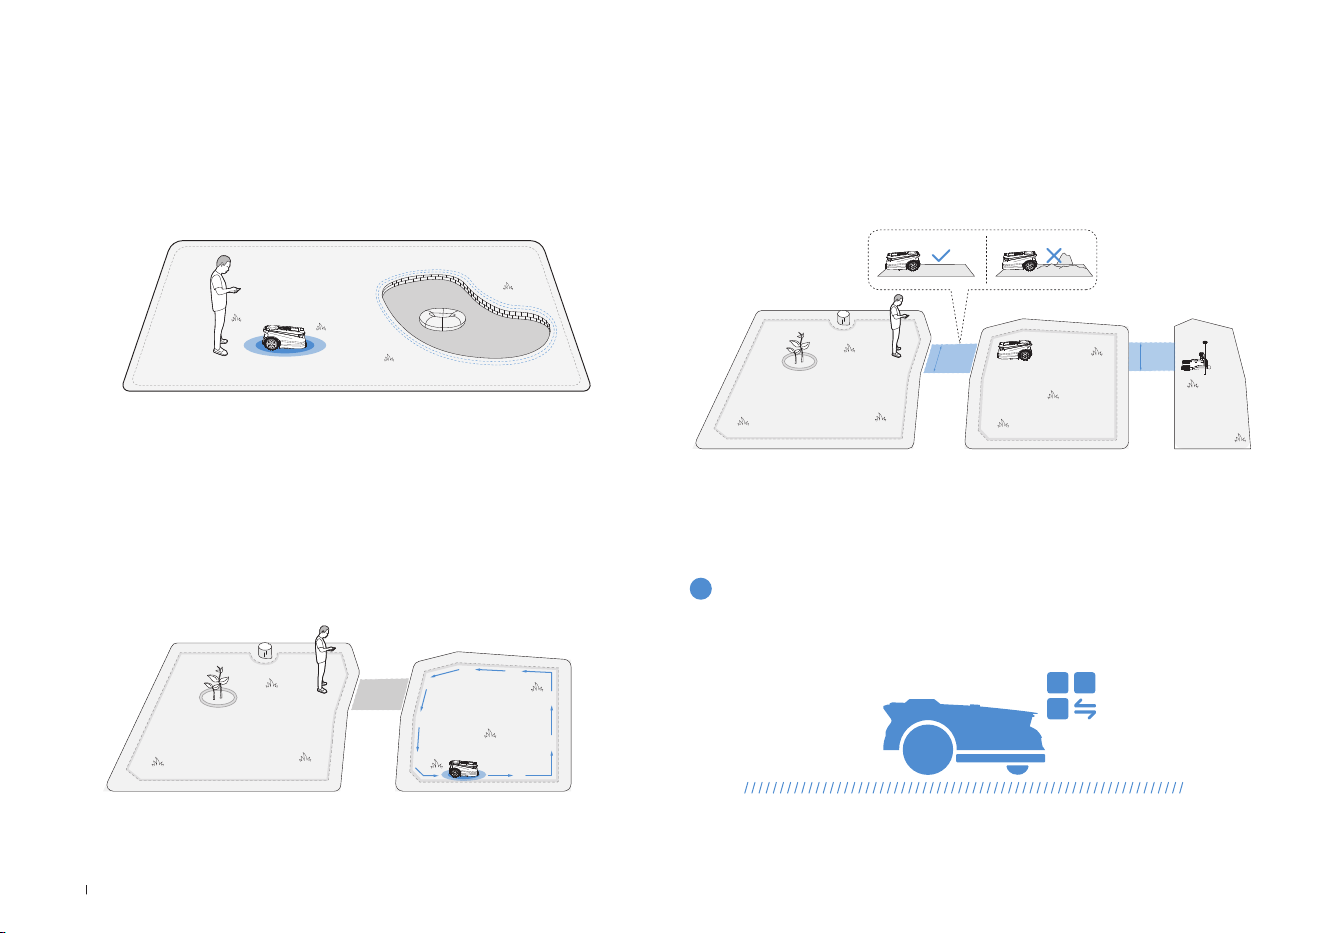
118IT
Per proteggere ECOVACS GOAT, creare delle zone ad accesso vietato
dove il dispositivo non può entrare, come ad esempio un'aiuola, un
trampolino o un orto�
Seguire le istruzioni riportate nell'app� Spostare ECOVACS GOAT fino al
punto di partenza della zona ad accesso vietato� La lunghezza minima
del singolo lato dell'area riservata deve essere superiore a 0,5 metri�
7. Definizione di una zona ad accesso vietato
Nota: Si raccomanda di tenere ECOVACS GOAT a una distanza di 25cm dai
confini di aree estremamente pericolose, come uno stagno o una scogliera�
• Partire dalla stazione o all'interno della mappa e spostare ECOVACS
GOAT fino alla nuova area da creare�
• Mappare la nuova area in base all'ambiente�
8. Creazione di una nuova area
• Il percorso deve collegare due aree separate o il bordo di un prato alla
stazione di ricarica�
• ECOVACS GOAT può generare automaticamente un percorso quando
parte da un punto e raggiunge un altro punto�
• La larghezza del percorso per ECOVACS GOAT deve essere superiore
a 1 metro�
9. Creazione di un percorso
>1m
>1m
I contenuti seguenti aiuteranno a capire come funziona ECOVACS GOAT�
È possibile scegliere la modalità sul ECOVACS GOAT o tramite l'app�
4. Cominciare a usare ECOVACS GOAT
4.1 Come funziona ECOVACS GOAT
1
Modalità di taglio

119 IT
ECOVACS GOAT è un robot intelligente per la cura del prato� Prima di
iniziare, assicurarsi che l'erba non superi i 10 cm� Qualora sia più lunga,
tagliarla grossolanamente con un tagliaerba manuale� Successivamente
ECOVACS GOAT manterrà l'erba ben tagliata entro un'altezza di 9 cm�
Quando la batteria è quasi scarica, ECOVACS GOAT si interromperà
autonomamente e tornerà alla stazione per ricaricarsi� Una volta
completata la ricarica, ECOVACS GOAT riprenderà l'attività di taglio
incompiuto della giornata�
Con il taglio programmato, ECOVACS GOAT falcia lungo un percorso a
forma di S per ottenere la massima efcienza�
3
Altezza di taglio
5
Ricarica automatica
4
Taglio programmato
È possibile impostare il programma di taglio personalizzato sull'app
ECOVACS HOME� Grazie ai due programmi congurabili, ECOVACS
GOAT consente di impostare e cambiare le modalità di taglio in base
alle diverse stagioni�
2
Programma
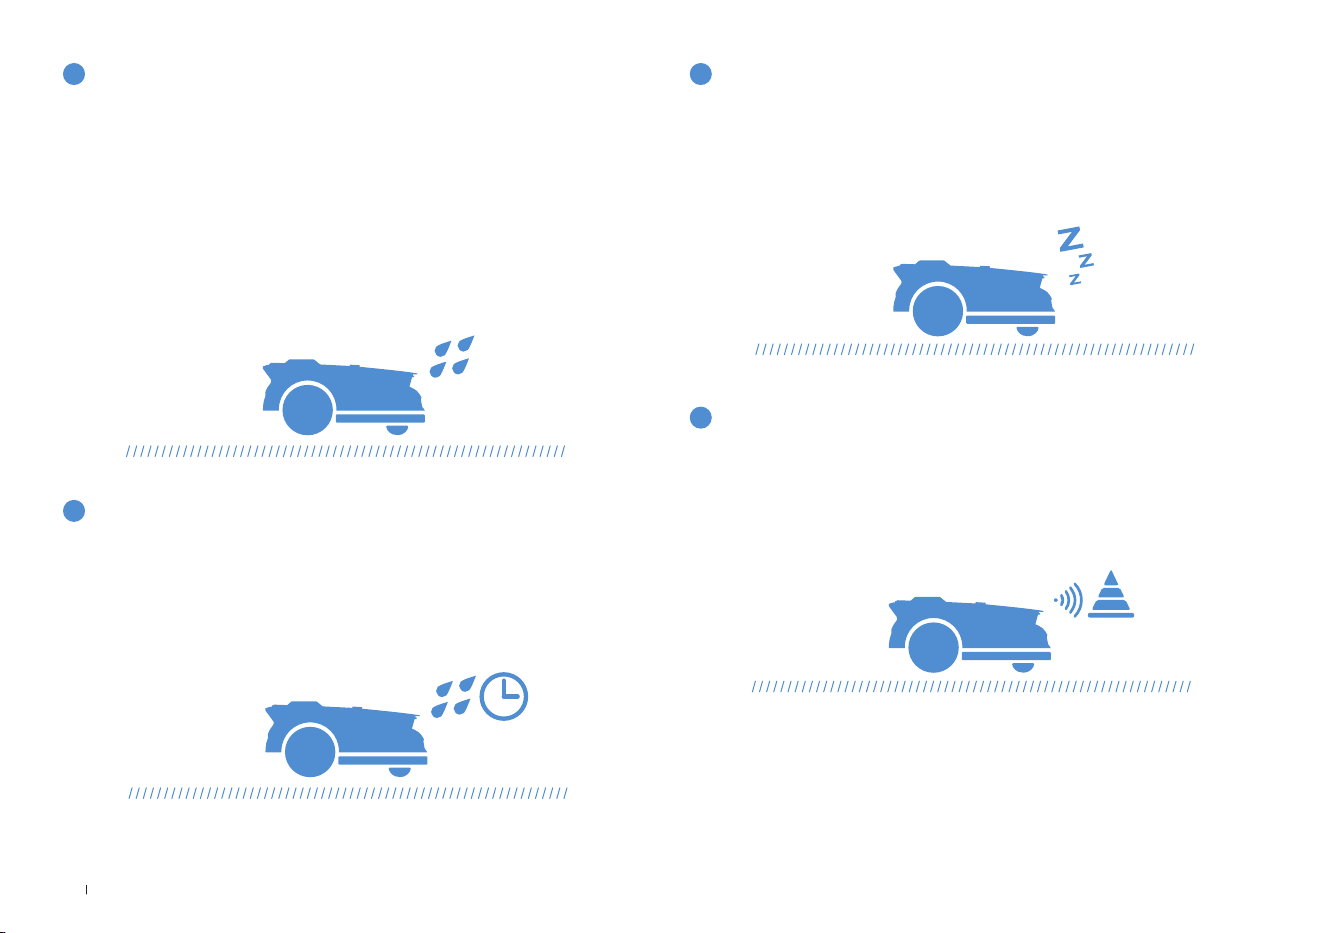
120IT
Con il suo livello di impermeabilità IPX6, ECOVACS GOAT non ha
problemi a stare all'aperto� Tuttavia, la falciatura sotto la pioggia
battente non darà il miglior risultato� ECOVACS GOAT, grazie al suo
sensore pioggia, interromperà la falciatura e tornerà automaticamente
alla stazione quando viene rilevata una certa quantità di acqua piovana�
Cessata la pioggia, ECOVACS GOAT riprenderà automaticamente
l'attività di taglio� Per ottenere i migliori risultati di falciatura si consiglia
di falciare con tempo asciutto�
Può anche essere disattivato direttamente sul ECOVACS GOAT o
tramite l'App, per falciare nei giorni di pioggia�
6
Sensore pioggia
Al termine della pioggia il prato potrebbe essere ancora bagnato� Per un
migliore risultato di falciatura, per impostazione predenita ECOVACS
GOAT riprenderà a falciare 3 ore dopo che il sensore pioggia abbia
rilevato che la pioggia è cessata� È possibile modicare il tempo di
ritardo in caso di pioggia tramite l'app�
Dotato di 3D-ToF LiDAR, ECOVACS GOAT può rilevare gli oggetti
ed evitarli in anticipo� L'altezza degli ostacoli da evitare può essere
impostata nell'app ECOVACS HOME� Inoltre, alcuni ostacoli possono
essere evitati con precisione dal riconoscimento tramite IA�
Per proteggere gli animali notturni, ECOVACS GOAT interromperà la
falciatura di notte� Questa funzione può essere disattivata sul ECOVACS
GOAT o tramite l’App per falciare durante la notte�
7
Tempo di ritardo in caso di pioggia
9
Aggiramento intelligente degli ostacoli
8
Protezione animali
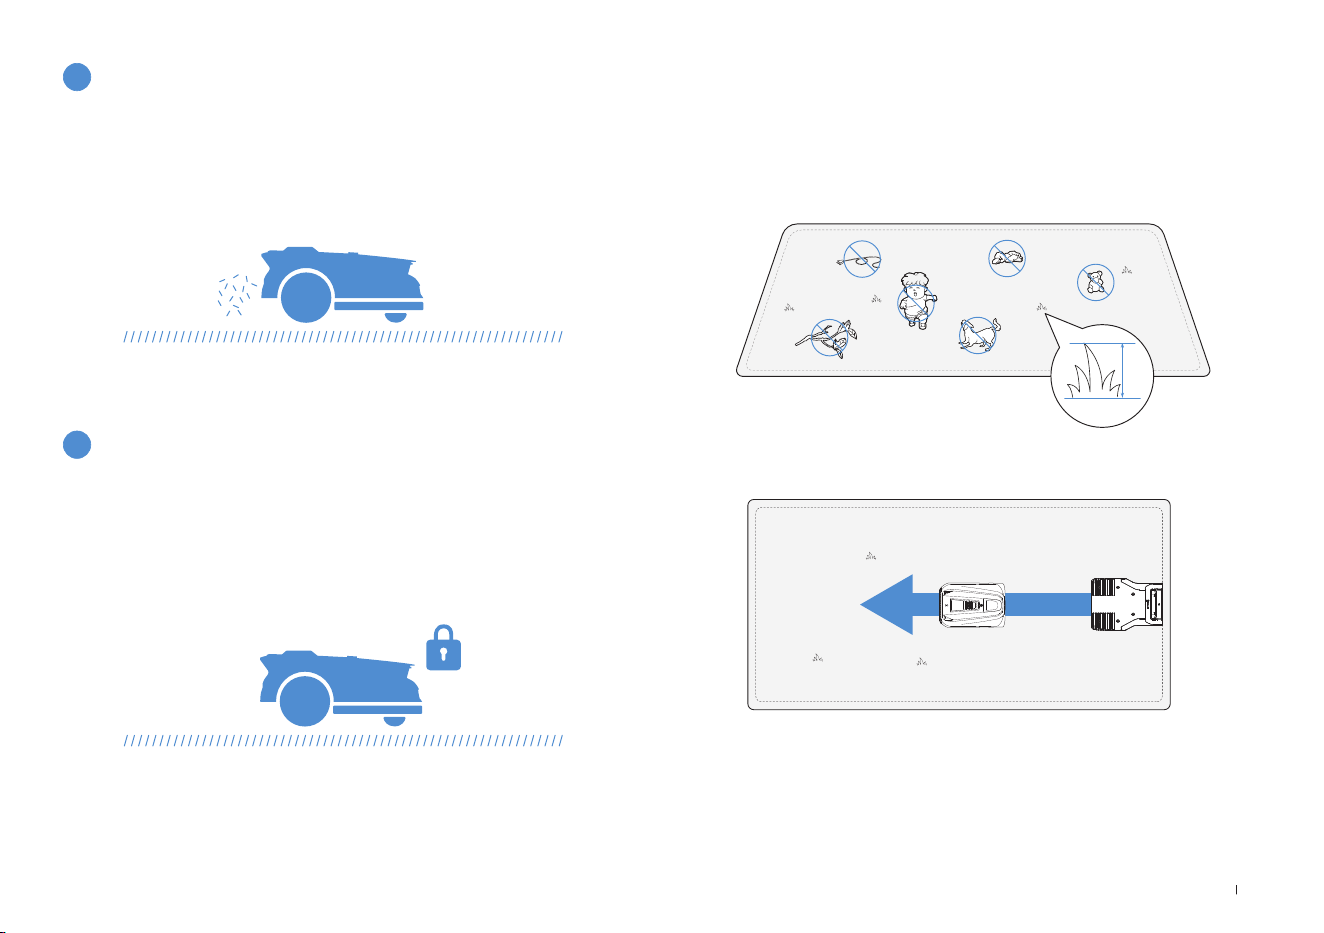
121 IT
• Tagliare l'erba a un'altezza non superiore a 10 cm con un tagliaerba
manuale ed eliminare ostacoli come detriti, accumuli di foglie, giocat-
toli, cavi e pietre�
• Non permettere che i bambini giochino sul prato mentre ECOVACS
GOAT sta falciando�
• Impostare la direzione di taglio desiderata�
11
Sicurezza e protezione con codice PIN
Nota: ECOVACS GOAT correggerà la sua direzione dopo essere partito dalla
stazione e, per impostazione predefinita, andrà dritto per falciare�
4.2 Suggerimenti prima del primo taglio
≤
10cm
La falciatura quotidiana con ECOVACS GOAT lascia uno sfalcio corto,
che verrà distribuito uniformemente sul prato come ottimo fertilizzante�
10
Non è necessario lo smaltimento dell'erba tagliata
Il codice PIN impostato al primo avvio del tuo ECOVACS GOAT viene
utilizzato per prevenire furti e l’uso da parte dei bambini� Se è bloccato,
puoi sbloccarlo inserendo il codice PIN�
Nota:
dopo cinque tentativi errati, attendere 30 minuti prima di riprovare�
È possibile modicare il codice PIN sull'App�
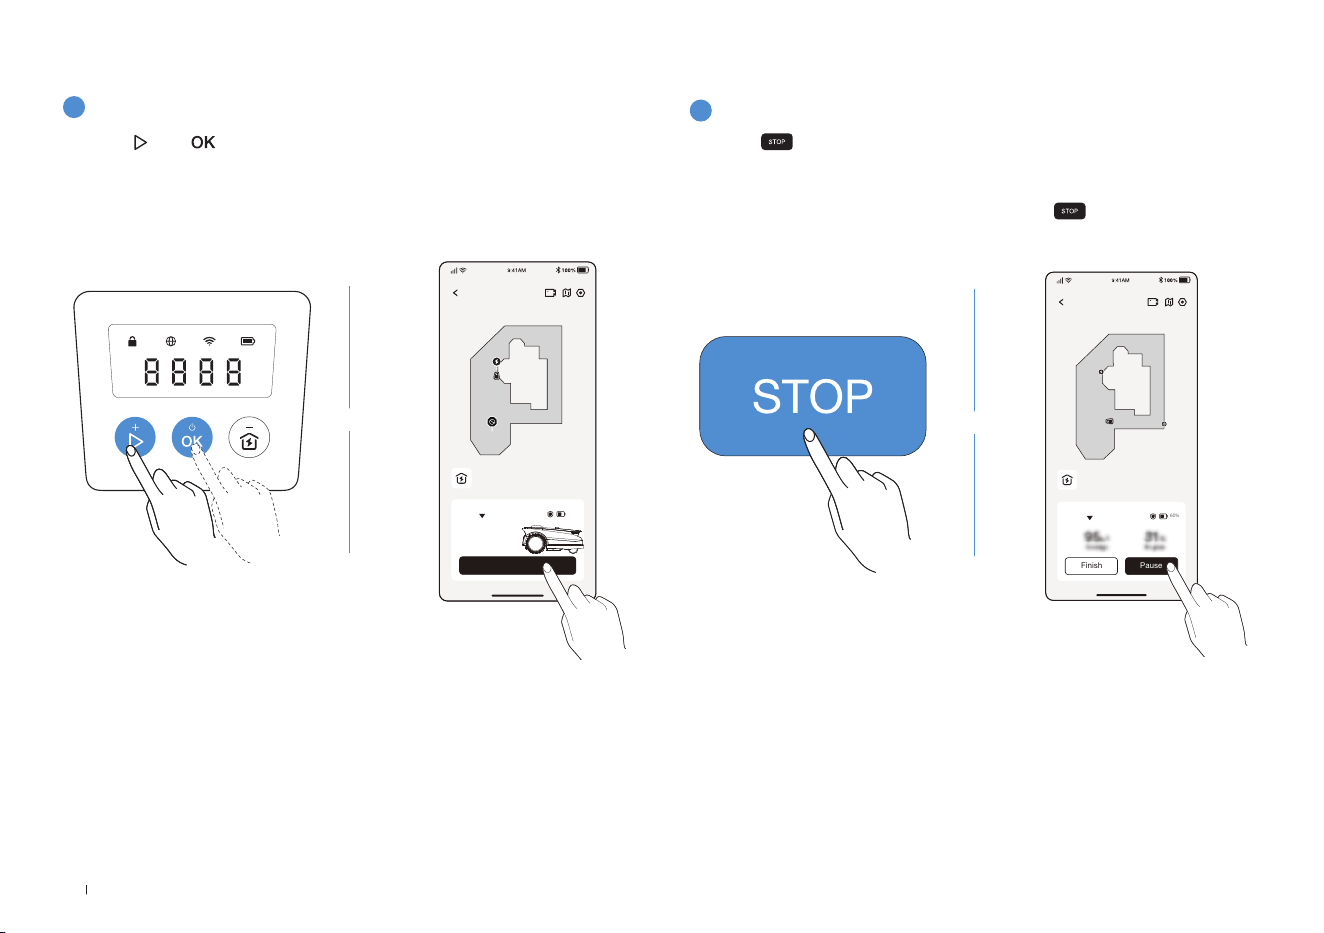
122IT
2
Mettere in pausa il taglio dell'erba
Premere su ECOVACS GOAT, oppure metterlo in pausa tramite
l'app�
• Per sicurezza, ECOVACS GOAT sarà bloccato e non potrà essere
avviato direttamente tramite l'app dopo che è stato premuto�
Premere prima AVVIO, quindi OK sul pannello di controllo�
ECOVACS GOAT
Finish Pause
Auto
60%
Station
1
Avviare il taglio dell'erba
4.3 PRONTO PER IL TAGLIO
Premere , poi � ECOVACS GOAT inizierà a falciare� In alternativa, è
possibile dare il via alla falciatura dall'app�
Nota: accertarsi che l'erba sia stata tagliata a un'altezza non superiore a 10 cm
con il tagliaerba manuale
.
ECOVACS GOAT
Start
Auto
Station
60%
OPPURE
OPPURE
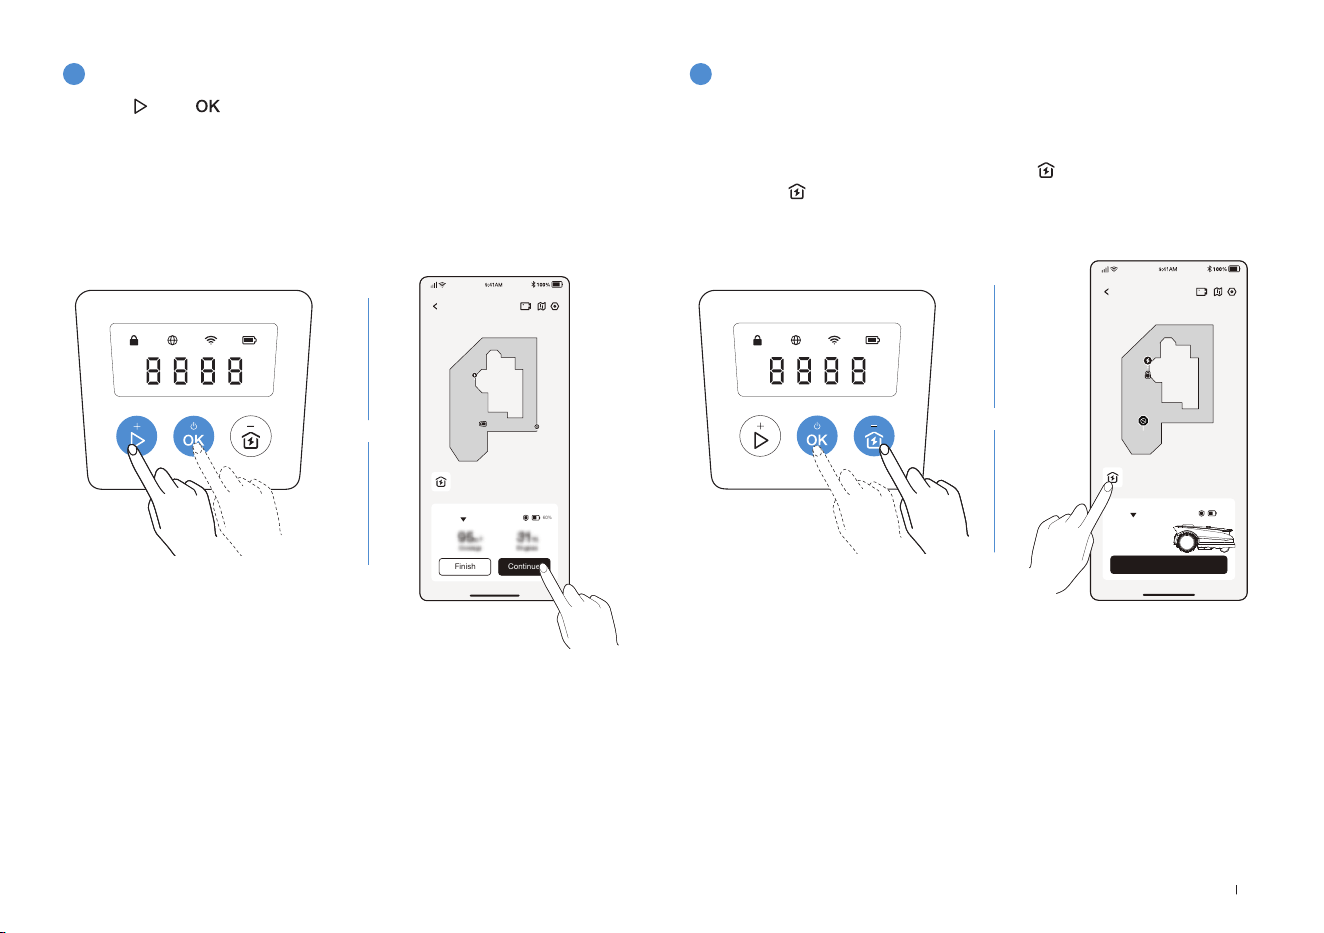
123 IT
3
Ripresa della falciatura
4
Fine del taglio
Premere e poi su ECOVACS GOAT, o toccare il pulsante nell'App
per riprendere la falciatura�
1� Dopo aver completato l'attività di taglio, ECOVACS GOAT torna
automaticamente alla stazione�
2� Quando il taglio viene terminato manualmente, è necessario inviare
ECOVACS GOAT alla stazione premendo
, quindi OK, oppure
toccando sull'app�
ECOVACS GOAT
Finish Continue
Auto
60%
Station
ECOVACS GOAT
Start
Auto
Station
60%
OPPURE
OPPURE
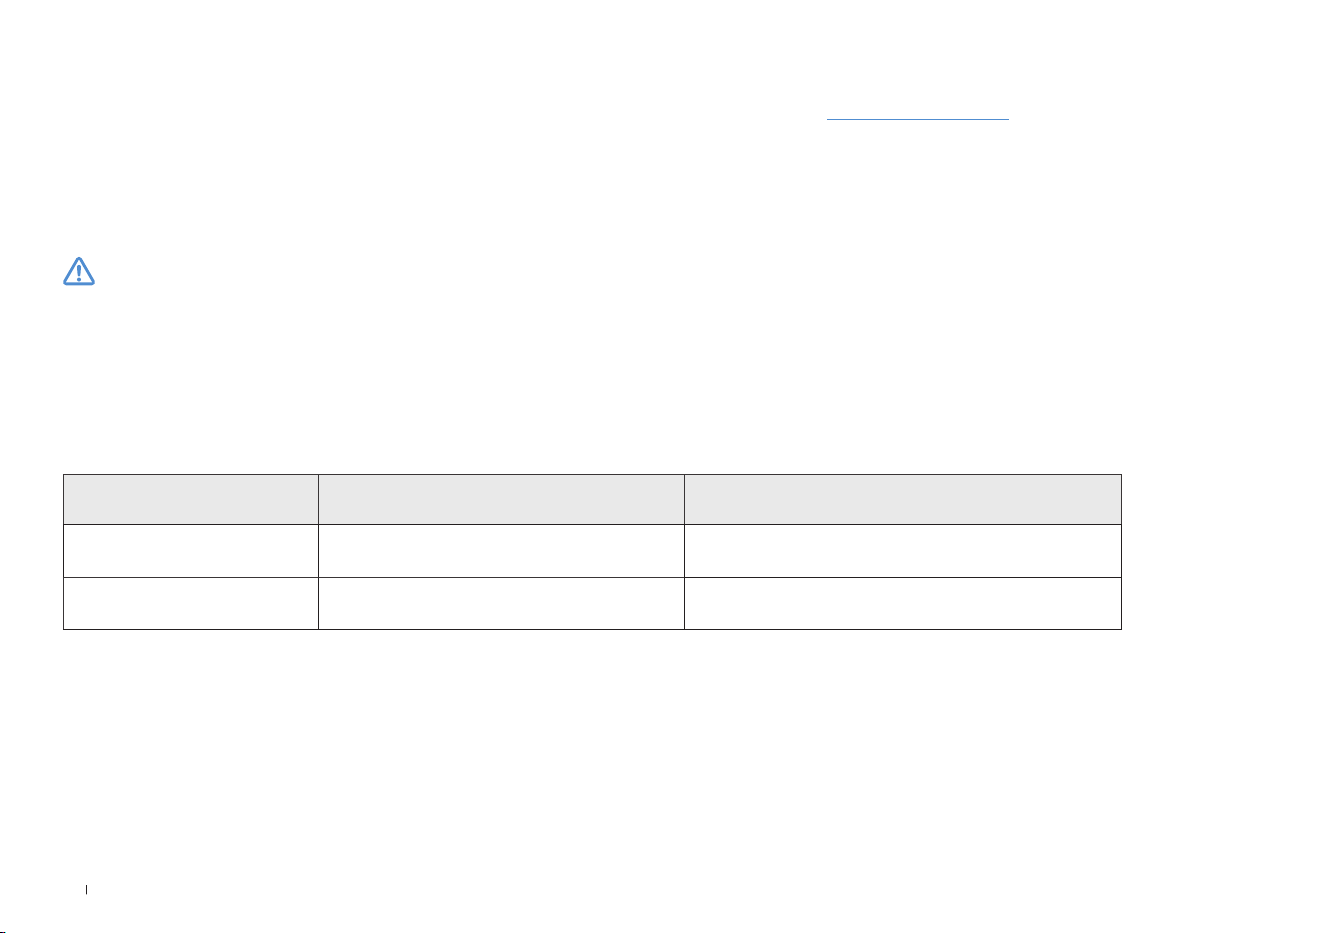
124IT
Parte
Manutenzione Sostituzione
Videocamera IA anteriore 2-4 settimane -
Lame - 4-6 settimane
In caso di problemi durante l'utilizzo di ECOVACS GOAT, consultare gli articoli delle FAQ sul sito
https://www�ecovacs�com
o la sezione
dell'app ECOVACS HOME�
Per garantire migliori prestazioni e prolungare la durata di ECOVACS GOAT, è necessario effettuare la relativa manutenzione e sostituire
correttamente le parti usurate�
AVVERTENZA
• Spegnere sempre ECOVACS GOAT prima di qualunque intervento�
• Indossare sempre guanti protettivi quando si sostituiscono le lame�
• Montare solo lame prodotte da ECOVACS e viti nuove�
• Pulire i componenti che non possono essere lavati con un panno pulito e asciutto� Non utilizzare spray per la pulizia o altri detergenti�
• Girare delicatamente ECOVACS GOAT su una superficie morbida�
5. Risoluzione dei problemi
6. Manutenzione
6.1 Frequenza
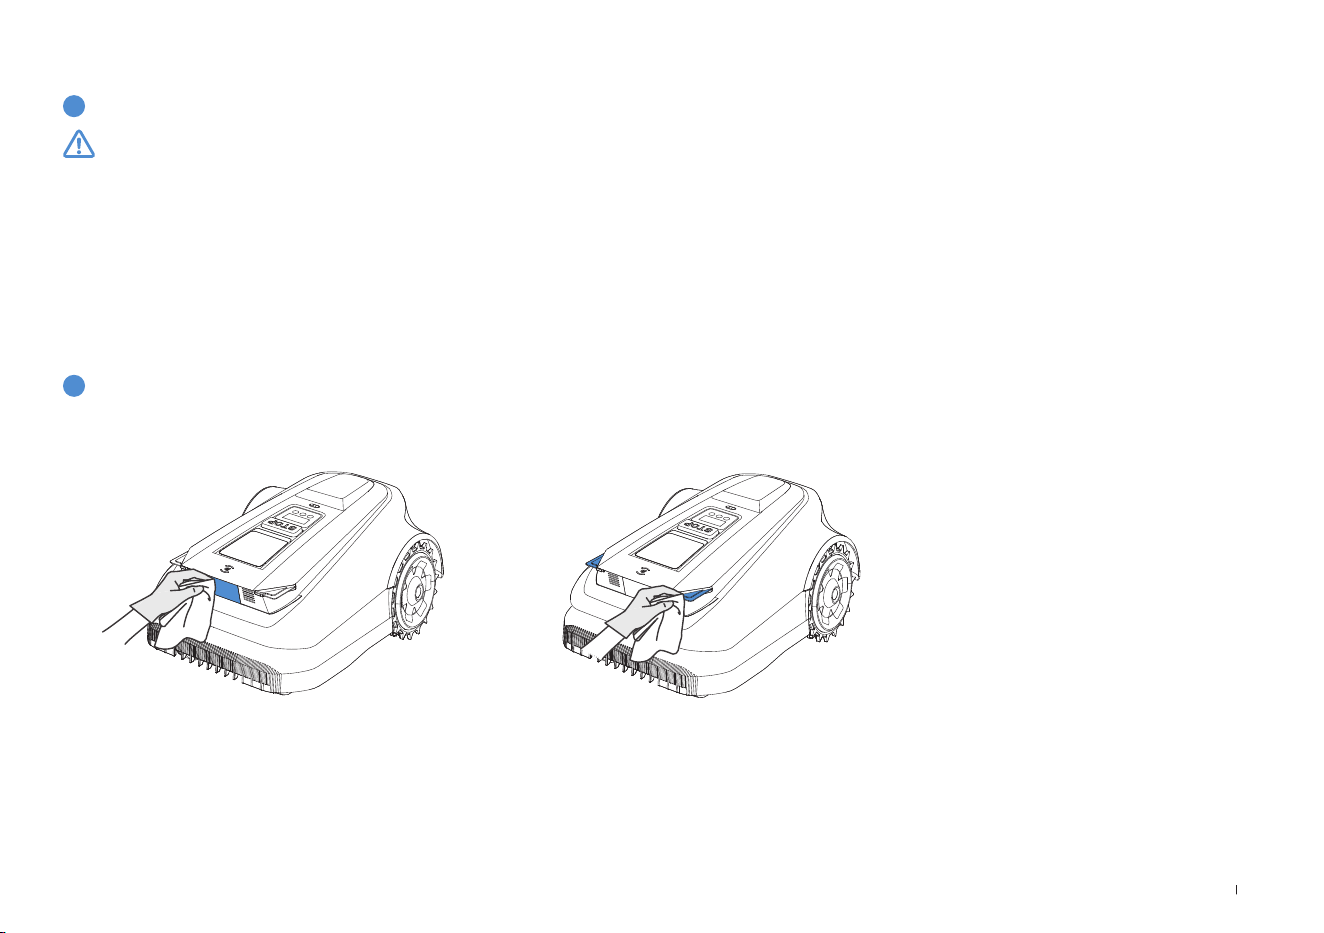
125 IT
1
Pulire il disco lama, il telaio, le ruote fuoristrada e le ruote anteriori
2
Altri componenti
6.2 Manutenzione ordinaria
AVVERTENZA
• Indossare SEMPRE guanti protettivi�
• NON utilizzare un irrigatore ad alta pressione perché l'acqua può penetrare nelle guarnizioni e danneggiare le parti elettroniche e
meccaniche�
PASSAGGI PER LA PULIZIA DEI COMPONENTI PRINCIPALI
Passaggio 1: Spegnere ECOVACS GOAT�
Passaggio 2: Girare delicatamente ECOVACS GOAT su una superficie morbida�
Passaggio 3: Pulire il disco lama e il telaio con una spazzola�
Passaggio 4: Verificare che il disco lama possa ruotare e le lame ruotino liberamente�
Passaggio 5: Eliminare il fango dalle ruote fuoristrada e dalle ruote anteriori usando una spazzola�
Pulire i componenti con un panno pulito e asciutto� Evitare l'uso di spray o detergenti per la pulizia�

126IT
3
Stazione di riferimento RTK
1
Conservazione durante l'inverno
Regolare correttamente la stazione di riferimento RTK, compreso il
paletto di montaggio, in caso di inclinazione�
ECOVACS GOAT
• Spegnere ECOVACS GOAT dopo che è completamente carico�
• Pulirlo a fondo�
• Riporlo coperto da una protezione impermeabile e antipolvere in un
luogo fresco, ben ventilato e asciutto�
Stazione
• Scollegare l'alimentatore dalla presa di corrente�
• Scollegare l'alimentatore dalla stazione�
• Contrassegnare il punto in cui è stata impostata la stazione come
riferimento per la stagione successiva�
• Conservare la stazione e l'alimentatore in un luogo fresco, ben
ventilato e asciutto, lontano dalla luce solare diretta�
6.3 Manutenzione stagionale
Nota: sarà necessario rimettere la stazione nella posizione originale per lavorare
in una nuova stagione� In caso contrario, potrebbe causare errori di posizione e
invalidamento della mappa�
2
Riavvio in primavera
• Rimuovere tutte le coperture protettive da ECOVACS GOAT e dalla
stazione�
• Montare la stazione e riposizionarla nel punto in cui si trovava la
stagione precedente�
• Controllare che i cavi non presentino danni o rotture e ripararli se
necessario� Collegare i cavi sicuri e adatti all'uso�
• Controllare l'aflatura delle lame e sostituirle se necessario� Per
informazioni dettagliate sui diversi passaggi e suggerimenti, consultare
la sezione Manutenzione del presente manuale�
• Accendere ECOVACS GOAT e vericare che sia connesso all'app e
che funzioni correttamente�
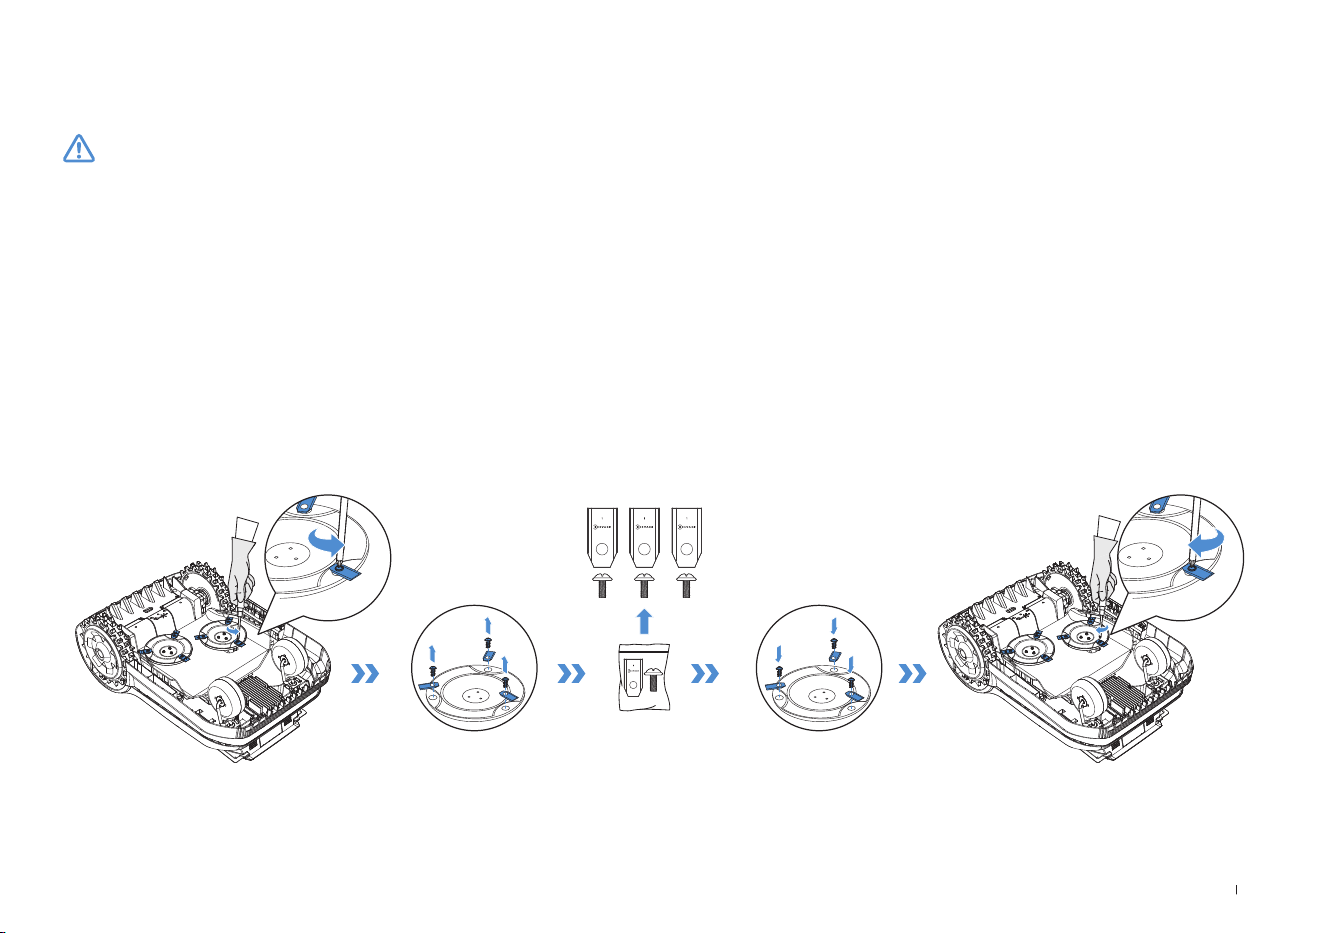
127 IT
Sostituzione delle lame
6.4 Ricambi
AVVERTENZA
• Spegnere sempre ECOVACS GOAT prima di qualunque intervento�
• Indossare sempre guanti protettivi quando si sostituiscono le lame�
• Montare solo lame prodotte da ECOVACS e viti nuove�
• Pulire i componenti che non possono essere lavati con un panno pulito e asciutto� Non utilizzare spray per la pulizia o altri detergenti�
PASSAGGI PER LA SOSTITUZIONE DELLE LAME
Passaggio 1: Spegnere ECOVACS GOAT�
Passaggio 2: Girare delicatamente ECOVACS GOAT su una supercie morbida�
Passaggio 3: Allentare le viti con un cacciavite�
Passaggio 4: Rimuovere le viti e le lame�
Passaggio 5: Stringere le nuove lame e viti�
Passaggio 6: Accertarsi che le lame possano ruotare liberamente�
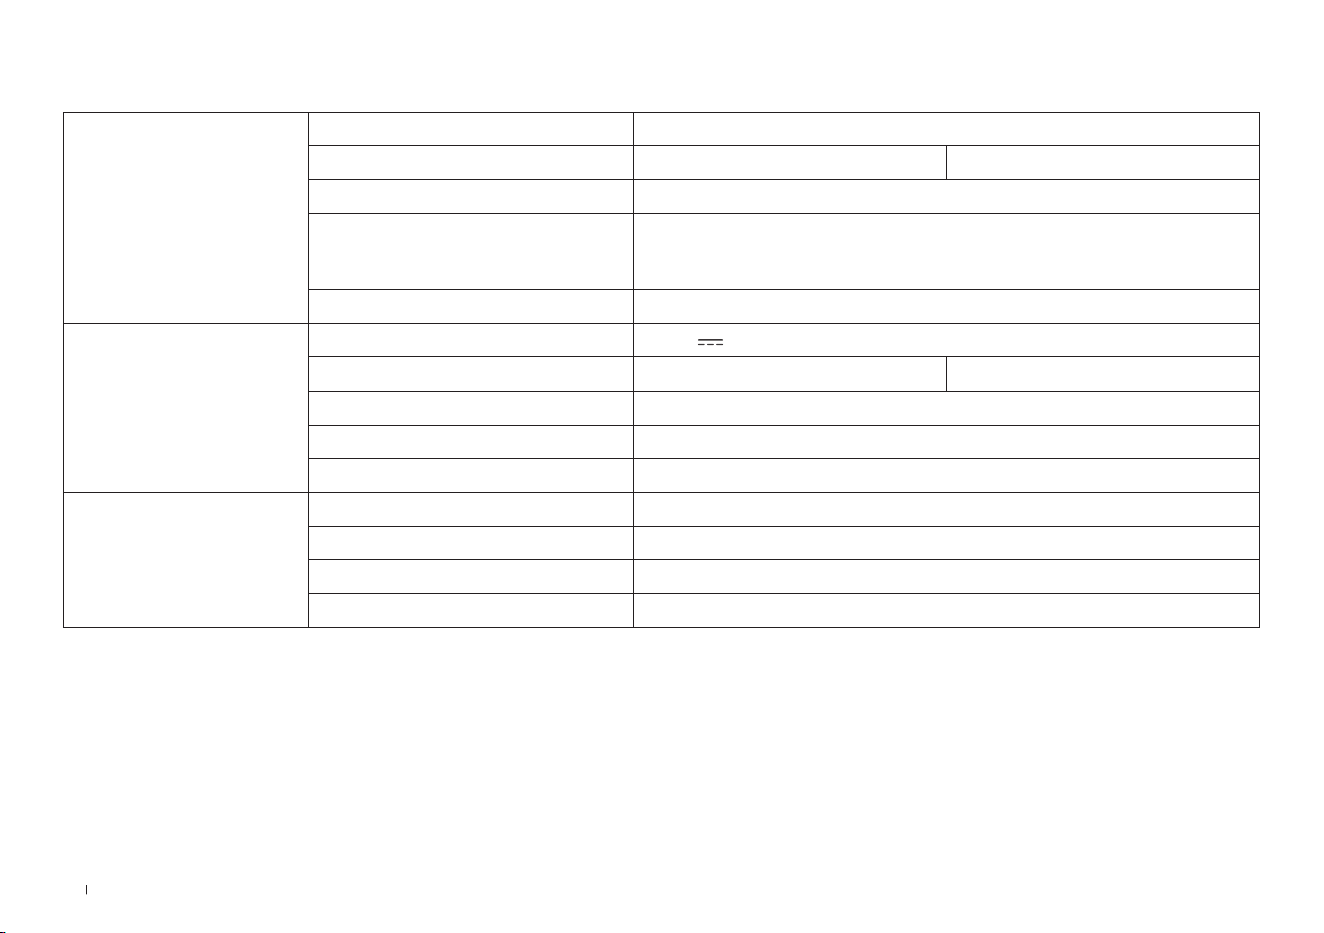
128IT
7. Dati tecnici
Informazioni di base
Nome del prodotto Robot tagliaerba
Modello GPR11 GPR12
Marchio ECOVACS
Dimensioni:
Lunghezza (mm) × Larghezza (mm) ×
Altezza (mm)
680*460*310
Peso netto (kg) (batteria inclusa) 15,8
Parametri del tagliaerba
Tensione nominale 37,8 V
Capacità di lavoro (㎡)
1600 3000
Larghezza di taglio (cm) 33
Altezza di taglio (cm) 3-9
Tempo di ricarica (min�) 45±5
Emissione di rumore
Livello di potenza sonora misurato L
WA 60 dB(A)
Incertezze di potenza sonora KWA 3 dB(A)
Livello di pressione sonora L
pA 52 dB(A)
Incertezze di pressione sonora KpA 3 dB(A)

129 IT
Connettività
Intervallo di frequenza
Bluetooth® 2400 MHz ~ 2483,5 MHz
Wi-Fi 2400 MHz ~ 2483,5 MHz
Rete cellulare (acquistato)
WCDMA: BANDA I: Uplink:1920-1980MHz, Downlink: 2110-2170MHz
BANDA VIII: Uplink: 880-915MHz, Downlink:925-960MHz
LTE:E-UTRA
BANDA 1: Uplink:1920-1980MHz,Downlink:2110-2170MHzE-UTRA
BANDA 3: Uplink:1710-1785MHz,Downlink:1805-1880MHzE-UTRA
BANDA 7: Uplink:2500-2570MHz,Downlink:2620-2690MHzE-UTRA
BANDA 8: Uplink:880-915MHz,Downlink:925-960MHzE-UTRA
BANDA 20: Uplink:832-862MHz,Downlink:791-821MHzE-UTRA
BANDA 28: Uplink:703-748MHz,Downlink:758-803MHzE-UTRA
BANDA 38: Uplink:2570-2620MHz,Downlink:2570-2620MHzE-UTRA
BANDA 40: Uplink:2300-2400MHz,Downlink:2300-2400MHz
Le bande di frequenza disponibili per la banda LTE 28 in Europa sono 703-
736MHz (TX), 758-791MHz (RX)
RTK(GNSS) GPS, Beidou, Galileo, GLONASS
RTK(LoRa) 863-870 MHz
MAX� potenza di
radiofrequenza
Bluetooth® ≤20 dBm
Wi-Fi ≤20 dBm
Rete cellulare (acquistato)
WCDMA:+24dBm+1,7/-3,7dB
LTE: E-UTRA Banda 28:23 dBm + 2,7/-3,2 dB altre Bande: 23 dBm ± 2,7 dB
Lora in RTK ≤14 dbm(25 mw)
Motore di trazione
Velocità nominale (r/min) 34,6
Velocità massima (r/min) 60,5
Motore delle lame Velocità (r/min) 3000
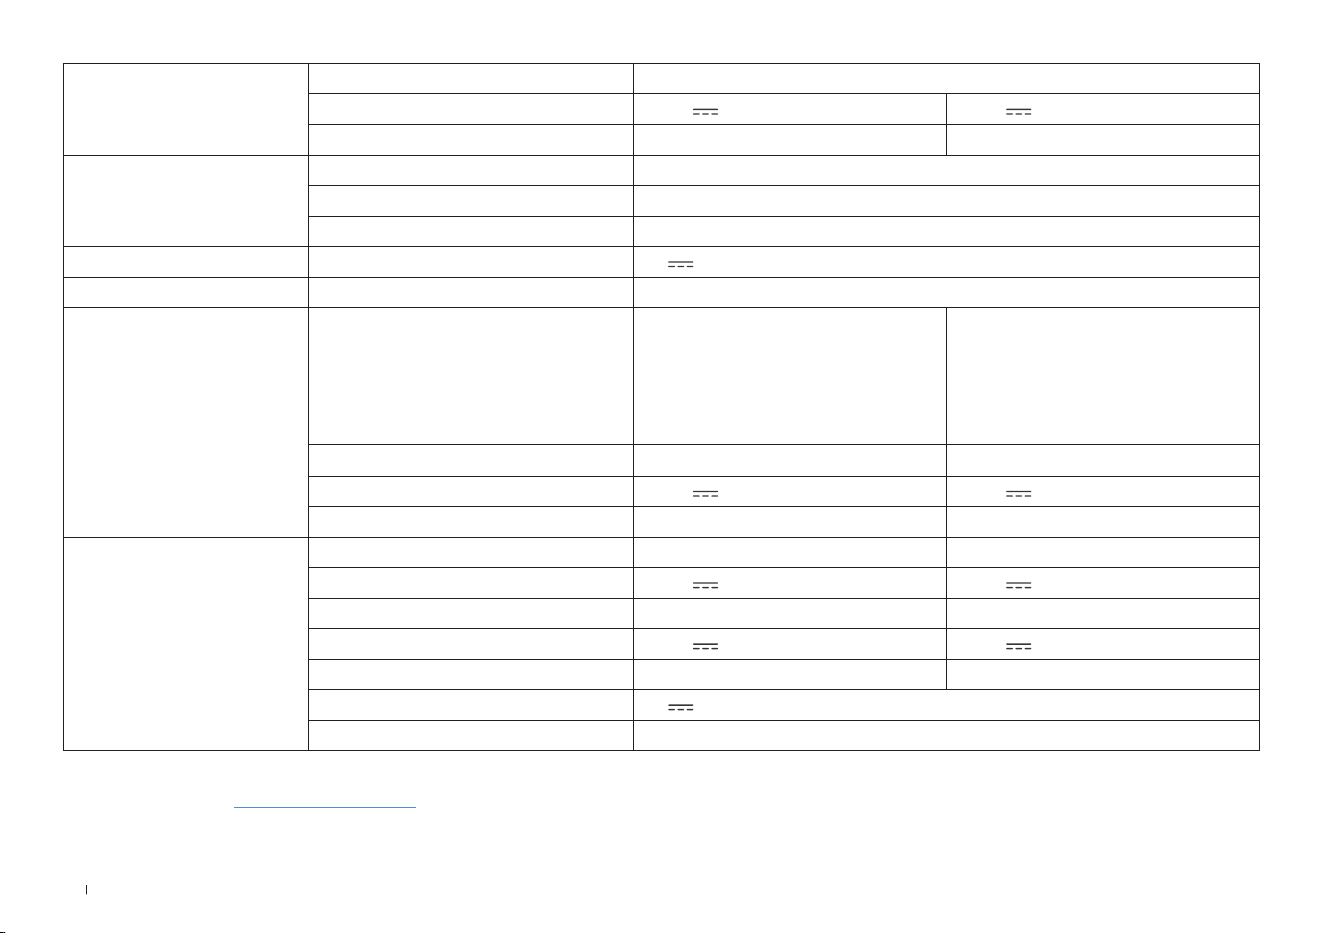
130IT
Batteria (tagliaerba)
Tipo di batteria Ioni di litio
Tensione nominale 32�4V 32�4V
Capacità nominale 3000 mAh 5000 mAh
Stazione di riferimento RTK
Modello FM24A9
Temperatura di esercizio -40~85°C / -40~185°F
Temperatura di stoccaggio -55~95°C / -67~203°F
Tensione in ingresso 5V
Corrente in ingresso 1A
Alimentatore
Modello di alimentatore
GM152-3780300-2DG
GM152-3780300-3DG
GM152-3780300-SDG
BLJ125W378300P-V
BLJ125W378300P-B
GM403-3780500-2DG
GM403-3780500-3DG
GM403-3780500-SDG
BLJ240W378500P-V
BLJ240W378500P-B
Tensione in ingresso
100-240 V ~ 100-240 V ~
Tensione in uscita 37�8V
37�8V
Corrente in uscita 3A 5A
Stazione
Modello CH2491 CH2491A
Tensione in ingresso 37�8V
37�8V
Corrente in ingresso 3A 5A
Tensione in uscita per ECOVACS GOAT 37�8V
37�8V
Corrente in uscita per ECOVACS GOAT 3A 5A
Tensione in uscita for RTK 5V
Corrente in uscita for RTK 1A
Nota: Le specifiche tecniche e di progettazione possono essere modificate alla luce del continuo miglioramento del prodotto�
Scopri altri accessori su https://www�ecovacs�com�


Ecovacs Home Service Robotics Co., Ltd.
No�518 Songwei Road, Wusongjiang Industry Park, Guoxiang Street,
Wuzhong District, Suzhou, Jiangsu, China�
Need Help?
Save the trouble for return�
Contact us, we are here to help!
451-2337-0701