Model:
UPF1-12H
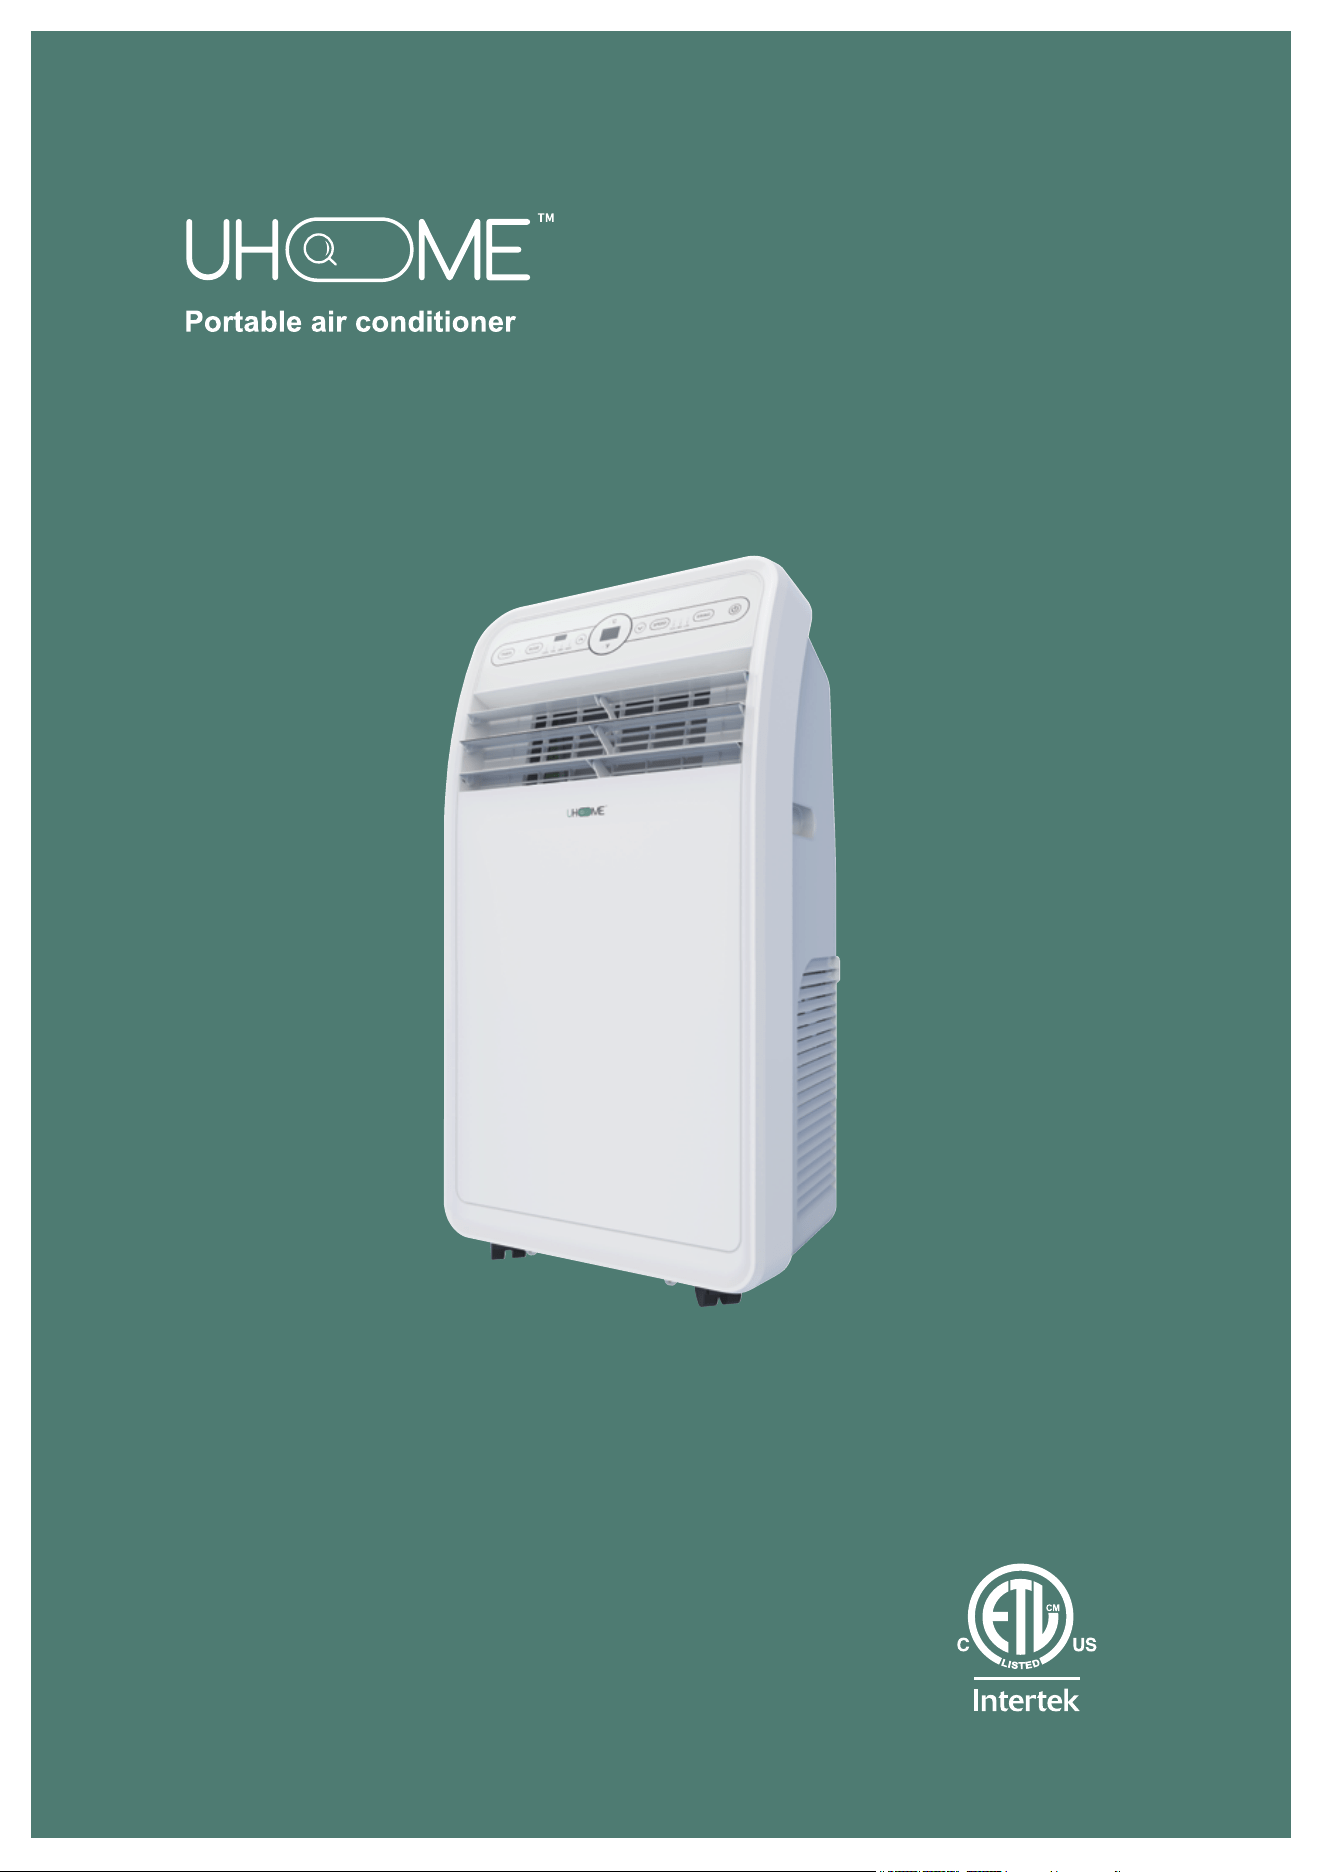
Thank you very much for selecting this new model of
Portable Air Conditioner,please read this Operation
Manual carefully before installing and using this appliance.
Please keep this Operation Manual properly for future reference.
2 3 4
5 6 7 8 9
10 11 12 13 14
15 16 17 18

2 3 4
5 6 7 8 9
10 11 12 13 14
15 16 17 18
TABLEOFCONTENTS
Safety Information & Warnings...............................................................................3
Setting up your portable conditioner ......................................................................6
Product features .................................................................................................
..
7
Installing your air conditioner..................................................................................8
Using your air conditioner.....................................................................................
..
12
Cleaning & Maintenance .......................................................................................15
Trouble shooting ...................................................................................................
17
Limited Manufacturer’s Warranty ..........................................................................18
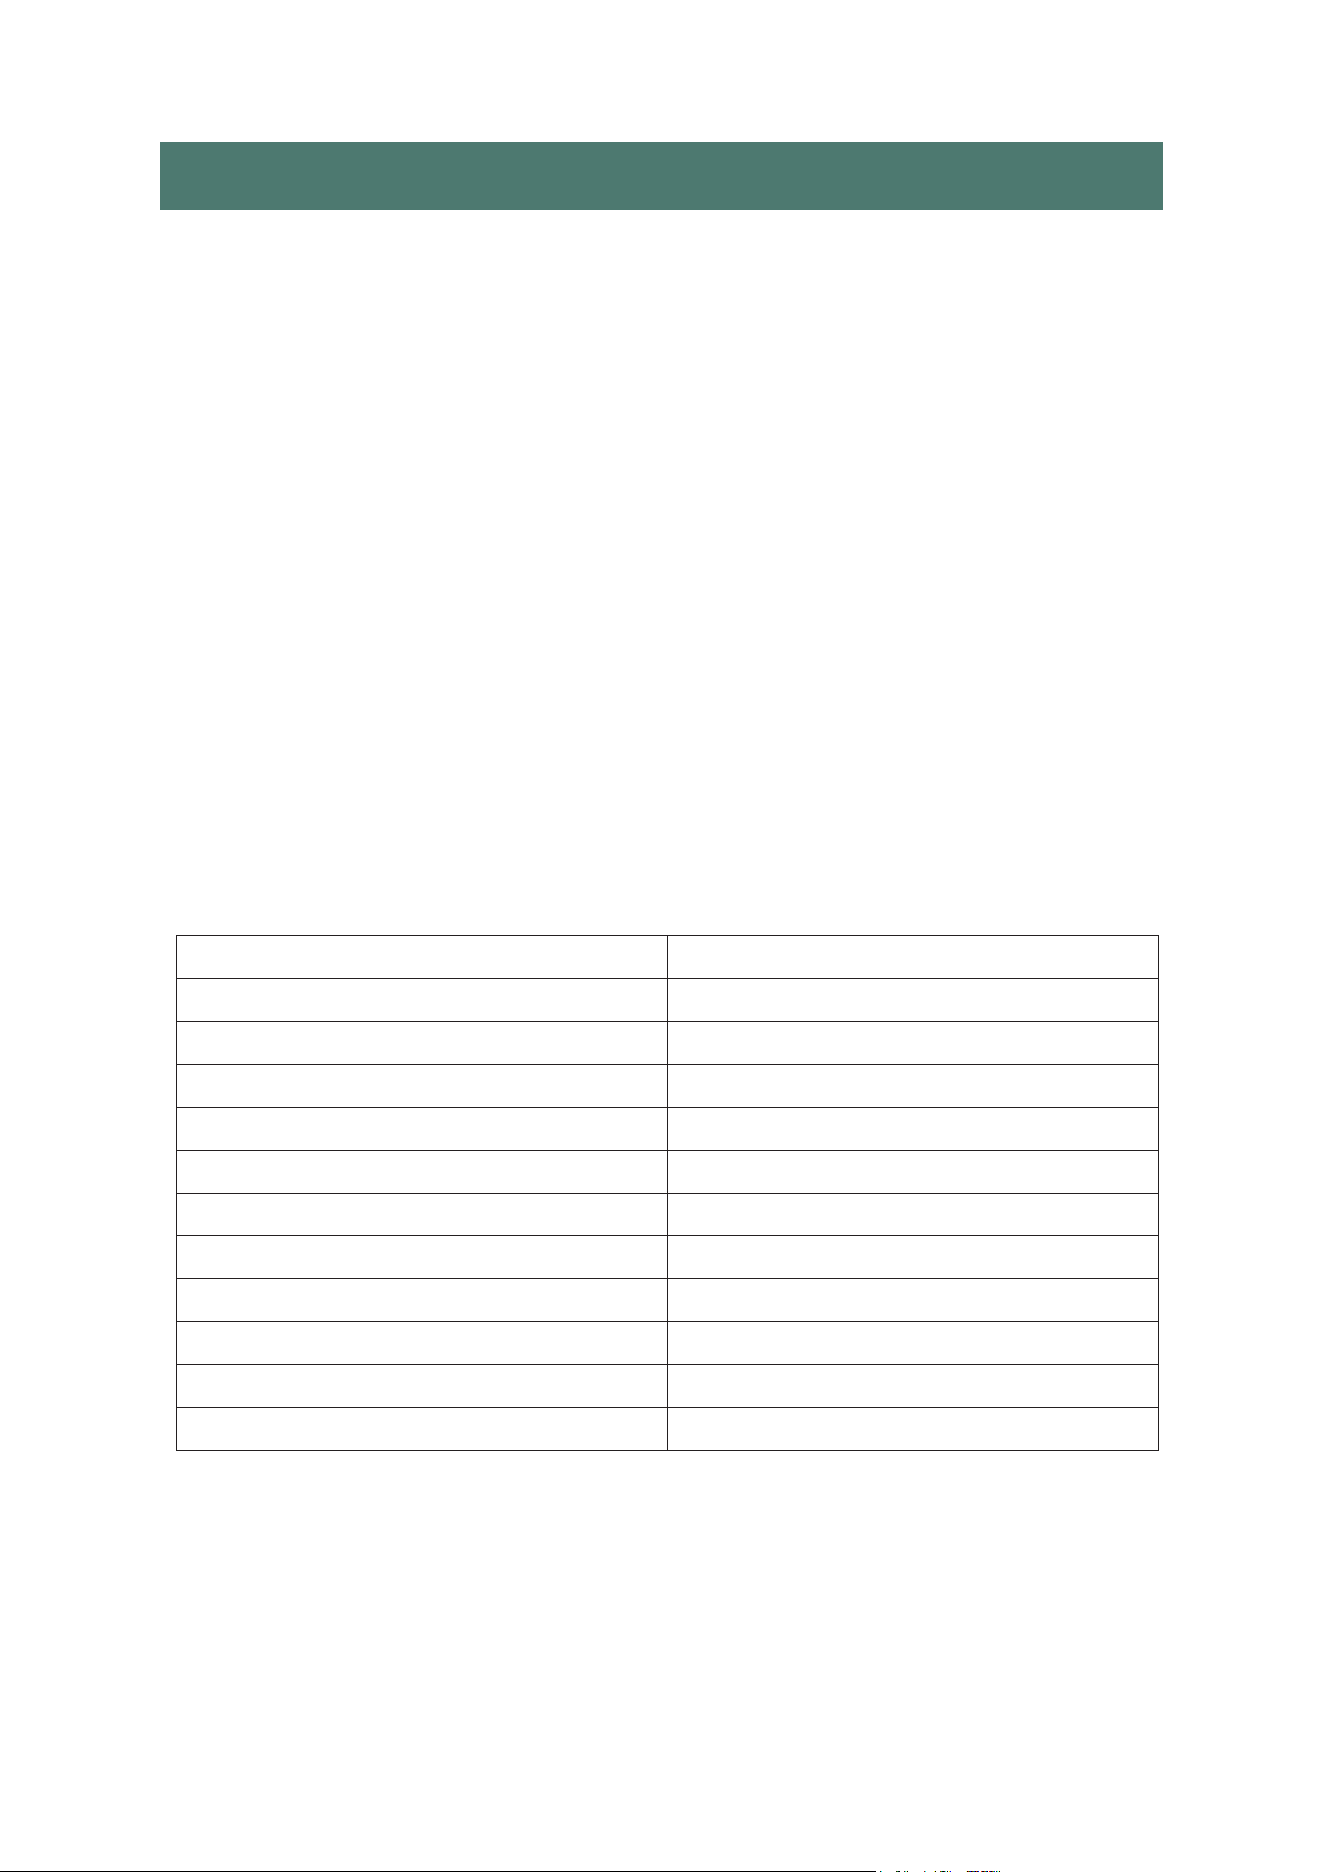
SPECIFICATIONS
Model No. UPF1-12H
Voltage
110V~120V
Frequency
60Hz
Power
1380W
Body Size
17.4in(W)x13.4in(D)x32.7in(H)
Package Size
18.9in(W)x17.13in(D)x34.65in(H)
Net Weight
29kg(63.93lbs)
Gross Weight
34kg(74.96lbs)
Cooling/Heating Area
400 sq.ft
BTU Rateing
12000(ASHRAE)
Power Cord Length
4.9ft
Refrigerant/Charge R410A/19.7oz
22 3 4
5 6 7 8 9
10 11 12 13 14
15 16 17 18
IMPORTANT
The air conditioner unit must always be stored and transported upright,
otherwise you may cause irreparable damage to the compressor. In case
of doubt, we suggest that you wait for at least 24 hours before you start
the air-conditioning unit.

SAFETY INFORMATION &WARNINGS
Please read the Manual carefully before operating the machine:
2 3 4
5 6 7 8 9
10 11 12 13 14
15 16 17 18
1. Read and keep these instructions.
2. Heed all warnings.
3. Follow all instructions.
4. Do not use this machine near water.
5. Clean it only with a damp cloth.
6.
Do not block any ventilation openings. Install in accordance with the
manufacturer's instructions.
7.
Do not install near any heat sources such as radiators, heat registers,
stoves, or other apparatus(including amplifiers)that produce heat.
8.
Do not defeat the safety purpose of the polarized or grounding-type
plug. A polarized plug has two blades with one wider than the other.
A
grounding-type plug has two blades and a third grounding prong.
The
wide blade or the third prong are provided for your safety
. If the provided
plug does not fit into your outlet, consult an electrician for replacement
of the obsolete outlet.
9. Protect the power cord from being walked on or pinched particularly
at plugs, convenience receptacles, and the point where they exit from
the machine.
10. Do not attempt to modify or extend the power cord of this machine.
11.
Unplug this machine during lightning storms or when it will not be
used for long periods of time.
12. Make sure that the available
AC power matches the voltage
requirements of this machine.
13.
Do not handle the plug with wet hands. This could result in an electric
shock.
14. Unplug the power cord by holding the plug, never by pulling the cord.
15. Do not turn the machine on or of
f by plugging or unpligging the power
cord.

CAUTION: Danger of explosion if batteries are incorrectly replaced.Replace
only with the same or equivalent type.
WARNING:
ELECTRIC SHOCK HAZARD
Failure to follow these instructions can result inelectric shock, fire, or death.
2 3 4
5 6 7 8 9
10 11 12 13 14
15 16 17 18
• This unit must be properly grounded.
• Do not, under any circumstances, cut or remove the grounding plug.
• If you do not have a properly grounded
AC outlet, or if there is any
doubt that the outlet is not properly grounded, a qualified electrician
should check the outlet and circuit and, If necessary
, install a properly
grounded outlet.
• This air conditioner must be plugged into a grounded 115V, 60Hz
AC
outlet protected by a 15 amp time-delay fuse or circuit breaker.
•
This air conditioner must be installed in accordance with national
wiring codes.
• Do not alter or modify the plug or cord of this air conditioner
. If the
power cord becomes worn or damaged, the cord should only be
replaced by a qualified service technician using genuine replacement
parts.
• Do not use an extension cord.
16. Turn off the machine before unplugging it.
17.
Refer all servicing to qualified service personnel. Servicing is required
when the machine has been damaged in any way
, such as power-supply
cord or plug is damaged, liquid has been spilled or objects have fallen into
the machine, the machine has been exposed to rain or moisture, does not
operate normally, or has been dropped.
18. T
o reduce the risk of fire or electric shock, do not expose this machine
to rain, moisture, dripping, or splashing, and no objects filled with liquids
should be placed on top of it.
19.
Batteries of the control remote should not be exposed to excessive heat
such as sunshine, fire, or the like.
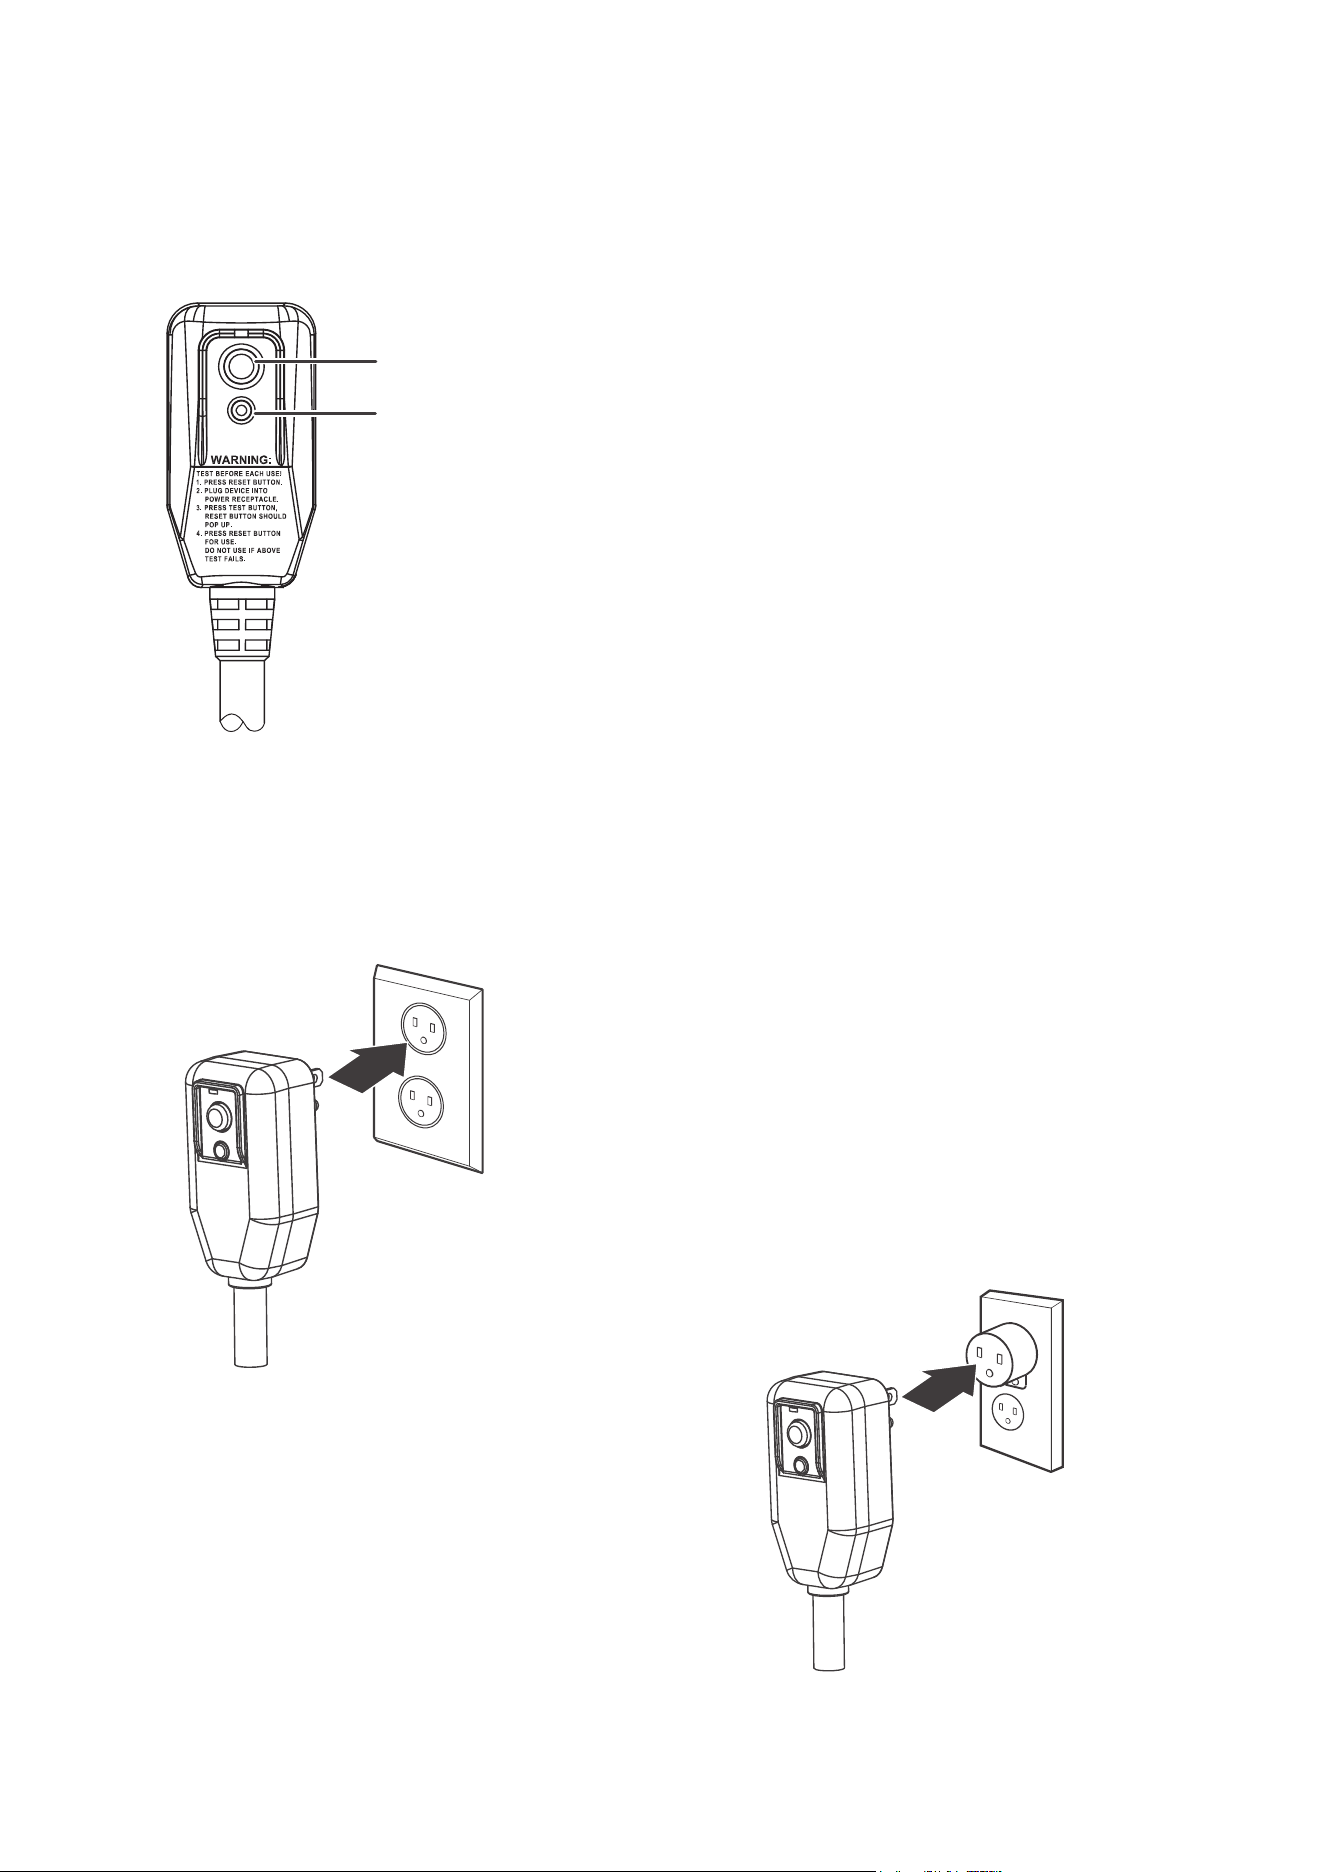
Make sure that a proper
ground exists before use.
Ma
ke sure that a proper
gr
ound exists before use.
TEST button
RESET button
2 3 4
5 6 7 8 9
10 11 12 13 14
15 16 17 18
ELECTRICAL SAFETY
Integrated circuit breaker
For additional safety
, the power cord on this air
conditioner featuresan integrated circuit breaker.
Y
ou can test and reset the circuit breaker using
the buttons provided on the plug case.Consulta
qualified electrician or service person if the
grounding instructions are not completely
understood,or if doubt exists as to whether the
air conditioner is properly grounded.
The circuit breaker should be tested periodically
by pressing the TEST
button, then pressing the
RESET button. If the TEST
button does not cause
the circuit breaker to trip, or if the RESET
button
does not stay engaged, unplug the air
conditioner immediately .
Temporary grounding
Due to potential safety hazards,
we strongly discourage the use
of an adapter plug.
If an adapter plug must be used for
a temporary connection, use only a
UL-listed adapter with a maximum
capacity of 120V~60Hz, 12A, and
1380W. Make sure that the large
slot of the adapter is aligned with
the large slot in the outlet.
SETTING UP YOUR PORTABLE AIR CONDITIONER
Before using your portable air conditioner
• Remove and store (optional) packing materials for reuse.
• Remove any shipping tape before using the air conditioner.
• Remove tape residue with liquid dish soap and a damp cloth.
Do not use sharp tools, alcohol, thinners, or abrasive cleaners to
remove adhesive, which could damage the finish.
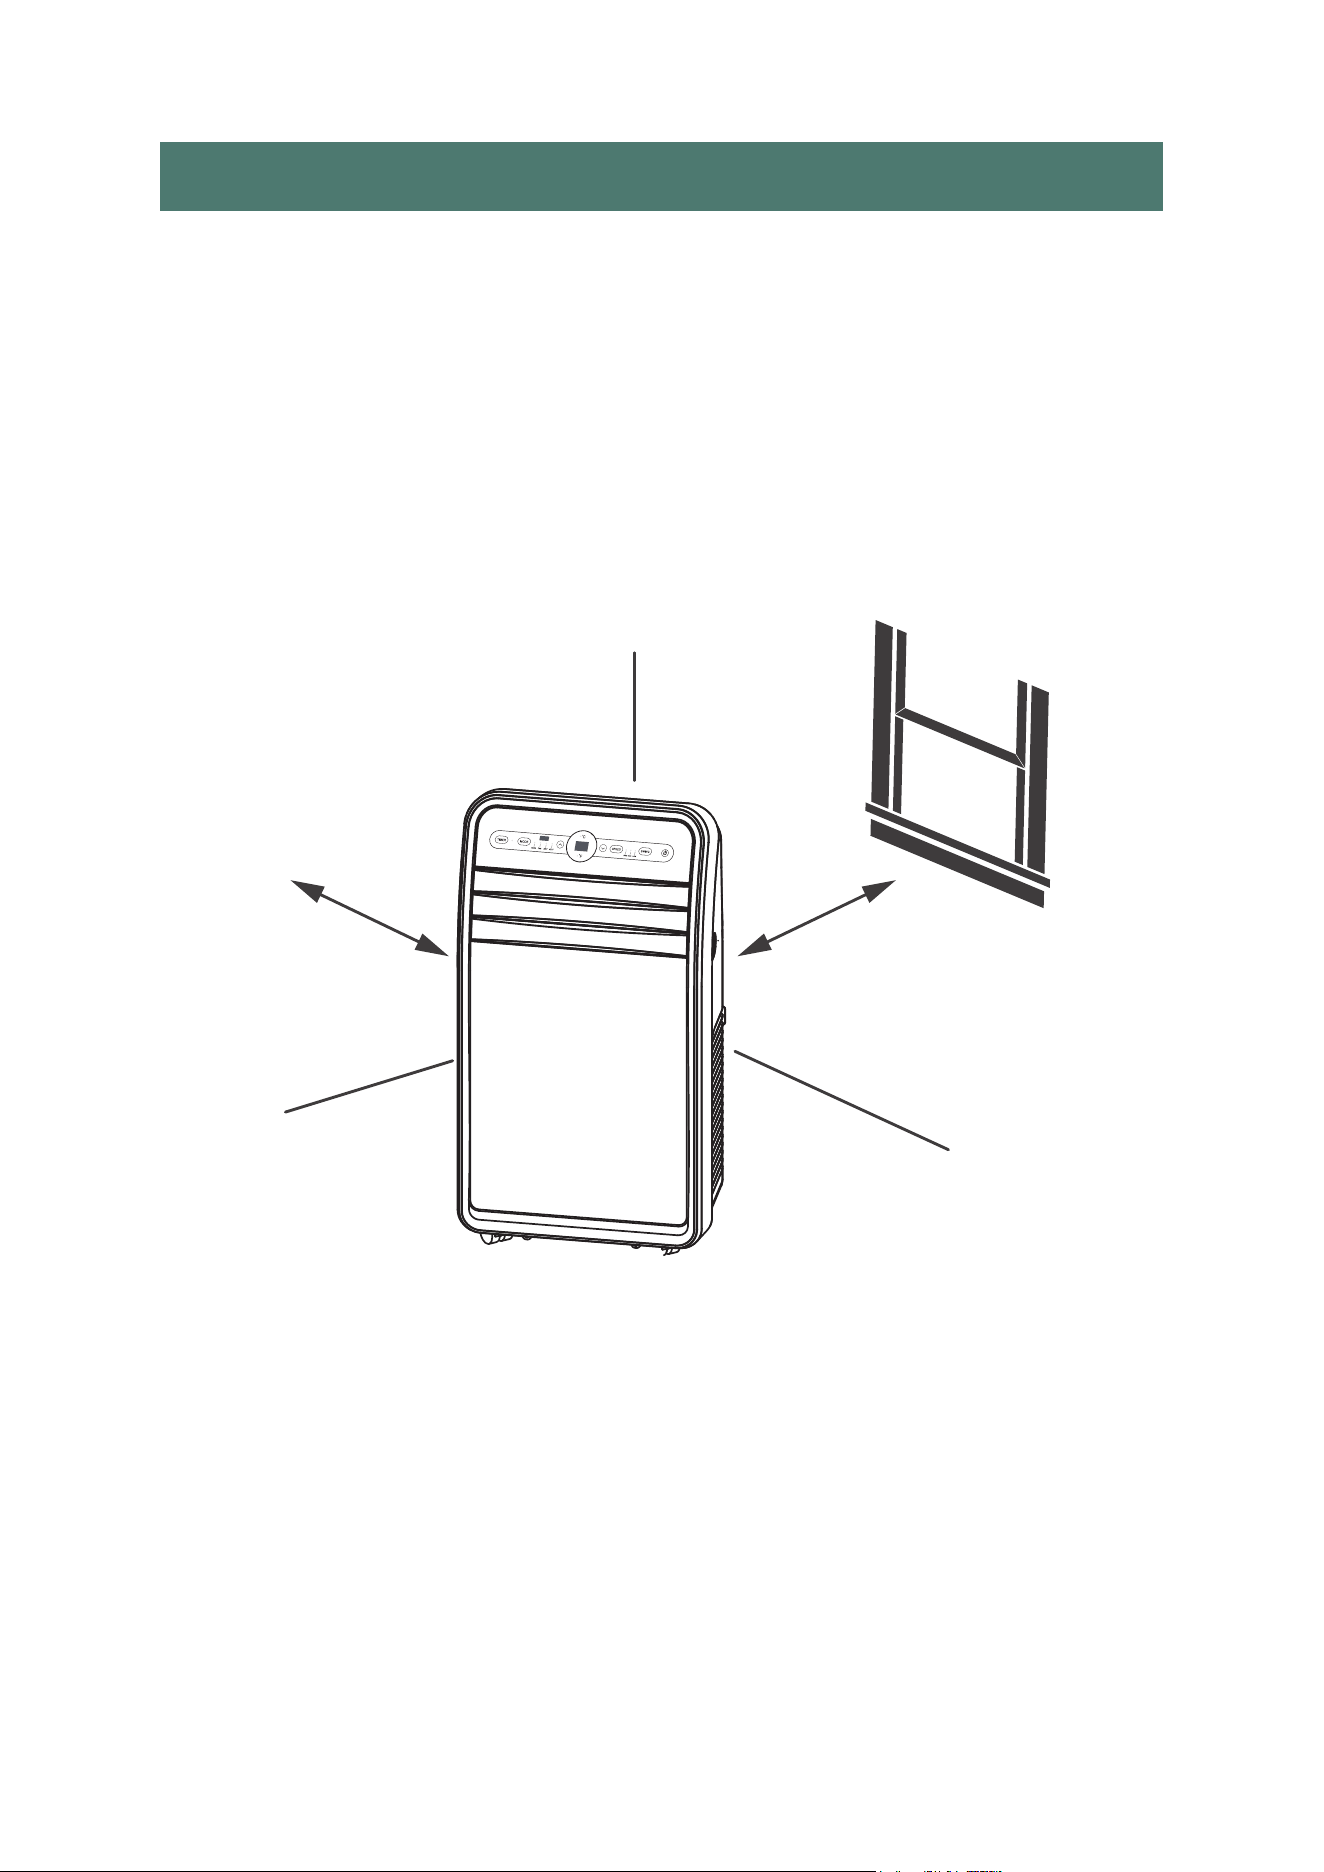
Placing your air conditioner
Place the unit on a flat, dry area near a window, so you can use the hose
anddiffuser to connect the air conditioner to the window installation kit in
order to vent the exhaust air outside. To maintain good air circulation and
optimum machine performance, leave a 20 in. (50 cm) space around it.
20 in. (50 cm)
20 in. (50 cm)
2 3 4
5
6 7 8 9
10 11 12 13 14
15 16 17 18
TABLEOFCONTENTS
Safety Information & Warnings...............................................................................3
Setting up your portable conditioner ......................................................................6
Product features .................................................................................................
..
7
Installing your air conditioner..................................................................................8
Using your air conditioner.....................................................................................
..
12
Cleaning & Maintenance .........................................................................................
15
Trouble shooting ...................................................................................................
17
Limited Manufacturer’s Warranty ..........................................................................18
SPECIFICATIONS
Model No. UPF1-12H
Voltage
110V~120V
Frequency
60Hz
Power
1380W
Body Size
17.4in(W)x13.4in(D)x32.7in(H)
Package Size
18.9in(W)x17.13in(D)x34.65in(H)
Net Weight
29kg(63.93lbs)
Gross Weight
34kg(74.96lbs)
Cooling/Heating Area
400 sq.ft
BTU Rateing
12000(ASHRAE)
Power Cord Length
4.9ft
Refrigerant/Charge R410A/19.7oz
IMPORTANT
The air conditionerunit must always be stored and transported upright,
otherwise you may causeirreparabledamage to the compressor. In case
of doubt, we suggest that you wait for at least 24 hours before you start
the air-conditioning unit.
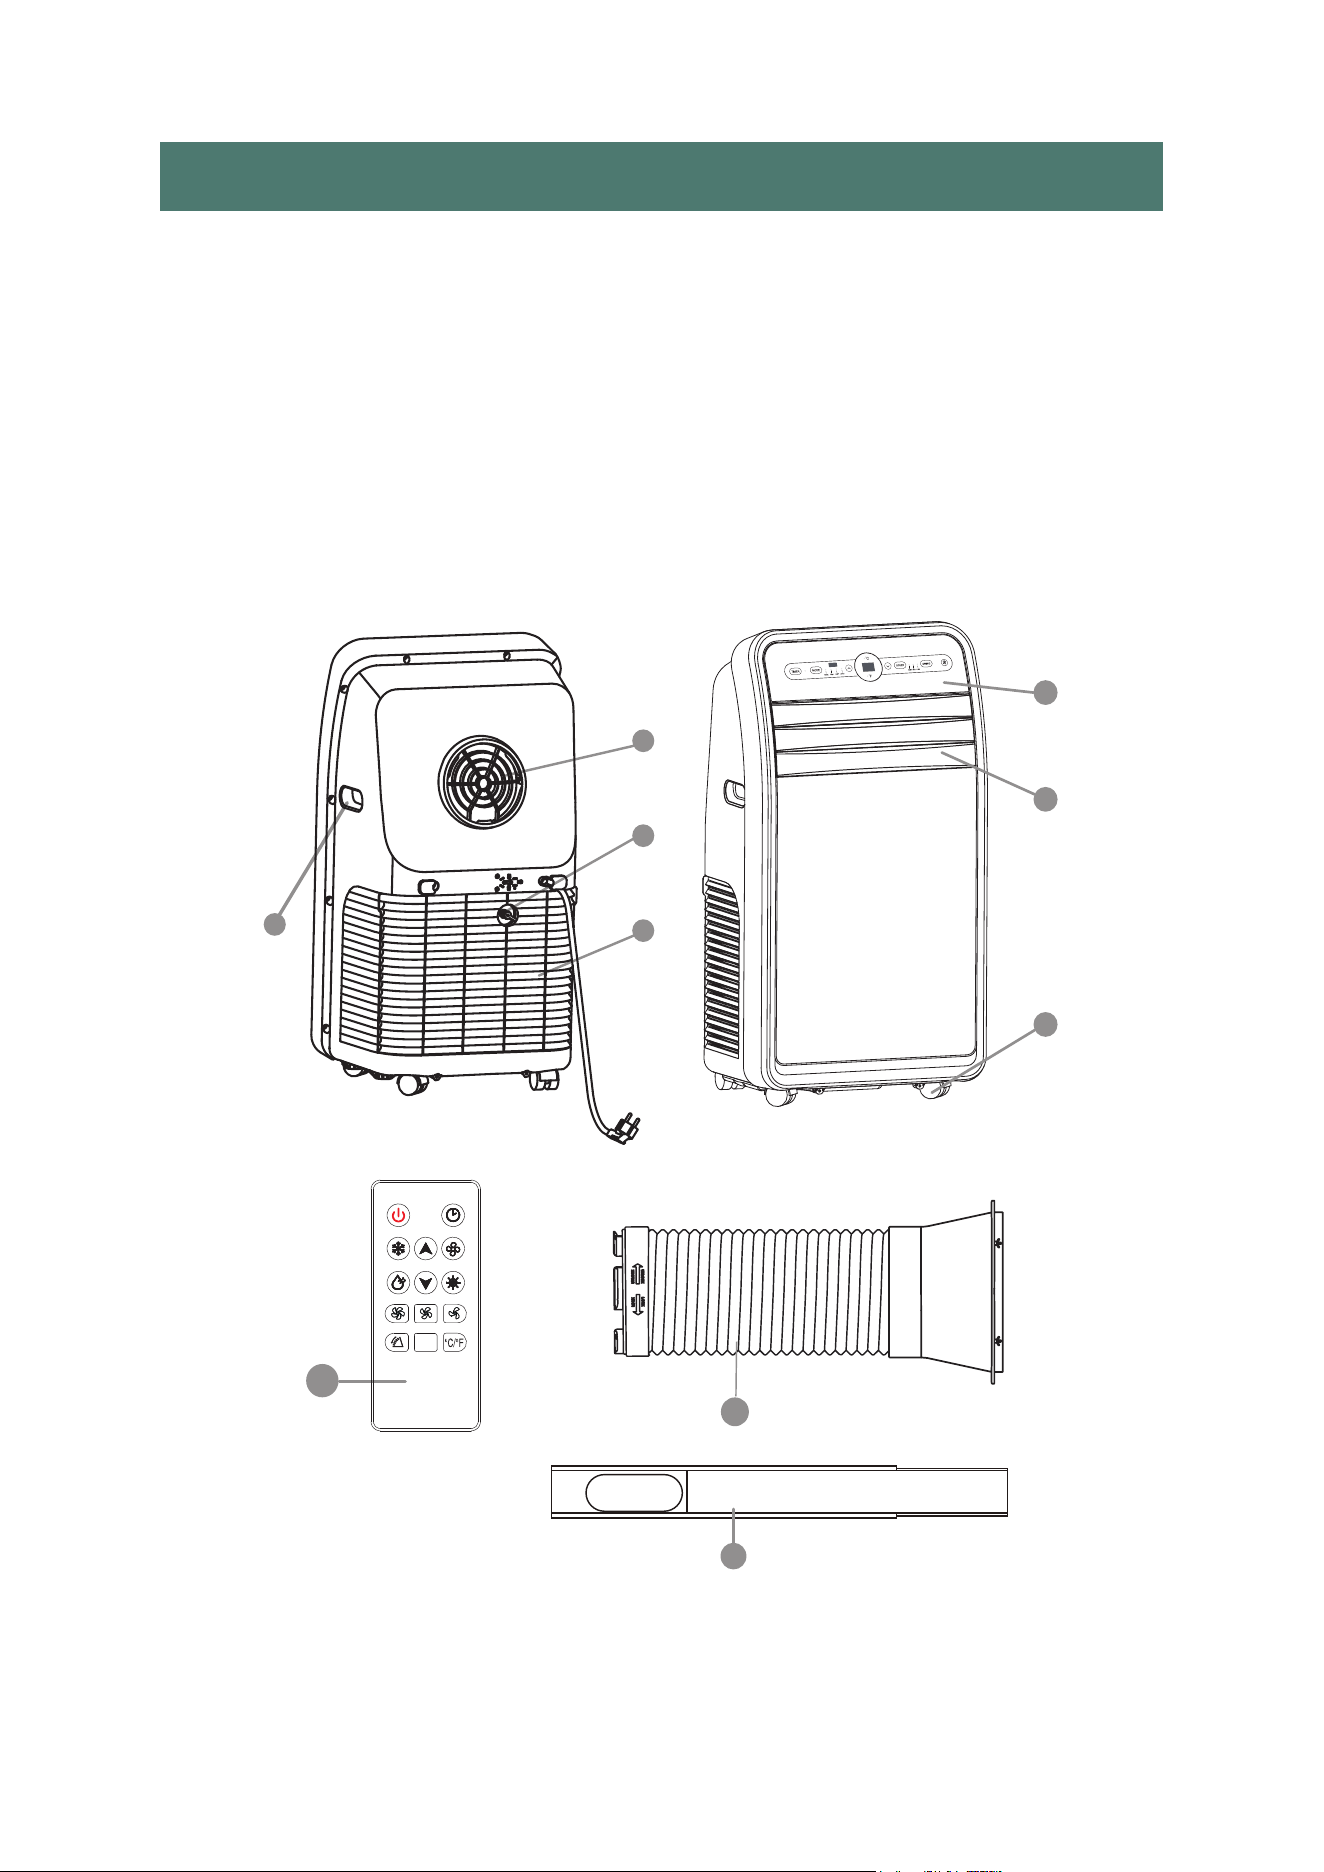
PRODUCT FEATURES
1. Carrying Handle
2. Control Panel
3. Adjustable Front Grille 4. Casters
5. Exhaust Output
6. Air Intake
7. Moisture Drain Plug
8. Remote Control
9. Exhaust Duct
10. Window Sealing Plate
5
6
7
1
8
10
9
3
2
4
2 3 4
5 6
7 8 9
10 11 12 13 14
15 16 17 18
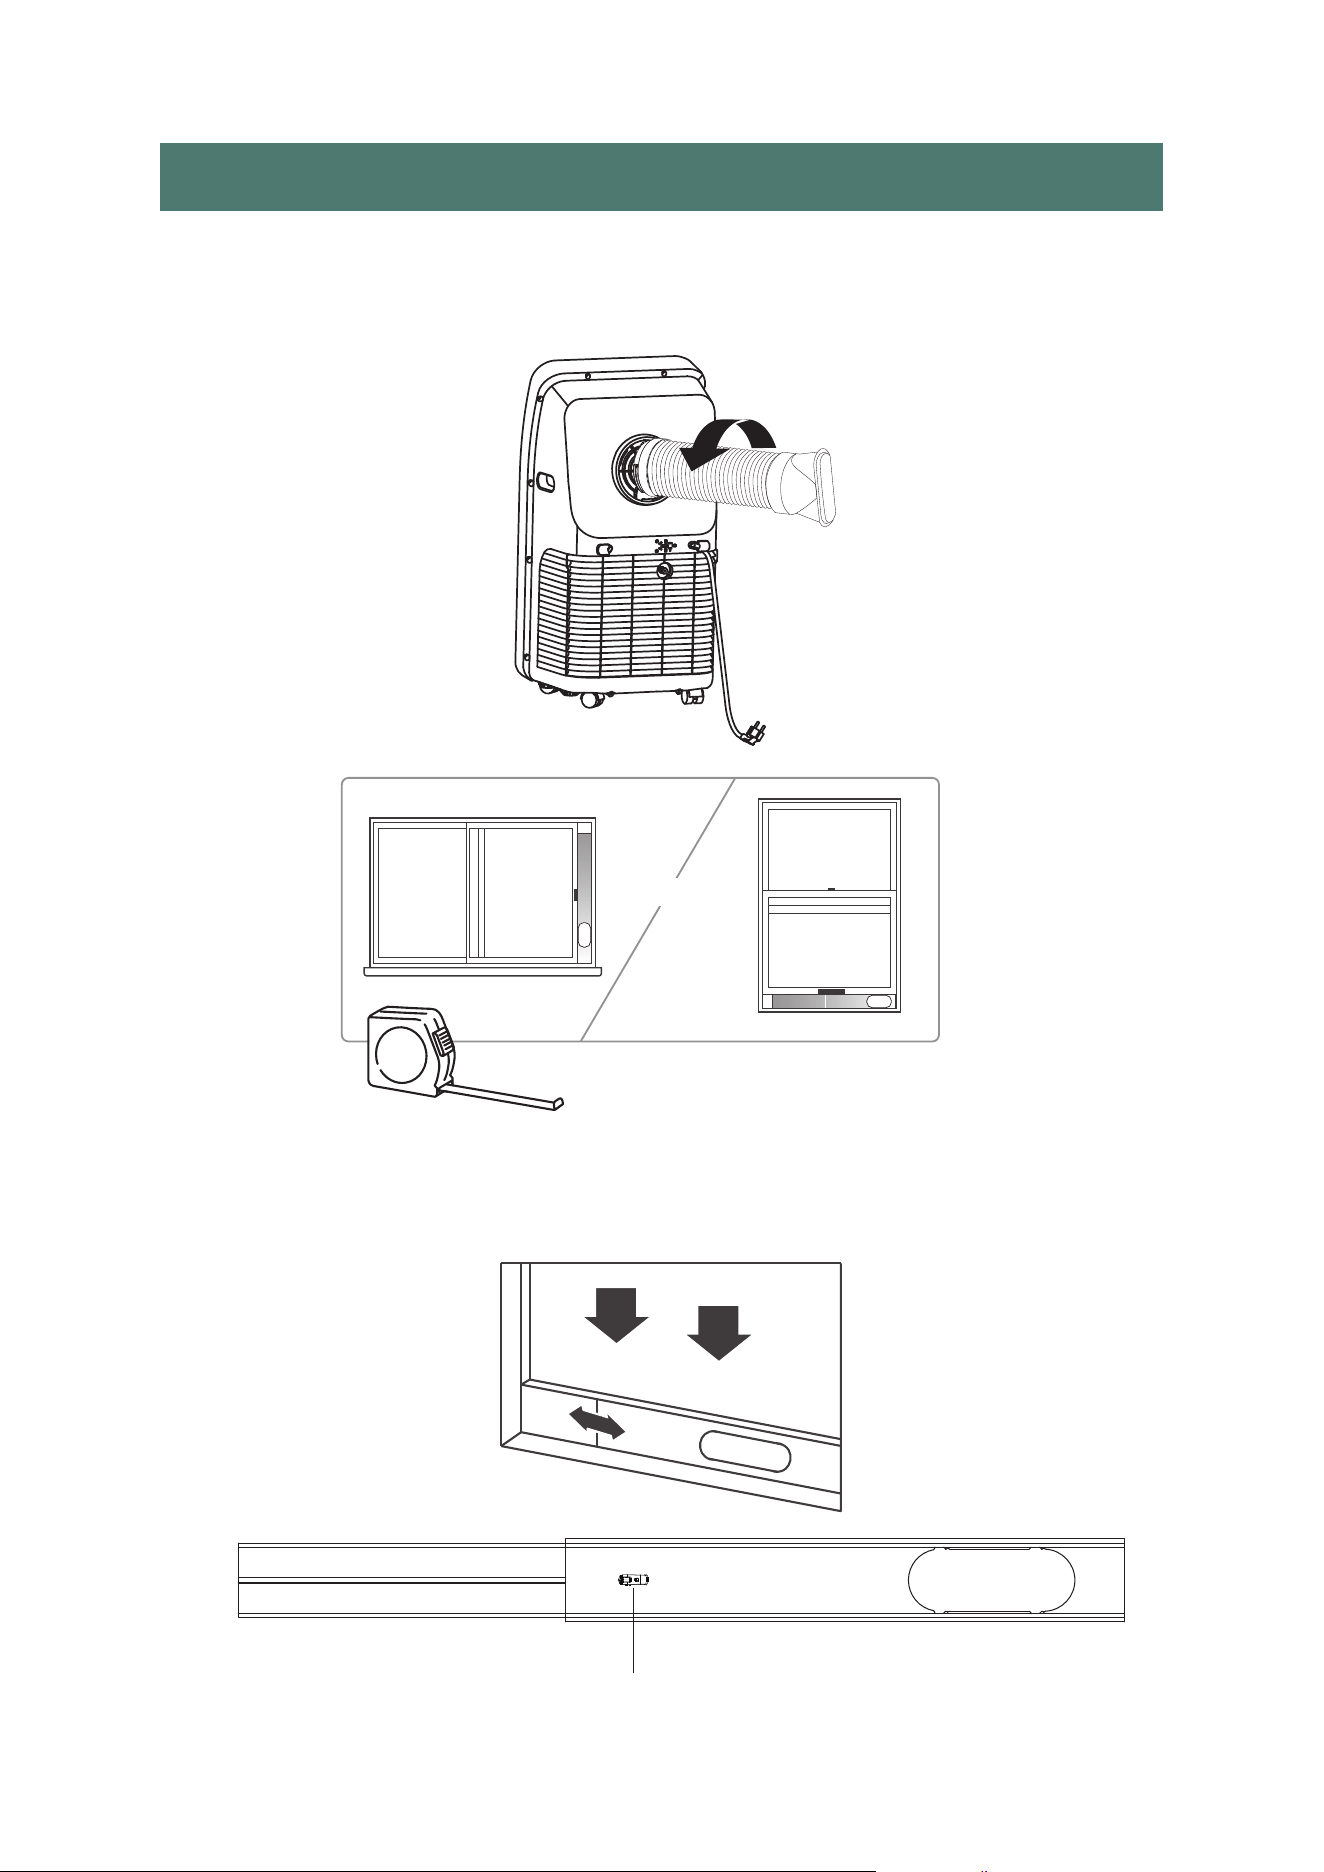
INSTALLING YOUR AIR CONDITIRNE
1.Screw the exhaust hose to the exhaust outlet on the back of your air
conditioner, then screw the hose adapter to the other end of the hose.
2.Measure the window size.M
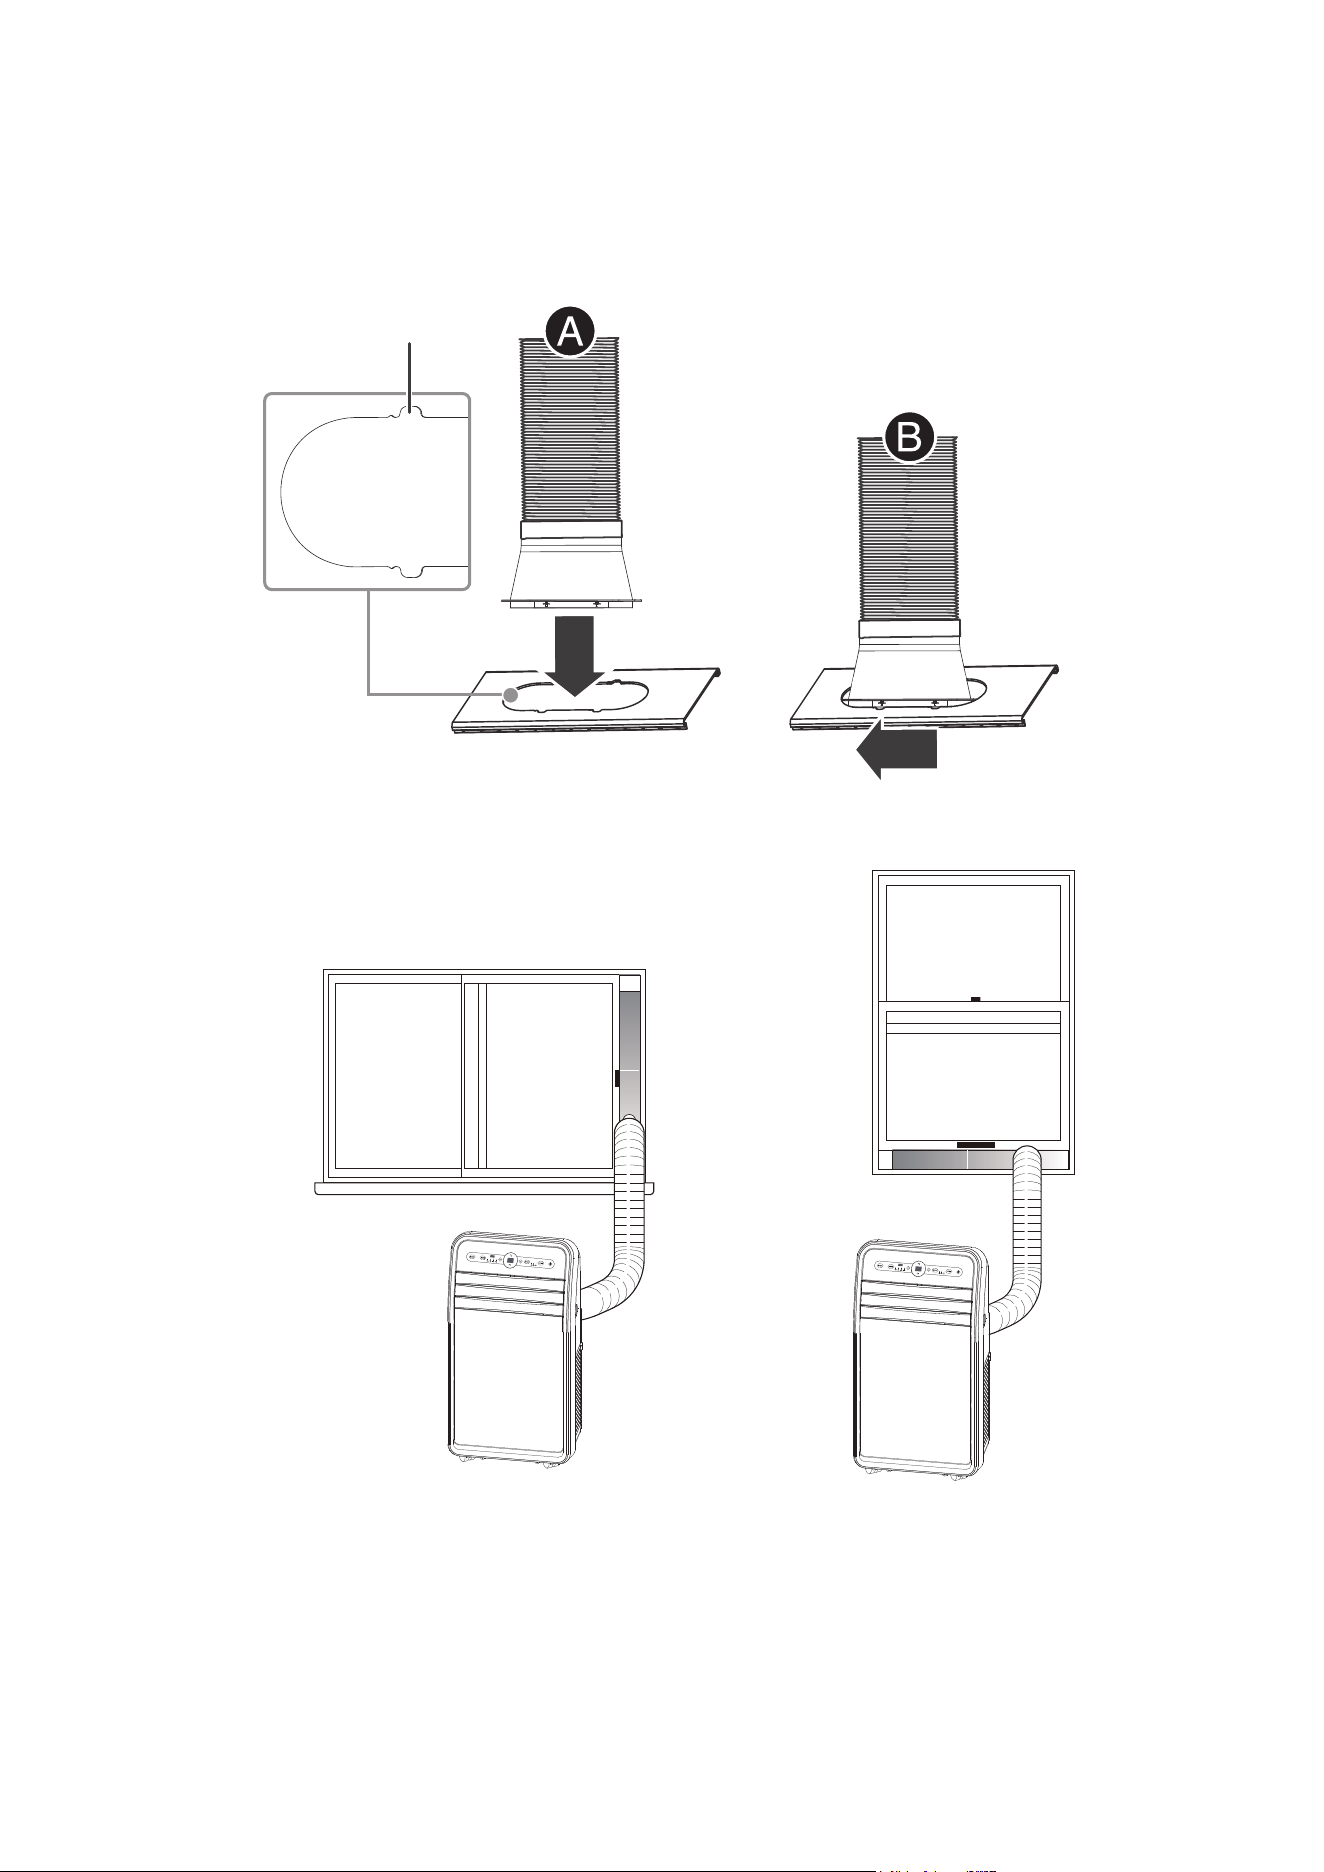
3.Install the window sealing plate in the window opening, adjusting
the length to fit the window opening and securing it with“Clip"(provided).
Note: The window sealing kit works with sliding windows.
Clip
OR
2 3 4
5 6 7
8 9
10 11 12 13 14
15 16 17 18
Usually Portable air conditioner needs to be equipped with sliding windows.
We put two sealing plates in the packaging box of the machine, and the size
range after connection is 94cm-127.5cm(37in-50.20in). We also have two
spare parts, one short(40cm=15.75in) and one long(67.5cm=26.57in)with"Clip".
If your window size is small, just between 67.5cm-98cm(26.57in-38.58in),
you can buy a piece of short board(40cm=15.75in)and then assemble it with the
one piece board with clip;
If your window size is large and there is still a gap on the side of the window
where the two sealing panels are installed, you can buy another long panel
(67.5cm=26.57in), the size range after connection is 135cm-187cm
(53.15in-73.62in).
If your room has a casement window, you can also buy oursealing cloth to use.
And in the packaging bag, we also prepared 4 piece of sealing plate sponges.
Just adjust the sealing plate to the size of thewindow, then tear off the spacer
paper of the sponge, and stick the sponges along the circumference of the
sealing plate. It can well prevent hot air from entering room from outside, and
keeping the indoor temperature cool.
15.75in
26.57in
2 3 4
5 6 7 8
9
10 11 12 13 14
15 16 17 18
(
Optional):Secure the venting hose to the vent adapter using the included
screw.
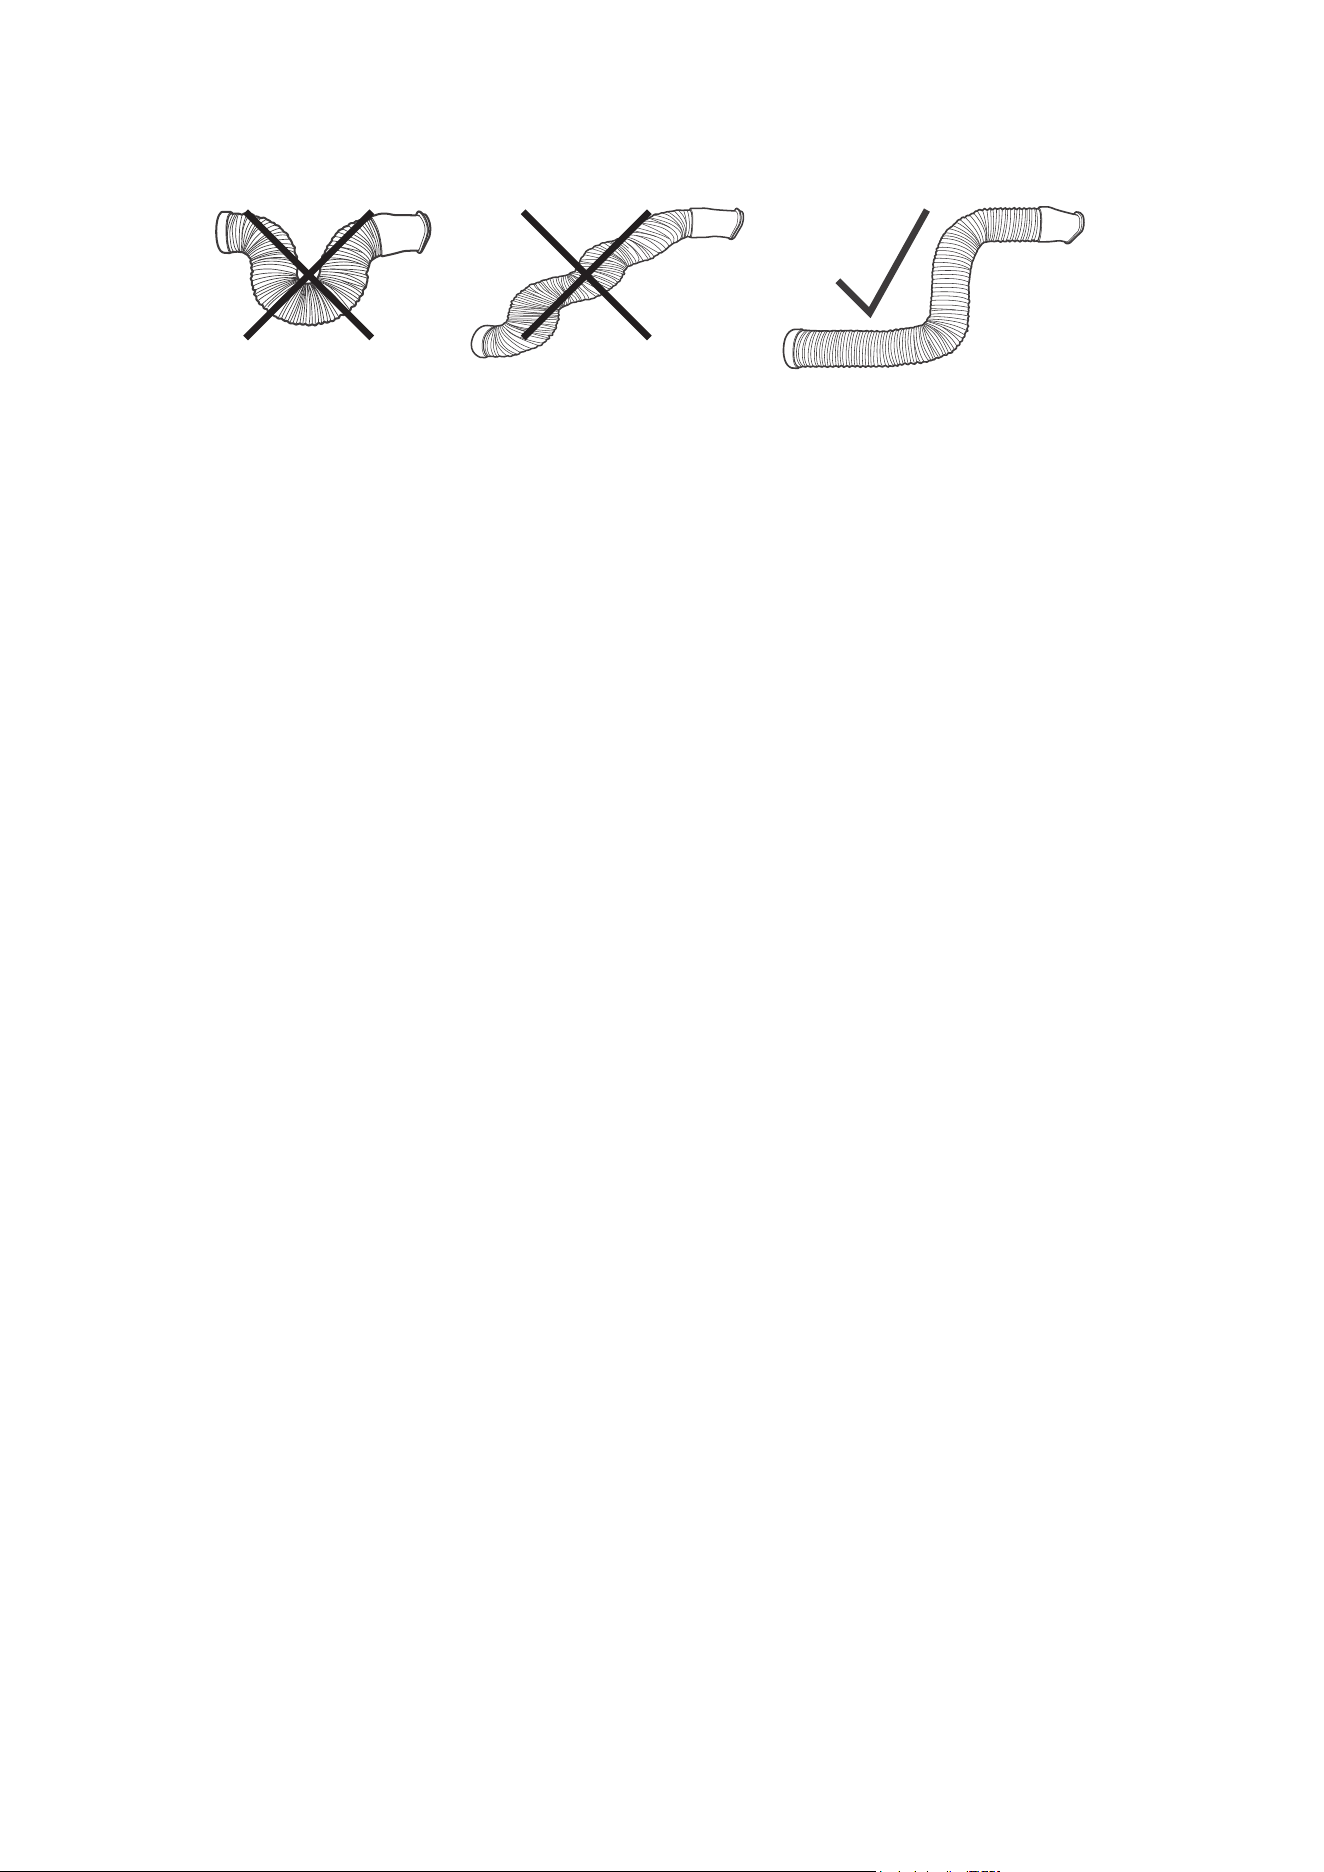
Note:For optimum performance, make sure the venting hoseis not twisted
and is free of kinks. For better ef
ficiency, shorten the hose by squeezing its
sections together.
Slide
Insert
Small gap
2 3 4
5 6 7 8 9
10
11 12 13 14
15 16 17 18
4.
Insert the hose adapter into the vent panel(A), then slide the adapter until it
clicks into place(B).
2 3 4
5 6 7 8 9
10
11
12 13 14
15 16 17 18
Caution:The exhaust duct is designed especially for this air conditione
r.
Replacing or lengthening the duct could result in damage to your unit.
USING YOUR AIR CONDITIONER
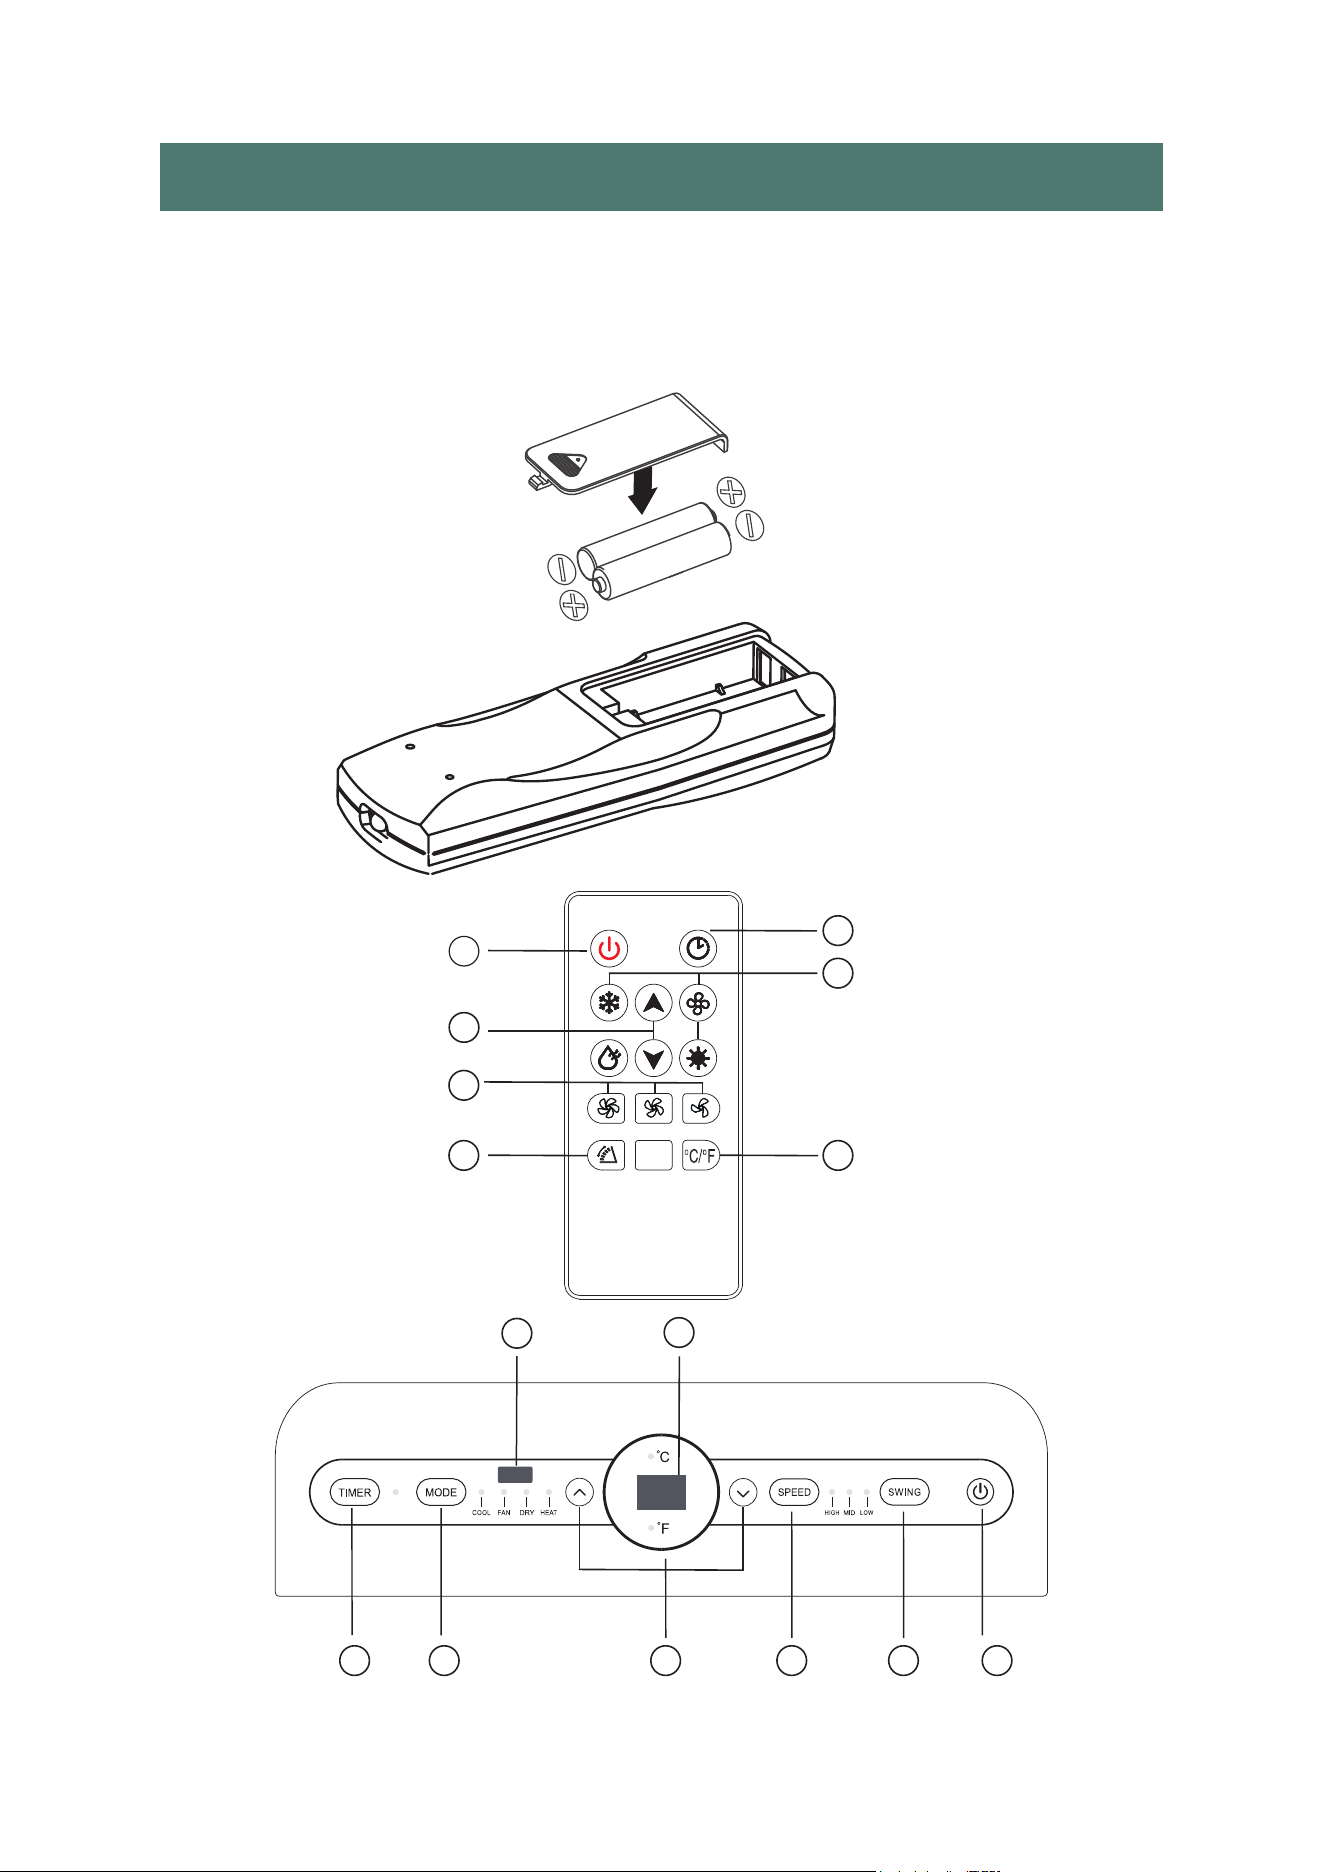
Inserting the batteries in the remote control
• Insert two AAA batteries (provided) into the remote control.
Make sure that you orient t
hebatteries correctly(+and-)
when you install them.
A
A
B
B
C
D
E
E
F
F
G
G
C
D
H
2 3 4
5 6 7 8 9
10 11
12 13 14
15 16 17 18

POWER BUTTON
Turns ON/OFF power to the air conditioner.
NOTE: Turning off power by pressing the Power button does NOT
disconnect the appliance from the power supply.
SWING BUTTON
Press this key at any time after turning on the A/C to swing the wind guide
bar automatically.
FAN SPEED BUTTON
The fan speed can be adjusted from Low speed to High speed when the air
conditioner is in operation.
NOTE: The fan speed cannot be adjusted when the unit is in Dry mode.
• Press the Fan Speed button to toggle among the three speeds.
The corresponding fan speed indicator will illuminate.
UP AND DOWN ARROW BUTTONS
Adjusts the Temperature or Hours in Time Delay.
To Set the Temperature:
The temperature can be set between 16°C and 30°C when the air conditioner
is in Cool mode.
1. Press the Mode button until the Cool mode is selected.
2. Press the Up Arrow or Down Arrow buttons to select the Temperature.
NOTE: The temperature cannot be set when the air conditioner is in either
Fan or Dry mode.
NOTE: The Up Arrow and Down Arrow buttons,when pressedat the same
time, allow you to select between displaying the temperature in°C or °F.
The corresponding indicator will illuminate.
MODE BUTTON
Press the Mode button to toggle among the operating options. The
corresponding indicator will illuminate:
Heat- Heats the room to the set temperature.
Cool- Cools the room to the set temperature.
Fan- Circulates the air in the room without cooling.
Dry- Fan operation plus dehumidification. In dry mode, water wil collect
inside the unit, and must be drained by removing the plug from the bottom
of the back of the unit. If the tank is full,“ FL ” wil appear on the display to
indicate that it needs to be drained. In dry mode, the unit will stay on low
fan speed, and maintain a temperature of 62 degrees.
A
B
C
D
E
2 3 4
5 6 7 8 9
10 11 12
13 14
15 16 17 18

TIMER BUTTTON
Program a time from (1-hour to 24-hours) for the air conditioner
to turn OFF.
While the air conditioner is operating :
1. Press the Timer button.
2. Press the Up/Down arrow buttons to select the number of hours you want
the air conditioner to continue to operate before turning off.
NOTE: Wait approximately 5 seconds for the Turn - Off time to be saved.
While the air conditioner is off :
1. Press the Timer button .
2. Press the Up/Down arrow buttons to select the number of hours you want
the air conditioner to remain off before turning on.
NOTE: Wait approximately 5 seconds for the Turn - On time to be saved.
To cancel the timer :
• Press the Timer button once , the hours remaining will flash, press the timer
button again and the timer will be cancelled .
CONTROL PANEL DISPLAY
Displays the Set Temperature in degrees Fahrenheit or degrees Celsius, or the
hours remaining in a Time Delay. The corresponding indicator light will illvuminate.
REMOTE CONTROL SIGNAL RECEIVING WINDOW
Aim the Remote Control at this window so the Control will receive
the signal.
F
G
H
2 3 4
5 6 7 8 9
10 11 12 13
14
15 16 17 18
CLEANING & MAINTENANCE
Notice:To avoid electric shock, please turn off and unplug the unit
before maintenance or repair.
CLEANING
2 3 4
5 6 7 8 9
10 11 12 13 14
15 16 17 18
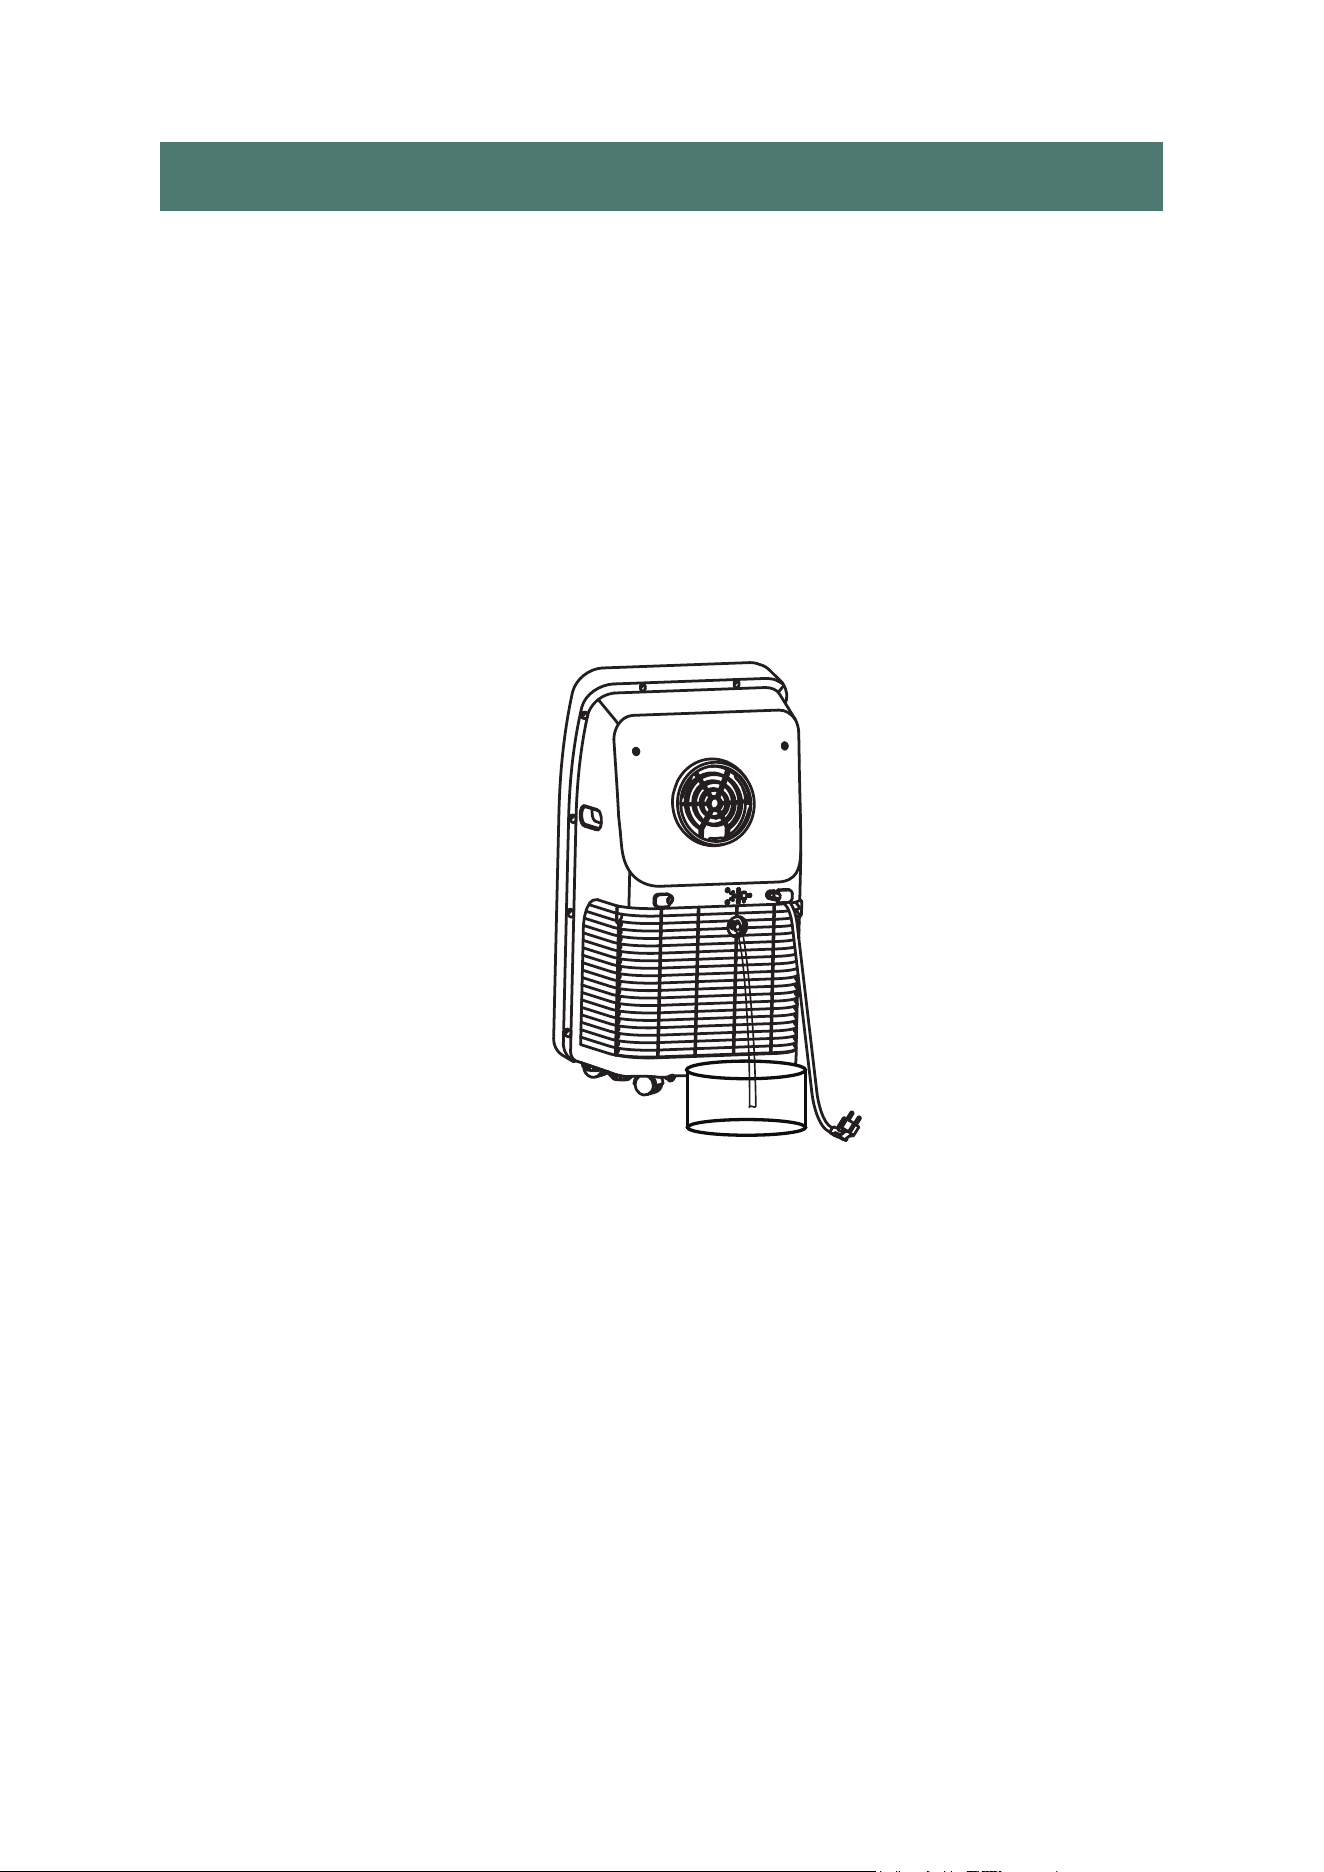
DRAINING THE WATER TANK
This unit is equipped with an automatic water vaporization system.
The condenser is cooled through the circulation of condensing water to
improve cooling efficiency and energy conservation.
If the tank is full ,“ FL" will appear on the display to indicate that it needs
tobe drained. Turn off the unit, remove the drain plug on the middle of the back
of the unit, and drain the tank until empty. Replace the plug and turn the unit
back on to resume use.
• Unplug before cleaning.
•
Clean the outside of the unit with a soft, damp cloth. Do not use
chemical agents such as benzene, alcohol, gasoline, etc. which can
damage the unit and void your warranty.
• Prevent any water or other liquids from getting inside the unit.
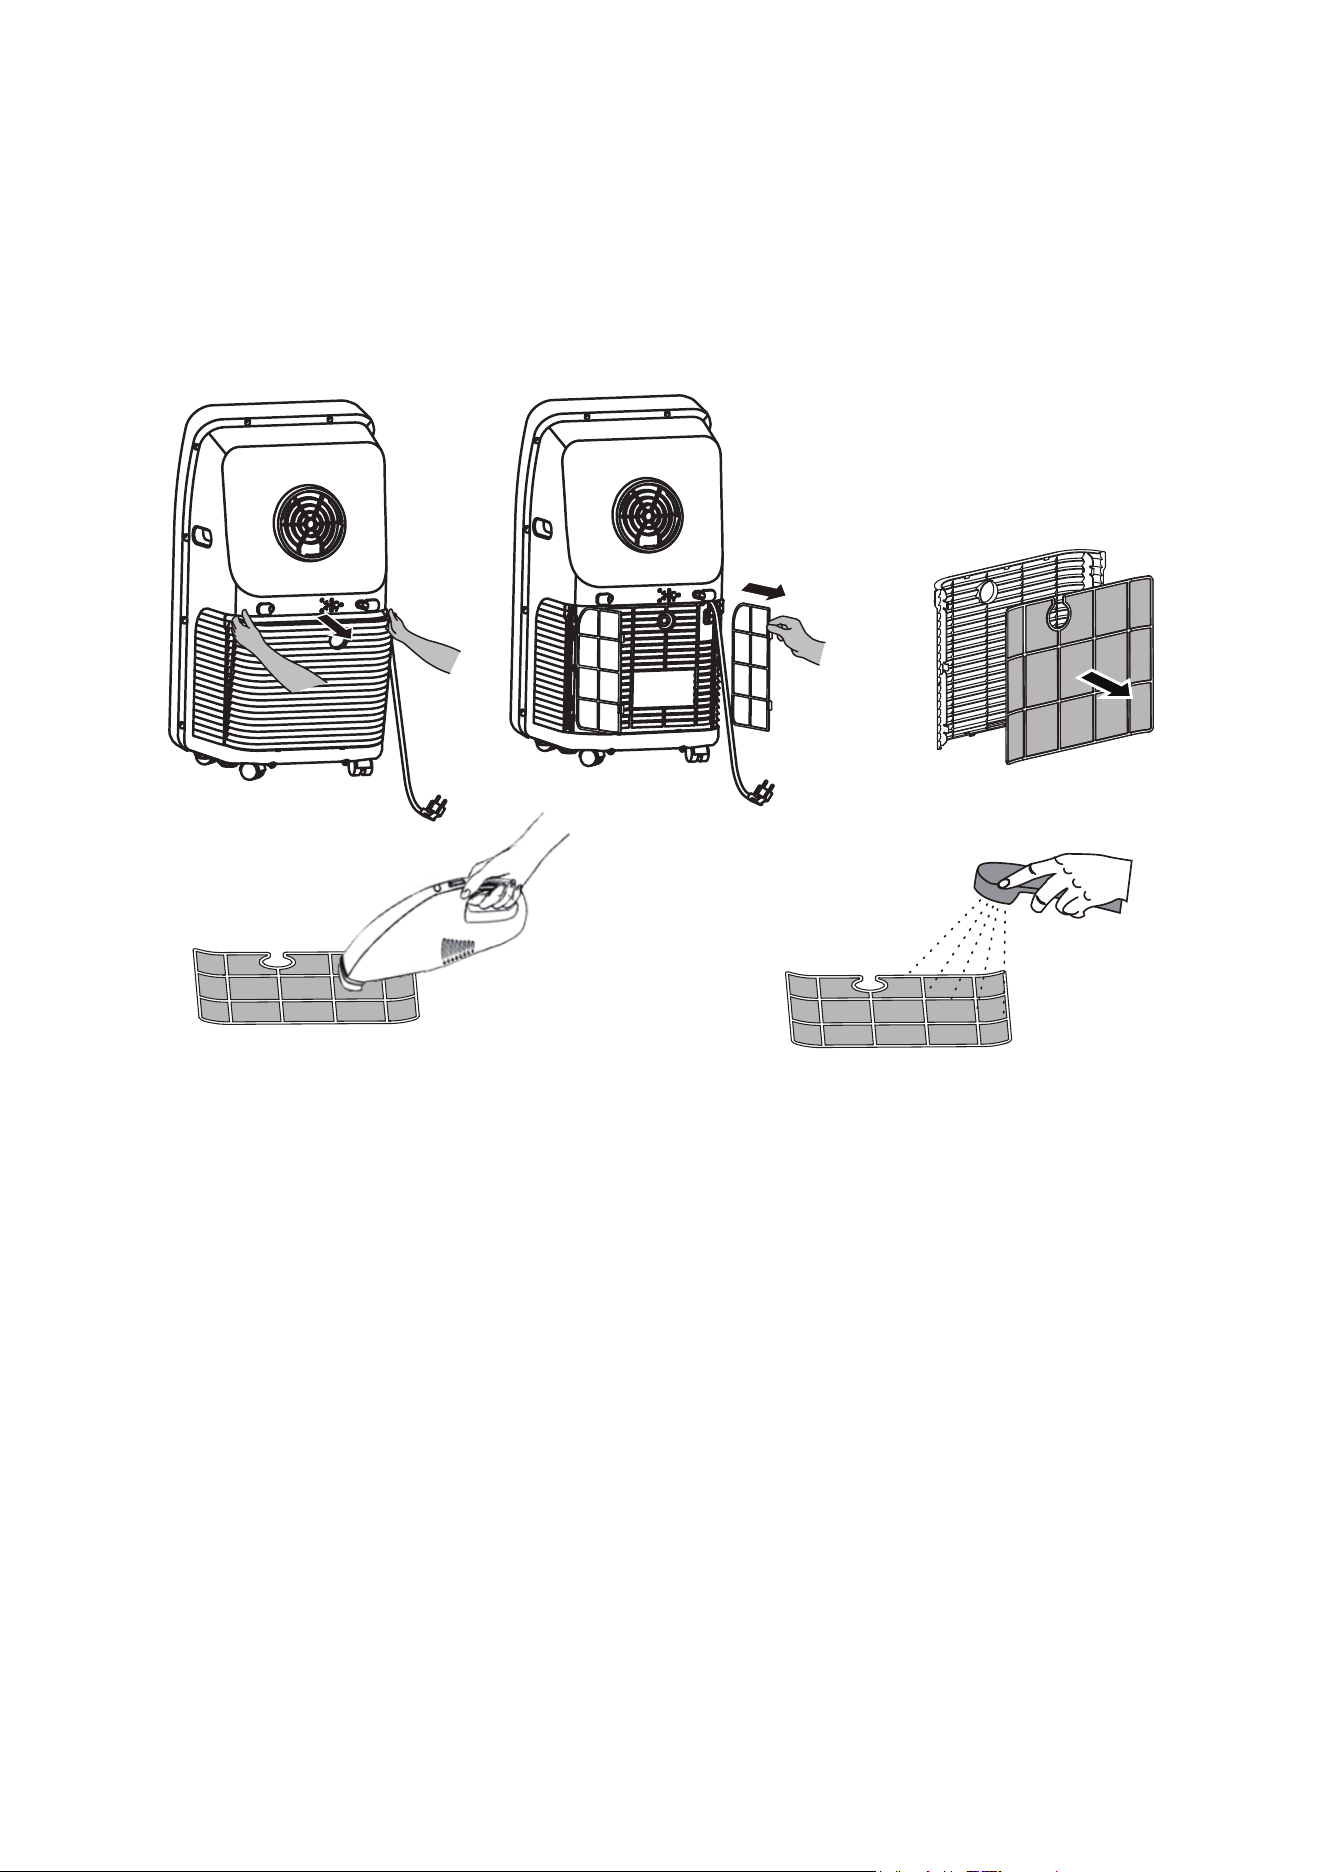
DUST FILTER
• Once every two weeks, remove the dust filter from the back of the unit and
wash it. Neglecting to clean the dust filter may cause the unit to run
poorly over time
SEASONAL CLEANING
If you are planning on putting the unit away long -term:
• Pull the drain plug to drain any water left in the tank.
• Run fan mode for 2 hours to help dry any collected moisture within the
unit.
• Turn off the unit and unplug it.
• Wash and replace the dust filter.
• Take apart the exhaust duct.
• Cover the unit and the exhaust duct pieces with something to keep dust out.
2 3 4
5 6 7 8 9
10 11 12 13 14
15
16 17 18
The A/C doesn't
work
The A/C starts
up too frequently
The unit is making
too much noise
FL
E1
E2
E4
DESCRIPTIONCODE
The internal watertank is full and needs to be emptied.
Coil temperature sensor error. Turn off your air conditioner and
call a professional maintenance technician or service center.
Indoor temperature sensor error.Turn off your air conditioner and
call a professional maintenance technician or service center.
Anti-freezing protection.The air conditioner coil temperature is
too low and the unit has turned off automatically.The unit resets
itself when the temperature reaches °F(8°C).
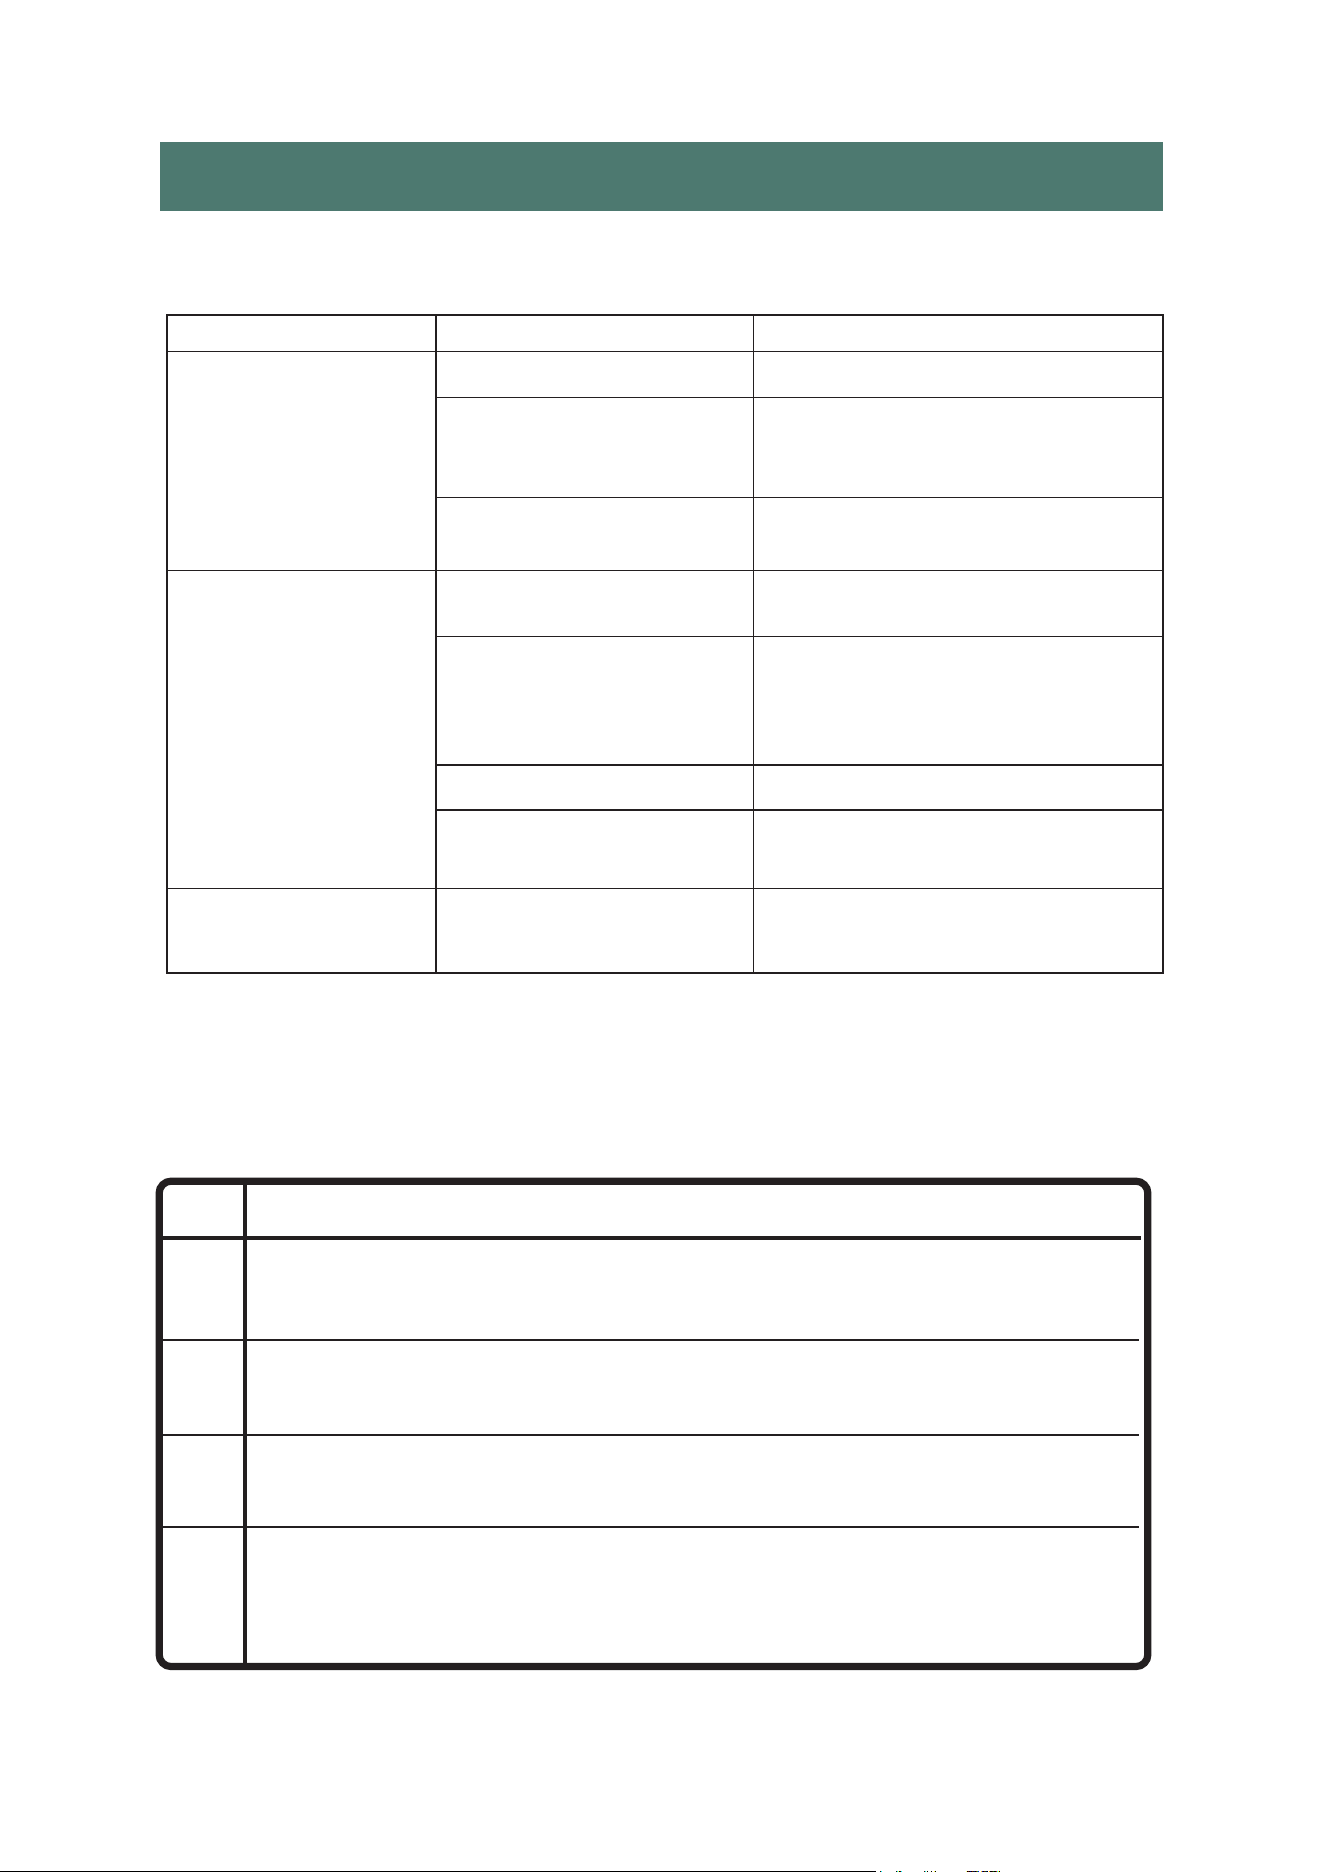
TROUBLE SHOOTING
In case of any of the following problems, please contact our custome
ISSUE CAUSE SOLUTION
Unit is not plugged in
Plug in unit in
The display panel Restart the A/C after powering
displays“FL”. off and draining, then it will
return to normal
The timer was set, Restart the unit 3 minutes after
and the unit shut off automatically shuts off
The unit is in direct Move the unit out of direct
sunlight sunlight
Too many Close doors and windows,
doors/windows are remove any heat sources
open;a heat source too close to the A/C
is affecting the unit
Dust filter is dirty Clean the dust filter
Air intake or exhaust Remove the exhaust tube and
output are clogged check for any blockage
The unit isn't placed Place it on even and firm
on a level surface ground, avoid shaking
2 3 4
5 6 7 8 9
10 11 12 13 14
15 16
17 18
Notice:For any issues not listed here that arise while using the A/C, turn the
unit of
f and unplug it, wait a few minutes, and try again. If problems persist,
contact customer service.
ERROR CODE

LIMITED MANUFACTURER'S WARRANTY
Warranty:
Your product is protected by this warranty. Warranty service must be obtained
from Uhome Consumer Services.
Warranty Period: One year warranty (One year from original purchasedate)
NORMAL RESPONSIBILITIES OF THE CONSUMER
This warranty applies only to products in ordinary household use, and the
consumer is responsible for the items listed below:
1. Proper use of the appliance in accordance with the instructions provided with
the product
2. Proper installation in accordance with all local plumbing, electrical and/or gas
codes.
3. Proper connection to a grounded power supply of sufficient voltage, replacement
of blown fuses, repair of loose connections or defects in housing wiring.
Warranty Exclusions:
The warranty will not apply if the damage is caused by any of the following:
• Power failure.
• Damage when moving the appliance.
• Improper power supply such as low voltage,defective household wiring or
inadequate fuses.
• Accident, alteration, misuse, or abuse of the appliance such as using
non-approved accessories, inadequate air circulation in the room or
abnormal operating conditions (extreme temperatures).
• Use in commercial or industrial applications.
• Fire, water damage, theft, war, riot, hostility or acts of God such as
hurricanes, floods, etc.
• Use of force or damage caused by external influences.
• Partially or completely dismantled appliances.
• Excess wear and tear by the user.
IF YOU NEED SERVICE:
Keep your bill of sale, or some other appropriate payment record. The date on
the bill established the warranty period should servicebe required. If service is
performed, it is in your best interest toobtain and keep all receipts.This written
warranty gives you specificlegal rights.You may also have other rights that vary
from state to state.
Service under this warranty must be obtained by following these
steps in order:
1.Please contact us by email. Sales support: [email protected]
2.Provide the order number.
3.Uhome reserves rights to upgrade products without user notice.
2 3 4
5 6 7 8 9
10 11 12 13 14
15 16 17
18

2 3 4
5 6 7 8 9
10 11 12 13 14
15 16 17 18