Instruction Manual
Page 2 Page 3
Page 4
Page 5 Page 6 Page 7
Page 1
WARNING
DO NOT crush, impact, puncture or open the
charging stand or any included accessory.
Keep away from water and fire.
Use only in cool, dry and well ventilated areas.
Keep magnetic objects away from the charging
stand, including cards with magnetic chips or strips.
Do not place metal objects on the charging stand.
Keep away from childlren and pets.
SPECIFICATIONS
Input: DC 5V/2A, 9V/1.8A
Charging Output: 5W/7.5W/10W
Rated Frequency: 110~205KHz
Product Dimensions: 9.27" x 2.64" x 7.56"
Weight: 0.85 lbs
CONTENTS
• Wireless Charging Base
• Suction Cup Bracket
• Vent Mount Bracket
• USB Cable
• User Manual
Compatible phones include but not limited to: iPhone 12/12
Pro/12 Pro Max/12 Mini/iPhone 11/11 Pro/11 Pro/Max/ XS/
XS/Max/XR/X/8/8 Plus, Samsung Galaxy Note10/S10/S10
Plus/S10 Edge/Note9/S9/S9 Plus/Note 8/S8 Plus/S8/S7/S7
Edge/S6/S6 Edge, Nexus 4/5/6/7, Google Pixel 3/3xl, LG
V30/V30+/G6 and all other Qi-enabled devices.
MTCCARCHRG
www.matcotools.com
1-YEAR LIMITED WARRANTY INFORMATION
Protection for malfunction due to defects in materials or
workmanship in the 12 months from the purchase date, we
will replace the unit at our discretion after inspection.
Save proof of purchase, such as a dated store receipt, to
establish warranty period. Without a dated receipt, we will
use the manufacturing date code. This warranty for the
charger is extended to the original purchaser or user, and it
covers defects in materials and workmanship for one year.
This warranty is in lieu of all other express warranties.
Horizon Tool, Inc. will not be liable for consequential or
incidental damages. Some states do not allow limitations on
warranties. In such case, the above limitation may not apply.
This warranty is invalid if any of the following occurs, but
not limited to this list:
• Failure to follow instructions in the User Manual
• Accidental or unreasonable use or misuse
• Repairs by unauthorized person or modification
For warranty replacement, contact customer service at
1-800-537-1077. DO NOT SHIP UNTIL YOU RECEIVE A
RETURN MERCHANDISE AUTHORIZATION (RMA) number
from customer service at Allstart, Inc.
Customer Service Contact:
Horizon Tool, Inc.
Tel: 1-800-537-1077
Fax: 1-800-537-1717
Email: [email protected]
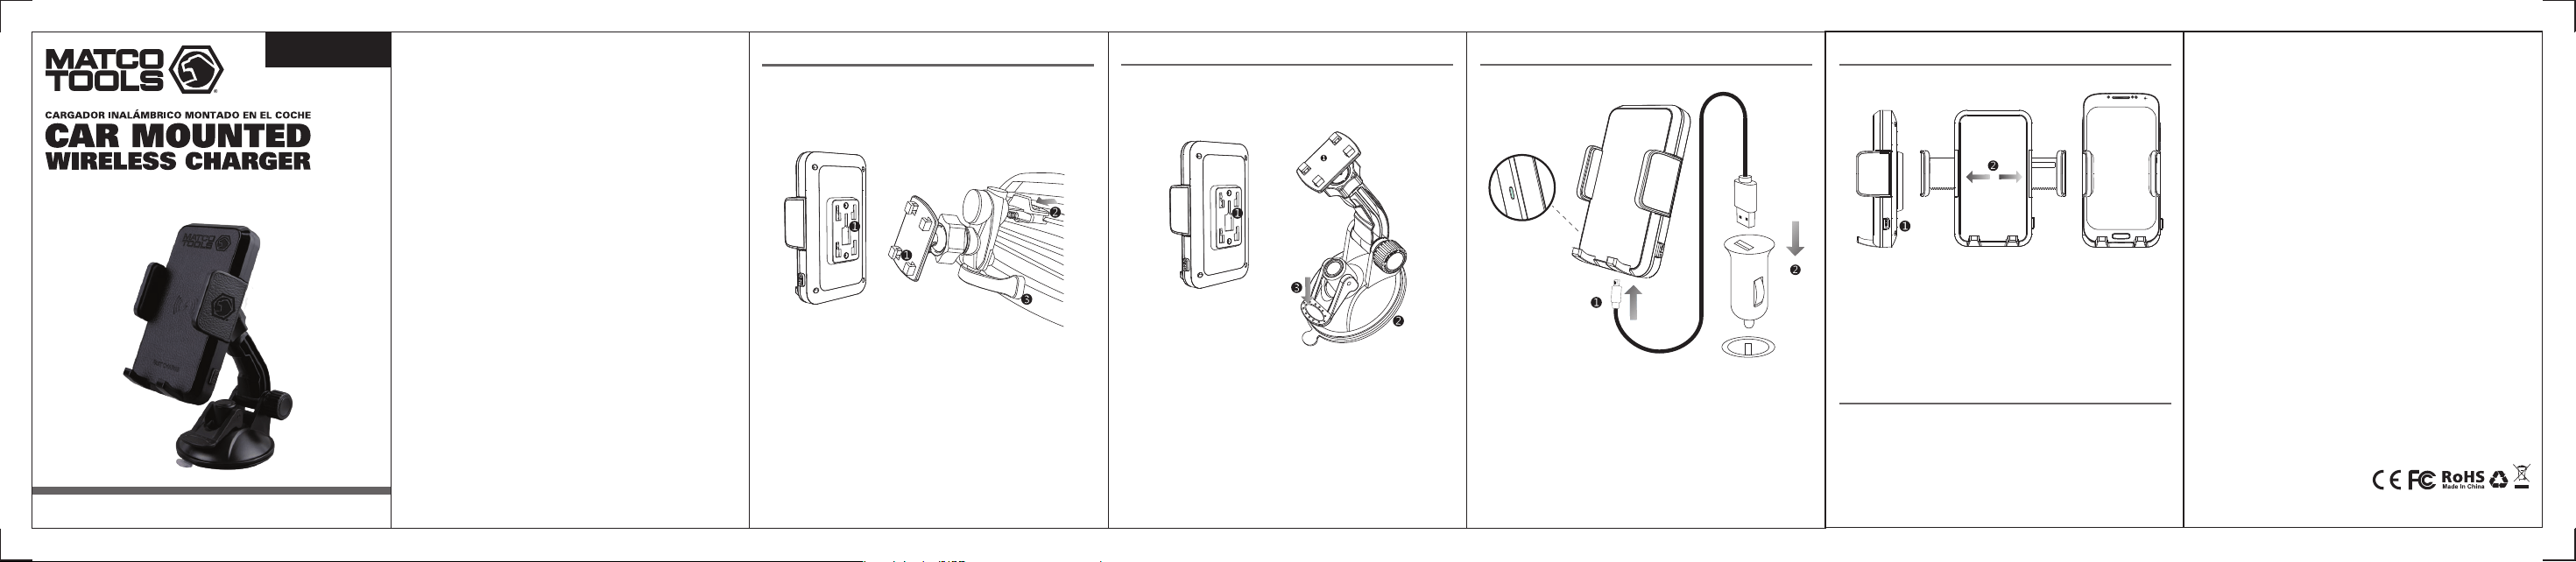
INSTALLATION OF CHARGER INSTALLATION OF CHARGER
CONNECT THE POWER SUPPLY WIRE
1. Mount wireless charging base into the air vent mount by
connecting the two brackets.
2. Push the spring lock buckle back, place and engage the
hook buckle into the back of car's air condition vent.
3. Position support bracket into the vent edge, affix, and
adjust the support bracket according to the vent area
to secure the vent mount and wireless charger.
1. Put the wireless charging base on the bracket and lock
into place.
2. To avoid the rough surface of dashboard, make sure
suction lever is in the up position, place suction cup
bracket on the dashboard and press the bottom of holder
firmly to ensure the PU sticker surface sticks together
tightly with dashboard.
3. Push down on suction lever until it closes and is secure
to dash.
1. Press the button on the side of wireless charger to release
the clamp of the phone holder
2. Place device in the cell phone holder and retract the
extension arms until the phone is firmly fixed and secured.
Green LED light indicates charging.
CHARGING FOR MOBILE PHONES
COMPATIBILITY
1. Connect the Micro USB charging cable to wireless charger.
2. Insert the other end of USB cable to the USB port of the
car charging adapter. Car charging adapter needs to be
purchased seperately.
*The LED status light on cigarette lighter charger will turn to
blue in standby mode indicating that wireless charger device
is properly connected to the power source
(Configuration mode II)(Configuration mode I)
2101018-17
Manual de instrucciones
Página 2 Página 3
Página 4
Página 5 Página 6 Página 7
Página 1
ADVERTENCIA
NO aplaste, golpee, perfore ni abra el soporte de
carga ni ningún accesorio incluido.
Manténgalo alejado del agua y del fuego.
Utilícelo solo en áreas frescas, secas y bien
ventiladas. Mantenga los objetos magnéticos
alejados del soporte de carga, incluidas las tarjetas
con tiras o chips magnéticos. No coloque objetos
metálicos sobre el soporte de carga. Manténgalo
alejado de niños y mascotas.
ESPECIFICACIONES
Entrada: DC 5V/2A, 9V/1.8A
Salida de carga: 5W/7.5W/10W
Frecuencia nominal: 110~205KHz
Dimensiones del producto: 9.27" x 2.64" x 7.56"
Peso: 0.85 lbs
CONTENIDO
• Base de carga inalámbrica
• Soporte de ventosa
• Soporte de montaje de ventilación
• Cable USB
• Manual de usuario
Los teléfonos compatibles incluyen, entre otros: iPhone
12/12 Pro/12 Pro Max/12 Mini/iPhone 11/11 Pro/11 Pro/Max/
XS/ XS/Max/XR/X/8/8 Plus, Samsung Galaxy Note10 /S10/
S10 Plus/S10 Edge/Note9/S9/S9 Plus/Note 8/S8 Plus/ S8/ S7/
S7 Edge/S6/S6 Edge, Nexus 4/5/6/7, Google Pixel 3/3xl, LG
V30/V30+/G6 y todos los demás dispositivos compatibles
con Qi.
MTCCARCHRG
www.matcotools.com
INFORMACIÓN SOBRE LA GARANTÍA LIMITADA DE 1 AÑO
Protección frente a fallos de funcionamiento debidos a
defectos de materiales o mano de obra. En los 12 meses
siguientes a la fecha de compra, sustituiremos la unidad a
nuestra discreción después de su inspección.
Guarde la prueba de compra, como un recibo de la tienda
en el que se indique la fecha de compra, para establecer el
periodo de garantía. Si no tiene un recibo con la fecha de
compra, utilizaremos el código de la fecha de fabricación.
Esta garantía del cargador se extiende al comprador o
usuario original, y cubre los defectos de materiales y
fabricación durante un año.
Esta garantía reemplaza todas las demás garantías expresas.
Horizon Tool, Inc. no será responsable de daños consecuentes
ni incidentales. Algunos estados no permiten las garantías
con limitaciones. En ese caso, la limitación anterior podría
no aplicarse.
Esta garantía quedará invalidada si se produce alguna de las
circunstancias siguientes, entre otras:
• Incumplimiento de las instrucciones de este manual de
usuario
• Uso indebido accidental o irrazonable
• Reparaciones o modificaciones realizadas por personas
no autorizadas
Para reparaciones bajo la garantía, póngase en contacto con
el servicio de atención al cliente llamando al 1-800-537-1077.
NO REALICE EL ENVÍO HASTA QUE RECIBA UN NÚMERO DE
AUTORIZACIÓN DE DEVOLUCIÓN DE MERCANCÍA (RMA) del
servicio de atención al cliente de Allstart, Inc.
Contacto de atención al cliente:
Horizon Tool, Inc.
Tel: 1-800-537-1077
Fax: 1-800-537-1717
Email: [email protected]
INSTALACIÓN DEL CARGADOR INSTALACIÓN DEL CARGADOR
CONECTE EL CABLE DE ALIMENTACIÓN
1. Monte el cargador inalámbrico en el soporte de
ventilación conectando los dos soportes.
2. Presione la hebilla de bloqueo de resorte hacia delante;
coloque y acople la hebilla de gancho en la solapa de la
salida de aire acondicionado del vehículo.
3. Coloque el soporte de las alfombrillas en el borde de
ventilación; fije y ajuste el soporte de las alfombrillas
según el área de ventilación para fijar el soporte de
ventilación y el cargador inalámbrico.
1. Coloque la hebilla del transmisor de carga inalámbrico en
la hebilla del soporte del transmisor y fíjela.
2. Para evitar la superficie rugosa del salpicadero, reduzca la
adherencia del soporte con ventosa; instale el soporte en
el salpicadero horizontal y presione con fuerza la parte
inferior del soporte para asegurarse de que la superficie de
la pegatina de PU encaje perfectamente con el salpicadero.
3. Apriete la palanca fija hasta que se cierre y compruebe que
haya quedado fijada.
1. Pulse el botón de la parte superior del cargador inalámbrico
para soltar la abrazadera del soporte del teléfono.
2. Coloque el dispositivo compatible con Qi en el soporte del
teléfono móvil, y retraiga la abrazadera elástica hasta que
el teléfono quede bien fijado y asegurado. El indicador LED
verde indica que se está cargando.
CARGA PARA TELÉFONOS MÓVILES
COMPATIBILIDAD
1. Conecte el cable de carga Micro USB al cargador
inalámbrico.
2. Inserte el otro extremo del cable USB en el puerto USB del
cabezal de carga del coche. El cabezal de carga del coche
debe adquirirse por separado.
*El indicador LED de estado del cargador del encendedor se
iluminará en azul en el modo de espera, lo que indica que el
cargador inalámbrico está conectado correctamente a la
fuente de alimentación.
(Modo de configuración II)(Modo de configuración I)
2101018-17