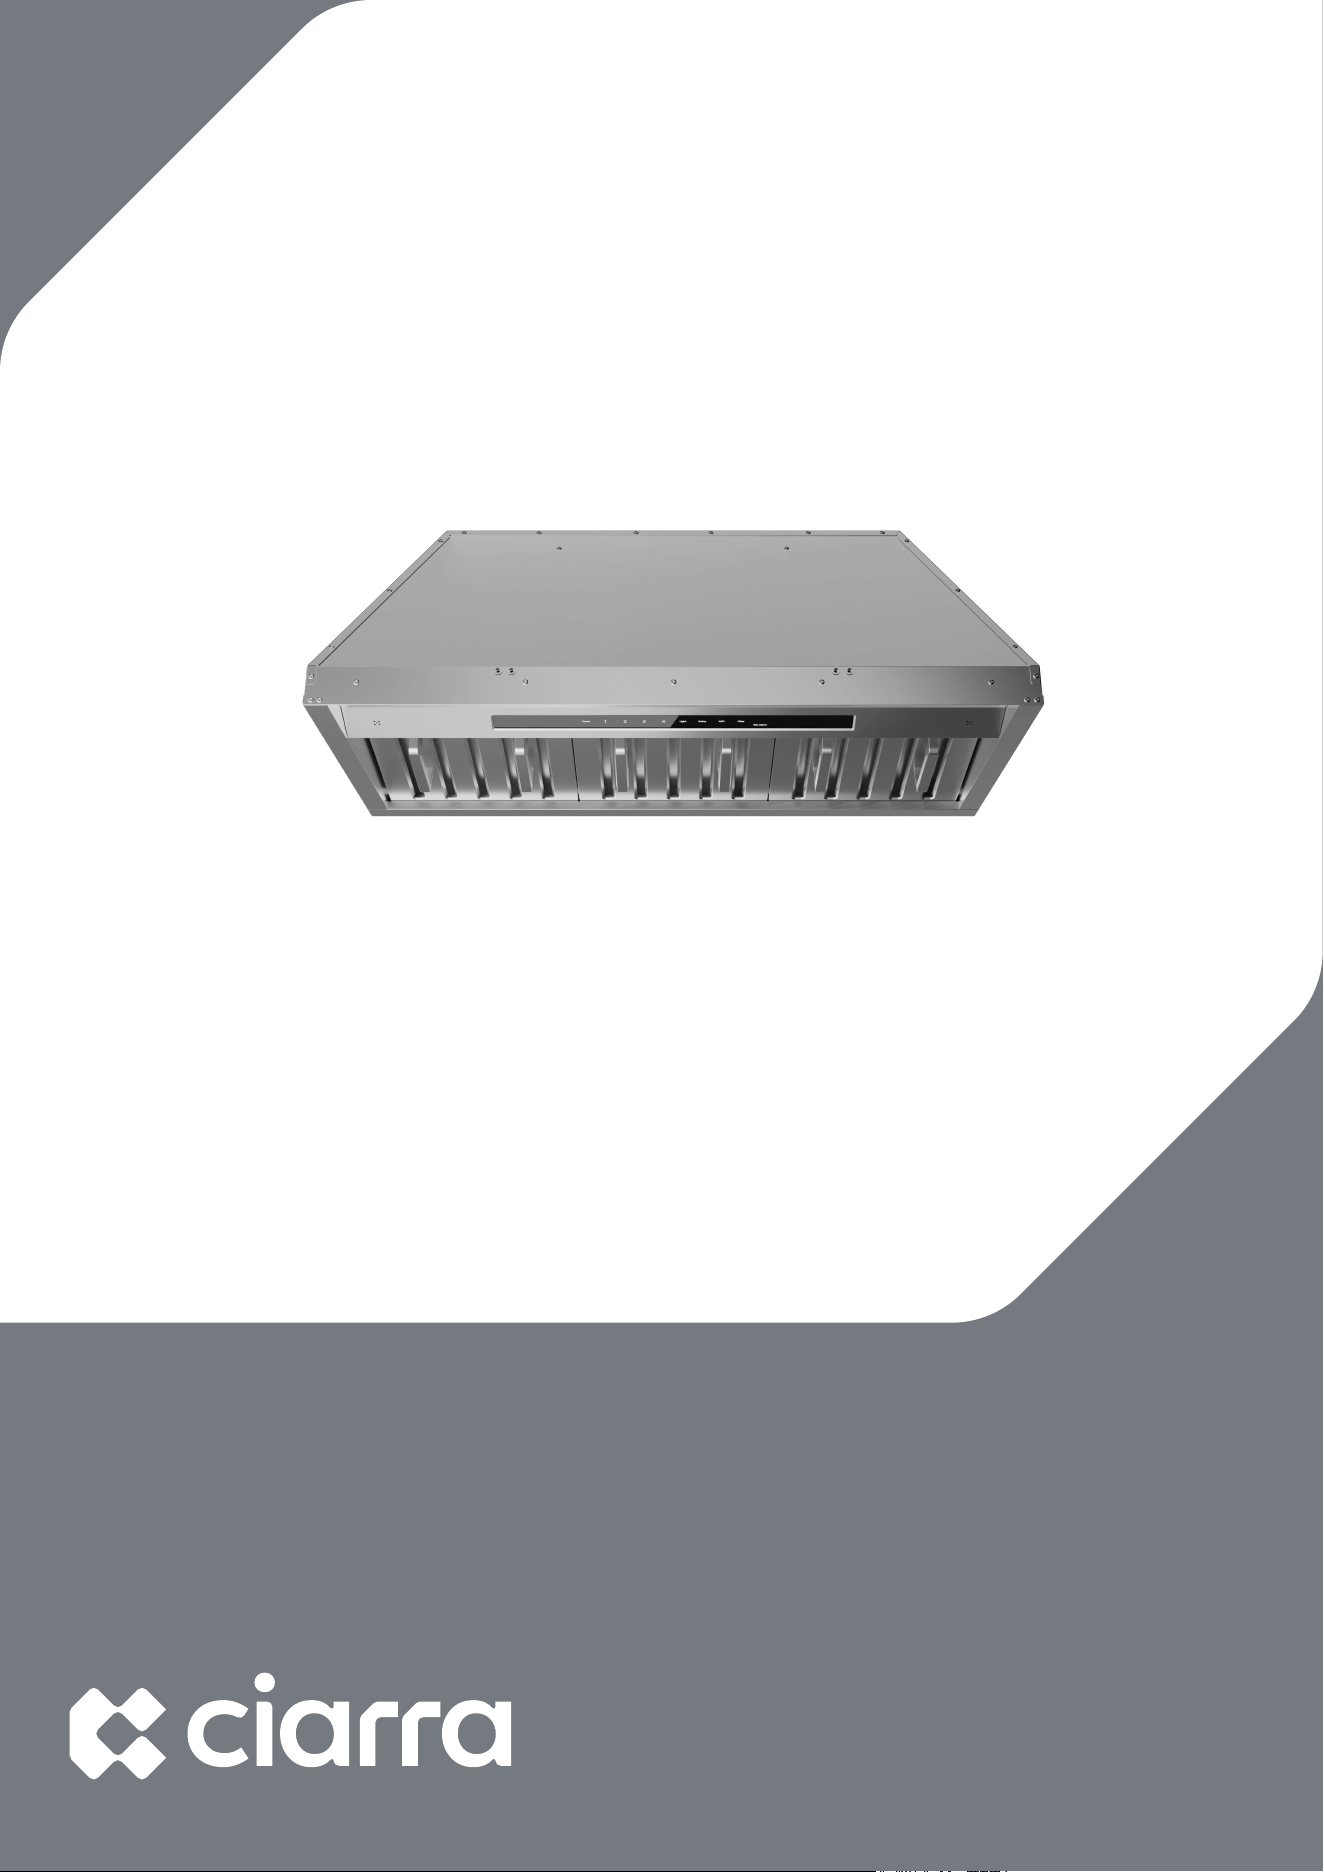
Model Number:
CAS28927A
CAS34927A
www.ciarraappliances.com


Grease Fil
ter------------------------------------------------20
Stainless Steel Cleaning-------------------------------------20
Painted Finish Cleaning-------------------------------------20
LED Replacement ----------------------------------------21-22
Troubleshooting-----------------------------------23
Environmental Protection-------------------------24
CONTENTS
Safety------------------------------------------- 2-4
Specifications--------------------------------------5
Before Using the Range Hood ----------------------6
Prepare for Installation ----------------------------7
Installation--------------------------------------8-14
Install the Hood-------------------------------------------8-11
PLASMA Installation -------------------------------------12-14
Operation--------------------------------------15-19
Cleaning and Maintenance -------------------20-22
1
Safety
! WARNING
If the information in this manual is not followed exactly, a fire or explosion
may result causing property damage, personal injury, or death.
Before beginning installation, please read and follow these important
instructions for the safety of your home and the people living in it.
The instructions in this manual are intended for qualified installers and
certified service technicians. Installation and electrical wiring must be
completed by qualified professionals and in accordance with applicable
codes and standards.
DO NOT attempt to install this appliance yourself. Injury could result from
installing the unit due to lack of appropriate electrical and technical
background.
The installer should leave these instructions with the consumer who should
retain for local inspectors’ use and for future reference.
Due to the size and weight of this range hood, two-person installation is
highly recommended.
Use care when handling the range hood, chimney cover, baffle filters, and
any parts or accessories, as sharp edges may lead to injury. Use of gloves
during installation is highly recommended.
The manufacturer will not be responsible for any damage to property or to
persons caused by incorrect installation, improper use of the appliance, or
failure to heed the warnings listed.
The manufacturer reserves the right to make changes to its products
when considered necessary and useful, without affecting the essential
safety and operating characteristics.
This appliance is designed for general ventilating use only. DO NOT use to
exhaust hazardous or explosive materials and vapors.
The combustion air flow needed for safe operation of fuel-burning
equipment may be affected by this unit’s operation. Follow heating
equipment guidelines and safety standards such as those published by
the National Fire Protection Association (NFPA), American Society of
Heating, Refrigeration and Air Conditioning Engineers (ASHRAE), and local
code and government authorities.
2

Safety
Sufficient air is needed for proper combustion and exhausting of gases
through the duct to prevent back drafting.
Before servicing or cleaning the unit, fully disconnect the range hood from
power to avoid risk of electric shock and injury.
When cutting or drilling into a wall or ceiling, be careful not to damage
electrical wiring or other hidden utilities.
All electrical wiring must be properly installed, insulated, and grounded.
Electrical installation must be in accordance with the National Electrical
Code ANSI/NPA70-latest edition and/or local codes.
Old duct work should be cleaned or replaced, if necessary, to avoid the
possibility of a grease fire or other hazard. Check all joints on duct work to
ensure proper connection; all joints should be properly taped/secured.
When the range hood ventilates air out of the room, the vented air must
be replaced; this is called makeup air. If a makeup air system is needed,
but not used, a hood may not function as expected due to negative air
pressure.
Keep the motor, fans, baffle channels, filters, tunnels, oil containers, and
grease- laden surfaces clean. Grease should not be allowed to
accumulate inside or on the surface of the range hood; clean surfaces
frequently.
Take care when cleaning the range hood in spray form: never direct the
spray onto the electrical wiring, motor, button panel, or light bulbs.
After installation, use a stainless steel cleaning product or wipe to
eliminate any residues from protective film after removal.
When cleaning stainless steel, only use a stainless steel cleaner product
with a soft sponge, or use a cloth with a warm soap and water solution.
Never use abrasive powders or liquids.
To reduce the risk of fire and to disperse air properly, make sure to vent air
outside. DO NOT vent exhaust into spaces between walls, crawl spaces,
ceilings, attics, or garages.
All CIARRA range hoods are ETL-listed, ensuring all parts were tested for
safety and meet industry standards and regulations.
3

Safety
You must purchase appropriate flexible ducting and any additional items
to vent the hood in accordance with government codes.
Please verify with local and state regulations on the proper venting
method for your hood. Many agencies have CFM rating specifications for
your hood.
Always turn the range hood on when cooking at high heat or when
cooking flaming foods. Use high settings on the cooking range only when
necessary.
Never leave range top surface units unattended at high settings. Boil over
can cause smoking and greasy spillovers that may ignite. Heat oils slowly
on low or medium settings.
Always use appropriate cookware and utensils. Always use cookware
appropriate for the size of the surface element on your range top.
To reduce the risk of injury in the event of a range top grease fire, smother
flames with a close fitting lid, cookie sheet, or metal tray, then turn off the
burner. Never pick up a flaming pan — you may be severely burned.
Keep flammable or combustible material away from flames. If flames do
not go out immediately, evacuate and call the fire department. DO NOT
use water, including wet dishcloths or towels — a violent steam explosion
will result.
Carefully inspect all items for damages upon delivery. Upon acceptance of
items, owner assumes responsibility for its safe arrival.
Before installing your unit, test the range hood for proper functionality by
plugging it into the wall and testing the fan and lights. Do not install this
range hood if it has missing or broken parts. If the unit arrives damaged,
please contact CIARRA Customer Care Service.
4
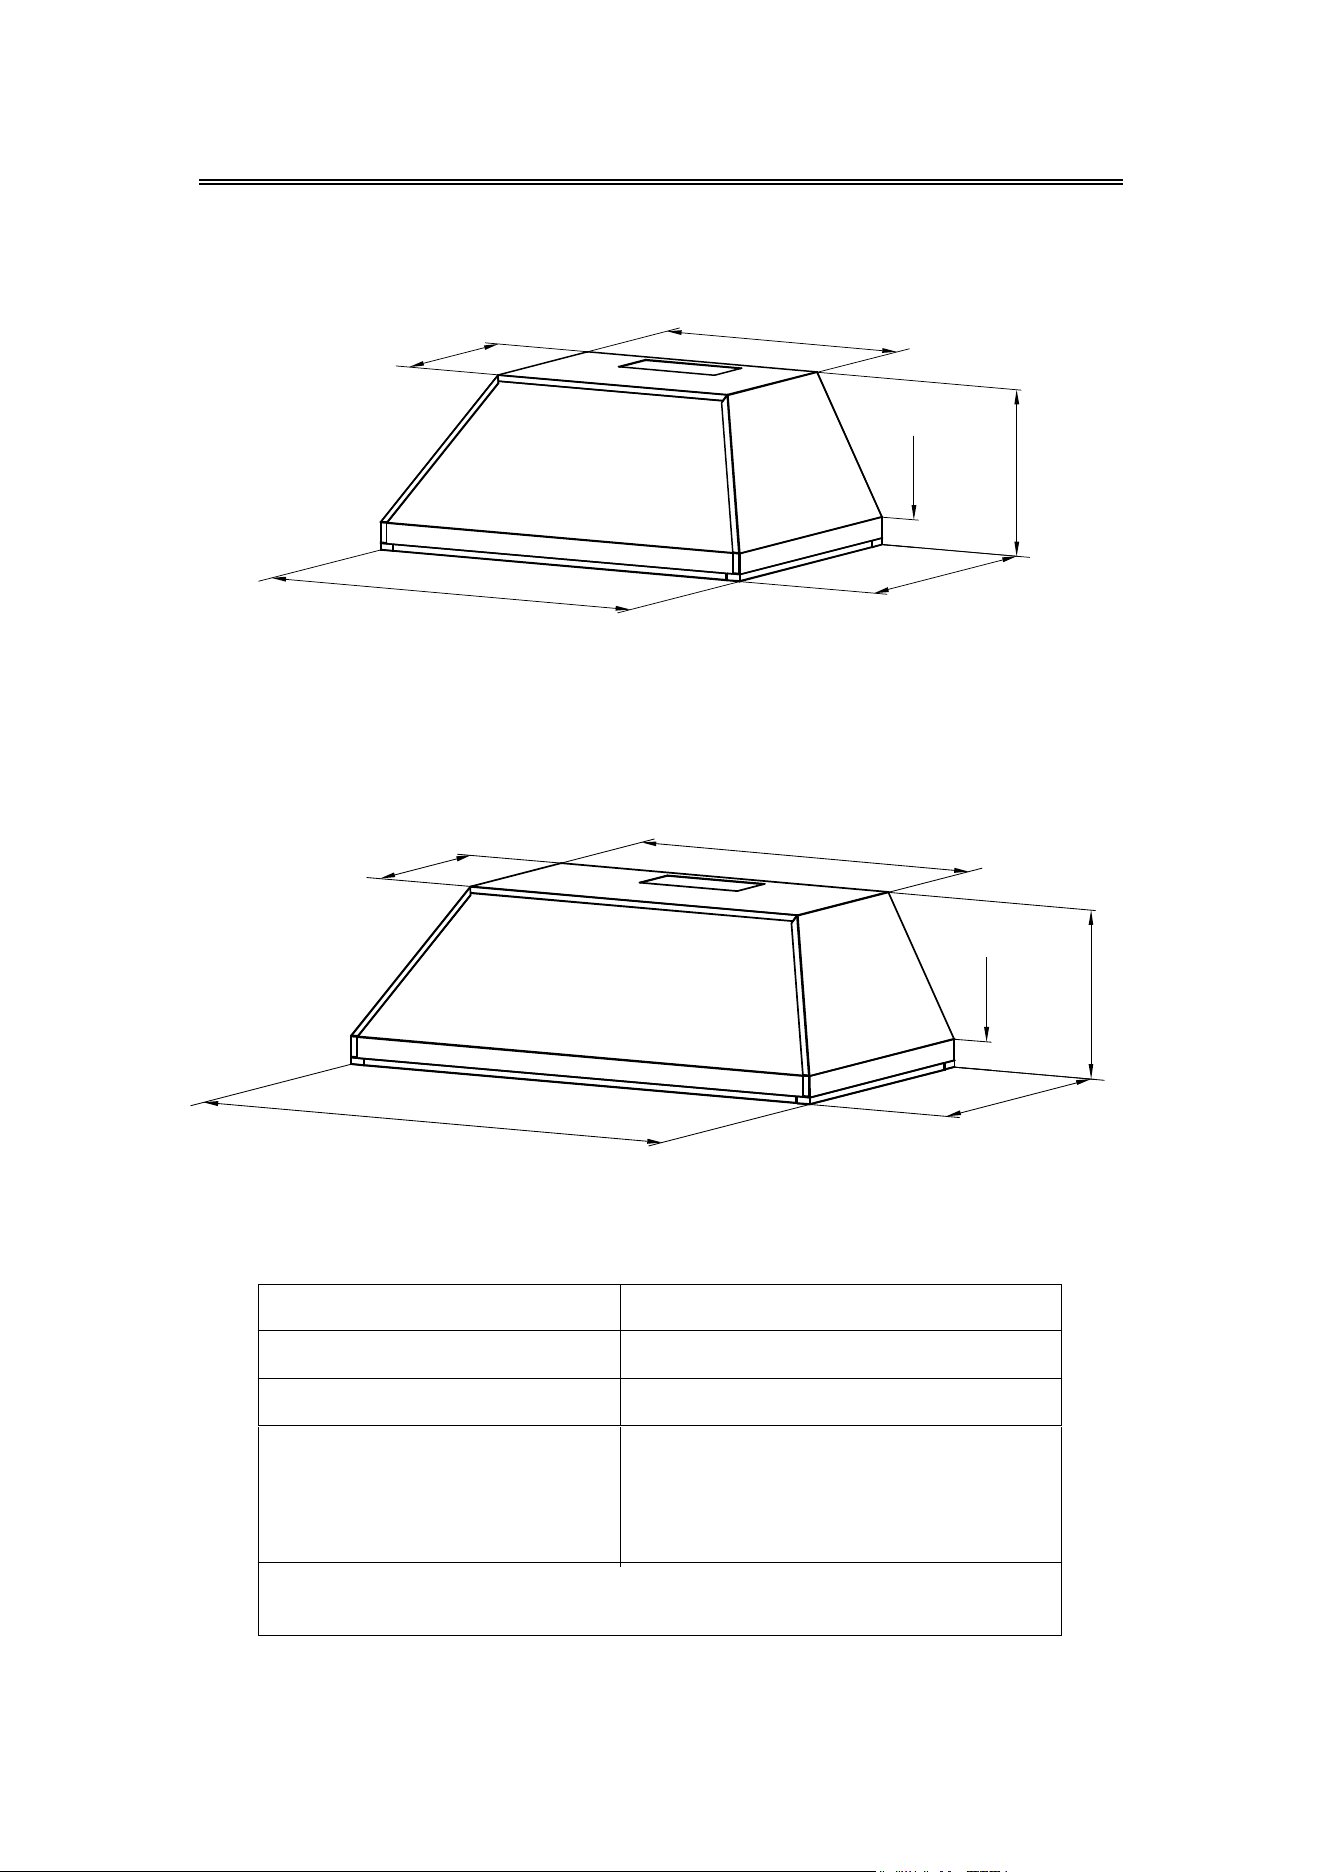
Specifications
Voltage 120V~ 60Hz
Power of Motor 1 x 150W(DC)
Power of lamps 2x 1.5 W
Appliance Dimension
28¼" * 19⅛" * 12⅕"(CAS30927A)
34¼" * 19⅛" * 12⅕"(CAS36927A)
(W x D x H)
Note: The manufacturer reserves the right to change any
technological improvement or modification without prior notice.
28¼"
19⅛"
12⅕"
2"
12"
18"
34¼"
19⅛"
12⅕"
2"
12"
24"
CAS30927A
CAS36927A
5
Before Using the Range Hood
CAUTION: Before proceeding to the installation, check If items
are missing or damaged, contact the manufacturer.
Observe all governing codes and ordinances. Have a qualified
technician install the range hood. It is the installer’s
responsibility to comply with installation clearances specified on
the model/serial rating plate. The manufacturer declines all
responsibility for improper installation and does not accept
responsibility for appliance warranty in the event of damage
caused by incorrect installation.
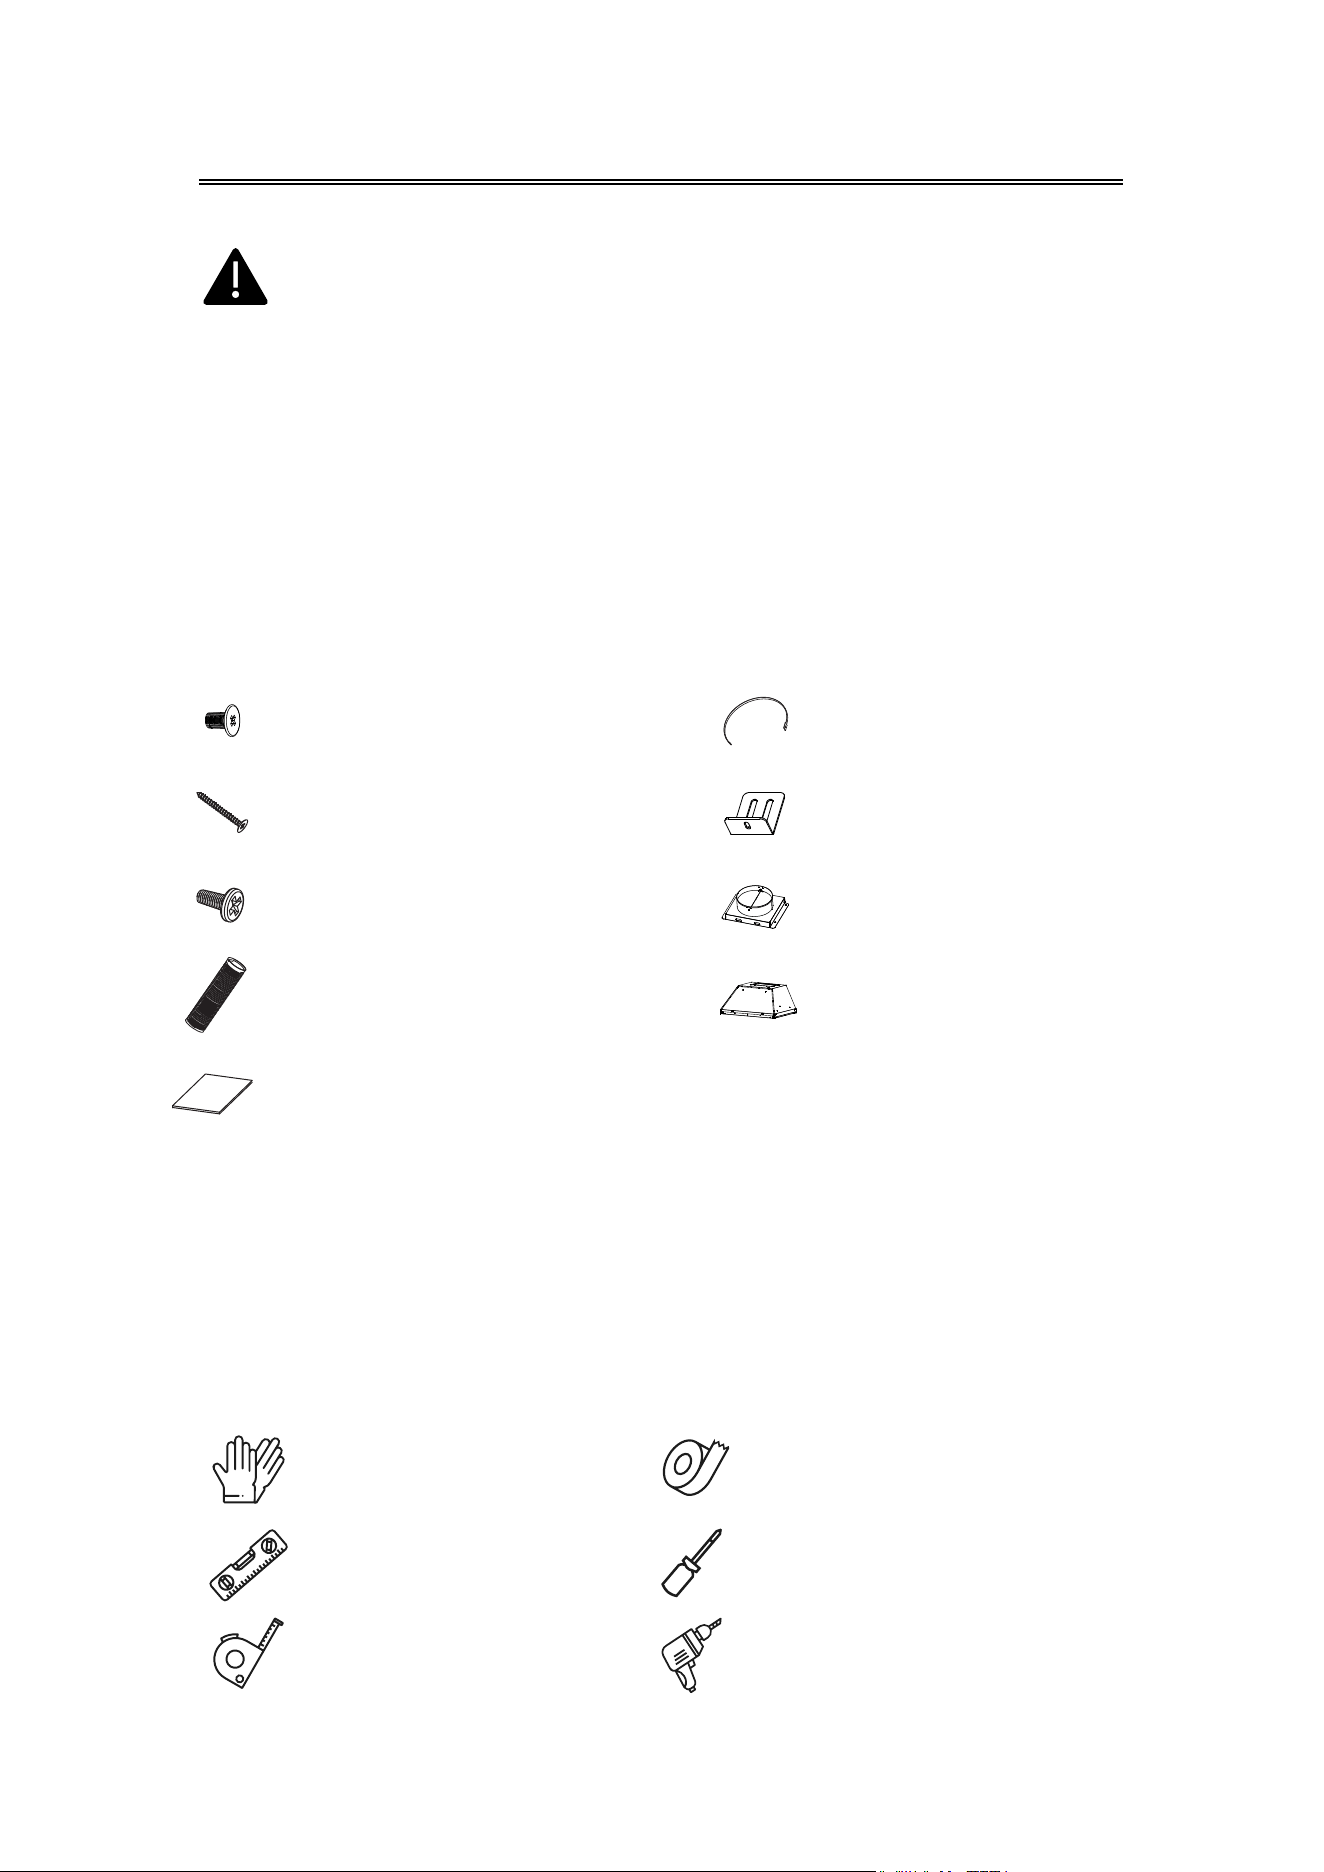
COMPONENTS:
YOU WILL BE NEEDING THESE TOOLS FOR INSTALLATION
1.Protective Gloves
2.Spirit Level Ruler
3.Measuring Tape
4.Double Sided Tape or Tape
5.Cross-Head Screwdriver Set
6.Electric drill and 8mm drill
Part 2 : Screws(B) X 8
Part 3 : Screws(C) X 4
Part 4 : Aluminum Exhaust Pipe X 1
Part 6 : Cable Ties X 2
Part 5 : Installation Manual X 1
Part 7 : L brackets X 8
Part 9 : Range Hood Body X 1
Part 8 : Air outlet assembly X 1
Part 1 : Screws(A) X 16
6

Prepare for Installation
NOTES:
• Recirculation Mode: Recirculating with Plasma, the smells and odors can
be filtered and vented through the top vented hole and the exhaust
pipe is not required.
Extraction Mode: You can install the 78" long and 7" diameter
aluminum exhaust pipe for extracting, which is included in the
installation kit.
• Use a maximum of 40' of ductwork. Try to minimize the use of elbows.
• You must establish a minimum of 1 2" of vertical airflow from the top of
the hood before executing any 90° turn. No more than 3 elbows are
allowed; each 90° turn you make equates to 5' lost when accounting for
the maximum 40'.
• Do not use any reducers on ducting smaller than the appropriate
diameter (6" or 8").
• Any existing or additional dampers should be inspected for proper
operation.
• Before installation, don't connect the power.
EXAMPLES OF PROPER AND IMPROPER DUCTING:
Direct unobsctructed path
Indirect path with too mant elbows
7
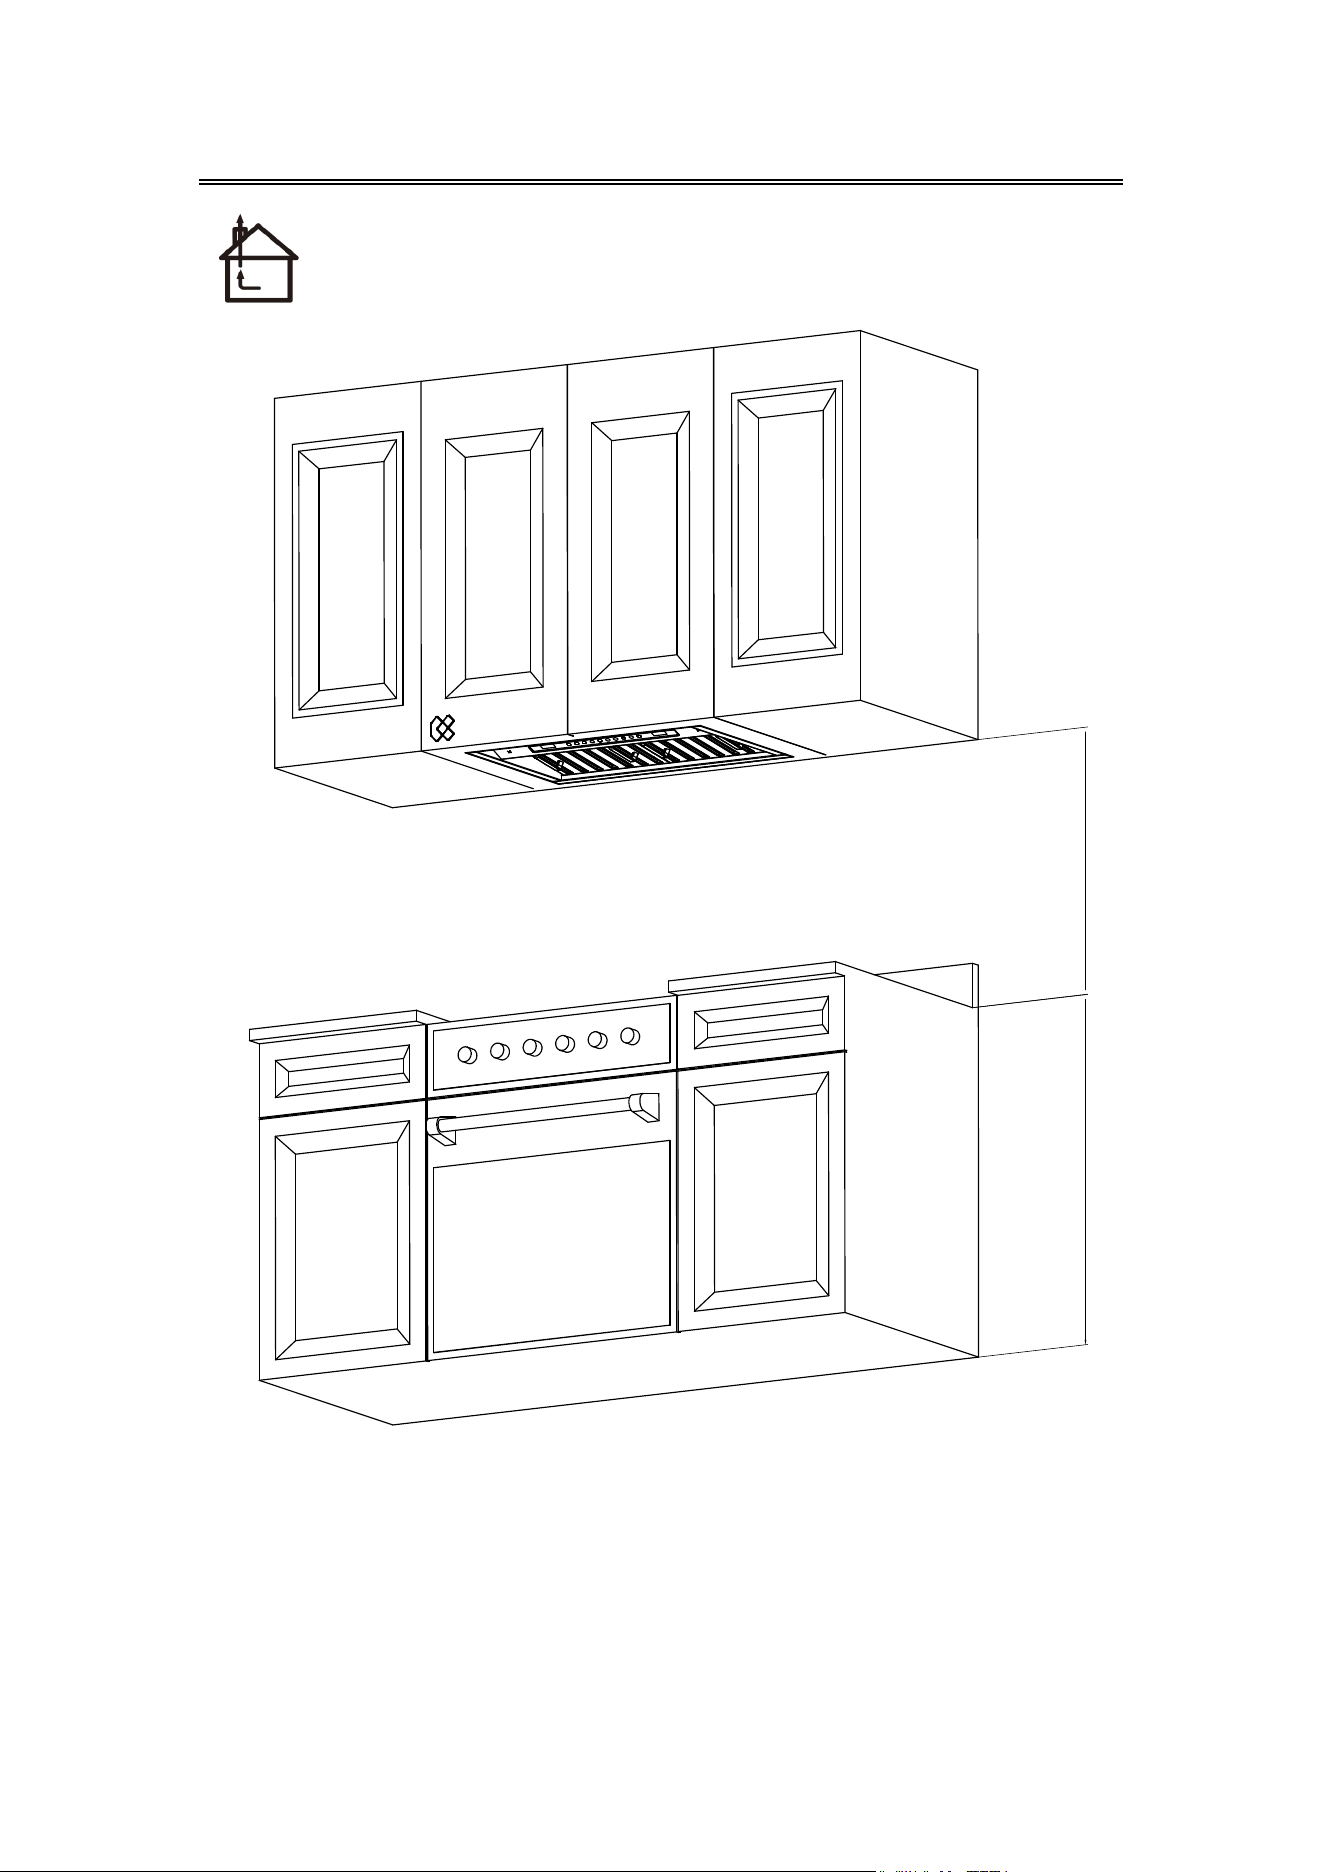
Installation
Install the Hood(Extraction):
36"
30"~36"
NOTE: The recommended height to install your hood is 30" minimum
and 36" maximum above the range top or cook top. These distances
allow for maximum venting efficiency. The height of your chimney will
vary depending on model of hood, as well as the height of your
kitchen ceiling.
8
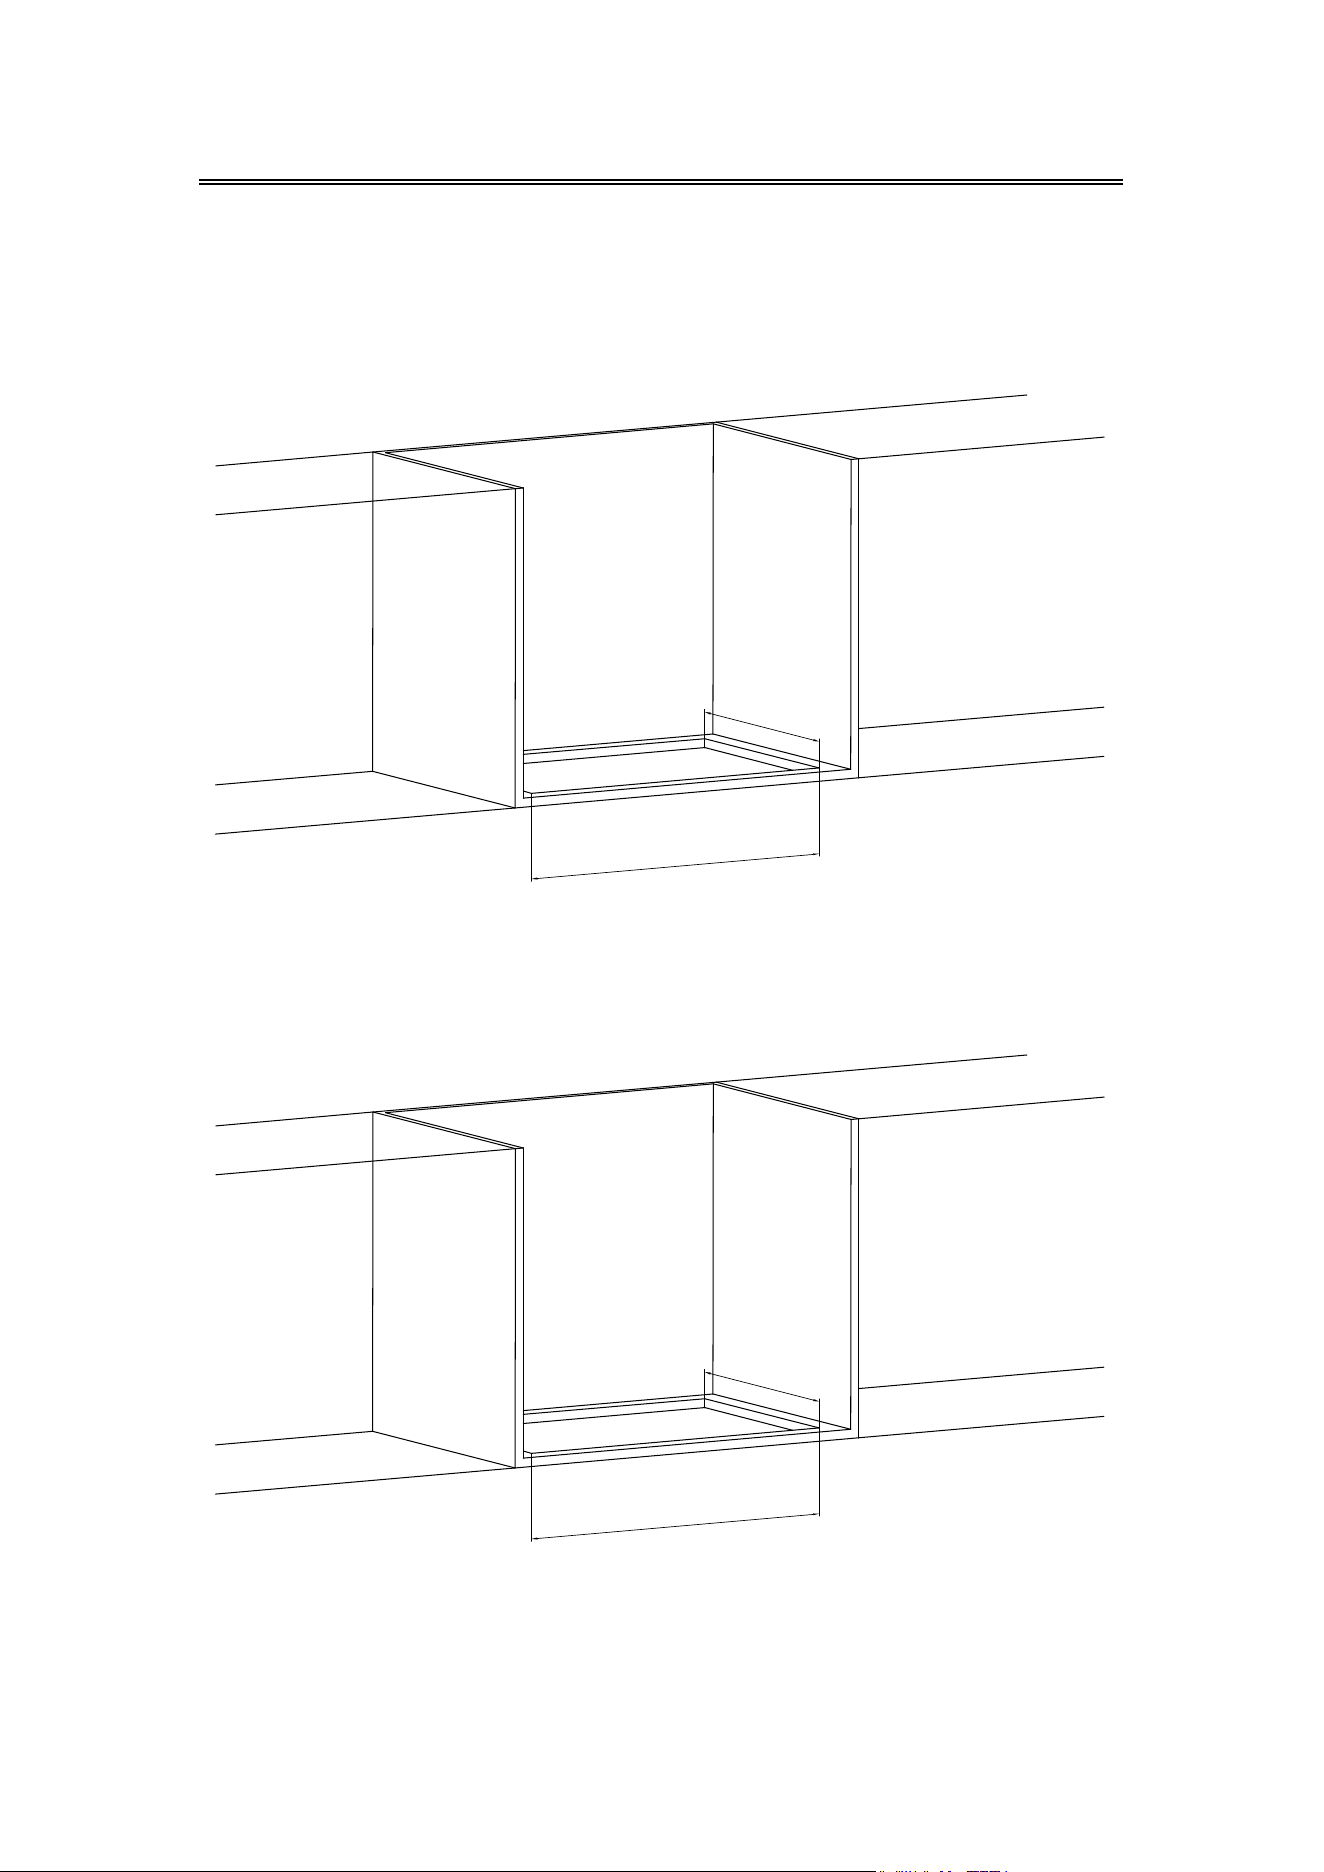
Installation
Installation Dimension Drawing
28½"
34½"
19⅓"
CAS30927A
CAS36927A
19⅓"
9
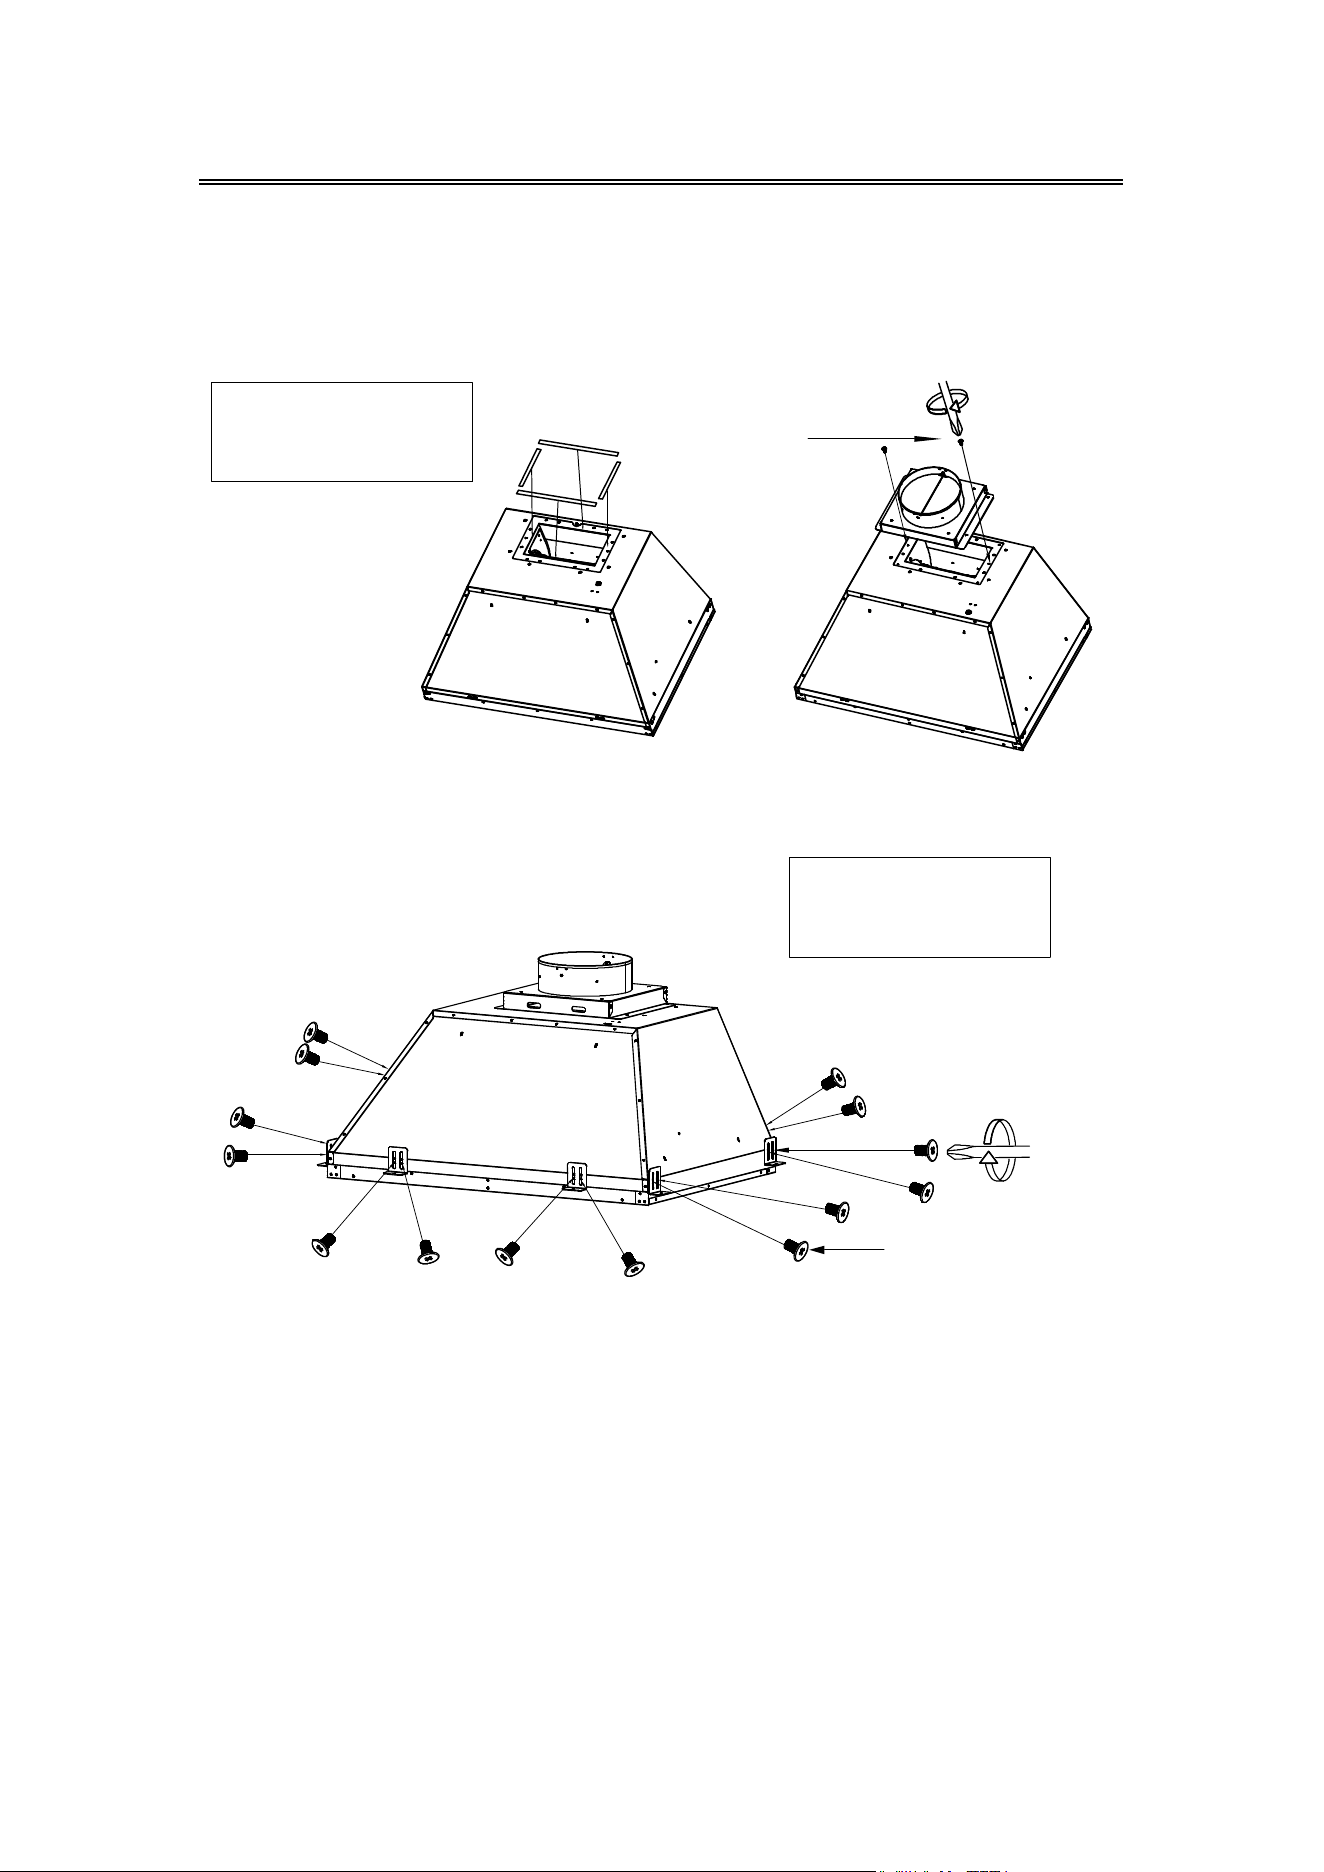
Installation
1. Attach strips of sponge to the four sides of the hood vents.
Secure the air outlet assembly to the top of the range hood in the
corresponding position with the two Screws (C).
2. Using L brackets and screws provided, attach L brackets to each side
of the insert.
NOTE: Due to some installation differences with custom hoods the L
brackets may not work. Before installing insert please determine if the
insert will work for your installation needs. You may pre-drill holes into
the insert unit to accommodate for custom hood installations.
COMPONENTS:
Part 3: Screws (C) X 2
Part 8: Air outlet assembly
COMPONENTS:
Part 1: Screws (A) X 16
Part 7: L brackets X 8
Screws (C)
Screws (A)
10
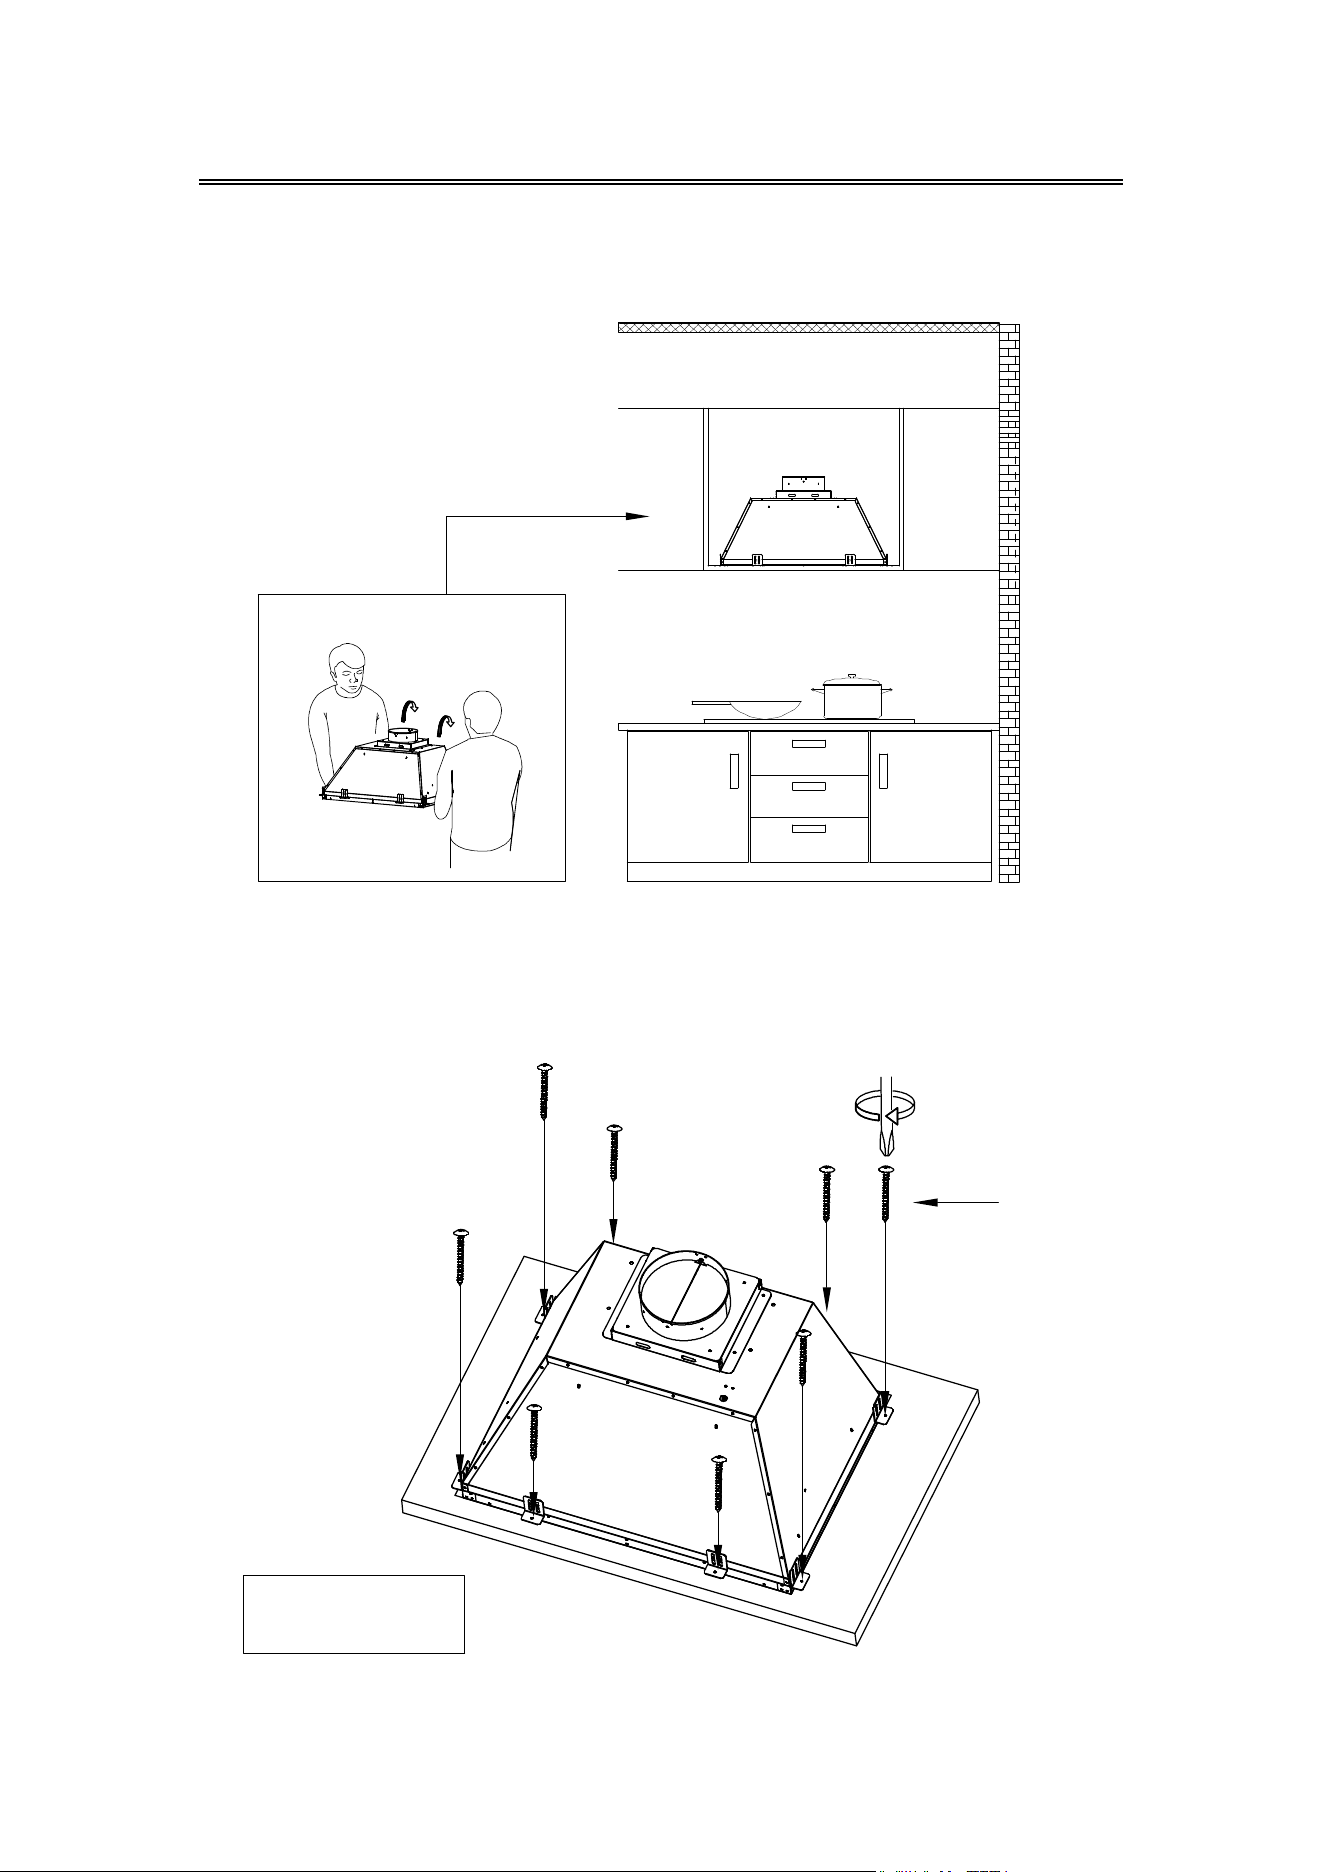
Installation
4. Secure the L brackets on the hood to the cabinet with 8
screws (B) .
3. Lift the range hood insert into cabinet or custom hood structure.
Screws (B)
COMPONENTS:
Part 2: Screws (B) X 8
11
Installation
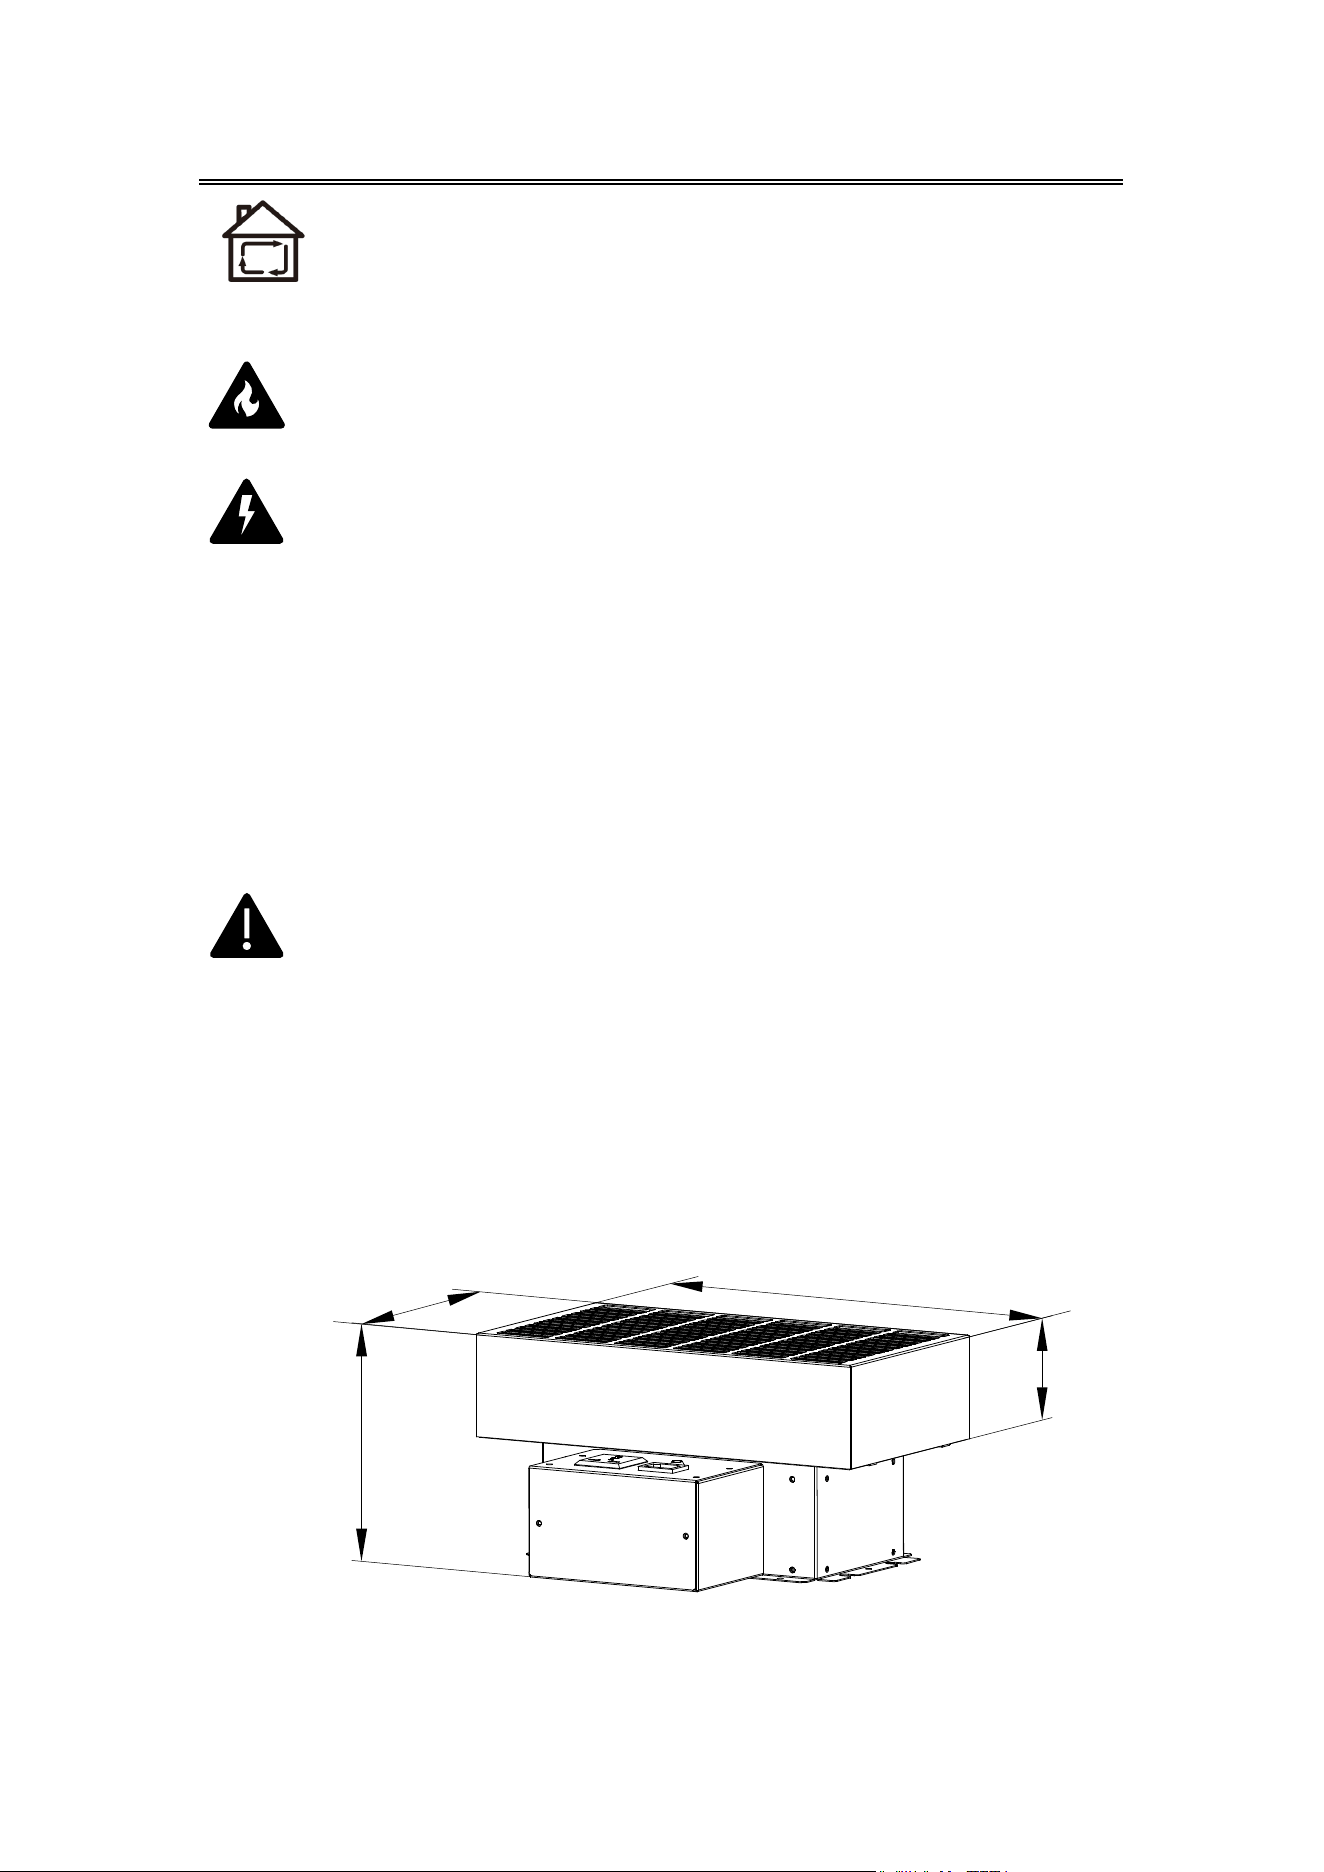
PLASMA Installation(Recirculation):
Specifications:
Read all safety instructions before you use the device.
WARNING: TO REDUCE THE RISK OF FIRE, ELECTRIC SHOCK OR
INJURY PLEASE ADHERE TO THE FOLLOWING:
WARNING: RISK OF ELECTRIC SHOCK – These servicing
instructions are for use by qualified personnel only. To reduce
the risk of electric shock, do not perform any servicing other
than that contained in the operating instructions unless you are
qualified to do so.
To reduce the risk of electric shock, this equipment has a
grounding type plug that has a third
(grounding) pin. This plug will only fit into a grounding type
power outlet. If the plug does not fit into the outlet, contact
qualified personnel to install the proper outlet. Do not alter the
plug in any way.
DO NOT connect to power before installation before handling is
complete.
To avoid risk of injury, this device should not be used by children
or persons with reduced physical sensory or mental capacity.
13"
3⅕"
6¾"
7"
12
Installation
13
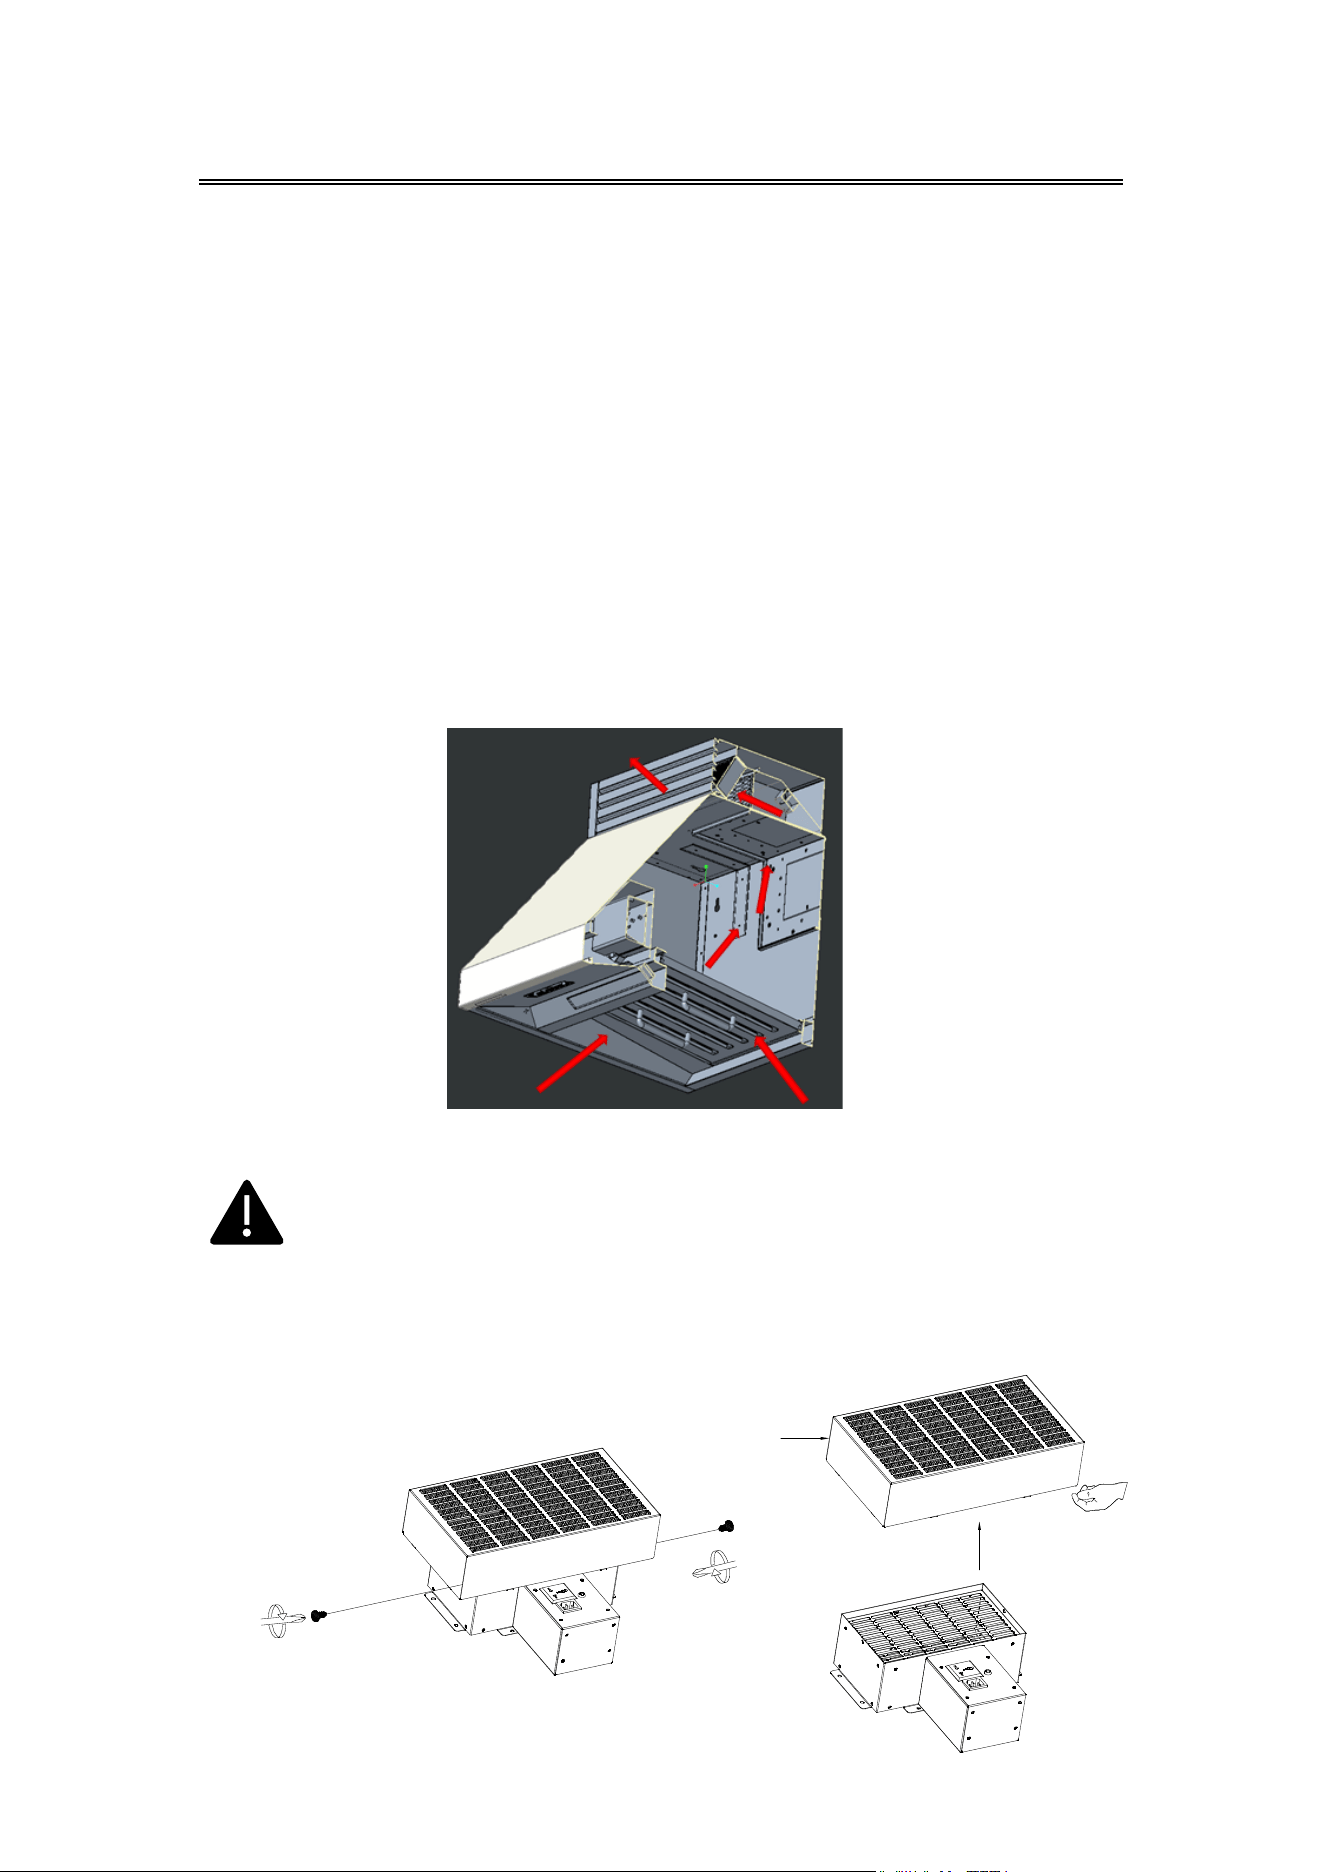
Installation:
1. Loosen the screws holding the molecular sieve on the plasma and remove
the molecular sieve.
Outline of the function principle:
1. The purifier is installed and fixed on the top of the hood, when the
hood is turned on, it will be turned on automatically through the
wind pressure sensing device.
2. The grease and fumes firstly pass through the stainless steel filter
of the hood to filter and separate the grease and fats in the air.
3. The Plasma System effectively disintegrates and transforms
cooking odours and scent molecules into harmless substances,
providing a fresher kitchen environment without the need for filter
replacements.
4. The fume then passes through the zeolite molecular sieve, the air
ozone, sulfur dioxide, ammonia and other odor molecules
concentrated on the surface of the molecular sieve, and oxidize
and separate them, and then remove the odor.
If you install plasma using Recirculation mode, you don't need to
install the air outlet component, just install plasma directly.
molecular
sieve
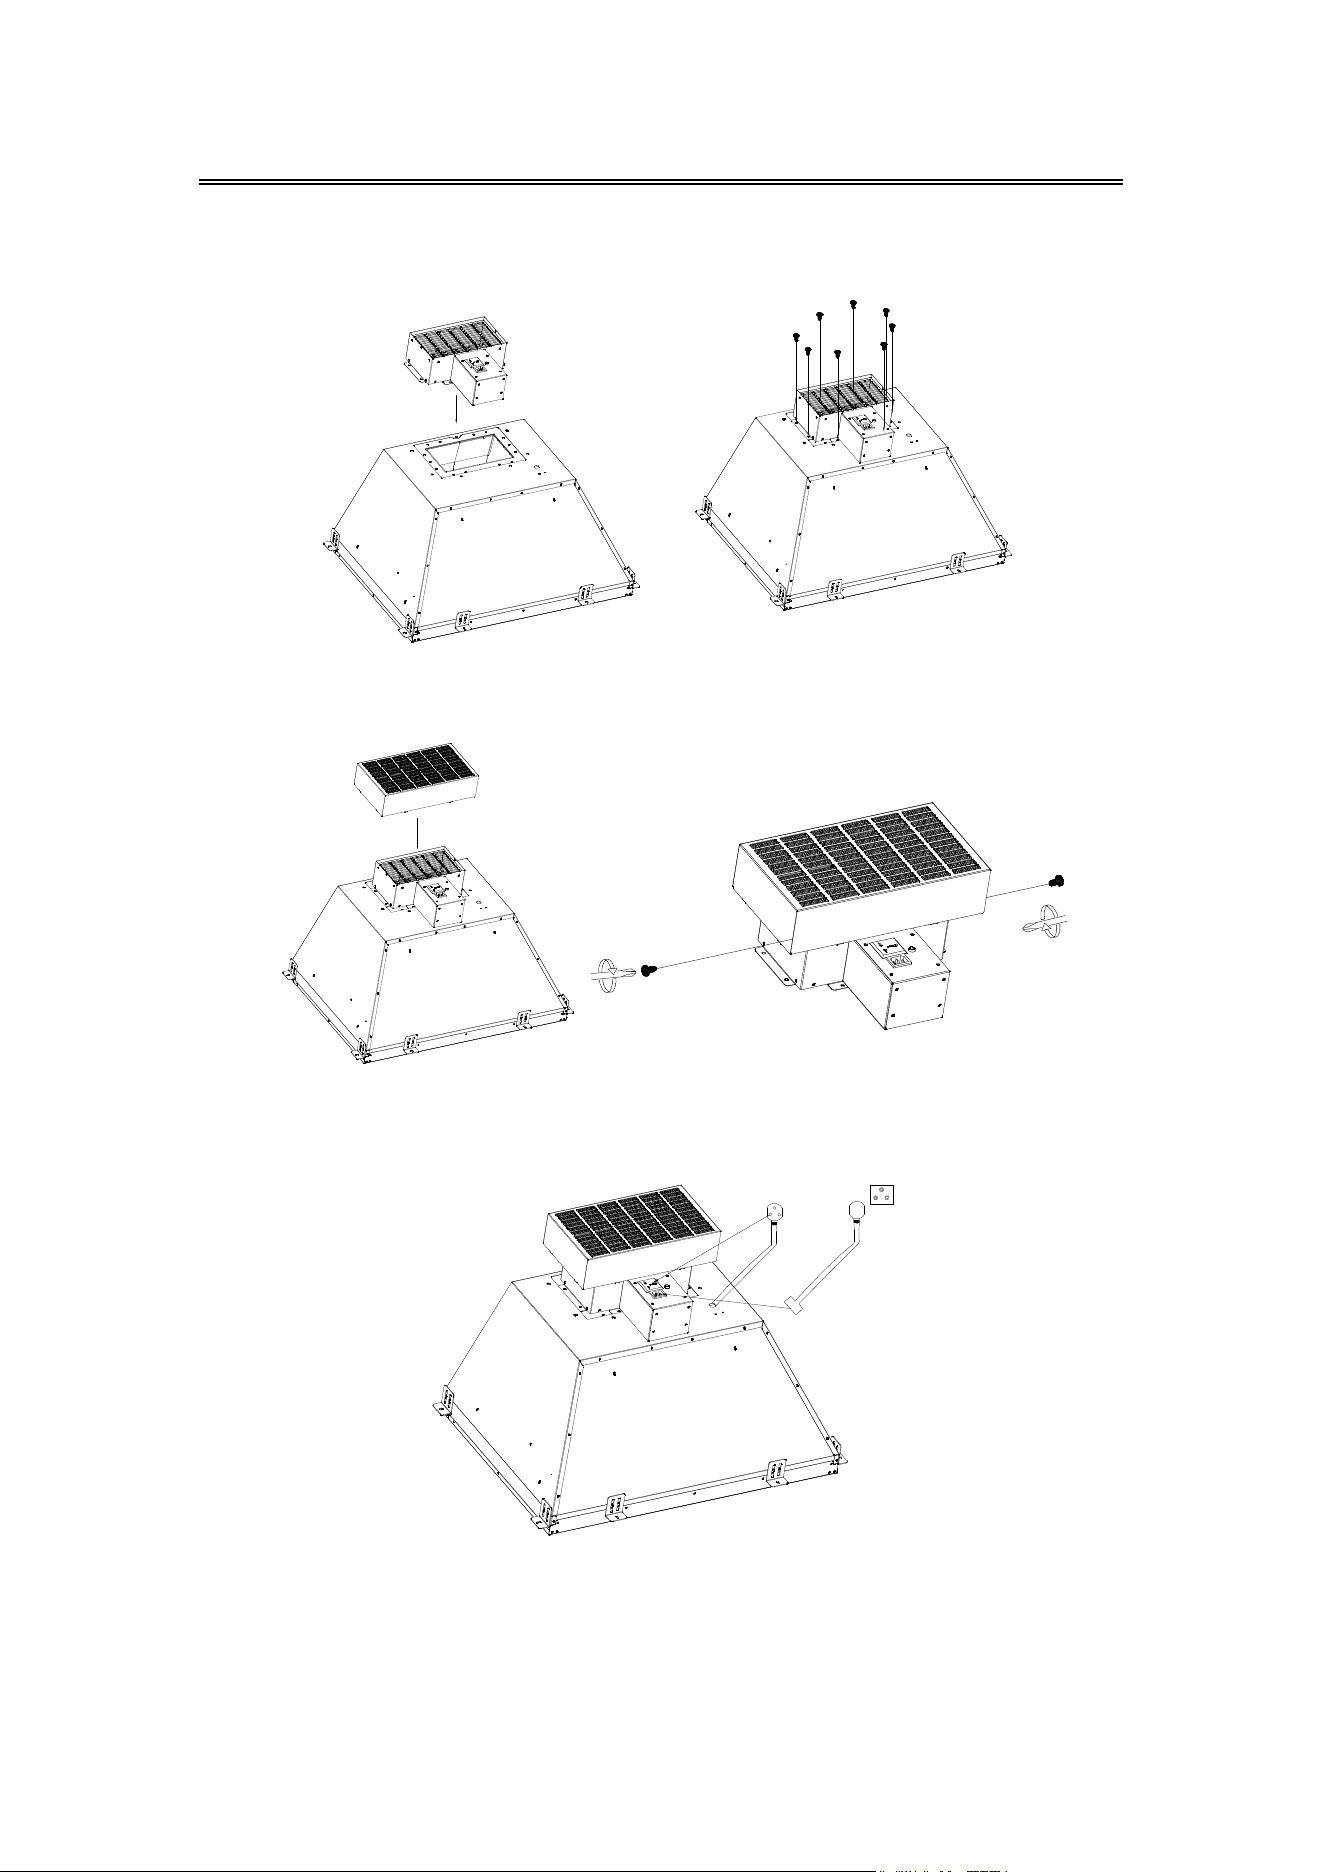
Installation
4. When hood installs plasma, the hood's power plug can be plugged
into the plasma's power outlet.
When the hood is activated, the plasma's air speed sensor receives a
signal to activate the plasma, and the indicator light flashes. When the
hood is turned off, the plasma is also turned off synchronously and the
indicator light goes out.
2. Place the plasma in the corresponding position on top of the hood
3. Reinstall the molecular sieve onto the plasma and secure with screws.
and secured with screws.
14
Operation
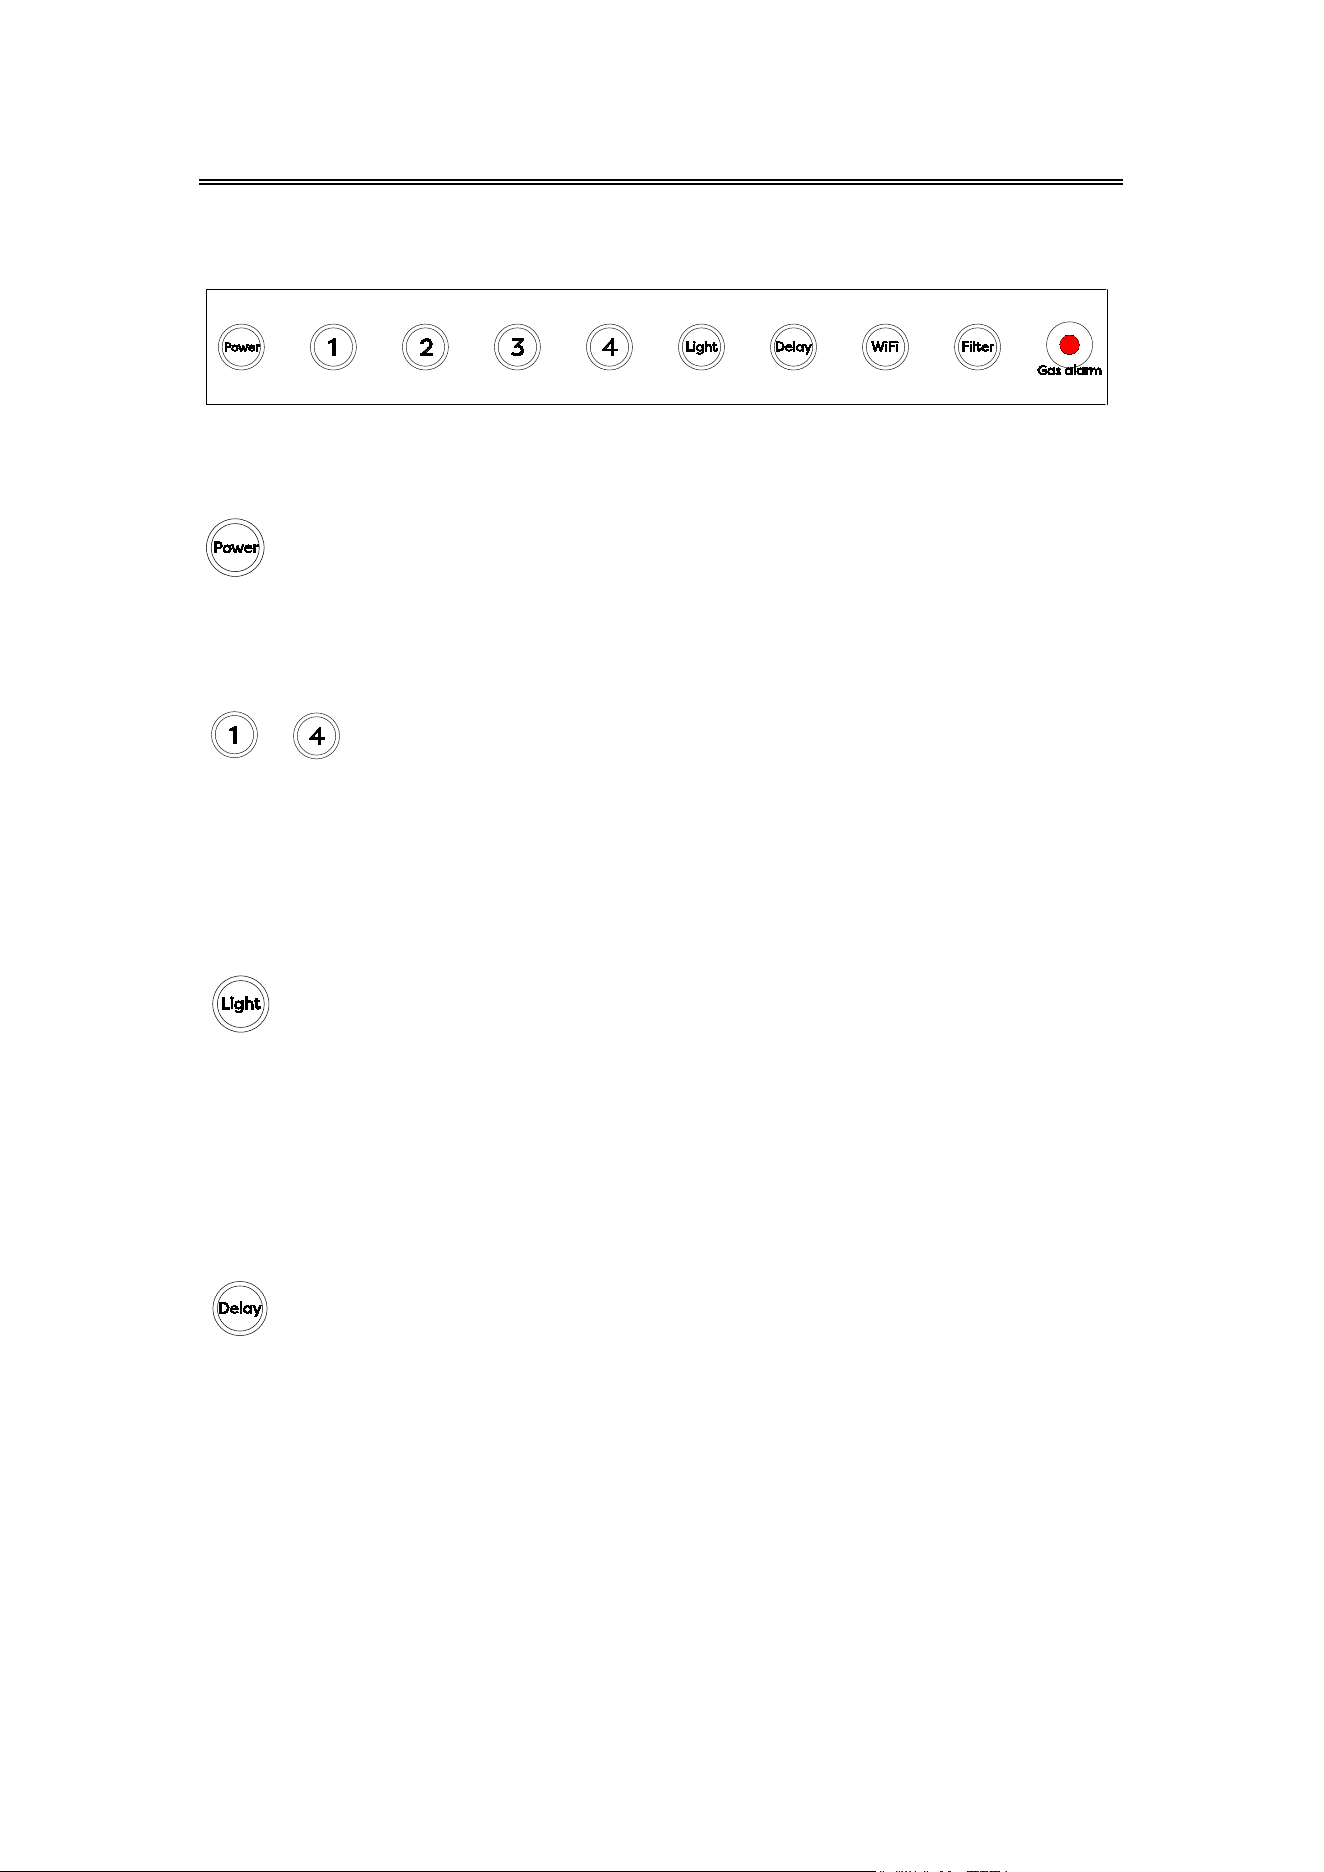
Touch control
Light button
When the range hood is turned on:
Press once, turn on the LED light in level 1, Press for the second time,
turn on the LED light in level 2, increase brightness; Press for the third
time, turn off the LED light..
Power button:
It's used to turn on/off the power. Press 2S to power on, the range
hood will enter the standby mode. press 1S to power off.
-- Speed button:
Wind speed gear control for range hood, 1-2-3-4 respectively.
When your range hood is in standby mode; you can easily switch on
1-2-3-4 speed level by pressing the corresponding speed level you
want, press the corresponding speed level button again, the cooker
hood will go back to standby mode.
Delay function:
When range hood working, could set delay function.
press this key, the key indicator will blink (1 time in 1 second) to
enter the 5-minute time-delayed shutdown function.
During the time-delay function, press the "Delay" key again to exit
the time-delay shutdown. After the delay countdown is completed,
all the key indicators will go out, and after 3 consecutive beeps, all
the outputs will be turned off to enter the shutdown state.
15
Motor work about 90 hours and remind cleaning filter, The key
indicator flashes, touch to cancel the prompt, the indicator goes out,
and the accumulated working time of the motor is cleared to zero and
recalculated. If there is no short press to cancel, the key indicator still
flashes after the power off.
Operation
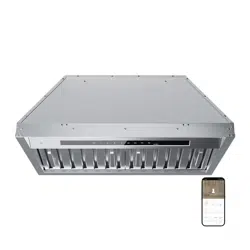
Wifi pairing mode
Long press "WiFi" key for 3 seconds in power off state, a beep will sound
and the key indicator light will flash to enter WiFi pairing mode; short
press Power key or "WiFi" key to exit pairing during the pairing process,
and other keys are invalid during the pairing period;
After successfully pairing your device, press the light button again for 3
seconds to disconnect the wifi connection and clear the wifi configuration,
( Note: after you disconnect the Wi-Fi connection, you will not be able to
control your range hood with the “Smart Life App”)
Filter cleaning reminder
Gas alarm
Regardless of any state, when the range hood receives the alarm
signal from the gas detection sensor, the key indicator (red LED) is fully
illuminated and flashing rapidly, and the buzzer alarm frequency is 1
time per second, and at the same time, the alarm will be sent to APP
through Wifi; by touching this button or until the switch receives the
normal signal from the sensor, the alarm will be canceled, and the key
indicator will go off; this function is on by default after power on, in the
power off state, the key will be long pressed for 5 seconds, and the
beep will beep 1 time prompting to shut down the gas alarm function
(the key indicator will turn from faintly illuminated to off), and then the
key will be long pressed for another 5 seconds, and the beep will beep
2 times prompting to turn on the gas alarm function.
16
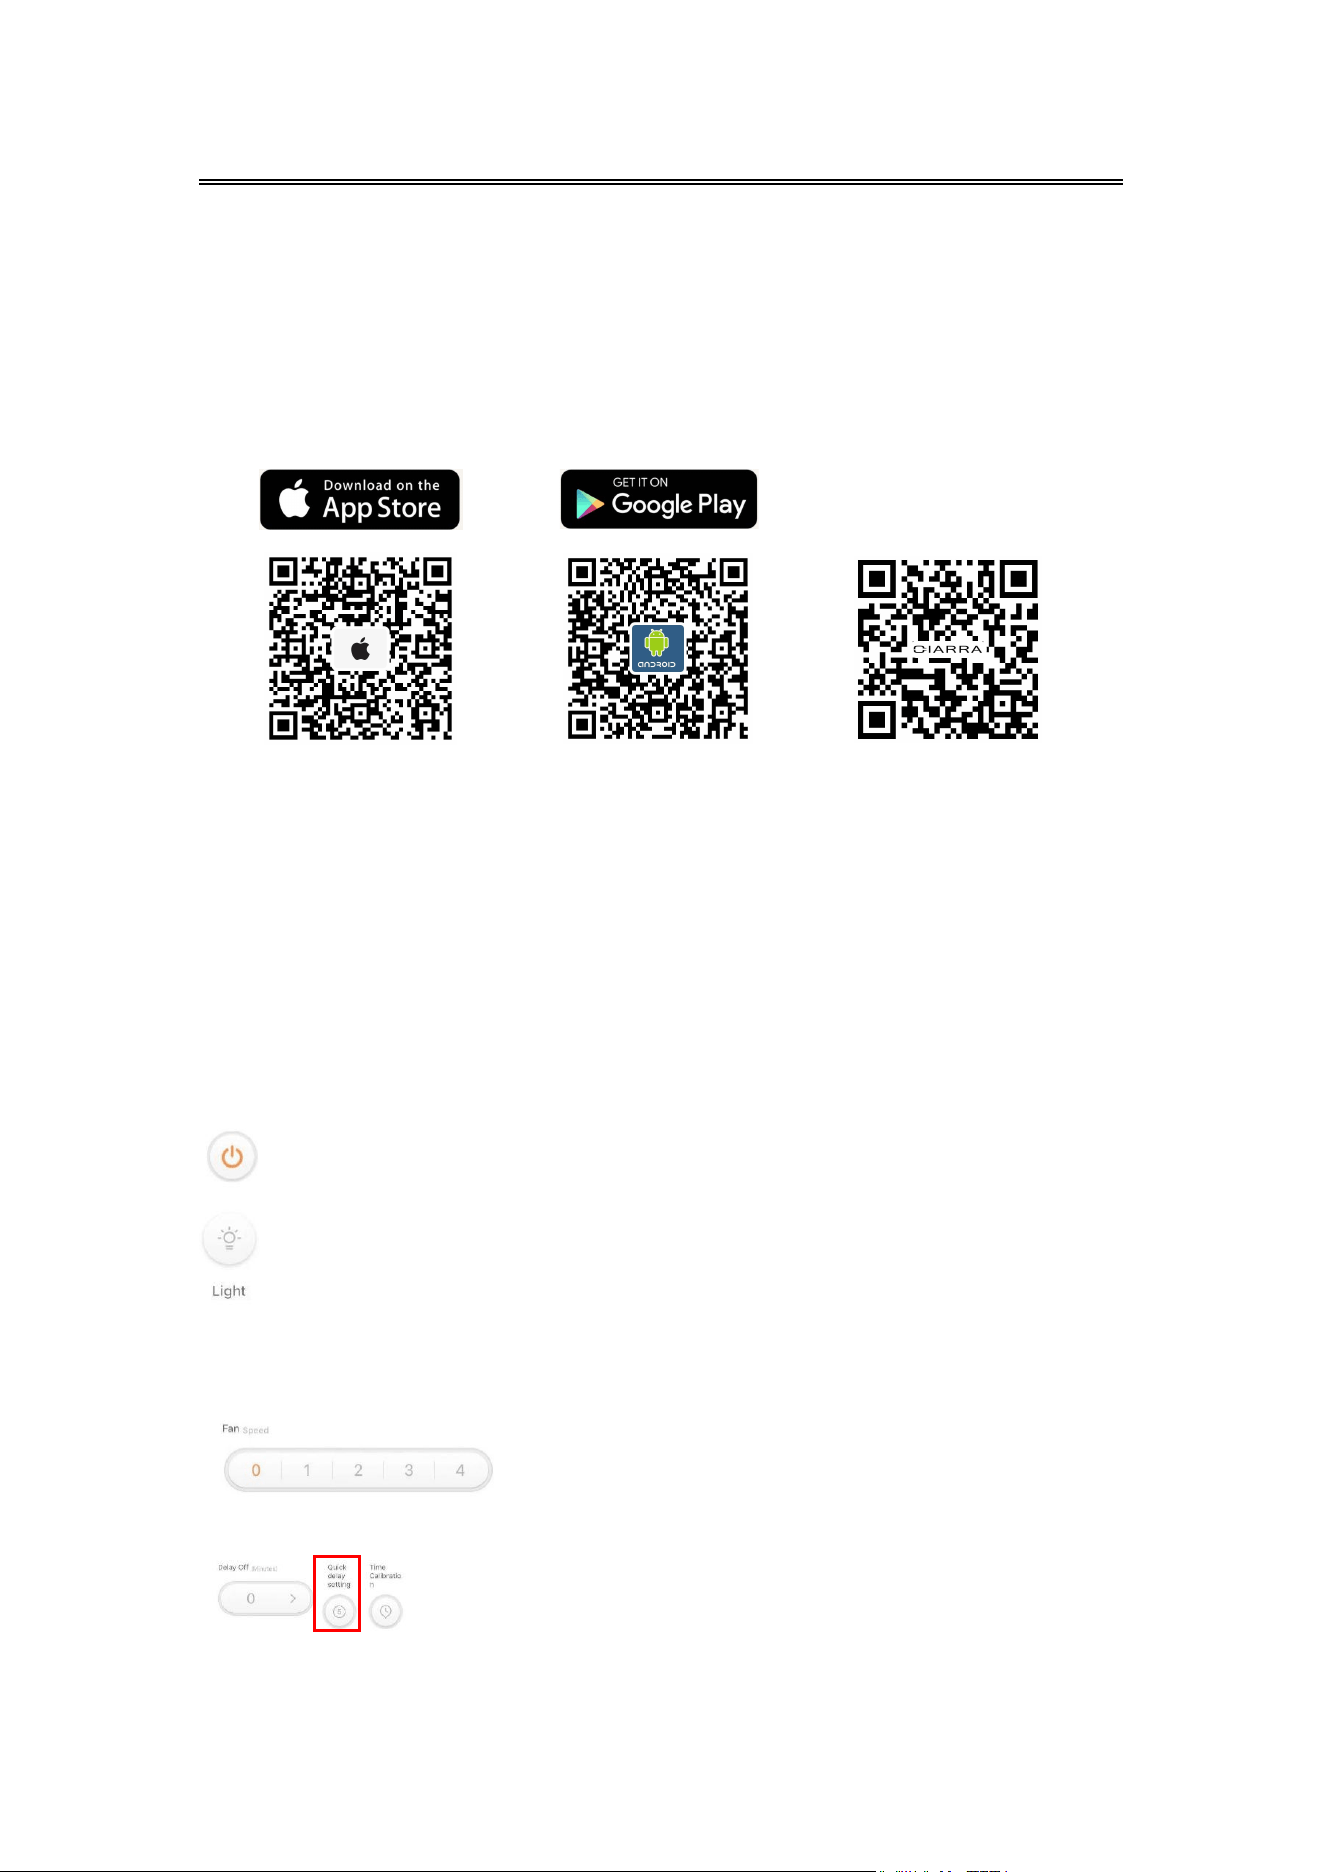
Smart Life APP
1. You must use Android phone or iPhone to download and use this APP.
2. Search “Smart Life” in the Google Play store for Android or IOS App
Store to download and install the APP.
Range Hood and Smart Life APP pairing
1. When you log in to Smart Life APP for the first time, you need to
create a new account. When creating a new account, follow the app
prompts to register.
2. If you already have an account, you can use existing account to log in.
3. After logging in, follow the steps below to connect the range hood
(the operating procedures of Android and IOS systems are the same).
Video Guide
Light Button
Press once, turn on the LED light in level 1, orange out ring light will
be on; Press for the second time, turn on the LED light in level
2,increase brightness; Press for the third time, turn off the LED
light and the orange out ring light.
Fan Speed Button
You can control the corresponding gears of 1-2-3-P on the range hood.
Quick Delay Setting
When range hood is working, you can set the delay timer through
delay function.
Push this button, the range hood will stop working in 5 minutes.
About operation interface:
ON/Off Button
Operation
Download and Intallation of Smart Life APP
17
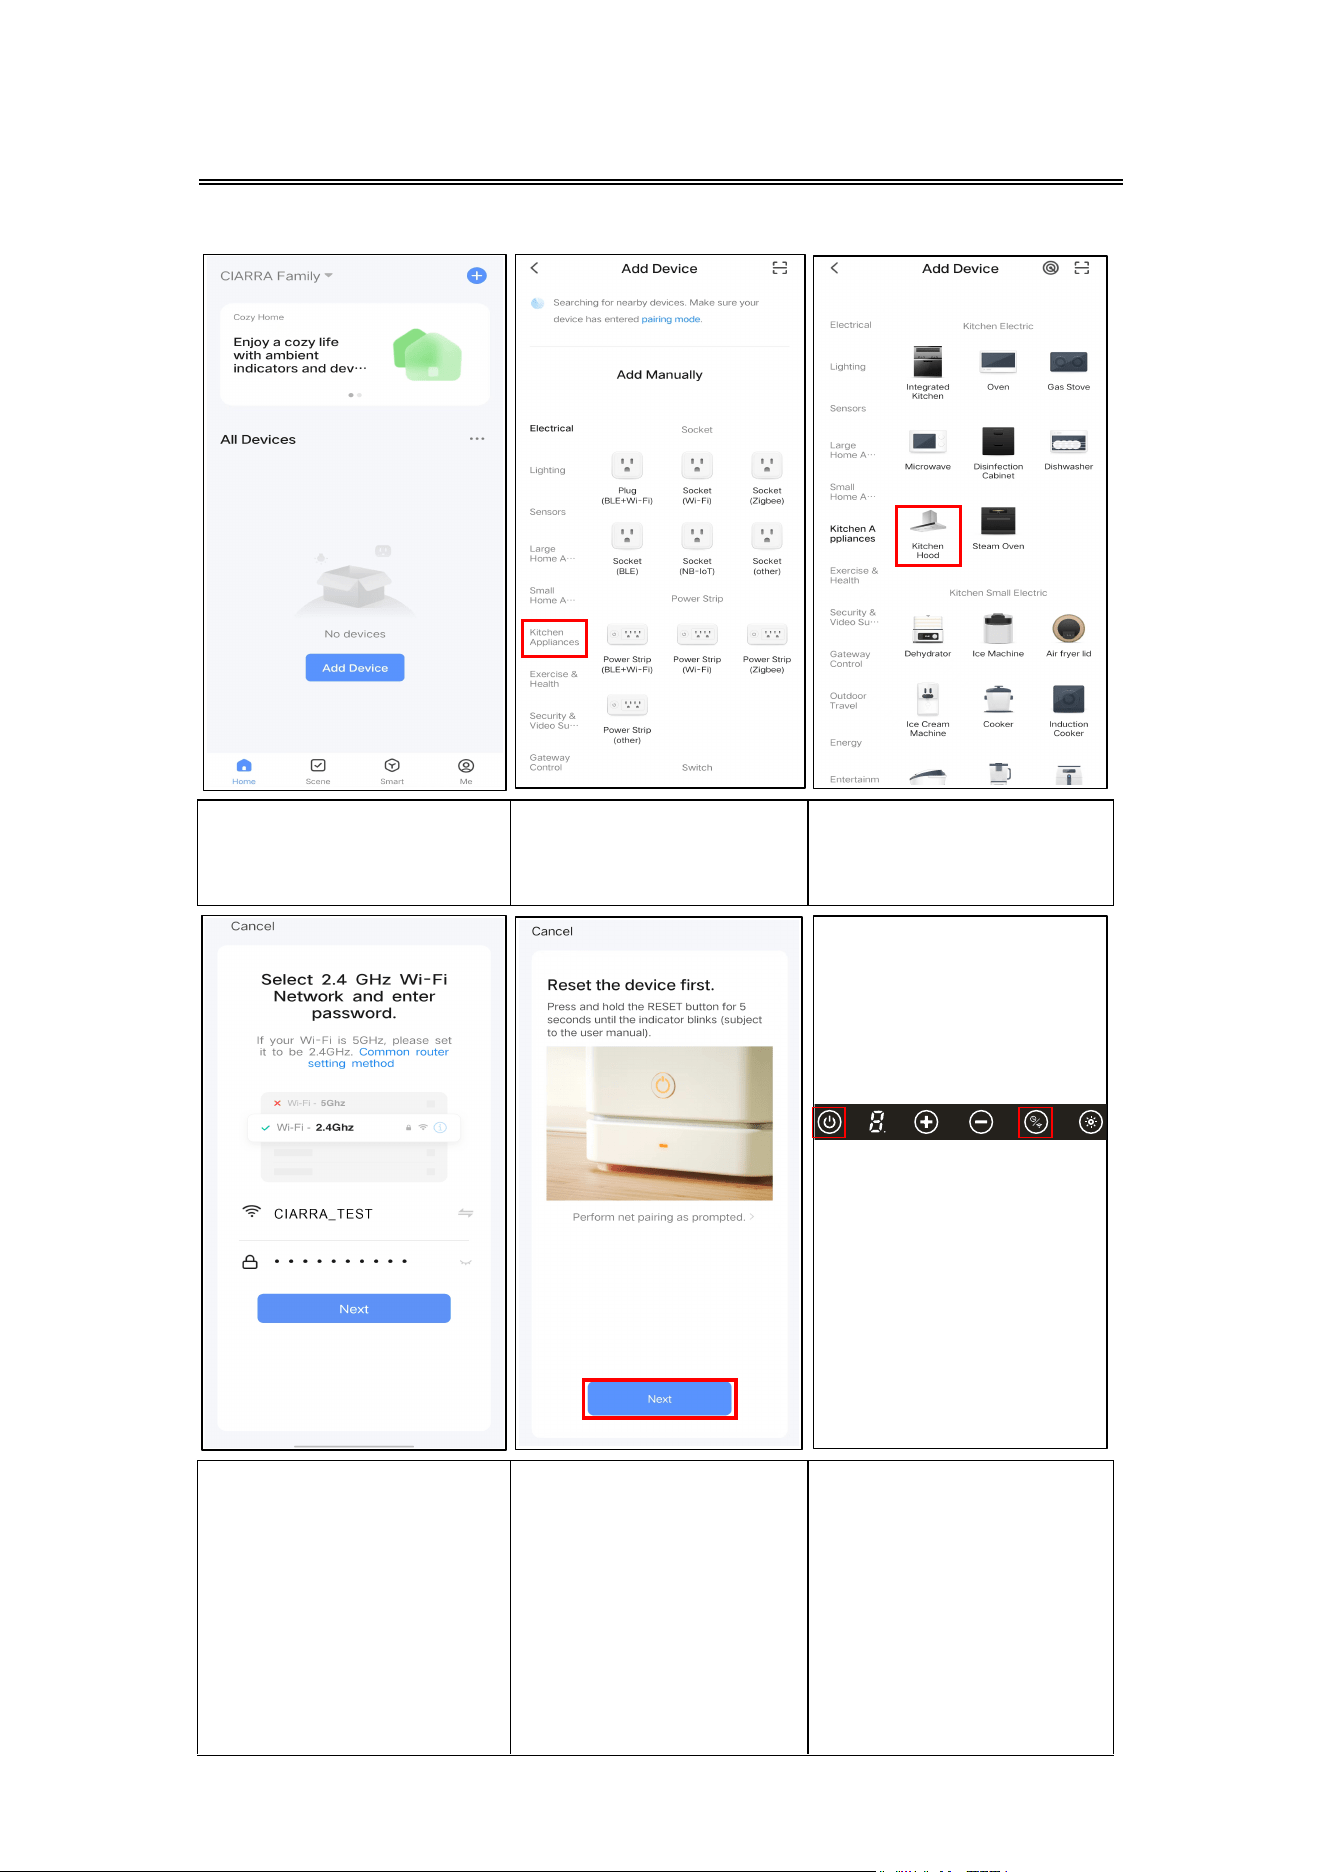
1. Open the smart life
app, Click Add Device.
2. Choose kitchen
appliances from the
menu bar on the left.
3. Choose kitchen
hood.
Operation
4. Connect your
home Wi-Fi and
enter the password,
then click Confirm.
5. Click "Next" to go
to the next step.
6. Press 2S to power
on,and press the “Delay
function+WIFI” button
for 5 seconds, you will
hear the beeping sound,
and all orange out ring
lights will be flashing,
enter Wi-Fi pairing
mode.
18
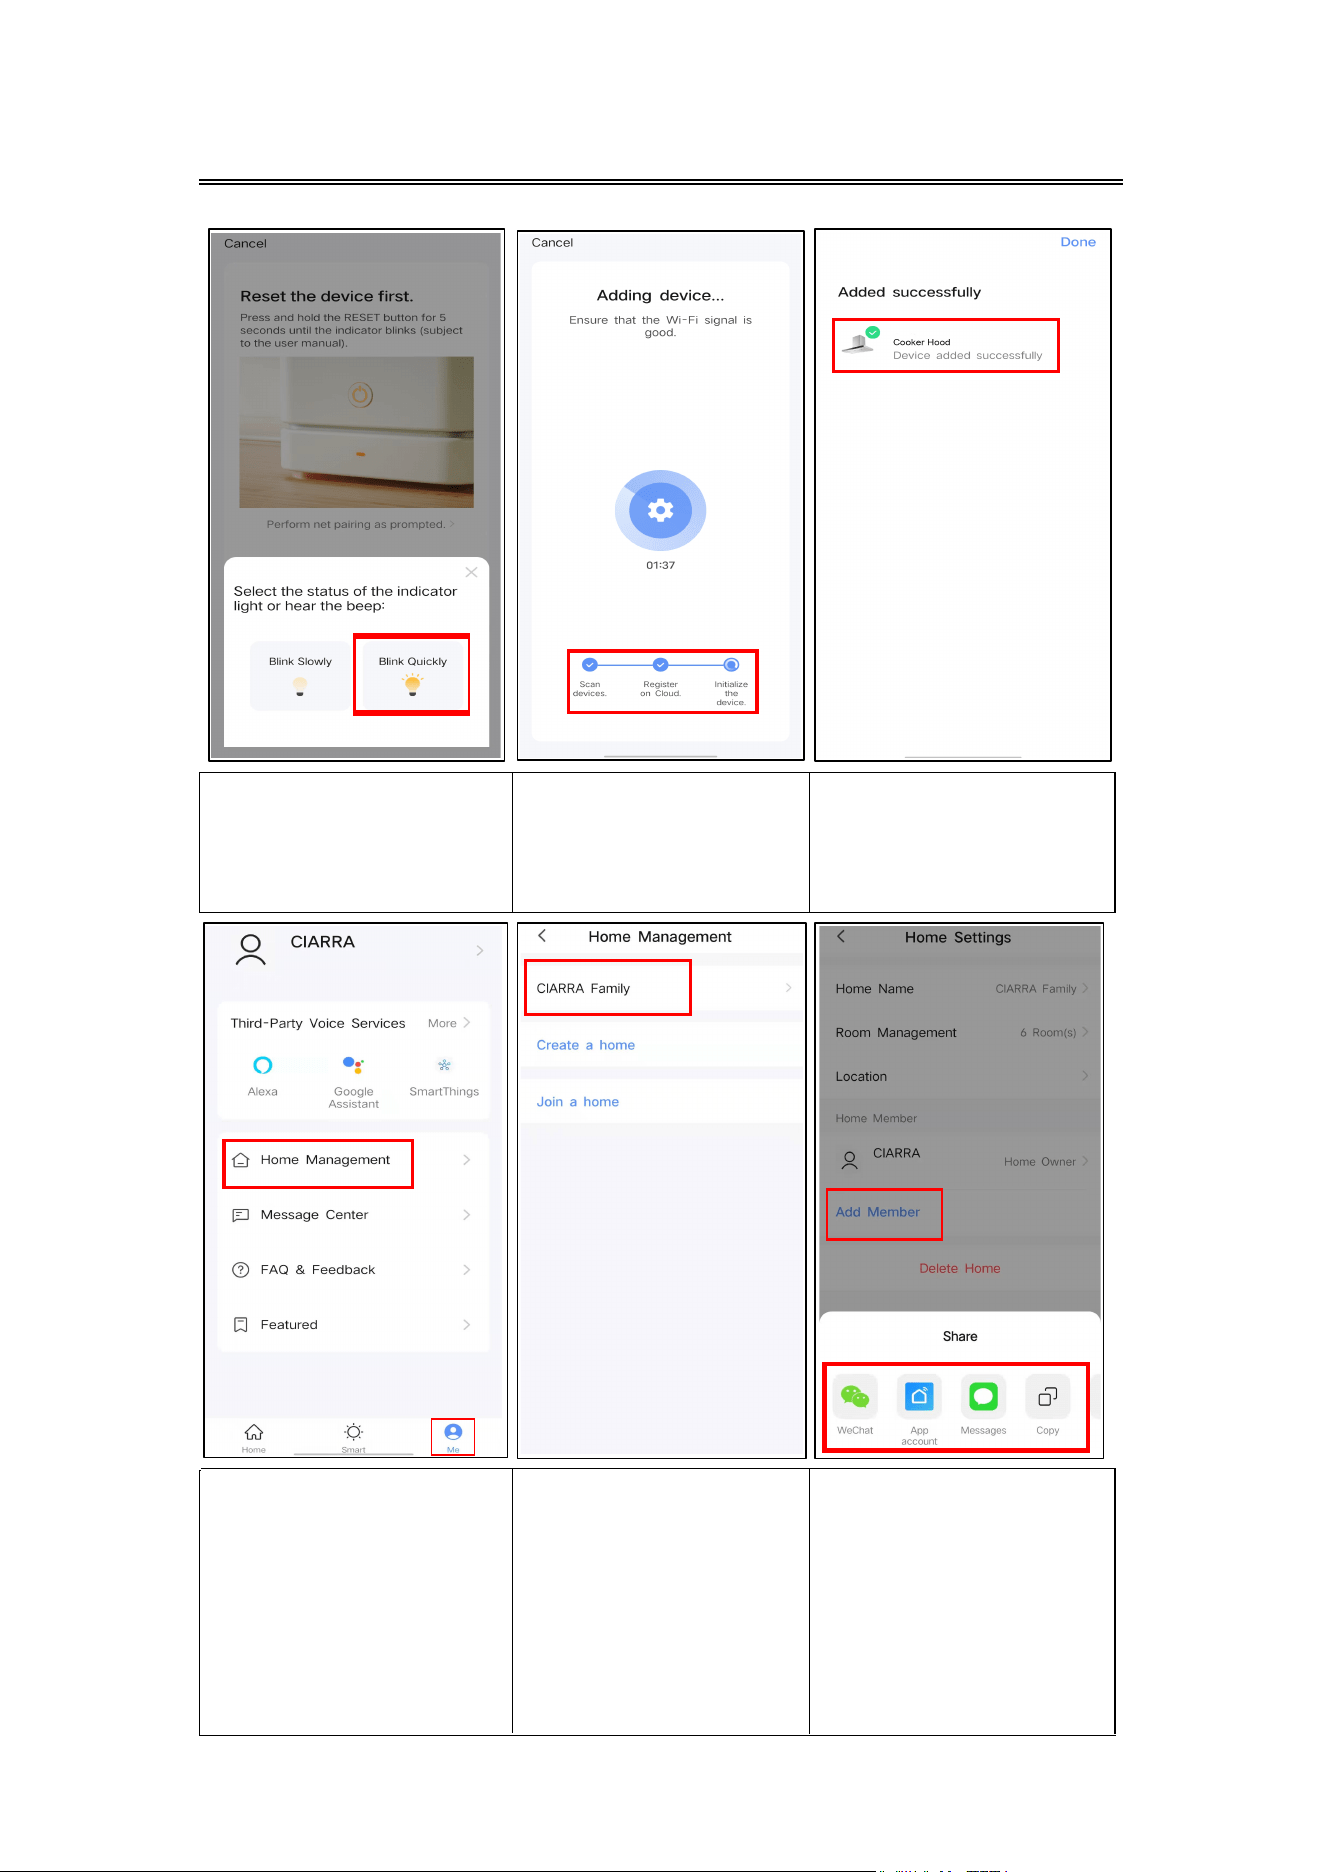
7. Click “Blink Quickly”
and click “Next”.
8. Adding device...
9. When
you see
this
interface
it
means
you
have successfully
c
o
nnected your device
.
Operation
10.Click "Me" and
select "Home
Management".
11. You can create a
home or join a home
in this area. Click "my
family
management".
12. Select "Add
members" and share to
members, after members
are successfully join the
same family, they can
remotely control "Range
Hood" .
19

Cleaning and Maintenance
Proper maintenance of the Range Hood will assure proper performance
of the unit. Before cleaning unit, unplug or disconnect the range hood
from the power supply.
GREASE FILTERS
The grease filters should be cleaned frequently. Can be cleaned in
dishwasher under high temperature without using any detergent. There
is a fire risk if cleaning is not carried out in accordance with the
instructions.
STAINLESS STEEL CLEANING
Do:
Regularly clean it with a cloth or rag soaked with warm water and
mild soap or liquid dish detergent.
You may also use a specialized household stainless steel cleaner.
Don't:
Use any steel or stainless-steel wool or any other scrapers to remove
stubborn dirt.
Use any harsh or abrasive cleansers.
Let plaster dust or any other construction residues reach the hood.
During construction/ renovation, cover the range hood to make sure
no dust sticks to the stainless-steel surface.
Avoid when choosing a detergent:
Any cleaners that contain bleach will attack stainless steel.
Any products containing: chloride, fluoride, iodide, bromide will
deteriorate surfaces rapidly.
Any combustible products used for cleaning such as acetone,
alcohol, ether, benzol, etc., are highly explosive and should never
be used close to a range.
PAINTED FINISH CLEANING:
Clean with warm water and mild detergent only. If discoloration occurs,
use a finish polish such as automotive polish. (DO NOT use a rough
abrasive cleaner or porcelain cleaner.)
20
Cleaning and Maintenance
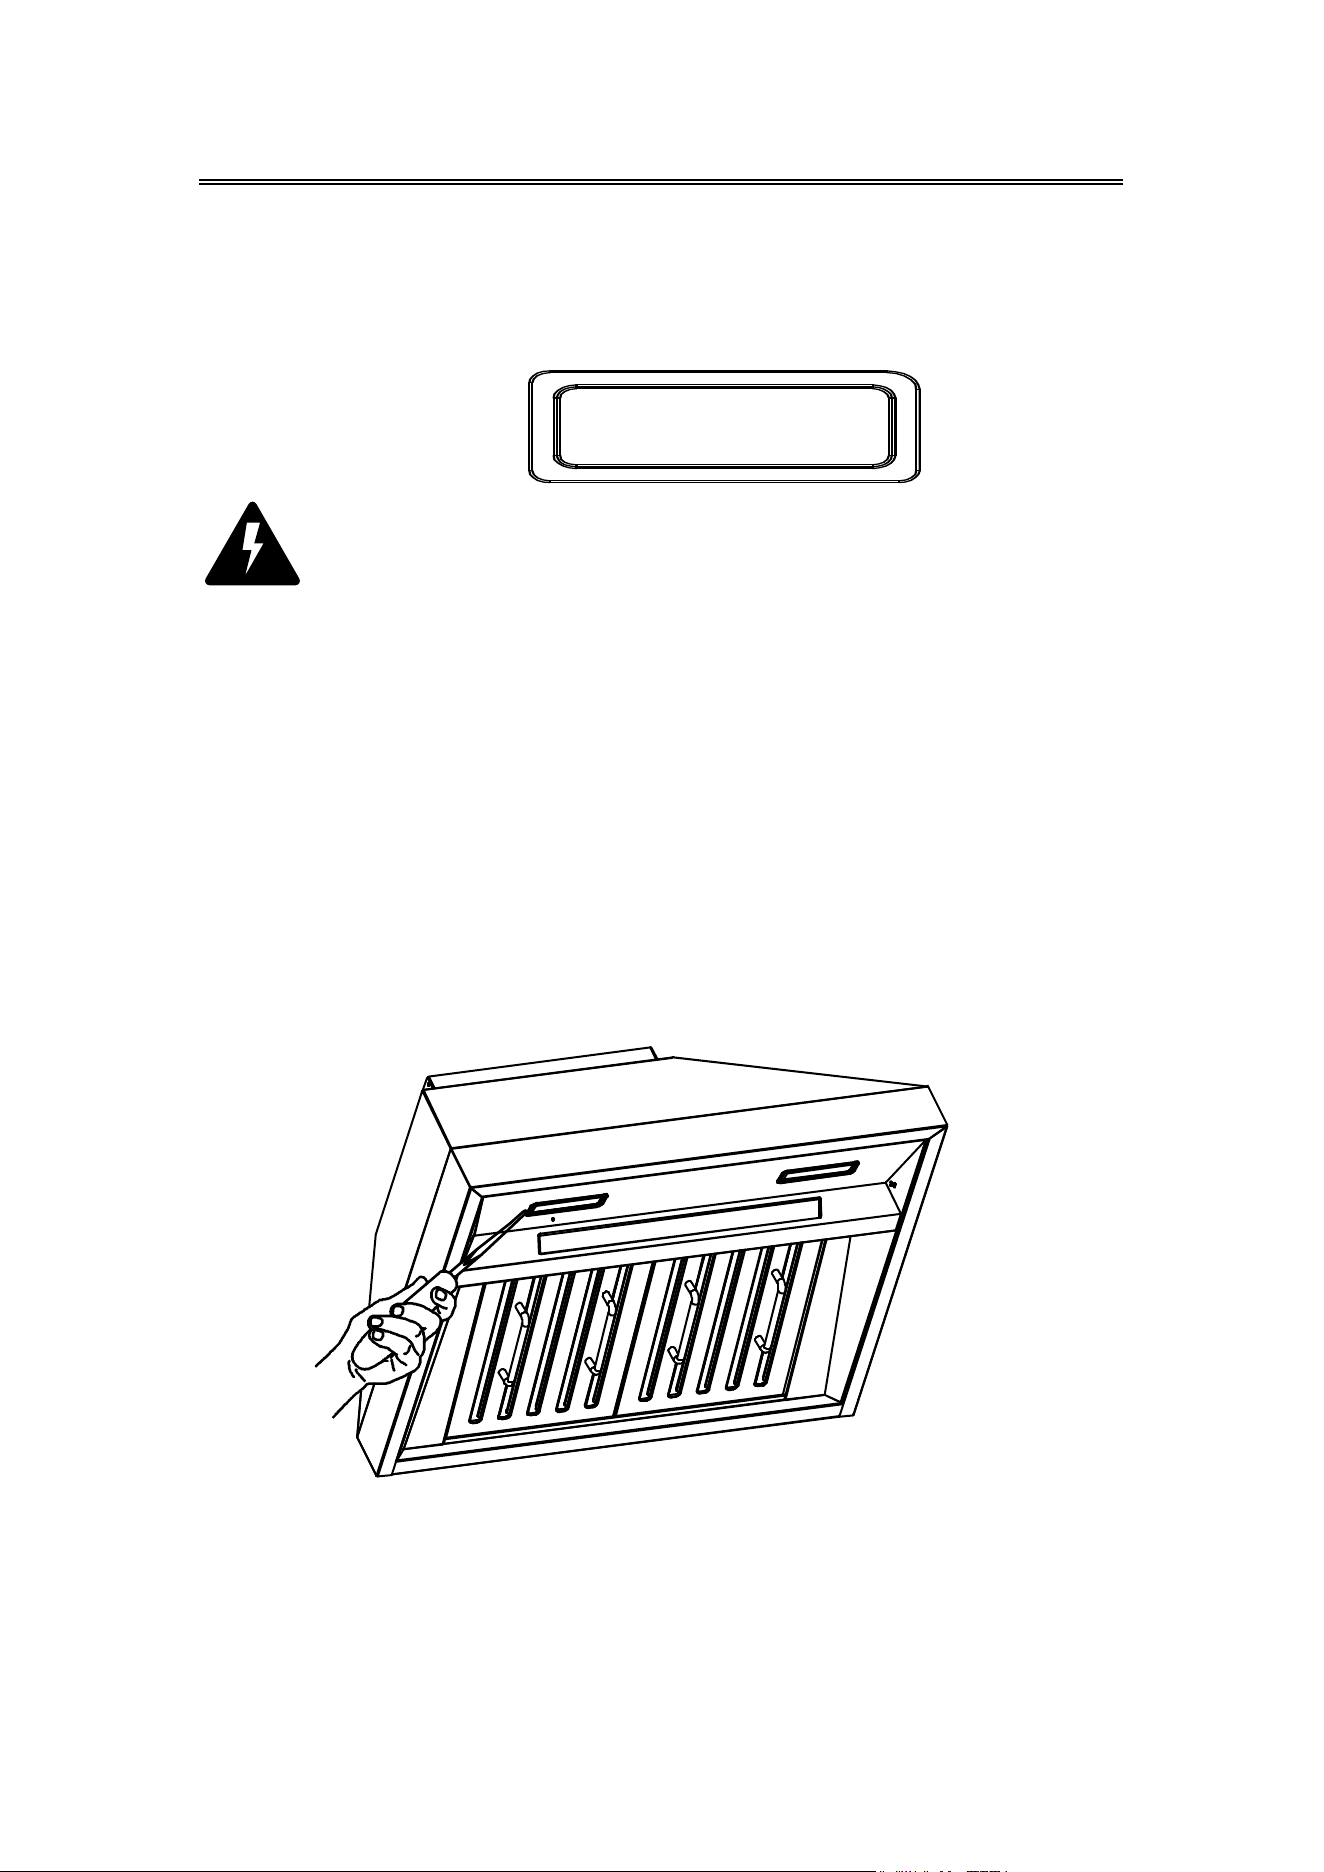
LED REPLACEMENT
Rectangle LED lamp:
CAUTION
:
Before cleaning or repairing and replacing accessories, please make
sure to shut down the power before operation, so as to avoid electric
shock, damage to human body and even endanger life safety!
1. Push the LED lamp holder out from the cabinet by hand, or use
screwdriver to prize up the LED lamp around the edges, pull out
slotted the LED lamp and the wire together.
21
Cleaning and Maintenance
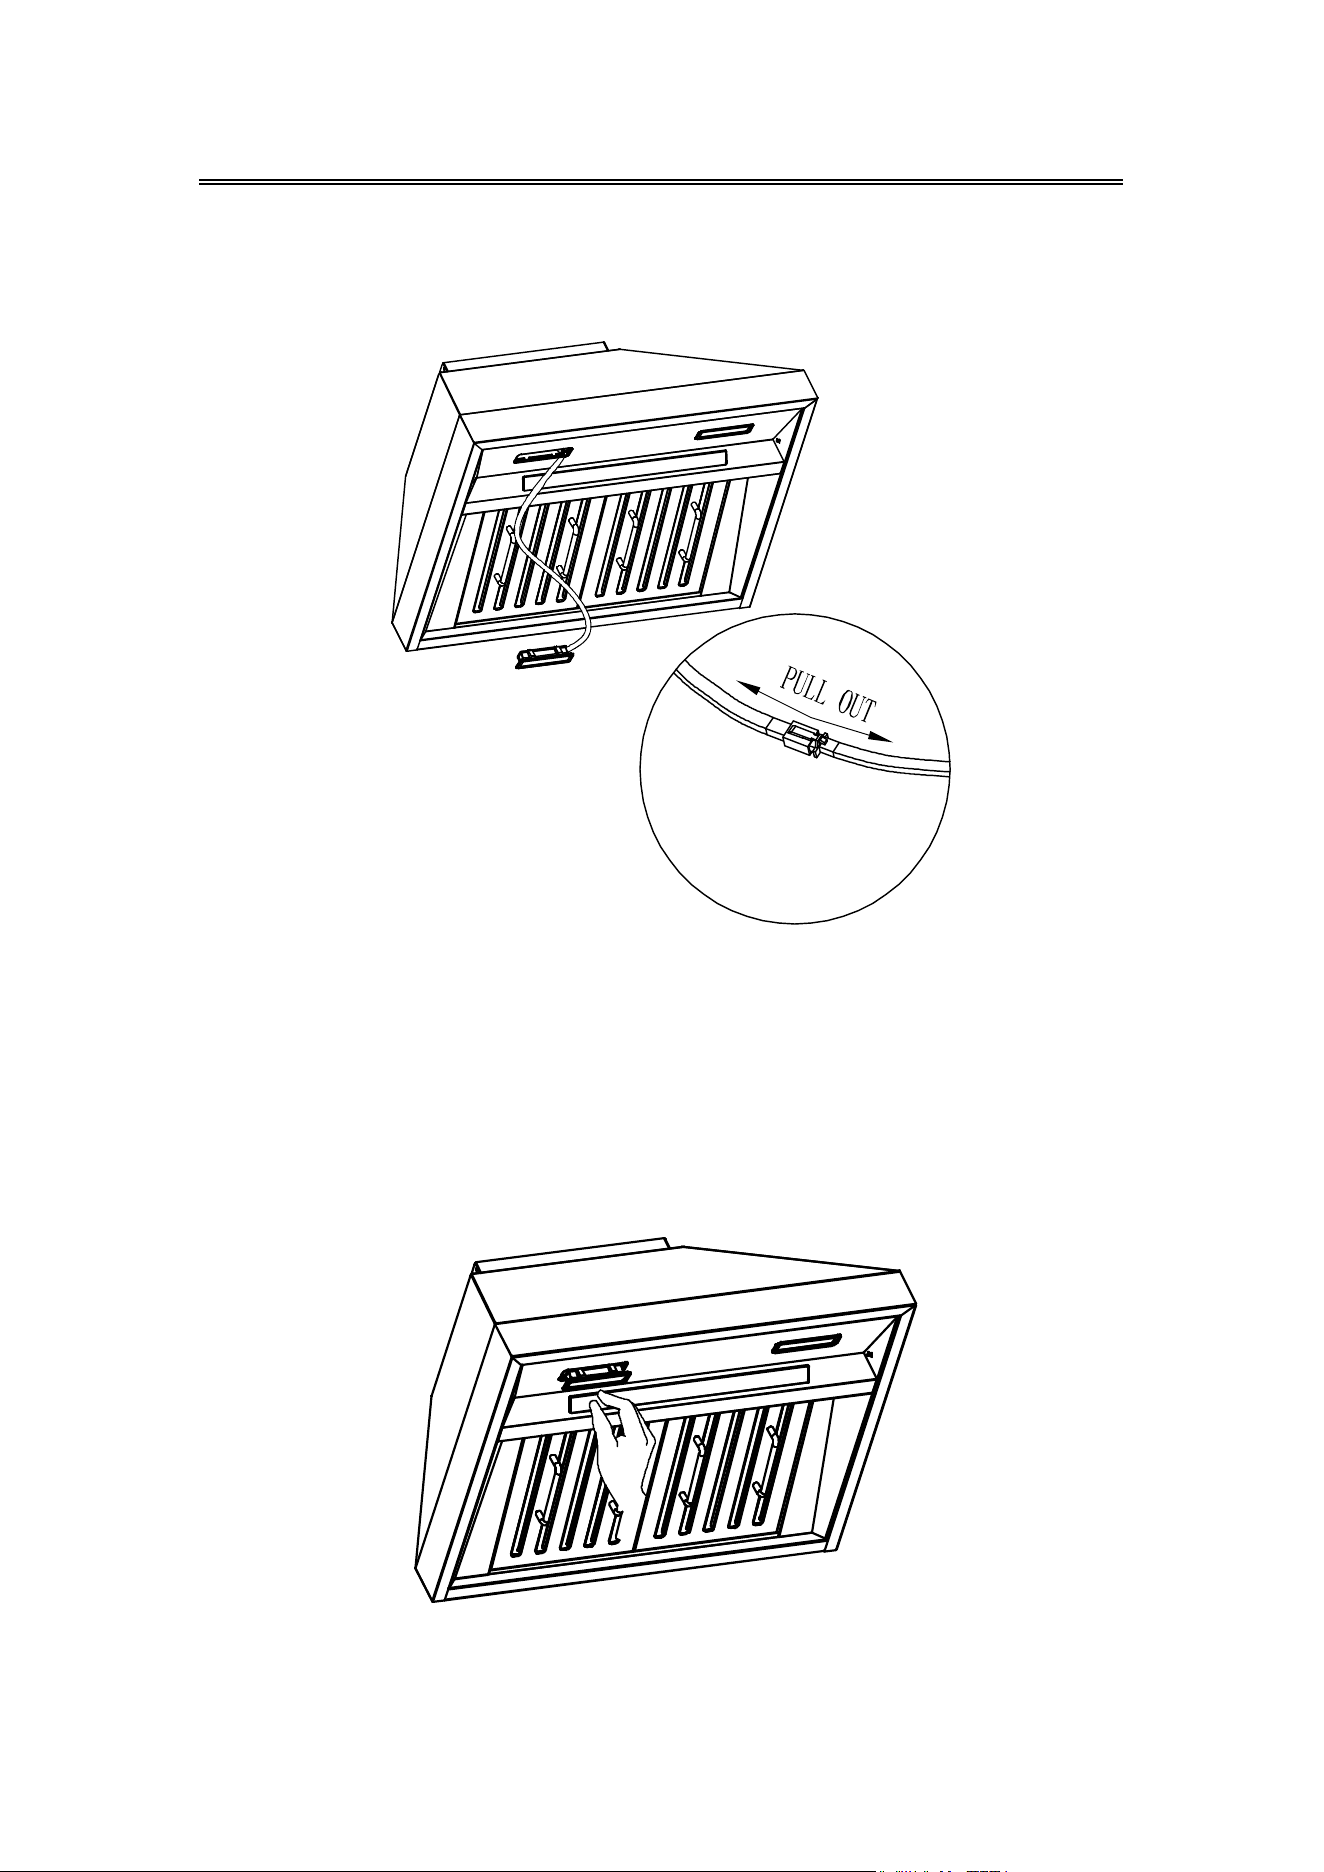
2. Open the power protection cover, pull out the plug and replace the
corresponding model of the LED lamp.
3. Turn the power on and test all blower and light functions to ensure
they areoperating properly.
Insert the new LED light gently into the light socket, please make
sure you aim at the grooves on the lighting panel when installing.
Push the LED light in until it is flushed with the light panel.
22
Troubleshooting
If problem persists after the above checks, please contact CIARRA
Customer Care Centre for assistance.
Problem Possible Cause Solution
Extractor
hood does
not turn on
No electrical supply
Make sure that range hood
is plugged into powered
outlet. Test outlet with other
device if not working
My range
hood has
poor
performance
Inadequate ventilation
Ensure that the kitchen is
sufficiently ventilated to
allow entry of fresh air
The range hood and
cooktop are too far
away from each other
Optimal distance is
30"~36" above the cooktop
for best extraction
Check and make sure
the tape holding down
the damper flaps at the
vent hole are removed
before use
Remove the tape holding
down the damper
Grease filters clogged
with grease build-up
Clean the grease filters or
replace the grease filters
Carbon filters clogged
with grease build-up
Replace new carbon filters
Motor is running but no
extraction
Please contact CIARRA
Customer Care Service
My range
hood is noisy
Check inside the range
hood for any loose
debris and remove
Please contact CIARRA
Customer Care Service
If the noise is from the
motor, please contact
our Customer Care
Service
Lights are
not working
Light is damaged
Replace with new LED lamp;
remove grease filters, reach
inside behind the control
panel and locate the wire
with clip behind the light
housing.
The light wire terminal is
loose
Reset the connection
23

Environmental Protection
Waste electrical products should not be disposed of with
household waste. Please recycle where facilities exist. Check
with your Local Authority or retailer for recycling advice.
By ensuring this product is disposed of correctly, you will help prevent
potential negative consequences for the environment and human
health, which could otherwise be caused by inappropriate waste
handling of this product.
The symbol on the product indicates that this product may not be
treated as household waste. Instead it shall be handed over to the
applicable collection point for the recycling of electrical and
electronic equipment.
Disposal must be carried out in accordance with local environmental
regulations for waste disposal.
For more detailed information about treatment, recovery and
recycling of this product, please contact your local city office, your
household waste disposal service or the shop where you purchased
the product.
24