PORTABLE
CAR AIR PUMP
AIRUN L4
USER MANUAL
ES
EN


CATALOG
ENGLISH
INTRODUCTION
WARNING
PACKAGE INCLUDES
DIAGRAM
PREPARATION
INSTRUCTIONS
MAINTENANCE
TROUBLESHOOTING/FAQ
SPECIFICATIONS
RECYCLING
WARRANTY PERIOD
04
05
05
06
07
08
13
13
14
14
15
ESPAÑOL
INTRODUCCIÓN
ADVERTENCIAS
EL PAQUETE INCLUYE
DIAGRAMA
PREPARACIÓN
INSTRUCCIONES
MANTENIMIENTO
SOLUCIÓN DE PROBLEMAS/PREGUNTAS FRECUENTES
CARACTERÍSTICAS
RECICLAJE
PERÍODO DE GARANTÍA
16
17
17
18
19
20
25
25
26
26
27

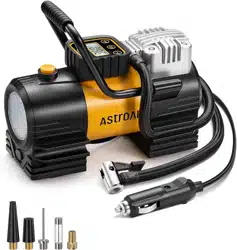
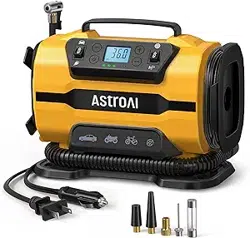
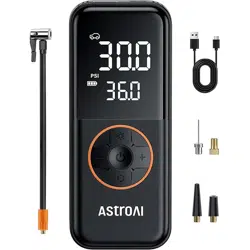
Thank you for purchasing the AstroAI Portable Car Air Pump.
This product is lightweight, portable, easy to operate, and capable of
inflating small car tires, motorcycle tires, bicycles, balls, and other
inflatables. It also works as an emergency flashlight and power bank.
For optimum performance and safe operation, read and follow all of the
instructions in this manual before operating this product.
We hope you enjoy your new air pump!
INTRODUCTION
Please fully read and follow this manual before using this
product and keep this manual for future reference.
EN
- 04 -

WARNING
Carefully read the instructions before use.
Check the preset pressure value before inflating. The preset pressure
value should match the object to be inflated.
Keep this product away from flammables and explosive chemicals or
objects.
Avoid storing this product in humid or dusty conditions.
Avoid putting this product in a place where it can easily fall.
Keep out of reach of children.
Do not improperly dispose of this product or expose it to an open flame.
High temperatures caused by prolonged continuous use may damage
the product. Let the pump cool down for 10 minutes after 15 minutes of
continuous use.
Do not use chemical cleaners to clean the pump. Only use mild soap
and a cloth dipped in hot water to clean the plastic parts.
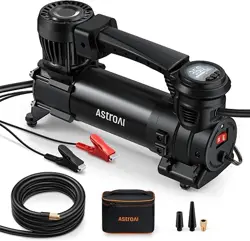
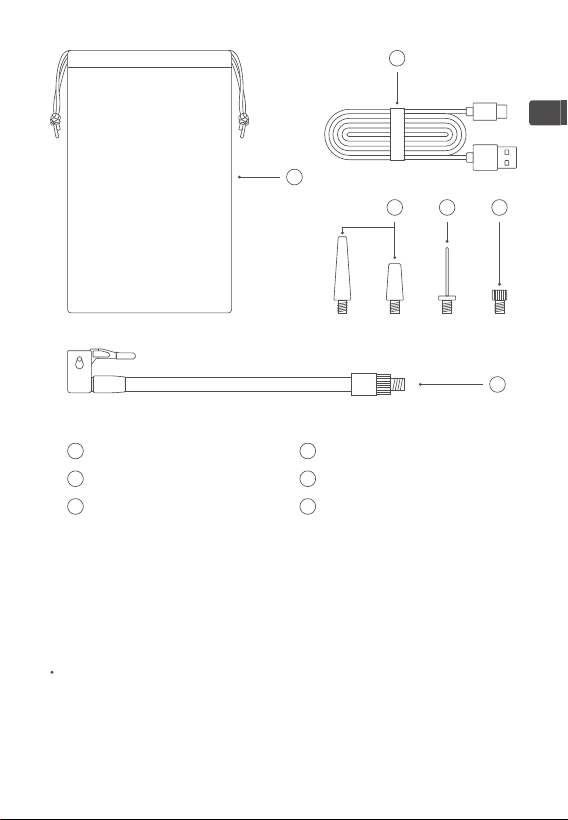
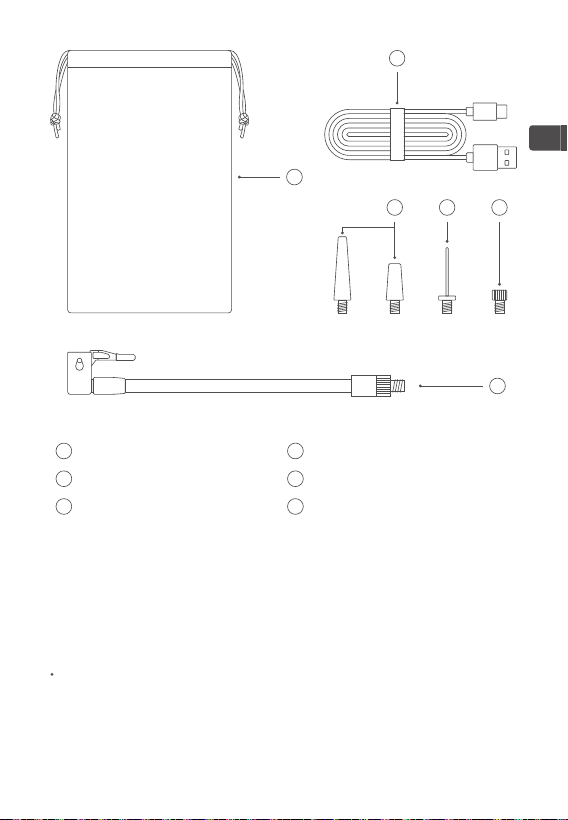
PACKAGE INCLUDES
AstroAI Car Air Pump
Quick Connector
USB Charging Cord
Air Nozzles
× 1
× 1
× 1
× 2
Presta to Schrader Adapter
Needle Valve Adapter
Storage Bag
User Manual
× 1
× 1
× 1
× 1
EN
- 05 -
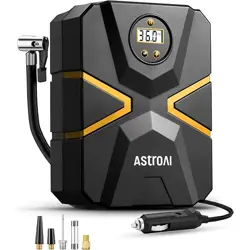
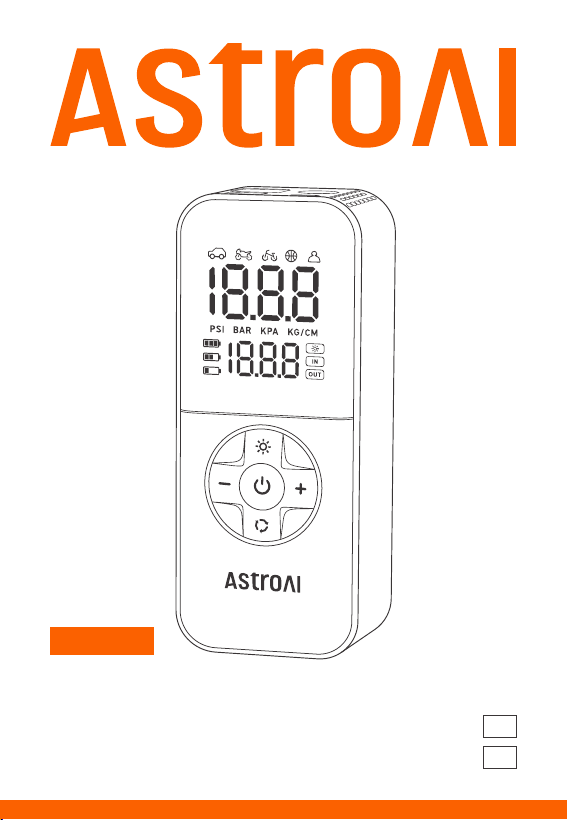
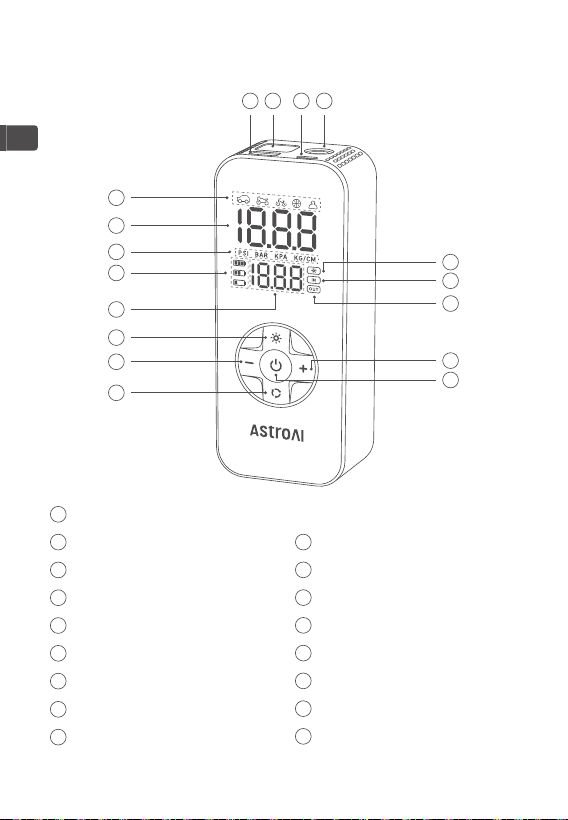
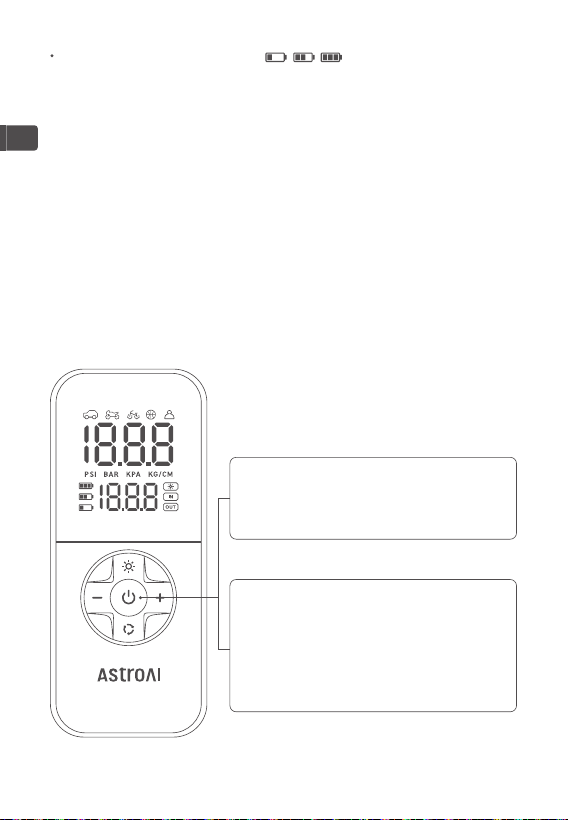
DIAGRAM
7
1
13
14
15
16
17
4
3
5
6
8
2
10
1211
9
Inflation Modes
Real-Time Pressure Display
Pressure Units
Battery Level Display
Preset Pressure Value Display
LED Flashlight Button
“-” Button (Decrease Pressure)
Settings Button
USB Output Port
1
2
3
4
5
6
7
9
8
LED Light
Type-C Charging Port
Quick Connector Port
Light Icon Display
Input Charging Icon Display
Output Charging Icon Display
“+” Button (Increase Pressure)
Power Button
10
11
12
13
14
15
17
16
EN
- 06 -
Storage Bag
USB Charging Cord
2 x Air Nozzles
18
19
20
Needle Valve Adapter
Presta to Schrader Adapter
Quick Connector
21
22
23
Before initial use, please charge the product with the included Type-C
cord (outlet adapter not included).
PREPARATION
Charging
EN
18
20 21 22
19
23
- 07 -
EN
Press and hold the Power Button for
1.5 seconds to turn o the product.
It also turns o automatically if there
are no operations within 90 seconds.
Press and hold the Power Button for
1.5 seconds to turn on the product.
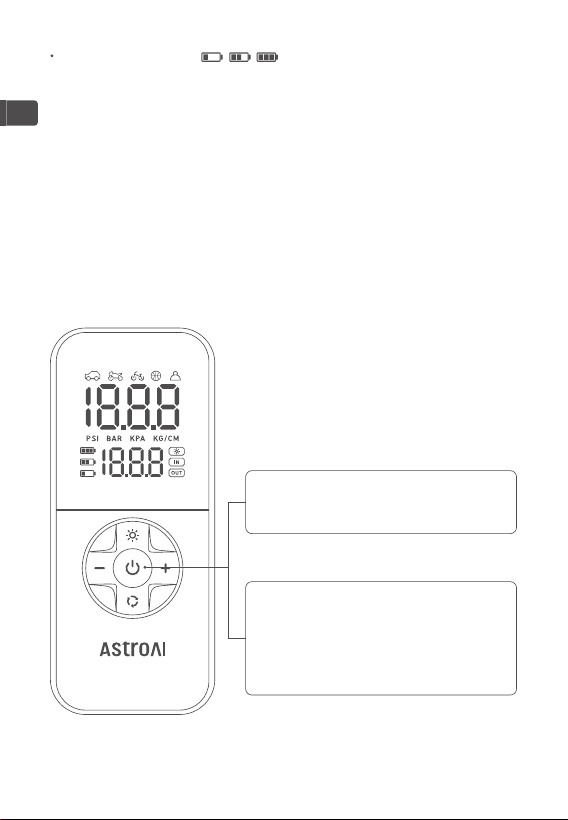
Battery level display:
This icon has three statuses based on the device’s battery level: one cell
means the pump is < 30% charged, two cells mean 50% charged,
and three cells mean the device is fully charged.
The battery level icon will flash when the product is charging and
stays on when it is fully charged.
INSTRUCTIONS
I. Turn On/O
- 08 -
EN
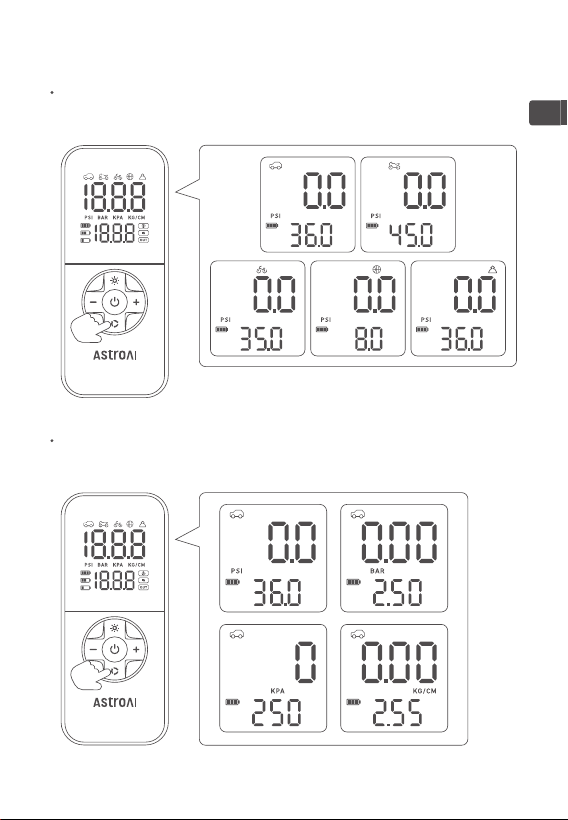
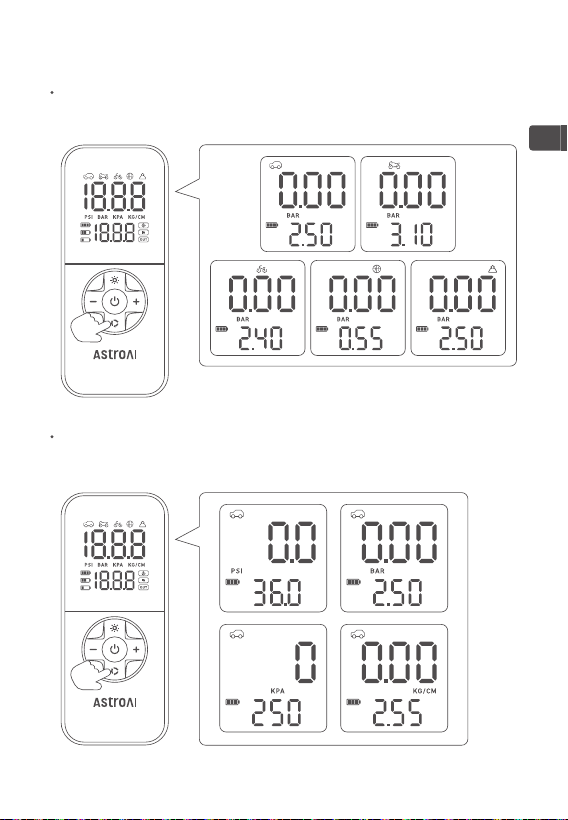
Press the Settings Button to switch between the 5 inflation modes:
cars, motorcycles, bicycles, basketballs, and custom mode.
Press and hold the Settings Button to switch units between PSI, Bar,
kPa, and kg/cm².
II. Switch Units/Modes
- 09 -
EN
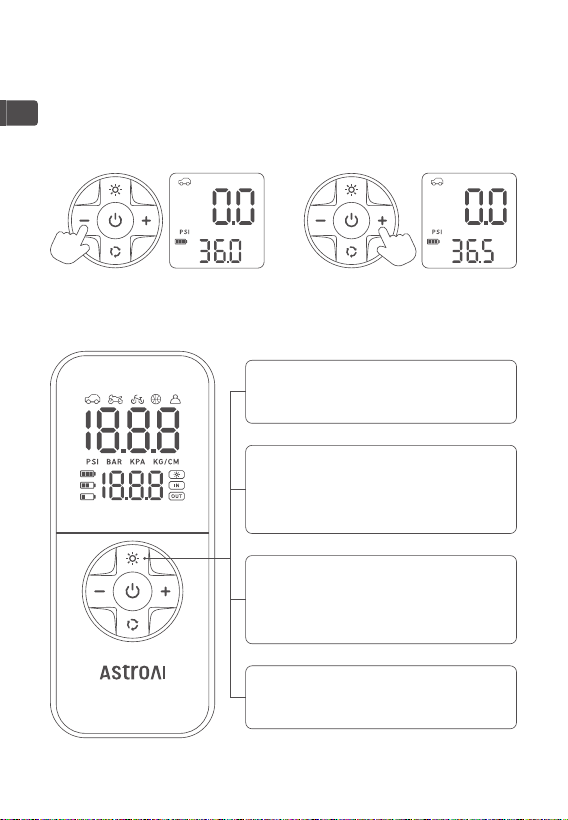
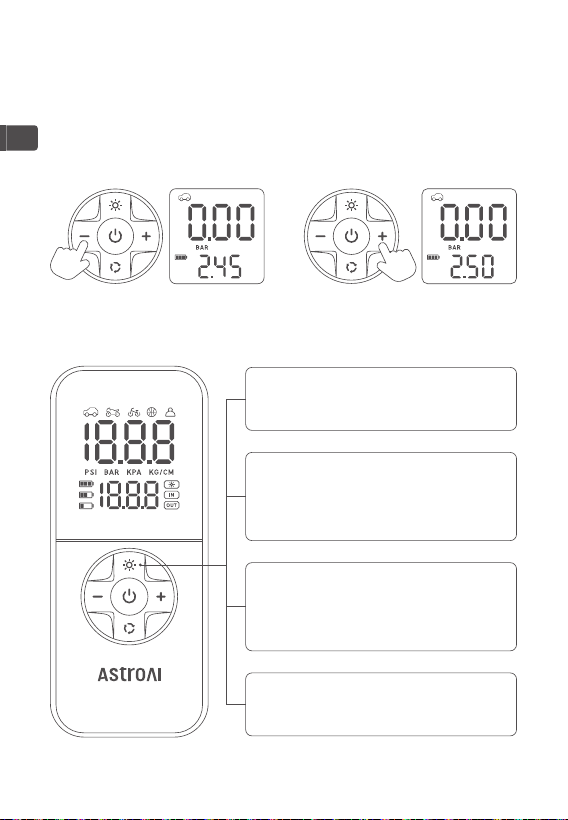
Press the “+” and “-” Buttons to set the pressure value. Press and hold
a button to rapidly change the pressure value. After choosing the
desired value, the number will blink three times and be set.
III. Preset the Pressure Value
IV. Turn the LED Light On/O
Press the LED Light Button once to
turn the light on.
Press the LED Light Button for a
fourth time to turn the light o.
Press the LED Light Button for a
second time to activate the slow
flashing feature.
Press the LED Light Button for a third
time to activate the quick flashing
feature.
- 10 -
EN
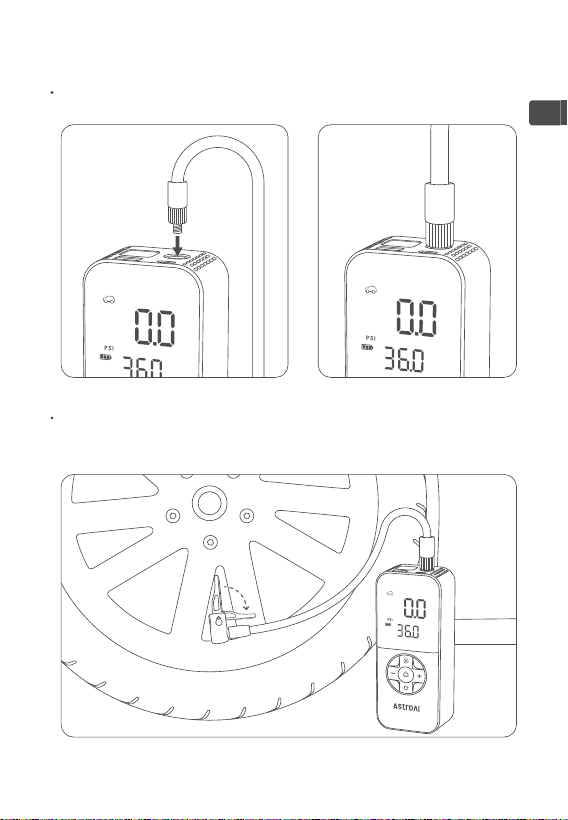
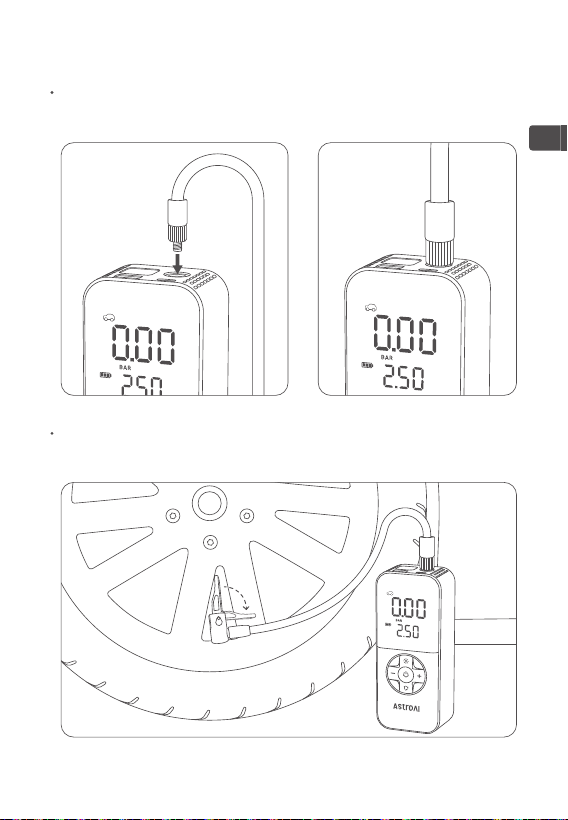
Screw the quick connector onto the quick connector port of the product.
V. Connect the Hose
Remove the valve cap from the tire valve stem and attach the quick
connector to the valve stem.
- 11 -
EN
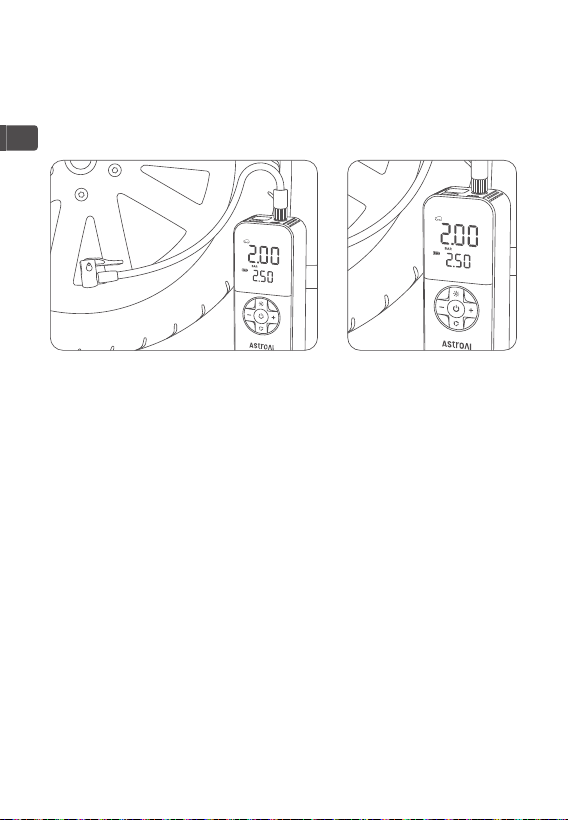
When the quick connector is connected to the inflatables and powered
on, the screen will display the inflatable’s real-time pressure value.
VI. Measure Pressure Value
When the inflation is completed, remove the quick connector from the
tire’s valve stem and attach the valve cap back to the tire’s valve stem.
IX. Complete Inflation
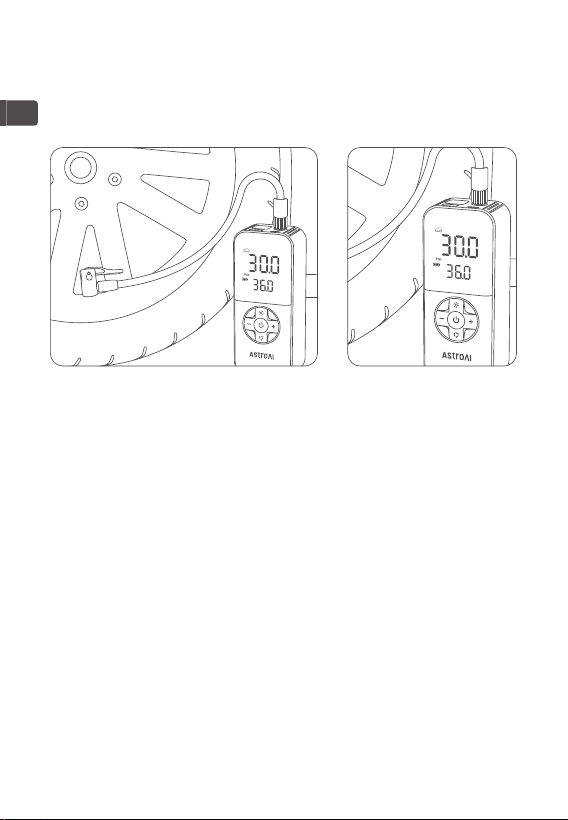
Press the Power Button to start inflating; the digital screen will display
the tire’s real-time pressure value. (Note: do not touch the hose during
inflation.)
VII. Start Inflation
The air pump will automatically stop inflating when it reaches the
preset pressure value. You can also press the Power Button to manually
stop inflation.
VIII. Stop Inflation
- 12 -

EN
The product’s USB output port can be used to charge other electronic
devices.
X. Power Bank Function
MAINTENANCE
Store the product in a cool and dry place and avoid direct sunlight.
Please charge the product to a battery level of 50% ~ 80% before
long-term storage. Charge it every 3 months to prolong its battery life.
Only use mild soap and a cloth dipped in hot water to clean the plastic
parts.
TROUBLESHOOTING
The air pump does not work: Please check the battery level of the
product. The lithium battery may discharge when it is not in use.
Slow inflation: Check if the quick connector is correctly connected to
the tire’s valve stem.
The air pump will get hot after continuous use, please wait until it
cools down before using it again.
The lithium battery’s capacity and life will worsen in low-temperature
environments. This is a normal phenomenon of lithium products.
- 13 -

EN
SPECIFICATIONS
Model
Inflation Speed
Power
Maximum Working Pressure
Battery Capacity
Input
Output
Display Units
Inflation Modes
Functions
Inflation Hose Length
USB Charging Cord Length
Dimensions
AIRUN L4
19L/Min
80W
150PSI
2200mAh × 3
5V 2A (Type-C)
5V 1A (USB)
PSI, Bar, kPa, kg/cm²
Cars, Motorcycles, Bicycles,
Basketballs and Custom
Inflation, Illumination, SOS, Power Bank
0.98ft (30cm)
2.95ft (0.9m)
6.49 × 2.75 × 1.96in (16.5 × 7 × 5cm)
You may dispose of the product when its service life has ended, please
recycle the recyclable parts according to local guidelines.
RECYCLING
- 14 -

EN
Each AstroAI Portable Air Pump will be free from defects in material
and workmanship.
This warranty does not cover damage from neglect, misuse, contami-
nation, alteration, accident, or abnormal conditions of operation or
handling. This warranty covers the original purchaser only and is not
transferable.
AstroAI always wants to provide our customers with excellent prod-
ucts and customer service.
Questions or concerns? We’re happy to help!
Please contact us via [email protected].
WARRANTY PERIOD
2-Year Limited Warranty from AstroAI
- 15 -

Gracias por adquirir la Bomba de Aire Portátil para Coche AstroAI.
Este producto es ligero, portátil, fácil de manejar y capaz de inflar
neumáticos de coche pequeños, neumáticos de motocicleta, bicicletas,
balones y otros inflables. También funciona como linterna de emergencia
y fuente de alimentación.
Para un rendimiento óptimo y un funcionamiento seguro, lea y siga
todas las instrucciones de este manual antes de utilizar este producto.
¡Esperamos que disfrute de su nueva bomba de aire!
INTRODUCCIÓN
Por favor lea completamente y comprenda este manual
antes de utilizar este producto. Conserve este manual
para futuras consultas.
!
ES
- 16 -

ADVERTENCIAS
Lea atentamente las instrucciones antes de utilizar el aparato.
Compruebe el valor de presión preestablecido antes del inflar. El valor
de presión preestablecido debe coincidir con el objeto a inflar.
Mantenga este producto alejado de productos químicos u objetos
inflamables y explosivos.
Evite almacenar este producto en condiciones de humedad o polvo.
Evite colocar este producto en un lugar donde pueda caerse fácilmente.
Manténgalo fuera del alcance de los niños.
No deseche este producto de forma inadecuada ni lo exponga a una
llama abierta.
Las altas temperaturas causadas por el uso continuo prolongado
pueden dañar el producto. Deje que la bomba se enfríe durante 10
minutos después de 15 minutos de uso continuo.
No utilice productos químicos para limpiar la bomba. Utilice única-
mente jabón suave y un paño humedecido en agua caliente para
limpiar las piezas de plástico.
EL PAQUETE INCLUYE
Bomba de Aire para coche AstroAI
Adaptador Presta a Schrader
Adaptador de válvula de aguja
Bolsa de Almacenamiento
× 1
× 1
× 1
× 1
Conector rápido
Boquillas de aire
Cable de carga USB
Manual de Usuario
× 1
× 2
× 1
× 1
ES
- 17 -
DIAGRAMA
7
1
13
14
15
16
17
4
3
5
6
8
2
10
1211
9
Modos de inflado
Presión en tiempo real
Unidades de presión
Indicador de nivel de batería
Valor de presión preestablecido
Botón de linterna LED
Botón “-” (disminuir la presión)
Botón de configuración
Puerto de salida USB
1
2
3
4
5
6
7
9
8
Luz LED
Puerto de carga Tipo-C
Puerto de conexión rápida
Icono de luz
Icono de carga de entrada
Icono de carga de salida
Botón “+” (aumentar la presión)
Botón de encendido
10
11
12
13
14
15
17
16
ES
- 18 -
ES
18
Bolsa de Almacenamiento
Cable de carga USB
2 x Boquillas de Aire
18
19
20
Adaptador de válvula de aguja
Adaptador Presta a Schrader
Conector rápido
21
22
23
20 21 22
19
Antes del uso inicial, por favor, cargue el producto con el cable Tipo-C
incluido (adaptador de corriente no incluido).
PREPARACIÓN
Carga
23
- 19 -
ES
INSTRUCCIONES
I. Encendido/Apagado
Indicación del nivel de batería:
Este icono tiene tres estados basados en el nivel de batería del
dispositivo: una celda significa que la bomba está <30% cargada, dos
celdas significan 50% cargada y tres celdas significan que el dispositivo
está completamente cargado.
El icono de nivel de batería parpadeará cuando el producto se esté
cargando y se mantendrá iluminado cuando esté completamente
cargado.
Mantenga pulsado el Botón de Encendido
durante 1,5 segundos para encender
el producto.
Mantenga pulsado el Botón de Encendido
durante 1,5 segundos para apagar el
producto. También se apaga automáti-
camente si no se realiza ninguna
operación en 90 segundos.
- 20 -
ES
Pulse el Botón Ajustes para cambiar entre los 5 modos de inflado:
coches, motos, bicicletas, balones de baloncesto y modo personalizado.
II. Cambio de Unidades/Modo
Mantenga pulsado el Botón Ajustes para cambiar las unidades entre
PSI, Bar, kPa y kg/cm².
- 21 -
ES
IV. Encender y apagar la luz LED
Pulse los botones “+” y “-” para ajustar el valor de presión. Mantenga
presionado un botón para cambiar rápidamente el valor de presión.
Después de elegir el valor deseado, el número parpadeará tres veces
y quedará establecido.
III. Preajuste del Valor de Presión
Pulse el Botón de Luz LED una vez
para encender la luz.
Pulse el botón de luz LED por cuarta
vez para apagar la luz.
Pulse el botón de luz LED por segunda
vez para activar la función de parpadeo
lento.
Pulse el botón de luz LED por tercera
vez para activar la función de parpadeo
rápido.
- 22 -
ES
Retire el tapón del vástago de la válvula del neumático y conecte el
conector rápido al vástago de la válvula.
Enrosque el conector rápido en el puerto del conector rápido del
producto.
V. Conectar la Manguera
- 23 -
ES
Una vez finalizado el inflado, retire el conector rápido del vástago de
la válvula del neumático y vuelva a colocar el tapón de la válvula en el
vástago de la válvula del neumático.
IX. Inflado completo
Pulse el botón de encendido para iniciar el inflado; la pantalla digital
mostrará el valor de presión del neumático en tiempo real. (Nota: no
toque la manguera durante el inflado).
VII. Iniciar el inflado
La bomba de aire dejará automáticamente de inflar cuando alcance el
valor de presión preestablecido. También puede pulsar el botón de
encendido para detener el inflado manualmente.
VIII. Detener inflado
Cuando el conector rápido se encuentra encendido y conectado a los
inflables, la pantalla mostrará el valor de presión en tiempo real del
inflable.
VI. Medir el valor de presión
- 24 -

ES
SOLUCIÓN DE PROBLEMAS
La bomba de aire no funciona: Compruebe el nivel de carga de la
batería del producto. La batería de litio puede descargarse cuando
no está en uso.
Inflado lento: Compruebe si el conector rápido está correctamente
conectado al vástago de la válvula del neumático.
La bomba de aire se calienta tras un uso continuado, por favor
espere a que se enfríe antes de volver a utilizarla.
La capacidad y la vida útil de la batería de litio empeoran en entor-
nos de baja temperatura. Se trata de un fenómeno normal de los
productos de litio.
MANTENIMIENTO
Almacene el producto en un lugar fresco y seco y evite la luz solar directa.
Por favor, cargue el producto a un nivel de batería de 50% ~ 80%
antes de almacenamiento a largo plazo. Cárguelo cada 3 meses para
prolongar la vida útil de la batería.
Utilice únicamente jabón suave y un paño humedecido en agua
caliente para limpiar las piezas de plástico.
El puerto de salida USB del producto puede utilizarse para cargar
otros dispositivos electrónicos.
X. Función Fuente de Alimentación
- 25 -

ES
Puede deshacerse del producto cuando haya finalizado su vida útil;
recicle las piezas reciclables de acuerdo con las directrices locales.
RECICLAJE
CARACTERÍSTICAS
Modelo
Velocidad de inflado
Potencia
Presión máxima de trabajo
Capacidad de la batería
Entrada
Salida
Unidades de visualización
Modos de inflado
Funciones
Longitud de la manguera de inflado
Longitud del cable de carga USB
Dimensiones
AIRUN L4
19 L/Min
80 W
10.3 Bar
2200mAh × 3
5 V 2 A (Tipo-C)
5 V 1 A (USB)
PSI, Bar, kPa, kg/cm²
Coches, Motos, Bicicletas, Balones
de Baloncesto y Modo Personalizado
Inflado, Iluminación, SOS, Fuente de
alimentación
30 cm
0.9 m
16.5 × 7 × 5 cm
- 26 -

ES
Cada Bomba de Aire Portátil AstroAI esta libre de defectos en materi-
ales y mano de obra.
Esta garantía no cubre daños por negligencia, mal uso, contami-
nación, alteración, accidente o condiciones anormales de funciona-
miento o manipulación. Esta garantía cubre únicamente al comprador
original y no es transferible.
AstroAI siempre quiere proporcionar a nuestros clientes excelentes
productos y servicio al cliente.
¿Preguntas o dudas? Estaremos encantados de ayudarle.
Póngase en contacto con nosotros a través de [email protected].
PERÍODO DE GARANTÍA
Garantía limitada de 2 años de AstroAI
- 27 -

产品名称 L4锂电款空气泵
V1.1
Power 参数变更
说明书 (EN/ES)
90*130mm
骑马钉
封面封底:Pantone 1585C+K;内页K
80g双胶纸
Eddy
Vicky / Jessica
2024.03.14
1. 印刷内容、字体、字体颜色(和文档一致)符合要求
2. 表面整洁平整,无褶皱破损、无污渍杂质、无划痕
3. 字体、图案应清晰、正确、无错印、漏印,无油墨污染
物料类型
物料版本
更新说明
本设计图纸版权归本公司所有,未经本公司书
面同意不得复印。
重庆麦一科技有限公司
Chongqing Maiyi Technology Co., Ltd.
本图纸应与说明,产品状况,产品结构设计图及有
关图纸协调使用,发现任何差异请立即通知设计师。
图档中所有尺寸比例为1:1.
公差: L(长)*(宽): +1/-1mm,H(高): ±1mm
项目信息 技术规格
尺寸规格 设计人员
设计日期
产品对接
翻译对接
印刷颜色
物料材质
后道工艺
Web: www.astroai.com
E-Mail: [email protected]
PORTABLE
CAR AIR PUMP
AIRUN L4
USER MANUAL
ES
EN
V1.1