2/20/24, 9:57 AM
Wireless PRO | USER GUIDE & SUPPORT | RØDE
https://rode.com/en-us/user-guides/wireless-pro
1/41
USER GUIDE & SUPPORT
The
Wireless
PRO
is
the
most
powerful
compact
microphone
system
ever
,
packed
full
of
professional
features
that
offer
ultimate
flexibility
when
recording
pristine
audio
for
your
content
.
Discover
everything
you
need
to
know
about
using
your
Wireless
PRO
here
.
Contents
Features
Receiver
RX
Wireless
PRO
/
USER
GUIDE
&
SUPPORT
EN
US
0
2/20/24, 9:57 AM
Wireless PRO | USER GUIDE & SUPPORT | RØDE
https://rode.com/en-us/user-guides/wireless-pro
2/41
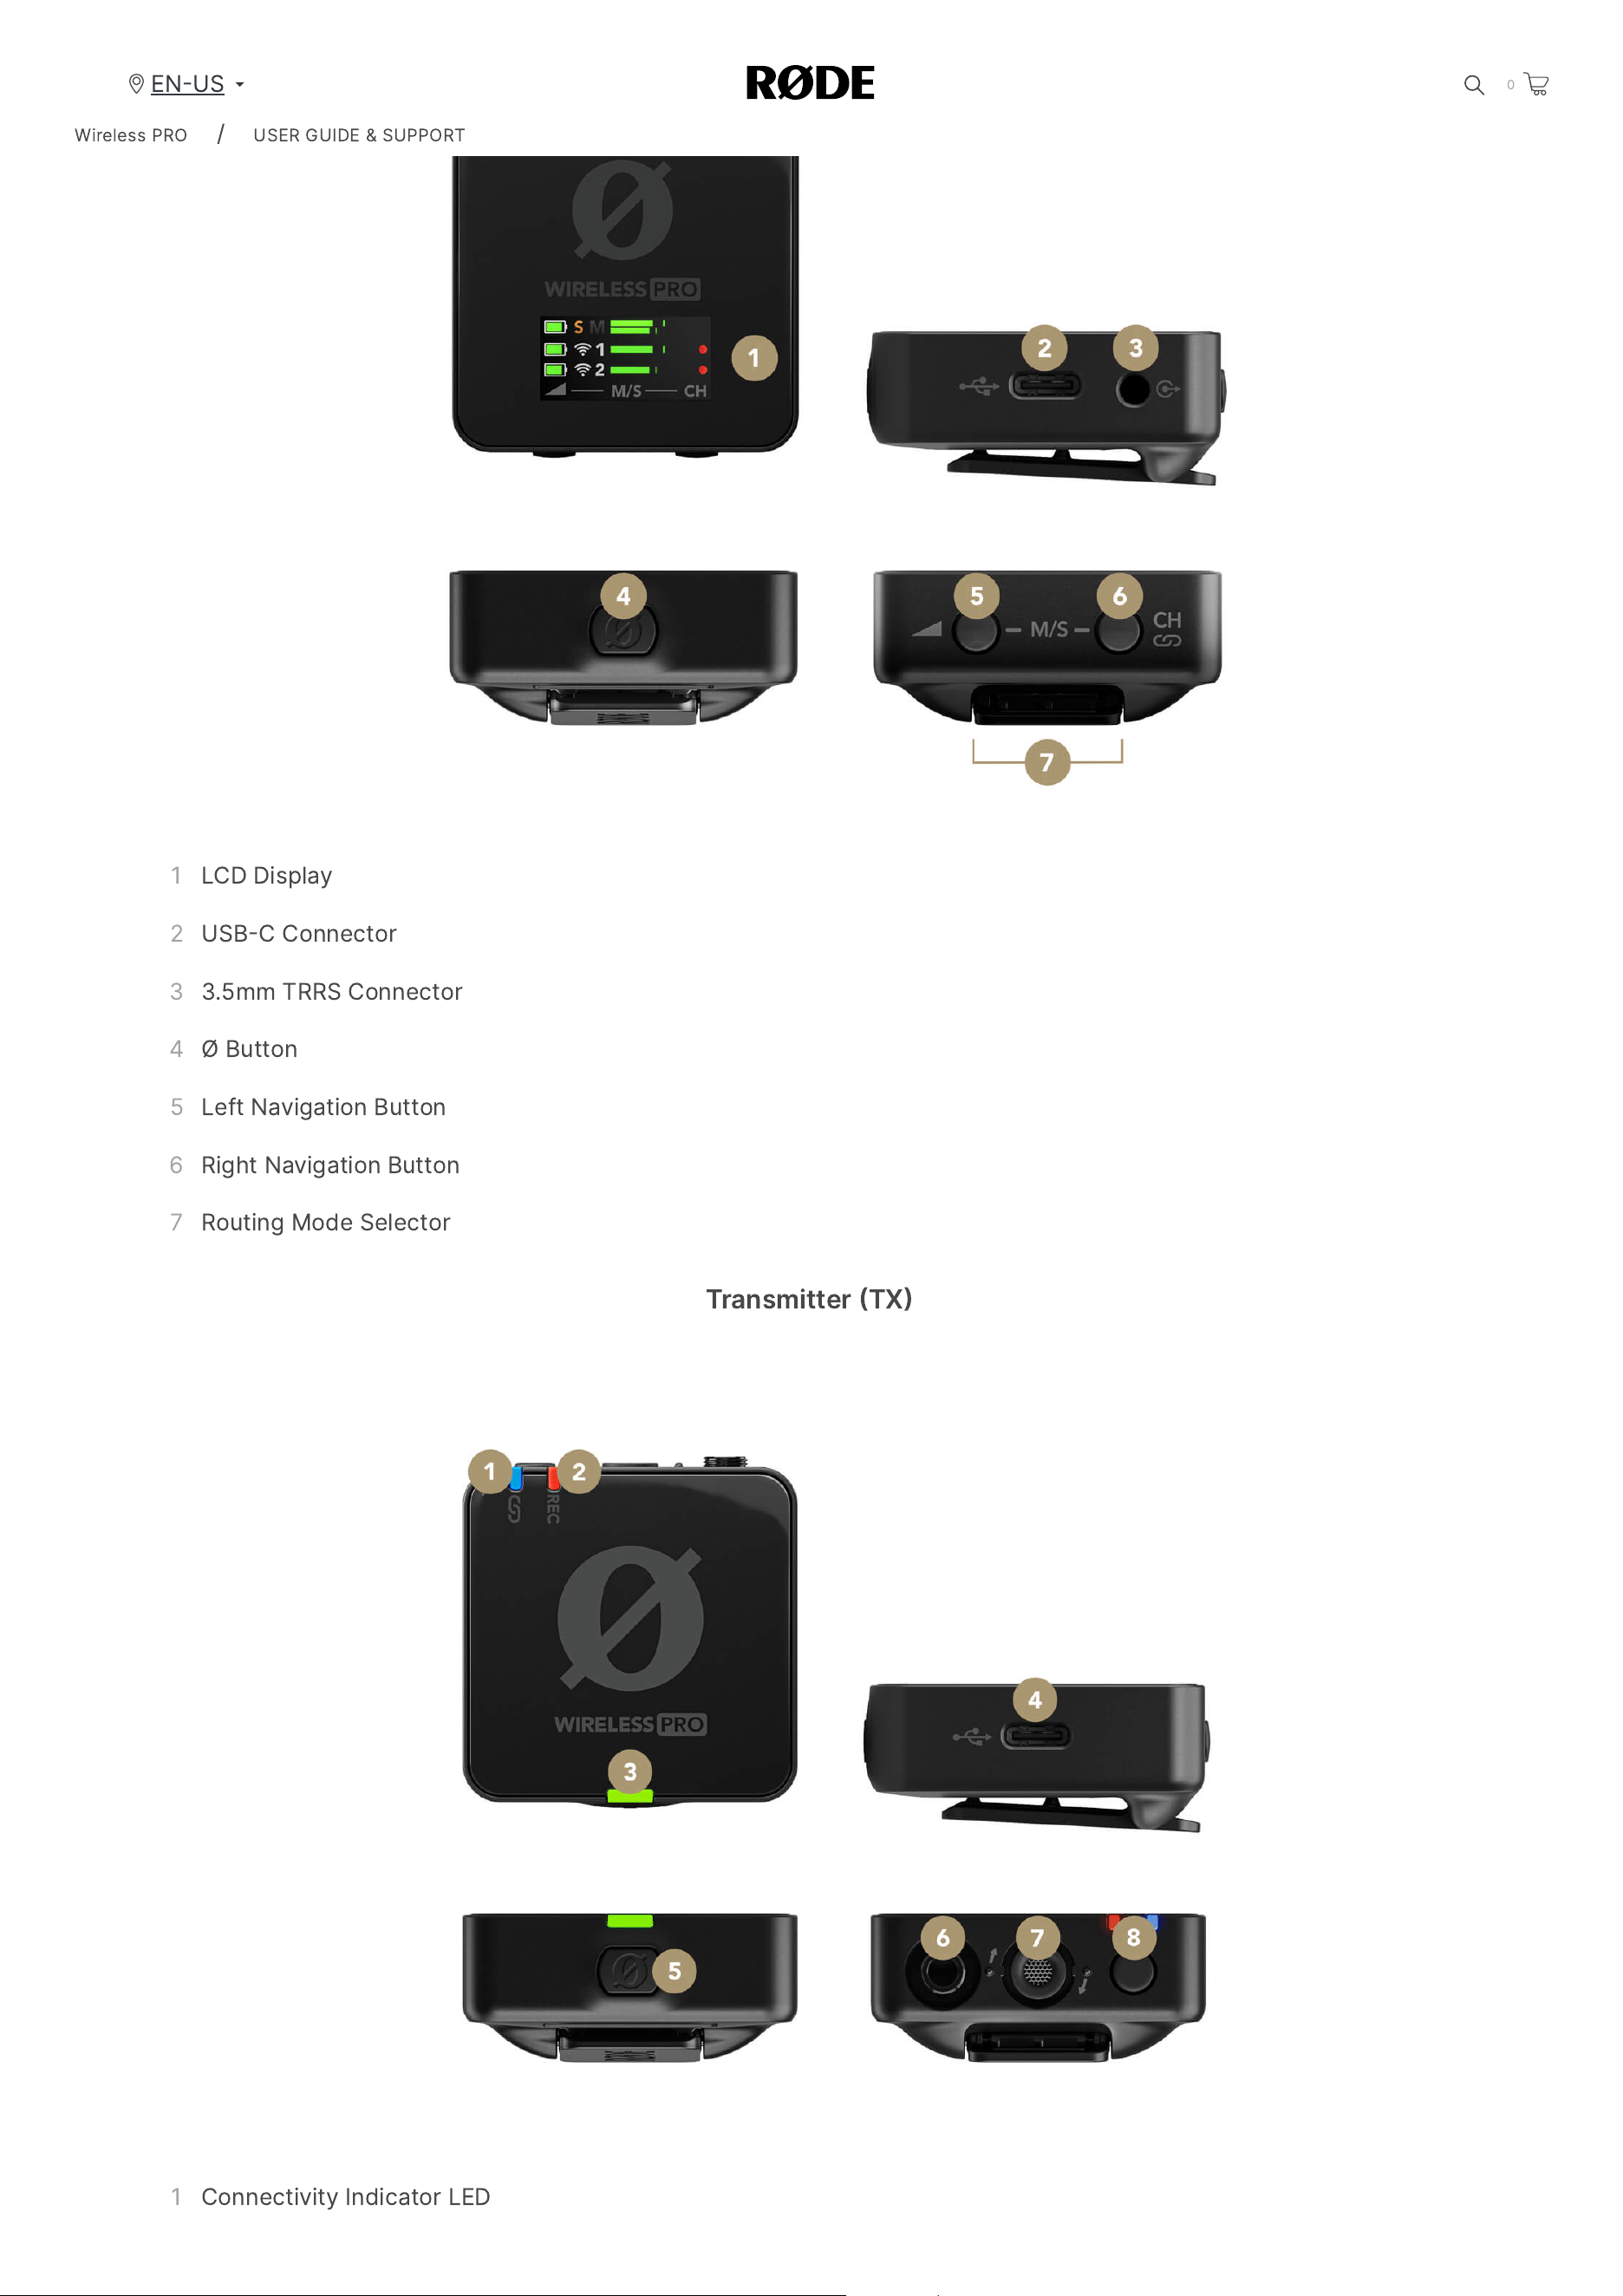
1
LCD
Display
2
USB
C
Connector
3 3.5
mm
TRRS
Connector
4
Ø
Button
5
Left
Navigation
Button
6
Right
Navigation
Button
7
Routing
Mode
Selector
Transmitter
TX
1
Connectivity
Indicator
LED
Wireless
PRO
/
USER
GUIDE
&
SUPPORT
EN
US
0
2/20/24, 9:57 AM
Wireless PRO | USER GUIDE & SUPPORT | RØDE
https://rode.com/en-us/user-guides/wireless-pro
3/41
2
Recording
Status
LED
3
Battery
Indicator
LED
4
USB
C
Connector
5
Ø
Button
6
Locking
a
3.5
mm
TRS
Input
7
In
-
built
Microphone
8
Record
Button
Getting
Started
with
the
Wireless
PRO
The
Wireless
PRO
comes
with
everything
you
need
to
record
broadcast
-
grade
wireless
audio
,
including
a
smart
charging
case
,
pair
of
lavalier
microphones
,
windshields
,
magnetic
clips
and
all
necessary
cables
for
plugging
into
your
devices
.
The
system
itself
consists
of
a
pair
of
transmitters
and
a
single
receiver
.
Each
transmitter
picks
up
audio
via
its
built
-
in
microphone
,
or
an
external
mic
such
as
a
lavalier
,
which
can
be
connected
via
the
3.5
mm
input
.
This
audio
is
transmitted
wirelessly
to
the
receiver
unit
,
which
connects
to
your
camera
,
smartphone
,
computer
or
other
recording
device
either
via
USB
or
its
3.5
mm
output
.
Audio
can
also
be
recorded
directly
to
the
transmitters
,
giving
you
maximum
flexibility
.
Turning on Your Wireless PRO
Each
transmitter
and
receiver
unit
features
a
‘
Ø
’
button
that
functions
as
the
power
button
as
well
as
performing
various
other
functions
.
Simply
long
-
press
this
button
to
power
on
or
power
off
your
units
.
By
default
,
the
Wireless
PRO
transmitters
will
automatically
power
down
after
15
minutes
if
they
are
unpaired
and
not
recording
,
but
this
can
be
disabled
via
RØDE
Central
with
the
‘
Timeout
’
toggle
.
The
receiver
does
not
power
down
automatically
.
Wireless
PRO
/
USER
GUIDE
&
SUPPORT
EN
US
0
2/20/24, 9:57 AM
Wireless PRO | USER GUIDE & SUPPORT | RØDE
https://rode.com/en-us/user-guides/wireless-pro
4/41
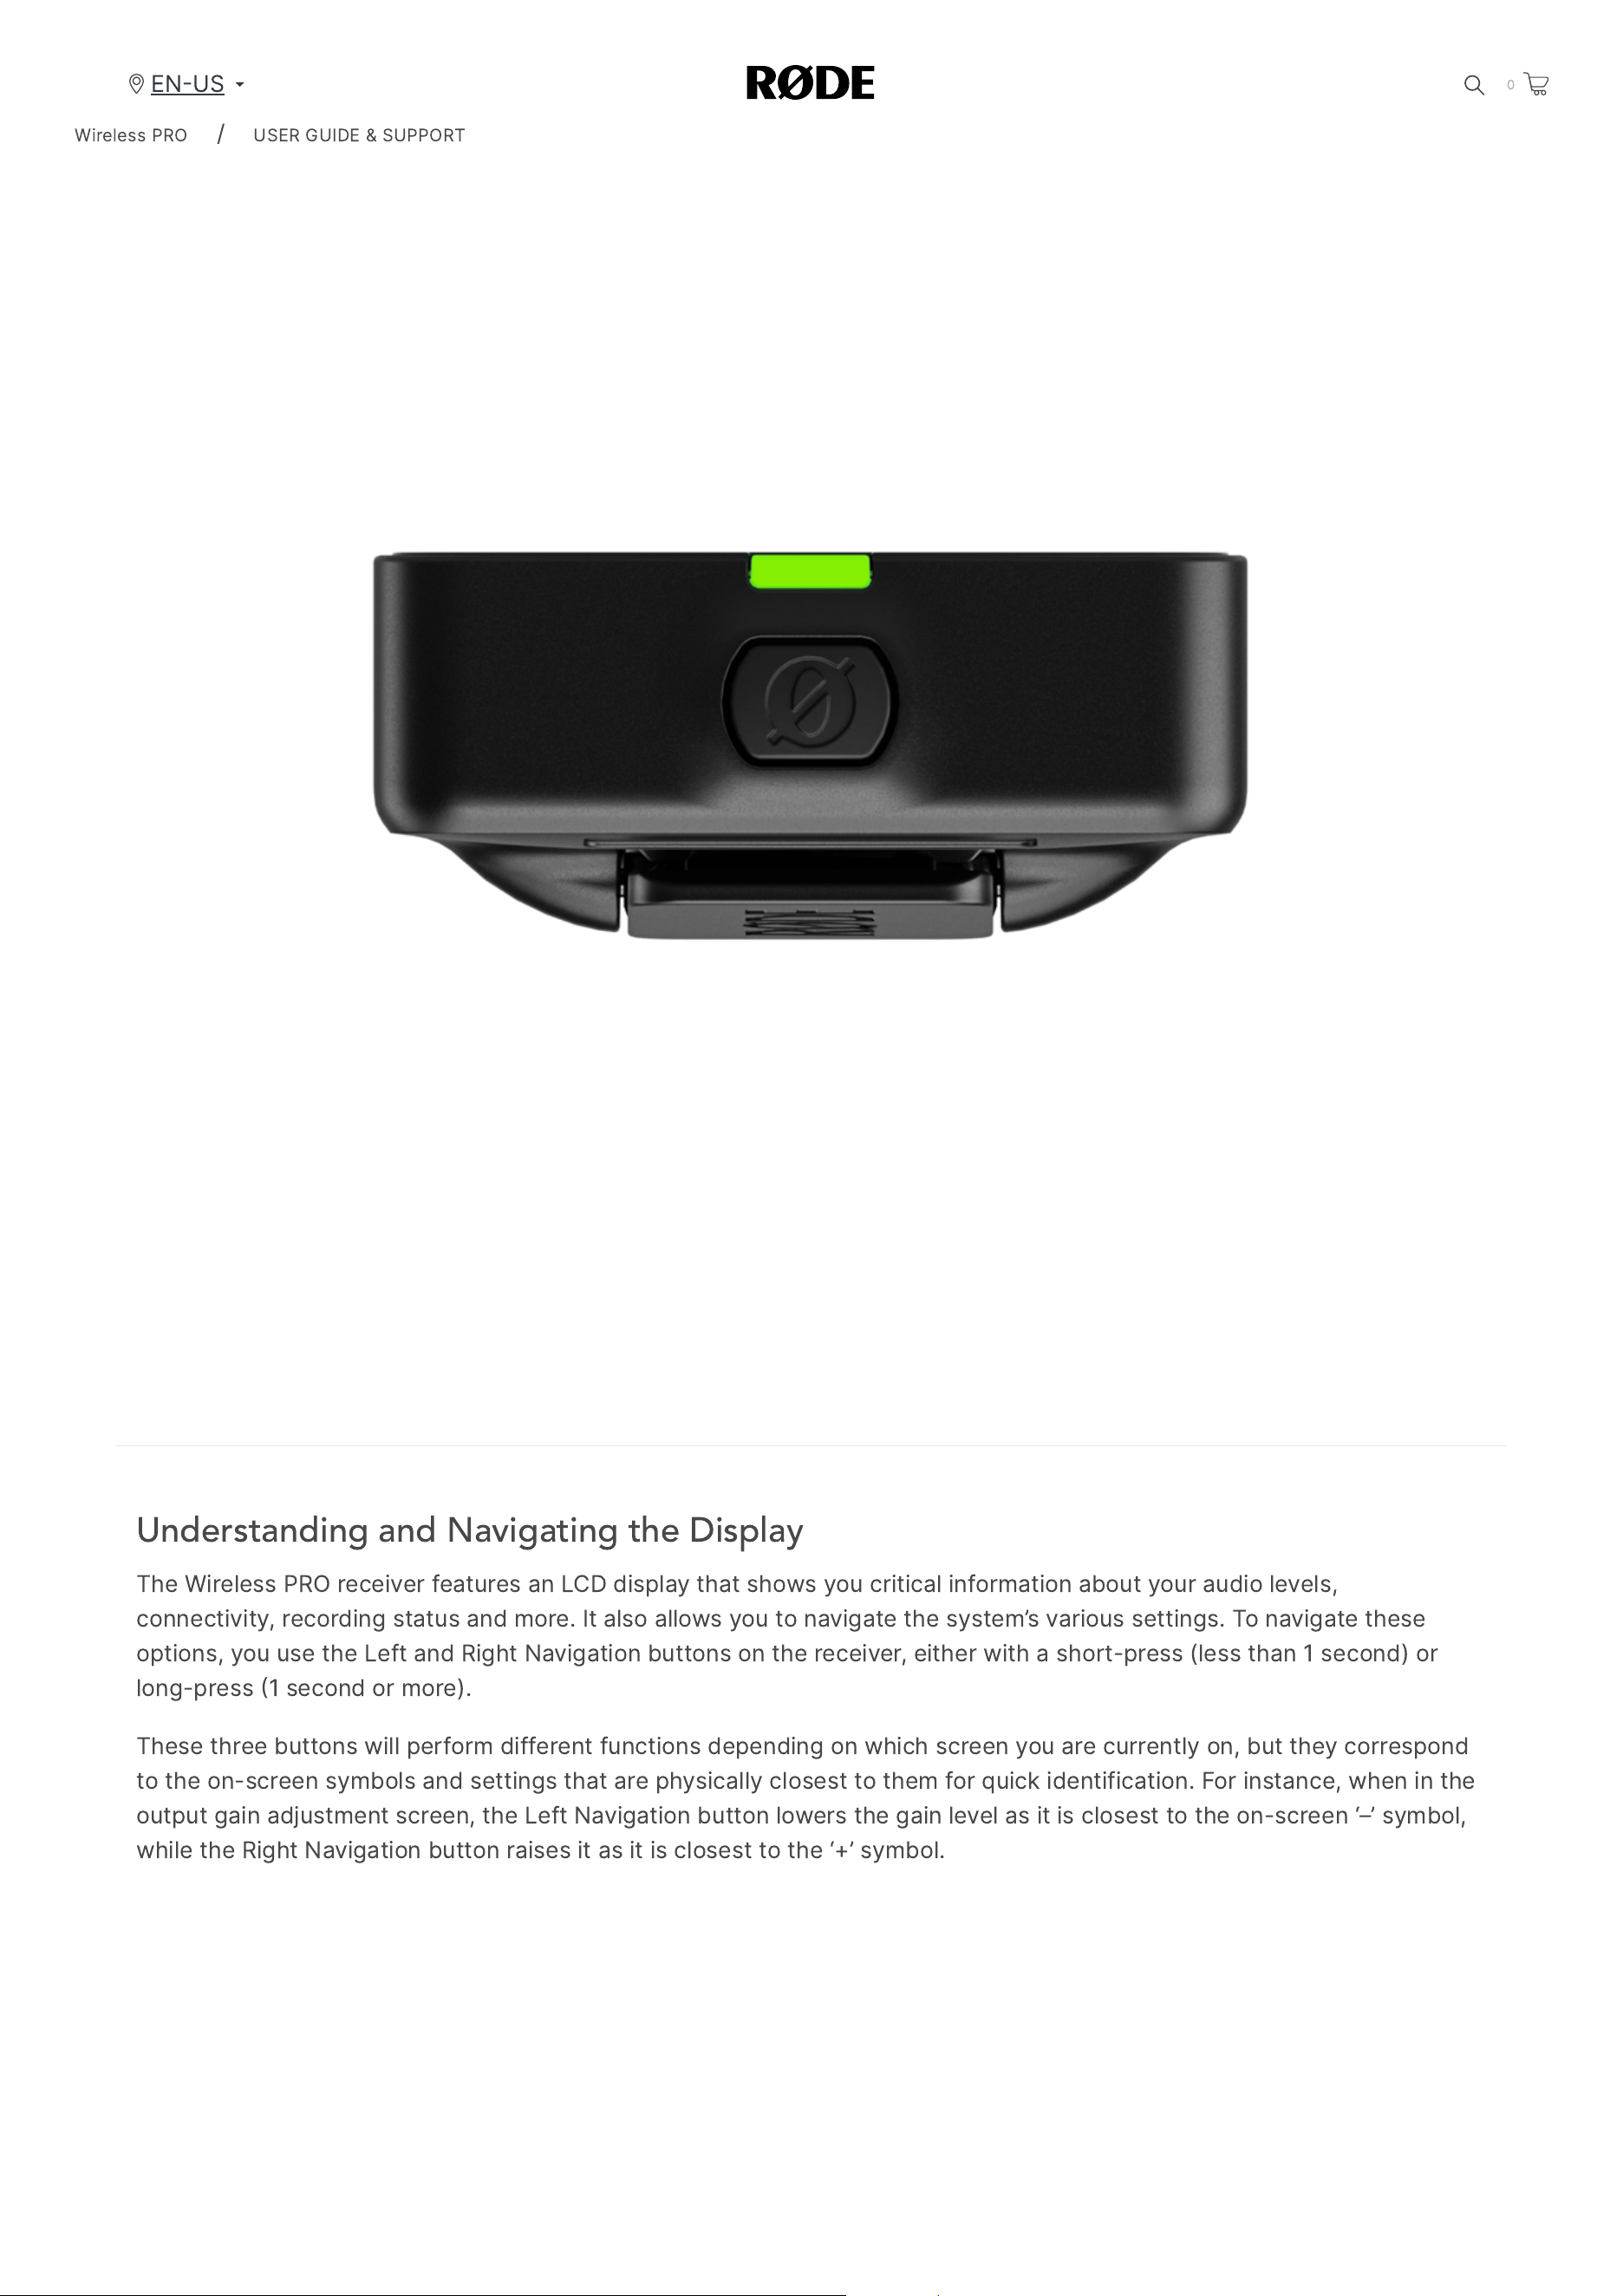
Understanding and Navigating the Display
The
Wireless
PRO
receiver
features
an
LCD
display
that
shows
you
critical
information
about
your
audio
levels
,
connectivity
,
recording
status
and
more
.
It
also
allows
you
to
navigate
the
system
’
s
various
settings
.
To
navigate
these
options
,
you
use
the
Left
and
Right
Navigation
buttons
on
the
receiver
,
either
with
a
short
-
press
(
less
than
1
second
)
or
long
-
press
1
second
or
more
).
These
three
buttons
will
perform
different
functions
depending
on
which
screen
you
are
currently
on
,
but
they
correspond
to
the
on
-
screen
symbols
and
settings
that
are
physically
closest
to
them
for
quick
identification
.
For
instance
,
when
in
the
output
gain
adjustment
screen
,
the
Left
Navigation
button
lowers
the
gain
level
as
it
is
closest
to
the
on
-
screen
‘–’
symbol
,
while
the
Right
Navigation
button
raises
it
as
it
is
closest
to
the
‘+’
symbol
.
Wireless
PRO
/
USER
GUIDE
&
SUPPORT
EN
US
0

2/20/24, 9:57 AM
Wireless PRO | USER GUIDE & SUPPORT | RØDE
https://rode.com/en-us/user-guides/wireless-pro
5/41
Pairing Your Wireless PRO
When
you
first
power
on
your
Wireless
PRO
,
the
transmitters
and
receiver
will
automatically
pair
.
You
can
also
manually
pair
them
if
required
.
Manual
Pairing
With
all
your
units
powered
on
,
short
-
press
the
Right
Navigation
button
on
the
receiver
to
cycle
to
the
first
transmitter
screen
and
then
long
-
press
the
Right
Navigation
button
to
enter
pairing
mode
–
the
display
will
read
“
PAIR
TX
NOW
”.
Short
-
press
the
Ø
button
on
one
of
your
transmitters
to
enter
pairing
mode
–
the
pairing
LED
on
the
transmitter
will
start
quickly
flashing
blue
until
it
turns
solid
blue
when
successfully
paired
.
Navigate
to
the
next
transmitter
page
on
the
receiver
with
a
short
-
press
of
the
Right
Navigation
button
and
repeat
the
process
for
your
second
transmitter
.
To
unpair
a
transmitter
,
short
-
press
the
Right
Navigation
button
on
the
receiver
to
cycle
to
the
desired
transmitter
screen
and
then
long
-
press
the
Right
Navigation
button
.
Note
:
You
will
need
to
manually
re
-
pair
the
transmitter
after
doing
this
.
Pairing
in
RØDE
Central
With
your
Wireless
PRO
receiver
connected
to
a
computer
running
RØDE
Central
(
learn
more
about
RØDE
Central
here
),
you
can
see
if
transmitters
are
currently
paired
to
your
receiver
in
the
top
-
right
section
of
the
app
.
If
a
transmitter
isn
’
t
paired
,
turn
it
on
,
short
-
press
its
Ø
button
,
and
then
click
‘
pair
’
in
the
app
.
Here
,
you
can
also
unpair
your
transmitters
.
Wireless
PRO
/
USER
GUIDE
&
SUPPORT
EN
US
0
2/20/24, 9:57 AM
Wireless PRO | USER GUIDE & SUPPORT | RØDE
https://rode.com/en-us/user-guides/wireless-pro
6/41
Battery and Charging
The
receiver
and
transmitters
each
contain
a
rechargeable
lithium
-
ion
battery
capable
of
up
to
seven
7
hours
of
use
when
fully
charged
.
You
can
charge
each
transmitter
and
receiver
individually
via
the
unit
’
s
USB
C
port
using
computer
or
other
USB
charging
device
,
but
it
’
s
much
more
convenient
to
use
the
included
smart
charging
case
.
Charge Case
The
included
charge
case
can
store
more
than
two
full
recharges
for
the
whole
system
(
two
transmitters
and
one
receiver
)
for
extended
use
.
To
recharge
your
Wireless
PRO
,
simply
place
all
three
units
in
the
case
,
ensuring
the
receiver
is
placed
in
the
slot
marked
‘
RX
’
and
that
the
USB
C
port
for
each
unit
lines
up
with
the
USB
C
connections
in
the
case
.
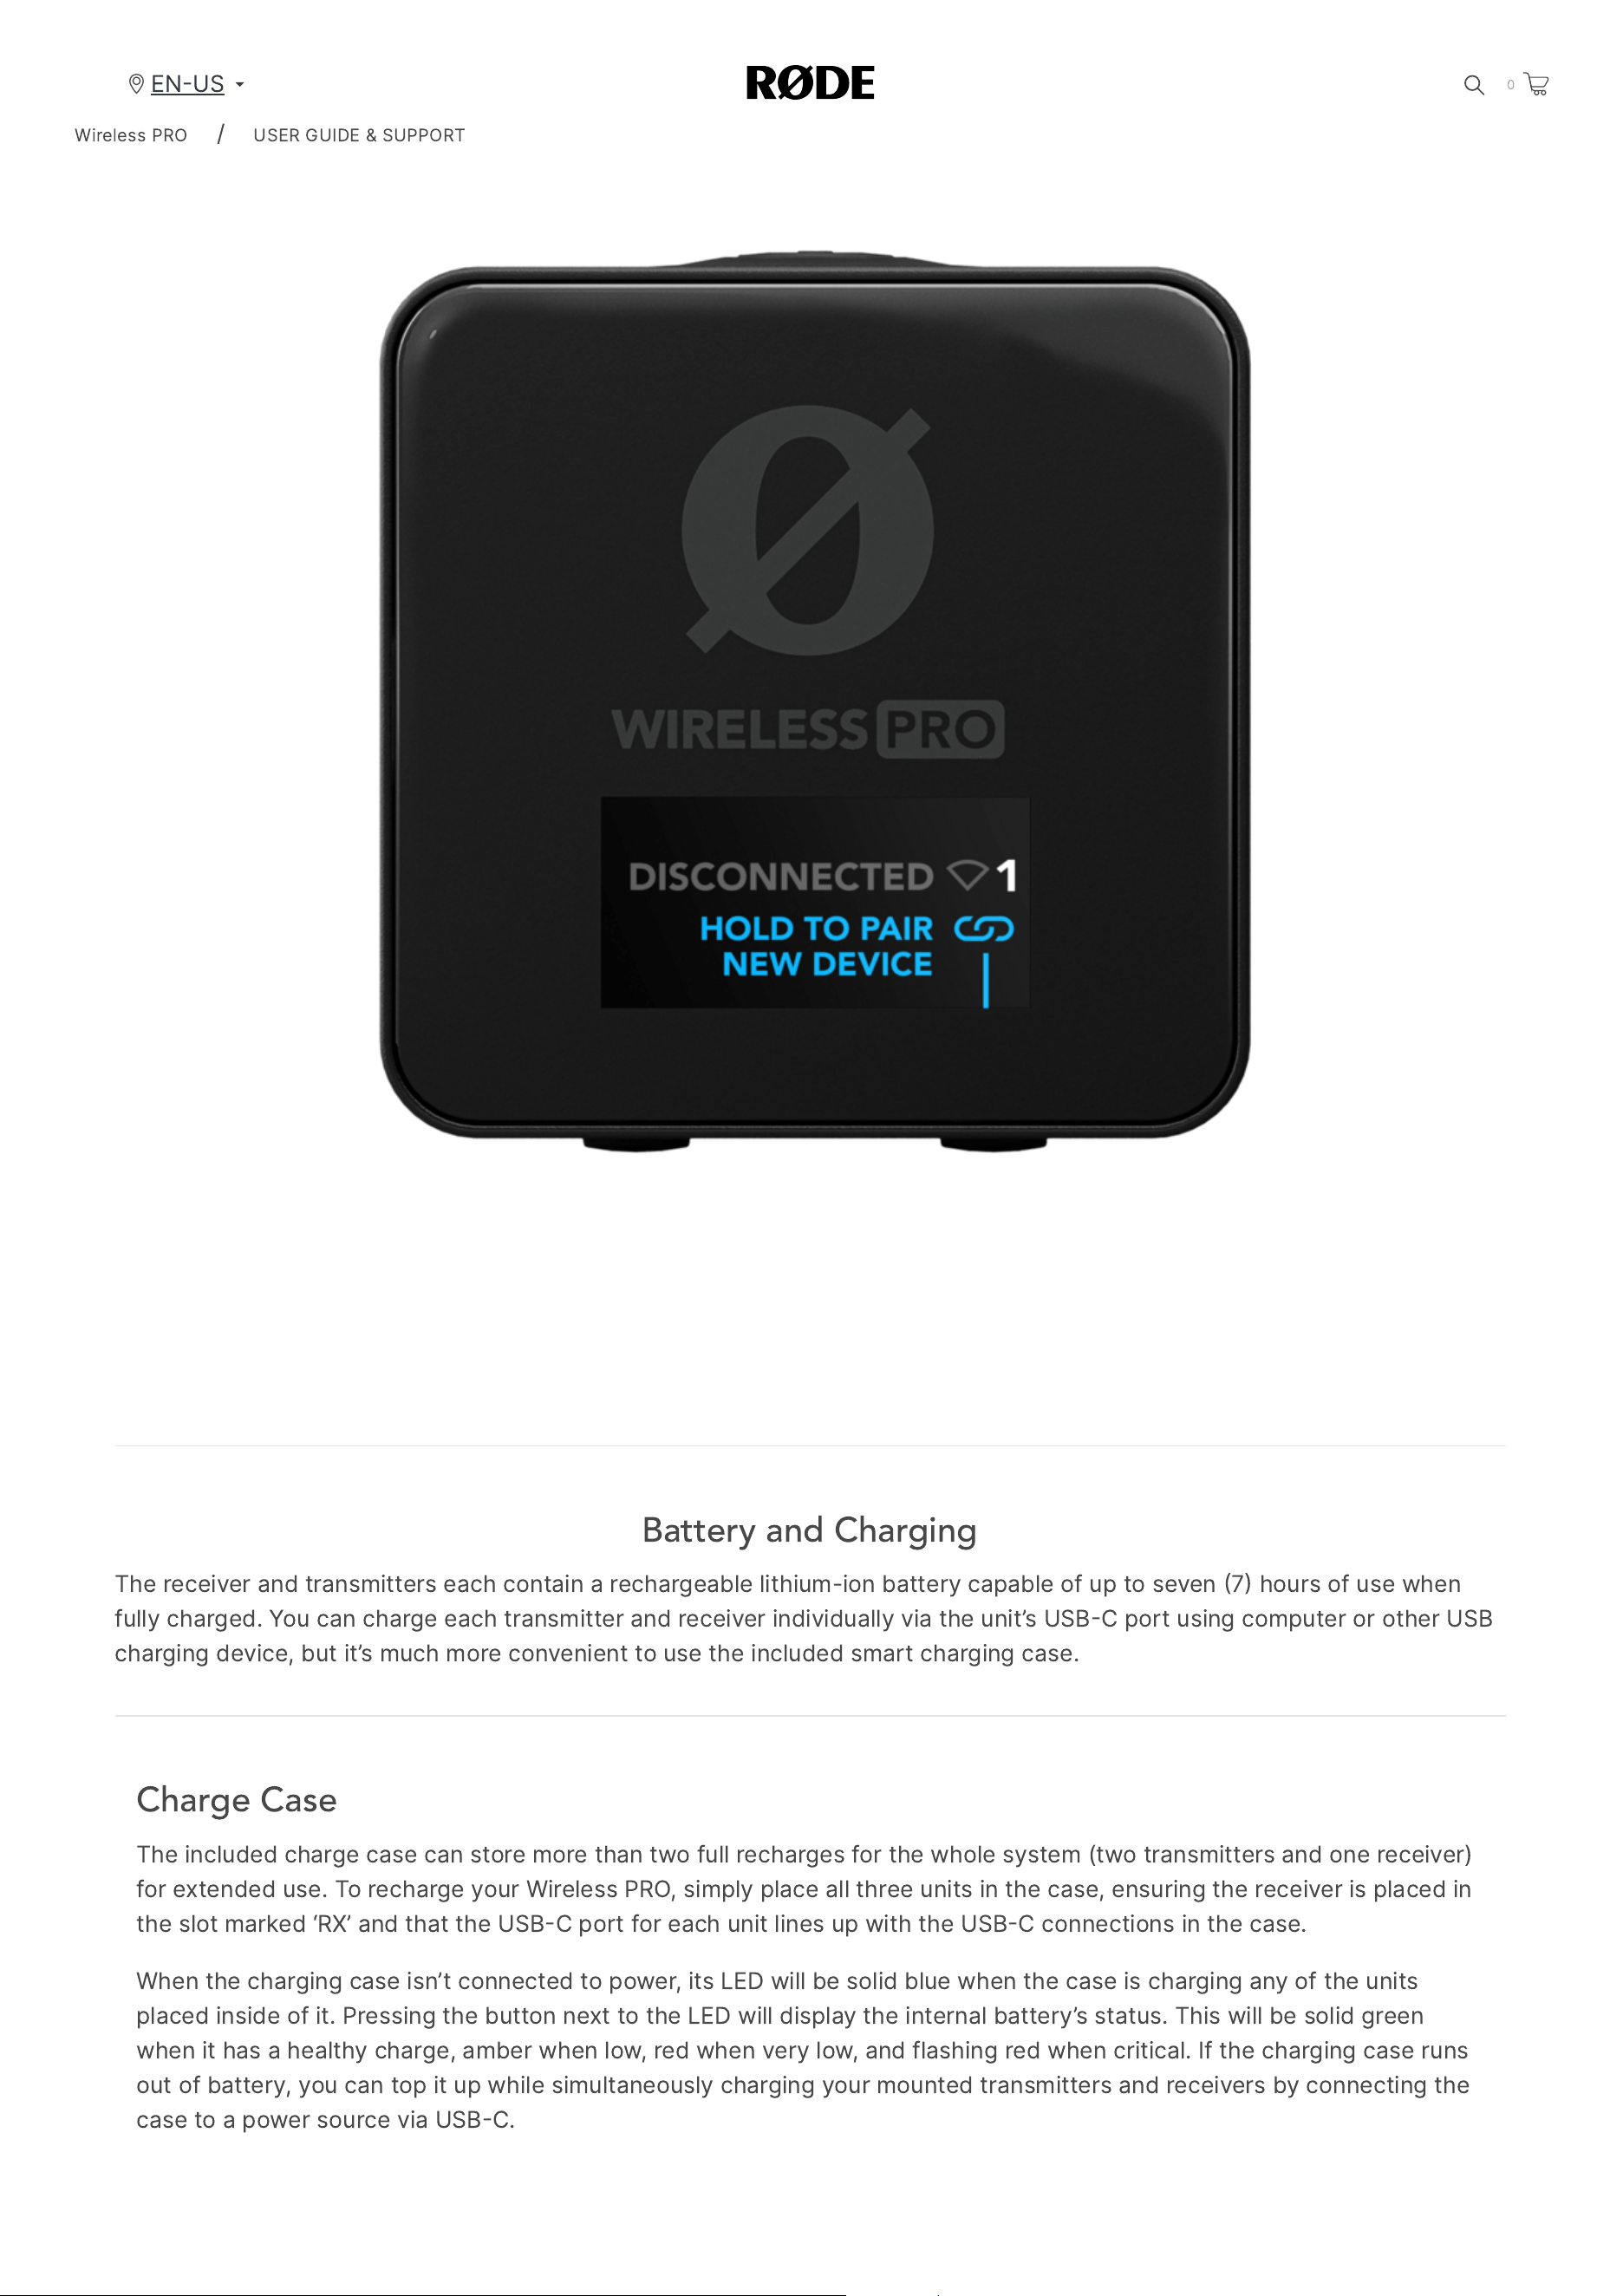
When
the
charging
case
isn
’
t
connected
to
power
,
its
LED
will
be
solid
blue
when
the
case
is
charging
any
of
the
units
placed
inside
of
it
.
Pressing
the
button
next
to
the
LED
will
display
the
internal
battery
’
s
status
.
This
will
be
solid
green
when
it
has
a
healthy
charge
,
amber
when
low
,
red
when
very
low
,
and
flashing
red
when
critical
.
If
the
charging
case
runs
out
of
battery
,
you
can
top
it
up
while
simultaneously
charging
your
mounted
transmitters
and
receivers
by
connecting
the
case
to
a
power
source
via
USB
C
.
Wireless
PRO
/
USER
GUIDE
&
SUPPORT
EN
US
0
2/20/24, 9:57 AM
Wireless PRO | USER GUIDE & SUPPORT | RØDE
https://rode.com/en-us/user-guides/wireless-pro
7/41
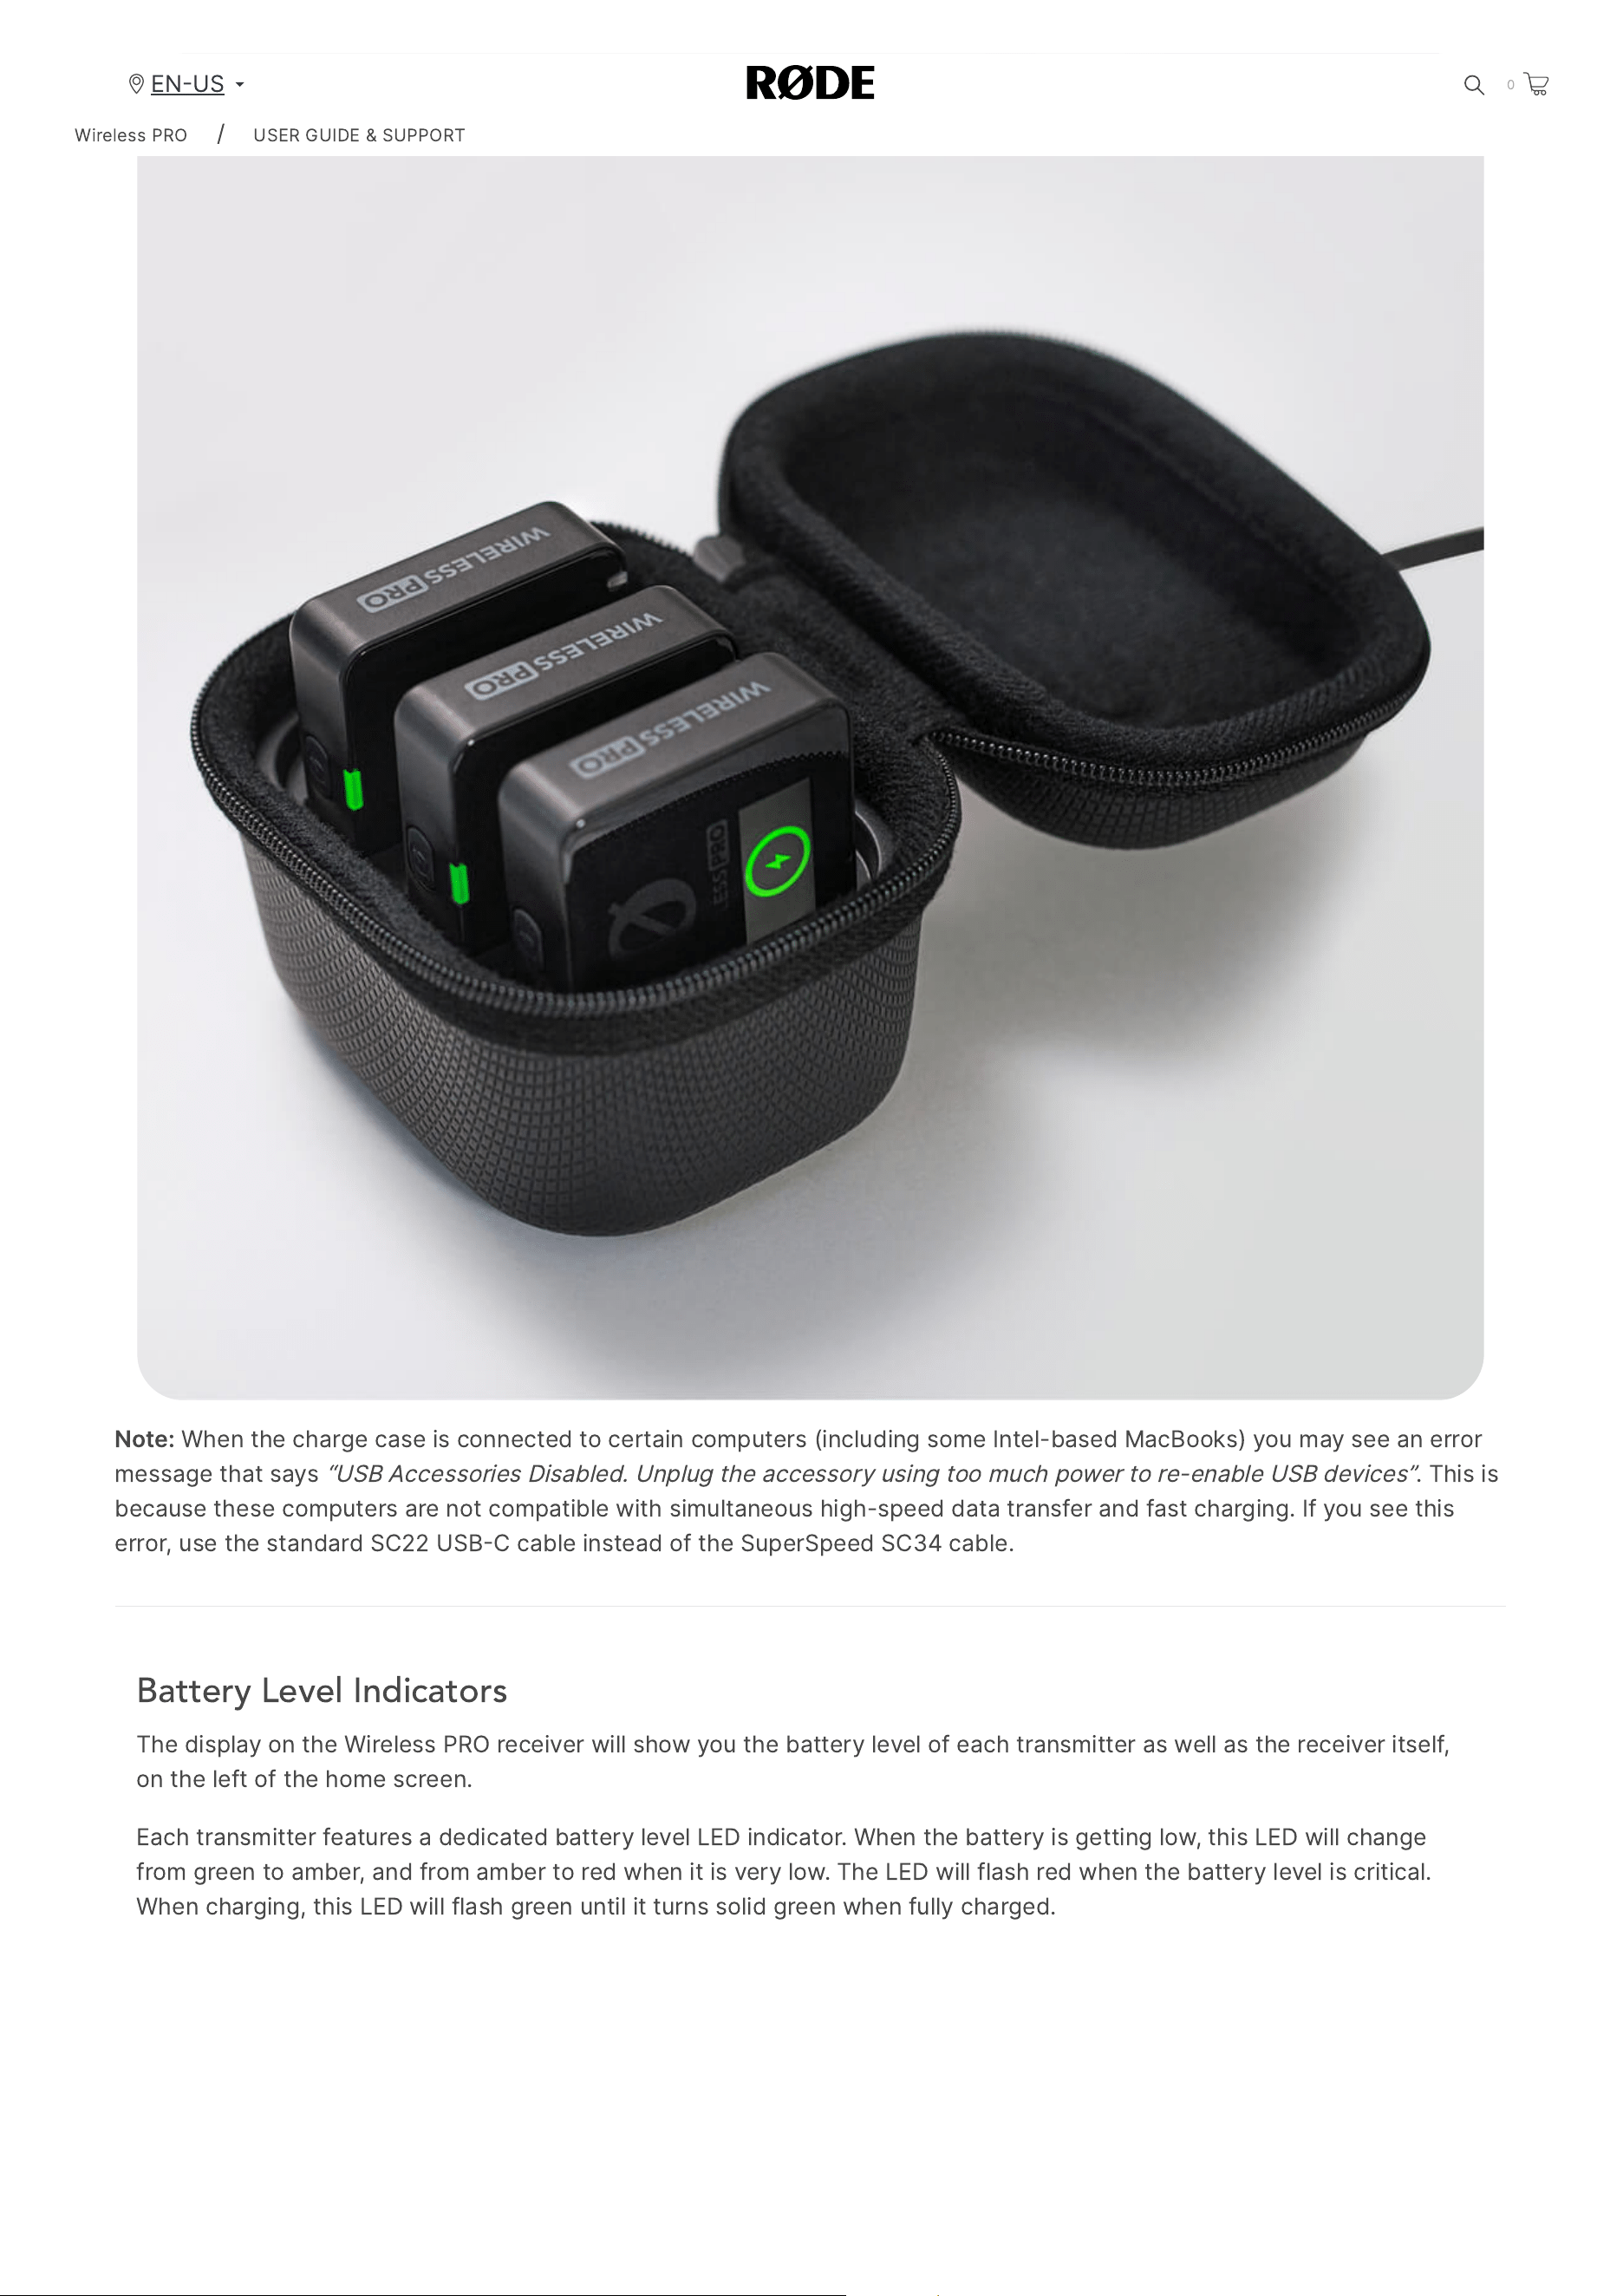
Note
:
When
the
charge
case
is
connected
to
certain
computers
(
including
some
Intel
-
based
MacBooks
)
you
may
see
an
error
message
that
says
“
USB
Accessories
Disabled
.
Unplug
the
accessory
using
too
much
power
to
re
-
enable
USB
devices
”
.
This
is
because
these
computers
are
not
compatible
with
simultaneous
high
-
speed
data
transfer
and
fast
charging
.
If
you
see
this
error
,
use
the
standard
SC
22
USB
C
cable
instead
of
the
SuperSpeed
SC
34
cable
.
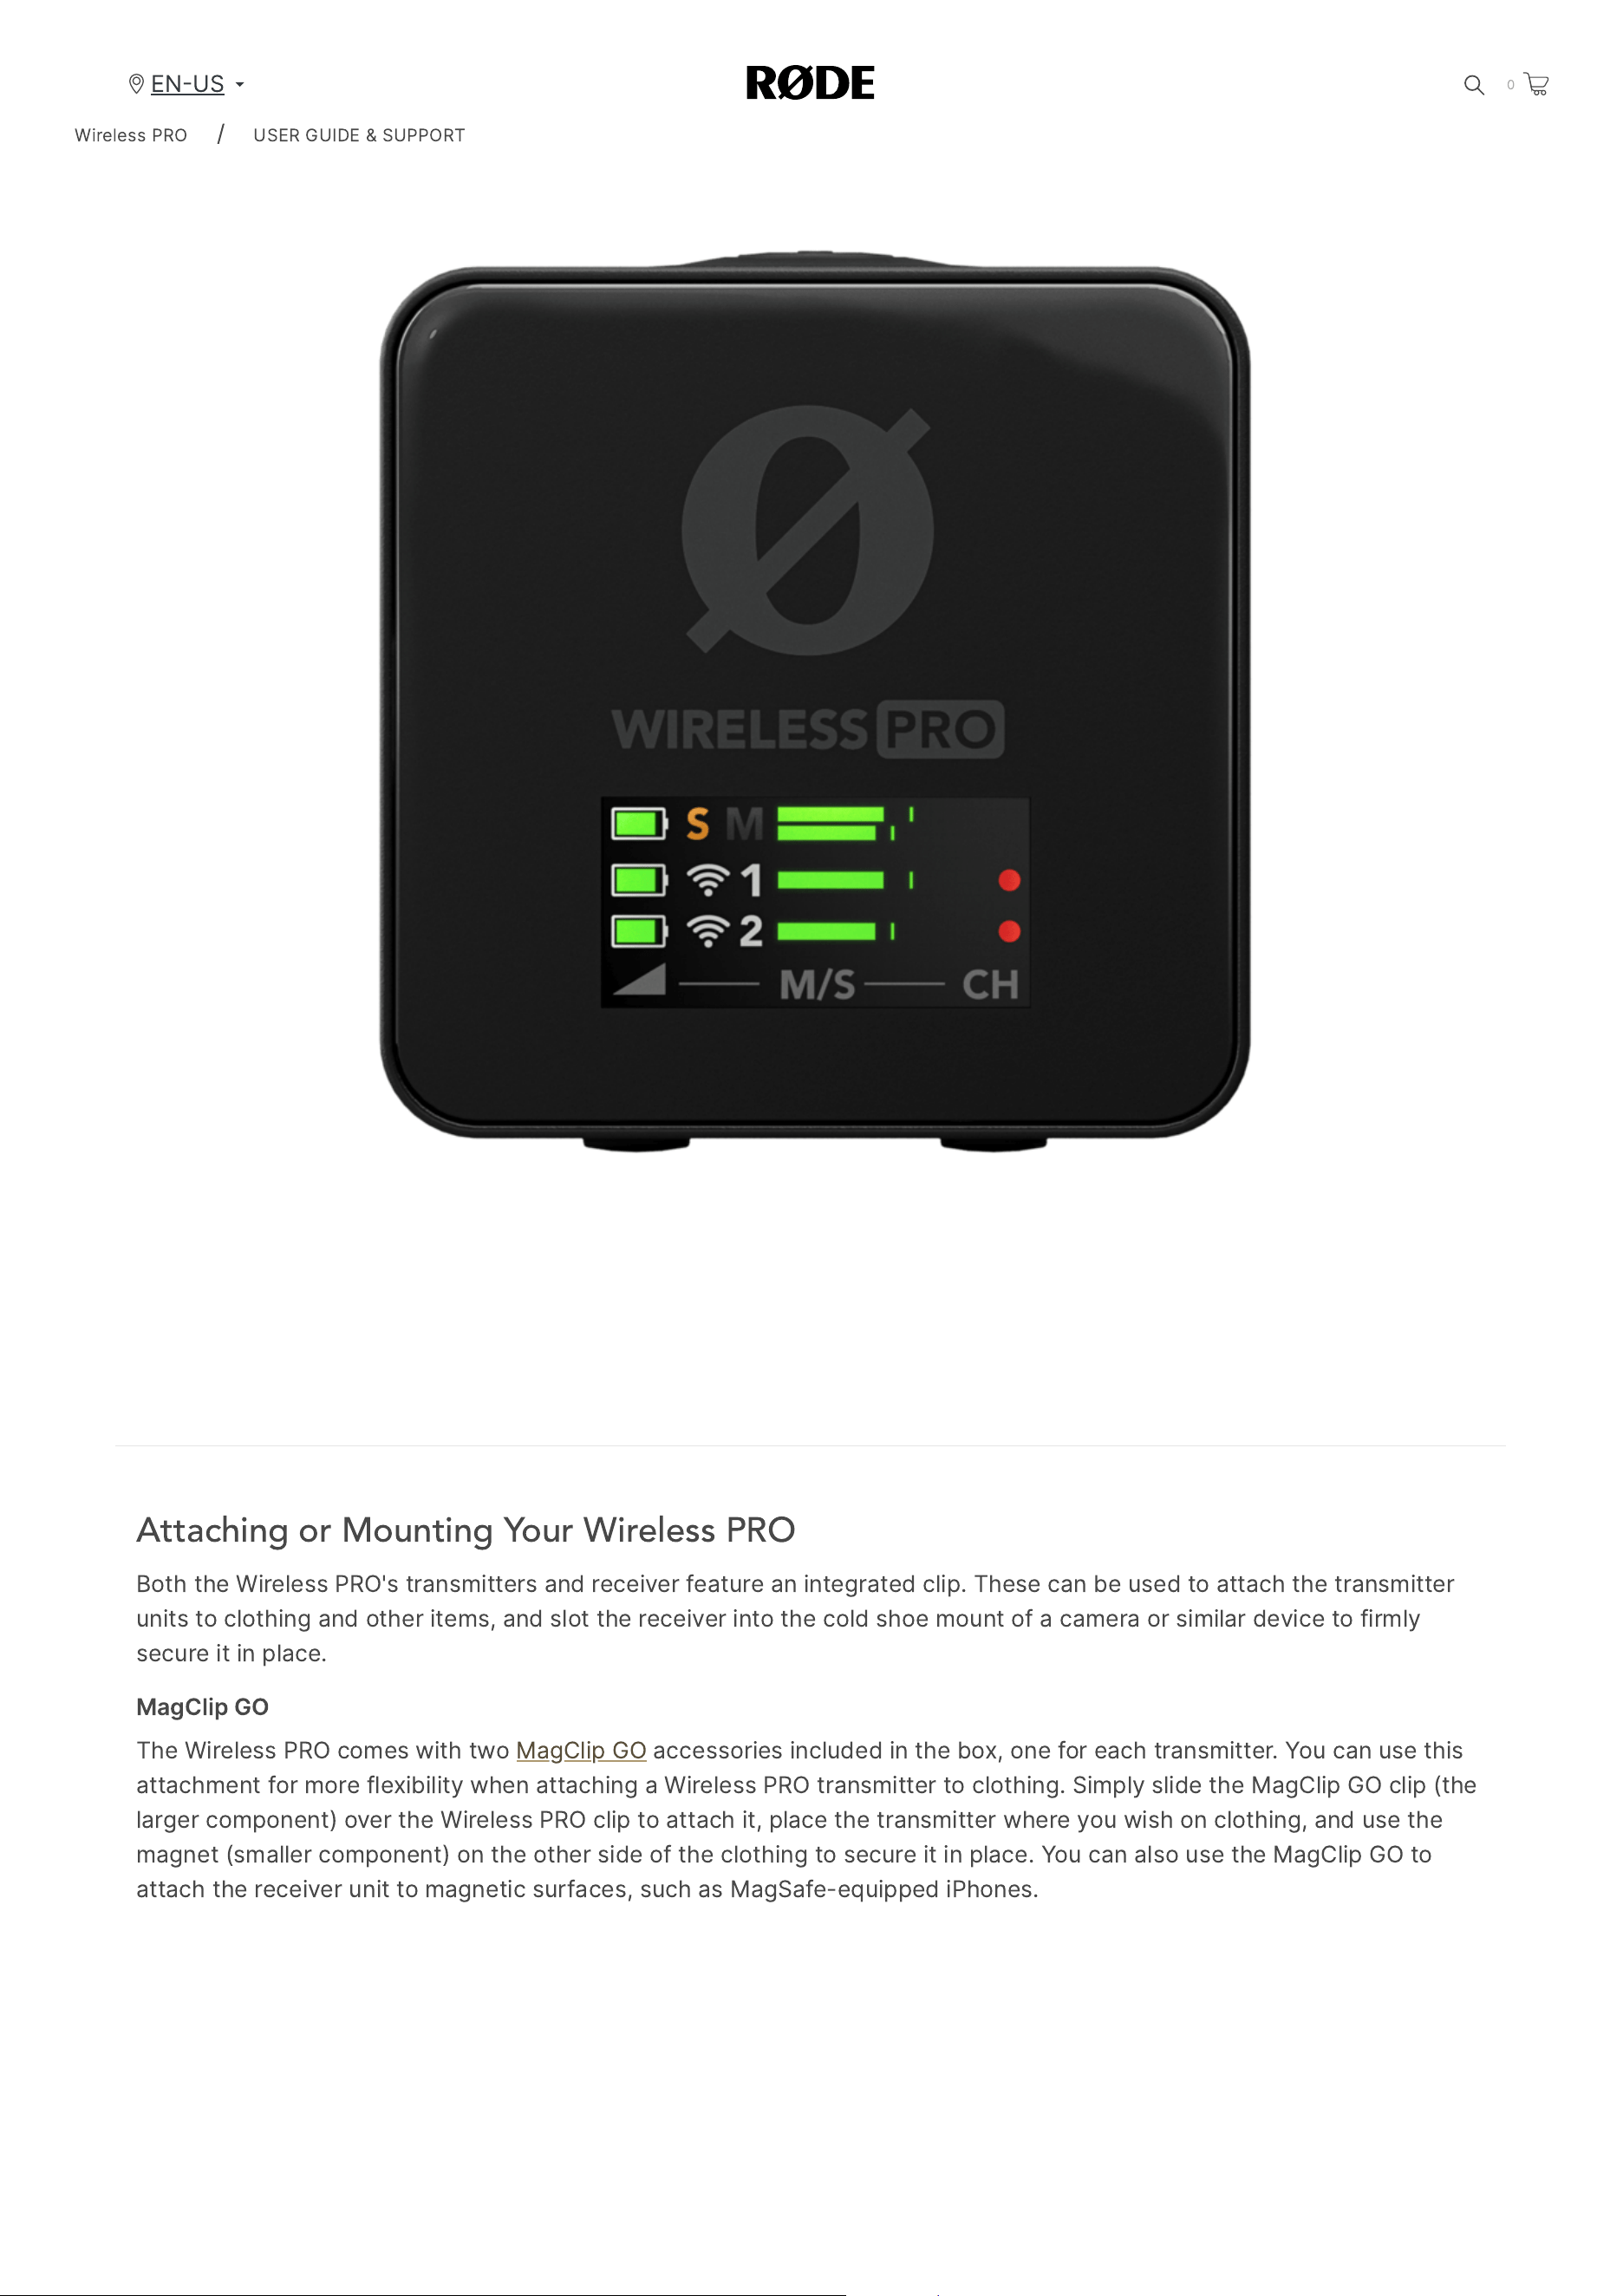
Battery Level Indicators
The
display
on
the
Wireless
PRO
receiver
will
show
you
the
battery
level
of
each
transmitter
as
well
as
the
receiver
itself
,
on
the
left
of
the
home
screen
.
Each
transmitter
features
a
dedicated
battery
level
LED
indicator
.
When
the
battery
is
getting
low
,
this
LED
will
change
from
green
to
amber
,
and
from
amber
to
red
when
it
is
very
low
.
The
LED
will
flash
red
when
the
battery
level
is
critical
.
When
charging
,
this
LED
will
flash
green
until
it
turns
solid
green
when
fully
charged
.
Wireless
PRO
/
USER
GUIDE
&
SUPPORT
EN
US
0
2/20/24, 9:57 AM
Wireless PRO | USER GUIDE & SUPPORT | RØDE
https://rode.com/en-us/user-guides/wireless-pro
8/41
Attaching or Mounting Your Wireless PRO
Both
the
Wireless
PRO
'
s
transmitters
and
receiver
feature
an
integrated
clip
.
These
can
be
used
to
attach
the
transmitter
units
to
clothing
and
other
items
,
and
slot
the
receiver
into
the
cold
shoe
mount
of
a
camera
or
similar
device
to
firmly
secure
it
in
place
.
MagClip
GO
The
Wireless
PRO
comes
with
two
MagClip
GO
accessories
included
in
the
box
,
one
for
each
transmitter
.
You
can
use
this
attachment
for
more
flexibility
when
attaching
a
Wireless
PRO
transmitter
to
clothing
.
Simply
slide
the
MagClip
GO
clip
(
the
larger
component
)
over
the
Wireless
PRO
clip
to
attach
it
,
place
the
transmitter
where
you
wish
on
clothing
,
and
use
the
magnet
(
smaller
component
)
on
the
other
side
of
the
clothing
to
secure
it
in
place
.
You
can
also
use
the
MagClip
GO
to
attach
the
receiver
unit
to
magnetic
surfaces
,
such
as
MagSafe
-
equipped
iPhones
.
Wireless
PRO
/
USER
GUIDE
&
SUPPORT
EN
US
0
2/20/24, 9:57 AM
Wireless PRO | USER GUIDE & SUPPORT | RØDE
https://rode.com/en-us/user-guides/wireless-pro
9/41
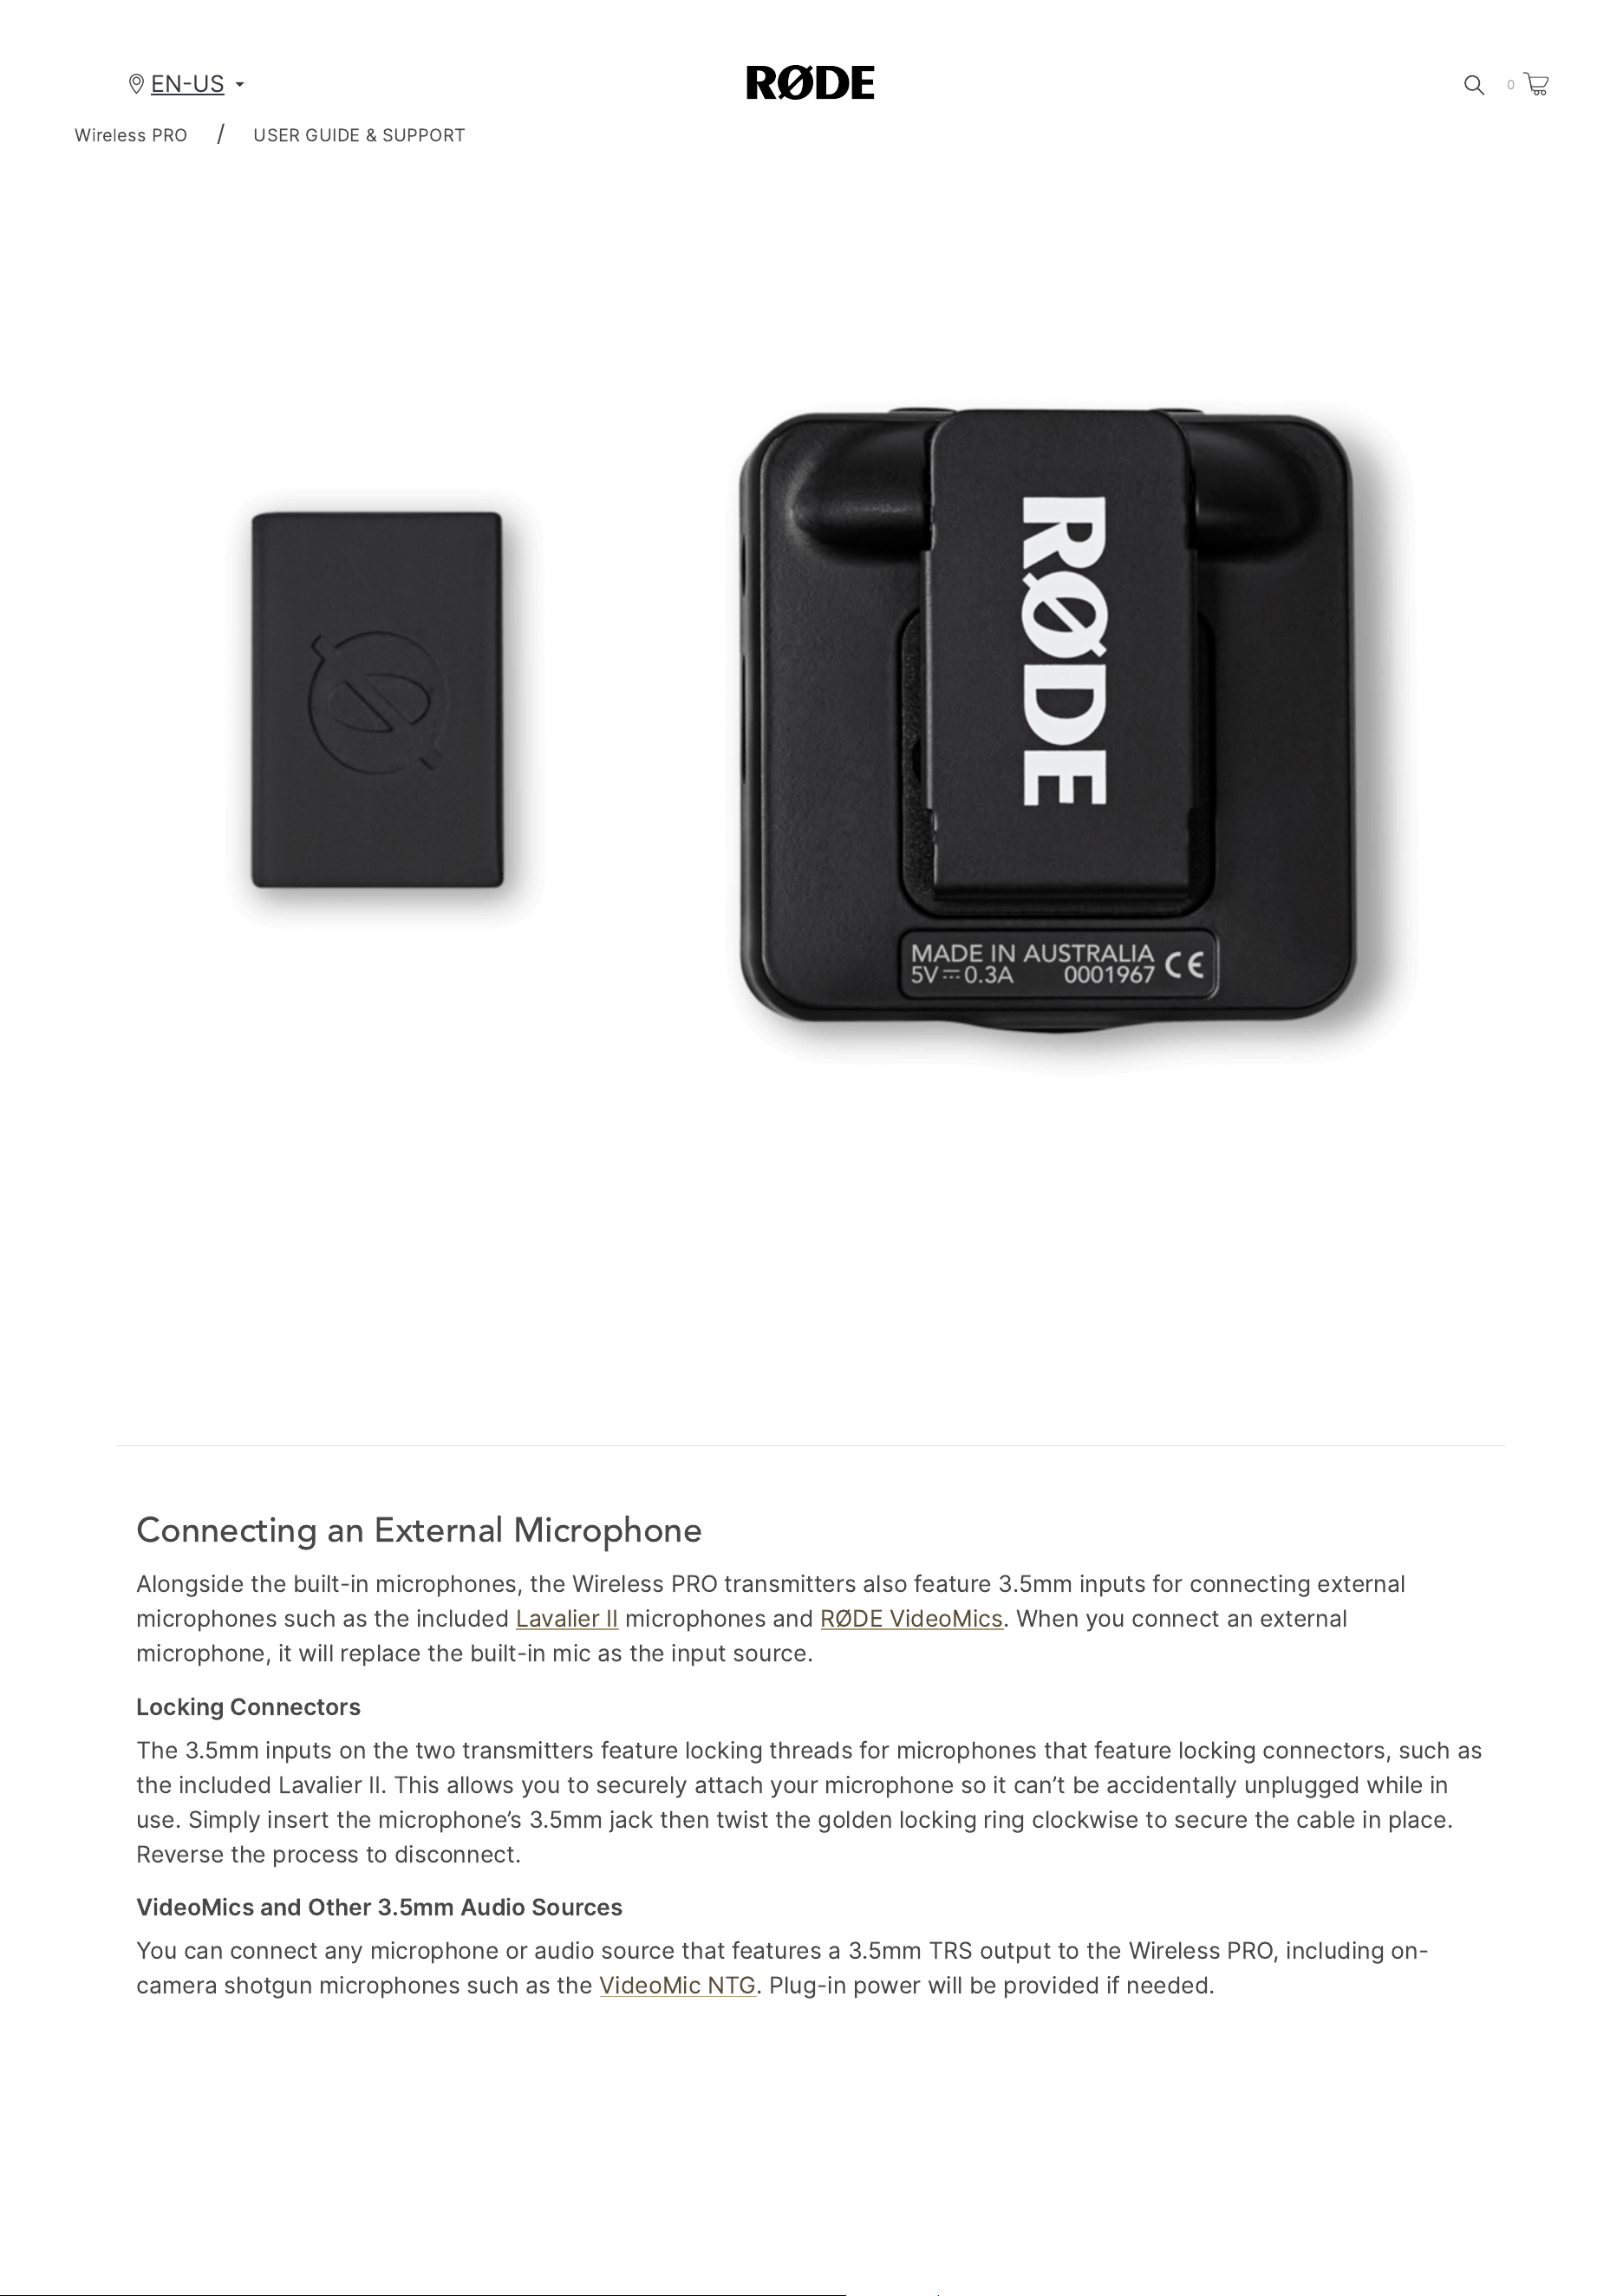
Connecting an External Microphone
Alongside
the
built
-
in
microphones
,
the
Wireless
PRO
transmitters
also
feature
3.5
mm
inputs
for
connecting
external
microphones
such
as
the
included
Lavalier
II
microphones
and
RØDE
VideoMics
.
When
you
connect
an
external
microphone
,
it
will
replace
the
built
-
in
mic
as
the
input
source
.
Locking
Connectors
The
3.5
mm
inputs
on
the
two
transmitters
feature
locking
threads
for
microphones
that
feature
locking
connectors
,
such
as
the
included
Lavalier
II
.
This
allows
you
to
securely
attach
your
microphone
so
it
can
’
t
be
accidentally
unplugged
while
in
use
.
Simply
insert
the
microphone
’
s
3.5
mm
jack
then
twist
the
golden
locking
ring
clockwise
to
secure
the
cable
in
place
.
Reverse
the
process
to
disconnect
.
VideoMics
and
Other
3.5
mm
Audio
Sources
You
can
connect
any
microphone
or
audio
source
that
features
a
3.5
mm
TRS
output
to
the
Wireless
PRO
,
including
on
-
camera
shotgun
microphones
such
as
the
VideoMic
NTG
.
Plug
-
in
power
will
be
provided
if
needed
.
Wireless
PRO
/
USER
GUIDE
&
SUPPORT
EN
US
0
2/20/24, 9:57 AM
Wireless PRO | USER GUIDE & SUPPORT | RØDE
https://rode.com/en-us/user-guides/wireless-pro
10/41
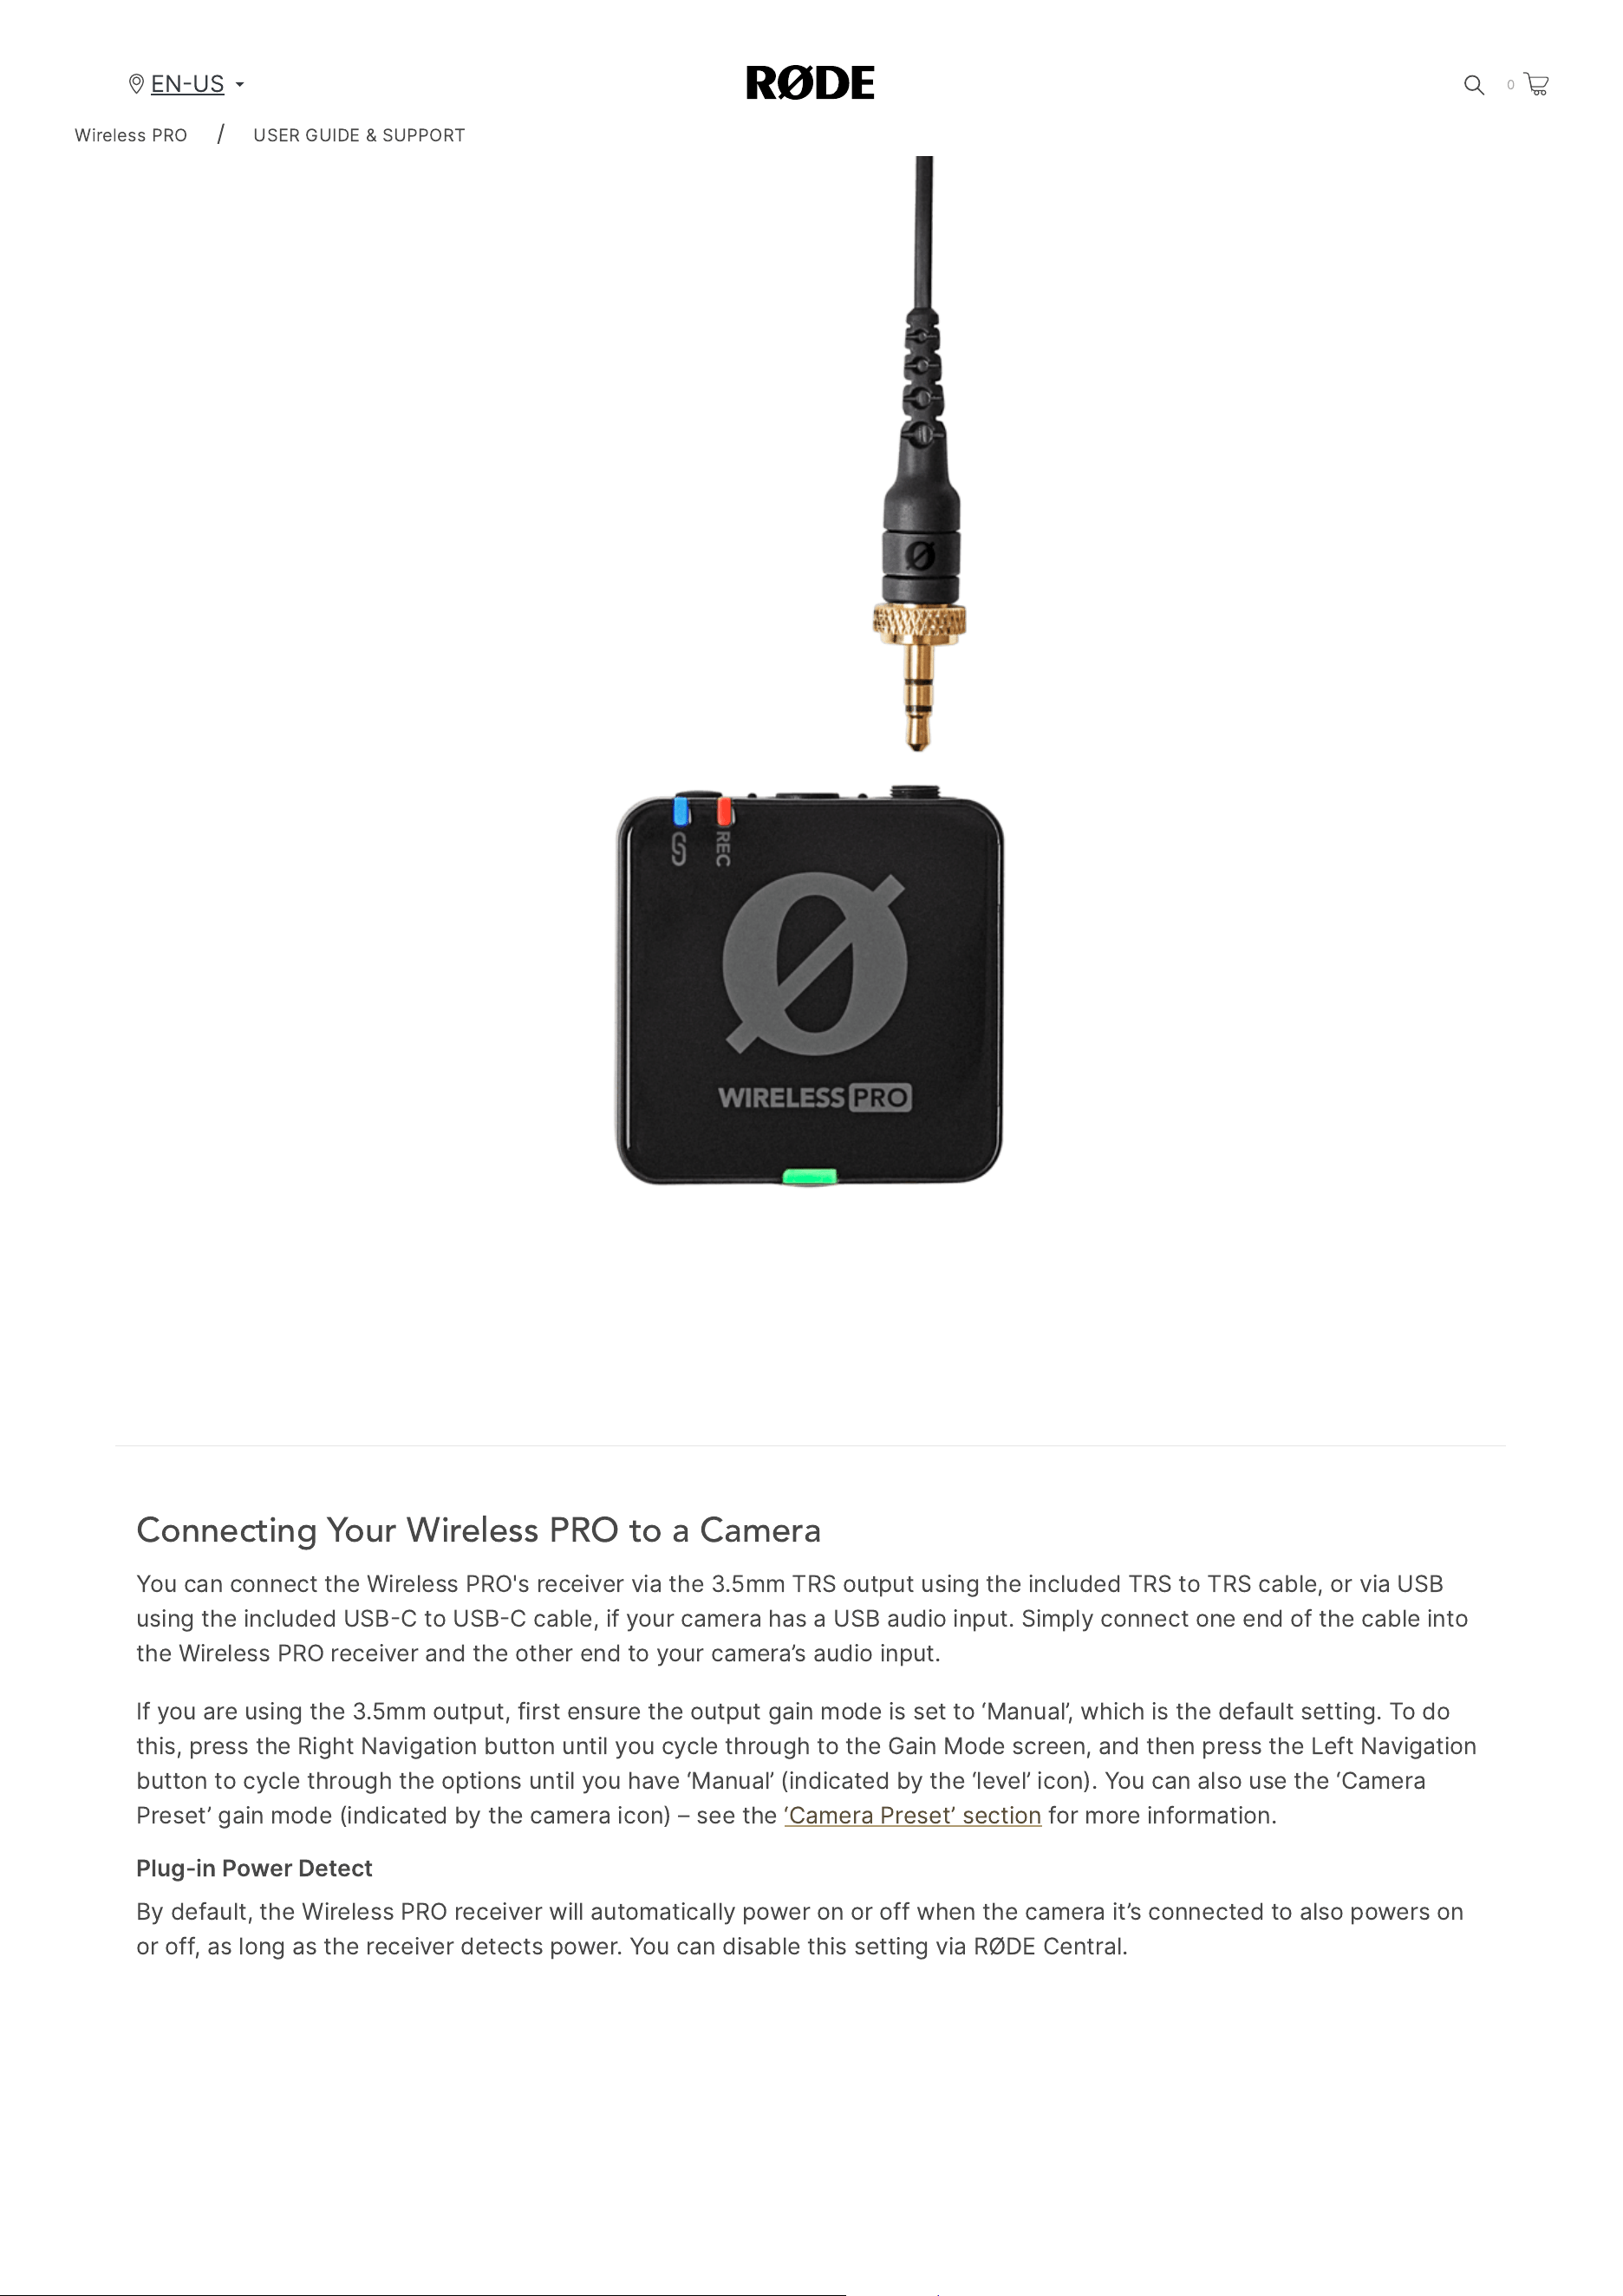
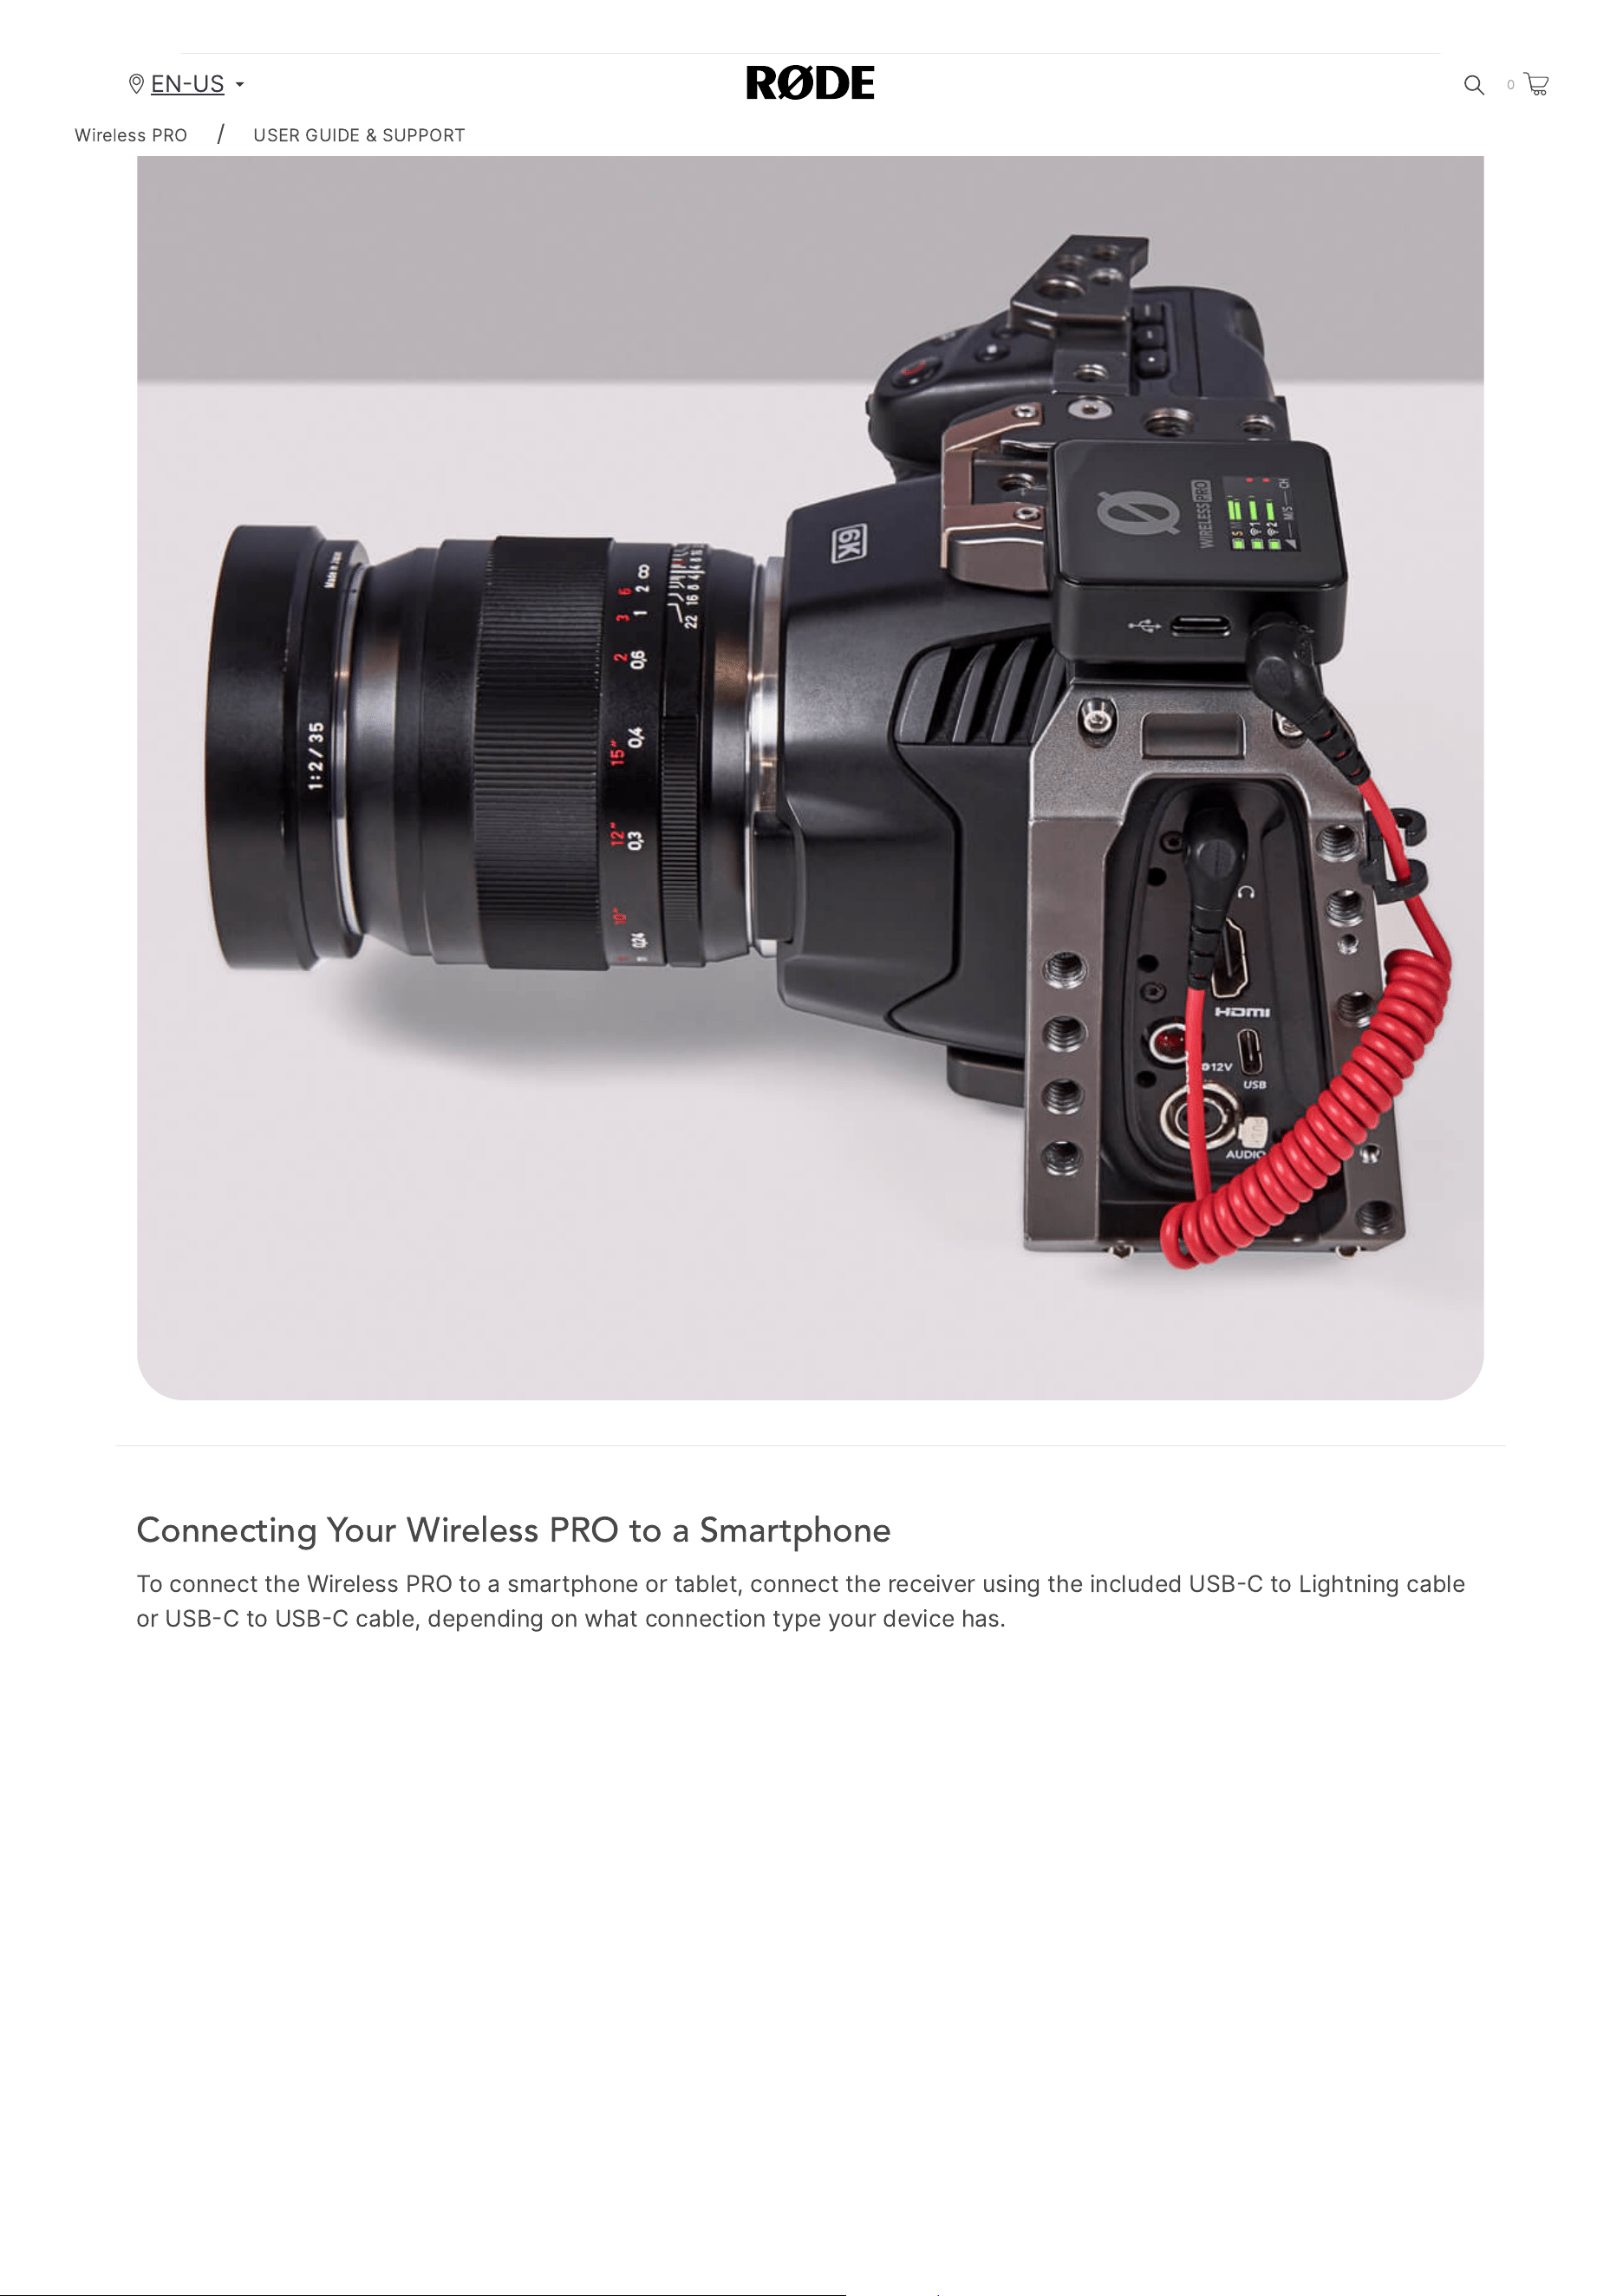
Connecting Your Wireless PRO to a Camera
You
can
connect
the
Wireless
PRO
'
s
receiver
via
the
3.5
mm
TRS
output
using
the
included
TRS
to
TRS
cable
,
or
via
USB
using
the
included
USB
C
to
USB
C
cable
,
if
your
camera
has
a
USB
audio
input
.
Simply
connect
one
end
of
the
cable
into
the
Wireless
PRO
receiver
and
the
other
end
to
your
camera
’
s
audio
input
.
If
you
are
using
the
3.5
mm
output
,
first
ensure
the
output
gain
mode
is
set
to
‘
Manual
’,
which
is
the
default
setting
.
To
do
this
,
press
the
Right
Navigation
button
until
you
cycle
through
to
the
Gain
Mode
screen
,
and
then
press
the
Left
Navigation
button
to
cycle
through
the
options
until
you
have
‘
Manual
’ (
indicated
by
the
‘
level
’
icon
).
You
can
also
use
the
‘
Camera
Preset
’
gain
mode
(
indicated
by
the
camera
icon
) –
see
the
‘
Camera
Preset
’
section
for
more
information
.
Plug
-
in
Power
Detect
By
default
,
the
Wireless
PRO
receiver
will
automatically
power
on
or
off
when
the
camera
it
’
s
connected
to
also
powers
on
or
off
,
as
long
as
the
receiver
detects
power
.
You
can
disable
this
setting
via
RØDE
Central
.
Wireless
PRO
/
USER
GUIDE
&
SUPPORT
EN
US
0
2/20/24, 9:57 AM
Wireless PRO | USER GUIDE & SUPPORT | RØDE
https://rode.com/en-us/user-guides/wireless-pro
11/41
Connecting Your Wireless PRO to a Smartphone
To
connect
the
Wireless
PRO
to
a
smartphone
or
tablet
,
connect
the
receiver
using
the
included
USB
C
to
Lightning
cable
or
USB
C
to
USB
C
cable
,
depending
on
what
connection
type
your
device
has
.
Wireless
PRO
/
USER
GUIDE
&
SUPPORT
EN
US
0
2/20/24, 9:57 AM
Wireless PRO | USER GUIDE & SUPPORT | RØDE
https://rode.com/en-us/user-guides/wireless-pro
12/41
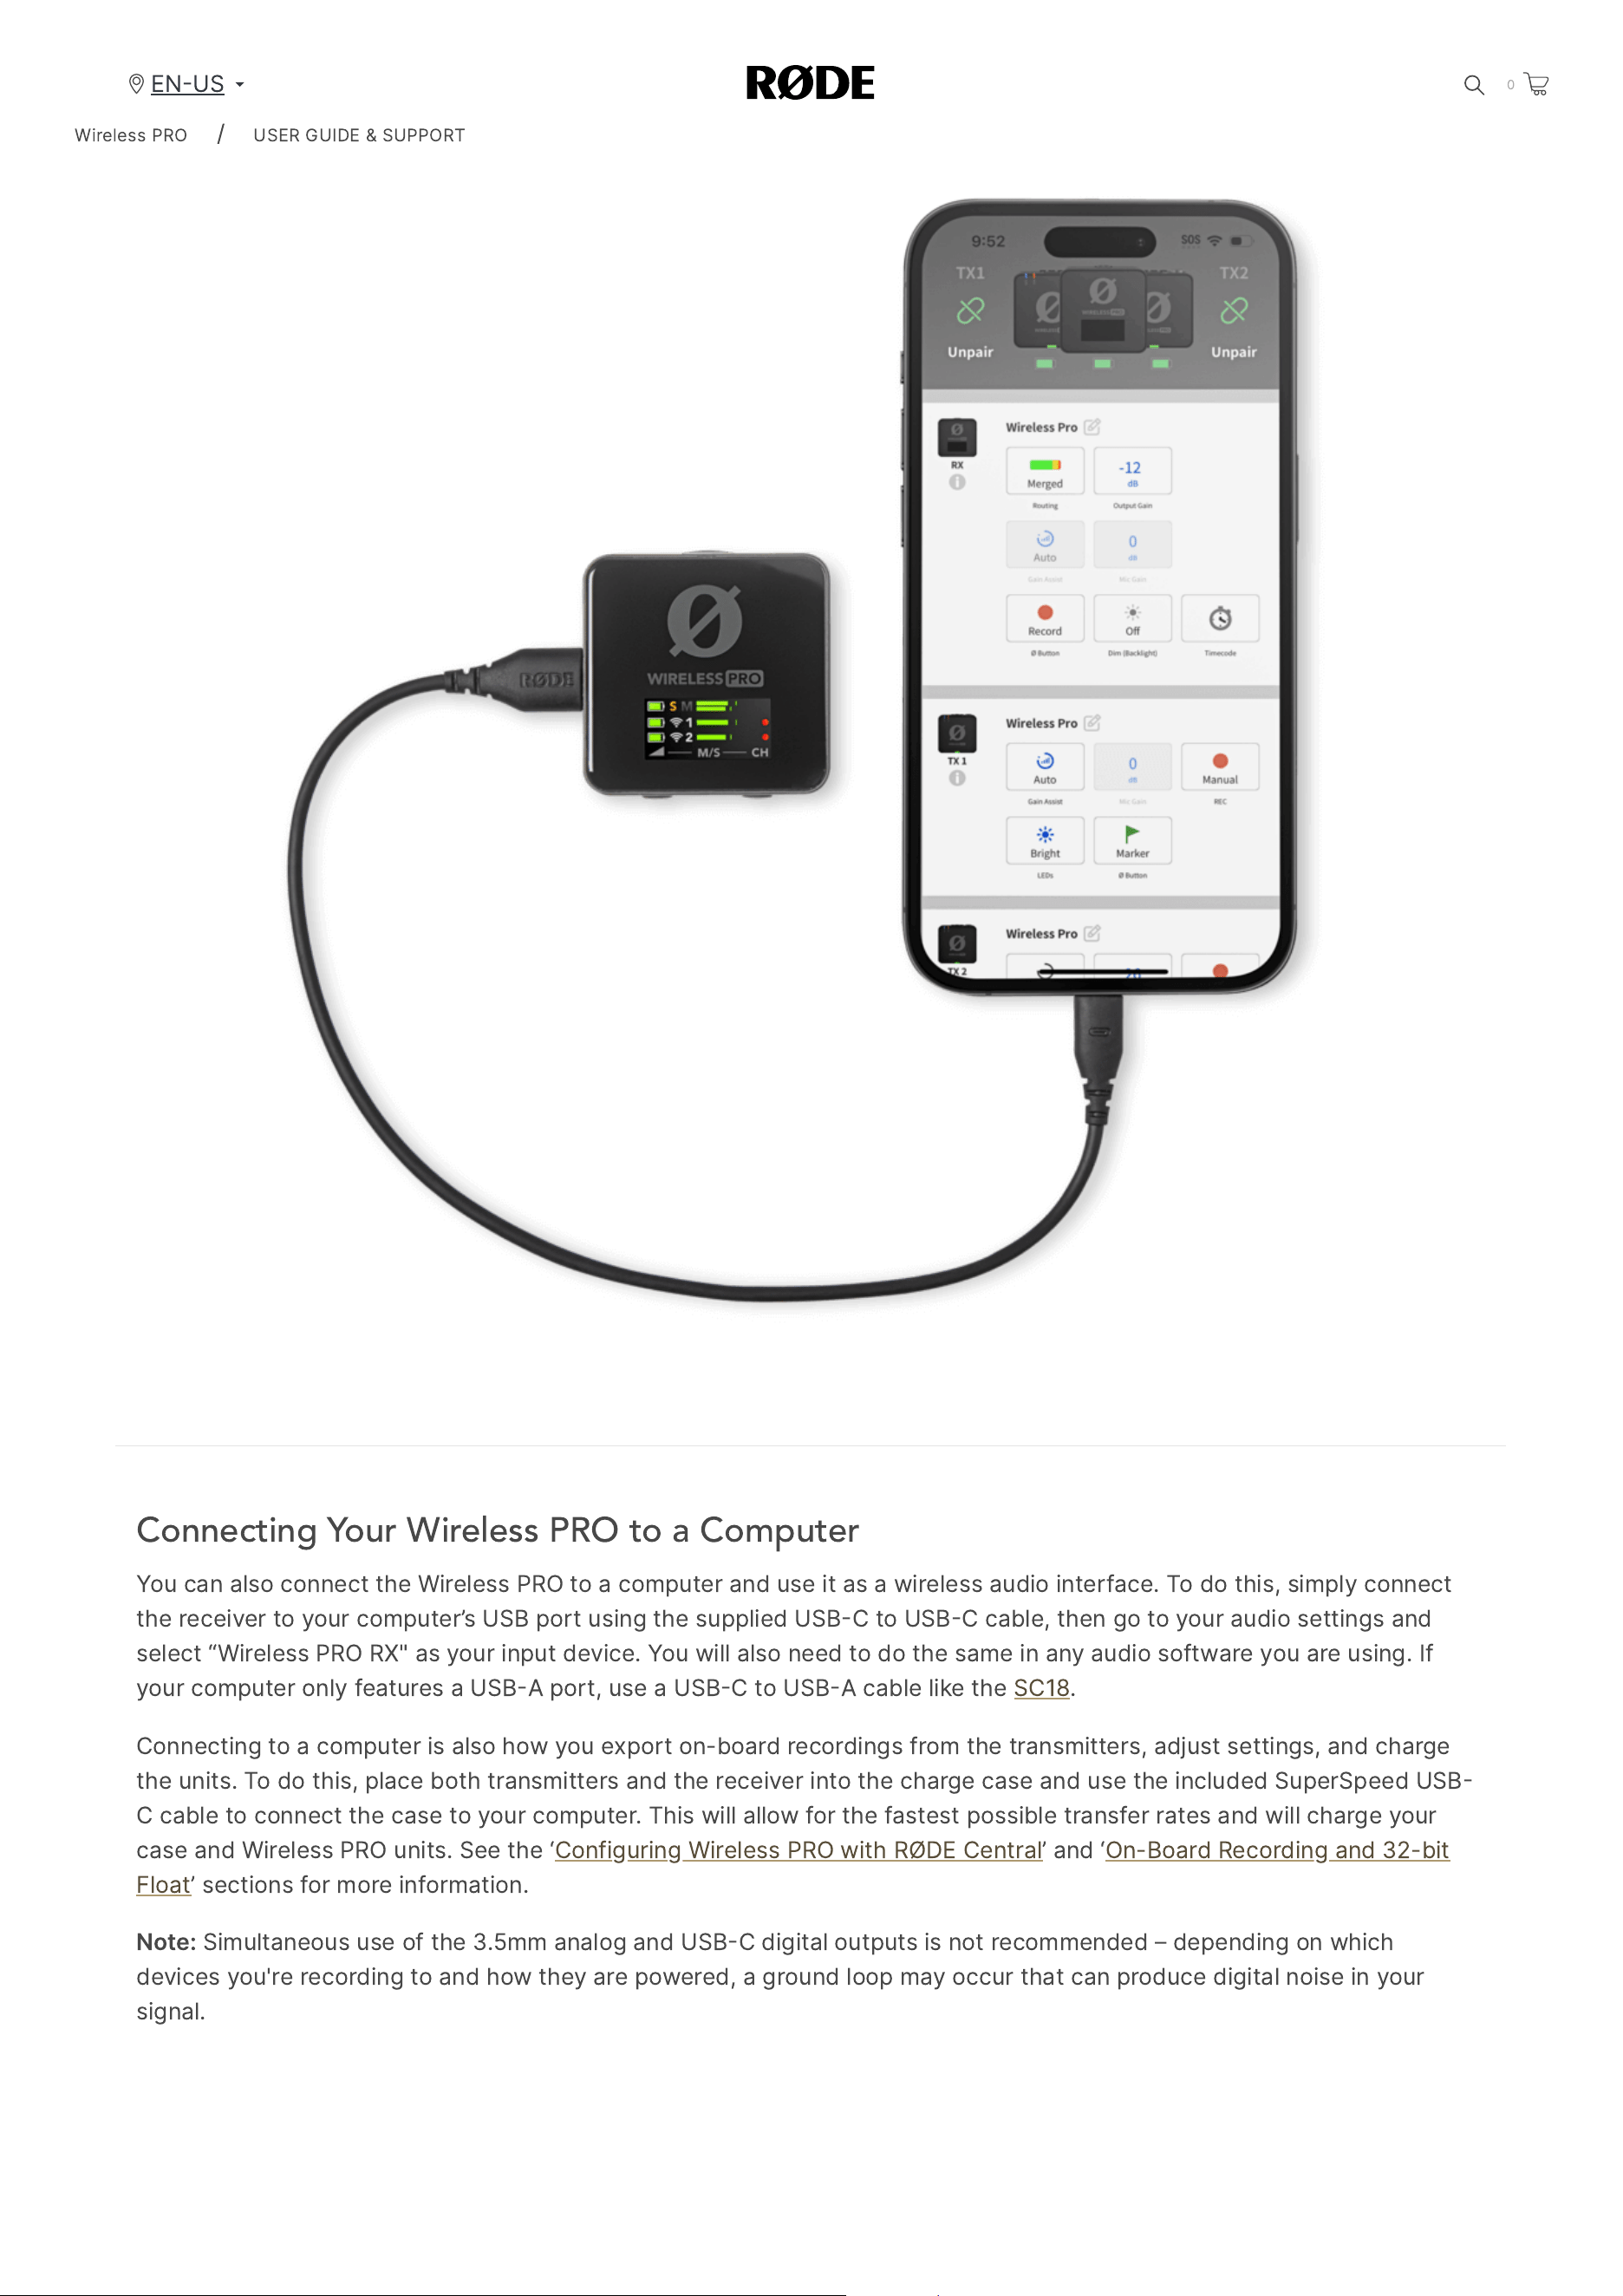
Connecting Your Wireless PRO to a Computer
You
can
also
connect
the
Wireless
PRO
to
a
computer
and
use
it
as
a
wireless
audio
interface
.
To
do
this
,
simply
connect
the
receiver
to
your
computer
’
s
USB
port
using
the
supplied
USB
C
to
USB
C
cable
,
then
go
to
your
audio
settings
and
select
“
Wireless
PRO
RX
"
as
your
input
device
.
You
will
also
need
to
do
the
same
in
any
audio
software
you
are
using
.
If
your
computer
only
features
a
USB
A
port
,
use
a
USB
C
to
USB
A
cable
like
the
SC
18.
Connecting
to
a
computer
is
also
how
you
export
on
-
board
recordings
from
the
transmitters
,
adjust
settings
,
and
charge
the
units
.
To
do
this
,
place
both
transmitters
and
the
receiver
into
the
charge
case
and
use
the
included
SuperSpeed
USB
C
cable
to
connect
the
case
to
your
computer
.
This
will
allow
for
the
fastest
possible
transfer
rates
and
will
charge
your
case
and
Wireless
PRO
units
.
See
the
‘
Configuring
Wireless
PRO
with
RØDE
Central
’
and
‘
On
-
Board
Recording
and
32-
bit
Float
’
sections
for
more
information
.
Note
:
Simultaneous
use
of
the
3.5
mm
analog
and
USB
C
digital
outputs
is
not
recommended
–
depending
on
which
devices
you
'
re
recording
to
and
how
they
are
powered
,
a
ground
loop
may
occur
that
can
produce
digital
noise
in
your
signal
.
Wireless
PRO
/
USER
GUIDE
&
SUPPORT
EN
US
0
2/20/24, 9:57 AM
Wireless PRO | USER GUIDE & SUPPORT | RØDE
https://rode.com/en-us/user-guides/wireless-pro
13/41
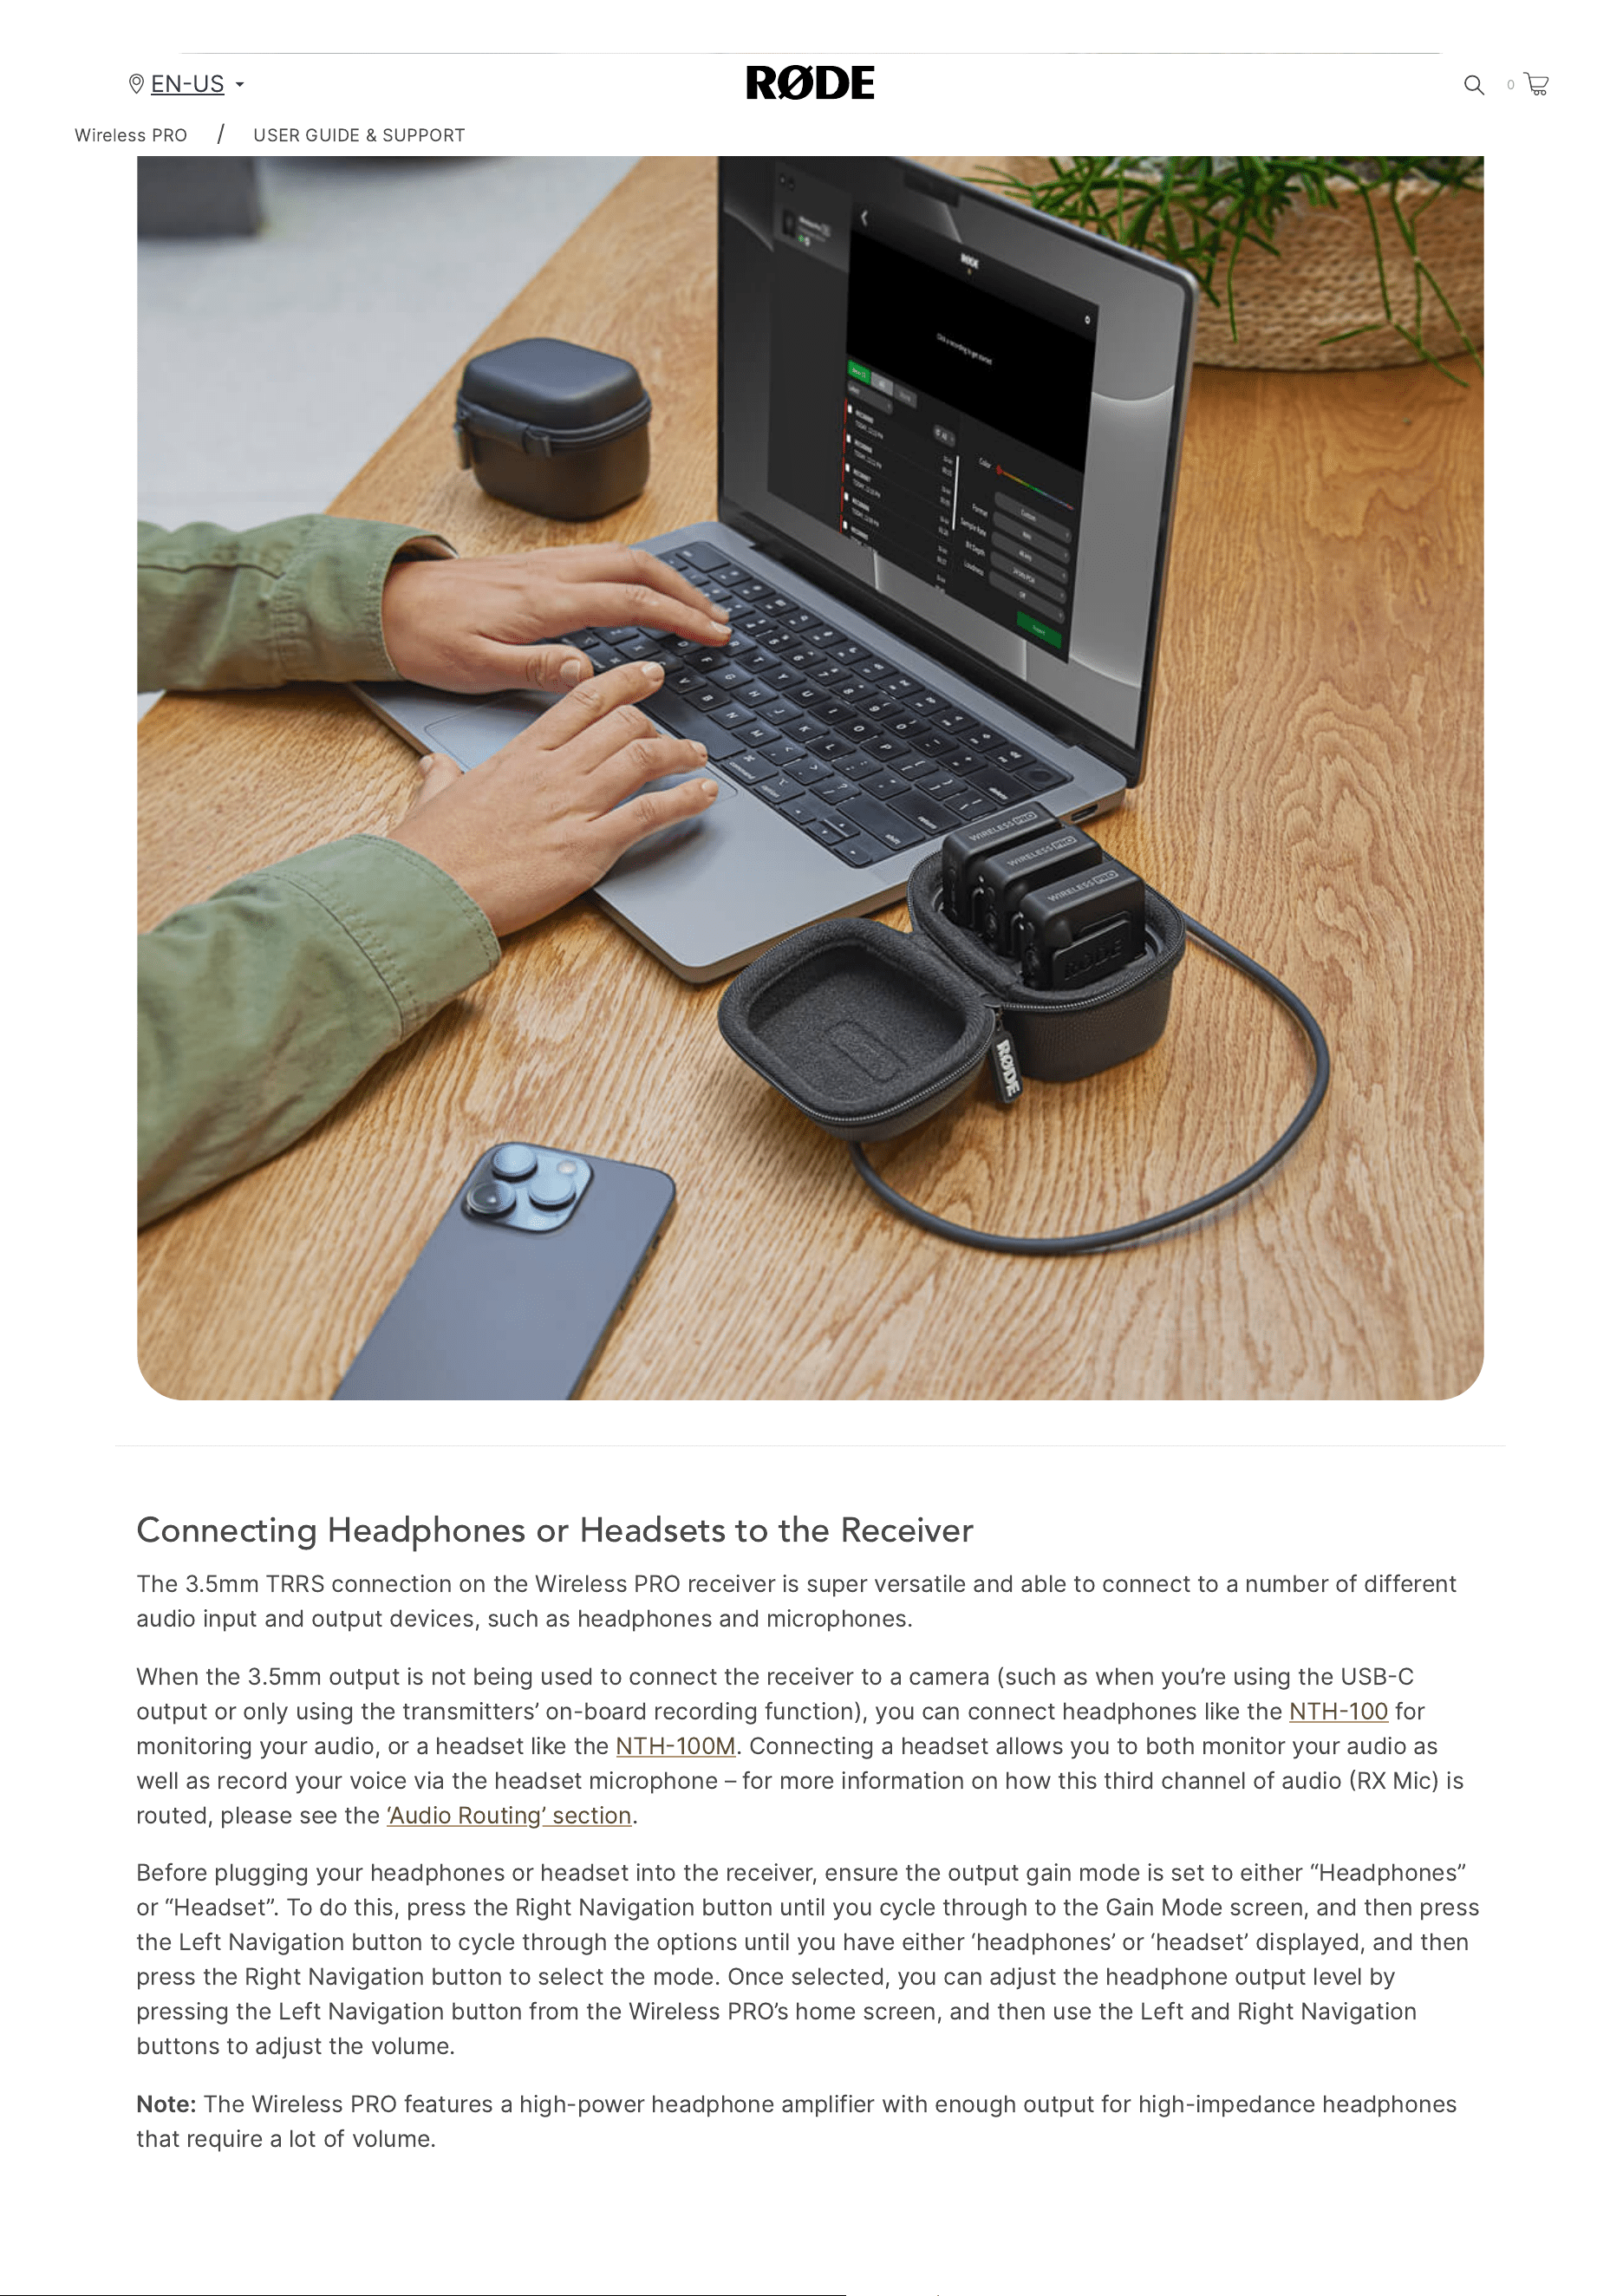
Connecting Headphones or Headsets to the Receiver
The
3.5
mm
TRRS
connection
on
the
Wireless
PRO
receiver
is
super
versatile
and
able
to
connect
to
a
number
of
different
audio
input
and
output
devices
,
such
as
headphones
and
microphones
.
When
the
3.5
mm
output
is
not
being
used
to
connect
the
receiver
to
a
camera
(
such
as
when
you
’
re
using
the
USB
C
output
or
only
using
the
transmitters
’
on
-
board
recording
function
),
you
can
connect
headphones
like
the
NTH
100
for
monitoring
your
audio
,
or
a
headset
like
the
NTH
100
M
.
Connecting
a
headset
allows
you
to
both
monitor
your
audio
as
well
as
record
your
voice
via
the
headset
microphone
–
for
more
information
on
how
this
third
channel
of
audio
RX
Mic
)
is
routed
,
please
see
the
‘
Audio
Routing
’
section
.
Before
plugging
your
headphones
or
headset
into
the
receiver
,
ensure
the
output
gain
mode
is
set
to
either
“
Headphones
”
or
“
Headset
”.
To
do
this
,
press
the
Right
Navigation
button
until
you
cycle
through
to
the
Gain
Mode
screen
,
and
then
press
the
Left
Navigation
button
to
cycle
through
the
options
until
you
have
either
‘
headphones
’
or
‘
headset
’
displayed
,
and
then
press
the
Right
Navigation
button
to
select
the
mode
.
Once
selected
,
you
can
adjust
the
headphone
output
level
by
pressing
the
Left
Navigation
button
from
the
Wireless
PRO
’
s
home
screen
,
and
then
use
the
Left
and
Right
Navigation
buttons
to
adjust
the
volume
.
Note
:
The
Wireless
PRO
features
a
high
-
power
headphone
amplifier
with
enough
output
for
high
-
impedance
headphones
that
require
a
lot
of
volume
.
Wireless
PRO
/
USER
GUIDE
&
SUPPORT
EN
US
0
2/20/24, 9:57 AM
Wireless PRO | USER GUIDE & SUPPORT | RØDE
https://rode.com/en-us/user-guides/wireless-pro
14/41
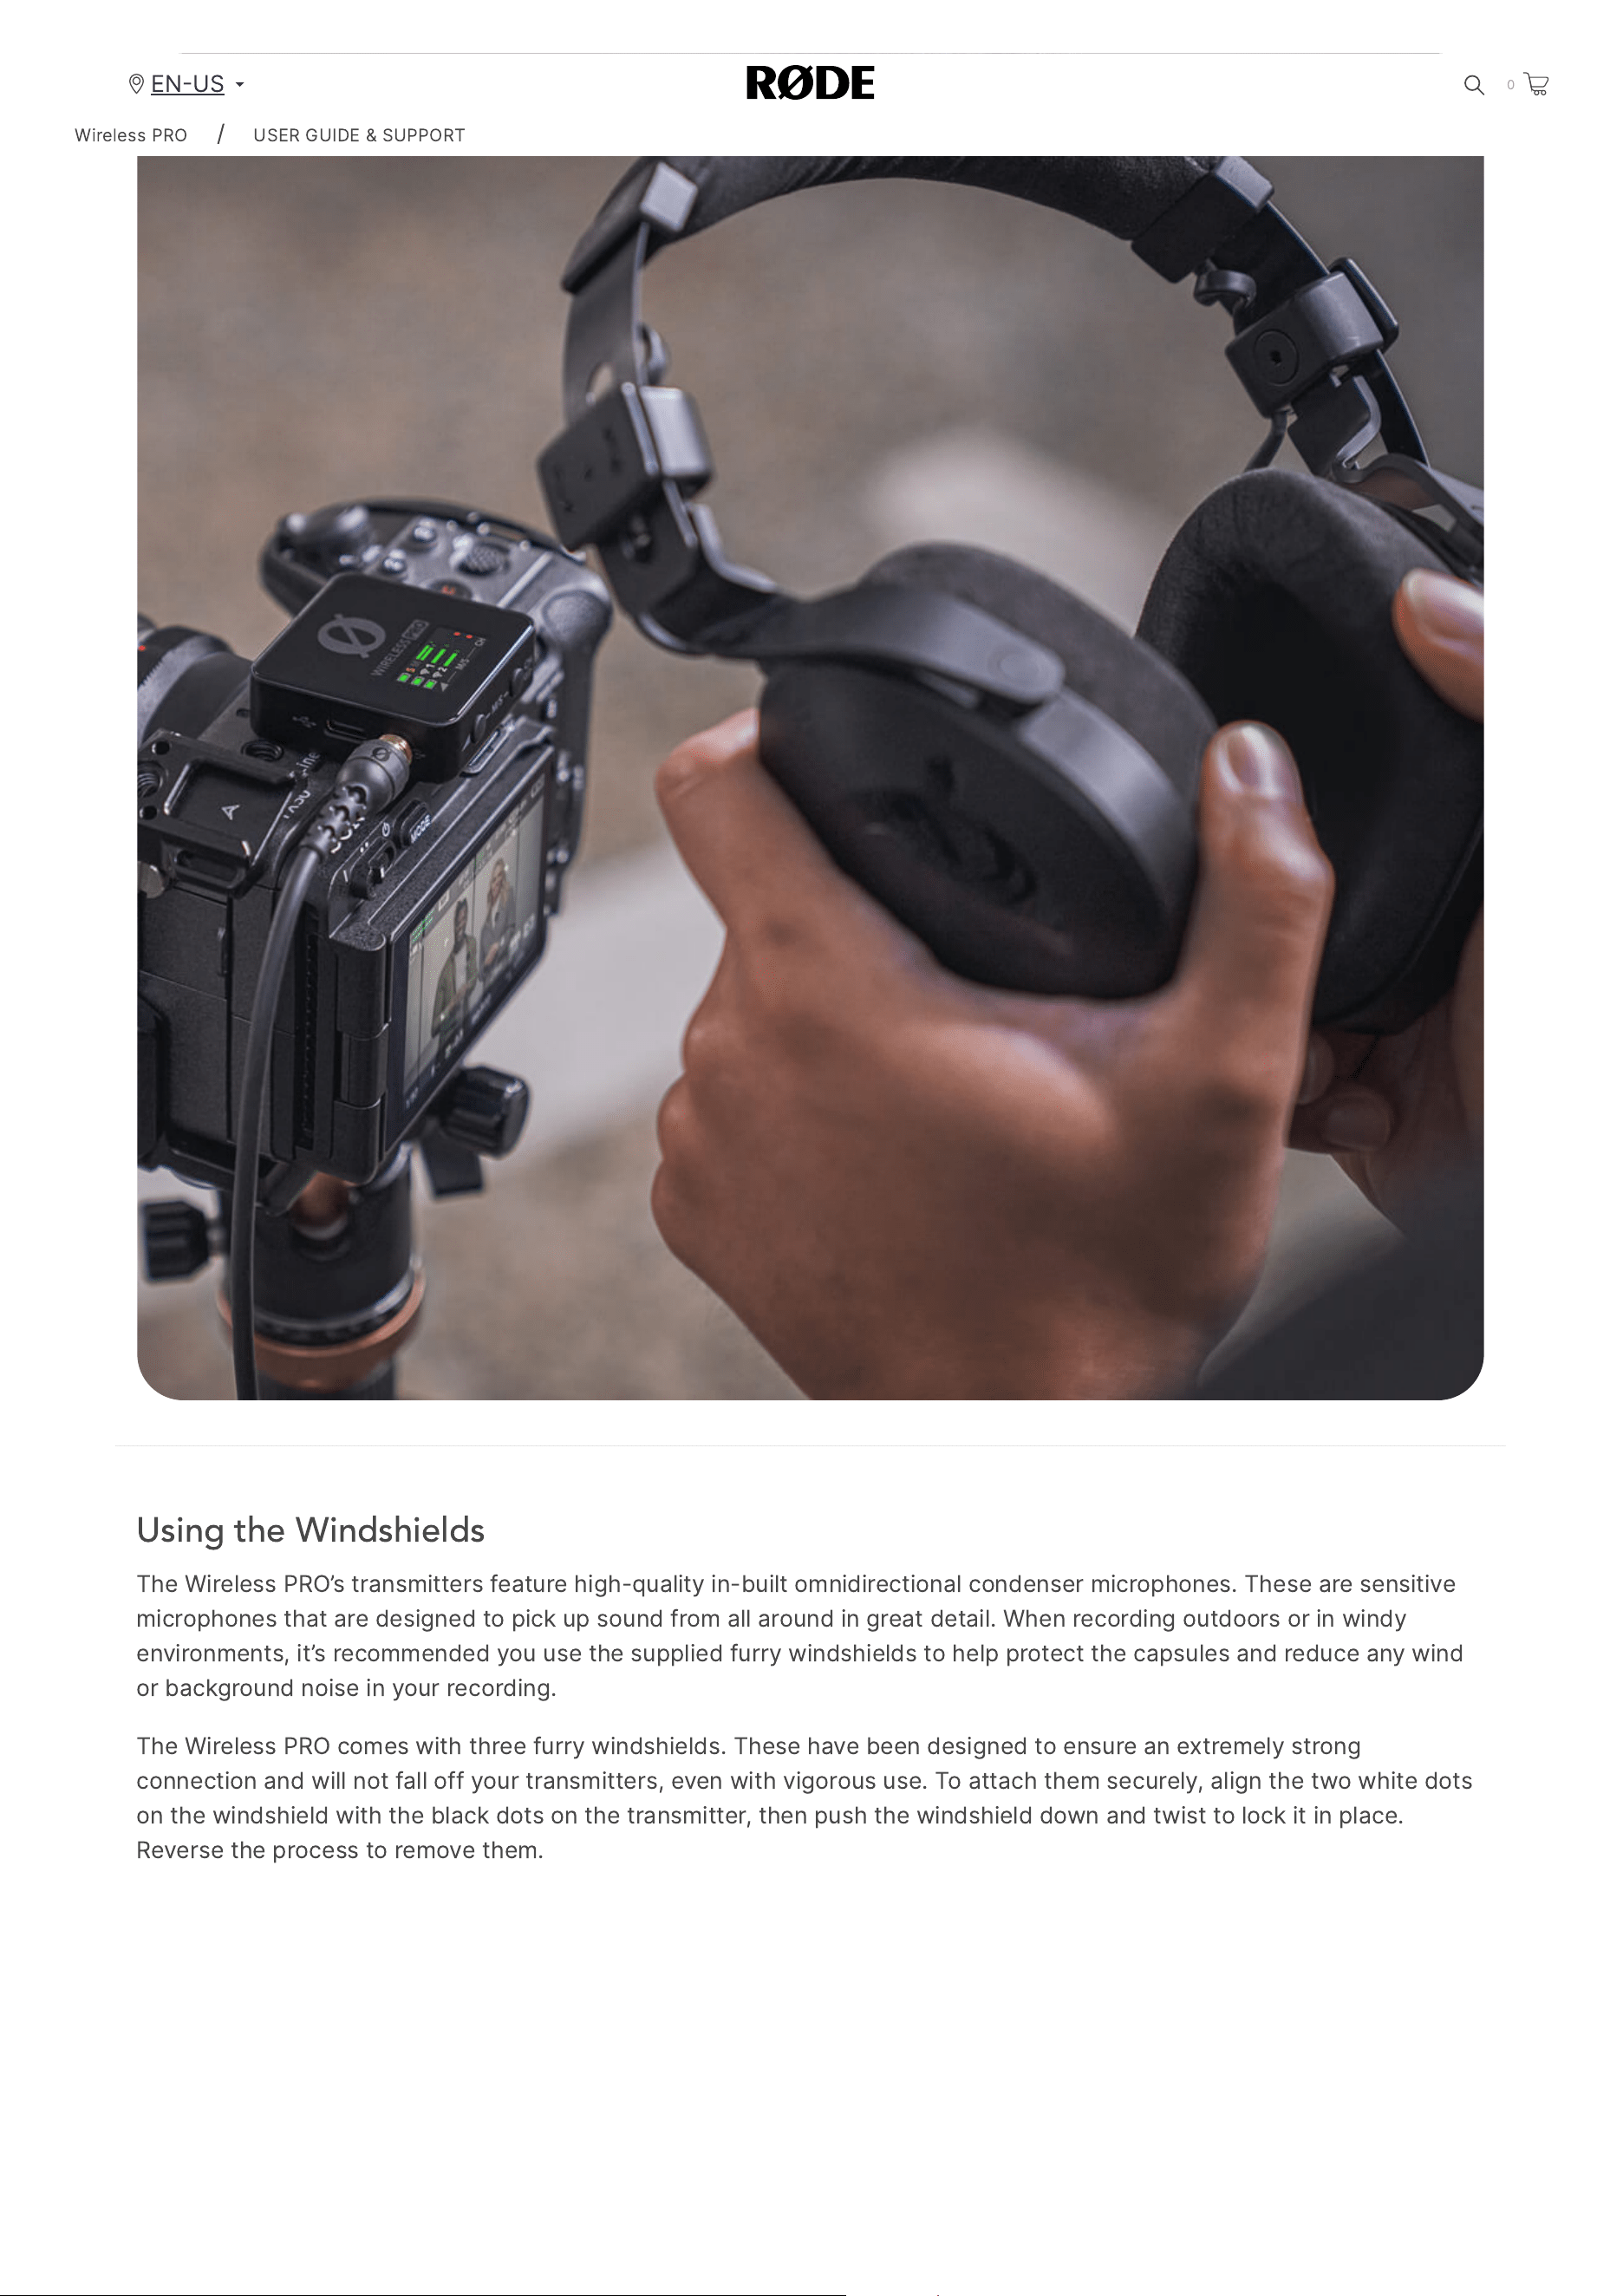
Using the Windshields
The
Wireless
PRO
’
s
transmitters
feature
high
-
quality
in
-
built
omnidirectional
condenser
microphones
.
These
are
sensitive
microphones
that
are
designed
to
pick
up
sound
from
all
around
in
great
detail
.
When
recording
outdoors
or
in
windy
environments
,
it
’
s
recommended
you
use
the
supplied
furry
windshields
to
help
protect
the
capsules
and
reduce
any
wind
or
background
noise
in
your
recording
.
The
Wireless
PRO
comes
with
three
furry
windshields
.
These
have
been
designed
to
ensure
an
extremely
strong
connection
and
will
not
fall
off
your
transmitters
,
even
with
vigorous
use
.
To
attach
them
securely
,
align
the
two
white
dots
on
the
windshield
with
the
black
dots
on
the
transmitter
,
then
push
the
windshield
down
and
twist
to
lock
it
in
place
.
Reverse
the
process
to
remove
them
.
Wireless
PRO
/
USER
GUIDE
&
SUPPORT
EN
US
0
2/20/24, 9:57 AM
Wireless PRO | USER GUIDE & SUPPORT | RØDE
https://rode.com/en-us/user-guides/wireless-pro
15/41
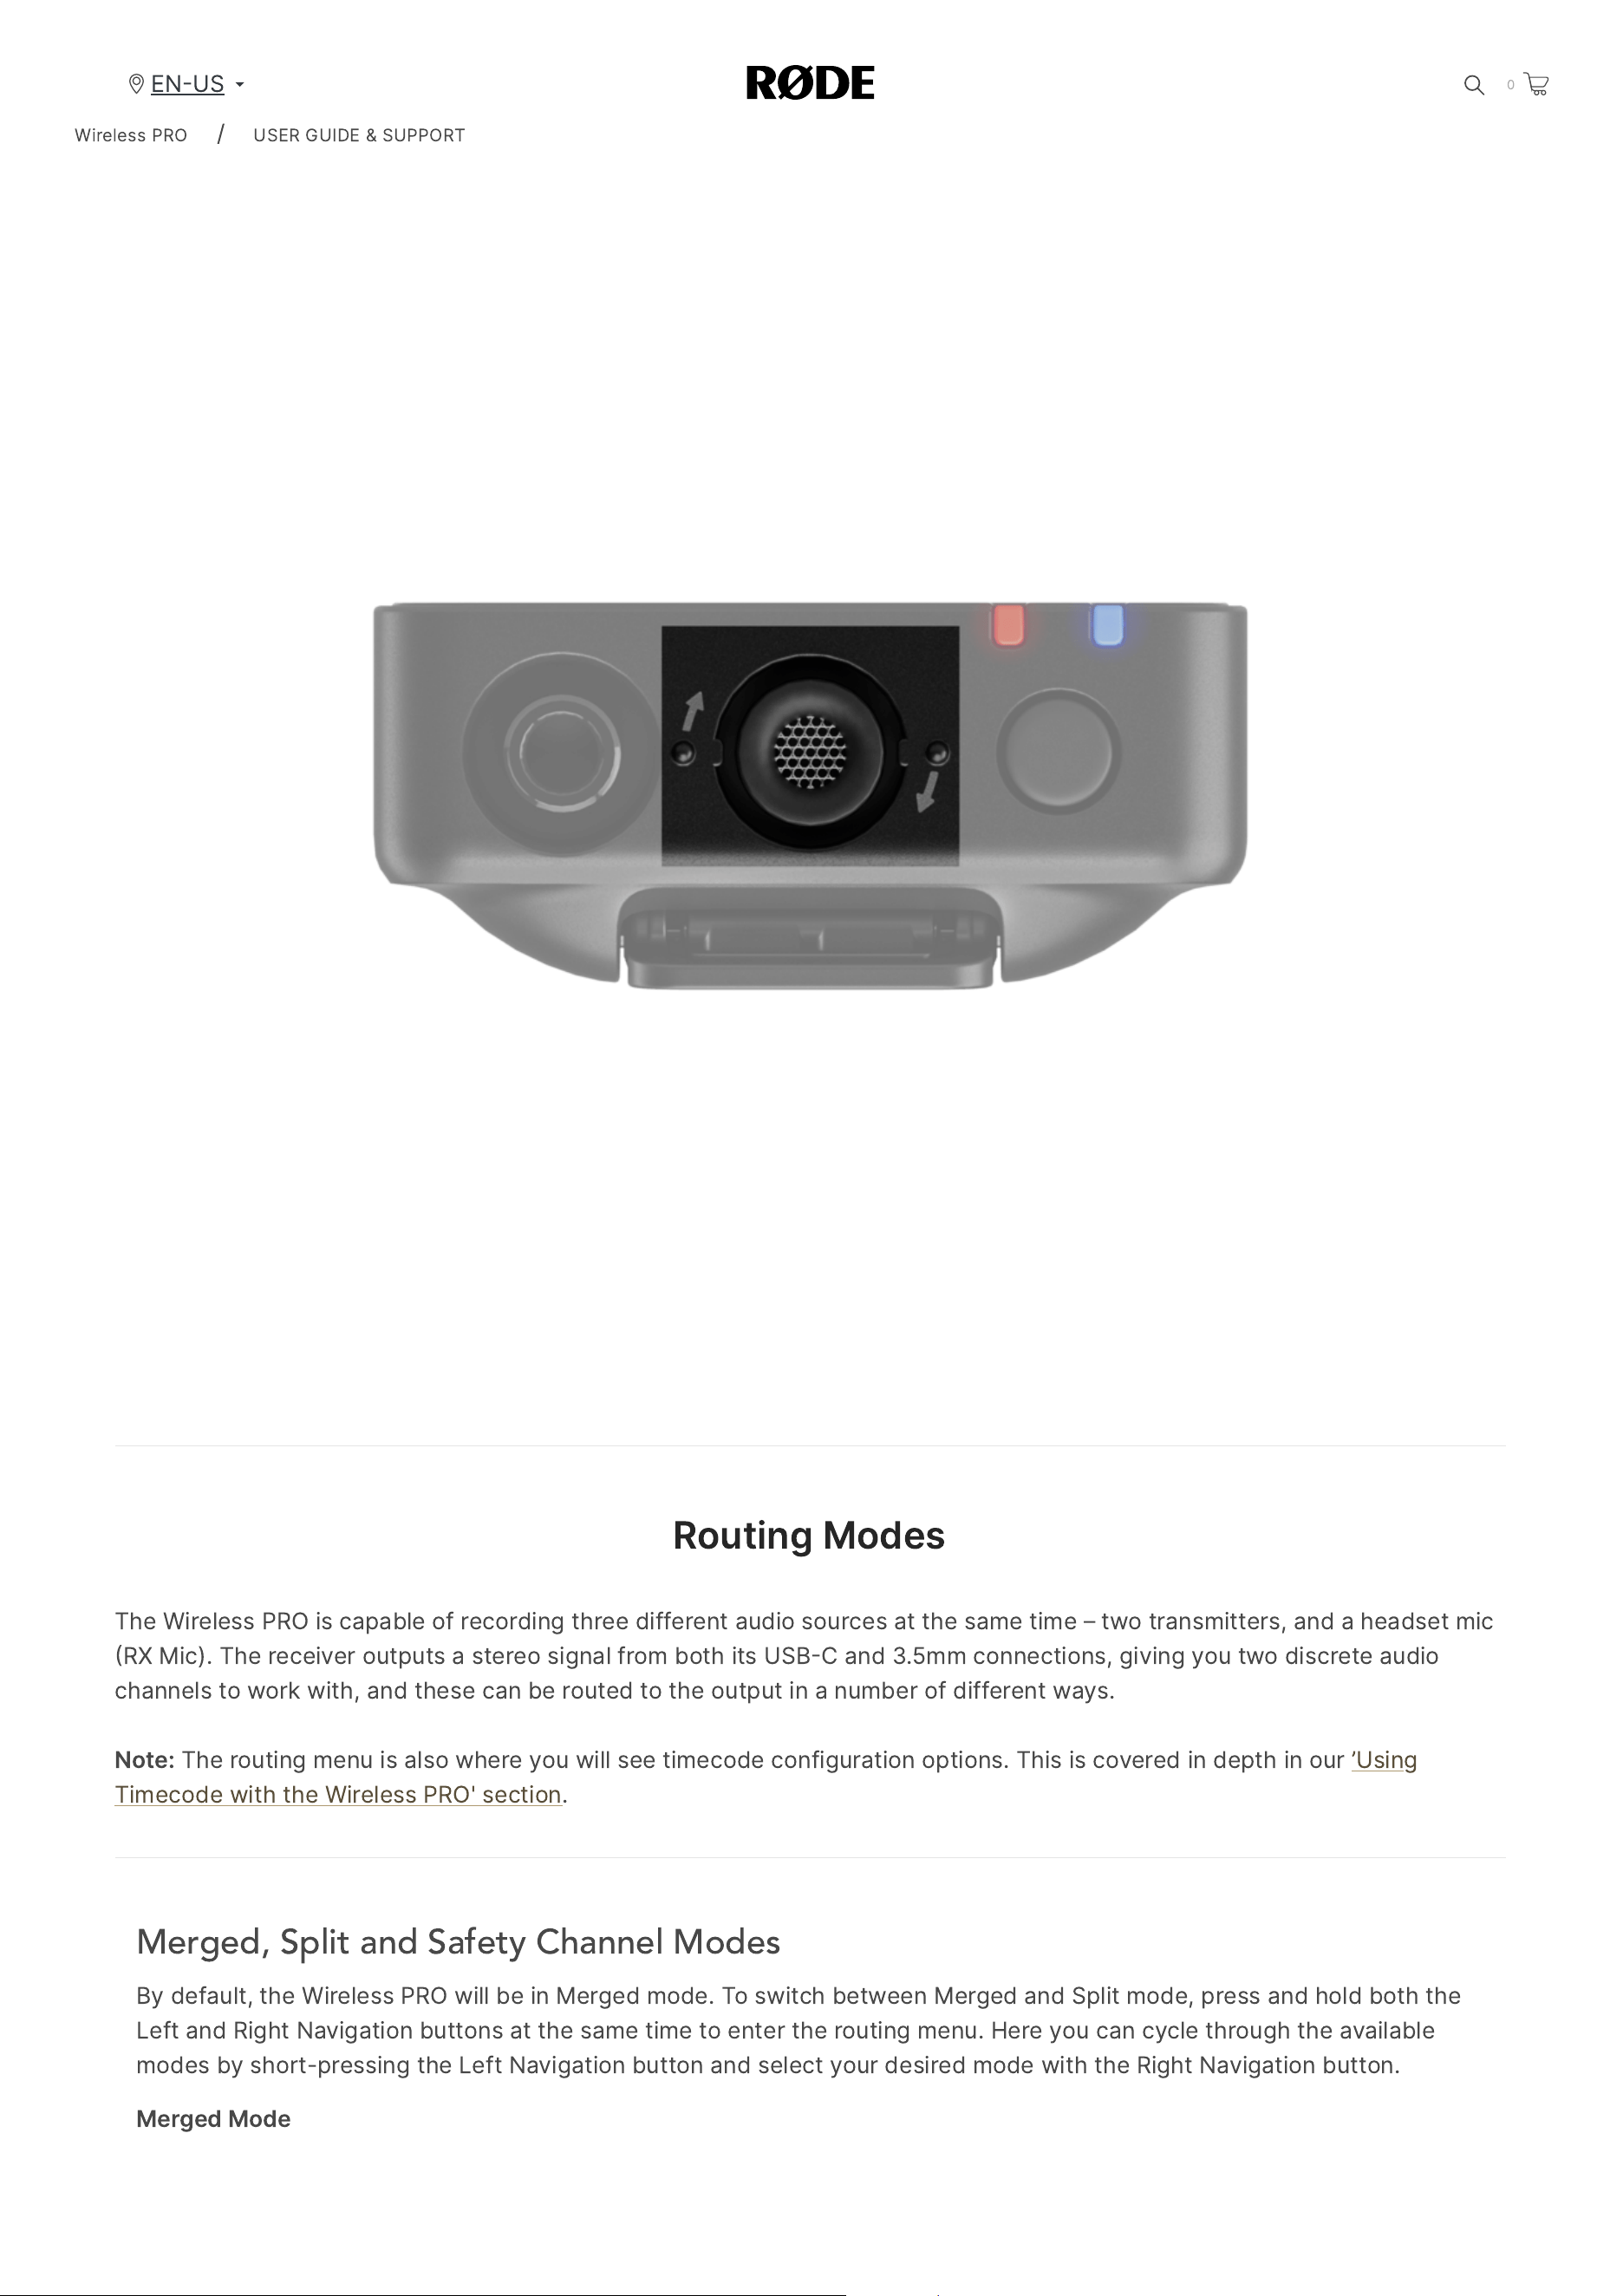
Routing
Modes
The
Wireless
PRO
is
capable
of
recording
three
different
audio
sources
at
the
same
time
–
two
transmitters
,
and
a
headset
mic
RX
Mic
).
The
receiver
outputs
a
stereo
signal
from
both
its
USB
C
and
3.5
mm
connections
,
giving
you
two
discrete
audio
channels
to
work
with
,
and
these
can
be
routed
to
the
output
in
a
number
of
different
ways
.
Note
:
The
routing
menu
is
also
where
you
will
see
timecode
configuration
options
.
This
is
covered
in
depth
in
our
’
Using
Timecode
with
the
Wireless
PRO
'
section
.
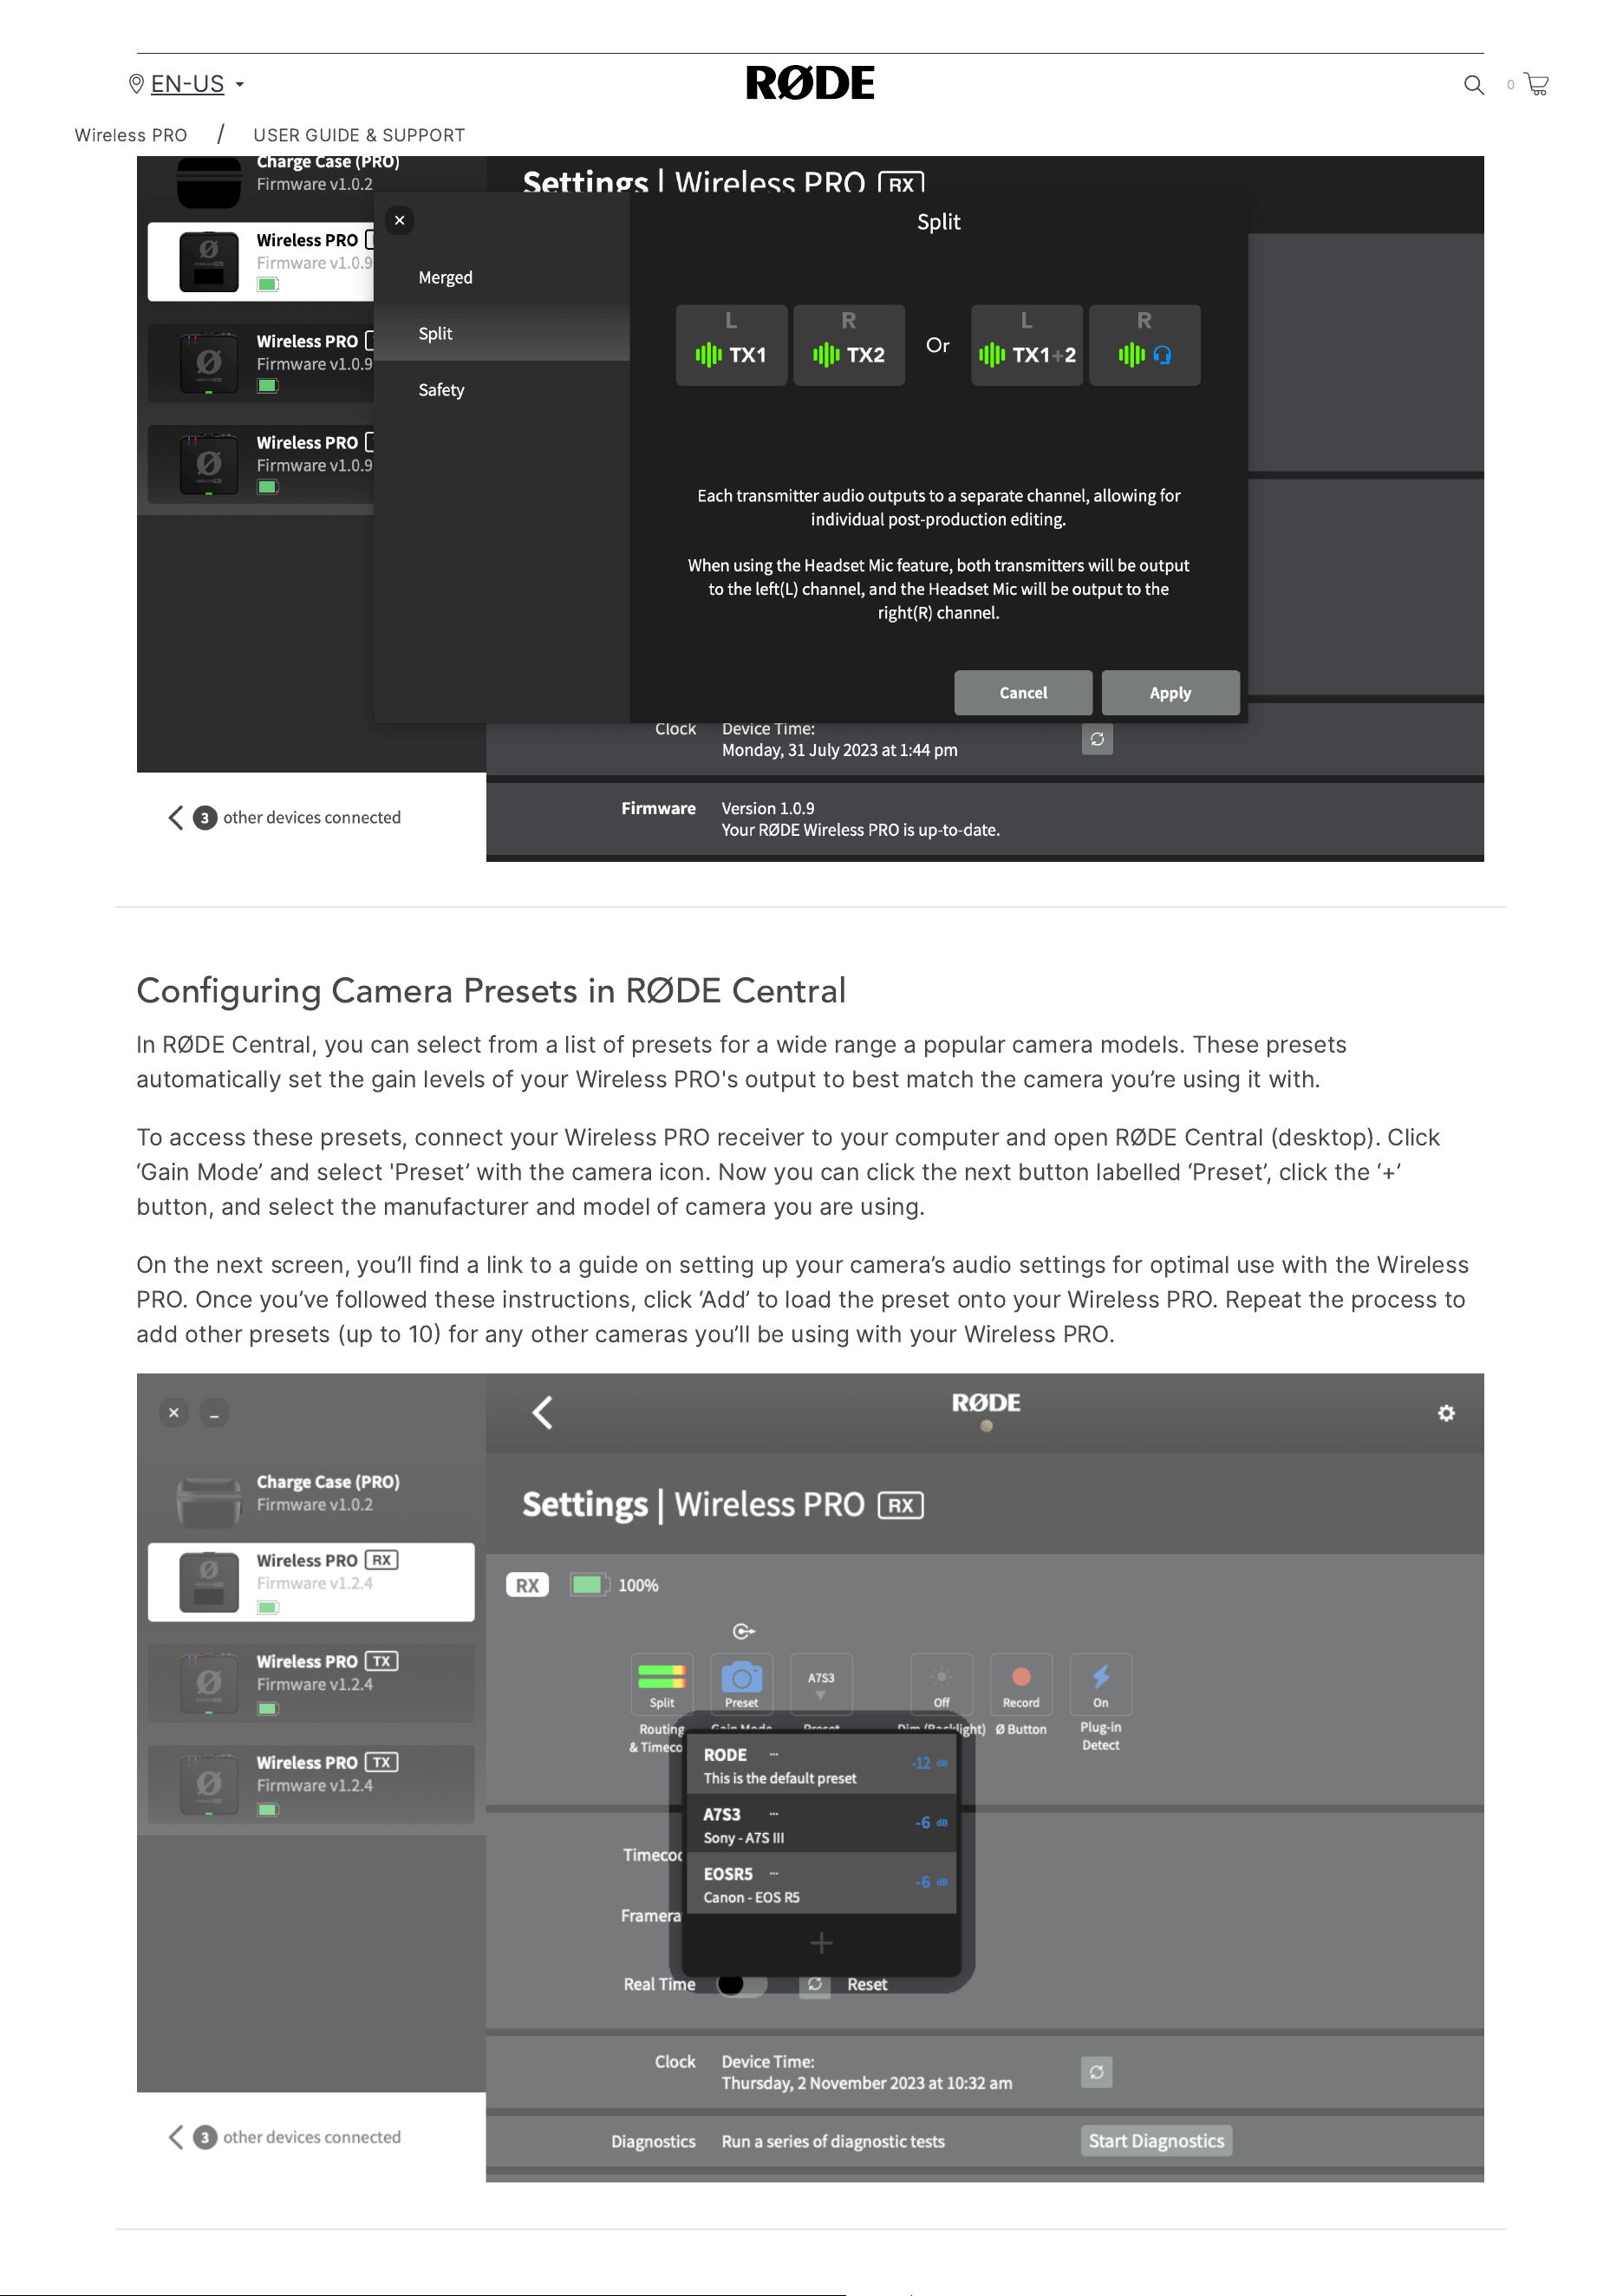
Merged, Split and Safety Channel Modes
By
default
,
the
Wireless
PRO
will
be
in
Merged
mode
.
To
switch
between
Merged
and
Split
mode
,
press
and
hold
both
the
Left
and
Right
Navigation
buttons
at
the
same
time
to
enter
the
routing
menu
.
Here
you
can
cycle
through
the
available
modes
by
short
-
pressing
the
Left
Navigation
button
and
select
your
desired
mode
with
the
Right
Navigation
button
.
Merged
Mode
Wireless
PRO
/
USER
GUIDE
&
SUPPORT
EN
US
0
2/20/24, 9:57 AM
Wireless PRO | USER GUIDE & SUPPORT | RØDE
https://rode.com/en-us/user-guides/wireless-pro
16/41
In
Merged
mode
,
the
two
transmitters
(
and
RX
Mic
,
if
it
is
being
used
)
are
combined
into
a
single
summed
output
.
This
is
great
if
you
’
re
using
the
Wireless
PRO
in
a
live
presentation
setup
,
or
only
using
one
transmitter
and
want
the
audio
to
be
recorded
onto
both
channels
of
your
recording
device
.
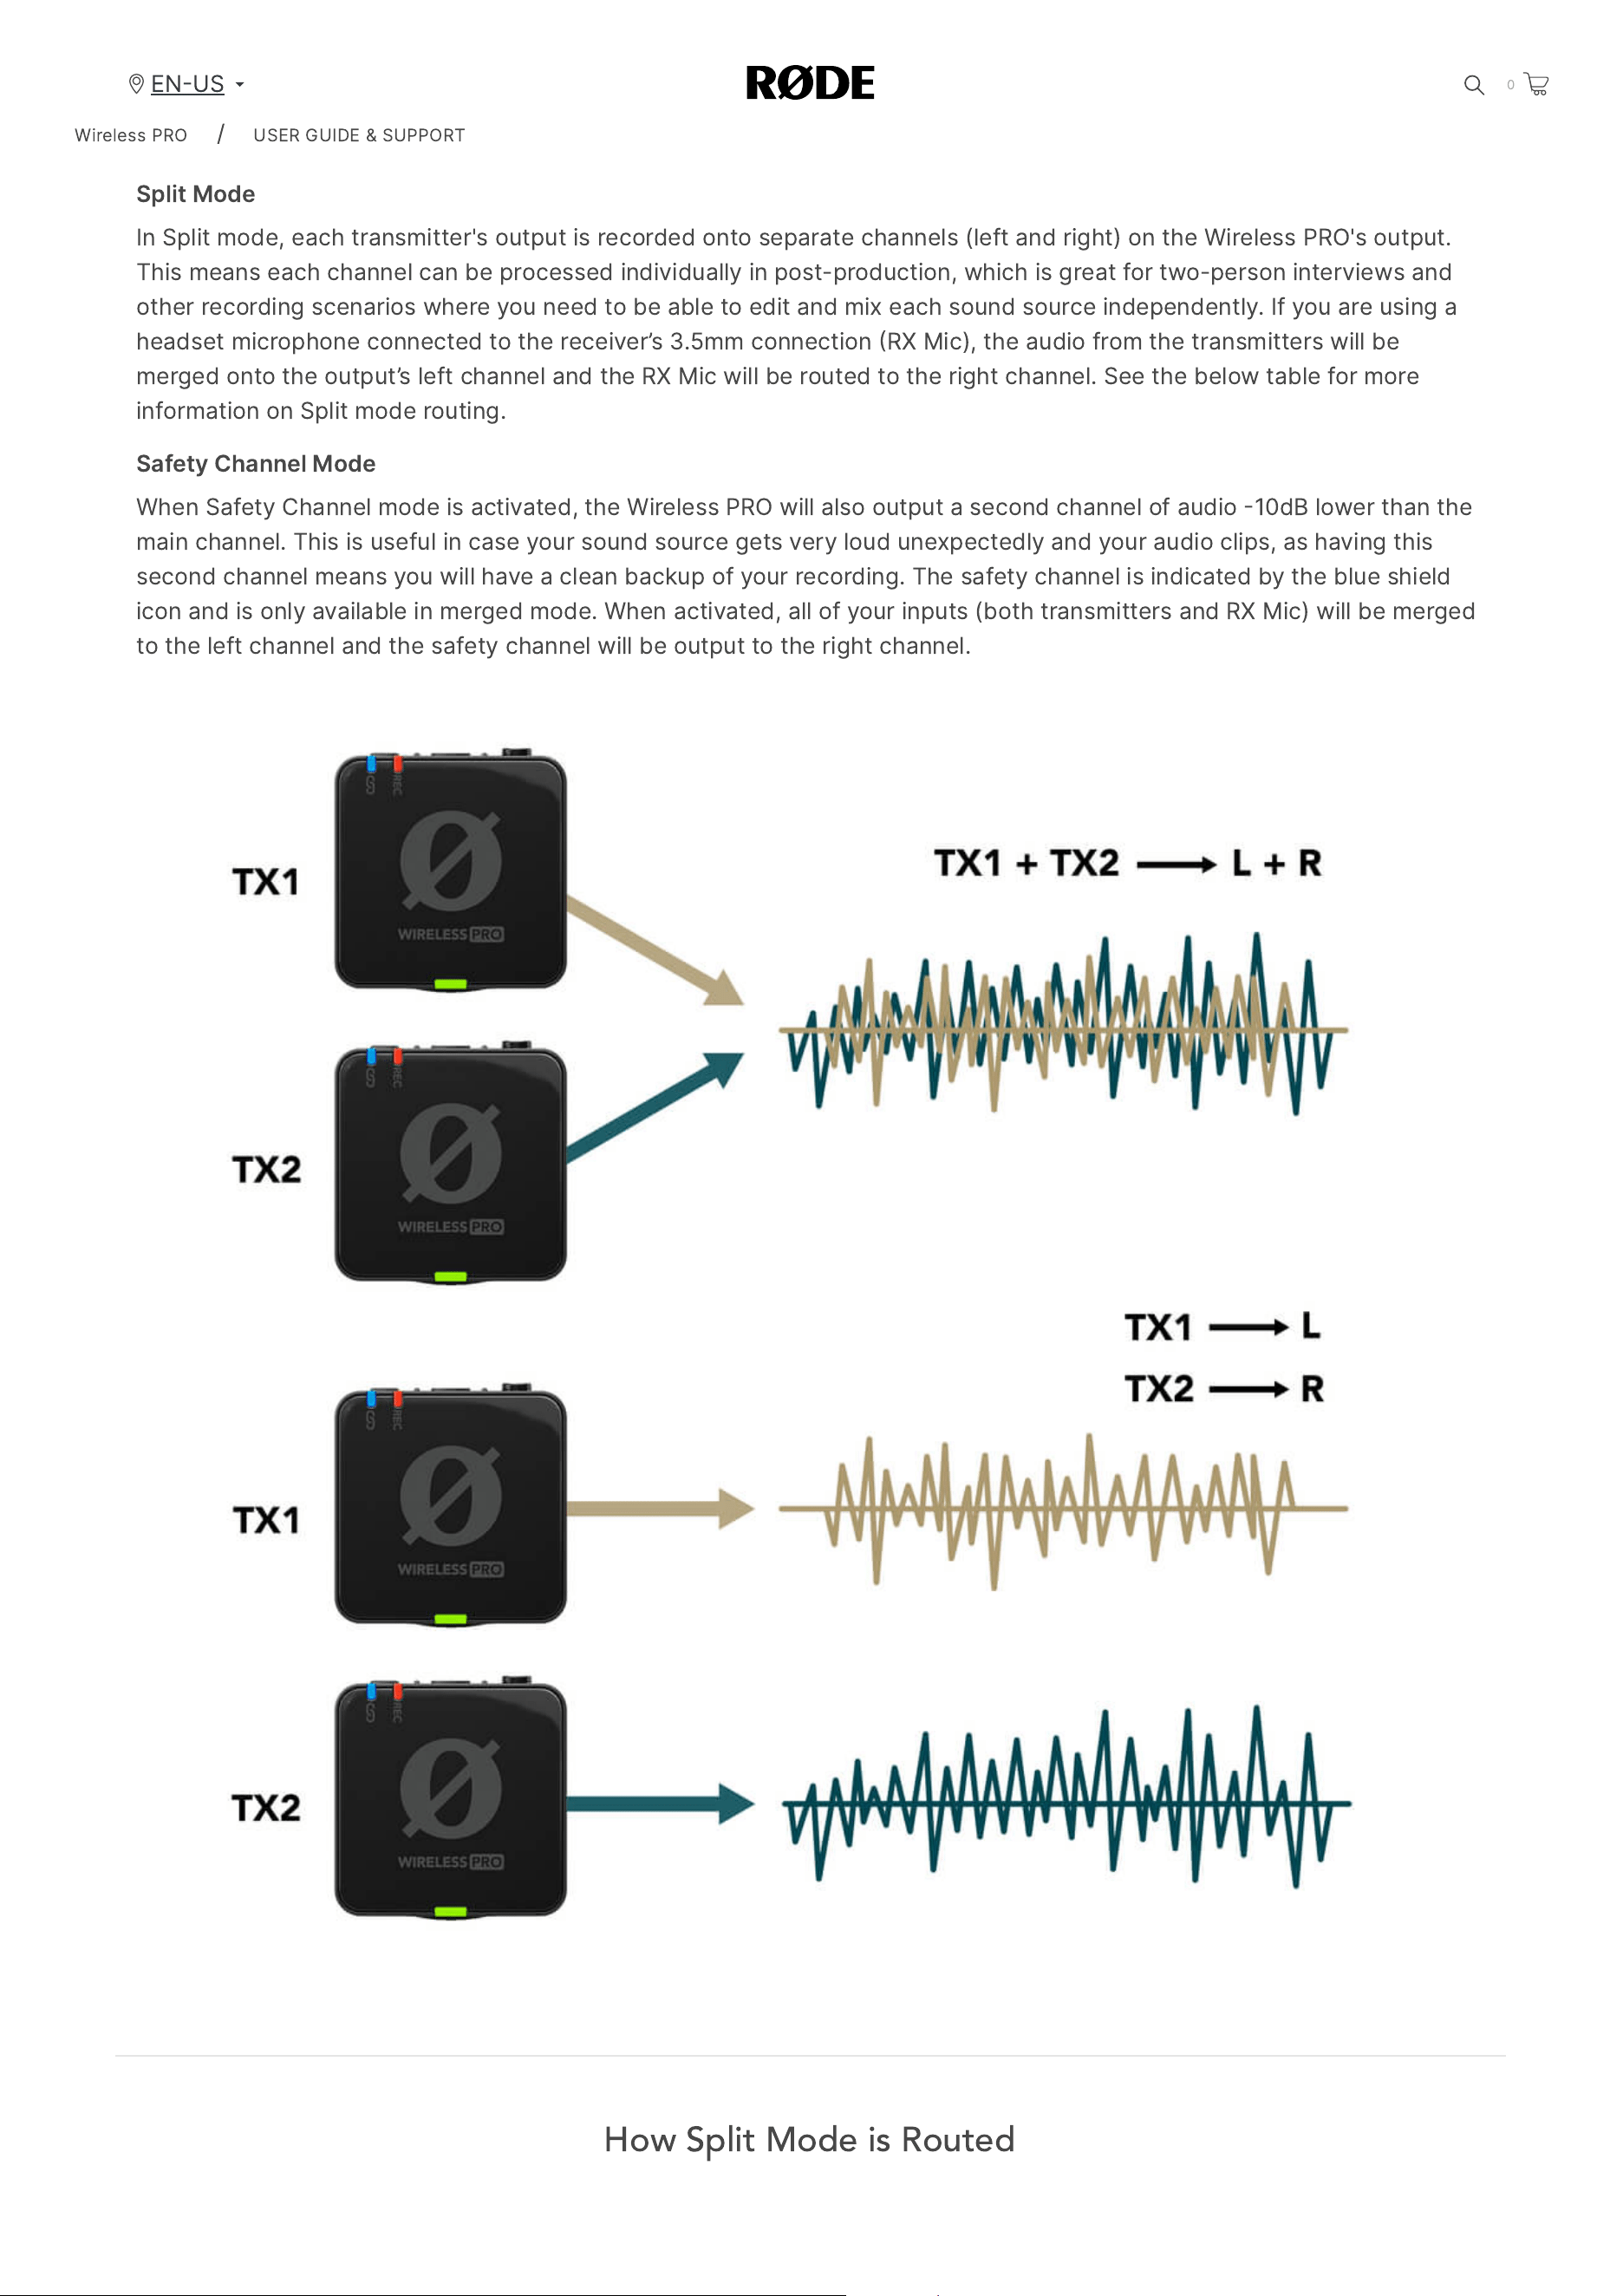
Split
Mode
In
Split
mode
,
each
transmitter
'
s
output
is
recorded
onto
separate
channels
(
left
and
right
)
on
the
Wireless
PRO
'
s
output
.
This
means
each
channel
can
be
processed
individually
in
post
-
production
,
which
is
great
for
two
-
person
interviews
and
other
recording
scenarios
where
you
need
to
be
able
to
edit
and
mix
each
sound
source
independently
.
If
you
are
using
a
headset
microphone
connected
to
the
receiver
’
s
3.5
mm
connection
RX
Mic
),
the
audio
from
the
transmitters
will
be
merged
onto
the
output
’
s
left
channel
and
the
RX
Mic
will
be
routed
to
the
right
channel
.
See
the
below
table
for
more
information
on
Split
mode
routing
.
Safety
Channel
Mode
When
Safety
Channel
mode
is
activated
,
the
Wireless
PRO
will
also
output
a
second
channel
of
audio
10
dB
lower
than
the
main
channel
.
This
is
useful
in
case
your
sound
source
gets
very
loud
unexpectedly
and
your
audio
clips
,
as
having
this
second
channel
means
you
will
have
a
clean
backup
of
your
recording
.
The
safety
channel
is
indicated
by
the
blue
shield
icon
and
is
only
available
in
merged
mode
.
When
activated
,
all
of
your
inputs
(
both
transmitters
and
RX
Mic
)
will
be
merged
to
the
left
channel
and
the
safety
channel
will
be
output
to
the
right
channel
.
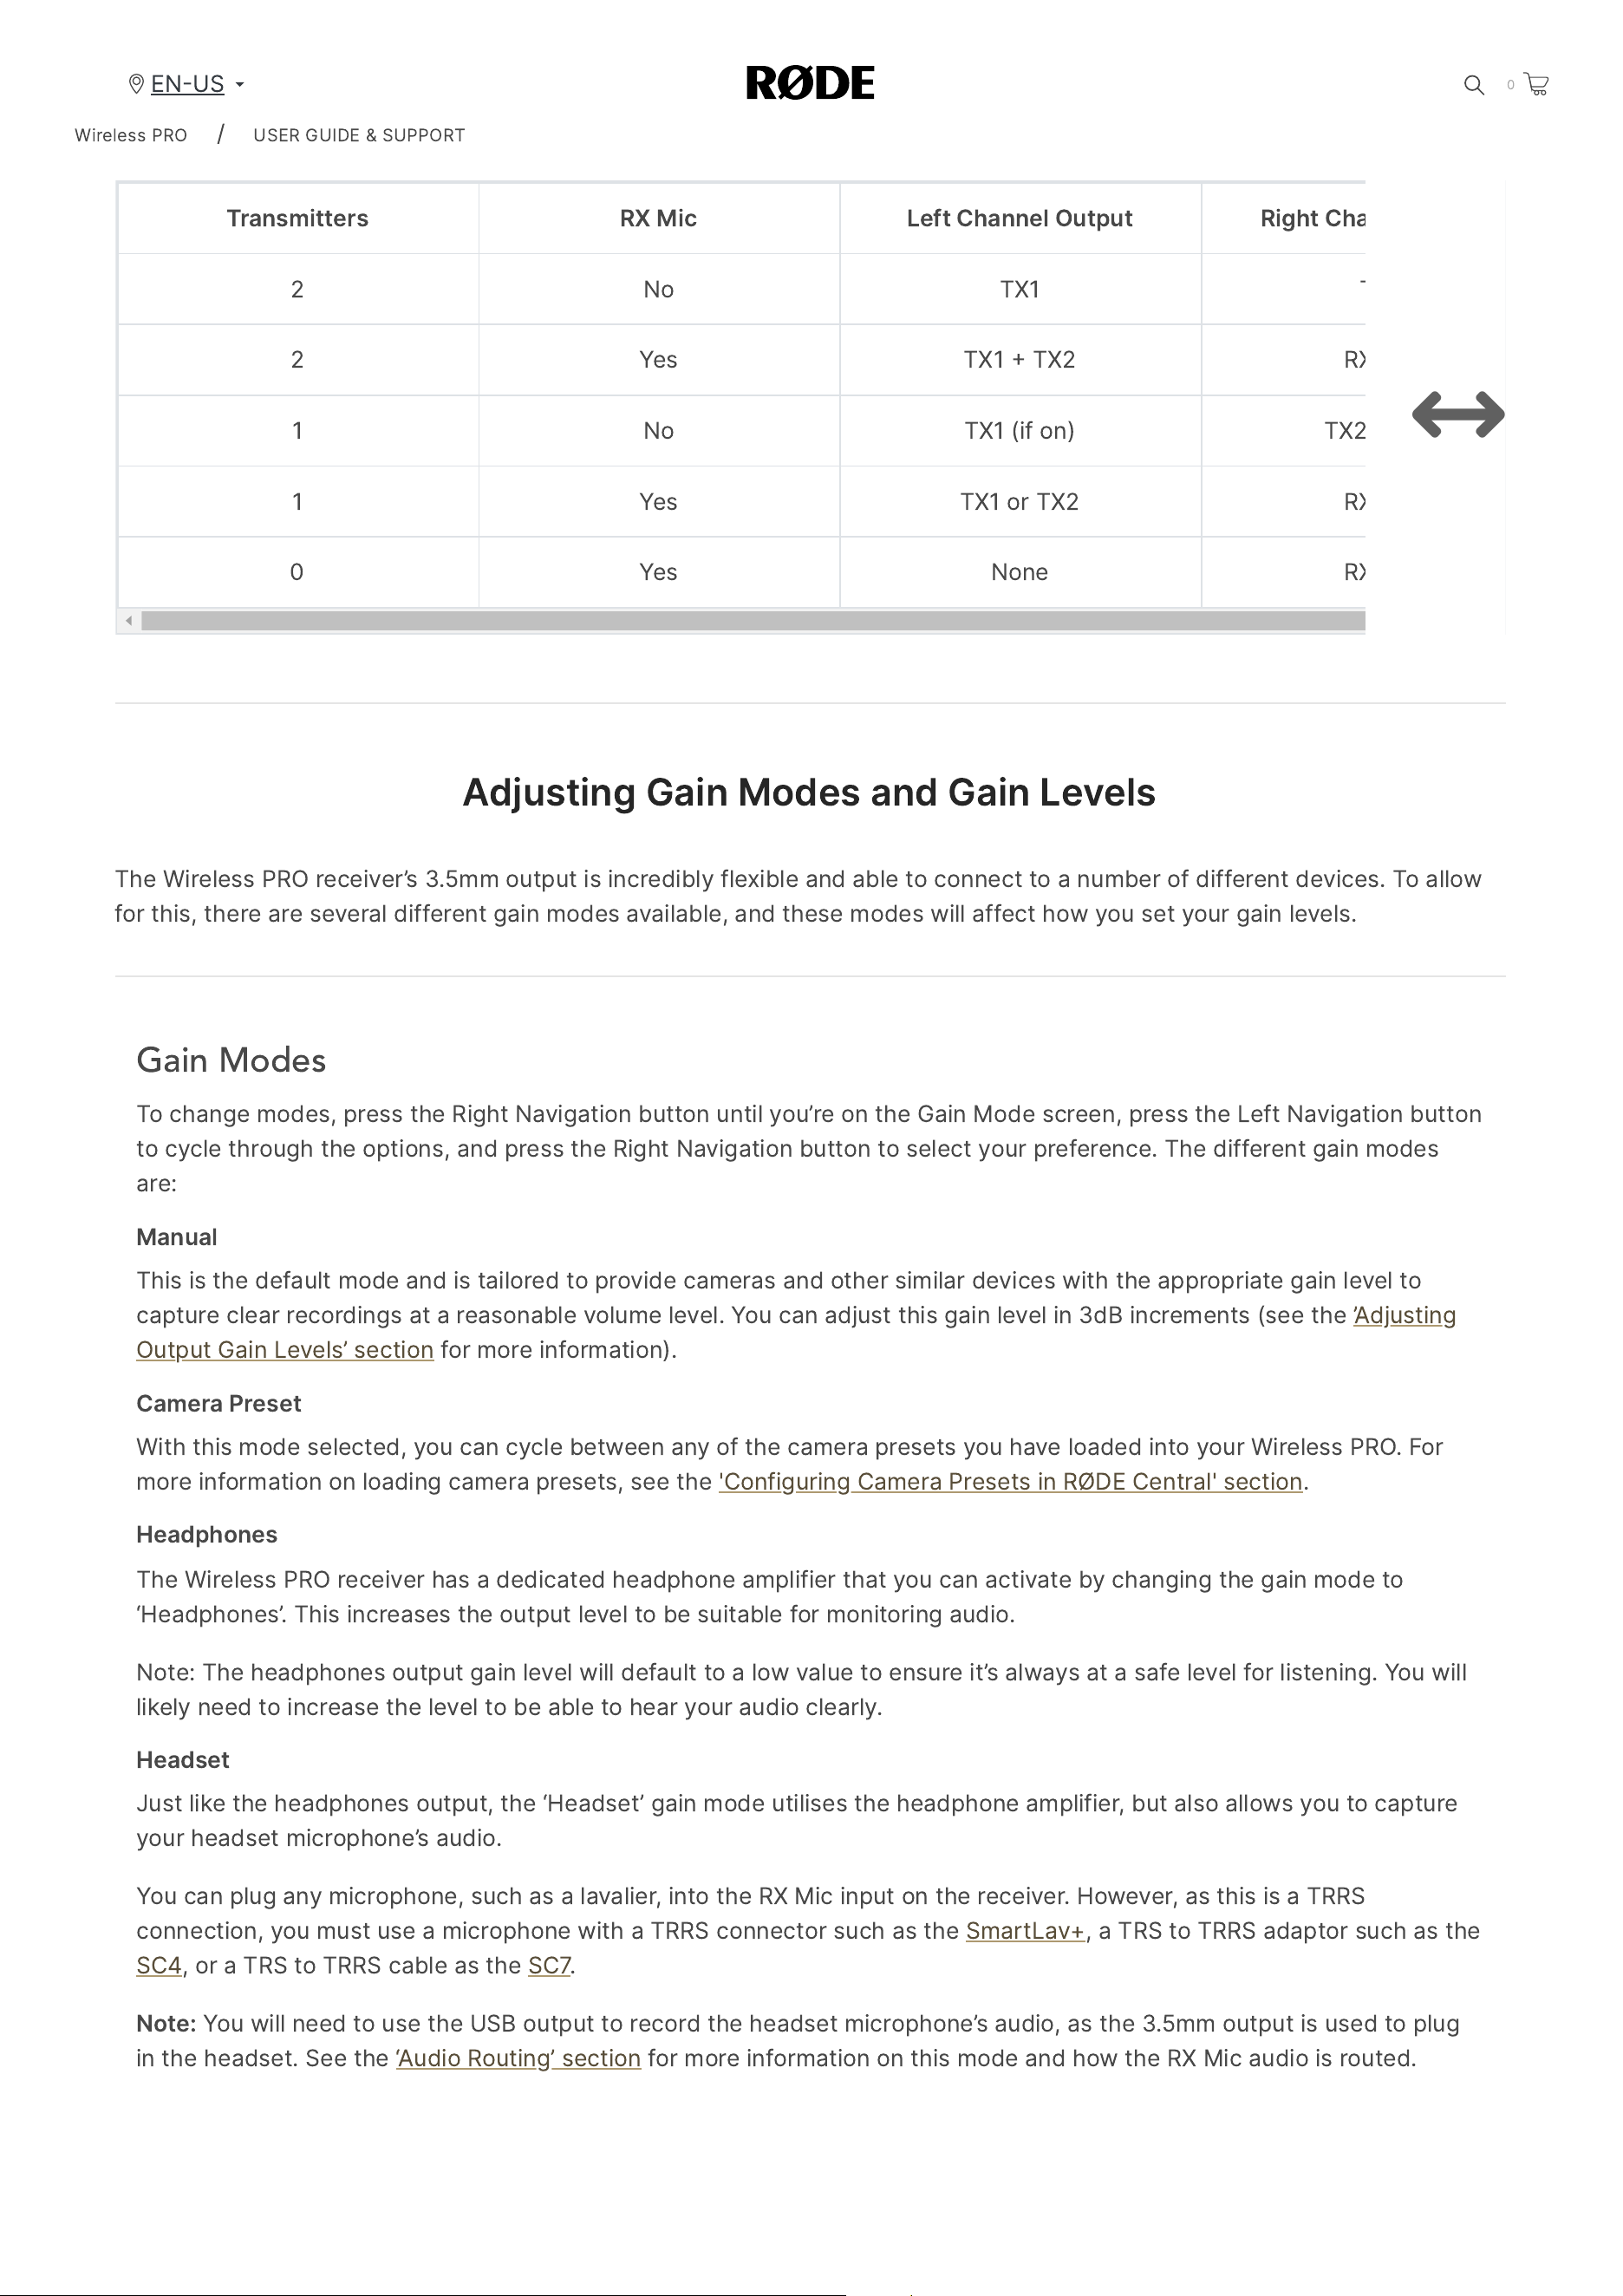
How Split Mode is Routed
Wireless
PRO
/
USER
GUIDE
&
SUPPORT
EN
US
0
2/20/24, 9:57 AM
Wireless PRO | USER GUIDE & SUPPORT | RØDE
https://rode.com/en-us/user-guides/wireless-pro
17/41
When
in
Split
mode
,
the
stereo
Left
/
Right
)
output
will
be
configured
differently
depending
on
which
inputs
are
being
used
and
which
transmitters
are
actively
paired
.
Below
is
a
table
showing
each
possible
output
mode
in
Split
mode
,
depending
on
which
transmitter
TX
1
or
TX
2
you
have
connected
,
as
well
as
a
headset
or
lavalier
microphone
connected
to
the
receiver
RX
Mic
).
Transmitters RX
Mic Left
Channel
Output Right
Channel
Output
2
No TX
1
TX
2
2
Yes TX
1
TX
2
RX
Mic
1
No TX
1 (
if
on
)
TX
2 (
if
on
)
1
Yes TX
1
or
TX
2
RX
Mic
0
Yes None RX
Mic
Adjusting
Gain
Modes
and
Gain
Levels
The
Wireless
PRO
receiver
’
s
3.5
mm
output
is
incredibly
flexible
and
able
to
connect
to
a
number
of
different
devices
.
To
allow
for
this
,
there
are
several
different
gain
modes
available
,
and
these
modes
will
affect
how
you
set
your
gain
levels
.
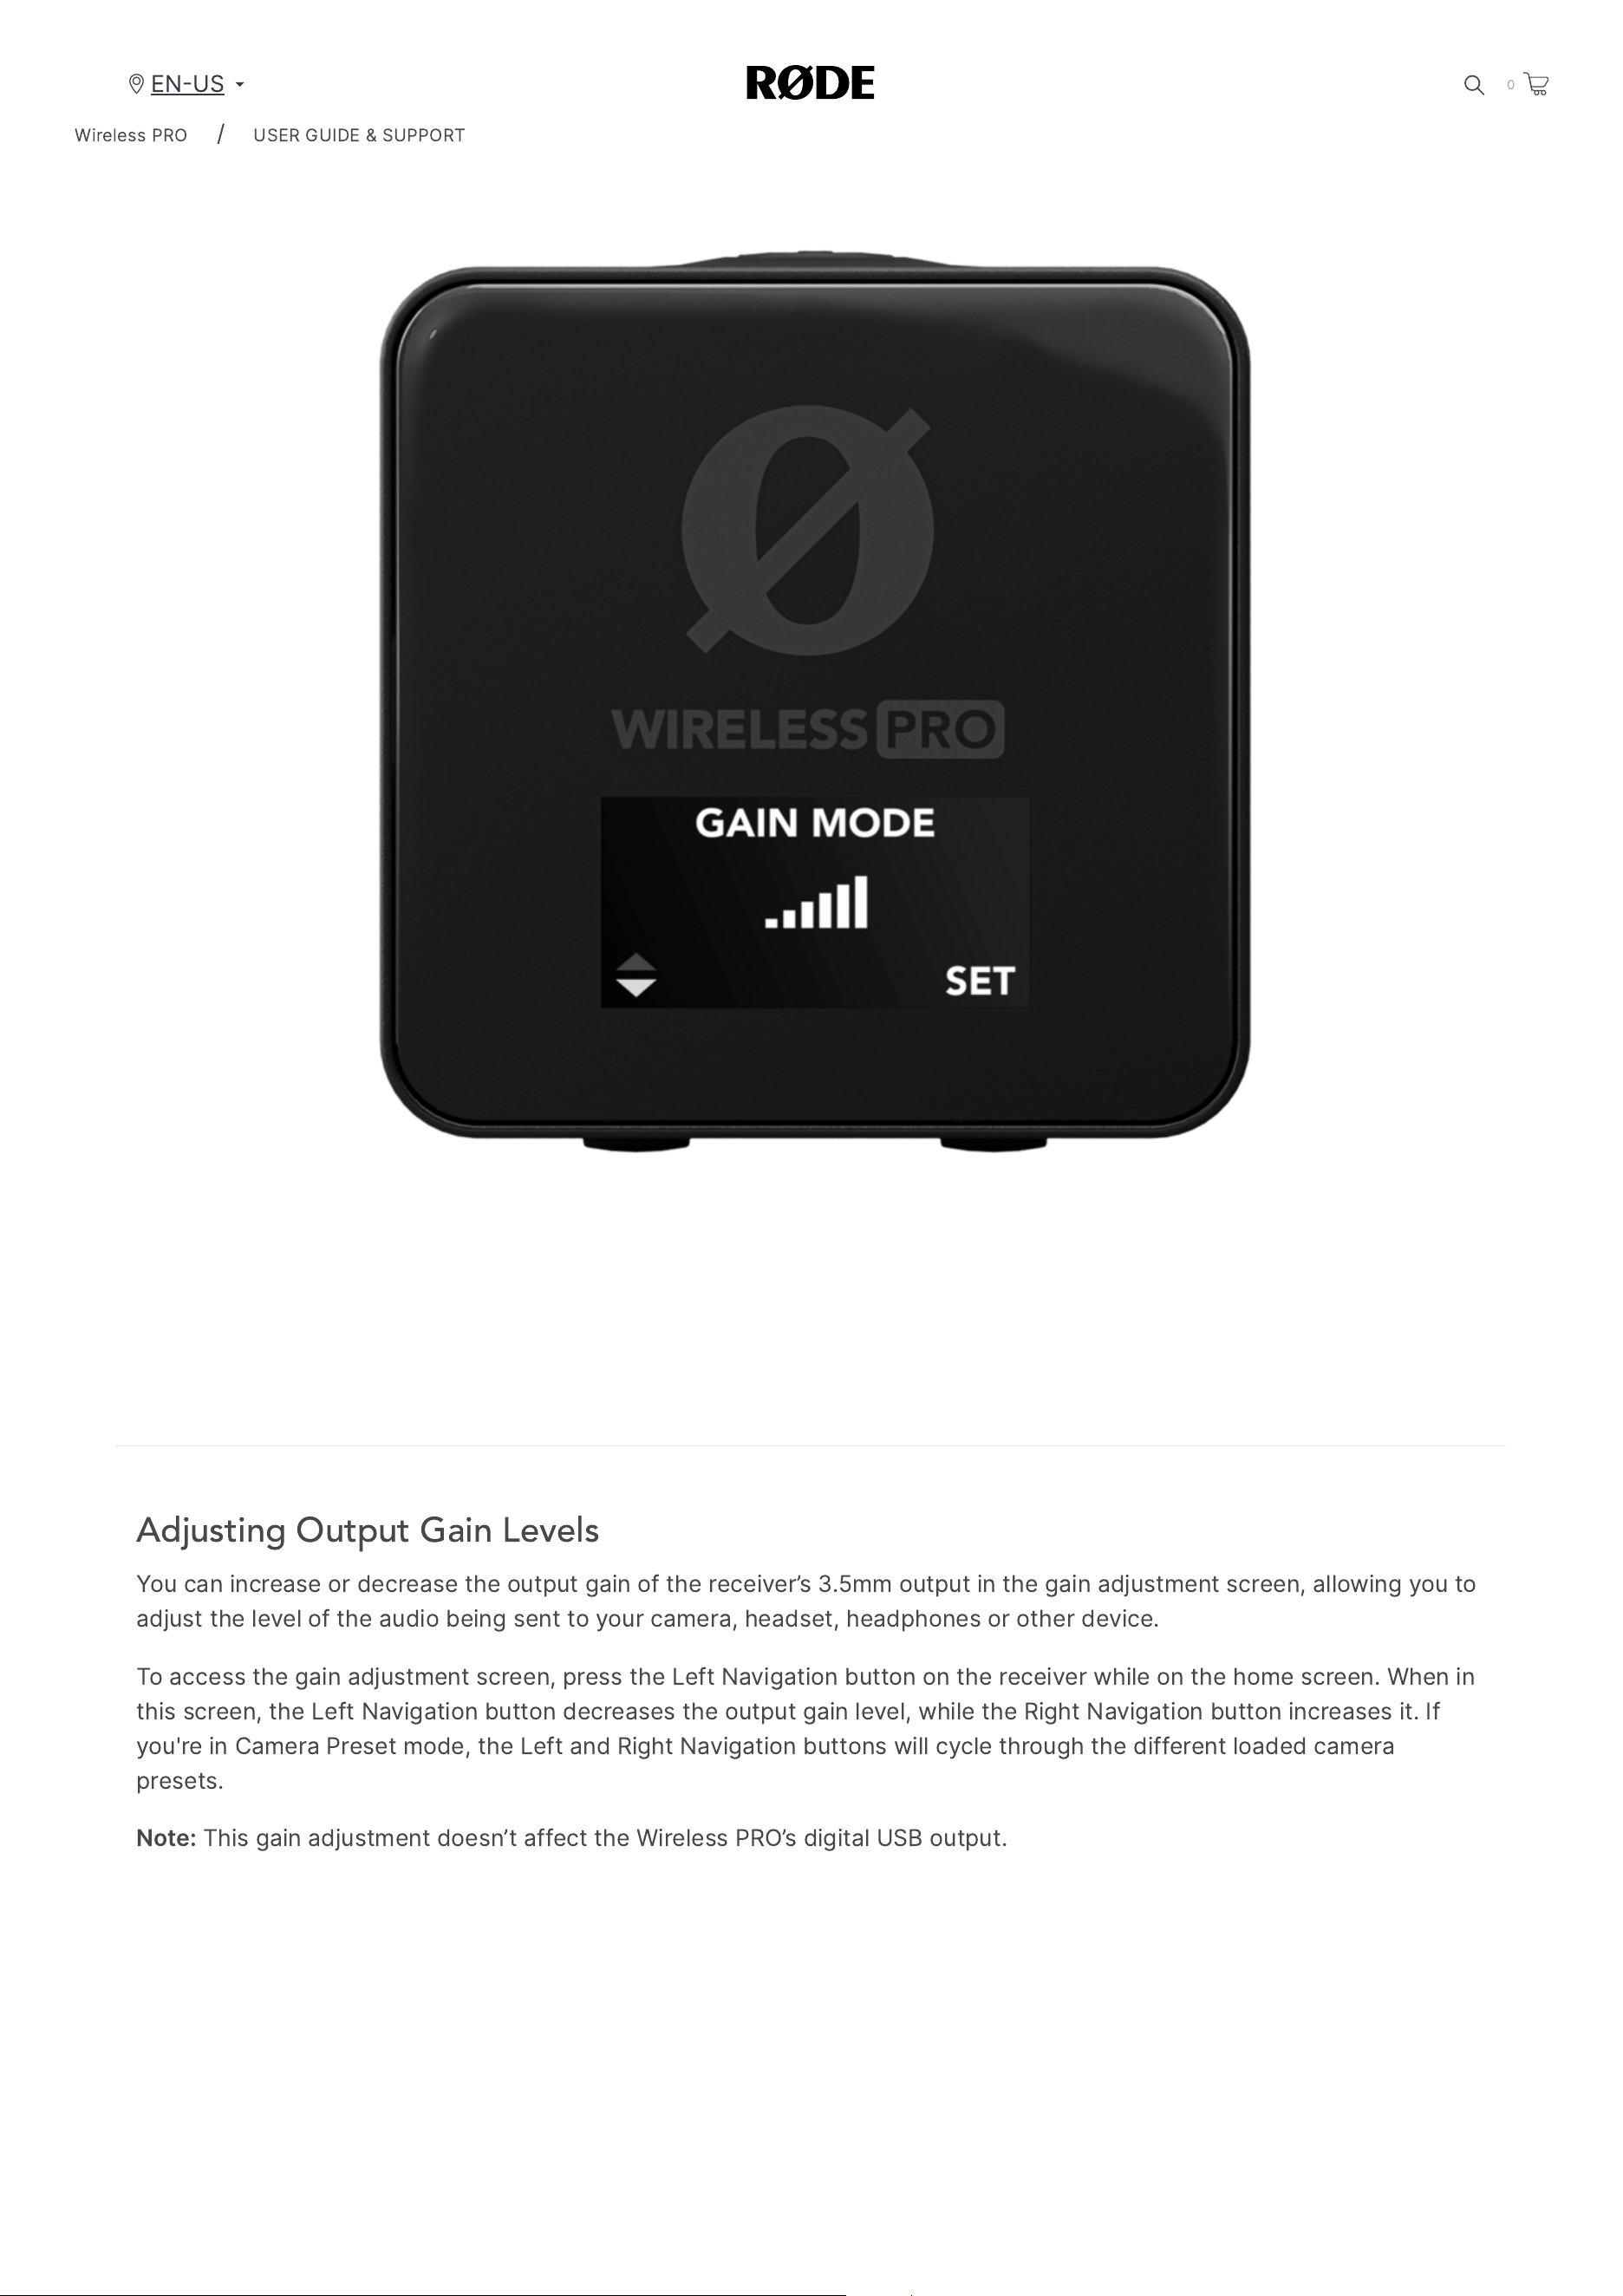
Gain Modes
To
change
modes
,
press
the
Right
Navigation
button
until
you
’
re
on
the
Gain
Mode
screen
,
press
the
Left
Navigation
button
to
cycle
through
the
options
,
and
press
the
Right
Navigation
button
to
select
your
preference
.
The
different
gain
modes
are
:
Manual
This
is
the
default
mode
and
is
tailored
to
provide
cameras
and
other
similar
devices
with
the
appropriate
gain
level
to
capture
clear
recordings
at
a
reasonable
volume
level
.
You
can
adjust
this
gain
level
in
3
dB
increments
(
see
the
’
Adjusting
Output
Gain
Levels
’
section
for
more
information
).
Camera
Preset
With
this
mode
selected
,
you
can
cycle
between
any
of
the
camera
presets
you
have
loaded
into
your
Wireless
PRO
.
For
more
information
on
loading
camera
presets
,
see
the
'
Configuring
Camera
Presets
in
RØDE
Central
'
section
.
Headphones
The
Wireless
PRO
receiver
has
a
dedicated
headphone
amplifier
that
you
can
activate
by
changing
the
gain
mode
to
‘
Headphones
’.
This
increases
the
output
level
to
be
suitable
for
monitoring
audio
.
Note
:
The
headphones
output
gain
level
will
default
to
a
low
value
to
ensure
it
’
s
always
at
a
safe
level
for
listening
.
You
will
likely
need
to
increase
the
level
to
be
able
to
hear
your
audio
clearly
.
Headset
Just
like
the
headphones
output
,
the
‘
Headset
’
gain
mode
utilises
the
headphone
amplifier
,
but
also
allows
you
to
capture
your
headset
microphone
’
s
audio
.
You
can
plug
any
microphone
,
such
as
a
lavalier
,
into
the
RX
Mic
input
on
the
receiver
.
However
,
as
this
is
a
TRRS
connection
,
you
must
use
a
microphone
with
a
TRRS
connector
such
as
the
SmartLav
+,
a
TRS
to
TRRS
adaptor
such
as
the
SC
4,
or
a
TRS
to
TRRS
cable
as
the
SC
7.
Note
:
You
will
need
to
use
the
USB
output
to
record
the
headset
microphone
’
s
audio
,
as
the
3.5
mm
output
is
used
to
plug
in
the
headset
.
See
the
‘
Audio
Routing
’
section
for
more
information
on
this
mode
and
how
the
RX
Mic
audio
is
routed
.
Wireless
PRO
/
USER
GUIDE
&
SUPPORT
EN
US
0
2/20/24, 9:57 AM
Wireless PRO | USER GUIDE & SUPPORT | RØDE
https://rode.com/en-us/user-guides/wireless-pro
18/41
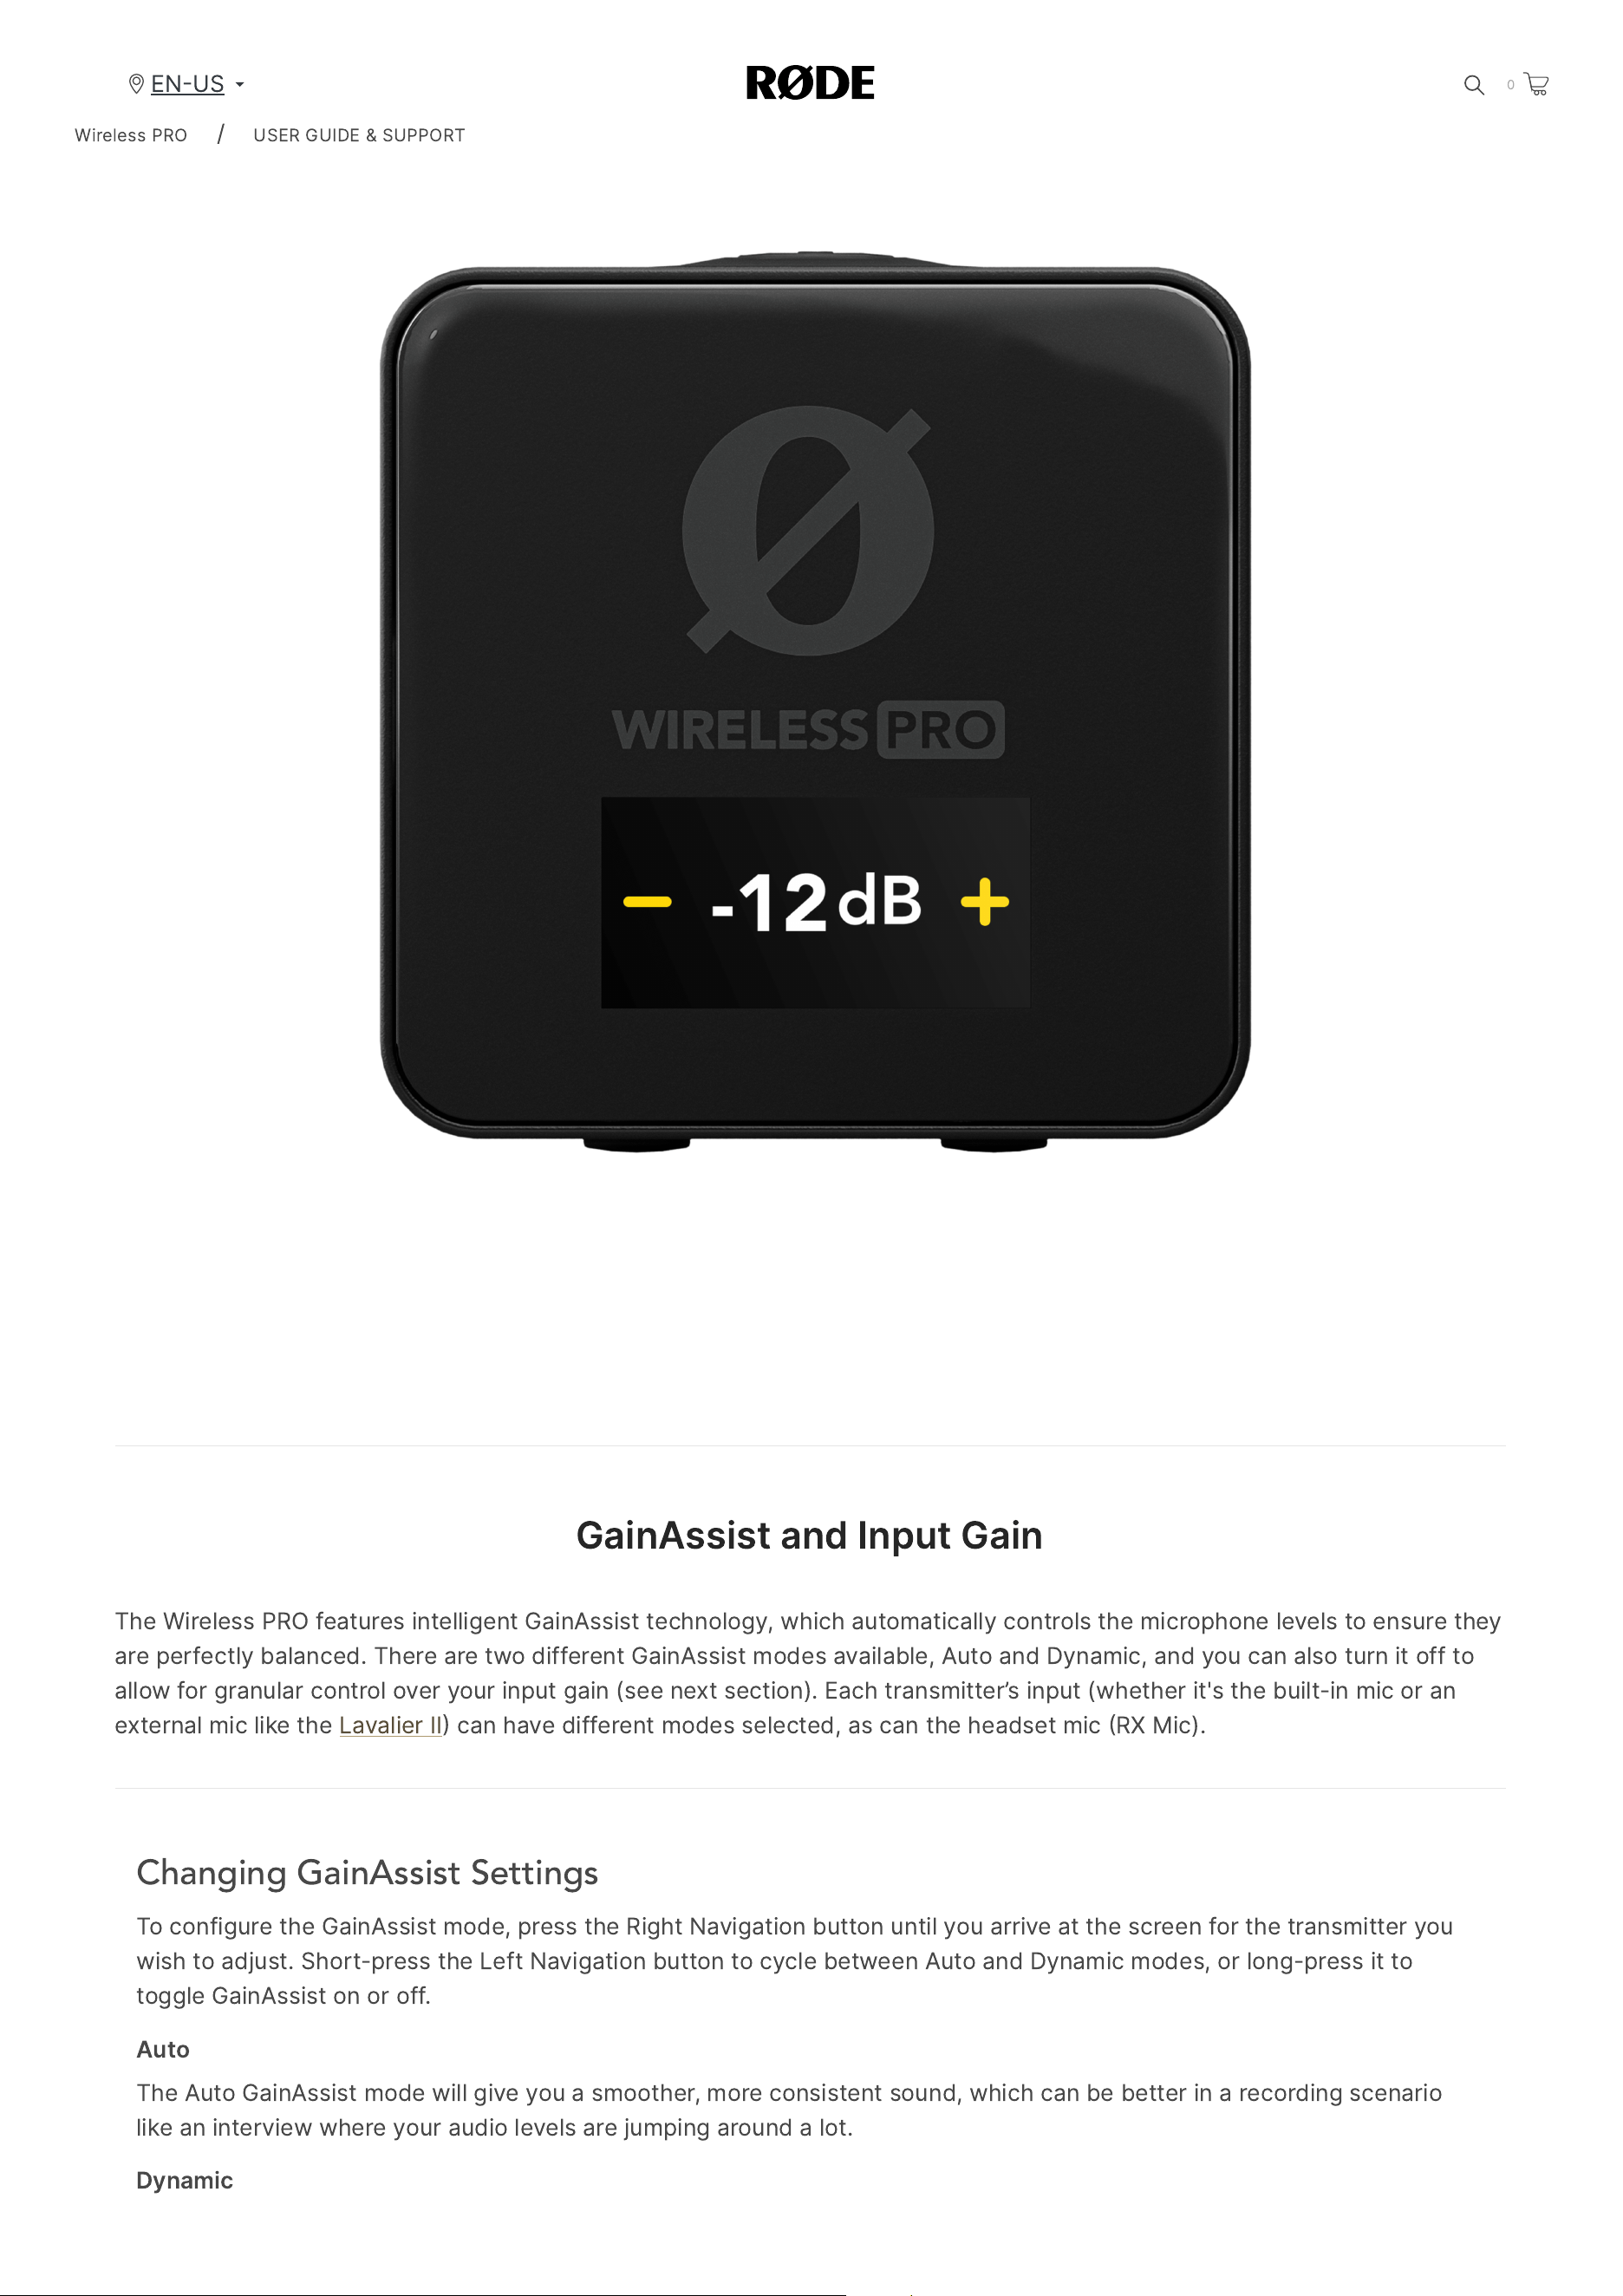
Adjusting Output Gain Levels
You
can
increase
or
decrease
the
output
gain
of
the
receiver
’
s
3.5
mm
output
in
the
gain
adjustment
screen
,
allowing
you
to
adjust
the
level
of
the
audio
being
sent
to
your
camera
,
headset
,
headphones
or
other
device
.
To
access
the
gain
adjustment
screen
,
press
the
Left
Navigation
button
on
the
receiver
while
on
the
home
screen
.
When
in
this
screen
,
the
Left
Navigation
button
decreases
the
output
gain
level
,
while
the
Right
Navigation
button
increases
it
.
If
you
'
re
in
Camera
Preset
mode
,
the
Left
and
Right
Navigation
buttons
will
cycle
through
the
different
loaded
camera
presets
.
Note
:
This
gain
adjustment
doesn
’
t
affect
the
Wireless
PRO
’
s
digital
USB
output
.
Wireless
PRO
/
USER
GUIDE
&
SUPPORT
EN
US
0
2/20/24, 9:57 AM
Wireless PRO | USER GUIDE & SUPPORT | RØDE
https://rode.com/en-us/user-guides/wireless-pro
19/41
GainAssist
and
Input
Gain
The
Wireless
PRO
features
intelligent
GainAssist
technology
,
which
automatically
controls
the
microphone
levels
to
ensure
they
are
perfectly
balanced
.
There
are
two
different
GainAssist
modes
available
,
Auto
and
Dynamic
,
and
you
can
also
turn
it
off
to
allow
for
granular
control
over
your
input
gain
(
see
next
section
).
Each
transmitter
’
s
input
(
whether
it
'
s
the
built
-
in
mic
or
an
external
mic
like
the
Lavalier
II
can
have
different
modes
selected
,
as
can
the
headset
mic
RX
Mic
).
Changing GainAssist Settings
To
configure
the
GainAssist
mode
,
press
the
Right
Navigation
button
until
you
arrive
at
the
screen
for
the
transmitter
you
wish
to
adjust
.
Short
-
press
the
Left
Navigation
button
to
cycle
between
Auto
and
Dynamic
modes
,
or
long
-
press
it
to
toggle
GainAssist
on
or
off
.
Auto
The
Auto
GainAssist
mode
will
give
you
a
smoother
,
more
consistent
sound
,
which
can
be
better
in
a
recording
scenario
like
an
interview
where
your
audio
levels
are
jumping
around
a
lot
.
Dynamic
Wireless
PRO
/
USER
GUIDE
&
SUPPORT
EN
US
0
2/20/24, 9:57 AM
Wireless PRO | USER GUIDE & SUPPORT | RØDE
https://rode.com/en-us/user-guides/wireless-pro
20/41
The
Dynamic
GainAssist
mode
balances
your
audio
while
maintaining
dynamics
,
resulting
in
a
more
“
natural
”
sound
.
This
can
be
better
in
a
controlled
recording
environment
where
the
sound
you
’
re
recording
is
more
even
.
Note
:
GainAssist
does
not
apply
to
on
-
board
recordings
.
Manual Input Gain
If
you
have
the
GainAssist
setting
disabled
for
your
transmitters
or
RX
Mic
,
you
’
re
able
to
manually
adjust
the
input
gain
for
the
built
-
in
mic
or
connected
external
mic
.
To
disable
GainAssist
,
long
-
press
the
Left
Navigation
button
when
in
your
desired
transmitter
screen
until
AUTO
or
DYNAMIC
is
replaced
by
a
dB
level
.
In
the
same
screen
,
you
can
set
the
input
gain
level
by
short
-
pressing
the
Left
Navigation
button
,
and
then
adjusting
the
gain
up
or
down
(
in
1
dB
increments
)
with
the
Left
and
Right
Navigation
buttons
.
Wireless
PRO
/
USER
GUIDE
&
SUPPORT
EN
US
0
2/20/24, 9:57 AM
Wireless PRO | USER GUIDE & SUPPORT | RØDE
https://rode.com/en-us/user-guides/wireless-pro
21/41
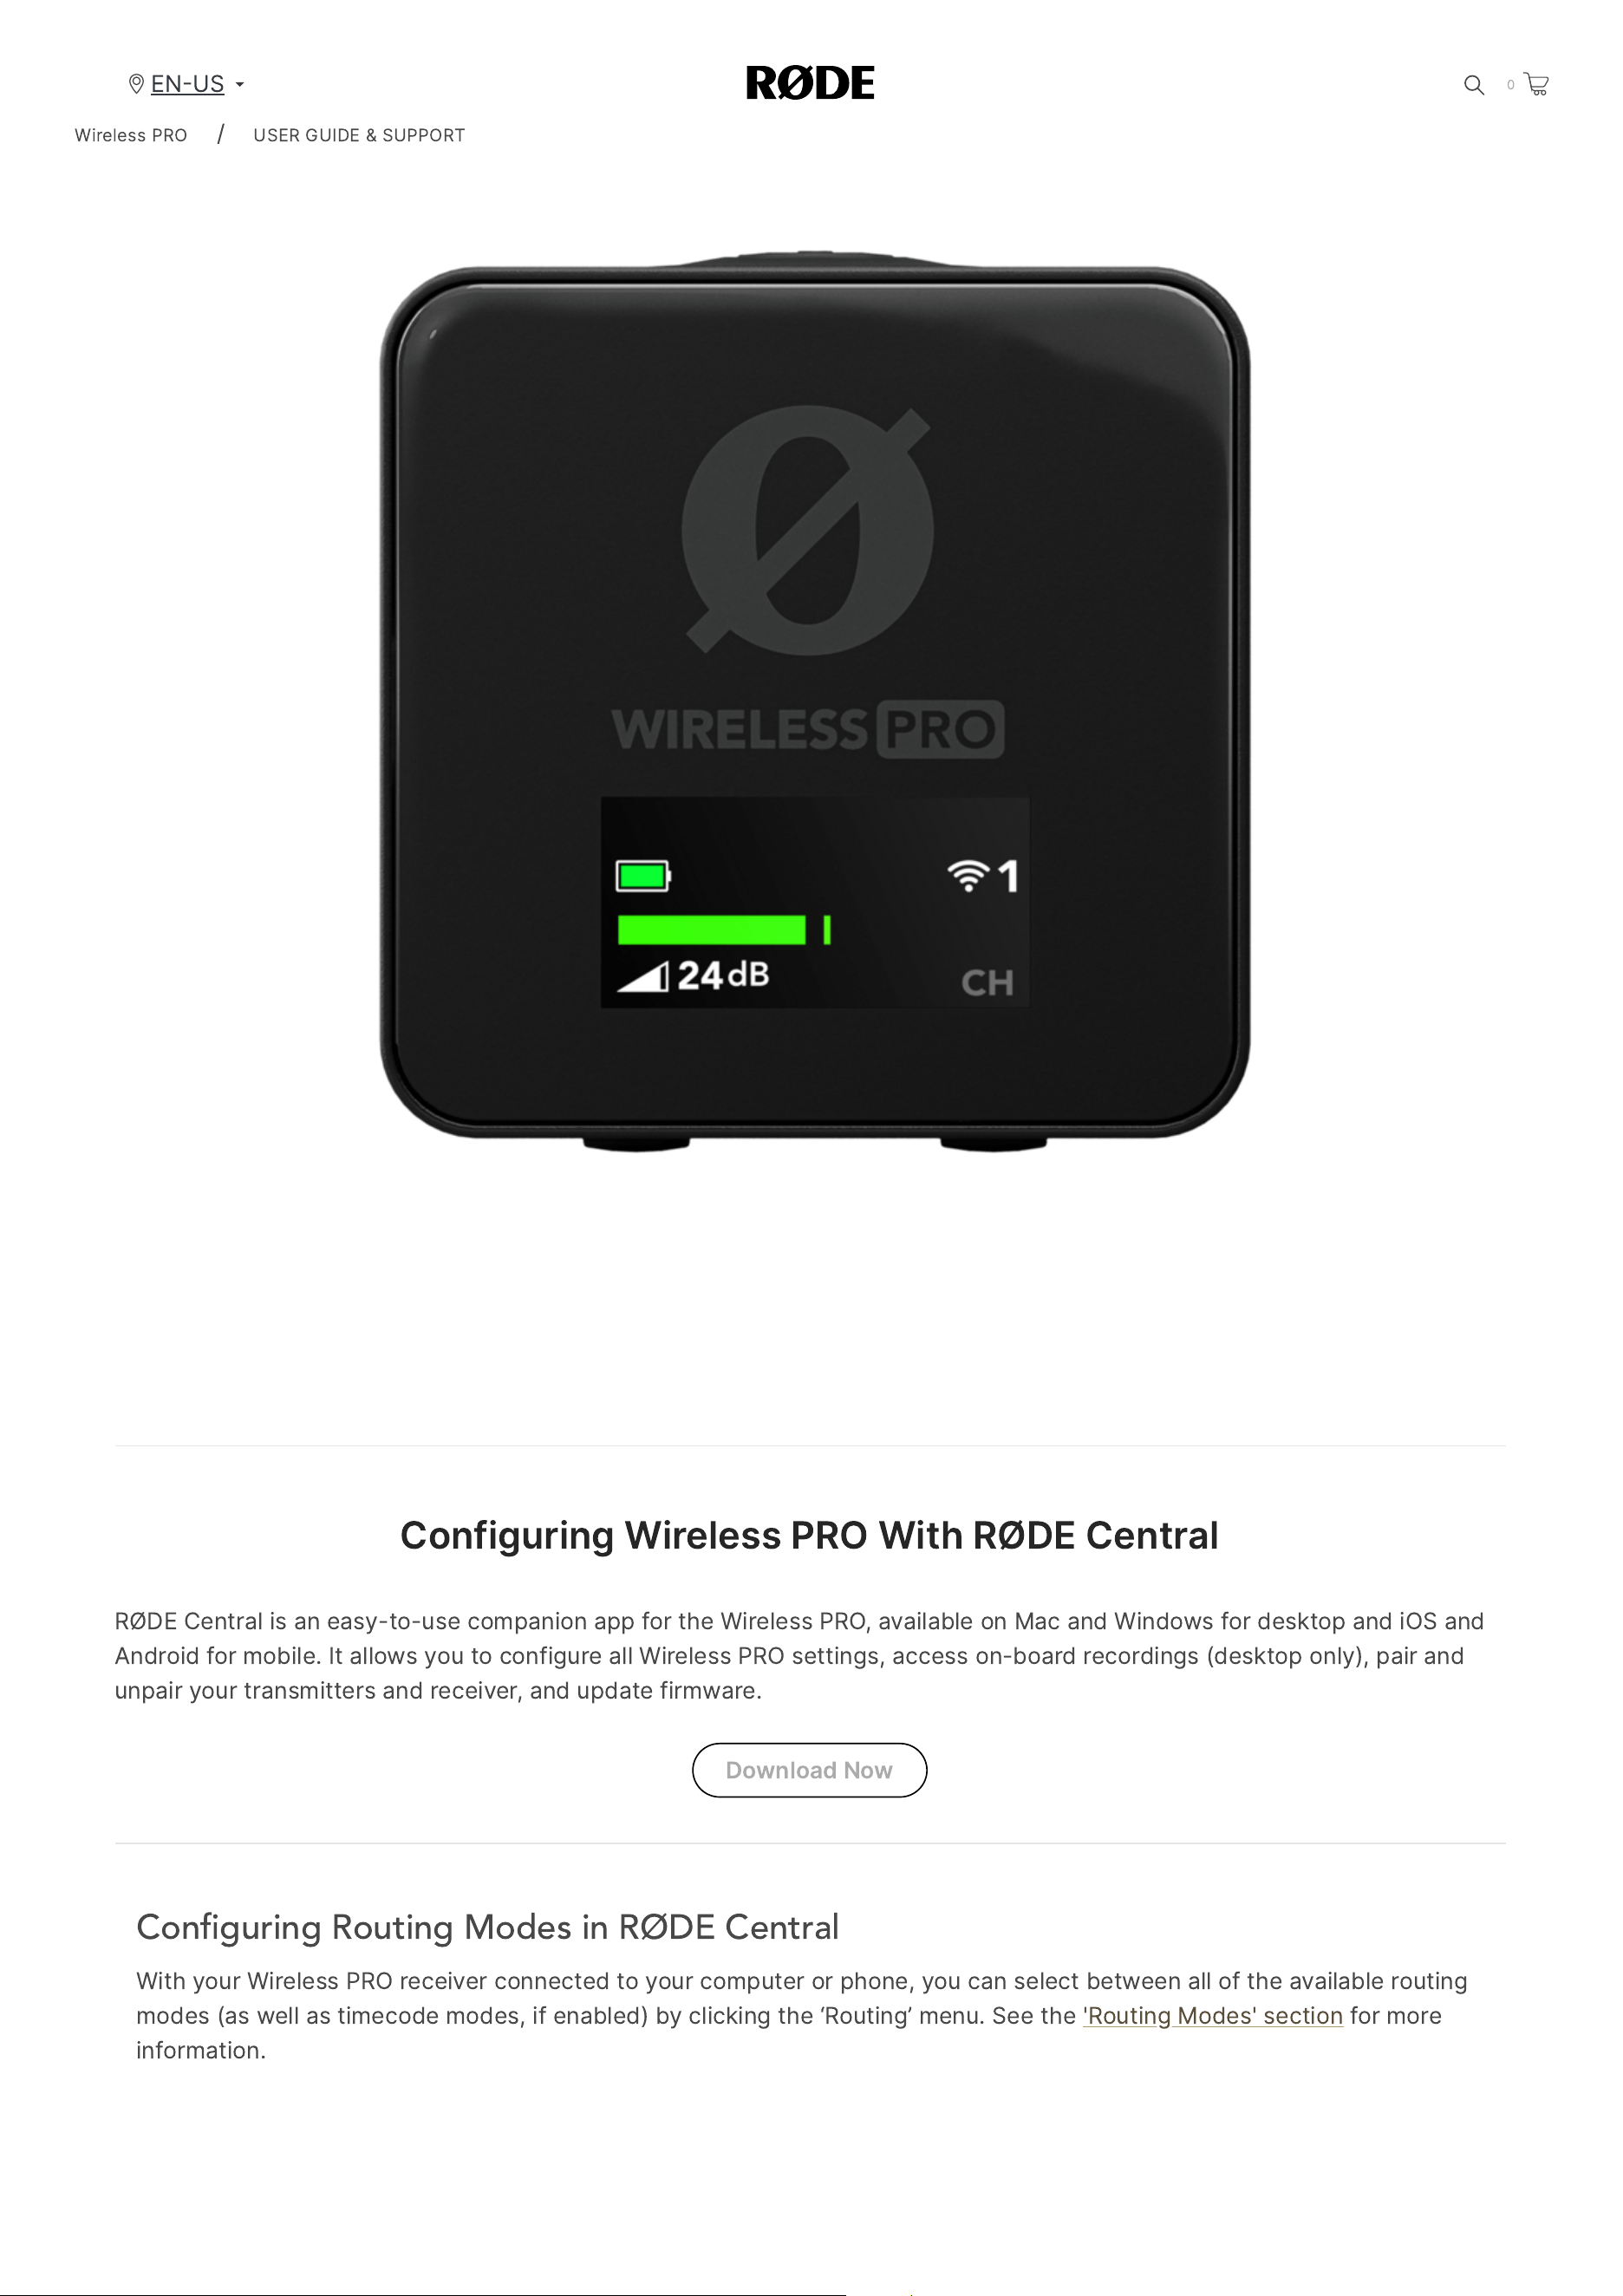
Configuring
Wireless
PRO
With
RØDE
Central
RØDE
Central
is
an
easy
-
to
-
use
companion
app
for
the
Wireless
PRO
,
available
on
Mac
and
Windows
for
desktop
and
iOS
and
Android
for
mobile
.
It
allows
you
to
configure
all
Wireless
PRO
settings
,
access
on
-
board
recordings
(
desktop
only
),
pair
and
unpair
your
transmitters
and
receiver
,
and
update
firmware
.
Download
Now
Con
fi
guring Routing Modes in RØDE Central
With
your
Wireless
PRO
receiver
connected
to
your
computer
or
phone
,
you
can
select
between
all
of
the
available
routing
modes
(
as
well
as
timecode
modes
,
if
enabled
)
by
clicking
the
‘
Routing
’
menu
.
See
the
'
Routing
Modes
'
section
for
more
information
.
Wireless
PRO
/
USER
GUIDE
&
SUPPORT
EN
US
0
2/20/24, 9:57 AM
Wireless PRO | USER GUIDE & SUPPORT | RØDE
https://rode.com/en-us/user-guides/wireless-pro
22/41
Con
fi
guring Camera Presets in RØDE Central
In
RØDE
Central
,
you
can
select
from
a
list
of
presets
for
a
wide
range
a
popular
camera
models
.
These
presets
automatically
set
the
gain
levels
of
your
Wireless
PRO
'
s
output
to
best
match
the
camera
you
’
re
using
it
with
.
To
access
these
presets
,
connect
your
Wireless
PRO
receiver
to
your
computer
and
open
RØDE
Central
(
desktop
).
Click
‘
Gain
Mode
’
and
select
'
Preset
’
with
the
camera
icon
.
Now
you
can
click
the
next
button
labelled
‘
Preset
’,
click
the
‘+’
button
,
and
select
the
manufacturer
and
model
of
camera
you
are
using
.
On
the
next
screen
,
you
’
ll
find
a
link
to
a
guide
on
setting
up
your
camera
’
s
audio
settings
for
optimal
use
with
the
Wireless
PRO
.
Once
you
’
ve
followed
these
instructions
,
click
‘
Add
’
to
load
the
preset
onto
your
Wireless
PRO
.
Repeat
the
process
to
add
other
presets
(
up
to
10
for
any
other
cameras
you
’
ll
be
using
with
your
Wireless
PRO
.
Wireless
PRO
/
USER
GUIDE
&
SUPPORT
EN
US
0
2/20/24, 9:57 AM
Wireless PRO | USER GUIDE & SUPPORT | RØDE
https://rode.com/en-us/user-guides/wireless-pro
23/41
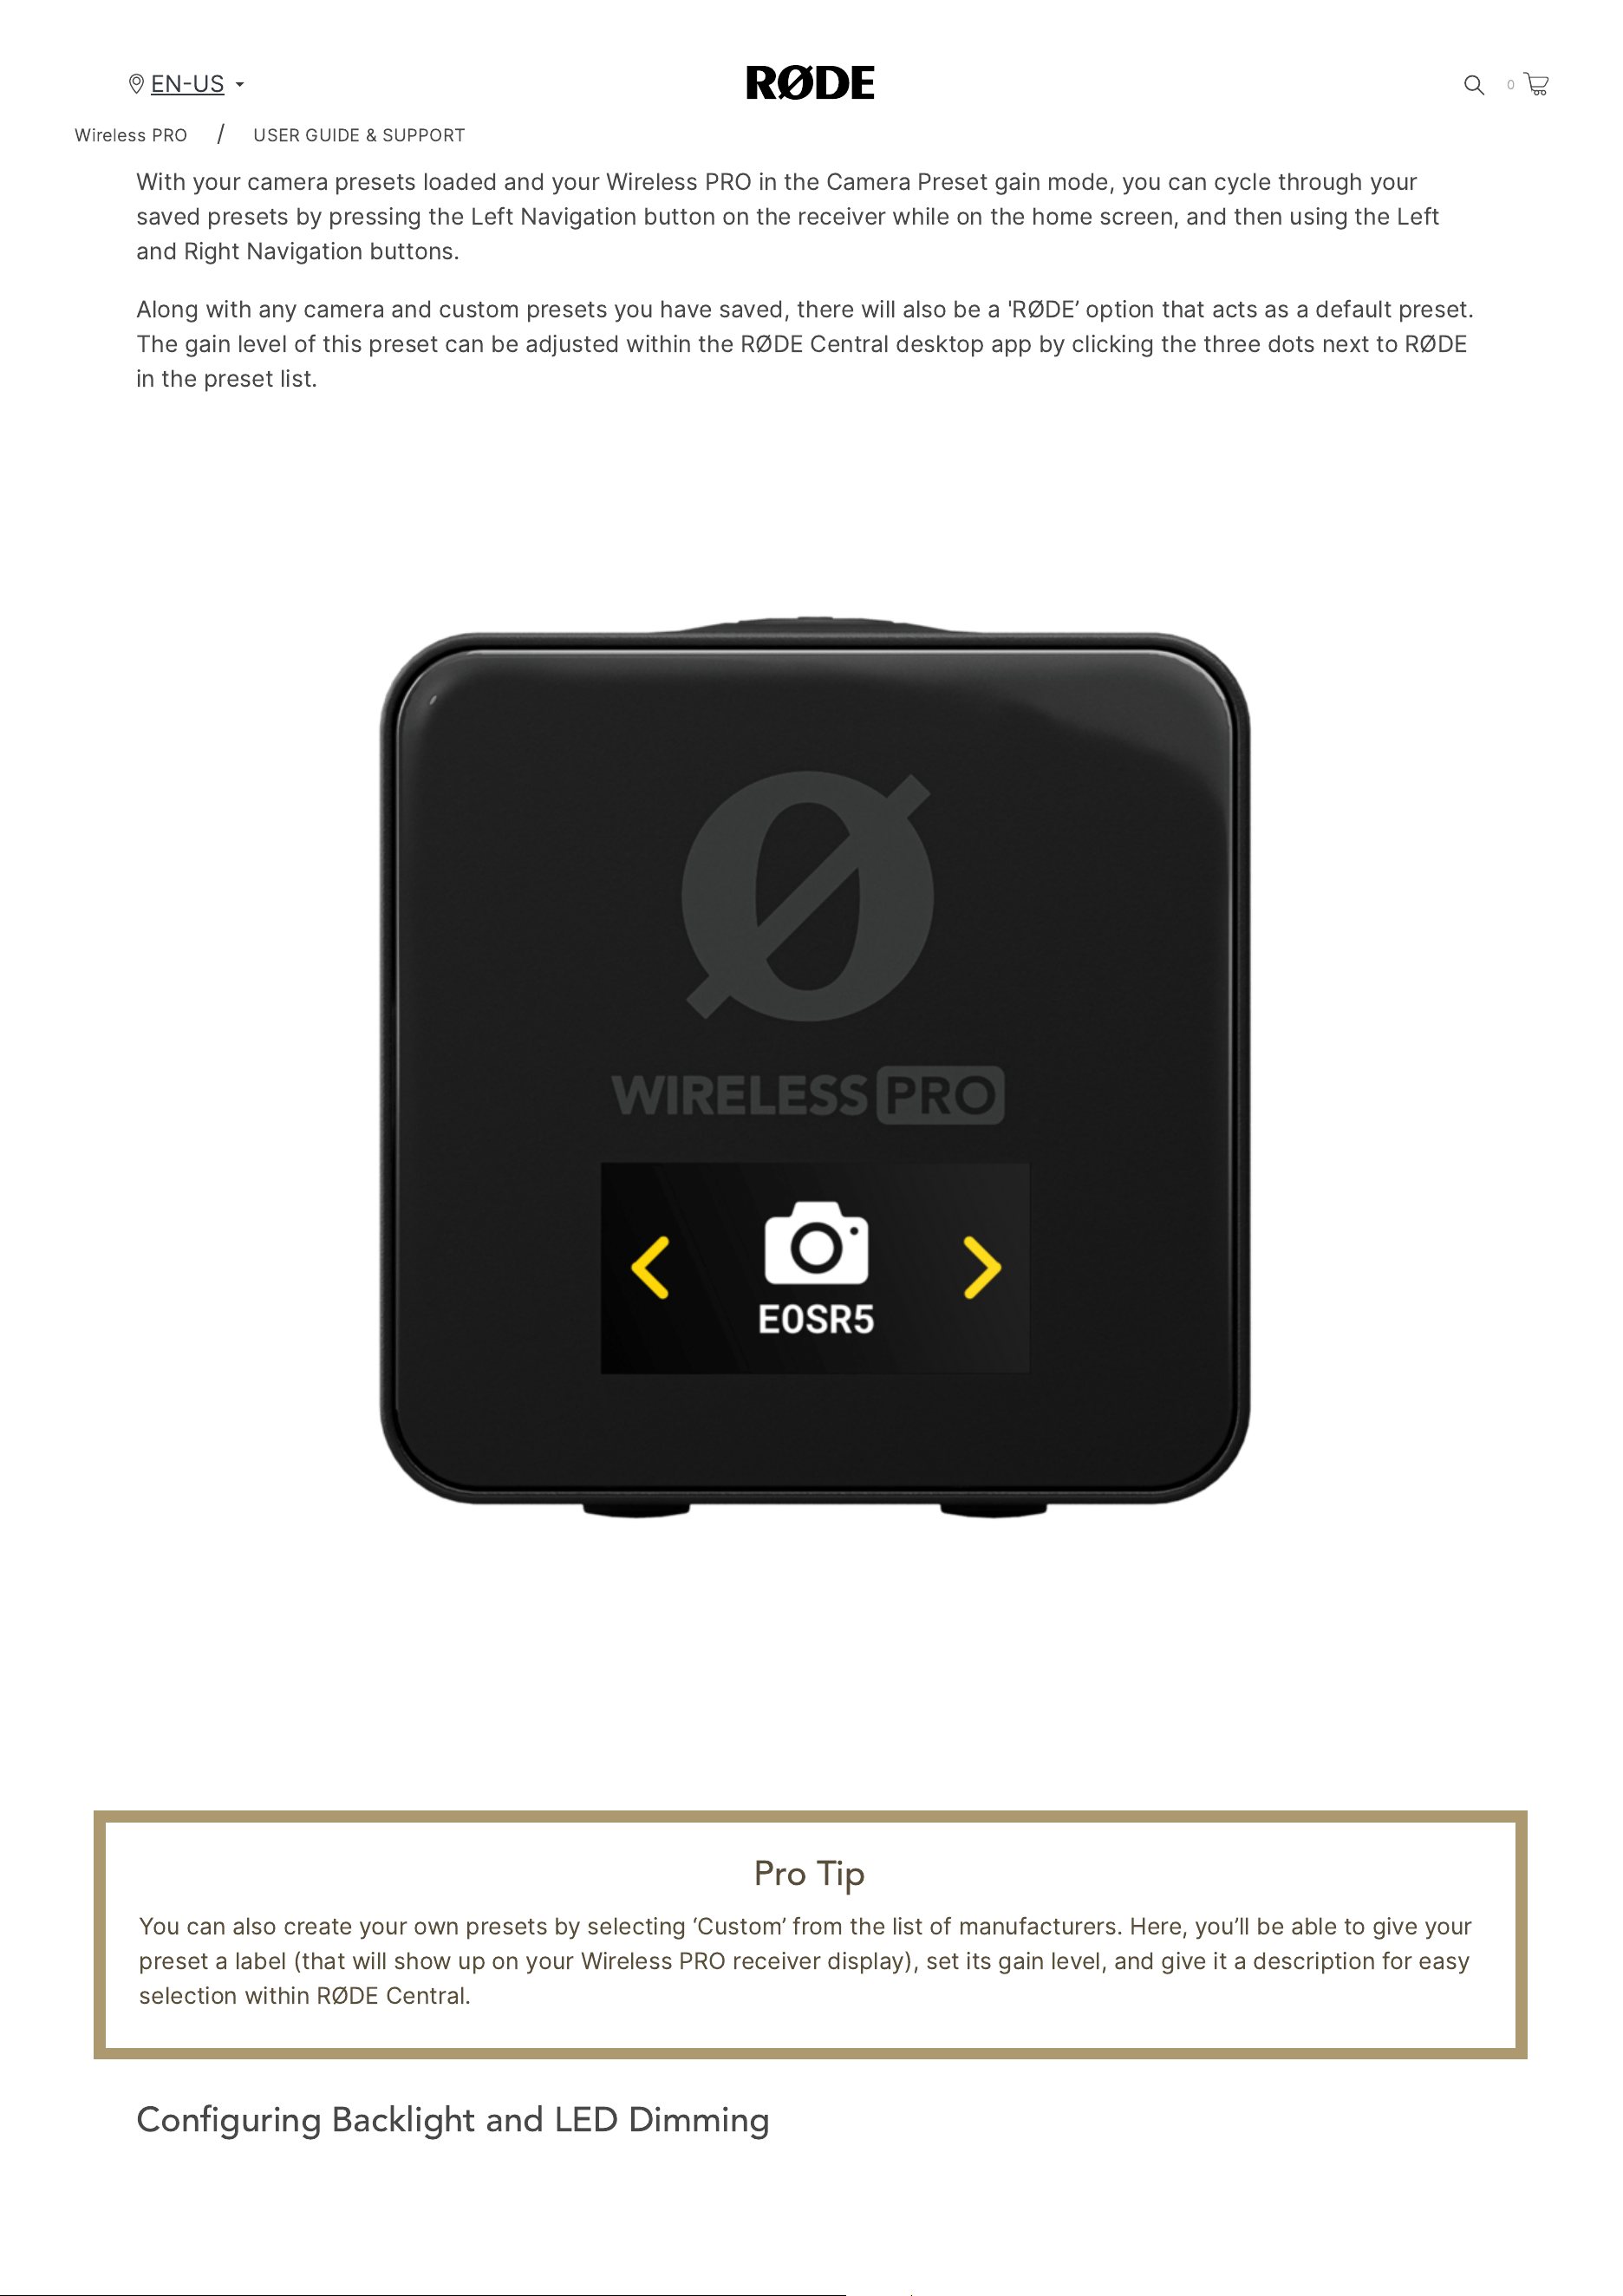
Selecting a Camera Preset on Your Receiver
With
your
camera
presets
loaded
and
your
Wireless
PRO
in
the
Camera
Preset
gain
mode
,
you
can
cycle
through
your
saved
presets
by
pressing
the
Left
Navigation
button
on
the
receiver
while
on
the
home
screen
,
and
then
using
the
Left
and
Right
Navigation
buttons
.
Along
with
any
camera
and
custom
presets
you
have
saved
,
there
will
also
be
a
'
RØDE
’
option
that
acts
as
a
default
preset
.
The
gain
level
of
this
preset
can
be
adjusted
within
the
RØDE
Central
desktop
app
by
clicking
the
three
dots
next
to
RØDE
in
the
preset
list
.
Pro Tip
You
can
also
create
your
own
presets
by
selecting
‘
Custom
’
from
the
list
of
manufacturers
.
Here
,
you
’
ll
be
able
to
give
your
preset
a
label
(
that
will
show
up
on
your
Wireless
PRO
receiver
display
),
set
its
gain
level
,
and
give
it
a
description
for
easy
selection
within
RØDE
Central
.
Con
fi
guring Backlight and LED Dimming
Wireless
PRO
/
USER
GUIDE
&
SUPPORT
EN
US
0
2/20/24, 9:57 AM
Wireless PRO | USER GUIDE & SUPPORT | RØDE
https://rode.com/en-us/user-guides/wireless-pro
24/41
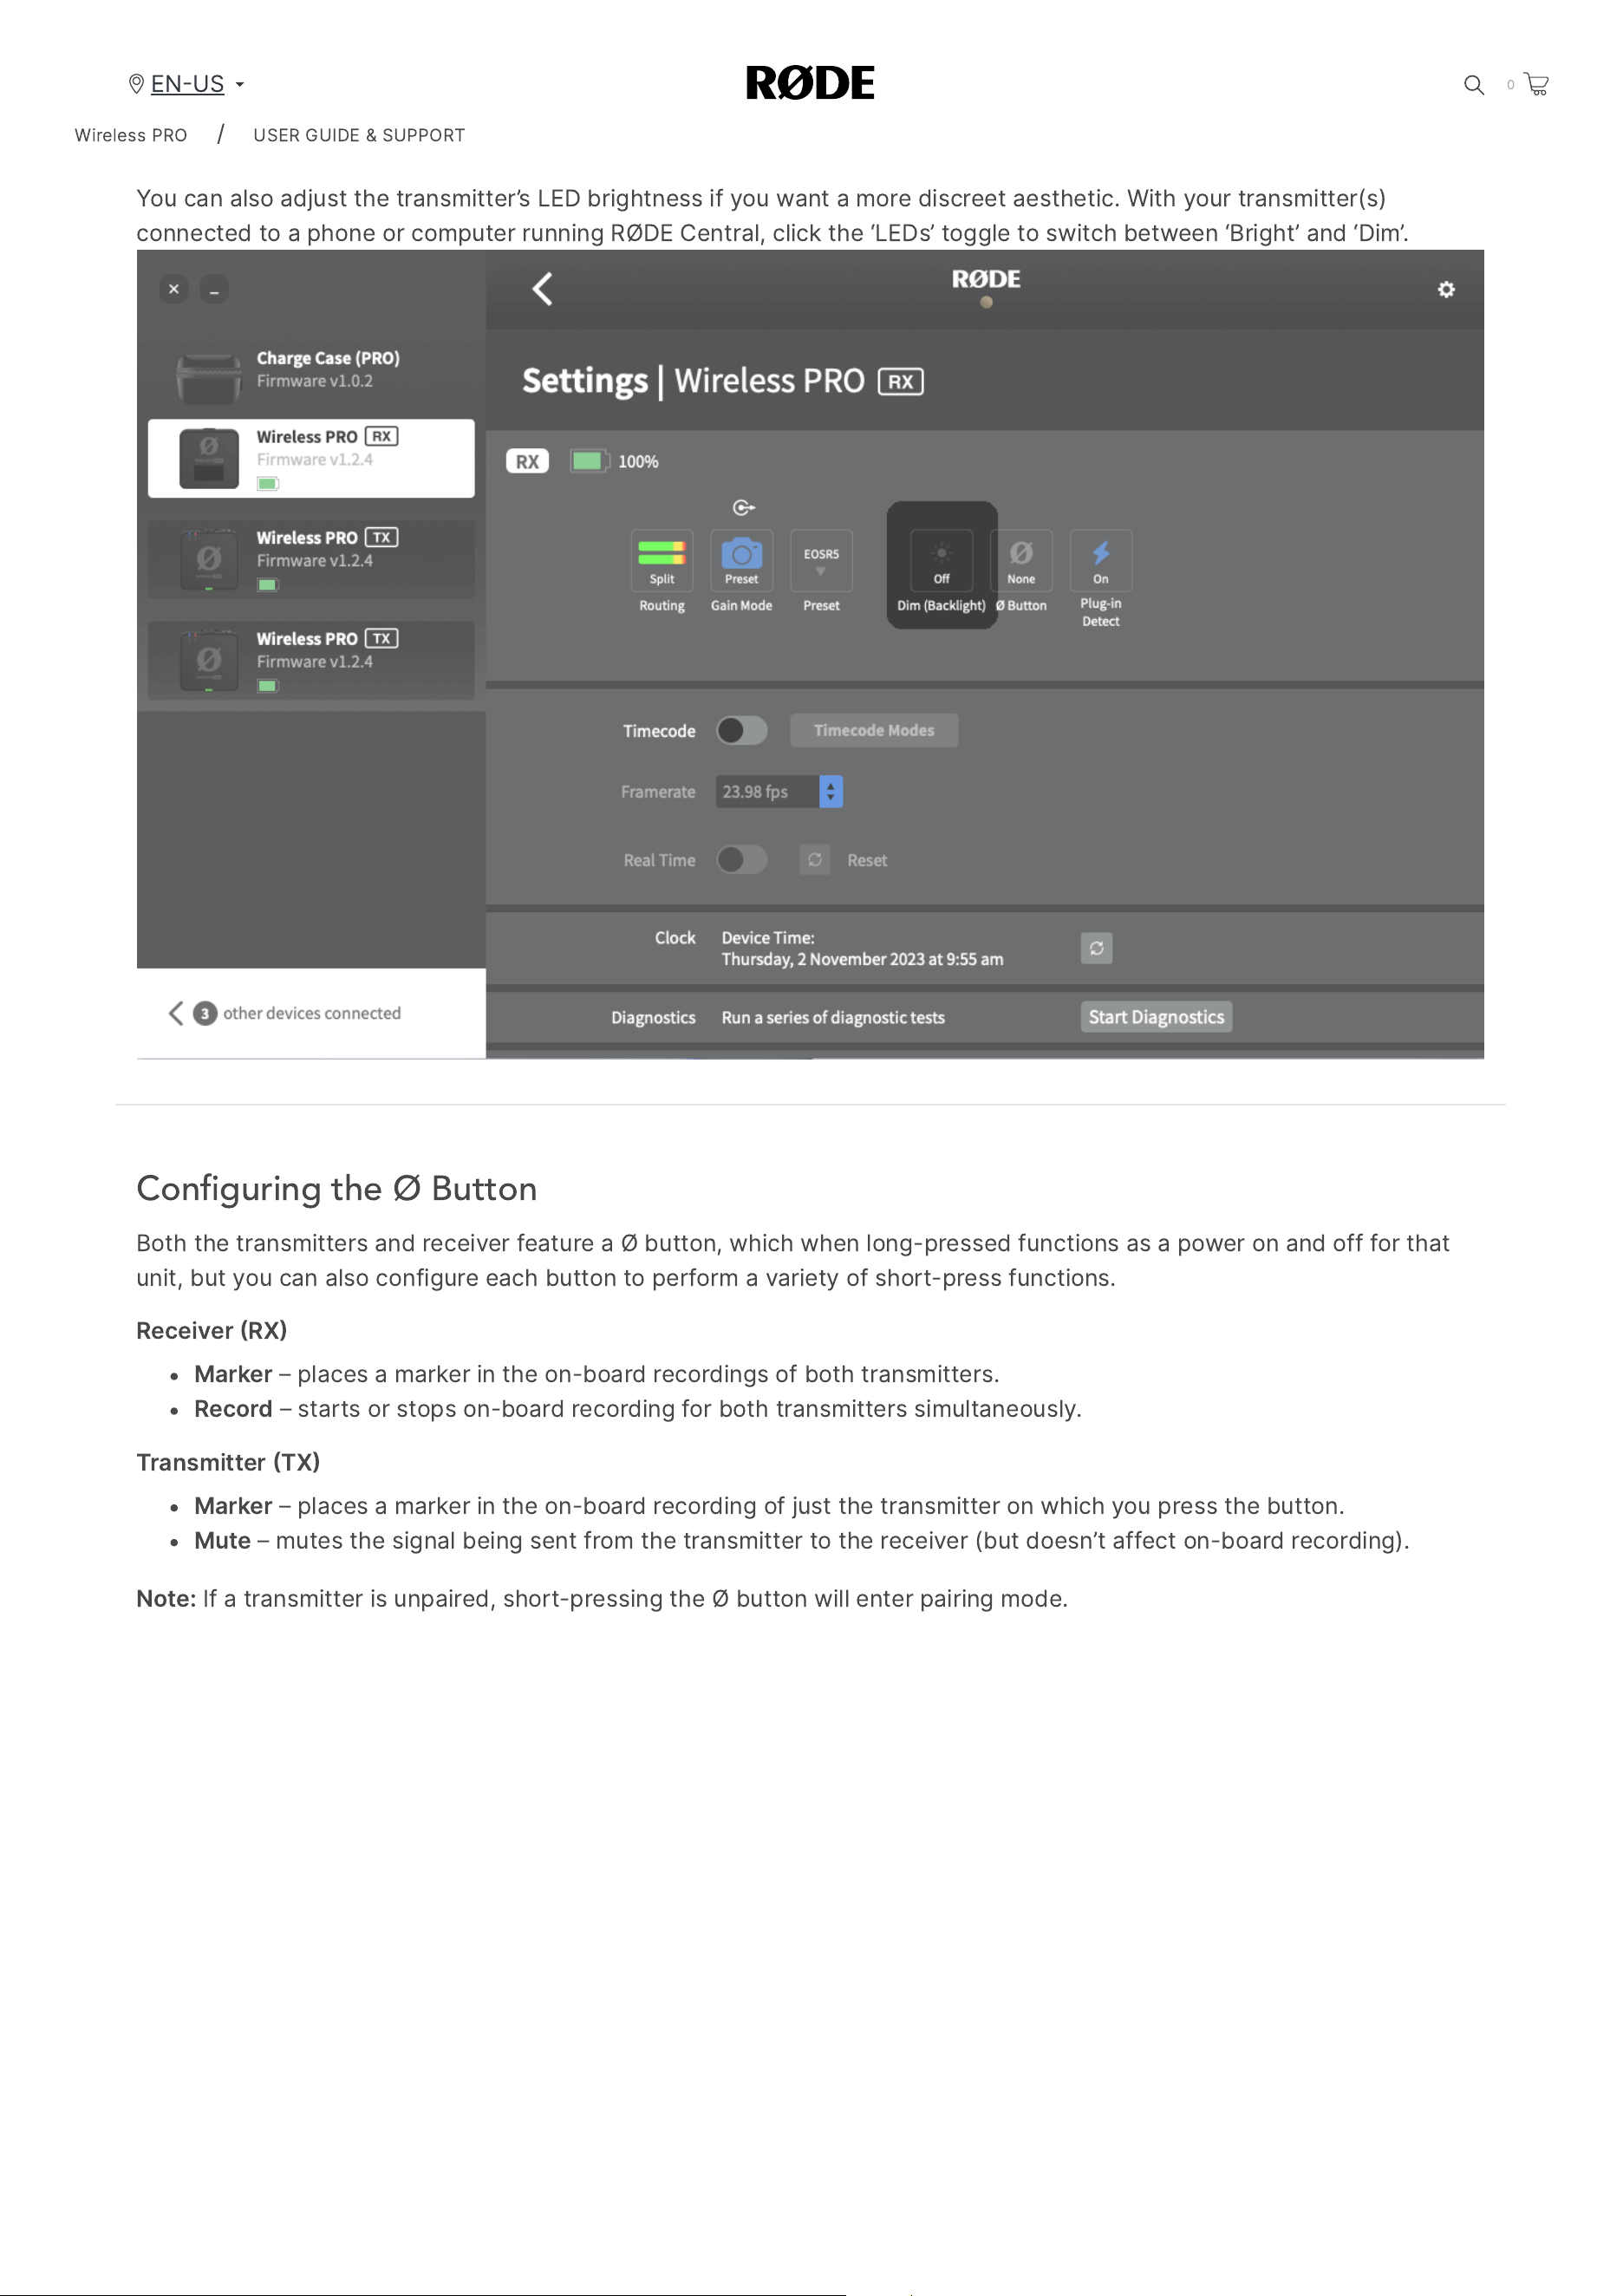
The
Wireless
PRO
receiver
’
s
screen
features
a
backlight
that
you
can
set
to
automatically
dim
after
10
seconds
of
inactivity
.
To
enable
this
,
connect
your
receiver
to
a
computer
or
phone
,
open
RØDE
Central
,
then
toggle
the
‘
Dim
Backlight
)’
setting
to
‘
Auto
’.
Toggle
it
to
‘
Off
’
to
disable
automatic
dimming
.
You
can
also
adjust
the
transmitter
’
s
LED
brightness
if
you
want
a
more
discreet
aesthetic
.
With
your
transmitter
(
s
)
connected
to
a
phone
or
computer
running
RØDE
Central
,
click
the
‘
LEDs
’
toggle
to
switch
between
‘
Bright
’
and
‘
Dim
’.
Con
fi
guring the Ø Button
Both
the
transmitters
and
receiver
feature
a
Ø
button
,
which
when
long
-
pressed
functions
as
a
power
on
and
off
for
that
unit
,
but
you
can
also
configure
each
button
to
perform
a
variety
of
short
-
press
functions
.
Receiver
RX
Marker
–
places
a
marker
in
the
on
-
board
recordings
of
both
transmitters
.
Record
–
starts
or
stops
on
-
board
recording
for
both
transmitters
simultaneously
.
Transmitter
TX
Marker
–
places
a
marker
in
the
on
-
board
recording
of
just
the
transmitter
on
which
you
press
the
button
.
Mute
–
mutes
the
signal
being
sent
from
the
transmitter
to
the
receiver
(
but
doesn
’
t
affect
on
-
board
recording
).
Note
:
If
a
transmitter
is
unpaired
,
short
-
pressing
the
Ø
button
will
enter
pairing
mode
.
Wireless
PRO
/
USER
GUIDE
&
SUPPORT
EN
US
0
2/20/24, 9:57 AM
Wireless PRO | USER GUIDE & SUPPORT | RØDE
https://rode.com/en-us/user-guides/wireless-pro
25/41
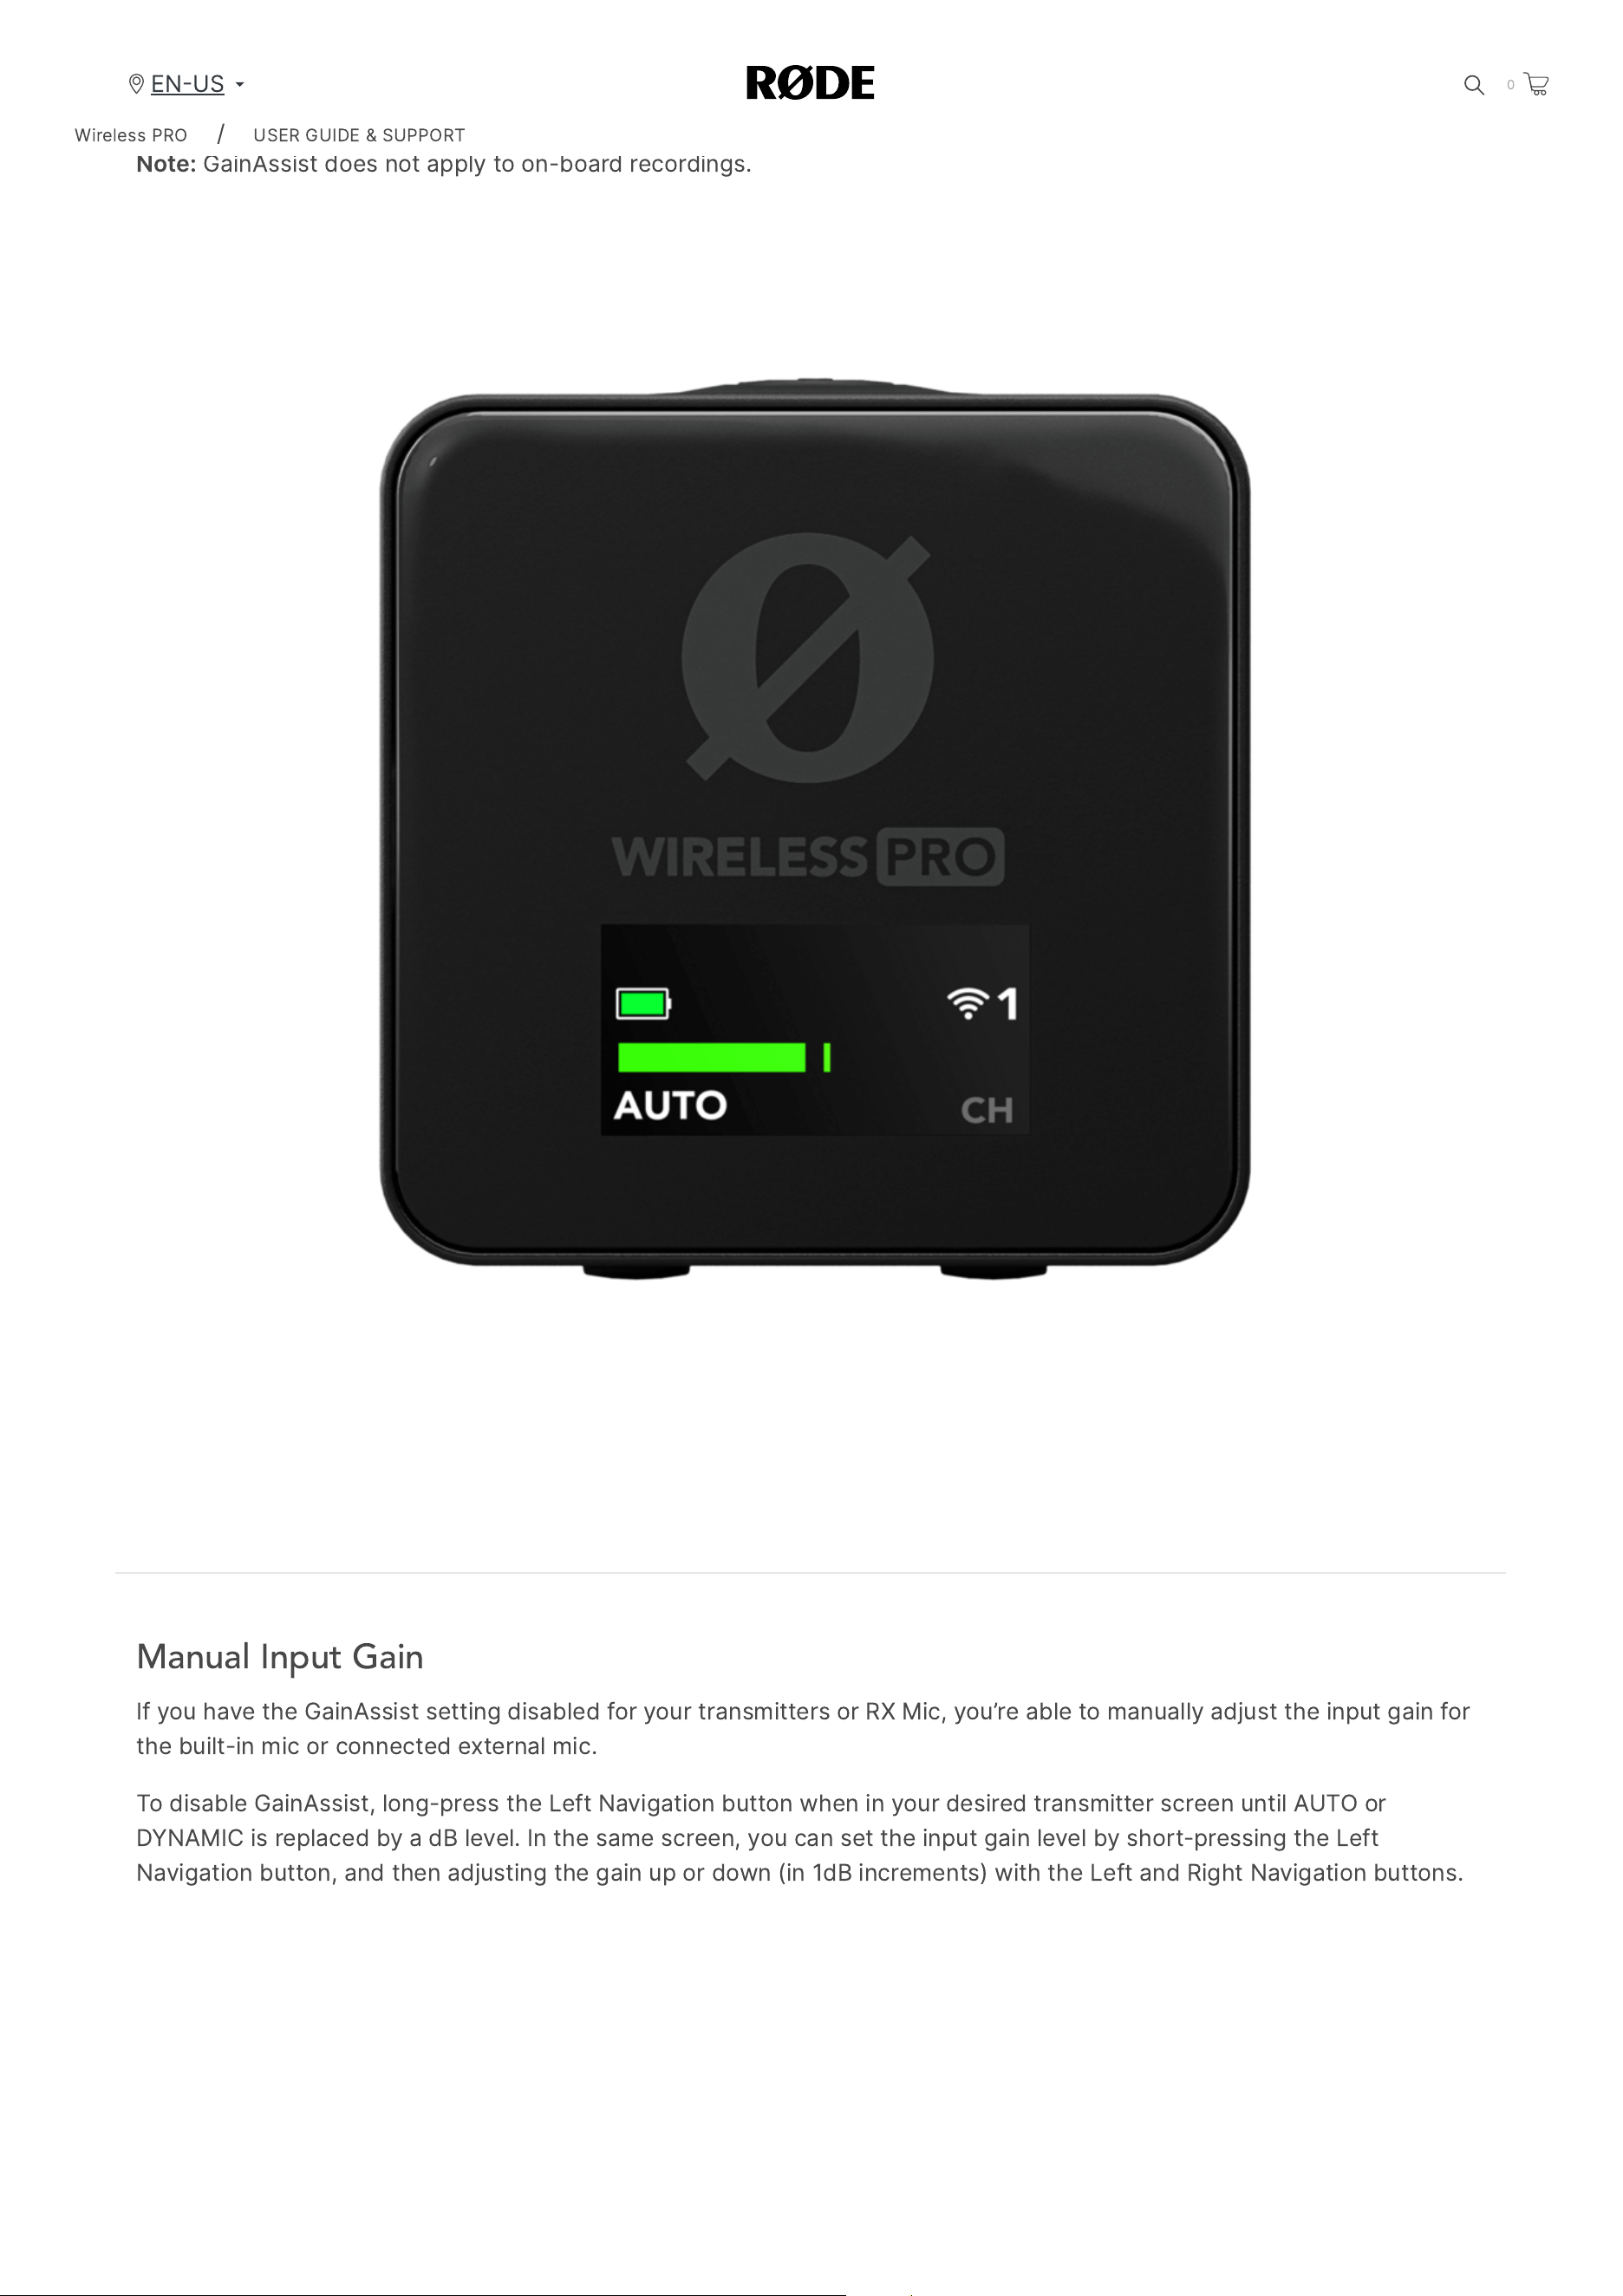
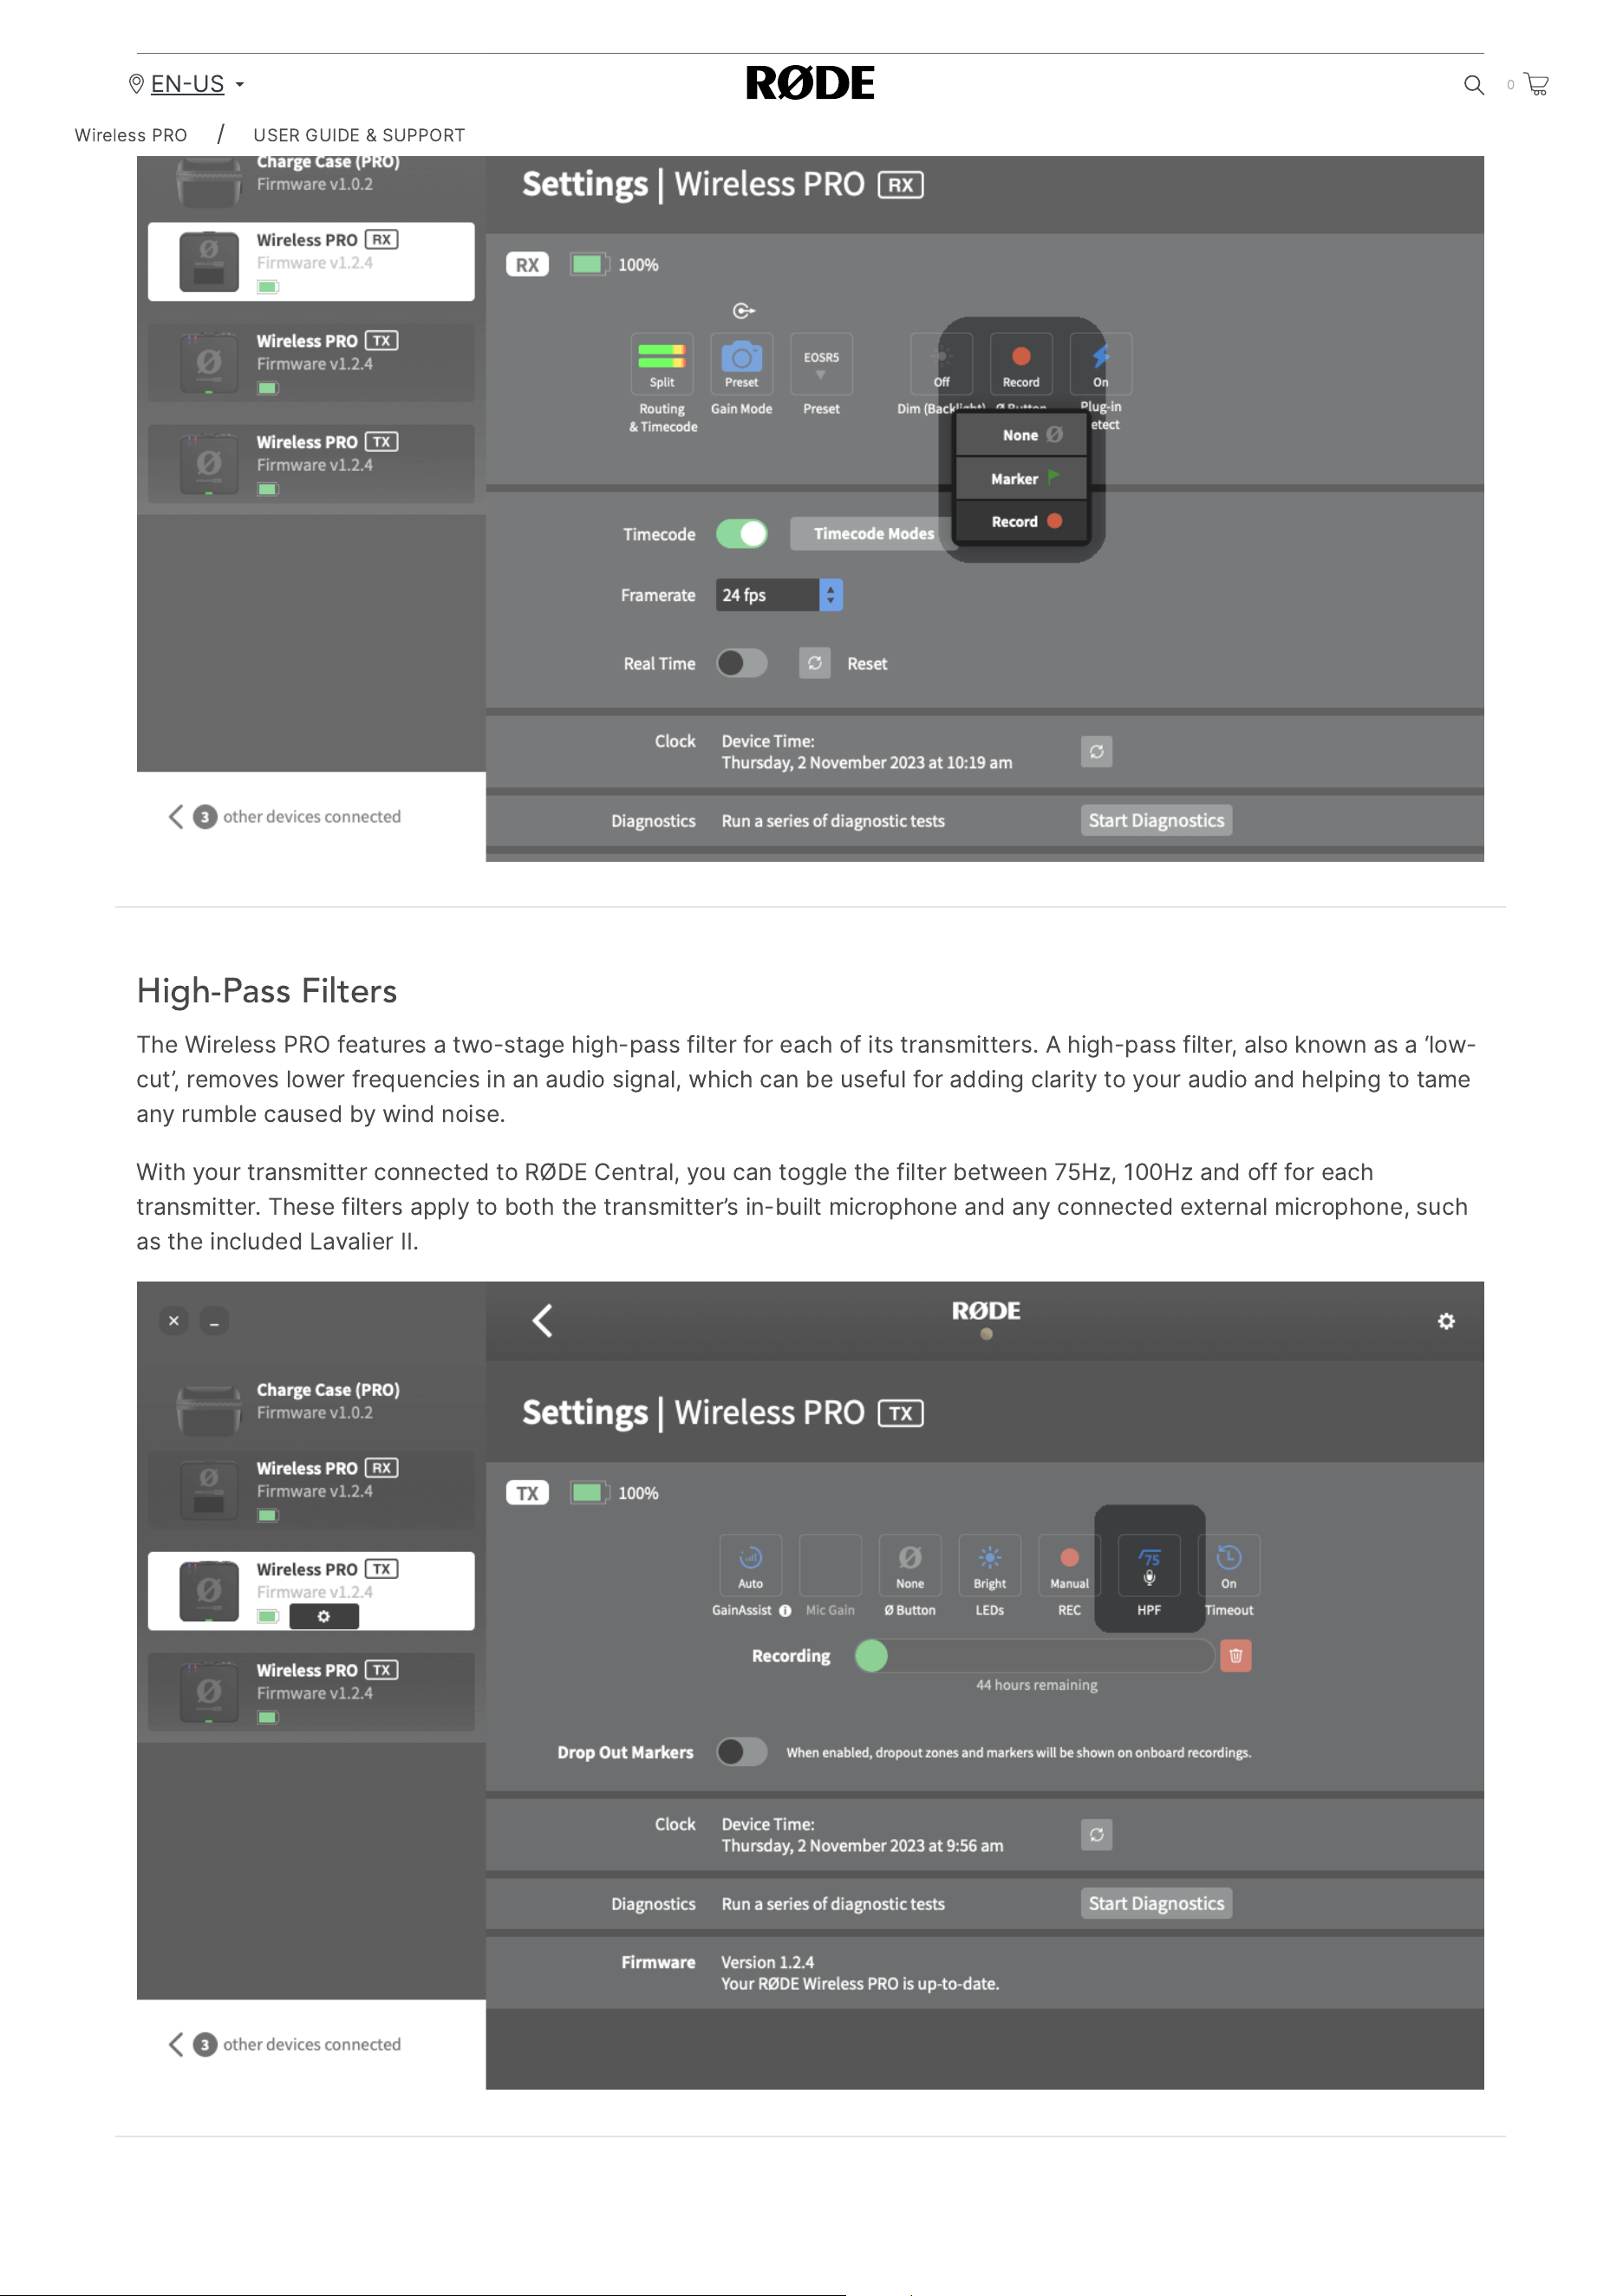
High-Pass Filters
The
Wireless
PRO
features
a
two
-
stage
high
-
pass
filter
for
each
of
its
transmitters
.
A
high
-
pass
filter
,
also
known
as
a
‘
low
-
cut
’,
removes
lower
frequencies
in
an
audio
signal
,
which
can
be
useful
for
adding
clarity
to
your
audio
and
helping
to
tame
any
rumble
caused
by
wind
noise
.
With
your
transmitter
connected
to
RØDE
Central
,
you
can
toggle
the
filter
between
75
Hz
, 100
Hz
and
off
for
each
transmitter
.
These
filters
apply
to
both
the
transmitter
’
s
in
-
built
microphone
and
any
connected
external
microphone
,
such
as
the
included
Lavalier
II
.
Wireless
PRO
/
USER
GUIDE
&
SUPPORT
EN
US
0
2/20/24, 9:57 AM
Wireless PRO | USER GUIDE & SUPPORT | RØDE
https://rode.com/en-us/user-guides/wireless-pro
26/41
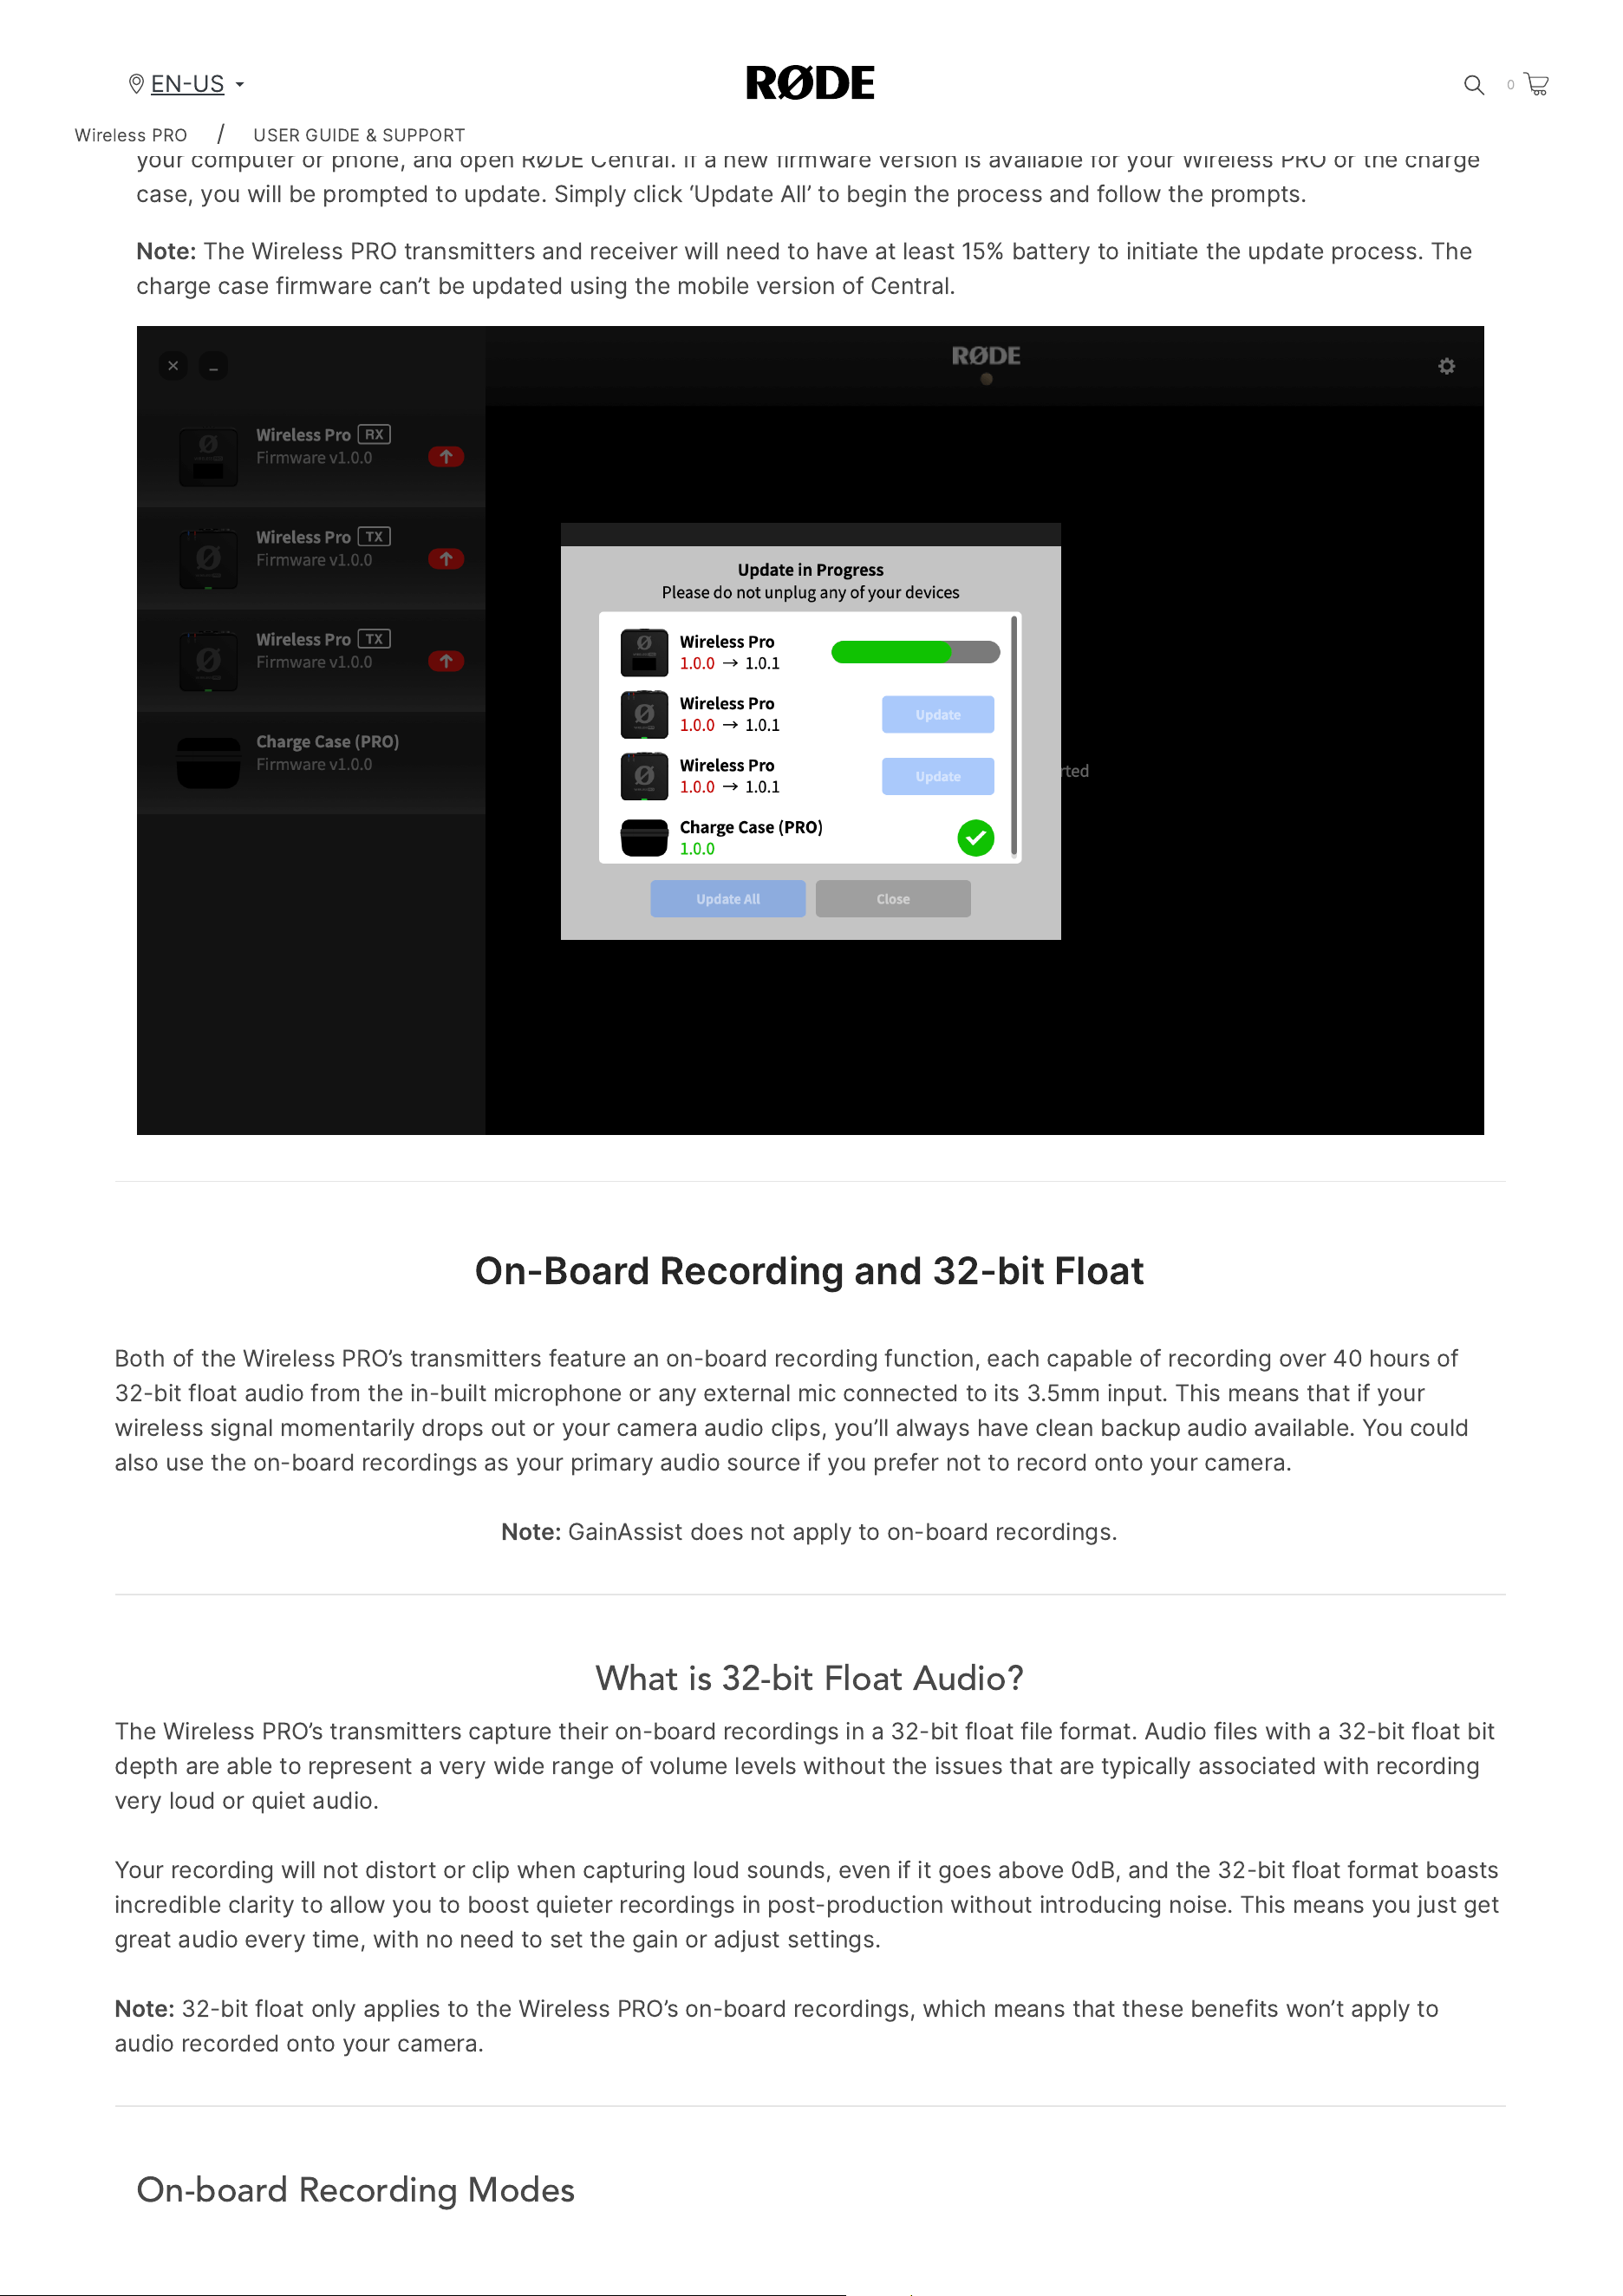
Updating Wireless PRO Firmware with RØDE Central
To
update
the
firmware
on
your
Wireless
PRO
,
place
the
receiver
and
both
transmitters
in
the
charge
case
,
connect
it
to
your
computer
or
phone
,
and
open
RØDE
Central
.
If
a
new
firmware
version
is
available
for
your
Wireless
PRO
or
the
charge
case
,
you
will
be
prompted
to
update
.
Simply
click
‘
Update
All
’
to
begin
the
process
and
follow
the
prompts
.
Note
:
The
Wireless
PRO
transmitters
and
receiver
will
need
to
have
at
least
15%
battery
to
initiate
the
update
process
.
The
charge
case
firmware
can
’
t
be
updated
using
the
mobile
version
of
Central
.
On
-
Board
Recording
and
32-
bit
Float
Both
of
the
Wireless
PRO
’
s
transmitters
feature
an
on
-
board
recording
function
,
each
capable
of
recording
over
40
hours
of
32-
bit
float
audio
from
the
in
-
built
microphone
or
any
external
mic
connected
to
its
3.5
mm
input
.
This
means
that
if
your
wireless
signal
momentarily
drops
out
or
your
camera
audio
clips
,
you
’
ll
always
have
clean
backup
audio
available
.
You
could
also
use
the
on
-
board
recordings
as
your
primary
audio
source
if
you
prefer
not
to
record
onto
your
camera
.
Note
:
GainAssist
does
not
apply
to
on
-
board
recordings
.
What is 32-bit Float Audio?
The
Wireless
PRO
’
s
transmitters
capture
their
on
-
board
recordings
in
a
32-
bit
float
file
format
.
Audio
files
with
a
32-
bit
float
bit
depth
are
able
to
represent
a
very
wide
range
of
volume
levels
without
the
issues
that
are
typically
associated
with
recording
very
loud
or
quiet
audio
.
Your
recording
will
not
distort
or
clip
when
capturing
loud
sounds
,
even
if
it
goes
above
0
dB
,
and
the
32-
bit
float
format
boasts
incredible
clarity
to
allow
you
to
boost
quieter
recordings
in
post
-
production
without
introducing
noise
.
This
means
you
just
get
great
audio
every
time
,
with
no
need
to
set
the
gain
or
adjust
settings
.
Note
:
32-
bit
float
only
applies
to
the
Wireless
PRO
’
s
on
-
board
recordings
,
which
means
that
these
benefits
won
’
t
apply
to
audio
recorded
onto
your
camera
.
On-board Recording Modes
Wireless
PRO
/
USER
GUIDE
&
SUPPORT
EN
US
0
2/20/24, 9:57 AM
Wireless PRO | USER GUIDE & SUPPORT | RØDE
https://rode.com/en-us/user-guides/wireless-pro
27/41
There
are
two
different
modes
for
recording
on
your
Wireless
PRO
transmitters
that
you
can
configure
using
RØDE
Central
Manual
and
Always
.
Manual
:
In
this
mode
,
on
-
board
recordings
are
started
and
stopped
when
you
press
the
record
button
on
the
transmitter
.
Always
:
In
this
mode
,
on
-
board
recordings
will
always
be
running
if
the
transmitter
is
powered
on
,
even
if
it
’
s
not
paired
or
connected
to
a
receiver
.
You
can
also
press
the
receiver
'
s
Ø
button
to
start
and
stop
recording
on
your
transmitters
when
it
'
s
in
'
Record
'
mode
(
see
the
'
Configuring
the
Ø
Button
'
section
for
more
information
).
Note
:
For
transmitters
in
'
Manual
'
recording
mode
,
using
the
receiver
'
s
Ø
button
will
start
or
stop
recording
,
just
as
the
transmitter
'
s
dedicated
record
button
does
.
But
for
transmitters
in
'
Always
'
recording
mode
,
pressing
the
receiver
'
s
Ø
button
will
start
a
new
recording
.
How to Export On-board Recordings
There
are
two
methods
for
exporting
your
on
-
board
recordings
onto
your
computer
from
your
Wireless
PRO
transmitters
.
You
can
either
quickly
copy
the
files
from
the
transmitters
(
direct
export
)
directly
or
use
RØDE
Central
.
While
it
’
s
faster
to
directly
export
your
recordings
to
your
desktop
,
using
RØDE
Central
gives
you
access
to
placed
markers
along
with
a
variety
of
export
options
,
such
as
the
ability
to
normalise
your
audio
and
change
its
file
format
,
sample
rate
,
bit
depth
and
loudness
.
Wireless
PRO
/
USER
GUIDE
&
SUPPORT
EN
US
0
2/20/24, 9:57 AM
Wireless PRO | USER GUIDE & SUPPORT | RØDE
https://rode.com/en-us/user-guides/wireless-pro
28/41
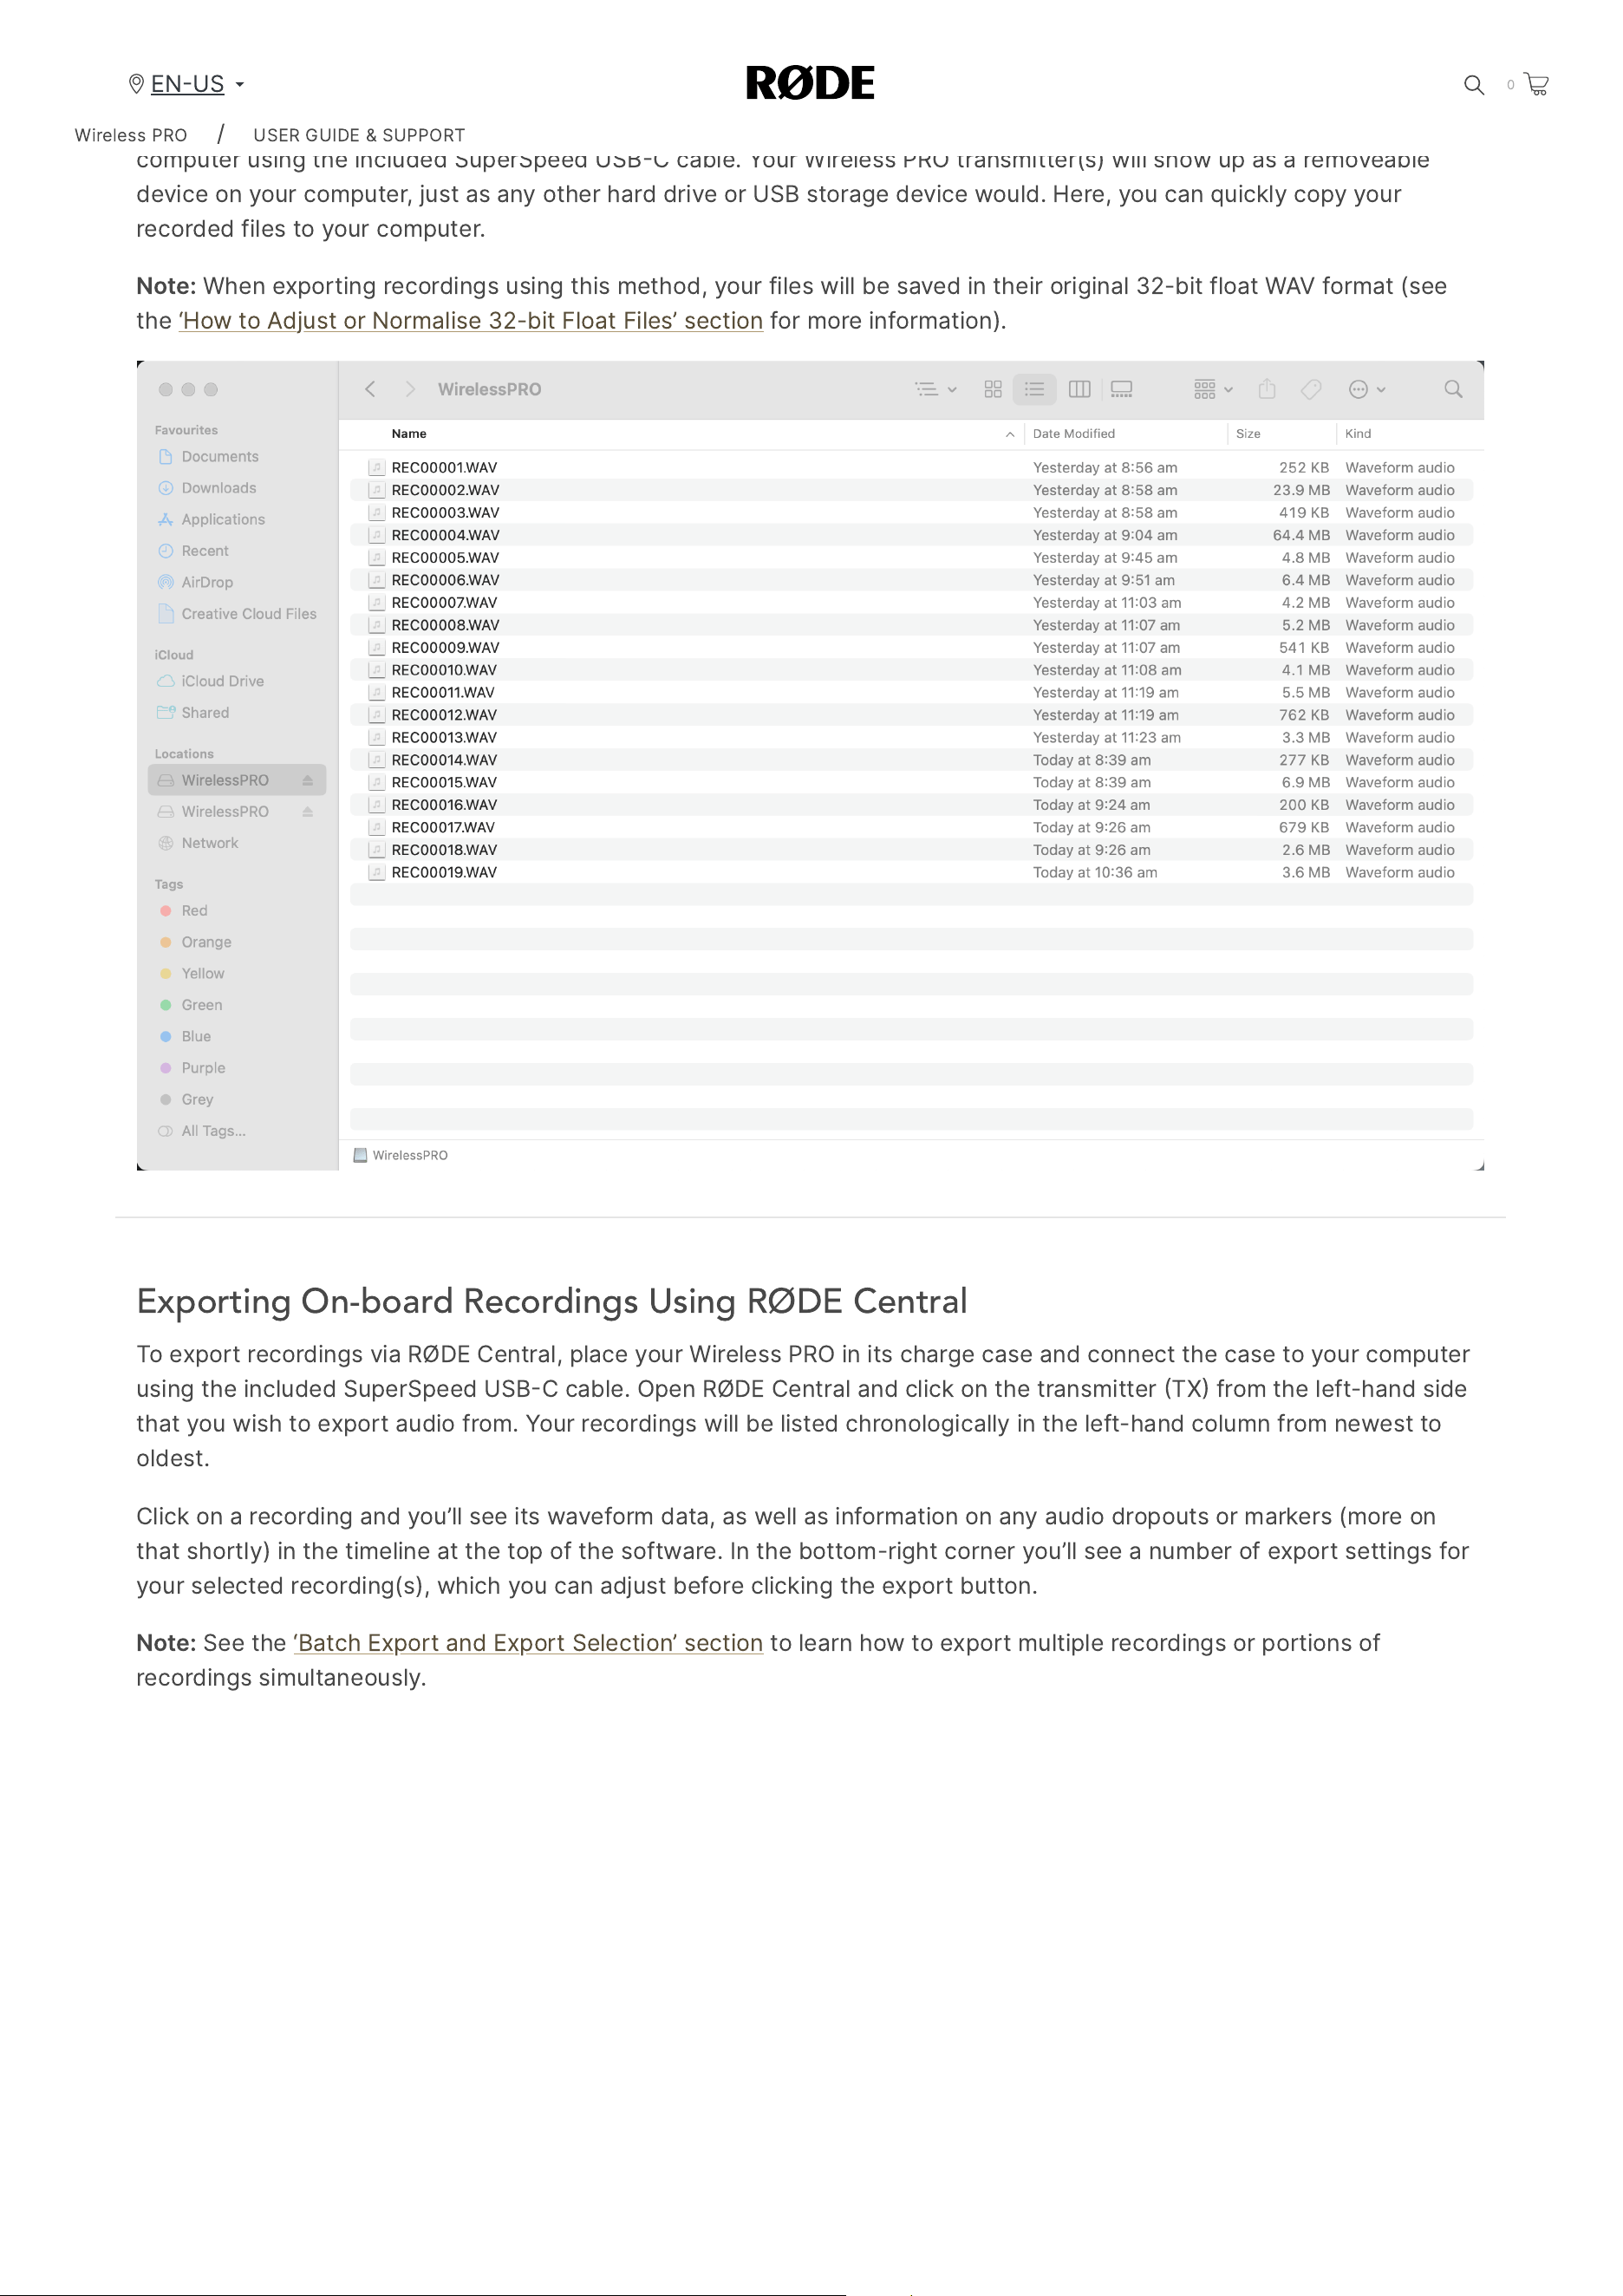
Direct WAV Export
To
export
recordings
directly
,
start
by
placing
your
Wireless
PRO
in
its
charge
case
and
connecting
the
case
to
your
computer
using
the
included
SuperSpeed
USB
C
cable
.
Your
Wireless
PRO
transmitter
(
s
)
will
show
up
as
a
removeable
device
on
your
computer
,
just
as
any
other
hard
drive
or
USB
storage
device
would
.
Here
,
you
can
quickly
copy
your
recorded
files
to
your
computer
.
Note
:
When
exporting
recordings
using
this
method
,
your
files
will
be
saved
in
their
original
32-
bit
float
WAV
format
(
see
the
‘
How
to
Adjust
or
Normalise
32-
bit
Float
Files
’
section
for
more
information
).
Exporting On-board Recordings Using RØDE Central
To
export
recordings
via
RØDE
Central
,
place
your
Wireless
PRO
in
its
charge
case
and
connect
the
case
to
your
computer
using
the
included
SuperSpeed
USB
C
cable
.
Open
RØDE
Central
and
click
on
the
transmitter
TX
from
the
left
-
hand
side
that
you
wish
to
export
audio
from
.
Your
recordings
will
be
listed
chronologically
in
the
left
-
hand
column
from
newest
to
oldest
.
Click
on
a
recording
and
you
’
ll
see
its
waveform
data
,
as
well
as
information
on
any
audio
dropouts
or
markers
(
more
on
that
shortly
)
in
the
timeline
at
the
top
of
the
software
.
In
the
bottom
-
right
corner
you
’
ll
see
a
number
of
export
settings
for
your
selected
recording
(
s
),
which
you
can
adjust
before
clicking
the
export
button
.
Note
:
See
the
‘
Batch
Export
and
Export
Selection
’
section
to
learn
how
to
export
multiple
recordings
or
portions
of
recordings
simultaneously
.
Wireless
PRO
/
USER
GUIDE
&
SUPPORT
EN
US
0
2/20/24, 9:57 AM
Wireless PRO | USER GUIDE & SUPPORT | RØDE
https://rode.com/en-us/user-guides/wireless-pro
29/41
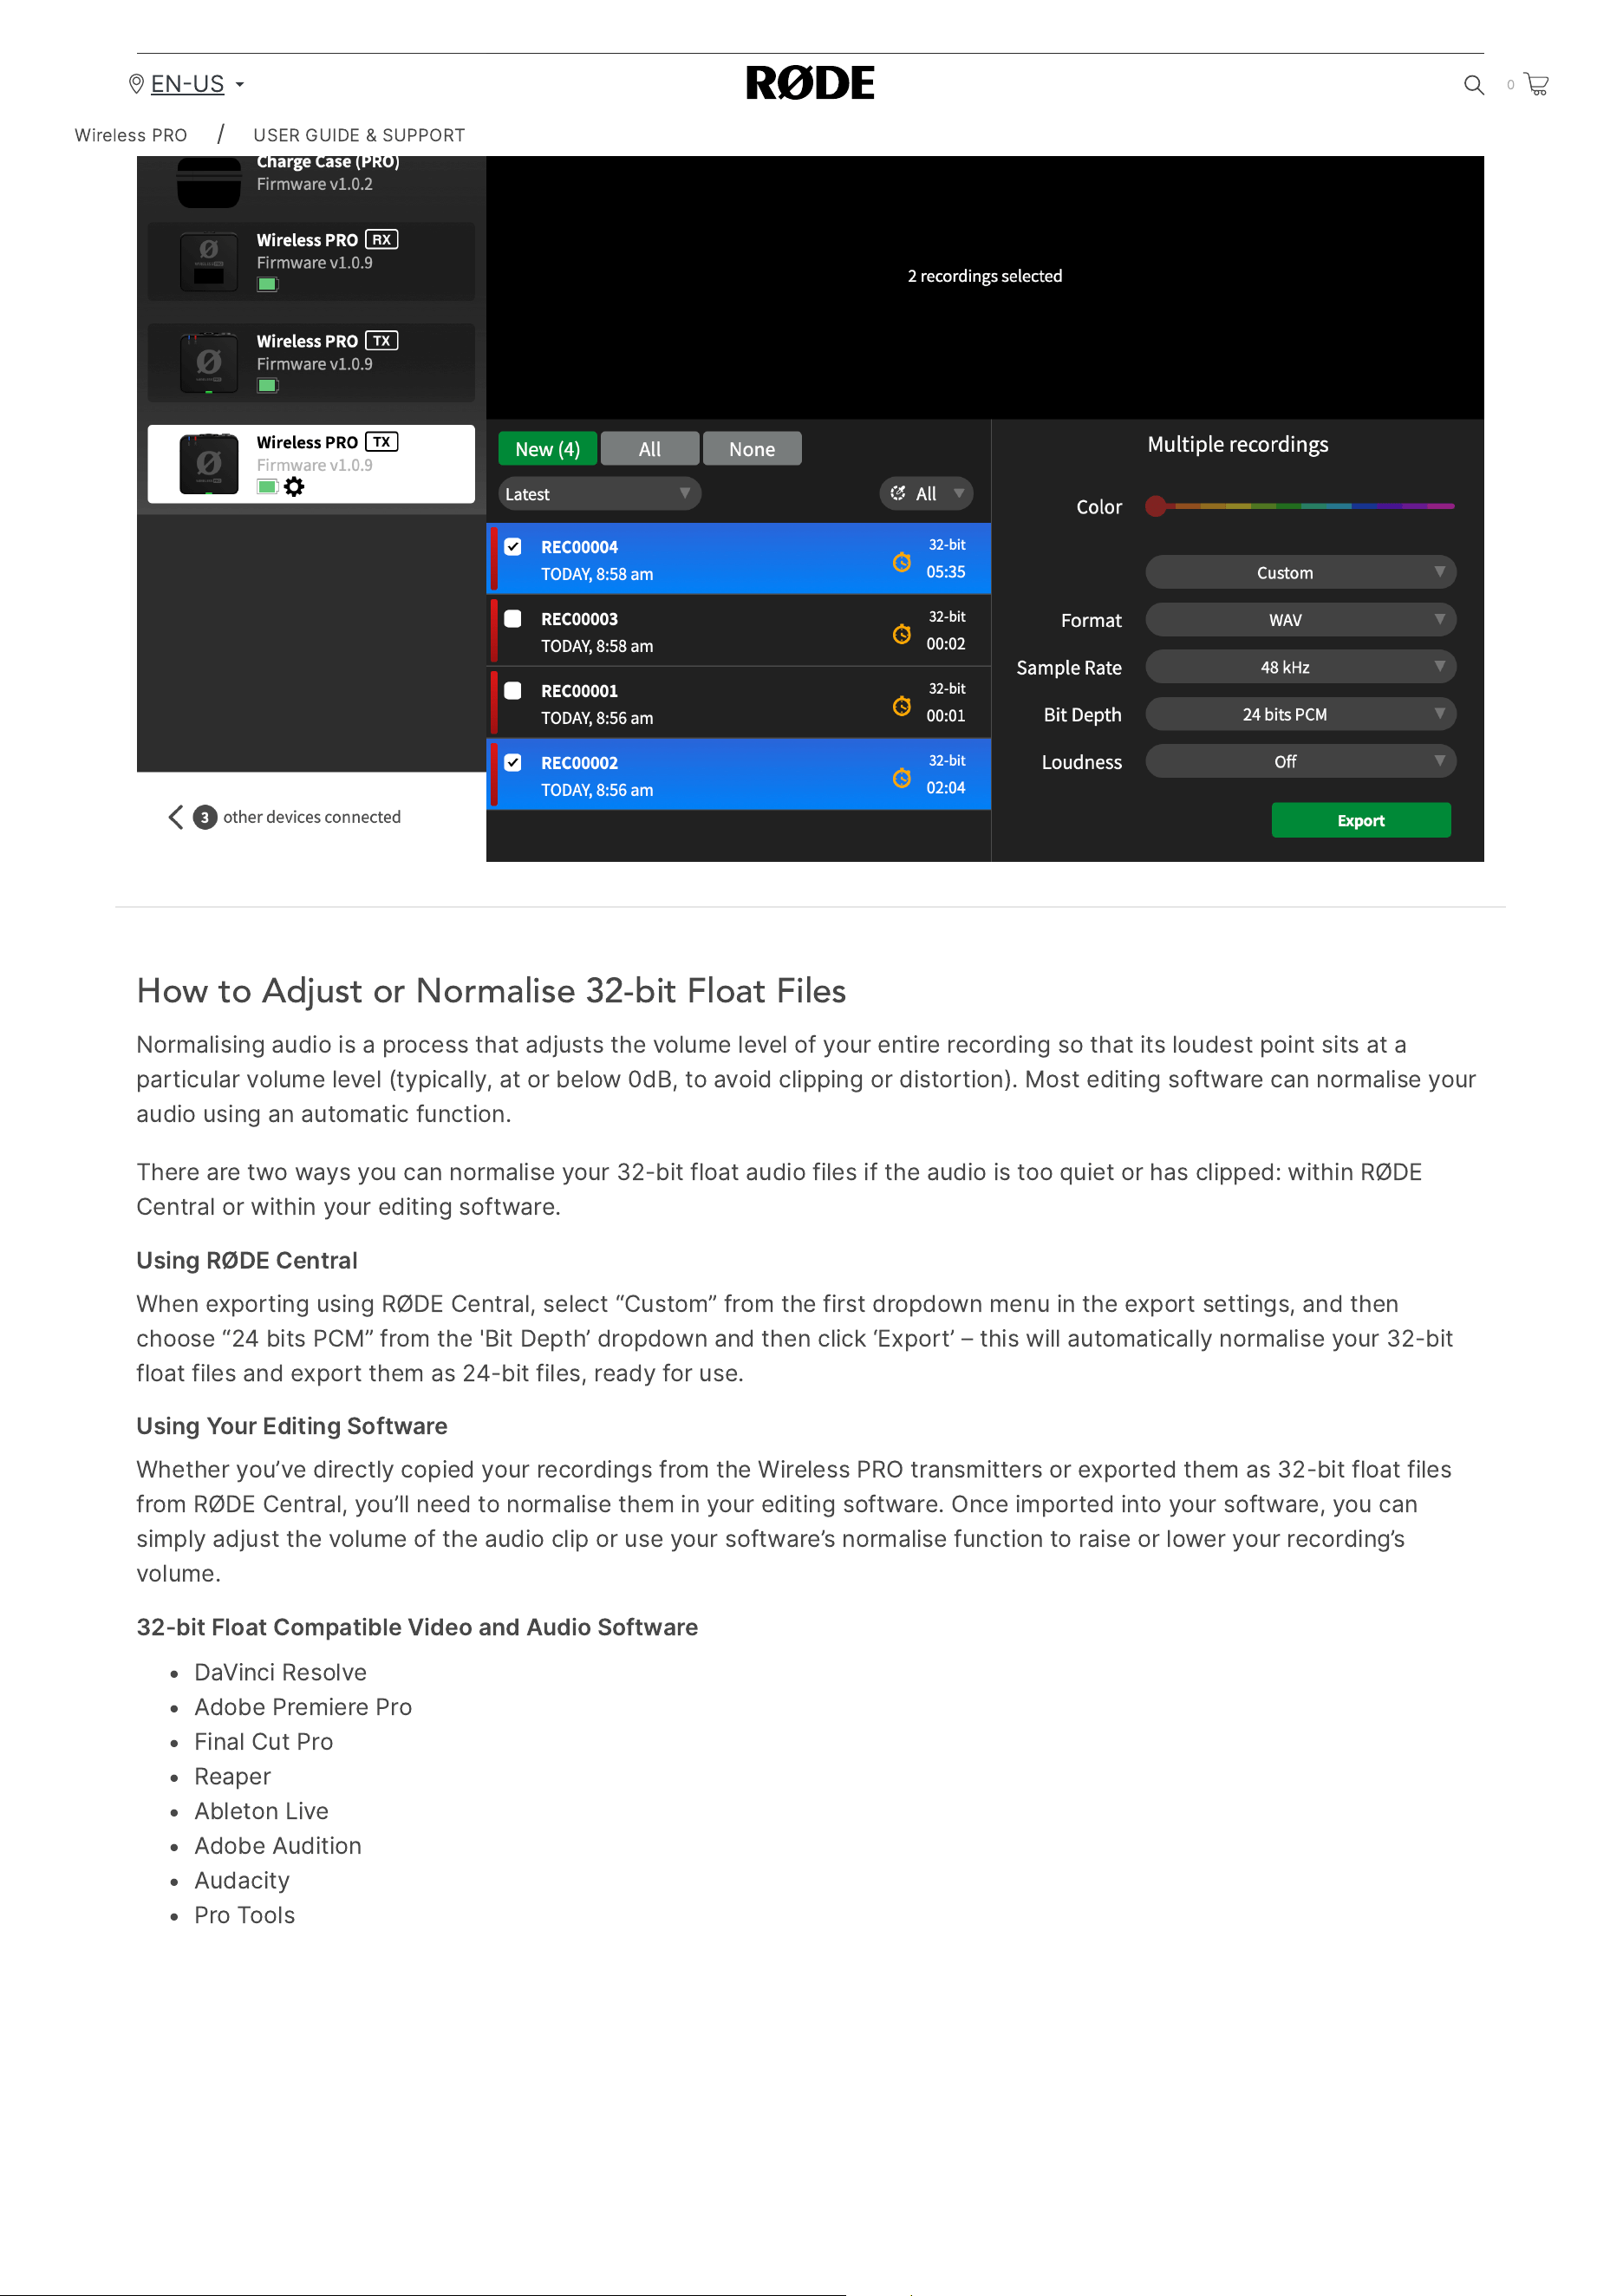
How to Adjust or Normalise 32-bit Float Files
Normalising
audio
is
a
process
that
adjusts
the
volume
level
of
your
entire
recording
so
that
its
loudest
point
sits
at
a
particular
volume
level
(
typically
,
at
or
below
0
dB
,
to
avoid
clipping
or
distortion
).
Most
editing
software
can
normalise
your
audio
using
an
automatic
function
.
There
are
two
ways
you
can
normalise
your
32-
bit
float
audio
files
if
the
audio
is
too
quiet
or
has
clipped
:
within
RØDE
Central
or
within
your
editing
software
.
Using
RØDE
Central
When
exporting
using
RØDE
Central
,
select
“
Custom
”
from
the
first
dropdown
menu
in
the
export
settings
,
and
then
choose
“24
bits
PCM
”
from
the
'
Bit
Depth
’
dropdown
and
then
click
‘
Export
’ –
this
will
automatically
normalise
your
32-
bit
float
files
and
export
them
as
24-
bit
files
,
ready
for
use
.
Using
Your
Editing
Software
Whether
you
’
ve
directly
copied
your
recordings
from
the
Wireless
PRO
transmitters
or
exported
them
as
32-
bit
float
files
from
RØDE
Central
,
you
’
ll
need
to
normalise
them
in
your
editing
software
.
Once
imported
into
your
software
,
you
can
simply
adjust
the
volume
of
the
audio
clip
or
use
your
software
’
s
normalise
function
to
raise
or
lower
your
recording
’
s
volume
.
32-
bit
Float
Compatible
Video
and
Audio
Software
DaVinci
Resolve
Adobe
Premiere
Pro
Final
Cut
Pro
Reaper
Ableton
Live
Adobe
Audition
Audacity
Pro
Tools
Wireless
PRO
/
USER
GUIDE
&
SUPPORT
EN
US
0
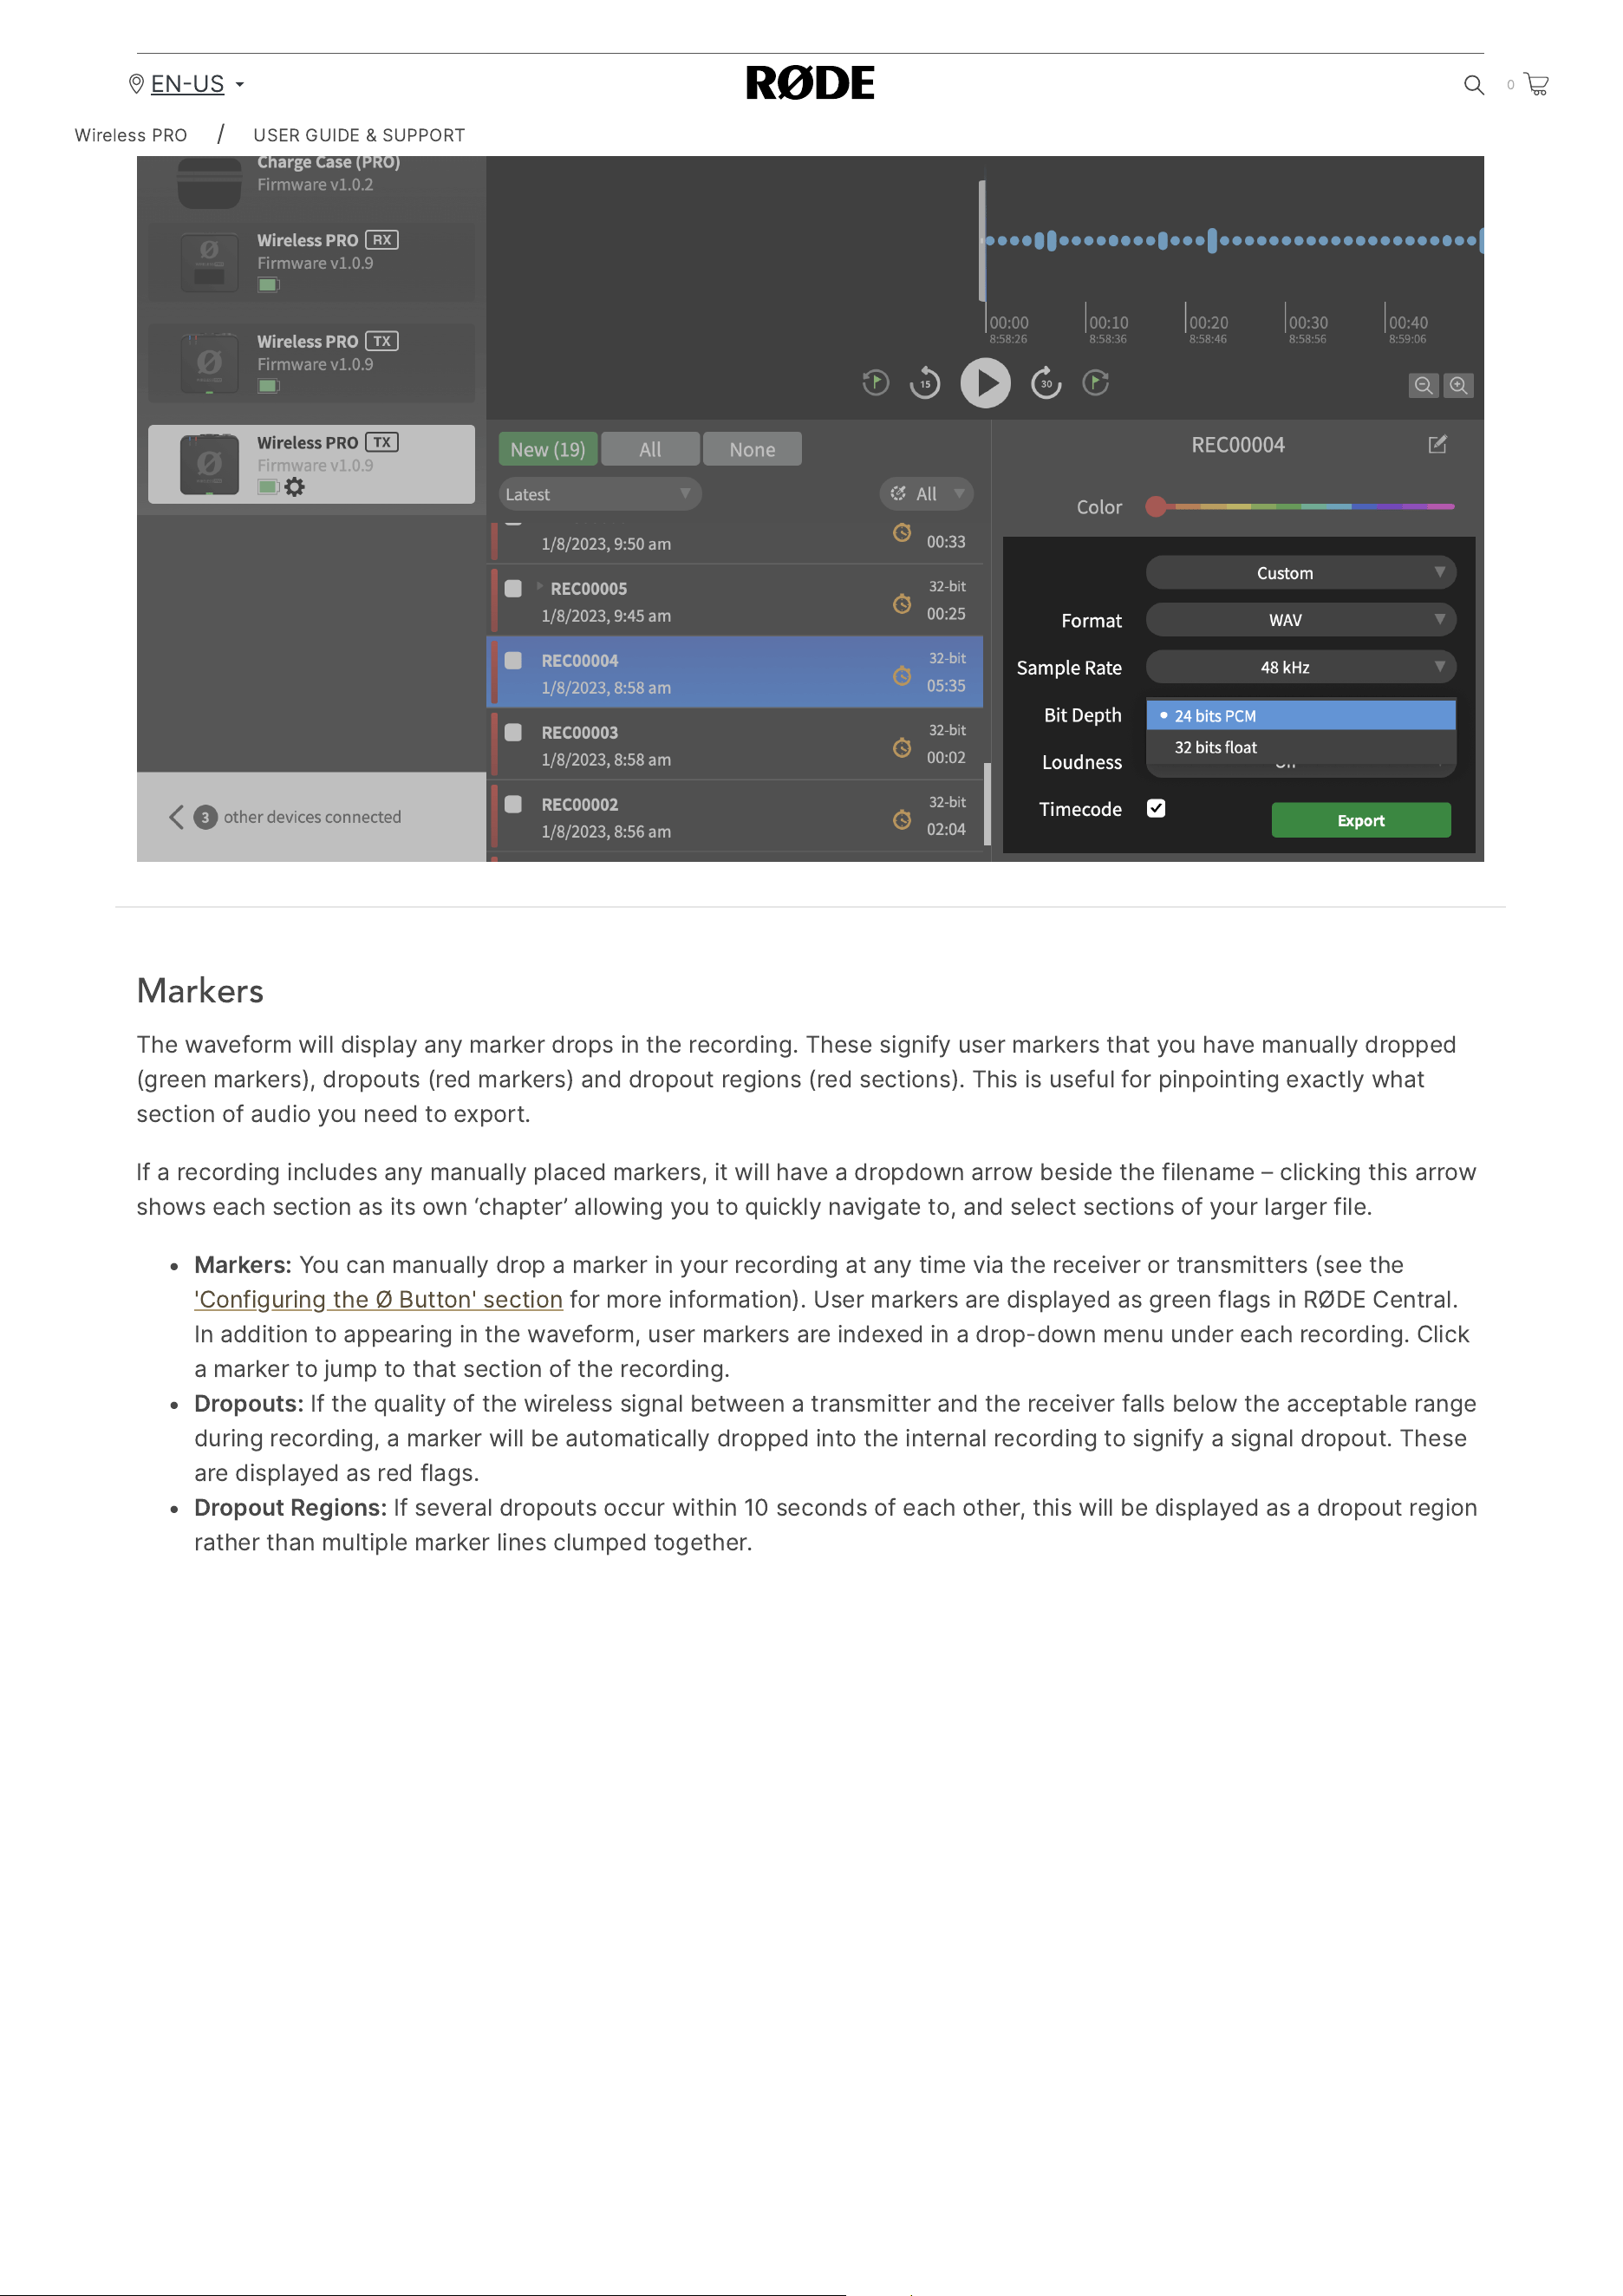
2/20/24, 9:57 AM
Wireless PRO | USER GUIDE & SUPPORT | RØDE
https://rode.com/en-us/user-guides/wireless-pro
30/41
Markers
The
waveform
will
display
any
marker
drops
in
the
recording
.
These
signify
user
markers
that
you
have
manually
dropped
(
green
markers
),
dropouts
(
red
markers
)
and
dropout
regions
(
red
sections
).
This
is
useful
for
pinpointing
exactly
what
section
of
audio
you
need
to
export
.
If
a
recording
includes
any
manually
placed
markers
,
it
will
have
a
dropdown
arrow
beside
the
filename
–
clicking
this
arrow
shows
each
section
as
its
own
‘
chapter
’
allowing
you
to
quickly
navigate
to
,
and
select
sections
of
your
larger
file
.
Markers
:
You
can
manually
drop
a
marker
in
your
recording
at
any
time
via
the
receiver
or
transmitters
(
see
the
'
Configuring
the
Ø
Button
'
section
for
more
information
).
User
markers
are
displayed
as
green
flags
in
RØDE
Central
.
In
addition
to
appearing
in
the
waveform
,
user
markers
are
indexed
in
a
drop
-
down
menu
under
each
recording
.
Click
a
marker
to
jump
to
that
section
of
the
recording
.
Dropouts
:
If
the
quality
of
the
wireless
signal
between
a
transmitter
and
the
receiver
falls
below
the
acceptable
range
during
recording
,
a
marker
will
be
automatically
dropped
into
the
internal
recording
to
signify
a
signal
dropout
.
These
are
displayed
as
red
flags
.
Dropout
Regions
:
If
several
dropouts
occur
within
10
seconds
of
each
other
,
this
will
be
displayed
as
a
dropout
region
rather
than
multiple
marker
lines
clumped
together
.
Wireless
PRO
/
USER
GUIDE
&
SUPPORT
EN
US
0
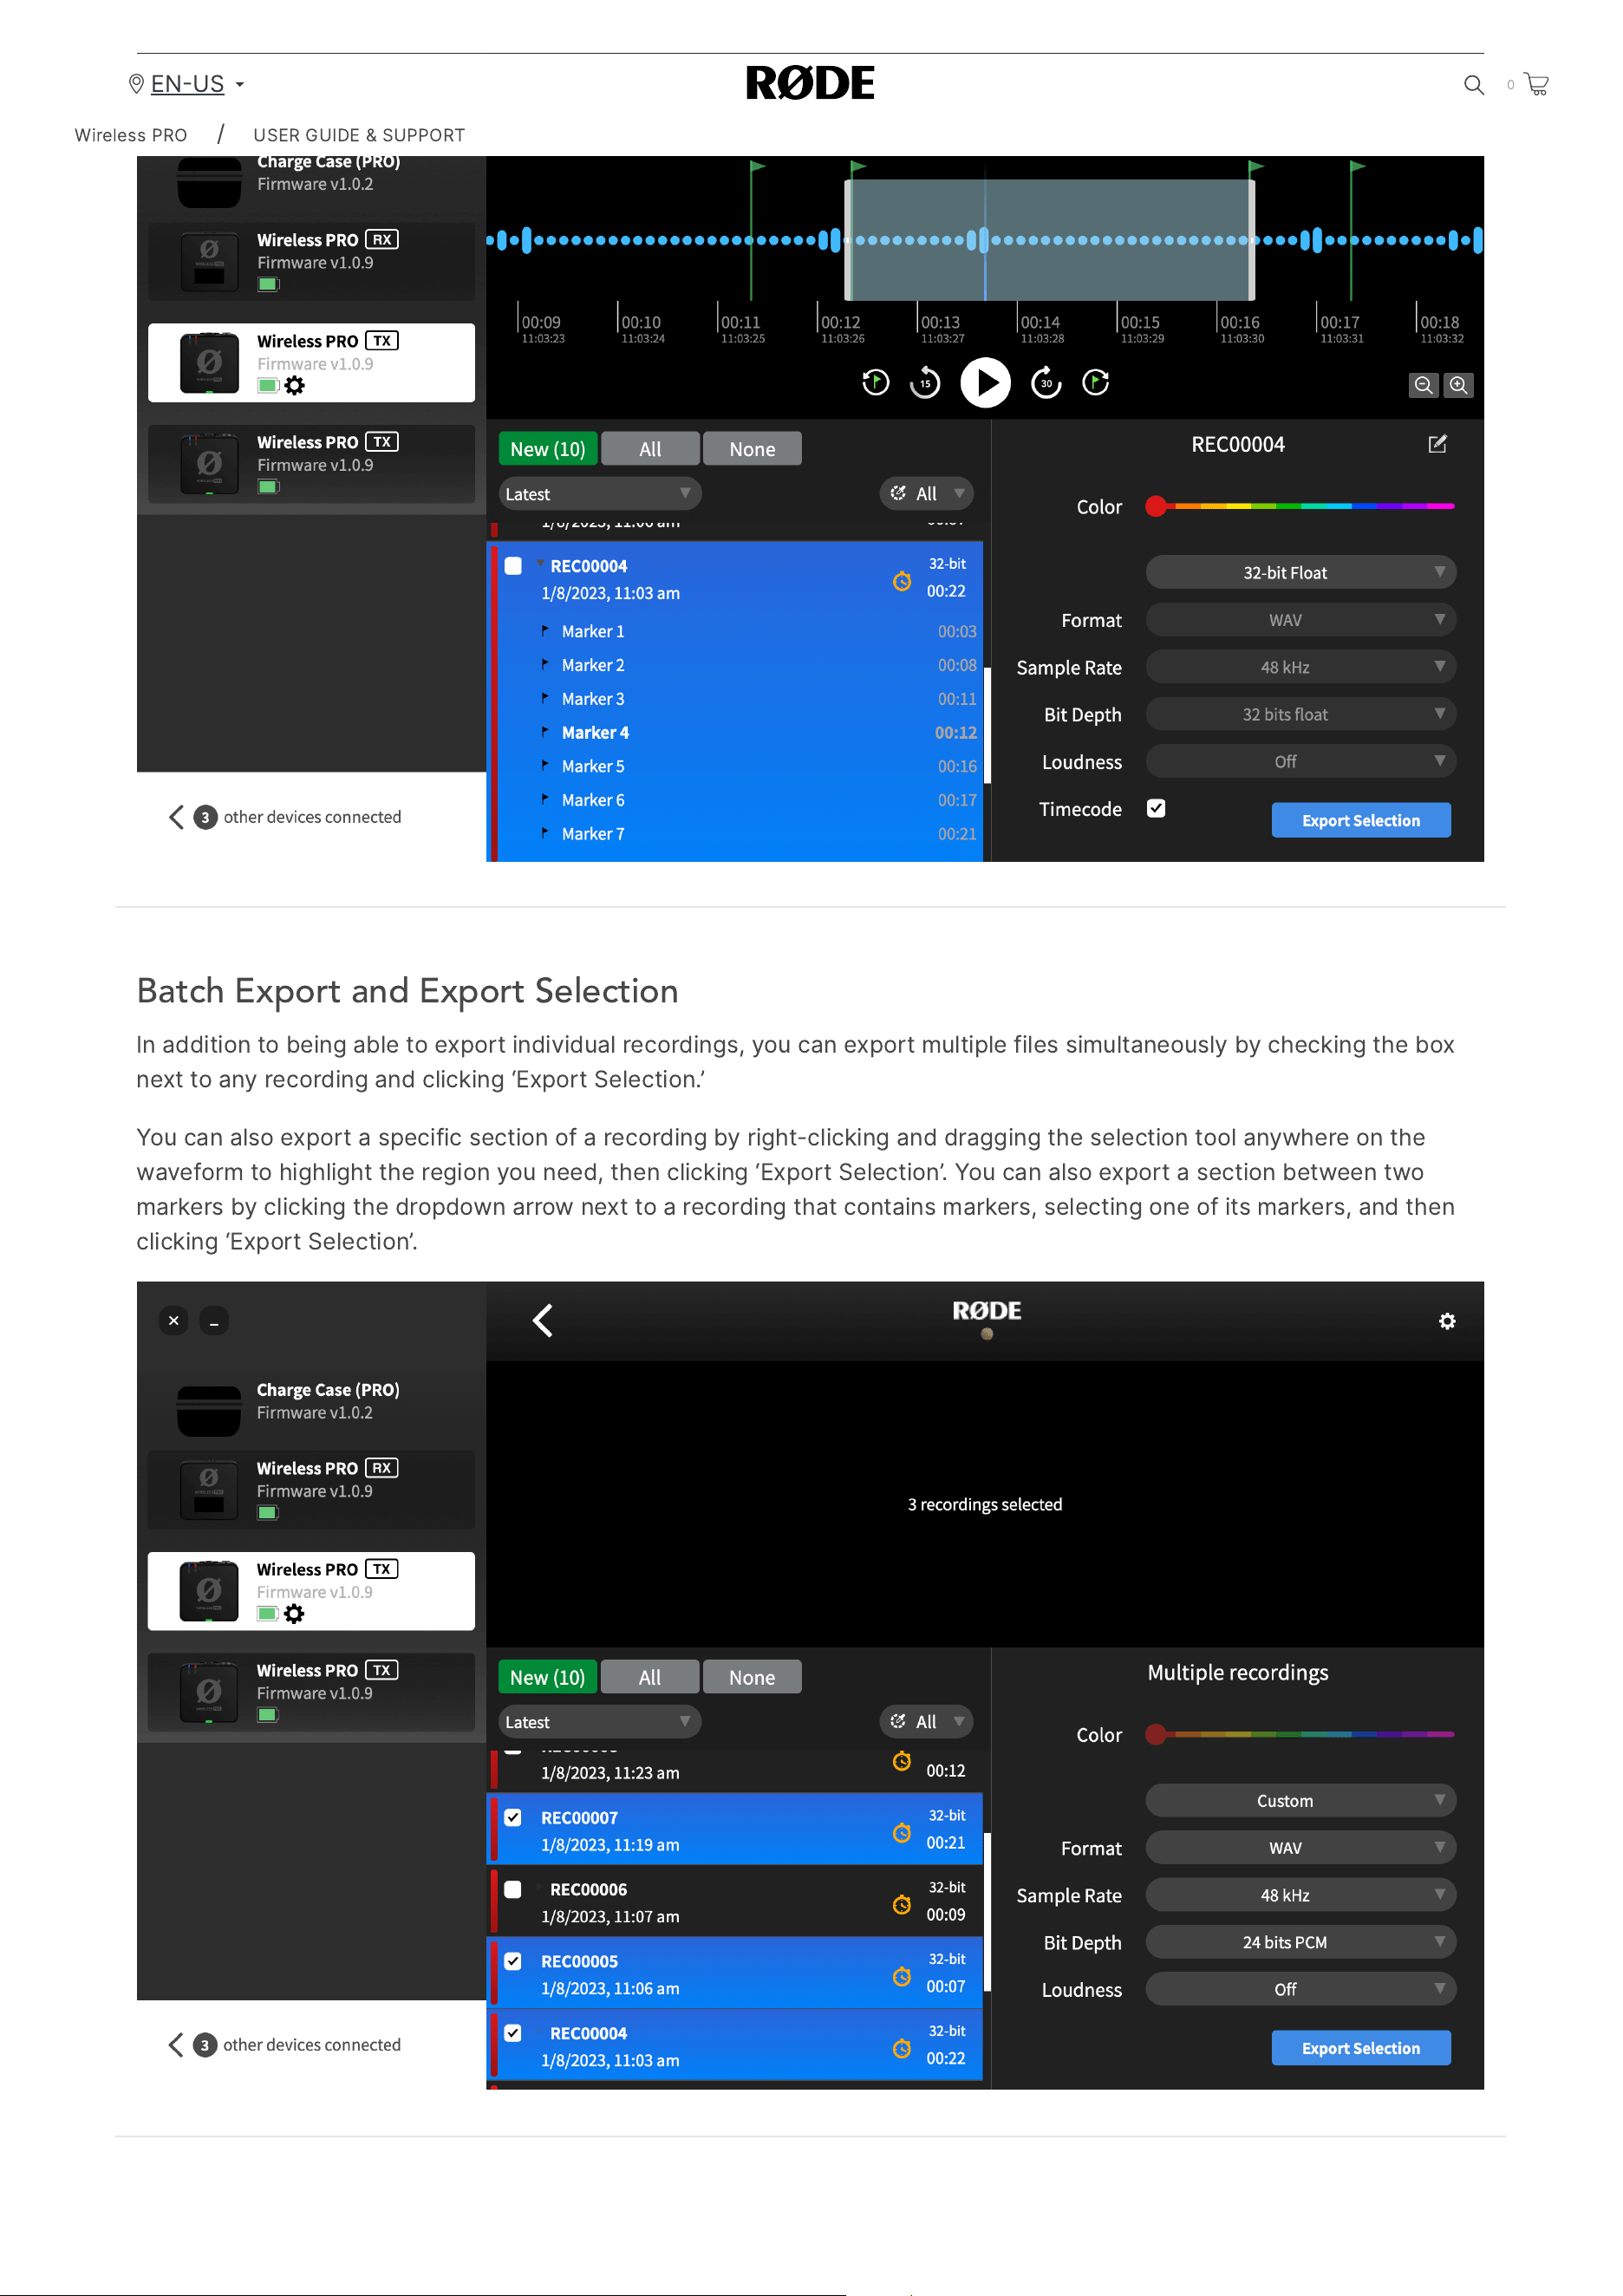
2/20/24, 9:57 AM
Wireless PRO | USER GUIDE & SUPPORT | RØDE
https://rode.com/en-us/user-guides/wireless-pro
31/41
Batch Export and Export Selection
In
addition
to
being
able
to
export
individual
recordings
,
you
can
export
multiple
files
simultaneously
by
checking
the
box
next
to
any
recording
and
clicking
‘
Export
Selection
.’
You
can
also
export
a
specific
section
of
a
recording
by
right
-
clicking
and
dragging
the
selection
tool
anywhere
on
the
waveform
to
highlight
the
region
you
need
,
then
clicking
‘
Export
Selection
’.
You
can
also
export
a
section
between
two
markers
by
clicking
the
dropdown
arrow
next
to
a
recording
that
contains
markers
,
selecting
one
of
its
markers
,
and
then
clicking
‘
Export
Selection
’.
Wireless
PRO
/
USER
GUIDE
&
SUPPORT
EN
US
0
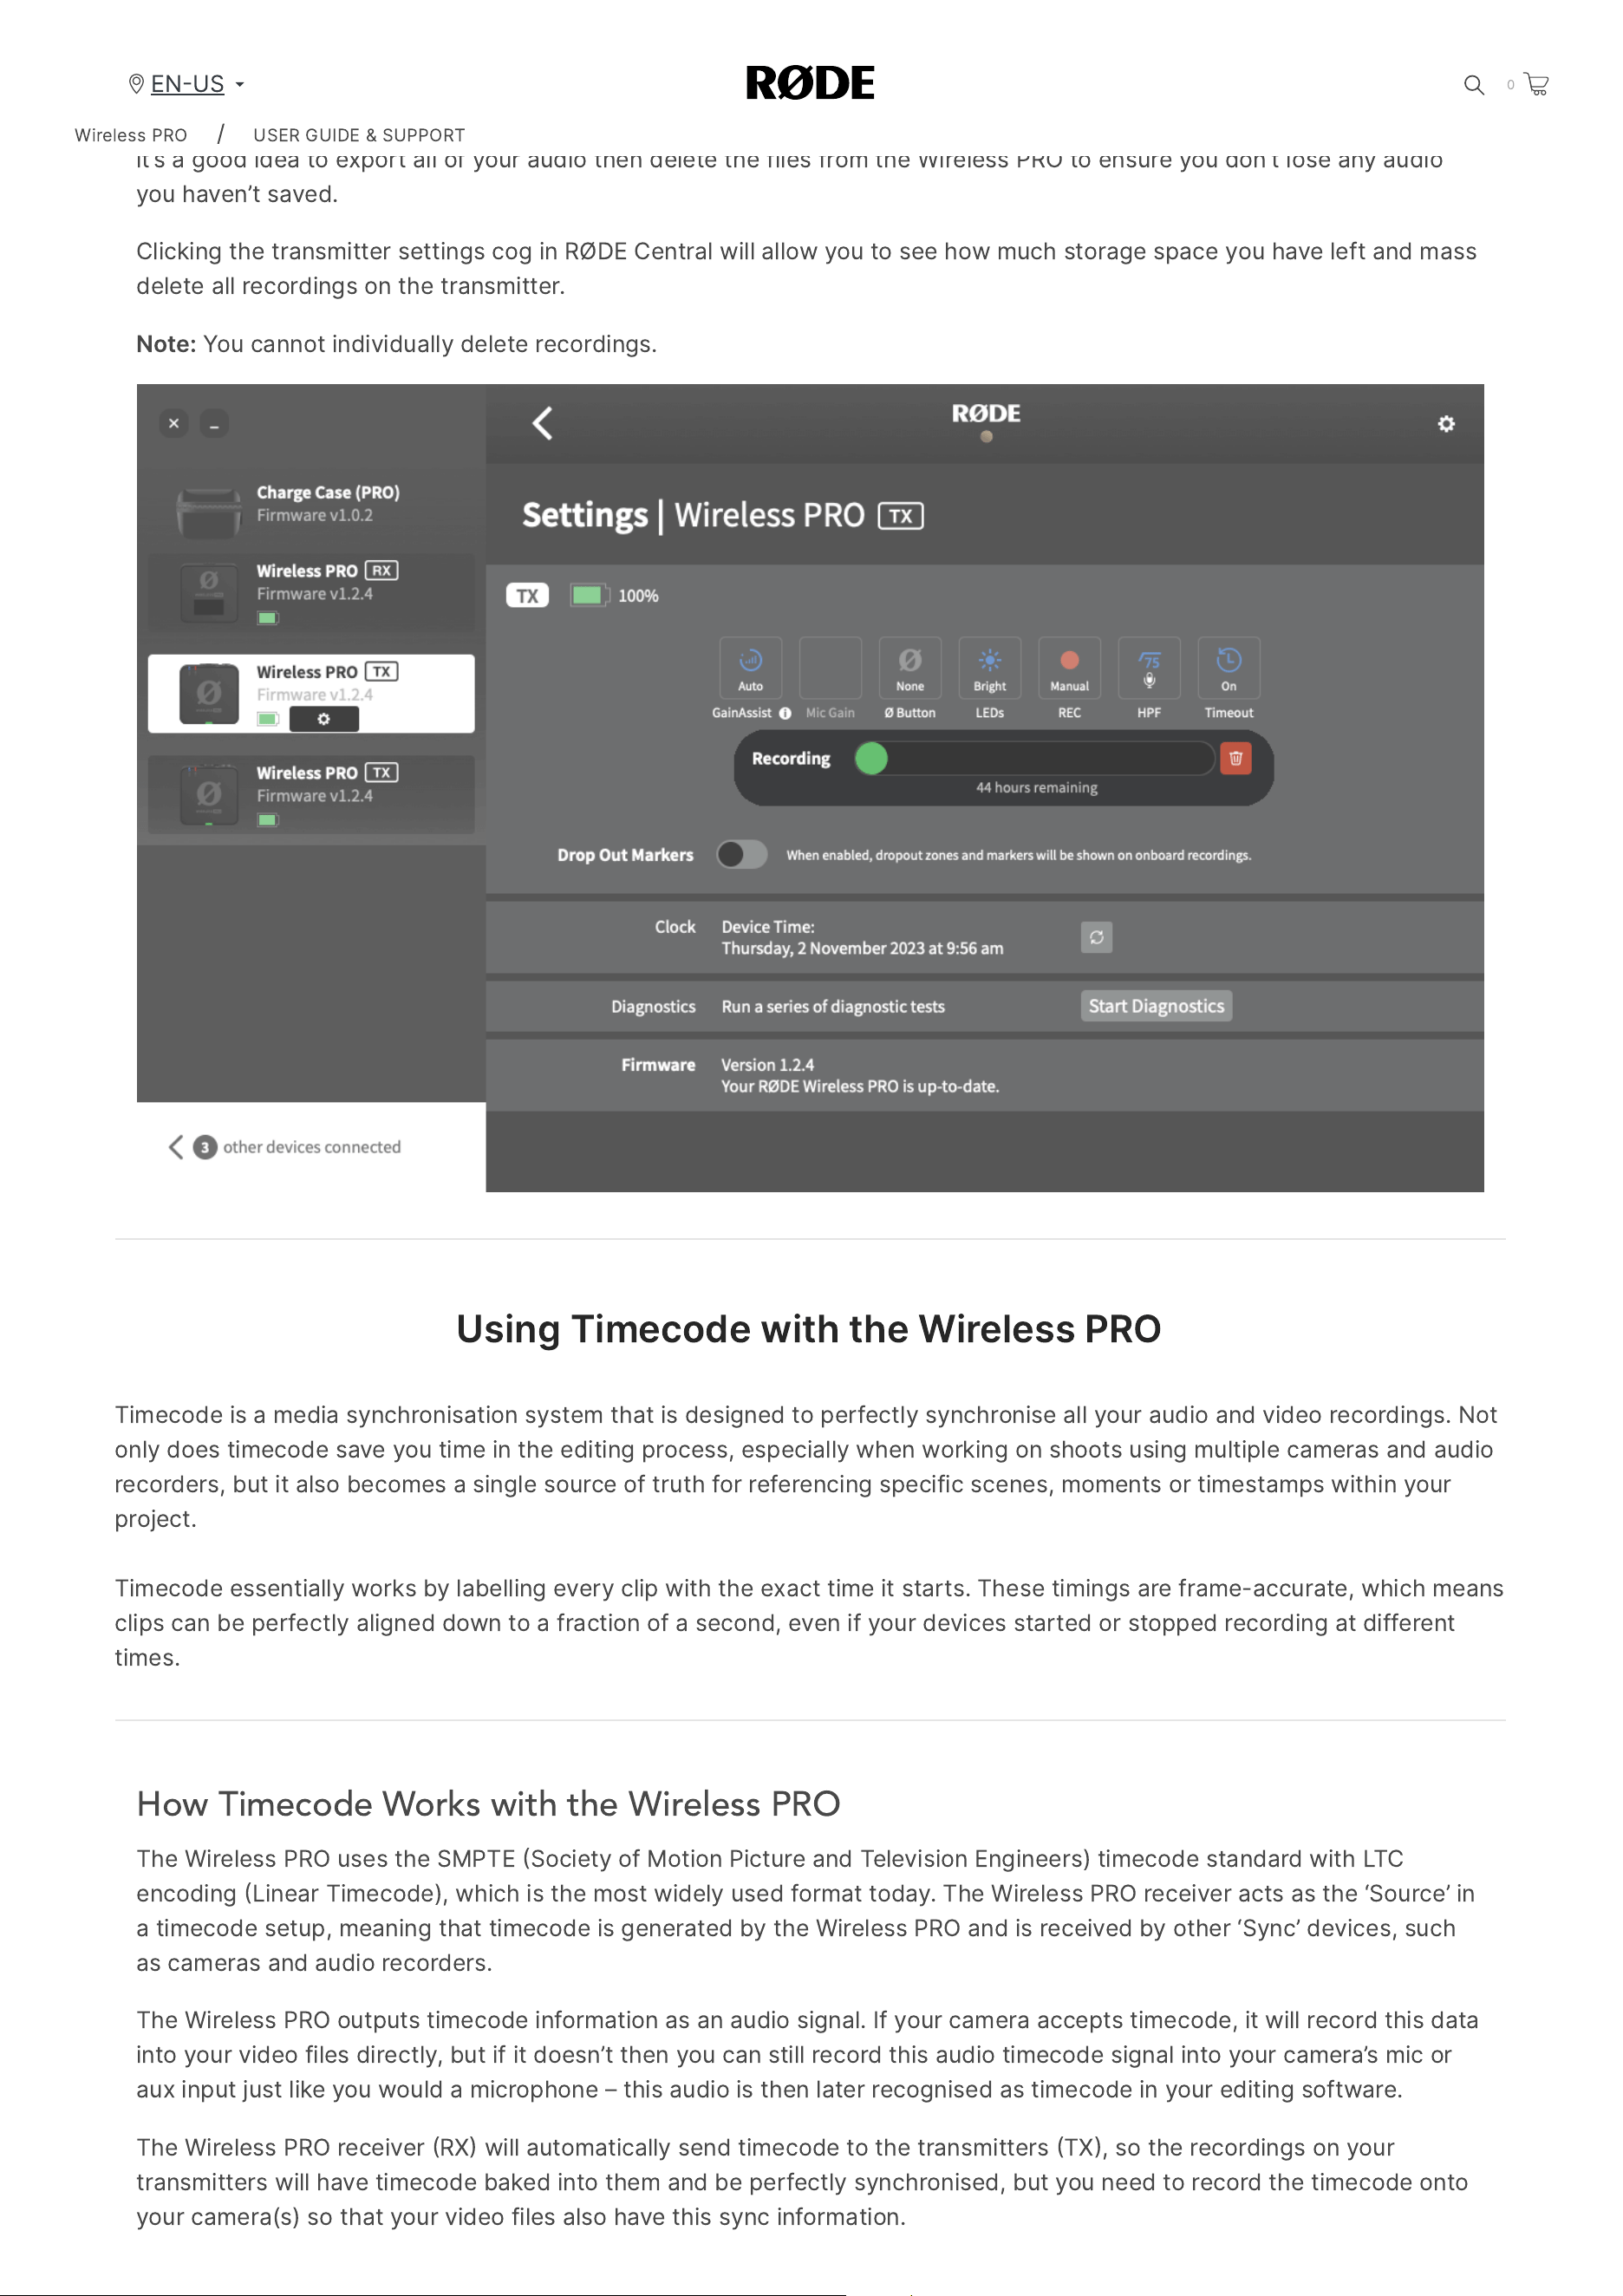
2/20/24, 9:57 AM
Wireless PRO | USER GUIDE & SUPPORT | RØDE
https://rode.com/en-us/user-guides/wireless-pro
32/41
Deleting Your Recordings
When
storage
in
a
transmitter
is
full
,
new
recordings
will
begin
overwriting
the
oldest
recordings
.
After
a
recording
session
,
it
’
s
a
good
idea
to
export
all
of
your
audio
then
delete
the
files
from
the
Wireless
PRO
to
ensure
you
don
’
t
lose
any
audio
you
haven
’
t
saved
.
Clicking
the
transmitter
settings
cog
in
RØDE
Central
will
allow
you
to
see
how
much
storage
space
you
have
left
and
mass
delete
all
recordings
on
the
transmitter
.
Note
:
You
cannot
individually
delete
recordings
.
Using
Timecode
with
the
Wireless
PRO
Timecode
is
a
media
synchronisation
system
that
is
designed
to
perfectly
synchronise
all
your
audio
and
video
recordings
.
Not
only
does
timecode
save
you
time
in
the
editing
process
,
especially
when
working
on
shoots
using
multiple
cameras
and
audio
recorders
,
but
it
also
becomes
a
single
source
of
truth
for
referencing
specific
scenes
,
moments
or
timestamps
within
your
project
.
Timecode
essentially
works
by
labelling
every
clip
with
the
exact
time
it
starts
.
These
timings
are
frame
-
accurate
,
which
means
clips
can
be
perfectly
aligned
down
to
a
fraction
of
a
second
,
even
if
your
devices
started
or
stopped
recording
at
different
times
.
How Timecode Works with the Wireless PRO
The
Wireless
PRO
uses
the
SMPTE
Society
of
Motion
Picture
and
Television
Engineers
)
timecode
standard
with
LTC
encoding
Linear
Timecode
),
which
is
the
most
widely
used
format
today
.
The
Wireless
PRO
receiver
acts
as
the
‘
Source
’
in
a
timecode
setup
,
meaning
that
timecode
is
generated
by
the
Wireless
PRO
and
is
received
by
other
‘
Sync
’
devices
,
such
as
cameras
and
audio
recorders
.
The
Wireless
PRO
outputs
timecode
information
as
an
audio
signal
.
If
your
camera
accepts
timecode
,
it
will
record
this
data
into
your
video
files
directly
,
but
if
it
doesn
’
t
then
you
can
still
record
this
audio
timecode
signal
into
your
camera
’
s
mic
or
aux
input
just
like
you
would
a
microphone
–
this
audio
is
then
later
recognised
as
timecode
in
your
editing
software
.
The
Wireless
PRO
receiver
RX
will
automatically
send
timecode
to
the
transmitters
TX
,
so
the
recordings
on
your
transmitters
will
have
timecode
baked
into
them
and
be
perfectly
synchronised
,
but
you
need
to
record
the
timecode
onto
your
camera
(
s
)
so
that
your
video
files
also
have
this
sync
information
.
Wireless
PRO
/
USER
GUIDE
&
SUPPORT
EN
US
0
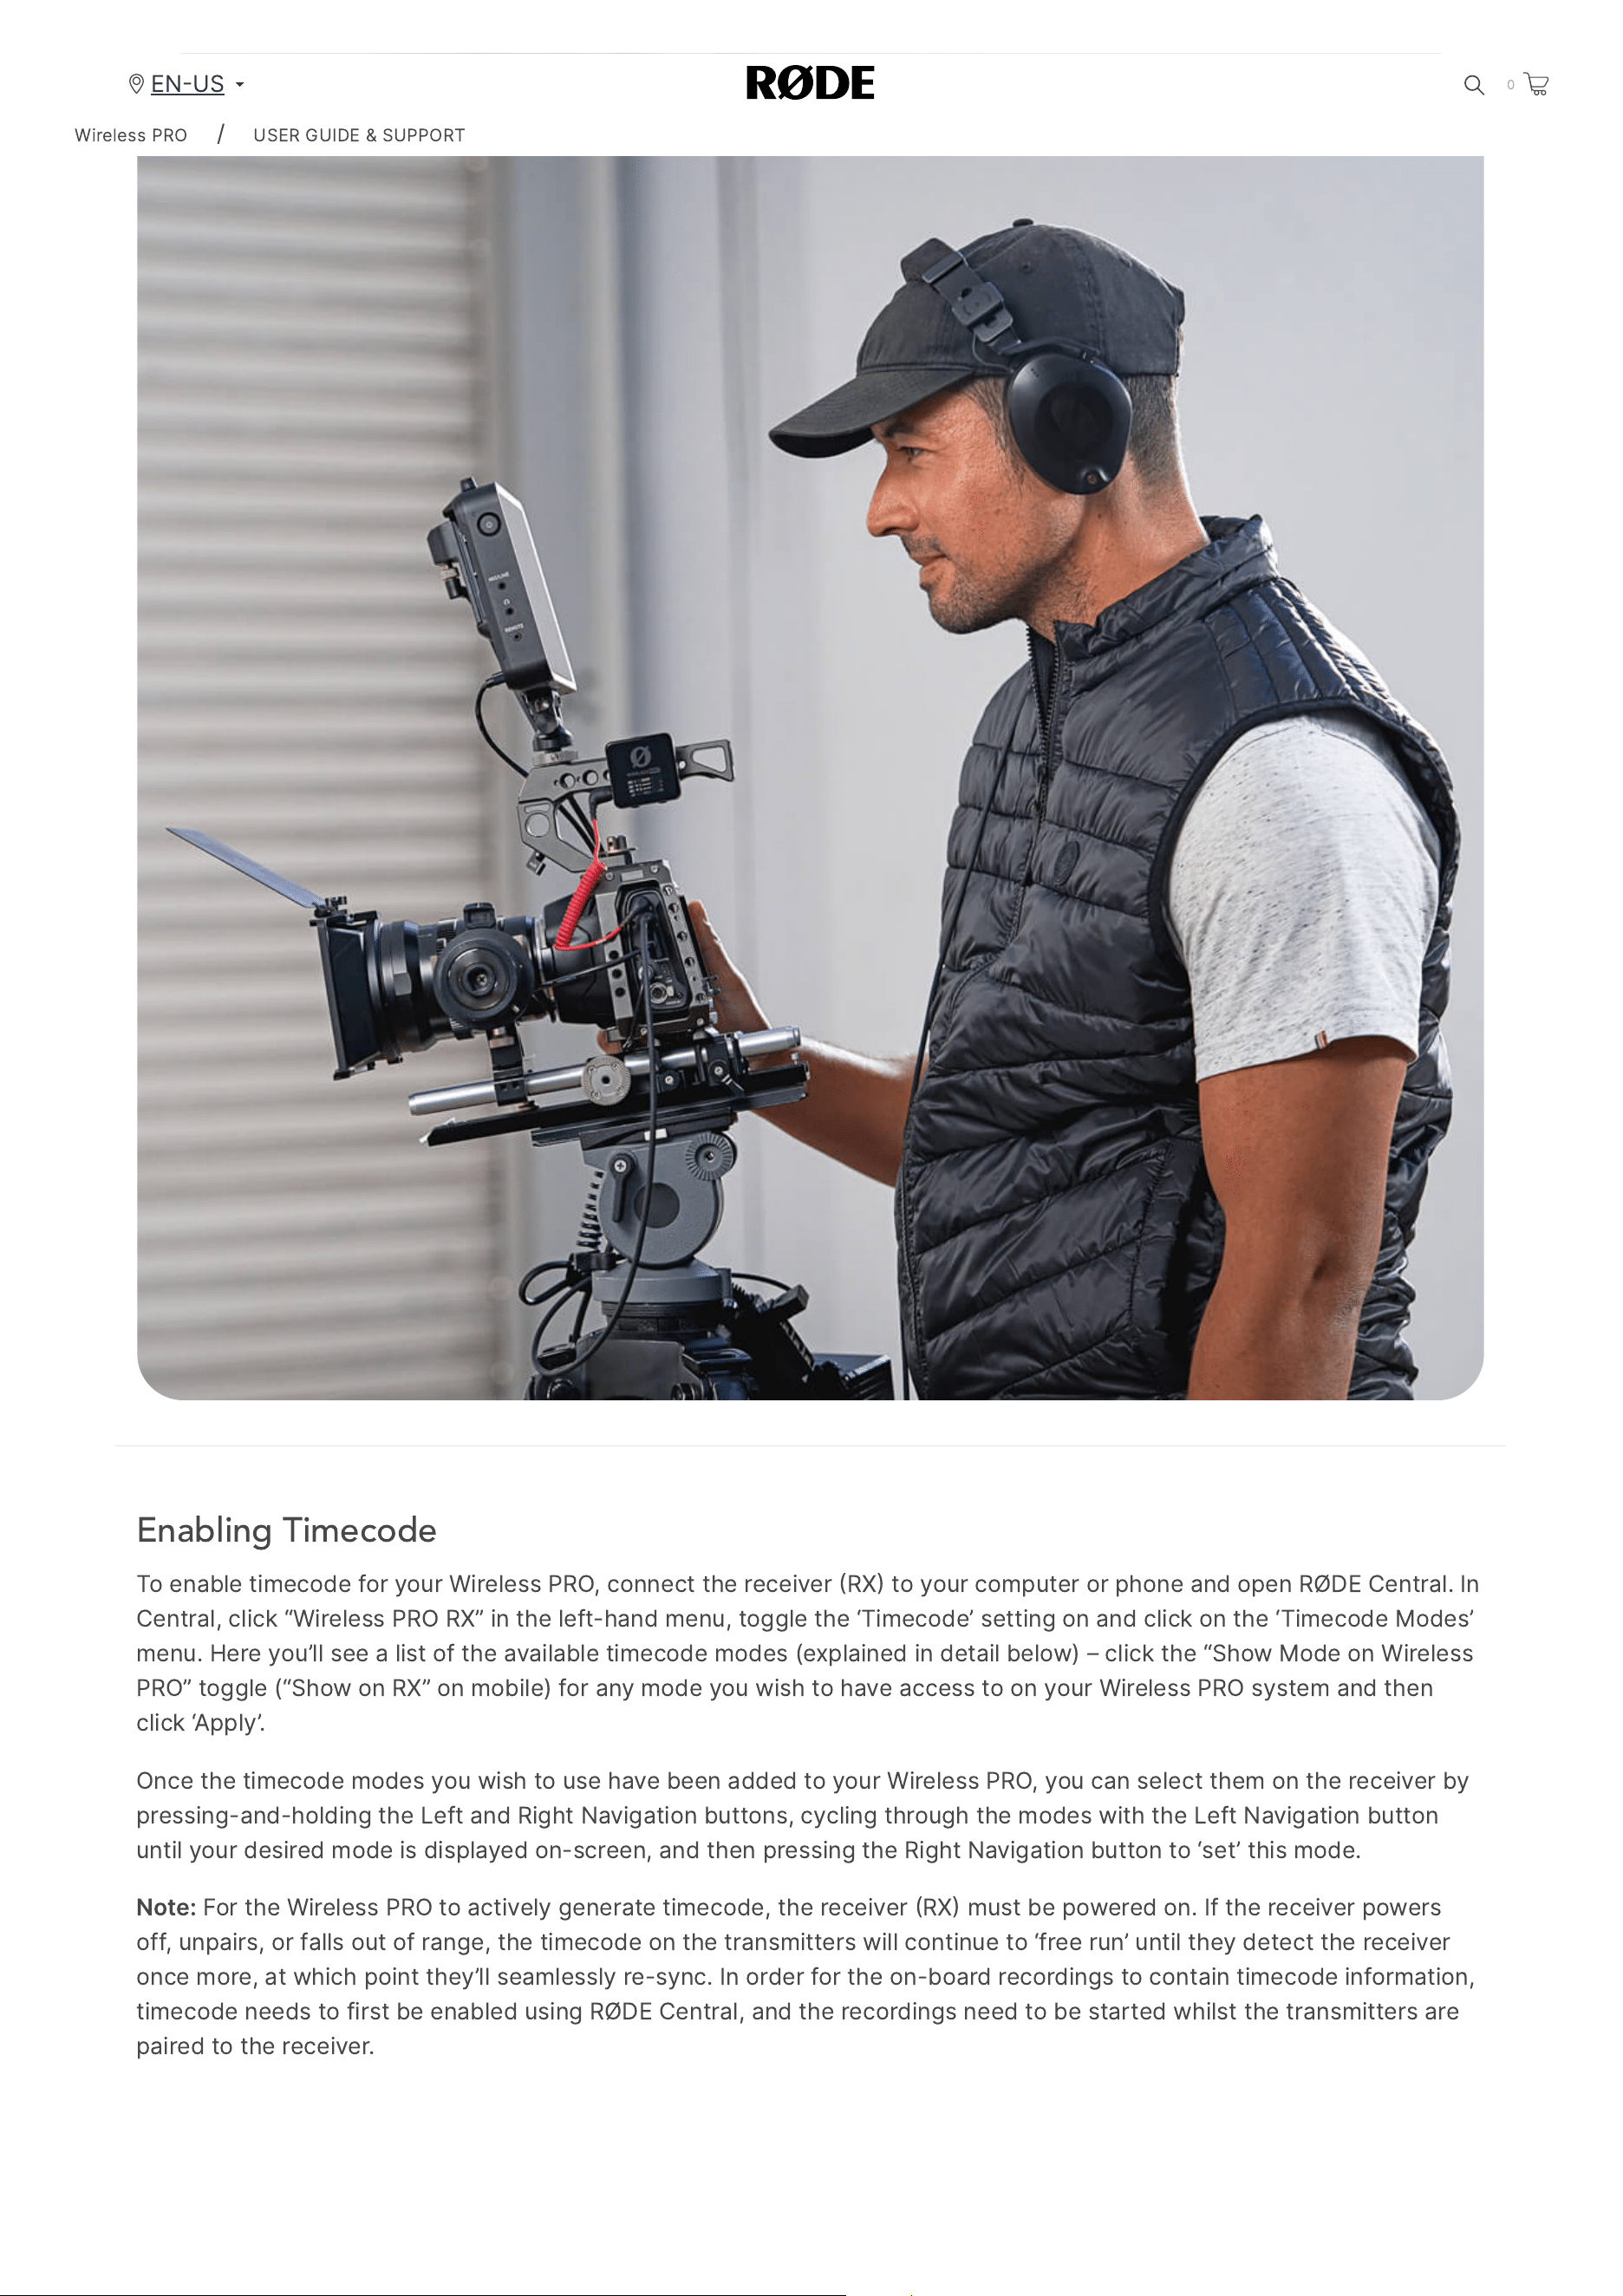
2/20/24, 9:57 AM
Wireless PRO | USER GUIDE & SUPPORT | RØDE
https://rode.com/en-us/user-guides/wireless-pro
33/41
Enabling Timecode
To
enable
timecode
for
your
Wireless
PRO
,
connect
the
receiver
RX
to
your
computer
or
phone
and
open
RØDE
Central
.
In
Central
,
click
“
Wireless
PRO
RX
”
in
the
left
-
hand
menu
,
toggle
the
‘
Timecode
’
setting
on
and
click
on
the
‘
Timecode
Modes
’
menu
.
Here
you
’
ll
see
a
list
of
the
available
timecode
modes
(
explained
in
detail
below
) –
click
the
“
Show
Mode
on
Wireless
PRO
”
toggle
(“
Show
on
RX
”
on
mobile
)
for
any
mode
you
wish
to
have
access
to
on
your
Wireless
PRO
system
and
then
click
‘
Apply
’.
Once
the
timecode
modes
you
wish
to
use
have
been
added
to
your
Wireless
PRO
,
you
can
select
them
on
the
receiver
by
pressing
-
and
-
holding
the
Left
and
Right
Navigation
buttons
,
cycling
through
the
modes
with
the
Left
Navigation
button
until
your
desired
mode
is
displayed
on
-
screen
,
and
then
pressing
the
Right
Navigation
button
to
‘
set
’
this
mode
.
Note
:
For
the
Wireless
PRO
to
actively
generate
timecode
,
the
receiver
RX
must
be
powered
on
.
If
the
receiver
powers
off
,
unpairs
,
or
falls
out
of
range
,
the
timecode
on
the
transmitters
will
continue
to
‘
free
run
’
until
they
detect
the
receiver
once
more
,
at
which
point
they
’
ll
seamlessly
re
-
sync
.
In
order
for
the
on
-
board
recordings
to
contain
timecode
information
,
timecode
needs
to
first
be
enabled
using
RØDE
Central
,
and
the
recordings
need
to
be
started
whilst
the
transmitters
are
paired
to
the
receiver
.
Wireless
PRO
/
USER
GUIDE
&
SUPPORT
EN
US
0
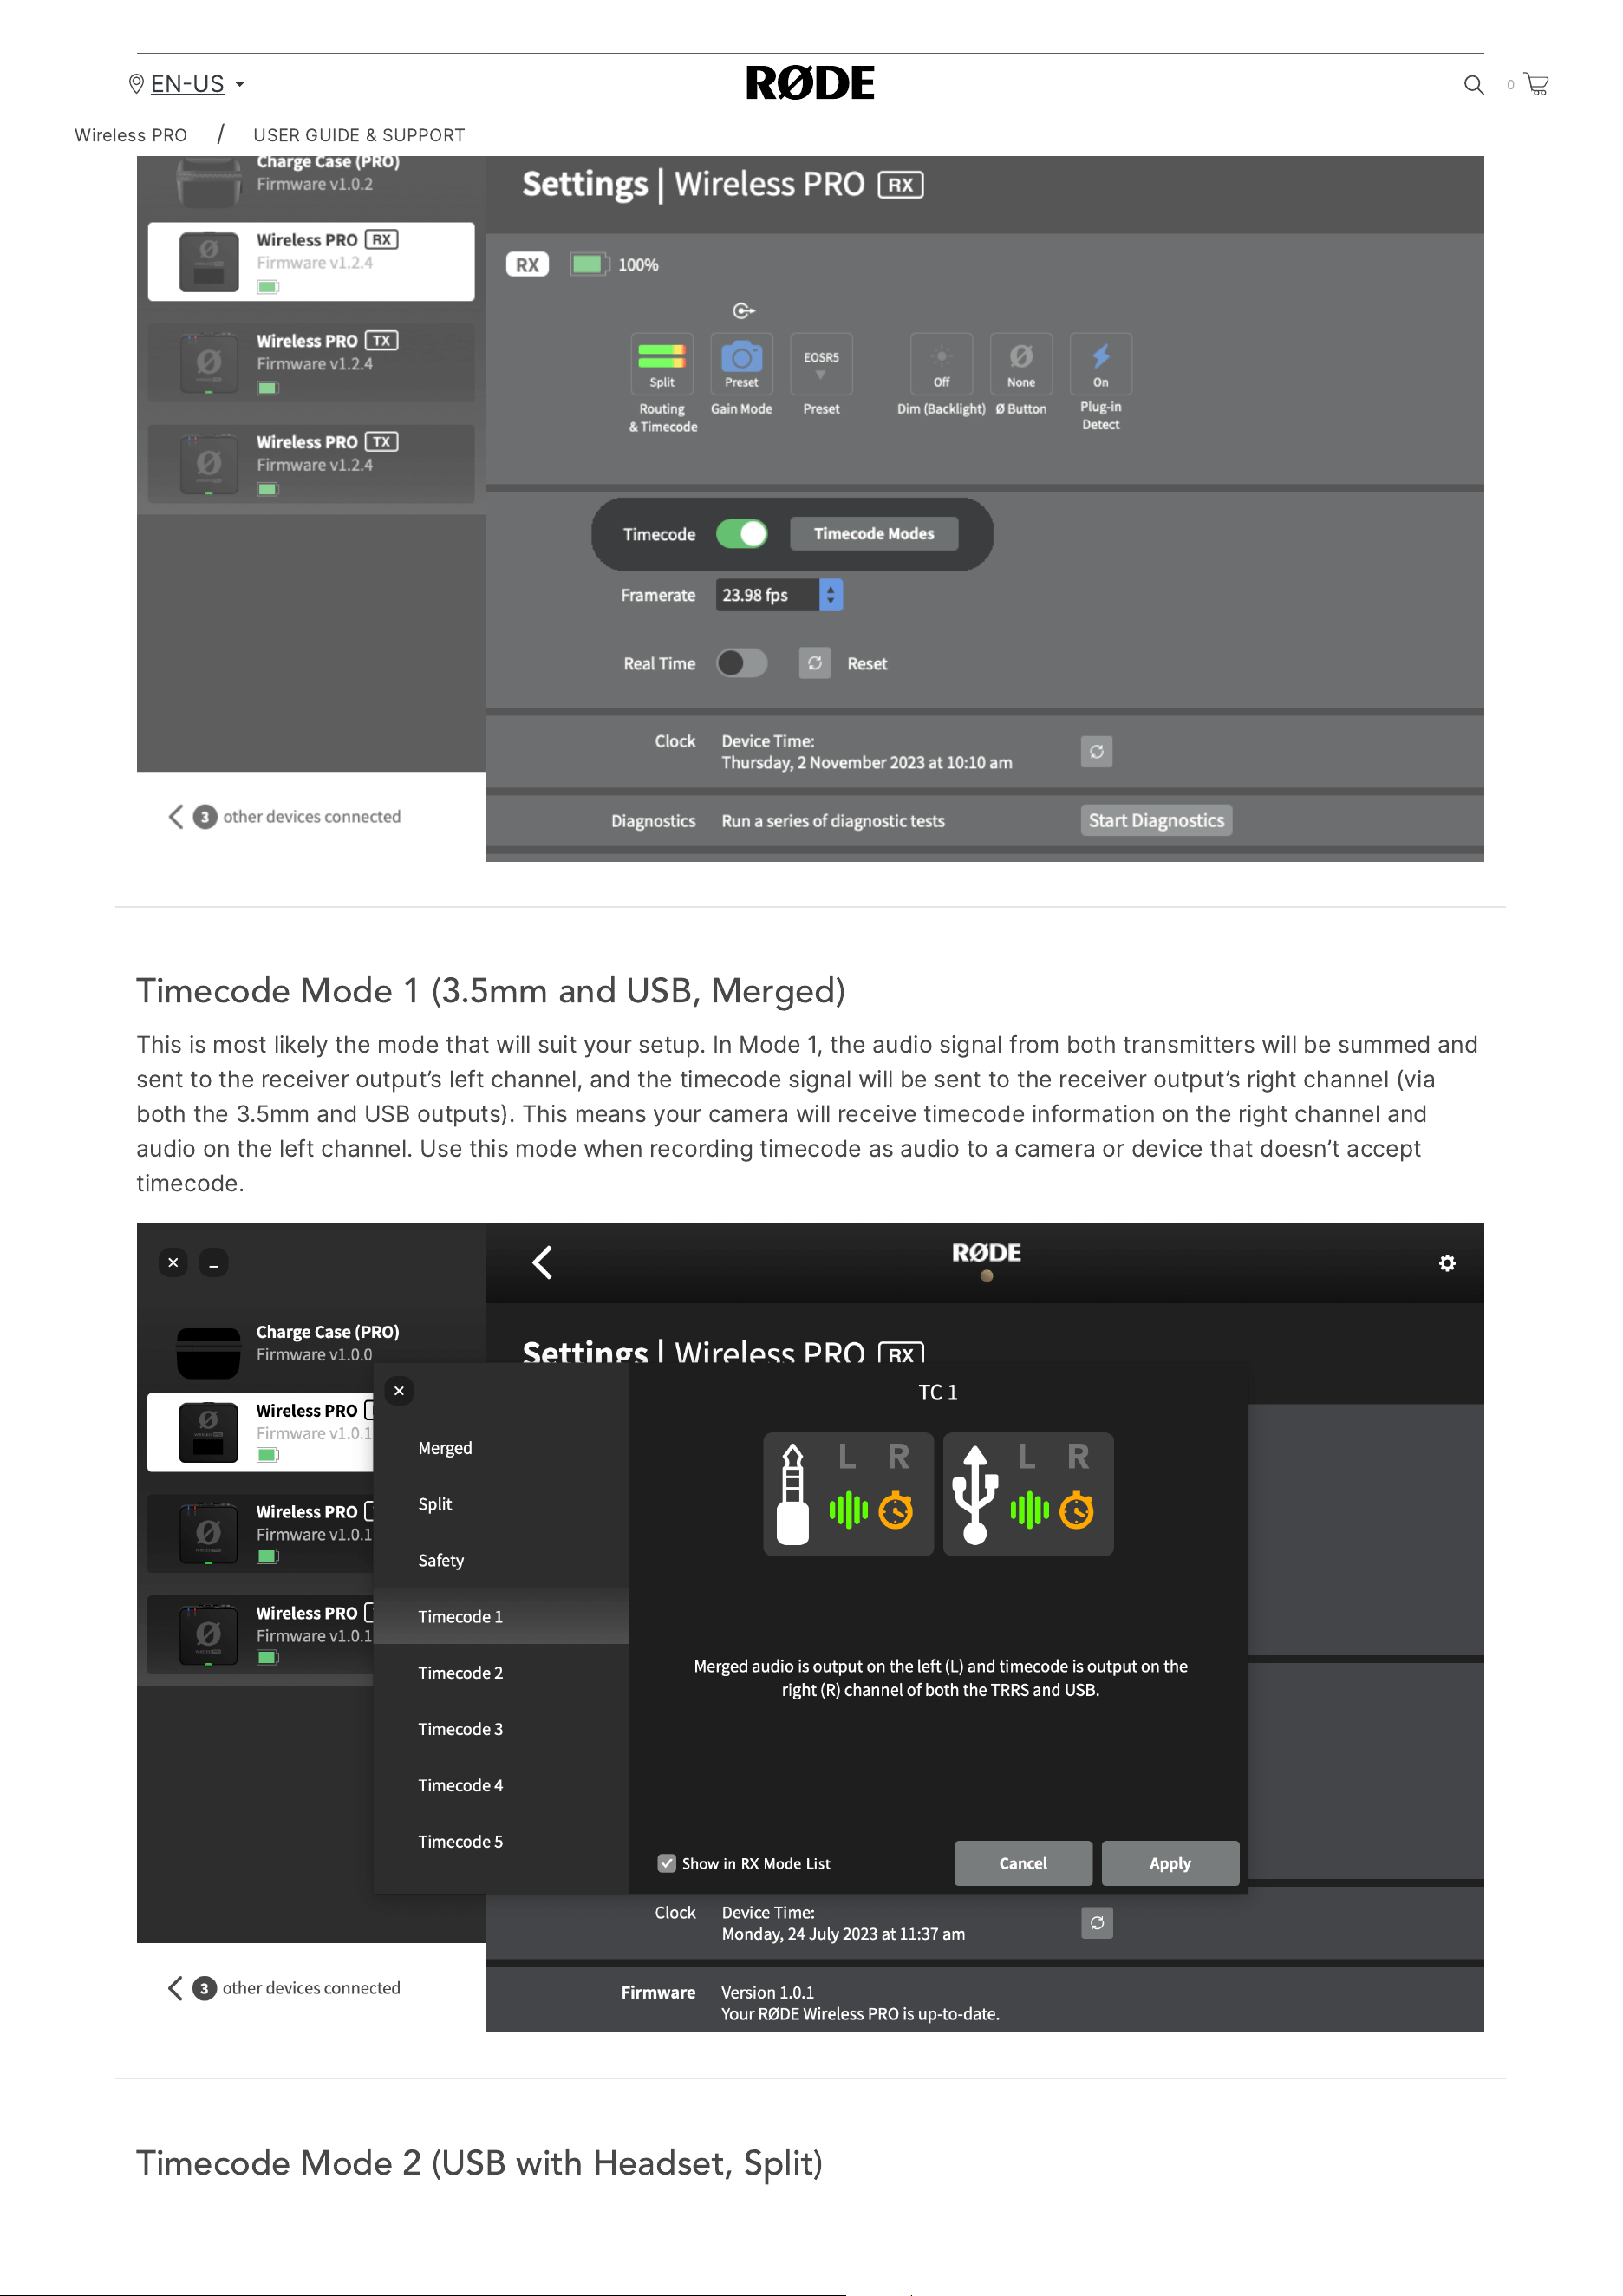
2/20/24, 9:57 AM
Wireless PRO | USER GUIDE & SUPPORT | RØDE
https://rode.com/en-us/user-guides/wireless-pro
34/41
Timecode Mode 1 (3.5mm and USB, Merged)
This
is
most
likely
the
mode
that
will
suit
your
setup
.
In
Mode
1,
the
audio
signal
from
both
transmitters
will
be
summed
and
sent
to
the
receiver
output
’
s
left
channel
,
and
the
timecode
signal
will
be
sent
to
the
receiver
output
’
s
right
channel
(
via
both
the
3.5
mm
and
USB
outputs
).
This
means
your
camera
will
receive
timecode
information
on
the
right
channel
and
audio
on
the
left
channel
.
Use
this
mode
when
recording
timecode
as
audio
to
a
camera
or
device
that
doesn
’
t
accept
timecode
.
Timecode Mode 2 (USB with Headset, Split)
Wireless
PRO
/
USER
GUIDE
&
SUPPORT
EN
US
0

2/20/24, 9:57 AM
Wireless PRO | USER GUIDE & SUPPORT | RØDE
https://rode.com/en-us/user-guides/wireless-pro
35/41
Mode
2
is
for
when
you
have
a
headset
connected
to
the
receiver
’
s
3.5
mm
TRRS
output
and
you
want
to
capture
audio
from
both
transmitters
and
the
headset
microphone
on
separate
channels
.
In
this
mode
,
the
headset
mic
audio
will
be
sent
via
USB
in
the
left
channel
,
and
the
right
channel
will
contain
the
timecode
information
.
Each
transmitter
will
capture
audio
as
on
-
board
recordings
,
and
all
three
input
sources
will
be
summed
and
sent
to
the
receiver
’
s
3.5
mm
output
so
you
can
monitor
all
sources
in
your
headset
.
Timecode Mode 3 (USB with Headset, Merged)
Mode
3
works
identically
to
Mode
2,
except
the
audio
sent
to
the
left
channel
of
the
USB
output
will
be
a
summed
output
of
all
three
microphones
TX
1,
TX
2
and
your
headset
microphone
)
rather
than
just
the
headset
microphone
.
Wireless
PRO
/
USER
GUIDE
&
SUPPORT
EN
US
0
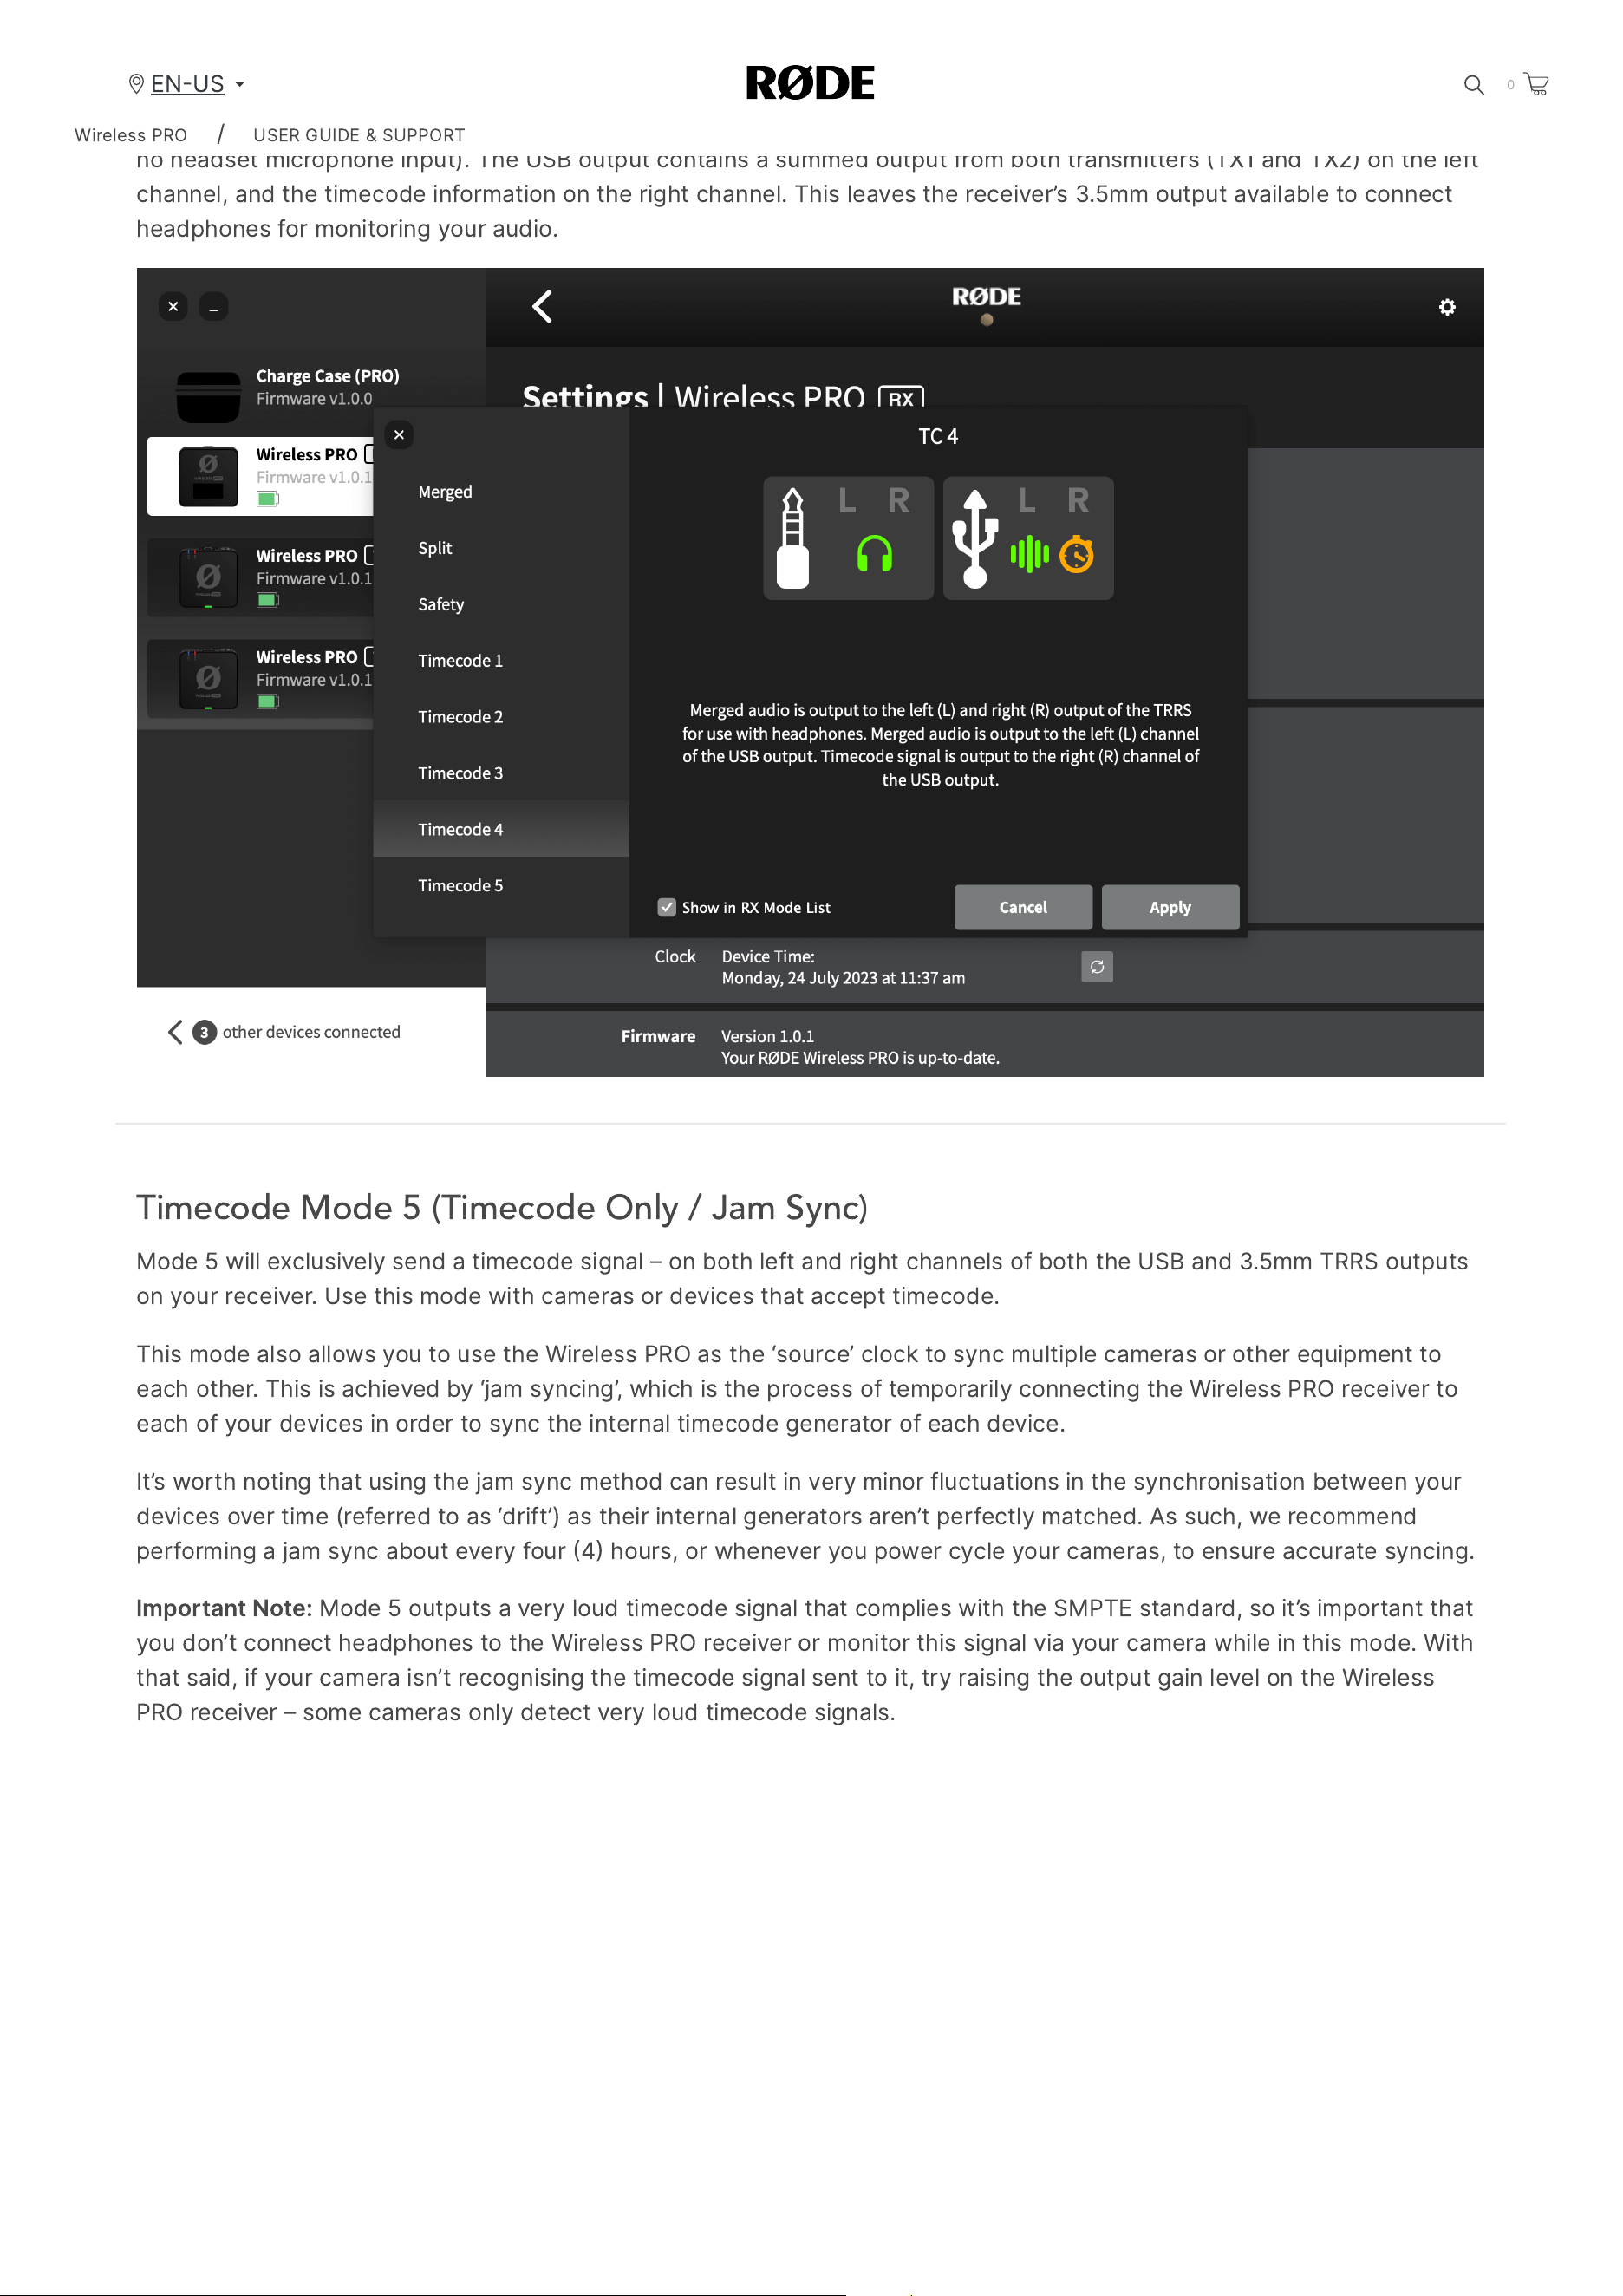
2/20/24, 9:57 AM
Wireless PRO | USER GUIDE & SUPPORT | RØDE
https://rode.com/en-us/user-guides/wireless-pro
36/41
Timecode Mode 4 (USB with Headphones, Merged)
Mode
4
is
the
same
as
Mode
3,
except
that
it
is
optimised
monitoring
with
headphones
instead
of
a
headset
(
i
.
e
.
there
is
no
headset
microphone
input
).
The
USB
output
contains
a
summed
output
from
both
transmitters
TX
1
and
TX
2
on
the
left
channel
,
and
the
timecode
information
on
the
right
channel
.
This
leaves
the
receiver
’
s
3.5
mm
output
available
to
connect
headphones
for
monitoring
your
audio
.
Timecode Mode 5 (Timecode Only / Jam Sync)
Mode
5
will
exclusively
send
a
timecode
signal
–
on
both
left
and
right
channels
of
both
the
USB
and
3.5
mm
TRRS
outputs
on
your
receiver
.
Use
this
mode
with
cameras
or
devices
that
accept
timecode
.
This
mode
also
allows
you
to
use
the
Wireless
PRO
as
the
‘
source
’
clock
to
sync
multiple
cameras
or
other
equipment
to
each
other
.
This
is
achieved
by
‘
jam
syncing
’,
which
is
the
process
of
temporarily
connecting
the
Wireless
PRO
receiver
to
each
of
your
devices
in
order
to
sync
the
internal
timecode
generator
of
each
device
.
It
’
s
worth
noting
that
using
the
jam
sync
method
can
result
in
very
minor
fluctuations
in
the
synchronisation
between
your
devices
over
time
(
referred
to
as
‘
drift
’)
as
their
internal
generators
aren
’
t
perfectly
matched
.
As
such
,
we
recommend
performing
a
jam
sync
about
every
four
4
hours
,
or
whenever
you
power
cycle
your
cameras
,
to
ensure
accurate
syncing
.
Important
Note
:
Mode
5
outputs
a
very
loud
timecode
signal
that
complies
with
the
SMPTE
standard
,
so
it
’
s
important
that
you
don
’
t
connect
headphones
to
the
Wireless
PRO
receiver
or
monitor
this
signal
via
your
camera
while
in
this
mode
.
With
that
said
,
if
your
camera
isn
’
t
recognising
the
timecode
signal
sent
to
it
,
try
raising
the
output
gain
level
on
the
Wireless
PRO
receiver
–
some
cameras
only
detect
very
loud
timecode
signals
.
Wireless
PRO
/
USER
GUIDE
&
SUPPORT
EN
US
0
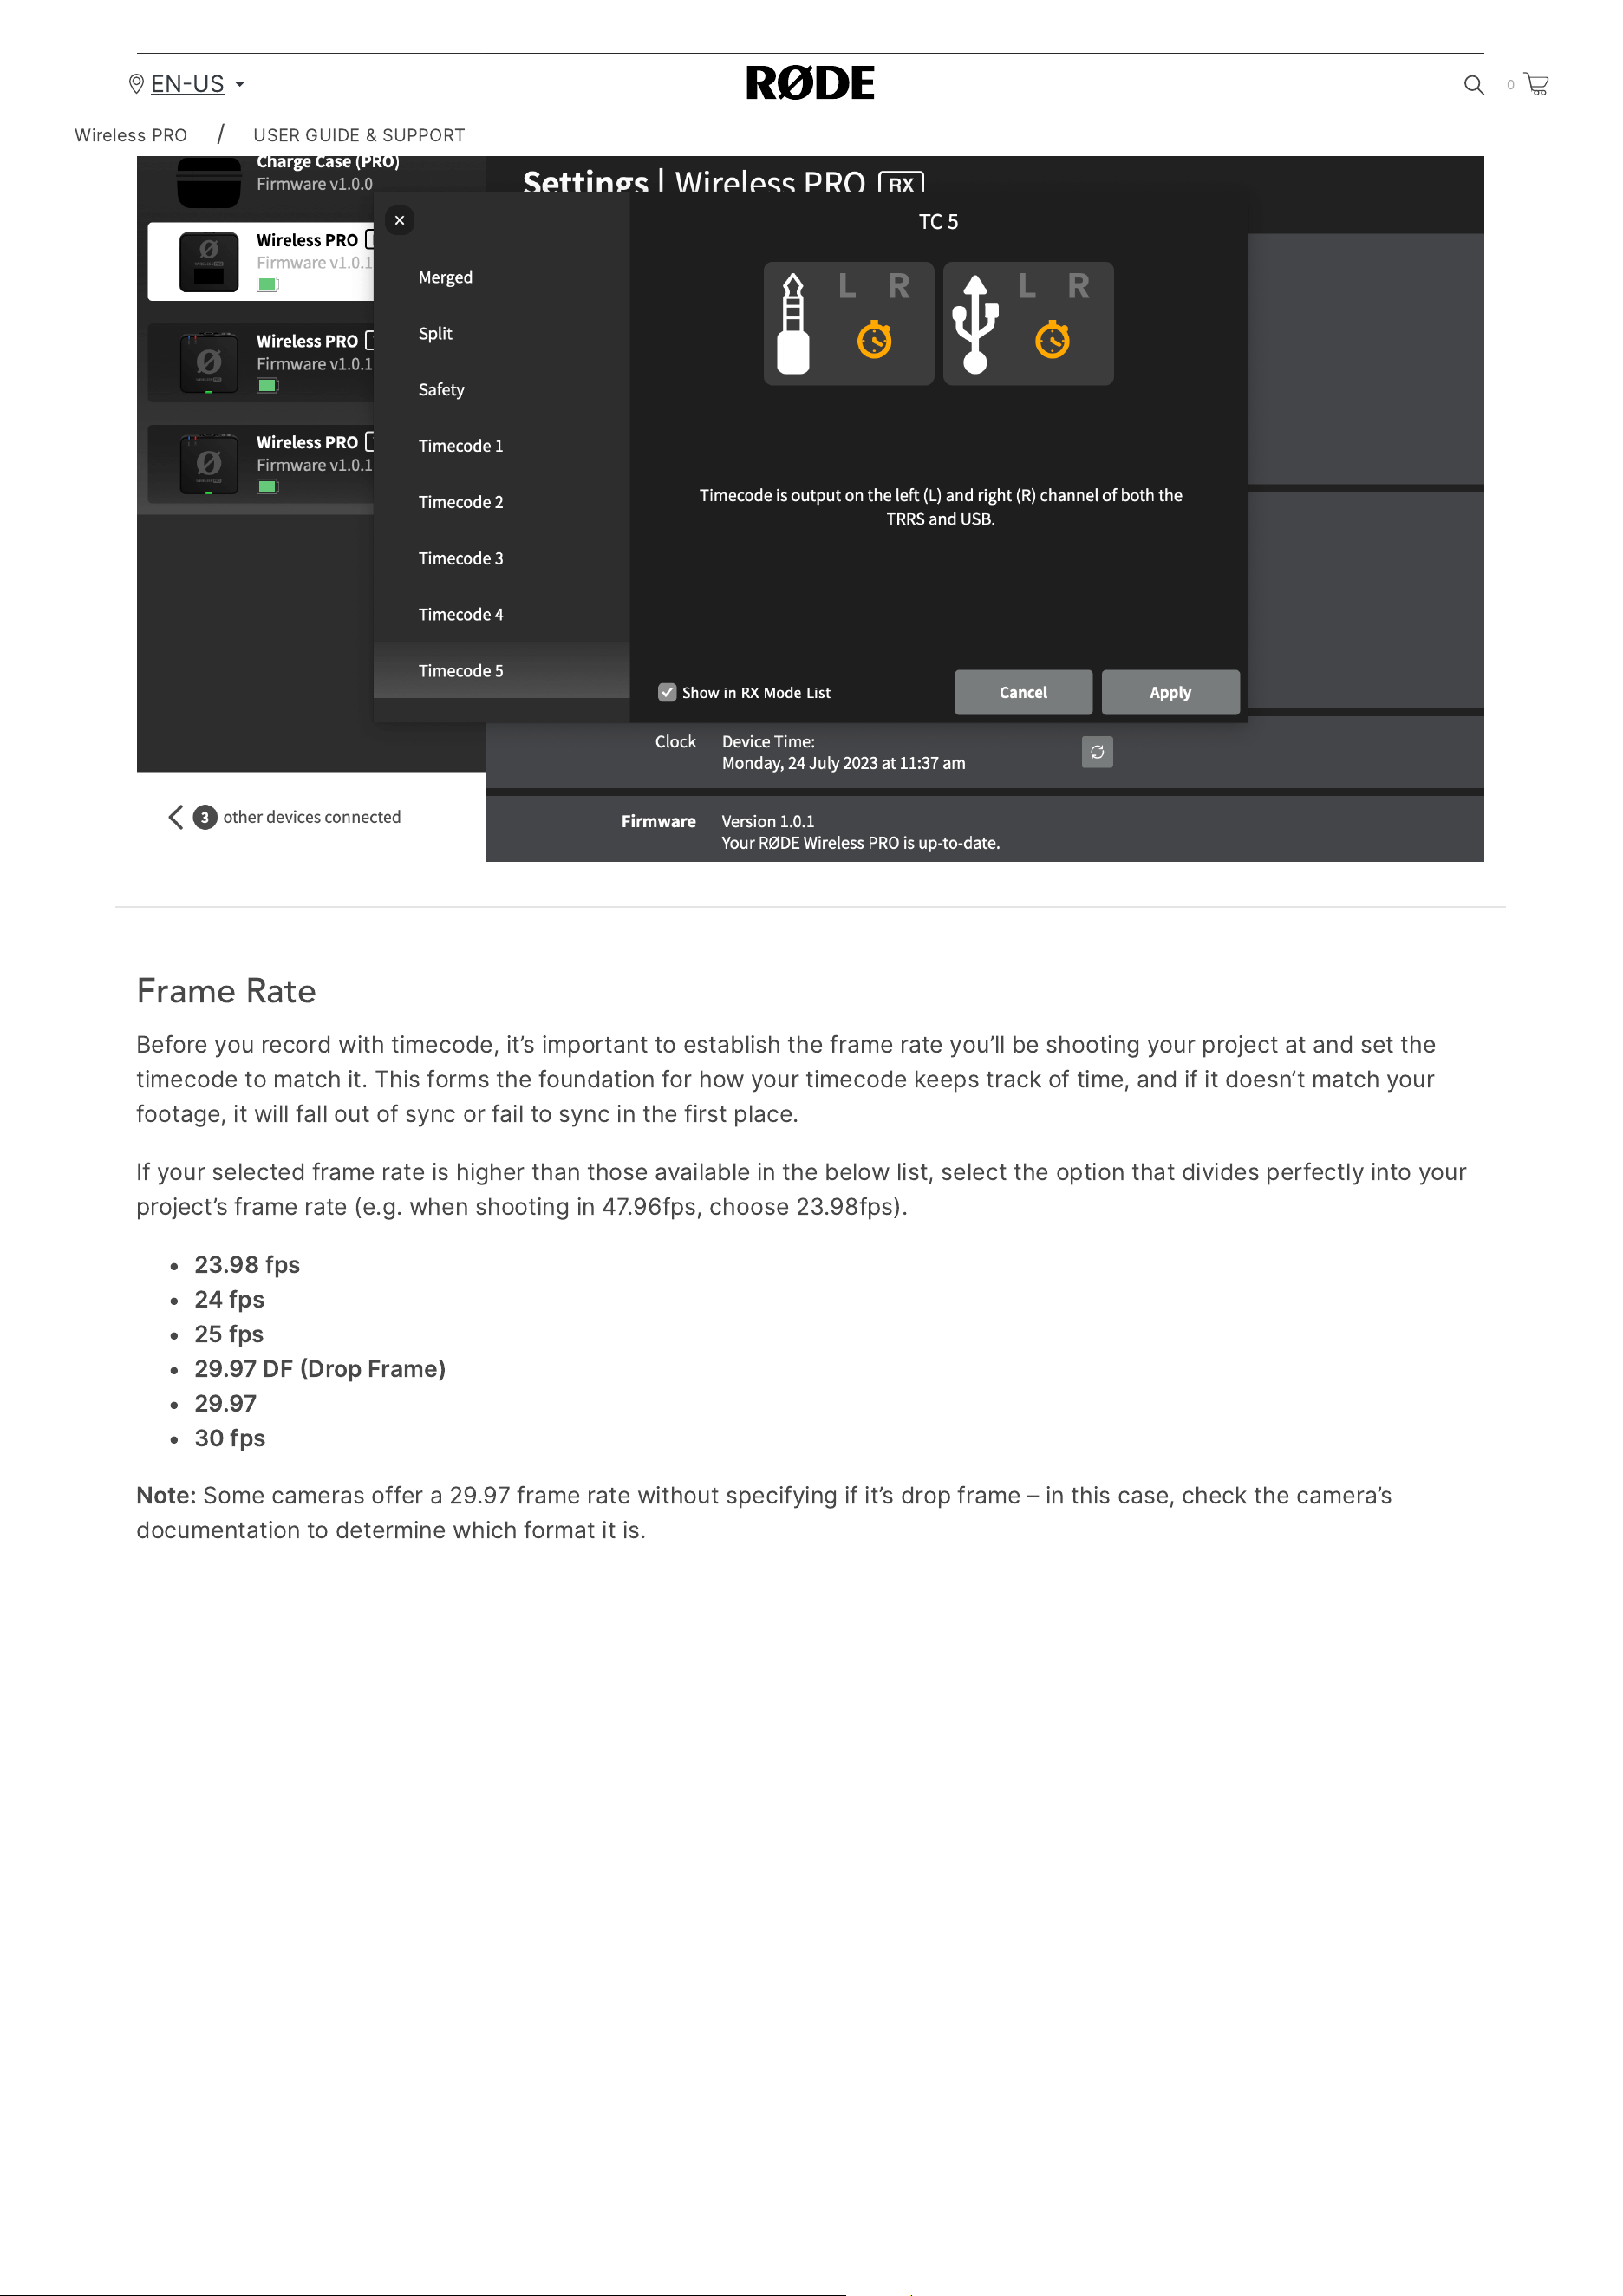
2/20/24, 9:57 AM
Wireless PRO | USER GUIDE & SUPPORT | RØDE
https://rode.com/en-us/user-guides/wireless-pro
37/41
Frame Rate
Before
you
record
with
timecode
,
it
’
s
important
to
establish
the
frame
rate
you
’
ll
be
shooting
your
project
at
and
set
the
timecode
to
match
it
.
This
forms
the
foundation
for
how
your
timecode
keeps
track
of
time
,
and
if
it
doesn
’
t
match
your
footage
,
it
will
fall
out
of
sync
or
fail
to
sync
in
the
first
place
.
If
your
selected
frame
rate
is
higher
than
those
available
in
the
below
list
,
select
the
option
that
divides
perfectly
into
your
project
’
s
frame
rate
(
e
.
g
.
when
shooting
in
47.96
fps
,
choose
23.98
fps
).
23.98
fps
24
fps
25
fps
29.97
DF
Drop
Frame
)
29.97
30
fps
Note
:
Some
cameras
offer
a
29.97
frame
rate
without
specifying
if
it
’
s
drop
frame
–
in
this
case
,
check
the
camera
’
s
documentation
to
determine
which
format
it
is
.
Wireless
PRO
/
USER
GUIDE
&
SUPPORT
EN
US
0
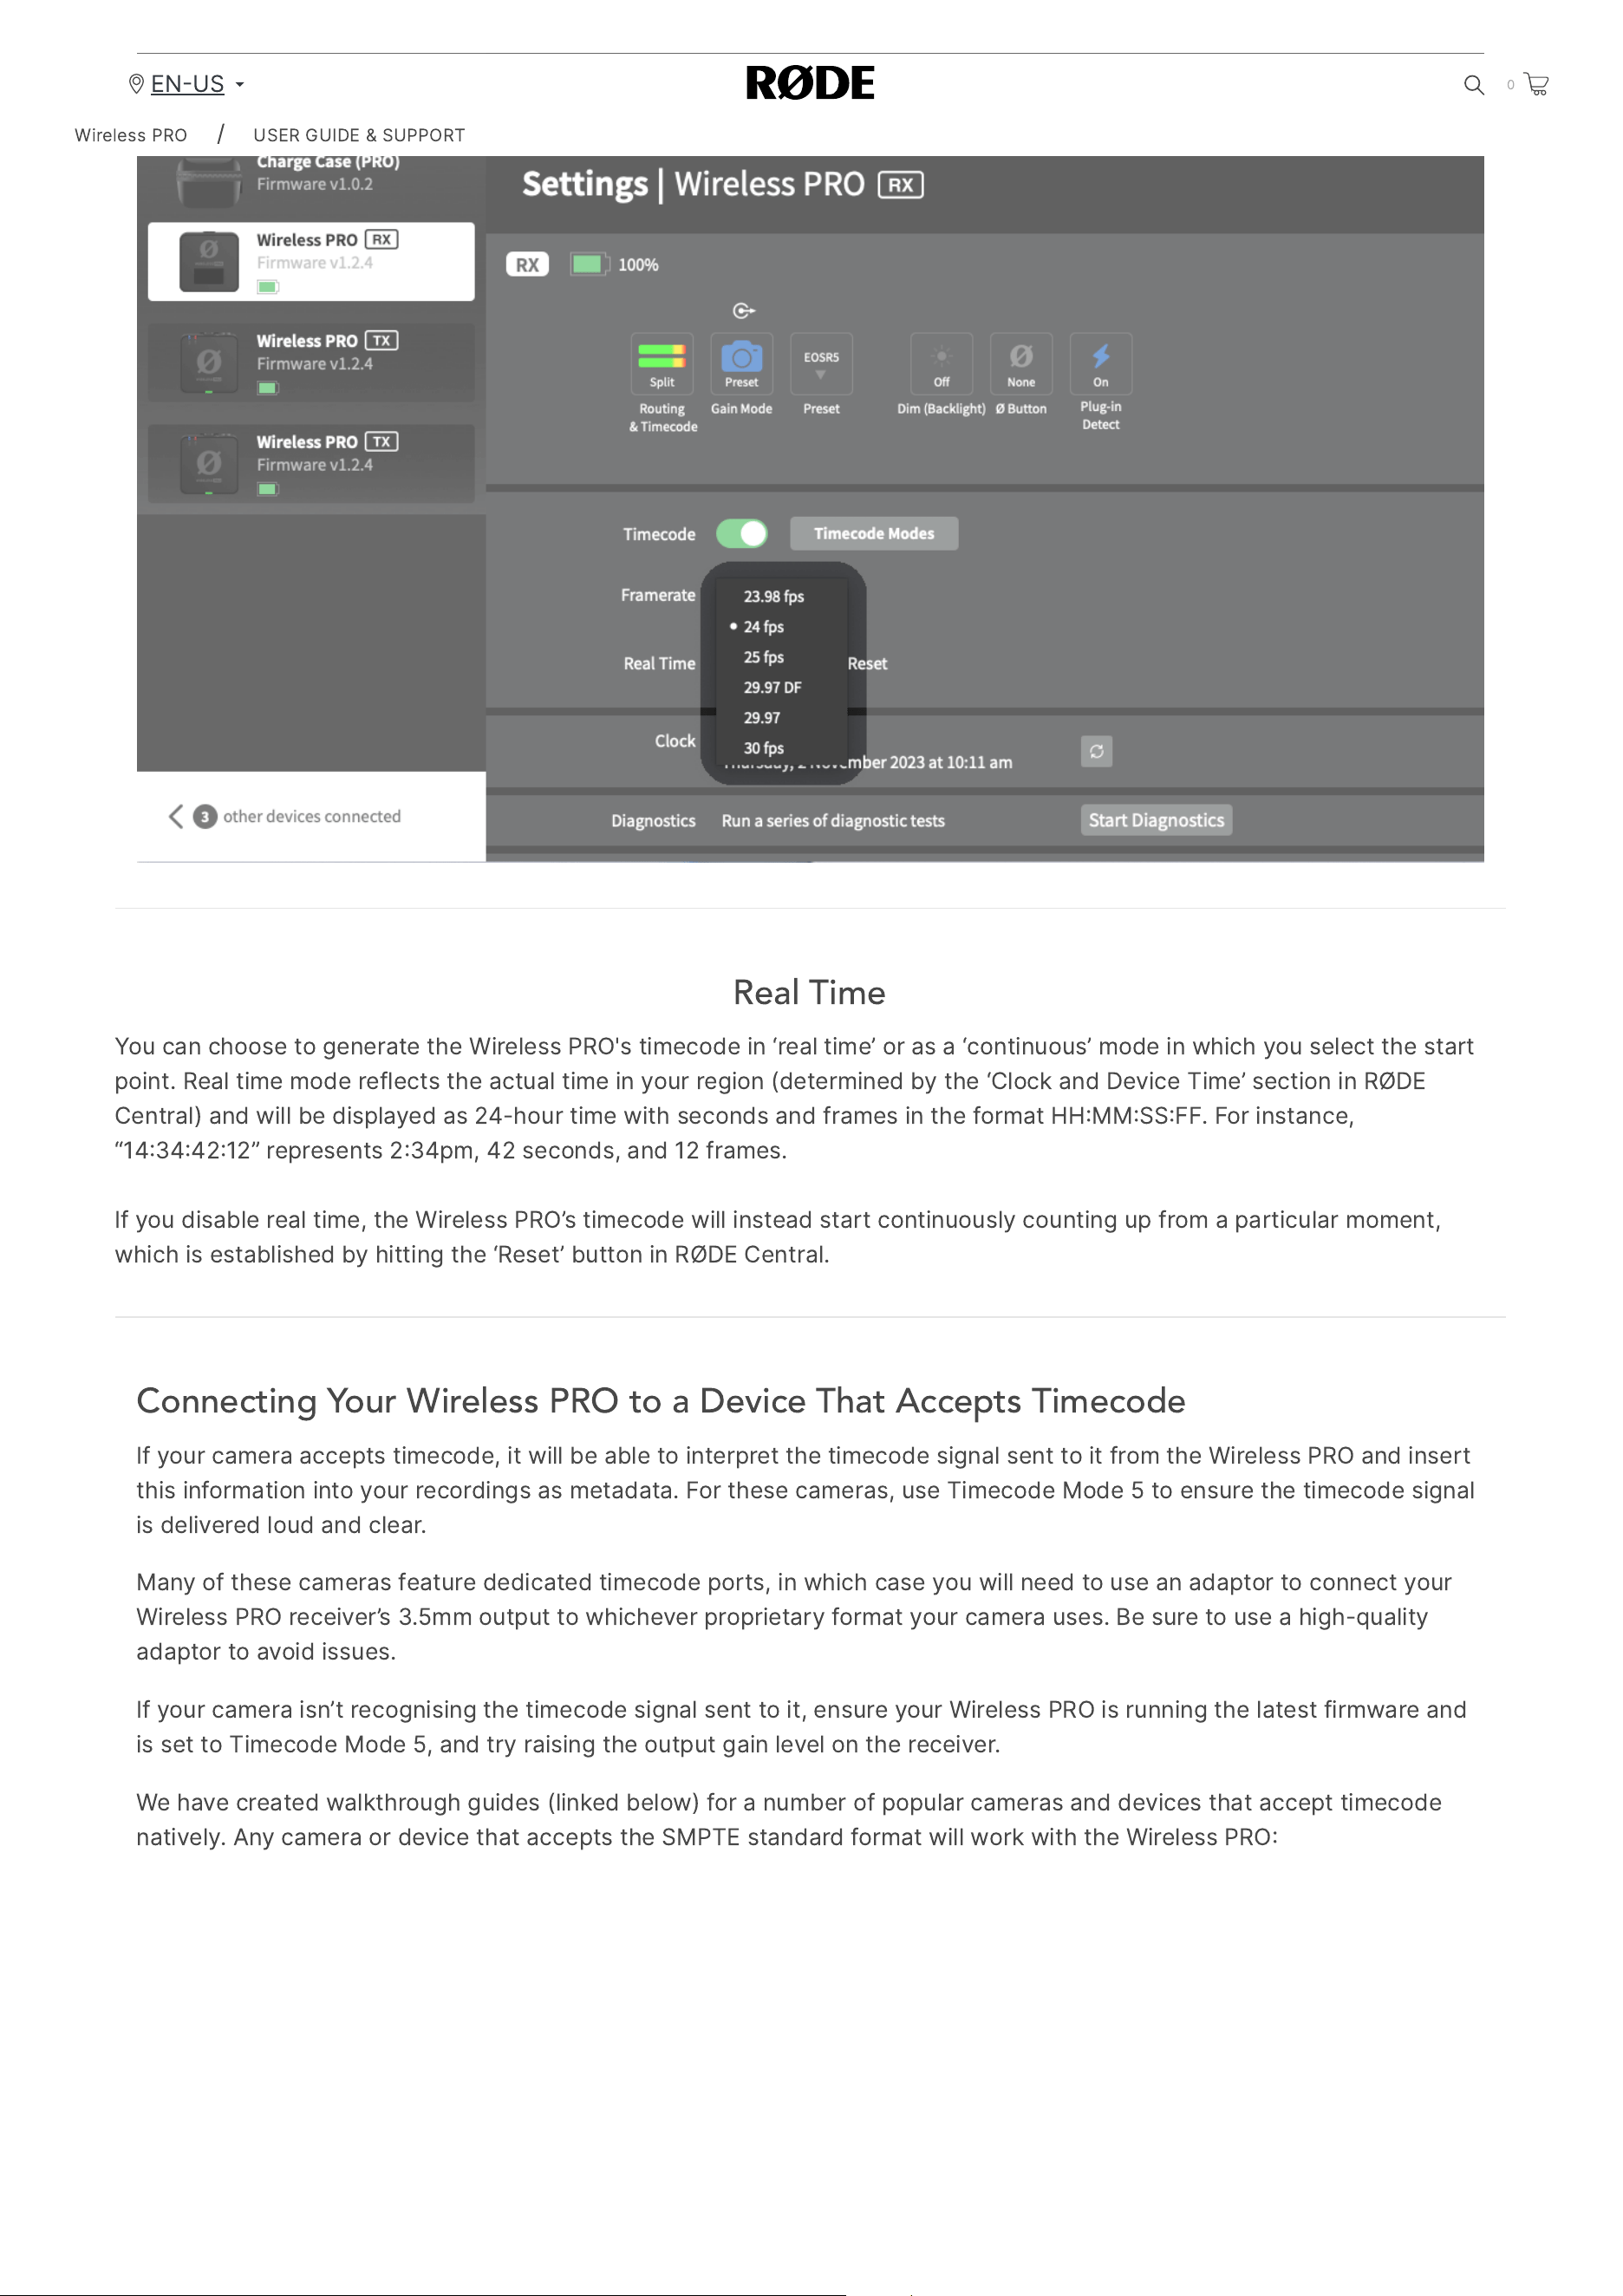
2/20/24, 9:57 AM
Wireless PRO | USER GUIDE & SUPPORT | RØDE
https://rode.com/en-us/user-guides/wireless-pro
38/41
Real Time
You
can
choose
to
generate
the
Wireless
PRO
'
s
timecode
in
‘
real
time
’
or
as
a
‘
continuous
’
mode
in
which
you
select
the
start
point
.
Real
time
mode
reflects
the
actual
time
in
your
region
(
determined
by
the
‘
Clock
and
Device
Time
’
section
in
RØDE
Central
)
and
will
be
displayed
as
24-
hour
time
with
seconds
and
frames
in
the
format
HH
MM
SS
FF
.
For
instance
,
“14344212”
represents
234
pm
, 42
seconds
,
and
12
frames
.
If
you
disable
real
time
,
the
Wireless
PRO
’
s
timecode
will
instead
start
continuously
counting
up
from
a
particular
moment
,
which
is
established
by
hitting
the
‘
Reset
’
button
in
RØDE
Central
.
Connecting Your Wireless PRO to a Device That Accepts Timecode
If
your
camera
accepts
timecode
,
it
will
be
able
to
interpret
the
timecode
signal
sent
to
it
from
the
Wireless
PRO
and
insert
this
information
into
your
recordings
as
metadata
.
For
these
cameras
,
use
Timecode
Mode
5
to
ensure
the
timecode
signal
is
delivered
loud
and
clear
.
Many
of
these
cameras
feature
dedicated
timecode
ports
,
in
which
case
you
will
need
to
use
an
adaptor
to
connect
your
Wireless
PRO
receiver
’
s
3.5
mm
output
to
whichever
proprietary
format
your
camera
uses
.
Be
sure
to
use
a
high
-
quality
adaptor
to
avoid
issues
.
If
your
camera
isn
’
t
recognising
the
timecode
signal
sent
to
it
,
ensure
your
Wireless
PRO
is
running
the
latest
firmware
and
is
set
to
Timecode
Mode
5,
and
try
raising
the
output
gain
level
on
the
receiver
.
We
have
created
walkthrough
guides
(
linked
below
)
for
a
number
of
popular
cameras
and
devices
that
accept
timecode
natively
.
Any
camera
or
device
that
accepts
the
SMPTE
standard
format
will
work
with
the
Wireless
PRO
Wireless
PRO
/
USER
GUIDE
&
SUPPORT
EN
US
0

2/20/24, 9:57 AM
Wireless PRO | USER GUIDE & SUPPORT | RØDE
https://rode.com/en-us/user-guides/wireless-pro
39/41
*
These
cameras
don
’
t
accept
timecode
but
you
can
still
follow
the
linked
guide
to
record
timecode
information
as
audio
.
Arri
Alexa
Mini
LF
Arri
Alexa
35
Blackmagic
Ursa
Mini
Pro
12
K
Blackmagic
Pocket
Cinema
Camera
4
K
Blackmagic
Pocket
Cinema
Camera
6
K
Blackmagic
Pocket
6
K
Pro
Canon
EOS
R
5*
Canon
EOS
R
5
C
Canon
EOS
C
70
Canon
EOS
C
300
Mk
II
Canon
EOS
C
300
Mk
III
Canon
EOS
C
500
Mk
II
Deity
TC
1
RED
KOMODO
6
K
RED
KOMODO
X
Sony
A
7
S
III
*
Sony
FX
3
Sony
FX
30
Wireless
PRO
/
USER
GUIDE
&
SUPPORT
EN
US
0
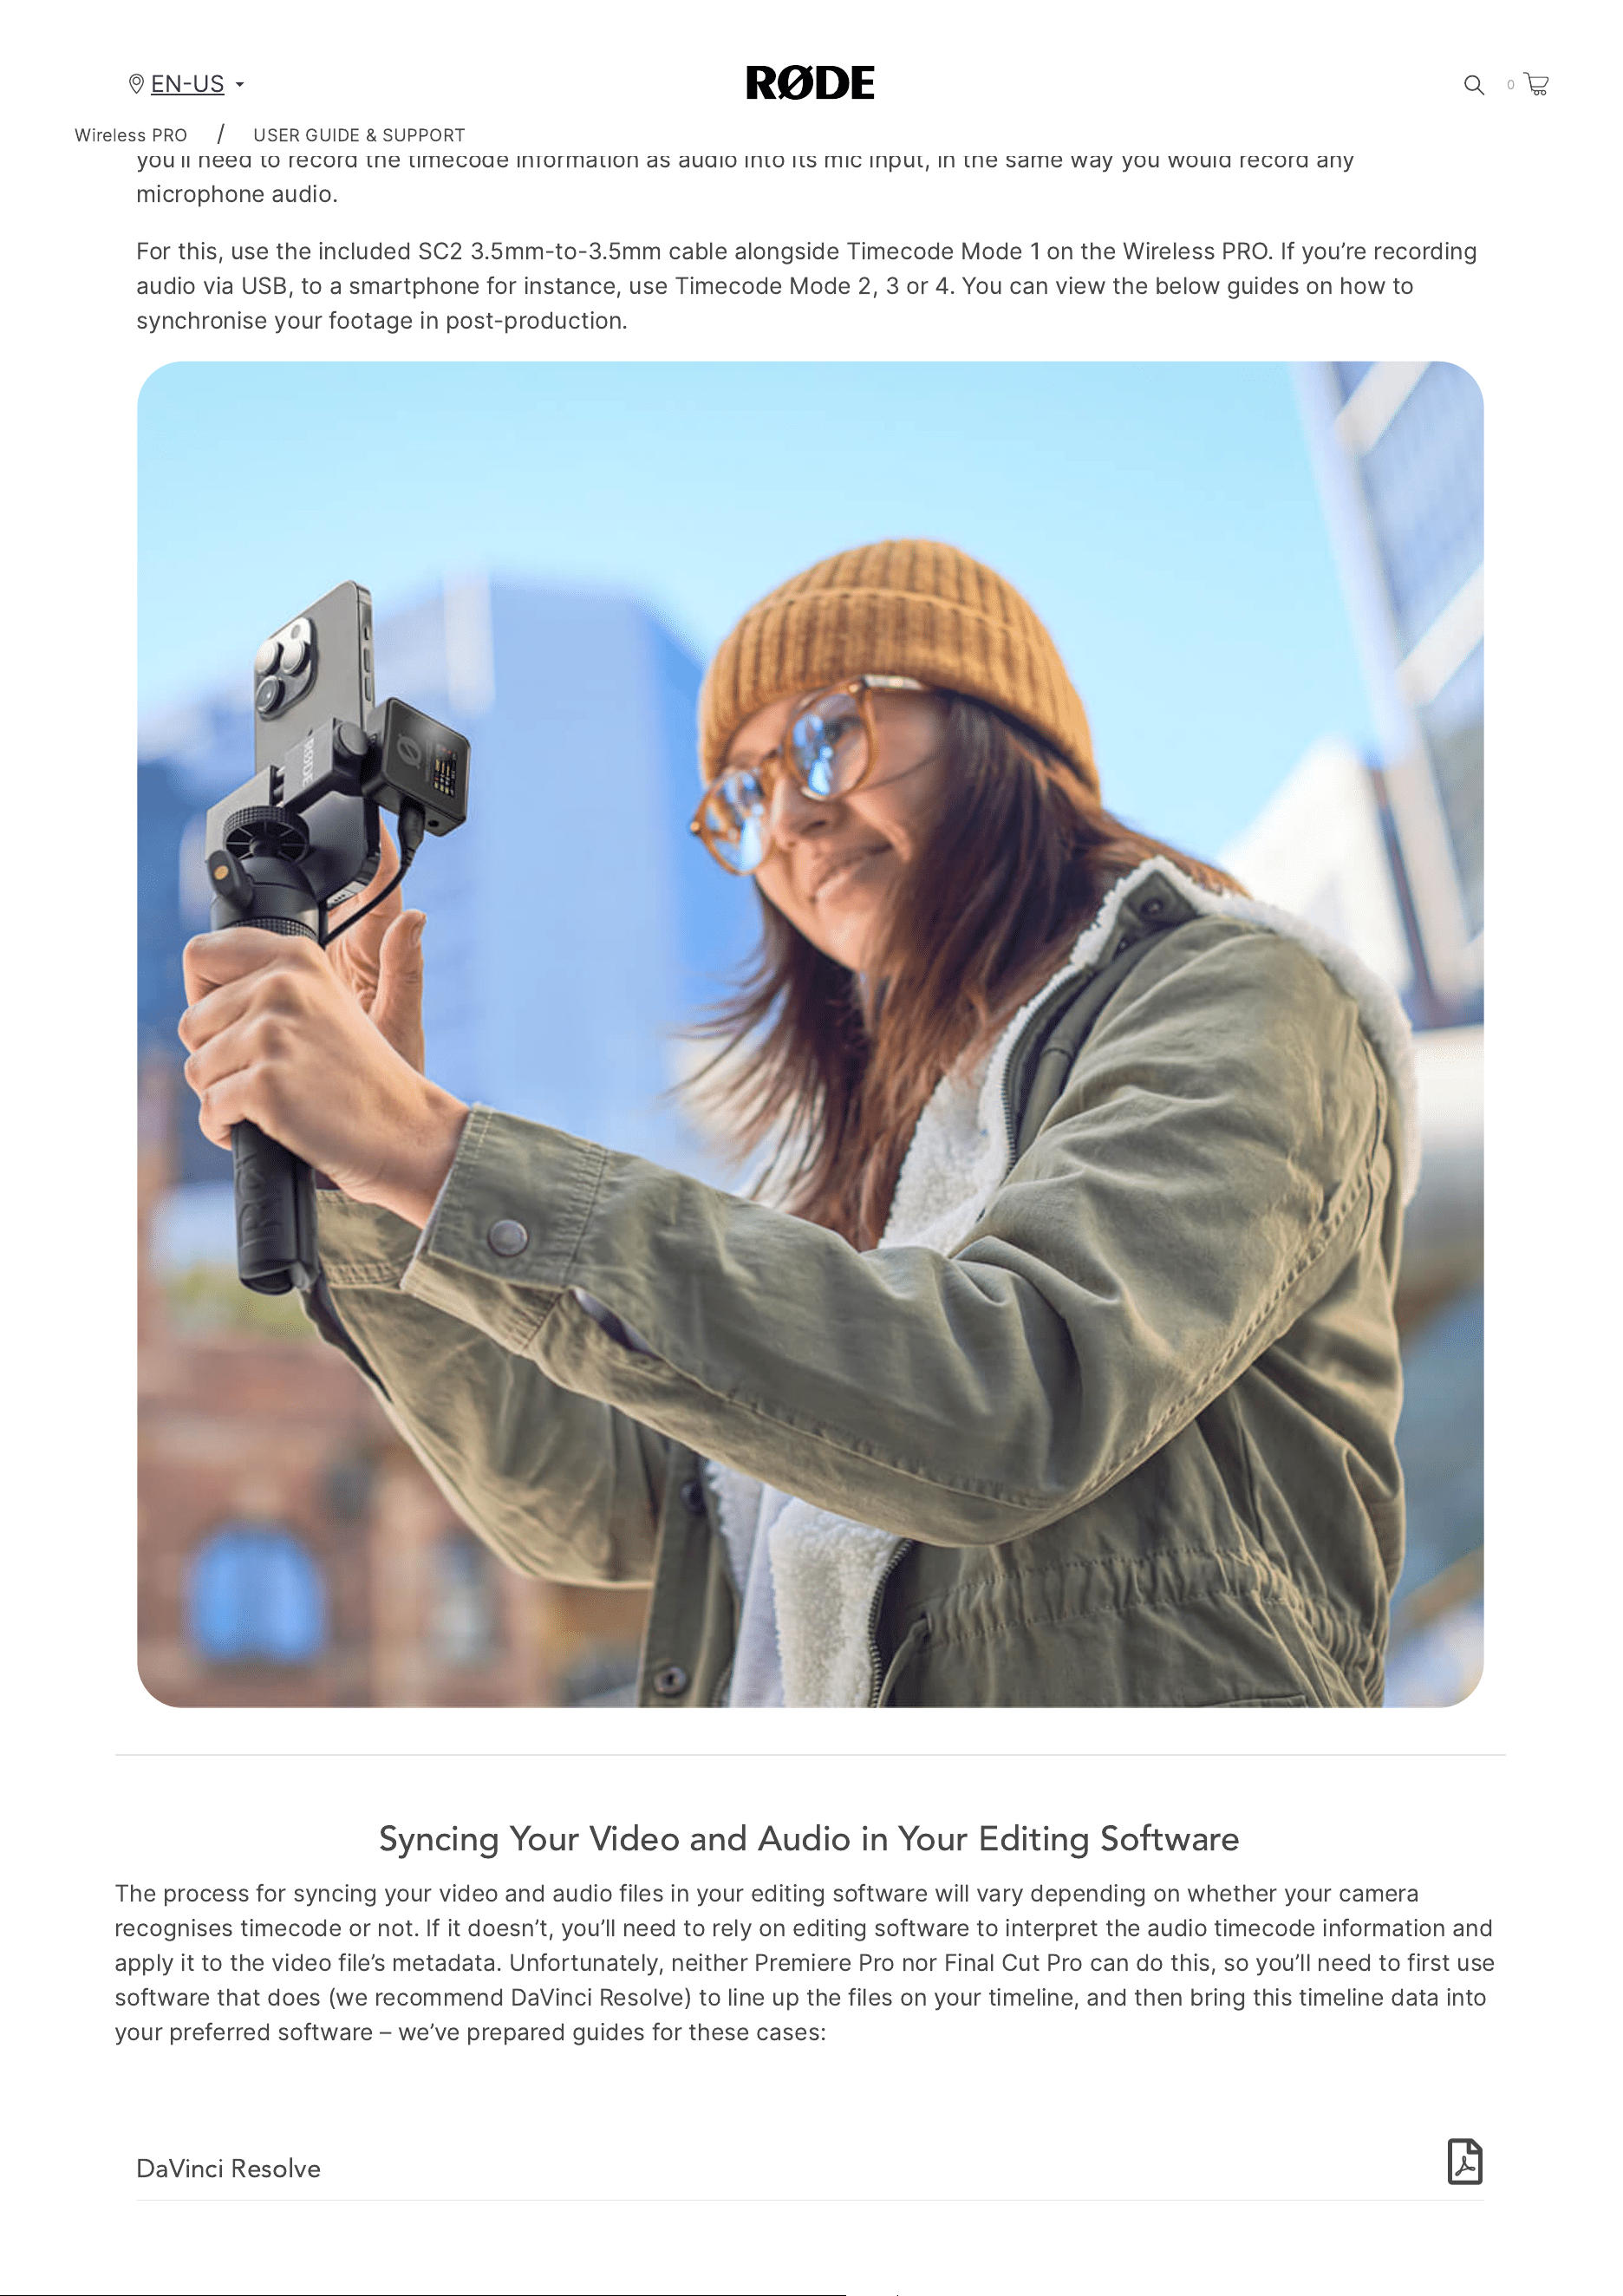
2/20/24, 9:57 AM
Wireless PRO | USER GUIDE & SUPPORT | RØDE
https://rode.com/en-us/user-guides/wireless-pro
40/41
Connecting Your Wireless PRO to a Device That Doesn
’
t Accept Timecode
If
your
camera
model
doesn
’
t
accept
timecode
natively
,
such
as
the
Sony
A
7
s
III
,
Canon
EOS
R
5
or
Panasonic
Lumix
GH
5,
you
’
ll
need
to
record
the
timecode
information
as
audio
into
its
mic
input
,
in
the
same
way
you
would
record
any
microphone
audio
.
For
this
,
use
the
included
SC
2 3.5
mm
-
to
-3.5
mm
cable
alongside
Timecode
Mode
1
on
the
Wireless
PRO
.
If
you
’
re
recording
audio
via
USB
,
to
a
smartphone
for
instance
,
use
Timecode
Mode
2, 3
or
4.
You
can
view
the
below
guides
on
how
to
synchronise
your
footage
in
post
-
production
.
Syncing Your Video and Audio in Your Editing Software
The
process
for
syncing
your
video
and
audio
files
in
your
editing
software
will
vary
depending
on
whether
your
camera
recognises
timecode
or
not
.
If
it
doesn
’
t
,
you
’
ll
need
to
rely
on
editing
software
to
interpret
the
audio
timecode
information
and
apply
it
to
the
video
file
’
s
metadata
.
Unfortunately
,
neither
Premiere
Pro
nor
Final
Cut
Pro
can
do
this
,
so
you
’
ll
need
to
first
use
software
that
does
(
we
recommend
DaVinci
Resolve
)
to
line
up
the
files
on
your
timeline
,
and
then
bring
this
timeline
data
into
your
preferred
software
–
we
’
ve
prepared
guides
for
these
cases
:
DaVinci Resolve
Wireless
PRO
/
USER
GUIDE
&
SUPPORT
EN
US
0
2/20/24, 9:57 AM
Wireless PRO | USER GUIDE & SUPPORT | RØDE
https://rode.com/en-us/user-guides/wireless-pro
41/41
Download
Final Cut Pro
Download
Premiere Pro
Download
A Note on Timecode Limitations
Cameras
and
other
recording
devices
differ
in
how
they
handle
internal
video
and
audio
file
synchronisation
,
as
well
as
in
how
they
accept
timecode
,
and
this
can
have
some
consequences
for
timecode
syncing
.
While
the
Wireless
PRO
system
is
perfectly
synchronised
internally
between
the
receiver
and
transmitters
,
there
’
s
a
small
chance
that
your
video
and
audio
may
be
out
of
sync
by
a
tiny
amount
depending
on
a
wide
range
of
variables
in
the
other
equipment
you
’
re
using
(
this
disparity
could
measure
1
or
2
frames
in
extreme
cases
).
Even
with
this
in
mind
,
it
is
still
significantly
quicker
to
use
timecode
to
synchronise
your
files
and
then
adjust
them
by
a
frame
or
two
.
We
recommend
you
record
a
clap
that
’
s
visible
and
audible
on
all
of
your
video
and
audio
recording
equipment
.
Once
you
’
ve
synchronised
your
files
using
timecode
,
this
can
be
used
as
a
reference
point
for
nudging
your
video
or
audio
if
it
’
s
needed
.
Products
Microphones
Headphones
Interfaces
and
Mixers
Accessories
Apps
Apparel
Support
Contact
RØDE
Service
Centre
Warranty
Where
to
Buy
Authorised
Dealers
Company
About
RØDE
News
and
Info
Job
Opportunities
Account
Create
Account
Subscribe
to
our
latest
news
and
offers
Subscribe
Privacy
Policy
|
Terms
&
Conditions
© 2024
RØDE
All
Rights
Reserved
.
Wireless
PRO
/
USER
GUIDE
&
SUPPORT
EN
US
0