Quick Start Guide
GO CAM WIRELESS
Digital Wireless Clip-On Microphone System for Content Creators
V 1.0
2 GO CAM WIRELESS Quick Start Guide 3
(EN) Safety Instruction
1.
Please read and follow all instructions.
2.
Keep the apparatus away from water, except for
outdoor products.
3.
Clean only with a dry cloth.
4.
Do not block any ventilation openings. Install in
accordance with the manufacturer’s instructions.
5.
Do not install near any heat sources such as radiators,
heat registers, stoves or other apparatus (including
ampli ers) that produce heat.
6.
Use only attachments/accessories speci ed by
the manufacturer.
7. Use only speci ed
carts, stands, tripods,
brackets, or tables. Use
caution to prevent tip-over
when moving the cart/
apparatus combination.
8.
Avoid installing in con ned spaces like bookcases.
9.
Do not place near naked ame sources, such as
lighted candles.
10.
Operating temperature range 5° to 45°C
(41° to 113°F).
LEGAL DISCLAIMER
Music Tribe accepts no liability for any loss which may
be su ered by any person who relies either wholly or in
part upon any description, photograph, or statement
contained herein. Technical speci cations, appearances
and other information are subject to change without
notice. All trademarks are the property of their
respective owners. Midas, Klark Teknik, Lab Gruppen,
Lake, Tannoy, Turbosound, TC Electronic, TC Helicon,
Behringer, Bugera, Aston Microphones and Coolaudio
are trademarks or registered trademarks of Music
Tribe Global Brands Ltd. © Music Tribe Global Brands
Ltd. 2024 All rights reserved.
LIMITED WARRANTY
For the applicable warranty terms and conditions
and additional information regarding Music Tribe’s
Limited Warranty, please see complete details online at
community.musictribe.com/support.
(ES)
Instrucción de seguridad
1.
Por favor, lea y siga todas las instrucciones.
2.
Mantenga el aparato alejado del agua, excepto para
productos destinados al uso en exteriores.
3.
Limpie solo con un paño seco.
4.
No bloquee ninguna abertura de ventilación. Instale
de acuerdo con las instrucciones del fabricante.
5.
No instale cerca de fuentes de calor como radiadores,
registros de calor, estufas u otros aparatos (incluyendo
ampli cadores) que generen calor.
6. Utilice solo accesorios especi cados por el fabricante.
7. Use solo carros,
soportes, trípodes,
soportes o mesas
especi cados. Tenga
precaución para evitar el
vuelco al mover la
combinación carro/
aparato.
8. Evite la instalación en espacios con nados
como estanterías.
9. No colocar cerca de fuentes de llama desnuda,
como velas encendidas.
10. Rango de temperatura de funcionamiento de
5° a 45°C (41° a 113° F).
NEGACIÓN LEGAL
Music Tribe no admite ningún tipo de responsabilidad
por cualquier daño o pérdida que pudiera sufrir
cualquier persona por con ar total o parcialmente en la
descripciones, fotografías o a rmaciones contenidas en
este documento. Las especi caciones técnicas, imágenes
y otras informaciones contenidas en este documento
están sujetas a modi caciones sin previo aviso. Todas las
marcas comerciales que aparecen aquí son propiedad
de sus respectivos dueños. Midas, Klark Teknik,
Lab Gruppen, Lake, Tannoy, Turbosound, TC Electronic,
TC Helicon, Behringer, Bugera, Aston Microphones y
Coolaudio son marcas comerciales o marcas registradas
de Music Tribe Global Brands Ltd. © Music Tribe Global
Brands Ltd. 2024 Reservados todos los derechos.
GARANTÍA LIMITADA
Si quiere conocer los detalles y condiciones aplicables
de la garantía así como información adicional sobre
la Garantía limitada de Music Tribe, consulte online
toda la información en la web community.musictribe.
com/support.
(FR) Consignes de sécurité
1. Veuillez lire et suivre toutes les instructions.
2. Gardez l'appareil éloigné de l'eau, sauf pour les
produits destinés à une utilisation en extérieur.
3. Nettoyez uniquement avec un chi on sec.
4. Ne bloquez aucune ouverture de ventilation. Installez
conformément aux instructions du fabricant.
5. N'installez pas près de sources de chaleur telles
que radiateurs, grilles de chaleur, cuisinières ou autres
appareils (y compris les ampli cateurs) qui produisent de
la chaleur.
6. Utilisez uniquement les accessoires spéci és par
le fabricant.
7. Utilisez uniquement
des chariots, des supports,
des trépieds, des supports
ou des tables spéci és.
Faites attention pour éviter
le renversement lors du
déplacement de la
combinaison chariot/
appareil.
8. Évitez l'installation dans des espaces con nés comme
les bibliothèques.
9. Ne pas placer près de sources de amme nue,
telles que des bougies allumées.
10. Plage de température de fonctionnement de
5° à 45°C (41° à 113°F)
DÉNI LÉGAL
Music Tribe ne peut être tenu pour responsable pour
toute perte pouvant être subie par toute personne
se ant en partie ou en totalité à toute description,
photographie ou a rmation contenue dans ce
document. Les caractéristiques, l’apparence et d’autres
informations peuvent faire l’objet de modi cations
sans noti cation. Toutes les marques appartiennent
à leurs propriétaires respectifs. Midas, Klark Teknik,
Lab Gruppen, Lake, Tannoy, Turbosound, TC Electronic,
TC Helicon, Behringer, Bugera, Aston Microphones et
Coolaudio sont des marques ou marques déposées de
Music Tribe Global Brands Ltd. © Music Tribe Global
Brands Ltd. 2024 Tous droits réservés.
GARANTIE LIMITÉE
Pour connaître les termes et conditions de
garantie applicables, ainsi que les informations
supplémentaires et détaillées sur la Garantie
Limitée de Music Tribe, consultez le site Internet
community.musictribe.com/support.
(DE) Wichtige Sicherheitshinweise
1. Bitte lesen Sie alle Anweisungen sorgfältig durch und
befolgen Sie diese.
2. Halten Sie das Gerät von Wasser fern, außer für
Produkte, die für den Außeneinsatz vorgesehen sind.
3. Reinigen Sie es nur mit einem trockenen Tuch.
4.
Blockieren Sie keine Belüftungsö nungen. Installieren
Sie gemäß den Anweisungen des Herstellers.
5. Installieren Sie nicht in der Nähe von Wärmequellen
wie Heizkörpern, Heizregistern, Öfen oder anderen
Geräten (einschließlich Verstärkern), die Wärme erzeugen.
6. Verwenden Sie nur Zubehörteile, die vom Hersteller
angegeben sind.
7. Verwenden Sie nur
spezi zierte Wagen,
Ständer, Stative,
Halterungen oder Tische.
Achten Sie darauf, beim
Bewegen der Wagen-
Geräte-Kombination ein
Umkippen zu vermeiden.
8.
Vermeiden Sie die Installation in beengten Räumen
wie Bücherregalen.
9.
Nicht in der Nähe von o enen Flammenquellen
platzieren, wie brennende Kerzen.
10.
Betriebstemperaturbereich von 5° bis 45°C
(41° bis 113°F).
HAFTUNGSAUSSCHLUSS
Music Tribe übernimmt keine Haftung für Verluste,
die Personen entstanden sind, die sich ganz oder
teilweise auf hier enthaltene Beschreibungen,
Fotos oder Aussagen verlassen haben. Technische Daten,
Erscheinungsbild und andere Informationen können
ohne vorherige Ankündigung geändert werden. Alle
Warenzeichen sind Eigentum der jeweiligen Inhaber.
Midas, Klark Teknik, Lab Gruppen, Lake, Tannoy,
Turbosound, TC Electronic, TC Helicon, Behringer, Bugera,
Aston Microphones und Coolaudio sind Warenzeichen
oder eingetragene Warenzeichen der Music Tribe Global
Brands Ltd. © Music Tribe Global Brands Ltd. 2024 Alle
Rechte vorbehalten.
BESCHRÄNKTE GARANTIE
Die geltenden Garantiebedingungen und zusätzliche
Informationen bezüglich der von Music Tribe gewährten
beschränkten Garantie nden Sie online unter
community.musictribe.com/support.
(PT)
Instruções de Seguranç
Importantes
1.
Por favor, leia e siga todas as instruções.
2.
Mantenha o aparelho longe da água, exceto para
produtos destinados ao uso externo.
3.
Limpe apenas com um pano seco.
4.
Não bloqueie nenhuma abertura de ventilação. Instale
de acordo com as instruções do fabricante.
5.
Não instale próximo a fontes de calor, como
radiadores, grelhas de calor, fogões ou outros aparelhos
(incluindo ampli cadores) que gerem calor.
6.
Use apenas acessórios especi cados pelo fabricante.
7. Use apenas carrinhos,
suportes, tripés, suportes
ou mesas especi cados.
Tenha cuidado para evitar
tombamentos ao mover a
combinação carrinho/
aparelho.
8.
Evite instalar em espaços con nados, como estantes.
9. Não coloque perto de fontes de chama nua,
como velas acesas.
10. Intervalo de temperatura de operação de 5° a 45°C
(41° a 113° F).
LEGAL RENUNCIANTE
O Music Tribe não se responsabiliza por perda
alguma que possa ser sofrida por qualquer pessoa
que dependa, seja de maneira completa ou parcial,
de qualquer descrição, fotogra a, ou declaração
aqui contidas. Dados técnicos, aparências e outras
informações estão sujeitas a modi cações sem aviso
prévio. Todas as marcas são propriedade de seus
respectivos donos. Midas, Klark Teknik, Lab Gruppen,
Lake, Tannoy, Turbosound, TC Electronic, TC Helicon,
Behringer, Bugera, Aston Microphones e Coolaudio
são marcas ou marcas registradas do Music Tribe
Global Brands Ltd. © Music Tribe Global Brands Ltd.
2024 Todos direitos reservados.
GARANTIA LIMITADA
Para obter os termos de garantia aplicáveis e condições e
informações adicionais a respeito da garantia limitada do
Music Tribe, favor veri car detalhes na íntegra através do
website community.musictribe.com/support.
(IT) Istruzioni di sicurezza importanti
1. Per favore, leggere e seguire tutte le istruzioni.
2. Mantenere l'apparecchio lontano dall'acqua, tranne
per i prodotti destinati all'uso all'aperto.
3. Pulire solo con un panno asciutto.
4. Non ostruire alcuna apertura di ventilazione. Installare
in conformità alle istruzioni del produttore.
5. Non installare vicino a fonti di calore come
termosifoni, bocchette di calore, fornelli o altri apparecchi
(compresi gli ampli catori) che producono calore.
6. Utilizzare solo accessori speci cati dal produttore.
7. Usare solo carrelli,
supporti, treppiedi, sta e
o tavoli speci cati. Prestare
attenzione per evitare il
ribaltamento durante lo
spostamento della
combinazione carrello/
apparecchio.
8. Evitare l'installazione in spazi con nati come librerie.
9. Non posizionare vicino a fonti di amma nude,
come candele accese.
10. Intervallo di temperatura di funzionamento da
5° a 45°C (41° a 113°F).
DISCLAIMER LEGALE
Music Tribe non si assume alcuna responsabilità per
eventuali danni che possono essere subiti da chiunque
si a di in tutto o in parte a qualsiasi descrizione,
fotogra a o dichiarazione contenuta qui. Speci che
tecniche, aspetti e altre informazioni sono soggette
a modi che senza preavviso. Tutti i marchi sono di
proprietà dei rispettivi titolari. Midas, Klark Teknik,
Lab Gruppen, Lake, Tannoy, Turbosound, TC Electronic,
TC Helicon, Behringer, Bugera, Aston Microphones e
Coolaudio sono marchi o marchi registrati di Music Tribe
Global Brands Ltd. © Music Tribe Global Brands Ltd.
2024 Tutti i diritti riservati.
GARANZIA LIMITATA
Per i termini e le condizioni di garanzia applicabili e le
informazioni aggiuntive relative alla garanzia limitata
di Music Tribe, consultare online i dettagli completi su
community.musictribe.com/support.
(NL) Belangrijke
veiligheidsvoorschriften
1. Lees alsjeblieft alle instructies en volg deze op.
2. Houd het apparaat uit de buurt van water, behalve
voor producten die bedoeld zijn voor buitengebruik.
3. Reinig alleen met een droge doek.
4. Blokker geen ventilatieopeningen. Installeer volgens
de instructies van de fabrikant.
5. Installeer niet in de buurt van warmtebronnen
zoals radiatoren, warmte registers, fornuizen of andere
apparaten (inclusief versterkers) die warmte produceren.
6. Gebruik alleen accessoires die door de fabrikant
zijn gespeci ceerd.
7. Gebruik alleen
gespeci ceerde karren,
standaards, statieven,
beugels of tafels. Wees
voorzichtig om kantelen te
voorkomen bij het
verplaatsen van de kar/
apparaatcombinatie.
8. Vermijd installatie in afgesloten ruimtes
zoals boekenkasten.
9. Plaats niet in de buurt van naakte vlambronnen,
zoals brandende kaarsen.
10. Bedrijfstemperatuurbereik
van 5° tot 45°C (41° tot 113°F).
WETTELIJKE ONTKENNING
Music Tribe aanvaardt geen aansprakelijkheid voor enig
verlies dat kan worden geleden door een persoon die
geheel of gedeeltelijk vertrouwt op enige beschrijving,
foto of verklaring hierin. Technische speci caties,
verschijningen en andere informatie kunnen zonder
voorafgaande kennisgeving worden gewijzigd. Alle
handelsmerken zijn eigendom van hun respectievelijke
eigenaren. Midas, Klark Teknik, Lab Gruppen, Lake,
Tannoy, Turbosound, TC Electronic, TC Helicon,
Behringer, Bugera, Aston Microphones en Coolaudio
4 GO CAM WIRELESS Quick Start Guide 5
zijn handelsmerken of gedeponeerde handelsmerken
van Music Tribe Global Brands Ltd. © Music Tribe Global
Brands Ltd. 2024 Alle rechten voorbehouden.
BEPERKTE GARANTIE
Voor de toepasselijke garantievoorwaarden en
aanvullende informatie met betrekking tot de beperkte
garantie van Music Tribe, zie de volledige details online
op community.musictribe.com/support.
(SE)
Viktiga säkerhetsanvisningar
1.
Vänligen läs och följ alla instruktioner noggrant.
2.
Håll apparaten borta från vatten, förutom
för utomhusprodukter.
3.
Rengör endast med en torr trasa.
4.
Blockera inte några ventilationsöppningar.
Installera enligt tillverkarens anvisningar.
5.
Installera inte nära några värmekällor som element,
värmeregistrar, spisar eller andra apparater (inklusive
förstärkare) som genererar värme.
6.
Använd endast tillbehör som anges av tillverkaren.
7. Använd endast
speci cerade vagnar, ställ,
stativ, fästen eller bord. Var
försiktig för att undvika att
vagnen/
apparatkombinationen
tippar när den yttas.
8. Undvik installation i
trånga utrymmen som bokhyllor.
9.
Placera inte nära öppen låga, såsom tända ljus.
10.
Driftstemperaturområde 5° till 45°C (41° till 113°F).
FRISKRIVNINGSKLAUSUL
Music Tribe tar inget ansvar för någon förlust som kan
drabbas av någon person som helt eller delvis förlitar
sig på någon beskrivning, fotogra eller uttalande som
nns här. Tekniska speci kationer, utseenden och annan
information kan ändras utan föregående meddelande.
Alla varumärken tillhör respektive ägare. Midas,
Klark Teknik, Lab Gruppen, Lake, Tannoy, Turbosound,
TC Electronic, TC Helicon, Behringer, Bugera, Aston
Microphones och Coolaudio är varumärken eller
registrerade varumärken som tillhör Music Tribe Global
Brands Ltd. © Music Tribe Global Brands Ltd. 2024 Alla
Rättigheter reserverade.
BEGRÄNSAD GARANTI
För tillämpliga garantivillkor och ytterligare information
om Music Tribes begränsade garanti, se fullständig
information online på community.musictribe.
com/support.
(PL) Ważne informacje o
bezpieczeństwie
1. Proszę przeczytać i ścisłe przestrzegać
wszystkich instrukcji.
2. Trzymaj urządzenie z dala od wody, z wyjątkiem
produktów przeznaczonych do użytku na zewnątrz.
3. Czyść tylko suchą szmatką.
4. Nie blokuj żadnych otworów wentylacyjnych.
Instaluj zgodnie z instrukcjami producenta.
5. Nie instaluj w pobliżu źródeł ciepła, takich jak
grzejniki, rejestratory ciepła, kuchenki lub inne urządzenia
(w tym wzmacniacze), które generują ciepło.
6. Używaj tylko akcesoriów określonych
przez producenta.
7. Używaj tylko
określonych wózków,
stojaków, statywów,
uchwytów lub stołów.
Uważaj, aby zapobiec
przewróceniu się wózka/
aparatu podczas
przemieszczania.
8. Unikaj instalacji w ciasnych miejscach, takich jak
regały na książki.
9. Nie umieszczaj w pobliżu źródeł otwartego ognia,
takich jak zapalone świeczki.
10. Zakres temperatury pracy od 5° do 45°C
(41° do 113°F).
ZASTRZEŻENIA PRAWNE
Music Tribe nie ponosi odpowiedzialności za
jakiekolwiek straty, które mogą ponieść osoby, które
polegają w całości lub w części na jakimkolwiek opisie,
fotogra i lub oświadczeniu zawartym w niniejszym
dokumencie. Specy kacje techniczne, wygląd i inne
informacje mogą ulec zmianie bez powiadomienia.
Wszystkie znaki towarowe są własnością ich
odpowiednich właścicieli. Midas, Klark Teknik,
Lab Gruppen, Lake, Tannoy, Turbosound, TC Electronic,
TC Helicon, Behringer, Bugera, Aston Microphones i
Coolaudio są znakami towarowymi lub zastrzeżonymi
znakami towarowymi rmy Music Tribe Global Brands
Ltd. © Music Tribe Global Brands Ltd. 2024 Wszystkie
prawa zastrzeżone.
OGRANICZONA GWARANCJA
Aby zapoznać się z obowiązującymi warunkami
gwarancji i dodatkowymi informacjami dotyczącymi
ograniczonej gwarancji Music Tribe, zapoznaj się ze
wszystkimi szczegółami w trybie online pod adresem
community.musictribe.com/support.
(JP) 安全指示
1. す べ て の 指 示 を 読 ん で 、従 っ て く だ
さい。
2. 屋 外 の 製 品 を 除 き 、機 器 を 水 か ら 遠 ざ
け てください 。
3. 乾いた布でのみ清掃してください。
4. 通気口を塞がないでください。
メーカーの指示に従ってインストールして
ください。
5. 暖 房 器 、ヒ ー ト レ ジ ス タ ー 、ス ト ー ブ な
どの発熱機器(アンプを含む)の近くには
取り付けないでください。
6. メーカーが 指定したアタッチメント/
アクセサリーのみ使用してください。
7. 指定されたカー
ト、スタンド、三
脚 、ブ ラ ケ ッ ト 、ま
たはテーブル のみ
使 用してください 。
カート/ 機器の組み
合わせを移動する
際 に は 、転 倒 を 防 ぐ
よう注意してください。
8. 書棚などの密閉された空間には設置し
ないでください。
9. 裸火のような火の元の近くに置かない
でください。
10. 動作温度範囲は摂氏 5 度から 45
度 (華氏
41 度から 113 度) です。
法的放棄
こ こ に 含 ま れ る 記 述 、写 真 、意 見 の 全
体 ま た は 一 部 に 依 拠 し て 、い か な る 人 が
損害を生じさせた場合にも、Music Tribe
は 一 切 の 賠 償 責 任 を 負 い ま せ ん 。技 術
仕様、外観およびその他の情報は予告
な く 変 更 に な る 場 合 が あ り ま す。商 標
はすべて、それぞれの所有者に帰属し
ます。Midas、Klark Teknik、Lab Gruppen、
Lake、Tannoy、Turbosound、TC Electronic、
TC Helicon、Behringer、Bugera、
Aston Microphones
および Coolaudio は Music Tribe Global Brands
Ltd. の商標または登録商標です。© Music
Tribe Global Brands Ltd. 2024
無断転用禁止。
限定保証
適用される保証条件と Music Tribe の限定
保 証 に 関 す る 概 要 に つ い て は 、オ ン ラ イ
ン上
community.musictribe.com/support にて詳
細をご確認ください。
(CN) 安全须知
1.
请阅读, 保存, 遵守所有的说明, 注意所
有的警示。
2.
请勿在靠近水的地方使用本产品。
3.
请用干布清洁本产品。
4.
请只使用厂家指定的附属设备和配件。
不要堵塞任何通风口。按照制造商的说明
进行安装。
5. 请只使用厂家指
定的或随货销售的
手推车, 架子, 三角
架, 支架和桌子等。
若使用手推车来搬
运设备, 请注意安
全放置设备, 以避
免手推车和设备倾
倒而受伤。
6.
请勿安装在密闭空间, 如书柜或类似
装置。
7.
请勿将本产品安装在热源附近, 如暖气
片, 炉子或其它产生热量的设备 (包括功放
器)。 产品上不要放置裸露的火焰源, 如点
燃的蜡烛。
8.
如果液体流入或异物落入设备内,
设备遭雨淋或受潮, 设备不 能正常运作或
被摔坏等, 设备受损需进行维修时, 所有维
修均须由 合格的维修人员进行维修。
法律声明
对于任何因在此说明书提到的全部或部份
描述、 图片或声明而造成的损失,
Music Tribe
不负任何责任。 技术参数和外观若有更改,
恕不另行通知。 所有的商标均为其各自所
有者的财产。
Midas, Klark Teknik, Lab Gruppen,
Lake, Tannoy, Turbosound, TC Electronic, TC Helicon,
Behringer, Bugera, Aston Microphones
和 Coolaudio
是
Music Tribe Global Brands Ltd. 公司的商标
或注册商标。
© Music Tribe Global Brands Ltd.
2024
版权所有。
保修条款
有关音乐集团保修的适用条款及其它相关
信息, 请登陆
community.musictribe.com/support
网站查看完整的详细信息。
6 GO CAM WIRELESS Quick Start Guide 7
(EN)
GO CAM WIRELESS
• Get professional-grade audio with our wireless microphone system, designed to work seamlessly with your video recorders, DSLRs, mobile devices,
tablets, and audio recorders.
• Perfect for interviews, podcasts, live-streaming, vlogs, virtual classrooms, voice overs, and video production.
• Experience superior performance with Go Cam Wireless’s 30 m (100 ft) wireless freedom.
• Keep your hands free with our compact transmitter, featuring a convenient shirt clip and easy on/o switch.
• Capture clear audio with ease using our integrated omnidirectional microphone.
• Eliminate unwanted background noise with our receiver’s state-of-the-art 3-level noise reduction switch.
• Easily adjust the gain with our user-friendly 3-level switch that oers -24 dB, -12 dB, and 0 dB options.
• Mount our specially designed receiver on your camera using the built-in camera shoe adapter.
• Enjoy real-time monitoring with our included earphones.
• Connect an external microphone with transmitter using 3.5 mm (1/8") connector.
• Stay powered up and protected on the go with up to 8 hours of runtime and our camera connection cable, USB charging cables, fur windshield, and
protective carry case.
Accessories Supplied
• Fur windshield x 1
• USB charging cable x 1
• TRS to TRS audio cable for Camera x 1
• TRRS to TRS audio cable for Phones x 1
• Type C to Type C audio cable for Phones x 1
• Type C earphones x 1
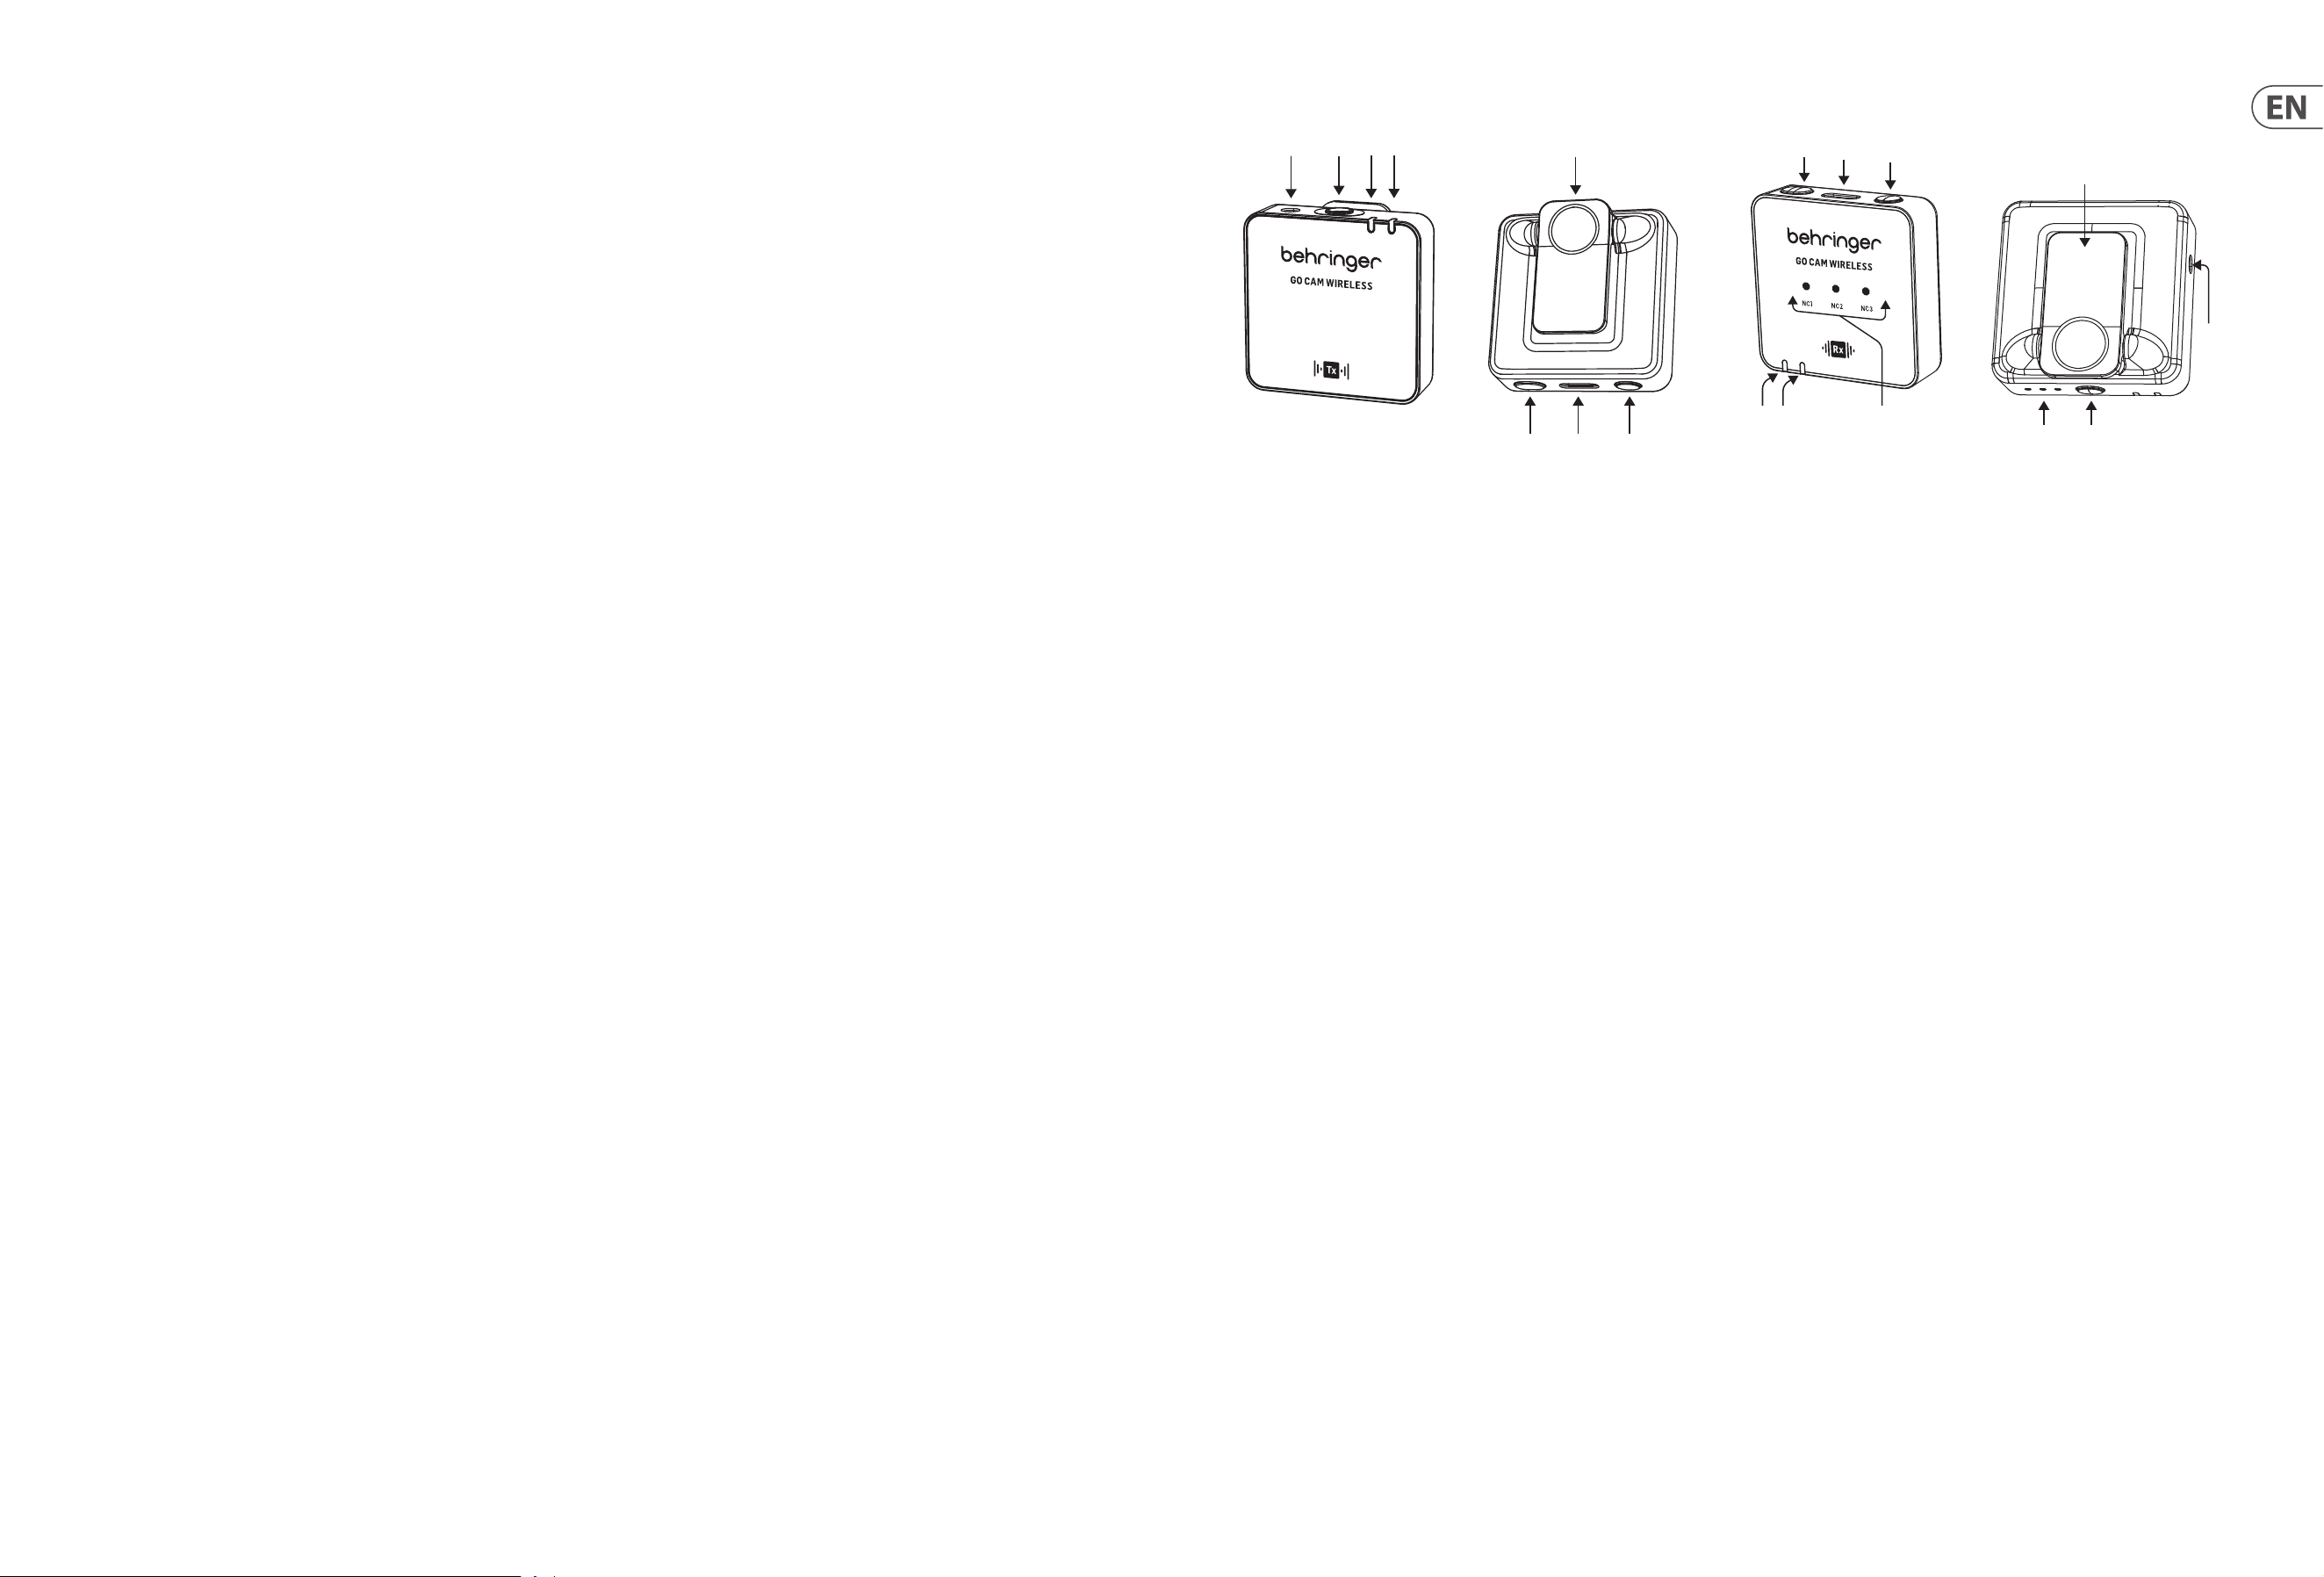
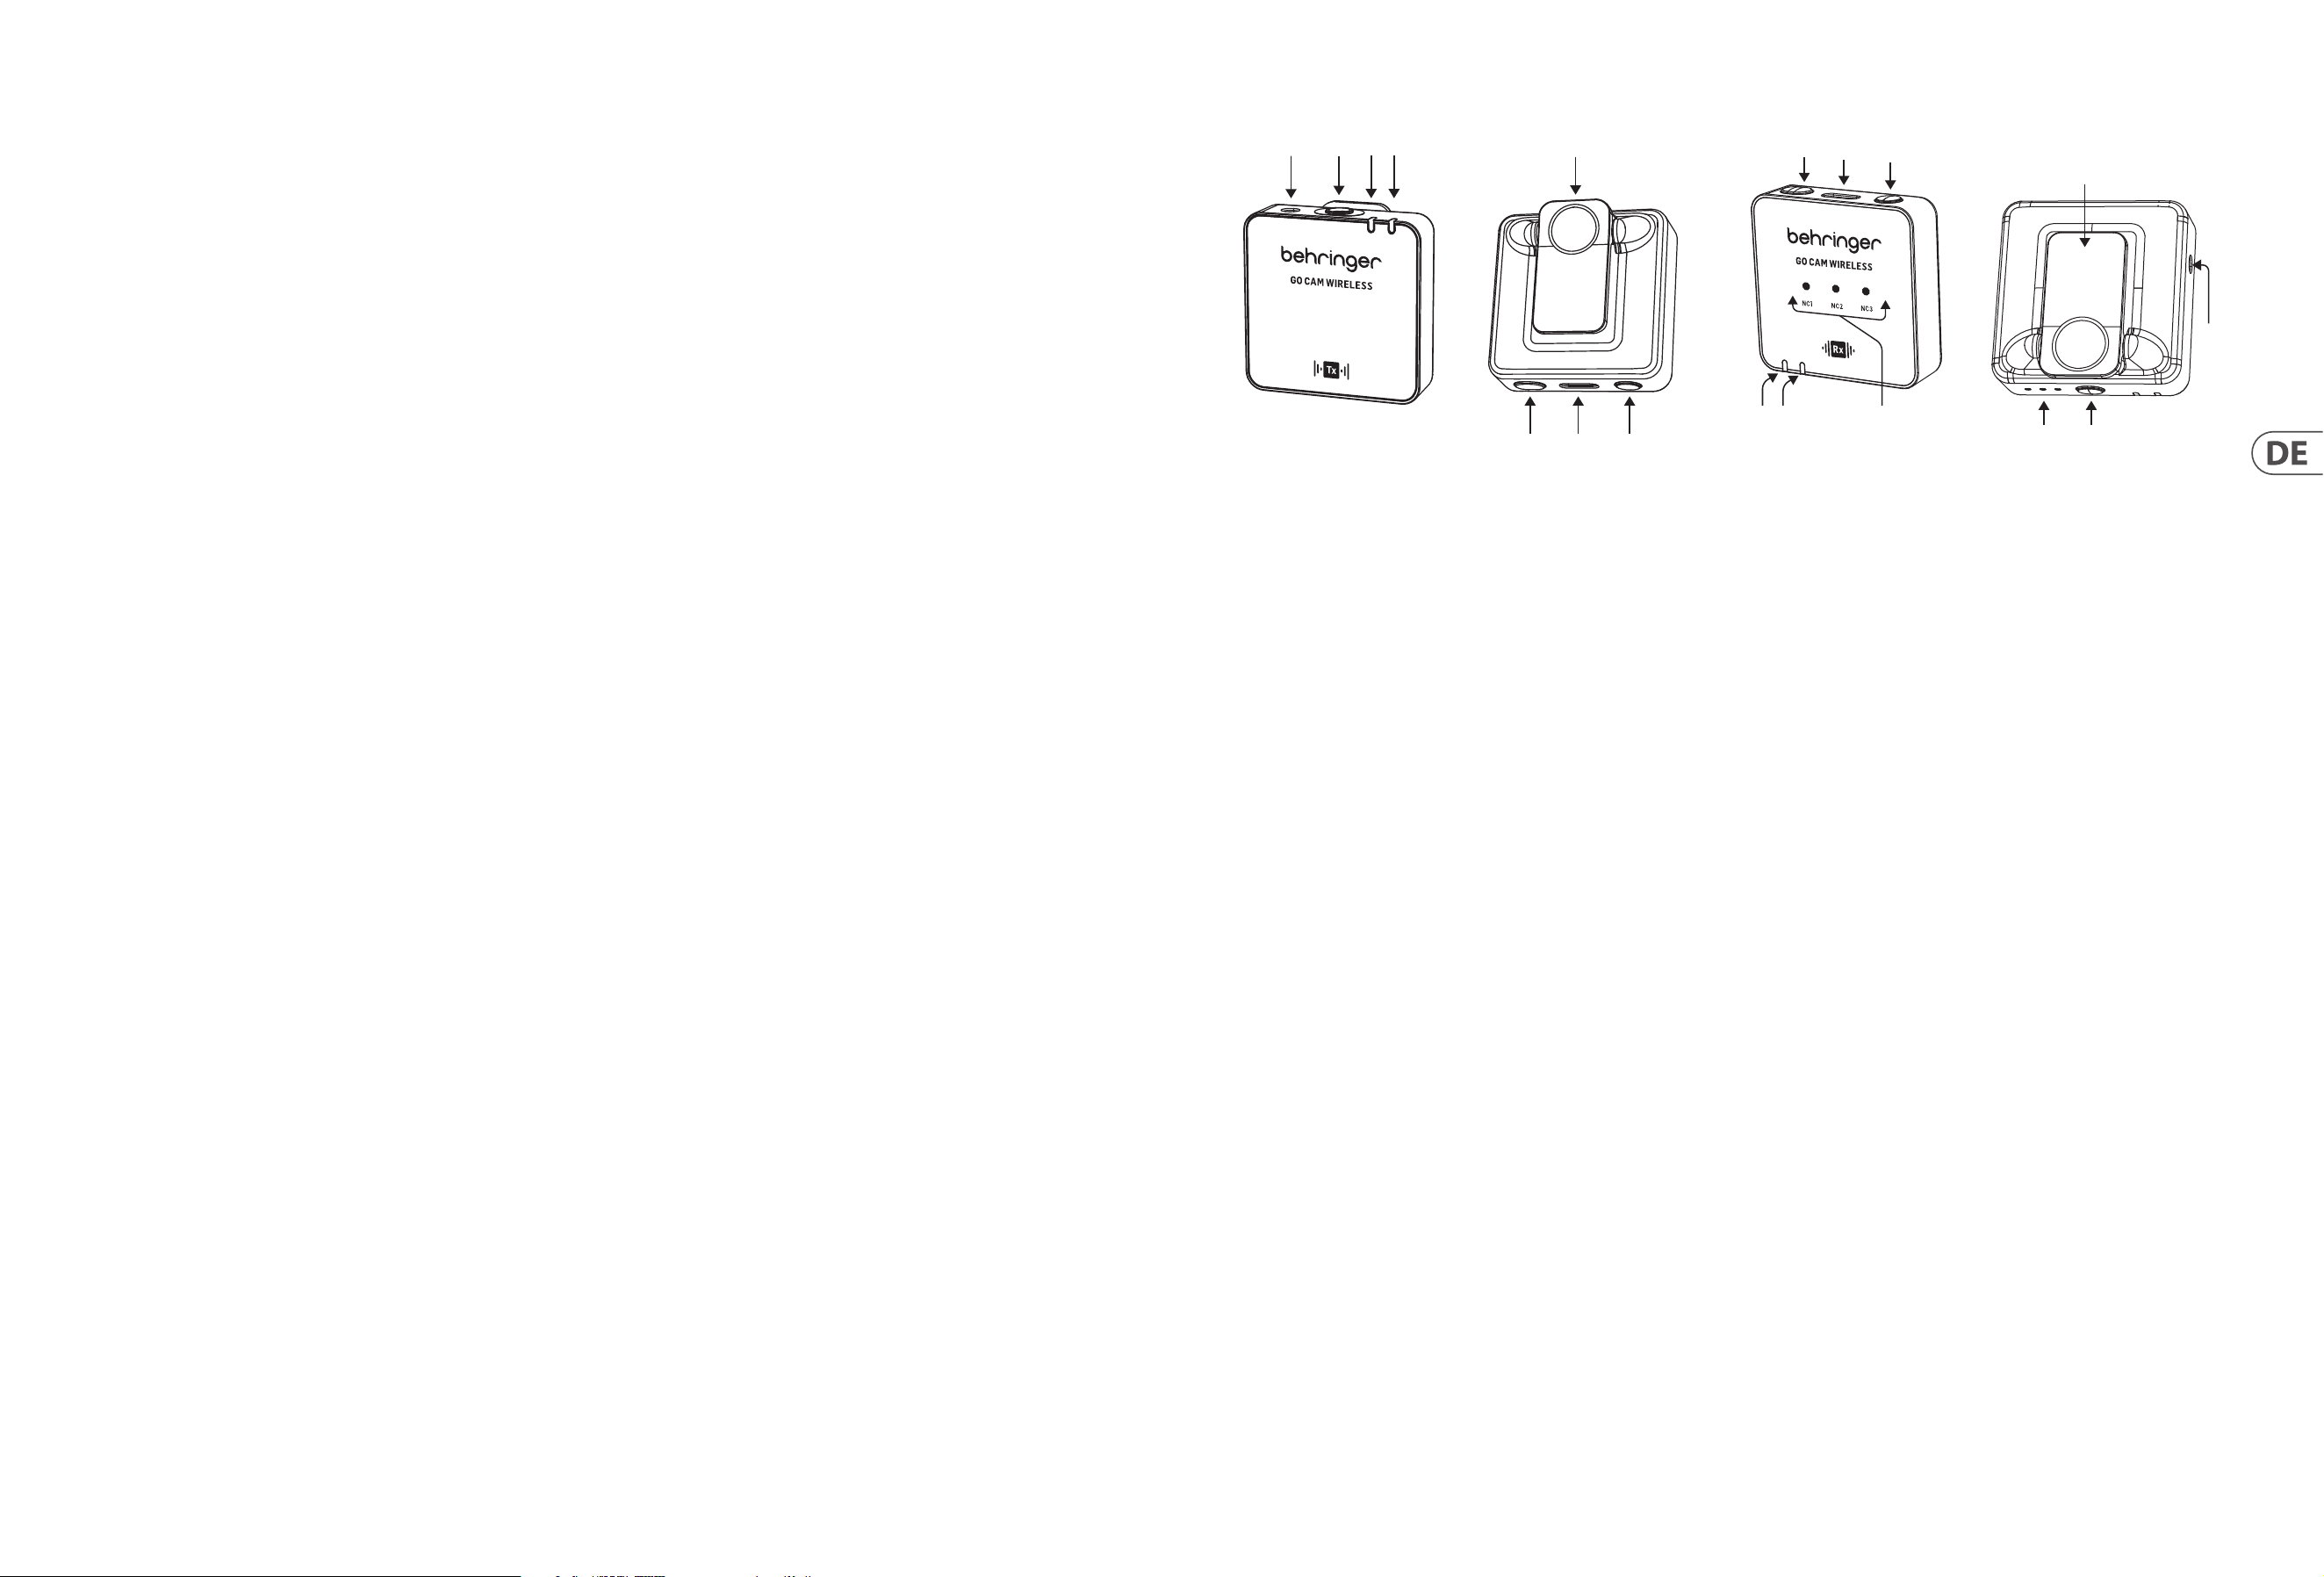
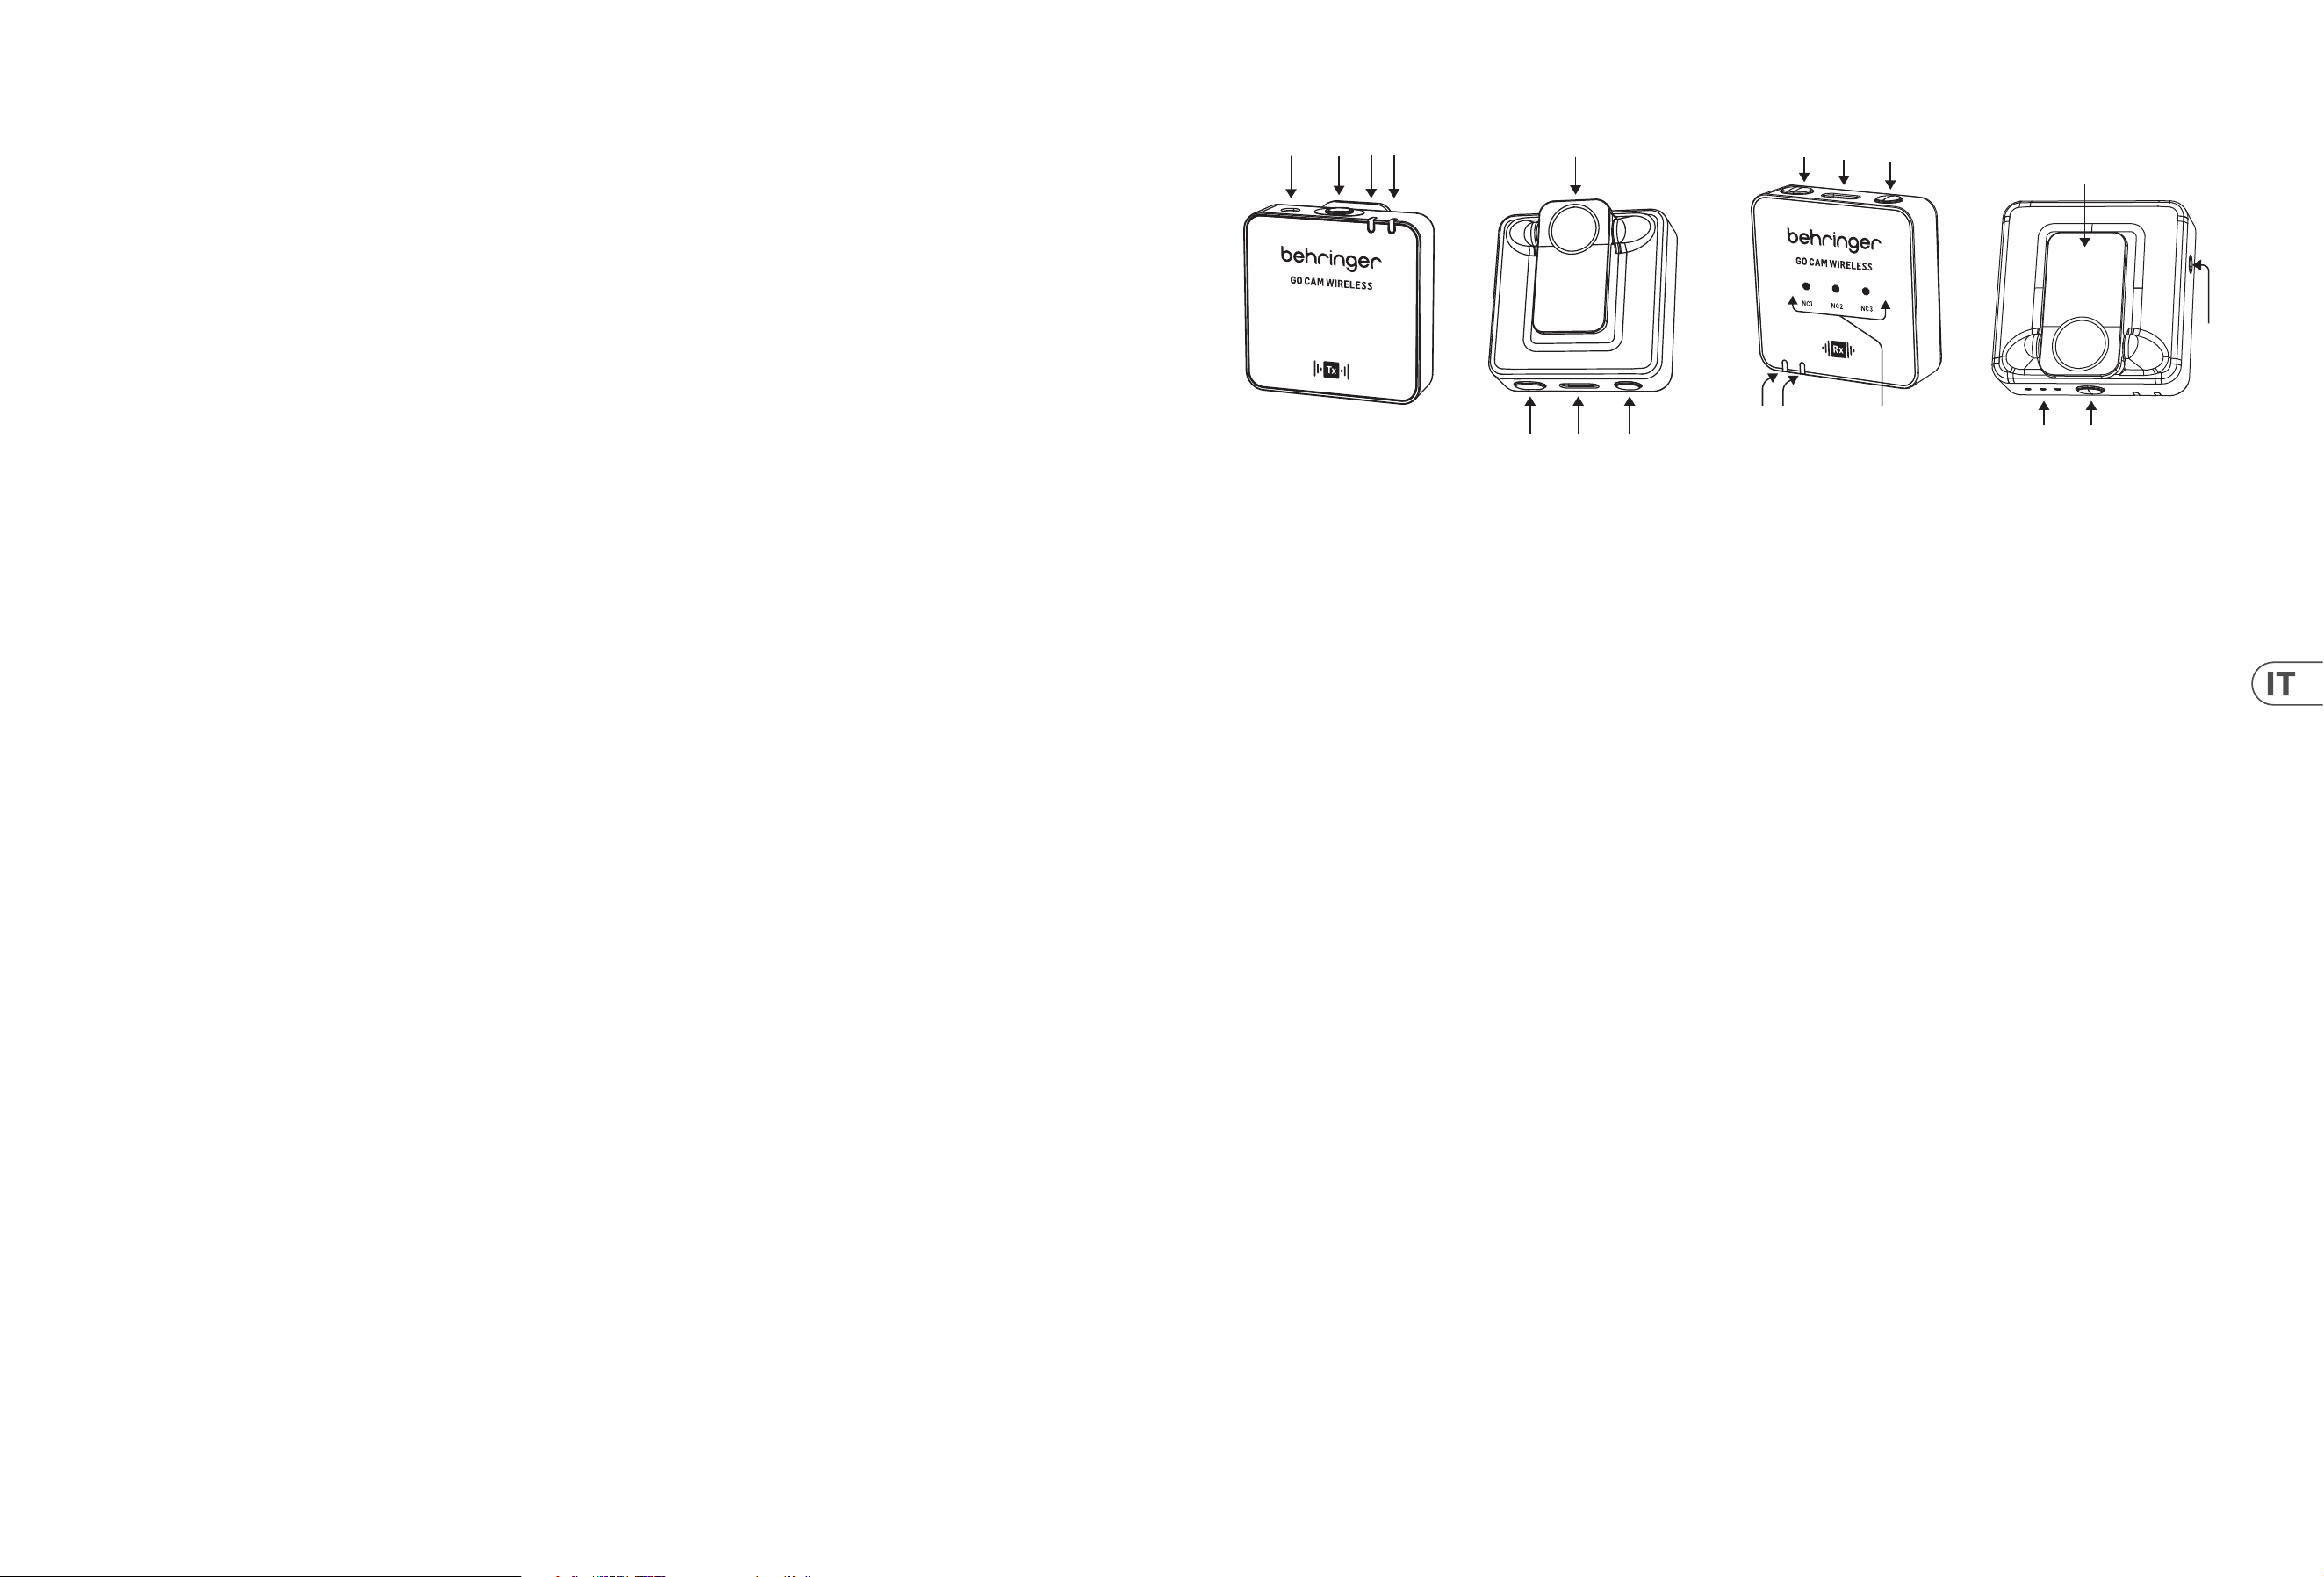
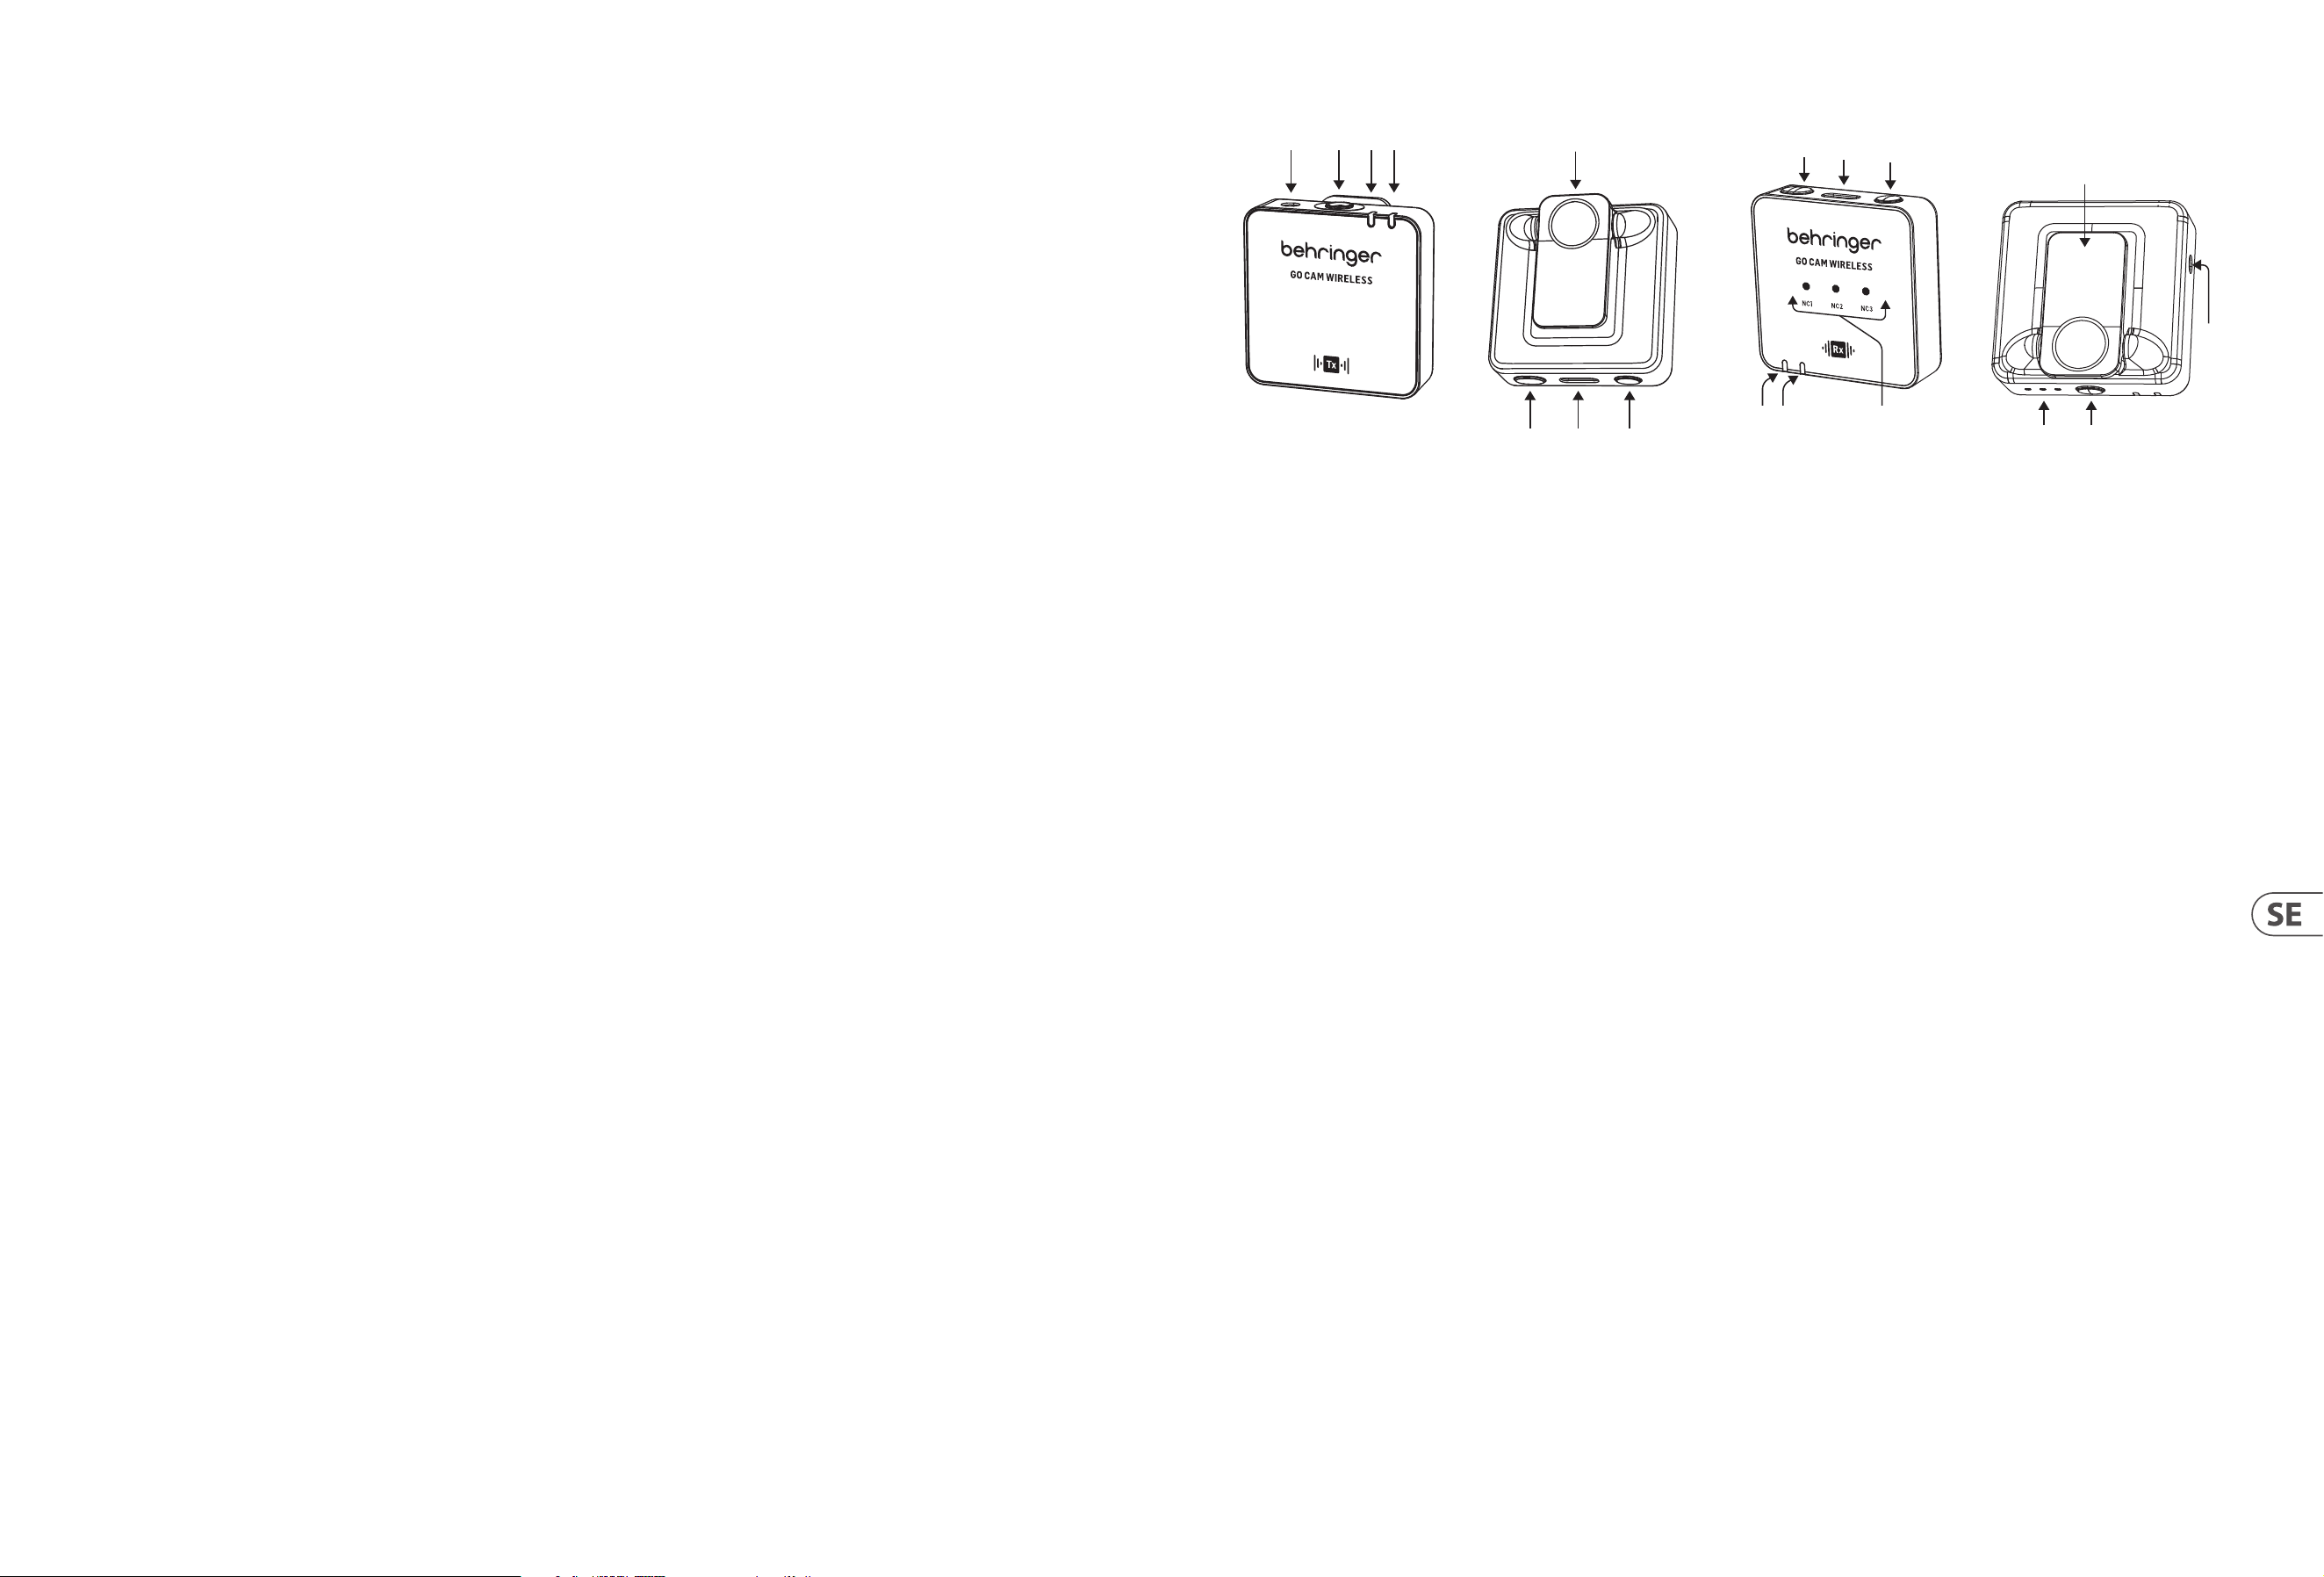
MICROPHONE CONTROLS
(6)
(2)(1)
(3)(4)
(5)
(7) (8)
1. External microphone input, 3.5 mm (1/8")
2. Built-in microphone
3. Wireless status LED - blue LED = successful connection to receiver,
ashing blue = not connected
4. Battery status LED - red LED = charging, ashing red = low battery
5. Shirt clip
6. Power On/O - press for 2 seconds to turn ON, press for 3 seconds to
turn OFF
7. USB Type C charging port
8. Mute On/O - double-click = ON, press once = OFF
RECEIVER CONTROLS
(18)
(10)
(9)
(16)
(15)
(17)
(11)(12)
(14)
(13)
9. Gain LEDs - III = 0 dB, II = -12 dB, I = -24 dB
10. Gain switch - press once to select a dierent gain level
11. Battery status LED - red LED = charging, ashing red = low battery
12. Wireless status LED - blue LED = successful connection to receiver, ashing
blue = not connected
13. Noise reduction LEDs - mild = NC1, medium = NC2, strong = NC3,
Dark = No NC
14. Audio output, 3.5 mm (1/8")
15. Power On/O - press for 2 seconds to turn ON, press for 3 seconds to
turn OFF
16. USB Type C charging port and earphones output for real-time monitoring
17. Noise reduction switch - press once to select a dierent level
18. Clip/camera shoe adaptor
8 GO CAM WIRELESS Quick Start Guide 9
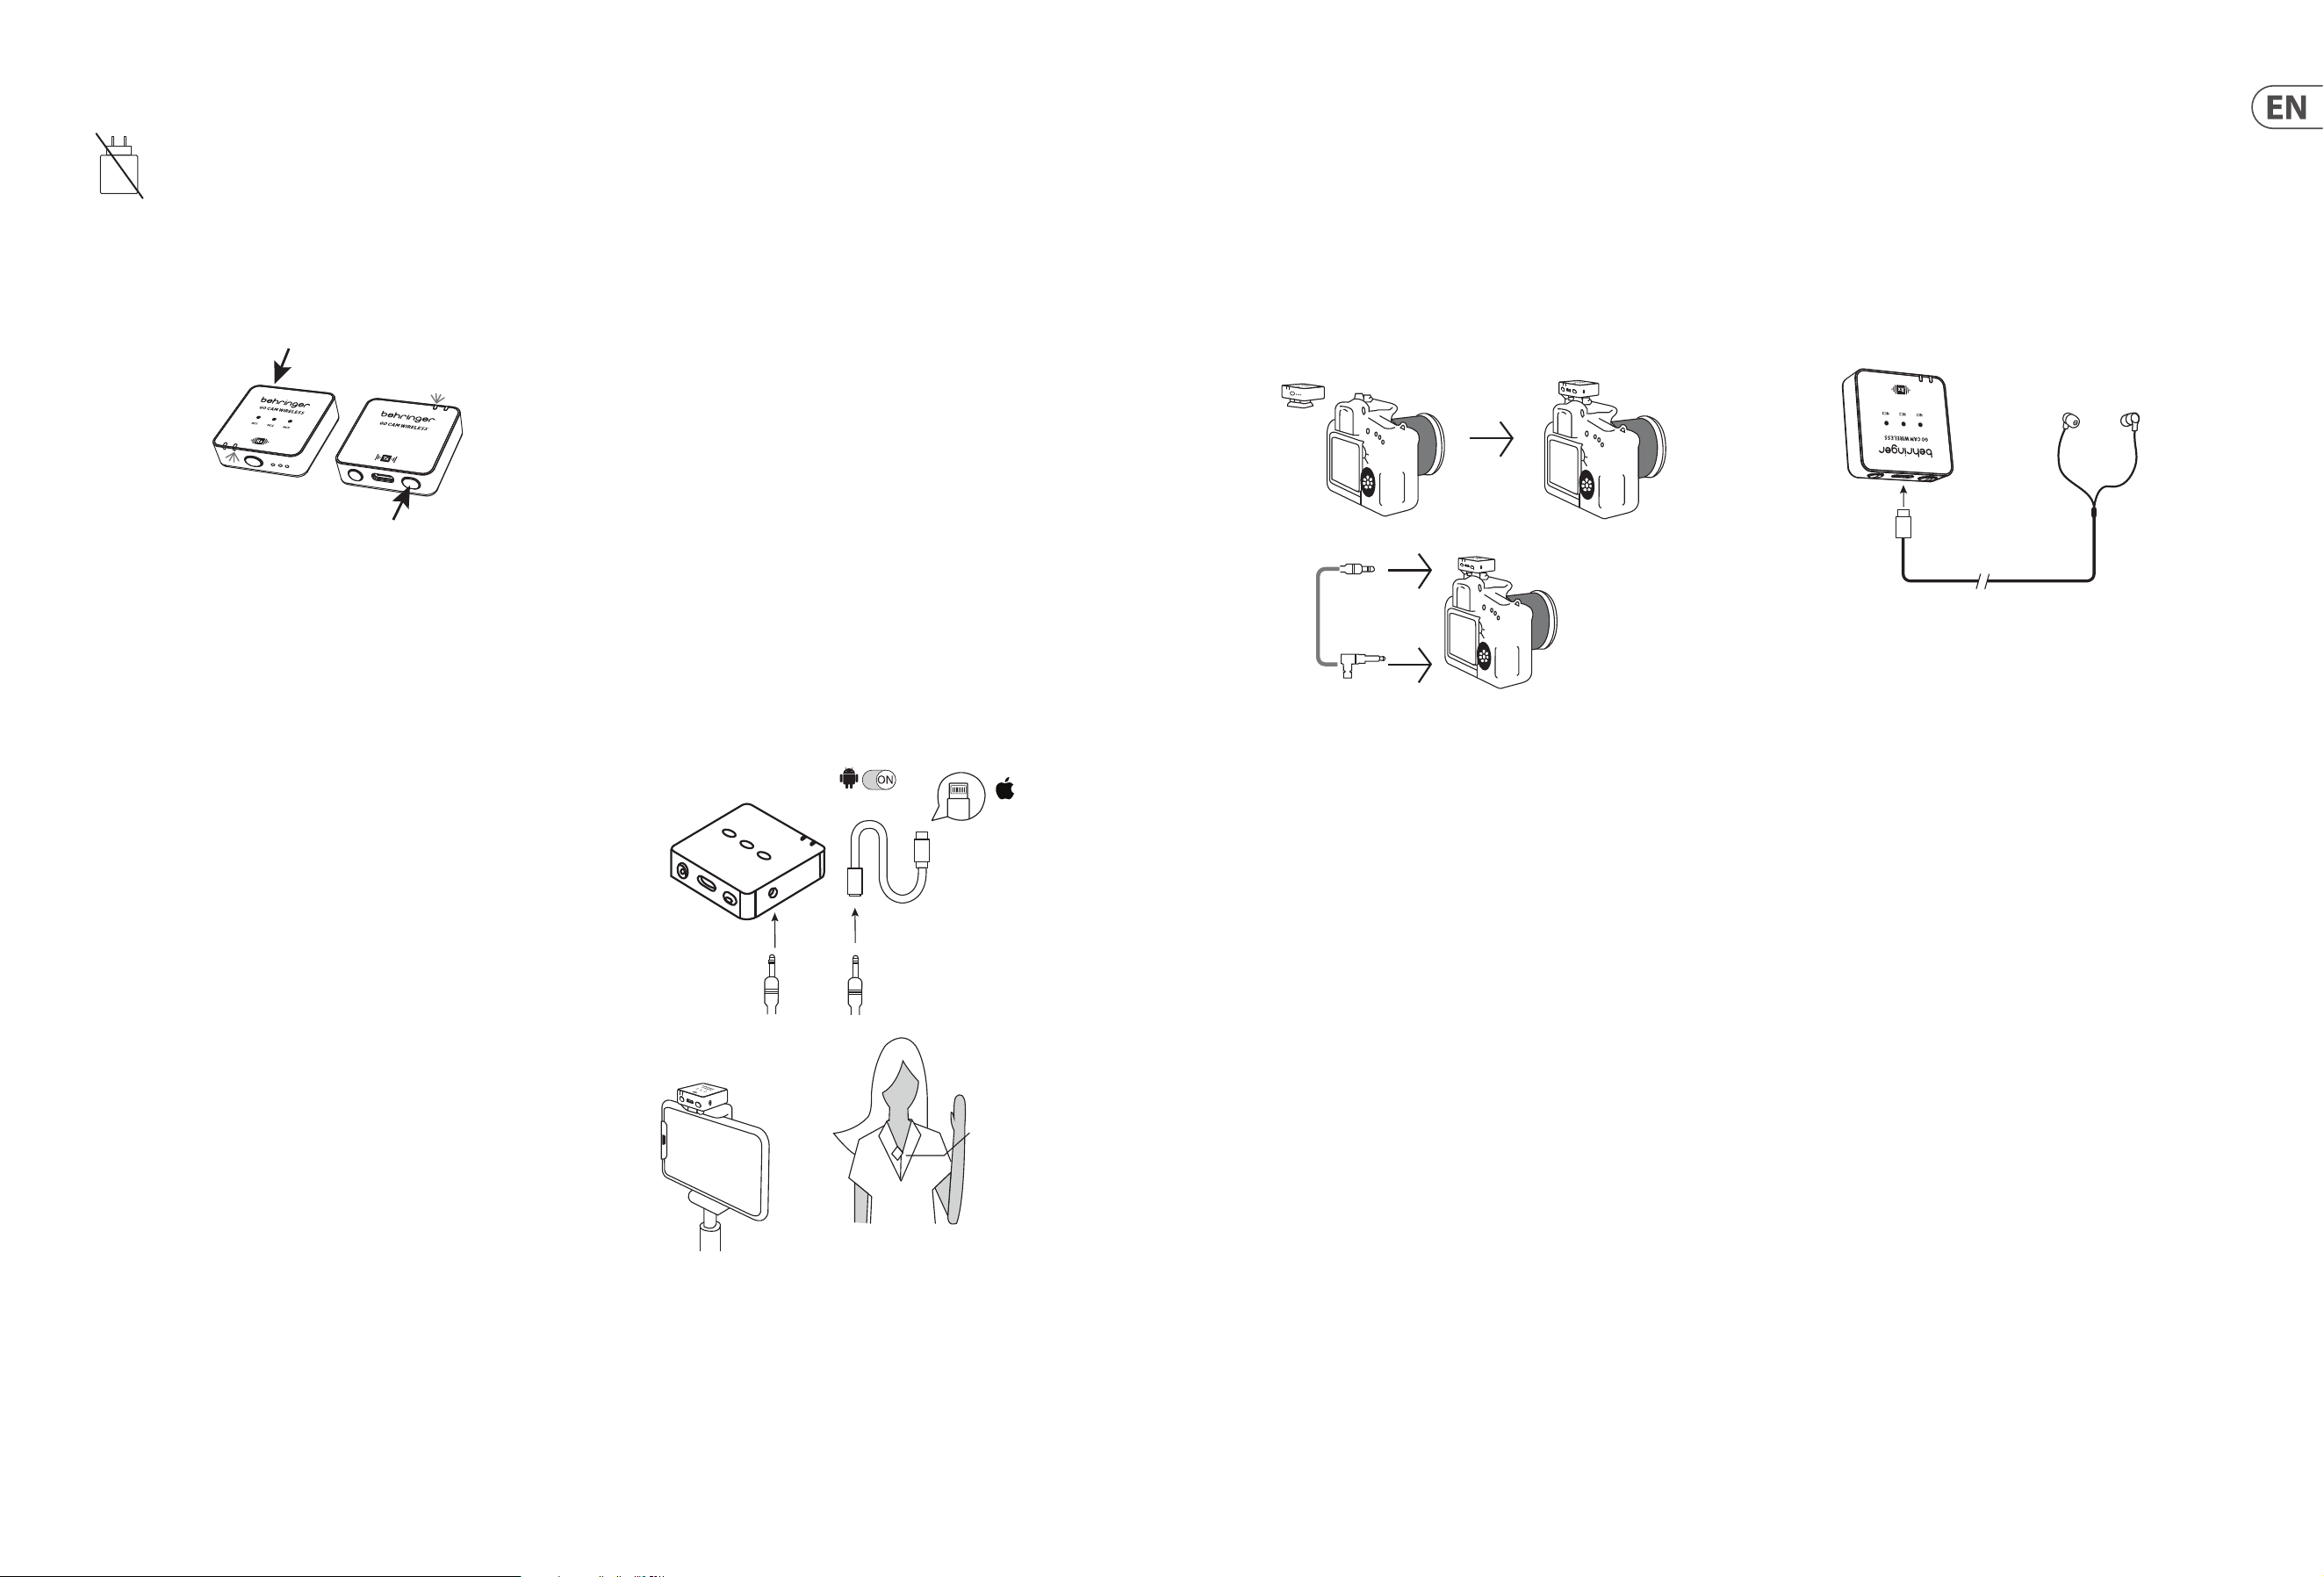
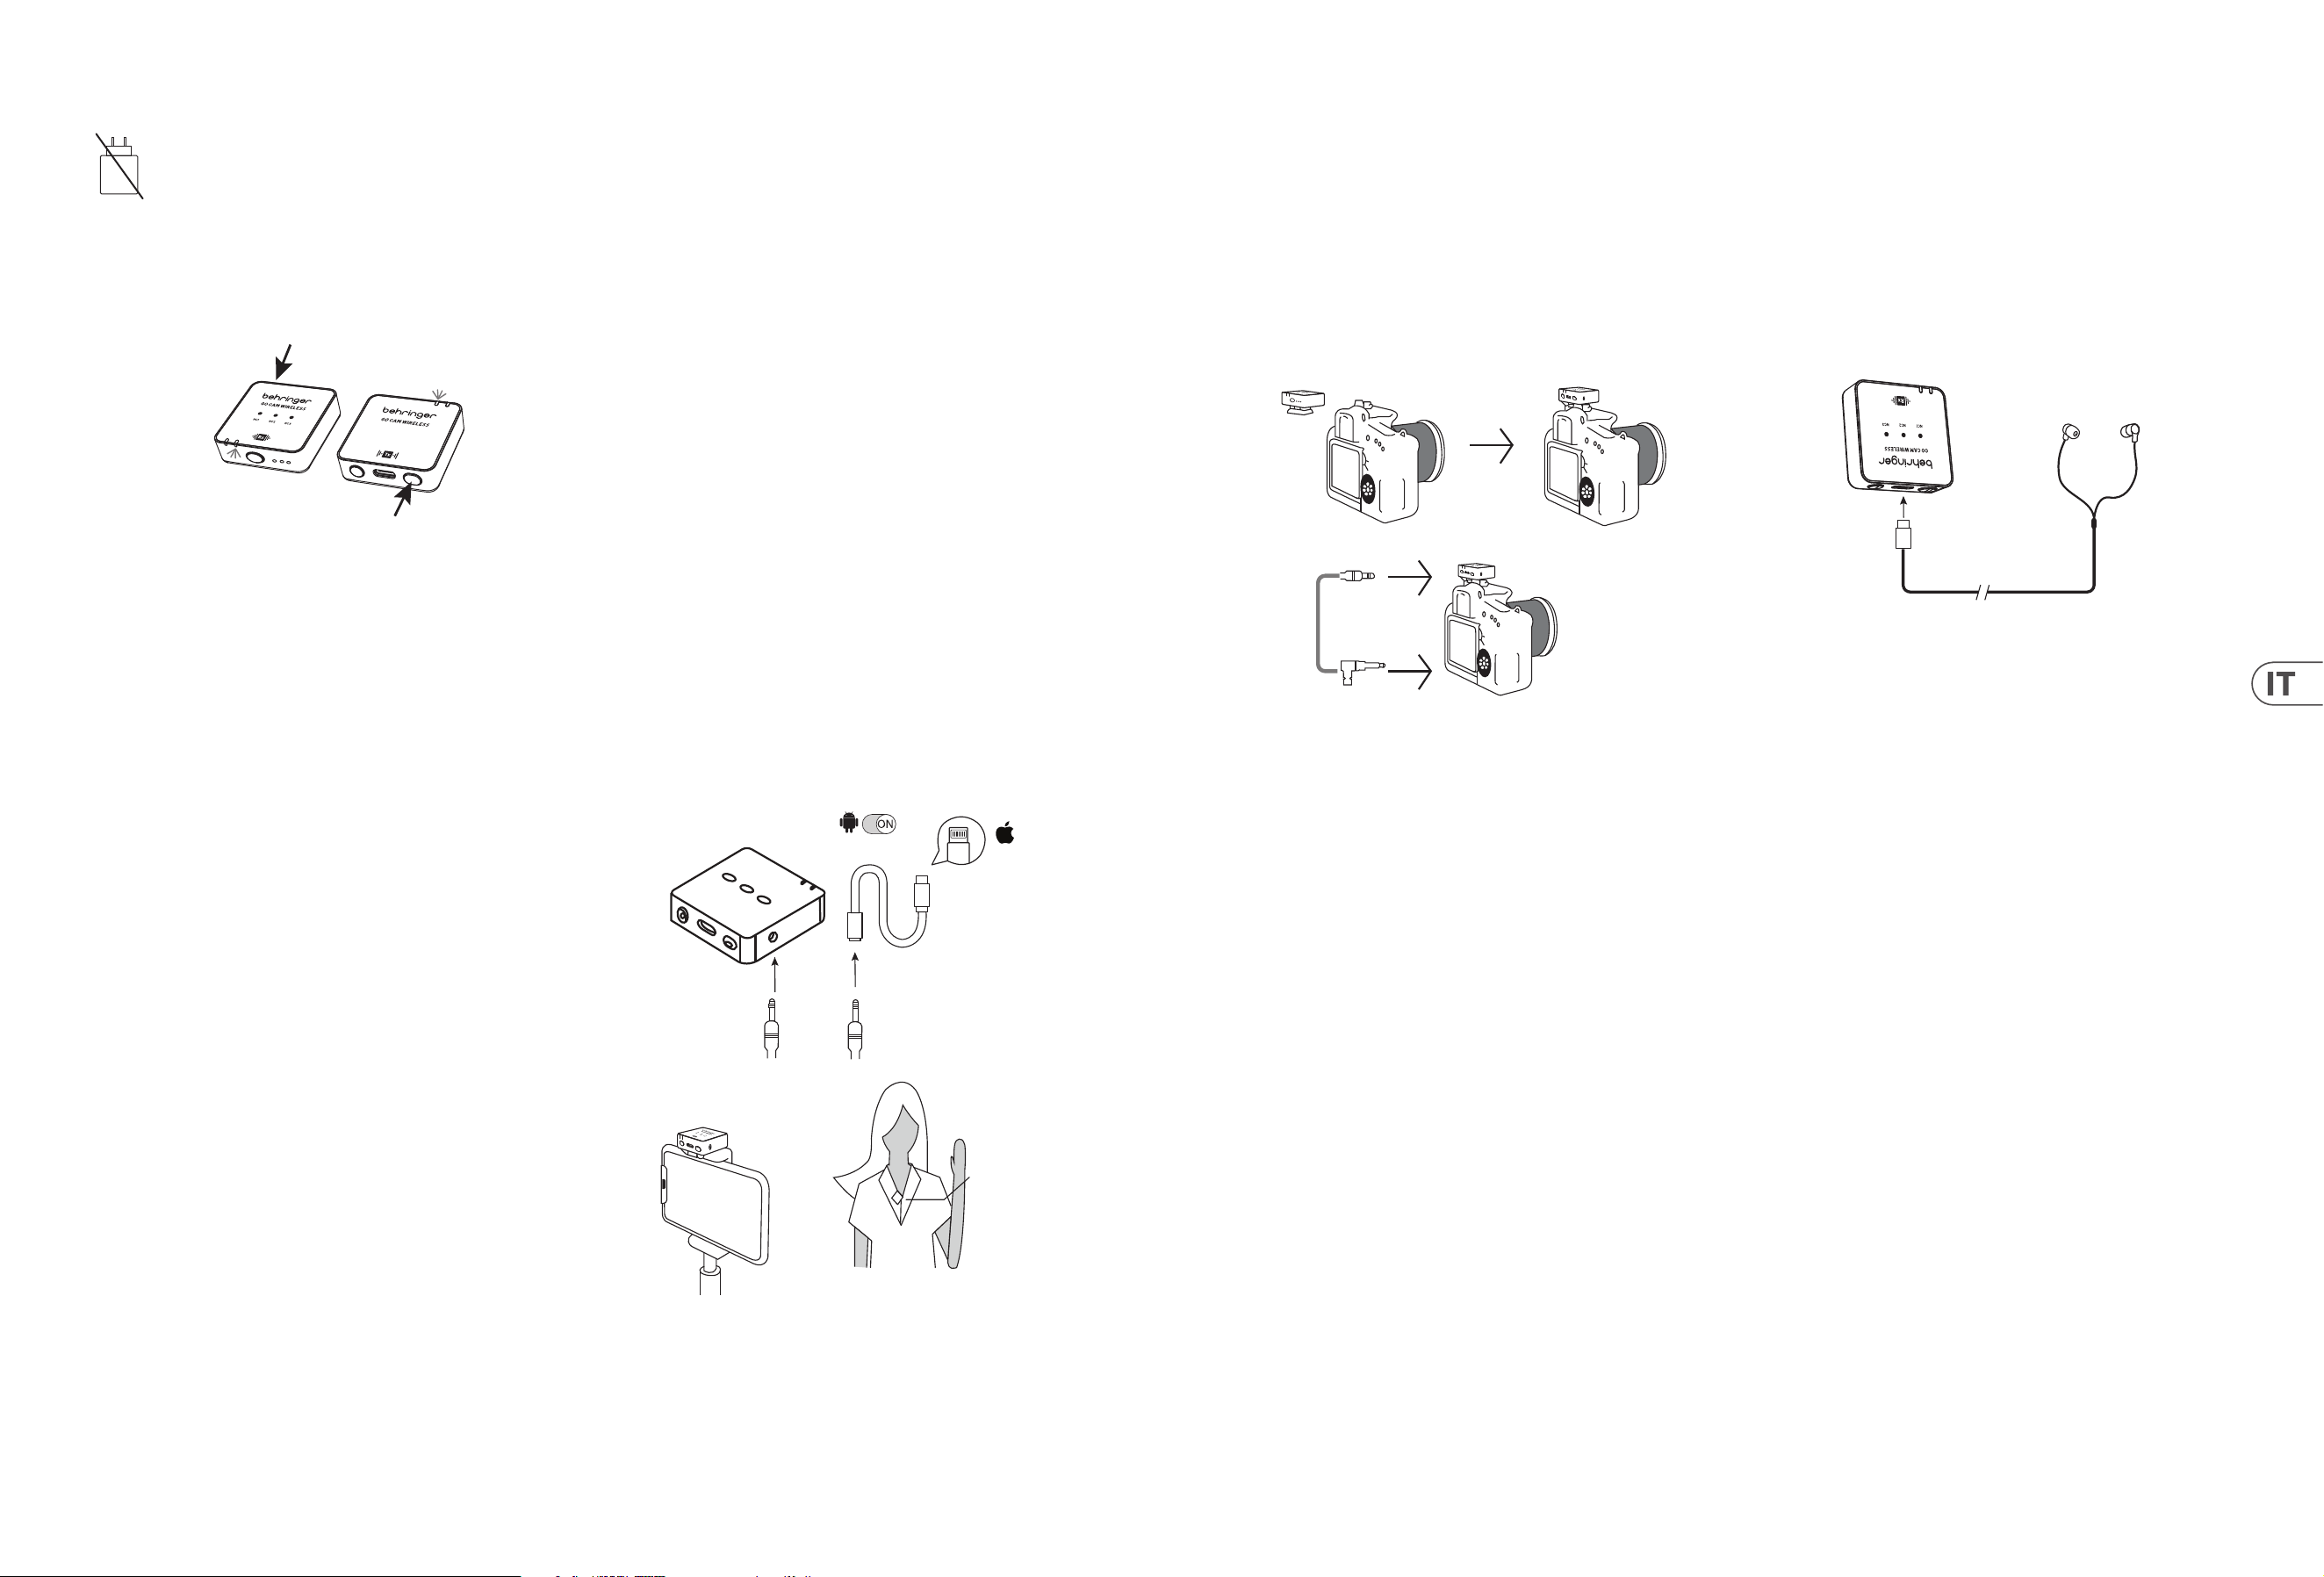
Operation
A charger is not included. The power delivered by the charger must be
between 5 V / 32 mA (0.16 W) minimum required by this equipment,
and 5 V / 400 mA (2 W) maximum, in order to achieve the maximum
charging speed. This equipment supports the USB Power Delivery
charging protocol.
1. Please charge the transmitter and receiver before use.
2. Press the receiver power switch and the transmitter power switch for 2
seconds to power ON.
R
eceiver
Transmitt
ers
3. A solid Blue LED indicates that the wireless connection between receiver and
transmitter is successful.
4. Clip the transmitter to your shirt, t-shirt, or jacket.
5. Please make sure the built-in microphone is not covered or blocked. For
optimum audio recording performance, we recommended the distance
between the user’s mouth and the transmitter's microphone is 15 to 20 cm.
6. If the audio is too loud, causing distortion – please reduce the
microphone gain.
7. In case the environment is noisy – please use the noise reduction feature.
8. Please make sure to check the microphone gain and the noise reduction
settings before starting your recording.
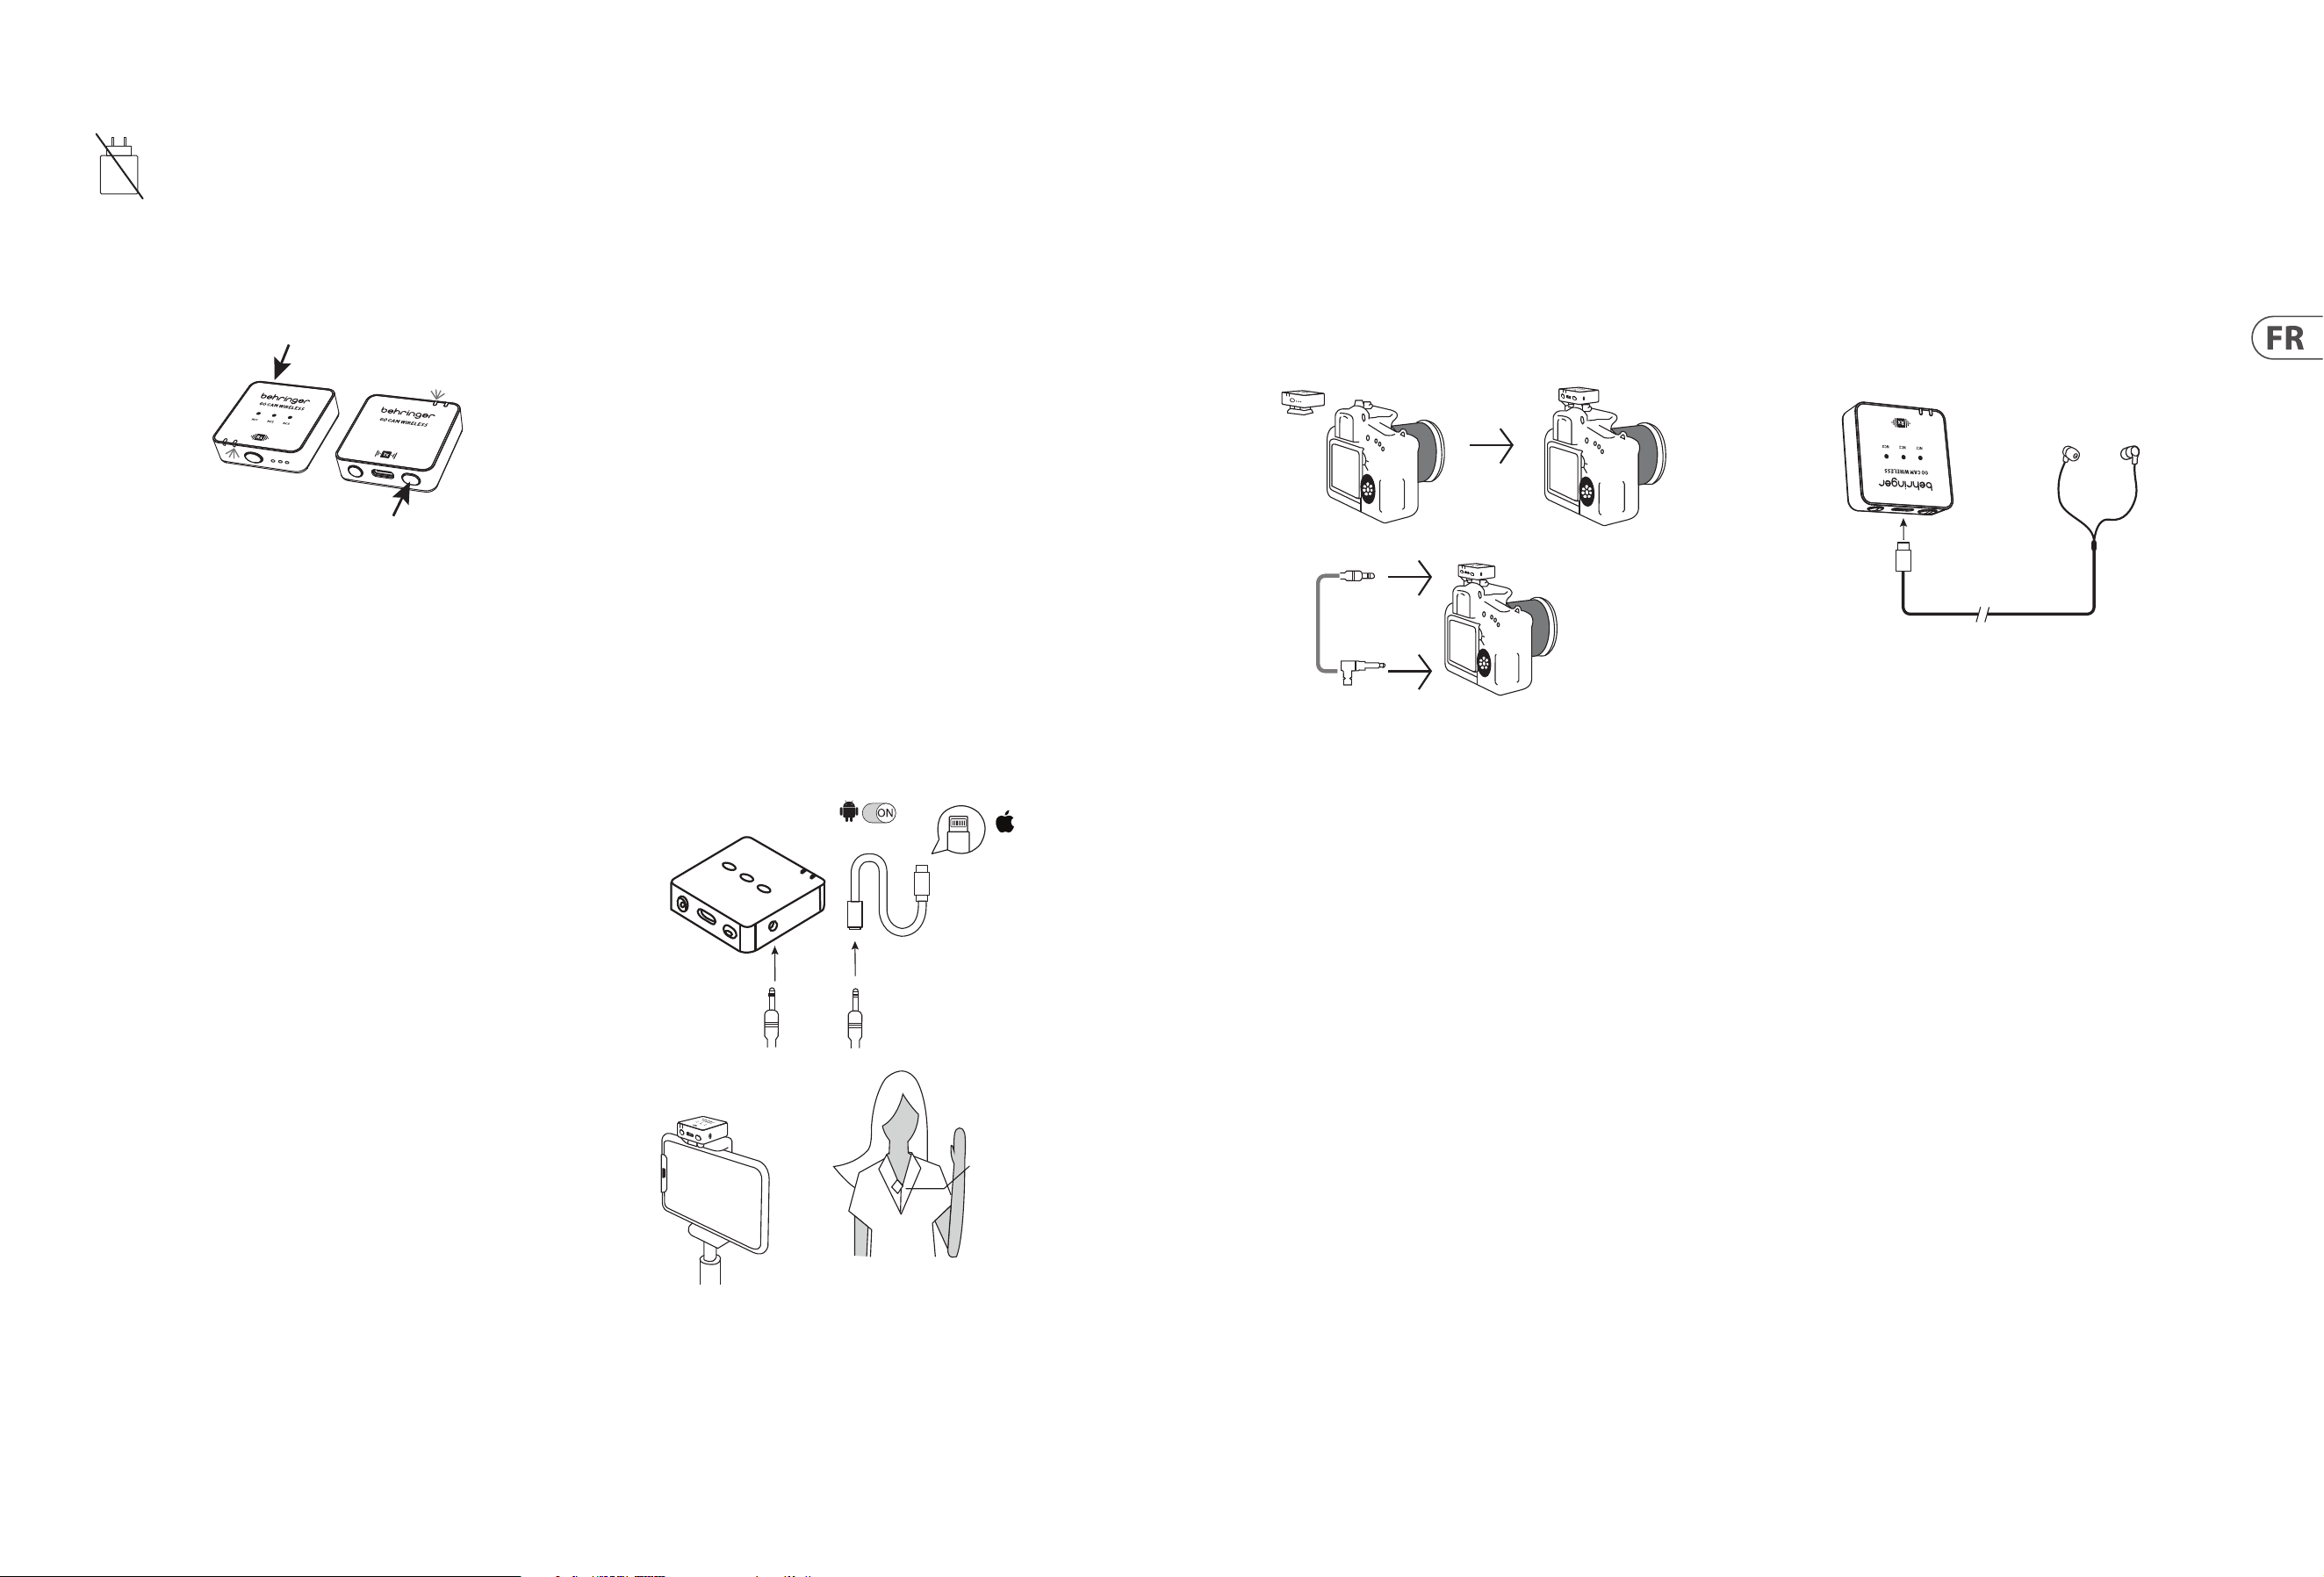
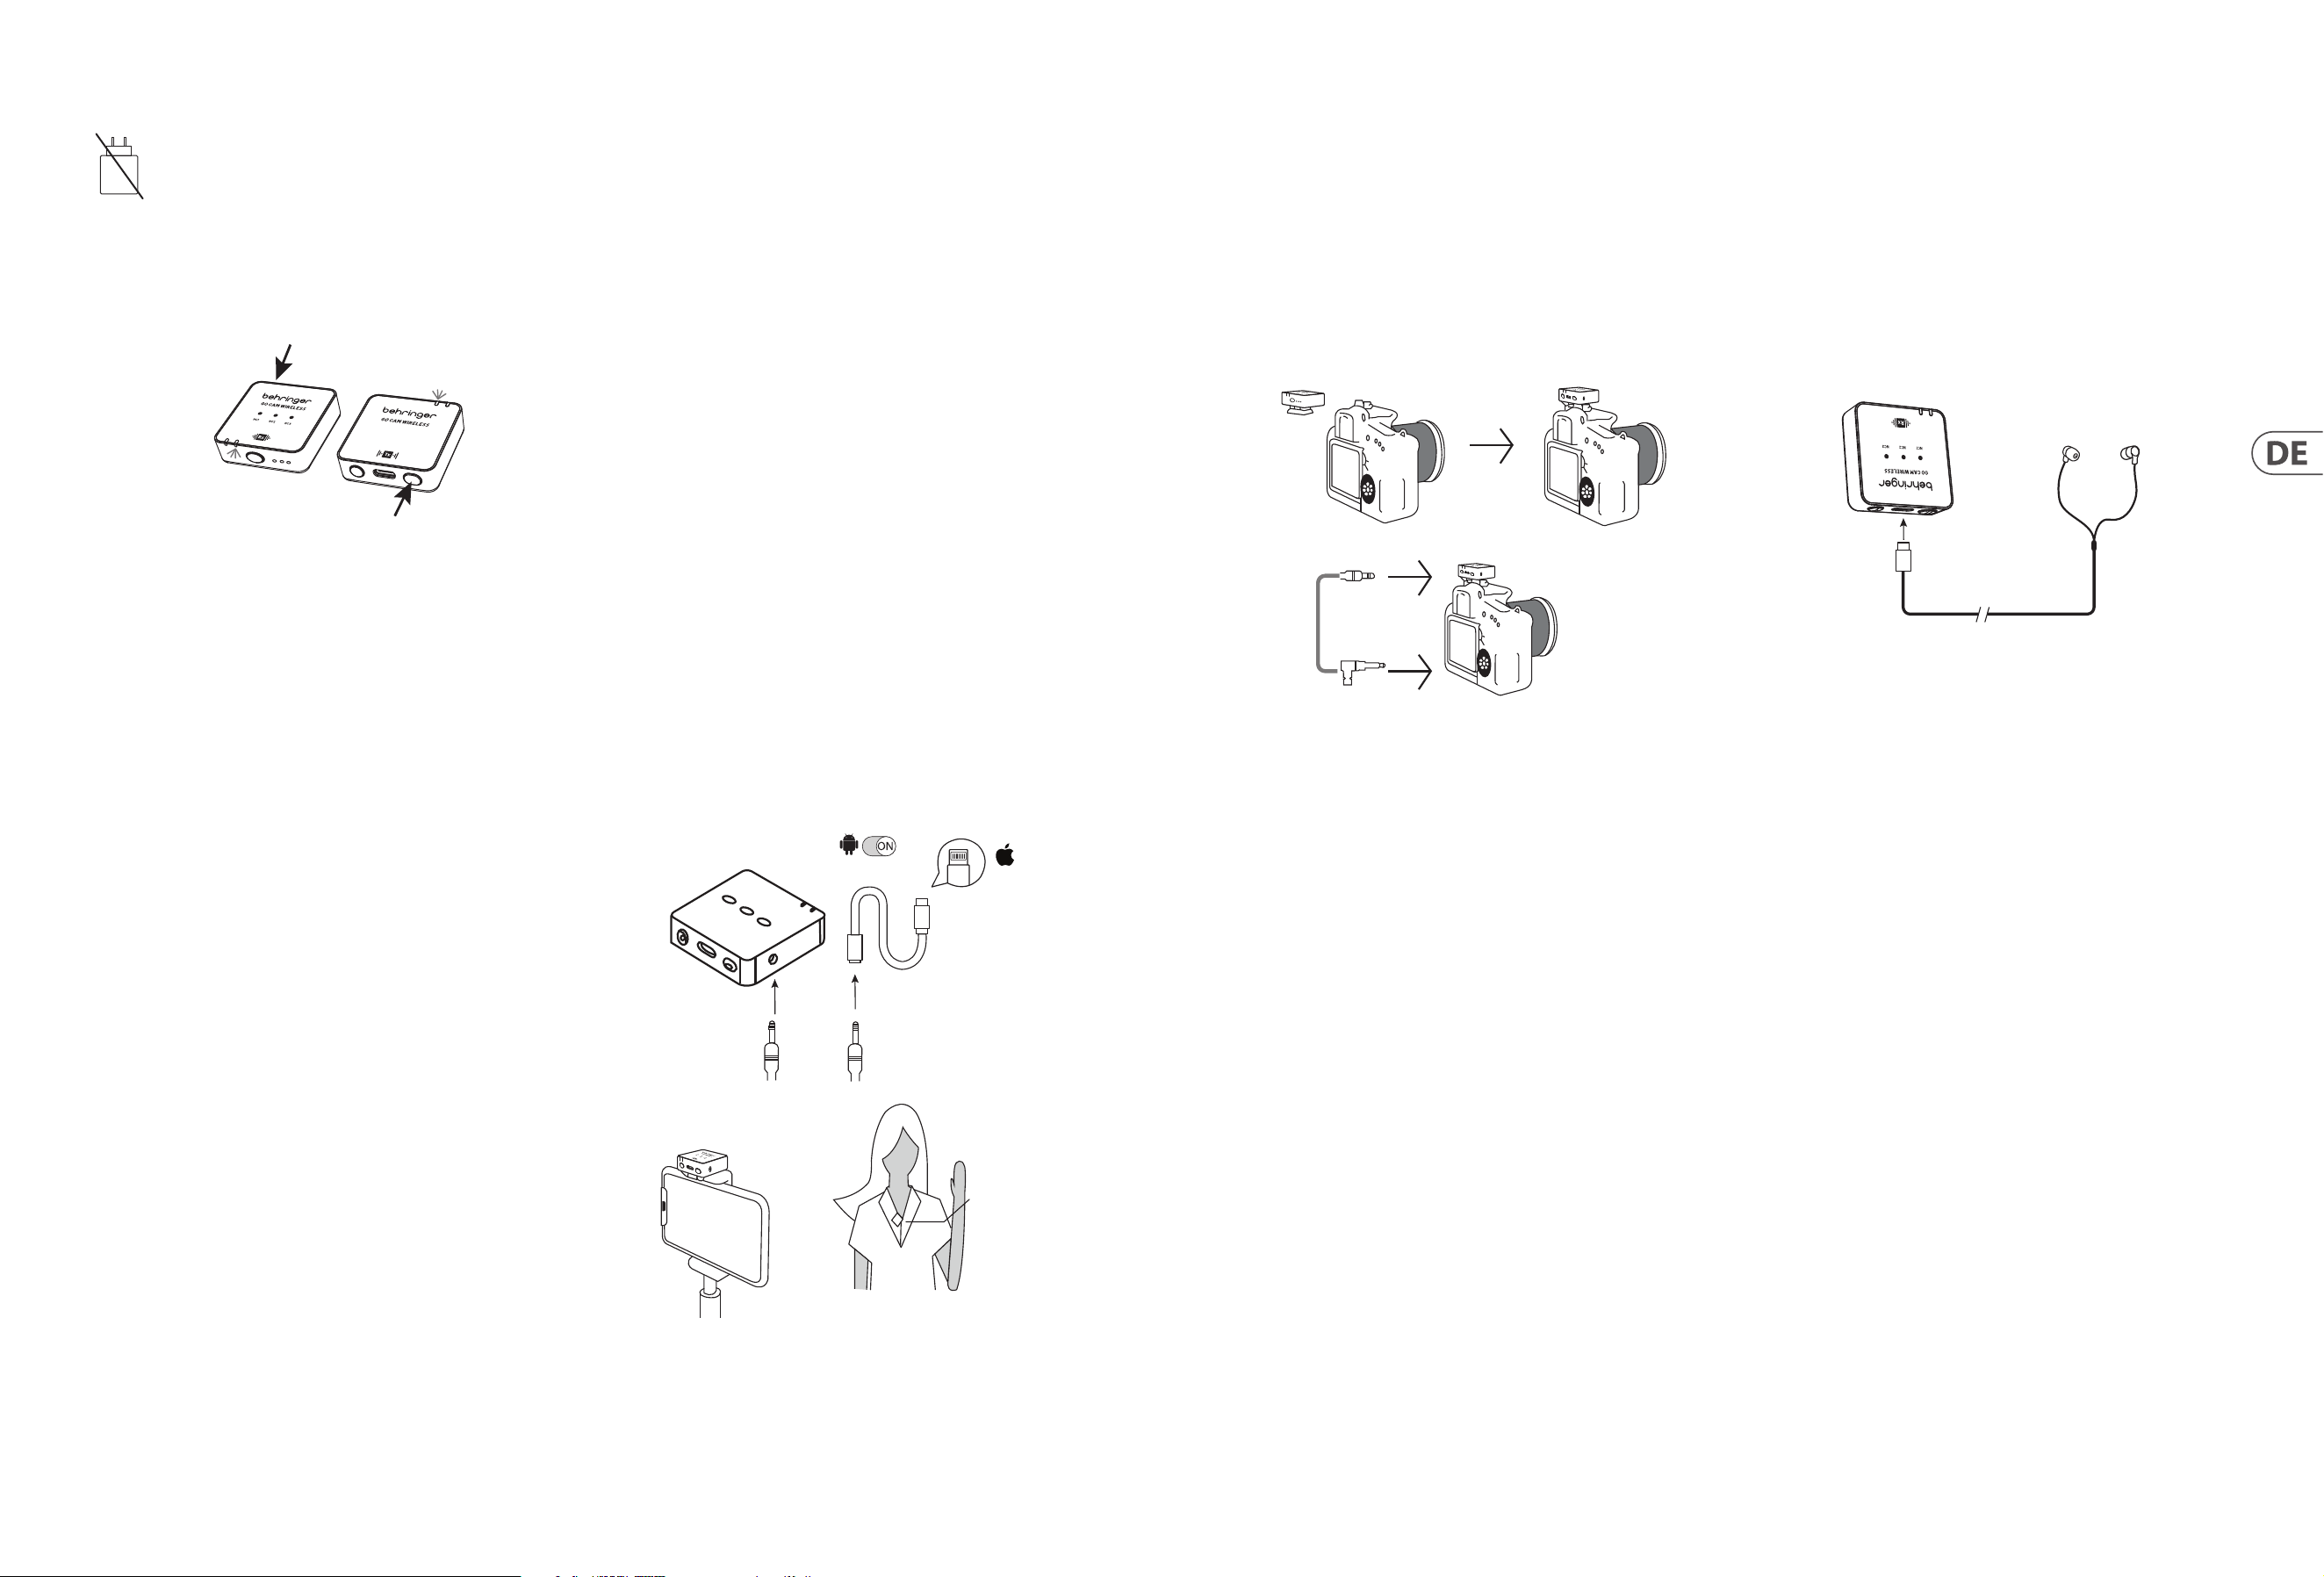
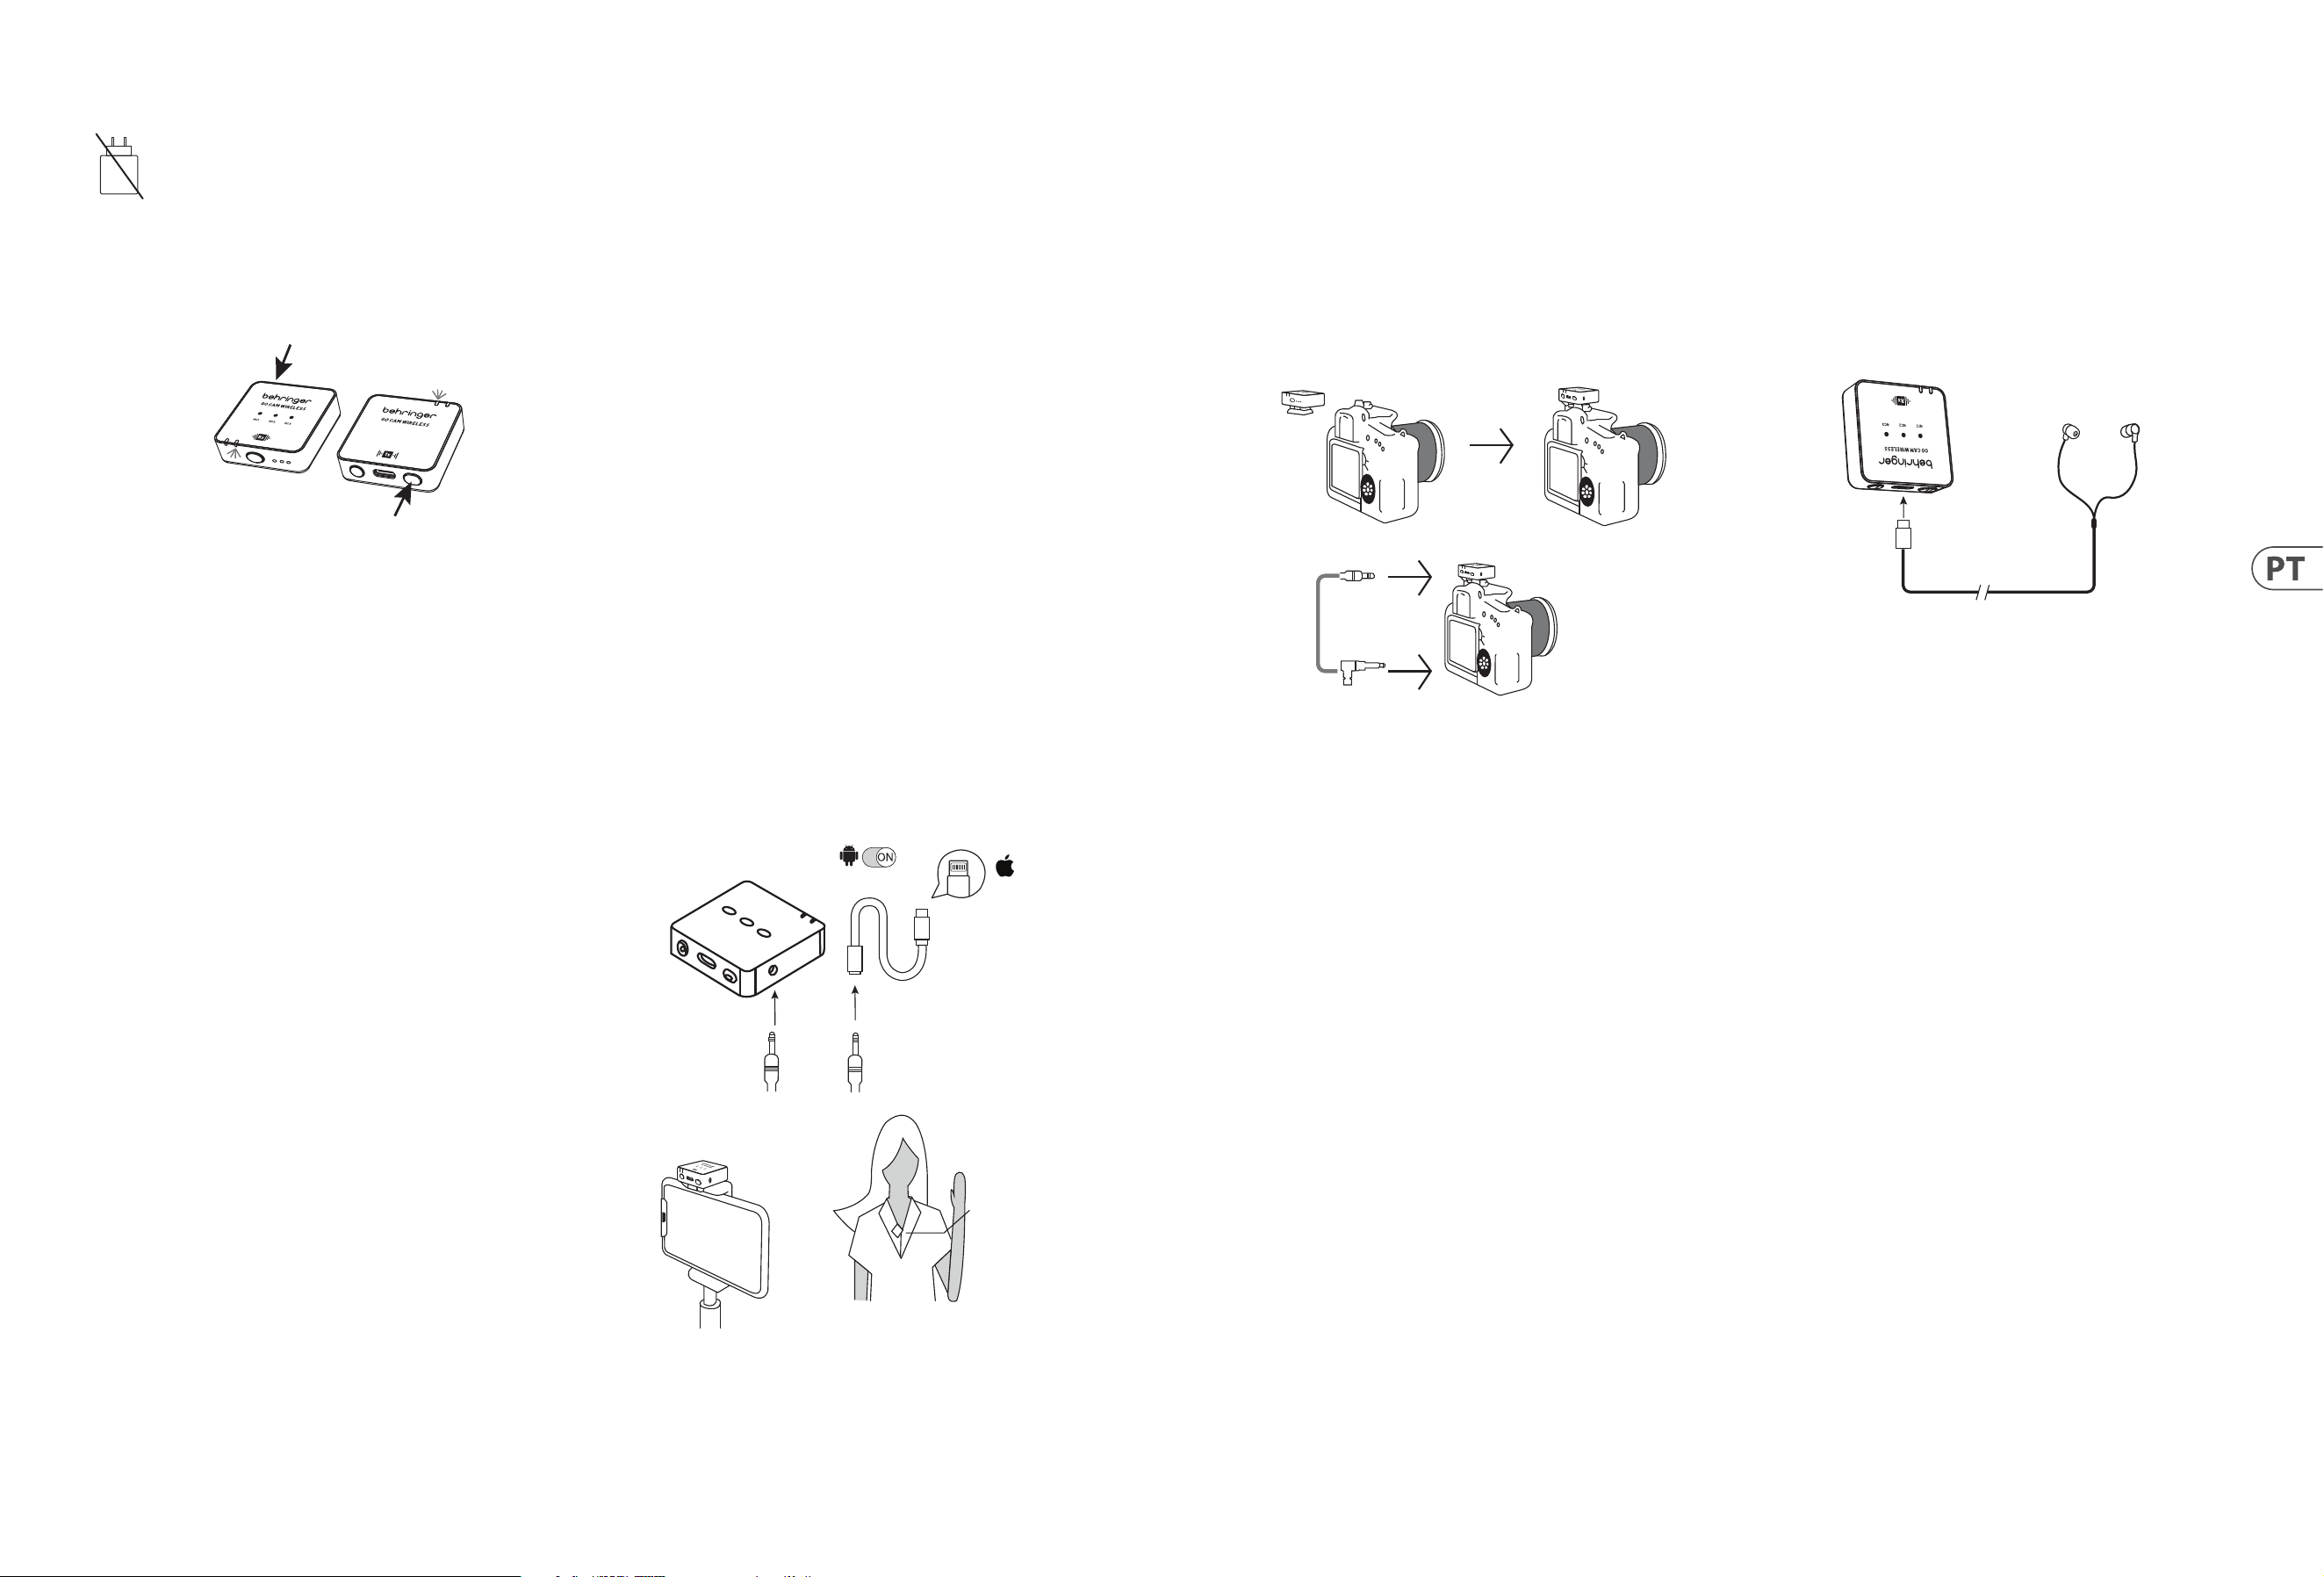
Connecting to a Smartphone for
video recording
1. Android Smartphones: Use the ocial Type-C to Type-C audio cable to
connect the smartphone to the receiver for audio recording. Please ensure
that the OTG function and "External Device" option are enabled in the phone
settings. For example, OPPO and VIVO phones need to enable the "OTG"
function, and OPPO phones also need to enable the "External Device" option.
Huawei, Xiaomi, Samsung, and other phones usually plug and play, requiring
no additional settings. (As shown in the picture.)
2. iPhone 14 and earlier models: Use a 3-section audio head 3.5mm audio
cable to plug into the recording output port of the receiver, insert the
4-section audio head (with a phone icon) into a Lightning-certied adapter,
and then connect the adapter to the phone's charging port. Please ensure
the audio head is inserted correctly and check the audio cable connection.
(As shown in the picture.)
3. iPhone 15 and later models (including iPhone 15): Support the following
two connection methods:
A. Use a 3-section audio head 3.5mm audio cable to plug into the
recording output port of the receiver, insert the 4-section audio
head (with a phone icon) into a 3.5mm female to Type-C certied
adapter, then connect the adapter to the phone's charging port. Please
ensure the audio head is inserted correctly and check the audio cable
connection. (As shown in the picture.)
B. Use the ocial Type-C to Type-C cable to directly connect the
iPhone 15 (or iPhone 15 and later models of smartphones) to the
receiver for audio recording.
Android
OTG
Lighting
Receiver RX
4-segment audio jack
Lighting for
Apple iPhone
14 or earlier
versions with
Lightning
3-segment audio jack
Receiver
Transmitter
Connecting to a DLSR Camera for
video recording
1. Clip the Receiver into the shoe mount of the DSLR camera.
2. Connect the audio output of the receiver to the audio input of camera, using
a 3.5 mm TRS to 3.5 mm TRS audio cable.
3. Please make sure that both 3.5 mm connectors are fully inserted to ensure
the proper contact.
4. Turn the camera ON and start video recording.
Receiver
TRS 3.5 mm
TRS 3.5 mm
audio cable
Connecting to earphones for
real-time monitoring
1. Please charge the transmitter and receiver before use.
2. Press the receiver and the transmitter Power switch for 2 seconds to
power ON. Solid Blue LED indicates the wireless connection between
receiver and transmitter is successful.
3. Insert USB C earphones into the USB Type C port of the receiver for real-time
monitoring of the recording session.
Receiver
Earphones
Type C
10 GO CAM WIRELESS Quick Start Guide 11
(ES)
GO CAM WIRELESS
• Obtenga audio de calidad profesional con nuestro sistema de micrófono inalámbrico, diseñado para funcionar per-fectamente con sus grabadoras de video, DSLRs,
dispositivos móviles, tabletas y grabadoras de audio.
• Perfecto para entrevistas, podcasts, transmisión en vivo, vlogs, aulas virtuales, doblajes y producción de video.
• Experimente un rendimiento superior con la libertad inalámbrica de 30 m (100 pies) de Go Cam Wireless.
• Mantenga las manos libres con nuestro transmisor compacto, que cuenta con un práctico clip para camisa y un fácil interruptor de encendido/apagado.
• Capture audio claro con facilidad usando nuestro micrófono omnidireccional integrado.
• Elimine el ruido de fondo no deseado con el interruptor de reducción de ruido de 3 niveles de nuestro recep-tor.
• Ajuste fácilmente la ganancia con nuestro interruptor de 3 niveles fácil de usar que ofrece opciones de -24 dB, -12 dB y 0 dB.
• Monte nuestro receptor especialmente diseñado en su cámara usando el adaptador de zapata de cámara in-tegrado.
• Disfrute del monitoreo en tiempo real con nuestros auriculares incluidos.
• Conecte un micrófono externo al transmisor usando el conector de 3.5 mm (1/8").
• Manténgase con energía y protegido en movimiento con hasta 8 horas de tiempo de ejecución y nuestro cable de conexión de cámara, cables de carga USB,
protectores de viento de piel y estuche de transporte protector.
Accesorios Suministrados
• Paravientos de piel x 1
• Cable de carga USB x 1
• Cable de audio TRS a TRS para Cámara x 1
• Cable de audio TRRS a TRS para Teléfonos x 1
• Cable de audio Tipo C a Tipo C para Teléfonos x 1
• Auriculares Tipo C x 1
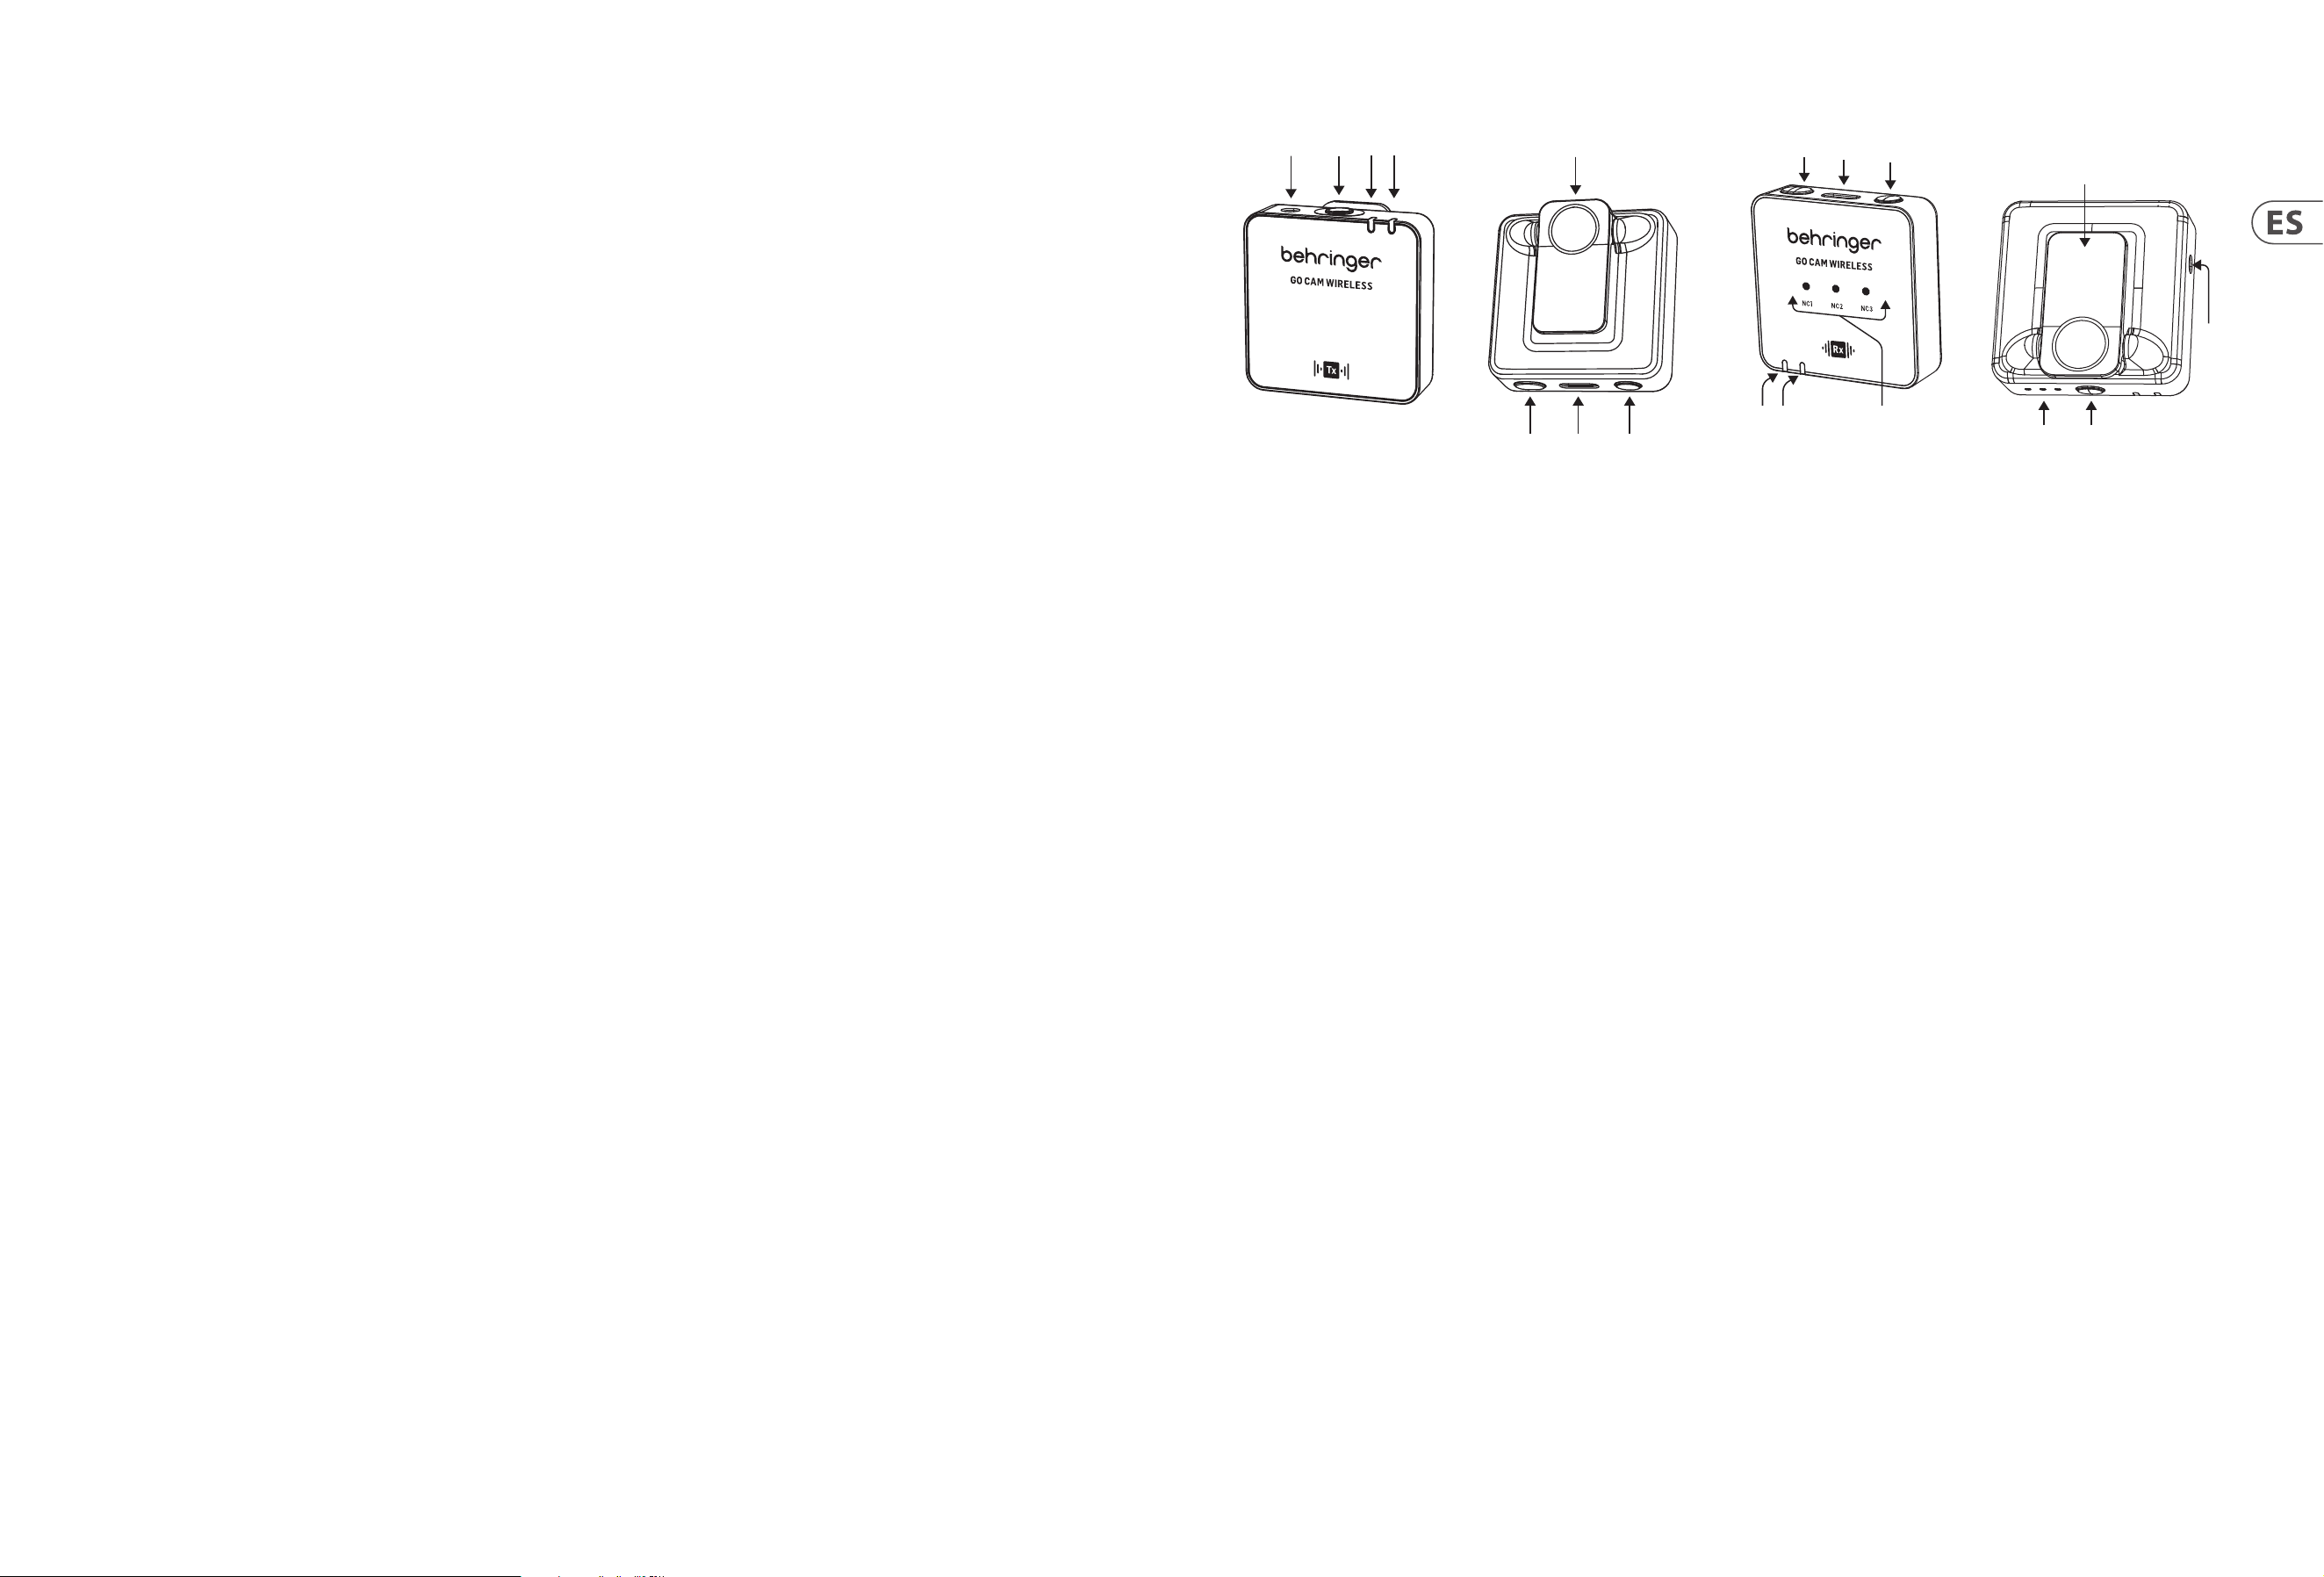
CONTROLES DEL MICRÓFONO
(6)
(2)(1)
(3)(4)
(5)
(7) (8)
1. Entrada de micrófono externo, 3.5 mm (1/8")
2. Micrófono incorporado
3. LED de estado inalámbrico - LED azul = conexión exitosa al receptor,
parpadeo azul = no conectado
4. LED de estado de la batería - LED rojo = cargando, parpadeo rojo =
batería baja
5. Clip para camisa
6. Encendido/Apagado - presione durante 2 segundos para encender, presione
durante 3 segundos para apa-gar
7. Puerto de carga USB Tipo C
8. Silencio Encendido/Apagado - haga doble clic = encendido, presione
una vez = apagado
CONTROLES DEL RECEPTOR
(18)
(10)
(9)
(16)
(15)
(17)
(11)(12)
(14)
(13)
9. LEDs de ganancia - III = 0 dB, II = -12 dB, I = -24 dB
10. Interruptor de ganancia - presione una vez para seleccionar un nivel de
ganancia diferente
11. LED de estado de la batería - LED rojo = cargando, parpadeo rojo =
batería baja
12. LED de estado inalámbrico - LED azul = conexión exitosa al receptor,
parpadeo azul = no conectado
13. LEDs de reducción de ruido - leve = NC1, medio = NC2, fuerte = NC3,
Oscuro = Sin NC
14. Salida de audio, 3.5 mm (1/8")
15. Encendido/Apagado - presione durante 2 segundos para encender, presione
durante 3 segundos para apagar
16. Puerto de carga USB Tipo C y salida para auriculares para monitoreo en
tiempo real
17. Interruptor de reducción de ruido - presione una vez para seleccionar un
nivel diferente
18. Clip/adaptador de zapata de cámara

12 GO CAM WIRELESS Quick Start Guide 13
Operación
No se incluye un cargador. La potencia entregada por el cargador debe
estar entre 5 V/32 mA (0.16 W) mínimo requerido por este equipo y
5 V/400 mA (2 W) máximo, para lograr la velocidad máxima de carga.
Este equipo admite el protocolo de carga USB Power Delivery.
1. Por favor, cargue el transmisor y el receptor antes de usar.
2. Presione el interruptor de encendido del receptor y el interruptor de
encendido del transmisor durante 2 segundos para encender.
R
eceiver
Transmitt
ers
3. Un LED Azul sólido indica que la conexión inalámbrica entre el receptor y el
transmisor es exitosa.
4. Sujete el transmisor a su camisa, camiseta o chaqueta.
5. Asegúrese de que el micrófono integrado no esté cubierto o bloqueado.
Para un rendimiento óptimo de grabación de audio, recomendamos que
la distancia entre la boca del usuario y el micrófono del transmisor sea
de 15 a 20 cm.
6. Si el audio es demasiado alto, causando distorsión – reduzca la ganancia
del micrófono.
7. En caso de que el entorno sea ruidoso – use la función de reducción de ruido.
8. Asegúrese de vericar la ganancia del micrófono y la conguración de
reducción de ruido antes de comen-zar su grabación.
Conexión a un Smartphone para grabación de video
1. Smartphones Android: Usa el cable de audio Type-C a Type-C ocial para
conectar el smartphone al receptor para la grabación de audio. Asegúrate de
que la función OTG y la opción "Dispositivo Externo" estén habilitadas en la
conguración del teléfono. Por ejemplo, los teléfonos OPPO y VIVO necesitan
habilitar la función "OTG", y los teléfonos OPPO también necesitan habilitar
la opción "Dispositivo Externo". Los teléfonos Huawei, Xiaomi, Samsung y
otros generalmente se conectan y funcionan sin conguraciones adicionales.
(Como se muestra en la imagen.)
2. iPhone 14 y modelos anteriores: Usa un cable de audio de 3 secciones
de 3.5mm para conectar al puerto de salida de grabación del receptor,
inserta el conector de 4 secciones (con un ícono de teléfono) en un
adaptador certicado Lightning, y luego conecta el adaptador al puerto de
carga del teléfono. Asegúrate de que el conector de audio esté insertado
correctamente y revisa la conexión del cable de audio. (Como se muestra
en la imagen.)
3. iPhone 15 y modelos posteriores (incluido el iPhone 15): Admite los
siguientes dos métodos de conexión:
A. Usa un cable de audio de 3 secciones de 3.5mm para conectar al puerto
de salida de grabación del receptor, inserta el conector de 4 secciones
(con un ícono de teléfono) en un adaptador certicado de 3.5mm
hembra a Type-C, luego conecta el adaptador al puerto de carga
del teléfono. Asegúrate de que el conector de audio esté insertado
correctamente y revisa la conexión del cable de audio. (Como se
muestra en la imagen.)
B. Usa el cable ocial Type-C a Type-C para conectar directamente el
iPhone 15 (o modelos de iPhone 15 y posteriores) al receptor para la
grabación de audio.
Android
OTG
Lighting
Receiver RX
4-segment audio jack
Lighting for
Apple iPhone
14 or earlier
versions with
Lightning
3-segment audio jack
Receiver
Transmitter
Conexión a una Cámara DSLR para grabación de video
1. Coloque el Receptor en la montura de zapata de la cámara DSLR.
2. Conecte la salida de audio del receptor a la entrada de audio de la cámara,
usando un cable de audio TRS a TRS de 3.5 mm.
3. Asegúrese de que ambos conectores de 3.5 mm estén completamente
insertados para asegurar el contacto adecuado.
4. Encienda la cámara y comience a grabar video.
Receiver
TRS 3.5 mm
TRS 3.5 mm
audio cable
Conexión a auriculares para monitoreo en tiempo real
1. Por favor, cargue el transmisor y el receptor antes de usar.
2. Presione el interruptor de encendido del receptor y el interruptor de
encendido del transmisor durante 2 segundos para encender. Un LED
Azul sólido indica que la conexión inalámbrica entre el receptor y el trans-
misor es exitosa.
3. Inserte auriculares USB C en el puerto USB Tipo C del receptor para
monitorear en tiempo real la sesión de grabación.
Receiver
Earphones
Type C
14 GO CAM WIRELESS Quick Start Guide 15
(FR)
GO CAM WIRELESS
• Obtenez un son de qualité professionnelle avec notre système de microphone sans l, conçu pour fonctionner par-faitement avec vos enregistreurs vidéo,
reex numériques, appareils mobiles, tablettes et enregistreurs audio.
• Parfait pour les interviews, podcasts, diusion en direct, vlogs, salles de classe virtuelles, voix o et production vidéo.
• Protez de performances supérieures avec la liberté sans l de 30 m (100 pieds) du Go Cam Wireless.
• Gardez vos mains libres avec notre émetteur compact, doté d'un clip pour chemise pratique et d'un interrupt-eur marche/arrêt facile.
• Capturez un son clair avec facilité grâce à notre microphone omnidirectionnel intégré.
• Éliminez les bruits de fond indésirables avec l'interrupteur de réduction de bruit à 3 niveaux de notre ré-cepteur.
• Ajustez facilement le gain avec notre interrupteur à 3 niveaux convivial orant des options de -24 dB, -12 dB et 0 dB.
• Montez notre récepteur spécialement conçu sur votre caméra en utilisant l'adaptateur de grie de caméra intégré.
• Protez de la surveillance en temps réel avec nos écouteurs inclus.
• Connectez un microphone externe à l'émetteur en utilisant le connecteur de 3,5 mm (1/8").
• Restez alimenté et protégé en déplacement avec jusqu'à 8 heures d'autonomie et notre câble de connexion à la caméra, câbles de charge USB,
pare-brise en fourrure et étui de transport protecteur.
Accessoires Fournis
• Pare-brise en fourrure x 1
• Câble de charge USB x 1
• Câble audio TRS à TRS pour Caméra x 1
• Câble audio TRRS à TRS pour Téléphones x 1
• Câble audio Type C à Type C pour Téléphones x 1
• Écouteurs Type C x 1
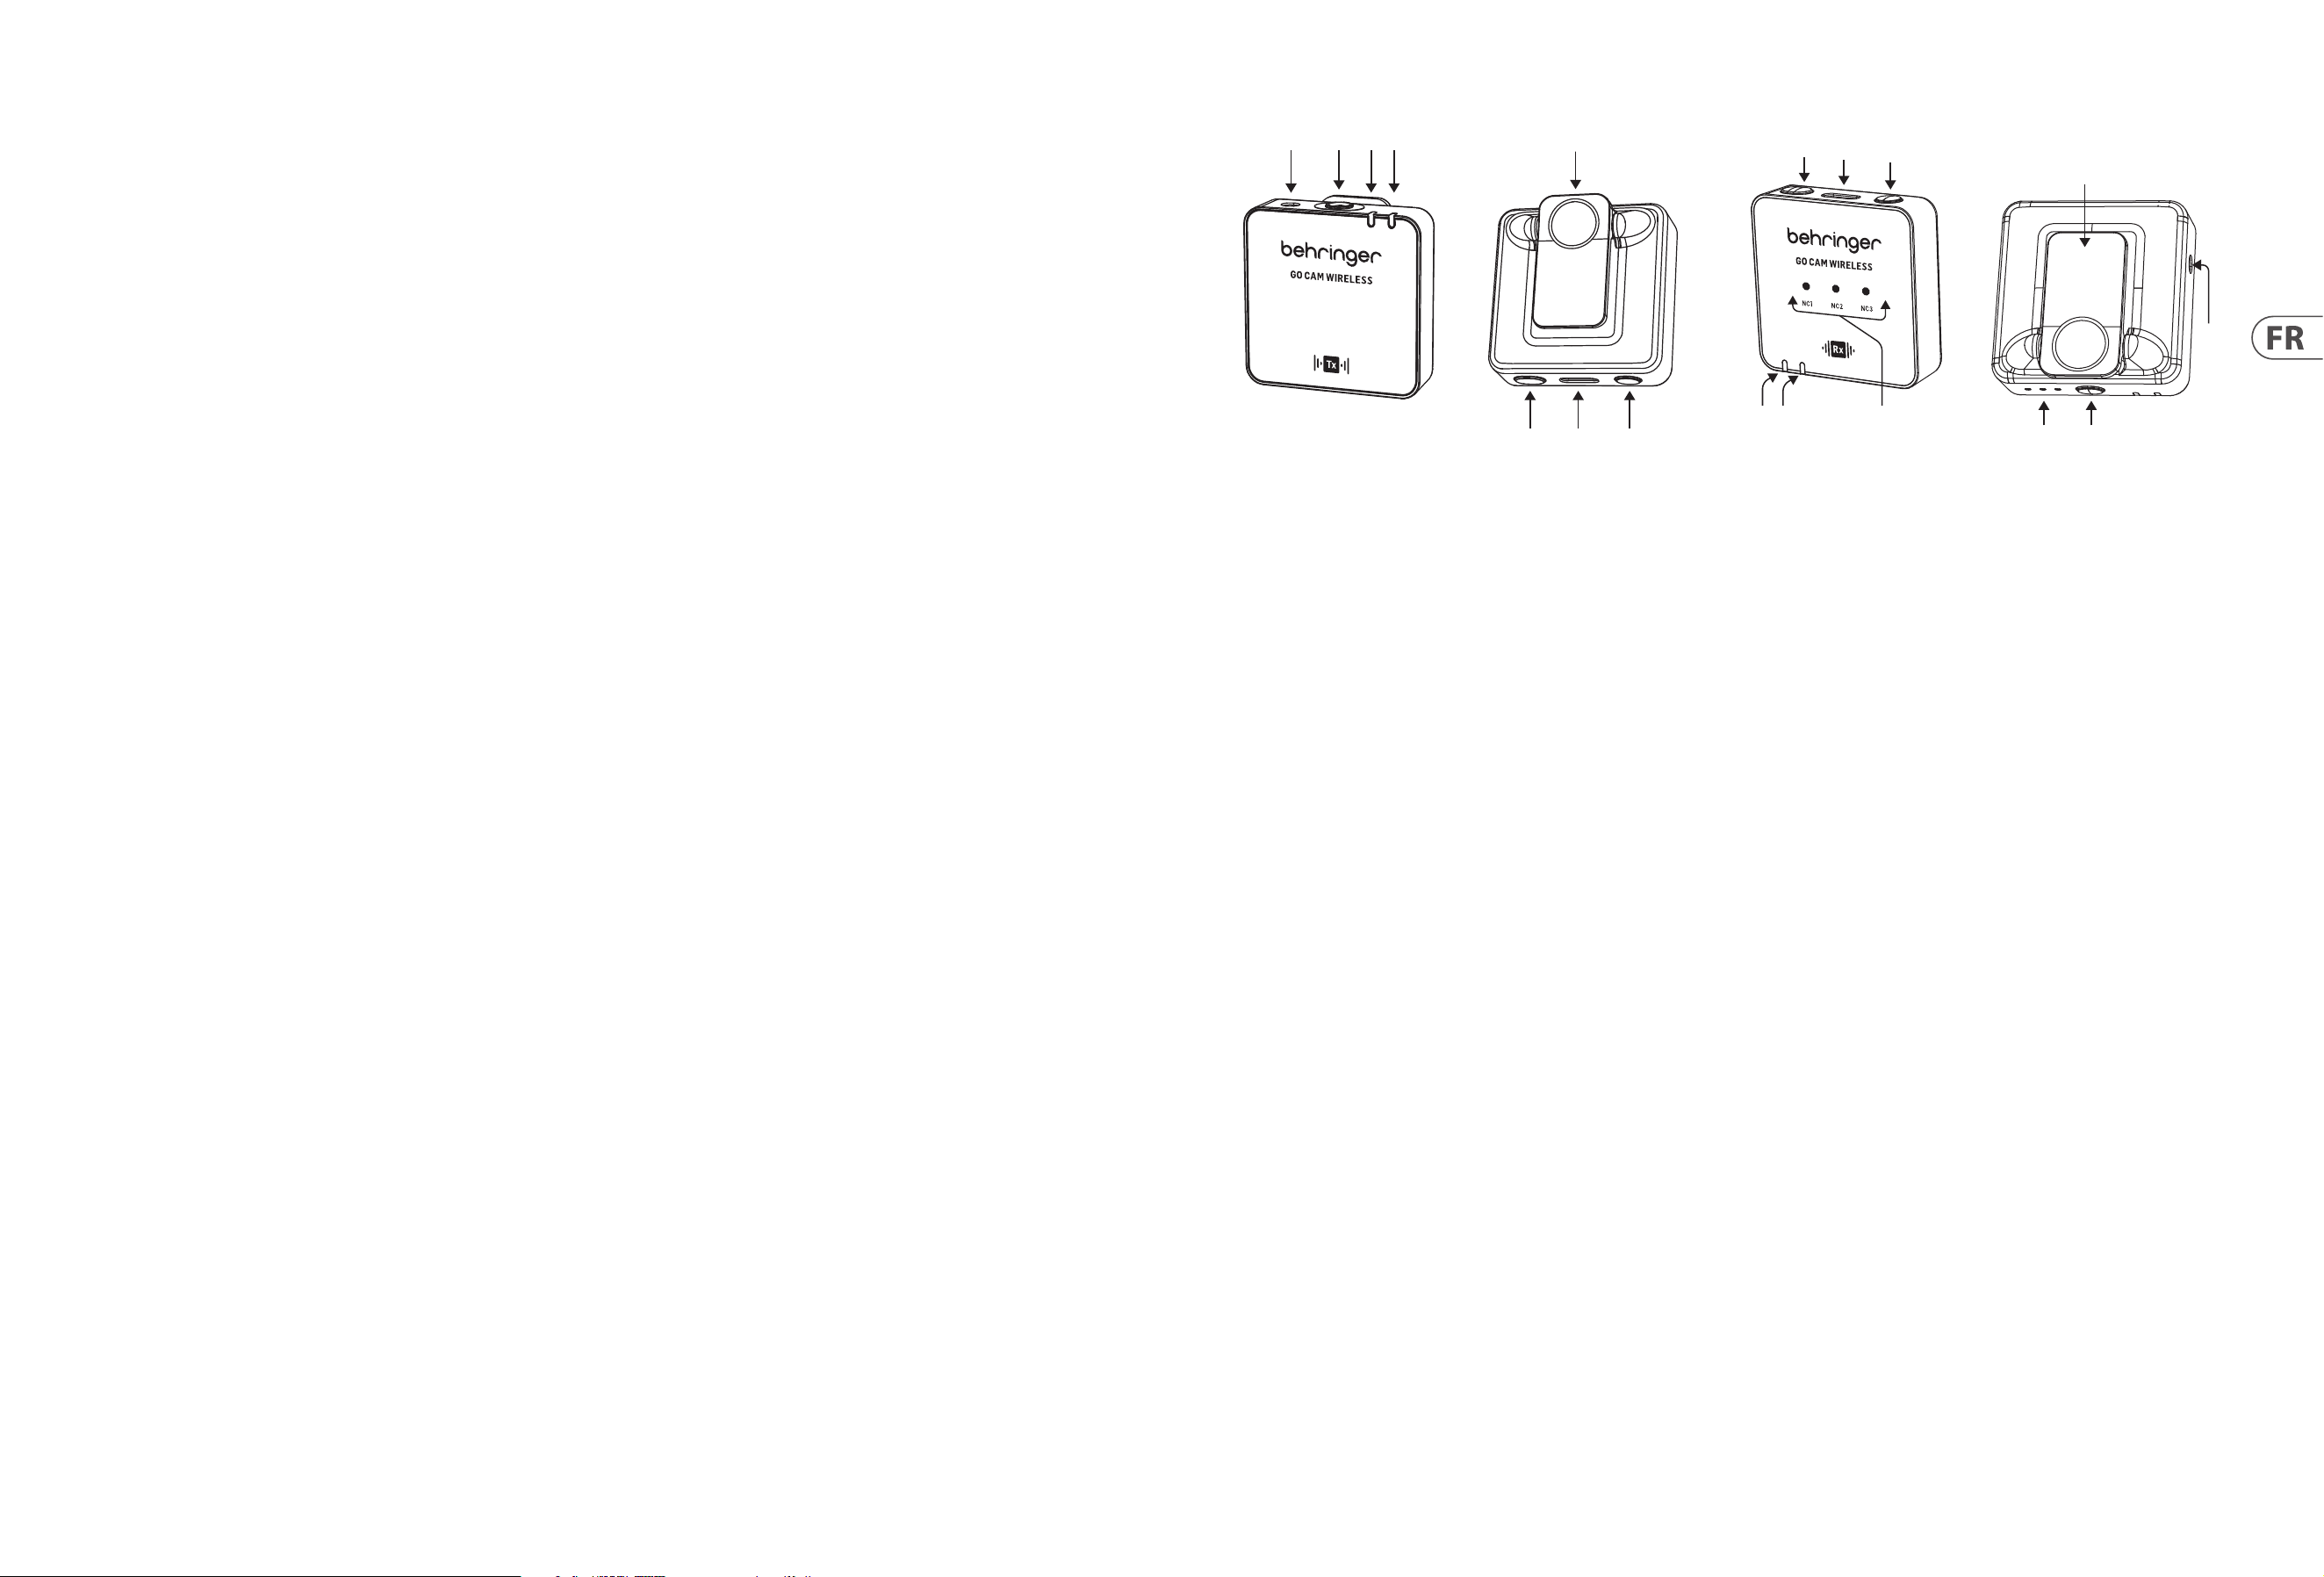
CONTRÔLES DU MICROPHONE
(6)
(2)(1)
(3)(4)
(5)
(7) (8)
1. Entrée de microphone externe, 3,5 mm (1/8")
2. Microphone intégré
3. LED de statut sans l - LED bleue = connexion réussie au récepteur,
clignotement bleu = non connecté
4. LED de statut de la batterie - LED rouge = chargement, clignotement
rouge = batterie faible
5. Clip pour chemise
6. Marche/Arrêt - appuyez pendant 2 secondes pour allumer, appuyez
pendant 3 secondes pour éteindre
7. Port de charge USB Type C
8. Mute Marche/Arrêt - double-cliquez = allumé, appuyez une fois = éteint
CONTRÔLES DU RÉCEPTEUR
(18)
(10)
(9)
(16)
(15)
(17)
(11)(12)
(14)
(13)
9. LEDs de gain - III = 0 dB, II = -12 dB, I = -24 dB
10. Interrupteur de gain - appuyez une fois pour sélectionner un niveau de
gain diérent
11. LED de statut de la batterie - LED rouge = chargement, clignotement
rouge = batterie faible
12. LED de statut sans l - LED bleue = connexion réussie au récepteur,
clignotement bleu = non connecté
13. LEDs de réduction de bruit - léger = NC1, moyen = NC2, fort = NC3,
Sombre = Pas de NC
14. Sortie audio, 3,5 mm (1/8")
15. Marche/Arrêt - appuyez pendant 2 secondes pour allumer, appuyez pendant
3 secondes pour éteindre
16. Port de charge USB Type C et sortie écouteurs pour surveillance en temps réel
17. Interrupteur de réduction de bruit - appuyez une fois pour sélectionner un
niveau diérent
18. Clip/adaptateur de grie de caméra
16 GO CAM WIRELESS Quick Start Guide 17
Opération
Un chargeur n'est pas inclus. La puissance délivrée par le chargeur
doit être comprise entre 5V/32mA (0,16W) minimum requise par cet
équipement et 5V/400mA (2W) maximum, an d'atteindre la vitesse
de charge maximale. Cet équipement prend en charge le protocole de
charge USB Power Delivery.
1. Veuillez charger l'émetteur et le récepteur avant utilisation.
2. Appuyez sur l'interrupteur d'alimentation du récepteur et sur l'interrupteur
d'alimentation de l'émetteur pendant 2 secondes pour allumer.
R
eceiver
Transmitt
ers
3. Une LED Bleue solide indique que la connexion sans l entre le récepteur et
l'émetteur est réussie.
4. Attachez l'émetteur à votre chemise, t-shirt ou veste.
5. Assurez-vous que le microphone intégré n'est pas couvert ou bloqué. Pour
une performance optimale d'en-registrement audio, nous recommandons
que la distance entre la bouche de l'utilisateur et le microphone de
l'émetteur soit de 15 à 20 cm.
6. Si le son est trop fort, causant de la distorsion – réduisez le gain
du microphone.
7. En cas d'environnement bruyant – utilisez la fonction de réduction de bruit.
8. Assurez-vous de vérier le gain du microphone et les réglages de réduction
de bruit avant de commencer votre enregistrement.
Connexion à un Smartphone pour
enregistrement vidéo
1. Smartphones Android: Utilisez le câble audio Type-C à Type-C ociel pour
connecter le smartphone au récepteur pour l'enregistrement audio. Assurez-
vous que la fonction OTG et l'option "Appareil Externe" sont activées dans les
paramètres du téléphone. Par exemple, les téléphones OPPO et VIVO doivent
activer la fonction "OTG", et les téléphones OPPO doivent également activer
l'option "Appareil Externe". Les téléphones Huawei, Xiaomi, Samsung et
autres sont généralement plug-and-play, sans paramètres supplémentaires
nécessaires. (Comme le montre l'image.)
2. iPhone 14 et modèles antérieurs: Utilisez un câble audio de 3 sections
de 3,5 mm pour brancher au port de sortie d'enregistrement du récepteur,
insérez la prise de 4 sections (avec une icône de téléphone) dans un
adaptateur certié Lightning, puis connectez l'adaptateur au port de charge
du téléphone. Assurez-vous que la prise audio est correctement insérée et
vériez la connexion du câble audio. (Comme le montre l'image.)
3. iPhone 15 et modèles ultérieurs (y compris l'iPhone 15): Supporte les
deux méthodes de connexion suivantes:
A. Utilisez un câble audio de 3 sections de 3,5 mm pour brancher au port
de sortie d'enregistrement du récepteur, insérez la prise de 4 sections
(avec une icône de téléphone) dans un adaptateur certié de 3,5 mm
femelle à Type-C, puis connectez l'adaptateur au port de charge du
téléphone. Assurez-vous que la prise audio est correctement insérée et
vériez la connexion du câble audio. (Comme le montre l'image.)
B. Utilisez le câble ociel Type-C à Type-C pour connecter directement
l'iPhone 15 (ou les modèles d'iPhone 15 et ultérieurs) au récepteur pour
l'enregistrement audio.
Android
OTG
Lighting
Receiver RX
4-segment audio jack
Lighting for
Apple iPhone
14 or earlier
versions with
Lightning
3-segment audio jack
Receiver
Transmitter
Connexion à une Caméra DSLR
pour enregistrement vidéo
1. Placez le Récepteur dans la grie de la caméra DSLR.
2. Connectez la sortie audio du récepteur à l'entrée audio de la caméra, en
utilisant un câble audio TRS à TRS de 3,5 mm.
3. Assurez-vous que les deux connecteurs de 3,5 mm sont complètement
insérés pour garantir un contact cor-rect.
4. Allumez la caméra et commencez l'enregistrement vidéo.
Receiver
TRS 3.5 mm
TRS 3.5 mm
audio cable
Connexion à des écouteurs pour
surveillance en temps réel
1. Veuillez charger l'émetteur et le récepteur avant utilisation.
2. Appuyez sur l'interrupteur d'alimentation du récepteur et sur l'interrupteur
d'alimentation de l'émetteur pendant 2 secondes pour allumer. Une
LED Bleue solide indique que la connexion sans l entre le récepteur et
l'émetteur est réussie.
3. Insérez des écouteurs USB C dans le port USB Type C du récepteur pour
surveiller en temps réel la session d'enregistrement.
Receiver
Earphones
Type C
18 GO CAM WIRELESS Quick Start Guide 19
(DE)
GO CAM WIRELESS
• Erhalten Sie Audio in professioneller Qualität mit unserem drahtlosen Mikrofonsystem, das nahtlos mit Ihren Videore-kordern, DSLRs, mobilen Geräten,
Tablets und Audiorekordern funktioniert.
• Perfekt für Interviews, Podcasts, Live-Streaming, Vlogs, virtuelle Klassenzimmer, Sprachaufnahmen und Vide-oproduktion.
• Erleben Sie überlegene Leistung mit der 30 m (100 ft) drahtlosen Freiheit des Go Cam Wireless.
• Behalten Sie Ihre Hände frei mit unserem kompakten Sender, der über einen praktischen Hemdclip und einen einfach zu bedienenden Ein-/Ausschalter verfügt.
• Erfassen Sie klaren Ton mühelos mit unserem integrierten omnidirektionalen Mikrofon.
• Eliminieren Sie unerwünschte Hintergrundgeräusche mit dem hochmodernen 3-Stufen-Rauschunterdrückungsschalter unseres Empfängers.
• Stellen Sie die Verstärkung einfach mit unserem benutzerfreundlichen 3-Stufen-Schalter ein, der Optionen von -24 dB, -12 dB und 0 dB bietet.
• Befestigen Sie unseren speziell entwickelten Empfänger an Ihrer Kamera mit dem integrierten Kameraschu-hadapter.
• Genießen Sie Echtzeit-Überwachung mit unseren enthaltenen Kopfhörern.
• Schließen Sie ein externes Mikrofon an den Sender mit dem 3,5 mm (1/8") Anschluss an.
• Bleiben Sie unterwegs mit bis zu 8 Stunden Betriebszeit und unserem Kameraverbindungskabel, USB-Ladekabeln, Fellwindschutz und Schutzhülle mit
Strom versorgt und geschützt.
Mitgeliefertes Zubehör
• Fellwindschutz x 1
• USB-Ladekabel x 1
• TRS zu TRS Audiokabel für Kamera x 1
• TRRS zu TRS Audiokabel für Telefone x 1
• Typ C zu Typ C Audiokabel für Telefone x 1
• Typ C Kopfhörer x 1
MIKROFONKONTROLLEN
(6)
(2)(1)
(3)(4)
(5)
(7) (8)
1. Externer Mikrofoneingang, 3,5 mm (1/8")
2. Eingebautes Mikrofon
3. Drahtlos-Status-LED - blaue LED = erfolgreiche Verbindung zum
Empfänger, blinkend blau = nicht verbun-den
4. Batteriestatus-LED - rote LED = Laden, blinkend rot =
niedriger Batteriestand
5. Hemdclip
6. Ein/Aus - 2 Sekunden drücken, um EINzuschalten, 3 Sekunden
drücken, um AUSzuschalten
7. USB Typ C Ladeanschluss
8. Stummschaltung Ein/Aus - Doppelklick = EIN, einmal drücken = AUS
EMPFÄNGERKONTROLLEN
(18)
(10)
(9)
(16)
(15)
(17)
(11)(12)
(14)
(13)
9. Verstärkungs-LEDs - III = 0 dB, II = -12 dB, I = -24 dB
10. Verstärkungsschalter - einmal drücken, um einen anderen
Verstärkungspegel auszuwählen
11. Batteriestatus-LED - rote LED = Laden, blinkend rot =
niedriger Batteriestand
12. Drahtlos-Status-LED - blaue LED = erfolgreiche Verbindung zum Empfänger,
blinkend blau = nicht verbun-den
13. Rauschunterdrückungs-LEDs - mild = NC1, mittel = NC2, stark = NC3,
Dunkel = Kein NC
14. Audioausgang, 3,5 mm (1/8")
15. Ein/Aus - 2 Sekunden drücken, um EINzuschalten, 3 Sekunden drücken,
um AUSzuschalten
16. USB Typ C Ladeanschluss und Kopfhörerausgang für Echtzeitüberwachung
17. Rauschunterdrückungsschalter - einmal drücken, um einen anderen
Pegel auszuwählen
18. Clip/Kameraschuhadapter
20 GO CAM WIRELESS Quick Start Guide 21
Betrieb
Ein Ladegerät ist nicht im Lieferumfang enthalten. Die vom Ladegerät
gelieferte Leistung muss zwischen 5 V/32 mA (0,16 W) minimal und 5
V/400 mA (2 W) maximal liegen, um die maximale
Ladegeschwindigkeit zu erreichen. Dieses Gerät unterstützt das USB
Power Delivery Ladeprotokoll.
1. Bitte laden Sie den Sender und den Empfänger vor der Verwendung auf.
2. Drücken Sie den Netzschalter des Empfängers und den Netzschalter des
Senders 2 Sekunden lang, um das Gerät einzuschalten.
R
eceiver
Transmitt
ers
3. Eine solide blaue LED zeigt an, dass die drahtlose Verbindung zwischen
Empfänger und Sender erfolgreich ist.
4. Befestigen Sie den Sender an Ihrem Hemd, T-Shirt oder Ihrer Jacke.
5. Stellen Sie sicher, dass das integrierte Mikrofon nicht abgedeckt oder
blockiert ist. Für eine optimale Au-dioaufnahmeleistung empfehlen wir
einen Abstand von 15 bis 20 cm zwischen dem Mund des Benutzers und dem
Mikrofon des Senders.
6. Wenn der Ton zu laut ist und Verzerrungen verursacht – verringern Sie
die Mikrofonverstärkung.
7. Falls die Umgebung laut ist – verwenden Sie die Rauschunterdrückungsfunktion.
8. Überprüfen Sie vor Beginn Ihrer Aufnahme die Mikrofonverstärkung und die
Rauschunterdrückungseinstel-lungen.
Verbindung zu einem Smartphone
für Videoaufnahmen
1. Android-Smartphones: Verwenden Sie das ozielle Type-C-zu-Type-C-
Audiokabel, um das Smartphone mit dem Empfänger für die Audioaufnahme
zu verbinden. Stellen Sie sicher, dass die OTG-Funktion und die Option "Externes
Gerät" in den Telefoneinstellungen aktiviert sind. Zum Beispiel müssen OPPO-
und VIVO-Telefone die OTG-Funktion aktivieren, und OPPO-Telefone müssen
auch die Option "Externes Gerät" aktivieren. Huawei-, Xiaomi-, Samsung-
und andere Telefone funktionieren in der Regel direkt, ohne zusätzliche
Einstellungen. (Siehe Bild.)
2. iPhone 14 und frühere Modelle: Verwenden Sie ein 3-teilige
3,5-mm-Audiokabel, um es an den Aufnahmeausgang des Empfängers
anzuschließen, stecken Sie den 4-teiligen Audioanschluss (mit einem
Telefonsymbol) in einen zertizierten Lightning-Adapter und verbinden Sie dann
den Adapter mit dem Ladeanschluss des iPhones. Stellen Sie sicher, dass der
Audioanschluss korrekt eingesteckt ist und überprüfen Sie die Verbindung des
Audiokabels. (Siehe Bild.)
3. iPhone 15 und spätere Modelle (einschließlich iPhone 15): Unterstützt die
folgenden zwei Verbindungsarten:
A. Verwenden Sie ein 3-teilige 3,5-mm-Audiokabel, um es an den
Aufnahmeausgang des Empfängers anzuschließen, stecken Sie den
4-teiligen Audioanschluss (mit einem Telefonsymbol) in einen zertizierten
3,5-mm-Weibchen-zu-Type-C-Adapter und verbinden Sie dann den
Adapter mit dem Ladeanschluss des Telefons. Stellen Sie sicher, dass der
Audioanschluss korrekt eingesteckt ist und überprüfen Sie die Verbindung
des Audiokabels. (Siehe Bild.)
B. Verwenden Sie das ozielle Type-C-zu-Type-C-Kabel um das iPhone 15
(oder iPhone 15 und spätere Modelle) direkt mit dem Empfänger für die
Audioaufnahme zu verbinden.
Android
OTG
Lighting
Receiver RX
4-segment audio jack
Lighting for
Apple iPhone
14 or earlier
versions with
Lightning
3-segment audio jack
Receiver
Transmitter
Verbindung zu einer DSLR-Kamera
für Videoaufnahmen
1. Befestigen Sie den Empfänger im Schuh der DSLR-Kamera.
2. Verbinden Sie den Audioausgang des Empfängers mit dem Audioeingang der
Kamera, indem Sie ein 3,5 mm TRS zu 3,5 mm TRS Audiokabel verwenden.
3. Stellen Sie sicher, dass beide 3,5 mm Stecker vollständig eingesteckt sind,
um einen ordnungsgemäßen Kontakt zu gewährleisten.
4. Schalten Sie die Kamera ein und beginnen Sie mit der Videoaufnahme.
Receiver
TRS 3.5 mm
TRS 3.5 mm
audio cable
Verbindung zu Kopfhörern für
Echtzeitüberwachung
1. Bitte laden Sie den Sender und den Empfänger vor der Verwendung auf.
2. Drücken Sie den Netzschalter des Empfängers und den Netzschalter des
Senders 2 Sekunden lang, um das Gerät einzuschalten. Eine solide blaue
LED zeigt an, dass die drahtlose Verbindung zwischen Empfänger und
Sender erfolgreich ist.
3. Stecken Sie USB-C-Kopfhörer in den USB-Typ-C-Anschluss des Empfängers,
um die Aufnahmesession in Echtzeit zu überwachen.
Receiver
Earphones
Type C

22 GO CAM WIRELESS Quick Start Guide 23
(PT)
GO CAM WIRELESS
• Obtenha áudio de qualidade prossional com nosso sistema de microfone sem o, projetado para funcionar perfeit-amente com seus gravadores de vídeo,
DSLRs, dispositivos móveis, tablets e gravadores de áudio.
• Perfeito para entrevistas, podcasts, transmissão ao vivo, vlogs, salas de aula virtuais, locuções e produção de vídeo.
• Experimente desempenho superior com a liberdade sem o de 30 m (100 pés) do Go Cam Wireless.
• Mantenha as mãos livres com nosso transmissor compacto, que possui um prático clipe de camisa e um fácil interruptor de ligar/desligar.
• Capture áudio claro com facilidade usando nosso microfone omnidirecional integrado.
• Elimine ruídos de fundo indesejados com o interruptor de redução de ruído de 3 níveis de nosso receptor.
• Ajuste facilmente o ganho com nosso interruptor de 3 níveis fácil de usar, que oferece opções de -24 dB, -12 dB e 0 dB.
• Monte nosso receptor especialmente projetado em sua câmera usando o adaptador de sapata de câmera embutido.
• Desfrute de monitoramento em tempo real com nossos fones de ouvido incluídos.
• Conecte um microfone externo ao transmissor usando o conector de 3,5 mm (1/8").
• Fique carregado e protegido em movimento com até 8 horas de tempo de execução e nosso cabo de conexão de câmera, cabos de carregamento USB, pára-brisas
de pelo e estojo de transporte protetor.
Acessórios Fornecidos
• Pára-brisas de pelo x 1
• Cabo de carregamento USB x 1
• Cabo de áudio TRS para TRS para Câmera x 1
• Cabo de áudio TRRS para TRS para Telefones x 1
• Cabo de áudio Tipo C para Tipo C para Telefones x 1
• Fones de ouvido Tipo C x 1
CONTROLES DO MICROFONE
(6)
(2)(1)
(3)(4)
(5)
(7) (8)
1. Entrada de microfone externo, 3,5 mm (1/8")
2. Microfone embutido
3. LED de status sem o - LED azul = conexão bem-sucedida com o receptor,
azul piscando = não conectado
4. LED de status da bateria - LED vermelho = carregando, vermelho
piscando = bateria fraca
5. Clipe de camisa
6. Ligar/Desligar - pressione por 2 segundos para ligar, pressione por
3 segundos para desligar
7. Porta de carregamento USB Tipo C
8. Mudo Ligar/Desligar - clique duplo = LIGADO, pressione uma
vez = DESLIGADO
CONTROLES DO RECEPTOR
(18)
(10)
(9)
(16)
(15)
(17)
(11)(12)
(14)
(13)
9. LEDs de ganho - III = 0 dB, II = -12 dB, I = -24 dB
10. Interruptor de ganho - pressione uma vez para selecionar um nível de
ganho diferente
11. LED de status da bateria - LED vermelho = carregando, vermelho piscando =
bateria fraca
12. LED de status sem o - LED azul = conexão bem-sucedida com o receptor,
azul piscando = não conectado
13. LEDs de redução de ruído - leve = NC1, médio = NC2, forte = NC3,
Escuro = Sem NC
14. Saída de áudio, 3,5 mm (1/8")
15. Ligar/Desligar - pressione por 2 segundos para ligar, pressione por
3 segundos para desligar
16. Porta de carregamento USB Tipo C e saída para fones de ouvido para
monitoramento em tempo real
17. Interruptor de redução de ruído - pressione uma vez para selecionar um
nível diferente
18. Clipe/adaptador de sapata de câmera
24 GO CAM WIRELESS Quick Start Guide 25
Operação
Um carregador não está incluído. A potência fornecida pelo
carregador deve estar entre 5 V/32 mA (0,16 W) mínimo necessário
para este equipamento e 5 V/400 mA (2 W) máximo, para atingir a
velocidade máxima de carregamento. Este equipamento suporta o
protocolo de carregamento USB Power Delivery.
1. Por favor, carregue o transmissor e o receptor antes de usar.
2. Pressione o interruptor de energia do receptor e o interruptor de energia do
transmissor por 2 segundos para ligar.
R
eceiver
Transmitt
ers
3. Um LED Azul sólido indica que a conexão sem o entre o receptor e o
transmissor foi bem-sucedida.
4. Prenda o transmissor à sua camisa, camiseta ou jaqueta.
5. Certique-se de que o microfone embutido não esteja coberto
ou bloqueado. Para um desempenho ideal de gravação de áudio,
recomendamos que a distância entre a boca do usuário e o microfone do
transmissor seja de 15 a 20 cm.
6. Se o áudio estiver muito alto, causando distorção – reduza o ganho
do microfone.
7. Em caso de ambiente barulhento – use o recurso de redução de ruído.
8. Certique-se de vericar o ganho do microfone e as congurações de
redução de ruído antes de iniciar sua gravação.
Conexão a um Smartphone para
gravação de vídeo
1. Smartphones Android: Use o cabo de áudio ocial Type-C para Type-C para
conectar o smartphone ao receptor para gravação de áudio. Certique-se
de que a função OTG e a opção "Dispositivo Externo" estejam habilitadas
nas congurações do telefone. Por exemplo, os telefones OPPO e VIVO
precisam ativar a função "OTG", e os telefones OPPO também precisam ativar
a opção "Dispositivo Externo". Telefones Huawei, Xiaomi, Samsung e outros
geralmente funcionam diretamente, sem congurações adicionais. (Como
mostrado na imagem.)
2. iPhone 14 e modelos anteriores: Use um cabo de áudio de 3 seções de
3,5 mm para conectar à porta de saída de gravação do receptor, insira
o conector de 4 seções (com um ícone de telefone) em um adaptador
certicado Lightning e, em seguida, conecte o adaptador ao porto de
carregamento do telefone. Certique-se de que o conector de áudio esteja
inserido corretamente e verique a conexão do cabo de áudio. (Como
mostrado na imagem.)
3. iPhone 15 e modelos posteriores (incluindo iPhone 15): Suporta os
seguintes dois métodos de conexão:
A. Use um cabo de áudio de 3 seções de 3,5 mm para conectar à porta de
saída de gravação do receptor, insira o conector de 4 seções (com um
ícone de telefone) em um adaptador certicado de 3,5 mm fêmea para
Type-C e, em seguida, conecte o adaptador ao porto de carregamento
do telefone. Certique-se de que o conector de áudio esteja inserido
corretamente e verique a conexão do cabo de áudio. (Como mostrado
na imagem.)
B. Use o cabo ocial Type-C para Type-C para conectar diretamente
o iPhone 15 (ou iPhone 15 e modelos posteriores) ao receptor para
gravação de áudio.
Android
OTG
Lighting
Receiver RX
4-segment audio jack
Lighting for
Apple iPhone
14 or earlier
versions with
Lightning
3-segment audio jack
Receiver
Transmitter
Conexão a uma Câmera DSLR para
gravação de vídeo
1. Prenda o Receptor no suporte de sapata da câmera DSLR.
2. Conecte a saída de áudio do receptor à entrada de áudio da câmera, usando
um cabo de áudio TRS para TRS de 3,5 mm.
3. Certique-se de que ambos os conectores de 3,5 mm estejam
completamente inseridos para garantir o contato adequado.
4. Ligue a câmera e comece a gravação de vídeo.
Receiver
TRS 3.5 mm
TRS 3.5 mm
audio cable
Conexão a fones de ouvido para
monitoramento em tempo real
1. Por favor, carregue o transmissor e o receptor antes de usar.
2. Pressione o interruptor de energia do receptor e o interruptor de energia
do transmissor por 2 segundos para ligar. Um LED Azul sólido indica que a
conexão sem o entre o receptor e o transmissor foi bem-sucedida.
3. Insira os fones de ouvido USB C na porta USB Tipo C do receptor para
monitoramento em tempo real da sessão de gravação.
Receiver
Earphones
Type C
26 GO CAM WIRELESS Quick Start Guide 27
(IT)
GO CAM WIRELESS
• Ottieni audio di qualità professionale con il nostro sistema di microfoni wireless, progettato per funzionare perfetta-mente con i tuoi videoregistratori, DSLR,
dispositivi mobili, tablet e registratori audio.
• Perfetto per interviste, podcast, streaming live, vlog, aule virtuali, doppiaggi e produzione video.
• Sperimenta prestazioni superiori con la libertà wireless di 30 m (100 piedi) del Go Cam Wireless.
• Tieni le mani libere con il nostro trasmettitore compatto, dotato di una comoda clip per camicia e un facile interruttore on/o.
• Cattura audio chiaro con facilità utilizzando il nostro microfono omnidirezionale integrato.
• Elimina i rumori di fondo indesiderati con l'interruttore di riduzione del rumore a 3 livelli del nostro ricevitore.
• Regola facilmente il guadagno con il nostro interruttore a 3 livelli facile da usare che ore opzioni di -24 dB, -12 dB e 0 dB.
• Monta il nostro ricevitore appositamente progettato sulla tua fotocamera utilizzando l'adattatore per scarpa della fotocamera integrato.
• Goditi il monitoraggio in tempo reale con le cue incluse.
• Collega un microfono esterno al trasmettitore utilizzando il connettore da 3,5 mm (1/8").
• Rimani carico e protetto in movimento con no a 8 ore di autonomia e il nostro cavo di connessione per foto-camera, cavi di ricarica USB, paravento in pelo e
custodia protettiva.
Accessori Forniti
• Paravento in pelo x 1
• Cavo di ricarica USB x 1
• Cavo audio TRS a TRS per Fotocamera x 1
• Cavo audio TRRS a TRS per Telefoni x 1
• Cavo audio Tipo C a Tipo C per Telefoni x 1
• Cue Tipo C x 1
CONTROLLI DEL MICROFONO
(6)
(2)(1)
(3)(4)
(5)
(7) (8)
1. Ingresso microfono esterno, 3,5 mm (1/8")
2. Microfono integrato
3. LED di stato wireless - LED blu = connessione riuscita al ricevitore,
lampeggio blu = non connesso
4. LED di stato della batteria - LED rosso = in carica, lampeggio
rosso = batteria scarica
5. Clip per camicia
6. Accensione/Spegnimento - premere per 2 secondi per accendere,
premere per 3 secondi per spegnere
7. Porta di ricarica USB Tipo C
8. Muto Accensione/Spegnimento - doppio clic = acceso, premere una
volta = spento
CONTROLLI DEL RICEVITORE
(18)
(10)
(9)
(16)
(15)
(17)
(11)(12)
(14)
(13)
9. LED di guadagno - III = 0 dB, II = -12 dB, I = -24 dB
10. Interruttore di guadagno - premere una volta per selezionare un diverso
livello di guadagno
11. LED di stato della batteria - LED rosso = in carica, lampeggio
rosso = batteria scarica
12. LED di stato wireless - LED blu = connessione riuscita al ricevitore,
lampeggio blu = non connesso
13. LED di riduzione del rumore - leggero = NC1, medio = NC2, forte = NC3,
Scuro = Nessun NC
14. Uscita audio, 3,5 mm (1/8")
15. Accensione/Spegnimento - premere per 2 secondi per accendere, premere
per 3 secondi per spegnere
16. Porta di ricarica USB Tipo C e uscita per cue per monitoraggio in
tempo reale
17. Interruttore di riduzione del rumore - premere una volta per selezionare un
livello diverso
18. Clip/adattatore per scarpa della fotocamera
28 GO CAM WIRELESS Quick Start Guide 29
Operazione
Un caricabatterie non è incluso. La potenza erogata dal caricabatterie
deve essere compresa tra 5 V/32 mA (0,16 W) minimo richiesto da
questo dispositivo e 5 V/400 mA (2 W) massimo, per ottenere la
massima veloci-tà di carica. Questo dispositivo supporta il protocollo
di ricarica USB Power Delivery.
1. Si prega di caricare il trasmettitore e il ricevitore prima dell'uso.
2. Premere l'interruttore di accensione del ricevitore e l'interruttore di
accensione del trasmettitore per 2 se-condi per accendere.
R
eceiver
Transmitt
ers
3. Un LED Blu solido indica che la connessione wireless tra ricevitore e
trasmettitore è riuscita.
4. Fissare il trasmettitore alla camicia, mag lietta o giacca.
5. Assicurarsi che il microfono integrato non sia coperto o bloccato. Per
prestazioni ottimali di registrazione audio, si consiglia una distanza di
15-20 cm tra la bocca dell'utente e il microfono del trasmettitore.
6. Se l'audio è troppo forte, causando distorsioni – ridurre il guadagno
del microfono.
7. In caso di ambiente rumoroso – utilizzare la funzione di riduzione
del rumore.
8. Assicurarsi di vericare il guadagno del microfono e le impostazioni di
riduzione del rumore prima di in-iziare la registrazione.
Connessione a uno Smartphone
per registrazione video
1. Smartphone Android: Utilizza il cavo audio uciale Type-C a Type-C per
collegare lo smartphone al ricevitore per la registrazione audio. Assicurati
che la funzione OTG e l'opzione "Dispositivo Esterno" siano abilitate nelle
impostazioni del telefono. Ad esempio, i telefoni OPPO e VIVO devono
abilitare la funzione "OTG", e i telefoni OPPO devono anche abilitare
l'opzione "Dispositivo Esterno". I telefoni Huawei, Xiaomi, Samsung e altri
di solito sono plug-and-play e non richiedono impostazioni aggiuntive.
(Come mostrato nell'immagine.)
2. iPhone 14 e modelli precedenti: Usa un cavo audio da 3 sezioni da 3,5 mm
per collegare alla porta di uscita di registrazione del ricevitore, inserisci il
connettore a 4 sezioni (con un'icona di telefono) in un adattatore certicato
Lightning e poi collega l'adattatore alla porta di ricarica del telefono.
Assicurati che il connettore audio sia inserito correttamente e controlla la
connessione del cavo audio. (Come mostrato nell'immagine.)
3. iPhone 15 e modelli successivi (incluso l'iPhone 15): Supporta i seguenti
due metodi di connessione:
A. Usa un cavo audio da 3 sezioni da 3,5 mm per collegare alla porta di
uscita di registrazione del ricevitore, inserisci il connettore a 4 sezioni
(con un'icona di telefono) in un adattatore certicato da 3,5 mm
femmina a Type-C e poi collega l'adattatore alla porta di ricarica del
telefono. Assicurati che il connettore audio sia inserito correttamente
e controlla la connessione del cavo audio. (Come mostrato
nell'immagine.)
B. Usa il cavo uciale Type-C a Type-C per collegare direttamente
l'iPhone 15 (o iPhone 15 e modelli successivi) al ricevitore per la
registrazione audio.
Android
OTG
Lighting
Receiver RX
4-segment audio jack
Lighting for
Apple iPhone
14 or earlier
versions with
Lightning
3-segment audio jack
Receiver
Transmitter
Connessione a una Fotocamera
DSLR per registrazione video
1. Fissare il Ricevitore alla scarpa della fotocamera DSLR.
2. Collegare l'uscita audio del ricevitore all'ingresso audio della fotocamera,
utilizzando un cavo audio TRS a TRS da 3,5 mm.
3. Assicurarsi che entrambi i connettori da 3,5 mm siano completamente
inseriti per garantire un contatto corretto.
4. Accendere la fotocamera e iniziare la registrazione video.
Receiver
TRS 3.5 mm
TRS 3.5 mm
audio cable
Connessione a cue per
monitoraggio in tempo reale
1. Si prega di caricare il trasmettitore e il ricevitore prima dell'uso.
2. Premere l'interruttore di accensione del ricevitore e l'interruttore di
accensione del trasmettitore per 2 se-condi per accendere. Un LED Blu solido
indica che la connessione wireless tra ricevitore e trasmettitore è rius-cita.
3. Inserire le cue USB C nella porta USB Tipo C del ricevitore per monitorare in
tempo reale la sessione di registrazione.
Receiver
Earphones
Type C
30 GO CAM WIRELESS Quick Start Guide 31
(NL)
GO CAM WIRELESS
• Krijg audio van professionele kwaliteit met ons draadloze microfoonsysteem, ontworpen om naadloos samen te wer-ken met uw videorecorders, DSLR's,
mobiele apparaten, tablets en audiorecorders.
• Perfect voor interviews, podcasts, live-streaming, vlogs, virtuele klaslokalen, voice-overs en videoproductie.
• Ervaar superieure prestaties met de 30 m (100 ft) draadloze vrijheid van de Go Cam Wireless.
• Houd uw handen vrij met onze compacte zender, die is voorzien van een handige klem voor uw shirt en een gemakkelijke aan/uit-schakelaar.
• Leg helder geluid vast met gemak met onze geïntegreerde omnidirectionele microfoon.
• Elimineer ongewenste achtergrondgeluiden met de geavanceerde 3-niveaus ruisonderdrukkingsschakelaar van onze ontvanger.
• Stel de gain eenvoudig in met onze gebruiksvriendelijke 3-niveaus schakelaar die opties biedt van -24 dB, -12 dB en 0 dB.
• Monteer onze speciaal ontworpen ontvanger op uw camera met behulp van de ingebouwde cameras-hoedadapter.
• Geniet van realtime monitoring met de meegeleverde oortelefoons.
• Sluit een externe microfoon aan op de zender met de 3,5 mm (1/8") connector.
• Blijf opgeladen en beschermd onderweg met tot 8 uur gebruikstijd en onze cameraverbindingskabel, USB-oplaadkabels, windschermen van bont en
beschermende draagtas.
Meegeleverde Accessoires
• Windscherm van bont x 1
• USB-oplaadkabel x 1
• TRS naar TRS audiokabel voor Camera x 1
• TRRS naar TRS audiokabel voor Telefoons x 1
• Type C naar Type C audiokabel voor Telefoons x 1
• Type C oortelefoons x 1
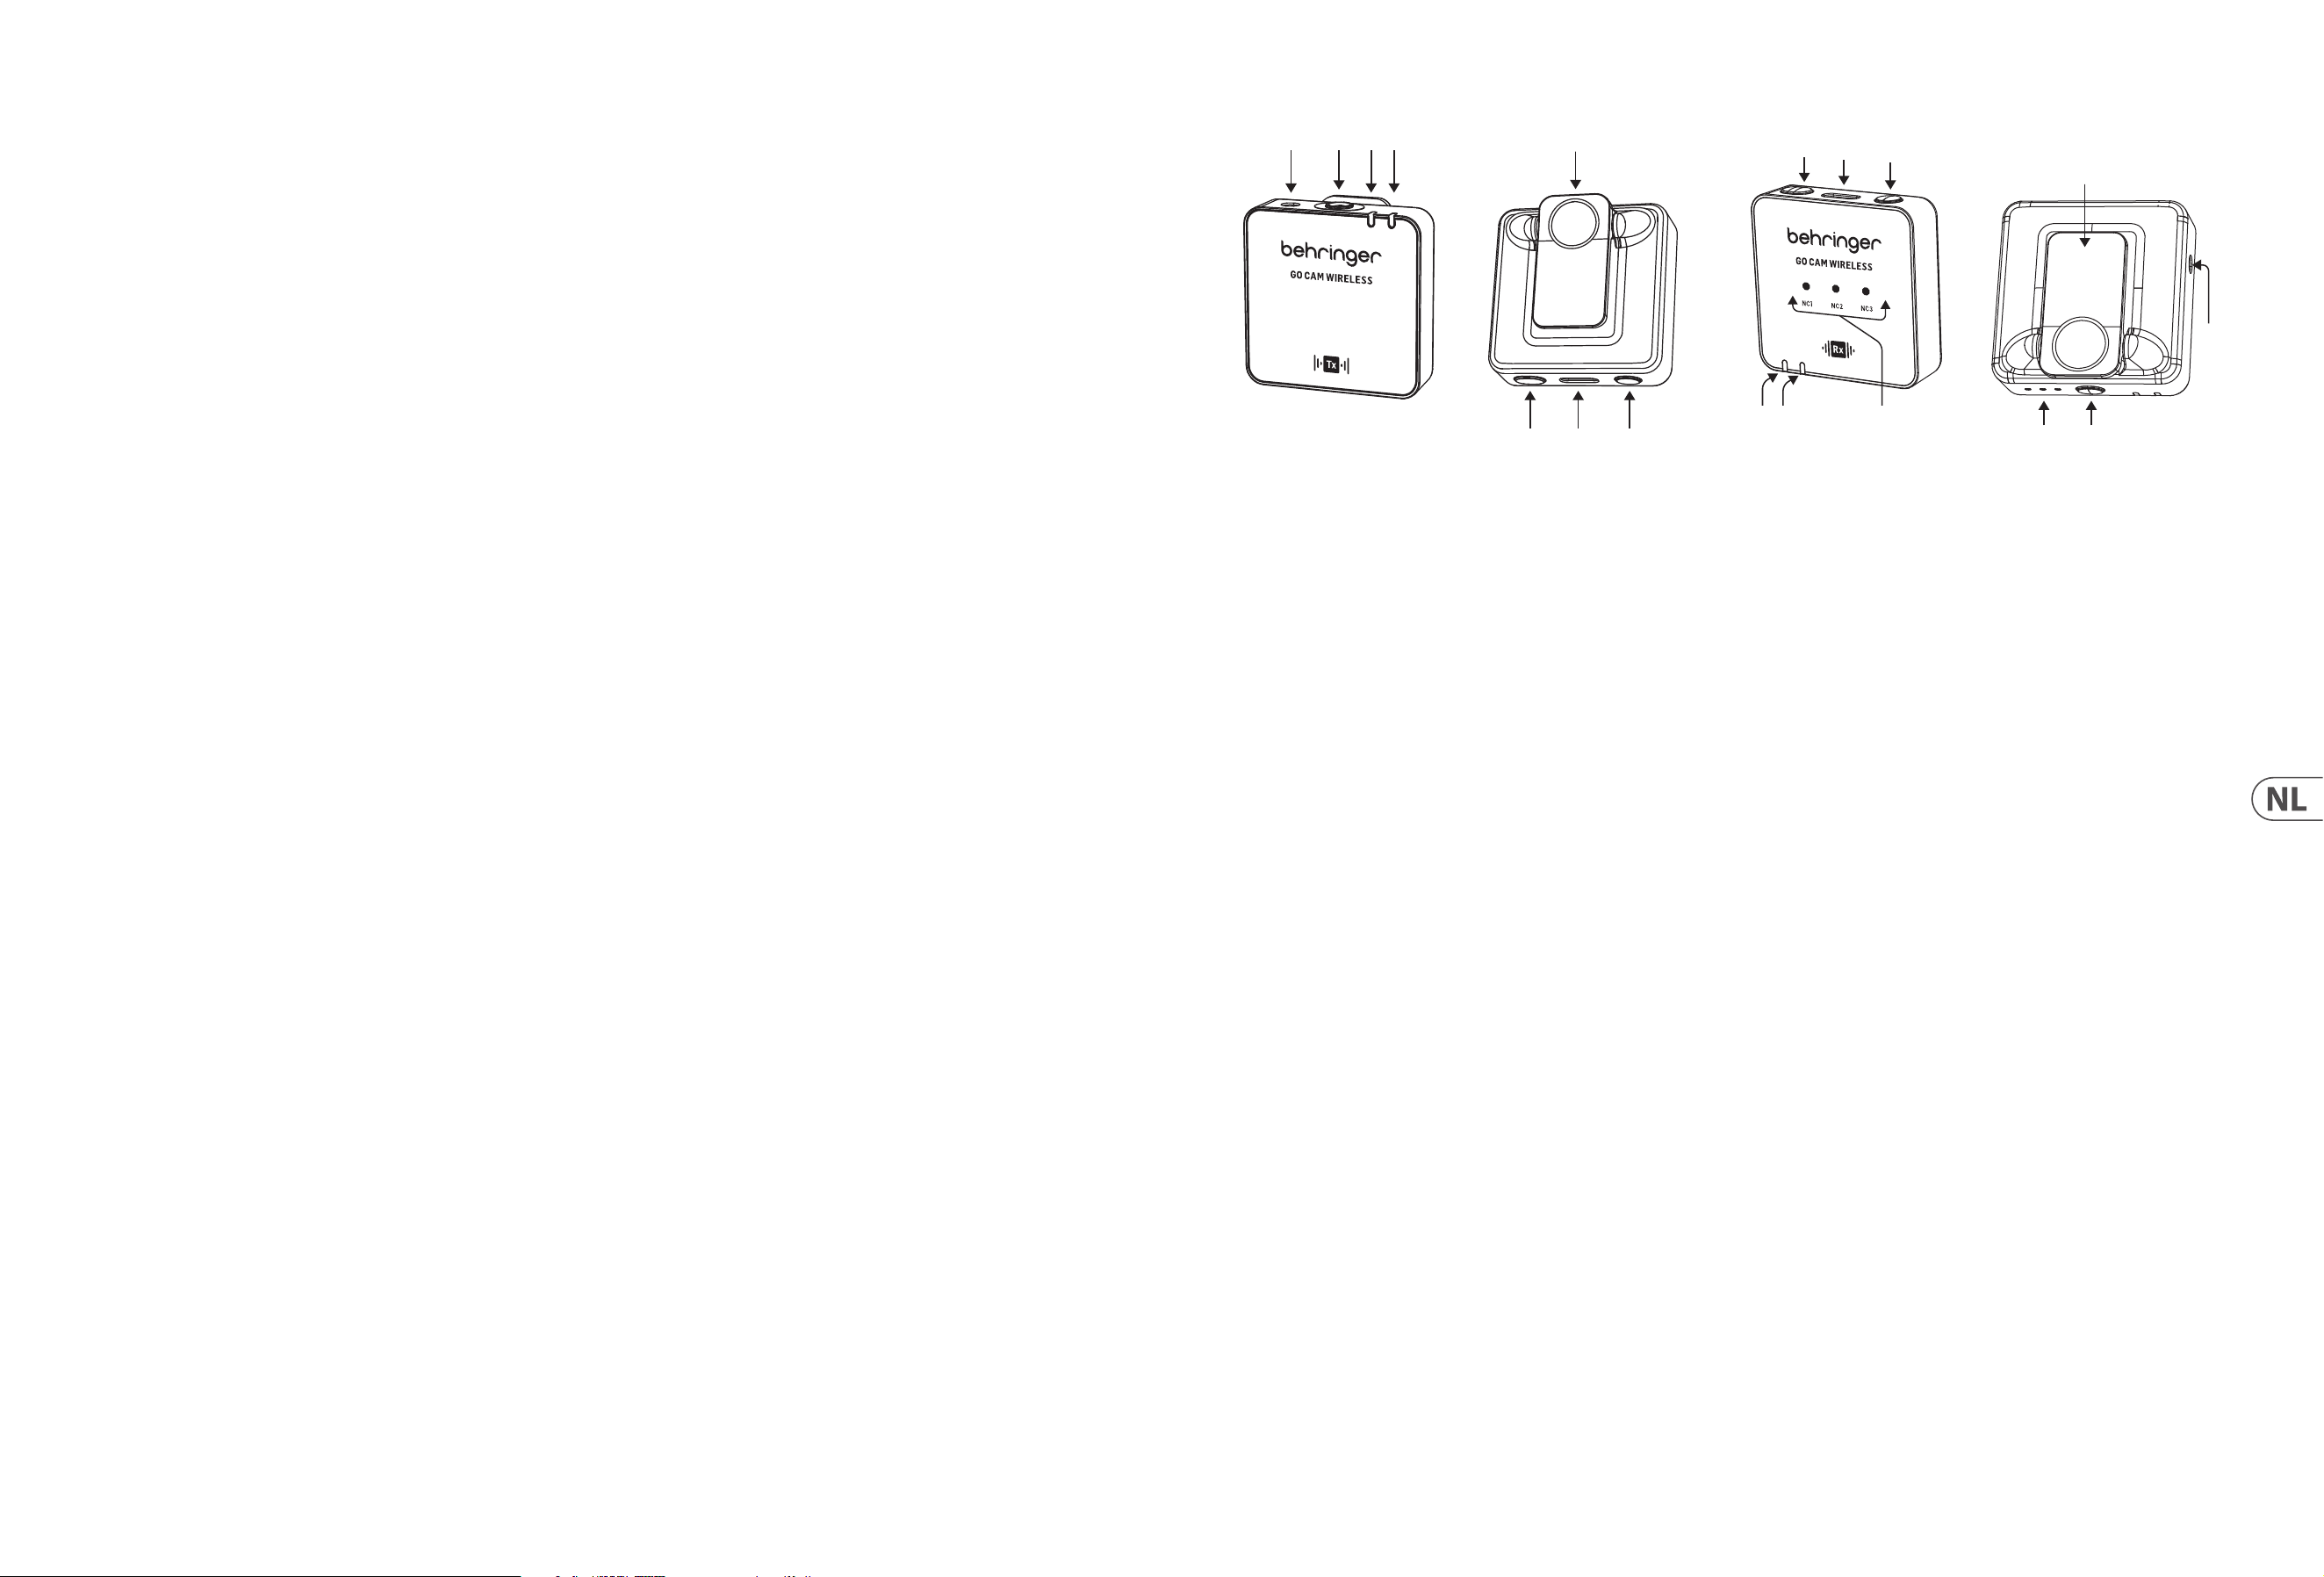
MICROFOON CONTROLES
(6)
(2)(1)
(3)(4)
(5)
(7) (8)
1. Externe microfooningang, 3,5 mm (1/8")
2. Ingebouwde microfoon
3. Draadloze status LED - blauwe LED = succesvolle verbinding met ontvanger,
knipperend blauw = niet ver-bonden
4. Batterijstatus LED - rode LED = opladen, knipperend rood = lage batterij
5. Shirtklem
6. Aan/Uit - 2 seconden indrukken om aan te zetten, 3 seconden indrukken
om uit te zetten
7. USB Type C oplaadpoort
8. Dempen Aan/Uit - dubbelklik = aan, een keer drukken = uit
ONTVANGER CONTROLES
(18)
(10)
(9)
(16)
(15)
(17)
(11)(12)
(14)
(13)
9. Gain LED's - III = 0 dB, II = -12 dB, I = -24 dB
10. Gain schakelaar - een keer drukken om een ander gain-niveau te selecteren
11. Batterijstatus LED - rode LED = opladen, knipperend rood = lage batterij
12. Draadloze status LED - blauwe LED = succesvolle verbinding met ontvanger,
knipperend blauw = niet ver-bonden
13. Ruisonderdrukkings LED's - mild = NC1, medium = NC2, sterk = NC3,
Donker = Geen NC
14. Audio-uitgang, 3,5 mm (1/8")
15. Aan/Uit - 2 seconden indrukken om aan te zetten, 3 seconden indrukken
om uit te zetten
16. USB Type C oplaadpoort en oortelefoons uitgang voor realtime monitoring
17. Ruisonderdrukkingsschakelaar - een keer drukken om een ander
niveau te selecteren
18. Klem/camerashoe-adapter
32 GO CAM WIRELESS Quick Start Guide 33
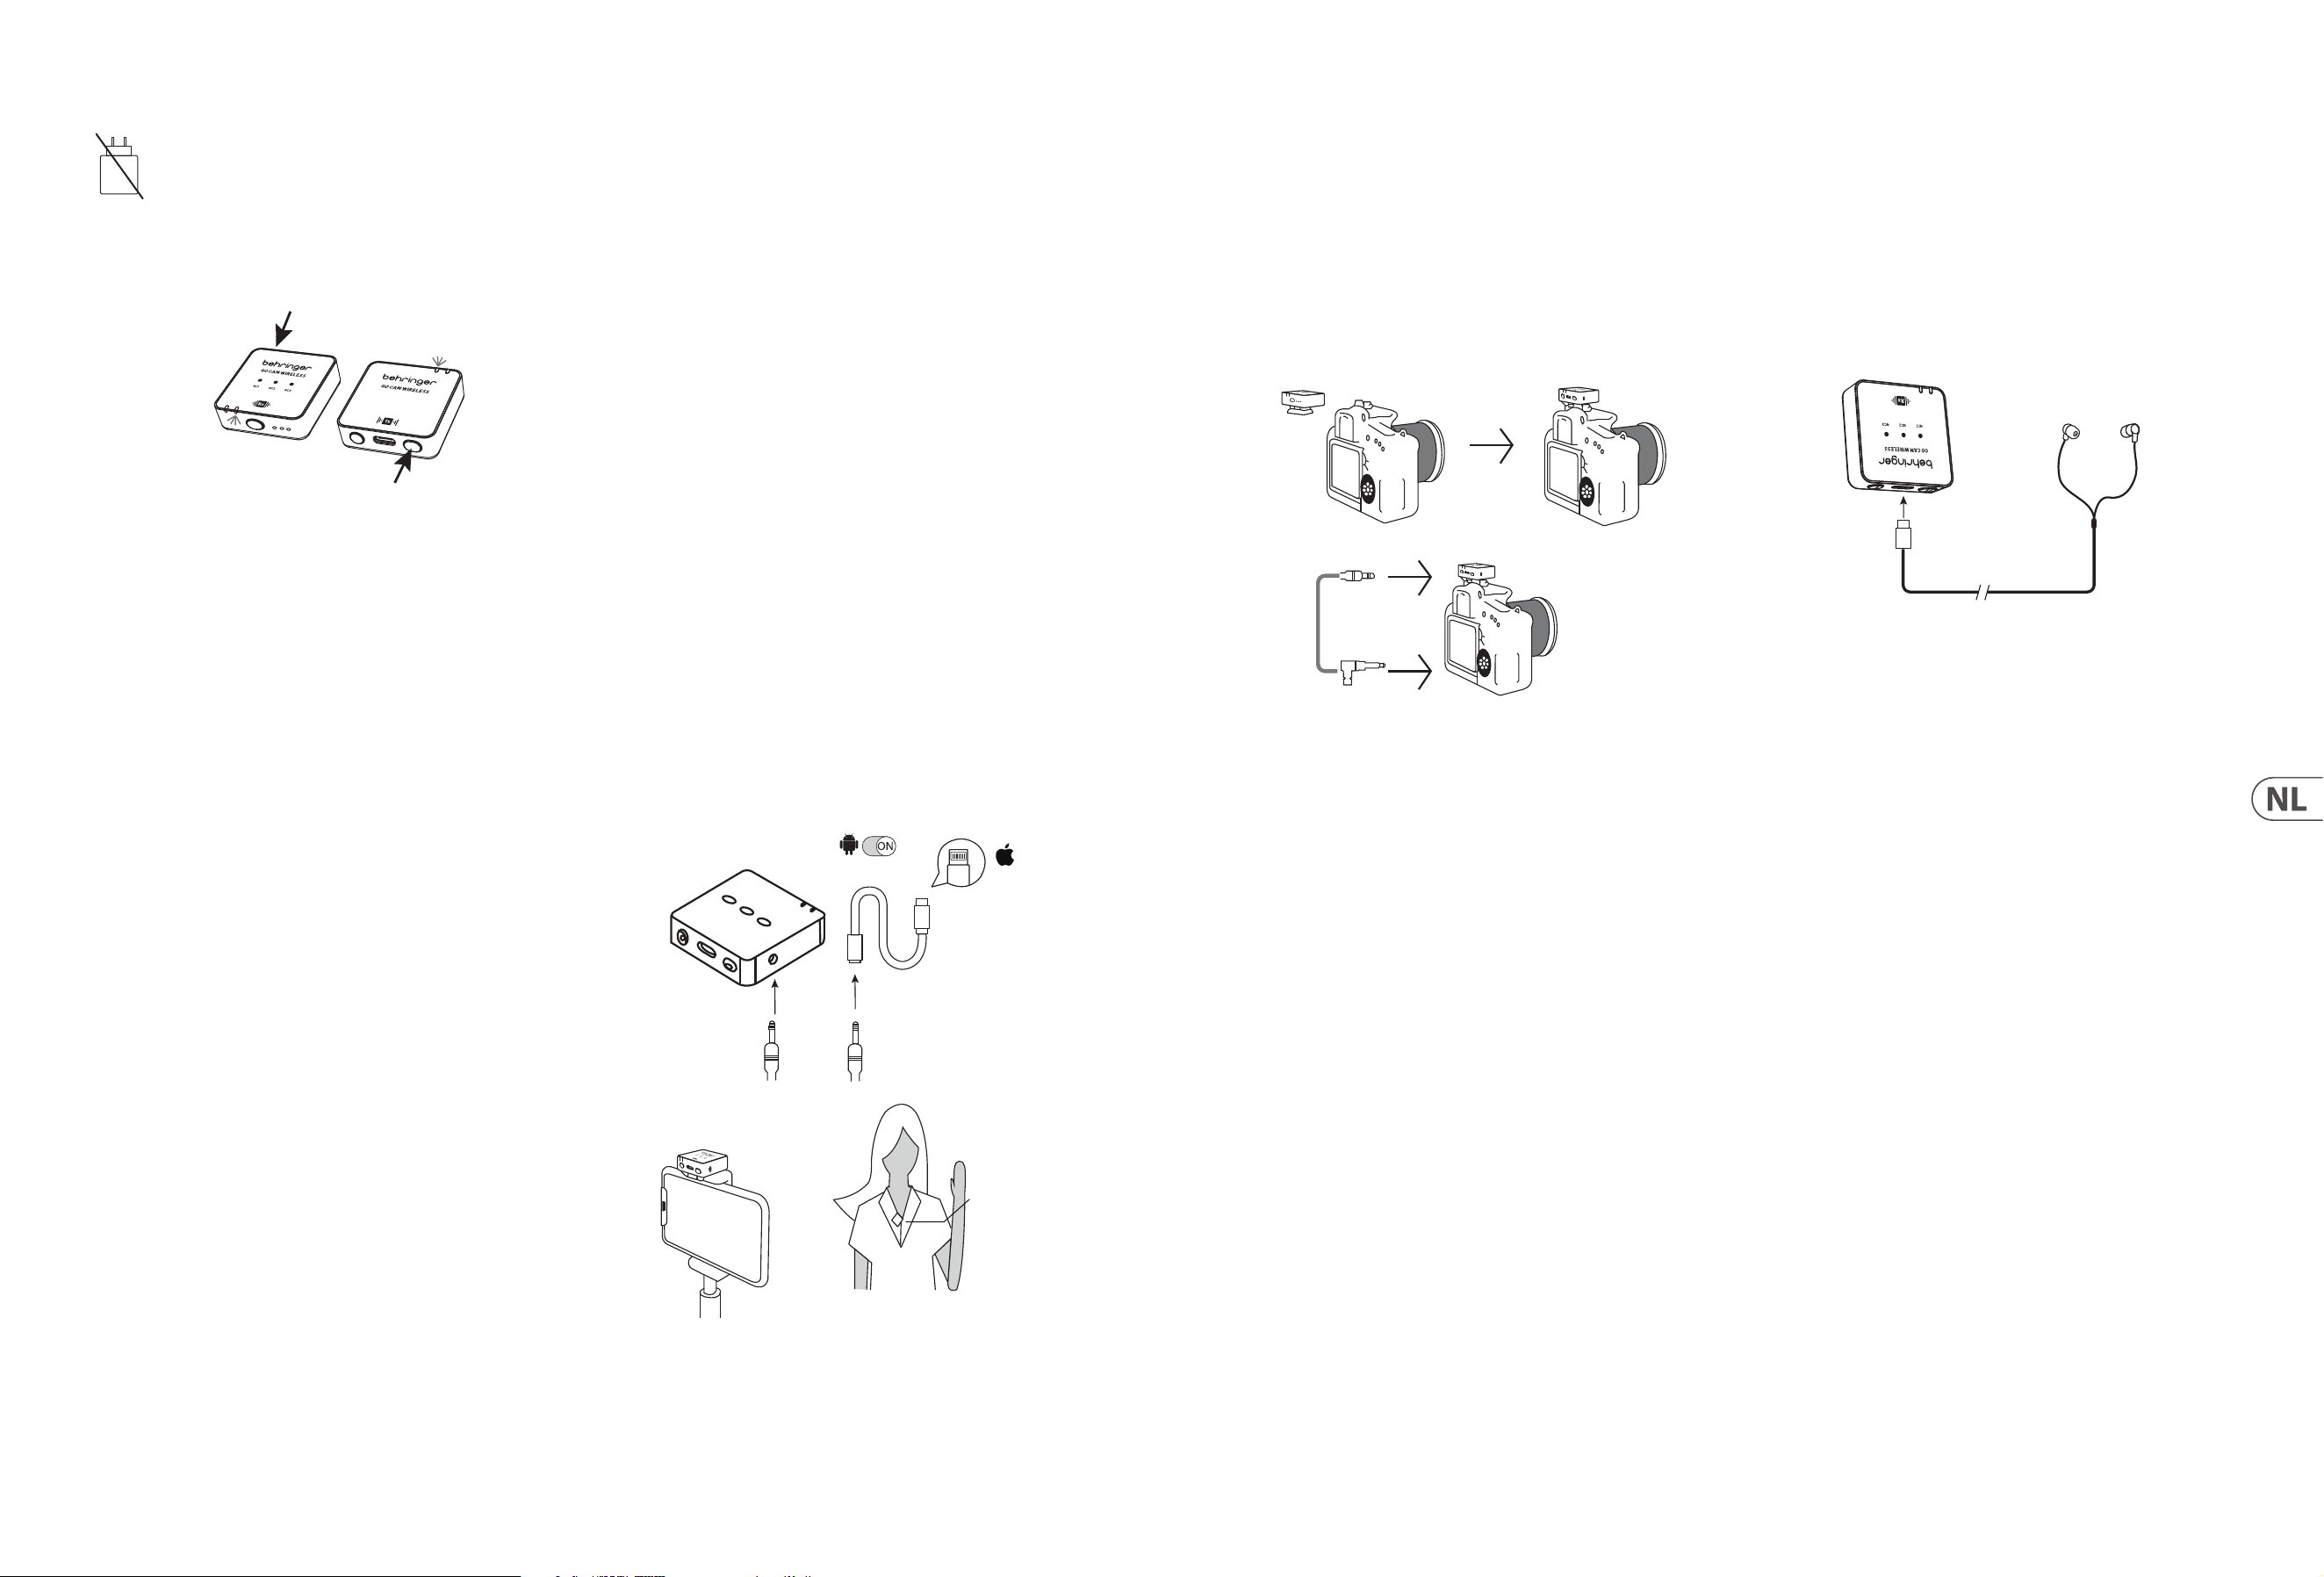
Bediening
Een oplader is niet inbegrepen. Het door de oplader geleverde
vermogen moet tussen 5 V/32 mA (0,16 W) mi-nimaal en 5 V/400 mA
(2 W) maximaal liggen om de maximale laadsnelheid te bereiken. Dit
apparaat onder-steunt het USB Power Delivery oplaadprotocol.
1. Laad de zender en ontvanger op voor gebruik.
2. Druk de aan/uit-schakelaar van de ontvanger en de aan/uit-schakelaar van
de zender 2 seconden in om aan te zetten.
R
eceiver
Transmitt
ers
3. Een vaste blauwe LED geeft aan dat de draadloze verbinding tussen de
ontvanger en de zender succesvol is.
4. Klem de zender aan uw shirt, T-shirt of jas.
5. Zorg ervoor dat de ingebouwde microfoon niet bedekt of geblokkeerd is.
Voor optimale audio-opnameprestaties raden we aan dat de afstand tussen
de mond van de gebruiker en de microfoon van de zender 15 tot 20 cm is.
6. Als het geluid te hard is en vervorming veroorzaakt – verlaag
de microfoongain.
7. Als de omgeving luidruchtig is – gebruik de ruisonderdrukkingsfunctie.
8. Zorg ervoor dat u de microfoongain en de ruisonderdrukkingsinstellingen
controleert voordat u met opne-men begint.
Verbinden met een Smartphone
voor video-opname
1. Android Smartphones: Gebruik de ociële Type-C naar Type-C audiokabel
om de smartphone aan de ontvanger te verbinden voor audiorecording. Zorg
ervoor dat de OTG-functie en de optie "Extern Apparaat" zijn ingeschakeld
in de telefooninstellingen. Bijvoorbeeld, OPPO- en VIVO-telefoons moeten
de OTG-functie inschakelen, en OPPO-telefoons moeten ook de optie "Extern
Apparaat" inschakelen. Huawei-, Xiaomi-, Samsung- en andere telefoons
werken meestal plug-and-play, zonder aanvullende instellingen. (Zoals
weergegeven in de afbeelding.)
2. iPhone 14 en eerdere modellen: Gebruik een 3-delige 3,5 mm
audiokabel om aan de opname-uitgang van de ontvanger te koppelen,
steek de 4-delige audio-aansluiting (met een telefoonpictogram) in een
Lightning-gecerticeerde adapter, en sluit de adapter vervolgens aan op de
oplaadpoort van de telefoon. Zorg ervoor dat de audio-aansluiting correct
is ingevoerd en controleer de audio-kabelverbinding. (Zoals weergegeven
in de afbeelding.)
3. iPhone 15 en latere modellen (inclusief iPhone 15): Ondersteunt de
volgende twee verbindingsmethoden:
A. Gebruik een 3-delige 3,5 mm audiokabel om aan de opname-uitgang
van de ontvanger te koppelen, steek de 4-delige audio-aansluiting
(met een telefoonpictogram) in een 3,5 mm vrouwelijke naar Type-C
gecerticeerde adapter, en sluit de adapter vervolgens aan op de
oplaadpoort van de telefoon. Zorg ervoor dat de audio-aansluiting
correct is ingevoerd en controleer de audio-kabelverbinding.
(Zoals weergegeven in de afbeelding.)
B. Gebruik de ociële Type-C naar Type-C kabel om de iPhone 15
(of iPhone 15 en latere modellen) rechtstreeks aan de ontvanger te
verbinden voor audiorecording.
Android
OTG
Lighting
Receiver RX
4-segment audio jack
Lighting for
Apple iPhone
14 or earlier
versions with
Lightning
3-segment audio jack
Receiver
Transmitter
Verbinden met een DSLR-camera
voor video-opname
1. Klem de Ontvanger in de schoenbevestiging van de DSLR-camera.
2. Verbind de audio-uitgang van de ontvanger met de audio-ingang van de
camera, met behulp van een 3,5 mm TRS naar 3,5 mm TRS audiokabel.
3. Zorg ervoor dat beide 3,5 mm stekkers volledig zijn ingeplugd om een goede
contact te garanderen.
4. Zet de camera aan en begin met video-opname.
Receiver
TRS 3.5 mm
TRS 3.5 mm
audio cable
Verbinden met oortelefoons voor
realtime monitoring
1. Laad de zender en ontvanger op voor gebruik.
2. Druk de aan/uit-schakelaar van de ontvanger en de aan/uit-schakelaar van
de zender 2 seconden in om aan te zetten. Een vaste blauwe LED geeft aan
dat de draadloze verbinding tussen de ontvanger en de zender suc-cesvol is.
3. Steek USB C oortelefoons in de USB Type C-poort van de ontvanger voor
realtime monitoring van de opna-mesessie.
Receiver
Earphones
Type C
34 GO CAM WIRELESS Quick Start Guide 35
(SE)
GO CAM WIRELESS
• Få ljud av professionell kvalitet med vårt trådlösa mikrofonsystem, designat för att fungera sömlöst med dina video-kameror, DSLR:er, mobila enheter,
surfplattor och ljudinspelare.
• Perfekt för intervjuer, podcasts, live-streaming, vloggar, virtuella klassrum, voice-overs och videoproduktion.
• Upplev överlägsen prestanda med Go Cam Wireless’s 30 m (100 ft) trådlösa frihet.
• Håll händerna fria med vår kompakta sändare, som har en praktisk skjortklämma och en lättanvänd av/på-knapp.
• Fånga klart ljud med lätthet med vår integrerade rundstrålande mikrofon.
• Eliminera oönskat bakgrundsljud med vår mottagares toppmoderna 3-nivåers brusreduceringsknapp.
• Justera enkelt gain med vår användarvänliga 3-nivåers knapp som erbjuder -24 dB, -12 dB och 0 dB alternativ.
• Montera vår specialdesignade mottagare på din kamera med den inbyggda kameraskoadaptern.
• Njut av realtidsövervakning med de medföljande hörlurarna.
• Anslut en extern mikrofon till sändaren med en 3,5 mm (1/8") kontakt.
• Håll dig laddad och skyddad på språng med upp till 8 timmars batteritid och vår kamerakabel, USB-laddningskablar, pälsvindskydd och skyddande bärväska.
Medföljande Tillbehör
• Pälsvindskydd x 1
• USB-laddningskabel x 1
• TRS till TRS ljudkabel för Kamera x 1
• TRRS till TRS ljudkabel för Telefoner x 1
• Typ C till Typ C ljudkabel för Telefoner x 1
• Typ C hörlurar x 1
MIKROFONKONTROLLER
(6)
(2)(1)
(3)(4)
(5)
(7) (8)
1. Extern mikrofoningång, 3,5 mm (1/8")
2. Inbyggd mikrofon
3. Trådlös status-LED - blå LED = framgångsrik anslutning till mottagaren,
blinkande blå = inte ansluten
4. Batteristatus-LED - röd LED = laddar, blinkande röd = låg batterinivå
5. Skjortklämma
6. Av/På - tryck i 2 sekunder för att slå på, tryck i 3 sekunder för att stänga av
7. USB Typ C laddningsport
8. Mute Av/På - dubbelklick = PÅ, tryck en gång = AV
MOTTAGARKONTROLLER
(18)
(10)
(9)
(16)
(15)
(17)
(11)(12)
(14)
(13)
9. Gain-LEDs - III = 0 dB, II = -12 dB, I = -24 dB
10. Gain-knapp - tryck en gång för att välja en annan gain-nivå
11. Batteristatus-LED - röd LED = laddar, blinkande röd = låg batterinivå
12. Trådlös status-LED - blå LED = framgångsrik anslutning till mottagaren,
blinkande blå = inte ansluten
13. Brusreducerings-LEDs - mild = NC1, medium = NC2, stark = NC3,
Mörk = Ingen NC
14. Ljudutgång, 3,5 mm (1/8")
15. Av/På - tryck i 2 sekunder för att slå på, tryck i 3 sekunder för att stänga av
16. USB Typ C laddningsport och hörlursutgång för realtidsövervakning
17. Brusreduceringsknapp - tryck en gång för att välja en annan nivå
18. Klämma/kameraskoadapter
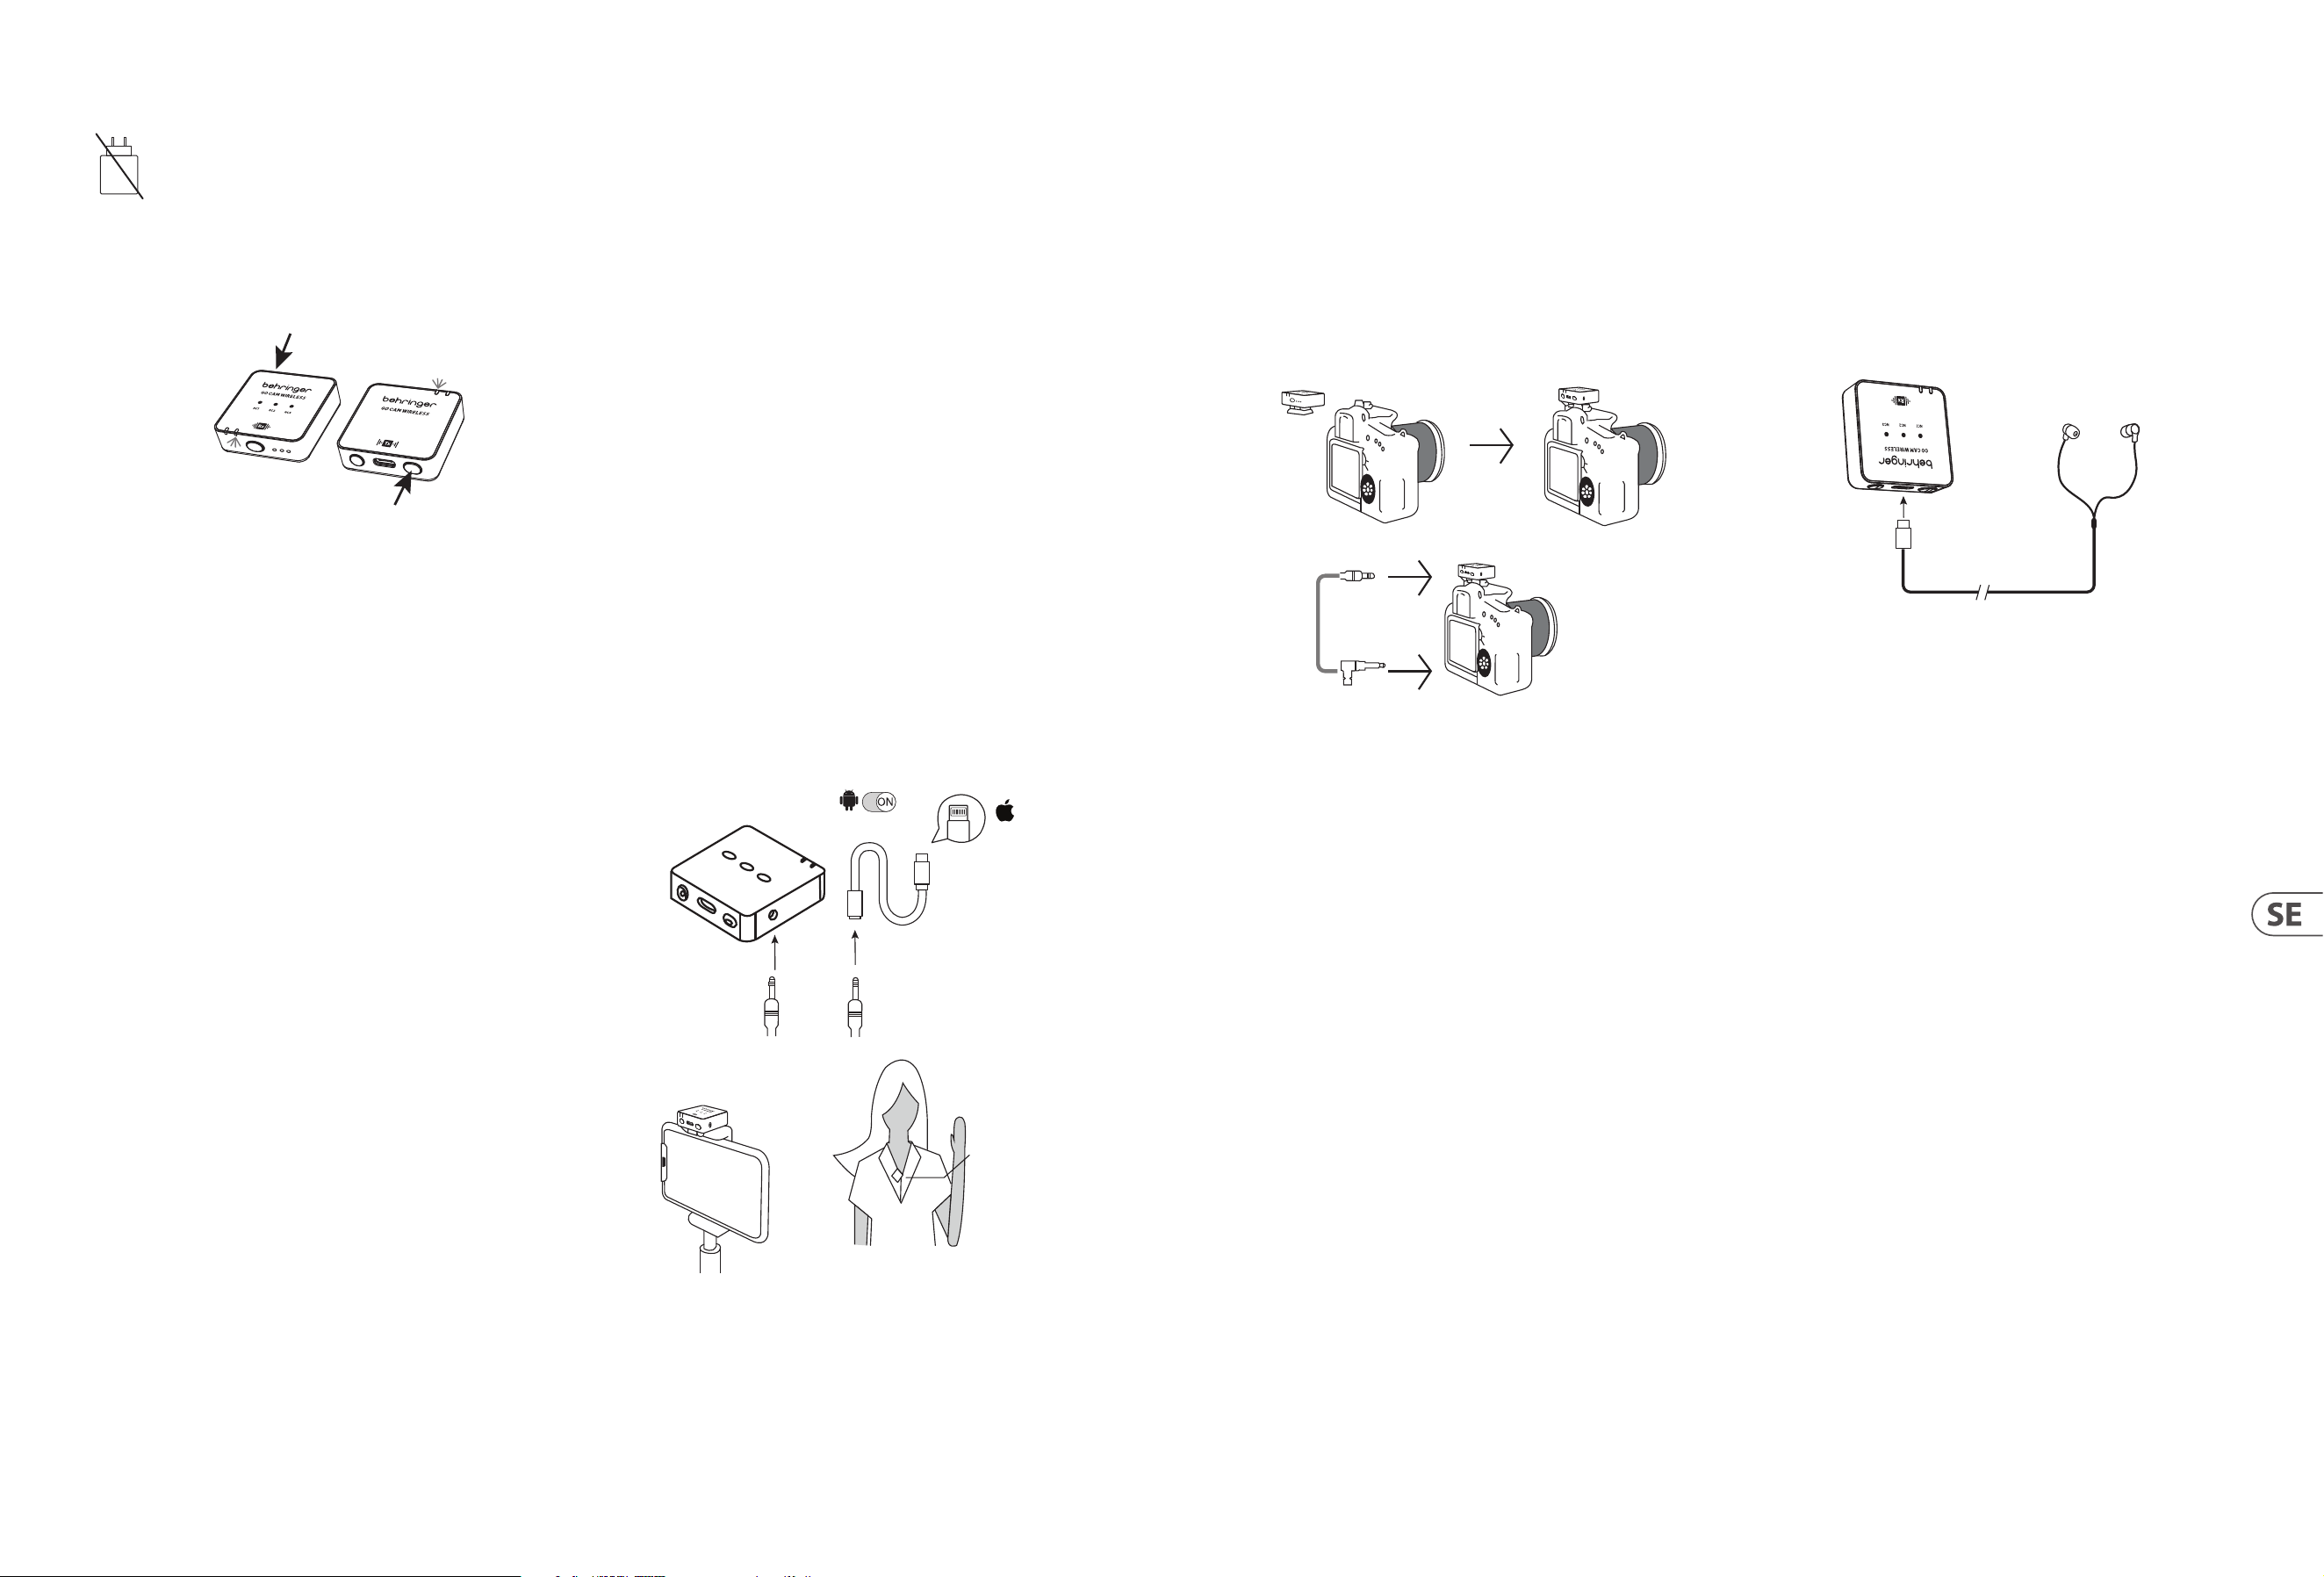
36 GO CAM WIRELESS Quick Start Guide 37
Drift
En laddare ingår inte. Eekten som laddaren levererar måste vara
mellan 5 V/32 mA (0,16 W) minimalt som krävs av denna utrustning
och 5 V/400 mA (2 W) maximalt för att uppnå maximal
laddningshastighet. Denna utrustning stödjer USB Power
Delivery laddningsprotokoll.
1. Ladda sändaren och mottagaren innan användning.
2. Tryck på mottagarens strömbrytare och sändarens strömbrytare
i 2 sekunder för att slå på.
R
eceiver
Transmitt
ers
3. En fast blå LED indikerar att den trådlösa anslutningen mellan mottagaren
och sändaren är framgångsrik.
4. Kläm fast sändaren på din skjorta, t-shirt eller jacka.
5. Se till att den inbyggda mikrofonen inte är täckt eller blockerad. För optimal
ljudinspelning rekommenderar vi ett avstånd på 15 till 20 cm mellan
användarens mun och sändarens mikrofon.
6. Om ljudet är för högt och orsakar distorsion – minska mikrofonens gain.
7. Om miljön är bullrig – använd brusreduceringsfunktionen.
8. Kontrollera mikrofonens gain och brusreduceringsinställningarna innan du
börjar din inspelning.
Ansluta till en Smartphone för
videoinspelning
1. Android Smartphones: Använd den ociella Type-C till Type-C ljudkabeln
för att ansluta smarttelefonen till mottagaren för ljudinspelning. Se
till att OTG-funktionen och alternativet "Extern Enhet" är aktiverade
i telefoninställningarna. Till exempel, OPPO- och VIVO-telefoner
behöver aktivera "OTG"-funktionen, och OPPO-telefoner måste också
aktivera alternativet "Extern Enhet". Huawei-, Xiaomi-, Samsung- och
andra telefoner är vanligtvis plug-and-play och kräver inga ytterligare
inställningar. (Som visas på bilden.)
2. iPhone 14 och tidigare modeller: Använd en 3-sektions 3,5 mm ljudkabel
för att ansluta till inspelningsutgången på mottagaren, sätt in den
4-sektions ljudkontakten (med en telefonikon) i en Lightning-certierad
adapter och anslut sedan adaptern till telefonens laddningsport. Kontrollera
att ljudkontakten är korrekt isatt och kontrollera anslutningen av ljudkabeln.
(Som visas på bilden.)
3. iPhone 15 och senare modeller (inklusive iPhone 15): Stöder följande
två anslutningsmetoder:
A. Använd en 3-sektions 3,5 mm ljudkabel för att ansluta till
inspelningsutgången på mottagaren, sätt in den 4-sektions
ljudkontakten (med en telefonikon) i en 3,5 mm hona till Type-C
certierad adapter och anslut sedan adaptern till telefonens
laddningsport. Kontrollera att ljudkontakten är korrekt isatt och
kontrollera anslutningen av ljudkabeln. (Som visas på bilden.)
B. Använd den ociella Type-C till Type-C kabeln för att direkt ansluta
iPhone 15 (eller iPhone 15 och senare modeller) till mottagaren
för ljudinspelning.
Android
OTG
Lighting
Receiver RX
4-segment audio jack
Lighting for
Apple iPhone
14 or earlier
versions with
Lightning
3-segment audio jack
Receiver
Transmitter
Ansluta till en DSLR Kamera för
videoinspelning
1. Fäst Mottagaren i sko-fästet på DSLR-kameran.
2. Anslut ljudutgången från mottagaren till ljudingången på kameran
med hjälp av en 3,5 mm TRS till 3,5 mm TRS ljudkabel.
3. Se till att båda 3,5 mm kontakterna är helt isatta för att säkerställa
korrekt kontakt.
4. Slå på kameran och börja videoinspelning.
Receiver
TRS 3.5 mm
TRS 3.5 mm
audio cable
Ansluta till hörlurar för
realtidsövervakning
1. Ladda sändaren och mottagaren innan användning.
2. Tryck på mottagarens och sändarens strömbrytare i 2 sekunder för att slå på.
En fast blå LED indikerar att den trådlösa anslutningen mellan mottagaren
och sändaren är framgångsrik.
3. Sätt in USB C-hörlurar i USB Typ C-porten på mottagaren för
realtidsövervakning av inspelningssessionen.
Receiver
Earphones
Type C
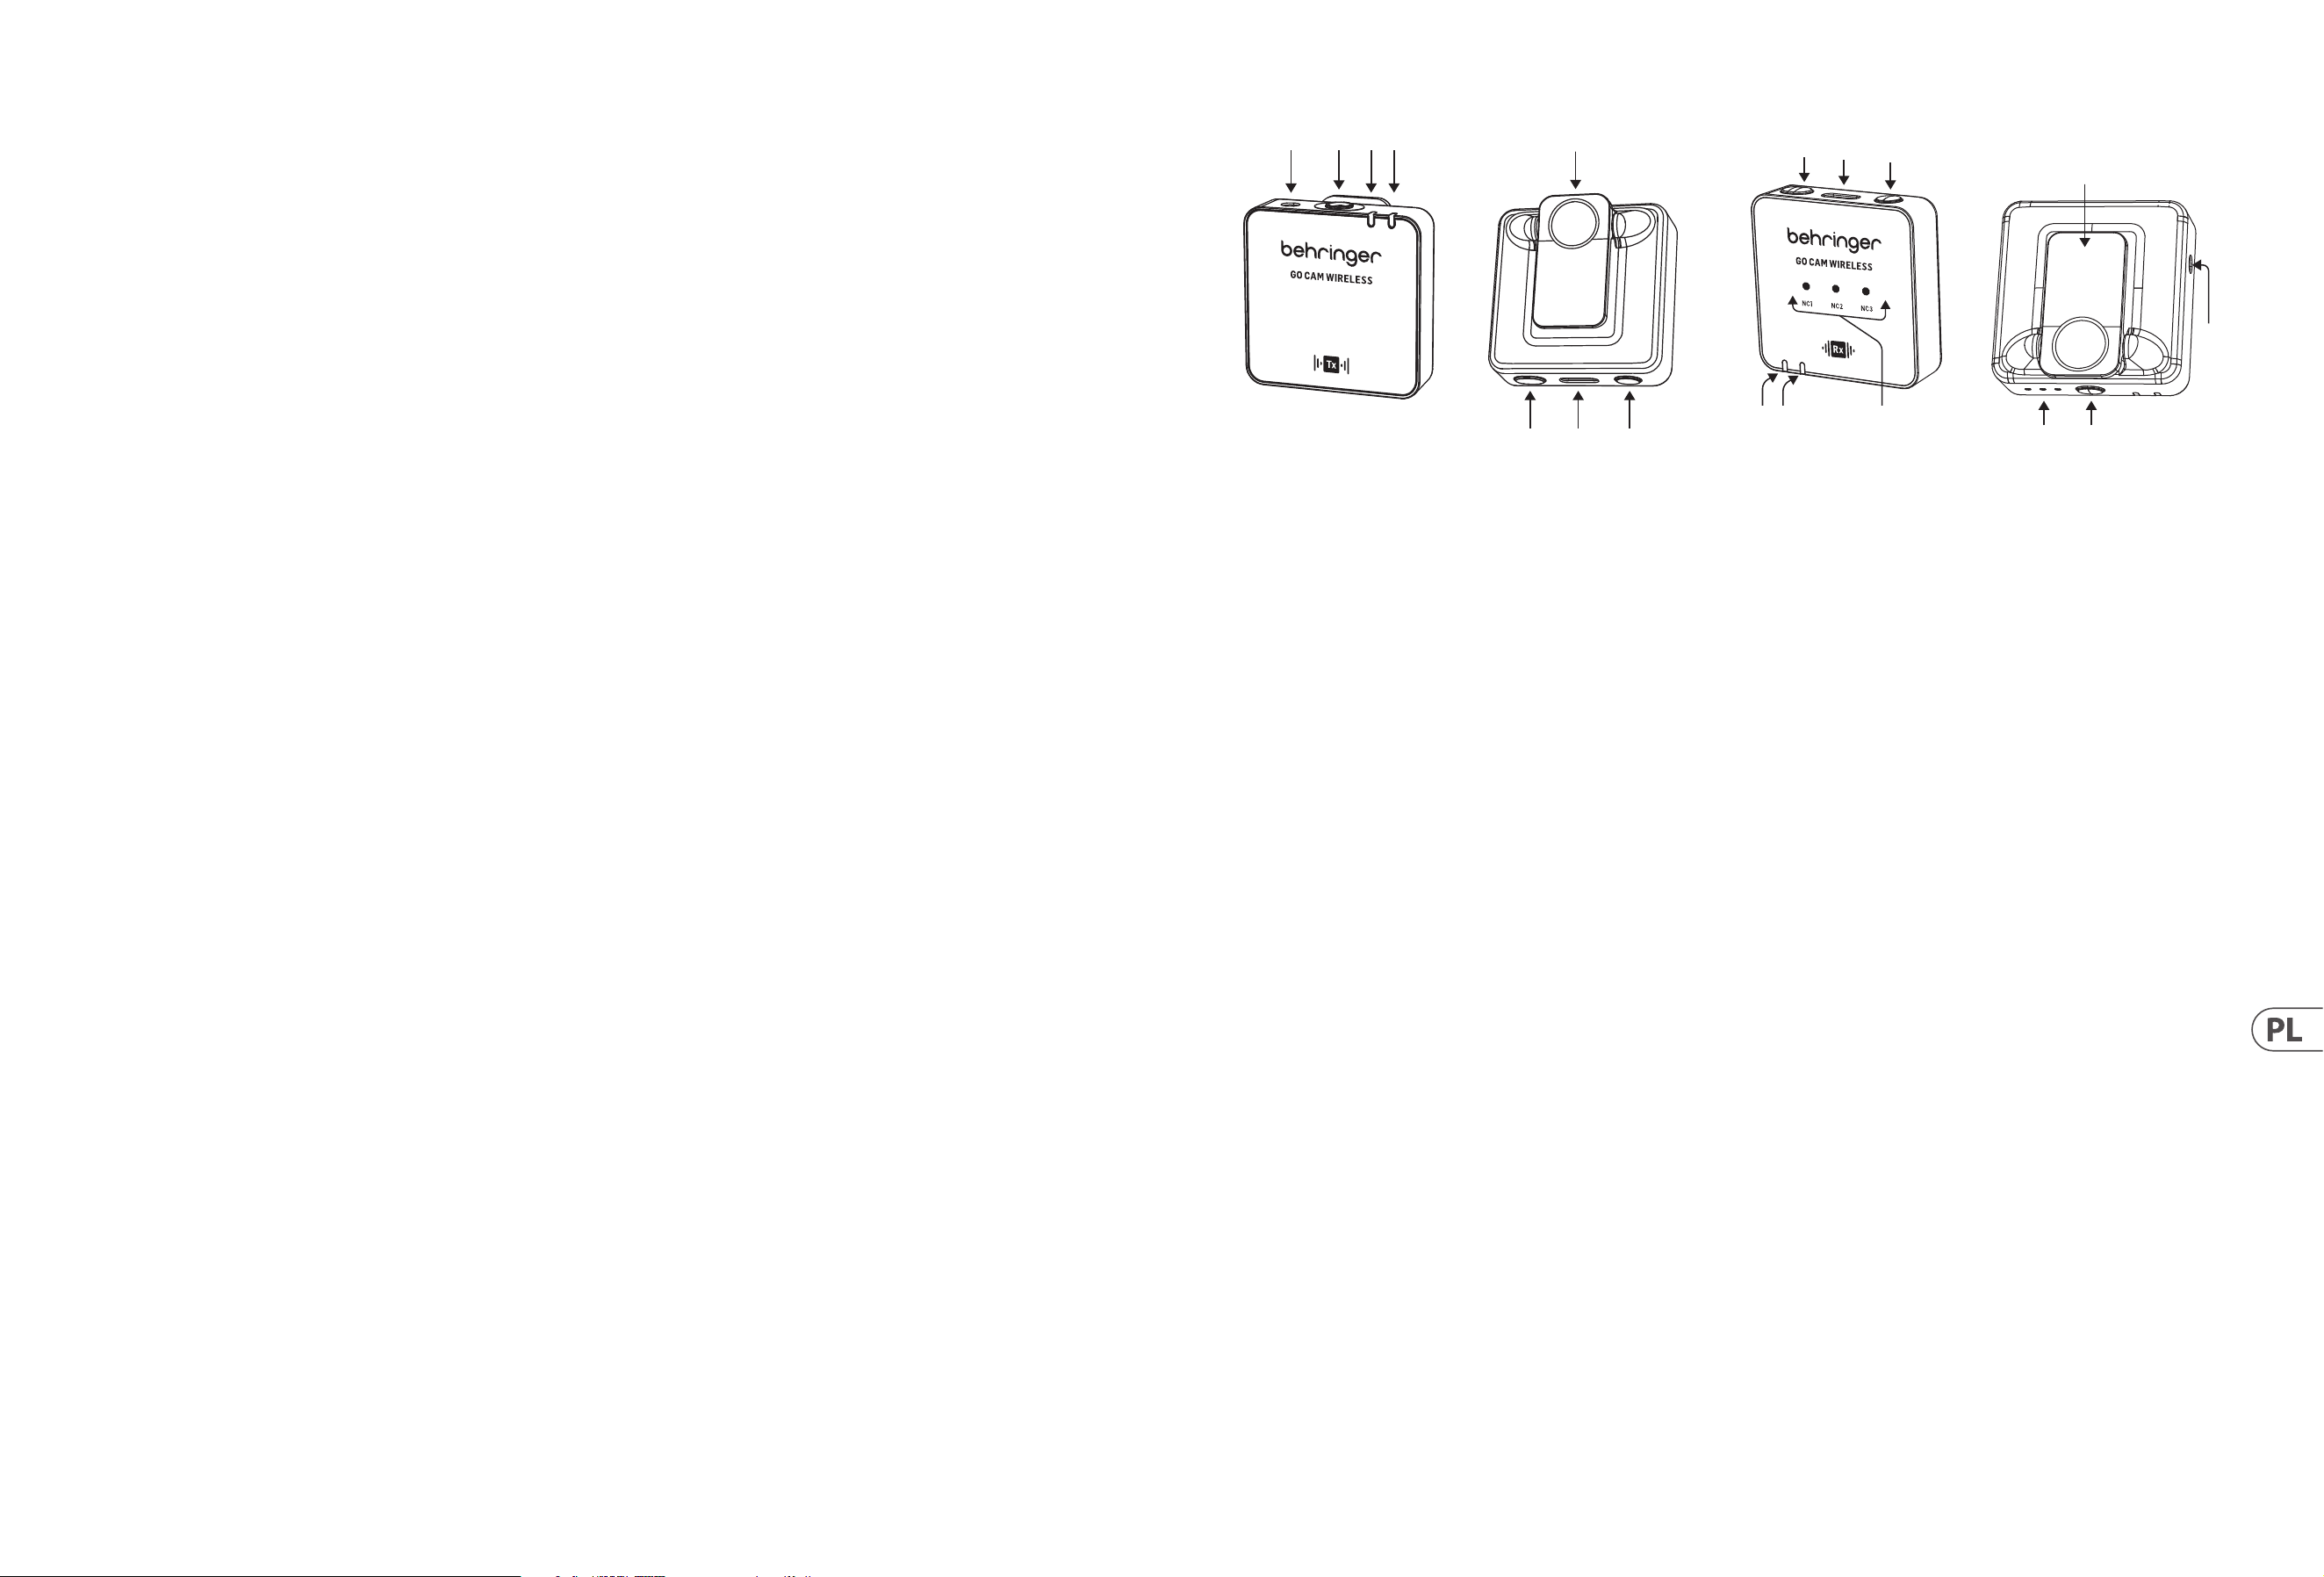
38 GO CAM WIRELESS Quick Start Guide 39
(PL)
GO CAM WIRELESS
• Uzyskaj dźwięk o jakości profesjonalnej dzięki naszemu bezprzewodowemu systemowi mikrofonów, zaprojek-towanemu do współpracy z rejestratorami wideo,
lustrzankami cyfrowymi, urządzeniami mobilnymi, tabletami i rejestra-torami dźwięku.
• Idealny do wywiadów, podcastów, transmisji na żywo, vlogów, wirtualnych klas, nagrań głosowych i produkcji wideo.
• Doświadcz doskonałej wydajności dzięki bezprzewodowej swobodzie 30 m (100 ft) Go Cam Wireless.
• Trzymaj ręce wolne dzięki naszemu kompaktowemu nadajnikowi, wyposażonemu w wygodny klips do koszuli i łatwy w użyciu przełącznik włącz/wyłącz.
• Łatwo przechwytuj czysty dźwięk za pomocą naszego zintegrowanego mikrofonu wielokierunkowego.
• Eliminuj niepożądane hałasy w tle dzięki naszemu zaawansowanemu przełącznikowi redukcji szumów o 3 poziomach.
• Łatwo reguluj wzmocnienie za pomocą naszego przyjaznego użytkownikowi przełącznika o 3 poziomach, który oferuje opcje -24 dB, -12 dB i 0 dB.
• Zamontuj nasz specjalnie zaprojektowany odbiornik na swojej kamerze za pomocą wbudowanego adaptera do stopki kamery.
• Ciesz się monitorowaniem w czasie rzeczywistym za pomocą dołączonych słuchawek.
• Podłącz zewnętrzny mikrofon do nadajnika za pomocą złącza 3,5 mm (1/8”).
• Bądź naładowany i chroniony w podróży z czasem pracy do 8 godzin i naszym kablem połączeniowym do ka-mery, kablami do ładowania USB, osłonami
przeciwwiatrowymi z futra i ochronnym etui do przenoszenia.
Dostarczone Akcesoria
• Osłona przeciwwiatrowa z futra x 1
• Kabel do ładowania USB x 1
• Kabel audio TRS do TRS do Kamery x 1
• Kabel audio TRRS do TRS do Telefonów x 1
• Kabel audio Typ C do Typ C do Telefonów x 1
• Słuchawki Typ C x 1
KONTROLA MIKROFONU
(6)
(2)(1)
(3)(4)
(5)
(7) (8)
1. Wejście mikrofonu zewnętrznego, 3,5 mm (1/8")
2. Wbudowany mikrofon
3. Dioda LED stanu bezprzewodowego - niebieska dioda LED = udane
połączenie z odbiornikiem, migająca niebieska = brak połączenia
4. Dioda LED stanu baterii - czerwona dioda LED = ładowanie, migająca
czerwona = niski poziom naładowa-nia baterii
5. Klips do koszuli
6. Włącz/Wyłącz - naciśnij przez 2 sekundy, aby włączyć, naciśnij przez 3
sekundy, aby wyłączyć
7. Port ładowania USB Typ C
8. Wyciszanie Włącz/Wyłącz - podwójne kliknięcie = włączone, naciśnij
raz = wyłączone
KONTROLA ODBIORNIKA
(18)
(10)
(9)
(16)
(15)
(17)
(11)(12)
(14)
(13)
9. Dioda LED wzmocnienia - III = 0 dB, II = -12 dB, I = -24 dB
10. Przełącznik wzmocnienia - naciśnij raz, aby wybrać inny
poziom wzmocnienia
11. Dioda LED stanu baterii - czerwona dioda LED = ładowanie, migająca
czerwona = niski poziom nałado-wania baterii
12. Dioda LED stanu bezprzewodowego - niebieska dioda LED = udane
połączenie z odbiornikiem, migająca niebieska = brak połączenia
13. Dioda LED redukcji szumów - łagodna = NC1, średnia = NC2, silna = NC3,
Ciemno = Brak NC
14. Wyjście audio, 3,5 mm (1/8")
15. Włącz/Wyłącz - naciśnij przez 2 sekundy, aby włączyć, naciśnij przez
3 sekundy, aby wyłączyć
16. Port ładowania USB Typ C i wyjście słuchawek do monitorowania
w czasie rzeczywistym
17. Przełącznik redukcji szumów - naciśnij raz, aby wybrać inny poziom
18. Klips/adapter do stopki kamery
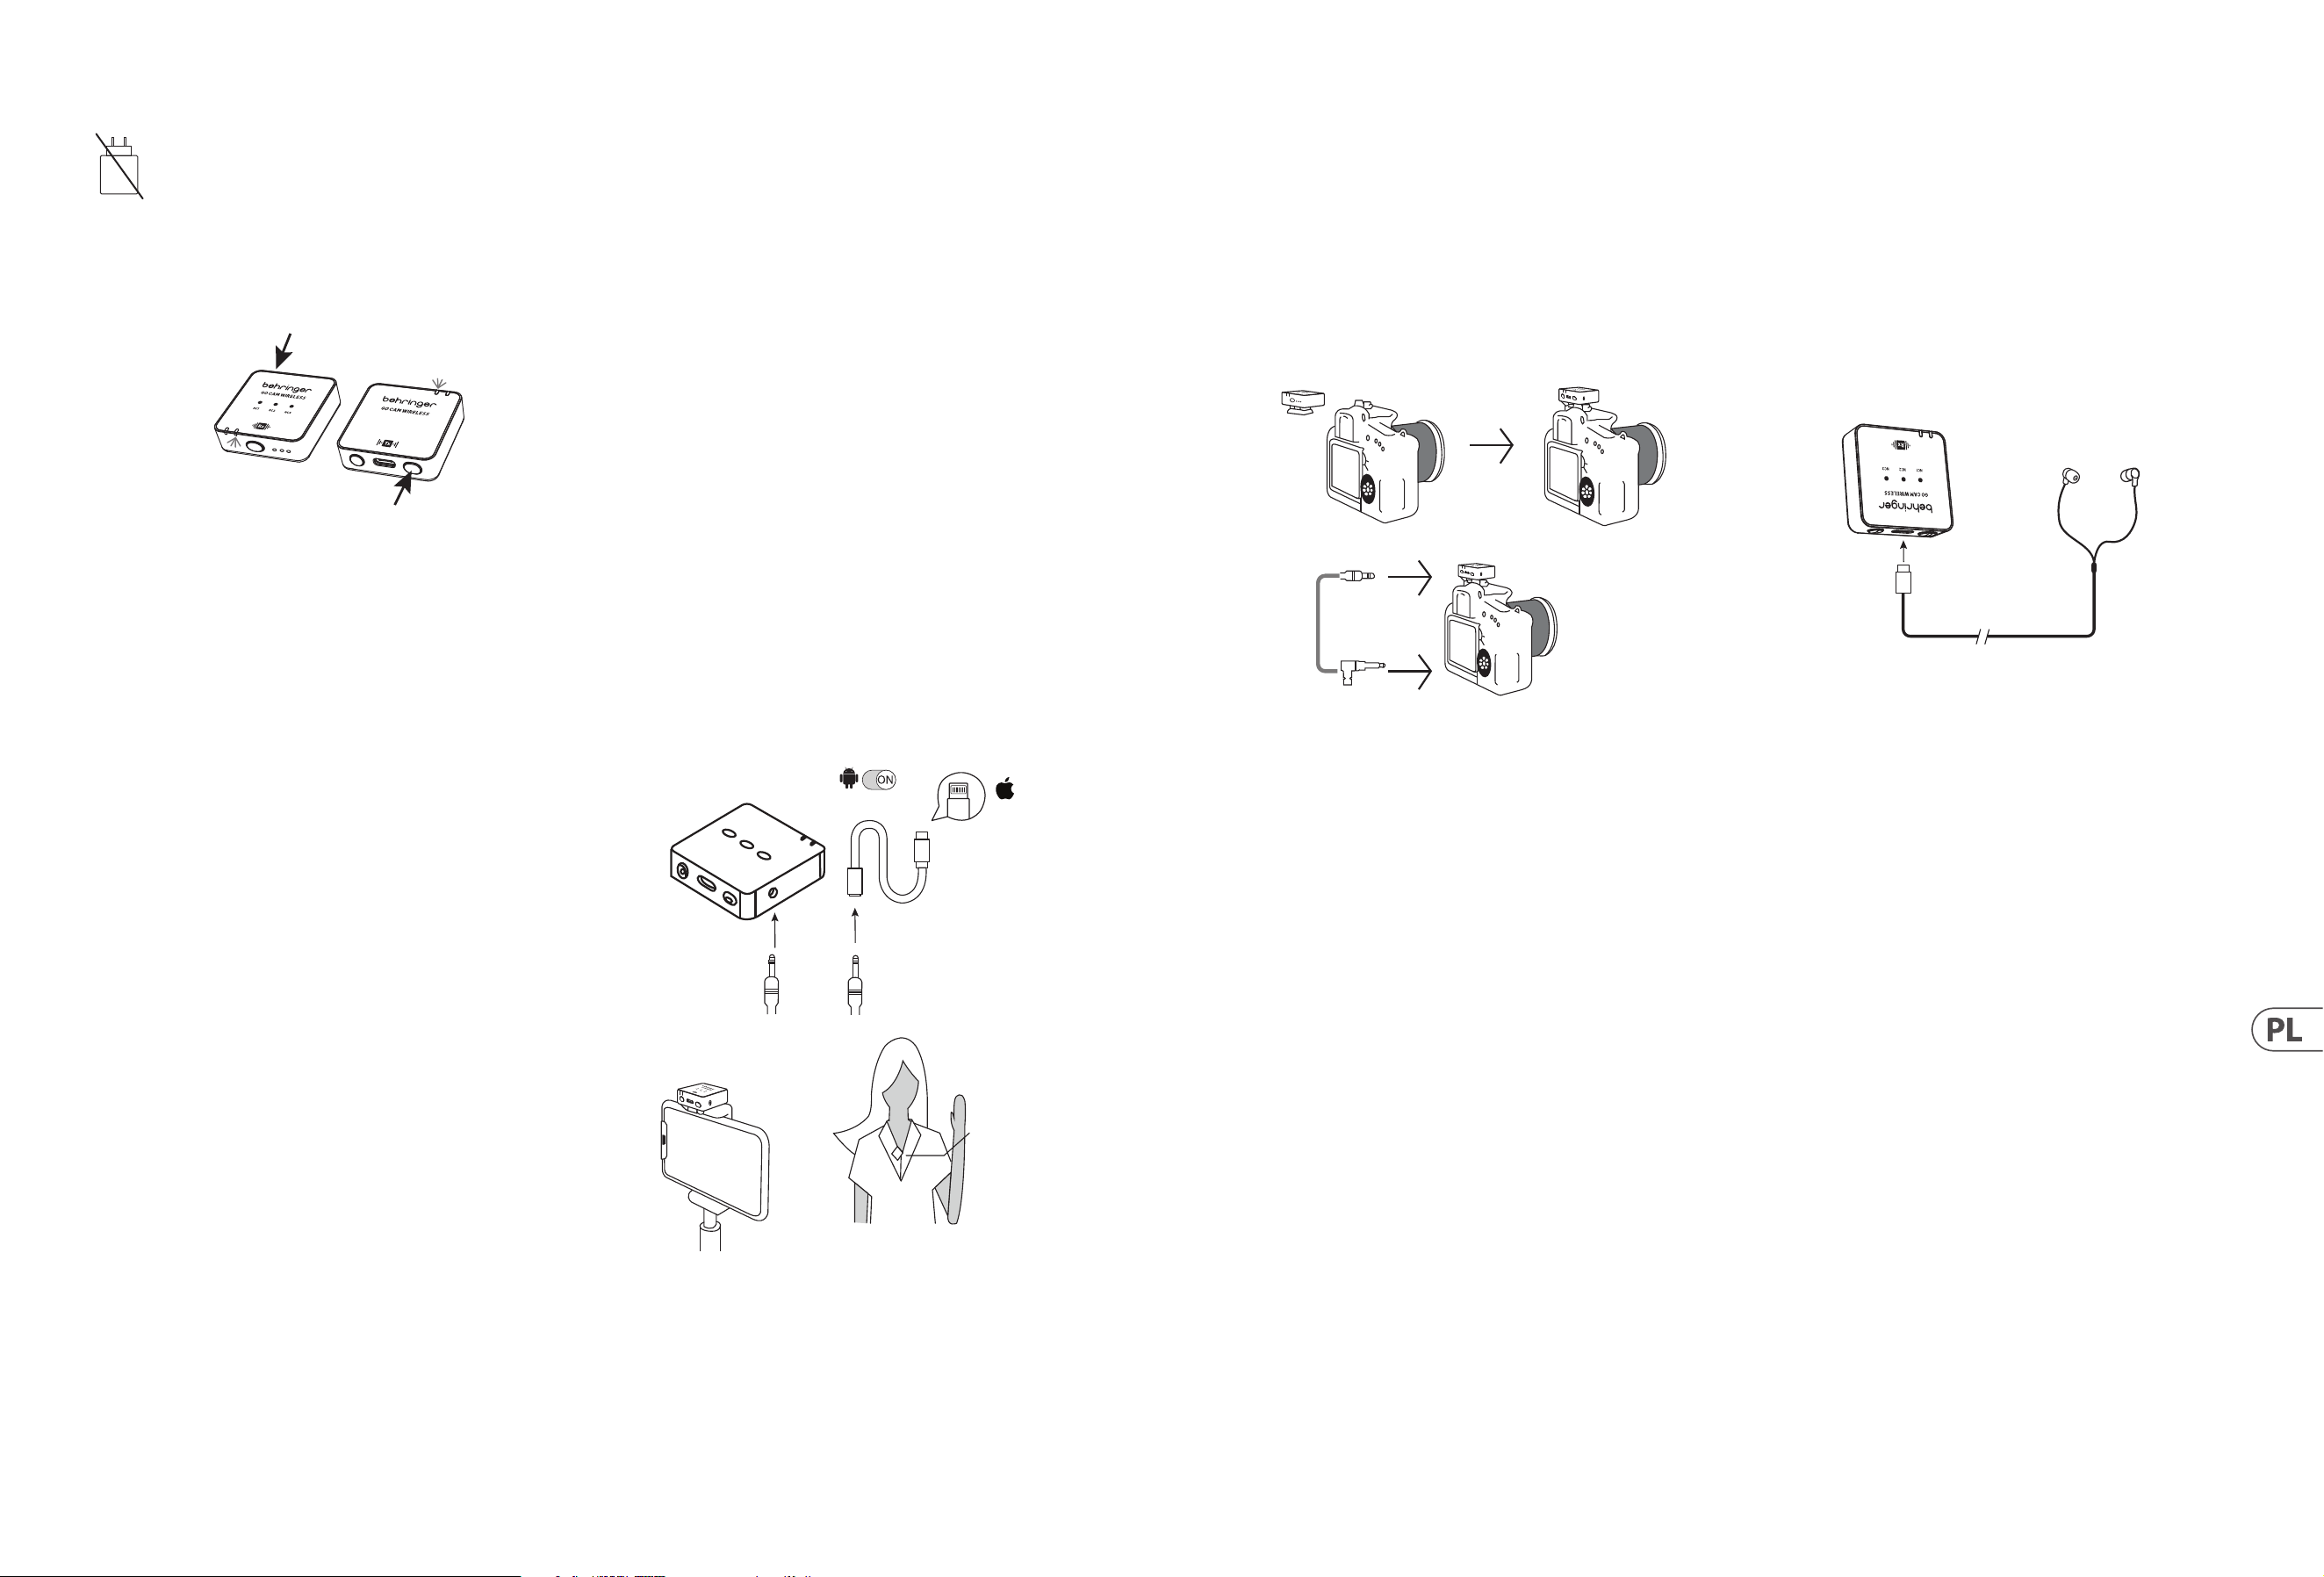
40 GO CAM WIRELESS Quick Start Guide 41
Obsługa
Ładowarka nie jest w zestawie. Moc dostarczana przez ładowarkę
musi wynosić między 5 V/32 mA (0,16 W) minimalnie wymaganą
przez to urządzenie a 5 V/400 mA (2 W) maksymalnie, aby osiągnąć
maksymalną prędkość ładowania. To urządzenie obsługuje protokół
ładowania USB Power Delivery.
1. Proszę naładować nadajnik i odbiornik przed użyciem.
2. Naciśnij przełącznik zasilania odbiornika i przełącznik zasilania nadajnika na
2 sekundy, aby włączyć.
R
eceiver
Transmitt
ers
3. Stała niebieska dioda LED wskazuje, że połączenie bezprzewodowe między
odbiornikiem a nadajnikiem za-kończyło się sukcesem.
4. Przymocuj nadajnik do swojej koszuli, T-shirtu lub kurtki.
5. Upewnij się, że wbudowany mikrofon nie jest zasłonięty ani zablokowany.
Dla optymalnej wydajności nag-rywania audio zalecamy, aby odległość
między ustami użytkownika a mikrofonem nadajnika wynosiła 15-20 cm.
6. Jeśli dźwięk jest zbyt głośny, powodując zniekształcenia – zmniejsz
wzmocnienie mikrofonu.
7. W przypadku hałaśliwego otoczenia – użyj funkcji redukcji szumów.
8. Upewnij się, że sprawdziłeś wzmocnienie mikrofonu i ustawienia redukcji
szumów przed rozpoczęciem nagrywania.
Podłączanie do Smartfona do
nagrywania wideo
1. Smartfony z Androidem: Użyj ocjalnego kabla audio Type-C do Type-C,
aby podłączyć smartfon do odbiornika w celu nagrywania dźwięku. Upewnij
się, że funkcja OTG oraz opcja "Urządzenie zewnętrzne" są włączone w
ustawieniach telefonu. Na przykład, telefony OPPO i VIVO muszą włączyć
funkcję "OTG", a telefony OPPO muszą również włączyć opcję "Urządzenie
zewnętrzne". Telefony Huawei, Xiaomi, Samsung i inne zazwyczaj działają
bez dodatkowych ustawień. (Jak pokazano na obrazku.)
2. iPhone 14 i wcześniejsze modele: Użyj 3-sekcyjnego kabla audio 3,5
mm, aby podłączyć go do portu wyjściowego nagrywania odbiornika, włóż
4-sekcyjny wtyk audio (z ikoną telefonu) do certykowanego adaptera
Lightning, a następnie podłącz adapter do portu ładowania telefonu.
Upewnij się, że wtyk audio jest prawidłowo włożony i sprawdź połączenie
kabla audio. (Jak pokazano na obrazku.)
3. iPhone 15 i modele późniejsze (w tym iPhone 15): Obsługuje następujące
dwie metody połączenia:
A. Użyj 3-sekcyjnego kabla audio 3,5 mm, aby podłączyć go do portu
wyjściowego nagrywania odbiornika, włóż 4-sekcyjny wtyk audio (z
ikoną telefonu) do certykowanego adaptera 3,5 mm żeńskiego na
Type-C, a następnie podłącz adapter do portu ładowania telefonu.
Upewnij się, że wtyk audio jest prawidłowo włożony i sprawdź
połączenie kabla audio. (Jak pokazano na obrazku.)
B. Użyj ocjalnego kabla Type-C do Type-C aby bezpośrednio połączyć
iPhone'a 15 (lub iPhone'a 15 i późniejsze modele) z odbiornikiem w celu
nagrywania dźwięku.
Android
OTG
Lighting
Receiver RX
4-segment audio jack
Lighting for
Apple iPhone
14 or earlier
versions with
Lightning
3-segment audio jack
Receiver
Transmitter
Podłączanie do Aparatu DSLR do
nagrywania wideo
1. Przymocuj Odbiornik do stopki aparatu DSLR.
2. Podłącz wyjście audio odbiornika do wejścia audio aparatu, używając kabla
audio TRS do TRS 3,5 mm.
3. Upewnij się, że oba złącza 3,5 mm są w pełni wsunięte, aby zapewnić
odpowiedni kontakt.
4. Włącz aparat i rozpocznij nagrywanie wideo.
Receiver
TRS 3.5 mm
TRS 3.5 mm
audio cable
Podłączanie do słuchawek
do monitorowania w czasie
rzeczywistym
1. Proszę naładować nadajnik i odbiornik przed użyciem.
2. Naciśnij przełącznik zasilania odbiornika i przełącznik zasilania nadajnika
na 2 sekundy, aby włączyć. Stała niebieska dioda LED wskazuje, że
połączenie bezprzewodowe między odbiornikiem a nadajnikiem
zakończyło się sukcesem.
3. Włóż słuchawki USB C do portu USB Typ C odbiornika, aby monitorować sesję
nagraniową w czasie rzec-zywistym.
Receiver
Earphones
Type C
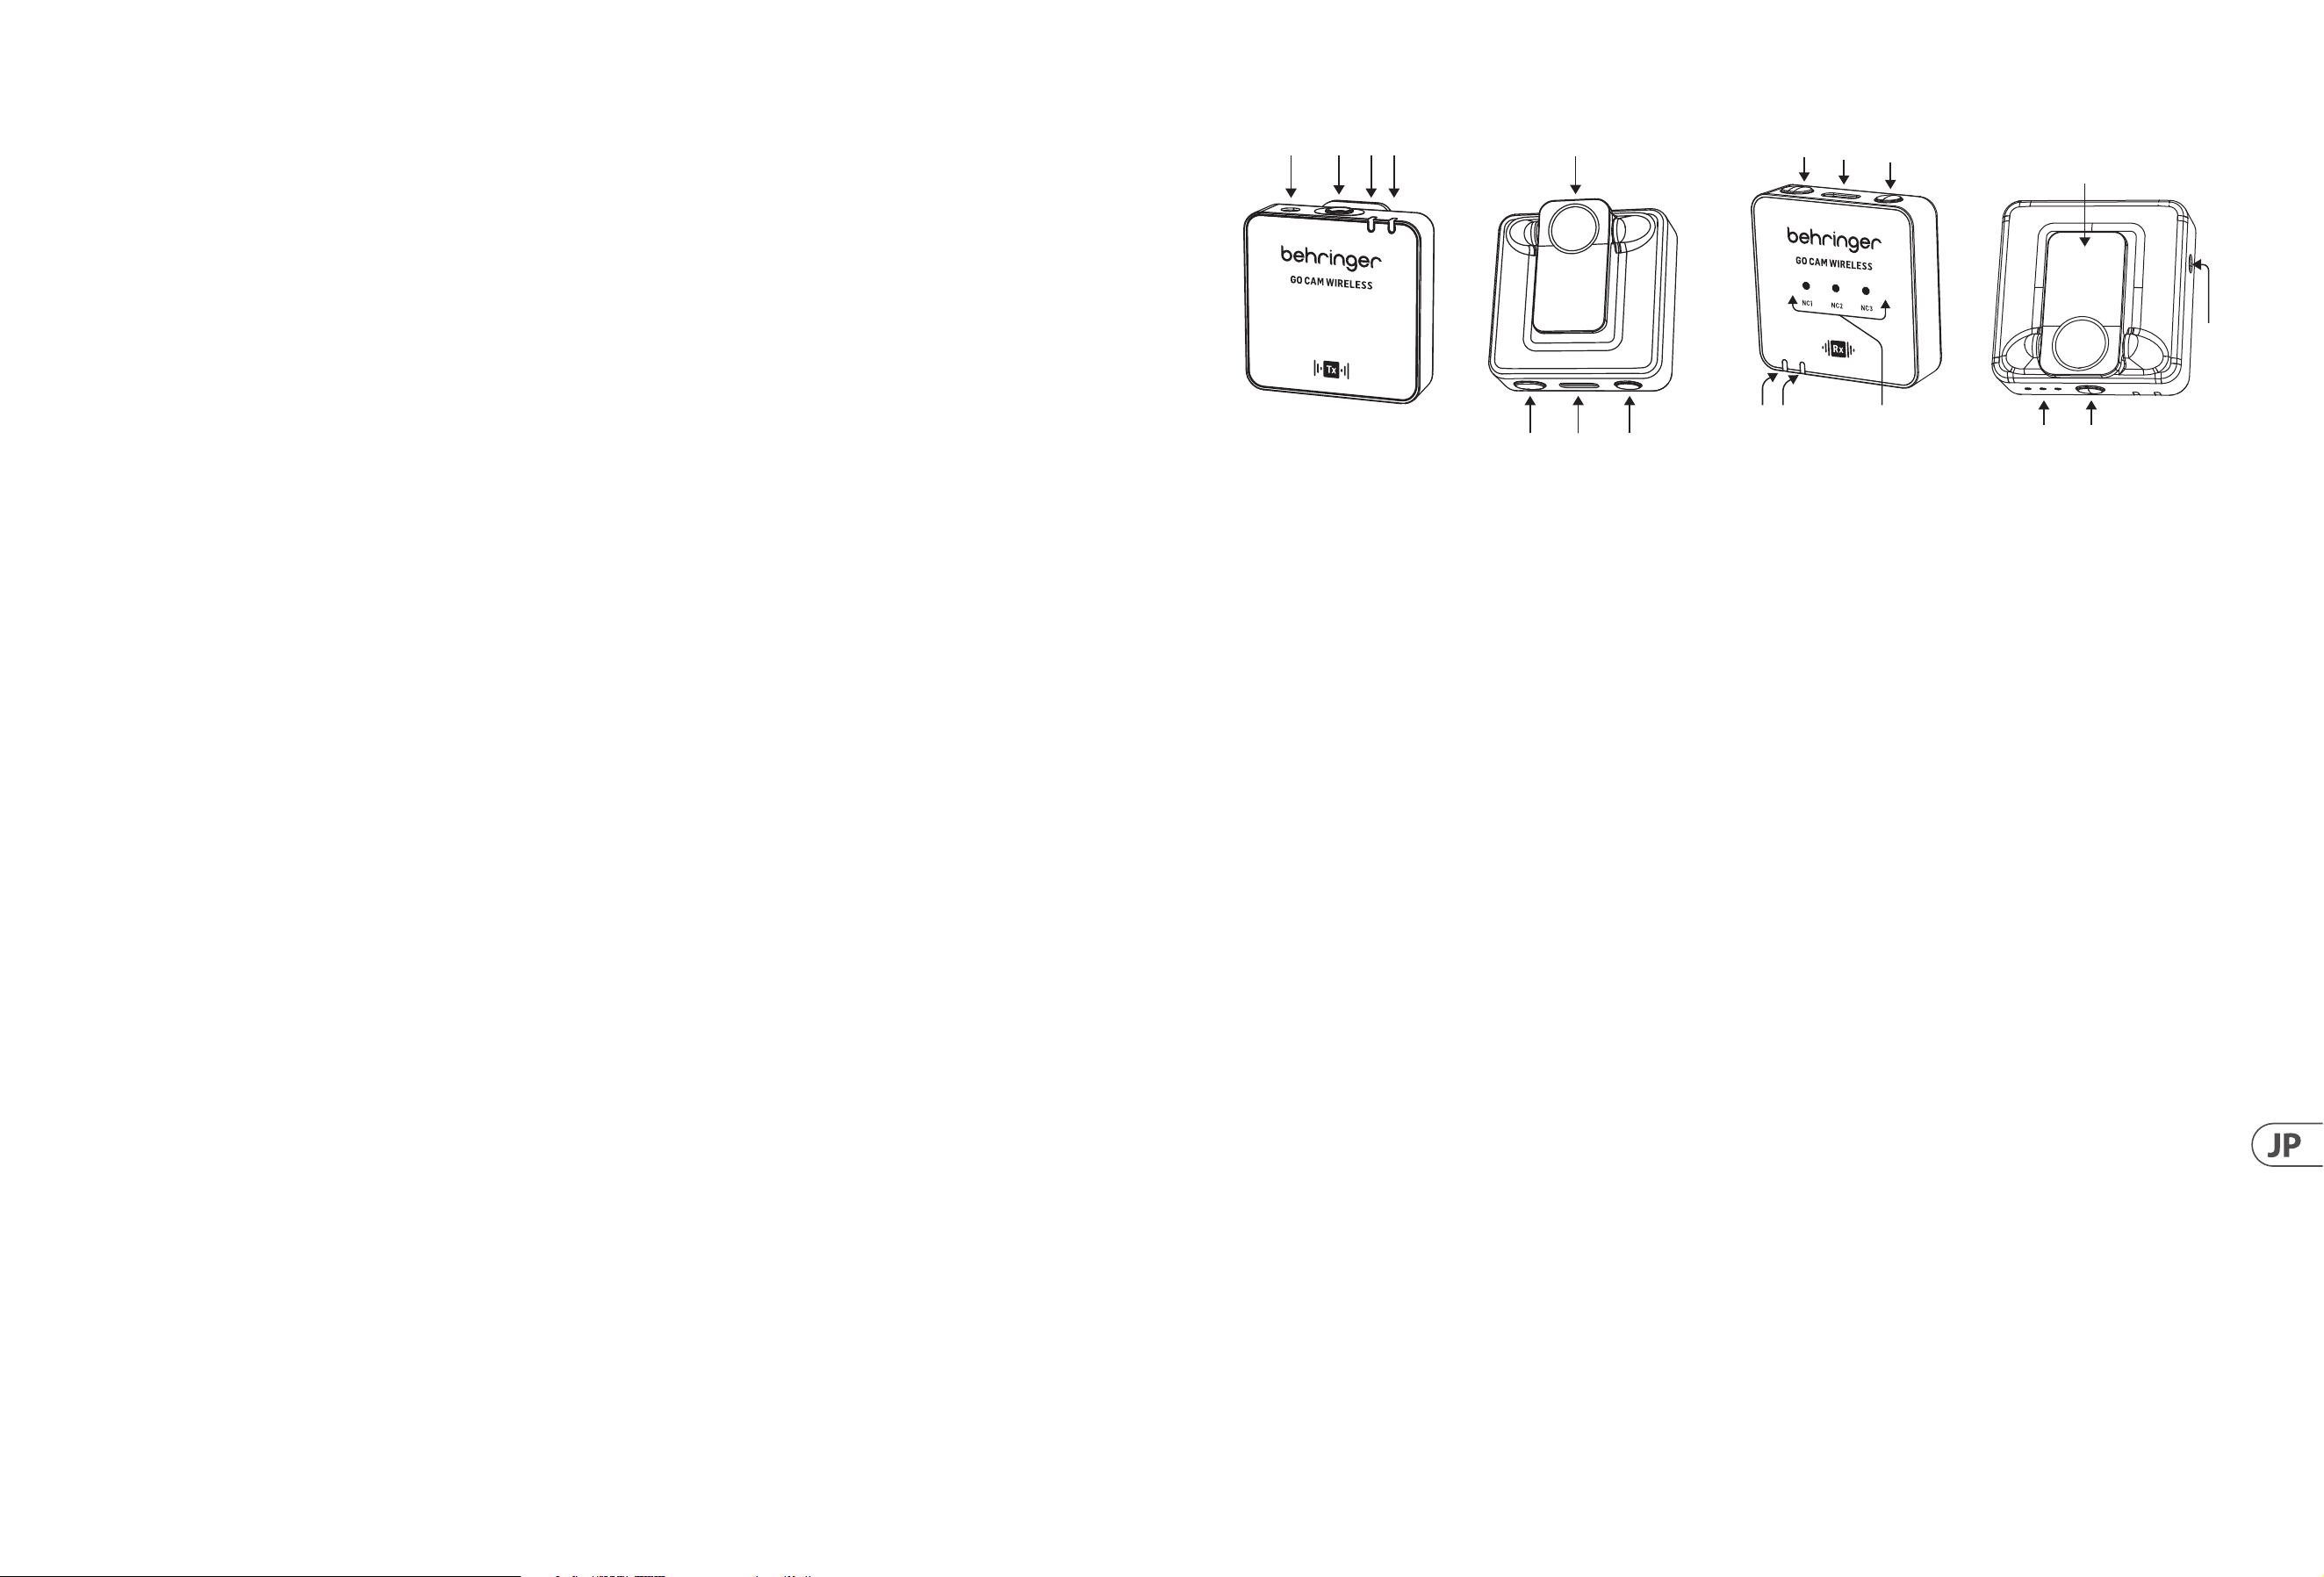
42 GO CAM WIRELESS Quick Start Guide 43
(JP) GO CAM WIRELESS
• • ビデオレコーダー、DSLR 、モ バイルデバイス、タブレット、オー ディオレコー ダーとシームレスに連 携 する、プ ロフェッショナル グレード
のオーディオを提 供するワイヤレスマイクシステムです。
• • インタビュー、ポッドキャスト、ライブストリーミング、ブログ、バーチャル 教 室、ナレーション、ビデオ制 作に最 適です。
• • Go Cam Wireless の 30 m (100 ft) のワイヤレス自 由 度 で 優 れ た パ フォーマ ンスを 体 験してください 。
• • 便 利 な シ ャツクリップと簡 単 な オン/オフスイッチを備えたコンパクトな送信機で手を自由に保てます。
• • 統合された全方向性マイクを使用して、簡単にクリアなオーディオをキャプチャできます。
• • 受信機の最先端の 3 レベルノイズリダクションスイッチで不要なバックグラウンドノイズを排除します。
• • -24 dB、-12 dB、お よ び 0 dB オ プ シ ョ ン を 提 供 す る 、ユ ー ザ ーフ レ ン ド リ ー な 3 レ ベ ルスイッチで ゲイン を 簡 単 に 調 整 で きま す。
• • 内 蔵のカメラシューアダプターを 使 用して、特 別 に設 計され た 受 信 機 をカメラに 取り付けます。
• • 付属のイヤホンでリアルタイムモニタリングを楽しめます。
• • 3.5 mm (1/8 インチ) コネクタを使用して、外部マイクを送信機に接続します。
• • 最大 8 時間の稼働時間と、カメラ接続ケーブル、USB 充電ケーブル、ファーウインドシールド、保護キャリーケースを使って、移動中も
電 力 を 維 持 し 、保 護 さ れ ま す 。
同梱アクセサリ
• • ファーウインドシールド x 1
• • USB 充 電 ケーブル x 1
• • カメラ用 TRS から TRS オー ディオケーブル x 1
• • 携帯電話用 TRRS から TRS オー ディオケーブル x 1
• • 携帯電話用 Type C から Type C オー ディオケーブル x 1
• • Type C イヤホン x 1
マイクのコントロ ール
(6)
(2)(1)
(3)(4)
(5)
(7) (8)
1. 外 部 マイク入 力 、3.5 mm (1/8 インチ)
2. 内 蔵 マイク
3. ワイヤレス ステ ータス LED - 青色 LED = 受信機との接続成功、
青色点滅 = 未接続
4. バッテリーステータス LED - 赤色 LED = 充 電 中 、赤 色 点 滅 =
バッテリー残 量 低 下
5. シャツクリップ
6. 電源オン / オフ - 2 秒 間 押してオンにし、3 秒 間 押してオフ
にします
7. USB Type C 充電 ポート
8. ミュートオン/オフ - ダ ブルクリック = オン、1 回押す = オフ
受 信 機 のコントロール
(18)
(10)
(9)
(16)
(15)
(17)
(11)(12)
(14)
(13)
9. ゲイン LED - III = 0 dB、II = -12 dB、I = -24 dB
10. ゲインスイッチ - 1 回押して別のゲインレベルを選択します
11. バッテリーステータス LED - 赤色 LED = 充 電 中 、赤 色 点 滅 = バ
ッテリー残量低下
12. ワイヤレス ステ ータス LED - 青色 LED = 受信機との接続成功、
青色点滅 = 未接続
13. ノイズリダクション LED - 弱 = NC1、中 = NC2、強 = NC3,
暗い = NCなし
14. オーディオ出力、3.5 mm (1/8 インチ)
15. 電源オン/オフ - 2 秒 間 押してオンにし、3 秒 間 押してオフ
にします
16. USB Type C 充電 ポートとリアルタイムモニタリング用イヤホ
ン出力
17. ノイズリダクションスイッチ - 1 回 押して別 のレ ベ ル を 選 択
します
18. クリップ/カメラシューアダ プター

44 GO CAM WIRELESS Quick Start Guide 45
操作方法
充電器は含まれていません。充電器が提供する電力は、
機器が必要とする最小限の 5 V/32 mA (0.16 W) から
最大限の 5 V/400 mA (2 W) の範囲内である必要があり、
最大充電速度を達成するために USB Power Delivery 充電プ
ロトコルをサポートします。
1. 使用前に送信機と受信機を充電してください。
2. 受 信 機 の 電 源 スイッ チと 送 信 機 の 電 源 スイッチ を 2 秒間押し
てオンにします。
R
eceiver
Transmitt
ers
3. 固定された青色 LED は、受信機と送信機の間のワイヤレス接
続 が 成 功したことを示します。
4. 送 信 機をシャツ、T シャツ、またはジャケットにクリップで固
定します。
5. 内蔵マイクが覆われたりブロックされたりしていないことを確
認してください。最適なオーディオ録音性能のために、ユーザ
ー の 口と 送 信 機 のマイクの 間 の 距 離 は 15 〜 20 cm であることを
お 勧 めします。
6. オ ー デ ィ オ が 大 き す ぎ て 歪 み を 引 き 起 こ す 場 合 は 、マ イ ク ゲ イ
ンを下 げ てください 。
7. 環境が騒がしい場合は、ノイズリダクション機能を使用して
ください。
8. 録 音を開始する前に、マイクゲインとノイズリダクション設 定
を 確 認してください 。
ビ デ オ 録 画 用 スマ ートフォン へ の 接 続
1. Android スマ ートフォン : スマ ートフォン をレシ ー バ ー に 接 続 する
た め に 、公 式 の Type-C to Type-C オー ディオケーブル を 使 用して
ください。電話の設定で OTG 機能と「外部デバイス」オプショ
ンが有効になっていることを確認してください。例えば、OPPO
や VIVO のスマートフォン は OTG 機能を有効にする必要があ
り、OPPO のスマートフォンはさらに「外部デバイス」オプション
も有効にする必要があります。Huawei、Xiaomi、Samsung などの
他のスマートフォンは通常、プラグ&プレイで 追 加の設 定は不
要 で す 。( 写 真 参 照 )
2. iPhone 14 およびそれ以前のモデル: 3 セクションのオーディオ
ヘッド 3.5mm オー ディオケーブル をレシーバー の 録 音出 力ポー
トに接続し、4セクションのオーディオヘッド (電話アイコン付
き )を Lightning 認証アダプターに挿入し、その後アダプターを
電 話 の 充 電 ポ ー ト に 接 続 し ま す 。オ ー デ ィ オ ヘッド が 正 し く 挿
入されていることを確認し、オーディオケーブルの接続を確認
し て く だ さ い 。( 写 真 参 照 )
3. iPhone 15 およびそれ以降のモデル: 次の 2 つの接続方法がサ
ポートさ れて い ま す:
A. セクションの オー ディオヘッド 3.5 mm オー ディオケーブル
をレシーバーの録 音出力ポートに接 続し、4セクションの
オーディオヘッド(電話アイコン付き)を 3.5 mm メスから
Type-C 認証アダプターに挿入し、アダプターを電話の充電
ポートに接続します。オーディオヘッドが正しく挿入されて
いることを確 認し、オー ディオケーブル の 接 続 を確 認して
く だ さ い 。( 写 真 参 照 )
B. 公式の Type-C to Type-C ケーブル を使用して、直接 iPhone 15
(または iPhone 15 以降のモデル) をレシーバーに接続して
オー ディオ 録 音を行いま す。
Android
OTG
Lighting
Receiver RX
4-segment audio jack
Lighting for
Apple iPhone
14 or earlier
versions with
Lightning
3-segment audio jack
Receiver
Transmitter
ビデオ録画用 DSLR カメラへの 接 続
1. 受信機を DSLR カメラのシュー に 取り付けます。
2. 受 信 機 のオーディオ出力をカメラのオーディオ入 力
に、3.5 mm TRS から 3.5 mm TRS オー ディオケーブル を 使 用し
て 接 続します。
3. 両方の 3.5 mm コネクタが完全に挿入されていることを確認し
て、適切な接 触を確保してください。
4. カメラをオンにしてビデオ録画を開始します。
Receiver
TRS 3.5 mm
TRS 3.5 mm
audio cable
リアル タイムモ ニタリン グ 用 イヤ ホ ンへ
の接続
1. 使用前に送信機と受信機を充電してください。
2. 受信機と送信機の電源スイッチを 2 秒 間 押してオンにします。
固定された青色 LED は、受信機と送信機の間のワイヤレス接続
が 成 功したことを示します。
3. 受信機の USB Type C ポートに USB C イ ヤ ホ ン を 挿 入 し て 、録 音 セ
ッションをリアルタイムで モニタリングします。
Receiver
Earphones
Type C
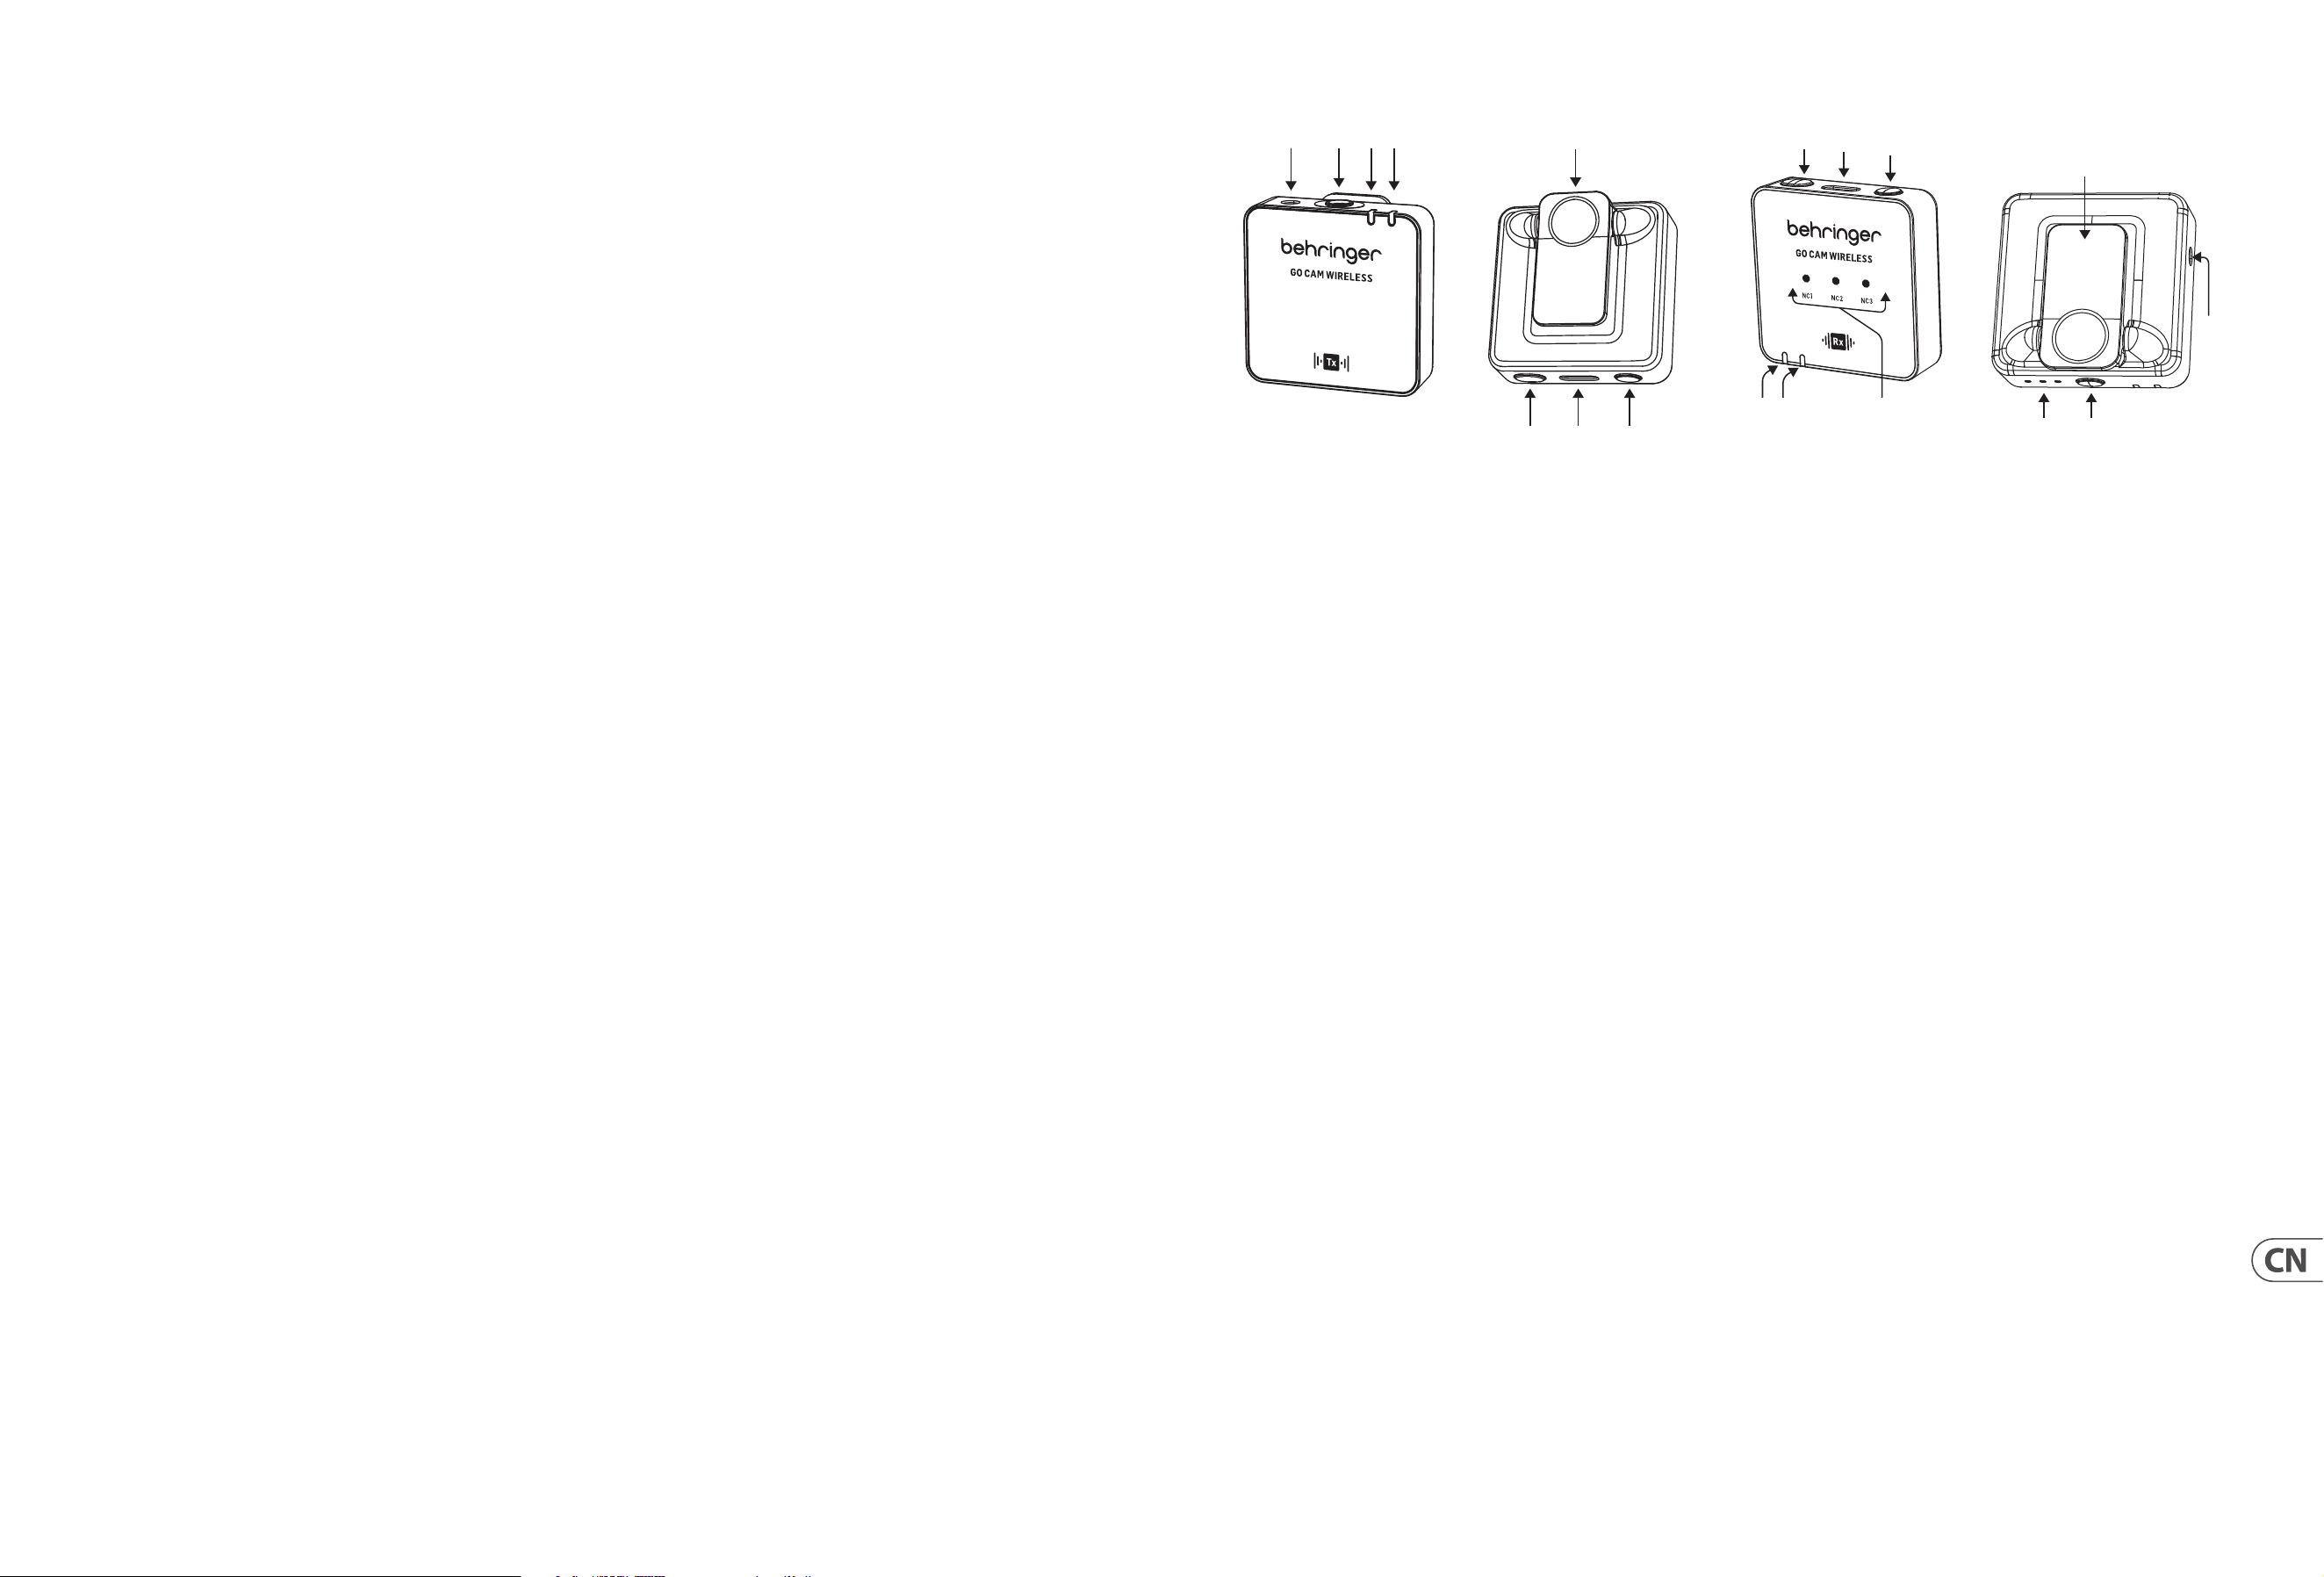
46 GO CAM WIRELESS Quick Start Guide 47
(CN) GO CAM WIRELESS
• • 获取专业级音频体验, 使用我们的无线麦克风系统, 专为与您的视频录像机、 DSLR 相机、移动设备、平板电脑和音频录音机无
缝配合设计。
• • 非常适合采访、播客、直播、视频博客、虚拟课堂、配音以及视频制作。
• • 体验 Go Cam Wireless 提供的 30 mm (100 mm) 无线自由的卓越性能
• • 使用我们的紧凑发射器保持双手自由, 配有方便的衬衫夹和简易开/关开关。
• • 使用我们集成的全向麦克风轻松捕捉清晰音频。
• • 利用我们接收器的最新 3 级降噪开关消除不需要的背景噪音。
• • 使用我们用户友好的 3 级增益开关轻松调节增益, 提供 -24 dB、 -12 dB 和 0 dB 选项。
• • 使用内置相机鞋适配器在您的相机上安装我们专门设计的接收器。
• • 通过我们随附的耳机享受实时监控。
• • 使用 3.5 mm (1/8 英寸) 连接器将外部麦克风与发射器连接。
• • 在外出时保持供电和保护, 续航时间长达 8 小时, 并配有相机连接电缆、 USB 充电线、皮毛风挡和保护性携带箱。
附带配件
• • 皮毛风挡 x 1
• • USB 充电线 x 1
• • 相机用 TRS 至 TRS 音频线 x 1
• • 手机用 TRRS 至 TRS 音频线 x 1
• • 手机用 Type C 至 Type C 音频线 x 1
• • Type C 耳机 x 1
麦克风控制
(6)
(2)(1)
(3)(4)
(5)
(7) (8)
1. 外部麦克风输入, 3.5 mm
2. 内置麦克风
3. 无线状态 LED - 蓝色 LED = 成功连接到接收器, 闪烁蓝色 =
未连接
4. 电池状态 LED - 红色 LED = 正在充电, 闪烁红色 = 电池电量低
5. 衬衫夹
6. 电源开/关 - 按压 2 秒钟开机, 按压 3 秒钟关机
7. USB Type C 充电端口
8. 静音开/关 - 双击 = 开启, 按一次 = 关闭
操作说明
(18)
(10)
(9)
(16)
(15)
(17)
(11)(12)
(14)
(13)
9. 增益 LED - III = 0 dB, II = -12 dB, I = -24 dB
10. 增益开关 - 按一次以选择不同的增益级别
11. 电池状态 LED - 红色 LED = 正在充电, 闪烁红色 = 电池电量低
12. 无线状态 LED - 蓝色 LED = 成功连接到接收器, 闪烁蓝色
= 未连接
13. 降噪 LED - 轻度 = NC1, 中度 = NC2, 强度 = NC3, 暗 = 无 NC
14. 音频输出, 3.5 mm
15. 电源开/关 - 按压 2 秒钟开机, 按压 3 秒钟关机
16. USB Type C 充电端口及耳机输出, 用 于实时监控
17. 降噪开关 - 按一次以选择不同的级别
18. 衣领夹/相机热靴适配器
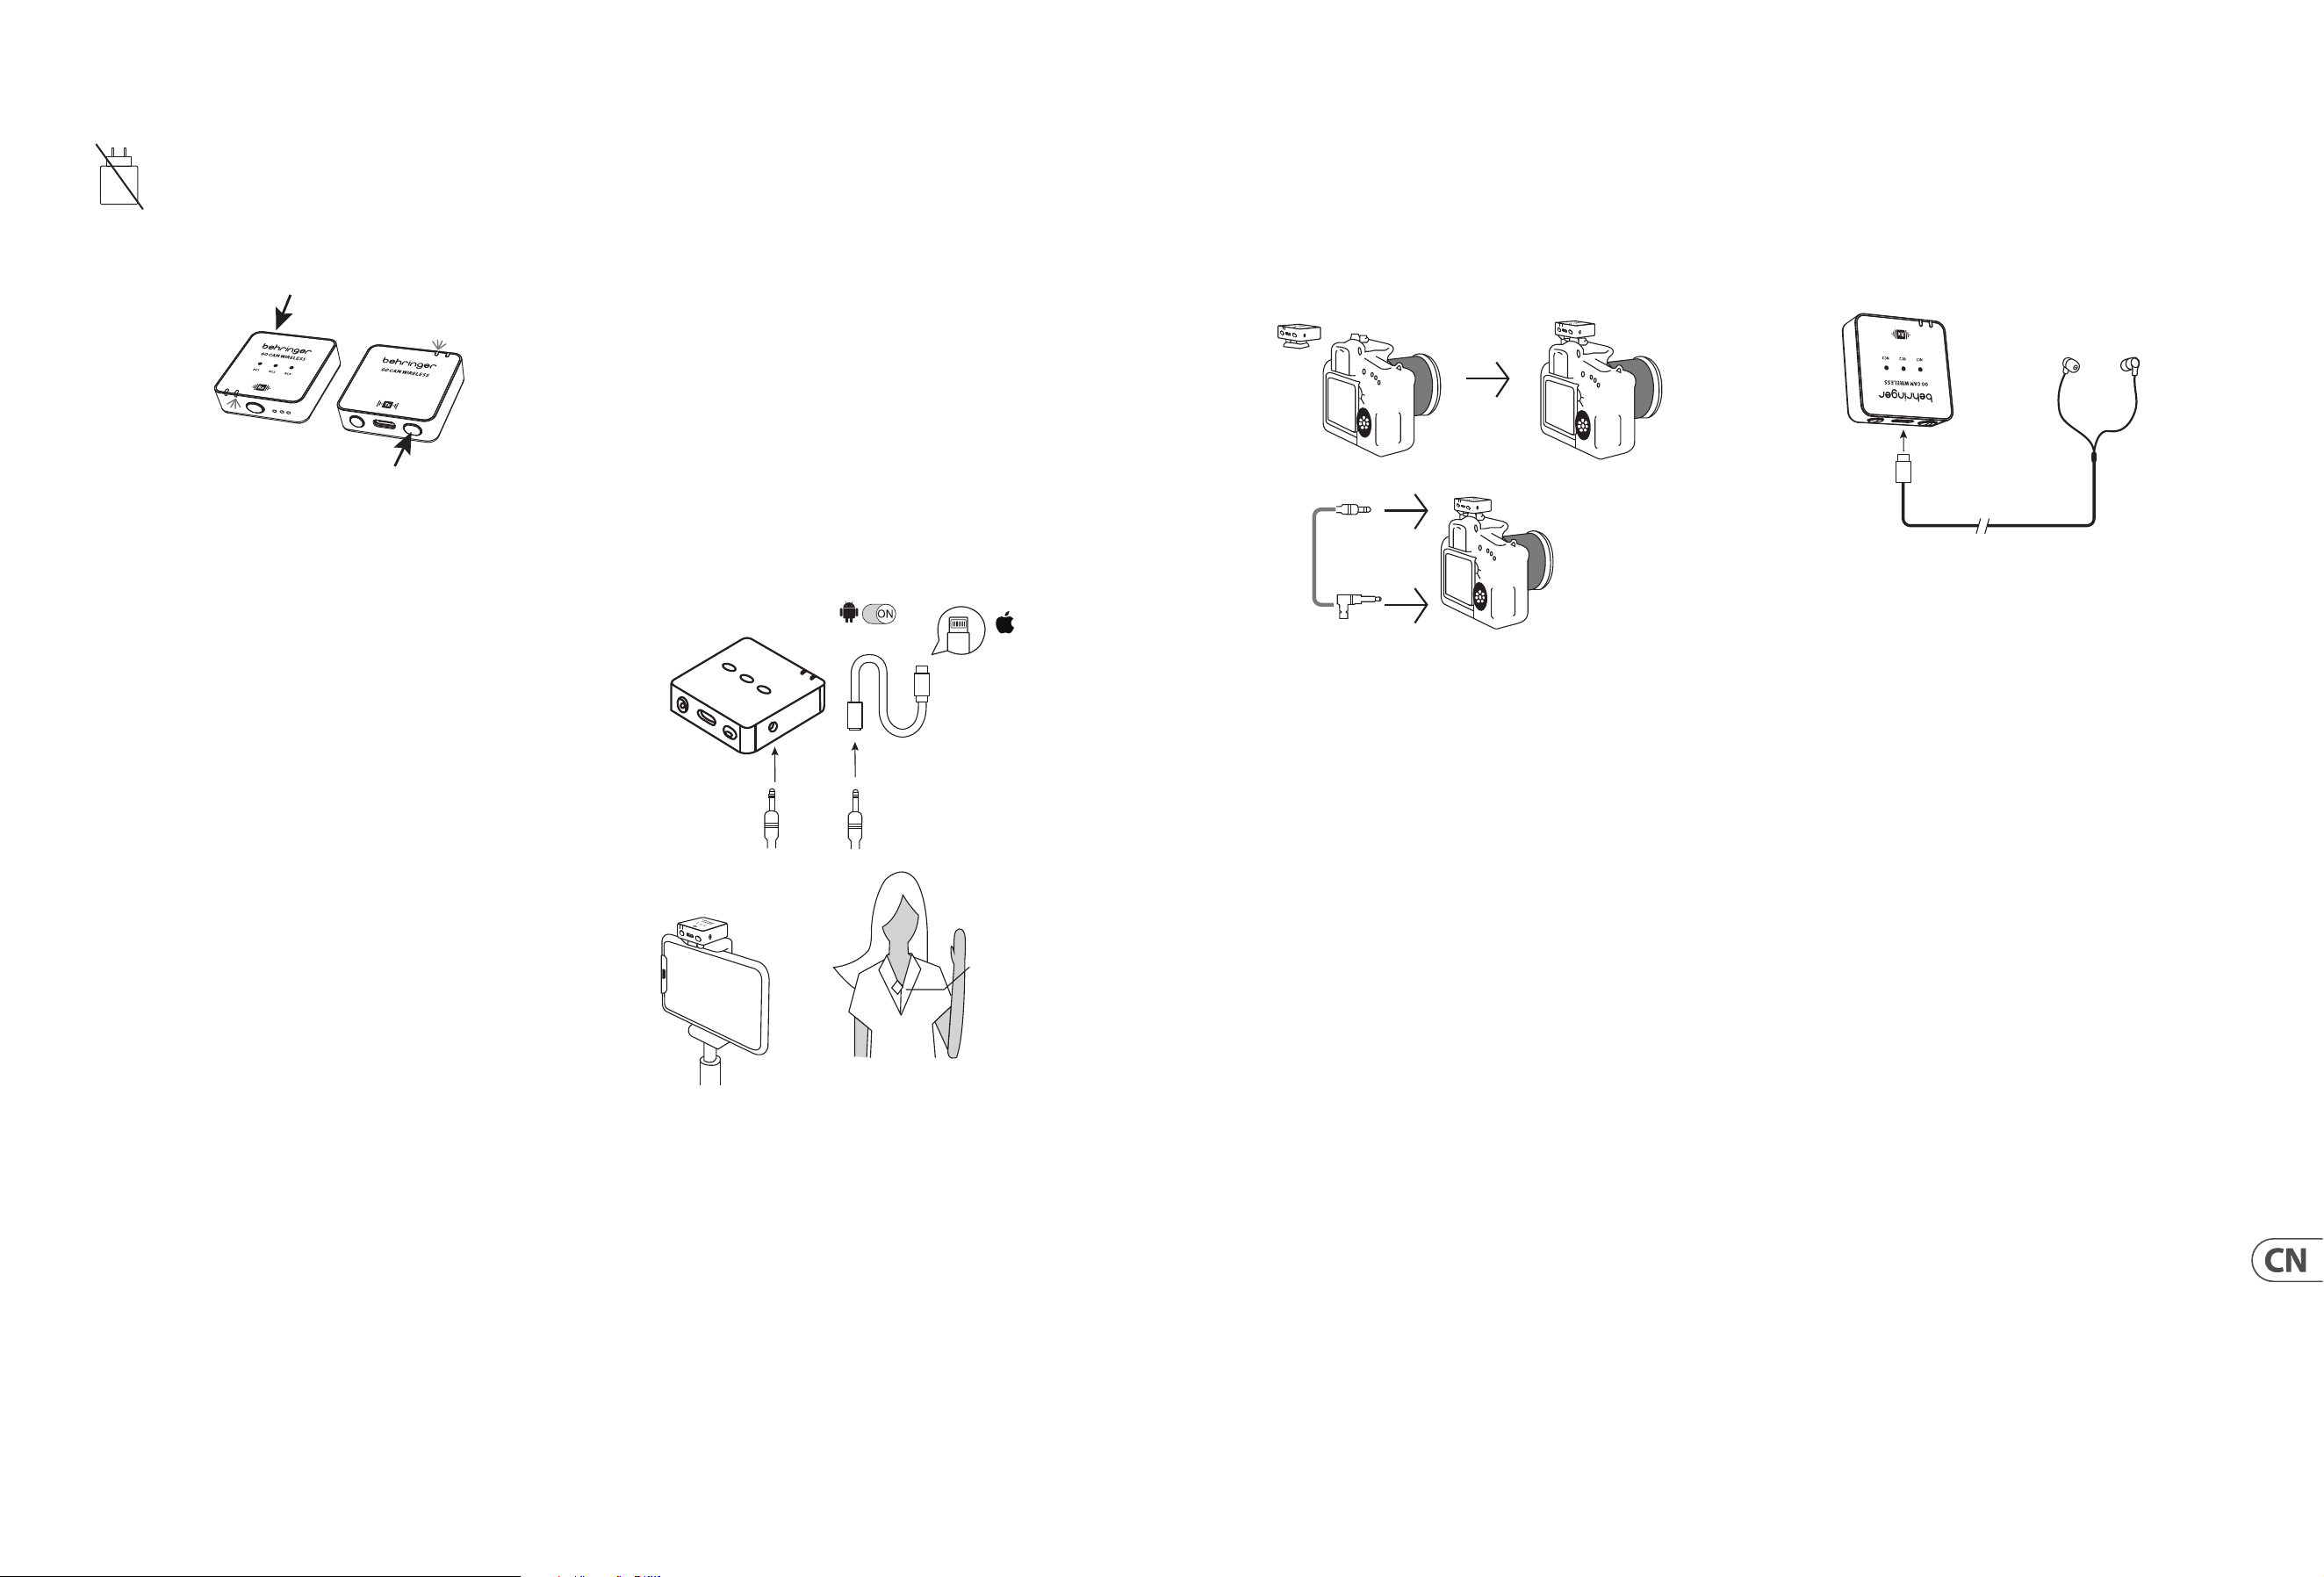
48 GO CAM WIRELESS Quick Start Guide 49
操作说明
本产品不包括充电器。 充电器的输出电压必须在
5 V/ 32 mA (0.16 W) 到 5 V/ 400 mA (2 W) 之间, 以实现最
大充电速度。 本设备支持 USB 电力传输充电协议。
1. 使用前请充电发射器和接收器。
2. 按下接收器和发射器的电源开关 2 秒钟以开机。
R
eceiver
Transmitt
ers
3. 稳定的蓝色 LED 表示接收器和发射器之间的无线连接成功。
4. 将发射器夹在您的衬衫、T 恤或夹克上。
5. 请确保内置麦克风未被遮挡或堵塞。为了获得最佳的音频录
制性能, 我们建议用户的嘴巴与发射器麦克风之间的距离为
15 至 20 cm。
6. 如果音频过大, 导致失真 - 请降低麦克风增益。
7. 如果环境嘈杂 - 请使用降噪功能。
8. 开始录制前, 请确保检查麦克风增益和降噪设置。
连接智能手机进行视频录制
1. Android 智能手机: 使用官方 Type-C 到 Type-C 音频线将智能手
机连接到接收器进行音频录制。 请确保在手机设置中启用
OTG 功能和 “外部设备” 选项。 例如, OPPO 和 VIVO 手机需要启
用 “OTG”功能, OPPO 手机还需启用 “外部设备” 选项。 华为、小
米、三星及其他品牌的手机通常支持即插即用, 无需额外设置。
(如图所示)
2. iPhone 14 及之前的型号: 使用三节音频头 3.5mm 音频线插入
接收器的录音输出端口, 将四节音频头 (带电话图标) 插入
Lightning 认证适配器, 然后将适配器连接到手机的充电端口。
请确保音频头插入正确, 并检查音频线连接。 (如图所示)
3. iPhone 15 及以后的型号 (包括 iPhone 15): 支持以下两种连接
方式:
A. 使用三节音频头 3.5 mm 音频线插入接收器的录音输出端
口, 将四节音频头 (带电话图标) 插入 3.5 mm 母头到 Type-C
认证适配器中, 然后将适配器连接到手机的充电端口。 请
确保音频头插入正确, 并检查音频线连接。 (如图所示)
B. 使用官方 Type-C 到 Type-C 电 直接将 iPhone 15 (或 iPhone 15 及
以后的型号) 连接到接收器进行音频录制。
Android
OTG
Lighting
Receiver RX
4-segment audio jack
Lighting for
Apple iPhone
14 or earlier
versions with
Lightning
3-segment audio jack
Receiver
Transmitter
连接 DSLR 相机进行视频录制
1. 将接收器夹到 DSLR 相机的鞋架上。
2. 使用 3.5 mm TRS 至 3.5 mm TRS 音频线将接收器的音频输出连接
到相机的音频输入。
3. 请确保两个 3.5 mm 连接器完全插入以确保正确接触。
4. 打开相机并开始视频录制。
Receiver
TRS 3.5 mm
TRS 3.5 mm
audio cable
连接耳机进行实时监控
1. 使用前请充电发射器和接收器。
2. 按下接收器和发射器的电源开关 2 秒钟以开机。 稳定的蓝色
LED 表示接收器和发射器之间的无线连接成功。
3. 将 USB C 耳机插入接收器的 USB Type C 端口, 进行录制会话的实时
监控。
Receiver
Earphones
Type C
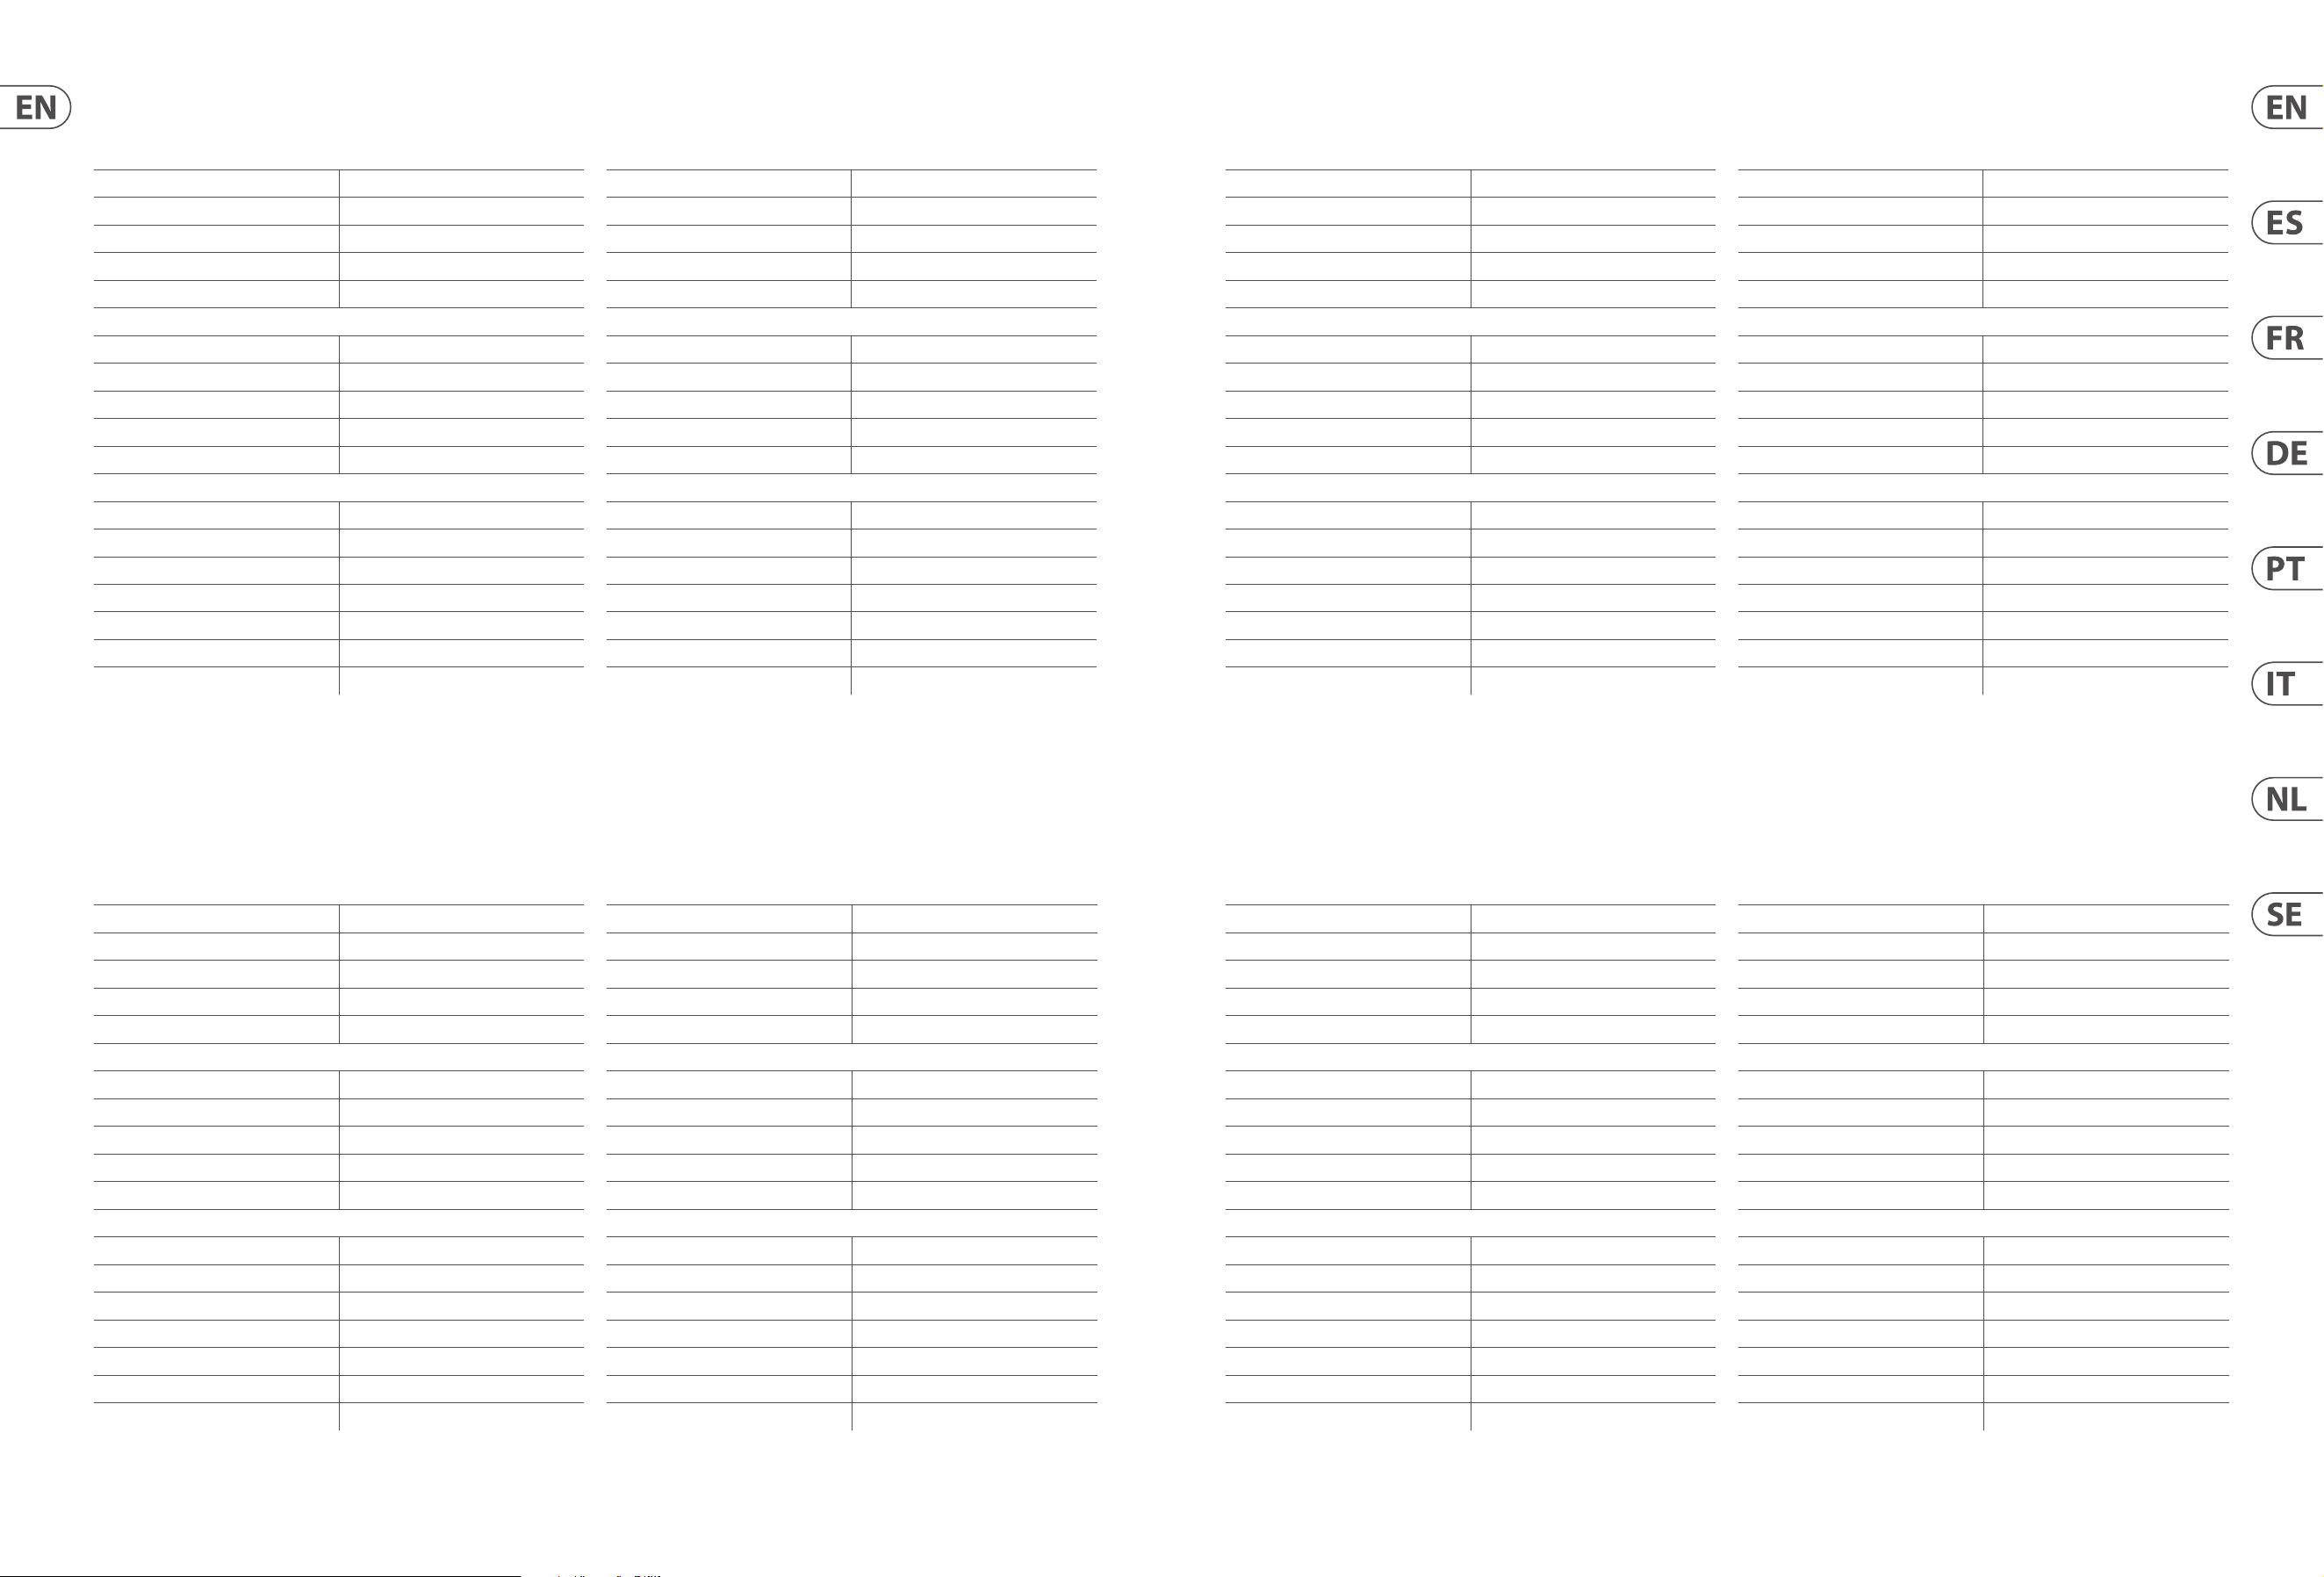
50 GO CAM WIRELESS Quick Start Guide 51
Specications
Wireless Transmitter
Connector type 3.5 mm and Type C
Battery backup Up to 30 hours
Battery capacity 400 mAh / 3.7 V
Charging duration About 1.5 hours
Weight 30 grams
Wireless Receiver
Connector type 3.5 mm and Type C
Battery backup Up to 8 hours
Battery capacity 400 mAh / 3.7 V
Charging duration About 1.5 hours
Weight 30 grams
Wireless System
Wireless technology 2.4 GHz ISM
Modulation GFSK
Maximum output power 4.01 dBm
Operating frequency 2.402 GHz - 2.480 GHz
Channels 79
Latency Less than 20 mS
Working distance Up to 30 m
Behringer is constantly striving to maintain the highest professional standards. As a result of these efforts,
modifications may be made from time to time to existing products without prior notice. Specifications and
appearance may differ from those listed or illustrated.
Especicaciones
Transmisor inalámbrico
Tipo de conector 3.5 mm y Tipo C
Respaldo de batería Hasta 30 horas
Capacidad de batería 400 mAh / 3.7 V
Duración de la carga Aproximadamente 1.5 horas
Peso 30 gramos
Receptor inalámbrico
Tipo de conector 3.5 mm y Tipo C
Respaldo de batería Hasta 8 horas
Capacidad de batería 400 mAh / 3.7 V
Duración de la carga Aproximadamente 1.5 horas
Peso 30 gramos
Sistema inalámbrico
Tecnología inalámbrica 2.4 GHz ISM
Modulación GFSK
Potencia máxima de salida 4.01 dBm
Frecuencia de operación 2.402 GHz - 2.480 GHz
Canales 79
Latencia Menos de 20 mS
Distancia de trabajo Hasta 30 m
Behringer se esfuerza constantemente por mantener los más altos estándares profesionales. Como resultado de
estos esfuerzos, pueden realizarse modificaciones de vez en cuando a los productos existentes sin previo aviso.
Las especificaciones y la apariencia pueden diferir de las enumeradas o ilustradas.
Spécications
Émetteur sans l
Type de connecteur 3.5 mm et Type C
Autonomie de la batterie Jusqu'à 30 heures
Capacité de la batterie 400 mAh / 3.7 V
Durée de charge Environ 1.5 heures
Poids 30 grammes
Récepteur sans l
Type de connecteur 3.5 mm et Type C
Autonomie de la batterie Jusqu'à 8 heures
Capacité de la batterie 400 mAh / 3.7 V
Durée de charge Environ 1.5 heures
Poids 30 grammes
Système sans l
Technologie sans l 2.4 GHz ISM
Modulation GFSK
Puissance de sortie maximale 4.01 dBm
Fréquence de fonctionnement 2.402 GHz - 2.480 GHz
Canaux 79
Latence Moins de 20 mS
Distance de travail Jusqu'à 30 m
Behringer s'efforce constamment de maintenir les normes professionnelles les plus élevées. En conséquence, des
modifications peuvent être apportées de temps en temps aux produits existants sans préavis. Les spécifications
et l'apparence peuvent différer de celles listées ou illustrées.
Spezikationen
Drahtloser Sender
Anschlusstyp 3.5 mm und Typ C
Akkulaufzeit Bis zu 30 Stunden
Akkukapazität 400 mAh / 3.7 V
Ladedauer Etwa 1.5 Stunden
Gewicht 30 Gramm
Drahtloser Empfänger
Anschlusstyp 3.5 mm und Typ C
Akkulaufzeit Bis zu 8 Stunden
Akkukapazität 400 mAh / 3.7 V
Ladedauer Etwa 1.5 Stunden
Gewicht 30 Gramm
Drahtloses System
Drahtlostechnologie 2.4 GHz ISM
Modulation GFSK
Maximale Ausgangsleistung 4.01 dBm
Betriebsfrequenz 2.402 GHz - 2.480 GHz
Kanäle 79
Latenz Weniger als 20 mS
Arbeitsabstand Bis zu 30 m
Behringer bemüht sich ständig, die höchsten professionellen Standards zu halten. Infolge dieser Bemühungen
können gelegentlich Änderungen an bestehenden Produkten ohne vorherige Ankündigung vorgenommen
werden. Spezifikationen und Erscheinungsbild können von den aufgeführten oder abgebildeten abweichen.
Especicações
Transmissor sem o
Tipo de conector 3.5 mm e Tipo C
Duração da bateria Até 30 horas
Capacidade da bateria 400 mAh / 3.7 V
Duração da carga Aproximadamente 1.5 horas
Peso 30 gramas
Receptor sem o
Tipo de aconector 3.5 mm e Tipo C
Duração da bateria Até 8 horas
Capacidade da bateria 400 mAh / 3.7 V
Duração da carga Aproximadamente 1.5 horas
Peso 30 gramas
Sistema sem o
Tecnologia sem o 2.4 GHz ISM
Modulação GFSK
Potência máxima de saída 4.01 dBm
Frequência de operação 2.402 GHz - 2.480 GHz
Canais 79
Latência Menos de 20 mS
Distância de trabalho Até 30 m
A Behringer está constantemente se esforçando para manter os mais altos padrões profissionais. Como resultado
desses esforços, modificações podem ser feitas de tempos em tempos em produtos existentes sem aviso prévio.
As especificações e a aparência podem diferir das listadas ou ilustradas.
Speciche
Trasmettitore wireless
Tipo di connettore 3.5 mm e Tipo C
Autonomia della batteria Fino a 30 ore
Capacità della batteria 400 mAh / 3.7 V
Durata della ricarica Circa 1.5 ore
Peso 30 grammi
Ricevitore wireless
Tipo di connettore 3.5 mm e Tipo C
Autonomia della batteria Fino a 8 ore
Capacità della batteria 400 mAh / 3.7 V
Durata della ricarica Circa 1.5 ore
Peso 30 grammi
Sistema wireless
Tecnologia wireless 2.4 GHz ISM
Modulazione GFSK
Potenza massima di uscita 4.01 dBm
Frequenza di funzionamento 2.402 GHz - 2.480 GHz
Canali 79
Latenza Meno di 20 mS
Distanza di lavoro Fino a 30 m
Behringer si impegna costantemente a mantenere i più alti standard professionali. Come risultato di questi
sforzi, possono essere apportate modifiche ai prodotti esistenti di tanto in tanto senza preavviso. Le specifiche e
l'aspetto possono differire da quelli elencati o illustrati.
Specicaties
Draadloze zender
Type connector 3.5 mm en Type C
Batterijduur Tot 30 uur
Batterijcapaciteit 400 mAh / 3.7 V
Oplaadtijd Ongeveer 1.5 uur
Gewicht 30 gram
Draadloze ontvanger
Type connector 3.5 mm en Type C
Batterijduur Tot 8 uur
Batterijcapaciteit 400 mAh / 3.7 V
Oplaadtijd Ongeveer 1.5 uur
Gewicht 30 gram
Draadloos systeem
Draadloze technologie 2.4 GHz ISM
Modulatie GFSK
Maximaal uitgangsvermogen 4.01 dBm
Frequentiebereik 2.402 GHz - 2.480 GHz
Kanalen 79
Latentie Minder dan 20 mS
Werkafstand Tot 30 m
Behringer streeft er voortdurend naar om de hoogste professionele normen te handhaven. Als resultaat van
deze inspanningen kunnen er van tijd tot tijd wijzigingen worden aangebracht aan bestaande producten zonder
voorafgaande kennisgeving. Specificaties en uiterlijk kunnen afwijken van de vermelde of geïllustreerde.
Specikationer
Trådlös sändare
Kontakttyp 3.5 mm och Typ C
Batteritid Upp till 30 timmar
Batterikapacitet 400 mAh / 3.7 V
Laddningstid Cirka 1.5 timmar
Vikt 30 gram
Trådlös mottagare
Kontakttyp 3.5 mm och Typ C
Batteritid Upp till 8 timmar
Batterikapacitet 400 mAh / 3.7 V
Laddningstid Cirka 1.5 timmar
Vikt 30 gram
Trådlöst system
Trådlös teknik 2.4 GHz ISM
Modulering GFSK
Maximal uteekt 4.01 dBm
Arbetsfrekvens 2.402 GHz - 2.480 GHz
Kanaler 79
Latens Mindre än 20 mS
Arbetsavstånd Upp till 30 m
Behringer strävar ständigt efter att upprätthålla de högsta professionella standarderna. Som ett resultat av
dessa ansträngningar kan ändringar göras då och då på befintliga produkter utan föregående meddelande.
Specifikationer och utseende kan skilja sig från de listade eller illustrerade.
52 GO CAM WIRELESS Quick Start Guide 53
Other important information
1. Register online. Please register your new
Music Tribe equipment right after you purchase it by
visiting musictribe.com. Registering your purchase using
our simple online form helps us to process your repair
claims more quickly and eciently. Also, read the terms
and conditions of our warranty, if applicable.
2. Malfunction. Should your Music Tribe
Authorized Reseller not be located in your vicinity,
you may contact the Music Tribe Authorized Fulller for
your country listed under “Support” at musictribe.com.
Should your country not be listed, please check if your
problem can be dealt with by our “Online Support” which
may also be found under “Support” at musictribe.com.
Alternatively, please submit an online warranty claim at
musictribe.com BEFORE returning the product.
3. Power Connections. Before plugging the
unit into a power socket, please make sure you are using
the correct mains voltage for your particular model.
Faulty fuses must be replaced with fuses of the same type
and rating without exception.
1. Registro online. Le recomendamos que
registre su nuevo aparato Music Tribe justo después de
su compra accediendo a la página web musictribe.com.
El registro de su compra a través de nuestro sencillo
sistema online nos ayudará a resolver cualquier
incidencia que se presente a la mayor brevedad posible.
Además, aproveche para leer los términos y condiciones de
nuestra garantía, si es aplicable en su caso.
2. Averías. En el caso de que no exista un distribuidor
Music
Tribe en las inmediaciones, puede ponerse en
contacto con el distribuidor
Music
Tribe de su país,
que encontrará dentro del apartado “Support” de nuestra
página web musictribe.com. En caso de que su país no
aparezca en ese listado, acceda a la sección “Online Support”
(que también encontrará dentro del apartado “Support”
de nuestra página web) y compruebe si su problema aparece
descrito y solucionado allí. De forma alternativa, envíenos a
través de la página web una solicitud online de soporte en
periodo de garantía ANTES de devolvernos el aparato.
3. Conexiones de corriente. Antes de enchufar
este aparato a una salida de corriente, asegúrese de que dicha
salida sea del voltaje adecuado para su modelo concreto.
En caso de que deba sustituir un fusible quemado, deberá
hacerlo por otro de idénticas especicaciones, sin excepción.
1. Enregistrez-vous en ligne. Prenez le
temps d’enregistrer votre produit Music Tribe aussi vite
que possible sur le site Internet musictribe.com. Le fait
d’enregistrer le produit en ligne nous permet de gérer
les réparations plus rapidement et plus ecacement.
Prenez également le temps de lire les termes et conditions
de notre garantie.
2. Dysfonctionnement. Si vous n’avez pas
de revendeur Music Tribe près de chez vous, contactez le
distributeur Music Tribe de votre pays : consultez la liste
des distributeurs de votre pays dans la page “Support”
de notre site Internet musictribe.com. Si votre pays n’est
pas dans la liste, essayez de résoudre votre problème avec
notre “aide en ligne” que vous trouverez également dans
la section “Support” du site musictribe.com. Vous pouvez
également nous faire parvenir directement votre demande
de réparation sous garantie par Internet sur le site
musictribe.com AVANT de nous renvoyer le produit.
3. Raccordement au secteur. Avant de relier
cet équipement au secteur, assurez-vous que la tension
secteur de votre région soit compatible avec l’appareil.
Veillez à remplacer les fusibles uniquement par des
modèles exactement de même taille et de même valeur
électrique — sans aucune exception.
1. Online registrieren. Bitte registrieren Sie
Ihr neues Music Tribe-Gerät direkt nach dem Kauf auf der
website musictribe.com. Wenn Sie Ihren Kauf mit unserem
einfachen online Formular registrieren, können wir Ihre
Reparaturansprüche schneller und ezienter bearbeiten.
Lesen Sie bitte auch unsere Garantiebedingungen,
falls zutreend.
2. Funktionsfehler. Sollte sich kein Music Tribe
Händler in Ihrer Nähe benden, können Sie den
Music Tribe Vertrieb Ihres Landes kontaktieren, der auf
musictribe.com unter „Support“ aufgeführt ist. Sollte Ihr
Land nicht aufgelistet sein, prüfen Sie bitte, ob Ihr Problem
von unserem „Online Support“ gelöst werden kann, den
Sie ebenfalls auf musictribe.com unter „Support“ nden.
Alternativ reichen Sie bitte Ihren Garantieanspruch
online auf musictribe.com ein, BEVOR Sie das
Produkt zurücksenden.
3. Stromanschluss. Bevor Sie das Gerät an
eine Netzsteckdose anschließen, prüfen Sie bitte, ob Sie
die korrekte Netzspannung für Ihr spezielles Modell
verwenden. Fehlerhafte Sicherungen müssen ausnahmslos
durch Sicherungen des gleichen Typs und Nennwerts
ersetzt werden.
1. Registre-se online. Por favor, registre seu
novo equipamento Music Tribe logo após a compra
visitando o site musictribe.com Registrar sua compra
usando nosso simples formulário online nos ajuda a
processar seus pedidos de reparos com maior rapidez e
eciência. Além disso, leia nossos termos e condições de
garantia, caso seja necessário.
2. Funcionamento Defeituoso.
Caso seu fornecedor Music Tribe não esteja localizado
nas proximidades, você pode contatar um distribuidor
Music Tribe para o seu país listado abaixo de “Suporte”
em musictribe.com. Se seu país não estiver na lista,
favor checar se seu problema pode ser resolvido com o
nosso “Suporte Online” que também pode ser achado
abaixo de “Suporte”em musictribe.com. Alternativamente,
favor enviar uma solicitação de garantia online em
musictribe.com ANTES da devolução do produto.
3. Ligações. Antes de ligar a unidade à tomada,
assegure-se de que está a utilizar a voltagem correcta para
o modelo em questão. Os fusíveis com defeito terão de
ser substituídos, sem qualquer excepção, por fusíveis do
mesmo tipo e corrente nominal.
1. Registratevi online. Vi invitiamo a registrare
il nuovo apparecchio Music Tribe subito dopo averlo
acquistato visitando musictribe.com. La registrazione
dell'acquisto tramite il nostro semplice modulo online ci
consente di elaborare le richieste di riparazione in modo
più rapido ed eciente. Leggete anche i termini e le
condizioni della nostra garanzia, qualora applicabile.
2. Malfunzionamento. Nel caso in cui il
rivenditore autorizzato Music Tribe non si trovi nelle vostre
vicinanze, potete contattare il Music Tribe Authorized
Fulller per il vostro paese, elencato in “Support”
@ musictribe.com. Se la vostra nazione non è elencata,
controllate se il problema può essere risolto tramite il
nostro “Online Support”che può anche essere trovato sotto
“Support” @ musictribe.com. In alternativa, inviate una
richiesta di garanzia online su musictribe.com PRIMA di
restituire il prodotto.
3. Collegamento all’alimentazione.
Prima di collegare l'unità a una presa di corrente,
assicuratevi di utilizzare la tensione di rete corretta
per il modello specico. I fusibili guasti devono essere
sostituiti, senza eccezioni, con fusibili dello stesso tipo e
valore nominale.
Important information
Aspectos importantes
Informations importantes
Weitere wichtige
Informationen
Outras Informações
Importantes
Informazioni importanti
Specykacje
Nadajnik bezprzewodowy
Rodzaj złącza 3.5 mm i Typ C
Czas pracy na baterii Do 30 godzin
Pojemność baterii 400 mAh / 3.7 V
Czas ładowania Około 1.5 godzin
Waga 30 gramów
Odbiornik bezprzewodowy
Rodzaj złącza 3.5 mm i Typ C
Czas pracy na baterii Do 8 godzin
Pojemność baterii 400 mAh / 3.7 V
Czas ładowania Około 1.5 godzin
Waga 30 gramów
System bezprzewodowy
Technologia bezprzewodowa 2.4 GHz ISM
Modulacja GFSK
Maksymalna moc wyjściowa 4.01 dBm
Częstotliwość pracy 2.402 GHz - 2.480 GHz
Kanały 79
Opóźnienie Mniej niż 20 mS
Odległość działania Do 30 m
Behringer nieustannie dąży do utrzymania najwyższych standardów profesjonalnych. W wyniku tych
starań, zmiany mogą być wprowadzane do istniejących produktów od czasu do czasu bez wcześniejszego
powiadomienia. Specyfikacje i wygląd mogą różnić się od wymienionych lub zilustrowanych.
仕様
ワイヤレストランスミッター
コネクタータイプ 3.5 mm および Type C
バッテリー持 続 時 間 最大 30 時間
バッテリー容量 400 mAh / 3.7 V
充電時間 約 1.5 時間
重量 30 グラム
ワイヤレスレシーバー
コネクタータイプ 3.5 mm および Type C
バッテリー持 続 時 間 最大 8 時間
バッテリー容量 400 mAh / 3.7 V
充電時間 約 1.5 時間
重量 30 グラム
ワイヤレスシステム
ワイヤレス技 術 2.4 GHz ISM
変調 GFSK
最大出力 4.01 dBm
動作周波数 2.402 GHz - 2.480 GHz
チャネル 79
レイテンシー 20 mS 未満
動作距離 最大30 m
Behringer は常に最高のプロフェッショナルスタンダードを維持するために努力してい
ます。その結果として、既存の製品に変更が加えられることがありますが、事前通知
なしに行われることがあります。仕様および外観は記載されたものまたは図示され
たものと異 なる場 合 が ありま す。
规格
无线发射器
连接类型 3.5 mm 和 Type C
电池续航 最长 30 小时
电池容量 400 mAh / 3.7 V
充电时长 约 1.5 小时
重量 30 grams
无线接收器
连接类型 3.5 mm 和 Type C
电池续航 最长 8 小时
电池容量 400 mAh / 3.7 V
充电时长 约 1.5 小时
重量 30 grams
无线系统
无线技术 2.4 GHz ISM
调制方式 GFSK
最大输出功率 4.01 dBm
工作频率 2.402 GHz - 2.480 GHz
信道 79
延迟 小于 20 mS
工作距离 最长 30 m
Behringer 不断努力保持最高的专业标准。 由于这些努力, 现有产品可能会不时进行修改,
恕不另行通知。 规格和外观可能与所列或所示的有所不同。
54 GO CAM WIRELESS Quick Start Guide 55
FEDERAL COMMUNICATIONS
COMMISSION COMPLIANCE
INFORMATION
Responsible Party Name: Music Tribe Commercial NV Inc.
Address: 122 E. 42nd St.1,
8th Floor NY, NY 10168,
United States
Email Address: [email protected]
This equipment has been tested and found to comply with the limits for a Class
B digital device, pursuant to part 15 of the FCC Rules. These limits are designed
to provide reasonable protection against harmful interference in a residential
installation. This equipment generates, uses and can radiate radio frequency
energy and, if not installed and used in accordance with the instructions, may cause
harmful interference to radio communications. However, there is no guarantee that
interference will not occur in a particular installation. If this equipment does cause
harmful interference to radio or television reception, which can be determined
by turning the equipment o and on, the user is encouraged to try to correct the
interference by one or more of the following measures:
• • Reorient or relocate the receiving antenna.
• • Increase the separation between the equipment and receiver.
• • Connect the equipment into an outlet on a circuit dierent from that to which the
receiver is connected.
• • Consult the dealer or an experienced radio/TV technician for help.
This equipment complies with Part 15 of the FCC rules. Operation is subject to the
following two conditions:
(1) this device may not cause harmful interference, and
(2) this device must accept any interference received, including interference that may
cause undesired operation.
Important information:
Changes or modications to the equipment not expressly approved by Music Tribe
can void the user’s authority to use the equipment.
Caution!
The manufacturer is not responsible for any radio or TV interference caused by
unauthorized modication to this equipment. Such modications could void the user
authority to operate the equipment.
FCC RF Radiation Exposure Statement:
This equipment complies with FCC RF radiation exposure limits set forth for an
uncontrolled environment.
CAN ICES-003 (B)/NMB-003(B)
IC RF Radiation Exposure Statement:
Caution!
This device contains licence-exempt transmitter(s)/receiver(s) that comply with
Innovation, Science and Economic Development Canada’s licence-exempt RSS(s).
Operation is subject to the following two conditions:
(1) This device may not cause interference.
(2) This device must accept any interference, including interference that may cause
undesired operation of the device.
This equipment complies with IC radiation exposure limits set forth for an uncontrolled
environment.
L’émetteur/récepteur exempt de licence contenu dans le présent appareil est
conforme aux CNR d’Innovation, Sciences et Développement économique Canada
applicables aux appareils radio exempts de licence. L’exploitation est autorisée aux
deux conditions suivantes :
1) L’appareil ne doit pas produire de brouillage;
2) L’appareil doit accepter tout brouillage radioélectrique subi, même si le brouillage
est susceptible d’en compromettre le fonctionnement
Cet appareil est conforme à IC l’exposition aux rayonnements limites xées pour un
environnement non contrôlé.
Hereby, Music Tribe declares that this product is in compliance with Directive
2014/53/EU, Directive 2014/30/EU, Directive 2014/35/EU, Directive 2011/65/EU and
Amendment 2015/863/EU, Directive 2012/19/EU, Regulation 519/2012 REACH SVHC
and Directive 1907/2006/EC.
Full text of EU DoC is available at https://community.musictribe.com/
EU Representative: Music Tribe Brands DK A/S
Address: Gammel Strand 44, DK-1202 København K, Denmark
UK Representative: Music Tribe Brands UK Ltd.
Address: 8th Floor, 20 Farringdon Street, London EC4A 4AB, United Kingdom
Correct disposal of this product: This symbol indicates that this
product must not be disposed of with household waste,
according to the WEEE Directive (2012/19/EU) and your
national law. This product should be taken to a collection
center licensed for the recycling of waste electrical and
electronic equipment (EEE). The mishandling of this type of
waste could have a possible negative impact on the
environment and human health due to potentially hazardous
substances that are generally associated with EEE. At the same
time, your cooperation in the correct disposal of this product will contribute to the
ecient use of natural resources. For more information about where you can take
your waste equipment for recycling, please contact your local city oce, or your
household waste collection service.
Behringer
GO CAM WIRELESS
GO CAM WIRELESS
FCC ID: QWHGOCAM
Other important information
1. Registreer online. Registreer uw nieuwe
Music Tribe-apparatuur direct nadat u deze hebt gekocht
door naar musictribe.com te gaan. Door uw aankoop
te registreren via ons eenvoudige online formulier,
kunnen wij uw reparatieclaims sneller en eciënter
verwerken. Lees ook de voorwaarden van onze garantie,
indien van toepassing.
2. Storing. Mocht uw door Music Tribe
geautoriseerde wederverkoper niet bij u in de buurt zijn
gevestigd, dan kunt u contact opnemen met de door Music
Tribe Authorized Fulller voor uw land vermeld onder
“Support” op musictribe.com. Als uw land niet in de lijst
staat, controleer dan of uw probleem kan worden opgelost
door onze "Online Support", die u ook kunt vinden onder
"Support" op musictribe.com. U kunt ook een online
garantieclaim indienen op musictribe.com VOORDAT u het
product retourneert.
3. Stroomaansluitingen. Voordat u het
apparaat op een stopcontact aansluit, moet u ervoor
zorgen dat u de juiste netspanning voor uw specieke
model gebruikt. Defecte zekeringen moeten zonder
uitzondering worden vervangen door zekeringen van
hetzelfde type en dezelfde waarde.
1. Registrera online. Registrera din nya Music
Tribe-utrustning direkt efter att du köpt den genom
att besöka musictribe.com. Att registrera ditt köp med
vårt enkla onlineformulär hjälper oss att behandla dina
reparationsanspråk snabbare och mer eektivt. Läs också
villkoren i vår garanti, om tillämpligt.
2. Fel. Om din Music Tribe-auktoriserade återförsäljare
inte nns i din närhet kan du kontakta Music Tribe
Authorized Fulller för ditt land listat under “Support” på
musictribe.com. Om ditt land inte är listat, kontrollera om
ditt problem kan hanteras av vår “Onlinesupport” som
också nns under “Support” på musictribe.com. Alternativt
kan du skicka in ett online-garantianspråk på musictribe.
com INNAN du returnerar produkten.
3. Strömanslutningar. Innan du ansluter
enheten till ett eluttag, se till att du använder rätt
nätspänning för just din modell. Felaktiga säkringar
måste bytas ut mot säkringar av samma typ och
märkning utan undantag.
1. Zarejestrować online. Zarejestruj swój
nowy sprzęt Music Tribe zaraz po zakupie na stronie
musictribe.com. Zarejestrowanie zakupu za pomocą
naszego prostego formularza online pomaga nam szybciej
i efektywniej rozpatrywać roszczenia dotyczące naprawy.
Przeczytaj również warunki naszej gwarancji, jeśli dotyczy.
2. Awaria. Jeśli Twój autoryzowany sprzedawca
Music Tribe nie znajduje się w pobliżu, możesz
skontaktować się z autoryzowanym dostawcą Music Tribe
dla swojego kraju, wymienionym w sekcji „Wsparcie” na
stronie musictribe.com. Jeśli Twojego kraju nie ma na
liście, sprawdź, czy Twój problem może zostać rozwiązany
przez nasze „Wsparcie online”, które można również
znaleźć w sekcji „Wsparcie” na stronie musictribe.com.
Alternatywnie, prześlij zgłoszenie gwarancyjne online na
musictribe.com PRZED zwrotem produktu.
3. Połączenia zasilania. Przed podłączeniem
urządzenia do gniazdka sieciowego upewnij się, że
używasz odpowiedniego napięcia sieciowego dla danego
modelu. Wadliwe bezpieczniki należy bez wyjątku
wymienić na bezpieczniki tego samego typu i wartości.
1. ヒューズの格納部 / 電圧の選択:
ユニットをパワーソケットに接続する前
に、各モデルに対応した正しい主電源を
使用していることを確認してください。
ユニットによっては、230 V と 120 V の
2 つの違うポジションを切り替えて使う、
ヒューズの格納部を備えているものがあ
ります。正しくない値のヒューズは、絶
対に適切な値のヒューズに交換されてい
る必要がありま す。
2. 故障: Music Tribe ディーラーがお客様
のお近くにないときは、musictribe.com の
“Support” 内に列記されている、お客様の国
の Music Tribe ディストリビューターにコン
タクトすることができます。お 客様の国
がリストにない場合は、同じ musictribe.com
の “Support” 内にある “Online Support” でお客
様の問題が処理できないか、チェックし
てみてください。あるいは、商品を返送
する前に、musictribe.com で、オンラインの
保証請求を要請してください。
3. 電源接続: 電源ソケットに電源コー
ドを接続する前に、本製品に適切な電圧
を使用していることをご確認ください。
不具合が発生したヒューズは必ず電圧お
よび電流、種類が同じヒューズに交換す
る必要があります。
1. 在线注册。 购买后, 请访问我们的网站
立即注册新的 Music Tribe 设备。 使用我们简
单的在线表格注册您的购买信息有助于我
们更快, 更有效地处理您的维修索赔。 另外,
请阅读我们保修的条款和条件 (如适用)。
2. 无法正常工作。 如果您所在地区没有
Music Tribe 授权的经销商, 您可以联系您
所在国家/地区的 Music Tribe 授权履行者,
其联系方式在 behringer.com 的 “支持” 部
分列出。 如果您的国家/地区未列出, 请检
查您的问题是否可以通过我们的 “在线支
持” 解决, 该选项也可以在 behringer.com 的
“支持” 部分找到。 或者, 您也可以在退回产
品之前在 behringer.com 提交在线保修索赔。
3. 电源连接。 将本设备连接电源前,
请确保使用的电压正确。 保险丝需要更换时,
必须使用相同型号及定额的保险丝。
Belangrijke informatie
Viktig information
Ważna informacja
その他の重要な情報
其他的重要信息

56 GO CAM WIRELESS Quick Start Guide 57
WARNING
• • Replacement of a battery with an incorrect type can defeat a safeguard.
• • Disposal of a battery into re or a hot oven, or mechanically crushing or
cutting of a battery can result in an explosion.
• • Leaving a battery in an extremely high temperature surrounding environment
can result in an explosion or the leakage of ammable liquid or gas.
• • A battery subjected to extremely low air pressure may result in an explosion or
the leakage of ammable liquid or gas.
• • Attention should be drawn to the environmental aspects of battery disposal.
• • Batteries (battery pack or batteries installed) shall not be exposed to excessive
heat such as sunshine, re or the like.
ADVERTENCIA
• • El reemplazo de una batería con un tipo incorrecto puede anular una medida
de seguridad.
• • La eliminación de una batería en fuego o en un horno caliente, o la trituración
o corte mecánico de una batería puede resultar en una explosión.
• • Dejar una batería en un entorno de temperatura extremadamente alta puede
resultar en una explosión o en la fuga de líquido o gas inamable.
• • Una batería sometida a una presión de aire extremadamente baja puede
resultar en una explosión o en la fuga de líquido o gas inamable.
• • Debe prestarse atención a los aspectos medioambientales de la eliminación
de baterías.
• • Las baterías (paquete de baterías o baterías instaladas) no deben exponerse a
un calor excesivo como la luz solar, el fuego o similares.
AVERTISSEMENT
• • Le remplacement d'une batterie par un type incorrect peut annuler une
mesure de sécurité.
• • L'élimination d'une batterie dans le feu ou dans un four chaud, ou l'écrasement
ou la découpe mécanique d'une batterie peut entraîner une explosion.
• • Laisser une batterie dans un environnement à température extrêmement
élevée peut entraîner une explosion ou une fuite de liquide ou de
gaz inammable.
• • Une batterie soumise à une pression atmosphérique extrêmement basse peut
entraîner une explosion ou une fuite de liquide ou de gaz inammable.
• • Il convient de prêter attention aux aspects environnementaux de l'élimination
des batteries.
• • Les batteries (pack de batteries ou batteries installées) ne doivent pas être
exposées à une chaleur excessive telle que la lumière du soleil, le feu ou des
éléments similaires.
WARNUNG
• • Der Austausch einer Batterie mit einem falschen Typ kann eine
Sicherheitsmaßnahme außer Kraft setzen.
• • Die Entsorgung einer Batterie in Feuer oder in einem heißen Ofen, oder
das mechanische Zerkleinern oder Schneiden einer Batterie kann zu einer
Explosion führen.
• • Das Verlassen einer Batterie in einer Umgebung mit extrem hoher
Temperatur kann zu einer Explosion oder dem Austreten von brennbarer
Flüssigkeit oder Gas führen.
• • Eine Batterie, die extrem niedrigem Luftdruck ausgesetzt ist, kann zu einer
Explosion oder dem Austreten von brennbarer Flüssigkeit oder Gas führen.
• • Auf die Umweltaspekte der Batterieentsorgung sollte geachtet werden.
• • Batterien (Batteriepack oder eingebaute Batterien) dürfen nicht übermäßiger
Hitze wie Sonnenschein, Feuer oder ähnlichem ausgesetzt werden.
AVISO
• • A substituição de uma bateria por um tipo incorreto pode anular uma
medida de segurança.
• • A eliminação de uma bateria no fogo ou em um forno quente, ou a trituração
ou corte mecânico de uma bateria pode resultar em uma explosão.
• • Deixar uma bateria em um ambiente de temperatura extremamente alta pode
resultar em uma explosão ou no vazamento de líquido ou gás inamável.
• • Uma bateria submetida a uma pressão de ar extremamente baixa pode
resultar em uma explosão ou no vazamento de líquido ou gás inamável.
• • Deve-se prestar atenção aos aspectos ambientais da eliminação de baterias.
• • As baterias (pacote de baterias ou baterias instaladas) não devem ser expostas
a calor excessivo, como luz solar, fogo ou semelhantes.
AVVERTENZA
• • La sostituzione di una batteria con un tipo non corretto può annullare una
misura di sicurezza.
• • L'eliminazione di una batteria nel fuoco o in un forno caldo, o la frantumazione
o il taglio meccanico di una batteria può provocare un'esplosione.
• • Lasciare una batteria in un ambiente con temperatura estremamente elevata
può provocare un'esplosione o la fuoriuscita di liquido o gas inammabile.
• • Una batteria sottoposta a una pressione dell'aria estremamente bassa può
provocare un'esplosione o la fuoriuscita di liquido o gas inammabile.
• • Si deve prestare attenzione agli aspetti ambientali dello smaltimento delle batterie.
• • Le batterie (pacchi batterie o batterie installate) non devono essere esposte a
calore eccessivo come la luce solare, il fuoco o simili.
WAARSCHUWING
• • Het vervangen van een batterij door een onjuist type kan een
veiligheidsmaatregel tenietdoen.
• • Het weggooien van een batterij in vuur of in een hete oven, of het mechanisch
verpletteren of snijden van een batterij kan resulteren in een explosie.
• • Het achterlaten van een batterij in een omgeving met een extreem hoge
temperatuur kan resulteren in een explosie of het vrijkomen van brandbare
vloeistof of gas.
• • Een batterij die aan een extreem lage luchtdruk wordt blootgesteld, kan
resulteren in een explosie of het vrijkomen van brandbare vloeistof of gas.
• • Er moet aandacht worden besteed aan de milieuaspecten van batterijverwijdering.
• • Batterijen (batterijpakket of geïnstalleerde batterijen) mogen niet worden
blootgesteld aan overmatige hitte zoals zonlicht, vuur of dergelijke.
VARNING
• • Ersättning av ett batteri med fel typ kan upphäva en säkerhetsåtgärd.
• • Bortskaande av ett batteri i eld eller en het ugn, eller mekanisk krossning
eller skärning av ett batteri kan resultera i en explosion.
• • Att lämna ett batteri i en miljö med extremt hög temperatur kan resultera i en
explosion eller läckage av brandfarlig vätska eller gas.
• • Ett batteri som utsätts för extremt lågt lufttryck kan resultera i en explosion
eller läckage av brandfarlig vätska eller gas.
• • Uppmärksamhet bör riktas mot de miljömässiga aspekterna av batterihantering.
• • Batterier (batteripaket eller installerade batterier) får inte utsättas för
överdriven värme såsom solljus, eld eller liknande.
OSTRZEŻENIE
• • Wymiana baterii na niewłaściwy typ może unieważnić środek ochronny.
• • Utylizacja baterii w ogniu lub gorącym piekarniku, lub mechaniczne
zgniatanie lub cięcie baterii może skutkować wybuchem.
• • Pozostawienie baterii w otoczeniu o ekstremalnie wysokiej temperaturze
może skutkować wybuchem lub wyciekiem łatwopalnej cieczy lub gazu.
• • Bateria poddana ekstremalnie niskim ciśnieniem powietrza może skutkować
wybuchem lub wyciekiem łatwopalnej cieczy lub gazu.
• • Należy zwrócić uwagę na aspekty środowiskowe związane z utylizacją baterii.
• • Baterii (pakietu baterii lub zainstalowanych baterii) nie należy narażać na
nadmierne ciepło, takie jak światło słoneczne, ogień lub tym podobne.
警告
• • 不 適 切 な 種 類 の バ ッ テ リ ー に 交 換 す る と 、安 全 装 置 が 無 効 に な
る可 能 性 が あります。
• • バッテリーを火中や 熱い オーブンに廃 棄する、または バッテ
リーを機械的に粉砕・切断すると、爆発を引き起こす可能性
が あります。
• • バッテリーを極めて高温の環境に放置すると、爆発や可燃性液
体または ガ スの 漏 れ の原 因となる 場 合 が ありま す。
• • バッテリーが極めて低い気圧にさらされると、爆発や可燃性液
体または ガ スの 漏 れ の原 因となる 場 合 が ありま す。
• • バッテリーの廃棄に際しては、環境面への配慮が必要です。
• • バッテリー(バッテリーパックまたは 取り付けられた バッテ
リー)は、日光、火などの過度の熱にさらされないようにして
ください。
警告
• 用不正确类型的电池替换电池可能会破坏安全保护措施。
• 将电池丢弃到火中或热烤箱中, 或机械性地压碎或切割电池可
能会导致爆炸。
• 将电池置于极高温的环境中可能会导致爆炸或可燃液体或气
体的泄漏。
• 电池暴露在极低气压下可能会导致爆炸或可燃液体或气体的
泄漏。
• 应注意电池处理的环境问题。
• 电池 (电池组或已安装的电池) 不应暴露于过热环境, 如阳光、
火等。
中国无线电型号核准豁免声明:
(一) 该设备符合‘微功率短距离无线电发射设备名录和技术要求’
的第 (一) 条款, 用于家庭、办公室和商场等场所, 采用高斯频移键
控 (GFSK) 技术, 内置天线, 进行无线音频传输。
(二)用户不得擅自改变使用场景或使用条件、扩大发射频率范围、
加大发射功率 (包括额外加装射频功率放大器), 不得擅自更改
发射天线;
(三) 不得对其他合法的无线电台 (站) 产生有害干扰, 也不得提出
免受有害干扰保护;
(四) 该设备可以承受辐射射频能量的工业、科学及医疗 (ISM) 应用
设备的干扰或其他合法的无线电台(站)干扰;
(五) 如对其他合法的无线电台(站)产生有害干扰时, 应立即停止使
用, 并采取措施消除干扰后方可继续使用;
(六) 在航空器内和依据法律法规、国家有关规定、标准划设的射
电天文台、气象雷达站、卫星地球站 (含测控、测距、接收、导航站)
等军民用无线电台 (站)、机场等的电磁环境保护区域内使用微功
率设备, 应当遵守电磁环境保护及相关行业主管部门的规定;
(七) 禁止在以机场跑道中心点位圆心、半径 5000 米的区域内使用
各类模型遥控器;
(八) 该微功率设备使用时运行的环境条件: 运行温度为
0°C ~+45°C, 3.7 V 锂电池供电, 充电电压 5 V

We Hear You