產品安全指引、使用說明安裝指南及網上登記保養資料
Model
產品型號
:
DS242HEHK
DS242HGHK
Installation Guide and
Online Warranty Registration Information
產 5
產 ( ) 6
產 ( ) 7
8-9
10
查 11
11
11
抽濕模式
安裝過濾網
12
14
夜間模式
空氣質量指示燈
16
16
16
17
17
1 8
19
20-21
22-23
24
產 概
空氣淨化功能
:
感 您 惠而浦抽濕 , 為您 。 您的 。
, , 查 、 。
產 , , 。
10
19
乾衣模式 13
13
第 6 感智能模式
14
15
1 -2
3-
4
功能
1
警告
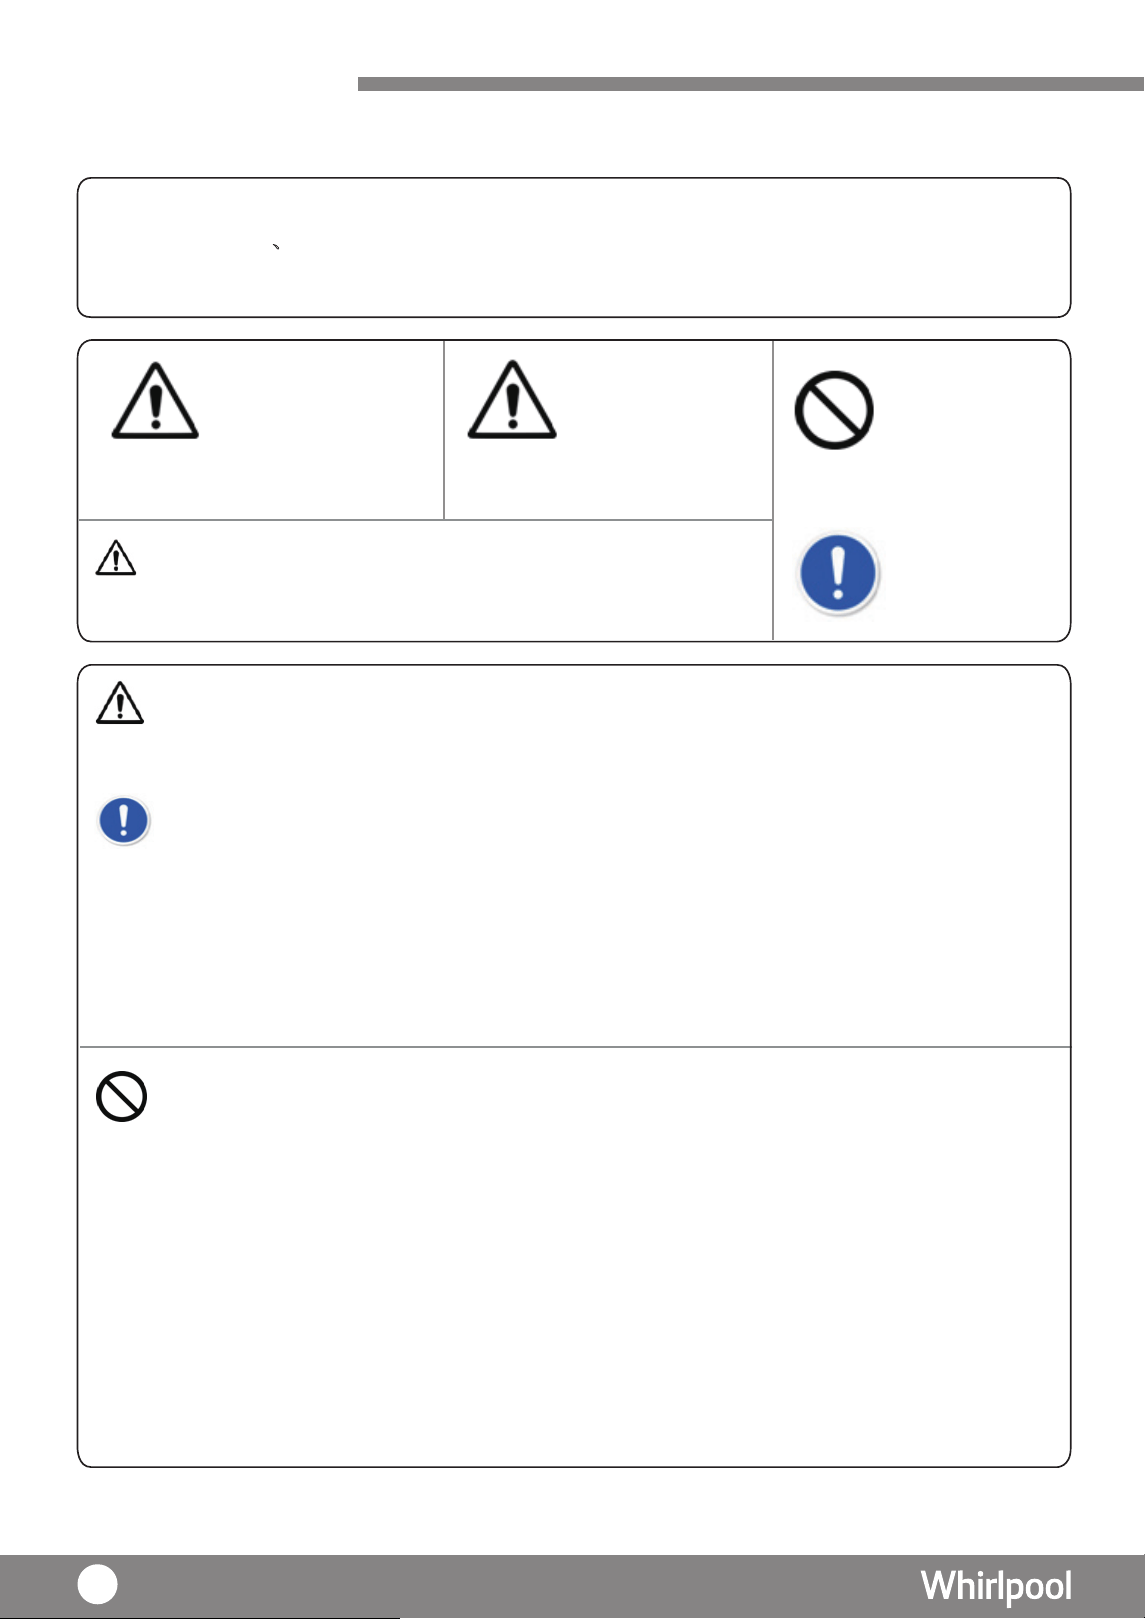
安全注意事項
安全標誌
在使用本產品前,請仔細閱讀本使用說明書。使用此產品時,應遵照本說明書的要
求,以減少火災 電擊及受傷風險。、
請妥善保存此說明書以便日後查閱。
警告 : 此產品只限於室內使用。此產品不適合及不建議用於家居以外
的 地方。不適當使用此產品會有機會引致火警 、 觸電的危險或對人身
此標誌的內容是必
造成傷害或財產的損失。
否須禁止的行為,
則可能會導致產品
警告的損壞及導致
死亡或重傷。
·
不可使用額定電壓 220V (50Hz) 以外的電源。
·
確保電源線未被擠壓,損壞或過度彎曲。手濕時禁止接觸電源線及插頭。
·
此
產品必須連接地線。
·
請確保電源插頭上沒有積塵及沒鬆動後,將其牢固地插入電源插座,及應用乾
布擦拭電插頭的灰塵。積塵或接觸不良可導致觸電或火警發生。
·
此
產
品必須嚴格按照使用地區的接線要求進行。
·
禁止使用容易破損的電源線或插頭。會導致火警或觸電的危險。
·
切勿移除地線的插腳。
·
若電源線損壞,必須由製造商或其維修部之技術人員更換。
·
·
切勿以拉扯電源線的方式拔出電源插頭。請抓緊插頭,從插座中直接拔出。
切勿扭曲或擠壓電源線,防止電源線受損壞。
·
切勿使用拖板或延長線,否則可能會導致火警發生。
·
切勿把產品,插頭或電源線浸泡於水中或用液體噴灑,否則可能會導致觸電或會
對人身及財產造成傷害及損失。
·
手濕時切勿接觸電源插頭,斷路器及緊急按鈕。
有關電源及電源線
警告 注意
此 標 誌 的 內 容
是 必 須 禁 止 的
行 為, 否 則 可
能 會 導 致 受 傷
及財物損失。
表示不允許做
的禁止事項。
表示必須做的
強制事項。
警告
監顧人必須確保兒童不能將此產品當成玩具使用。
確保在移動或不使用此產品前,把水箱內的水倒掉。切勿飲用在水箱內的水。
切勿將此產品排出的水供人或寵物作飲用,可能會對身體有害。
切勿站立或斜靠在此產品上。否則本機會移動或傾倒而導致受傷。
此產品的操作溫度為攝氏 5 至 35 度之間。
在維修前,必須把插頭拔出。
在移動此產品前,必須將水箱的水倒掉。
每次進行產品清潔前,必須將產品電源完全關掉。產品內置的風扇會以高速運轉,
會引致受傷。
若長時間不使用此產品,請確保產品拔掉插頭及把水箱內的水倒掉 。否則,
可能引致短路或發生火警等危險。
每次使用後,請把水箱內的水倒掉,以免細菌滋生。
使用時
切勿將手指或其他物品放置在產品上或放入產品內,否則會有可能會導致受傷。
切勿用水或清潔劑直接清洗此產品。
此產品不能由無行為能力,或缺乏經驗和知識的人士使用
包括兒童 ,除
非他們已獲得由負責他們安全的人就使用本產品進行監督或指導。
此產品只限於室內使用。本機不可直接被陽光照射,或沒有遮蓋的地方使用。
否則,有可能導致觸電,短路或火警等危險發生。
切勿在產品的出風口處放置燃燒產品,
例如火爐。否則可能影響燃燒產品不
能正常運作。
切勿在衣櫃或家具之間或狹窄不通風的地方使用此產品。若通風不良,可導
致本機發熱或火警發生等危險。
切勿將裝有水的容器例如花瓶等放置在此產品上或附近,若不慎將水倒入機
內,會降低產品的絕緣性能,導致觸電,短路或發生火警等危險。
切勿將衣服或任何物產覆蓋在出風口和入風口處 。否則通風受阻,可導致本
機發熱或火警發生等危險。
切勿自行維修,拆卸或改裝此產品。否則,可能引致短路或發生火警。請聯
絡生產商或其認可之代理查詢。
確保拔掉插頭前,必須將產品電源完全關掉,否則可能引致受傷。
·
·
·
·
·
·
·
·
·
·
·
·
·
·
·
·
·
·
·
·
2
安全注意事項
3
熱時,壓縮機會自動停止以防止意外發生。如出現過熱情況,請把插頭從電源
拔出,並等待約 45 分鐘後,再次啟動產品。
切勿將此產品用於一些需要儲存在常溫保存物品的地方,例如藝術珍品或學
術資料等。
若沒有裝上生產商指定的過濾網,切勿使用此產品。
切勿於存有化學物品的地方使用此產品,例如醫院、實驗室、工廠等等,否
則可導致燃燒及發生火警等危險。
切勿使用易燃清潔劑清洗此產品,例如汽油。
當可燃氣體泄漏時,切勿使用此產品,否則可導致燃燒及發生火警等危險。
切勿使用輪子將此產品放在不平坦的地面上移動。在不平坦的地面上移動此
產品時,請把此產品身抬高,避免損壞滑輪或地板。在厚地毯上移動時,請
抬起機身,否則滑輪可能會在地板或地毯上留下痕跡。
切勿令機身翻倒或使其掉落。切勿在機身一側儲存物品或用力移動。否則可
導致產品損壞或漏水或短路等情況。
切勿在高處 ( 如桌子上)使用此產品,否則可導致此產品跌落造成傷害或損壞。
切勿觸碰感應器,如感應器上有污漬,將無法進行正常偵測。
機身翻倒或運輸後
當 品有異味或怪異聲響時,請關閉電源,並聯繫客戶服務。
,需直立靜止 4 小時以上,再通電。
使用時 請檢查房間尺寸,確定此產品是否有足夠的抽濕能力。當壓縮機變得異常地發
注意事項
·
·
·
·
·
·
·
·
·
·
·
安全注意事項
產
·
4
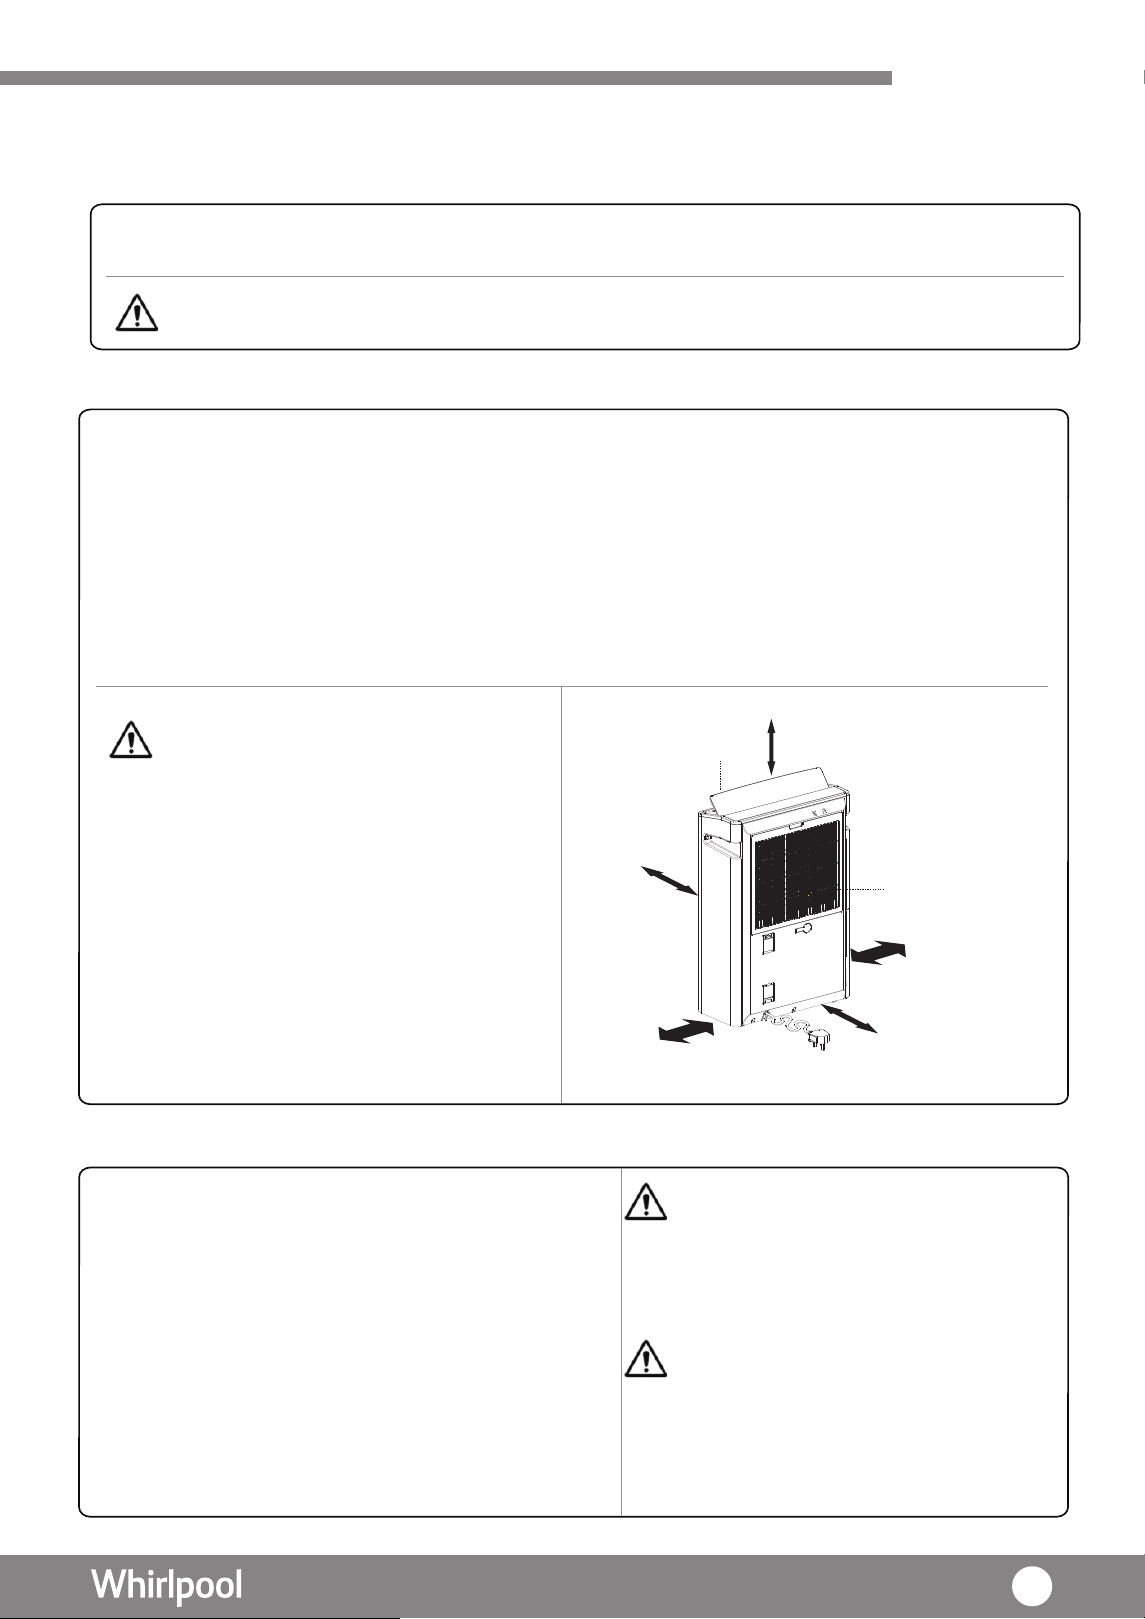
此產品必須保持直立狀態,不可傾斜或翻側。為免產品受損壞,必須將產品放
置於平穩的地方
請時常確保產品附近有足夠空間 ( 建議空間與產品距離 : 機頂 50 厘米或以上 ;
機身 50 厘米或以上 ; 機背 50 厘米或以上,機則 50 厘米或以上 )
當使用連續排水時,確保排水管完全插入排水孔內,以避免漏水情況出現,否則
可導致產品及週邊物品損壞。
當使用連續排水時,確保排水管沒有堵塞及受阻,否則可導致產品損壞。
請定期檢查 及每兩星期清潔背板 及前置過 濾網。若通風不良,會影響產品抽濕之
能力,及導致結霜 、水滴、過熱或火災等危險。
若連續長時間使用請定期進行檢查 ( 包括濾網有否堵塞,電源線是否過熱等 )
當在同一位置,長期使用此產品時,請清除此產品機底部及機身的污垢。請定
期移動此產品,及清潔機身底部的地板。
使用時
注意事項
·
·
·
·
·
·
·
·
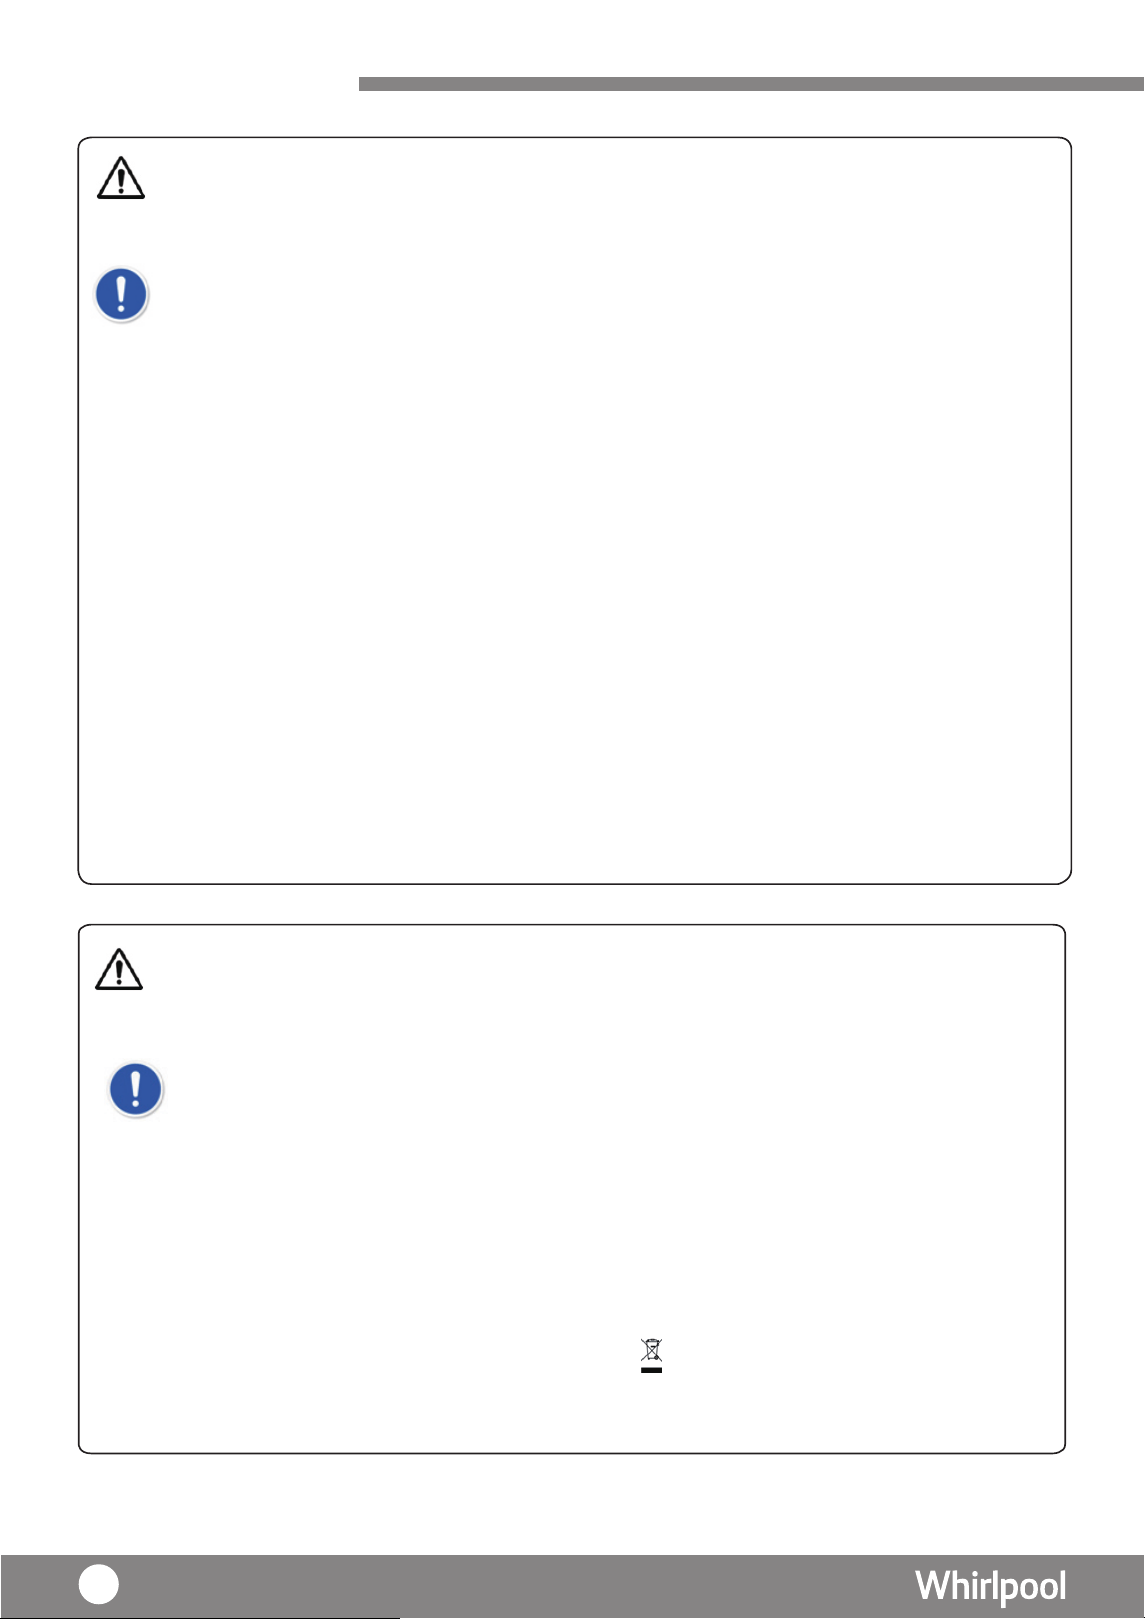
包裝物料為 100% 環保,並且有回收標誌 。包裝物料不能分散棄置,必須 符
合所在當地有關法規的規定。
·
有關處理和回收該產品及其包裝更詳細的信息,請聯絡當地有關機構或您
所購買本產品的商店作廢物回收。
·
此產品已經取得了回收或可重復使用的材料。報廢必須符合當地的垃圾
處理規定進行。報廢前,一定要切斷電源線,使設備無法重新使用。
·
在產品或者產品附帶的文件中有此標誌 ,表示該產品不能被當作一般生活
垃圾處理,但必須棄於用作儲存或回收電子 / 電器產品的地方。
環境保護
注意事項
安全注意事項
第 6 感智能模式 – 透過
此產品備有抽濕及空氣凈化功能,達致凈濾全護,全年適用。
智能濕度感測功能,來感測周
邊環境濕度
的改變;使風扇可即時調節適當的風速。
抽濕模式 – 通過個人設置來進行調整風速及運行時間。
乾衣模式 – 以最高的風速來進行乾衣,
季節
適用於潮濕的
,亦適合於全年使用。
夜間模式 – 風速以低速運行,
環境
造就一個寧靜和舒適的
。
產品特點
空氣淨化模式(手動) – 可調校風速以進行空氣 化。
空氣淨化模式(自動) – 此功能可獨立運行,以其
獨有的過濾系統,進行空氣 化。凈
凈
5
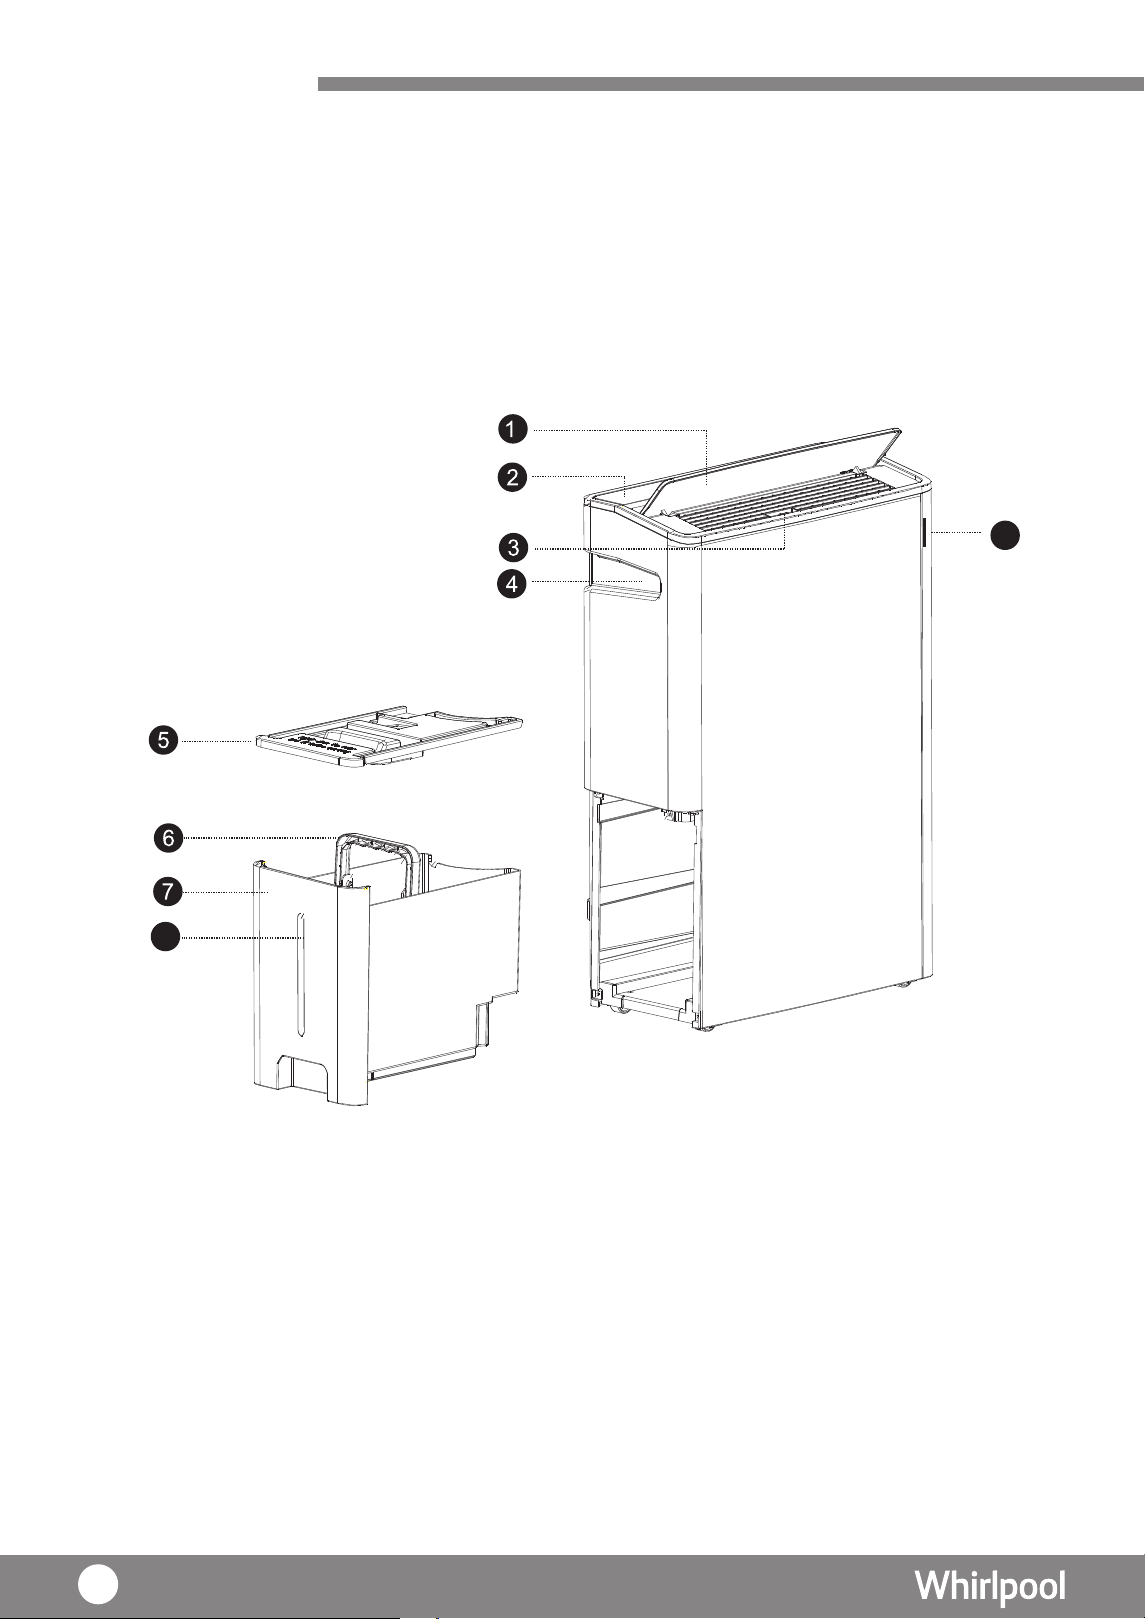
3. 風擺左右撥輪
5. 水箱蓋
1. 導風板
7. 水箱
2. 操作面板
6. 水箱把 手
8. 水位顯示
9. 空氣質素指示燈
4. 隱藏式把手
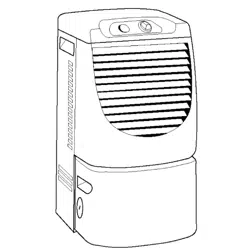
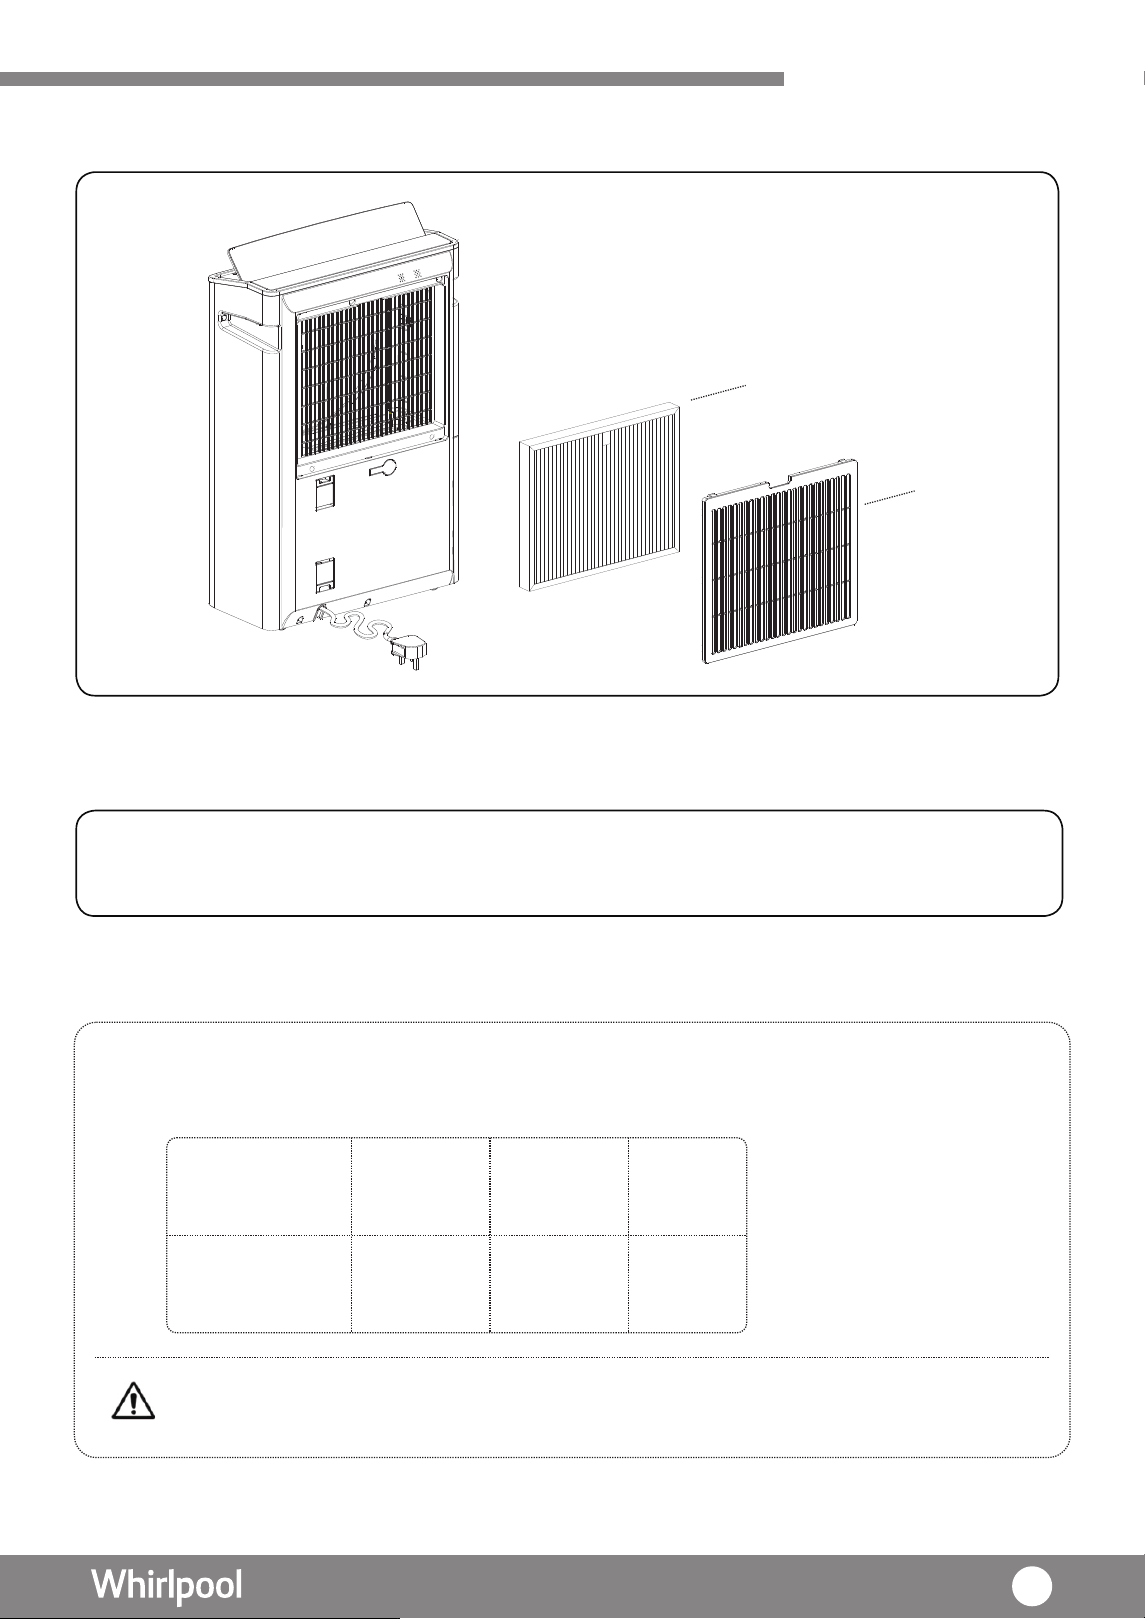
產品概述
主機
( 正面 )
8
9
6
主機簡圖 ( 背面 )
產品概述
1. 連續排水孔及水塞 5. 背板及前置過濾網
6. 濕度感應器
2. 繞線板
3. 電源線
7. 空氣質量感應器
4. 多重過濾網
U P
6
7
7
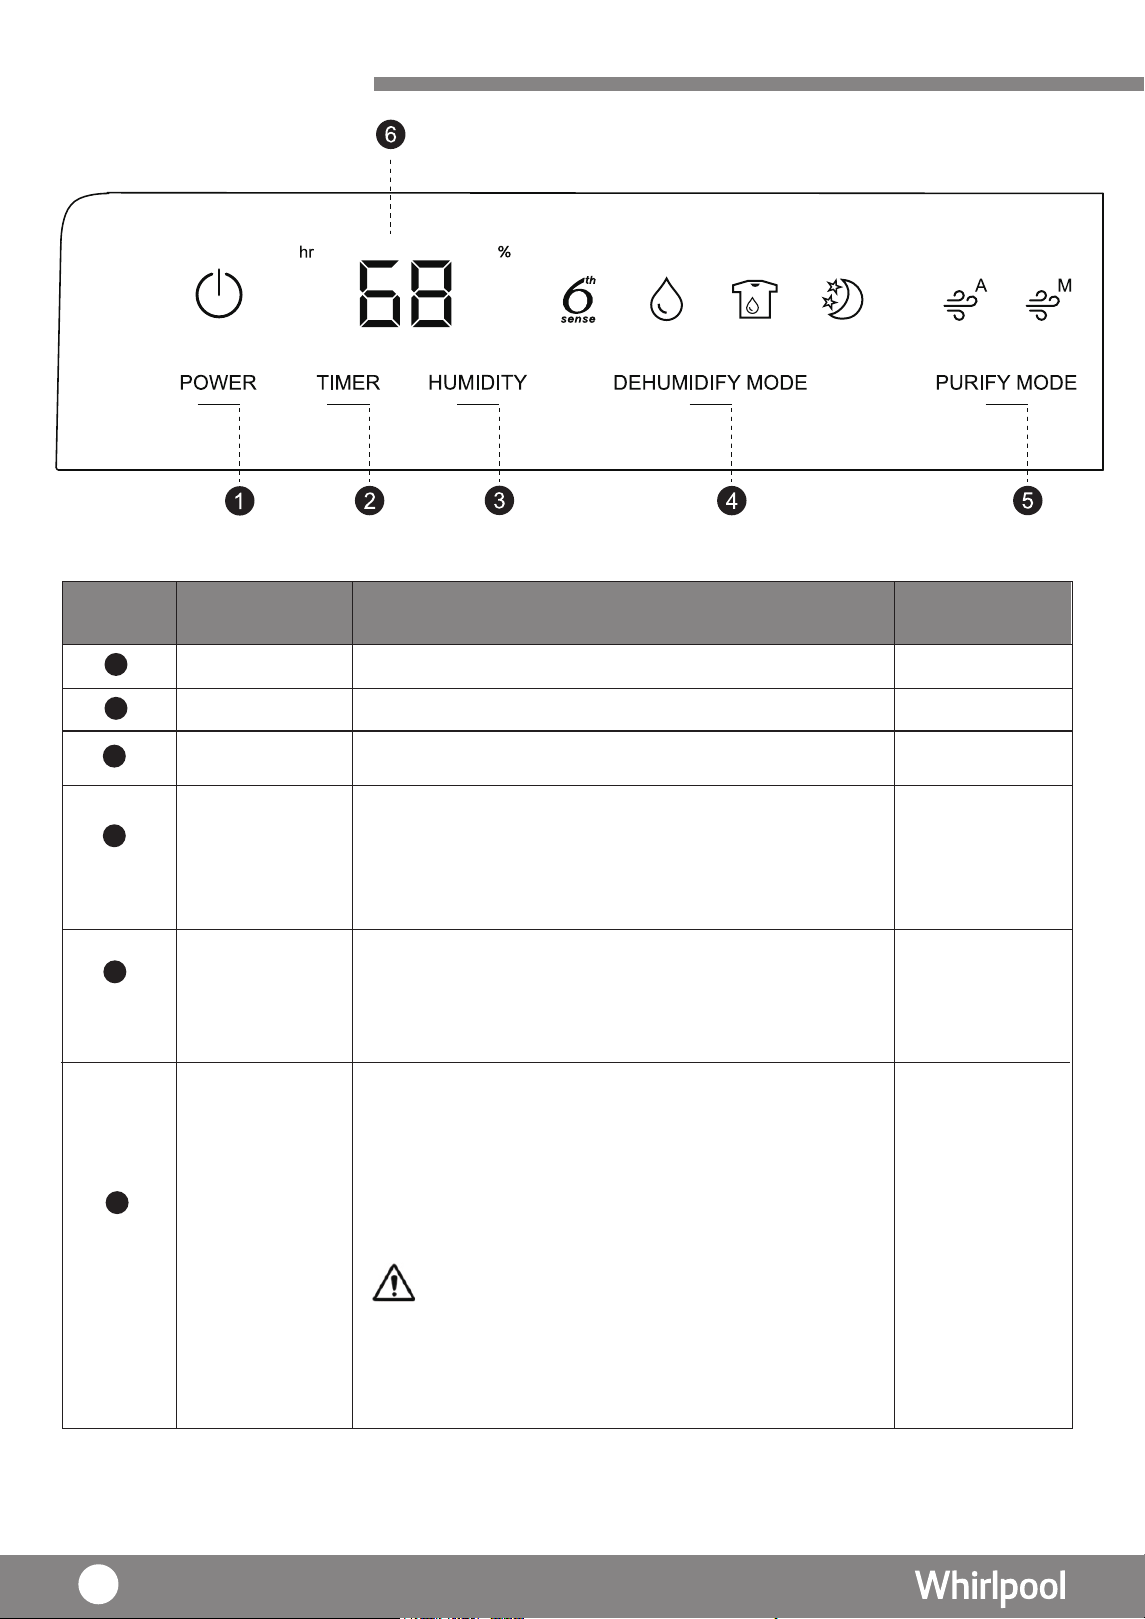
操作面板
開 / 關按鍵 電源開/關
號 碼 按 鍵 / 項 目 內 容 相 關 內 容
模式按鍵
鍵空氣淨化按
選擇 4 種不同模式包括
選擇 2 種不同模式包括
時間按鍵 頁12
-
頁12
頁12-14
頁14-15
設定所需操作時間 ( 小時 )。
濕度按鍵 設定所需的室內濕度
1
2
顯示屏
頁12
當“%”燈亮起時,屏 會幕 顯示目前大約的濕度;
當“hr”燈亮起時,屏幕會顯示 設定運行的時間
( 小時 )。
屏 會幕
設定完成後, 顯示當前環境濕度 (
乾衣、空
氣淨化模式除外 ),而濕度則會顯示在
35%-80% 範圍。
注意事項 :
屏
幕室內相對濕度在80%以上時, 顯示為"HI"。
屏幕室內相對濕度在35%以下時, 顯示為"LO"。
6
3
4
5
第
6
感智能模式
乾衣模式
抽濕模式 夜間模式
空氣淨化模式 (自動)
空氣淨化模式 (手動)
8
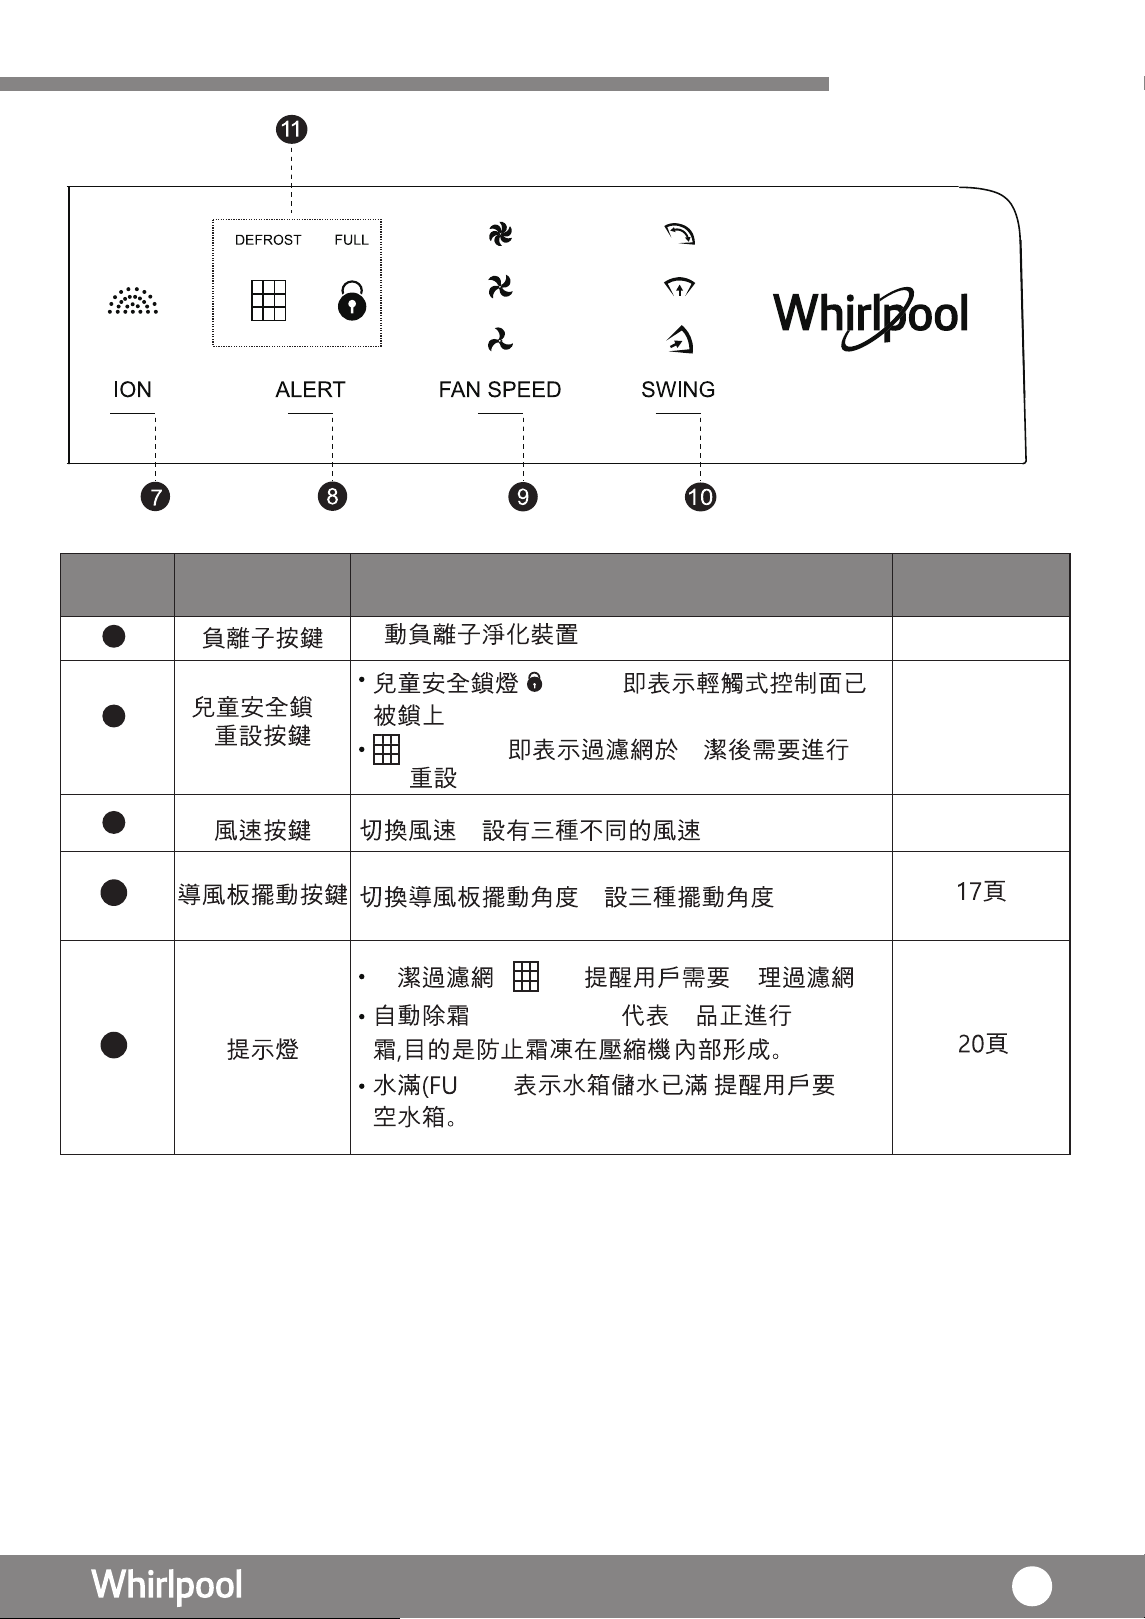
控制面板
, 。
, 。
啟
16頁
16頁
16頁
/
燈亮起, 清
DEFROST
( ) – 產 自動除
–
清
亮起,
。
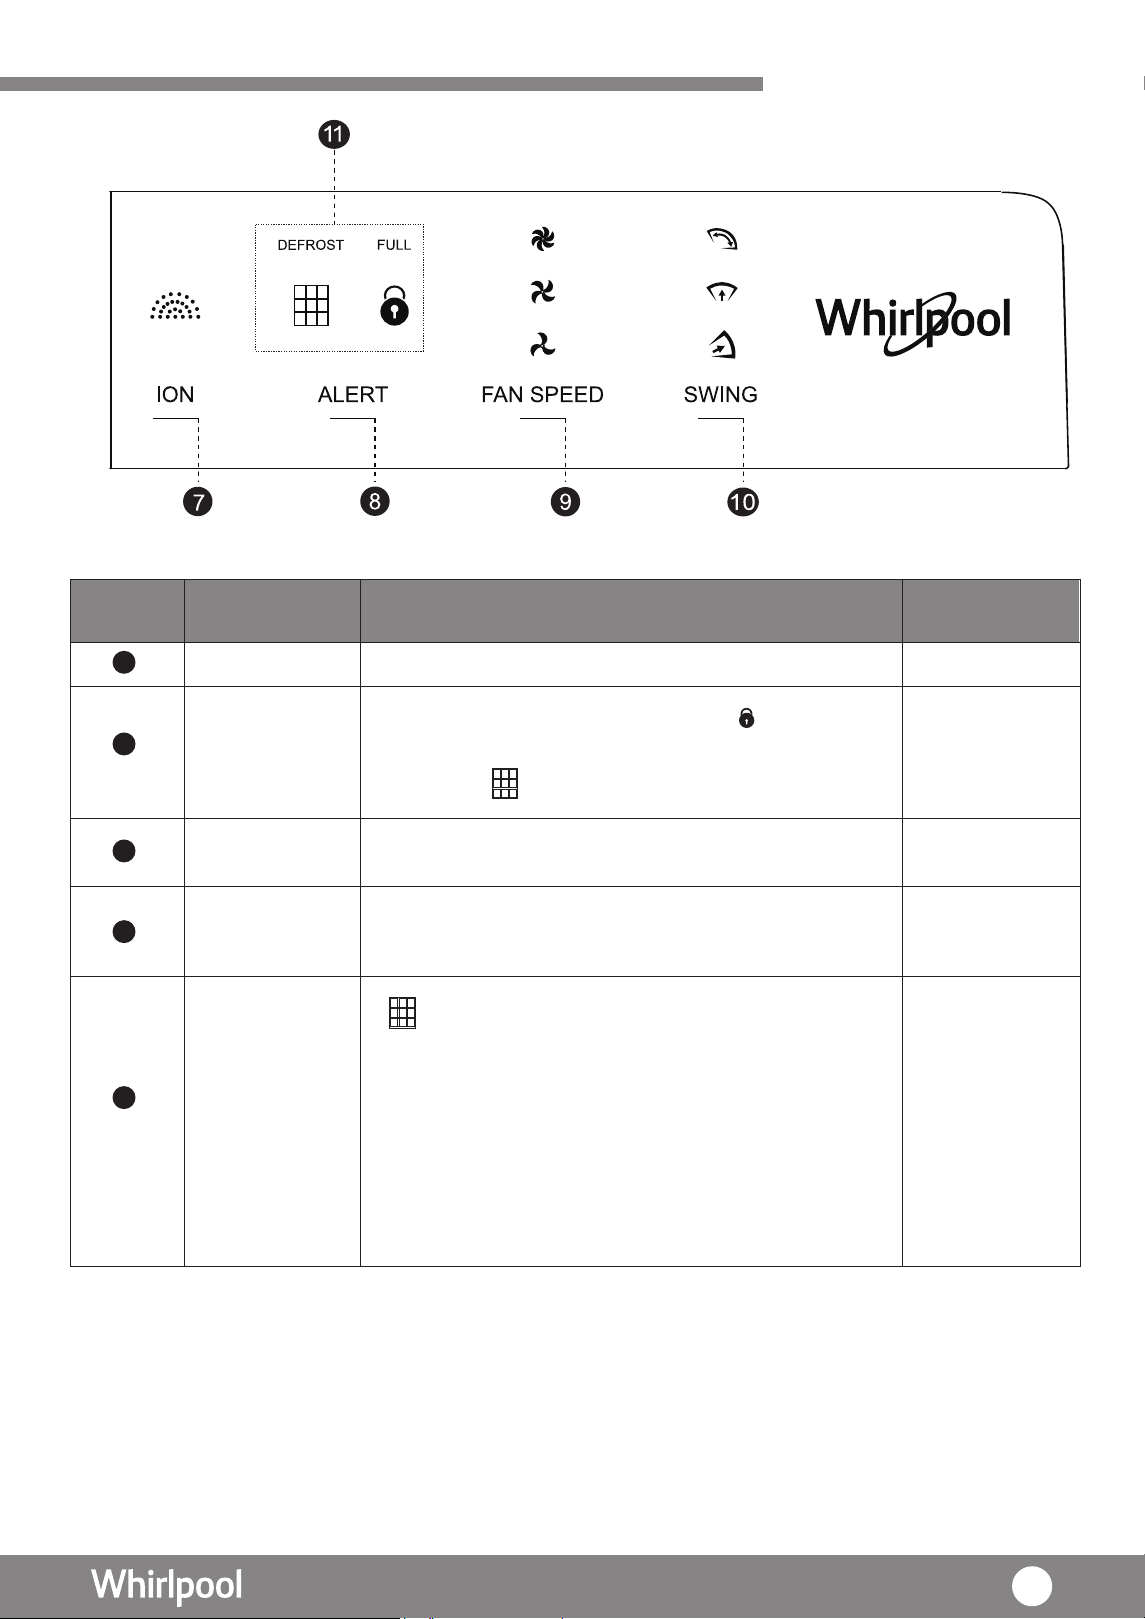
號 碼
7
按 鍵 / 項 目 內 容 相 關 內 容
8
9
10
11
清清 ( ) –
。
LL)
。
頁12-15
9
使用準備
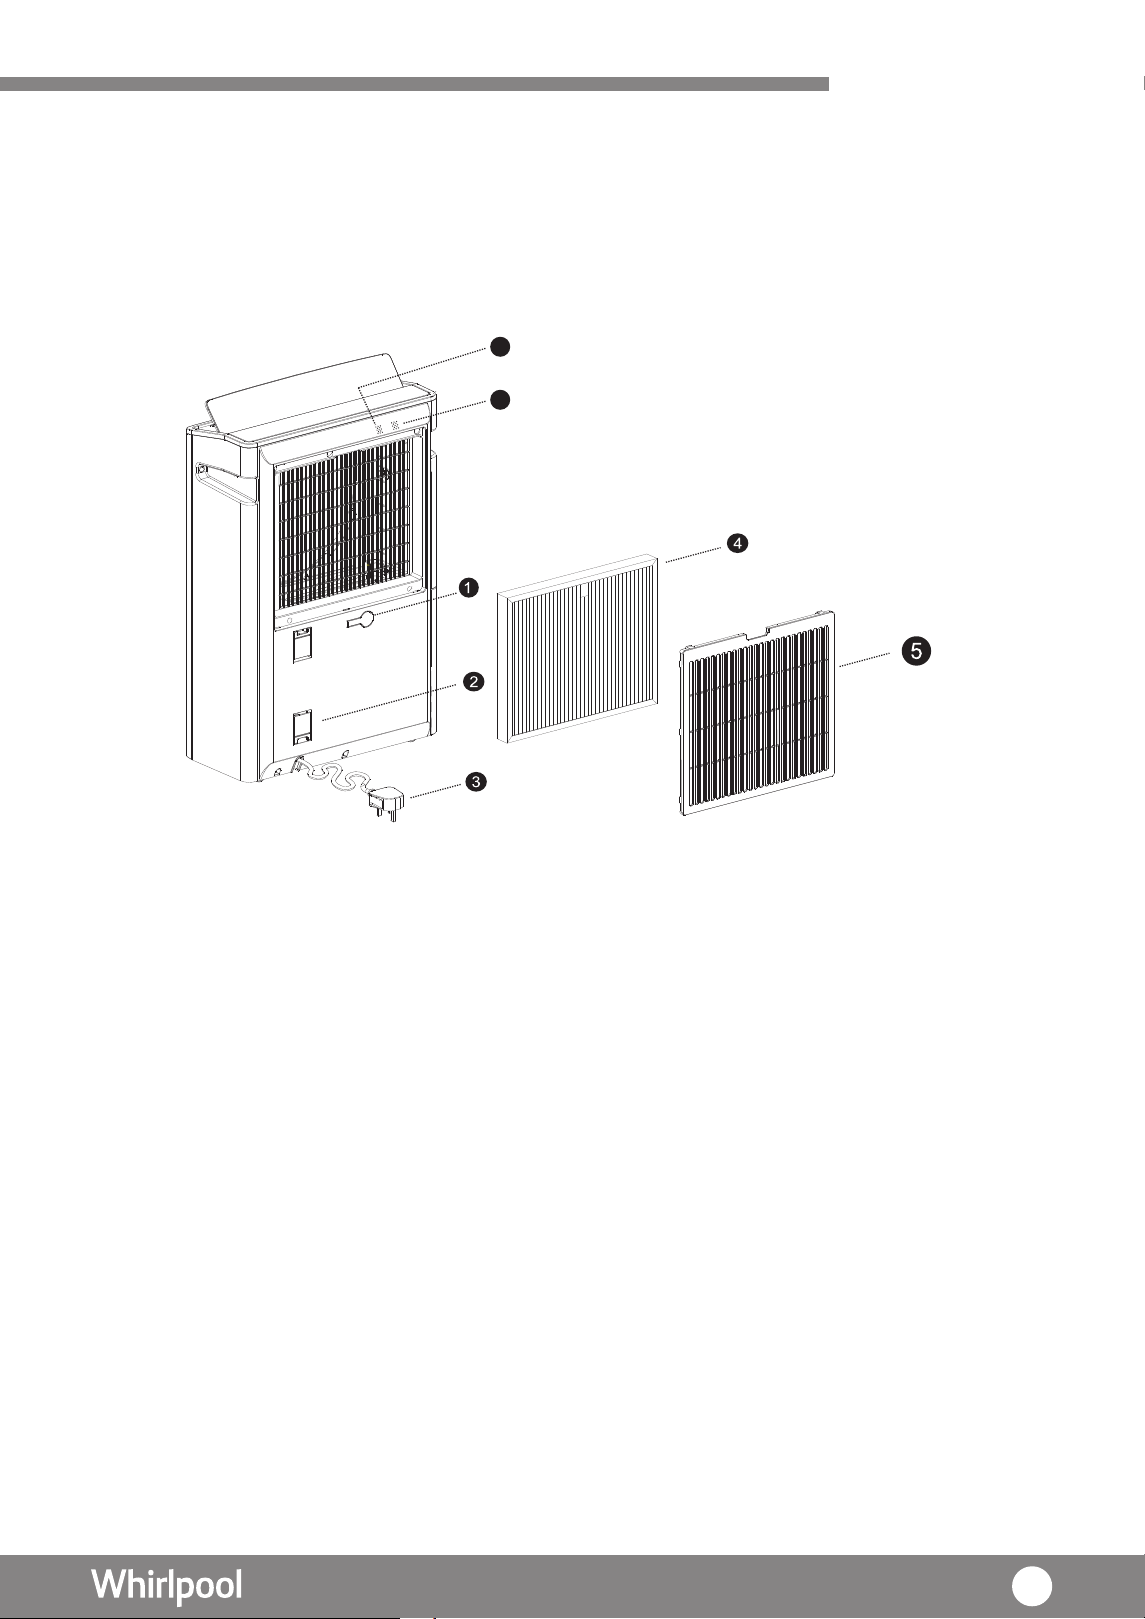
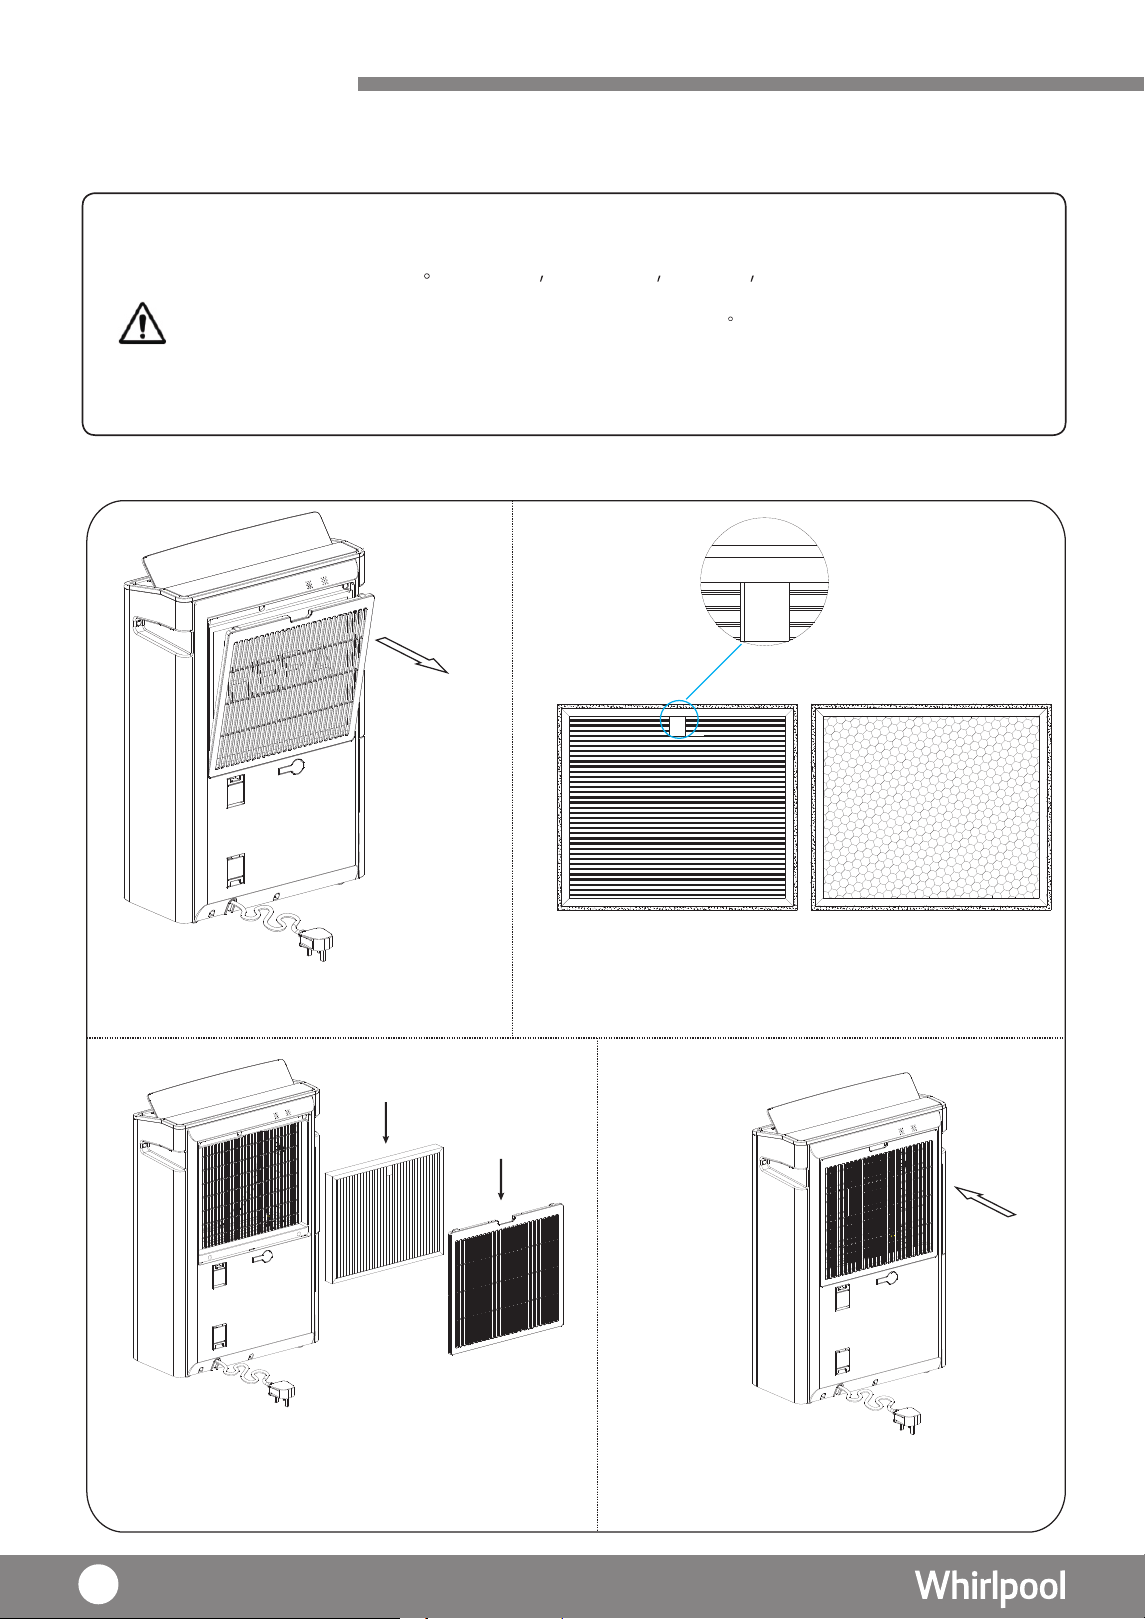
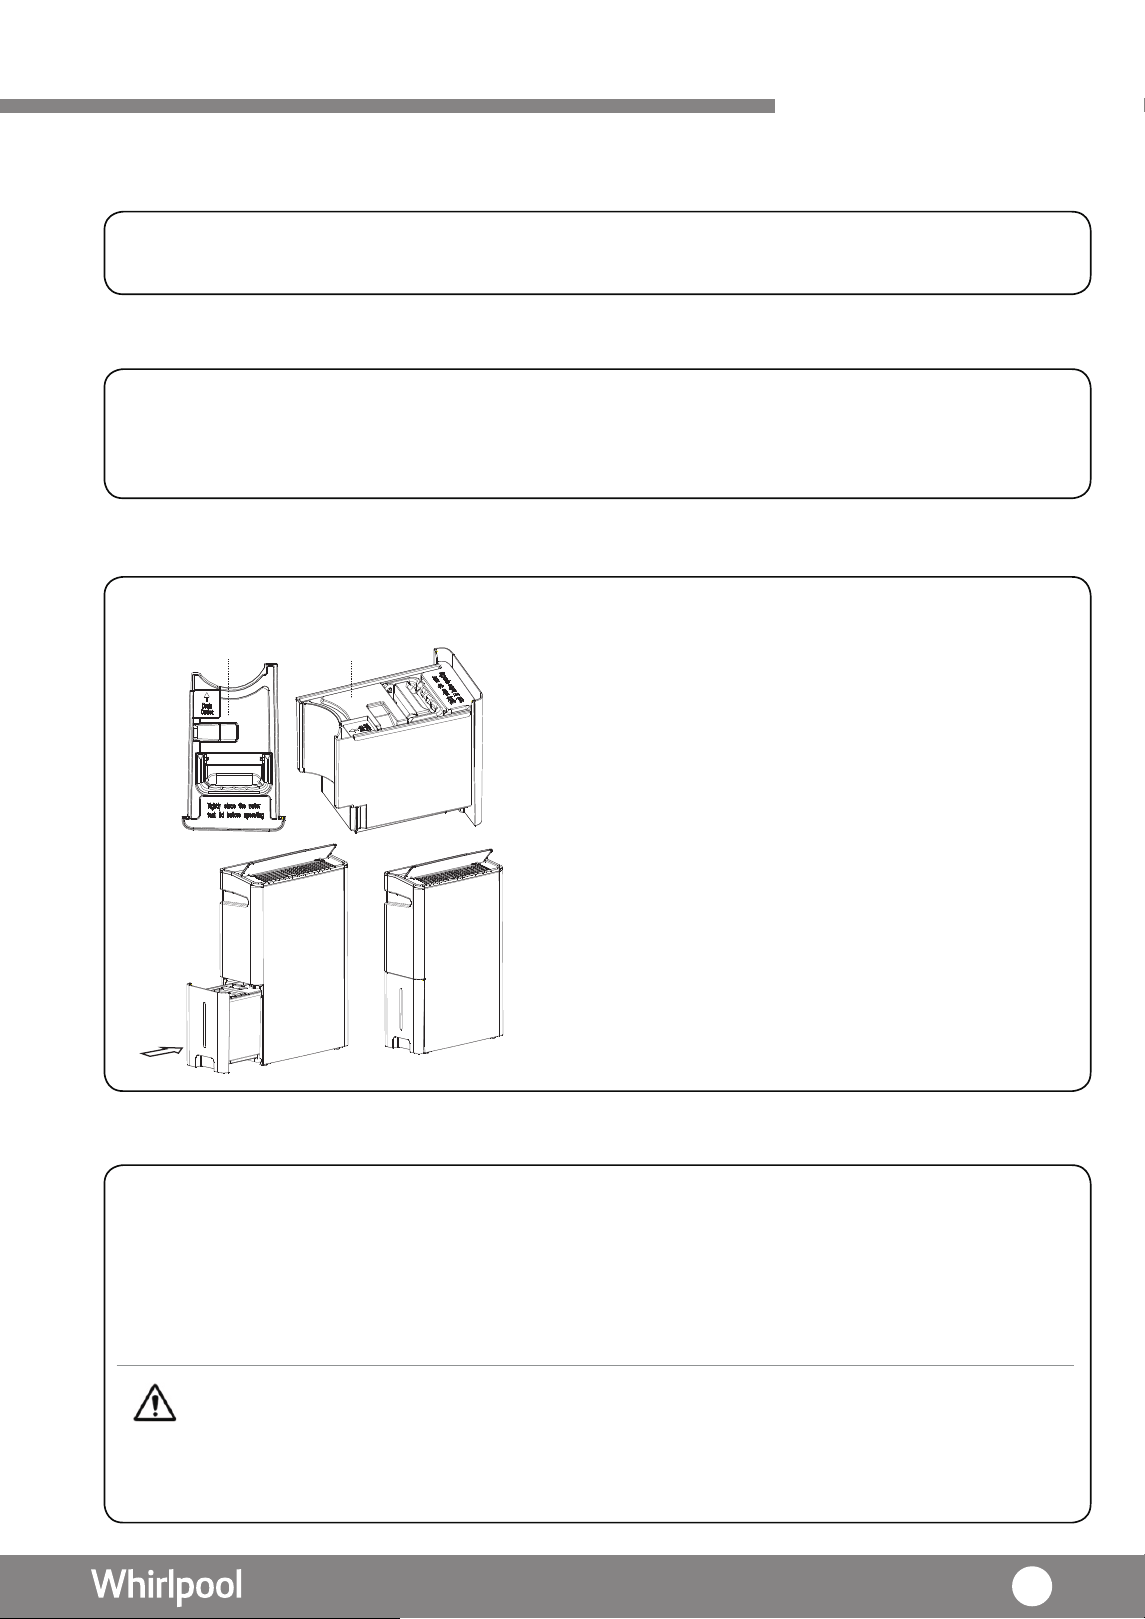
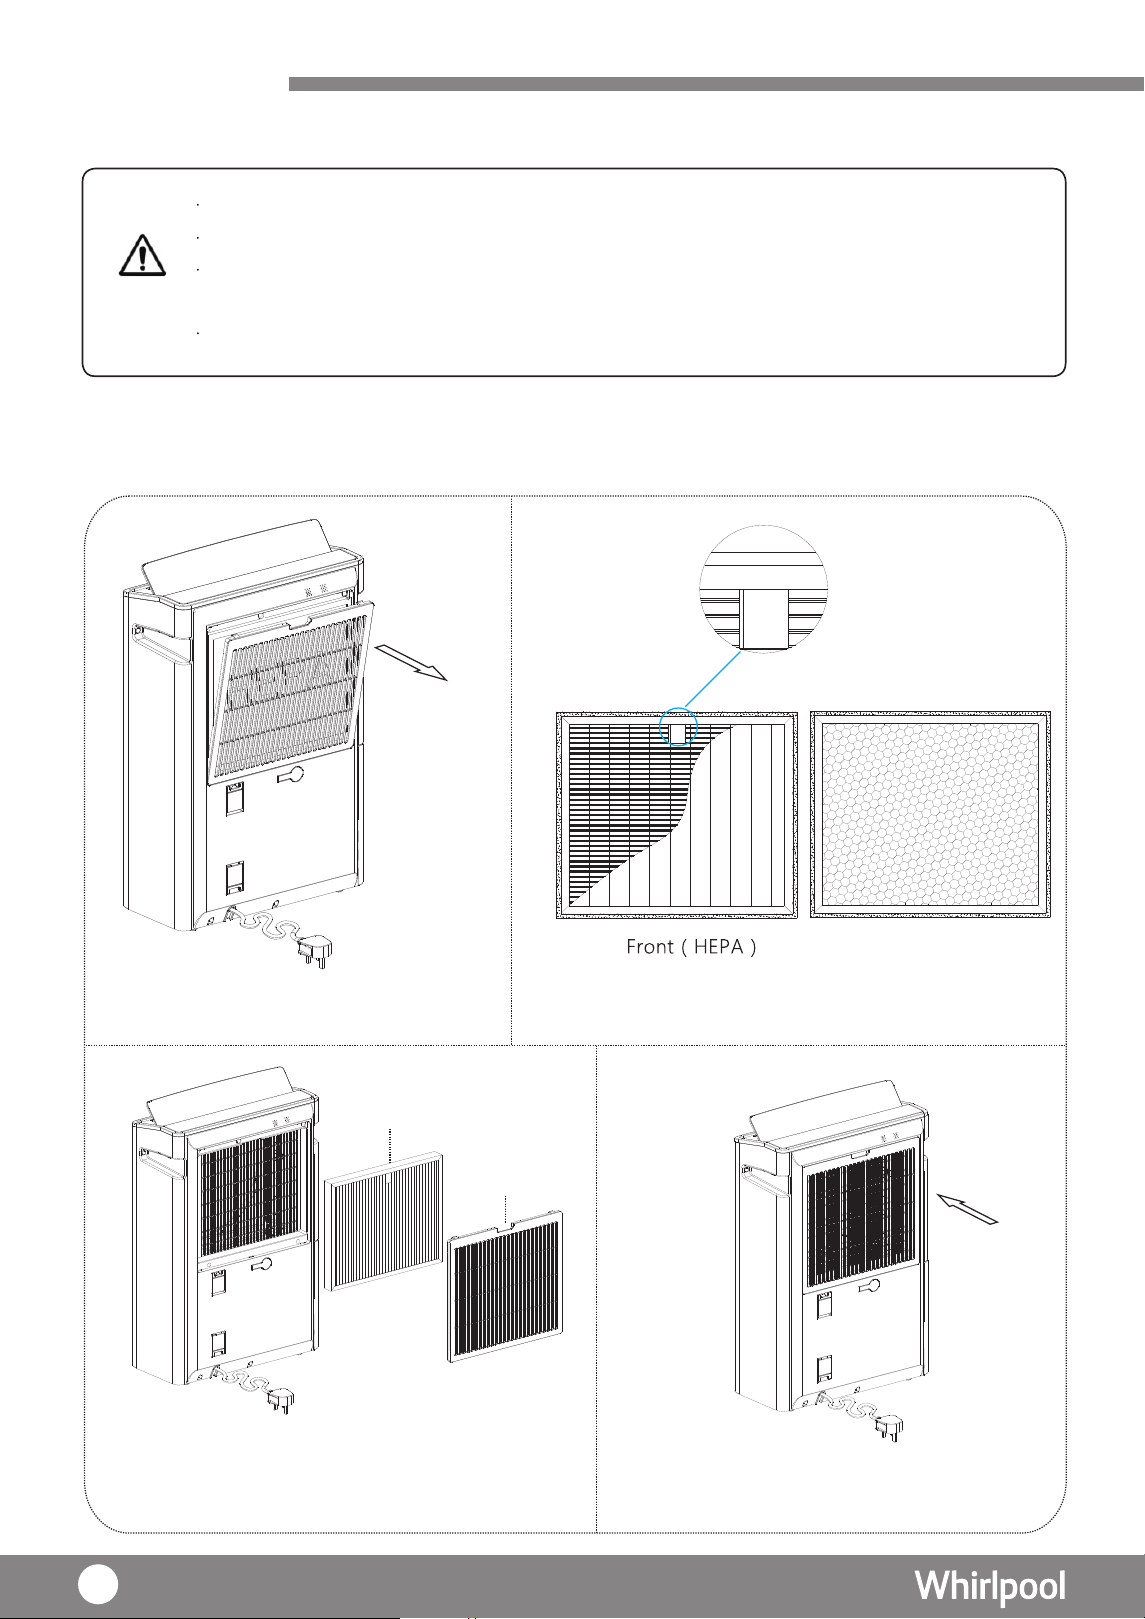
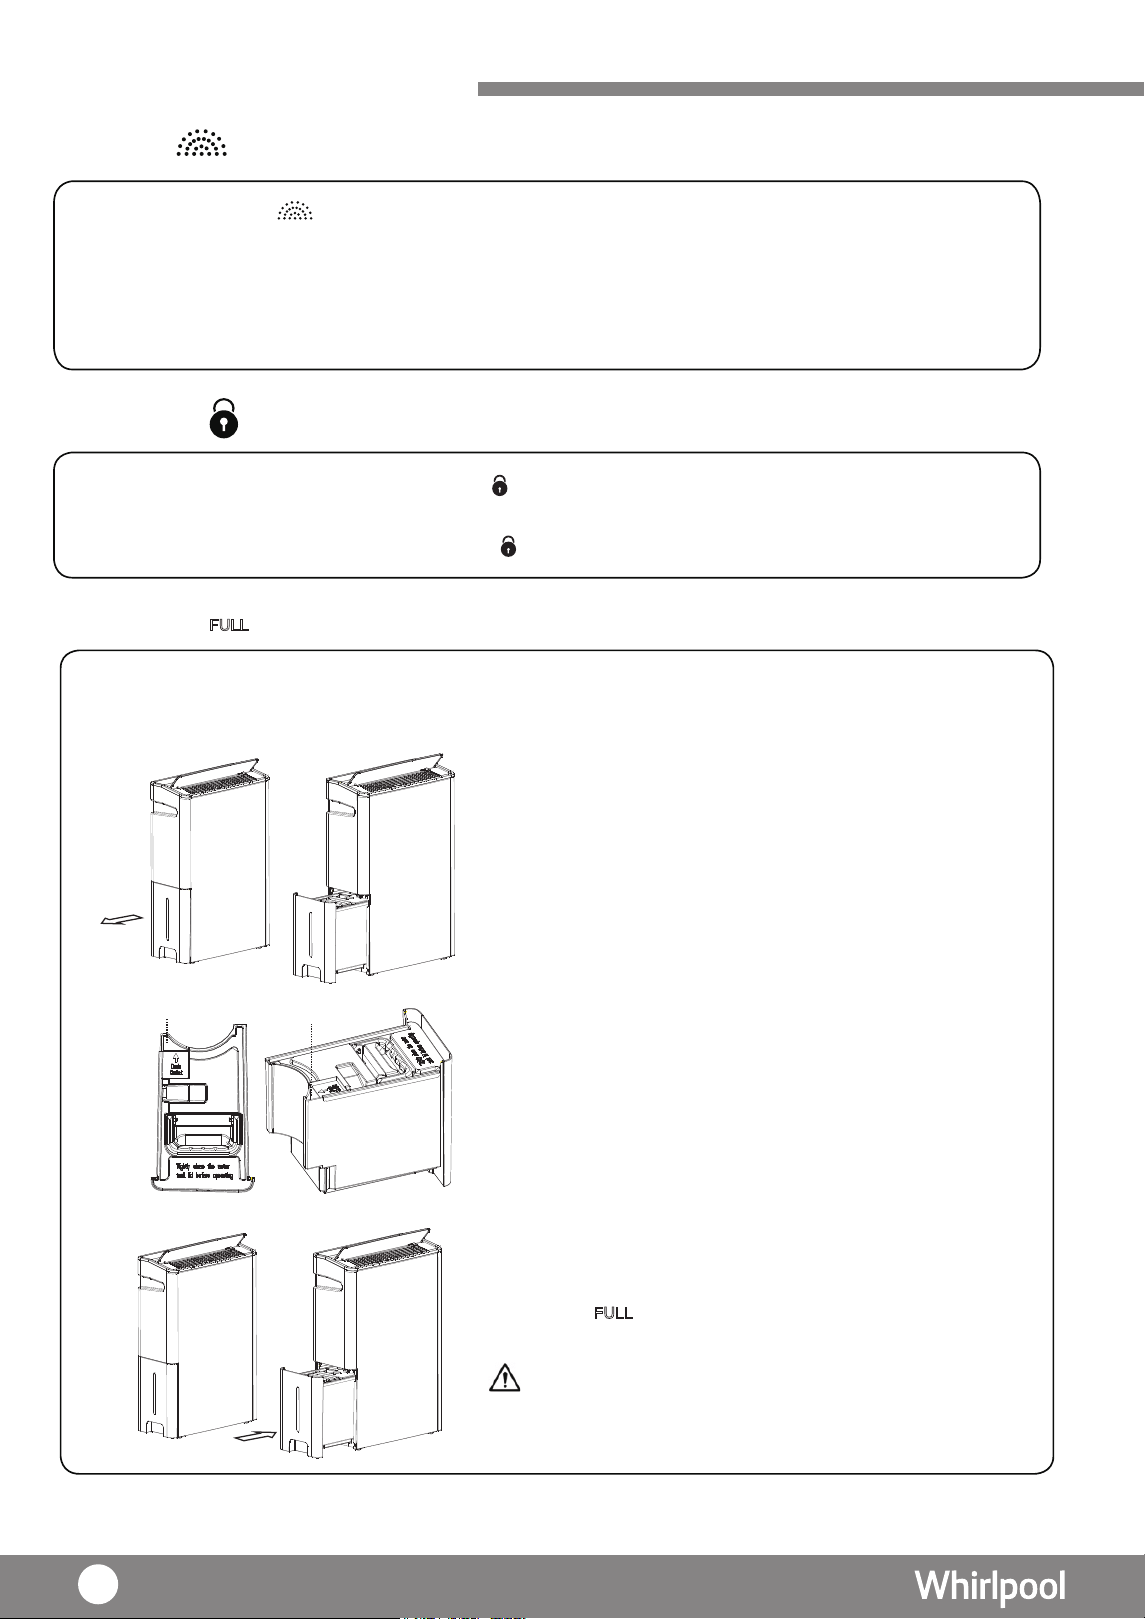
拆除所有包裝物料
請拆除過濾網的膠
袋包裝,以使主機正常運作。
包括紙箱
泡沫塑料 塑料袋 標籤必須拆除。
警告
包裝物料及塑膠袋可導致窒息,必須讓兒童遠離包裝物料
檢查配件,依據配件清單檢查所有配件是否齊備。
正面
正面及向上
(HEPA)
背面(活性碳)
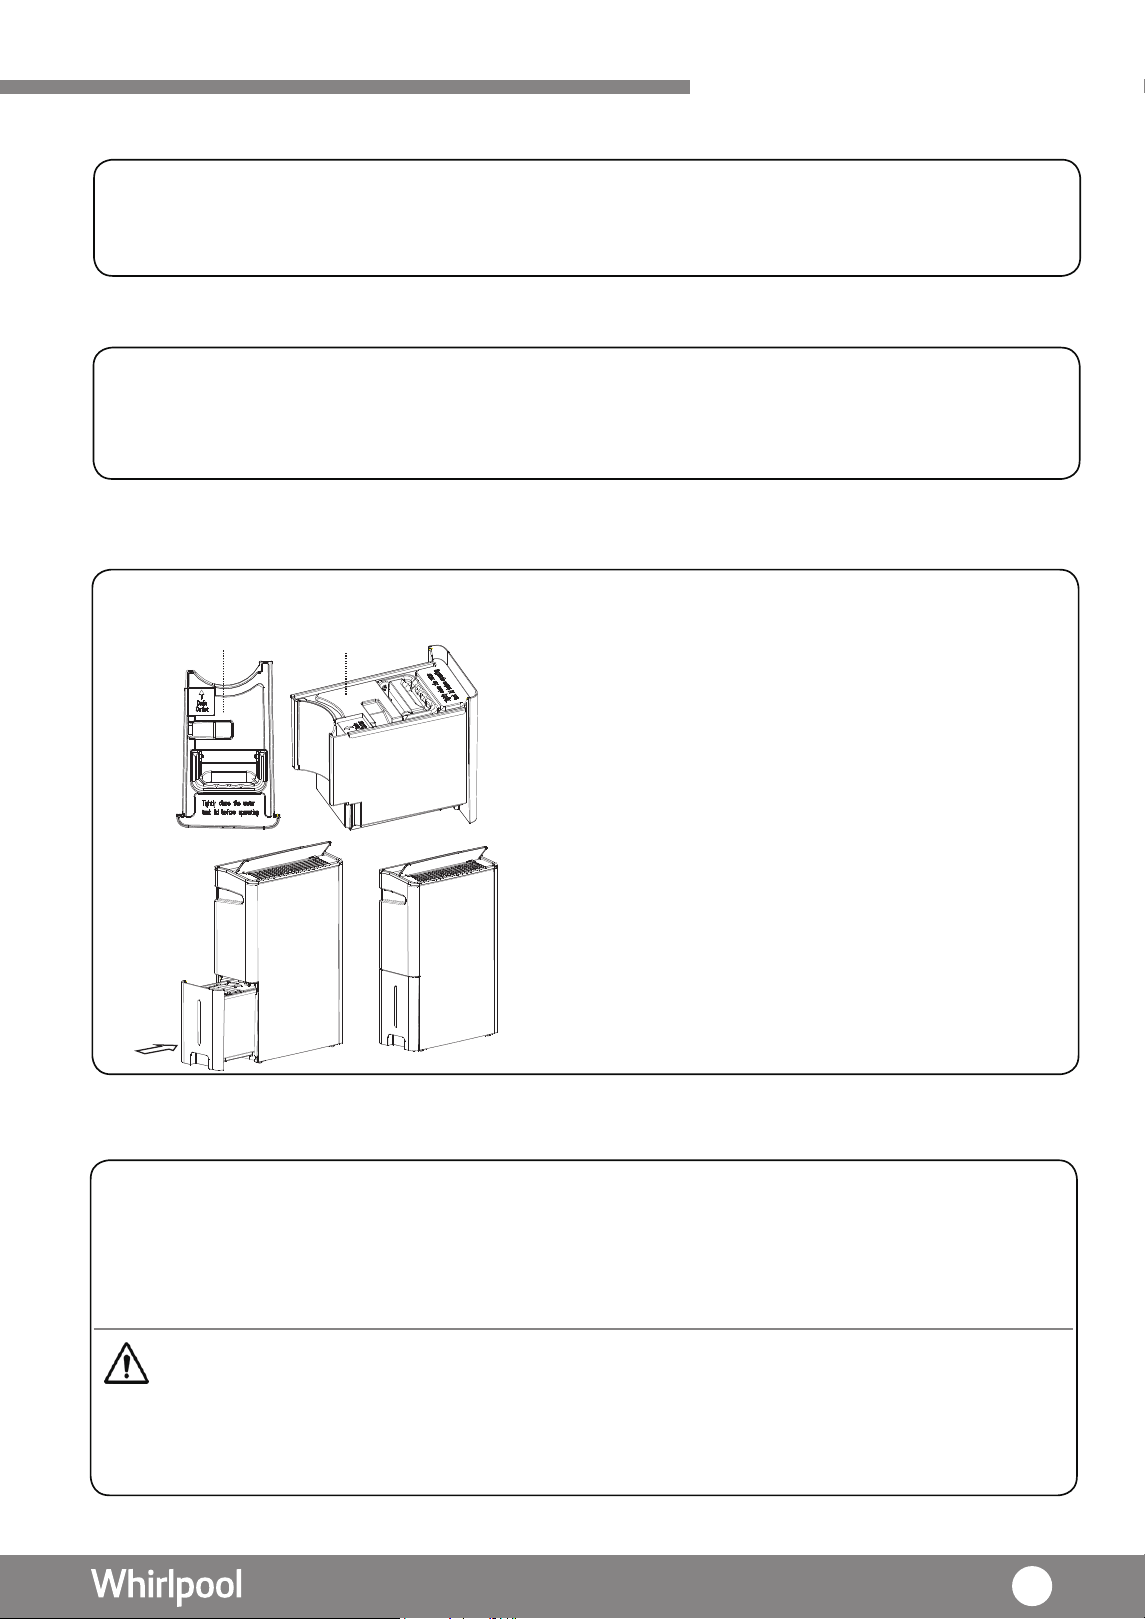
拆除包裝
安裝過濾網
U P
U
1. 拆下機身後的
2. 將 多重過濾網從膠袋
中取出
( )標誌
U
P
3. 按照上 左方圖 安裝 多重過濾網 (
” ”
標 誌必須向外。)
。
4. 重新裝上背蓋。
為
UP
&
FRONT
背蓋
多重過濾網
UP&FRONT
UP&FRONT
·
·
·
·
背板
10
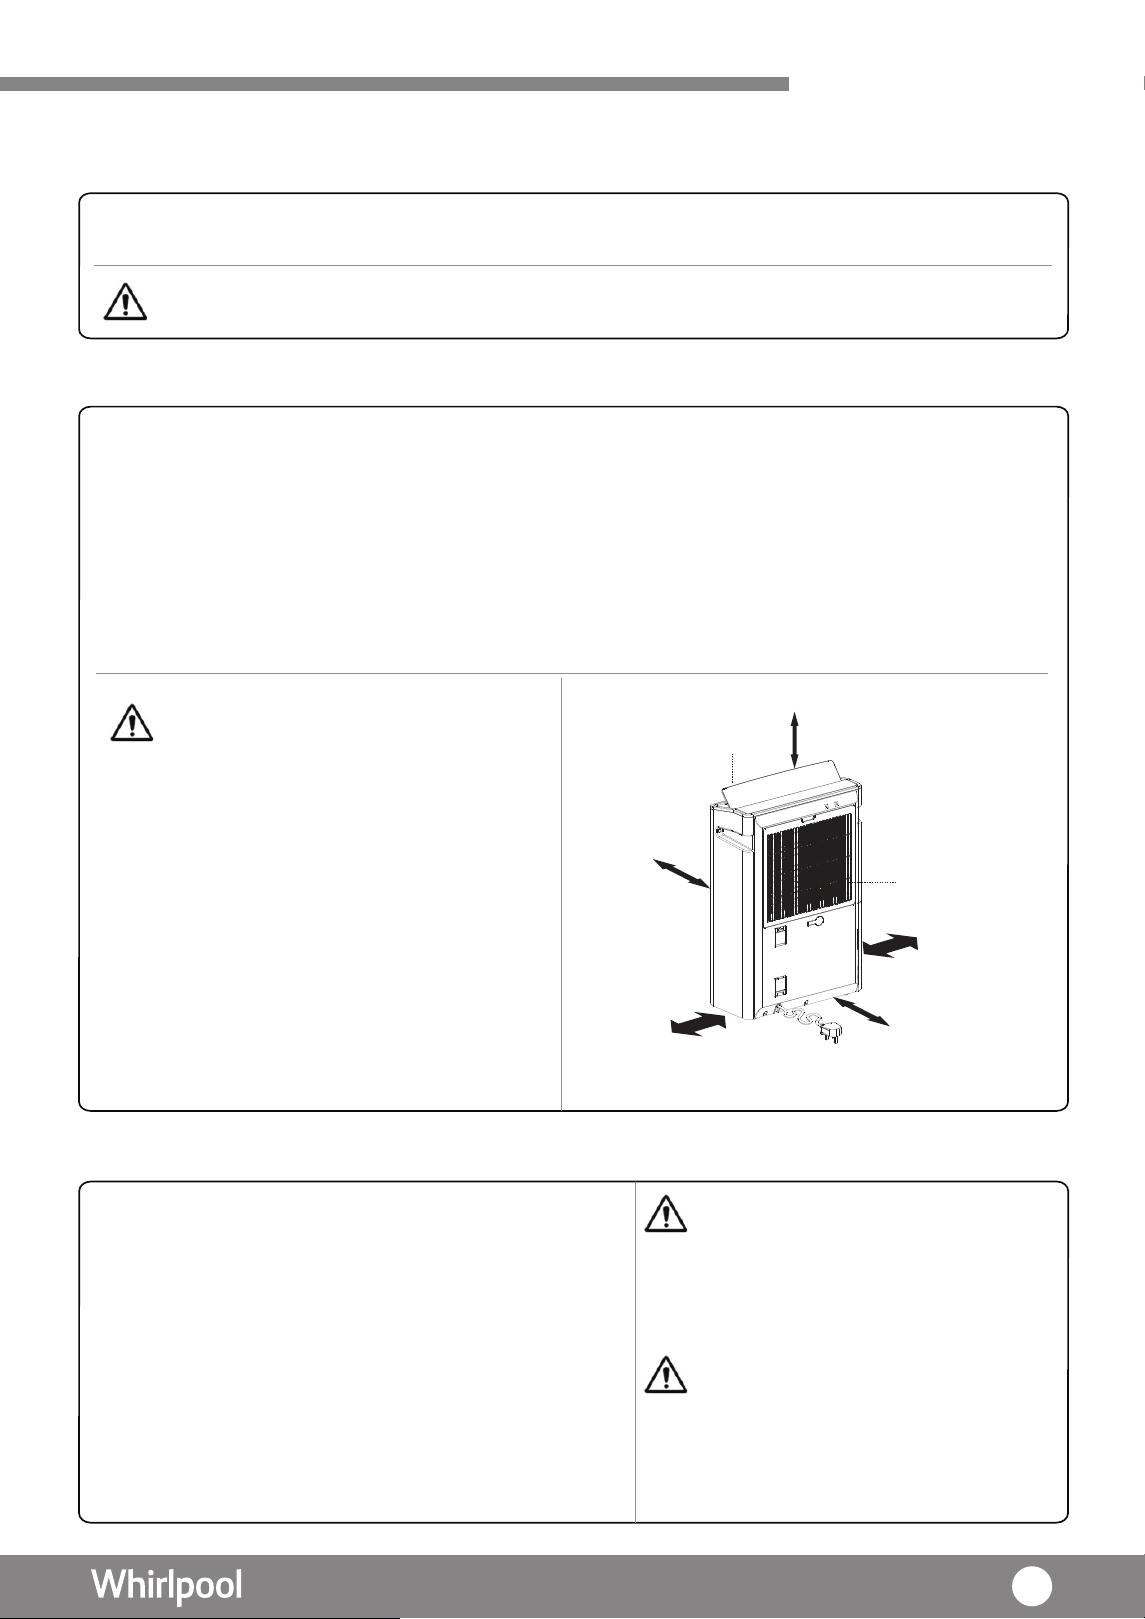
50 厘米以上
50 厘米
50 厘米
50 厘米
50 厘米
或以上
或以上
或以上
或以上
入風口
出風口
使用準備
安裝位置
操作條件
·
·
室外戶外地方
·
狹窄的空間環境,如衣櫃內
·
充滿大量蒸汽或油,如廚房
·
顯示 " HI ",抽濕機如常運作。
·
顯示 " LO ",抽濕機會出
機會停止運作
風,而壓縮
。
· 抽濕機必須垂直放置。
· 擺放於一個穩定,平坦地面上。若放置在地毯上,可能會導致翻倒。
· 確保產品附近有足夠空間 ( 建議的 產品距離 : 機頂 50 厘米或以上 ; 機身 50 厘
米或以上 ; 機背 50 厘米或以上,機側 50 厘米或以上 ; 機側 ( 水箱面 5) 0 厘米或以上 )
· 避免光直接照射。
。
。
。
· 若其他電器受到干擾或無法正常顯示時,請盡可能將抽濕機遠離這些電器。
· 操作環境溫度 5℃ - 35℃
· 操作環境相對濕度 RH% >30%
· 只適合 220V 電源插座
· 將電源插頭插入電源座
- 抽濕機發出“嗶”一聲,代表已連上電源。
- 此時操作面板上的 LED 燈未有亮起。
- 此時除了“開 / 關”鍵及“定時”鍵,其他
鍵未能操作。
- 按“ 開 / 關” 鍵,開啟抽濕機。
警告 : 在下以情況下,切勿使用本產品:
警告 : 以下地方並不適合使用 :
注意事項:
• 存有大量化學物品的地方,例如 : 工廠、醫
院及實驗室
• 存有大量易燃物或氣體品的地方
• 充滿
着
大量蒸汽或油的地方,如廚房、溫
泉等硫化氣體較多的地方
室內相對濕度高於80%時
會室 內 相 對 濕 度 低 於 35%時,屏幕
會屏幕
,
被陽光直射
地方
檢查水箱
· 水箱必須正確安裝,否則將無法
啟動主機
。
注意事項 : 由於出廠前會進行水箱檢驗,可能會有水遺留在水箱,這並不是故障。
11

操作方法
1. 按下”開 / 關”鍵,開啟產品,開 / 關燈 亮起。
2. 幕會顯示周邊的濕度。
屏
3. 如首次使用,模式會自動依當前濕度自動切換風速及導風板擺動角度為廣角。
4.
5. 按“風速”鍵,以選擇所需的風速。
6. 按“導風板擺動”鍵,以選擇導風板擺動角度。
* 注意
1: 當每次選擇不同的導風板擺動角度時,導風板會先擺到 " 廣角 " 最大角度,然後停留約 10 秒才會
再次擺動到所選的導風板擺動角度。
2: 當選擇導風板廣角角度後,然後再按一次導風板擺動鍵,導風板會停頓並固定於當前位置。
7. 時間設定
由 1 -> 2 -> 3->
……
>23 -> 24-> CO ( 連續 ),當操作設定完成後,待
5 秒後確認
,
8. 濕度設定
再按下“濕度”鍵或“時間”鍵選擇所需濕度。每按一下“時間”鍵,濕度會增加,由
待 5 秒後,
風扇則會繼續運行。若環境濕度低 此時壓縮機會暫停運作,風扇
則會繼續運行。
於 RH30%,
9. 按下“ 開 / 關鍵” 關機,此產品會繼續運行一段時間,然後停止運作。有關內部乾燥
詳細,請參考( 頁21 ) 。
•水箱已滿 ( 17頁 )
•周邊環境溫度及濕度超出操作範圍及設定 ( 11頁 )
•按下 "CO"( 連續 ),模式連續運作時間超過 48 小時後,會自動關機。如在運作途中取
重新計算。
出水箱,運作時間會再
•當此產品在關機狀態時,可預設開機時間,如按 01,代表 1 小時後會自動開啟運作。
抽濕模式
注意事項 :
以下情況此抽濕機會停止運作:
幕
屏
停機。會切換成顯示當前濕度,當所設置的時間已過,產品會自動幕
屏
顯示當前環境的濕度,
當
周邊的濕度低於所設置濕度時,
此時壓
會
暫停運作,
縮機
幕會屏
按下“ 時間 ”鍵,設定 所需時間,於 左上角的“ hr ” 圖案會閃爍 ,再按下
,“
時
鍵或“濕度”鍵選擇運行時間之長短。每按一下” 時間”鍵,時間間 會增加1 小時,”
按下 “ 濕度 ”鍵,設定所需 環境濕度 (RH%),於 右上角的 “ % ”圖案會閃爍幕屏
,
燈亮起。如不是首次使用,按下“模式”鍵,直至“抽濕模式
最高風速 中度風速 低風速。
廣角 向上 向前
而“濕度”鍵則40% ->
55% -> 60%
-> 80% ->“--”,
45%
->
50%
-> -> 65%
-> 75%
-> 70%
由 80%
-> 70%
-> 60%
-> 50% -> 40% ->“--”。
-> 75
%
-> 65%
55%
->
->
45%
12
操作方法
1.
第 6 感智能模式
2 按下 模式”鍵, 選擇 第 6 感智能模式 。
3
如果於首次開機,約 5 秒內,風速會設定為
為
低風速。約 5 秒後,依當前濕度,自動調
整風速。
4
如果不是首次開機,在第 6 感智能模式下,風速會根據以下條件而自動調整
濕度大於 75 設定 最高風速。
為
設定 中度風速。
為
濕度介乎 50
至 70 之間
風速濕度小於 50 設定 最低風速。
5 按下 導風板擺動 鍵,選擇所需的擺動角度
廣角 向上 向前
注意 1 當每次選擇不同的導風板擺動角度時,導風板會先擺到 廣角 最大角度,然後停留約 10 秒才會
再次擺動到所選的導風板擺動角度。
2
當選擇導風板廣角角度後,然後再按一次導風板擺動鍵,導風板會停頓並固定於當前位置。
6 如有需要,可按 時間 鍵,調校運行時間 1 24小時
7
如有需要,可按 濕度 鍵,設定濕度。
注意事項
在第 6 感智能模式下,不能調節風速。
以下情況此抽濕機會停止運作:
•
•
•
•
水箱已滿
17頁
• 周邊環境溫度及濕度超出操作範圍及設定 11頁
• 按下 CO 連續 模式連續運作時間超過 48 小時後,會自動關機。
會再重新計算。
如在運作途中取出水箱,運作時間
按下“開 / 關”鍵,開啟產品,開 / 關燈 亮起。
乾衣模式
2
3 在乾衣模式下,屏幕會顯示 表示濕度無法設定,而抽濕機會以最高風速連續
運行10小時
導風板會以廣角擺動。
4 按下 導風板擺動 鍵,選擇所需的擺動角度。
注意
1
當每次選擇不同的導風板擺動角度時,導風板會先擺到 廣角 最大角度,然後停留約 10 秒才會
再次擺動到所選的導風板擺動角度。
2
當選擇導風板廣角角度後,然後再按一次導風板擺動鍵,導風板會停頓並固定於當前位置。
5. 如有需要,可按 時間 鍵,調校運行時間 1 24小時 或連續運作(CO )。
•
在乾衣模式下:
不能設定濕度。
•
可使用負離子淨化功能。
• 不能調校風速。
以下情況此抽濕機品會停止運作:
• 水箱已滿
17頁
• 工作 10 小時後會自動關機
•
周邊環境溫度及濕度超出操作範圍及設定
11頁
•
時間間會再重新計算。
按下 CO 連續 模式連續運作時間超過48 小時後,會自動關機。如在運作途中取出水箱,運作
按下 模式 鍵,直至 乾衣模式 燈 亮起。
注意事項:
1.
按下“開 / 關”鍵,開啟產品,開/關燈 亮起。
廣角 向上 向前
或連續運作(CO )。
13
操作方法
夜間模式
注意事項
在夜間模式下 不能調節風速
以下情況抽濕機會停止運作:
•
•
水箱已滿 17頁
• 周邊環境溫度及濕度超出操作範圍及設定 11頁
•
間會再重新計算。
1 按下 開 關 鍵,開啟產品,開 關燈亮起
2
3 在 夜間模式 下,風速設置為最低風速。導風板則設定為向上 運行 1 分鐘後,空氣質素
指示燈便會關上及所有顯示及顯示屏燈會變暗
4 按下 導風板擺動 鍵,選擇所需的擺動角度。
注意
1: 當每次選擇不同的導風板擺動角度時,導風板會先擺到
廣角 最大角度,然後停留約 10 秒才會
再次擺動到所選的導風板擺動角度。
2
當選擇導風板廣角角度後,然後再按一次導風板擺動鍵,導風板會停頓並固定於當前位置
5 如有需要,可按 時間 鍵,調校運行時間 1 24小時或連續運作(CO)。
6 如有需要,可按 濕度 鍵,設定濕度
廣角 向上 向前
廣角 向上 向前
按下 模式鍵 直至 夜間模式 燈 亮起
空氣淨化模式 (自 動)
空氣淨化模式能將空氣中的微粒及懸浮粒子進行淨化,同時去除異味,再配合
空氣淨化系統,使空氣變得潔淨清新。空氣淨化系統包括 前置過 濾網
、
多重過濾網,
負離子淨化功能 及空氣質素指示燈。
1.
按下 凈化模式 鍵,直至 空氣淨化模式 自動 燈 亮起。
2
在 空氣淨化模式 自動 下,壓縮機會暫停運作及停止抽濕功能。
3
空氣質素指示燈會根據以下條件顯示
3
種不同顏色
綠色 空氣質素屬於 良好
藍色 空氣質素屬於 一般
紅色 空氣質素屬於 差
4
按下 導風板擺動 鍵,選擇所需的擺動角度
注意
1
當每次選擇不同的導風板擺動角度時,導風板會先擺到 廣角 最大角度,然後停留約
10
秒
才 會再次擺動到所選的導風板擺動角度。
2
: 當選擇導風板廣角角度後,然後再按一次導風板擺動鍵,導風板會停頓並固定於當前位置。
5
在空氣淨化模式 自動 下, 負離子淨化功能 鍵會自動啟動,有需要時,可自行
關掉此功能。
6
在空氣淨化模式 自動 下,時間可自行設定
7
在空氣淨化模式 自動 下,顯示屏會顯示
注意事項 :
• 在所有模式下及無人關閉的情況下,負離子 淨化功能會自動運作
• 按下 "CO"( 連續 ),模式連續運作時間超過 48 小時後,會自動關機
如
在運作途中取出水箱
,
運作時間會再重新計算。
•
於空氣淨化模式(自動)下:
•
•
不能設置 濕度。
風速會依據空氣質素指示燈所顯示的環境自動調節。
不能改動風速
按下 CO 連續 模式連續運作時間超過 48 小時後,自動關機 如在運作途
中取出水箱
,
運作時
14

操作方法
空氣淨化模式 ( 動)手
此手動模式下, 可按需要設置 風速。
1.
按下 凈化模 式 鍵 直至 空氣淨化模式 手動 燈 亮起。
2
. 按“風速”鍵,以選擇所需的風速。
最高風速 中度風速 低風速
3
. 空氣質素指示燈會根據以下條件顯示
3
種不同顏色
綠色 空氣質素屬於 良好
色藍 空氣質素屬於 一般
紅色 空氣質素屬於 差
4
. 按下 導風板擺動 鍵 選擇所需的擺動角度
注意
1
當每次選擇不同的導風板擺動角度時 導風板會先擺到 廣角 最大角度 然後停留約
10
秒
才會再次擺動到所選的導風板擺動角度。
2
: 當選擇導風板廣角角度後,然後再按一次導風板擺動鍵,導風板會停頓並固定於當前位置。
注意事項 :
• 於空氣淨化模式(手動)下,不能設置 濕度 。
• 按下 "CO"( 連續 ),模式連續運作時間超過 48 小時後,會自動關機。如在 運作途中取出水箱,
運作時間會再重新計算。
廣角 向上 向前
15
負離子淨化功能
兒童安全鎖
排水提示
按下“負離子”鍵,負離子淨化 亮起燈 。
·
此功能能夠獨立運作。
·
建議開啟抽濕模式、乾衣模式 、第 6 感智能模式及夜間模式時,同時開 啟負離子淨
化功能。
1.按ALERT鍵 3秒,安全鎖燈
按ALERT鍵
FULL
3秒,安全鎖燈2.
便會亮起,顯示操控面板已被鎖上 ;電源鍵除外。
熄滅,顯示操作面板已被解鎖。
”燈亮起時,表示水箱 當“ 已滿( 約5.4L)。抽濕機會自動停止運作。
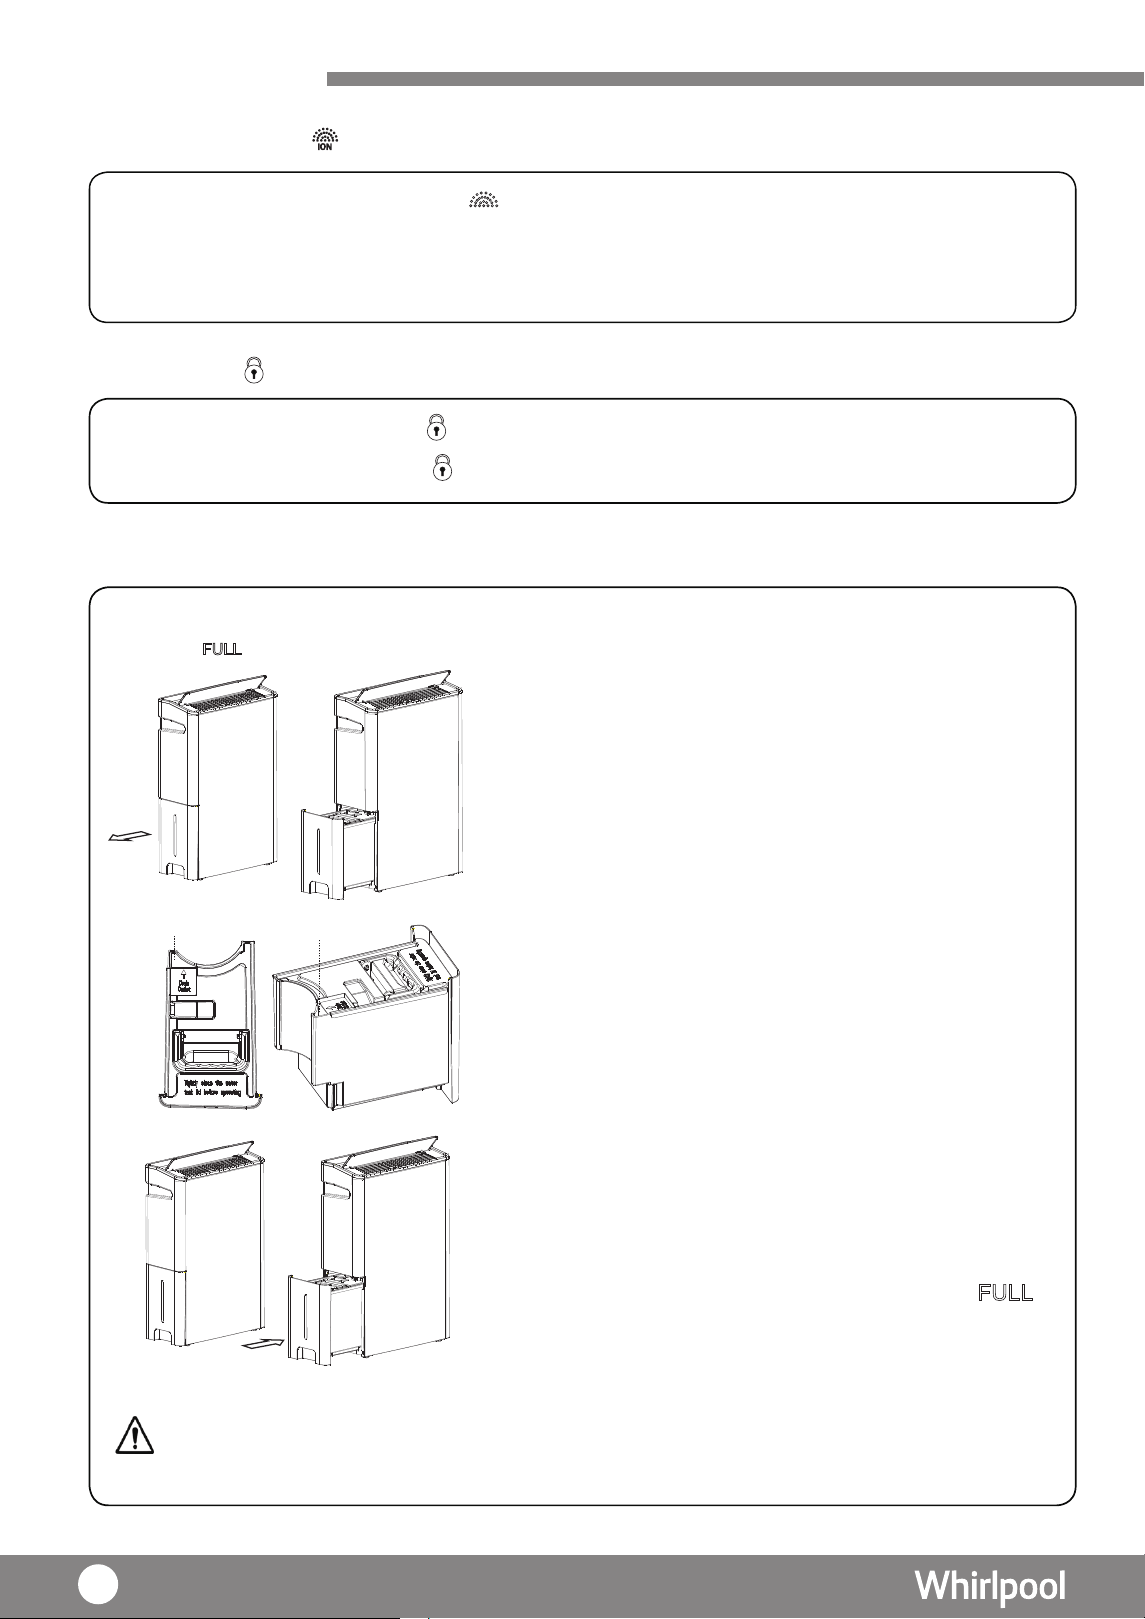
1 . 從抽濕機左側及其底部取出水箱,水箱設有把手,
能輕易將其提取。
2. 排水口清理積水,直至將水箱清空。可從
排水口
排水口
3. 確認水箱蓋好, 並將儲水箱放回此
抽濕機的原來位置。
”
便會消除 。
4. 當儲水箱放回此產品的原來位置後,提示燈“
注意事項 :
當抽濕機運作剛剛結束時,可能還有殘餘的水流到水箱,請避免立即把水箱拉出,以免有餘水流到機殼。
操作方法
16

操作方法
導風板設定
連續排水
1. 按下
當處於廣角角度下,
“導風板擺動”鍵,選擇導風板的擺動角度。
2. 再次按下“導風板擺動”鍵,數秒後顯示燈熄滅,
前位置。
可固定導風板於當
3. 亦可人手調節風擺的左右撥輪, 以調節左右的風擺方向。
1. 關閉抽濕機之電源及從電源插座拔下插頭。
2. 。打開水塞
3. 插 。入水管
4.
廣角搖擺 向上搖擺 向前搖擺
注意事項 :
•排水喉內徑 10 毫米,外徑為15毫米, 長度大約為1米。
如要拆除及收納水管,請以相反次序進行。
•確保排水管牢牢接駁到排水孔,以避免滲漏。
•如果儲水箱放置位置不佳 ,抽濕模式便不能進行運作。
* 注意 : 當每次選擇不同的導風板擺動角度時,導風板會先擺到“廣角”最大角度, 然後停留約 10 秒,才
會再次擺動到所選的導風板擺動角度。
插入水管
水塞
打開水塞
17
UP
&
FRONT
空氣淨化功能
空氣淨化模式能將空氣中的微塵及懸浮粒子進行淨化,同時去除異味,再配合空氣淨
化系統,使空氣變得潔淨清新
。
空氣淨化系統包括:
1.) 納米銀離子前置過濾網
2.) Multi-protection 多重過濾網
3.) 負離子淨化功能
4.) 空氣質素指示燈
Multi-protection
多重過濾網
Multi-protection
多重過濾網
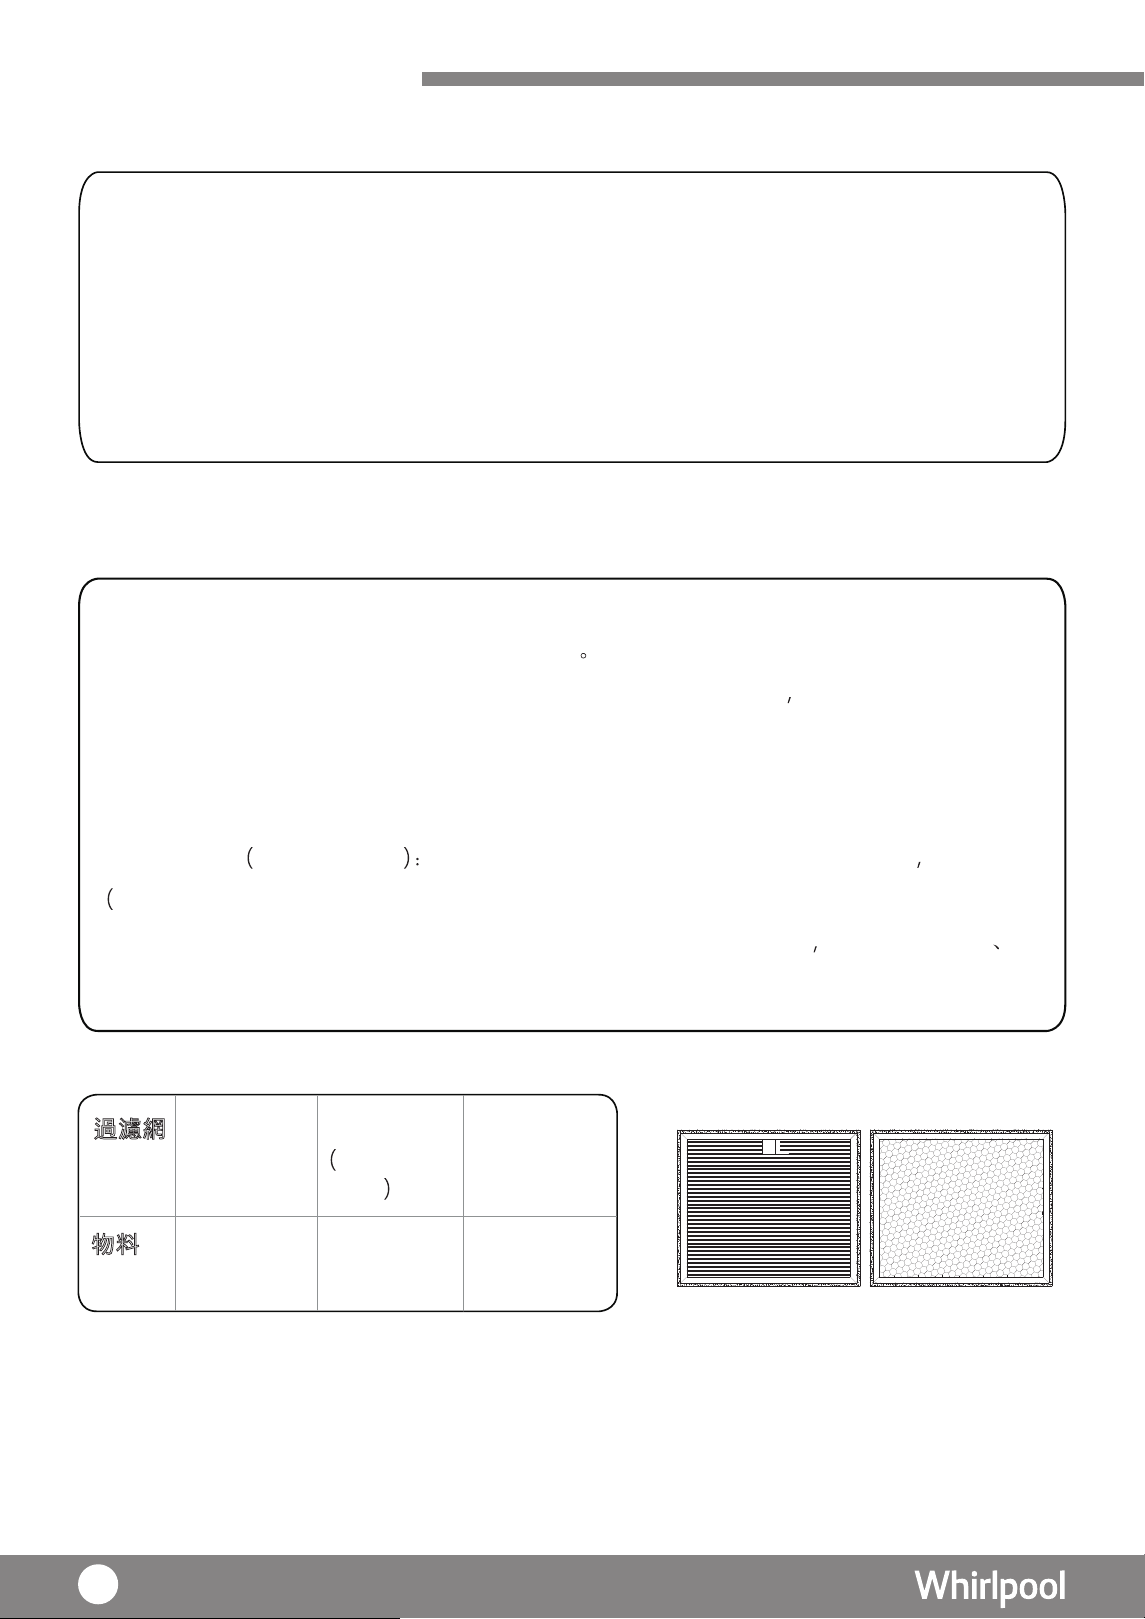
此抽濕機設有以下不同功能的過濾網:
1.
2.
前置過濾網:
主要過濾空氣中的塵埃及毛髮
納米銀離子濾網: 能有效阻隔空氣中體積較大的粒子及污染物 更有高效抗菌作用,
特別是對金黃葡萄球菌及大腸肝菌。
3a. HEPA過濾網:
在Multi-protection 多重過濾網中的HEPA高效過濾網能有效去除空氣中
塵粒、花粉及PM2.5 懸浮粒子,
使空
氣更清新潔淨。
3b. 活性碳層
Active Carbon 在Multi-protection 多重過濾網中的活性碳層 能去除異味
如煙、寵物等),亦可有效去除甲醛等各種有害氣體。
3c. 高效抗菌塗層:
Multi-protection 多重過濾網備有高效抗菌塗層 能抵抗肺炎杆菌 甲型
流感 H1N1、流感H3N2、腸道病毒EV71等病毒。
過
濾網 前置過濾網 前置過濾網
過濾網
納米銀離子
濾網
聚乙烯 聚乙烯納米 物料
銀離子濾網
聚丙烯聚乙
烯活性炭
正面(HEPA
)
背面(活性碳)
及高效抗菌塗層
18
U
P
空氣淨化系統
使用高電壓以負離子(電荷)的空氣分子,使空氣中的分子變為正或負離子。負離
子淨化功能被用來減少空氣中的微塵數量。對於負離子淨化功能的操作,請參考 16 . 頁
負離子淨化
Multi-protection
多重
過濾網
前置過濾網
及銀離子過
濾網(*設於
後蓋上)
空氣質量指示燈之作用為以不同顏色顯示當前的室內空氣質數。指示燈會因應室內空氣質
素而改變顏色,詳情如下:
顯示燈顏色 綠色 藍色 紅色
空氣質量 良好 一般 差
注意事項 :
空氣質量指示燈會於夜間模式進行時,在 1 分鐘無任何操作後, 自動關燈。
空氣質量指示燈
19
保養及維修
1
a) 。
b)
。
c)
d)
.
2.
當
註意事項:
空氣凈化模式下(自動/手動),抽濕機不會進行化霜。
DEFROST“ ”燈亮起
,
除霜功能將會啟動。
除霜功能
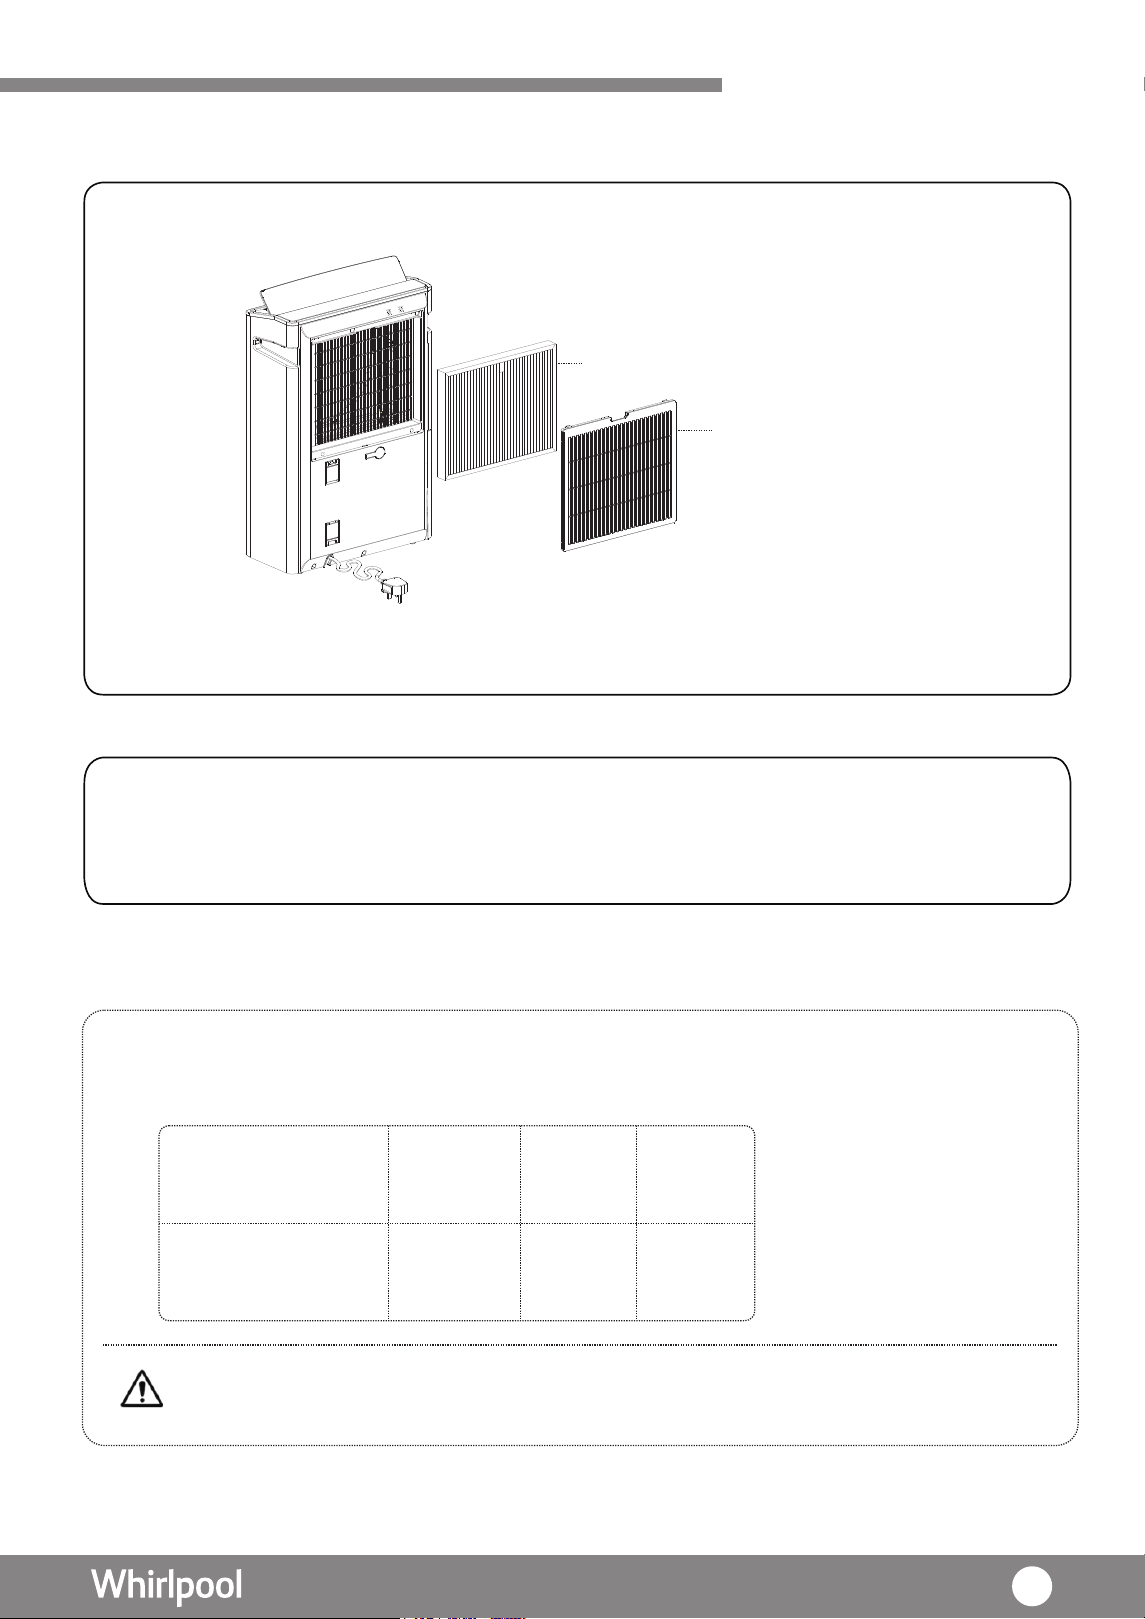
清潔前置過濾網及 Multi-protection
多重過濾網
1.當“ ”提示燈亮起時,表示需要 洗前置過濾網及 Multi-protection
2. 打開 ,而前置過濾網則貼於 內方。
3. 取出 Multi-protection多重過濾網及用吸塵機輕輕地去除過濾網上的灰塵。
4. 將 Multi-protection 多重過濾網放回此產品上,過濾網上的”UP&FRONT”標誌必須向外
擺放。
5. 將主機背板連同前置過濾網放回此機上。
6.提示燈“ ”仍然會亮著。長按“ ”鍵直至燈滅(約8秒以上)。
清 多重過濾網。
主機背板 過濾網框
警告
警告
Multi-protection多重過濾網:切勿
用清水洗淨。使用吸塵機輕輕地吸
去過濾網上的灰塵,若吸力過大
(特別是活性炭的一面)可能會 導
致過濾網損壞。
• Multi-protection 多重過濾網,建議每 5 年
更換一
次。 若使用環境較為 塵多 或有於室內吸煙,這會縮
短 Multi-protection多重過濾網的壽命。
• 納米銀離子過濾網和前置過濾網是可用水清洗的。
清洗後從新裝上過濾網,必須將其徹底吹乾。
• 納米銀離子濾網是過濾網附有納米銀離子塗層,
顏色為銀
化霜說明
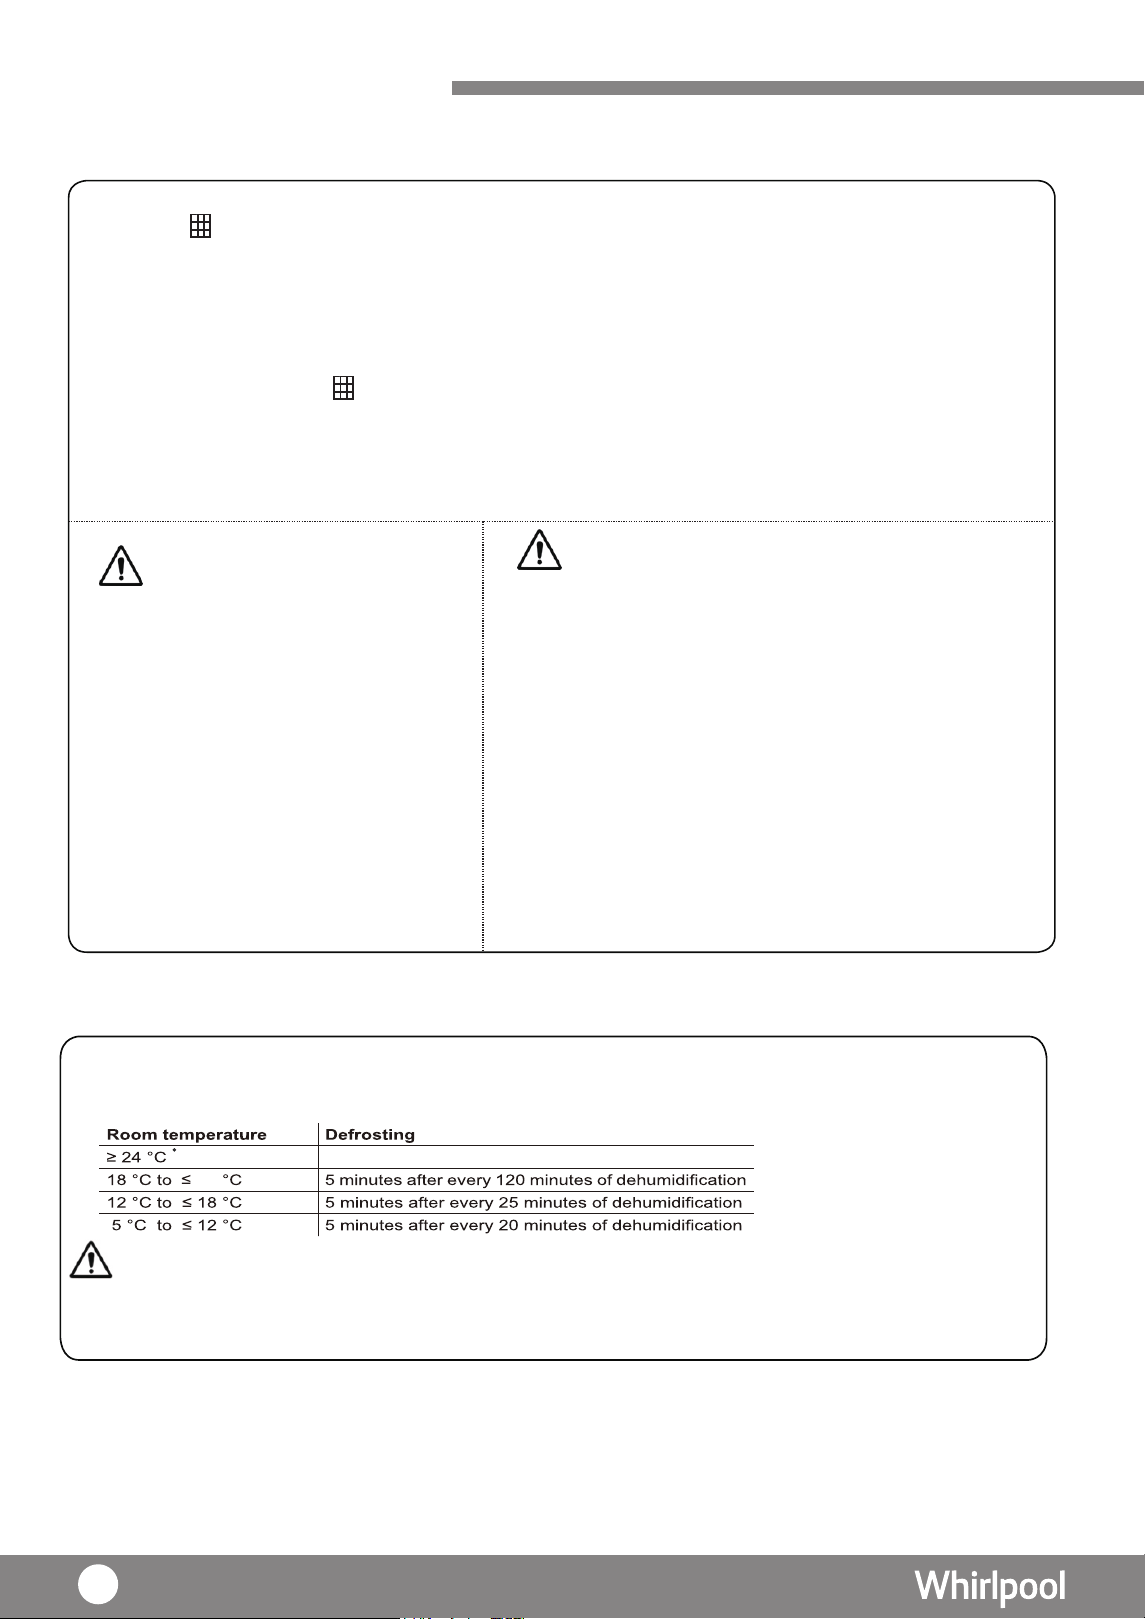
檢測到室溫≥24℃時,連續運行,不除霜
檢測到18℃<室溫≤23℃時,每除濕120分鐘後除霜(壓機關,風機轉 高速)5分鐘循環
色。如果經常清洗,顏色可能會有所改
變(如黑色或灰色)。
為
。
檢測到12℃<室溫≤18℃時,每除濕25分鐘後除霜(壓機關,風機轉 高速)5分鐘循環
為
。
檢測到5℃≤室溫≤12℃時,每除濕20分鐘後除霜(壓機關,風機轉 高速)5分鐘循環
為
·
除霜進行時,請勿開機或關閉電源。
·
20
保養及維修
內部乾燥
背蓋 (前置濾網)
水箱
主機
1. 關機後,風扇會以高風速連續運行約 10 秒,把機內水份吹乾,以防止霉菌滋生。
1. 除了納米銀離子過濾網外,灰塵亦可能被困於背板內。建議每兩周清潔背板一次。
2. 打開背板,用吸塵機輕輕地去除背板上多餘的灰塵。
建議定期清潔抽濕機的機身。
1. 清潔前,必須拔掉電源插頭。
2. 使用濕的軟布或中性洗滌劑擦進行清潔,再用乾布抹乾。
3. 若長時間不使用此產品,建議拔掉電源插頭,清潔包裝此產品及存放於乾燥及沒有
陽光直接照射的地方。
1. 每次使用此產品後,必須清空水箱內的剩餘水份。
2. 除去水箱蓋,用軟抹布擦乾水箱。
3.將水箱蓋裝回水箱上及放回其原本的位置。
警告
水箱蓋 水箱蓋
•切勿使用沸水,去污劑,酸性或鹼性洗潔劑,肥
皂
,研磨粉,汽油,稀釋劑,酒精,苯有機
溶液和刷子清潔抽濕機。
• 切勿用噴水沖洗方式去清洗抽濕機。
21
故障與排除
在聯絡客戶服務前,請先檢查是否出現以下情況,從而找出解決方案。若問題仍未能
解決,請勿自行拆開機殼及進行維修。應立即停止使用此產品,與客戶服務聯絡。
疑難排除
·
當使用第 6 感智能、夜間、抽濕及乾衣模式時,會產生
熱風,這是正常現象,並不是故障。
·
檢查電源是否連接;電壓是否過低 ; 電源插頭是否緊緊插上。
·
檢查環境溫度是否處於攝氏 5℃至 35℃之間。因為此產品
的操作溫度是設定於攝氏 5℃至 35℃之間。
·
檢查周邊環境相對濕度是否大於 30%。因為此產品的 操作環
境相對濕度必須大於 30%。
·
檢查是否已裝上水箱。若沒有裝上水箱,此產品將無
法正常工作,另檢查水箱是否放置在適當的位置。
·
( 16頁 ) 檢查水箱是否已滿。若是,請清空水箱
·
檢查空氣入口和出口是否被堵塞。若是,請除去 障礙,
( 11頁 ) 並確保有抽濕機有足夠的空間使用。
·
檢查背板,是否正確關上。
·
·
·
·
( 20頁 ) 檢查是否需要清潔過濾網。
檢查抽濕功能是否正在開啟。
檢查房間面積是否過大。
檢查是否在有電器或設備產生蒸汽 。
問題
抽濕機產生熱風
抽濕機不能正常運作
抽濕機沒有效能
( 濕度水平沒有下降
至設定水平 )
22
故障與排除
疑難排除
·
聲音是由於抽濕機於高風速運行所產生,音量會因環境而
有所變化,此產品性能是不受影響的。
·
壓縮機運行時亦會產生聲音,屬正常現象,這不是故障。
·
聲音的音量是取決於導風板的角度。
·
檢查此產品是否放置在平面上。
·
檢查背板是否正確地裝上。
·
( 11頁 )
檢查空氣入口和出口是否被堵塞。若是,請除去障
有此
礙,並確保
產品有足夠的空間使用。
·
( 20頁 ) 檢查是否需要清洗過濾網。
·
檢查水箱是否放置在平面上。
·
檢查此產品是否處於在水平的表面上。
·
在連續排水的情況下,檢查排水管是否正確地接至排水孔。
·
是否水箱剛剛拉出清空,引致機內殘餘的水流到機殼。
·
嘗試將插頭改插另一個插座,看是否有同樣情況。
·
停止使用此產品,並立即聯繫客戶服務尋求協助。
問題
產品發出噪音
漏水
濕度計顯示濕度
與產品不符
電源線或插頭
過熱
·
抽濕機顯示的濕度為現行位置的濕度,可能與其他位置的
濕度不同。
·
抽濕機所顯示的濕度是存在正常誤差 , 並不能與濕度計直接
作比較。
23

規格表
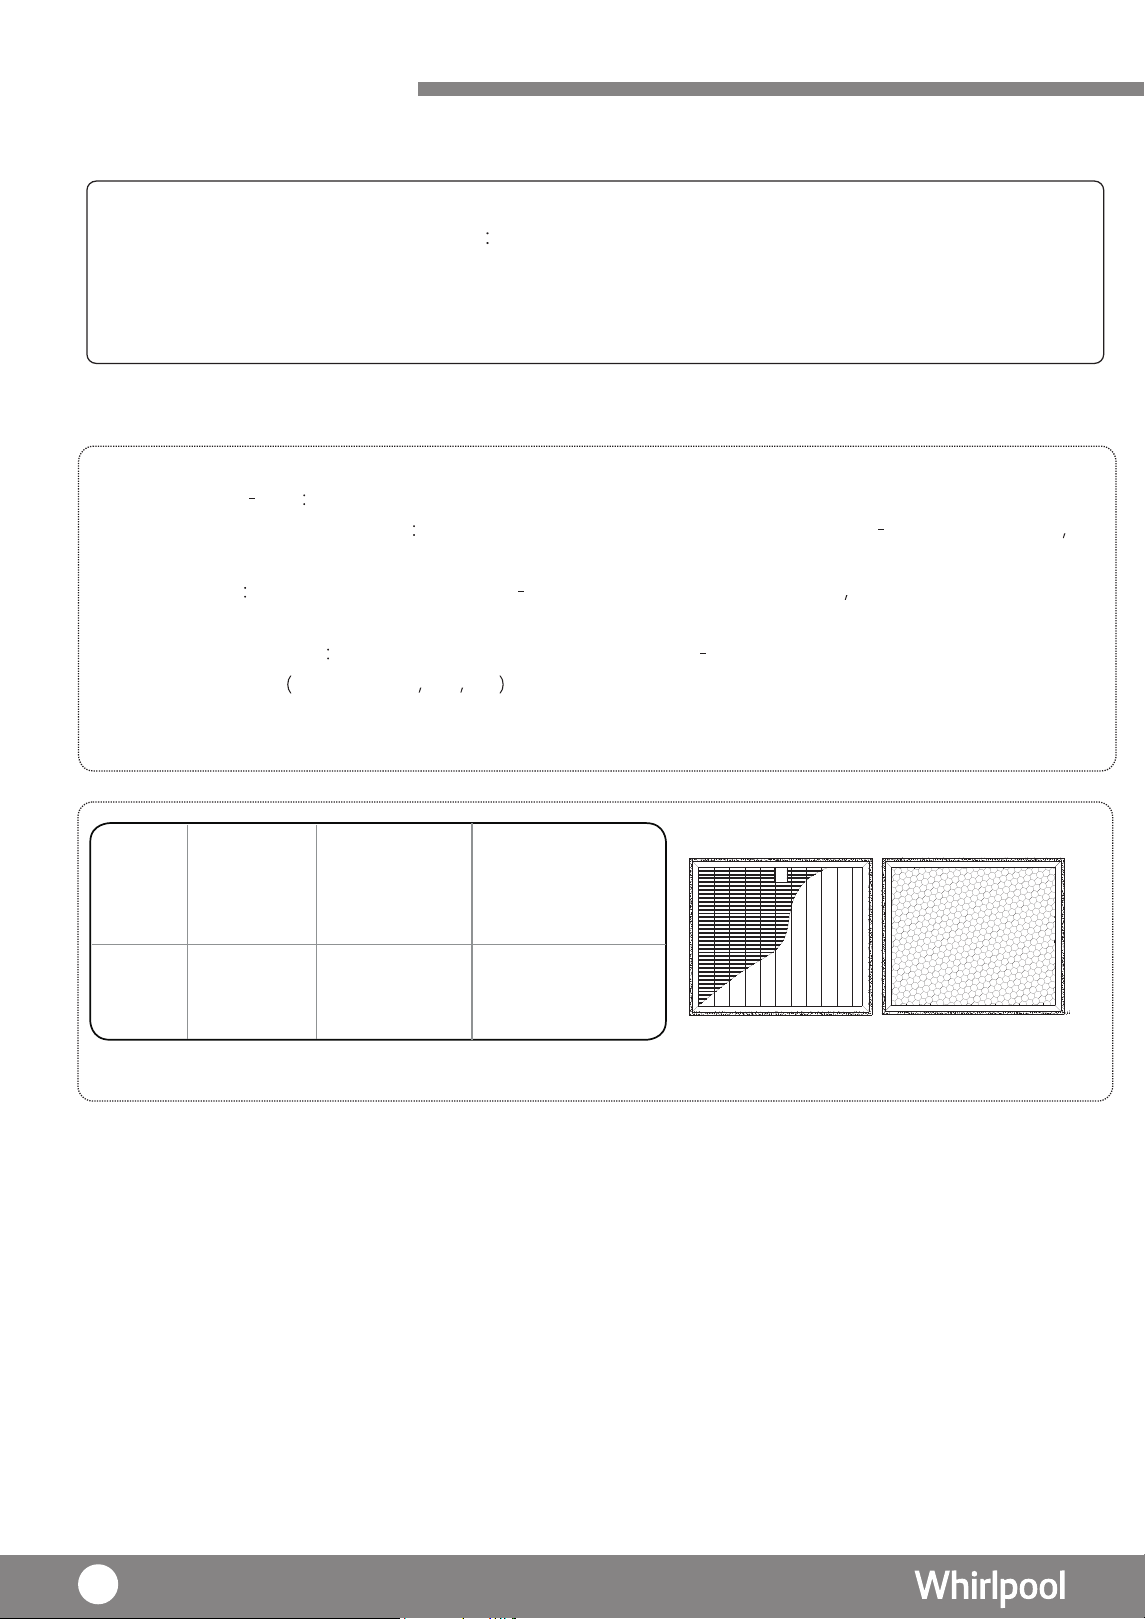
產品型號
因
注意:
產品改進和技術不斷更新,參數更新後,恕不另行通知,請以抽濕機的規格標籤為準。
12.6升
12.6升
DS242HEHK
DS242HGHK
220V/ 50Hz
220V/ 50Hz電源
容量 ( 升 /日)
( 溫度 : 26.7
℃
; RH
60%)
容量
尺寸(寬x高x深)毫米
( 升 /日)
( 溫度 : 30
℃
; RH 80%)
淨重(公斤)
把手
水箱容量 ( 升 )
水滿防溢容量 ( 升 )
雪種
14.1
14.1
24 升
24 升
隱藏式把手
6升
6升
5.4升
5.4升
R134a ( 175 克 )
R134a ( 175 克 )
400 x 590 x 190
400 x 590 x 190
隱藏式把手
24

Dear User,
Thank you for choosing our products. We are sure you will find your new appliance please
to use. Before using this appliance, we highly recommend you read through this operation
instruction carefully and retain for future reference. Design and specifcation may change due to
product development, no prior notice will be given.
Before Use
36
37
37
37
Unpacking
Check Water Tank
Placement
Operating Condition
Using Your Dehumidifer 38
39
39
40
Dehumidifying Mode
Laundry Mode
6th Sense Mode
Night Mode
Ionizer
Child Lock
Drainage
Louver Setting
Continuous Drainage
42
42
42
43
43
Air Purifying System
44
45
Filter
Ionizer
Care and Maintenance
46-47
Trouble Shooting
48-49
Product Specifcation
50
Content
36Installing Filter
Product Overview Product Features 31
Diagram(Front view) 32
Diagram(Back view) 33
Control Panel 34-35
Safety Instruction Safety Marks 27-28
Safety Notice 29-30
44
Air Purification
45
Air Q uality Indicator
Safety Instructions
Safety mark
Please read all instructions carefully before using this product. When using the appliances,
should always follow this instruction to reduce the risk of fire, electric shock, and injury to
person.
Please keep this manual.
This mark indicates
t h e b e h a v i o r s i s
strictly prohibited,
whic h may re s u lt
in fatal or serious
injuries.
Electricity Supply and Power Cord
Warning: This appliance is intended for use in domestic environment
only. Any other use is not recommended. Improper user may cause fire,
electric shock or other injury to person
or property.
This mark indicates
t h e b e h a v i o r s i s
strictly prohibited,
which may result in
injuries or damage to
product or property.
Prohibit
Action
Mandatory
Action
CAUTIONWARNING
· Make sure the voltage is 220V (50Hz). This appliance is only operated at the rated
voltage.
· Make sure the power cord is not squashed, damaged or overly bended, and do not
touch the power cord and plug or unplug it with wet hands.
· This product must be connected to the ground wire.
· Make sure no dust on the power plug and insert it into the outlet firmly. Wipe off the
dust by dry cloth periodically. Dust will accumulate on the power plug if it is not
insert into the outlet firmly. It may cause electric shock or fire.
· The appliance shall be installed in accordance with national wiring regulations.
·
Do not use easily-damaged power cord or plug. It may cause fire or electr
ic shock.
·
Do not remove earth pin.
·
If the supply cord is damaged, it must be replaced by a special cord or assembly
available from the manufacturer or its service agent.
·
Do not pull the power supply cord to remove it from the socket. Do not twist or
press the power supply cord, and make sure it is not broken.
·
Do not use extension cord, otherwise it may cause fire hazard.
·
Do not immerse unit, plug or power cord in water or spray with liquid; it may cause
electric shock or other injury to product.
·
Do not touch the power plug, circuit breaker and emergency button when your
hands are wet.
WARNING
27
Safety Instructions
·
Children should be supervised to ensure that they do not play with the appliance.
·
Always empty the water tank before moving the unit and unused.
·
Do not drink the accumulated water. Do not use the drain water for humans or pets
to drink. It may be harmful to health.
·
Do not stand on or lean against the unit. This may cause it to fall over, resulting in
personal injury.
·
The ambient operation temperature of this unit is between 5°C-35°C.
·
Unplug before servicing
·
Ensure water tank is empty before moving the unit.
·
Always switch off the unit before cleaning. The internal fan rotate in high speed may
cause injury.
·
If not using the unit for long time, ensure it is safely unplugged and empty water
tank. Otherwise electric shock or fire may result.
·
Empty and clean the water tank frequently to prevent bacteria growth.
·
Do not put your finger or anything on top of the unit or inside
the unit. It may result
in injury.
·
Do not wash the unit directly with water or cleansing detergent.
·
This appliance is not intended for use by person (including children) with reduced
physical, sensory or mental capabilities or lack of experience and knowledge,
unless they have been given supervision or instruction concerning user of the
appliance by a person responsible for their safety.
·
The units for indoor use only. Do not use in locations without shelter or exposed to
direct sunlight. This may cause overheating, electric shock, short circuit or fire.
·
Do not place in the vicinity of a burner such as a stove. This may prevent proper
heating.
·
Do not operate in a cupboard or in any narrow or confined s
pace. Insufficient
ventilation may cause overheating or fire.
·
Do not place any water container such as a vase on the unit. Water spillage may
impair insulation and cause electric shock, short circuit or fire.
·
Do not obstruct air intake or outlet with clothing or anything else. Obstruction of the
airfow causes overheating, malfunction or fire.
·
Do not attempt to repair, dismantle or modify the unit. This may cause electric shock
or fire. Please contact Whirlpool customer service centre.
·
Do not unplug the power cord without power “OFF” the appliance as it could injury
the unit.
WARNING
28
Safety Instructions
·
Check that the room where the unit is to operate is not too small. When its
compressor overheats, it cuts out automatically to prevent accidents. Should this
happen, unplug the appliance, rectify the problem, wait for about 45 minutes and
then restart the unit.
·
Do not use the unit to control ambient temperature for storage – for instance for
artworks or books, doing this may cause deterioration of the objects.
·
Do not use the unit without air filter.
·
Do not use the unit in place where chemicals are used such as hospitals,
laboratories, factories etc…It may cause combustion and fire.
·
Do not use flammable detergent to clean the appliance, such as gasoline.
·
Do not use the unit in place where fammable gas or oil is leakage.
It
may cause
combustion and fire.
·
Do not move the unit on its castors on an uneven surface. Lifting the unit instead
to prevent damage on castors and floor. This advice also applies to thick-pile
carpets, because the castors may leave marks.
·
Do not topple or drop the unit or ever put it on its side. This might damage it or
cause a leak or short circuit.
·
Do not use the unit above floor level, for instance on a table. This might cause the unit
to fall, resulting in personal injury or damage to the unit.
·
Do not touch the sensor lens. The sensor cannot work well if the lens is stained.
·
When the machine was turned over or after transportation. It needs to be stand still
for more than 4 hours before switching the unit on.
CAUTION
29
Disconnect power plug when there is strange smell or abnormal noise from the
.ecnatsissa rof ecivres remotsuc tcatnoc esael lP .ecnailppa
·
Safety Instructions
· This unit sho uld always keep in an upright position. To avoid damage, this unit
should be located on a flat and stable surface.
· Always have plenty of room around the main unit(Recommended space: Upper
50cm; Side 50 cm or more on each side; Behind 50cm or more; Front; 50cm or
more)
· When using the continuous drainage, make su re the pipe insert to the hole
completely to prevent water leakage to surrounding. It may cause damage to other
object and the unit.
· When using continuous drainage, make sure there is no obstruction on the pipe. It
may damage the unit.
· Check and clean
the
pre-filter every two weeks. Insufficient
ventilation may cause low dehumidification performance, frosting, dripping,
overheating or fire.
· Regularly inspect any unit used continuously or for long periods (filter block, power
cord overheat). Otherwise overheating or short circuit may result.
· If the unit is operated in the same position for some time, you should check for dirt
under and around it. Move the unit intermittently and clean the floor under it.
During Usage
CAUTION
· The packaging can be 100% recycled as confirmed by the recycling symbol. The
various parts of the packaging must not be dispersed in the environment, but must
be scrapped in line with local authority regulations.
· F or more detail information on handling and recycling of this product and its’
packaging, contact your local authorities who deal with the separate collection of
rubbish or the shop where you bought the appliance.
· This appliance has been made of recyclable or re-usable material. Scrapping must
be carried out in compliance with local waste disposal regulations. Before scrapping
it, make sure to cut off the mains cord so that the appliance cannot be re-used.
· The symbol on the product or on the documents accompanying the product
must be given to the appropriate local gatheri
ng place where electric and
electronic appliances are stored and recycled.
indicates that this appliance should not be treated as household waste , but
CAUTION
Safeguarding the Environment
back panel and
30
Product Features
6th Sense mode – It detects the ambient humidity changes through it’s
intelligent humidity sensors, and reacts to make a prompt adjustments on
the Fan speed.
Dehumidifying mode – Fan Speed and operation hours can be adjusted by
personal setting.
Laundry mode – Dry the clothes with maximum fan s peed. Not
only suitable in humid season but the entire year .
Night mode – Motor and fan speed will operate in extra low speed,
ultimately leads to a silent and comfortable environment.
Air Purifying mode (Auto) – can be operated separately, together with its
unique filtration system, leads to a high level of air quality.
A
This product comes with independent dehumidifying and purifying functions, suitable
in all seasons.
ir Purifying mode (Manual) – Fan Speed can be adjusted for air
purification.
for usage
31
Product Overview
Product outlook
(Front view )
3. Horizontal louver slider
1. Louver
2. Control panel
4. Recess handle
5. Water tank lid
6. Water tank handle
7. Water tank
8. Water level indicator
rotacdni ytilau q riA .9
8
9
32
Product Overview
1. Outlet of continuous drainage
and water plug
2. Power cable stand
3. Power plug
4. Multi-protection filter
5. Back cover with Pre-filter
6. Humidity sensor
7. Air quality sensor
U P
Product outlook
( kca B view )
6
7
33
Product Overview
·
·
·
·
Power key On / Off the unit
Set the duration for operating hour
Remarks:
When the room relative humidity is
higher than 80%, “HI” will be displayed.
When the room relative humidity is
lower than 35%, “LO” will be displayed.
When “%” lights, indicates the approximate
humidity; When “hr” lights, indicates the Timer.
After setting, LED display will show the current
humidity (except Laundry and Air Purify mode).
The displayed range of humidity is from 35%-
80%.
Set your desire humidity level
Select 4 different operation mode includes
6 sense
th
Night
Dehumidifying
·
·
Air Purify Mode (Auto)
Air Purify Mode (Manual)
Laundry
Timer key
LED display
Humidity key
MODE
Air Purification
key
Key Function Referring page
1
2
6
3
4
5
P.38
P.38
P.38
P.38 - P.40
P.40 - P.41
There are two purifying modes:
P.38
34
Product Overview
Ion Key Activate ionizer function
There are 3 fan speed for selection.
There are 3 vertical swing direction of louver
for selection.
“DEFROST” – When lights, the unit starts
defrosting automatically in order to prevent
frost from forming inside the main unit.
“FULL” – When lights, it means the water tank
is full, it is necessary for user to empty the
tank.
“ “ - When lights, it is necessary for user
to clean the filter.
·
·
Child lock is activated when the light is on.
After cleaning the filter, reset is necessary
when the light is on .
Child Lock /
Reset key
Fan Speed key
Louver Swing
key
Alert
Key Function Referring page
7
8
9
10
11
P.42
P.42
P.43
P.46
35
P.38 & P.41
Before Use
Unpack including carton box,foams,plastic bag,stickers,etc.. all the packaging materials,
Remove the plastic bag of filter before operating the unit.
WARNING
Keep children away from the packaging since the folded packing and plastic bag may cause
suffocation.
Please check the accessories inside the package according to packing list.
Unpacking
Back(Carbon)
U P
U
P
1. Remove the back cover.
Installing Filter
2. Remove the plastic bag of filter (The side with“UP &
FRONT”should be placed outward).
3. I
“UP & FRONT”should be placed outward).
(The side withnstall the Multi-Protection filter.
4. Return the back cover.
Back Cover
Multi-Protection Filter
UP
FRONT
&
36
Before Use
Placement
Operating Condition
CAUTION: Do not use the product in
below areas.
•With a lot of chemicals are used such
as factory, hospital, laboratories.
• With a lot of flammable gas or oil.
• With a lot of steam or oil such as
kitchen.
• With a lot of sulfide gas such as hot-
spring are.
−“Beep” sounds indicate connected to power source.
−At this moment, no icon light up in the control panel.
−All keys with no response, except “POWER” key and
“ Timer ” Key.
−Press “POWER ” to start the machine.
·
Operating ambient temperature 5°C - 35°C
·
Operating ambient humidity RH% >30%
·
220V AC power supply only
·
Insert Power plug into power socket
WARNING Do not use the unit in the
following places:
·
Under direct sunlight
·
Outdoor
·
Narrow space environment such as
inside a cabinet
·
With a lot of steam or oil such as
kitchen
CAUTION:
· Display shows "HI", when the room
relative humidity is higher than 80%,
the dehumidfier operates as normal.
· Display shows "LO" when the room
relative humidity is lower than 35%,
compressor
fan will keep operating.
will stop operation, but the
· Place the unit in an upright position.
· Place the unit on a stable and flat surface. Carpet or futon is an unstable place. Do not place
above floor level such as on table.
· Keep enough space around the unit. (Recommended space: Upper 50cm or more; Side 50 cm
or more; Back
side 50cm or more; Behind 50cm or more; Front 50cm or more)
· Avoid place in direct sunlight
· Any electric machine in the same space, if there is noise or cannot display correct time,
move the product far away from the electrical machines.
Air outlet
Air intake
50cm or above
50cm or
above
50cm or
above
50cm or
above
50cm or
above
Check Water Tank
·
Water tank must be properly installed otherwise
the unit
will not operate.
CAUTION: There may be some
water left in the water tank from the product inspection
in
factory. This is not a
malfunction.
residual
.
37
Dehumidfying Mode
Before Use
1. Press “POWER” key to turn on the dehumidifer, lights up
2. LED displays the ambient humidity
3. In the first time, the mode will base on current humidity to change the fan speed automatically. And set
the swing angel as the
maximum
4.
5. Press “FAN SPEED” key to select fan speed
High
Medium
Low
6. Press “SWING” key to select vertical louver swing angle
Air Flow Front-up Front-down
Remarks:
1 : When choosing different angle of the louver, louver will be swing to the largest angle for 10 seconds first, and then move to the
selected option.
2: Press the Air flow icon again, louver will stop as is.
7.Timer setting
Press “TIMER” to set the dehumidifying duration. The“hr”on the display top left corner will flash ,
Press the “TIMER” or “HUMIDITY” key to select the duration with sequence 1 -> 2 -> 3-> ……>23->
24-->CO(CONTINUOUS). The dehumidifer will stop when the time is up.
8.Humidity setting
Press “HUMIDI
TY” to
set the desire ambient humidity(RH%). The “%” on the top right corner display
will
flash , by pressing the “HUMIDITY” or “TIMER” key to select the humidity.
“TIMER”
increases the RH% with sequence 40%
->
50% -> 60% ->
70% -> 80% -> --
(
continuous
)
and
“HUMIDITY” in decreasing sequence 80%
-> 70%
-> 60% -> 50%
-> 40%
-> -- (continuous),
5
seconds
later
,
display
will
show
the
current
ambient
humidity
.
When
the ambient
humidity is lower
than selected humidity, the display will show the current ambient
humidity.
At
that
moment, the
compressor will stop operation. But the fan will keep operating .
The
machine will stop
automatically
when
the ambient humidity is lower than 30%.
9. Press “POWER” to stop the machine, it will continue to operate for 1 0 seconds. Then, it will stop
operation . (For details of 'INTERNAL DRYING
",
please refer to P.47)
•When the water tank is full (P.42)
•When the temperature or humidity is out of operation range ( P. 3 7)
•Press "CO"(continuous), the unit will stop automatically after 48 hours operation. If water tank was
taken out during operation , the counting time will start over again.
•When the unit is off, the user can pre-set the operation time. For example, press 01, the unit will
turn on automatically after 1 hour .
CAUTION
Machine will stop operation under following situation:
lights up.
If it is not the first time, press “DEHUMIDFY MODE ” key until
38
->
75%
->
65%
->
55%
->
45%
45%
55%
->
65%
->
75%
->
->
Using your Dehumidifer
1. Press “POWER” key to turn on the dehumidifer, lights up
2. Press 6th sense “ MODE” key until lights up.
3. In the first time, the fan speed will set as Low in 5 seconds, after that, it will base on current humidity
to adjust the fan speed automatically.
4. Under “ 6th Sense “
mode, the fan speed will change automatically according to following conditions:
· RH% > 75% : High Fan Speed
· RH% 50%-70% : Medium Fan Speed
· RH% < 50% : Low Fan speed
5. Press “SWING” key to select vertical louver swing angle
Air fow front-up front-down
Remarks:
1 : When choosing different angle of the louver, louver will be swing to the maximum angle for 10 seconds first , and then move to the
selected option.
2 : Press the Air flow icon again, louver will stop as is.
6. If necessary, press “TIMER” key to adjust the operation duration 1-24 hours or CO(continuous).
7. If necessary, press “Humidity” key to adjust the humidity level.
Remarks :
• Under 6th Sense mode, fan speed cannot be adjusted.
Machine will stop under following situation:
• When the water tank is full (P. 42)
• When the temperature or humidity is out of operation range (P.
37)
• Press" CO " (continuous), the unit will stop automatically after 48 hours operation. If water
tank was taken out during operation , the counting time will start over again.
6th Sense Mode
Laundry Mode
2. Press “ DEHUMIDITY MODE” key until lights up.
3. Under Laundry Mode, the Display will show "--" and cannot set the humidity. Under this mode, the fan
speed operates at high speed, auto swing at maximum and will stop automatically after 10 hours operation.
4. Press “SWING” key to select vertical louver swing angle
Air fow front-up front-down
Remarks:
1 : When choosing different angle of the louver, louver will be swing to the maximum angle for 10 seconds first , and then move to the
selected option.
2 : Press the Air flow icon again, louver will stop as is.
5. If necessary, press “TIMER” key to adjust the operation duration as 1-24 hours or CO (continuous).
Under Laundry Mode:
• Humidity and timer cannot be set .
• " RE ZINOI " function can be turned on.
• Fan Speed cannot be adjusted.
Machine will stop under following situation:
• When the water tank is full (P.42)
• After operation for 10 hours.
• When the temperature or humidity is out of operation range ( P. 37 )
• Press "CO"(continuous), the unit will stop automatically after 48 hours operation. If water tank
was taken out during operation , the counting time will start over again.
1. Press “POWER” key to turn on the machine, lights up.
39
Using your Dehumidifer
Night Mode
1. Press “POWER” key to turn on the dehumidifer, lights up.
2. Press “ DEHUMIDITY MODE” key until
lights up.
3. Under Night mode, fan speed operates at low speed. Louver will set at front-up. After 1 minute
operation, the Air Quality
Indicator will turn off, the display and other icons will become dim.
4. Press “SWING” key to select vertical louver swing angle.
Air fow front-up front-down
Remarks:
1 : When choosing different angle of the louver, louver will be swing to the maximum angle for 10 seconds first , and then move to
the selected option.
2 : Press the Air flow icon again, louver will stop as is.
5. If necessary, press “TIMER” key to adjust the operation duration as 1-24 hours or CO(continuous).
6. If necessary, press “HUMIDITY ” key to adjust the humidity level.
Remarks :
Remarks :
• Under Night mode, the fan speed cannot be adjusted.
Machine will stop under following situation:
• When the water tank is full (P. 42)
• When the temperature or humidity is out of operation range (P. 37)
• Press "CO" ( continuous)the unit will stop automatically after 48 hours operation. If water
tank was taken out during operation , the counting time
will start over again.
CAUTION
Air Purifying (Auto) Mode
1. Press “PURIFY MODE ” key until lights up.
2. Under Air purifying (Auto) mode , compressor will be stopped and no dehumidify function.
3. The 3-color Air Quality Indicator lights up according to below conditions:
· Green – Air Quality is good
· Blue – Air Quality is normal
· Red – Air Quality is bad
4. Press “SWING” key to select vertical louver swing angle.
Air flow front-up front-down
Remarks:
1 : When choosing different angle of the louver, louver will be swing to the largest angle for 10
seconds
first , and then move to the selected option.
2 : Press the “SWING ”key again, louver will stop as is.
5. Under Air Purifying (Auto) mode , IONIZER turns on automatically. You can stop it when necessary.
6. Under Air Purifying (Auto) mode , Timer can be set.
7. Under Air Purifying (Auto) mode , LED display will show “--”.
Air purifying system is used to remove contaminants and odors from the air in a room. This unit also
includes air purify system such as pre-filter and Multi-protection
filter,
Ionizer and Air
Quality Indicator.
• Air Purifying function will be operated automatically under every mode and cannot be switched off.
• Press "CO" (continuous), the unit will stop automatically after 48 hours operation. If water tank
was taken out during operation, the counting time will start over again.
• Under Air Purify (Auto) mode, HUMIDITY mode cannot be adjusted.
• Under Air Purifying (Auto) mode, fan speed will be operated automatically according to the air
quality level.
• Under Air Purifying (Auto) mode, fan speed cannot be adjusted manually.
40
Using
your Dehumidifier
Air Purifying (Manual) Mode
The Fan speed can be adjusted under Air Purifying (Manual) mode.
1. Press “PURIFY MODE” key until lights up.
2. Press “FAN SPEED” key to select fan speed.
High Medium Low
2. Under Air purifying (Auto) mode , compressor will be stopped and no dehumidify function.
3. The 3-color Air Quality Indicator lights up according to below condition:
· Green – Air Quality is good
· Orange – Air Quality is normal
· Red – Air Quality is bad
4. Press “SWING” key to select vertical louver swing angle.
Air flow front-up front-down
Remarks:
1 : When choosing different angle of the louver, louver will be swing to the maximum angle for 10
seconds first , and then move to the selected option.
2 : Press the “ SWING ” key again, louver will stop as is.
Remarks:
• Under Air Purifying (Manual) mode , HUMIDITY mode cannot be adjusted.
• Press "CO" (continuous),the mode will stop automatically after 48 hours operation. If water
tank was taken out during operation , the counting time will start over again.
41
Using your Dehumidifer
Ionizer
Child Lock
•Press “ION” key until lights up
•This function can be operated independently.
• It is suggested to turn on the ionizer at the same time under Dehumidifying, 6th Sense, Laundry, Air
Purifying ( Auto / Manual )and Night mode.
1. Press “
ALERT ”
” key for about 3 seconds ,
lights up to activate the key lock function, but the
POWER Key is still functionable.
2.
• Under Air Pur ifying (Auto) mode, ionizer operates automatically.
Press “ key for about 3 seconds until disappear to deactivate the key lock function.
When the “FULL" indicator lights up, it means the water tank is full (around 5.4L) , the unit will be stoppped
automatically.
1 . Take out the water tank gently. There is a handle at the
the top of water tank.
2. Open the drain outlet and empty the water tank.
Drain outlet
Drain outlet
3. Close the drain outlet and place the water tank back
to the unit properly.
4. The “
” indicator will disappear when the empty
water tank returns to its position.
Remarks:
To avoid residual water from leaking into the
machine , water tank should not be pulled out
immediately once the operation is completed.
Drainage
ALERT
42
Using your rei fidi muhe D
Louver Setting
1.Press “SWING” key to select the vertical louver swing angle.
2.Press “SWING” until the light is off, the louver will stop at the angle as is.
3. For horizontal louver, it can be operated manually by adjusting the
louver slider to left or
right.
Remarks: When choosing different angle of the louver, louver will be swing to the maximum angle for 10 seconds first , and then move to
the selected option.
Vertical
louver swing
in wide angle
Vertical
louver swing
forward angle
Vertical
louver swing
forwards
Continuous Drainage
• Drain hose inner diameter is 10mm
• To avoid water leakage, ensure that the drain hose fit with the drainage hole tightly.
• If water tank is not in proper position, dehumidifying operation cannot be performed.
CAUTION
water
plug
Pull out the
water plug
Insert the
water pipe
revuol latnoziro H
can be operated manually
.m
1
s approximately
i htgnel eht dna mm 51 si retemaid retuo eht ,
1. Turn off the unit and unplug the power plug.
2. Pull out the water plug.
3. Insert the water pipe.
4. To remove the water pipe, perform the above procedures reversely.
43
Air
Purifying System
system is used to remove contaminants and odors in the air. This unit also
includes air purify system as follows
1. Nano Silver ion pre-filter
2. All-in-one Multi-Protection filter
3. Ionize
4. Air Quality LED.
Filter
This dehumidifier comes with following filtration functions:
1. Washable Pre filter Use to filtrate
dust and hair in the air.
2. Washable Nano Silver Coating
Use to dust in the air and effective on anti bacterial
activities
especially for MRSA and E. coli
3a. HEPA Filter
It is one of the layer in Multi Protection
filter. It
can
dust pollen and small
contaminants PM2.5 in the air. It can also
0.26um particles.
3b. Active Carbon Filter
It is one of the layer in Multi Protection filter. It comes with
to remove odor
e.g. cigarette pet etc .
3c. Multi-Protection Coating : This coating on Multi-Protection filter can against different virus such as
H1N1,H3N2,EV71,etc.
U P
Front(HEPA
Back(Carbon)
Multi-Protection filter
Pre-Filter
Nano Silver ion
Coating Pre-
Filter
AII-in-one Multi-
Protection filter
multi-protection coating)
Polypropylene
Polyethylene
Active Carbon
Polyethylene
with Nano
Silver ion
coating Prefilter
polyethylene
Air Purification
filtrate
filtrate
filtrate
&
44
Air Purification
deodorizing function
F ilter
M aterials
Air Purifying System
U
P
Pre-filter and
Nano silver coating
Multi-Protection Filter
Uses high voltage to ionize (electric charge) air molecules, such that the air molecules
become positive or negative c harges. Ionizer is used to remove particles in the air.
For Ionizer operation, please refer to P.42.
Ionizer
Air Quality Indicator
It is a 3-color LED used to indicate the air quality in room. The indicator color will change
according to the air quality as follows:
Green Blue Red
Air Quality Good Normal Poor
Remark:
• Under Night Mode, Air Quality Indicator will turn off automatically after 1 minute.
LED Color
(on back cover)
45
Care and Maintenance
Clean the pre-filter and Multi-protection filter
1. When “ ” light up, it is necessary to clean the pre-filter and Multi-p rotection filter.
2. Take off the back cover of main unit , pre-filter is integrated into the back cover.
3. Take off the Multi-protection filter and remove the dust on filter by vacuum them gently.
4. Return the Multi-protection filter to the main unit with the tag side face outward.
5. Return the back cover to the main unit.
6. At this moment, the “ ” still light
up, press the “ ALERT
” key for more than 8 seconds until
disappear.
Never wash with water. Vacuum the
Multi-protection filter very gently and
the filter (especially the side with Active
Carbon) may be damaged if too much force
was applied.
WARNING
For Multi-protection filter, it is suggested to replace a new
one every 5 years but it depends on the environment.The life
of Multi-protection filter will be shorten if the room always
occupied with cigarette smoke or dusty air,etc..
N ano-Silver Ion coating and Pre-filter are washable.Make
sure to dry them completely before replacing it to the
machine.
Nano-Silver Ion coating is a filter with nano silver
coating, which is in silver color. It may change color
(such as black or gray) if wash frequently.
Remark:
CAUTION
Defrost
1.
The Defrost
“ ” indicator will light up and dehumidifier will start defrost cycle.
During the defrosting operation, the dehumidifiying function
Caution
may intermit.
Please don't turn off the power or pull out the power plug of the dehumidifier during the defrosting
operation.
2.
23
Defrosting is not available
•
•
•
•
•
Multi-purpose filter:
Defrosting operation:
46
Water tank lid
Water tank lid
Care and Maintenance
• Boiling water, eradicator, acid or alkaline detergent, soap, abrasive powder, gasoline, thinner,
alcohol, benzene organic solution and brush are not allowed to use for cleaning.
•
CAUTION
Do not rinse clean with water spray.
It is recommended to clean the main body of dehumidifer regularly.
1. Unplug the power plug before cleaning.
2. Use wet soft cloth or mild detergent to wipe the dehumidifier and followed by a dry cloth.
3. If the dehumidifier will not be used for a long time , it is recommended to unplug, clean and
wrap the machine and store it in a dry place without sunlight.
Back Cover (Pre-filter)
1. Except the filter, heavy dust may also trapped around the rear panel. It is suggested to clean the
rear panel bi-weekly .
2. Take off the back cover and vacuum the rear panel gently to remove heavy dust.
1.
2. R
3.
After each use of dehumidifier, empty the
water tank.
emove the water tank lid and dry the water
tank by using a soft cloth.
Return the water tank lid and place the water tank
back to
Inter
Water Tank
Main Body
nal Drying
1. When power off , the fan will continue to operate for 10 seconds at high fan speed to
dry out the internal moisture
for
anti-mildew
purpose
.
At
this
moment
,
the
light"DEFORST" will
light up. That's mean the internal drying function is in progress.
its position.
47

Trouble shooting
Dehumidifier
generate warm air
Problem Possible Cause & Solution
Please check the below phenomenon to find out the solution before contact customer
services. If the problem still cannot be solved, please do not dismantle the machine. You
should stop using the machine and contact customer services to solve the problem.
• Warm air will be generated during 6th sense, dehumidifying and laundry
modes. It is not a malfunction.
Dehumidifier is
not working
• Check the power is connected; voltage is too low; power plug is plugged
firmly.
• Check the ambient temperature is between 5°C ~ 35°C. As the operating
temperature of th
e
machine is 5°C ~ 35°C.
• Check the ambient humidity RH% >30%. As the operating humidity of
the machine is RH% >30%.
• Check the water tank is placed. Without the water tank lid, the machine
will not work. [P.47]
• Check the water tank is placed in proper position.
• Check the water tank is full or not. If yes, dispose the water. [P.42]
• Check if the machine is under defrost process.
• Check if the air inlet or outlet is blocked. If yes, remove the barrier and
make sure there is enough
s
pace for the machine. [P.37
Dehumidifier is not
efficiency (Humidity level
does not drop to set level)
• Check the the back cover is in proper position.
• Check if there is any appliance producing steam in the room.
• Check if the room size is too big.
• Check if dehumidifying function is turn on.
• Check if the filter is dirty. Clean the filter. [P.46]
48
]
Noisy
Water leakage
The humidity
shows on display
is different from
hygrometer
Power Cord or plug
generate abnormal heat
• The sound is generated due to the air flow especially in high fan speed.
The sound level varied with the environment but the efficiency is not
affected.
• S ound will be generated when starts up. It is due to the operation of
compressor. It is not a malfunction.
• The volume of sound is differs depending on the louver angle.
• Check if the dehumidifier is placed on a flat surface.
• Check if the rear panel is in proper position
• Check if the air inlet or outlet is blocked. If yes, remove the barrier and
make sure there is enough space for the dehumidifier [P.37]
• Check if the filter is dirty. Clean the filter [P.46]
•
•
Check if the water tank is in pro
per position.
Check if the dehumidifer place in a flat surface.
• If under continuous drainage, check the water pipe inserted in the
drainage hole properly.
• Whether the water tank is pull out the water empty, causing the machine
having the residual water inside the machine.
• Try the plug into another plug socket to see whether still have the same
situation or not.
• Stop using the dehumidifer immediate and contact customer services for
assistance.
Problem Possible Cause & Solution
• The display shows the humidity level at its current position , which may
be different from the level at other position.
• The humidity level shows by the product contains tolerance , which is
normal. And it should not be compared with the hygrometer directly.
Trouble shooting
49
Specification
Power Supply
Capacity (L/day)
( Temp: 26.7℃; RH 60% )
Capacity (L/day)
( Temp: 30℃; RH 80% )
Net Weight (kg)
Dimension
( L x H x W )
Handle
Water Tank
Capacity (L)
Water Full-Stop
Capacity (L)
Refrigerant (g)
Recess Handle
Remarks:
noitaicficeps rof le bal gnitar eht ot refer esaelp ,eciton roirp tuohtiw egnahc ot tce j bus si noitacificeps tcudorP
details.
•
50
12.6L
12.6L
DS242HEHK
DS242HGHK
220V/ 50Hz
220V/ 50Hz
14.1
14.1
24 L
24 L
6L
6L
5.4L
5.4L
R134a ( 175 g )
R134a ( 175 g )
400 x 590 x 190
400 x 590 x 190
Recess Handle
Model

Register your product online
網上登記新產品保養
Enjoy extra 1-month free warranty upon online registration.
「惠」環保出力,減少用紙!於網上登記產品更可獲額外多一個月保養。
Save the planet and register your product warranty online!
https://qrco.de/WHKwarranty