
OWNER'S MANUAL
BUILT-IN OVEN
Before beginning installation, read these instructions
carefully. This will simplify installation and ensure that the
product is installed correctly and safely. Leave these
instructions near the product after installation for future
reference.
ENGLISH
WSEZM7225S2
MFL62060359
Rev.05_032125
www.lg.com
Copyright © 2022-2025 LG Electronics. All Rights Reserved
Scan the QR code to see the manual.

TABLE OF CONTENTS
This manual may contain images or
content that may be different from the
model you purchased.
This manual is subject to revision by the
manufacturer.
IMPORTANT SAFETY INSTRUCTIONS
READ ALL INSTRUCTIONS BEFORE USE .................................................... 4
Safety Messages...................................................................................................4
WARNING .................................................................................................... 5
Installation ............................................................................................................5
Damage .................................................................................................................5
Maintenance .........................................................................................................6
Operation ..............................................................................................................6
CAUTION...................................................................................................... 9
Operation ..............................................................................................................9
Maintenance .......................................................................................................10
PRODUCT OVERVIEW
Product Features ...................................................................................... 12
Accessories..........................................................................................................12
Product Specifications .......................................................................................12
INSTALLATION
Before Installing....................................................................................... 13
Proper Location and Dimensions.....................................................................13
Parts / Tools ........................................................................................................14
Installing the Oven .................................................................................. 14
Instructions.........................................................................................................14
OPERATION
Operating Control Panel ......................................................................... 16
Control Panel Features......................................................................................16
Energy Saving Tips .............................................................................................16
Changing Settings .................................................................................... 17
Clock.....................................................................................................................17
Cooking with Oven.............................................................................................18
Quick Preheat .....................................................................................................18
Setting Overall Cooking and Baking Time ......................................................18

Timer....................................................................................................................18
Child-Proof Lock .................................................................................................19
Operating the Oven ................................................................................. 19
Before Using the Oven ......................................................................................19
Locking Function ................................................................................................19
Selecting Cooking Modes..................................................................................20
Cooking with ECO Mode....................................................................................22
Recommended Baking Guide...........................................................................23
Recommended Roasting Guide........................................................................25
Test Food According to EN 60350-1.................................................................26
MAINTENANCE
Cleaning..................................................................................................... 28
General Cleaning Tips........................................................................................28
Exterior ................................................................................................................28
Interior.................................................................................................................29
Periodic Maintenance .............................................................................. 29
Changing the Oven Light ..................................................................................29
Removing and Assembling the Oven Door.....................................................30
Removing the Door Cover.................................................................................31
Changing the Power Cord.................................................................................32
Removing Rails ...................................................................................................33
Removing and Assembling the Telescopic Runners......................................33
Removing and Assembling the Self-cleaning Baffle......................................34
TROUBLESHOOTING
FAQs ........................................................................................................... 36
Frequently Asked Questions.............................................................................36
Before Calling for Service ........................................................................ 37
Cooking ...............................................................................................................37
Parts & Features.................................................................................................38
Customer Service ...............................................................................................40
After Sales Service (Egypt Only)........................................................................40
4
IMPORTANT SAFETY INSTRUCTIONS
IMPORTANT SAFETY INSTRUCTIONS
READ ALL INSTRUCTIONS BEFORE USE
Safety Messages
Your safety and the safety of others are very important.
We have provided many important safety messages in this manual and
on your appliance. Always read and follow all safety messages.
Read and follow instructions when you use the appliance to avoid fire
risks, electric shock, bodily injuries or damage. This guide does not
include all possible situations that could happen. Always contact your
technical service agent or the manufacturer when any
incomprehensible problem appears. These instructions are only valid if
the country symbol appears on the appliance. If the symbol does not
appear on the appliance, it is necessary to refer to the technical
instructions which will provide the necessary instructions concerning
modification of the appliance to the conditions for use in the country.
All safety messages will tell you what the potential hazard is, tell you
how to reduce the chance of injury, and tell you what may happen if the
instructions are not followed.
This is the safety alert symbol.
This symbol alerts you to potential hazards that can kill or
injure you and others. All safety messages will follow the safety
alert symbol and either the word WARNING or CAUTION.
These words mean:
WARNING
You may be killed or seriously injured if you do not follow
instructions.
CAUTION
You may be injured or cause damage to the product if you do
not follow instructions.

5
IMPORTANT SAFETY INSTRUCTIONS
ENGLISH
WARNING
WARNING
• To reduce the risk of explosion, fire, death, electric shock, injury or
scalding to persons when using this product, follow basic
precautions, including the following:
Installation
• Never allow anyone to climb, sit, stand or hang on the oven door.
Injury might result from contact with hot food or the oven itself.
• Do not line the oven walls, racks, bottom, or any other part of the
oven with aluminium foil or any other material. Doing so will disrupt
heat distribution, produce poor baking results and cause permanent
damage to the oven interior (aluminium foil will melt to the interior
surface of the oven).
• Do not use aluminium foil or any other material to line the oven
bottom. Improper installation of oven liners may result in a risk of
electric shock or fire.
• Make sure your appliance is properly installed and grounded by a
qualified installer, according to the installation instructions. Any
adjustment and service should be performed only by qualified
installers or service technicians.
• Be certain that all packing materials are removed from the appliance
before operating. Keep plastic, clothes, paper, and other flammable
materials away from parts of the appliance that may become hot.
• The electrical power must be shut off while the electrical connections
are being made.
• Improper connection of aluminium house wiring to copper leads can
result in an electrical hazard or fire. Use only connectors designed for
joining copper to aluminium and follow the manufacturer’s
recommended procedure closely.
Damage
• If the oven has been damaged in transport, do not connect it.

6
IMPORTANT SAFETY INSTRUCTIONS
• In the event of a fault or damage to the appliance, do not attempt to
operate it.
• Repairs to the appliance should be carried out by a licensed
technician only. Wrong repairs may result in considerable danger. If
you need repairs, contact an LG Service Centre or your dealer.
• If the supply cord is damaged, it must be replaced by the
manufacturer, its service agent or similarly qualified persons in order
to avoid a hazard.
• Never remove the outer casing from the oven. If the oven is faulty
and needs servicing or you are in doubt about its condition, unplug it
from the wall socket and contact the nearest after-sales service
centre. Failure to do so can result in malfunctioning and death or
electrical shock during use.
Maintenance
• The power supply of the appliance should be turned off when it is
being repaired or cleaned.
• Be careful when connecting electrical appliances to sockets near to
this appliance.
• Do not use high-pressure water cleaners or steam jet cleaners for
electrical safety reasons.
• Do not use harsh abrasive cleaners or sharp metal scrapers to clean
the oven door glass since they can scratch the surface, which may
result in shattering of the glass.
• Ensure that the appliance is switched off before replacing the lamp to
avoid the possibility of electric shock. Failure to do so can result in
malfunctioning and death or electrical shock during use.
Operation
• Do not touch interior parts until they have cooled down sufficiently.
When the oven operates, the interior parts will be very hot and burns
may occur.
• Accessible parts may become hot during use. Young children should
be kept away.

7
IMPORTANT SAFETY INSTRUCTIONS
ENGLISH
• The appliance is not intended for use by young children or infirm
persons without supervision.
• Young children should be supervised to ensure that they do not play
with the appliance.
• Children should be kept at a safe distance when the oven operates.
• Children should be kept at a safe distance until the oven has cooled
down after cooking.
• This appliance is not intended for use by persons (including children)
with reduced physical, sensory or mental capabilities, or lack of
experience and knowledge, unless they have been given supervision
or instruction concerning the use of the appliance by a person
responsible for their safety.
• The appliance and its accessible parts become hot during use. Care
should be taken to avoid touching heating elements. Children less
than 8 years of age shall be kept away unless continuously
supervised.
• This appliance can be used by children aged from 8 years and above
and persons with reduced physical, sensory or mental capabilities or
lack of experience and knowledge if they have been given supervision
or instruction concerning the use of the appliance in a safe way and
they understand the hazards involved. Children shall not play with
the appliance. Cleaning and user maintenance shall not be made by
children without supervision.
• Never block the air vents. The oven may overheat and automatically
switch itself off. It will remain inoperable until it has cooled
sufficiently.
• Do not cover or obstruct the ventilation with cloth or paper. The cloth
or paper may catch fire as hot air is emitted from the oven.
• Do not spill or pour water in the vents.
• During use the appliance becomes hot. Care should be taken to avoid
touching heating elements inside the oven. These walls may be hot
enough to burn skin even after cooking is finished, though they do
not appear to be so, avoid placing hands and arms inside the oven.
• The oven surfaces will become hot when the appliance is operated at
a high temperature for a long period of time.

8
IMPORTANT SAFETY INSTRUCTIONS
• The oven door must be closed while cooking.
• When cooking, take care when opening the oven door as hot air and
steam will escape rapidly. The hot air or steam released may cause
scalding.
• When cooking dishes that contain alcohol, the alcohol can evaporate
due to the high temperatures. The vapour can catch fire if it comes
into contact with a hot oven part.
• Never store flammable or easily deformable materials in the oven to
reduce the risk of fire in the oven cavity.
• Should an oven fire occur, leave the oven door closed and turn the
oven off. If the fire continues, throw baking soda on the fire or use a
fire extinguisher. Do not put water or flour on the fire. Flour may be
explosive and water can cause a grease fire to spread and cause
personal injury.
• Use oven gloves when removing a dish from the oven. The trays and
racks are hot.
• The oven must be secured by screwing a minimum of 2 thin general
purpose self tapping screws into the 2 upper mounting holes located
on the outer side fascias, into the cabinetry. Check if the oven is
installed properly.
• Do not store or operate this equipment outdoors. Do not use this
product near water (for example, near a kitchen sink, in a wet
basement, or near a swimming pool, and the like).
• Be sure all packaging materials are removed from the appliance
before operating it.
• Do not use this oven for commercial purposes. This oven has been
designed only for the cooking of household foods and for domestic
use.
• Do not use the oven door as a rest table for hot items or cookware.
• Never use your appliance for warming or heating the room.
• Do not step, lean, or sit on the door of the oven. These can cause the
oven to tip resulting in burns or serious injuries.
• Do not touch an electric cord with a wet hand. It is very dangerous.
You can get an electric shock.

9
IMPORTANT SAFETY INSTRUCTIONS
ENGLISH
• Be careful not to damage the power cable.
• Do not operate this appliance if it has a damaged power cable or
plug.
• Do not immerse power cable or plug in water and keep power cable
away from heated surfaces.
• Do not let cord hang over the edge of table or counter.
• Please ensure cooking times are correctly set. Over cooking may
result in the food catching fire and subsequent damage to your oven.
• Do not pour water on to the oven bottom when it is hot. This could
cause damage to the enamel surface and deform the base.
• When cooking very moist cakes, use a deep pan (or baking tray).
Dripping fruit juices from the baking tray will leave stains, which
become indelible.
• Do not heat unopened food containers. Build-up of pressure may
cause the container to burst and result in injury.
• Do not use the oven door as a rest table under any circumstances.
• Be careful when you remove the door. The door is heavy.
• Do not let sparks or open flames come in contact with the appliance
when you open the door.
• Always cook with the oven door closed.
• Be careful when you remove or install accessories.
• Remaining fat or food in the appliance can cause fire.
• Do not change the specification of this appliance.
• Do not close or open the oven door by foot excessively.
• Do not use the oven to dry live animals.
• The appliance must not be installed behind a decorative door in order
to avoid overheating.
CAUTION
Operation
• Always heat fat slowly, and watch as it heats.

10
IMPORTANT SAFETY INSTRUCTIONS
• If frying combinations of oils and fats, stir them together before
heating.
• Use a deep fat thermometer, if possible, to prevent overheating fat
beyond the smoking point.
• Use the least possible amount of fat for effective shallow or deep-fat
frying. Filling the pan with too much fat can cause spillovers when
food is added.
• Accessible parts may become hot when the grill is in use.
• When using cooking or roasting bags in the oven, follow the
manufacturer’s directions.
• The door or the outer surface may get hot when the appliance is
operating.
• Do not use this oven for purposes other than cooking.
• Use caution if opening the door when the oven is operating. Hot
surfaces can cause serious burns.
Maintenance
• Do not repair or replace any part of the appliance unless specifically
recommended in the manual. All other servicing should be
performed by a qualified technician.
• Do not use harsh etching, abrasive cleaners or sharp metal scrapers
to clean the oven door glass since they can scratch the surface.
Scratches may cause the glass to shatter.
• Make sure oven lights are cool before cleaning.
• Do not clean the door gasket. The door gasket is essential for a good
seal. Care should be taken not to rub, damage, or move the gasket.
• Do not rinse trays and racks by placing them in water just after
cooking. This may cause breakage or damage.
• The oven should be cleaned regularly and any food deposits should
be removed. Failure to maintain the oven in a clean condition could
lead to deterioration of the surface that could shorten the life of the
appliance and possibly result in a hazardous situation.

11
IMPORTANT SAFETY INSTRUCTIONS
ENGLISH
• Never use oven cleaner in the cooking compartment when it is still
warm, and never heat up the oven unless all oven cleaner has been
wiped off.
• Do not clean the accessories in a dishwasher.
• Do not use oven cleaners, steam cleaners, harsh chemical cleaners,
bleach, vinegar, steel scouring pads, or abrasive pads or cleansers to
clean the oven, as they can permanently damage the oven surface.
12
PRODUCT OVERVIEW
PRODUCT OVERVIEW
Product Features
The appearance and specifications listed in this manual may vary due to constant product improvements.
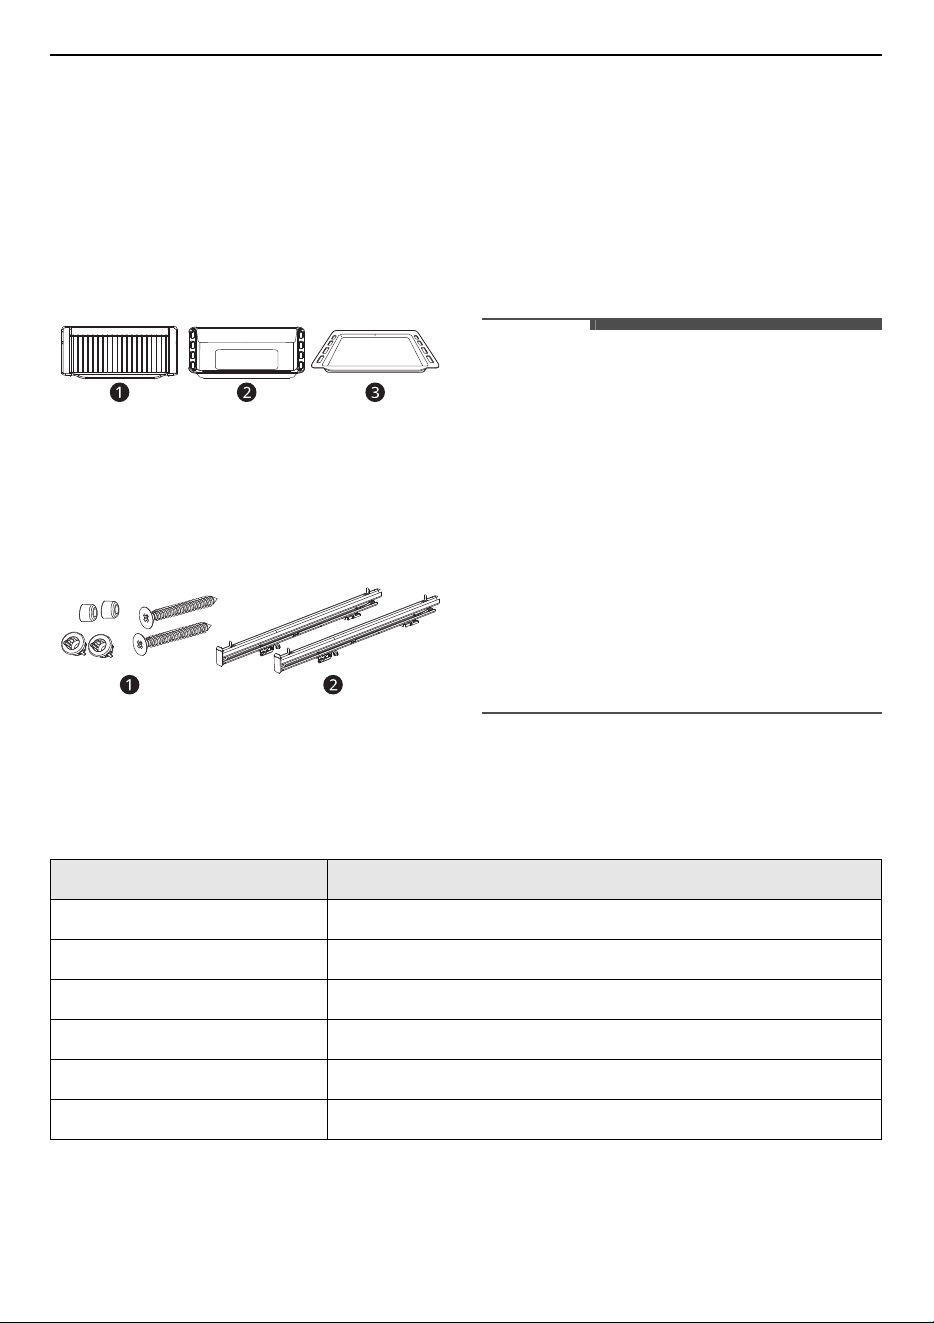
Accessories
Accessories for Cooking
a
Grill Rack
b
Deep Tray
c
Baking Tray
Accessories for Installation
a
Installation Kit
b
Telescopic Runner (2 ea)
NOTE
• Contact your LG Electronics customer
information center if any accessories are missing
for your particular model.
• For your safety and for extended product life,
only use authorized components.
• The manufacturer is not responsible for product
malfunction or accidents caused by the use of
separately purchased, unauthorized
components or parts.
• The images in this guide may be different from
the actual components and accessories, which
are subject to change by the manufacturer
without prior notice for product improvement
purposes.
Product Specifications
The appearance and specifications listed in this manual may vary due to constant product improvements.
Model WSEZM7225S2
Description Electric Built-In Oven
Power Supply 220-240 V, 50-60 Hz
Max Power Consumption 2900 Watts (2.9 kW)
Interior Dimensions 503 mm (W) x 362 mm (H) x 394 mm (D)
Net Weight 32.6 kg
Capacity 72 L
13
INSTALLATION
ENGLISH
INSTALLATION
Before Installing
Proper Location and Dimensions
CAUTION
• The appliance must not be installed behind a decorative door in order to avoid overheating.
• A kitchen cabinet that is in direct contact with the oven must have heat resistance to temperatures up
to 90 ℃, the front panels of other appliances located near the oven must be heat resistant to a minimum
temperature of 70 ℃.
• If the supply cord is damaged, it must be replaced by the manufacturer, its service agent or similarly
qualified persons in order to avoid a hazard.
NOTE
• This installation must be completed by a qualified installer or technician. Proper installation is the
responsibility of the installer and product failure due to improper installation is NOT covered under
warranty.
• Make sure the base is level and the front of the cabinet is square. If the cabinet base is not level, the oven
glides will tend to slide out when opening the door.
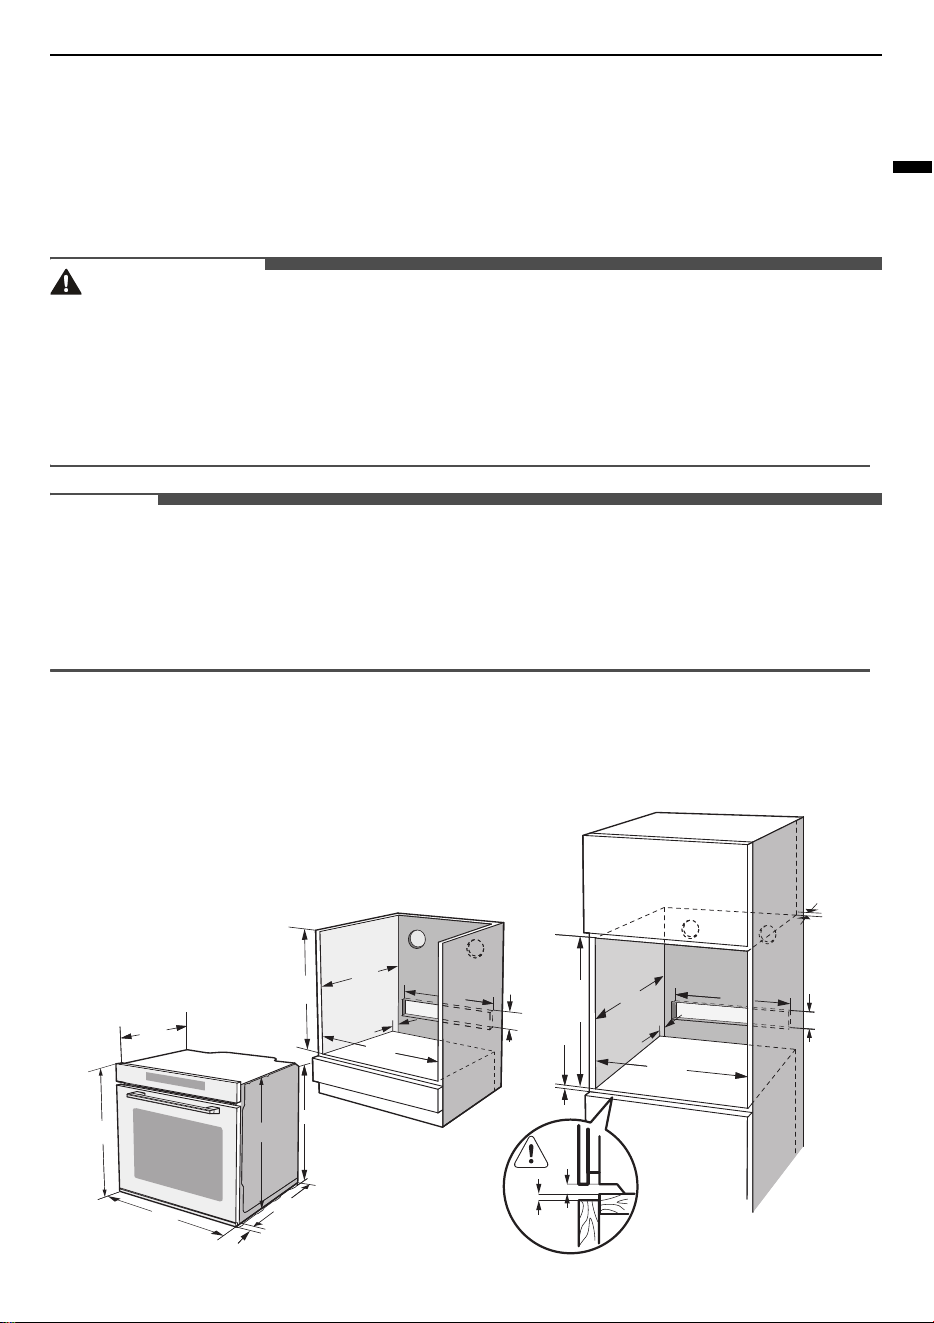
Dimensions and Clearances
Measure the current cutout dimensions and compare them to the cutout dimensions shown below. Little
or no cabinet work may be necessary.
SINGLE BUILT- IN OVEN
435
596
595
20
545
576
530
min.
600
min.
550
min.35
min.35
min.5
3
5
min.
550
min.35
460
460
105
105
590
min.585
max.595
560
+8
560
+8
14
INSTALLATION
Parts / Tools
WARNING
• Mounting screws must be used. Failure to do so
can result in the oven falling out of the cabinet
causing serious injury.
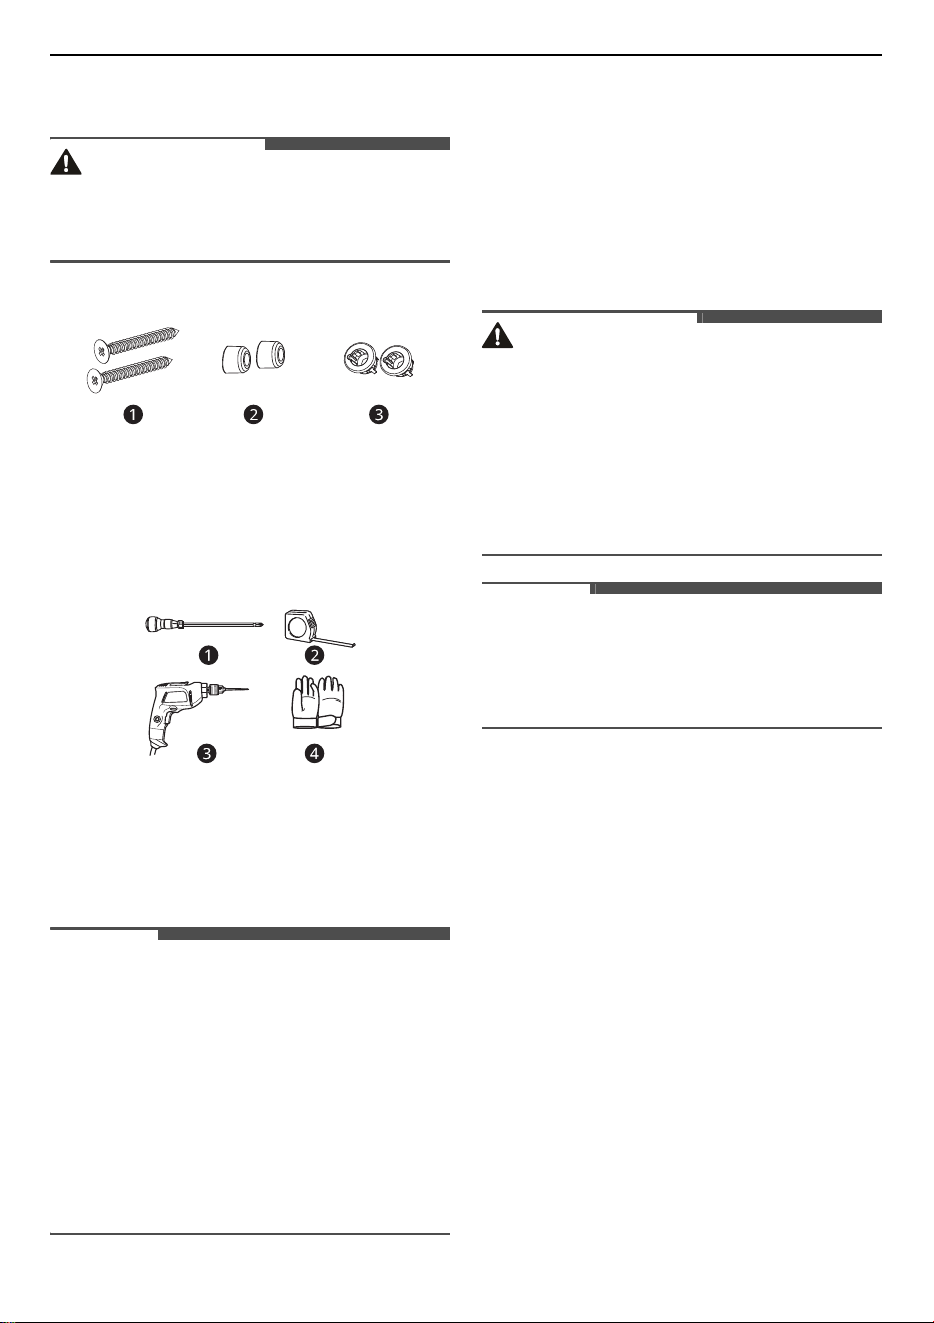
Parts Provided
a
Wood Screw for Mounting (4X25) (2 ea)
b
Rubber Pad (2 ea)
c
Cabinet Screw Mount (2 ea)
Tools Needed
a
Phillips screwdriver
b
Tape measure
c
Drill
d
Gloves
NOTE
• Observe all governing codes and ordinances.
• Have the installer show you the location of the
circuit breaker or fuse. Mark it for easy
reference.
• As when using any appliance generating heat,
there are certain safety precautions you should
follow.
• Be sure your appliance is installed and grounded
properly by a qualified installer or service
technician.
Installing the Oven
Instructions
This oven must only be installed by a licensed
electrician. The installer is responsible for the
correct electrical connection of the appliances and
the observance of the relative safety codes and
recommendations.
WARNING
• The oven should be connected to the electricity
supply by means of a proper circuit breaker or
fuse. Never use multiple plug adapters or
extension leads.
• This connection may be achieved by having the
plug accessible or by incorporating a switch in
the fixed wiring in accordance with the wiring
rules. Failure to do so can result in a fire.
NOTE
• The oven must be installed in compliance with
the manufacturer’s instructions. For more
information about installation, please refer to
the installation manual.
Safety Instructions for the Installer
• During installation, ensure that no persons can
come into contact with live components.
• The oven must be installed by a qualified
professional electrician, in accordance with the
corresponding regulations and standards.
• The oven is a heavy appliance and must be
transported with great care.
• Before initial use, remove all packaging, both
external and from inside the appliance.
• No modification may be made to the oven’s
technical characteristics.
• To operate this appliance safe, please be sure
that it has been installed to a professional
standard respecting the installation instructions.
Damages occur because of incorrect installation
are not within the warranty.
• While doing the installation, please wear
protective gloves to prevent yourself from
getting cut by sharp edges.
15
INSTALLATION
ENGLISH
• Check the appliance if there is any damage
before installation and do not connect the
appliance if there is.
• Before turning on the appliance, please remove
all the packaging materials and adhesive film
from the appliance.
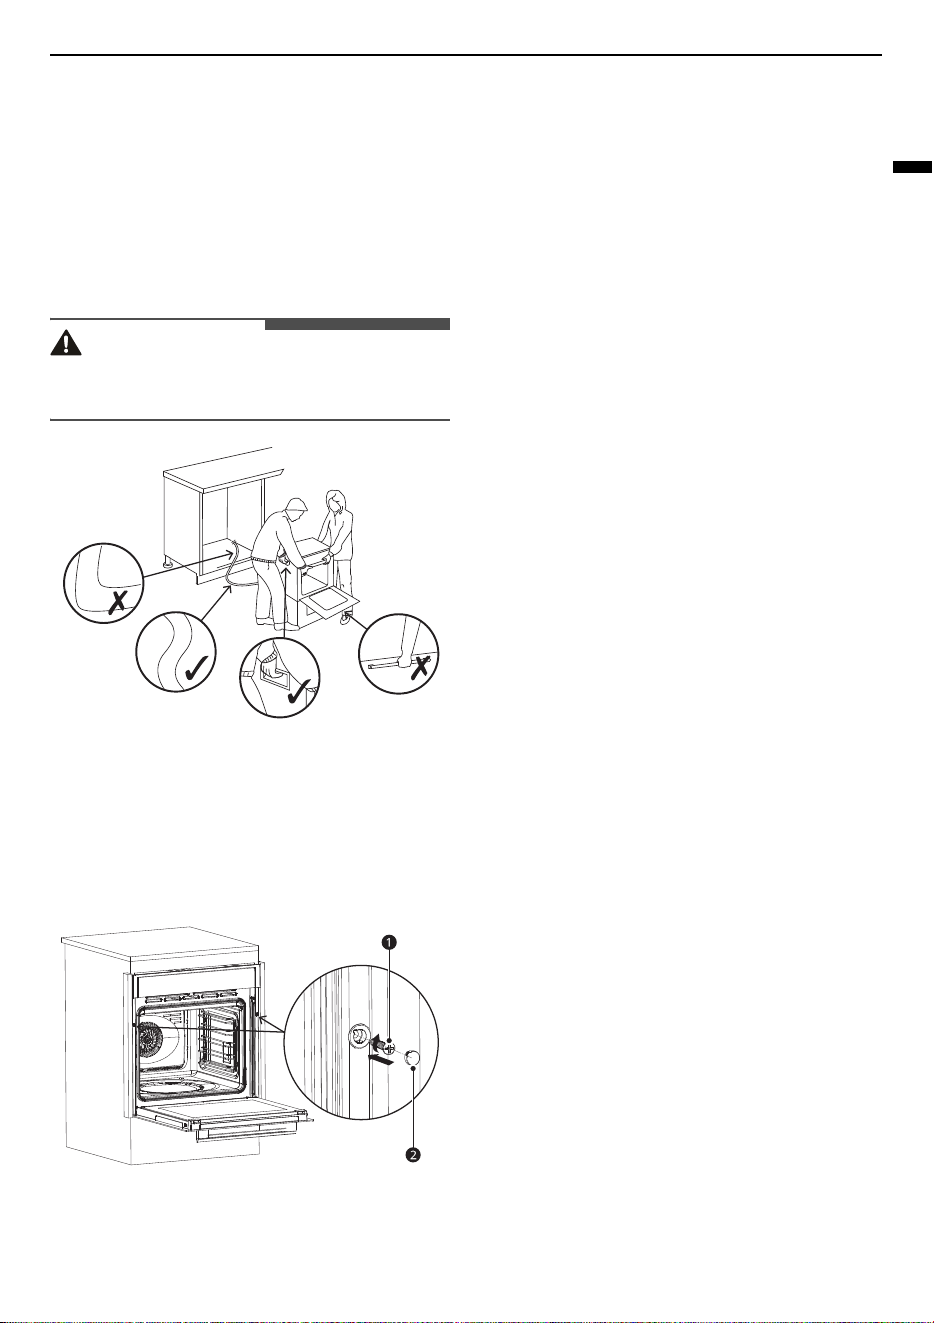
1
Lift the appliance and place it inside the
housing unit.
CAUTION
• Do not lift the appliance by the door handle to
avoid potential damage to the glass and hinges.
2
Fix the appliance to the housing unit using 2
screws 07a
a
. Cover both screws with rubber
pads 07b
b
.
• Hand-tight only. Do not use power drill to
avoid damage to the screw.
a
07a
b
07b
3
Connect the power plug to an easily reachable
electrical outlet so that in case of an emergency
the appliance can be unplugged immediately.
• Once the appliance is connected to the
electrical outlet, it emits a beep sound and
enters standby mode.
4
Pull the power plug out of the electrical outlet
to completely switch off the appliance.
16
OPERATION
OPERATION
Operating Control Panel
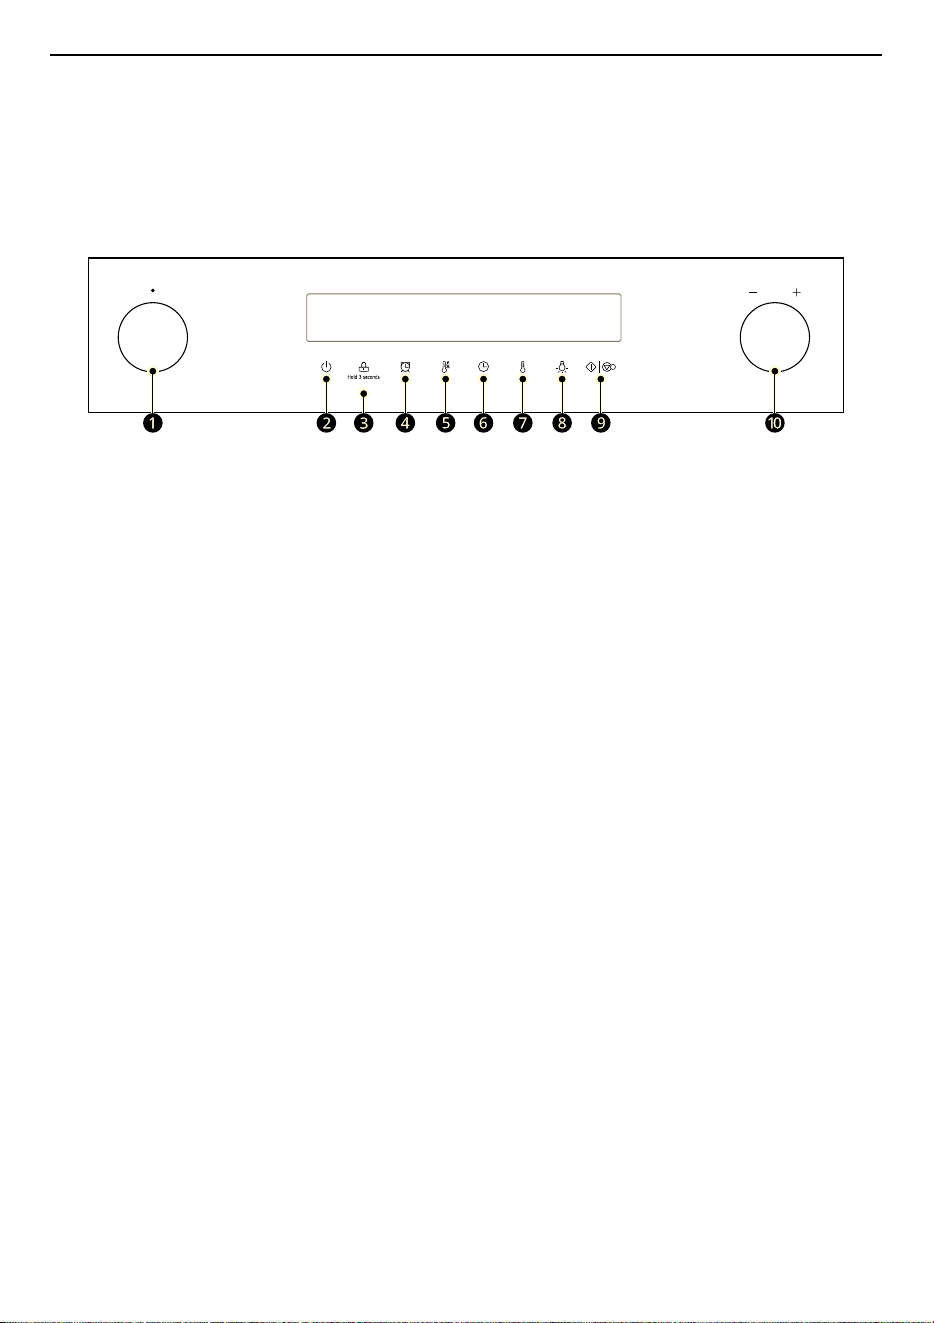
Control Panel Features
a
Oven Mode Knob
Turn the knob to select oven operating mode. See
Operating the Oven
.
b
On / Off
Press to turn the oven on or off.
c
Child-Proof Lock
Press and hold the button for 3 seconds to activate or deactivate Child-Proof Lock.
d
Timer
Press to set or cancel timer on oven.
e
Quick Preheat
Press to start Quick Preheat mode.
f
Duration
Press to set the overall cooking and/or baking time.
Clock Setting
Press the button then turn the setting knob to set clock in standby mode.
g
Temperature
Press to set temperature of the oven.
h
Light On / Off
Press to turn the oven light on or off.
i
Start / Pause
Press to start or pause the cooking.
j
Setting Knob
Turn the knob to adjust oven settings.
Energy Saving Tips
• Remove all accessories, which are not necessary during the cooking & baking process.

17
OPERATION
ENGLISH
• Do not open the door during the cooking & baking process.
• If you open the door during cooking & baking, switch the mode to “Lamp” (Without change the
temperature setting).
• Decrease the temperature setting in not fan assisted modes to 50 °C at 5 minutes to 10 minutes before
end of cooking & baking time. So you can use the cavity heat to complete the process.
• Use “Fan Heating”, whenever possible. You can reduce the temperature by 20 °C to 30 °C.
• You can cook and bake using “Fan Heating” on more than one level at the same time.
• If it is not possible to cook and bake different dishes at the same time, you can heat one after the other
to use the preheat status of the oven.
• Do not preheat the empty oven, if it is not required. If necessary put the food into the oven immediately
after reaching the temperature indicated by switching off the indicator light the first time.
• Do not use reflective foil, like aluminum foil to cover the cavity floor.
• Use the timer and or a temperature probe whenever possible.
• Use dark matt finish and light weighted baking molds and containers. Try not to use heavy accessories
with shiny surfaces, like stainless steel or aluminum.
Environment
The packaging is made for protect your new appliance against damages during transport. The materials
used are selected carefully and should be recycled. Recycling reduces the use of raw materials and waste.
Electrical and electronic appliances often contain valuable materials. Please do not dispose of it with your
household waste.
Energy Efficiency According to EN 60350-1
Please note the following information:
• The measurement is carried out in the “ECO” mode to determine the data regarding the forced air mode
and the label-class.
• The measurement is carried out in the “Top & Bottom Heating” mode to determine the data regarding
the conventional mode.
• During the measurement only the necessary accessory is in the cavity. All other parts have to be
removed.
• The oven is installed as described in the installation guide and placed in the middle of the cabinet.
• It is necessary for the measurement to close the door like in the household, even when the cable
disturbs the sealing function of the gasket during the measurement. To make sure, that there are no
negative effects regarding the disturbed sealing due to the energy data, it is necessary to close the door
carefully during the measurement. It is maybe required to use a tool to guarantee the sealing of the
gasket like in the household, where no cable disturbs the sealing function.
• The determination of the cavity volume carried out for the usage “Defrost” as described on page 20. To
ensure an efficient use of the oven, all accessories including side-racks are removed.
Changing Settings
Clock
Before the oven can be used, the time should be
set.
1
After the oven has been electrically connected,
press the Clock button
y
then set the time of
day in hours by turning the setting knob.
18
OPERATION
2
Press the Clock button
y
again then set the
time in minutes by turning the setting knob.
3
Press the Clock button
y
to finish the setting.
NOTE
• The clock has a 24 hour display.
Cooking with Oven
1
After the oven has been electrically connected,
turn the oven mode knob to select functions,
turn the setting knob the set cooking
temperature.
2
Press the Start / Pause button
{
|
,
. The
oven starts to heat. If not, oven will back to
clock after 10 minutes.
3
Press the On / Off button
t
to cancel at any
time.
NOTE
• After temperature setting, press the Clock
button
y
and turn the setting knob to set the
cooking duration time.
Quick Preheat
Use quick preheat to shorten the preheat time.
Select a function, press the Quick Preheat button
>
. The preheat icon flashes in the display. If this
function can’t quick preheat, a “beep” sounds.
Defrosting, fermentation and "ECO" functions
cannot be used with quick preheat function.
Setting Overall Cooking and
Baking Time
To change the overall cooking / baking time during
cooking, follow the steps below.
1
Press the Clock button
y
and turn the setting
knob to set the overall cooking / baking time.
2
Press the Start / Pause button
{
|
,
to start
the cooking process.
3
Press the On / Off button
t
to cancel at any
time.
CAUTION
• After the appliance switched off, it becomes very
hot especially inside the cavity. Never touch the
interior surfaces of the appliance or the heating
elements.
• Use oven gloves to remove accessories or
cookware from the cavity, and allow the
appliance to cool down.
• Keep children at a safe distance at the same time
to avoid the injury of burns.
NOTE
• Changing modes/temperature/rest cooking
time may have some negative influences for the
result of cooking. It is recommended not to do so
unless you are well experienced on cooking.
• To change the heating type and temperature
during cooking, turn the oven mode knob or
setting knob at any time. If no other actions are
taken within 6 seconds of changing settings, the
oven starts to heat with new setting.
Timer
The timer can be set before and during cooking
process. The timer is not available when function
and temperature settings are being changed.
Quick Preheat icon

19
OPERATION
ENGLISH
1
Press the Timer button
x
to set the timer in
hours.
2
Press the Timer button
x
again to set the
timer in minutes.
3
Press the Timer button
x
to accept changes.
4
When the set time runs out, a “beep” sounds.
Child-Proof Lock
Child-Proof Lock is to help prevent children from
accidentally turning on the oven or change any
settings. Child-Proof Lock is available at any time
when the oven is in use or not in use.
1
Press the Child-Proof Lock button
k
for 3
seconds to activate. Child-proof lock icon
k
appears in the display.
2
Press the Child-Proof Lock button
k
again for
3 seconds to deactivate.
Operating the Oven
Before Using the Oven
Before using the oven to prepare food for the first
time, you must clean the cavity and accessories.
1
Remove all stickers, surface protection foils
and transport protection parts.
2
Remove all accessories and the side-racks from
the cavity.
3
Clean the accessories and the side-racks
thoroughly using soapy water and a dish cloth
or soft brush.
4
Ensure that the cavity does not contain any
leftover packaging, such as polystyrene pellets
or wooden piece which may cause risk of fire.
5
Wipe the smooth surfaces in the cavity and the
door with a soft, wet cloth.
6
To remove the new-appliance smell, heat up
the appliance when empty and with the oven
door closed.
7
Keep the kitchen highly ventilated while the
appliance is heating up first time. Keep
children and pets out of the kitchen during this
time. Close the door to the adjacent rooms.
8
Adjust the settings indicated. You can find out
how to set the heating type and the
temperature in the next section.
NOTE
• The maximum operating time of the oven is 9
hours to prevent overheating.
After the appliance has cooled
down:
1
Clean the smooth surfaces and the door with
soapy water and a dish cloth.
2
Dry all surfaces.
3
Install the side-racks.
Locking Function
The accessories can be pulled out approximately
halfway until they lock in place. The locking
function prevents the accessories from tilting when
they are pulled out. The accessories must be
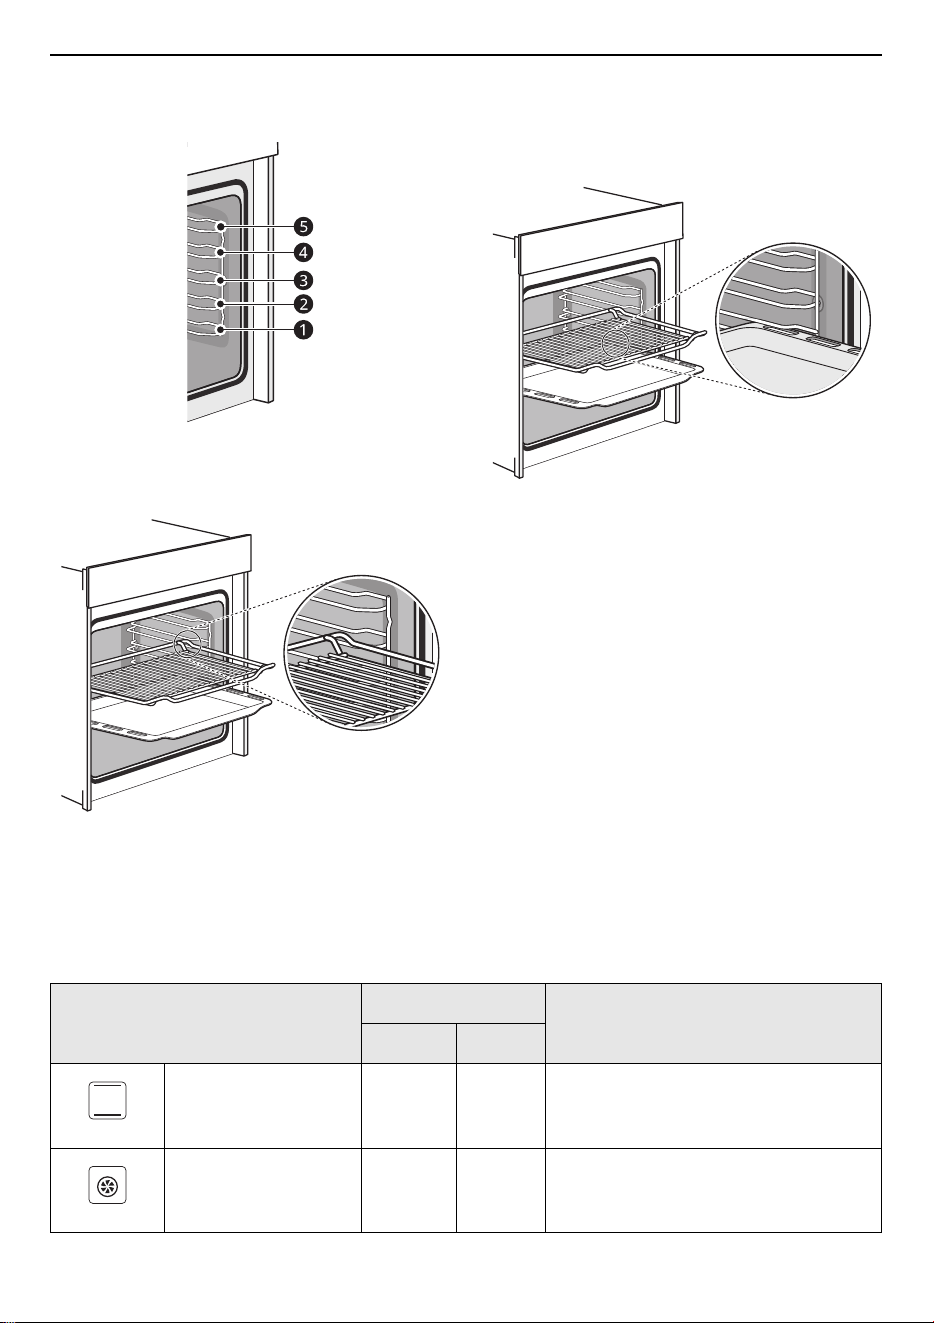
20
OPERATION
inserted into the cavity correctly for the tilt
protection to work properly.
Using the Wire Rack
When inserting the wire rack, ensure the wire rack
is onto the right facing direction like the picture.
Using the Baking Tray
When inserting the backing tray, ensure the
backing tray is onto the right facing direction like
the picture.
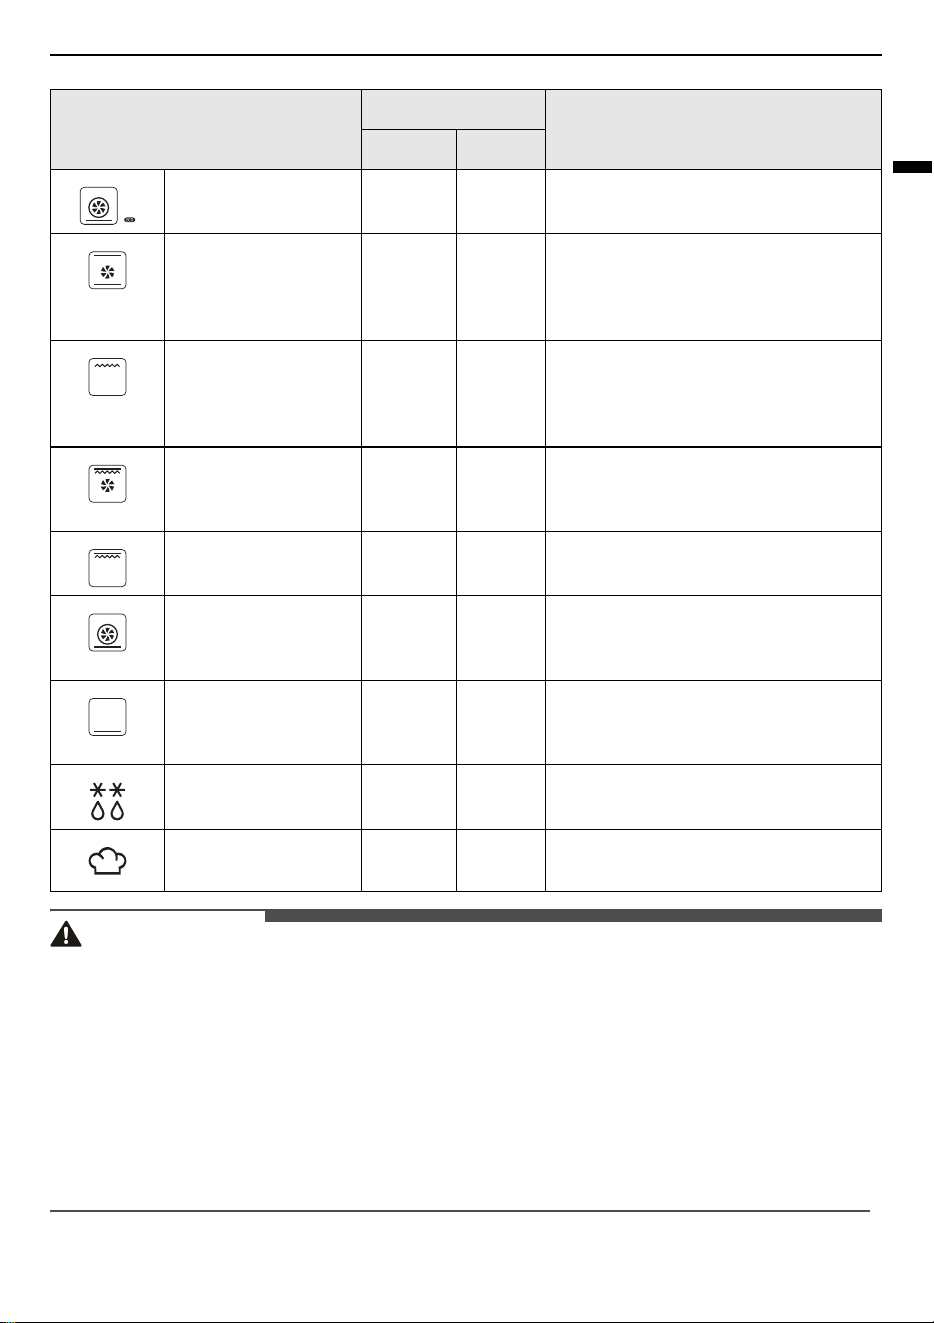
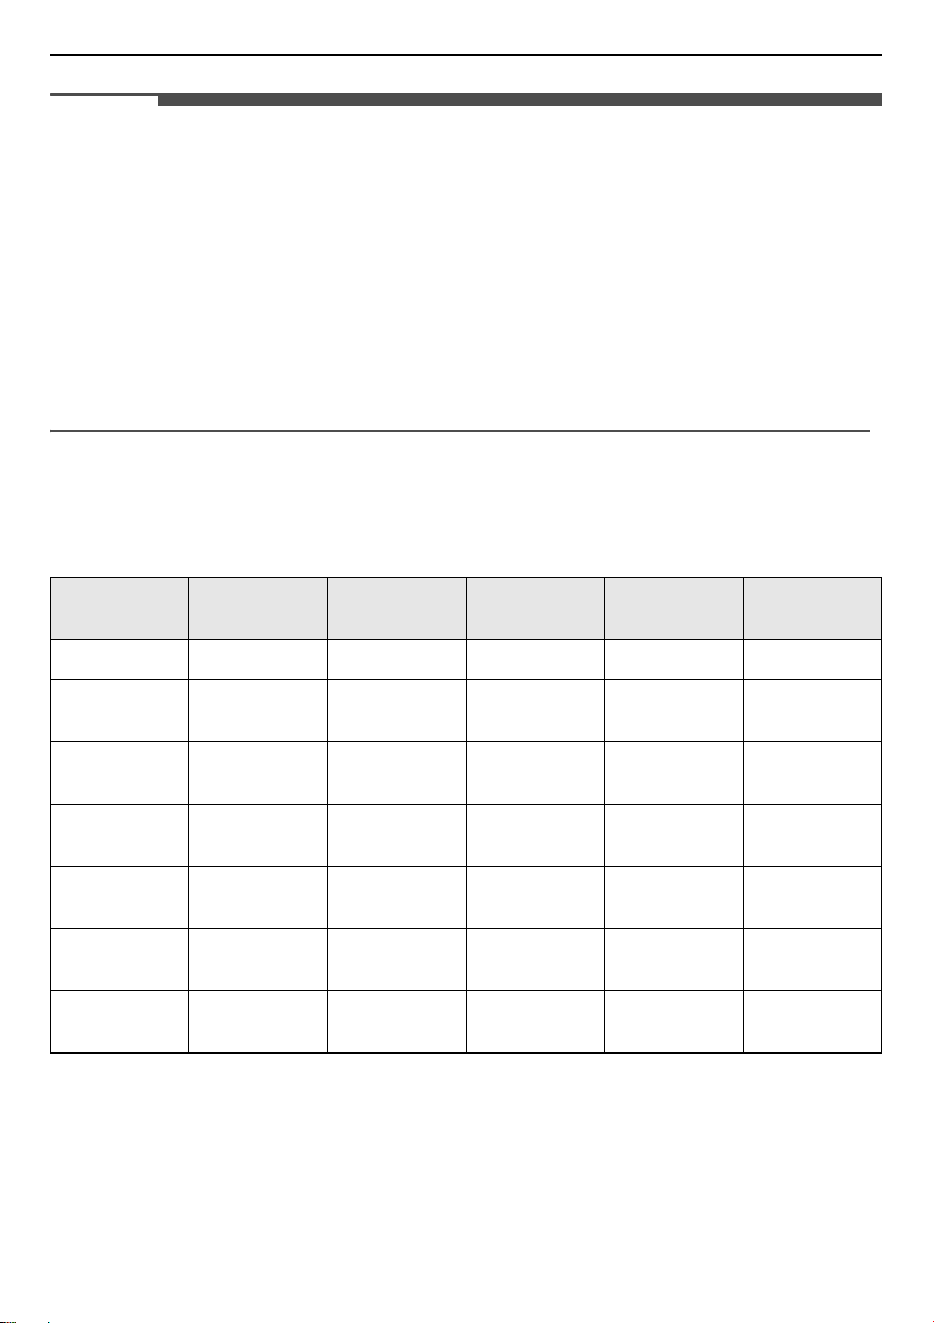
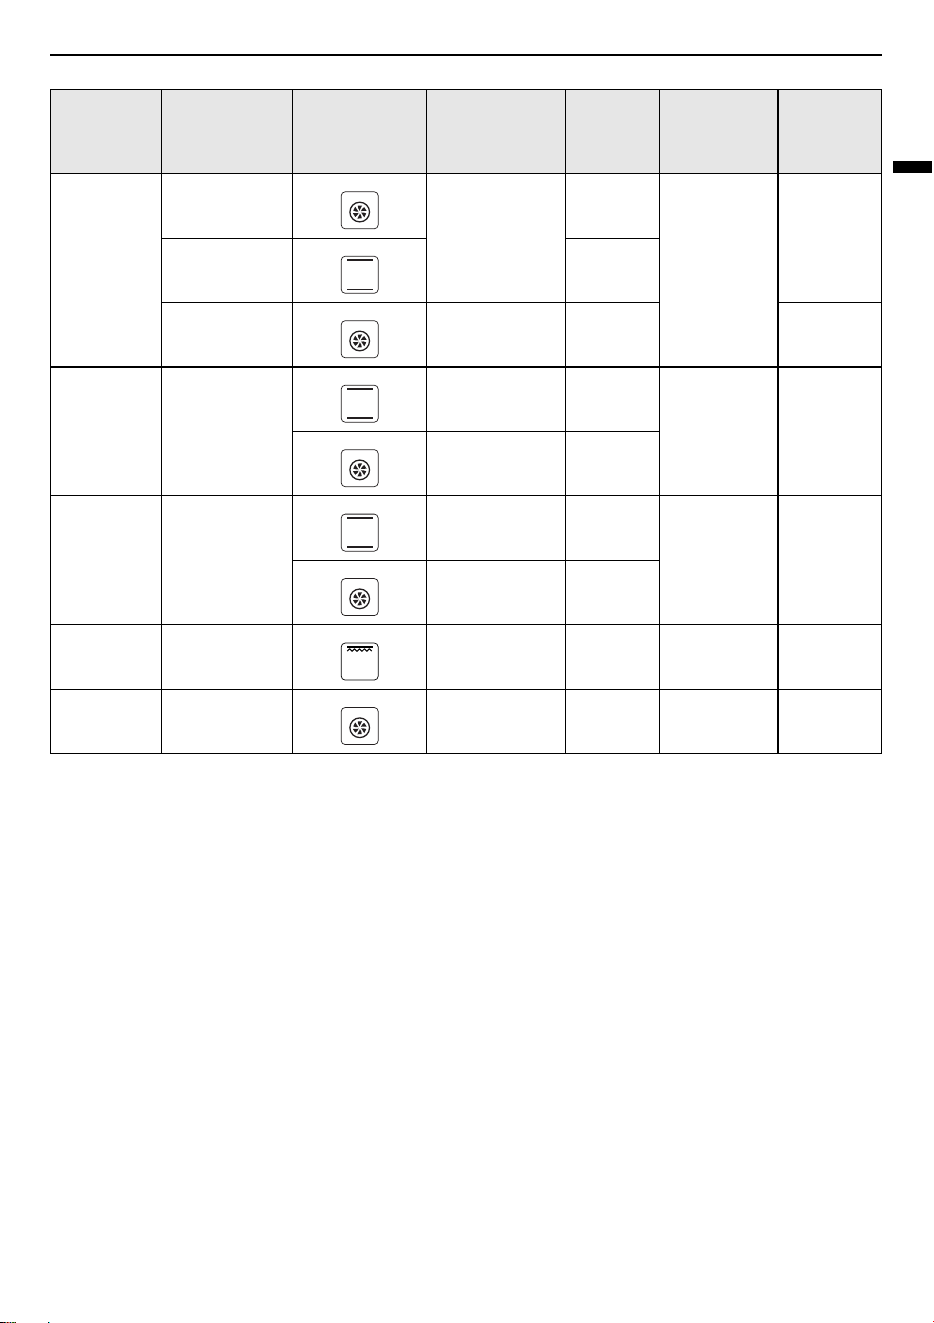
Selecting Cooking Modes
Oven Mode Knob
Turn the Oven Mode Knob to select the desired cooking mode.
Types of Heating
Temperature (°C)
Guide
Min. Max.
Conventional 30 250 For traditional baking and roasting on
one rack. Especially suitable for cakes
with moist toppings.
Convection 50 250 For baking and roasting on one or more
racks. Heat comes from the ring heater
surrounding the fan evenly.
21
OPERATION
ENGLISH
CAUTION
• If you open the appliance door during an on-going operation, the operation will not be paused. Please
be especially careful with the risk of burns.
• Do not cover the ventilation slots. Otherwise, the appliance may overheat.
• Use caution if opening the door when the oven is operating. Hot surfaces can cause serious burns.
• After the appliance switched off, it becomes very hot especially inside the cavity. Never touch the interior
surfaces of the appliance or the heating elements.
• Use oven gloves to remove accessories or cookware from the cavity, and allow the appliance to cool
down.
• Keep children at a safe distance at the same time to avoid the injury of burns.
ECO 140 240 For energy-saved cooking.
Conventional + Fan 50 250 For baking and roasting on one or more
racks. The fan distributes the heat from
the heating elements evenly around the
cavity.
Radiant Heat 150 250 For grilling small amounts of food and
for browning food. Please put the food
in the center part under the grill heating
element.
Double Grill + Fan 50 250 For grilling flat items and for browning
food. The fan distributes the heat evenly
around the cavity.
Double Grill 150 250 For grilling flat items and for browning
food.
Pizza 50 250 For pizza and dishes which need a lot of
heat from underneath. The bottom
heater and ring heater will work.
Bottom Heat 30 220 For add extra browning to the bases of
pizzas, pies, and pastries. Heating come
from the bottom heater.
Defrost - - For gently defrosting frozen food.
Fermentation 30 45 For making yeast dough and sour
dough to prove and culturing yogurt.
Types of Heating
Temperature (°C)
Guide
Min. Max.
22
OPERATION
NOTE
• To defrost big portions of food, it is possible to remove the side-racks and place the container on the
cavity floor.
• To warming tableware, it is beneficial to remove the side-racks and the heating modes Hot Air Grilling
and Fan Heating with temperature setting of 50 °C are useful. Hot Air Grilling should be used, if more
than half of the cavity floor is covered by the tableware.
• Due to an optimum evenness of heat distribution inside the cavity during Fan Heating, the fan will work
at certain times of the heating process, to guarantee the best possible performance.
• To make the appliance cools down more quickly after the operation, the cooling fan may continue to run
for a period afterwards.
• It is normal for the fan to operate on and off automatically to circulate the heat evenly within the oven
during operation or to cool down the oven after operation.
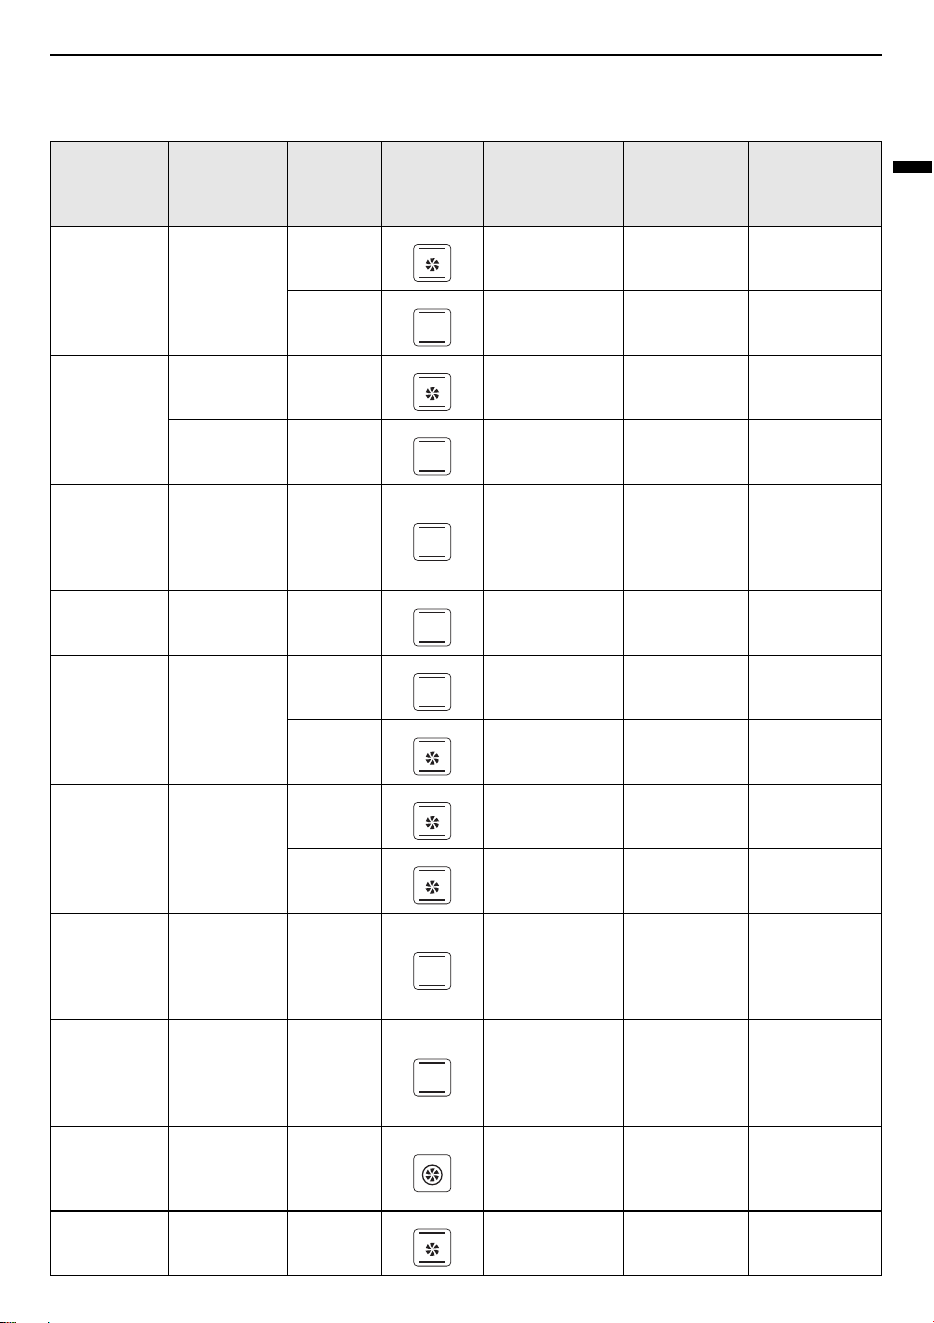
Cooking with ECO Mode
ECO mode uses bottom and ring heater. Use ECO mode to save energy during cooking.
Menu Accessories
Temperature
(℃)
Rack
Position
Cooking Time
(minutes)
Preheat
Challah 1 tray 180 1 45-50 No
Clafouti
Cherry Cake
Round form 200 1 55-60 No
Beef Roast (1.3
kg)
1 tray 200 1 80-85 No
Brownies
Rack and glass
plate
180 1 55-60 No
Potato Gratin
Rack and
round plate
180 1 65-70 No
Lasagne
Rack and glass
plate
180 1 75-80 No
Cheese Cake
Springform
Φ20 cm
160 1 80-90 No
23
OPERATION
ENGLISH
Recommended Baking Guide
Menu
Cookware /
Baking
Shape
Rack
Position
Mode
Temperature
(℃)
Preheating
Time
(minutes)
Baking Time
(minutes)
Sponge
Cake
Square
form
2170-50
1140-70
Sponge
Cake with
fruits
Round form 1 150 - 50
Tray 1 140 - 70
Raisins
Brioche
Muffin
(Yeast Cake)
Muffin form 2 220 19 11
Gugelhupf
(with Yeast)
Tray 1 150 11 60
Muffin Muffin form
1160830
1150830
Apple Yeast
Cake
Tray
1 160 10 42
2150842
Water
Sponge
Cake
(6 Eggs)
Springform 1 160 9 41
Water
Sponge
Cake
(4 Eggs)
Springform 1 160 9 26
Water
sponge
Cake
Springform 1 160 - 35
Hefezopf
(Callah)
Tray 2 150 - 40
24
OPERATION
Tips for baking
Do you want to cook your own recipe?
Try to use settings of similar recipes first and optimize the cooking process due to the result.
Is the cake baked ready?
Put a wooden stick inside the cake about 10 minutes before the given baking time is reached. If there is no
raw dough at the stick after pulling out, the cake is ready.
Small Cakes
(20 ea)
Tray 2 150 - 36
Small Cakes
(40 ea)
Tray 2+4 150 10 34
Butter Yeast
Cake
Tray 2 150 8 30
Shortbread Tray 2 170 8 13
Shortbread
(2 trays)
Tray 2+4 160 8 12
Vanilla
Cookies
Tray
2160810
2+4 150 8 14
White
Bread (1 kg
flour)
Box 1
170 9 50
170 12 45
Fresh Pizza
(thin)
Tray 2 170 9 21
Fresh Pizza
(thick)
Tray 2 170 10 45
Fresh Pizza
(thick)
Tray 2 170 8 41
Bread Tray 1 190 9 30
Menu
Cookware /
Baking
Shape
Rack
Position
Mode
Temperature
(℃)
Preheating
Time
(minutes)
Baking Time
(minutes)

25
OPERATION
ENGLISH
The cake loses massive volume during cooling down after baking.
Try to lower the temperature setting by 10 °C and double check the food preparing instructions regarding
the mechanical handling of the dough.
The height of the cake is in the middle much higher than at the outer ring.
Do not grease the outer ring of the Springform form.
The cake is too brown at the top.
Use a lower shelf rack and or use a lower set temperature (this may lead to a longer cooking time).
The cake is too dry.
Use a 10 °C higher set temperature (this may lead to a shorter cooking time).
The food is good looking but the humidity inside is too high.
Use a 10 °C lower set temperature (this may lead to a longer cooking time) and double check the recipe.
The browning is uneven.
Use a 10 °C lower set temperature (this may lead to a longer cooking time). Use the “Top & Bottom Heating”
mode on one rack.
The cake is less browned on the bottom.
Choose a rack down.
Baking on more than one rack at the same time: One rack is darker than the other.
Use a fan assisted mode for baking at more than one rack and take out the trays individually when ready.
It is not necessary that all trays are ready at the same time.
Condensing water during baking.
Steam is part of baking and cooking and moves normally out of the oven together with the cooling air flow.
This steam may condensate at different surfaces at the oven or near to the oven and build water droplets.
This is a physical process and cannot be avoid completely.
Which kind of cookware can be used?
Every heat resistant cookware can be used. It is recommended not to use aluminium in direct contact with
food, especially when it is sour. Please ensure a good fitting between container and lid.
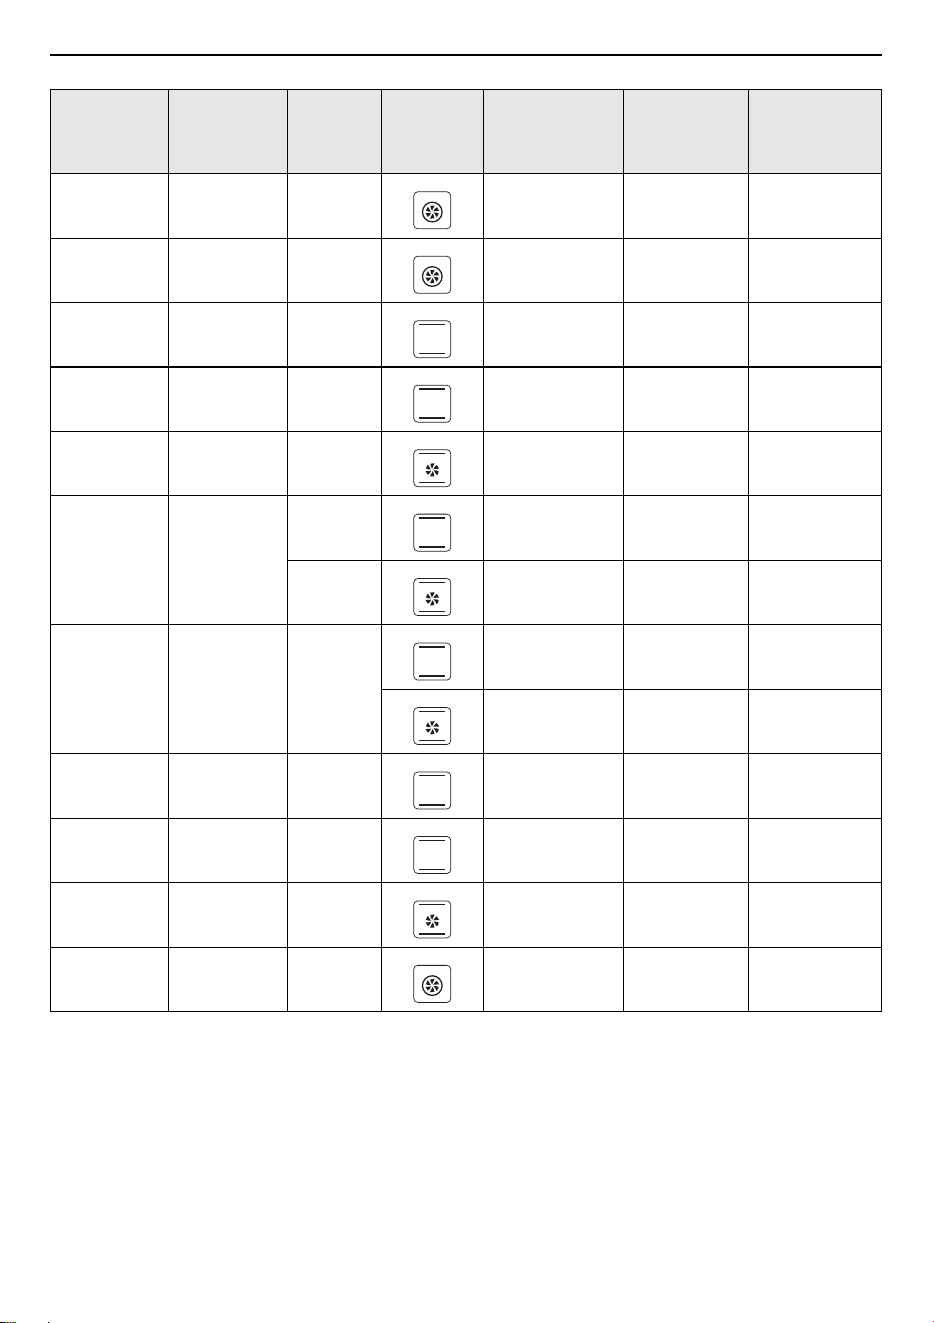
Recommended Roasting Guide
Menu Cookware Rack Position Mode
Temperature
(℃)
Roasting
Time
(minutes)
Beef Tender
Loin (1.6 kg)
Tray 2 180 55
Meatloaf (1 kg) Tray 1 180 75
Chicken (1 kg) Tray
Rack at 2
Tray at 1
180 50
26
OPERATION
Tips for roasting
How to use the grill function?
Preheat the oven for 5 minutes and place the food in the rack given by this manual. Close the oven door
when you use any grilling mode. Do not use the oven when the door is open, except for load / remove /
check the food.
How to keep clean the oven during grilling?
Use the tray filled with 2 L of water in at rack position 1. Nearly all fluids drip down from the food placed
on the rack will captured by the tray.
The heating element in all grilling modes are switching on and off over the time.
It is a normal operation and depends on the temperature setting.
What happens if a fluid is poured to a food in the oven during the baking or cooking process?
The fluid will boil and steam will arise as a normal physical process. Please be careful, because the steam
is hot.
See also “Condensing water during baking” for more information. If the fluid contains alcohol, the boiling
process will be quicker and can lead to flames in the cavity. Make sure that the oven door is closed during
such kind of processes. Please control the baking or cooking process carefully. Open the door very gentle
and only if necessary.
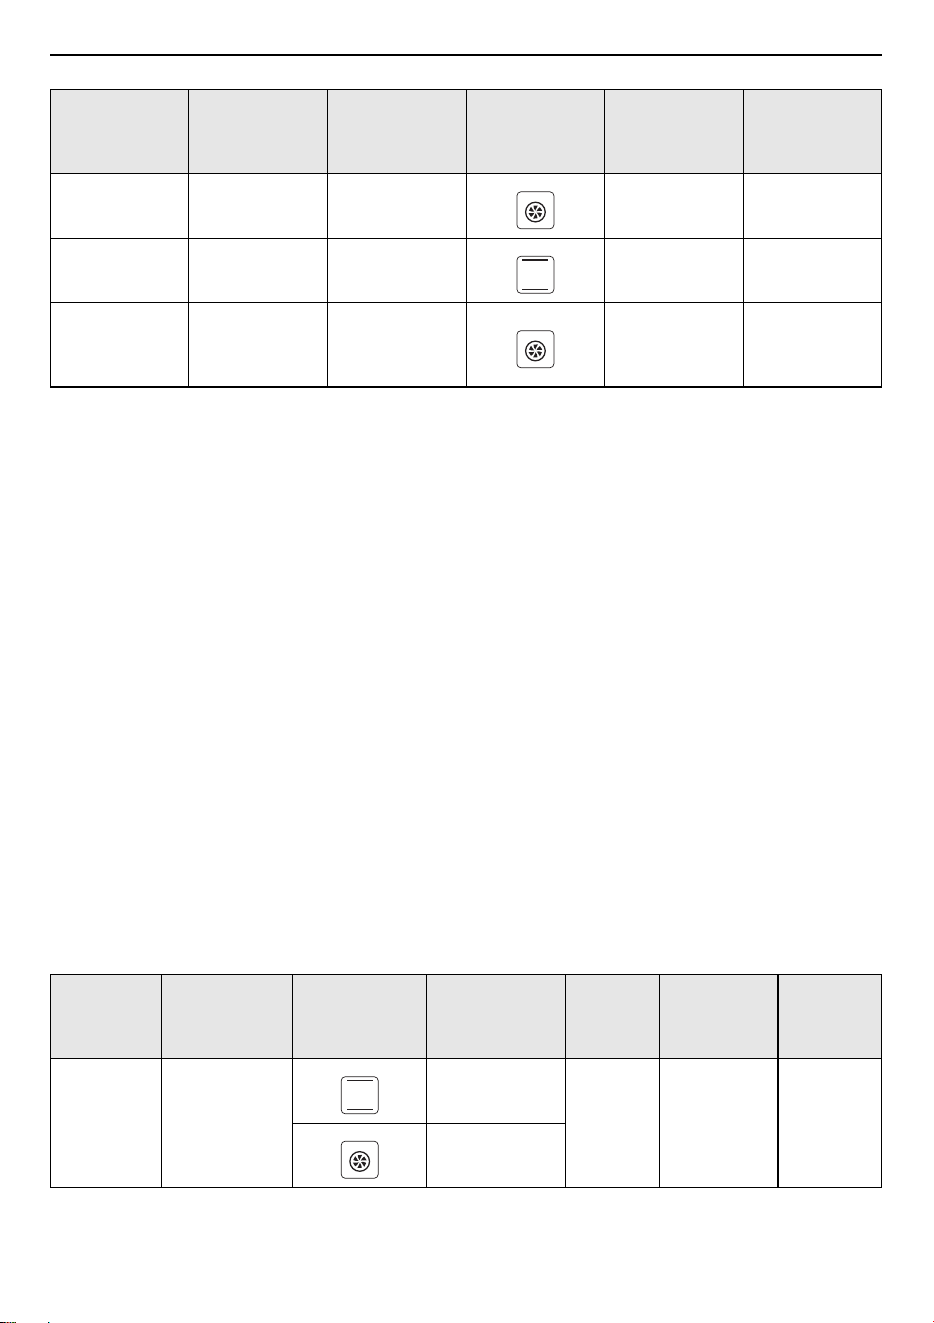
Test Food According to EN 60350-1
Chicken
(1.7 kg)
Tray
Rack at 2
Tray at 1
180 78
Fish (2.5 kg) Tray 2 170 70
Ribs
Tomahawk
Cooked B.T.
Tray 3 120 85
Menu
Accessories /
Cookware
Mode
Temperature
(℃)
Rack
Position
Preheat
Cooking
Time
(minutes)
Sponge
Cake
Springform
Φ26 cm
175
2Yes30-35
160
Menu Cookware Rack Position Mode
Temperature
(℃)
Roasting
Time
(minutes)
27
OPERATION
ENGLISH
1
In chicken recipe, begin with the backside on top and turn the chicken after 30 minutes to the topside.
2
Use a dark, frosted mold and place it on the rack.
3
Take out the trays at the moment, when the food is ready, even when it is not at the end of the given
baking time.
4
Choose the lower temperature and check after the shortest time, given in the table.
5
If using the tray to capture fluids dripping from the food placed on the rack during any grilling mode,
the tray should be set to rack position 1 and filled with some water.
6
The burger patties should turned around after
2
/
3
of the time.
Small Cake
1 tray
160
3
Yes
25-30
1 tray 4
2 trays 170 2 + 4 20-25
Apple Pie
Springform
Φ20 cm
180 1
No 70-80
160 2
Bread 1 tray
200 2
Yes 30-35
200 3
Toast Rack Max. 5
Yes
5 minutes
1-3
Chicken Rack & Tray 180
Rack at 2
Tray at 1
Yes 50-60
Menu
Accessories /
Cookware
Mode
Temperature
(℃)
Rack
Position
Preheat
Cooking
Time
(minutes)

28
MAINTENANCE
MAINTENANCE
Cleaning
General Cleaning Tips
• A plastic spatula can be used as a scraper to
scrape off any chunks or debris before and
during oven cleaning.
• Using the rough side of a non-scratch scouring
pad may help to take off burnt-on stains better
than a soft sponge or towel.
• Certain non-scratch scrubbing sponges, such as
those made of melamine foam, available at your
local stores, can also help improve cleaning.
Exterior
Take care and clean the oven to retain its
appearance and remain fully functioning for a long
time. Apply the cleaner to the soft cloth. Do not
spray directly on the oven. For general cleaning,
use a cloth with hot soapy water.
CAUTION
• Do not use harsh cleaners or harsh abrasive
cleaning materials on the outside of the oven
door. Doing so can cause damage.
• Do not use any steel scouring pads, abrasive
pads or cleaners as these materials can
permanently damage the oven surface.
• Do not use Cleaning agents with a high alcohol
content, high-pressure cleaners or steam
cleaners.
NOTE
• Cleaning products can be purchased online or
from most retailers of appliances or home
goods.
• Slight differences in colour on the front of the
appliance are caused by the use of different
materials, such as glass, plastic and metal.
• Shadows on the door panels, which look like
streaks, are caused by reflections made by the
interior lighting.
Stainless Steel Surface
1
Place a small amount of stainless steel
appliance cleaner or polish on a damp cloth or
paper towel.
2
Clean a small area, rubbing with the grain of
the stainless steel if applicable.
3
Remove flecks of lime scale, grease, starch and
albumin (e.g.egg white) immediately.
Corrosion can form under such flecks.
4
Dry and buff with a clean, dry paper towel or
soft cloth.
5
Repeat as necessary.
Plastic Surface
Clean with a dish cloth and then dry with a soft
cloth. Do not use glass cleaner or a glass scraper.
Painted Surface
Clean with a dish cloth and then dry with a soft
cloth.
Control Panel
Clean with a dish cloth and then dry with a soft
cloth. Do not use glass cleaner or a glass scraper.
Door Panel
Clean with a dish cloth and then dry with a soft
cloth. Do not use a glass scraper or a stainless steel
scouring pad.

29
MAINTENANCE
ENGLISH
Door Handle
Clean with a dish cloth and then dry with a soft
cloth. If descaler comes into contact with the door
handle, wipe it off immediately. Otherwise, any
stains will not be able to be removed.
Door seal
Do not remove door seal. Clean with a dish cloth.
Do not scour.
Interior
Wash often with warm, sudsy water and a sponge
or soft cloth. Use only mild, non-abrasive soaps or
a mild detergent. Keep the areas clean where the
door and oven frame touch when closed. Wipe well
with a clean cloth. Over time, stains can occur on
the surfaces as the result of food particles
spattering during cooking. This is normal.
Glass Cover for the Interior Lighting
Clean with a dish cloth and then dry with a soft
cloth. If the cooking compartment is heavily soiled,
use oven cleaner.
Accessories
Soak and clean with a dish cloth or brush. If there
are heavy deposits of dirt, use a stainless steel
scouring pad.
Rails
Soak and clean with a dish cloth or brush.
Pull-out System
Clean with a dish cloth or a brush. Do not remove
the lubricant while the pull-out rails are pulled out.
It is best to clean them when they are pushed in. Do
not clean in the dish washer.
Enamel Surfaces
Observe the instructions for the surfaces of the
cooking compartment.
NOTE
• Always keep the appliance clean and remove dirt
immediately so that stubborn deposits of dirt do
not build up.
• Clean the cooking compartment after each use.
This will ensure that dirt cannot be baked on.
• Always remove flecks of lime scale, grease,
starch and albumin (e.g. egg white) immediately.
• Remove flecks of food with sugar content
immediately, if possible, when the fleck is still
warm.
• Use suitable cookware for roasting, e.g. a
roasting dish.
• Enamel is baked on at very high temperatures.
This can cause some slight colour variation. This
is normal and does not affect operation. The
edges of thin trays cannot be completely
enameled. As a result, these edges can be rough.
This does not impair the anti-corrosion
protection.
Periodic Maintenance
Changing the Oven Light
The oven light is a standard 25-watt, 230 V halogen
bulb. The bulb and glass cover can be purchased
online or from most retailers of appliances or
home goods.
WARNING
• Make sure that the oven and bulb are cool.
• Disconnect the electrical power to the appliance
at the main fuse or circuit breaker panel. Failure
to do so can result in severe personal injury,
death, or electrical shock.
• Wear gloves while changing the oven light. Glass
fragments from broken bulbs can cause risk of
injury.
• Gently twist the screwdriver blade while
changing the oven light. If you apply force, the
glass or oven may crack.
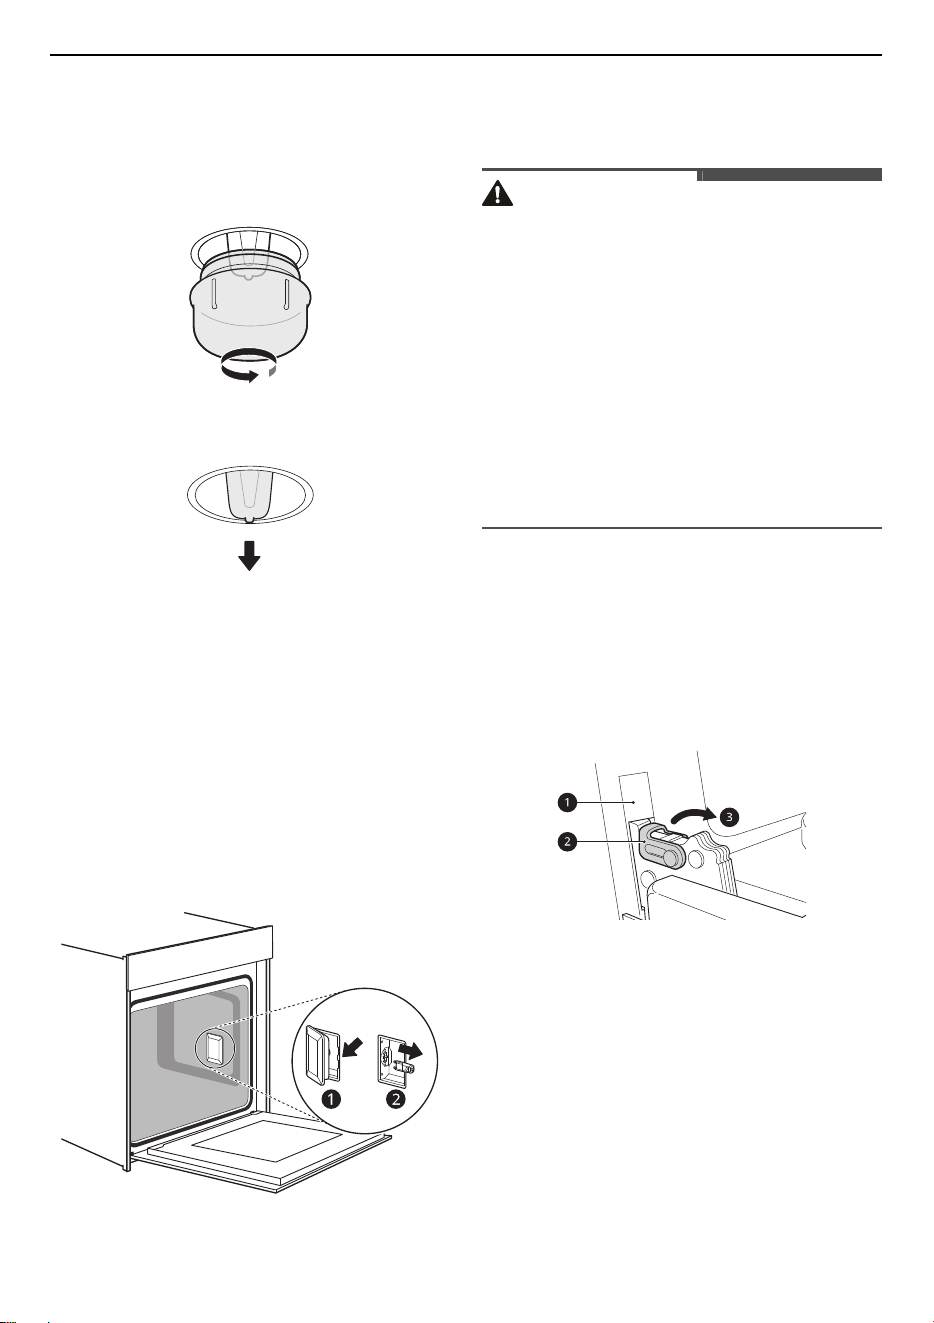
1
Unplug the oven or disconnect power.
30
MAINTENANCE
2
Remove the oven racks.
3
Turn the glass cover counter-clockwise to
remove it.
4
Pull out the bulb.
5
Replace the bulb, and reassemble the class
cover by snapping it back into place.
6
Plug in the oven or reconnect power. Switch on
the circuit breaker to see if the light turns on.
Glass Cover
If the glass cover of the halogen lamp is damaged,
it must be replaced. You can obtain a new glass
cover from the after-sales service. Please specify
the E number and FD number of your appliance.
Removing and Assembling the
Oven Door
CAUTION
• The door is very heavy. Be careful when
removing, lifting and replacing the door.
• Do not lift the door by its handle. The handle is
not designed to support the weight of the door
when it has been removed from the oven.
• Do not hit the glass with pots, pans, or any other
object.
• Scratching, hitting, jarring or stressing the glass
may weaken its structure, causing an increased
risk of breakage at a later time.
• Do not close the oven door until all the oven
racks are fully in place.
Removing the Oven Door
1
Fully open the door.
2
Lift up the hinge lock
b
and flip it towards the
hinge arm
c
completely.
a
Slot
b
Hinge Lock
c
Hinge Arm
3
Firmly grasp both sides of the door at the top.
31
MAINTENANCE
ENGLISH
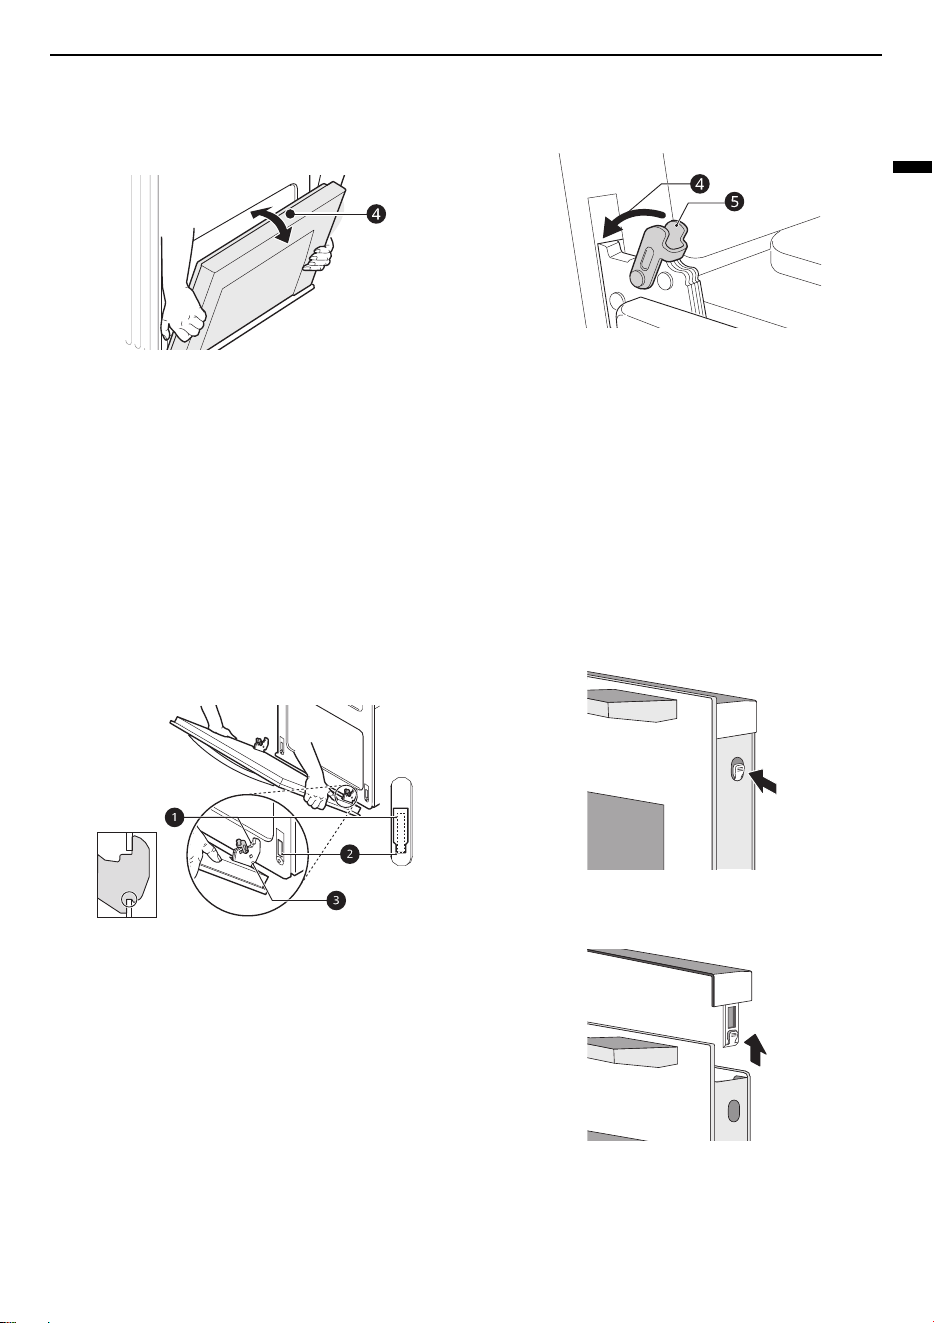
4
Partially close the door to approximately 70
degrees
d
. If the position is correct, the hinge
arms will move freely.
5
Lift and pull the door towards you until the
hinge latches are completely loosened.
Assembling the Oven Door
1
Firmly grasp both sides of the door at the top.
2
Fully insert the hinge arms
a
into the slots
b
until the indentations
c
on the hinge arms rest
on the bottom edges of the slots.
a
Hinge Arm
b
Bottom Edge of Slot
c
Indentation
3
Slowly open the door fully. Make sure that the
hinge arms are properly engaged in the slots.
4
Lift up the hinge lock
e
and flip it towards the
oven
d
until it clicks into position.
5
Close the door.
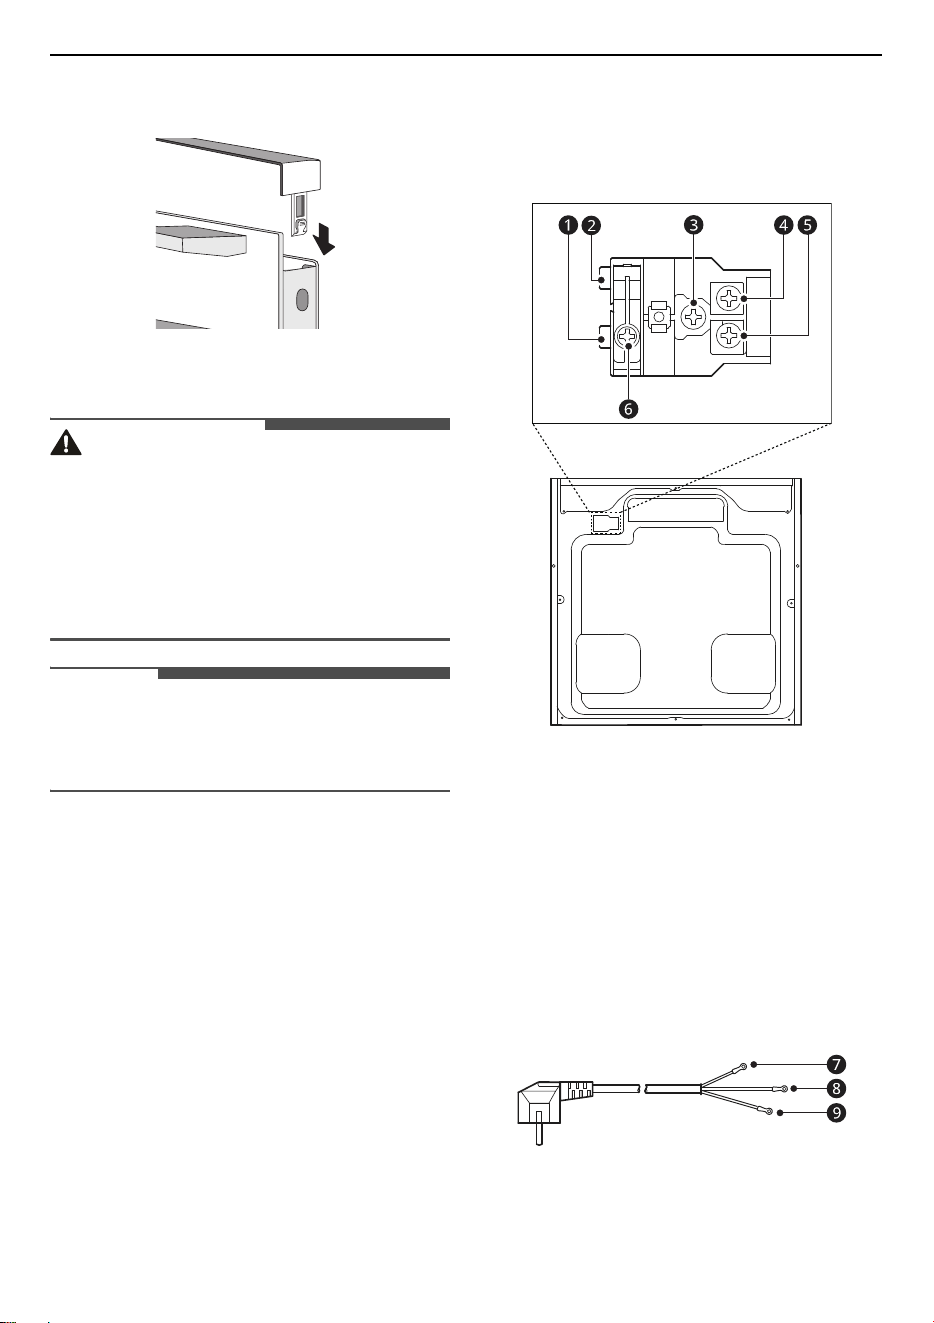
Removing the Door Cover
The plastic inlay in the door cover may become
discoloured. Remove the door cover if necessary to
carry out a thorough cleaning.
1
Remove the appliance door first before
removing the door cover. Press the lockers on
both sides of the cover.
2
Remove the cover.
3
After removing the door cover, the rest parts of
the appliance door can be easily taken off so
that you can go on with the cleaning. When the
cleaning of the appliance door has finished,
32
MAINTENANCE
put the cover back in place and press the
lockers until they clicks audibly into place.
4
Assemble and refit the appliance door.
CAUTION
• Do not remove the door cover without the
appliance door removed beforehand. Damage
caused by incorrect operation is not covered
under warranty.
• Keep your hands away from the hinges when
removing the door cover and inner glass and/or
closing the door.
NOTE
• Once the door cover is removed, the inner glass
can be easily moved and it can cause damage
and/or injury.
Changing the Power Cord
1
The terminal box is located on the back of the
back outer case.
2
Cut off the power. Use a small flat screwdriver
to open two snaps
a
and
b
.
3
Use a Phillips screwdriver to take off screws
c
,
d
,
e
and
f
.
4
Change the new power cord, fix the brown wire
g
on
d
, yellow/green wire
h
on
c
, blue wire
i
on
e
.
g
Brown (Live)
h
Yellow/Green
i
Blue (Neutral)
33
MAINTENANCE
ENGLISH
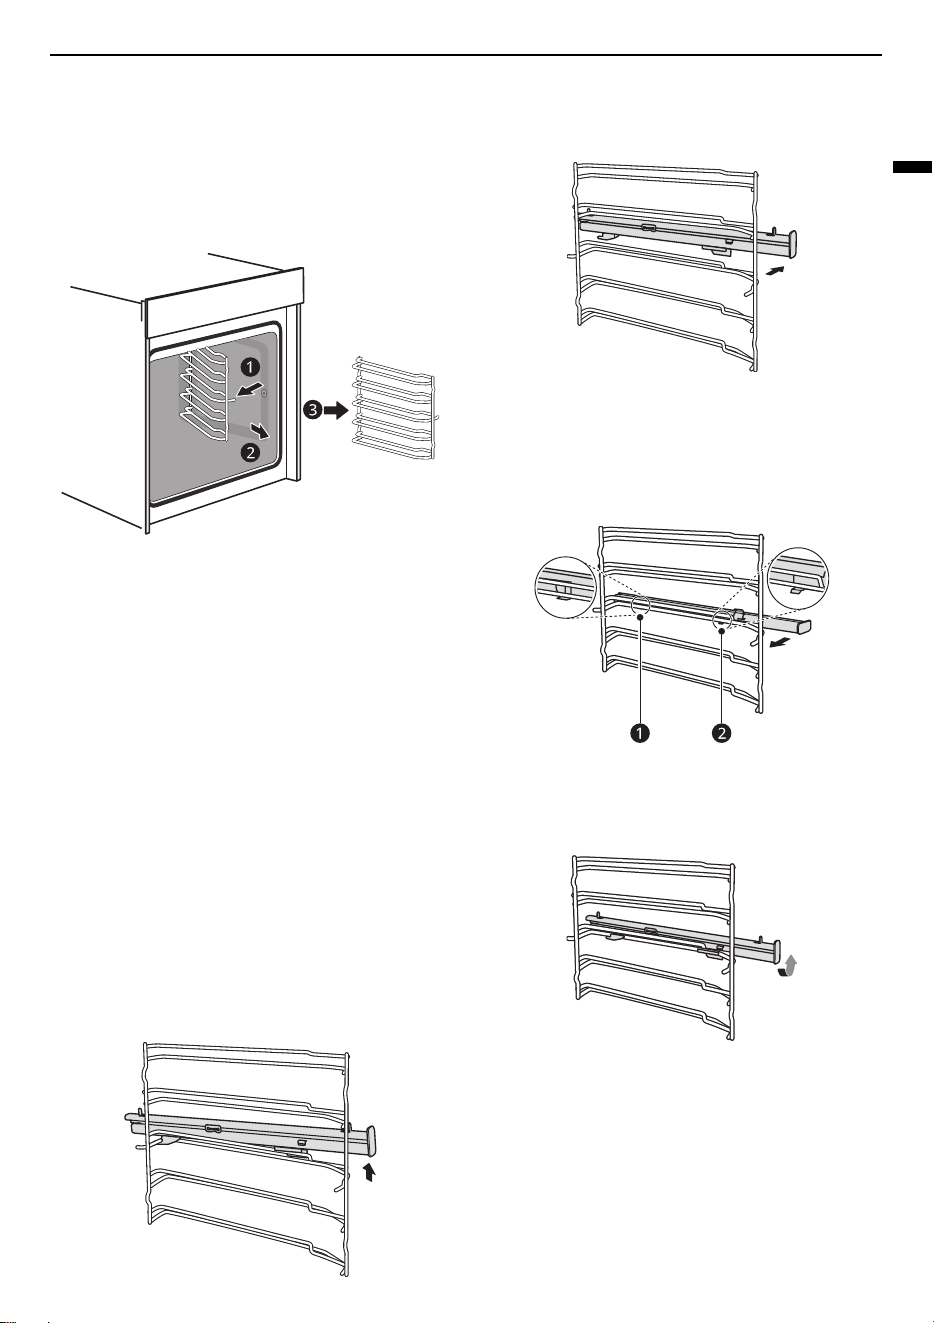
Removing Rails
When you want have a good cleaning for the rails
and cavity, you can remove the shelves and clean it.
In this way your appliance will retain its
appearance and remain fully functional for a long
time.
1
Pull the rail towards the other side to detach.
2
Insert the rail holders to attach and refit the
rails.
Removing and Assembling the
Telescopic Runners
Below procedures show removing and assembling
the telescopic runners from the left side of the
oven as an example. Do the same to remove and
assemble the telescopic runners from the right
side of the oven.
Removing the Telescopic Runners
1
Lift up one end of the telescopic runners hard.
2
Lift up the whole telescopic runners and
remove backward.
Assembling the Telescopic Runners
1
Put the
a
and
b
of the telescopic runners
horizontally on the outer wire.
2
Rotate the telescopic runners anti-clockwise
(clockwise for right side) by 90 degrees.
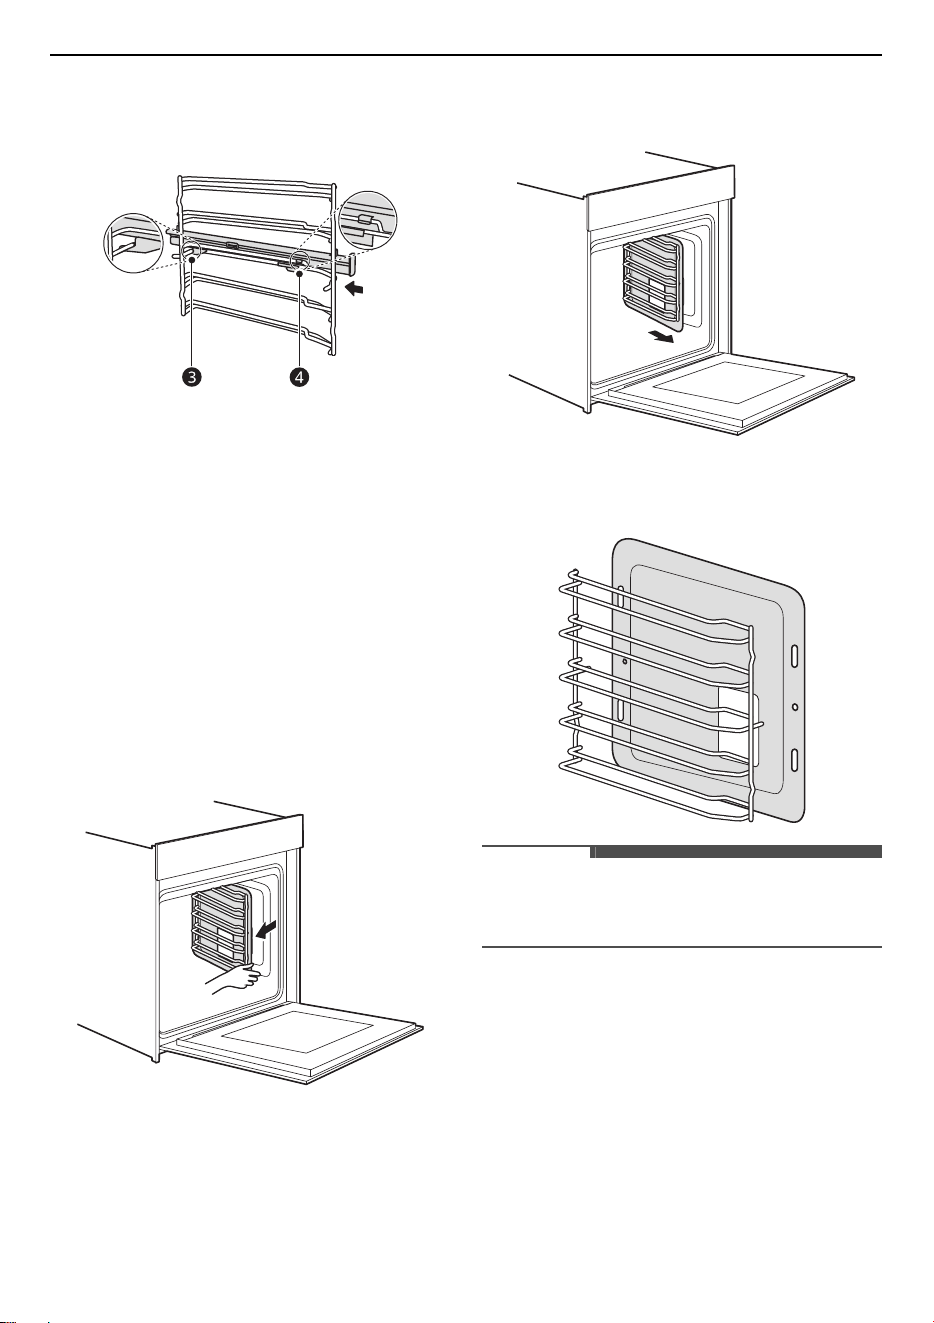
34
MAINTENANCE
3
Push forward the telescopic runners, make the
c
buckled onto the lower wire and the
d
buckled onto the upper wire.
Removing and Assembling the
Self-cleaning Baffle
Self-cleaning baffle is with special enameling
treatment on its surface, which can absorb oil and
fat, volatilize them out later on, make cavity clean
ad no peculiar smell during the process of cooking.
Removing the Self-cleaning Baffle
Take self-cleaning baffle out for the convenience of
cleaning lateral sides of cavity:
1
Pull the side rack out from the cavity
horizontally. The self-cleaning baffle will be
pulled out together with the side rack.
2
Take side rack out of the cavity together with
the self-cleaning baffle.
3
Separate the self-cleaning baffle from the side
rack.
NOTE
• The telescopic runners, shelves, and self-
cleaning baffles are optional accessories.

35
MAINTENANCE
ENGLISH
Assembling the Self-cleaning Baffle
Install side rack
a
and self-cleaning baffle
b
in
turn according to direction as shown in the picture:
a
Side Rack
b
Self-cleaning Baffle

36
TROUBLESHOOTING
TROUBLESHOOTING
FAQs
Frequently Asked Questions
CAUTION
• Foil may be used to wrap food in the oven, but do not allow the foil to come into contact with the exposed
heating/broiling elements in the oven. The foil could melt or ignite, causing smoke, fire, or injury.
Q: My new oven doesn’t cook like my old one. Is there something wrong with the
temperature settings?
A: No. Your oven has been factory tested and calibrated. For the first few uses, follow your recipe
times and temperatures carefully. If you still think your new oven is too hot or too cold, you can
adjust the oven temperature yourself to meet your specific cooking needs. Refer to the
Changing Settings
section in this manual for easy instructions on how to adjust your
thermostat.
Q: Is it normal to hear a clicking noise coming from the back of my oven when I am using it?
A: Your new appliance is designed to maintain a tighter control over your oven’s temperature. You
may hear your oven’s heating elements click on and off more frequently on your new oven. This
is NORMAL.
Q: During convection cooking the fan stops when I open the door. Is that normal?
A: Yes, this is normal. When the door is opened, the convection fan will stop until the door is
closed.
Q: Can I use aluminum foil to catch drippings in my oven cavity?
A: Never use aluminum foil to line the bottom or sides of the oven. The foil will melt and stick to
the bottom surface of the oven and will not be removable. Use a foil-lined sheet pan placed on
a lower oven rack to catch drippings instead. Never place any rack, tray or pan on the base of
the oven. (If foil has already melted onto the bottom of the oven, it will not interfere with the
oven’s performance.)
Q: Can I use aluminum foil on the racks?
A: Do not cover racks with aluminum foil. Covering entire racks with foil restricts air flow, leading
to poor cooking results. Use a sheet pan lined with foil under fruit pies or other acidic or sugary
foods to prevent spillovers from damaging the oven finish.
Q: What should I do if my racks are sticky and have become hard to slide in and out?
A: Over time, the racks may become hard to slide in and out. Apply a small amount of olive oil to
the sides of the racks. This will work as a lubricant for easier gliding.
Q: Should I broil with the door open or closed?
37
TROUBLESHOOTING
ENGLISH
Before Calling for Service
Cooking
A: Your electric oven isn't designed for open door broiling. If you broil with the oven door open, it
can damage the oven knobs or display.
Q: Why aren't the function buttons working?
A:
Check if Child-Proof Lock is activated. The lock icon
k
will show in the display if Child-Proof Lock
is activated. To deactivate Child-Proof Lock, refer to the Child-Proof Lock in Operation chapter.
Q: How can I help keep children safe around the appliance?
A: Children should be supervised around the appliance whenever it is in use, and after use until
the oven surfaces have cooled. You can also use Child-Proof Lock to prevent children from
accidentally turning on the oven. Child-Proof Lock disables most of control panel buttons. Refer
to the Child-Proof Lock in Operation section.
Symptoms Possible Cause & Solution
Oven will not work Plug on appliance is not completely inserted in the electrical outlet.
• Make sure electrical plug is plugged into a live, properly grounded outlet.
A fuse in your home may be blown or the circuit breaker tripped.
• Replace the fuse or reset the circuit breaker.
Oven controls improperly set.
• See the "Operating the Oven" section in the Operation chapter.
Steam is exhausted
through the oven vent.
Cooking foods with high moisture produces steam.
• This is normal.
Appliance does not
operate.
Cord is not plugged in correctly.
• Make sure cord is plugged correctly into outlet. Check circuit breakers.
Service wiring is not complete.
• Contact your electrician for assistance.
Power outage.
• Check house lights to be sure. Call your local electric company for service.
Food does not bake or
roast properly
Oven controls improperly set.
• See the "Operating the Oven" section in the Operation chapter.
Rack position is incorrect or the rack is not level.
• See the "Operating the Oven" section in the Operation chapter.
Incorrect cookware or cookware of improper size being used.
• See the "Operating the Oven" section in the Operation chapter.
38
TROUBLESHOOTING
Parts & Features
Food does not broil
properly
Oven controls improperly set.
• Make sure you select the Broil mode properly.
Improper rack position being used.
• See the Broiling Guide.
Cookware not suited for broiling.
• Use broiling pan and grid.
In some areas the power voltage may be low.
• Preheat the broil element for 5-7 minutes. See the Broiling Guide.
Moisture collects on
oven window or steam
comes from oven vent
This happens when cooking foods high in moisture.
• This is normal.
Excessive moisture was used when cleaning the window.
• Do not use excessive moisture when cleaning the window.
Warm air venting into
kitchen after oven has
been turned off.
Warm air exhaust is needed to maintain and cool down oven
temperatures. It turns off automatically when the heat cools to a safe
temperature.
• This is normal.
Symptoms Possible Cause & Solution
Knobs have fallen out
of the control panel.
Knobs have been accidentally disengaged.
• Knobs can be removed.
• Simply place knobs back in their support in the control panel and push
them in so that they engage and can be turned as usual.
Knobs can no longer be
turned easily.
There is dirt under knobs.
• Knobs can be removed.
• To disengage knobs, simply remove them from the support. Alternatively,
press on the outer edge of knobs so that they tip and can be picked up
easily.
• Carefully clean the knobs using a cloth and soapy water. Dry with a soft
cloth.
• Do not remove knobs too often so that the support remains stable.
Fan does not work all
the time in “Fan
Heating” mode.
This is a normal operation due to the best possible heat distribution and
best possible performance of the oven.
• Wait until the cooking cycle is completed.
Symptoms Possible Cause & Solution

39
TROUBLESHOOTING
ENGLISH
After a cooking process
a noise can be heard
and a air flow in the
near of the control
panel can be observed.
The cooling fan is still working, to prevent high moisture conditions in
the cavity and cool down the oven for your convenience.
• The cooling fan will switch off automatically.
The food is not
sufficient cooked in the
time given by the
recipe.
A temperature different from the recipe is used.
• Double check the temperatures. The ingredient quantities are different to
the recipe. Double check the recipe.
Symptoms Possible Cause & Solution
40
TROUBLESHOOTING
Customer Service
Our after-sales service is there for you if your appliance needs to be repaired. We will always find an
appropriate solution. Please contact the dealer where you by this appliance. When calling us, please give
the model number and the serial number (S/N) so that we can provide you with the correct advice. The
rating plate bearing these numbers can be found when you open the appliance door.
Maintenance Card
To save time, make a note of the model of your appliance and the telephone number of the after sales
service in the space below, should it be required.
After Sales Service (Egypt Only)
• Shelf Life Time : 6 Years
• LG is committed to providing all spare parts of this appliance during the shelf life time.
Rated Voltage 220-240 V~
Rated Frequency 50-60 Hz
Electric Power 2.9 kW
Country of Origin China
Model Number Purchasing Date
Serial Number Purchasing Store

Memo

Memo

Memo