
Technical Support and E-Warranty Certificate
www.vevor.com/support
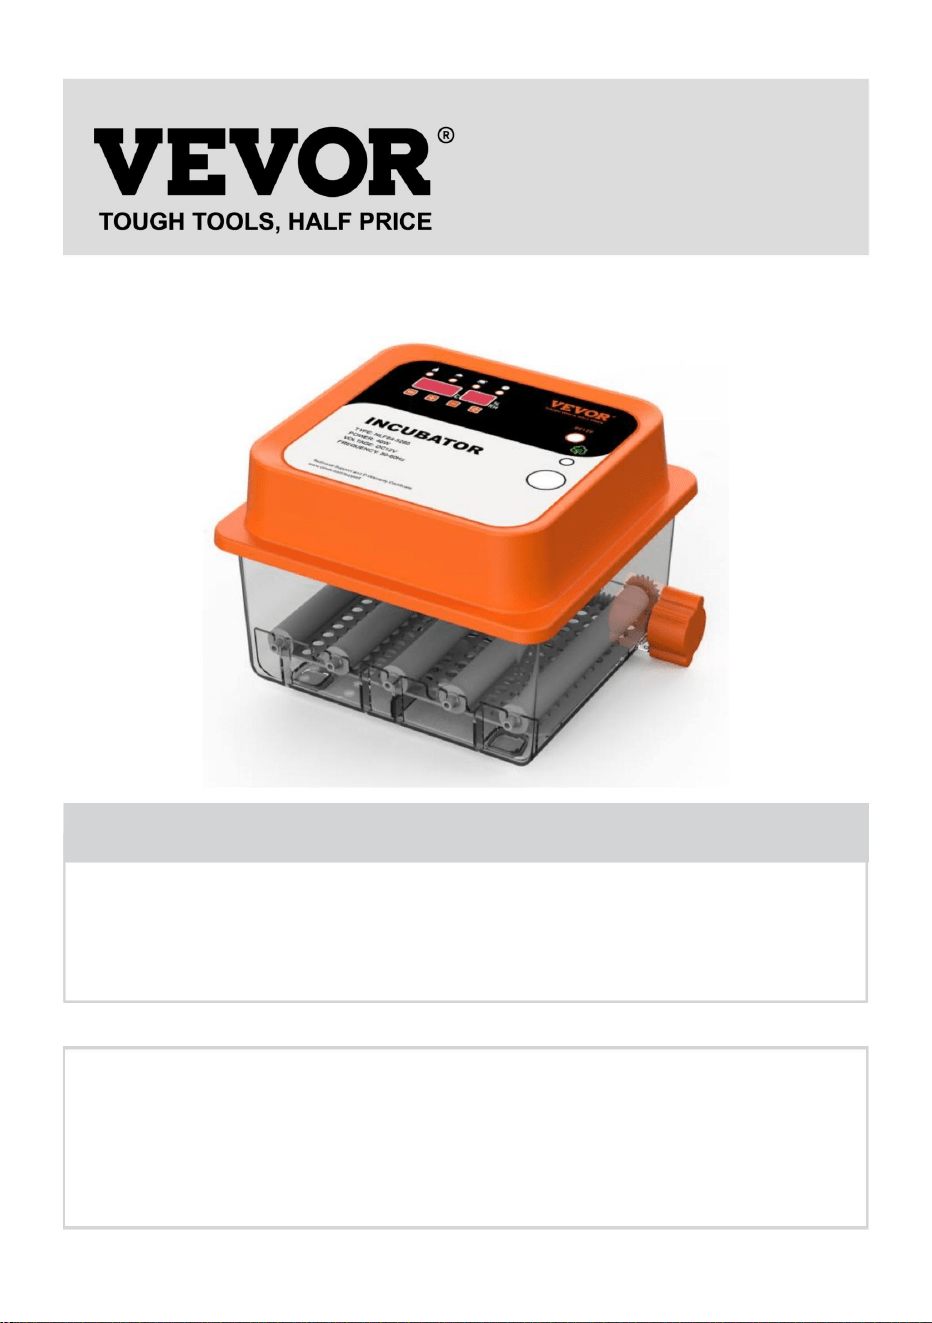
INCUBATOR
USER MANUAL
We continue to be committed to provide you tools with competitive price.
"Save Half", "Half Price" or any other similar expressions used by us only represents an
estimate of savings you might benefit from buying certain tools with us compared to the major
top brands and doses not necessarily mean to cover all categories of tools offered by us. You
are kindly reminded to verify carefully when you are placing an order with us if you are
actually saving half in comparison with the top major brands.


- 1 -
NLF64-5280/NLF64-5281
Have product questions? Need technical support? Please feel free to
contact us:
Technical Support and E-Warranty Certificate
www.vevor.com/support
NEED HELP? CONTACT US!
This is the original instruction, please read all manual instructions
carefully before operating. VEVOR reserves a clear interpretation of our
user manual. The appearance of the product shall be subject to the
product you received. Please forgive us that we won't inform you again if
there are any technology or software updates on our product.
INCUBATOR

- 2 -
IMPORTANT SAFEGUARDS
WARNING: Read all safety warnings, instructions, illustrations
and specifications provided with this electrical appliance. Failure to follow all
instructions listed below may result in electric shock, fire and/or serious injury.
1. This product is connected to the power supply through an adapter.
2. Do not use this product in areas where it may be exposed to water or other
liquids.
3. Unplug this product from the wall outlet before cleaning. Do not use liquid or
aerosol cleaners. Use a damp cloth for cleaning.
4. To reduce the risk of electric shock, do not disassemble this product. Take it to
qualified service personnel when service or repair work is required. Opening or
removing adapter covers -like the rear cover plate- may expose you to dangerous
voltages or other risks. If the cover is damaged, the adapter may no longer be
used.
5. Do not operate the unit in areas with high temperatures or high humidity since
it may prevent it from working correctly.
6. This appliance can be used by children aged 8 years and above and persons
with reduced physical, sensory or mental capabilities or lack of experience and
knowledge if they have been given supervision or instruction concerning the use of
the appliance in a safe way and understand the hazards involved.
7. Children shall not play with the appliance.
8. Cleaning and user maintenance shall not be made by children without
supervision.
9. For indoor use only.
SAVE THESE INSTRUCTIONS

- 3 -
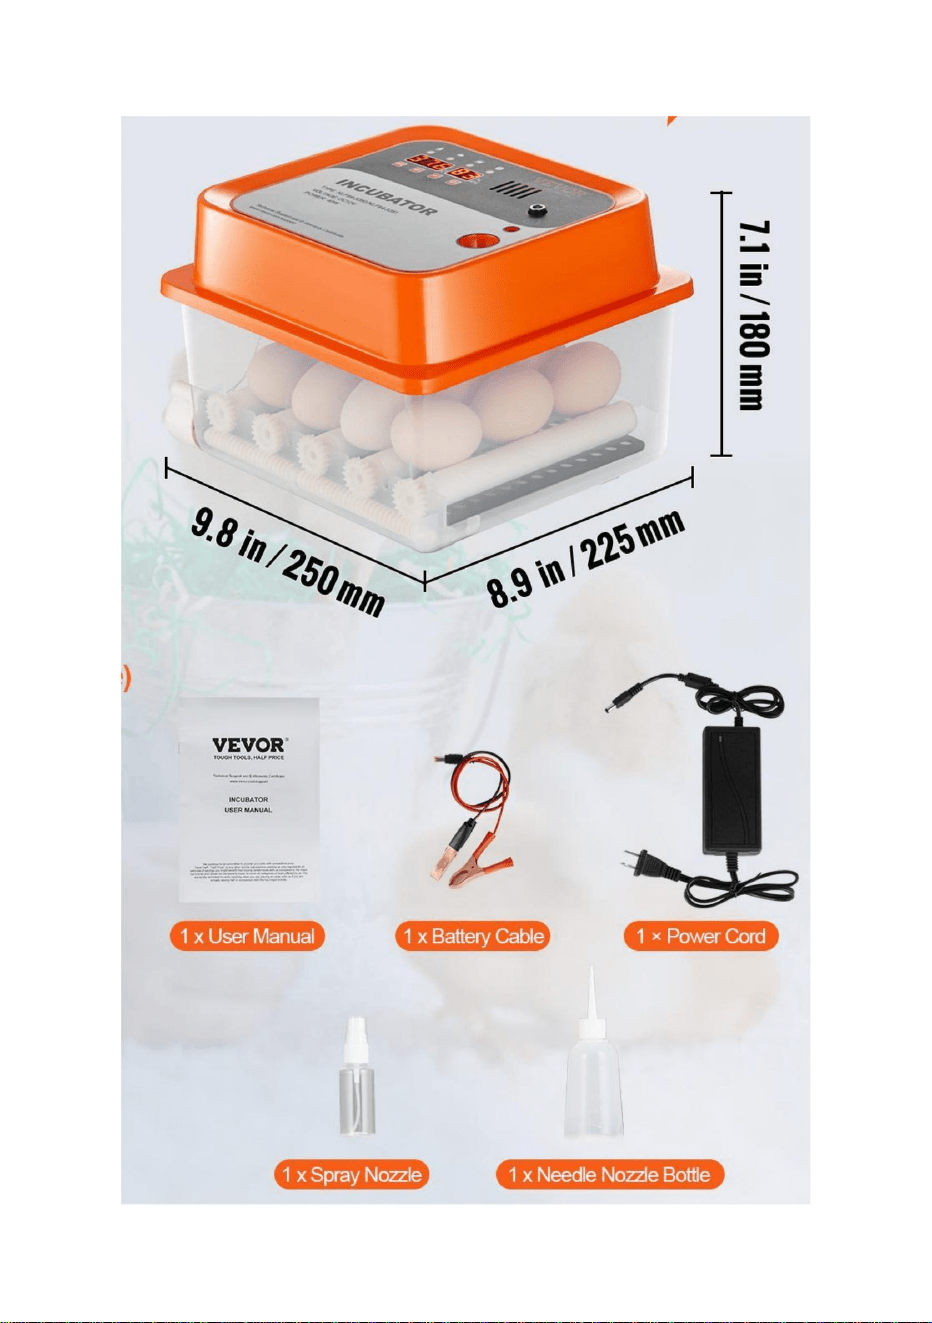
PART LIST

- 4 -
Main technical indexes
Temperature measuring range
0 ~ 50.0
℃
Temperature measuring accuracy
0.1
℃
Humidity measuring range
0-99% RH
Humidity control accuracy
± 4% RH
FCC statement: This device complies with Part 15 of the FCC Rules.
Operation is subject to the following two conditions: (1)This device may
not cause harmful interference, and (2) this device must accept any
interference received, including interference that may cause undesired
operation.
Operation Conditions
Operating voltage
AC 105V ~ 235V, 50HZ
Relative humidity
Less than 85% RH
Ambient temperature
-10 ℃ ~ 35 ℃
- 5 -
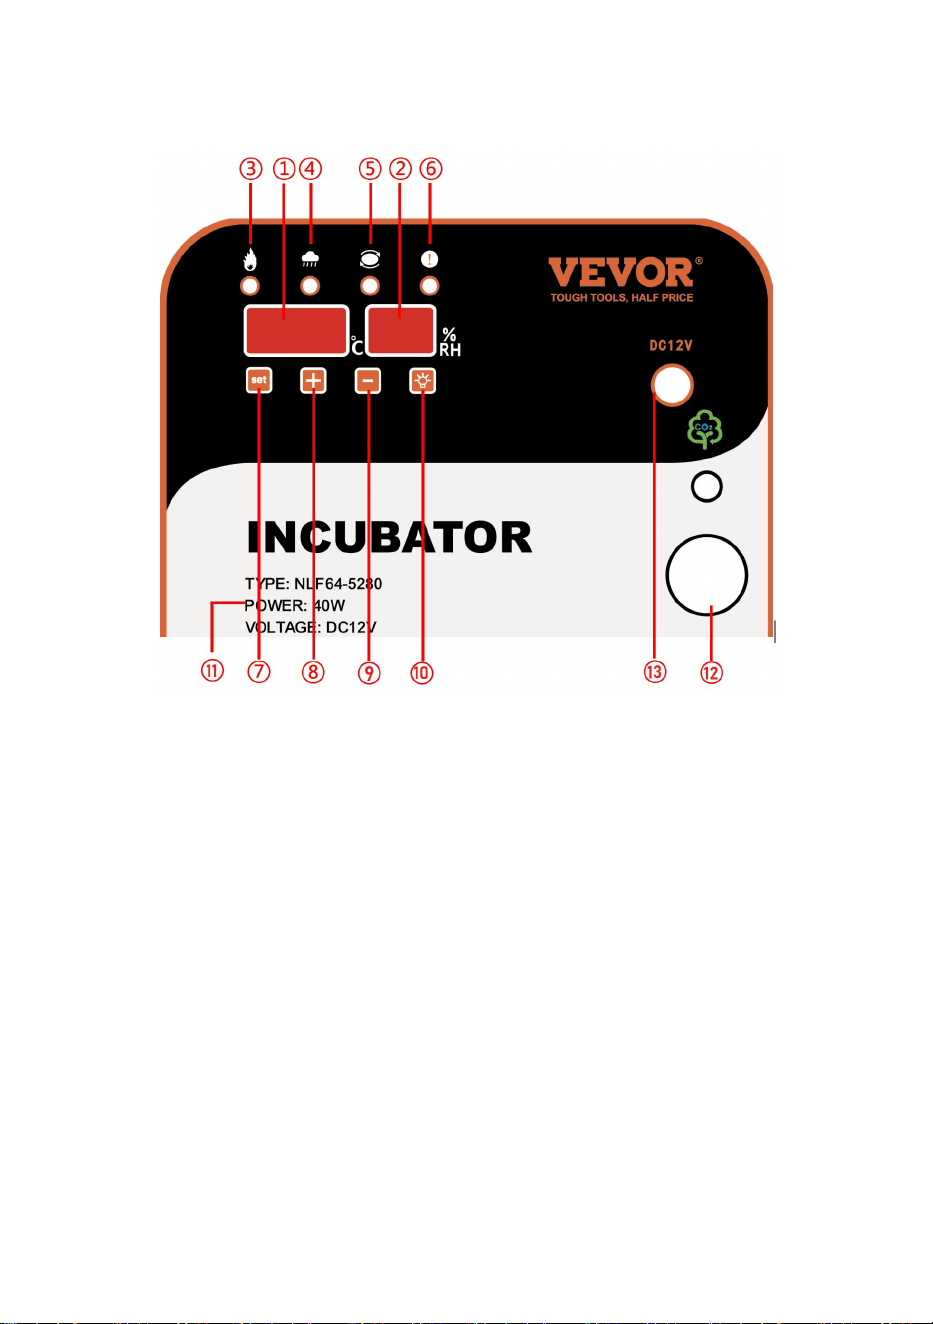
Screen Settings
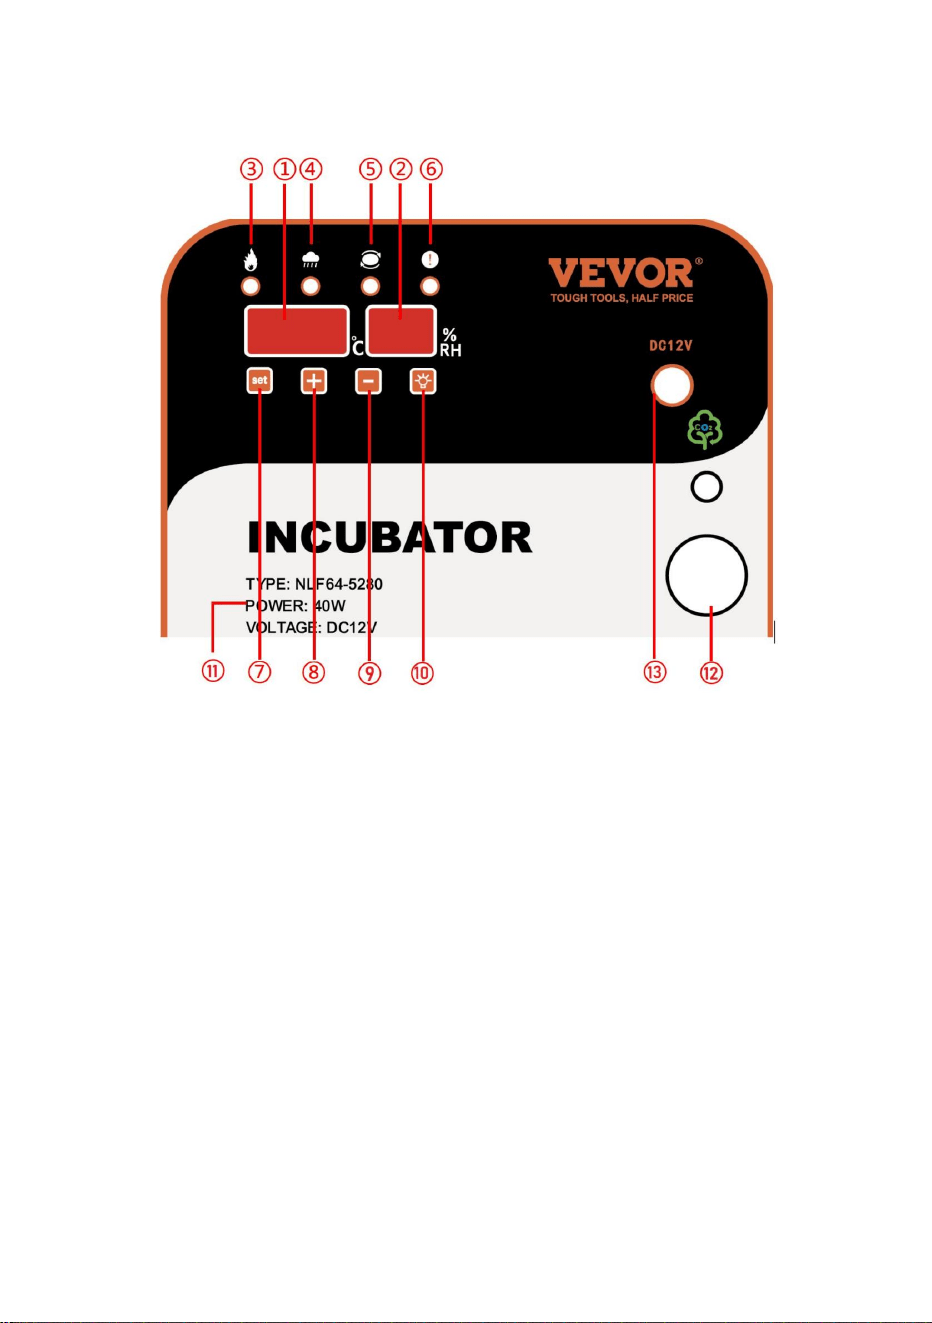
Introduction of the display screen
1. Temperature display screen
2. Humidity display screen
3. Heating indicator
4. Humidification indicator
5. Egg turning indicator light
6. Alarm light
7. Setting key
8. “+” key
9. “-” key
10. Egg candler key
11. Parameter description
12. Observe the egg area
13. DC12V interface

- 6 -
1- Setting method of temperature and humidity
- Temperature setting method: Under normal working conditions, press the
"Setting" button to enter the temperature setting.
- At this time, the temperature display flashes. Press "+" or "-" can adjust the
temperature.
After the adjustment is completed, press the "Set" button to save the temperature
setting. At this time, the screen will display all "8" to indicate that the parameter
setting is successful and automatically enter the humidity parameter setting;
- At this time, the humidity display flashes, click "+" or The "-" flashing value will
increase or decrease accordingly until you reach the humidity value you need.
- After the adjustment is completed, press the "Set" button to save the humidity. At
this time, all "8" is displayed on the screen, indicating that the parameter setting is
successful.
Note: Long press "+" or "-" to quickly increase or decrease the value;
2- Setting methods of temperature and
humidity-related parameters, egg turning cycle, egg
turning time, and days of incubation
Please use this function with caution,
it is not suggested to adjust under normal circumstances.
- Under normal working conditions, press the " Setting" key (about 5 seconds) to
enter the temperature and humidity-related parameters, egg turning cycle, egg
turning time, and incubation days setting. The humidity display shows the code
"P1", and temperature display Flashing. Click on the "+" or "-" flashing value to
increase or decrease accordingly until you need the P1 high-temperature alarm
value parameter.
- After adjustment, press the " Setting " key to save the high-temperature alarm
parameter settings and automatically enter the "P2" heating upper limit Value
setting. The meaning and code of all parameters are shown in the following table:

- 7 -
Parameter
code
Parameter
meaning
Factory
default data
Parameter description
P1
High temperature
alarm value
38.8℃
Measure the temperature to
reach the value alarm
P2
Low temperature
alarm value
36.5℃
Measure the temperature to
reach the value alarm
H1
High humidity
alarm value
85%RH
Measure humidity to reach
the value alarm
H2
Low humidity
alarm value
30%RH
Measure humidity to reach
the value alarm
F1
Egg rotation cycle
90 minutes
Turn the egg motor once
every 90 minutes
F2
Turning operation
time
20
0econds
The turning time of the egg
turning motor
F3
Temperature
calibration
0.0℃
Adjustment after comparison
with standard thermometer
F4
Humidity
calibration
0%RH
Adjustment after comparing
with a standard hygrometer
F5
Incubation days
1
Total incubation time
After all the associated parameters have been set, then press the " Temperature
setting key " button to exit.
Note: the machine configuration sensor is more accurate than the market’s
ordinary thermometer, and generally no deviation occurs. Please make sure that
the deviation is indeed to be adjusted. Even if the adjustment should not be
adjusted too large, otherwise it may have an impact on hatching.

- 8 -
3- Manual egg-turning operation:
Under normal display state, pressing the "+" button can achieve manual egg
turning.
4- Alarm sound off:
Under normal display conditions, when the instrument detects temperature or
humidity abnormally, the instrument will send a "drop, drop, drop"..." alarm sound.
At this time, you can click the "-" key to lift the alarm sound. Under normal
circumstances, the humidity alarm is not significant. If the temperature is alarming,
please find the reason in time.
5- Restore factory settings:
Restore the factory settings in the normal working state while holding the "+" -
"key" for about 8 seconds until all the screen display "8" and hear the buzzer
"drop" and let go. The machine is to restore the factory default value. Or merge the
"Restore Factory Settings" button to quickly restore the factory settings.
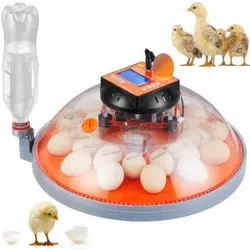
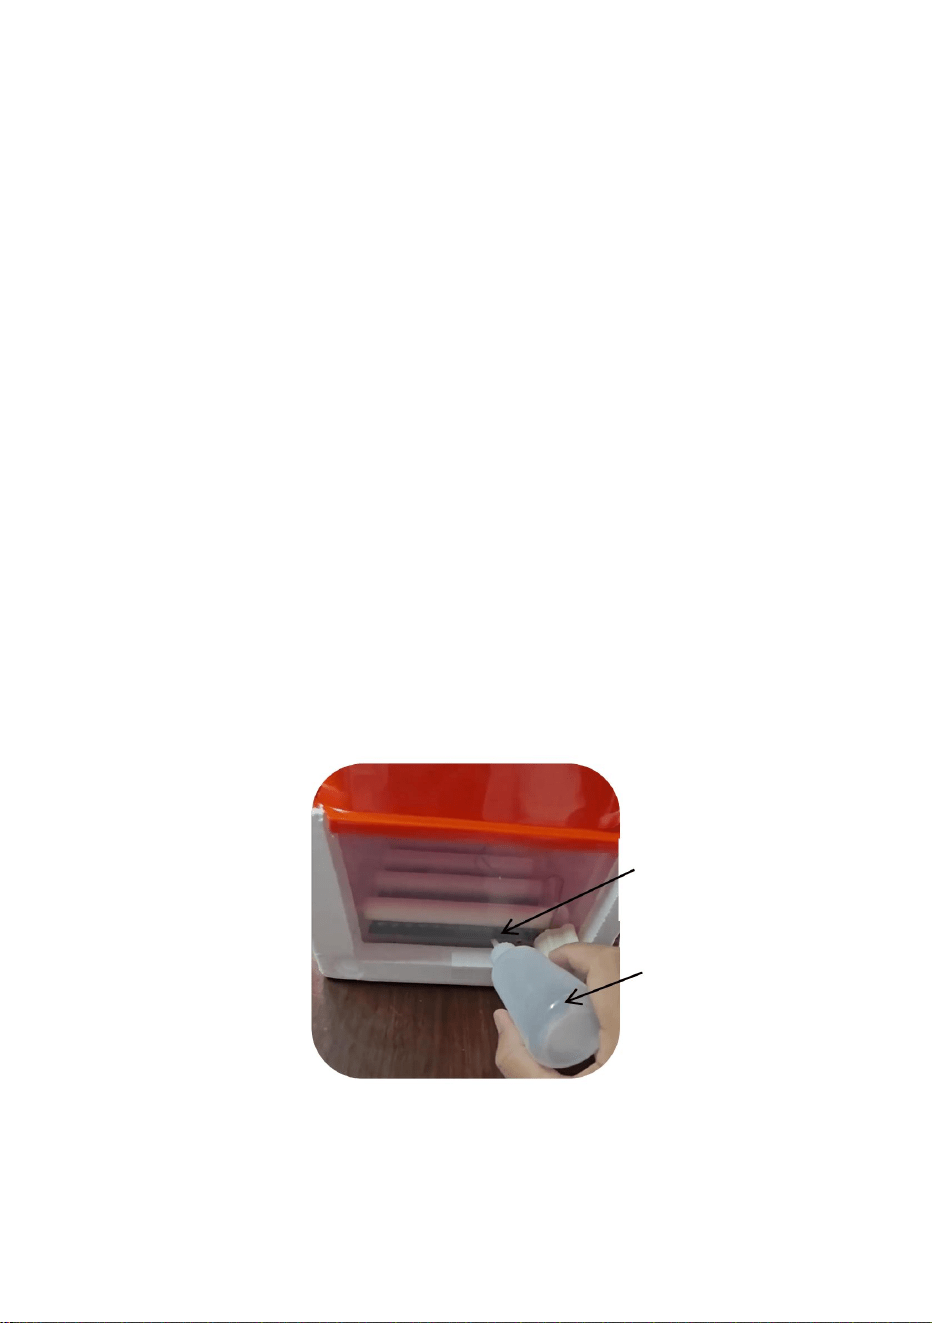
6- Increase humidity:
Inject some water into the bottom of the incubator daily with a Needle Nozzle
Bottle to increase humidity, and the water retained at the bottom is maintained at
50-200 ml.
For the last 3 days (19-21 days) before hatching, spray water on the surface of the
eggs 3 times a day with a Spray Nozzle to increase the humidity.
Water injection holes*2
Needle Nozzle Bottle

- 9 -
Correct Disposal
This product is subject to the provision of European Directive
2012/19/EC. The symbol showing a wheelie bin crossed through
indicates that the product requires separate refuse collection in the
European Union. This applies to the product and all accessories
marked with this symbol. Products marked as such may not be discarded with
normal domestic waste, but must be taken to a collection point for recycling
electrical and electronic devices.


INSTRUKCJA OBSŁUGI
INKUBATOR
Wsparcie techniczne i certyfikat gwarancji
elektronicznej www.vevor.com/support
Nadal staramy się oferować Państwu narzędzia w konkurencyjnych cenach.
„Oszczędź połowę”, „Połowa ceny” lub inne podobne wyrażenia używane przez nas stanowią
jedynie szacunkowe oszczędności, jakie możesz uzyskać kupując u nas określone narzędzia w
porównaniu z głównymi markami i niekoniecznie oznaczają one objęcie wszystkich kategorii narzędzi
oferowanych przez nas. Uprzejmie przypominamy, aby dokładnie sprawdzić, czy składając u nas
zamówienie faktycznie oszczędzasz połowę w porównaniu z głównymi markami.
Machine Translated by Google

Machine Translated by Google

POTRZEBUJESZ POMOCY? SKONTAKTUJ SIĘ Z NAMI!
Wsparcie techniczne i certyfikat gwarancji
elektronicznej www.vevor.com/support
Masz pytania dotyczące produktu? Potrzebujesz wsparcia technicznego? Skontaktuj się z
nami:
NLF64-5280/NLF64-5281
To jest oryginalna instrukcja, przed użyciem należy uważnie przeczytać wszystkie
instrukcje. VEVOR zastrzega sobie jasną interpretację naszej instrukcji obsługi. Wygląd
produktu będzie zależał od produktu, który otrzymałeś. Prosimy o wybaczenie, że
nie poinformujemy Cię ponownie, jeśli w naszym produkcie pojawią się jakiekolwiek aktualizacje
technologiczne lub oprogramowania.
INKUBATOR
- 1 -
Machine Translated by Google

ZAPISZ TE INSTRUKCJE
- 2 -
Nieprzestrzeganie poniższych instrukcji może skutkować porażeniem prądem, pożarem i/lub poważnymi obrażeniami.
środki czyszczące w aerozolu. Do czyszczenia należy używać wilgotnej ściereczki.
4. Aby zmniejszyć ryzyko porażenia prądem, nie rozmontowuj tego produktu. Zanieś go do
napięcia lub inne zagrożenia. Jeśli pokrywa jest uszkodzona, adapter może nie być już
o ograniczonej sprawności fizycznej, sensorycznej lub umysłowej lub braku doświadczenia i
wiedzę, jeżeli sprawowano nad nimi nadzór lub udzielono im instrukcji dotyczących korzystania z nich
wykwalifikowany personel serwisowy, gdy wymagane są prace serwisowe lub naprawcze. Otwieranie lub
obsługiwać urządzenie w bezpieczny sposób i rozumieć związane z tym zagrożenia.
płyny.
może to uniemożliwić jego prawidłowe działanie.
6. Z urządzenia mogą korzystać dzieci w wieku od 8 lat oraz osoby
3. Przed czyszczeniem odłącz ten produkt od gniazdka ściennego. Nie używaj płynów ani
1. Produkt ten podłącza się do zasilania za pomocą adaptera.
używany.
2. Nie należy używać tego produktu w miejscach, w których może być narażony na działanie wody lub innych substancji.
5. Nie należy używać urządzenia w miejscach o wysokiej temperaturze lub dużej wilgotności, ponieważ
nadzór.
9. Tylko do użytku wewnątrz pomieszczeń.
zdejmowanie osłon adaptera, np. tylnej płyty osłonowej, może narazić Cię na niebezpieczne sytuacje
i specyfikacje dostarczone z tym urządzeniem elektrycznym. Nieprzestrzeganie wszystkich
7. Dzieci nie mogą bawić się urządzeniem.
8. Dzieciom nie wolno czyścić ani konserwować bez nadzoru.
WAŻNE ZABEZPIECZENIA
OSTRZEŻENIE: Przeczytaj wszystkie ostrzeżenia dotyczące bezpieczeństwa, instrukcje i ilustracje
Machine Translated by Google

- 3 -
LISTA CZĘŚCI
Machine Translated by Google

0,1 ℃
odbierane zakłócenia, w tym zakłócenia mogące powodować niepożądane
Oświadczenie FCC: To urządzenie jest zgodne z częścią 15 przepisów FCC.
± 4% wilgotności względnej
Wilgotność względna
Wilgotność względna poniżej 85%
Zakres pomiaru temperatury
Eksploatacja urządzenia podlega następującym dwóm warunkom: (1) Urządzenie to może
0-99% wilgotności względnej
Napięcie robocze
Temperatura otoczenia
Prąd zmienny 105 V ~ 235 V, 50 Hz
Dokładność kontroli wilgotności
Dokładność pomiaru temperatury
działanie.
Zakres pomiaru wilgotności
nie powodować szkodliwych zakłóceń, a (2) urządzenie to musi akceptować wszelkie
0 ~ 50,0 ℃
-10 ℃ ~ 35 ℃
Warunki działania
Główne indeksy techniczne
- 4 -
Machine Translated by Google

6. Światło alarmowe
7. Ustawienie klucza
5. Kontrolka obracania się jajka
8. Klawisz „+”
3. Wskaźnik ogrzewania
4. Wskaźnik nawilżenia
2. Ekran wyświetlania wilgotności
1. Ekran wyświetlania temperatury
9. Klawisz „-”
11. Opis parametrów
12. Obserwuj obszar jajek
13. Interfejs DC12V
10. Klucz do świecznika jajecznego
- 5 -
Wprowadzenie do ekranu wyświetlacza
Ustawienia ekranu
Machine Translated by Google

nie zaleca się dokonywania zmian w normalnych warunkach.
Proszę używać tej funkcji ostrożnie,
- 6 -
- W tym momencie wyświetlacz temperatury miga. Naciśnij „+” lub „-”, aby dostosować
zwiększaj lub zmniejszaj odpowiednio, aż osiągniesz potrzebną wartość wilgotności.
- Po zakończeniu regulacji naciśnij przycisk „Set”, aby zapisać wilgotność.
Uwaga: Aby szybko zwiększyć lub zmniejszyć wartość, naciśnij i przytrzymaj przycisk „+” lub „-”.
ustawienie. Znaczenie i kod wszystkich parametrów są pokazane w poniższej tabeli:
- W normalnych warunkach pracy naciśnij przycisk „Ustawienia” (około 5 sekund), aby
- Metoda ustawiania temperatury: W normalnych warunkach pracy naciśnij przycisk
tym razem na ekranie wyświetla się wszystkie „8”, co oznacza, że ustawienie parametru jest prawidłowe
ustawienie. W tym momencie ekran wyświetli wszystkie „8”, aby wskazać, że parametr
wprowadź parametry związane z temperaturą i wilgotnością, cyklem obracania jaj, jajem
- Po dokonaniu regulacji naciśnij przycisk „Ustawienia”, aby zapisać alarm wysokiej temperatury.
ustawienie jest poprawne i automatycznie przechodzi do ustawień parametrów wilgotności; - W
tym momencie wyświetlacz wilgotności miga, kliknij „+” lub „-” migająca wartość
ustawienia parametrów i automatycznie wprowadź wartość górnego limitu grzania „P2”
temperatura.
zwiększaj lub zmniejszaj odpowiednio, aż do momentu, gdy będziesz potrzebować alarmu wysokiej temperatury P1
Po zakończeniu regulacji naciśnij przycisk „Ustaw”, aby zapisać temperaturę
parametr wartości.
udany.
Przycisk „Ustawienia” umożliwiający wejście w ustawienia temperatury.
czas obracania i ustawienie dni inkubacji. Wyświetlacz wilgotności pokazuje kod
„P1” i wyświetlacz temperatury migają. Kliknij na migającą wartość „+” lub „-”, aby
parametry związane z wilgotnością, cykl obracania jaj, jajo
2- Ustawianie metod temperatury i
1- Metoda ustawiania temperatury i wilgotności
czas obracania i dni inkubacji
Machine Translated by Google

- 7 -
Czas obracania jajka
Zmierz temperaturę do
F5
38,8℃
zwykły termometr i generalnie nie występuje żadne odchylenie. Upewnij się, że
Opis parametrów
wartość alarmu
Temperatura
P2
F1
kalibrowanie
Parametr
Wysoka wilgotność
Całkowity czas inkubacji
Operacja toczenia
wartość alarmowa
Korekta po porównaniu
wartość alarmowa
co 90 minut
36,5℃
ze standardowym higrometrem
Wilgotność
Zmierz wilgotność, aby osiągnąć
F3
dane domyślne
1
F2
Uwaga: czujnik konfiguracji maszyny jest dokładniejszy niż dostępne na rynku
osiągnąć wartość alarmową
wartość alarmu
Niska wilgotność
0,0℃
Wysoka temperatura
ustawiona jako zbyt duża, w przeciwnym razie może mieć to wpływ na kreskowanie.
kod
H1
Korekta po porównaniu
wartość alarmowa
Obróć silnik jajka raz
85% wilgotności względnej
200 sekund
Fabryka
ustawienie klucza " przycisk, aby wyjść.
Zmierz temperaturę do
Zmierz wilgotność, aby osiągnąć
F4
Parametr
silnik obrotowy
Dni inkubacji
osiągnąć wartość alarmową
H2
P1
kalibrowanie
odchylenie rzeczywiście należy dostosować. Nawet jeśli dostosowanie nie powinno być
Po ustawieniu wszystkich powiązanych parametrów naciśnij przycisk „Temperatura”
0% wilgotności względnej
Niska temperatura
Cykl rotacji jaj 90 minut
ze standardowym termometrem
30% wilgotności względnej
oznaczający
wartość alarmowa
czas
Machine Translated by Google

Otwory wtrysku wody*2
Przez ostatnie 3 dni (19-21 dni) przed wykluciem się spryskać powierzchnię jaj wodą.
Przywróć ustawienia fabryczne w normalnym stanie roboczym, przytrzymując klawisz „+” - „” przez około 8
sekund, aż cały ekran wyświetli „8” i usłyszysz brzęczyk „opadający” i puść. Maszyna ma przywrócić
domyślną wartość fabryczną. Lub połączyć
jaja 3 razy dziennie przy użyciu rozpylacza w celu zwiększenia wilgotności.
Przycisk „Przywróć ustawienia fabryczne” umożliwia szybkie przywrócenie ustawień fabrycznych.
W normalnym stanie wyświetlania naciśnięcie przycisku „+” umożliwia ręczne ustawienie jajek
W tym momencie możesz kliknąć przycisk „-”, aby wyłączyć dźwięk alarmu. W normalnym trybie
Butelka zwiększa wilgotność, a woda zatrzymywana na dnie jest utrzymywana na poziomie
50-200 ml.
okoliczności, alarm wilgotności nie jest znaczący. Jeśli temperatura jest alarmująca, proszę znaleźć przyczynę na
czas.
W normalnych warunkach wyświetlania, gdy przyrząd wykrywa temperaturę lub
Butelka z dyszą igłową
Jeśli wilgotność powietrza jest nieprawidłowa, urządzenie wyemituje dźwięk alarmu: „kap, kap, kap”.
Codziennie wstrzykuj trochę wody do dna inkubatora za pomocą końcówki igłowej
obrócenie.
5- Przywróć ustawienia fabryczne:
4- Wyłączenie dźwięku alarmu:
3- Ręczna operacja obracania jaj:
6- Zwiększ wilgotność:
- 8 -
Machine Translated by Google

Ten produkt podlega postanowieniom Dyrektywy Europejskiej 2012/19/WE. Symbol
przedstawiający przekreślony kosz na śmieci na kółkach oznacza, że produkt wymaga
oddzielnej zbiórki odpadów w Unii Europejskiej. Dotyczy to produktu i wszystkich
akcesoriów oznaczonych tym symbolem. Produktów oznaczonych w ten sposób nie
można wyrzucać razem ze zwykłymi odpadami domowymi, ale należy je oddać do punktu zbiórki w celu
recyklingu.
urządzenia elektryczne i elektroniczne.
Prawidłowa utylizacja
- 9 -
Machine Translated by Google


INCUBATRICE
MANUALE D'USO
Supporto tecnico e certificato di garanzia
elettronica www.vevor.com/support
"Risparmia la metà", "Metà prezzo" o qualsiasi altra espressione simile da noi utilizzata rappresenta
solo una stima del risparmio che potresti ottenere acquistando determinati utensili con noi rispetto ai
principali marchi principali e non necessariamente intende coprire tutte le categorie di utensili da noi
offerti. Ti ricordiamo cortesemente di verificare attentamente quando effettui un ordine con noi se
stai effettivamente risparmiando la metà rispetto ai principali marchi principali.
Continuiamo a impegnarci per fornirvi strumenti a prezzi competitivi.
Machine Translated by Google

Machine Translated by Google

HAI BISOGNO DI AIUTO? CONTATTACI!
Supporto tecnico e certificato di garanzia
elettronica www.vevor.com/support
Hai domande sui prodotti? Hai bisogno di supporto tecnico? Non esitare a contattarci:
NLF64-5280/NLF64-5281
Questa è l'istruzione originale, si prega di leggere attentamente tutte le istruzioni del
manuale prima di utilizzare. VEVOR si riserva una chiara interpretazione del nostro manuale
utente. L'aspetto del prodotto sarà soggetto al prodotto ricevuto. Vi preghiamo di
perdonarci se non vi informeremo di nuovo se ci sono aggiornamenti tecnologici o software sul
nostro prodotto.
INCUBATRICE
- 1 -
Machine Translated by Google

SALVA QUESTE ISTRUZIONI
- 2 -
con ridotte capacità fisiche, sensoriali o mentali o mancanza di esperienza e
8. La pulizia e la manutenzione da parte dell'utente non devono essere eseguite da bambini senza
Le istruzioni elencate di seguito possono causare scosse elettriche, incendi e/o lesioni gravi.
tensioni o altri rischi. Se il coperchio è danneggiato, l'adattatore potrebbe non essere più
la rimozione delle coperture dell'adattatore, come la piastra di copertura posteriore, può esporre a pericoli
e le specifiche fornite con questo apparecchio elettrico. La mancata osservanza di tutte le
2. Non utilizzare questo prodotto in aree in cui potrebbe essere esposto all'acqua o ad altri
5. Non utilizzare l'unità in aree con temperature elevate o elevata umidità poiché
7. I bambini non devono giocare con l'apparecchio.
9. Solo per uso interno.
1. Questo prodotto è collegato all'alimentazione tramite un adattatore.
usato.
6. Questo apparecchio può essere utilizzato da bambini di età pari o superiore a 8 anni e da persone
3. Scollegare il prodotto dalla presa a muro prima di pulirlo. Non utilizzare liquidi o
supervisione.
liquidi.
potrebbe impedirne il corretto funzionamento.
conoscenza se hanno ricevuto supervisione o istruzioni riguardanti l'uso di
personale di assistenza qualificato quando è necessario un intervento di assistenza o riparazione. L'apertura o
l'apparecchio in modo sicuro e comprendere i pericoli connessi.
detergenti spray. Per la pulizia utilizzare un panno umido.
4. Per ridurre il rischio di scosse elettriche, non smontare questo prodotto. Portarlo a
IMPORTANTI MISURE DI SICUREZZA
ATTENZIONE: leggere tutte le avvertenze di sicurezza, le istruzioni, le illustrazioni
Machine Translated by Google

- 3 -
ELENCO DEI PEZZI
Machine Translated by Google

Umidità relativa
0,1 ÿ
interferenze ricevute, comprese le interferenze che possono causare effetti indesiderati
non causare interferenze dannose e (2) questo dispositivo deve accettare qualsiasi
0 ~ 50,0 ÿ
Campo di misura dell'umidità
-10 ÿ ~ 35 ÿ
Precisione della misurazione della temperatura
operazione.
CA 105 V ~ 235 V, 50 Hz
Precisione del controllo dell'umidità
0-99% UR
Tensione di esercizio
Meno dell'85% di umidità relativa
Campo di misura della temperatura
Il funzionamento è soggetto alle due condizioni seguenti: (1) Questo dispositivo può
Temperatura ambiente
± 4% UR
Dichiarazione FCC: questo dispositivo è conforme alla Parte 15 delle Norme FCC.
Condizioni operative
Principali indici tecnici
- 4 -
Machine Translated by Google

5. Spia luminosa che indica la rotazione delle uova
7. Impostazione chiave
4. Indicatore di umidificazione
8. Tasto “+”
3. Indicatore di riscaldamento
6. Spia di allarme
2. Schermo di visualizzazione dell'umidità
1. Schermo di visualizzazione della temperatura
9. Tasto “-”
11. Descrizione dei parametri
12. Osserva la zona dell'uovo
13. Interfaccia DC12V
10. Chiave per accendere le uova
- 5 -
Introduzione dello schermo di visualizzazione
Impostazioni dello schermo
Machine Translated by Google

non è consigliabile effettuare regolazioni in circostanze normali.
Si prega di utilizzare questa funzione con cautela,
- 6 -
impostazione. Il significato e il codice di tutti i parametri sono riportati nella seguente tabella:
"P1" e visualizzazione della temperatura lampeggiante. Fare clic sul valore lampeggiante "+" o "-" per
- A questo punto, il display della temperatura lampeggia. Premere "+" o "-" per regolare la
Nota: premere a lungo "+" o "-" per aumentare o diminuire rapidamente il valore;
riuscito.
Pulsante "Impostazione" per immettere l'impostazione della temperatura.
Dopo aver completato la regolazione, premere il pulsante "Set" per salvare la temperatura
tempo di rotazione e impostazione dei giorni di incubazione. Il display dell'umidità mostra il codice
parametro valore.
temperatura.
aumentare o diminuire di conseguenza fino a quando non è necessario l'allarme di alta temperatura P1
impostazioni dei parametri e immettere automaticamente il valore limite superiore del riscaldamento "P2"
l'impostazione è riuscita e si accede automaticamente all'impostazione del parametro di umidità; - A
questo punto, il display dell'umidità lampeggia, fare clic su "+" o Il valore lampeggiante "-"
impostazione. A questo punto, lo schermo visualizzerà tutti gli "8" per indicare che il parametro
- Dopo la regolazione, premere il tasto "Setting" per salvare l'allarme di alta temperatura
- In condizioni di lavoro normali, premere il tasto "Setting" (circa 5 secondi) per
- Metodo di impostazione della temperatura: in normali condizioni di lavoro, premere il pulsante
questa volta, sullo schermo viene visualizzato tutto "8", indicando che l'impostazione del parametro è
inserire i parametri relativi alla temperatura e all'umidità, ciclo di rotazione delle uova, uovo
aumentare o diminuire di conseguenza fino a raggiungere il valore di umidità desiderato.
- Dopo aver completato la regolazione, premere il pulsante "Set" per salvare l'umidità. A
parametri legati all'umidità, ciclo di rotazione delle uova, uovo
tempo di svolta e giorni di incubazione
2- Metodi di impostazione della temperatura e
1- Metodo di impostazione della temperatura e dell'umidità
Machine Translated by Google

- 7 -
P2
Formula 1
calibrazione
Operazione di tornitura
Tempo totale di incubazione
Parametro
Alta umidità
38,8ÿ
Misurare la temperatura a
Il tempo di rotazione dell'uovo
La F5
Descrizione del parametro
l'allarme valore
Temperatura
termometro ordinario, e generalmente non si verifica alcuna deviazione. Si prega di assicurarsi che
dati predefiniti
Misurare l'umidità per raggiungere
La F3
Umidità
Nota: il sensore di configurazione della macchina è più preciso di quello del mercato
raggiungere il valore di allarme
l'allarme valore
La F2
1
valore di allarme
Regolazione dopo il confronto
valore di allarme
36,5ÿ
con un igrometro standard
ogni 90 minuti
tasto impostazione " per uscire.
Fabbrica
85% UR
200 secondi
F4
Misurare la temperatura a
Misurare l'umidità per raggiungere
codice
H1
Bassa umidità
Alta temperatura
0.0ÿ
regolato troppo grande, altrimenti potrebbe influire sulla schiusa.
valore di allarme
Girare una volta il motore dell'uovo
Regolazione dopo il confronto
Bassa temperatura
Ciclo di rotazione delle uova 90 minuti
0% UR
Dopo aver impostato tutti i parametri associati, premere il tasto "Temperatura"
Senso
valore di allarme
tempo
30% UR
con termometro standard
raggiungere il valore di allarme
motore di tornitura
Giorni di incubazione
Parametro
P1
L'H2
calibrazione
la deviazione deve essere effettivamente aggiustata. Anche se l'aggiustamento non dovesse essere
Machine Translated by Google

Fori di iniezione dell'acqua*2
svoltando.
umidità anomala, lo strumento emetterà un suono di allarme "goccia, goccia, goccia...".
Iniettare quotidianamente un po' d'acqua sul fondo dell'incubatrice con un ugello ad ago
In condizioni di visualizzazione normali, quando lo strumento rileva la temperatura o
Bottiglia con ugello ad ago
Da 50 a 200 ml.
circostanze, l'allarme umidità non è significativo. Se la temperatura è allarmante, si prega di trovare la ragione in
tempo.
A questo punto, puoi cliccare sul tasto "-" per togliere il suono dell'allarme. In condizioni normali
Bottiglia per aumentare l'umidità e l'acqua trattenuta sul fondo viene mantenuta a
uova 3 volte al giorno con uno spruzzatore per aumentare l'umidità.
In condizioni di visualizzazione normali, premendo il pulsante "+" è possibile ottenere l'uovo manuale
Pulsante "Ripristina impostazioni di fabbrica" per ripristinare rapidamente le impostazioni di fabbrica.
Negli ultimi 3 giorni (19-21 giorni) prima della schiusa, spruzzare acqua sulla superficie della
Ripristinare le impostazioni di fabbrica nello stato di funzionamento normale tenendo premuto il tasto "+" - ""
per circa 8 secondi finché tutto lo schermo non visualizza "8" e si sente il cicalino "cadere" e rilasciare. La
macchina deve ripristinare il valore predefinito di fabbrica. Oppure unire il
5- Ripristinare le impostazioni di fabbrica:
6- Aumentare l'umidità:
4- Disattivazione del suono dell'allarme:
3- Operazione di voltaggio manuale delle uova:
- 8 -
Machine Translated by Google

dispositivi elettrici ed elettronici.
Questo prodotto è soggetto alle disposizioni della Direttiva Europea 2012/19/CE. Il
simbolo raffigurante un bidone della spazzatura barrato indica che il prodotto richiede
la raccolta differenziata dei rifiuti nell'Unione Europea. Ciò si applica al prodotto e a
tutti gli accessori contrassegnati con questo simbolo. I prodotti contrassegnati come
tali non possono essere smaltiti con i normali rifiuti domestici, ma devono essere portati in un punto di
raccolta per il riciclaggio
Smaltimento corretto
- 9 -
Machine Translated by Google


INCUBADORA
MANUALDELUSUARIO
Soportetécnicoycertificadodegarantía
electrónicawww.vevor.com/support
"Ahorrelamitad","mitaddeprecio"ocualquierotraexpresiónsimilarqueutilicemossolorepresenta
unaestimacióndelahorroquepodríaobteneralcomprarciertasherramientasconnosotrosencomparación
conlasprincipalesmarcasynonecesariamentesignificaquecubratodaslascategoríasdeherramientas
queofrecemos.Lerecordamosque,alrealizarunpedidoconnosotros,verifiquecuidadosamentesi
realmenteestáahorrandolamitadencomparaciónconlasprincipalesmarcas.
Seguimoscomprometidosabrindarleherramientasaprecioscompetitivos.
Machine Translated by Google

Machine Translated by Google

¿NECESITAAYUDA?¡CONTÁCTENOS!
Soportetécnicoycertificadodegarantía
electrónicawww.vevor.com/support
¿Tienepreguntassobreelproducto?¿Necesitaasistenciatécnica?Nodudeenponerseencontacto
connosotros:
NLF645280/NLF645281
Estassonlasinstruccionesoriginales,leaatentamentetodaslasinstruccionesdelmanual
antesdeutilizarelproducto.VEVORsereservaunainterpretaciónclaradenuestromanualde
usuario.Laaparienciadelproductoestarásujetaalproductoquerecibió.Perdónenosporno
informarlenuevamentesihayactualizacionesdetecnologíaosoftwareennuestroproducto.
INCUBADORA
1
Machine Translated by Google

GUARDEESTASINSTRUCCIONES
2
concapacidadesfísicas,sensorialesomentalesreducidasofaltadeexperienciay
8.Lalimpiezayelmantenimientodelusuarionodebenserrealizadosporniñossin
Lasinstruccionesqueseenumeranacontinuaciónpuedenprovocardescargaseléctricas,incendiosy/olesionesgraves.
voltajesuotrosriesgos.Silacubiertaestádañada,esposiblequeeladaptadoryanofuncione.
Quitarlascubiertasdelosadaptadores(comolaplacadecubiertatrasera)puedeexponerloapeligros.
yespecificacionesproporcionadasconesteaparatoeléctrico.Elincumplimientodetodaslas
2.Noutiliceesteproductoenáreasdondepuedaestarexpuestoalaguauotros
5.Noutilicelaunidadenáreasconaltastemperaturasoaltahumedadyaque
7.Losniñosnodebenjugarconelaparato.
9.Sóloparausoeninteriores.
1.Esteproductoseconectaalafuentedealimentaciónatravésdeunadaptador.
usado.
6.Esteaparatopuedeserutilizadoporniñosmayoresde8añosypersonas
3.Desconecteesteproductodelatomadecorrienteantesdelimpiarlo.Noutilicelíquidosni
supervisión.
líquidos.
Podríaimpedirquefuncionecorrectamente.
conocimientosiseleshadadosupervisiónoinstrucciónsobreelusode
personaldeserviciocalificadocuandoserequieratrabajodeserviciooreparación.Aperturao
elaparatodeformaseguraycomprenderlospeligrosqueconlleva.
Limpiadoresenaerosol.Utiliceunpañohúmedoparalimpiar.
4.Parareducirelriesgodedescargaeléctrica,nodesmonteesteproducto.Lléveloa
ADVERTENCIA:Leatodaslasadvertenciasdeseguridad,instruccioneseilustraciones.
MEDIDASDESEGURIDADIMPORTANTES
Machine Translated by Google
3
LISTADEPIEZAS
Machine Translated by Google

Humedadrelativa
0,1
Interferenciasrecibidas,incluidaslasinterferenciasquepuedancausarefectosnodeseados.
nocausarinterferenciasdañinas,y(2)estedispositivodebeaceptarcualquier
0~50,0
Rangodemedicióndehumedad
10~35
Precisióndemedicióndetemperatura
operación.
CA105V~235V,50Hz
Precisióndelcontroldehumedad
099%dehumedadrelativa
Voltajedefuncionamiento
Menosdel85%dehumedadrelativa
Rangodemedicióndetemperatura
Elfuncionamientoestásujetoalasdoscondicionessiguientes:(1)Estedispositivopuede
Temperaturaambiente
±4%HR
DeclaracióndelaFCC:EstedispositivocumpleconlaParte15delasNormasdelaFCC.
Condicionesdeoperación
Principalesíndicestécnicos
4
Machine Translated by Google

5.Luzindicadoradegirodelhuevo
7.Tecladeconfiguración
4.Indicadordehumidificación
8.Tecla“+”
3.Indicadordecalentamiento
6.Luzdealarma
2.Pantalladevisualizacióndehumedad
1.Pantalladevisualizacióndetemperatura
9.Tecla“”
12.Observalazonadelhuevo.
13.Interfazde12VCC
11.Descripcióndeparámetros
10.Llaveparaveladehuevo
5
Introduccióndelapantalladevisualización
Configuracióndepantalla
Machine Translated by Google

Ajuste.Elsignificadoyelcódigodetodoslosparámetrossemuestranenlasiguientetabla:
"P1"ylatemperaturaparpadea.Hagaclicenelvalorparpadeante"+"o""para
Enestemomento,lapantalladetemperaturaparpadea.Presione"+"o""paraajustarlatemperatura.
Nota:Mantengapresionado"+"o""paraaumentarodisminuirrápidamenteelvalor;
exitoso.
Botón“Configuración”paraingresaralaconfiguracióndetemperatura.
Unavezcompletadoelajuste,presioneelbotón"Establecer"paraguardarlatemperatura.
tiempodegiroyconfiguracióndedíasdeincubación.Lapantalladehumedadmuestraelcódigo
parámetrodevalor.
temperatura.
AumenteodisminuyasegúncorrespondahastaquenecesitelaalarmadealtatemperaturaP1
Ajustesdeparámetroseintroducciónautomáticadelvalorlímitesuperiordecalentamiento"P2"
Laconfiguraciónesexitosayseingresaautomáticamentelaconfiguracióndelparámetrodehumedad;En
estemomento,lapantalladehumedadparpadea,hagaclicen"+"oElvalorparpadeante""
configuración.Enestemomento,lapantallamostrarátodoslos"8"paraindicarqueelparámetro
Despuésdelajuste,presionelatecla"Configuración"paraguardarlaalarmadealtatemperatura.
Encondicionesnormalesdetrabajo,presionelatecla"Configuración"(aproximadamente5segundos)para
Métododeajustedetemperatura:Encondicionesnormalesdetrabajo,presioneelbotón
Estavez,semuestraun"8"enlapantalla,loqueindicaquelaconfiguracióndelparámetroescorrecta.
Introduzcalosparámetrosrelacionadosconlatemperaturaylahumedad,elciclodegirodeloshuevos,elhuevo
Aumenteodisminuyasegúncorrespondahastaalcanzarelvalordehumedadquenecesita.
Unavezcompletadoelajuste,presioneelbotón"Establecer"paraguardarlahumedad.
6
Noserecomiendarealizarajustesencircunstanciasnormales.
Utiliceestafunciónconprecaución.
parámetrosrelacionadosconlahumedad,ciclodevolteodehuevos,huevo
tiempodevolteoydíasdeincubación
2Métodosdeajustedetemperaturay
1Métododeajustedetemperaturayhumedad
Machine Translated by Google

7
Temperatura
termómetrocomúny,porlogeneral,noseproducendesviaciones.Asegúresedeque
Descripcióndeparámetros
Laalarmadevalor
38,8
F5
Midalatemperaturaa
EltiempodegirodelhuevoOperacióndetorneado
Tiempototaldeincubación
Parámetro
Altahumedad
P2
F1
calibración
conunhigrómetroestándar
36,5
Cada90minutos
valordealarma
Ajustedespuésdelacomparación
valordealarma alcanzarelvalordealarma
Laalarmadevalor
F2
1
Medirlahumedadparaalcanzar
F3
Nota:elsensordeconfiguracióndelamáquinaesmásprecisoqueeldelmercado.
datospredeterminados
Humedad
Gireelmotordelhuevounavez
Ajustedespuésdecomparar
valordealarma
código
H1
ajustadodemasiadogrande,delocontrariopodríatenerunimpactoenlaeclosión.
Temperaturaalta
Bajahumedad
0,0
F4
Midalatemperaturaa
Medirlahumedadparaalcanzar
Presioneelbotón"tecladeconfiguración"parasalir.
85%dehumedadrelativa
200segundos
Fábrica
calibración
Ladesviacióndebeserajustada,inclusosielajustenodebeserlo.
P1
H2
alcanzarelvalordealarma
motorgiratorio
Díasdeincubación
Parámetro
significado
valordealarma
tiempo
30%dehumedadrelativa
contermómetroestándar
Cicloderotacióndehuevos90minutos
0%dehumedadrelativa
Bajatemperatura
Unavezquesehayanconfiguradotodoslosparámetrosasociados,presioneelbotón"Temperatura".
Machine Translated by Google

Orificiosdeinyeccióndeagua*2
torneado.
Silahumedadesanormal,elinstrumentoemitiráunsonidodealarmadeltipo"gota,gota,gota".
Inyecteunpocodeaguaenelfondodelaincubadoradiariamenteconunaboquilladeaguja.
Encondicionesnormalesdevisualización,cuandoelinstrumentodetectatemperaturao
Botellaconboquilladeaguja
50200ml.
Endeterminadascircunstancias,laalarmadehumedadnoessignificativa.Silatemperaturaesalarmante,busquela
razónatiempo.
Enestemomento,puedehacerclicenlatecla""paraquesuenelaalarma.Encondicionesnormales
Botellaparaaumentarlahumedad,yelaguaretenidaenelfondosemantienea
huevos3vecesaldíaconunaboquillarociadoraparaaumentarlahumedad.
Botón"Restaurarconfiguracióndefábrica"pararestaurarrápidamentelaconfiguracióndefábrica.
Enestadodevisualizaciónnormal,alpresionarelbotón"+"sepuedelograrlacocciónmanualdehuevos.
Durantelosúltimos3días(1921días)antesdelaeclosión,rocíeaguasobrelasuperficiedelos
Restaurelaconfiguracióndefábricaenelestadodefuncionamientonormalmientrasmantienepresionadala
tecla"+""duranteaproximadamente8segundoshastaquetodalapantallamuestre"8"yescucheeltimbre
"drop"ysuéltelo.Lamáquinarestauraráelvalorpredeterminadodefábrica.Ofusionelosvalorespredeterminadosdefábrica.
5Restaurarconfiguracióndefábrica:
6Aumentarlahumedad:
4Sonidodealarmadesactivado:
3Operaciónmanualdevolteodehuevos:
8
Machine Translated by Google

Dispositivoseléctricosyelectrónicos.
EsteproductoestásujetoalasdisposicionesdelaDirectivaEuropea2012/19/CE.El
símboloquemuestrauncontenedordebasuratachadoindicaqueelproductorequiere
unarecogidaselectivaderesiduosenlaUniónEuropea.Estoseaplicaalproductoya
todoslosaccesoriosmarcadosconestesímbolo.Losproductosmarcadoscomotales
nopuedendesecharseconlosresiduosdomésticosnormales,sinoquedebenllevarseaunpuntode
recogidaparasureciclaje.
Eliminacióncorrecta
9
Machine Translated by Google


ANVÄNDARMANUAL
INKUBATOR
Teknisk support och e-garanticertifikat
www.vevor.com/support
"Spara halva", "halva priset" eller andra liknande uttryck som används av oss representerar bara
en uppskattning av besparingar du kan dra nytta av att köpa vissa verktyg hos oss jämfört med de stora
toppmärkena och doser behöver inte nödvändigtvis täcka alla kategorier av verktyg som erbjuds av
oss. Du påminns vänligen om att noggrant kontrollera när du gör en beställning hos oss om du
faktiskt sparar hälften i jämförelse med de främsta stora varumärkena.
Vi fortsätter att vara engagerade i att ge dig verktyg till konkurrenskraftiga priser.
Machine Translated by Google

Machine Translated by Google

BEHÖVER HJÄLP? KONTAKTA OSS!
Teknisk support och e-garanticertifikat
www.vevor.com/support
Har du produktfrågor? Behöver du teknisk support? Kontakta oss gärna:
NLF64-5280/NLF64-5281
Detta är den ursprungliga instruktionen, läs alla instruktioner noggrant innan du
använder den. VEVOR reserverar sig för en tydlig tolkning av vår användarmanual. Utseendet
på produkten är beroende av den produkt du fått. Ursäkta oss att vi inte kommer att
informera dig igen om det finns någon teknik eller mjukvaruuppdateringar på vår produkt.
INKUBATOR
- 1 -
Machine Translated by Google

SPARA DESSA INSTRUKTIONER
- 2 -
med nedsatt fysisk, sensorisk eller mental förmåga eller brist på erfarenhet och
8. Rengöring och användarunderhåll får inte utföras av barn utan
instruktionerna nedan kan leda till elektriska stötar, brand och/eller allvarliga skador.
spänningar eller andra risker. Om locket är skadat kanske adaptern inte längre är det
Om du tar bort adapterhöljen -som den bakre täckplåten - kan du utsättas för farliga
och specifikationer som medföljer denna elektriska apparat. Underlåtenhet att följa alla
2. Använd inte denna produkt i områden där den kan utsättas för vatten eller annat
5. Använd inte enheten i områden med höga temperaturer eller hög luftfuktighet sedan dess
7. Barn får inte leka med apparaten.
9. Endast för inomhusbruk.
1. Denna produkt är ansluten till strömförsörjningen via en adapter.
begagnad.
6. Denna apparat kan användas av barn från 8 år och uppåt och personer
3. Koppla bort produkten från vägguttaget innan rengöring. Använd inte vätska eller
tillsyn.
vätskor.
det kan hindra den från att fungera korrekt.
kunskap om de har fått handledning eller instruktioner angående användningen av
kvalificerad servicepersonal när service eller reparationsarbete krävs. Öppning eller
apparaten på ett säkert sätt och förstå de risker som är involverade.
aerosolrengöringsmedel. Använd en fuktig trasa för rengöring.
4. För att minska risken för elektriska stötar, ta inte isär denna produkt. Ta det till
VARNING: Läs alla säkerhetsvarningar, instruktioner, illustrationer
VIKTIGA SÄKERHETSÅTGÄRDER
Machine Translated by Google

- 3 -
DELLISTA
Machine Translated by Google

Relativ luftfuktighet
0,1 ÿ
mottagna störningar, inklusive störningar som kan orsaka oönskade
inte orsaka skadliga störningar, och (2) denna enhet måste acceptera alla
0 ~ 50,0 ÿ
Fuktighetsmätområde
-10 ÿ ~ 35 ÿ
Temperaturmätningsnoggrannhet
drift.
AC 105V ~ 235V, 50HZ
Fuktighetskontrollnoggrannhet
0-99% RH
Driftspänning
Mindre än 85 % RF
Temperaturmätområde
Driften är föremål för följande två villkor: (1)Denna enhet kan
Omgivningstemperatur
± 4 % RH
FCC-uttalande: Denna enhet överensstämmer med del 15 av FCC-reglerna.
Driftsvillkor
Huvudsakliga tekniska index
- 4 -
Machine Translated by Google

5. Indikeringslampa för äggvändning
7. Inställningsnyckel
4. Befuktningsindikator
8. “+”-tangent
3. Värmeindikator
6. Larmljus
2. Fuktighetsskärm
1. Temperaturdisplay
9. “-”-tangent
10. Äggljusnyckel
11. Parameterbeskrivning
12. Observera äggområdet
13. DC12V gränssnitt
- 5 -
Introduktion av bildskärmen
Skärminställningar
Machine Translated by Google

det rekommenderas inte att justera under normala omständigheter.
Använd denna funktion med försiktighet,
- 6 -
miljö. Innebörden och koden för alla parametrar visas i följande tabell:
"P1" och temperaturdisplay Blinkar. Klicka på "+" eller "-" blinkande värde till
- Vid denna tidpunkt blinkar temperaturdisplayen. Tryck på "+" eller "-" för att justera
Obs: Tryck länge på "+" eller "-" för att snabbt öka eller minska värdet;
framgångsrik.
"Setting"-knapp för att gå in i temperaturinställningen.
När justeringen är klar, tryck på "Set"-knappen för att spara temperaturen
inställning av vändtid och inkubationsdagar. Fuktighetsdisplayen visar koden
värdeparameter.
temperatur.
öka eller minska i enlighet med detta tills du behöver P1-högtemperaturlarmet
parameterinställningar och automatiskt ange övre gränsvärdet för värme "P2".
inställningen är framgångsrik och anger automatiskt inställningen för
fuktighetsparametern; - Vid denna tidpunkt blinkar fuktighetsdisplayen, klicka på "+" eller "-" blinkar
miljö. Vid denna tidpunkt kommer skärmen att visa alla "8" för att indikera att parametern
- Efter justering, tryck på knappen " Inställning " för att spara högtemperaturlarmet
- Under normala arbetsförhållanden, tryck på knappen "Inställning" (ca 5 sekunder) för att
- Temperaturinställningsmetod: Under normala arbetsförhållanden, tryck på
denna gång visas alla "8" på skärmen, vilket indikerar att parameterinställningen är
ange temperatur- och luftfuktighetsrelaterade parametrar, äggvändningscykel, ägg
öka eller minska tills du når det fuktighetsvärde du behöver.
- När justeringen är klar, tryck på "Set"-knappen för att spara fuktigheten. På
2- Inställningsmetoder för temperatur och
vändtid och inkubationsdagar
luftfuktighetsrelaterade parametrar, äggvändningscykel, ägg
1- Inställningsmetod för temperatur och luftfuktighet
Machine Translated by Google

P2
F1
kalibrering
Vändningsoperation
Total inkubationstid
Parameter
Hög luftfuktighet
38,8 ÿ
Mät temperaturen till
Äggets vändtid
F5
Parameterbeskrivning
värdelarmet
Temperatur
vanlig termometer, och i allmänhet förekommer ingen avvikelse. Vänligen se till att
standarddata
Mät luftfuktigheten för att nå
F3
Fuktighet
Obs! Maskinkonfigurationssensorn är mer exakt än marknadens
nå värdelarmet
värdelarmet
F2
1
larmvärde
Justering efter jämförelse
larmvärde
36,5 ÿ
med en vanlig hygrometer
var 90:e minut
inställningsknappen " för att avsluta.
Fabrik
85% RH
200 sekunder
F4
Mät temperaturen till
Mät luftfuktigheten för att nå
koda
H1
Låg luftfuktighet
Hög temperatur
0ÿ0ÿ
justeras för stor, annars kan det påverka kläckningen.
larmvärde
Vrid äggmotorn en gång
Justering efter jämförelse
Låg temperatur
Äggrotationscykel 90 minuter
0%RH
När alla tillhörande parametrar har ställts in, tryck sedan på " Temperatur
menande
larmvärde
tid
30% RH
med standard termometer
nå värdelarmet
vridande motor
Inkubationsdagar
Parameter
P1
H2
kalibrering
avvikelsen ska verkligen justeras. Även om justeringen inte borde vara det
- 7 -
Machine Translated by Google

Vatteninsprutningshål*2
vändning.
onormal luftfuktighet kommer instrumentet att skicka ett "drop, drop, drop"..." larmljud.
Injicera lite vatten i botten av inkubatorn dagligen med ett nålmunstycke
Under normala visningsförhållanden, när instrumentet känner av temperatur eller
Nålmunstyckesflaska
50-200 ml.
omständigheterna är fuktlarmet inte signifikant. Om temperaturen är alarmerande, vänligen hitta orsaken i
tid.
Vid denna tidpunkt kan du klicka på "-"-tangenten för att lyfta larmljudet. Under normala
Flaska för att öka luftfuktigheten, och vattnet som hålls kvar i botten hålls vid
ägg 3 gånger om dagen med ett spraymunstycke för att öka luftfuktigheten.
Knappen "Återställ fabriksinställningar" för att snabbt återställa fabriksinställningarna.
Under normalt visningsläge kan ett manuellt ägg uppnås genom att trycka på "+"-knappen
Under de sista 3 dagarna (19-21 dagar) före kläckning, spraya vatten på ytan av ytan
Återställ fabriksinställningarna i normalt arbetsläge medan du håller ned "+" - "tangenten" i cirka 8
sekunder tills hela skärmen visar "8" och hör summern "släppa" och släppa taget. Maskinen ska
återställa fabriksinställningarna. Eller slå samman
4- Larmljud av:
6- Öka luftfuktigheten:
5- Återställ fabriksinställningar:
3- Manuell äggvändning:
- 8 -
Machine Translated by Google

elektriska och elektroniska apparater.
Denna produkt omfattas av bestämmelserna i det europeiska direktivet 2012/19/EC.
Symbolen som visar en soptunna korsad anger att produkten kräver separat
sophämtning i EU. Detta gäller för produkten och alla tillbehör märkta med denna
symbol. Produkter märkta som sådana får inte slängas tillsammans med vanligt
hushållsavfall utan måste lämnas till en insamlingsplats för återvinning
Korrekt avfallshantering
- 9 -
Machine Translated by Google


GEBRUIKERSHANDLEIDING
Broedmachine
Technische ondersteuning en e-garantiecertificaat
www.vevor.com/support
"Bespaar de helft", "halve prijs" of andere soortgelijke uitdrukkingen die wij gebruiken, geven alleen een schatting
van de besparingen die u kunt behalen door bepaalde gereedschappen bij ons te kopen in vergelijking met de grote
topmerken en doseringen betekenen niet noodzakelijkerwijs dat ze alle categorieën gereedschappen dekken die wij
aanbieden. Wij herinneren u eraan om zorgvuldig te controleren of u daadwerkelijk de helft bespaart in
vergelijking met de grote topmerken wanneer u een bestelling bij ons plaatst.
Wij streven er voortdurend naar om u gereedschappen tegen concurrerende prijzen te leveren.
Machine Translated by Google

Machine Translated by Google

HULP NODIG? NEEM CONTACT MET ONS OP!
Technische ondersteuning en e-
garantiecertificaat www.vevor.com/support
Dit is de originele instructie, lees alle handleidingen zorgvuldig door voordat u het product
gebruikt. VEVOR behoudt zich een duidelijke interpretatie van onze gebruikershandleiding voor.
Het uiterlijk van het product is afhankelijk van het product dat u hebt ontvangen. Vergeef ons
dat we u niet opnieuw zullen informeren als er technologie- of software-updates voor ons product zijn.
NLF64-5280/NLF64-5281
Heeft u vragen over het product? Heeft u technische ondersteuning nodig? Neem dan gerust
contact met ons op:
Broedmachine
- 1 -
Machine Translated by Google

BEWAAR DEZE INSTRUCTIES
- 2 -
met verminderde fysieke, sensorische of mentale vermogens of gebrek aan ervaring en
8. Reiniging en gebruikersonderhoud mogen niet door kinderen worden uitgevoerd zonder toezicht.
Het niet opvolgen van onderstaande instructies kan leiden tot een elektrische schok, brand en/of ernstig letsel.
spanningen of andere risico's. Als de kap beschadigd is, is de adapter mogelijk niet meer
Het verwijderen van adapterafdekkingen - zoals de achterste afdekplaat - kan u blootstellen aan gevaarlijke situaties.
en specificaties die bij dit elektrische apparaat worden geleverd. Het niet naleven van alle
2. Gebruik dit product niet op plekken waar het blootgesteld kan worden aan water of andere schadelijke stoffen.
5. Gebruik het apparaat niet in ruimtes met hoge temperaturen of een hoge luchtvochtigheid, omdat
7. Kinderen mogen niet met het apparaat spelen.
9. Alleen voor gebruik binnenshuis.
1. Dit product wordt via een adapter op het stroomnet aangesloten.
gebruikt.
6. Dit apparaat kan worden gebruikt door kinderen van 8 jaar en ouder en door personen
3. Haal de stekker van dit product uit het stopcontact voordat u het schoonmaakt. Gebruik geen vloeibare of
overzicht.
vloeistoffen.
Het kan ertoe leiden dat het niet goed werkt.
kennis als zij toezicht of instructie hebben gekregen met betrekking tot het gebruik van
gekwalificeerd servicepersoneel wanneer service- of reparatiewerkzaamheden vereist zijn. Openen of
het apparaat op een veilige manier gebruiken en de gevaren begrijpen die ermee gepaard gaan.
aerosolreinigers. Gebruik een vochtige doek voor het schoonmaken.
4. Om het risico op een elektrische schok te verminderen, mag u dit product niet demonteren. Breng het naar
WAARSCHUWING: Lees alle veiligheidswaarschuwingen, instructies en illustraties
BELANGRIJKE VEILIGHEIDSMAATREGELEN
Machine Translated by Google

ONDERDELENLIJST
- 3 -
Machine Translated by Google

- 4 -
Belangrijkste technische indexen
Bedrijfsomstandigheden
Relatieve vochtigheid
0,1 °C
ontvangen interferentie, met inbegrip van interferentie die ongewenste
geen schadelijke interferentie veroorzaken, en (2) dit apparaat moet alle
0 ~ 50,0 ÿ
Meetbereik vochtigheid
-10ÿ ~ 35ÿ
Nauwkeurigheid van temperatuurmeting
operatie.
Wisselstroom 105V ~ 235V, 50Hz
Nauwkeurigheid van vochtigheidsregeling
0-99% RV
Bedrijfsspanning
Minder dan 85% RV
Temperatuurmeetbereik
De werking is onderworpen aan de volgende twee voorwaarden: (1) Dit apparaat mag
Omgevingstemperatuur
± 4% RV
FCC-verklaring: Dit apparaat voldoet aan Deel 15 van de FCC-regels.
Machine Translated by Google

Introductie van het beeldscherm
- 5 -
5. Indicatielampje voor het draaien van eieren
7. Instelsleutel
6. Alarmlicht
10. Eierkaarssleutel
3. Verwarmingsindicator
4. Bevochtigingsindicator
2. Vochtigheidsweergavescherm
1. Temperatuurweergavescherm
8. “+” toets
11. Parameterbeschrijving
12. Observeer het eiergebied
9. “-” toets
13. DC12V-interface
Scherminstellingen
Machine Translated by Google

Onder normale omstandigheden is het niet raadzaam om aanpassingen te doen.
Gebruik deze functie met de nodige voorzichtigheid,
- 6 -
instelling. De betekenis en code van alle parameters worden weergegeven in de volgende tabel:
"P1" en temperatuurweergave knipperen. Klik op de knipperende waarde "+" of "-" om
- Op dit moment knippert de temperatuurweergave. Druk op "+" of "-" om de
Let op: druk lang op "+" of "-" om de waarde snel te verhogen of te verlagen;
succesvol.
Knop "Instellingen" om de temperatuur in te stellen.
Nadat de aanpassing is voltooid, drukt u op de knop "Set" om de temperatuur op te slaan
draaitijd en incubatiedagen instellen. De vochtigheidsweergave toont de code
waardeparameter.
temperatuur.
verhoog of verlaag dienovereenkomstig totdat u het P1-hogetemperatuuralarm nodig hebt
parameterinstellingen en automatisch de "P2" verwarmingsbovengrenswaarde invoeren
instelling is succesvol en automatisch de vochtigheidsparameterinstelling invoeren; - Op
dit moment knippert de vochtigheidsweergave, klik op "+" of De knipperende waarde "-" zal
instelling. Op dit moment zal het scherm alle "8" weergeven om aan te geven dat de parameter
- Druk na het aanpassen op de toets "Instellingen" om het hogetemperatuuralarm op te slaan
- Druk onder normale werkomstandigheden op de toets "Instelling" (ongeveer 5 seconden) om
Deze keer worden alle "8" op het scherm weergegeven, wat aangeeft dat de parameterinstelling is
- Temperatuurinstellingsmethode: Druk onder normale werkomstandigheden op de
voer de parameters in die verband houden met de temperatuur en de vochtigheid, de draaicyclus van het ei, het ei
Verhoog of verlaag de vochtigheidsgraad totdat u de gewenste vochtigheidswaarde bereikt.
- Nadat de aanpassing is voltooid, drukt u op de knop "Set" om de vochtigheid op te slaan.
vochtigheidsgerelateerde parameters, eierkeercyclus, ei
draaitijd en incubatiedagen
2- Instelmethoden voor temperatuur en
1- Instelmethode van temperatuur en vochtigheid
Machine Translated by Google

- 7 -
Aanpassing na vergelijking
standaardgegevens
Meet de luchtvochtigheid om te bereiken
F3
Vochtigheid
Let op: de machineconfiguratiesensor is nauwkeuriger dan die van de markt
bereik de waarde alarm
het waarde alarm
F2
1
alarmwaarde
Aanpassing na vergelijking
alarmwaarde
36,5ÿ
met een standaard hygrometer
elke 90 minuten
P2
Formule 1
kalibratie
Draaibewerking
Totale incubatietijd
Parameter
Hoge luchtvochtigheid
38,8ÿ
Meet de temperatuur tot
De draaitijd van het ei
F5
Parameterbeschrijving
het waarde alarm
Temperatuur
gewone thermometer, en over het algemeen treedt er geen afwijking op. Zorg ervoor dat
Lage temperatuur
Eierrotatiecyclus 90 minuten
0%RV
Nadat alle bijbehorende parameters zijn ingesteld, drukt u op de knop "Temperatuur".
betekenis
alarmwaarde
tijd
30%RV
met standaardthermometer
bereik de waarde alarm
draaiende motor
Incubatiedagen
Parameter
P1
H2
kalibratie
de afwijking moet inderdaad worden aangepast. Ook al zou de aanpassing niet moeten worden
insteltoets " om af te sluiten.
Fabriek
85%RV
200 seconden
F4
Meet de temperatuur tot
Meet de luchtvochtigheid om te bereiken
code
H1
Lage luchtvochtigheid
Hoge temperatuur
0ÿ0ÿ
te groot ingesteld, anders kan dit gevolgen hebben voor de arcering.
alarmwaarde
Draai de eiermotor eenmaal
Machine Translated by Google

Waterinjectiegaten*2
draaien.
vochtigheid abnormaal is, zal het instrument een "druppel, druppel, druppel"..." alarmsignaal uitzenden.
Spuit dagelijks wat water in de bodem van de broedmachine met een naaldspuit
Onder normale weergaveomstandigheden, wanneer het instrument temperatuur of
Naaldspuitfles
50-200 ml.
omstandigheden, is het vochtigheidsalarm niet significant. Als de temperatuur alarmerend is, zoek dan op
tijd de reden.
Op dit moment kunt u op de "-" toets klikken om het alarmgeluid op te heffen. Onder normale omstandigheden
Fles om de luchtvochtigheid te verhogen, en het water dat op de bodem wordt vastgehouden, wordt op peil gehouden
eieren 3 keer per dag met een sproeikop om de luchtvochtigheid te verhogen.
In de normale weergavestand kunt u door op de knop "+" te drukken handmatig eieren selecteren.
Knop 'Fabrieksinstellingen herstellen' om snel de fabrieksinstellingen te herstellen.
Spuit de laatste 3 dagen (19-21 dagen) voor het uitkomen water op het oppervlak van de
Herstel de fabrieksinstellingen in de normale werkstatus terwijl u de "+" - "toets" ongeveer 8
seconden ingedrukt houdt totdat het hele scherm "8" weergeeft en u de zoemer hoort "vallen" en
laat los. De machine moet de fabrieksinstellingen herstellen. Of voeg de
4- Alarmgeluid uit:
6- Verhoog de luchtvochtigheid:
5- Herstel fabrieksinstellingen:
3- Handmatige eierkeerbewerking:
- 8 -
Machine Translated by Google

elektrische en elektronische apparaten.
Dit product is onderworpen aan de bepalingen van de Europese richtlijn 2012/19/EG.
Het symbool met een doorgestreepte afvalbak geeft aan dat het product in de Europese
Unie gescheiden afvalinzameling vereist. Dit geldt voor het product en alle accessoires
die met dit symbool zijn gemarkeerd. Producten die als zodanig zijn gemarkeerd,
mogen niet met het normale huishoudelijke afval worden weggegooid, maar moeten voor recycling
naar een inzamelpunt worden gebracht.
Correcte verwijdering
- 9 -
Machine Translated by Google


MANUELD'UTILISATION
INCUBATEUR
Assistancetechniqueetcertificatdegarantie
électroniquewww.vevor.com/support
Nouscontinuonsànousengageràvousfournirdesoutilsàdesprixcompétitifs.
«Économisezlamoitié»,«Moitiéprix»outouteautreexpressionsimilaireutiliséeparnousnereprésente
qu'uneestimationdeséconomiesquevouspourriezréaliserenachetantcertainsoutilscheznousparrapport
auxgrandesmarquesetnecouvrepasnécessairementtouteslescatégoriesd'outilsquenousproposons.Nous
vousrappelonsdebienvouloirvérifiersoigneusementlorsquevouspassezunecommandecheznous
sivouséconomisezréellementlamoitiéparrapportauxgrandesmarques.
Machine Translated by Google

Machine Translated by Google

BESOIND'AIDE?CONTACTEZNOUS!
Assistancetechniqueetcertificatdegarantie
électroniquewww.vevor.com/support
Vousavezdesquestionssurnosproduits?Vousavezbesoind'assistancetechnique?N'hésitezpasà
nouscontacter:
NLF645280/NLF645281
Ils'agitdelanoticed'utilisationd'origine.Veuillezlireattentivementtoutes
lesinstructionsdumanuelavantdel'utiliser.VEVORseréserveledroitd'interpréter
clairementnotremanueld'utilisation.L'apparenceduproduitdépenddu
produitquevousavezreçu.Veuilleznousexcuser,nousnevousinformeronsplus
encasdemiseàjourtechnologiqueoulogicielledenotreproduit.
INCUBATEUR
1
Machine Translated by Google

CONSERVEZCESINSTRUCTIONS
2
3.Débranchezceproduitdelaprisemuraleavantdelenettoyer.N'utilisezpasdeliquideou
6.Cetappareilpeutêtreutilisépardesenfantsâgésde8ansetplusetpardespersonnes
surveillance.
liquides.
celapeutl'empêcherdefonctionnercorrectement.
connaissancess'ilsontreçuunesupervisionoudesinstructionsconcernantl'utilisation
personneldeservicequalifiélorsquedestravauxd'entretienouderéparationsontnécessaires.Ouvertureou
Nettoyantsenaérosol.Utilisezunchiffonhumidepourlenettoyage.
ayantdescapacitésphysiques,sensoriellesoumentalesréduitesoumanquantd'expérienceet
Utilisezl'appareildemanièresûreetcomprenezlesdangersencourus.
4.Pourréduirelerisquedechocélectrique,nedémontezpasceproduit.Emmenezlechez
lenonrespectdesinstructionscidessouspeutentraînerunchocélectrique,unincendieet/oudesblessuresgraves.
tensionsouautresrisques.Silecouvercleestendommagé,l'adaptateurpeutneplusêtre
8.Lenettoyageetl'entretiendel'utilisateurnedoiventpasêtreeffectuéspardesenfantssans
etlesspécificationsfourniesaveccetappareilélectrique.Lenonrespectdetoutesles
leretraitdescouverclesdel'adaptateurcommelaplaquedeprotectionarrièrepeutvousexposeràdes
7.Lesenfantsnedoiventpasjoueravecl’appareil.
2.N'utilisezpasceproduitdansdeszonesoùilpourraitêtreexposéàl'eauouàd'autres
5.N'utilisezpasl'appareildansdeszonesàhautetempératureouàfortehumiditécar
9.Pouruneutilisationenintérieuruniquement.
1.Ceproduitestconnectéàl'alimentationélectriqueviaunadaptateur.
utilisé.
AVERTISSEMENT:Liseztouslesavertissementsdesécurité,instructionsetillustrations
MESURESDESÉCURITÉIMPORTANTES
Machine Translated by Google

3
LISTEDESPIÈCES
Machine Translated by Google

Précisionducontrôledel'humidité
CA105V~235V,50Hz
099%HR
Tensiondefonctionnement
Moinsde85%HR
Plagedemesuredelatempérature
±4%HR
Sonfonctionnementestsoumisauxdeuxconditionssuivantes:(1)Cetappareilpeut
Humiditérelative
DéclarationFCC:Cetappareilestconformeàlapartie15desrèglesFCC.
Températureambiante
0,1
interférencesreçues,ycomprislesinterférencesquipeuventcauserdeseffetsindésirables
0~50,0
nepascauserd'interférencesnuisibles,et(2)cetappareildoitacceptertoute
10~35
Plagedemesuredel'humidité
Précisiondelamesuredelatempérature
opération.
Conditionsdefonctionnement
Principauxindicestechniques
4
Machine Translated by Google
5.Témoinlumineuxderetournementdesœufs
7.Cléderéglage
4.Indicateurd'humidification
8.Touche«+»
3.Indicateurdechauffage
6.Voyantd'alarme
2.Écrand'affichagedel'humidité
1.Écrand'affichagedelatempérature
9.Touche«»
10.Clépourmirelesœufs
12.Observezlazonedesœufs
13.InterfaceDC12V
11.Descriptiondesparamètres
5
Présentationdel'écrand'affichage
Paramètresdel'écran
Machine Translated by Google

iln'estpasconseillédeprocéderàunréglagedansdescirconstancesnormales.
Veuillezutilisercettefonctionavecprudence,
6
leréglageestréussietentrezautomatiquementdansleréglageduparamètred'humidité;Àcemoment,
l'affichagedel'humiditéclignote,cliquezsur«+»ouLavaleurclignotante«»
paramètresetsaisirautomatiquementlavaleurlimitesupérieuredechauffage«P2»
réglage.Àcemoment,l'écranafficheratousles«8»pourindiquerqueleparamètre
Aprèsleréglage,appuyezsurlatouche«Réglage»pourenregistrerl'alarmehautetempérature
Dansdesconditionsdetravailnormales,appuyezsurlatouche«Réglage»(environ5secondes)pour
Méthodederéglagedelatempérature:Dansdesconditionsdetravailnormales,appuyezsurle
augmentezoudiminuezenconséquencejusqu'àatteindrelavaleurd'humiditédontvousavezbesoin.
cettefois,tousles«8»s'affichentsurl'écran,indiquantqueleréglagedesparamètresestterminé.
saisirlesparamètresliésàlatempératureetàl'humidité,lecyclederetournementdesœufs,l'œuf
Unefoisleréglageterminé,appuyezsurlebouton«Set»pourenregistrerl'humidité.
réglage.Lasignificationetlecodedetouslesparamètressontindiquésdansletableausuivant:
Àcemoment,l'affichagedelatempératureclignote.Appuyezsur«+»ou«»pourréglerla
Remarque:Appuyezlonguementsur«+»ou«»pouraugmenteroudiminuerrapidementlavaleur;
"P1"etaffichagedelatempératureclignotant.Cliquezsurlavaleurclignotante"+"ou""pour
Bouton«Réglage»pouraccéderauréglagedelatempérature.
réussi.
réglagedutempsderetournementetdesjoursd'incubation.L'affichagedel'humiditéindiquelecode
Unefoisleréglageterminé,appuyezsurlebouton«Set»pourenregistrerlatempérature
paramètredevaleur.
température.
augmentezoudiminuezenconséquencejusqu'àcequevousayezbesoindel'alarmedetempératureélevéeP1
paramètresliésàl'humidité,cyclederetournementdesœufs,œufs
tempsderetournementetjoursd'incubation
2Méthodesderéglagedelatempératureet
1Méthodederéglagedelatempératureetdel'humidité
Machine Translated by Google

7
Humidité
donnéespardéfaut
Mesurerl'humiditépouratteindre
F3
1
F2
Remarque:lecapteurdeconfigurationdelamachineestplusprécisqueceluidumarché
l'alarmedevaleur
atteindrelavaleurd'alarmevaleurd'alarme
valeurd'alarme
Ajustementaprèscomparaison
36,5
toutesles90minutes
avecunhygromètrestandard
F1
P2
étalonnage
Humiditéélevée
Paramètre
Opérationdetournage
Duréetotaled'incubation
Mesurerlatempératureà
Letempsderetournementdel'œuf
F5
38,8
Descriptiondesparamètres
l'alarmedevaleur
Température
thermomètreordinaire,etengénéral,aucunécartneseproduit.Veuillezvousassurerque
Unefoistouslesparamètresassociésdéfinis,appuyezsurlebouton«Température».
Bassetempérature
0%HR
Cyclederotationdesœufs90minutes
avecthermomètrestandard
30%HR
valeurd'alarme
temps
signification
Paramètre
atteindrelavaleurd'alarme
moteurtournant
Journéesd'incubation
H2
P1
étalonnage
l'écartdoiteneffetêtreajusté.Mêmesil'ajustementnedoitpasêtre
Usine
85%HR
200secondes
touchederéglage"boutonpourquitter.
Mesurerlatempératureà
Mesurerl'humiditépouratteindre
F4
Faiblehumidité
Hautetempérature
00
ajustétropgrand,sinoncelapeutavoirunimpactsurl'éclosion.
code
H1
valeurd'alarme
Tournezlemoteuràœufsunefois
Ajustementaprèscomparaison
Machine Translated by Google
Danscertainscas,l'alarmed'humiditén'estpassignificative.Silatempératureestalarmante,veuillezentrouver
laraisonàtemps.
50200ml.
Àcestade,vouspouvezcliquersurlatouche«»pourarrêterlesondel'alarme.Dansdesconditionsnormales
Bouteillepouraugmenterl'humidité,etl'eauretenueaufondestmaintenueà
œufs3foisparjouravecunebusedepulvérisationpouraugmenterl'humidité.
Bouton«Restaurerlesparamètresd'usine»pourrestaurerrapidementlesparamètresd'usine.
Dansunétatd'affichagenormal,appuyersurlebouton«+»peutpermettrederéaliserunœufmanuel.
Pendantles3derniersjours(1921jours)avantl'éclosion,vaporisezdel'eausurlasurfacedel'œuf.
Restaurezlesparamètresd'usinedansl'étatdefonctionnementnormalenmaintenantlatouche«+»
«»enfoncéependantenviron8secondesjusqu'àcequetoutl'écranaffiche«8»etentendezlebuzzer
«tomber»etlâcherprise.Lamachinedoitrestaurerlavaleurpardéfautd'usine.Oufusionnezle
Trousd'injectiond'eau*2
tournant.
humiditéanormale,l'instrumentémettraunsond'alarme«goutte,goutte,goutte»...
Injectezquotidiennementunpeud'eaudanslefonddel'incubateuràl'aided'unebuseàaiguille
Dansdesconditionsd'affichagenormales,lorsquel'instrumentdétecteunetempératureou
Bouteilleàaiguille
5Restaurerlesparamètresd'usine:
6Augmenterl'humidité:
4Sondel'alarmedésactivé:
3Opérationderetournementmanueldesœufs:
8
Machine Translated by Google

appareilsélectriquesetélectroniques.
Ceproduitestsoumisauxdispositionsdeladirectiveeuropéenne2012/19/CE.Le
symbolereprésentantunepoubelleàroulettesbarréeindiquequeleproduitdoitfaire
l'objetd'unecollectesélectivedesdéchetsdansl'Unioneuropéenne.Celas'applique
auproduitetàtouslesaccessoiresmarquésdecesymbole.Lesproduitsmarqués
commetelsnepeuventpasêtrejetésaveclesdéchetsménagersnormaux,maisdoiventêtredéposés
dansunpointdecollectepourêtrerecyclés.
Éliminationcorrecte
9
Machine Translated by Google


BENUTZERHANDBUCH
INKUBATOR
Technischer Support und E-Garantie-Zertifikat
www.vevor.com/support
„Sparen Sie die Hälfte“, „Halber Preis“ oder andere ähnliche Ausdrücke, die wir verwenden, stellen nur eine
Schätzung der Ersparnis dar, die Sie beim Kauf bestimmter Werkzeuge bei uns im Vergleich zu den großen
Topmarken erzielen können, und bedeuten nicht notwendigerweise, dass sie alle von uns angebotenen
Werkzeugkategorien abdecken. Wir möchten Sie freundlich daran erinnern, bei Ihrer Bestellung bei uns
sorgfältig zu prüfen, ob Sie im Vergleich zu den großen Topmarken tatsächlich die Hälfte sparen.
Wir sind weiterhin bestrebt, Ihnen Werkzeuge zu wettbewerbsfähigen Preisen anzubieten.
Machine Translated by Google

Machine Translated by Google
Brauchen Sie Hilfe? Kontaktieren Sie uns!
- 1 -
Dies ist die Originalanleitung. Bitte lesen Sie alle Anweisungen sorgfältig durch, bevor Sie
das Gerät in Betrieb nehmen. VEVOR behält sich eine klare Auslegung unserer Bedienungsanleitung
vor. Das Erscheinungsbild des Produkts richtet sich nach dem Produkt, das Sie erhalten
haben. Bitte verzeihen Sie uns, dass wir Sie nicht erneut informieren, wenn es Technologie- oder
Software-Updates für unser Produkt gibt.
NLF64-5280/NLF64-5281
Sie haben Fragen zu unseren Produkten? Sie benötigen technischen Support? Dann kontaktieren
Sie uns gerne:
INKUBATOR
Technischer Support und E-Garantie-Zertifikat
www.vevor.com/support
Machine Translated by Google

BEWAHREN SIE DIESE ANWEISUNGEN AUF
Sprühreiniger. Zum Reinigen ein feuchtes Tuch verwenden.
Die Nichtbeachtung der unten aufgeführten Anweisungen kann zu Stromschlag, Brand und/oder schweren Verletzungen führen.
mit eingeschränkten physischen, sensorischen oder geistigen Fähigkeiten oder mangelnder Erfahrung und
4. Um das Risiko eines Stromschlags zu verringern, zerlegen Sie dieses Produkt nicht. Bringen Sie es zu
nur unter Aufsicht oder Einweisung in die Benutzung des Geräts.
8. Reinigung und Benutzerwartung dürfen nicht von Kindern ohne
qualifiziertes Servicepersonal, wenn Wartungs- oder Reparaturarbeiten erforderlich sind. Öffnen oder
Sie sollten das Gerät sicher bedienen und sich über die damit verbundenen Gefahren im Klaren sein.
Flüssigkeiten.
es könnte sein, dass es nicht mehr richtig funktioniert.
3. Ziehen Sie vor dem Reinigen den Netzstecker aus der Steckdose. Verwenden Sie keine Flüssigkeiten oder
6. Dieses Gerät kann von Kindern ab 8 Jahren und Personen verwendet werden,
1. Dieses Produkt wird über einen Adapter an die Stromversorgung angeschlossen.
gebraucht.
Aufsicht.
2. Verwenden Sie dieses Produkt nicht in Bereichen, in denen es Wasser oder anderen
5. Betreiben Sie das Gerät nicht in Bereichen mit hohen Temperaturen oder hoher Luftfeuchtigkeit, da
9. Nur für den Innenbereich.
und Spezifikationen, die mit diesem Elektrogerät geliefert werden. Die Nichtbeachtung aller
Das Entfernen von Adapterabdeckungen - wie z. B. der hinteren Abdeckplatte - kann zu gefährlichen
7. Kinder dürfen nicht mit dem Gerät spielen.
Spannungen oder andere Risiken. Wenn die Abdeckung beschädigt ist, kann der Adapter nicht mehr
WARNUNG: Lesen Sie alle Sicherheitswarnungen, Anweisungen, Abbildungen
WICHTIGE SICHERHEITSHINWEISE
- 2 -
Machine Translated by Google

- 3 -
TEILELISTE
Machine Translated by Google

Empfangene Störungen, einschließlich Störungen, die unerwünschte
0,1 ÿ
FCC-Erklärung: Dieses Gerät entspricht Teil 15 der FCC-Regeln.
± 4 % relative Luftfeuchtigkeit
Relative Luftfeuchtigkeit
Weniger als 85 % relative Luftfeuchtigkeit
Temperaturmessbereich
Für den Betrieb gelten die beiden folgenden Bedingungen: (1) Dieses Gerät darf
0-99 % relative Luftfeuchtigkeit
Betriebsspannung
Umgebungstemperatur
Wechselstrom 105 V – 235 V, 50 Hz
Genauigkeit der Feuchtigkeitsregelung
Temperaturmessgenauigkeit
Betrieb.
Feuchtemessbereich
keine schädlichen Störungen verursachen, und (2) dieses Gerät muss alle
0 ~ 50,0 ÿ
-10 ÿ ~ 35 ÿ
Betriebsbedingungen
Wichtigste technische Indizes
- 4 -
Machine Translated by Google

6. Alarmlicht
7. Einstellschlüssel
5. Kontrollleuchte für Eierwende
11. Parameterbeschreibung
3. Heizanzeige
4. Befeuchtungsanzeige
2. Feuchtigkeitsanzeige
1. Temperaturanzeige
10. Eierleuchter-Schlüssel
12. Beobachten Sie den Eierbereich
9. Taste „-“
13. DC12V-Schnittstelle
8. „+“-Taste
- 5 -
Einführung des Anzeigebildschirms
Bildschirmeinstellungen
Machine Translated by Google

- Zu diesem Zeitpunkt blinkt die Temperaturanzeige. Drücken Sie "+" oder "-" kann die
Erhöhen oder verringern Sie den Wert entsprechend, bis Sie den gewünschten Feuchtigkeitswert erreicht haben.
- Nach Abschluss der Einstellung drücken Sie die Taste „Set“, um die Luftfeuchtigkeit zu speichern.
Hinweis: Drücken Sie lange „+“ oder „-“, um den Wert schnell zu erhöhen oder zu verringern.
Einstellung. Die Bedeutung und der Code aller Parameter sind in der folgenden Tabelle aufgeführt:
- Unter normalen Betriebsbedingungen die Taste „Setting“ (ca. 5 Sekunden) drücken, um
- Temperatureinstellungsmethode: Unter normalen Arbeitsbedingungen drücken Sie die
dieses mal, alle "8" ist auf dem bildschirm angezeigt, was darauf hinweist, dass die parameter einstellung ist
Einstellung. Zu diesem Zeitpunkt wird auf dem Bildschirm nur „8“ angezeigt, um anzuzeigen, dass der Parameter
Geben Sie die Temperatur- und Feuchtigkeitsparameter, den Eierwendezyklus, die Eiertemperatur,
- Nach der Einstellung drücken Sie die Taste "Setting", um den Hochtemperaturalarm zu speichern
Einstellung ist erfolgreich und automatisch geben Sie die Feuchtigkeit Parameter-Einstellung; - Zu diesem
Zeitpunkt blinkt die Feuchtigkeitsanzeige, klicken Sie auf "+" oder Der "-" blinkende Wert wird
Parametereinstellungen und geben automatisch den oberen Grenzwert für die Heizung „P2“ ein.
Temperatur.
erhöhen oder verringern Sie entsprechend, bis Sie den P1 Hochtemperaturalarm benötigen
Nachdem die Einstellung abgeschlossen ist, drücken Sie die Taste „Set“, um die Temperatur zu speichern
Wertparameter.
erfolgreich.
Mit der Taste „Setting“ gelangen Sie zur Temperatureinstellung.
Wendezeit und Inkubationstage einstellen. Die Feuchtigkeitsanzeige zeigt den Code
"P1" und Temperaturanzeige blinken. Klicken Sie auf den blinkenden Wert "+" oder "-", um
- 6 -
Es wird nicht empfohlen, unter normalen Umständen eine Anpassung vorzunehmen.
Bitte verwenden Sie diese Funktion mit Vorsicht,
2- Einstellmethoden für Temperatur und
Wendezeit und Inkubationstage
Feuchtigkeitsabhängige Parameter, Eierwendezyklus, Eier
1- Einstellmethode für Temperatur und Luftfeuchtigkeit
Machine Translated by Google

- 7 -
Die Wendezeit des Eies
Messen Sie die Temperatur, um
F5
38.8ÿ
gewöhnliches Thermometer, und im Allgemeinen tritt keine Abweichung auf. Bitte stellen Sie sicher, dass
Parameterbeschreibung
der Wertalarm
Temperatur
Platz 2
Formel 1
Kalibrierung
Parameter
Hohe Luftfeuchtigkeit
Gesamte Inkubationszeit
Drehbearbeitung
Alarmwert
Anpassung nach Vergleich
Alarmwert
alle 90 Minuten
36.5ÿ
mit einem handelsüblichen Hygrometer
Luftfeuchtigkeit
Messen Sie die Luftfeuchtigkeit, um
F3
Standarddaten
1
F2
Hinweis: Der Maschinenkonfigurationssensor ist genauer als die marktüblichen
erreichen den Wert Alarm
der Wertalarm
Niedrige Luftfeuchtigkeit
0,0ÿ
Hohe Temperatur
zu groß eingestellt werden, da es sonst zu Auswirkungen auf die Schraffur kommen kann.
Code
H1
Anpassung nach Vergleich
Alarmwert
Drehen Sie den Eiermotor einmal
85 % relative Luftfeuchtigkeit
200 Sekunden
Fabrik
Zum Beenden die Taste „Einstellungsschlüssel“ drücken.
Messen Sie die Temperatur, um
Messen Sie die Luftfeuchtigkeit, um
F4
Parameter
Drehmotor
Inkubationstage
erreichen den Wert Alarm
H2
Platz 1
Kalibrierung
die Abweichung tatsächlich angepasst werden soll. Auch wenn die Anpassung nicht
Nachdem alle zugehörigen Parameter eingestellt wurden, drücken Sie die Taste " Temperatur
0 % relative Luftfeuchtigkeit
Niedrige Temperatur
Eierrotationszyklus 90 Minuten
mit Standardthermometer
30 % relative Luftfeuchtigkeit
Bedeutung
Alarmwert
Zeit
Machine Translated by Google

- 8 -
5- Werkseinstellungen wiederherstellen:
4- Alarmton aus:
3- Manueller Eierwendevorgang:
6- Luftfeuchtigkeit erhöhen:
Wassereinspritzlöcher * 2
Sprühen Sie in den letzten 3 Tagen (19-21 Tage) vor dem Schlüpfen Wasser auf die Oberfläche der
Stellen Sie die Werkseinstellungen im normalen Betriebszustand wieder her, indem Sie die Taste „+“ - „Taste“
etwa 8 Sekunden lang gedrückt halten, bis auf dem gesamten Bildschirm „8“ angezeigt wird und Sie den
Summer „fallen“ hören und loslassen. Die Maschine soll die Werkseinstellungen wiederherstellen. Oder führen Sie die
Eier 3 mal täglich mit einer Sprühdüse besprühen um die Luftfeuchtigkeit zu erhöhen.
Schaltfläche „Werkseinstellungen wiederherstellen“, um die Werkseinstellungen schnell wiederherzustellen.
Unter normalen Anzeigebedingungen kann durch Drücken der Taste „+“ eine manuelle Ei-
Zu diesem Zeitpunkt können Sie auf die Taste „-“ klicken, um den Alarmton auszuschalten. Unter normalen
Flasche , um die Luftfeuchtigkeit zu erhöhen, und das Wasser am Boden gehalten wird bei
50-200 ml.
Unter diesen Umständen ist der Feuchtigkeitsalarm nicht signifikant. Wenn die Temperatur alarmierend ist, finden Sie
bitte rechtzeitig den Grund.
Unter normalen Anzeigebedingungen, wenn das Gerät Temperatur erkennt oder
Nadeldüsenflasche
Wenn die Luftfeuchtigkeit ungewöhnlich hoch ist, gibt das Gerät einen „Tropfen, Tropfen, Tropfen“...-Alarmton aus.
Spritzen Sie täglich etwas Wasser mit einer Nadeldüse in den Boden des Inkubators
Drehen.
Machine Translated by Google

- 9 -
Richtige Entsorgung
Dieses Produkt unterliegt den Bestimmungen der europäischen Richtlinie
2012/19/EU. Das Symbol einer durchgestrichenen Mülltonne weist darauf hin,
dass das Produkt in der Europäischen Union einer getrennten Müllentsorgung
unterliegt. Dies gilt für das Produkt und alle mit diesem Symbol gekennzeichneten
Zubehörteile. So gekennzeichnete Produkte dürfen nicht im normalen Hausmüll entsorgt
werden, sondern müssen zur Wiederverwertung an einer Sammelstelle abgegeben werden.
elektrische und elektronische Geräte.
Machine Translated by Google