

Technical Support and E-Warranty Certificate www.vevor.com/support
AUGER
USER MANUAL
We continue to be committed to provide you tools with competitive price.
"Save Half", "Half Price" or any other similar expressions used by us only represents an
estimate of savings you might benefit from buying certain tools with us compared to the major
top brands and doses not necessarily mean to cover all categories of tools offered by us. You
are kindly reminded to verify carefully when you are placing an order with us if you are
actually saving half in comparison with the top major brands.

1
D43-F
Have product questions? Need technical support? Please feel free to
contact us:
CustomerService@vevor.com
NEED HELP? CONTACT US!
This is the original instruction, please read all manual instructions
carefully before operating. VEVOR reserves a clear interpretation of our
user manual. The appearance of the product shall be subject to the
product you received. Please forgive us that we won't inform you again if
there are any technology or software updates on our product.
AUGER


3
1. SAFETY INSTRUCTIONS
THIS MACHINE MAY CAUSE SERIOUS INJURIES. Read the instructions carefully for
handling, preparing, maintaining, starting and stopping the machine. Learn more
about all the controls and proper use of the machine.
-
WARNING! When using this type of tool, basic precautions should
always be followed to reduce the risk of fire, electric shock and injury.
-
Read all instructions carefully before attempting to use this product and
retain these instructions. Be familiar with all the operations described in
these operating instructions. This product must be operated and
operated by experienced users.
-
If you are giving this machine to others, please also provide them with
this instructions manual.
-
Also read all markings on the product. The symbols on the tools are explained
in the manual.
-
Use this machine as described in this instruction manual. It is strictly
forbidden to use this tool for applications other than those described in
this manual.
-
Failure to follow these instructions can result in serious injuries and, in some
cases, death.
-
This product is intended for private domestic use only. Do not use it for
commercial purposes.
-
Never let people unfamiliar with these instructions or children use this
product.
-
National regulations may limit the use of the machine.
-
People under the age of 18 must not use this product
-
Keep in mind that the operator or user is responsible for accidents or
risks to other persons or their property.
-
Do not use the tool if you are drunk, tired, under the influence of drugs or
ill. Do not use the tool if you are not in an adequate physical condition.
-
This tool is intended for outdoor use. Never use it indoors.
-
Never allow children to use the machine;
-
Avoid running it while people, especially children, are around;
-
Dress properly! Do not wear loose fitting-clothing or jewelry that can be
caught in moving parts. Using resistant gloves, non-slip shoes and

4
safety glasses is recommended;
-
Stop the engine or disconnect it before:
o
cleaning or clearing a blockage;
o
checking, maintaining, or working on the machine;
o
when adjusting the working position of the cutting device.
-
Handle fuel with care; it's highly flammable. Never add fuel to a machine
with a running engine or when it's hot. Do not inhale fuel fumes as they
are toxic;
-
Do not attempt to repair the machine unless you are qualified to do so;
-
Do not use the machine with a damaged or excessively worn cutting device;
-
To reduce the risk of fire, keep the engine and muffler free from debris,
leaves or excessive lubricant;
-
Always make sure that all handles and guards are installed when
operating the machine. Never attempt to use an incomplete machine or a
machine equipped with an unauthorized modification
-
When transporting or storing the machine, always install the cutting
device protection if provided;
-
Always be aware of your environment and pay attention to possible
dangers that cannot be heard due to the noise of the machine.
-
Keep people and animals away from the work area. Children and people
who do not know how to use this tool should not touch it and handle it.
-
Use the product only under daylight or under good artificial light.
-
When using the machine, always wear full protective equipment
including a helmet, protective mask, ear protection, gloves, non-slip
footwear and protective clothing.
-
Wear appropriate clothing. Do not wear loose or unbuttoned shirts. Do
not wear jewelry that may come in contact with moving parts. If you have
long hair, tie them down and wear an appropriate safety helmet.
-
Do not operate the product with damaged guards or shields not in place.
-
Keep hands and feet away from the unit at all times, especially when
turning the tool off and on.

5
-
Do not use the tool in an area where ventilation is poor. Gas emissions can
causeinjury.
-
Do not work when it rains and in bad weather. Do not use the tool in damp
locations.
-
Do not use the tool in the presence of flammable liquids or gases.
-
Caution: The machine releases gases when it is used. Avoid coming into
contact with these gases.
-
Keep the work area clear. Before working, inspect the work area and
remove any materials or objects that could cause accidents.
-
Do not force the tool.
-
Keep the tool and drill clean for better and safer performance. Follow the
instructions in this manual to lubricate and change the accessories.
-
Always inspect the machine before and after operation. If the tool is
damaged or faulty, stop using the tool and bring it to an authorized
service for inspection and repair.
-
Turn off the tool after use, when you leave it unattended, when changing
these accessories and before servicing.
-
Keep handles dry, clean and free from oil and grease.
-
Be concentrated when using the tool. Look at what you do, make sense
and do not use the tool when you are tired.
-
Place the equipment in a well-lit area on a flat, stable, dry and
well-ventilated surface, away from flammable materials and with plenty
of space for sparking and sharpeningwaste.
-
Do not allow anyone, especially children, to come within a radius of at
least five meters around the work area when all work is in progress.
-
Immediately stop the tool in the event of a malfunction of the motor or
the ON/OFF button or in case of unusual noise.
-
When not in use, the machine must be stored in a dry, locked place out
of the reach of children.
-
Before using the product and after any shock, please check it for signs of
wear or damage. Please carry out repairs if necessary.

6
-
Always switch off the machine:
o
every time you leave the device unattended;
o
before releasing an obstruction;
o
before checking, cleaning or working on the product;
o
after hitting a foreign object;
o
every time the product starts to vibrate abnormally.
-
Pay attention to foot and cutting injuries.
-
Inspect and regularly service the product. Repairs should be carried out
only by an authorized service center or a similar qualified specialist.
-
When not in use, store the product out of the reach of children.
-
Children should not play with plastic bags, sheets and small parts! Keep
them out of the reach of children. There is a danger of suffocation!
-
Always carry the tool while holding the handle, never the drill.
-
Do not use the product on a slippery surface.
-
Do not use the product on steep, slippery slopes.
-
If the machine has struck foreign objects, check if the tool is damaged
and bring it to repair if necessary.
-
Keep away all body parts from the running machine
-
Be careful when using the machine in stormy weather. Do not use the
machine during lightning, thunderstorms and bad weather in general.
Fuel Handling
Be very careful when handling fuels. They are flammable and the vapors are
explosive.
Use only an approved container.
Never remove the fuel cap or add fuel while the machine is on. Turn off
the unit and allow the engine and exhaust components to cool before
refueling.
Do not smoke.
Never refuel inside a room
Never store the tool and the fuel tray indoors where there is a naked
flame, such as near a water heater.
If fuel has spilled, do not attempt to start the machine, but rather move it

7
away from the spill before starting to use it. Clean any spills.
Replace and tighten the fuel tank cap after refueling.
Follow the instructions in this manual for filling the tool with fuel.
During maintenance and storage
Stop the tool and wait until it stops. Make sure all moving parts have come to
a standstill.
Allow the machine to cool before performing inspection, adjustments,
maintenance, servicing and storage.
Residual risks
Even if you use this product in accordance with all safety requirements, the
potential risks of injuries and damage remain. The following hazards might
happen within the structure and design of this product:
-
There are adverse health consequences due to the emission of
vibrations if the product is used over long periods of time or not
managed properly and maintained in a suitable way.
-
There are risks of injuries and property damage caused by the
attachments or broken attachments or sudden impact of hidden objects
when using the cutting function.
-
Risk of damage to persons and property caused by flying objects.
-
A prolonged use of this product exposes the operator to vibration and
may determine the so-called "white finger" disease. To reduce the risk,
please wear gloves and keep your hands warm.
-
If any of the symptoms of the "white finger" syndrome appear, consult a
doctor immediately. Symptoms of the "white finger" include: numbness,
loss of sensitivity, tickling, tingling, pain, loss of strength, color changes
or skin condition. These symptoms usually appear on fingers, hands or
wrists. The risk is higher at low temperatures.
-
Risk of hearing loss if the machine is used for long periods of time
without hearing protection.
8
Symbols
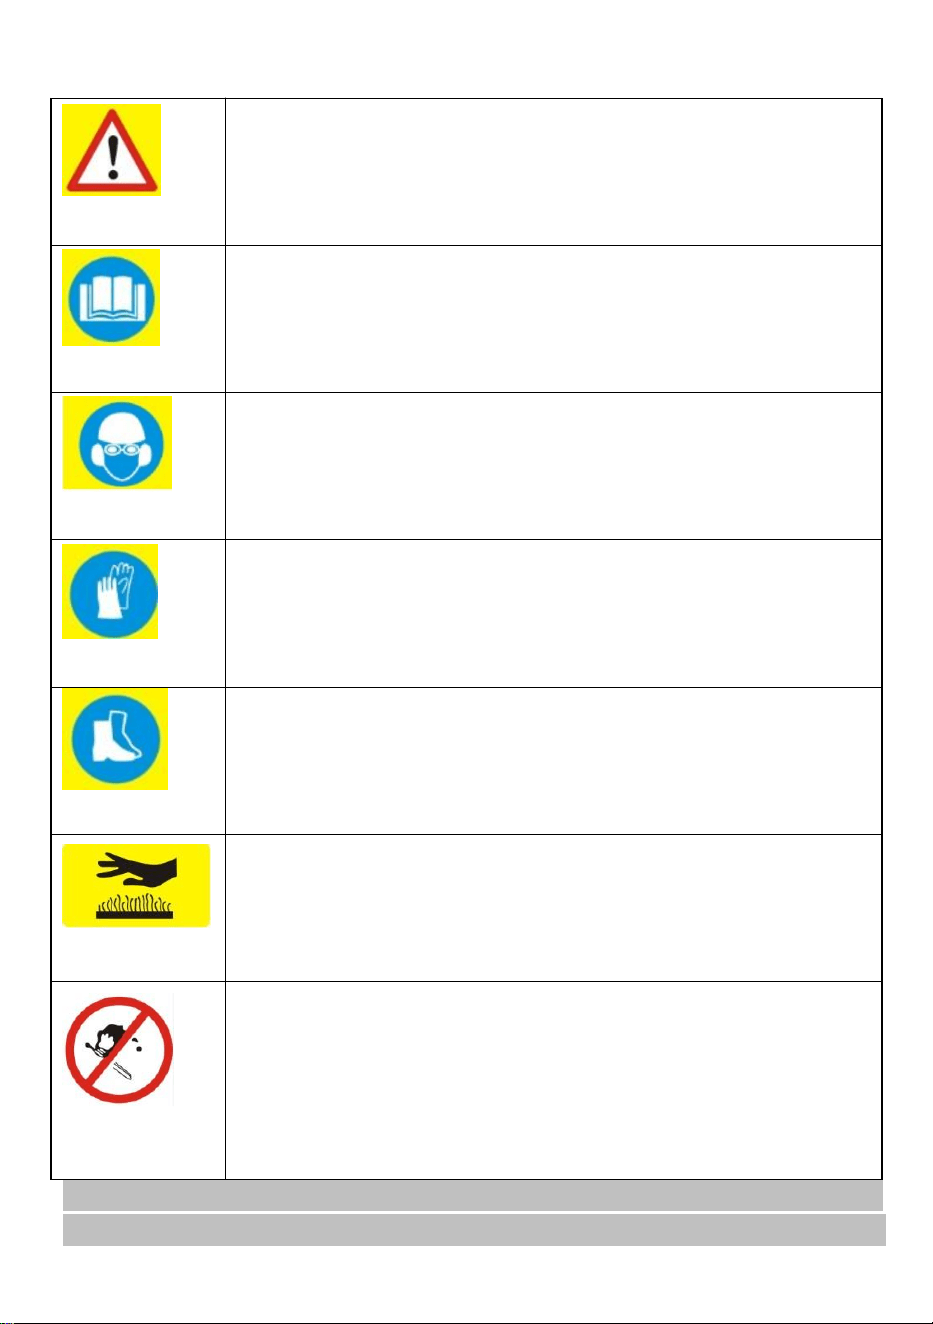
Warning symbol
Read the instruction manual
Wear protective equipment: protective helmet, safety glasses,
noise protection helmet
Wear protective gloves
Wear protective foot wear.
CAUTION : Hot surface
Don't smoke
EPA Certificate Issued To: ZheJiang TOPWE Tools Manufacturing CO.,
LTD. EPA Certificate No.:PZTTS.0434OC
9
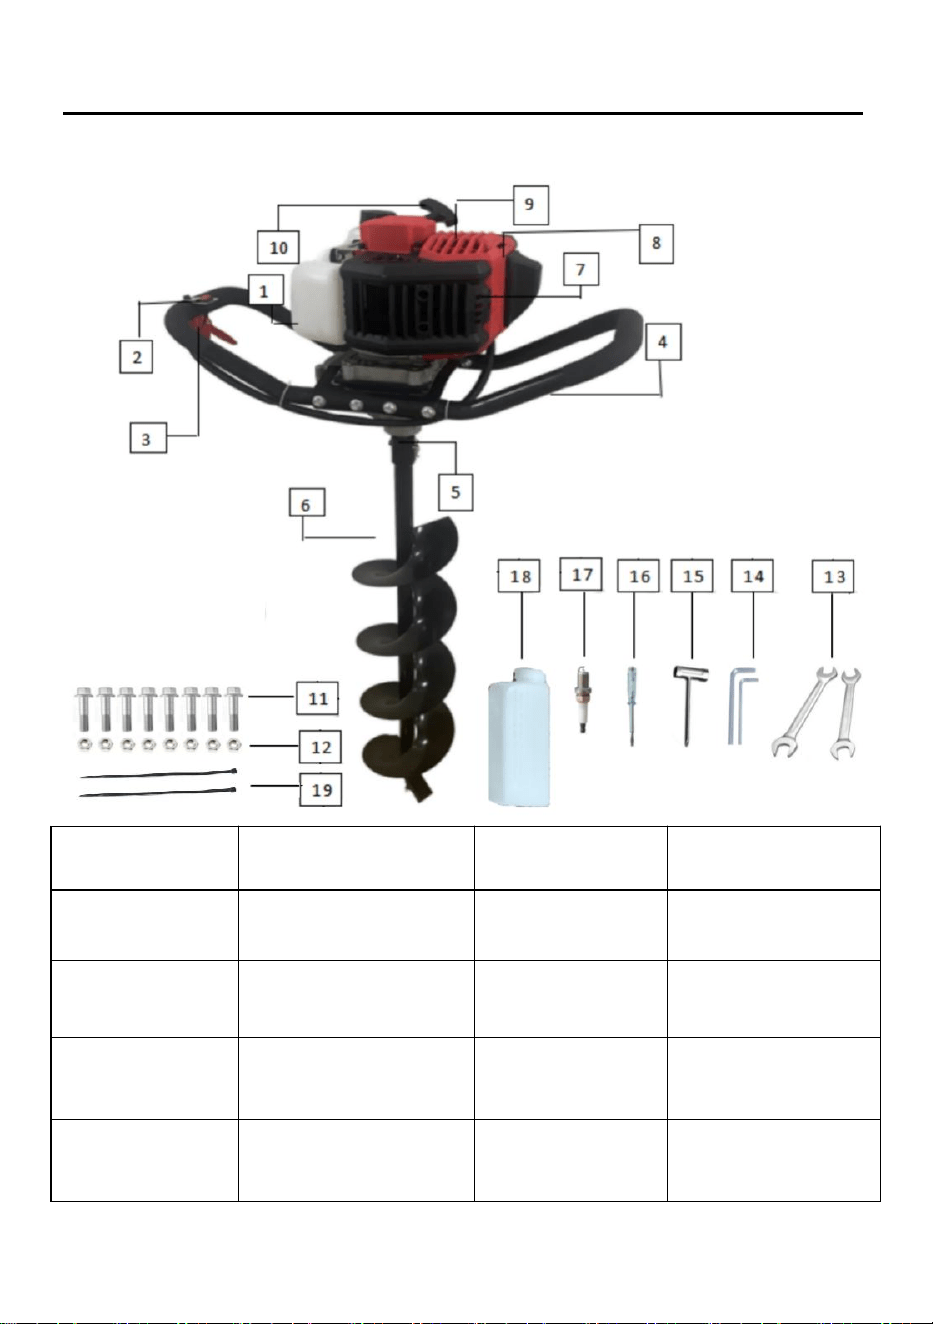
2. YOUR PRODUCT
a.Description
1 – Fuel
cap/tank
2 – ON/OFF
Switch
3 - Throttle
4 - Handle
5 – Gear box
6 – Auger/Drill
(200*800mm)
7 – Spark plug
8 – Air filter/
Carburetor
9 – Choke lever
10 – Recoil starter
handle
11 – Screws
(8pcs)
12 - Nuts (8pcs)
13 - Wrenches
(5/8 13/15)
14 - Allen wrench
15 - Socket
spanner
16 - Busca-polo
17 - Sparking
plug
18 - Oilcan
19 - Nylon ties
(2pcs)

10
b.Technical data
Model
D43-F
Engine capacity
43cm³
Maximum engine power
1.25kW 7500r/min
Maximum speed of the motor
9500r/min
Engaging speed
4200~4500r/min
Idle speed
3000r/min
Fuel tank volume
1.2L
Drilling specific diameter
200mm
Drilling speed at the maximum
speed of the machine
240r/min
Fuel consumption at maximum
engine power
≥700kg/h
Fuel oil ratio
25:1
Guaranteed sound power
111dB(A)
Sound pressure
Idling speed
68.4dB(A)
K=3dB(A)
In operation
93.8dB(A)
K=3dB(A)
Sound power
Idling speed
88.4 dB(A)
K= 3dB(A)
In operation
113.8 dB(A)
K= 3dB(A)
Vibration
Idling speed Main handle
5.948m/s²
Auxiliary handle
6.812ms² K=1.5m/s²
In operation Main handle
20.520ms² K=1.5m/s²

11
Auxiliary handle
20.984ms² K=1.5m/s²
Weight
11.9kg
3. FILLING THE FUEL TANK
WARNING: When filling the tank:
- The drill should always be stopped and cooled.
- Never smoke during refueling. It must not have flames or sparks near the fuel.
- Do not attempt to refuel when the engine is hot.
- If fuel has been spilled, immediately stop refueling and do not start the engine.
Clean up the spill and fill the machine in another location.
- Never fill the fuel tank to the flange; there is a risk of overflow.
- Do not refuel in a closed and unventilated area.
The fuel used for this tool is a mixture of unleaded gasoline and registered
engine lubricant.
When mixing gasoline with oil, use only gasoline that does not contain
ethanol or methanol. Unleaded gasoline is a quality gasoline type. This will
help to avoid damaging the fuel lines of the engine and other engine parts.
The recommended mixing ratio is 40:1 (make sure the mixing ratio is
correct before filling the product.
b) Mixing
- Prepare the mixture in a clean and empty container.
- Pour the oil into the container.
- Pour the fuel into the tank. Stir the mixture long enough (more than one
minute) to get a proper blending.
c) Filling the fuel tank
- Unscrew the fuel tank cap and remove it.
- Fill the tank slowly with the mixture. Do not exceed the maximum capacity
(fill to 80% of its capacity preferably).
- Replace the cap on the fuel tank and tighten it.
- Wipe any spillage around the unit if necessary.
12
Note: To avoid damage and accidents, DO NOT USE OTHER MIXTURES AND
OTHER TYPES OF OIL / PETROL
d) Storage of fuel
The fuel must be kept in a clean and safe container and always closed.
If you do not use the product for a long time, remove the fuel mixture and
add it to a container.
Do not leave the fuel for a long time in the product. The fuel may clog the
carburetor, and the engine will not operate properly.
e) Disposal of fuel
When the fuel is no longer used or worn, please dispose of it in an
authorized location. Check local laws regarding the disposal of fuel.
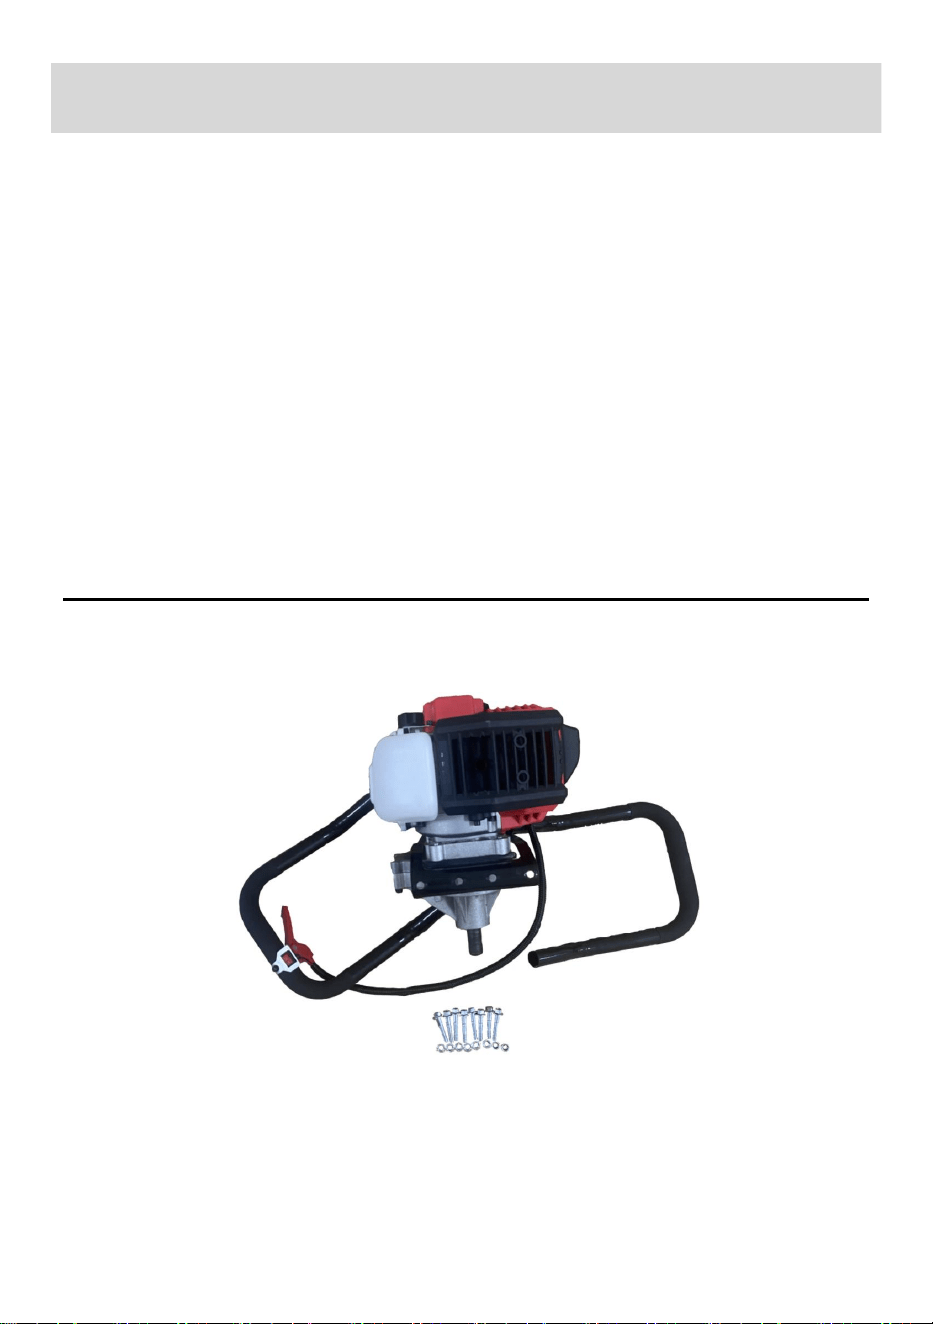
4. ASSEMBLY
a. The first step is to prepare 8 pairs of screws, nuts, 10# and 13# wrenches.
13
b. Insert both handles into the handle fixing seat.
c. Use the 13# helper to secure the nut and the 10# helper to turn the screws
clockwise.
d. Secure the wire and handle with 19# Nylon ties (2pcs)。
14
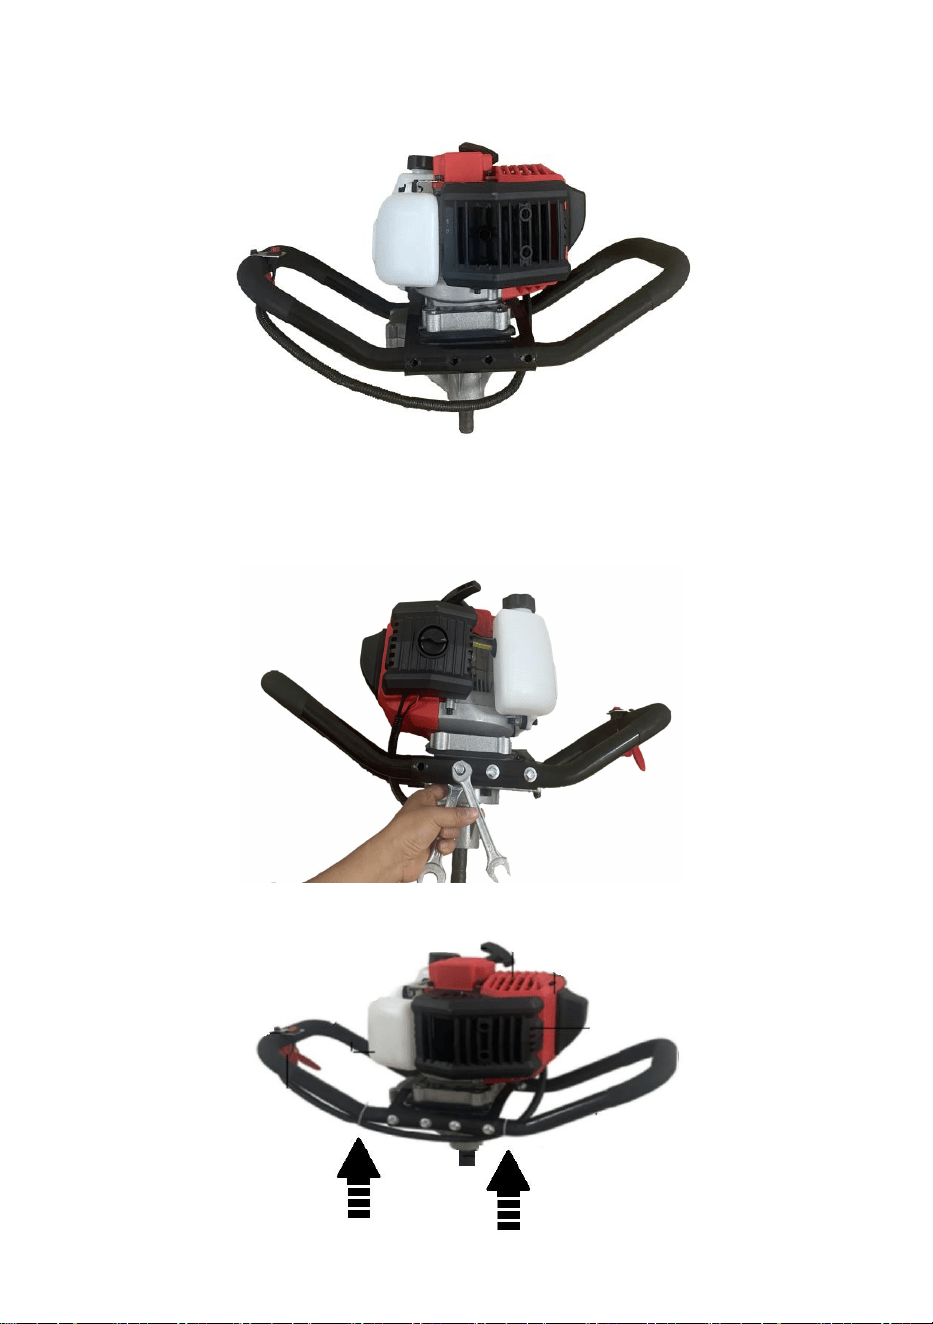
5. USE
a.
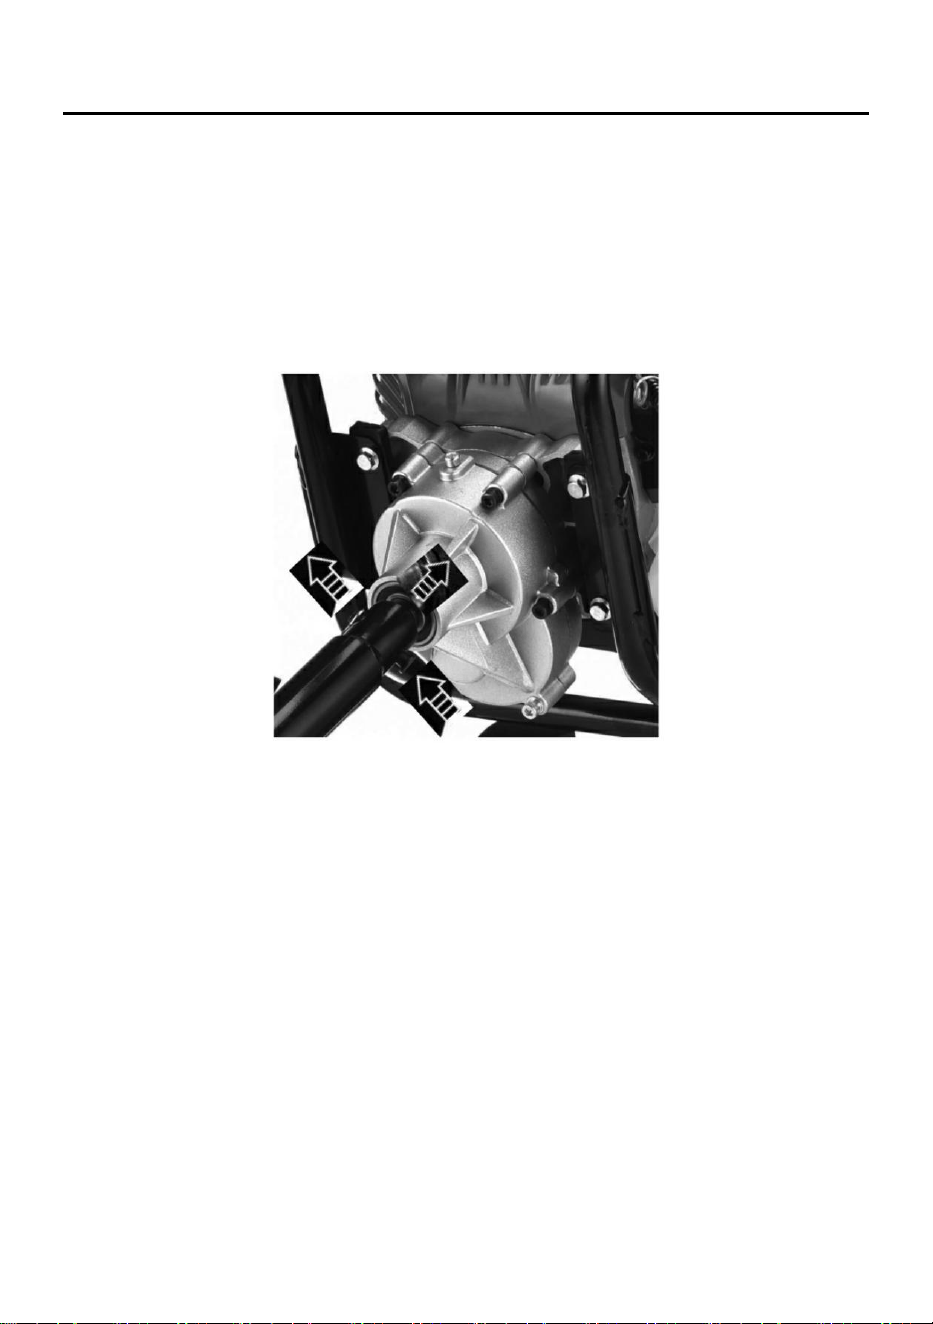
Drill rod assembly
-
Place the machine body on a flat and stable location
-
Remove the clip and pin on the drill rod
-
Install the rod and align the holes to be able to connect the two sets
-
Put the pin back in place by clipping
-
Release the clipping and remove the pin
b. Before use
-
Check the condition of the machine to ensure that there is no
damage or malfunction. In case of problems, do not use the
machine and inspect it.
-
Check that the drill rod is properly assembled.
-
Check the fuel volume. Always refuel before operating the
machine. Never use the machine with little or no fuel.
-
Check the workspace; remove all obstacles, materials and objects
that could pose a danger and cause an accident.
-
Secure the workspace by placing markings to alert spectators of
existing potential risks.
c. Use
-
Hold the drill vertically. Place the rod against the ground.
-
Switch on the machine by turning the switch to ON.
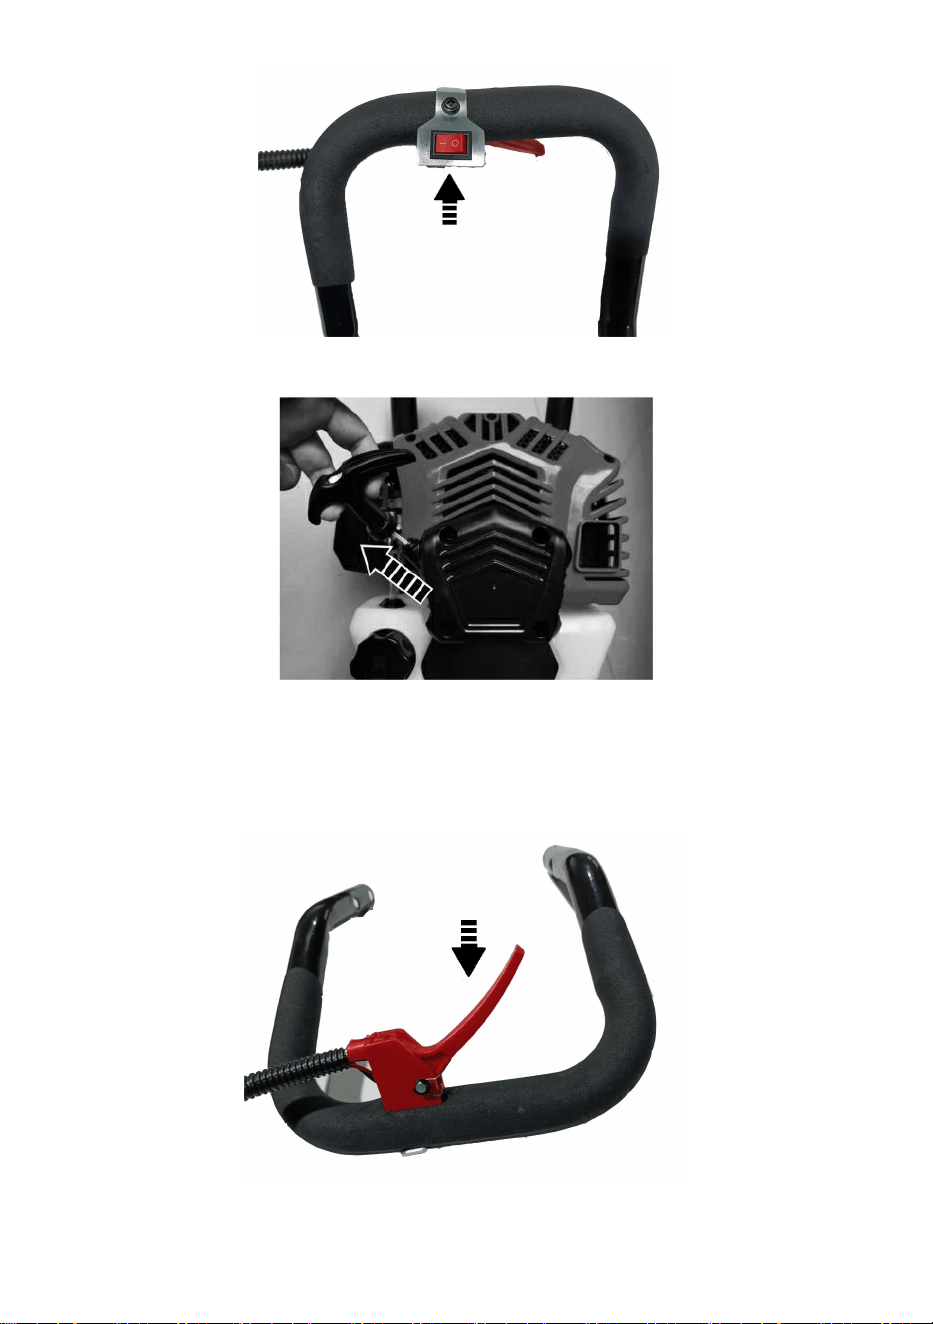
15
-
Pull the launcher cable to start the machine.
-
Hold the drill by grasping the holding handle and main handle
-
Gradually increase the speed by pressing and holding the safety
switch and then pulling the acceleration trigger. Exert some
downward force.
-
When the drill rod has penetrated 10 cm into the ground, grasp the
frame strongly and increase the effort downwards.

16
-
To drill a deep hole, lower the rod gradually.
-
When you have dug the required size, decrease the drilling speed.
-
Remove the rod, then stop the machine.
-
You can start drilling another hole.
-
To stop the machine, release the trigger and turn the switch to OFF.
Let the machine stop completely before placing it on the ground.
d. Precautions during the operation
-
Spectators (especially children and animals) should remain at
least 5 meters away from the workspace. Stop anyone from
entering the workspace during the operation.
-
When a person comes close, stop the machine to avoid possible
injury.
-
Pay attention to your work and the environment where you work.
Stop theoperation immediately when something unexpected
happens.
-
Avoid working on slopes. If you absolutely have to work on a slope,
pay double attention to avoid accidents and injuries.
-
Stop the machine when you take a break, change the workplace
and leave the machine unattended.
-
Never touch the drill rod while operating the machine. Any
intervention on the machine should be done with the machine
switched off and cooled.
-
During the operation, move all parts of the body away from the rod.
-
Wait until the machine has stopped completely before placing it on the
ground.
e. Jamming and breakdowns
-
When the drill gets stuck, release the accelerator to slow
down the machine. You have to release the accelerator
and turn it back to idle to loosen it.
-
In case of failure, stop the machine completely. Check the machine
and have it inspected and repaired by a qualified service technician.

17
6. MAINTENANCE AND STORAGE
A.Maintenance
Service your tool regularly. This shall keep your tool in good working
condition and extend its service life.
Do not use abrasive and corrosive agents to clean the tool. These types of
products damage your tool.
Do not repair it yourself. Repairs and inspections should be performed by a
qualified person or an authorized service center (please contact your
dealer).
a.After each use
Check the rod and tool body (cleanliness, wear, damage, etc.). If you
notice damage, wear or malfunction, do not use the tool and submit it to a
qualified service for inspection and repair.
b.Maintenance schedule
The maintenance work described below may be performed by the operator.
You can also request a qualified technician to perform this maintenance
work.
After
each
use
1st
month
or 20
hours
Every
season
or 50
hours
6
months
or 100
hours
12
month
s
or 300
hours
Engine
oil
Checking
the oil
level
√
Change
√
√
Air
filter
Checking
√
Cleaning
change
√
Spark
plug
Cleaning or
readjusting
√
Change
√

18
B.
Storage
-
Cleaning the machine
-
Store the machine in a dry and safe place. It should be out of the
reach of children. Place the machine in its packaging to avoid
contact with the drill rod.
-
When storing for long periods of time, empty the fuel tank completely.