B5H-0358-03 (K)© 2020 JVCKENWOOD Corporation
DDX5707S
DDX57S
MONITOR WITH DVD RECEIVER
Quick Start Guide
MONITEUR AVEC RÉCEPTEUR DVD
Guide de démarrage rapide
MONITOR CON RECEPTOR DVD
Guía de inicio rápido
• Updated information (the latest Instruction Manual, system updates, new
functions, etc.) is available from
• Les informations les plus récentes (dernier mode d'emploi, mises à jour du
système, nouvelles fonctions, etc.) sont disponibles sur
• Encontrará la información actualizada (el Manual de instrucciones más
reciente, las actualizaciones del sistema, las nuevas funciones, etc.) en
<https://www.kenwood.com/cs/ce/>
Take the time to read through this instruction manual.
Familiarity with installation and operation procedures will help you obtain the best performance from your new
receiver.
For your records
Record the serial number, found on the back of the unit, in the spaces designated on the warranty card, and in the space
provided below. Refer to the model and serial numbers whenever you call upon your KENWOOD dealer for information or
service on the product.
Model DDX5707S / DDX57S Serial number
US Residence Only
Register Online
Register your KENWOOD product at www.kenwood.com/usa/
• To request a repair or get support information, you need the
model number on the included model name card.
• Pour demander une réparation ou obtenir des informations de
support, vous avez besoin du numéro de modèle, qui gure sur
la carte du nom du modèle incluse.
• Para solicitar una reparación u obtener información de ayuda,
necesitará el número de modelo incluido en la tarjeta del
nombre del modelo.
Model number
Numéro de modèle
Número de modelo
!B5H-0358-03_QSG_DDX_K_EnFrEs.indb 1 2020/06/03 13:14

2
Important Notice on Software
Ñ Software License on This Product
The software embedded in this product comprises a
number of independent software components, each
of which is copyrighted by JVCKENWOOD Corporation
or by a third party.
This product uses software components that
are based on an End-User License Agreement
(hereinafter called “EULA”) stipulated by JVCKENWOOD
Corporation and by third parties.
The EULA dictates the availability of the source codes
of free-software components as a prerequisite to
distributing them in executable form under the
terms of the GNU General Public License or the Lesser
General Public License (hereinafter called “GPL/LGPL”).
To get information about the software components
that are subject to the terms of the GPL/LGPL, please
visit the following Website:
Website URL https://www2.jvckenwood.com/gpl/
Queries concerning the contents of the source code or
the like will not be accepted.
Please note that software components based on a
EULA that is not subject to the terms of the GPL/LGPL
or those that have been developed or created by
JVCKENWOOD Corporation will be excluded from the
scope of source code disclosure.
Because licenses to use software components
distributed under the GPL/LGPL are offered to the
customers for free of charge, no warranty is granted to
the customers, whether explicitly or implicitly, to the
extent of the applicable laws.
Unless otherwise stipulated by the applicable laws
or agreed upon in writing, the copyright holders or
those who are entitled to modify and redistribute the
software components are not held responsible for
any and all damages resulting from their use or from
inability to use them. For more information about the
terms of use of the software components, required
items of compliance and so on, please refer to the
GPL/LGPL.
Customers wishing themselves to use a software
component that is subject to the GPL/LGPL embedded
in this product are encouraged to read the terms of
the corresponding license before use. Because each
individual license is prescribed by a third party other
than JVCKENWOOD Corporation, the original (English)
of the license is presented.
EULA
Ñ Software License Agreement
JVCKENWOOD Corporation (hereinafter called
“Licensor”) holds either the copyright to the
embedded software or the right to sublicense it. This
agreement establishes the conditions under which the
customer uses this “Licensed Software.”
The customer shall agree to the terms of this license
agreement before proceeding to use Licensed
Software.
This agreement is deemed to have taken effect when
the customer (hereinafter called “User”) has used a
product implementation of Licensed Software.
The Licensed Software may contain software Licensor
has been licensed to use by third parties directly
or indirectly. Some third parties may have terms of
use prescribed for their customers, apart from this
Software License Agreement. This agreement does not
apply to such software. Be sure to consult “Important
Notice on Software” as presented separately.
Article 1 (General)
Licensor grants to User a non-exclusive, non-
assignable right of use Licensed Software within
the country where the User purchases the Product
(hereinafter the "Country") (except for the exception
provided for in Paragraph 1, Article 3).
Article 2 (Right of Use)
1. The rise of use granted under this agreement is the
right to use Licensed Software in this product.
2. User may not duplicate, copy, modify, add to,
translate or otherwise alter, or loan licensed Software
and the associated literature in whole or in part.
3. Use of Licensed Software is limited to a private
extent , and Licensed Software may not be
distributed, licensed or sublicensed for any purposes
whatsoever, including commercial use.
4. User shall use Licensed Software as per the
instruction manual or instructions given in the help
file and may not use or duplicate data in violations
of the regulations of the Copyright Law or other
governing laws by using Licensed Software in whole
or in part.
!B5H-0358-03_QSG_DDX_K_EnFrEs.indb 2 2020/06/03 13:14

3
Article 3 (Terms of License)
1. In assigning this product, User may not retain
the original copy of the embedded Licensed
Software (including associated literature, updates
and upgrades) and any duplicates and associated
literature with regard to the license to use Licensed
Software. User may transfer Licensed Software only
to the condition of binding the assignee to abide by
the terms of this Software License Agreement.
2. User may not reverse-engineer, disassemble,
decompile or otherwise analyze the source code of
Licensed Software.
Article 4 (Rights to Licensed Software)
All rights to Licensed Software and the associated
literature, including copyrights, shall reside with
Licensor or the original right holder who has granted
the Right of Use and right to sublicense to Licensor
(hereinafter referred to as “Original Right Holder”), and
User does not have any rights other than Right of Use
granted hereunder with regard to Licensed Software
and the associated literature.
Article 5 (Exemption Granted to Licensor)
1. Licensor and Original Right Holder do not assume
any responsibility for damages caused to User or
third parties resulting from the exercise by User of
the license granted hereunder, unless otherwise
provided by any law to the contrary.
2. Licensor does not warrant Licensed Software to
be merchantable, compatible and fit for specific
purposes.
Article 6 (Responsibility for Third Parties)
If disputes over the infringement of third parties’
intellectual property rights, such as copyrights and
patent rights, arise out of the use of Licensed Software
by User, User shall resolve these disputes at User’s
own expenses while keep Licensor and Original Right
Holder harmless.
Article 7 (Secrecy Obligation)
User shall keep confidential Licensed Software
provided hereunder, information contained in the
associated literature or the like and those provisions of
this agreement not yet in public knowledge and may
not disclose or leak these to third parties without prior
written consent from Licensor.
Article 8 (Cancellation of the Agreement)
Licensor reserves the right to cancel this agreement
forthwith and claim compensation from User for the
damages caused by such cancellation when User:
(1) Breaches any of the provisions of this agreement, or
(2) Has received a petition for seizure, provisional
seizure, provisional disposition or any other kind of
compulsory execution.
Article 9 (Destruction of Licensed Software)
If this agreement is terminated under the provision of
the foregoing paragraph, User shall destroy Licensed
Software, along with all associated literature and its
duplicates, within two (2) weeks from the date of
termination.
Article 10 (Copyright Protection)
1. Copyrights and all other intellectual property
rights relating to Licensed Software shall reside
with Licensor and Original Right Holder and in no
circumstances with User.
2. User shall abide by the laws relating to copyrights
and intellectual property rights in using Licensed
Software.
Article 11 (Export Control)
1. Licensed Software and the associated literature or
the like may not be exported to places outside the
Country (including transmission outside the Country
over the Internet or the like).
2. User agrees that Licensed Software is subject to
export controls imposed by the Country and the
United States of America.
3. User agrees to comply with all the international
and domestic laws that apply to this software (U.S.
Export Administration Regulations and regulations
established by the U.S., the Country and their
governmental agencies regarding usage by end
users and export destinations).
Article 12 (Miscellaneous)
1. Even if this agreement is invalidated in part by law,
all other provisions shall remain in effect.
2. Licensor and User shall consult each other in
good faith to resolve any matters not provided for
in this agreement or questions arising from the
interpretation of this agreement.
3. Licensor and User agree that this agreement is
governed by the law of Japan and that all disputes
involving claims and obligations that may arise out
of this agreement will be settled by arbitration at the
Tokyo District Court as the court of first instance.
!B5H-0358-03_QSG_DDX_K_EnFrEs.indb 3 2020/06/03 13:14

Before Use
4
Contents Before Use
About the Quick start guide
This Quick Start Guide describes basic functions
of this unit.
For detailed operations and information, refer
to the INSTRUCTION MANUAL on the following
website:
<https://www.kenwood.com/cs/ce/>
The Instruction manual is subject to change for
modification of specifications and so forth.
Be sure to download the latest edition of the
Instruction manual for reference.
How to read this manual
• The screens and panels shown in this manual are
examples used to provide clear explanations of
the operations.
For this reason, they may be different from the
actual screens or panels used, or some display
patterns may be different.
• Indication language: English indications are
used for the purpose of explanation. You can
select the indication language from the [SETUP]
menu. See Instruction Manual.
Before Use ..................................................................... 4
About the Quick start guide ...........................................................4
How to read this manual ..................................................................4
Precautions ................................................................................................5
Basic Operations ......................................................... 7
Functions of the Buttons on the Front Panel .......................7
Turning on the Unit .............................................................................7
Getting Started ....................................................................................... 8
Adjusting the volume .........................................................................9
Touch screen operations ..................................................................9
HOME screen descriptions ........................................................... 10
Source selection screen descriptions .................................... 10
Source control screen descriptions ........................................12
MENU screen .........................................................................................13
List screen ...............................................................................................13
Disc ................................................................................14
Playing a disc.........................................................................................14
DVD/VCD Basic Operation ............................................................14
DVD Disc Menu Operation ...........................................................15
USB ................................................................................16
Connecting a USB device..............................................................16
USB Basic Operation ......................................................................... 16
Radio .............................................................................17
Radio Basic Operation ..................................................................... 17
SiriusXM® .....................................................................18
SiriusXM® Basic Operation ............................................................ 18
Memory Operation ...........................................................................18
Bluetooth Control.....................................................20
Register from the Bluetooth device........................................20
Using Hands-Free Unit .................................................................... 21
Controlling Audio ..................................................... 24
Connection/Installation .........................................26
Before Installation ..............................................................................26
Installing the unit ............................................................................... 27
Appendix .....................................................................31
Specifications ........................................................................................31
About this Unit ....................................................................................31
!B5H-0358-03_QSG_DDX_K_EnFrEs.indb 4 2020/06/03 13:14
Before Use
5English
Precautions
# WARNINGS
Ñ To prevent injury or re, take
the following precautions:
• To prevent a short circuit, never put or leave any
metallic objects (such as coins or metal tools)
inside the unit.
• Do not watch or fix your eyes on the unit’s display
when you are driving for any extended period.
• If you experience problems during installation,
consult your KENWOOD dealer.
Ñ Precautions on using this unit
• When you purchase optional accessories, check
with your KENWOOD dealer to make sure that
they work with your model and in your area.
• You can select language to display menus, audio
file tags, etc. See Instruction Manual.
• The Radio Data System or Radio Broadcast Data
System feature won’t work where the service is
not supported by any broadcasting station.
Ñ Protecting the monitor
• To protect the monitor from damage, do not
operate the monitor using a ball point pen or
similar tool with the sharp tip.
Ñ Cleaning the unit
• If the faceplate of this unit is stained, wipe it
with a dry soft cloth such as a silicon cloth. If the
faceplate is stained badly, wipe the stain off with
a cloth moistened with neutral cleaner, then
wipe it again with a clean soft dry cloth.
NOTE
• Applying spray cleaner directly to the unit may
affect its mechanical parts. Wiping the faceplate
with a hard cloth or using a volatile liquid such
as thinner or alcohol may scratch the surface or
erase screened print.
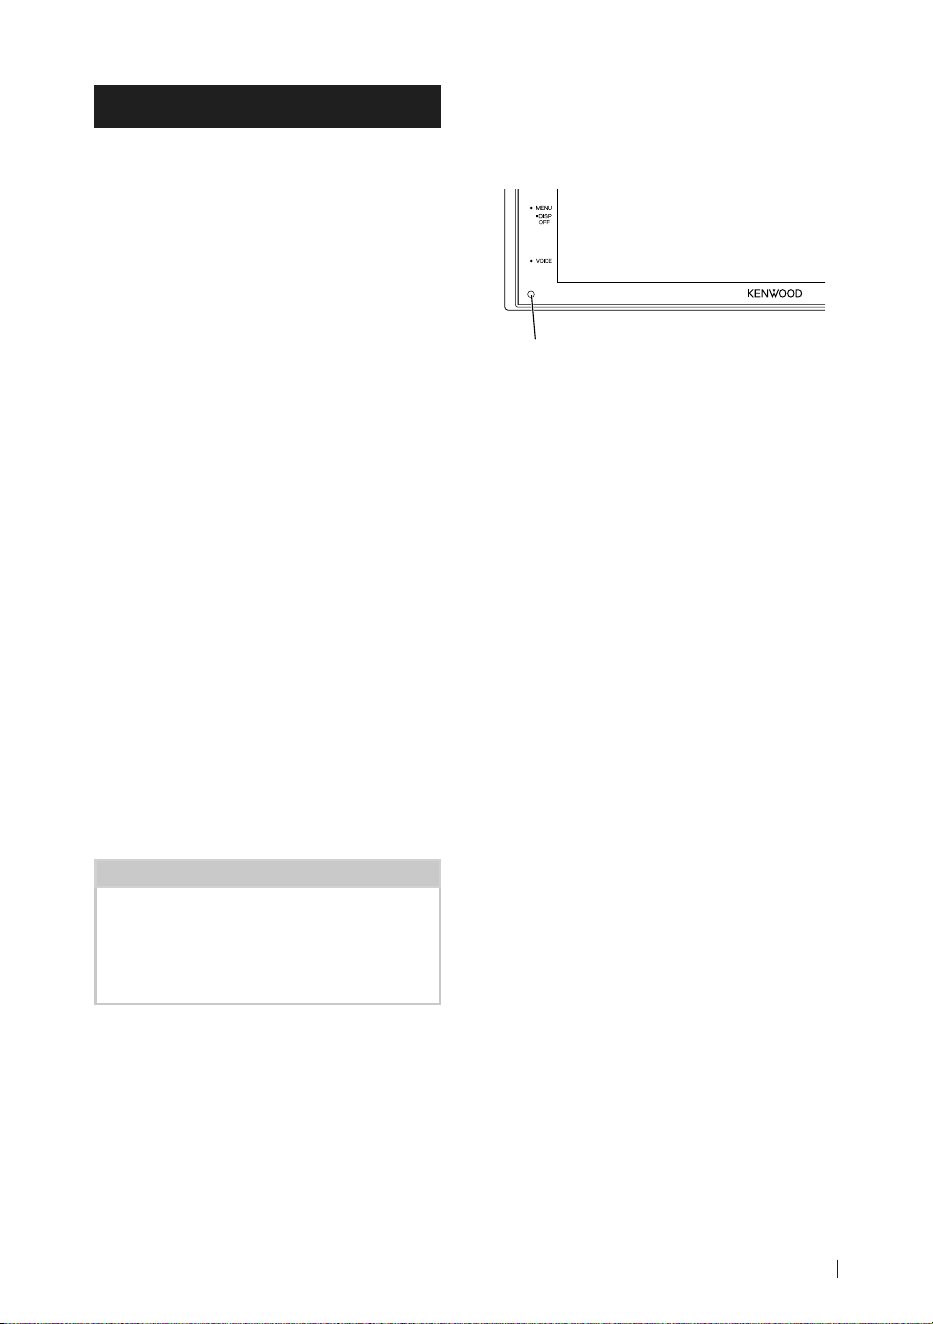
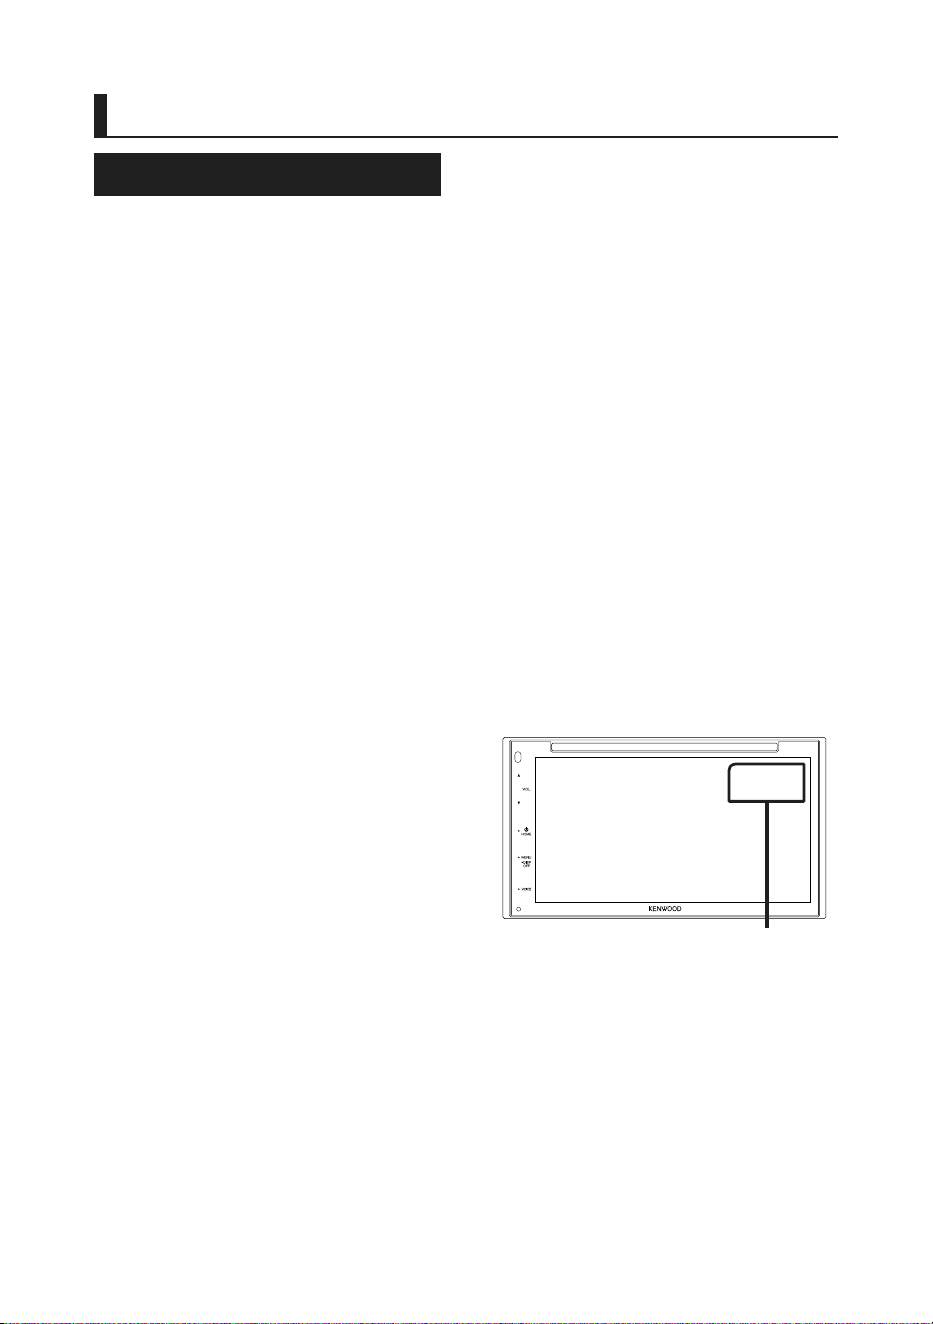
Ñ How To Reset Your Unit
• If the unit or the connected unit fails to operate
properly, reset the unit. Press the <Reset> button.
The unit returns to factory settings.
Reset button
Ñ Lens fogging
• When you turn on the car heater in cold weather,
dew may form on the lens in the disc player of
the unit due to condensation. This condensation
on the lens (also called lens fogging) may not
allow discs to play. In such a situation, remove
the disc and wait for the dew to evaporate. If the
unit still does not operate normally after a while,
consult your KENWOOD dealer.
!B5H-0358-03_QSG_DDX_K_EnFrEs.indb 5 2020/06/03 13:14
Before Use
6
Ñ Precautions on handling discs
• Do not touch the recording surface of the disc.
• Do not stick tape etc. on the disc, or use a disc
with tape stuck on it.
• Do not use disc type accessories.
• Clean the disc from the center toward the
outside rim.
• When removing a disc from this unit, pull it out
horizontally.
• If the disc center hole or outside rim has burrs,
use the disc only after removing the burrs with a
ballpoint pen etc.
• Discs that are not round cannot be used.
• 8-cm (3 inch) discs cannot be used.
• Discs with coloring on the recording surface or
discs that are dirty cannot be used.
• This unit can only play the following types of
CDs.
• This unit may not correctly play discs which do
not have the mark.
• You cannot play a disc that has not been
finalized. (For the finalization process, see your
writing software and your recorder's instruction
manual.)
Ñ Caution for Smartphone Users
• Simultaneously running multiple applications
on your smartphone while screen sharing places
heavy demand on the microprocessor of the
phone, potentially affecting communication and
performance.
• For best results while pairing with your
KENWOOD receiver, please be sure to close any
unused applications.
!B5H-0358-03_QSG_DDX_K_EnFrEs.indb 6 2020/06/03 13:14
Basic Operations
7English
Basic Operations
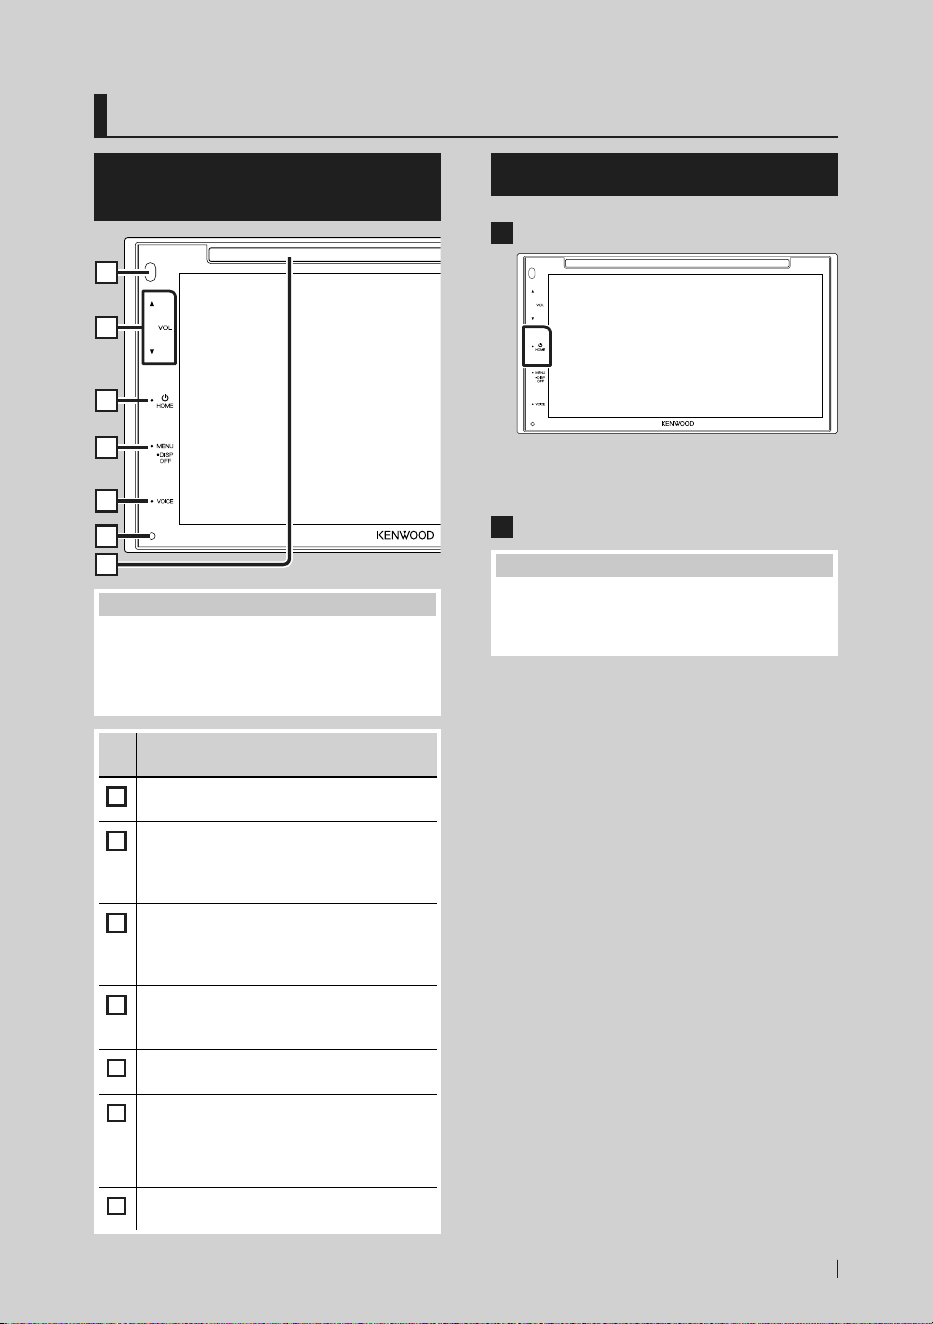
Functions of the Buttons on
the Front Panel
1
2
3
4
5
6
7
NOTE
• The panels shown in this guide are examples
used to provide clear explanations of the
operations. For this reason, they may be different
from the actual panels.
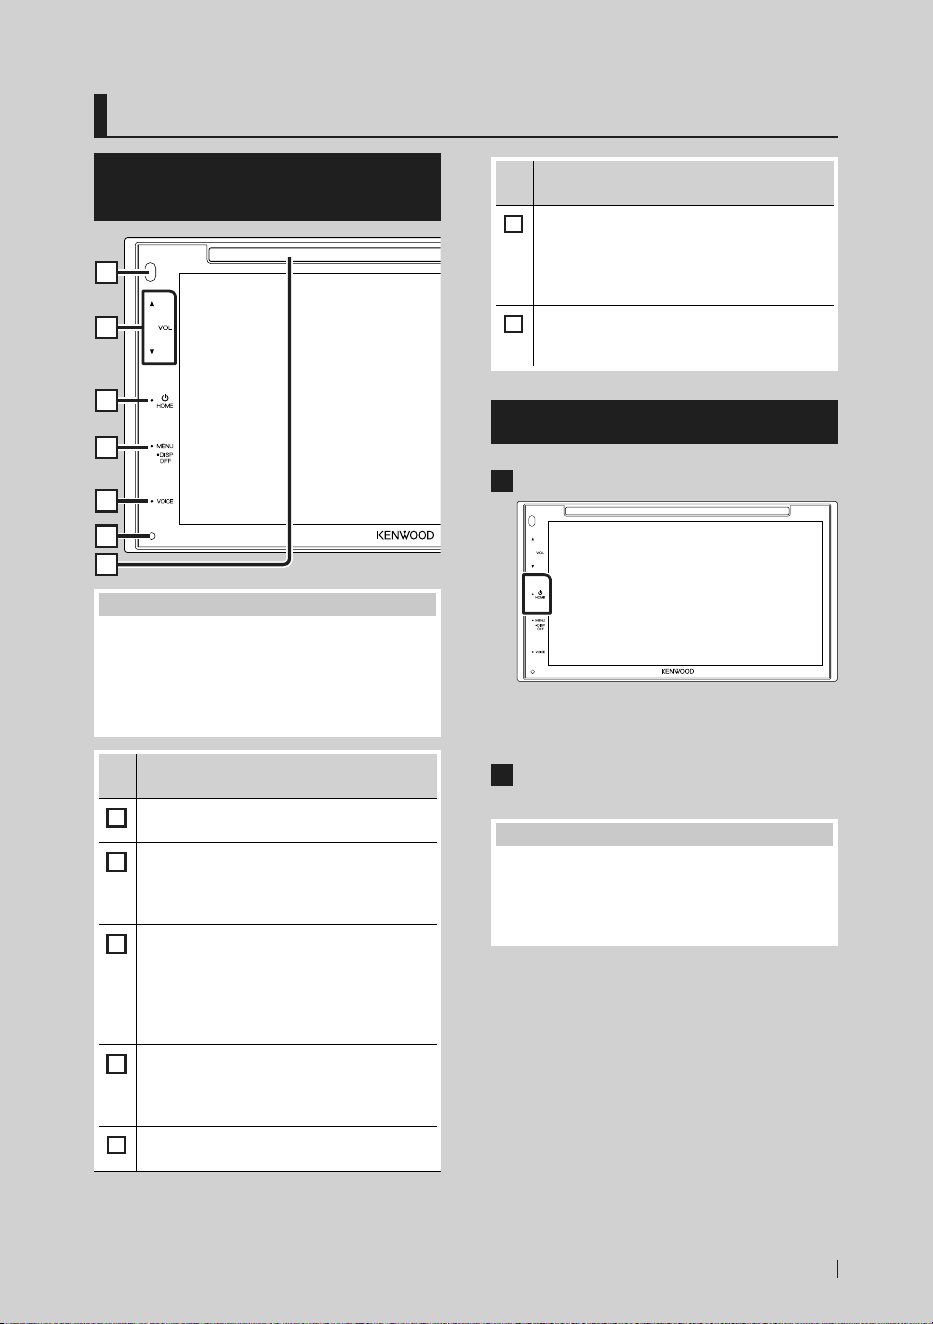
Name
• Motion
1
Remote Sensor
• Receives the remote control signal.
2
[S], [R] ([VOL])
• Adjusts volume.
The volume will go up until 15 when you
keep pressing [R].
3
[HOME]
• Displays the HOME screen (P.10).
• Pressing for 1 second turns the power off.
• When the power off, turns the power on.
4
[MENU]
• Displays the MENU screen.
• Pressing for 1 second turns the screen off.
5
[VOICE]
• Displays the Voice Recognition screen.
6
Reset
• If the unit or the connected unit fails to
operate properly, the unit returns to initial
settings when this button is pressed.
7
Disc insert slot
• A slot to insert a disc media. (P.14)
Turning on the Unit
1
Press the [HOME] button.
hh The unit is turned on.
● To turn off the unit:
1
Press the [HOME] button for 1 second.
NOTE
• If it is your first time turning the unit on after
installation, it will be necessary to perform Initial
setup (P.8).
!B5H-0358-03_QSG_DDX_K_EnFrEs.indb 7 2020/06/03 13:14
Basic Operations
8
Getting Started
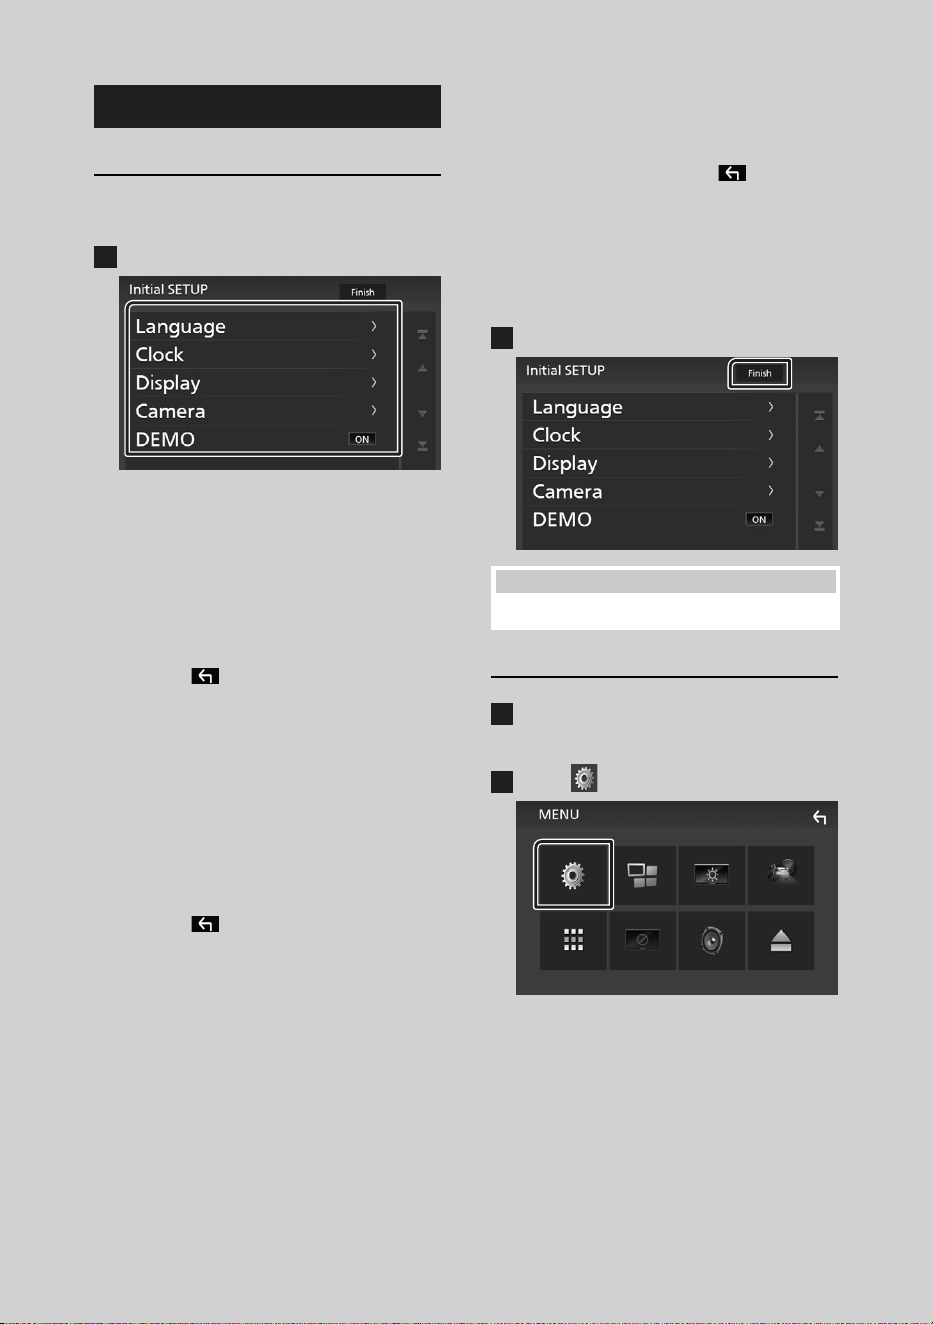
Initial setup
Perform this setup when you use this unit first
time.
1
Set each item as follows.
■ [Language]
Select the language used for the control
screen and setting items. Default is
“[American English(en)]”.
1Touch [Language].
2Touch [Language Select].
3Select the desired language.
4Touch [
].
■ [Clock]
Adjusts clock.
For detailed operation, see Calendar/clock
settings (P.8).
■ [Display]
Set the image on the screen.
1Touch [Display].
2Touch [Background].
3Select the image.
4Touch [
].
For detailed operation, see Instruction
Manual.
■ [Camera]
Set the parameters for the camera.
1Touch [Camera].
2Set each item and touch [
].
For detailed operation, see Instruction
Manual.
■ [DEMO]
Set the demonstration mode. Default is “ON”.
1Touch [DEMO] and set [ON] or [OFF].
2
Touch [Finish].
NOTE
• These settings can be set from the SETUP menu.
Calendar/clock settings
1
Press the [MENU] button.
hh MENU screen appears.
2
Touch [ ].
hh SETUP Menu screen appears.
!B5H-0358-03_QSG_DDX_K_EnFrEs.indb 8 2020/06/03 13:14

Basic Operations
9English
3
Touch [User Interface].
hh User Interface screen appears.
4
Touch [Clock Adjust].
5
Adjust the date, then adjust the time.
6
Touch [Set].
NOTE
• Deactivate [RDS CT] before adjusting the clock.
See Instruction Manual.
Adjusting the volume
To adjust the volume (0 to 40),
Press [R] to increase, and press [S] to decrease.
Holding [R] increases the volume continuously
to level 15.
Touch screen operations
To perform operations on the screen, you need
to touch, touch and hold, flick or swipe to select
an item, display setting menu screen or to
change the page, etc.
● Touch
Touch the screen gently to
select an item on the screen.
● Touch and hold
Touch the screen and keep
your finger in place until the
display changes or a message
is displayed.
● Flick
Slide your finger quickly to
the left or right on the screen
to change the page.
You can scroll the list screen
by flicking the screen up/
down.
● Swipe
Slide your finger up or down
on the screen to scroll the
screen.
!B5H-0358-03_QSG_DDX_K_EnFrEs.indb 9 2020/06/03 13:14
Basic Operations
10
HOME screen descriptions
Most functions can be performed from the
HOME screen.
3
2
4 5
1
1
• Displays the control screen of current source.
2
• Current source information
3
• Displays the source selection screen. (P.10)
4
• Short-cut playback source icons (P.11)
5
• Displays the Hands Free screen. (P.21)
• When connecting as Apple CarPlay or
Android Auto, it works as a phone provided
in Apple CarPlay or Android Auto.
Display the HOME screen
1
Press the [HOME] button.
hh HOME screen appears.
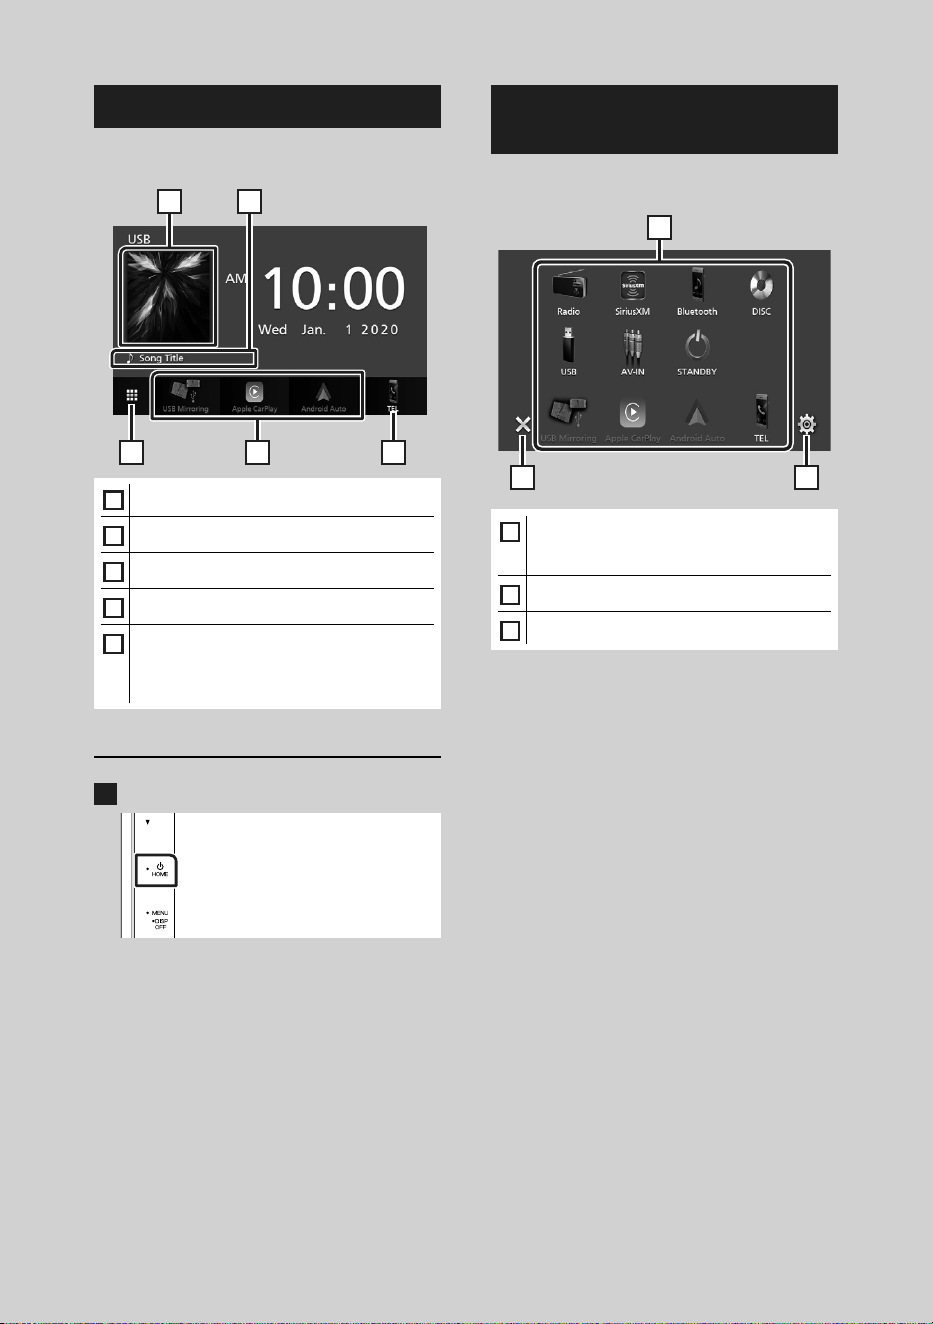
Source selection screen
descriptions
You can display all playback sources and options
on the source selection screen.
2 3
1
1
• Changes the playback source.
For playback sources, see Select the
playback source (P.11).
2
• Returns to previous screen.
3
• Displays the SETUP Menu screen.
!B5H-0358-03_QSG_DDX_K_EnFrEs.indb 10 2020/06/03 13:14

Basic Operations
11English
Select the playback source
1
Touch [ ] on the HOME screen.
From the screen, you can select the
following sources and functions.
• Switches to the USB Mirroring screen from
the connected Android smartphone.
It is necessary to connect Android
smartphone with “Mirroring OA for
KENWOOD” application installed and to
set [Mode] to [Mirroring for Android™].
• Switches to the Apple CarPlay screen from
the connected iPhone.
• Switches to the Android Auto screen from
the connected Android smartphone.
It is necessary to connect Android
smartphone compatible with
Android Auto and to set [Mode] to
[Android Auto].
• Displays the Hands Free screen. (P.21)
When neither Apple CarPlay, Android
Auto, nor a Bluetooth Hands-Free phone
is connected, displays "[Disconnected]"
message in the TEL screen.
When connecting as Apple CarPlay
or Android Auto, it works as a phone
provided in Apple CarPlay or Android
Auto.
• Switches to the Radio broadcast. (P.17)
• Switches to the SiriusXM® satellite radio
broadcast. (P.18)
• Plays a Bluetooth audio player.
• Plays a disc. (P.14)
• Plays files on a USB device. (P.16)
• Switches to an external component
connected to the AV-IN input terminal.
• Puts the unit in standby. (P.11)
Put the unit in standby
1
Touch [ ] on the HOME screen.
2
Touch [STANDBY].
!B5H-0358-03_QSG_DDX_K_EnFrEs.indb 11 2020/06/03 13:14
Basic Operations
12
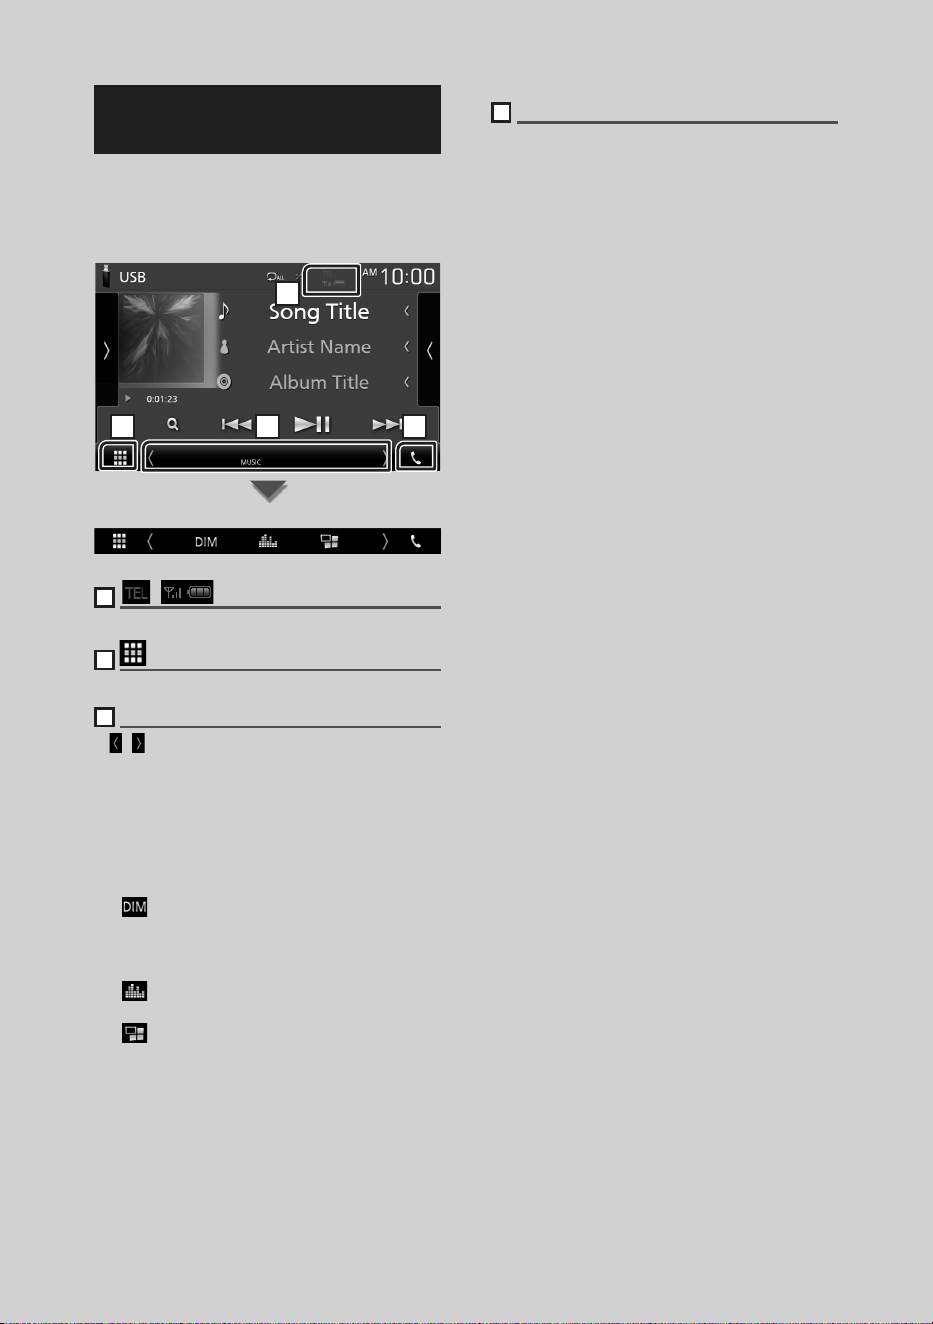
Source control screen
descriptions
There are some functions which can be
operated from most screens.
Indicators
1
2 3 4
Sub menu
1
[ ]/[ ]
Connected Bluetooth device information.
2
All sources icon
Displays all sources.
3
Secondary screen
• [ ]/[ ] : The Secondary screen changes every time
you touch it. You can also change the Secondary
screen by flicking left or right on the screen.
• Indicators: Displays the current source condition
and so on.
– [MUTE]: The mute function is active.
– [LOUD]: The loudness control function is on.
• Sub menu
– [ ]: Operation when the icon is touched:
The first touch darkens the screen, the second
touch darkens the screen further, and the third
touch restores the screen to its original brightness.
– [
]: Displays the Graphic Equalizer screen.
(P.25)
– [
]: Displays the APP (Apple CarPlay/ Android
Auto) screen.
4
[Û]
Touch to display the Hands Free screen.
(P.21)
When connecting as Apple CarPlay or Android
Auto, it works as a phone provided in Apple
CarPlay or Android Auto.
!B5H-0358-03_QSG_DDX_K_EnFrEs.indb 12 2020/06/03 13:14
Basic Operations
13English
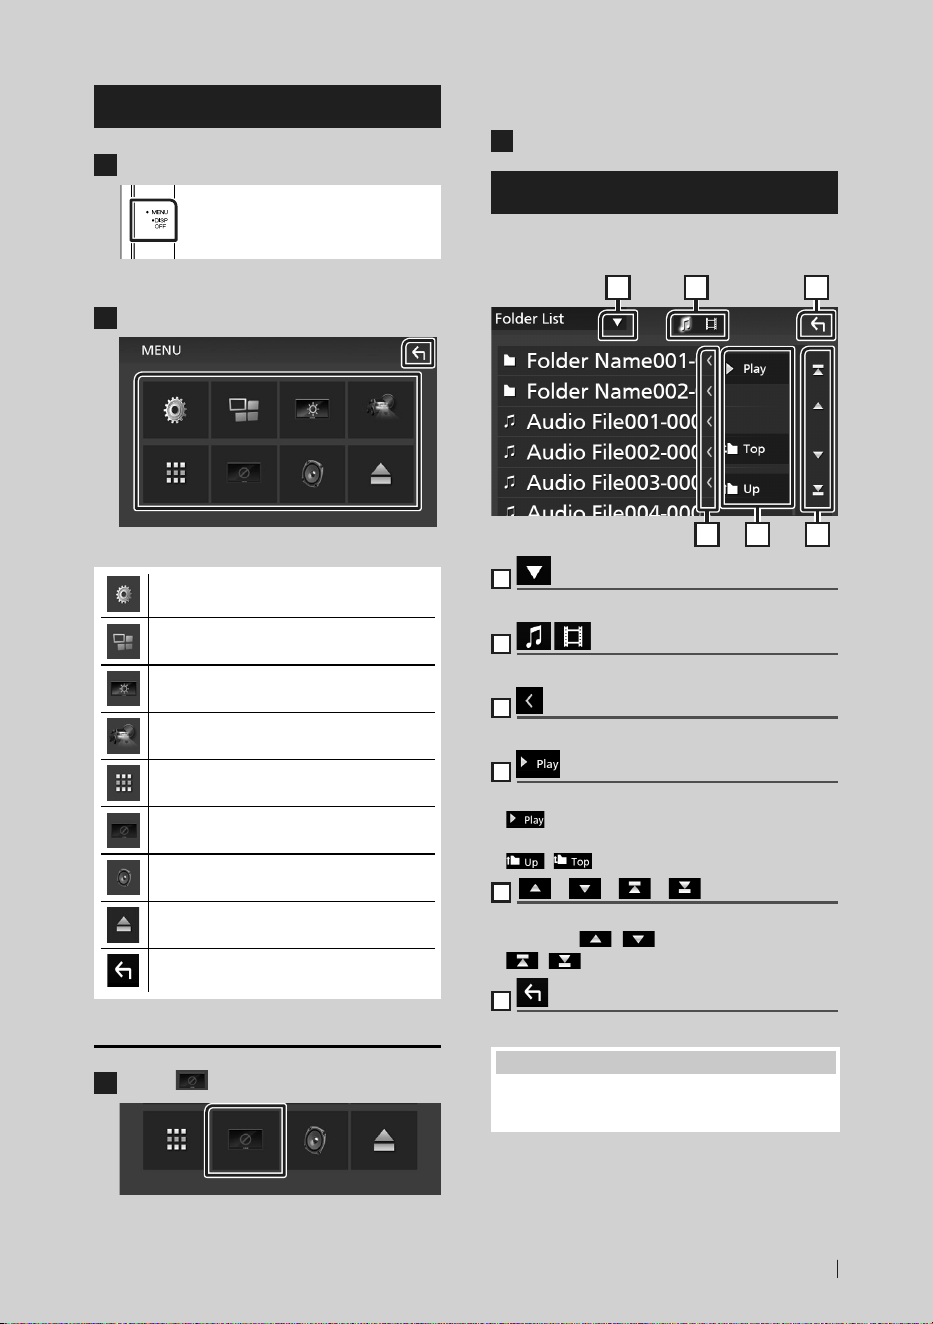
MENU screen
1
Press the [MENU] button.
hh MENU screen appears.
2
Touch to display the MENU screen.
The contents of the menu are as follows.
• Displays the SETUP Menu screen.
• Displays the APP (Apple CarPlay/ Android
Auto) screen.
• Displays the Screen Adjustment screen.
• Displays the view camera.
• Displays the source selection screen.
(P.11)
• Turns the display off. (P.13)
• Displays the Audio Control Menu screen.
(P.24)
• Touch to eject the disc. (P.14)
• Close the MENU screen.
Turn o the screen
1
Select [ ] on the MENU screen.
● To turn on the screen
1
Touch the display.
List screen
There are some common function keys in the
list screens of most sources.
61 2
3 4 5
1
Displays list type selection window.
2
Displays music/movie file list.
3
Text scroll
Scrolls the displayed text.
4
etc.
Keys with various functions are displayed here.
• [ ] : Plays all tracks in the folder containing
the current track.
• [
] [ ] : Moves to the upper hierarchy.
5
[ ] / [ ] / [ ] / [ ] Page scroll
You can change the page to display more items
by pressing [
]/[ ].
• [ ]/[ ] : Displays the top or bottom page.
6
Return
Returns to previous screen.
NOTE
• Buttons which cannot be activated from the list
screen are not displayed.
!B5H-0358-03_QSG_DDX_K_EnFrEs.indb 13 2020/06/03 13:14
Disc
14
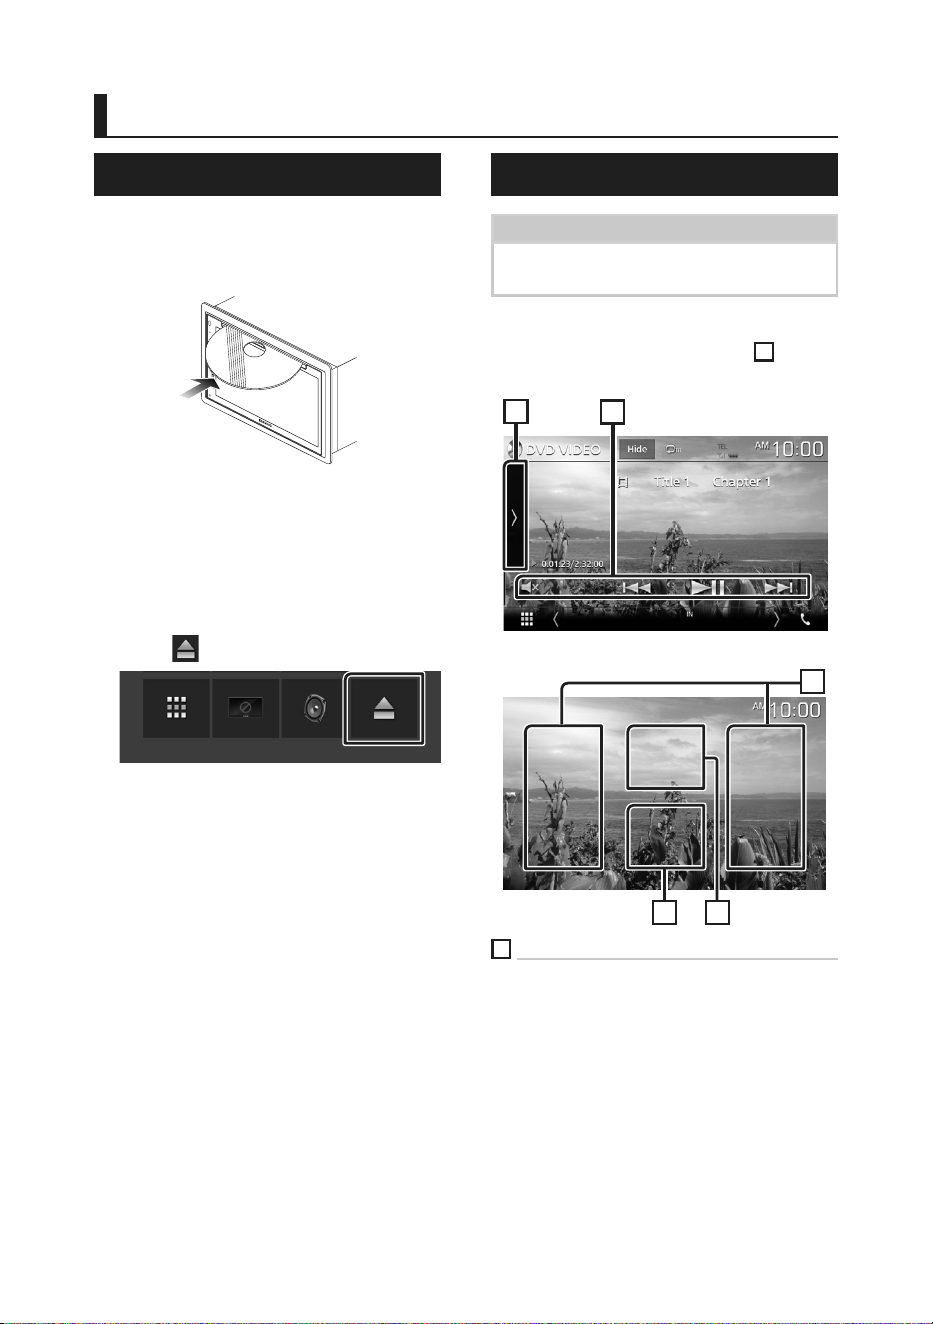
Disc
Playing a disc
Ñ Insert a disc
1 Insert the disc into the slot.
hh The unit loads the disc and playback
starts.
Ñ Eject a disc
1 Press the [MENU] button.
hh MENU screen appears.
2 Touch [ ].
When removing a disc, pull it horizontally.
DVD/VCD Basic Operation
NOTE
• The screen shot below is for DVD. It may be
different from the one for VCD.
1 When the operation buttons are not
displayed on the screen, touch
4
area.
Control screen
2
1
Video screen
3
4 5
1
Function panel
Touch the left side of the screen to display the
function panel. Touch again to close the panel.
For details on the keys, see Function panel
(P.15).
!B5H-0358-03_QSG_DDX_K_EnFrEs.indb 14 2020/06/03 13:14
Disc
15English
2
Operation keys
• [E] [F] : Searches for the previous/next
content.
Touch and hold to fast-forward or fast-backward
the disc.
• [DH] : Plays or pauses.
• [
] : Touch to mute or not to mute.
3
Searching area
Touch to search for the next/previous content.
4
Key display area
Touch to display the control screen.
5
[MENU CTRL] (DVD only)
Touch to display the DVD-VIDEO disc menu
control screen. See DVD Disc Menu Operation
(P.15).
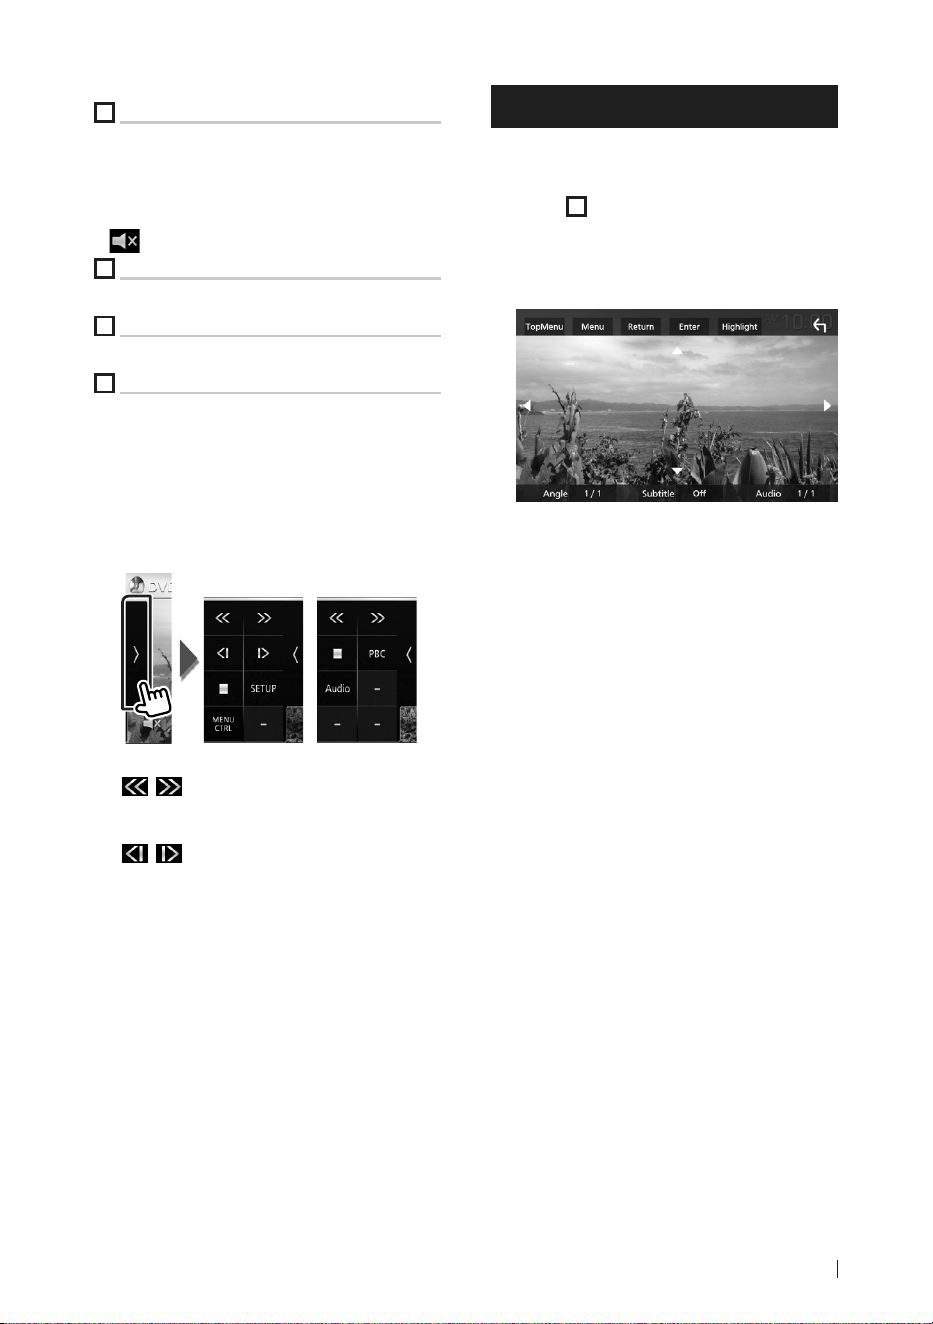
Ñ Function panel
1 Touch on the left side of the control
screen.
DVD VCD
The functions of each key are as follows.
[
] [ ]: Fast-forwards or fast-backward
the disc. Each time you touch the key, the
speed changes.
[
] [ ] (DVD only): Plays in slow motion
forward or backward.
[I]: Stops playback. Touching twice will play
the disc from the beginning when you
play it next time.
[SETUP] (DVD only): Touch to display the
DVD SETUP screen.
[MENU CTRL] (DVD only): Touch to display
the DVD-VIDEO disc menu control
screen. See DVD Disc Menu Operation
(P.15).
[PBC] (VCD only): Touch to turn Playback
control (PBC) on or off.
[Audio] (VCD only): Touch to change audio
output channels.
DVD Disc Menu Operation
You can set up some functions using the DVD-
VIDEO disc menu.
1 Touch
5
area during playback.
hh Menu Control screen appears.
2 Perform your desired operation as
follows.
■ To display the top menu
Touch [TopMenu].*
■ To display the menu
Touch [Menu].*
■ To display the previous menu
Touch [Return].*
■ To enter selected item
Touch [Enter].
■ To enable direct operation
Touch [Highlight] to enter the highlight
control mode.
■ To move the cursor
Touch [R], [S], [C], [D].
■ To switch among subtitle languages
Touch [Subtitle]. Each time you touch this
key, subtitle languages are switched.
■ To switch among audio languages
Touch [Audio]. Each time you touch this key,
audio languages are switched.
■ To switch among picture angles
Touch [Angle]. Each time you touch this key,
picture angles are switched.
* These keys may not function depending on
the disc.
!B5H-0358-03_QSG_DDX_K_EnFrEs.indb 15 2020/06/03 13:14
USB
16
USB
Connecting a USB device
1 Connect the USB device with the USB
cable. (P.29)
2 Press the [HOME] button.
3 Touch [ ].
4 Touch [USB]. (P.11)
Ñ Disconnect the USB device
1 Press the [HOME] button.
2 Touch [ ].
3 Touch a source other than [USB].
4 Detach the USB device.
Ñ Usable USB device
You can use a mass-storage-class USB device on
this unit.
The word “USB device” appearing in this manual
indicates a flash memory device.
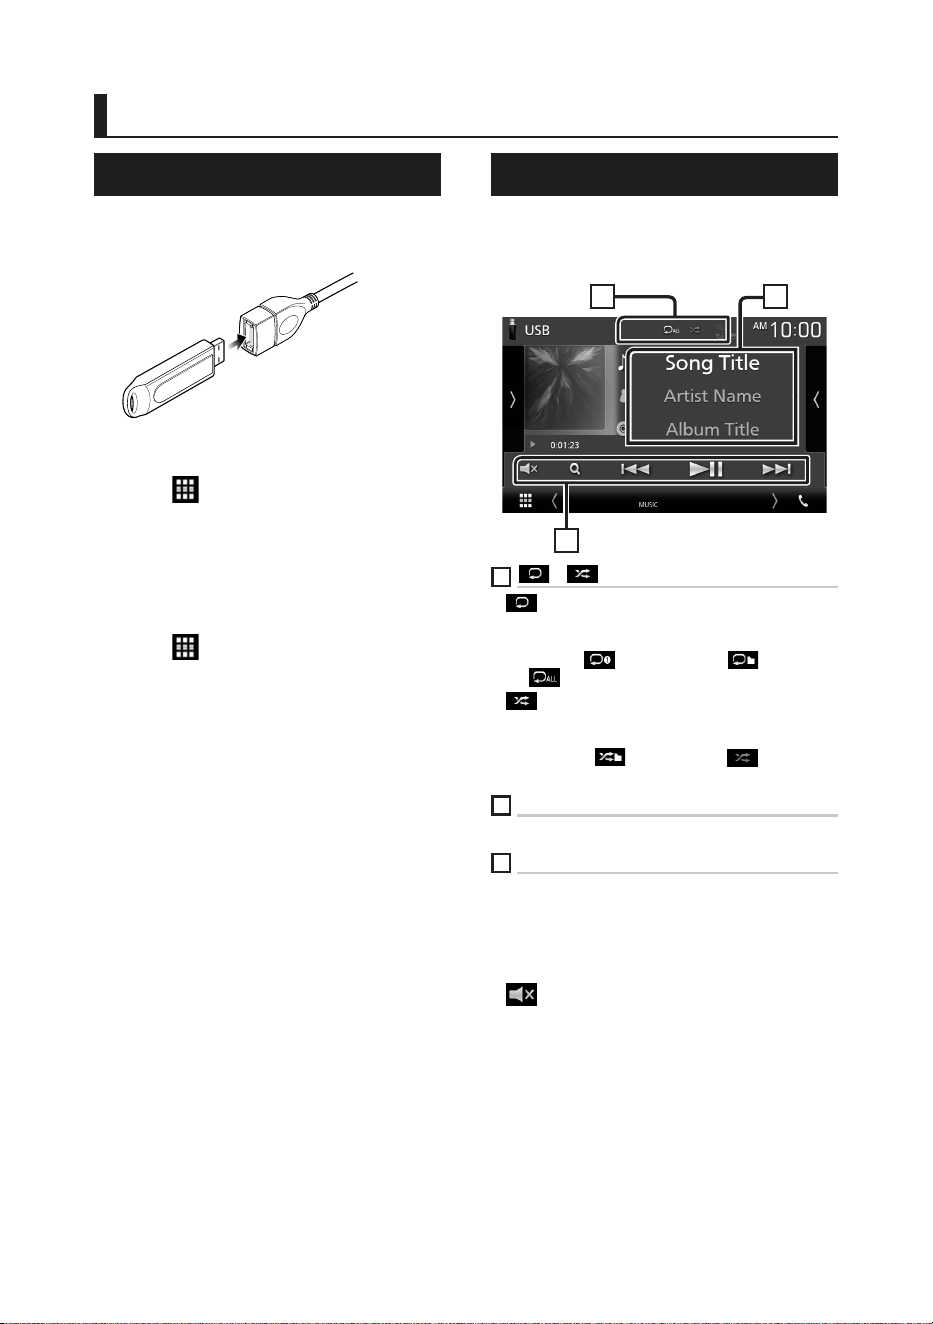
USB Basic Operation
Most functions can be controlled from the
source control screen and playback screen.
Control screen
21
3
1
[ ] / [ ]
• [ ] : Repeats the current track/folder. Each time
you touch the key, repeat mode switches in the
following sequence;
File repeat ([
]), Folder repeat ([ ]), Repeat
all ([
])
• [
] : Randomly plays all tracks in current folder.
Each time you touch the key, random mode
switches in the following sequence;
File random ([
]), Random off ([ ])
2
Track information
Displays the information of the current file.
3
[Operation keys
• [1] : Searches track/file. For details on search
operation, see Instruction Manual.
• [E] [F] : Searches the previous/next track/file.
Touch and hold to fast forward or fast backward.
• [D]H] : Plays or pauses.
• [
] : Touch to mute or not to mute.
!B5H-0358-03_QSG_DDX_K_EnFrEs.indb 16 2020/06/03 13:14
Radio
17English
Radio
Radio Basic Operation
Most functions can be controlled from the
source control screen.
To enter Radio source, touch [Radio] icon in the
source selection screen. (P.11)
Control screen
4
6
5
3
2
1
Open the drawer
4
7
5
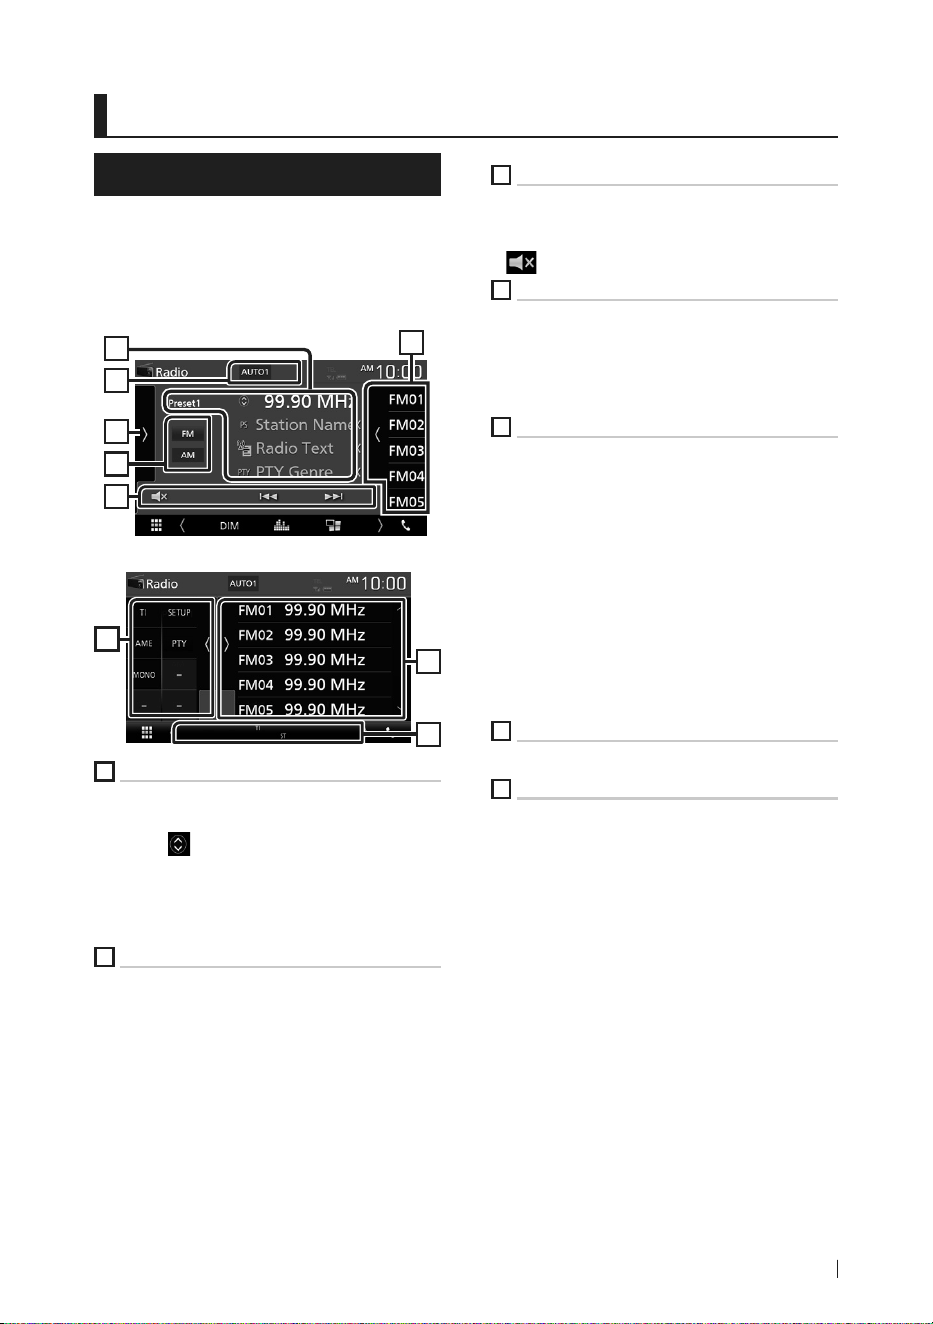
1
Information display
Displays the information of the current station:
Frequency
Touching [
] allows you to switch between
Content A and Content B.
– Content A: PS name, Radio Text, PTY Genre
– Content B: Radio Text plus, Title Artist
[Preset#]: Preset number
2
Seek mode
Switches the seek mode in the following
sequence; [AUTO1], [AUTO2], [MANUAL].
• [AUTO1]: Tunes in a station with good reception
automatically.
• [AUTO2]: Tunes in stations in memory one after
another.
• [MANUAL]: Switches to the next frequency
manually.
3
Operation keys
• [E] [F] : Tunes in a station. The method of
frequency switching can be changed (see 2 in
table).
• [
] : Touch to mute or not to mute.
4
Preset list
• Touch on the right side of the screen to display
the Preset list. Touch again to close the list.
• Recalls the memorized station.
• When touched for 2 seconds, stores the current
receiving station in memory.
5
Function panel
Touch on the left side of the screen to display
the function panel. Touch again to close the
panel.
• [TI] (FM only): Sets the traffic information mode
on. For details, see Instruction Manual.
• [SETUP] (FM only): Displays the Radio SETUP
screen. For details, see Instruction Manual.
• [AME]: Presets stations automatically. For details,
see Instruction Manual.
• [PTY] (FM only): Searches a program by setting
program type. For details, see Instruction Manual.
• [MONO] (FM only): Select the Monaural
reception.
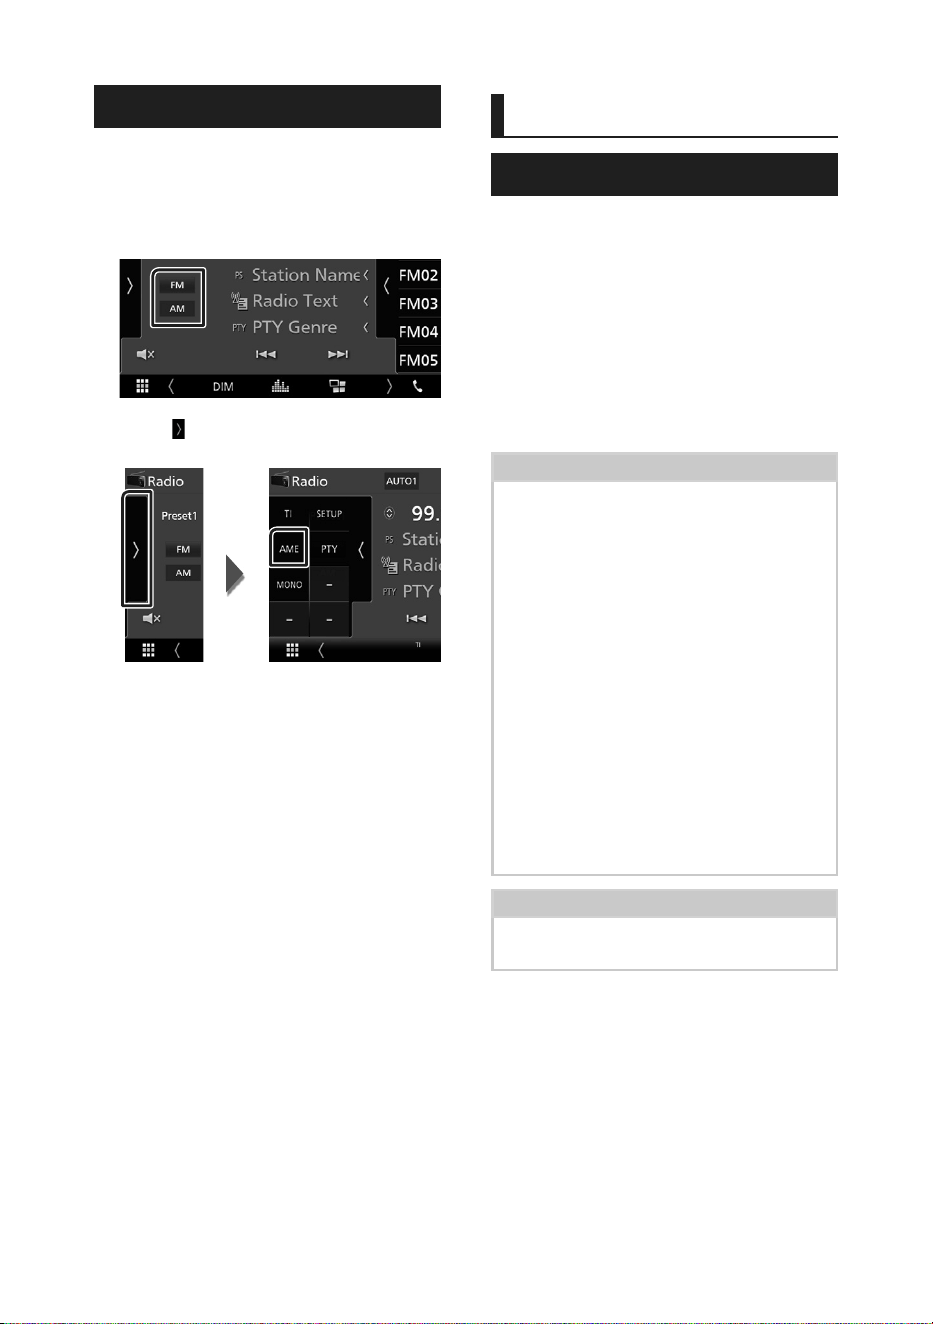
6
[FM] [AM]
Switches the band.
7
Indicator Items
• [ST]: A stereo broadcast is being received.
• [MONO]: The forced monaural function is on.
• [TI]: Indicates the reception state of traffic
information.
White: TP is being received.
Orange: TP is not being received.
!B5H-0358-03_QSG_DDX_K_EnFrEs.indb 17 2020/06/03 13:14
Radio
18
Memory Operation
Ñ Auto memory
You can store stations with good reception in
memory automatically.
1 Touch desired band key.
2 Touch [ ] on the left side of the screen.
Touch [AME].
hh A confirmation screen appears.
3 Touch [Ye s ].
hh Auto memory starts.
Ñ Manual memory
You can store the current receiving station in
memory.
1 Select a station you wish to store in
memory.
2 Touch [FM#] (#: 1-24) or [AM#] (#: 1-12) in
which you want to store the station for 2
seconds.
SiriusXM®
SiriusXM® Basic Operation
Only SiriusXM® brings you more of what you
love to listen to, all in one place. Get over 140
channels, including commercial-free music
plus the best sports, news, talk, comedy and
entertainment. Welcome to the world of satellite
radio. A SiriusXM Vehicle Tuner and Subscription
are required. For more information, visit www.
siriusxm.com.
To listen to the SiriusXM source, touch the
[SiriusXM] icon on the source selection screen.
(P.11)
Activating subscription
• Check your Radio ID.
The SiriusXM Satellite Radio ID is required
for activation and can be found by tuning in
Channel 0 as well as on the label found on the
SiriusXM Connect tuner and its package.
The Radio ID does not include the letters I, O,
S or F.
• Activate the SiriusXM Connect Vehicle Tuner
using either one of the two methods below:
– For users in U.S.A.
Online: Visit www.siriusxm.com/activatenow
Phone:
Call SiriusXM Listener Care at 1-866-635-2349
– For users in Canada:
Online: Visit
https://www.siriusxm.ca/help/activation-help/
Phone:
Call XM customer Care at 1-877-438-9677
NOTE
• To use SiriusXM® Satellite Radio, the optional
accessory is necessary.
SiriusXM®
!B5H-0358-03_QSG_DDX_K_EnFrEs.indb 18 2020/06/03 13:14
SiriusXM®
19English
Control screen
2
3
1
5
4
Open the drawer
5
3
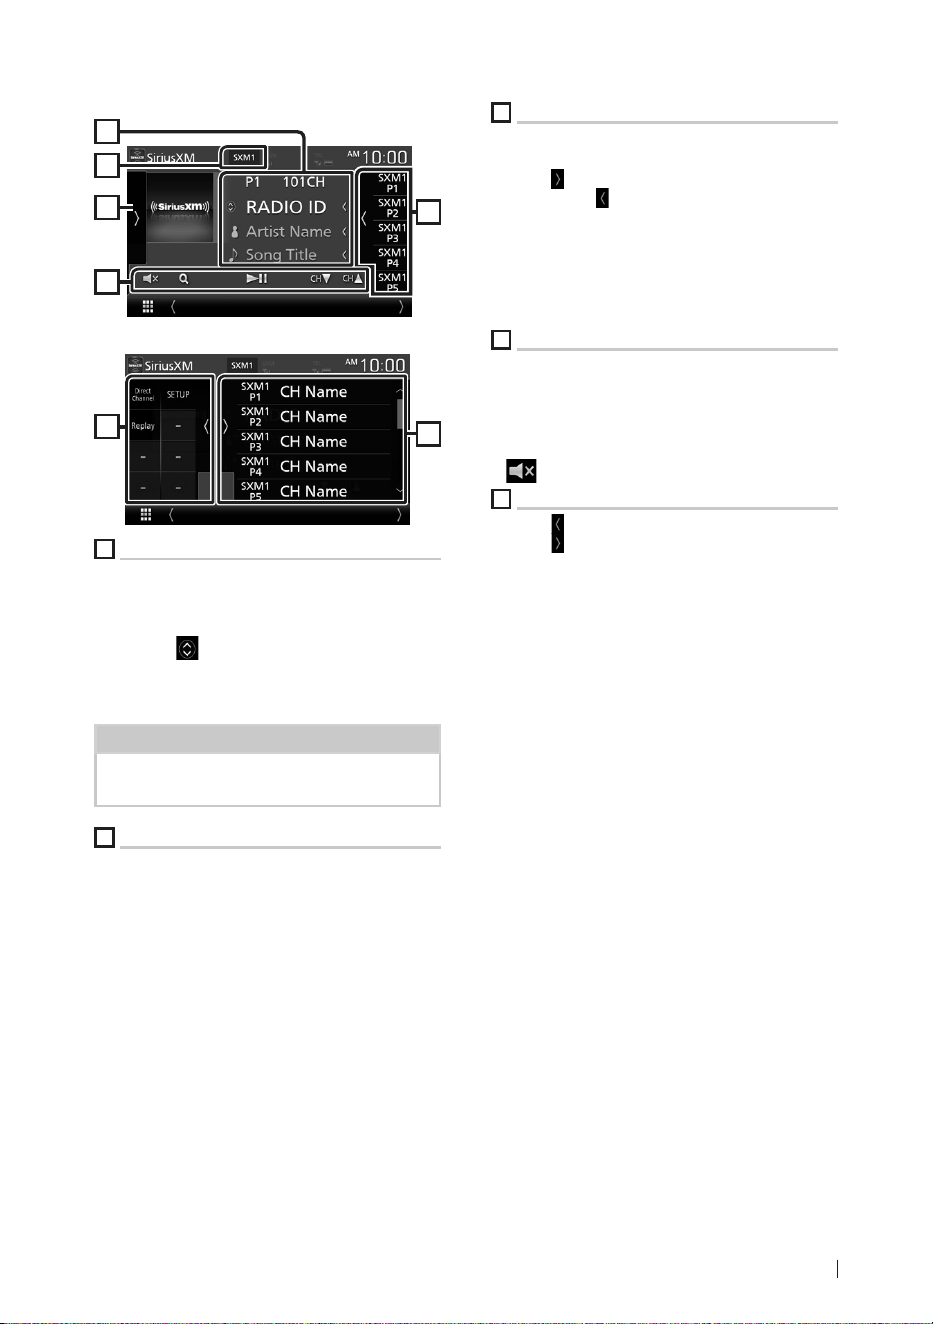
1
Information display
• Displays the information on the current channel:
Channel Name
[P#]: Preset number
[#CH]: Channel number
Touching [
] allows you to switch between
Content A and Content B.
– Content A: Artist Name, Song Title
– Content B: Content Info, Category Name
NOTE
• While getting contents, "Waiting" is showing on
the display.
2
Band button
Switches among bands. (SXM1/SXM2/SXM3)
3
Artwork / Function panel
• Displays the album artwork for most SiriusXM
music channels.
• Touch [
] of the screen to display the function
panel. Touch [
] to close the panel.
– [Direct Channel]: Touch and enter the desired
number. For details, see Instruction Manual.
– [SETUP]: Touch to display the SiriusXM SETUP
screen. For details, see Instruction Manual.
– [Replay/Live]: Touch to turn on or off the replay
mode. See Instruction Manual.
4
Operation keys
• [1] : Display the Category search screen. For
details on search operation, see Instruction
Manual.
• [DH] : Plays or pauses. See Instruction Manual.
• [CHS] [CHR] : Selects a channel.
• [
] : Touch to mute or not to mute.
5
Preset list
• Touch [ ] of the screen to display the preset list.
Touch [
] to close the list.
• Recalls the memorized channel.
• When touched for 2 seconds, stores the currently
being received channel in the memory.
!B5H-0358-03_QSG_DDX_K_EnFrEs.indb 19 2020/06/03 13:14

Bluetooth Control
20
Bluetooth Control
Ñ About the cell-phone and
Bluetooth audio player
This unit conforms to the following Bluetooth
specifications:
Version
Bluetooth Ver. 4.1
Profile
Cell-phone:
HFP (Hands Free Profile)
SPP (Serial Port Profile)
PBAP (Phonebook Access Profile)
Audio player:
A2DP (Advanced Audio Distribution Profile)
AVRCP (Audio/Video Remote Control Profile)
Sound codec
SBC, AAC
NOTE
• The units supporting the Bluetooth function
have been certified for conformity with the
Bluetooth Standard following the procedure
prescribed by Bluetooth SIG.
• However, it may be impossible for such units to
communicate with your cell-phone depending
on its type.
Register from the Bluetooth
device
It is necessary to register the Bluetooth audio
player or cell-phone to this unit before using the
Bluetooth function.
1 Turn on the Bluetooth function on your
smartphone/cell-phone.
2 Search the unit (“DDX*****”) from your
smartphone/cell-phone.
3 Operate your smartphone/cell-phone
according to the displayed messages.
■ Confirm the request on the
smartphone/cell-phone.
■ If a PIN code is required, enter the PIN
code (“0000”).
4 Touch [Ye s ].
5 Press the [MENU] button.
hh MENU screen appears.
6 Touch [ ].
hh SETUP Menu screen appears.
7 Touch [Bluetooth].
hh Bluetooth SETUP screen appears.
!B5H-0358-03_QSG_DDX_K_EnFrEs.indb 20 2020/06/03 13:14
Bluetooth Control
21English
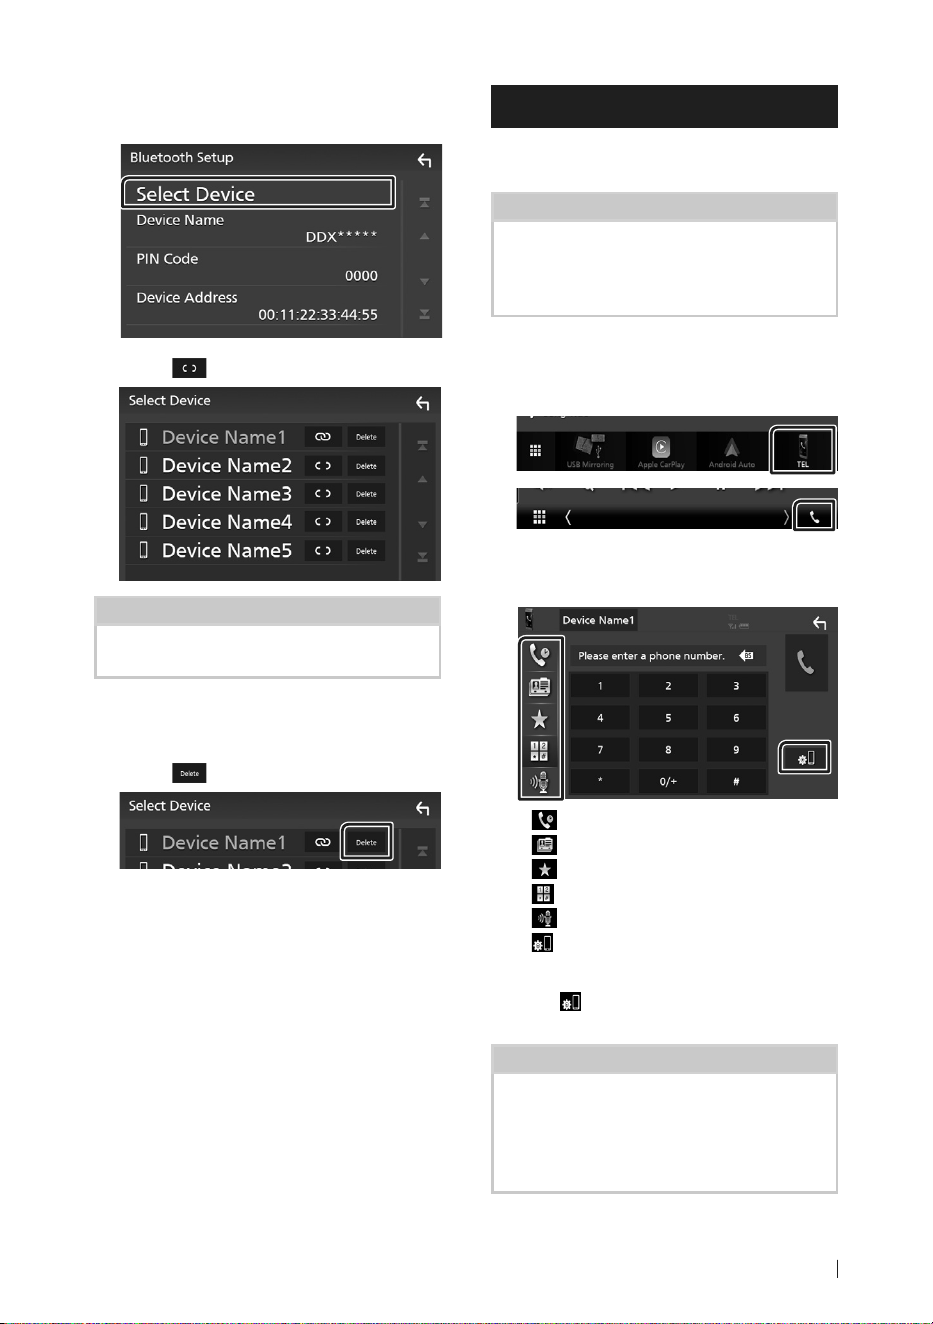
8 Touch [Select Device] in the Bluetooth
SETUP screen.
9 Touch [ ] you want to connect.
NOTE
• If the icon is lighted, it means that the unit will
use that device.
To delete the registered Bluetooth
device
1 Touch [ ].
hh Confirmation message appears.
2 Touch [Ye s ].
Using Hands-Free Unit
You can use telephone function by connecting
the Bluetooth telephone to this unit.
NOTE
• While Apple CarPlay or Android Auto is being
connected, Bluetooth Hands-Free function
cannot be used. Only Apple CarPlay or Android
Auto Hands-Free function can be used.
Ñ Make a call
1 Touch [TEL] / [Û].
hh Hands Free screen appears.
2 Select a dialing method.
• [ ]: Call using call records
• [
]: Call using the phonebook
• [
]: Call using the preset number
• [
]: Call by entering a phone number
• [
]: Voice Recognition
• [
]: Bluetooth SETUP
● Bluetooth SETUP
1) Touch [
].
Bluetooth SETUP screen appears.
NOTE
• The status icons such as battery and antenna
displayed may differ from those displayed on the
cell-phone.
• Setting the cell-phone in the private mode can
disable the hands-free function.
!B5H-0358-03_QSG_DDX_K_EnFrEs.indb 21 2020/06/03 13:14
Bluetooth Control
22
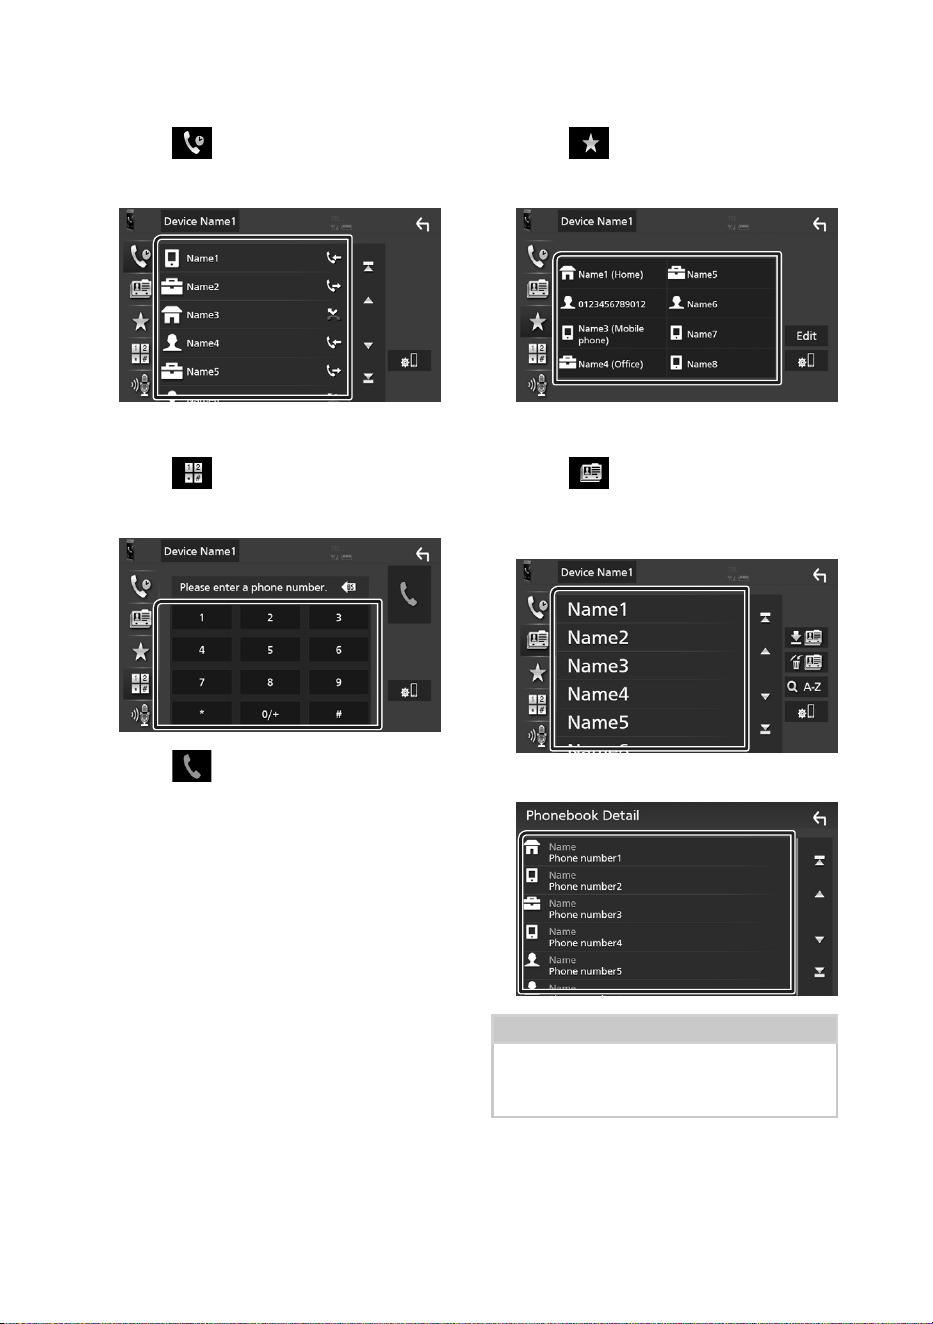
Call using call records
1 Touch [ ].
2 Select the phone number from the list.
Call by entering a phone number
1 Touch [ ].
2 Enter a phone number with number keys.
3 Touch [ ].
Call using the preset number
1 Touch [ ].
2 Touch the Name or phone number.
Call using the phonebook
1 Touch [ ].
2 Select the person you want to call from
the list.
3 Select the phone number from the list.
NOTE
• If no Phonebook has been downloaded,
touching [Download Phonebook Now] will
start downloading the Phonebook.
!B5H-0358-03_QSG_DDX_K_EnFrEs.indb 22 2020/06/03 13:14
Bluetooth Control
23English
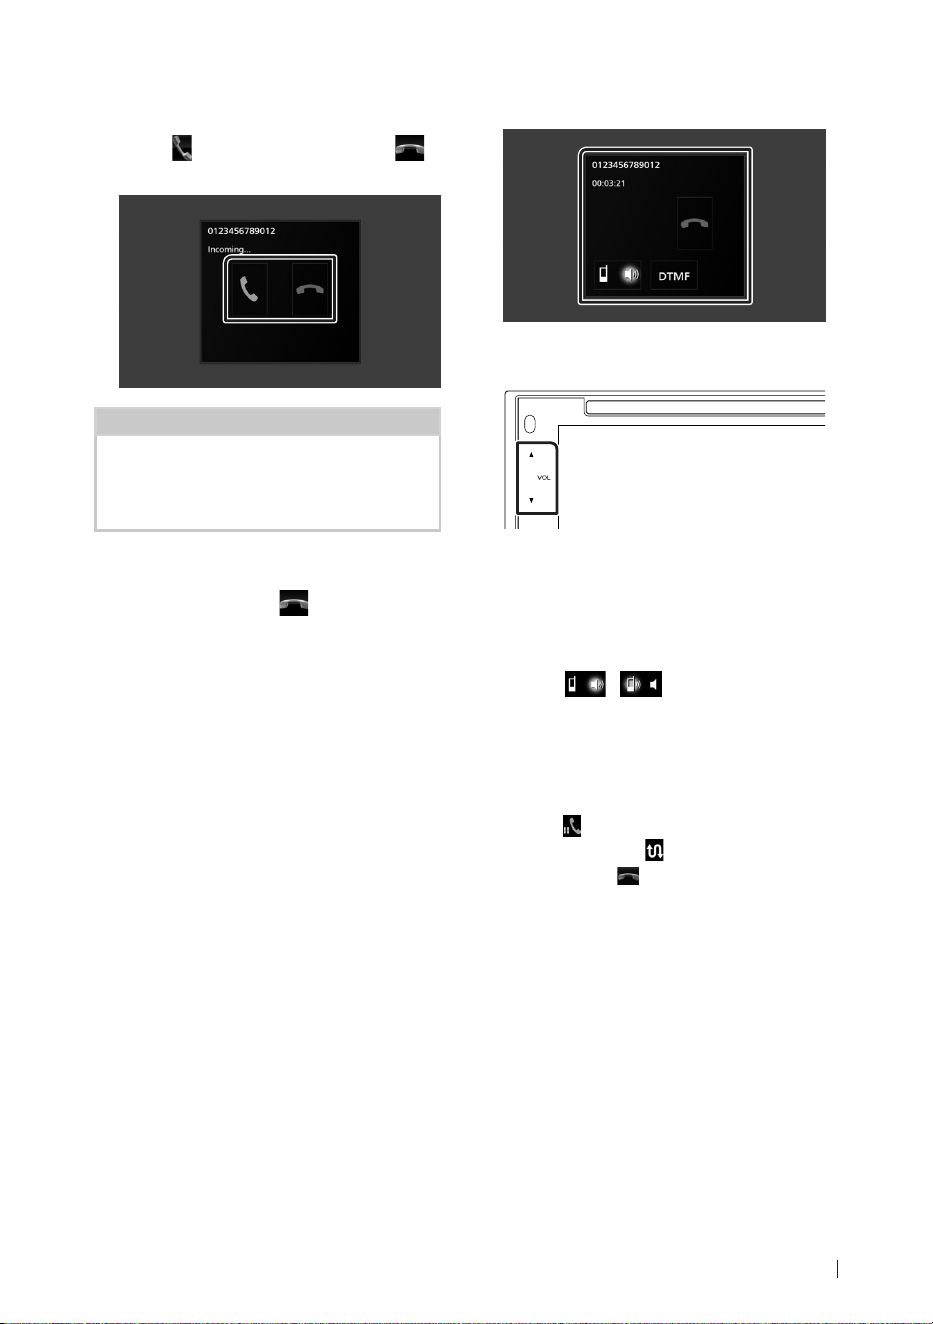
Ñ Receive a call
1 Touch [ ] to answer a phone call or [ ]
to reject an incoming call.
NOTE
• While monitoring the view camera, this screen
does not appear even if a call comes in. To
display this screen, return the shift knob of car to
the driver position.
To end call
1 While talking, touch [ ].
Ñ Operations during a call
● Adjust the receiver volume
Press the [S] or [R] button.
● Output the dial tone
Touch [DTMF] to display the tone input screen.
You can send tones by touching desired keys on
the screen.
● Switching the speaking voice output
Touching [
]/ [ ] each time switches the
speaking voice output between cell-phone and
speaker.
● Call-waiting
When you receive a call while talking on another
call, you can answer the newly received call by
touching [
]. The current call is on hold.
Each time you touch [
], the caller will change.
When you touch [
], the current call will end
and switch to the call in hold.
!B5H-0358-03_QSG_DDX_K_EnFrEs.indb 23 2020/06/03 13:14
Controlling Audio
24
Controlling Audio
You can adjust the various settings such as
audio balance or subwoofer level.
1 Press the [MENU] button.
hh MENU screen appears.
2 Touch [ ].
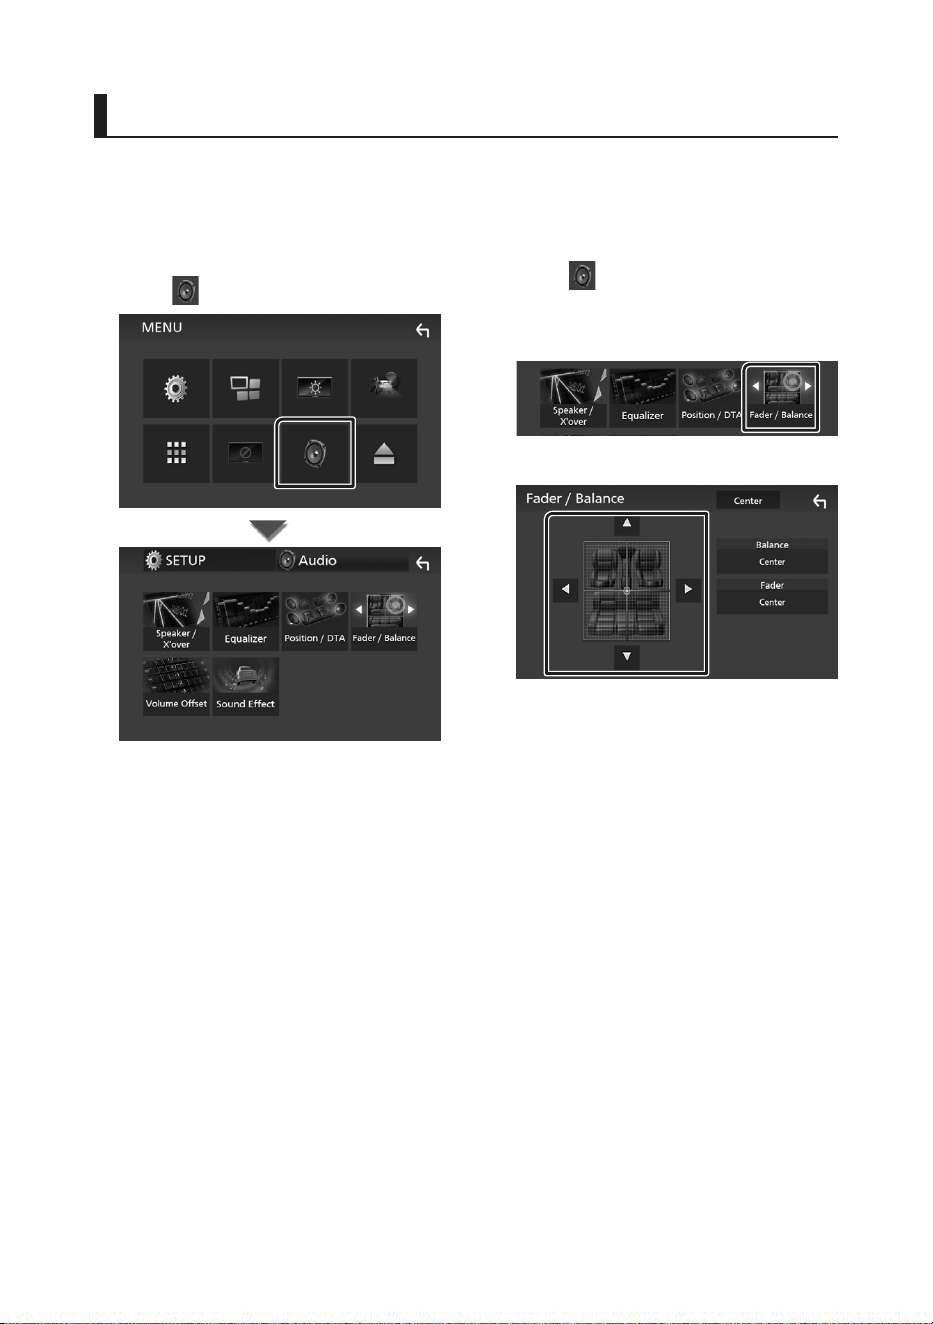
Ñ Controlling General Audio
1 Press the [MENU] button.
hh MENU screen appears.
2 Touch [ ].
hh Audio screen appears.
3 Touch [Fader / Balance].
4 Set each item as follows.
■ [Fader] / [Balance]
Adjust the volume balance around the
touched area.
[C] and [D] adjust the right and left volume
balance.
[R] and [S] adjust the front and rear volume
balance.
■ [Center]
Clear the adjustment.
!B5H-0358-03_QSG_DDX_K_EnFrEs.indb 24 2020/06/03 13:14

Controlling Audio
25English
Ñ Equalizer Control
You can adjust equalizer by selecting the
optimized setting for each category.
1 Press the [MENU] button.
hh MENU screen appears.
2 Touch [ ].
hh Audio screen appears.
3 Touch [Equalizer].
4 Touch the screen and set the Graphic
Equalizer as desired.
■ [ALL SRC]
Apply the adjusted equalizer to all sources.
Touch [ALL SRC] and then touch [OK] on the
confirmation screen.
■ Gain level (dotted frame area)
Adjust the gain level by touching the each
frequency bar.
You can select frequency bar and adjust its
level by [R], [S].
■ [Preset Select]
Displays the screen to recall the preset
equalizer curve.
■ [Initialize]
The current EQ curve returns to flat.
■ [Memory]
Saves the adjusted equalizer curve from
“[User1]” to “[User3]”.
■ [Bass EXT] (Bass Extend Settings)
When turned on, the frequency lower than
62.5 Hz is set to the same gain level as 62.5
Hz.
■ [SW Level]
Adjusts the subwoofer volume.
!B5H-0358-03_QSG_DDX_K_EnFrEs.indb 25 2020/06/03 13:14
Connection/Installation
26
Connection/Installation
Before Installation
Before installation of this unit, please note the
following precautions.
# WARNINGS
• If you connect the ignition wire (red) and the
battery wire (yellow) to the car chassis (ground),
you may cause a short circuit, that in turn may
start a fire. Always connect those wires to the
power source running through the fuse box.
• Do not cut out the fuse from the ignition wire
(red) and the battery wire (yellow). The power
supply must be connected to the wires via the
fuse.
# CAUTION
• Install this unit in the console of your vehicle.
Do not touch the metal part of this unit during
and shortly after the use of the unit. Metal part
such as the heat sink and enclosure become hot.
NOTE
• Mounting and wiring this product requires
skills and experience. For best safety, leave the
mounting and wiring work to professionals.
• Make sure to ground the unit to a negative 12V
DC power supply.
• Do not install the unit in a spot exposed to direct
sunlight or excessive heat or humidity. Also avoid
places with too much dust or the possibility of
water splashing.
• Do not use your own screws. Use only the screws
provided. If you use the wrong screws, you could
damage the unit.
• If the power is not turned ON (“There is an
error in the speaker wiring. Please check the
connections.” is displayed), the speaker wire
may have a short-circuit or touched the chassis
of the vehicle and the protection function may
have been activated. Therefore, the speaker wire
should be checked.
• If your car’s ignition does not have an ACC
position, connect the ignition wires to a power
source that can be turned on and off with the
ignition key. If you connect the ignition wire to
a power source with a constant voltage supply,
such as with battery wires, the battery may be
drained.
• If the console has a lid, make sure to install the
unit so that the front panel will not hit the lid
when closing and opening.
• If the fuse blows, first make sure the wires aren’t
touching to cause a short circuit, then replace the
old fuse with one with the same rating.
• Insulate unconnected wires with vinyl tape or
other similar material. To prevent a short circuit,
do not remove the caps on the ends of the
unconnected wires or the terminals.
• Connect the speaker wires correctly to the
terminals to which they correspond. The unit may
be damaged or fail to work if you share the ¤
wires or ground them to any metal part in the car.
• When only two speakers are being connected
to the system, connect the connectors either to
both the front output terminals or to both the
rear output terminals (do not mix front and rear).
For example, if you connect the ¢ connector
of the left speaker to a front output terminal, do
not connect the ¤ connector to a rear output
terminal.
• After the unit is installed, check whether the
brake lamps, blinkers, wipers, etc. on the car are
working properly.
• Mount the unit so that the mounting angle is 30°
or less.
• Do not press hard on the panel surface when
installing the unit to the vehicle. Otherwise scars,
damage, or failure may result.
• Reception may drop if there are metal objects
near the Bluetooth antenna.
Bluetooth antenna unit
!B5H-0358-03_QSG_DDX_K_EnFrEs.indb 26 2020/06/03 13:14
Connection/Installation
27English
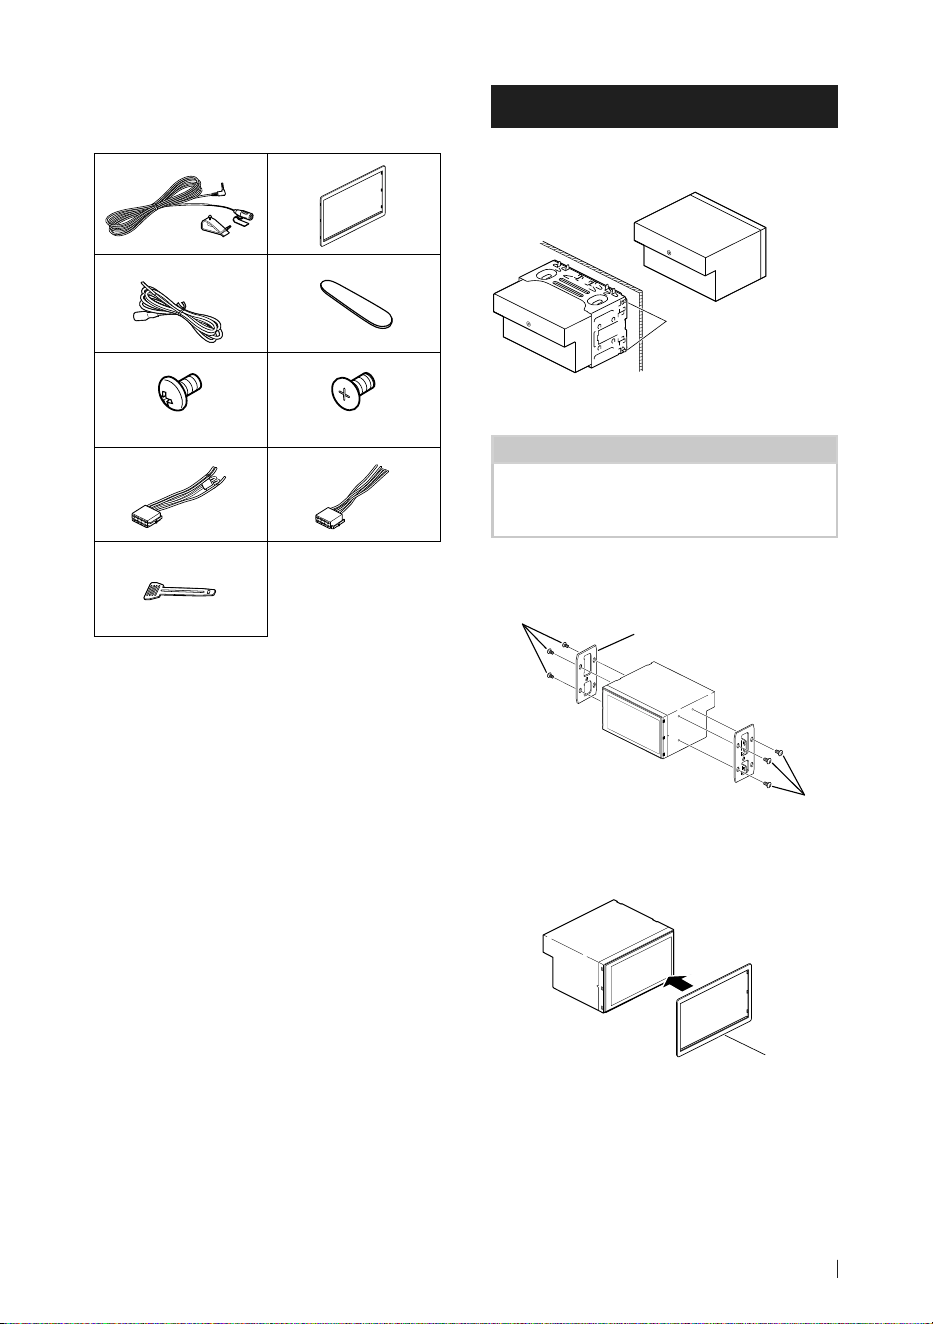
Ñ Supplied accessories for
installation
1
(3 m)
x1
2
x1
3
(2 m)
x1
4
x1
5
(M5 × 6 mm)
x6
6
(M5 × 8 mm)
x6
7
x1
8
x1
9
x2
Ñ Installation procedure
1) To prevent a short circuit, remove the key
from the ignition and disconnect the ¤
terminal of the battery.
2) Make the proper input and output wire
connections for each unit.
3) Take Connector B (accessory 8) on the
wiring harness and connect it to the speaker
connector in your vehicle.
4) Take Connector A (accessory 7) on the wiring
harness and connect it to the external power
connector on your vehicle.
5) Connect the wiring harness connector to the
unit.
6) Install the unit in your car.
7) Reconnect the ¤ terminal of the battery.
8) Press the reset button.
Installing the unit
Ñ Non-Japanese cars
Bend the tabs of the
mounting sleeve with
a screwdriver or similar
utensil and attach it in
place.
NOTE
• Make sure that the unit is installed securely in
place. If the unit is unstable, it may malfunction
(eg, the sound may skip).
Ñ Japanese cars
5 or 6
5 or 6
Car Bracket
Ñ Trim plate
1) Attach accessory 2 to the unit.
2
!B5H-0358-03_QSG_DDX_K_EnFrEs.indb 27 2020/06/03 13:14
Connection/Installation
28
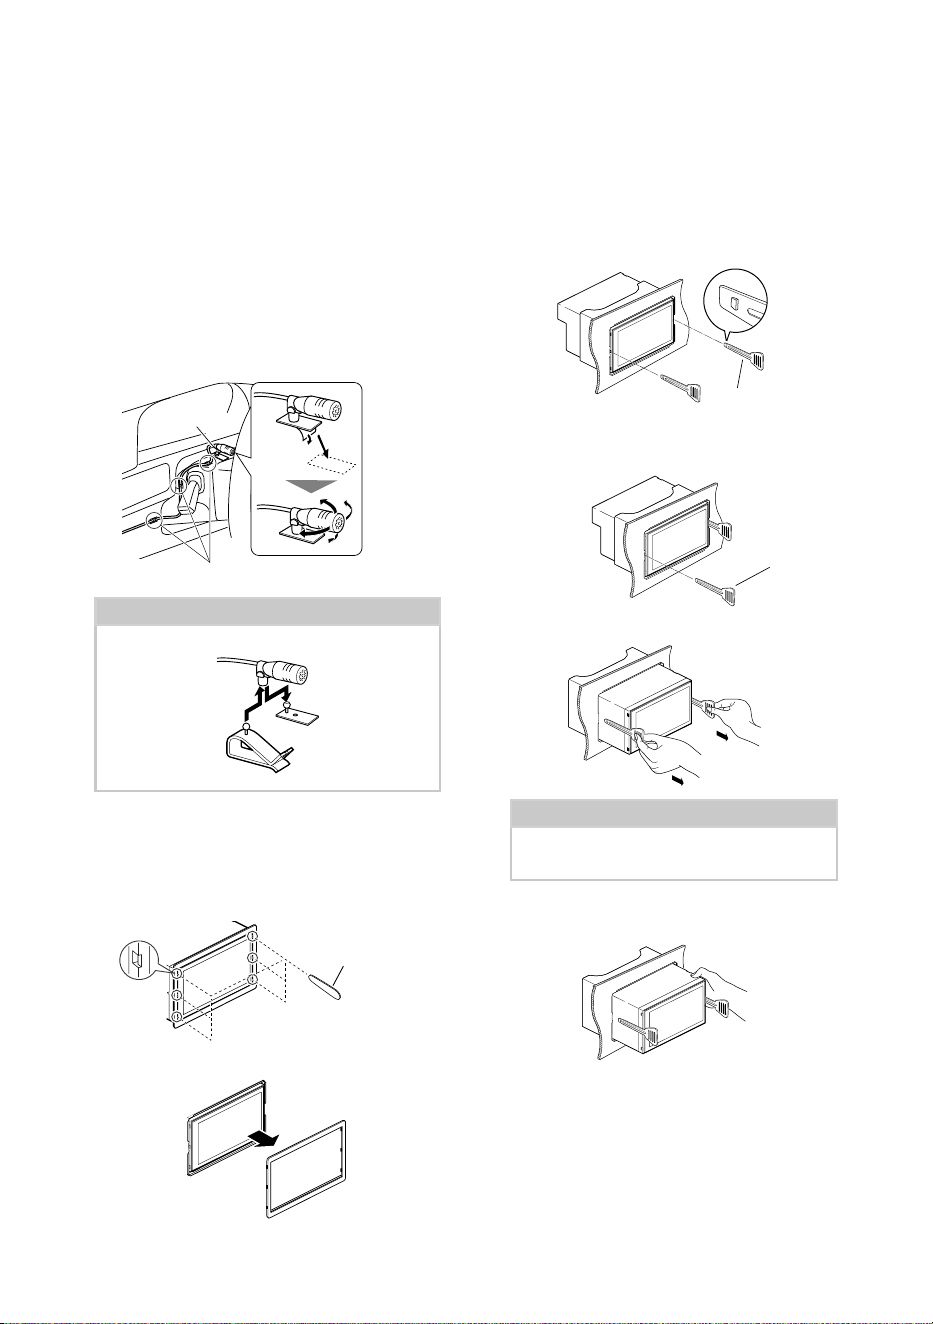
Ñ Microphone unit
1) Check the installation position of the
microphone (accessory 1).
2) Clean the installation surface.
3) Remove the separator of the microphone
(accessory 1), and stick the microphone to
the place shown below.
4) Wire the microphone cable up to the unit
with it secured at several positions using tape
or other desired method.
5) Adjust the direction of the microphone
(accessory 1) to the driver.
1
Fix a cable with a commercial item of tape.
NOTE
• Swap the clips if necessary.
Ñ Removing the trim plate
1) Use the extraction key (accessory 4) to lever
out the six tabs (three on the left part, three
on the right part).
4
2) Pull the trim plate forward.
Ñ Removing the unit
1) Remove the trim plate by referring to step 1 in
“Removing the trim plate”.
2) Insert the extraction key (accessory 9) deeply
into the slot as shown. (The protrusion at the
tip of the extraction key must face toward
the unit.)
9
3) With the inserted extraction key secured,
insert the other extraction key into the slot.
9
4) Pull out the unit halfway.
NOTE
• Be careful to avoid injury from the catch pins
on the extraction key.
5) Pull the unit all the way out with your hands,
being careful not to drop it.
!B5H-0358-03_QSG_DDX_K_EnFrEs.indb 28 2020/06/03 13:14

Connection/Installation
29English
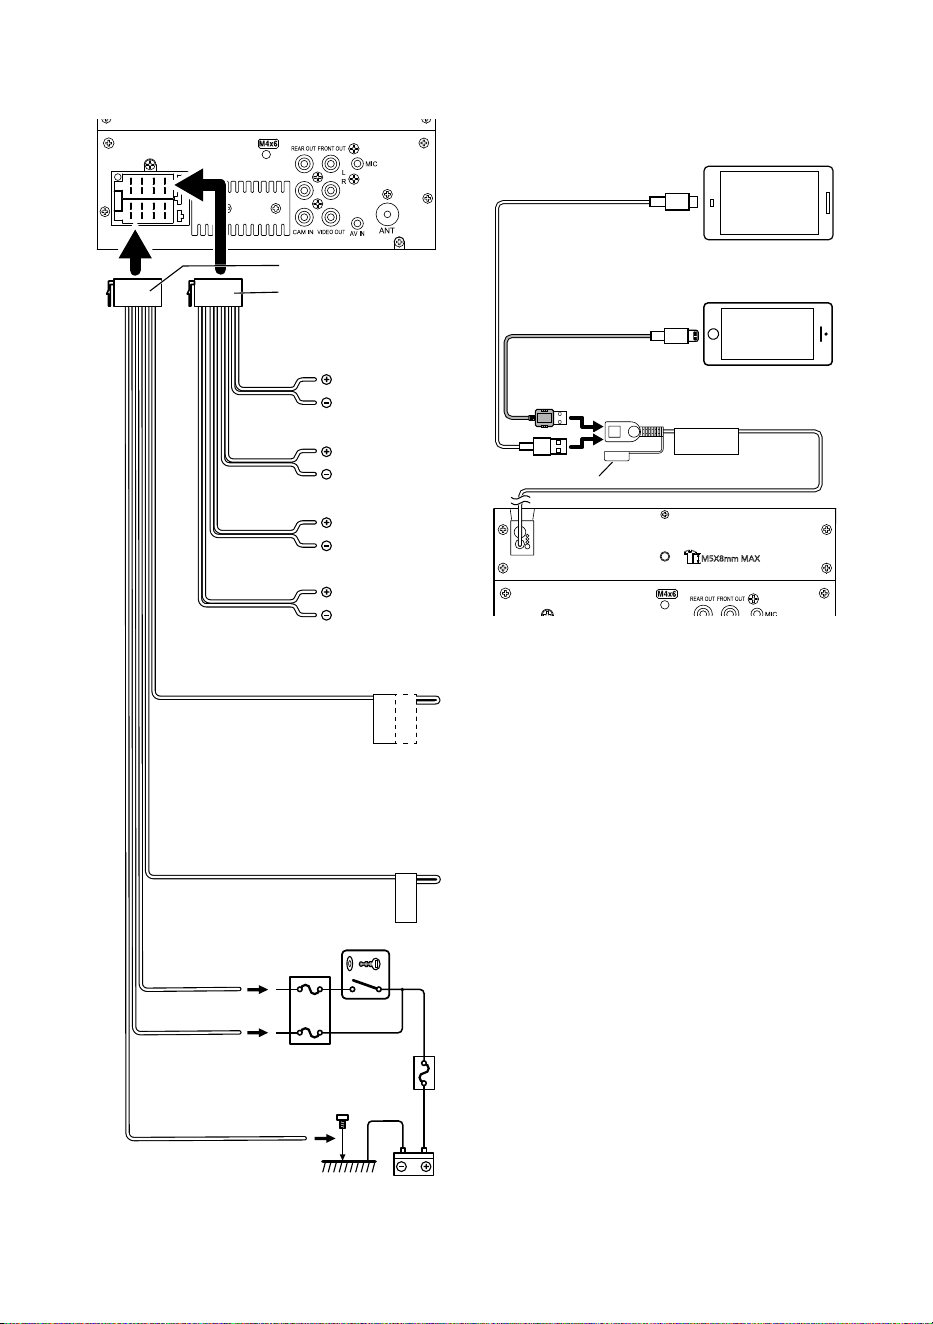
Ñ Connecting wires to terminals
PRK SW
STEERING
WHEEL
REMOTE
INPUT
2 4 6 8
1 3 5 7
2 4 6 8
1 3 5 7
REVERSE
SUB
WOOFER
1 2 3 4
5V
=
1.5A
Sirius XM
Connect to the vehicle’s parking brake
detection switch harness.
For best safety, be sure to connect the parking
sensor.
Light Green (Parking sensor wire)
Accessory 3: Parking Extention cable
Purple/White (Reverse sensor wire)
Accessory 1:
Bluetooth Microphone
To steering remote
To use the steering wheel remote control feature, you need an exclusive
remote adapter (not supplied) matched to your car.
Connect to vehicle’s reverse lamp harness when using the optional rear view
camera.
Light Blue/Yellow (Steering remote control wire)
Fuse (15A)
Subwoofer Preout
Cap
Cap
FM/AM antenna
Connector A
Connector B
USB device
[2]
USB terminal
[1]
(1.0 m)
[1]
USB maximum power supply current :
DC 5 V = 1.5 A
[2]
Sold separately
Accessory 7
Accessory 8
FRONT OUTREAR OUT
VIDEO OUTCAM IN
Rear Audio Preout
(Left; White, Right; Red)
AV-IN
[2]
(1; Left audio, 2; Composite video,
3; Ground, 4; Right audio).
Front Audio Preout
(Left; White, Right; Red)
Visual Output (Yellow)
Rear view camera input (Yellow)
For more information on how to install the SiriusXM Connect Vehicle tuner, consult the
installation guide included with the tuner.
SiriusXM Connect Vehicle Tuner connector
!B5H-0358-03_QSG_DDX_K_EnFrEs.indb 29 2020/06/03 13:14
Connection/Installation
30
Ñ Connecting an iPhone/Android
5V
=
1.5A
KCA-iP103 (0.8m)
[3]
USB cable
[2]
iPhone
[2]
Lightning connector
Android smartphone
[2]
Cap
USB terminal
[1]
(1.0 m)
[1]
iPhone maximum power supply current :
DC 5 V = 1.5 A
[2]
Sold separately
[3]
Optional accessory
2 4 6 8
1 3 5 7
2 4 6 8
1 3 5 7
P.CONT
ANT.CONTILLUMI
Accessory 8
Accessory 7
Blue
(Power control/ Antenna control wire)
Connect either to the power
control terminal when using the
optional power amplifier, or to
the power terminal for the booster amplifier
of the film-type or short pole type antenna.
(Max. 150mA, 12V)
White/Black
Gray/Black
Green/Black
Purple/Black
To car light control switch
Speaker impedance: 4-8 Ω
Purple
Green
Gray
White
To front left
speaker
To front right
speaker
To rear left
speaker
To rear right
speaker
Red (Ignition wire)
Black (Ground wire) ¤
(To car chassis)
Yellow (Battery wire)
Orange/ White (Dimmer control wire)
Ignition key switch
Car fuse box
Battery
!B5H-0358-03_QSG_DDX_K_EnFrEs.indb 30 2020/06/03 13:14
Appendix
31English
Appendix
Specications
■ Bluetooth section
Frequency
: 2.402 – 2.480 GHz
RF Output Power (E.I.R.P.)
: +8 dBm (Avg.), Power Class 1
■ General
Operating Voltage
: 12V DC Car Battery
Speaker Impedance
: 4 – 8 Ω
Specications subject to change without
notice.
About this Unit
■ Copyrights
• The Bluetooth® word mark and logos are registered
trademarks owned by Bluetooth SIG, Inc. and any use
of such marks by JVCKENWOOD Corporation is under
license. Other trademarks and trade names are those of
their respective owners.
• Manufactured under license from Dolby Laboratories.
Dolby, Dolby Audio and the double-D symbol are
trademarks of Dolby Laboratories.
•
is a trademark of DVD Format/Logo Licensing
Corporation registered in the U.S., Japan and other
countries.
• This item incorporates copy protection technology
that is protected by U.S. patents and other intellectual
property rights of Rovi. Reverse engineering and
disassembly are prohibited.
• Windows Media is a registered trademark or trademark
of Microsoft Corporation in the United States and/or
other countries.
• This product is protected by certain intellectual
property rights of Microsoft. Use or distribution of
such technology outside of this product is prohibited
without a license from Microsoft.
• Use of the Made for Apple badge means that an
accessory has been designed to connect specifically
to the Apple product(s) identified in the badge, and
has been certified by the developer to meet Apple
performance standards. Apple is not responsible for
the operation of this device or its compliance with
safety and regulatory standards. Please note that the
use of this accessory with an Apple product may affect
wireless performance.
• Apple, iPhone and Lightning are trademarks of Apple
Inc., registered in the U.S. and other countries.
• Apple, Siri, Apple CarPlay and Apple CarPlay logo are
trademarks of Apple Inc., registered in the U.S. and other
countries.
• App Store is a service mark of Apple Inc., registered in
the U.S. and other countries.
• Sirius, XM and all related marks and logos are
trademarks of Sirius XM Radio Inc. All rights reserved.
• IOS is a trademark or registered trademark of Cisco in
the U.S. and other countries and is used under license.
• Google, Android, Google Play and Android Auto are
trademarks of Google LLC.
• To use Android Auto on your car display, you’ll need an
Android Auto compatible vehicle or aftermarket stereo,
an Android phone running Android 5.0 or higher, and
the Android Auto app.
• Linux® is the registered trademark of Linus Torvalds in
the U.S. and other countries.
!B5H-0358-03_QSG_DDX_K_EnFrEs.indb 31 2020/06/03 13:14

Appendix
32
• THIS PRODUCT IS LICENSED UNDER THE AVC PATENT
PORTFOLIO LICENSE FOR THE PERSONAL USE OF A
CONSUMER OR OTHER USES IN WHICH IT DOES NOT
RECEIVE REMUNERATION TO (¡)ENCODE VIDEO IN
COMPLIANCE WITH THE AVC STANDARD (“AVC VIDEO”)
AND/OR (¡¡)DECODE AVC VIDEO THAT WAS ENCODED BY
A CONSUMER ENGAGED IN A PERSONAL ACTIVITY AND/
OR WAS OBTAINED FROM A VIDEO PROVIDER LICENSED
TO PROVIDE AVC VIDEO. NO LICENSE IS GRANTED OR
SHALL BE IMPLIED FOR ANY OTHER USE. ADDITIONAL
INFORMATION MAY BE OBTAINED FROM MPEG LA, L.L.C.
SEE HTTP://WWW.MPEGLA.COM
• THIS PRODUCT IS LICENSED UNDER THE MPEG-4 VISUAL
PATENT PORTFOLIO LICENSE FOR THE PERSONAL
AND NON-COMMERCIAL USE OF A CONSUMER FOR
(¡) ENCODING VIDEO IN COMPLIANCE WITH THE
MPEG-4 VISUAL STANDARD (“MPEG-4 VIDEO”) AND/
OR (¡¡) DECODING MPEG-4 VIDEO THAT WAS ENCODED
BY A CONSUMER ENGAGED IN A PERSONAL AND
NON-COMMERCIAL ACTIVITY AND/OR WAS OBTAINED
FROM A VIDEO PROVIDER LICENSED BY MPEG LA TO
PROVIDE MPEG-4 VIDEO. NO LICENSE IS GRANTED OR
SHALL BE IMPLIED FOR ANY OTHER USE. ADDITIONAL
INFORMATION INCLUDING THAT RELATING TO
PROMOTIONAL, INTERNAL AND COMMERCIAL USES
AND LICENSING MAY BE OBTAINED FROM MPEG LA, LLC.
SEE HTTP://WWW.MPEGLA.COM.
• THIS PRODUCT IS LICENSED UNDER THE VC-1 PATENT
PORTFOLIO LICENSE FOR THE PERSONAL AND NON-
COMMERCIAL USE OF A CONSUMER TO ( i ) ENCODE
VIDEO IN COMPLIANCE WITH THE VC-1 STANDARD
(“VC-1 VIDEO”) AND/OR ( ii ) DECODE VC-1 VIDEO
THAT WAS ENCODED BY A CONSUMER ENGAGED IN A
PERSONAL AND NON-COMMERCIAL ACTIVITY AND/
OR WAS OBTAINED FROM A VIDEO PROVIDER LICENSED
TO PROVIDE VC-1 VIDEO. NO LICENSE IS GRANTED OR
SHALL BE IMPLIED FOR ANY OTHER USE. ADDITIONAL
INFORMATION MAY BE OBTAINED FROM MPEG LA, L.L.C.
SEE HTTP://WWW.MPEGLA.COM
• libFLAC
Copyright (C) 2000,2001,2002,2003,2004,2005,2006,2007
,2008,2009 Josh Coalson
Redistribution and use in source and binary forms, with
or without modification, are permitted provided that
the following conditions are met:
– Redistributions of source code must retain the above
copyright notice, this list of conditions and the
following disclaimer.
– Redistributions in binary form must reproduce the
above copyright notice, this list of conditions and the
following disclaimer in the documentation and/or
other materials provided with the distribution.
– Neither the name of the Xiph.org Foundation nor the
names of its contributors may be used to endorse or
promote products derived from this software without
specific prior written permission.
THIS SOFTWARE IS PROVIDED BY THE COPYRIGHT
HOLDERS AND ONTRIBUTORS ``AS IS’’ AND ANY
EXPRESS OR IMPLIED WARRANTIES, INCLUDING,
BUT NOT LIMITED TO, THE IMPLIED WARRANTIES OF
MERCHANTABILITY AND FITNESS FOR A PARTICULAR
PURPOSE ARE DISCLAIMED. IN NO EVENT SHALL THE
FOUNDATION OR CONTRIBUTORS BE LIABLE FOR ANY
DIRECT, INDIRECT, INCIDENTAL, SPECIAL, EXEMPLARY,
OR CONSEQUENTIAL DAMAGES (INCLUDING, BUT NOT
LIMITED TO, PROCUREMENT OF SUBSTITUTE GOODS
OR SERVICES; LOSS OF USE, DATA, OR PROFITS; OR
BUSINESS INTERRUPTION) HOWEVER CAUSED AND ON
ANY THEORY OF LIABILITY, WHETHER IN CONTRACT,
STRICT LIABILITY, OR TORT (INCLUDING NEGLIGENCE OR
OTHERWISE) ARISING IN ANY WAY OUT OF THE USE OF
THIS SOFTWARE, EVEN IF ADVISED OF THE POSSIBILITY
OF SUCH DAMAGE.
• libvorbis
Copyright (c) 2002-2008 Xiph.org Foundation
Redistribution and use in source and binary forms, with
or without modification, are permitted provided that
the following conditions are met:
– Redistributions of source code must retain the above
copyright notice, this list of conditions and the
following disclaimer.
– Redistributions in binary form must reproduce the
above copyright notice, this list of conditions and the
following disclaimer in the documentation and/or
other materials provided with the distribution.
– Neither the name of the Xiph.org Foundation nor the
names of its contributors may be used to endorse or
promote products derived from this software without
specific prior written permission.
THIS SOFTWARE IS PROVIDED BY THE COPYRIGHT
HOLDERS AND CONTRIBUTORS ``AS IS’’ AND ANY
EXPRESS OR IMPLIED WARRANTIES, INCLUDING,
BUT NOT LIMITED TO, THE IMPLIED WARRANTIES OF
MERCHANTABILITY AND FITNESS FOR A PARTICULAR
PURPOSE ARE DISCLAIMED. IN NO EVENT SHALL THE
FOUNDATION OR CONTRIBUTORS BE LIABLE FOR ANY
DIRECT, INDIRECT, INCIDENTAL, SPECIAL, EXEMPLARY,
OR CONSEQUENTIAL DAMAGES (INCLUDING, BUT NOT
LIMITED TO, PROCUREMENT OF SUBSTITUTE GOODS
OR SERVICES; LOSS OF USE, DATA, OR PROFITS; OR
BUSINESS INTERRUPTION) HOWEVER CAUSED AND ON
ANY THEORY OF LIABILITY, WHETHER IN CONTRACT,
STRICT LIABILITY, OR TORT (INCLUDING NEGLIGENCE OR
OTHERWISE) ARISING IN ANY WAY OUT OF THE USE OF
THIS SOFTWARE, EVEN IF ADVISED OF THE POSSIBILITY
OF SUCH DAMAGE.
!B5H-0358-03_QSG_DDX_K_EnFrEs.indb 32 2020/06/03 13:14

Appendix
33English
• libogg
Copyright (c) 2002, Xiph.org Foundation Redistribution
and use in source and binary forms, with or without
modification, are permitted provided that the following
conditions are met:
– Redistributions of source code must retain the above
copyright notice, this list of conditions and the
following disclaimer.
– Redistributions in binary form must reproduce the
above copyright notice, this list of conditions and the
following disclaimer in the documentation and/or
other materials provided with the distribution.
– Neither the name of the Xiph.org Foundation nor the
names of its contributors may be used to endorse or
promote products derived from this software without
specific prior written permission.
THIS SOFTWARE IS PROVIDED BY THE COPYRIGHT
HOLDERS AND CONTRIBUTORS ``AS IS’’ AND ANY
EXPRESS OR IMPLIED WARRANTIES, INCLUDING,
BUT NOT LIMITED TO, THE IMPLIED WARRANTIES OF
MERCHANTABILITY AND FITNESS FOR A PARTICULAR
PURPOSE ARE DISCLAIMED. IN NO EVENT SHALL THE
FOUNDATION OR CONTRIBUTORS BE LIABLE FOR ANY
DIRECT, INDIRECT, INCIDENTAL, SPECIAL, EXEMPLARY,
OR CONSEQUENTIAL DAMAGES (INCLUDING, BUT NOT
LIMITED TO, PROCUREMENT OF SUBSTITUTE GOODS
OR SERVICES; LOSS OF USE, DATA, OR PROFITS; OR
BUSINESS INTERRUPTION) HOWEVER CAUSED AND ON
ANY THEORY OF LIABILITY, WHETHER IN CONTRACT,
STRICT LIABILITY, OR TORT (INCLUDING NEGLIGENCE OR
OTHERWISE) ARISING IN ANY WAY OUT OF THE USE OF
THIS SOFTWARE, EVEN IF ADVISED OF THE POSSIBILITY
OF SUCH DAMAGE.
!B5H-0358-03_QSG_DDX_K_EnFrEs.indb 33 2020/06/03 13:14

Avant l'utilisation
34
Table des matières Avant l'utilisation
À propos du guide de
démarrage rapide
Ce Guide de démarrage rapide décrit les
fonctions de base de cet appareil.
Pour plus d'informations et de détails sur les
opérations, reportez-vous au MODE D'EMPLOI
sur le site Internet suivant :
<https://www.kenwood.com/cs/ce/>
Le mode d'emploi est susceptible d'être modifié
suite aux changements pouvant être apportés
aux spécifications etc.
Téléchargez impérativement la dernière édition
du mode d'emploi aux fins de référence.
Comment lire ce manuel
• Les écrans et façades illustrés dans le présent
manuel sont des exemples destinés à fournir des
explications plus claires des opérations.
C'est pourquoi il est possible qu'ils soient
différents des écrans effectivement affichés
ou de la façade de l'appareil, ou que certaines
séquences d'affichage soient différentes.
• Langue des indications : Les indications en
anglais sont utilisées dans un but explicatif. Vous
pouvez choisir la langue des indications à partir
du menu [SETUP]. Voir le Mode d'emploi.
Avant l'utilisation ...................................................... 34
À propos du guide de démarrage rapide ........................... 34
Comment lire ce manuel ..............................................................34
Précautions ............................................................................................. 35
Utilisation de base....................................................37
Fonctions des boutons en façade ...........................................37
Mise en marche de l'appareil ......................................................37
Mise en route ........................................................................................ 38
Régler le volume. ................................................................................ 39
Fonctionnement tactile .................................................................39
Descriptions de l'écran d'ACCUEIL ..........................................40
Descriptions de l'écran de sélection de source ..............40
Descriptions de l'écran de commande de source.........42
Écran MENU ........................................................................................... 43
Écran des listes ..................................................................................... 43
Disque ..........................................................................44
Lecture d'un disque .......................................................................... 44
Utilisation de base avec les DVD/VCD ..................................44
Utilisation du menu DVD ..............................................................45
USB ................................................................................46
Connecter un périphérique USB ..............................................46
Fonctionnement de base USB ...................................................46
Radio .............................................................................47
Utilisation de base de la radio .................................................... 47
SiriusXM® .....................................................................48
Utilisation de base de SiriusXM® ............................................... 48
Utilisation de la mémorisation ...................................................48
Utilisation du Bluetooth ......................................... 50
Enregistrez depuis le périphérique Bluetooth .................50
Utilisation du module mains-libres ......................................... 51
Contrôle de l'audio ..................................................54
Connexion/Installation ...........................................56
Avant l'installation .............................................................................56
Installation de l'appareil ................................................................. 57
Annexes .......................................................................61
Spécifications ........................................................................................61
À propos de cet appareil ...............................................................61
!B5H-0358-03_QSG_DDX_K_EnFrEs.indb 34 2020/06/03 13:14

Avant l'utilisation
35Français
Précautions
#AVERTISSEMENTS
Ñ Pour éviter toute blessure
ou incendie, prenez les
précautions suivantes:
• Pour éviter un court-circuit, ne mettez ni ne
laissez jamais d'objets métalliques (comme des
pièces de monnaie ou des outils en métal) à
l'intérieur de l'appareil.
• Ne regardez pas ni ne fixez votre regard sur
l'affichage de l'appareil trop longtemps pendant
la conduite.
• Si vous rencontrez des problèmes pendant
l'installation, consultez votre revendeur
KENWOOD.
Ñ Précautions d'utilisation de
l'appareil
• Lorsque vous achetez des accessoires en option,
vérifiez auprès de votre revendeur KENWOOD
qu'ils fonctionneront avec votre modèle et dans
votre région.
• Vous avez le choix de la langue dans laquelle
s'affichent les menus, les balises des fichiers
audio, etc. Voir le Mode d'emploi.
• Les fonctions Radio Data System ou Radio
Broadcast Data System sont inopérantes dans
les zones où le service n'est pris en charge par
aucune station de radiodiffusion.
Ñ Protection du moniteur
• Ne touchez pas le moniteur avec un stylo à
bille ou tout autre outil pointu. Cela pourrait
l'endommager.
Ñ Nettoyage de l'appareil
• Si la façade de l'appareil est tâchée, essuyez-la
avec un chiffon doux et sec comme un chiffon en
silicone. Si la façade est très sale, essuyez-la avec
un chiffon imbibé d'un produit de nettoyage
neutre, puis essuyez-la à nouveau avec un chiffon
doux et sec propre.
REMARQUE
• La pulvérisation directe de produit de nettoyage
sur l'appareil risque d'endommager les pièces
mécaniques. Si vous nettoyez la façade avec
un chiffon trop rugueux ou un liquide volatil,
comme un solvant ou de l'alcool, vous risquez
d'en rayer la surface ou d'effacer les caractères
sérigraphiés.
Ñ Comment réinitialiser votre
appareil
• Si l'appareil ou l'équipement qui lui est branché
ne fonctionne pas normalement, réinitialisez-
le. Appuyez sur la touche < Réinit. >. L'appareil
revient aux réglages d'usine.
Bouton de réinitialisation
Ñ Condensation sur la lentille
• Par temps froid, lorsque vous allumez le
chauffage de la voiture, de la buée peut se
former sur la lentille du lecteur de disque de
l'appareil à cause de la condensation. Cette
condensation présente sur la lentille (également
appelée voile de lentille) peut empêcher la
lecture des disques. Dans ce cas, retirez le disque
et attendez que la buée s'évapore. Si l'appareil
ne fonctionne toujours pas normalement au
bout d'un moment, consultez votre revendeur
KENWOOD.
!B5H-0358-03_QSG_DDX_K_EnFrEs.indb 35 2020/06/03 13:14
Avant l'utilisation
36
Ñ Précautions relatives à la
manipulation des disques
• Ne touchez pas la surface d'enregistrement du
disque.
• Ne collez pas de ruban adhésif sur le disque et
n'utilisez pas de disques sur lesquels du ruban
adhésif est collé.
• N'utilisez pas d'accessoires de disque.
• Nettoyez le disque en partant du centre vers le
contour extérieur.
• Lorsque vous retirez un disque de l'appareil,
extrayez-le à l'horizontale.
• Si le trou central ou le bord extérieur du disque
comporte des bavures, éliminez-les avec un stylo
à bille ou un objet similaire avant de l'utiliser.
• Les disques qui ne sont pas ronds ne peuvent pas
être utilisés.
• Les disques de 8 cm (3 pouces) sont inutilisables.
• Les disques sales ou comportant des coloriages
sur la surface d'enregistrement ne peuvent être
utilisés.
• Cet appareil ne peut lire que les types de CD
suivants.
• Cet appareil risque de ne pas lire correctement
les disques qui ne portent pas cette marque.
• Vous ne pouvez pas lire un disque qui n'a pas été
finalisé. (Pour la procédure de finalisation, référez-
vous à votre logiciel de gravure et au mode
d'emploi de votre graveur.)
Ñ Avertissement pour les
utilisateurs de smartphones
• L’exécution en simultané de plusieurs
applications sur votre smartphone, en écran
partagé, sollicite tout particulièrement son
microprocesseur, d’où une altération potentielle
des performances et de la qualité des
communications.
• Afin d'obtenir des résultats optimaux lors de
l'association de votre smartphone avec votre
récepteur KENWOOD, assurez-vous de fermer
toutes les applications inutilisées.
!B5H-0358-03_QSG_DDX_K_EnFrEs.indb 36 2020/06/03 13:14
Utilisation de base
37Français
Utilisation de base
Fonctions des boutons en
façade
1
2
3
4
5
6
7
REMARQUE
• Les écrans illustrés dans le présent guide sont
des exemples destinés à fournir des explications
plus claires des opérations. Pour cette raison,
il peut arriver qu'ils soient différents de ceux
rencontrés dans la réalité.
Désignation
• Mouvement
1
Capteur de télécommande
• Reçoit le signal de la télécommande.
2
[S], [R] ([VOL])
• Règle le volume.
Le volume augmentera jusqu'à 15 tant que
vous maintiendrez [R] enfoncé.
3
[ HOME ]
• Affiche l'écran d'ACCUEIL (p.40).
• Appuyez pendant 1 seconde pour éteindre
l'appareil.
• Permet de mettre l'appareil en marche
lorsqu'il est éteint.
4
[MENU]
• Affiche l'écran MENU.
• Appuyez pendant 1 seconde pour éteindre
l'écran.
5
[VOICE]
• Affiche l'écran de reconnaissance vocale.
Désignation
• Mouvement
6
Réinitialisation
• Si l'appareil ou l'appareil qui y est connecté
ne fonctionne pas correctement, appuyez
sur ce bouton pour que l'appareil retrouve
les réglages initiaux.
7
Logement d'insertion des disques
• Logement où insérer les disques à contenu
multimédia. (p.44)
Mise en marche de l'appareil
1
Appuyez sur le bouton [HOME].
hh L'appareil se met en marche.
● Pour éteindre l'appareil:
1
Appuyez sur le bouton [HOME] pendant 1
seconde.
REMARQUE
• Si c'est la première fois que vous mettez en
marche l'appareil après son installation, il
vous faut procéder à la Configuration initiale
(p.38).
!B5H-0358-03_QSG_DDX_K_EnFrEs.indb 37 2020/06/03 13:14
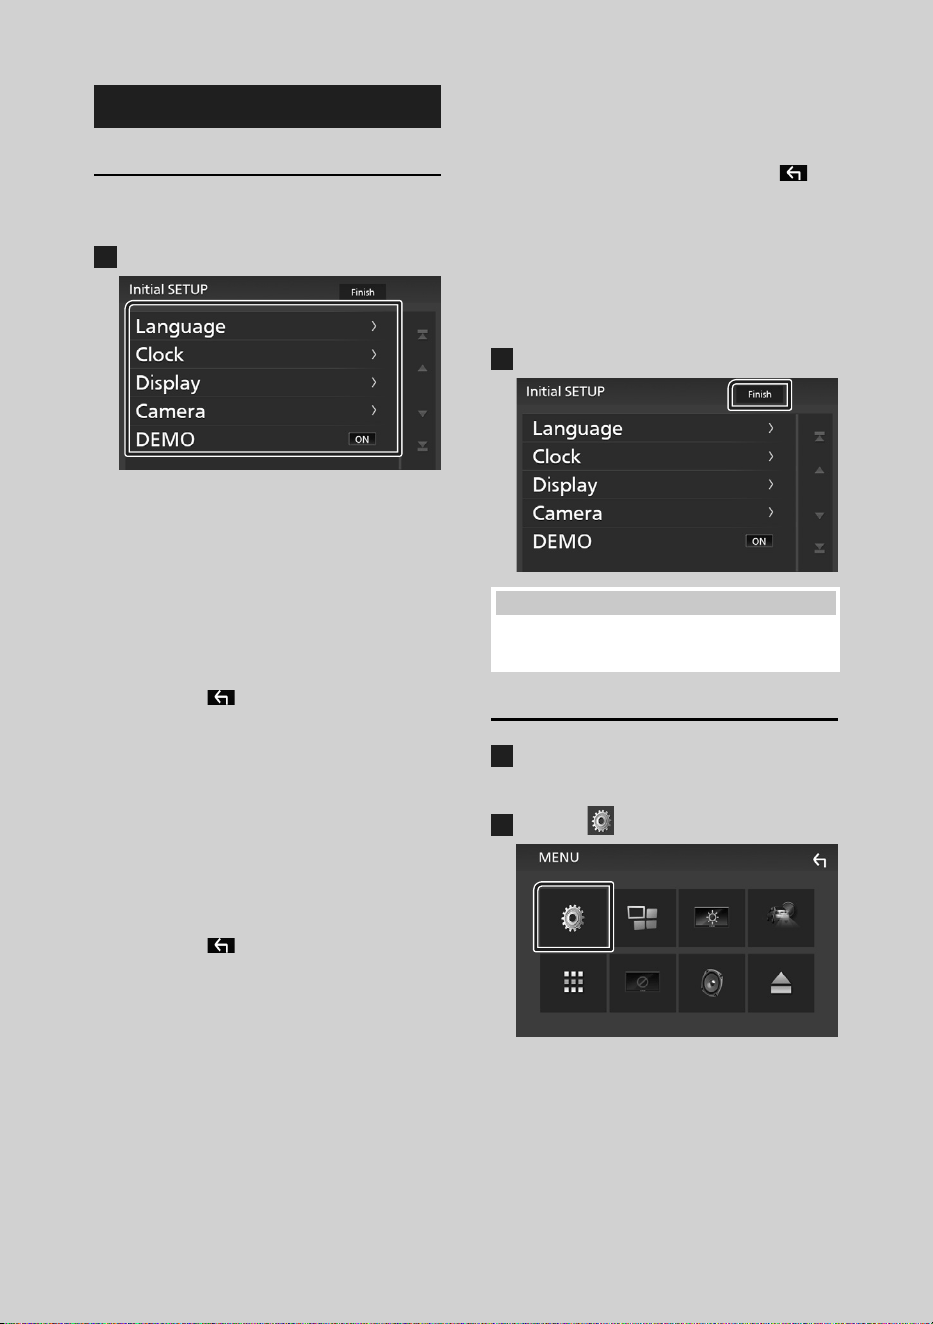
Utilisation de base
38
Mise en route
Conguration initiale
Effectuez cette configuration lors de la première
utilisation de cet appareil.
1
Réglez chaque option comme suit.
■ [Language]
Sélectionne la langue utilisée sur l'écran
de commande et sur les éléments de
configuration. Le choix par défaut est
« [American English(en)] ».
1Touchez [Language].
2Touchez [Language Select].
3Sélectionnez la langue désirée.
4Touchez [
].
■ [Clock]
Règle l'horloge.
Pour les explications détaillées, voir Réglages
du calendrier/horloge (p.38).
■ [Display]
Réglez l'image à l'écran.
1Appuyez sur [Display].
2Touchez [Background].
3Sélectionnez l'image.
4Touchez [
].
Pour les explications détaillées, voir le Mode
d'emploi.
■ [Camera]
Configurez les paramètres de caméra.
1Touchez [Camera].
2Réglez chaque option et touchez [
].
Pour les explications détaillées, voir le Mode
d'emploi.
■ [DEMO]
Permet de paramétrer le mode de
démonstration. Le choix par défaut est “ON”.
1Touchez [DEMO] et réglez [ON] ou [OFF].
2
Touchez [Finish].
REMARQUE
• Ces réglages sont paramétrables depuis le menu
de configuration.
Réglages du calendrier/horloge
1
Appuyez sur le bouton [MENU].
hh L'écran MENU apparaît.
2
Touchez [ ].
hh L'écran de menu de configuration
s'affiche.
!B5H-0358-03_QSG_DDX_K_EnFrEs.indb 38 2020/06/03 13:14
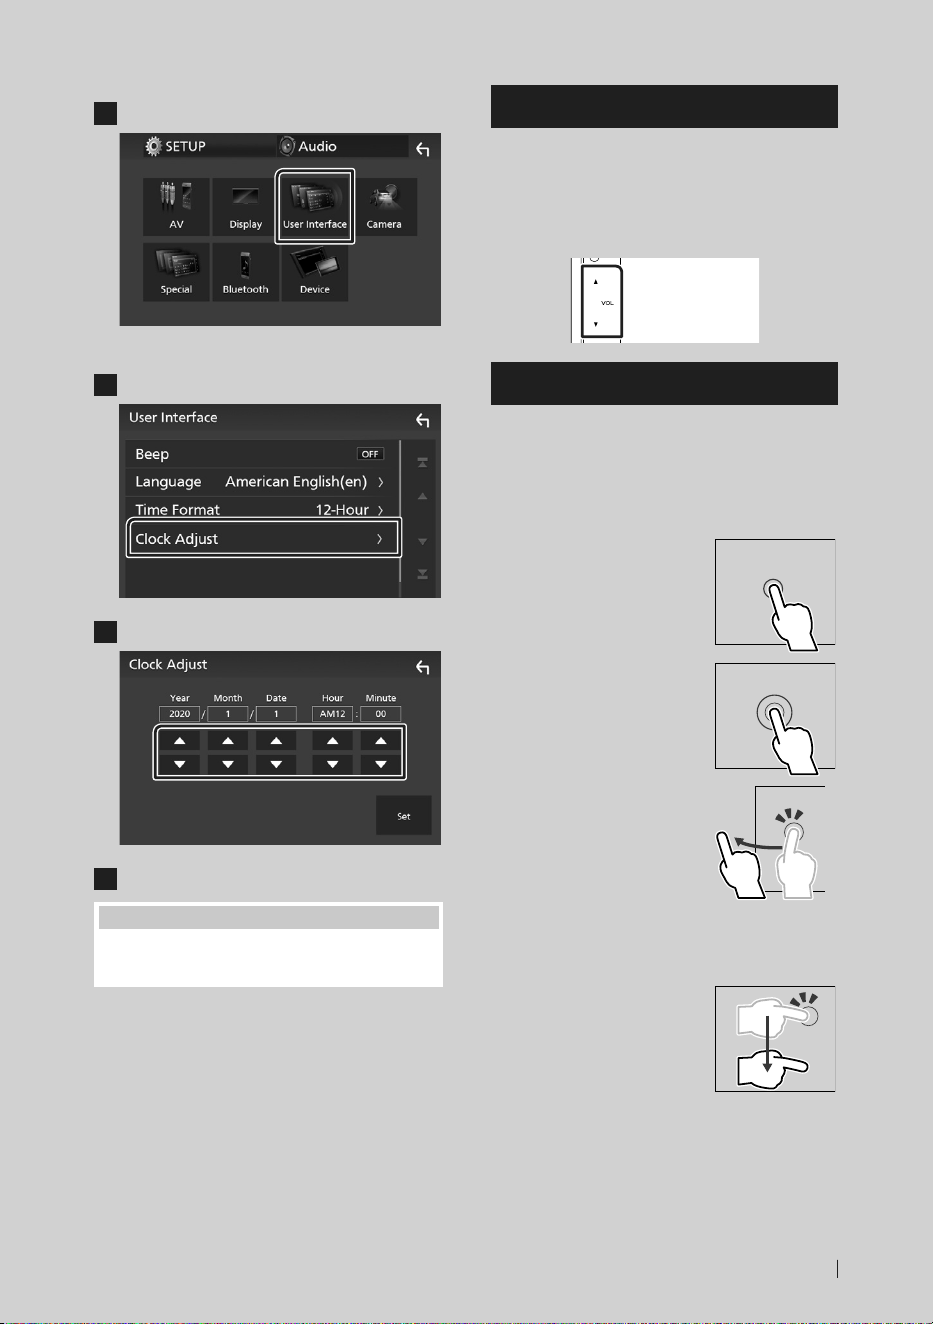
Utilisation de base
39Français
3
Touchez [User Interface].
hh L'écran d'interface utilisateur s'affiche.
4
Touchez [Clock Adjust].
5
Réglez la date puis l'heure.
6
Touchez [Set].
REMARQUE
• Désactivez [RDS CT] avant de régler l'horloge.
Voir le Mode d'emploi.
Régler le volume.
Pour régler le volume (0 à 40),
Appuyez sur [R] pour augmenter, et appuyez sur
[S] pour réduire.
Maintenez [R] enfoncé pour augmenter le
volume de façon continue jusqu'au niveau 15.
Fonctionnement tactile
Pour réaliser des opérations sur l'écran, vous
devez toucher, toucher longuement, feuilleter
ou défiler pour sélectionner un élément, afficher
l'écran de menu de réglage, changer la page,
etc.
● Toucher
Touchez légèrement l'écran
pour sélectionner un élément
sur l'écran.
● Toucher longuement
Touchez l'écran et gardez
votre doigt sur l'écran jusqu'à
ce que l'affichage change ou
qu'un message soit affiché.
● Feuilleter
Faites glisser votre doigt
rapidement vers la gauche ou
vers la droite sur l'écran pour
changer de page.
Vous pouvez faire défiler
l'écran de la liste en le faisant
défiler au doigt vers le haut
ou vers le bas.
● Défiler
Faites glisser votre doigt vers
le haut ou le bas pour faire
défiler l'écran.
!B5H-0358-03_QSG_DDX_K_EnFrEs.indb 39 2020/06/03 13:14
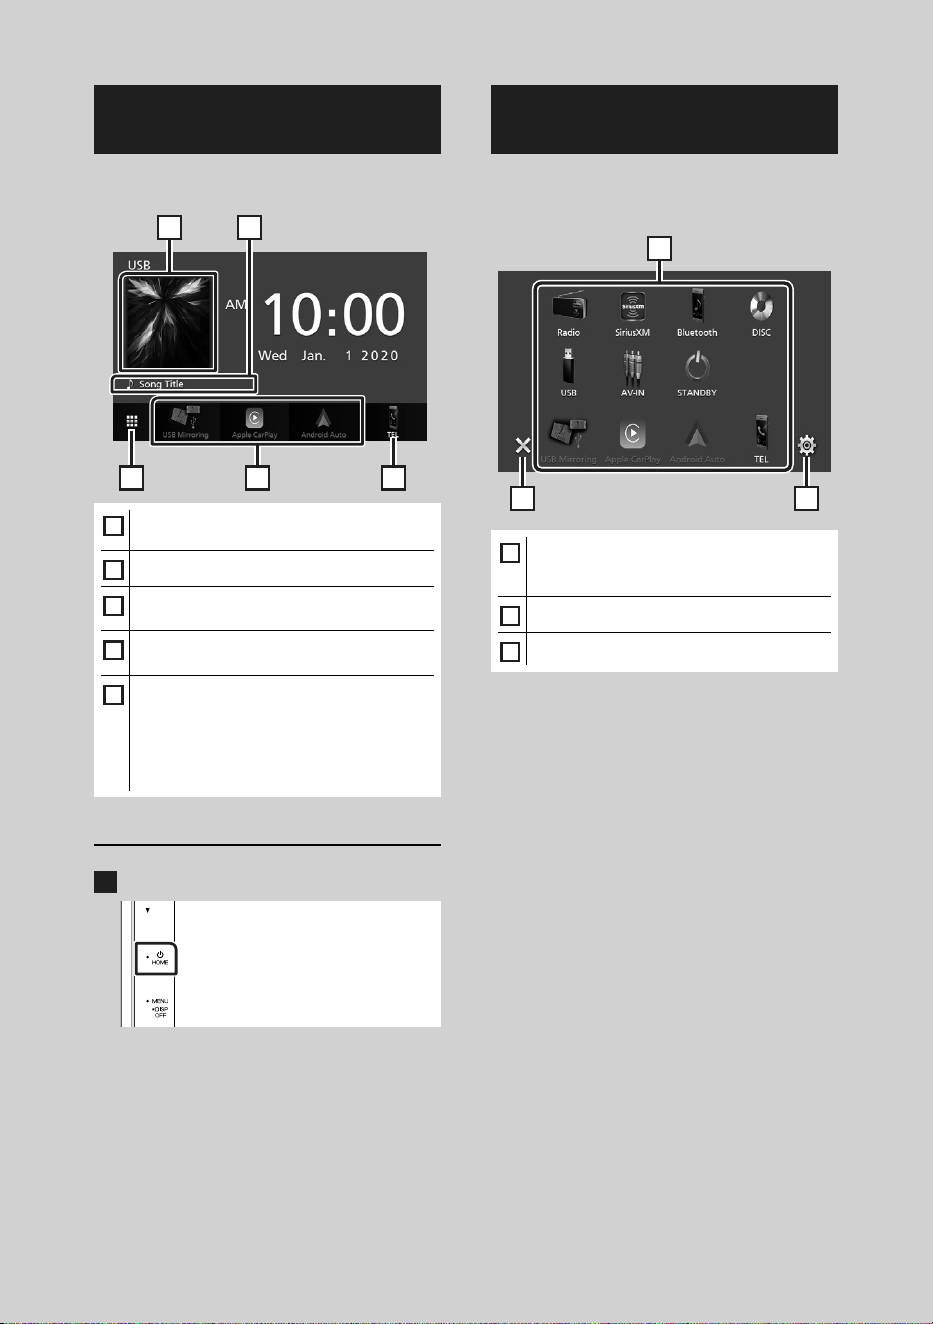
Utilisation de base
40
Descriptions de l'écran
d'ACCUEIL
La plupart des fonctions sont accessibles depuis
l'écran ACCUEIL.
3
2
4 5
1
1
• Affiche l'écran de contrôle de la source en
cours.
2
• Informations sur la source actuelle
3
• Affiche l'écran de sélection de la source.
(p.40)
4
• Icônes de raccourci de source de lecture
(p.41)
5
• Affiche l'écran Mains libres. (p.51)
• Lorsque vous vous connectez avec Apple
CarPlay ou Android Auto, le mode de
fonctionnement est le même que sur un
téléphone fourni dans Apple CarPlay ou
Android Auto.
Ache l'écran d'ACCUEIL
1
Appuyez sur le bouton [HOME].
hh L'écran d'ACCUEIL apparaît.
Descriptions de l'écran de
sélection de source
Vous pouvez afficher toutes les sources de
lecture et les options sur l'écran de sélection de
source.
2 3
1
1
• Change la source de lecture.
Pour les sources de lecture, voir Sélectionnez
la source de lecture (p.41).
2
• Revient à l'écran précédent.
3
• Affiche l'écran du menu CONFIGURATION.
!B5H-0358-03_QSG_DDX_K_EnFrEs.indb 40 2020/06/03 13:14
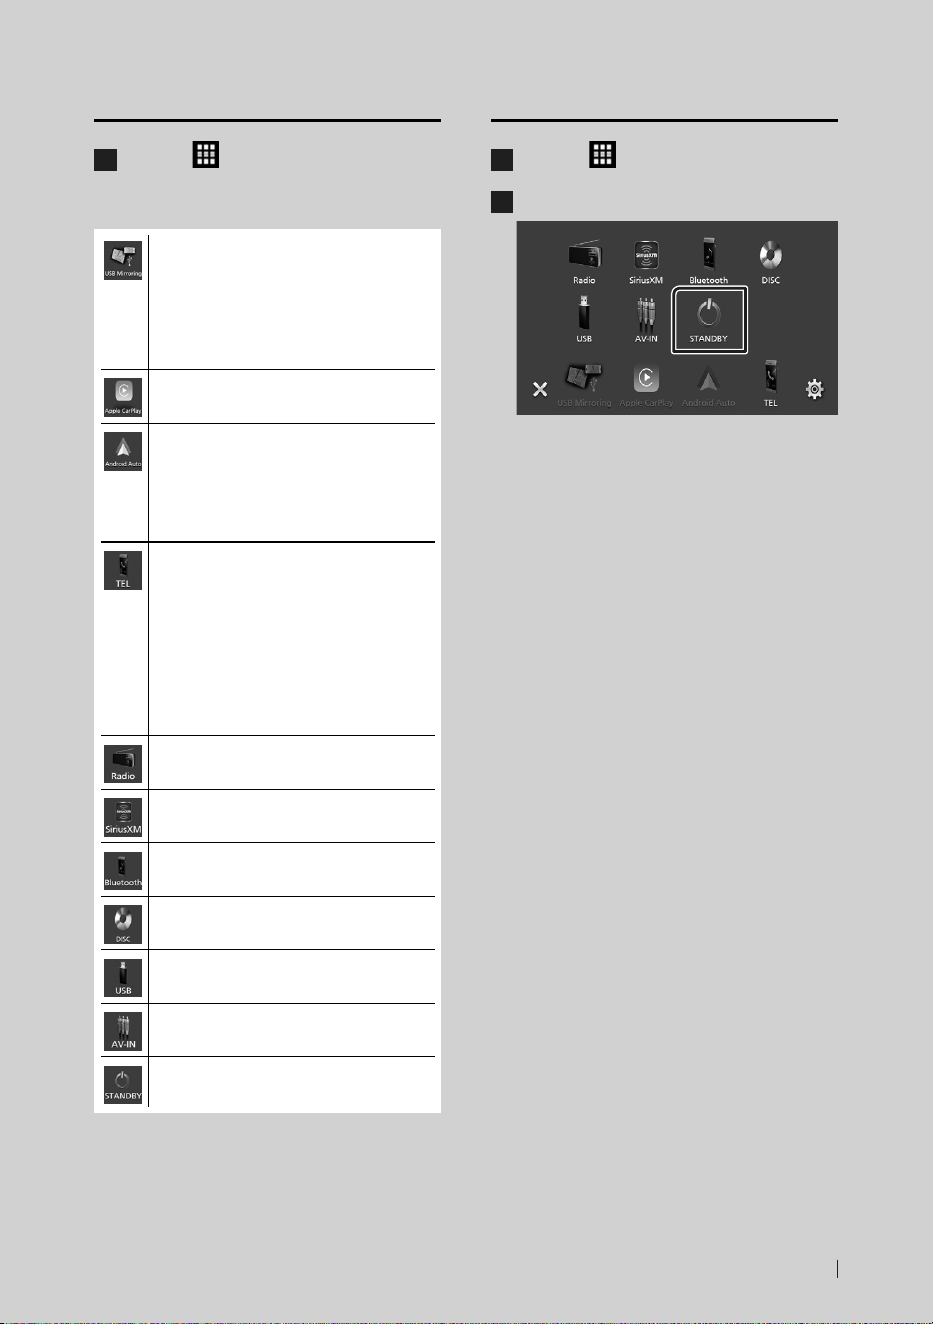
Utilisation de base
41Français
Sélectionnez la source de lecture
1
Touchez [ ] sur l'écran d'ACCUEIL.
Depuis cet écran, vous pouvez sélectionner
les sources et fonctions suivantes.
• Passe à l'écran Miroitage USB depuis le
smartphone Android connecté.
Il est nécessaire de connecter un
smartphone Android avec l'application
«Mirroring OA for KENWOOD»
installée et de régler [Mode] sur
[Mirroring for Android™].
• Passe à l'écran Apple CarPlay depuis
l'iPhone connecté.
• Passe à l'écran Android Auto depuis le
smartphone Android connecté.
Il est nécessaire de connecter un
smartphone Android compatible avec
Android Auto et de régler [Mode] sur
[Android Auto].
• Affiche l'écran Mains libres. (p.51)
Lorsque ni Apple CarPlay, ni Android
Auto, ni un téléphone mains libres
Bluetooth n'est connecté, le message
« [Disconnected] » s'affiche. sur l'écran TEL.
Lorsque vous vous connectez avec Apple
CarPlay ou Android Auto, le mode de
fonctionnement est le même que sur un
téléphone fourni dans Apple CarPlay ou
Android Auto.
• Commute sur la réception radio. (p.47)
• Commute sur la réception radio satellite
SiriusXM®. (p.48)
• Lit les fichiers sur un lecteur audio
Bluetooth.
• Lit un disque. (p.44)
• Joue les fichiers d'un périphérique USB.
(p.46)
• Commute sur un appareil extérieur
connecté à la borne d'entrée AV-IN.
• Met l'appareil en veille. (p.41)
Mettez l'appareil en veille
1
Touchez [ ] sur l'écran d'ACCUEIL.
2
Touchez [STANDBY].
!B5H-0358-03_QSG_DDX_K_EnFrEs.indb 41 2020/06/03 13:14

Utilisation de base
42
Descriptions de l'écran de
commande de source
Certaines fonctions sont accessibles depuis la
plupart des écrans.
Indicateurs
1
2 3 4
Menu secondaire
1
[ ]/[ ]
Informations concernant les périphériques
Bluetooth connectés.
2
Icône de toutes les sources
Affiche toutes les sources.
3
Écran secondaire
• [ ]/[ ] : L'écran secondaire change à chaque fois
que vous le touchez. Vous pouvez aussi changer
l'écran secondaire en faisant défiler vers la
gauche ou la droite sur l'écran.
• Indicateurs : Affiche l'état actuel de la source et
ainsi de suite.
– [MUTE]: La fonction de réglage de coupure de son
(sourdine) est active.
– [LOUD]: La fonction de réglage du volume est
active.
• Menu secondaire
– [ ]: Opération lorsque l'icône est touchée :
La première touche assombrit l'écran, la deuxième
touche assombrit davantage l'écran et la troisième
touche restaure l'écran à sa luminosité d'origine.
– [
] : Affiche l'écran de l'égaliseur graphique.
(p.55)
– [
]: Affiche l'écran APP (Apple CarPlay/Android
Auto).
4
[Û]
Touchez pour afficher l'écran mains-libres.
(p.51)
Lorsque vous vous connectez avec Apple
CarPlay ou Android Auto, le mode de
fonctionnement est le même que sur un
téléphone fourni dans Apple CarPlay ou Android
Auto.
!B5H-0358-03_QSG_DDX_K_EnFrEs.indb 42 2020/06/03 13:14

Utilisation de base
43Français
Écran MENU
1
Appuyez sur le bouton [MENU].
hh L'écran MENU s'affiche.
2
Touchez pour afficher l'écran MENU.
Le menu contient les options suivantes.
• Affiche l'écran du menu CONFIGURATION.
• Affiche l'écran APP (Apple CarPlay/Android
Auto).
• Affiche l'écran de réglage de l'écran.
• Affiche la caméra de vue.
• Affiche l'écran de sélection de la source.
(p.41)
• Éteint l'affichage. (p.43)
• Affiche l'écran du Menu de contrôle audio.
(p.54)
• Appuyez pour éjecter le disque. (p.44)
• Fermez l'écran MENU.
Mettez l'écran hors tension
1
Sélectionnez [ ] sur l'écran MENU.
● Pour allumer l'écran
1
Touchez l'affichage.
Écran des listes
Certaines touches de fonction sont communes
aux écrans de liste de la plupart des sources.
61 2
3 4 5
1
Affiche la fenêtre de sélection de type liste.
2
Affiche la liste des fichiers de musique ou de
film.
3
Défilement du texte
Fait défiler le texte affiché.
4
etc.
Les touches ayant plusieurs fonctions s'affichent
ici.
• [ ] : Joue toutes les pistes dans le dossier
contenant la piste actuelle.
• [
] [ ] : Remonte au niveau hiérarchique
supérieur.
5
[ ] / [ ] / [ ] / [ ] Défilement de la
page
Vous pouvez changer de page pour afficher
plus d'éléments en appuyant sur [
]/[ ].
• [ ]/[ ] : Affiche la page du haut ou la page
du bas.
6
Retour
Revient à l'écran précédent.
REMARQUE
• Les boutons qui ne peuvent pas être activés
depuis la liste ne sont pas affichés.
!B5H-0358-03_QSG_DDX_K_EnFrEs.indb 43 2020/06/03 13:14
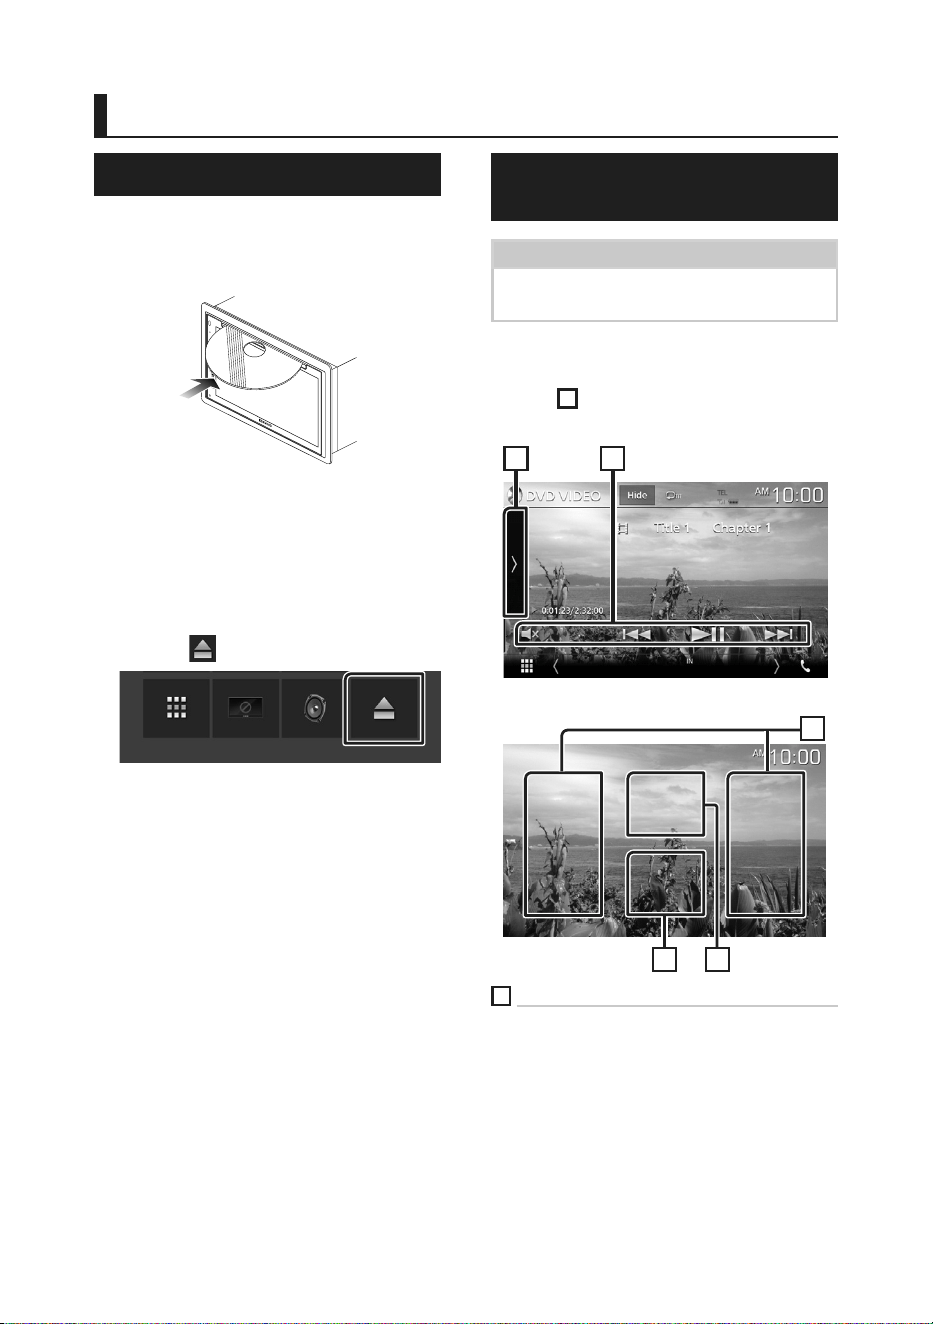
Disque
44
Disque
Lecture d'un disque
Ñ Insérer un disque
1 Insérez le disque dans son logement.
hh L'appareil charge le disque et la lecture
commence.
Ñ Éjecter un disque
1 Appuyez sur le bouton [MENU].
hh L'écran MENU apparaît.
2 Touchez [ ].
Lors de l'extraction d'un disque, extrayez-le
à l'horizontal.
Utilisation de base avec les
DVD/VCD
REMARQUE
• La capture d'écran ci-dessous est avec un DVD.
Elle peut être différente avec un VCD.
1 Lorsque les touches de fonctionnement
ne sont pas affichées à l'écran, touchez la
zone
4
.
Écran de contrôle
2
1
Écran vidéo
3
4 5
1
Panneau de fonction
Appuyez sur le côté gauche de l'écran pour
afficher le panneau de fonction. Appuyez de
nouveau pour fermer le panneau. Pour plus
de détails sur les touches, voir Panneau de
fonction (p.45).
!B5H-0358-03_QSG_DDX_K_EnFrEs.indb 44 2020/06/03 13:14

Disque
45Français
2
Touches de commande
• [E] [F] : Recherche le contenu précédent/
suivant.
Touchez et maintenez enfoncé pour effectuer
une avance rapide ou un retour rapide du disque.
• [DH] : Lance la lecture ou met en pause.
• [
] : Touchez pour désactiver le son ou l'activer.
3
Zone de recherche
Touchez pour faire une recherche du contenu
suivant/précédent.
4
Zone d'affichage des touches
Touchez pour afficher l'écran de contrôle.
5
[MENU CTRL] (DVD uniquement)
Touchez pour afficher l'écran de contrôle du
menu du disque DVD-VIDÉO. Voir Utilisation
du menu DVD (p.45).
Ñ Panneau de fonction
1 Touchez sur le côté gauche de l'écran de
commande.
DVD VCD
Les fonctions de chaque touche sont les
suivantes.
[
] [ ]: Avance rapide ou retour rapide
du disque. Chaque fois que vous touchez
cette touche, la vitesse change.
[
] [ ] (DVD uniquement) : Lit au ralenti
en avant ou en arrière.
[I]: Arrête la lecture. Toucher deux fois
permet de lire le disque depuis le début la
prochaine fois que vous le lirez.
[SETUP] (DVD uniquement): Touchez pour
afficher l'écran CONFIGURATION DVD.
[MENU CTRL] (DVD uniquement): Touchez
pour afficher l'écran de contrôle du menu
du disque DVD-VIDÉO. Voir Utilisation du
menu DVD (p.45).
[PBC] (VCD uniquement): Touchez pour
activer ou désactiver la commande de
lecture (PBC).
[Audio] (VCD uniquement): Touchez pour
changer les canaux de sortie audio.
Utilisation du menu DVD
Vous pouvez configurer certaines fonctions
dans le menu du disque DVD-VIDÉO.
1 Touchez la zone
5
pendant la lecture.
hh L'écran de contrôle par menu s'affiche.
2 Effectuez les actions de votre choix,
comme suit.
■ Pour afficher le menu supérieur
Touchez [TopMenu].*
■ Pour afficher le menu
Touchez [Menu].*
■ Pour afficher le menu précédent
Touchez [Return].*
■ Pour valider l'élément sélectionné
Touchez [Enter].
■ Pour activer le fonctionnement direct
Touchez [Highlight] pour passer en mode
de contrôle par surbrillance.
■ Pour déplacer le curseur
Touchez [R], [S], [C], [D].
■ Pour changer parmi les langues des
sous-titres
Touchez [Subtitle]. Chaque fois que vous
touchez cette touche, les langues des sous-
titres changent.
■ Pour changer parmi les langues audio
Touchez [Audio]. Chaque fois que vous
touchez cette touche, les langues audio
changent.
■ Pour changer parmi les angles d'image
Touchez [Angle]. Chaque fois que vous
touchez cette touche, les angles d'images
changent.
* Il peut arriver que ces touches soient
inopérantes, selon le disque.
!B5H-0358-03_QSG_DDX_K_EnFrEs.indb 45 2020/06/03 13:14
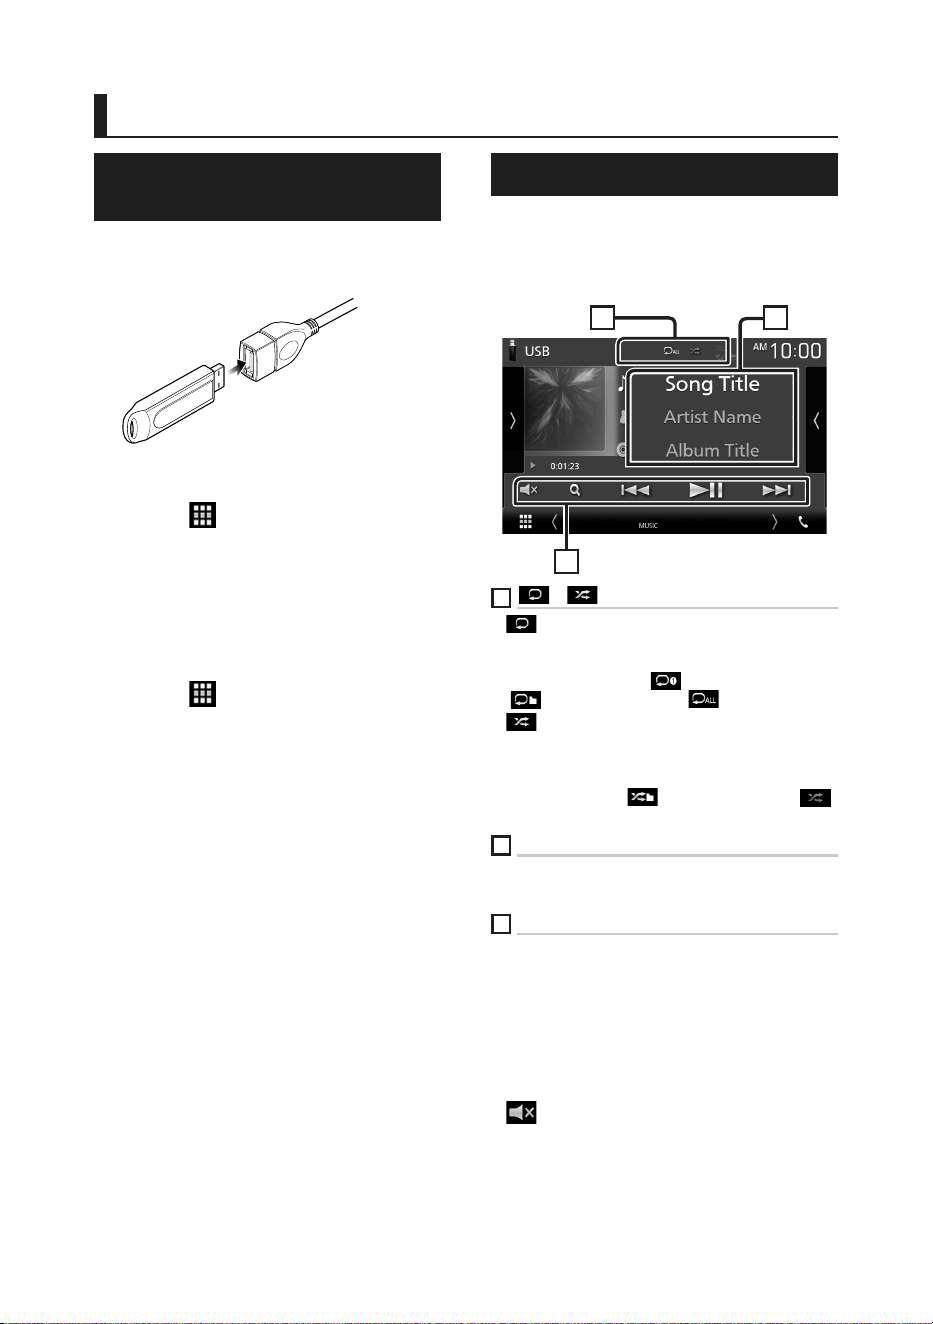
USB
46
USB
Connecter un périphérique
USB
1 Branchez le périphérique USB avec le
câble USB. (p.59)
2 Appuyez sur le bouton [HOME].
3 Touchez [ ].
4 Touchez [USB]. (p.41)
Ñ Déconnectez le périphérique
USB
1 Appuyez sur le bouton [HOME].
2 Touchez [ ].
3 Sélectionner une source autre que [USB].
4 Débranchez le périphérique USB.
Ñ Périphérique USB utilisable
Vous pouvez utiliser sur cet appareil une clé USB
de mémoire de masse.
Le terme « périphérique USB » indique dans ce
manuel un dispositif mémoire flash.
Fonctionnement de base USB
La plupart des fonctions sont utilisables depuis
l'écran de contrôle de la source et depuis l'écran
de lecture.
Écran de contrôle
21
3
1
[ ] / [ ]
• [ ] : Répète la piste/le dossier en cours. Chaque
fois que vous touchez la touche, le mode de
répétition change dans l'ordre suivant ;
Répétition de fichier ([
]), Répétition de dossier
([
]), Répétition de tous ([ ])
• [
] : Lit de manière aléatoire tous les morceaux
du dossier en cours. Chaque fois que vous
touchez la touche, le mode aléatoire change
dans l'ordre suivant ;
Fichier au hasard ([
]), Fonction sur arrêt ([ ])
2
Informations sur la piste
Affiche les informations concernant le fichier
en cours.
3
[Touches d'opération
• [1] : Fait une recherche de piste/fichier. Pour plus
de détails sur les opérations de recherche, voir le
Mode d'emploi.
• [E] [F] : Recherche la piste/fichier précédent/
suivant.
Touchez et maintenez enfoncé pour effectuer
une avance ou un retour rapide.
• [D]H] : Lit ou effectue une pause.
• [
] : Touchez pour désactiver le son ou l'activer.
!B5H-0358-03_QSG_DDX_K_EnFrEs.indb 46 2020/06/03 13:14

Radio
47Français
Radio
Utilisation de base de la radio
La plupart des fonctions sont utilisables depuis
l'écran de contrôle des sources.
Pour passer sur la source radio, touchez l'icône
[Radio] sur l'écran de sélection de la source.
(p.41)
Écran de contrôle
4
6
5
3
2
1
Ouvrir le tiroir
4
7
5
1
Affichage des informations
Affiche les informations concernant la station en
cours : Fréquence
Toucher [
] vous permet de basculer entre le
Contenu A et le Contenu B.
– Contenu A : Nom du PS, texte radio, genre PTY
– Contenu B : Texte radio plus, titre de l'artiste
[Preset#]: Numéro de préréglage
2
Mode de recherche
Sélectionne successivement les modes
d'exploration des fréquences, dans l'ordre
suivant : [AUTO1], [AUTO2], [MANUAL].
• [AUTO1]: Syntonise automatiquement sur une
station offrant une bonne réception.
• [AUTO2]: Syntonise les stations en mémoire les
unes après les autres.
• [MANUAL] : Commute sur la fréquence suivante
manuellement.
3
Touches d'opération
• [E] [F] : Syntoniser sur une station. Il est
possible de changer de méthode de sélection
des fréquences (voir 2 dans le tableau).
• [
] : Touchez pour désactiver le son ou l'activer.
4
Liste des présélections
• Touchez le côté droit de l'écran pour afficher la
Liste de préréglage. Appuyez de nouveau pour
fermer la liste.
• Rappelle la station mémorisée.
• En le touchant pendant 2 secondes, il mémorise
la station en cours de réception.
5
Panneau de fonction
Appuyez sur le côté gauche de l'écran pour
afficher le panneau de fonction. Appuyez de
nouveau pour fermer le panneau.
• [TI] (FM uniquement) : Active le mode infos-trafic.
Pour plus de détails, voir le Mode d'emploi.
• [SETUP] (FM uniquement) : Affiche l'écran de
CONFIGURATION de la radio. Pour plus de détails,
voir le Mode d'emploi.
• [AME]: Prédéfinit automatiquement les stations.
Pour plus de détails, voir le Mode d'emploi.
• [PTY] (FM uniquement) : Recherche un
programme en spécifiant un type de
programme. Pour plus de détails, voir le Mode
d'emploi.
• [MONO] (FM uniquement) : Sélectionne la
réception en mono.
6
[FM] [AM]
Change la bande.
7
Éléments indicateurs
• [ST]: Indique que l´émission stéréo est
actuellement reçue.
• [MONO]: Indique que la fonction monophonique
forcée est active.
• [TI]: Indique l´état de réception des informations
routières.
Blanc : Le signal TP est reçu.
Orange : Le signal TP n'est pas reçu.
!B5H-0358-03_QSG_DDX_K_EnFrEs.indb 47 2020/06/03 13:14
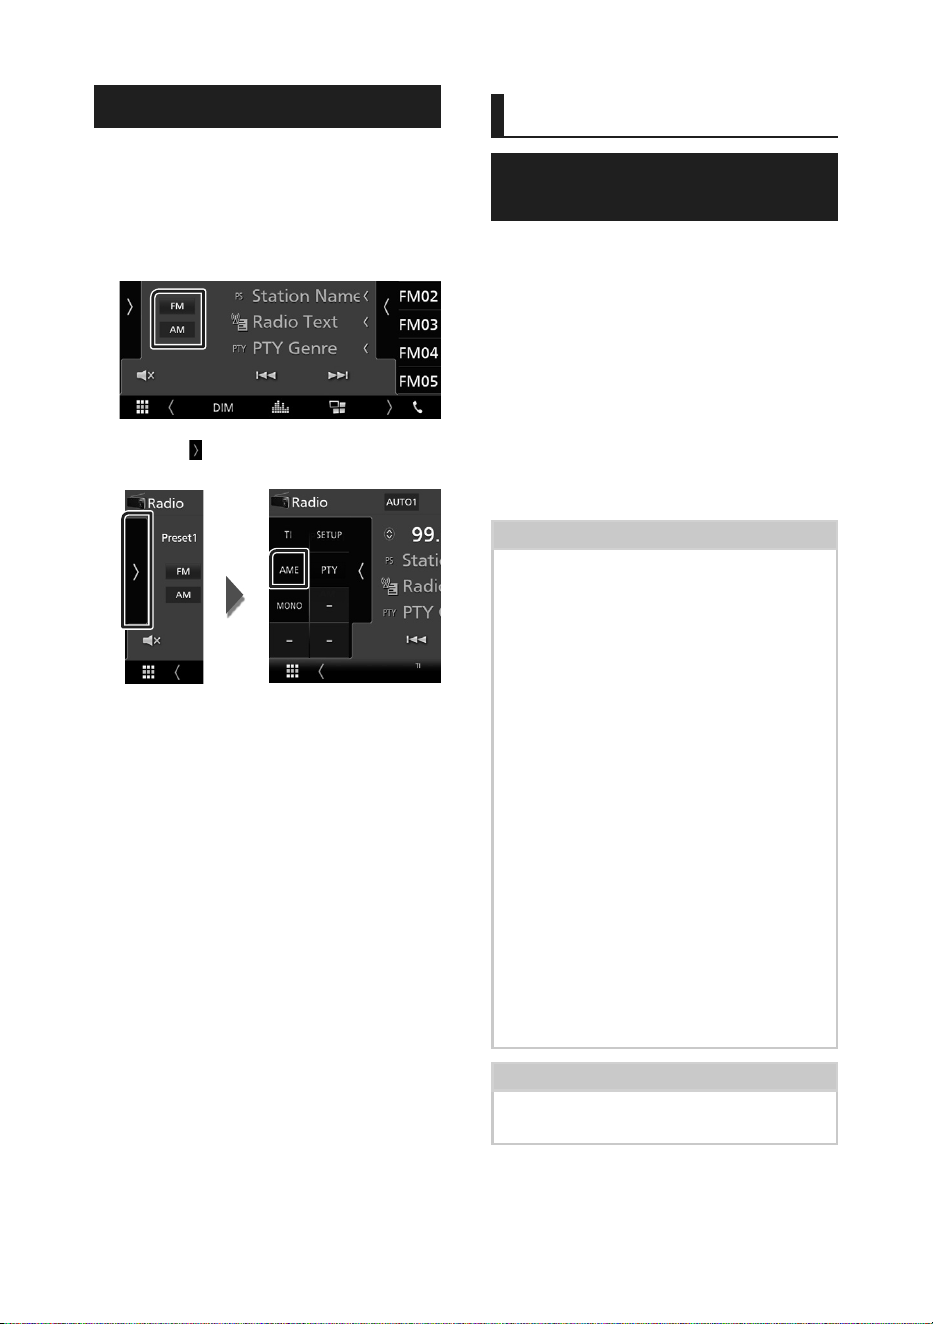
Radio
48
Utilisation de la mémorisation
Ñ Mémoire automatique
Vous pouvez mémoriser automatiquement les
stations offrant une bonne réception.
1 Touchez la touche de la bande de votre
choix.
2 Touchez [ ] sur le côté gauche de l'écran.
Touchez [AME].
hh Un écran de confirmation s'affiche.
3 Touchez [Ye s ].
hh La mémorisation automatique se lance.
Ñ Mémoire manuelle
Vous pouvez mémoriser la station que vous êtes
en train de recevoir.
1 Sélectionnez la station que vous
souhaitez mémoriser.
2 Touchez [FM#] (#:1-24) ou [AM#] (#:1-12)
dans lequel vous souhaitez enregistrer la
station pendant 2 secondes.
SiriusXM®
Utilisation de base de
SiriusXM®
Seul SiriusXM® vous propose encore plus de ce
que vous aimez écouter, tout au même endroit.
Disposez de plus de 140 canaux, musique sans
publicité comprise plus le meilleur du sport,
des informations, des débats, de la comédie et
du divertissement. Bienvenue dans le monde
de la radio satellite. Syntoniseur pour véhicule
SiriusXM et abonnement requis.
Pour de plus amples informations, visitez la
page www.siriusxm.com.
Pour écouter la source SiriusXM, appuyez sur
l'icône [SiriusXM] de l'écran de sélection de la
source. (p.41)
Activation de l'abonnement
• Vérifiez votre identifiant radio.
L'identifiant de la radio satellite SiriusXM est
nécessaire pour l'activation et est disponible en
allant sur le Canal 0 ainsi que sur l'étiquette qui
se trouve sur le syntoniseur SiriusXM Connect et
son emballage.
L'identifiant Radio ne comprend pas les lettres
I, O, S ou F.
• Activez le syntoniseur de véhicule SiriusXM,
à l'aide d'une des deux méthodes expliquées
ci-après :
– Pour les utilisateurs résidant aux États-Unis
En ligne : Visitez
www.siriusxm.com/activatenow
Téléphone :
Appelez le service après-vente SiriusXM au
1-866-635-2349
– Pour les utilisateurs résidant au Canada :
En ligne : Visitez
https://www.siriusxm.ca/help/activation-help/
Téléphone :
Appelez le service après-vente XM au
1-877-438-9677
REMARQUE
• L'accessoire en option est indispensable au
fonctionnement du Radio satellite SiriusXM®.
SiriusXM®
!B5H-0358-03_QSG_DDX_K_EnFrEs.indb 48 2020/06/03 13:14

SiriusXM®
49Français
Écran de contrôle
2
3
1
5
4
Ouvrez le tiroir
5
3
1
Affichage des informations
• Affiche les informations du canal en cours : Nom
du canal
[P#]: Numéro de préréglage
[#CH] : Numéro de canal
Toucher [
] vous permet de basculer entre le
Contenu A et le Contenu B.
– Contenu A : Nom de l'artiste, titre de la chanson
– Contenu B : Informations du contenu, nom de la
catégorie
REMARQUE
• Pendant l'obtention du contenu, « Waiting »
apparaît sur l'affichage.
2
Bouton de bande
Bascule entre les bandes. (SXM1/SXM2/SXM3)
3
Panneau d'illustration/de fonction
• Affiche les illustrations des albums pour la
plupart des chaînes musicales SiriusXM.
• Appuyez sur [
] de l'écran pour afficher le
panneau de fonction. Appuyez sur [
] pour
fermer le panneau.
– [Direct Channel] : Touchez et entrez le numéro
de votre choix. Pour plus de détails, voir le Mode
d'emploi.
– [SETUP]: Touchez pour afficher l'écran
CONFIGURATION SiriusXM. Pour plus de détails, voir
le Mode d'emploi.
– [Replay/Live] : Touchez pour activer ou désactiver
le mode replay. Voir le Mode d'emploi.
4
Touches d'opération
• [1] : Affichez l'écran de recherche de catégorie.
Pour plus de détails sur les opérations de
recherche, voir le Mode d'emploi.
• [DH] : Lance la lecture ou met en pause. Voir le
Mode d'emploi.
• [CHS] [CHR] : Sélectionne un canal.
• [
] : Touchez pour désactiver le son ou l'activer.
5
Liste des présélections
• Appuyez sur [ ] de l'écran pour afficher la liste de
préréglages. Appuyez sur [
] pour fermer la liste.
• Rappelle le canal mémorisé.
• Touchez pendant 2 secondes pour mémoriser le
canal en cours de réception.
!B5H-0358-03_QSG_DDX_K_EnFrEs.indb 49 2020/06/03 13:14
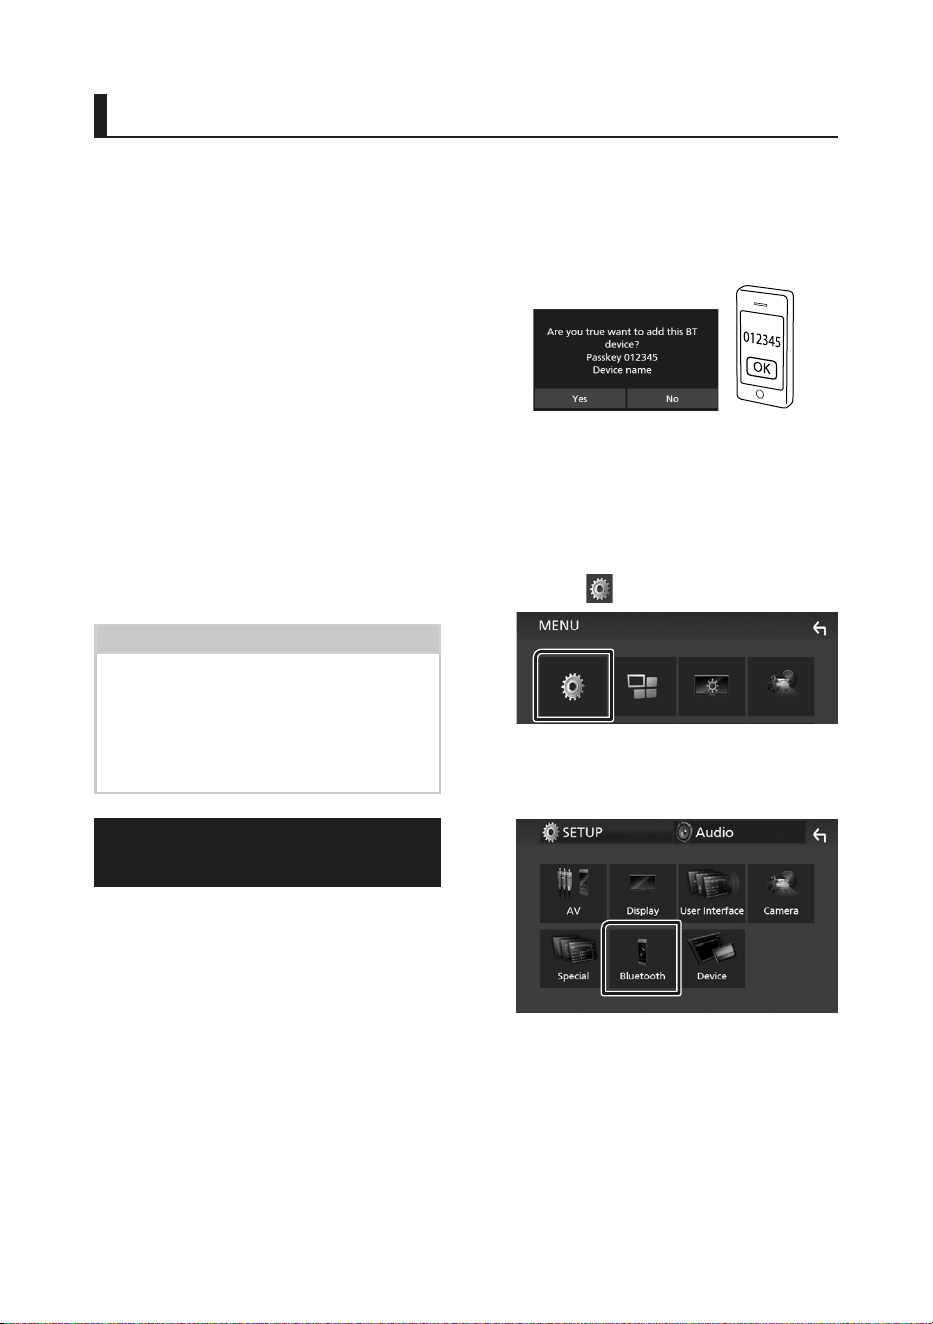
Utilisation du Bluetooth
50
Utilisation du Bluetooth
Ñ À propos du téléphone mobile
et du lecteur audio Bluetooth
Cet appareil est conforme aux caractéristiques
techniques suivantes de la norme Bluetooth :
Version
Bluetooth Ver. 4.1
Profil
Téléphone mobile :
HFP (Profil mains libres)
SPP (Profil port série)
PBAP (Profil d'accès au répertoire
téléphonique)
Lecteur audio :
A2DP (Profil de distribution audio avancée)
AVRCP (Profil de télécommande audio/vidéo)
Codec son
SBC, AAC
REMARQUE
• Les appareils disposant de la fonction Bluetooth
sont certifiés conformes à la norme Bluetooth
d'après la procédure prescrite par Bluetooth SIG.
• Cependant, il est possible que ces appareils ne
puissent pas communiquer avec certains types
de téléphones portables.
Enregistrez depuis le
périphérique Bluetooth
Il est indispensable de déclarer à l'appareil le
lecteur audio ou le téléphone mobile Bluetooth
avant de pouvoir utiliser la fonction Bluetooth.
1 Activer la fonction Bluetooth sur votre
smartphone/téléphone portable.
2 Recherchez l'appareil (« DDX***** ») à
partir de votre smartphone/téléphone
portable.
3 Utilisez votre smartphone/téléphone
portable en fonction des messages
affichés.
■ Confirmez la requête sur le
smartphone/téléphone portable.
■ Si un code PIN est requis, entrez le code
PIN (« 0000 »).
4 Touchez [Ye s ].
5 Appuyez sur le bouton [MENU].
hh L'écran MENU s'affiche.
6 Touchez [ ].
hh L'écran de menu de configuration
s'affiche.
7 Touchez [Bluetooth].
hh L'écran de configuration Bluetooth
s'affiche.
!B5H-0358-03_QSG_DDX_K_EnFrEs.indb 50 2020/06/03 13:14
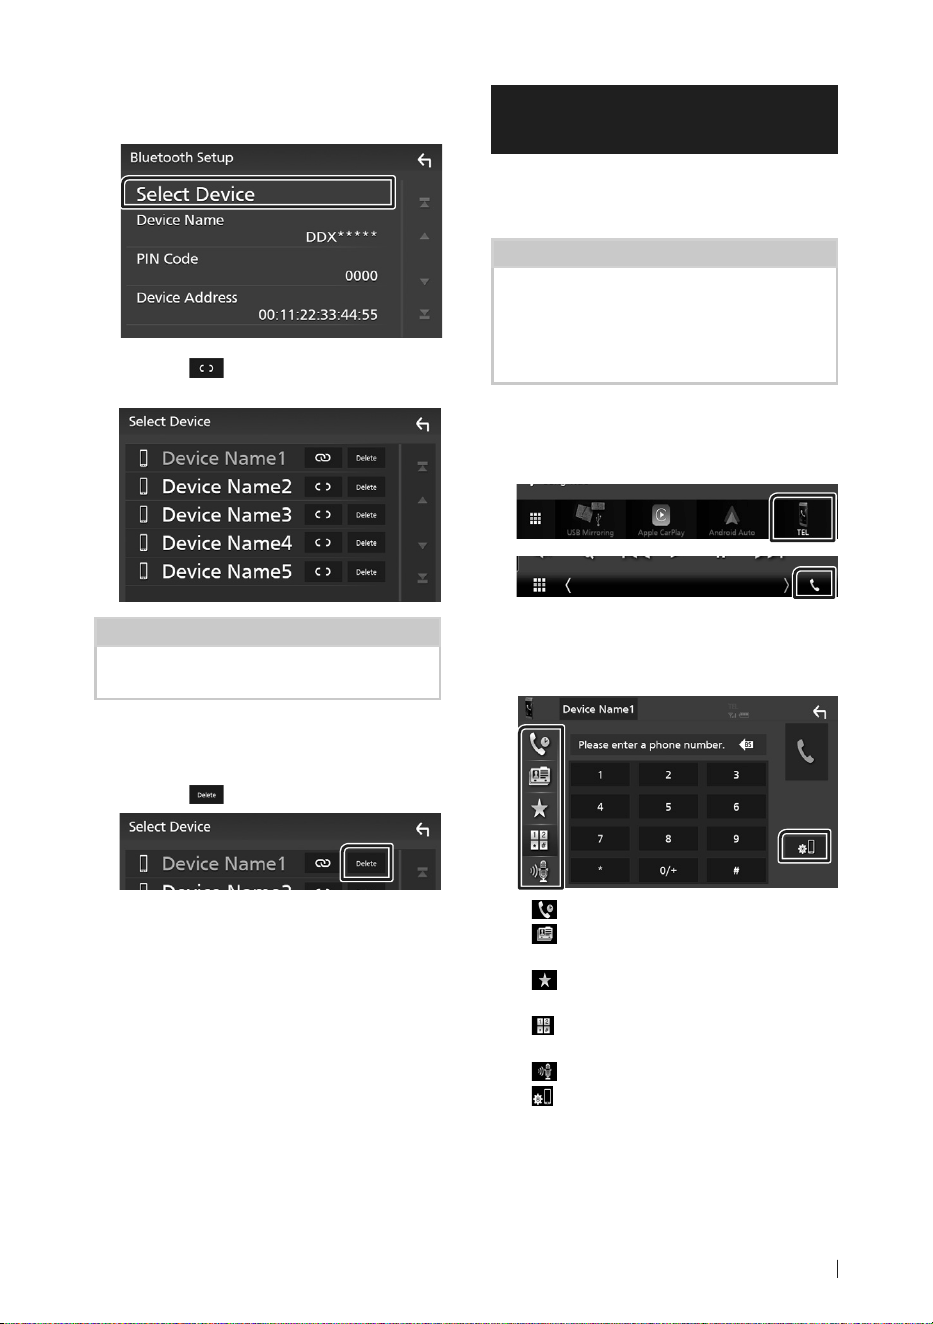
Utilisation du Bluetooth
51Français
8 Touchez [Select Device] sur l'écran de
CONFIGURATION du Bluetooth.
9 Touchez [ ] que vous souhaitez
connecter.
REMARQUE
• Si le pictogramme est en surbrillance, cela
indique que l'appareil correspondant sera utilisé.
Pour supprimer l'appareil Bluetooth
enregistré
1 Touchez [ ].
hh Le message de confirmation s'affiche.
2 Touchez [Ye s ].
Utilisation du module mains-
libres
Vous pouvez utiliser la fonction téléphone
de l'appareil en lui connectant un téléphone
Bluetooth.
REMARQUE
• Lorsque l'application Apple CarPlay ou Android
Auto est connectée, la fonction Bluetooth mains
libres ne peut pas être utilisée. Seule la fonction
mains-libres d'Apple CarPlay ou d'Android Auto
peut être utilisée.
Ñ Passer un appel
1 Touchez [TEL] / [Û].
hh L'écran mains-libres s'affiche.
2 Sélectionnez une méthode de
numérotation.
• [ ]: Appel depuis l'historique des appels
• [
]: Appel depuis le répertoire
téléphonique
• [
]: Appel depuis un numéro
présélectionné
• [
]: Appel en saisissant un numéro de
téléphone
• [
]: Reconnaissance vocale
• [
]: CONFIGURATION Bluetooth
!B5H-0358-03_QSG_DDX_K_EnFrEs.indb 51 2020/06/03 13:14
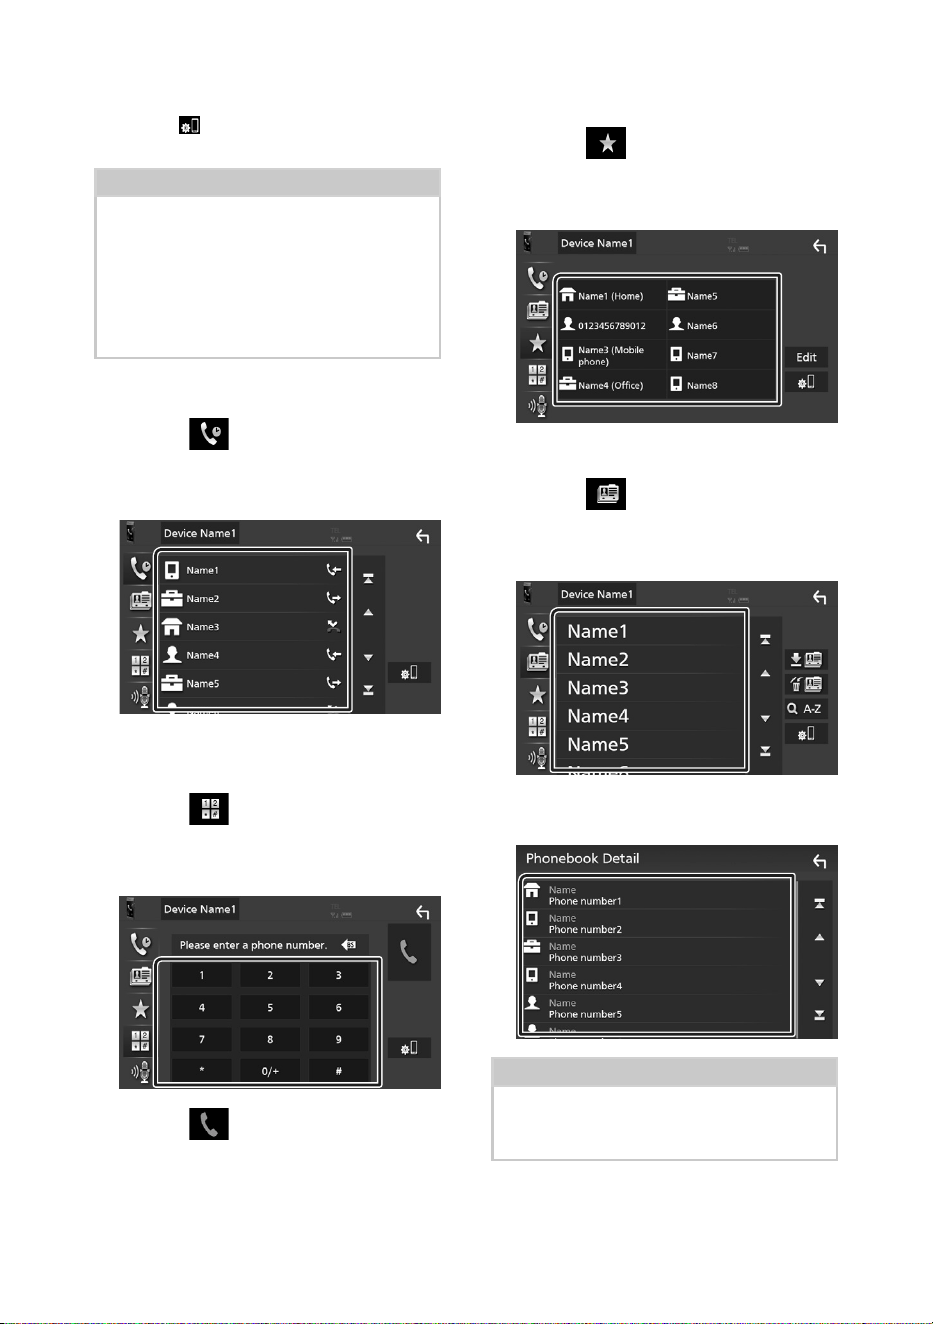
Utilisation du Bluetooth
52
● Configuration Bluetooth
1) Touchez [
].
L'écran de configuration Bluetooth s'affiche.
REMARQUE
• Les pictogrammes d'état affichés, notamment
ceux représentant une batterie et une antenne,
peuvent être différents de ceux affichés sur le
téléphone portable.
• Le fait de configurer le téléphone portable au
mode privé peut désactiver la fonction mains
libres.
Appel depuis l'historique des appels
1 Touchez [ ].
2 Sélectionnez dans la liste le numéro de
téléphone.
Appel par entrée d'un numéro de
téléphone
1 Touchez [ ].
2 Utilisez les touches numériques pour
entrer un numéro de téléphone.
3 Touchez [ ].
Appel depuis un numéro présélectionné
1 Touchez [ ].
2 Touchez le nom ou le numéro de
téléphone.
Appel depuis le répertoire téléphonique
1 Touchez [ ].
2 Sélectionnez la personne que vous
souhaitez appeler dans la liste.
3 Sélectionnez dans la liste le numéro de
téléphone.
REMARQUE
• Si aucun répertoire n'a été téléchargé, toucher
[Download Phonebook Now] va commencer
le téléchargement du répertoire.
!B5H-0358-03_QSG_DDX_K_EnFrEs.indb 52 2020/06/03 13:14
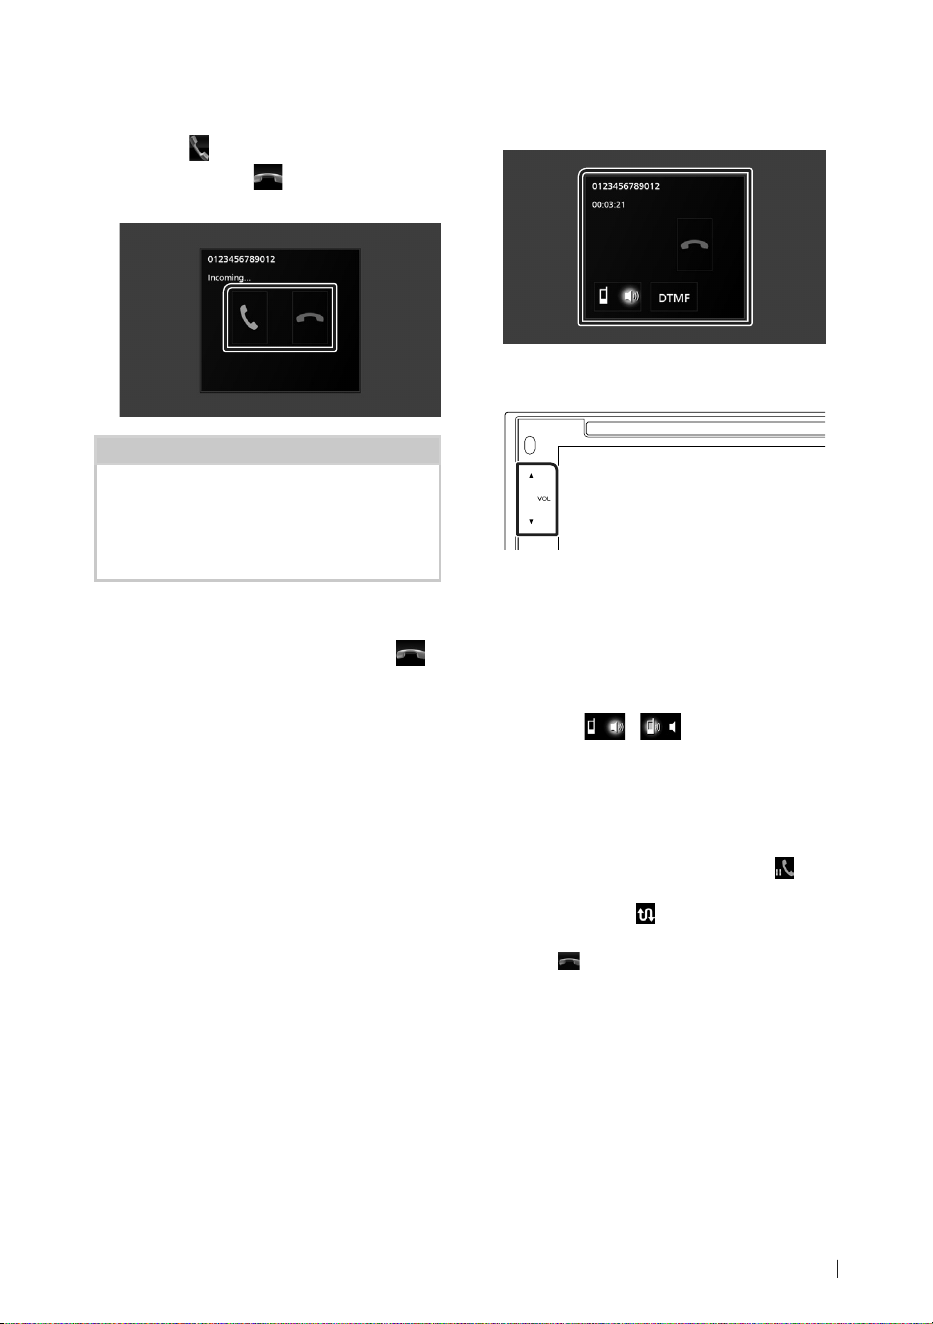
Utilisation du Bluetooth
53Français
Ñ Réception d'un appel
1 Touchez [ ] pour répondre à un appel
téléphonique ou [
] pour rejeter un
appel entrant.
REMARQUE
• Lorsque l'affichage est déjà occupé par la caméra
de vision, cet écran ne s'affiche pas même si un
appel est reçu. Pour afficher cet écran, ramenez
le sélecteur de vitesse du véhicule sur la position
du conducteur.
Pour mettre fin à l'appel
1 Pendant une conversation, touchez [ ].
Ñ Actions possibles pendant un
appel
● Régler le volume de réception
Appuyez sur le bouton [S] ou [R].
● Envoyer la tonalité de numérotation
Touchez [DTMF] pour afficher l'écran de saisie
des tonalités.
Vous pouvez envoyer des tonalités en touchant
les touches voulues à l'écran.
● Sélection de la sortie vocale
En touchant [
]/ [ ], la sortie vocale
bascule systématiquement entre le téléphone
portable et le haut-parleur.
● Attente d'appel
Lorsque vous recevez un appel alors que vous
êtes en cours de conversation, vous pouvez
répondre à l'appel entrant en touchant [
].
L'appel en cours est alors mis en attente.
À chaque appui sur [
], vous changez de
correspondant.
Touchez [
] pour mettre fin à l'appel en cours
et passer sur l'appel en attente.
!B5H-0358-03_QSG_DDX_K_EnFrEs.indb 53 2020/06/03 13:14
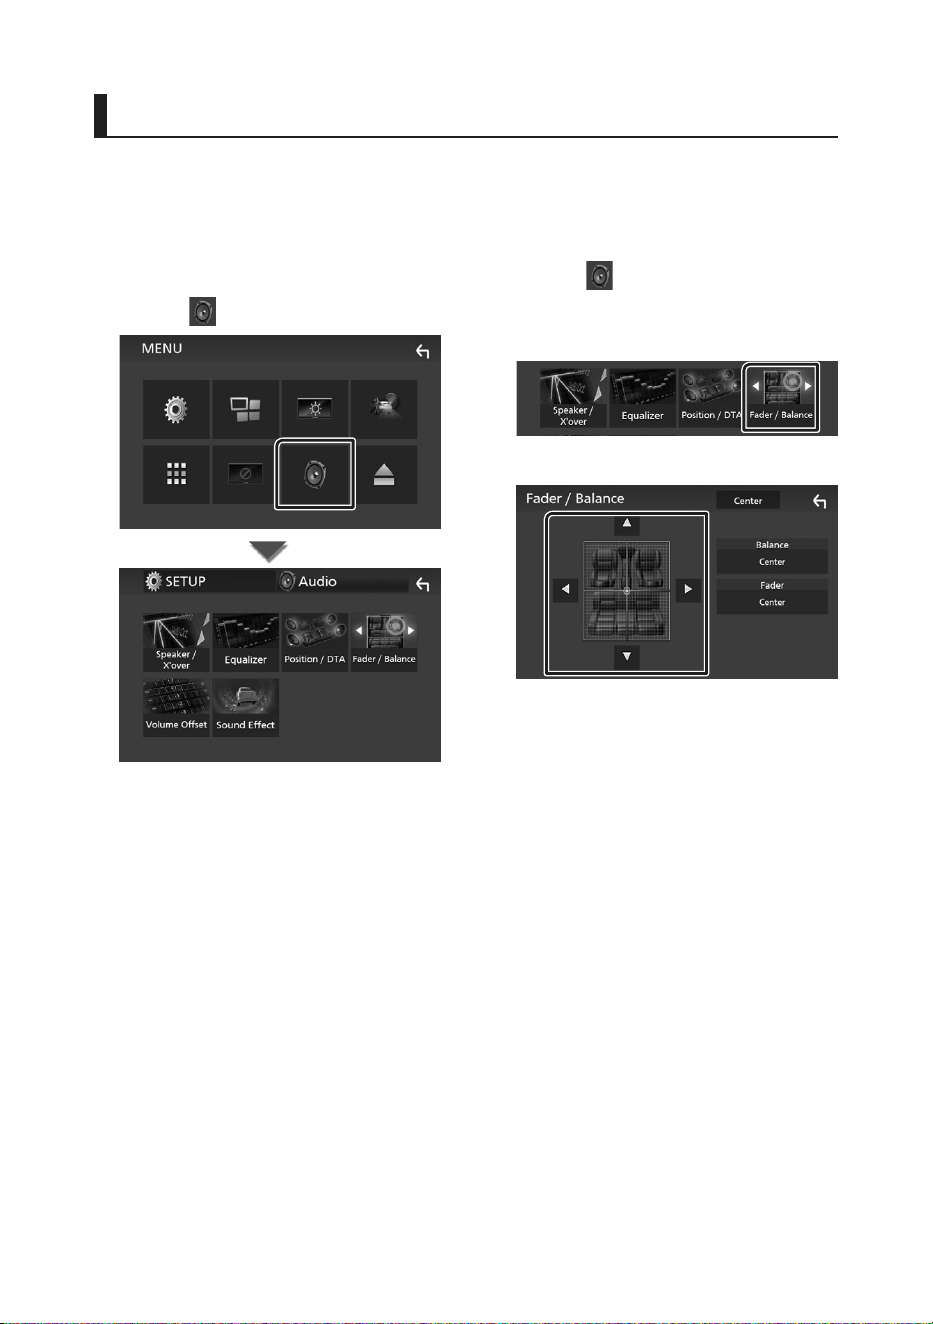
Contrôle de l'audio
54
Contrôle de l'audio
Vous pouvez agir sur les différents paramètres,
comme la balance audio ou le niveau du caisson
de graves par exemple.
1 Appuyez sur le bouton [MENU].
hh L'écran MENU s'affiche.
2 Touchez [ ].
Ñ Contrôle de l’audio en général
1 Appuyez sur le bouton [MENU].
hh L'écran MENU s'affiche.
2 Touchez [ ].
hh L'écran audio s'affiche.
3 Touchez [Fader / Balance].
4 Réglez chaque option comme suit.
■ [Fader] / [Balance]
Réglez la balance en agissant sur les touches
périphériques.
[C] et [D] permettent de régler la balance
droite/gauche.
[R] et [S] permettent de régler la balance
avant/arrière.
■ [Center]
Annulez le réglage.
!B5H-0358-03_QSG_DDX_K_EnFrEs.indb 54 2020/06/03 13:14
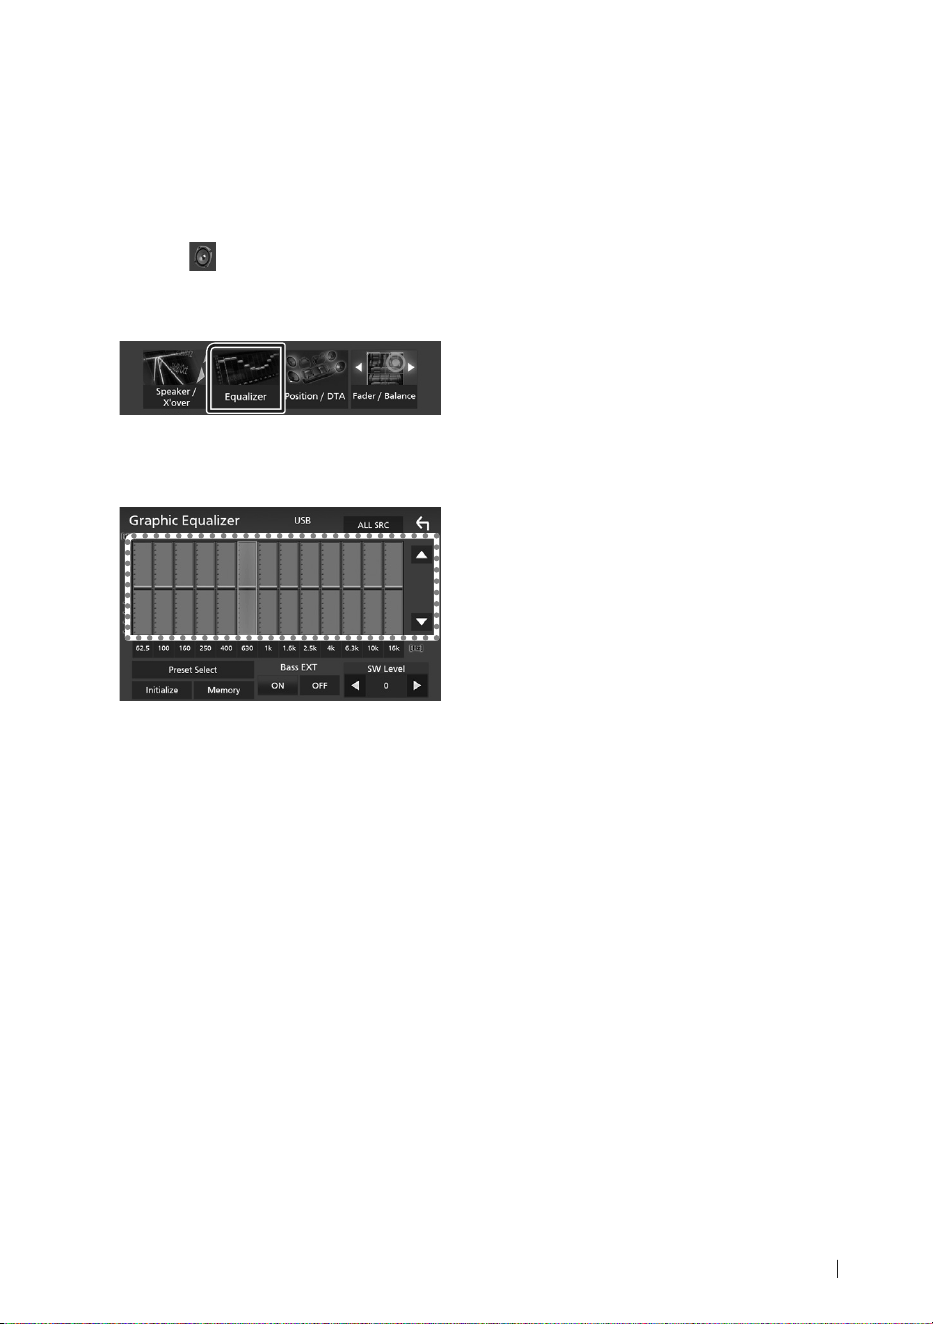
Contrôle de l'audio
55Français
Ñ Contrôle d'égaliseur
Vous pouvez régler l'égaliseur en sélectionnant
le réglage optimal pour chaque catégorie.
1 Appuyez sur le bouton [MENU].
hh L'écran MENU apparaît.
2 Touchez [ ].
hh L'écran audio s'affiche.
3 Touchez [Equalizer].
4 Touchez l'écran pour configurer
l'égaliseur graphique comme vous le
souhaitez.
■ [ALL SRC]
Appliquer l'égaliseur réglé pour toutes les
sources. Touchez [ALL SRC] puis touchez
[OK] sur l'écran de confirmation.
■ Niveau de gain (zone de cadre
pointillé)
Réglez le niveau de gain en touchant
chacune des barres de fréquences.
Vous pouvez sélectionner la barre de
fréquence et ajuster son niveau en utilisant
[R], [S].
■ [Preset Select]
Affiche l'écran pour présenter à nouveau la
courbe prédéfinie de l'égaliseur.
■ [Initialize]
La courbe EQ actuelle est revenue en
position linéaire.
■ [Memory]
Enregistre la courbe d'égaliseur ajustée de
« [User1] » à « [User3] ».
■ [Bass EXT] (Paramètres étendus des
graves)
Lorsque cette fonction est active, toute
fréquence inférieure à 62,5 Hz est configurée
sur le même niveau de gain que la fréquence
62,5 Hz.
■ [SW Level]
Règle le volume du caisson de graves.
!B5H-0358-03_QSG_DDX_K_EnFrEs.indb 55 2020/06/03 13:14

Connexion/Installation
56
Connexion/Installation
Avant l'installation
Avant d'installer cet appareil, veuillez prendre les
mesures de précaution suivantes.
#AVERTISSEMENTS
• Si vous branchez le câble d'allumage (rouge) et
le câble de la batterie (jaune) au châssis de la
voiture (masse), il peut y avoir un court-circuit
entraînant, à son tour, un incendie. Il faut toujours
brancher ces câbles à la source d'alimentation
fonctionnant via le boîtier de fusibles.
• Ne débranchez pas le fusible du câble d'allumage
(rouge) ni du câble de la batterie (jaune).
L'alimentation électrique doit être connectée aux
câbles via le fusible.
#ATTENTION
• Installez cet appareil dans la console du véhicule.
Ne touchez pas les éléments métalliques de
cet appareil pendant et juste après l'utilisation
de l'appareil. Les éléments métalliques tels que
le dissipateur thermique et le coffret sont très
chauds.
REMARQUE
• Le montage et le câblage de ce produit
requièrent expérience et savoir-faire. Pour des
questions de sécurité, les travaux de montage
et de câblage doivent être effectués par des
professionnels.
• Veillez à brancher l'appareil à une alimentation
électrique négative de 12 Vcc avec mise à la terre.
• N'installez pas l'appareil dans un endroit
directement exposé aux rayons du soleil, à
une chaleur excessive ou à l'humidité. Évitez
également les endroits trop poussiéreux ou
susceptibles d'être éclaboussés par de l'eau.
• N'utilisez pas vos propres vis. N'utilisez que les
vis fournies. L'utilisation de vis non appropriées
risque d'endommager l'appareil.
• Si l'appareil n'est pas sous tension (« There is
an error in the speaker wiring. Please check
the connections. » (Il y a un problème avec le
câblage du haut-parleur. Veuillez vérifier les
branchements) s'affiche), le câble du haut-parleur
est peut-être en court-circuit ou est en contact
avec le châssis du véhicule et la fonction de
protection a peut-être été enclenchée. C'est
pourquoi il faut vérifier le câble de l'enceinte.
• Si l'allumage de votre véhicule ne possède pas
de position ACC, branchez les câbles d'allumage
à une source d'alimentation que la clé de contact
peut allumer ou éteindre. Si vous branchez le
câble d'allumage à une source d'alimentation
à tension constante comme les câbles de la
batterie, il se peut que la batterie se décharge.
• Si la console est dotée d'un couvercle, veillez
à installer l'appareil de sorte que la façade ne
heurte pas le couvercle quand elle s'ouvre ou se
ferme.
• Si le fusible saute, vérifiez d'abord que les câbles
ne se touchent pas afin d'éviter tout court-circuit,
puis remplacez l'ancien fusible par un nouveau
fusible de même puissance.
• Isolez les câbles non connectés avec un ruban
vinyl, ou tout autre matériau similaire. Pour éviter
tout court-circuit, ne retirez pas les capuchons
placés aux extrémités des câbles non connectés
ou des bornes.
• Branchez correctement les câbles de l'enceinte
aux bornes correspondantes. L'appareil peut subir
des dommages ou ne plus fonctionner si vous
partagez les fils ¤ ou les mettez à la masse avec
une partie métallique du véhicule.
• Si seulement deux enceintes sont branchées
au système, branchez les connecteurs soit aux
bornes de sortie avant soit aux bornes de sortie
arrière (ne pas mélanger les bornes de sortie
avant et arrière). Par exemple, si vous connectez
le connecteur ¢ de l'enceinte gauche à une
borne de sortie avant, ne connectez pas le
connecteur ¤ à une borne de sortie arrière.
• Une fois l'appareil installé, vérifiez que les feux de
freinage, les clignotants et les essuie-glace, etc.
du véhicule fonctionnent correctement.
• L'angle de montage de l'appareil doit être
inférieur ou égal à 30°.
• N'exercez pas de pression excessive sur la surface
du panneau lors de l'installation de l'appareil
dans le véhicule. Cela risque de rayer la surface,
de l'endommager ou d'entraîner une défaillance.
• Il se peut que la réception soit mauvaise si des
objets métalliques se trouvent à proximité de
l'antenne Bluetooth.
Antenne Bluetooth
!B5H-0358-03_QSG_DDX_K_EnFrEs.indb 56 2020/06/03 13:14
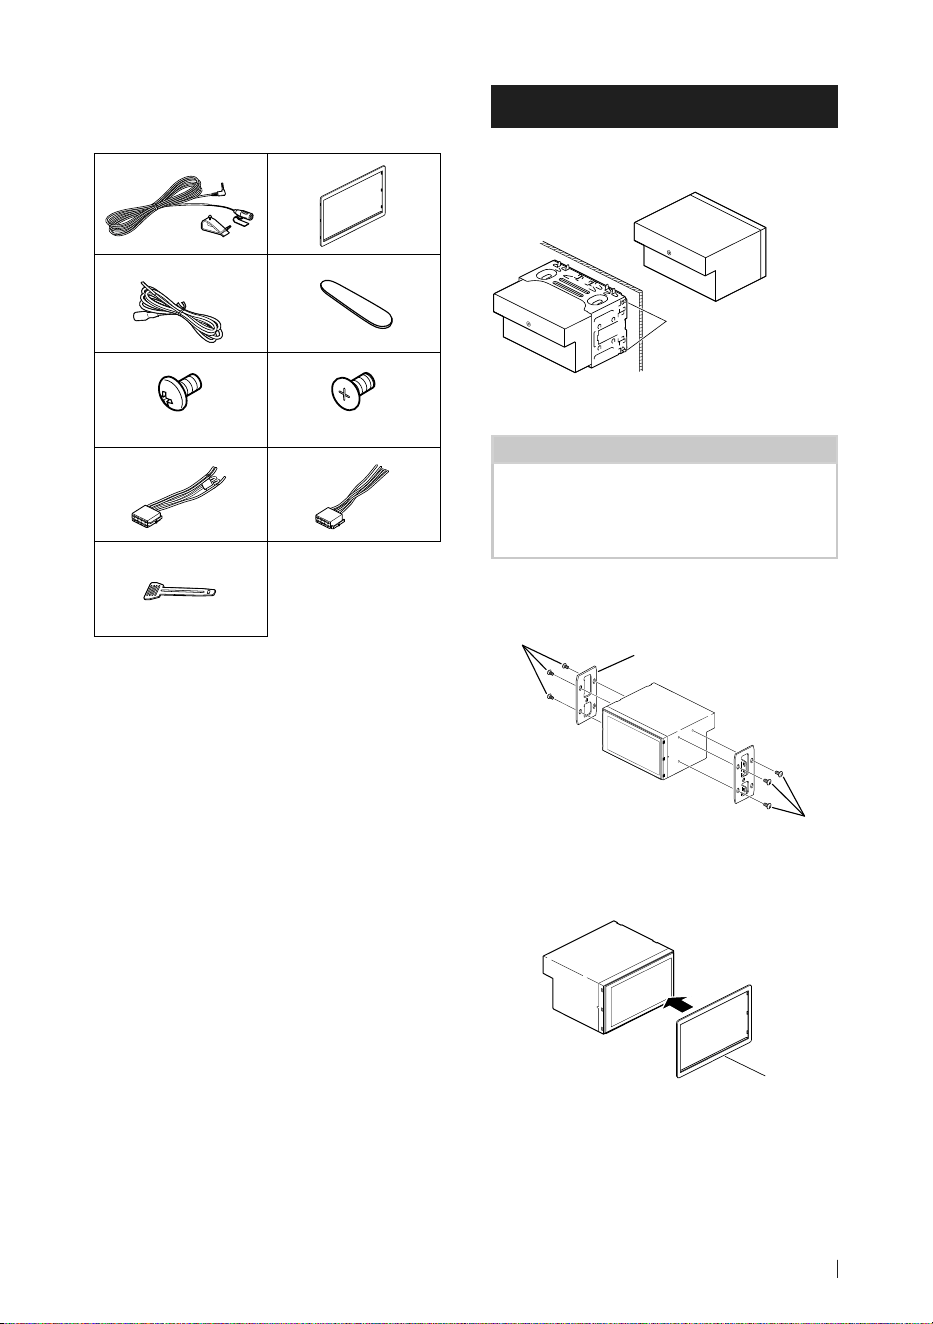
Connexion/Installation
57Français
Ñ Accessoires fournis pour
l'installation
1
(3 m)
x1
2
x1
3
(2 m)
x1
4
x1
5
(M5 × 6 mm)
x6
6
(M5 × 8 mm)
x6
7
x1
8
x1
9
x2
Ñ Procédure d'installation
1) Pour éviter les courts-circuits, retirez la clé de
contact, puis débranchez la borne ¤ de la
batterie.
2) Veillez à effectuer correctement les
connexions des câbles d'entrée et de sortie
pour chaque appareil.
3) Prenez le connecteur B (accessoire 8)
sur le faisceau de fils, puis branchez-le au
connecteur de l'enceinte dans votre véhicule.
4) Prenez le connecteur A (accessoire 7) sur
le faisceau de fils, puis branchez-le à la prise
d'alimentation externe de votre véhicule.
5) Branchez le connecteur du faisceau de fils sur
l'appareil.
6) Installez l'appareil dans votre véhicule.
7) Reconnectez la borne ¤ de la batterie.
8) Appuyez sur le bouton réinitialiser.
Installation de l'appareil
Ñ Voitures non japonaises
Courbez les languettes
de la douille de montage
à l'aide d'un tournevis ou
d'un outil similaire, puis
fixez-la en place.
REMARQUE
• Vérifiez que l'appareil est correctement en
place. Si l'appareil n'est pas stable, cela peut
occasionner un dysfonctionnement (le son peut
par exemple sauter).
Ñ Voitures japonaises
5 ou 6
5 ou 6
Support automobile
Ñ Plaque de garniture
1) Fixez l'accessoire 2 sur l'appareil.
2
!B5H-0358-03_QSG_DDX_K_EnFrEs.indb 57 2020/06/03 13:14
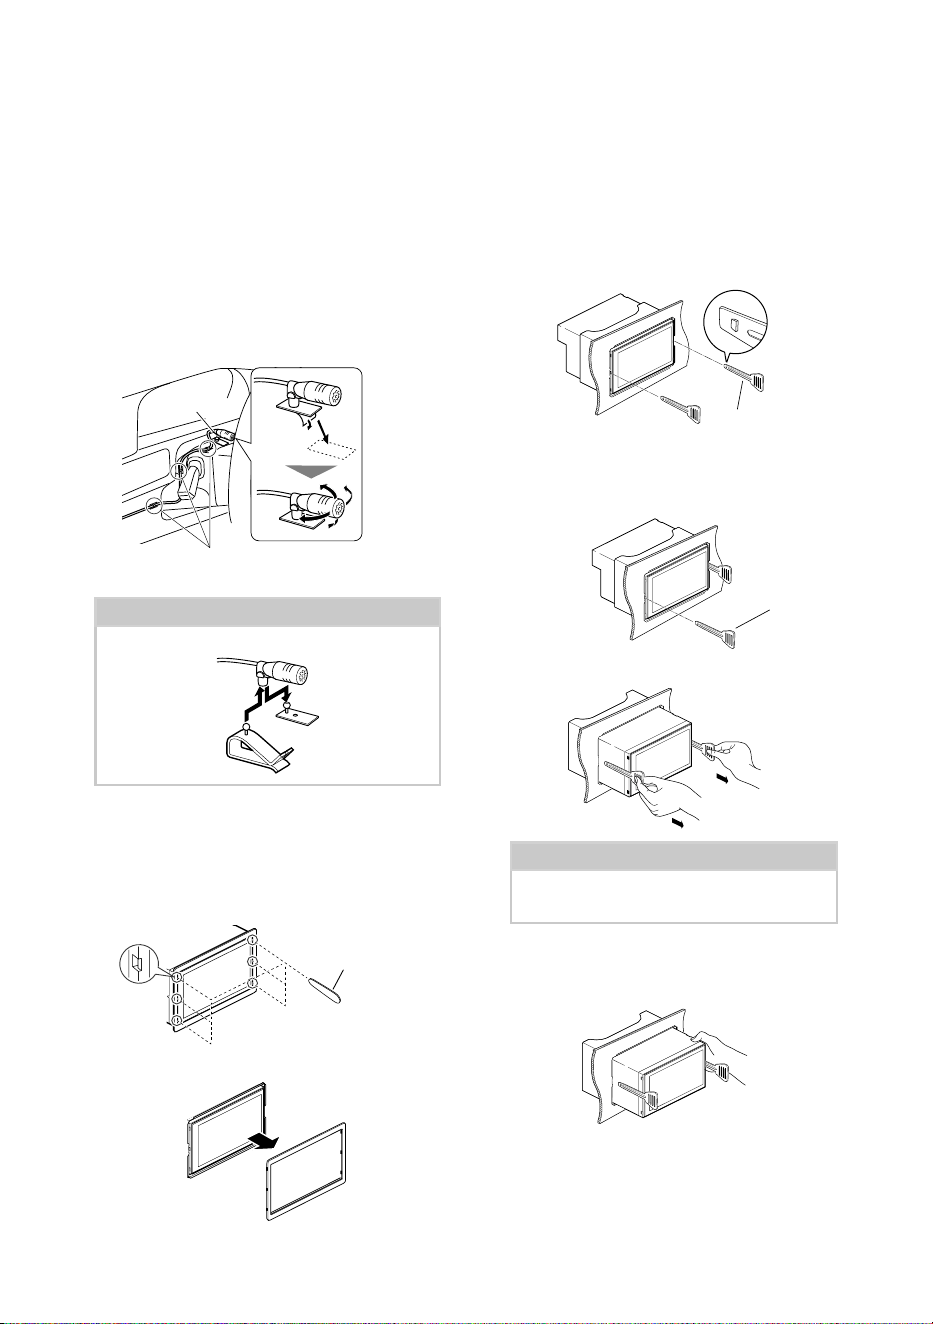
Connexion/Installation
58
Ñ Microphone
1) Vérifiez la position d'installation du
microphone (accessoire 1).
2) Nettoyez la surface d'installation.
3) Retirez le séparateur du microphone
(accessoire 1) et collez le microphone à
l'emplacement indiqué ci-dessous.
4) Branchez le câble du microphone sur l'appareil
en le fixant à divers endroits à l'aide de ruban
adhésif ou de toute autre méthode appropriée.
5) Réglez l'orientation du microphone (accessoire
1) en direction du conducteur.
1
Fixez un câble avec du ruban spécialement prévu à
cet effet.
REMARQUE
• Échanger les attaches si nécessaire.
Ñ
Retrait de la plaque de garniture
1) Utilisez la clé d'extraction (accessoire 4) pour
sortir les six languettes (trois sur la partie
gauche, trois sur la partie droite) en effectuant
un mouvement de levier.
4
2) Tirer la plaque de garniture vers l'avant.
Ñ Retrait de l'appareil
1) Retirez la plaque de garniture en vous référant
à l'étape 1 de « Retrait de la plaque de
garniture ».
2) Insérez la clé d'extraction (accessoire
9) profondément dans l'emplacement,
comme illustré. (La saillie à la pointe de la clé
d'extraction doit faire face à l'appareil.)
9
3) Une fois que vous avez correctement inséré la
clé d'extraction, insérez l'autre clé d'extraction
dans l'emplacement.
9
4) Extraire l'appareil à moitié.
REMARQUE
• Veillez à ne pas vous blesser avec les broches
d'arrêt sur la clé d'extraction.
5) Tenez l'appareil des deux mains et faites-le
sortir complètement en veillant à ne pas le
laisser tomber.
!B5H-0358-03_QSG_DDX_K_EnFrEs.indb 58 2020/06/03 13:14

Connexion/Installation
59Français
Ñ Connexion des câbles sur les contacts électriques
PRK SW
STEERING
WHEEL
REMOTE
INPUT
2 4 6 8
1 3 5 7
2 4 6 8
1 3 5 7
REVERSE
SUB
WOOFER
1 2 3 4
5V
=
1.5A
Sirius XM
Connexion au commutateur de
détection du frein à main.
Par mesure de sécurité, connectez le détecteur
de stationnement.
Vert clair (Câble du détecteur de stationnement)
Accessoire 3: Câble d'extension de stationnement
Violet/Blanc (Câble du détecteur de marche arrière)
Accessoire 1:
Microphone Bluetooth
Vers la télécommande au volant
Pour utiliser la fonction de télécommande au volant, vous avez besoin d'un
adaptateur de télécommande spécial (non fourni) qui correspond à votre
véhicule.
Connexion au faisceau du feu de marche arrière du véhicule lors de
l'utilisation de la vue arrière de la caméra.
Bleu ciel/Jaune (Câble de la télécommande au volant)
Fusible (15 A)
Préamplification du caisson de basses
Capuchon
Capuchon
Antenne FM/AM
Connecteur A
Connecteur B
Périphérique USB
[2]
Borne USB
[1]
(1,0 m)
[1]
Courant d'alimentation maximum USB :
CC 5 V = 1,5 A
[2]
Vendue séparément
Accessoire 7
Accessoire 8
FRONT OUTREAR OUT
VIDEO OUTCAM IN
Préamplification audio arrière
(Gauche : blanc, Droite : rouge)
AV-IN
[2]
(1; audio gauche, 2; vidéo composite,
3; masse, 4; audio droite).
Sortie Audio Avant
(Gauche ; Blanc, Droite ; Rouge)
Sortie vidéo (jaune)
Entrée de la caméra vue arrière (jaune)
Pour plus d'informations sur la manière d'installer le tuner pour véhicule SiriusXM, consultez le
Guide d'installation inclus avec le tuner.
Connecteur du syntoniseur de véhicule SiriusXMTuner
!B5H-0358-03_QSG_DDX_K_EnFrEs.indb 59 2020/06/03 13:14
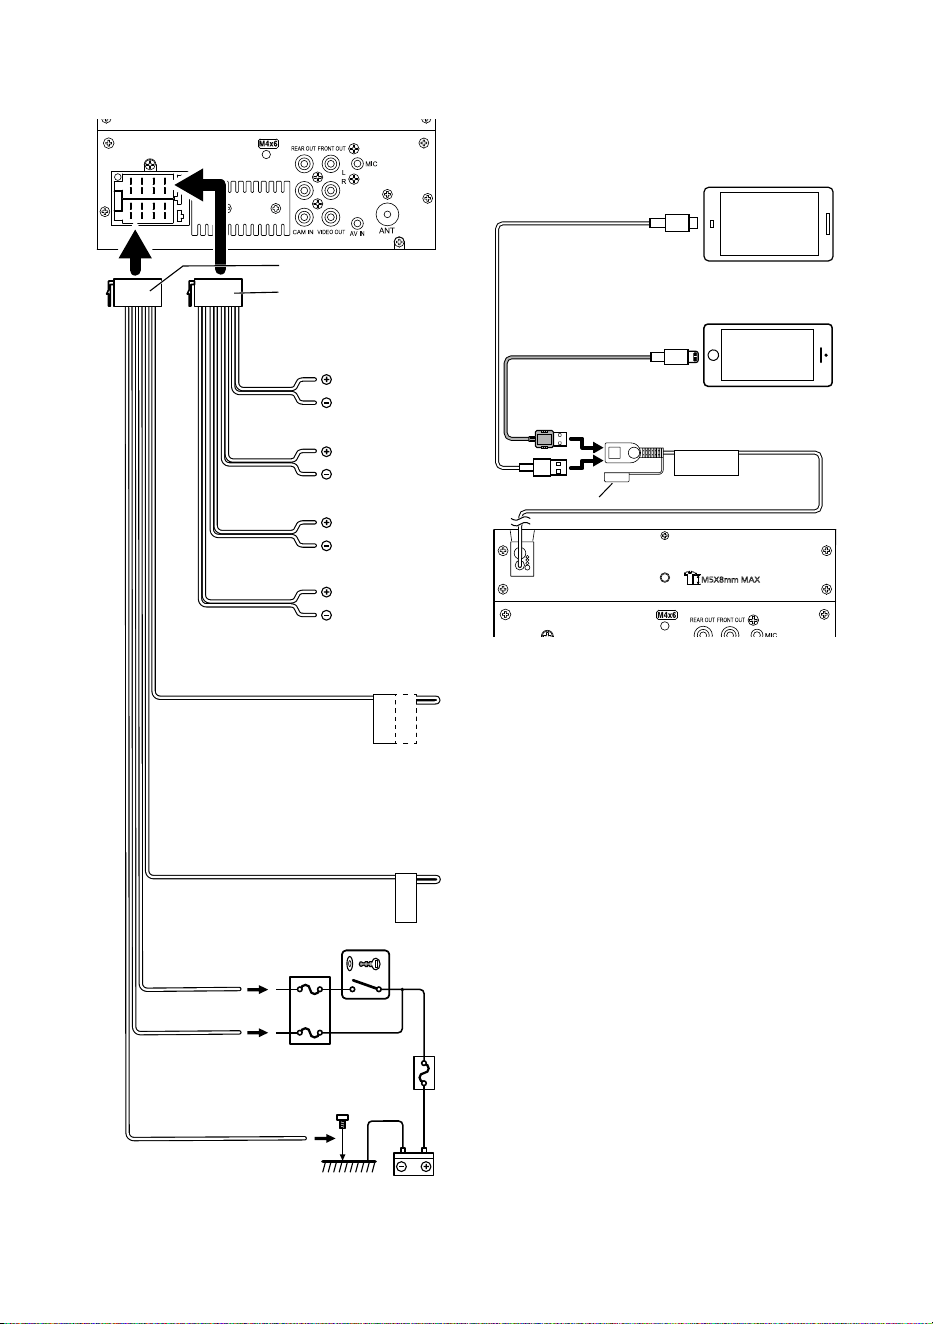
Connexion/Installation
60
Ñ Branchement d'un iPhone/
Android
5V
=
1.5A
KCA-iP103 (0,8 m)
[3]
Câble USB
[2]
iPhone
[2]
Connecteur lumineux
Smartphone Android
[2]
Capuchon
Borne USB
[1]
(1,0 m)
[1]
Tension d'alimentation maximum pour iPhone
:
CC 5 V = 1,5 A
[2]
Vendue séparément
[3]
Accessoire proposé en option
2 4 6 8
1 3 5 7
2 4 6 8
1 3 5 7
P.CONT
ANT.CONTILLUMI
Accessoire 8
Accessoire 7
Bleu
(Câble de contrôle de l'alimentation/
contrôle de l'antenne)
À brancher à la borne de
commande motorisée avec
l'amplificateur de puissance
en option, ou à la borne d'alimentation de
l'amplificateur de puissance d'une antenne
de type film ou courte. (Max. 150 mA, 12 V)
Blanc/Noir
Gris/Noir
Vert/Noir
Violet/Noir
Vers commutateur des feux de la
voiture
Impédance d'enceinte : 4-8 Ω
Violet
Vert
Gris
Blanc
Au haut-parleur
avant gauche
Vers haut-parleur
avant droit
Au haut-parleur
arrière gauche
Vers haut-parleur
arrière droit
Rouge
(Câble d'allumage)
Noir (Câble de terre) ¤
(Au châssis de la voiture)
Jaune
(Câble de la batterie)
Orange/Blanc
(câble de commande du gradateur)
Commutateur d'allumage
Boite de fusibles de la voiture
Batterie
!B5H-0358-03_QSG_DDX_K_EnFrEs.indb 60 2020/06/03 13:14

Annexes
61Français
Annexes
Spécications
■ Section Bluetooth
Fréquence
: 2,402 – 2,480 GHz
Puissance de sortie RF (E.I.R.P.)
: +8 dBm (moy.), Classe de puissance 1
■ Général
Tension de fonctionnement
: batterie de voiture 12 V CC
Impédance de haut-parleur
: 4 – 8 Ω
Les spécications sont sujettes à changements
sans notication.
À propos de cet appareil
■ Copyrights
• La marque du mot et les logos Bluetooth® sont
des marques déposées de Bluetooth SIG, Inc. et
toute utilisation de ces marques par JVCKENWOOD
Corporation est faite sous licence. Les autres marques
déposées et appellations commerciales appartiennent à
leurs propriétaires respectifs.
• Manufactured under license from Dolby Laboratories.
Dolby, Dolby Audio and the double-D symbol are
trademarks of Dolby Laboratories.
•
is a trademark of DVD Format/Logo Licensing
Corporation registered in the U.S., Japan and other
countries.
• This item incorporates copy protection technology
that is protected by U.S. patents and other intellectual
property rights of Rovi. Reverse engineering and
disassembly are prohibited.
• Windows Media is a registered trademark or trademark
of Microsoft Corporation in the United States and/or
other countries.
• This product is protected by certain intellectual
property rights of Microsoft. Use or distribution of
such technology outside of this product is prohibited
without a license from Microsoft.
• Use of the Made for Apple badge means that an
accessory has been designed to connect specifically
to the Apple product(s) identified in the badge, and
has been certified by the developer to meet Apple
performance standards. Apple is not responsible for
the operation of this device or its compliance with
safety and regulatory standards. Please note that the
use of this accessory with an Apple product may affect
wireless performance.
• Apple, iPhone and Lightning are trademarks of Apple
Inc., registered in the U.S. and other countries.
• Apple, Siri, Apple CarPlay and Apple CarPlay logo are
trademarks of Apple Inc., registered in the U.S. and other
countries.
• App Store is a service mark of Apple Inc., registered in
the U.S. and other countries.
• Sirius, XM and all related marks and logos are
trademarks of Sirius XM Radio Inc. All rights reserved.
• IOS is a trademark or registered trademark of Cisco in
the U.S. and other countries and is used under license.
• Google, Android, Google Play and Android Auto are
trademarks of Google LLC.
• To use Android Auto on your car display, you’ll need an
Android Auto compatible vehicle or aftermarket stereo,
an Android phone running Android 5.0 or higher, and
the Android Auto app.
• Linux® is the registered trademark of Linus Torvalds in
the U.S. and other countries.
!B5H-0358-03_QSG_DDX_K_EnFrEs.indb 61 2020/06/03 13:14

Annexes
62
• THIS PRODUCT IS LICENSED UNDER THE AVC PATENT
PORTFOLIO LICENSE FOR THE PERSONAL USE OF A
CONSUMER OR OTHER USES IN WHICH IT DOES NOT
RECEIVE REMUNERATION TO (¡)ENCODE VIDEO IN
COMPLIANCE WITH THE AVC STANDARD (“AVC VIDEO”)
AND/OR (¡¡)DECODE AVC VIDEO THAT WAS ENCODED BY
A CONSUMER ENGAGED IN A PERSONAL ACTIVITY AND/
OR WAS OBTAINED FROM A VIDEO PROVIDER LICENSED
TO PROVIDE AVC VIDEO. NO LICENSE IS GRANTED OR
SHALL BE IMPLIED FOR ANY OTHER USE. ADDITIONAL
INFORMATION MAY BE OBTAINED FROM MPEG LA, L.L.C.
SEE HTTP://WWW.MPEGLA.COM
• THIS PRODUCT IS LICENSED UNDER THE MPEG-4 VISUAL
PATENT PORTFOLIO LICENSE FOR THE PERSONAL
AND NON-COMMERCIAL USE OF A CONSUMER FOR
(¡) ENCODING VIDEO IN COMPLIANCE WITH THE
MPEG-4 VISUAL STANDARD (“MPEG-4 VIDEO”) AND/
OR (¡¡) DECODING MPEG-4 VIDEO THAT WAS ENCODED
BY A CONSUMER ENGAGED IN A PERSONAL AND
NON-COMMERCIAL ACTIVITY AND/OR WAS OBTAINED
FROM A VIDEO PROVIDER LICENSED BY MPEG LA TO
PROVIDE MPEG-4 VIDEO. NO LICENSE IS GRANTED OR
SHALL BE IMPLIED FOR ANY OTHER USE. ADDITIONAL
INFORMATION INCLUDING THAT RELATING TO
PROMOTIONAL, INTERNAL AND COMMERCIAL USES
AND LICENSING MAY BE OBTAINED FROM MPEG LA, LLC.
SEE HTTP://WWW.MPEGLA.COM.
• THIS PRODUCT IS LICENSED UNDER THE VC-1 PATENT
PORTFOLIO LICENSE FOR THE PERSONAL AND NON-
COMMERCIAL USE OF A CONSUMER TO ( i ) ENCODE
VIDEO IN COMPLIANCE WITH THE VC-1 STANDARD
(“VC-1 VIDEO”) AND/OR ( ii ) DECODE VC-1 VIDEO
THAT WAS ENCODED BY A CONSUMER ENGAGED IN A
PERSONAL AND NON-COMMERCIAL ACTIVITY AND/
OR WAS OBTAINED FROM A VIDEO PROVIDER LICENSED
TO PROVIDE VC-1 VIDEO. NO LICENSE IS GRANTED OR
SHALL BE IMPLIED FOR ANY OTHER USE. ADDITIONAL
INFORMATION MAY BE OBTAINED FROM MPEG LA, L.L.C.
SEE HTTP://WWW.MPEGLA.COM
• libFLAC
Copyright (C) 2000,2001,2002,2003,2004,2005,2006,2007
,2008,2009 Josh Coalson
Redistribution and use in source and binary forms, with
or without modification, are permitted provided that
the following conditions are met:
– Redistributions of source code must retain the above
copyright notice, this list of conditions and the
following disclaimer.
– Redistributions in binary form must reproduce the
above copyright notice, this list of conditions and the
following disclaimer in the documentation and/or
other materials provided with the distribution.
– Neither the name of the Xiph.org Foundation nor the
names of its contributors may be used to endorse or
promote products derived from this software without
specific prior written permission.
THIS SOFTWARE IS PROVIDED BY THE COPYRIGHT
HOLDERS AND ONTRIBUTORS ``AS IS’’ AND ANY
EXPRESS OR IMPLIED WARRANTIES, INCLUDING,
BUT NOT LIMITED TO, THE IMPLIED WARRANTIES OF
MERCHANTABILITY AND FITNESS FOR A PARTICULAR
PURPOSE ARE DISCLAIMED. IN NO EVENT SHALL THE
FOUNDATION OR CONTRIBUTORS BE LIABLE FOR ANY
DIRECT, INDIRECT, INCIDENTAL, SPECIAL, EXEMPLARY,
OR CONSEQUENTIAL DAMAGES (INCLUDING, BUT NOT
LIMITED TO, PROCUREMENT OF SUBSTITUTE GOODS
OR SERVICES; LOSS OF USE, DATA, OR PROFITS; OR
BUSINESS INTERRUPTION) HOWEVER CAUSED AND ON
ANY THEORY OF LIABILITY, WHETHER IN CONTRACT,
STRICT LIABILITY, OR TORT (INCLUDING NEGLIGENCE OR
OTHERWISE) ARISING IN ANY WAY OUT OF THE USE OF
THIS SOFTWARE, EVEN IF ADVISED OF THE POSSIBILITY
OF SUCH DAMAGE.
• libvorbis
Copyright (c) 2002-2008 Xiph.org Foundation
Redistribution and use in source and binary forms, with
or without modification, are permitted provided that
the following conditions are met:
– Redistributions of source code must retain the above
copyright notice, this list of conditions and the
following disclaimer.
– Redistributions in binary form must reproduce the
above copyright notice, this list of conditions and the
following disclaimer in the documentation and/or
other materials provided with the distribution.
– Neither the name of the Xiph.org Foundation nor the
names of its contributors may be used to endorse or
promote products derived from this software without
specific prior written permission.
THIS SOFTWARE IS PROVIDED BY THE COPYRIGHT
HOLDERS AND CONTRIBUTORS ``AS IS’’ AND ANY
EXPRESS OR IMPLIED WARRANTIES, INCLUDING,
BUT NOT LIMITED TO, THE IMPLIED WARRANTIES OF
MERCHANTABILITY AND FITNESS FOR A PARTICULAR
PURPOSE ARE DISCLAIMED. IN NO EVENT SHALL THE
FOUNDATION OR CONTRIBUTORS BE LIABLE FOR ANY
DIRECT, INDIRECT, INCIDENTAL, SPECIAL, EXEMPLARY,
OR CONSEQUENTIAL DAMAGES (INCLUDING, BUT NOT
LIMITED TO, PROCUREMENT OF SUBSTITUTE GOODS
OR SERVICES; LOSS OF USE, DATA, OR PROFITS; OR
BUSINESS INTERRUPTION) HOWEVER CAUSED AND ON
ANY THEORY OF LIABILITY, WHETHER IN CONTRACT,
STRICT LIABILITY, OR TORT (INCLUDING NEGLIGENCE OR
OTHERWISE) ARISING IN ANY WAY OUT OF THE USE OF
THIS SOFTWARE, EVEN IF ADVISED OF THE POSSIBILITY
OF SUCH DAMAGE.
!B5H-0358-03_QSG_DDX_K_EnFrEs.indb 62 2020/06/03 13:14

Annexes
63Français
• libogg
Copyright (c) 2002, Xiph.org Foundation Redistribution
and use in source and binary forms, with or without
modification, are permitted provided that the following
conditions are met:
– Redistributions of source code must retain the above
copyright notice, this list of conditions and the
following disclaimer.
– Redistributions in binary form must reproduce the
above copyright notice, this list of conditions and the
following disclaimer in the documentation and/or
other materials provided with the distribution.
– Neither the name of the Xiph.org Foundation nor the
names of its contributors may be used to endorse or
promote products derived from this software without
specific prior written permission.
THIS SOFTWARE IS PROVIDED BY THE COPYRIGHT
HOLDERS AND CONTRIBUTORS ``AS IS’’ AND ANY
EXPRESS OR IMPLIED WARRANTIES, INCLUDING,
BUT NOT LIMITED TO, THE IMPLIED WARRANTIES OF
MERCHANTABILITY AND FITNESS FOR A PARTICULAR
PURPOSE ARE DISCLAIMED. IN NO EVENT SHALL THE
FOUNDATION OR CONTRIBUTORS BE LIABLE FOR ANY
DIRECT, INDIRECT, INCIDENTAL, SPECIAL, EXEMPLARY,
OR CONSEQUENTIAL DAMAGES (INCLUDING, BUT NOT
LIMITED TO, PROCUREMENT OF SUBSTITUTE GOODS
OR SERVICES; LOSS OF USE, DATA, OR PROFITS; OR
BUSINESS INTERRUPTION) HOWEVER CAUSED AND ON
ANY THEORY OF LIABILITY, WHETHER IN CONTRACT,
STRICT LIABILITY, OR TORT (INCLUDING NEGLIGENCE OR
OTHERWISE) ARISING IN ANY WAY OUT OF THE USE OF
THIS SOFTWARE, EVEN IF ADVISED OF THE POSSIBILITY
OF SUCH DAMAGE.
!B5H-0358-03_QSG_DDX_K_EnFrEs.indb 63 2020/06/03 13:14

Antes de la utilización
64
Contenido
Antes de la utilización
Acerca de la Guía de inicio
rápido
Esta Guía de inicio rápido describe las funciones
básicas de esta unidad.
Para obtener más información y detalles sobre
el funcionamiento, consulte el MANUAL DE
INSTRUCCIONES en el siguiente sitio web:
<https://www.kenwood.com/cs/ce/>
El Manual de instrucciones está sujeto
a cambios por modificaciones de las
especificaciones, etc.
Asegúrese de descargar la última edición del
manual de instrucciones como referencia.
Cómo leer este manual
• Las pantallas y paneles que se incluyen en este
manual son ejemplos utilizados para ofrecer
explicaciones de las distintas operaciones.
Por este motivo, pueden diferir de las pantallas
o paneles reales, y algunos patrones de
visualización también pueden ser diferentes.
• Idioma para las indicaciones: En este
manual, se utilizan indicaciones en inglés para
las explicaciones. Puede seleccionar el idioma
para las indicaciones desde el menú [SETUP].
Consulte el Manual de instrucciones.
Antes de la utilización .............................................64
Acerca de la Guía de inicio rápido ........................................... 64
Cómo leer este manual ..................................................................64
Precauciones .........................................................................................65
Funciones básicas.....................................................67
Funciones de los botones del panel frontal ...................... 67
Poner en marcha la unidad ..........................................................67
Inicio ...........................................................................................................68
Ajuste del volumen ........................................................................... 69
Operaciones de la pantalla táctil .............................................. 69
Descripciones de la pantalla INICIO........................................70
Descripciones de la pantalla de selección de fuente .. 70
Descripciones de la pantalla de control de fuente ....... 72
Pantalla MENÚ ...................................................................................... 73
Pantalla de lista ....................................................................................73
Disco..............................................................................74
Reproducción de un disco ........................................................... 74
Manejo básico de DVD/VCD ....................................................... 74
Manejo del menú de disco DVD...............................................75
USB ................................................................................76
Conexión de un dispositivo USB ..............................................76
Manejo básico del USB ................................................................... 76
Radio .............................................................................77
Manejo básico de radio .................................................................. 77
SiriusXM® .....................................................................78
Funcionamiento básico de SiriusXM® ................................... 78
Manejo de la memoria ....................................................................78
Control de Bluetooth ..............................................80
Registre desde el dispositivo Bluetooth ...............................80
Usar la unidad de manos libres .................................................81
Control del audio ......................................................84
Conexión/Instalación ..............................................86
Antes de la instalación .................................................................... 86
Instalación de la unidad ................................................................. 87
Apéndice .....................................................................91
Especificaciones .................................................................................. 91
Acerca de esta unidad .....................................................................91
!B5H-0358-03_QSG_DDX_K_EnFrEs.indb 64 2020/06/03 13:14

Antes de la utilización
65Español
Precauciones
#ADVERTENCIAS
Ñ Para evitar lesiones
o incendios, tome las
precauciones siguientes:
• Para evitar un cortocircuito, nunca coloque
ni deje objetos metálicos (como monedas o
herramientas metálicas) dentro de la unidad.
• No mire fijamente la pantalla de la unidad
mientras está conduciendo durante un periodo
prolongado de tiempo.
• Si tiene problemas durante la instalación,
consulte con su distribuidor KENWOOD.
Ñ Precauciones para el uso de
esta unidad
• Cuando compre accesorios opcionales, pregunte
a su distribuidor KENWOOD si dichos accesorios
son compatibles con su modelo y en su región.
• Puede seleccionar el idioma de visualización de
los menús, las etiquetas de archivos de audio, etc.
Consulte el Manual de instrucciones.
• La función Radio Data System o Radio Broadcast
Data System no funcionará en lugares donde no
existan emisoras compatibles con este servicio.
Ñ Cómo proteger el monitor
• Para proteger el monitor de posibles daños, no lo
utilice con un bolígrafo con punta de bola ni con
ninguna herramienta similar de punta afilada.
Ñ Limpieza de la unidad
• Si la placa frontal de la unidad está manchada,
límpiela con un paño suave y seco, como un
paño de silicio. Si la placa frontal está muy
manchada, límpiela con un paño humedecido
con detergente neutro y, después, vuelva a
limpiarla con un paño suave y seco.
NOTA
• Si aplica un limpiador en spray directamente
sobre la unidad, puede dañar sus componentes
mecánicos. Si limpia la placa frontal con un paño
áspero o con líquido volátil, como disolvente o
alcohol, puede rayar la superficie o borrar los
caracteres impresos.
Ñ Cómo reiniciar su unidad
• Si la unidad o la unidad conectada no funcionan
correctamente, reiníciela. Pulse el botón <Reset>.
La unidad vuelve a los ajustes de fábrica.
Botón Restablecer
Ñ Empañamiento de la lente
• Al activar la calefacción del coche cuando
hace frío, puede aparecer vaho en la lente del
reproductor de disco de la unidad a causa
de la condensación. Esta condensación en la
lente (también denominada empañamiento
de la lente) puede hacer que los discos no se
reproduzcan. Si esto ocurre, retire el disco y
espere hasta que se evapore el vaho. Si la unidad
no funciona de forma normal después de un
tiempo, consulte con su distribuidor KENWOOD.
!B5H-0358-03_QSG_DDX_K_EnFrEs.indb 65 2020/06/03 13:14
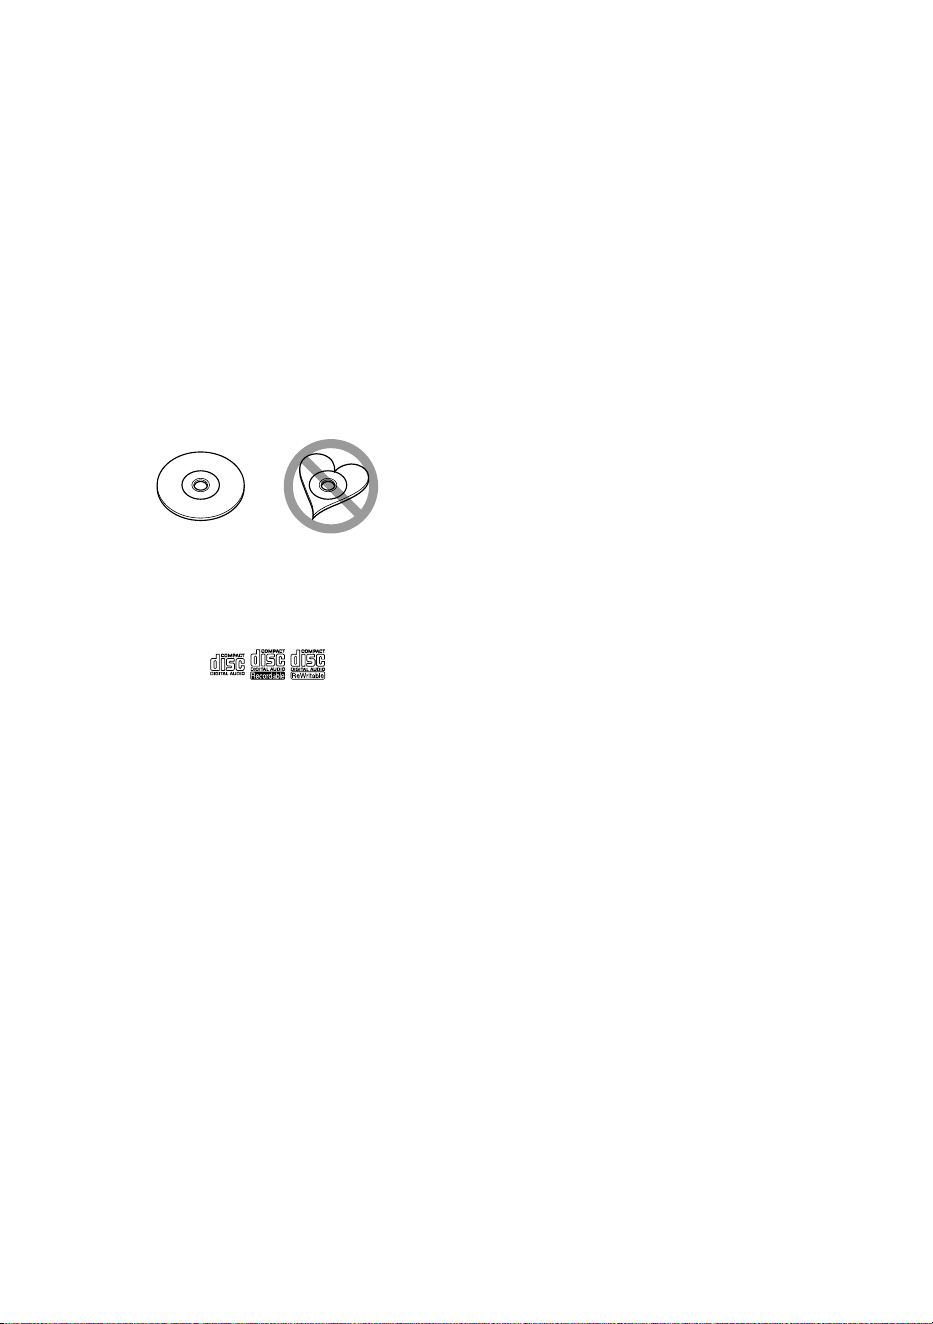
Antes de la utilización
66
Ñ Precauciones con el manejo de
los discos
• No toque la superficie de grabación del disco.
• No pegue cinta, etc., en el disco, ni utilice ningún
disco con cinta adherida.
• No utilice accesorios de tipo disco.
• Limpie el disco desde el centro hacia el borde
exterior.
• Al extraer un disco de esta unidad, tire de él
horizontalmente.
• Si el orificio central del disco o el borde exterior
tienen rebabas, utilice el disco únicamente
después de haber eliminado dichas rebabas con
un bolígrafo de bola o similar.
• No pueden utilizarse discos que no sean
redondos.
• No pueden utilizarse CDs de 8 cm (3 pulgadas).
• No pueden utilizarse discos con colores en la
superficie de grabación ni discos sucios.
• Esta unidad solo puede reproducir los siguientes
tipos de CD.
• Es posible que esta unidad no reproduzca
correctamente los discos que no tengan la marca.
• No puede reproducir un disco que no esté
finalizado. (Para el proceso de finalización,
consulte su programa de escritura y el manual de
instrucciones de su grabador).
Ñ Precauciones para usuarios de
teléfonos inteligentes
• Ejecutar simultáneamente múltiples aplicaciones
en su teléfono inteligente mientras comparte
pantalla implica una gran demanda en el
microprocesador del teléfono, afectando
potencialmente a la comunicación y al
rendimiento.
• Para obtener los mejores resultados mientras
empareja su receptor KENWOOD, por favor,
asegúrese de cerrar cualquier aplicación no
utilizada.
!B5H-0358-03_QSG_DDX_K_EnFrEs.indb 66 2020/06/03 13:14

Funciones básicas
67Español
Funciones básicas
Funciones de los botones del
panel frontal
1
2
3
4
5
6
7
NOTA
• Los paneles que se incluyen en este manual son
ejemplos utilizados para ofrecer explicaciones
de las distintas operaciones. Por esta razón,
pueden diferir de los paneles que se visualizan
en realidad.
Nombre
• Función
1
Sensor remoto
• Recibe la señal del control remoto.
2
[S], [R] ([VOL])
• Ajusta el volumen.
Si continúa presionando [R], el volumen
aumentará hasta 15.
3
[ HOME ]
• Muestra la pantalla de inicio (P.70).
• Si se pulsa durante 1 segundo, se apaga la
unidad.
• Si la unidad está apagada, la enciende.
4
[MENU]
• Muestra la pantalla MENÚ.
• Al pulsar durante 1 segundo se apaga la
pantalla.
5
[VOICE]
• Muestra la pantalla de reconocimiento de
voz.
Nombre
• Función
6
Restablecer
• Si la unidad o el equipo conectado no
funcionan correctamente, la unidad
restablece la configuración inicial al pulsar
este botón.
7
Ranura para inserción de discos
• Ranura que permite insertar discos (P.74).
Poner en marcha la unidad
1
Pulse el botón [HOME].
hh La unidad se pone en marcha.
● Para apagar la unidad:
1
Pulse el botón [HOME] durante 1
segundo.
NOTA
• La primera vez que se pone en marcha la unidad
después de la instalación, debe realizarse la
configuración inicial (P.68).
!B5H-0358-03_QSG_DDX_K_EnFrEs.indb 67 2020/06/03 13:14
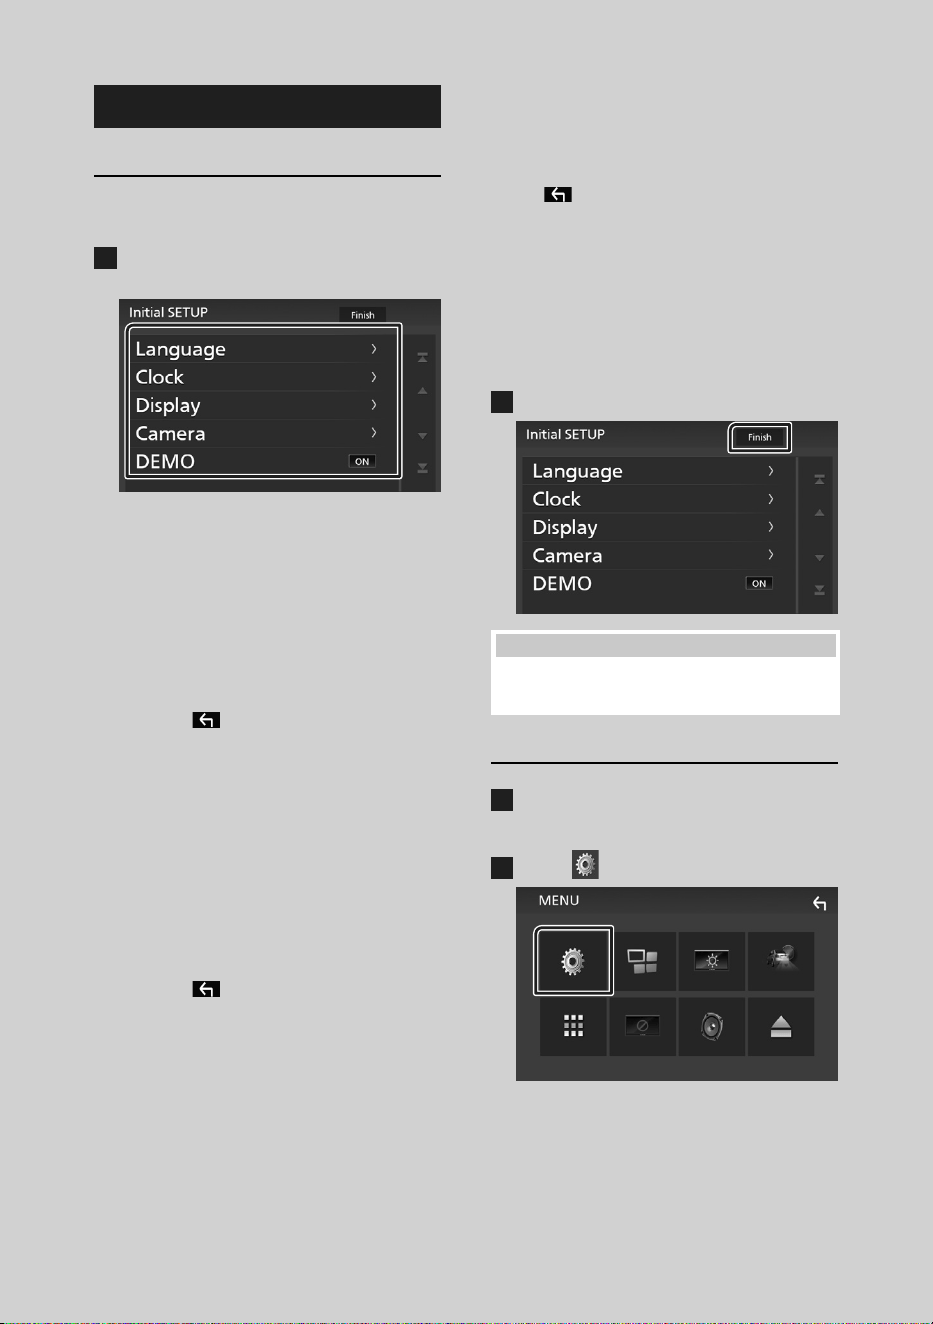
Funciones básicas
68
Inicio
Conguración inicial
Realice esta configuración si es la primera vez
que utiliza esta unidad.
1
Ajuste cada elemento del modo
siguiente.
■ [Language]
Seleccione el idioma utilizado para la pantalla
de control y los elementos de configuración.
La opción predeterminada es “[American
English(en)]”.
1Toque [Language].
2Toque [Language Select].
3Seleccione el idioma deseado.
4Toque [
].
■ [Clock]
Ajusta el reloj.
Para más información sobre el manejo,
consulte Ajustes del calendario/reloj
(P.68).
■ [Display]
Ajustar la imagen en la pantalla.
1Toque [Display].
2Toque [Background].
3Seleccione la imagen.
4Toque [
].
Para más información sobre el manejo,
consulte el manual de instrucciones.
■ [Camera]
Ajusta los parámetros de la cámara.
1Toque [Camera].
2Ajuste cada uno de los elementos y toque
[
].
Para obtener información detallada sobre
el funcionamiento, consulte el Manual de
instrucciones.
■ [DEMO]
Configure el modo de demostración. La
opción predeterminada es "ON".
1Toque [DEMO] y ajuste [ON] u [OFF].
2
Toque [Finish].
NOTA
• Estas opciones pueden ajustarse desde el menú
SE TUP.
Ajustes del calendario/reloj
1
Pulse el botón [MENU].
hh Aparece la pantalla MENÚ.
2
Toque [ ].
hh Aparece la pantalla SETUP Menu.
!B5H-0358-03_QSG_DDX_K_EnFrEs.indb 68 2020/06/03 13:14
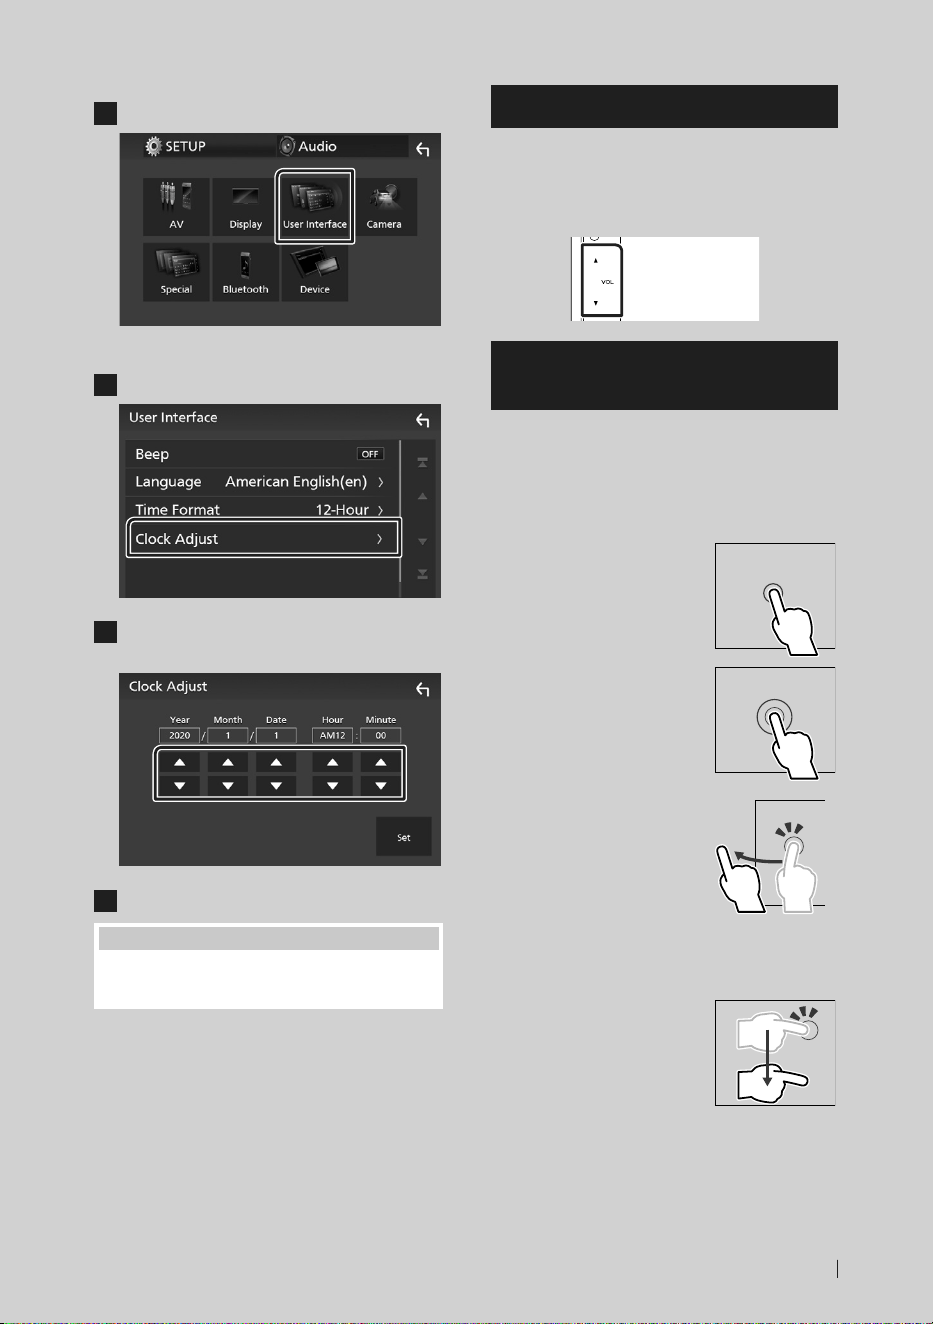
Funciones básicas
69Español
3
Toque [User Interface].
hh Aparecerá la pantalla User Interface.
4
Toque [Clock Adjust].
5
Ajuste la fecha y, a continuación, ajuste la
hora.
6
Toque [Set].
NOTA
• Desactive [RDS CT] antes de ajustar el reloj.
Consulte el Manual de instrucciones.
Ajuste del volumen
Para ajustar el volumen (0 a 40),
Pulse [R] para subirlo y pulse [S] para bajarlo.
Si mantiene pulsado [R] el volumen aumenta de
forma continua hasta el nivel 15.
Operaciones de la pantalla
táctil
Para realizar operaciones en la pantalla, deberá
tocar, tocar y mantener pulsado, hojear o
deslizar un dedo para seleccionar un elemento,
visualizar la pantalla del menú de configuración
o cambiar de página, etc.
● Tocar
Toque suavemente la
pantalla para seleccionar un
elemento.
● Tocar y mantener
pulsado
Toque la pantalla y continúe
pulsando hasta que se
cambie la visualización o se
muestre un mensaje.
● Hojear
Deslice su dedo rápidamente
hacia la izquierda o hacia la
derecha de la pantalla para
cambiar de página.
Puede desplazarse arriba/
abajo por la pantalla de la
lista arrastrándola con el
dedo.
● Deslizar
Deslice el dedo hacia arriba
o hacia abajo en la pantalla
para desplazarse por la
misma.
!B5H-0358-03_QSG_DDX_K_EnFrEs.indb 69 2020/06/03 13:14
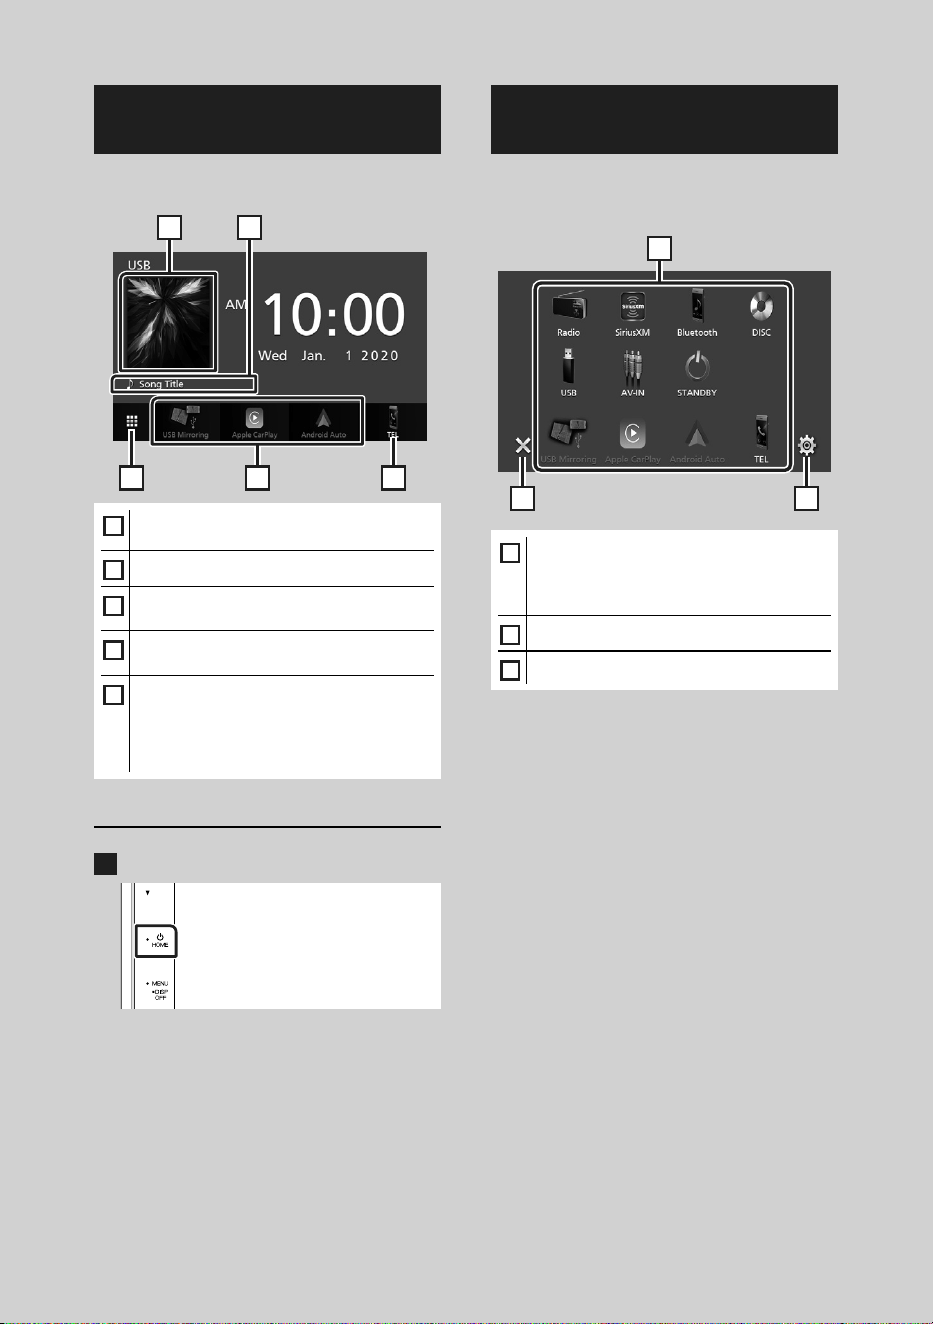
Funciones básicas
70
Descripciones de la pantalla
INICIO
La mayoría de las funciones pueden ejecutarse
desde la pantalla INICIO.
3
2
4 5
1
1
• Muestra la pantalla de control de la fuente
actual.
2
• Información de la fuente actual
3
• Muestra la pantalla de selección de fuente.
(P.70)
4
• Iconos de acceso directo a la fuente de
reproducción (P.71)
5
• Muestra la pantalla Manos libres. (P.81)
• Al conectar como Apple CarPlay o
Android Auto, funciona como un teléfono
proporcionado en Apple CarPlay o Android
Auto.
Visualización de la pantalla INICIO
1
Pulse el botón [HOME].
hh Aparece la pantalla INICIO.
Descripciones de la pantalla de
selección de fuente
Todas las fuentes y opciones de reproducción
se pueden visualizar en la pantalla de selección
de fuente.
2 3
1
1
• Cambia la fuente de reproducción.
Para las fuentes de reproducción, consulte
Selección de la fuente de reproducción
(P.71).
2
• Regresa a la pantalla anterior.
3
• Muestra la pantalla Menú CONFIGURACIÓN.
!B5H-0358-03_QSG_DDX_K_EnFrEs.indb 70 2020/06/03 13:14
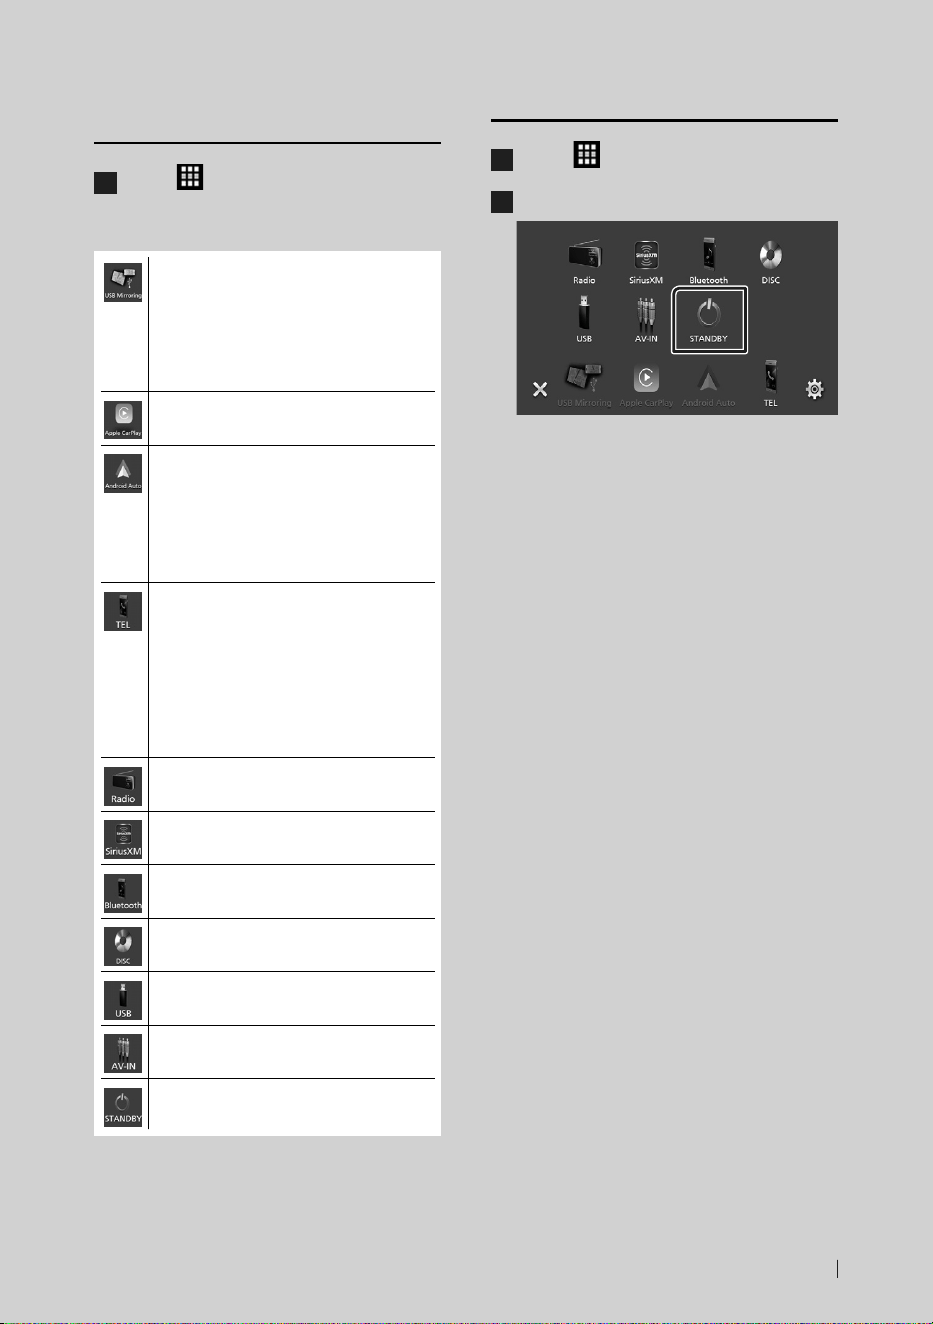
Funciones básicas
71Español
Selección de la fuente de
reproducción
1
Toque [ ] en la pantalla INICIO.
Desde la pantalla puede seleccionar las
siguientes fuentes y funciones.
• Cambia a la pantalla USB Mirroring desde
el teléfono inteligente Android conectado.
Es necesario conectar el teléfono
inteligente Android con la aplicación
“Mirroring OA for KENWOOD”
instalada y configurar [Mode] en
[Mirroring for Android™].
• Cambia a la pantalla de Apple CarPlay
desde el iPhone conectado.
• Cambia a la pantalla de Android Auto
desde el teléfono inteligente Android
conectado.
Es necesario conectar un teléfono
inteligente Android compatible con
Android Auto y configurar [Mode] en
[Android Auto].
• Muestra la pantalla Manos libres. (P.81)
Si no hay conectado un teléfono con
Apple CarPlay, Android Auto ni con manos
libres Bluetooth, se muestra el mensaje
“[Disconnected]” en la pantalla TEL.
Al conectar como Apple CarPlay o
Android Auto, funciona como un teléfono
proporcionado en Apple CarPlay o
Android Auto.
• Cambia a la emisión de radio. (P.77)
• Cambia a la transmisión de radio satelital
SiriusXM®. (P.78)
• Reproduce el reproductor de audio
Bluetooth.
• Reproduce un disco. (P.74)
• Reproduce archivos en un dispositivo USB.
(P.76)
• Cambia a un componente externo
conectado al terminal de entrada AV-IN.
• Pone la unidad en espera. (P.71)
Poner la unidad en espera
1
Toque [ ] en la pantalla INICIO.
2
Toque [STANDBY].
!B5H-0358-03_QSG_DDX_K_EnFrEs.indb 71 2020/06/03 13:14
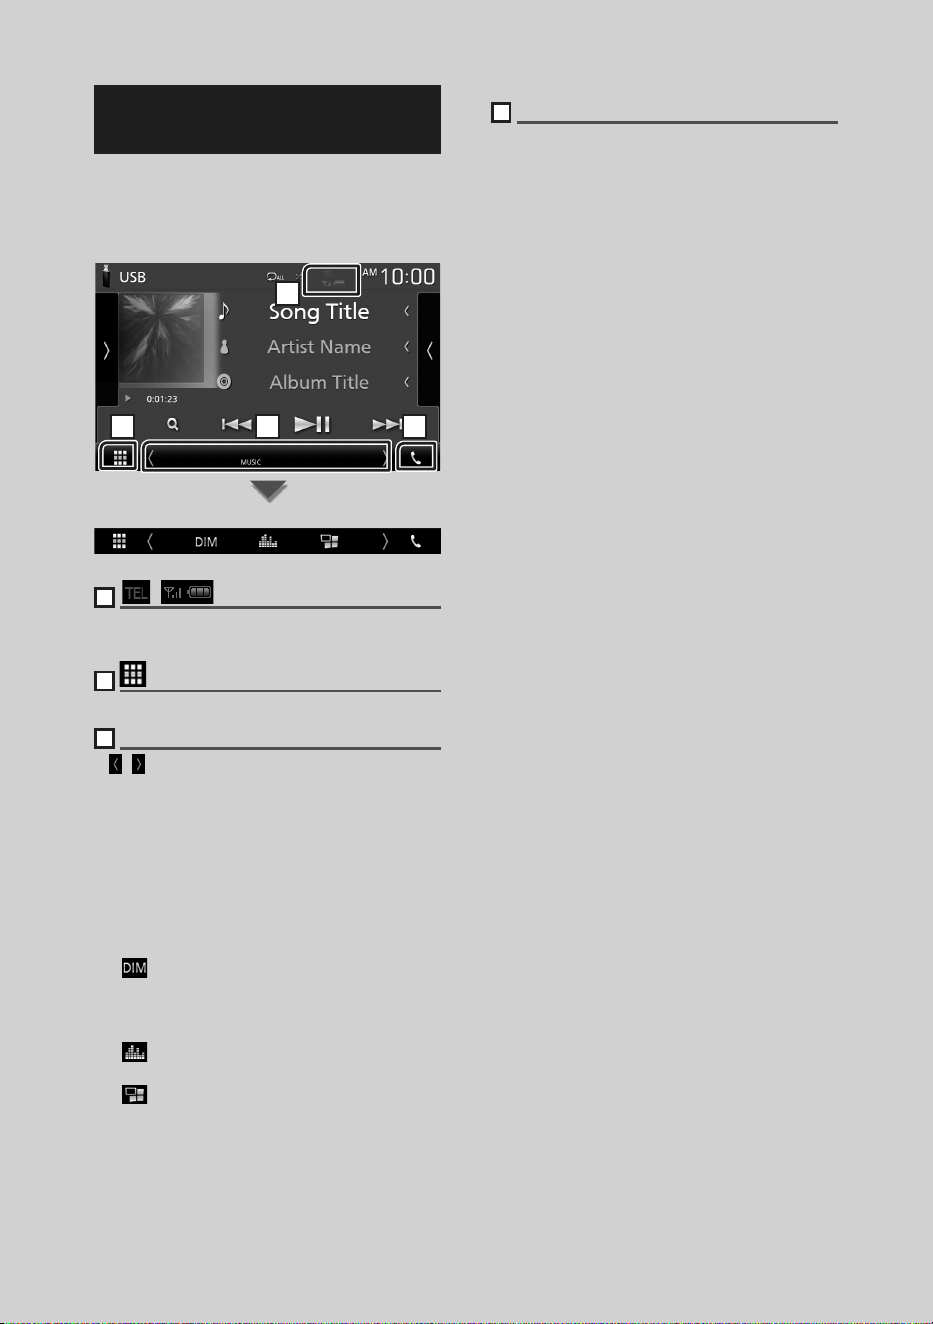
Funciones básicas
72
Descripciones de la pantalla de
control de fuente
Existen funciones que pueden ejecutarse desde
la mayoría de las pantallas.
Indicadores
1
2 3 4
Menú secundario
1
[ ]/[ ]
Información del dispositivo Bluetooth
conectado.
2
Icono de todas las fuentes
Muestra todas las fuentes.
3
Pantalla secundaria
• [ ]/[ ]: La pantalla secundaria cambia cada vez
que la toca. También puede cambiar la pantalla
secundaria moviendo el dedo hacia la izquierda o
hacia la derecha en la pantalla.
• Indicadores: Muestra el estado de la fuente
actual, etc.
– [MUTE]: La función de silenciamiento está activa.
– [LOUD]: La función de control de volumen está
activada.
• Menú secundario
– [ ]: Funcionamiento cuando se pulsa el icono:
El primer toque oscurece la pantalla, el segundo
toque oscurece aún más la pantalla y el tercer
toque restaura la pantalla a su brillo original.
– [
]: Muestra la pantalla Ecualizador gráfico.
(P.85)
– [
]: Muestra la pantalla APP (Apple CarPlay/
Android Auto).
4
[Û]
Toque para visualizar la pantalla Manos libres.
(P.81)
Al conectar como Apple CarPlay o Android Auto,
funciona como un teléfono proporcionado en
Apple CarPlay o Android Auto.
!B5H-0358-03_QSG_DDX_K_EnFrEs.indb 72 2020/06/03 13:14
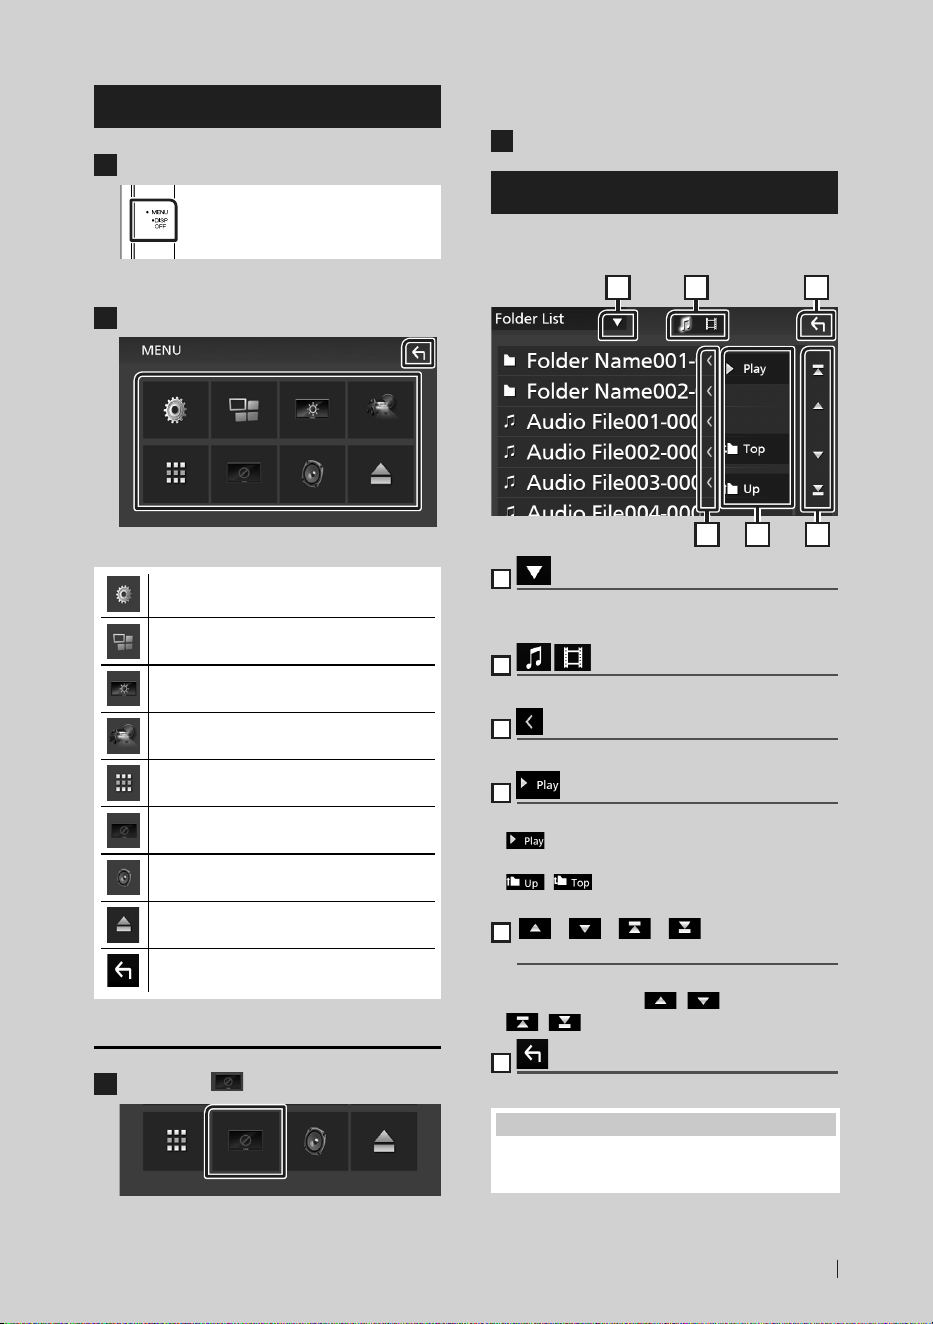
Funciones básicas
73Español
Pantalla MENÚ
1
Pulse el botón [MENU].
hh Aparece la pantalla MENÚ.
2
Toque para visualizar la pantalla MENÚ.
El contenido del menú es el siguiente.
• Muestra la pantalla Menú
CONFIGURACIÓN.
• Muestra la pantalla APP (Apple CarPlay/
Android Auto).
• Muestra la pantalla Ajuste de pantalla.
• Muestra la vista de cámara.
• Muestra la pantalla de selección de fuente.
(P.71)
• Desactiva la visualización. (P.73)
• Muestra la pantalla Menú de Control de
Audio. (P.84)
• Toque para expulsar el disco (P.74).
• Cierra la pantalla MENÚ.
Apagar la pantalla
1
Seleccione [ ] en la pantalla MENÚ.
● Para encender la pantalla
1
Toque la pantalla.
Pantalla de lista
Existen teclas de funciones comunes en las
pantallas de listas de la mayoría de las fuentes.
61 2
3 4 5
1
Visualiza la ventana de selección del tipo de
lista.
2
Muestra la lista de archivos de música/películas.
3
Desplazar texto
Desplaza el texto visualizado.
4
etc.
Aquí se muestran teclas con varias funciones.
• [ ]: Reproduce todas las pistas de la carpeta
que contiene la pista actual.
• [
] [ ]: Se desplaza al nivel jerárquico
superior.
5
[ ] / [ ] / [ ] / [ ] Desplazar
página
Podrá cambiar la página para visualizar más
elementos pulsando [
]/[ ].
• [ ]/[ ]: Muestra la página superior o inferior.
6
Retorno
Regresa a la pantalla anterior.
NOTA
• No se muestran los botones que no pueden ser
activados desde la pantalla de lista.
!B5H-0358-03_QSG_DDX_K_EnFrEs.indb 73 2020/06/03 13:14
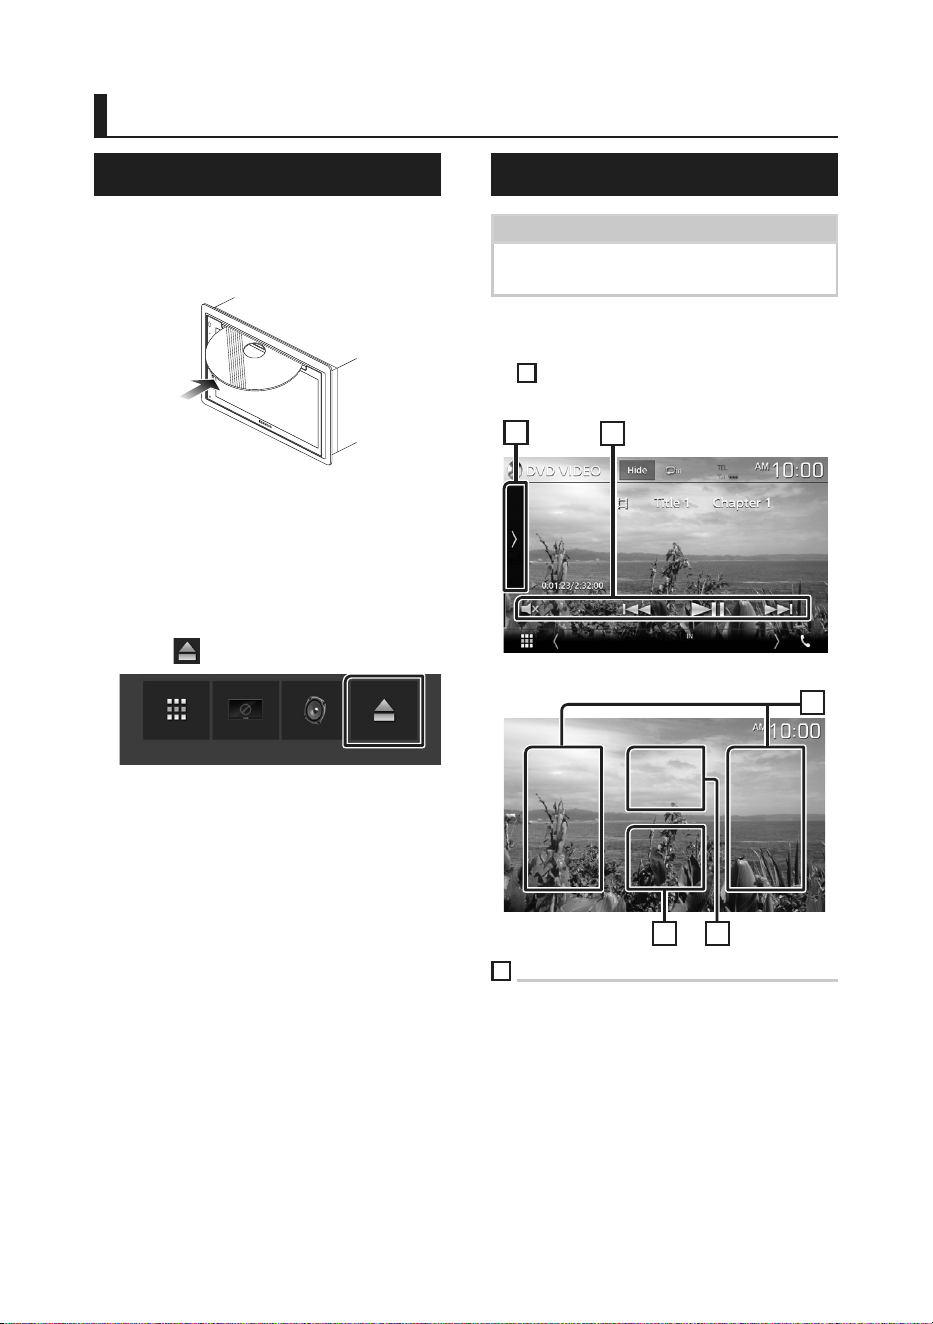
Disco
74
Disco
Reproducción de un disco
Ñ Introduzca un disco
1 Introduzca el disco en la ranura.
hh La unidad carga el disco y se inicia la
reproducción.
Ñ Expulse un disco
1 Pulse el botón [MENU].
hh Aparece la pantalla MENÚ.
2 Toque [ ].
Al extraer un disco, tire de él
horizontalmente.
Manejo básico de DVD/VCD
NOTA
• La captura siguiente corresponde al modo de
DVD. Puede ser distinta de la de un VCD.
1 Si los botones de operación no se
visualizan en la pantalla, toque la zona
4
.
Pantalla de control
2
1
Pantalla de vídeo
3
4 5
1
Panel de funciones
Toque el lado izquierdo de la pantalla para
mostrar el panel de funciones. Toque de nuevo
para cerrar el panel. Para obtener más detalles
sobre las teclas, consulte Panel de funciones
(P.75).
!B5H-0358-03_QSG_DDX_K_EnFrEs.indb 74 2020/06/03 13:14
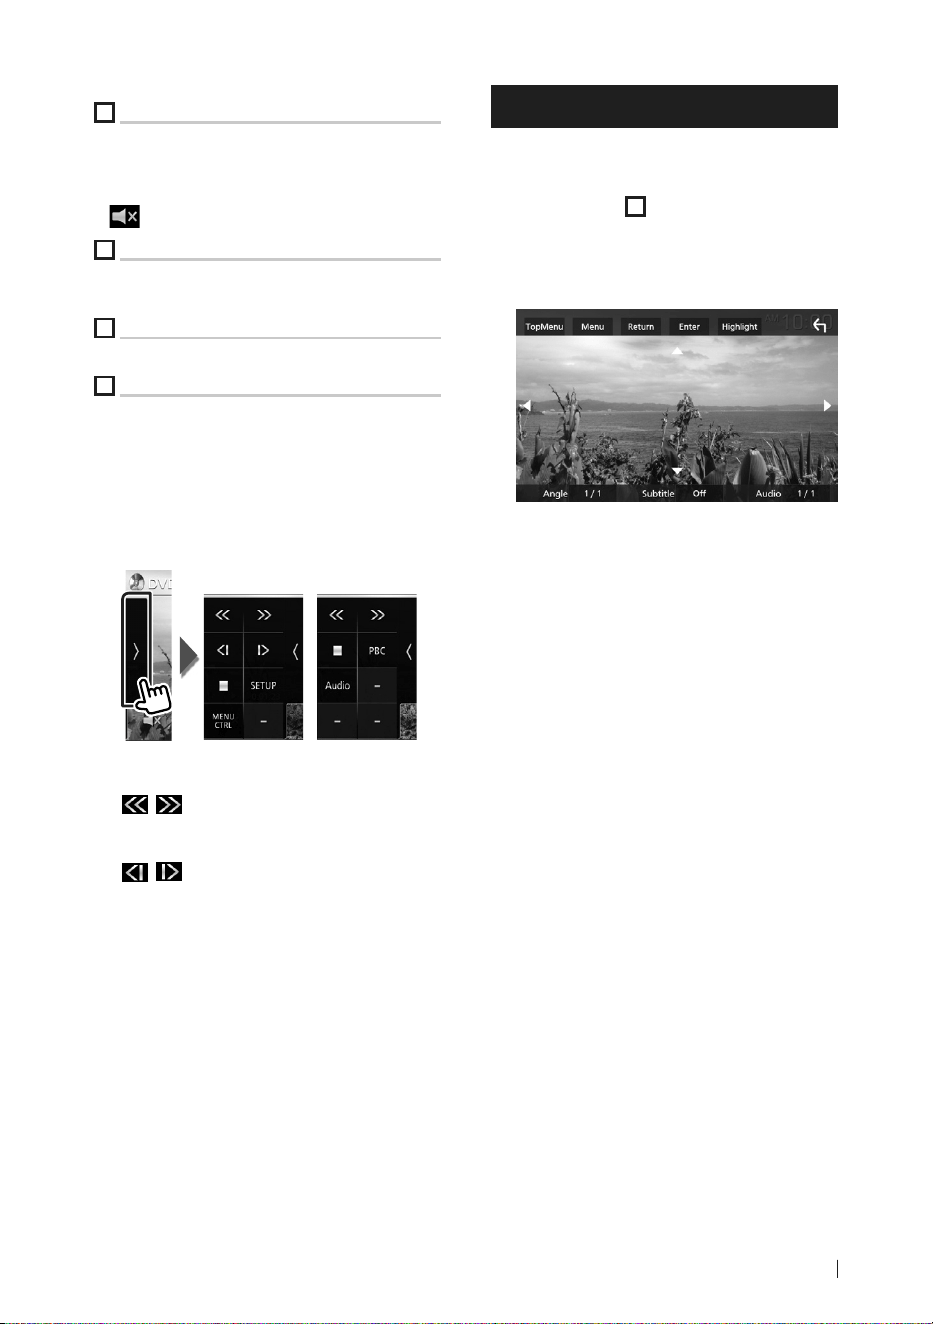
Disco
75Español
2
Teclas de operación
• [E] [F] : Busca el contenido anterior/siguiente.
Toque y mantenga para avanzar o retroceder
rápidamente el disco.
• [DH] : Inicia la reproducción o hace una pausa.
• [
]: Toque para silenciar o no silenciar.
3
Zona de búsqueda
Toque para buscar el contenido siguiente/
anterior.
4
Zona de visualización de teclas
Toque para visualizar la pantalla de control.
5
[MENU CTRL] (DVD solamente)
Toque para visualizar la pantalla de control del
menú del disco DVD-VIDEO. Consulte Manejo
del menú de disco DVD (P.75).
Ñ Panel de funciones
1 Toque en el lado izquierdo de la pantalla
de control.
DVD VCD
Las funciones de cada una de las teclas son
las siguientes.
[
] [ ]: Avanza o retrocede rápidamente
el disco. Cada vez que se toca la tecla, la
velocidad cambia.
[
] [ ] (DVD solamente): Reproduce hacia
delante o hacia atrás en modo lento.
[I]: Detiene la reproducción. Tocar dos veces
reproducirá el disco desde el principio la
próxima vez que lo reproduzca.
[SETUP] (DVD solamente): Toque para
visualizar la pantalla CONFIGURACIÓN
DVD.
[MENU CTRL] (DVD solamente): Toque para
visualizar la pantalla de control del menú
del disco DVD-VIDEO. Consulte Manejo
del menú de disco DVD (P.75).
[PBC] (VCD solamente): Toque para activar o
desactivar el control de la reproducción
(PBC).
[Audio] (VCD solamente): Toque para
cambiar los canales de salida de audio.
Manejo del menú de disco DVD
Es posible configurar algunas funciones usando
el menú de disco DVD-VIDEO.
1 Toque la zona
5
durante la reproducción.
hh Aparece la pantalla Control de menú.
2 Realice la operación deseada del modo
que se indica a continuación.
■ Para mostrar el menú principal
Toque [TopMenu].*
■ Para mostrar el menú
Toque [Menu].*
■ Para mostrar el menú anterior
Toque [Return].*
■ Para ingresar el elemento seleccionado
Toque [Enter].
■ Para habilitar el manejo directo
Toque [Highlight] para pasar al modo de
control de resalte.
■ Para mover el cursor
Toque [R], [S], [C], [D].
■ Para cambiar entre los idiomas de los
subtítulos
Toque [Subtitle]. Cada vez que se toca esta
tecla, cambia el idioma de los subtítulos.
■ Para cambiar entre los idiomas del
audio
Toque [Audio]. Cada vez que se toca esta
tecla, cambia el idioma del audio.
■ Para cambiar entre los ángulos de
imagen
Toque [Angle]. Cada vez que se toca esta
tecla, cambia el ángulo de la imagen.
* Estas teclas pueden no funcionar
dependiendo del disco.
!B5H-0358-03_QSG_DDX_K_EnFrEs.indb 75 2020/06/03 13:14
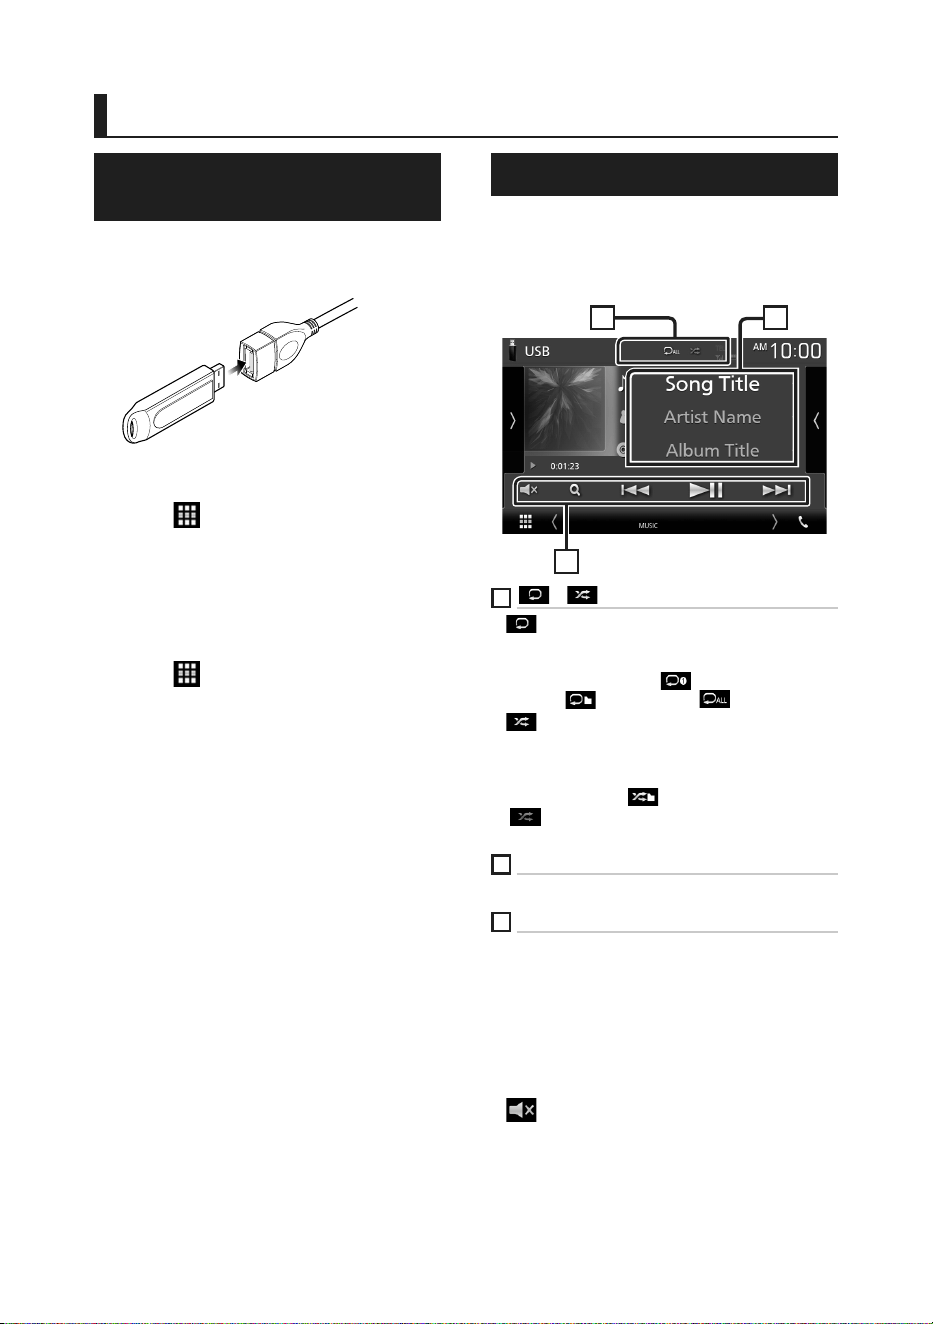
USB
76
USB
Conexión de un dispositivo
USB
1 Conecte el dispositivo USB con el cable
USB. (P.89)
2 Pulse el botón [HOME].
3 Toque [ ].
4 Toque [USB]. (P.71)
Ñ Desconecte el dispositivo USB
1 Pulse el botón [HOME].
2 Toque [ ].
3 Toque una fuente distinta de [USB].
4 Desconecte el dispositivo USB.
Ñ Dispositivos USB que pueden
utilizarse
En esta unidad puede utilizar un dispositivo USB
de tipo de almacenamiento masivo.
La palabra “USB device” que aparece en este
manual se refiere a un dispositivo de memoria
flash.
Manejo básico del USB
La mayoría de las funciones pueden controlarse
desde la pantalla de control de fuentes y de
reproducción.
Pantalla de control
21
3
1
[ ] / [ ]
• [ ]: Repite la pista/carpeta actual. Cada vez que
se toca el botón, el modo de repetición cambia
en la siguiente secuencia:
Repetición de archivo ([
]), repetición de
carpeta ([
]), repetir todo ([ ])
• [
]: Reproduce aleatoriamente todas las pistas
de la carpeta actual. Cada vez que se toca la
tecla, el modo aleatorio cambia en la siguiente
secuencia:
Archivo aleatorio ([
]), aleatorio desactivado
([
])
2
Información de pista
Muestra la información del archivo actual.
3
[Teclas de operación
• [1] : Busca una pista/un archivo. Para obtener
más detalles sobre la función de búsqueda,
consulte el manual de instrucciones.
• [E] [F] : Busca la pista o archivo anterior/
siguiente.
Mantenga pulsado para avanzar o retroceder
rápidamente.
• [D]H]: Inicia la reproducción o hace una pausa.
• [
]: Toque para silenciar o no silenciar.
!B5H-0358-03_QSG_DDX_K_EnFrEs.indb 76 2020/06/03 13:14

Radio
77Español
Radio
Manejo básico de radio
La mayoría de las funciones pueden controlarse
desde la pantalla de control de fuentes.
Para acceder a la fuente Radio, toque el icono
[Radio] en la pantalla de selección de fuente.
(P.71)
Pantalla de control
4
6
5
3
2
1
Abre el cajón
4
7
5
1
Pantalla de información
Muestra información sobre la emisora actual:
Frecuencia
Tocar [
] le permite alternar entre el contenido
A y el contenido B.
– Contenido A: Nombre de PS, radio texto, género
PTY
– Contenido B: Radio Texto plus, artista del título
[Preset#]: Número de presintonía
2
Modo de búsqueda
El modo de búsqueda cambia en el orden
siguiente: [AUTO1], [AUTO2], [MANUAL].
• [AUTO1]: Sintoniza automáticamente una
emisora con buena recepción.
• [AUTO2]: Sintoniza las emisoras de la memoria
una después de la otra.
• [MANUAL]: Cambia a la frecuencia siguiente
manualmente.
3
Teclas de operación
• [E] [F] : Sintoniza una emisora. El método
de cambio de frecuencia puede modificarse
(consulte 2 en la tabla).
• [
]: Toque para silenciar o no silenciar.
4
Preset list
• Toque el lado derecho de la pantalla para
visualizar la lista de presintonías. Toque de nuevo
para cerrar la lista.
• Restaura la emisora memorizada.
• Si se toca durante 2 segundos, almacena en la
memoria la emisora de recepción actual.
5
Panel de funciones
Toque el lado izquierdo de la pantalla para
mostrar el panel de funciones. Toque de nuevo
para cerrar el panel.
• [TI] (FM solamente): Activa el modo de
información del tráfico. Para obtener más
información, consulte el manual de instrucciones.
• [SETUP] (FM solamente): Muestra la pantalla
CONFIGURACIÓN de radio. Para obtener más
detalles, consulte el Manual de instrucciones.
• [AME]: Preajusta emisoras automáticamente. Para
obtener más información, consulte el manual de
instrucciones.
• [PTY] (solo FM): Busca una emisora estableciendo
el tipo de programa. Para obtener más
información, consulte el manual de instrucciones.
• [MONO] (FM solamente): Selecciona la recepción
monoaural.
6
[FM] [AM]
Cambia la banda.
7
Elementos del indicador
• [ST]: Se está recibiendo una difusión en estéreo.
• [MONO]: La función de forzar monoaural está
activa.
• [TI]: Indica el estado de recepción de información
de tráfico.
Blanco: Se recibe TP.
Naranja: No se recibe TP.
!B5H-0358-03_QSG_DDX_K_EnFrEs.indb 77 2020/06/03 13:14
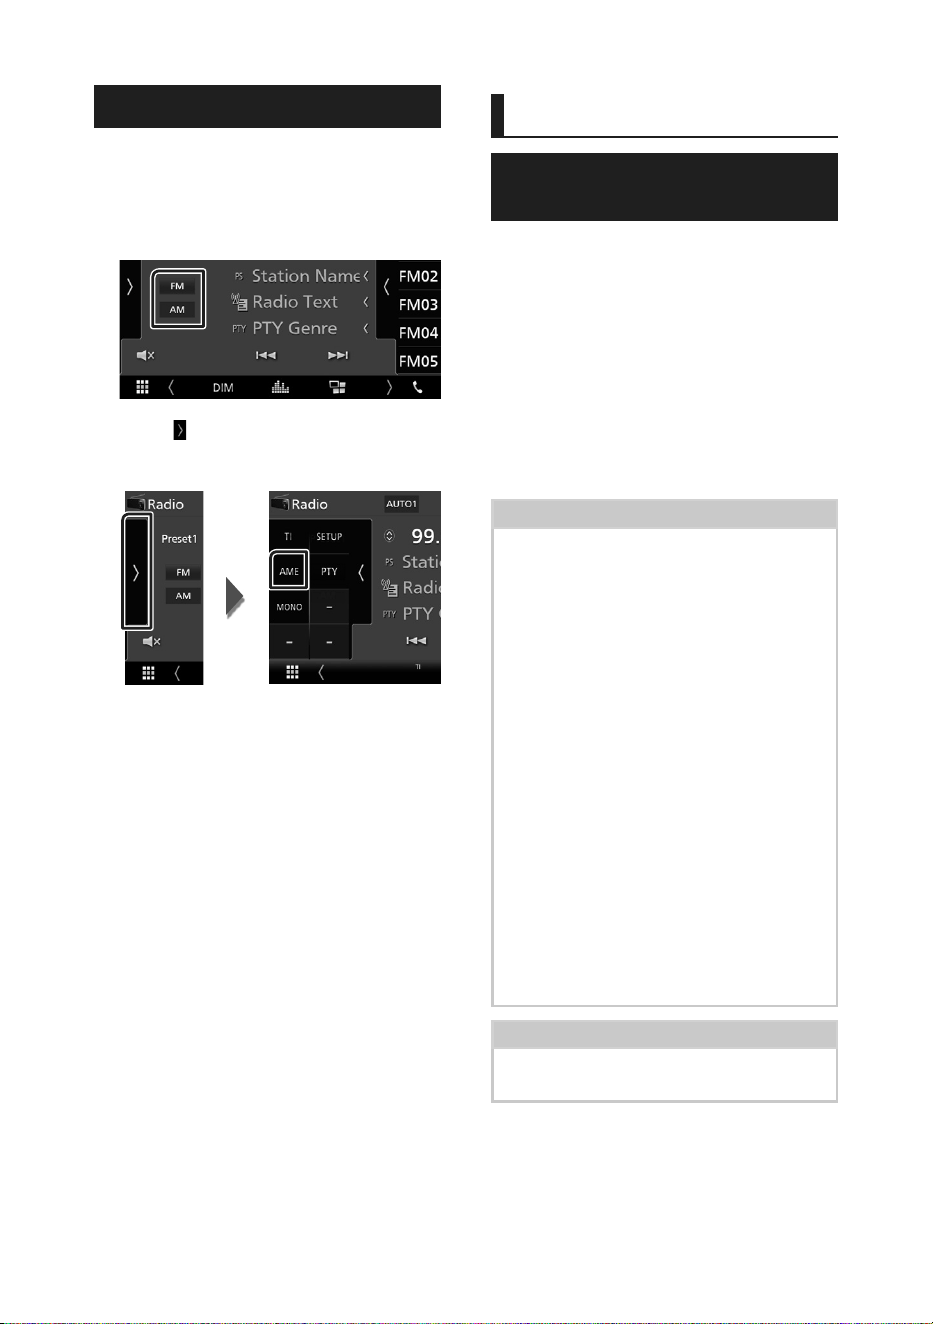
Radio
78
Manejo de la memoria
Ñ Memoria automática
Puede almacenar automáticamente en memoria
las emisoras con buena recepción.
1 Toque la tecla de la banda deseada.
2 Toque [ ] en el lado izquierdo de la
pantalla.
Toque [AME].
hh Aparecerá una pantalla de confirmación.
3 Toque [Ye s ].
hh Se inicia la memoria automática.
Ñ Memoria manual
La emisora que se está recibiendo actualmente
puede almacenarse en la memoria.
1 Seleccione una emisora que desee
almacenar en la memoria.
2 Toque el botón en el que desee almacenar
la emisora durante 2 segundos, [FM#] (#:
1-24) o [AM#] (#: 1-12).
SiriusXM®
Funcionamiento básico de
SiriusXM®
SiriusXM® es el único capaz de ofrecerle más
de lo que desea escuchar, todo en un solo
lugar. Consiga más de 140 canales, incluyendo
música sin anuncios y los mejores deportes,
noticias, tertulias, comedias y entretenimiento.
Bienvenido al mundo de la radio satelital. Serán
necesarios un sintonizador para vehículos
SiriusXM y una subscripción. Para obtener más
información, visite www.siriusxm.com.
Para escuchar la fuente SiriusXM, toque el
icono [SiriusXM] en la pantalla de selección de
fuente. (P.71)
Activación de la suscripción
• Compruebe el ID de su radio.
El ID de la radio satelital SiriusXM será necesario
para la activación y podrá encontrarlo
sintonizando el canal 0 así como en la etiqueta
del sintonizador SiriusXM Connect y en su
envoltorio.
El ID de la radio no incluye las letras I, O, S ni F.
• Active el sintonizador para vehículos SiriusXM
Connect utilizando uno de los siguientes dos
métodos:
– Para los usuarios de EE. UU.
En línea:
Visite www.siriusxm.com/activatenow
Teléfono:
Contacte con el centro de atención al cliente
de SiriusXM en el 1-866-635-2349
– Para los usuarios en Canadá:
En línea: Visite
https://www.siriusxm.ca/help/activation-help/
Teléfono:
Contacte con el centro de atención al cliente
de XM en el 1-877-438-9677
NOTA
• Para utilizar la radio satelital SiriusXM®, se
requiere el accesorio opcional.
SiriusXM®
!B5H-0358-03_QSG_DDX_K_EnFrEs.indb 78 2020/06/03 13:14

SiriusXM®
79Español
Pantalla de control
2
3
1
5
4
Abra el cajón
5
3
1
Pantalla de información
• Muestra la información del canal actual: Nombre
del canal
[P#]: Número de presintonía
[#CH]: Número de canal
Tocar [
] le permite alternar entre el contenido
A y el contenido B.
– Contenido A: Nombre del intérprete, título de la
canción
– Contenido B: Información del contenido, nombre
de categoría
NOTA
• Durante la obtención de contenido, “Waiting”
aparece en pantalla.
2
Botón de banda
Cambia entre bandas. (SXM1/SXM2/SXM3)
3
Ilustraciones/panel de funciones
• Muestra las ilustraciones del álbum para la
mayoría de los canales de música de SiriusXM.
• Toque el icono [
] de la pantalla para visualizar
el panel de funciones. Toque [
] para cerrar el
panel.
– [Direct Channel]: Toque e introduzca el número
deseado. Para obtener más información, consulte
el manual de instrucciones.
– [SETUP]: Toque para visualizar la pantalla
CONFIGURACIÓN de SiriusXM. Para obtener más
información, consulte el manual de instrucciones.
– [Replay/Live]: Toque para activar o desactivar
el modo de repetición. Consulte el Manual de
instrucciones.
4
Teclas de operación
• [1] : Visualice la pantalla de Búsqueda
de categoría. Para más detalles sobre las
funciones de búsqueda, consulte el Manual de
instrucciones.
• [DH] : Inicia la reproducción o hace una pausa.
Consulte el Manual de instrucciones.
• [CHS] [CHR]: Selecciona un canal.
• [
]: Toque para silenciar o no silenciar.
5
Lista de preselección
• Toque el icono [ ] de la pantalla para visualizar la
lista de presintonías. Toque [
] para cerrar la lista.
• Recupera el canal memorizado.
• Si se toca durante 2 segundos, almacena en la
memoria el canal que se recibe actualmente.
!B5H-0358-03_QSG_DDX_K_EnFrEs.indb 79 2020/06/03 13:14
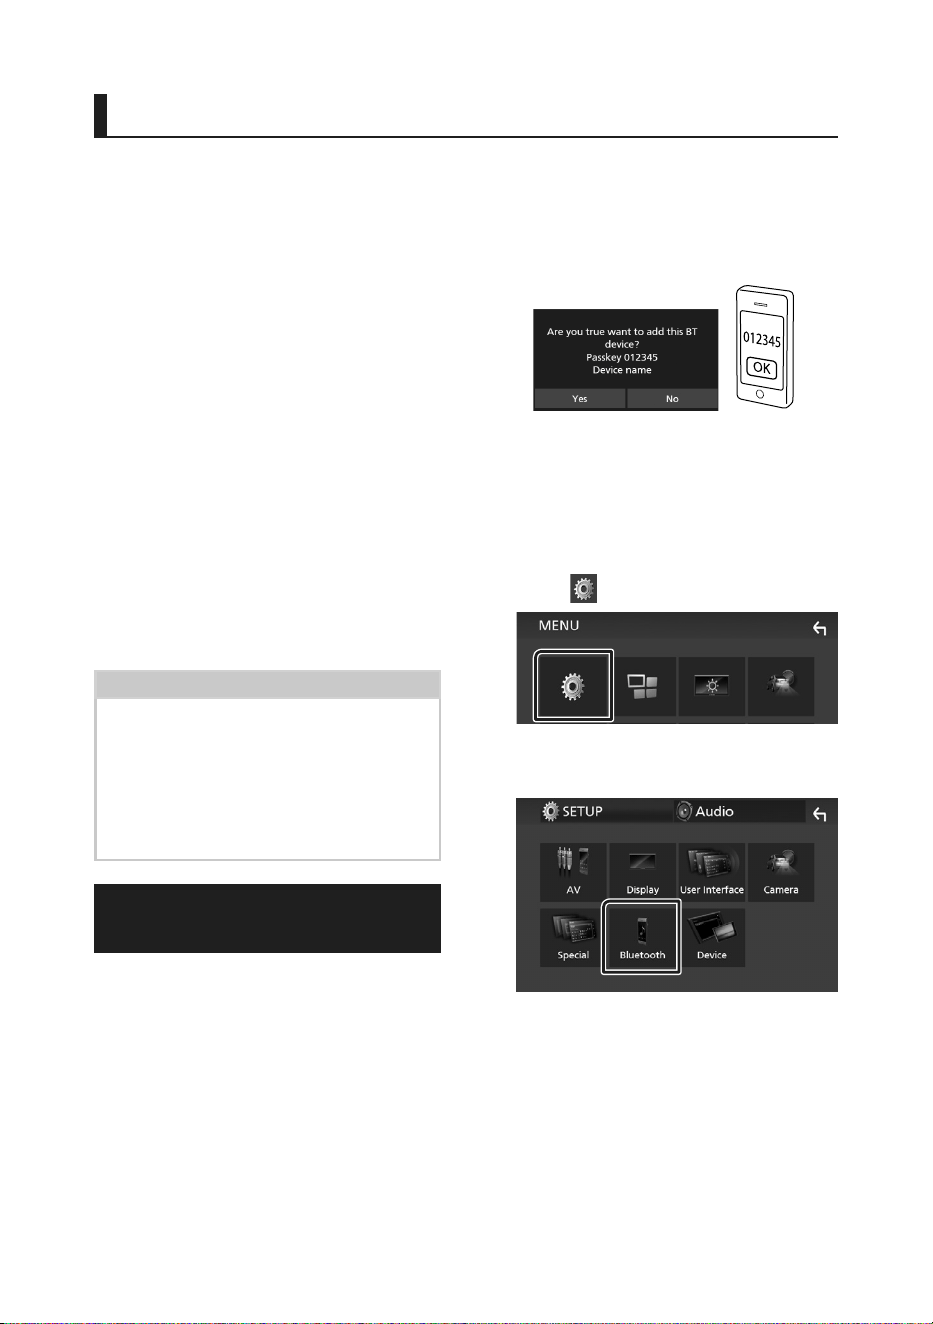
Control de Bluetooth
80
Control de Bluetooth
Ñ Acerca de los teléfonos móviles
y los reproductores de audio
Bluetooth
Esta unidad cumple las siguientes
especificaciones Bluetooth:
Versión
Bluetooth Ver. 4.1
Perfil
Teléfono móvil:
HFP (Perfil de manos libres)
SPP (Perfil de puerto serie)
PBAP (Perfil de acceso a agenda telefónica)
Reproductor de audio :
A2DP (Perfil avanzado de distribución de
audio)
AVRCP (Perfil de mando a distancia de audio/
vídeo)
Códec de sonido
SBC, AAC
NOTA
• La unidad compatible con la función Bluetooth
tiene la certificación de conformidad con la
norma Bluetooth con arreglo al procedimiento
estipulado por Bluetooth SIG.
• Sin embargo, puede que dichas unidades
no puedan comunicarse con ciertos tipos de
teléfono móvil.
Registre desde el dispositivo
Bluetooth
Es necesario registrar el reproductor de audio o
el teléfono móvil Bluetooth antes de utilizarlos
en esta unidad con la función Bluetooth.
1 Active la función Bluetooth en su teléfono
inteligente/teléfono móvil.
2 Busque la unidad (“DDX*****”) en su
teléfono inteligente/teléfono móvil.
3 Accione su smartphone/teléfono móvil
en conformidad con los mensajes
visualizados.
■ Confirme la petición en el teléfono
inteligente/móvil.
■ Si se requiere un código PIN, introduzca
el código PIN (“0000”).
4 Toque [Ye s ].
5 Pulse el botón [MENU].
hh Aparece la pantalla MENÚ.
6 Toque [ ].
hh Aparece la pantalla SETUP Menu.
7 Toque [Bluetooth].
hh Aparece la pantalla Bluetooth SETUP.
!B5H-0358-03_QSG_DDX_K_EnFrEs.indb 80 2020/06/03 13:14
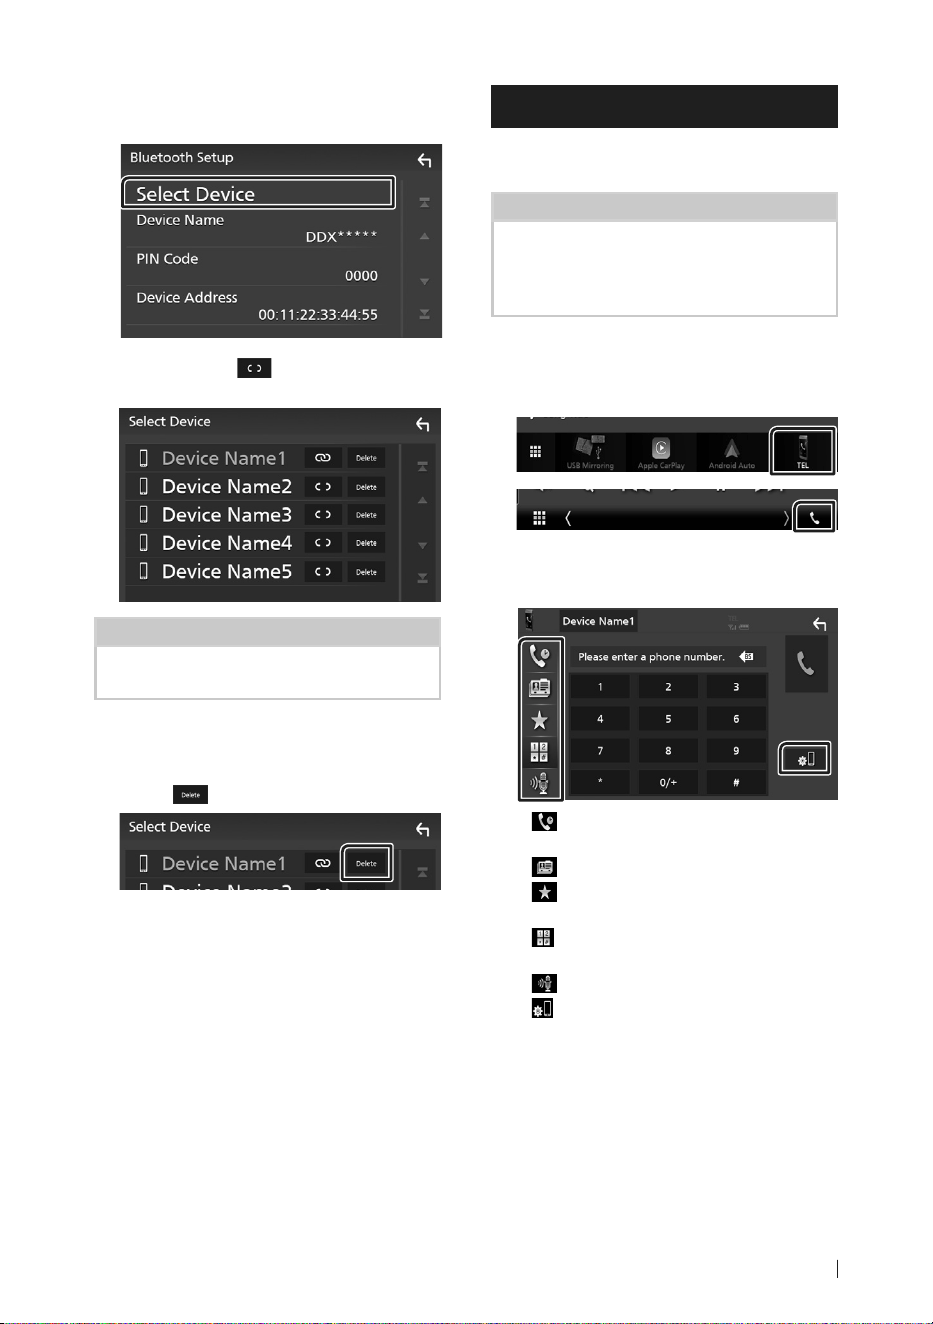
Control de Bluetooth
81Español
8 Toque [Select Device] en la pantalla
CONFIGURACIÓN de Bluetooth.
9 Toque el icono [ ] del dispositivo al que
desee conectarse.
NOTA
• Si el icono está iluminado, significa que la unidad
utilizará este dispositivo.
Para eliminar el dispositivo Bluetooth
registrado
1 Toque [ ].
hh Aparece el mensaje de confirmación.
2 Toque [Ye s ].
Usar la unidad de manos libres
Puede usar la función de teléfono conectando
un teléfono Bluetooth a esta unidad.
NOTA
• Mientras Apple CarPlay o Android Auto se
conectan, no se puede usar la función de manos
libres Bluetooth. Solo puede usar la función de
manos libres Apple CarPlay o Android Auto.
Ñ Haga una llamada
1 Toque [TEL]/[Û].
hh Aparece la pantalla Hands Free.
2 Seleccione un método de marcación.
• [ ]: Llamar usando los registros de
llamada almacenados
• [
]: Llamar usando la agenda telefónica
• [
]: Llamar usando el número
preseleccionado
• [
]: Llamar introduciendo un número
telefónico
• [
]: Reconocimiento de voz
• [
]: Configurar Bluetooth
!B5H-0358-03_QSG_DDX_K_EnFrEs.indb 81 2020/06/03 13:15

Control de Bluetooth
82
● Configurar Bluetooth
1) Toque [
].
Aparece la pantalla Bluetooth SETUP.
NOTA
• Los iconos de estado para la batería y la antena
mostrados en la unidad de control pueden no
coincidir con los mostrados en el teléfono móvil.
• La configuración del teléfono móvil en modo
privado puede desactivar la función manos
libres.
Llamar usando datos de llamada
almacenados
1 Toque [ ].
2 Seleccione el número de teléfono de la
lista.
Llamar introduciendo un número
telefónico
1 Toque [ ].
2 Introduzca un número de teléfono con las
teclas numéricas.
3 Toque [ ].
Llamar usando el número
preseleccionado
1 Toque [ ].
2 Toque el nombre o número de teléfono.
Llamar usando la agenda telefónica
1 Toque [ ].
2 Seleccione en la lista la persona a la que
desea llamar.
3 Seleccione el número de teléfono de la
lista.
NOTA
• Si no se descargó ninguna agenda telefónica,
tocar [Download Phonebook Now] iniciará la
descarga de la agenda telefónica.
!B5H-0358-03_QSG_DDX_K_EnFrEs.indb 82 2020/06/03 13:15
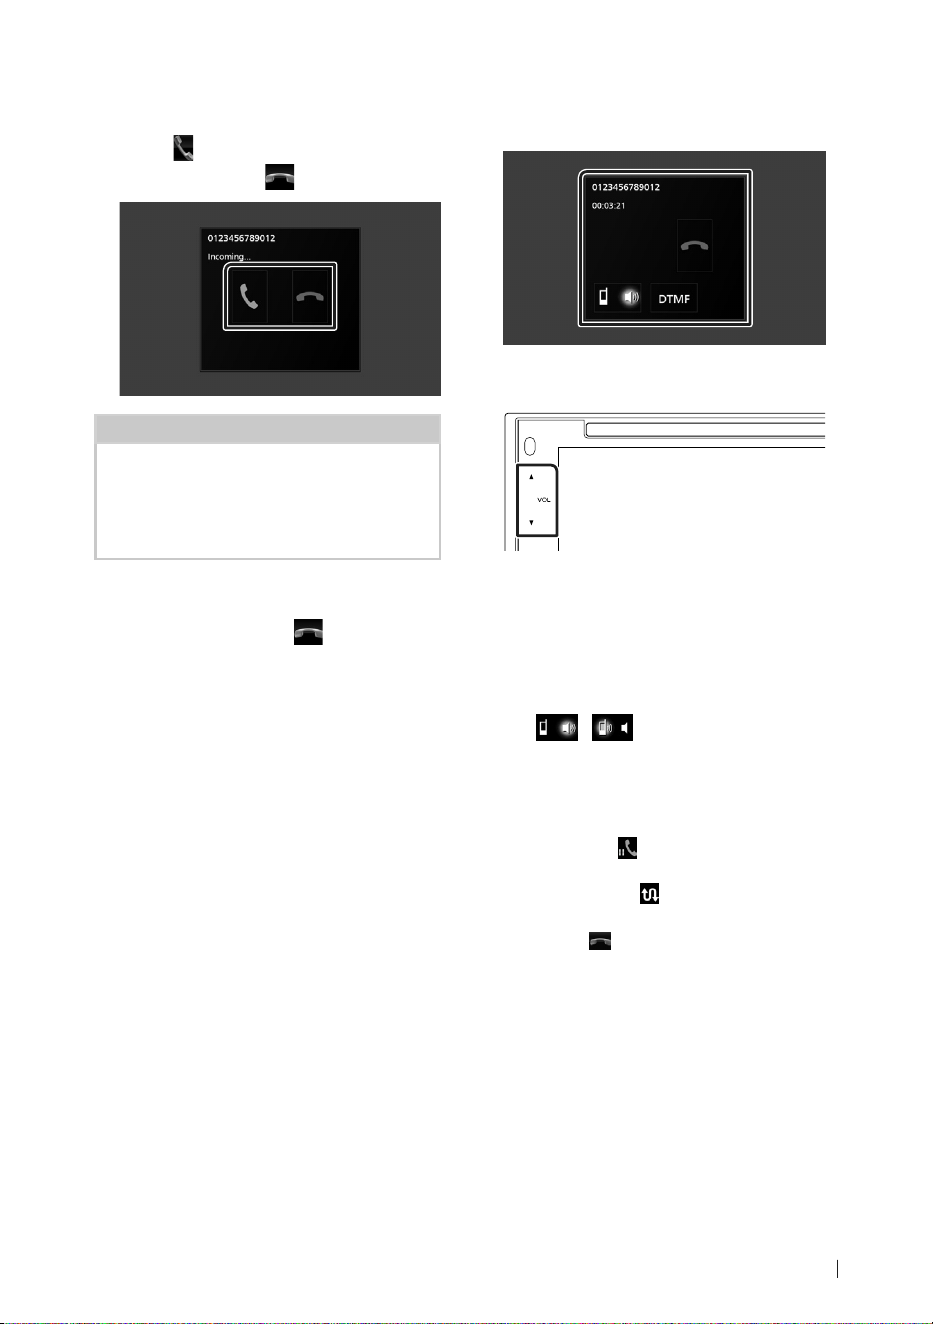
Control de Bluetooth
83Español
Ñ Reciba una llamada
1 Toque [ ] para contestar una llamada
telefónica o toque [
] para rechazarla.
NOTA
• Mientras se controla la vista de cámara, esta
pantalla no se mostrará aunque reciba una
llamada. Para mostrar esta pantalla, regrese la
palanca de cambios del vehículo a la posición de
conducción.
Para finalizar una llamada
1 Mientras habla, toque [ ].
Ñ Operaciones durante una
llamada
● Ajustar el volumen del receptor
Pulse el botón [S] o [R].
● Emitir el tono de llamada
Toque [DTMF] para visualizar la pantalla de
entrada de tono.
Puede enviar tonos tocando las teclas
correspondientes de la pantalla.
● Cambiar la salida de voz
Tocar [
]/ [ ] cada vez cambia la salida
de voz entre el teléfono móvil y el altavoz.
● Llamada en espera
Cuando reciba una llamada mientras esté
atendiendo otra, podrá contestar a la nueva
llamada tocando [
]. La llamada actual quedará
en espera.
Cada vez que toque [
], cambiará la persona
con la que hable.
Cuando toca [
], la llamada actual finalizará y
cambiará a la llamada en espera.
!B5H-0358-03_QSG_DDX_K_EnFrEs.indb 83 2020/06/03 13:15

Control del audio
84
Control del audio
Puede ajustar diversas opciones como el
balance o el subwoofer.
1 Pulse el botón [MENU].
hh Aparece la pantalla MENÚ.
2 Toque [ ].
Ñ Control general del audio
1 Pulse el botón [MENU].
hh Aparece la pantalla MENÚ.
2 Toque [ ].
hh Aparece la pantalla de audio.
3 Toque [Fader / Balance].
4 Ajuste cada elemento del modo siguiente.
■ [Fader]/[Balance]
Ajuste el balance alrededor de la zona de
contacto.
[C] y [D] ajustan el balance izquierdo y
derecho.
[R] y [S] ajustan el balance delantero y
trasero.
■ [Center]
Borre el ajuste.
!B5H-0358-03_QSG_DDX_K_EnFrEs.indb 84 2020/06/03 13:15
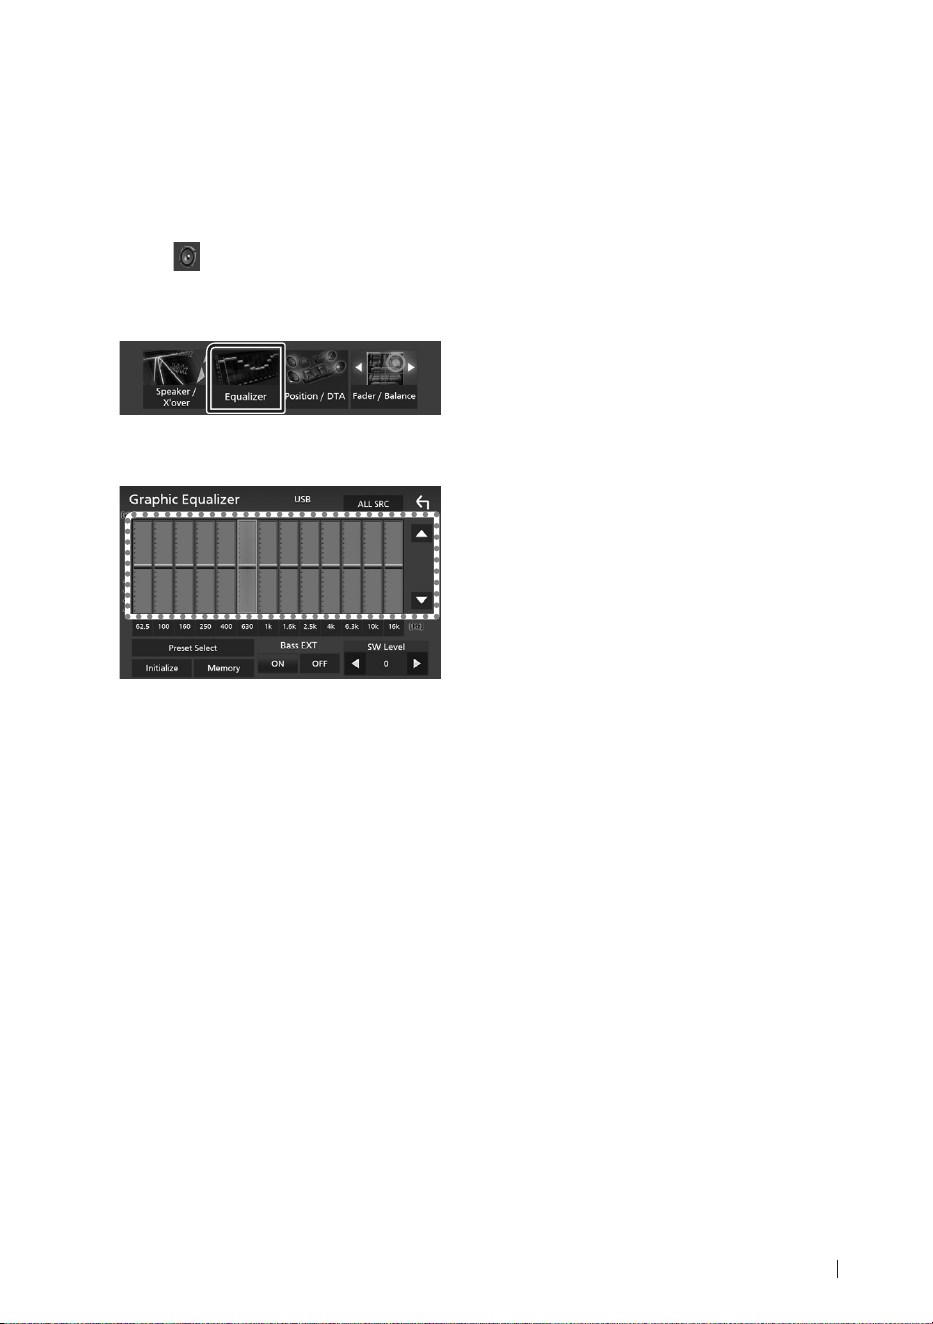
Control del audio
85Español
Ñ Control del ecualizador
Puede ajustar el ecualizador seleccionando el
ajuste optimizado para cada categoría.
1 Pulse el botón [MENU].
hh Aparece la pantalla MENÚ.
2 Toque [ ].
hh Aparece la pantalla de audio (Audio).
3 Toque [Equalizer].
4 Toque la pantalla y ajuste a su gusto el
ecualizador gráfico.
■ [ALL SRC]
Aplique el equalizador ajustado a todas las
fuentes. Toque [ALL SRC] y entonces toque
[OK] en la pantalla de confirmación.
■ Nivel de ganancia (área de marco
punteado)
Ajuste la ganancia tocando cada una de las
barras de frecuencia.
Podrá seleccionar la barra de frecuencia y
ajustar su nivel usando [R], [S].
■ [Preset Select]
Muestra la pantalla para recuperar la curva
del ecualizador preajustado.
■ [Initialize]
La curva EQ actual vuelve a plana.
■ [Memory]
Guarda la curva del ecualizador ajustada
entre “[User1]” y “ [User3]”.
■ [Bass EXT] (ajustes avanzados de
graves)
Si está activo, las frecuencias inferiores a 62,5
Hz se establecen al mismo nivel de ganancia
que 62,5 Hz.
■ [SW Level]
Ajusta el volumen del subwoofer.
!B5H-0358-03_QSG_DDX_K_EnFrEs.indb 85 2020/06/03 13:15

Conexión/Instalación
86
Conexión/Instalación
Antes de la instalación
Antes de la instalación de esta unidad, tenga en
cuenta las precauciones siguientes.
#ADVERTENCIAS
• Si conecta el cable de encendido (rojo) y el cable
de la batería (amarillo) al chasis del automóvil
(tierra), podría producir un cortocircuito y esto, a
su vez, un incendio. Conecte siempre esos cables
a la fuente de alimentación que pasa por la caja
de fusibles.
• No corte el fusible del cable de ignición (rojo) y
el cable de la batería (amarillo). El suministro de
energía debe conectarse a los cables por medio
del fusible.
#PRECAUCIÓN
• Instale esta unidad en la consola de su vehículo.
No toque la parte metálica de esta unidad
durante e inmediatamente después del uso de
la unidad. Las partes metálicas, tales como el
disipador de calor o la carcasa, pueden estar muy
calientes.
NOTA
• La instalación y el cableado de este producto
requieren habilidad y experiencia. Para mayor
seguridad, deje el trabajo de montaje y cableado
en manos de profesionales.
• Asegúrese de utilizar para la unidad una fuente
de alimentación de 12 V CC con conexión a tierra
negativa.
• No instale la unidad en un sitio expuesto a la
luz directa del sol, o excesivamente húmedo o
caluroso. Además deberá evitar sitios con mucho
polvo o con posibilidad de salpicaduras de agua.
• No utilice sus propios tornillos. Utilice solo
los tornillos suministrados. El uso de tornillos
diferentes podría causar daños en la unidad.
• Si la alimentación no se enciende (se visualiza
“There is an error in the speaker wiring. Please
check the connections.” (Hay un error en el
cableado del altavoz. Por favor, compruebe las
conexiones)), puede que el cable del altavoz haya
sufrido un cortocircuito o que haya tocado el
chasis del vehículo y se haya activado la función
de protección. Por lo tanto, el cable del altavoz
debe ser revisado.
• Si el encendido de su automóvil no está provisto
de la posición ACC, conecte los cables de
encendido a una fuente de alimentación que
pueda conectarse y desconectarse con la llave
de encendido. Si conecta el cable de encendido
a una fuente de alimentación con un suministro
de voltaje constante, como con los cables de la
batería, la batería puede agotarse.
• Si la consola tiene una tapa, asegúrese de instalar
la unidad de forma que el panel frontal no
golpee la tapa al abrirse o cerrarse.
• Si se funden los fusibles, asegúrese primero
de que los cables no están en contacto pues
pueden ocasionar un cortocircuito, luego
reemplace el fusible dañado por uno nuevo que
tenga la misma potencia de servicio.
• Aísle los cables no conectados con una cinta
de vinilo u otro material similar. Para evitar
cortocircuitos, no retire las tapas de los extremos
de los cables o terminales no conectados.
• Conecte los cables de los altavoces a cada uno
de los terminales correspondientes. La unidad
se puede dañar o no funcionar si comparte los
cables ¤ o los conecta a tierra a cualquier parte
metálica del vehículo.
• Si se han conectado solamente dos altavoces
al sistema, enchufe los conectores a ambos
terminales de salida delanteros o a ambos
terminales de salida traseros (es decir, no mezcle
terminales delanteros y traseros). Por ejemplo,
si conecta el conector ¢ del altavoz izquierdo
a un terminal de salida delantero, no conecte el
conector ¤ a un terminal de salida trasero.
• Después de instalar la unidad, compruebe
que las luces de freno, las luces intermitentes,
el limpiaparabrisas, etc. funcionan
satisfactoriamente.
• Instale la unidad en un ángulo de 30˚ o menos.
• No presione con fuerza la superficie del panel al
instalar la unidad en el vehículo. De lo contrario,
pueden producirse marcas, daños o fallos.
• La recepción podría ser baja si existen objetos
metálicos cerca de la antena Bluetooth.
Unidad de antena Bluetooth
!B5H-0358-03_QSG_DDX_K_EnFrEs.indb 86 2020/06/03 13:15
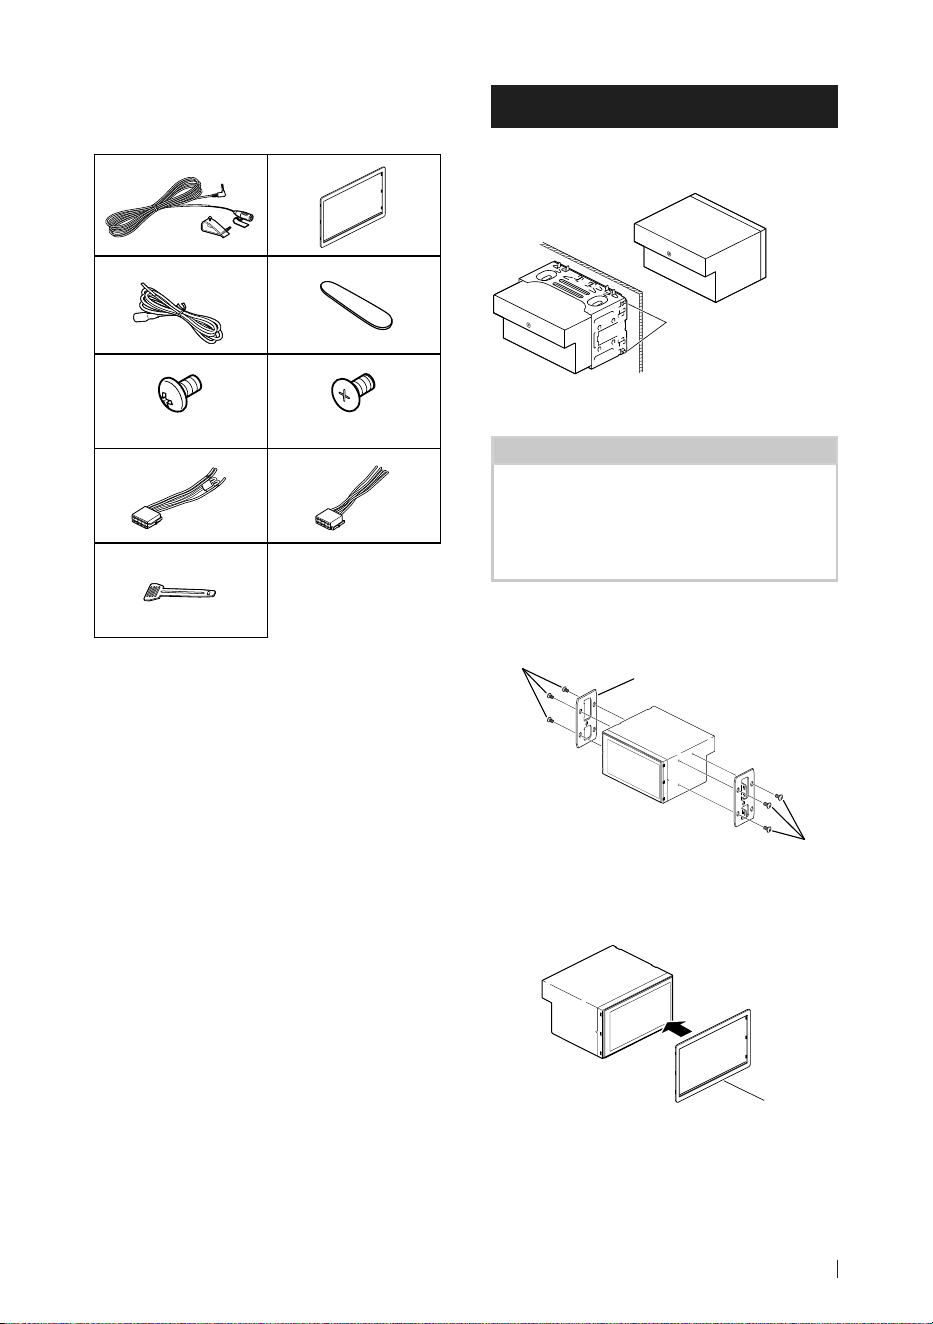
Conexión/Instalación
87Español
Ñ Accesorios suministrados para
la instalación
1
(3 m)
x1
2
x1
3
(2 m)
x1
4
x1
5
(M5 × 6 mm)
x6
6
(M5 × 8 mm)
x6
7
x1
8
x1
9
x2
Ñ Procedimiento de instalación
1) Para evitar cortocircuitos, retire la llave del
encendido y desconecte el terminal ¤ de la
batería.
2) Realice de forma adecuada las conexiones de
cables de entrada y salida para cada unidad.
3) Tome el conector B (accesorio 8) en el mazo
de cables y conéctelo al conector de altavoz
de su vehículo.
4) Tome el conector A (accesorio 7) en el
mazo de cables y conéctelo al conector de
alimentación externa de su vehículo.
5) Conecte el mazo de cables a la unidad.
6) Instale la unidad en el automóvil.
7) Conecte nuevamente el terminal ¤ de la
batería.
8) Pulse el botón Restablecer.
Instalación de la unidad
Ñ Coches no japoneses
Doble las lengüetas del
manguito de montaje con
un destornillador o similar
y fíjelo.
NOTA
• Asegúrese de que la unidad esté firmemente
instalada en su lugar. Si la unidad está en una
posición inestable, es posible que no funcione
correctamente (por ejemplo, el sonido puede
interrumpirse).
Ñ Automóviles japoneses
5 o 6
5 o 6
Soporte del vehículo
Ñ Marco
1) Conecte el accesorio 2 a la unidad.
2
!B5H-0358-03_QSG_DDX_K_EnFrEs.indb 87 2020/06/03 13:15
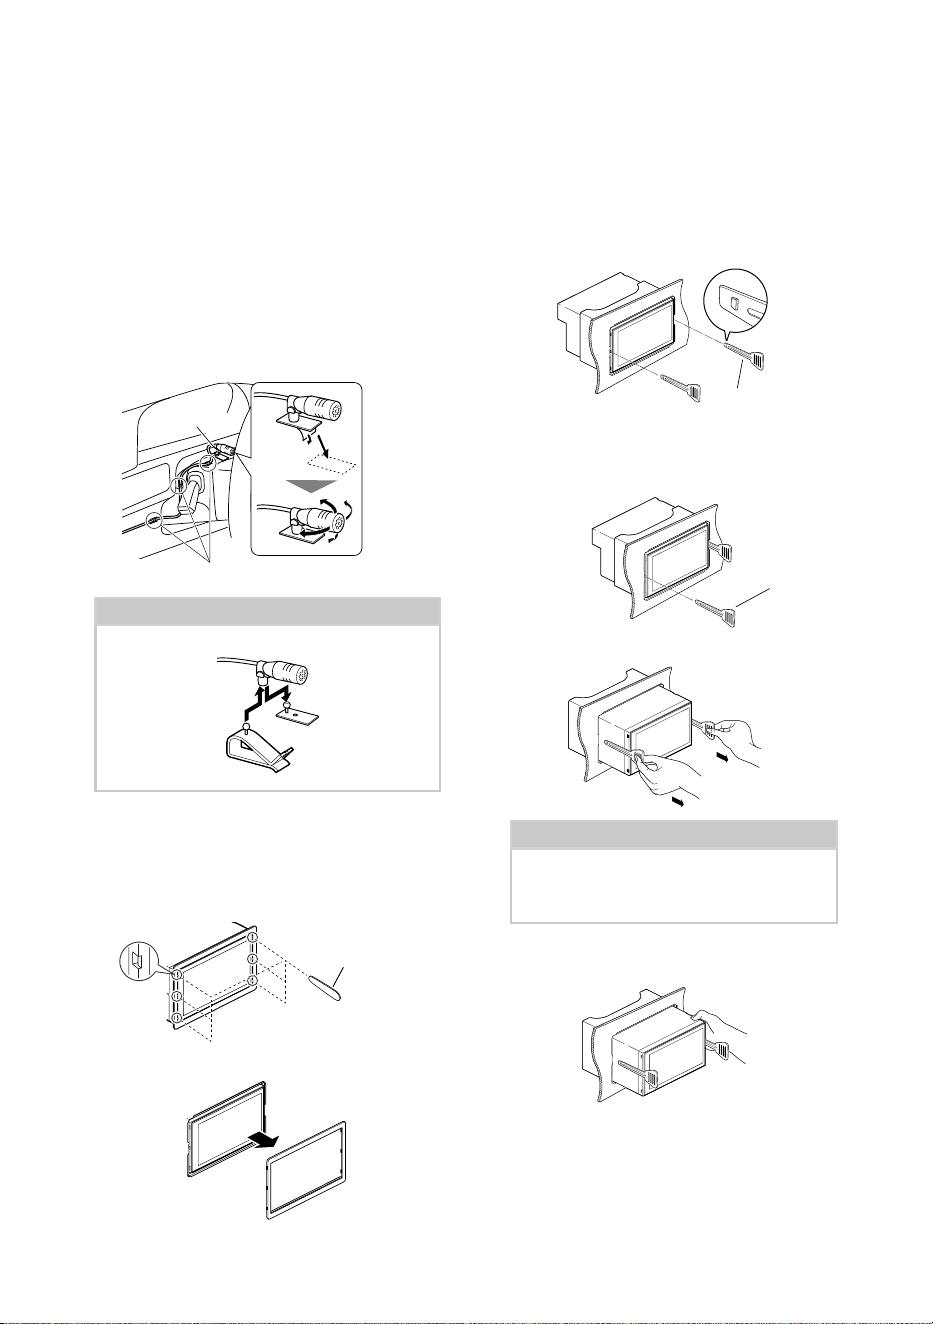
Conexión/Instalación
88
Ñ Unidad de micrófono
1) Compruebe la posición de instalación del
micrófono (accesorio 1).
2) Limpie la superficie de instalación.
3) Extraiga el separador del micrófono (accesorio
1) y fije el micrófono en la posición que se
indica a continuación.
4) Conecte el cable del micrófono a la unidad de
forma segura en varias posiciones mediante
cinta u otro método.
5) Ajuste la dirección del micrófono (accesorio
1) hacia el conductor.
1
Fije un cable con una cinta adhesiva de uso comercial.
NOTA
• Cambie los clips si es necesario.
Ñ Retirada del marco
1) Use la llave de extracción (accesorio 4) para
extraer las seis pestañas (tres en la parte
izquierda, tres en la parte derecha).
4
2) Tire de la placa hacia adelante.
Ñ Retirada de la unidad
1) Retire el marco según las indicaciones del
paso 1 en “Retirada del marco”
2) Introduzca la llave de extracción (accesorio
9) profundamente en la ranura tal y como se
muestra. (El saliente en la punta de la tecla de
extracción debe mirar hacia la unidad).
9
3) Con la llave de extracción introducida
asegurada, inserte la otra llave de extracción
en la ranura.
9
4) Saque la unidad hasta la mitad.
NOTA
• Tenga cuidado de no hacerse daño con
los pasadores de bloqueo de la llave de
extracción.
5) Termine de sacar la unidad con las manos,
prestando atención para no dejarla caer.
!B5H-0358-03_QSG_DDX_K_EnFrEs.indb 88 2020/06/03 13:15
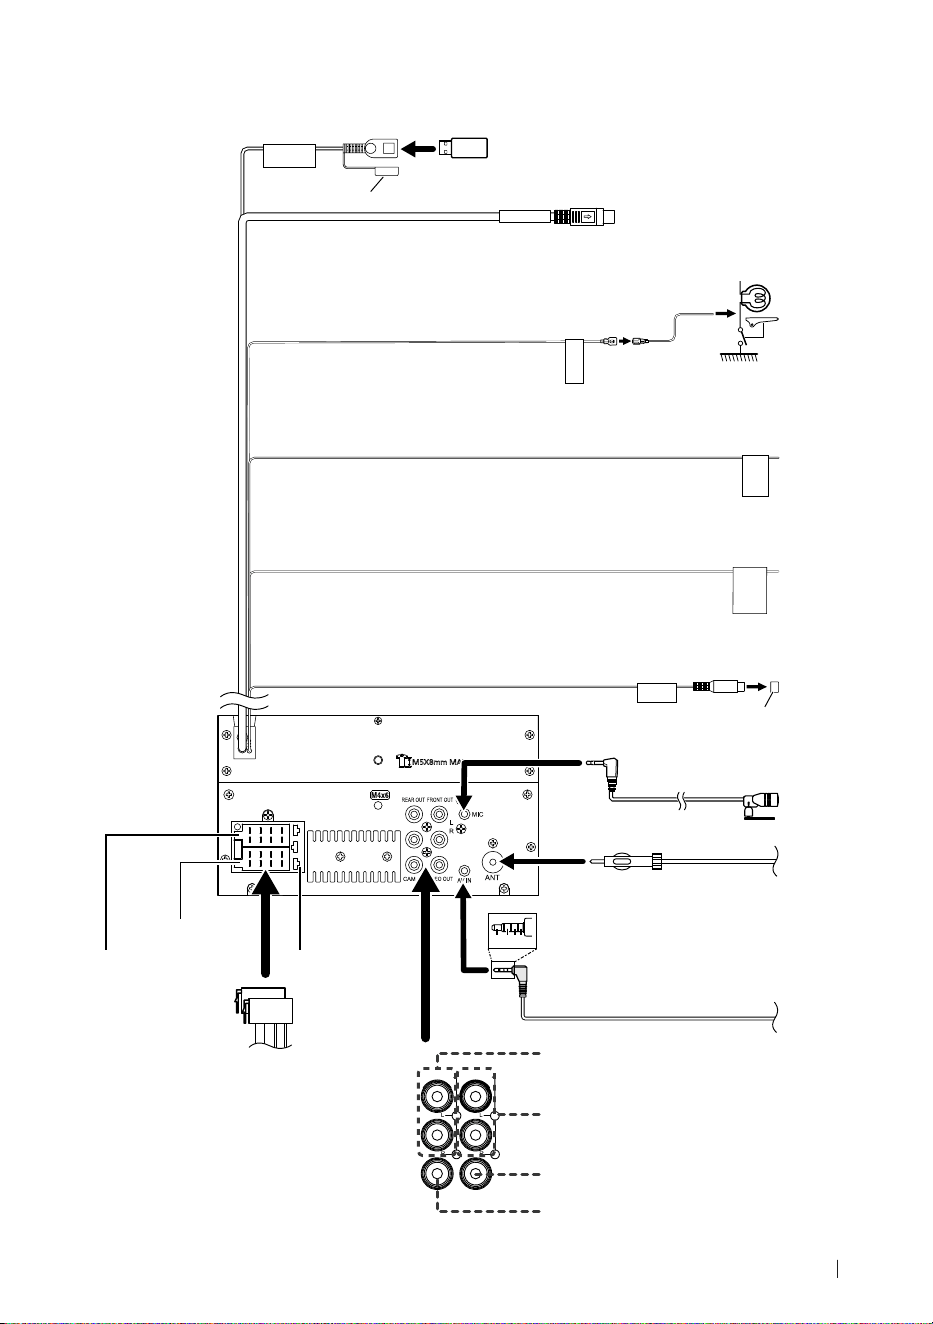
Conexión/Instalación
89Español
Ñ Conectar los cables a los terminales
PRK SW
STEERING
WHEEL
REMOTE
INPUT
2 4 6 8
1 3 5 7
2 4 6 8
1 3 5 7
REVERSE
SUB
WOOFER
1 2 3 4
5V
=
1.5A
Sirius XM
Realice la conexión en el arnés del
interruptor de detección del freno de
aparcamiento del vehículo.
Para mayor seguridad, asegúrese de conectar el
sensor de estacionamiento.
Luz verde (Cable del sensor de aparcamiento)
Accesorio 3: Cable de extensión de estacionamiento
Morado/blanco (Cable del sensor de marcha atrás)
Accesorio 1:
Micrófono Bluetooth
Al mando a distancia de la dirección
Para utilizar la función de mando a distancia en el volante es necesario un
adaptador remoto exclusivo (no suministrado) apropiado para su vehículo.
Conecte el mazo de la luz de marcha atrás del vehículo cuando utilice una
cámara de visión trasera opcional.
Azul claro/Amarillo (cable del mando a distancia de la dirección)
Fusible (15A)
Salida previa del subwoofer
Tapa
Tapa
Antena FM/AM
Conector A
Conector B
Dispositivo USB
[2]
Terminal USB
[1]
(1,0 m)
[1]
Corriente de alimentación eléctrica
máxima USB: CC 5 V = 1,5 A
[2]
Vendida por separado
Accesorio 7
Accesorio 8
FRONT OUTREAR OUT
VIDEO OUTCAM IN
Salida previa de audio trasera
(izquierda: blanca, derecha: roja)
AV-IN
[2]
(1, audio izquierdo; 2, vídeo
compuesto; 3, tierra; 4, audio derecho).
Salida previa de audio delantera
(Izquierda; Blanco, Derecha; Rojo)
Salida de vídeo (Amarillo)
Entrada de la cámara de visión trasera
(Amarillo)
Para obtener más información sobre cómo instalar el sintonizador para vehículos SiriusXM
Connect, consulte la guía de instalación incluida con el sintonizador.
Conector del sintonizador para vehículos SiriusXM Connect
!B5H-0358-03_QSG_DDX_K_EnFrEs.indb 89 2020/06/03 13:15
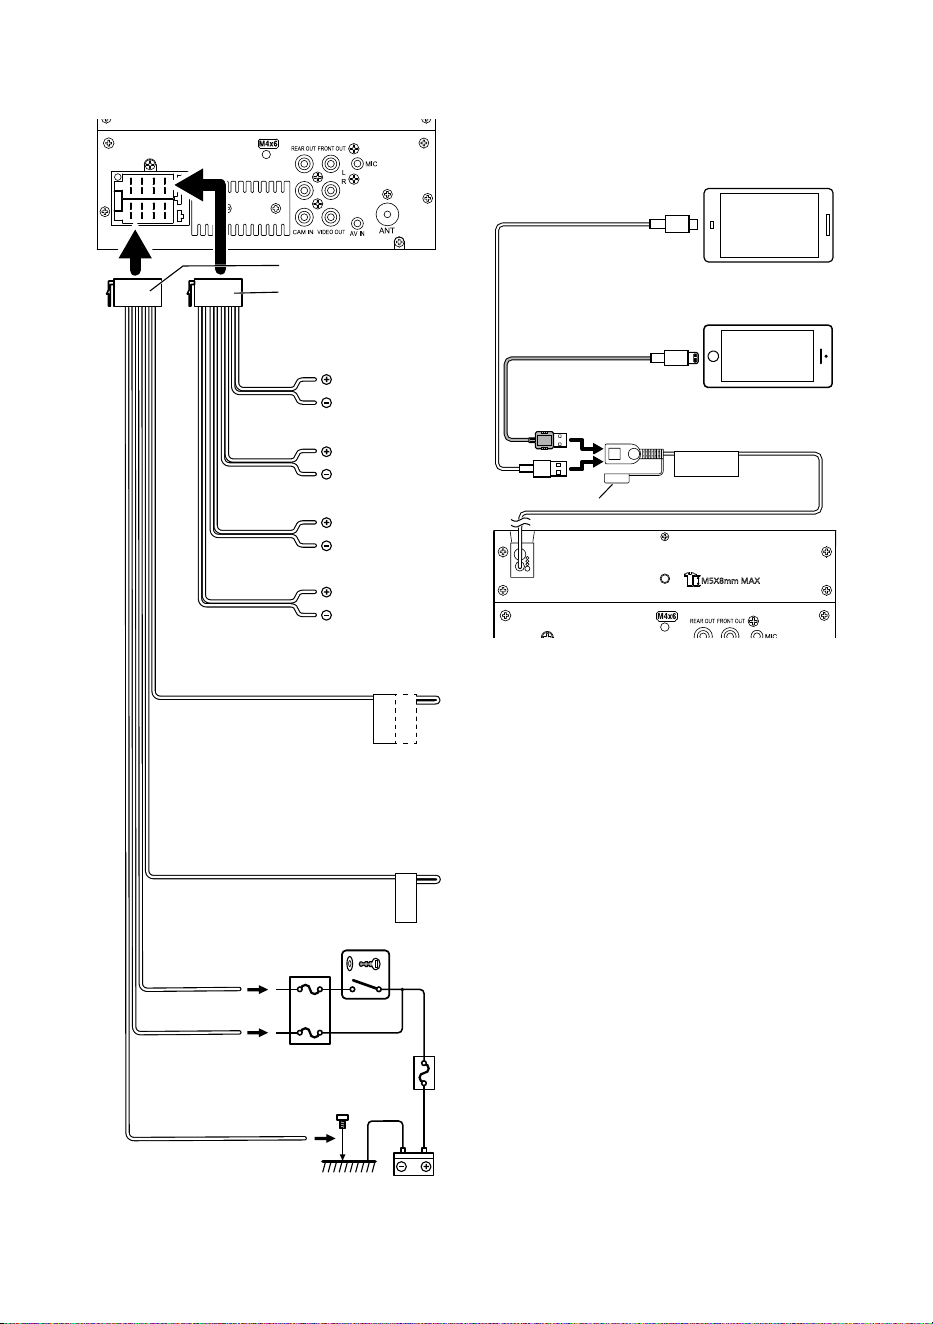
Conexión/Instalación
90
Ñ Conexión de un iPhone/
Android
5V
=
1.5A
KCA-iP103 (0,8 m)
[3]
Cable USB
[2]
iPhone
[2]
Conector Lightning
Smartphone Android
[2]
Tapa
Terminal USB
[1]
(1,0 m)
[1]
Corriente de alimentación máxima del iPhone:
CC 5 V = 1,5 A
[2]
Vendida por separado
[3]
Accesorio opcional
2 4 6 8
1 3 5 7
2 4 6 8
1 3 5 7
P.CONT
ANT.CONTILLUMI
Accesorio 8
Accesorio 7
Azul
(Cable de control de alimentación/control
de la antena)
Realice la conexión al terminal
de control de alimentación
si utiliza el amplificador
de potencia opcional, o al terminal de
alimentación para el amplificador de refuerzo
de la antena de tipo película o de mástil
corto. (Máx. 150 mA, 12 V)
Blanco/Negro
Gris/negro
Verde/negro
Púrpura/Negro
Al interruptor de control de la luz del
automóvil
Impedancia del altavoz: 4-8 Ω
Morado
Verde
Gris
Blanco
Al altavoz
delantero
izquierdo
Al altavoz
delantero
derecho
Al altavoz trasero
izquierdo
Al altavoz trasero
derecho
Rojo
(cable de encendido)
Negro (cable de toma de tierra) ¤
(Al chasis del vehículo)
Amarillo
(cable de la batería)
Naranja/blanco
(cable de control del atenuador)
Interruptor de la llave de encendido
Caja de fusibles del coche
Batería
!B5H-0358-03_QSG_DDX_K_EnFrEs.indb 90 2020/06/03 13:15

Apéndice
91Español
Apéndice
Especicaciones
■ Sección de Bluetooth
Frecuencia
: 2,402 – 2,480 GHz
Potencia de salida de RF (EIRP)
: +8 dBm (prom.), potencia de clase 1
■ General
Voltaje de funcionamiento
: Batería de coche de 12 V CC
Impedancia del altavoz
: 4 – 8 Ω
Las especicaciones se encuentran sujetas a
cambios sin previo aviso.
Acerca de esta unidad
■ Derechos de autor
• La marca Bluetooth® y sus logotipos son marcas
registradas propiedad de Bluetooth SIG, Inc., y cualquier
uso de los mismos por JVCKENWOOD Corporation se
realiza bajo licencia. El resto de marcas comerciales y
nombres comerciales corresponden a sus respectivos
propietarios.
• Manufactured under license from Dolby Laboratories.
Dolby, Dolby Audio and the double-D symbol are
trademarks of Dolby Laboratories.
•
is a trademark of DVD Format/Logo Licensing
Corporation registered in the U.S., Japan and other
countries.
• This item incorporates copy protection technology
that is protected by U.S. patents and other intellectual
property rights of Rovi. Reverse engineering and
disassembly are prohibited.
• Windows Media is a registered trademark or trademark
of Microsoft Corporation in the United States and/or
other countries.
• This product is protected by certain intellectual
property rights of Microsoft. Use or distribution of
such technology outside of this product is prohibited
without a license from Microsoft.
• Use of the Made for Apple badge means that an
accessory has been designed to connect specifically
to the Apple product(s) identified in the badge, and
has been certified by the developer to meet Apple
performance standards. Apple is not responsible for
the operation of this device or its compliance with
safety and regulatory standards. Please note that the
use of this accessory with an Apple product may affect
wireless performance.
• Apple, iPhone and Lightning are trademarks of Apple
Inc., registered in the U.S. and other countries.
• Apple, Siri, Apple CarPlay and Apple CarPlay logo are
trademarks of Apple Inc., registered in the U.S. and other
countries.
• App Store is a service mark of Apple Inc., registered in
the U.S. and other countries.
• Sirius, XM and all related marks and logos are
trademarks of Sirius XM Radio Inc. All rights reserved.
• IOS is a trademark or registered trademark of Cisco in
the U.S. and other countries and is used under license.
• Google, Android, Google Play and Android Auto are
trademarks of Google LLC.
• To use Android Auto on your car display, you’ll need an
Android Auto compatible vehicle or aftermarket stereo,
an Android phone running Android 5.0 or higher, and
the Android Auto app.
• Linux® is the registered trademark of Linus Torvalds in
the U.S. and other countries.
!B5H-0358-03_QSG_DDX_K_EnFrEs.indb 91 2020/06/03 13:15

Apéndice
92
• THIS PRODUCT IS LICENSED UNDER THE AVC PATENT
PORTFOLIO LICENSE FOR THE PERSONAL USE OF A
CONSUMER OR OTHER USES IN WHICH IT DOES NOT
RECEIVE REMUNERATION TO (¡)ENCODE VIDEO IN
COMPLIANCE WITH THE AVC STANDARD (“AVC VIDEO”)
AND/OR (¡¡)DECODE AVC VIDEO THAT WAS ENCODED BY
A CONSUMER ENGAGED IN A PERSONAL ACTIVITY AND/
OR WAS OBTAINED FROM A VIDEO PROVIDER LICENSED
TO PROVIDE AVC VIDEO. NO LICENSE IS GRANTED OR
SHALL BE IMPLIED FOR ANY OTHER USE. ADDITIONAL
INFORMATION MAY BE OBTAINED FROM MPEG LA, L.L.C.
SEE HTTP://WWW.MPEGLA.COM
• THIS PRODUCT IS LICENSED UNDER THE MPEG-4 VISUAL
PATENT PORTFOLIO LICENSE FOR THE PERSONAL
AND NON-COMMERCIAL USE OF A CONSUMER FOR
(¡) ENCODING VIDEO IN COMPLIANCE WITH THE
MPEG-4 VISUAL STANDARD (“MPEG-4 VIDEO”) AND/
OR (¡¡) DECODING MPEG-4 VIDEO THAT WAS ENCODED
BY A CONSUMER ENGAGED IN A PERSONAL AND
NON-COMMERCIAL ACTIVITY AND/OR WAS OBTAINED
FROM A VIDEO PROVIDER LICENSED BY MPEG LA TO
PROVIDE MPEG-4 VIDEO. NO LICENSE IS GRANTED OR
SHALL BE IMPLIED FOR ANY OTHER USE. ADDITIONAL
INFORMATION INCLUDING THAT RELATING TO
PROMOTIONAL, INTERNAL AND COMMERCIAL USES
AND LICENSING MAY BE OBTAINED FROM MPEG LA, LLC.
SEE HTTP://WWW.MPEGLA.COM.
• THIS PRODUCT IS LICENSED UNDER THE VC-1 PATENT
PORTFOLIO LICENSE FOR THE PERSONAL AND NON-
COMMERCIAL USE OF A CONSUMER TO ( i ) ENCODE
VIDEO IN COMPLIANCE WITH THE VC-1 STANDARD
(“VC-1 VIDEO”) AND/OR ( ii ) DECODE VC-1 VIDEO
THAT WAS ENCODED BY A CONSUMER ENGAGED IN A
PERSONAL AND NON-COMMERCIAL ACTIVITY AND/
OR WAS OBTAINED FROM A VIDEO PROVIDER LICENSED
TO PROVIDE VC-1 VIDEO. NO LICENSE IS GRANTED OR
SHALL BE IMPLIED FOR ANY OTHER USE. ADDITIONAL
INFORMATION MAY BE OBTAINED FROM MPEG LA, L.L.C.
SEE HTTP://WWW.MPEGLA.COM
• libFLAC
Copyright (C) 2000,2001,2002,2003,2004,2005,2006,2007
,2008,2009 Josh Coalson
Redistribution and use in source and binary forms, with
or without modification, are permitted provided that
the following conditions are met:
– Redistributions of source code must retain the above
copyright notice, this list of conditions and the
following disclaimer.
– Redistributions in binary form must reproduce the
above copyright notice, this list of conditions and the
following disclaimer in the documentation and/or
other materials provided with the distribution.
– Neither the name of the Xiph.org Foundation nor the
names of its contributors may be used to endorse or
promote products derived from this software without
specific prior written permission.
THIS SOFTWARE IS PROVIDED BY THE COPYRIGHT
HOLDERS AND ONTRIBUTORS ``AS IS’’ AND ANY
EXPRESS OR IMPLIED WARRANTIES, INCLUDING,
BUT NOT LIMITED TO, THE IMPLIED WARRANTIES OF
MERCHANTABILITY AND FITNESS FOR A PARTICULAR
PURPOSE ARE DISCLAIMED. IN NO EVENT SHALL THE
FOUNDATION OR CONTRIBUTORS BE LIABLE FOR ANY
DIRECT, INDIRECT, INCIDENTAL, SPECIAL, EXEMPLARY,
OR CONSEQUENTIAL DAMAGES (INCLUDING, BUT NOT
LIMITED TO, PROCUREMENT OF SUBSTITUTE GOODS
OR SERVICES; LOSS OF USE, DATA, OR PROFITS; OR
BUSINESS INTERRUPTION) HOWEVER CAUSED AND ON
ANY THEORY OF LIABILITY, WHETHER IN CONTRACT,
STRICT LIABILITY, OR TORT (INCLUDING NEGLIGENCE OR
OTHERWISE) ARISING IN ANY WAY OUT OF THE USE OF
THIS SOFTWARE, EVEN IF ADVISED OF THE POSSIBILITY
OF SUCH DAMAGE.
• libvorbis
Copyright (c) 2002-2008 Xiph.org Foundation
Redistribution and use in source and binary forms, with
or without modification, are permitted provided that
the following conditions are met:
– Redistributions of source code must retain the above
copyright notice, this list of conditions and the
following disclaimer.
– Redistributions in binary form must reproduce the
above copyright notice, this list of conditions and the
following disclaimer in the documentation and/or
other materials provided with the distribution.
– Neither the name of the Xiph.org Foundation nor the
names of its contributors may be used to endorse or
promote products derived from this software without
specific prior written permission.
THIS SOFTWARE IS PROVIDED BY THE COPYRIGHT
HOLDERS AND CONTRIBUTORS ``AS IS’’ AND ANY
EXPRESS OR IMPLIED WARRANTIES, INCLUDING,
BUT NOT LIMITED TO, THE IMPLIED WARRANTIES OF
MERCHANTABILITY AND FITNESS FOR A PARTICULAR
PURPOSE ARE DISCLAIMED. IN NO EVENT SHALL THE
FOUNDATION OR CONTRIBUTORS BE LIABLE FOR ANY
DIRECT, INDIRECT, INCIDENTAL, SPECIAL, EXEMPLARY,
OR CONSEQUENTIAL DAMAGES (INCLUDING, BUT NOT
LIMITED TO, PROCUREMENT OF SUBSTITUTE GOODS
OR SERVICES; LOSS OF USE, DATA, OR PROFITS; OR
BUSINESS INTERRUPTION) HOWEVER CAUSED AND ON
ANY THEORY OF LIABILITY, WHETHER IN CONTRACT,
STRICT LIABILITY, OR TORT (INCLUDING NEGLIGENCE OR
OTHERWISE) ARISING IN ANY WAY OUT OF THE USE OF
THIS SOFTWARE, EVEN IF ADVISED OF THE POSSIBILITY
OF SUCH DAMAGE.
!B5H-0358-03_QSG_DDX_K_EnFrEs.indb 92 2020/06/03 13:15

Apéndice
93Español
• libogg
Copyright (c) 2002, Xiph.org Foundation Redistribution
and use in source and binary forms, with or without
modification, are permitted provided that the following
conditions are met:
– Redistributions of source code must retain the above
copyright notice, this list of conditions and the
following disclaimer.
– Redistributions in binary form must reproduce the
above copyright notice, this list of conditions and the
following disclaimer in the documentation and/or
other materials provided with the distribution.
– Neither the name of the Xiph.org Foundation nor the
names of its contributors may be used to endorse or
promote products derived from this software without
specific prior written permission.
THIS SOFTWARE IS PROVIDED BY THE COPYRIGHT
HOLDERS AND CONTRIBUTORS ``AS IS’’ AND ANY
EXPRESS OR IMPLIED WARRANTIES, INCLUDING,
BUT NOT LIMITED TO, THE IMPLIED WARRANTIES OF
MERCHANTABILITY AND FITNESS FOR A PARTICULAR
PURPOSE ARE DISCLAIMED. IN NO EVENT SHALL THE
FOUNDATION OR CONTRIBUTORS BE LIABLE FOR ANY
DIRECT, INDIRECT, INCIDENTAL, SPECIAL, EXEMPLARY,
OR CONSEQUENTIAL DAMAGES (INCLUDING, BUT NOT
LIMITED TO, PROCUREMENT OF SUBSTITUTE GOODS
OR SERVICES; LOSS OF USE, DATA, OR PROFITS; OR
BUSINESS INTERRUPTION) HOWEVER CAUSED AND ON
ANY THEORY OF LIABILITY, WHETHER IN CONTRACT,
STRICT LIABILITY, OR TORT (INCLUDING NEGLIGENCE OR
OTHERWISE) ARISING IN ANY WAY OUT OF THE USE OF
THIS SOFTWARE, EVEN IF ADVISED OF THE POSSIBILITY
OF SUCH DAMAGE.
!B5H-0358-03_QSG_DDX_K_EnFrEs.indb 93 2020/06/03 13:15

94
■ FCC CAUTION
Changes or modifications not expressly approved by
the party responsible for compliance could void the
user’s authority to operate the equipment.
NOTE
• This equipment has been tested and found to
comply with the limits for a Class B digital device,
pursuant to part 15 of the FCC Rules. These limits
are designed to provide reasonable protection
against harmful interference in a residential
installation.
• This equipment generates, uses and can radiate
radio frequency energy and, if not installed
and used in accordance with the instructions,
may cause harmful interference to radio
communications. However, there is no guarantee
that interference will not occur in a particular
installation. If this equipment does cause harmful
interference to radio or television reception,
which can be determined by turning the
equipment off and on, the user is encouraged to
try to correct the interference by one or more of
the following measures:
– Reorient or relocate the receiving antenna.
– Increase the separation between the
equipment and receiver.
– Connect the equipment into an outlet on a
circuit different from that to which the receiver
is connected.
– Consult the dealer or an experienced radio/TV
technician for help.
# CAUTION
Use of controls or adjustments or performance of
procedures other than those specified herein may result
in hazardous radiation exposure.
In compliance with Federal Regulations, following
are reproductions of labels on, or inside the product
relating to laser product safety.
JVCKENWOOD Corporation
2967-3, ISHIKAWA-MACHI,
HACHIOJI-SHI, TOKYO, JAPAN
THIS PRODUCT COMPLIES WITH DHHS RULES
21 CFR SUBCHAPTER J IN EFFECT AT DATE OF
MANUFACTURE.
Location: Top plate
This transmitter must not be co-located or operated in
conjunction with any other antenna or transmitter.
■ ISED CAUTION
This device contains licence-exempt transmitter(s)/
receiver(s) that comply with Innovation, Science and
Economic Development Canada’s licence-exempt
RSS(s).
Operation is subject to the following two conditions:
(1) This device may not cause interference.
(2) This device must accept any interference, including
interference that may cause undesired operation of
the device.
# CAUTION
This equipment complies with FCC/ISED radiation
exposure limits set forth for an uncontrolled
environment and meets the FCC radio frequency (RF)
Exposure Guidelines and RSS-102 of the ISED radio
frequency (RF) Exposure rules. This equipment should
be installed and operated keeping the radiator at least
20cm or more away from person’s body.
■ Attention de ‘ISED
L’émetteur/récepteur exempt de licence contenu dans
le présent appareil est conforme aux CNR d’Innovation,
Sciences et Développement économique Canada
applicables aux appareils radio exempts de licence.
L’exploitation est autorisée aux deux conditions
suivantes :
(1) L’appareil ne doit pas produire de brouillage.
(2) L’appareil doit accepter tout brouillage
radioélectrique subi, même si le brouillage est
susceptible d’en compromettre le fonctionnement.
# ATTENTION
Cet équipement est conforme aux limites d’exposition
aux rayonnements énoncées pour un environnement
non contrôlé et respecte les règles les radioélectriques
(RF) de la FCC lignes directrices d’exposition et
d’exposition aux fréquences radioélectriques (RF)
CNR-102 de l’ISED. Cet équipement doit être installé et
utilisé en gardant une distance de 20 cm ou plus entre
le radiateur et le corps humain.
!B5H-0358-03_QSG_DDX_K_EnFrEs.indb 94 2020/06/03 13:15

95
Supplier’s Declaration of Conformity
Trade Name: KENWOOD
Products: MONITOR WITH DVD RECEIVER
Model Name: DDX5707S / DDX57S
Responsible Party: JVCKENWOOD USA
CORPORATION
2201 East Dominguez Street,
Long Beach, CA 90810, U.S.A.
PHONE: 310 639-9000
THIS DEVICE COMPLIES WITH PART 15 OF THE FCC
RULES. OPERATION IS SUBJECT TO THE FOLLOWING
TWO CONDITIONS:
(1) THIS DEVICE MAY NOT CAUSE HARMFUL
INTERFERENCE, AND
(2) THIS DEVICE MUST ACCEPT ANY INTERFERENCE
RECEIVED, INCLUDING INTERFERENCE THAT MAY
CAUSE UNDESIRED OPERATION.
■ Informação sobre a eliminação de
pilhas
Este produto não deve ser eliminado como lixo
doméstico geral. Devolva a pilha usada ao revendedor
ou entidade autorizada para que a mesma seja
devolvida ao fabricante ou importador.
A reciclagem e a eliminação de lixo de maneira
apropriada ajudarão a conservar os recursos naturais ao
mesmo tempo que prevenirão os efeitos prejudicais à
nossa saúde e ao meio ambiente.
■ Para cumplimiento de la IFT:
“La operación de este equipo esta sujeta a las
siguientes dos condiciones:
(1) es posible que este equipo o dispositivo no
cause interferencia perjudicial y
(2) este equipo o dispositivo debe aceptar
cualquier interferencia, incluyendo la que
pueda causar su operación no deseada.”
!B5H-0358-03_QSG_DDX_K_EnFrEs.indb 95 2020/06/03 13:15

!B5H-0358-03_QSG_DDX_K_EnFrEs.indb 96 2020/06/03 13:15