©COPYRIGHT AVPRO GLOBAL HOLDINGS 2024 - 22410 70TH AVENUE WEST, MOUNTLAKE TERRACE, WA 98043
1
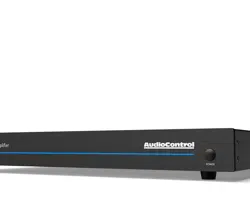
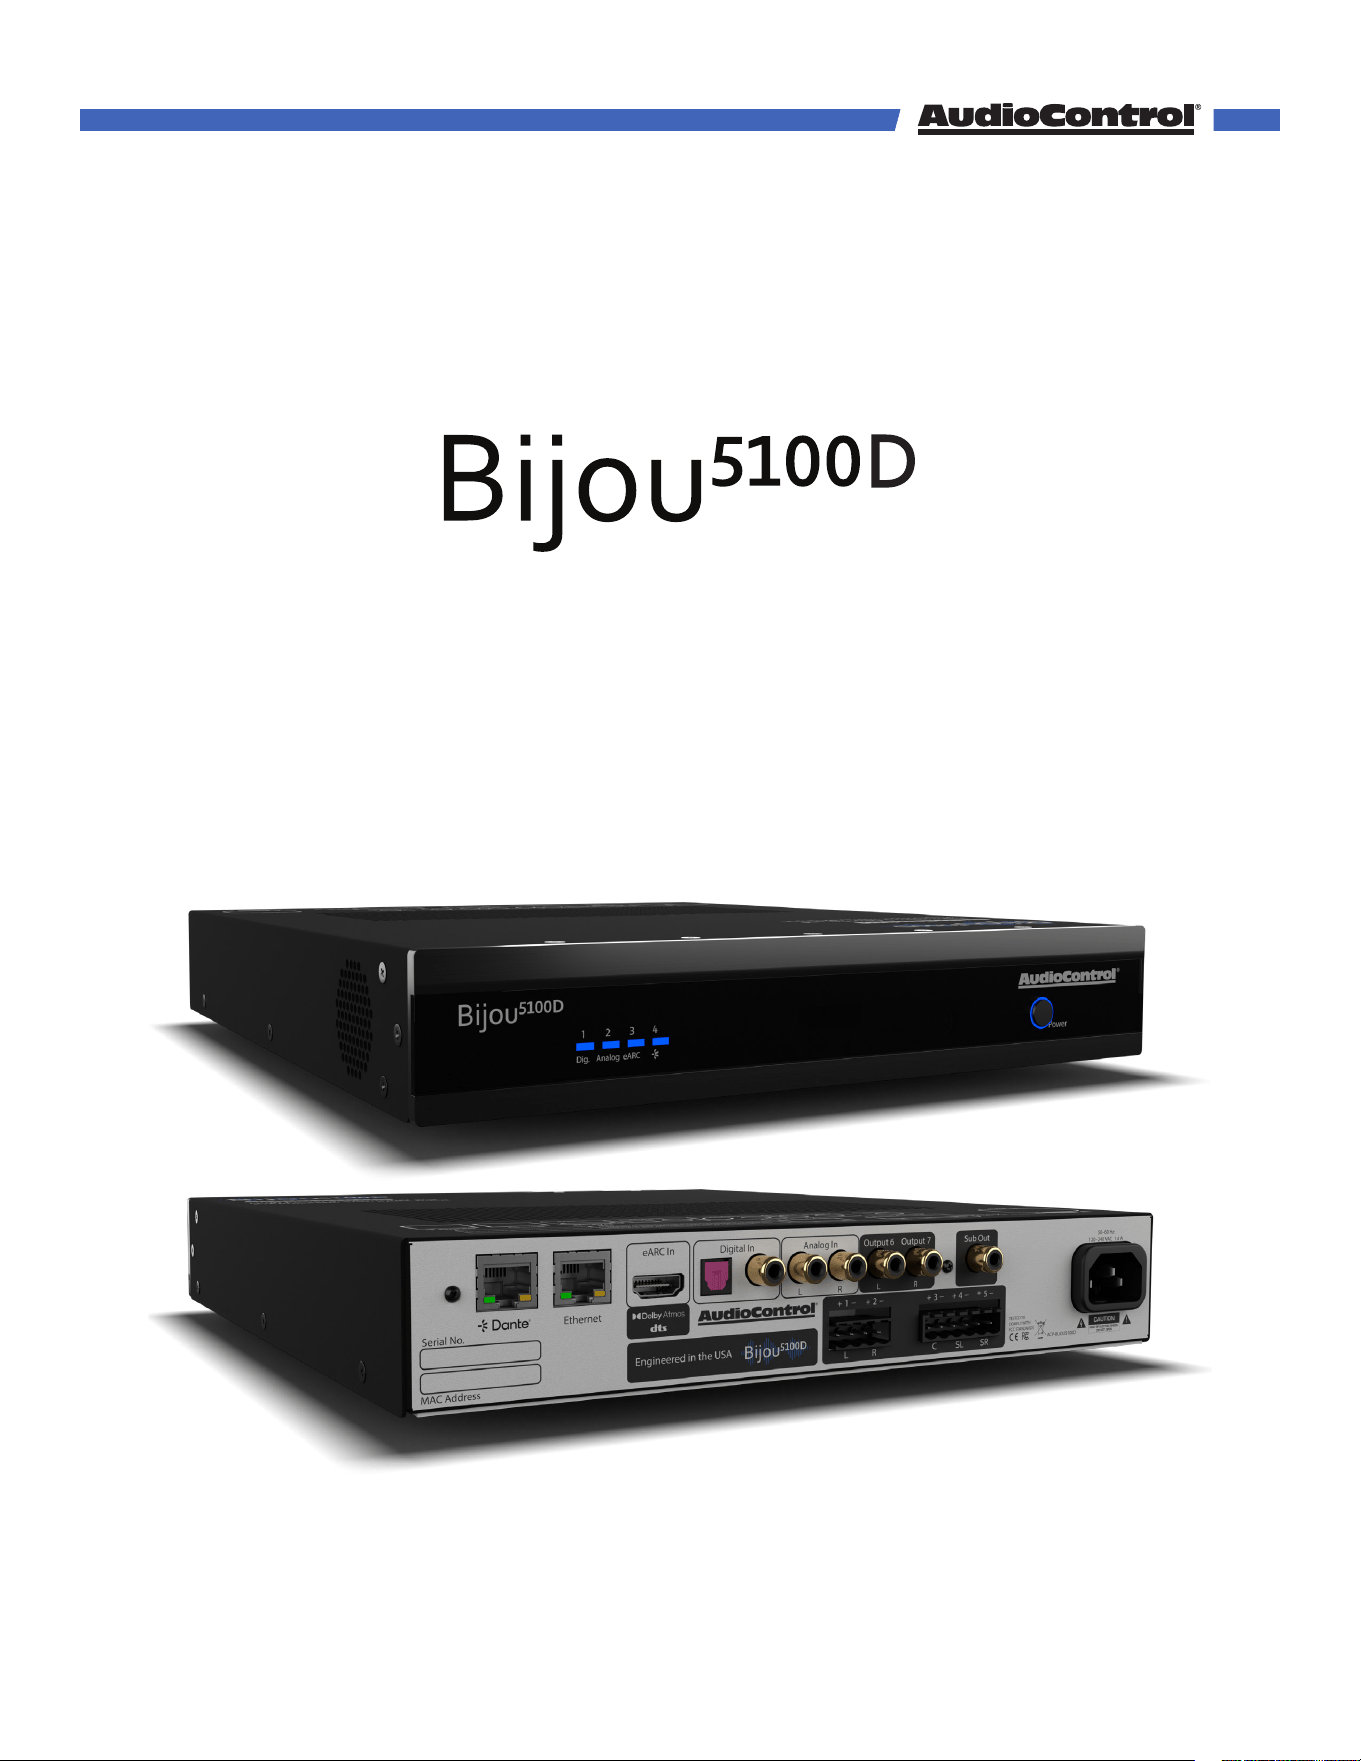
High power 5.1 Amplifier and Preprocessor with eARC Input
User Manual

Table of Contents
Introduction .............................................................................................................................................. 3
Features .............................................................................................................................................. 3
What’s in the Box ............................................................................................................................... 3
Specifications ..........................................................................................................................................4
Front & Rear Panel Overview ...............................................................................................................5
Front Panel Details ..................................................................................................................................6
Rear Panel Details .................................................................................................................................. 7
Remote Control .......................................................................................................................................9
Quick Start Guide .................................................................................................................................. 10
Installation ............................................................................................................................................... 11
Web GUI
Main ....................................................................................................................................................12
System Settings ................................................................................................................................13
Input Setup ........................................................................................................................................15
Speaker Config ................................................................................................................................. 17
Graphic EQ ....................................................................................................................................... 19
Network Settings .............................................................................................................................20
Firmware Update .................................................................................................................................. 22
Speaker Layouts ....................................................................................................................................23
Speaker Notes ........................................................................................................................................ 24
Using dante ............................................................................................................................................25
Internet Connectivity and Control ....................................................................................................26
Troubleshooting ..................................................................................................................................... 27
Command List ....................................................................................................................................... 28
Related Products ................................................................................................................................... 32
Service ..................................................................................................................................................... 33
Warranty .................................................................................................................................................34
Acknoledgements .................................................................................................................................35
Installation Notes ...................................................................................................................................36
©COPYRIGHT AVPRO GLOBAL HOLDINGS 2024 - 22410 70TH AVENUE WEST, MOUNTLAKE TERRACE, WA 98043
2

• The Bijou5100D
• Bijou Remote
• AC Power cord
• 1x 4-pin connector and 1x 6-pin connector
(attached to unit)
• A feeling of excitement
What’s in the box
• Best in class audio processing
• HDMI eARC input
• Digital Optical and Coax inputs
• Analog RCA Inputs
• Assignable RCA outputs
• Subwoofer output
• 5x 100W amplified outputs
• Dolby Atmos & DTS Digital Surround formats
• Full IP control integration
• Easy to navigate web interface
Features
Thank you and congratulations for the purchase of your AudioControl Bijou5100D. Our first
eARC enabled 5.1 amplifier with assignable preprocessed outputs, allowing for a full 7.1
surround sound environment.
Edge-of-the-art gallium nitride (GaN) amplifier technology enables Bijou series integrated
amplifiers to reduce chassis size while vastly increasing Class-D audio fidelity. The ul-
tra-compact Bijou series packs 48 years of AudioControl’s USA engineering expertise into
a 1 RU, half-rack-wide, thermally ecient, hardback spy novel-sized footprint. Speaking
of novels, Bijou integrated amplifiers compose a new chapter in AudioControl Pro’s book
on leveraging GaN-semiconductors into high-current output circuit topologies, alongside
our CM series Dual-Mode 70-volt designs and Hyperion Series RCV 11 AVR. The Bijou 5100D
adds support for Dante audio networking.
Introduction
©COPYRIGHT AVPRO GLOBAL HOLDINGS 2024 - 22410 70TH AVENUE WEST, MOUNTLAKE TERRACE, WA 98043
3

Inputs
eArc Inputs 1 HDMI Audio-Only Input
Digital Inputs 1 Optical TOSLINK and 1 Coax S/PDIF
Dante network RJ45
Analog Inputs Stereo L/R RCA single-ended
Analog Input Impedance 47 k Ω
Analog Input Sensitivity 2 Vrms
Outputs
Preamp Outputs Stereo L/R RCA single-ended
Subwoofer Output 1 RCA single-ended
Speaker Level Outputs 5 via 4-pin and 6-pin Euroblock connectors
Power Output 65 W into 8Ω, 130 W into 4Ω, 260 W bridged into 8Ω
Audio
Minimum Speaker Load 4 Ω, 8 Ω bridged
Frequency Range 20 Hz to 20 kHz
Total Harmonic Distortion 0.15%
DAC Capable of handling sampling rates up to 384 kHz
and bit depths up to32-bit
Power
Input Voltage 110 VAC to 240 VAC
Power Consumption
Standby 3 W
Typical loud listening (1/8th power) 150 W
Maximum 1000 W
BTU/hr
Standby 10 BTU/hr
Typical loud listening (1/8th power) 425 BTU/hr
Maximum 2800 BTU/hr
Network
Default IP Address 192.168.1.249
Dimensions
Height 1.7 in (43.9 mm)
Width 8.3 in (211.3 mm)
Depth 11.9 in (302.2 mm)
Weight 6 lbs. (2.7 kg)
Rack Space 1 RU High, half-rack width
Coee of the Day Mocha, with a hint of Rose
Specifications
©COPYRIGHT AVPRO GLOBAL HOLDINGS 2024 - 22410 70TH AVENUE WEST, MOUNTLAKE TERRACE, WA 98043
4
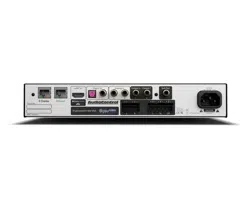
Front and Rear Panel Overview
~50Hz - 60Hz 4A
110V-220VAC
ACP-BIJOU5100D
3
Output 7
Output 6Analog InDigital IneARC In
L R
1
2
1 2 3 4 5 6 7
8 9
Overview of product with photos of the front and back panel labeling each port
1 2 3 4
1. Input Selection LEDs
2. Info Display Screen
3. IR Sensor
4. On/Standby Button
1. Dante Port
2. Ethernet Port
3. HDMI eARC Input
4. Optical TOSLINK and Coax Digital Input
5. Analog RCA Input
6. Assignable Preamp Analog Output
7. Sub/LFE Output
8. Speaker Outputs
9. AC Input
©COPYRIGHT AVPRO GLOBAL HOLDINGS 2024 - 22410 70TH AVENUE WEST, MOUNTLAKE TERRACE, WA 98043
5
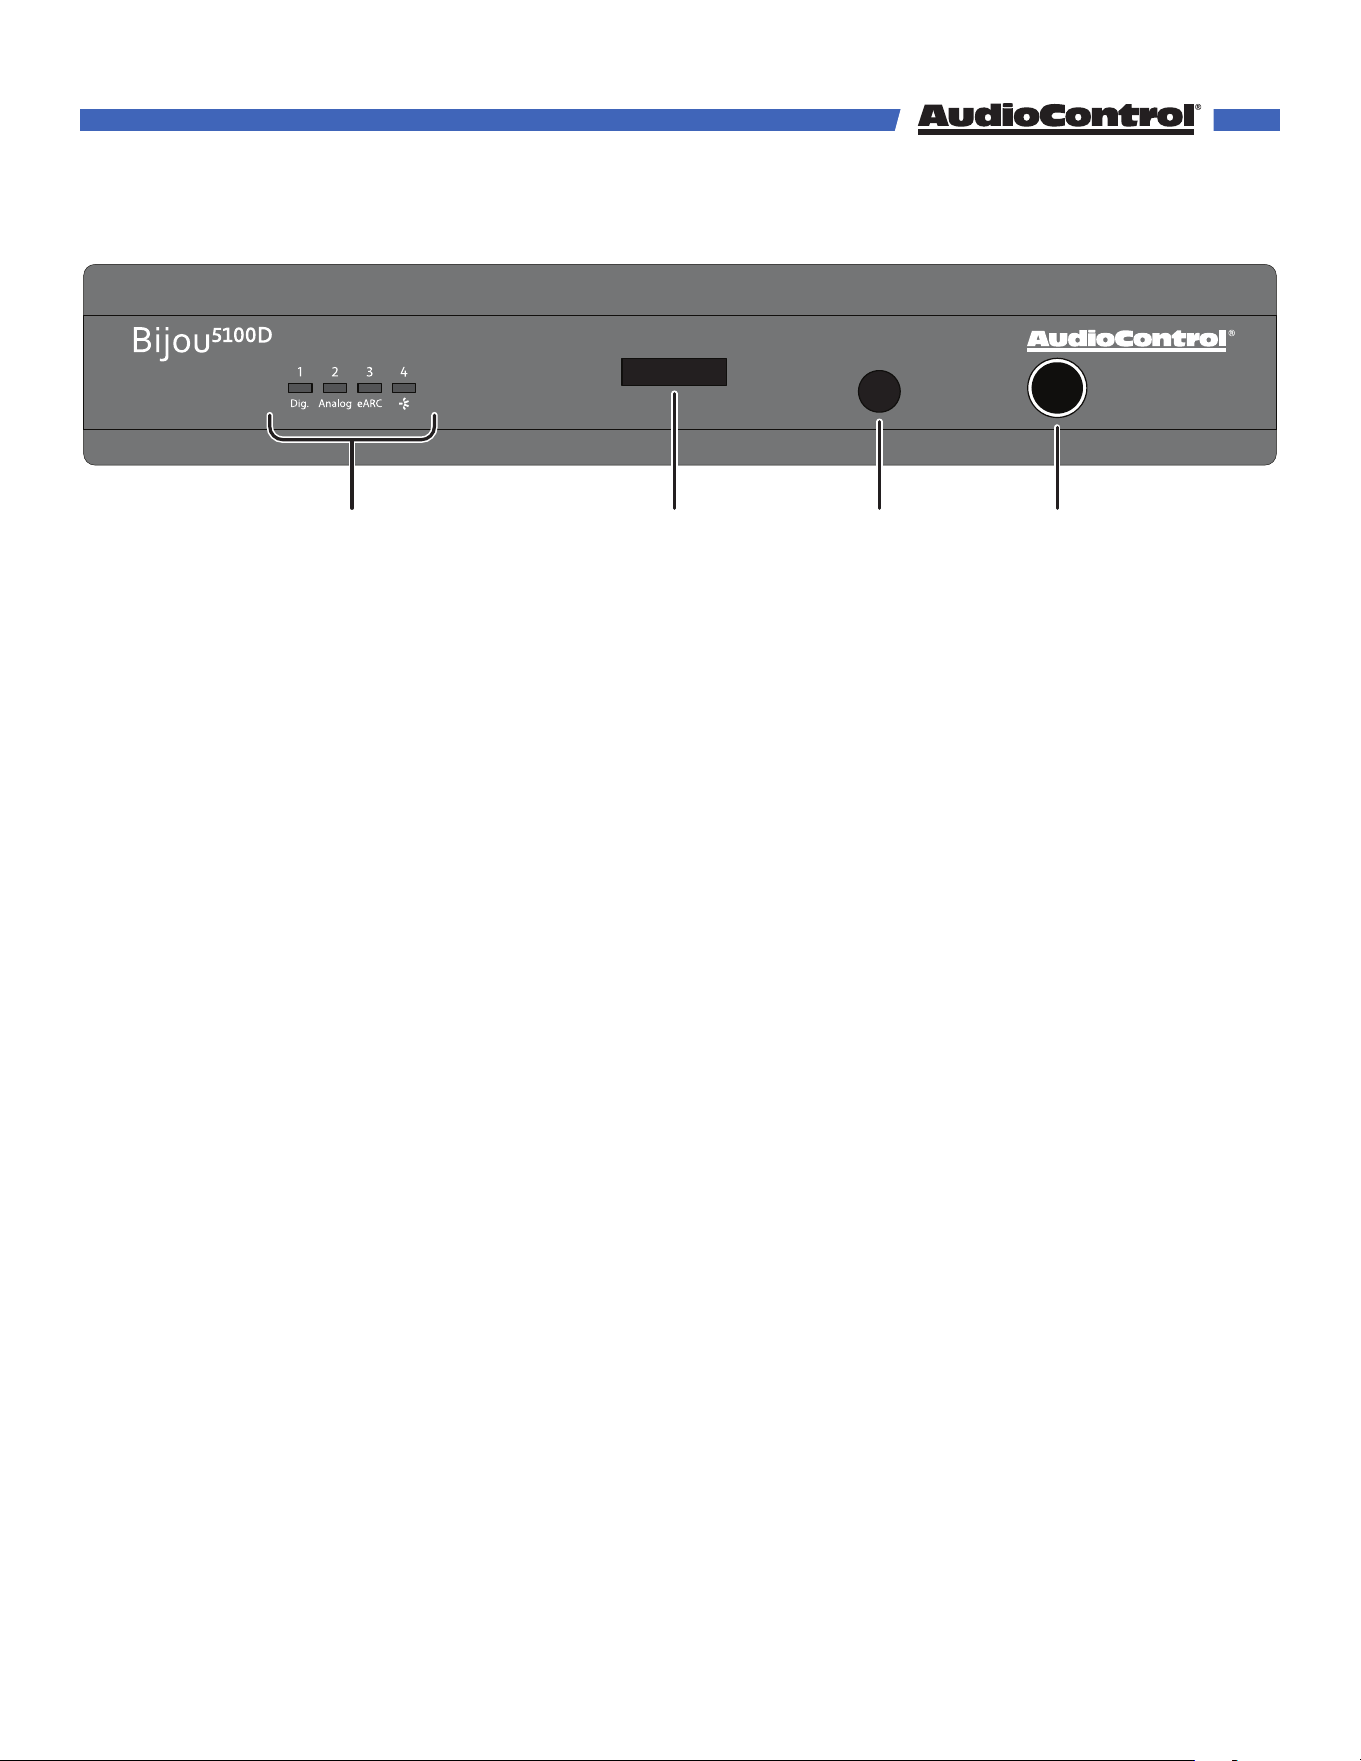
Front Panel Details
Overview of product with photos of the front and back panel labeling each port
1 2 3 4
1. Input Selection LEDs
Each of these LEDs illuminate blue to indicate which input is selected.
LED 1 - Digital input is selected.
LED 2 - Analog input is selected.
LED 3 - eARC input is selected.
LED 4 - Dante input is selected.
2. Info Display
This screen displays helpful information like the IP address, audio mode, and volume
level.
3. IR Sensor
This sensor receives the IR signals from the Bijou5100D remote. Do not block this
port, or else the remote control will not work. If the unit is hidden out of the line of
sight, an IR emitter may be placed over the sensor.
4. Power button
Press the button once to turn the unit on.
Hold down the button for 2 seconds to put the unit into standby.
Press and hold for 10 seconds to reset the unit to factory defaults.
The light around the power button will illuminate dierently depending on the status
of the amplifier.
Bright Blue — Normal Operation
Dim Blue — Standby Mode
O — The unit is powered o
Beige — Smooth Jazz detected
©COPYRIGHT AVPRO GLOBAL HOLDINGS 2024 - 22410 70TH AVENUE WEST, MOUNTLAKE TERRACE, WA 98043
6
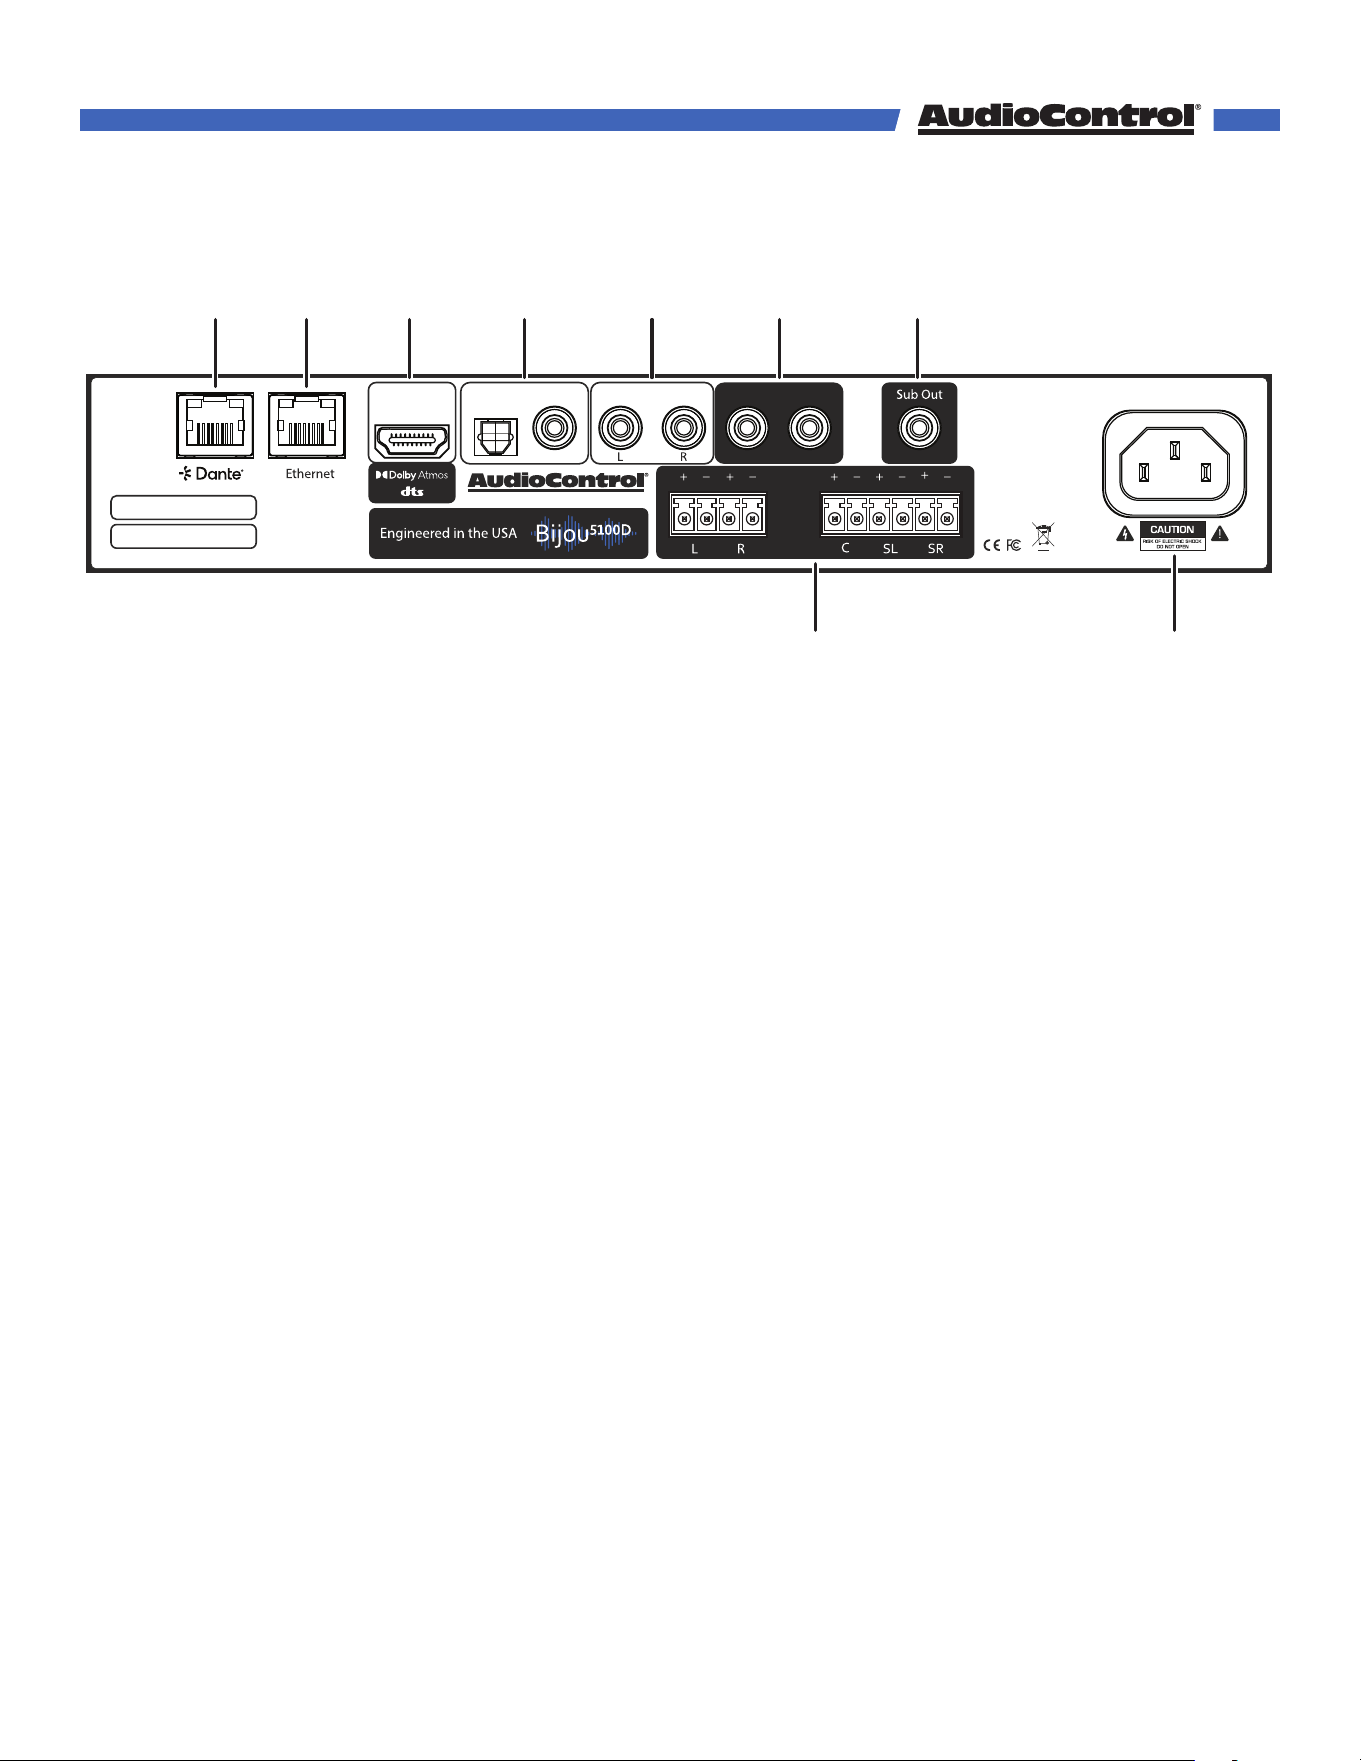
Rear Panel Details
~50Hz - 60Hz 4A
110V-220VAC
ACP-BIJOU5100D
3
Output 7
Output 6Analog InDigital IneARC In
L R
1
2
1 2 3 4 5 6 7
8 9
1. Dante Port
Connect a CAT 5 (or better) cable from the Dante port to the network to share and
receive audio over IP.
2. Ethernet Port
Connect a standard CAT 5 (or better) cable from the Ethernet port to a router or
network switch to allow access to the Bijou5100D web interface, and IP controls.
3. HDMI eARC Input
Connect a High Speed HDMI Cable with Ethernet (or better) from the ARC/eARC
HDMI port on your TV to the eARC input on the Bijou5100D to allow all TV audio to
output from the Bijou5100D. Adjust the TV settings to ensure audio is sent to the Bijou
via eARC.
Note: the eARC input does not send or receive video signals, and will not eect the
video quality of your television.
4. Digital Inputs
The TOSLINK Optical and RCA S/PDIF coaxial digital inputs can receive multi-
channel, bitsream, and PCM audio from a TV, streaming box, or other audio source.
5. Analog RCA Input
These RCA line-level inputs accept the left and right analog signal from any source
equipment, such as a CD player, DVD Player, or retro video game console.
6. Assignable Preamp Analog Output
These RCA line-level outputs send audio signals to a secondary audio device.
Depending on the settings, these can output front left & right, surround left & right,
or height channels to a secondary amplifier, or provide a stereo downmix for
headphones.
©COPYRIGHT AVPRO GLOBAL HOLDINGS 2024 - 22410 70TH AVENUE WEST, MOUNTLAKE TERRACE, WA 98043
7

Rear Panel Overview
7. Sub/LFE Output
This RCA line-level output is used to send a mono output to a powered subwoofer or
subwoofer amplifier. Using the Bijou5100D settings, the low-pass frequency for the
subwoofer can be adjusted in the web UI to your preference.
8. Speaker Outputs
The speaker-level output for channels 1-5 of the amplifier connects from a 4-pin
and a 6-pin Euroblock connector to your speakers or soundbar. Make a note of the
polarity markings and make sure they match those of your speakers (positive to
positive, negative to negative).
Outputs 1-2 and 4-5 are reassignable, and can be used for front, surround, or height
speakers. Output 3 is dedicated for the center channel.
The output 4-5 can be bridged together for a subwoofer, use the positive terminal
on output 4 for the positive speaker post, and the positive terminal on output 5 for
the negative speaker post.
9. AC Input
Connect the supplied AC power cord here, and plug the other end into a standard
mains AC outlet. The Bijou5100D can safely power on and operate with 110 V or 220 V
AC power.
Disconnect power from the Bijou5100D during lighting storms, when you are not
using it for long periods of time (due to zombie apocalypses or tropical vacations),
or if you are adjusting the connections of the amplifier.
©COPYRIGHT AVPRO GLOBAL HOLDINGS 2024 - 22410 70TH AVENUE WEST, MOUNTLAKE TERRACE, WA 98043
8
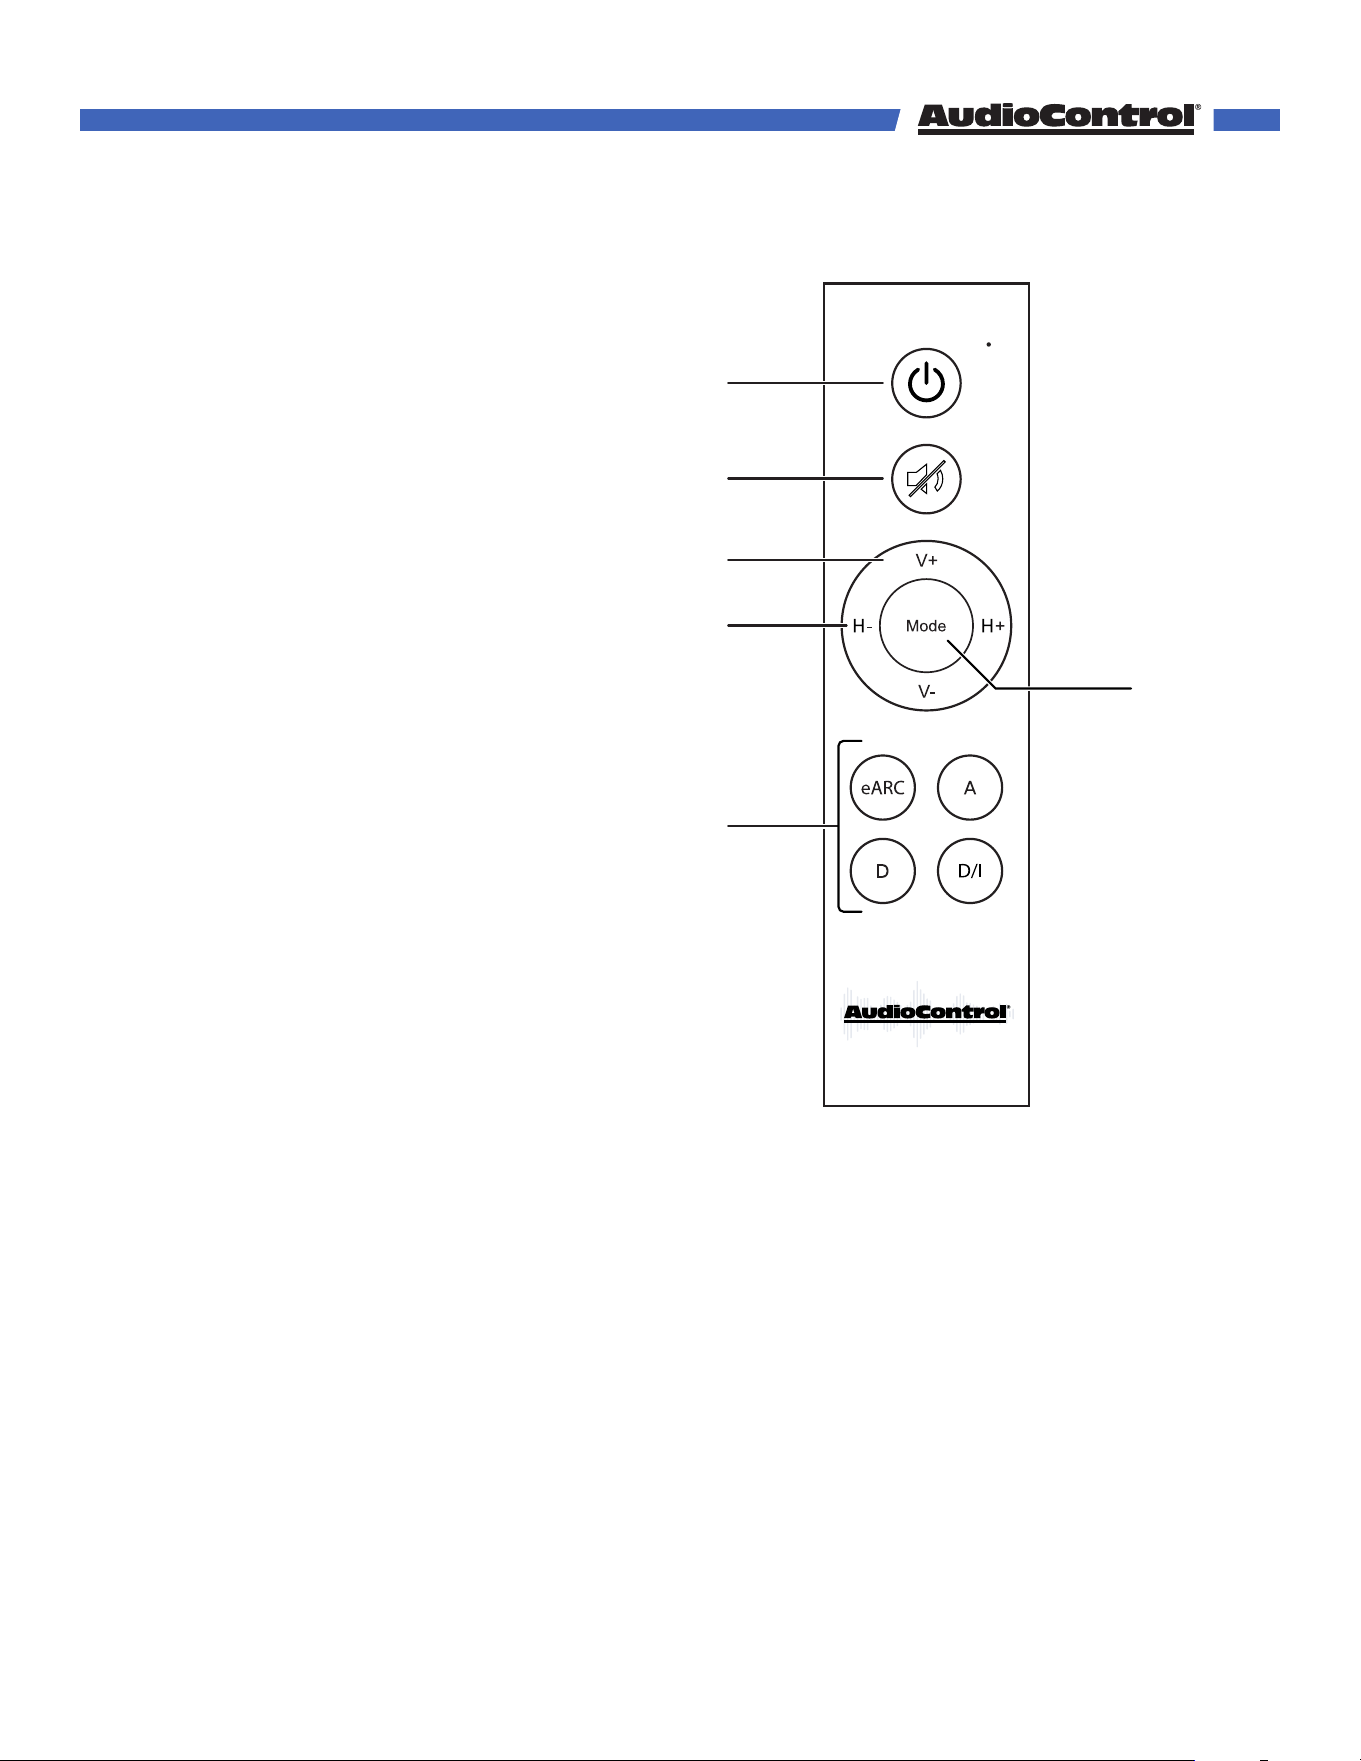
Remote Control
1. Power On/Standby
Turn the unit On or put it into Standby.
2. Mute/Unmute
Mute or Unmute the audio.
3. Volume Up/Down
Adjust the volume from 0 to 100.
4. Headphone Volume Up/Down
If headphone mode is enabled, adjust
headphone volume from 0 to 100.
5. Mode
The mode button lets you toggle
between the audio modes of the Bijou.
6. Input Selection
Select between the eARC, Analog,
Digital, or Dante inputs.
1
2
3
4
5
6
©COPYRIGHT AVPRO GLOBAL HOLDINGS 2024 - 22410 70TH AVENUE WEST, MOUNTLAKE TERRACE, WA 98043
9
~50Hz - 60Hz 4A
110V-220VAC
ACP-BIJOU5100D
3
Output 7
Output 6Analog InDigital IneARC In
L R
1
2
2
1
3
4
eARC
A
5
7
6
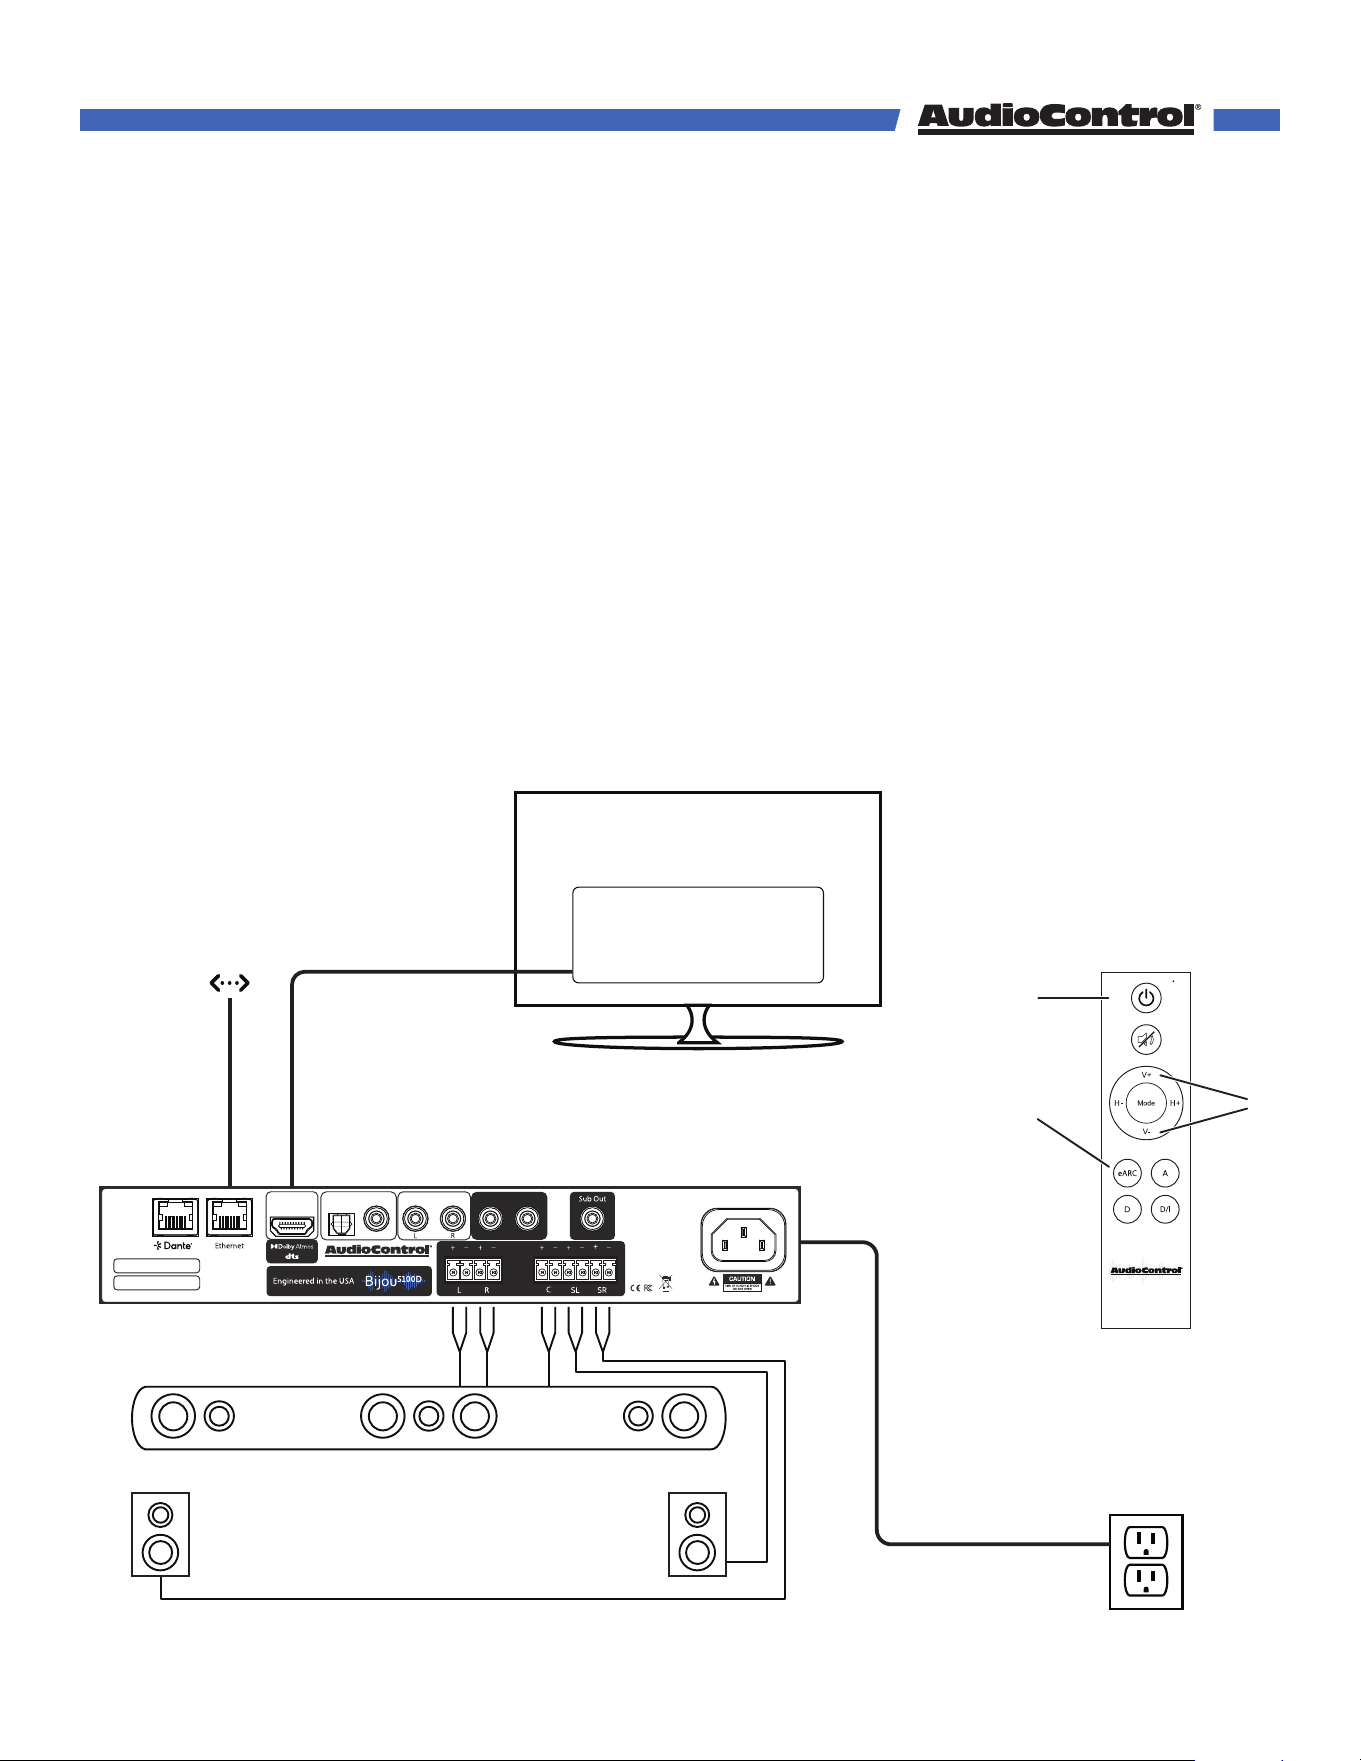
Quick Start Guide
In just a few short minutes after reading this page, your Bijou5100D will be up and running.
The steps below are explained in more detail throughout this manual.
1. Connect at least one source (i.e. a TV’s eARC output, digital output of a PlayStation,
digital music player, RCA output of a turntable, blender, etc.), to one of the inputs on the
Bijou5100D.
2. Connect an Ethernet cable from the local network to the Bijou5100D’s Ethernet port.
3. Connect your speakers or soundbar to the Speaker Outputs of the Bijou5100D.
4. Connect the Bijou5100D to power.
5. Using the Bijou5100D remote or the button on the front panel, turn the Bijou5100D on.
6. Using the Bijou5100D remote, select the input you have connected to the Bijou5100D.
7. Using the Bijou5100D remote, adjust the volume to your preferred listening level.
8. Enjoy the great sound from the Bijou5100D, and have a mini dance party.
©COPYRIGHT AVPRO GLOBAL HOLDINGS 2024 - 22410 70TH AVENUE WEST, MOUNTLAKE TERRACE, WA 98043
10

Installation
Now that we know what it looks like and how to power it on, it’s time to decide where and
how to install the Bijou5100D.
Important Safety Note: Remove power at all times while conducting removal or installation
of the Bijou5100D.
Media Center
The simplest way to install the Bijou5100D is to place it on a shelf in a media center. The
Bijou5100D comes equipped with 4 rubber feet to keep it elevated and stable, allowing for
airflow on all sides.
Do not place the Bijou5100D directly on top of or underneath a game console, AV receiver,
amplifier, cable box, or any other heat-producing product in your media center.
Amp Rack
The Bijou5100D only takes up just over half of a full rack space. AudioControl oers a Rack
Mounting Kit lets you fit the Bijou5100D into a 1U rack space.
Attach the rack mounts per the instructions of the kit. For optimal performance, the
Bijou5100D should have at least 1U of empty space above and below it. However, we know
space is limited, so up to 4 units can be stacked together. Any more than that and a rack
space above and below is required for adequate ventilation.
Behind a TV
With proper mounting equipment, the Bijou5100D can be mounted behind a TV. Attach the
Bijou5100D to the mount per the instructions provided with the kit. Mount the Bijou5100D so
the bottom of the amplifier faces the TV and the top panel is faces away from it, and ensure
there is room for ventilation on all sides of the amplifier.
In-Wall Mount
The Bijou5100D may be mounted in an enclosed wall box, following the instructions
provided with the kit. As with all previous installations, make sure there is adequate room
for ventilation around the sides and top of the amplifier.
Mount Doom
One does not simply install the Bijou5100D in Mordor.
©COPYRIGHT AVPRO GLOBAL HOLDINGS 2024 - 22410 70TH AVENUE WEST, MOUNTLAKE TERRACE, WA 98043
11
Once the Bijou5100D is connected to the local network via Ethernet, open your browser of
choice and type the unit’s IP address into the URL address bar to access your Bijou5100D’s
web GUI. The IP address is displayed on the Bijou5100D front panel when the unit powers
on.
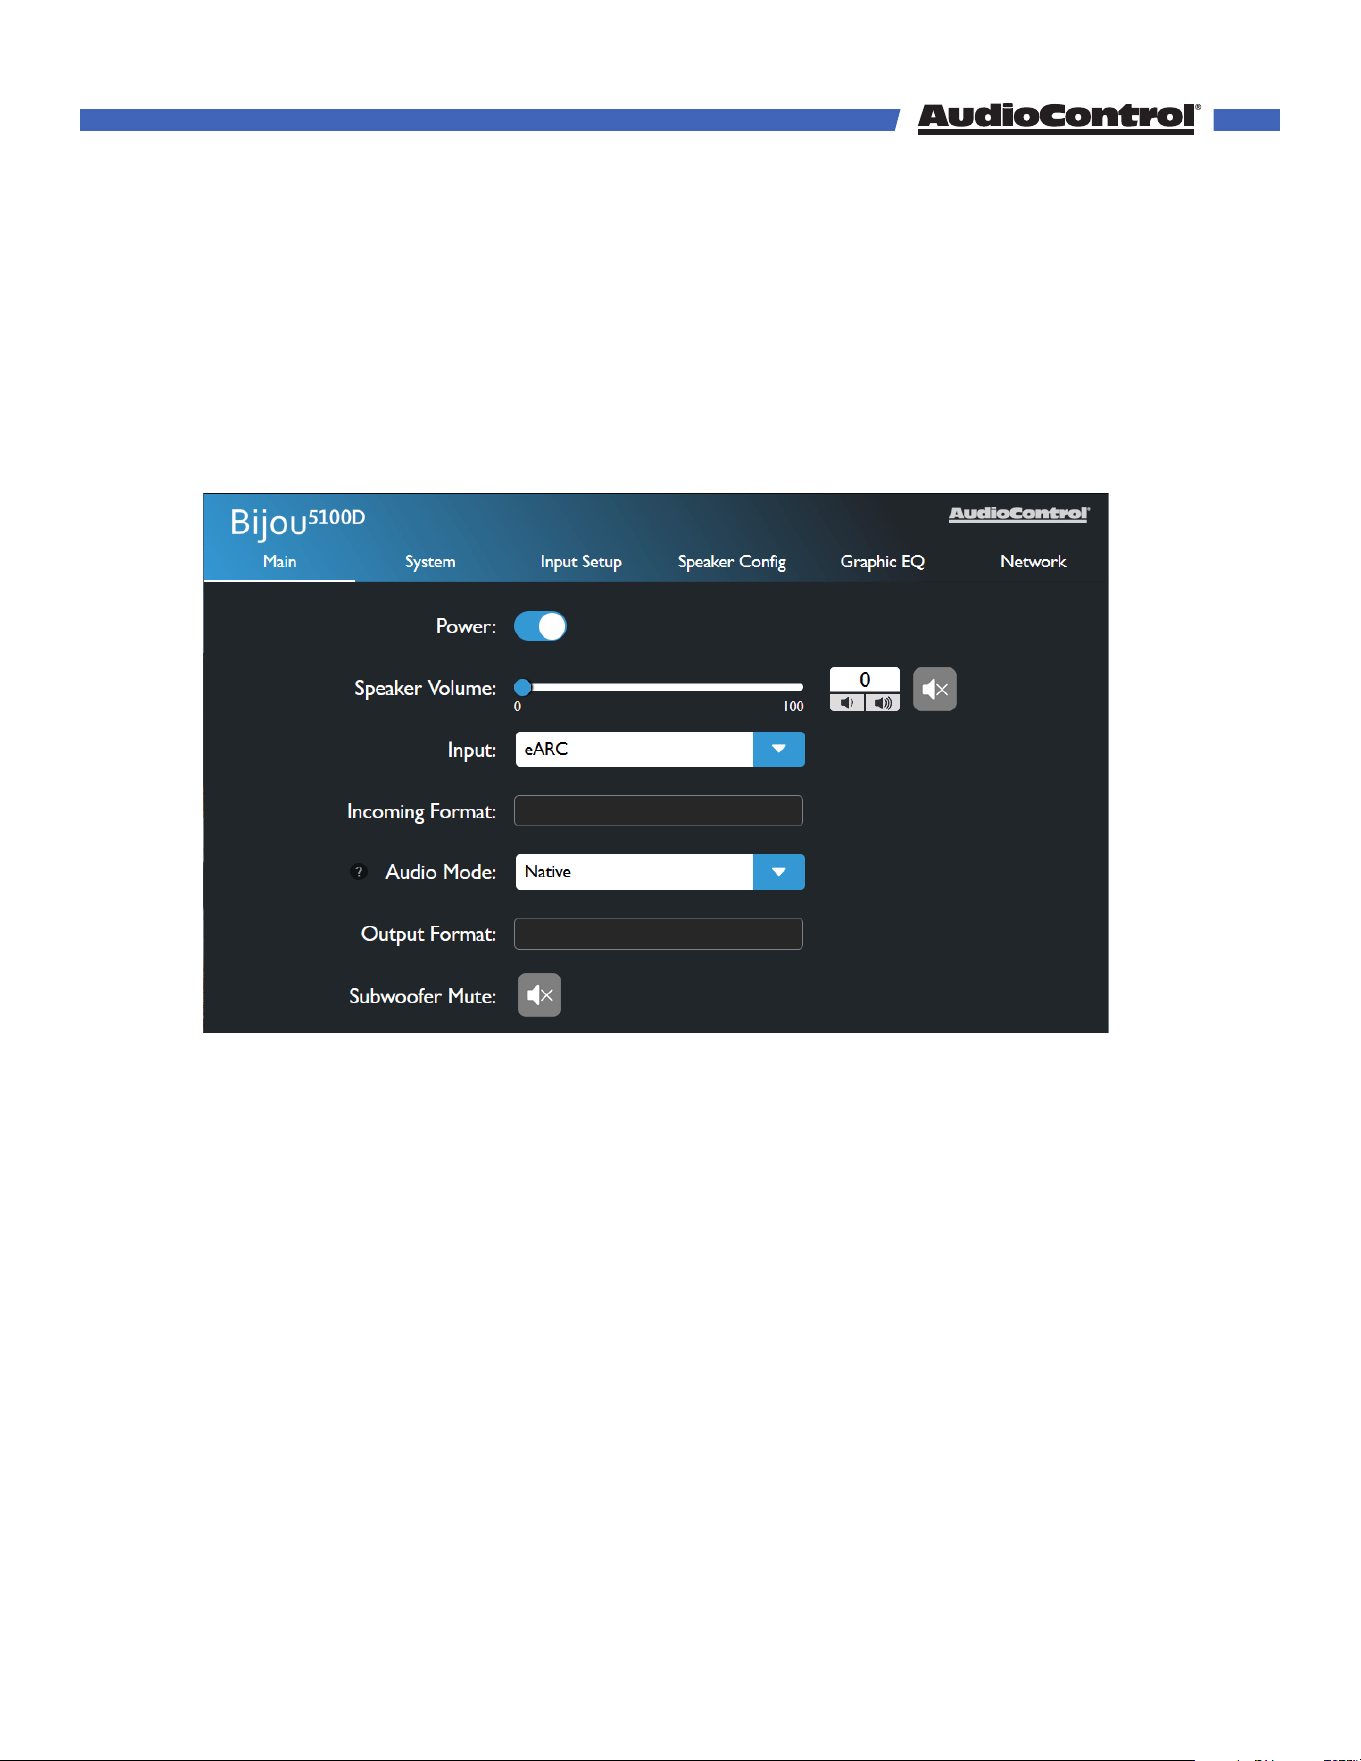
Main
The Main page acts similar to the remote control, with a few additional settings.
Power - Toggle the unit on or put it into standby.
Speaker Volume - Control the volume of the speaker outputs, or toggle the mute state of
the speaker outputs.
Note: If Headphones are assigned to outputs 6-7 and “Follow Speaker Volume” is
enabled in System Settings, this slider will also control the headphone output.
Input - Select the input source.
Incoming Format - Displays information about the incoming audio signal.
Audio Mode - Sets the upmix mode for stereo signals, and sets the decode mode for multi-
channel signals. This will automatically assign itself based on the incoming audio signal, but
can be changed to stereo or multi-channel stereo.
Output Format - Displays the decode or upmix mode applied to the output.
Web GUI
©COPYRIGHT AVPRO GLOBAL HOLDINGS 2024 - 22410 70TH AVENUE WEST, MOUNTLAKE TERRACE, WA 98043
12
Output - When headphones are connected, choose whether the audio outputs to speakers
only, both speakers and headphones, or headphones only. This setting will be hidden if
Headphones are not selected in the Speaker Config menu.
Headphone Volume - Control the volume of the speaker outputs, or toggle the mute state
of the headphone output. This setting will be hidden if Headphones are not selected in the
Speaker Config menu.
Note: This setting will be disabled if “Follow Speaker Volume” is enabled in the System
Settings, or if Headphones are not selected in the Speaker Config Menu
Subwoofer Mute - Toggles mute on and o for the subwoofer output. This setting will not
be available if no subwoofer is assigned in the Speaker Config menu.
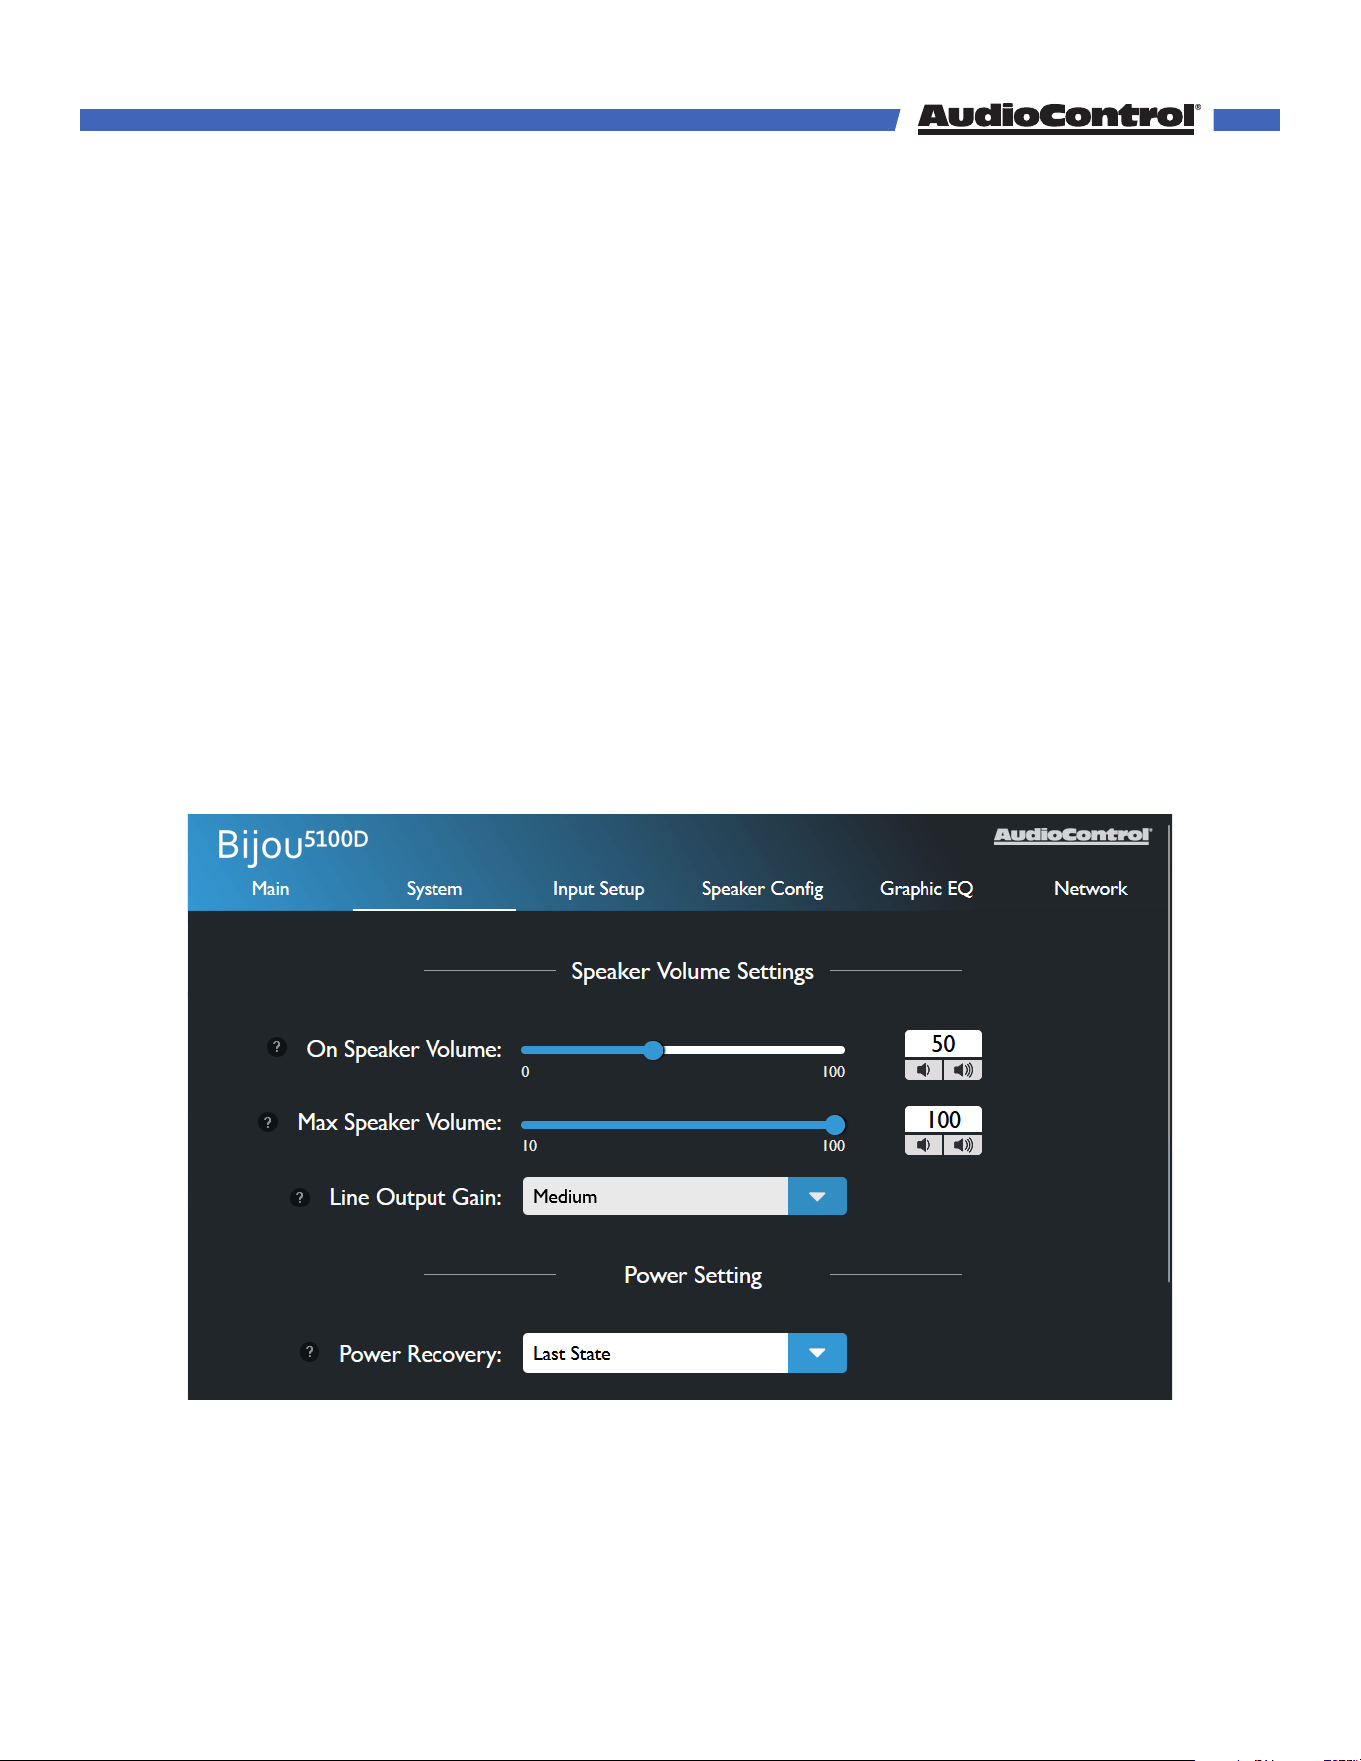
System Settings
The settings on this page apply to the global functions of the Bijou5100D.
On Speaker Volume - Sets the default volume level for the Bijou5100D. By setting this
parameter, the Bijou5100D will always return to this set value when powered on.
Max Speaker Volume - Sets a maximum limit on how high the user can increase the
volume, helpful if you need to protect smaller speakers (or your ear drums).
Web GUI
©COPYRIGHT AVPRO GLOBAL HOLDINGS 2024 - 22410 70TH AVENUE WEST, MOUNTLAKE TERRACE, WA 98043
13
Web GUI
Line Output Gain - Set the gain on the line outputs to Low, Medium (default), or High
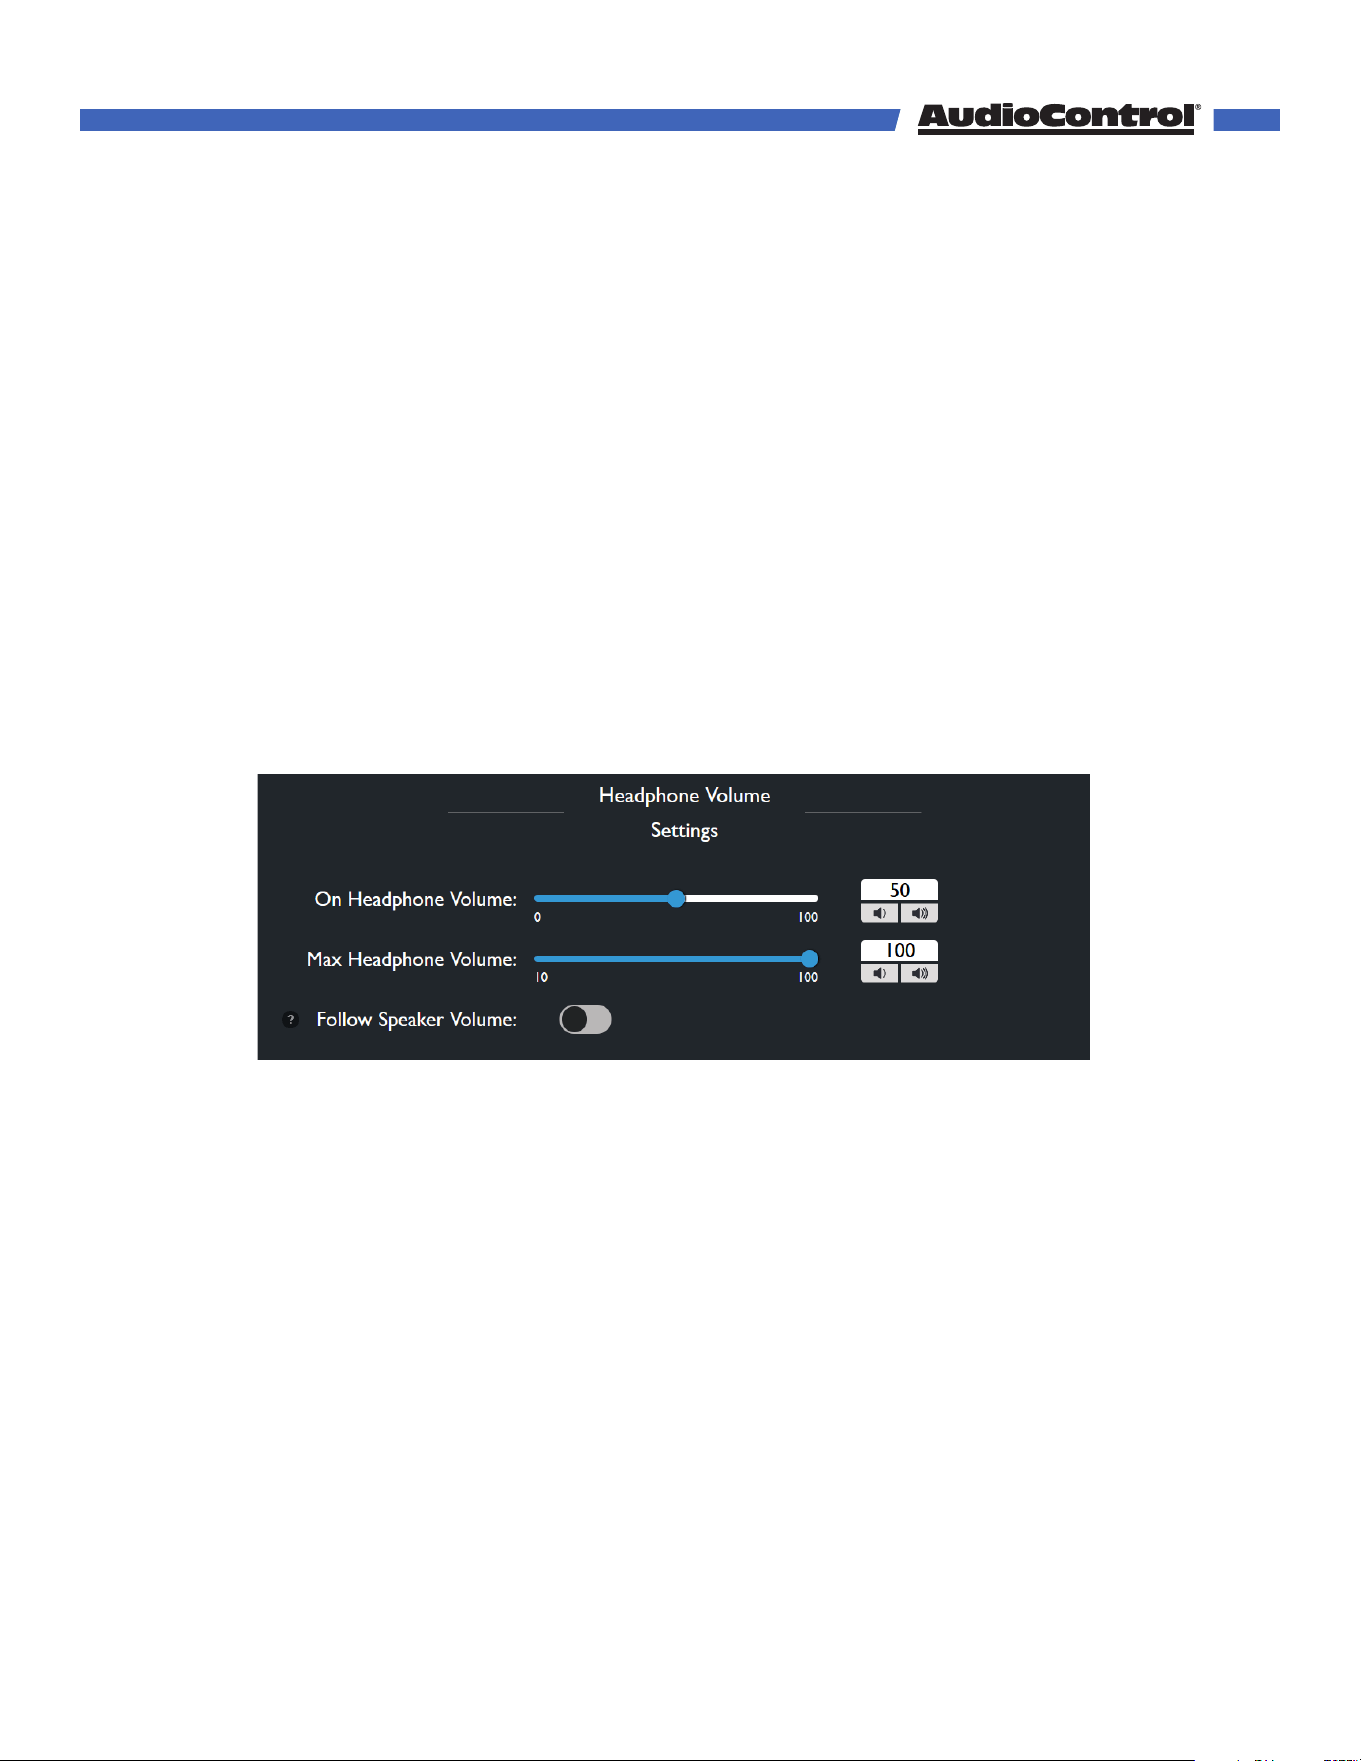
On Headphone Volume - Sets the default volume level for the headphone output (channels
6-7) whenever the Bijou5100D is powered on.
Max Headphone Volume - Sets a maximum limit on how high the user can increase the
volume for the headphone output.
Follow Speaker Volume - Toggles volume control for the headphone output. When this
setting is ON, the headphone volume level and mute state follow the main speaker volume
and mute. When this setting is OFF, the headphone output will have independent volume
and mute controls. This option will be disabled if "Volume Defeat" is enabled on any input.
Note: Headphone volume settings are only available if Outputs 6-7 are set to
Headphones in the Speaker Config menu. Otherwise, these settings are hidden.
Power On - Determines the state the Bijou5100D enters once power is restored after a loss
of power.
• Last State - Enters whichever state it was in before losing power.
• On - Turns on once power is applied.
• O - Stays in Standby once power is applied.
Serial Number - Displays this unit’s serial number
MCU & DSP Firmware - Displays the Bijou5100D’s current firmware versions.
Update - Allows you to manually update the Bijou5100D’s firmware using a file saved
locally on your computer.
Save Settings – Download a config file of all settings on the Bijou
©COPYRIGHT AVPRO GLOBAL HOLDINGS 2024 - 22410 70TH AVENUE WEST, MOUNTLAKE TERRACE, WA 98043
14
Web GUI
Load Settings – Import a config file to change all settings on the Bijou
System Reset - The Factory Reset button will restore the Bijou5100D to it’s default settings.
The reboot button will turn the Bijou5100D o, and wake it back up.
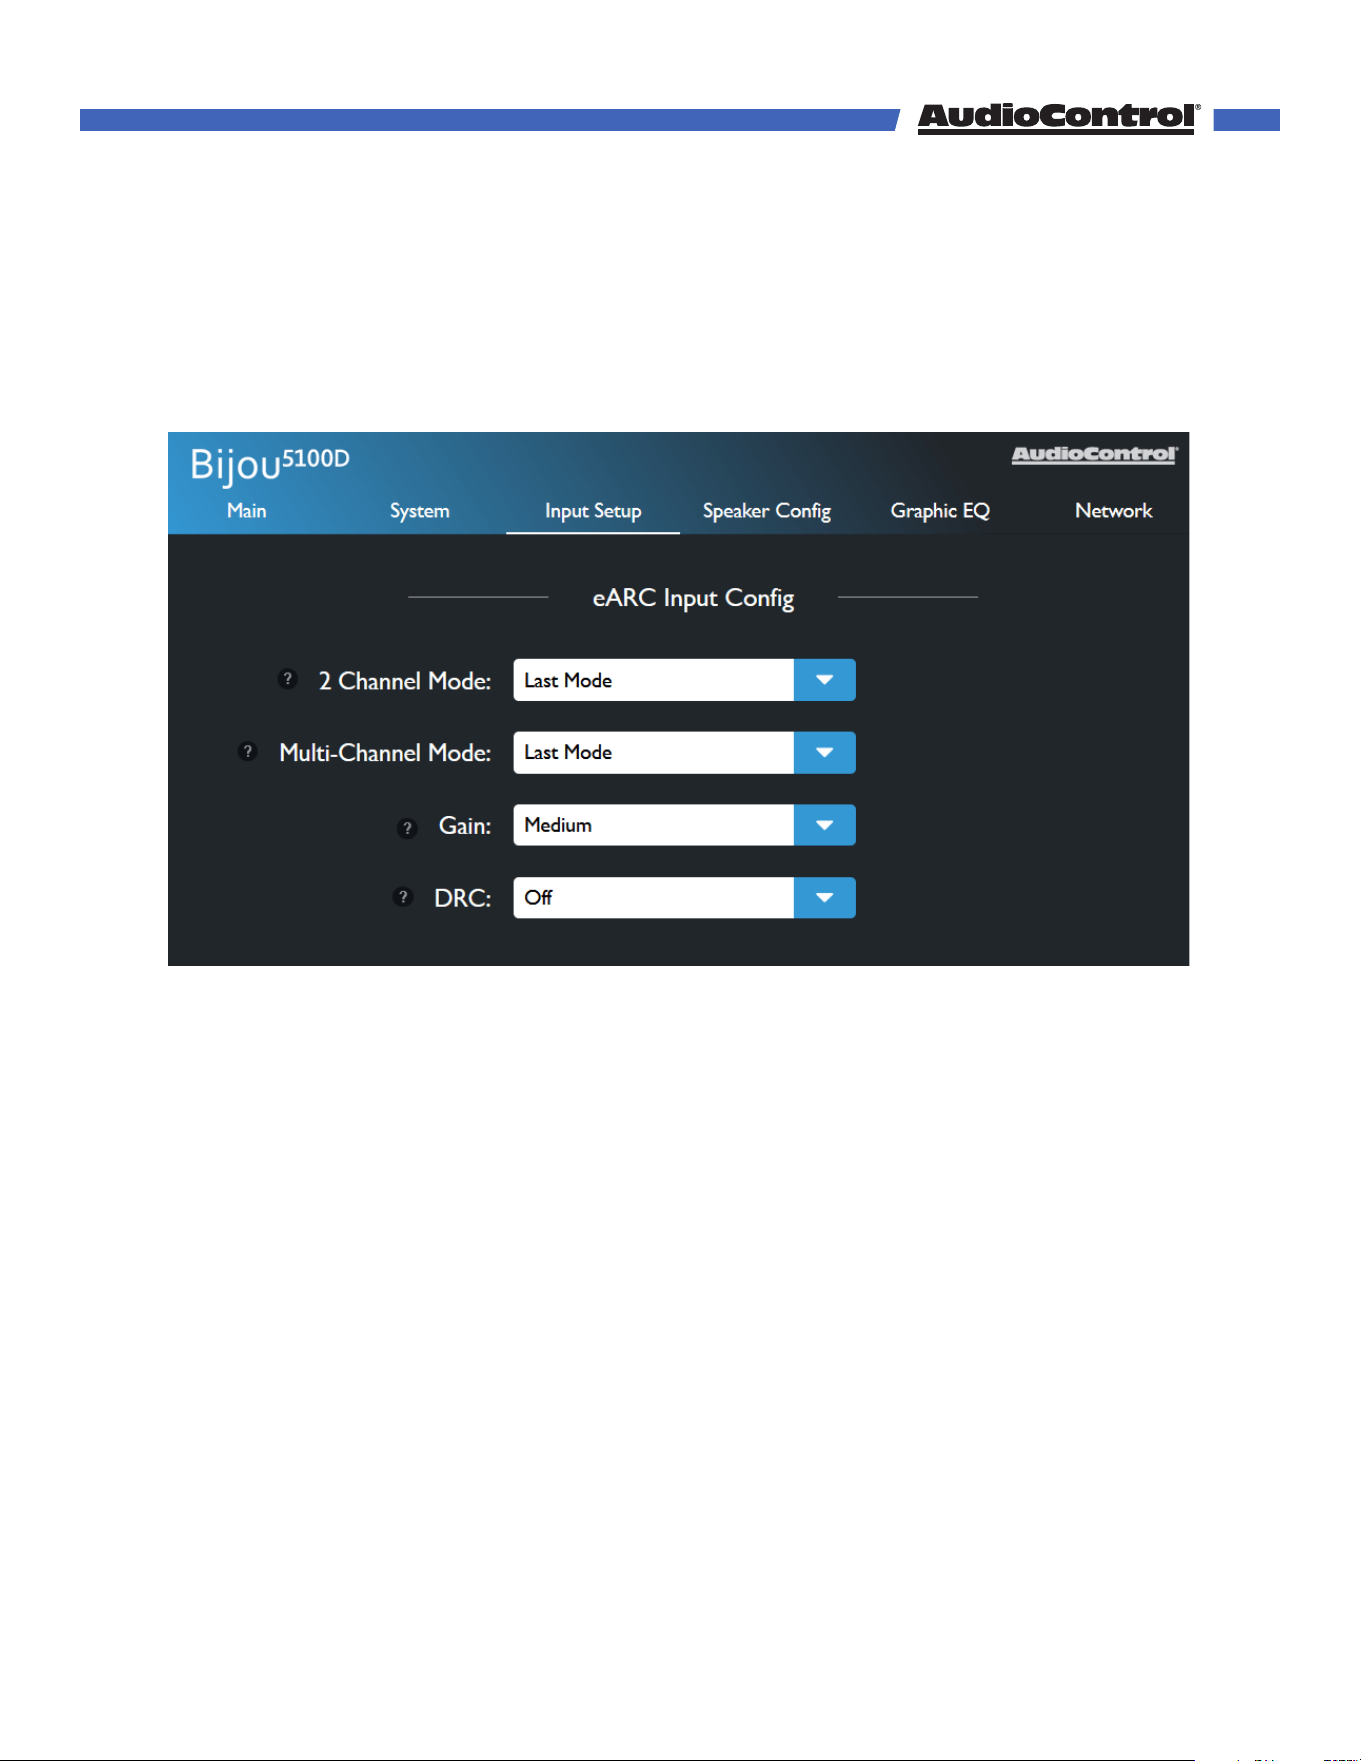
Input Setup
In this menu, you can change settings that only aect specified inputs. Each of the settings
defined here are available on every input unless otherwise noted.
2-Channel Mode - Set the default upmix mode when the input receives a stereo signal.
Last Mode - Defaults to whichever setting was used the last time a stereo signal was
received on this input.
2-Channel Stereo
All-Channel Stereo
Dolby Surround
Dolby Mode - Like Dolby Surround with the addition of Dolby’s virtualization
technology.
Multi-Channel Mode - Sets the default surround mode when the input receives a multi-
©COPYRIGHT AVPRO GLOBAL HOLDINGS 2024 - 22410 70TH AVENUE WEST, MOUNTLAKE TERRACE, WA 98043
15

Web GUI
channel signal.
Last Mode - Defaults to whichever setting was used the last time a multi-channel signal
was received on this input.
Native - Leaves the incoming signal untouched, passing it through without alteration.
2-Channel Stereo
All-Channel Stereo
Dolby Surround
Dolby Mode - Like Dolby Surround with the addition of Dolby’s virtualization
technology.
The Multi-Channel Mode setting is not available for the Analog or Dante inputs.
Gain - For the eArc and Digital inputs, sets the reference level for these inputs. For the
analog input, this sets the input sensitivity
Digital and eARC Input
• Low — 0 dB
• Medium — -6 dB
• High — -12 dB (we promise, this makes it louder)
Analog Input - the Gain sets the input sensitivity for the input:
• Low — 2 Vrms
• Medium — 1 Vrms
• High — 0.5 Vrms
Volume Defeat - Fixes the output level of the 5100D to maximum in order for the 5100D to
accept a variable input. Allowing the source to control the volume, instead of the Bijou. This
settings is not available on the eARC input.
Dynamic Range Control - Allows the user to ensure a consistent volume level when
receiving either a Dolby or DTS encoded signal. This setting is only available on eARC and
Digital inputs.
Signal Sense - Toggle this on to wake the unit from standby when signal is present on the
selected input. This setting is not available on the eARC input.
©COPYRIGHT AVPRO GLOBAL HOLDINGS 2024 - 22410 70TH AVENUE WEST, MOUNTLAKE TERRACE, WA 98043
16
Web GUI
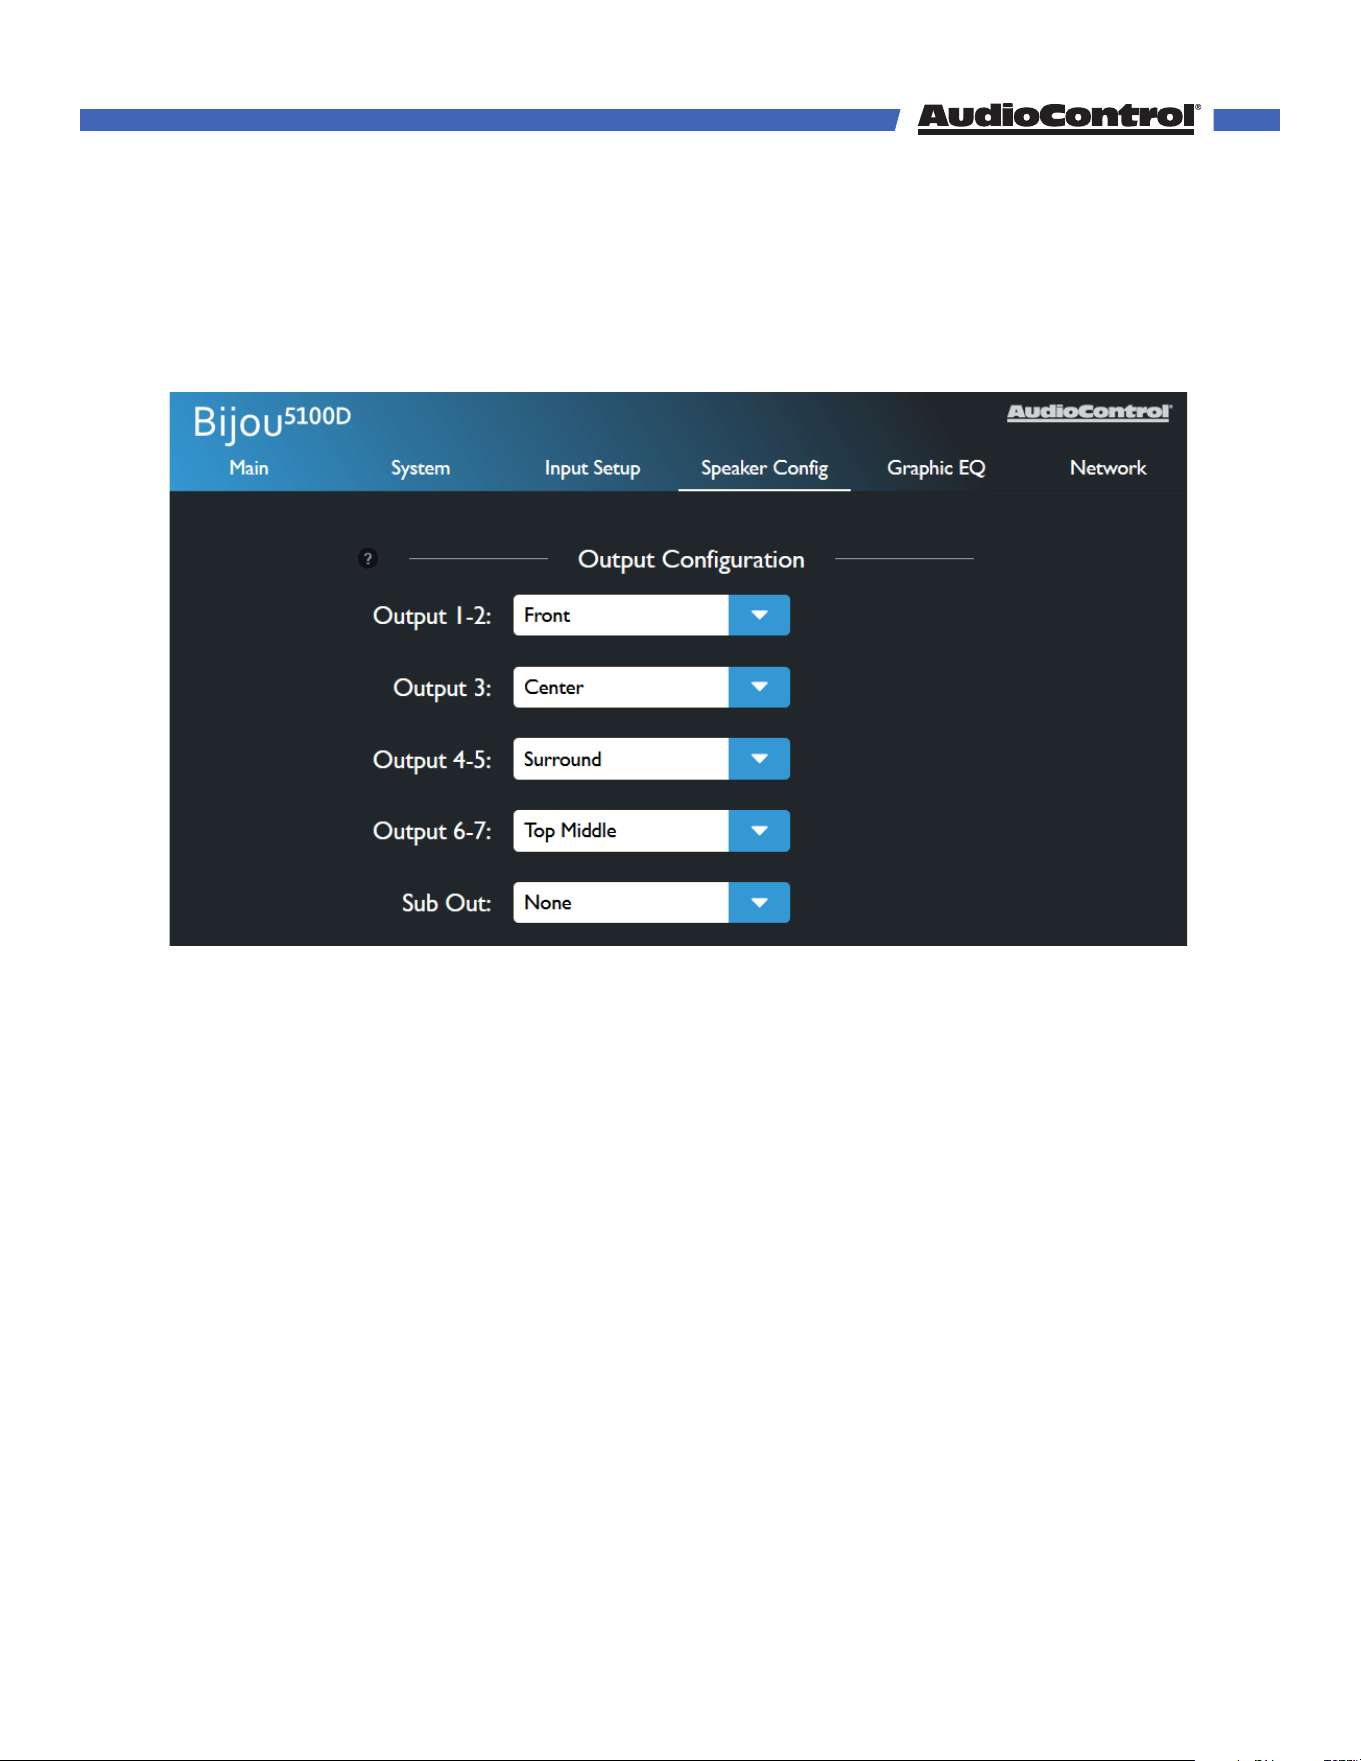
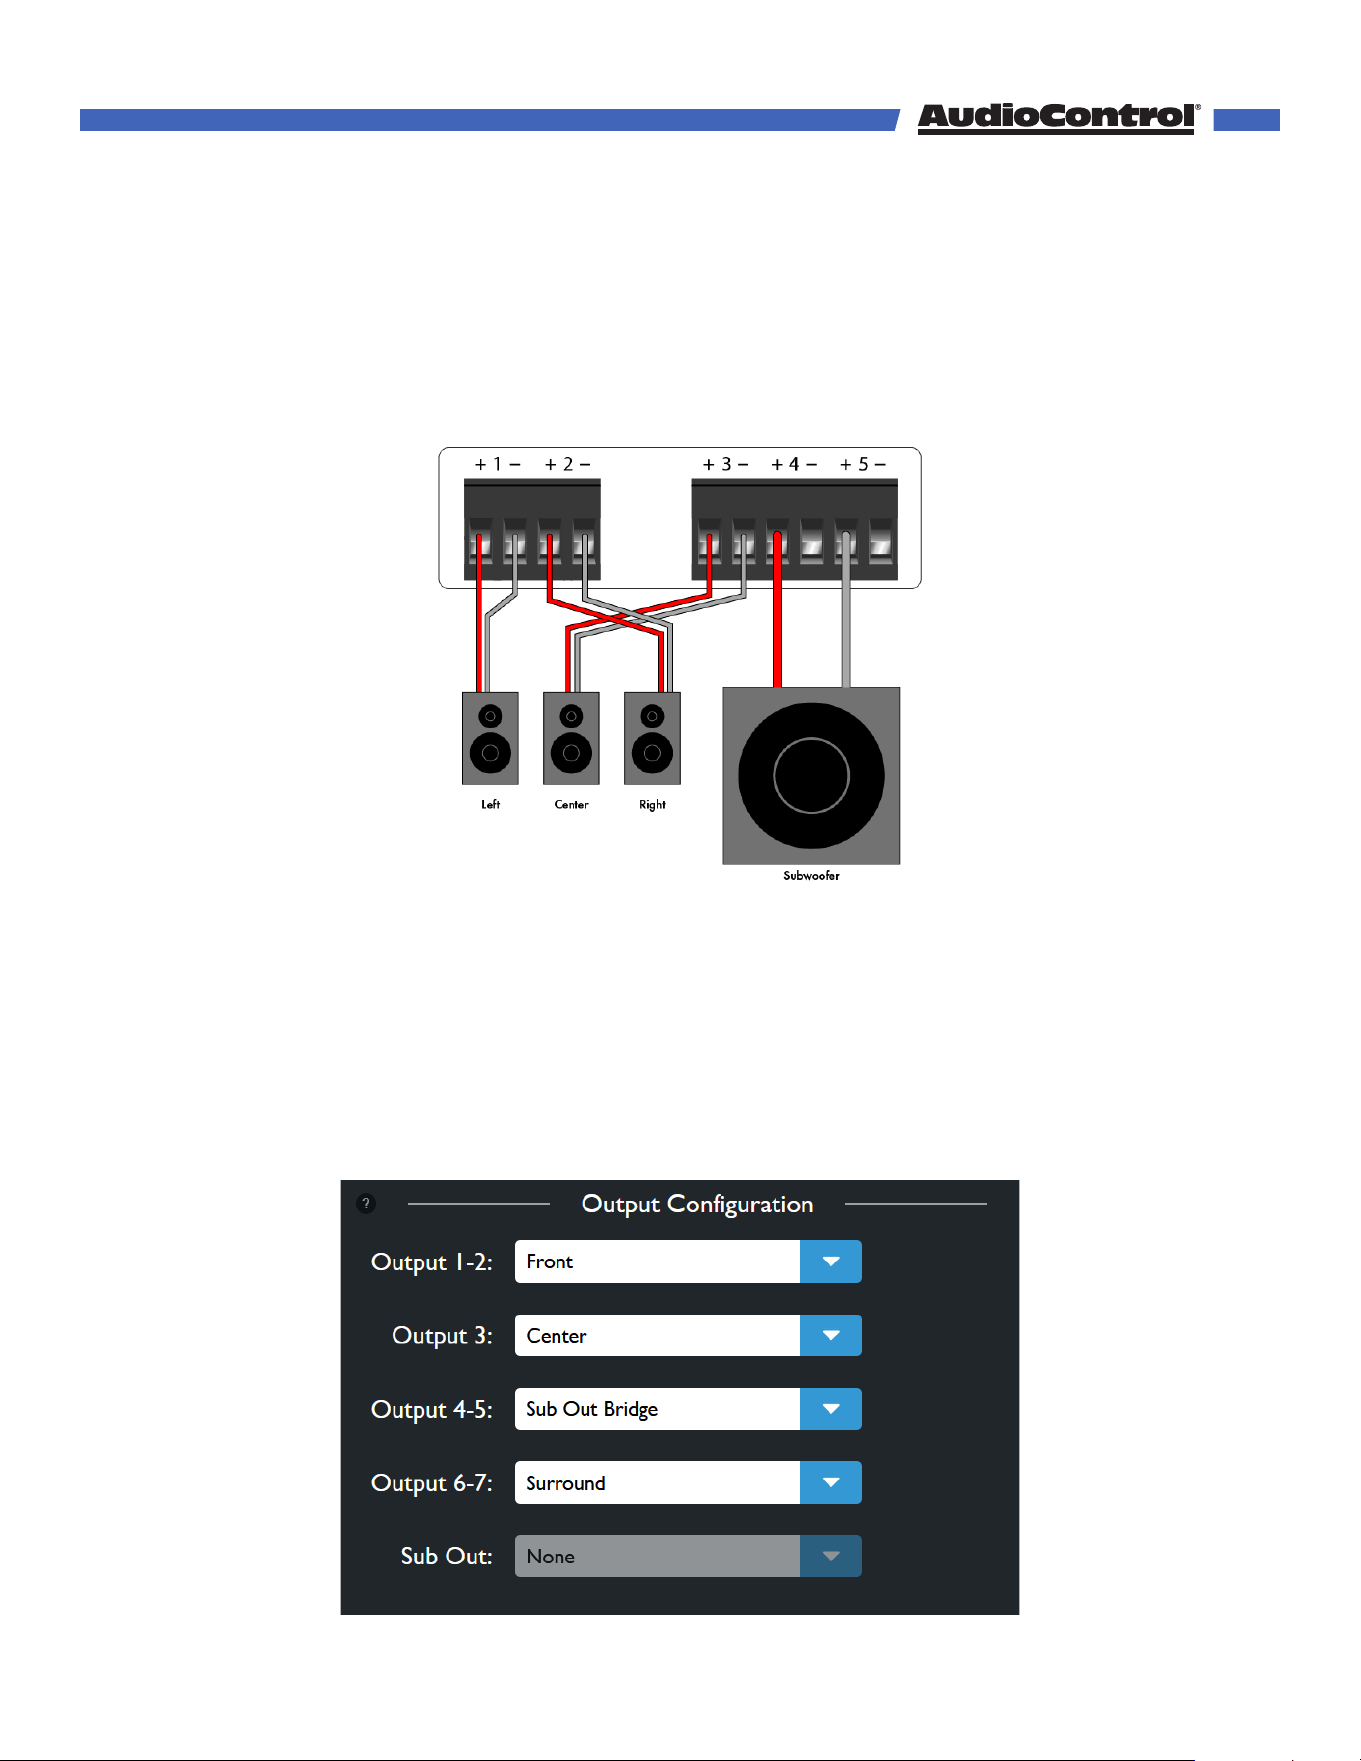
Speaker Config
This menu allows you to configure the amplified and preamplified outputs on your
Bijou5100D.
Output Configuration - Assign speaker channels each set of outputs, or turn the center
and subwoofer channels on or o.
Output 1-2 - Assign Front, Surround, Surround Back, Top Middle, Dolby Enabled, or
None to this amplified output.
Output 3 - The center channel is selected by default. Change this to None to turn the
center channel o.
Output 4-5 - Assign Front, Surround, Surround Back, Top Middle, Dolby Enabled, Sub
Out Bridged, or None to this amplified output.
Output 6-7 - Assign Front, Surround, Surround Back, Top Middle, Dolby Enabled,
Headphones or None to this line level output.
Sub Out - Set whether or not a subwoofer is connected to the Sub Output.
*Note: When Sub Out Bridged is selected on Output 4-5, the Subwoofer pre-out will be
disabled. Use Subwoofer level and distance controls to control this output. To bridge
these channels, use the positive terminal on output 4 for the positive speaker post, and
the positive terminal on output 5 for the negative speaker post.
©COPYRIGHT AVPRO GLOBAL HOLDINGS 2024 - 22410 70TH AVENUE WEST, MOUNTLAKE TERRACE, WA 98043
17
Web GUI
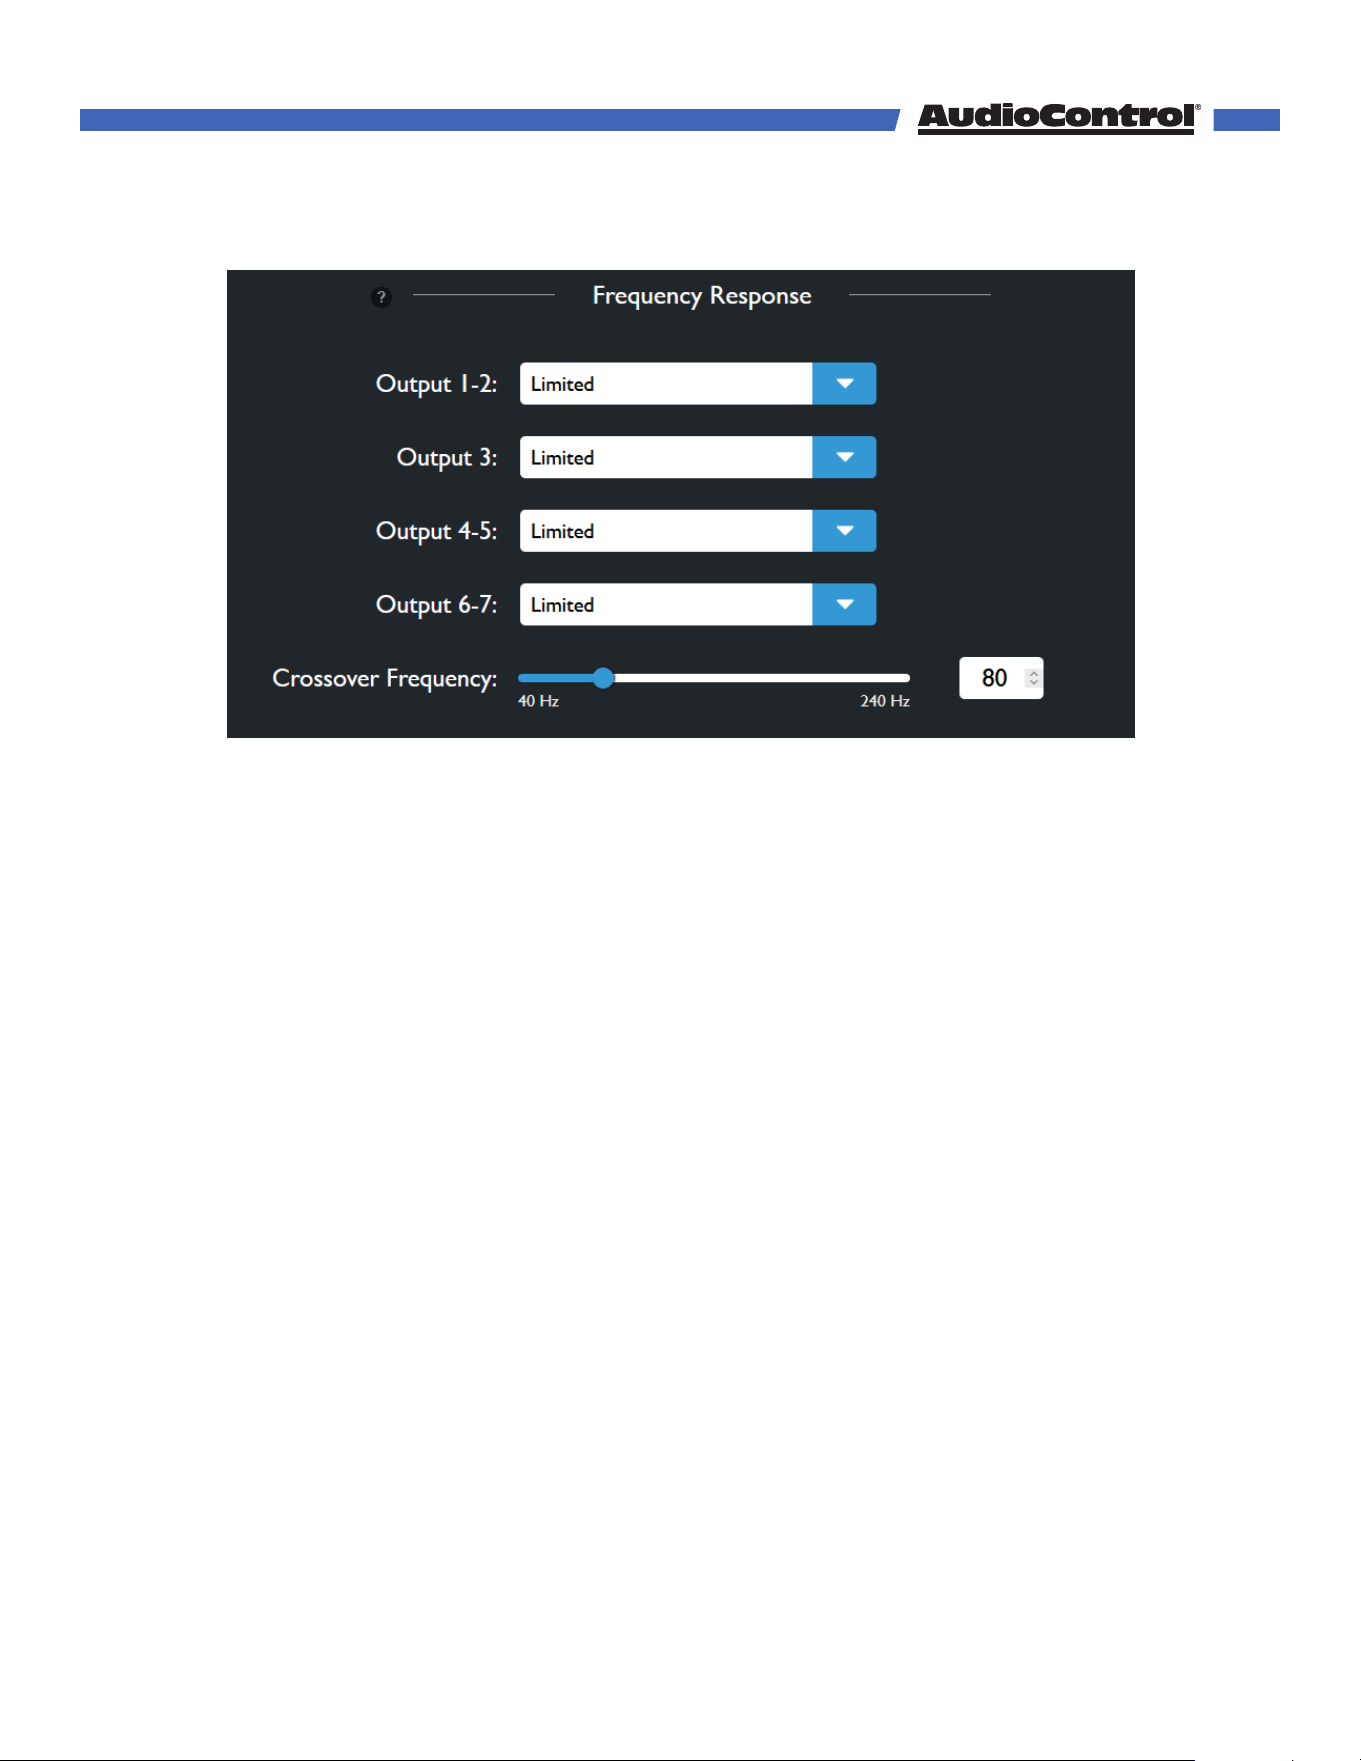
Frequency Response - Choose whether outputs 1-7 are full range or have a limited
frequency response.
Full range - The output channel will pass all frequencies.
Limited - The output will have a high-pass crossover determined by the Crossover
Frequency Slider.
Crossover Frequency - Sets the value of the low-pass filter for the subwoofer output and
the high-pass filter for all speakers set to Limited. The crossover can be adjusted from 40
Hz to 240 Hz.
Output Gain - Adjust the gain for each output independently. The gain can be adjusted
from -12 dB to +12 dB.
Test Tone - Select an output from the dropdown menu and press the play button (▶) to
output pink noise to the selected output. Press the Pause Button (II) to stop the test tone.
Speaker Distances - Set the distance from selected channels to the listening position.
You can set whether the measurement calculated in feet or meters. The distance can be
adjusted from 0.1 ft (0.03 m) to 30 ft (9 m).
©COPYRIGHT AVPRO GLOBAL HOLDINGS 2024 - 22410 70TH AVENUE WEST, MOUNTLAKE TERRACE, WA 98043
18
Web GUI
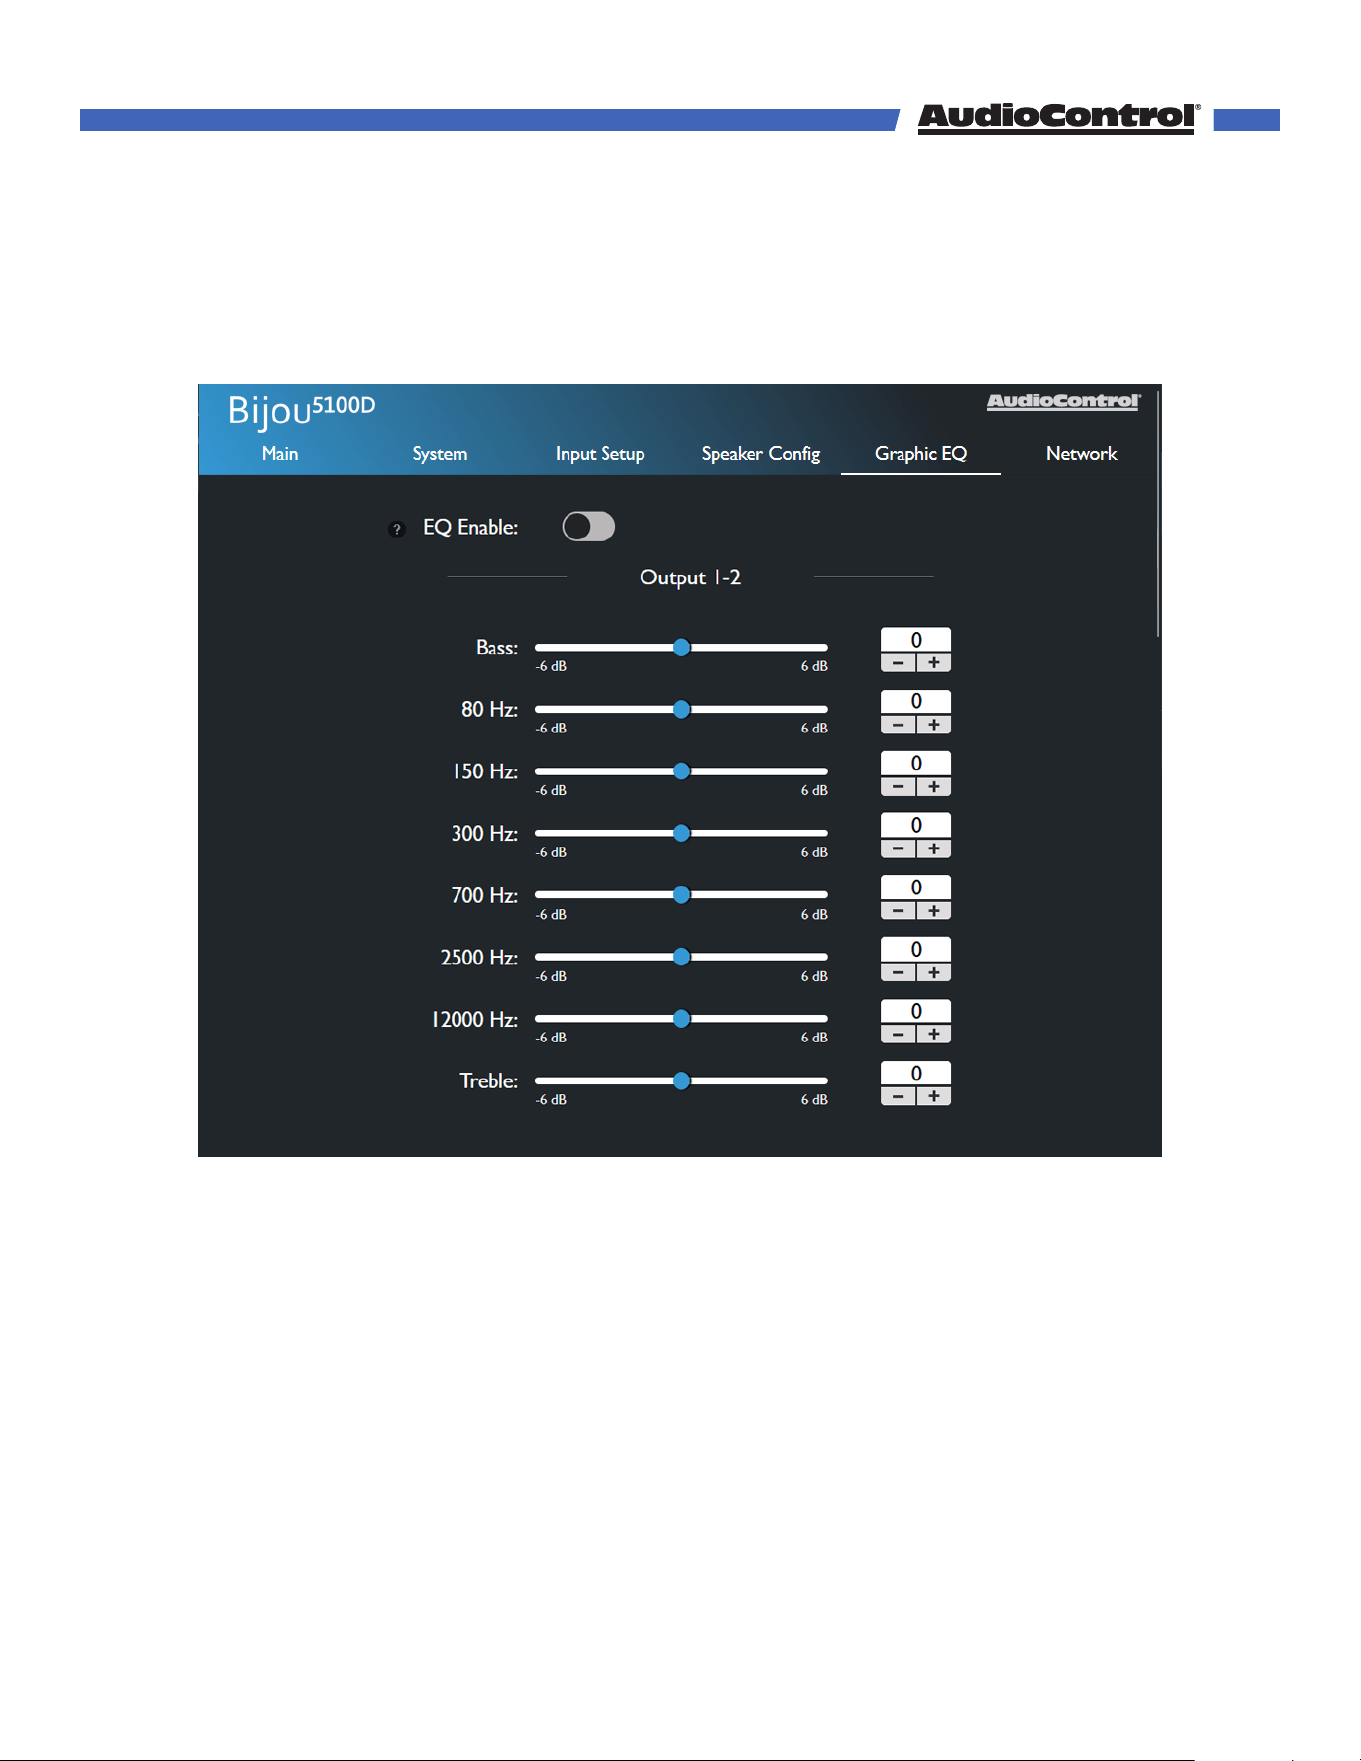
Graphic EQ
You may optionally set an EQ curve for each set of outputs on the Bijou5100D.
EQ Enable - Toggle this ON to apply the EQ curve to the outputs, and turn it OFF to flatten
the EQ curve back to default.
EQ Sliders - Each set of outputs has a 6-band EQ and 2 shelving filters for bass and treble.
Each EQ band has a Q of 1.4, except 2500 Hz which has a Q of 0.6.
Bass Shelf Center Frequency: 120 Hz Q: 1.4
Treble Shelf Center Frequency: 5000 Hz Q: 1.4
©COPYRIGHT AVPRO GLOBAL HOLDINGS 2024 - 22410 70TH AVENUE WEST, MOUNTLAKE TERRACE, WA 98043
19
Web GUI
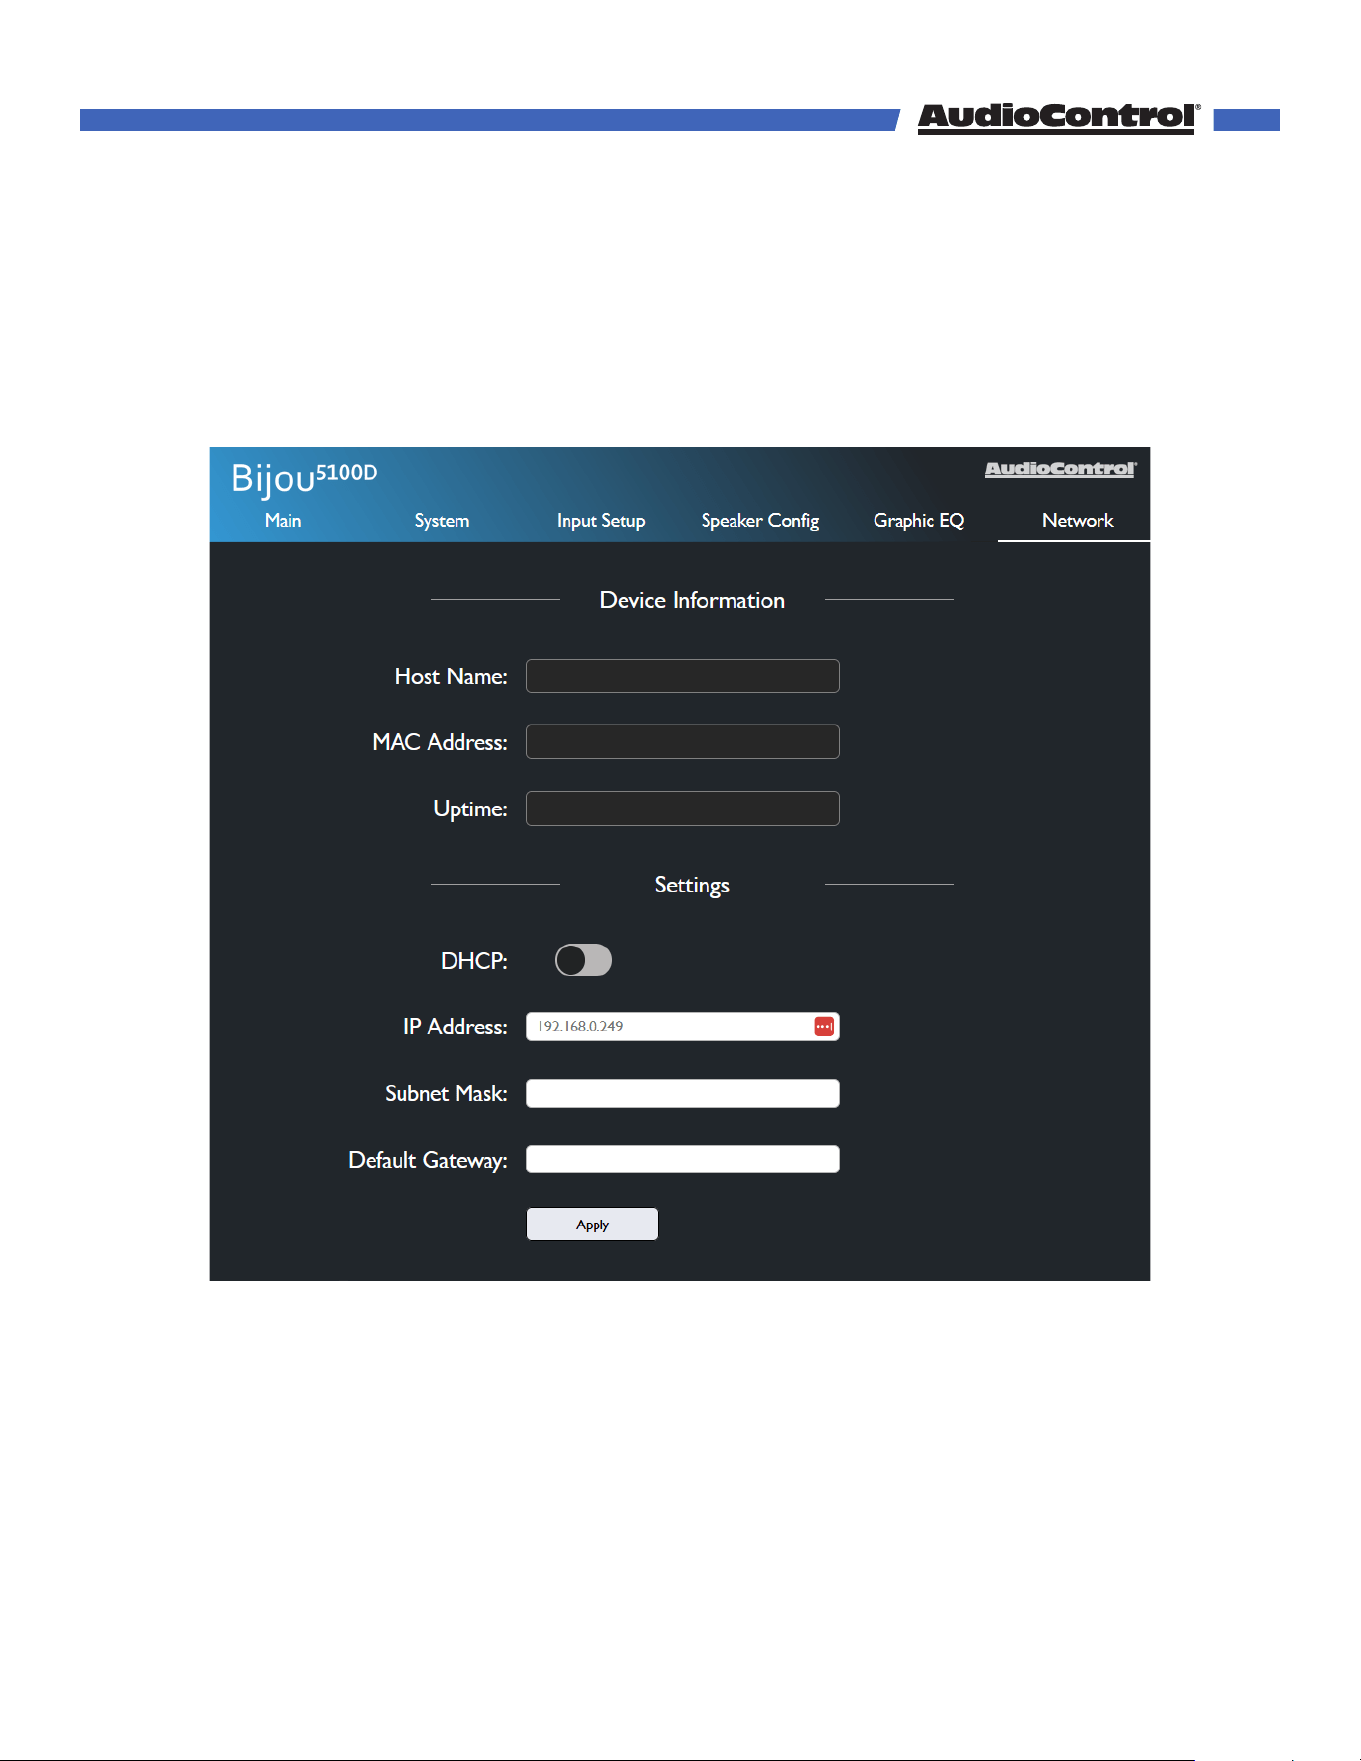
Network Settings
Here you can set an automatic or static IP address for your Bijou5100D. By default, the
Bijou5100D will automatically pick up an IP address if there is a DHCP server on the
network.
Device Information - This section tells you the unit’s Host Name, its MAC Address, and its
Uptime (how long it has been powered on).
Settings - This section allows you to configure the IP settings for the Bijou5100D.
Dante Settings - This section allows you to configure the IP settings for the Bijou5100D’s
Dante port.
©COPYRIGHT AVPRO GLOBAL HOLDINGS 2024 - 22410 70TH AVENUE WEST, MOUNTLAKE TERRACE, WA 98043
20

Web GUI
DHCP - Set DHCP on or o. DHCP is enabled by default. To set a static IP address, turn
DHCP o.
IP Address - Displays the current IP address for the Bijou5100D. If you are setting a
static IP address, you can type your desired address into this field. Double check all
network devices to make sure a dierent device is not using your IP address.
When setting a static IP address, you will need to know the desired Subnet Mask and
Default Gateway. If you do not know these, leave the unit set to DHCP and contact your
network administrator.
Once your static IP settings are established, click the Apply button to save these
settings.
TCP Port - Use this field to change the TCP port from its default to a port of your choosing.
Click Set TCP Port to apply the change.
©COPYRIGHT AVPRO GLOBAL HOLDINGS 2024 - 22410 70TH AVENUE WEST, MOUNTLAKE TERRACE, WA 98043
21

Our dedicated team of engineers is always working to improve the quality of our products,
and ensure it will last in your system for as long as possible. As such, firmware updates will
be available occasionally when improvements are needed. It’s always recommended to
keep the firmware up to date, so be sure to check for updates regularly.
How To Update:
1. Download the latest firmware from the Bijou5100D’s product page at
www.audiocontrolpro.com/products/bijou-5100d
2. Extract the files from the .zip folder.
3. Open the Bijou’s web interface by typing the unit’s IP address or Host Name into your
web browser of choice.
4. In the web interface, go to the System Settings menu, scroll down to Firmware Update,
and click Browse.
5. In the file browser window, navigate to and select the MCU firmware file you just
downloaded.
6. Click Upload to begin the firmware update. This process may take a few minutes. When
finished, the unit will reboot.
7. Refresh the page, return to the System Settings menu, scroll down to Firmware Update,
and click Browse.
8. Now, navigate to and select the DSP firmware file, then click Upload.
9. The update may take up to 5-10 minutes.
10. When the update is finished the page will refresh, and the version number will be
updated.
Firmware Update
©COPYRIGHT AVPRO GLOBAL HOLDINGS 2024 - 22410 70TH AVENUE WEST, MOUNTLAKE TERRACE, WA 98043
22

Speaker Layouts
2.x 3.x 4.x 5.x 7.x 2.x.2 3.x.2 5.x.2
2-Channel Stereo
✓
All-Channel Stereo
✓ ✓ ✓ ✓ ✓ ✓ ✓ ✓
DD
✓ ✓ ✓ ✓
DD+
✓ ✓ ✓ ✓ ✓ ✓ ✓ ✓
DTHD
✓ ✓ ✓ ✓ ✓ ✓ ✓ ✓
Atmos
✓ ✓ ✓ ✓ ✓ ✓ ✓ ✓
Dolby Surround
✓ ✓ ✓ ✓ ✓ ✓ ✓ ✓
Dolby Mode
✓ ✓ ✓ ✓ ✓ ✓ ✓ ✓
DTS
✓ ✓ ✓ ✓
Speaker Layout →
Listening Mode ↓
Below is a guide detailing the dierent speaker layouts possibilities on the Bijou5100D, and
how certain audio formats will output audio with those layouts.
All listening modes are compatible with every speaker layout, but some speakers may be
silent depending on the format. For example, in a 5.1.2 system, Dolby Digital (DD) content
will play perfectly fine, but the two height channels will be silent because standard DD
does not upmix to those speaker channels.
©COPYRIGHT AVPRO GLOBAL HOLDINGS 2024 - 22410 70TH AVENUE WEST, MOUNTLAKE TERRACE, WA 98043
23

A few rules must be followed when setting up speaker types on the speaker config pages.
The Bijou will try its best to stop you from breaking these rules.
1. The Front speaker channels must always be assigned to an output pair. If you make
a change where Front is not selected on any output, one of the output pairs will be
assigned as Front speakers.
2. Surround Back cannot be selected if Surround is not selected. If the Surround channels
are not assigned to any of the outputs, the Surround Back option will be disabled. If
Surround Back is assigned to an output when Surround is unassigned, that output will
be set to None.
3. Only 1 height type can be selected at a time. On any of the output pairs, you can
select either a Top Middle or Dolby Enabled height channels. If a Height speaker type is
assigned to more than 1 output, one of the height channels will be set to “None.”
Speaker Type Definitions
Front - Front Left/Right audio channels. These speakers sit at listener level on either side of
the display.
Center - The Center audio channel is a single speaker that sits at listener level, aligned with
the center of the display.
Surround - Surround Left/Right audio channels. These speakers sit at listener level on the
left and right of the listener position.
Surround Back - Surround Back Left/Right audio channels. These speakers sit at listener
level behind the listener.
Top Middle - Top Middle Left/Right audio channels. These speakers sit above the listener in
the center of the listening area. They can be installed on wall, in-wall or in-ceiling.
Dolby Enabled - Dolby Enabled refers to a special type of speaker that sits at listener level
and acts as a normal Front or Surround speaker, which has an up-firing speaker built
into it, creating a height channel without needing to install a speaker on the wall or in the
ceiling.
Headphones - The line output can be dedicated as a headphone output, sending a stereo-
downmixed signal. When selected, additional headphone settings are available on the
Main page and System Settings in the Bijou5100D web GUI.
Speaker Layouts
©COPYRIGHT AVPRO GLOBAL HOLDINGS 2024 - 22410 70TH AVENUE WEST, MOUNTLAKE TERRACE, WA 98043
24

The Bijou5100D is equipped with a Dante port, allowing you to send and receive audio
signals using Dante or AES67. A CAT 5e or CAT 6 cable is recommended, but a CAT 5 cable
can be used in some systems.
Connect an Ethernet cable from the Dante port to a network switch on the same network
as other Dante devices.
To route audio between Dante-enabled devices you will need the Dante Controller
software, which can be downloaded and installed from Audinate’s website at:
https://my.audinate.com/support/downloads/dante-controller.
Use an Ethernet cable to connect your computer to the same network as the Dante devices,
and open Dante Controller. Here you will see a list of all available Dante-enabled products
in your system.
The Bijou5100D can send and receive stereo audio signals across the network. The Bijou
will transmit audio from whichever input is active. If the Bijou5100D is receiving a Multi-
Channel signal from its eARC or Digital inputs, it will transmit a downmixed stereo signal
over Dante.
Enable AES67
If you plan to use AES67 in your system, you will need to enable AES67 mode on the device
using Dante Controller.
In the software, double-click the Bijou5100D to open the Device View window, and
navigate to the AES67 Config tab. On this tab, in the AES67 mode panel, you will see the
current AES67 status, and you can set a new status.
Change the new status from Disabled to Enabled.
Using Dante
©COPYRIGHT AVPRO GLOBAL HOLDINGS 2024 - 22410 70TH AVENUE WEST, MOUNTLAKE TERRACE, WA 98043
25

Access the Bijou's web interface, connect the device's Ethernet port to a network switch or
router using a CAT 5 or better cable.
If a DHCP is enabled on your network, the Bijou will display the IP address on the front
panel display. If the display is o, press the power button to wake it up.
Open a web browser, enter the IP address, and the web interface will open!
Note: Some browsers don't like leading zeros in IP addresses. For example, if the IP
Address reads as 010.000.000.089, remove any leading 0 and enter 10.0.0.89.
Connecting Without a Network
If DHCP isn't enabled on your network, or you'd like to setup the Bijou without connecting it
to the local network, the Bijou can be connected directly to a computer by plugging a CAT
5 (or better) cable from the Bijou's Ethernet port to your computer's.
The Bijou's default IP address is: 192.168.1.249
Set the computer's IP address to fit in the same subnet as the Bijou's default IP address:
192.168.1.x, where x is any number between 2-255 excluding 249. Open your browser,
enter the default IP address, and the web interface will open.
Changing the IP address on a Windows computer
On a Windows 11 PC, open the Settings app, select Network & Internet, then click Ethernet.
On IP Assignment, click Edit, change from Automatic to Manual, turn on IPv4, and enter
the information below.
On a Windows 10 or older PC, go to Control Panel > Network and Internet > Network
Connections, right-click the Ethernet, and select Properties . Select Internet Protocol
Version 4, and click the Properties button. Select Use the following IP address and enter
the information below
IP Address: 192.168.1.23* Subnet Mask: 255.255.255.0
Gateway: 192.168.1.1 DNS: 8.8.8.8 (not needed on Windows 10 or older)
Then click Save (or OK).
*The IP address should be 192.168.1.x, where x is any number from 2-255 excluding 249.
Changing the IP address on an Apple computer
Diering versions of Apple hardware and operating systems may have dierent
instructions. If in doubt, try searching for instructions online.
Open System Preferences, select Network, and under Other Services select the port on
the computer connected to the Bijou. Click Details, select TCP/IP, set Configure IPv4 to
Manually. In the IP address field, type in 192.168.1.x, where x is any number from 2-255
excluding 249, then click OK.
Remember to revert network settings to "Automatic" or "Using DHCP" when finished setting
up the Bijou.
Internet Connectivity and Control
©COPYRIGHT AVPRO GLOBAL HOLDINGS 2024 - 22410 70TH AVENUE WEST, MOUNTLAKE TERRACE, WA 98043
26
We’ve mentioned it before, but just in case you missed it you can choose to bridge the
Bijou5100D’s Outputs 4 & 5 together to power a passive subwoofer. Use the positive
terminal on output 4 for the positive speaker post, and the positive terminal on output 5 for
the negative speaker post.
The minimum impedance for a bridged subwoofer on the Bijou5100D is 8 Ω. Using
a subwoofer on the bridged output with an impedance lower than 8 Ω will put the
Bijou5100D into protect mode.
In the Bijou5100D’s web interface, navigate to the Speaker Config menu, and under Output
Configuration set Output 4-5 to Sub Out Bridge.
The web page will ask you to confirm you want to do this to protect any non-subwoofer
speakers connected to 4 & 5 from inadvertently receiving a blast of high-power low
frequency signal.
When Sub Out Bridge is active, the Sub pre-out on the Bijou will be disabled, since the
amplified outputs are now designated for the subwoofer. Use the Subwoofer Level and
Distance controls for this output, as the Output 4 & 5 controls will be disabled.
Bridged Subwoofer
©COPYRIGHT AVPRO GLOBAL HOLDINGS 2024 - 22410 70TH AVENUE WEST, MOUNTLAKE TERRACE, WA 98043
27

There are no lights on the Bijou5100D
• Pressing the power button on the front panel or the factory remote should wake the
Bijou5100D.
• Verify that the power cord is plugged into a live AC outlet.
The audio doesn’t match the video
• Confirm that you are on the correct input.
• Switch to a dierent audio mode.
Audio sound is poor or distorted
• Verify speaker configuration settings matches your speakers.
• Verify that all interconnect cables are fully seated in their ports. Disconnect and
reconnect them to ensure a good connection.
• You’re listening to an old album by The Mountain Goats
Humming on the outputs
• Replace input cables and ensure they are connected properly.
• Disconnect all input cables. If the hum disappears, connect one input at a time until the
hum returns. That input may have a bad connection, or may require a ground isolator.
No Audio from the TV
• Check your TV’s sound settings to ensure that the eARC channel or Digital output is
enabled.
The Bijou5100D is not coming out of standby
• Remove power from the Bijou5100D and disconnect all inputs and outputs. Let the amp
sit without power for at least 5 minutes, then reconnect power.
The Bijou5100D is not appearing on the network
• Connect the Bijou5100D’s Ethernet port directly to a computer and try accessing the
default IP address: 192.168.0.249
• If there was an issue setting up the static IP address, press and hold the Power button
for 10 seconds to factory reset the Bijou5100D.
My soué didn’t rise
• Increase oven temperature.
Troubleshooting
©COPYRIGHT AVPRO GLOBAL HOLDINGS 2024 - 22410 70TH AVENUE WEST, MOUNTLAKE TERRACE, WA 98043
28
Command Description
H Help
STA Show system status
SET RBT Reboot device
SET RST Reset to factory defaults
GET STA Get settings status
GET INPUT STATUS Get input signal type information
GET SER NUM Get current product serial number
GET MODEL Get the unit model
GET MODELNAME Get the unit model (alternative command)
GET VER INF Get system firmware versions
SPEAKER VOLUME Commands
SET VOL x Set speaker volume level x {x=[0~100]}
SET VOL+ x Increase speaker volume level by x {x=[1~100, optional
default=1]}
SET VOL- x Decrease speaker volume level by x {x=[1~100, optional
default=1]}
SET MAX VOL x Map the maximum speaker max volume level x to 100.
{x=[10~100]}
SET POWER ON VOL x Set the speaker volume level x when the unit powers on
{x=[0~100]}
SET INPUT x Set Audio Output to Input x{x=[EARC,DIGITAL,ANALOG,DANTE]}
SET AUDIO MODE x Set the active decoder mode x {x=[NATIVE, 2CHSTEREO,
ALLCHSTEREO, DOLBY SURROUND, DOLBY MODE]]}
SET OUTPUT x Set the enable state x for speaker and/or headphone outputs
{x=[SPEAKER, HEADPHONE, BOTH]}
HEADPHONE VOLUME Commands
SET HVOL x Set headphone volume level x {x=[0~100]}
SET HVOL+ x Increase headphone volume level by x {x=[1~100, optional
default=1]}
SET HVOL- x Decrease headphone volume level by x {x=[1~100, optional
default=1]}
SET MAX HVOL x Map the maximum headphone max volume level x to 100.
{x=[10~100]}
SET POWER ON HVOL x Set the headphone volume level x when the unit powers on
{x=[0~100]}
SET HVOL FOLLOW x Set headphone volume to follow speaker volume {x=[OFF,ON]}
Command List
©COPYRIGHT AVPRO GLOBAL HOLDINGS 2024 - 22410 70TH AVENUE WEST, MOUNTLAKE TERRACE, WA 98043
29
SET HMUTE Mute headphone output
SET HUNMUTE Unmute headphone output
GET HVOL Get speaker volume level
GET MAX HVOL Get value of lineout max volume level {[10~100]}
GET POWER ON HVOL Get the headphone volume level when the unit powers on
{[0~100]}
GET HVOL FOLLOW Get status of lineout volume follow mode {[OFF/ON]}
GET HMUTE Get status of lineout mute {[MUTE/UNMUTE]}
INPUT Commands
SET INPUT x Set Audio Output to Input x{x=[EARC,DIGITAL,ANALOG, DANTE]}
SET AUDIO MODE x Set the active decoder mode x {x=[NATIVE, 2CHSTEREO,
ALLCHSTEREO, DOLBY SURROUND, DOLBY MODE]}
SET OUTPUT x Set the enable state x for speaker and/or headphone outputs
{x=[SPEAKER, HEADPHONE, BOTH]}
SET SOURCE AUDIO x y Set input x fixed/variable audio y configuration {x=[DIGITAL,
ANALOG, DANTE], y=[FIXED, VARIABLE]}
SET 2CH MODE x y Set input x default surround mode y when input is two-
channel audio {x=[EARC, DIGITAL, ANALOG, DANTE], y=[LAST,
2CHSTEREO,ALLCHSTEREO, DOLBY SURROUND, DOLBY
MODE]}
SET MULTICH MODE x y Set input x default surround mode y when input
is multi-channel audio {x=[EARC, DIGITAL],
y=[LAST,NATIVE,2CHSTEREO,ALLCHSTEREO, DOLBY SURROUND,
DOLBY MODE]}
SET DRC x y Set Dynamic Range Control mode to x {x=[EARC, DIGITAL,
DANTE], y=[OFF/ON/AUTO]}
GET INPUT Get Audio Input
GET AUDIO MODE x Set the active decoder mode x {x=[NATIVE, STEREO, MULTI]}
GET OUTPUT x Get the enable state x for speaker and/or headphone outputs
{x=[SPEAKER, HEADPHONE, BOTH]}
GET SOURCE AUDIO x y Get input x fixed/variable audio y configuration {x=[DIGITAL,
ANALOG], y=[FIXED, VARIABLE]}
GET MULT CH MODE x Get the multichannel decode mode
GET TWO CH MODE x Get the two channel decode mode
GET LIPSYNC DELAY x Get Audio Input to x to matches the video from
sources{x=[0-250]}
GET DRC MODE x Get Dynamic Range Control mode
©COPYRIGHT AVPRO GLOBAL HOLDINGS 2024 - 22410 70TH AVENUE WEST, MOUNTLAKE TERRACE, WA 98043
30

SUBWOOFER Commands
SET SUB MUTE Mute subwoofer output
SET SUB UNMUTE Unmute subwoofer output
GET SUB MUTE Get status of subwoofer mute {[MUTE/UNMUTE]}
SPEAKER CONFIG Commands
SET TEST TONE OUT x Sends a full-range pink noise signal to output x. {x=[1~5,
SUB,NONE]}
SET OUT CH w x y z " Assign channel/channel pairs w,x,y and z to all output(s) 1_2, 3,
4_5, 6_7 and SUB
{w=[FRONT, SUR, TM, FH, DE, NONE];
x=[CENTER, NONE];
y=[FRONT, SUR, TM, FH, DE, HP, NONE];
z=[SUB, NONE]}
SUR=SURROUND, TM=TOP MIDDLE, FH=FRONT HEIGHT,
DE=DOLBY ENABLED, HP=HEADPHONE, SUB=SUBWOOFER
1_2=OUTPUT 1 (L) and OUTPUT 2 (R), 3=OUTPUT 3,
4_5=OUTPUT 4 (L) and OUTPUT 5 (R) , 6_7=OUTPUT 6 (L) and
OUTPUT 7 (R)"
SET OUT CH GAIN x y Set the gain in dB for the channel assigned to output x {x=[1~7,
SUB, ALL], y=[-12~12]}
SET OUT CH DISTANCE x
y z
" Set the distance y (in units z) between the speaker assigned to
output x and the listener. limited to one x y z entry.
{x=[1~7, SUB, ALL], y=[0.1~30] 0.1 step, z=[FEET];
x=[1~7, SUB, ALL], y=[0.03~9] 0.01 step, z=[METERS]}"
SET OUT FREQ RESPONSE
x y
"Set output x frequency response y {x=[1&2, 3, 4&5, 6&7, ALL],
y=[XOVER,FULLRANGE]}
1&2=OUTPUT 1 (L) and OUTPUT 2 (R), 3=OUTPUT 3,
4&5=OUTPUT 4 (L) and OUTPUT 5 (R), 6&7=OUTPUT 6 (L) and
OUTPUT 7 (R) "
SET XOVER FREQ x Set cross over cuto frequency y for channel(s) x in increments
of 5 {x=[40~120]}
GET OUT CH " Get channel/channel pairs assigned to output(s) 1_2, 3, 4_5,
6_7, SUB in order
SUR=SURROUND, TM=TOP MIDDLE, FH=FRONT HEIGHT,
DE=DOLBY ENABLED, HP=HEADPHONE, SUB=SUBWOOFER
1_2=OUTPUT 1 (L) and OUTPUT 2 (R), 3=OUTPUT 3,
4_5=OUTPUT 4 (L) and OUTPUT 5 (R), 6_7=OUTPUT 6 (L) and
OUTPUT 7 (R) "
GET OUT CH GAIN x Get the gain in dB for the channel assigned to output x
{x=[1~7, SUB, ALL]}
©COPYRIGHT AVPRO GLOBAL HOLDINGS 2024 - 22410 70TH AVENUE WEST, MOUNTLAKE TERRACE, WA 98043
31
GET OUT CH DISTANCE x " Get the distance with units between the speaker assigned to
output x and the listener. {x=[1~7, SUB, ALL}]}
"
GET OUT FREQ RESPONSE
x
" Get output x frequency response y {x=[1&2, 3, 4&5, 6&7, ALL]}
1&2=OUTPUT 1 (L) and OUTPUT 2 (R), 3=OUTPUT 3,
4&5=OUTPUT 4 (L) and OUTPUT 5 (R), 6&7=OUTPUT 6 (L) and
OUTPUT 7 (R) "
GET XOVER FREQ x Get cross over cuto frequency y for channel(s) x in increments
of 5 {x=[40~120]}
Network Setup Commands (xxx=[000-255], zzzz = [0001~9999]
SET RIP xxx.xxx.xxx.xxx Set route IP address to xxx.xxx.xxx.xxx
SET HIP xxx.xxx.xxx.xxx Set host IP address to xxx.xxx.xxx.xxx
SET NMK xxx.xxx.xxx.xxx Set net mask to xxx.xxx.xxx.xxx
SET TIP zzzz Set TCP/IP port to zzzz
SET DHCP x Set DHCP {x=[ON,OFF]}
SET HOSTNAME Set device hostname x {x=[hostname]}
GET RIP Get route IP Address
GET HIP Get host IP Address
GET NMK Get net mask
SET PDNS xxx.xxx.xxx.xxx Set primary DNS server xxx.xxx.xxx.xxx
SET SDNS xxx.xxx.xxx.xxx Set secondary DNS server xxx.xxx.xxx.xxx
GET TIP Get TCP/IP port
GET DHCP Get DHCP status
GET MAC Get MAC address
GET HOSTNAME Get product hostname
©COPYRIGHT AVPRO GLOBAL HOLDINGS 2024 - 22410 70TH AVENUE WEST, MOUNTLAKE TERRACE, WA 98043
32
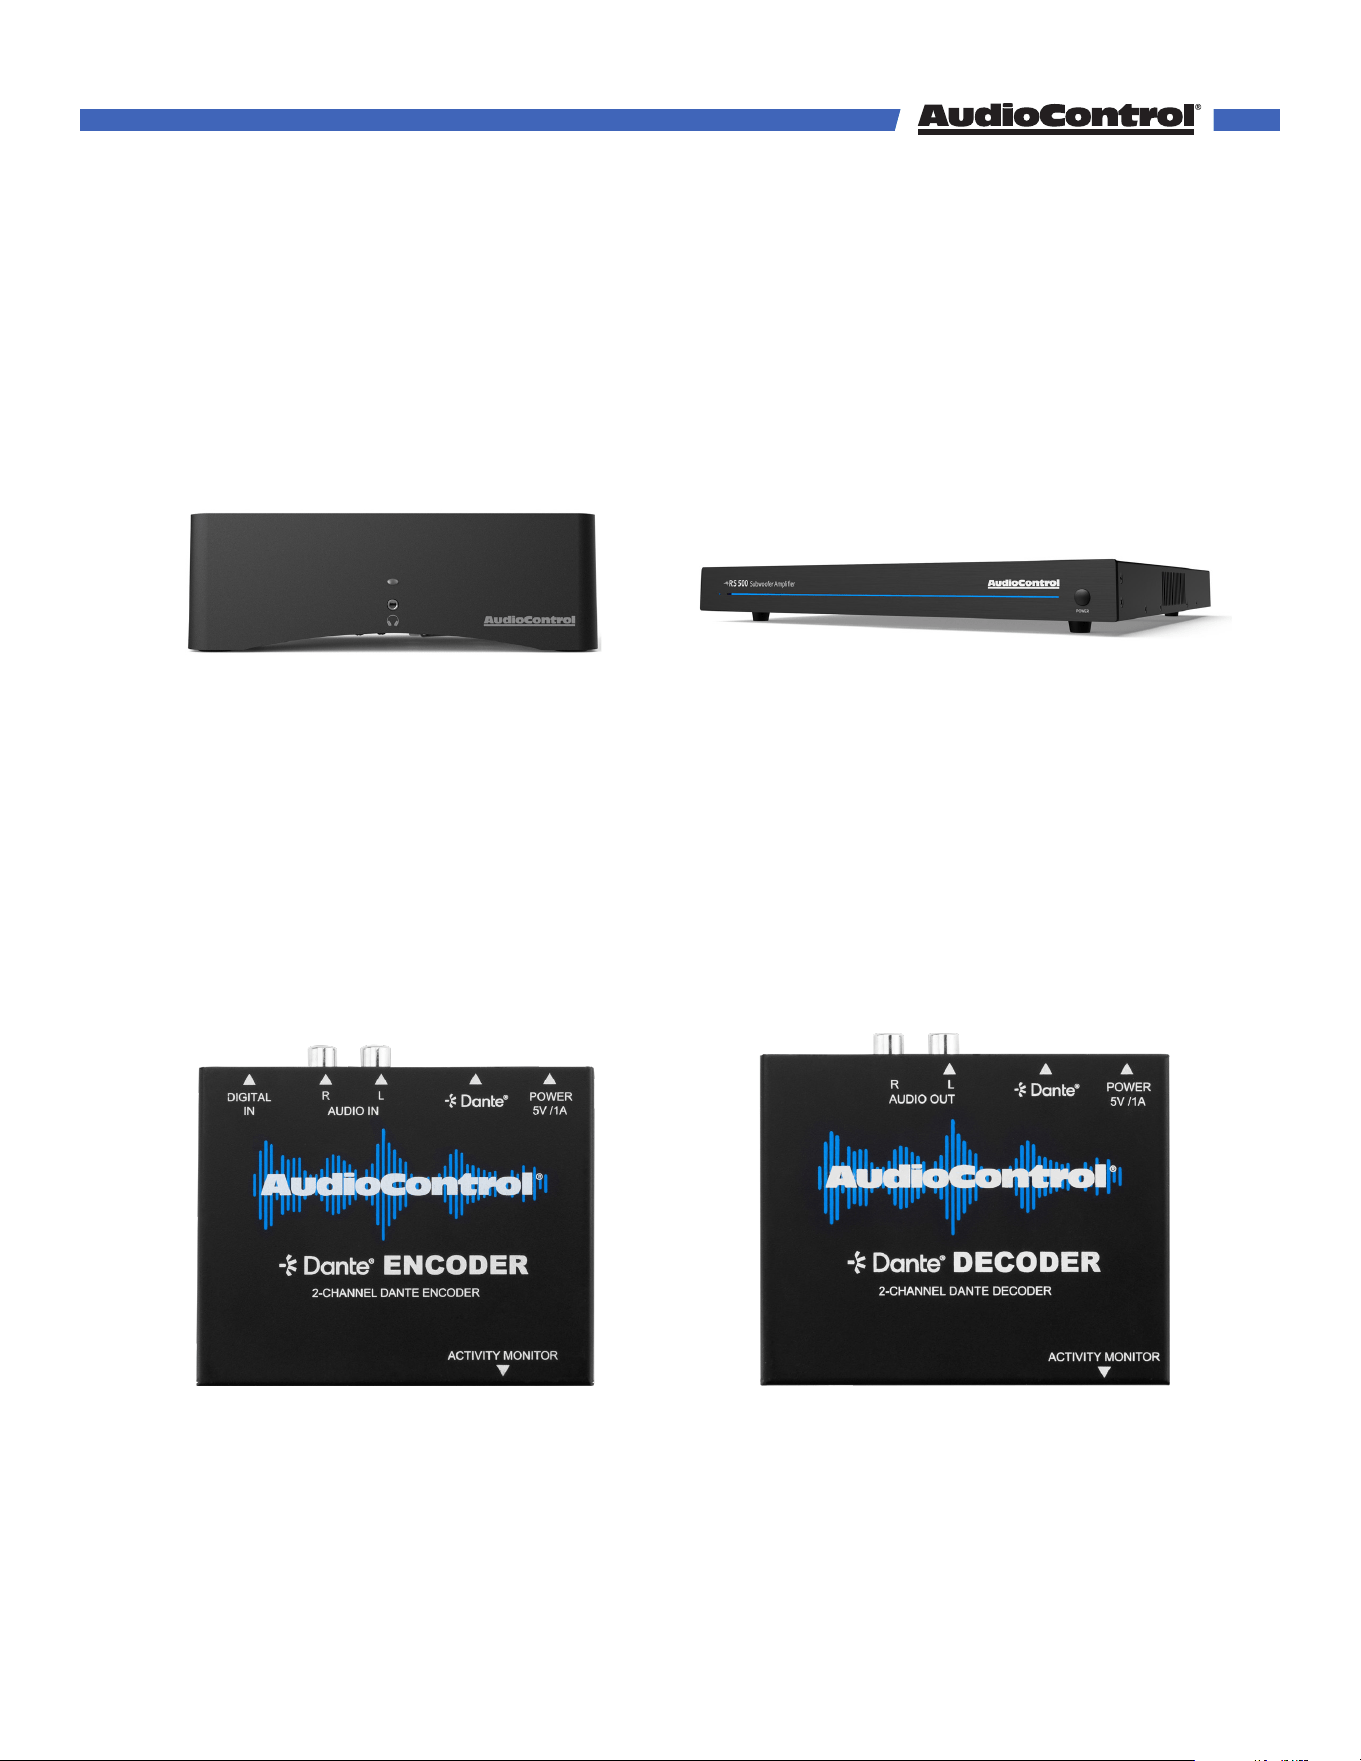
AudioControl Dante Decoder
ACP-DANTE-D-POE
• Receives audio from the Dante network
to output to another device in the system.
AudioControl Dante Encoder
ACP-DANTE-E-POE
• Input audio using Digital or Analog
inputs, and transmit over Dante to the
Bijou5100D.
RS500
ACP-RS500
• Great subwoofer amp to pair with the
Bijou5100D
• 500W output
Rialto 400
ACP-RIALTO400
• 2 channel, 100W amplifier
• Great way to utilize the Bijou5100D pre-
amp outs
Related Products
©COPYRIGHT AVPRO GLOBAL HOLDINGS 2024 - 22410 70TH AVENUE WEST, MOUNTLAKE TERRACE, WA 98043
33

Service
What to do if you need service
If the unit needs service, then please contact AudioControl, either by e-mail or phone.
We will verify if there is anything wrong in the system that you can correct yourself, or if it
needs to be sent back to our factory.
Please include the following items when returning the unit:
1. A copy of your proof of purchase. No originals please. We cannot guarantee
returning them to you.
2. A brief explanation of the trouble you are having with the unit. (You’d be surprised
how many people forget this.) If you can supply a really detailed description of the
problem, this would be so much better, and our service technicians may add you
to their Christmas Card list. Please include any notes about the system and other
components you are using. Is it an intermittent problem that only occurs on the first
full moon of Spring?
3. A return street address. (No PO Boxes, please).
4. A daytime phone number in case our technicians have a question about the
problem you are having, or if they are just feeling lonely.
5. Package the unit in the original packaging if you still have it. Use great care and
plenty of good packing materials to protect the unit and prevent it from moving
about inside the box. Do not use loose materials like packing peanuts or real
peanuts.
You are responsible for the freight charges to us, but we’ll pay the return freight back
as long as the unit is under warranty. We match whatever shipping method you use to
send it to us, so if you return the unit overnight freight, we send it back overnight. We
recommend United Parcel Service (UPS) for most shipments.
Please do not return the unit to AudioControl if you have not received an RMA number
from our masterful customer support team.
Phone 425-775-8461
techsupport@audiocontrolpro.com
support.audiocontrolpro.com
www.audiocontrolpro.com/contact-us
©COPYRIGHT AVPRO GLOBAL HOLDINGS 2024 - 22410 70TH AVENUE WEST, MOUNTLAKE TERRACE, WA 98043
34

Warranty
In just the same way as being covered in honey and thrown into a dark pit full of hungry woodchucks, people are
scared of warranties. Lots of fine print. Months of waiting around. Well, fear no more. This warranty is designed to make
you rave about AudioControl. It’s a warranty that looks out for you and your client, plus helps you resist the temptation
to have your friend Sparky, who’s “good with electronics,” try to repair your AudioControl product. So go ahead, grab a
cup of tea, and carefully read through this warranty.
Our warranty has conditional conditions! “Conditional” doesn’t mean anything ominous. The Federal Trade Commission
tells all manufacturers to use the term to indicate that certain conditions have to be met before they’ll honor the
warranty. If you meet all of these conditions, AudioControl will, at its discretion, perform warranty service on any
AudioControl products that exhibit defects in materials and/or workmanship during the warranty on your product for
five (5) years from the date you bought it, and we will fix or replace it, at our option, during that time.
Here are the conditional conditions:
1. You need to hold on to your sales receipt! All warranty service requires original sales receipt documentation.
The warranty only applies to the original purchaser from an authorized AudioControl dealer. Note: Products
purchased from unauthorized dealers are not covered under warranty.
2. If an authorized AudioControl dealer installs your AudioControl product, the warranty is five years, otherwise
the warranty is limited to one year.
3. Our warranty covers AudioControl products that have been installed according to the instructions in the
installation manual.
4. You cannot let anybody who isn’t: (A) the AudioControl factory; or (B) somebody authorized in writing by
AudioControl service your AudioControl product. If anyone other than (A), or (B) messes with your AudioControl
product, the warranty is void.
5. The warranty is void if the serial number is altered, defaced or removed, or if your product has been used
improperly. Now that may sound like a big loophole, but here is what we mean by this: Unwarranted abuse is:
(A) physical damage (don’t use your product to level your dining room table); (B) improper connections (120
volts into the RCA jacks can fry the poor thing); (C) sadistic things! This is the best product we know how to
build, but for example if you mount it to the front bumper of your car, drop it over the Niagara Falls or use it for
Clay Pigeon shooting practice, something will go wrong.
Assuming you conform to 1 through 5, and it really isn’t all that hard to do, we will have you send your product to us for
warranty service.
Legalese Section
This is the only warranty issued by AudioControl. This warranty gives you specific legal rights, and you may also have
rights that vary from state to state. Promises of how well your AudioControl product will work are not implied by this
warranty. Other than what we’ve said we’ll do in this warranty, we have no obligation, express or implied. We make
no warranty of merchantability or fitness for any particular purpose. Also neither we nor anyone else who has been
involved in the development or manufacture of the unit will have any liability of any incidental, consequential, special
or punitive damages, including but not limited to any lost profits or damage to other parts of your system by hooking up
to the unit (whether the claim is one for breach of warranty, negligence of other tort, or any other kind of claim). Some
states do not allow limitations of consequential damages.
©COPYRIGHT AVPRO GLOBAL HOLDINGS 2024 - 22410 70TH AVENUE WEST, MOUNTLAKE TERRACE, WA 98043
35

Acknowledgments
Dolby Atmos
Dolby, Dolby Atmos, and the double-D symbol are registered trademarks
of Dolby Laboratories Licensing Corporation. Manufactured under license
from Dolby Laboratories. Confidential unpublished works. Copyright ©
2012-2024 Dolby Laboratories. All rights reserved.
DTS
®
Digital Surround™
FOR DTS PATENTS, SEE HTTP://XPERI.COM/DTS-PATENTS/.
MANUFACTURED UNDER LICENSE FROM DTS, INC. AND ITS AFFILIATES.
DTS, THE DTS LOGO, AND DIGITAL SURROUND ARE REGISTERED
TRADEMARKS OR TRADEMARKS OF DTS, INC. AND ITS AFFILIATES IN
THE UNITED STATES AND/OR OTHER COUNTRIES. © DTS, INC. AND ITS
AFFILIATES. ALL RIGHTS RESERVED.
HDMI, the HDMI logo and High-Definition Multimedia Interface are
trademarks or registered trademarks of HDMI Licensing LLC.
©COPYRIGHT AVPRO GLOBAL HOLDINGS 2024 - 22410 70TH AVENUE WEST, MOUNTLAKE TERRACE, WA 98043
36

Installation Notes
©COPYRIGHT AVPRO GLOBAL HOLDINGS 2024 - 22410 70TH AVENUE WEST, MOUNTLAKE TERRACE, WA 98043
37
Thank you for choosing AudioControl!
Please contact us with any questions, we are
happily at your service!
22410 70th Avenue West ~ Mountlake Terrace, WA 98043
support: 425-775-8461
techsupport@audiocontrolpro.com
©COPYRIGHT AVPRO GLOBAL HOLDINGS 2024 - 22410 70TH AVENUE WEST, MOUNTLAKE TERRACE, WA 98043
38