
Technical Support and E-Warranty Certificate
www.vevor.com/support
PURE SINE WAVE INVERTER
USER MANUAL
We continue to be committed to provide you tools with competitive price.
"Save Half", "Half Price" or any other similar expressions used by us only represents an
estimate of savings you might benefit from buying certain tools with us compared to the major
top brands and does not necessarily mean to cover all categories of tools offered by us. You
are kindly reminded to verify carefully when you are placing an order with us if you are
actually saving half in comparison with the top major brands.

- 1 -
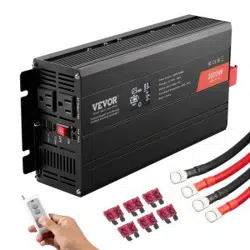
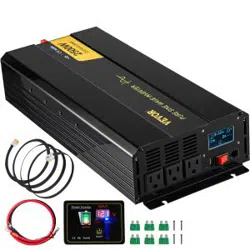
MODEL:TP2500W / TP3500W / TP5000W / TM2000W / TP2000W / TM2500W /
TM1250W / TM3000W / TM3500W / TP3000W / TP1500W / TM-6000W
(The picture is for reference only, please refer to the actual object)
Have product questions? Need technical support? Please feel free to
contact us:
Technical Support and E-Warranty Certificate
www.vevor.com/support
NEED HELP? CONTACT US!
This is the original instruction, please read all manual instructions
carefully before operating. VEVOR reserves a clear interpretation of our
user manual. The appearance of the product shall be subject to the
product you received. Please forgive us that we won't inform you again if
there are any technology or software updates on our product.
PURE SINE
WAVE INVERTER

- 2 -
Warning-To reduce the risk of injury, user must read instructions
manual carefully.
This device complies with Part 15 of the FCC Rules. Operation is
subject to the following two conditions:(1)This device may not cause
harmful interference, and (2)this device must accept any interference
received, including interference that may cause undesired operation.
This product is subject to the provision of European Directive
2012/19/EC. The symbol showing a wheelie bin crossed through
indicates that the product requires separate refuse collection in the
European Union. This applies to the product and all accessories
marked with this symbol. Products marked as such may not be
discarded with normal domestic waste, but must be taken to a
collection point for recycling electrical and electronic devices
WARNING:
1. The load (appliances) power aka the output of inverter shall not be
greater than the rated power, which could lead the inverter out of work.
2. Please ensure the the input voltage of the inverter of the battery shall
comply with the rated voltage, the inverter would be damaged, if the input
voltage would be greater than 1.6 times the rated voltage.
3. When connected with inductive or capacitive load, please reverse the
allowance 3-5 times of load power. (aka 4-6 x Appliance power)
4. Red to positive pole, Black to negative pole, please connect it properly .
Reversely connection would melt the fuse, it could work normally after
replacing the fuse and connecting properly.
5.Forbidden to plug the inverter in mains power.
HIGH FREQUENCY INVERTER INSTRUCTIONS FOR USE
Please read this manual carefully before using products.
Thank you for choosing the vehicle inverter provided by us. We hope our
products can bring you the most satisfied service.

- 3 -
1) Product Description
This high frequency inverter has adapted SPWM technology, and it's highly
efficient and reliable. Product has passed lS09001:2000. However,
improper operation or
misuse may still cause injury or loss, instruction and information provided
in this manual must be followed all the time.
2) Technical Parameters
Model
1000W
1500W
2000W-
2500 W
3000W-
3500W
4000W
5000W-
6000W
Input output
DC12V/24V/48V/60V(not automatically)
Output voltage
AC220V±10% -120V±10%(not automatically)
Loss when
no load
<1A
<1 .2A
<1 .8A
Output wave
Pure sine wave - Modified wave
Surge Power
≤2000 W
≤3000 W
≤4000W-
500 0W
≤6000-
7000W
≤8000 W
≤10KW-
12KW
Output
frequency
50Hz±0 .5Hz or 60Hz±0 .5Hz
Efficiency
≥85%
Over voltage
≥16V - ≥30V - ≥60V - ≥75V
Low voltage
shutting
≤9 .5V - ≤20V - ≤40V - ≤50V
Over
temperature
shutting
>80 ℃
Ambient
temperature
-10℃ - +45℃
Note: Keep the power supply around the ventilation dry, within 1 meters
must not have flammable items, strictly prevent the cause of fire.

- 4 -
3)Protective Functions
Overload protection when overloading 125%, the inverter will send alarm,
and stop working after 20 seconds.
1. Loads are reduced to accepted level, the inverter will resume working.
2. Short circuit protection: inverter is with short circuit protection.
3. Over-temperature protection: when the inside temperature of the
inverter reach 80℃, the RED indication light will be on. The inverter will
stop working, once the temperature drops to accepted level, the inverter
will automatically resume working.
4. Low voltage protection: when the battery voltage is below the setting
level, the inverter will send alarm by beeping. When the battery voltage
keeps dropping to its shutting level, the inverter will beep, and the RED
LED will lit, the inverter will stop working, when the battery voltage is
increased to its restart level, inverter will automatically resume working.
5. Over voltage protection: when the input voltage is higher than the setting
level, the inverter will stop working, when the input voltage is normal, it will
automatically resume working.
6. Reverse connection protection: once there is reverse connection, the
inverter fuse will be burnt. In this case, please switch off the inverter,
disconnect the power source, change the fuse.
REVERSE CONNECT IS STRICTLY PROHIBITED.
7. LCD display: Inverter display as LCD LCD screen, display a variety of
states, the following drawings detailed introduction.
4) Installation
1. The function of inverter is to convert the DC 12v/24v/48v/60v voltage
into AC 110v/220V, before connection, please make sure the inverter is
switched off.
2. When connecting the inverter to the battery, make sure that the battery
voltage is consistent with the inverter reference voltage! ! !
3. Connect the Red cable of the inverter to the Positive pole of battery,
Connect
the Black cable of the inverter to the Negative poly of battery. Do not
connect the cable reversely, otherwise the inverter fuse will be burnt.

- 5 -
4. Turn on the inverter power switch, at which point the green (blue)
indicator light is on, indicating that the inverter is working properly.
5. Please connect the loads to the AC output of the inverter, please do not
overload. in the case of overloading, the inverter will send alarm and stop
working.
To restart the inverter, please firstly switch off the inverter for 5 second,
reduce the load, and switch on again.
5) Precautions
The inverters are designed, manufactured and tested as per safety
standards. However, as an electrical and electric product, it must be
installed, operated and maintained strictly according to the related safety
instructions as follows:
1. Reverse connection between the inverter and battery is strictly
prohibited, it will burn the fuse of the inverter.
2. Please double check if the voltage of the battery matches the inverter
input DC voltage, mismatch connection between the inverter and battery
can cause serious damage.
3. Double check if the connections are correct, make sure the connections
are tight and firm.
4. Do not extend the inverter power cable.
5. When the inverter is not in use, please switch off and disconnect inverter
from the system.
6. Avoid contacting of any foreign objects or fluid. Do not touch the inverter
with wet hand. Keep the product away from children. Avoid using it in damp,
dusty, high temperature area.Do not use this product in1lammable and
combustible area.
7. Install the product in well ventilated place, avoid using this product on or
nearby hot objects such as electrical heater etc.Do not cover the inverter,
avoid direct sun shine, moisture, and water.
8.This inverter cannot be connected in parallel with other inverters.
9. It's strictly prohibited to connect this product to the city grid.
10. Do not try to repair the inverter, Once the inverter is opened,warranty
void.

- 6 -
6) Trouble Shooting
When there is no output, please check the follows:
1. Excessive use of electrical appliances, too heavy load. Solution: Reduce
electrical appliances, the use of electrical total power should be less than
the inverter rated power.
2. Overheat protection. WORKAROUND: Reduce load cooling and restart
after 15 minutes. (Summer temperature is high or the heat dissipation
conditions are poor, should be appropriately reduced the use of the total
power of electrical appliances.)
3. It must replace the fuse with the same capacity after fusing
4. Loose connection of the cable: make sure the cable is firmly and tightly
connected.
5. Low voltage of battery; please charge the battery.
6. Battery exhausted: Please change battery, battery can be exhausted
over the years.
7) Warranty
1. The company provides a free warranty period of one year. Please note
that the dealer is in contact with the warranty and repair business.
2. The failure range of this insurance clause does not include damage
caused by external factors: incorrect installation, misuse or improper
operation, unauthorized private maintenance, damage during
transportation, etc.
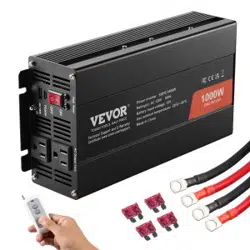
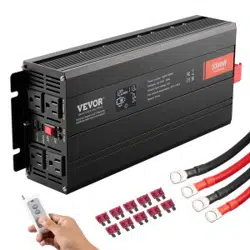
8) Random Accessories
Products are carefully tested and inspected prior to shipment, but it is still
possible to receive damage in transit, please carefully check the equipment
before installation. If there is any damage, contact the distributor in time.
1. Portable Inverter power supply One
2. Power Cable Pair
3. A copy of the product instruction manual
4. A copy of the car spare fuse
5. Desiccant Bag
6. External screen set (including cable one)
- 7 -
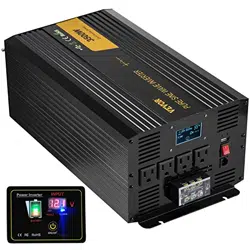
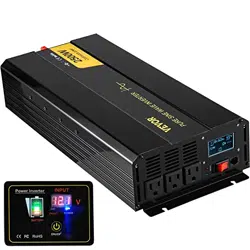
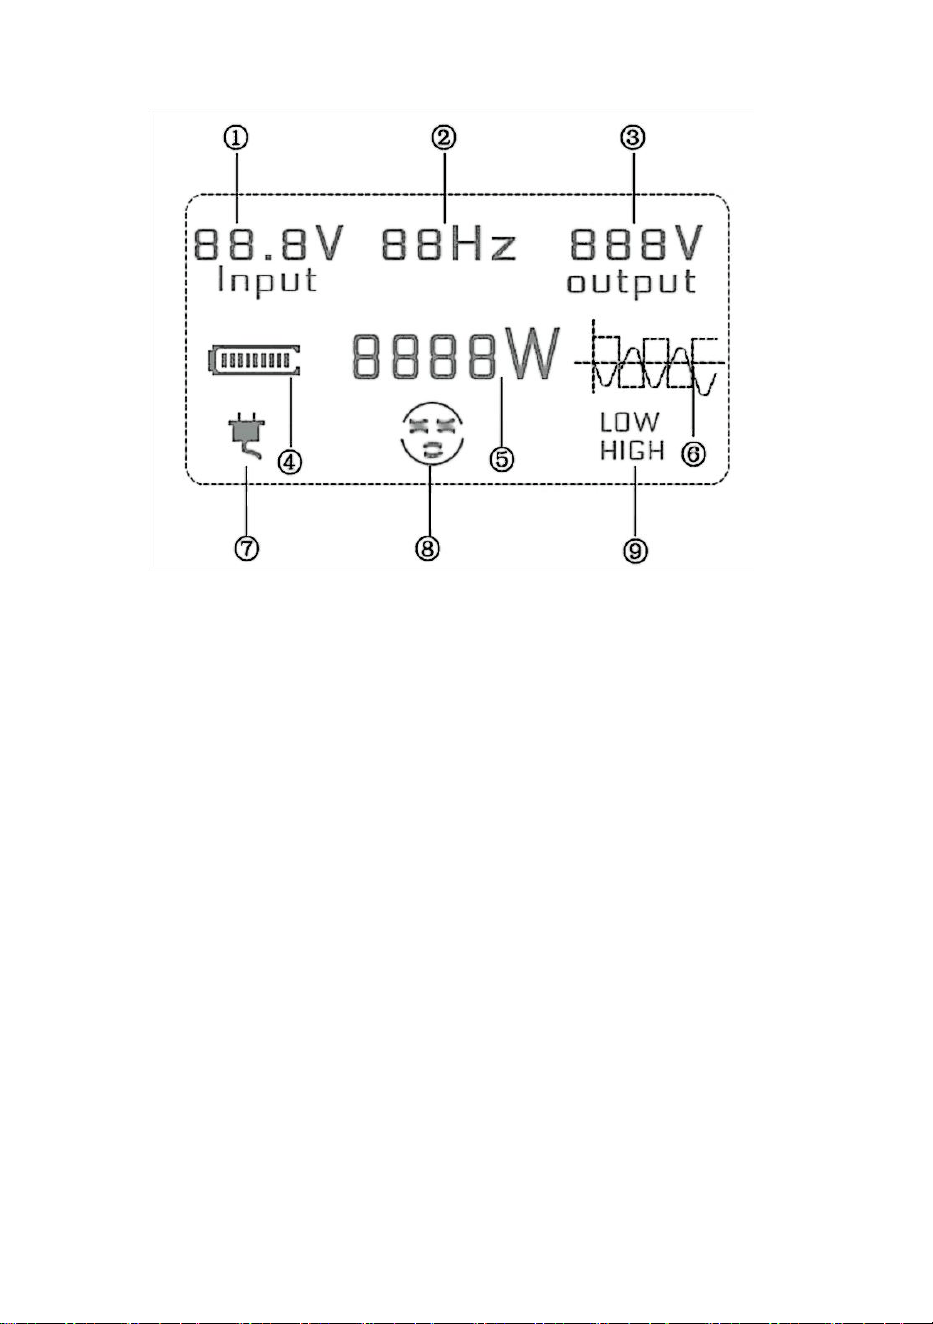
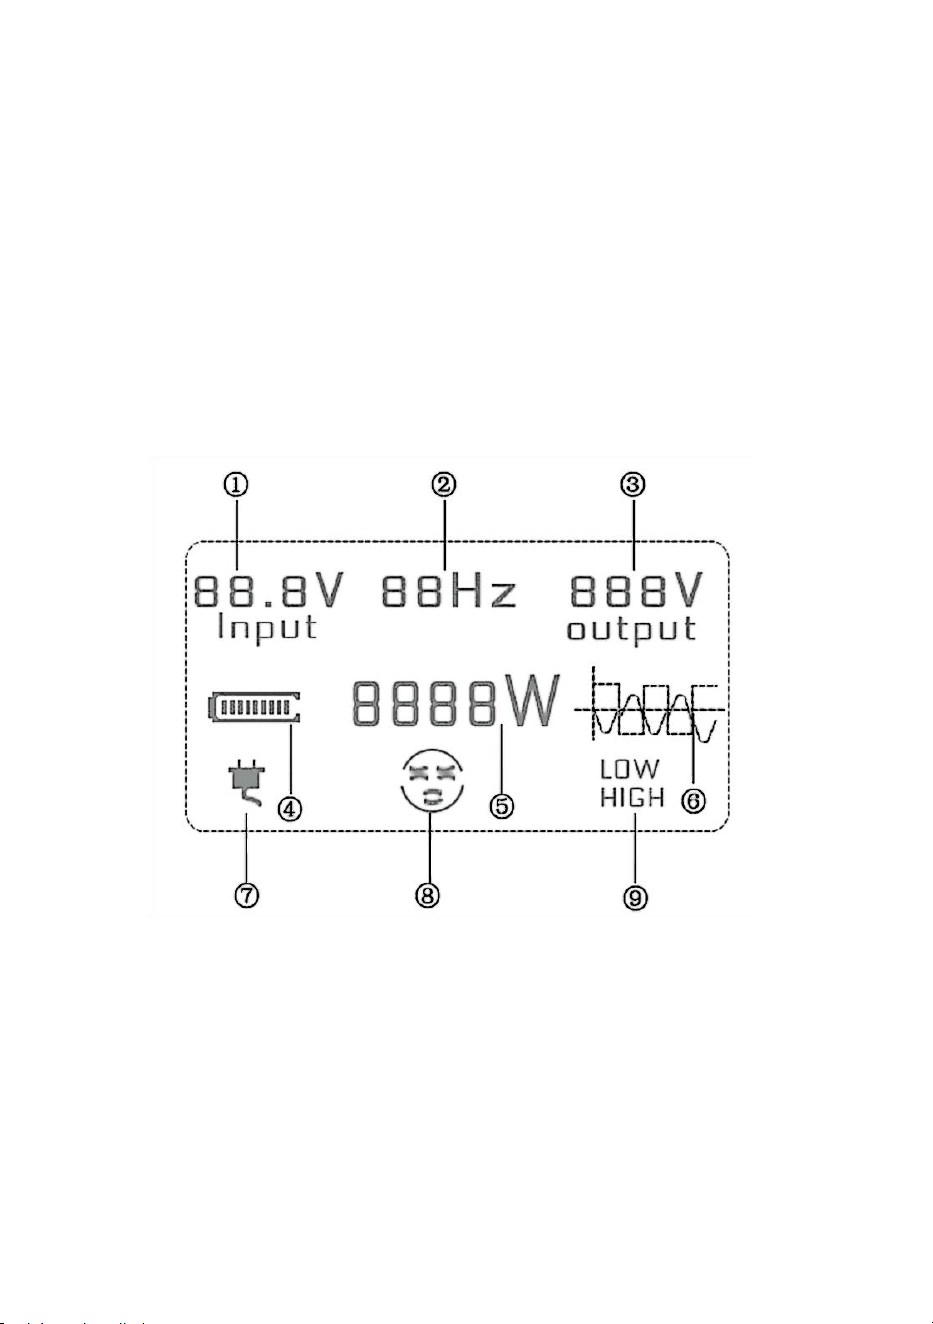
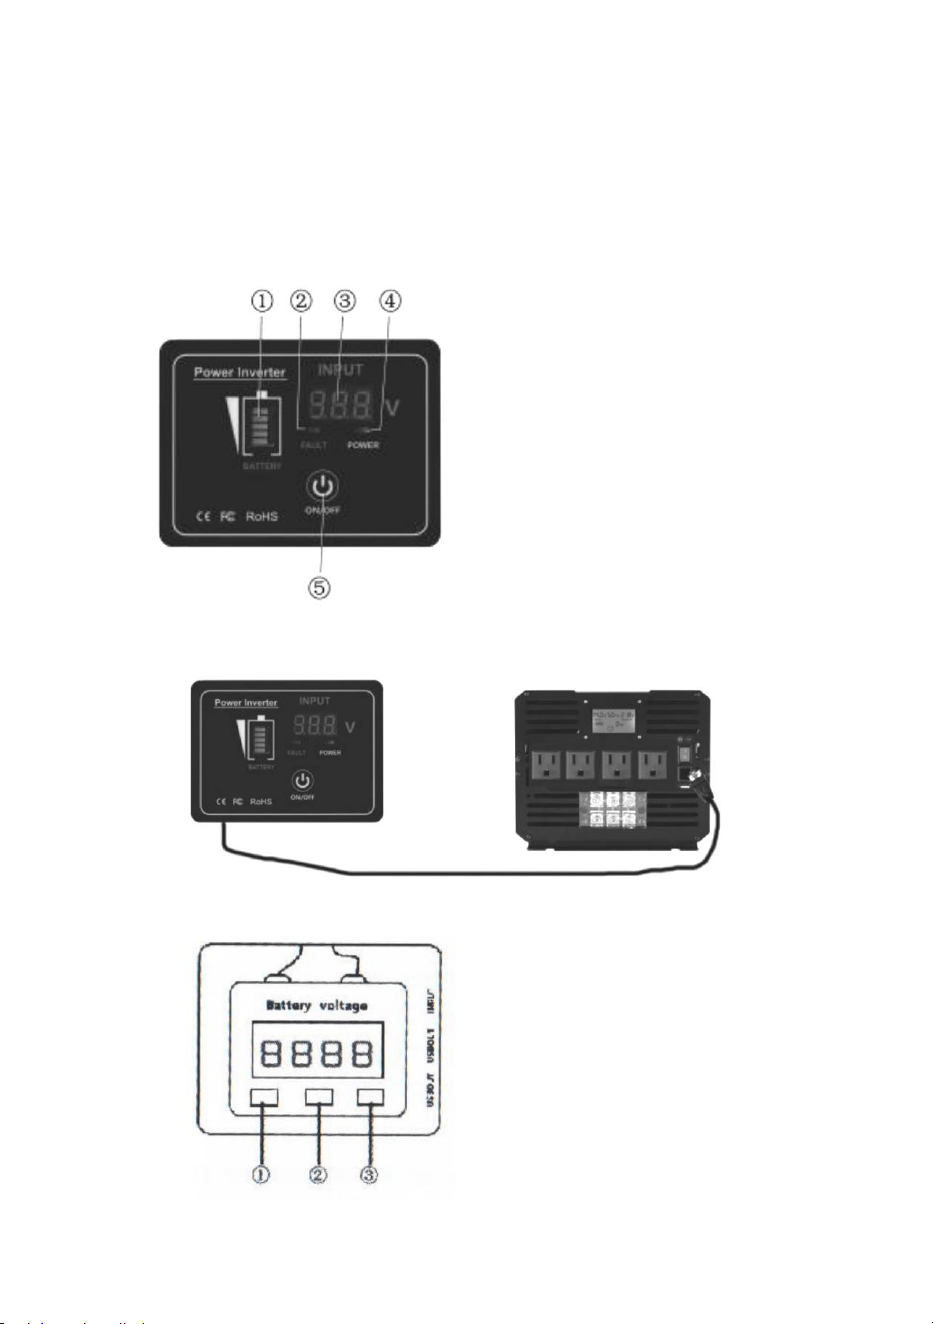
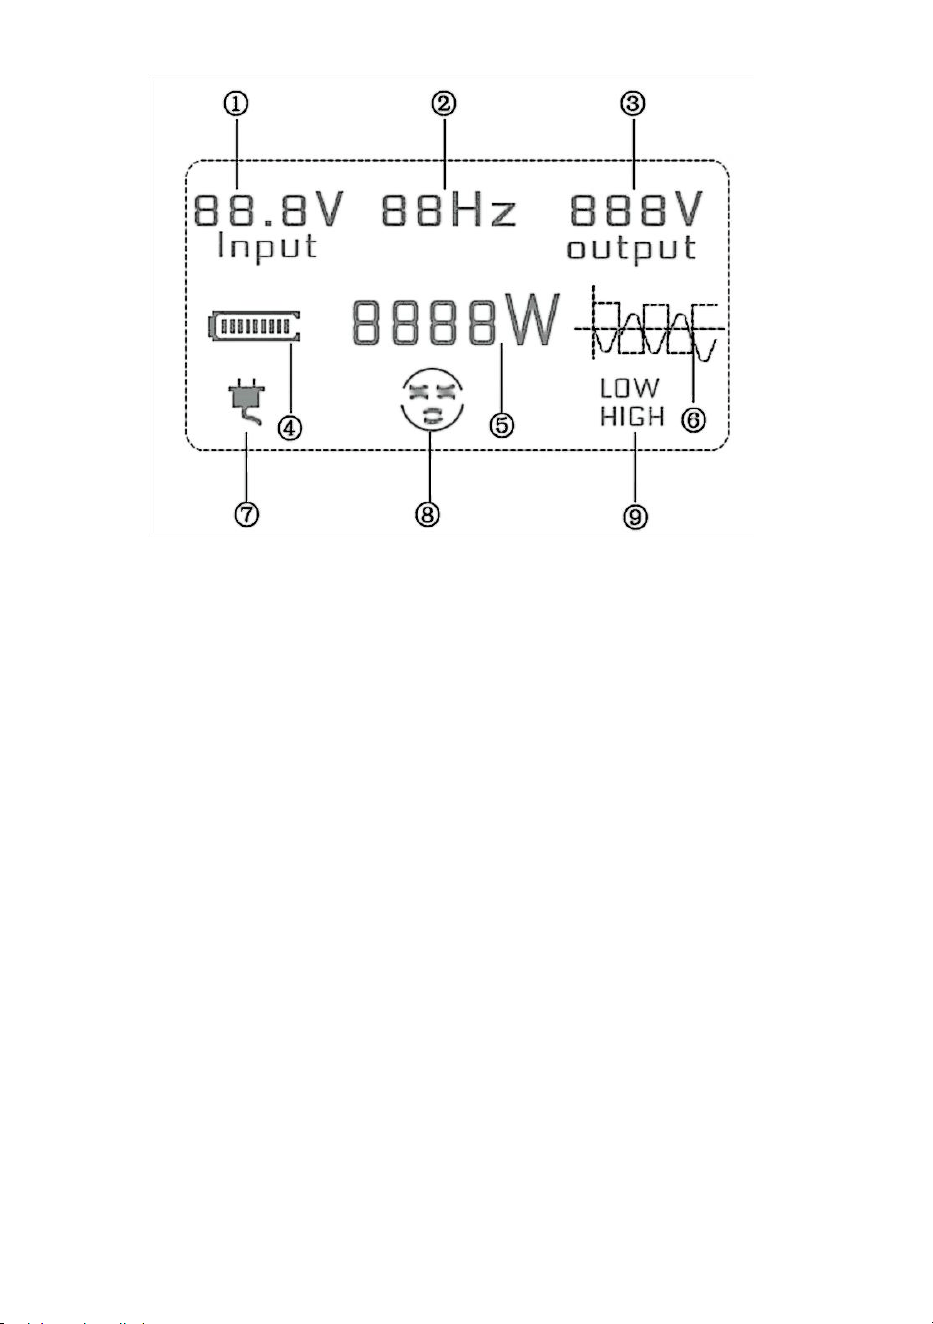
9) Panel diagram
①:Product Input Voltage ②:Frequency ③:Product Output Voltage
④:Battery power ⑤:Product power ⑥:Product Waveform
⑦:Mains connection (with charging function) ⑧:Working status
⑨:High voltage/low voltage protection
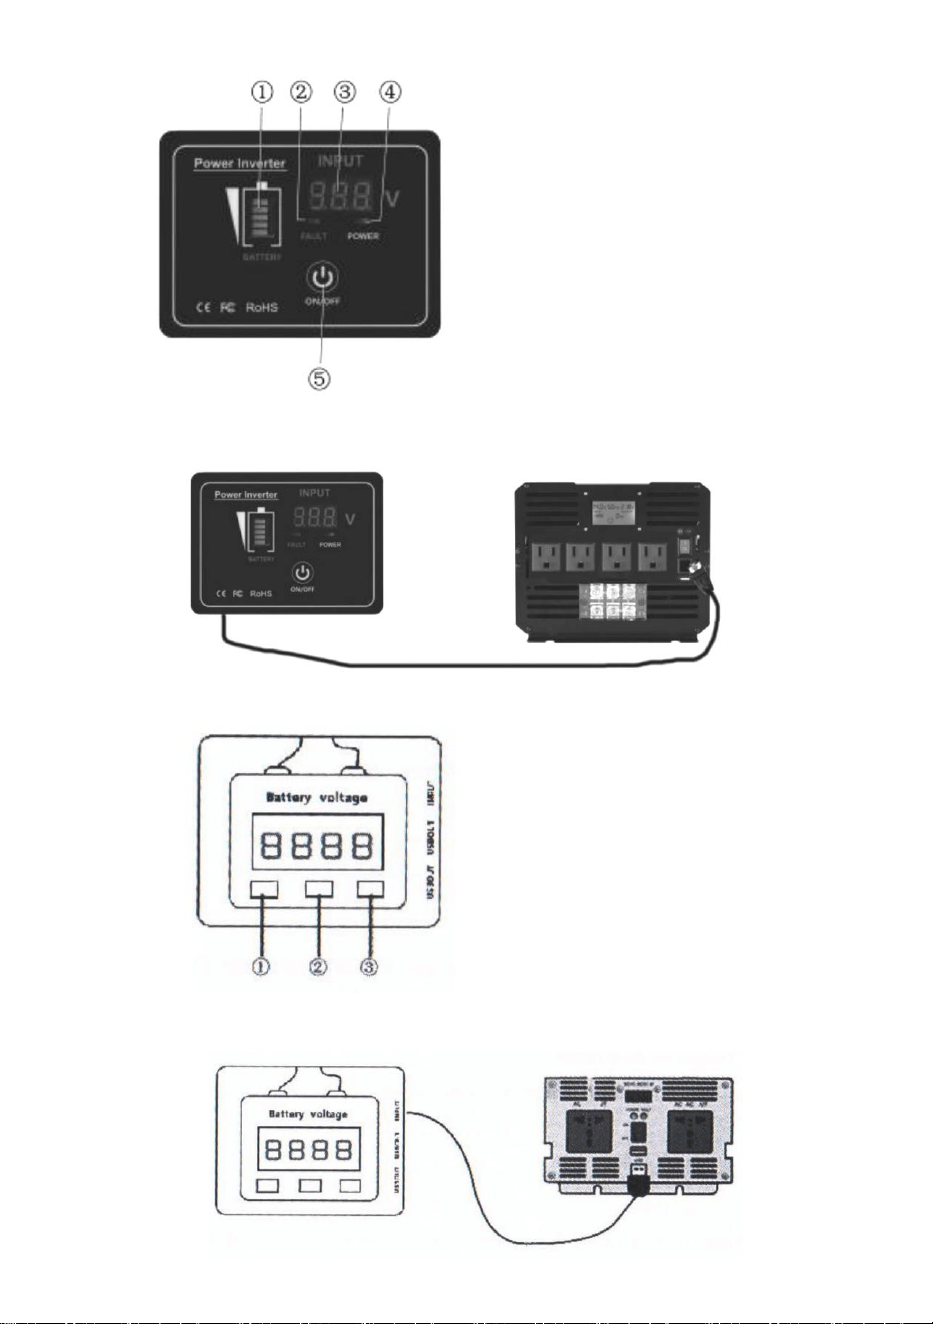
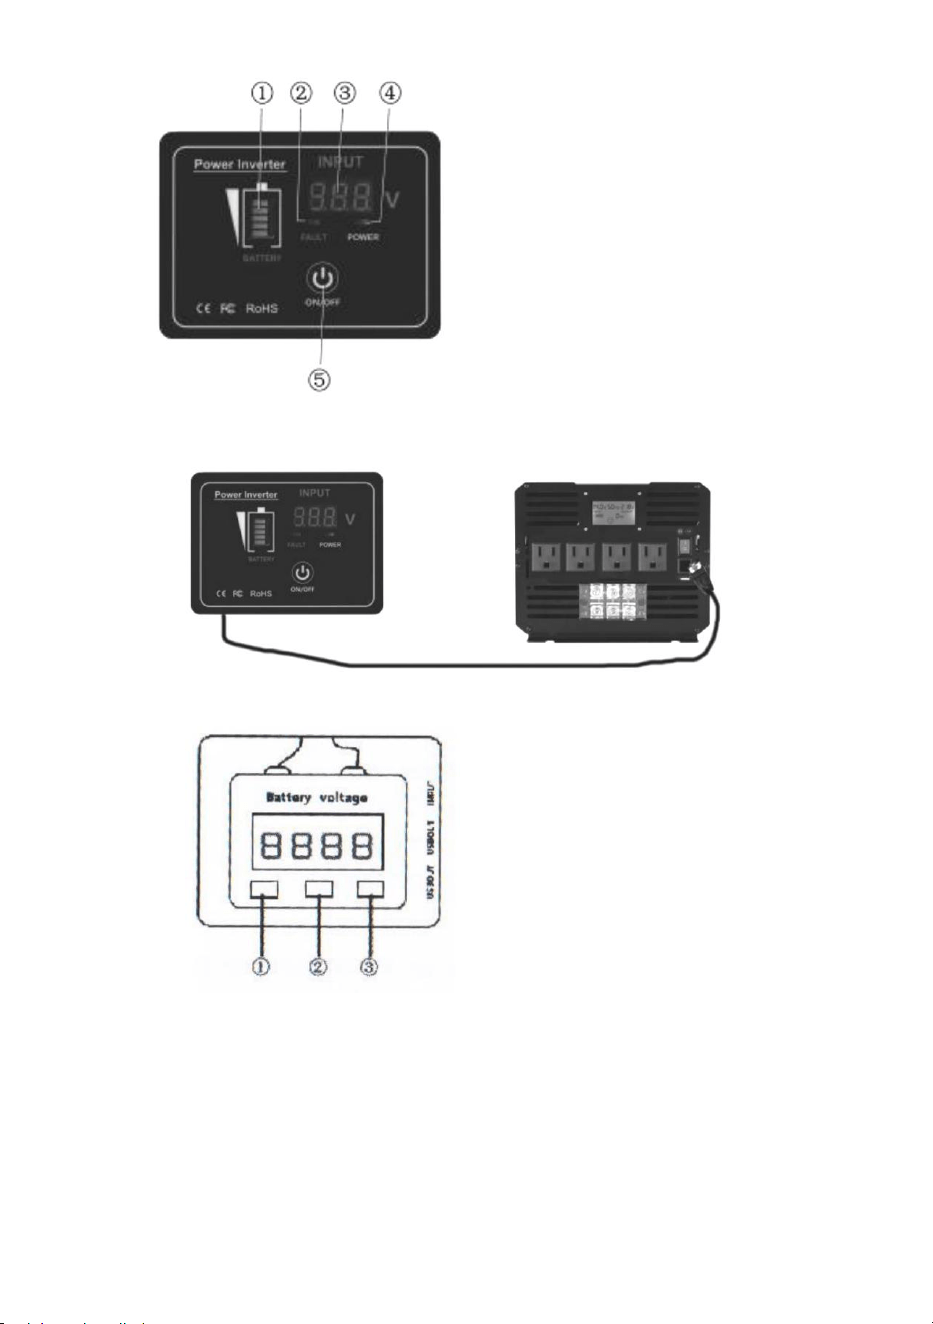
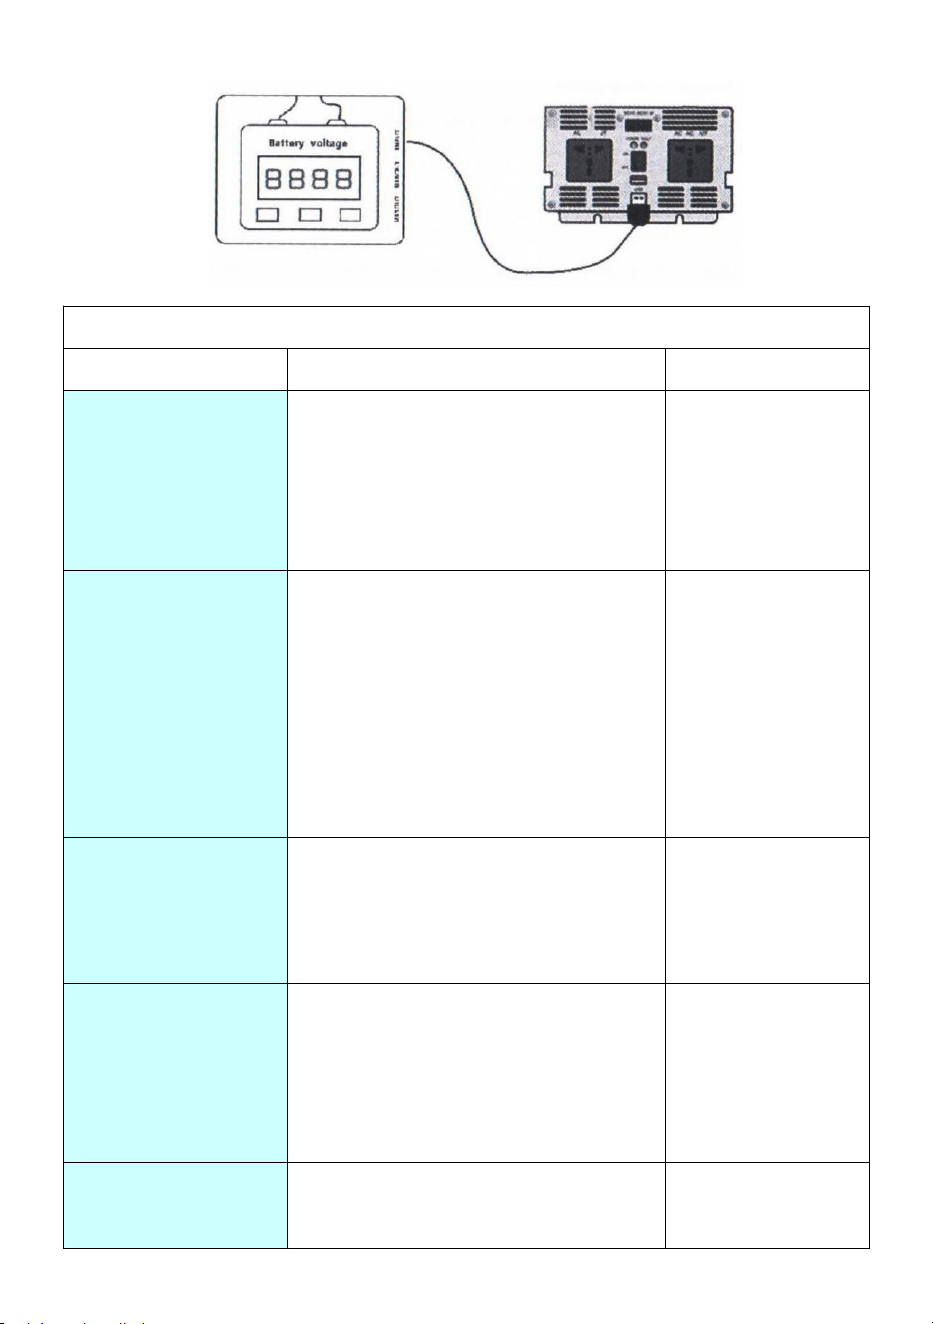
10)Instructions for external wired remote control equipment
Equipment introduction: The inverter can be remotely controlled to turn on
and off. Digital display battery voltage value. The equipment adopts a wall
switch design scheme, which can be installed in RVs and homes according
to user needs. Comes with convenient stickers, which can be pasted at
will.
- 8 -
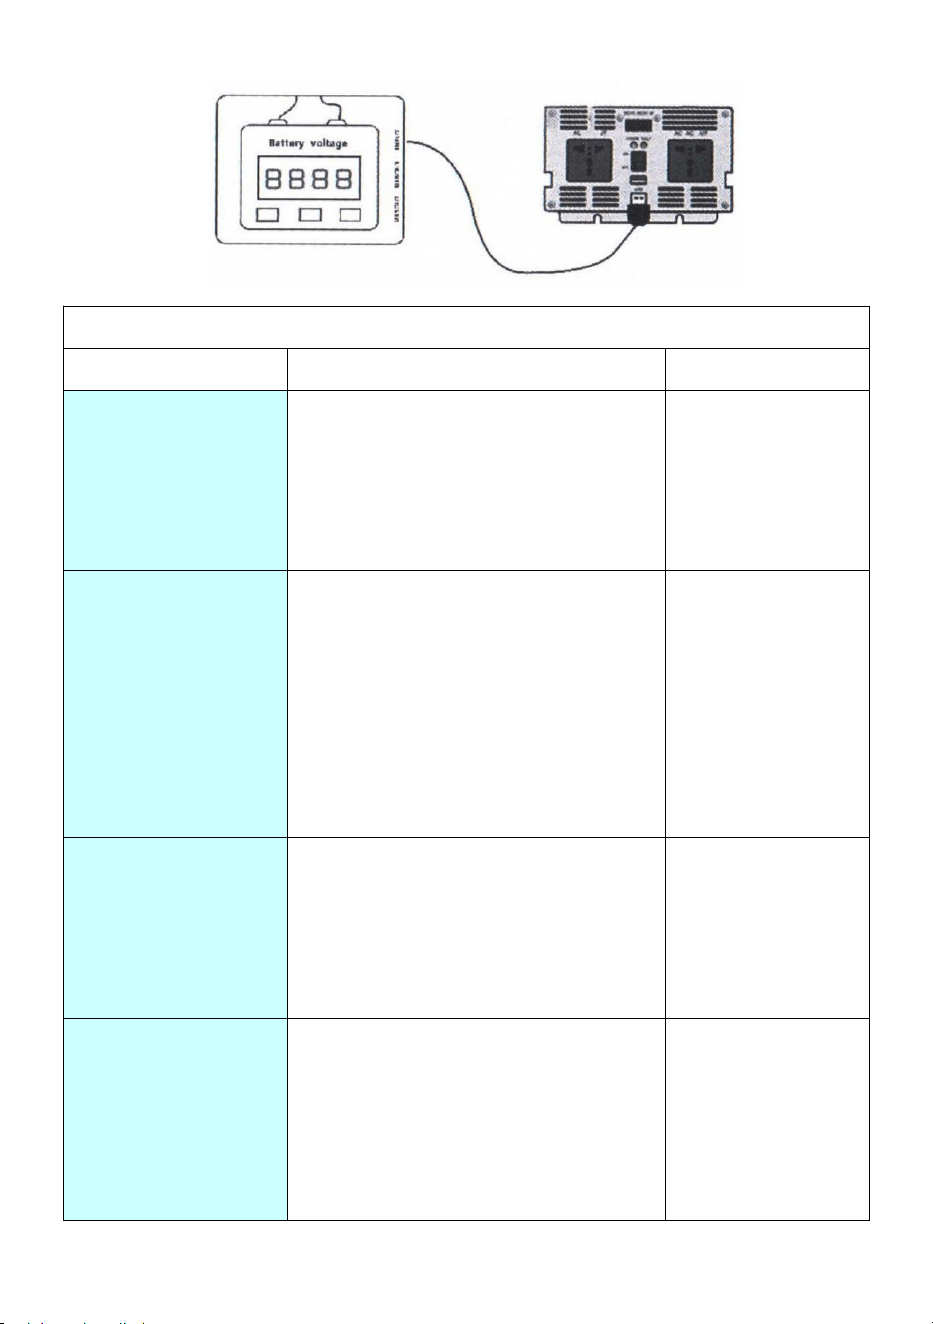
Remote Control Connection Diagram
Remote Control Connection Diagram
①:Battery power
②:Fault indicator
③:Input voltage
④:Work indicator
⑤:Inverter switch key
①:Backlight On/Of
②:Lead-acid / Lithium
③:Inverter switch key

- 9 -
Inverter basic fault and troubleshooting method
fault
Fault embodiment
Exclusions
The battery is low
Start by making an alarm sound (judge the
alarm sound as one, BI-BI-BI... ),the LED
red light flashes,The voltage continues to
decrease and the machine shuts down.
The battery is
fully charged
The battery voltage is
high
Alarm sound first (judge alarm sound is two,
BIBI - BIBI - BIBI...) THE LED red light
flashes,
The voltage continues to rise and the
machine shuts down.
The battery is fully
charged or replaced
in line with the
nominal voltage of
the inverter
Too much load
First issue an alarm sound (judge the alarm
sound as a continuous
alarm,BIBIBIBIBIBI... ), the LED flashes
red and the machine shuts down.
Reduce the load
The temperature is too
high
Alarm sound first (judge alarm sound is
three, BIBIBI - BIBIBI - BIBIBI... ),the LED
flashes red, the temperature continues to
rise, and the machine shuts down.
Subtract the load and
wait for the inverter to
cool down
The output is shorted
Alarm sound without damaging the circuit
(judge alarm sound as continuous alarm,
BIBIBIBIBI...)
Just disconnect
the short circuit
The battery is turned
back
The built-in fuse is blown and the machine
is powered on and unresponsive.
Replace the new fuse

- 10 -
Manufacturer: Shanghaimuxinmuyeyouxiangongsi
Address: Shuangchenglu 803nong11hao1602A-1609shi, baoshanqu,
shanghai 200000 CN.
Imported to AUS: SIHAO PTY LTD, 1 ROKEVA STREETEASTWOOD NSW
2122 Australia
Imported to USA: Sanven Technology Ltd., Suite 250, 9166 Anaheim Place,
Rancho Cucamonga, CA 91730
REP
EC
E-CrossStu GmbH
Mainzer Landstr.69, 60329 Frankfurt am Main.
REP
UK
YH CONSULTING LIMITED.
C/O YH Consulting Limited Office 147, Centurion House,
London Road, Staines-upon-Thames, Surrey, TW18 4AX


- 12 -
Technique Certificat d'assistance et de garantie électronique
www.vevor.com/support
ONDULEUR À ONDE SINUSOÏDALE PURE
MANUEL D'UTILISATION
We continue to be committed to provide you tools with competitive price.
"Save Half", "Half Price" or any other similar expressions used by us only represents an
estimate of savings you might benefit from buying certain tools with us compared to the major
top brands and does not necessarily mean to cover all categories of tools offered by us. You
are kindly reminded to verify carefully when you are placing an order with us if you are
actually saving half in comparison with the top major brands.

- 1 -
MODÈLE : TP2500W / TP3500W / TP5000W / TM2000W / TP2000W / TM2500W
/ TM1250W / TM3000W / TM3500W / TP3000W / TP1500W / TM-6000W
(L'image est à titre de référence uniquement, veuillez vous référer à l'objet
réel)
Have product questions? Need technical support? Please feel free to
contact us:
Technical Support and E-Warranty Certificate
www.vevor.com/support
NEED HELP? CONTACT US!
This is the original instruction, please read all manual instructions
carefully before operating. VEVOR reserves a clear interpretation of our
user manual. The appearance of the product shall be subject to the
product you received. Please forgive us that we won't inform you again if
there are any technology or software updates on our product.
PURE SINE
WAVE INVERTER
- 2 -
Avertissement - Pour réduire le risque de blessure, l'utilisateur doit lire
attentivement le manuel d'instructions.
Cet appareil est conforme à la partie 15 des règles de la FCC. Son
fonctionnement est soumis aux deux conditions suivantes : (1) Cet
appareil ne doit pas provoquer d'interférences nuisibles et (2) Cet
appareil doit accepter toute interférence reçue, y compris les
interférences pouvant entraîner un fonctionnement indésirable.
Ce produit est soumis aux dispositions de la directive européenne
2012/19/CE. Le symbole représentant une poubelle à roulettes barrée
indique que le produit doit faire l'objet d'une collecte sélective des
déchets dans l'Union européenne. Cela s'applique au produit et à
tous les accessoires marqués de ce symbole. Les produits marqués
comme tels ne peuvent pas être jetés avec les déchets ménagers
normaux, mais doivent être déposés dans un point de collecte pour le
recyclage des appareils électriques et électroniques.
AVERTISSEMENT:
1. La puissance de charge (appareils), c'est-à-dire la puissance de sortie
de l'onduleur, ne doit pas être supérieure à la puissance nominale, ce qui
pourrait mettre l'onduleur hors service.
2. Veuillez vous assurer que la tension d'entrée de l'onduleur de la batterie
est conforme à la tension nominale. L'onduleur serait endommagé si la
tension d'entrée était supérieure à 1,6 fois la tension nominale.
3. En cas de connexion à une charge inductive ou capacitive, veuillez
inverser la tolérance de 3 à 5 fois la puissance de charge. (c'est-à-dire 4 à
6 fois la puissance de l'appareil)
4. Le rouge est connecté au pôle positif et le noir au pôle négatif. Veuillez
le connecter correctement. Une connexion inversée ferait fondre le fusible.
Il pourrait fonctionner normalement après avoir remplacé le fusible et
l'avoir connecté correctement.
5. Il est interdit de brancher l'onduleur sur le secteur.
HIGH FREQUENCY INVERTER INSTRUCTIONS FOR USE

- 3 -
Veuillez lire attentivement ce manuel avant d'utiliser les produits.
Merci d'avoir choisi l'onduleur pour véhicule que nous vous proposons.
Nous espérons que nos produits vous apporteront le service le plus
satisfaisant.
1) Description du produit
Cet onduleur haute fréquence a adopté la technologie SPWM, et il est très
efficace et fiable. Le produit a passé la norme lS09001:2000. Cependant,
une utilisation incorrecte ou
Une mauvaise utilisation peut néanmoins entraîner des blessures ou des
pertes, les instructions et informations fournies dans ce manuel doivent
être suivies à tout moment.
2) Paramètres techniques
Modèle
1000 W
1500 W
2000W-
2500 L
3000W-
3500 W
4000 W
5 000 W -
6000 W
Entrée-sortie
DC12V/24V/48V/60V (pas automatiquement)
Tension de
sortie
CA 220 V ± 10 % - 120 V ± 10 % ( non automatiquement )
Perte
lorsque
Non charger
< 1A
< 1 .2A
< 1 .8A
Onde de sortie
Onde sinusoïdale pure - Onde modifiée
Surtension
Pouvoir
≤2000 L
≤3000 L
≤4000W-
500 0W
≤6000-
7000 W
≤8000 L
≤10 kW -
12 000 W
Sortir
fréquence
50 Hz ±0 .5 Hz ou 60 Hz ±0 .5 Hz
Efficacité
≥85%
Surtension
≥16V - ≥30V - ≥ 60 V - ≥ 75 V
Basse
tension
fermeture
≤9 .5V - ≤20V - ≤40V - ≤50V
Sur
température
> 80 ℃

- 4 -
fermeture
Ambiant
température
-10 ℃ - +45 ℃
Remarque : Gardez l'alimentation électrique à proximité de la ventilation et
au sec, aucun objet inflammable ne doit se trouver à moins de 1 mètre,
évitez strictement toute cause d'incendie.
4)Fonctions de protection
Protection contre les surcharges en cas de surcharge de 125 %, l'onduleur
envoie une alarme et cesse de fonctionner après 20 secondes.
1. Les charges sont réduites au niveau accepté , l' onduleur reprendra son
fonctionnement .
2. Protection contre les courts - circuits : l' onduleur est doté d' une
protection contre les courts - circuits .
3. Protection contre la surchauffe : lorsque la température intérieure de l'
onduleur atteint 80 ℃ , le voyant ROUGE s'allume . L' onduleur cesse de
fonctionner , une fois que la température redescend au niveau accepté , l'
onduleur reprend automatiquement son
fonctionnement .
4. Protection basse tension : lorsque la tension de la batterie est inférieure
au niveau de réglage , l' onduleur émet un bip sonore . Lorsque la tension
de la batterie continue de chuter jusqu'à son niveau de fermeture , l'
onduleur émet un bip sonore et la LED ROUGE s'allume , l' onduleur
s'arrête de fonctionner , lorsque la tension de la batterie augmente jusqu'à
son niveau de redémarrage , l' onduleur reprend automatiquement son
fonctionnement .
5. Protection contre les surtensions : lorsque la tension d' entrée est
supérieure au niveau de réglage , l' onduleur cesse de fonctionner ,
lorsque la tension d' entrée est normale , il s'arrête .
reprendre automatiquement le travail .
6. Protection contre les inversions de polarité : en cas d' inversion de
polarité , le fusible de l' onduleur risque de griller . Dans ce cas , veuillez

- 5 -
éteindre l' onduleur , débrancher la source d' alimentation et changer le
fusible .
LA CONNEXION INVERSE EST STRICTEMENT INTERDITE .
8. Affichage LCD : Affichage de l'onduleur sous forme d'écran LCD LCD,
affiche une variété d'états, les dessins suivants présentent une introduction
détaillée.
4 ) Installation
1. La fonction de l'onduleur est de convertir la tension DC 12v/24v/48v/60v
en AC 110v/220V, avant la connexion, veuillez vous assurer que l'onduleur
est éteint.
2. Lors de la connexion de l'onduleur à la batterie, assurez-vous que la
tension de la batterie est cohérente avec la tension de référence de
l'onduleur ! ! !
3. Connectez le câble rouge de l'onduleur au pôle positif de la batterie,
connectez
le câble noir de l'onduleur au pôle négatif de la batterie. Ne pas connecter
le câble à l'envers, sinon le fusible de l'onduleur sera grillé.
4. Allumez l'interrupteur d'alimentation de l'onduleur, auquel cas le voyant
vert (bleu) s'allume, indiquant que l'onduleur fonctionne correctement.
5. Veuillez connecter les charges à la sortie CA de l'onduleur, veuillez ne
pas
surcharge. En cas de surcharge, l'onduleur enverra une alarme et cessera
de fonctionner.
Pour redémarrer l'onduleur, veuillez d'abord l'éteindre pendant 5 secondes,
réduire la charge, puis le rallumer.
5) Précautions
Les onduleurs sont conçus, fabriqués et testés conformément aux normes
de sécurité. Cependant, en tant que produit électrique, ils doivent être
installés, utilisés et entretenus strictement conformément aux consignes
de sécurité correspondantes, comme suit :
La connexion inversée entre l'onduleur et la batterie est strictement
interdite , elle brûlerait le fusible de l' onduleur .

- 6 -
2. Veuillez vérifier si la tension de la batterie correspond à la tension CC
d'entrée de l'onduleur. Une mauvaise connexion entre l'onduleur et la
batterie peut entraîner de graves dommages.
3. Vérifiez que les connexions sont correctes, assurez-vous qu'elles sont
serrées et fermes.
4. Ne rallongez pas le câble d’ alimentation de l’ onduleur .
5. Lorsque l'onduleur n'est pas utilisé, veuillez l'éteindre et le déconnecter
du système.
6. Évitez tout contact avec des objets étrangers ou des liquides. Ne
touchez pas l'onduleur avec les mains mouillées. Gardez le produit hors de
portée des enfants. Évitez de l'utiliser dans un endroit humide, poussiéreux
ou à haute température. N'utilisez pas ce produit dans une zone
inflammable et combustible.
7. Installez le produit dans un endroit bien ventilé, évitez d'utiliser ce
produit sur ou
à proximité d'objets chauds tels que radiateurs électriques, etc. Ne couvrez
pas l'onduleur, évitez la lumière directe du soleil, l'humidité et l'eau.
8. Cet onduleur ne peut pas être connecté en parallèle avec d’autres
onduleurs.
9. Il est strictement interdit de connecter ce produit au réseau électrique
urbain .
10. N'essayez pas de réparer l' onduleur . Une fois l'onduleur ouvert , la
garantie est annulée.
6) Dépannage
Lorsqu'il n'y a pas de sortie, veuillez vérifier les points suivants :
1. Utilisation excessive d'appareils électriques, charge trop lourde.
Solution : Réduisez le nombre d'appareils électriques, la consommation
d'énergie électrique totale doit être inférieure à la puissance nominale de
l'onduleur.
2. Protection contre la surchauffe. SOLUTION DE CONTOURNEMENT :
Réduisez le refroidissement de la charge et redémarrez après 15 minutes.
(La température estivale est élevée ou les conditions de dissipation de
chaleur sont mauvaises, il convient de réduire de manière appropriée
l'utilisation de la puissance totale des appareils électriques.)

- 7 -
3. Il faut remplacer le fusible par un fusible de même capacité après la
fusion
4. Connexion lâche du câble : assurez - vous que le câble est fermement
et fermement fixé .
connecté .
5. Faible tension de la batterie ; veuillez charger la batterie .
6. Batterie épuisée : veuillez changer la batterie , elle peut s'épuiser au fil
des ans .
7) Garantie
1. L'entreprise offre une période de garantie gratuite d'un an. Veuillez noter
que le revendeur est en contact avec l'entreprise de garantie et de
réparation.
2. La portée des défaillances de cette clause d'assurance n'inclut pas les
dommages causés par des facteurs externes : installation incorrecte,
mauvaise utilisation ou fonctionnement impropre, entretien privé non
autorisé, dommages pendant transport, etc.
8) Accessoires aléatoires
Les produits sont soigneusement testés et inspectés avant l'expédition,
mais il est toujours possible qu'ils subissent des dommages pendant le
transport. Veuillez vérifier soigneusement l'équipement avant l'installation.
En cas de dommage, contactez le distributeur à temps.
1. Alimentation à onduleur portable One
2. Paire de câbles d'alimentation
3. Une copie du manuel d'instructions du produit
4. Une copie du fusible de rechange de la voiture
5. Sachet déshydratant
6. Ensemble d'écran externe (y compris le câble)
9) Schéma du panneau

- 8 -
① : Tension d'entrée du produit ② : Fréquence ③ : Tension de sortie du
produit
④:Alimentation par batterie ⑤:Puissance du produit ⑥ : Forme d'onde du
produit
⑦:Raccordement secteur (avec fonction de charge) ⑧ : État de
fonctionnement
⑨:Protection haute tension/basse tension
10) Instructions pour l'équipement de télécommande filaire externe
Présentation de l'équipement : L'onduleur peut être contrôlé à distance
pour allumer et éteindre. Affichage numérique de la valeur de tension de la
batterie. L'équipement adopte un schéma de conception d'interrupteur
mural, qui peut être installé dans les camping-cars et les maisons en
fonction des besoins de l'utilisateur. Livré avec des autocollants pratiques,
qui peuvent être collés à volonté.

- 9 -
Schéma de connexion de la télécommande
Schéma de connexion de la télécommande
①:Battery power
②:Fault indicator
③:Input voltage
④:Work indicator
⑤:Inverter switch key
①:Backlight On/Of
②:Lead-acid / Lithium
③:Inverter switch key

- 10 -
Méthode de dépannage et de dépannage de base de l'onduleur
faute
Incarnation du défaut
Exclusions
La batterie est faible
Commencez par faire un son d' alarme
(juge le son de l'alarme comme un ,
BI-BI-BI... ), la LED rouge lumière clignote,
la tension continue de baisser et la machine
s'arrête n.
La batterie est
pleinement
chargé
Le batterie tension est
élevé
Son d'alarme en premier (juge alarme son
est deux, BIBI - BIBI -BIBI...) LE DIRIGÉ
lumière rouge clignote,
La tension continue de monter et le la
machine s'arrête vers le bas.
La batterie est
pleinement chargé
ou remplacé dans
en ligne avec la
valeur nominale
tension de le
onduleur
Trop de charge
Premier numéro un alarme son (juger le
son d'alarme comme un continu alarme,
BIBIBIBIBIBI... ), la LED clignote rouge et
la machine s'arrête vers le bas.
Réduire le charger
La température est trop
élevée
Son d'alarme en premier (juge alarme son
est trois, BIBIBI - BIBIBI - BI BIBI... ), la LED
clignote en rouge, la température continue
de monter, et la machine ferme vers le bas.
Soustraire la charge
et
attends le onduleur à
cool vers le bas
La sortie est
court-circuitée
Son d'alarme sans dommage le circuit
(alarme juge son comme continu alarme,
Il suffit de
déconnecter le

- 11 -
BIBIBIBIBI. ..)
court circuit
La batterie est remise en
marche
Le fusible intégré est soufflé et le la
machine est sous tension et ne répond
pas.
Remplacer le
nouveau fusible

- 12 -
Fabricant : Shanghaimuxinmuyeyouxiangongsi
Adresse : Shuangchenglu 803nong11hao1602A-1609shi, baoshanqu,
shanghai 200000 CN.
Importé en Australie : SIHAO PTY LTD, 1 ROKEVA STREET, ASTWOOD
NSW 2122 Australie
Importé aux États-Unis : Sanven Technology Ltd., Suite 250, 9166 Anaheim
Place, Rancho Cucamonga, CA 91730
REP
EC
E-CrossStu GmbH
Mainzer Landstr.69, 60329 Frankfurt am Main.
REP
UK
YH CONSULTING LIMITED.
C/O YH Consulting Limited Office 147, Centurion House,
London Road, Staines-upon-Thames, Surrey, TW18 4AX


- 14 -
Technisch Support und E-Garantie-Zertifikat
www.vevor.com/support
REINER
SINUSWELLEN-WECHSELRICHTER
BENUTZERHANDBUCH
We continue to be committed to provide you tools with competitive price.
"Save Half", "Half Price" or any other similar expressions used by us only represents an
estimate of savings you might benefit from buying certain tools with us compared to the major
top brands and does not necessarily mean to cover all categories of tools offered by us. You
are kindly reminded to verify carefully when you are placing an order with us if you are
actually saving half in comparison with the top major brands.

- 1 -
MODELL: TP2500W / TP3500W / TP5000W / TM2000W / TP2000W / TM2500W /
TM1250W / TM3000W / TM3500W / TP3000W / TP1500W / TM-6000W
(Das Bild dient nur als Referenz, bitte beziehen Sie sich auf das
tatsächliche Objekt)
Have product questions? Need technical support? Please feel free to
contact us:
Technical Support and E-Warranty Certificate
www.vevor.com/support
NEED HELP? CONTACT US!
This is the original instruction, please read all manual instructions
carefully before operating. VEVOR reserves a clear interpretation of our
user manual. The appearance of the product shall be subject to the
product you received. Please forgive us that we won't inform you again if
there are any technology or software updates on our product.
PURE SINE
WAVE INVERTER
- 2 -
Warnung: Um das Verletzungsrisiko zu verringern, muss der Benutzer
die Bedienungsanleitung sorgfältig lesen.
Dieses Gerät entspricht Teil 15 der FCC-Bestimmungen. Der Betrieb
unterliegt den folgenden beiden Bedingungen: (1) Dieses Gerät darf
keine schädlichen Störungen verursachen und (2) dieses Gerät muss
alle empfangenen Störungen akzeptieren, einschließlich Störungen,
die einen unerwünschten Betrieb verursachen können.
Dieses Produkt unterliegt den Bestimmungen der europäischen
Richtlinie 2012/19/EU. Das Symbol einer durchgestrichenen
Mülltonne weist darauf hin, dass das Produkt in der Europäischen
Union einer getrennten Müllentsorgung unterliegt. Dies gilt für das
Produkt und alle mit diesem Symbol gekennzeichneten Zubehörteile.
So gekennzeichnete Produkte dürfen nicht im normalen Hausmüll
entsorgt werden, sondern müssen an einer Sammelstelle für das
Recycling von elektrischen und elektronischen Geräten abgegeben
werden.
WARNUNG:
1. Die Leistung der Last (Geräte), d. h. die Leistung des Wechselrichters,
darf nicht höher sein als die Nennleistung, da dies zum Ausfall des
Wechselrichters führen könnte.
2. Bitte stellen Sie sicher, dass die Eingangsspannung des
Wechselrichters der Batterie der Nennspannung entspricht. Der
Wechselrichter würde beschädigt werden, wenn die Eingangsspannung
größer als das 1,6-fache der Nennspannung wäre.
3. Bei Anschluss an eine induktive oder kapazitive Last kehren Sie bitte die
zulässige Leistung um das 3- bis 5-fache der Last um (also das 4- bis
6-fache der Geräteleistung).
4. Rot an Pluspol, Schwarz an Minuspol, bitte richtig anschließen. Bei
umgekehrtem Anschluss würde die Sicherung schmelzen. Nach dem
Ersetzen der Sicherung und dem richtigen Anschluss funktioniert es
wieder normal.
5. Es ist verboten, den Wechselrichter an das Stromnetz anzuschließen.

- 3 -
HIGH FREQUENCY INVERTER INSTRUCTIONS FOR USE
Bitte lesen Sie dieses Handbuch sorgfältig durch, bevor Sie Produkte
verwenden.
Vielen Dank, dass Sie sich für den von uns angebotenen
Fahrzeugwechselrichter entschieden haben. Wir hoffen, dass unsere
Produkte Ihnen den zufriedenstellendsten Service bieten.
1) Produktbeschreibung
Dieser Hochfrequenz-Wechselrichter verfügt über die angepasste
SPWM-Technologie und ist äußerst effizient und zuverlässig. Das Produkt
hat die Norm lS09001:2000 bestanden. Unsachgemäßer Betrieb oder
Missbrauch kann dennoch zu Verletzungen oder Verlusten führen, die
Anweisungen und Informationen in diesem Handbuch müssen stets befolgt
werden.
2) Technische Parameter
Modell
1000 W
1500 W
2000W-
2500 B
3000W-
3500 W
4000 W
5 000 W -
6000 W
Eingang
Ausgang
DC12V/24V/48V/60V (nicht automatisch)
Ausgangsspan
nung
AC 220V±10% -120V±10% ( nicht automatisch )
Verlust,
wenn
NEIN laden
< 1A
< 1 .2A
< 1 .8A
Ausgangswell
e
Reine Sinuswelle - Modifizierte Welle
Anstieg
Leistung
≤2000 B
≤3000 B
≤4000W-
500 0 W
≤6000-
7000 W
≤8000 B
≤10 KW -
12K W
Ausgabe
Frequenz
50 Hz ±0 .5 Hz oder 60 Hz ±0 .5 Hz
Effizienz
≥85 %

- 4 -
Überspannung
≥16V - ≥30V - ≥60 V - ≥75 V
Niederspan
nung
Schließun
g
≤9 0,5 V - ≤20 V - ≤40 V - ≤50 V
Über
Temperatur
Schließung
> 80 ℃
Umgebung
Temperatur
-10 ℃ - +45 ℃
Hinweis: Halten Sie die Stromversorgung rund um die Belüftung trocken.
Im Umkreis von 1 Meter dürfen sich keine brennbaren Gegenstände
befinden. Vermeiden Sie unbedingt die Entstehung von Bränden.
5)Schutzfunktionen
Überlastschutz Bei einer Überlastung von 125 % sendet der
Wechselrichter einen Alarm und stellt den Betrieb nach 20 Sekunden ein.
1. Die Lasten werden auf ein akzeptables Niveau reduziert , der
Wechselrichter nimmt den Betrieb wieder auf .
2. Kurzschlussschutz : Der Wechselrichter verfügt über einen
Kurzschlussschutz .
3. Übertemperaturschutz : Wenn die Innentemperatur des Wechselrichters
80 ° C erreicht , leuchtet die ROTE Anzeigeleuchte . Der Wechselrichter
stellt den Betrieb ein . Sobald die Temperatur auf ein akzeptables Niveau
fällt , nimmt der Wechselrichter den Betrieb automatisch wieder
auf .
4. Unterspannungsschutz : Wenn die Batteriespannung unter den
eingestellten Wert fällt , sendet der Wechselrichter einen Alarm durch
Piepen . Wenn die Batteriespannung weiter auf ihr Abschaltniveau abfällt ,
piept der Wechselrichter und die rote LED leuchtet auf . Der
Wechselrichter stellt den Betrieb ein . Wenn die Batteriespannung auf ihr
Neustartniveau ansteigt , nimmt der Wechselrichter den Betrieb
automatisch wieder auf .

- 5 -
5. Überspannungsschutz : Wenn die Eingangsspannung höher als der
eingestellte Wert ist , stoppt der Wechselrichter . Wenn die
Eingangsspannung normal ist , schaltet er sich
ab .
Die Arbeit wird automatisch fortgesetzt .
6. Verpolungsschutz : Bei einem Verpolungsanschluss brennt die
Sicherung des Wechselrichters durch . In diesem Fall schalten Sie den
Wechselrichter bitte aus , trennen Sie die Stromquelle und wechseln Sie
die Sicherung .
Rückwärtsanschließen ist strengstens verboten .
9. LCD-Anzeige: Die Wechselrichteranzeige ist ein LCD-LCD-Bildschirm
und zeigt verschiedene Zustände an. Die folgenden Zeichnungen stellen
eine detaillierte Einführung dar.
4 ) Installation
1. Die Funktion des Wechselrichters besteht darin, die Gleichspannung 12
V/24 V/48 V/60 V in Wechselspannung 110 V/220 V umzuwandeln. Stellen
Sie vor dem Anschließen sicher, dass der Wechselrichter ausgeschaltet
ist.
2. Achten Sie beim Anschließen des Wechselrichters an die Batterie
darauf, dass die Batteriespannung mit der Referenzspannung des
Wechselrichters übereinstimmt!!! ! !
3. Verbinden Sie das rote Kabel des Wechselrichters mit dem Pluspol der
Batterie.
das schwarze Kabel des Wechselrichters an den Minuspol der Batterie.
Schließen Sie das Kabel nicht verkehrt herum an, da sonst die Sicherung
des Wechselrichters durchbrennt.
4. Schalten Sie den Netzschalter des Wechselrichters ein. Die grüne
(blaue) Kontrollleuchte leuchtet auf und zeigt damit an, dass der
Wechselrichter ordnungsgemäß funktioniert.
5. Bitte schließen Sie die Lasten an den AC-Ausgang des Wechselrichters
an, bitte nicht
Überlastung. Im Falle einer Überlastung sendet der Wechselrichter einen
Alarm und stellt den Betrieb ein.

- 6 -
Um den Wechselrichter neu zu starten, schalten Sie ihn zunächst für 5
Sekunden aus, reduzieren Sie die Last und schalten Sie ihn wieder ein.
5) Vorsichtsmaßnahmen
Die Wechselrichter werden gemäß den Sicherheitsnormen entwickelt,
hergestellt und geprüft. Da es sich jedoch um ein elektrisches Produkt
handelt, muss es streng nach den entsprechenden
Sicherheitsanweisungen wie folgt installiert, betrieben und gewartet
werden:
Ein umgekehrter Anschluss zwischen Wechselrichter und Batterie ist
strengstens verboten , da dadurch die Sicherung des Wechselrichters
durchbrennt .
2. Überprüfen Sie bitte noch einmal, ob die Spannung der Batterie mit der
Gleichspannung am Wechselrichtereingang übereinstimmt. Eine falsche
Verbindung zwischen Wechselrichter und Batterie kann schwere Schäden
verursachen.
3. Überprüfen Sie noch einmal, ob die Verbindungen korrekt sind und
stellen Sie sicher, dass sie fest und stabil sind.
4. Verlängern Sie das Stromkabel des Wechselrichters nicht .
5. Wenn der Wechselrichter nicht verwendet wird, schalten Sie ihn bitte
aus und trennen Sie ihn vom System.
6. Vermeiden Sie den Kontakt mit Fremdkörpern oder Flüssigkeiten.
Berühren Sie den Wechselrichter nicht mit nassen Händen. Bewahren Sie
das Produkt außerhalb der Reichweite von Kindern auf. Vermeiden Sie die
Verwendung in feuchten, staubigen oder heißen Umgebungen.
Verwenden Sie dieses Produkt nicht in entzündbaren oder brennbaren
Bereichen.
7. Installieren Sie das Produkt an einem gut belüfteten Ort. Vermeiden Sie
die Verwendung des Produkts auf oder
in der Nähe von heißen Objekten wie elektrischen Heizgeräten usw.
Decken Sie den Wechselrichter nicht ab und vermeiden Sie direkte
Sonneneinstrahlung, Feuchtigkeit und Wasser.
8. Dieser Wechselrichter kann nicht parallel mit anderen Wechselrichtern
angeschlossen werden.

- 7 -
9. Es ist strengstens verboten , dieses Produkt an das städtische
Stromnetz anzuschließen .
10. Versuchen Sie nicht , den Wechselrichter zu reparieren . Sobald der
Wechselrichter geöffnet ist , erlischt die Garantie.
6) Fehlerbehebung
Wenn keine Ausgabe erfolgt, überprüfen Sie bitte Folgendes :
1. Übermäßiger Gebrauch von Elektrogeräten, zu hohe Belastung. Lösung:
Reduzieren Sie die Anzahl der Elektrogeräte. Die Gesamtstromnutzung
sollte unter der Nennleistung des Wechselrichters liegen.
2. Überhitzungsschutz. PROBLEMUMGEHUNG: Reduzieren Sie die
Kühllast und starten Sie nach 15 Minuten neu. (Bei hohen
Sommertemperaturen oder schlechten Wärmeableitungsbedingungen
sollte die Gesamtleistung der Elektrogeräte entsprechend reduziert
werden.)
3. Es muss die Sicherung mit der gleichen Kapazität nach dem Fixieren
ersetzen
4. Lösen Sie die Verbindung des Kabels : Stellen Sie sicher , dass das
Kabel fest und fest sitzt .
verbunden .
5. Niedrige Batteriespannung ; bitte laden Sie die Batterie auf .
6. Batterie leer : Bitte wechseln Sie die Batterie , die Batterie kann sich im
Laufe der Jahre erschöpfen .
7) Gewährleistung
1. Das Unternehmen gewährt eine kostenlose Garantiezeit von einem Jahr.
Bitte beachten Sie, dass der Händler mit dem Garantie- und
Reparaturgeschäft in Kontakt steht.
2. Der Ausfallbereich dieser Versicherungsklausel umfasst nicht Schäden,
die durch äußere Einflüsse verursacht werden: falsche Installation,
Missbrauch oder unsachgemäße Bedienung, unbefugte private Wartung,
Schäden während Transport usw.
8) Zufälliges Zubehör
- 8 -
Die Produkte werden vor dem Versand sorgfältig getestet und überprüft.
Dennoch können Transportschäden auftreten. Bitte überprüfen Sie das
Gerät vor der Installation sorgfältig. Wenden Sie sich bei Schäden
rechtzeitig an den Händler.
1. Tragbares Wechselrichter-Netzteil Ein
2. Stromkabelpaar
3. Eine Kopie der Produktbedienungsanleitung
4. Eine Kopie der Auto-Ersatzsicherung
5. Trockenmittelbeutel
6. Externes Bildschirmset (inkl. Kabelset)
9) Paneldiagramm
①: Produkt-Eingangsspannung ②: Frequenz ③:
Produktausgangsspannung
④: Batterieleistung ⑤: Produktleistung ⑥: Produktwellenform
⑦: Netzanschluss (mit Ladefunktion) ⑧: Arbeitsstatus
⑨: Hochspannungs-/Niederspannungsschutz
10)Anweisungen für externe kabelgebundene Fernbedienungsgeräte
- 9 -
Geräteeinführung: Der Wechselrichter kann per Fernsteuerung ein- und
ausgeschaltet werden. Digitalanzeige des Batteriespannungswerts. Das
Gerät verfügt über ein Wandschalter-Design, das je nach
Benutzeranforderungen in Wohnmobilen und Häusern installiert werden
kann. Kommt mit praktischen Aufklebern, die angeklebt werden können
Wille.
Anschlussdiagramm der Fernbedienung
Anschlussdiagramm der Fernbedienung
①:Battery power
②:Fault indicator
③:Input voltage
④:Work indicator
⑤:Inverter switch key
①:Backlight On/Of
②:Lead-acid / Lithium
③:Inverter switch key
- 10 -
Grundlegende Fehler und Fehlerbehebungsmethoden beim Wechselrichter
Fehler
Fehlerverkörperung
Ausschlüsse
Die Batterie ist schwach
Beginnen Sie mit der Erstellung eines
Alarmton (Richter der Alarmton als eins ,
BI-BI-BI … ),die LED rot Licht blinkt, Die
Spannung nimmt weiter ab Und die
Maschine fährt herunter n.
Die Batterie Ist
voll
aufgeladen
Der Batterie
Stromspannung ist hoch
Alarmton zuerst (Richter Alarm Klang Ist
zwei, BIBI - BIBI - BIBI...) DER LED Rotlicht
Blitze,
steigt weiter und die Maschine schaltet ab
runter.
Die Batterie ist voll
aufgeladen oder
ersetzt In im
Einklang mit dem
Nominalwert
Spannung von Die
Wechselrichter
Zu hohe Belastung
Geben Sie zunächst eine Alarm Klang
(beurteilen Sie die Alarmton als A
kontinuierlich Alarm, BIBIBIBIBIBI... ),
blinkt die LED Rot und die Maschine
schaltet ab runter .
Reduzieren Sie die
laden
Die Temperatur ist zu
hoch
Alarmton zuerst (Richter Alarm Klang Ist
drei, BIBIBI - BIBIBI - BI, BIBI ... ), die LED
blinkt rot, die Temperatur steigt weiter, und
die Maschine schließt runter.
Subtrahieren Sie die
Last Und
warten auf die
Wechselrichter
Cool runter

- 11 -
Der Ausgang ist
kurzgeschlossen
Alarmton ohne Beschädigung Die
Schaltung (Richteralarm Klang als
kontinuierlich Alarm, BIBIBIBIBI. ..)
Trennen Sie
einfach den
kurz Schaltung
Die Batterie wird
zurückgedreht
Die eingebaute Sicherung ist geblasen
Und Die Maschine ist eingeschaltet Und
reagiert nicht.
Ersetzen Sie die neue
Sicherung

- 12 -
Hersteller: Shanghaimuxinmuyeyouxiangongsi
Adresse: Shuangchenglu 803nong11hao1602A-1609shi, baoshanqu,
Shanghai 200000 CN.
Nach AUS importiert: SIHAO PTY LTD, 1 ROKEVA STREETEASTWOOD
NSW 2122 Australien
Importiert in die USA: Sanven Technology Ltd., Suite 250, 9166 Anaheim
Place, Rancho Cucamonga, CA 91730
REP
EC
E-CrossStu GmbH
Mainzer Landstr.69, 60329 Frankfurt am Main.
REP
UK
YH CONSULTING LIMITED.
C/O YH Consulting Limited Office 147, Centurion House,
London Road, Staines-upon-Thames, Surrey, TW18 4AX


- 14 -
Tecnico Supporto e certificato di garanzia elettronica
www.vevor.com/support
INVERTER A ONDA SINUSOIDALE PURA
MANUALE D'USO
We continue to be committed to provide you tools with competitive price.
"Save Half", "Half Price" or any other similar expressions used by us only represents an
estimate of savings you might benefit from buying certain tools with us compared to the major
top brands and does not necessarily mean to cover all categories of tools offered by us. You
are kindly reminded to verify carefully when you are placing an order with us if you are
actually saving half in comparison with the top major brands.
- 1 -
MODELLO: TP2500W / TP3500W / TP5000W / TM2000W / TP2000W /
TM2500W / TM1250W / TM3000W / TM3500W / TP3000W / TP1500W /
TM-6000W
(L'immagine è solo di riferimento, fare riferimento all'oggetto reale)
Have product questions? Need technical support? Please feel free to
contact us:
Technical Support and E-Warranty Certificate
www.vevor.com/support
NEED HELP? CONTACT US!
This is the original instruction, please read all manual instructions
carefully before operating. VEVOR reserves a clear interpretation of our
user manual. The appearance of the product shall be subject to the
product you received. Please forgive us that we won't inform you again if
there are any technology or software updates on our product.
PURE SINE
WAVE INVERTER

- 2 -
Attenzione: per ridurre il rischio di lesioni, l'utente deve leggere
attentamente il manuale di istruzioni.
Questo dispositivo è conforme alla Parte 15 delle Norme FCC. Il
funzionamento è soggetto alle due condizioni seguenti: (1) Questo
dispositivo non può causare interferenze dannose e (2) Questo
dispositivo deve accettare qualsiasi interferenza ricevuta, comprese
le interferenze che possono causare un funzionamento indesiderato.
Questo prodotto è soggetto alle disposizioni della Direttiva Europea
2012/19/CE. Il simbolo raffigurante un bidone della spazzatura
barrato indica che il prodotto richiede la raccolta differenziata dei rifiuti
nell'Unione Europea. Ciò si applica al prodotto e a tutti gli accessori
contrassegnati con questo simbolo. I prodotti contrassegnati come tali
non possono essere smaltiti con i normali rifiuti domestici, ma devono
essere portati in un punto di raccolta per il riciclaggio di dispositivi
elettrici ed elettronici
AVVERTIMENTO:
1. La potenza del carico (elettrodomestici), ovvero l'uscita dell'inverter, non
deve essere superiore alla potenza nominale, altrimenti l'inverter potrebbe
non funzionare.
2. Assicurarsi che la tensione di ingresso dell'inverter della batteria sia
conforme alla tensione nominale; l'inverter potrebbe danneggiarsi se la
tensione di ingresso fosse superiore a 1,6 volte la tensione nominale.
3. Quando si collega un carico induttivo o capacitivo, invertire la tolleranza
di 3-5 volte la potenza del carico (ovvero 4-6 volte la potenza
dell'apparecchio).
4. Rosso al polo positivo, Nero al polo negativo, collegarlo correttamente.
La connessione inversa scioglierebbe il fusibile, potrebbe funzionare
normalmente dopo aver sostituito il fusibile e averlo collegato
correttamente.
5. È vietato collegare l'inverter alla rete elettrica.
HIGH FREQUENCY INVERTER INSTRUCTIONS FOR USE

- 3 -
Si prega di leggere attentamente il presente manuale prima di utilizzare i
prodotti.
Grazie per aver scelto l'inverter per veicoli da noi fornito. Ci auguriamo che
i nostri prodotti possano offrirti il servizio più soddisfacente.
1) Descrizione del prodotto
Questo inverter ad alta frequenza ha adattato la tecnologia SPWM ed è
altamente efficiente e affidabile. Il prodotto ha superato lS09001:2000.
Tuttavia, un funzionamento improprio o
Anche un uso improprio può causare lesioni o perdite; le istruzioni e le
informazioni fornite nel presente manuale devono essere sempre
rispettate.
2) Parametri tecnici
Modello
1000W
1500W
2000W-
2500 L'
3000W-
3500W
4000W
5 000W -
6000W
Ingresso/uscit
a
DC12V/24V/48V/60V (non automaticamente)
Tensione di
uscita
CA 220 V±10% -120 V±10% ( non automaticamente )
Perdita
quando
NO carico
< 1A
< 1 .2A
< 1 .8A
Onda di uscita
Onda sinusoidale pura - Onda modificata
Ondeggiare
Energia
≤2000 L'
≤3000 L'
≤4000W-
500
0Sette
mbre
≤6000-
7000W
≤8000 L'
≤10KW
-
12KW
Produzio
ne
frequenza
50 Hz ±0 .5 Hz o 60 Hz ±0 .5 Hz
Efficienza
≥85%
Sovratensione
≥16V - ≥30V - ≥60V - ≥75V

- 4 -
Bassa
tensione
chiusura
≤9 .5V - ≤20V - ≤40V - ≤50V
Sopra
temperatura
chiusura
> 80 ℃
Ambiente
temperatura
-10 ℃ - +45 ℃
Nota: tenere l'alimentatore in un luogo asciutto vicino alla ventilazione,
entro 1 metro non devono esserci oggetti infiammabili, evitare
rigorosamente che ciò causi incendi.
6)Funzioni protettive
Protezione da sovraccarico in caso di sovraccarico del 125%, l'inverter
invierà un allarme e smetterà di funzionare dopo 20 secondi.
1. I carichi vengono ridotti al livello accettato , l' inverter riprenderà a
funzionare .
2. Protezione da corto circuito : l' inverter è dotato di protezione da corto
circuito .
3. Protezione da sovratemperatura : quando la temperatura interna
dell'inverter raggiunge gli 80 ℃ , la spia ROSSA si accende . L' inverter
smetterà di funzionare , una volta che la temperatura scende a un livello
accettato , l' inverter riprenderà automaticamente a
funzionare .
4. Protezione da bassa tensione : quando la tensione della batteria è al di
sotto del livello di impostazione , l' inverter emette un allarme tramite un
segnale acustico . Quando la tensione della batteria continua a scendere
fino al livello di spegnimento , l' inverter emette un segnale acustico e il
LED ROSSO si accende , l' inverter smette di funzionare , quando la
tensione della batteria viene aumentata fino al livello di riavvio , l' inverter
riprenderà automaticamente a funzionare .
5. Protezione da sovratensione : quando la tensione di ingresso è
superiore al livello di impostazione , l' inverter smetterà di funzionare ,
quando la tensione di ingresso è normale , si spegnerà .

- 5 -
riprendere automaticamente a lavorare .
6. Protezione da collegamento inverso : una volta che si verifica il
collegamento inverso , il fusibile dell'inverter si brucia . In questo caso ,
spegnere l' inverter , scollegare la fonte di alimentazione e sostituire il
fusibile .
IL COLLEGAMENTO INVERSO È SEVERAMENTE PROIBITO .
10. Display LCD: il display dell'inverter è come uno schermo LCD LCD,
visualizza vari stati, i seguenti disegni ne forniscono un'introduzione
dettagliata.
4 ) Installazione
1. La funzione dell'inverter è quella di convertire la tensione CC 12 V/24
V/48 V/60 V in CA 110 V/220 V. Prima del collegamento, assicurarsi che
l'inverter sia spento.
2. Quando si collega l'inverter alla batteria, assicurarsi che la tensione
della batteria sia coerente con la tensione di riferimento dell'inverter!!!
3. Collegare il cavo rosso dell'inverter al polo positivo della batteria,
Collegare
il cavo nero dell'inverter al polo negativo della batteria. Non collegare il
cavo in modo inverso, altrimenti il fusibile dell'inverter verrà bruciato.
4. Accendere l'interruttore di alimentazione dell'inverter: a questo punto la
spia verde (blu) si accende, indicando che l'inverter funziona
correttamente.
5. Collegare i carichi all'uscita CA dell'inverter, non
sovraccarico. In caso di sovraccarico, l'inverter invierà un allarme e
smetterà di funzionare.
Per riavviare l'inverter, innanzitutto spegnerlo per 5 secondi, ridurre il
carico e riaccenderlo.
5) Precauzioni
Gli inverter sono progettati, realizzati e testati secondo gli standard di
sicurezza. Tuttavia, in quanto prodotto elettrico ed elettrico, devono essere
installati, azionati e sottoposti a manutenzione rigorosamente secondo le
relative istruzioni di sicurezza come segue:

- 6 -
1. È severamente vietato il collegamento inverso tra inverter e batteria ,
poiché brucerebbe il fusibile dell'inverter .
2. Controllare attentamente che la tensione della batteria corrisponda alla
tensione CC in ingresso dell'inverter. Una connessione non corretta tra
inverter e batteria può causare gravi danni.
3. Controllare attentamente che i collegamenti siano corretti e che siano
ben saldi e saldi.
4. Non estendere il cavo di alimentazione dell'inverter .
5. Quando l'inverter non è in uso, spegnerlo e scollegarlo dal sistema.
6. Evitare il contatto con oggetti estranei o liquidi. Non toccare l'inverter
con le mani bagnate. Tenere il prodotto lontano dalla portata dei bambini.
Evitare di utilizzarlo in aree umide, polverose e ad alta temperatura. Non
utilizzare questo prodotto in aree infiammabili e combustibili.
7. Installare il prodotto in un luogo ben ventilato, evitare di utilizzare questo
prodotto su o
vicino a oggetti caldi come termosifoni ecc. Non coprire l'inverter, evitare la
luce diretta del sole, l'umidità e l'acqua.
8. Questo inverter non può essere collegato in parallelo ad altri inverter.
9. È severamente vietato collegare questo prodotto alla rete elettrica
cittadina .
10. Non tentare di riparare l' inverter . Una volta aperto , la garanzia
decade.
6) Risoluzione dei problemi
Se non c'è output, controllare quanto segue :
1. Uso eccessivo di elettrodomestici, carico troppo pesante. Soluzione:
ridurre gli elettrodomestici, l'uso della potenza elettrica totale dovrebbe
essere inferiore alla potenza nominale dell'inverter.
2. Protezione da surriscaldamento. SOLUZIONE ALTERNATIVA: ridurre il
raffreddamento del carico e riavviare dopo 15 minuti. (Se la temperatura
estiva è elevata o le condizioni di dissipazione del calore sono scarse, si
dovrebbe ridurre opportunamente l'uso della potenza totale degli
elettrodomestici.)
3. Deve sostituire il fusibile con uno della stessa capacità dopo la fusione

- 7 -
4. Collegamento allentato del cavo : assicurarsi che il cavo sia saldamente
e saldamente collegato
connesso .
5. Bassa tensione della batteria ; caricare la batteria .
6. Batteria scarica : sostituire la batteria , che può esaurirsi nel corso degli
anni .
7) Garanzia
1. L'azienda fornisce un periodo di garanzia gratuito di un anno. Si prega di
notare che il rivenditore è in contatto con l'attività di garanzia e riparazione.
2. L'intervallo di guasto di questa clausola assicurativa non include i danni
causati da fattori esterni: installazione errata, uso improprio o
funzionamento improprio, manutenzione privata non autorizzata, danni
durante trasporti, ecc.
8) Accessori casuali
I prodotti vengono attentamente testati e ispezionati prima della spedizione,
ma è comunque possibile ricevere danni durante il trasporto, si prega di
controllare attentamente l'attrezzatura prima dell'installazione. In caso di
danni, contattare il distributore in tempo.
1. Alimentatore inverter portatile Uno
2. Coppia di cavi di alimentazione
3. Una copia del manuale di istruzioni del prodotto
4. Una copia del fusibile di scorta dell'auto
5. Sacchetto essiccante
6. Set schermo esterno (incluso cavo uno)
9) Schema del pannello
- 8 -
①:Tensione di ingresso del prodotto ②: Frequenza ③:Tensione di uscita
del prodotto
④:Alimentazione della batteria ⑤:Potenza del prodotto ⑥:Forma d'onda
del prodotto
⑦:Collegamento alla rete elettrica (con funzione di ricarica) ⑧:Stato di
funzionamento
⑨:Protezione alta/bassa tensione
10) Istruzioni per apparecchiature di controllo remoto cablate esterne
Introduzione all'apparecchiatura: L'inverter può essere controllato a
distanza per accendersi e spegnersi. Valore della tensione della batteria
con display digitale. L'apparecchiatura adotta uno schema di progettazione
dell'interruttore a parete, che può essere installato in camper e case in
base alle esigenze dell'utente. Viene fornito con comodi adesivi, che
possono essere incollati a Volere.

- 9 -
Schema di collegamento del telecomando
Schema di collegamento del telecomando
①:Battery power
②:Fault indicator
③:Input voltage
④:Work indicator
⑤:Inverter switch key
①:Backlight On/Of
②:Lead-acid / Lithium
③:Inverter switch key

- 10 -
guasti dell'inverter
colpa
Esecuzione difettosa
Esclusioni
La batteria è scarica
Inizia creando un suono di ala rm (giudice il
suono dell'allarme COME uno , BI-BI-BI... ),
il LED rosso leggero lampeggia, la tensione
continua a diminuire E la macchina si
spegne n.
La batteria È
completament
e caricato
IL batteria voltaggio è
alto
Suona prima l'allarme (giudice allarme
suono È due, BIBI - BIBI - BIBI...) IL
GUIDATO luce rossa lampi,
La tensione continua a salire e il la
macchina si spegne giù.
La batteria è
completamente
caricato o sostituito
In in linea con il
nominale tensione
di IL invertitore
Troppo carico
Primo numero un allarme suono (giudicare
il suono di allarme come UN continuo
allarme, BIBIBIBIBIBI... ), il led lampeggia
rosso e la macchina si spegne giù .
Ridurre il carico
La temperatura è troppo
alta
Suona prima l'allarme (giudice allarme
suono È tre, BIBIBI - BIBIBI - BI BIBI... ), il
LED lampeggia in rosso, la temperatura
continua a salire e la macchina chiude giù.
Sottrai il carico E
aspettare il inverter a
Freddo giù
L'uscita è in cortocircuito
Suono di allarme senza danneggiare IL
circuito (allarme giudice suono COME
continuo allarme, BIBIBIBIBI. ..)
Basta scollegare
il corto circuito

- 11 -
La batteria è tornata
indietro
Il fusibile incorporato è soffiato E IL la
macchina è accesa E non risponde.
Sostituire il nuovo
fusibile

- 12 -
Produttore: Shanghaimuxinmuyeyouxiangongsi
Indirizzo: Shuangchenglu 803nong11hao1602A-1609shi, baoshanqu,
shanghai 200000 CN.
Importato in AUS: SIHAO PTY LTD, 1 ROKEVA STREETEASTWOOD NSW
2122 Australia
Importato negli USA: Sanven Technology Ltd., Suite 250, 9166 Anaheim
Place, Rancho Cucamonga, CA 91730
REP
EC
E-CrossStu GmbH
Mainzer Landstr.69, 60329 Frankfurt am Main.
REP
UK
YH CONSULTING LIMITED.
C/O YH Consulting Limited Office 147, Centurion House,
London Road, Staines-upon-Thames, Surrey, TW18 4AX


- 14 -
Técnico Certificado de soporte y garantía electrónica
www.vevor.com/support
INVERSOR DE ONDA SENOIDAL PURA
MANUAL DEL USUARIO
We continue to be committed to provide you tools with competitive price.
"Save Half", "Half Price" or any other similar expressions used by us only represents an
estimate of savings you might benefit from buying certain tools with us compared to the major
top brands and does not necessarily mean to cover all categories of tools offered by us. You
are kindly reminded to verify carefully when you are placing an order with us if you are
actually saving half in comparison with the top major brands.

- 1 -
MODELO: TP2500W / TP3500W / TP5000W / TM2000W / TP2000W / TM2500W
/ TM1250W / TM3000W / TM3500W / TP3000W / TP1500W / TM-6000W
(La imagen es solo de referencia, consulte el objeto real)
Have product questions? Need technical support? Please feel free to
contact us:
Technical Support and E-Warranty Certificate
www.vevor.com/support
NEED HELP? CONTACT US!
This is the original instruction, please read all manual instructions
carefully before operating. VEVOR reserves a clear interpretation of our
user manual. The appearance of the product shall be subject to the
product you received. Please forgive us that we won't inform you again if
there are any technology or software updates on our product.
PURE SINE
WAVE INVERTER

- 2 -
Advertencia: Para reducir el riesgo de lesiones, el usuario debe leer
atentamente el manual de instrucciones.
Este dispositivo cumple con la Parte 15 de las Normas de la FCC. Su
funcionamiento está sujeto a las dos condiciones siguientes: (1) Este
dispositivo no puede causar interferencias perjudiciales y (2) Este
dispositivo debe aceptar cualquier interferencia que reciba, incluidas
las interferencias que puedan causar un funcionamiento no deseado.
Este producto está sujeto a las disposiciones de la Directiva Europea
2012/19/CE. El símbolo que muestra un contenedor de basura
tachado indica que el producto requiere una recogida selectiva de
residuos en la Unión Europea. Esto se aplica al producto y a todos los
accesorios marcados con este símbolo. Los productos marcados
como tales no pueden desecharse con los residuos domésticos
normales, sino que deben llevarse a un punto de recogida para
reciclar dispositivos eléctricos y electrónicos.
ADVERTENCIA:
1. La potencia de carga (aparatos), es decir, la salida del inversor, no debe
ser mayor que la potencia nominal, lo que podría provocar que el inversor
deje de funcionar.
2. Asegúrese de que el voltaje de entrada del inversor de la batería cumpla
con el voltaje nominal; el inversor se dañaría si el voltaje de entrada fuera
mayor a 1,6 veces el voltaje nominal.
3. Cuando se conecta con una carga inductiva o capacitiva, invierta el
margen de 3 a 5 veces la potencia de carga (es decir, 4 a 6 veces la
potencia del aparato).
4. Rojo al polo positivo, negro al polo negativo, conéctelos correctamente.
La conexión inversa fundiría el fusible. Podría funcionar normalmente
después de reemplazar el fusible y conectarlo correctamente.
5.Está prohibido enchufar el inversor a la red eléctrica.
HIGH FREQUENCY INVERTER INSTRUCTIONS FOR USE
Lea atentamente este manual antes de utilizar los productos.

- 3 -
Gracias por elegir el inversor para vehículos que le proporcionamos.
Esperamos que nuestros productos le brinden el servicio más
satisfactorio.
1) Descripción del producto
Este inversor de alta frecuencia tiene tecnología SPWM adaptada y es
altamente eficiente y confiable. El producto ha pasado la prueba
LS09001:2000. Sin embargo, el funcionamiento incorrecto o
El mal uso aún puede causar lesiones o pérdidas, por lo que se deben
seguir en todo momento las instrucciones e información proporcionadas
en este manual.
2) Parámetros técnicos
Modelo
1000W
1500 W
2000W-
2500 Yo
3000W-
3500 W
4000W
5 000 W -
6000W
Entrada salida
DC12V/24V/48V/60V (no automáticamente)
Voltaje de
salida
CA 220 V ± 10 % - 120 V ± 10 % ( no automáticamente )
Pérdida
cuando
No carga
< 1A
< 1 .2A
< 1 .8A
Onda de
salida
Onda sinusoidal pura - Onda modificada
Aumento
Fuerza
≤2000
Yo
≤3000
Yo
≤4000W-
500 0W
≤6000-
7000W
≤8000
Yo
≤10KW-
12KW
Producci
ón
frecuencia
50 Hz ± 0 .5 Hz o 60 Hz ±0 .5 Hz
Eficiencia
≥85%
Sobrevoltaje
≥16 V - ≥30 V - ≥60 V - ≥75 V
Bajo voltaje
cerrando
≤9 .5 V - ≤20 V - ≤40 V - ≤50 V

- 4 -
Encima
temperatura
cerrando
> 80 ℃
Ambiente
temperatura
-10 ℃ - +45 ℃
Nota: Mantenga la fuente de alimentación cerca de la ventilación seca,
dentro de 1 metro no debe haber elementos inflamables, para evitar
estrictamente que se produzcan incendios.
7)Funciones protectoras
Protección contra sobrecarga Cuando la sobrecarga supera el 125%, el
inversor enviará una alarma y dejará de funcionar después de 20
segundos.
1. Las cargas se reducen al nivel aceptado , el inversor reanudará su
funcionamiento .
2. Protección contra cortocircuitos : el inversor tiene protección contra
cortocircuitos .
3. Protección contra sobretemperatura : cuando la temperatura interna del
inversor alcance los 80 ℃ , la luz indicadora ROJA se encenderá . El
inversor dejará de funcionar , una vez que la temperatura baje al nivel
aceptado , el inversor reanudará automáticamente el
funcionamiento .
4. Protección de bajo voltaje : cuando el voltaje de la batería está por
debajo del nivel de ajuste , el inversor enviará una alarma mediante un
pitido . Cuando el voltaje de la batería sigue bajando hasta su nivel de
apagado , el inversor emitirá un pitido y el LED ROJO se iluminará , el
inversor dejará de funcionar , cuando el voltaje de la batería aumenta
hasta su nivel de reinicio , el inversor reanudará automáticamente el
funcionamiento .
5. Protección contra sobretensión : cuando el voltaje de entrada es mayor
que el nivel de ajuste , el inversor dejará de funcionar ; cuando el voltaje
de entrada sea normal , dejará de funcionar .
reanudar automáticamente el trabajo .

- 5 -
6. Protección contra conexión inversa : una vez que se produce una
conexión inversa , el fusible del inversor se quemará . En este caso ,
apague el inversor , desconecte la fuente de alimentación y cambie el
fusible .
LA CONEXIÓN INVERSA ESTÁ ESTRICTAMENTE
PROHIBIDA .
11. Pantalla LCD: La pantalla del inversor como pantalla LCD LCD,
muestra una variedad de estados, los siguientes dibujos de introducción
detallada.
4 ) Instalación
1. La función del inversor es convertir el voltaje de CC 12 V/24 V/48 V/60 V
en CA 110 V/220 V. Antes de la conexión, asegúrese de que el inversor
esté apagado.
2. Al conectar el inversor a la batería, asegúrese de que el voltaje de la
batería sea consistente con el voltaje de referencia del inversor.
3. Conecte el cable rojo del inversor al polo positivo de la batería. Conecte
El cable negro del inversor al polo negativo de la batería. No conecte el
cable al revés, de lo contrario se quemará el fusible del inversor.
4. Encienda el interruptor de encendido del inversor, momento en el cual
se encenderá la luz indicadora verde (azul), lo que indica que el inversor
está funcionando correctamente.
5. Conecte las cargas a la salida de CA del inversor, no lo haga.
Sobrecarga. En caso de sobrecarga, el inversor enviará una alarma y
dejará de funcionar.
Para reiniciar el inversor, primero apáguelo durante 5 segundos, reduzca
la carga y vuelva a encenderlo.
5) Precauciones
Los inversores están diseñados, fabricados y probados de acuerdo con las
normas de seguridad. Sin embargo, como producto eléctrico, deben
instalarse, operarse y mantenerse estrictamente de acuerdo con las
instrucciones de seguridad relacionadas, como se indica a continuación:

- 6 -
1. La conexión inversa entre el inversor y la batería está estrictamente
prohibida , ya que quemará el fusible del inversor .
2. Verifique nuevamente si el voltaje de la batería coincide con el voltaje
de CC de entrada del inversor; una conexión incorrecta entre el inversor y
la batería puede causar daños graves.
3. Verifique nuevamente si las conexiones son correctas, asegúrese de
que las conexiones estén apretadas y firmes.
4. No extienda el cable de alimentación del inversor .
5. Cuando el inversor no esté en uso, apáguelo y desconéctelo del
sistema.
6. Evite el contacto con objetos o líquidos extraños. No toque el inversor
con las manos mojadas. Mantenga el producto alejado de los niños. Evite
utilizarlo en áreas húmedas, polvorientas o de alta temperatura. No utilice
este producto en áreas inflamables o combustibles.
7. Instale el producto en un lugar bien ventilado, evite utilizar este producto
sobre o
cerca de objetos calientes como calentadores eléctricos, etc. No cubra el
inversor, evite la luz solar directa, la humedad y el agua.
8. Este inversor no se puede conectar en paralelo con otros inversores.
9. Está estrictamente prohibido conectar este producto a la red eléctrica de
la ciudad .
10. No intente reparar el inversor . Una vez abierto el inversor , la garantía
quedará anulada.
6) Solución de problemas
Cuando no haya salida, verifique lo siguiente :
1. Uso excesivo de aparatos eléctricos, carga demasiado pesada.
Solución: Reducir el uso de aparatos eléctricos, el consumo total de
energía eléctrica debe ser menor que la potencia nominal del inversor.
2. Protección contra sobrecalentamiento. SOLUCIÓN ALTERNATIVA:
Reducir la refrigeración de la carga y reiniciar después de 15 minutos. (Si
la temperatura del verano es alta o las condiciones de disipación de calor
son deficientes, se debe reducir adecuadamente el uso de la potencia total
de los aparatos eléctricos).

- 7 -
3. Debe reemplazar el fusible por uno de la misma capacidad después de
la fusión.
4. Conexión floja del cable : asegúrese de que el cable esté firme y
apretado .
conectado .
5. Bajo voltaje de la batería ; cargue la batería .
6. Batería agotada: cambie la batería , la batería puede agotarse con el
paso de los años .
7) Garantía
1. La empresa ofrece un período de garantía gratuito de un año. Tenga en
cuenta que el distribuidor está en contacto con la empresa de garantía y
reparación.
2. El alcance de falla de esta cláusula de seguro no incluye los daños
causados por factores externos: instalación incorrecta, mal uso o manejo
inadecuado, mantenimiento privado no autorizado, daños durante
transporte, etc.
8) Accesorios aleatorios
Los productos se prueban e inspeccionan cuidadosamente antes del envío,
pero aún así es posible que sufran daños durante el transporte. Revise
cuidadosamente el equipo antes de la instalación. Si hay algún daño,
comuníquese con el distribuidor a tiempo.
1. Fuente de alimentación inversora portátil Uno
2. Par de cables de alimentación
3. Una copia del manual de instrucciones del producto.
4. Una copia del fusible de repuesto del automóvil.
5. Bolsa desecante
6. Conjunto de pantalla externa (incluye cable)
9) Diagrama de panel

- 8 -
①:Voltaje de entrada del producto ②:Frecuencia ③:Voltaje de salida del
producto
④:Energía de la batería ⑤:Potencia del producto ⑥:Forma de onda del
producto
⑦:Conexión a la red eléctrica (con función de carga) ⑧:Estado de
funcionamiento
⑨:Protección de alto voltaje/bajo voltaje
10)Instrucciones para equipos de control remoto con cable externo
Introducción del equipo: El inversor se puede controlar de forma remota
para encenderlo y apagarlo. El valor del voltaje de la batería se muestra en
la pantalla digital. El equipo adopta un diseño de interruptor de pared, que
se puede instalar en vehículos recreativos y hogares según las
necesidades del usuario. Viene con pegatinas convenientes, que se
pueden pegar en voluntad.
- 9 -
Diagrama de conexión del control remoto
Diagrama de conexión del control remoto
①:Battery power
②:Fault indicator
③:Input voltage
④:Work indicator
⑤:Inverter switch key
①:Backlight On/Of
②:Lead-acid / Lithium
③:Inverter switch key
- 10 -
Método básico de resolución de problemas y fallas del inversor
falla
Encarnación de falla
Exclusiones
La batería está baja
Comience por hacer una sonido ala rm
(juez el sonido de la alarma como uno ,
BI-BI-BI... ), el LED rojo luz parpadea, el
voltaje continúa disminuyendo y La
máquina apaga n.
La batería es
completament
e cargado
El batería Voltaje es alto
El sonido de la alarma primero (juez alarma
sonido es dos, BIBI - BIBI -Bibi...) EL
CONDUJO luz roja Destellos,
El voltaje sigue aumentando y el La
máquina se apaga abajo.
La batería está
completamente
cargado o
reemplazado en en
línea con el nominal
voltaje de el
inversor
Demasiada carga
Primer número de un alarma sonido (juzgar
el sonido de alarma como a continuo
alarma, BIBIBIBIBIBI... ), el LED parpadea
rojo y la máquina se apaga abajo .
Reducir la carga
La temperatura es
demasiado alta
El sonido de la alarma primero (juez alarma
sonido es tres, BIBIBI - BIBIBI - YO YO
YO... ), el LED parpadea en rojo, la
temperatura sigue subiendo, y la máquina
cierra abajo.
Restar la carga y
Esperar el inversor a
Frío abajo
La salida está en
cortocircuito
Sonido de alarma sin dañar el circuito
(alarma de juez sonido como continuo
Simplemente
desconecte el

- 11 -
alarma, BIBIBIBIBI. ..)
corto circuito
La batería está apagada
El fusible incorporado es soplado y el
La máquina está encendida y insensible.
Reemplace el fusible
nuevo

- 12 -
Fabricante: Shanghaimuxinmuyeyouxiangongsi
Dirección: Shuangchenglu 803nong11hao1602A-1609shi, baoshanqu,
shanghai 200000 CN.
Importado a AUS: SIHAO PTY LTD, 1 ROKEVA STREETEASTWOOD NSW
2122 Australia
Importado a EE. UU.: Sanven Technology Ltd., Suite 250, 9166 Anaheim
Place, Rancho Cucamonga, CA 91730
REP
EC
E-CrossStu GmbH
Mainzer Landstr.69, 60329 Frankfurt am Main.
REP
UK
YH CONSULTING LIMITED.
C/O YH Consulting Limited Office 147, Centurion House,
London Road, Staines-upon-Thames, Surrey, TW18 4AX


- 14 -
Techniczny Wsparcie i certyfikat e-gwarancji
www.vevor.com/support
CZYSTA FALA SINUSOWA INWERTER
INSTRUKCJA OBSŁUGI
We continue to be committed to provide you tools with competitive price.
"Save Half", "Half Price" or any other similar expressions used by us only represents an
estimate of savings you might benefit from buying certain tools with us compared to the major
top brands and does not necessarily mean to cover all categories of tools offered by us. You
are kindly reminded to verify carefully when you are placing an order with us if you are
actually saving half in comparison with the top major brands.

- 1 -
MODELE: TP2500W / TP3500W / TP5000W / TM2000W / TP2000W / TM2500W
/ TM1250W / TM3000W / TM3500W / TP3000W / TP1500W / TM-6000W
(Zdjęcie ma charakter poglądowy, proszę odnosić się do rzeczywistego
obiektu)
Have product questions? Need technical support? Please feel free to
contact us:
Technical Support and E-Warranty Certificate
www.vevor.com/support
NEED HELP? CONTACT US!
This is the original instruction, please read all manual instructions
carefully before operating. VEVOR reserves a clear interpretation of our
user manual. The appearance of the product shall be subject to the
product you received. Please forgive us that we won't inform you again if
there are any technology or software updates on our product.
PURE SINE
WAVE INVERTER
- 2 -
Ostrzeżenie: Aby zminimalizować ryzyko obrażeń, użytkownik
powinien uważnie przeczytać instrukcję obsługi.
To urządzenie jest zgodne z częścią 15 przepisów FCC. Jego
działanie podlega następującym dwóm warunkom: (1) To urządzenie
nie może powodować szkodliwych zakłóceń i (2) to urządzenie musi
akceptować wszelkie odbierane zakłócenia, w tym zakłócenia, które
mogą powodować niepożądane działanie.
Ten produkt podlega postanowieniom Dyrektywy Europejskiej
2012/19/WE. Symbol przedstawiający przekreślony kosz na śmieci na
kółkach oznacza, że produkt wymaga oddzielnej zbiórki odpadów w
Unii Europejskiej. Dotyczy to produktu i wszystkich akcesoriów
oznaczonych tym symbolem. Produktów oznaczonych w ten sposób
nie można wyrzucać razem ze zwykłymi odpadami domowymi, ale
należy je oddać do punktu zbiórki w celu recyklingu urządzeń
elektrycznych i elektronicznych.
OSTRZEŻENIE:
1. Moc obciążenia (urządzeń), zwana mocą wyjściową falownika, nie może
być większa od mocy znamionowej, gdyż mogłoby to spowodować awarię
falownika.
2. Upewnij się, że napięcie wejściowe falownika akumulatora jest zgodne z
napięciem znamionowym. Falownik ulegnie uszkodzeniu, jeśli napięcie
wejściowe będzie większe niż 1,6-krotność napięcia znamionowego.
3. W przypadku podłączenia obciążenia indukcyjnego lub
pojemnościowego należy odwrócić moc obciążenia równą 3–5-krotności
mocy obciążenia (czyli 4–6-krotności mocy urządzenia).
4. Czerwony do bieguna dodatniego, czarny do bieguna ujemnego,
podłącz je prawidłowo. Odwrotne podłączenie stopiłoby bezpiecznik, może
działać normalnie po wymianie bezpiecznika i prawidłowym podłączeniu.
5. Zabrania się podłączania falownika do zasilania sieciowego.
HIGH FREQUENCY INVERTER INSTRUCTIONS FOR USE
Przed użyciem produktów prosimy o dokładne zapoznanie się z niniejszą

- 3 -
instrukcją.
Dziękujemy za wybranie dostarczonego przez nas falownika
samochodowego. Mamy nadzieję, że nasze produkty zapewnią Ci
najbardziej satysfakcjonującą obsługę.
1) Opis produktu
Ten falownik wysokiej częstotliwości ma dostosowaną technologię SPWM i
jest wysoce wydajny i niezawodny. Produkt przeszedł ls09001:2000.
Jednak nieprawidłowa obsługa lub
niewłaściwe użycie może spowodować obrażenia ciała lub straty, dlatego
należy zawsze przestrzegać instrukcji i informacji zawartych w niniejszej
instrukcji.
2) Parametry techniczne
Model
1000 W
1500 W
2000W-
2500 W
3000 W-
3500 W
4000 W
5 000 W -
6000 W
Wejście
wyjście
DC12V/24V/48V/60V (nie automatycznie)
Napięcie
wyjściowe
AC 220 V ± 10% -120 V ± 10% ( nie automatycznie )
Strata kiedy
NIE
obciążeni
e
< 1A
< 1 .2A
< 1 .8A
Fala
wyjściowa
Czysta fala sinusoidalna - Fala modyfikowana
Wzrost Moc
≤2000 W
≤3000 W
≤4000W-
500 0W
≤6000-
7000 W
≤8000 W
≤10 kW -
12K W
Wyjście
częstotliw
ość
50Hz ± 0 .5 Hz lub 60 Hz ±0 .5 Hz
Efektywność
≥85%
Nadmierne
napięcie
≥16V - ≥30V - ≥60 V - ≥75 V

- 4 -
Niskie
napięcie
zamykając
y
≤9 .5V- ≤20V - ≤40 V - ≤50 V
Nad
temperatura
zamykający
> 80 ℃
Otoczenia
temperatura
-10 ℃ - +45 ℃
Uwaga: Zasilacz powinien być umieszczony w suchym miejscu wokół
otworów wentylacyjnych. W odległości 1 metra nie mogą znajdować się
żadne przedmioty łatwopalne. Należy bezwzględnie zapobiegać
powstawaniu pożaru.
8)Funkcje ochronne
Zabezpieczenie przed przeciążeniem przy przeciążeniu 125% falownik
wyśle alarm i zatrzyma się po 20 sekundach.
1. Obciążenia zostaną zredukowane do akceptowalnego poziomu ,
falownik wznowi pracę .
2. Zabezpieczenie przed zwarciem : falownik jest wyposażony w
zabezpieczenie przed zwarciem .
3. Zabezpieczenie przed przegrzaniem : gdy temperatura wewnątrz
falownika osiągnie 80 ℃ , zaświeci się CZERWONA lampka kontrolna .
Falownik przestanie pracować , gdy temperatura spadnie do
akceptowalnego poziomu , falownik automatycznie wznowi
pracę .
4. Ochrona przed niskim napięciem : gdy napięcie akumulatora spadnie
poniżej ustawionego poziomu , falownik wyśle alarm za pomocą sygnału
dźwiękowego . Gdy napięcie akumulatora będzie spadać do poziomu
wyłączenia , falownik wyda sygnał dźwiękowy , a CZERWONA dioda LED
zaświeci się , falownik przestanie pracować , gdy napięcie akumulatora
wzrośnie do poziomu ponownego uruchomienia , falownik automatycznie
wznowi pracę .

- 5 -
5. Zabezpieczenie przed przepięciem : gdy napięcie wejściowe jest
wyższe od ustawionego poziomu , falownik przestanie pracować , gdy
napięcie wejściowe będzie normalne , falownik przestanie
pracować .
automatycznie wznawia pracę .
6. Zabezpieczenie przed odwrotnym podłączeniem : w przypadku
odwrotnego podłączenia bezpiecznik falownika ulegnie spaleniu . W takim
przypadku należy wyłączyć falownik , odłączyć źródło zasilania i wymienić
bezpiecznik .
POŁĄCZENIE ODWROTNE JEST SUROWO ZABRONIONE .
12. Wyświetlacz LCD: Wyświetlacz inwertera w postaci ekranu LCD LCD,
wyświetla różne stany, szczegółowe wprowadzenie przedstawiono na
poniższych rysunkach.
4 ) Instalacja
1. Funkcją falownika jest zamiana napięcia stałego 12 V/24 V/48 V/60 V na
napięcie przemienne 110 V/220 V. Przed podłączeniem należy upewnić
się, że falownik jest wyłączony.
2. Podłączając falownik do akumulatora, należy upewnić się, że napięcie
akumulatora jest zgodne z napięciem odniesienia falownika! ! !
3. Podłącz czerwony kabel falownika do dodatniego bieguna akumulatora.
Podłącz
Czarny kabel falownika do ujemnego bieguna akumulatora. Nie podłączaj
kabla odwrotnie, w przeciwnym razie bezpiecznik falownika ulegnie
spaleniu.
4. Włącz zasilanie falownika. W tym momencie zaświeci się zielona
(niebieska) lampka kontrolna, co oznacza, że falownik działa prawidłowo.
5. Podłącz obciążenia do wyjścia prądu przemiennego falownika, nie
podłączaj
przeciążenie. W przypadku przeciążenia falownik wyśle alarm i zatrzyma
się.
Aby ponownie uruchomić falownik, należy najpierw wyłączyć falownik na 5
sekund, zmniejszyć obciążenie i ponownie włączyć.

- 6 -
5) Środki ostrożności
Falowniki są projektowane, produkowane i testowane zgodnie z normami
bezpieczeństwa. Jednak jako produkt elektryczny i elektryczny, musi być
instalowany, obsługiwany i konserwowany ściśle według powiązanych
instrukcji bezpieczeństwa, jak następuje:
1. Odwrotne podłączenie falownika do akumulatora jest surowo
zabronione , gdyż spowoduje spalenie bezpiecznika falownika .
2. Sprawdź dokładnie, czy napięcie akumulatora jest zgodne z napięciem
wejściowym prądu stałego falownika. Niedopasowanie połączenia między
falownikiem a akumulatorem może spowodować poważne uszkodzenia.
3. Sprawdź dokładnie, czy połączenia są prawidłowe, upewnij się, że są
dobrze dokręcone i solidne.
4. Nie przedłużaj kabla zasilającego falownika .
5. Jeżeli falownik nie jest używany, należy go wyłączyć i odłączyć od
systemu.
6. Unikaj kontaktu z jakimikolwiek ciałami obcymi lub płynami. Nie dotykaj
falownika mokrą ręką. Trzymaj produkt z dala od dzieci. Unikaj używania
go w wilgotnych, zakurzonych i o wysokiej temperaturze. Nie używaj tego
produktu w miejscach łatwopalnych i palnych.
7. Zainstaluj produkt w miejscu o dobrej wentylacji, unikaj używania
produktu na lub
w pobliżu gorących obiektów, takich jak grzejnik elektryczny itp. Nie należy
przykrywać falownika, unikać bezpośredniego działania promieni
słonecznych, wilgoci i wody.
8. Tego falownika nie można podłączać równolegle z innymi falownikami.
9. Podłączanie tego produktu do sieci miejskiej jest surowo
zabronione .
10. Nie próbuj naprawiać falownika . Po jego otwarciu gwarancja ulega
unieważnieniu .
6) Rozwiązywanie problemów
Jeżeli nie ma wyników, sprawdź następujące kwestie :
1. Nadmierne używanie urządzeń elektrycznych, zbyt duże obciążenie.
Rozwiązanie: Zmniejsz liczbę urządzeń elektrycznych, całkowita moc
elektryczna powinna być mniejsza niż moc znamionowa falownika.

- 7 -
2. Zabezpieczenie przed przegrzaniem. ROZWIĄZANIE: Zmniejszyć
chłodzenie obciążenia i ponownie uruchomić po 15 minutach. (Kiedy
temperatura latem jest wysoka lub warunki odprowadzania ciepła są złe,
należy odpowiednio zmniejszyć wykorzystanie całkowitej mocy urządzeń
elektrycznych.)
3. Po zwarciu należy wymienić bezpiecznik na taki sam o tej samej
pojemności.
4. Luźne połączenie kabla : upewnij się , że kabel jest solidnie i ciasno
podłączony .
połączony
5. Niskie napięcie akumulatora . Naładuj akumulator .
6. Wyczerpana bateria : Wymień baterię , ponieważ bateria może się
wyczerpać z biegiem lat .
7) Gwarancja
1. Firma zapewnia bezpłatny okres gwarancji wynoszący jeden rok. Należy
pamiętać, że dealer jest w kontakcie z firmą zajmującą się naprawami i
gwarancją.
2. Zakres uszkodzeń objętych niniejszą klauzulą ubezpieczeniową nie
obejmuje uszkodzeń powstałych na skutek czynników zewnętrznych:
nieprawidłowej instalacji, niewłaściwego użytkowania lub niewłaściwej
eksploatacji, nieautoryzowanej konserwacji prywatnej, uszkodzeń
powstałych podczas transport itp.
8) Losowe akcesoria
Produkty są dokładnie testowane i sprawdzane przed wysyłką, ale nadal
istnieje możliwość uszkodzenia podczas transportu, prosimy o dokładne
sprawdzenie sprzętu przed instalacją. Jeśli występują jakiekolwiek
uszkodzenia, skontaktuj się z dystrybutorem na czas.
1. Przenośny zasilacz inwerterowy Jeden
2. Para kabli zasilających
3. Kopia instrukcji obsługi produktu
4. Kopia zapasowego bezpiecznika samochodowego
5. Worek pochłaniający wilgoć
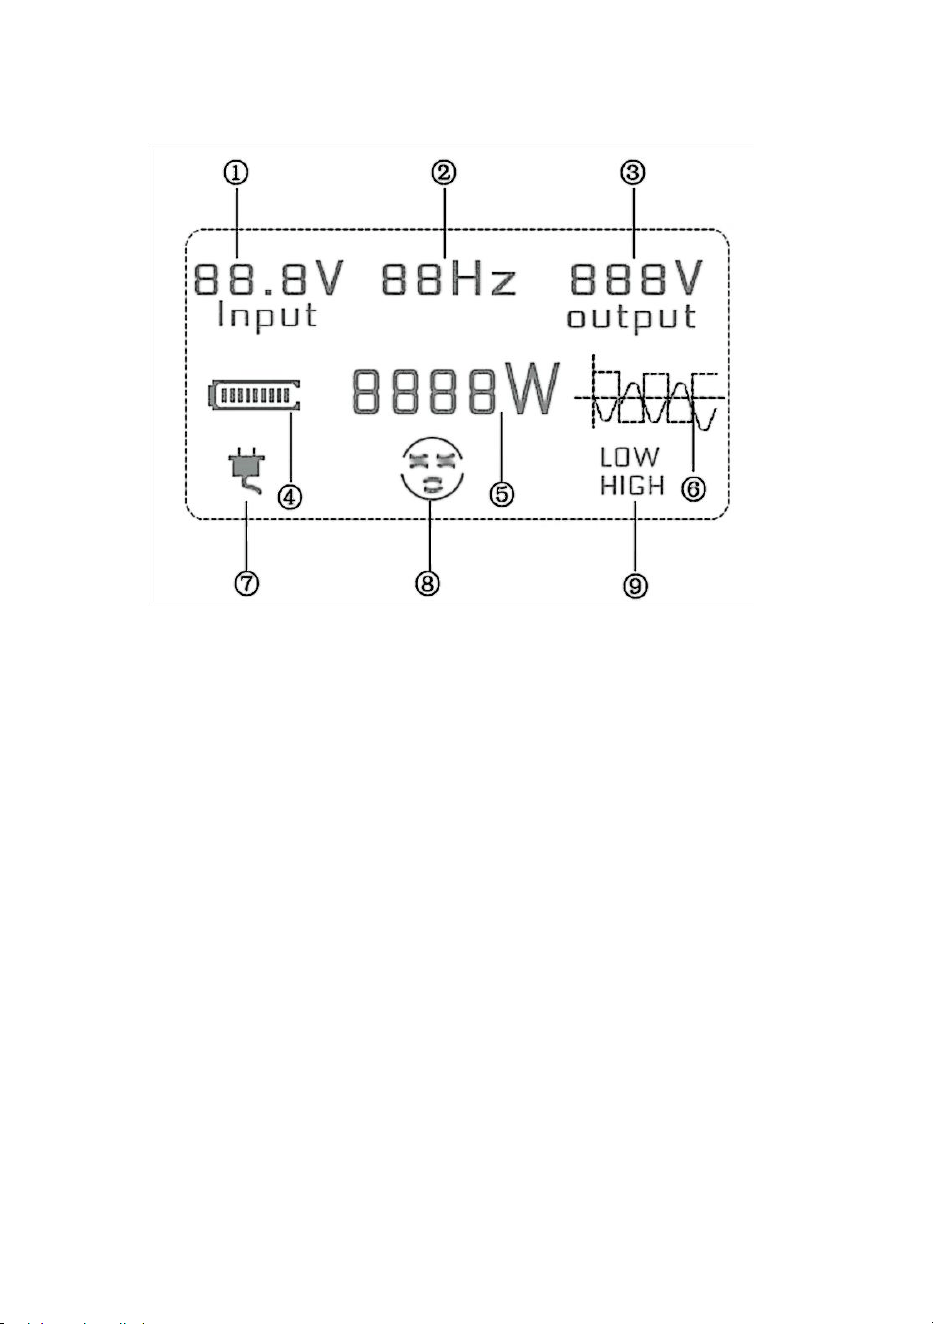
- 8 -
6. Zestaw ekranów zewnętrznych (w tym kablowy)
9) Schemat panelu
①:Napięcie wejściowe produktu ②: Częstotliwość ③:Napięcie wyjściowe
produktu
④:Moc baterii ⑤:Moc produktu ⑥:Forma fali produktu
⑦:Podłączenie do sieci (z funkcją ładowania) ⑧:Status roboczy
⑨:Ochrona przed wysokim/niskim napięciem
10) Instrukcje dotyczące zewnętrznego przewodowego sprzętu
zdalnego sterowania
Wprowadzenie do sprzętu: Falownik można zdalnie włączać i wyłączać.
Cyfrowy wyświetlacz wartości napięcia akumulatora. Sprzęt przyjmuje
schemat projektu przełącznika ściennego, który można zainstalować w
kamperach i domach zgodnie z potrzebami użytkownika. W zestawie
znajdują się wygodne naklejki, które można nakleić będzie.

- 9 -
Schemat podłączenia pilota zdalnego sterowania
Schemat podłączenia pilota zdalnego sterowania
①:Battery power
②:Fault indicator
③:Input voltage
④:Work indicator
⑤:Inverter switch key
①:Backlight On/Of
②:Lead-acid / Lithium
③:Inverter switch key
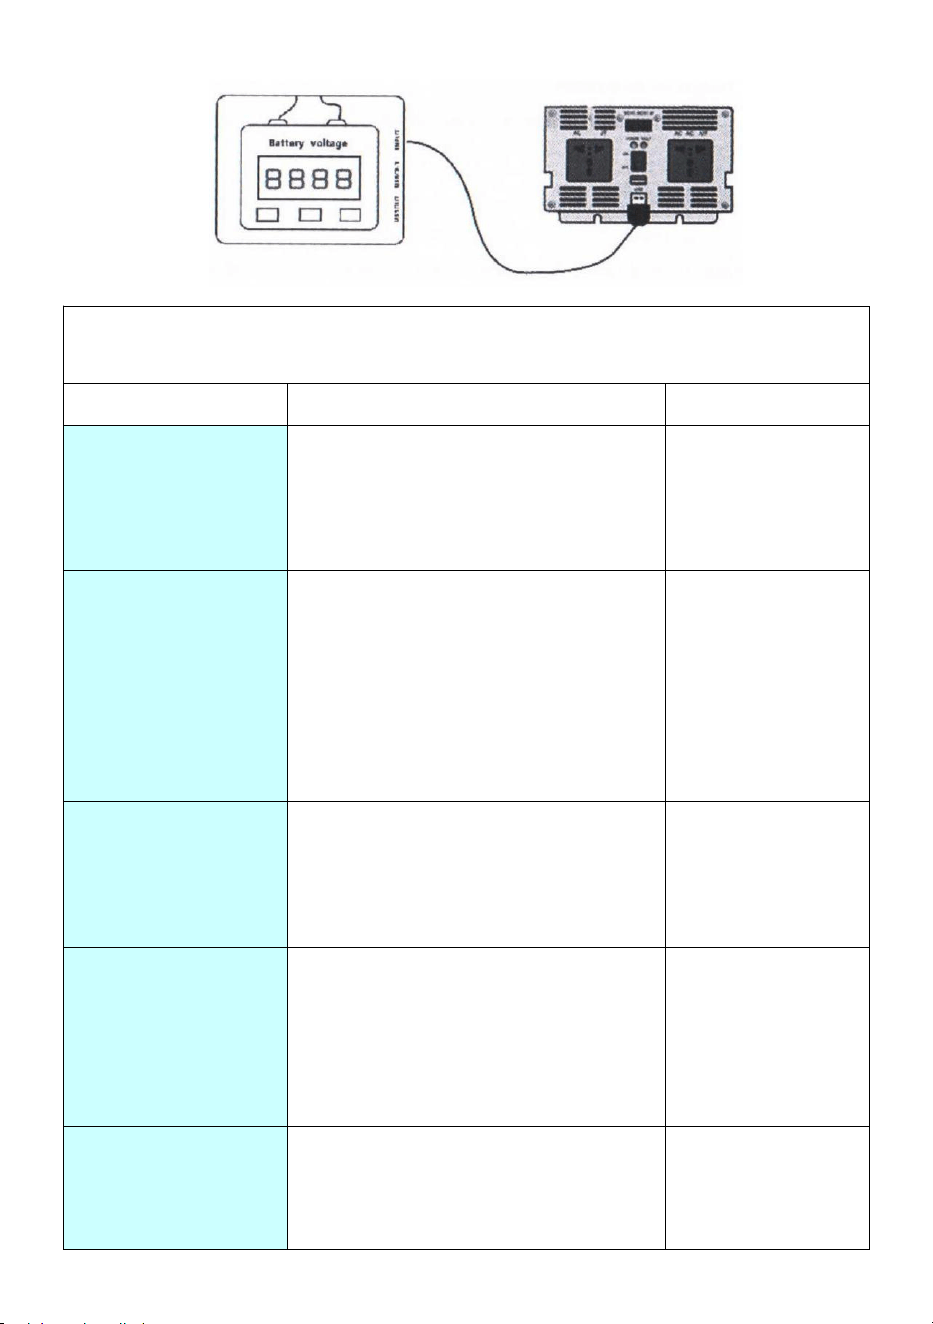
- 10 -
Podstawowa metoda usuwania usterek i rozwiązywania problemów z
falownikiem
wada
Ucieleśnienie błędu
Wykluczenia
Bateria jest słaba
Zacznij od zrobienia dźwięk ala rm (sędzia
dźwięk alarmu Jak jeden , BI-BI-BI... ),dioda
LED czerwona światło miga, napięcie nadal
spada I Maszyna wyłącza n.
Bateria Jest w
pełni
oskarżony
Ten bateria woltaż jest
wysoki
Najpierw rozlegnie się dźwięk alarmu
(sędzia alarm dźwięk Jest dwa, BIBI - BIBI -
BIBI...) TO PROWADZONY czerwone
światło błyski,
Napięcie nadal rośnie i maszyna się
wyłącza w dół.
Bateria jest w pełni
naładowany lub
zastąpiony W linia z
nominalną
napięcie ten
falownik
Za duże obciążenie
Pierwsze wydanie alarm dźwięk (osądzać
dźwięk alarmu jako A ciągły alarm,
BIBIBIBIBIBI... ), dioda LED miga
czerwony i maszyna się wyłącza w dół .
Zmniejszyć
obciążenie
Temperatura jest za
wysoka
Najpierw rozlegnie się dźwięk alarmu
(sędzia alarm dźwięk Jest trzy, BIBIBI -
BIBIBI - BI BIBI... ), dioda LED miga na
czerwono, temperatura nadal rośnie, a
maszyna zamyka w dół.
Odejmij obciążenie I
czekać na falownik do
Fajny w dół
Wyjście jest zwarte
Dźwięk alarmu bez uszkodzeń ten obwód
(alarm sędziego) dźwięk Jak ciągły
alarmu, BIBIBIBIBI. ..)
Po prostu odłącz
krótki
okrążenie

- 11 -
Akumulator jest
włączony z powrotem
Wbudowany bezpiecznik jest
zdmuchnąć I ten maszyna jest
włączona I nie reaguje.
Wymień bezpiecznik
na nowy

- 12 -
Producent: Shanghaimuxinmuyeyouxiangongsi
Adres: Shuangchenglu 803nong11hao1602A-1609shi, baoshanqu, szanghaj
200000 CN.
Importowane do AUS: SIHAO PTY LTD, 1 ROKEVA STREETEASTWOOD
NSW 2122 Australia
Importowane do USA: Sanven Technology Ltd., Suite 250, 9166 Anaheim
Place, Rancho Cucamonga, CA 91730
REP
EC
E-CrossStu GmbH
Mainzer Landstr.69, 60329 Frankfurt am Main.
REP
UK
YH CONSULTING LIMITED.
C/O YH Consulting Limited Office 147, Centurion House,
London Road, Staines-upon-Thames, Surrey, TW18 4AX


- 14 -
Technisch Ondersteuning en E-garantiecertificaat
www.vevor.com/support
Zuivere sinusomvormer
GEBRUIKERSHANDLEIDING
We continue to be committed to provide you tools with competitive price.
"Save Half", "Half Price" or any other similar expressions used by us only represents an
estimate of savings you might benefit from buying certain tools with us compared to the major
top brands and does not necessarily mean to cover all categories of tools offered by us. You
are kindly reminded to verify carefully when you are placing an order with us if you are
actually saving half in comparison with the top major brands.

- 1 -
MODEL: TP2500W / TP3500W / TP5000W / TM2000W / TP2000W / TM2500W /
TM1250W / TM3000W / TM3500W / TP3000W / TP1500W / TM-6000W
(De afbeelding is alleen ter referentie, kijk naar het daadwerkelijke object)
Have product questions? Need technical support? Please feel free to
contact us:
Technical Support and E-Warranty Certificate
www.vevor.com/support
NEED HELP? CONTACT US!
This is the original instruction, please read all manual instructions
carefully before operating. VEVOR reserves a clear interpretation of our
user manual. The appearance of the product shall be subject to the
product you received. Please forgive us that we won't inform you again if
there are any technology or software updates on our product.
PURE SINE
WAVE INVERTER

- 2 -
Waarschuwing: om het risico op letsel te verkleinen, moet de
gebruiker de gebruiksaanwijzing zorgvuldig lezen.
Dit apparaat voldoet aan Deel 15 van de FCC-regels. De werking is
onderworpen aan de volgende twee voorwaarden: (1) Dit apparaat
mag geen schadelijke interferentie veroorzaken, en (2) dit apparaat
moet alle ontvangen interferentie accepteren, inclusief interferentie
die ongewenste werking kan veroorzaken.
Dit product is onderworpen aan de bepalingen van de Europese
richtlijn 2012/19/EG. Het symbool met een doorgestreepte afvalbak
geeft aan dat het product in de Europese Unie gescheiden
afvalinzameling vereist. Dit geldt voor het product en alle accessoires
die met dit symbool zijn gemarkeerd. Producten die als zodanig zijn
gemarkeerd, mogen niet met het normale huishoudelijke afval worden
weggegooid, maar moeten worden ingeleverd bij een inzamelpunt
voor recycling van elektrische en elektronische apparaten.
WAARSCHUWING:
1. Het vermogen van de belasting (apparaten), oftewel het
uitgangsvermogen van de omvormer, mag niet groter zijn dan het
nominale vermogen. Dit kan ertoe leiden dat de omvormer niet meer werkt.
2. Zorg ervoor dat de ingangsspanning van de omvormer van de batterij
overeenkomt met de nominale spanning. De omvormer raakt beschadigd
als de ingangsspanning hoger is dan 1,6 keer de nominale spanning.
3. Bij aansluiting op inductieve of capacitieve belasting, dient u de
toegestane belasting 3-5 keer om te draaien (oftewel 4-6 x het vermogen
van het apparaat).
4. Rood op de positieve pool, zwart op de negatieve pool, sluit het correct
aan. Omgekeerde aansluiting zou de zekering doen smelten, het zou
normaal kunnen werken na het vervangen van de zekering en het correct
aansluiten.
5. Het is verboden de omvormer op het lichtnet aan te sluiten.
HIGH FREQUENCY INVERTER INSTRUCTIONS FOR USE

- 3 -
Lees deze handleiding zorgvuldig door voordat u het product gebruikt.
Bedankt dat u voor de door ons geleverde voertuigomvormer hebt gekozen.
Wij hopen dat onze producten u de meest tevreden service kunnen bieden.
1) Productbeschrijving
Deze hoogfrequente omvormer heeft SPWM-technologie aangepast en is
zeer efficiënt en betrouwbaar. Het product is lS09001:2000 gepasseerd.
Echter, onjuiste bediening of
Onjuist gebruik kan nog steeds leiden tot letsel of verlies. De instructies en
informatie in deze handleiding moeten altijd worden opgevolgd.
2) Technische parameters
Model
1000W
1500W
2000W-
2500 W
3000W-
3500W
4000W
5 000W -
6000W
Invoer-uitvoer
DC12V/24V/48V/60V (niet automatisch)
Uitgangsspanni
ng
AC 220V±10% -120V±10% ( niet automatisch )
Verlies
wanneer
Nee laden
< 1A
< 1 .2A
< 1 .8A
Uitgangsgolf
Zuivere sinusgolf - Gewijzigde golf
Golf Stroom
≤2000 W
≤3000 W
≤4000W-
500 0W
≤6000-
7000W
≤8000 W
≤10 KW -
12K W
Uitvoer
frequentie
50Hz ± 0 .5 Hz of 60 Hz ±0 .5 Hz
Efficiëntie
≥85%
Overspanning
≥16V - ≥30V - ≥60V - ≥75V
Lage
spanning
afsluiten
≤9 .5V - ≤20V - ≤40V - ≤50V
Over
temperatuur
afsluiten
> 80 ℃

- 4 -
Omgeving
temperatuur
-10 ℃ - +45 ℃
Let op: Zorg ervoor dat de stroomvoorziening rondom de ventilatie droog
blijft. Binnen een straal van 1 meter mogen zich geen brandbare
voorwerpen bevinden. Voorkom dat er brand ontstaat.
9)Beschermende functies
Overbelastingsbeveiliging Bij een overbelasting van 125% zal de
omvormer een alarm geven en na 20 seconden stoppen met werken.
1. De belasting wordt teruggebracht tot het geaccepteerde niveau , de
omvormer zal weer gaan werken .
2. Kortsluitingsbeveiliging : de omvormer is voorzien van
kortsluitingsbeveiliging .
3. Overtemperatuurbeveiliging : wanneer de binnentemperatuur van de
omvormer 80 ℃ bereikt , gaat het RODE indicatielampje branden . De
omvormer stopt met werken . Zodra de temperatuur daalt tot het
geaccepteerde niveau , hervat de omvormer automatisch het
werk .
4. Lage spanningsbeveiliging : wanneer de accuspanning onder het
ingestelde niveau komt , zal de omvormer een alarmsignaal geven door te
piepen . Wanneer de accuspanning blijft dalen tot het uitschakelniveau ,
zal de omvormer een piepsignaal geven en zal de RODE LED gaan
branden , zal de omvormer stoppen met werken , wanneer de
accuspanning wordt verhoogd tot het herstartniveau , zal de omvormer
automatisch weer gaan werken .
5. Overspanningsbeveiliging : wanneer de ingangsspanning hoger is dan
het ingestelde niveau , stopt de omvormer met werken . Wanneer de
ingangsspanning normaal is , stopt de omvormer met
werken .
automatisch het werk hervatten .
6. Bescherming tegen omgekeerde aansluiting : zodra er een omgekeerde
aansluiting is , zal de zekering van de omvormer doorbranden . Schakel in

- 5 -
dat geval de omvormer uit , koppel de stroombron los en vervang de
zekering .
OMGEKEERDE VERBINDINGEN ZIJN TEN STRENGSTE
VERBODEN .
13. LCD-scherm: Omvormerscherm als LCD LCD-scherm, geeft
verschillende toestanden weer. De volgende tekeningen vormen een
gedetailleerde introductie.
4 ) Installatie
1. De functie van de omvormer is om de DC 12V/24V/48V/60V spanning
om te zetten in AC 110V/220V. Zorg ervoor dat de omvormer is
uitgeschakeld voordat u hem aansluit.
2. Wanneer u de omvormer op de accu aansluit, zorg er dan voor dat de
accuspanning overeenkomt met de referentiespanning van de
omvormer! ! !
3. Sluit de rode kabel van de omvormer aan op de positieve pool van de
accu.
de zwarte kabel van de omvormer naar de negatieve pool van de batterij.
Sluit de kabel niet omgekeerd aan, anders brandt de zekering van de
omvormer door.
4. Schakel de schakelaar van de omvormer in. Het groene (blauwe)
indicatielampje gaat branden, wat aangeeft dat de omvormer goed werkt.
5. Sluit de lasten aan op de AC-uitgang van de omvormer, maar niet op de
AC-uitgang.
overbelasting. Bij overbelasting zal de omvormer een alarm geven en
stoppen met werken.
Om de omvormer opnieuw te starten, schakelt u de omvormer eerst 5
seconden uit, verlaagt u de belasting en schakelt u deze vervolgens weer
in.
5) Voorzorgsmaatregelen
De omvormers zijn ontworpen, vervaardigd en getest volgens
veiligheidsnormen. Echter, als elektrisch en elektrisch product, moet het

- 6 -
strikt volgens de bijbehorende veiligheidsinstructies worden geïnstalleerd,
bediend en onderhouden, als volgt:
1. Omgekeerde aansluiting tussen de omvormer en de accu is ten
strengste verboden , omdat hierdoor de zekering van de omvormer
doorbrandt .
2. Controleer nogmaals of de spanning van de accu overeenkomt met de
DC-ingangsspanning van de omvormer. Een verkeerde aansluiting tussen
de omvormer en de accu kan ernstige schade veroorzaken.
3. Controleer nogmaals of de aansluitingen correct zijn en of ze stevig
vastzitten.
4. Verleng de stroomkabel van de omvormer niet .
5. Wanneer de omvormer niet in gebruik is, schakelt u deze uit en koppelt
u deze los van het systeem.
6. Vermijd contact met vreemde voorwerpen of vloeistoffen. Raak de
omvormer niet aan met natte handen. Houd het product buiten bereik van
kinderen. Vermijd gebruik in vochtige, stoffige, hoge temperatuur gebieden.
Gebruik dit product niet in een ontvlambare en brandbare omgeving.
7. Installeer het product op een goed geventileerde plaats. Vermijd het
gebruik van dit product op of
in de buurt van hete objecten zoals elektrische verwarming etc. Dek de
omvormer niet af en vermijd direct zonlicht, vocht en water.
8. Deze omvormer kan niet parallel met andere omvormers worden
aangesloten.
9. Het is ten strengste verboden om dit product op het stadsnet aan te
sluiten .
10. Probeer de omvormer niet te repareren . Zodra de omvormer is
geopend , vervalt de garantie.
6) Probleemoplossing
Als er geen uitvoer is, controleer dan het volgende :
1. Overmatig gebruik van elektrische apparaten, te zware belasting.
Oplossing: Verminder elektrische apparaten, het gebruik van het totale
elektrische vermogen moet lager zijn dan het nominale vermogen van de
omvormer.

- 7 -
2. Oververhittingsbeveiliging. OPLOSSING: Verminder de koelbelasting en
start na 15 minuten opnieuw op. (Als de zomertemperatuur hoog is of de
warmteafvoeromstandigheden slecht zijn, moet het gebruik van het totale
vermogen van elektrische apparaten dienovereenkomstig worden
verminderd.)
3. De zekering moet na het zekeren worden vervangen door een zekering
met dezelfde capaciteit
4. Maak de kabel los : zorg ervoor dat de kabel stevig en stevig
vastzit .
verbonden .
5. Lage spanning van de batterij . Laad de batterij op .
6. Batterij leeg: vervang de batterij , de batterij kan na verloop van jaren
leeg raken .
7) Garantie
1. Het bedrijf biedt een gratis garantieperiode van één jaar. Let op: de
dealer staat in contact met de garantie- en reparatiebranche.
2. De uitvalmarge van deze verzekeringsclausule omvat geen schade die
is veroorzaakt door externe factoren: onjuiste installatie, verkeerd gebruik
of onjuiste bediening, ongeautoriseerd privé-onderhoud, schade tijdens
vervoer, enz.
8) Willekeurige accessoires
Producten worden zorgvuldig getest en geïnspecteerd vóór verzending,
maar het is nog steeds mogelijk dat er schade optreedt tijdens het
transport. Controleer de apparatuur zorgvuldig vóór installatie. Neem bij
schade tijdig contact op met de distributeur.
1. Draagbare omvormervoeding Eén
2. Stroomkabelpaar
3. Een kopie van de productinstructiehandleiding
4. Een kopie van de reservezekering van de auto
5. Droogmiddelzak
6. Externe schermset (inclusief kabel)
9) Paneeldiagram

- 8 -
①:Productingangsspanning ②:Frequentie ③:Productuitgangsspanning
④:Batterijvermogen ⑤:Productvermogen ⑥:Productgolfvorm
⑦:Netaansluiting (met oplaadfunctie) ⑧:Werkstatus
⑨:Beveiliging tegen hoge spanning/lage spanning
10)Instructies voor externe bekabelde afstandsbedieningsapparatuur
Introductie van de apparatuur: De omvormer kan op afstand worden
bediend om aan en uit te zetten. Digitale weergave van de accuspanning.
De apparatuur maakt gebruik van een wandschakelaarontwerp, dat kan
worden geïnstalleerd in campers en huizen volgens de behoeften van de
gebruiker. Wordt geleverd met handige stickers, die kunnen worden
geplakt op zullen.

- 9 -
Schema voor aansluiting op afstandsbediening
Schema voor aansluiting op afstandsbediening
①:Battery power
②:Fault indicator
③:Input voltage
④:Work indicator
⑤:Inverter switch key
①:Backlight On/Of
②:Lead-acid / Lithium
③:Inverter switch key

- 10 -
Basisfout van omvormer en probleemoplossing op de juiste manier
schuld
Fout belichaming
Uitsluitingen
De batterij is bijna leeg
Begin met het maken van een ala rm geluid
(rechter het alarmgeluid als een ,
BI-BI-BI... ), de LED rood licht flitsen, De
spanning blijft afnemen En de machine
schakelt uit n.
De batterij is
volledig
opgeladen
De batterij spanning is
hoog
Alarmgeluid eerst (rechter alarm geluid is
twee, BIBI - BIBI - BIBI...) DE LED rood licht
flitsen,
De spanning blijft stijgen en de machine
slaat af omlaag.
De batterij is
volledig opgeladen
of vervangen in in
lijn met de nominale
spanning van de
omvormer
Te veel belasting
Eerste uitgave een alarm geluid (oordeel
de alarmgeluid als A doorlopend alarm,
BIBIBIBIBIBI...), de LED knippert rood en
de machine slaat af omlaag .
Verminder de laden
De temperatuur is te
hoog
Alarmgeluid eerst (rechter alarm geluid is
drie, BIBIBI - BIBIBI - IK IK IK... ), knippert
de LED rood, de temperatuur blijft stijgen,
en de machine sluit omlaag.
Trek de belasting af
En
wacht op de
omvormer naar
koel omlaag
De uitgang is
kortgesloten
Alarmgeluid zonder schade de circuit
(rechter alarm) geluid als doorlopend
alarm, BIBIBIBIBI. ..)
Koppel gewoon
de kort circuit

- 11 -
De batterij is
teruggedraaid
De ingebouwde zekering is opgeblazen
En de machine is ingeschakeld En niet
reagerend.
Vervang de nieuwe
zekering

- 12 -
Fabrikant: Shanghaimuxinmuyeyouxiangongsi
Adres: Shuangchenglu 803nong11hao1602A-1609shi, baoshanqu, shanghai
200000 CN.
Geïmporteerd naar AUS: SIHAO PTY LTD, 1 ROKEVA
STREETEASTWOOD NSW 2122 Australië
Geïmporteerd naar de VS: Sanven Technology Ltd., Suite 250, 9166
Anaheim Place, Rancho Cucamonga, CA 91730
REP
EC
E-CrossStu GmbH
Mainzer Landstr.69, 60329 Frankfurt am Main.
REP
UK
YH CONSULTING LIMITED.
C/O YH Consulting Limited Office 147, Centurion House,
London Road, Staines-upon-Thames, Surrey, TW18 4AX


- 14 -
Teknisk Support och e-garanticertifikat
www.vevor.com/support
REN SINEWAVE INVERTER
ANVÄNDARMANUAL
We continue to be committed to provide you tools with competitive price.
"Save Half", "Half Price" or any other similar expressions used by us only represents an
estimate of savings you might benefit from buying certain tools with us compared to the major
top brands and does not necessarily mean to cover all categories of tools offered by us. You
are kindly reminded to verify carefully when you are placing an order with us if you are
actually saving half in comparison with the top major brands.
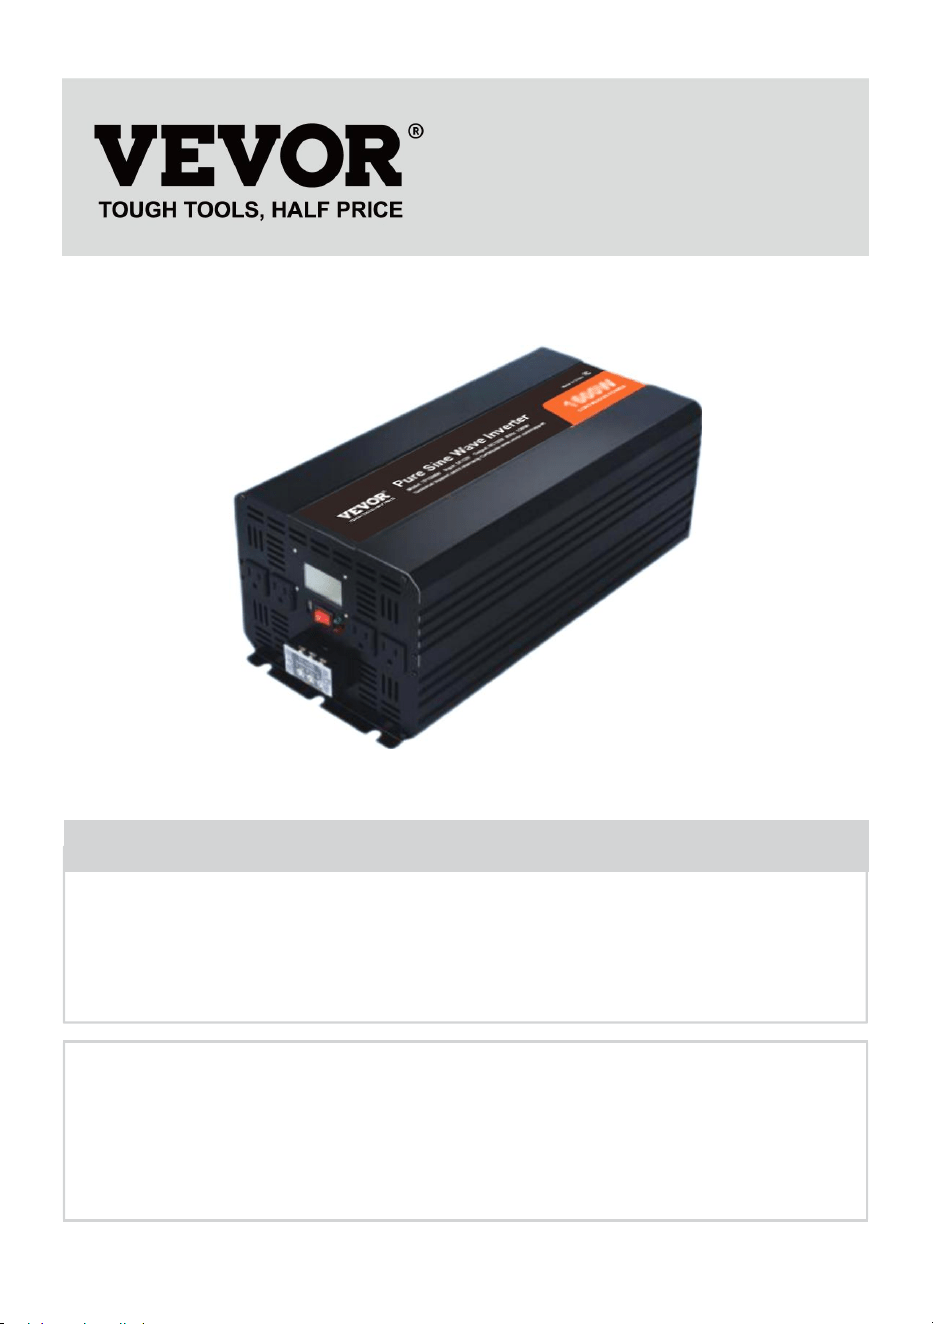
- 1 -
MODELL: TP2500W / TP3500W / TP5000W / TM2000W / TP2000W / TM2500W /
TM1250W / TM3000W / TM3500W / TP3000W / TP1500W / TM-6000W
(Bilden är endast för referens, se det faktiska objektet)
Have product questions? Need technical support? Please feel free to
contact us:
Technical Support and E-Warranty Certificate
www.vevor.com/support
NEED HELP? CONTACT US!
This is the original instruction, please read all manual instructions
carefully before operating. VEVOR reserves a clear interpretation of our
user manual. The appearance of the product shall be subject to the
product you received. Please forgive us that we won't inform you again if
there are any technology or software updates on our product.
PURE SINE
WAVE INVERTER
- 2 -
Varning - För att minska risken för skada måste användaren läsa
instruktionerna noggrant.
Denna enhet uppfyller del 15 av FCC-reglerna. Driften är föremål för
följande två villkor: (1) Den här enheten får inte orsaka skadliga
störningar och (2) den här enheten måste acceptera alla mottagna
störningar, inklusive störningar som kan orsaka oönskad funktion.
Denna produkt omfattas av bestämmelserna i det europeiska
direktivet 2012/19/EC. Symbolen som visar en soptunna korsad
anger att produkten kräver separat sophämtning i EU. Detta gäller för
produkten och alla tillbehör märkta med denna symbol. Produkter
märkta som sådana får inte slängas tillsammans med vanligt
hushållsavfall, utan måste lämnas till en insamlingsplats för
återvinning av elektriska och elektroniska apparater
VARNING:
1. Belastningseffekten (apparater) aka växelriktarens uteffekt får inte vara
större än märkeffekten, vilket kan leda till att växelriktaren inte fungerar.
2. Se till att ingångsspänningen för batteriets växelriktare överensstämmer
med märkspänningen, växelriktaren skulle skadas om ingångsspänningen
skulle vara större än 1,6 gånger märkspänningen.
3. När den är ansluten med induktiv eller kapacitiv belastning, vänd på
tillåten 3-5 gånger belastningseffekten. (alias 4-6 x Apparatkraft)
4. Röd till positiv pol, svart till negativ pol, vänligen anslut den ordentligt.
Omvänd anslutning skulle smälta säkringen, den kunde fungera normalt
efter att säkringen bytts ut och anslutits korrekt.
5. Förbjudet att koppla in växelriktaren till elnätet.
HIGH FREQUENCY INVERTER INSTRUCTIONS FOR USE
Läs denna bruksanvisning noggrant innan du använder produkterna.
Tack för att du valde den fordonsomriktare som tillhandahålls av oss. Vi
hoppas att våra produkter kan ge dig den mest nöjda servicen.

- 3 -
1) Produktbeskrivning
Denna högfrekvensomriktare har anpassad SPWM-teknik, och den är
mycket effektiv och pålitlig. Produkten har passerat lS09001:2000. Men
felaktig drift eller
felaktig användning kan fortfarande orsaka skada eller förlust, instruktioner
och information i denna manual måste följas hela tiden.
2) Tekniska parametrar
Modell
1000W
1500W
2000W-
2500 W
3000W-
3500W
4000W
5 000W -
6000W
Ingångsutgån
g
DC12V/24V/48V/60V (inte automatiskt)
Utspänning
AC 220V±10% -120V±10% ( inte automatiskt )
Förlust när
inga ladda
< 1A
< 1 .2A
< 1 .8A
Utgångsvåg
Ren sinusvåg - Modifierad våg
Svalla Driva
≤2000 W
≤3000 W
≤4000W-
500 0W
≤6000-
7000W
≤8000 W
≤10 KW -
12K W
Produktio
n frekvens
50 Hz ±0 .5 Hz eller 60 Hz ±0 .5 Hz
Effektivitet
≥85 %
Överspänning
≥16V - ≥30V - ≥60V - ≥75V
Låg
spänning
stängs
≤9 .5V - ≤20V - ≤40V - ≤50V
Över
temperatur
stängs
> 80 ℃
Omgivande
temperatur
-10 ℃ - +45 ℃
Obs: Håll strömförsörjningen runt ventilationen torr, inom 1 meter får inte

- 4 -
ha brandfarliga föremål, strikt förhindra brandorsaken.
10)Skyddsfunktioner
Överbelastningsskydd vid överbelastning på 125 % skickar växelriktaren
larm och slutar fungera efter 20 sekunder.
1. Belastningar reduceras till accepterad nivå , växelriktaren kommer att
återuppta arbetet .
2. Kortslutningsskydd : inverterare är med
kortslutningsskydd .
3 . Övertemperaturskydd : när invändig tempera ur av växeln på 80 ℃
tänds den RÖDA interna
ljuset . D e in v e rter kommer
att fortsätta att arbeta , när temperaturen sjunker till en accepterad nivå ,
kommer inve rtern automatiskt att återuppta arbetet .
4. Lågspänningsskydd : när batterispänningen är lägre än inställningsnivån
kommer växelriktaren att skicka larm med ett pip . NÄR
batterispänningen fortsätter att sjunka till sin slutnivå , piper växelriktaren
och den RÖDA LED - lampan tänds , slutar växelriktaren att
fungera , när batterispänningen har ökat till dess
omstartsnivå , kommer invertern att återuppta arbetet i g.
5. Överspänningsskydd : när ingångsspänningen är högre än
inställningsnivån , kommer inverteraren att sluta fungera med
ingångsvoten Det är normalt , det
kommer jag att göra
automatiskt arbete .
6. Omvänd anslutningsskydd : när det väl finns en omvänd anslutning
kommer invertsäkringen att brinna . I
det här fallet , vänligen stäng av inve rt e r , koppla ur strömkällan , byt
säkring .
OMVÄND ANSLUTNING STRIKT PRO HI BI T ED .
14. LCD-skärm: Inverter display som LCD LCD-skärm, visa en mängd
olika tillstånd, följande ritningar detaljerad introduktion.
4) I s t allation

- 5 -
1. Växelriktarens funktion är att omvandla DC 12v/24v/48v/60v spänning
till AC 110v/220V, innan anslutning, se till att växelriktaren är avstängd.
2. När växelriktaren ansluts till batteriet, se till att batterispänningen
överensstämmer med växelriktarens referensspänning! ! !
3. Anslut växelriktarens röda kabel till den positiva polen på batteriet,
Anslut
växelriktarens svarta kabel till batteriets negativa poly. Anslut inte kabeln
omvänt, annars kommer inverterns säkring att brinna.
4. Slå på växelriktarens strömbrytare, då den gröna (blå) indikatorlampan
lyser, vilket indikerar att växelriktaren fungerar korrekt.
5. Anslut belastningarna till växelriktarens AC-utgång, vänligen inte
överbelastning. vid överbelastning skickar växelriktaren larm och slutar
fungera.
För att starta om växelriktaren, stäng först av växelriktaren i 5 sekunder,
minska belastningen och slå på den igen.
5) Försiktighetsåtgärder
Växelriktarna är designade, tillverkade och testade enligt
säkerhetsstandarder. Men som en elektrisk och elektrisk produkt måste
den installeras, drivas och underhållas strikt enligt de relaterade
säkerhetsinstruktionerna enligt följande:
1. Omvänd anslutning mellan växelriktaren och batteriet är strikt förbjuden ,
den brinner växelriktarens säkring .
2. Vänligen dubbelkolla om spänningen på batteriet stämmer överens med
växelriktarens ingångslikspänning, felaktig anslutning mellan växelriktaren
och batteriet kan orsaka allvarlig skada.
3. Dubbelkolla om anslutningarna är korrekta, se till att anslutningarna är
täta och stadiga.
4. Utöka inte inve rterkraftskabeln .
5. När växelriktaren inte används, stäng av och koppla bort växelriktaren
från systemet.
6. Undvik att komma i kontakt med främmande föremål eller vätska. Rör
inte växelriktaren med våta händer. Håll produkten borta från barn. Undvik

- 6 -
att använda den i fuktiga, dammiga områden med hög temperatur. Använd
inte den här produkten i ett lättantändligt och brännbart område.
7. Installera produkten på väl ventilerad plats, undvik att använda denna
produkt på eller
närliggande heta föremål såsom elvärmare etc. Täck inte över
växelriktaren, undvik direkt solsken, fukt och vatten.
8. Denna växelriktare kan inte parallellkopplas med andra växelriktare.
9. Det är strängt förbjudet att ansluta den här produkten till stadens gr i d .
10. Försök inte att reparera växelriktaren . När växelriktaren har öppnat
upphör garantin .
6) Felsökning
Om det inte finns någon utdata, kontrollera följande :
1. Överdriven användning av elektriska apparater, för tung belastning.
Lösning: Minska elektriska apparater, användningen av elektrisk total
effekt bör vara mindre än växelriktarens märkeffekt.
2. Överhettningsskydd. LÖSNING: Minska belastningskylningen och starta
om efter 15 minuter. (Sommartemperaturen är hög eller
värmeavledningsförhållandena är dåliga, bör på lämpligt sätt minska
användningen av den totala effekten av elektriska apparater.)
3. Den måste byta ut säkringen med samma kapacitet efter säkringen
4. Lossa anslutningen av kabeln : se till att kablen är fast och
ordentligt
ansluten utg .
5. Låg batterispänning ; Lätt ladda batteriet .
6. Batteriet är slut : Vänligen byt batteri , batteriet kan förbrukas under
åren .
7) Garanti
1. Företaget tillhandahåller en gratis garantiperiod på ett år. Observera att
återförsäljaren är i kontakt med garanti- och reparationsverksamheten.
2. Felintervallet för denna försäkringsklausul omfattar inte skador orsakade
av yttre faktorer: felaktig installation, felaktig användning eller felaktig
användning, obehörigt privat underhåll, skador under transporter osv.
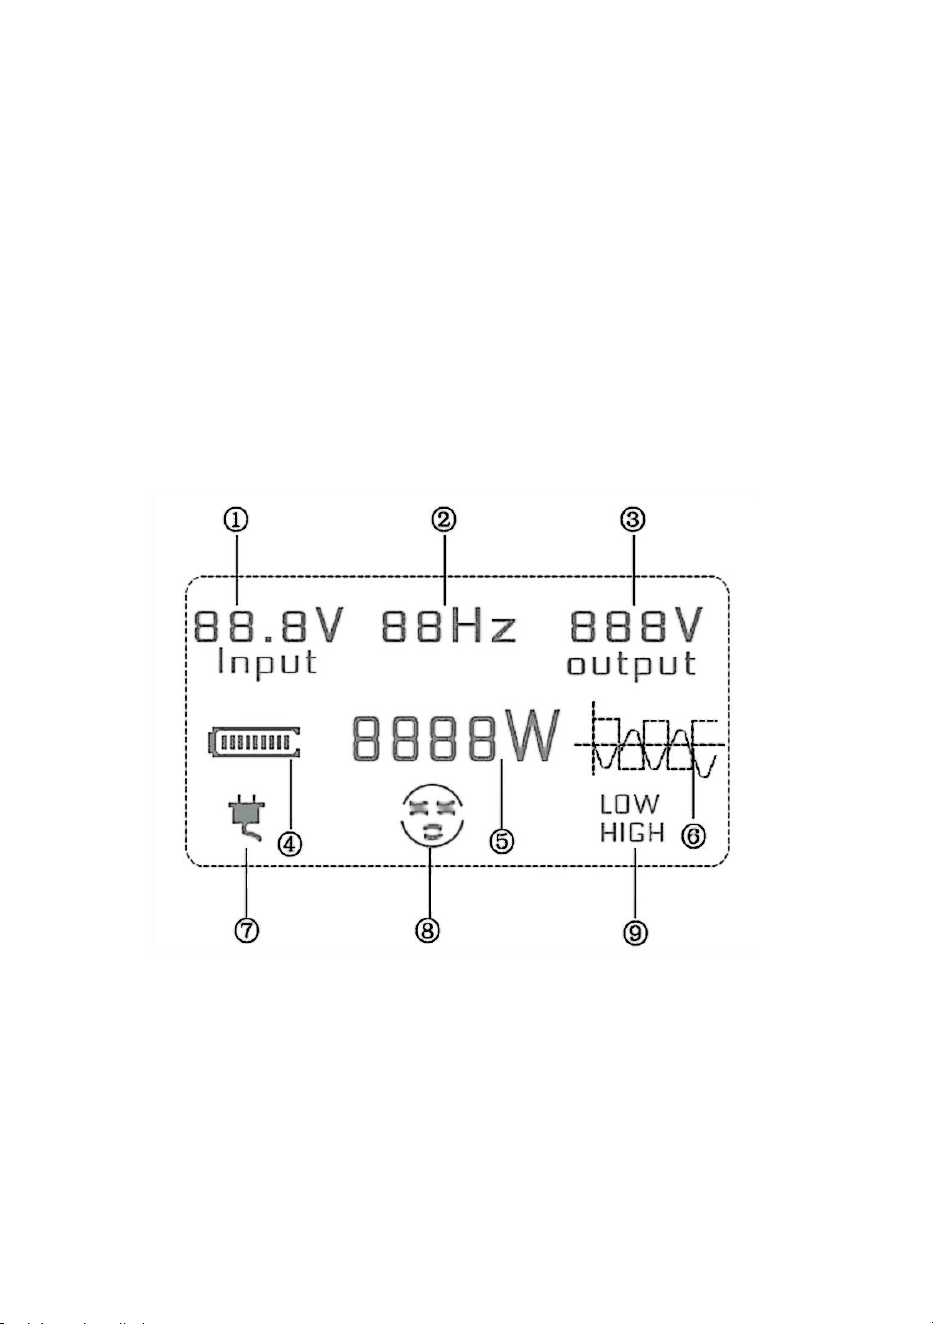
- 7 -
8) Slumpmässiga tillbehör
Produkter är noggrant testade och inspekterade innan de skickas, men det
är fortfarande möjligt att få skador under transporten, vänligen kontrollera
utrustningen noggrant före installation. Om det finns några skador,
kontakta distributören i tid.
1. Bärbar växelriktare strömförsörjning en
2. Strömkabelpar
3. En kopia av produktens bruksanvisning
4. En kopia av bilens reservsäkring
5. Torkmedelspåse
6. Extern skärmsats (inklusive kabel en)
9) Paneldiagram
①: Produktens ingångsspänning ②: Frekvens ③: Produktens utspänning
④: Batterikraft ⑤: Produktkraft ⑥: Produktvågform
⑦: Nätanslutning (med laddningsfunktion) ⑧:Arbetsstatus
⑨:Högspänning/lågspänningsskydd
10)Instruktioner för extern trådbunden fjärrkontrollutrustning
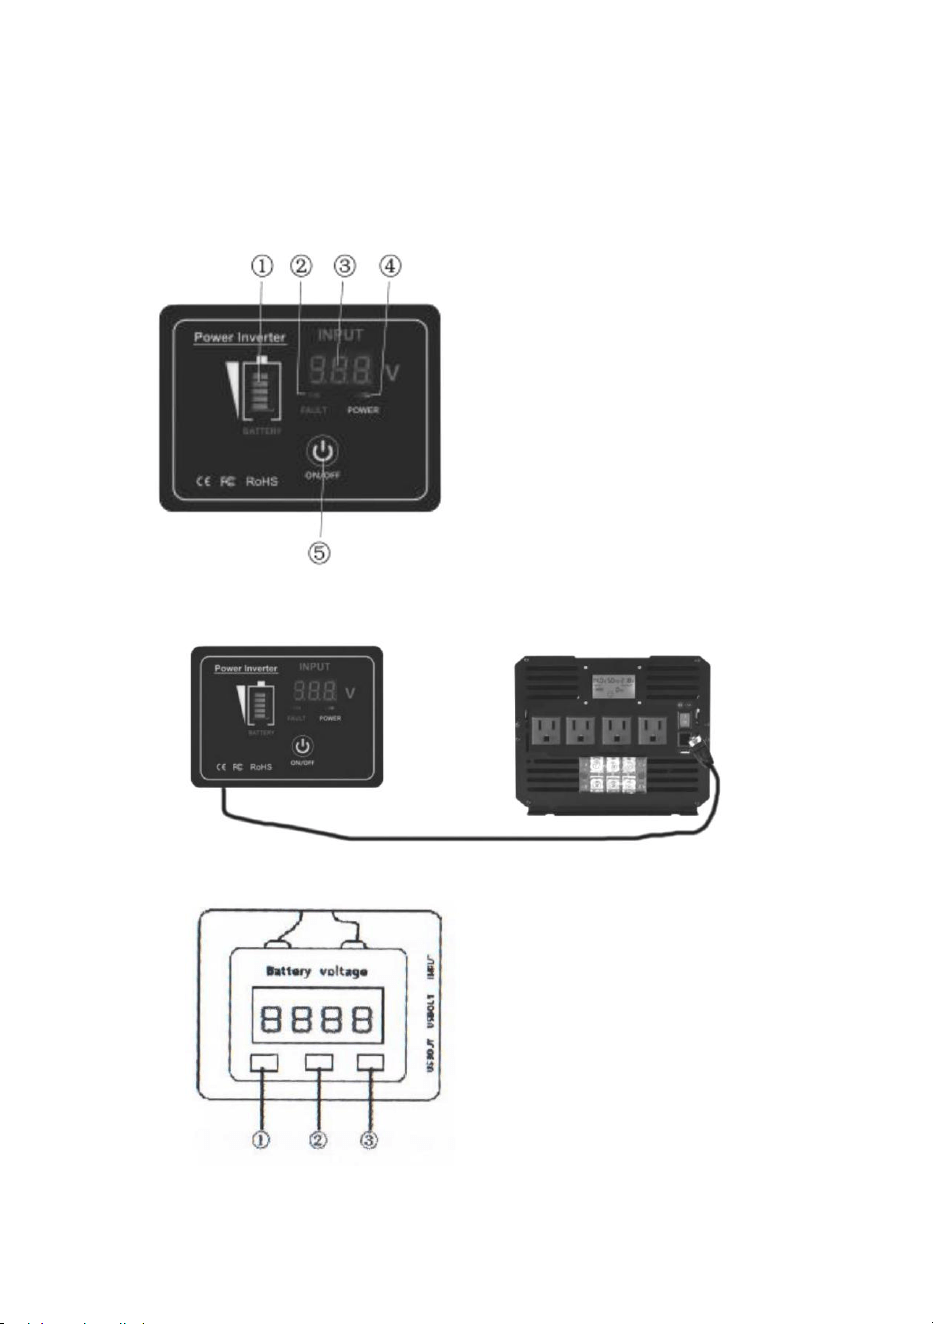
- 8 -
Utrustningsintroduktion: Växelriktaren kan fjärrstyras för att slå på och av.
Digital display batterispänningsvärde. Utrustningen antar ett
designschema för väggbrytare, som kan installeras i husbilar och hem
enligt användarens behov. Levereras med praktiska klistermärken som
kan klistras på vilja.
Anslutningsdiagram för fjärrkontroll
Anslutningsdiagram för fjärrkontroll
①:Battery power
②:Fault indicator
③:Input voltage
④:Work indicator
⑤:Inverter switch key
①:Backlight On/Of
②:Lead-acid / Lithium
③:Inverter switch key

- 9 -
Inverter grundläggande fel och felsökning med hod
fel
Utförande av fel
Uteslutningar
Batteriet är lågt
Börja med att göra en ala rm ljud (bedöma
larmet ljuder som ett , BI-BI-BI... ), den röda
lysdioden ljus blinkar, Spänningen fortsätter
att minska och maskinen stänger av n.
Batteriet är fullt
laddad
De batteri spänning är
hög
Larmet ljuder först (bedöma larm ljud är två,
BIBI - BIBI - BIBI...) DE LED rött ljus blinkar,
Spänningen fortsätter att stiga och den
maskinen stängs ner.
Batteriet är fullt
laddat eller ersatt i
linje med det
nominella
spänning av de
växelriktare
För mycket belastning
Första nummer an larm ljud (dömma
larmljud som a kontinuerlig larm,
BIBIBIBIBIBI... ), lysdioden blinkar röd och
maskinen stängs d egna.
Minska ladda
Temperaturen är för hög
Larmet ljuder först (bedöma larm ljud är tre,
BIBIBI - BIBIBI - BI BIBI... ), lysdioden
blinkar rött, temperaturen fortsätter att stiga,
och maskinen stängs ner.
Subtrahera
belastningen och
vänta på inverter till
sval ner
Utgången är kortsluten
Larmljud utan att skada de krets
(domarlarm ljud som kontinuerlig larm,
BIBIBIBIBI. ..)
Koppla bara bort
kort krets
Batteriet vrids tillbaka
Den inbyggda säkringen är blåsa och
Byt ut den nya

- 10 -
de maskinen är påslagen och okänslig.
säkringen

- 11 -
Tillverkare: Shanghaimuxinmuyeyouxiangongsi
Adress: Shuangchenglu 803nong11hao1602A-1609shi, baoshanqu,
shanghai 200000 CN.
Importerad till AUS: SIHAO PTY LTD, 1 ROKEVA STREETEASTWOOD
NSW 2122 Australien
Importerad till USA: Sanven Technology Ltd., Suite 250, 9166 Anaheim
Place, Rancho Cucamonga, CA 91730
REP
EC
E-CrossStu GmbH
Mainzer Landstr.69, 60329 Frankfurt am Main.
REP
UK
YH CONSULTING LIMITED.
C/O YH Consulting Limited Office 147, Centurion House,
London Road, Staines-upon-Thames, Surrey, TW18 4AX