
Technical Support and E-Warranty Certificate www.vevor.com/support
COMMODE
MODEL:FBL730211
We continue to be committed to provide you tools with competitive price.
"Save Half", "Half Price" or any other similar expressions used by us only represents an
estimate of savings you might benefit from buying certain tools with us compared to the major
top brands and does not necessarily mean to cover all categories of tools offered by us. You
are kindly reminded to verify carefully when you are placing an order with us if you are
actually saving half in comparison with the top major brands.

- 1 -
MODEL:FBL730211
Have product questions? Need technical support? Please feel free to
contact us:
Technical Support and E-Warranty Certificate
www.vevor.com/support
NEED HELP? CONTACT US!
This is the original instruction, please read all manual instructions
carefully before operating. VEVOR reserves a clear interpretation of our
user manual. The appearance of the product shall be subject to the
product you received. Please forgive us that we won't inform you again if
there are any technology or software updates on our product.
COMMODE

- 2 -
WARNING:
Read the manual completely to avoid harm, product damage, or warranty
voidance. Seek professional help if you encounter discomfort, pain or worsening
symptoms. If necessary, use supervision in order to assemble and use this product
correctly and safely. Do not exceed the weight limit.
Regularly check for secure assembly and contact support if in doubt. Ensure the
product’s legs are even and locked before use, and discontinue usage if there are
signs of wear, damage, or missing parts. The product is to be used on flat, stable
surfaces. Do not disassemble if not necessary, as it might compromise the
longevity of the product.Do not modify the product unless specified in the manual.
Physiotherapist
1. Before first use, adjust the height and the width of the rail to your toilet.
2. Back up to the toilet with your assistive device (if available) until the back of your
legs are touching the toilet.
3. Reach back for the rail, hold firmly, and slowly lower yourself into a seated
position on the toilet.
4. To return to standing position, place your hands on the rails firmly, and push
yourself up into a standing position.
5. Once you are standing, gradually let go of the rails, and only then, grab the
handle of your assistive device (if available).
IMPORTANT
1. Don’t exceed the weight capacity max.
2. Use on stable surfaces only.
3. Regularly inspect for signs of wear, damage, or loose parts.
4. Clean regularly using a mild detergent and warm water, rinse off any soap
residue. After cleaning, dry thoroughly.
5. Before use, confirm with your healthcare provider that the product meets your
specific needs. The following guidelines are not a substitute for medical advice.
SAVE THESE INSTRUCTION

- 3 -
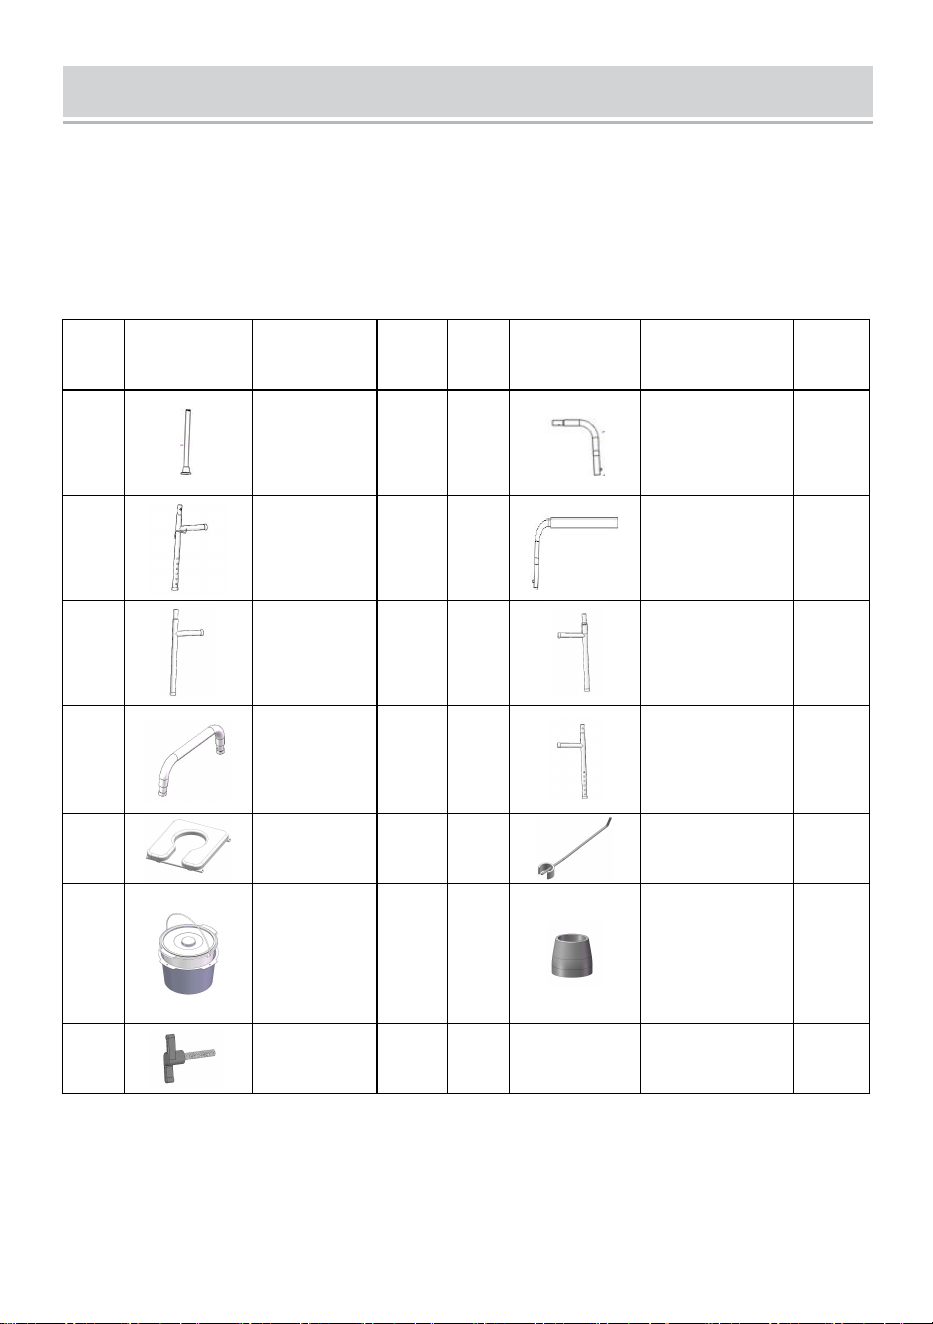
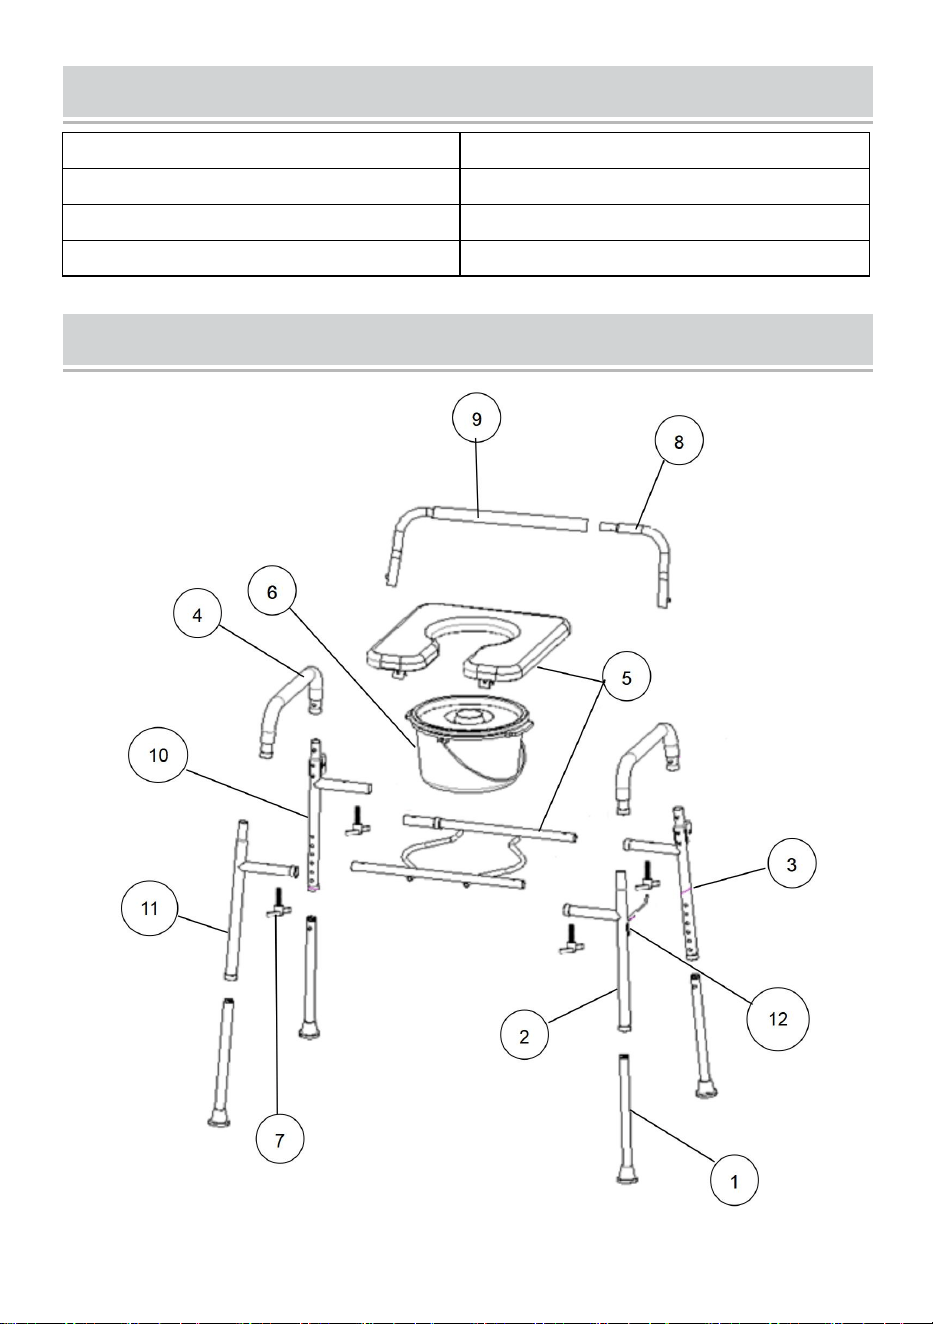
PART LIST
When unpacking this product, check to make sure the parts listed below are
included and carefully inspect for any damage that may have occurred during
transit. If any part is missing or damaged, do not attempt to assemble or use the
product.
NO
PICTURE
PART
NAME
QTY
NO
PICTURE
PART
NAME
QTY
○
1
Leg Tube
4
○
8
Short
Backrest
Tube
1
○
2
Left Front
Main
Frame
1
○
9
Long
Backrest
Tube
1
○
3
Left Rear
Main
Frame
1
○
10
Right Rear
Main Frame
1
○
4
Armrest
Tube
2
⑪
Right Front
Main Frame
1
○
5
Seat
1
⑫
Paper Towel
Holder
1
○
6
Pail &
Splash
Shield &
Lid
1
⑬
Foot Mats
(*Gifts)
2
○
7
Flat Knob
4

- 4 -
PRODUCT PAREMETERS
Model
FBL730211
Seat Measures(L×W)
440×400mm / 17.3”×15.7”
Seat Height
495-645mm / 20.3”-25.4”
Seat Rated Load
159kg / 350lbs
INSTALLATION AND OPERATION INSTRUCTIONS

- 5 -
1. As shown in the figure, the four legs
①
are installed into the left front main
frame
②
, the left rear main frame
③
, the right rear main frame
⑩
and the right
front main frame
⑪
in turn.
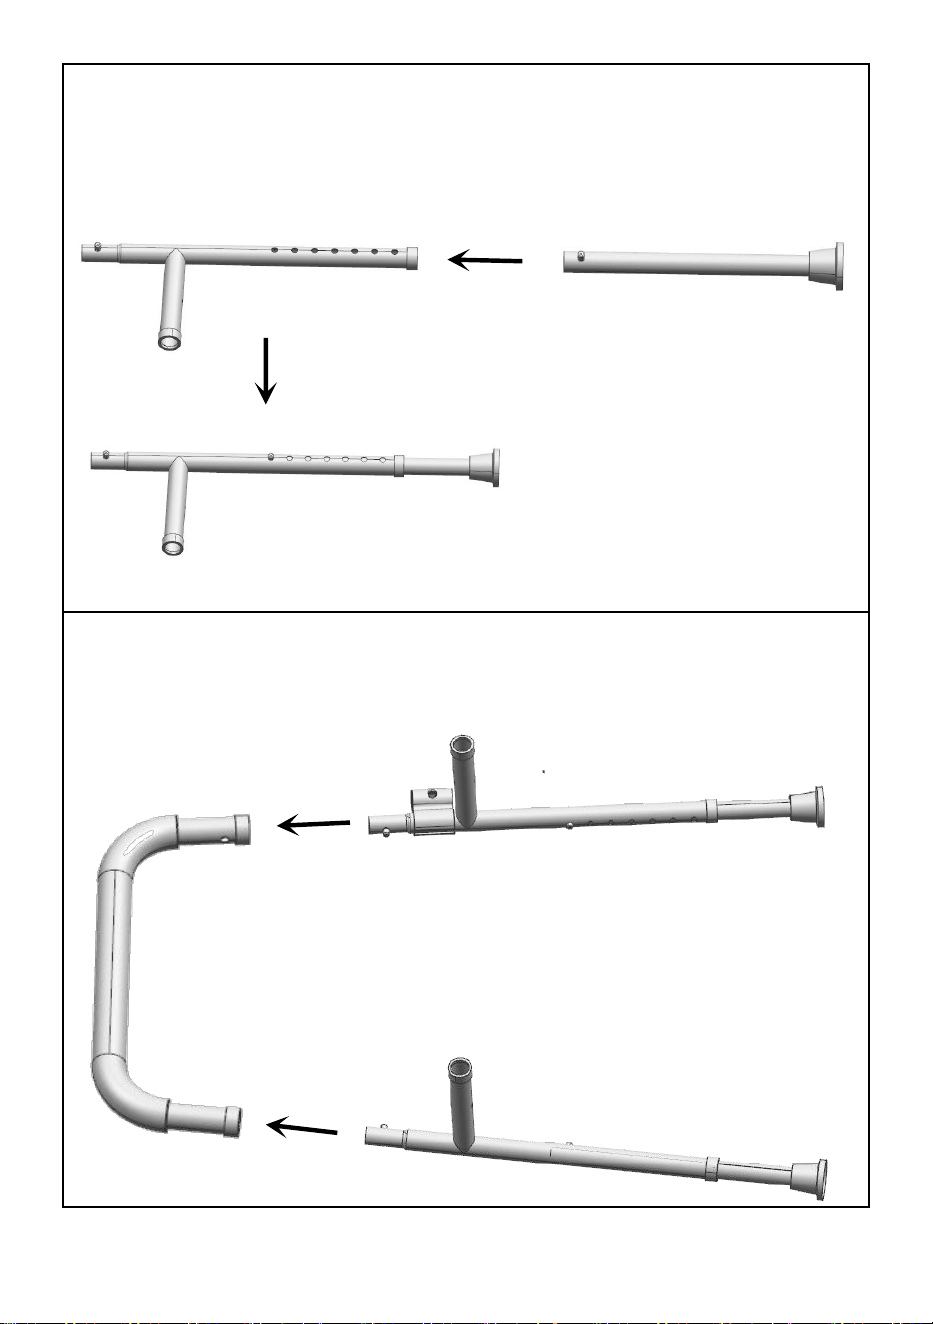
2. As shown in the figure, the assembled left front main frame ②, left rear main
frame ③, right rear main frame ⑩, and right front main frame are put into the
armrest tube ④ respectively, so that the marbles of each main frame eject
normally.
- 6 -
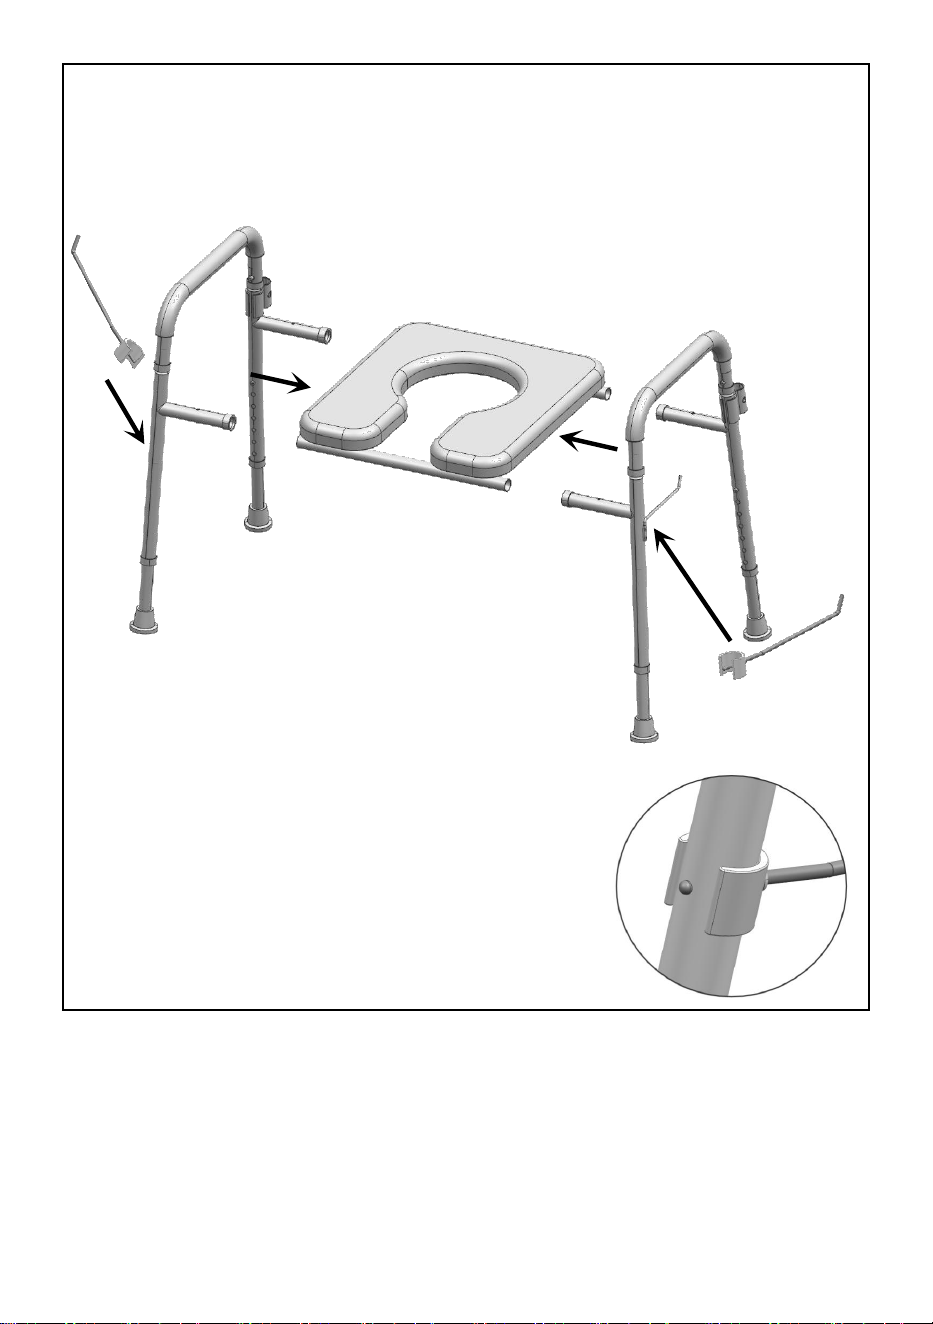
3. As shown in the figure, insert the assembled left and right main frames in line
with the tube openings of the seat frame
⑤
(be careful not to install the seat
frame and main frame in the front and rear directions in reverse).
4. As shown in the figure, install the paper
towel holder card ⑫ on the corresponding
position of the left front main frame ② or right
front main frame according to the usage
habits.

- 7 -
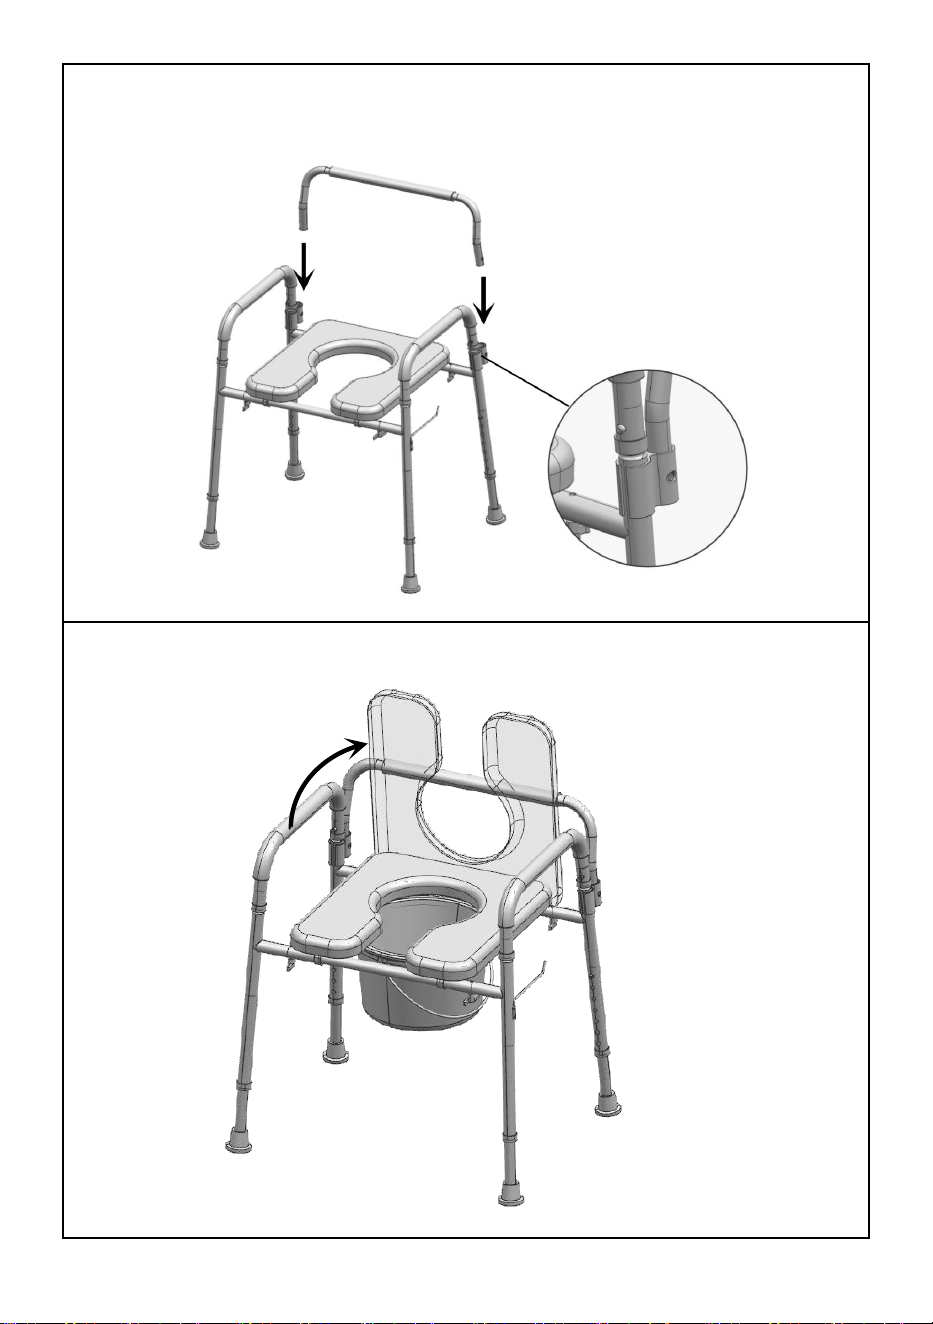
6. As shown in the figure, insert the short backrest tube ⑧ and the long
backrest tube ⑨ mouth alignment, so that the marbles pop up normally (Note:
Try to pull the two tubes apart by hand to confirm whether the two tubes are
assembled).
5. As shown in the figure, lock
the 4 knobs ⑦into the holes
corresponding to the main
frame and seat frame in turn.

- 8 -
8. As shown, lift the seat plate upwards and place the pail into the seat frame.
7. Insert the entire assembled backrest tube into the short tubes on either
side of the rear main frame as shown.

- 9 -
Zhongshan Bliss Medical Instrument Co., Ltd
Address: 3-6F & 7F-1, No. 63,Tongxing East Road, Yumin Community
Xiaolan, Zhongshan, Guangdong, 528414, CHINA
REP
UK
Pooledas Group Ltd
Unit 5 Albert Edward House,
The Pavilions Preston, United Kingdom
pooledas123@gmail.com
01772418127
REP
EC
SHUNSHUN GmbH
Römeräcker 9 Z2021,76351
Linkenheim-Hochstetten, Germany
euvertreter@gmail.com
+49 1727041930
Made In China


Technical Support and E-Warranty Certificate www.vevor.com/support
COMMODE
MODEL:FBL730211
We continue to be committed to provide you tools with competitive price.
"Save Half", "Half Price" or any other similar expressions used by us only represents an
estimate of savings you might benefit from buying certain tools with us compared to the major
top brands and does not necessarily mean to cover all categories of tools offered by us. You
are kindly reminded to verify carefully when you are placing an order with us if you are
actually saving half in comparison with the top major brands.

- 1 -
MODEL:FBL730211
Have product questions? Need technical support? Please feel free to
contact us:
Technical Support and E-Warranty Certificate
www.vevor.com/support
NEED HELP? CONTACT US!
This is the original instruction, please read all manual instructions
carefully before operating. VEVOR reserves a clear interpretation of our
user manual. The appearance of the product shall be subject to the
product you received. Please forgive us that we won't inform you again if
there are any technology or software updates on our product.
COMMODE

- 2 -
WARNING:
Read the manual completely to avoid harm, product damage, or warranty
voidance. Seek professional help if you encounter discomfort, pain or worsening
symptoms. If necessary, use supervision in order to assemble and use this product
correctly and safely. Do not exceed the weight limit.
Regularly check for secure assembly and contact support if in doubt. Ensure the
product’s legs are even and locked before use, and discontinue usage if there are
signs of wear, damage, or missing parts. The product is to be used on flat, stable
surfaces. Do not disassemble if not necessary, as it might compromise the
longevity of the product.Do not modify the product unless specified in the manual.
Physiotherapist
1. Before first use, adjust the height and the width of the rail to your toilet.
2. Back up to the toilet with your assistive device (if available) until the back of your
legs are touching the toilet.
3. Reach back for the rail, hold firmly, and slowly lower yourself into a seated
position on the toilet.
4. To return to standing position, place your hands on the rails firmly, and push
yourself up into a standing position.
5. Once you are standing, gradually let go of the rails, and only then, grab the
handle of your assistive device (if available).
IMPORTANT
1. Don’t exceed the weight capacity max.
2. Use on stable surfaces only.
3. Regularly inspect for signs of wear, damage, or loose parts.
4. Clean regularly using a mild detergent and warm water, rinse off any soap
residue. After cleaning, dry thoroughly.
5. Before use, confirm with your healthcare provider that the product meets your
specific needs. The following guidelines are not a substitute for medical advice.
SAVE THESE INSTRUCTION

- 3 -
PART LIST
When unpacking this product, check to make sure the parts listed below are
included and carefully inspect for any damage that may have occurred during
transit. If any part is missing or damaged, do not attempt to assemble or use the
product.
NO
PICTURE
PART
NAME
QTY
NO
PICTURE
PART
NAME
QTY
○
1
Leg Tube
4
○
8
Short
Backrest
Tube
1
○
2
Left Front
Main
Frame
1
○
9
Long
Backrest
Tube
1
○
3
Left Rear
Main
Frame
1
○
10
Right Rear
Main Frame
1
○
4
Armrest
Tube
2
⑪
Right Front
Main Frame
1
○
5
Seat
1
⑫
Paper Towel
Holder
1
○
6
Pail &
Splash
Shield &
Lid
1
⑬
Foot Mats
(*Gifts)
2
○
7
Flat Knob
4

- 4 -
PRODUCT PAREMETERS
Model
FBL730211
Seat Measures(L×W)
440×400mm / 17.3”×15.7”
Seat Height
495-645mm / 20.3”-25.4”
Seat Rated Load
159kg / 350lbs
INSTALLATION AND OPERATION INSTRUCTIONS

- 5 -
1. As shown in the figure, the four legs
①
are installed into the left front main
frame
②
, the left rear main frame
③
, the right rear main frame
⑩
and the right
front main frame
⑪
in turn.
2. As shown in the figure, the assembled left front main frame ②, left rear main
frame ③, right rear main frame ⑩, and right front main frame are put into the
armrest tube ④ respectively, so that the marbles of each main frame eject
normally.

- 6 -
3. As shown in the figure, insert the assembled left and right main frames in line
with the tube openings of the seat frame
⑤
(be careful not to install the seat
frame and main frame in the front and rear directions in reverse).
4. As shown in the figure, install the paper
towel holder card ⑫ on the corresponding
position of the left front main frame ② or right
front main frame according to the usage
habits.

- 7 -
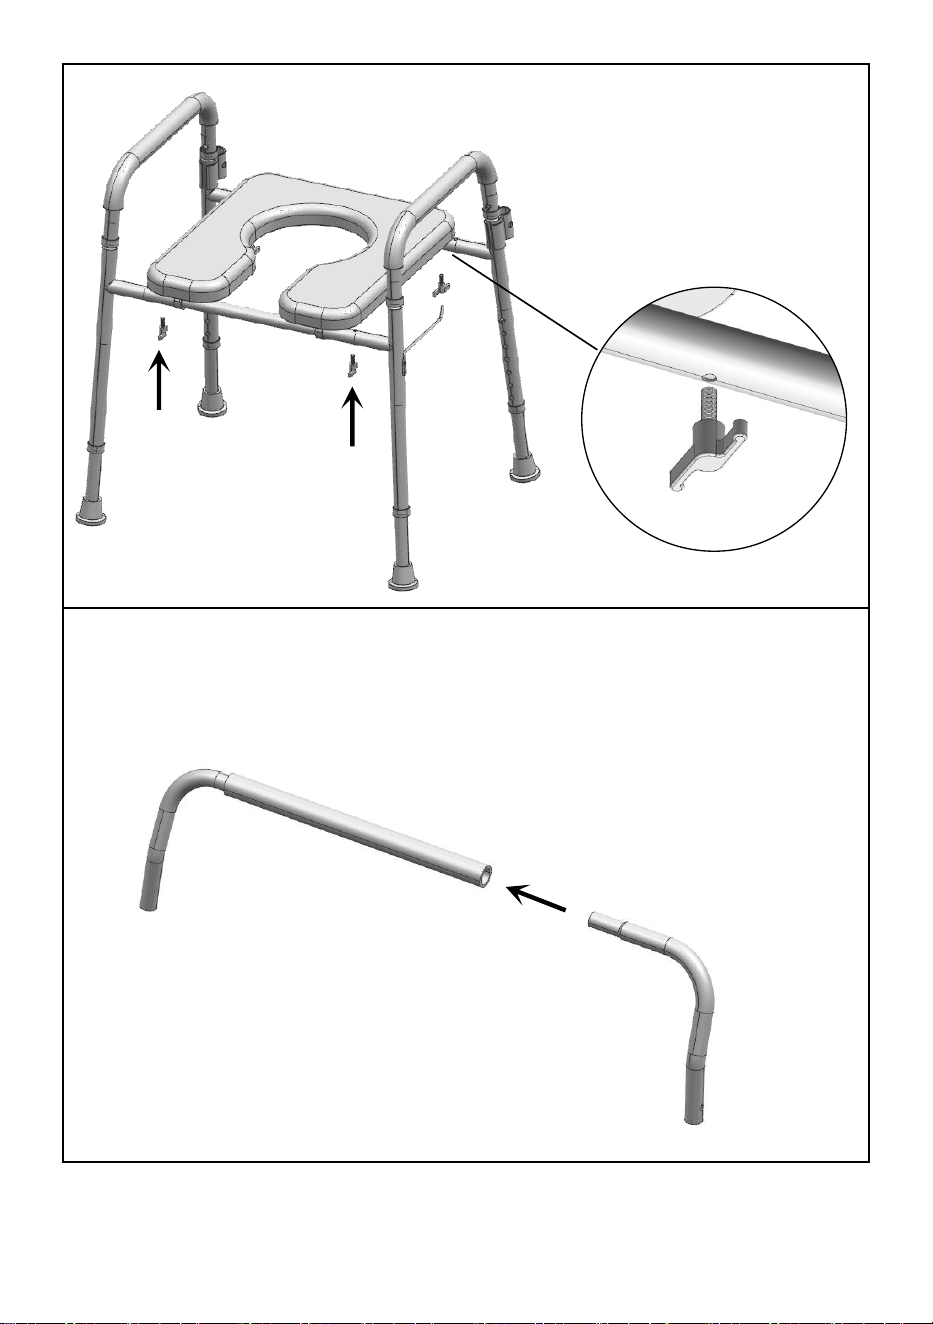
6. As shown in the figure, insert the short backrest tube ⑧ and the long
backrest tube ⑨ mouth alignment, so that the marbles pop up normally (Note:
Try to pull the two tubes apart by hand to confirm whether the two tubes are
assembled).
5. As shown in the figure, lock
the 4 knobs ⑦into the holes
corresponding to the main
frame and seat frame in turn.
- 8 -
8. As shown, lift the seat plate upwards and place the pail into the seat frame.
7. Insert the entire assembled backrest tube into the short tubes on either
side of the rear main frame as shown.

- 9 -
Zhongshan Bliss Medical Instrument Co., Ltd
Address: 3-6F & 7F-1, No. 63,Tongxing East Road, Yumin Community
Xiaolan, Zhongshan, Guangdong, 528414, CHINA
REP
UK
Pooledas Group Ltd
Unit 5 Albert Edward House,
The Pavilions Preston, United Kingdom
pooledas123@gmail.com
01772418127
REP
EC
SHUNSHUN GmbH
Römeräcker 9 Z2021,76351
Linkenheim-Hochstetten, Germany
euvertreter@gmail.com
+49 1727041930
Made In China


Technical Support and E-Warranty Certificate www.vevor.com/support
COMMODE
MODEL:FBL730211
We continue to be committed to provide you tools with competitive price.
"Save Half", "Half Price" or any other similar expressions used by us only represents an
estimate of savings you might benefit from buying certain tools with us compared to the major
top brands and does not necessarily mean to cover all categories of tools offered by us. You
are kindly reminded to verify carefully when you are placing an order with us if you are
actually saving half in comparison with the top major brands.
- 1 -
MODEL:FBL730211
Have product questions? Need technical support? Please feel free to
contact us:
Technical Support and E-Warranty Certificate
www.vevor.com/support
NEED HELP? CONTACT US!
This is the original instruction, please read all manual instructions
carefully before operating. VEVOR reserves a clear interpretation of our
user manual. The appearance of the product shall be subject to the
product you received. Please forgive us that we won't inform you again if
there are any technology or software updates on our product.
COMMODE

- 2 -
WARNING:
Read the manual completely to avoid harm, product damage, or warranty
voidance. Seek professional help if you encounter discomfort, pain or worsening
symptoms. If necessary, use supervision in order to assemble and use this product
correctly and safely. Do not exceed the weight limit.
Regularly check for secure assembly and contact support if in doubt. Ensure the
product’s legs are even and locked before use, and discontinue usage if there are
signs of wear, damage, or missing parts. The product is to be used on flat, stable
surfaces. Do not disassemble if not necessary, as it might compromise the
longevity of the product.Do not modify the product unless specified in the manual.
Physiotherapist
1. Before first use, adjust the height and the width of the rail to your toilet.
2. Back up to the toilet with your assistive device (if available) until the back of your
legs are touching the toilet.
3. Reach back for the rail, hold firmly, and slowly lower yourself into a seated
position on the toilet.
4. To return to standing position, place your hands on the rails firmly, and push
yourself up into a standing position.
5. Once you are standing, gradually let go of the rails, and only then, grab the
handle of your assistive device (if available).
IMPORTANT
1. Don’t exceed the weight capacity max.
2. Use on stable surfaces only.
3. Regularly inspect for signs of wear, damage, or loose parts.
4. Clean regularly using a mild detergent and warm water, rinse off any soap
residue. After cleaning, dry thoroughly.
5. Before use, confirm with your healthcare provider that the product meets your
specific needs. The following guidelines are not a substitute for medical advice.
SAVE THESE INSTRUCTION

- 3 -
PART LIST
When unpacking this product, check to make sure the parts listed below are
included and carefully inspect for any damage that may have occurred during
transit. If any part is missing or damaged, do not attempt to assemble or use the
product.
NO
PICTURE
PART
NAME
QTY
NO
PICTURE
PART
NAME
QTY
○
1
Leg Tube
4
○
8
Short
Backrest
Tube
1
○
2
Left Front
Main
Frame
1
○
9
Long
Backrest
Tube
1
○
3
Left Rear
Main
Frame
1
○
10
Right Rear
Main Frame
1
○
4
Armrest
Tube
2
⑪
Right Front
Main Frame
1
○
5
Seat
1
⑫
Paper Towel
Holder
1
○
6
Pail &
Splash
Shield &
Lid
1
⑬
Foot Mats
(*Gifts)
2
○
7
Flat Knob
4

- 4 -
PRODUCT PAREMETERS
Model
FBL730211
Seat Measures(L×W)
440×400mm / 17.3”×15.7”
Seat Height
495-645mm / 20.3”-25.4”
Seat Rated Load
159kg / 350lbs
INSTALLATION AND OPERATION INSTRUCTIONS

- 5 -
1. As shown in the figure, the four legs
①
are installed into the left front main
frame
②
, the left rear main frame
③
, the right rear main frame
⑩
and the right
front main frame
⑪
in turn.
2. As shown in the figure, the assembled left front main frame ②, left rear main
frame ③, right rear main frame ⑩, and right front main frame are put into the
armrest tube ④ respectively, so that the marbles of each main frame eject
normally.

- 6 -
3. As shown in the figure, insert the assembled left and right main frames in line
with the tube openings of the seat frame
⑤
(be careful not to install the seat
frame and main frame in the front and rear directions in reverse).
4. As shown in the figure, install the paper
towel holder card ⑫ on the corresponding
position of the left front main frame ② or right
front main frame according to the usage
habits.

- 7 -
6. As shown in the figure, insert the short backrest tube ⑧ and the long
backrest tube ⑨ mouth alignment, so that the marbles pop up normally (Note:
Try to pull the two tubes apart by hand to confirm whether the two tubes are
assembled).
5. As shown in the figure, lock
the 4 knobs ⑦into the holes
corresponding to the main
frame and seat frame in turn.

- 8 -
8. As shown, lift the seat plate upwards and place the pail into the seat frame.
7. Insert the entire assembled backrest tube into the short tubes on either
side of the rear main frame as shown.

- 9 -
Zhongshan Bliss Medical Instrument Co., Ltd
Address: 3-6F & 7F-1, No. 63,Tongxing East Road, Yumin Community
Xiaolan, Zhongshan, Guangdong, 528414, CHINA
REP
UK
Pooledas Group Ltd
Unit 5 Albert Edward House,
The Pavilions Preston, United Kingdom
pooledas123@gmail.com
01772418127
REP
EC
SHUNSHUN GmbH
Römeräcker 9 Z2021,76351
Linkenheim-Hochstetten, Germany
euvertreter@gmail.com
+49 1727041930
Made In China


Technical Support and E-Warranty Certificate www.vevor.com/support
COMMODE
MODEL:FBL730211
We continue to be committed to provide you tools with competitive price.
"Save Half", "Half Price" or any other similar expressions used by us only represents an
estimate of savings you might benefit from buying certain tools with us compared to the major
top brands and does not necessarily mean to cover all categories of tools offered by us. You
are kindly reminded to verify carefully when you are placing an order with us if you are
actually saving half in comparison with the top major brands.

- 1 -
MODEL:FBL730211
Have product questions? Need technical support? Please feel free to
contact us:
Technical Support and E-Warranty Certificate
www.vevor.com/support
NEED HELP? CONTACT US!
This is the original instruction, please read all manual instructions
carefully before operating. VEVOR reserves a clear interpretation of our
user manual. The appearance of the product shall be subject to the
product you received. Please forgive us that we won't inform you again if
there are any technology or software updates on our product.
COMMODE

- 2 -
WARNING:
Read the manual completely to avoid harm, product damage, or warranty
voidance. Seek professional help if you encounter discomfort, pain or worsening
symptoms. If necessary, use supervision in order to assemble and use this product
correctly and safely. Do not exceed the weight limit.
Regularly check for secure assembly and contact support if in doubt. Ensure the
product’s legs are even and locked before use, and discontinue usage if there are
signs of wear, damage, or missing parts. The product is to be used on flat, stable
surfaces. Do not disassemble if not necessary, as it might compromise the
longevity of the product.Do not modify the product unless specified in the manual.
Physiotherapist
1. Before first use, adjust the height and the width of the rail to your toilet.
2. Back up to the toilet with your assistive device (if available) until the back of your
legs are touching the toilet.
3. Reach back for the rail, hold firmly, and slowly lower yourself into a seated
position on the toilet.
4. To return to standing position, place your hands on the rails firmly, and push
yourself up into a standing position.
5. Once you are standing, gradually let go of the rails, and only then, grab the
handle of your assistive device (if available).
IMPORTANT
1. Don’t exceed the weight capacity max.
2. Use on stable surfaces only.
3. Regularly inspect for signs of wear, damage, or loose parts.
4. Clean regularly using a mild detergent and warm water, rinse off any soap
residue. After cleaning, dry thoroughly.
5. Before use, confirm with your healthcare provider that the product meets your
specific needs. The following guidelines are not a substitute for medical advice.
SAVE THESE INSTRUCTION

- 3 -
PART LIST
When unpacking this product, check to make sure the parts listed below are
included and carefully inspect for any damage that may have occurred during
transit. If any part is missing or damaged, do not attempt to assemble or use the
product.
NO
PICTURE
PART
NAME
QTY
NO
PICTURE
PART
NAME
QTY
○
1
Leg Tube
4
○
8
Short
Backrest
Tube
1
○
2
Left Front
Main
Frame
1
○
9
Long
Backrest
Tube
1
○
3
Left Rear
Main
Frame
1
○
10
Right Rear
Main Frame
1
○
4
Armrest
Tube
2
⑪
Right Front
Main Frame
1
○
5
Seat
1
⑫
Paper Towel
Holder
1
○
6
Pail &
Splash
Shield &
Lid
1
⑬
Foot Mats
(*Gifts)
2
○
7
Flat Knob
4

- 4 -
PRODUCT PAREMETERS
Model
FBL730211
Seat Measures(L×W)
440×400mm / 17.3”×15.7”
Seat Height
495-645mm / 20.3”-25.4”
Seat Rated Load
159kg / 350lbs
INSTALLATION AND OPERATION INSTRUCTIONS
- 5 -
1. As shown in the figure, the four legs
①
are installed into the left front main
frame
②
, the left rear main frame
③
, the right rear main frame
⑩
and the right
front main frame
⑪
in turn.
2. As shown in the figure, the assembled left front main frame ②, left rear main
frame ③, right rear main frame ⑩, and right front main frame are put into the
armrest tube ④ respectively, so that the marbles of each main frame eject
normally.

- 6 -
3. As shown in the figure, insert the assembled left and right main frames in line
with the tube openings of the seat frame
⑤
(be careful not to install the seat
frame and main frame in the front and rear directions in reverse).
4. As shown in the figure, install the paper
towel holder card ⑫ on the corresponding
position of the left front main frame ② or right
front main frame according to the usage
habits.

- 7 -
6. As shown in the figure, insert the short backrest tube ⑧ and the long
backrest tube ⑨ mouth alignment, so that the marbles pop up normally (Note:
Try to pull the two tubes apart by hand to confirm whether the two tubes are
assembled).
5. As shown in the figure, lock
the 4 knobs ⑦into the holes
corresponding to the main
frame and seat frame in turn.

- 8 -
8. As shown, lift the seat plate upwards and place the pail into the seat frame.
7. Insert the entire assembled backrest tube into the short tubes on either
side of the rear main frame as shown.

- 9 -
Zhongshan Bliss Medical Instrument Co., Ltd
Address: 3-6F & 7F-1, No. 63,Tongxing East Road, Yumin Community
Xiaolan, Zhongshan, Guangdong, 528414, CHINA
REP
UK
Pooledas Group Ltd
Unit 5 Albert Edward House,
The Pavilions Preston, United Kingdom
pooledas123@gmail.com
01772418127
REP
EC
SHUNSHUN GmbH
Römeräcker 9 Z2021,76351
Linkenheim-Hochstetten, Germany
euvertreter@gmail.com
+49 1727041930
Made In China


Technical Support and E-Warranty Certificate www.vevor.com/support
COMMODE
MODEL:FBL730211
We continue to be committed to provide you tools with competitive price.
"Save Half", "Half Price" or any other similar expressions used by us only represents an
estimate of savings you might benefit from buying certain tools with us compared to the major
top brands and does not necessarily mean to cover all categories of tools offered by us. You
are kindly reminded to verify carefully when you are placing an order with us if you are
actually saving half in comparison with the top major brands.

- 1 -
MODEL:FBL730211
Have product questions? Need technical support? Please feel free to
contact us:
Technical Support and E-Warranty Certificate
www.vevor.com/support
NEED HELP? CONTACT US!
This is the original instruction, please read all manual instructions
carefully before operating. VEVOR reserves a clear interpretation of our
user manual. The appearance of the product shall be subject to the
product you received. Please forgive us that we won't inform you again if
there are any technology or software updates on our product.
COMMODE

- 2 -
WARNING:
Read the manual completely to avoid harm, product damage, or warranty
voidance. Seek professional help if you encounter discomfort, pain or worsening
symptoms. If necessary, use supervision in order to assemble and use this product
correctly and safely. Do not exceed the weight limit.
Regularly check for secure assembly and contact support if in doubt. Ensure the
product’s legs are even and locked before use, and discontinue usage if there are
signs of wear, damage, or missing parts. The product is to be used on flat, stable
surfaces. Do not disassemble if not necessary, as it might compromise the
longevity of the product.Do not modify the product unless specified in the manual.
Physiotherapist
1. Before first use, adjust the height and the width of the rail to your toilet.
2. Back up to the toilet with your assistive device (if available) until the back of your
legs are touching the toilet.
3. Reach back for the rail, hold firmly, and slowly lower yourself into a seated
position on the toilet.
4. To return to standing position, place your hands on the rails firmly, and push
yourself up into a standing position.
5. Once you are standing, gradually let go of the rails, and only then, grab the
handle of your assistive device (if available).
IMPORTANT
1. Don’t exceed the weight capacity max.
2. Use on stable surfaces only.
3. Regularly inspect for signs of wear, damage, or loose parts.
4. Clean regularly using a mild detergent and warm water, rinse off any soap
residue. After cleaning, dry thoroughly.
5. Before use, confirm with your healthcare provider that the product meets your
specific needs. The following guidelines are not a substitute for medical advice.
SAVE THESE INSTRUCTION
- 3 -
PART LIST
When unpacking this product, check to make sure the parts listed below are
included and carefully inspect for any damage that may have occurred during
transit. If any part is missing or damaged, do not attempt to assemble or use the
product.
NO
PICTURE
PART
NAME
QTY
NO
PICTURE
PART
NAME
QTY
○
1
Leg Tube
4
○
8
Short
Backrest
Tube
1
○
2
Left Front
Main
Frame
1
○
9
Long
Backrest
Tube
1
○
3
Left Rear
Main
Frame
1
○
10
Right Rear
Main Frame
1
○
4
Armrest
Tube
2
⑪
Right Front
Main Frame
1
○
5
Seat
1
⑫
Paper Towel
Holder
1
○
6
Pail &
Splash
Shield &
Lid
1
⑬
Foot Mats
(*Gifts)
2
○
7
Flat Knob
4

- 4 -
PRODUCT PAREMETERS
Model
FBL730211
Seat Measures(L×W)
440×400mm / 17.3”×15.7”
Seat Height
495-645mm / 20.3”-25.4”
Seat Rated Load
159kg / 350lbs
INSTALLATION AND OPERATION INSTRUCTIONS

- 5 -
1. As shown in the figure, the four legs
①
are installed into the left front main
frame
②
, the left rear main frame
③
, the right rear main frame
⑩
and the right
front main frame
⑪
in turn.
2. As shown in the figure, the assembled left front main frame ②, left rear main
frame ③, right rear main frame ⑩, and right front main frame are put into the
armrest tube ④ respectively, so that the marbles of each main frame eject
normally.

- 6 -
3. As shown in the figure, insert the assembled left and right main frames in line
with the tube openings of the seat frame
⑤
(be careful not to install the seat
frame and main frame in the front and rear directions in reverse).
4. As shown in the figure, install the paper
towel holder card ⑫ on the corresponding
position of the left front main frame ② or right
front main frame according to the usage
habits.

- 7 -
6. As shown in the figure, insert the short backrest tube ⑧ and the long
backrest tube ⑨ mouth alignment, so that the marbles pop up normally (Note:
Try to pull the two tubes apart by hand to confirm whether the two tubes are
assembled).
5. As shown in the figure, lock
the 4 knobs ⑦into the holes
corresponding to the main
frame and seat frame in turn.

- 8 -
8. As shown, lift the seat plate upwards and place the pail into the seat frame.
7. Insert the entire assembled backrest tube into the short tubes on either
side of the rear main frame as shown.

- 9 -
Zhongshan Bliss Medical Instrument Co., Ltd
Address: 3-6F & 7F-1, No. 63,Tongxing East Road, Yumin Community
Xiaolan, Zhongshan, Guangdong, 528414, CHINA
REP
UK
Pooledas Group Ltd
Unit 5 Albert Edward House,
The Pavilions Preston, United Kingdom
pooledas123@gmail.com
01772418127
REP
EC
SHUNSHUN GmbH
Römeräcker 9 Z2021,76351
Linkenheim-Hochstetten, Germany
euvertreter@gmail.com
+49 1727041930
Made In China


Technical Support and E-Warranty Certificate www.vevor.com/support
COMMODE
MODEL:FBL730211
We continue to be committed to provide you tools with competitive price.
"Save Half", "Half Price" or any other similar expressions used by us only represents an
estimate of savings you might benefit from buying certain tools with us compared to the major
top brands and does not necessarily mean to cover all categories of tools offered by us. You
are kindly reminded to verify carefully when you are placing an order with us if you are
actually saving half in comparison with the top major brands.
- 1 -
MODEL:FBL730211
Have product questions? Need technical support? Please feel free to
contact us:
Technical Support and E-Warranty Certificate
www.vevor.com/support
NEED HELP? CONTACT US!
This is the original instruction, please read all manual instructions
carefully before operating. VEVOR reserves a clear interpretation of our
user manual. The appearance of the product shall be subject to the
product you received. Please forgive us that we won't inform you again if
there are any technology or software updates on our product.
COMMODE

- 2 -
WARNING:
Read the manual completely to avoid harm, product damage, or warranty
voidance. Seek professional help if you encounter discomfort, pain or worsening
symptoms. If necessary, use supervision in order to assemble and use this product
correctly and safely. Do not exceed the weight limit.
Regularly check for secure assembly and contact support if in doubt. Ensure the
product’s legs are even and locked before use, and discontinue usage if there are
signs of wear, damage, or missing parts. The product is to be used on flat, stable
surfaces. Do not disassemble if not necessary, as it might compromise the
longevity of the product.Do not modify the product unless specified in the manual.
Physiotherapist
1. Before first use, adjust the height and the width of the rail to your toilet.
2. Back up to the toilet with your assistive device (if available) until the back of your
legs are touching the toilet.
3. Reach back for the rail, hold firmly, and slowly lower yourself into a seated
position on the toilet.
4. To return to standing position, place your hands on the rails firmly, and push
yourself up into a standing position.
5. Once you are standing, gradually let go of the rails, and only then, grab the
handle of your assistive device (if available).
IMPORTANT
1. Don’t exceed the weight capacity max.
2. Use on stable surfaces only.
3. Regularly inspect for signs of wear, damage, or loose parts.
4. Clean regularly using a mild detergent and warm water, rinse off any soap
residue. After cleaning, dry thoroughly.
5. Before use, confirm with your healthcare provider that the product meets your
specific needs. The following guidelines are not a substitute for medical advice.
SAVE THESE INSTRUCTION

- 3 -
PART LIST
When unpacking this product, check to make sure the parts listed below are
included and carefully inspect for any damage that may have occurred during
transit. If any part is missing or damaged, do not attempt to assemble or use the
product.
NO
PICTURE
PART
NAME
QTY
NO
PICTURE
PART
NAME
QTY
○
1
Leg Tube
4
○
8
Short
Backrest
Tube
1
○
2
Left Front
Main
Frame
1
○
9
Long
Backrest
Tube
1
○
3
Left Rear
Main
Frame
1
○
10
Right Rear
Main Frame
1
○
4
Armrest
Tube
2
⑪
Right Front
Main Frame
1
○
5
Seat
1
⑫
Paper Towel
Holder
1
○
6
Pail &
Splash
Shield &
Lid
1
⑬
Foot Mats
(*Gifts)
2
○
7
Flat Knob
4

- 4 -
PRODUCT PAREMETERS
Model
FBL730211
Seat Measures(L×W)
440×400mm / 17.3”×15.7”
Seat Height
495-645mm / 20.3”-25.4”
Seat Rated Load
159kg / 350lbs
INSTALLATION AND OPERATION INSTRUCTIONS

- 5 -
1. As shown in the figure, the four legs
①
are installed into the left front main
frame
②
, the left rear main frame
③
, the right rear main frame
⑩
and the right
front main frame
⑪
in turn.
2. As shown in the figure, the assembled left front main frame ②, left rear main
frame ③, right rear main frame ⑩, and right front main frame are put into the
armrest tube ④ respectively, so that the marbles of each main frame eject
normally.

- 6 -
3. As shown in the figure, insert the assembled left and right main frames in line
with the tube openings of the seat frame
⑤
(be careful not to install the seat
frame and main frame in the front and rear directions in reverse).
4. As shown in the figure, install the paper
towel holder card ⑫ on the corresponding
position of the left front main frame ② or right
front main frame according to the usage
habits.

- 7 -
6. As shown in the figure, insert the short backrest tube ⑧ and the long
backrest tube ⑨ mouth alignment, so that the marbles pop up normally (Note:
Try to pull the two tubes apart by hand to confirm whether the two tubes are
assembled).
5. As shown in the figure, lock
the 4 knobs ⑦into the holes
corresponding to the main
frame and seat frame in turn.

- 8 -
8. As shown, lift the seat plate upwards and place the pail into the seat frame.
7. Insert the entire assembled backrest tube into the short tubes on either
side of the rear main frame as shown.

- 9 -
Zhongshan Bliss Medical Instrument Co., Ltd
Address: 3-6F & 7F-1, No. 63,Tongxing East Road, Yumin Community
Xiaolan, Zhongshan, Guangdong, 528414, CHINA
REP
UK
Pooledas Group Ltd
Unit 5 Albert Edward House,
The Pavilions Preston, United Kingdom
pooledas123@gmail.com
01772418127
REP
EC
SHUNSHUN GmbH
Römeräcker 9 Z2021,76351
Linkenheim-Hochstetten, Germany
euvertreter@gmail.com
+49 1727041930
Made In China


Technical Support and E-Warranty Certificate www.vevor.com/support
COMMODE
MODEL:FBL730211
We continue to be committed to provide you tools with competitive price.
"Save Half", "Half Price" or any other similar expressions used by us only represents an
estimate of savings you might benefit from buying certain tools with us compared to the major
top brands and does not necessarily mean to cover all categories of tools offered by us. You
are kindly reminded to verify carefully when you are placing an order with us if you are
actually saving half in comparison with the top major brands.

- 1 -
MODEL:FBL730211
Have product questions? Need technical support? Please feel free to
contact us:
Technical Support and E-Warranty Certificate
www.vevor.com/support
NEED HELP? CONTACT US!
This is the original instruction, please read all manual instructions
carefully before operating. VEVOR reserves a clear interpretation of our
user manual. The appearance of the product shall be subject to the
product you received. Please forgive us that we won't inform you again if
there are any technology or software updates on our product.
COMMODE

- 2 -
WARNING:
Read the manual completely to avoid harm, product damage, or warranty
voidance. Seek professional help if you encounter discomfort, pain or worsening
symptoms. If necessary, use supervision in order to assemble and use this product
correctly and safely. Do not exceed the weight limit.
Regularly check for secure assembly and contact support if in doubt. Ensure the
product’s legs are even and locked before use, and discontinue usage if there are
signs of wear, damage, or missing parts. The product is to be used on flat, stable
surfaces. Do not disassemble if not necessary, as it might compromise the
longevity of the product.Do not modify the product unless specified in the manual.
Physiotherapist
1. Before first use, adjust the height and the width of the rail to your toilet.
2. Back up to the toilet with your assistive device (if available) until the back of your
legs are touching the toilet.
3. Reach back for the rail, hold firmly, and slowly lower yourself into a seated
position on the toilet.
4. To return to standing position, place your hands on the rails firmly, and push
yourself up into a standing position.
5. Once you are standing, gradually let go of the rails, and only then, grab the
handle of your assistive device (if available).
IMPORTANT
1. Don’t exceed the weight capacity max.
2. Use on stable surfaces only.
3. Regularly inspect for signs of wear, damage, or loose parts.
4. Clean regularly using a mild detergent and warm water, rinse off any soap
residue. After cleaning, dry thoroughly.
5. Before use, confirm with your healthcare provider that the product meets your
specific needs. The following guidelines are not a substitute for medical advice.
SAVE THESE INSTRUCTION

- 3 -
PART LIST
When unpacking this product, check to make sure the parts listed below are
included and carefully inspect for any damage that may have occurred during
transit. If any part is missing or damaged, do not attempt to assemble or use the
product.
NO
PICTURE
PART
NAME
QTY
NO
PICTURE
PART
NAME
QTY
○
1
Leg Tube
4
○
8
Short
Backrest
Tube
1
○
2
Left Front
Main
Frame
1
○
9
Long
Backrest
Tube
1
○
3
Left Rear
Main
Frame
1
○
10
Right Rear
Main Frame
1
○
4
Armrest
Tube
2
⑪
Right Front
Main Frame
1
○
5
Seat
1
⑫
Paper Towel
Holder
1
○
6
Pail &
Splash
Shield &
Lid
1
⑬
Foot Mats
(*Gifts)
2
○
7
Flat Knob
4
- 4 -
PRODUCT PAREMETERS
Model
FBL730211
Seat Measures(L×W)
440×400mm / 17.3”×15.7”
Seat Height
495-645mm / 20.3”-25.4”
Seat Rated Load
159kg / 350lbs
INSTALLATION AND OPERATION INSTRUCTIONS

- 5 -
1. As shown in the figure, the four legs
①
are installed into the left front main
frame
②
, the left rear main frame
③
, the right rear main frame
⑩
and the right
front main frame
⑪
in turn.
2. As shown in the figure, the assembled left front main frame ②, left rear main
frame ③, right rear main frame ⑩, and right front main frame are put into the
armrest tube ④ respectively, so that the marbles of each main frame eject
normally.

- 6 -
3. As shown in the figure, insert the assembled left and right main frames in line
with the tube openings of the seat frame
⑤
(be careful not to install the seat
frame and main frame in the front and rear directions in reverse).
4. As shown in the figure, install the paper
towel holder card ⑫ on the corresponding
position of the left front main frame ② or right
front main frame according to the usage
habits.
- 7 -
6. As shown in the figure, insert the short backrest tube ⑧ and the long
backrest tube ⑨ mouth alignment, so that the marbles pop up normally (Note:
Try to pull the two tubes apart by hand to confirm whether the two tubes are
assembled).
5. As shown in the figure, lock
the 4 knobs ⑦into the holes
corresponding to the main
frame and seat frame in turn.

- 8 -
8. As shown, lift the seat plate upwards and place the pail into the seat frame.
7. Insert the entire assembled backrest tube into the short tubes on either
side of the rear main frame as shown.

- 9 -
Zhongshan Bliss Medical Instrument Co., Ltd
Address: 3-6F & 7F-1, No. 63,Tongxing East Road, Yumin Community
Xiaolan, Zhongshan, Guangdong, 528414, CHINA
REP
UK
Pooledas Group Ltd
Unit 5 Albert Edward House,
The Pavilions Preston, United Kingdom
pooledas123@gmail.com
01772418127
REP
EC
SHUNSHUN GmbH
Römeräcker 9 Z2021,76351
Linkenheim-Hochstetten, Germany
euvertreter@gmail.com
+49 1727041930
Made In China