3.5qt
Hand & Stand Mixer
Instruction Manual
Batidora vertical
y de mano de 3.5 cuartos
Manual de instrucciones
Scan to register
bellakitchenware.com
35196_35211_35212_35213_35214_Bella_MultiUSA_3.5 QT_StandMixer_IM_V6_R2.indd 135196_35211_35212_35213_35214_Bella_MultiUSA_3.5 QT_StandMixer_IM_V6_R2.indd 1 2024-10-21 10:07 PM2024-10-21 10:07 PM

35196_35211_35212_35213_35214_Bella_MultiUSA_3.5 QT_StandMixer_IM_V6_R2.indd 235196_35211_35212_35213_35214_Bella_MultiUSA_3.5 QT_StandMixer_IM_V6_R2.indd 2 2024-10-21 10:07 PM2024-10-21 10:07 PM

1
TABLE OF CONTENTS
IMPORTANT SAFEGUARDS ....................................................................................................................................................2
ADDITIONAL IMPORTANT SAFEGUARDS ........................................................................................................................3
NOTES ON THE PLUG ..............................................................................................................................................................3
NOTES ON THE CORD.............................................................................................................................................................4
PLASTICIZER WARNING .........................................................................................................................................................4
ELECTRIC POWER ......................................................................................................................................................................4
MANUAL THERMAL PROTECTOR ........................................................................................................................................5
GETTING TO KNOW YOUR 3.5QT HAND & STAND MIXER ......................................................................................5
BEFORE USING FOR THE FIRST TIME ................................................................................................................................ 6
OPERATING INSTRUCTIONS ............................................................................................................................................... 6
BELLA MIXING CHART: CHOOSING MIXING SPEEDS & ATTACHMENTS ........................................................... 7
USER MAINTENANCE INSTRUCTIONS ........................................................................................................................... 7
CARE & CLEANING INSTRUCTIONS ................................................................................................................................. 7
STORAGE INSTRUCTIONS .....................................................................................................................................................8
COOKING TIPS ..........................................................................................................................................................................8
LIMITED TWO-YEAR WARRANTY ....................................................................................................................................... 9
ÍNDICE
MEDIDAS IMPORTANTES DE SEGURIDAD ....................................................................................................................10
MEDIDAS IMPORTANTES DE SEGURIDAD ADICIONALES .......................................................................................11
NOTAS SOBRE EL ENCHUFE ...............................................................................................................................................11
NOTAS SOBRE EL CABLE ..................................................................................................................................................11-12
ADVERTENCIA SOBRE EL ACABADO ............................................................................................................................. 12
ALIMENTACIÓN ELÉCTRICA ..............................................................................................................................................12
PROTECTOR TÉRMICO MANUAL ....................................................................................................................................... 12
CONOZCA MEJOR SU BATIDORA VERTICAL Y DE MANO DE 3.5 CUARTOS ...................................................13
ANTES DEL PRIMER USO .....................................................................................................................................................14
INSTRUCCIONES DE FUNCIONAMIENTO..................................................................................... ......................14
TABLA DE MEZCLA DE BELLA: CÓMO ELEGIR LA VELOCIDAD DE MEZCLA Y LOS ACCESORIOS ............15
INSTRUCCIONES DE MANTENIMIENTO PARA EL USUARIO ...............................................................................15
INSTRUCCIONES DE LIMPIEZA Y CUIDADO ................................................................................................................15
INSTRUCCIONES DE ALMACENAMIENTO ...................................................................................................................16
CONSEJOS DE COCCIÓN ................................................................................................................................................... 16
GARANTÍA ................................................................................................................................................................................. 17
35196_35211_35212_35213_35214_Bella_MultiUSA_3.5 QT_StandMixer_IM_V6_R2.indd 135196_35211_35212_35213_35214_Bella_MultiUSA_3.5 QT_StandMixer_IM_V6_R2.indd 1 2024-10-21 10:07 PM2024-10-21 10:07 PM

2
IMPORTANT SAFEGUARDS
When using electrical appliances, basic safety precautions shouldalways
be followed, including the following:
1. READ ALL INSTRUCTIONS.
2. To protect against risk of electrical shock do not put cord, plugs, or appliance in
water or other liquid.
3. Before using unit, check that the voltage of your wall outlet corresponds to the
one on the rating plate which is on the bottom of the appliance.
4. Do not operate any appliance with a damaged cord or plug or aer the
appliance malfunctions or is dropped or damaged in any manner. Contact the
manufacturer at their customer service telephone number for information on
examination, repair, or adjustment.
5. If the supply cord is damaged, it must be replaced by the manufacturer or its
service agent to avoid an electric shock.
6. Do not place an appliance on or near a hot gas or on a heated oven.
1. Never eject beaters/dough hooks when the appliance is in operation.
2. Remove beaters from mixer before washing.
7. Switch o the appliance before changing accessories or approaching parts
which move in use.
8. The appliance is not intended for use by Children or by persons with reduced
physical, sensory, or mental capabilities, or lack of experience and knowledge.
9. Close supervision is necessary when any appliance is used by or near
children. Children should be supervised to ensure that they do not play
with the appliance.
10. Turn the appliance OFF by turning the switch to 0, then unplug from the
outlet when not in use, before assembling or disassembling parts and before
cleaning. To unplug, grasp the plug and pull from the outlet. Never pull
from the power cord.
11. Avoid contacting moving parts. Do not attempt to defeat any safety
interlock mechanisms.
NOTE: DO NOT ATTEMPT TO REPAIR THE UNIT YOURSELF.
THIS WILL VOID THE WARRANTY.
12. The use of attachments not recommended or sold by the manufacturer may
cause re, electric shock or injury.
13. Do not use outdoors.
14. Do not let cord hang over edge of table or counter.
15. Do not let cord contact hot surfaces, including the stove.
16 Keep hands, hair, clothing, as well as spatulas and other utensils away from
beaters and hooks during operation to reduce the risk of injury to persons,
and/or damage to the Hand & Stand Mixer.
17. Remove beaters or hooks from the Hand & Stand Mixer before washing.
18. Do not mix food with a temperature exceeding 70 °C.
CAUTION: UNPLUG BEFORE INSERTING OR REMOVING PARTS.
CAUTION: DO NOT IMMERSE IN WATER.
35196_35211_35212_35213_35214_Bella_MultiUSA_3.5 QT_StandMixer_IM_V6_R2.indd 235196_35211_35212_35213_35214_Bella_MultiUSA_3.5 QT_StandMixer_IM_V6_R2.indd 2 2024-10-21 10:07 PM2024-10-21 10:07 PM

3
FOR HOUSEHOLD USE ONLY
SAVE THESE INSTRUCTIONS
ADDITIONAL IMPORTANT
SAFEGUARDS
1. All users of this appliance must read and understand this Instruction Manual
before operating or cleaning this appliance.
2. The cord to this appliance should be plugged into a 120V AC
electrical outlet only.
3. Do not leave this appliance unattended during use.
4. If this appliance begins to malfunction during use, immediately turn the
switch to 0 (OFF) and unplug the cord. Do not use or attempt to repair the
malfunctioning appliance.
5. If this appliance falls or accidentally becomes immersed in water, unplug it
immediately. Do not reach into the water! Do not use this appliance aer it has
fallen into or becomes immersed in water.
6. To reduce the risk of injury to persons or property, never use this appliance in
an unstable position.
7. Do not use this appliance for other than its intended use.
NOTES ON THE PLUG
This appliance has a polarized plug (one blade is wider than the other). To reduce
the risk of electric shock, this plug will t in a polarized outlet only one way. If the
plug does not t fully into the outlet, reverse the plug. If it still does not t, contact a
qualied electrician. Do not modify the plug in any way.
NOTES ON THE CORD
A. A short power-supply cord (or detached power-supply cord) is provided
to reduce the risk resulting from becoming entangled in or tripping over
a long cord.
B. Longer detachable power-supply cords or extension cords are available
and may be used if care is exercised in their use.
C. If a long detachable power-supply cord or extension cord is used:
1. The marked electrical rating of the cord set, or extension cord should
be at least as great as the electrical rating of the appliance.
2. If the appliance is of the grounded type, the extension cord should
be a grounding-type3-wire cord.
3. The longer cord should be arranged so that it will not drape over
the countertop or tabletop where it can be pulled on by children
or tripped over.
35196_35211_35212_35213_35214_Bella_MultiUSA_3.5 QT_StandMixer_IM_V6_R2.indd 335196_35211_35212_35213_35214_Bella_MultiUSA_3.5 QT_StandMixer_IM_V6_R2.indd 3 2024-10-21 10:07 PM2024-10-21 10:07 PM

4
PLASTICIZER WARNING
CAUTION: To prevent plasticizers from migrating to the nish of the countertop
or tabletop or other furniture, place NON-PLASTIC coasters or place mats between
the appliance and the nish of the countertop or tabletop.
Failure to do so may cause the nish to darken, permanent blemishes may occur,
or stains can appear.
ELECTRIC POWER
If the electrical circuit is overloaded with other appliances, your appliance may
not operate properly. It should be operated on a separate electrical circuit from
other appliances.
MANUAL THERMAL PROTECTOR
This product is equipped with a Manual Resettable Thermal protector to protect
the motor. If the motor shuts down, turn o the unit by slide the speed switch to (0)
position, and then unplug the unit. Let the unit rest for approximately 20 minutes.
Once the resetting period has elapsed, plug the power cord back into the outlet
and turn the speed switch to the desired setting to continue.
35196_35211_35212_35213_35214_Bella_MultiUSA_3.5 QT_StandMixer_IM_V6_R2.indd 435196_35211_35212_35213_35214_Bella_MultiUSA_3.5 QT_StandMixer_IM_V6_R2.indd 4 2024-10-21 10:07 PM2024-10-21 10:07 PM

5
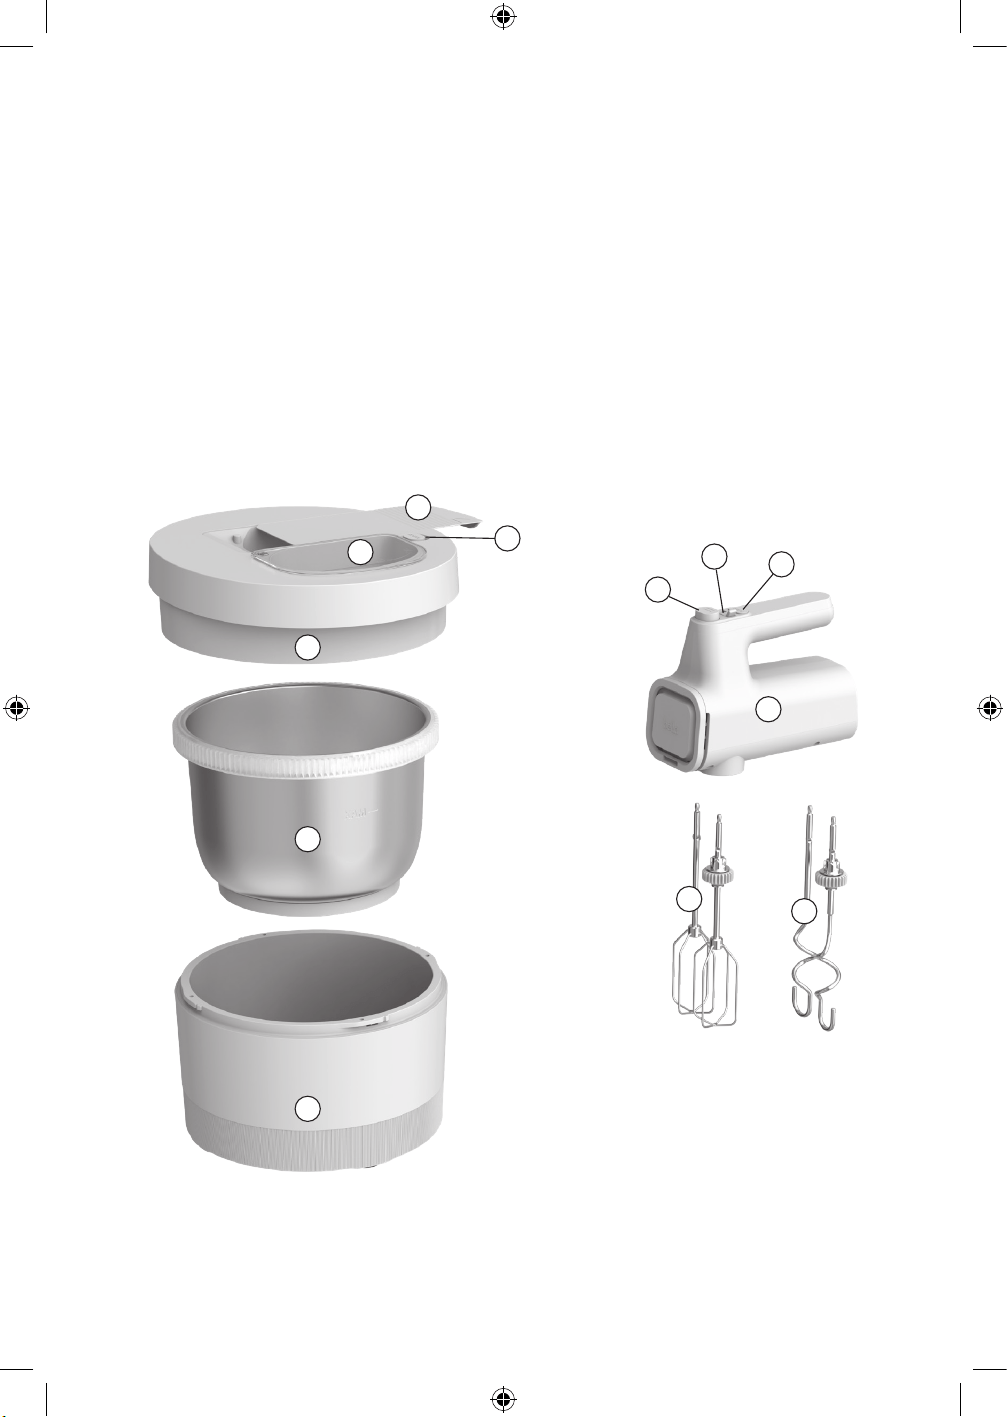
GETTING TO KNOW YOUR BELLA 3.5QT HAND & STAND MIXER
Product may vary slightly from illustration.
1. Bench scraper (Dishwaher safe)
2. Hand mixer release button
3. Feeding cover
4. Bowl cover (Not dishwaher safe)
5. Inner mixing bowl (Dishwaher safe)
6. Outer mixing bowl (Not dishwaher safe)
7. Ejector button
8. Speed switch
9 Turbo button
10. Hand mixer (Not dishwaher safe)
11. Beaters (2) (Dishwaher safe)
12. Hooks (2) (Dishwaher safe)
13. Cord with Polarized Plug (not shown)
1
2
3
4
5
6
10
11
12
7
8
9
35196_35211_35212_35213_35214_Bella_MultiUSA_3.5 QT_StandMixer_IM_V6_R2.indd 535196_35211_35212_35213_35214_Bella_MultiUSA_3.5 QT_StandMixer_IM_V6_R2.indd 5 2024-10-21 10:07 PM2024-10-21 10:07 PM

6
BEFORE USING FOR THE FIRST TIME
1. Carefully unpack the Hand & Stand MIxer and remove all packaging materials. Check the contents to ensure
that all parts are present and have been received in good condition.
2. Wash all parts in warm, soapy water. Rinse and dry thoroughly. Be sure the power cord is unplugged from the
power outlet and the speed selector is at the “0” position.
NOTE: Only the inner mixing bowl, beaters and hooks are dishwasher safe.
3. The motor base may be wiped with a damp cloth.
WARNING: DO NOT IMMERSE THE MOTOR BASE IN WATER.
CAUTION: Suction cup feet help to fix the unit to the countertop. Lift unit carefully to avoid spilling ingredients.
OPERATING INSTRUCTIONS
1. Place the motor base on a at, clean, dry countertop or table.
2. Make sure the unit is unplugged.
3. Select the desired attachments, which will depend on the mixing task to be performed: Beaters are used for
mixing various ingredients, whipping egg white or cream. Dough hooks are used for kneading dough.
4. Insert the selected attachments into the corresponding sockets.
The attachments shall be inserted in the specied position. For each set of attachment, there is one with a gear
that can only be inserted into the bigger socket of the motor unit. The other attachment can only be inserted
into the smaller socket of the motor unit.
NOTE: Ensure beaters or dough hooks are fully inserted into place, otherwise the appliance will
not work properly.
NOTE: Do not use two dierent types of attachment at the same time.
STAND MIXER FUNCTION
1. When using the stand mixing function, place ingredients into the inner mixing bowl. The quantity of the
ingredients shall not exceed 2L or 1.2Kg, otherwise they will spill over the edge of the bowl while mixing or may
result in damage to the appliance.
2. Place the inner mixing bowl into the outer mixing bowl.
3. Place the bowl cover onto the outer mixing bowl and turn it clockwise to lock into position.
4. Remove bench scraper and insert the hand mixer into the bowl cover, making sure the slots at the bottom of the
hand mixer align with the lock lugs on the bowl cover. Press the handle down to lock the hand mixer in place
until it clicks.
NOTE: To detach hand mixer, press and hold the release button and li the motor unit out of the cover.
5. Ensure that the speed switch is at the “0” setting, then plug the unit in the power source.
6. Set the speed switch to your desired speed. There are 6 speed settings to choose from. The mixer will run at the
highest speed when pressing Turbo button.
WARNING: Do not stick knives, metal spoons, forks and other cutlery into bowl while in working mode. When
the machine is working, do not reach into the mixing bowl through the opening of the feeding cover with your
hands, to avoid possible injury.
NOTE: While kneading dough ingredients, some our may adhere to the inside of the bowl. If this happens,
stop the appliance, open the lid, and scrape the our on the inside wall of bowl with the plastic bench scraper
to obtain optimal results.
7. When mixing is complete, turn the Speed selector to the “0” setting, and unplug unit from power outlet.
8. Press the Release button to li and remove the hand mixer o the lid. Hold the beaters or hooks with one hand
and rmly press the Ejector button down with the other hand to remove them.
NOTE: Before removing the attachments, make sure that the Speed switch is set to the “0” setting.
9. To remove the cover, rotate the bowl cover counterclockwise to the unlock position.
10. Take the inner mixing bowl out of the outer mixing bowl.
11. If necessary, scrape the excess food particles from the beaters or hooks with a plastic spatula.
HAND MIXER FUNCTION
1. The hand mixer can be used separately if it is detached from the cover. To do so, simply press the Release
button to li and remove the hand mixer o the lid. Both the inner mixing bowl and outer mixing bowl can be
used separately or stacked together for use.
WARNING: Do not use glass or other breakable containers to mix ingredients there may be a risk of damage.
35196_35211_35212_35213_35214_Bella_MultiUSA_3.5 QT_StandMixer_IM_V6_R2.indd 635196_35211_35212_35213_35214_Bella_MultiUSA_3.5 QT_StandMixer_IM_V6_R2.indd 6 2024-10-21 10:07 PM2024-10-21 10:07 PM
7
BELLA MIXING CHART: CHOOSING MIXING SPEEDS & ATTACHMENTS
These are general guidelines for selecting the best speed to stir, blend, mix, beat, whip or knead ingredients with your
Hand & Stand Mixer and the best attachments to use. Refer to recipes for suggested Hand Mixer speeds and times.
If your Hand Mixer slows down, switch speed control to a higher speed, press the TURBO feature for a brief surge of
mixing power or divide the quantity of ingredients being mixed.
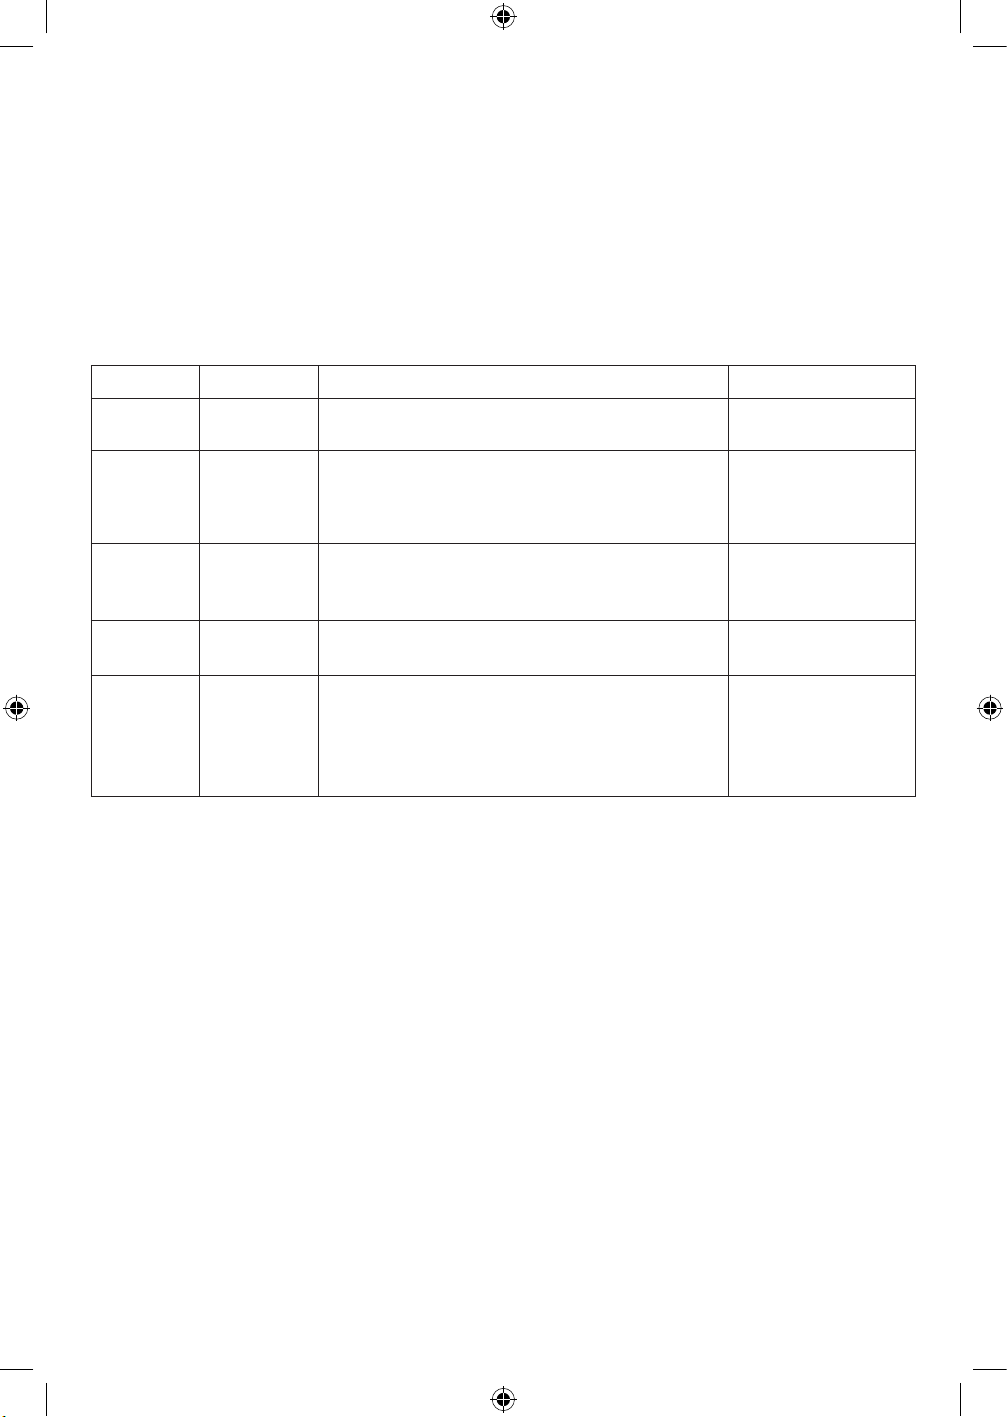
SPEED FUNCTION USE ATTACHMENT
1 STIR Blend liquids, combine dry ingredients. Stir one ingredient into
another.
Beaters
2 BLEND Blend liquids and dry ingredients at a slightly higher speed
Add in nuts, chips, shredded cheeses, onions, olives.
Prepare sauces and puddings
Beaters
3 MIX Mix cake batters, mixes and frosting.
Mash potatoes, mix cream cheese spreads.
Mix yeast pastry dough.
Beaters
Dough Hooks
4 BEAT/
CREAM
Beat whole eggs and frosting.
Cream butter and sugar.
Beaters
5 - 6 FINISH/
WHIP/
KNEAD
Finish cookie dough or other heavy batters.
Whip/beat potatoes.
Prepare light and uy mixtures. Whisk dressings, sauces, egg
whites.
Knead yeast doughs and breads.
Beaters
Beaters
Dough Hooks
USER MAINTENANCE INSTRUCTIONS
This appliance requires little maintenance. It contains no user serviceable parts. Do not try to repair it yourself.
Any servicing that requires disassembly other than cleaning must be performed by a qualied appliance
repair technician.
CARE & CLEANING INSTRUCTIONS
CAUTION: Never immerse the motor base, plug or cord in water or any other liquid.
1. Unplug the appliance and wait until it completely cools down before cleaning and storing.
2. Wipe over the outside surface of the mixer with a damp cloth and polish with a soft dry cloth.
3. Wipe any excess food particles from the power cord.
4. Detach the inner mixing bowl and outer mixing bowl from the appliance. Clean them with warm water and
soap, then wipe them with dry a cloth. If preferred, the inner mixing bowl is dishwasher safe.
5. Wash the beaters and dough hooks in warm water and soap and wipe them with a dry cloth. If preferred, the
beaters and dough hooks are dishwasher safe.
CAUTION: The hand mixer, bowl cover and outer mixing bowl cannot be immersed in water or other liquid.
WARNING: Only an authorized service representative should handle any other servicing.
WARNING: DO NOT IMMERSE THE MOTOR BASE IN WATER.
35196_35211_35212_35213_35214_Bella_MultiUSA_3.5 QT_StandMixer_IM_V6_R2.indd 735196_35211_35212_35213_35214_Bella_MultiUSA_3.5 QT_StandMixer_IM_V6_R2.indd 7 2024-10-21 10:07 PM2024-10-21 10:07 PM
8
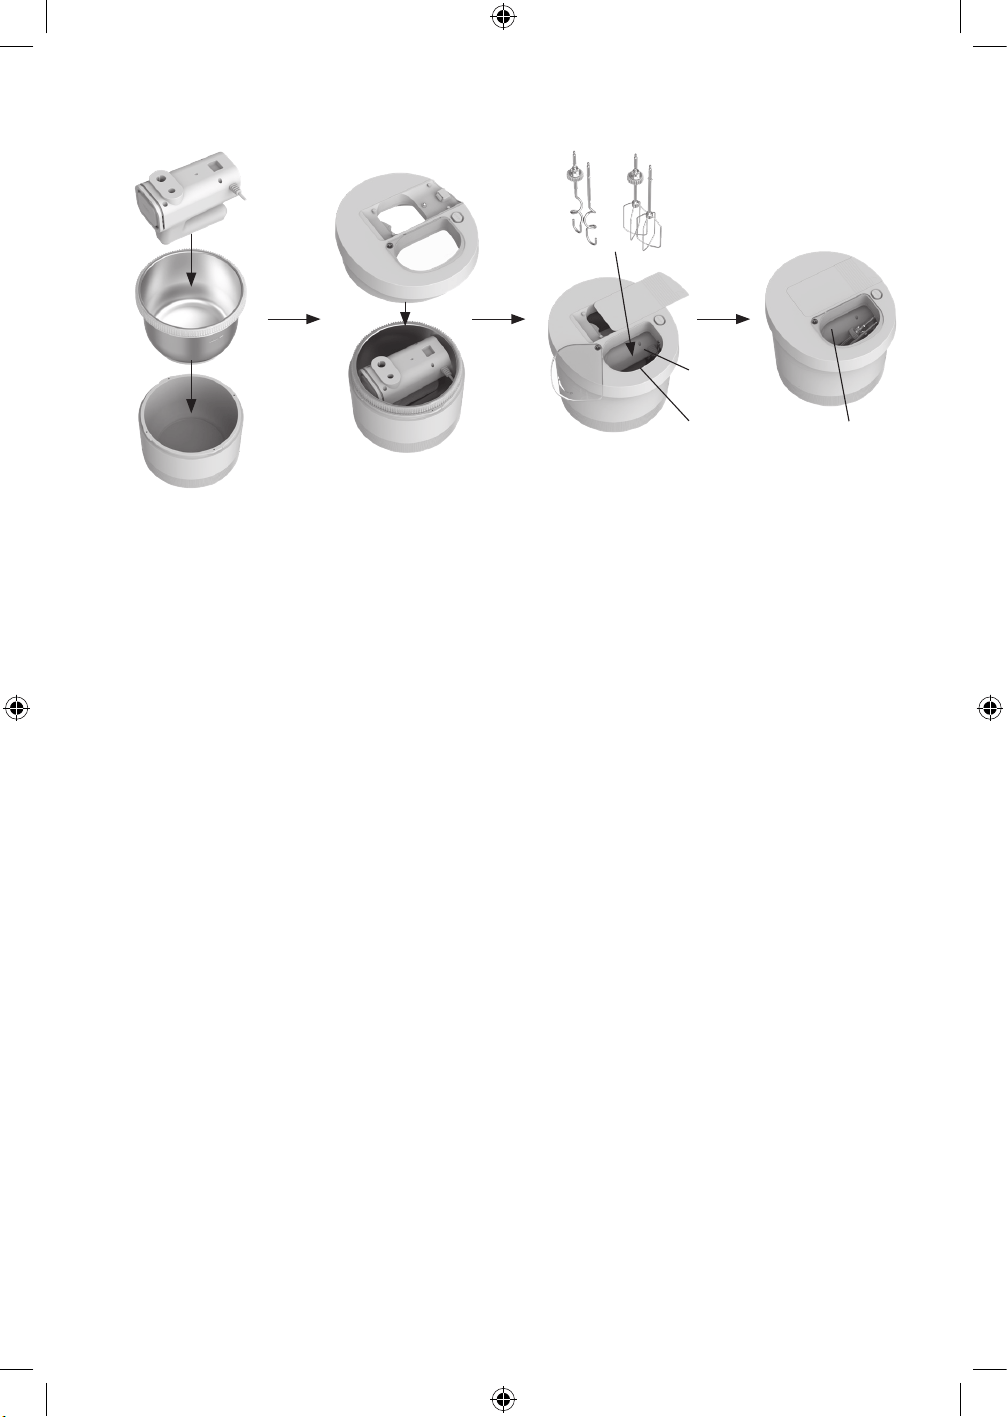
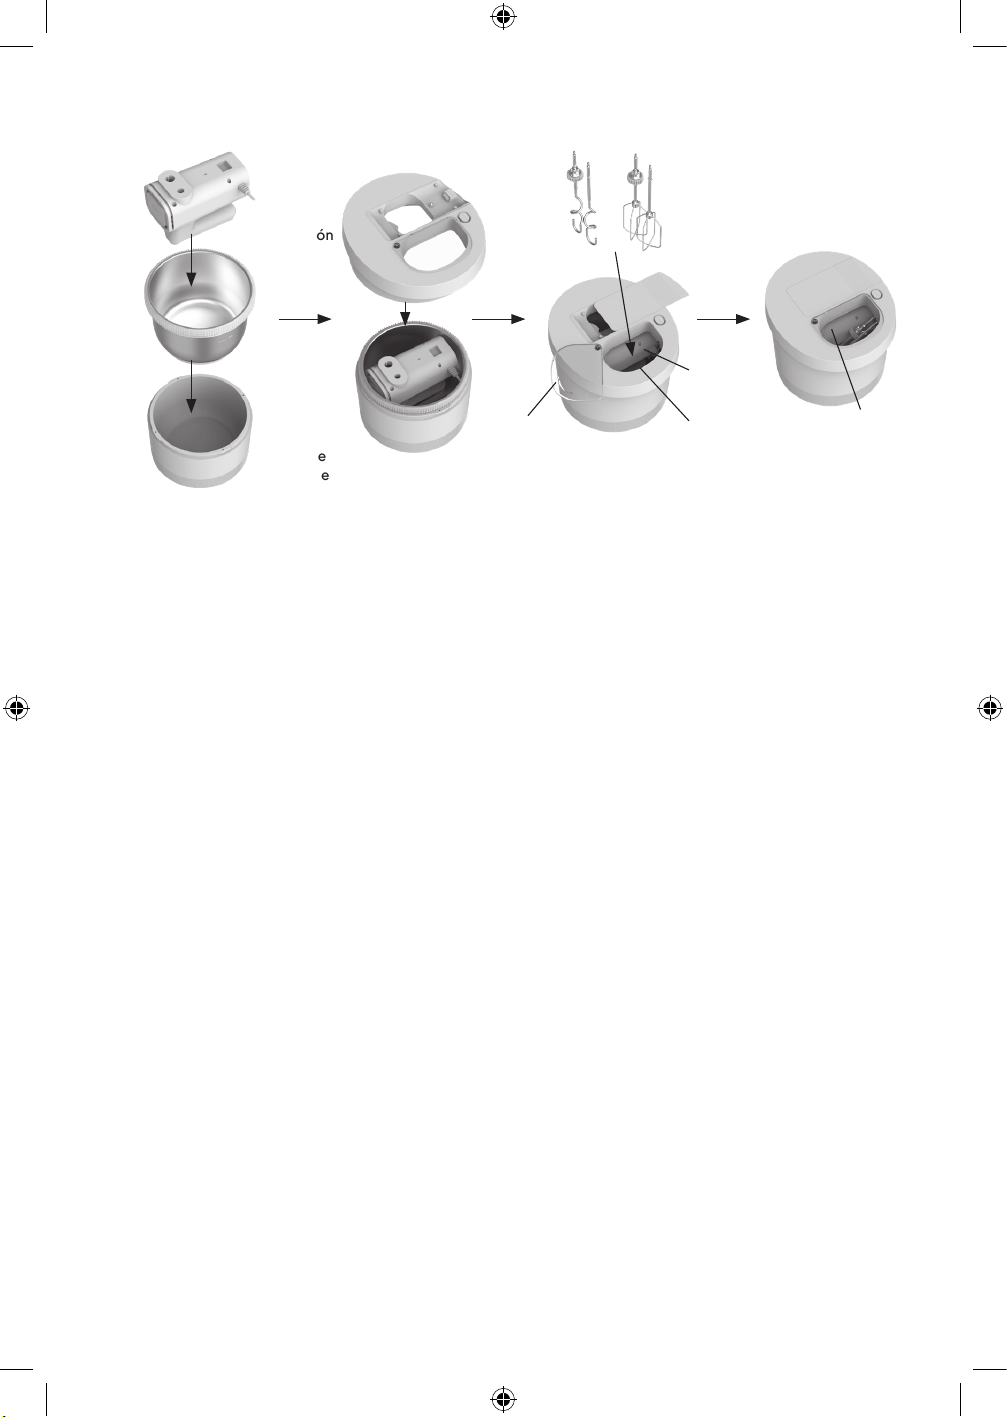
STORING INSTRUCTIONS
1. Unplug and clean the unit.
2. Place the hand mixer with its handle downwards into the inner mixing bowl (Figure 1). The power cord can be
wound around the hand mixer’s body.
3. Place the inner mixing bowl containing the hand mixer into the outer mixing bowl (Figure 1).
4. Rotate clockwise to lock the bowl cover onto the outer mixing bowl (Figure 2).
5. Open the feeding cover (Figure 3).
6. Place the beaters and hooks upside down and insert them into the inner mixing bowl through the feeding
port. If the hand mixer bowl blocks the feeding port, it can be carefully moved into the proper position to
then store the beaters and hooks inside the mixing bowl (Figure 3).
7. Push the bench scraper to snap onto the bowl cover (Figure 3).
8. Close the feeding cover to complete the storage of the entire unit (Figure 4).
COOKING TIPS
1. Refrigerated ingredients, i.e., butter and eggs, should be at room temperature before mixing in the Hand &
Stand Mixer. Set these ingredients out ahead of time.
2. To avoid having eggshells in your recipe, break eggs into separate bowl rst, then add them to the mixture in
the Hand & Stand Mixer bowl.
3. Do not over-mix. Be careful to only mix/blend dough until recommended in the recipe. Fold dry ingredients
only until just combined. Always use the low speed to start.
4. Dierent climate conditions and seasonal temperature changes aect the temperature of ingredients and
their texture from area to area. All these play a part in the required mixing time.
5. Always start mixing at slow speeds. Gradually increase to the recommended speed as stated in the recipe.
6. When mixing liquids, especially hot liquids, add small quantities at a time to reduce spillage.
7. Ingredients should be added to the mixing bowl as they are specied in the recipe.
8. Should an object, such as a spatula, fall into the bowl while the mixer is operating, turn the speed switch to
the “0” setting immediately, then remove the object.
9. For easier clean-up remove beaters and rinse immediately with warm water.
10. If some ingredients are not mixed suciently, turn o the appliance and try to push the ingredients towards
the middle of the bowl with a plastic spatula. Turn the unit on again to finish mixing.
11. If the quantity of ingredients to be mixed is very small, the Stand Mixer might not be able to mix them
properly. In this case, please use the hand mixer.
Figure 1 Figure 4Figure 3
Power
cord
Hand Mixer
Hand
Mixer
Feeder
Inner
mixing
bowl
Outer
mixing
bowl
Figure 2
Hand
Mixer
Bowl cover Hooks Beaters
Bench
scraper
Bench
scraper
Feeding
cover
Feeding
cover
35196_35211_35212_35213_35214_Bella_MultiUSA_3.5 QT_StandMixer_IM_V6_R2.indd 835196_35211_35212_35213_35214_Bella_MultiUSA_3.5 QT_StandMixer_IM_V6_R2.indd 8 2024-10-21 10:07 PM2024-10-21 10:07 PM

9
SENSIO Inc. hereby warrants that for a period of TWO YEARS from the date of purchase,
this product will be free from mechanical defects in material and workmanship, and
for 90 days in respect to non-mechanical parts. At its sole discretion, SENSIO Inc. will
either repair or replace the product found to be defective, or issue a refund on the
product during the warranty period.
The warranty is only valid for the original retail purchaser from the date of initial retail
purchase and is not transferable. Keep the original sales receipt, as proof of purchase is
required to obtain warranty validation. Retail stores selling this product do not have the
right to alter, modify, or in any way revise the terms and conditions of the warranty.
EXCLUSIONS:
The warranty does not cover normal wear of parts or damage resulting from any of the
following: negligent use of the product, use of improper voltage or current, improper
routine maintenance, use contrary to the operating instructions, disassembly, repair, or
alteration by anyone other than qualied SENSIO Inc. personnel. Also, the warranty
does not cover Acts of God such as re, oods, hurricanes, or tornadoes.
SENSIO Inc. shall not be liable for any incidental or consequential damages caused
by the breach of any express or implied warranty. Apart from the extent prohibited
by applicable law, any implied warranty of merchantability or tness for a particular
purpose is limited in time to the duration of the warranty. Some states, provinces or
jurisdictions do not allow the exclusion or limitation of incidental or consequential
damages, or limitations on how long an implied warranty lasts, and therefore, the
above exclusions or limitations may not apply to you. The warranty covers specic legal
rights which may vary by state, province and/or jurisdiction.
HOW TO OBTAIN WARRANTY SERVICE:
You must contact Customer Service at our toll-free number: 1-866-832-4843.
A Customer Service Representative will attempt to resolve warranty issues over the
phone. If the Customer Service Representative is unable to resolve the problem, you will
be provided with a case number and asked to return the product to SENSIO Inc. Attach
a tag to the product that includes: your name, address, daytime contact telephone
number, case number, and description of the problem. Also, include a copy of the
original sales receipt. Carefully package the tagged product with the sales receipt,
and send it (with shipping and insurance prepaid) to SENSIO Inc.’s address. SENSIO
Inc. shall bear no responsibility or liability for the returned product while in transit to
SENSIOInc.’s Customer Service Center.
LIMITED TWO-YEAR WARRANTY
35196_35211_35212_35213_35214_Bella_MultiUSA_3.5 QT_StandMixer_IM_V6_R2.indd 935196_35211_35212_35213_35214_Bella_MultiUSA_3.5 QT_StandMixer_IM_V6_R2.indd 9 2024-10-21 10:07 PM2024-10-21 10:07 PM

10
MEDIDAS IMPORTANTES DE
SEGURIDAD
Al usar electrodomésticos, se deben tener en cuenta precauciones de seguridad
básicas, como las siguientes:
1. LEA TODAS LAS INSTRUCCIONES.
2. Para protegerse de descargas eléctricas, no sumerja el cable, los enchufes o el
aparato en agua u otro líquido.
3. Antes de usar la unidad, verique que el voltaje del tomacorriente de pared
corresponda al que se muestra en la placa de clasicación que se encuentra
en la parte inferior del aparato.
4. No utilice un aparato con un cable o enchufe dañados, después de una avería,
después de una caída o si está dañado de alguna manera. Comuníquese con
el fabricante a su número de teléfono de Atención al Cliente para obtener
información sobre el proceso de revisión, reparación o ajuste.
5. Si el cable de alimentación está dañado, debe ser reemplazado por el
fabricante, su agente de servicio para evitar una descarga eléctrica.
6. No coloque el aparato sobre o cerca de un hornillo eléctrico o a gas, o en
un horno caliente.
1. Nunca libere los batidores/ganchos para masa cuando el aparato está
en funcionamiento.
2. Quite los batidores de la batidora antes de lavarlos.
7. Apague el aparato antes de cambiar los accesorios o de acercar otras piezas
que se mueven durante el uso.
8. Este aparato no está diseñado para que lo utilicen niños o personas con
capacidades físicas, sensoriales o mentales limitadas, ni con falta de
experiencia o conocimiento.
9. Es necesaria una estrecha supervisión cuando los niños utilizan un aparato o
si este se utiliza cerca de ellos. Se debe supervisar a los niños para asegurarse
de que no jueguen con el aparato.
10. Apague el aparato llevando el interruptor a 0, luego desenchúfelo del
tomacorriente cuando no esté en uso, antes de ensamblar o desensamblar
piezas y antes de limpiarlo. Para desenchufarlo, sujete el enchufe y tire del
tomacorriente. Nunca tire del cable de alimentación.
11. Evite el contacto con las piezas móviles. No intente anular ningún mecanismo
del interbloqueo de seguridad.
NOTA: NO INTENTE REPARAR LA UNIDAD USTED MISMO.
ESTO ANULARÁ LA GARANTÍA.
12. El uso de accesorios no recomendados o vendidos por el fabricante puede
causar incendios, descargas eléctricas o lesiones.
13. No utilizar en exteriores.
14. No deje que el cable cuelgue del borde de la mesa o del mostrador.
15. No permita que el cable entre en contacto con supercies calientes,
incluida la estufa.
35196_35211_35212_35213_35214_Bella_MultiUSA_3.5 QT_StandMixer_IM_V6_R2.indd 1035196_35211_35212_35213_35214_Bella_MultiUSA_3.5 QT_StandMixer_IM_V6_R2.indd 10 2024-10-21 10:07 PM2024-10-21 10:07 PM

11
16. Mantenga las manos, cabellos, ropa, espátulas y otros utensilios lejos de los
batidores y los ganchos durante su funcionamiento para reducir el riesgo de
ocasionar lesiones a personas o daños a la batidora vertical y de mano.
17. Quite los batidores o los ganchos de la batidora vertical y de mano
antes de lavarlos.
18. No mezcle alimentos a una temperatura superior a 70°C.
PRECAUCIÓN: DESENCHUFAR ANTES DE INSERTAR O QUITAR PIEZAS..
PRECAUCIÓN: NO SUMERGIR EN AGUA.
SOLO PARA USO DOMÉSTICO
GUARDE ESTAS INSTRUCCIONES
MEDIDAS DE SEGURIDAD
IMPORTANTES ADICIONALES
1. Todos los usuarios de este aparato deben leer y comprender el manual de
instrucciones antes de utilizar o limpiar el aparato.
2. El cable de este aparato se debe enchufar solamente a un tomacorriente de
120 voltios de CA.
3. No deje este aparato sin supervisión mientras está en uso.
4. Si este aparato comienza a funcionar defectuosamente durante el uso, coloque
inmediatamente el interruptor en 0 (APAGADO) y desenchufe el cable. No
utilice ni intente reparar al aparato averiado.
5. Si este aparato cae o por accidente se sumerge en agua, desenchúfelo
inmediatamente. ¡No toque el agua! No utilice este aparato si se cayó o se
sumergió en agua.
6. Para reducir el riesgo de provocar lesiones a personas o daños a la propiedad,
nunca use este aparato en una posición inestable.
7. No utilice este aparato para otro uso que no sea el indicado.
NOTAS SOBRE EL ENCHUFE
Este aparato posee un enchufe polarizado (una clavija es más ancha que la
otra). Para reducir el riesgo de descarga eléctrica, este enchufe encajará en un
tomacorriente polarizado en un solo sentido. Si el enchufe no entra completamente
en el tomacorriente, gire el enchufe. Si aun así no encaja, contacte a un técnico
electricista calicado. No modique el enchufe de ninguna manera.
NOTAS SOBRE EL CABLE
A. Se proporciona un cable de alimentación corto (o un cable de alimentación
desconectable) para reducir el riesgo de enredarse o tropezarse
con un cable largo.
35196_35211_35212_35213_35214_Bella_MultiUSA_3.5 QT_StandMixer_IM_V6_R2.indd 1135196_35211_35212_35213_35214_Bella_MultiUSA_3.5 QT_StandMixer_IM_V6_R2.indd 11 2024-10-21 10:07 PM2024-10-21 10:07 PM

12
B. Hay disponibles cables de alimentación desconectables más largos o cables
de extensión, y estos se pueden utilizar si se tiene cuidado en su uso.
C. Si se utiliza un cable de alimentación desconectable largo o un
cable de extensión:
1. La clasicación eléctrica marcada en el cable de alimentación
desconectable o cable de extensión deberá ser al menos igual a la
clasicación eléctrica del aparato.
2. Si el aparato es del tipo con conexión a tierra, el cable de extensión
deberá ser un cable de 3 hilos con conexión a tierra.
3. El cable más largo debe colocarse de manera que no cuelgue de una
encimera o mesa de donde los niños pudieran jalarlo o tropezar con él.
ADVERTENCIA SOBRE EL ACABADO
PRECAUCIÓN: Para evitar que el acabado del mostrador o de la mesa u otros
muebles se dañe, coloque posavasos o manteles individuales que NO SEAN
DE PLÁSTICO entre el aparato y la supercie del mostrador o de la mesa. No
hacerlo puede provocar que el acabado se oscurezca, provocar imperfecciones
permanentes o hacer que aparezcan manchas.
ALIMENTACIÓN ELÉCTRICA
Si el circuito eléctrico está sobrecargado con otros aparatos, este aparato podría
no funcionar correctamente. Debe utilizarse en un circuito eléctrico diferente al de
otros electrodomésticos.
PROTECTOR TÉRMICO MANUAL
Este producto cuenta con un protector térmico reajustable manual para proteger el
motor. Si el motor se apaga, apague la unidad llevando el interruptor de velocidad
a la posición (0) y luego desenchufe la unidad. Deje la unidad en reposo por
aproximadamente 20 minutos. Una vez que pasó el período de restablecimiento,
vuelva a enchufar el cable en el tomacorriente y lleve el interruptor de velocidad al
ajuste deseado para continuar.
35196_35211_35212_35213_35214_Bella_MultiUSA_3.5 QT_StandMixer_IM_V6_R2.indd 1235196_35211_35212_35213_35214_Bella_MultiUSA_3.5 QT_StandMixer_IM_V6_R2.indd 12 2024-10-21 10:07 PM2024-10-21 10:07 PM
13
CONOZCA MEJOR SU BATIDORA VERTICAL Y DE MANO DE 3.5 CUARTOS
El producto puede diferir ligeramente del que aparece en la ilustración.
1. Raspador (Apto para el lavavajillas)
2. Botón de liberación de la batidora de mano
3. Cubierta de alimentación
4. Cubierta del recipiente (Apta para el lavavajillas)
5. Recipiente interior de mezcla (Apto para el lavavajillas)
6. Recipiente exterior de mezcla (Apto para el lavavajillas)
7. Botón eyector
8. Interruptor de velocidad
9. Botón Turbo
10. Batidora de mano (No apto para lavavajillas)
11. Batidores (2) (Apto para el lavavajillas)
12. Ganchos (2) (Apto para el lavavajillas)
13. Cable con enchufe polarizado (no se muestra)
1
2
3
4
5
6
10
11
12
7
8
9
35196_35211_35212_35213_35214_Bella_MultiUSA_3.5 QT_StandMixer_IM_V6_R2.indd 1335196_35211_35212_35213_35214_Bella_MultiUSA_3.5 QT_StandMixer_IM_V6_R2.indd 13 2024-10-21 10:07 PM2024-10-21 10:07 PM

14
ANTES DEL PRIMER USO
1. Desempaque la batidora vertical y de mano con cuidado y quite todo el material de embalaje. Revise el
contenido para asegurarse de que no falte ninguna pieza y de que estén en buen estado.
2. Lave todas las piezas con agua tibia y jabón. Enjuague y seque por completo. Asegúrese de desenchufar el
cable de alimentación del tomacorriente y que el selector de velocidad esté en la posición “0”.
NOTA: Solo el recipiente interior de mezcla, los batidores y los ganchos son aptos para lavavajillas.
3. Puede limpiar la base del motor con un paño húmedo.
ADVERTENCIA: NO SUMERJA LA BASE DEL MOTOR EN AGUA.
PRECAUCIÓN: Las patas con ventosa ayudan a jar la unidad a la encimera. Levante la unidad con cuidado para
evitar derramar ingredientes.
INSTRUCCIONES DE FUNCIONAMIENTO
1. Coloque la base del motor sobre una mesa o mostrador plano, limpio y seco.
2. Asegúrese de que la unidad esté desconectada.
3. Seleccione los accesorios deseados, los cuales dependen de la tarea de mezcla a realizar: Los batidores
se usan para mezclar diversos ingredientes, batir clara de huevo o crema. Los ganchos para masa se usan
para amasar masa.
4. Inserte los accesorios seleccionados en las ranuras correspondientes.
Los accesorios se insertarán en la posición especicada. Para cada conjunto de accesorios, hay uno con un
engranaje que solo puede insertarse en la ranura más grande de la unidad del motor. El otro accesorio solo
puede insertarse en la ranura más pequeña de la unidad del motor.
Nota: Asegúrese de que los batidores o los ganchos para masa estén bien insertados en su lugar; de lo
contrario el aparato no funcionará correctamente.
Nota: No utilice dos tipos diferentes de accesorio al mismo tiempo.
USO DE LA BATIDORA VERTICAL
1. Cuando use la función de mezcla vertical, coloque los ingredientes en el recipiente interior de mezcla. La
calidad de los ingredientes no puede exceder 2 l o 1.2 kg, de lo contrario, se derramarán por el borde del
recipiente mientras mezcla o puede causar daños al aparato.
2. Coloque el recipiente interior de mezcla en el recipiente exterior de mezcla.
3. Coloque la cubierta del recipiente en el recipiente exterior de mezcla y gírelo en sentido horario para
jarlo en posición.
4. Quite el raspador e inserte la batidora de mano en la cubierta del recipiente. Asegúrese de que las ranuras
en la parte inferior de la batidora de mano estén alineadas con los sujetadores de bloqueo en la cubierta del
recipiente. Presione el asa hacia abajo hasta que se escuche un clic para jar la batidora de mano en su lugar.
NOTA: Para desbloquear la batidora de mano, mantenga presionado el botón de liberación y levante la
unidad del motor de la cubierta.
5. Asegúrese de que el interruptor de velocidad esté en el ajuste “0” y luego enchufe la unidad a la fuente
de alimentación.
6. Gire el interruptor de velocidad a la velocidad deseada. Hay 6 ajustes de velocidad para elegir. La batidora
funcionará a la velocidad más alta cuando presione el botón Turbo.
ADVERTENCIA: No clave cuchillos, cucharas de metal, tenedores u otros cubiertos en el recipiente mientras
opera. Cuando la máquina esté en functionamiento, no introduzca las manos en el recipiente a través de la
abertura de la tapa de alimentación para evitar posibles lesiones.
NOTA: Mientras amasa masa, algo de harina podría adherirse al interior del recipiente. Si esto sucede,
detenga el aparato, abra la tapa y raspe la harina en la pared interior en la pared interior del recipiente con
el raspador plástico para obtener resultados óptimos.
7. Cuando termine de procesar, gire el selector de velocidad al ajuste “0” y desenchufe la unidad
del tomacorriente.
8. Presione el botón de liberación para levantar y quitar la batidora de mano de la tapa. Sostenga los batidores
o ganchos para masa con una mano y presione con rmeza el botón de liberación hacia abajo con la otra
mano para extraerlos.
NOTA: Antes de quitar los accesorios, asegúrese de que el interruptor de velocidad esté en el ajuste “0”.
9. Para quitar la cubierta, rote la cubierta del recipiente en sentido antihorario a la posición de desbloqueo.
10. Quite el recipiente interior de mezcla del recipiente exterior de mezcla.
11. De ser necesario, raspe el exceso de alimento de los batidores o los ganchos con una espátula de plástico.
35196_35211_35212_35213_35214_Bella_MultiUSA_3.5 QT_StandMixer_IM_V6_R2.indd 1435196_35211_35212_35213_35214_Bella_MultiUSA_3.5 QT_StandMixer_IM_V6_R2.indd 14 2024-10-21 10:07 PM2024-10-21 10:07 PM
15
USO DE LA BATIDORA DE MANO
1. La batidora de mano se puede usar por separado si se la desprende de la cubierta. Para ello, solo presione
el botón de liberación y quite la batidora de mano de la tapa. Tanto el recipiente interior de mezcla como el
recipiente exterior de mezcla pueden usarse por separado o apilarse para usarlos juntos.
ADVERTENCIA: No use contenedores de vidrio o de materiales que puedan romperse para mezclar
ingredientes que puedan causar daños. “
TABLA DE MEZCLA DE BELLA: CÓMO ELEGIR LA VELOCIDAD DE MEZCLA Y LOS ACCESORIOS
Estas son las pautas generales para seleccionar la mejor velocidad para agitar, licuar, mezclar, batir o amasar
ingredientes con su batidora vertical y de mano y para usar los accesorios más apropiados. Consulte las recetas para
ver las velocidades y los tiempos de mezcla sugeridos de la batidora de mano. Si su batidora de mano reduce su
velocidad, cambie el control de velocidad a un ajuste mayor, presione la función de TURBO para aumentar la potencia
de mezcla durante un periodo breve o divida la cantidad de ingredientes que va a mezclar.
VELOCIDAD FUNCIÓN USO ACCESORIO
1 AGITAR Licuar líquidos, combinar ingredientes secos, agitar un
ingrediente para integrarlo a otro.
Batidores
2 LICUAR Licuar líquidos e ingredientes secos a una velocidad
apenas más alta.
Añadir nueces, patatas fritas, quesos rallados, cebollas,
aceitunas. Preparar salsas y budines.
Batidores
3 MEZCLAR Mezclar masas de pasteles, mezclas y glaseados.
Triturar patatas, mezclar queso crema para untar.
Mezclar masa de levadura.
Batidores
Ganchos para masa
4 BATIR/
CREMA
Batir huevos enteros y glaseados.
Crema de mantequilla y azúcar.
Batidores
5 - 6 TERMINAR/
BATIR/
AMASAR
Terminar masa de galletas u otras masas pesadas.
Batir/triturar patatas.
Preparar mezclas poco densas y esponjosas.
Batir aderezos, salsas y claras de huevo.
Amasar masas de levadura y de pan.
Batidores
Batidores
Ganchos para masa
INSTRUCCIONES DE MANTENIMIENTO PARA EL USUARIO
Este aparato requiere poco mantenimiento. No contiene piezas que el usuario pueda reparar. Cualquier
mantenimiento que requiera desarmarlo, aparte de la limpieza, debe ser realizado por un técnico calicado en
reparación de electrodomésticos.
INSTRUCCIONES DE LIMPIEZA Y CUIDADO
PRECAUCIÓN: Nunca sumerja la base del motor, el enchufe o el cable en agua ni en otro líquido.
1. Desenchufe el aparato y espere a que se enfríe por completo antes de limpiarlo y guardarlo.
2. Limpie las supercies exteriores de la batidora con un paño húmedo y pula con un paño seco suave.
3. Limpie los restos de alimento del cable de alimentación.
4. Desprenda el recipiente interior de mezcla y el recipiente exterior de mezcla del aparato. Lávelos en
agua tibia y jabón, y séquelos con un paño seco. Si así lo preere, el recipiente interior de mezcla es apto
para lavavajillas.
5. Lave los batidores y los ganchos para masa en agua tibia y jabón, y séquelos con un paño seco. Si lo preere,
los batidores y los ganchos para masa son aptos para lavavajillas.
PRECAUCIÓN: La batidora de mano, la cubierta del recipiente y el recipiente exterior de mezcla no se pueden
sumergir en agua u otros líquidos.
ADVERTENCIA: Solo un representante autorizado de servicio debe hacerse cargo de otros mantenimientos.
ADVERTENCIA: NO SUMERJA LA BASE DEL MOTOR EN AGUA.
35196_35211_35212_35213_35214_Bella_MultiUSA_3.5 QT_StandMixer_IM_V6_R2.indd 1535196_35211_35212_35213_35214_Bella_MultiUSA_3.5 QT_StandMixer_IM_V6_R2.indd 15 2024-10-21 10:07 PM2024-10-21 10:07 PM
16
INSTRUCCIONES DE ALMACENAMIENTO:
Figura 1 Figura 4Figura 3
Cable de
alimentación
Batidora de
mano
Entrada de
alimentos
Recipiente
interior de
mezcla
Recipiente
exterior de
mezcla
Figura 2
Batidora
de mano
Cubierta del
recipiente
Ganchos Batidores
Raspador
Raspador
Cubierta de
alimentación
1. Desenchufe y limpie la unidad.
2. Coloque la batidora de mano con el asa hacia abajo en dirección al recipiente interior de mezcla (Figura 1).
El cable de alimentación se puede enrollar alrededor del cuerpo de la batidora de mano.
3. Coloque el recipiente interior de mezcla con la batidora de mano en dirección al recipiente exterior de
mezcla (Figura 1).
4. Rote en sentido horario para bloquear la cubierta del recipiente en el recipiente exterior de mezcla (Figura 2).
5. Abra la cubierta de alimentación (Figura 3).
6. Coloque los batidores y los ganchos boca abajo e insértelos en el recipiente interior de mezcla a través del
puerto de alimentación. Si el recipiente de la batidora de mano bloquea el puerto de alimentación, se lo puede
mover con cuidado a la posición adecuada para luego almacenar los batidores y los ganchos dentro del
recipiente de mezcla (Figura 3).
7. Presione el raspador para que encaje en la cubierta del recipiente (Figura 3).
8. Cierre la cubierta de alimentación para completar el almacenamiento de la unidad entera (Figura 4).
CONSEJOS DE COCCIÓN
1. Los ingredientes refrigerados, como manteca y huevos, deben estar a temperatura ambiente antes de mezclar
con la batidora vertical y de mano. Prepare estos ingredientes antes de tiempo.
2. Para evitar que haya cáscara de huevo en la preparación, primero rompa los huevos en un recipiente diferente
y luego los puede agregar al recipiente de la batidora vertical y de mano.
3. No mezcle en exceso. Tenga cuidado de solo mezclar/licuar la masa hasta donde lo recomiende la receta.
Pliegue los ingredientes secos solo hasta que apenas se combinen. Use siempre velocidad lenta para comenzar.
4. Los cambios de las diferentes condiciones climáticas y temperaturas estacionales afectan la temperatura de los
ingredientes y su textura de área a área. Todo esto incluye en el tiempo requerido de mezcla.
5. Siempre comience a mezclar a velocidad baja. Aumente gradualmente a la velocidad recomendada como lo
indica la receta.
6. Cuando mezcle líquidos, en particular líquidos calientes, agregue pequeñas cantidades a la vez para
reducir los derrames.
7. Los ingredientes deben agregarse al recipiente de mezcla como se especica en la receta.
8. Si un objeto, como una espátula, cae dentro del recipiente mientras la batidora está funcionando, lleve el
interruptor de velocidad al ajuste “0” de inmediato y luego quite el objeto.
9. Para limpiar más fácil, quite los batidores y enjuáguelos de inmediato en agua tibia.
10. Si algunos ingredientes no se mezclan bien, apague el aparato e intente empujar los ingredientes hacia el
medio del recipiente con una espátula de plástico. Vuelva a encender la unidad para terminar la mezcla.
11. Si la cantidad de ingredientes a batir es muy pequeña, la batidora vertical podría no poder batirlos bien. En
este caso, use la batidora de mano.
Batidora
de mano
Cubierta de
alimentación
35196_35211_35212_35213_35214_Bella_MultiUSA_3.5 QT_StandMixer_IM_V6_R2.indd 1635196_35211_35212_35213_35214_Bella_MultiUSA_3.5 QT_StandMixer_IM_V6_R2.indd 16 2024-10-21 10:07 PM2024-10-21 10:07 PM

17
Mediante la presente, SENSIO Inc. garantiza que, durante el plazo de DOS AÑOS a partir
de la fecha de compra, este producto no presentará defectos mecánicos en el material
ni en la mano de obra, y durante 90 días, no los presentará en las piezas no mecánicas.
A su entera discreción, SENSIO Inc. reparará o reemplazará el producto que resulte
defectuoso, o emitirá un reembolso por el producto durante el plazo de garantía.
Esta garantía es válida únicamente para el comprador minorista original a partir de
la fecha de compra minorista inicial y no es transferible. Conserve el recibo de compra
original, ya que se exige una prueba de compra para obtener la validación de la garantía.
Las tiendas minoristas no tienen derecho a alterar, modicar ni corregir de ninguna
manera los términos y condiciones de la garantía.
EXCLUSIONES:
La garantía no cubre el desgaste normal de las piezas ni el daño ocasionado por
cualquiera de las siguientes causas: uso negligente del producto, uso de un voltaje
o corriente incorrectos, mantenimiento de rutina inadecuado, uso contrario al de las
instrucciones de funcionamiento, desarmado, reparación o alteración a cargo de personas
que no sean miembros del personal calicado de SENSIO Inc. Asimismo, la garantía no
cubre actos de la naturaleza, como incendios, inundaciones, huracanes o tornados.
SENSIO Inc. no asumirá responsabilidad por daños incidentales o resultantes ocasionados
por la violación de cualquier garantía expresa o implícita. Salvo en la medida en que lo
prohíban las leyes aplicables, cualquier garantía implícita de comerciabilidad o aptitud
para un propósito particular se limita temporalmente a la duración de la garantía. Algunos
estados, provincias o jurisdicciones no permiten la exclusión ni la limitación de daños
incidentales o resultantes, o limitaciones sobre la duración de una garantía implícita y, por
lo tanto, es posible que las exclusiones o limitaciones mencionadas no le correspondan.
La garantía cubre derechos legales especícos que pueden variar de un estado, una
provincia o una jurisdicción a otros.
CÓMO OBTENER EL SERVICIO DE GARANTÍA:
Debe comunicarse con el Servicio de atención al cliente a nuestro número telefónico
gratuito: 1-866-832-4843. Un representante del Servicio de atención al cliente intentará
resolver los problemas referidos a la garantía por teléfono. Si este no puede resolver el
problema, le proporcionarán un número de caso y le solicitarán que devuelva el producto
a SENSIO Inc. Adhiera una etiqueta al producto que incluya: su nombre, dirección,
número telefónico de contacto durante el día, número de caso y descripción del problema.
Además, incluya una copia del recibo de compra original. Envuelva cuidadosamente
el producto etiquetado con el recibo de compra, y envíelo (con el envío y el seguro
prepagados) a la dirección de SENSIO Inc. SENSIO Inc. no asumirá obligación ni
responsabilidad alguna por el producto devuelto que esté en el trayecto hacia el Centro
de servicio al cliente de SENSIO Inc.
GARANTÍA LIMITADA DE DOS AÑOS
35196_35211_35212_35213_35214_Bella_MultiUSA_3.5 QT_StandMixer_IM_V6_R2.indd 1735196_35211_35212_35213_35214_Bella_MultiUSA_3.5 QT_StandMixer_IM_V6_R2.indd 17 2024-10-21 10:07 PM2024-10-21 10:07 PM
For customer service questions or comments
Dudas o comentarios contactar el departamento de servicio al cliente
1-866-832-4843 / help@bellahousewares.com
Sensio Inc.
dba Made by Gather
TM
New York, NY 10016/USA
35196_35211_35212_35213_35214_R2
35196_35211_35212_35213_35214_Bella_MultiUSA_3.5 QT_StandMixer_IM_V6_R2.indd 1835196_35211_35212_35213_35214_Bella_MultiUSA_3.5 QT_StandMixer_IM_V6_R2.indd 18 2024-10-21 10:07 PM2024-10-21 10:07 PM