
Technical Support and E-Warranty Certificate www.vevor.com/support
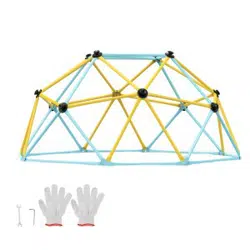
Geometric Climber Play
We continue to be committed to provide you tools with competitive price.
"Save Half", "Half Price" or any other similar expressions used by us only represents an
estimate of savings you might benefit from buying certain tools with us compared to the major
top brands and does not necessarily mean to cover all categories of tools offered by us. You
are kindly reminded to verify carefully when you are placing an order with us if you are
actually saving half in comparison with the top major brands.

1
MODEL: JX-DC-06
Have product questions? Need technical support? Please feel free to
contact us:
Technical Support and E-Warranty Certificate
www.vevor.com/support
NEED HELP? CONTACT US!
This is the original instruction, please read all manual instructions
carefully before operating. VEVOR reserves a clear interpretation of our
user manual. The appearance of the product shall be subject to the
product you received. Please forgive us that we won't inform you again if
there are any technology or software updates on our product.
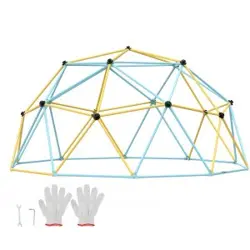
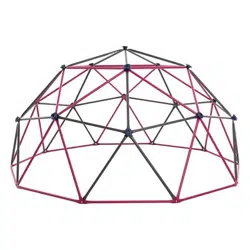
GEOMETRIC CLIMBER
PLAY

2
INSTRUCTIONS
Thank you very much for choosing this Geometric Climber Play.
- Please read all of the instructions before using it. The information will help you
achieve the best possible results.
The products carried in this catalog may be different in color than the actual item.
1. Safety Instructions
FAILURE TO FOLLOW THESE WARNINGS MAY RESULT IN SERIOUS INJURY
OR PROPERTY
DAMAGE AND WILL VOID WARRANTY.
Owner must ensure that all players know and follow these rules for safe operation
of the system.
To ensure safety, do not attempt to assemble this product without following the
instructions carefully.
Check entire box and inside all packing material for parts and/or additional
instruction material. Before beginning assembly, read the instructions and identify
parts using the hardware identifier and parts list in this document. Proper and
complete assembly, use and supervision are essential for proper operation and to
reduce the risk of accident or injury. A high probability of serious injury exists if this
product is not installed, maintained and operated properly.
· If using a ladder during assembly, use extreme caution.
· Two capable adults are recommended for this operation.
· Be aware that parts can be damaged by over tightening the screws.
· Wear safety glasses throughout the assembly.
Most injuries are caused by misuse and/or not following instructions. Use caution
when using this product.
BEFORE BEGINNING ASSEMBLY
Keep the hardware bags and their contents separate.
Identify and inventory all parts and hardware using the parts and hardware lists

3
and identifiers in this document. Test fit all Bolts by inserting them into their
respective holes. Do not scrape away all of the powder coating. Bare metal may
rust. You may need to pound some Bolts into place with a hammer or mallet.
*Two adults required to complete assembly*
Only adults should set up the product. Do not allow children in the setup
area until assembly is complete.
INSTALLATION & GROUND PREPARATION INSTRUCTIONS:
· Provide enough room so that children can use the equipment safely. For example,
for structures with multiple play activities, a slide should not exit in front of aswing.
·Separate active and quiet activities from each other. For example, locate
sandboxes away from swings or use a guardrail or barrier to separate the sandbox
from the movement of the swings.
· Do not install home playground equipment over concrete, asphalt, packed earth,
grass, carpet, or any other hard surface. A fall onto a hard surface can result in
serious injury to the equipment user.
· To prevent serious injury, warn children that they must not use the equipment
until properly installed.
· Create a site free of obstacles that could cause injuries – such as low
overhanging tree branches, overhead wires, tree stumps and/or roots, large rocks,
bricks, and concrete.
· Choose a level location for the equipment. This can reduce the likelihood of the
play set tipping over and loose-fill surfacing materials washing away during heavy
rains.
PLAYGROUND AND SURFACE MATERIALS INSTRUCTIONS
· Use containment, such as digging out around the perimeter and/or lining the
perimeter with landscape edging.
· Do not install loose fill surfacing over hard surfaces such as concrete orasphalt.
· Installation of rubber tiles or poured-in-place surfaces (other than loose fill
materials) generally requires a professional and are not “do-it-yourself” projects.
· Use playground surfacing materials (other than loose fill material) that comply to
the safety standard ASTM F1292 Standard Specification for Impact Attenuation of
Surfacing Materials within the Use Zone of Playground Equipment.

4
OPERATING INSTRUCTIONS
Observing the following instructions and warnings reduces the likelihood of serious
or fatal injury:
· On-site adult supervision should be provided for children of all ages.
· Instruct children not to use the equipment in a manner other than intended.
· To prevent entanglement and strangulation, dress children appropriately, using
well-fitting shoes and avoiding ponchos, scarves, jackets with neck drawstrings,
helmets with straps, and other loose-fitting clothing that is potentially hazardous
while using equipment.
· Instruct children not to play when the equipment is wet.
· Instruct children not to attach items to the playground equipment that are not
specifically designed for use with the equipment, such as, but not limited to, jump
ropes, clotheslines, pet leashes, cables and chains, as they may cause a
strangulation hazard. Do not move the equipment while in use.
· Impact surfacing needs to cover the entire recommended play area.
CONSUMER INFORMATION SHEET FOR PLAYGROUND SURFACING
MATERIALS
Select Protective Surfacing:
One of the most important things you can do to reduce the likelihood of serious
head injuries is to install shock-absorbing protective surfacing under and around
your play equipment. The protective surfacing should be applied to a depth that is
suitable for the equipment height in accordance with ASTM Specification F1292.
There are different types of surfacing to choose from; whichever product you
select, follow these guidelines:
NOTE: Do not install home playground equipment over concrete, asphalt, or any
other hard surface. A fall onto a hard surface can result in serious injury to the
equipment user. Grass and dirt are not considered protective surfacing because
wear and environmental factors can reduce their shock-absorbing effectiveness.
Carpeting and thin mats are generally not adequate protective surfacing.
Ground level equipment – such as a sandbox, activity wall, playhouse or other
equipment that has no elevated play surface – does not need any protective
surfacing. Loose Fill Materials: Maintain a minimum depth of 9 inches (23 cm) of

5
loose fill materials such as wood mulch/chips, engineered wood fiber (EWF), or
shredded/recycled rubber mulch for equipment up to 8 feet (244 cm)
high; and 9 inches (23 cm) of sand or pea gravel for equipment up to 5 feet (152
cm) high.
NOTE: An initial fill level of 12 inches (30 cm) will compress to about a 9-inch (23
cm) depth of surfacing over time. The surfacing will also compact, displace, and
settle, and should be periodically refilled to maintain at least a 9-inch (23 cm)
depth. Use a minimum of 6 inches (15 cm) of protective surfacing for play
equipment less than 4 feet (122 cm) in height. If maintained properly, this should
be adequate. (At depths less than 6 inches (15 cm), the protective material is too
easily displaced or compacted.) Use containment, such as digging out around the
perimeter and/or lining the perimeter with landscape edging. Don’t forget to
account for water drainage. Check and maintain the depth of the loose fill
surfacing material. To maintain the right amount of loose fill materials, mark the
correct level on play equipment support posts. That way you can easily see when
to replenish and/or redistribute the surfacing. Do not install loose fill surfacing over
hard surfaces such as concrete or asphalt.
Poured-In-Place surfaces or Premanufactured Rubber Tiles—You may be
interested in using surfacing other than loose fill materials – like rubber tiles or
poured-in-place surfaces. Installation of these surfaces generally requires a
professional and is not a “do-it-yourself” project. Review surface specifications
before purchasing this type of surfacing. Ask the installer/manufacturer for a report
showing that the product has been tested to the following safety standard: ASTM
F1292 Standard Specification for Impact Attenuation of Surfacing Materials within
the Use Zone of Playground Equipment.
This report should show the specific height for which the surface is intended to
protect against serious head injury. This height should be equal to or greater than
the fall height – vertical distance between a designated play surface (elevated
surface for standing, sitting, or climbing) and the protective surfacing
below – of your play equipment. Check the protective surfacing frequently for wear.
Placements—Proper placement and maintenance of protective surfacing is
essential.
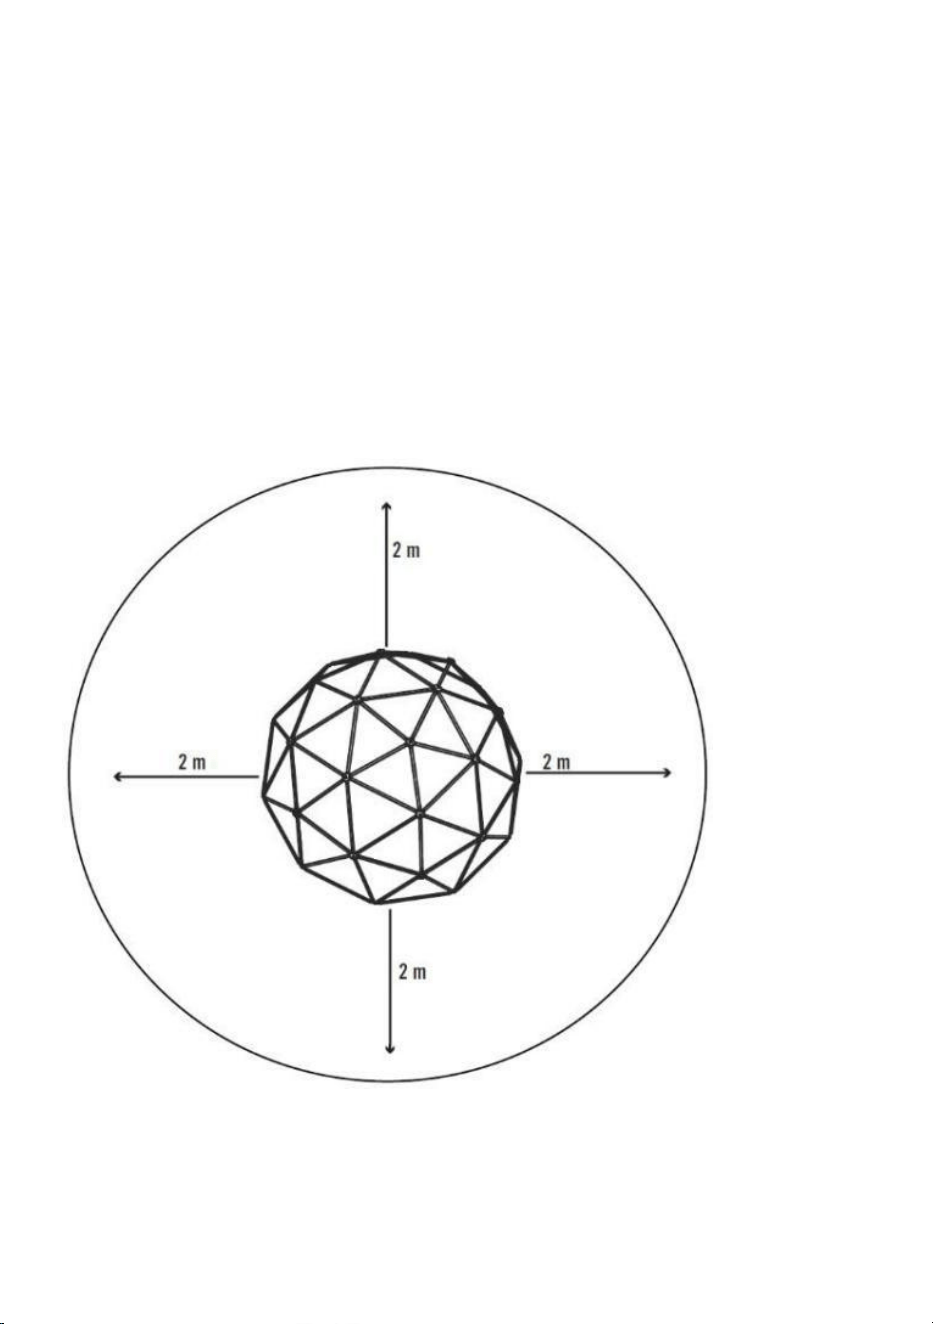
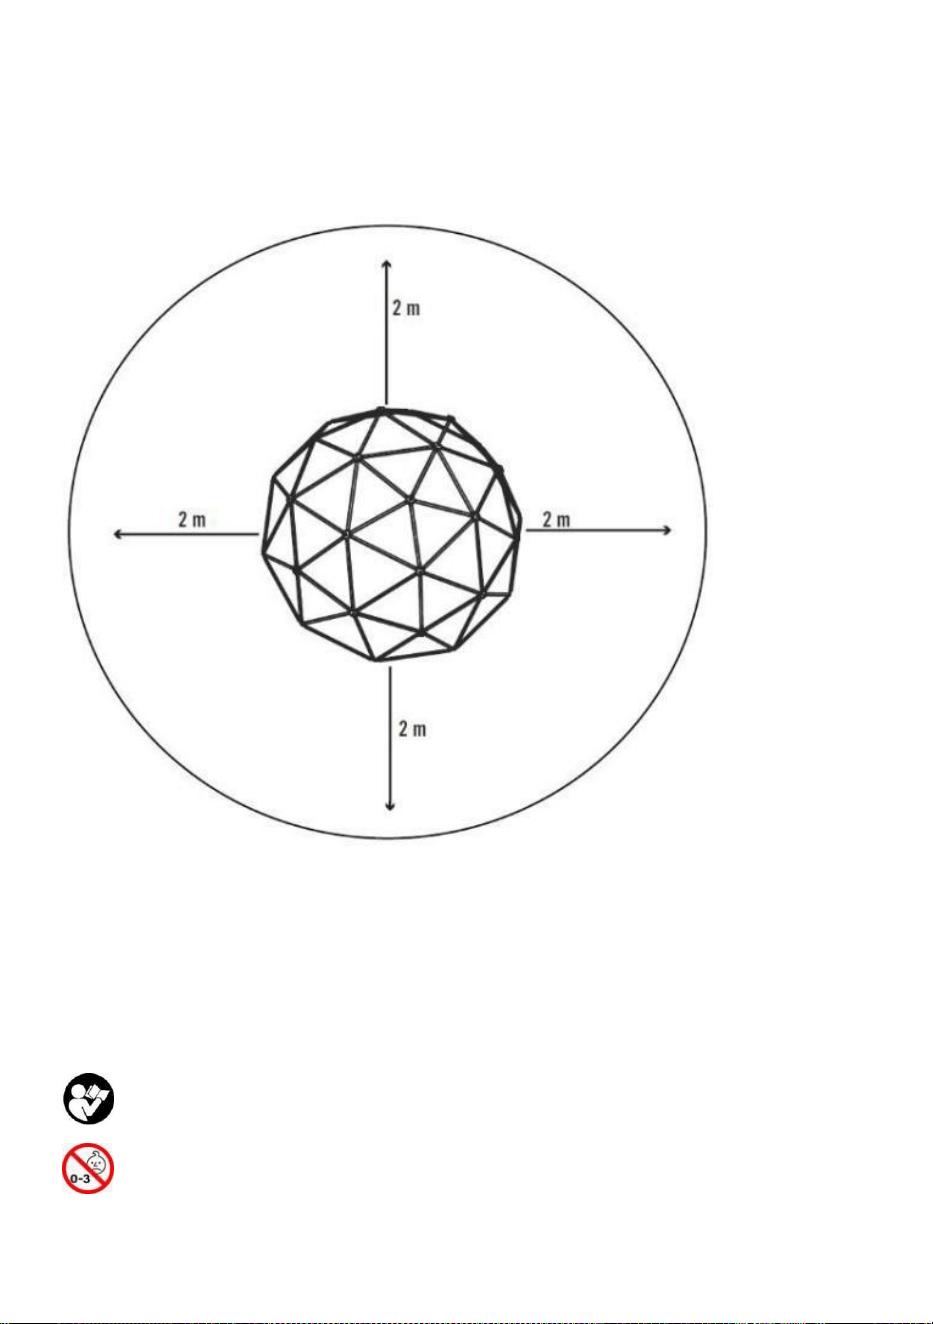
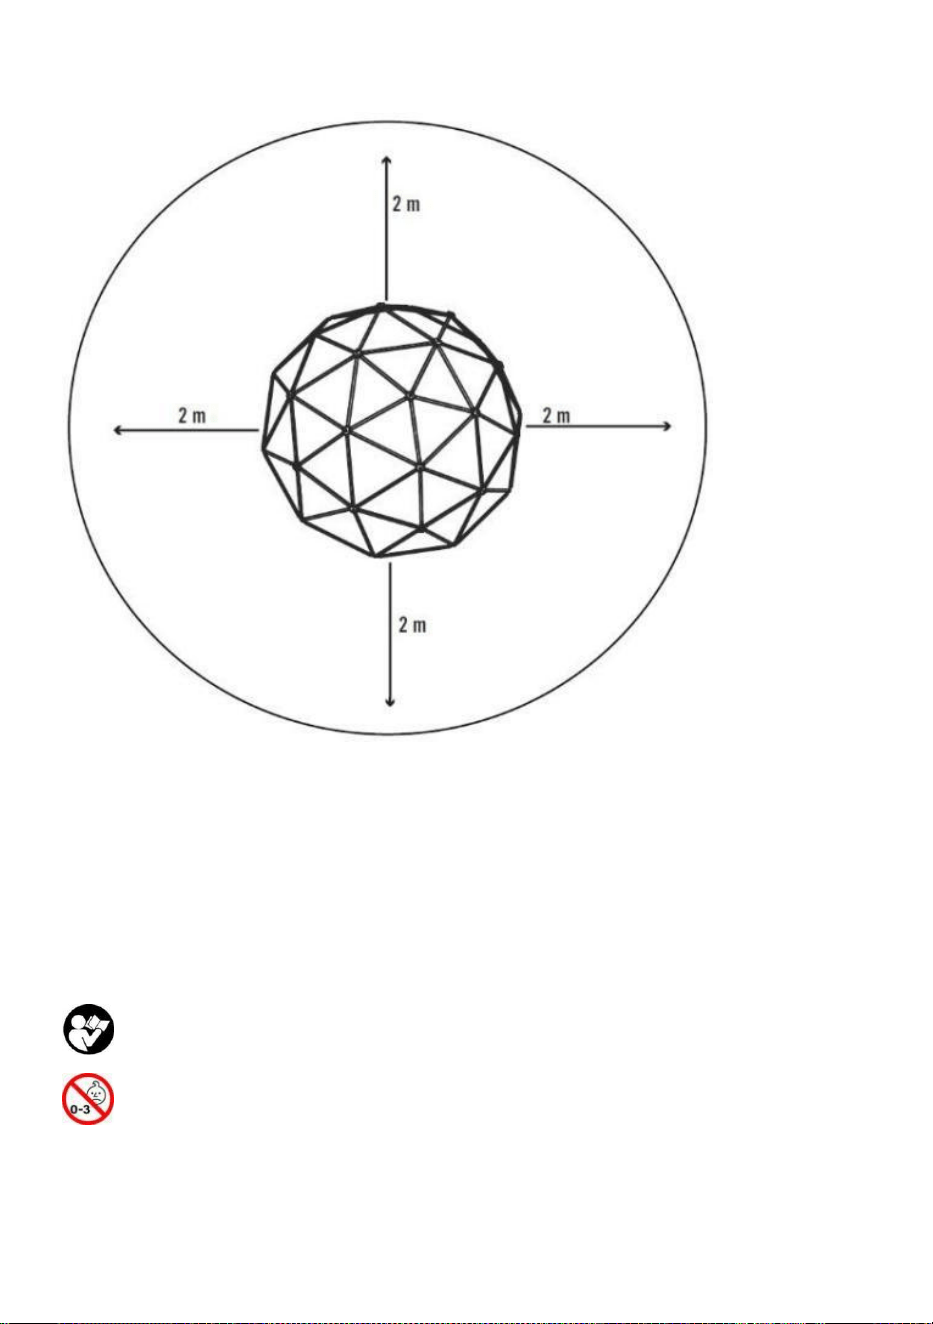
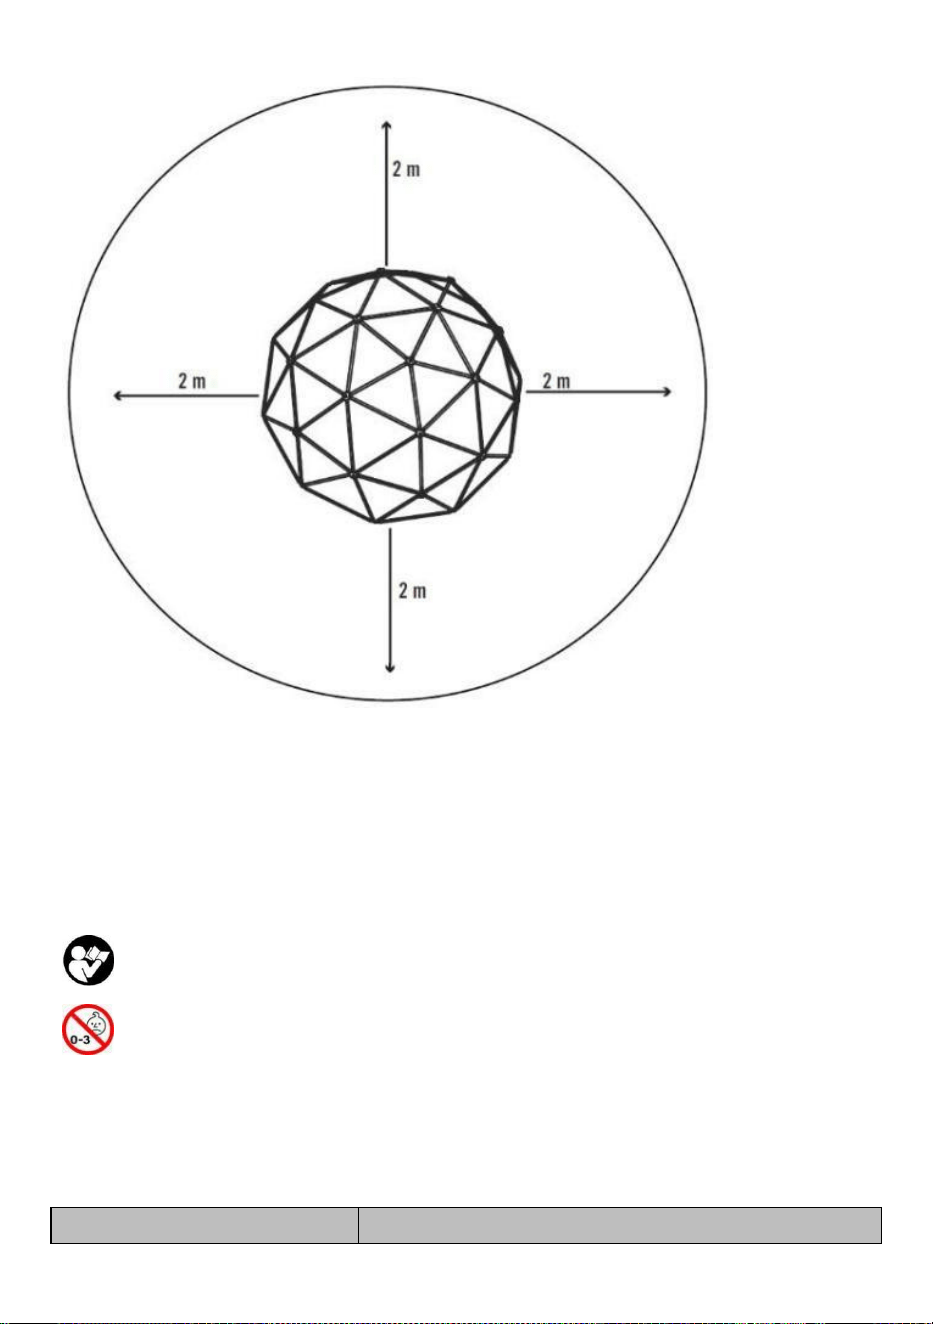
The protective surfacing must extend at least 2 m (6.6 feet) in all directions beyond
6
the limits of the device.
SAFE PLAY AREA
SAFETY ZONE - Place the equipment no less than 6.6 ft. (2 m) from any structure
or obstruction such as a fence, garage, house, overhanging branches, laundry
lines, or electrical wires. The impact surfacing needs to cover the entire
recommended play area. Refer to the example below.
Play set dimensions:
10’ (3.05 m) x 10’ (3.05m)
Recommended play area:
16’ 6” (5.05 m) x 16’ 6” (5.05 m)
2.1 Intended use
· The article is only suitable for recreational use by people aged 3 and over.
· The article is not suitable for use on public playgrounds.
· The article is not suitable for children under 3 years!
7
3. Symbols
Read the operating instructions carefully!
The article is not suitable for children under 3 years!
MODEL AND PARAMETERS
Model
JX-DC-06
Weight Capacity
600 lbs (272kg)
Ages
3-9
Number
2-3kids
Assembled Dimensions
6FT.W × 3FT.H
ASSEMBLY AND USE
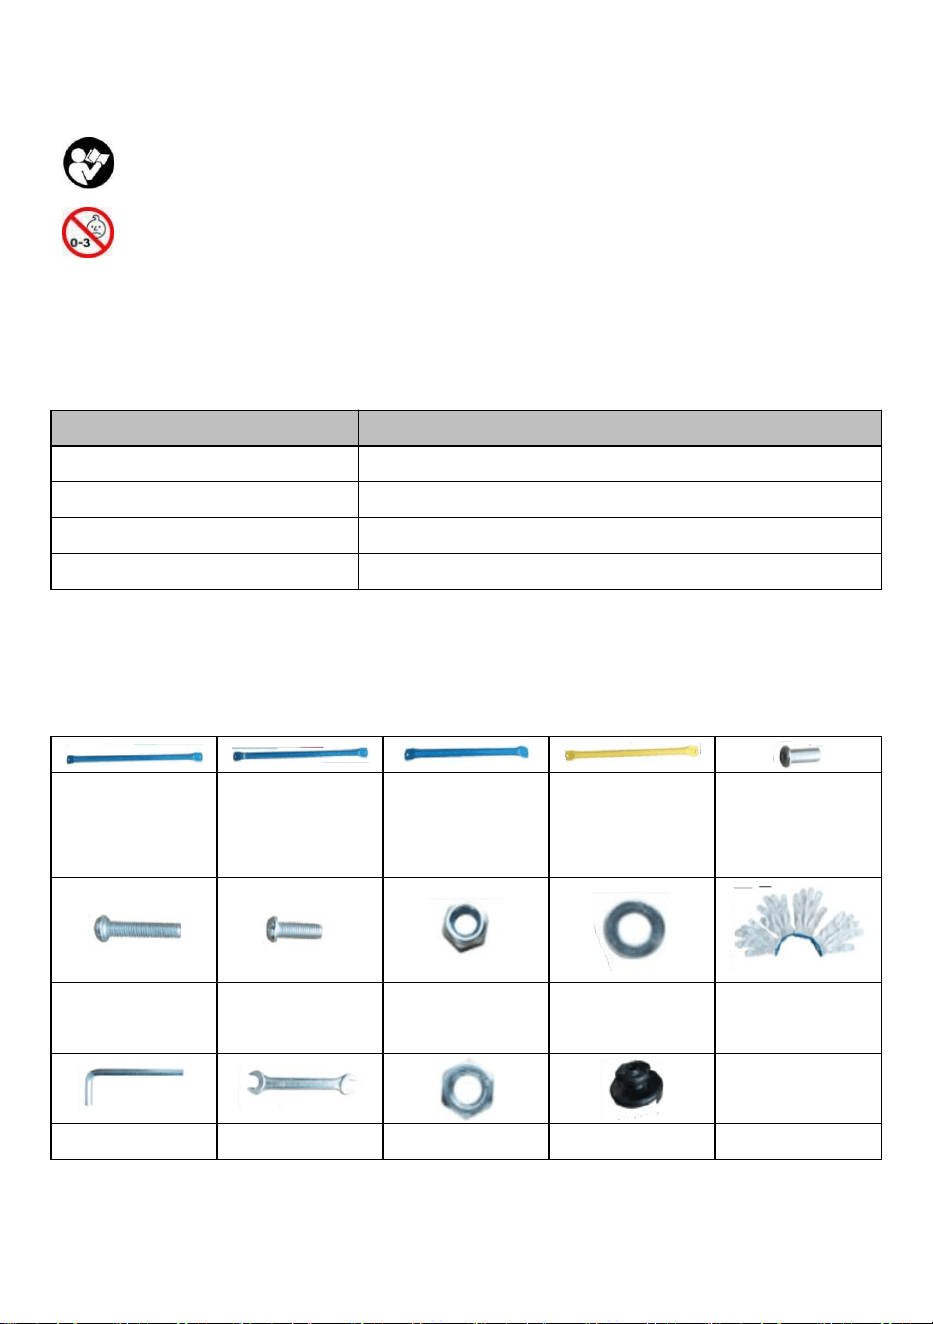
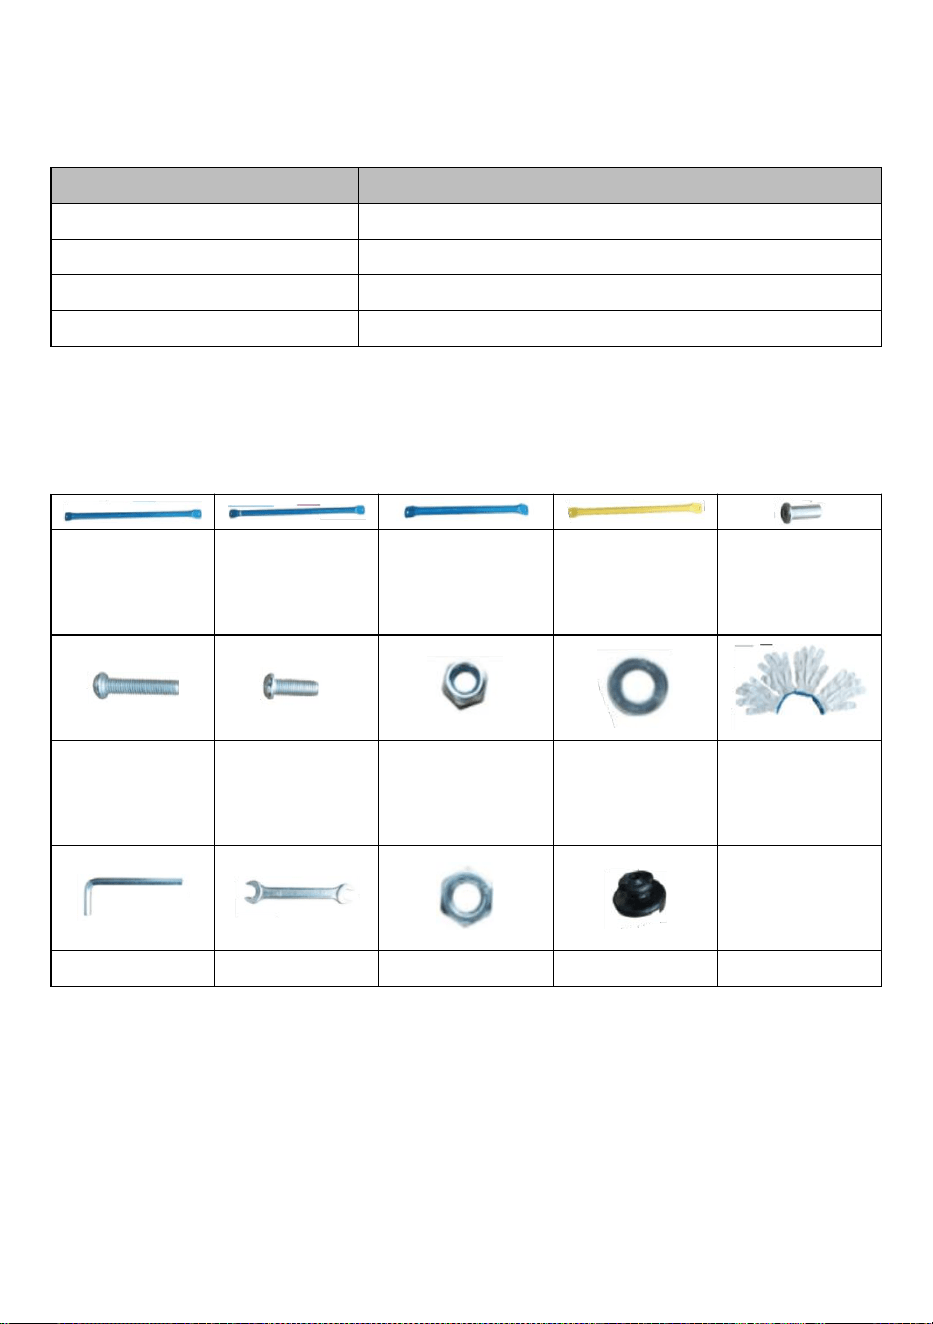
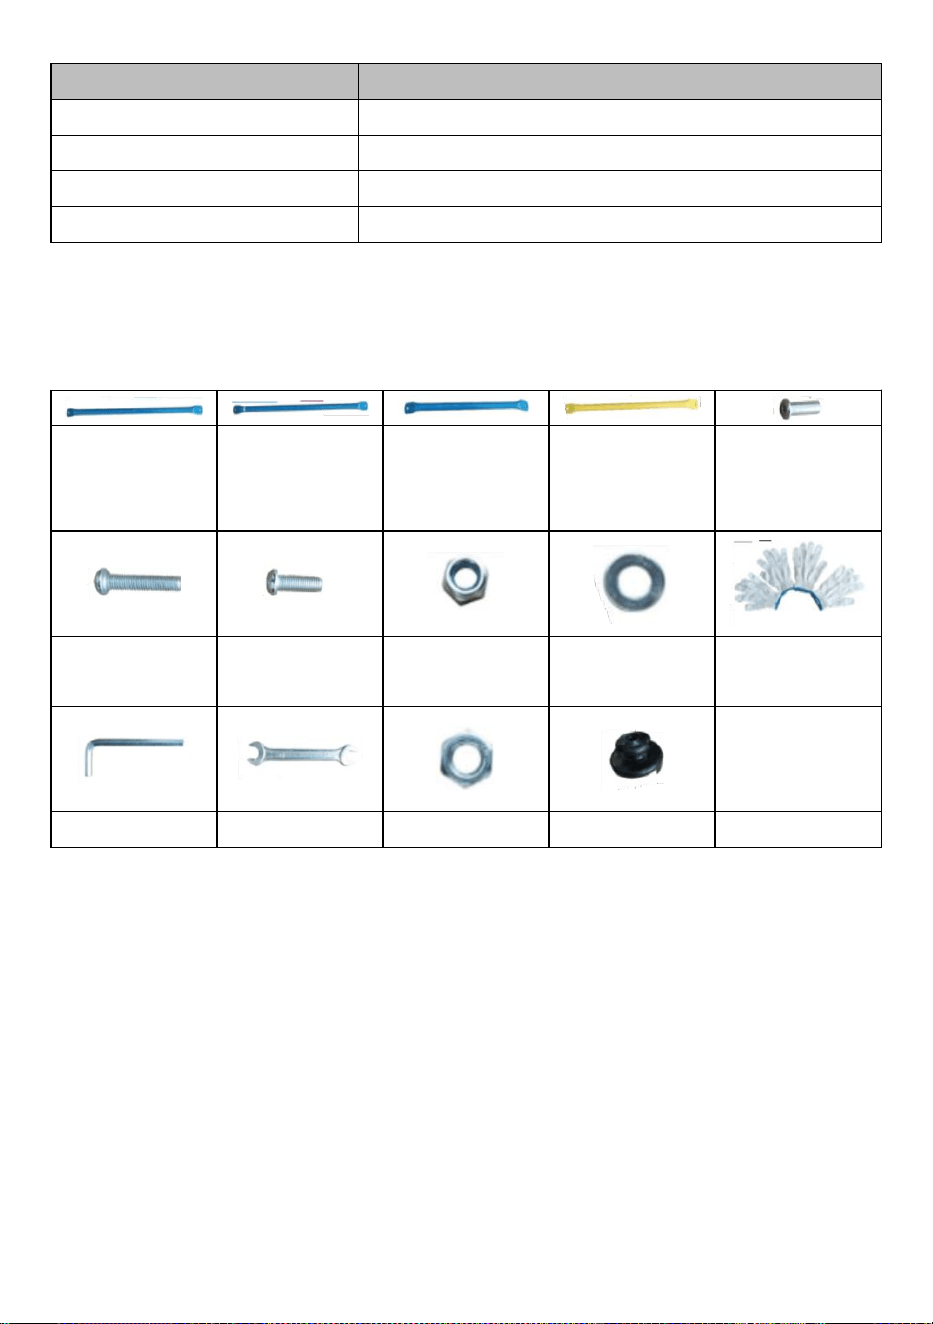
Part List:
Part Mx4 (Long
Blue Tube)
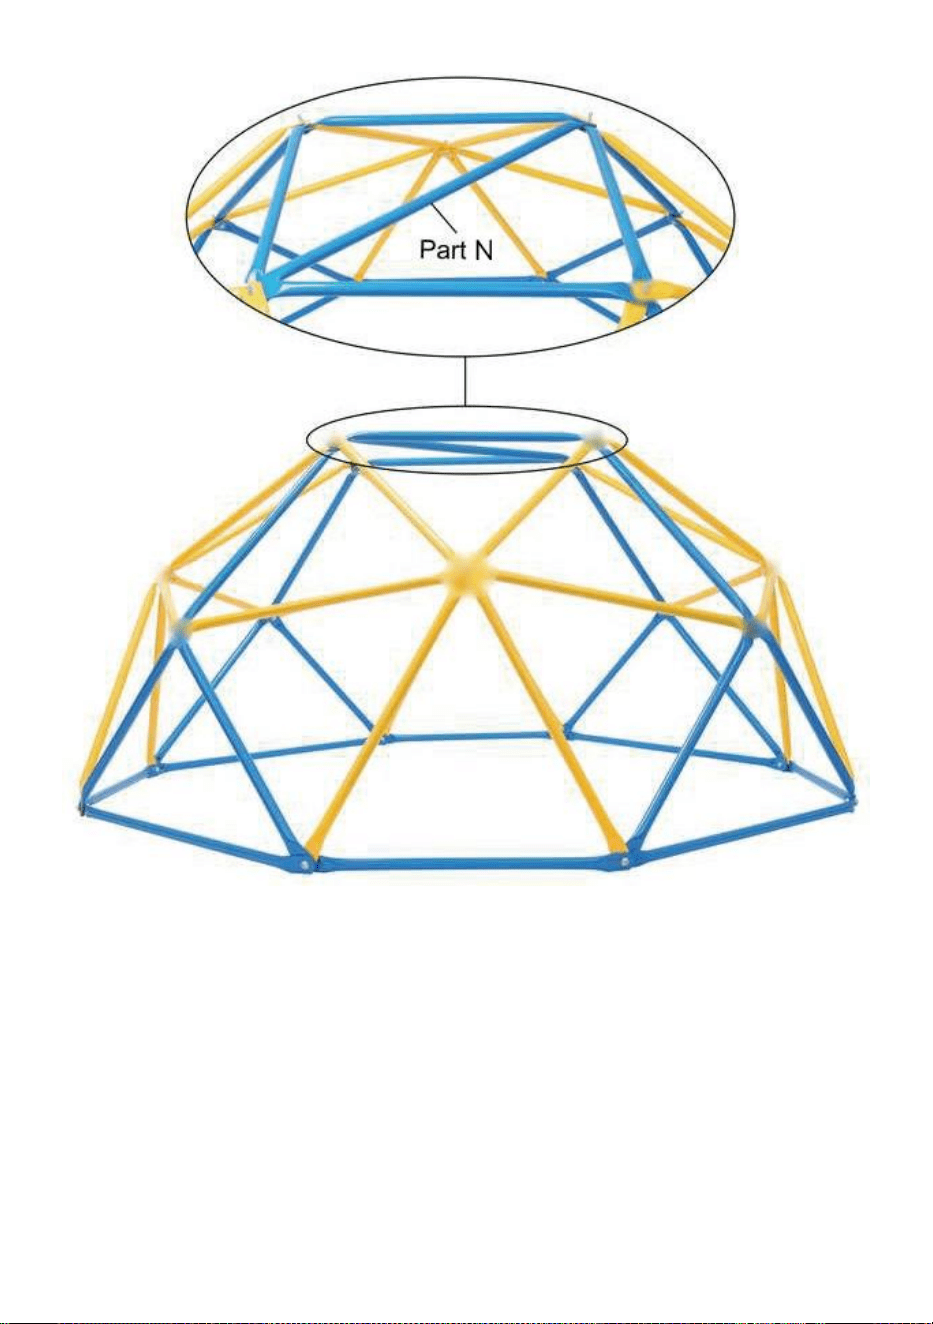
Part Nx1(Long &
Thicker Blue
Tube)
Part Ax20 (Short
Blue Tube)
Part Bx24 (Yellow
Tube)
Part Dx12 (Long
Nut)
Part Ex12 (Long
Bolt)
Part Fx8 (Short
Bolt)
Part Gx8 (Lock
Nut)
Part Hx28
(Washer)
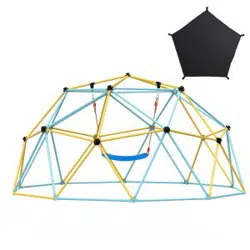
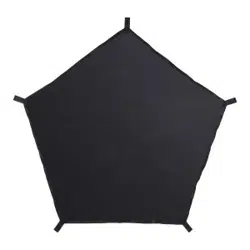
Part Lx2
Part Ix2
Part Jx1
Part Kx12
Part Cx12
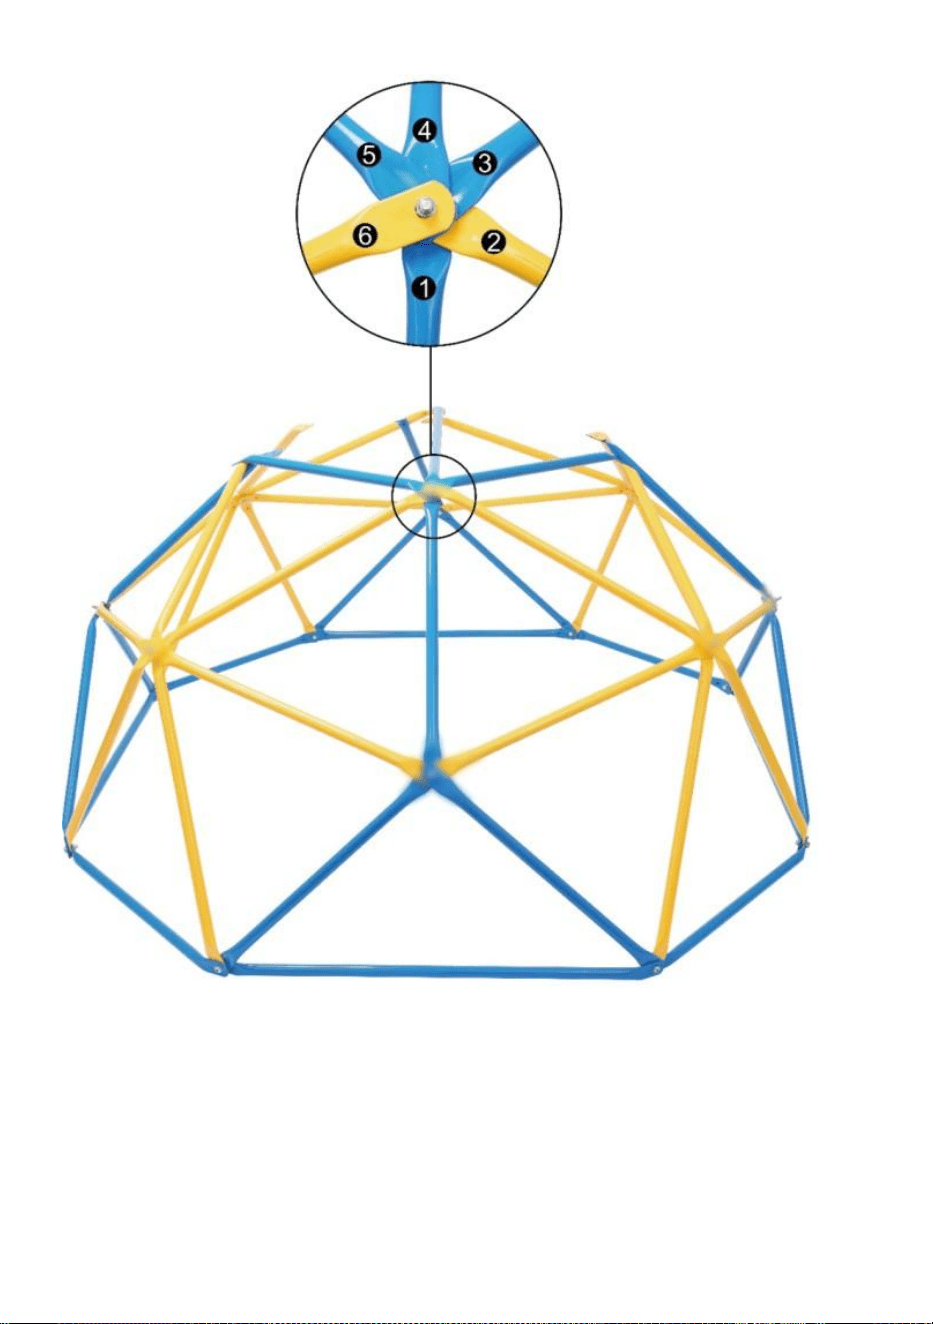
Note: Be careful not to confuse Part N with Part M, and let Part N aside for using at
the last step.

8
Installation Steps:
Step1:
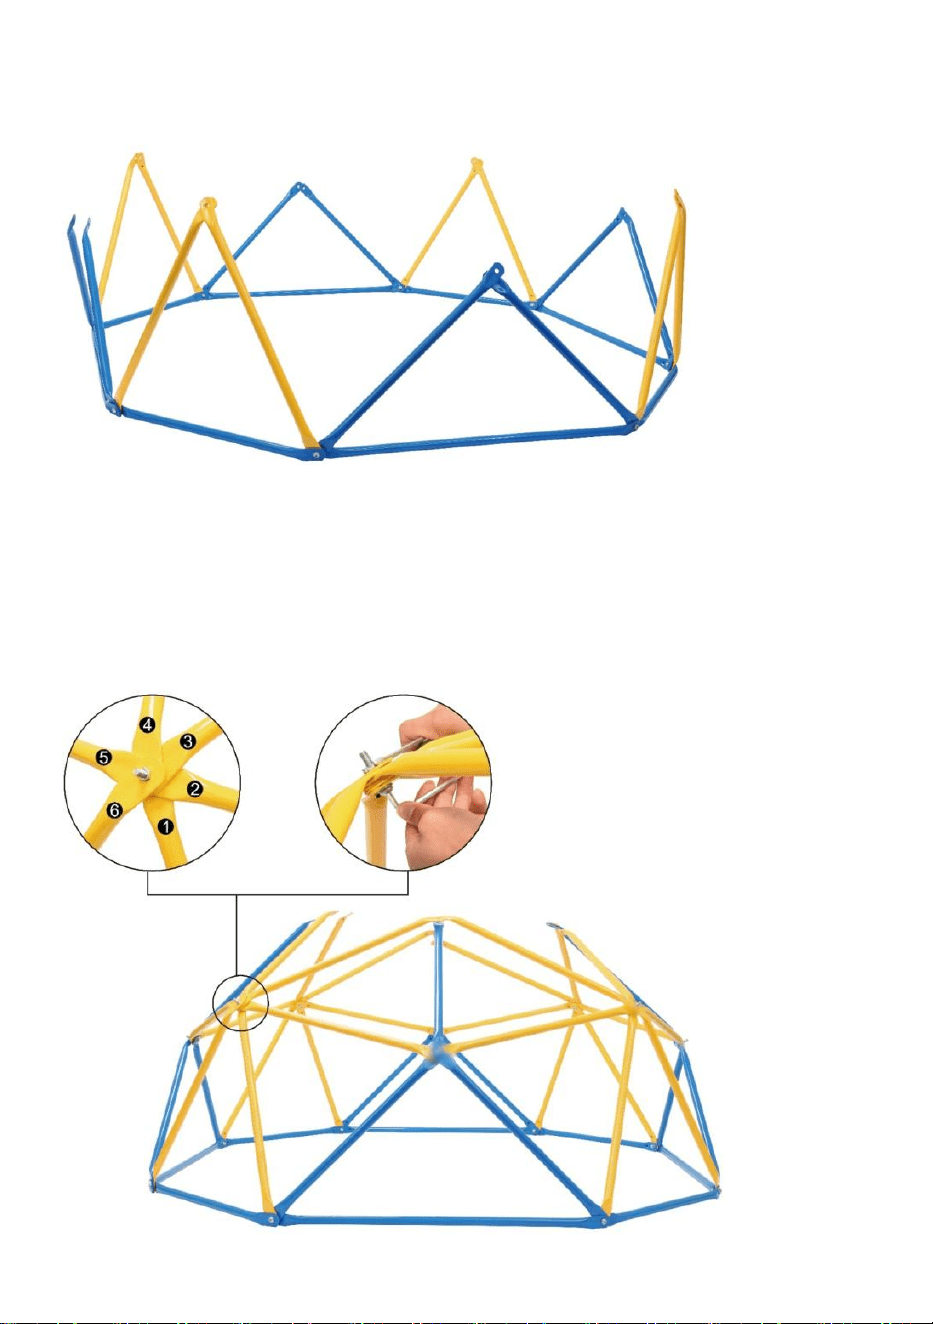
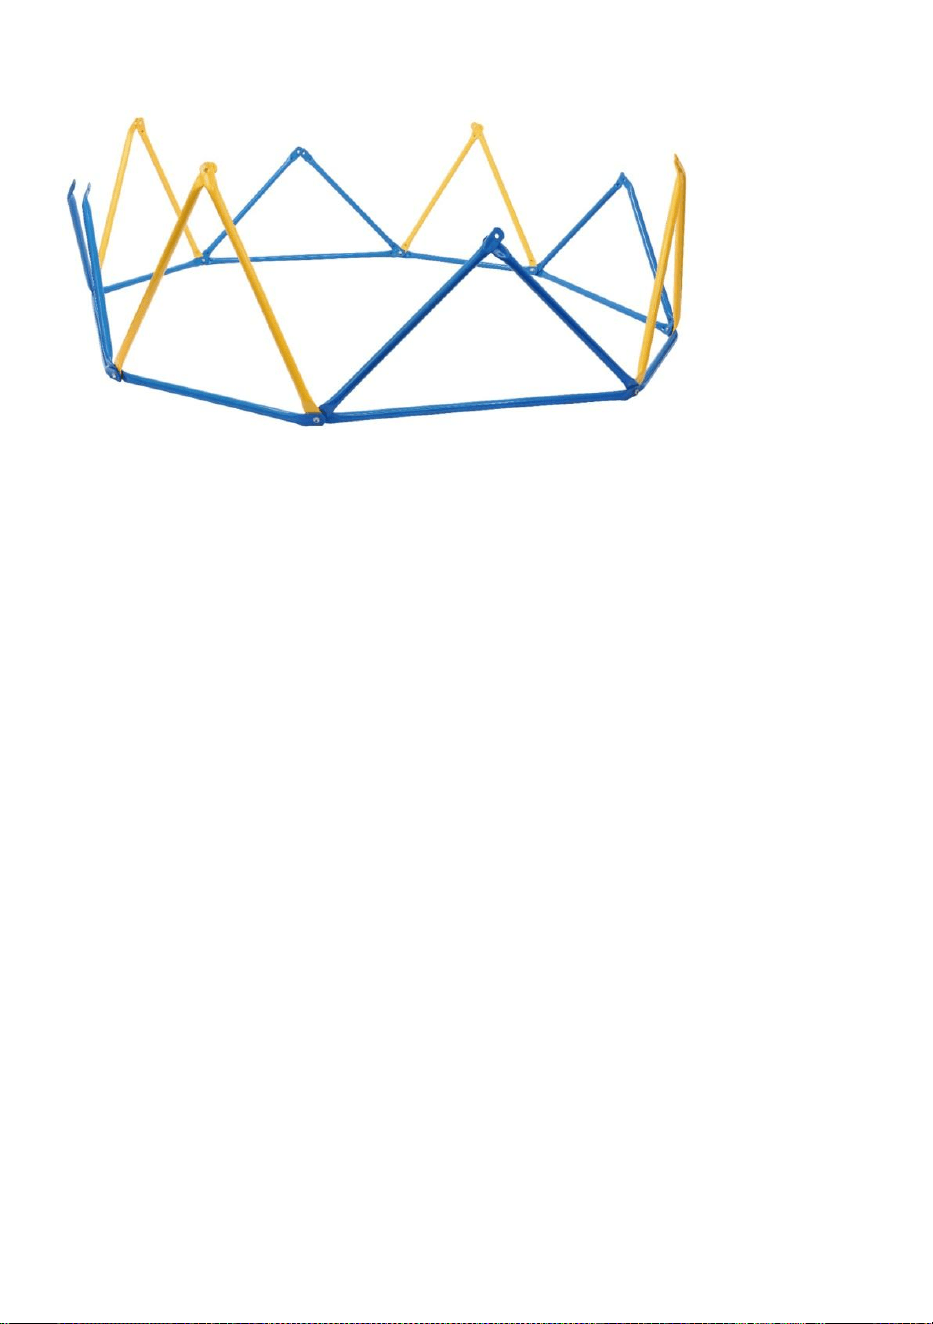
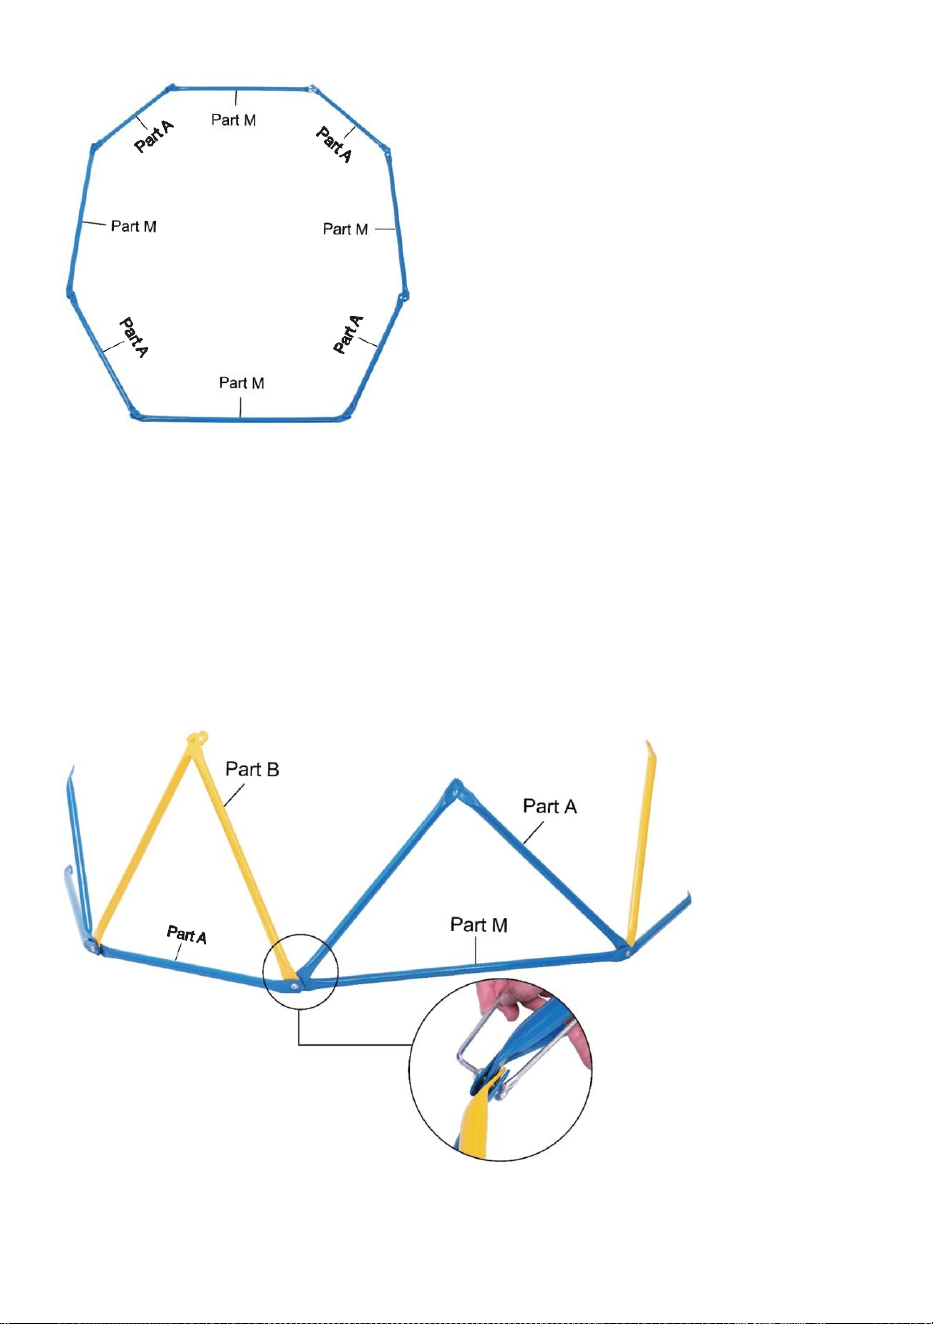
Create an octagon as the base with 4 long blue tubes (Part M) +4 short blue tubes (Part A).
Step2:
Connect 2 yellow tubes(Part B) to the short blue tube(Part A) of the base, making them a
triangle, and fix them with short bolts(Part F), lock nuts(Part G) and washers(Part H). Create
a triangle with 2 short blue tubes(Part A) and 1 long blue tube(Part M) in the same way.
Note: Do not lock the bolts! Otherwise it would increase the difficulty of following steps.
9
Step3:
Repeat the Step2 four times until you get the frame as shown below.
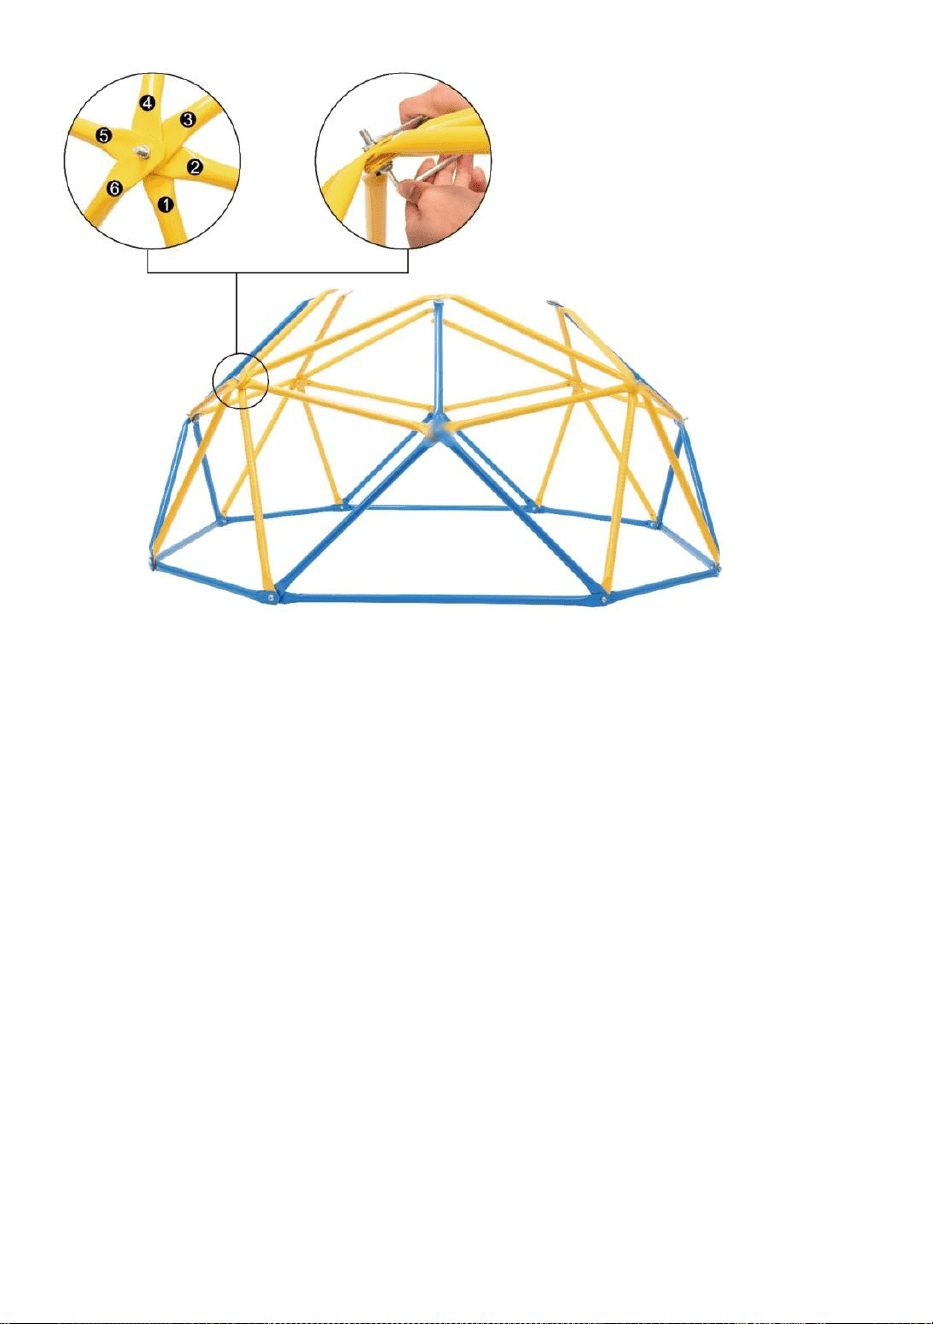
Step4:
Add 4 yellow tubes(Part B) to the Point X, with the order of tubes being consistent with the
picture below, and fix them with long bolts(Part E), washers(Part H) & Part K.
Note: Do not lock the bolts! Otherwise it would increase the difficulty of following steps.
Point X

10
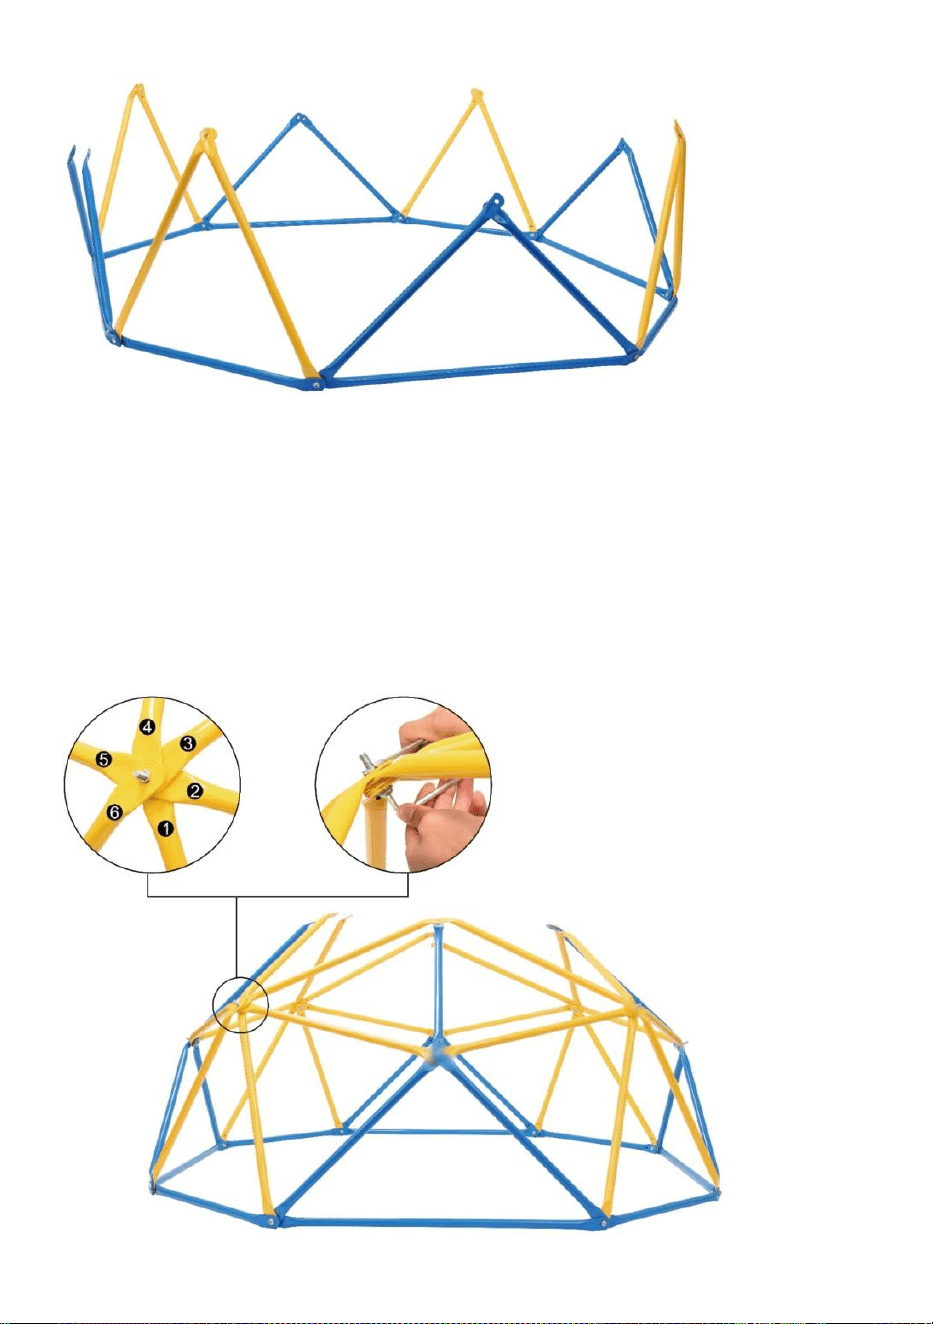
Add 1 short blue tube(Part A) and 1 yellow tube(Part B) to the Point Y, with 1 assembled
yellow tube(Part B) from Point X, so 5 tubes meet at the Point Y.
Fix them in the same way, with the order of tubes being consistent with the picture below.
Note: Do not lock the bolts!
Point Y
Just repeat the above step until the second level is finished.
11
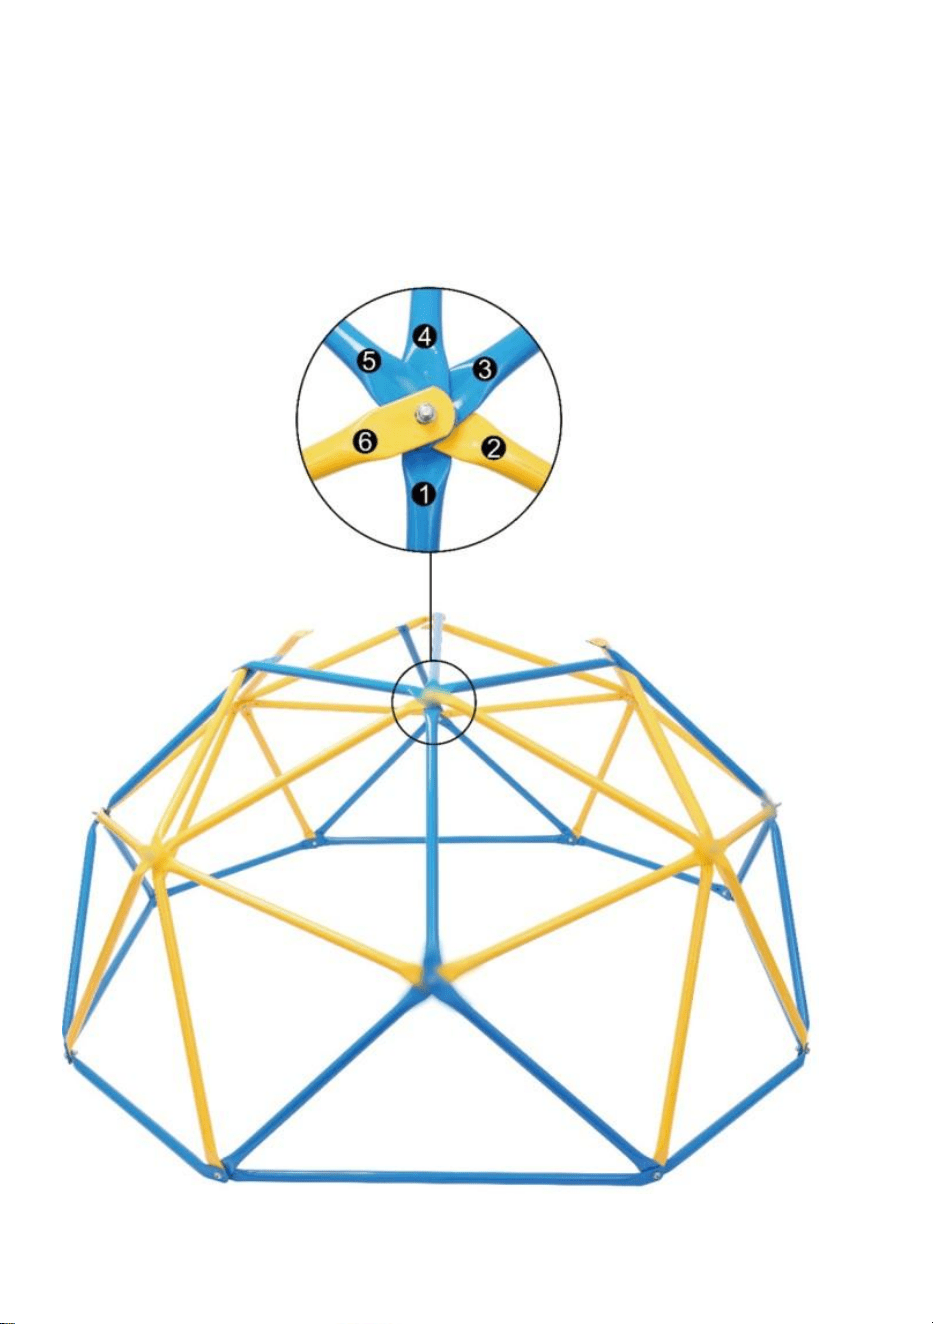
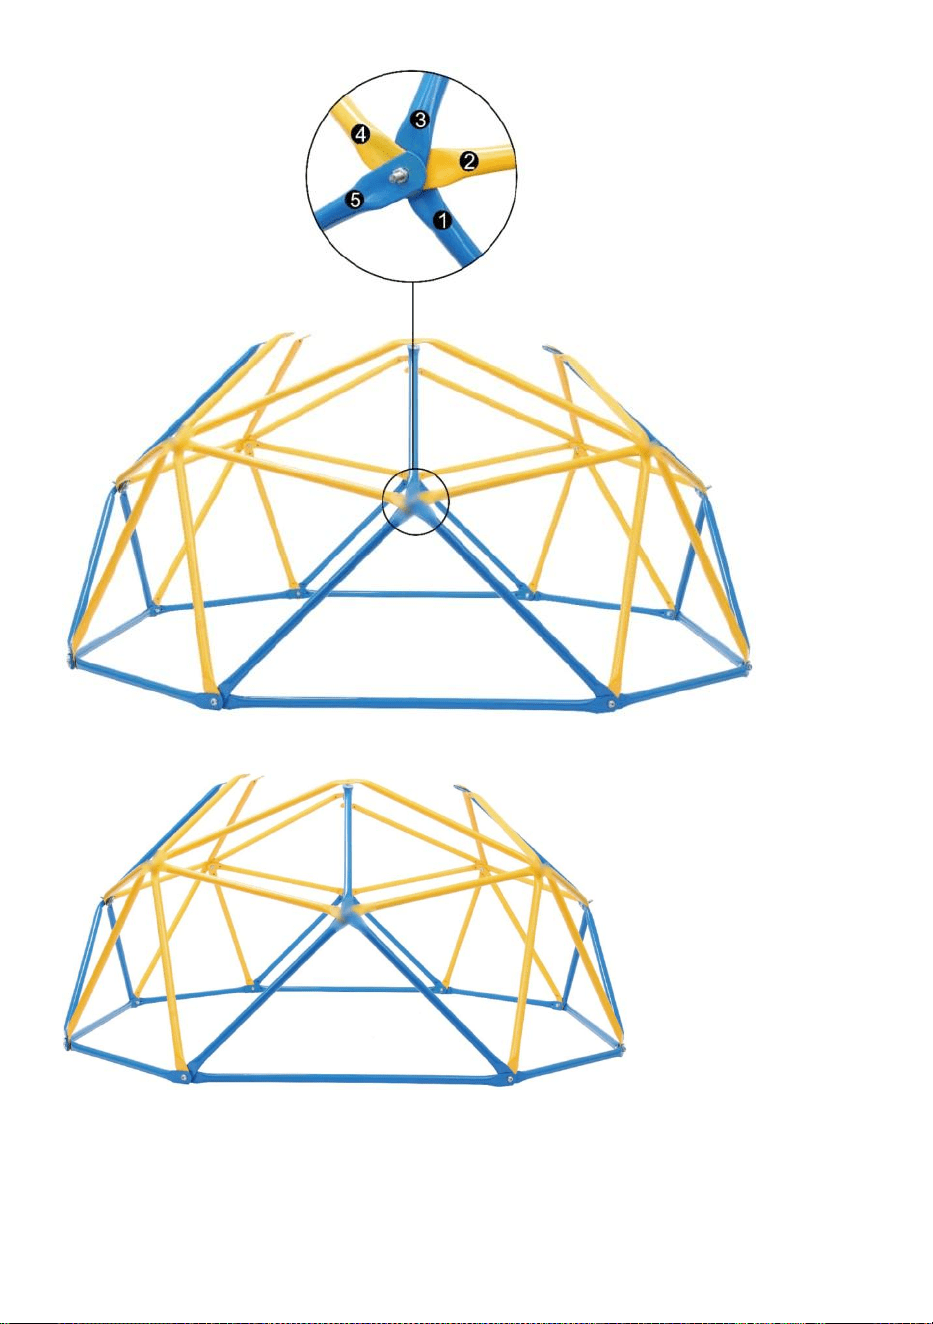
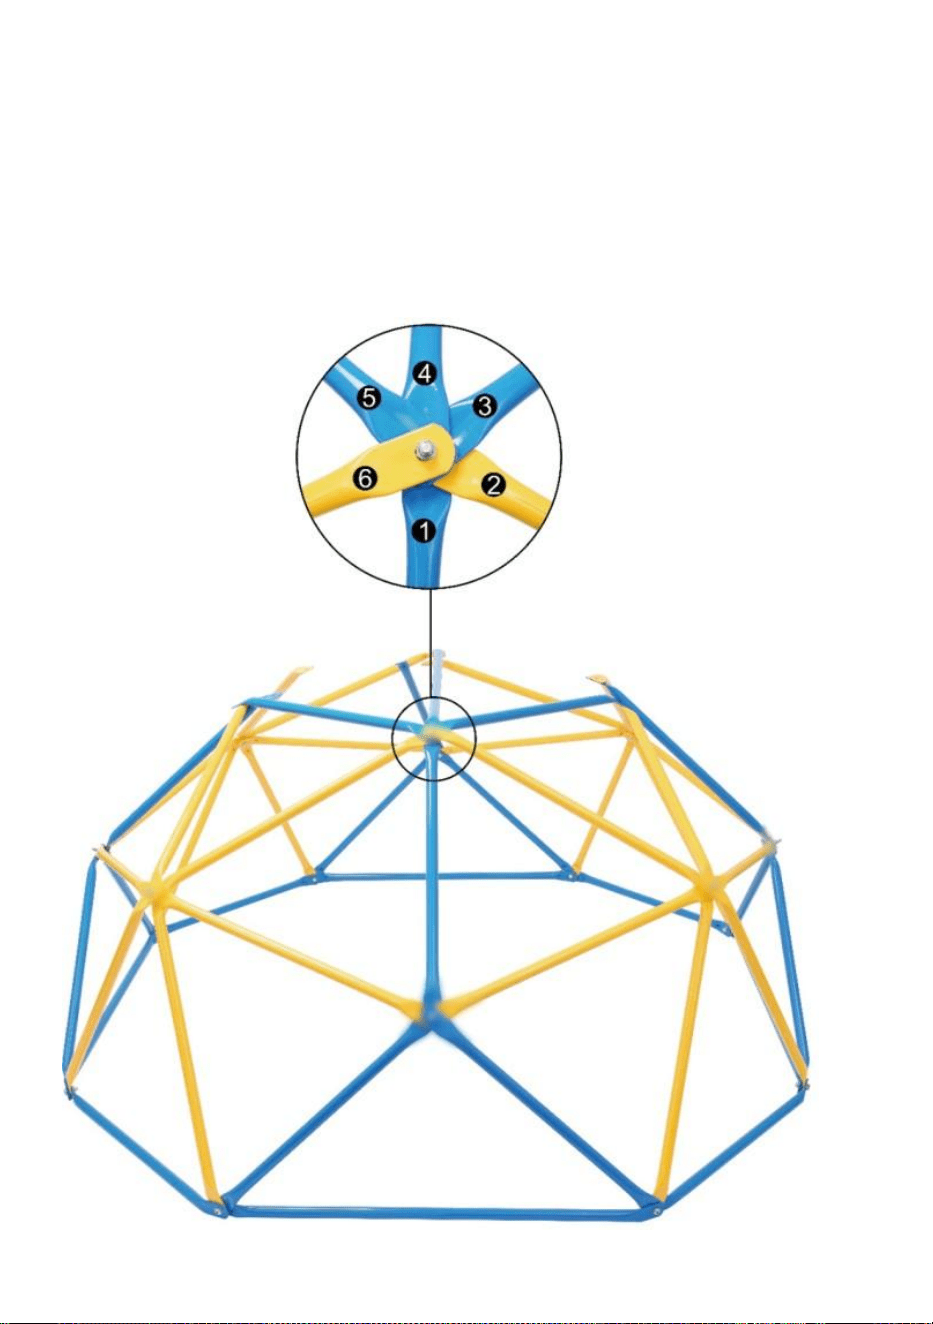
Step5:
Add 2 short blue tubes(Part A) and 1 long&thicker blue tube(Part N) to the Point Z, with 3
assembled tubes from Point X/Y, the endpoints of 6 tubes overlap at the Point Z. Make sure
the tubes are arranged counterclockwise as shown below, with the long&thicker blue
tube(Part N) in 4th.
Point Z
12
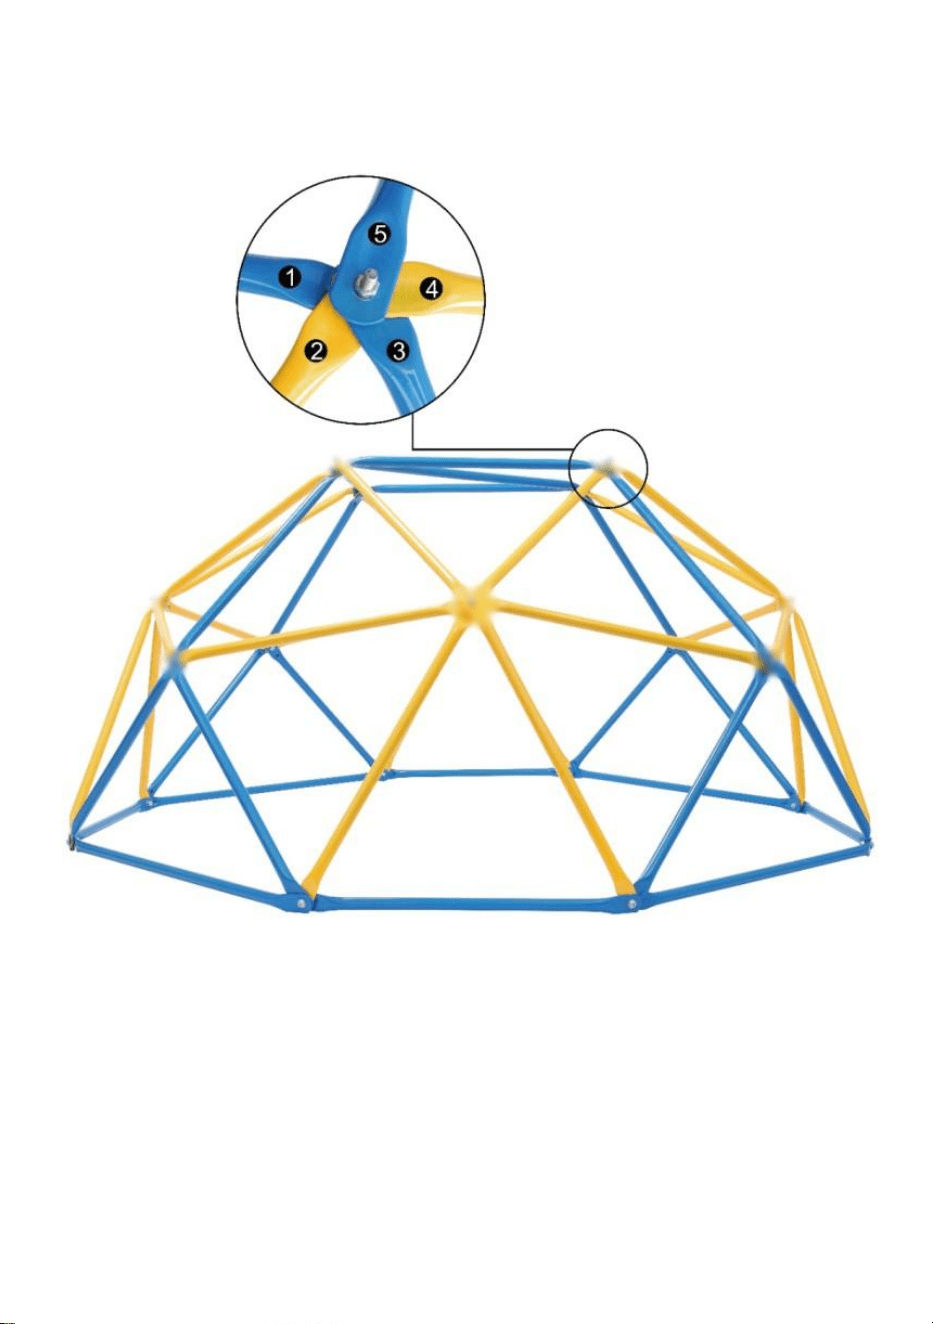
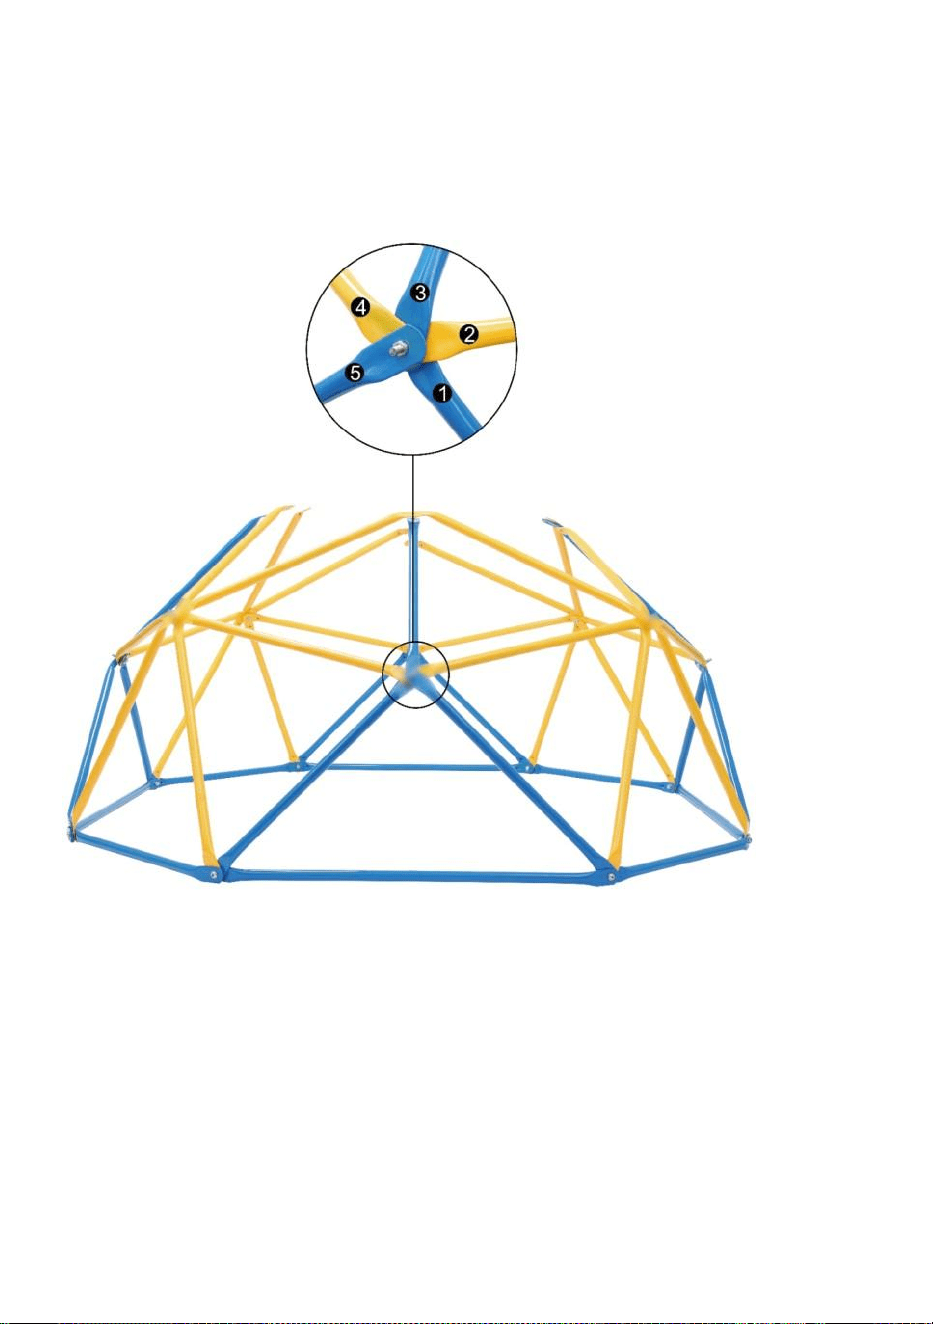
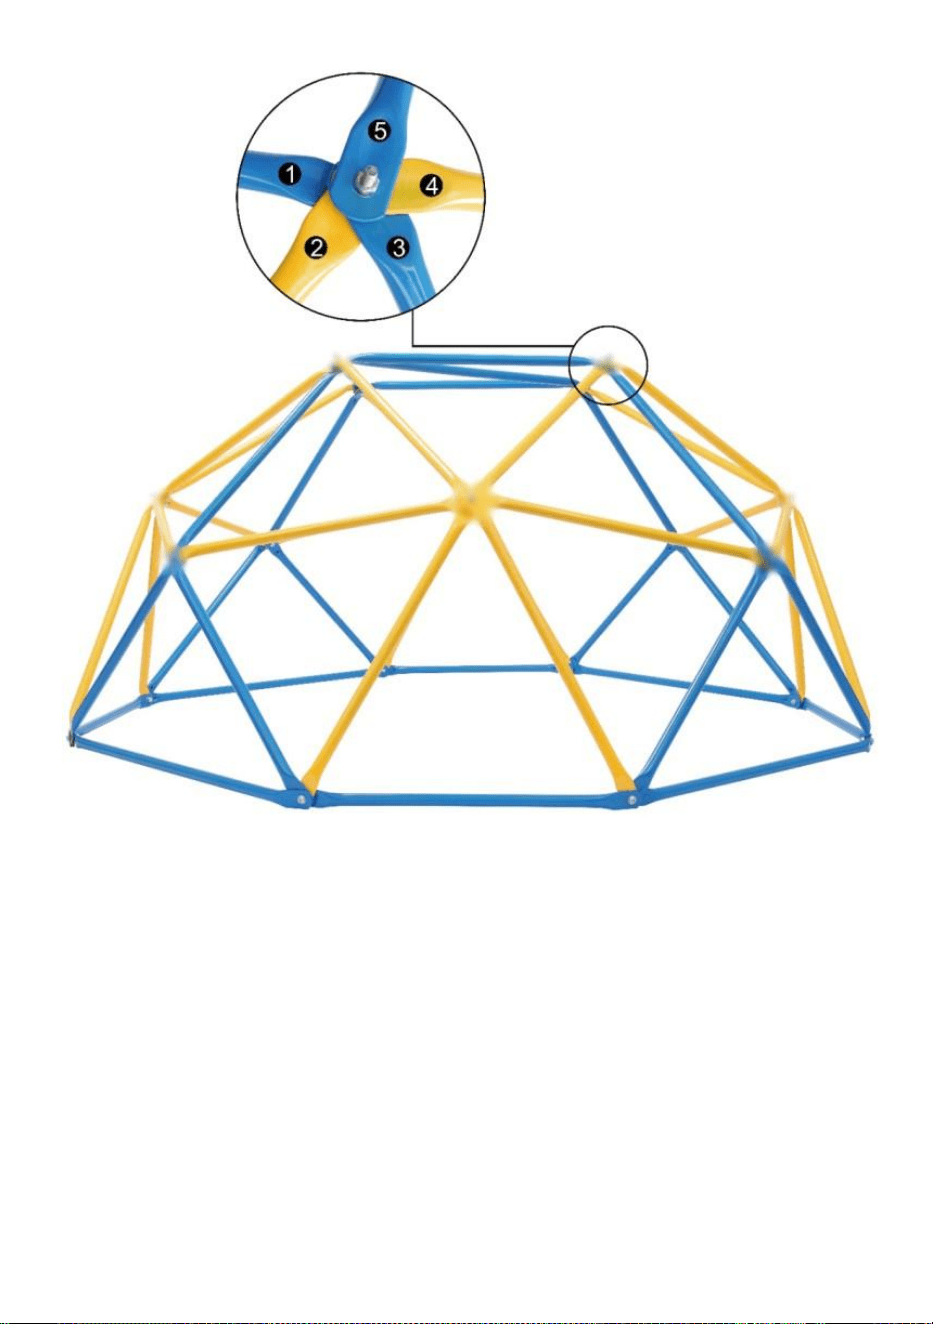
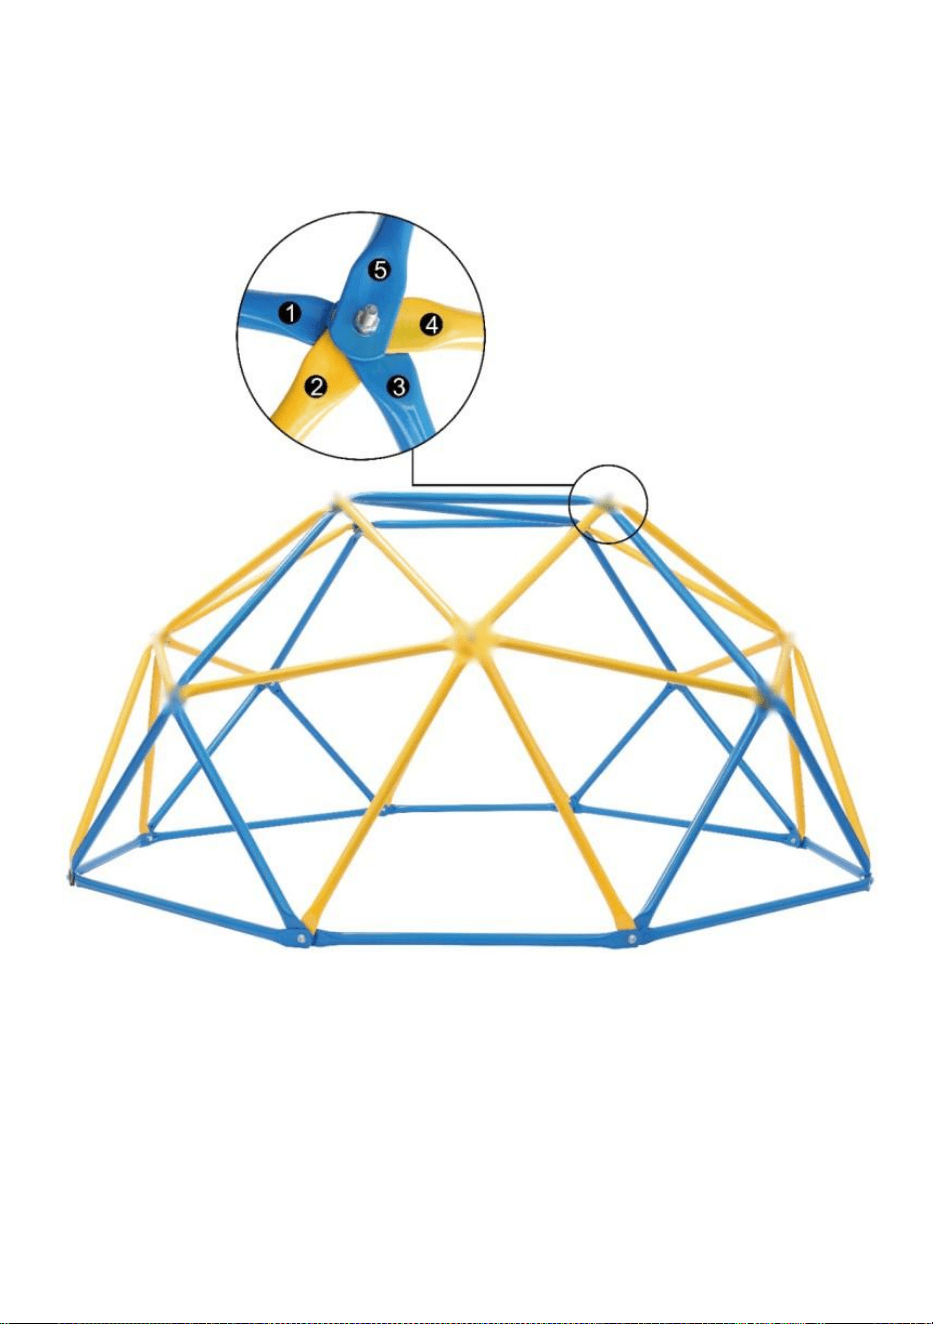
Come to the Point T, connect 1 new short blue tube(Part A) with 4 assembled tubes from
Point X/Y/Z, and fix them in an arranged sequence.
Point T
Just repeat the above step and you will get a square roof, with four sides(Part A) and one
diagonal(Part N) .

13
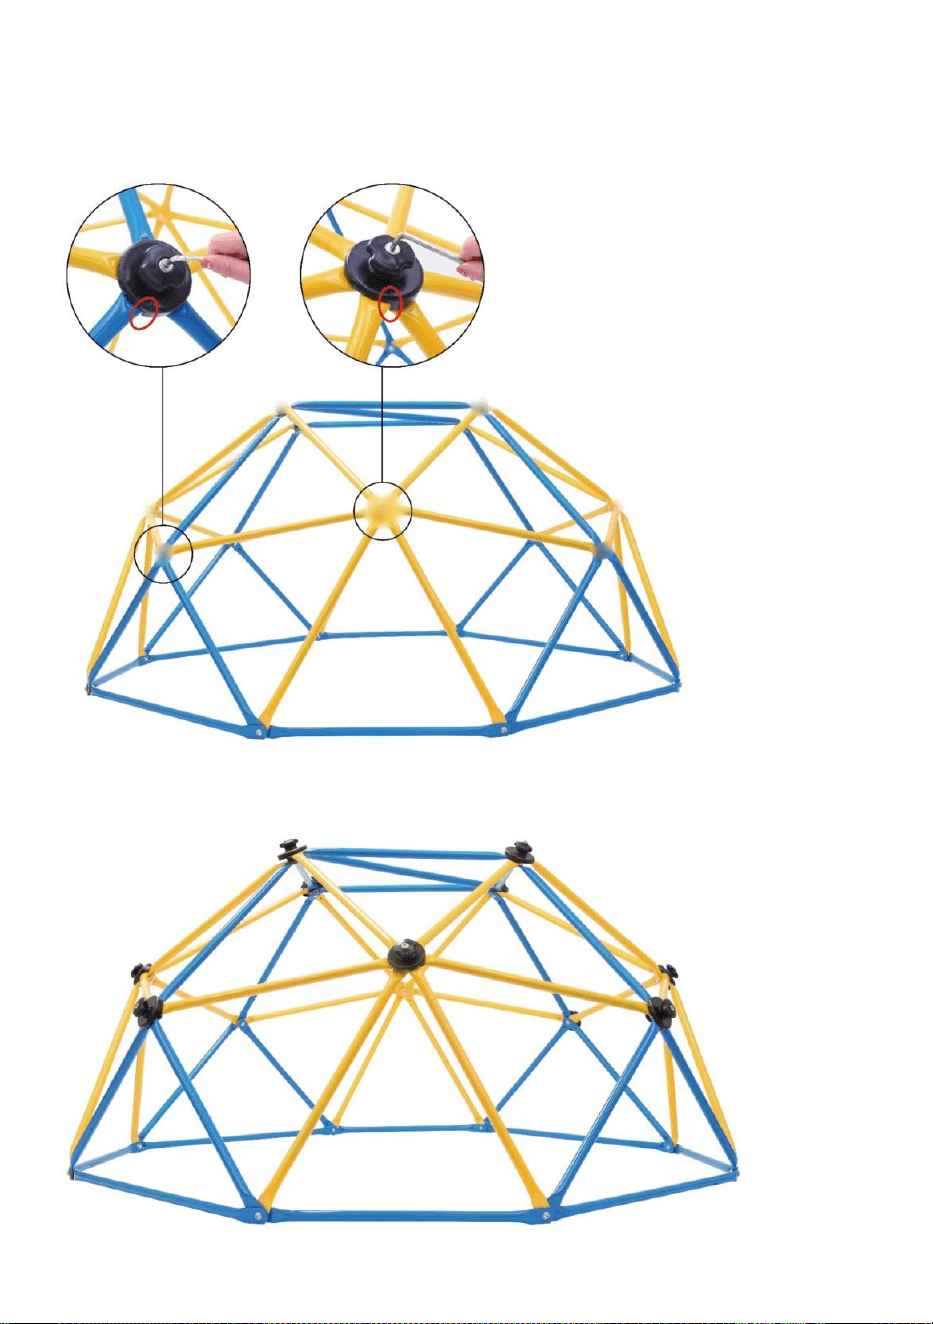
Note: After the frame is fully assembled, use tools (Part I & Part J) to tighten all the bolts.
Step6:
After the frame is complete and all bolts are locked, start to install black grips(Part C).
Except the bottom nodes, all nodes need grips for safe climbing.
Use long nuts(Part D) to fix black grips(Part C).
Note: The gap of the grip should be placed between the 1st tube and the 5th/6th tube.

14
Now your jungle gym is set up. Congratulations!
Attention please, if there is any problem when you are assembling, just touch us and we will
try our best to help you!
15
MAINTENANCE
· Check the poles, handles and screw connections regularly for cracks, damage and
material fatigue. If you discover any damage, the scaffolding must not be used. Please
contact your seller to replace the damaged items with new ones. Use only original
replacement elements!
· Never use aggressive cleaning agents for cleaning!
Disposal
The product packaging consists of recyclable materials. Dispose of them in
an environmentally
friendly manner and in the collection containers provided.
Manufacturer: Shanghaimuxinmuyeyouxiangongsi
Address:Baoshanqu Shuangchenglu 803long 11hao 1602A-1609shi
Shanghai
Imported to AUS: SIHAO PTY LTD, 1 ROKEVA STREETEASTWOOD
NSW 2122 Australia
Imported to USA: Sanven Technology Ltd., Suite 250, 9166 Anaheim
Place, Rancho Cucamonga, CA 91730
Made In China
REP
EC
SHUNSHUN GmbH
Römeräcker 9 Z2021,76351
Linkenheim-Hochstetten,Germany
euvertreter@gmail.com
+49 1727041930
REP
UK
Pooledas Group Ltd
Unit 5 Albert Edward House, The
Pavilions Preston, United Kingdom
pooledas12[email protected]
Tel: 01772418127


Technisch Support- und E-Garantie-Zertifikat www.vevor.com/support
Geometrisches Kletterspiel
We continue to be committed to provide you tools with competitive price.
"Save Half", "Half Price" or any other similar expressions used by us only represents an
estimate of savings you might benefit from buying certain tools with us compared to the major
top brands and does not necessarily mean to cover all categories of tools offered by us. You
are kindly reminded to verify carefully when you are placing an order with us if you are
actually saving half in comparison with the top major brands.


1
MODELL: JX-DC-06
Have product questions? Need technical support? Please feel free to
contact us:
Technical Support and E-Warranty Certificate
www.vevor.com/support
NEED HELP? CONTACT US!
This is the original instruction, please read all manual instructions
carefully before operating. VEVOR reserves a clear interpretation of our
user manual. The appearance of the product shall be subject to the
product you received. Please forgive us that we won't inform you again if
there are any technology or software updates on our product.
GEOMETRIC CLIMBER
PLAY

2
ANWEISUNGEN
Vielen Dank, dass Sie sich für dieses geometrische Kletterspiel entschieden
haben.
- Bitte lesen Sie alle Anweisungen, bevor Sie es verwenden. Die Informationen
helfen Ihnen, die bestmöglichen Ergebnisse zu erzielen.
Die in diesem Katalog aufgeführten Produkte können farblich vom tatsächlichen
Artikel abweichen.
1. Sicherheitshinweise
Die Nichtbeachtung dieser Warnhinweise kann zu schweren Verletzungen
oder Sachschäden führen
Dies führt zu Schäden und zum Erlöschen der Garantie.
Der Eigentümer muss sicherstellen, dass alle Spieler diese Regeln kennen und
befolgen, um einen sicheren Betrieb des Systems zu gewährleisten.
Um die Sicherheit zu gewährleisten, versuchen Sie nicht, dieses Produkt
zusammenzubauen, ohne die Anweisungen sorgfältig zu befolgen.
Überprüfen Sie den gesamten Karton und das gesamte Verpackungsmaterial auf
Teile und/oder zusätzliches Anleitungsmaterial. Vor Beginnen Sie mit der Montage,
lesen Sie die Anweisungen und identifizieren Sie die Teile anhand der
Hardware-Kennung und Teileliste in diesem Dokument. Voraussetzung für den
ordnungsgemäßen Betrieb ist die ordnungsgemäße und vollständige Montage,
Nutzung und Überwachung Betrieb zu gewährleisten und das Unfall- oder
Verletzungsrisiko zu verringern. In diesem Fall besteht eine hohe
Wahrscheinlichkeit schwerer Verletzungen
Das Produkt wird nicht ordnungsgemäß installiert, gewartet und betrieben.
· Wenn Sie bei der Montage eine Leiter verwenden, verwenden Sie Extreme
Vorsicht.
· Hierzu werden zwei fähige Erwachsene empfohlen Betrieb.
· Beachten Sie, dass durch zu festes Anziehen Teile beschädigt werden können
Schrauben.
· Tragen Sie während der gesamten Fahrt eine Schutzbrille Montage.

3
Die meisten Verletzungen werden durch Missbrauch und/oder Nichtbefolgen der
Anweisungen verursacht. Seien Sie vorsichtig, wenn Sie dieses Produkt
verwenden.
BEVOR SIE MIT DER MONTAGE BEGINNEN
Bewahren Sie die Hardware-Taschen und deren Inhalt getrennt auf.
Identifizieren und inventarisieren Sie alle Teile und Hardware mithilfe der Teile-
und Hardwarelisten und -kennzeichnungen in diesem Dokument. Testen Sie den
Sitz aller Schrauben, indem Sie sie in die entsprechenden Löcher einsetzen.
Kratzen Sie nicht die gesamte Pulverbeschichtung ab. Blankes Metall kann rosten.
Möglicherweise müssen Sie einige Schrauben mit einem Hammer oder Hammer
einschlagen.
*Für die Montage sind zwei Erwachsene erforderlich*
Nur Erwachsene sollten das Produkt aufstellen. Erlauben Sie Kindern nicht,
sich im Aufstellbereich aufzuhalten, bis die Montage abgeschlossen ist.
INSTALLATIONS- UND BODENVORBEREITUNGSANWEISUNGEN:
· Bieten genug Zimmer Also Das Kinder dürfen verwenden Die Ausrüstung sicher.
Für Beispiel, Bei Strukturen mit mehreren Spielaktivitäten sollte eine Rutsche nicht
vor einem austretenschwingen.
· Trennen Sie aktive und ruhige Aktivitäten voneinander. Platzieren Sie
Sandkästen beispielsweise in einiger Entfernung von Schaukeln oder verwenden
Sie ein Geländer oder eine Barriere, um den Sandkasten von der Bewegung der
Schaukeln zu trennen Schaukeln.
· Stellen Sie Heimspielgeräte nicht auf Beton, Asphalt, gestampfter Erde, Gras
usw. auf. Teppich, oder beliebig andere hart Oberfläche. A fallen auf zu A hart
Oberfläche dürfen Ergebnis In schwere Verletzungen der Ausrüstung verursachen
Benutzer.
· Um schwere Verletzungen zu vermeiden, weisen Sie Kinder darauf hin, dass sie
das Gerät erst ordnungsgemäß verwenden dürfen Eingerichtet.
· Sorgen Sie dafür, dass der Standort frei von Hindernissen ist, die Verletzungen
verursachen könnten – wie zum Beispiel niedrig überhängende Äste,
Oberleitungen, Baumstümpfe und/oder Wurzeln, große Steine, Ziegel und Beton.
· Wählen Sie einen ebenen Standort für die Ausrüstung. Dies kann die

4
Wahrscheinlichkeit des Spiels verringern Kippen über Und lose Füllung
Auftauchen Materialien Waschen weg während schwer regnet.
ANLEITUNG FÜR SPIELPLATZ- UND OBERFLÄCHENMATERIALIEN
· Nutzen Sie eine Eindämmung, z. B. indem Sie den Umfang umgraben und/oder
den Umfang mit Landschaft auskleiden Kanten.
· Installieren Sie lose Füllbeläge nicht auf harten Oberflächen wie Beton oder
anderen MaterialienAsphalt.
· Die Installation von Gummifliesen oder vor Ort gegossenen Oberflächen (außer
losen Füllmaterialien) erfordert in der Regel einen Fachmann und ist keine
„Do-it-yourself“-Installation. Projekte.
· Verwenden Sie Spielplatzbelagsmaterialien (außer losem Füllmaterial), die der
Sicherheitsnorm ASTM F1292 Standard Specification for Impact Attenuation of
Surfaceing Materials in the Use Zone of Playground entsprechen Ausrüstung.
BEDIENUNGSANLEITUNG
Das Befolgen der folgenden Anweisungen und Warnungen verringert die
Wahrscheinlichkeit schwerer oder tödlicher Verletzungen:
· Für alle Kinder sollte eine Aufsicht durch Erwachsene vor Ort gewährleistet sein
Alter.
· Weisen Sie Kinder an, das Gerät nicht auf andere Weise zu verwenden
beabsichtigt.
· Um ein Verfangen und Strangulieren zu verhindern, ziehen Sie Kinder
angemessen an, tragen Sie gut sitzende Schuhe und vermeiden Sie Ponchos,
Schals, Jacken mit Kordelzug am Hals, Helme mit Riemen und andere locker
sitzende Kleidung, die bei der Verwendung potenziell gefährlich sein kann
Ausrüstung.
· Weisen Sie Kinder an, nicht mit dem Gerät zu spielen nass.
· Weisen Sie Kinder an, keine Gegenstände an den Spielgeräten anzubringen,
die nicht dafür vorgesehen sind entworfen für verwenden mit Die Ausrüstung, solch
als, Aber nicht begrenzt Zu, springen Seile, Wäscheleinen, Haustierleinen, Kabel
und Ketten, da diese eine Strangulationsgefahr darstellen können. Bewegen Sie
das Gerät nicht, während es sich darin befindet verwenden.
· Der Prallbelag muss das gesamte empfohlene Spiel abdecken Bereich.

5
Verbraucherinformationsblatt für Spielplatzbelagsmaterialien
Schutzbelag auswählen:
Eines der wichtigsten Dinge, die Sie tun können, um die Wahrscheinlichkeit
schwerer Kopfverletzungen zu verringern, ist die Installation eines
stoßdämpfenden Schutzbelags unter und um Ihre Spielgeräte. Der Schutzbelag
sollte bis zu einer Tiefe aufgetragen werden, die für die Gerätehöhe gemäß
ASTM-Spezifikation F1292 geeignet ist. Es stehen verschiedene Belagsarten zur
Auswahl; Unabhängig davon, für welches Produkt Sie sich entscheiden, befolgen
Sie diese Richtlinien:
HINWEIS: Stellen Sie Heimspielgeräte nicht auf Beton, Asphalt oder anderen
harten Oberflächen auf. Ein Sturz auf eine harte Oberfläche kann zu schweren
Verletzungen des Gerätebenutzers führen. Gras und Schmutz gelten nicht als
Schutzbelag, da Abnutzung und Umwelteinflüsse ihre stoßdämpfende Wirkung
verringern können. Teppiche und dünne Matten sind in der Regel kein
ausreichender Schutzbelag.
Bodennahe Geräte – wie ein Sandkasten, eine Aktivitätswand, ein Spielhaus oder
andere Geräte ohne erhöhte Spielfläche – benötigen keinen schützenden
Bodenbelag. Lose Füllmaterialien: Halten Sie eine Mindesttiefe von 9 Zoll (23 cm)
für lose Füllmaterialien wie Holzmulch/-späne, technische Holzfasern (EWF) oder
zerkleinerten/recycelten Gummimulch für Geräte bis zu 8 Fuß (244 cm) ein.
hoch; und 9 Zoll (23 cm) Sand oder Erbsenkies für Geräte mit einer Höhe von bis
zu 5 Fuß (152 cm).
HINWEIS: Bei einer anfänglichen Füllhöhe von 12 Zoll (30 cm) wird die Oberfläche
mit der Zeit auf eine Tiefe von etwa 9 Zoll (23 cm) komprimiert. Der Belag
verdichtet sich außerdem, verschiebt sich und setzt sich ab. Daher sollte
regelmäßig nachgefüllt werden, um eine Tiefe von mindestens 9 Zoll (23 cm)
beizubehalten. Verwenden Sie für Spielgeräte mit einer Höhe von weniger als 122
cm (4 Fuß) einen Schutzbelag von mindestens 15 cm (6 Zoll). Bei
ordnungsgemäßer Wartung sollte dies ausreichend sein. (In Tiefen von weniger
als 15 cm wird das Schutzmaterial zu leicht verdrängt oder verdichtet.) Verwenden
Sie eine Eindämmung, indem Sie beispielsweise den Umfang ausgraben und/oder

6
den Umfang mit Landschaftsrändern auskleiden. Vergessen Sie nicht, den
Wasserabfluss zu berücksichtigen. Überprüfen und halten Sie die Tiefe des losen
Füllbelagsmaterials ein. Um die richtige Menge an losem Füllmaterial
beizubehalten, markieren Sie die richtige Höhe an den Stützpfosten der
Spielgeräte. Auf diese Weise können Sie leicht erkennen, wann der Belag
erneuert und/oder neu verteilt werden muss. Installieren Sie lose Füllbeläge nicht
auf harten Oberflächen wie Beton oder Asphalt.
Vor Ort gegossen Oberflächen oder Vorgefertigt Gummi Fliesen – Du Mai Sei
interessiert bei der Verwendung von anderen Oberflächen als losen
Füllmaterialien – wie Gummifliesen oder vor Ort gegossenen Oberflächen. Die
Installation dieser Oberflächen erfordert in der Regel einen Fachmann und ist kein
„Do-it-yourself“-Projekt. Überprüfen Sie die Oberflächenspezifikationen, bevor Sie
diese Art von Oberfläche kaufen. Bitten Sie den Installateur/Hersteller um einen
Bericht, aus dem hervorgeht, dass das Produkt gemäß der folgenden
Sicherheitsnorm getestet wurde: ASTM F1292 Standard Specification for Impact
Attenuation of Surfaceing Materials Within the Use Zone of Playground
Equipment.
Aus diesem Bericht sollte hervorgehen, ab welcher spezifischen Höhe die
Oberfläche vor schweren Kopfverletzungen schützen soll. Diese Höhe sollte gleich
oder größer als die Fallhöhe sein – der vertikale Abstand zwischen einer
ausgewiesenen Spielfläche (erhöhte Fläche zum Stehen, Sitzen oder Klettern)
und dem Schutzbelag
unten – Ihrer Spielgeräte. Überprüfen Sie den Schutzbelag regelmäßig auf
Abnutzung. Platzierungen – Die ordnungsgemäße Platzierung und Wartung des
Schutzbelags ist von entscheidender Bedeutung.
Der Schutzbelag muss in alle Richtungen mindestens 2 m (6,6 Fuß) über die
Gerätegrenzen hinausragen.
SICHERER SPIELBEREICH
SICHERHEITSBEREICH – Platzieren Sie das Gerät in einem Abstand von
mindestens 2 m (6,6 Fuß) von jeglichen Strukturen oder Hindernissen wie Zäunen,
Garagen, Häusern, überhängenden Ästen, Wäscheleinen oder Elektrokabeln. Der
Fallschutzbelag muss die gesamte empfohlene Spielfläche abdecken. Siehe das
Beispiel unten.
7
Abmessungen des Spielsets:
10' (3,05 m) x 10' (3,05 m)
Empfohlenes Spiel Bereich:
16 Fuß 6 Zoll (5,05 m) x 16 Fuß 6 Zoll (5,05 m)
2.1 Verwendungszweck
· Der Artikel ist nur für den Freizeitgebrauch von Personen ab 3 Jahren geeignet über.
· Der Artikel ist nicht für den öffentlichen Gebrauch geeignet Spielplätze.
· Der Artikel ist nicht für Kinder unter 3 Jahren geeignet Jahre!
4. Symbole
Lesen Sie die Bedienungsanleitung sorgfältig durch!
Der Artikel ist nicht für Kinder unter 3 Jahren geeignet!
8
MODELL UND PARAMETER
Modell
JX-DC-06
Gewichtskapazität
600 lbs ( 272 kg)
Alter
3- 9
Nummer
2-3 Kinder
Gebaut Maße
6 Fuß breit × 3 Fuß hoch
MONTAGE UND VERWENDUNG
Stückliste:
Teil Mx4 (lange
blaue Röhre)
Teil Nx1 (langes
und dickeres
blaues Rohr)
Teil Ax20 (kurzes
blaues Rohr)
Teil Bx24 (Gelbe
Röhre)
Teil Dx12 (lange
Mutter)
Teil Ex12 (Langer
Bolzen)
Teil Fx8 (kurze
Schraube)
Teil Gx8
(Sicherungsmutter
)
Teil Hx28
(Unterlegscheibe
)
Teil Lx2
Teil Ix2
Teil Jx1
Teil Kx12
Teil Cx12
Hinweis: Achten Sie darauf, Teil N nicht mit Teil M zu verwechseln, und lassen Sie
Teil N für die Verwendung im letzten Schritt beiseite.
Installationsschritte:
Schritt 1:
Erstellen Sie ein Achteck als Basis mit 4 langen blauen Röhren (Teil M) + 4 kurzen blauen
Röhren (Teil A).

9
Schritt 2:
Verbinden Sie zwei gelbe Rohre (Teil B) mit dem kurzen blauen Rohr (Teil A) der Basis,
sodass ein Dreieck entsteht , und befestigen Sie sie mit kurzen Schrauben (Teil F),
Sicherungsmuttern (Teil G) und Unterlegscheiben (Teil H). Erstellen Sie auf die gleiche
Weise ein Dreieck mit 2 kurzen blauen Röhren (Teil A) und 1 langen blauen Röhre (Teil M) .
Hinweis: Bolzen nicht verriegeln! Andernfalls würde es die Schwierigkeit erhöhen, den
Schritten zu folgen.
Schritt 3:
Wiederholen Sie Schritt 2 viermal, bis Sie den unten gezeigten Rahmen erhalten.
10
Schritt 4:
Fügen Sie 4 gelbe Rohre (Teil B) zum Punkt X hinzu, wobei die Reihenfolge der Rohre mit
der Abbildung unten übereinstimmt, und befestigen Sie sie mit langen Schrauben (Teil E),
Unterlegscheiben (Teil H) und Teil K.
Hinweis: Bolzen nicht verriegeln! Andernfalls würde es die Schwierigkeit erhöhen, den
Schritten zu folgen.
Point X
11
Fügen Sie 1 kurzes blaues Rohr (Teil A) und 1 gelbes Rohr (Teil B) zum Punkt Y hinzu, mit 1
zusammengesetzten gelben Rohr (Teil B) vom Punkt X, sodass sich 5 Rohre am Punkt Y
treffen.
Befestigen Sie sie auf die gleiche Weise, wobei die Reihenfolge der Rohre mit der
Abbildung unten übereinstimmt. Hinweis: Bolzen nicht verriegeln!
Point Y
Wiederholen Sie einfach den obigen Schritt, bis die zweite Ebene abgeschlossen ist.

12
Schritt 5:
Fügen Sie 2 kurze blaue Rohre (Teil A) und 1 langes, dickeres blaues Rohr (Teil N) zum
Punkt Z hinzu, mit 3 zusammengesetzten Rohren von Punkt X/Y, die Endpunkte von 6
Rohren überlappen sich am Punkt Z. Stellen Sie sicher, dass die Rohre angeordnet sind
gegen den Uhrzeigersinn, wie unten gezeigt, mit dem langen und dickeren blauen Rohr
(Teil N) hinein 4.
13
Point Z
Kommen Sie zum Punkt T, verbinden Sie 1 neues kurzes blaues Rohr (Teil A) mit 4
zusammengebauten Rohren von Punkt X/Y/Z und befestigen Sie sie in einer geordneten
Reihenfolge.

14
Point T
Wiederholen Sie einfach den obigen Schritt und Sie erhalten ein quadratisches Dach mit
vier Seiten (Teil A) und einer Diagonale (Teil N).
15
Hinweis: Nachdem der Rahmen vollständig zusammengebaut ist, ziehen Sie alle
Schrauben mit Werkzeugen (Teil I und Teil J) fest.
Schritt 6:
Nachdem der Rahmen fertig ist und alle Schrauben verriegelt sind, beginnen Sie mit der
Montage der schwarzen Griffe (Teil C). Mit Ausnahme der unteren Knotenpunkte benötigen
alle Knotenpunkte Griffe zum sicheren Klettern.
Verwenden Sie lange Muttern (Teil D), um die schwarzen Griffe (Teil C) zu befestigen.
Hinweis: Der Spalt des Griffs sollte zwischen dem 1. Rohr und dem 5./6. Rohr liegen.

16
Jetzt ist Ihr Klettergerüst aufgebaut. Glückwunsch!
Achtung: Sollte beim Zusammenbau ein Problem auftreten, kontaktieren Sie uns einfach

17
und wir werden unser Bestes geben, um Ihnen zu helfen!
WARTUNG
· Überprüfen Sie die Stangen, Griffe und Schraubverbindungen regelmäßig auf Risse,
Beschädigungen und Materialermüdung. Sollten Sie Schäden feststellen, darf das
Gerüst nicht benutzt werden. Bitte wenden Sie sich an Ihren Verkäufer, um die
beschädigten Artikel durch neue zu ersetzen. Verwenden Sie nur Originalersatzteile
Elemente!
· Verwenden Sie niemals aggressive Reinigungsmittel Reinigung!
Entsorgung
Die Produktverpackung besteht aus recycelbaren Materialien. Entsorgen
Sie sie umweltgerecht
freundlich und in den bereitgestellten Sammelbehältern abzugeben.
Hersteller: Shanghaimuxinmuyeyouxiangongsi
Adresse: Baoshanqu Shuangchenglu 803long 11hao 1602A-1609shi
Shanghai
Importiert nach AUS: SIHAO PTY LTD, 1 ROKEVA STREETEASTWOOD
NSW 2122 Australien
In die USA importiert: Sanven Technology Ltd., Suite 250, 9166 Anaheim
Place, Rancho Cucamonga, CA 91730
REP
EC
SHUNSHUN GmbH
Römeräcker 9 Z2021,76351
Linkenheim-Hochstetten,Germany
euvertreter@gmail.com
+49 1727041930
REP
UK
Pooledas Group Ltd
Unit 5 Albert Edward House, The
Pavilions Preston, United Kingdom
pooledas12[email protected]
Tel: 01772418127

18
In China hergestellt


Technique Assistance et certificat de garantie électronique
www.vevor.com/support
Jeu de grimpeur géométrique
We continue to be committed to provide you tools with competitive price.
"Save Half", "Half Price" or any other similar expressions used by us only represents an
estimate of savings you might benefit from buying certain tools with us compared to the major
top brands and does not necessarily mean to cover all categories of tools offered by us. You
are kindly reminded to verify carefully when you are placing an order with us if you are
actually saving half in comparison with the top major brands.


1
MODÈLE : JX-DC-06
Have product questions? Need technical support? Please feel free to
contact us:
Technical Support and E-Warranty Certificate
www.vevor.com/support
NEED HELP? CONTACT US!
This is the original instruction, please read all manual instructions
carefully before operating. VEVOR reserves a clear interpretation of our
user manual. The appearance of the product shall be subject to the
product you received. Please forgive us that we won't inform you again if
there are any technology or software updates on our product.
GEOMETRIC CLIMBER
PLAY

2
INSTRUCTIONS
Merci beaucoup d'avoir choisi ce jeu de grimpeur géométrique.
- Veuillez lire toutes les instructions avant de l'utiliser. Les informations vous
aideront à obtenir les meilleurs résultats possibles.
Les produits présentés dans ce catalogue peuvent avoir une couleur différente de
celle de l'article réel.
1. Consignes de sécurité
LE NON-RESPECT DE CES AVERTISSEMENTS PEUT ENTRAÎNER DES
BLESSURES OU DES MATÉRIELS GRAVES
DOMMAGES ET ANNULERA LA GARANTIE.
Le propriétaire doit s'assurer que tous les joueurs connaissent et suivent ces
règles pour un fonctionnement sûr du système.
Pour garantir la sécurité, n'essayez pas d'assembler ce produit sans suivre
attentivement les instructions.
Vérifiez toute la boîte et à l’intérieur de tout le matériel d’emballage pour les pièces
et/ou les instructions supplémentaires. Avant commencer l'assemblage, lire les
instructions et identifier les pièces à l'aide de l'identifiant du matériel et liste des
pièces dans ce document. Un assemblage, une utilisation et une surveillance
appropriés et complets sont essentiels pour fonctionnement et pour réduire le
risque d’accident ou de blessure. Il existe une forte probabilité de blessures
graves si cela
le produit n’est pas installé, entretenu et utilisé correctement.
· Si vous utilisez une échelle lors de l'assemblage, utilisez une prudence.
· Deux adultes capables sont recommandés pour cela opération.
· Soyez conscient que des pièces peuvent être endommagées en serrant trop les
des vis.
· Portez des lunettes de sécurité tout au long de assemblée.
La plupart des blessures sont causées par une mauvaise utilisation et/ou par le
non-respect des instructions. Soyez prudent lorsque vous utilisez ce produit.

3
AVANT DE COMMENCER LE MONTAGE
Gardez les sacs de matériel et leur contenu séparés.
Identifiez et inventoriez toutes les pièces et le matériel à l'aide des listes et des
identifiants de pièces et de matériel figurant dans ce document. Testez
l'ajustement de tous les boulons en les insérant dans leurs trous respectifs. Ne
grattez pas la totalité du revêtement en poudre. Le métal nu peut rouiller. Vous
devrez peut-être enfoncer certains boulons en place avec un marteau ou un
maillet.
*Deux adultes sont requis pour terminer l'assemblage*
Seuls les adultes doivent installer le produit. Ne laissez pas les enfants
entrer dans la zone d'installation jusqu'à ce que l'assemblage soit terminé.
INSTRUCTIONS D'INSTALLATION ET DE PRÉPARATION DU SOL :
· Fournir assez chambre donc que enfants peut utiliser le équipement sans
encombre. Pour exemple, pour les structures comportant plusieurs activités
ludiques, un toboggan ne doit pas sortir devant unbalançoire.
· Séparez les activités actives et calmes les unes des autres. Par exemple, placez
les bacs à sable loin des balançoires ou utilisez un garde-corps ou une barrière
pour séparer le bac à sable du mouvement du oscillations.
· N'installez pas d'équipement de terrain de jeu domestique sur du béton, de
l'asphalte, de la terre battue, de l'herbe, tapis, ou n'importe lequel autre dur surface.
UN automne sur un dur surface peut résultat dans blessure grave à l'équipement
utilisateur.
· Pour éviter des blessures graves, avertissez les enfants qu'ils ne doivent pas
utiliser l'équipement tant qu'il n'est pas correctement installée.
· Créez un site exempt d'obstacles susceptibles de causer des blessures, tels que
des branches d'arbres basses en surplomb, des câbles aériens, des souches
et/ou des racines d'arbres, de gros rochers, des briques et du béton.
· Choisissez un emplacement plat pour l'équipement. Cela peut réduire la
probabilité que le jeu se déroule pourboire sur et en vrac surfaçage matériaux la
lessive loin pendant lourd des pluies.
INSTRUCTIONS POUR LES MATÉRIAUX D'AIRE DE JEUX ET DE SURFACE

4
· Utiliser le confinement, par exemple en creusant autour du périmètre et/ou en
bordant le périmètre avec du paysage. bordure.
· N'installez pas de revêtement en vrac sur des surfaces dures telles que le béton
ouasphalte.
· L'installation de carreaux de caoutchouc ou de surfaces coulées sur place
(autres que les matériaux en vrac) nécessite généralement un professionnel et ne
se fait pas soi-même. projets.
· Utilisez des matériaux de revêtement de terrain de jeu (autres que des matériaux
de remplissage en vrac) conformes à la norme de sécurité ASTM F1292
Spécification standard pour l'atténuation des impacts des matériaux de
revêtement dans la zone d'utilisation du terrain de jeu. Équipement.
MODE D'EMPLOI
Le respect des instructions et avertissements suivants réduit le risque de
blessures graves, voire mortelles :
· La surveillance d'un adulte sur place doit être assurée pour les enfants de tous
âge.
· Demandez aux enfants de ne pas utiliser l'équipement d'une manière autre que
destiné.
· Pour éviter tout enchevêtrement et étranglement, habillez les enfants de manière
appropriée, en utilisant des chaussures bien ajustées et en évitant les ponchos,
foulards, vestes avec cordons de serrage au cou, casques à bretelles et autres
vêtements amples potentiellement dangereux lors de l'utilisation. équipement.
· Demandez aux enfants de ne pas jouer lorsque l'équipement est mouillé.
· Demandez aux enfants de ne pas attacher d'objets à l' équipement du terrain de
jeu qui ne sont pas spécifiquement conçu pour utiliser avec le équipement, tel
comme, mais pas limité à, saut cordes, cordes à linge, laisses pour animaux de
compagnie, câbles et chaînes, car ils peuvent présenter un risque d'étranglement.
Ne déplacez pas l’équipement lorsqu’il est utiliser.
· Le revêtement d'impact doit couvrir l'intégralité du jeu recommandé zone.
FICHE D'INFORMATION POUR LE CONSOMMATEUR POUR LES MATÉRIAUX
DE REVÊTEMENT D'AIRES DE JEUX
Sélectionnez une surface de protection :
L’une des choses les plus importantes que vous puissiez faire pour réduire le

5
risque de blessures graves à la tête est d’installer une surface protectrice
absorbant les chocs sous et autour de votre équipement de jeu. La surface de
protection doit être appliquée à une profondeur adaptée à la hauteur de
l'équipement, conformément à la spécification ASTM F1292. Il existe différents
types de revêtements parmi lesquels choisir ; Quel que soit le produit que vous
sélectionnez, suivez ces directives :
REMARQUE : N'installez pas d'équipement de terrain de jeu domestique sur du
béton, de l'asphalte ou toute autre surface dure. Une chute sur une surface dure
peut entraîner des blessures graves pour l'utilisateur de l'équipement. L'herbe et la
saleté ne sont pas considérées comme des surfaces protectrices car l'usure et les
facteurs environnementaux peuvent réduire leur efficacité d'absorption des chocs.
Les moquettes et les nattes minces ne constituent généralement pas une surface
protectrice adéquate.
Les équipements au niveau du sol – comme un bac à sable, un mur d’activités,
une maison de jeu ou tout autre équipement sans surface de jeu surélevée – n’ont
besoin d’aucune surface de protection. Matériaux de remplissage en vrac :
Maintenir une profondeur minimale de 9 pouces (23 cm) de matériaux de
remplissage en vrac tels que du paillis/copeaux de bois, de la fibre de bois
d'ingénierie (EWF) ou du paillis de caoutchouc déchiqueté/recyclé pour les
équipements jusqu'à 8 pieds (244 cm).
haut; et 9 pouces (23 cm) de sable ou de gravier pour les équipements jusqu'à 5
pieds (152 cm) de hauteur.
REMARQUE : Un niveau de remplissage initial de 12 pouces (30 cm) se
comprimera jusqu'à une profondeur de surface d'environ 9 pouces (23 cm) au fil
du temps. Le revêtement se compactera, se déplacera et se tassera également, et
doit être périodiquement rempli pour maintenir une profondeur d'au moins 9
pouces (23 cm). Utilisez un minimum de 6 pouces (15 cm) de surface protectrice
pour les équipements de jeu mesurant moins de 4 pieds (122 cm) de hauteur. S'il
est entretenu correctement, cela devrait être suffisant. (À des profondeurs
inférieures à 6 pouces (15 cm), le matériau de protection est trop facilement
déplacé ou compacté.) Utilisez un confinement, par exemple en creusant autour
du périmètre et/ou en recouvrant le périmètre d'une bordure paysagère. N'oubliez

6
pas de tenir compte de l'évacuation de l'eau. Vérifiez et maintenez la profondeur
du matériau de revêtement en vrac. Pour maintenir la bonne quantité de matériaux
de remplissage en vrac, marquez le niveau correct sur les poteaux de support de
l'équipement de jeu. De cette façon, vous pouvez facilement voir quand
reconstituer et/ou redistribuer le revêtement. N'installez pas de revêtement en vrac
sur des surfaces dures telles que le béton ou l'asphalte.
Coulé sur place surface ou Préfabriqué Caoutchouc Tuiles : vous peut être
intéressé en utilisant des revêtements autres que des matériaux de remplissage
en vrac – comme des dalles en caoutchouc ou des surfaces coulées sur place.
L'installation de ces surfaces nécessite généralement un professionnel et ne
constitue pas un projet de « bricolage ». Examinez les spécifications de la surface
avant d’acheter ce type de revêtement. Demandez à l'installateur/fabricant un
rapport démontrant que le produit a été testé selon la norme de sécurité suivante :
ASTM F1292 Spécification standard pour l'atténuation des impacts des matériaux
de surface dans la zone d'utilisation des équipements de terrain de jeu.
Ce rapport doit indiquer la hauteur spécifique pour laquelle la surface est censée
protéger contre des blessures graves à la tête. Cette hauteur doit être égale ou
supérieure à la hauteur de chute – distance verticale entre une surface de jeu
désignée (surface surélevée pour se tenir debout, s'asseoir ou grimper) et la
surface de protection.
ci-dessous – de votre équipement de jeu. Vérifiez fréquemment l'usure de la
surface de protection. Placements—Un placement et un entretien appropriés de la
surface de protection sont essentiels.
La surface de protection doit s'étendre sur au moins 2 m (6,6 pieds) dans toutes
les directions au-delà des limites de l'appareil.
ZONE DE JEU SÉCURISÉE
ZONE DE SÉCURITÉ - Placez l'équipement à au moins 6,6 pieds (2 m) de toute
structure ou obstacle tel qu'une clôture, un garage, une maison, des branches en
surplomb, des cordes à linge ou des fils électriques. Le revêtement d’impact doit
couvrir toute la zone de jeu recommandée. Reportez-vous à l'exemple ci-dessous.
Dimensions du coffret de jeu :
10' (3,05 m) x 10' (3,05m)
Jeu recommandé zone:
7
16' 6" (5,05 m) x 16' 6" (5,05 m)
2.1 Utilisation prévue
· L'article est uniquement adapté à un usage récréatif par des personnes âgées de 3
ans et sur.
· L'article ne convient pas à une utilisation publique cours de récréation.
· L'article ne convient pas aux enfants de moins de 3 ans années!
5. Symboles
Lisez attentivement le mode d'emploi !
L'article ne convient pas aux enfants de moins de 3 ans !
MODÈLE ET PARAMÈTRES
8
Modèle
JX-DC-06
Capacité de poids
600 livres ( 272 kg)
Âge
3-9 _
Nombre
2-3enfants
Assemblé Dimensions
6 PI.L × 3 PI.H
ASSEMBLAGE ET UTILISATION
Liste des pièces:
Pièce Mx4 (Long
Tube Bleu)
Pièce Nx1 (Tube
bleu long et plus
épais)
Pièce Ax20 (Tube
Bleu Court)
Pièce Bx24 (Tube
Jaune)
Pièce Dx12
(écrou long)
Pièce Ex12
(boulon long)
Pièce Fx8
(boulon court)
Pièce Gx8
(contre-écrou)
Pièce Hx28
(Rondelle)
Partie Lx2
Partie Ix2
Partie Jx1
Pièce Kx12
Partie Cx12
Remarque : veillez à ne pas confondre la partie N avec la partie M et laissez la
partie N de côté pour l'utiliser à la dernière étape.
Étapes d'installation :
Étape 1:
Créez un octogone comme base avec 4 longs tubes bleus (partie M) + 4 tubes bleus courts
(partie A).

9
Étape 2:
Connectez 2 tubes jaunes (partie B) au tube bleu court (partie A) de la base, en formant un
triangle, et fixez-les avec des boulons courts (partie F), des contre-écrous (partie G) et des
rondelles (partie H). Créez un triangle avec 2 tubes bleus courts (partie A) et 1 tube bleu
long (partie M) de la même manière.
Remarque : Ne verrouillez pas les boulons ! Sinon, cela augmenterait la difficulté de suivre
les étapes.
Étape 3:
Répétez l'étape 2 quatre fois jusqu'à ce que vous obteniez le cadre comme indiqué
10
ci-dessous.
Étape 4:
Ajoutez 4 tubes jaunes (partie B) au point X, l'ordre des tubes étant cohérent avec l'image
ci-dessous, et fixez-les avec des boulons longs (partie E), des rondelles (partie H) et la
partie K.
Remarque : Ne verrouillez pas les boulons ! Sinon, cela augmenterait la difficulté de suivre
les étapes.
11
Point X
Ajoutez 1 tube bleu court (partie A) et 1 tube jaune (partie B) au point Y, avec 1 tube jaune
assemblé (partie B) du point X, de sorte que 5 tubes se rencontrent au point Y.
Fixez-les de la même manière, l'ordre des tubes étant conforme à l'image ci-dessous.
Remarque : Ne verrouillez pas les boulons !
12
Point Y
Répétez simplement l’étape ci-dessus jusqu’à ce que le deuxième niveau soit terminé.
Étape 5 :
Ajoutez 2 tubes bleus courts (partie A) et 1 tube bleu long et plus épais (partie N) au point Z,
avec 3 tubes assemblés du point X/Y, les extrémités de 6 tubes se chevauchent au point Z.
Assurez-vous que les tubes sont disposés dans le sens antihoraire comme indiqué

13
ci-dessous, avec le tube bleu long et plus épais (partie N) dans 4ème.
Point Z
Venez au point T, connectez 1 nouveau tube bleu court (partie A) avec 4 tubes assemblés
du point X/Y/Z et fixez-les dans un ordre arrangé.
14
Point T
Répétez simplement l’étape ci-dessus et vous obtiendrez un toit carré, avec quatre côtés
(partie A) et une diagonale (partie N).

15
Remarque : Une fois le cadre entièrement assemblé, utilisez les outils (partie I et partie J)
pour serrer tous les boulons.
Étape 6 :
Une fois le cadre terminé et tous les boulons verrouillés, commencez à installer les
poignées noires (partie C). À l'exception des nœuds inférieurs, tous les nœuds ont besoin
de poignées pour grimper en toute sécurité.
Utilisez des écrous longs (partie D) pour fixer les poignées noires (partie C).
Remarque : L'espace du grip doit être placé entre le 1er tube et le 5ème/6ème tube.

16
Votre salle de gym dans la jungle est maintenant installée. Toutes nos félicitations!
Attention, s'il y a un problème lors du montage, contactez-nous et nous ferons de notre

17
mieux pour vous aider !
ENTRETIEN
· Vérifiez régulièrement les poteaux, les poignées et les raccords à vis pour déceler
des fissures, des dommages et une fatigue du matériau. Si vous constatez des
dommages, l'échafaudage ne doit pas être utilisé. Veuillez contacter votre vendeur
pour remplacer les articles endommagés par des neufs. Utilisez uniquement un
remplacement d'origine éléments!
· N'utilisez jamais de produits de nettoyage agressifs pour nettoyage!
Élimination
L'emballage du produit est constitué de matériaux recyclables.
Éliminez-les de manière écologique
de manière conviviale et dans les conteneurs de collecte mis à disposition.
Fabricant : Shanghaimuxinmuyeyouxiangongsi
Adresse : Baoshanqu Shuangchenglu 803long 11hao 1602A-1609shi
Shanghai
Importé en Australie : SIHAO PTY LTD, 1 ROKEVA STREETASTWOOD
NSW 2122 Australie
Importé aux États-Unis : Sanven Technology Ltd., Suite 250, 9166
Anaheim Place, Rancho Cucamonga, CA 91730
REP
EC
SHUNSHUN GmbH
Römeräcker 9 Z2021,76351
Linkenheim-Hochstetten,Germany
euvertreter@gmail.com
+49 1727041930
REP
UK
Pooledas Group Ltd
Unit 5 Albert Edward House, The
Pavilions Preston, United Kingdom
pooledas12[email protected]
Tel: 01772418127

18
Fabriqué en Chine


Technisch Ondersteuning en e-garantiecertificaat www.vevor.com/support
Geometrisch klimmerspel
We continue to be committed to provide you tools with competitive price.
"Save Half", "Half Price" or any other similar expressions used by us only represents an
estimate of savings you might benefit from buying certain tools with us compared to the major
top brands and does not necessarily mean to cover all categories of tools offered by us. You
are kindly reminded to verify carefully when you are placing an order with us if you are
actually saving half in comparison with the top major brands.


1
MODEL: JX-DC-06
Have product questions? Need technical support? Please feel free to
contact us:
Technical Support and E-Warranty Certificate
www.vevor.com/support
NEED HELP? CONTACT US!
This is the original instruction, please read all manual instructions
carefully before operating. VEVOR reserves a clear interpretation of our
user manual. The appearance of the product shall be subject to the
product you received. Please forgive us that we won't inform you again if
there are any technology or software updates on our product.
GEOMETRIC CLIMBER
PLAY

2
INSTRUCTIES
Hartelijk dank voor het kiezen van dit geometrische klimspel.
- Lees alle instructies voordat u het gebruikt. De informatie zal u helpen de best
mogelijke resultaten te bereiken.
De producten in deze catalogus kunnen qua kleur afwijken van het daadwerkelijke
artikel.
1. Veiligheidsinstructies
HET NIET OPVOLGEN VAN DEZE WAARSCHUWINGEN KAN LEIDEN TOT
ERNSTIG LETSEL OF EIGENDOMMEN
SCHADE EN VERVALT DE GARANTIE.
De eigenaar moet ervoor zorgen dat alle spelers deze regels kennen en volgen
voor een veilige werking van het systeem.
Om de veiligheid te garanderen, mag u dit product niet proberen te monteren
zonder de instructies zorgvuldig te volgen.
Controleer de hele doos en al het verpakkingsmateriaal op onderdelen en/of
aanvullend instructiemateriaal. Voor Begin met de montage, lees de instructies en
identificeer de onderdelen met behulp van de hardware-identificatie en
onderdelenlijst in dit document. Een juiste en volledige montage, gebruik en
toezicht zijn essentieel voor een goede werking bediening en om het risico op
ongelukken of letsel te verminderen. Als dit het geval is, bestaat er een grote kans
op ernstig letsel
product niet op de juiste wijze wordt geïnstalleerd, onderhouden en bediend.
· Als u tijdens de montage een ladder gebruikt, gebruik dan extreme
voorzichtigheid.
· Hiervoor worden twee capabele volwassenen aanbevolen operatie.
· Houd er rekening mee dat onderdelen beschadigd kunnen raken als u ze te strak
aandraait schroeven.
· Draag de hele tijd een veiligheidsbril montage.
De meeste verwondingen worden veroorzaakt door verkeerd gebruik en/of het niet

3
opvolgen van de instructies. Wees voorzichtig bij het gebruik van dit product.
VOORDAT U BEGINT MET DE MONTAGE
Houd de hardwaretassen en hun inhoud gescheiden.
Identificeer en inventariseer alle onderdelen en hardware met behulp van de
onderdelen- en hardwarelijsten en identificatiegegevens in dit document. Test alle
bouten door ze in hun respectievelijke gaten te steken. Schraap niet alle
poedercoating weg. Blank metaal kan roesten. Mogelijk moet u enkele bouten op
hun plaats slaan met een hamer of hamer.
*Twee volwassenen nodig om de montage te voltooien*
Alleen volwassenen mogen het product installeren. Laat geen kinderen toe
in de opstellingsruimte totdat de montage voltooid is.
INSTALLATIE- EN GRONDVOORBEREIDING INSTRUCTIES:
· Voorzien genoeg kamer Dus Dat kinderen kan gebruik de apparatuur veilig. Voor
voorbeeld, bij constructies met meerdere speelactiviteiten mag een glijbaan niet
vóór a uitkomenschommel.
· Scheid actieve en rustige activiteiten van elkaar. Plaats zandbakken bijvoorbeeld
uit de buurt van schommels of gebruik een vangrail of barrière om de zandbak te
scheiden van de beweging van de schommel. schommels.
· Installeer thuisspeeltoestellen niet op beton, asfalt, aangestampte aarde, gras,
tapijt, of elk ander moeilijk oppervlak. A val op A moeilijk oppervlak kan resultaat in
ernstig letsel aan de apparatuur gebruiker.
· Om ernstig letsel te voorkomen, waarschuw kinderen dat zij het apparaat pas op
de juiste wijze mogen gebruiken geïnstalleerd.
· Creëer een terrein vrij van obstakels die verwondingen kunnen veroorzaken –
zoals laag overhangende boomtakken, bovenleidingen, boomstronken en/of
wortels, grote rotsen, stenen en beton.
· Kies een vlakke locatie voor de apparatuur. Dit kan de kans op de speelset
verkleinen fooien over En losse vulling opduiken materialen wassen weg tijdens
zwaar regent.
SPEELPLAATS- EN OPPERVLAKTEMATERIALEN INSTRUCTIES
· Gebruik insluiting, zoals uitgraven rond de perimeter en/of de perimeter bekleden

4
met landschap rand.
· Installeer geen losse vullaag op harde oppervlakken zoals beton ofasfalt.
· Installatie van rubberen tegels of ter plaatse gestorte oppervlakken (anders dan
losse vulmaterialen) vereist doorgaans een professional en is geen “doe-het-zelf”
projecten.
· Gebruik oppervlaktematerialen voor speeltuinen (anders dan los vulmateriaal)
die voldoen aan de veiligheidsnorm ASTM F1292 Standaardspecificatie voor
schokdemping van oppervlaktematerialen binnen de gebruikszone van de
speeltuin Apparatuur.
GEBRUIKSAANWIJZING
Het in acht nemen van de volgende instructies en waarschuwingen verkleint de
kans op ernstig of dodelijk letsel:
· Voor alle kinderen moet er ter plaatse toezicht door een volwassene zijn
leeftijden.
· Instrueer kinderen om de apparatuur niet op een andere manier te gebruiken dan
bedoeld.
· Om verstrikking en wurging te voorkomen, moet u kinderen op de juiste manier
kleden, goed passende schoenen gebruiken en poncho's, sjaals, jassen met
trekkoorden in de nek, helmen met riemen en andere loszittende kleding
vermijden die mogelijk gevaarlijk is tijdens het gebruik apparatuur.
· Instrueer kinderen om niet te spelen als het apparaat in de buurt is nat.
· Instrueer kinderen om geen voorwerpen aan het speeltoestel te bevestigen die
daar niet speciaal voor bedoeld zijn ontworpen voor gebruik met de apparatuur, zo
een als, Maar niet beperkt naar, springen touwen, waslijnen, hondenriemen,
kabels en kettingen, omdat deze een wurgingsgevaar kunnen veroorzaken.
Verplaats de apparatuur niet terwijl deze zich in de ruimte bevindt gebruik.
· Impact-surfaces moeten de gehele aanbevolen speling bestrijken gebied.
CONSUMENTENINFORMATIEBLAD VOOR SPEELPLAATSMATERIALEN
Selecteer een beschermende ondergrond:
Een van de belangrijkste dingen die u kunt doen om de kans op ernstig hoofdletsel
te verkleinen, is het aanbrengen van schokabsorberende beschermlagen onder en
rond uw speeltoestellen. De beschermende laag moet worden aangebracht op
een diepte die geschikt is voor de hoogte van de apparatuur, in overeenstemming

5
met ASTM-specificatie F1292. Er zijn verschillende soorten verhardingen waaruit
u kunt kiezen; welk product u ook kiest, volg deze richtlijnen:
OPMERKING: Installeer geen speeltoestellen voor thuisgebruik op beton, asfalt of
een ander hard oppervlak. Een val op een hard oppervlak kan leiden tot ernstig
letsel bij de gebruiker van het apparaat. Gras en vuil worden niet als
beschermende ondergrond beschouwd, omdat slijtage en omgevingsfactoren hun
schokabsorberende werking kunnen verminderen. Vloerbedekking en dunne
matten zijn over het algemeen geen adequate beschermende ondergrond.
Apparatuur op grondniveau – zoals een zandbak, activiteitenmuur, speelhuisje of
andere apparatuur die geen verhoogd speeloppervlak heeft – heeft geen
beschermende ondergrond nodig. Losse vulmaterialen: Zorg voor een minimale
diepte van 23 cm (9 inch) aan losse vulmaterialen, zoals houtmulch/chips,
samengestelde houtvezels (EWF) of versnipperde/gerecyclede rubbermulch voor
apparatuur tot 244 cm (8 voet)
hoog; en 23 cm zand of erwtengrind voor apparatuur tot 152 cm hoog.
OPMERKING: Een aanvankelijk vulniveau van 30 cm (12 inch) zal na verloop van
tijd worden samengedrukt tot een oppervlaktediepte van ongeveer 23 cm (9 inch).
De verharding zal ook verdichten, verplaatsen en bezinken, en moet periodiek
worden bijgevuld om een diepte van ten minste 23 cm (9 inch) te behouden.
Gebruik minimaal 15 cm (6 inch) beschermende ondergrond voor speeltoestellen
met een hoogte van minder dan 122 cm (4 voet). Bij goed onderhoud zou dit
voldoende moeten zijn. (Op diepten van minder dan 15 cm wordt het
beschermende materiaal te gemakkelijk verplaatst of samengedrukt.) Gebruik
insluiting, zoals uitgraven rond de omtrek en/of de omtrek bekleden met
landschapsranden. Vergeet niet rekening te houden met de waterafvoer.
Controleer en onderhoud de diepte van het losse vulmateriaal. Om de juiste
hoeveelheid losse vulmaterialen aan te houden, markeert u het juiste niveau op de
steunpalen van de speeltoestellen. Zo kunt u gemakkelijk zien wanneer u de
verharding moet aanvullen en/of herverdelen. Installeer geen losse vullaag op
harde oppervlakken zoals beton of asfalt.
Op zijn plaats gegoten oppervlakken of Voorgefabriceerd Rubber Tegels – Jij
kunnen zijn geïnteresseerd bij het gebruik van andere verhardingen dan losse

6
vulmaterialen – zoals rubberen tegels of ter plaatse gestorte oppervlakken. De
installatie van deze oppervlakken vereist doorgaans een professional en is geen
“doe-het-zelf”-project. Controleer de oppervlaktespecificaties voordat u dit type
oppervlakte aanschaft. Vraag de installateur/fabrikant om een rapport waaruit blijkt
dat het product is getest volgens de volgende veiligheidsnorm: ASTM F1292
standaardspecificatie voor schokdemping van oppervlaktematerialen binnen de
gebruikszone van speeltoestellen.
Uit dit rapport moet blijken voor welke specifieke hoogte het oppervlak bedoeld is
om te beschermen tegen ernstig hoofdletsel. Deze hoogte moet gelijk zijn aan of
groter zijn dan de valhoogte – verticale afstand tussen een aangewezen
speeloppervlak (verhoogd oppervlak om te staan, zitten of klimmen) en de
beschermende ondergrond
hieronder – van uw speeltoestel. Controleer de beschermlaag regelmatig op
slijtage. Plaatsingen: Een juiste plaatsing en onderhoud van een beschermende
ondergrond is essentieel.
De beschermende laag moet in alle richtingen ten minste 2 m (6,6 voet) buiten de
grenzen van het apparaat uitsteken.
VEILIGE SPEELRUIMTE
VEILIGHEIDSZONE - Plaats de apparatuur op minimaal 2 m afstand van een
constructie of obstakel, zoals een hek, garage, huis, overhangende takken,
waslijnen of elektriciteitsdraden. De impactverharding moet het gehele
aanbevolen speelgebied bestrijken. Raadpleeg het onderstaande voorbeeld.
Afmetingen speelset:
10' (3,05 m) x 10' (3,05m)
Aanbevolen spel gebied:
5,05 m x 5,05 m
7
2.1 Beoogd gebruik
· Het artikel is alleen geschikt voor recreatief gebruik door personen vanaf 3 jaar over.
· Het artikel is niet geschikt voor gebruik op het publiek speeltuinen.
· Het artikel is niet geschikt voor kinderen onder de 3 jaar jaar!
6. Symbolen
Lees de gebruiksaanwijzing zorgvuldig door!
Het artikel is niet geschikt voor kinderen jonger dan 3 jaar!
MODEL EN PARAMETERS
Model
JX-DC-06

8
Draagvermogen
600 pond ( 272 kg)
Leeftijden
3- 9
Nummer
2-3 kinderen
Geassembleerd Dimensies
6FT.W × 3FT.H
MONTAGE EN GEBRUIK
Onderdelen lijst:
Onderdeel Mx4
(lange blauwe
buis)
Onderdeel Nx1
(lange en dikkere
blauwe buis)
Onderdeel Ax20
(korte blauwe
buis)
Onderdeel Bx24
(gele buis)
Onderdeel Dx12
(lange moer)
Onderdeel Ex12
(lange bout)
Onderdeel Fx8
(korte bout)
Onderdeel Gx8
(borgmoer)
Onderdeel Hx28
(sluitring)
Onderdeel Lx2
Deel Ix2
Deel Jx1
Onderdeel Kx12
Onderdeel Cx12
Opmerking: Zorg ervoor dat u Deel N niet verwart met Deel M, en laat Deel N opzij
voor gebruik bij de laatste stap.
Installatiestappen:
Stap 1:
Maak een achthoek als basis met 4 lange blauwe buizen (deel M) +4 korte blauwe buizen
(deel A).
9
Stap 2:
Sluit 2 gele buizen (Deel B) aan op de korte blauwe buis (Deel A) van de basis, waardoor ze
een driehoek vormen, en bevestig ze met korte bouten (Deel F), borgmoeren (Deel G) en
ringen (Deel H). Maak op dezelfde manier een driehoek met 2 korte blauwe buizen (deelA) en
1 lange blauwe buis (deel M).
Let op: Vergrendel de bouten niet! Anders zou het de moeilijkheid van het volgen van de
stappen vergroten.
Stap 3:
Herhaal stap 2 vier keer totdat u het frame krijgt zoals hieronder weergegeven.

10
Stap 4:
Voeg 4 gele buizen (Deel B) toe aan Punt X, waarbij de volgorde van de buizen consistent
is met de onderstaande afbeelding, en bevestig ze met lange bouten (Deel E), sluitringen
(Deel H) en Deel K.
Let op: Vergrendel de bouten niet! Anders zou het de moeilijkheid van het volgen van de
stappen vergroten.
Point X

11
Voeg 1 korte blauwe buis (deel A) en 1 gele buis (deel B) toe aan punt Y, met 1
gemonteerde gele buis (deel B) vanaf punt X, zodat 5 buizen samenkomen op punt Y.
Bevestig ze op dezelfde manier, waarbij de volgorde van de buizen consistent is met de
onderstaande afbeelding. Let op: Vergrendel de bouten niet!
Point Y
Herhaal gewoon de bovenstaande stap totdat het tweede niveau is voltooid.
12
Stap 5:
Voeg 2 korte blauwe buizen (Deel A) en 1 lange en dikkere blauwe buis (Deel N) toe aan
Punt Z, met 3 samengestelde buizen vanaf Punt X/Y, de eindpunten van 6 buizen
overlappen elkaar op Punt Z. Zorg ervoor dat de buizen op hun plaats liggen tegen de klok
in, zoals hieronder weergegeven, met de lange en dikkere blauwe buis (onderdeel N) erin
4e.
Point Z
13
Kom naar punt T, verbind 1 nieuwe korte blauwe buis (deel A) met 4 gemonteerde buizen
van punt X/Y/Z en bevestig ze in een bepaalde volgorde.
Point T
Herhaal gewoon de bovenstaande stap en je krijgt een vierkant dak, met vier zijden (deel A)
en één diagonaal (deel N).

14
Opmerking: Nadat het frame volledig is gemonteerd, gebruikt u gereedschap (Deel I en
Deel J) om alle bouten vast te draaien.
Stap6:
Nadat het frame compleet is en alle bouten zijn vergrendeld, begint u met het installeren
van de zwarte handgrepen (deel C). Behalve de onderste knooppunten hebben alle
knooppunten handvatten nodig om veilig te kunnen klimmen.
Gebruik lange moeren (onderdeel D) om de zwarte handgrepen te bevestigen (onderdeel
C).
Let op: De opening van de handgreep moet tussen de 1e buis en de 5e/6e buis worden
15
geplaatst.
Nu is je jungle gym ingericht. Gefeliciteerd!
16
Let op, als er een probleem is tijdens de montage, raak ons dan gewoon aan en wij zullen
ons best doen om u te helpen!
ONDERHOUD
· Controleer regelmatig de palen, handgrepen en schroefverbindingen op scheuren,
beschadigingen en materiaalmoeheid. Indien u schade constateert, mag de steiger
niet gebruikt worden. Neem contact op met uw verkoper om de beschadigde artikelen
door nieuwe te vervangen. Gebruik alleen originele vervanging elementen!
· Gebruik nooit agressieve schoonmaakmiddelen voor schoonmaak!
Beschikbaarheid
De productverpakking bestaat uit recycleerbare materialen. Gooi ze weg
op een milieuvriendelijke manier
vriendelijke wijze en in de daarvoor bestemde inzamelcontainers.
Fabrikant: Shanghaimuxinmuyeyouxiangongsi
Adres: Baoshanqu Shuangchenglu 803long 11hao 1602A-1609shi
Shanghai
Geïmporteerd naar AUS: SIHAO PTY LTD, 1 ROKEVA
STREETEASTWOOD NSW 2122 Australië
Geïmporteerd naar de VS: Sanven Technology Ltd., Suite 250, 9166
Anaheim Place, Rancho Cucamonga, CA 91730
REP
EC
SHUNSHUN GmbH
Römeräcker 9 Z2021,76351
Linkenheim-Hochstetten,Germany
euvertreter@gmail.com
+49 1727041930
REP
UK
Pooledas Group Ltd
Unit 5 Albert Edward House, The
Pavilions Preston, United Kingdom
pooledas12[email protected]
Tel: 01772418127

17
Gemaakt in China


Teknisk Support och e-garanticertifikat www.vevor.com/support
Geometrisk klättrarelek
We continue to be committed to provide you tools with competitive price.
"Save Half", "Half Price" or any other similar expressions used by us only represents an
estimate of savings you might benefit from buying certain tools with us compared to the major
top brands and does not necessarily mean to cover all categories of tools offered by us. You
are kindly reminded to verify carefully when you are placing an order with us if you are
actually saving half in comparison with the top major brands.


1
MODELL: JX-DC-06
Have product questions? Need technical support? Please feel free to
contact us:
Technical Support and E-Warranty Certificate
www.vevor.com/support
NEED HELP? CONTACT US!
This is the original instruction, please read all manual instructions
carefully before operating. VEVOR reserves a clear interpretation of our
user manual. The appearance of the product shall be subject to the
product you received. Please forgive us that we won't inform you again if
there are any technology or software updates on our product.
GEOMETRIC CLIMBER
PLAY

2
INSTRUKTIONER
Tack så mycket för att du valde denna Geometric Climber Play.
- Läs alla instruktioner innan du använder den. Informationen hjälper dig att uppnå
bästa möjliga resultat.
Produkterna i denna katalog kan ha en annan färg än den faktiska varan.
1. Säkerhetsinstruktioner
UNDERLÅTANDE ATT FÖLJA DESSA VARNINGAR KAN RESULTERA I
ALLVARLIG SKADA ELLER EGENDOM
SKADA OCH KOMMER ATT Ogiltigförklara GARANTIEN.
Ägaren måste se till att alla spelare känner till och följer dessa regler för säker drift
av systemet.
För att garantera säkerheten, försök inte att montera denna produkt utan att följa
instruktionerna noggrant.
Kontrollera hela lådan och inuti allt förpackningsmaterial för delar och/eller
ytterligare instruktionsmaterial. Innan börja monteringen, läs instruktionerna och
identifiera delar med hjälp av hårdvaruidentifieraren och dellista i detta dokument.
Korrekt och fullständig montering, användning och övervakning är avgörande för
korrekt drift och för att minska risken för olyckor eller skada. En hög sannolikhet för
allvarlig skada föreligger om detta
produkten är inte installerad, underhållen och använd på rätt sätt.
· Om du använder en stege under montering, använd extrem varning.
· Två kompetenta vuxna rekommenderas för detta drift.
· Var medveten om att delar kan skadas genom att dra åt för mycket skruvar.
· Bär skyddsglasögon hela tiden hopsättning.
De flesta skador orsakas av felaktig användning och/eller att instruktionerna inte
följs. Var försiktig när du använder denna produkt.
INNAN DU BÖRJAR MONTERING
Håll hårdvarupåsarna och deras innehåll åtskilda.

3
Identifiera och inventera alla delar och hårdvara med hjälp av reservdels- och
hårdvarulistorna och identifierarna i detta dokument. Provmontera alla bultar
genom att föra in dem i sina respektive hål. Skrapa inte bort all pulverlackering.
Bar metall kan rosta. Du kan behöva slå några bultar på plats med en hammare
eller klubba.
*Två vuxna krävs för att slutföra monteringen*
Endast vuxna bör ställa in produkten. Låt inte barn vistas i
installationsområdet förrän monteringen är klar.
INSTRUKTIONER FÖR INSTALLATION OCH FÖRBEREDELSE AV MARK:
· Ge tillräckligt rum så den där barn burk använda sig av de Utrustning säkert. För
exempel, för strukturer med flera lekaktiviteter bör en rutschkana inte gå ut framför
engunga.
· Separera aktiva och tysta aktiviteter från varandra. Placera till exempel sandlådor
borta från gungor eller använd ett skyddsräcke eller barriär för att skilja sandlådan
från rörelsen av gungor.
· Installera inte hemlekplatsutrustning över betong, asfalt, packad jord, gräs, matta,
eller några Övrig hård yta. A falla till a hård yta burk resultat i allvarlig skada på
utrustningen användare.
· För att förhindra allvarliga skador, varna barn att de inte får använda utrustningen
förrän på rätt sätt installerat.
· Skapa en plats fri från hinder som kan orsaka skador – såsom lågt överhängande
trädgrenar, luftledningar, stubbar och/eller rötter, stora stenar, tegelstenar och
betong.
· Välj en plan plats för utrustningen. Detta kan minska sannolikheten för
speluppsättningen tippning över och lös-fyllning ytbeläggning material tvättning
bort under tung regnar.
INSTRUKTIONER FÖR LEKPLATS OCH YTMATERIAL
· Använd inneslutning, till exempel att gräva ut runt omkretsen och/eller fodra
omkretsen med landskap bård.
· Installera inte lösa ytor på hårda ytor som betong ellerasfalt.
· Installation av gummiplattor eller gjutna ytor (andra än lösa fyllnadsmaterial)
kräver i allmänhet en professionell och är inte "gör-det-själv" projekt.

4
· Använd ytmaterial för lekplats (andra än löst fyllnadsmaterial) som
överensstämmer med säkerhetsstandarden ASTM F1292 standardspecifikation
för stötdämpning av ytmaterial inom lekplatsens användningszon Utrustning.
BRUKSANVISNINGAR
Att följa följande instruktioner och varningar minskar sannolikheten för allvarliga
eller dödliga skador:
· På plats vuxen tillsyn bör tillhandahållas för alla barn åldrar.
· Instruera barn att inte använda utrustningen på annat sätt än avsedd.
· För att förhindra intrassling och strypning, klä barnen på lämpligt sätt, använd
välsittande skor och undvik ponchos, halsdukar, jackor med dragsko i nacken,
hjälmar med remmar och andra löst sittande kläder som är potentiellt farliga när du
använder Utrustning.
· Instruera barn att inte leka när utrustningen finns våt.
· Instruera barn att inte fästa föremål på lekplatsutrustningen som inte är specifikt
designad för använda sig av med de Utrustning, sådan som, men inte begränsad
till, hoppa rep, tvättlinor, husdjurskoppel, kablar och kedjor, eftersom de kan
orsaka strypningsrisk. Flytta inte utrustningen medan den är inne använda sig av.
· Slagytan måste täcka hela det rekommenderade spelet område.
KONSUMENTINFORMATIONSBLAD FÖR LEKPLATS YTMATERIAL
Välj skyddsyta:
En av de viktigaste sakerna du kan göra för att minska sannolikheten för allvarliga
huvudskador är att installera stötdämpande skyddsyta under och runt din
lekutrustning. Den skyddande ytan bör appliceras på ett djup som är lämpligt för
utrustningens höjd i enlighet med ASTM-specifikationen F1292. Det finns olika
typer av ytbeläggning att välja mellan; vilken produkt du än väljer, följ dessa
riktlinjer:
OBS: Installera inte hemlekplatsutrustning över betong, asfalt eller någon annan
hård yta. Ett fall på en hård yta kan resultera i allvarliga skador på utrustningens
användare. Gräs och smuts anses inte vara skyddande ytor eftersom slitage och
miljöfaktorer kan minska deras stötdämpande effektivitet. Mattor och tunna mattor
är i allmänhet inte tillräckliga skyddande ytor.
Utrustning på marknivå – som sandlåda, aktivitetsvägg, lekstuga eller annan

5
utrustning som inte har någon förhöjd lekyta – behöver inget skyddande underlag.
Lösa fyllningsmaterial: Behåll ett minsta djup på 23 cm av lösa fyllningsmaterial
som träkompost/spån, konstruerad träfiber (EWF) eller strimlad/återvunnen
gummikompost för utrustning upp till 8 fot (244 cm)
hög; och 9 tum (23 cm) sand eller ärtgrus för utrustning upp till 5 fot (152 cm) hög.
OBS: En initial fyllnadsnivå på 12 tum (30 cm) kommer att komprimeras till cirka 9
tum (23 cm) djup av ytan över tiden. Ytan kommer också att kompaktera, förskjuta
och sätta sig och bör fyllas på med jämna mellanrum för att bibehålla ett djup på
minst 9 tum (23 cm). Använd minst 6 tum (15 cm) skyddande yta för lekredskap
som är mindre än 4 fot (122 cm) höga. Om det underhålls på rätt sätt bör detta
vara tillräckligt. (På djup mindre än 6 tum (15 cm) kan skyddsmaterialet för lätt
förskjutas eller komprimeras.) Använd inneslutning, som att gräva ut runt
omkretsen och/eller fodra omkretsen med landskapskanter. Glöm inte att ta
hänsyn till vattenavrinning. Kontrollera och bibehåll djupet på det lösa ytmaterialet.
För att behålla rätt mängd löst fyllmaterial, markera rätt nivå på lekredskapens
stödstolpar. På så sätt kan du enkelt se när du ska fylla på och/eller omfördela
ytan. Installera inte lösa ytor på hårda ytor som betong eller asfalt.
Hällt-på-plats ytor eller Förtillverkade Sudd Kakel—Du Maj vara intresserad att
använda andra ytor än lösa fyllnadsmaterial – som gummiplattor eller gjutna ytor.
Installation av dessa ytor kräver i allmänhet en professionell och är inte ett
"gör-det-själv"-projekt. Granska ytspecifikationerna innan du köper den här typen
av beläggning. Be installatören/tillverkaren om en rapport som visar att produkten
har testats enligt följande säkerhetsstandard: ASTM F1292 Standardspecifikation
för stötdämpning av ytmaterial inom lekplatsutrustningens användningszon.
Denna rapport ska visa den specifika höjd för vilken ytan är avsedd att skydda mot
allvarliga huvudskador. Denna höjd bör vara lika med eller större än fallhöjden –
vertikalt avstånd mellan en avsedd lekyta (förhöjd yta för att stå, sitta eller klättra)
och det skyddande underlaget
nedan – av dina lekredskap. Kontrollera den skyddande ytan ofta för slitage.
Placeringar – Korrekt placering och underhåll av skyddande ytor är avgörande.
Den skyddande ytan måste sträcka sig minst 2 m (6,6 fot) i alla riktningar utanför
enhetens gränser.

6
SÄKERT LEKOMRÅDE
SÄKERHETSZON - Placera utrustningen inte mindre än 2 m (6,6 fot) från alla
strukturer eller hinder som ett staket, garage, hus, överhängande grenar, tvättlinor
eller elektriska ledningar. Anslagsytan måste täcka hela det rekommenderade
lekområdet. Se exemplet nedan.
Speluppsättningens mått:
10' (3,05 m) x 10' (3,05 m)
Rekommenderad spelning område:
16' 6" (5,05 m) x 16' 6" (5,05 m)
2.1 Avsedd användning
· Artikeln är endast lämplig för rekreationsbruk av personer i åldern 3 och över.
· Artikeln är inte lämplig för användning på allmänheten lekplatser.
· Artikeln är inte lämplig för barn under 3 år år!
7. Symboler
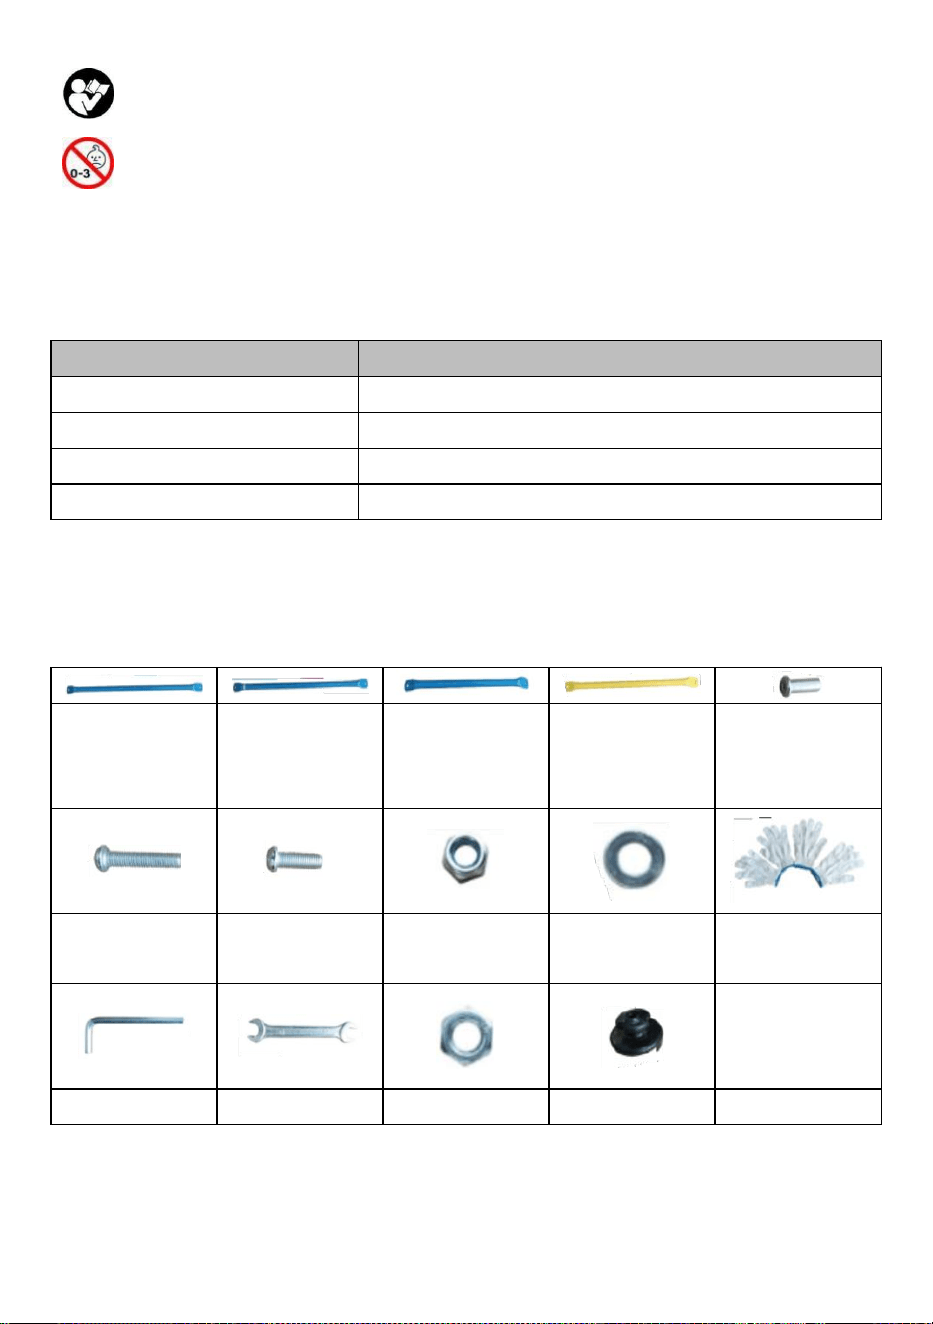
7
Läs bruksanvisningen noggrant!
Artikeln är inte lämplig för barn under 3 år!
MODELL OCH PARAMETRAR
Modell
JX-DC-06
Viktkapacitet
600 lbs ( 272 kg)
Åldrar
3-9 _
siffra
2-3 barn
Monteras Mått
6FT.W × 3FT.H
MONTERING OCH ANVÄNDNING
Dellista:
Del Mx4 (långt
blått rör)
Del Nx1 (långt
och tjockare blått
rör)
Del Ax20 (Kort
blått rör)
Del Bx24 (gult
rör)
Del Dx12 (Lång
mutter)
Del Ex12 (lång
bult)
Del Fx8 (Short
Bolt)
Del Gx8
(låsmutter)
Del Hx28 (bricka)
Del Lx2
Del Ix2
Del Jx1
Del Kx12
Del Cx12
Obs: Var noga med att inte blanda ihop del N med del M, och låt del N åt sidan för
användning i det sista steget.
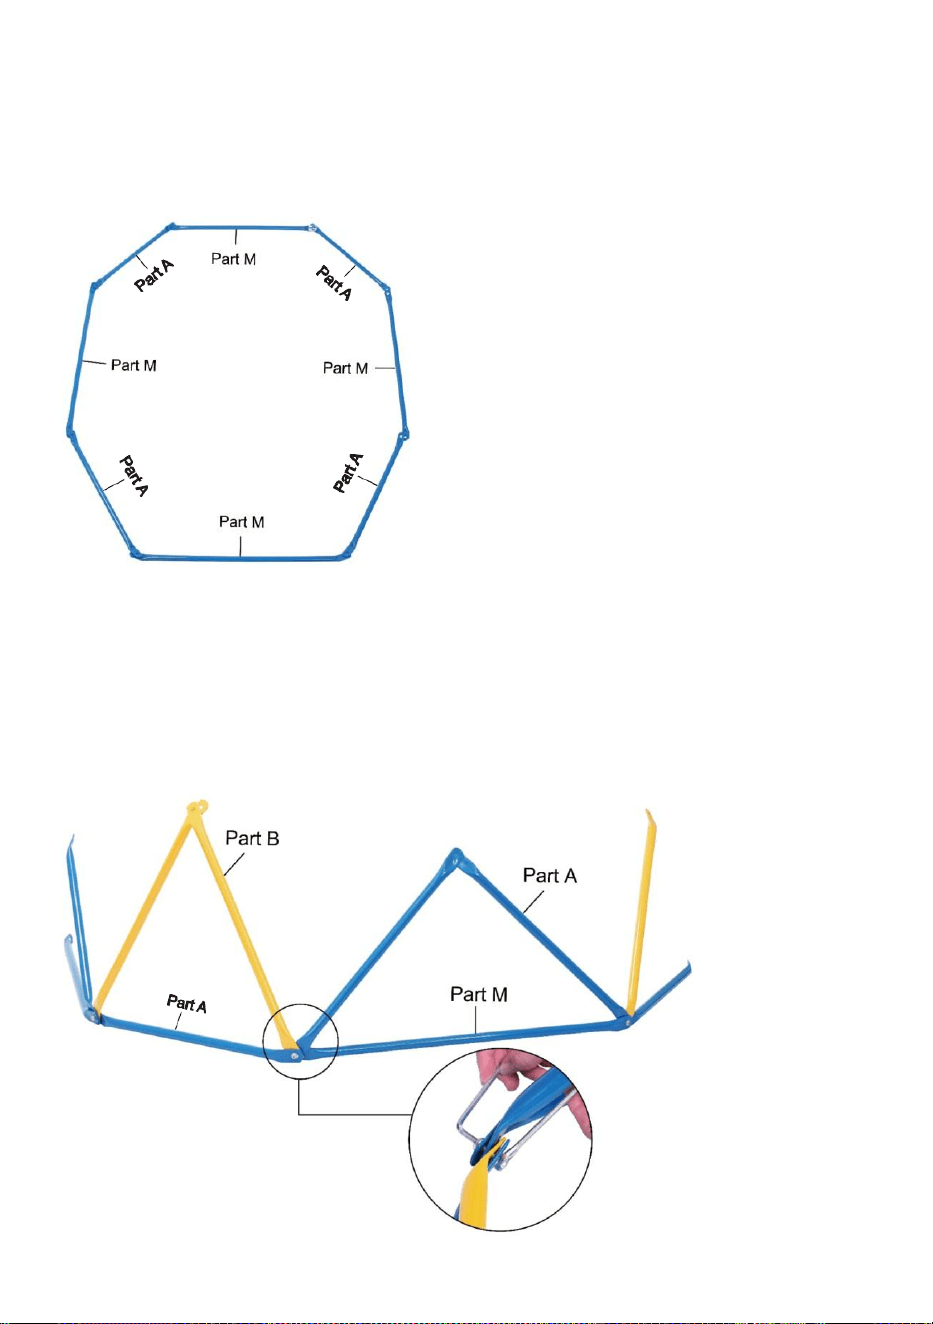
8
Installationssteg:
Steg 1:
Skapa en oktagon som bas med 4 långa blå rör (del M) + 4 korta blå rör (del A).
Steg 2:
Anslut 2 gula rör (del B) till det korta blå röret (del A) på basen, gör dem till en triangel, och
fixera dem med korta bultar (del F), låsmuttrar (del G) och brickor (del H). Skapa en triangel
med 2 korta blåa rör (Del A) och 1 långt blått rör (Del M) på samma sätt.
Obs: Lås inte bultarna! Annars skulle det öka svårigheten att följa stegen.
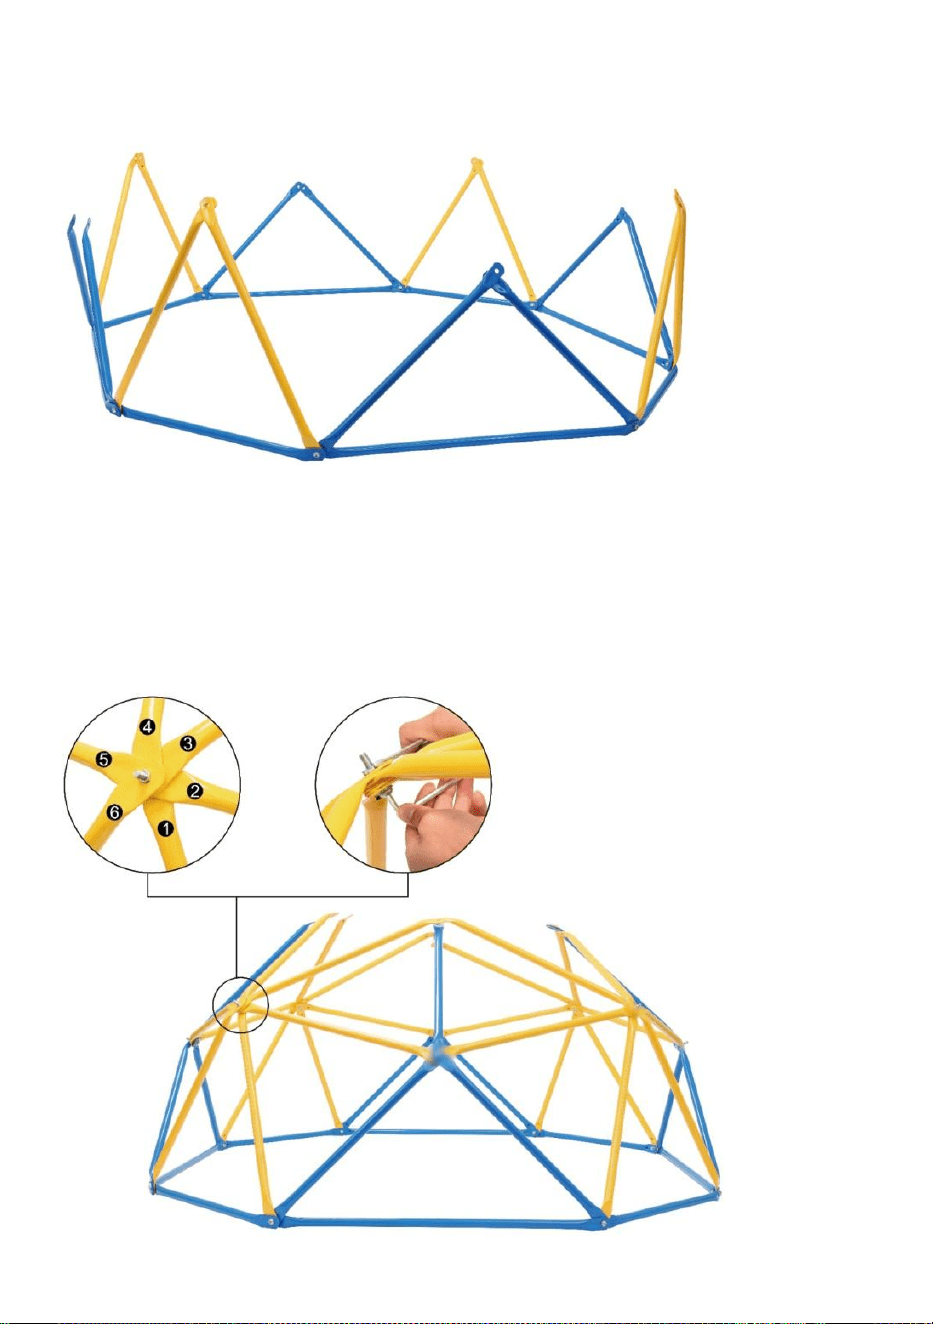
9
Steg 3:
Upprepa steg 2 fyra gånger tills du får ramen som visas nedan.
Steg 4:
Lägg till 4 gula rör (del B) till punkt X, varvid ordningen på rören överensstämmer med
bilden nedan, och fixera dem med långa bultar (del E), brickor (del H) och del K.
Obs: Lås inte bultarna! Annars skulle det öka svårigheten att följa stegen.
Point X
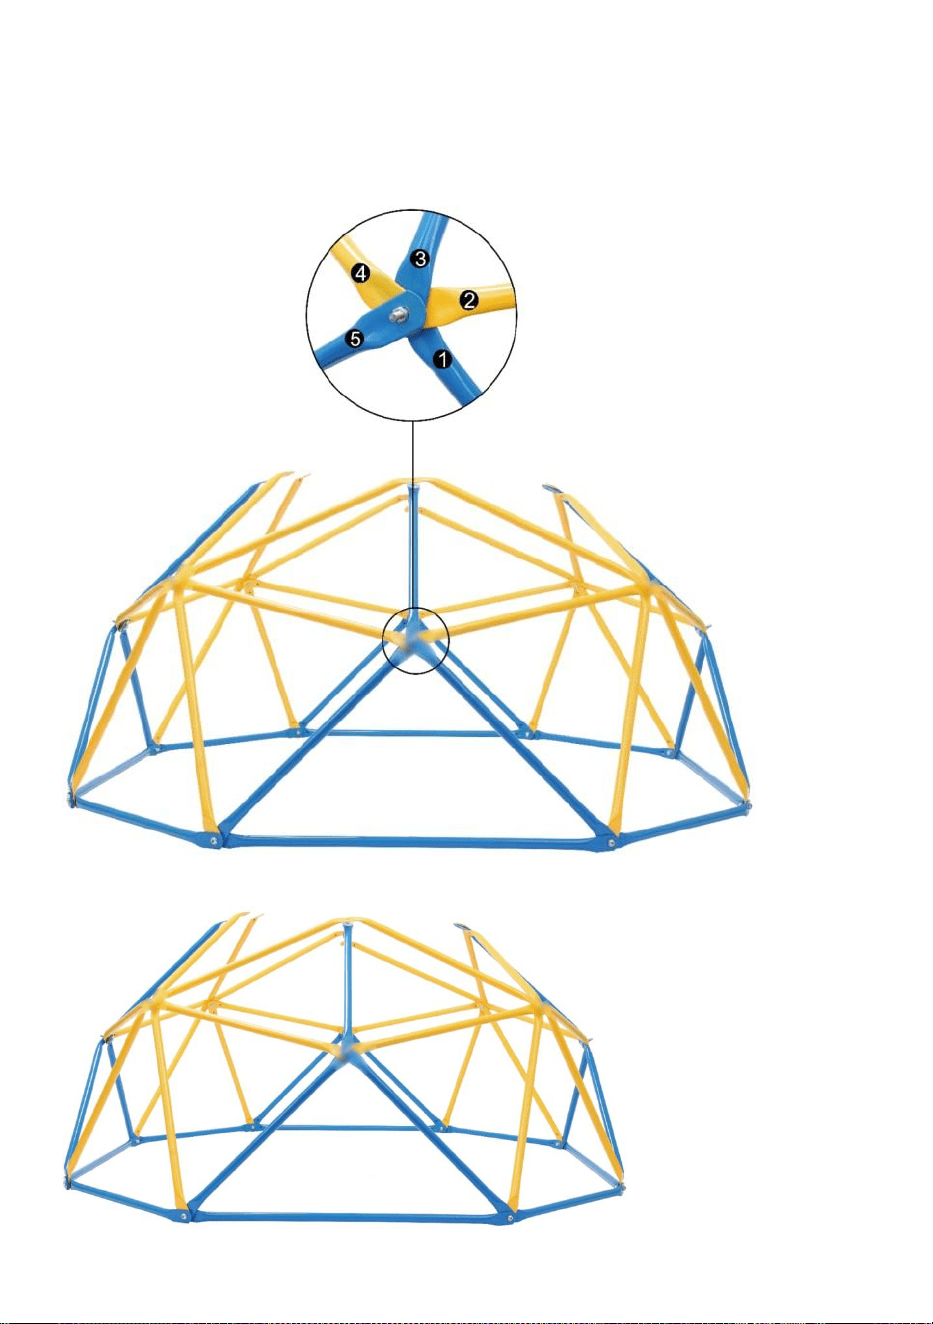
10
Lägg till 1 kort blått rör (del A) och 1 gult rör (del B) till punkten Y, med 1 monterat gult rör
(del B) från punkt X, så att 5 rör möts vid punkten Y.
Fixa dem på samma sätt, med ordningen på rören som överensstämmer med bilden nedan.
Obs: Lås inte bultarna!
Point Y
Upprepa bara steget ovan tills den andra nivån är klar.

11
Steg 5:
Lägg till 2 korta blåa rör (Del A) och 1 långt & tjockare blått rör (Del N) till Point Z, med 3
sammansatta rör från Point X/Y, ändpunkterna på 6 rör överlappar vid Point Z. Se till att
rören är ordnade moturs som visas nedan, med det långa och tjockare blå röret (del N) in
4:a.
Point Z

12
Kom till punkt T, anslut 1 nytt kort blått rör (del A) med 4 sammansatta rör från punkt X/Y/Z
och fixera dem i en ordnad ordning.
Point T
Upprepa bara steget ovan så får du ett fyrkantigt tak, med fyra sidor (del A) och en diagonal
(del N) .

13
Obs: När ramen är helt monterad, använd verktyg (del I och del J) för att dra åt alla bultar.
Steg 6:
När ramen är färdig och alla bultar är låsta, börja installera svarta grepp (del C). Förutom
bottennoderna behöver alla noder grepp för säker klättring.
Använd långa muttrar (del D) för att fixera svarta grepp (del C).
Notera: Mellanrummet på greppet ska placeras mellan det 1:a röret och det 5:e/6:e röret.
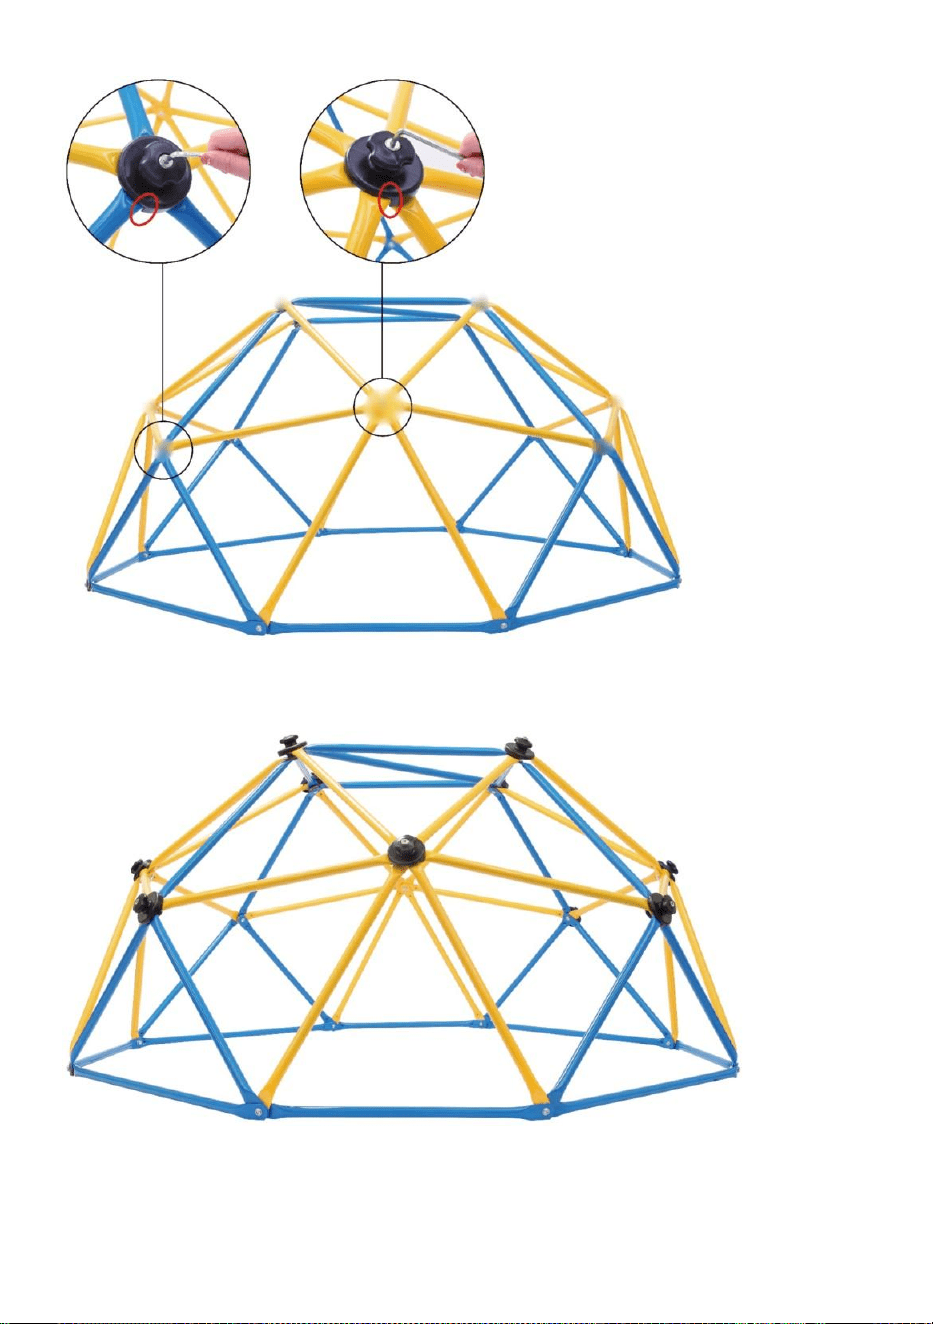
14
Nu är ditt djungelgym inrett. Grattis!
Observera snälla, om det är något problem när du monterar, bara rör oss så ska vi göra vårt
bästa för att hjälpa dig!

15
UNDERHÅLL
· Kontrollera regelbundet stolpar, handtag och skruvförband med avseende på sprickor,
skador och materialutmattning. Upptäcker du några skador får ställningen inte
användas. Kontakta din säljare för att ersätta de skadade föremålen med nya. Använd
endast originalersättning element!
· Använd aldrig aggressiva rengöringsmedel för rengöring!
Förfogande
Produktförpackningen består av återvinningsbart material. Kassera dem
på ett miljövänligt sätt
vänligt sätt och i de uppsamlingskärl som tillhandahålls.
Tillverkare: Shanghaimuxinmuyeyouxiangongsi
Adress: Baoshanqu Shuangchenglu 803long 11hao 1602A-1609shi
Shanghai
Importerad till AUS: SIHAO PTY LTD, 1 ROKEVA STREETEASTWOOD
NSW 2122 Australien
Importerad till USA: Sanven Technology Ltd., Suite 250, 9166 Anaheim
Place, Rancho Cucamonga, CA 91730
Tillverkad i Kina
REP
EC
SHUNSHUN GmbH
Römeräcker 9 Z2021,76351
Linkenheim-Hochstetten,Germany
euvertreter@gmail.com
+49 1727041930
REP
UK
Pooledas Group Ltd
Unit 5 Albert Edward House, The
Pavilions Preston, United Kingdom
pooledas12[email protected]
Tel: 01772418127


Técnico Soporte y certificado de garantía electrónica www.vevor.com/support
Juego de escalador geométrico
We continue to be committed to provide you tools with competitive price.
"Save Half", "Half Price" or any other similar expressions used by us only represents an
estimate of savings you might benefit from buying certain tools with us compared to the major
top brands and does not necessarily mean to cover all categories of tools offered by us. You
are kindly reminded to verify carefully when you are placing an order with us if you are
actually saving half in comparison with the top major brands.


1
MODELO: JX-DC-06
Have product questions? Need technical support? Please feel free to
contact us:
Technical Support and E-Warranty Certificate
www.vevor.com/support
NEED HELP? CONTACT US!
This is the original instruction, please read all manual instructions
carefully before operating. VEVOR reserves a clear interpretation of our
user manual. The appearance of the product shall be subject to the
product you received. Please forgive us that we won't inform you again if
there are any technology or software updates on our product.
GEOMETRIC CLIMBER
PLAY

2
INSTRUCCIONES
Muchas gracias por elegir este Juego de Escalador Geométrico.
- Lea todas las instrucciones antes de usarlo. La información le ayudará a
conseguir los mejores resultados posibles.
Los productos incluidos en este catálogo pueden tener un color diferente al del
artículo real.
1. Instrucciones de seguridad
EL NO SEGUIR ESTAS ADVERTENCIAS PUEDE RESULTAR EN LESIONES
GRAVES O A LA PROPIEDAD.
DAÑO Y ANULARÁ LA GARANTÍA.
El propietario debe asegurarse de que todos los jugadores conozcan y sigan
estas reglas para el funcionamiento seguro del sistema.
Para garantizar la seguridad, no intente ensamblar este producto sin seguir
cuidadosamente las instrucciones.
Revise toda la caja y el interior de todo el material de embalaje en busca de
piezas y/o material de instrucciones adicional. Antes Al comenzar el ensamblaje,
lea las instrucciones e identifique las piezas utilizando el identificador de hardware
y lista de piezas en este documento. El montaje, uso y supervisión adecuados y
completos son esenciales para una correcta operación y para reducir el riesgo de
accidentes o lesiones. Existe una alta probabilidad de sufrir lesiones graves si
esto
El producto no está instalado, mantenido y operado correctamente.
· Si usa una escalera durante el montaje, use extremo precaución.
· Se recomiendan dos adultos capaces para esto. operación.
· Tenga en cuenta que las piezas pueden dañarse si aprieta demasiado el
tornillos.
· Utilice gafas de seguridad durante todo el asamblea.
La mayoría de las lesiones son causadas por un mal uso y/o por no seguir las
instrucciones. Tenga cuidado al utilizar este producto.

3
ANTES DE COMENZAR EL MONTAJE
Mantenga las bolsas de hardware y su contenido separados.
Identifique e inventaria todas las piezas y el hardware utilizando las listas e
identificadores de piezas y hardware de este documento. Pruebe el ajuste de
todos los pernos insertándolos en sus respectivos orificios. No raspe todo el
recubrimiento en polvo. El metal desnudo puede oxidarse. Es posible que tengas
que colocar algunos pernos en su lugar con un martillo o mazo.
*Se necesitan dos adultos para completar el montaje*
Sólo los adultos deben instalar el producto. No permita que los niños entren
al área de instalación hasta que se complete el ensamblaje.
INSTRUCCIONES DE INSTALACIÓN Y PREPARACIÓN DEL SUELO:
· Proporcionar suficiente habitación entonces eso niños poder usar el equipo sin
peligro. Para ejemplo, Para estructuras con múltiples actividades de juego, un
tobogán no debe salir frente a unbalancearse.
· Separe las actividades activas y tranquilas entre sí. Por ejemplo, ubique los
areneros lejos de los columpios o use una barandilla o barrera para separar el
arenero del movimiento del columpios.
· No instale equipos de juegos domésticos sobre concreto, asfalto, tierra
compacta, pasto, alfombra, o cualquier otro duro superficie. A caer sobre a duro
superficie poder resultado en lesiones graves al equipo usuario.
· Para evitar lesiones graves, advierta a los niños que no deben utilizar el equipo
hasta que estén correctamente instalado.
· Cree un sitio libre de obstáculos que puedan causar lesiones, como ramas bajas
de árboles que sobresalgan, cables aéreos, tocones y/o raíces de árboles, rocas
grandes, ladrillos y concreto.
· Elija una ubicación nivelada para el equipo. Esto puede reducir la probabilidad
de que el juego se produzca. propina encima y relleno suelto emerger materiales
Lavado lejos durante pesado lluvias.
INSTRUCCIONES PARA LOS MATERIALES DE SUPERFICIE Y EL ÁREA DE
JUEGOS
· Utilice contención, como excavar alrededor del perímetro y/o revestir el

4
perímetro con paisaje. cenefa.
· No instale rellenos sueltos sobre superficies duras como concreto oasfalto.
· La instalación de losetas de caucho o superficies vertidas en el lugar (que no
sean materiales de relleno sueltos) generalmente requiere la intervención de un
profesional y no es algo que pueda hacer usted mismo. proyectos.
· Utilice materiales de superficie para juegos infantiles (que no sean material de
relleno suelto) que cumplan con la norma de seguridad ASTM F1292,
Especificación estándar para la atenuación de impactos de materiales de
superficies dentro de la zona de uso del patio de juegos. Equipo.
INSTRUCCIONES DE OPERACIÓN
El cumplimiento de las siguientes instrucciones y advertencias reduce la
probabilidad de sufrir lesiones graves o mortales:
· Se debe proporcionar supervisión de un adulto en el lugar para los niños de
todos los siglos.
· Indique a los niños que no utilicen el equipo de otra manera que no sea
destinado.
· Para evitar enredos y estrangulamiento, vista a los niños apropiadamente,
usando zapatos que les queden bien y evitando ponchos, bufandas, chaquetas
con cordones en el cuello, cascos con correas y otras prendas holgadas que sean
potencialmente peligrosas durante su uso. equipo.
· Indique a los niños que no jueguen cuando el equipo esté húmedo.
· Indique a los niños que no coloquen artículos en el equipo del patio de recreo
que no estén específicamente diseñado para usar con el equipo, semejante como,
pero no limitado a, saltar cuerdas, tendederos, correas para mascotas, cables y
cadenas, ya que pueden causar peligro de estrangulamiento. No mueva el equipo
mientras esté en usar.
· La superficie de impacto debe cubrir todo el juego recomendado área.
HOJA DE INFORMACIÓN AL CONSUMIDOR PARA MATERIALES DE
SUPERFICIES PARA PATIOS DE JUEGOS
Seleccione una superficie protectora:
Una de las cosas más importantes que puede hacer para reducir la probabilidad
de sufrir lesiones graves en la cabeza es instalar una superficie protectora que
absorba los golpes debajo y alrededor de su equipo de juego. La superficie

5
protectora debe aplicarse a una profundidad adecuada para la altura del equipo
de acuerdo con la especificación ASTM F1292. Hay diferentes tipos de superficies
para elegir; Cualquiera que sea el producto que seleccione, siga estas pautas:
NOTA: No instale equipos de juegos domésticos sobre concreto, asfalto o
cualquier otra superficie dura. Una caída sobre una superficie dura puede
provocar lesiones graves al usuario del equipo. El césped y la tierra no se
consideran superficies protectoras porque el desgaste y los factores ambientales
pueden reducir su eficacia de absorción de impactos. Las alfombras y los tapetes
finos generalmente no son superficies protectoras adecuadas.
Los equipos a nivel del suelo, como un arenero, una pared de actividades, una
casa de juegos u otro equipo que no tenga una superficie de juego elevada, no
necesitan ninguna superficie protectora. Materiales de relleno sueltos: Mantenga
una profundidad mínima de 9 pulgadas (23 cm) de materiales de relleno sueltos,
como mantillo/astillas de madera, fibra de madera diseñada (EWF) o mantillo de
caucho triturado/reciclado para equipos de hasta 8 pies (244 cm).
alto; y 9 pulgadas (23 cm) de arena o gravilla para equipos de hasta 5 pies (152
cm) de altura.
NOTA: Un nivel de relleno inicial de 12 pulgadas (30 cm) se comprimirá hasta una
profundidad de superficie de aproximadamente 9 pulgadas (23 cm) con el tiempo.
La superficie también se compactará, desplazará y asentará, y deberá rellenarse
periódicamente para mantener al menos una profundidad de 9 pulgadas (23 cm).
Utilice un mínimo de 15 cm (6 pulgadas) de superficie protectora para equipos de
juego de menos de 122 cm (4 pies) de altura. Si se mantiene adecuadamente,
esto debería ser adecuado. (A profundidades inferiores a 6 pulgadas (15 cm), el
material protector se desplaza o compacta con demasiada facilidad). Utilice
contención, como excavar alrededor del perímetro y/o revestir el perímetro con
bordes paisajísticos. No olvides tener en cuenta el drenaje del agua. Verifique y
mantenga la profundidad del material de superficie de relleno suelto. Para
mantener la cantidad correcta de materiales de relleno sueltos, marque el nivel
correcto en los postes de soporte del equipo de juego. De esa manera podrá ver
fácilmente cuándo reponer y/o redistribuir la superficie. No instale relleno suelto
sobre superficies duras como concreto o asfalto.

6
Vertido en el lugar superficies o Prefabricado Goma Azulejos: tú puede ser
interesado en el uso de superficies que no sean materiales de relleno sueltos,
como baldosas de caucho o superficies vertidas en el lugar. La instalación de
estas superficies generalmente requiere la intervención de un profesional y no es
un proyecto que pueda realizar usted mismo. Revise las especificaciones de la
superficie antes de comprar este tipo de superficie. Solicite al instalador/fabricante
un informe que demuestre que el producto ha sido probado según la siguiente
norma de seguridad: Especificación estándar ASTM F1292 para atenuación de
impactos de materiales de superficie dentro de la zona de uso de equipos de
juegos infantiles.
Este informe debe mostrar la altura específica para la cual la superficie está
destinada a proteger contra lesiones graves en la cabeza. Esta altura debe ser
igual o mayor que la altura de caída: distancia vertical entre una superficie de
juego designada (superficie elevada para pararse, sentarse o trepar) y la
superficie protectora.
a continuación – de su equipo de juego. Compruebe con frecuencia la superficie
protectora en busca de desgaste. Colocaciones: la colocación y el mantenimiento
adecuados de la superficie protectora son esenciales.
La superficie protectora debe extenderse al menos 2 m (6,6 pies) en todas las
direcciones más allá de los límites del dispositivo.
ÁREA DE JUEGO SEGURA
ZONA DE SEGURIDAD: Coloque el equipo a no menos de 2 m (6,6 pies) de
cualquier estructura u obstrucción, como una cerca, un garaje, una casa, ramas
colgantes, tendederos o cables eléctricos. La superficie de impacto debe cubrir
toda el área de juego recomendada. Consulte el ejemplo siguiente.
Dimensiones del set de juego:
10' (3,05m) x 10' (3,05 m)
Juego recomendado área:
16' 6” (5,05 m) x 16' 6” (5,05 m)

7
2.1 Uso previsto
· El artículo sólo es apto para uso recreativo por personas de 3 años y encima.
· El artículo no es adecuado para su uso en público. parques infantiles.
· El artículo no es apto para niños menores de 3 años. ¡años!
8. Símbolos
¡Lea atentamente las instrucciones de funcionamiento!
¡El artículo no es apto para niños menores de 3 años!
MODELO Y PARÁMETROS
Modelo
JX-DC-06

8
Capacidad de peso
600 libras ( 272 kg)
Siglos
3-9 _
Número
2-3 niños
Montado Dimensiones
6 PIES DE ANCHO × 3 PIES DE ALTO
MONTAJE Y USO
Lista de:
Parte Mx4 (Tubo
Largo Azul)
Parte Nx1 (tubo
azul largo y más
grueso)
Pieza Ax20 (tubo
azul corto)
Pieza Bx24 (tubo
amarillo)
Pieza Dx12
(tuerca larga)
Pieza Ex12
(perno largo)
Pieza Fx8 (perno
corto)
Pieza Gx8
(contratuerca)
Pieza Hx28
(Arandela)
Parte Lx2
Parte Ix2
Parte Jx1
Parte Kx12
Parte Cx12
Nota: Tenga cuidado de no confundir la Parte N con la Parte M y deje la Parte N a
un lado para usarla en el último paso.
Pasos de instalación:
Paso 1:
Crea un octágono como base con 4 tubos azules largos (Parte M) +4 tubos azules cortos
(Parte A).
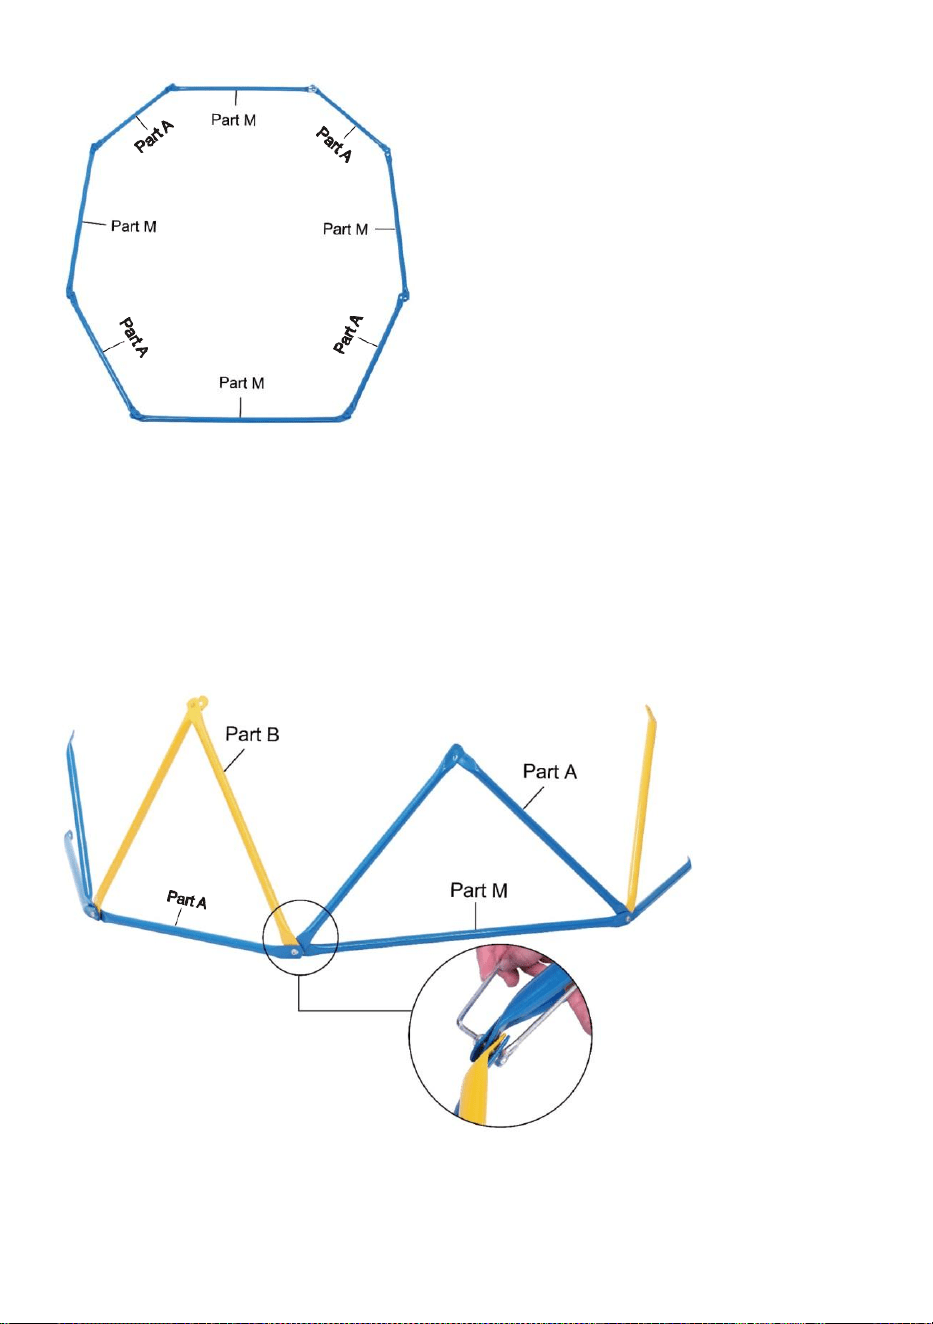
9
Paso 2:
Conecte 2 tubos amarillos (Parte B) al tubo azul corto (Parte A) de la base, formando un
triángulo, y fíjelos con pernos cortos (Parte F), contratuercas (Parte G) y arandelas (Parte
H). Crea un triángulo con 2 tubos azules cortos (Parte A) y 1 tubo azul largo (Parte M) de la
misma manera.
Nota: ¡No bloquee los pernos! De lo contrario aumentaría la dificultad de seguir los pasos.
Paso 3:
Repita el Paso 2 cuatro veces hasta obtener el marco como se muestra a continuación.
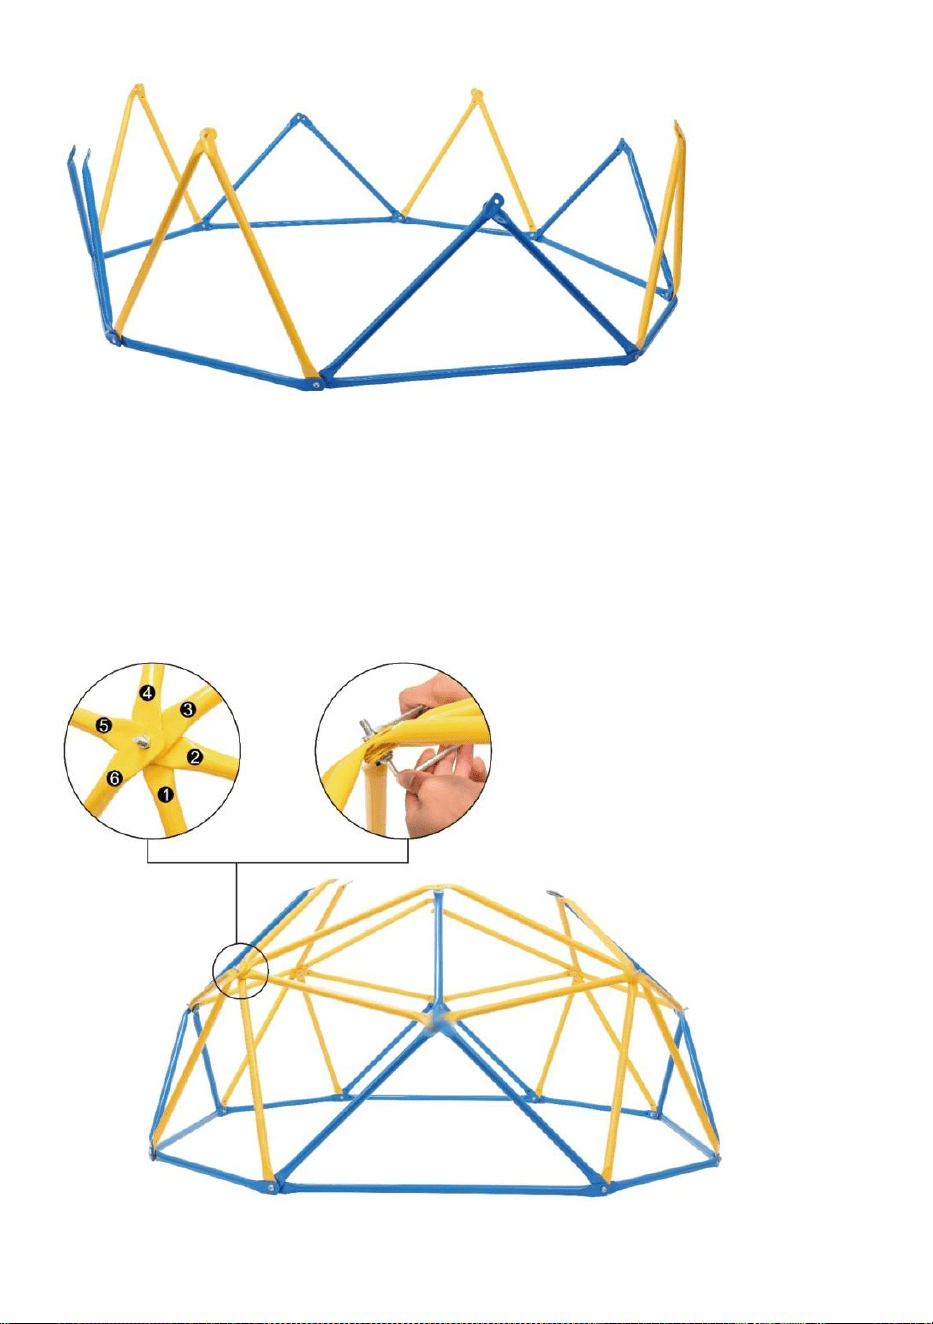
10
Etapa 4:
Agregue 4 tubos amarillos (Parte B) al Punto X, con el orden de los tubos consistente con
la imagen a continuación, y fíjelos con pernos largos (Parte E), arandelas (Parte H) y Parte
K.
Nota: ¡No bloquee los pernos! De lo contrario aumentaría la dificultad de seguir los pasos.
Point X
Agregue 1 tubo azul corto (Parte A) y 1 tubo amarillo (Parte B) al punto Y, con 1 tubo

11
amarillo ensamblado (Parte B) del punto X, de modo que 5 tubos se encuentren en el punto
Y.
Fíjelos de la misma manera, siendo el orden de los tubos el que se muestra en la imagen
de abajo. Nota: ¡No bloquee los pernos!
Point Y
Simplemente repita el paso anterior hasta terminar el segundo nivel.
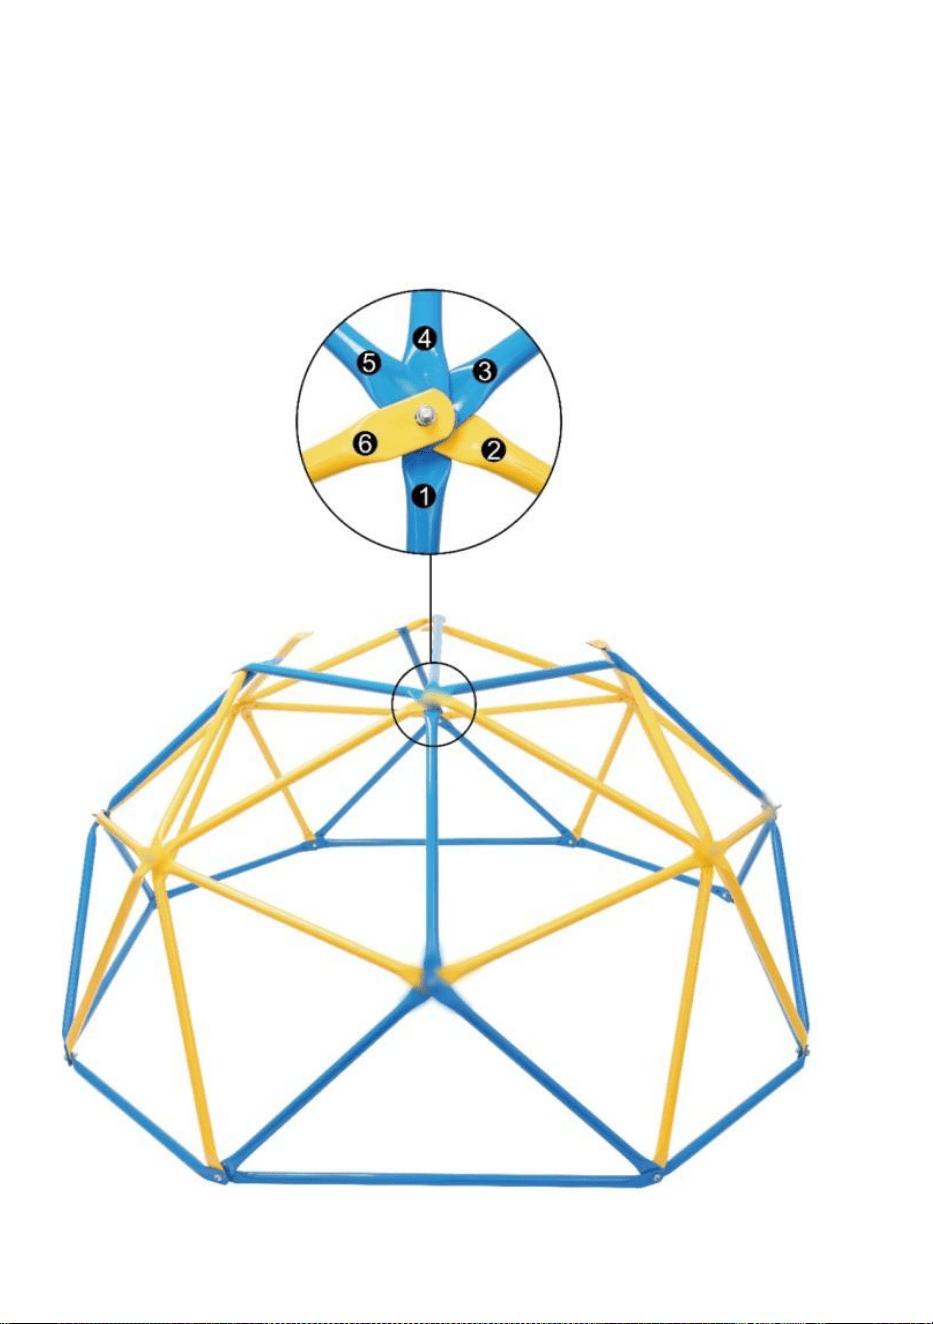
12
Paso 5:
Agregue 2 tubos azules cortos (Parte A) y 1 tubo azul largo y grueso (Parte N) al punto Z,
con 3 tubos ensamblados desde el punto X/Y, los extremos de los 6 tubos se superponen
en el punto Z.Asegúrese de que los tubos estén dispuestos en sentido antihorario como se
muestra a continuación, con el tubo azul largo y grueso (Parte N) en 4to.
Point Z
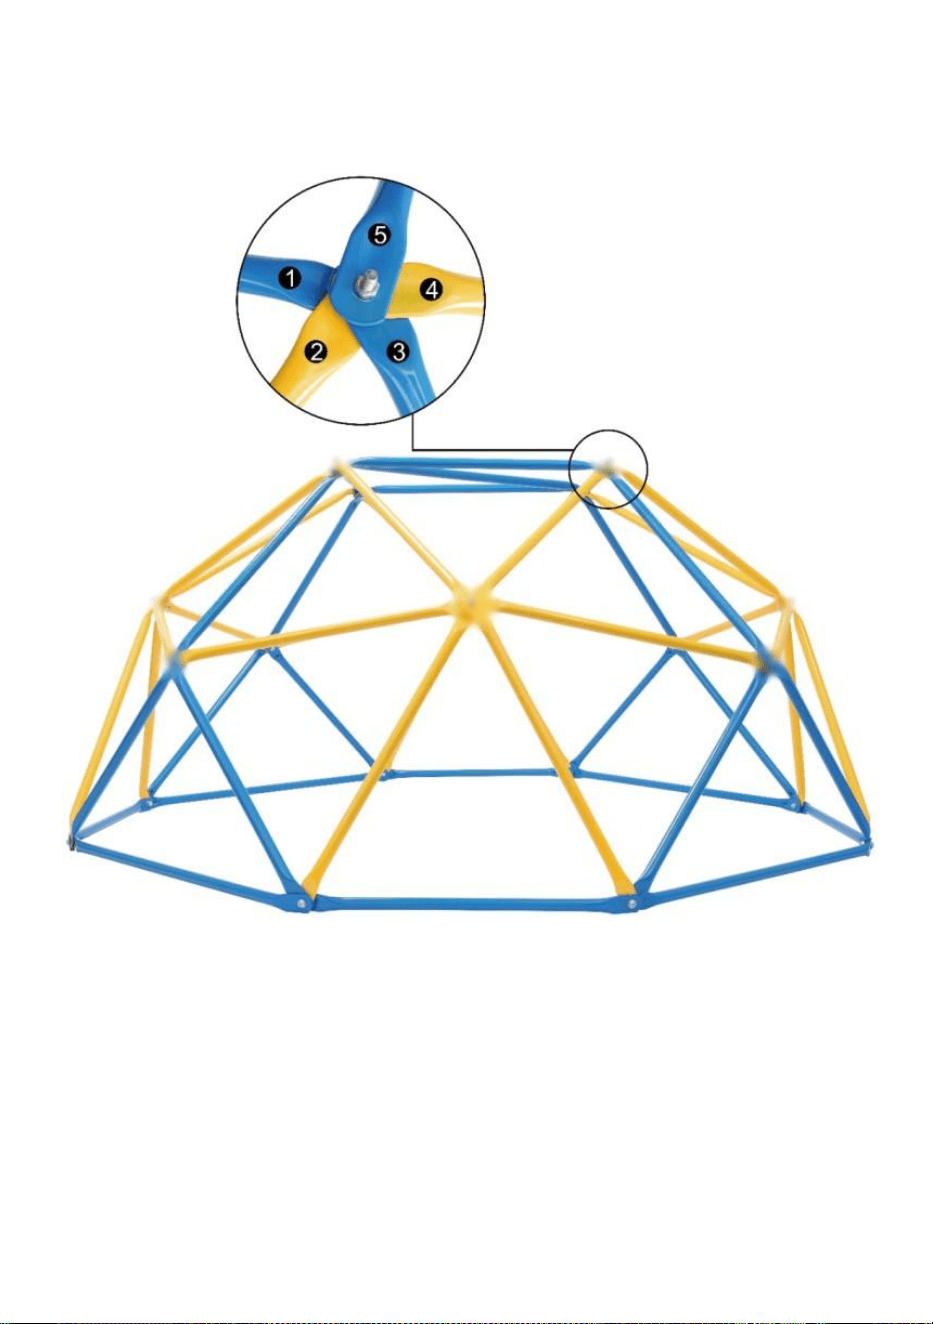
13
Vaya al Punto T, conecte 1 nuevo tubo azul corto (Parte A) con 4 tubos ensamblados desde
el Punto X/Y/Z y fíjelos en una secuencia ordenada.
Point T
Simplemente repita el paso anterior y obtendrá un techo cuadrado, con cuatro lados (Parte
A) y una diagonal (Parte N).

14
Nota: Una vez que el marco esté completamente ensamblado, use herramientas (Parte I y
Parte J) para apretar todos los pernos.
Paso 6:
Una vez que el marco esté completo y todos los pernos estén bloqueados, comience a
instalar las empuñaduras negras (Parte C). Excepto los nodos inferiores, todos los nodos
necesitan agarres para escalar con seguridad.
Utilice tuercas largas (Parte D) para fijar las empuñaduras negras (Parte C).
Nota: El espacio de la empuñadura debe colocarse entre el primer tubo y el quinto/sexto
tubo.
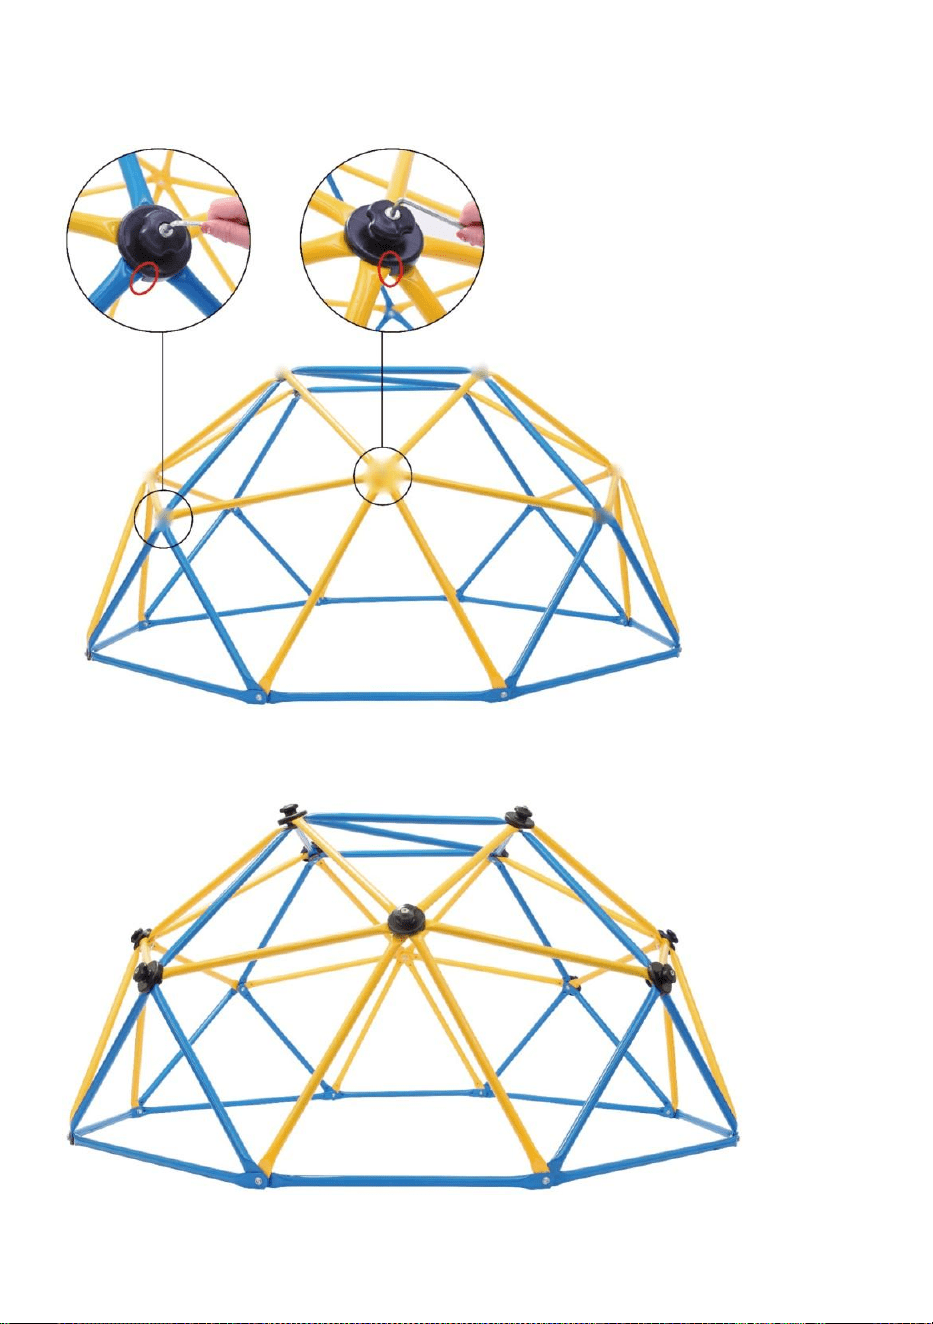
15
Ahora tu gimnasio en la jungla está configurado. ¡Felicidades!
16
Atención, por favor, si hay algún problema durante el montaje, ¡solo tóquenos y haremos
todo lo posible para ayudarle!
MANTENIMIENTO
· Compruebe periódicamente las barras, los mangos y las uniones atornilladas para
detectar grietas, daños y fatiga del material. Si descubre algún daño, no debe utilizar el
andamio. Comuníquese con su vendedor para reemplazar los artículos dañados por
otros nuevos. Utilice únicamente repuestos originales ¡elementos!
· Nunca utilice agentes de limpieza agresivos para ¡limpieza!
Desecho
El embalaje del producto se compone de materiales reciclables.
Deséchelos de forma respetuosa con el medio ambiente.
manera amigable y en los contenedores de recolección provistos.
Fabricante: Shanghaimuxinmuyeyouxiangongsi
Dirección: Baoshanqu Shuangchenglu 803long 11hao 1602A-1609shi
Shanghai
Importado a AUS: SIHAO PTY LTD, 1 ROKEVA STREETEASTWOOD
NSW 2122 Australia
Importado a EE. UU.: Sanven Technology Ltd., Suite 250, 9166 Anaheim
Place, Rancho Cucamonga, CA 91730
REP
EC
SHUNSHUN GmbH
Römeräcker 9 Z2021,76351
Linkenheim-Hochstetten,Germany
euvertreter@gmail.com
+49 1727041930
REP
UK
Pooledas Group Ltd
Unit 5 Albert Edward House, The
Pavilions Preston, United Kingdom
pooledas12[email protected]
Tel: 01772418127

17
Hecho en china


Tecnico Supporto e certificato di garanzia elettronica www.vevor.com/support
Gioco geometrico dello scalatore
We continue to be committed to provide you tools with competitive price.
"Save Half", "Half Price" or any other similar expressions used by us only represents an
estimate of savings you might benefit from buying certain tools with us compared to the major
top brands and does not necessarily mean to cover all categories of tools offered by us. You
are kindly reminded to verify carefully when you are placing an order with us if you are
actually saving half in comparison with the top major brands.


1
MODELLO: JX-DC-06
Have product questions? Need technical support? Please feel free to
contact us:
Technical Support and E-Warranty Certificate
www.vevor.com/support
NEED HELP? CONTACT US!
This is the original instruction, please read all manual instructions
carefully before operating. VEVOR reserves a clear interpretation of our
user manual. The appearance of the product shall be subject to the
product you received. Please forgive us that we won't inform you again if
there are any technology or software updates on our product.
GEOMETRIC CLIMBER
PLAY

2
ISTRUZIONI
Grazie mille per aver scelto questo gioco di arrampicata geometrica.
- Si prega di leggere tutte le istruzioni prima di utilizzarlo. Le informazioni ti
aiuteranno a ottenere i migliori risultati possibili.
I prodotti presenti in questo catalogo potrebbero differire nel colore rispetto
all'articolo reale.
1. Istruzioni di sicurezza
LA MANCATA OSSERVANZA DI QUESTE AVVERTENZE PUÒ CAUSARE
GRAVI LESIONI O PROPRIETÀ
DANNI E ANNULLERA' LA GARANZIA.
Il proprietario deve assicurarsi che tutti i giocatori conoscano e seguano queste
regole per il funzionamento sicuro del sistema.
Per garantire la sicurezza, non tentare di assemblare questo prodotto senza
seguire attentamente le istruzioni.
Controllare l'intera scatola e l'interno di tutto il materiale di imballaggio per
eventuali parti e/o materiale di istruzioni aggiuntivo. Prima iniziare l'assemblaggio,
leggere le istruzioni e identificare le parti utilizzando l'identificatore hardware e
elenco delle parti in questo documento. Il montaggio, l'uso e la supervisione
corretti e completi sono essenziali per il corretto funzionamento funzionamento e
per ridurre il rischio di incidenti o lesioni. In questo caso esiste un'alta probabilità di
lesioni gravi
il prodotto non è installato, mantenuto e utilizzato correttamente.
· Se si utilizza una scala durante il montaggio, utilizzare l'estremo attenzione.
· A questo scopo si consigliano due adulti capaci operazione.
· Tenere presente che le parti possono essere danneggiate stringendo
eccessivamente le viti viti.
· Indossare occhiali di sicurezza durante tutto il assemblaggio.
La maggior parte degli infortuni sono causati da un uso improprio e/o dal mancato
rispetto delle istruzioni. Prestare attenzione quando si utilizza questo prodotto.

3
PRIMA DI INIZIARE IL MONTAGGIO
Tenere separati i sacchetti dell'hardware e il relativo contenuto.
Identificare e inventariare tutte le parti e l'hardware utilizzando gli elenchi e gli
identificatori delle parti e dell'hardware contenuti nel presente documento. Prova a
montare tutti i bulloni inserendoli nei rispettivi fori. Non raschiare via tutto il
rivestimento in polvere. Il metallo nudo potrebbe arrugginirsi. Potrebbe essere
necessario inserire alcuni bulloni in posizione con un martello o una mazza.
*Sono necessari due adulti per completare il montaggio*
Solo gli adulti dovrebbero configurare il prodotto. Non consentire ai bambini
l'area di installazione fino al completamento dell'assemblaggio.
ISTRUZIONI PER L'INSTALLAZIONE E LA PREPARAZIONE DEL TERRENO:
· Fornire Abbastanza camera COSÌ Quello bambini Potere utilizzo IL attrezzatura
in sicurezza. Per esempio, per le strutture con più attività ludiche non deve uscire
uno scivolo davanti a aoscillazione.
· Separare le attività attive da quelle tranquille le une dalle altre. Ad esempio,
posizionare i recinti della sabbia lontano dalle altalene o utilizzare un guardrail o
una barriera per separare il recinto della sabbia dal movimento delle altalene.
· Non installare l'attrezzatura per il parco giochi domestico su cemento, asfalto,
terra battuta, erba, tappeto, O Qualunque altro difficile superficie. UN autunno su
UN difficile superficie Potere risultato In gravi lesioni all'apparecchiatura utente.
· Per evitare lesioni gravi, avvisare i bambini che non devono utilizzare
l'attrezzatura se non correttamente installato.
· Creare un sito privo di ostacoli che potrebbero causare lesioni, come rami di
alberi bassi e sporgenti, cavi aerei, ceppi e/o radici di alberi, grandi rocce, mattoni
e cemento.
· Scegliere una posizione piana per l'attrezzatura. Ciò può ridurre la probabilità del
set di gioco mancia Sopra E riempimento sciolto affioramento materiali lavaggio
lontano durante pesante piove.
ISTRUZIONI PER I MATERIALI DEL PARCO GIOCHI E DELLA SUPERFICIE
· Utilizzare misure di contenimento, come scavare attorno al perimetro e/o rivestire
il perimetro con paesaggio bordatura.

4
· Non installare superfici di riempimento sfuse su superfici dure come cemento o
asfalto.
· L'installazione di piastrelle in gomma o superfici gettate in opera (diverse dai
materiali di riempimento sfusi) richiede generalmente un professionista e non è
un'operazione "fai da te" progetti.
· Utilizzare materiali per la pavimentazione del parco giochi (diversi dal materiale
di riempimento sfuso) conformi allo standard di sicurezza ASTM F1292 Specifiche
standard per l'attenuazione dell'impatto dei materiali di superficie all'interno della
zona d'uso del parco giochi Attrezzatura.
ISTRUZIONI PER L'USO
L'osservanza delle seguenti istruzioni e avvertenze riduce la probabilità di lesioni
gravi o mortali:
· Dovrebbe essere garantita la supervisione di un adulto in loco per tutti i bambini
età.
· Istruire i bambini a non utilizzare l'attrezzatura in modo diverso da destinato.
· Per prevenire impigliamenti e strangolamento, vestire i bambini in modo
appropriato, utilizzando scarpe adatte ed evitando poncho, sciarpe, giacche con
lacci sul collo, caschi con cinghie e altri indumenti larghi che potrebbero essere
potenzialmente pericolosi durante l'uso attrezzatura.
· Istruire i bambini a non giocare quando l'apparecchiatura è in funzione Bagnato.
· Istruire i bambini a non attaccare all'attrezzatura del parco giochi oggetti che non
siano specificatamente progettato per utilizzo con IL attrezzatura, come COME, Ma
non limitato A, salto corde, stendibiancheria, guinzagli, cavi e catene di animali
domestici, poiché potrebbero causare pericolo di strangolamento. Non spostare
l'apparecchiatura mentre è all'interno utilizzo.
· La superficie d'impatto deve coprire l'intero gioco consigliato la zona.
SCHEDA INFORMATIVA PER IL CONSUMATORE DEI MATERIALI PER
SUPERFICI PER PARCHI GIOCO
Seleziona la superficie protettiva:
Una delle cose più importanti che puoi fare per ridurre la probabilità di gravi lesioni
alla testa è installare una superficie protettiva ammortizzante sotto e attorno
all'attrezzatura da gioco. La superficie protettiva deve essere applicata a una
profondità adeguata all'altezza dell'apparecchiatura in conformità con la specifica

5
ASTM F1292. Esistono diversi tipi di rivestimento tra cui scegliere; qualunque
prodotto tu scelga, segui queste linee guida:
NOTA: non installare l'attrezzatura per il parco giochi domestico su cemento,
asfalto o qualsiasi altra superficie dura. Una caduta su una superficie dura può
causare gravi lesioni all'utente dell'apparecchiatura. Erba e sporco non sono
considerati superfici protettive perché l'usura e i fattori ambientali possono ridurne
l'efficacia ammortizzante. Moquette e tappetini sottili generalmente non
costituiscono una superficie protettiva adeguata.
Le attrezzature a livello del suolo, come sabbiere, pareti per attività, casette o altre
attrezzature prive di superficie di gioco rialzata, non necessitano di superficie
protettiva. Materiali di riempimento sfusi: mantenere una profondità minima di 9
pollici (23 cm) di materiali di riempimento sfusi come pacciame/trucioli di legno,
fibra di legno ingegnerizzato (EWF) o pacciame di gomma triturata/riciclata per
attrezzature fino a 8 piedi (244 cm)
alto; e 9 pollici (23 cm) di sabbia o ghiaia per attrezzature alte fino a 5 piedi (152
cm).
NOTA: un livello di riempimento iniziale di 30 cm (12 pollici) si comprimerà nel
tempo fino a raggiungere una profondità di superficie di circa 23 cm (9 pollici). La
superficie inoltre si compatterà, si sposterà e si depositerà e dovrà essere
periodicamente riempita per mantenere una profondità di almeno 9 pollici (23 cm).
Utilizzare un minimo di 6 pollici (15 cm) di superficie protettiva per attrezzature da
gioco di altezza inferiore a 4 piedi (122 cm). Se mantenuto correttamente,
dovrebbe essere adeguato. (A profondità inferiori a 6 pollici (15 cm), il materiale
protettivo viene spostato o compattato troppo facilmente.) Utilizzare misure di
contenimento, ad esempio scavando attorno al perimetro e/o rivestendo il
perimetro con bordi orizzontali. Non dimenticare di tenere conto del drenaggio
dell'acqua. Controllare e mantenere la profondità del materiale di superficie di
riempimento sfuso. Per mantenere la giusta quantità di materiali di riempimento
sfusi, segnare il livello corretto sui montanti di supporto dell'attrezzatura da gioco.
In questo modo puoi facilmente vedere quando ricostituire e/o ridistribuire la
superficie. Non installare superfici di riempimento sfuse su superfici dure come
cemento o asfalto.

6
Versato sul posto superfici O Prefabbricato Gomma Piastrelle: tu Maggio Essere
interessato nell’utilizzo di superfici diverse dai materiali di riempimento sfusi, come
piastrelle di gomma o superfici colate sul posto. L'installazione di queste superfici
richiede generalmente un professionista e non è un progetto “fai da te”. Rivedere
le specifiche della superficie prima di acquistare questo tipo di superficie. Chiedere
all'installatore/produttore un rapporto che dimostri che il prodotto è stato testato
secondo il seguente standard di sicurezza: ASTM F1292 Specifiche standard per
l'attenuazione dell'impatto dei materiali di superficie all'interno della zona di utilizzo
delle attrezzature del parco giochi.
Questo rapporto dovrebbe indicare l'altezza specifica per la quale la superficie è
destinata a proteggere da gravi lesioni alla testa. Questa altezza dovrebbe essere
uguale o maggiore dell'altezza di caduta – distanza verticale tra una superficie di
gioco designata (superficie rialzata per stare in piedi, sedersi o arrampicarsi) e la
superficie protettiva
sotto – della tua attrezzatura da gioco. Controllare frequentemente l'eventuale
usura della superficie protettiva. Posizionamenti: il posizionamento e la
manutenzione corretti della superficie protettiva sono essenziali.
La superficie protettiva deve estendersi per almeno 2 m (6,6 piedi) in tutte le
direzioni oltre i limiti del dispositivo.
AREA GIOCO SICURA
ZONA DI SICUREZZA - Posizionare l'apparecchiatura a non meno di 2 m (6,6
piedi) da qualsiasi struttura o ostruzione come recinzione, garage, casa, rami
sporgenti, fili della biancheria o cavi elettrici. La superficie d'impatto deve coprire
l'intera area di gioco consigliata. Fare riferimento all'esempio seguente.
Dimensioni del set da gioco:
10' (3,05 m) x 10' (3,05 metri)
Gioco consigliato la zona:
5,05 m (16' 6") x 5,05 m (16' 6")

7
2.1 Destinazione d'uso
· L'articolo è adatto solo per l'uso ricreativo da parte di persone dai 3 anni in suSopra.
· L'articolo non è adatto all'uso sul pubblico campi da gioco.
· L'articolo non è adatto a bambini di età inferiore a 3 anni anni!
9. Simboli
Leggere attentamente le istruzioni per l'uso!
L'articolo non è adatto a bambini di età inferiore a 3 anni!
MODELLO E PARAMETRI
Modello
JX-DC-06
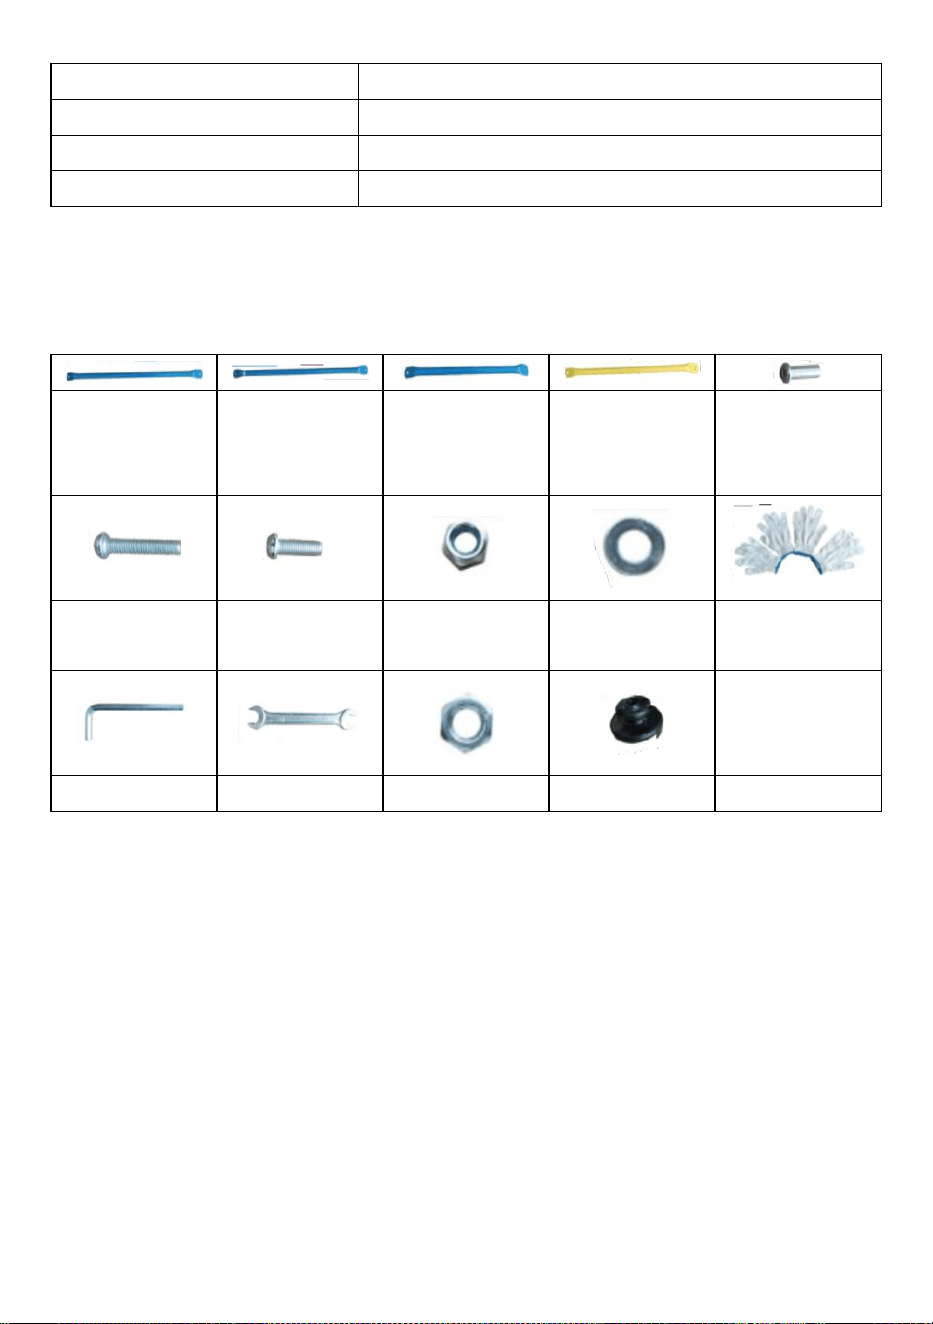
8
Capacità di peso
600 libbre ( 272 kg)
Età
3-9 _
Numero
2-3 bambini
Assemblato Dimensioni
6FT.W × 3FT.H
MONTAGGIO E UTILIZZO
Elenco delle parti:
Parte Mx4 (Tubo
lungo blu)
Parte Nx1 (tubo
blu lungo e più
spesso)
Parte Ax20 (Tubo
corto blu)
Parte Bx24 (tubo
giallo)
Parte Dx12 (dado
lungo)
Parte Ex12
(bullone lungo)
Parte Fx8
(bullone corto)
Parte Gx8 (dado
di bloccaggio)
Parte Hx28
(Rondella)
Parte Lx2
Parte Ix2
Parte Jx1
Parte Kx12
Parte Cx12
Nota: fare attenzione a non confondere la Parte N con la Parte M e lasciare da
parte la Parte N per utilizzarla nell'ultimo passaggio.
Passaggi di installazione:
Passo 1:
Crea un ottagono come base con 4 tubi blu lunghi (Parte M) +4 tubi blu corti (Parte A).
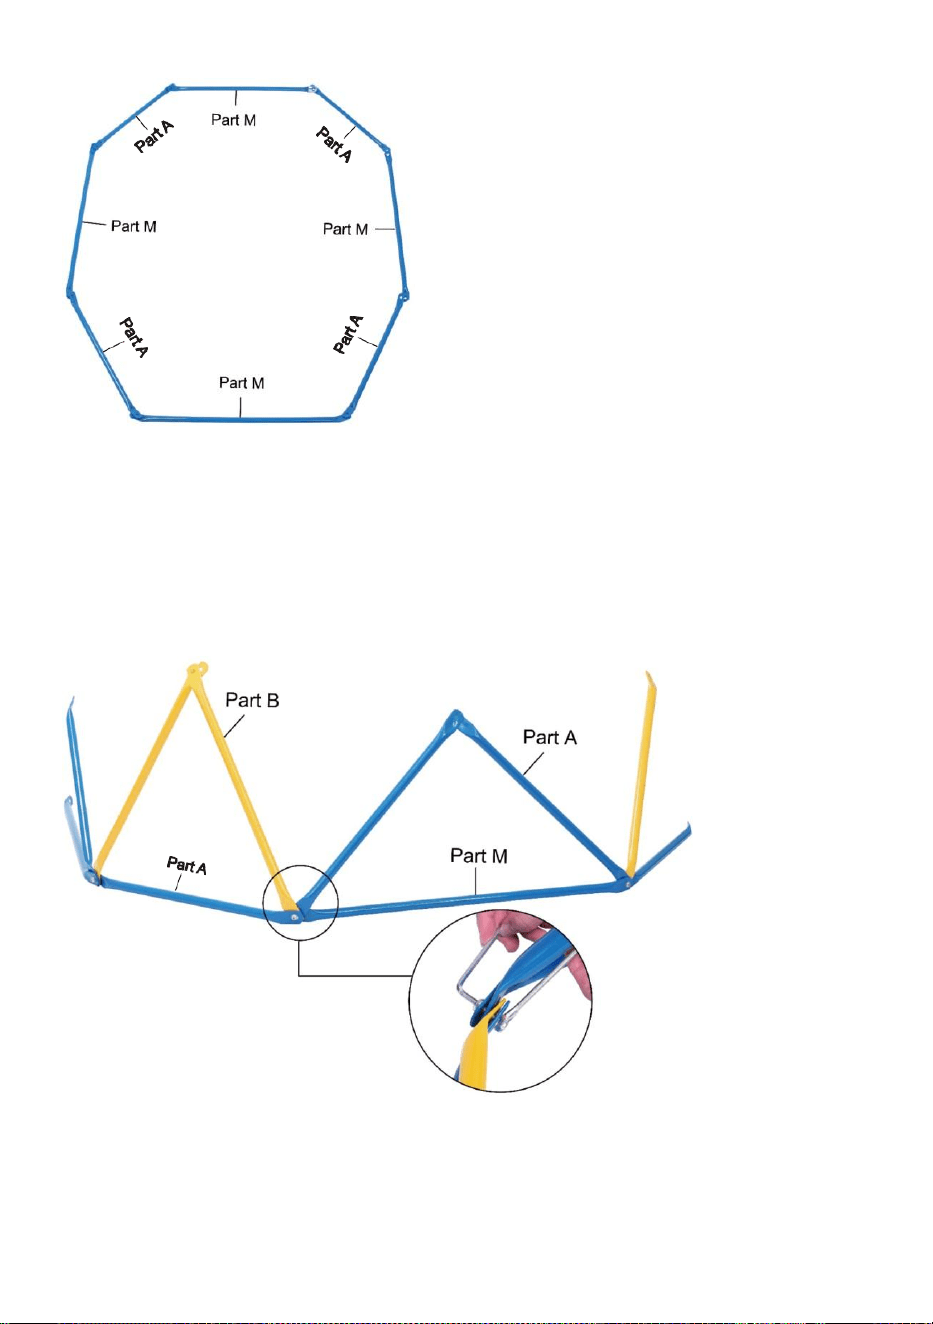
9
Passo 2:
Collega 2 tubi gialli (Parte B) al tubo blu corto (Parte A) della base, formando un triangolo e
fissali con bulloni corti (Parte F), dadi di bloccaggio (Parte G) e rondelle (Parte H). Crea un
triangolo con 2 tubi blu corti (Parte A) e 1 tubo blu lungo (Parte M) allo stesso modo.
Nota: non bloccare i bulloni! Altrimenti aumenterebbe la difficoltà dei passaggi successivi.
Passaggio 3:
Ripeti il passaggio 2 quattro volte finché non ottieni la cornice come mostrato di seguito.
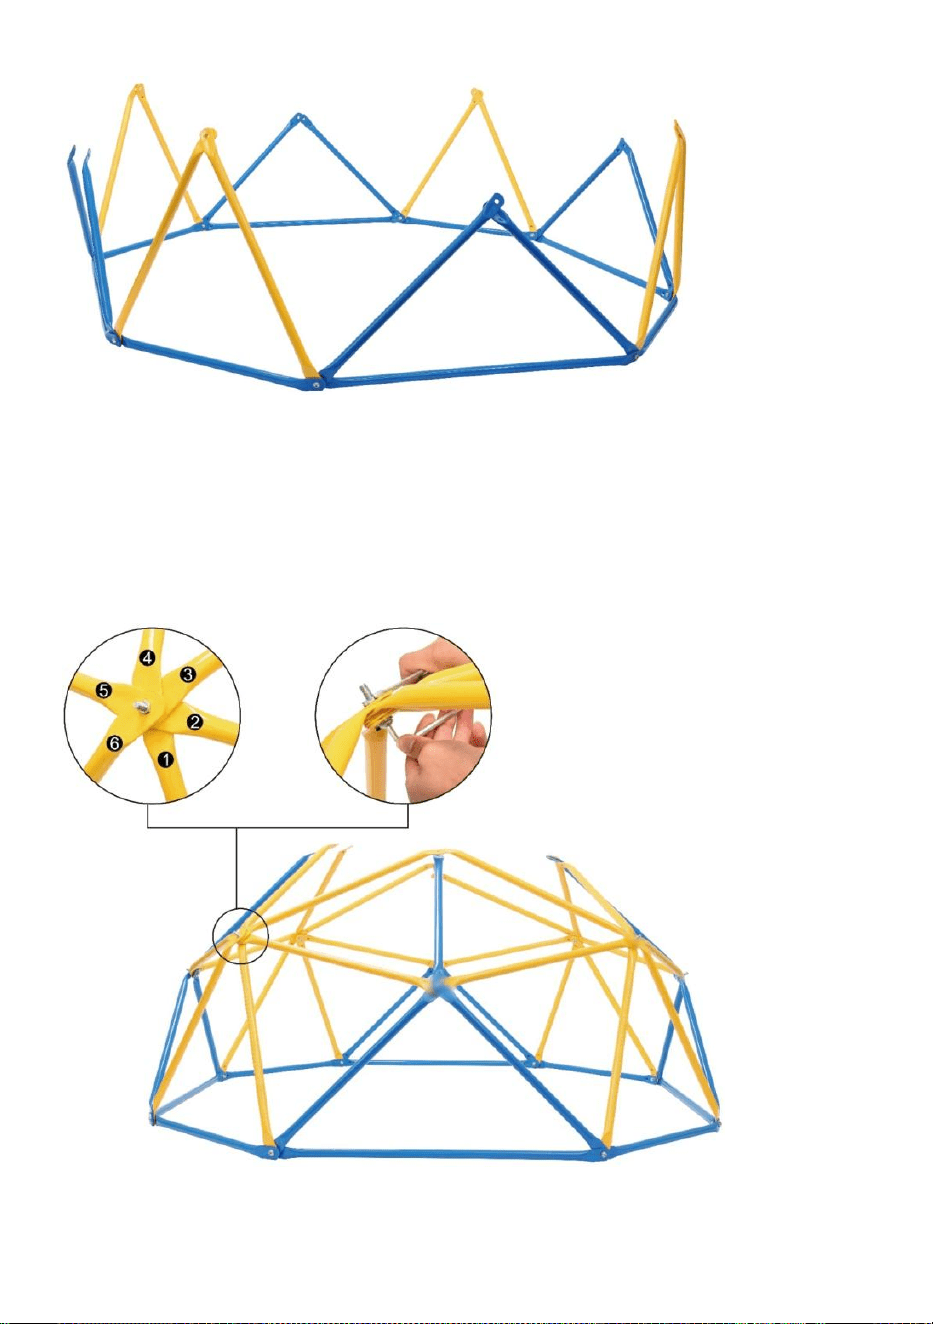
10
Passaggio 4:
Aggiungi 4 tubi gialli (Parte B) al punto X, rispettando l'ordine dei tubi con l'immagine
seguente, e fissali con bulloni lunghi (Parte E), rondelle (Parte H) e Parte K.
Nota: non bloccare i bulloni! Altrimenti aumenterebbe la difficoltà dei passaggi successivi.
Point X
Aggiungi 1 tubo blu corto (Parte A) e 1 tubo giallo (Parte B) al punto Y, con 1 tubo giallo
assemblato (Parte B) dal punto X, in modo che 5 tubi si incontrino nel punto Y.
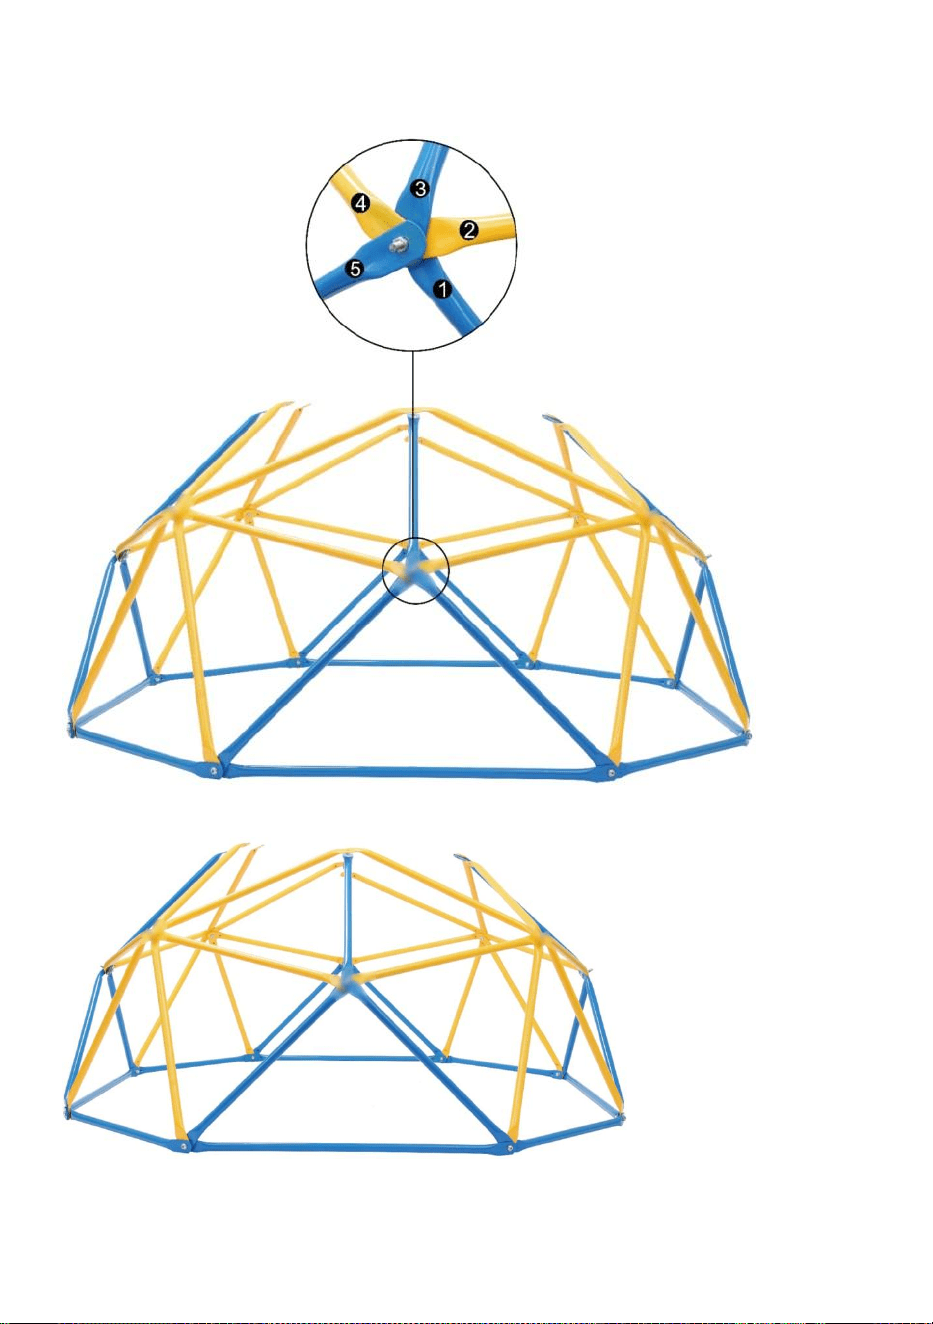
11
Fissateli allo stesso modo, mantenendo l'ordine dei tubi coerente con l'immagine qui sotto.
Nota: non bloccare i bulloni!
Point Y
Basta ripetere il passaggio precedente fino al completamento del secondo livello.
Passaggio 5:
Aggiungi 2 tubi blu corti (Parte A) e 1 tubo blu lungo e più spesso (Parte N) al Punto Z, con
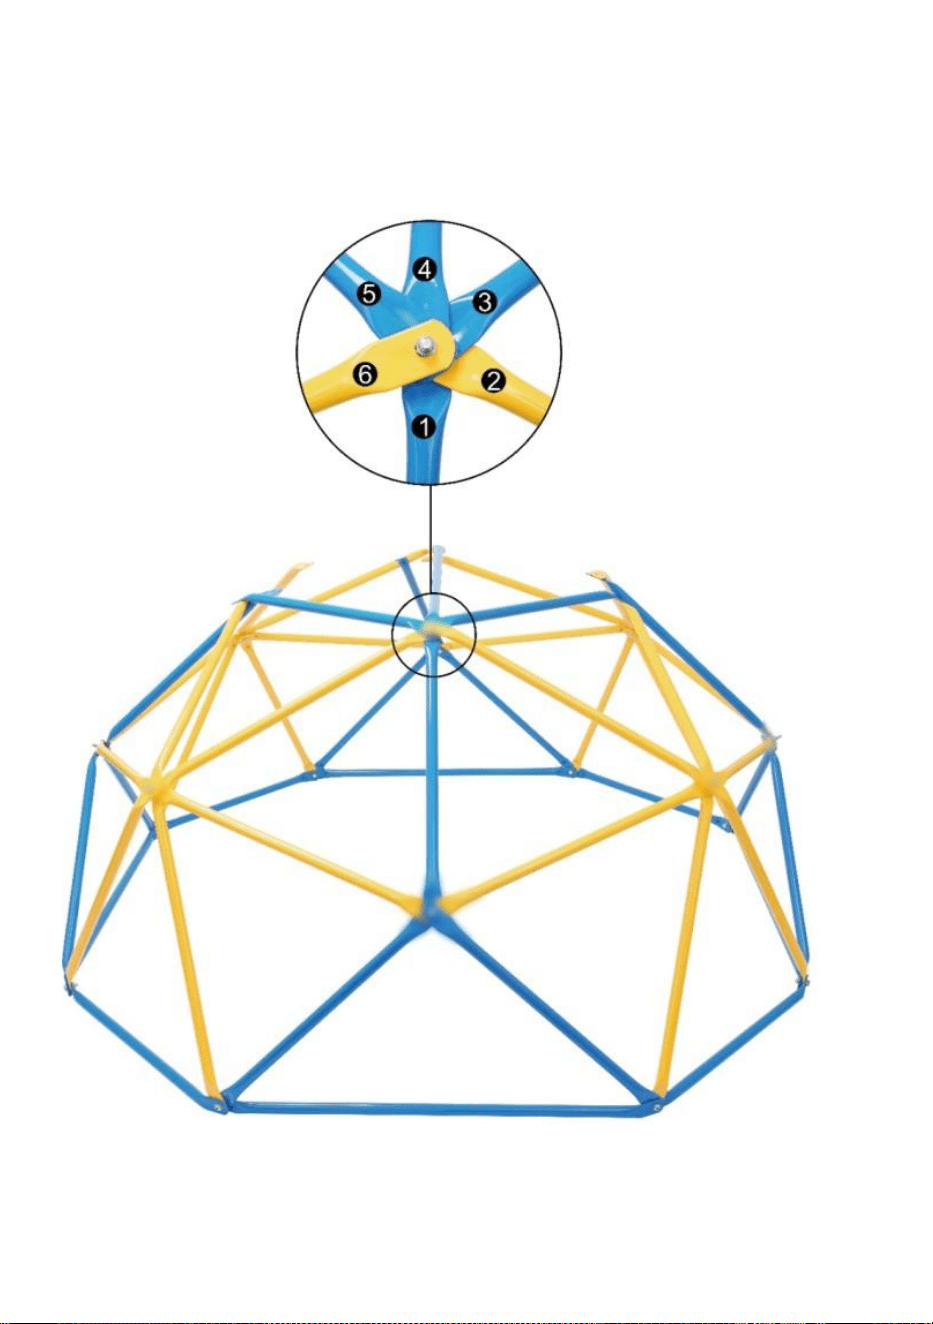
12
3 tubi assemblati dal Punto X/Y, le estremità di 6 tubi si sovrappongono al Punto Z.
Assicurati che i tubi siano disposti in senso antiorario come mostrato di seguito, con il tubo
blu lungo e più spesso (Parte N) inserito 4°.
Point Z
Vieni al punto T, collega 1 nuovo tubo blu corto (parte A) con 4 tubi assemblati dal punto
X/Y/Z e fissali in una sequenza prestabilita.
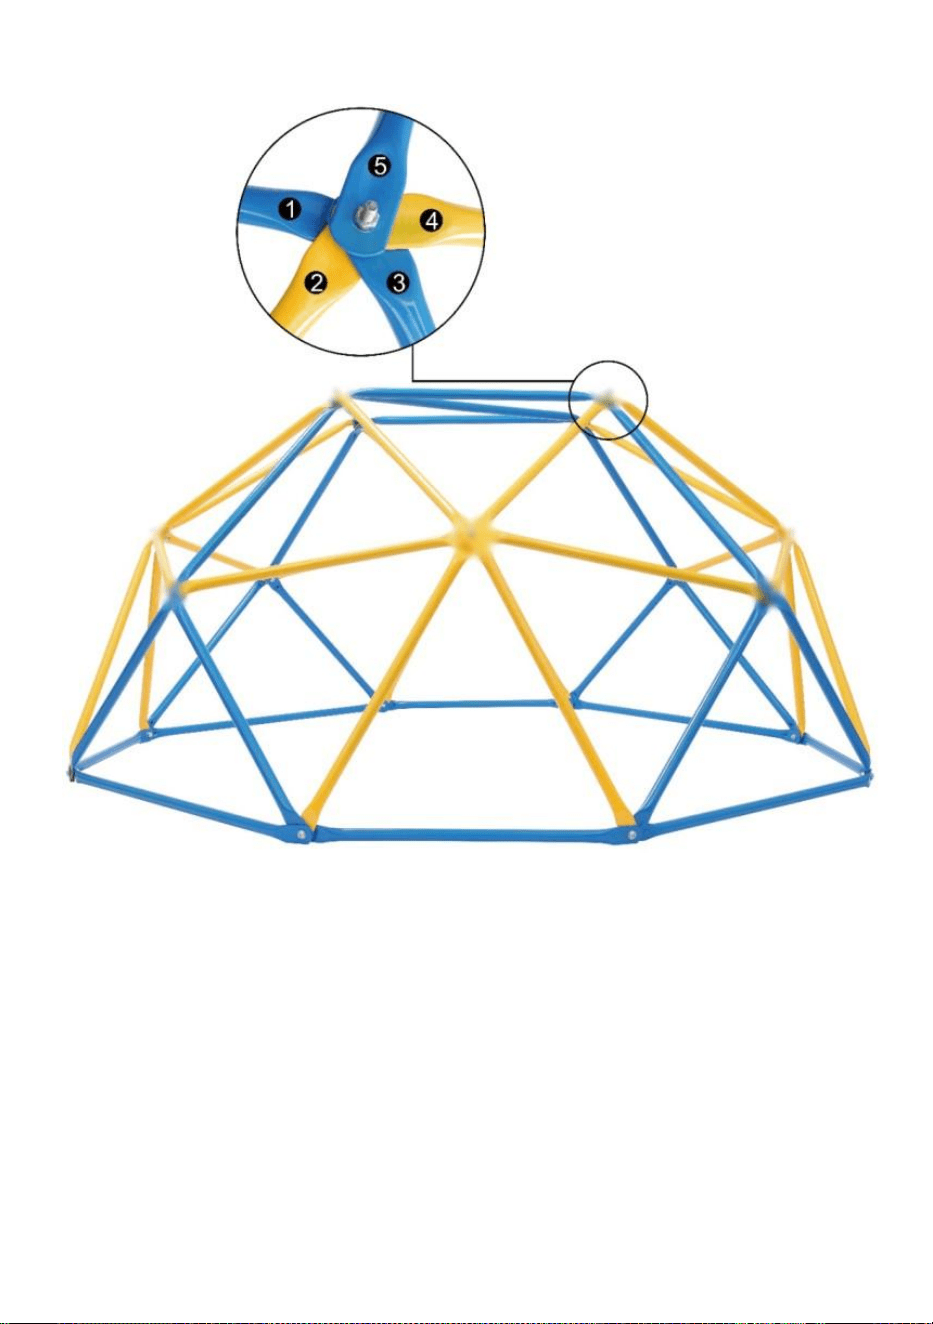
13
Point T
Ripeti semplicemente il passaggio precedente e otterrai un tetto quadrato, con quattro lati
(Parte A) e una diagonale (Parte N).

14
Nota: una volta assemblato completamente il telaio, utilizzare gli strumenti (Parte I e Parte J)
per serrare tutti i bulloni.
Passaggio 6:
Dopo aver completato il telaio e bloccato tutti i bulloni, iniziare a installare le impugnature
nere (Parte C). Ad eccezione dei nodi inferiori, tutti i nodi necessitano di appigli per
un'arrampicata sicura.
Utilizzare dadi lunghi (Parte D) per fissare le impugnature nere (Parte C).
Nota: lo spazio dell'impugnatura deve essere posizionato tra il 1° tubo e il 5°/6° tubo.

15
Ora la tua palestra nella giungla è pronta. Congratulazioni!
Attenzione per favore, se c'è qualche problema durante il montaggio, toccaci e faremo del

16
nostro meglio per aiutarti!
MANUTENZIONE
· Controllare regolarmente i pali, le maniglie e i collegamenti a vite per individuare
eventuali crepe, danni e affaticamento del materiale. Se si riscontrano danni, il
ponteggio non deve essere utilizzato. Contatta il venditore per sostituire gli articoli
danneggiati con articoli nuovi. Utilizzare solo ricambi originali elementi!
· Non utilizzare mai detergenti aggressivi per pulizia!
Disposizione
L'imballaggio del prodotto è costituito da materiali riciclabili. Smaltirli in
modo rispettoso dell'ambiente
modo amichevole e negli appositi contenitori di raccolta.
Produttore: Shanghaimuxinmuyeyouxiangongsi
Indirizzo: Baoshanqu Shuangchenglu 803long 11hao 1602A-1609shi
Shanghai
Importato in AUS: SIHAO PTY LTD, 1 ROKEVA STREETEASTWOOD
NSW 2122 Australia
Importato negli Stati Uniti: Sanven Technology Ltd., Suite 250, 9166
Anaheim Place, Rancho Cucamonga, CA 91730
REP
EC
SHUNSHUN GmbH
Römeräcker 9 Z2021,76351
Linkenheim-Hochstetten,Germany
euvertreter@gmail.com
+49 1727041930
REP
UK
Pooledas Group Ltd
Unit 5 Albert Edward House, The
Pavilions Preston, United Kingdom
pooledas12[email protected]
Tel: 01772418127

17
Made in China


Techniczny Certyfikat wsparcia i e-gwarancji www.vevor.com/support
Zabawa w wspinaczkę geometryczną
We continue to be committed to provide you tools with competitive price.
"Save Half", "Half Price" or any other similar expressions used by us only represents an
estimate of savings you might benefit from buying certain tools with us compared to the major
top brands and does not necessarily mean to cover all categories of tools offered by us. You
are kindly reminded to verify carefully when you are placing an order with us if you are
actually saving half in comparison with the top major brands.


1
MODEL: JX-DC-06
Have product questions? Need technical support? Please feel free to
contact us:
Technical Support and E-Warranty Certificate
www.vevor.com/support
NEED HELP? CONTACT US!
This is the original instruction, please read all manual instructions
carefully before operating. VEVOR reserves a clear interpretation of our
user manual. The appearance of the product shall be subject to the
product you received. Please forgive us that we won't inform you again if
there are any technology or software updates on our product.
GEOMETRIC CLIMBER
PLAY

2
INSTRUKCJE
Dziękujemy bardzo za wybranie tej geometrycznej zabawy wspinaczkowej.
- Przed użyciem przeczytaj całą instrukcję. Informacje te pomogą Ci osiągnąć
najlepsze możliwe rezultaty.
Produkty prezentowane w tym katalogu mogą różnić się kolorem od
rzeczywistego.
1. Instrukcje bezpieczeństwa
NIEPRZESTRZEGANIE TYCH OSTRZEŻEŃ MOŻE SPOWODOWAĆ
POWAŻNE OBRAŻENIA LUB MIENIA
USZKODZENIA I UTRATA GWARANCJI.
Właściciel musi upewnić się, że wszyscy gracze znają i przestrzegają niniejszych
zasad w celu bezpiecznej obsługi systemu.
Aby zapewnić bezpieczeństwo, nie próbuj montować tego produktu bez
dokładnego przestrzegania instrukcji.
Sprawdź całe opakowanie i wszystkie materiały opakowaniowe pod kątem części
i/lub dodatkowych materiałów instruktażowych. Zanim rozpoczynając montaż,
przeczytaj instrukcję i zidentyfikuj części za pomocą identyfikatora sprzętu i listę
części w tym dokumencie. Prawidłowy i kompletny montaż, użytkowanie i nadzór
są niezbędne do prawidłowego działania obsługi i zmniejszyć ryzyko wypadku lub
obrażeń. W takim przypadku istnieje duże prawdopodobieństwo odniesienia
poważnych obrażeń
produkt nie jest prawidłowo zainstalowany, konserwowany i obsługiwany.
· Jeśli podczas montażu używasz drabiny, użyj ekstremalnej ostrożność.
· W tym celu zalecane są dwie zdolne osoby dorosłe operacja.
· Należy pamiętać, że nadmierne dokręcenie może spowodować uszkodzenie
części śruby.
· Nosić okulary ochronne przez cały czas montaż.
Większość obrażeń jest spowodowana niewłaściwym użytkowaniem i/lub
nieprzestrzeganiem instrukcji. Podczas korzystania z tego produktu należy

3
zachować ostrożność.
PRZED ROZPOCZĘCIEM MONTAŻU
Torby ze sprzętem i ich zawartość należy przechowywać oddzielnie.
Zidentyfikuj i zinwentaryzuj wszystkie części i sprzęt, korzystając z list części i
sprzętu oraz identyfikatorów zawartych w tym dokumencie. Przetestuj
dopasowanie wszystkich śrub, wkładając je do odpowiednich otworów. Nie
zeskrobuj całej powłoki proszkowej. Goły metal może rdzewieć. Może być
konieczne wbicie niektórych śrub na miejsce młotkiem lub młotkiem.
*Do ukończenia montażu potrzebne są dwie osoby dorosłe*
Tylko osoby dorosłe powinny konfigurować produkt. Nie pozwalaj dzieciom
przebywać w obszarze konfiguracji, dopóki montaż nie zostanie ukończony.
INSTRUKCJA MONTAŻU I PRZYGOTOWANIA PODŁOŻA:
· Dostarczać wystarczająco pokój Więc To dzieci Móc używać the sprzęt
bezpiecznie. Dla przykład, w przypadku konstrukcji z wieloma zabawami
zjeżdżalnia nie powinna wychodzić przedhuśtać się.
· Oddziel od siebie aktywne i ciche zajęcia. Na przykład umieść piaskownicę z
dala od huśtawek lub użyj poręczy lub bariery, aby oddzielić piaskownicę od ruchu
dzieci. huśtawki.
· Nie instaluj wyposażenia placów zabaw na betonie, asfalcie, ubitej ziemi, trawie,
dywan, Lub każdy Inny twardy powierzchnia. A jesień na A twardy powierzchnia
Móc wynik W poważne obrażenia sprzętu użytkownik.
· Aby zapobiec poważnym obrażeniom, należy ostrzec dzieci, że nie mogą
korzystać ze sprzętu, jeśli nie są one prawidłowo używane zainstalowany.
· Stwórz miejsce wolne od przeszkód, które mogłyby spowodować obrażenia –
takich jak nisko zwisające gałęzie drzew, przewody napowietrzne, pnie i/lub
korzenie drzew, duże kamienie, cegły i beton.
· Wybierz poziomą lokalizację dla sprzętu. Może to zmniejszyć
prawdopodobieństwo zestawu do gry napiwki nad I luźne wypełnienie wynurzanie
się materiały mycie z dala podczas ciężki deszcze.
INSTRUKCJE PLACÓW ZABAW I MATERIAŁÓW NAWIERZCHNI
· Należy stosować zabezpieczenia, takie jak wykopy wokół obwodu i/lub wyłożenie

4
terenu terenem borta.
· Nie instaluj luźnej nawierzchni na twardych powierzchniach, takich jak beton lub
asfalt.
· Montaż płytek gumowych lub powierzchni wylewanych na miejscu (innych niż
luźne materiały wypełniające) zazwyczaj wymaga specjalisty i nie jest
wykonywany samodzielnie projektowanie.
· Używaj materiałów do nawierzchni placów zabaw (innych niż luźne materiały
wypełniające), które są zgodne z normą bezpieczeństwa ASTM F1292
Standardowa specyfikacja dotycząca tłumienia uderzeń materiałów
nawierzchniowych w strefie użytkowania placu zabaw Sprzęt.
INSTRUKCJA OBSŁUGI
Przestrzeganie poniższych instrukcji i ostrzeżeń zmniejsza ryzyko poważnych lub
śmiertelnych obrażeń:
· Wszystkim dzieciom należy zapewnić nadzór osoby dorosłej na miejscu
wieczność.
· Poinstruuj dzieci, aby nie korzystały ze sprzętu w inny sposób niż przeznaczony.
· Aby zapobiec zaplątaniu się i uduszeniu, należy odpowiednio ubierać dzieci,
nosić dobrze dopasowane buty i unikać poncz, szalików, kurtek ściąganych na
szyję, kasków z paskami i innej luźnej odzieży, która może być potencjalnie
niebezpieczna podczas użytkowania sprzęt.
· Poinstruuj dzieci, aby nie bawiły się, gdy urządzenie jest włączone mokry.
· Poinstruuj dzieci, aby nie przyczepiały do wyposażenia placu zabaw
przedmiotów , które nie są do tego przeznaczone zaprojektowany Do używać z the
sprzęt, taki Jak, Ale nie ograniczony Do, skok liny, sznury do bielizny, smycze dla
zwierząt, kable i łańcuchy, ponieważ mogą one powodować ryzyko uduszenia. Nie
przesuwaj urządzenia w środku używać.
· Nawierzchnia udarowa musi obejmować całą zalecaną grę obszar.
KARTA INFORMACJI DLA KONSUMENTÓW DOTYCZĄCA MATERIAŁÓW
NAWIERZCHNI PLACÓW ZABAW
Wybierz nawierzchnię ochronną:
Jedną z najważniejszych rzeczy, które możesz zrobić, aby zmniejszyć
prawdopodobieństwo poważnych urazów głowy, jest zainstalowanie amortyzującej
nawierzchni ochronnej pod i wokół sprzętu do zabawy. Nawierzchnię ochronną

5
należy nałożyć na głębokość odpowiednią do wysokości sprzętu zgodnie ze
specyfikacją ASTM F1292. Do wyboru są różne rodzaje nawierzchni; Niezależnie
od tego, który produkt wybierzesz, postępuj zgodnie z poniższymi wskazówkami:
UWAGA: Nie instaluj wyposażenia domowego placu zabaw na betonie, asfalcie
lub innej twardej powierzchni. Upadek na twardą powierzchnię może spowodować
poważne obrażenia użytkownika urządzenia. Trawa i brud nie są uważane za
nawierzchnię ochronną, ponieważ zużycie i czynniki środowiskowe mogą
zmniejszyć ich skuteczność amortyzacji. Wykładziny i cienkie maty na ogół nie
stanowią odpowiedniej powierzchni ochronnej.
Sprzęt znajdujący się na parterze – taki jak piaskownica, ścianka do ćwiczeń,
domek do zabawy lub inny sprzęt, który nie ma podwyższonej powierzchni do
zabawy – nie wymaga żadnej nawierzchni ochronnej. Luźne materiały
wypełniające: Utrzymuj minimalną głębokość 9 cali (23 cm) luźnych materiałów
wypełniających, takich jak ściółka/wióry drzewne, konstrukcyjne włókno drzewne
(EWF) lub rozdrobniona/przetworzona ściółka gumowa w przypadku sprzętu o
długości do 8 stóp (244 cm).
wysoki; i 9 cali (23 cm) piasku lub żwiru grochowego dla sprzętu o wysokości do 5
stóp (152 cm).
UWAGA: Początkowy poziom napełnienia wynoszący 12 cali (30 cm) z czasem
ulegnie ściśnięciu do głębokości około 9 cali (23 cm). Nawierzchnia będzie
również zagęszczana, przemieszczana i osiadana, dlatego należy ją okresowo
uzupełniać, aby zachować głębokość co najmniej 9 cali (23 cm). W przypadku
urządzeń do zabawy o wysokości mniejszej niż 4 stopy (122 cm) należy
zastosować co najmniej 6 cali (15 cm) powierzchni ochronnej. Jeśli jest właściwie
konserwowany, powinno wystarczyć. (Na głębokościach mniejszych niż 15 cm
materiał ochronny ulega zbyt łatwemu przemieszczeniu lub zagęszczeniu.) Należy
stosować zabezpieczenia, takie jak wykopy na obwodzie i/lub wyłożenie obwodu
krawędzią poziomą. Nie zapomnij uwzględnić odprowadzania wody. Sprawdź i
utrzymuj głębokość luźnego materiału nawierzchniowego. Aby zachować
odpowiednią ilość luźnego materiału wypełniającego, zaznacz właściwy poziom
na słupkach podtrzymujących sprzęt do zabawy. W ten sposób można łatwo
sprawdzić, kiedy należy uzupełnić i/lub ponownie rozmieścić nawierzchnię. Nie

6
należy instalować luźnej nawierzchni na twardych powierzchniach, takich jak
beton lub asfalt.
Wylewane na miejscu powierzchnie Lub Wstępnie wyprodukowane Guma Płytki —
Ty móc Być zainteresowany przy stosowaniu nawierzchni innych niż luźne
materiały wypełniające – takich jak płytki gumowe lub powierzchnie wylewane na
miejscu. Montaż tych powierzchni z reguły wymaga fachowca i nie jest projektem
„zrób to sam”. Przed zakupem tego typu nawierzchni przejrzyj specyfikacje
powierzchni. Poproś instalatora/producenta o raport wykazujący, że produkt został
przetestowany zgodnie z następującą normą bezpieczeństwa: Standardowa
specyfikacja ASTM F1292 dotycząca tłumienia uderzeń materiałów
nawierzchniowych w strefie użytkowania wyposażenia placów zabaw.
W raporcie tym należy podać konkretną wysokość, dla której nawierzchnia ma
chronić przed poważnym urazem głowy. Wysokość ta powinna być równa lub
większa niż wysokość upadku – odległość w pionie pomiędzy wyznaczoną
powierzchnią do zabawy (podwyższoną powierzchnią do stania, siedzenia lub
wspinania się) a nawierzchnią ochronną
poniżej – Twojego sprzętu do zabawy. Często sprawdzaj powierzchnię ochronną
pod kątem zużycia. Umiejscowienie — istotne jest prawidłowe rozmieszczenie i
konserwacja nawierzchni ochronnych.
Powierzchnia ochronna musi rozciągać się co najmniej 2 m (6,6 stopy) we
wszystkich kierunkach poza granice urządzenia.
BEZPIECZNY MIEJSCE ZABAW
STREFA BEZPIECZEŃSTWA – Urządzenie należy umieścić w odległości nie
mniejszej niż 2 m od jakiejkolwiek konstrukcji lub przeszkody, takiej jak płot, garaż,
dom, zwisające gałęzie, sznury do prania lub przewody elektryczne. Nawierzchnia
uderzeniowa musi pokrywać cały zalecany obszar gry. Zapoznaj się z poniższym
przykładem.
Wymiary zestawu zabawowego:
10' (3,05 m) x 10' (3,05 m)
Polecana gra obszar:
16 stóp 6 cali (5,05 m) x 16 stóp 6 cali (5,05 m)
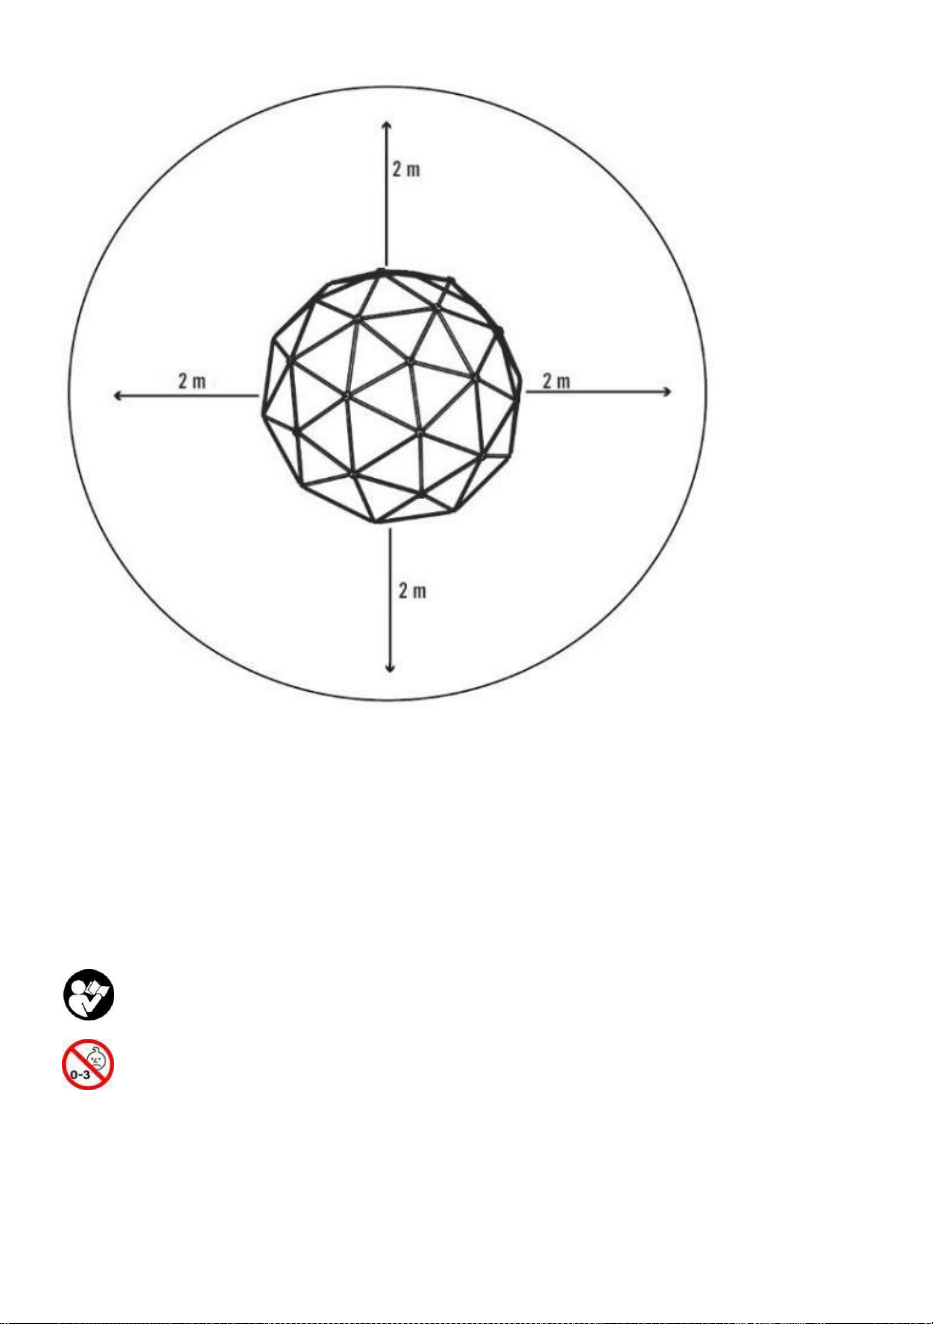
7
2.1 Przeznaczenie
· Artykuł jest przeznaczony wyłącznie do użytku rekreacyjnego przez osoby w wieku
od 3 lat nad.
· Artykuł nie nadaje się do użytku publicznego place zabaw.
· Artykuł nie jest odpowiedni dla dzieci poniżej 3 roku życia lata!
10. Symbolika
Przeczytaj uważnie instrukcję obsługi!
Artykuł nie jest odpowiedni dla dzieci poniżej 3 lat!
MODEL I PARAMETRY
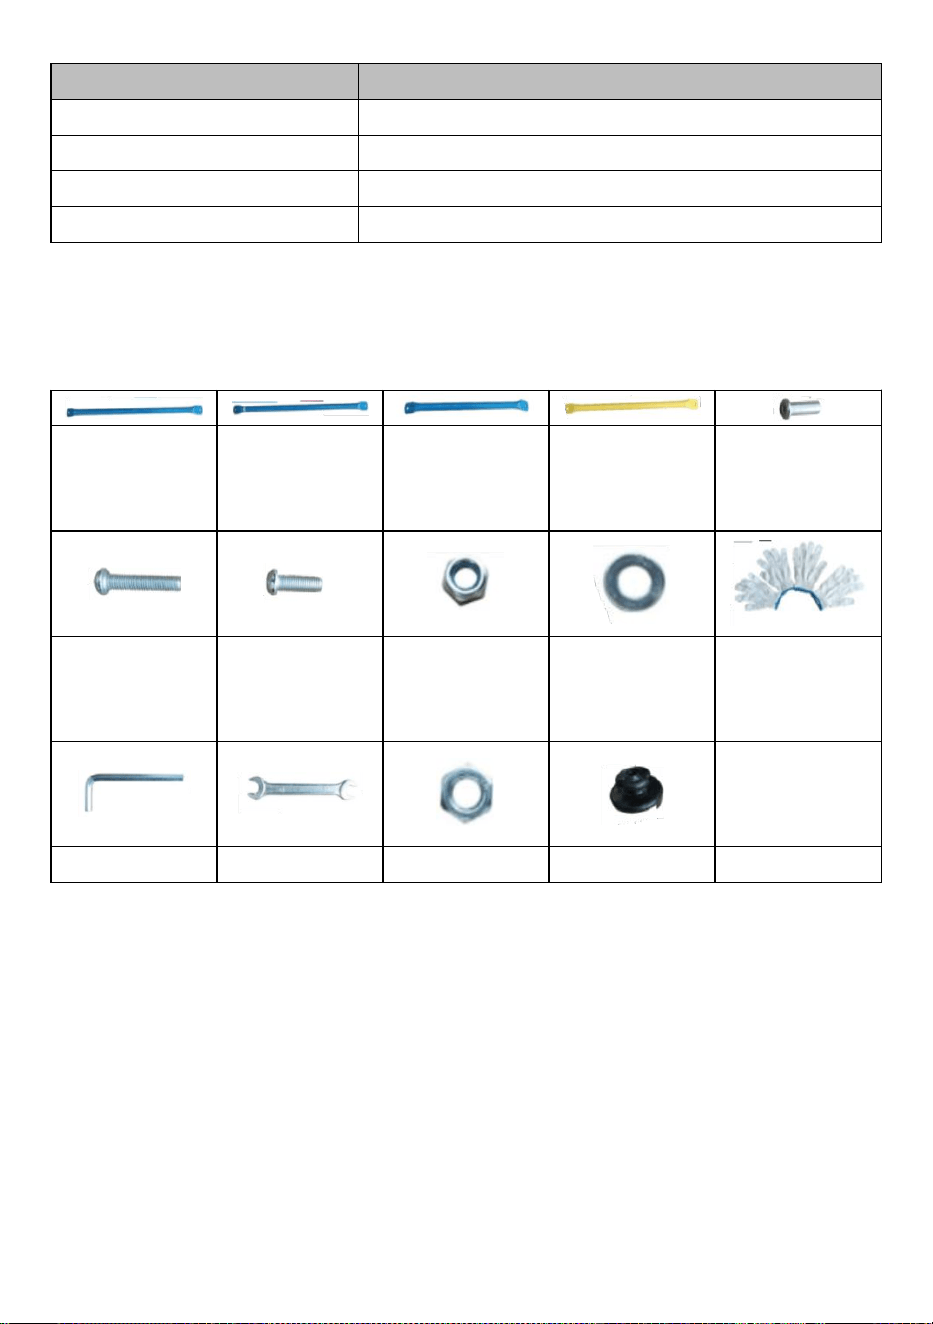
8
Model
JX-DC-06
Udźwig
600 funtów ( 272 kg)
Wieczność
3- 9
Numer
2-3 dzieci
Zmontowane Wymiary
6FT.W × 3FT.H
MONTAŻ I UŻYTKOWANIE
Lista części:
Część Mx4 (długa
niebieska tuba)
Część Nx1 (długa
i grubsza
niebieska rurka)
Część Ax20
(krótka niebieska
rurka)
Część Bx24
(żółta rurka)
Część Dx12
(długa nakrętka)
Część Ex12
(długa śruba)
Część Fx8
(krótka śruba)
Część Gx8
(nakrętka
zabezpieczająca)
Część Hx28
(Podkładka)
Część Lx2
Część Ix2
Część Jx1
Część Kx12
Część Cx12
Uwaga: Uważaj, aby nie pomylić Części N z Częścią M i odłóż Część N na bok do
użycia w ostatnim kroku.
Kroki instalacji:
Krok 1:
Utwórz ośmiokąt jako podstawę z 4 długich niebieskich rurek (Część M) + 4 krótkich
niebieskich rurek (Część A).

9
Krok 2:
Połącz 2 żółte rurki (Część B) z krótką niebieską rurką (Część A) podstawy, tworząc z nich
trójkąt i przymocuj je krótkimi śrubami (Część F), nakrętkami zabezpieczającymi (Część G)
i podkładkami (Część H). Utwórz trójkąt z 2 krótkich niebieskich rurek (część A) i 1 długiej
niebieskiej rurki (część M) w ten sam sposób.
Uwaga: Nie blokować śrub! W przeciwnym razie zwiększyłoby to trudność wykonywania
kolejnych kroków.
Krok 3:
Powtórz krok 2 cztery razy, aż otrzymasz ramkę, jak pokazano poniżej.

10
Krok 4:
Dodaj 4 żółte rurki (część B) do punktu X, zachowując kolejność rur zgodną z rysunkiem
poniżej i przymocuj je długimi śrubami (część E), podkładkami (część H) i częścią K.
Uwaga: Nie blokować śrub! W przeciwnym razie zwiększyłoby to trudność wykonywania
kolejnych kroków.
Point X
Dodaj 1 krótką niebieską rurkę (Część A) i 1 żółtą rurkę (Część B) do punktu Y i 1
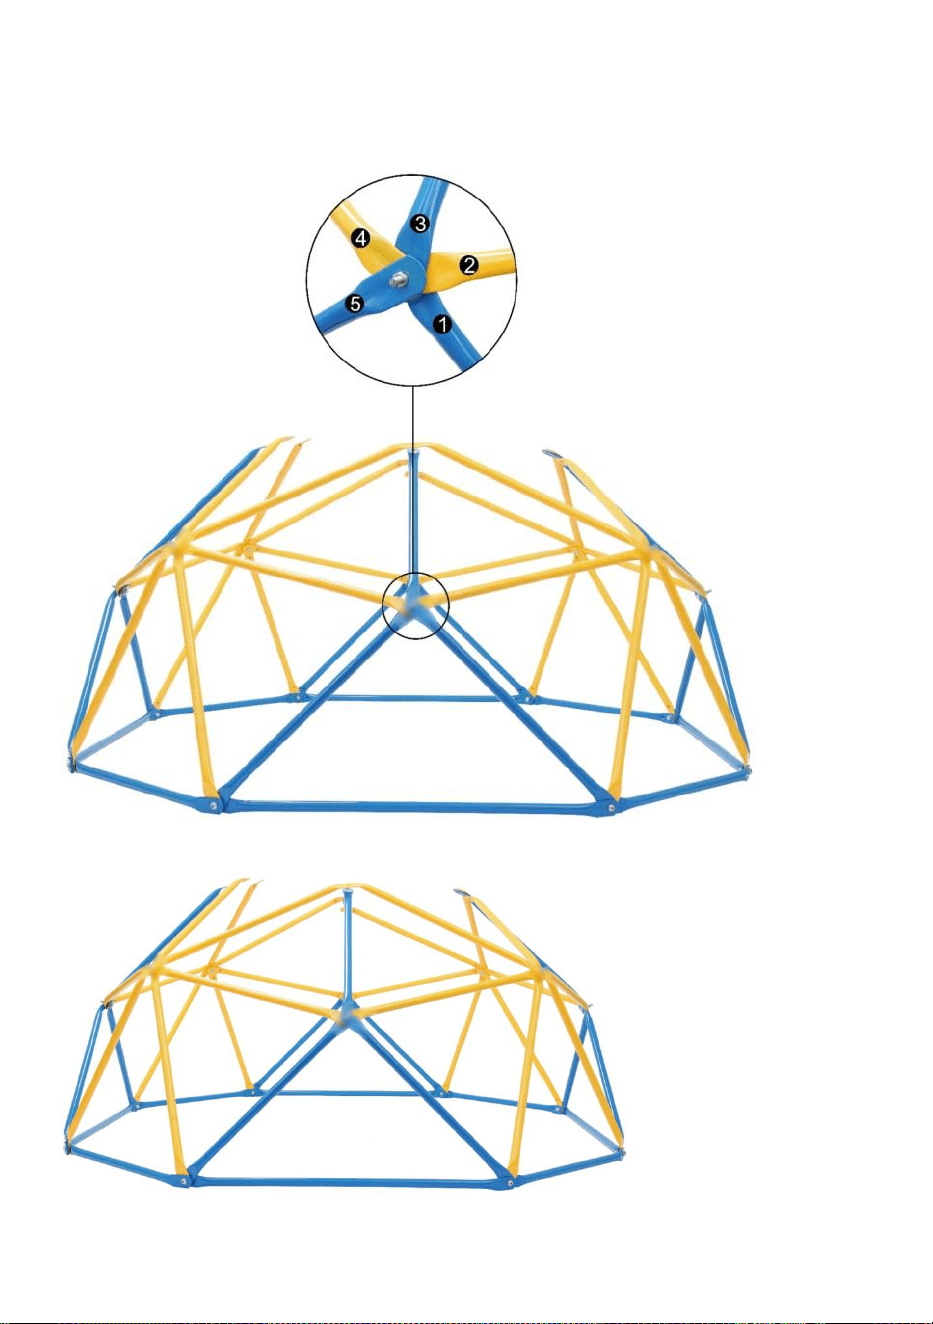
11
zmontowaną żółtą rurkę (Część B) z punktu X, tak aby 5 rurek spotkało się w punkcie Y.
Zamocuj je w ten sam sposób, zachowując kolejność rurek zgodną z rysunkiem poniżej.
Uwaga: Nie blokować śrub!
Point Y
Po prostu powtarzaj powyższy krok, aż do ukończenia drugiego poziomu.
Krok 5:
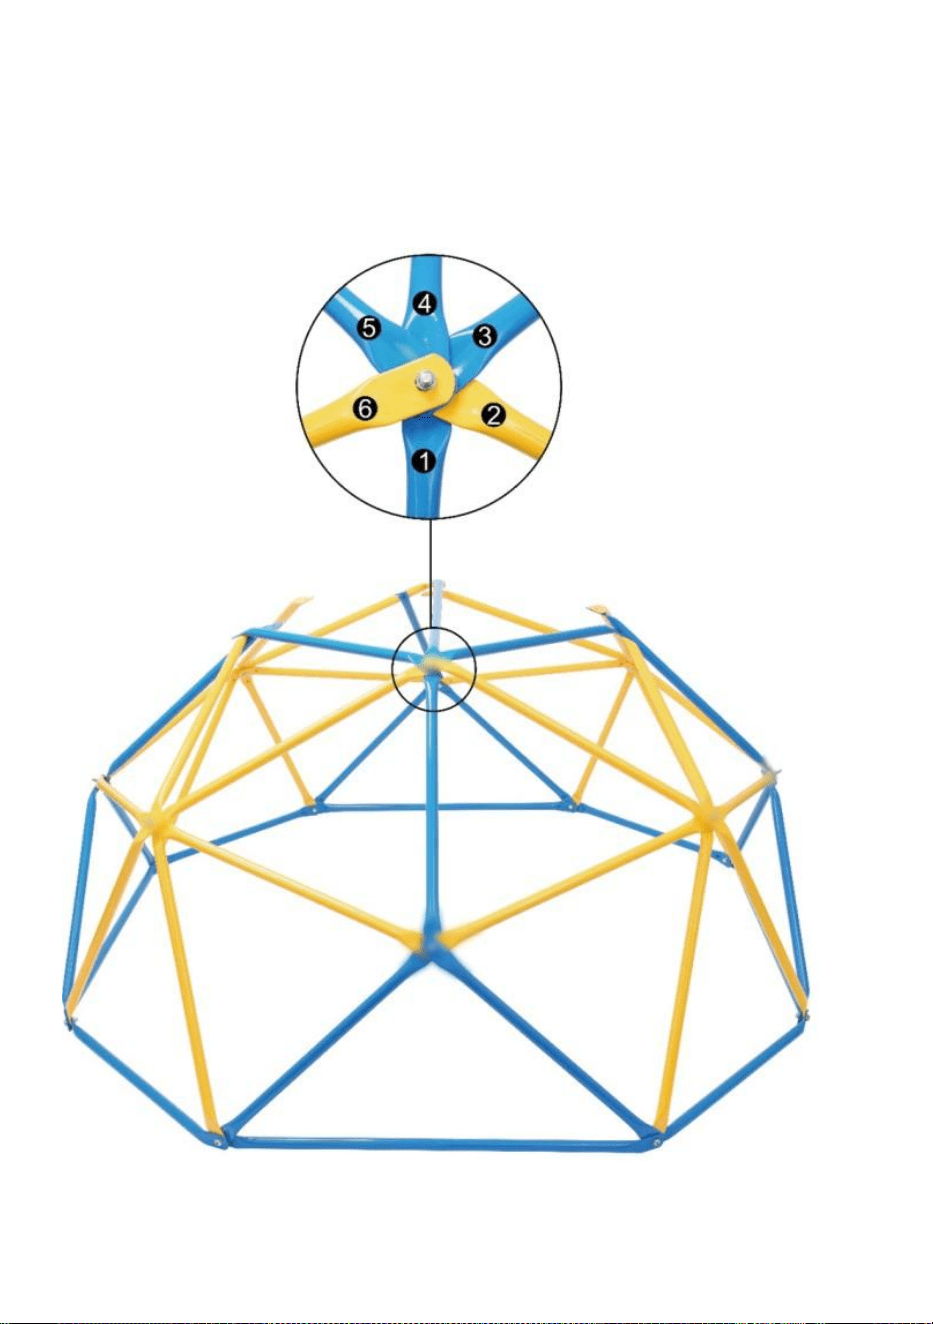
12
Dodaj 2 krótkie niebieskie rurki (część A) i 1 długą i grubszą niebieską rurkę (część N) do
punktu Z, z 3 złożonymi rurkami z punktu X/Y, punkty końcowe 6 rurek zachodzą na siebie w
punkcie Z. Upewnij się, że rurki są ułożone w kierunku przeciwnym do ruchu wskazówek
zegara, jak pokazano poniżej, z dłuższą i grubszą niebieską rurką (część N). 4.
Point Z
Dojdź do Punktu T, połącz 1 nową, krótką niebieską rurkę (Część A) z 4 złożonymi rurkami z
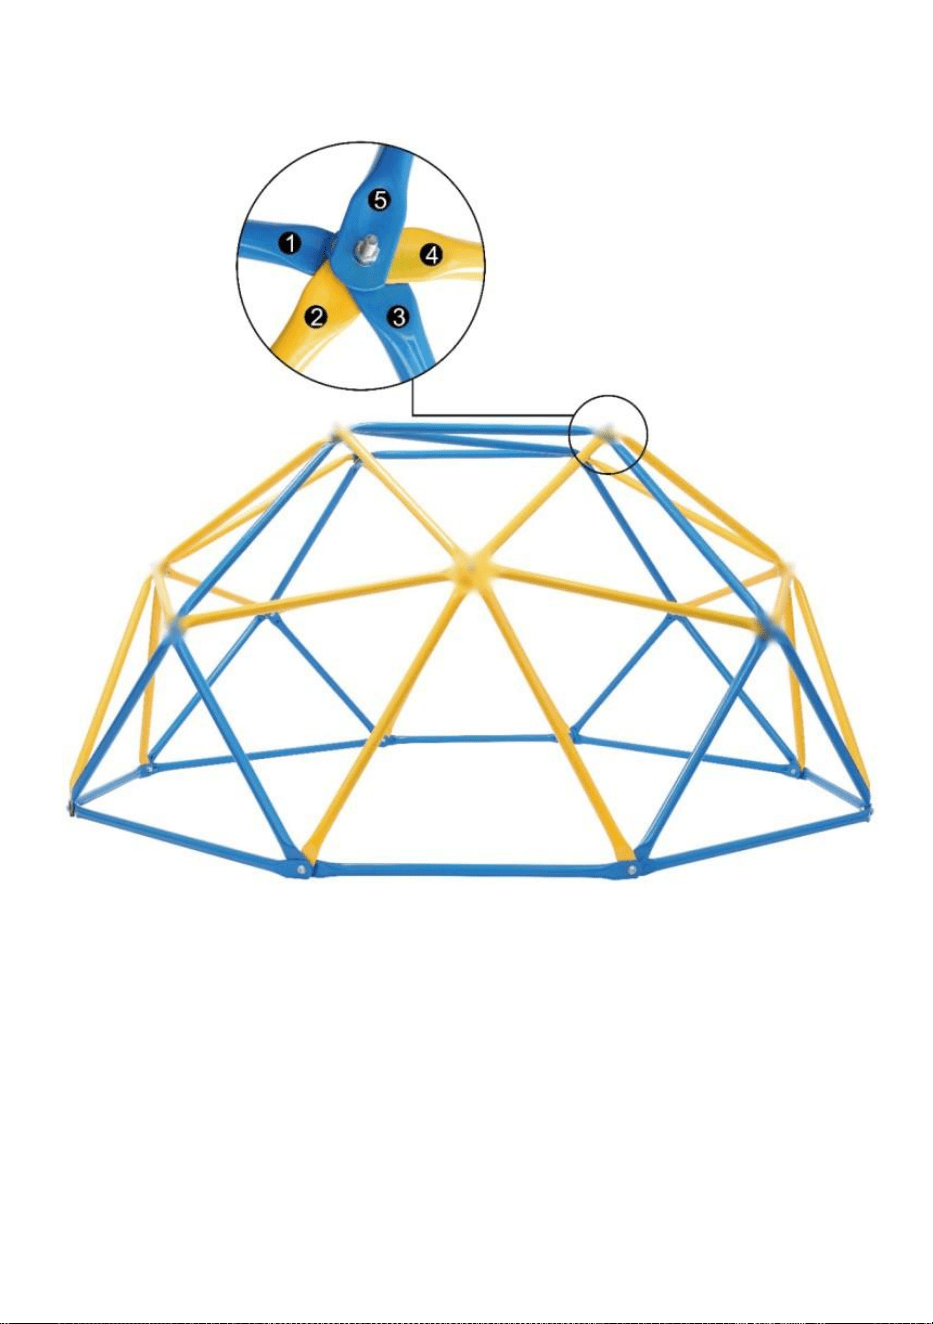
13
Punktu X/Y/Z i przymocuj je w ustalonej kolejności.
Point T
Po prostu powtórz powyższy krok, a otrzymasz kwadratowy dach z czterema bokami (część
A) i jedną przekątną (część N).

14
Uwaga: Po całkowitym zmontowaniu ramy użyj narzędzi (część I i część J), aby dokręcić
wszystkie śruby.
Krok 6:
Po ukończeniu ramy i zablokowaniu wszystkich śrub rozpocznij montaż czarnych uchwytów
(część C). Z wyjątkiem węzłów dolnych, wszystkie węzły wymagają uchwytów do
bezpiecznej wspinaczki.
Użyj długich nakrętek (część D) do zamocowania czarnych uchwytów (część C).
Uwaga: Szczelinę chwytu należy umieścić pomiędzy 1-szą rurą a 5-tą/6-tą rurą.

15
Teraz Twoja siłownia w dżungli jest skonfigurowana. Gratulacje!
Uwaga, jeśli wystąpi jakiś problem podczas montażu, po prostu nas dotknij, a my
16
postaramy się Ci pomóc!
KONSERWACJA
· Regularnie sprawdzaj drążki, uchwyty i połączenia śrubowe pod kątem pęknięć,
uszkodzeń i zmęczenia materiału. W przypadku stwierdzenia uszkodzeń nie wolno
używać rusztowania. Skontaktuj się ze sprzedawcą, aby wymienić uszkodzone
elementy na nowe. Używaj wyłącznie oryginalnego zamiennika elementy!
· Nigdy nie używaj agresywnych środków czyszczących czyszczenie!
Sprzedaż
Opakowanie produktu składa się z materiałów nadających się do
recyklingu. Należy je utylizować w sposób ekologiczny
przyjazny sposób i w dostarczonych pojemnikach do zbiórki.
Producent: Shanghaimuxinmuyeyouxiangongsi
Adres: Baoshanqu Shuangchenglu 803long 11hao 1602A-1609shi
Szanghaj
Import do AUS: SIHAO PTY LTD, 1 ROKEVA STREETEASTWOOD NSW
2122 Australia
Import do USA: Sanven Technology Ltd., Suite 250, 9166 Anaheim Place,
Rancho Cucamonga, CA 91730
REP
EC
SHUNSHUN GmbH
Römeräcker 9 Z2021,76351
Linkenheim-Hochstetten,Germany
euvertreter@gmail.com
+49 1727041930
REP
UK
Pooledas Group Ltd
Unit 5 Albert Edward House, The
Pavilions Preston, United Kingdom
pooledas12[email protected]
Tel: 01772418127

17
Wyprodukowano w Chinach