Operating and Installation
Instructions
Washer
To prevent accidents and appliance damage, read these instructions
before installation or use.
en-US M.-Nr. 11 622 722

Contents
Help protect our environment.................................................................................... 6
IMPORTANT SAFETY INSTRUCTIONS................................................................... 7
Operating the washing machine................................................................................ 11
Control panel...................................................................................................................
11
Touch display and sensor buttons ...............................................................................
11
Main menu ......................................................................................................................
12
Examples on how to operate the appliance ...............................................................
13
Moving programs...................................................................................................... 13
Environmentally friendly washing.............................................................................. 15
Feedback .........................................................................................................................
15
EcoFeedback ............................................................................................................. 15
Before using for the first time..................................................................................... 16
Requirements for networking ......................................................................................
17
3. Setting the clock format............................................................................................
17
4. Removing the shipping struts ..................................................................................
18
5. Commissioning TwinDos..........................................................................................
18
Determining the water hardness............................................................................ 18
6. Starting the calibration program..............................................................................
21
1. Prepare the laundry .................................................................................................. 22
2. Selecting a program................................................................................................. 23
3. Selecting program settings .................................................................................... 24
4. Loading the washing machine............................................................................... 26
5. Adding detergent...................................................................................................... 27
Detergent dispenser drawer.........................................................................................
28
Using chlorine bleach............................................................................................... 28
Using detergent tablets or pods............................................................................. 28
Adding powder detergent........................................................................................ 29
Adding fabric softener.............................................................................................. 29
CapDosing.......................................................................................................................
30
6. Starting a program ................................................................................................... 32
Adding laundry during a program sequence (AddLoad) ...........................................
32
7. Program end............................................................................................................... 33
Spin cycle........................................................................................................................ 34
Program guide................................................................................................................ 36
Extra options .................................................................................................................. 43
SingleWash......................................................................................................................
43
Eco....................................................................................................................................
43
2

Contents
SoftSteam ......................................................................................................................
43
Extra Gentle.....................................................................................................................
43
Pre-wash..........................................................................................................................
43
Soak..................................................................................................................................
43
ExtraRinse........................................................................................................................
43
AllergoWash ....................................................................................................................
43
Rinse Hold .......................................................................................................................
43
Wash program overview – extra options................................................................. 44
Favorite programs ......................................................................................................... 45
Program sequence........................................................................................................ 46
Changing the program sequence .............................................................................. 49
Changing a program (safety lock) ................................................................................
49
Interrupting a program...................................................................................................
49
Canceling a program......................................................................................................
49
Washing assistant......................................................................................................... 50
Timer................................................................................................................................ 51
SmartStart.......................................................................................................................
51
Detergent........................................................................................................................ 52
Detergents recommended............................................................................................
52
Replacing the TwinDos cartridge .............................................................................. 53
Cleaning and care ......................................................................................................... 54
Cleaning the housing and control panel......................................................................
54
Cleaning the detergent dispensing drawer.................................................................
54
Cleaning the drum (hygiene info).................................................................................
57
TwinDos maintenance...................................................................................................
57
Cleaning the water-inlet filter.......................................................................................
58
Frequently asked questions........................................................................................ 59
A wash program cannot be started .............................................................................
59
Fault message after a program has been interrupted ...............................................
59
Fault message after the end of the program ..............................................................
60
Messages or faults affecting the TwinDos system ...................................................
61
General problems with the washer..............................................................................
63
Poor wash results...........................................................................................................
64
The drum door cannot be opened ...............................................................................
65
Opening the door in the event of a blocked drain outlet and/or power outage ....
66
Customer Service ......................................................................................................... 68
Contact in the event of a fault......................................................................................
68
Optional accessories .....................................................................................................
68
3

Contents
Appliance warranty and product registration .............................................................
68
Installation...................................................................................................................... 69
Front view........................................................................................................................
69
Rear view .........................................................................................................................
70
Installation surface.........................................................................................................
71
Dimensions .....................................................................................................................
71
Transporting the washing machine to its installation site ........................................
71
Removing the transport safety device ........................................................................
72
Installing the shipping struts ........................................................................................
73
Leveling the machine .....................................................................................................
74
WTV502 .........................................................................................................................
75
WTV512 ..........................................................................................................................
79
Additional installation requirements............................................................................
84
Mounting the washing machine on the WTS510 base ...........................................
85
The water protection system........................................................................................
95
Water intake....................................................................................................................
95
Water drainage................................................................................................................
96
Installing the elbow .................................................................................................. 96
Electrical connection .....................................................................................................
97
Connection adapter for NEMA 14-30 socket ...................................................... 97
Technical data................................................................................................................ 98
Settings ........................................................................................................................... 99
Selecting settings...........................................................................................................
99
Changing a setting..........................................................................................................
99
Closing the Settings menu............................................................................................
99
Controls / Display .......................................................................................................
99
Language ................................................................................................................ 99
Code ........................................................................................................................... 100
Memory...................................................................................................................... 100
Clock display ............................................................................................................. 100
Volume ....................................................................................................................... 100
Display Brightness.................................................................................................... 100
Temperature unit....................................................................................................... 100
“Display” off status .................................................................................................. 101
Program sequence .........................................................................................................
101
TwinDos ..................................................................................................................... 101
Soiling......................................................................................................................... 101
Maximum rinse level ................................................................................................ 101
Soak duration ............................................................................................................ 101
Extra Gentle............................................................................................................... 101
Anti-crease ................................................................................................................ 102
Bleach......................................................................................................................... 102
4

Contents
Network ...........................................................................................................................
102
Miele@home............................................................................................................. 102
SmartGrid .................................................................................................................. 103
Remote Control......................................................................................................... 103
RemoteUpdate.......................................................................................................... 103
Appliance parameters....................................................................................................
104
Legal Information...................................................................................................... 104
Copyrights and licenses for operator and control software ............................... 104
Copyrights and licenses for the communication module ................................... 104
Water intake .............................................................................................................. 105
Installation requirements ..............................................................................................
105
Low water pressure .................................................................................................. 105
Suds cooling .............................................................................................................. 105
Temperature reduction............................................................................................. 105
5

Help protect our environment
6
Disposal of the packing material
The cardboard box and packing
materials protect the appliance during
shipping. They have been designed to
be biodegradable and recyclable.
Ensure that any plastic wrappings, bags,
etc. are disposed of safely and kept out
of the reach of children. Danger of
suffocation!
Disposal of your old appliance
Electrical and electronic appliances
contain valuable materials. They also
contain certain substances, compounds
and components which were essential
for the proper functioning and safe use
of the equipment. Handling these
materials improperly by disposing of
them in your household waste can be
harmful to your health and the
environment. Therefore, please do not
dispose of your old appliance with
regular household waste and follow
local regulations on proper disposal.
Consult with local authorities, dealers or
Miele in order to dispose of and recycle
electrical and electronic appliances.
Miele assumes no responsibility for
deleting any personal data left on the
appliance being disposed. Please
ensure that your old appliance is kept
away from children until removal.
Observe safety requirements for
appliances that may tip over or pose an
entrapment hazard.

IMPORTANT SAFETY INSTRUCTIONS
WARNING
To reduce the risk of fire, electric shock or injury to persons while
using your appliance follow basic safety precautions, including the
following:
Read all instructions before using the appliance.
GROUNDING INSTRUCTIONS
This appliance must be grounded. In the event of a malfunction or
breakdown, grounding will reduce the risk of electric shock by
providing a path of least resistance for electric current. This appliance
is equipped with a cord having an equipmentgrounding conductor
and a grounding plug. The plug must be plugged into an appropriate
outlet that is properly installed and grounded in accordance with all
local codes and ordinances.
WARNING - Improper connection of the equipment-grounding
conductor may result in a risk of electric shock. Check with a
qualified electrician if you are in doubt as to whether the appliance is
properly grounded.
Do not modify the plug provided with the appliance - if it will not fit
the outlet, have a proper outlet installed by a qualified electrician.
Do not install or use a washer with visible damage.
Do not install or store this appliance where it will be exposed to
the weather.
Do not install your washing machine where temperatures below
freezing may occur. Frozen hoses may burst under pressure. The
reliability of the electronic control unit may be impaired at
temperatures below freezing.
Before connecting the machine, ensure that the connection data
on the data plate (fusing, voltage and frequency) match the mains
electrical supply. If in doubt contact an electrician.
Do not use an extension cord to connect this appliance to the
power supply. Extension cords do not guarantee the required safety
of the appliance (e.g. danger of overheating).
This appliance is not designed for maritime use or for use in mobile
installations such as recreational vehicles or aircraft. However, under
certain conditions it may be possible for an installation in these
applications. Please contact the Miele Service Dept. with specific
requirements.
7

IMPORTANT SAFETY INSTRUCTIONS
Do not repair or replace any part of the appliance or attempt any
servicing unless specifically recommended in these operating
instructions.
If the power cord is damaged it must only be replaced by a Miele
Service technician with a genuine Miele power cord.
Under certain conditions, hydrogen gas may be produced in a hot
water system that has not been used for 2 weeks or more.
HYDROGEN GAS IS EXPLOSIVE. If the hot water system has not
been used for such a period, turn on all hot water faucets and let the
water flow from each for several minutes before using the washing
machine. This will release any built-up hydrogen gas. Do not smoke
or use an open flame during this time, the gas is flammable.
Before the appliance is removed for service or discarded, remove
the door.
Use
Do not allow children to play on or in the appliance. Close
supervision is necessary when the appliance is used near children.
The drum door glass will be hot when washing at very high
temperatures. Do not touch the glass. Danger of burns! Keep children
away from the washer when in use.
Only use the washing machine to wash items which are specified
by the manufacturer to be machine washable on the fabric care label.
Any other applications may be dangerous.
Do not wash articles that have been previously cleaned, washed,
soaked or spotted with gasoline, dry-cleaning solvents or other
flammable substances. These articles give off vapors that could ignite
or explode. Do not add these items to the wash load.
Do not add gasoline, dry-cleaning solvents, or other flammable or
explosive substances to the wash water. These substances give off
vapors which could ignite or explode.
Do not use cleaning solvents on or near the machine or the
controls. Contact with cleaning solvents will damage the surface..
Do not reach into the appliance if the drum is moving.
Do not tamper with the controls.
8

IMPORTANT SAFETY INSTRUCTIONS
SAVE THESE INSTRUCTIONS
Miele tumble dryers and Miele washing machines can be installed
as a washer-dryer stack. A Miele washer-dryer stacking kit is required
as an optional accessory for this. Please ensure that the washer-
dryer stacking kit is suitable for the Miele tumble dryer and the Miele
washing machine.
If installing the machine on a Miele plinth (available as an optional
accessory), please make sure you order the correct one for this
washing machine.
Should detergent enter the eyes, rinse out immediately with plenty
of lukewarm water. If accidentally ingested, seek medical advice
immediately. People who have sustained damage to the skin or who
have sensitive skin should avoid contact with the detergent.
Be careful when opening the door following use of the steam
function. There is a danger of burning due to escaping steam and the
high temperature of the surface of the drum as well as the porthole
glass. Step back and wait until the steam has dissipated.
The maximum dry laundry weight is 17.6 lb (8 kg). See the
“Program guide” for the maximum recommended loads for individual
programs.
Temporary or permanent operation on an autonomous power
supply system or a power supply system that is not synchronized
with the grid power supply (e.g., island networks, back-up systems) is
possible. A prerequisite for operation is that the power supply system
complies with national and local codes.
The function and operation of the protective measures provided in
the domestic electrical installation and in this Miele product must
also be maintained in isolated operation or in operation that is not
synchronized with the grid power supply, or these measures must be
replaced by equivalent measures in the installation.
This washing machine is supplied with a special lamp to cope with
particular conditions (e.g., temperature, moisture, chemical
resistance, abrasion resistance, and vibration). This special lamp
must only be used for the purpose for which it is intended. It is not
suitable for room lighting. Replacement lamps may only be fitted by a
Miele authorized person or by Miele Technical Service.
9

IMPORTANT SAFETY INSTRUCTIONS
FCC Declaration of Conformity
These devices comply with FCC Rules Part15. This equipment has
been tested and found to be in compliance with the limits for a
ClassB digital device, pursuant to Part15 of the FCC Rules of
Operation and is subject to the following conditions:
These devices may not cause harmful interference.
These devices must accept any interference received, including
interference that may cause undesired operation.
FCC Radiation Exposure Statement
This equipment complies with FCC radiation exposure limits set
forth for an uncontrolled environment. This equipment should be
installed and operated with minimum distance 8" (20cm) between
the radiator and your body.
Industry Canada Statement
This digital apparatus does not exceed the ClassB limits for Radio
Noise Emissions from digital apparatus set out in the Radio
Interference Regulations of the Canadian Department of
Communications.
Complies with Canadian ICES-003 ClassB specifications.
California Proposition 65
WARNING
This product can expose you to chemicals mineral oils
1
, Nickel
(Metallic)
1
, Diisononyl phthalate (DINP)
1
and Di-isodecyl phthalate
(DIDP)
2
, which are known to the State of California to cause
1
cancer and
2
birth defects or
2
other reproductive harm.
For more information go to www.P65Warnings.ca.gov.
10
Operating the washing machine
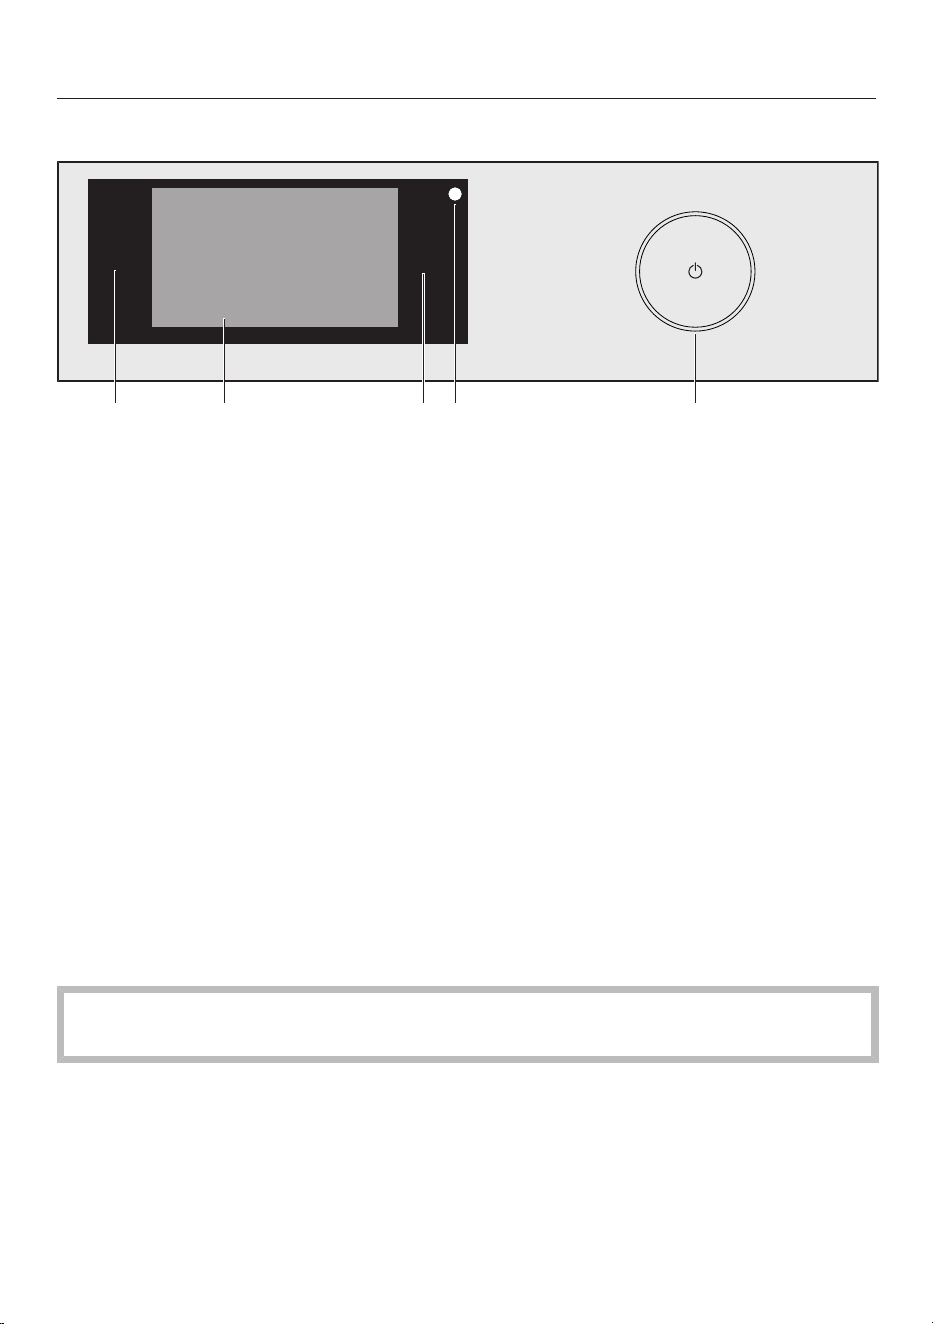
Control panel
Start/Stop
a
sensor button
Takes you back one level in a menu.
b
Touch display
c
Start/Stopsensor button
Touching the Start/Stopsensor button starts the selected program or cancels a
program that has already been started. The program can be started as soon as
the sensor button is flashing on and off. The sensor button lights up constantly
once the program has started.
d
Optical interface
This is used by the Service department as a transmission point.
e
button
For switching the washing machine on and off. To save energy, the washing
machine will switch off automatically. This occurs 15minutes after the end of
the program/anti-crease phase, or after being switched on if no further selection
is made.
Touch display and sensor buttons
The and Start/Stopsensor buttons and the sensor buttons in the display react
to finger tip contact.
The touch display can be scratched by pointed or sharp objects, e.g., pens.
Only touch the display with your fingers.
11

Operating the washing machine
12
Main menu
After switching on the washing
machine, the main menu will appear in
the display.
You can access all the important
submenus from the main menu.
Touch the sensor button at any time
to return to the main menu. Values set
previously are not saved.
11:02
Programs Favorites MobileStart
Help
Main menu page 1
You can scroll to the second page of the
main menu by swiping your finger
across the display.
11:02
Wash
Assistant
Maintenance Settings
Help
Main menu page 2
The symbol next to the time of day is
displayed when the washing machine is
connected to a network.
Programs
You can select the various wash
programs.
Favorites
You can save up to 12 of your own
customized wash programs (see
“Favorites”).
MobileStart
MobileStart enables you to operate your
washing machine remotely with the
Miele app.
The Remote controlsetting must be
switched on.
Touch the MobileStartsensor button and
follow the instructions in the display.
Wash Assistant
The Wash Assistant provides a step-by-
step guide to selecting the optimum
wash program for your laundry (see
“Washing assistant”).
Maintenance
Maintenance options for the TwinDos
system and the Clean Machineprogram
are located in the Maintenancemenu
(see “Cleaning and care”).
Settings
You can alter the washing machine’s
electronics to suit changing
requirements in the Settingsmenu (see
“Settings”).

Operating the washing machine
13
Examples on how to operate the
appliance
Option lists
Programsmenu (single selection)
11:02
1:57
2:43
1:39
1:04
h
h h
h
Normal
Delicates
Wrinkle-free
Programs
Help
Sanitize
You can scroll to the right or the left by
swiping your finger across the screen.
Place your finger on the touch display
and swipe it in the direction you want.
The orange scroll bar under the pictures
shows that there are further options to
choose from.
To select a wash program, touch a
program name.
The display will change to the standard
menu for that program.
Extrasmenu (multiple selection)
11:02
SingleWash
Eco
SoftSteam
Extras
OK
Gentle
You can scroll to the right or the left by
swiping your finger across the screen.
Place your finger on the touch display
and swipe it in the direction you want.
The orange scroll bar under the pictures
shows that there are further options to
choose from.
To select Extras, touch one or more
sensor buttons with Extras.
Currently selected Extras are
highlighted orange.
To deselect an Extra, simply touch the
Extrasensor button again.
Touch the OKsensor button to activate
all selected Extras.
Moving programs
You can move the programs around in
the menu to change the sequence in
which they are displayed.
11:02
2:39
3:19
1:59
1:09h
h h
h
Normal
Delicates
Wrinkle-free
Programs
Help
ECO 40-60
Place your finger on the program you
wish to move until a border is
displayed around it.
To move the program, swipe your
finger in the required direction.
Remove your finger when the program
reaches the new location.
The program has moved.

Operating the washing machine
14
Setting numerical values
You can set numerical values in some
menus.
12
11 59
10 58
01 01
02 02
Clock display
OK
pm
00
Enter the numbers by swiping upward or
downward. Place your finger on the
number that you want to change and
move your finger in the direction you
want. Touch the OKsensor button to
accept the set numerical value.
Tip: Briefly touching the numbers will
bring up the numerical keypad. Once a
valid number has been entered, the
OKsensor button will be highlighted
green.
Pull-down menu
The pull-down menu can be used to
display information, e.g., about a wash
program.
11:02
2:15
Normal
h
Overview
Temperature Spin speed
TwinDos Extras
not selectednot selected
Timer Save
Warm
Maximum
Touch the top edge of the screen in the
middle and drag down with your finger.
Help display
Help appears along the bottom line of
the display in the main menu and the
Programs menu.
Touch the Helpsensor button to
display the text.
Touch the Closesensor button to
return to the previous screen.
Exiting a menu
Tap the sensor button to return to
the previous screen.
Entries made before this which have not
been confirmed withOK will not be
saved.

Environmentally friendly washing
15
Energy and water consumption
- Make use of the maximum load that
the wash program can accommodate.
This will keep the energy and water
consumption to a minimum in relation
to the size of the load.
- When smaller amounts of laundry are
washed, the washing machine’s
automatic load control system will
reduce the amount of water and
energy used.
- Use the Express program for small,
lightly soiled loads.
- Modern detergents make it possible
to wash at lower temperatures. Using
the corresponding temperature
settings will save energy.
- Washing at low temperatures and/or
using liquid detergents can cause
bacteria and odors to build up in the
washing machine. Miele therefore
recommends cleaning the washing
machine once every month.
The washing machine provides you
with a reminder with the message
Hygiene info: Select “Maintenance” and
run the “Clean Machine” program. in the
display.
Detergent consumption
- Use the TwinDos system for exact
dispensing.
- Adjust the dosage to the level of
soiling of the laundry.
- Do not exceed the amounts of
detergent recommended on the
packaging.
- Only use high efficiency detergent
with the following label:
When drying with a tumble dryer
Select the highest possible spin speed
for the wash program to save energy in
the subsequent tumble dryer cycle.
Feedback
EcoFeedback
You can call up information about the
energy and water consumption of your
washing machine with the
EcoFeedbacksensor button.
An estimate of the energy and water
consumption before the program
begins.
Estimate
The estimated energy and water
consumption levels will be displayed
as a bar chart on the right-hand side.
The more bars visible, the higher the
energy or water consumption.
The estimate will vary depending on the
wash program, temperature, and any
extra options selected.
Before using for the first time
16
Damage from incorrect
installation and connection.
Installing and connecting the
washing machine incorrectly will
cause serious damage to property.
See “Installation”.
This washing machine has undergone a
complete functional test at the factory
and some residual water will therefore
remain in the drum from this process.
Removing the protective film
and stickers
Remove:
- any protective film from the door
- any stickers from the front and from
the lid
Please do not remove any labels (e.g.,
the data plate) which are visible
when you open the door.
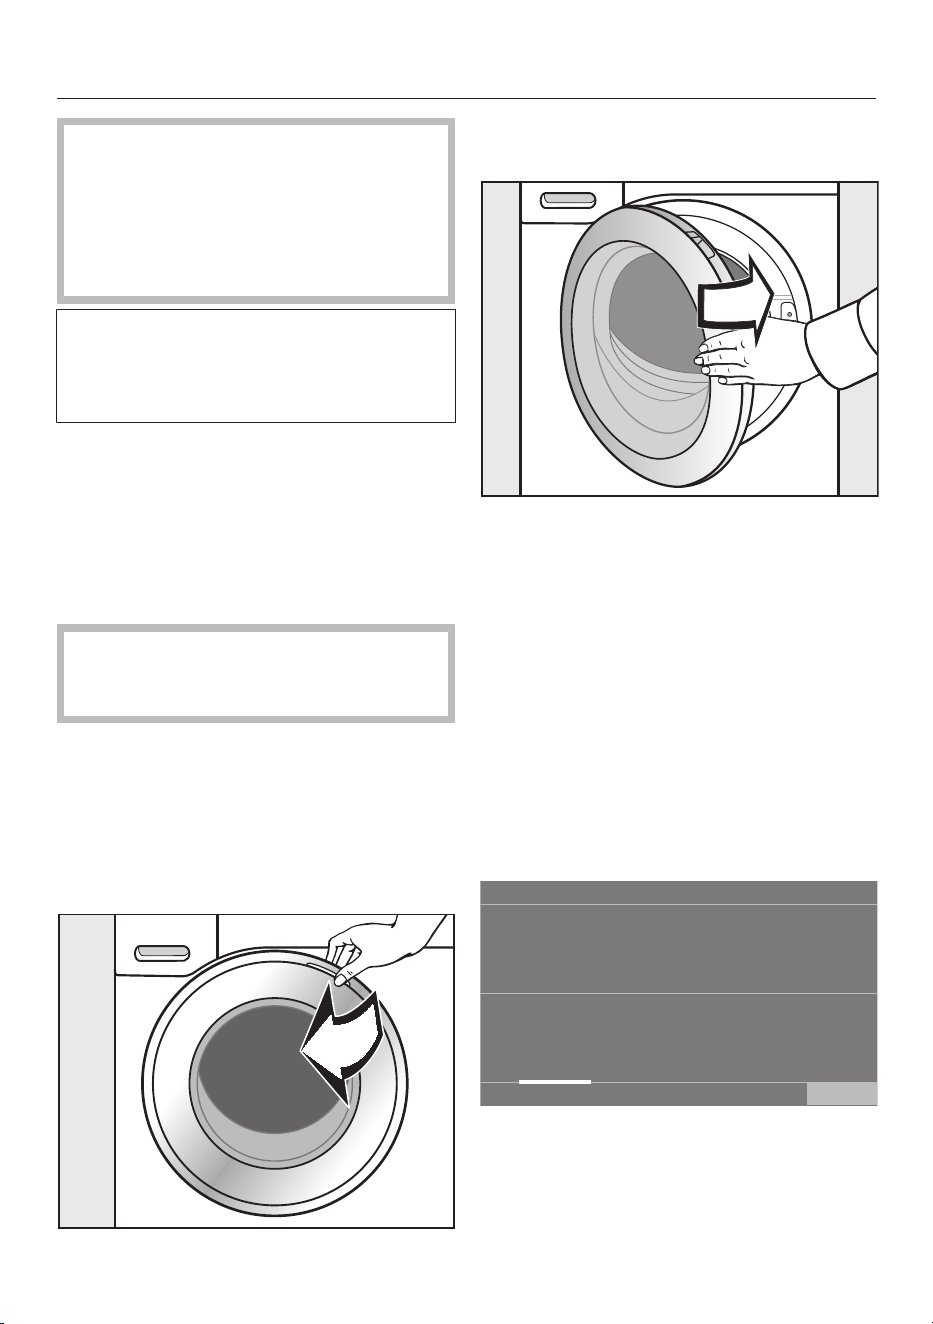
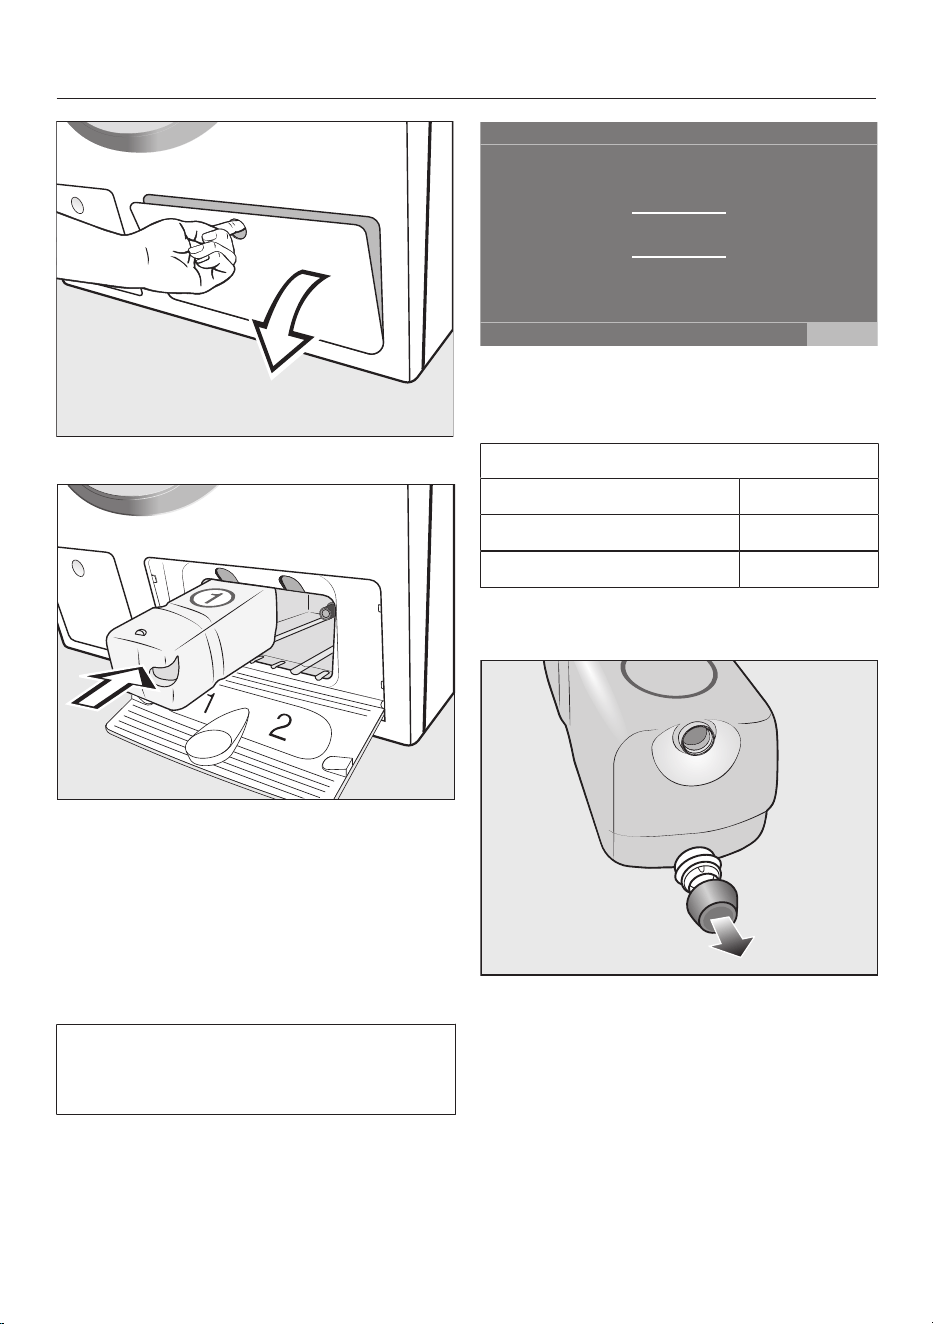
Remove the detergent
cartridges and the drain hose
elbow from the drum
Two detergent cartridges for automatic
detergent dispensing and an elbow piece
for the drain hose are stored in the drum.
Pull open the door.
Take the two cartridges and the elbow
piece out of the drum.
Shut the door.
Switching on the washing
machine
Press the button.
The welcome screen will light up.
The display will guide you through the
6steps of the initial commissioning.
1. Setting the display text
You will be asked to set the display
language. It is possible to change the
language at any time via the Settings
menu.
english (GB)
Language
english (US)
español
français (F)
français (CA)
hrvatski
OK
Scroll to the left or the right until the
language you want appears.
Touch the sensor button for the
language you want.

Before using for the first time
17
The selected language will be
highlighted in orange and the display will
change to the menu for setting up
Miele@home.
Requirements for networking
Note the following requirements for
networking:
1. A home network is available at the
installation site.
Have the Wi-Fi password ready.
2. The Miele app is available on a
mobile device.
3. You have a user account in the Miele
app.
Miele App
The Miele App is available to download
free of charge from the Apple App
Store
®
or from the Google Play Store™.
2. Setting up Miele@home
Skip
Continue
Set up “Miele@home”?
To set up Miele@home now: touch
the Continuesensor button.
Tip: To postpone setup until later: touch
the Skipsensor button. The following
message will then appear in the display:
It is possible to set up later in in
“Settings” / “TwinDos”.
Confirm with theOKsensor button.
Via WPS Via App
Which connection method do you
want to use?
Select the connection method you
wish to use.
You will then be guided by the display
and the Miele app.
3. Setting the clock format
The time of day can be displayed in 12-
hour or 24-hour clock format.
Select the clock format you want and
confirm this with the OKsensor
button.
The display will then bring up the screen
for setting the time of day.
Setting the time
This message only appears if the
washing machine has not yet been
connected to a WiFi network.
The time is set automatically when a
connection is established with a WiFi
network.
Before using for the first time
18
12
11 59
10 58
01 01
02 02
Clock display
OK
pm
00
Place your finger on the number that
you want to change and move your
finger in the direction you want.
Confirm with the OKsensor button.
4. Removing the shipping struts
Damage resulting from failure to
remove the shipping struts.
Failure to remove the shipping struts
can result in damage to the washing
machine and to adjacent cabinetry or
appliances.
Remove the shipping struts as
described in “Installation and
connection”.
Touch the OKsensor button to
confirm that the shipping struts have
been removed.
The following message will then appear
in the display:
Remove shipping struts and observe the
“Important Safety Instructions” and “Before
using for the first time” in the Operating
Instructions..
Confirm the message with the
OKsensor button.
The display will then change to the
screen for setting up TwinDos.
5. Commissioning TwinDos
Skip Continue
Set up “TwinDos”?
Touch the Continuesensor button to
set TwinDos up right away.
Tip: To postpone setup until later: touch
the Skipsensor button. The following
message will then appear in the display:
It is possible to set up later in in
“Settings” / “TwinDos”. Confirm with the
OKsensor button.
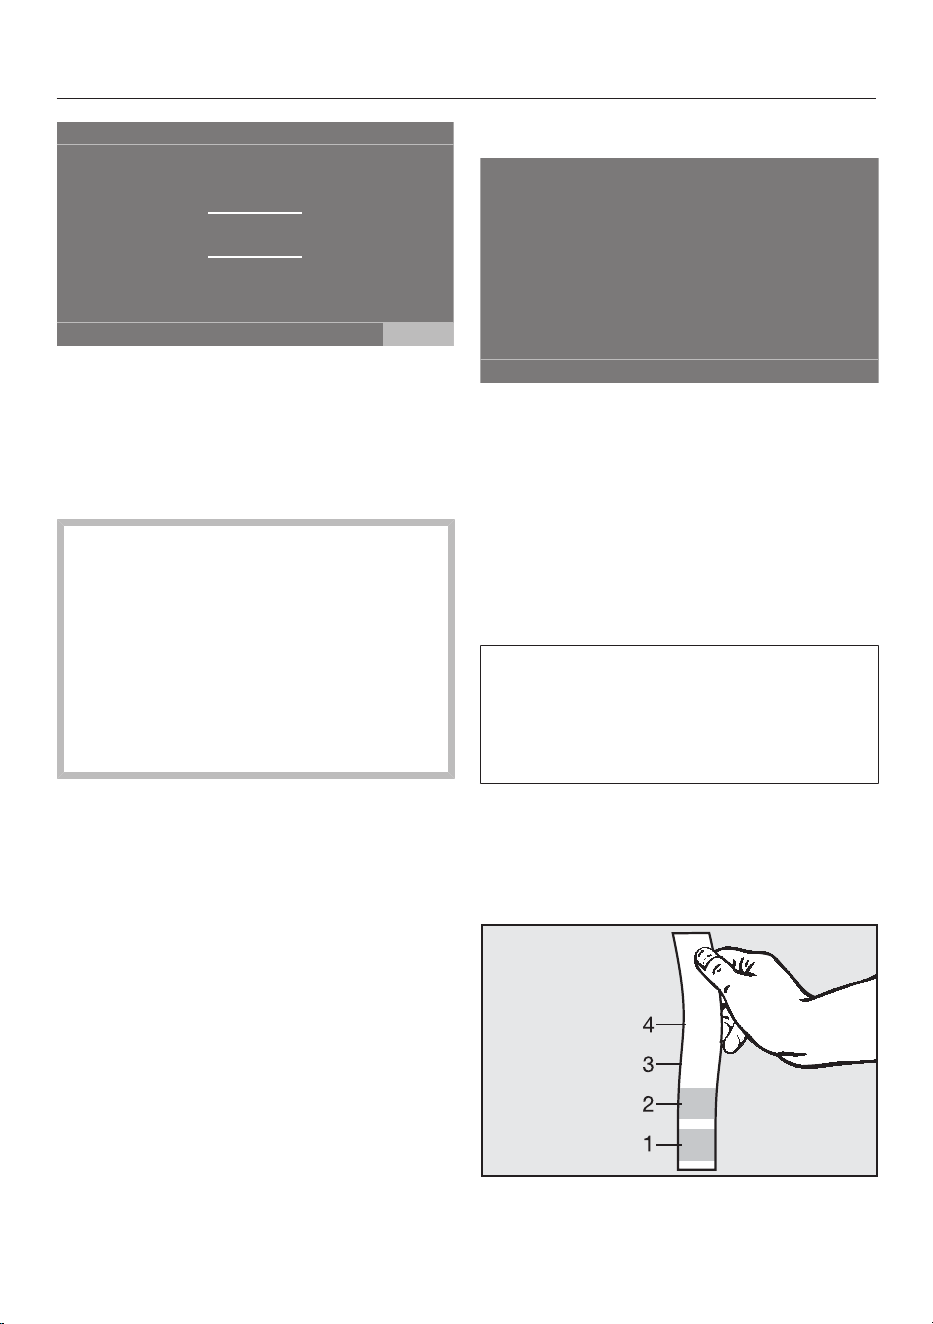
Determining the water hardness
Water hardness is an indication of the
amount of minerals dissolved in water.
The more minerals in the water, the
higher the water hardness and more
detergent must be dispensed.
Tip: You can measure the water
hardness yourself using the enclosed
test strip. Alternatively, your local water
authority will be able to tell you the
hardness of water in your area.
Dip the test strip in the water for
approx. 1second. Shake excess water
off the test strip.
Before using for the first time
19
After approx. 1minute, and based on the
coloration, you will be able to read the
water hardness from the table below.
Test strip Hardness range
4green areas Hardness level I
1red area
2red areas Hardness level II
3red areas Hardness level III
4red areas
Settings for compartment
The procedure for Miele UltraPhase 1
and Miele UltraPhase 2 is described
below.
No agent
Agent for comp.
Miele
UltraPhase 1
OK
11:02
Touch the Miele UltraPhase 1sensor
button.
The following message will then appear
in the display:
Please enter the dosage recommendation
of your detergent for a wash with normal
soiling. Note your water hardness level.
The dispensing quantity for
UltraPhase1 for (hardness level I)
is pre-set.
46
45
44
47
48
Dosage for comp.
ml
OK
11:02
Confirm the pre-set value with the
OKsensor button, or change the
value.
UltraPhase1
Hardness level I 46ml
Hardness level II 58ml
Hardness level III 70ml
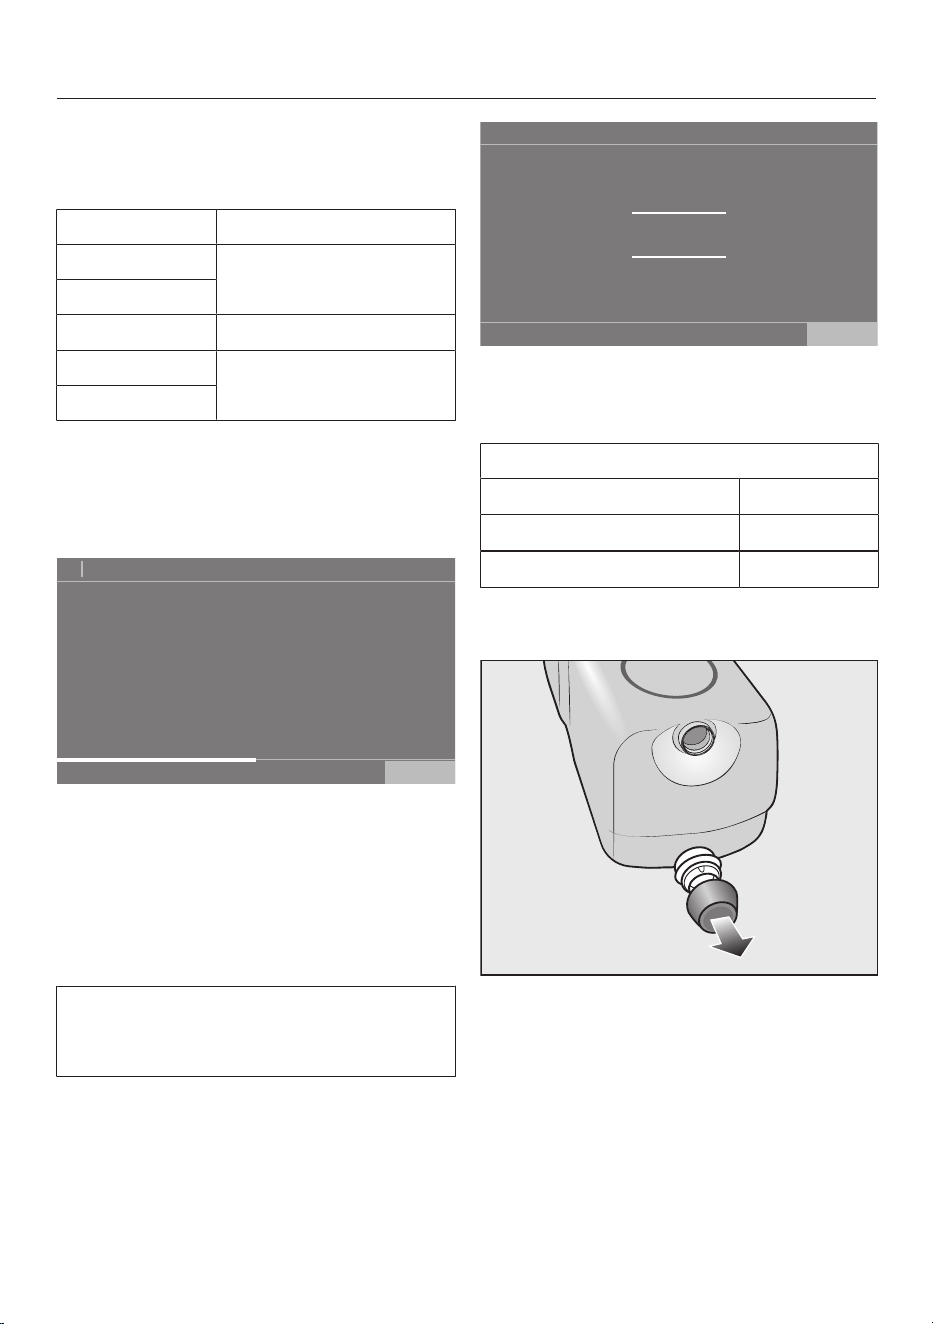
The following will appear in the display:
Insert container
Remove the cover cap from the
UltraPhase1 detergent cartridge
included with the delivery.
Before using for the first time
20
Open the TwinDos flap.
Push the UltraPhase1 detergent
cartridge into compartment1 until it
locks into position.
The following message will appear in the
display:
Now enter the settings for UltraPhase 2.
Settings for compartment
The dispensing quantity for
UltraPhase2 for (hardness level I)
is pre-set.
36
35
34
37
38
Dosage for comp.
ml
11:02
OK
Confirm the pre-set value with the
OKsensor button, or change the
value.
UltraPhase2
Hardness level I 36ml
Hardness level II 45ml
Hardness level III 54ml
The following will appear in the display:
Insert container
Remove the cover cap from the
UltraPhase2 detergent cartridge
included with the delivery.
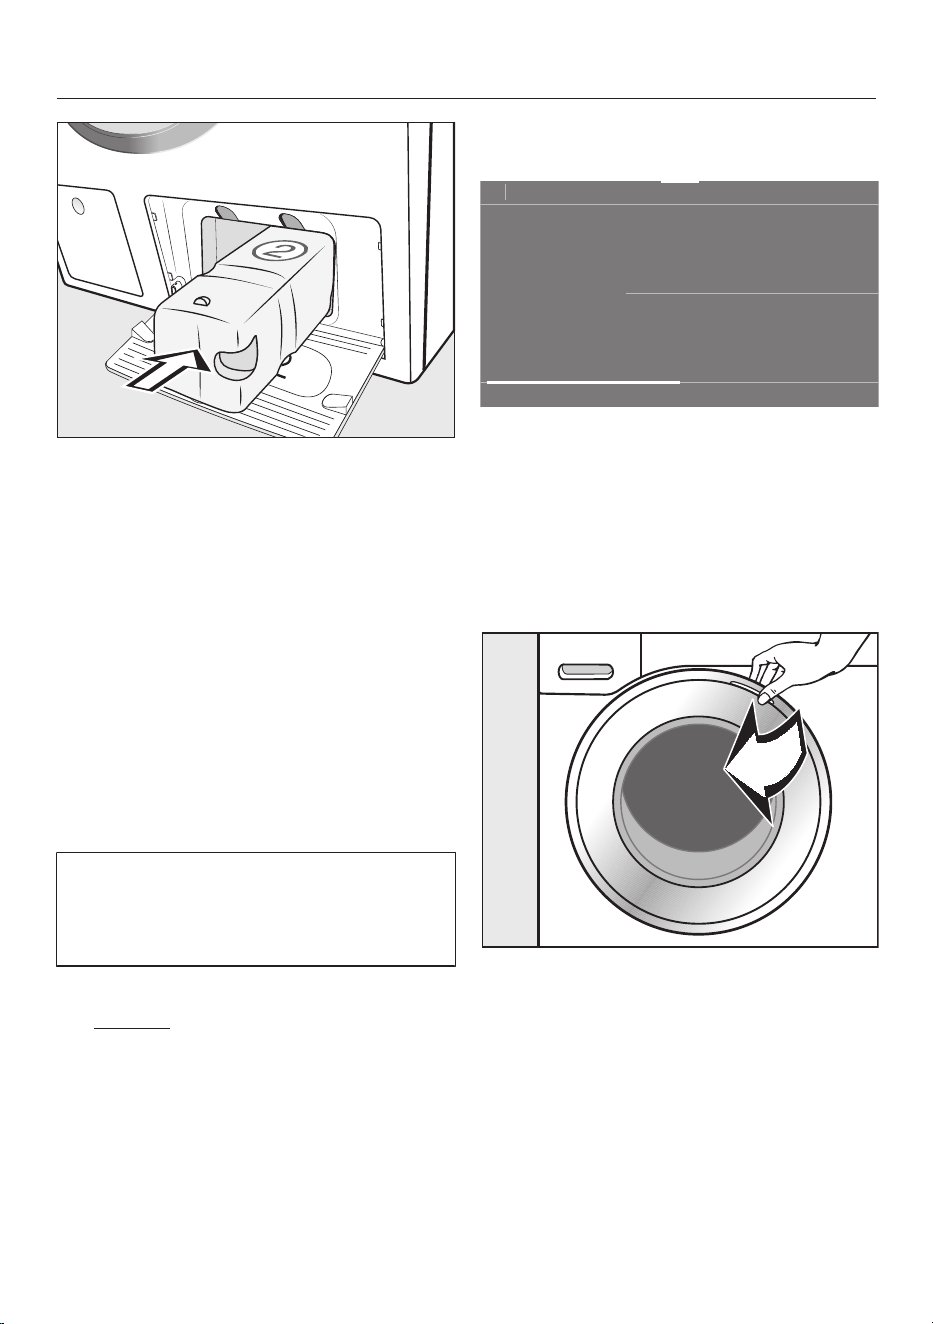
Before using for the first time
21
Push the UltraPhase2 detergent
cartridge into compartment2 until it
locks into position.
When the cartridge is pushed in, the
message in the display changes to:
“TwinDos” is set up. Corrections can be
made in “Settings” / “TwinDos”.
Confirm with the OKsensor control.
Close the TwinDos flap.
The display will then change to the
calibration program.
6. Starting the calibration
program
For optimum water and energy
consumption and excellent wash
results, it is important to calibrate the
washing machine.
To do this, the Normalprogram must be
run without laundry.
No other programs can be started until
calibration has been carried out.
The following message will then appear
in the display:
Open the water supply and start the
Normal program with an empty drum
Confirm with the OKsensor button.
The display will then change to the
standard menu for the Normalprogram.
11:02
1:57
Normal
h
Overview
Temperature Spin speed
TwinDos Extras
not selectedWhites
Timer Save
Hot plus Maximum
Touch the Start/Stopsensor button.
The washing machine calibration
program has started. It will take
approximately 2hours.
At the end of the program, the following
message will appear in the display:
Set up completed
Take hold of the door and pull it open.
Tip: Leave the door slightly open to
allow the drum to dry.
Switch the washing machine off with
the button.
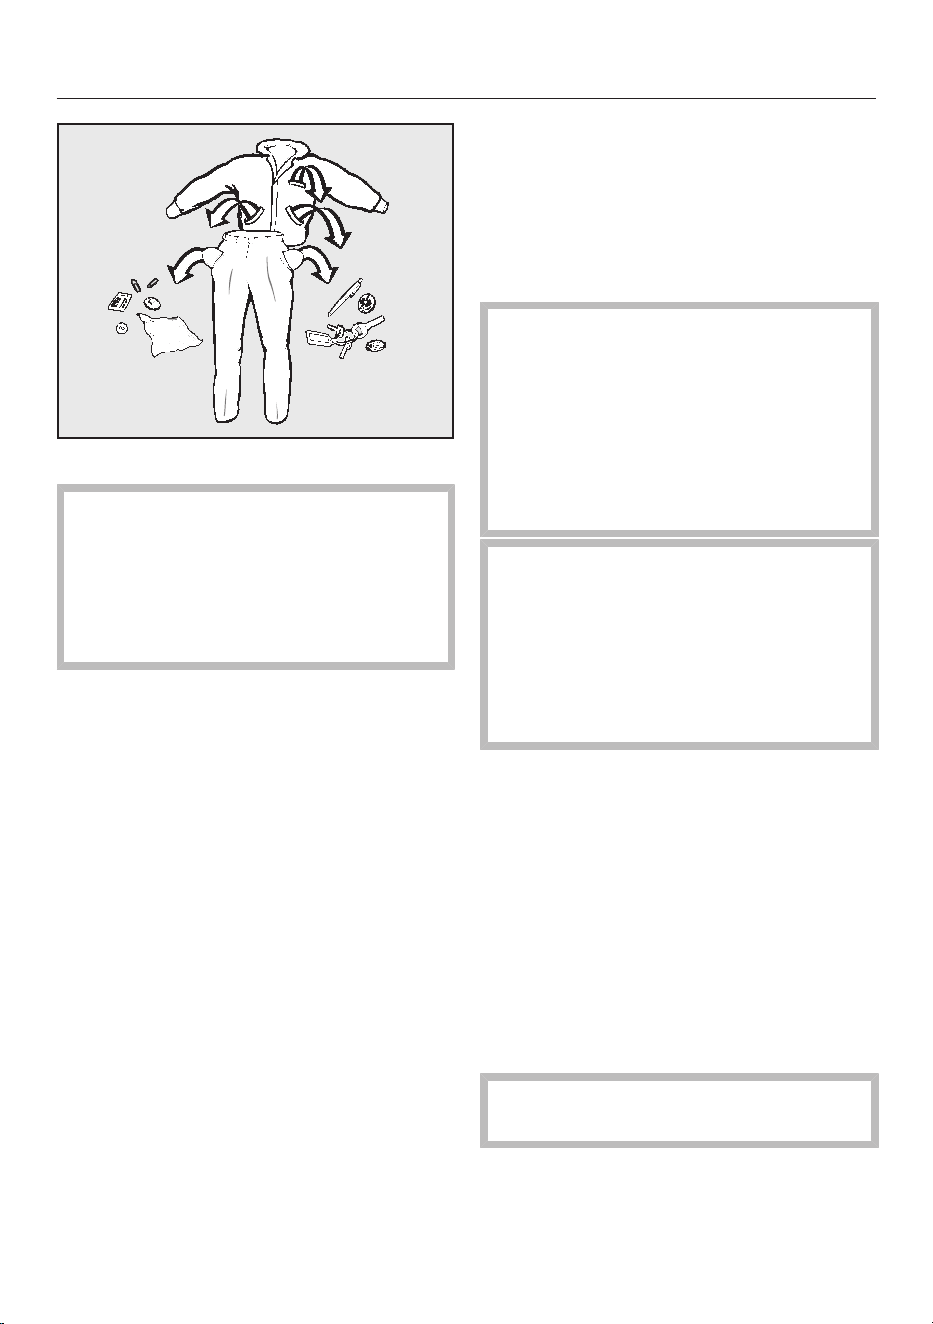
1. Prepare the laundry
22
Empty all pockets.
Damage due to foreign objects.
Nails, coins, paper clips, and so on
can cause damage to garments and
components in the machine.
Check the laundry before washing
and remove any such foreign objects.
Sort the laundry
Only wash items that are labeled
machine washable by the manufacturer.
Most garments have a fabric care label
in the collar or side seam.
Sort the laundry by care label and
color.
Tip: Dark fabrics often bleed the first
few times they are washed. They should
be washed separately several times
before being included in a mixed load.
Pre-treating stains
Badly soiled areas and stains should
be cleaned as soon as possible,
preferably while still fresh. Stains
should be carefully dabbed off using a
soft cloth. Do not rub!
Tip: Stains (such as blood, egg, coffee,
and tea) can be pre-treated using some
handy tricks which can be found in the
Miele guide to laundry care. Please
contact Miele directly or submit a
request via Internet page to obtain or
view a copy of this manual.
Damage due to solvent-based
cleaning agents
Cleaning agents containing benzine,
stain remover, etc., can damage
plastic parts.
When pre-treating a stain, make sure
that plastic parts do not come into
contact with cleaning agents.
Risk of explosion due to solvent-
based cleaning agents.
When using solvent-based cleaning
agents, an explosive mixture may
develop.
Never use solvent-based cleaning
agents in the washing machine.
General tips
- Curtains: Remove any lead weights or
strips before washing.
- Loose bra underwires should be
removed or sewn in place before
washing.
- Close zippers, hooks and eyelets
before washing.
- Comforter covers and pillowcases
should be fastened to prevent small
items from rolling inside of them.
Do not wash items with the
symbol on the fabric care label.

2. Selecting a program
23
Switching on the washing
machine
Press the button.
The drum lighting will come on.
The drum lighting goes out
automatically after 5minutes.
Tip: To switch the drum lighting on
again, open the pull-down menu from
the Overview menu and then touch the
sensor button.
The main menu will then appear in the
display.
Selecting a program
Touch the Programssensor button.
11:02
1:57
2:43
1:39
1:04
h
h h
h
Normal
Delicates
Wrinkle-free
Programs
Help
Sanitize
Scroll to the right in the display until
the program you want appears.
Touch the sensor button for that
program.
The display will change to the
Overviewmenu.
11:02
1:57
Normal
h
Overview
Temperature Spin speed
TwinDos Extras
not selectedWhites
Timer Save
Warm plus Maximum
There are 3additional ways of
selecting a program.
1. Favorites
2. Washing assistant
3. MobileStart

3. Selecting program settings
24
Selecting a temperature
You can alter the pre-set temperature
of a wash program.
The temperatures reached inside the
washing machine might not be the
same as the temperatures selected.
Perfect wash results are achieved
through a combination of energy use
and wash duration.
Touch the Temperaturesensor button.
Select the temperature you want.
The display will change to the
Overviewmenu.
Selecting a spin speed
You can alter the pre-set spin speed of
a wash program.
Touch the Spin speedsensor button.
Select the spin speed you want.
The display will change to the
Overviewmenu.
Activating TwinDos
TwinDos dispensing is automatically
activated on all programs in which
dispensing is possible.
1. Switch TwinDos on or off
Touch the TwinDossensor button and
select Off or On.
2. Set the color of the laundry
Select Whites for loads of white items,
or Colors for loads containing colored
items.
3. Select the degree of soiling
The display will ask you to enter the
degree of soiling of the laundry.
Select Light, Normal, or Heavy.
Confirm your selection with the
OKsensor button.
Automatic dispensing is now switched
on.
The display will change to the
Overviewmenu.
See “5. Adding detergent – TwinDos”
for more information.

3. Selecting program settings
25
Selecting extra options
You can supplement the wash
programs with extra options.
Touch the Extrassensor button.
Select one or more extra options.
Not all extra options can be used with
every program, e.g., AllergoWash, Gentle,
and Extra Silent. Extra options that
cannot be combined are grayed out
and cannot be selected.
Confirm with the OKsensor button.
The display will change to the
Overviewmenu.
See “Extra options” for more
information.
Activating CapDosing
You can use CapDosing with this wash
program.
Touch the CapDosingsensor button.
The types of capsules which can be
used with the program will appear in the
display.
Select the type of capsule you want.
CapDosing is now active.
The display will change to the
Overviewmenu.
See “5.Adding detergent – CapDosing”
for more information.
Selecting stains
In order to clean stained laundry more
effectively, you can choose from a list
of various types of stains. The wash
program will then adapt to the type of
stain selected.
Touch the Stainssensor button.
Select the types of stains in your load
from the list.
Confirm your selection with the
OKsensor button.
With some stains, helpful information
will also appear in the display when they
are selected.
Confirm the information with the
OKsensor button.
The display will change to the
Overviewmenu.
Timer
You can use the timer to set the finish
time or the start time for a wash
program.
See “Timer” for more information.
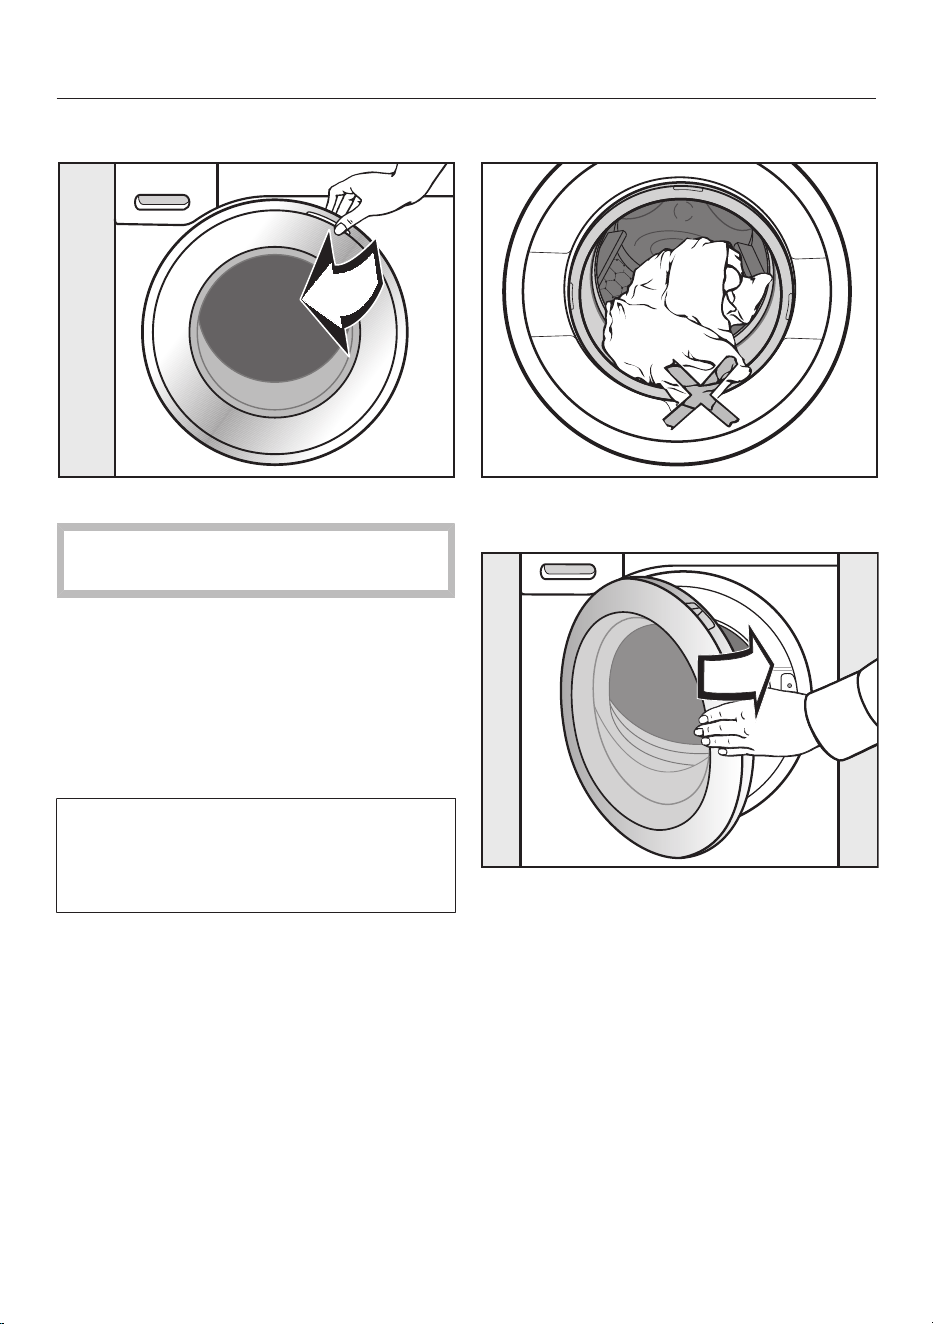
4. Loading the washing machine
26
Opening the door
Take hold of the door and pull it open.
Check the drum for pets or foreign
objects before loading it with laundry.
The most efficient use of energy and
water is achieved when a full load is
washed. However, do not overload as
this reduces cleaning efficiency and
causes creasing.
Unfold the laundry and load loosely
into the drum.
Mixing both large and small items
gives better wash results and also
helps distribute the load evenly during
spinning.
Tip: The maximum load size for the
program selected will appear in the pull-
down menu.
Closing the door
Make sure that no items are caught
between the door and the seal.
Shut the door with a gentle swing.

5. Adding detergent
27
There are several options for adding
detergent to the washing machine.
The washing machine is equipped with
the TwinDos system.
TwinDos has to be activated as
described in “Before using for the first
time”.
The TwinDos system can only be
operated with the Miele UltraPhase1
and UltraPhase2 Detergents.
How UltraPhase1 and UltraPhase2
work
UltraPhase1 is a liquid detergent which
dissolves dirt and removes the most
common stains. UltraPhase2 is a
bleaching agent and removes stubborn
stains. For the best washing result,
these two agents are dispensed at
separate times during the washing
process. UltraPhase1 and UltraPhase2
clean white and colored textiles
thoroughly. UltraPhase1 and
UltraPhase2 single use cartridges are
available to order from your Miele dealer
or via Miele online store.
Activating TwinDos dispensing
TwinDos dispensing is automatically
activated on all programs in which
dispensing is possible.
Tip: The detergent dispensing quantities
are pre-set. If too much foam builds up,
the dispensing quantity for UltraPhase1
and UltraPhase2 can be reduced via
Settings TwinDos.
Changing TwinDos dispensing
You can change the suggested color
composition of the laundry.
Touch the TwinDossensor button and
select the color composition of your
laundry.
Deactivating TwinDos dispensing
Touch the TwinDossensor button.
Touch the Offsensor button.
Using other methods to remove stains
If you use additional methods of stain
removal, you have the following options:
- using the Booster capsule and
activating the CapDosing
- adding stain remover to the
compartment in the detergent
dispenser drawer
Degree of soiling
The degree of soiling in laundry is
divided into 3settings:
- Light
No visible soiling or stains
- Normal
Visibly soiled and/or just a few slight
stains
- Heavy
Heavily soiled and/or stains clearly
visible
The dispensing amount for TwinDos and
the amount of water required for rinsing
is pre-set for theNormal degree of
soiling.
Touch the TwinDossensor button to
select a different degree of soiling.
The amount of detergent and water will
be adjusted to suit the selected degree
of soiling.
Some programs will not let you set the
degree of soiling. These programs are
designed for lightly soiled laundry only.
5. Adding detergent
28
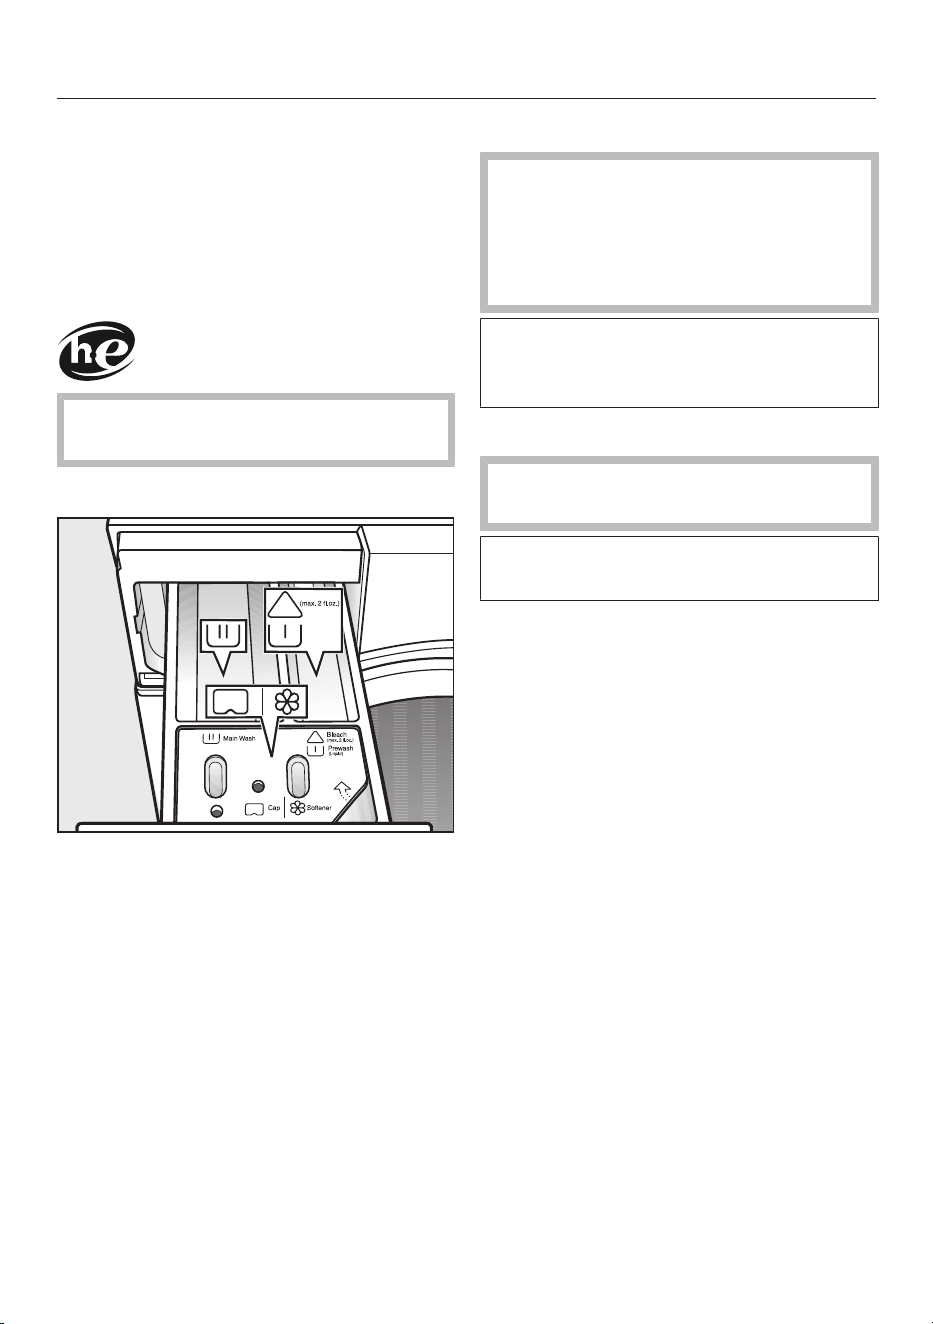
Detergent dispenser drawer
This washing machine requires high
efficiency detergent. Adhere strictly to
the dispensing amounts supplied by the
detergent manufacturer. The detergents
must be marked with the following
label:
Ensure that TwinDos dispensing is
deactivated.
Filling with detergent
Pull out the detergent drawer and add
detergents to the compartments.
Chlorine bleach for removing
stains or liquid detergent for the
pre-wash
Detergent for the main wash and
soaking
Fabric softener, liquid starch, or
capsules
Using chlorine bleach
Damage due to chlorine bleach.
Textiles may be discolored or their
fibers damaged.
Only use chlorine bleach on suitable
textiles.
Chlorination must be activated in the
settings before chlorine bleach is first
used.
Dispensing bleach
Follow the manufacturer's
instructions on the packaging.
The Pre-wash extra option must not
be selected.
Pour max. 1/4 cup (60ml) of bleach
into the chamber.
The bleach is added automatically
10minutes before the end of the main
wash.
Bleach may be used in the following
programs:
- Normal
- Sanitize
- Wrinkle-free
- Dress Shirts
- Extra White
- Table Linens/Drapes
- Baby Clothes
Using detergent tablets or pods
Always put detergent tablets or pods
directly in the drum with the laundry.
They cannot be added via the detergent
dispenser drawer.
5. Adding detergent
29
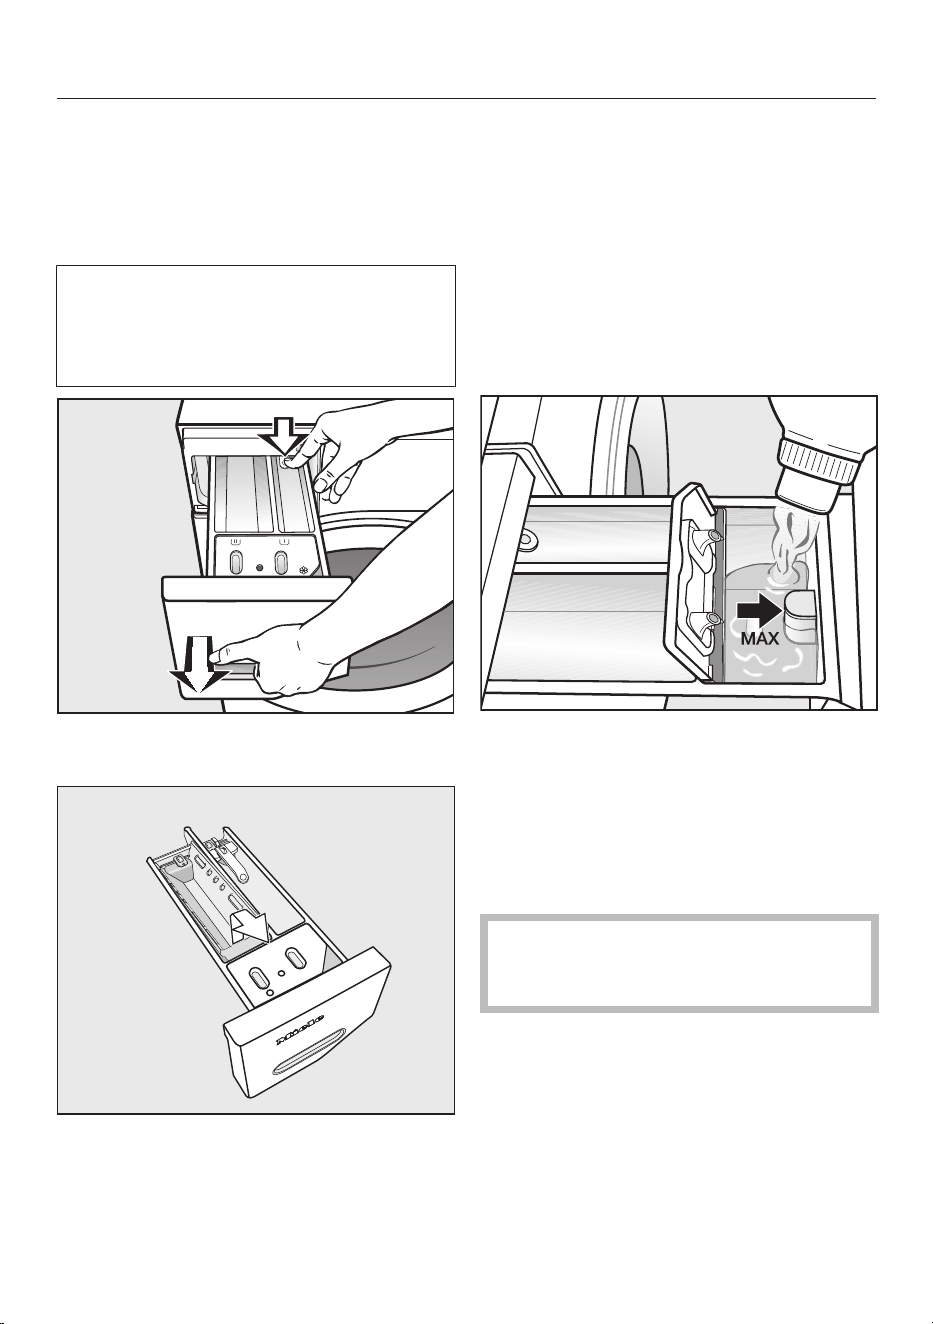
Adding powder detergent
The detergent dispenser drawer
contains an insert for liquid detergent in
the compartment. This insert must
be removed to use powder detergent.
It is not possible to use powder
detergent in the compartment.
A pre-wash cannot be carried out
when using powder detergent.
Remove the detergent dispenser
drawer.
Remove the insert for liquid
detergents from the
compartment.
Replace the detergent dispenser
drawer.
Add powder detergent to the
compartment.
Tip: Reinsert the insert into the
detergent dispenser drawer before next
using liquid detergent.
Tip: Use TwinDos dispensing if you
want to run a program with the Pre-
wash extra option.
Adding fabric softener
Add the fabric softener or the liquid
starch to the compartment. Do not
exceed the maximum level mark.
It will be automatically dispensed in the
final rinse cycle. At the end of the
program, a small amount of water
remains in the compartment.
If starching frequently, clean the
dispenser compartment, especially
the siphon, regularly.
Tips for dispensing
Adjust the detergent dosage to the level
of soiling of the laundry and the
maximum load. Reduce the amount of
detergent with smaller loads (e.g.,
reduce the amount of detergent by ⅓
when washing a half load).
5. Adding detergent
30
Too little detergent:
- The laundry is not cleaned properly
and may become gray and hard to the
touch over time.
- Can lead to a build-up of bacteria in
the washing machine.
- Grease is not completely removed
from the laundry.
- Can lead to limescale deposits on the
heater elements.
Too much detergent
- Poor wash, rinse, and spin results.
- Causes higher water consumption as
an extra rinse cycle is automatically
activated.
- A greater burden on the environment.
See “Detergent” for more information
about detergents and how much to
dispense.
CapDosing
If you selected CapDosing when setting
the program, detergent will be
dispensed via the capsule for this wash
program.
Only one capsule can be selected per
wash program.
3 different types of capsule are
available:
= Fabric care (e.g., fabric
softener, proofing agent)
= Additives (e.g., detergent
enhancers)
= Detergent (for the main wash
only)
Depending on the setting selected, the
detergent, additive, or fabric care agent
will be dispensed via the capsule.
Each capsule contains the correct
amount for one wash cycle.
Capsules are available to order from
Miele’s online store, Miele Customer
Service, or your Miele dealer.
Capsules pose a health risk.
The ingredients of capsules can be
hazardous to health if they are
swallowed or come into contact with
skin.
Keep capsules out of the reach of
children.
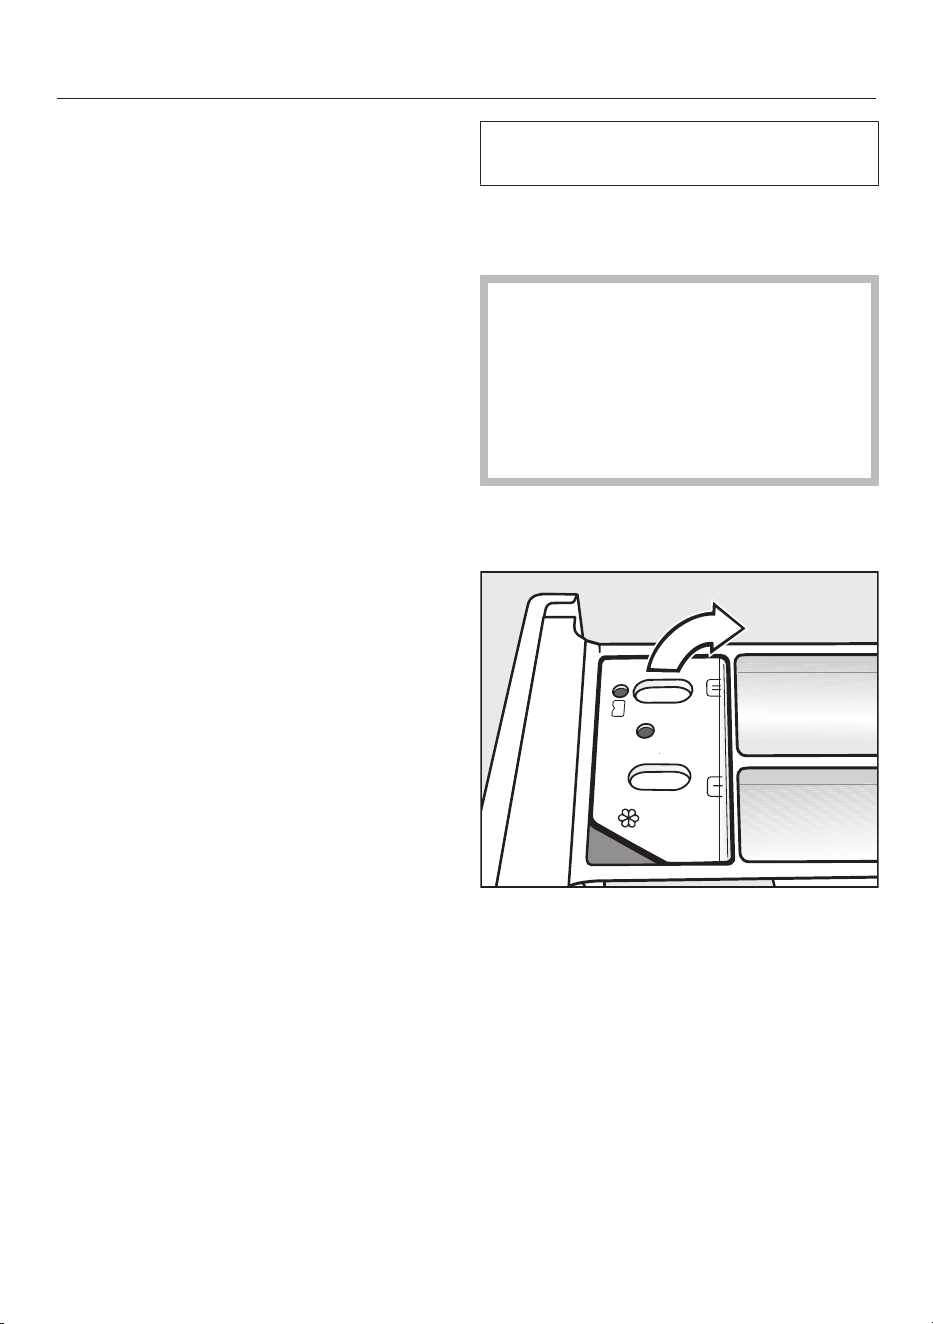
Inserting a capsule
Open the detergent dispenser drawer.
Open the lid of the /
compartment.
5. Adding detergent
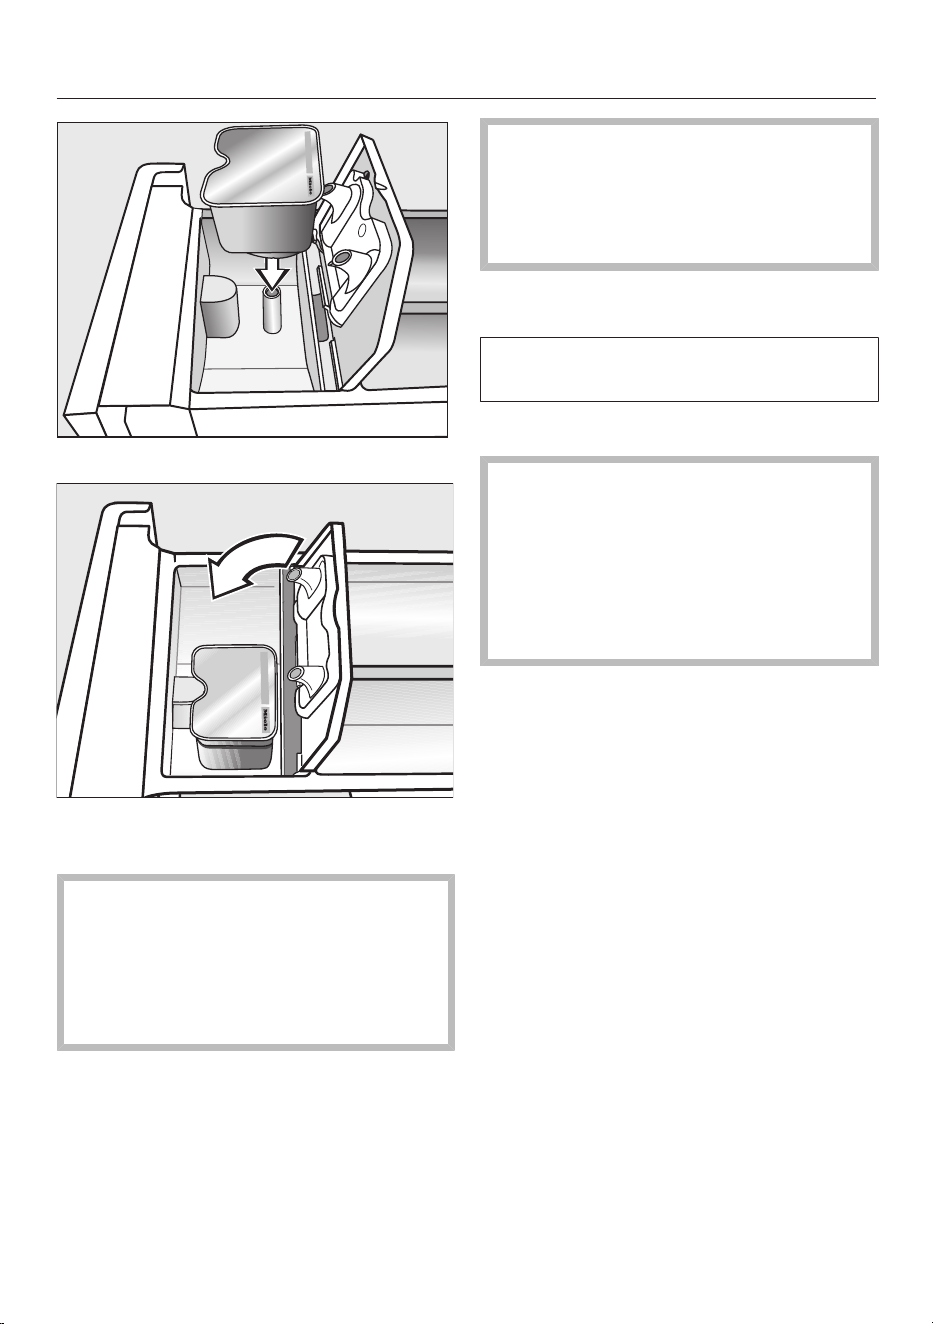
31
Press the capsule in firmly.
Close the lid and press it firmly shut.
Close the detergent dispenser drawer.
The capsule is opened by the act of
inserting it in the detergent dispenser
drawer. The contents can run out of
the capsule if you then remove it
from the drawer before it is used.
Dispose of opened capsules.
The contents of the capsule will be
added to the wash program at the
correct time.
During CapDosing, water intake to
the compartment takes place
solely via the capsule.
Do not add any additional fabric
softener to the compartment.
Remove the empty capsule at the end
of the wash program.
For technical reasons, a small amount
of water will remain in the capsule.
Color run and dye removers
Damage due to color run/dye
removers.
Color run and dye removers can
cause corrosion in the washing
machine.
Do not use color run or dye removers
in the washing machine.
Dyes suitable for use in domestic
washing machines can be used.
However, please note that the salt used
in the dyeing process can cause
corrosion to stainless steel components
in the machine if you use dye frequently.
Always observe the dye manufacturer’s
instructions carefully.

6. Starting a program
32
Starting a program
The program can be started when the
Start/Stopsensor button is flashing on
and off.
Touch the Start/Stopsensor button.
The door will lock and the wash program
will start.
The program status will appear in the
display.
11:02
Normal
Status
Time left
h1:57
Main wash
Add laundry
The washing machine will keep you
updated on the program status and the
time remaining for the program to run.
If a delay-start period has been
selected, this will count down in the
display until the program starts.
The drum lighting switches off once the
program has started.
Energy savings
After 10minutes, the indicators dim.
The Start/Stop sensor button will light
up, flashing.
You can reactivate the indicators:
Touch the Start/Stop sensor button
(this does not have any effect on a
running program).
Adding laundry during a
program sequence (AddLoad)
Laundry can be added or removed at
any time.
Touch the Add laundrysensor button.
The following appears in the display:
Please wait
The program will stop and the door will
unlock.
The following appears in the display:
11:02
Normal
Status
Add laundry
The door can be opened.
Open the door and add or remove
laundry.
Close the door.
Touch the Start/Stopsensor button.
The wash program will continue.
Laundry cannot usually be added or
removed if:
- The suds temperature is above 130°F
(55°C).
- The water inside the drum is above a
certain level.

7. Program end
33
Items left in the drum could discolor
other items in the next wash or
become discolored themselves.
Remove all items from the drum.
Check the folds in the door seal for
any foreign objects.
Tip: Leave the door slightly open to
allow the drum to dry.
Switch the washing machine off with
the button.
If applicable, remove the used
capsule from the detergent dispenser
drawer.
Tip: Leave the detergent dispenser
drawer slightly open to allow it to dry.
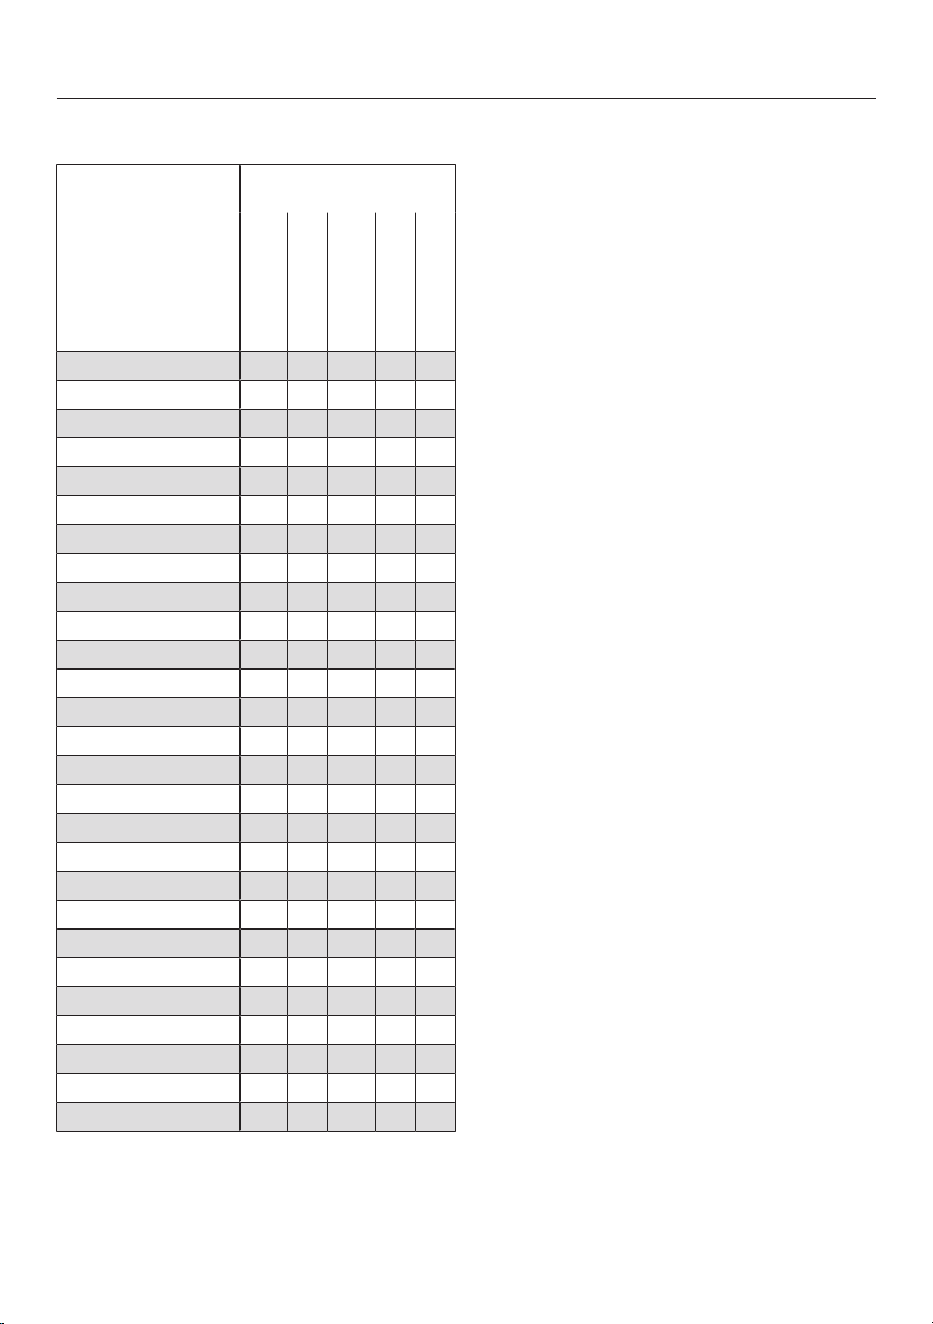
Spin cycle
34
Final spin speed
Program Selectable spin speeds
in words and numbers
Maximum
1,600rpm
High1,200rpm
Medium
800rpm
Slow600rpm
No Spin0rpm
Normal – – –
Sanitize – –
Wrinkle-free –
Delicates – –
QuickIntenseWash
Express –
Handwash –
Towels
Extra White – –
Dress Shirts – – –
Denim/Jeans –
Darks –
Woolens –
Silks – – –
Outdoor – –
Proofing –
Sportswear –
Sneakers – – –
Downs –
Pillows –
Table Linens/Drapes –
Curtains – – –
Baby Clothes
Drain/Spin
Quick Rinse
Starch
Clean Machine – – – –
= optimum spin speed for program is pre-
set
= can be selected
– = cannot be selected
Final spin speed in the wash
program
When a program is selected, the
optimum spin speed for the wash
program is always shown in the display.
A faster spin speed can be selected for
certain wash programs. The highest
selectable spin speed is indicated in the
table.
Omitting the final spin (Rinse hold)
Select the Rinse holdextra option.
If Rinse hold is selected, the laundry
remains in the water following the final
rinse cycle. This helps prevent creasing
if the laundry is not going to be removed
from the drum immediately after the
end of the program.
Ending a program with a spin cycle
The wash program is set to the
optimum spin speed. You can change
the spin speed.
Touch the Change spin speedsensor
button.
Select the spin speed you want.
Touch the Start/Stopsensor button
to start the final spin.
Ending a program without a spin cycle
Touch the Change spin speedsensor
button.
Select Spin speed 0rpm (no spin).
Touch the Start/Stopsensor button.
Rinse-spin
There is a spin cycle after the main wash
and between the rinse cycles. A
reduction in the final spin speed will
also reduce the interim spin speed as
appropriate.

Spin cycle
35
Omitting the rinse-spin and final spin
Touch the Spin speedsensor button.
Select the 0 rpm setting.
After the last rinse cycle, the water will
be pumped away and the anti-crease
phase will switch on.
An extra rinse cycle is carried out with
this setting for certain wash programs.

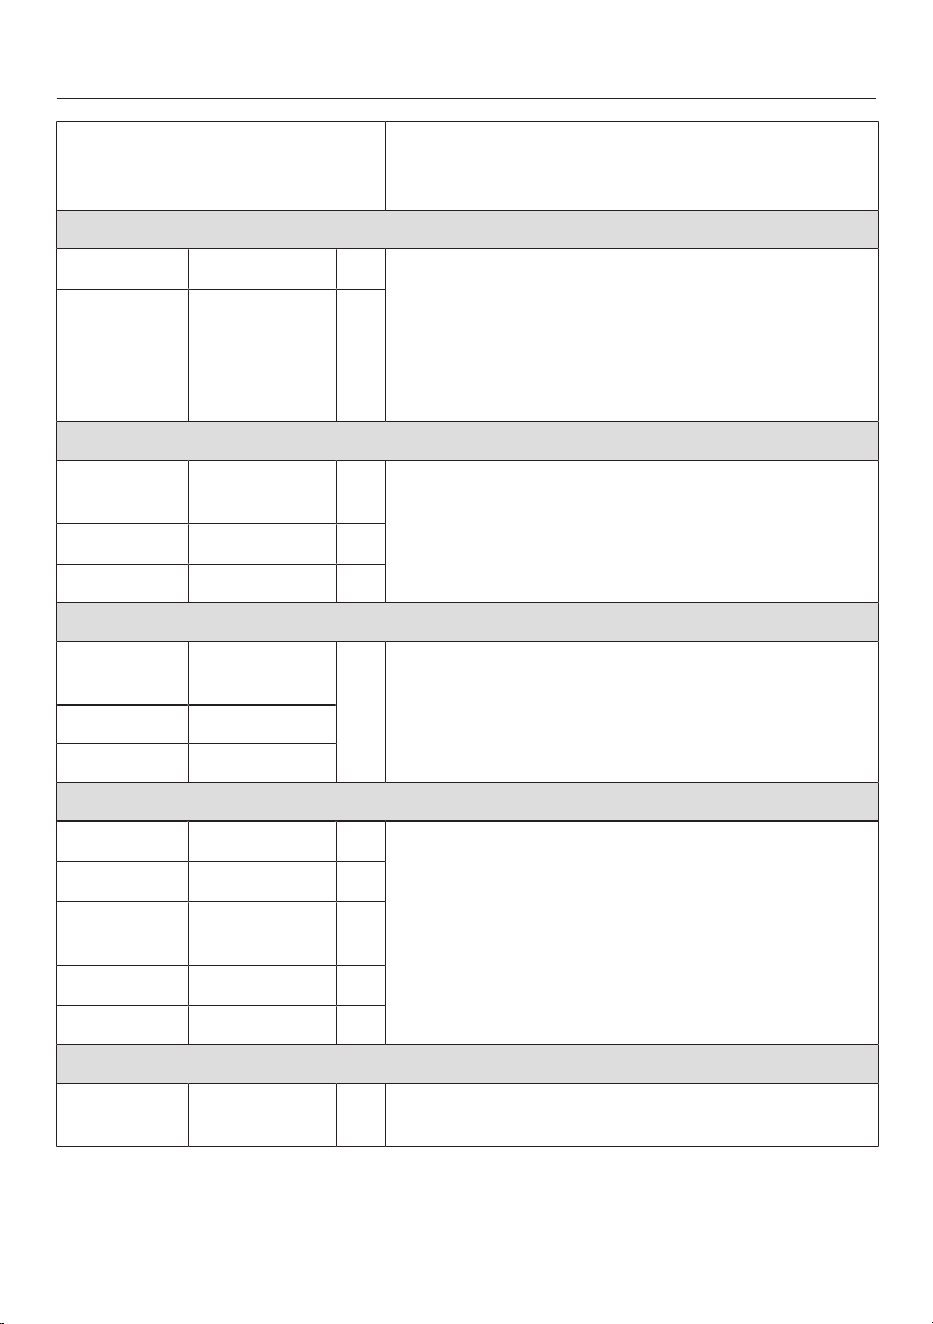
Program guide
The temperature marked with is pre-set.
Temperature
with garment care label
symbols
Item/Tip
Normal Full load (17.6lb/8kg)
Hot plus 140°F/60°C Cotton, linen, and mixed fiber textiles made of
both cotton and linen.
Hot 120°F/50°C
Warm
plus
105°F/40°C
Warm 85°F/30°C
Cold Cold
USA test program in accordance with: DOE Federal Register 10 CFR Part 430
Appendix J2 to subpart B
Canada test program in accordance with: CAN/CSA-C360-13
Sanitize Full load (17.6lb/8kg)
Sanitize 170°F/75°C Cotton or linen fabrics with direct skin contact
or for which special hygiene requirements apply.
Wrinkle-free Half load (8.8lb/4kg)
Hot plus 140°F/60°C Synthetic or mixed fiber fabric, or wrinkle-free
cotton.
Hot 120°F/50°C
Warm
plus
105°F/40°C
Warm 85°F/30°C
Cold Cold
Delicates Small load (6.6lb/3kg)
Hot plus 140°F/60°C For fine textiles made from synthetic fibers.
Hot 120°F/50°C
Warm
plus
105°F/40°C
Warm 85°F/30°C
Cold Cold
36
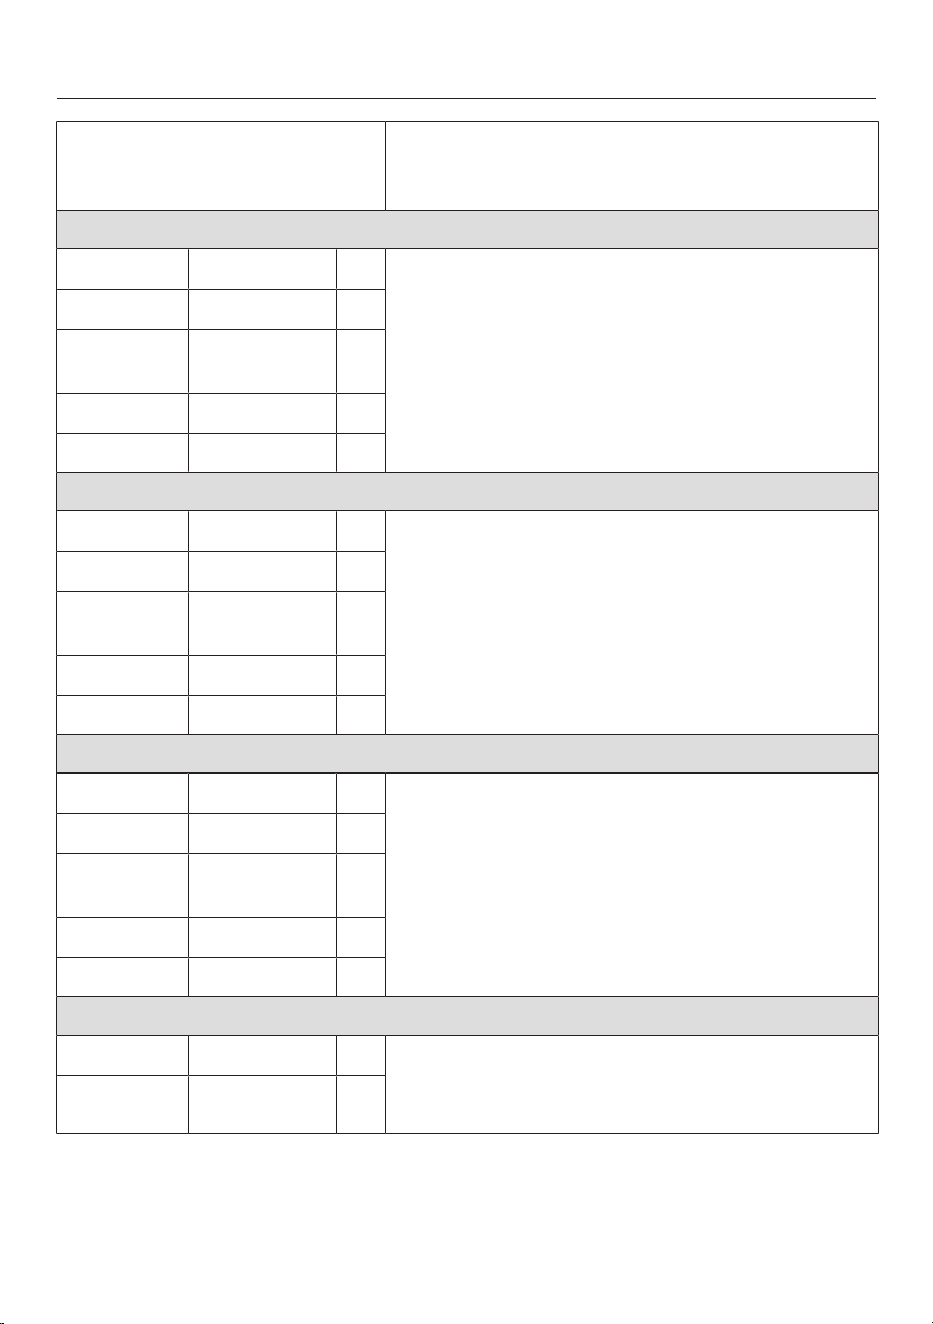
Program guide
Temperature
with garment care label
symbols
Item/Tip
QuickIntenseWash Full load (11lb/5kg)
Hot plus 140°F/60°C For lightly or moderately soiled textiles which
are also suitable for washing in the Normal
program.
A special saturation process and wash rhythm
ensure that the laundry is cleaned particularly
quickly and thoroughly.
Warm
plus
105°F/40°C
Express Half load (7.7lb/3.5kg)
Warm
plus
105°F/40°C Cotton textiles that have hardly been worn or
are only very lightly soiled.
Selecting the Light level of soiling will reduce
the washing time by 10minutes.
Warm 85°F/30°C
Cold Cold
Handwash Small load (4.4lb/2kg)
Warm
plus
105°F/40°C For fine textiles which are only suitable for hand
washing.
Warm 85°F/30°C
Cold Cold
Towels Full load (11lb/5kg)
Hot plus 140°F/60°C For linen or cotton towels used for personal
hygiene.
Hot 120°F/50°C
Warm
plus
105°F/40°C
Warm 85°F/30°C
Cold Cold
Extra White Full load (17.6lb/8kg)
Hot plus 140°F/60°C For white textiles made of cotton or linen
without special hygiene requirements.
37
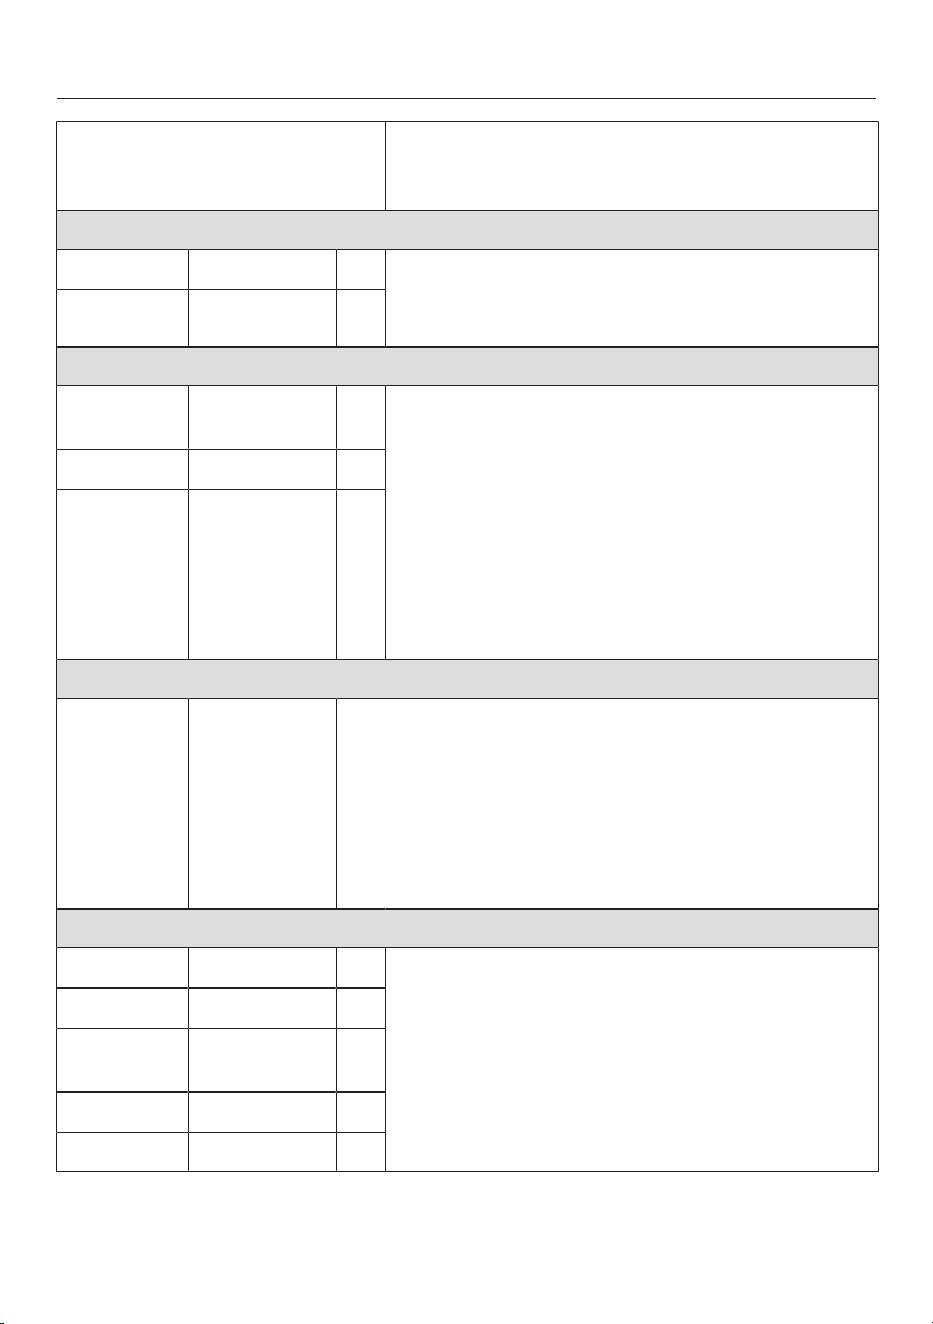
Program guide
Temperature
with garment care label
symbols
Item/Tip
Dress Shirts Small load (4.4lb/2kg)
Hot plus 140°F/60°C Pre-treat collars and cuffs depending on the
level of soiling.
Wash silk shirts and blouses in the Silks
program.
Hot 120°F/50°C
Warm
plus
105°F/40°C
Warm 85°F/30°C
Cold Cold
Denim/Jeans Small load (4.4lb/2kg)
Hot plus 140°F/60°C Textiles made from denim.
- Wash inside out.
- Denim often contains excess dye and may run
during the first few washes. Therefore, wash
light and colored items separately.
Hot 120°F/50°C
Warm
plus
105°F/40°C
Warm 85°F/30°C
Cold Cold
Darks Small load (4.4lb/2kg)
Hot plus 140°F/60°C - Wash inside out.
Hot 120°F/50°C
Warm
plus
105°F/40°C
Warm 85°F/30°C
Cold Cold
Woolens Small load (4.4lb/2kg)
Warm 85°F/30°C Wool or wool-blend textiles.
Reduce the final spin speed for items which
crease easily.
Cold Cold
38
Program guide
Temperature
with garment care label
symbols
Item/Tip
Silks Very small load (2.2lb/1kg)
Warm 85°F/30°C Silks and other hand-washable textiles with no
wool content.
Place tights, bras, etc., in a laundry bag.
Cold Cold
Outdoor Small load (5.5lb/2.5kg)
Warm
plus
105°F/40°C Performance outerwear (e.g., jackets and pants)
made from membrane fabric such as Gore-Tex®,
SYMPATEX®, WINDSTOPPER®, etc.
- Zip up or close any Velcro fasteners before
washing.
- Do not use fabric softener.
- If required, outdoor clothing can be re-proofed
in the Proofing program. Reproofing after each
wash cycle is not recommended.
Warm 85°F/30°C
Cold Cold
Proofing Small load (5.5lb/2.5kg)
Warm
plus
105°F/40°C Treating microfiber fabric, ski wear, or table linens/
drapes made from mainly synthetic fibers to provide
a finish which is resistant to water and dirt.
- The items should be freshly laundered and spun or
dried before proofing.
- For best results, the items should be heat-treated
afterwards either in a tumble dryer or by ironing.
Sportswear Half load (6.6lb/3kg)
Hot plus 140°F/60°C Sportswear such as jerseys and leggings, as
well as microfiber and fleece garments.
- Do not use fabric softener.
- Observe the instructions on the wash care
label.
Hot 120°F/50°C
Warm
plus
105°F/40°C
Warm 85°F/30°C
Cold Cold
39
Program guide
Temperature
with garment care label
symbols
Item/Tip
Sneakers Max. 2 pairs of shoes
Warm
plus
105°F/40°C Sneakers only (no leather shoes).
- Brush coarse soiling off before washing.
- Do not use fabric softener.
- Observe the instructions on the wash care label.
- Close Velcro fasteners.
- Use the dryer basket for tumble drying.
Warm 85°F/30°C
Cold Cold
Downs Small load (4.4lb/2kg)
Hot plus 140°F/60°C Jackets, sleeping bags, pillows, and other down-
filled items.
- Remove air from the laundry before washing
to prevent an excessive build-up of foam. To
do this, either push the items into a narrow
laundry bag to compress them or tie the items
together with a washable strap.
- Observe the instructions on the wash care
label.
Hot 120°F/50°C
Warm
plus
105°F/40°C
Warm 85°F/30°C
Cold 65°F/15°C
Pillows 2 pillows 16"x32" (40x80cm) or
1 pillow 32"x32" (80x80cm)
Hot plus 140°F/60°C Washable pillows with synthetic filling.
- Remove air from the laundry before washing
to prevent an excessive build-up of foam. To
do this, either push the items into a narrow
laundry bag to compress them or tie the items
together with a washable strap.
- Observe the instructions on the wash care
label.
Hot 120°F/50°C
Warm
plus
105°F/40°C
Warm 85°F/30°C
Cold 65°F/15°C
40
Program guide
Temperature
with garment care label
symbols
Item/Tip
Table Linens/Drapes Full load (13.2lb/6kg)
Hot plus 140°F/60°C Table linens and drapes made of cotton and
linen.
Hot 120°F/50°C
Warm
plus
105°F/40°C
Warm 85°F/30°C
Cold Cold
Curtains Small load (4.4lb/2kg)
Warm
plus
105°F/40°C Curtains made from synthetic fibers which have
been specified as machine-washable by the
manufacturer.
- To remove dust, the Pre-wash extra option is
selected automatically.
- For curtains which crease easily, reduce the
spin speed or deselect the spin.
- Remove weights from curtains.
Warm 85°F/30°C
Cold Cold
Baby Clothes Full load (13.2lb/6kg)
Hot plus 140°F/60°C Baby clothes, baby towels and bibs made from
cotton.
Hot 120°F/50°C
Warm
plus
105°F/40°C
Warm 85°F/30°C
Cold Cold
Drain/Spin Full load (17.6lb/8kg)
- Drain only: set spin speed to No Spin.
- Make sure you select the appropriate spin speed.
Quick Rinse Full load (17.6lb/8kg)
For rinsing hand-washed items.
Reduce the final spin speed for fabric that creases easily.
41

Program guide
Temperature
with garment care label
symbols
Item/Tip
Starch Full load (17.6lb/8kg)
Table cloths, serviettes, and workwear requiring starching.
- Reduce the final spin speed for fabric that creases easily.
- Laundry that is to be starched should be washed, but not treated with fabric
softener.
Maintenance
The washing machine has two maintenance programs.
1. Clean Machine for cleaning the washing machine.
2. Clean “TwinDos” for maintenance of the /TwinDos compartments. See
“Cleaning and care – TwinDos maintenance” for more details.
Temperature
with garment care label
symbols
Item/Tip
Clean Machine Without load
Sanitize 170°F/75°C With frequent washing at low temperatures there is a
danger of a build-up of bacteria in the washing
machine.
Cleaning the washing machine will significantly
reduce bacteria and prevent the build-up of
unpleasant odors.
- Dispense the multi-purpose detergent directly into
the drum.
- Do not load any laundry in the machine. The drum
must be empty for the maintenance wash.
42

Extra options
43
You can supplement the wash programs
with extra options.
SingleWash
For efficiently washing a very small load
(<2.2lb/1kg) in a normal wash
program. The wash duration is reduced.
Please note!
When adding detergent manually, only
use liquid detergent and use the proper
amount. Use a maximum of 50% of the
specified amount of detergent for ½
load. Bleaching is not possible.
Eco
The Eco Extra helps to save energy. The
wash temperature is reduced and the
wash duration is increased in return. The
wash program continues to provide a
deep clean.
SoftSteam
In order to reduce creasing, the laundry
undergoes a smoothing process at the
end of the program. Reducing the
maximum load by 50% will give a better
result. Please note the load information
in the display. Small loads achieve a
better result.
The garments must be suitable for
drying in a tumble dryer and
suitable for ironing .
Extra Gentle
Drum rotation and wash duration is
reduced. Lightly soiled textiles are
washed more gently.
Pre-wash
For laundry with large amounts of dirt,
e.g., dust and sand.
Pre-wash cannot be combined with
the use of chlorine bleach.
The chlorine bleach is added too
early.
Only liquid detergent may be added
to the chamber of the
detergent dispenser drawer.
Powder detergent clogs up the
chamber and water can escape from
the detergent dispenser drawer.
Soak
For heavily soiled and stained items
with protein stains.
A soak duration of between 30minutes
and 6hours in 30-minute increments
can be selected for the soak process.
See “Settings” for more information.
The factory default setting is
30minutes.
ExtraRinse
An extra rinse can be activated to
achieve a more thorough wash result.
AllergoWash
This option should be used where high
standards of hygiene are required. Energy
consumption is increased to lengthen
temperature holding times and water
consumption is increased to improve
rinsing efficiency. The items must be
suitable for drying in a tumble dryer
and suitable for ironing .
Rinse Hold
The laundry is not spun after the final
rinse and remains in the rinse water.
This helps prevent creasing if the
laundry is not going to be removed from
the drum immediately after the end of
the program.
Not all extra options can be selected
with every program. If an extra option
is not permitted for a wash program, it
will not be shown in the display. See
“Wash program overview – extra
options”.

Wash program overview – extra options
SingleWash
Eco
SoftSteam
Gentle
Pre-wash
Soak
ExtraRinse
AllergoWash
Rinse Hold
Normal ––
Sanitize
Wrinkle-free
Delicates
QuickIntenseWash – – – – – –
Express – – – – – – – –
Handwash – – – – – – –
Towels – – – – –
Extra White
Dress Shirts
Denim/Jeans
Darks
Woolens – – – – – – –
Silks – – – – – – –
Outdoor – – – –
Proofing – – – – – – – –
Sportswear –
Sneakers – – – – – – – –
Downs – – – –
Pillows – – – –
Table Linens/Drapes
Curtains – –
Baby Clothes
Drain/Spin – – – – – – – – –
Quick Rinse – – – – – – –
Starch – – – – – – – –
= Can be selected
– = Cannot be selected
44

Favorite programs
45
Creating Favorites
You can save your own customized
wash programs under names of your
choice.
Option 1
The main menu must be visible in the
display. Touch the Favoritessensor
button.
The display will change to show the
Favorites menu.
Touch the Createsensor button.
The display will change to the Create
Favoritemenu.
Select the program you want to use.
Select all the program settings you
want.
Then select Save.
Enter a name.
Option 2
You can save a program which has been
selected as a Favorite program before
you start it.
Before the program starts, touch the
Savesensor button.
Enter a name.
If 12 Favorites have already been
saved, the Create or Savesensor
button will not be visible. Delete an
existing Favorite if you wish to create a
new one.
Entering a name
It is best to select short names.
Tap the letters or characters you
want.
Confirm with the Savesensor button.
The wash program will then be saved to
the Favorites program list.
Changing a Favorite program
You can rename, delete, or move a
Favorite program.
Select the Favoritessensor button
from the main menu.
Touch the Favorite program that you
wish to change until the context menu
opens.
Select Rename, Delete, or Move.

Program sequence
Main wash Rinses Spin cycle
Water
level
Wash
rhythm
Water
level
Rinses
Normal 2-3
1,2
Sanitize 3-4
1,2
Wrinkle-free 2-4
1,2
Delicates 2-4
1,2
QuickIntenseWash 2
Express 2
Handwash 2
Towels 2-5
1,2
Extra White 2-5
1,2
Dress Shirts 3-4
2
Denim/Jeans 2-4
1,2
Darks 3-5
1,2
Woolens 2
Silks 2
Outdoor 3-4
2
Proofing – 1
Sportswear 2-3
2
Sneakers 2
Downs
3
3-4
2
Pillows
3
3-4
2
Table Linens/Drapes 2-3
1,2
Curtains 3-4
2
Baby Clothes 2-3
1,2
Drain/Spin – – – –
Quick Rinse – – 2
Starch – –
Please see the next page for a description of the symbols.
46

Program sequence
47
= low water level
= medium water level
= high water level
= intensive rhythm
= normal rhythm
= sensitive rhythm
= ultra sensitive rhythm
= handwash rhythm
= carried out
– = not carried out
This washing machine has fully
electronic controls with automatic load
control. The washing machine takes in
the right amount of water required for
the program depending on the amount
of laundry and its absorbency rate.
The program sequences outlined in the
chart are based on the basic program
with a full load.
Special features in the program
sequence
Anti-crease:
At the end of the program, the drum
continues to turn at intervals for up to
30 minutes to help prevent creasing.
Exception:There is no anti-crease phase
in the Normal, Woolens, Silks
and Handwash programs.
The washing machine can be opened at
any time.
1
An additional rinse is carried out if:
- there is too much foam in the drum
- a spin speed lower than Medium
(800rpm) has been selected.
2
An additional rinse is carried out if the
ExtraRinse extra option has been
selected.
3
Run-up to spin: A run-up to spin is
carried out before the wash process
begins to deflate down-filled items.
Subsequent water intake for the main
wash is through compartment .

Program sequence
48
PowerWash
PowerWash is a washing technique
developed by Miele. It is activated in the
following programs:
- Normal (with small and medium load
sizes)
- Wrinkle-free
- Dress Shirts
- Delicates
How it works
Conventional washing techniques wash
with more water than the laundry can
absorb. This total volume of water
needs to be heated.
The PowerWash washing technique
only uses slightly more water than the
laundry can absorb. The water which
has not been absorbed by the laundry
heats up the drum and the laundry and
is sprayed into the laundry over and over
again. This reduces energy
consumption.
Activation
PowerWash is activated automatically
in the programmes listed above.
PowerWash is deactivated if:
- CapDosing (, ) has been selected
for the main wash
- Extras such as Pre-wash or
ExtraRinse have been selected
- The selected final spin speed No Spin
has been selected
- A large load is being washed in the
Normal program
Special features
- Drenching phase
The washing machine will spin a few
times at the beginning of the program.
During spinning, the water discharged
is sprayed back into the laundry in
order to achieve optimum moisture
penetration.
The optimum water level is set at the
end of the drenching phase. If
necessary, the washing machine will
pump water away or take in a little
more fresh water
- Noises during the heating phase
Unusual bubbling noises can occur
while the laundry and the drum are
being heated.

Changing the program sequence
49
Changing a program (safety
lock)
A program, temperature, spin speed, or
selected extra options cannot be
changed once the machine has been
successfully started. This prevents the
machine being operated unintentionally,
e.g., by children.
If the washing machine is switched off
during active program operation, the
standby function does not switch the
washing machine off completely after
15minutes. Safety functions continue
to be active because there may still be
water inside the drum.
Interrupting a program
Switch the washing machine off with
the button.
Switch the washing machine back on
with the button to continue with
the same program.
Canceling a program
You can cancel a wash program at any
time after it has started.
Touch the Start/Stopsensor button.
The following will appear in the display:
Cancel the program?
Select Yes.
The following will appear in the display:
Program cancelled.
The suds are pumped away.
Wait until the door unlocks.
Pull open the door.
Remove the laundry.
Selecting another program
Close the door.
Select the program you want to use.
Add detergent to the detergent
dispenser drawer, if necessary.
Touch the Start/Stopsensor button.
The new program will begin.

Washing assistant
50
The wash assistant helps you with loads
consisting of items with different care
instructions. The washing machine will
use the list of items to put together a
suitable wash program.
Scroll to the second page in the main
menu.
Touch the Wash Assistantsensor
button.
A list of items will appear.
11:02
Fabrics
Dress Shirts
T-Shirts
Denims
Blouses
OK
Touch the appropriate sensor button
for your item of laundry.
The item selected will be highlighted
orange. You can select several items.
With some items, helpful information
will also appear in the display when they
are selected.
Confirm with the OKsensor button.
Follow the instructions in the display.
A summary of the selected parameters
will then appear in the display.
Confirm with the OKsensor button or
select Change if you would like to
make any changes.
The program which has been tailored to
your laundry is ready to start.
Tip: You can add individual program
settings, e.g., Options, before you start
the program.

Timer
51
The timer can be used to set the time
you wish a program to finish or start at.
The program start can be delayed by up
to 24hours.
Setting the timer
Touch the Timersensor button.
Select the Finish at or Start at option.
Set the hours and the minutes and
confirm your entry with the OKsensor
button.
Changing the timer
The selected times for the timer can be
changed before the program starts.
Touch the or sensor button.
Change the specified time and
confirm with the OKsensor button.
Deleting the timer
The selected time for the timer can be
deleted before the program starts.
Touch the or sensor button.
The selected time for the timer appears
in the display.
Touch the Deletesensor button.
Confirm with the OKsensor button.
The selected time for the timer is now
deleted.
Starting the timer
Touch the Start/Stopsensor button.
The door will lock and the time until the
program starts will appear in the display.
After the program has started, the
selected time can only be changed or
canceled by interrupting the program.
The program can be started
immediately at any time.
Touch the Start immediatelysensor
button.
SmartStart
The SmartStart function lets you define
a time period during which your washing
machine will start automatically. The
appliance will start on receipt of a signal,
e.g., from your energy supplier, that
indicates that the electricity rate is
particularly economical.
This function is active when the
SmartGridsetting is switched on.
The time period can be defined between
1minute and 24hours. During this period,
the washing machine waits for the signal
from the energy supplier. If no signal is
sent during the defined period, the wash-
ing machine starts the wash program.
Setting the time period
If you have activated the
SmartGridfunction in Settings,
SmartStart by or SmartFinish by will
appear in the display instead of Start at
or Finish at when you touch the
Timersensor button (see “Settings –
SmartGrid”).
The procedure for setting this is the
same as for setting the time for Delay
Start.
Now set the time you want and
confirm with the OKsensor button.
Touch the Start/Stopsensor button
to start the wash program with
SmartStart.
The selected program will start
automatically, as soon as the energy
supplier has sent the signal, or the latest
calculated start time has been reached.
The procedure for changing or deleting
the SmartStartfunction is the same as
described in “Changing the timer” and
“Deleting the timer”.

Detergent
Detergents recommended
The recommendations apply to the entire temperature range of the wash programs.
There are no detergent recommendations for wash programs that are not listed.
UltraPhase
1 und 2
Miele
Capsules
Miele
Capsules
Miele
Capsules
Universal
detergent
Color
detergent
Detergent for
Woolens and
delicates
Bleach
3
Normal
Sanitize
Normal
Delicates
QuickIntenseWash
Express
1
Handwash
Towels
Extra White
Dress Shirts
Denim/Jeans
Darks
Woolens
Silks
Outdoor
Proofing
Sportswear
Sneakers
Downs
1
Pillows
1
Table Linens/Drapes
Curtains
1
Baby Clothes
Quick Rinse
Pillows
2
Recommended Special-purpose detergents (e.g., WoolCare)
1
Liquid detergent Fabric care (e.g., fabric softener)
2
Powder detergent Additives (e.g., booster)
3
If the “Bleach” setting has been activated
52
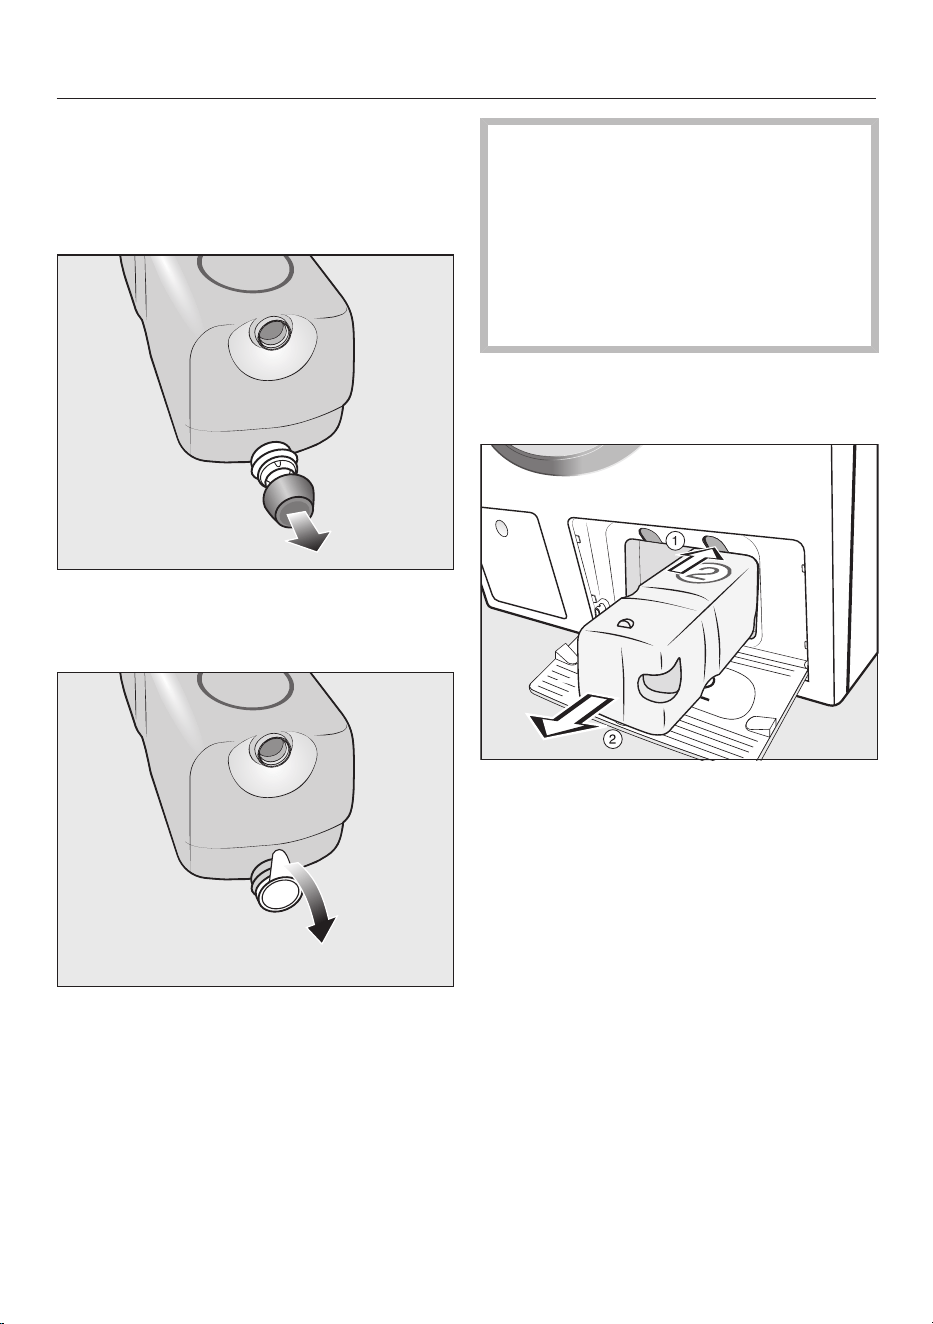
Replacing the TwinDos cartridge
53
A message will appear in your washing
machine display if a detergent cartridge
is empty.
Preparing the cartridge
Remove the cover cap from the
cartridge.
or
Remove the film seal from the
cartridge completely.
Risk of damage from film seal
If the film seal is not removed
completely, leaks can occur in the
TwinDos system.
Remove the film seal from the
suction port on the cartridge
completely before inserting the new
cartridge.
Replacing the cartridge
Switch on the washing machine.
To release the lock, press the yellow
button above the cartridge.
Remove the cartridge.
Insert a new cartridge.
Confirm the messages in the display.
The counter is set to 0.
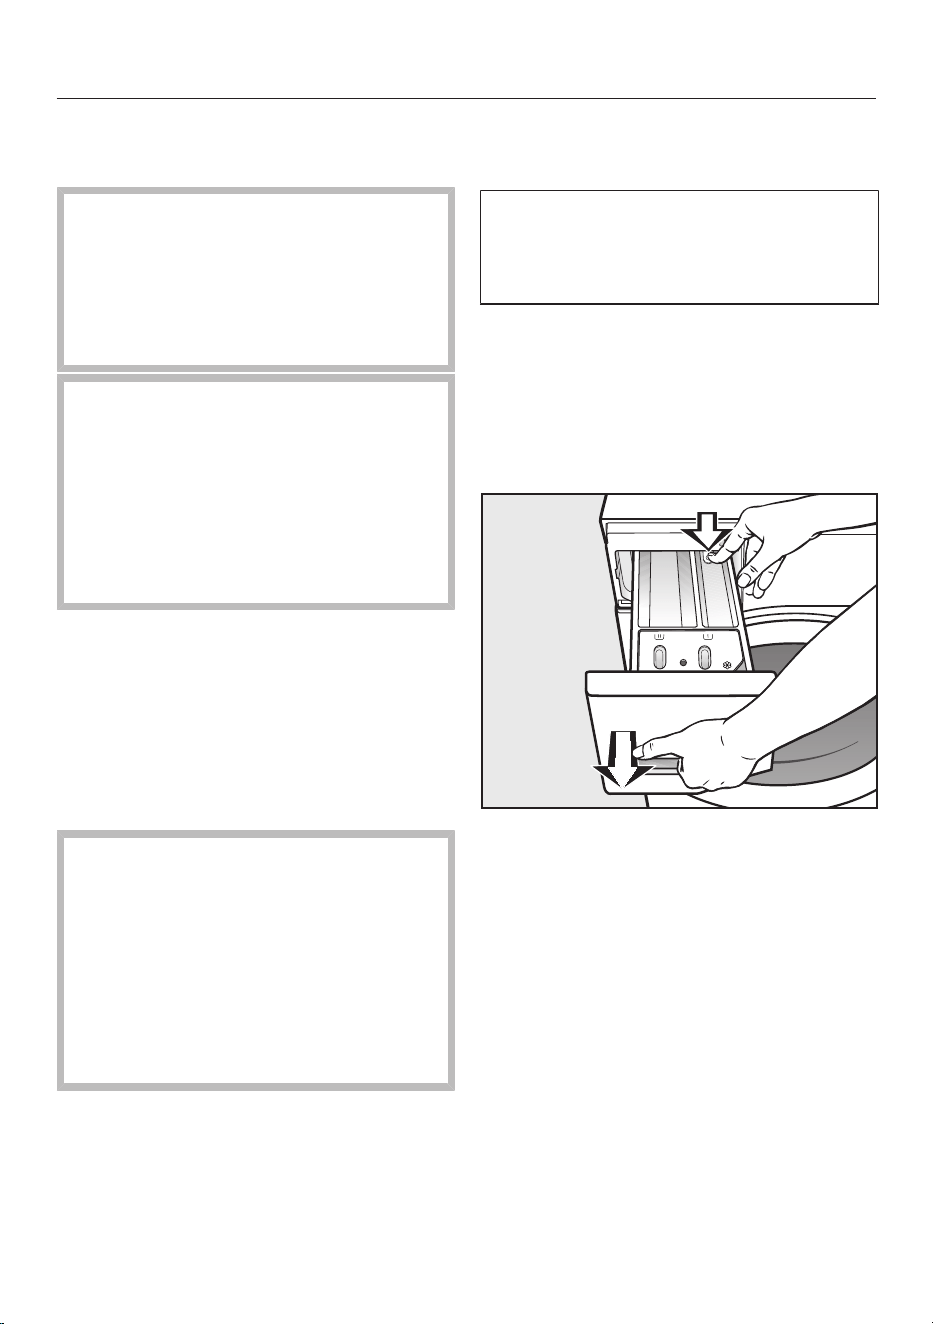
Cleaning and care
54
Cleaning the housing and
control panel
Risk of electric shock.
Mains voltage is present when the
washing machine is switched off
Disconnect the machine from the
electricity supply before cleaning or
maintenance.
Risk of damage due to ingress of
water.
The pressure of a water jet can cause
water to get into the washing
machine, resulting in damage to
components.
Do not spray the washing machine
with a water jet when hosing down.
Clean the housing and control panel
with a mild cleaning agent or soap
and water and dry both with a soft
cloth.
The drum can be cleaned using a
suitable stainless steel cleaning agent
following the manufacturer’s
instructions on the packaging.
Damage due to cleaning agents.
Do not use solvents, abrasive
cleaners, glass cleaners or all-
purpose cleaning agents. These
might damage plastic surfaces and
other components because of the
chemicals they contain.
Do not use any of these cleaning
agents.
Cleaning the detergent
dispensing drawer
Washing at low temperatures and the
use of liquid detergent can lead to a
build-up of bacteria in the detergent
dispensing drawer.
Clean the entire drawer at regular
intervals for hygiene reasons, even if
you are using the TwinDos system
exclusively.
Removing the detergent dispenser
drawer
Pull out the detergent dispenser
drawer until a resistance is felt. Press
down the release button and at the
same time pull the drawer right out of
the machine.
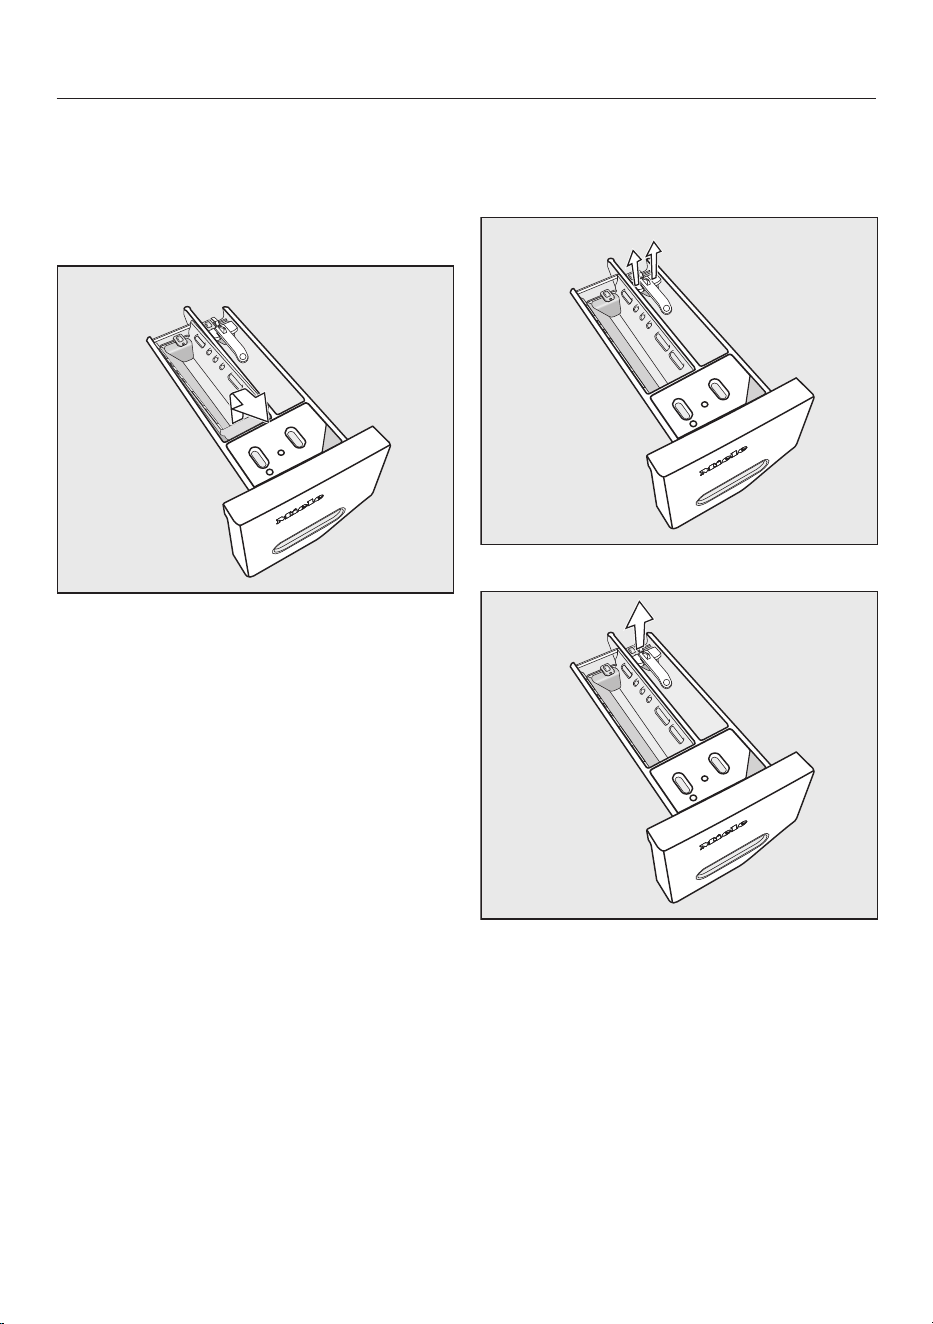
Cleaning and care
55
Removing and cleaning the insert for
liquid detergents
An insert for liquid detergents is located
in the compartment of the
detergent dispenser drawer.
Remove the insert. Clean the insert
thoroughly with warm water.
Cleaning the compartment
Compartment 1 has a siphon for better
dispensing of the chlorine bleach.
Remove the release catch.
Remove and clean the siphon.
Clean the and
compartments with warm water.
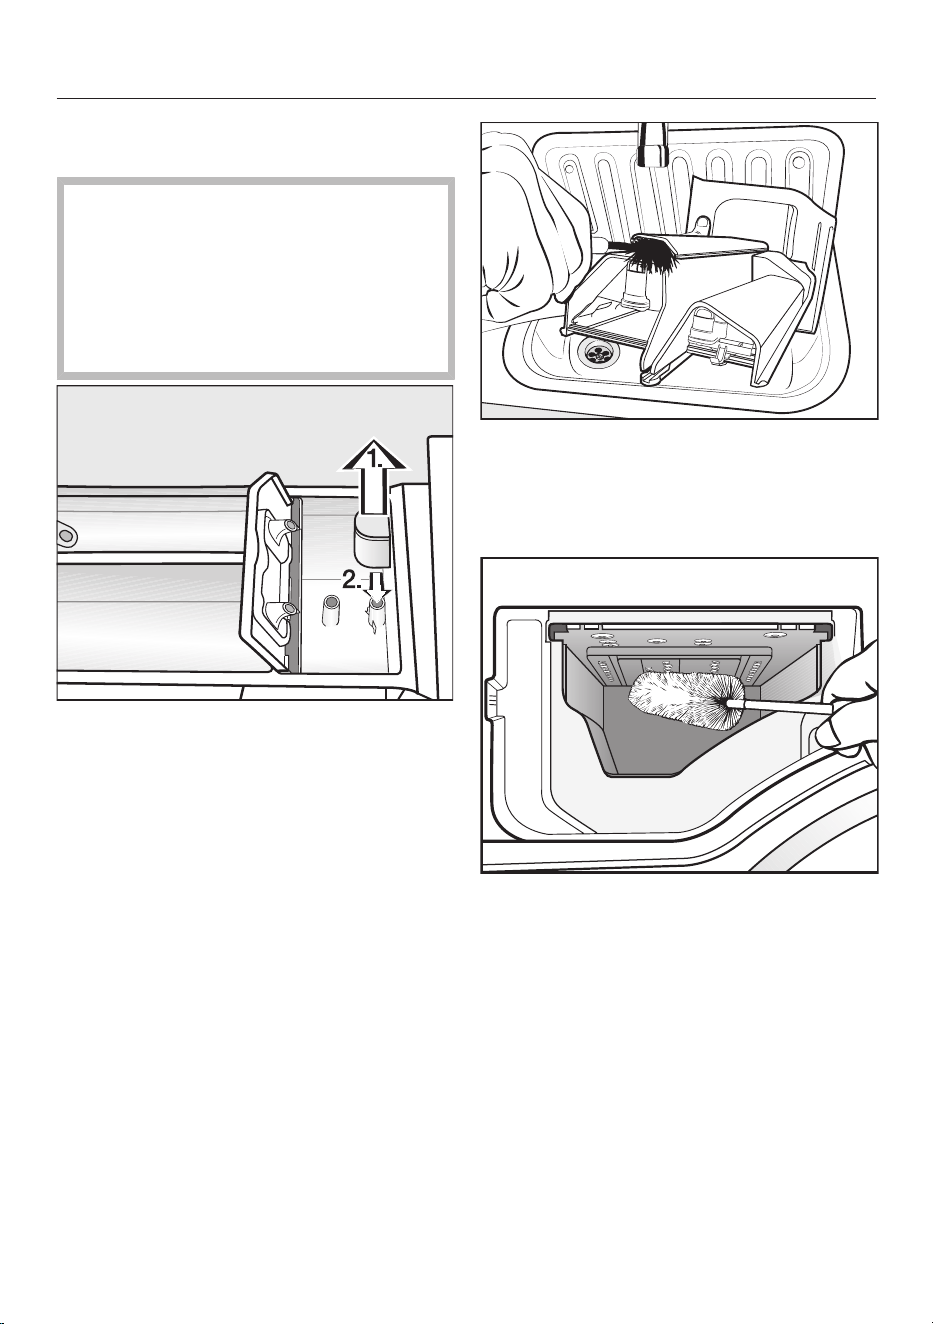
Cleaning and care
56
Cleaning the siphon and the /
compartment channel
Liquid starch results in clogging. The
siphon in the / compartment no
longer works and the compartment
can overflow.
Clean the siphon particularly
thoroughly after using liquid starch a
few times.
1. Remove the siphon from the
compartment and clean under warm
running water. Clean the siphon tube
in the same way.
2. Refit the siphon.
Clean the fabric softener channel with
a brush and warm water.
Cleaning the detergent dispenser
drawer housing
Use a bottle brush to remove
detergent residues and limescale
from the jets inside the detergent
dispenser drawer housing.
Replace the detergent dispenser
drawer.
Tip: Leave the detergent dispenser
drawer slightly open to allow it to dry.

Cleaning and care
57
Cleaning the drum
(hygiene info)
Washing at low temperatures and/or
using liquid detergent can cause
bacteria and unpleasant odors to build
up in the washing machine. Use the
Clean Machine program to clean the
washing machine. Run this program
regularly or at the latest when the
Hygiene info: Select “Maintenance” and run
the “Clean Machine” program.message
appears in the display.
TwinDos maintenance
Damage resulting from dried
laundry detergent.
If the system has not been used for a
long time (more than 2months),
detergent in the hoses can become
viscous or dry out. The hoses can
become blocked and would then
need to be cleaned by Customer
Service.
Clean the TwinDos system.
To clean the system, you need a
“TwinDosCare” cleaning cartridge,
which is available
from www.shop.miele.com.
The washing machine has a cleaning
program for the TwinDos system.
Running the cleaning program will clean
the hoses inside the washing machine.
Starting the maintenance program
Switch on the washing machine.
Scroll to the second page in the main
menu.
Touch the Maintenancesensor button.
The display will then change to show
the Maintenance menu.
Select Clean “TwinDos”.
Touch the sensor button for the
container you want to clean.
Confirm Start the Maintenance
program? with the Yessensor button.
Follow the instructions in the display.
The hoses will now be cleaned. The
TwinDos system can be used again at
any time.
Cleaning the removable compartment
Detergent residue can cause clogging.
Use a damp cloth to clean the
compartment interior when you
change the cartridges or container.
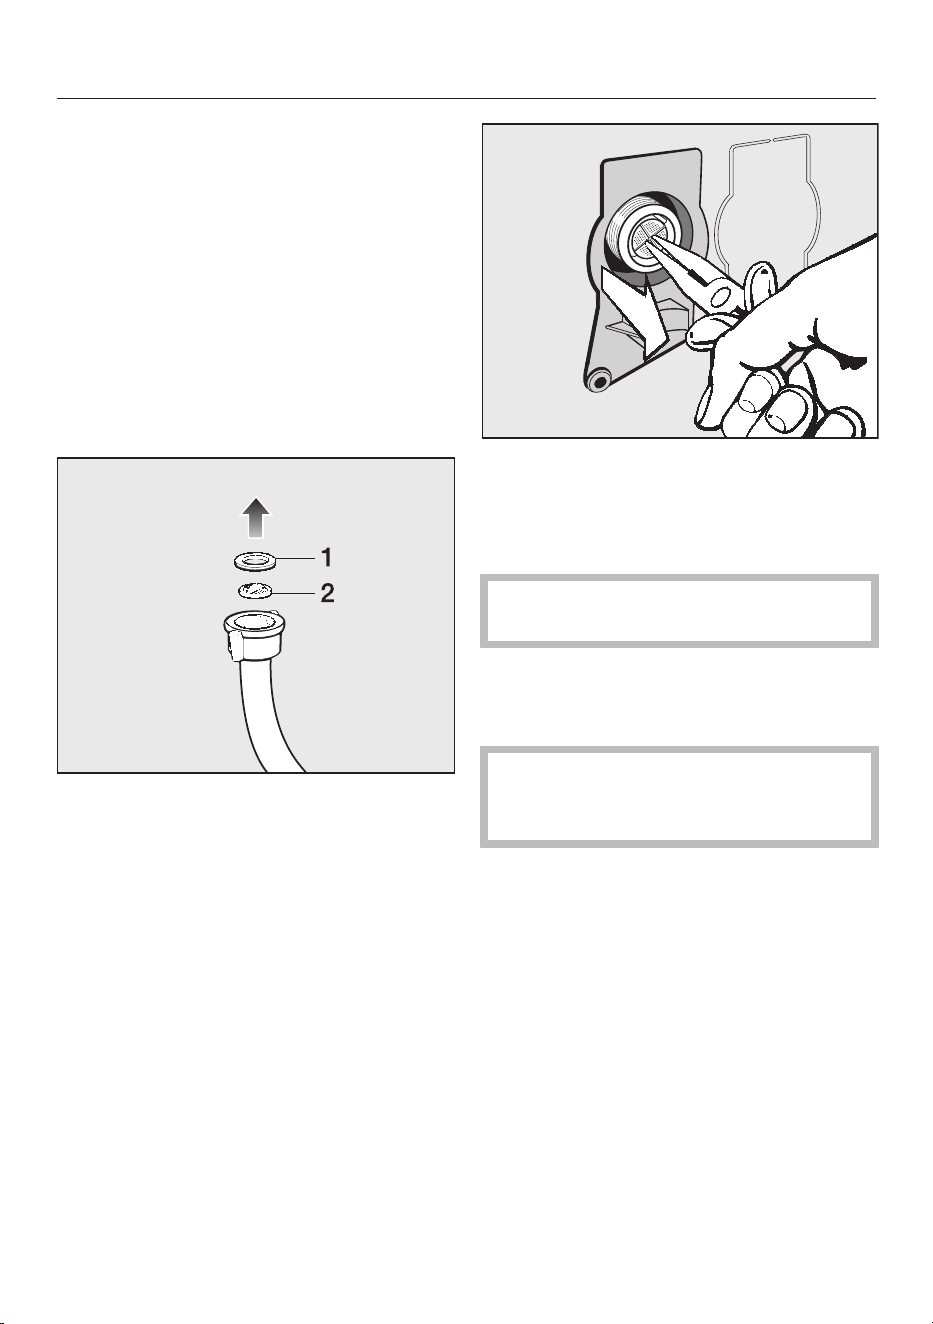
Cleaning and care
58
Cleaning the water-inlet filter
The washing machine has 2 filters to
protect the inlet valve. Check these
filters every 6 months or so. Check the
filters more often if there are frequent
interruptions to the external water
supply.
Cleaning the filter in the inlet hose
First turn off the faucet.
Unscrew the inlet hose from the
faucet.
Remove the rubber seal 1 from the
connector.
Using needle nose pliers, take hold of
the plastic filter bar 2 and remove the
plastic filter.
Clean the filter.
Reassemble in reverse order.
Cleaning the filter in the inlet valve
Using pliers, carefully loosen the
ribbed plastic nut on the inlet valve
and unscrew.
Use needle nose pliers to withdraw
the filter by the bar.
Clean the filter.
Reassemble in reverse order.
The filters must be put back in place
after cleaning.
Screw the screw thread securely back
onto the faucet.
Turn on the water-supply faucet.
Make sure there is no water leaking
from the screw thread.
Tighten the screw thread.

Frequently asked questions
Many malfunctions and faults that can occur in daily operation can be easily
remedied. You can save time and money in many cases, as you do not need to
contact Miele Customer Service.
Information to help you rectify faults yourself can be found at www.miele.com/
service.
The following tables are designed to help you to find the cause of a malfunction or
fault and resolve it.
A wash program cannot be started
Problem Possible cause and solution
The display remains dark
and the Start/Stop but-
ton indicator light does
not come on.
There is no power to the machine.
Check whether the plug is plugged in.
Check whether the fuse has tripped.
The washing machine has switched off automatically
to save energy.
Switch it back on with the button.
The display prompts you
to enter a code.
The PIN code is active.
Enter the code and confirm the entry. Deactivate the
PIN code if you do not wish this message to appear
in the display the next time the machine is switched
on.
The following appears in
the display:
Door will not lock. Con-
tact Service.
The door is not closed properly. The door lock could
not engage.
Close the door again.
Start the program again.
If the fault message appears again, contact
Customer Service.
Fault message after a program has been interrupted
Problem Possible cause and solution
Drainage fault. Clean
drain filter and pump.
Check the drain
hose.
The drain is blocked or restricted.
The drain hose has been fixed too high.
Clean the drain filter and the drain pump.
The maximum drain height is 3' 3" (1m).
Water intake fault.
Open the water sup-
ply.
The water inlet is blocked or restricted.
Check whether the faucet is turned on properly.
Check whether the inlet hose is kinked.
Check whether there is sufficient water pressure.
The filter in the water inlet is blocked.
Clean the filter.
59

Frequently asked questions
Problem Possible cause and solution
Fault F. If restart
fails, contact Ser-
vice.
There is a fault.
Disconnect the washing machine from the power
supply. Unplug the appliance or switch off the breaker.
Wait at least 2minutes before reconnecting the
washing machine to the power supply.
Switch the washing machine on again.
Restart the program.
If the fault message appears again, contact
Customer Service.
Waterproof system
activated. Close wa-
ter supply and con-
tact Service.
The water protection system has reacted.
Close the faucet.
Contact Customer Service.
To switch off the fault message: switch the washing machine off with the button.
Fault message after the end of the program
Problem Possible cause and solution
Check dosage
Excessive foam has built up during washing.
Check the amount of detergent dispensed.
With automatic detergent dispensing, check the
dispensing quantity set.
Observe the instructions on the detergent packaging
and the level of soiling on the laundry.
If necessary, reduce the dispensing quantity by
increments of 10%.
Hygiene info: Select
“Maintenance” and
run the “Clean Ma-
chine” program.
When washing, a wash program using a temperature
above 60°C (140°F) has not been run for a long time.
In order to prevent bacteria and unpleasant odors
building up in the washing machine, run the Clean
Machine program using a multi-purpose powder
detergent.
The messages will appear at the end of the program and when the washing
machine is switched on, and need to be confirmed with the OK sensor button.
60

Frequently asked questions
Fault message after the end of the program
Problem Possible cause and solution
Intensive flow: Clean
the filter and jet or
remove foreign ob-
jects from the pump
housing.
The pumps are dirty.
Clean the pumps as described in “Frequently Asked
Questions – Opening the door in the event of a
blocked drain outlet and/or power outage”.
Start a wash program again after cleaning.
The jet in the top of the door ring is blocked with lint.
Remove the lint with your finger. Do not use any
sharp or pointed tools to do this.
Start a wash program again after cleaning.
If the fault message appears again, contact Customer
Service. The washing machine can still be used but
with reduced functionality.
Align the machine.
Laundry not properly
spun
The SoftSteamextra option which runs at the end of
the program could not be carried out properly.
Check whether the washing machine is aligned
correctly (see “Installation – Leveling the machine”).
Check whether the maximum drain height of 3' 3"
(1m) has been exceeded.
If the fault message appears again, contact Customer
Service. The washing machine can still be used but
with reduced functionality.
The messages will appear at the end of the program and when the washing
machine is switched on, and need to be confirmed with the OK sensor button.
Messages or faults affecting the TwinDos system
Problem Possible cause and solution
Only a few more
wash cycles possi-
ble. Please order
new detergent for
compartment .
The detergent in the cartridge is running low. There are
between 4and 8wash cycles remaining.
Order a new cartridge.
“TwinDos” is
empty. Check wash
results.
The cartridge is empty.
Replace the cartridge.
Check whether the laundry is clean. If it is not, there
may not have been enough detergent.
Wash the laundry again if necessary.
61

Frequently asked questions
Problem Possible cause and solution
Use “TwinDos” or
carry out “TwinDos”
Maintenance in the
“Maintenance”
menu. See the Op-
erating Instructions
for more information.
TwinDos or automatic dispensing via compartment
and/or has not been used for a long time.
Use TwinDos for one of your next wash cycles.
Carry out the TwinDos maintenance program as
described in “Cleaning and care – TwinDos
maintenance”.
TwinDos Mainte-
nance for compart-
ment must be
started in the “Main-
tenance” menu. See
Operating Instruc-
tions for more infor-
mation
TwinDos or automatic dispensing via compartment
and/or has not been used for a long time. It is
possible that detergent has dried inside the hoses.
Immediately carry out the TwinDos maintenance
program as described in “Cleaning and care –
TwinDos maintenance”.
The messages shown on this page are examples. They may differ depending on
whether they refer to compartment or .
The messages will appear at the end of the program and when the washing
machine is switched on, and need to be confirmed with the OK sensor button.
Messages or faults affecting the TwinDos system
Problem Possible cause and solution
A new detergent car-
tridge has been inserted,
but the cartridge is iden-
tified as empty when the
machine is switched on.
The washing machine was switched off when the
detergent cartridge was replaced.
Switch on the washing machine.
Remove the detergent cartridge and then reinsert it
into the compartment.
The counter is set to 0.
There are dark specks in
the liquid detergent.
Bacteria has developed in the detergent.
Pour the liquid detergent out of the container and
then clean the container thoroughly.
62

Frequently asked questions
Problem Possible cause and solution
No detergent and/or fab-
ric softener was dis-
pensed during the wash
program.
TwinDos was not activated.
Touch the TwinDossensor button before running the
next program.
TwinDos is activated.
No detergent and/or fabric softener was dispensed
when TwinDos was selected.
Try again.
If detergent is still not dispensed, contact Customer
Service.
General problems with the washer
Problem Possible cause and solution
The washing machine
is emitting an odor.
The hygiene info was not observed. A wash program
using a temperature above 140°F (60°C) has not been
run for a long period of time.
In order to prevent bacteria and unpleasant odors
building up in the machine, run the Clean machine
program using Miele clean machine or universal
powder detergent.
The door and detergent dispenser drawer were closed
after washing.
Leave the door and the detergent dispenser drawer
slightly open to allow them to dry.
The washer shakes dur-
ing the spin cycle.
The four feet are not resting evenly on the floor.
Level the machine (see “Leveling the washer”).
The laundry has not
been spun properly and
the laundry is still wet.
The machine detected an imbalance during the final
spin and reduced the spin speed automatically.
Wash large and small items together in order to
achieve a more even load distribution.
There are unusual
sounds coming from
the drain pump.
There is no fault!
Lapping sounds at the beginning and end of the drain
process are normal.
The drum lighting does
not come on.
The drum lighting goes out automatically after 5minutes.
Open the pull-down menu from the Overview menu
and then touch the sensor button.
The drum lighting is faulty.
Contact Miele Customer Service.
63

Frequently asked questions
General problems with the washing machine
Problem Possible cause and solution
The fabric softener is not
completely dispensed or
too much water remains
in the compartment.
The siphon tube is either positioned incorrectly or
clogged.
Clean the siphon tube, see “Cleaning and care -
Cleaning the detergent drawer”.
At the end of the pro-
gram there is still liquid
in the capsule.
The small pipe in the detergent dispenser drawer
onto which the capsule is placed is blocked.
Clean the small pipe.
Not a fault.
For technical reasons, a small amount of water will
remain in the capsule.
There is water next to
the capsule in the fabric
softener compartment.
CapDosing was not activated or an empty capsule was
not removed at the end of the last wash program.
Make sure that you remember to activate CapDosing
the next time you insert a capsule.
Remove and then dispose of the empty capsule at
the end of each wash cycle.
The small pipe in the detergent dispenser drawer onto
which the capsule is placed is blocked.
Clean the small pipe.
Poor wash results
Problem Possible cause and solution
Liquid detergent is not
achieving the required
results.
Liquid detergents do not usually contain bleaching
agents. Consequently, fruit, coffee, and tea stains cannot
always be removed.
Use the Miele 2-phase system. The deliberate addition
of UltraPhase 2 during the wash process removes
stains effectively.
Use powder detergent containing a bleaching agent.
64

Frequently asked questions
Problem Possible cause and solution
White residues which
look like powder de-
tergent are seen on
dark textiles after
washing.
The detergent contained compounds (zeolites) to aid
water softening which are not soluble in water. These
have ended up on the laundry.
Try and brush off the residues with a soft brush once
the laundry is dry.
In the future, wash dark textiles using a detergent
which contains no zeolites. Liquid detergents do not
usually contain zeolites.
Use the Darksprogram to wash the textiles.
Gray, greasy particles
cling to washed laun-
dry.
Insufficient amounts of detergent were used. The
laundry was heavily soiled with grease (oils, ointments).
Use more detergent or liquid detergent with this type
of soiled laundry.
Before washing the next load, run the Clean Machine
wash program using a universal powder detergent.
The drum door cannot be opened
Problem Possible cause and solution
The door cannot be
pulled open during a
program.
The drum is locked during a program.
Touch the Start/Stop sensor button to cancel the
program.
The program is canceled, the door will unlock, and you
will be able to pull it open.
There is still water in the drum and the machine is
unable to drain.
Clean the drain filter and the drain pump as
described in “Opening the door in the event of a
blocked drain outlet and/or power outage”.
Comfort Cooling
appears in the display
after a program has been
canceled.
To protect the user against scalding, the door cannot
be opened if the suds temperature is higher than
130°F (55°C).
Wait until the temperature in the drum has
decreased and the message has gone out in the
display.
The following appears in
the display:
The door lock is jammed.
Contact Service.
The door lock has jammed.
Contact Customer Service.
65
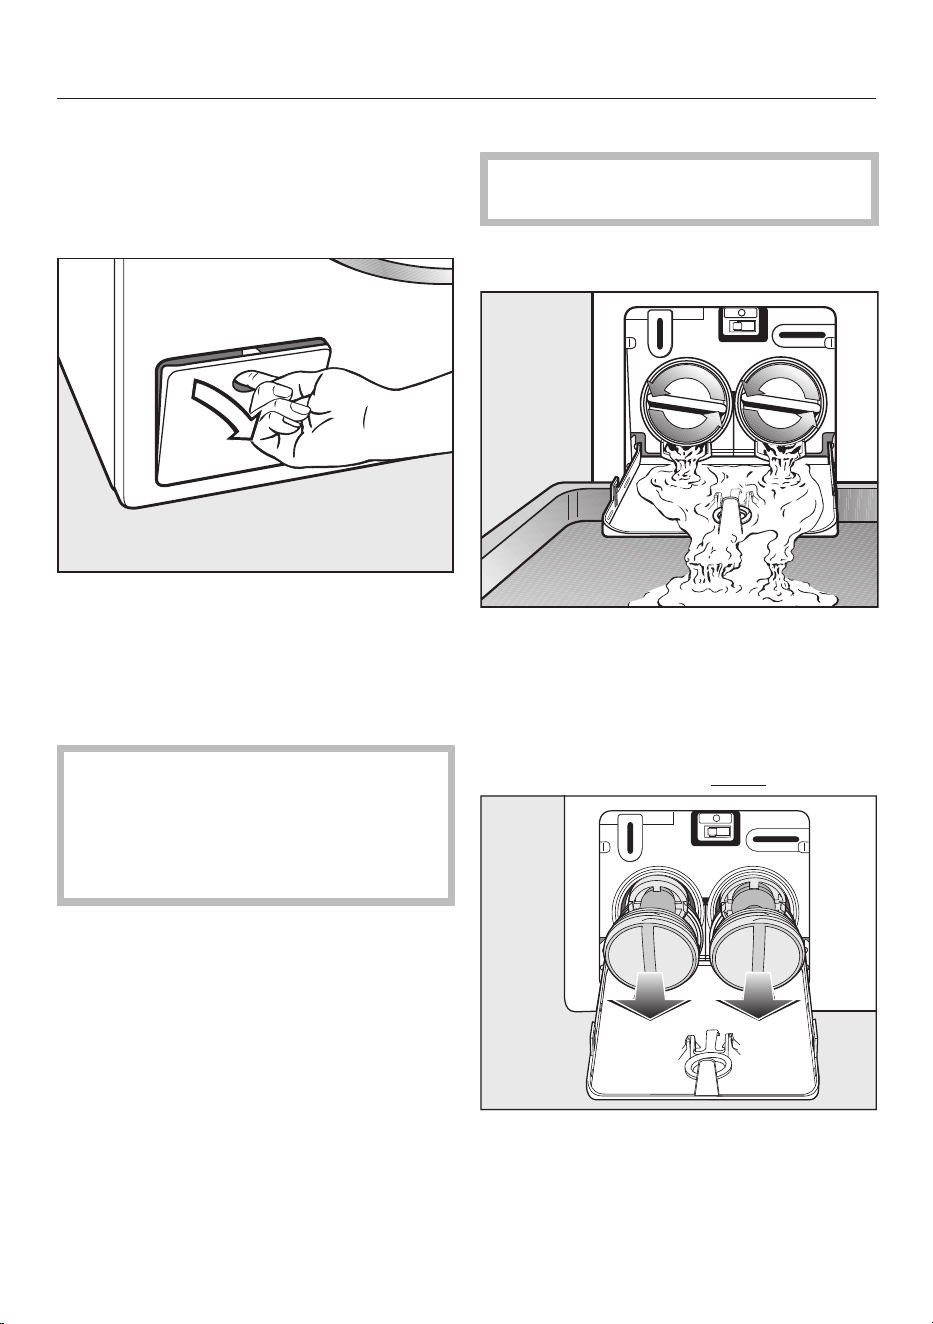
Frequently asked questions
66
Opening the door in the event
of a blocked drain outlet and/or
power outage
Turn off the washing machine.
Open the drain pump flap.
Blocked drain outlet
If the drain outlet is blocked, a larger
quantity of water can remain in the
washing machine.
Risk of scalding due to hot suds.
Escaping suds will be hot if laundry
has been washed at high
temperatures.
Carefully allow all suds to drain off.
Draining the washing machine
Remove the drain filters, though not
completely.
Place a suitable container under the
flap, e.g., a bowl or dish.
Slowly unscrew the drain filters to let
the water out.
Tighten the drain filters back up again
if you need to interrupt the flow of
water.
Once the flow of water stops:
Remove the drain filters completely.
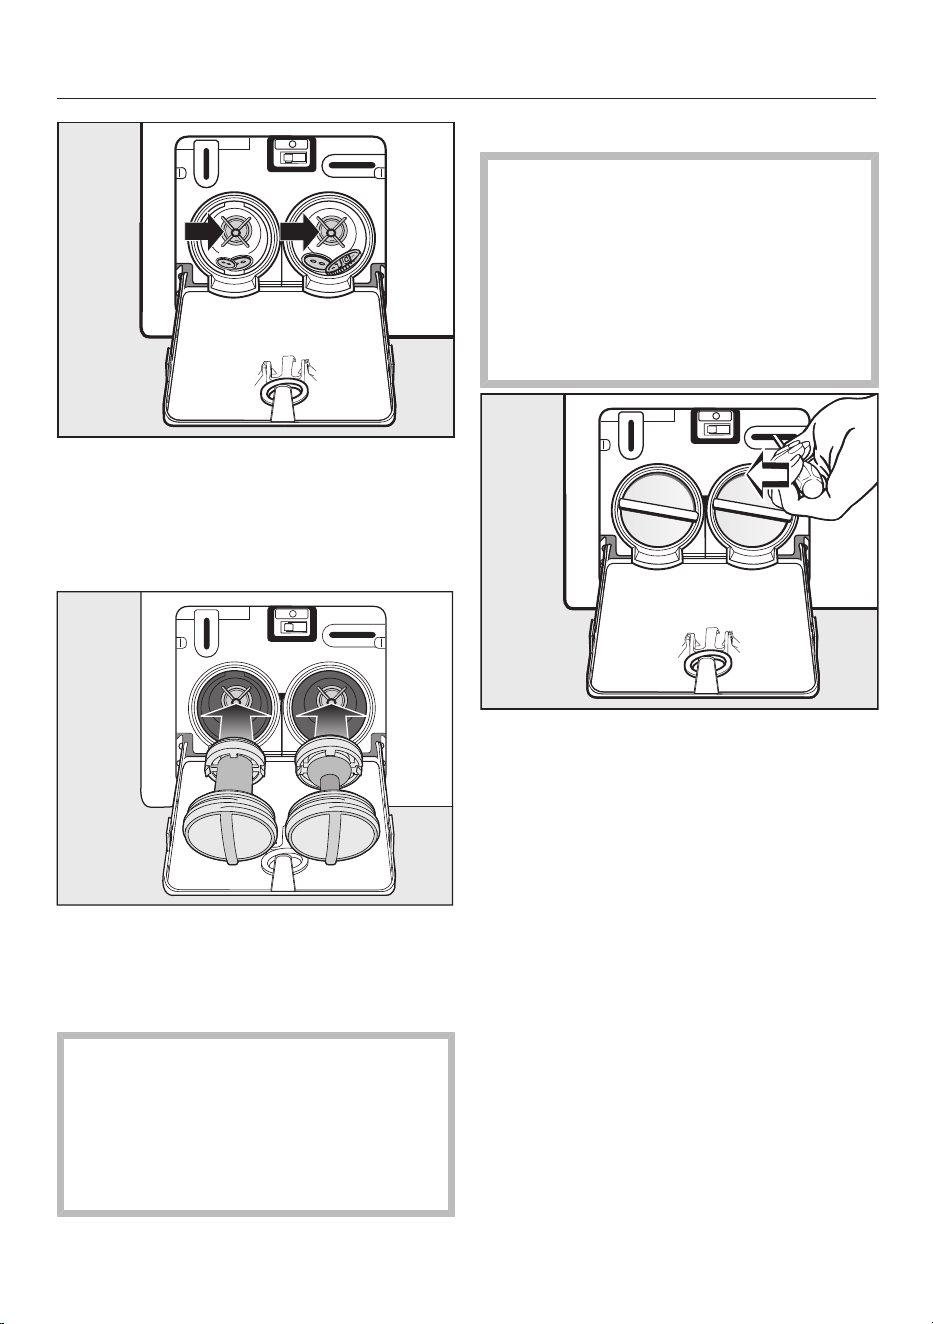
Frequently asked questions
67
Clean the drain filters thoroughly.
Remove any foreign objects (e.g.,
buttons, coins, etc.) and clean the
interior. Turn the impellers by hand to
check that they rotate freely.
Replace the drain filters correctly (on
the right and left) and tighten them
securely.
Close the drain pump flap.
Risk of water damage
Make sure the filters are securely
tightened. Otherwise there is a risk of
water leakage during use.
Replace the drain filters correctly and
tighten them securely.
Opening the door
Danger of injury due to rotating
drum.
Reaching into a rotating drum is
extremely dangerous and may result
in injury.
Always make sure that the drum is
stationary before reaching in to
remove laundry.
Use a screwdriver to unlock the door.
Pull open the door.
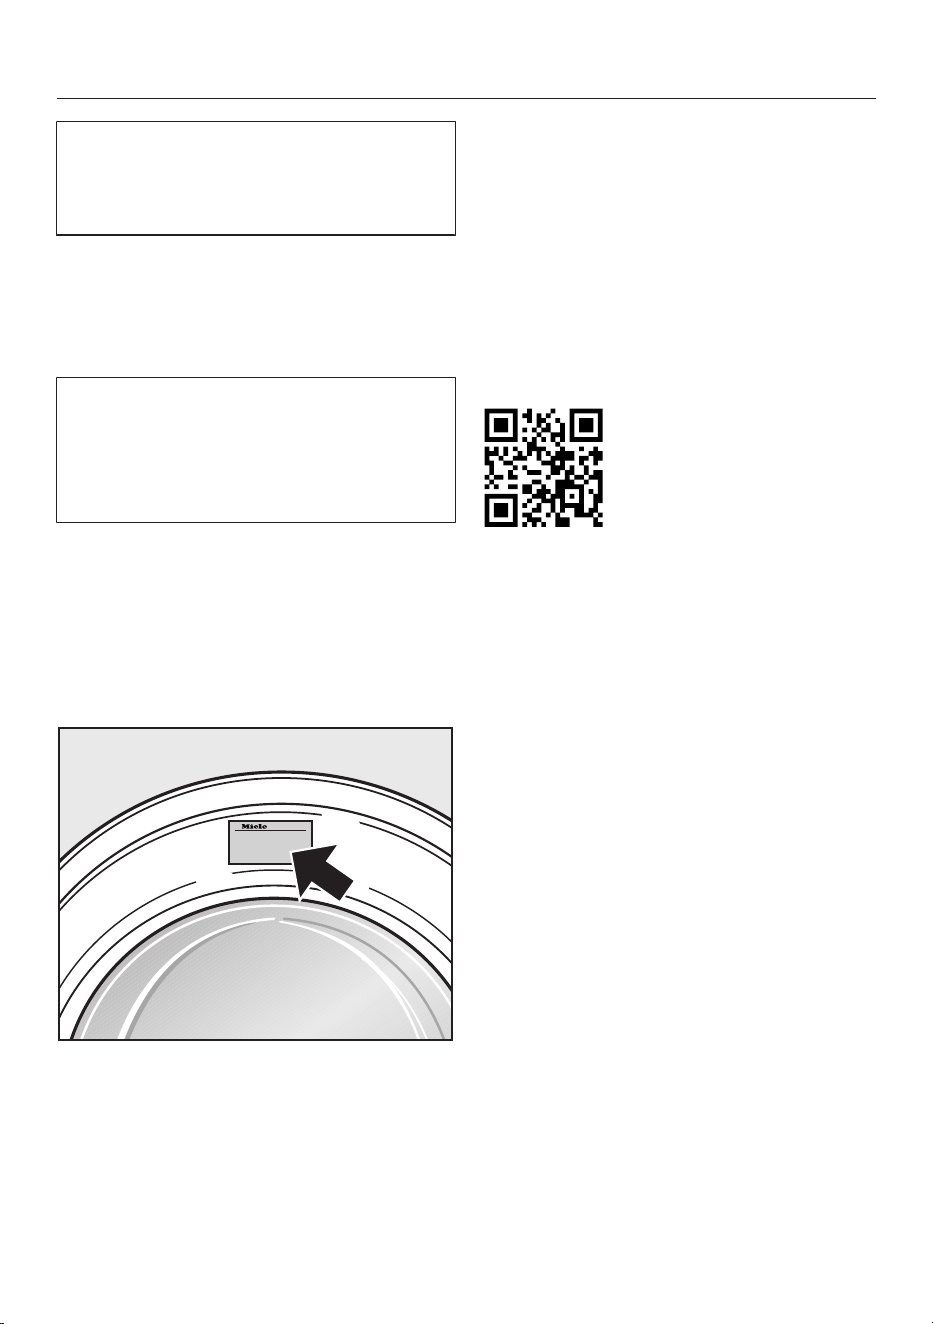
Customer Service
68
Information to help you rectify faults
yourself and about Miele spare parts
can be found at www.miele.com/
service.
Contact in the event of a fault
In the event of a fault which you cannot
remedy yourself, please contact your
Miele dealer or Miele Customer Service.
You can book a Miele Service Call
online at www.miele.com/service.
Contact information for Miele
Customer Service can be found at the
end of this document.
Please quote the model identifier and
serial number of your appliance (SN)
when contacting Miele Customer
Service. Both pieces of information can
be found on the data plate.
The data plate is found above the
porthole glass when the door is opened.
Optional accessories
Products specially tailored to your
washing machine – such as detergent,
fabric care products, additives,
appliance care products, and
accessories – are available from the
Miele online store or from Miele
Service.
You can access the Miele online store
via the following QR code:
Appliance warranty and product
registration
You can register your product and/or
view the manufacturer´s warranty terms
and conditions for Miele appliances and
vacuum cleaners at www.mieleusa.com.
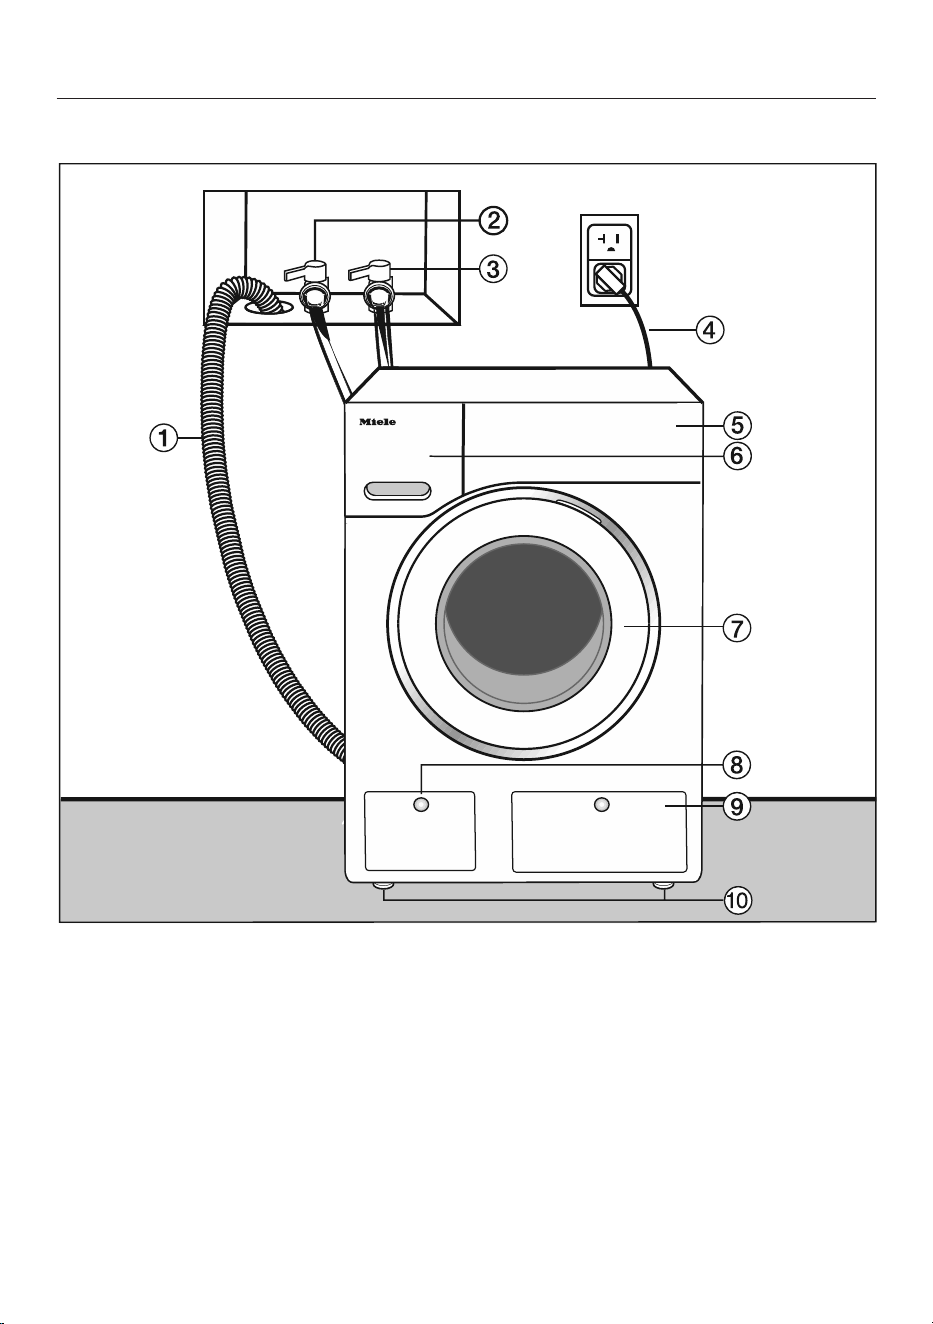
Installation
*INSTALLATION*
69
Front view
a
Drain hose
b
Hot-water inlet hose (pressure-proof
to 870psi/6,000kPa)
c
Cold-water inlet hose (pressure-
proof to 870psi/6,000kPa)
d
Electrical connection
e
Control panel
f
Detergent dispenser drawer
g
Door
h
Flap for drain filters, drain pumps,
and emergency release
i
Four height-adjustable feet
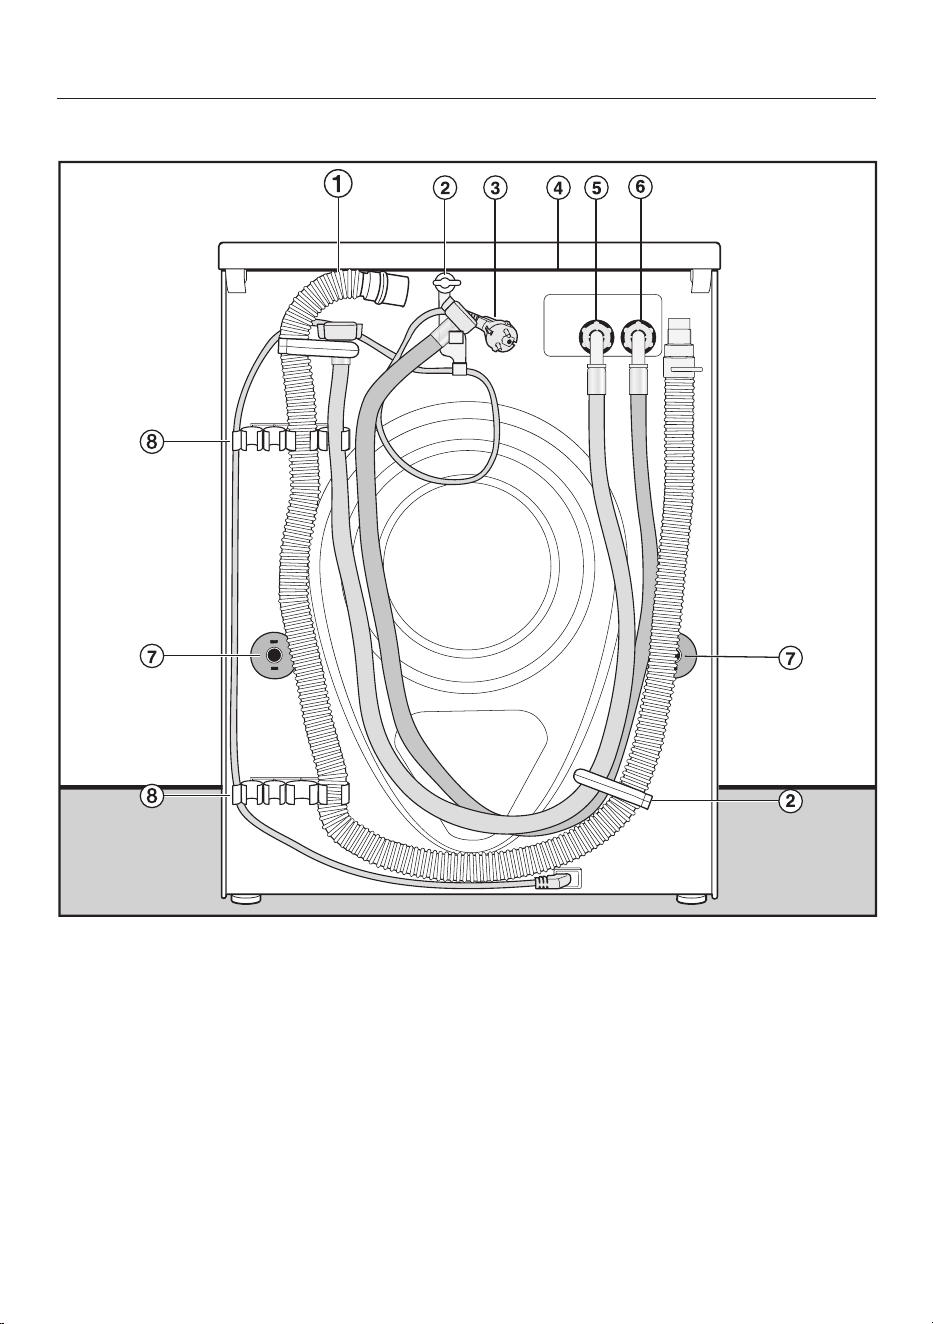
Installation
*INSTALLATION*
70
Rear view
a
Drain hose
b
Transport clips for inlet and drain
hoses and power cord
c
Electrical connection
d
Protruding lid for holding when
moving the machine
e
Cold-water inlet hose (pressure-
proof to 870psi/6,000kPa)
f
Hot-water inlet hose (pressure-proof
to 870psi/6,000kPa)
g
Safety caps for shipping struts
h
Transport clips for inlet and drain
hoses and for storing shipping struts
when not in use

Installation
*INSTALLATION*
71
Installation surface
A concrete floor is the most suitable
installation surface for this machine. It is
far less prone to vibration during the
spin cycle than wooden floorboards or a
carpeted surface.
Please note:
The machine must be level and
securely positioned.
To avoid vibrations during spinning,
the machine should not be installed
on soft floor coverings.
If installing on a wooden joist floor:
Install the unit on a 24"x 24"x1
3
/
16
“
(61 x 61 x 3 cm) plywood base. Ideally
the base should be large enough to
span several joists and should be
anchored to the joists and not just the
floor boards.
Tip: If possible, install the machine in a
corner. This is usually the most stable
part of the floor.
Injury can occur if the washing
machine has not been adequately
secured.
During installation, the washing
machine must be secured on a raised
plinth to be made available on site
(concrete or brick), in order to ensure
it cannot fall or slip.
Secure the washing machine using a
clamp/fastening bracket (MTS floor
mounting kit – available from your
Miele dealer or Miele Service).
Dimensions
= 4'11" (1.5m) drain hose with
connection to the top left on the
rear
= 6'6³⁄₄" (2.0m) electrical cord
with plug for 120V, 15A (NEMA
5-15 configuration) to the top
left on the rear
= 5'3" (1.6m) warm and cold-
water intake hoses to the top
left on the rear
Transporting the washing
machine to its installation site
Danger of injury due to unsecure
lid.
The fixings at the back of the lid may
become brittle due to external
circumstances. There is a danger of
the lid being pulled off when carrying
the appliance.
Before carrying the appliance, check
that the lid is secure where it
protrudes at the back of the appliance.
Carry the washing machine by the
front feet and by the lid where it
protrudes at the back of the
appliance.
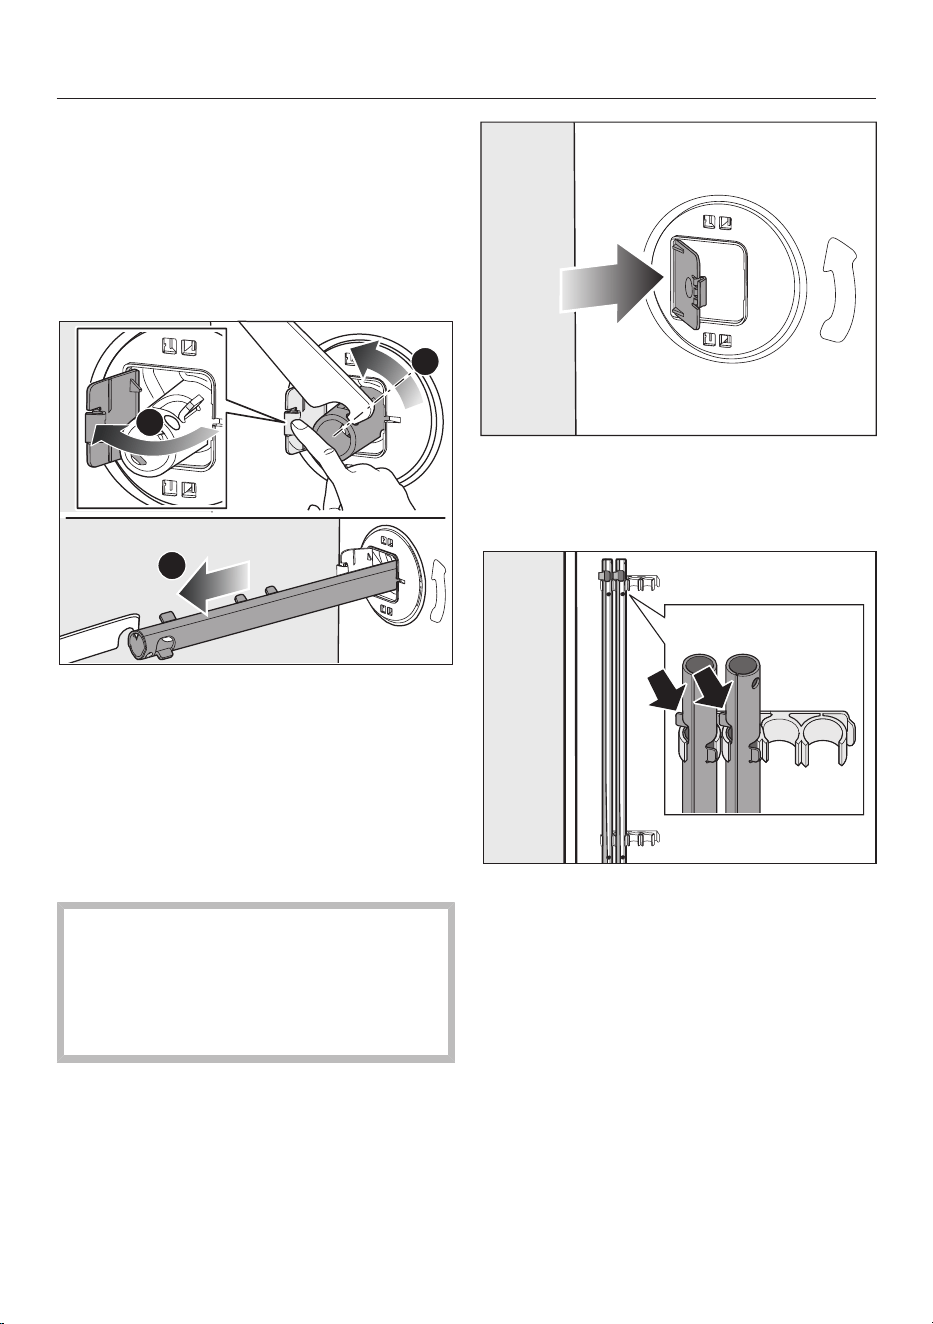
Installation
*INSTALLATION*
72
Removing the transport safety
device
Removing the shipping struts
Remove the left-hand shipping strut
first, followed by the right-hand shipping
strut.
3
2
1
Push the cover out.
Using the wrench supplied, turn the
shipping strut 90°.
Pull out the shipping strut.
Remove the right-hand shipping strut
in the same way.
Covering the holes
Risk of injury from sharp edges.
There is a risk of injury from reaching
into holes that are not covered.
After removing the transport safety
device, cover the exposed holes.
Press the covers firmly shut until they
click into place.
Securing the shipping struts
Secure the shipping struts to the rear
panel of the washing machine. Make
sure that the top retainer is located
above the holder.
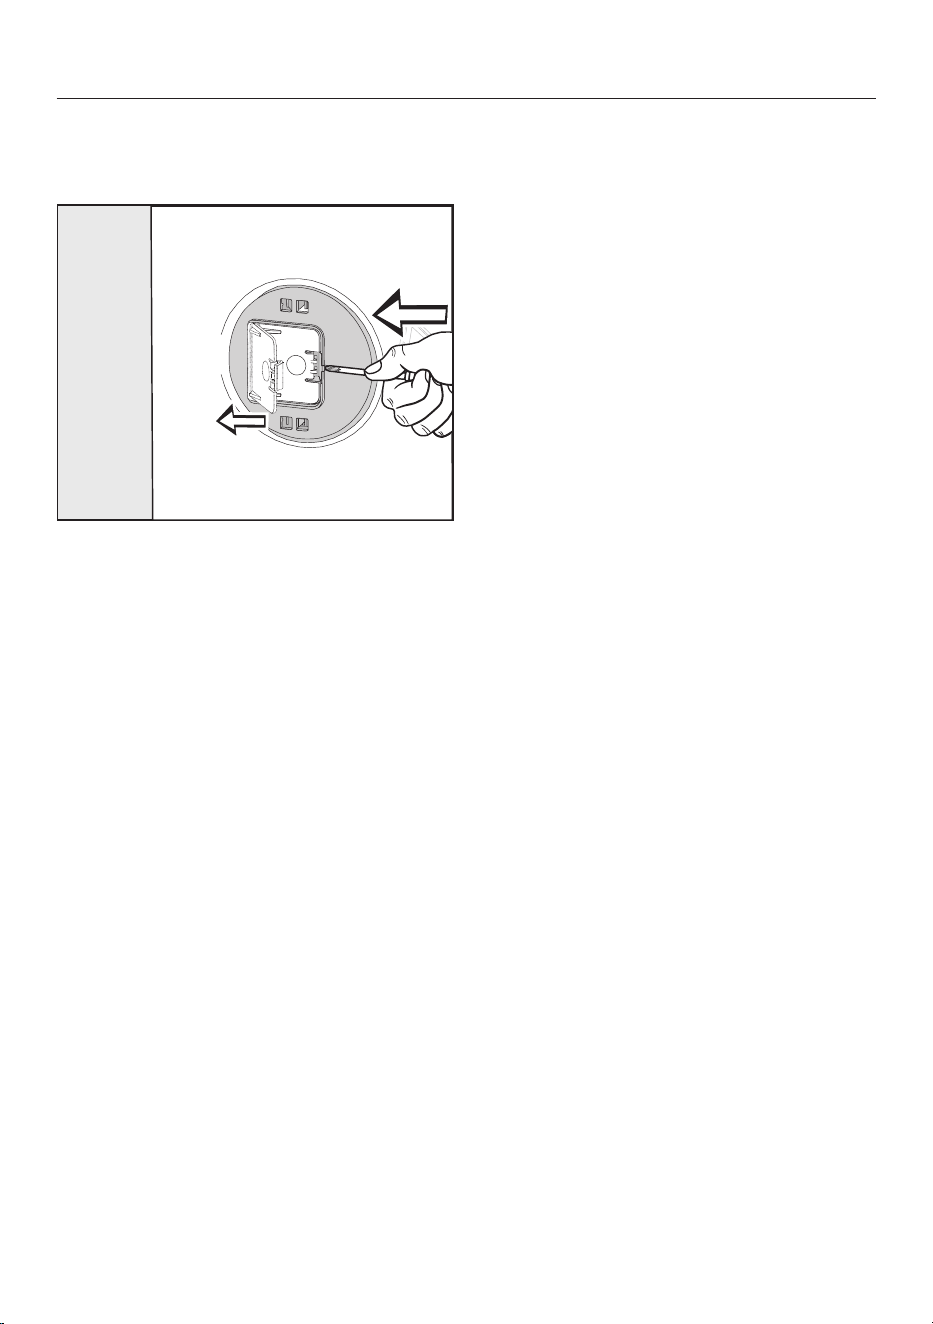
Installation
*INSTALLATION*
73
Installing the shipping struts
Opening the covers
Press against the catch with a thin
object (a narrow screwdriver, for
example).
The cover opens.
Installing the shipping struts
Install the shipping struts by following
the instructions for their removal in
reverse order.
Tip: The struts will slide in more easily if
you lift the drum slightly.
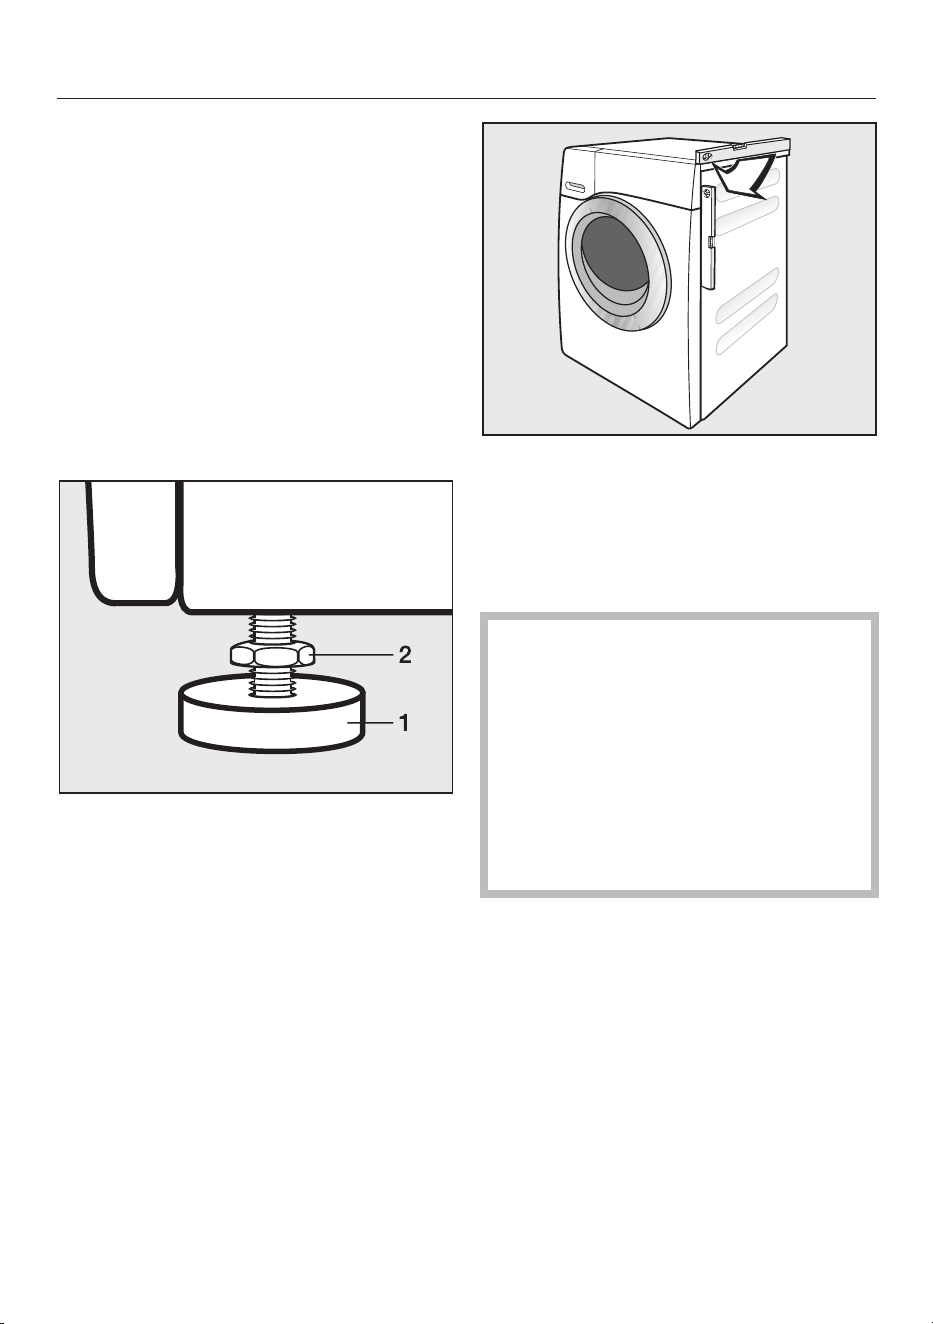
Installation
*INSTALLATION*
74
Leveling the machine
The washing machine must stand
perfectly level on all four feet to ensure
safe and proper operation.
Incorrect installation may increase
electric and water consumption and
may cause the machine to move about.
Unscrewing and adjusting the feet
The four adjustable screw feet are used
to level the washing machine. All four
feet are screwed in when the machine is
delivered.
Using the wrench supplied, turn
counter nut 2 in a clockwise direction.
Then turn counter nut 2 together with
foot 1 to unscrew.
Use a spirit level to check that the
washing machine is standing level.
Hold foot 1 securely with a pipe
wrench. Turn counter nut 2 again
using the wrench supplied until it sits
firmly up against the housing.
Risk of damage due to incorrectly
aligned washing machine.
There is a danger of the washing
machine moving about if the feet are
not secured.
Turn all four counter nuts for the feet
until they sit firmly up against the
housing. Please also check this for
the feet which did not need
adjustment.
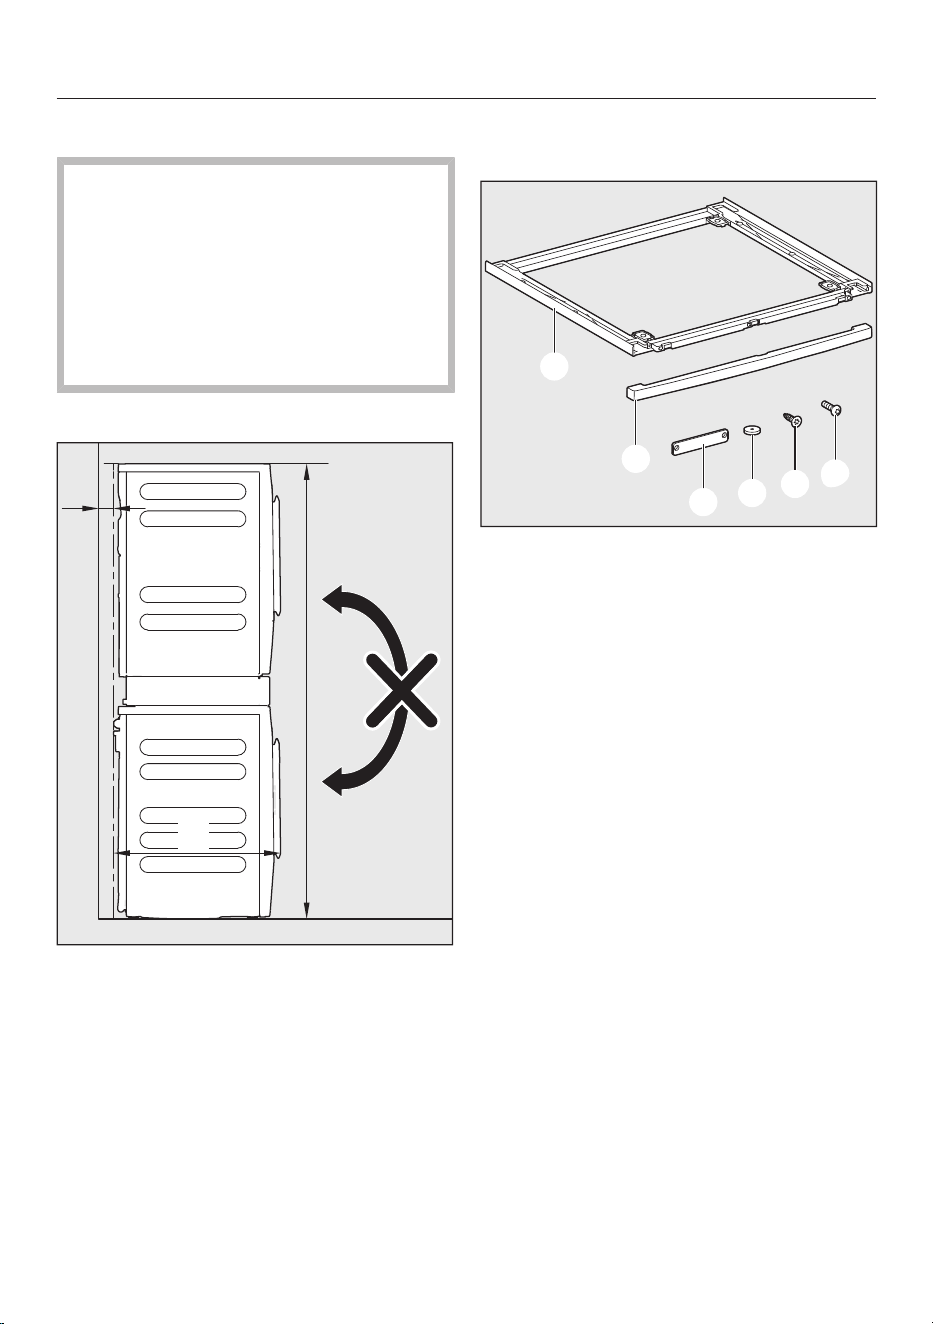
Installation
*INSTALLATION*
75
WTV502
Risk of tipping over due to
incorrect washer-dryer stack statics.
The washing machine must never be
mounted on the tumble dryer. This
will impair the statics of the washer-
dryer stack.
Always use the washing machine as
the base for the washer-dryer stack.
Washer-dryer stack dimensions
c
T1
W1
b
a
a = at least 3/4" (2cm)
b = 6711/16" (172cm)
c = 25 9/16" (65cm)
Components of the washer-dryer
stacking kit
2x
6x
6x
2x
a
Frame
b
Screen
c
Securing elements
d
Sealing rings
e
Countersunk screws for fastening
the stacking kit in place
f
Flathead screws for fastening the
securing elements in place
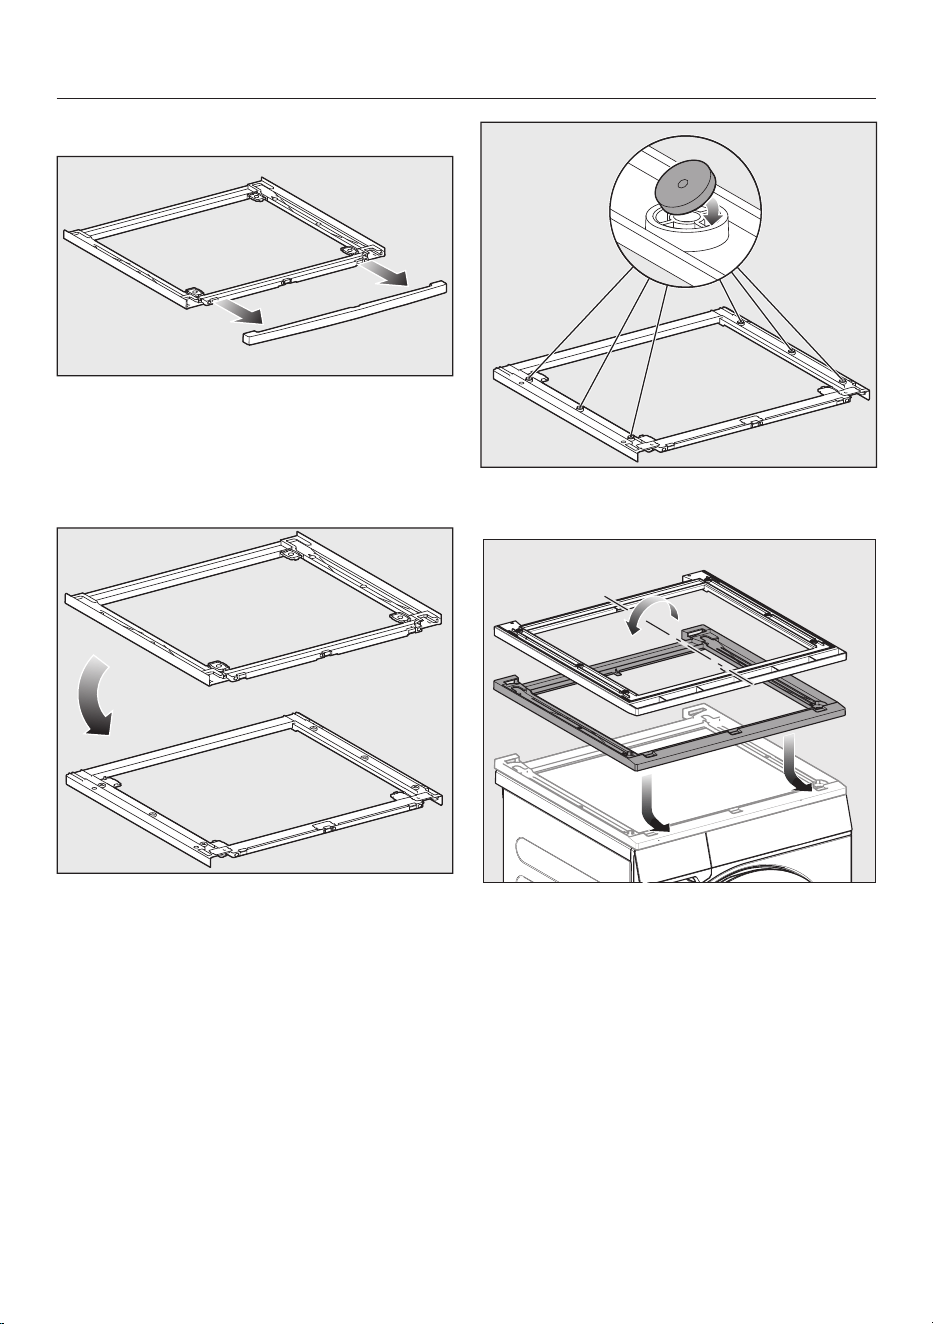
Installation
*INSTALLATION*
76
Preparing the stacking kit
Remove the screen from the stacking
kit.
Set the screen aside. The screen will not
be needed until the end of the
installation process.
180°
Place the stacking kit upside down on
a soft surface, e.g., a blanket.
Stick the 6 sealing rings to the
underside of the stacking kit.
180°
Turn the stacking kit the right way up
and place it on the washing machine
lid.
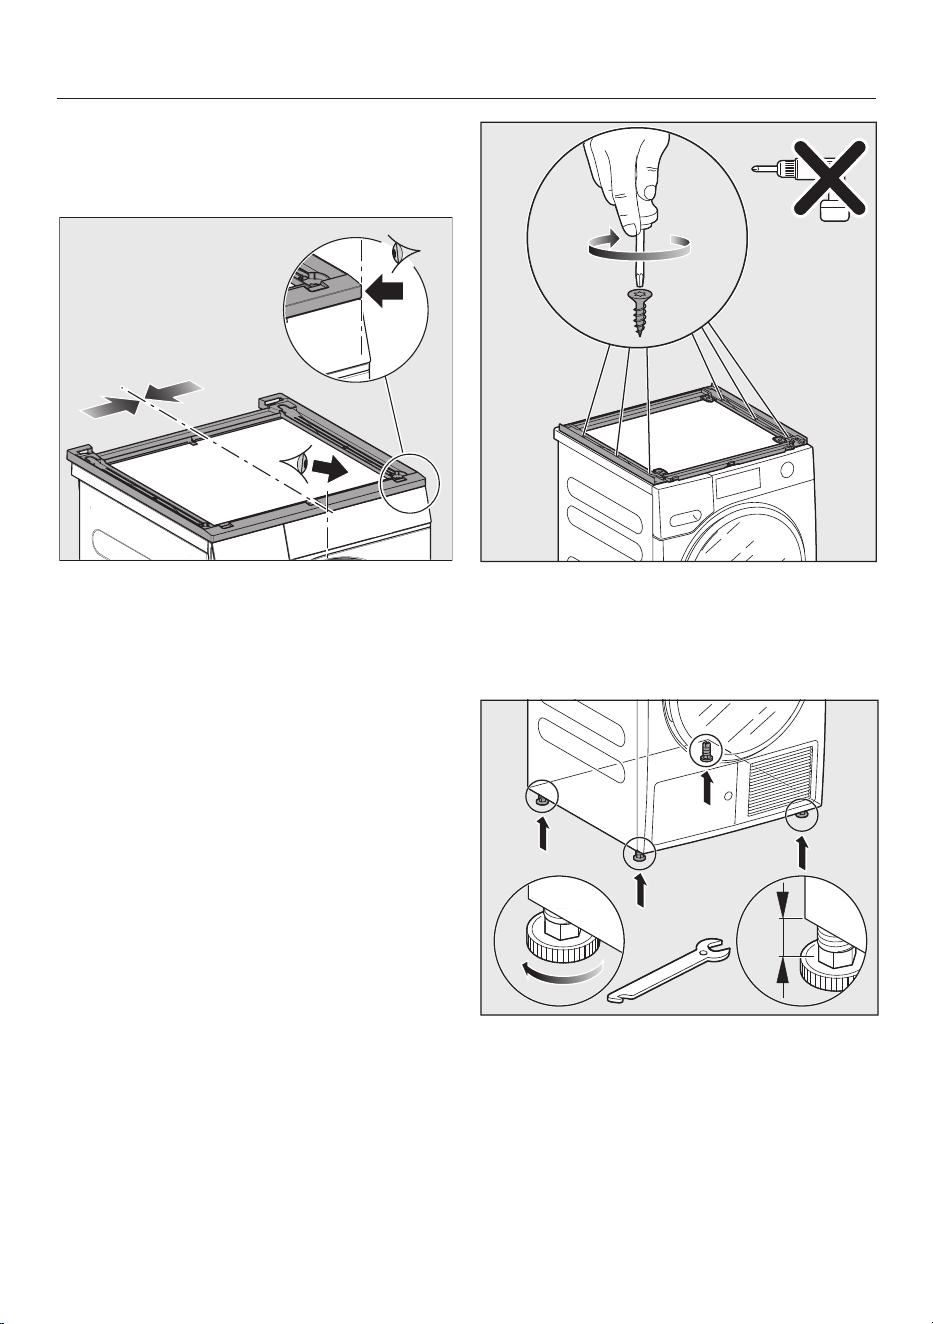
Installation
*INSTALLATION*
77
Aligning the stacking kit
Align the stacking kit centrally on the
washing machine lid.
Use the front edge of the washing
machine lid and the edges of the
stacking kit for this purpose.
Fastening the stacking kit in place
Use the 6 countersunk screws
included with the delivery to fasten
the stacking kit in place.
T20
Carefully screw the stacking kit onto
the washing machine lid by hand. Do
not overtighten the screws.
Preparing the tumble dryer
9/16“
(14mm)
Unscrew the 4 tumble dryer feet.
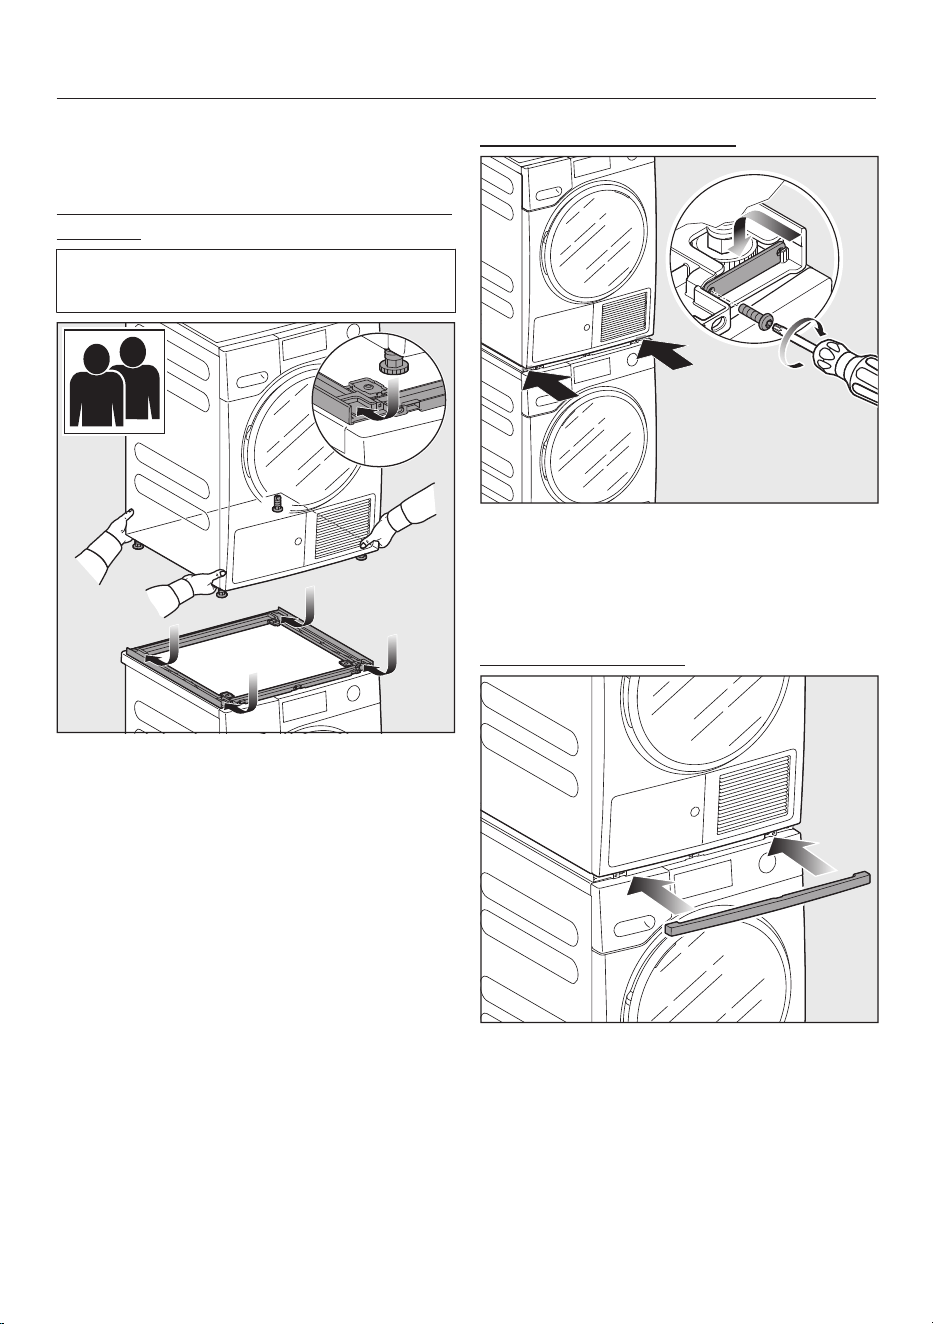
Installation
*INSTALLATION*
78
Mounting the tumble dryer on the
washer-dryer stacking kit
Placing the tumble dryer on the washing
machine
This step must be carried out by 2
people.
Place the tumble dryer on the
washer-dryer stacking kit.
Push the tumble dryer feet all the way
back in the mounting rails.
Securing the tumble dryer
T20
Insert the securing elements into the
corresponding holders.
Fasten the securing elements in place
with the 2 flathead screws.
Mounting the screen
Reinstall the screen.
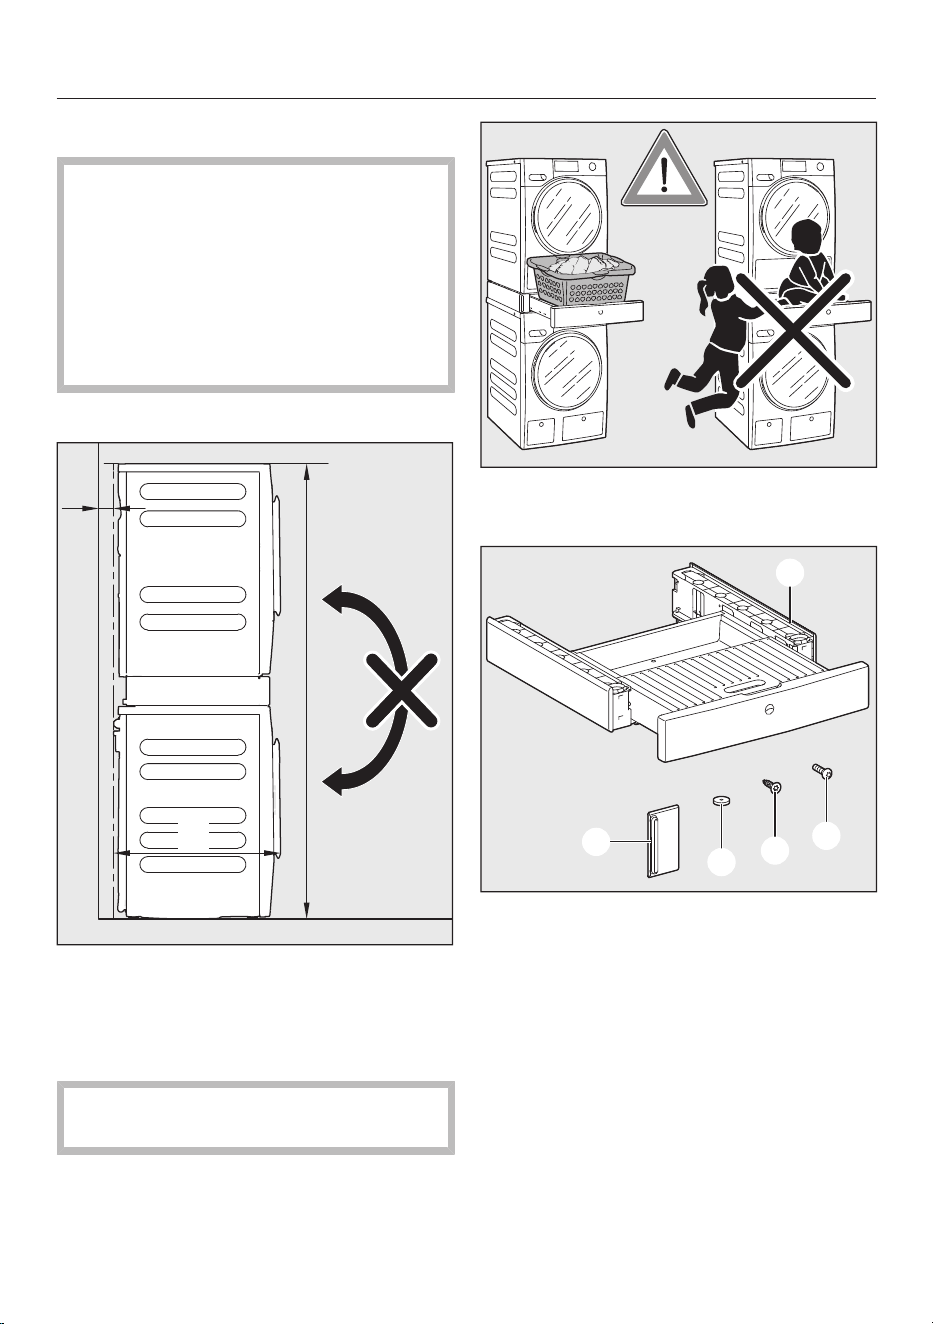
Installation
*INSTALLATION*
79
WTV512
Risk of tipping over due to
incorrect washer-dryer stack statics.
The washing machine must never be
mounted on the tumble dryer. This
will impair the statics of the washer-
dryer stack.
Always use the washing machine as
the base for the washer-dryer stack.
Washer-dryer stack dimensions
c
T1
W1
b
a
a = at least 3/4" (2cm)
b = 711/4" (181cm)
c = 25 9/16" (65cm)
The maximum load bearing capacity
of the drawer is 44lb (20kg).
max.
20kg/
44lb
Components of the washer-dryer
stacking kit
2x
10x
10x
2x
a
Frame
b
Flathead screws for securing the
tumble dryer
c
Countersunk screws for fastening
the stacking kit in place
d
Sealing rings
e
Securing elements
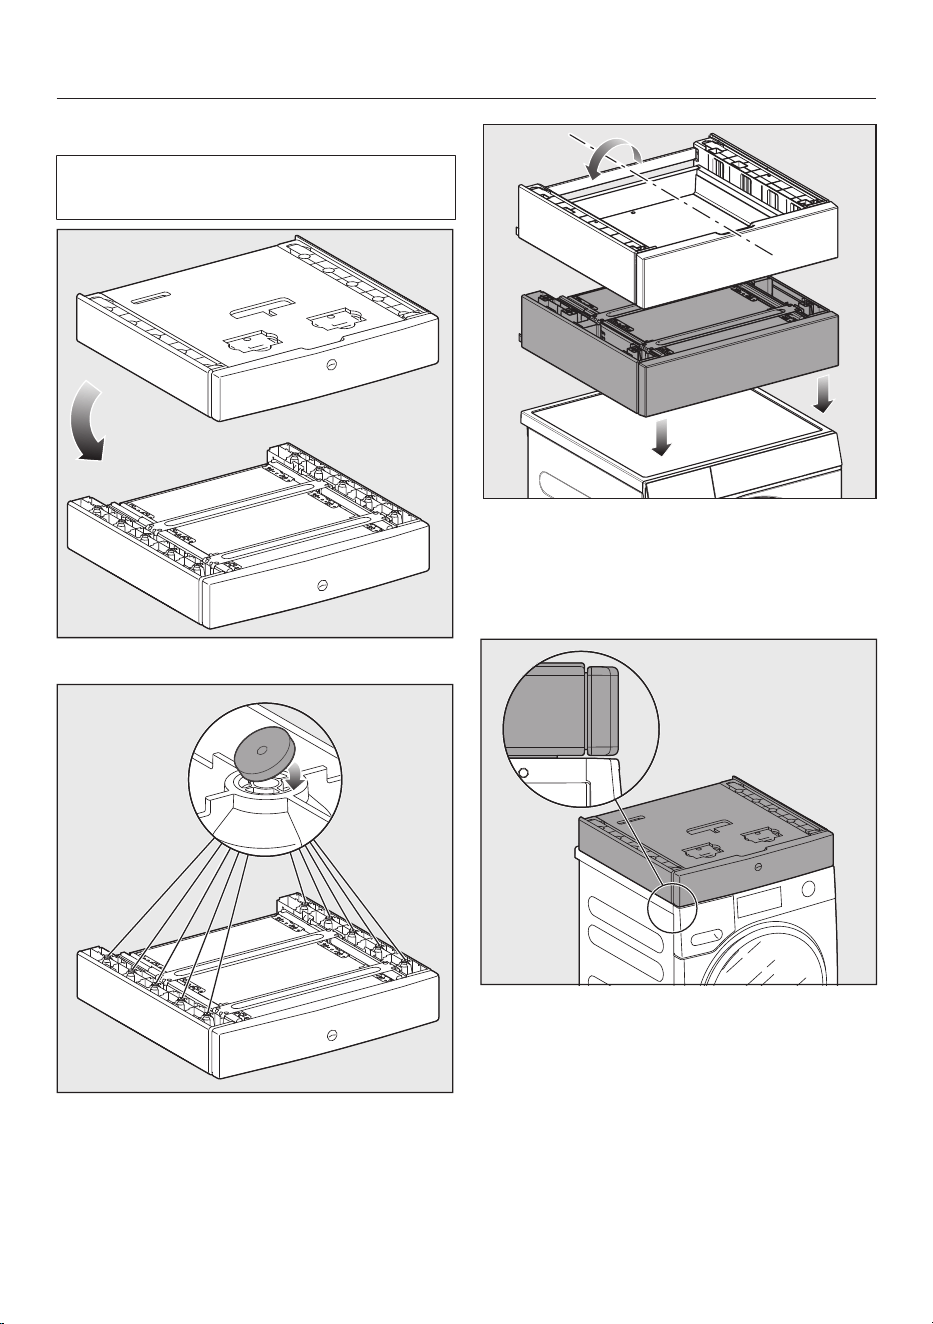
Installation
*INSTALLATION*
80
Preparing the stacking kit
Leave the cardboard inlay in the
drawer.
180°
Turn the stacking kit upside down.
Stick the sealing rings to the
underside of the stacking kit.
180°
Turn the stacking kit the right way up
and place it on the washing machine
lid.
Aligning the stacking kit
Align the stacking kit centrally and
make sure it is flush with the front of
the washing machine.
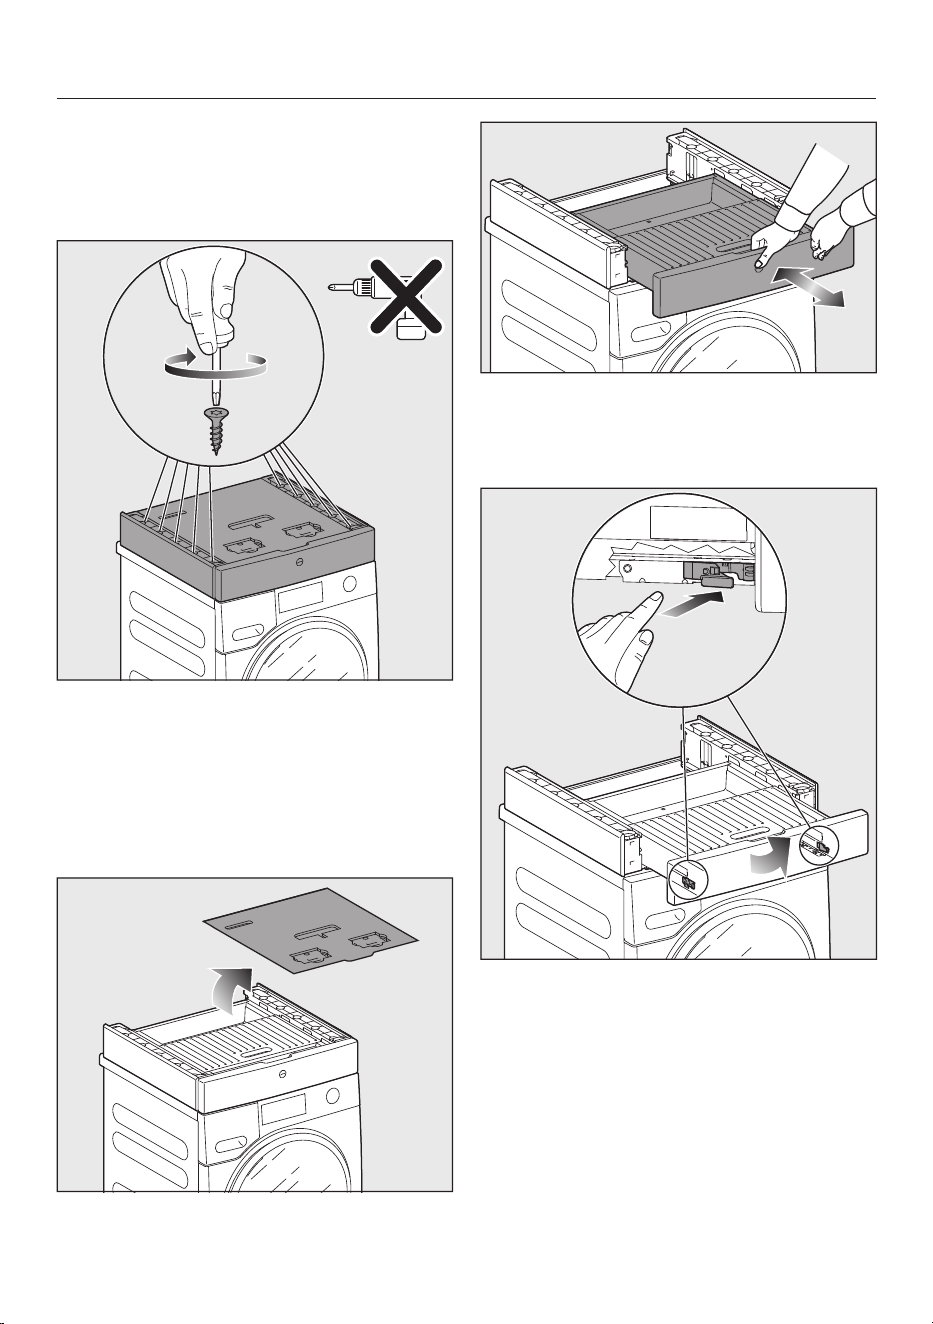
Installation
*INSTALLATION*
81
Fastening the stacking kit in place
Use the flathead screws supplied to
fasten the stacking kit to the washing
machine lid.
T20
Carefully tighten the screws by hand.
Do not overtighten the screws.
Removing the drawer
The drawer must be removed from the
stacking kit when mounting the tumble
dryer on the washing machine.
Remove the cardboard inlay from the
drawer.
Press against the drawer.
The drawer opens.
Pull the drawer out as far as it will go.
Press against the retainers at the
sides.
Lift the drawer slightly and remove it.
Push the runners back into the
stacking kit.
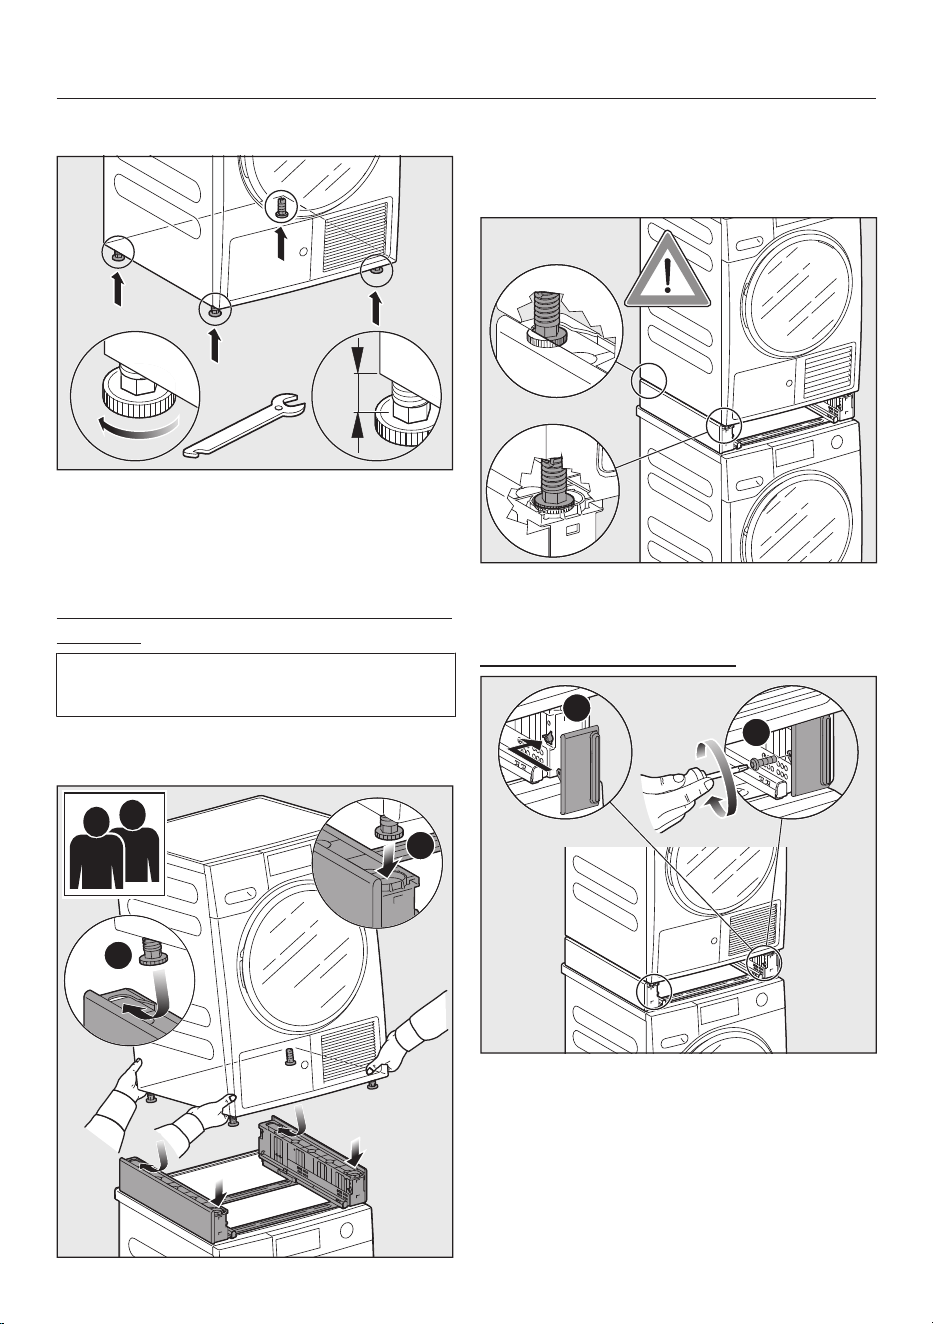
Installation
*INSTALLATION*
82
Preparing the tumble dryer
9/16“
(15mm)
Unscrew the 4 tumble dryer feet.
Mounting the tumble dryer on the
washer-dryer stacking kit
Placing the tumble dryer on the washing
machine
This step must be carried out by 2
people.
Lift the tumble dryer and tilt it back
slightly for installation.
1
2
Place the rear feet in the stacking kit
first and push them all the way back.
Then set down the front feet.
A
B
The tumble dryer feet are positioned
securely in the stacking kit.
Securing the tumble dryer
T20
1
2
Attach the securing elements and
push them outward.
Fasten the securing elements in
place by hand with the flathead
screws.
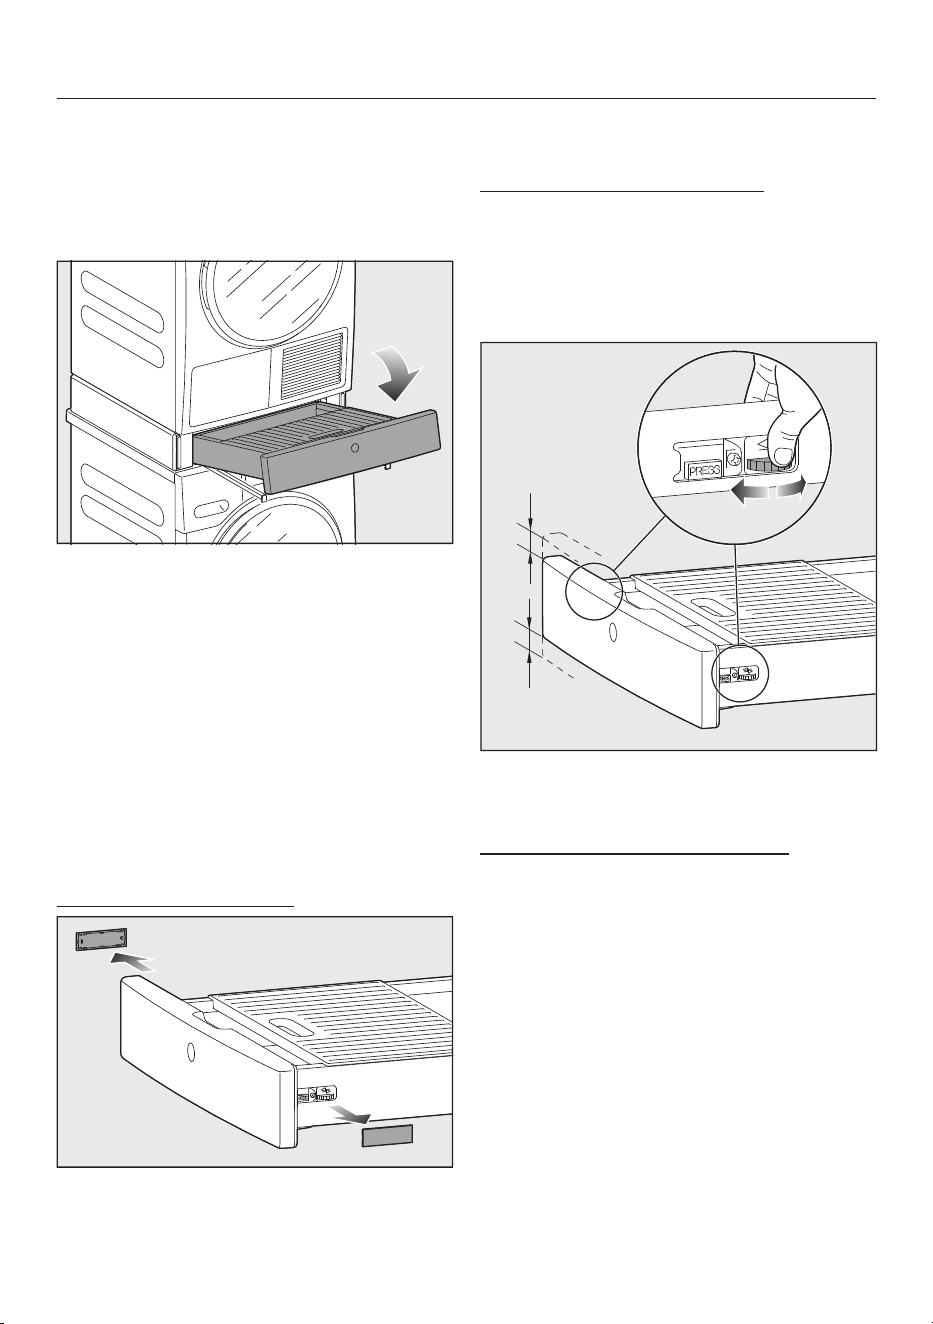
Installation
*INSTALLATION*
83
Inserting the drawer
Press against the two runners.
The runners move out slightly.
Pull the runners all the way out.
Place the drawer on the runners.
Push the drawer into the base.
The drawer audibly engages.
Tip: Open and close the drawer again to
check that it is engaged correctly.
Aligning the drawer front
If the drawer is not quite in the right
position, the drawer front can be moved
to the right or left and its height can be
adjusted.
Removing the cover cap
Open the drawer.
There is a cover cap on each side of
the drawer.
Remove the cover caps by hand.
Aligning the drawer vertically
Under each of the cover caps on the
drawer is a wheel which can be used to
adjust the height.
Make sure you adjust the height evenly
on the right and left.
Turn the wheels to move the drawer
up or down.
Aligning the drawer horizontally
There is also a screw on the right-hand
side, which can be used to move the
drawer front horizontally to the right or
left.
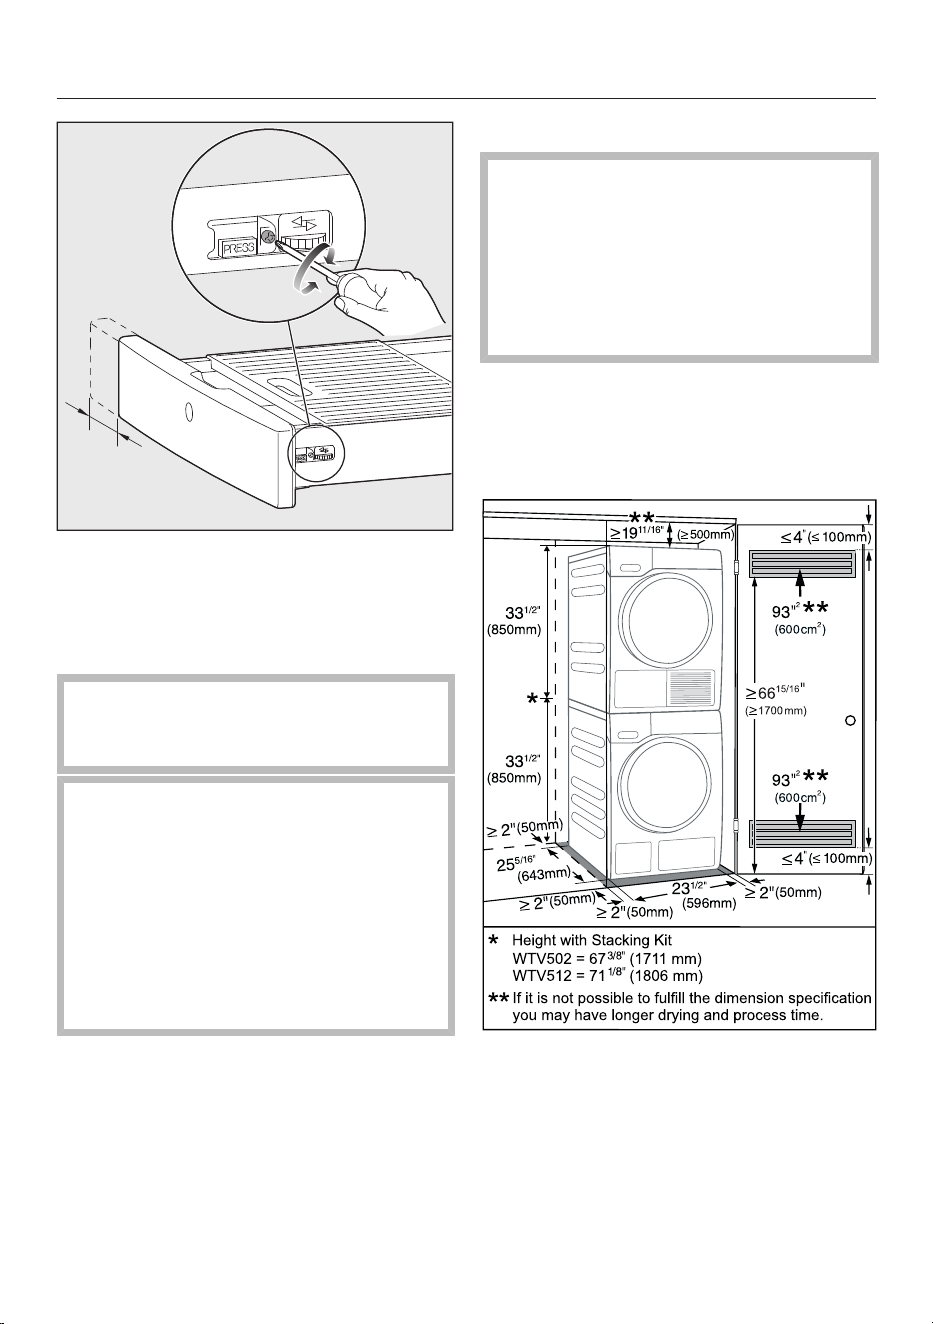
Installation
*INSTALLATION*
84
Turn the screw to move the drawer
front to the right or left.
Additional installation
requirements
The washing machine must be
installed in accordance with the
relevant local regulations.
Damage resulting from failure to
remove the shipping struts.
Failure to remove the shipping struts
can result in damage to the washing
machine and to adjacent cabinetry or
appliances.
Remove the shipping struts as
described in “Installation and
connection”.
Installing under a countertop
Risk of electric shock due to
exposed cables
There is a risk of coming into contact
with live parts while the lid is
removed.
Do not remove the washing machine
lid.
This washing machine (with lid intact)
can be pushed under a countertop if
there is space to do so.
Setting up the cabinet
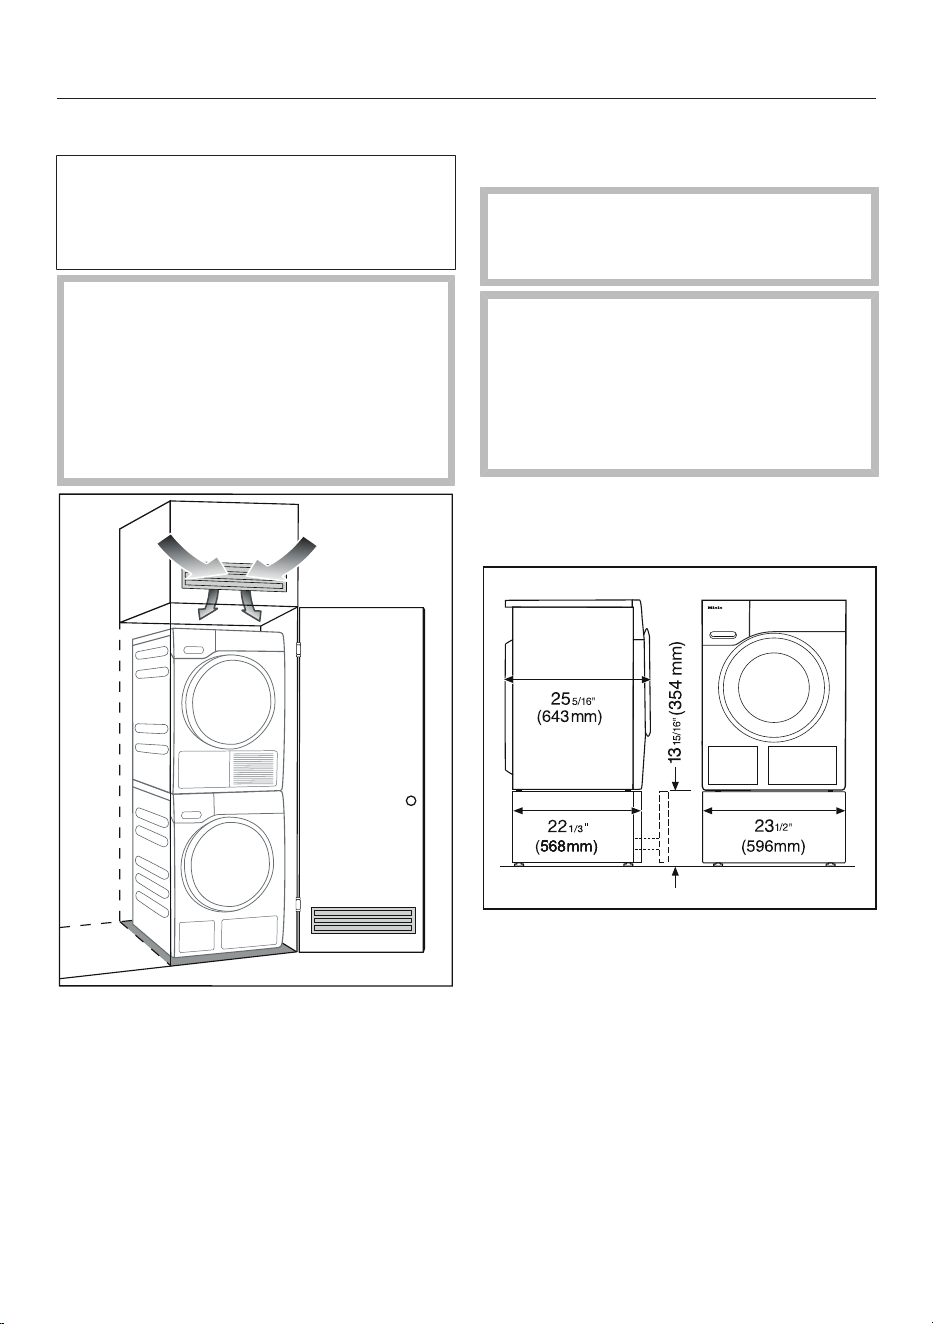
Installation
*INSTALLATION*
85
For closets at room height
You can also insert a ventilation
opening at the top of the closet. In
addition, you must provide an opening
on the bottom side of the door.
Risk of damage due to
overheating of the washing machine.
The air supply must not be hindered
by an additional closet or shelf.
Please ensure that air is able to
circulate freely at the top of the
closet.
Mounting the washing machine
on the WTS510 base
The base is only intended for Miele
washing machines and tumble
dryers.
Risk of accidents due to washing
machine tipping over.
If the washing machine is not
screwed to the base, it may tip over.
Screw the washing machine to the
base.
Installation on a plinth
- WTS 510 (only available in white)
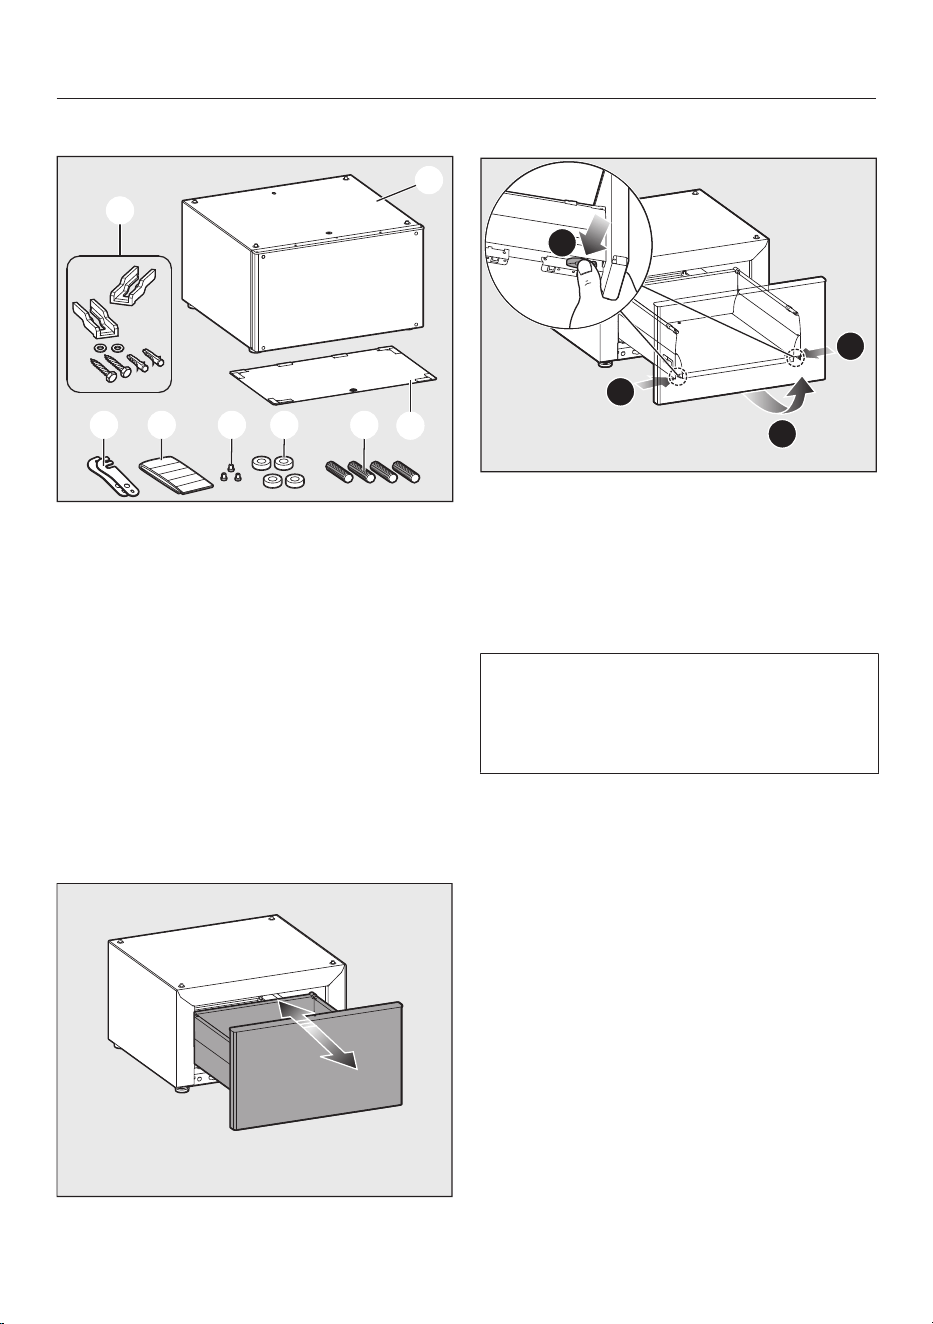
Installation
*INSTALLATION*
86
Components of the base
a
Base
b
Connecting pieces
c
Adhesive strips for rear panel
d
Raised head screws, CEM 4x10
e
Spacer sleeves
f
Set screws, M10x40mm
g
Rear panel for the base
h
Installation kit for fastening to the
floor
Removing the drawer
Press against the drawer.
Pull the drawer all the way out.
1
1
2
1
Press against the retainers at the
sides.
Lift the drawer slightly and remove it.
Push the runners back into the base.
Using the connecting pieces
If 2 bases are installed side by side,
they must be connected to each other.
Connecting pieces are provided for
this purpose.
How the connecting pieces are
mounted depends on the washing
machine door hinging.
Tip: You should mount the connecting
pieces even if you do not have a second
base. This will avoid the possibly
difficult task of retrofitting and also
ensures that the connecting pieces are
stored safely.
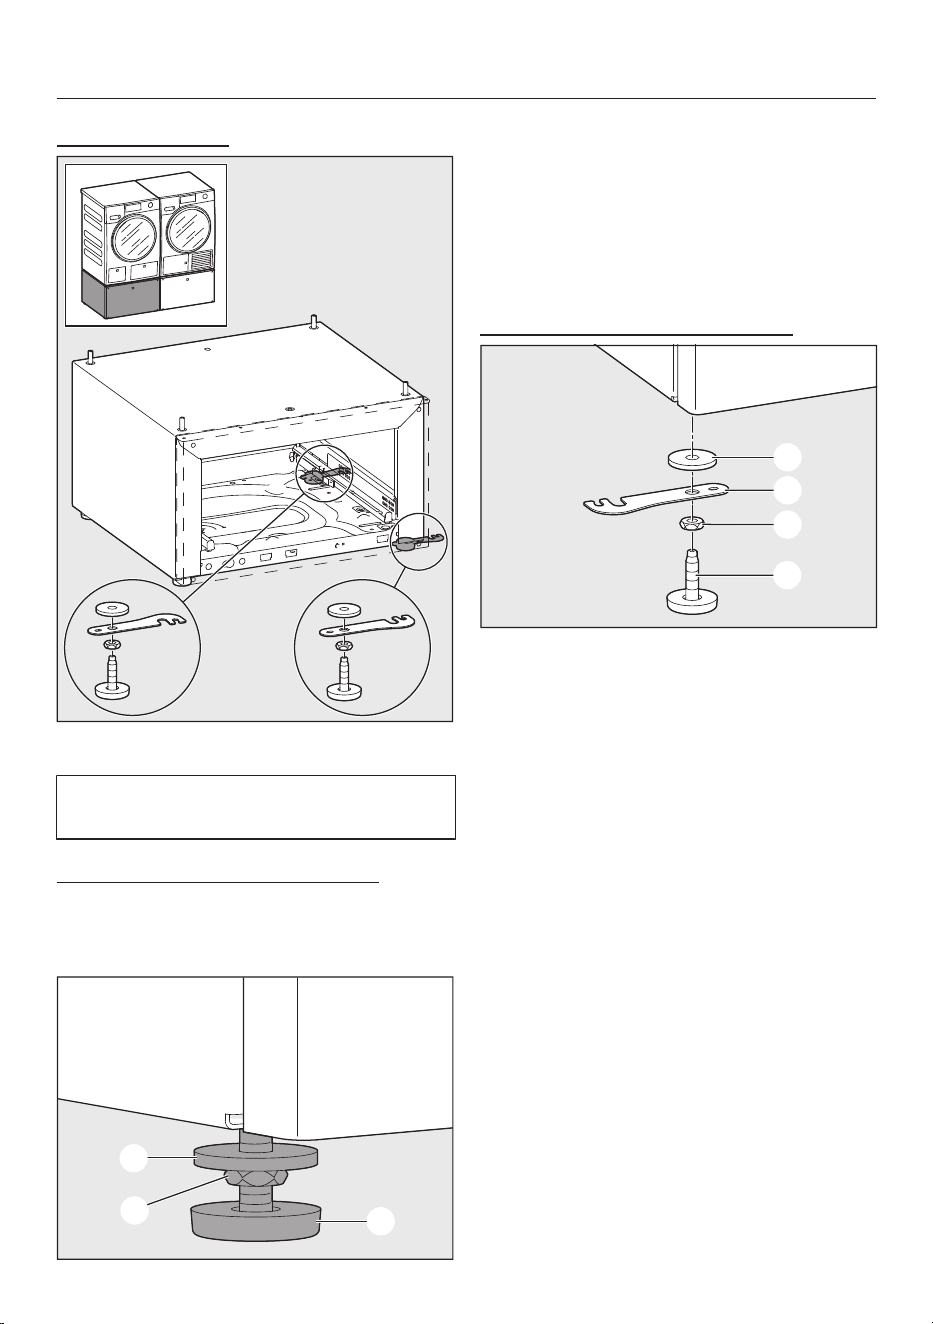
Installation
*INSTALLATION*
87
Left-hand hinging
Installing the connecting pieces
The connecting pieces are installed on
the feet of the base.
Removing the feet from the base
The feet must be removed from the
base in order to mount the connecting
pieces.
Using a wrench, turn the counter nut
between the washer and the
foot in a clockwise direction.
Repeat this step for all 4 feet.
Unscrew the 2 right or left feet all the
way.
Installing the connecting pieces
Install the connecting pieces together
with the feet that have been removed.
The components should be in the
following order, starting with the closest
to the base:
1. Washer
2. Connecting piece
3. Counter nut
4. Foot
Screw the base feet back on but do
not secure them with the counter nut
yet.
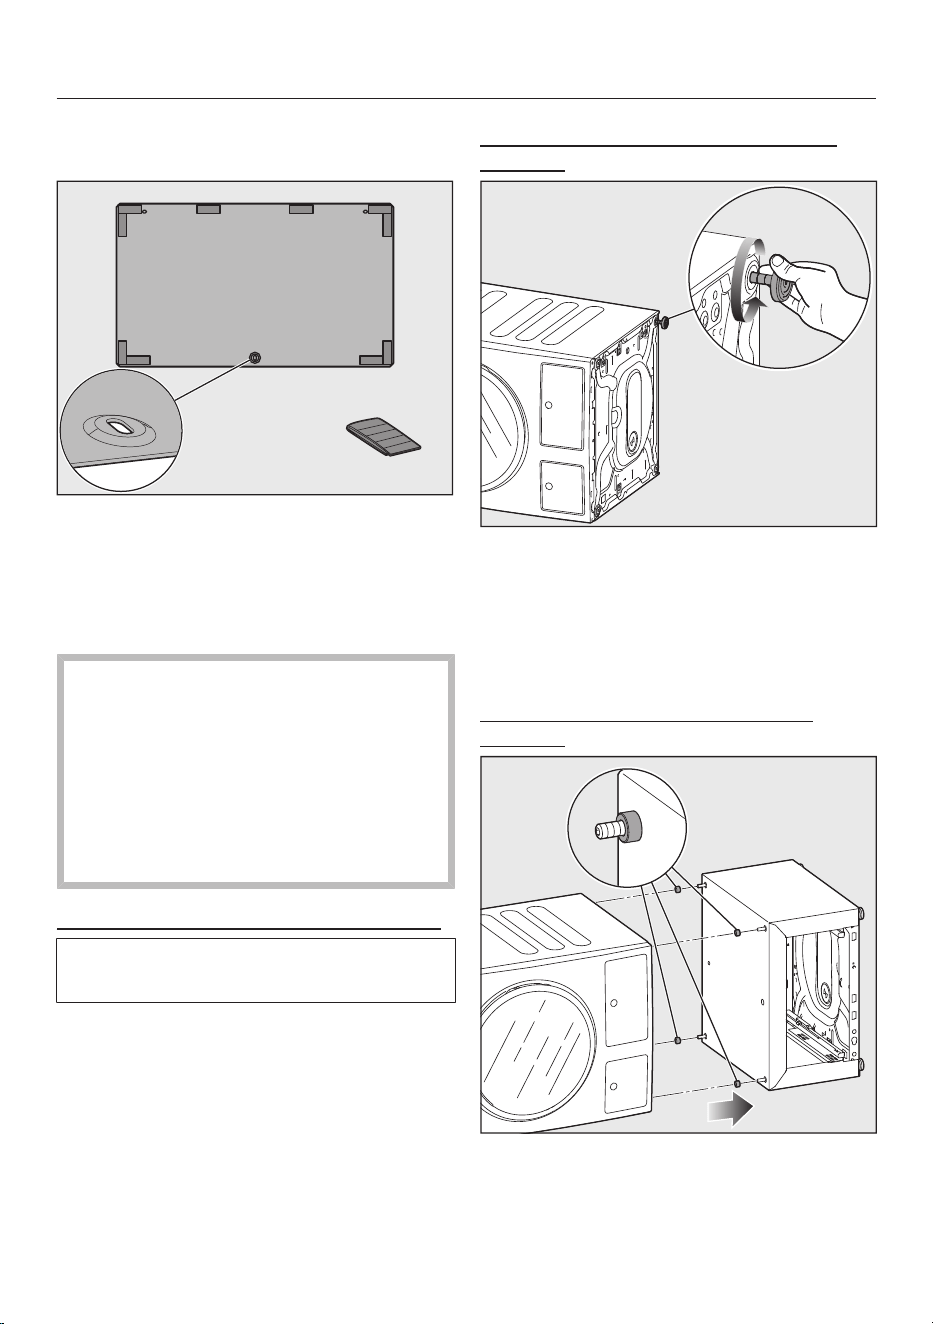
Installation
*INSTALLATION*
88
Preparing the rear panel of the
WTS510
Stick the sealing strips from the
accessory pack to the inside of the
rear panel as shown in the image.
Connecting the washing machine to
the base
Damage to washing machine and
floor
The washing machine and the floor
may be damaged if the instructions
for preparing the washing machine
are not observed.
Observe the instructions for
preparing the washing machine.
Laying the washing machine on its side
This step must be carried out by 2
people.
Prepare a soft, flat surface (e.g., a
blanket).
Slowly lay the washing machine on its
side opposite to the hinge or with
hinge up.
Removing the feet from the washing
machine
Using a wrench, turn the counter nut
in a clockwise direction.
Unscrew the foot all the way and
remove it.
Repeat the process for all 4 feet.
Screwing the base to the washing
machine
Place the spacer sleeves on the set
screws.
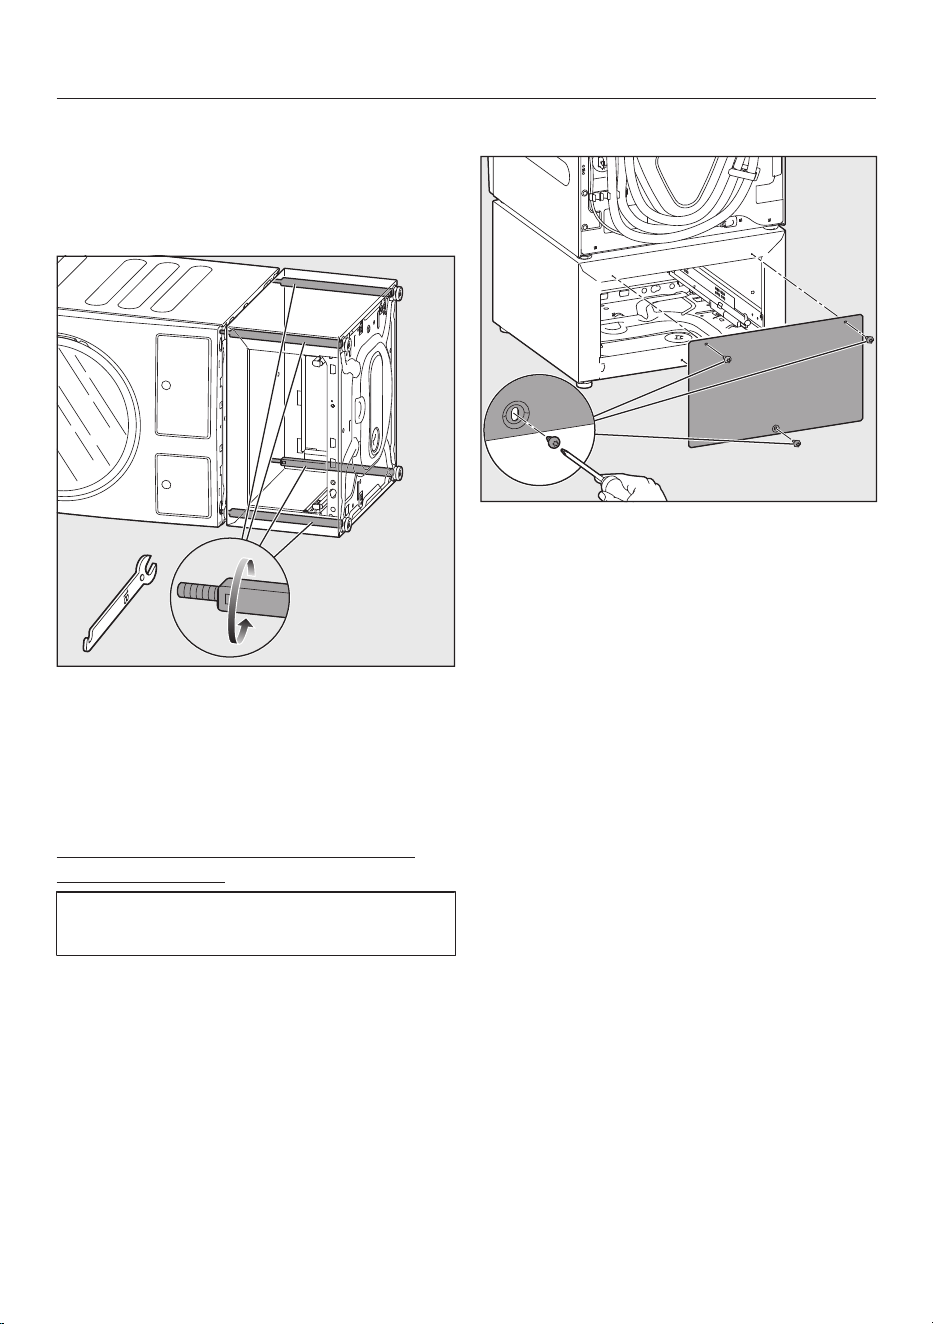
Installation
*INSTALLATION*
89
Push the base and the washing
machine together. The set screws
must be inserted in the holes of the
feet that have been removed from the
washing machine.
Using a wrench, tighten all 4
threaded bolts alternately and evenly
inside the base.
The base is screwed securely to the
washing machine.
Standing the washing machine/base
assembly upright
This step must be carried out by 2
people.
Carefully stand the assembly upright
again.
Fastening the rear panel to the base
T20
Use the raised head screws to screw
the prepared panel to the rear of the
base.
Aligning and securing the feet of the
base
The base must stand perfectly level on
all 4 feet to ensure safe and proper
operation. Incorrect installation may
increase water and energy
consumption.
Use a level to check that the washing
machine is level.
Unscrew one or more feet to level the
appliance.
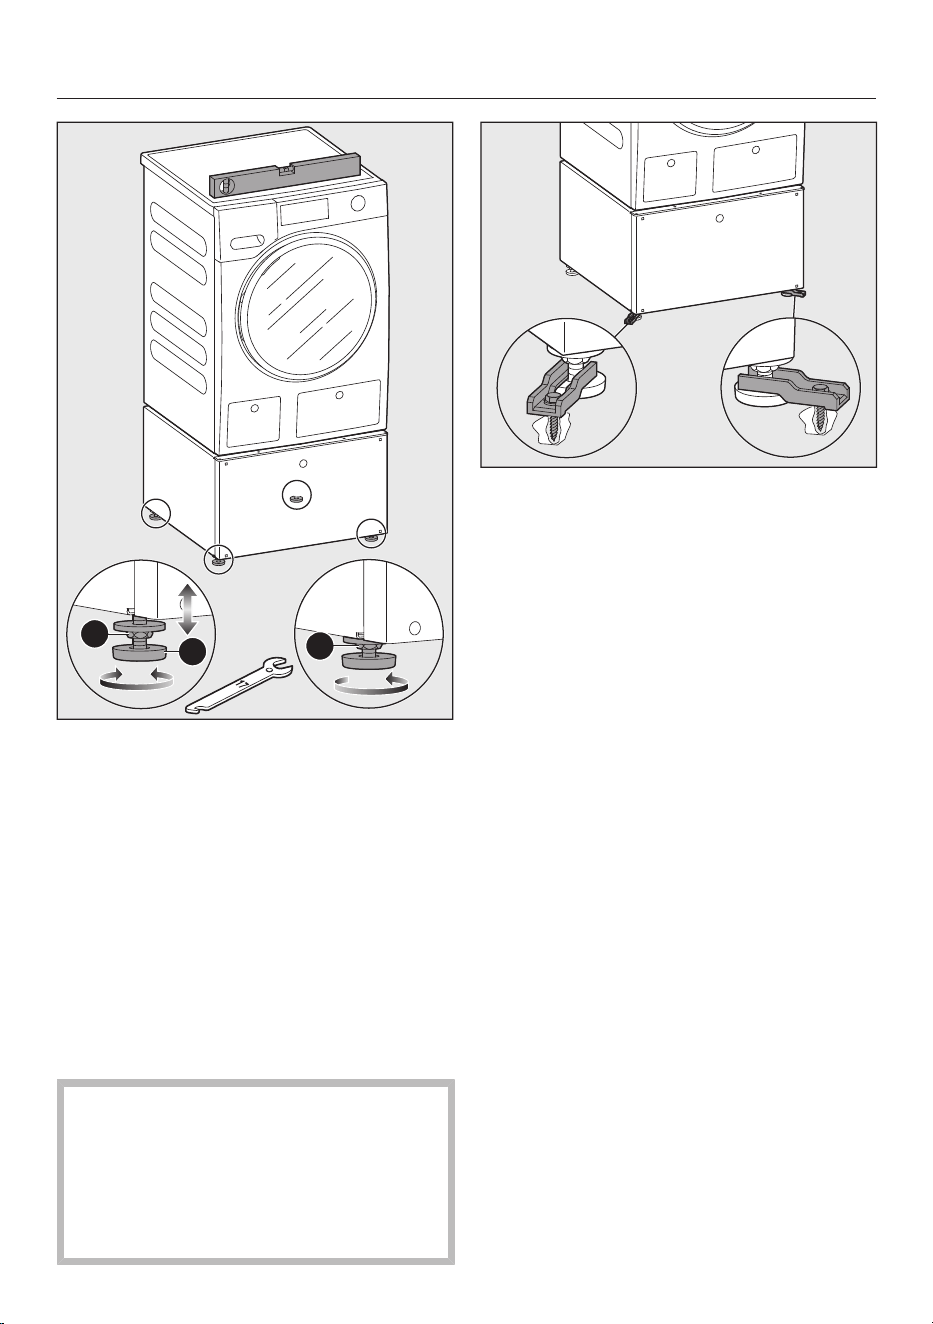
Installation
*INSTALLATION*
90
1
3
2
Using a wrench, turn the counter nut
on the feet in a clockwise direction.
Turn the counter nut together with
the feet to unscrew.
Hold the feet securely with a pipe
wrench. Turn the counter nut using a
wrench until it sits firmly up against
the casing of the base.
Tip: If the connecting pieces are not
required, fold them in.
Anchoring the base to the floor using
tensioning strips
Risk of tipping over
If the base is not anchored in place, it
may move around with the washing
machine or tip over.
Anchor the base in place with the
tensioning strips provided.
Anchor the base to the floor with the
tensioning strips provided.
Tip: The anchoring will be most
effective if the tensioning strips are
turned out slightly when fastened in
place. Refer to the installation
instructions for the tensioning strips.
Inserting the drawer
Press against the two runners.
The runners move out slightly.
Pull the runners all the way out.
Place the drawer on the runners.
Push the drawer into the base.
The drawer audibly engages.
Tip: Open and close the drawer again to
check that it is engaged correctly.
Aligning the drawer front
If the drawer front is not exactly in line
with the tumble dryer or the washing
machine, it can be adjusted.

Installation
*INSTALLATION*
91
Removing the cover cap
Open the drawer.
There is a cover cap on each side of
the drawer.
Remove the cover caps by hand.
Aligning the drawer vertically
On both sides of the drawer is a wheel
which can be used to adjust the height.
Make sure you adjust the height evenly
on the right and left.
Turn the wheel to move the drawer up
or down.
Replace the cover caps.
Aligning the drawer horizontally
There is also a screw on the right-hand
side, which can be used to move the
drawer front horizontally to the right or
left.
Turn the screw to move the drawer
front to the right or left.
Adjusting the inclination of the drawer
There are two different types of drawer.
1. Drawer with round rail
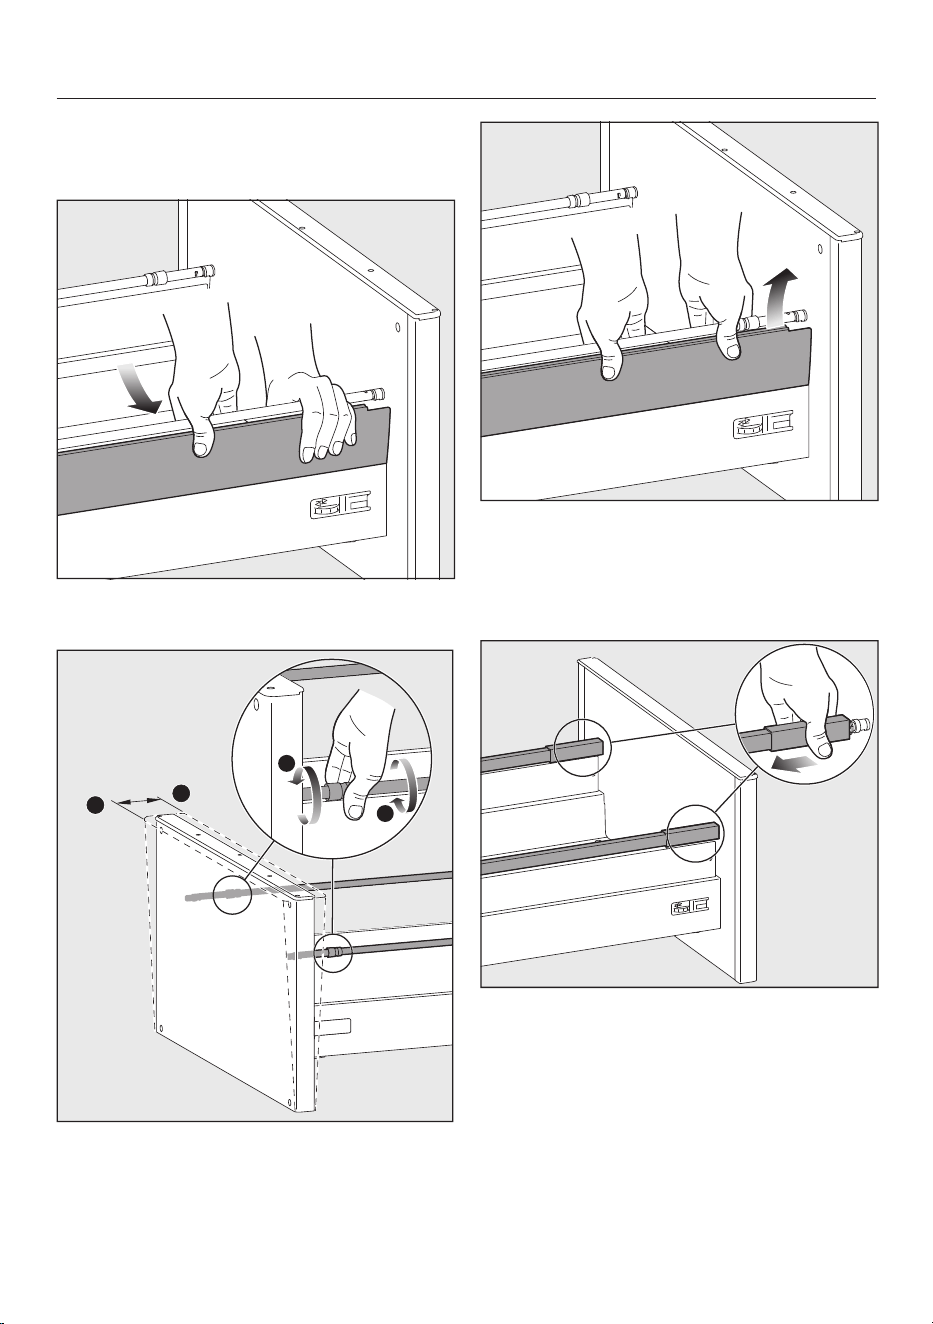
Installation
*INSTALLATION*
92
2. Drawer with square rail
Drawer with round rail
Push the top panels outward from
inside and set the panels aside.
-
+
-
+
To adjust the inclination of the drawer,
turn the two rails.
Place the bottom of the panels in
position and press the panels inward
at the top.
Drawer with square rail
Slide the two covers back.
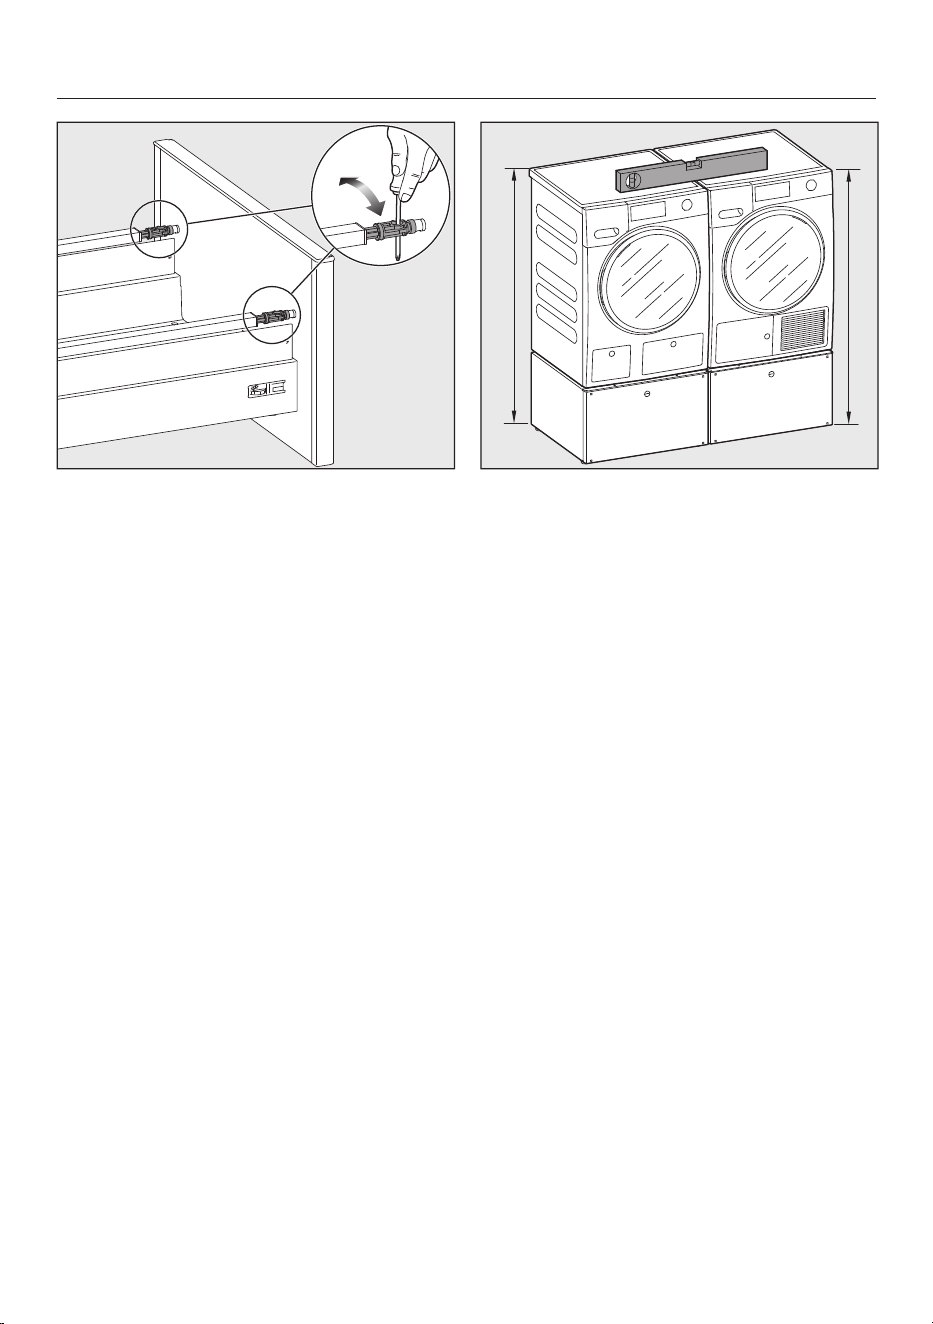
Installation
*INSTALLATION*
93
To adjust the inclination of the drawer,
turn the two rails using a screwdriver.
Preparing the washing machine for
washing
The following measures must be carried
out:
1. Remove the transport struts.
2. Insert the detergent drawer.
3. Insert detergent cartridges.
If the washing machine is new, carry out
initial commissioning.
Installing the tumble dryer and
washing machine side by side
If the tumble dryer and washing
machine are installed side by side, the
bases must be connected using the
connecting pieces on the feet of the
washing machine base. If the
connecting pieces are on the right-hand
side, the tumble dryer will be on the
right; if the connecting pieces are on the
left-hand side, the tumble dryer will be
on the left.
=
=
During installation, please note the
following:
- The bases must be the same height.
- The bases must be in line with each
other.
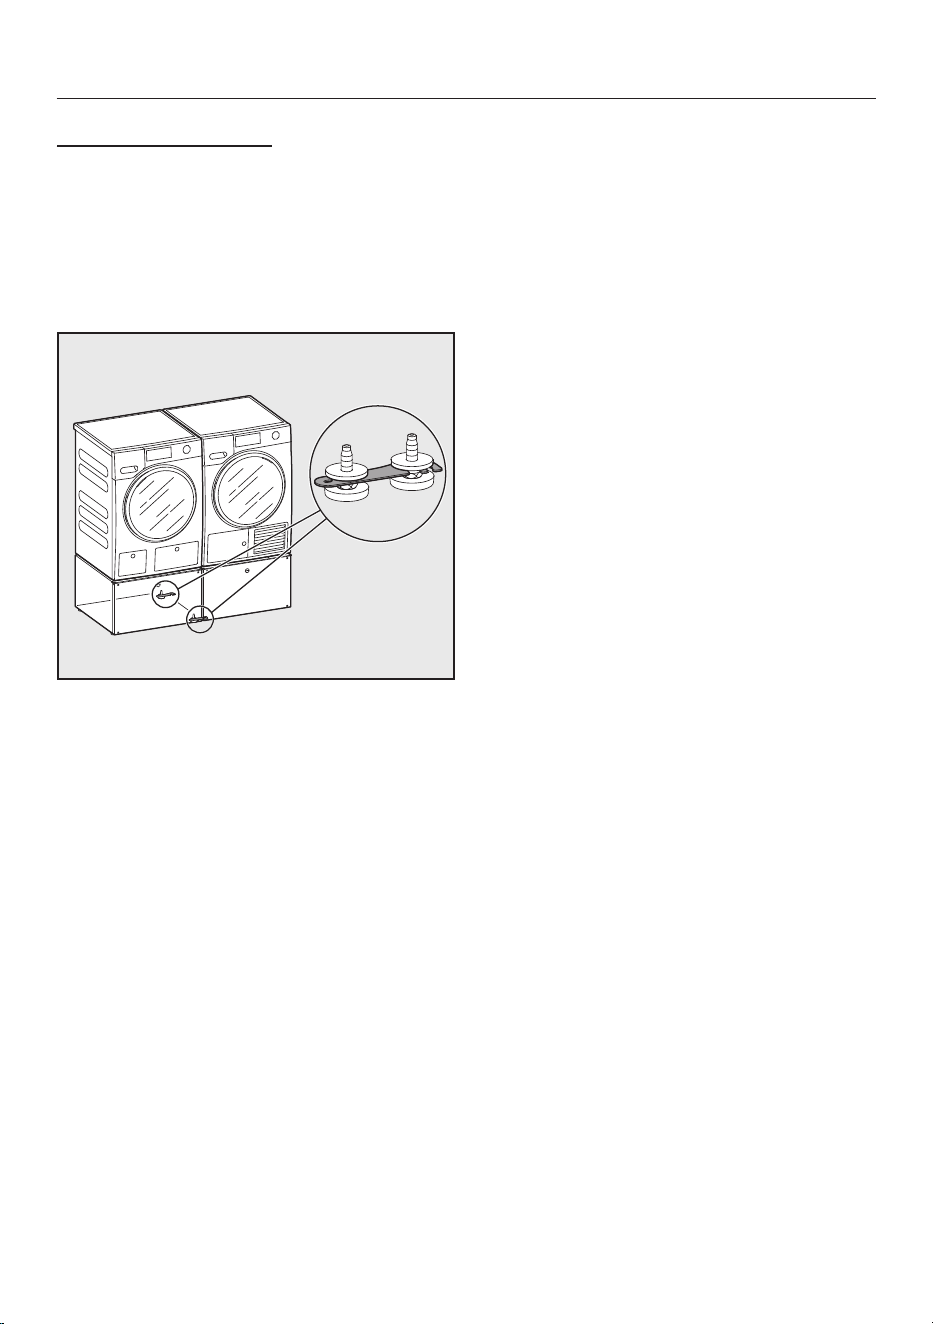
Installation
*INSTALLATION*
94
Connecting the bases
Loosen the counter nuts on the feet
of the base of the washing machine
and the tumble dryer.
Fold out the connecting pieces on the
feet of the washing machine base.
Push the two bases together.
Place the connecting pieces around
the feet of the tumble dryer base.
Check that the bases are the same
height and that they are in line with
each other.
If the heights are different, adjust the
feet accordingly.
Secure all feet using the counter nuts.

Installation
*INSTALLATION*
95
The water protection system
The Miele water protection system
protects all parts of the washing
machine and its surroundings from
water damage.
The system consists of the following
main components:
- the inlet hose
- the electronic module and drainage
and overflow protection
- the drain hose
Inlet hoses
- Protection against the hoses bursting
The inlet hose can withstand pressure
of more than 1,015psi (7,000kPa).
Electronics and housing
- Floor tray: Any leaking water from the
washing machine is collected in the
drip tray. There is a float switch to
close the water intake valve. The
water inlet is shut off and any water
inside the suds container is drained
away.
- Leak protection: Any leaking water
that is not collected in the drip tray is
detected. The water inlet is shut off
and any water inside the suds
container is drained away.
- Overflow protection: This prevents the
washing machine from taking in too
much water and overflowing. If the
water level exceeds a certain level, the
drain pump switches on and pumps
the excess water away.
Drain hose
The drain hose is protected by a
ventilation system which prevents the
washing machine from being emptied
completely.
Water intake
Health risk and risk of damage
due to contaminated incoming water.
The quality of the incoming water
must comply with the requirements
for drinking water in the country in
which the washing machine is being
operated.
Always connect the washing machine
to the drinking water supply.
The washing machine can be connected
to a portable water supply. A non-return
valve is not needed unless required by
building code.
The washing machine has ½“ (13mm)
pressure hoses with ¾” (19mm) female
hose thread connections. If there is no
water hookup, contact a plumber to
install a connection. Make sure that the
sealing ring is seated properly on the
hose connector.
Replace the hose only with a genuine
Miele hose, or with a hose able to
withstand up to 145psi (1,000kPa)
pressure. The water valve connector
must also be able to withstand 145psi
(1,000kPa).
The bolted connection is under water
pressure. Open the water supply
slowly to check for leaks. Adjust the
rubber seal and the bolted
connection if necessary.
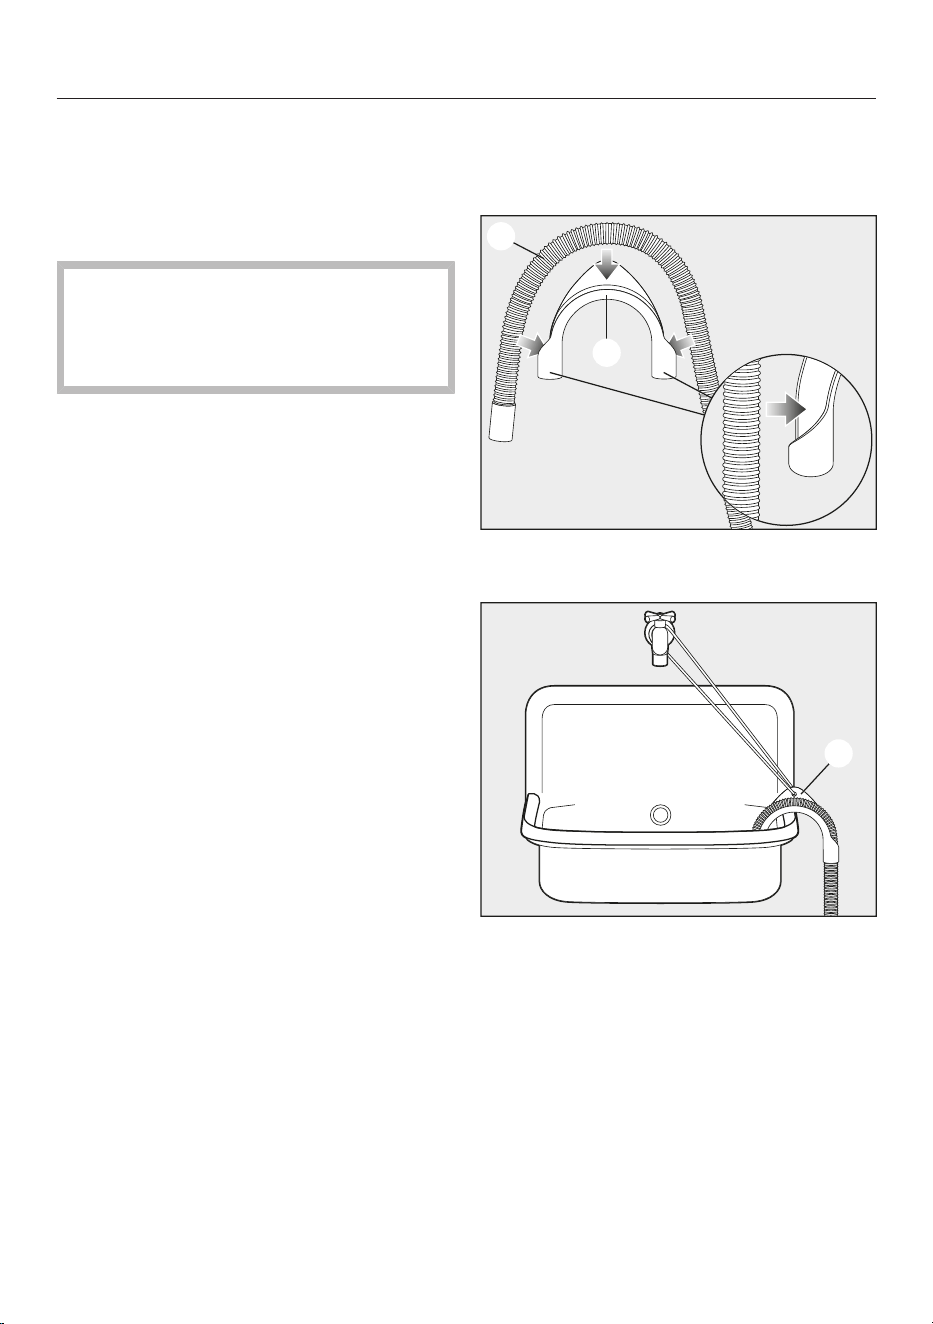
Installation
*INSTALLATION*
96
Maintenance
Only use a genuine Miele hose that has
been tested to withstand pressure of at
least 870psi (6,000kPa) should you
ever need a replacement.
A filter is located in the open end
of the inlet hose and another in the
intake point to protect the inlet valve.
Neither filter may be removed.
Water drainage
The suds are drained through a drain
pump with a 3'3³⁄₈" (1m) delivery head.
For the water to drain freely, the hose
must be installed free of kinks.
If required, the hose can be extended to
a length of up to 16'4⁷⁄₈" (5m).
Accessories are available from Miele.
Drainage options:
1. Direct into a sink or basin:
Please note:
– Hook the hose over the edge and
secure!
– If the water is pumped into a sink,
be sure that it can drain away
quickly enough. Otherwise there is
a risk of water overflowing or of
some of the drained water being
sucked back into the machine.
2. Connected securely to a plastic drain
pipe with a rubber nipple (there is no
need to use a non-return valve).
3. Connected securely to a floor drain.
4. Connected securely to a sink with a
plastic nipple.
Installing the elbow
Use the elbow supplied to stop the
drain hose from slipping.
Attach the elbow to the drain
hose.
Place the end of the drain hose in a
sink.
Use a strap with eyelet to stop the
elbow from slipping.

Installation
*INSTALLATION*
97
Electrical connection
GROUNDING INSTRUCTIONS
This appliance must be grounded. In
the event of a malfunction or
breakdown, grounding will reduce the
risk of electric shock by providing a
path of least resistance for electric
current. This appliance is equipped
with a cord having an equipment-
grounding conductor and a grounding
plug. The plug must be plugged into
an appropriate outlet that is properly
installed and grounded in accordance
with all local codes and ordinances.
WARNING – Improper connection of
the equipment-grounding conductor
can result in a risk of electric shock.
Check with a qualified electrician or
service representative if you are in
doubt as to whether the appliance is
properly grounded.
Do not modify the plug provided with
the appliance; if it will not fit the
outlet, have a proper outlet installed
by a qualified electrician.
ELECTRICAL INSTRUCTIONS
This installation should be performed by
an experienced and qualified technician,
in accordance with local codes and
regulations.
The washing machine is supplied with a
6'6³⁄₄" (2.0m) long, 3 wire cord, ending
in a NEMA 5-15P plug, ready for
connection to a 120V, 15A, 60Hz, AC
power supply.
The manufacturer recommends
operating the appliance on a dedicated
circuit to avoid overloading the electrical
circuit.
The proper outlet can be purchased
from an electrical supply dealer.
Connection adapter for NEMA 14-30
socket
If a NEMA 14-30 socket is
provided on-site for the dryer, the
Miele connection adapter* can be
used.
Observe the following description to
avoid damage to the washer.
Tip: * You can order the connection
adapter directly from Miele (USA or
CDN).
- The connection adapter has a NEMA
14-30 plug and two NEMA 5-15
socket-side connectors. The dryer and
washing machine can therefore be
connected to the 120V/60Hz
electricity supply.
- The connection adapter is equipped
with two 15A fuses which protect
both the connected appliances and
the connection adapter.

Technical data
Height 33 ¹⁄₂" (850 mm)
Width 23 ¹⁄₂" (596 mm)
Depth 25 ⁵⁄ ₁₆" (636 mm)
Depth with door open 41 ¹⁄₂" (1054 mm)
Height for building under 33 ¹⁄₂" (+⁵⁄₁₆"/-¹/₁₆") (850 mm)
Width for building under 23 ⁵⁄₈" (600 mm)
Weight Approx. 220.5 lb (100 kg)
Capacity 17.6lb/8.0kg dry laundry
Connection voltage See data plate
Rated load See data plate
Fuse rating See data plate
Minimum water flow pressure 14.5psi (100kPa)
Maximum water flow pressure 145psi (1,000kPa)
Water-inlet hose length 5'3" (1.6m)
Drain-hose length 4'11" (1.5m)
Power-cord length 6'6³⁄₄" (2.0m)
Maximum drain height 3'3³⁄₈" (1.0m)
Maximum drain length 16'4⁷⁄₈" (5.0m)
LEDs Class 1
Test certificates awarded See data plate
Frequency range 2.412–2.462GHz
Maximum transmission power <100mW
98

Settings
99
You can use the settings to alter the
washing machine's electronics to suit
changing requirements.
The settings can be altered at any
time.
Calling up settings
Switch on the washing machine.
Scroll to the second page in the main
menu.
Touch the Settingssensor button.
The display will change to show the
Settings menu.
Selecting settings
The settings are grouped into different
areas.
11:02
Controls /
Display
Settings
Network
Program
sequence
Appliance
parameters
Installation
requirements
Select the required area.
Scroll through the list until the desired
setting appears.
Touch the sensor button to select the
desired setting.
Changing a setting
Change the value displayed and
confirm with OK.
or
Touch an option to select it.
An option which is selected will be
highlighted orange.
The option is saved. The display will
then switch to the Settings menu, or go
back to the previous menu level.
Closing the Settings menu
Touch the sensor button.
The display will then go back to the
previous menu level.
Touch the sensor button.
The display will change to the main
menu.
Controls / Display
Language
The display can be set to appear in one
of several different languages.
The flag after the word Language acts
as a guide in case a language which is
not understood is set.
The language selected is saved to
memory.
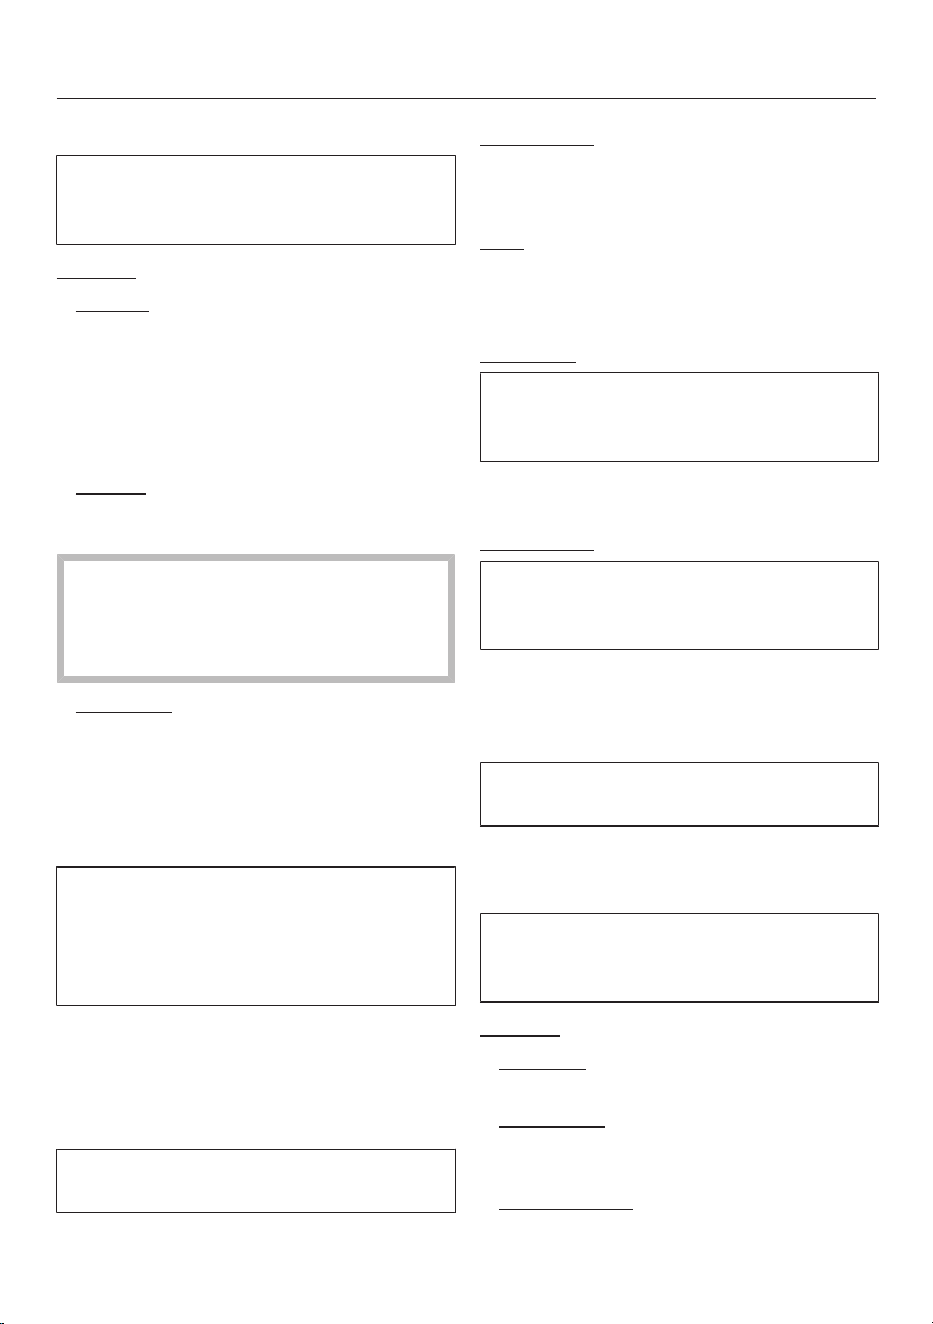
Settings
100
Code
The PIN code prevents the washing
machine being used without your
knowledge.
Options
- Activate
When the PIN code has been
activated, you have to enter it after
switching the washing machine on.
Otherwise, the washing machine
cannot be operated.
The factory default PIN code is 125.
- Change
You can set a different, three-digit PIN
code.
Make a note of the new PIN
code. If you forget the code, the
washing machine will need to be
unlocked by Miele Service.
- Deactivate
The washing machine is to be
operated again without entering the
PIN code. This only appears if the PIN
code has been activated previously.
Memory
The washing machine will save the last
settings (temperature, spin speed, and
some of the extra options) selected for
a wash program after the program has
started.
When the program is chosen again, the
saved settings will appear in the display.
Memory is deactivated as standard.
Clock display
After selecting the clock format, you
can set the time of day.
Clock format
- 24h clock (factory default)
- 12h clock
Time
- The time can be set.
Volume
Finish tone
The volume of the audible signal that
sounds at the end of the program can
be changed.
It can be set to one of 7 different levels
or switched off altogether.
Keypad tone
The volume of the audible signal that
sounds when a sensor button is
touched can be changed.
It can be set to one of 7 different levels
or switched off altogether.
Display Brightness
The brightness of the display can be
altered.
It can be set to one of 7different levels.
Temperature unit
The temperature and spin speed
values can be displayed in different
ways.
Options
- Clear text (factory default)
The values are displayed as words.
- °C / Celsius
The temperatures are displayed as
figures in °C.
- °F / Fahrenheit
The temperatures are displayed as
figures in °F.

Settings
101
“Display” off status
The display and the sensor button
lighting is switched off to save energy.
The Start/Stopsensor button flashes
slowly.
Options
- Off
The lighting remains switched on.
- On (factory default)
The lighting switches off after
10minutes.
- On -Not in current prog.
The lighting remains switched on
throughout the program. The lighting
switches off 10minutes after the
program has ended.
Program sequence
TwinDos
You can check the dispensing
quantities.
Select type of detergent
You can either use UltraPhase1 and
UltraPhase2, or switch TwinDos
dispensing off.
Use the No agent setting to switch
TwinDos dispensing off.
Change the dosage
The set values for dispensing
UltraPhase1 and UltraPhase2
detergent can be checked and
corrected.
Soiling
Allows selection of default setting for
level of soiling.
The following soiling levels are available
to choose from:
- Light
- Normal
- Heavy
The factory default setting is: Normal
Maximum rinse level
The water level in the rinse can be
permanently set to the highest value.
This function is important for allergy
sufferers as it achieves excellent wash
results. The water consumption will be
increased.
The maximum rinse level is deactivated
as standard.
Soak duration
You can set a duration for the soak
process of between 30minutes and
6hours.
A duration can be selected in 30-minute
increments. When the Soak extra option
is selected, the laundry will be soaked
for the duration selected.
A duration of 0: 30h is set as standard.
Extra Gentle
When Gentle action is activated, drum
rotation is reduced. In this way, lightly
soiled items can be washed more
gently.
Gentle action can be activated for the
Normal and Wrinkle-free programs.
Gentle action is deactivated as
standard.

Settings
102
Anti-crease
The Anti-crease function helps prevent
creasing after the end of the program.
At the end of the program, the drum
continues to turn for up to 30minutes.
The washing machine door can be
unlocked and then opened at any time
by touching the Start/Stopsensor
button.
Anti-crease is activated as standard.
Bleach
You can activate the automatic
addition of bleach at the end of the
main wash.
Bleach may only be used in some
programs. See “5. Adding detergent –
Using chlorine bleach” for more detailed
information.
Activating bleach extends the program
duration by approximately 10minutes.
The washing machine is delivered with
the bleach setting deactivated.
Network
Miele@home
Control the networking of your
washing machine with your WiFi
network.
The following points may appear in the
submenu:
Set up
This message only appears if the
washing machine has not yet been
connected to a WiFi network.
Please refer to “Before using for the first
time” for instructions on how to set up
the connection.
Activate
(visible if Miele@home is deactivated)
The WiFi function is reactivated.
Deactivate
(visible if Miele@home is activated)
Miele@home remains set up; the WiFi
function is turned off.
Connection status
(visible if Miele@home is activated)
The following values are displayed:
- the quality of WiFi reception
- the network name
- the IP address
Set up again
(visible if set up)
Resets the WiFi login (network) to
immediately re-establish a new
connection.
Reset
(visible if set up)
- The WiFi is switched off.
- The WiFi connection will be reset to
the factory default.
The network configuration should be
reset whenever a washing machine is
being disposed of or sold, or if a used
washing machine is being put into
operation. This is the only way to ensure
that all personal data has been removed
and the previous owner will no longer be
able to access the washing machine.
A new connection setup has to be
carried out in order to use the
Miele@home setting again.

Settings
103
SmartGrid
The SmartGrid setting is only visible if
the Miele@home setting is set up and
activated.
You can set your washing machine to
start automatically based on an
external signal within a certain time
period.
Activating SmartGrid gives the
Timersensor button a new function.
Use the Timer sensor button to set
SmartStart. The washing machine will
then start within the time period
specified by you when it receives an
external signal. If an external signal has
not been received by the latest start
time set, the washing machine will start
automatically (see “Delay Start”).
SmartGrid is deactivated as standard.
Remote Control
The Remote control setting is only
visible if the Miele@home setting is set
up and activated.
Once the Miele@mobile app has been
installed on your mobile device, you
can check the status of your washing
machine from anywhere and start it
remotely. You can also control it
remotely via the MobileStartprogram.
You can switch off the Remote control
setting if you do not want to operate the
washing machine with your mobile
device.
If Remote control is not switched on, the
app can cause the program to be
canceled.
Use the Timer sensor button to set a
timeframe within which you want to
start the washing machine and the
timer (see “Timer”).
The washing machine will then start
within the timeframe specified when it
receives your signal.
If it has not received a start signal by the
latest start time set, the washing
machine will start automatically.
Remote control is activated as standard.
RemoteUpdate
The RemoteUpdatemenu option is only
displayed and can only be selected if
the requirements for using
Miele@home have been met (see
“Before using for the first time –
Miele@home”).
The RemoteUpdate function updates
the software in your washing machine. If
an update is available for your washing
machine, it will automatically download
it. Updates will not be installed
automatically. They must be initiated
manually.
If you do not install an update, you can
continue to use your washing machine
in the usual way. However, Miele
recommends installing updates.
Activating/deactivating
The RemoteUpdate function is activated
as standard. Available updates will be
downloaded automatically but will only
be installed if you initiate installation
manually.
Deactivate RemoteUpdate if you do not
want any updates to be downloaded
automatically.

Settings
104
Running a RemoteUpdate
Information about the content and
scope of an update is provided in the
Miele app.
A message will appear in your washing-
machine display if a software update is
available.
You can install the update immediately
or postpone this until later. When the
washing machine is switched on again,
you will be reminded about the update.
Deactivate RemoteUpdate if you do not
want to install the update.
The update may take several minutes.
Please note the following information
about the RemoteUpdate function:
- You will only receive a message when
an update is available.
- Once an update has been installed, it
cannot be undone.
- Do not switch off the washing
machine during an update. Otherwise,
the update will be aborted and will not
be installed.
- Some software updates can only be
carried out by Miele Customer
Service.
Appliance parameters
Legal Information
Open Source Licenses
You can view information here.
Copyrights and licenses for operator
and control software
Miele uses their own and third party
software which is not subject to any so-
called open source license for the
operation and control of the device/
appliance. This software/these software
components are protected by copyright.
The copyright powers of Miele and third
parties have to be respected.
Furthermore, this device/appliance
contains software components which
are distributed under open source
license conditions. Please refer to the
menu item Settings| Device parameters|
Legal information| Open source licenses in
the device/appliance for the Open
Source components contained therein,
together with the corresponding
copyright notices, copies of the
licensing conditions valid at the time,
and any further information. The liability
and warranty provisions of the open
source licensing conditions as stated
therein apply only in relation to the
respective rights holders.
Copyrights and licenses for the
communication module
For the purpose of operating and
controlling the communication module,
Miele uses proprietary or third-party
software that is not covered by open
source licensing terms. This software/
these software components are
protected by copyright. The copyrights
held by Miele and third parties must be
respected.
This communication module contains
software components which are
distributed under open source license
conditions. The open source
components contained in the appliance
along with the corresponding copyright
notices, copies of the licensing terms
valid at the time, and any additional
information can be accessed locally via
http://<IP address>/Licenses. The
liability and warranty arrangements for

Settings
105
the open source licenses displayed in
this location only apply in relation to the
respective rights holders.
Water intake
You can program 2 options for the
water inlet. The water inlet is
controlled by the two inlet hoses.
Options
- Cold water
The washing machine will be operated
with cold water only.
- Hot main wash (default setting)
Hot water is used in the main wash to
save energy.
You can heat up your water with
cheaper, primary energy sources, e.g.,
gas, solar power, oil. The temperature
must be below 140°F (60°C.)
For technical reasons, the
washing machine must always be
connected to cold water.
Installation requirements
Low water pressure
If the water pressure is below 14.5psi
(1bar), the program will be canceled
and the fault message Water intake
fault. Open the water supply. will appear.
If the on-site water pressure cannot be
increased, activating this function will
prevent the program from being
canceled.
Low water pressure is deactivated as
standard.
Suds cooling
Additional water flows into the drum at
the end of the main wash to cool the
suds down.
Suds cooling takes place when a
Cottons program with a temperature of
158°F (70°C) or higher is selected.
Suds cooling should be activated:
- To prevent the danger of scalding if
the drain hose is hooked over the
edge of a sink or basin.
- Where the drainage pipes do not
comply with DIN1986.
Suds cooling is deactivated as standard.
Temperature reduction
At high altitudes, water has a lower
boiling point. Miele recommends
activating the reduced-temperature
setting at altitudes of 6,560 ft
(2,000m) or above to prevent water
from boiling. The maximum
temperature is reduced to 176°F
(80°C), even if a higher temperature
has been selected.
The reduced-temperature setting is
deactivated as standard.


9 Independence Way
Princeton, NJ 08540
www.mieleusa.com
U.S.A.
Miele, Inc.
National Headquarters
Please have the model and serial number
of your appliance available when
contacting Customer Service.
Canada
Importer
Miele Limited
Headquarters and Miele Centre
Customer Support
Phone: 888-99-MIELE (64353)
161 Four Valley Drive
Vaughan, ON L4K 4V8
www.miele.ca
Customer Care Centre
Phone:
1-800-565-6435
905-532-2272
International Headquarters
Miele & Cie. KG
Carl-Miele-Straße 29
33332 Gütersloh
Germany

M.-Nr. 11 622 722 / 04en-US
WXR 860