User Manual
For single user / home use only

© All Rights Reserved.
DISTRIBUTED BY:
ARKRAY USA
5182 West 76th Street
Minneapolis, MN 55439 U.S.A.
800.566.8558
www.arkrayusa.com
Technical Customer Service:
800.566.8558
24 hours a day, 7 days a week.
In case of emergency, please
contact your healthcare
professional or emergency
medical response.
P/N 5524-04 Rev. 01/23
PGUAA-0000033 REV4 01/2023

Welcome to the GLUCOCARD® Shine Connex
Blood Glucose Monitoring System
Thank you for choosing the GLUCOCARD Shine Connex Blood
Glucose Monitoring System. The system provides you with rapid
and convenient blood glucose in vitro (i.e., outside the body)
diagnostic monitoring. You can obtain accurate results in just
five seconds with a small (0.5 µL) blood sample.
Test results can be sent to a smartphone through a Bluetooth®
wireless connection.
Bluetooth® Wireless Technology
Bluetooth® wireless technology is used by some smartphones
and many other devices. GLUCOCARD® Shine Connex Meter
uses Bluetooth® wireless technology to pair* and to send your
glucose test results to a smartphone.
When using the GLUCOCARD Shine Connex Blood Glucose
System, we suggest you pair your GLUCOCARD Shine Connex
Meter with your smartphone and track your test results.
• No part of this document may be reproduced in any
form or by any means without the prior written consent
of the manufacturer.
• The information in this manual is correct at the time of
printing. However, the manufacturer reserves the right to
make any necessary changes at any time without notice as
our policy is one of continuous improvement.
* The process of creating a connection between two Bluetooth®
devices. An auto-generated passkey has to be exchanged between
the two devices. Once the devices are paired (connected), they will
automatically communicate with each other when the Bluetooth®
feature is activated.

WARNING
Turn off the Bluetooth® feature in areas where the use of
wireless devices is restricted, such as hospitals, some healthcare
professional offices, and airplanes.
Trademarks
The Bluetooth® word mark and logos are registered trademarks
owned by Bluetooth® SIG, Inc. and any use of such marks by the
manufacturer is under license. All other trademarks and trade
names are those of their respective owners.
FCC Radiation Exposure Statement
This equipment complies with FCC radiation exposure limits set
forth for an uncontrolled environment.
This equipment should be installed and operated with minimum
distance eight inches (20 cm) between the radiator and your
body.
Any changes or modifications not expressly approved by
the manufacturer could void the user's authority to operate
this equipment.

Table of Contents
Information
Important Information: Read This First --------------------------------------------------------------------------------------------------------------------------------------------------------------------------------------------------------------------------------------------------------------------------------------------------------------------------------------------- 6
Important Safety Information ------------------------------------------------------------------------------------------------------------------------------------------------------------------------------------------------------------------------------------------------------------------------------------------------------------------------------------------------------------------------------------------------------------------------------------------------------------------------ 7
Limitations of GLUCOCARD Shine Connex Blood Glucose
Monitoring System ---------------------------------------------------------------------------------------------------------------------------------------------------------------------------------------------------------------------------------------------------------------------------------------------------------------------------------------------------------------------------------------------------------------------------------------------------------------------------------------------------------------------------------------------------------------------------------------------- 8
Specifications ------------------------------------------------------------------------------------------------------------------------------------------------------------------------------------------------------------------------------------------------------------------------------------------------------------------------------------------------------------------------------------------------------------------------------------------------------------------------------------------------------------------------------------------------------------------------------------------------------------------------------------------ 10
GLUCOCARD Shine Connex Blood Glucose Monitoring System ----------------------------------------------------------------- 11
Inserting or Replacing the Batteries ------------------------------------------------------------------------------------------------------------------------------------------------------------------------------------------------------------------------------------------------------------------------------------------------------------------------------------------------------------------------------------------ 12
GLUCOCARD Shine Blood Glucose Test Strip ----------------------------------------------------------------------------------------------------------------------------------------------------------------------------------------------------------------------------------------------------------------------------- 13
GLUCOCARD Shine Connex Blood Glucose Meter ---------------------------------------------------------------------------------------------------------------------------------------------------------------------------------------------------------------------- 16
GLUCOCARD Shine Connex Blood Glucose Meter Display ----------------------------------------------------------------------------------------------------------------------------- 17
Preparation
Setting Up the GLUCOCARD Shine Connex System ----------------------------------------------------------------------------------------------------------------------------------------------------------------------------------------------------- 18
Setting Up Bluetooth® ---------------------------------------------------------------------------------------------------------------------------------------------------------------------------------------------------------------------------------------------------------------------------------------------------------------------------------------------------------------------------------------------------------------------------------------------------------------------------------------------------------------------------- 19
Adjusting the Date and Time --------------------------------------------------------------------------------------------------------------------------------------------------------------------------------------------------------------------------------------------------------------------------------------------------------------------------------------------------------------------------------------------------------------------------------------------------- 21
Setting the Sound On/OFF ---------------------------------------------------------------------------------------------------------------------------------------------------------------------------------------------------------------------------------------------------------------------------------------------------------------------------------------------------------------------------------------------------------------------------------------------------------------------------- 23
Turning on the Test Strip Expiration Date Indicator --------------------------------------------------------------------------------------------------------------------------------------------------------------------------------------------------- 24
Turning on the Hypoglycemia (HYPo) Indicator ------------------------------------------------------------------------------------------------------------------------------------------------------------------------------------------------------------------------------------------- 25
Setting the Test Strip Expiration Date Indicator ------------------------------------------------------------------------------------------------------------------------------------------------------------------------------------------------------------------------------------------------------------- 26
Checking the System ------------------------------------------------------------------------------------------------------------------------------------------------------------------------------------------------------------------------------------------------------------------------------------------------------------------------------------------------------------------------------------------------------------------------------------------------------------------------------------------------------------------------------------------------------- 27
Control Solution Testing ------------------------------------------------------------------------------------------------------------------------------------------------------------------------------------------------------------------------------------------------------------------------------------------------------------------------------------------------------------------------------------------------------------------------------------------------------------------------------------------------------- 28
Comparing the Control Solution Test Results ------------------------------------------------------------------------------------------------------------------------------------------------------------------------------------------------------------------------------------------------------------------ 31
Testing
Using the Lancing Device ------------------------------------------------------------------------------------------------------------------------------------------------------------------------------------------------------------------------------------------------------------------------------------------------------------------------------------------------------------------------------------------------------------------------------------------------------------------------------------------------------- 32
Preparing the Lancing Device ------------------------------------------------------------------------------------------------------------------------------------------------------------------------------------------------------------------------------------------------------------------------------------------------------------------------------------------------------------------------------------------------------------------------------------------ 33
Preparing the Meter and Test Strip ---------------------------------------------------------------------------------------------------------------------------------------------------------------------------------------------------------------------------------------------------------------------------------------------------------------------------------------------------------------------------------- 35
Applying Blood Sample ------------------------------------------------------------------------------------------------------------------------------------------------------------------------------------------------------------------------------------------------------------------------------------------------------------------------------------------------------------------------------------------------------------------------------------------------------------------------------------------------------------- 36
Discarding Used Lancets -------------------------------------------------------------------------------------------------------------------------------------------------------------------------------------------------------------------------------------------------------------------------------------------------------------------------------------------------------------------------------------------------------------------------------------------------------------------------------------------- 39
‘HI’ and ‘Lo’ Messages ------------------------------------------------------------------------------------------------------------------------------------------------------------------------------------------------------------------------------------------------------------------------------------------------------------------------------------------------------------------------------------------------------------------------------------------------------------------------------------------------------------------------------------ 40
Target Blood Glucose Ranges ------------------------------------------------------------------------------------------------------------------------------------------------------------------------------------------------------------------------------------------------------------------------------------------------------------------------------------------------------------------------------------------------------------------------------------------------------------ 41
Transferring Test Results -------------------------------------------------------------------------------------------------------------------------------------------------------------------------------------------------------------------------------------------------------------------------------------------------------------------------------------------------------------------------------------------------------------------------------------------------------------------------------------------------------------------- 42
Additional Functions
Meter Memory ------------------------------------------------------------------------------------------------------------------------------------------------------------------------------------------------------------------------------------------------------------------------------------------------------------------------------------------------------------------------------------------------------------------------------------------------------------------------------------------------------------------------------------------------------------------------------------------------------------------------------ 43
Viewing Past Test Averages ----------------------------------------------------------------------------------------------------------------------------------------------------------------------------------------------------------------------------------------------------------------------------------------------------------------------------------------------------------------------------------------------------------------------------------------------------------------- 43
Viewing Test Results --------------------------------------------------------------------------------------------------------------------------------------------------------------------------------------------------------------------------------------------------------------------------------------------------------------------------------------------------------------------------------------------------------------------------------------------------------------------------------------------------------------------------------------------- 45
Setting the Alarm Function --------------------------------------------------------------------------------------------------------------------------------------------------------------------------------------------------------------------------------------------------------------------------------------------------------------------------------------------------------------------------------------------------------------------------------------------------------------------------------------- 47
Setting the Post-meal Alarm (PP2 Alarm) ---------------------------------------------------------------------------------------------------------------------------------------------------------------------------------------------------------------------------------------------------------------------------------------------- 47
Setting the Time Alarms (Alarm 1–3) ---------------------------------------------------------------------------------------------------------------------------------------------------------------------------------------------------------------------------------------------------------------------------------------------------------------------------------------------- 48
Caring for the GLUCOCARD Shine Connex System -------------------------------------------------------------------------------------------------------------------------------------------------------------------------------------------------------------- 50
Maintenance
Understanding Error Messages ------------------------------------------------------------------------------------------------------------------------------------------------------------------------------------------------------------------------------------------------------------------------------------------------------------------------------------------------------------------------------------------------------------------------------------------ 56
General Troubleshooting --------------------------------------------------------------------------------------------------------------------------------------------------------------------------------------------------------------------------------------------------------------------------------------------------------------------------------------------------------------------------------------------------------------------------------------------------------------------------------------------------------------------- 58
Performance Characteristics --------------------------------------------------------------------------------------------------------------------------------------------------------------------------------------------------------------------------------------------------------------------------------------------------------------------------------------------------------------------------------------------------------------------------------------------------------------------------- 59
Warranty Information ----------------------------------------------------------------------------------------------------------------------------------------------------------------------------------------------------------------------------------------------------------------------------------------------------------------------------------------------------------------------------------------------------------------------------------------------------------------------------------------------------------------------------------------------------- 61

6 www.arkrayusa.com
Important Information: Read This First
Intended use
• The GLUCOCARD Shine Connex Blood Glucose Monitoring
System is intended for the quantitative measurement of
glucose in fresh capillary whole blood samples drawn from
the fingertips.
• The GLUCOCARD Shine Connex Blood Glucose Monitoring
System is intended for self-testing outside the body (in vitro)
by people with diabetes at home as an aid to monitor the
effectiveness of diabetes control.
• The system is intended to be used by a single person and
should not be shared.
• The system is not intended for use on neonates, and is not for
the diagnosis or screening of diabetes.
• The GLUCOCARD® Shine Blood Glucose Test Strips are for
use with the the GLUCOCARD® Shine family of blood glucose
meters to quantitatively measure glucose in fresh capillary
whole blood samples drawn from the fingertip.
• The GLUCOCARD® Shine Control Solutions are for use with the
GLUCOCARD Shine family of blood glucose meters and the
GLUCOCARD Shine Blood Glucose Test Strips to check that the
meter and test strips are working together properly, and that
the test is performing correctly.

www.arkrayusa.com 7
Important Safety Information
• Please use this device only for the intended use described in
this user manual.
• Please follow the suggested cleaning and disinfection
procedures described in this user manual.
• GLUCOCARD Shine Blood Glucose Test Strips are intended for
single use only. They should be disposed of in an appropriate
container immediately after use.
• The GLUCOCARD Shine Connex Blood Glucose Meter is
designed to minimize code-related errors in monitoring by using
the no-coding function.
• Glucose in blood samples reacts with the chemical in the test
strip to produce a small electrical current. The GLUCOCARD
Shine Connex Meter detects this electrical current and
measures the amount of glucose in the blood sample.
• If your test result is below 60 mg/dL or above 240 mg/dL,
consult a healthcare professional immediately.

8 www.arkrayusa.com
Limitations of GLUCOCARD Shine Connex Blood
Glucose Monitoring System
• An abnormally high or low red blood cell count (hematocrit
level over 65 % or below 15 %) may produce inaccurate results.
• Inaccurate results may occur in severely hypotensive
individuals or patients in shock.
• Inaccurate low results may occur for individuals experiencing a
hypoglycemic hyperosmolar state, with or without ketosis.
• Severe dehydration (excessive water loss) may cause false
low results. If you believe you are suffering from severe
dehydration, consult your healthcare professional immediately.
• Altitudes of higher than 10,000 ft. (3,048 m) above sea level
may have an effect on the performance of the test strip.
• This system is for single-patient use only and should not
be shared.
• Not for neonatal use.
• Do not use for diagnosis of or screening for diabetes mellitus.
• Not for use on critically ill patients.
• Not for use on anyone undergoing oxygen therapy.
• For in vitro diagnostic use only.
• The GLUCOCARD Shine Connex Blood Glucose Meter
should only be used with GLUCOCARD Shine Blood Glucose
Test Strips.
For questions or concerns, contact ARKRAY Technical Customer
Service: 800.566.8558, 24 hours a day, 7 days a week. In case
of emergency, please contact your healthcare professional or
emergency medical response.
www.arkrayusa.com 9
This device is not intended for use in healthcare or assisted-
use settings such as hospitals, physician offices or long-term
care facilities because it has not been cleared by FDA for use
in these settings, including for routine assisted testing or as
part of glycemic control procedures.
Use of this device on multiple patients may lead to
transmission of Human Immunodeficiency Virus (HIV),
Hepatitis C Virus (HCV), Hepatitis B Virus (HBV), or other
bloodborne pathogens.
10 www.arkrayusa.com
Specifications
Product specifications
Operating ranges
Measurement range 20–600 mg/dL
Sample size Minimum 0.5 μL
Test time Five seconds
Sample type Fresh capillary whole blood
Calibration Plasma-equivalent
Assay method Electrochemical
Battery life 1,000 tests
Power Two 3.0 V lithium batteries
(disposable, type CR2032)
Memory 1,000 test results
Size 4.06 x 2.23 x 0.63 inches
(103 x 54 x 16 mm)
Weight 2.54 oz. (72.1 g) with batteries
Bluetooth® • Frequency range: 2.4–2.4835 GHz
technology • Operating range distance: maximum
32 feet (10 meters) unobstructed
• Operating channels: 40 channels
• Security encryption: 128-bit AES
(Advanced encryption standard)
Temperature 42.8–111.2 ˚F (6–44 ˚C)
Relative humidity 10–90 %
Hematocrit 15–65 %

www.arkrayusa.com 11
GLUCOCARD Shine Connex Blood Glucose
Monitoring System
GLUCOCARD Shine Connex Blood Glucose Monitoring System
includes the following items:
GLUCOCARD Shine Connex Blood Glucose Meter
User Manual
Quick Reference Guide
Bluetooth® Pairing Quick Guide
Batteries (2)
Lancing Device
Lancets (10)
Logbook
Carry Case
• Check all the components after opening the GLUCOCARD®
Shine Connex Blood Glucose Monitoring System package.
• GLUCOCARD Shine Test Strips and Control Solutions are
necessary but not included.
• GLUCOCARD Shine Control Solutions and the data cable for
the diabetes management system can be ordered separately.
Please contact ARKRAY Technical Customer Service:
800.566.8558, 24 hours a day, 7 days a week.
12 www.arkrayusa.com
• The GLUCOCARD Shine Connex Meter uses two 3.0 V
lithium batteries.
• Before using the meter, check the battery compartment and
insert batteries if empty.
• When the
symbol appears on the display while the meter
is in use, the batteries should be replaced as soon as possible.
• The test results may not be saved if the batteries run
out completely.
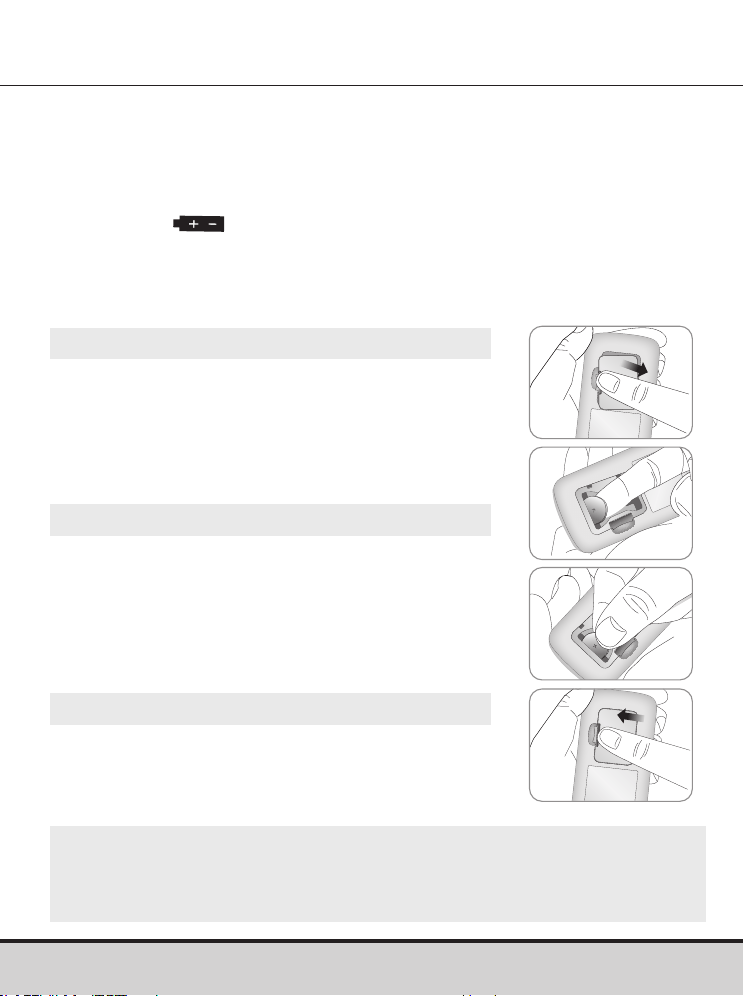
Inserting or Replacing the Batteries
Step 1
Make sure the meter is turned off.
Push the cover in the direction of the arrow
to open the battery compartment.
Step 2
Remove the used batteries and insert two
new batteries with the ‘+’ side facing up.
Make sure the batteries are inserted firmly.
Step 3
Place the cover on the battery compartment.
Push down firmly to close the cover.
A click may be heard.
NOTE
• Removing the meter batteries will not affect your stored results.
• However, meter settings may need to be reset. See page 18.
www.arkrayusa.com 13
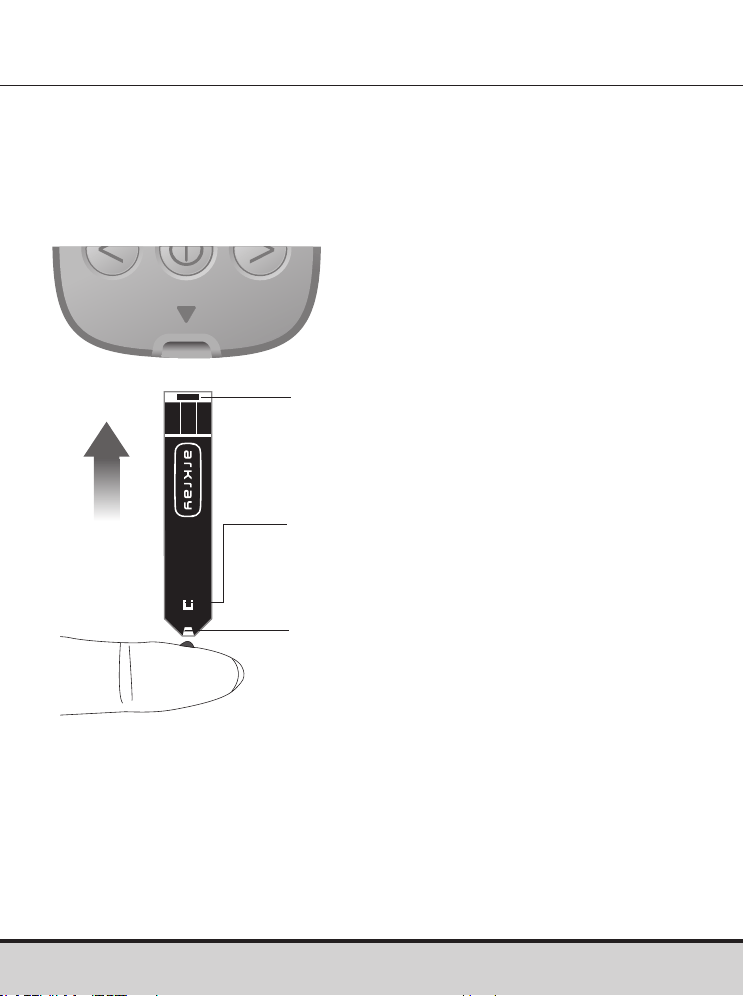
GLUCOCARD Shine Blood Glucose Test Strip
The GLUCOCARD Shine Connex Blood Glucose Monitoring
System measures blood glucose quickly and accurately. It
automatically absorbs the small blood sample applied to the
narrow edge of the test strip.
Insert
Contact bars
Gently push the test strip, with its
contact bars facing up, into the test
strip port of meter.
Confirmation window
Check here to see whether sufficient
blood sample has been applied.
Edge to apply blood sample
Apply blood sample here for testing.

14 www.arkrayusa.com
Warning
• GLUCOCARD Shine Blood Glucose Test Strips should only
be used with fresh capillary whole blood samples.
• Do not reuse test strips.
• Do not use test strips past the expiration date.
• When test strips are used and stored according to correct
storage and handling methods, both new, unopened vials
and vials that have been opened can be used until the
expiration date printed on the test strip box and vial label.
• Store test strips in a cool and dry place at a temperature
between 34–86 °F (1–30 ºC) and 20–80 % relative humidity.
• Keep test strips away from direct sunlight or heat, and
do not freeze.
• Store test strips only in their original vial.
• Close the vial tightly after taking out a test strip for testing
and use the test strip immediately.
• Avoid getting any liquid or moisture in the test strip vial.
This can affect the test strips and cause inaccurate test
results.
• Do not apply samples other than capillary whole blood or
control solution to the test strip.
• Handle test strips only with clean and dry hands.
• Do not bend, cut or alter test strips in any way.
• For detailed storage and usage information, refer
to the GLUCOCARD Shine Blood Glucose Test Strip
package insert.

www.arkrayusa.com 15
CAUTION
• Keep the meter and testing supplies away from
young children.
• Drying agents in the vial cap may be harmful if inhaled or
swallowed, and may cause skin or eye irritation.
CAUTION
Do not allow any foreign substances or liquid substances, such
as dirt, blood, or water, enter into the meter. The meter may be
damaged or may malfunction. Follow the warning information
provided below to prevent possible damage to the meter.
• Do not apply the blood or control solution samples directly to
the test strip port.
• Do not apply the blood or control solution samples to the test
strip while holding the meter in a way that the tip of the test
strip faces upwards. The blood or control solution samples
may run down the surface of the test strip and flow into the
test strip port.
• Do not store your meter in unsanitary or contaminated sites.
• Make sure to follow the Pre-cleaning and Disinfection
Procedures found in the Caring for the GLUCOCARD Shine
Connex System section of this user manual.
NOTE
You can get more safety information at FDA Public Health
Notification
(http://wayback.archive-it.org/7993/20170111013014/
http://www.fda.gov/MedicalDevices/Safety/AlertsandNotices/
ucm224025.htm)
or at CDC Clinical Reminder (www.cdc.gov/
injectionsafety/Fingerstick-DevicesBGM.html)
.

16 www.arkrayusa.com
GLUCOCARD Shine Connex Blood Glucose Meter
Display
Shows results
and messages
Button
Turns the meter
on/off, confirms
menu selections,
and changes
information
Test Strip Ejector
Slide down to discard
the used test strips
Data Port
Used to transfer data
from the meter to a
computer with
a cable
<, > Button
Turns the meter
on, selects
or changes
information
Test Strip Port
Insert test strip here
NOTE
• The cable for the data management system can be ordered
separately. Please contact ARKRAY Technical Customer
Service: 800.566.8558, 24 hours a day, 7 days a week.
• The unit of measurement is fixed in mg/dL and cannot be
changed by the user.
www.arkrayusa.com 17
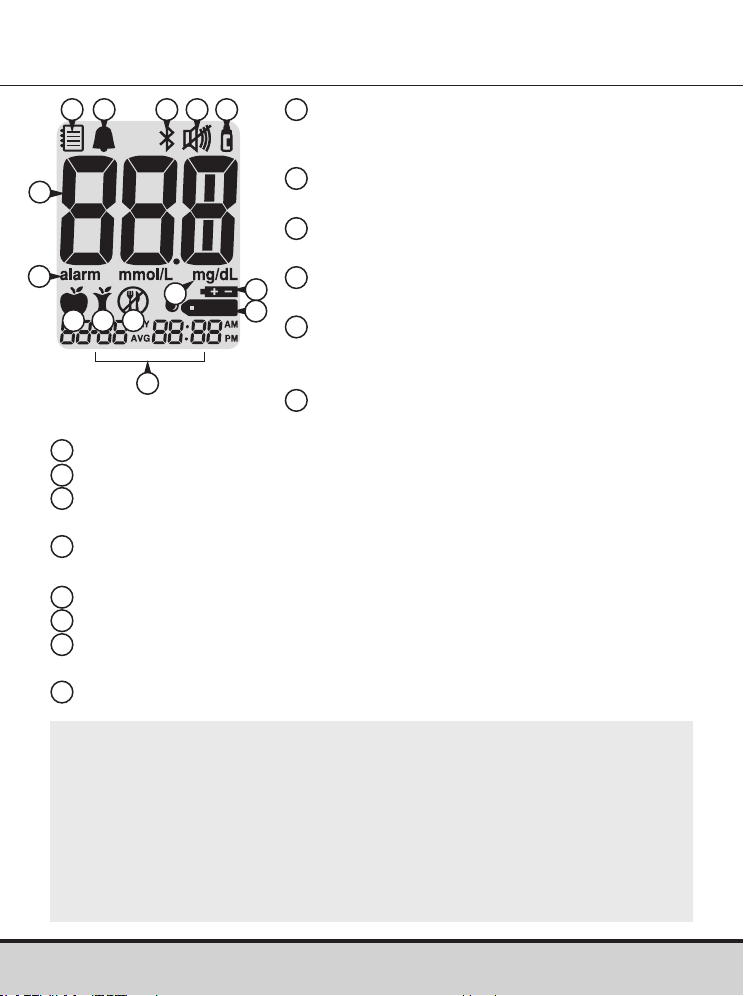
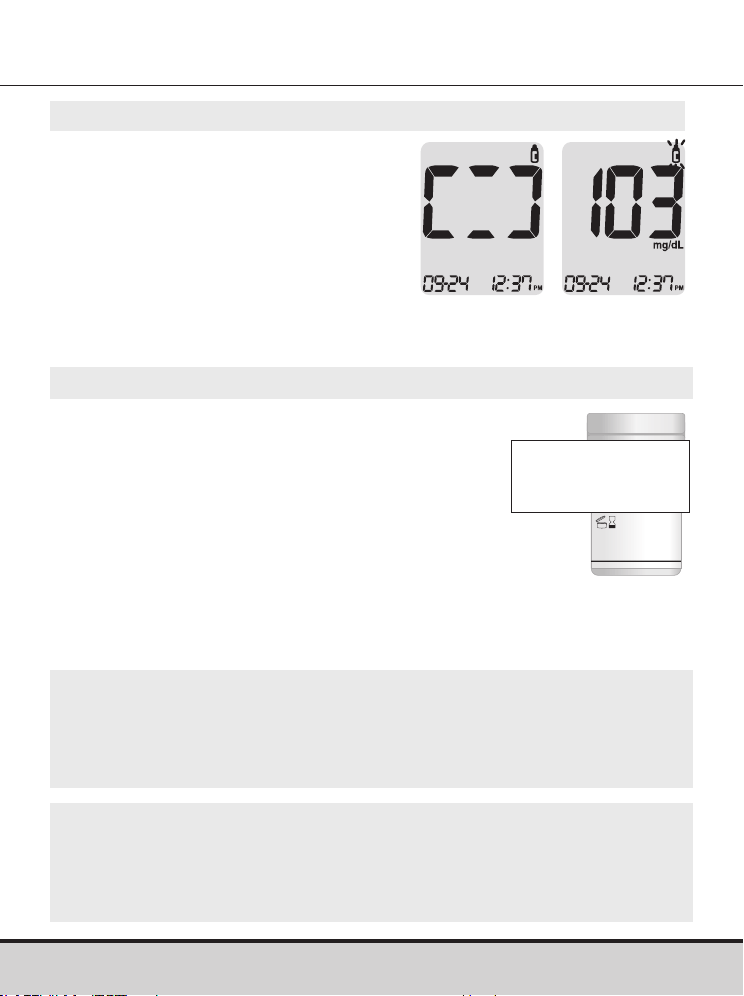
GLUCOCARD Shine Connex Blood Glucose Meter
Memory recall mode: appears when
test results stored in the memory
are displayed
PP2 Alarm: appears when the post-
meal alarm has been set
Bluetooth® symbol: appears when
Bluetooth® is turned on
Mute symbol: appears only when the
sound is set to OFF
Control Solution flag: appears when
the control solution test results are
saved or displayed
Test results: test results
displaying panel
alarm: appears when the time alarm has been set
mg/dL: unit for measuring blood glucose
Battery symbol: indicates meter battery is running low and
needs to be replaced
Blood insertion symbol: indicates meter is ready for the
application of a drop of blood or control solution
Pre-meal test flag: used for tests done before eating
Post-meal test flag: used for tests done after eating
Fasting test flag: used for tests done after fasting for at least
8 hours
Month/Day/Hour/Minute
GLUCOCARD Shine Connex Blood Glucose Meter Display
10
12
7
8
9
11
13
14
1
2 3 4
6
7
14
4
5
1
2
3
6
5
8
9
10
11
12 13
NOTE
• It is recommended to check if the display screen on the
meter matches the illustration above every time the meter
turns on.
• Do not use the meter if the display screen does not
exactly match the illustration as the meter may show
incorrect results.
18 www.arkrayusa.com
Setting Up the GLUCOCARD Shine Connex System
Meter settings, such as time and date, should be checked
and updated before using the meter or after changing the
meter batteries.
Press and hold the
button for three seconds to enter
‘SET’ mode. After all settings are finished, press and hold the
button for three seconds to turn off the meter.
Press the < or > button to change values. Press and hold the
< or > button to scroll faster.
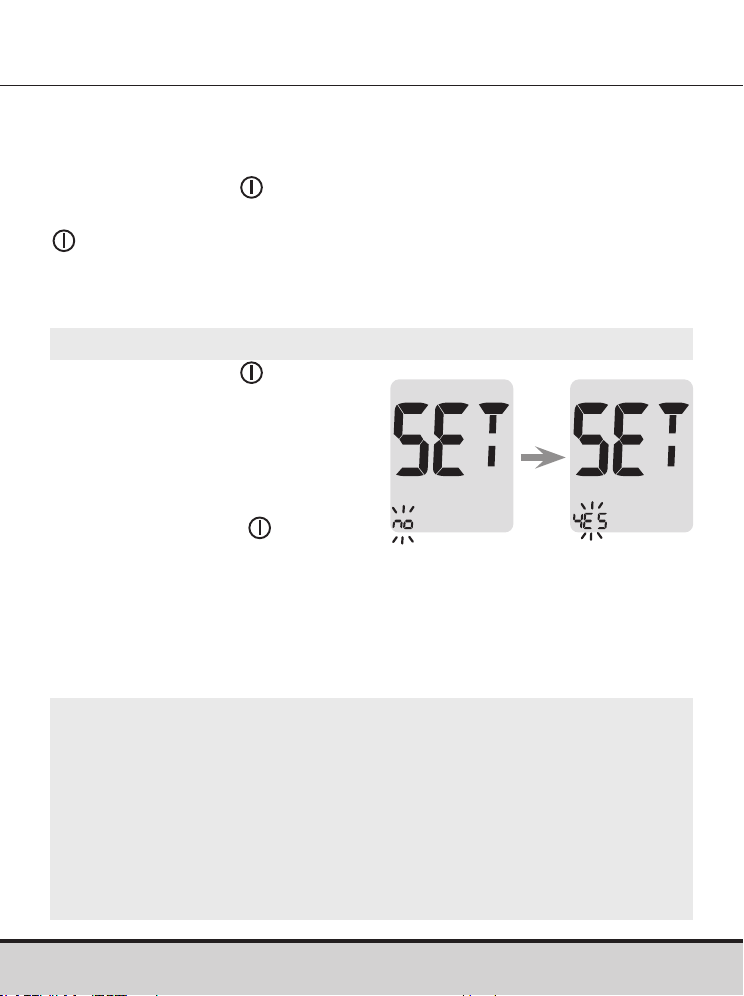
Step 1 Entering the ‘SET’ Mode
Press and hold the button for
three seconds to enter ‘SET’
mode. After all the segments
flash across the screen, ‘SET’
will show up.
Press the < or > button to select
'YES' and press the
button to
go to the next step.
NOTE
• Follow step 2 to pair your meter and smartphone.
• Pairing allows the meter to communicate wirelessly with
your smartphone.
• Ensure that devices are within the maximum Bluetooth®
range of 32 feet (10 meters).
www.arkrayusa.com 19
Setting Up the GLUCOCARD Shine Connex System
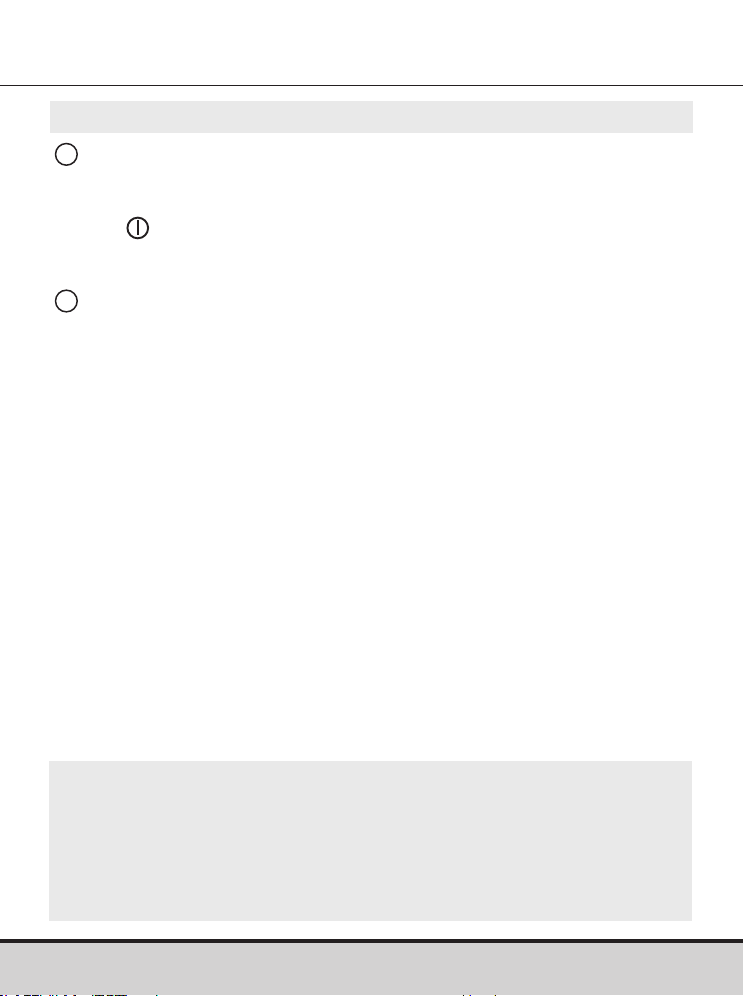
Step 2 Bluetooth® Pairing
1
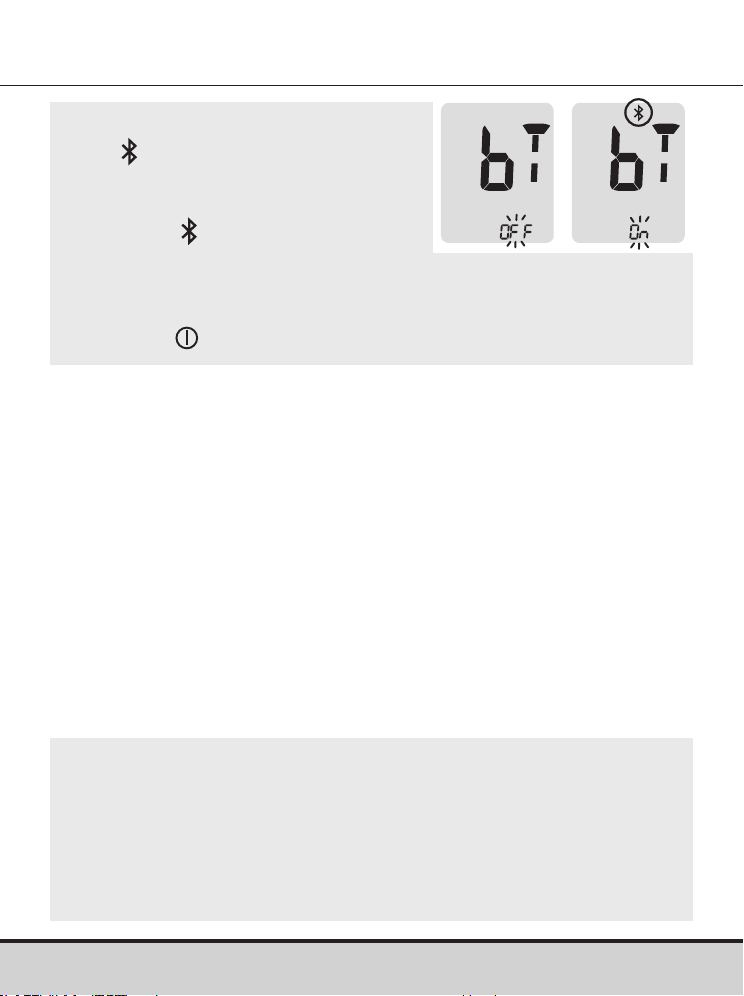
Setting Up Bluetooth®: By default, your GLUCOCARD Shine
Connex Meter will have the Bluetooth® feature turned on.
If you wish to turn off Bluetooth®, use the < or > arrow button
and to confirm your selection. The meter will go to Step 3,
Setting the Year.
2
Pairing Your Meter and Another Bluetooth® Device and/or
App: Initiate your meter's Bluetooth® pairing mode by one of
the following three methods:
• Take a blood glucose reading. Upon removal of the test strip,
the meter will automatically go into Bluetooth® pairing mode.
Or, press and hold down your meter’s right arrow button for
three seconds. This will place your meter into Bluetooth®
pairing mode.
• The Bluetooth® icon will blink, indicating your meter is in
Bluetooth® pairing mode.
• Follow the pairing instructions of the Bluetooth® device and/
or application you are pairing your meter with.
NOTE
For information on mobile apps that are compatible
with your GLUCOCARD Shine Connex, visit
datamanagement.arkrayusa.com
20 www.arkrayusa.com
NOTE
• The
symbol will appear on the
screen when the Bluetooth®
feature is on.
• When the
symbol is not present
on the screen, the Bluetooth®
feature is off.
• When you need to turn the Bluetooth® feature on or off,
press the
button when ‘On’ or ‘OFF’ blinks on the screen.
NOTE
• Some smartphones, especially those that are not tested or
approved by the manufacturer may NOT be compatible with
your meter.
• A list of compatible smartphones is available on the Apple
App Store and Android Google Play.
www.arkrayusa.com 21
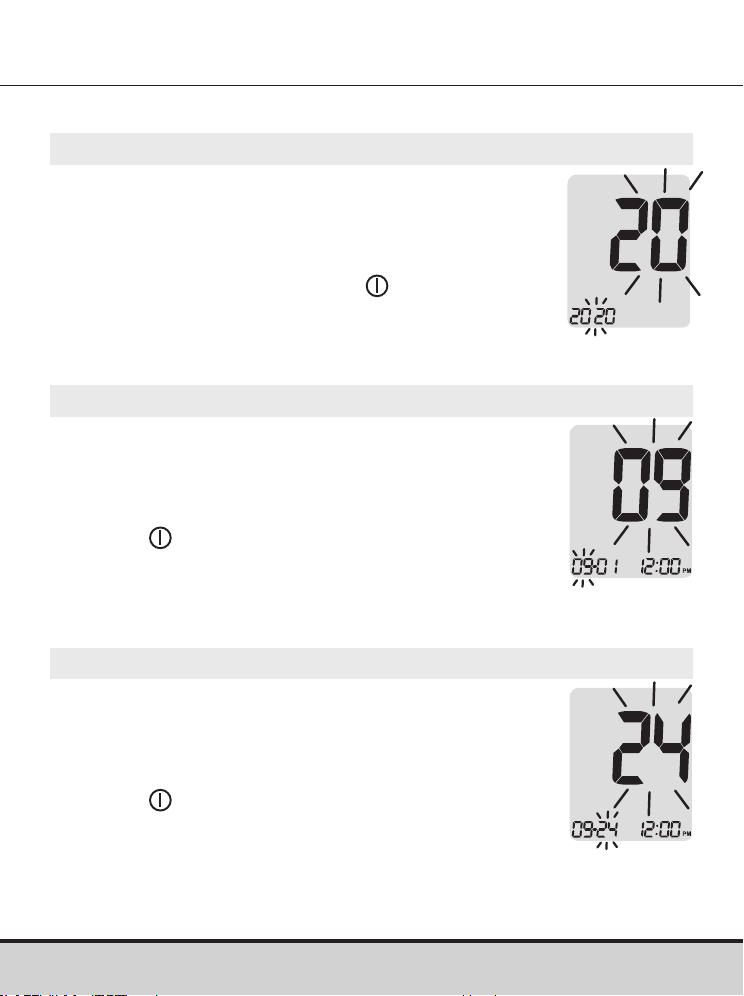
Adjusting the Date and Time
Step 3 Setting the Year
A number indicating the year will blink
on the screen.
Press the < or > button to adjust until the correct
year appears.
After setting the year, press the
button
to confirm your selection and to go to the
next step.
Step 4 Setting the Month
A number indicating the month will blink
on the screen.
Press the < or > button until the correct
month appears.
Press the
button to confirm your selection
and to go to the next step.
Step 5 Setting the Date
A number indicating the date will blink
on the screen.
Press the < or > button until the correct
date appears.
Press the
button to confirm the date and to
go to the next step.
22 www.arkrayusa.com
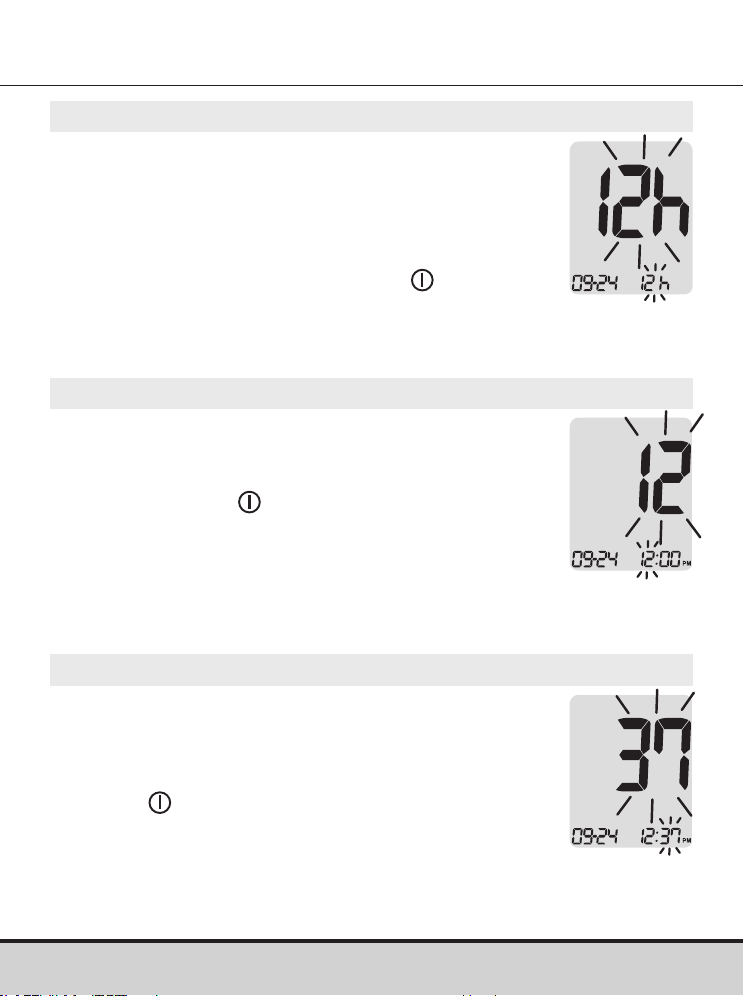
Step 8 Setting the Minute
A number indicating the minute will blink on
the screen.
Press the < or > button until the correct
minute appears. After setting the minute,
press the
button to go to the next step.
Step 7 Setting the Hour
A number indicating the hour will blink on
the screen.
Press the < or > button until the correct hour
appears. Press the
button to confirm the
hour and go to the next step.
Step 6 Setting the Time Format
The meter can be set in the 12-hour (AM/PM)
or the 24-hour clock format.
Press the < or > button to select a format.
The AM•PM symbol is not displayed in the
24-hour format.
After selecting the format, press the
button
to go to the next step.

www.arkrayusa.com 23
Step 9
On pressing the < or > button, the screen will
display 'On' or 'OFF'. Press the button to
confirm the selection.
The meter will beep in the following instances if
set to 'On':
• When a button is pressed to turn on the meter.
• When the test strip is inserted in the meter.
• When the blood sample is absorbed into the
test strip and the test starts.
• When the test result is displayed.
• When the < button is pressed and held to set
the post-meal (PP2) alarm.
• When it is time for a preset blood
glucose test.
Setting the Sound On/OFF
If the sound is set to 'OFF', none of the sound functions will
work. After setting the sound, press the button to progress
to the next step.
NOTE
• The
symbol is displayed only when the sound is set
to 'OFF'.
24 www.arkrayusa.com
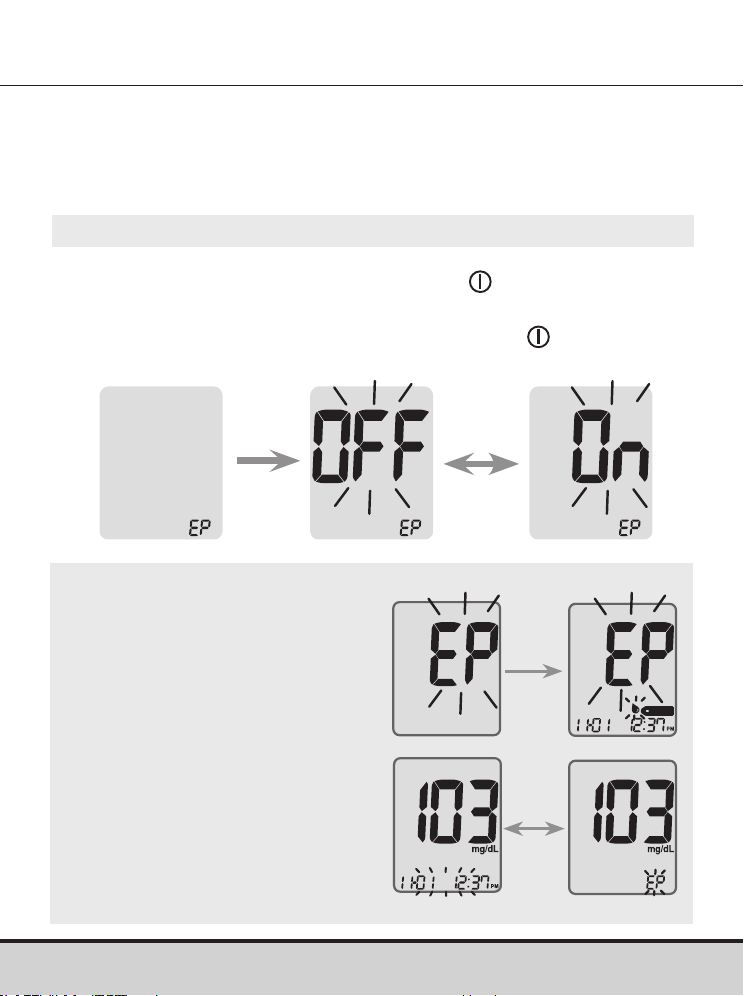
Step 10
When 'EP' appears on the screen, press the < or > button. The
screen will display 'On' or 'OFF'. Press the button to confirm
the setting.
If you do not want to set the indicator, press the
button while
the screen displays 'OFF'.
Turning on the Test Strip Expiration Date Indicator
NOTE
• If the preset expiration date
expires, the meter will display
‘EP’ when the test strip
is inserted.
• The display will alternate
between ‘EP’, and the date
and time when the test result
is displayed right after the test.
• If the expiration date is set to
October of 2022, the meter
will display ‘EP’ at the start of
November, 2022.
This setting allows you to turn the test strip expiration date
indicator 'On' or 'OFF'. This setting turns the function 'On' or
'OFF' only. See page 26 to set the test strip expiration date.
www.arkrayusa.com 25
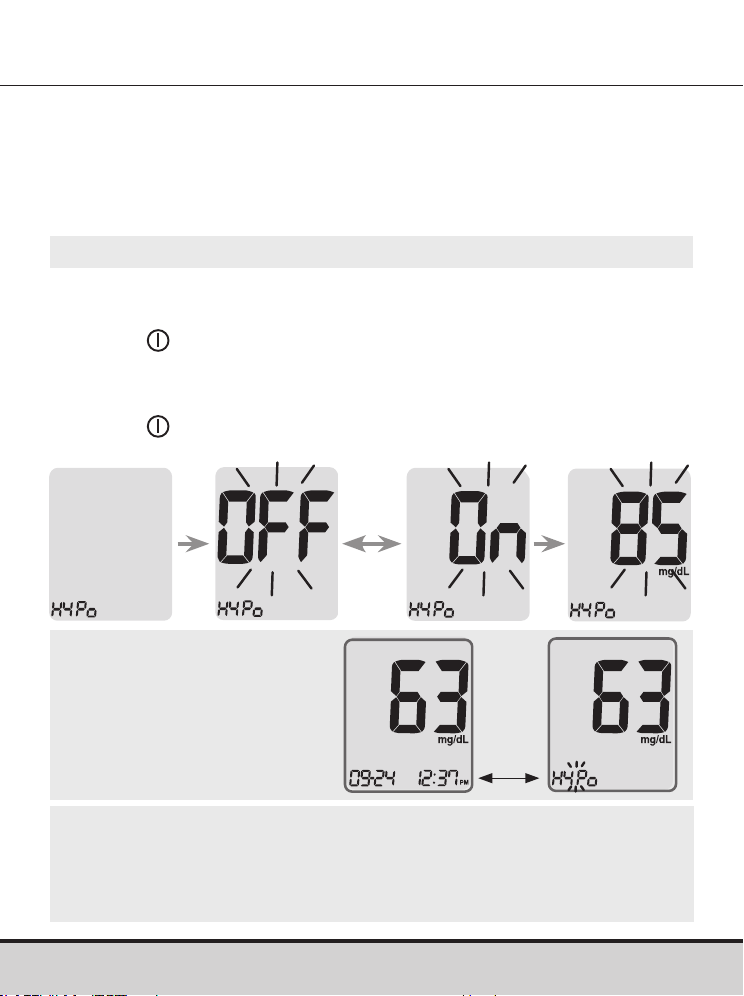
Step 11
On pressing the < or > button, the screen will display 'On'
or 'OFF'.
Press the
button when 'On' appears to enter the setting.
Press the < or > button until the desired hypoglycemia level
between 20 and 90 mg/dL appears.
Press the
button for three seconds to confirm the level, save
all settings and turn off the meter.
Turning on the Hypoglycemia (HYPo) Indicator
CAUTION
• Ask your healthcare professional to help you decide
what your hypoglycemia level is before setting your
hypoglycemia level.
NOTE
• If the test result is
lower than the pre-set
hypoglycemia level,
the meter will display
the following.
This setting allows you to turn the hypoglycemia indicator
(possible low blood sugar) 'On' or 'OFF' and to select the desired
level for the indicator. You will be alerted any time your test result
is lower than the selected level.
HYPo
warning
will blink
on the left
bottom
corner.

26 www.arkrayusa.com
Setting the Test Strip Expiration Date Indicator
Step 1 Entering the Expiration Date Setting
Press and hold the < and > buttons at the same time for three
seconds to enter the expiration date settings. After all segments
flash across the screen, 'EP' will show up.
Step 2 Setting the Expiration Year
A number indicating the year will blink in the
left corner of the screen.
Press the < or > button until the correct
year appears.
Press the
button to confirm the year and
go to the next step.
NOTE
• The test strip expiration date is printed on the test strip vial.
Step 3 Setting the Expiration Month
A number indicating the month will blink at
the bottom of the screen.
Press the < or > button until the correct
month appears.
After setting the month, press and hold the
button for three seconds to save your
setting and turn off the meter.
www.arkrayusa.com 27
Setting the Test Strip Expiration Date Indicator
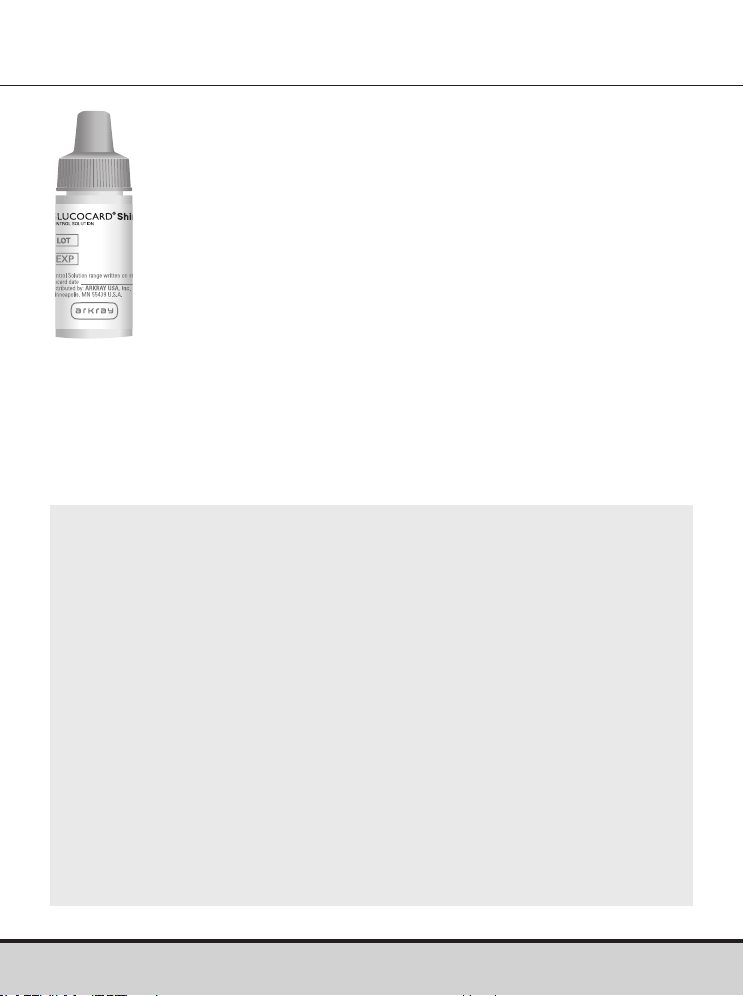
NOTE
• Use GLUCOCARD Shine Control Solutions only (available
for purchase separately).
• Check the expiration date printed on the bottle. When the
control solution bottle is first opened, record the discard
date (date opened plus three months) in the space provided
on the label.
• Make sure your meter, test strips and control solutions are
at room temperature before testing. Control solution tests
must be done at room temperature, 68–77 ºF (20–25 ºC).
• Before using the control solution, shake the bottle, discard
the first one or two drops and wipe the tip clean.
• Close the control solution bottle tightly and store at a
temperature between 46–86 ºF (8–30 ºC).
Checking the System
The GLUCOCARD Shine Connex Meter and
GLUCOCARD Shine Blood Glucose Test Strips
should be checked using GLUCOCARD Shine Control
Solutions, available in two levels (Level 1 and 2).
GLUCOCARD Shine Control Solutions contain known
amounts of glucose, and are used to check that the
meter and test strips are working properly.
The test strip vials have GLUCOCARD Shine Control
Solution ranges printed on their labels.
Compare the test result displayed on the meter to the
GLUCOCARD Shine Control Solution range printed on
the test strip vial.
Before using a new meter or new vial of test strips,
you should conduct a control solution test following
the procedure on pages 28–30.
28 www.arkrayusa.com
Control Solution Testing
Step 1
Insert a test strip into the meter’s test strip
port, with the contact bars facing upwards.
Gently push the test strip into the test strip
port until the meter beeps. Be careful not to
bend the test strip while pushing it in.
The
symbol will appear.
Step 2
You can flag the control solution test result by
pressing the > button for three seconds. To undo
the control solution flag, press the > button for
three seconds again.
Use GLUCOCARD® Shine Control Solution when:
• You want to practice the test procedure using the control
solution, instead of blood.
• You use the meter for the first time.
• You begin using a new vial of test strips.
• You suspect the meter or test strips are not working properly.
• You think your test results are inaccurate or they do not reflect
how you feel.
• The meter is dropped or damaged.
www.arkrayusa.com 29
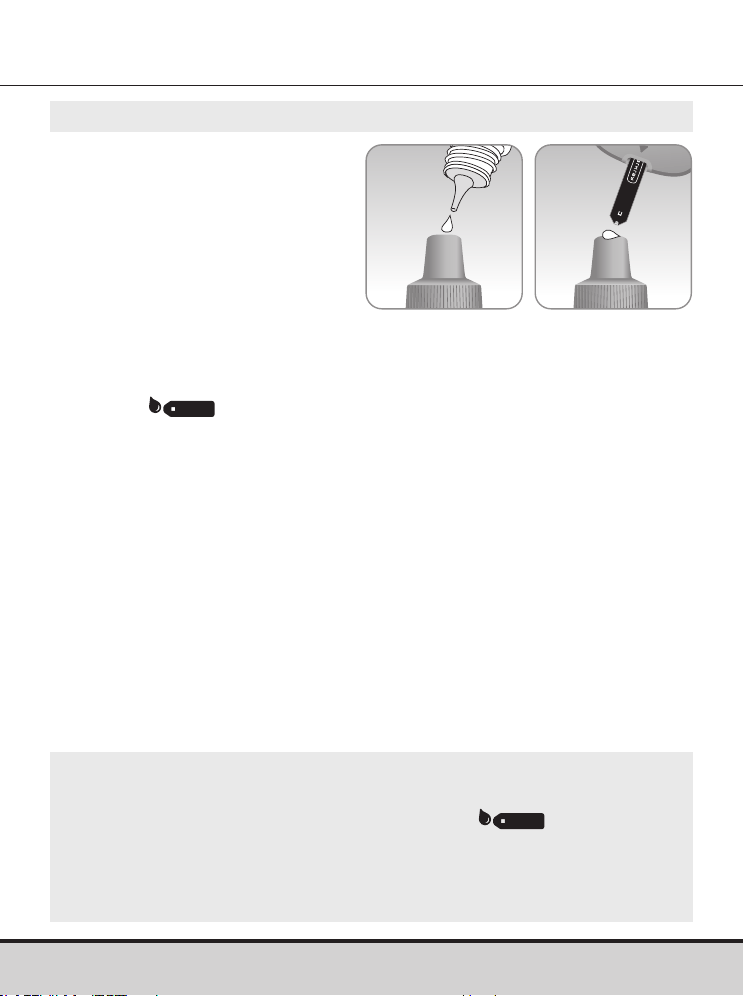
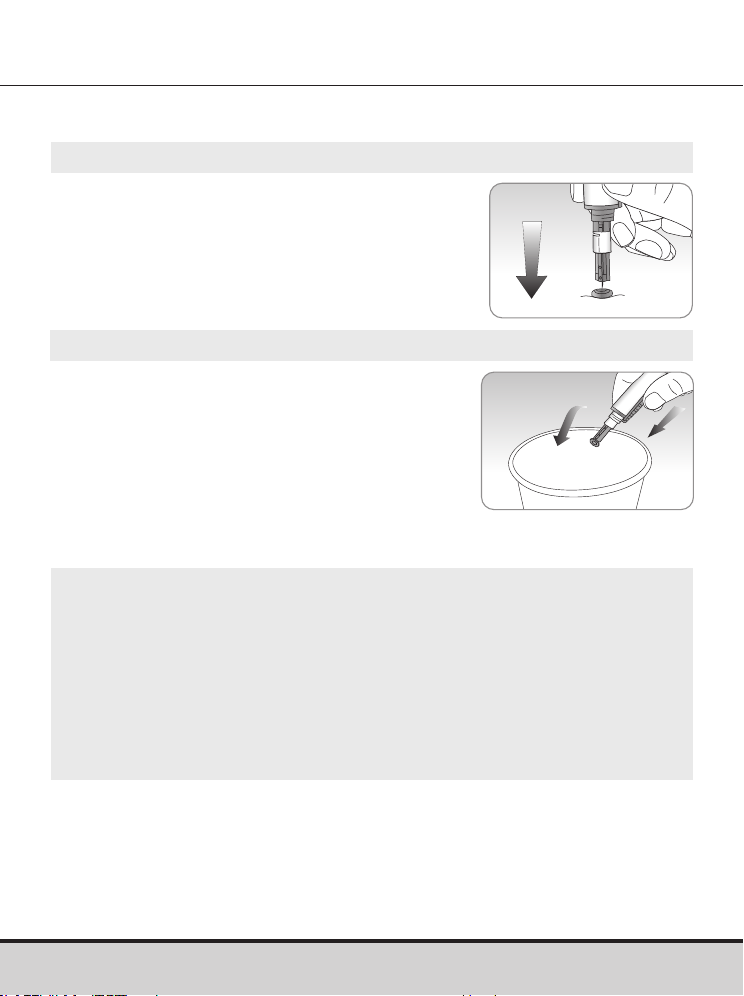
Step 3
Shake the GLUCOCARD
Shine Control Solution bottle
before each test.
Remove the cap and squeeze
the bottle to discard the first
one or two drops.
Wipe the tip with a clean
tissue or cloth. Dispense a drop of control solution onto a clean
non-absorbent surface. It helps to squeeze a drop onto the top of
the cap as shown.
After the
symbol appears on the display, apply the
solution to the narrow edge of the test strip until the meter
beeps. Make sure the confirmation window fills completely.
NOTE
• The meter may switch off if the control solution sample
is not applied within two minutes of the symbol
appearing on the screen.
• If the meter turns off, remove the test strip, reinsert, and start
from step 1.
30 www.arkrayusa.com
Step 4
The display segments will rotate
clockwise and a test result will
appear after the meter counts
down from '5' to '1'.
When flagged, the test result is
stored in the meter's memory but
it is not included in the averages.
Step 5
Compare the test result displayed
on the meter to the range printed
on the test strip vial. The test
result should fall within the range.
Control Solution Range
Level 1: 101–151 mg/dL
Level 2: 184–276 mg/dL
NOTE
• GLUCOCARD Shine Control Solutions can be ordered
separately by contacting ARKRAY Technical Customer
Service: 800.566.8558, 24 hours a day, 7 days a week.
CAUTION
• The range printed on the test strip vial is for GLUCOCARD
Shine Control Solutions only. It has nothing to do with your
blood glucose level.
www.arkrayusa.com 31
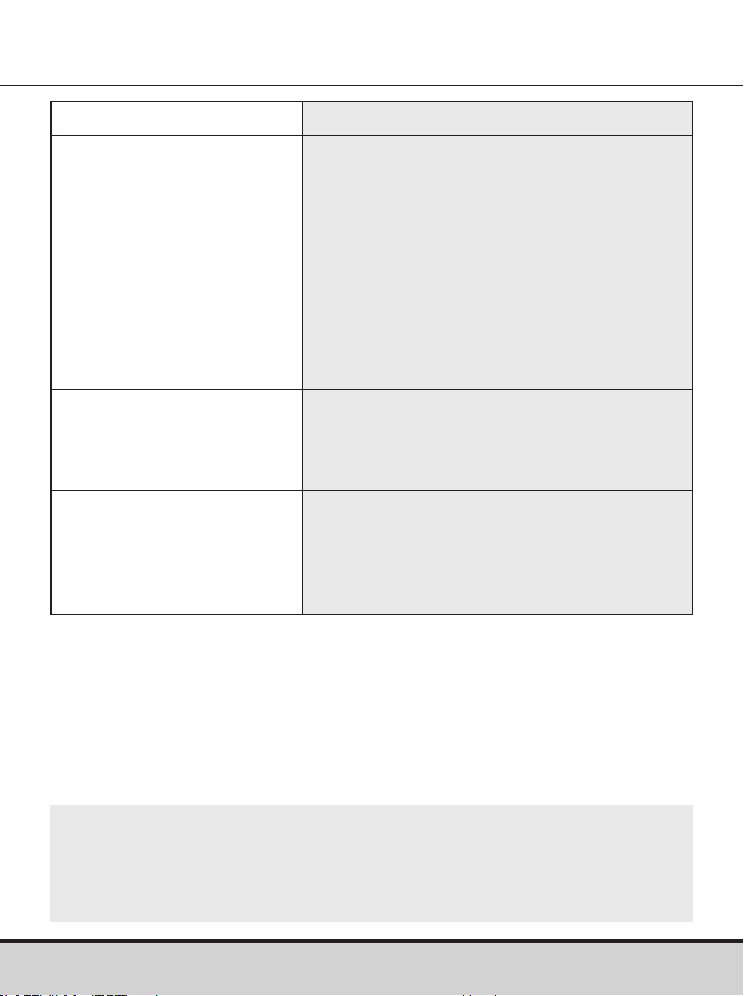
Comparing the Control Solution Test Results
The test result of each control solution should be within the
range printed on the label of the test strip vial. Repeat the
control solution test if the test result falls outside of the range.
Out of range test results may occur in following situations:
If results continue to fall outside the range printed on the test
strip vial, the GLUCOCARD Shine Blood Glucose Test Strip and
GLUCOCARD Shine Connex Meter may not be working properly.
Do not use your system and contact ARKRAY Technical
Customer Service: 800.566.8558, 24 hours a day, 7 days a week.
Situations Do This
• When the control solution bottle was not
shaken well.
• When the meter, test strip or control
solution have been exposed to high or
low temperatures.
• When the first one or two drops of control
solution were not discarded or the tip of
the bottle was not wiped clean.
• When the meter is not functioning properly.
Repeat the
control solution
test by referring
to page 28–30.
• When the control solution is past the
expiration date printed on the bottle.
• When the control solution is past its
discard date (the date the bottle was
opened plus three months).
• When the control solution is contaminated.
Discard the used
control solution
and repeat the
test using a new
bottle of control
solution.
32 www.arkrayusa.com
CAUTION
• To avoid infection when drawing a sample, do not use a
lancet more than once.
• Do not use a lancet that has been used by others.
• Always use a new sterile lancet.
NOTE
• Repeated puncturing at the same sample site may cause pain
or skin calluses (thick hard skin).
• Choose a different site each time you test.
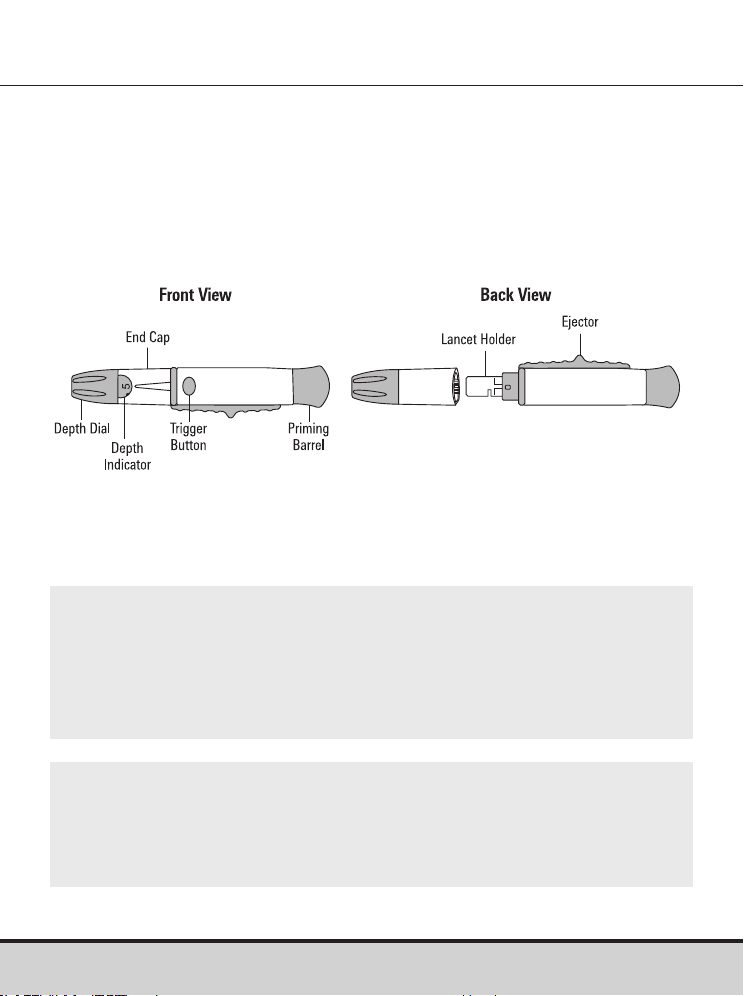
Using the Lancing Device
A lancing device is needed in order to collect a blood sample.
You may use the lancing device that is included in the
GLUCOCARD Shine Connex Blood Glucose Monitoring System
or any other medically approved lancing device.
For specific lancing device use instructions, see the lancing
device insert.
• The lancing device is for use by a single user only and should
not be shared with anyone.
www.arkrayusa.com 33
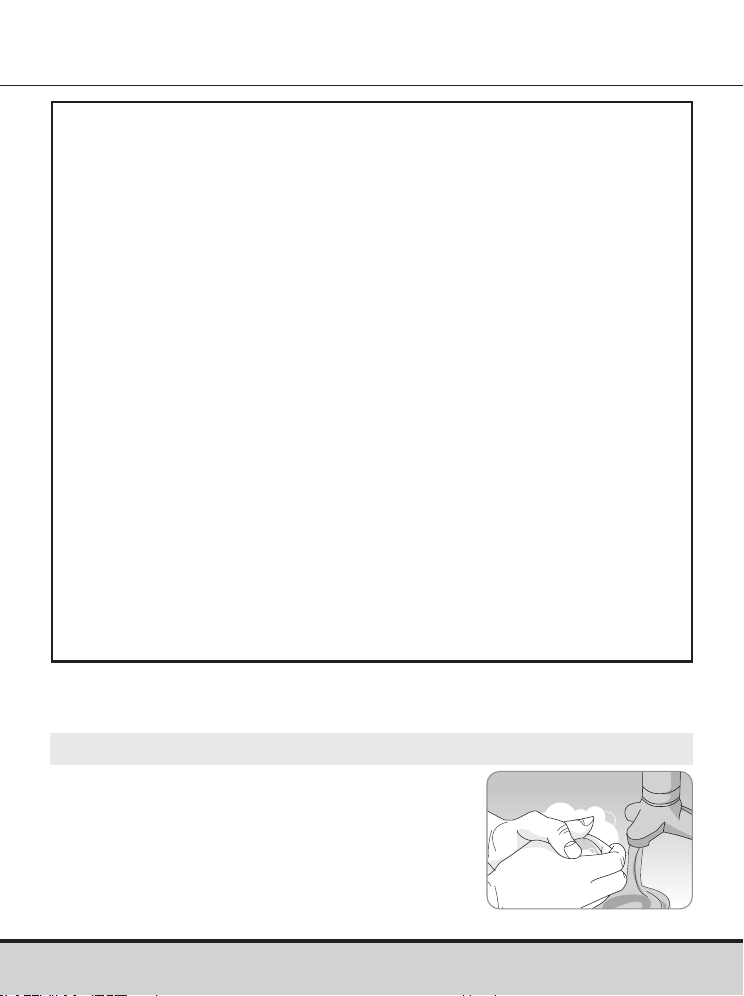
Step 1
Wash hands and sample site with
soap and warm water. Rinse and
dry thoroughly.
Preparing the Lancing Device
Warning
• For use only on a single person. Disinfect reusable
components according to manufacturer's instructions
between each use.
• Used lancet blades must be safely discarded after a single use.
• Do not use on more than one person. Improper use of blood
lancets can increase the risk of inadvertent transmission
of blood-borne pathogens, particularly in settings where
multiple people are tested. The cleaning and disinfection
instructions for this device are intended only to reduce the
risk of local use site infection; they cannot render this device
safe for use for more than one person.
• Do not draw more blood than necessary for testing.
• Persons younger than 18 years old should be supervised
by adults when using the subject device, or adults should
perform the procedure on persons younger than 18 years old.
• Risk of injury. If the penetration depth is too deep, the
puncture can injure children. Before using the lancing
device for the first time on children, ask your healthcare
professional. Start with the lowest penetration depth.
34 www.arkrayusa.com
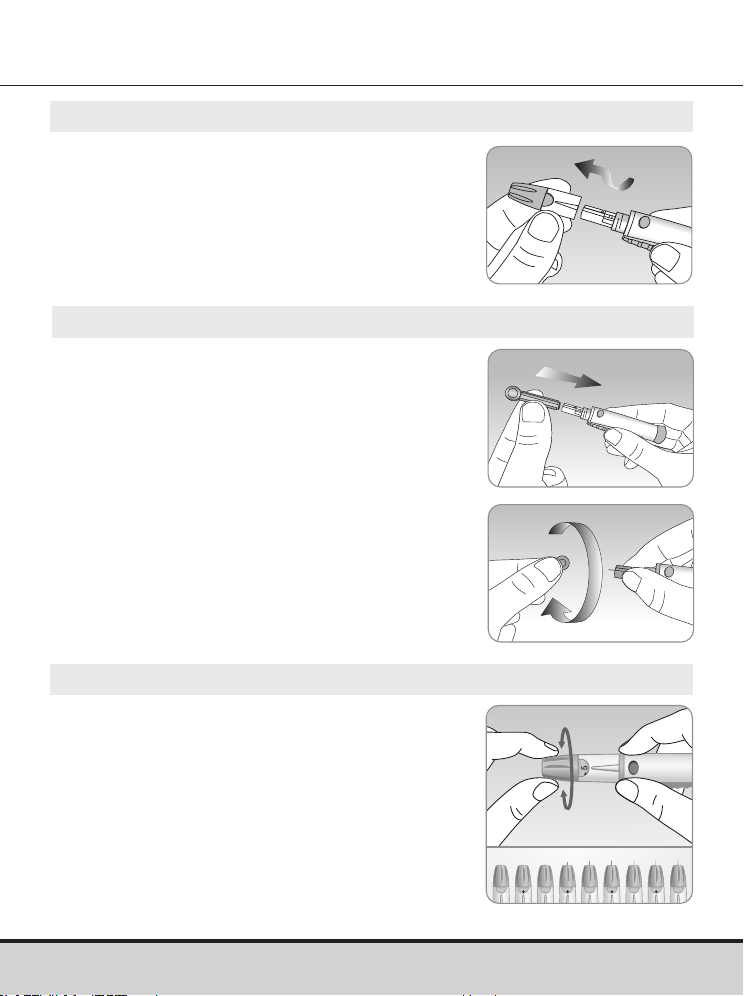
Step 4
The lancing device has multiple puncture
depth settings. The smaller numbers are
for a shallower puncture and the larger
numbers are for a deeper puncture.
Choose a depth of penetration by rotating
the top portion of the adjustable cap until
the setting number matches the arrow.
Finer adjustments can be made by setting
the arrow between numbers.
1 5432
Step 3
Insert a new disposable lancet into the
lancet holder.
Twist off the protective cover of the
lancet and set it aside, then replace the
adjustable cap.
Keep the protective cover to replace
on top of the used lancet after testing.
Step 2
Unscrew and remove the
lancing device cap.
5
www.arkrayusa.com 35
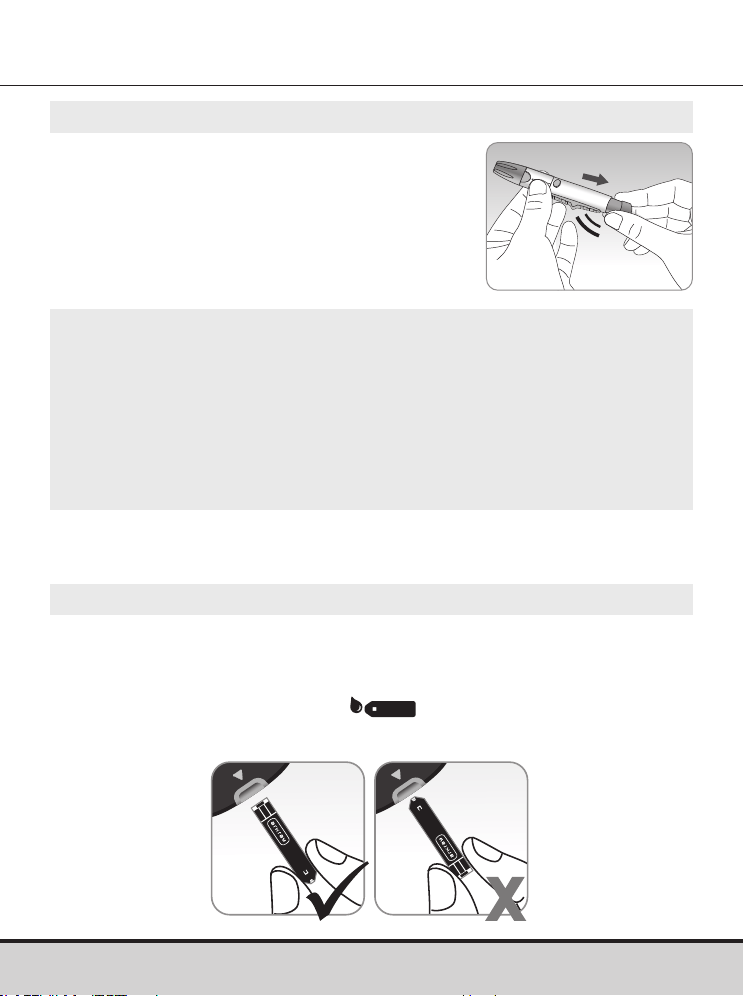
Step 5
Cock the lancing device by holding the
body in one hand and pulling on the
barrel until a click is heard.
NOTE
• The skin depth to get blood samples will vary by person at
different sample sites.
• The lancing device's adjustable cap allows the best depth of
skin penetration to get an adequate sample size.
• The lancing device cannot puncture at the selected depth
when the lancet is not inserted fully.
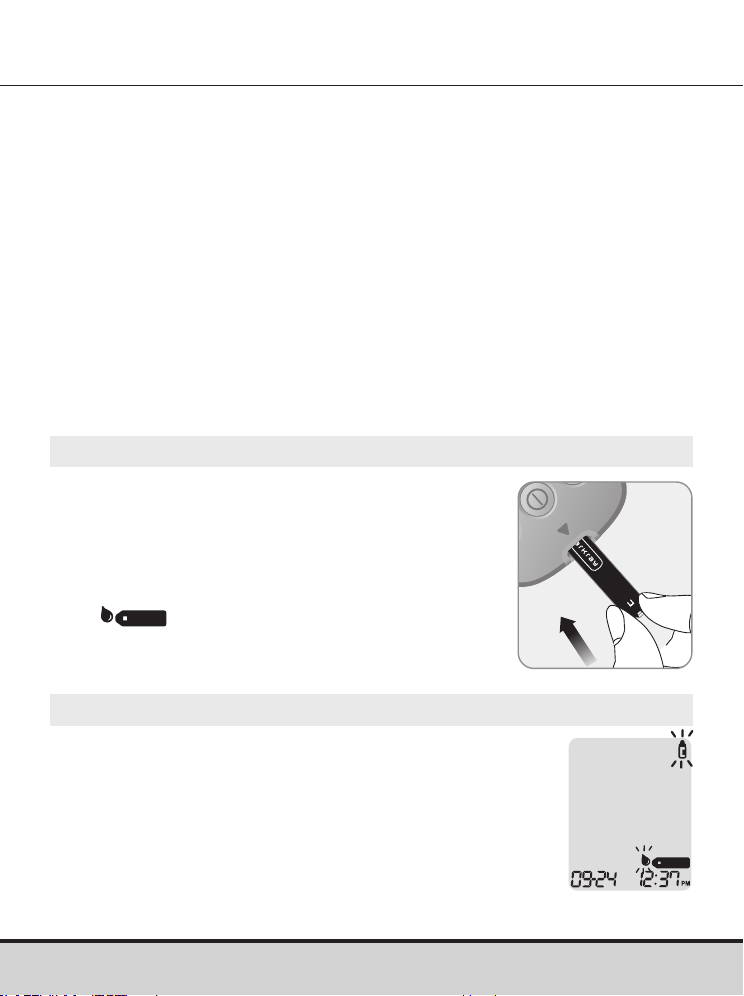
Step 6
Insert a test strip with the contact bars facing up into the meter’s
test strip port.
Push the test strip in gently until the meter beeps. Be careful
not to bend the test strip. The
symbol will appear on
the screen.
Preparing the Meter and Test Strip
3
5
click
36 www.arkrayusa.com
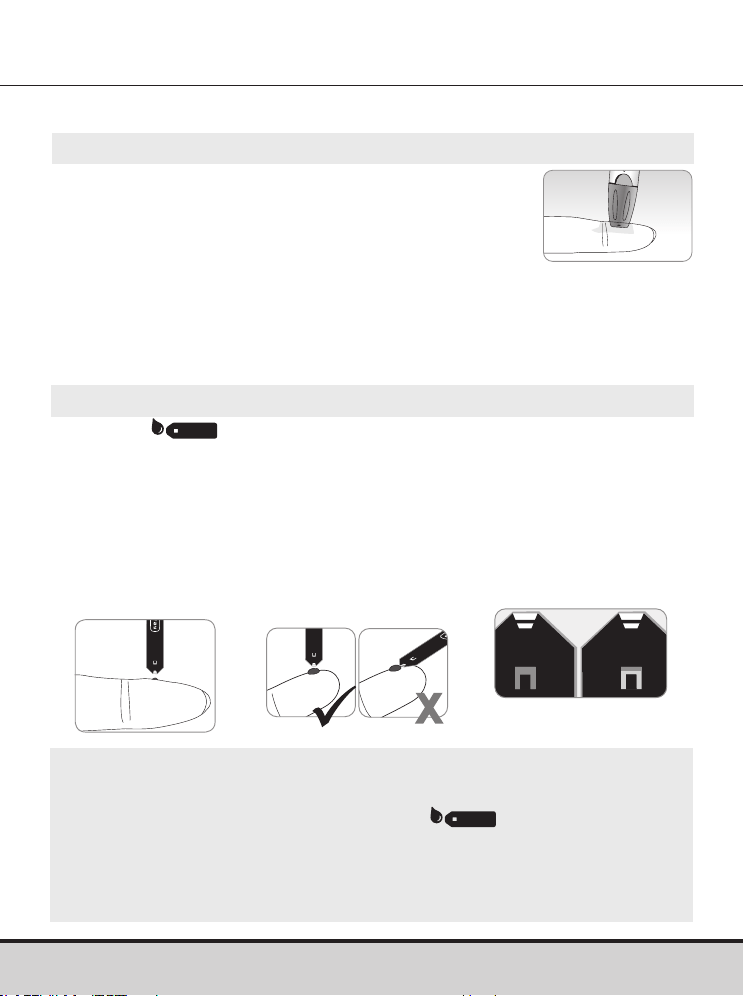
It is recommended to place the test strip vertically into the blood
sample site as shown below.
NOTE
• The meter may switch off if the blood sample is not
applied within two minutes of the symbol
appearing on the screen.
• If the meter turns off, remove the test strip, reinsert it, and
start from step 2.
Step 8
After the symbol appears on the screen, apply the blood
sample to the narrow end of the test strip until the meter beeps.
If the confirmation window is not filled in time because of
abnormal viscosity (thickness and stickiness) or insufficient
volume, the Er4 message may appear.
Good
Sample
Insufficient
Sample
Step 7
Obtain a blood sample using the lancing device.
Place the lancing device against the pad of the
finger. The best puncture sites are on the middle
or ring fingers.
Press the release button. Remove the lancing device from the
finger. Wait a few seconds for a blood drop to form.
A minimum volume of 0.5 μL is needed to fill the confirmation
window. (Approximate size of 0.5 μL:
•
)
Applying Blood Sample
5
www.arkrayusa.com 37
NOTE
• To transmit glucose data using the Bluetooth®
feature:
– The Bluetooth® feature on the meter must
be turned on.
– The meter and a smartphone must be paired.
• The meter will transmit data in the following cases:
– When the test strip is ejected after measuring.
– When the meter is turned on (only when untransmitted
data exists).
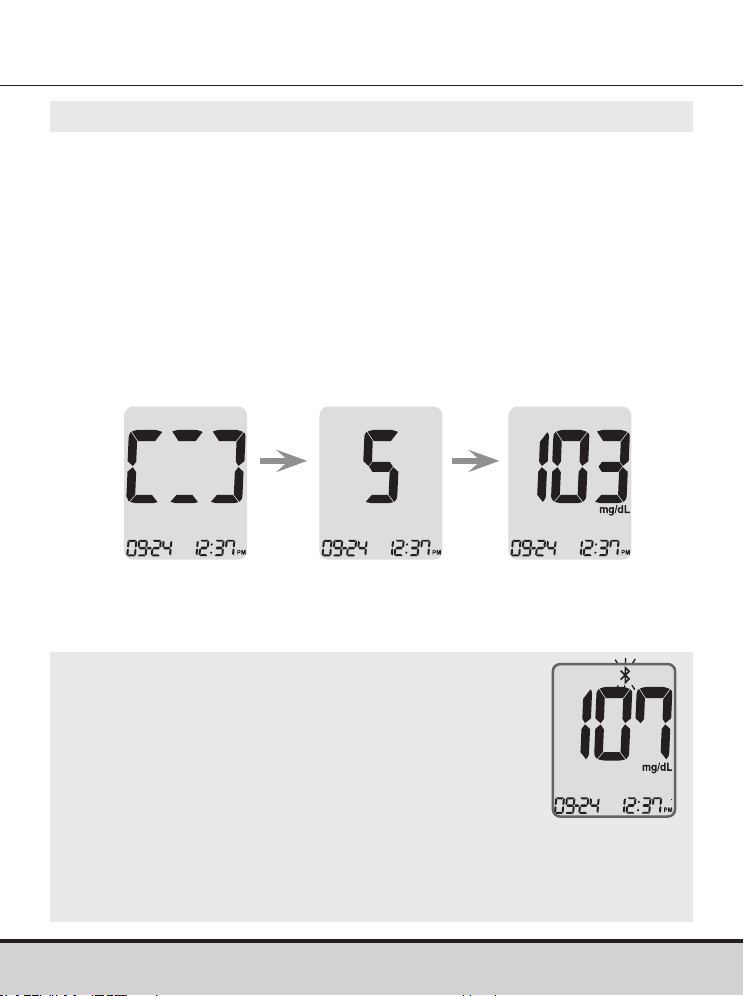
Step 9
At this time, the display segments will rotate clockwise while the
blood sample is going into the test strip.
The test result will appear after the meter counts down from '5' to '1'.
The test result will be automatically stored in the meter’s memory.
If the test strip is removed after the test result is displayed, the
meter will automatically switch off after three seconds.
Discard used test strips safely in a disposable container.
If the Bluetooth® feature is activated, the meter will send the test
result to the connected smartphone.
Test result

38 www.arkrayusa.com
Step 10
You can attach a flag to a test result to indicate particular
situations while the test strip is still in the meter.
When the result is displayed right after a test, press the < or >
button to select a Pre-meal flag (
), a Post-meal flag ( ), a
Fasting flag ( ) or a Control solution flag ( ).
When you remove the test strip while the desired flag is blinking,
the test result is stored with the flag.
If you do not want to add any flags on the test result, remove the
test strip after the test result is displayed.
No ag Pre-meal ag Post-meal ag
Fasting ag Control solution
ag
www.arkrayusa.com 39
Step 1
Unscrew the lancing device's
adjustable cap and place the protective
cover on the lancet.
Step 2
Remove lancet and dispose of the used
lancet in a proper biohazard container.
Discarding Used Lancets
CAUTION
• Check for damage before using the lancet. If it has been
damaged, please discard it and use another lancet.
• The lancet is very sharp. Please keep away from children.
• Keep the lancets in a cool and dry place.
• The lancet is for single use only. Never share or reuse a
lancet. Always dispose of lancets properly.

40 www.arkrayusa.com
NOTE
• If the message persists, please contact ARKRAY Technical
Customer Service: 800.566.8558, 24 hours a day, 7 days
a week.
‘HI’ and ‘Lo’ Messages
‘HI’ Message
The meter displays test results between
20–600 mg/dL. ‘HI’ appears when the blood
glucose level is greater than 600 mg/dL and
indicates severe hyperglycemia (much higher than
normal glucose levels).
If ‘HI’ is displayed again upon retesting, please
contact your healthcare professional immediately.
‘Lo’ Message
‘Lo’ appears when a test result is less than
20 mg/dL and indicates severe hypoglycemia
(very low glucose levels).
If ‘Lo’ is displayed again upon retesting,
please contact your healthcare professional
immediately.

www.arkrayusa.com 41
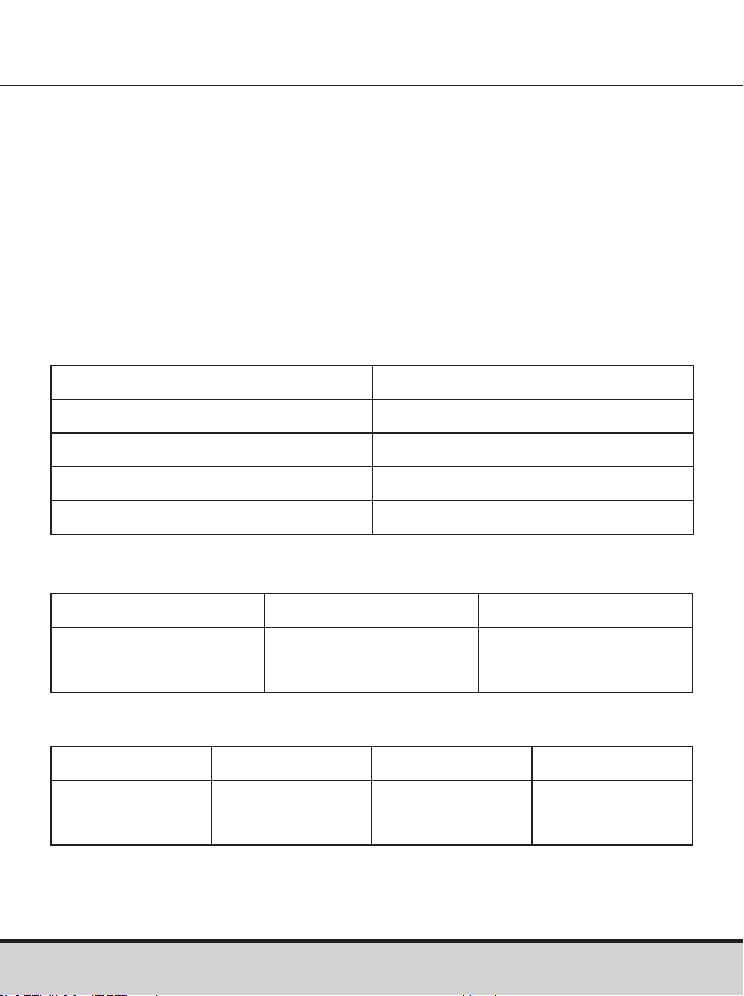
Target Blood Glucose Ranges
Reminders
Time of day
Before breakfast
Before lunch or dinner
One hour after meals
Two hours after meals
Between 2 a.m. and 4 a.m.
Expected Values: Normal blood glucose levels for an adult
without diabetes are below 100 mg/dL before meals and fasting*
and are less than 140 mg/dL two hours after meals.
1
*Fasting is defined as no caloric intake for at least eight hours.
Reference
1. American Diabetes Association (Standards of Medical Care
in Diabetes – 2021. Diabetes Care, January 2021, vol. 44,
Supplement 1, S15-S33)
Your target ranges
from your healthcare professional

42 www.arkrayusa.com
Transferring Test Results
Test results stored in GLUCOCARD Shine Connex Meter can
be transferred from the meter to an electronic logbook via a
data cable that connects the meter with a computer or
smartphone app.
For more information visit
datamanagement.arkrayusa.com or contact
Customer Service: 800.566.8558,
24 hours a day, 7 days a week.
NOTE
• To pair your meter and smartphone, see pages 19–20.
www.arkrayusa.com 43
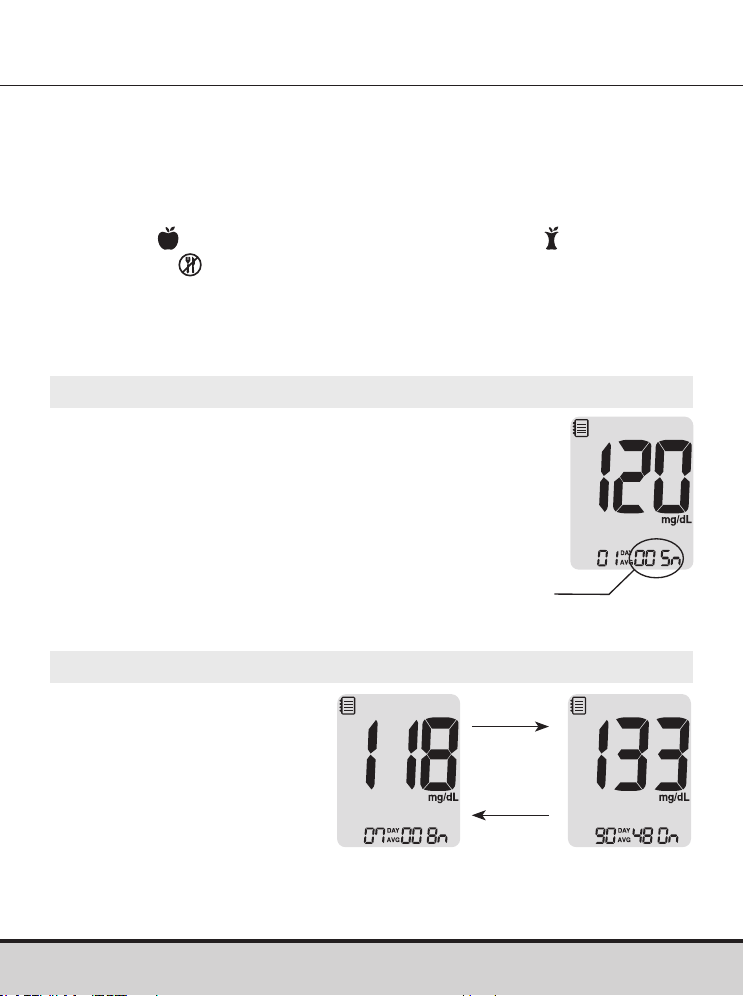
Meter Memory
Step 1
Press any button to turn the meter on.
The current date and time will be displayed
at the bottom of the screen followed by the
1-Day Average value and the number of the
test results saved within the current day.
Viewing Past Test Averages
The GLUCOCARD Shine Connex Blood Glucose Meter can
save up to 1,000 glucose test results with time and date. If the
memory is full, the oldest test result will be deleted and the latest
test result will be stored.
The meter calculates and displays the averages of total test results,
Pre-meal (
) test results, Post-meal test results ( ), and Fasting
test results ( ) from the last 1, 7, 14, 30 and 90 days.
The number of tests
within the current day
Step 2 Viewing Averages
Press the < button to view
1-, 7-, 14-, 30- and 90-Day
Average values, and the
number of tests performed
for the last test period.
> button
< button
Average
(1, 7, 14, 30,
90 days)
44 www.arkrayusa.com
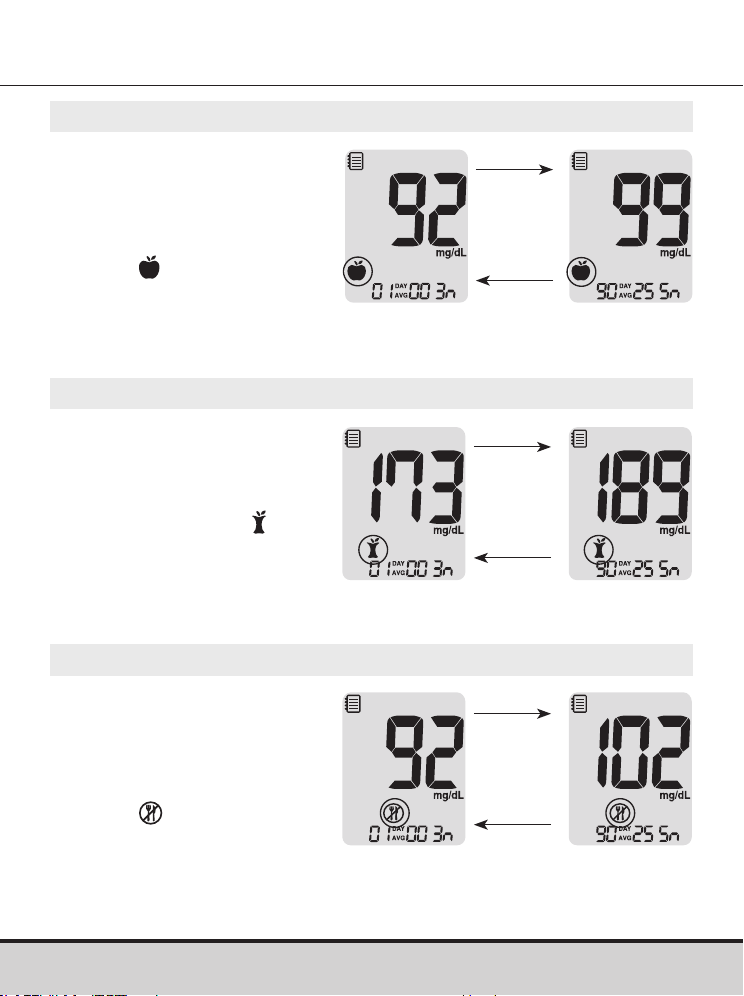
Step 3 Viewing Pre-meal Averages
Continue to press the <
button to view 1-, 7-, 14-,
30- and 90-Day Average
values, and the number of
tests performed pre-meals
with the symbol for the
last test period.
Step 4 Viewing Post-meal Averages
Press the < button to view
1-, 7-, 14-, 30- and 90-Day
Average values, and the
number of tests performed
post-meals with the
symbol for the last
test period.
< button
> button
Post-meal
Average
(1, 7, 14, 30,
90 days)
< button
> button
Pre-meal
Average
(1, 7, 14, 30,
90 days)
Step 5 Viewing Fasting Averages
Press the < button to
view 1-, 7-, 14-, 30- and
90-Day Average values,
and the number of tests
performed during fasting
with the symbol for the
last test period.
< button
> button
Fasting
Average
(1, 7, 14, 30,
90 days)
www.arkrayusa.com 45
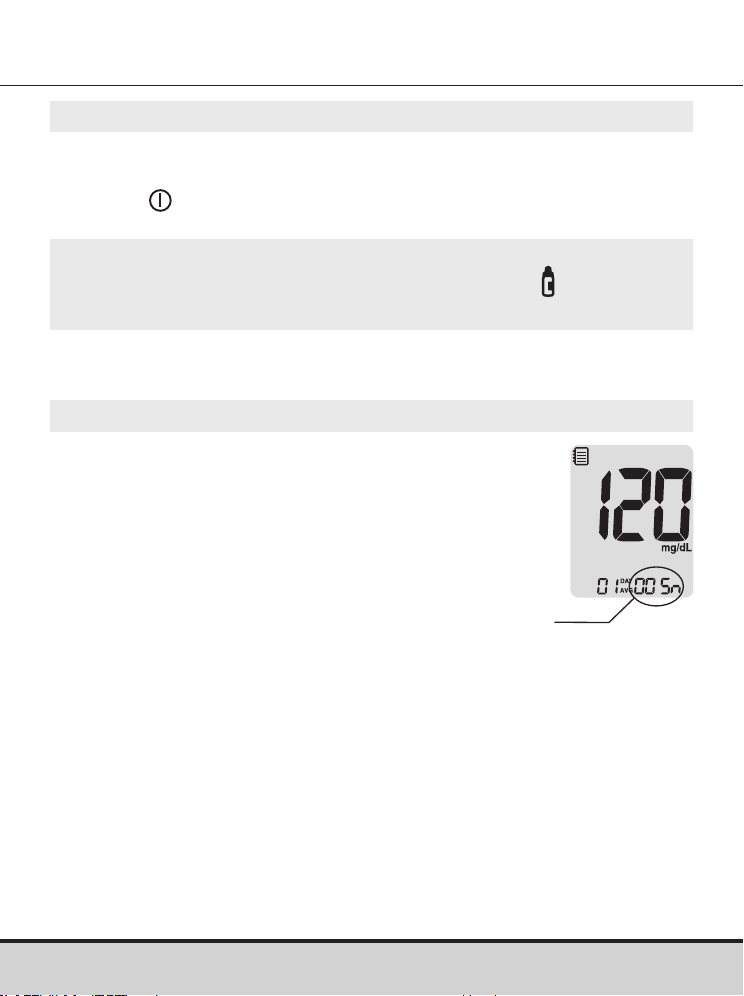
Step 1
Press any
button to turn the meter on.
The current date and time will be displayed on
the bottom of the screen followed by the 1-Day
Average value and the number of the test results
saved within the current day.
Viewing Test Results
The number of tests
within the current day
Step 6
Use the > button to scroll back through the averages
seen previously.
Press the
button to turn off the meter.
NOTE
• The control solution test results saved with the symbol are
not included in the averages.

46 www.arkrayusa.com
Step 2
Use the > button to scroll
through the test results,
starting from the most
recent and ending with
the oldest.
Press the < button to return
to the result seen previously.
After checking the stored
test results, press and hold the
button to turn off the meter.
NOTE
• The control solution test results saved with symbol will
be displayed with symbol when you review the stored
test results.
> button
< button
www.arkrayusa.com 47
Setting the Alarm Function
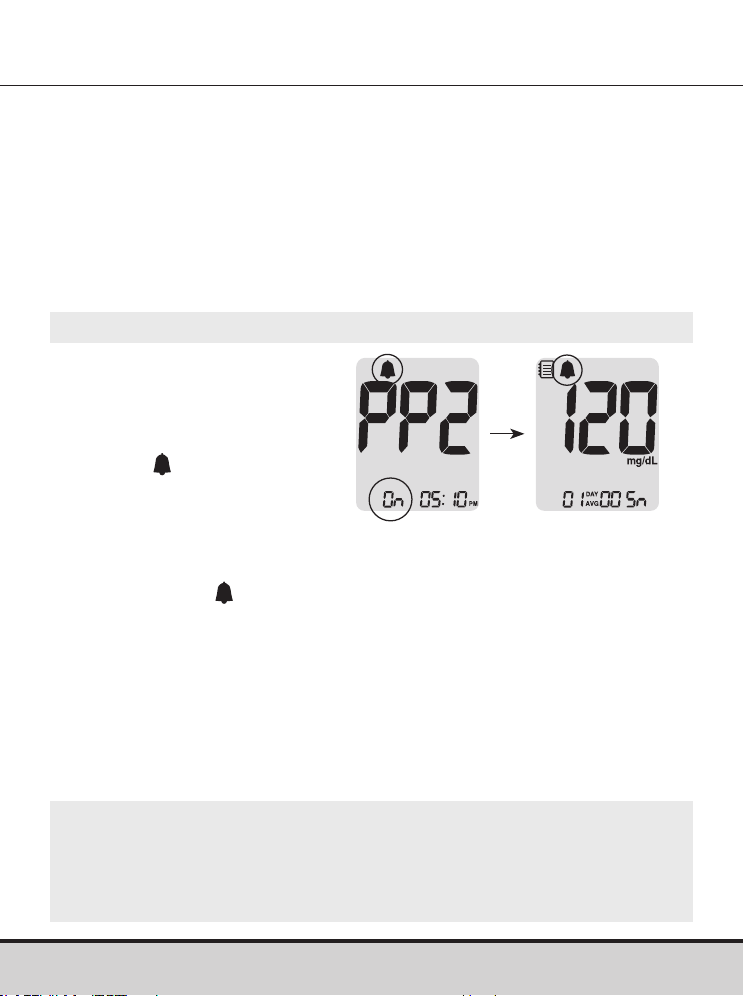
Step 1 Turning the PP2 Alarm On
Without inserting a test strip,
press and hold the < button
for three seconds to set the
post-meal alarm.
‘PP2’, the
symbol, and
‘On’ will be displayed. The
screen will then automatically
change to the memory
recall mode.
At this time, the
symbol,
indicating that the PP2 Alarm
has been set, will be displayed on the screen.
Four types of alarms can be set in the GLUCOCARD Shine
Connex Meter: one post-meal alarm (PP2 Alarm) and three time
set alarms (alarm 1–3).
• The PP2 Alarm goes off two hours after setting the alarm.
• The alarms ring for 15 seconds and can be silenced by pressing
any
button, or by inserting a test strip.
Setting the Post-meal Alarm (PP2 Alarm)
NOTE
• The PP2 Alarm will automatically turn off if the meter's time
setting is adjusted to more than two hours before or just past
the currently activated PP2 Alarm time.

48 www.arkrayusa.com
Step 2 Turning the PP2 Alarm OFF
To turn off the PP2 Alarm, press
and hold the < button for three
seconds.
‘PP2’, the
symbol, and ‘OFF’
will appear on the screen.
Then the screen will change
automatically to the memory
recall mode without the
symbol displayed.
disappears
Step 1
Without inserting a test strip, press the < and
buttons at the same time for three seconds
to enter the time alarm setting.
‘alarm 1’ will be displayed while ‘OFF’ blinks
on the screen.
Setting the Time Alarms (Alarm 1–3)
Step 2
On pressing the > button, ‘alarm 1’ is set and
‘On’ is displayed on the screen.
Press the > button again to cancel ‘alarm 1’.
‘OFF’ will blink on the screen.

www.arkrayusa.com 49
Step 3
Press the < button to adjust the time of ‘alarm 1’.
A number representing the hour will blink on
the screen.
Press the > button to set the hour
.
Step 4
On pressing the < button, the number
indicating the minute will start blinking.
Press the > button to set the minute
.
Step 5
Press the button to finish and to go to
‘alarm 2’ setting.
Repeat steps 2 to 4 to set the remaining
time alarms (alarm 2–3).
Step 6
Press the button for three seconds to finish and turn the
meter off.

50 www.arkrayusa.com
Caring for the GLUCOCARD Shine Connex System
• To minimize the risk of transmission of bloodborne pathogens,
the pre-cleaning and disinfection procedure should be
performed as recommended in the instructions below.
• Wash your hands thoroughly with soap and water after
handling the meter, lancing device or test strips.
• If the meter is being operated by a second person who is
providing testing assistance to the user, the meter and
lancing device should be disinfected prior to handling by
the second person.
• For the lancing device: For use only on a single person.
Disinfect reusable components according to manufacturer's
instructions between each use.
• Inspect the lancing device after cleaning. If residual blood,
debris, dust or lint remain, repeat the cleaning step. Do not
use the lancing device if it is not visually clean after several
repetitions of the cleaning step.
Pre-cleaning and Disinfection
The pre-cleaning procedure is needed to clean dirt as well as
blood and other body fluids on the exterior of the meter and
lancing device before performing the disinfection procedure.
The disinfection procedure is needed to prevent transmission of
bloodborne pathogens.
• For the meter and lancing device, this pre-cleaning and
disinfection procedure should be performed once a week.
www.arkrayusa.com 51
NOTE
• The life span of a GLUCOCARD Shine Connex Meter is
five years. We recommend disinfecting both the meter and
lancing device at least once a week. We have validated
a total of 260 cleaning and disinfecting cycles (260
pre-cleaning and 260 disinfection cycles) to represent
weekly cleaning and disinfecting over the life of your meter
and lancing device.
1 pre-cleaning and 1 disinfection cycle per week X
52 weeks per year X 5 years = 260 pre-cleaning and
260 disinfection cycles.
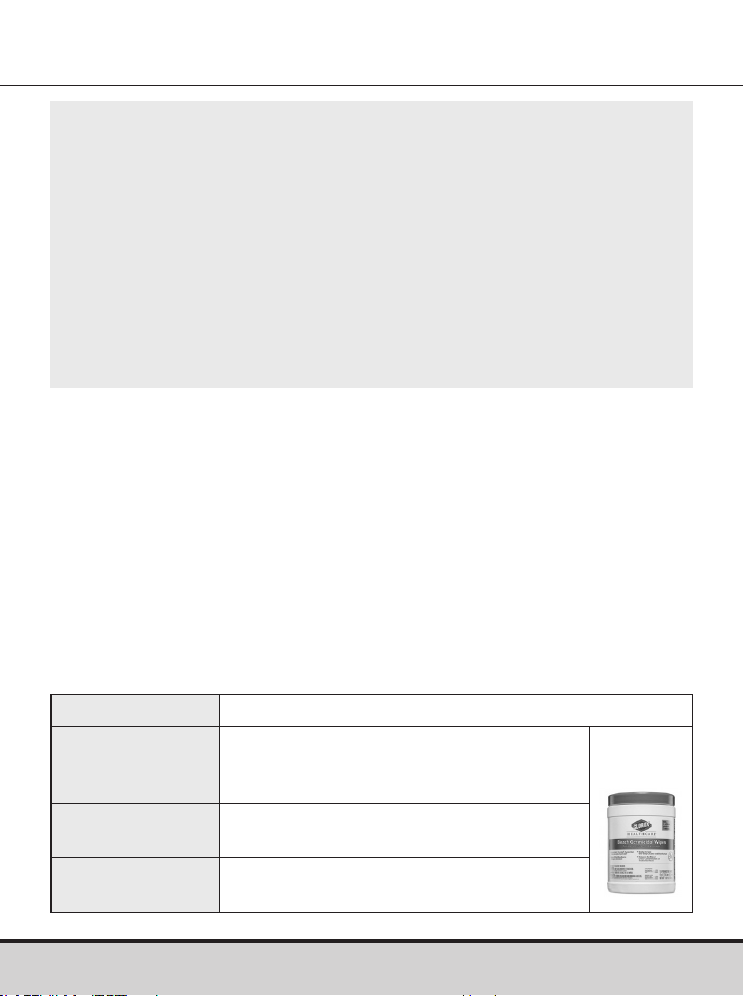
Name
Clorox Healthcare® Bleach Germicidal Wipes
Manufacturer Clorox® Professional Products Company
[Phone] 1.800.537.1415
[Website] www.cloroxprofessional.com
EPA registration
number
67619-12
Active
ingredients
Sodium Hypochlorite: 0.55 %
• We have validated Clorox Healthcare Bleach Germicidal
Wipes with 0.55 % sodium hypochlorite as the active
ingredient for disinfecting the GLUCOCARD Shine Connex
Meter and lancing device. It has been shown to be safe for use
with the meter and lancing device.
• This disinfectant is available commercially in towelette form.
• In addition to GLUCOCARD Shine Connex Blood Glucose
Monitoring System instruction, please read the instructions
provided by the manufacturer of Clorox Healthcare Bleach
Germicidal Wipes before using them.
52 www.arkrayusa.com
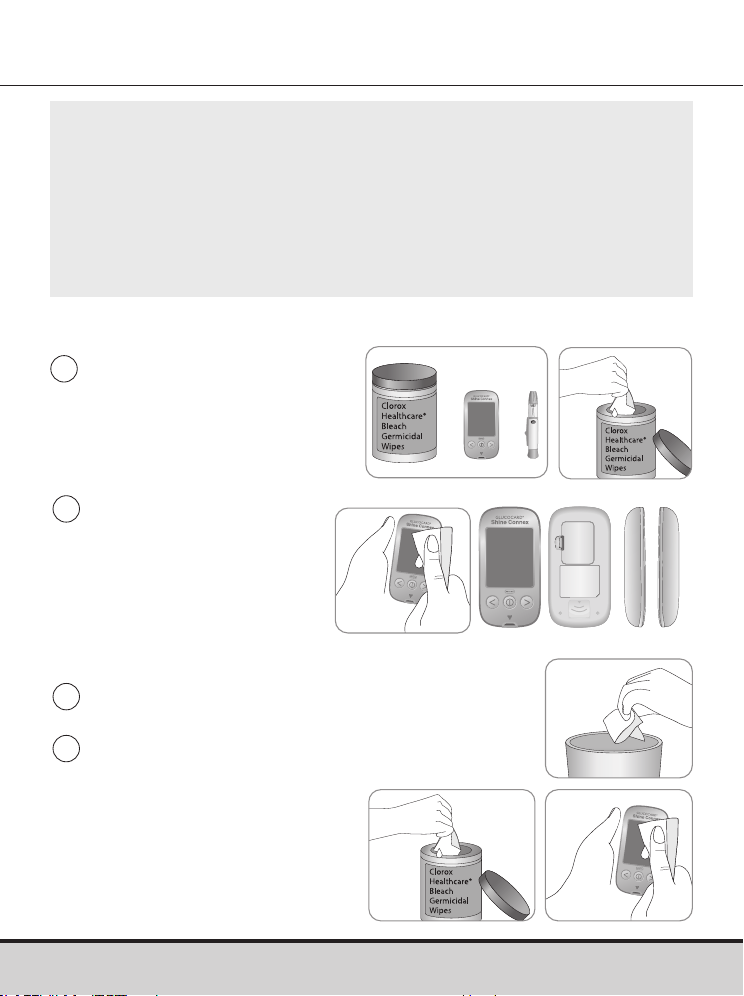
Pre-cleaning and Disinfection Procedures
1
Open the cap of the
Clorox Healthcare
Bleach Germicidal Wipes
container and pull out one
towelette and close the cap.
4
Pull out one new towelette
and wipe the entire surface
of the meter three times
horizontally and three
times vertically using a
new towelette to disinfect
the meter.
2
Wipe the entire surface
of the meter three times
horizontally and three
times vertically using
one towelette to pre-
clean blood and other
body fluids.
3
Dispose of the used towelette in a trash bin.
Front Back Both sides
NOTE
• The disinfectant product can be purchased through
online retailers (e.g. Amazon or Walmart) or by calling
the Clorox® company.
• To find out where to purchase the disinfectant product,
please contact the Clorox® company or visit their website as
listed above.

www.arkrayusa.com 53
6
Allow exteriors to remain wet for one minute.
5
Dispose of the used towelette in a trash bin.
7
Repeat the same procedure for the
lancing device (step
1
to step
6
).
NOTE
• After the pre-cleaning and disinfection procedure, the control
solution should be tested to confirm that the meter works
properly before using the meter.
• Control solution tests should be performed with two different
levels of GLUCOCARD Shine Control Solutions (Level 1 and 2).
• Verify that the test results are within the range printed on the
test strip vial.
• See pages 28–30 for how to do a control solution test.
NOTE
If any of the following deterioration signs appear after pre-
cleaning or disinfecting, please stop using the system and
contact ARKRAY Technical Customer Service: 800.566.8558,
24 hours a day, 7 days a week.
• The inscriptions on the exterior of the meter or lancing
device have been removed.
• The color of the meter or lancing device has changed
or faded.
• Cracks or roughness develop on the meter or lancing
device.
• A part of the segment on the meter display does not flash.
• Control solution test results do not fall within the stated
range on the test strip vial.

54 www.arkrayusa.com
CAUTION
• Do not use other cleaners or disinfectants because other
chemicals have not been validated and may damage the meter.
• Do not get fluids inside the meter through the test strip
port, data transmission port or battery compartment.
• Never immerse the meter or hold it under running water
because this will damage the meter.
CAUTION
Storage and Handling
• Store the meter in a cool and dry place between 32–122 °F
(0–50 ºC) and 20–80 % relative humidity.
• Do not expose the meter to direct sunlight, heat or excessive
humidity for an extended period of time.
• Do not let dirt, dust, blood or water enter into the meter’s
test strip port.
• Do not drop the meter or subject it to strong shock.
• Do not try to fix or alter the meter in any way.
• Store all meter components in the carry case to prevent loss
and to help keep the meter clean.
• Avoid getting any liquid or moisture in the test strip vial. This
can affect the test strips and cause inaccurate test results.
• Do not apply samples other than capillary whole blood or
control solution to the test strip.

www.arkrayusa.com 55
NOTE
• For additional information or technical assistance contact
ARKRAY Technical Customer Service: 800.566.8558, 24
hours a day, 7 days a week.
CAUTION
Do not allow any foreign substances or liquid substances,
such as dirt, blood, or water, enter into the meter. The meter
may be damaged or may malfunction. Follow the warning
information provided below to prevent possible damage to
the meter.
• Do not apply the blood or control solution samples directly
to the test strip port.
• Do not apply the blood or control solution samples to the
test strip while holding the meter in a way that the tip of
the test strip faces upwards. The blood or control solution
samples may run down the surface of the test strip and
flow into the test strip port.
• Do not store your meter in unsanitary or contaminated sites.
• Make sure to follow the Pre-cleaning and Disinfection
Procedures found in the Caring for the GLUCOCARD Shine
Connex System section of this user manual.
56 www.arkrayusa.com
Message What it means What to do
A used test strip was
inserted.
Repeat the test with a
new test strip.
The blood or control
solution sample was
applied before the
symbol
appeared.
Repeat the test with a
new test strip and wait
until the
symbol
appears before applying
the blood or control
solution sample.
The temperature during
the test was above or
below the operating
range.
Move to an area where
the temperature is within
the operating range
42.8–111.2 ºF (6–44 ºC).
Repeat the test after the
meter and test strips have
reached a temperature
within the operating range.
The blood sample is of
insufficient volume or
blood is too thick.
Repeat the test after
inserting a new test strip.
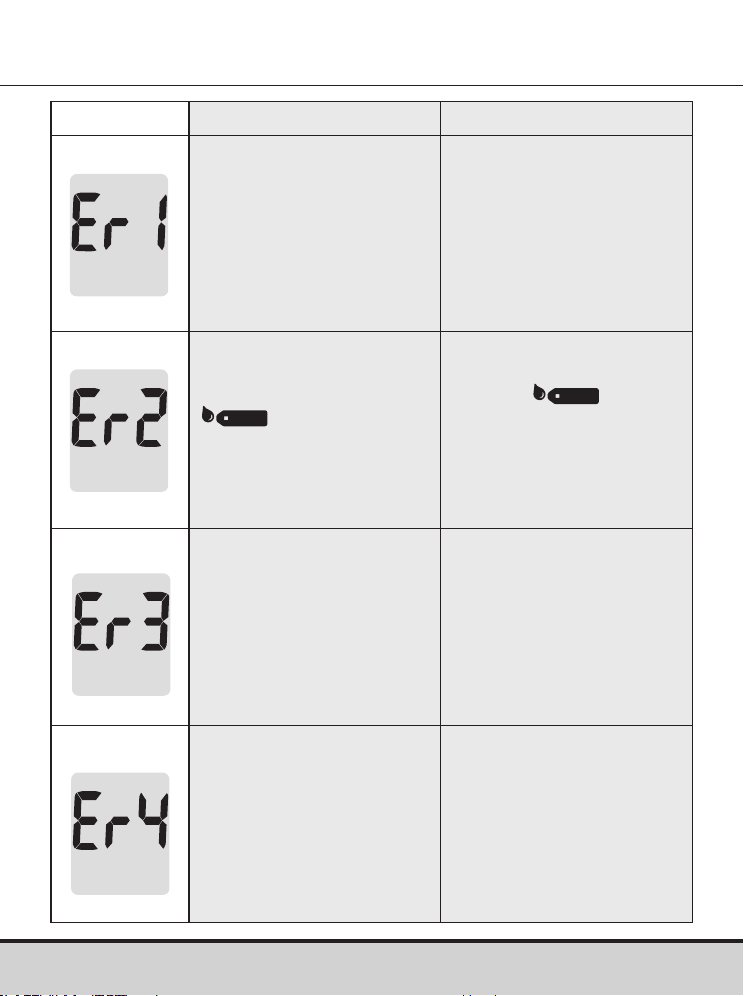
Understanding Error Messages

www.arkrayusa.com 57
Message What it means What to do
This error message may
appear when the wrong
blood glucose test
strip is used instead of
GLUCOCARD Shine Blood
Glucose Test Strip.
Repeat the test with a
GLUCOCARD Shine Blood
Glucose Test Strip.
There is a problem with
the meter.
Do not use the meter.
Contact ARKRAY
Technical Customer
Service: 800.566.8558,
24 hours a day, 7 days
a week.
There is a problem
with Bluetooth®
communication
Contact ARKRAY
Technical Customer
Service: 800.566.8558,
24 hours a day, 7 days
a week.
An electronic error
occurred during the test.
Repeat the test with
a new test strip. If the
error message persists,
contact ARKRAY Technical
Customer Service:
800.566.8558, 24 hours
a day, 7 days a week.
NOTE
If the error messages persist, contact ARKRAY Technical
Customer Service: 800.566.8558, 24 hours a day, 7 days
a week.
58 www.arkrayusa.com
General Troubleshooting
NOTE
If the problem is not resolved, please contact ARKRAY
Technical Customer Service: 800.566.8558, 24 hours a day,
7 days a week.
Problem Troubleshooting
The display is blank even
after inserting a test strip.
• Check whether the test strip is inserted
with the contact bars facing up. Check
if the test strip has been inserted
completely into the test strip port.
• Check if the appropriate test strip
was used.
• Check whether the batteries are
correctly inserted with the ‘+’ side
facing up.
• If the display is still blank, replace
the batteries.
The test does not start
even after applying the
blood sample on the
test strip.
• Check if the confirmation window is
filled completely.
• Repeat the test after inserting a new
test strip.
The test result doesn't
match the way you feel.
• Repeat the test after inserting a new
test strip.
• Check the expiration date of the
test strip.
• Perform control solution test.
www.arkrayusa.com 59
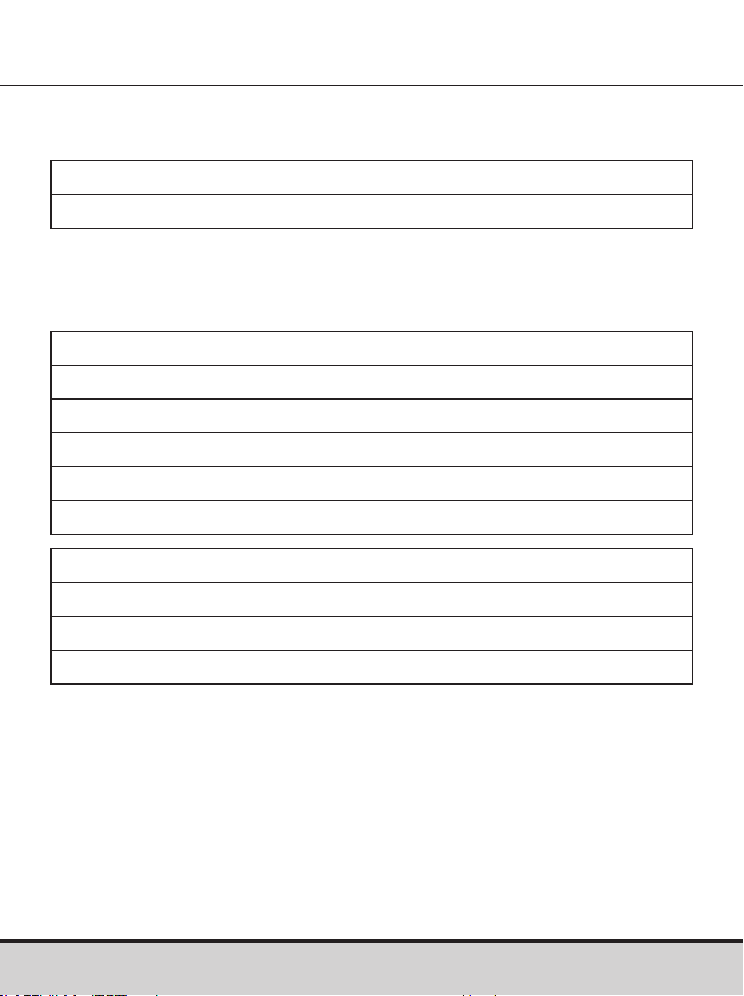
Performance Characteristics
The performance of GLUCOCARD Shine Connex Blood Glucose
Monitoring System has been evaluated in laboratory and in
clinical tests.
Accuracy
The accuracy of the GLUCOCARD Shine Connex Blood Glucose
Monitoring System was assessed by comparing blood glucose
results obtained by patients with those obtained using a YSI
Model 2300 Glucose Analyzer, a laboratory instrument.
The following results were obtained by diabetic patients at
clinic centers.
Accuracy results for glucose concentration < 75 mg/dL
Accuracy results for glucose concentration ≥ 75 mg/dL
Slope 1.0223
Y-Intercept -1.3686
Elation coefficient (r) 0.9934
Number of subjects 371
Range tested 48–553 mg/dL
Within ± 5 mg/dL Within ± 10 mg/dL Within ± 15 mg/dL
61.0 %
(25/41)
97.6 %
(40/41)
100 %
(41/41)
Within ± 5 % Within ± 10 % Within ± 15 % Within ± 20 %
70.0 %
(231/330)
96.1 %
(317/330)
100 %
(330/330)
100 %
(330/330)
60 www.arkrayusa.com
Precision
Precision studies were performed in a laboratory using the
GLUCOCARD Shine Connex Blood Glucose Monitoring System.
User performance results for glucose concentrations between
48 mg/dL and 553 mg/dL.
Within ± 15 mg/dL and Within ± 20 %
371/371 (100 %)
Within Run Precision
Blood avg. 43 mg/dL SD = 1.9 mg/dL CV = 4.3 %
Blood avg. 71 mg/dL SD = 2.1 mg/dL CV = 2.9 %
Blood avg. 135 mg/dL SD = 3.8 mg/dL CV = 2.8 %
Blood avg. 203 mg/dL SD = 5.2 mg/dL CV = 2.6 %
Blood avg. 343 mg/dL SD = 11 mg/dL CV = 3.2 %
Between Run Precision
Control avg. 36 mg/dL SD = 1.4 mg/dL CV = 3.8 %
Control avg. 114 mg/dL SD = 3.4 mg/dL CV = 3.0 %
Control avg. 341 mg/dL SD = 8.2 mg/dL CV = 2.4 %

www.arkrayusa.com 61
Warranty Information
Warranty
The manufacturer warrants that the GLUCOCARD Shine Connex
Meter shall be free of defects in material and workmanship in
normal use for a period of five years.
The meter must have been subjected to normal use. The
warranty does not cover improper handling, tampering, use or
service of the meter.
Any claim must be made within the warranty period.
The manufacturer will, at its discretion, repair or replace a
defective meter, or meter part that is covered by this warranty.
As a matter of warranty policy, the manufacturer will not
reimburse the consumer’s purchase price.
Obtaining Warranty Service
To obtain warranty service, you must return the defective meter
or meter part along with proof of purchase.
Returns
For instructions on how to return your meter, contact ARKRAY
Technical Customer Service: 800.566.8558, 24 hours a day,
7 days a week.
Meters returned without this authorization will not be accepted.

Page intentionally left blank

Una cordial bienvenida a GLUCOCARD® Shine Connex
Sistema de monitoreo de glucosa en sangre
Gracias por haber elegido el sistema de monitoreo de glucosa
en sangre GLUCOCARD Shine Connex. El sistema ofrece el
monitoreo diagnóstico rápido y cómodo de la glucosa en
la sangre in vitro (es decir, fuera del cuerpo). Podrá obtener
resultados exactos en apenas cinco segundos con una pequeña
muestra de sangre (0.5 µl).
Los resultados de las pruebas pueden enviarse a un teléfono
inteligente a través de una conexión inalámbrica Bluetooth®.
Tecnología inalámbrica Bluetooth®
Algunos teléfonos inteligentes y muchos otros dispositivos
emplean la tecnología inalámbrica Bluetooth®. El medidor de
glucosa en sangre GLUCOCARD® Shine Connex emplea la
tecnología inalámbrica Bluetooth® para emparejarse* con un
teléfono inteligente y enviarle los resultados de sus pruebas de
glucosa en la sangre.
Cuando use el sistema de monitoreo de glucosa en sangre
GLUCOCARD Shine Connex, le recomendamos que empareje el
medidor GLUCOCARD Shine Connex con su teléfono inteligente
y haga un seguimiento de los resultados de sus pruebas.
• Ninguna parte de este documento puede ser reproducida
de forma alguna ni por ningún medio sin haber obtenido el
consentimiento previo por escrito del fabricante.
• La información contenida en este manual es correcta en el
momento de su impresión. Sin embargo, el fabricante se
reserva el derecho de hacer cualquier modificación necesaria
en cualquier momento sin previo aviso, ya que tenemos por
norma mejorar continuamente.
* Proceso de crear una conexión entre dos dispositivos Bluetooth®. Debe
intercambiarse una contraseña autogenerada entre los dos dispositivos.
Una vez emparejados (conectados), los dispositivos se comunicarán
automáticamente entre sí cuando esté activada la función Bluetooth®.

ADVERTENCIA
Desactive la función Bluetooth® en zonas donde esté restringido
el uso de dispositivos inalámbricos, como hospitales, algunos
consultorios de profesionales de la salud y aviones.
Marcas comerciales
La marca de palabra Bluetooth® y sus logotipos son marcas
registradas propiedad de Bluetooth® SIG, Inc., y cualquier uso
de tales marcas por parte del fabricante se hace en virtud de
una licencia. Todas las demás marcas y nombres comerciales
pertenecen a sus respectivos titulares.
Declaración de exposición a la radiación de la FCC
Este equipo cumple con los límites de exposición a la radiación
establecidos por la FCC para entornos no controlados.
Este equipo deberá instalarse y manejarse dejando una distancia
mínima de 8 pulg. (20 cm) entre la fuente de radiación y el cuerpo.
Cualquier cambio o modificación que el fabricante no haya
aprobado expresamente podría anular la autoridad del usuario de
hacer funcionar este equipo.

Índice
Información
Información importante: Lea esto primero ------------------------------------------------ 6
Información importante de seguridad ------------------------------------------------------- 7
Limitaciones del sistema de monitoreo de glucosa en sangre
GLUCOCARD Shine Connex -------------------------------------------------------------------- 8
Especificaciones ----------------------------------------------------------------------------------- 10
Sistema de monitoreo de glucosa en sangre GLUCOCARD Shine Connex ------ 11
Inserción o cambio de las pilas --------------------------------------------------------------- 12
Tira de prueba de glucosa en sangre GLUCOCARD Shine ---------------------------- 13
Medidor de glucosa en sangre GLUCOCARD Shine Connex ------------------------- 16
Pantalla del medidor de glucosa en sangre GLUCOCARD Shine Connex --------- 17
Preparación
Configuración del sistema GLUCOCARD Shine Connex ------------------------------- 18
Configuración de Bluetooth® ---------------------------------------------------------------- 19
Ajuste de la fecha y la hora ------------------------------------------------------------------ 21
Configuración del sonido en encendido o apagado ------------------------------------ 23
Activación del indicador de la fecha de vencimiento de las tiras de prueba ------- 24
Activación del indicador de hipoglucemia (HYPo) ------------------------------------- 25
Configuración del indicador de la fecha de vencimiento de las
tiras de prueba ------------------------------------------------------------------------------------- 26
Verificación del sistema ------------------------------------------------------------------------- 27
Realización de pruebas con solución de control --------------------------------------- 28
Comparación de los resultados de una prueba con solución de control -------- 31
Pruebas
Uso del dispositivo de punción --------------------------------------------------------------- 32
Preparación del dispositivo de punción -------------------------------------------------- 33
Preparación del medidor y la tira de prueba -------------------------------------------- 35
Aplicación de la muestra de sangre ------------------------------------------------------- 36
Eliminación de las lancetas usadas -------------------------------------------------------- 39
Mensajes “HI” y “Lo” ----------------------------------------------------------------------------- 40
Intervalos deseados de glucosa en sangre ------------------------------------------------ 41
Transferencia de los resultados de prueba -------------------------------------------------- 42
Funciones adicionales
Memoria del medidor ---------------------------------------------------------------------------- 43
Visualización de los promedios de pruebas anteriores -------------------------------- 43
Visualización de los resultados de prueba ----------------------------------------------- 45
Configuración de la función de alarma ----------------------------------------------------- 47
Configuración de la alarma posterior a una comida (alarma PP2) -------------- 47
Configuración de las alarmas de hora (alarmas 1-3) -------------------------------- 48
Cuidado del sistema GLUCOCARD Shine Connex --------------------------------------- 50
Mantenimiento
Descripción de los mensajes de error ------------------------------------------------------- 56
Resolución de problemas generales --------------------------------------------------------- 58
Características de rendimiento ---------------------------------------------------------------- 59
Información sobre la garantía ----------------------------------------------------------------- 61

6 www.arkrayusa.com
Información importante: Lea esto primero
Uso previsto
• El sistema de monitoreo de glucosa en sangre GLUCOCARD
Shine Connex está diseñado para determinar cuantitativamente
la glucosa en muestras de sangre entera capilar recién
obtenida de las yemas de los dedos.
• El sistema de monitoreo de glucosa en sangre GLUCOCARD
Shine Connex está indicado para que las personas con diabetes
se hagan sus propias pruebas caseras fuera del cuerpo (in vitro),
como ayuda para monitorear la eficacia del control de su
diabetes.
• El sistema está diseñado para que lo use una sola persona y no
deberá compartirse.
• El sistema no está indicado para usarse en recién nacidos ni
para el diagnóstico o la detección de diabetes.
• Las tiras de prueba de glucosa en sangre GLUCOCARD®
Shine están indicadas para usarse con la serie de medidores
de glucosa en sangre GLUCOCARD® Shine, para medir
cuantitativamente la glucosa en muestras de sangre entera
capilar recién obtenida de la yema de un dedo.
• Las soluciones de control GLUCOCARD® Shine están indicadas
para usarse con la serie de medidores de glucosa en sangre
GLUCOCARD Shine y las tiras de prueba de glucosa en sangre
GLUCOCARD Shine, para verificar que el medidor y las tiras de
prueba estén interactuando debidamente y que la prueba se
esté realizando de forma correcta.

www.arkrayusa.com 7
Información importante de seguridad
• Use este dispositivo únicamente para las indicaciones descritas
en este manual del usuario.
• Siga los procedimientos recomendados de limpieza y
desinfección descritos en este manual del usuario.
• Las tiras de prueba de glucosa en sangre GLUCOCARD Shine
están destinadas a un solo uso y deberán desecharse en un
recipiente adecuado inmediatamente después de usarse.
• El medidor de glucosa en sangre GLUCOCARD Shine Connex
está diseñado para funcionar sin códigos, y así reducir al
mínimo los errores de monitoreo relacionados con códigos.
• La glucosa presente en las muestras de sangre reacciona con la
sustancia química incorporada en la tira de prueba para generar
una pequeña corriente eléctrica. El medidor GLUCOCARD Shine
Connex detecta esta corriente eléctrica y mide la cantidad de
glucosa presente en la muestra de sangre.
• Si el resultado de su prueba es inferior a 60 mg/dl o superior a
240 mg/dl, consulte de inmediato con un profesional de
la salud.

8 www.arkrayusa.com
Limitaciones del sistema de monitoreo de glucosa
en sangre GLUCOCARD Shine Connex
• Una cifra de glóbulos rojos anormalmente alta o baja (nivel de
hematocrito superior al 65% o inferior al 15%, respectivamente)
podría producir resultados erróneos.
• Podrían obtenerse resultados erróneos en personas con
hipotensión grave o en pacientes en estado de shock.
• Podrían obtenerse resultados erróneamente bajos en personas
que experimenten un estado hipoglucémico hiperosmolar, con o
sin cetosis.
• La deshidratación extrema (pérdida excesiva de agua) podría
ocasionar resultados de prueba falsamente bajos. Si usted cree
que tiene deshidratación extrema, consulte de inmediato con su
profesional de la salud.
• Las altitudes superiores a los 10,000 pies (3,048 m) sobre el nivel
del mar podrían afectar el rendimiento de la tira de prueba.
• Este sistema está diseñado para ser empleado por un solo
paciente y no deberá compartirse.
• No indicado para su uso en recién nacidos.
• No se debe usar para el diagnóstico o la detección de la
diabetes mellitus.
• No se debe usar en pacientes críticamente enfermos.
• No se debe usar en nadie que esté recibiendo oxigenoterapia.
• Únicamente para uso diagnóstico in vitro.
• El medidor de glucosa en sangre GLUCOCARD Shine Connex
deberá usarse únicamente con las tiras de prueba de glucosa en
sangre GLUCOCARD Shine.
Si tiene alguna pregunta o duda, llame al servicio técnico de
atención al cliente de ARKRAY: 800.566.8558, 24 horas del día,
7 días de la semana. En caso de emergencia, comuníquese con
su profesional de la salud o el personal de respuesta médica de
emergencia.
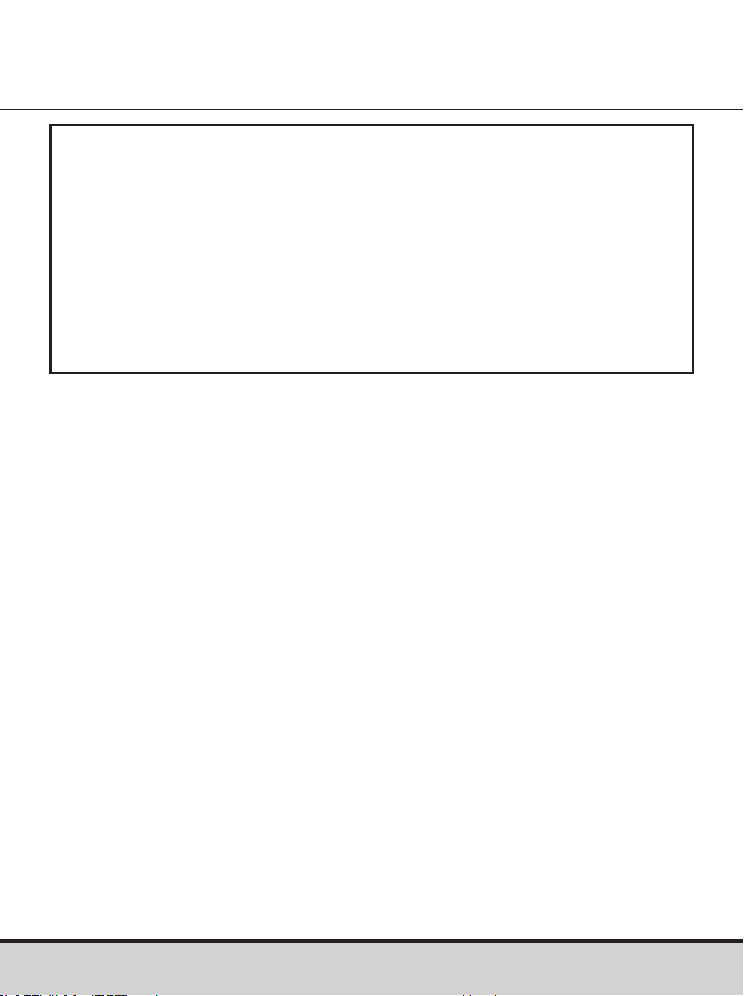
www.arkrayusa.com 9
Este dispositivo no está destinado a emplearse en entornos
de atención médica o de uso asistido —como hospitales,
consultorios médicos o instituciones de cuidado a largo
plazo— porque no cuenta con la aprobación de la FDA para
dichos usos (incluso para pruebas asistidas habituales o como
parte de procedimientos de control glucémico).
El uso de este dispositivo con múltiples pacientes podría
dar lugar a la transmisión del virus de la inmunodeficiencia
humana (VIH), el virus de la hepatitis C (VHC), el virus de la
hepatitis B (VHB) u otros patógenos sanguíneos.

10 www.arkrayusa.com
Especificaciones
Especificaciones del producto
Intervalos de funcionamiento
Intervalo de medición 20-600 mg/dl
Volumen de la muestra 0.5 μl como mínimo
Duración de la prueba Cinco segundos
Tipo de muestra Sangre entera capilar recién obtenida
Calibración Equivalente en plasma
Método de ensayo Electroquímico
Duración de las pilas 1,000 pruebas
Alimentación Dos pilas de litio de 3.0 V
(desechables, tipo CR2032)
Memoria 1,000 resultados de prueba
Tamaño 4.06 x 2.23 x 0.63 pulgadas
(103 x 54 x 16 mm)
Peso 2.54 onzas (72.1 g) con pilas
Tecnología Bluetooth® • Intervalo de frecuencias: 2.4-2.4835
GHz • Distancia de funcionamiento: máximo
32 pies (10 metros) sin impedimentos
• Canales de funcionamiento: 40 canales
• Cifrado de seguridad: AES (Advanced
encryption standard) de 128 bits
Temperatura 42.8-111.2 °F (6-44 °C)
Humedad relativa 10-90%
Hematocrito 15-65%

www.arkrayusa.com 11
Sistema de monitoreo de glucosa en sangre
GLUCOCARD Shine Connex
El sistema de monitoreo de glucosa en sangre GLUCOCARD
Shine Connex consta de los siguientes componentes:
Medidor de glucosa en sangre GLUCOCARD Shine Connex
Manual del usuario
Guía de consulta rápida
Guía rápida de emparejamiento Bluetooth®
Pilas (2)
Dispositivo de punción
Lancetas (10)
Libreta de registro
Estuche
• Verifique todos los componentes después de abrir la caja
que contiene el sistema de monitoreo de glucosa en sangre
GLUCOCARD® Shine Connex.
• Las tiras de prueba y las soluciones de control GLUCOCARD
Shine son necesarias, pero no se incluyen.
• Las soluciones de control GLUCOCARD Shine y el cable de
datos del sistema de manejo de la diabetes pueden pedirse por
separado. Llame al servicio técnico de atención al cliente de
ARKRAY: 800.566.8558, 24 horas del día, 7 días de la semana.
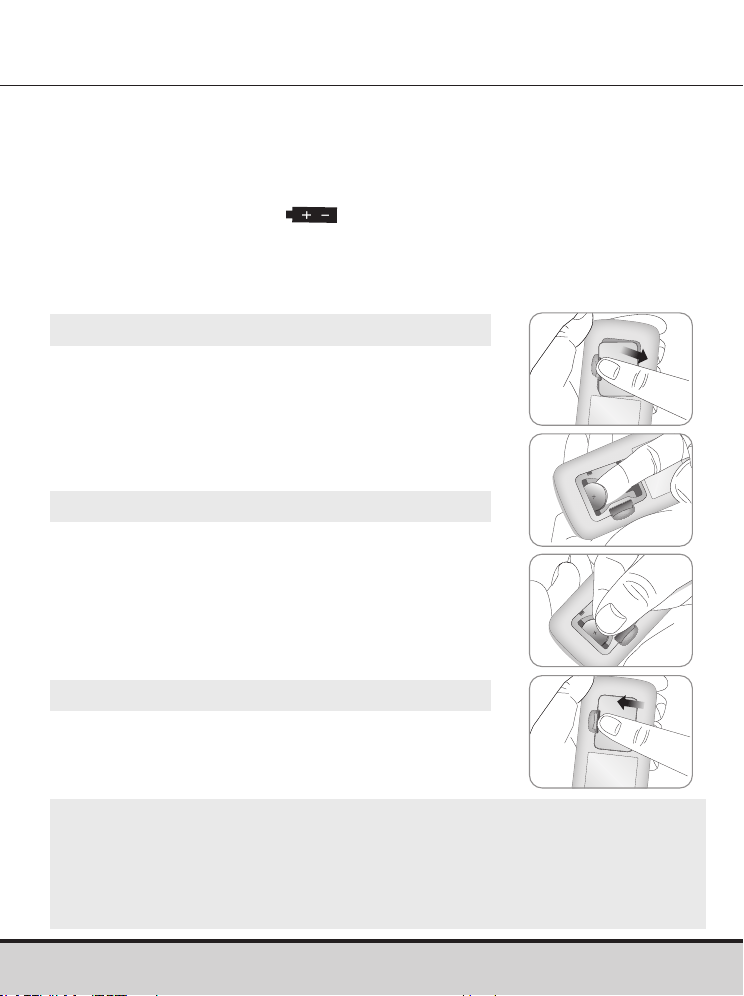
12 www.arkrayusa.com
• El medidor GLUCOCARD Shine Connex utiliza dos pilas de litio
de 3.0 V.
• Antes de usar el medidor, revise el compartimiento de las
pilas y, si está vacío, inserte unas pilas.
• Si aparece el símbolo
en la pantalla mientras el medidor
está en uso, deben cambiarse las pilas lo antes posible.
• Si se descargan las pilas por completo, puede que no se
guarden los resultados de prueba.
Inserción o cambio de las pilas
Paso 1
Asegúrese de que el medidor esté apagado.
Empuje la tapa en la dirección de la flecha
para abrir el compartimiento de las pilas.
Paso 2
Saque las pilas usadas e instale dos pilas
nuevas con el signo + orientado hacia arriba.
Asegúrese de que las pilas estén firmemente
instaladas.
Paso 3
Coloque la tapa sobre el compartimiento de las
pilas. Presione firmemente para cerrar la tapa.
Quizás se oiga un clic.
NOTA
• El hecho de retirar las pilas del medidor no afectará los
resultados almacenados.
• Sin embargo, puede que sea necesario reconfigurar los ajustes
del medidor. Consulte la página 18.

www.arkrayusa.com 13
Tira de prueba de glucosa en sangre GLUCOCARD Shine
El sistema de monitoreo de glucosa en sangre GLUCOCARD
Shine Connex mide la glucosa en sangre con rapidez y exactitud.
Absorbe automáticamente la pequeña muestra de sangre
aplicada al borde angosto de la tira de prueba.
Insertar
Barras de contacto
Introduzca suavemente la tira de
prueba en el orificio correspondiente
del medidor, con las barras de contacto
orientadas hacia arriba.
Ventana de confirmación
Revise aquí si se ha aplicado una
muestra suficiente de sangre.
Borde para aplicar la muestra
de sangre
Aplique aquí la muestra de sangre para
la prueba.

14 www.arkrayusa.com
Advertencia
• Las tiras de prueba de glucosa en sangre GLUCOCARD Shine
deberán usarse únicamente con muestras de sangre entera
capilar recién obtenida.
• No vuelva a usar las tiras de prueba.
• No use las tiras de prueba después de la fecha de vencimiento.
• Si las tiras de prueba se usan y almacenan conforme a métodos
correctos de conservación y manejo, tanto los frascos nuevos
sin abrir como los que se han abierto podrán usarse hasta la
fecha de vencimiento impresa en la caja de tiras de prueba y la
etiqueta de los frascos.
• Almacene las tiras de prueba en un lugar fresco y seco, a
temperaturas de 34-86 °F (1-30 °C) y humedades relativas de
20-80%.
• Mantenga las tiras de prueba resguardadas de la luz solar directa
o del calor, y no las congele.
• Almacene las tiras de prueba únicamente en su frasco original.
• Tape herméticamente el frasco después de sacar una tira de
prueba y use la tira de inmediato.
• Evite que el frasco de tiras de prueba entre en contacto con
líquidos o humedad, ya que eso puede afectar dichas tiras y
producir resultados incorrectos.
• No aplique a la tira de prueba muestras que no sean sangre
entera capilar o solución de control.
• Manipule las tiras de prueba solo con las manos limpias y secas.
• No doble, corte ni altere las tiras de prueba de ninguna manera.
• Para obtener información detallada sobre el uso y
almacenamiento, consulte el folleto adjunto sobre las tiras de
prueba de glucosa en sangre GLUCOCARD Shine.

www.arkrayusa.com 15
CUIDADO
• Mantenga el medidor y los materiales para pruebas fuera del
alcance de los niños pequeños.
• Los desecantes de la tapa del frasco podrían ser dañinos si se
inhalan o ingieren y podrían provocar irritación en la piel o los ojos.
CUIDADO
No deje que en el medidor entren sustancias extrañas o líquidas
(como suciedad, sangre o agua), ya que estas podrían dañarlo o
averiarlo. Para proteger el medidor contra posibles daños, observe
la información de advertencia indicada a continuación.
• No aplique las muestras de sangre o de solución de control
directamente al orificio de las tiras de prueba.
• No aplique las muestras de sangre o de solución de control a
la tira de prueba si el medidor tiene la punta de la tira orientada
hacia arriba, ya que podrían escurrirse por la superficie de la tira
de prueba y entrar en el respectivo orificio de inserción.
• No almacene el medidor en lugares antihigiénicos o
contaminados.
• Asegúrese de seguir los procedimientos de limpieza previa y
desinfección que encontrará en la sección “Cuidado del sistema
GLUCOCARD Shine Connex” de este manual del usuario.
NOTA
Podrá obtener más información de seguridad en los documentos
FDA Public Health Notification (http://wayback.archive-it.
org/7993/20170111013014/http://www.fda.gov/MedicalDevices/
Safety/AlertsandNotices/ucm224025.htm) y CDC Clinical Reminder
(http:// www.cdc.gov/injectionsafety/Fingerstick-DevicesBGM.html).
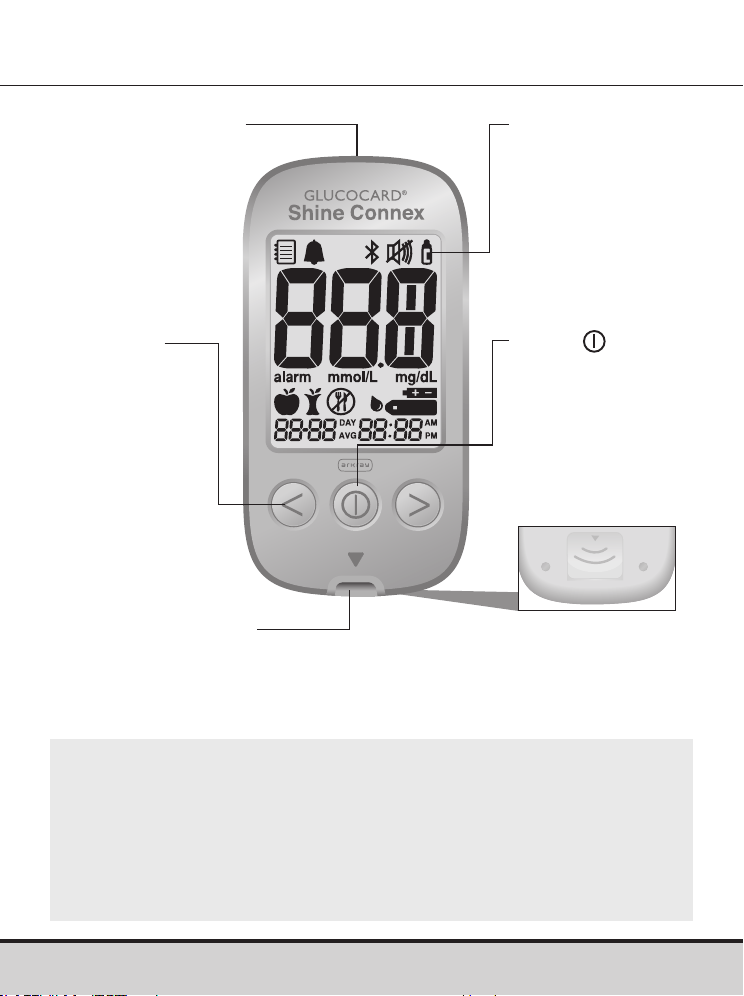
16 www.arkrayusa.com
Medidor de glucosa en sangre GLUCOCARD
Shine Connex
Pantalla
Muestra
resultados y
mensajes
Botón
Enciende/apaga el
medidor, confirma
las selecciones
de los menús
y cambia la
información
Expulsor de tiras
de prueba
Deslice hacia abajo
para desechar las tiras
de prueba usadas
Puerto de conexión
de datos
Permite transferir
datos del medidor
a una computadora
mediante un cable
Botón <, >
Enciende
el medidor,
selecciona
o cambia la
información
Orificio de inserción
de tiras de prueba
Inserte aquí la tira
de prueba
NOTA
• El cable del sistema de manejo de datos puede pedirse por
separado. Llame al servicio técnico de atención al cliente de
ARKRAY: 800.566.8558, 24 horas del día, 7 días de la semana.
• La unidad de medición es fija (mg/dl) y el usuario no la puede
cambiar.
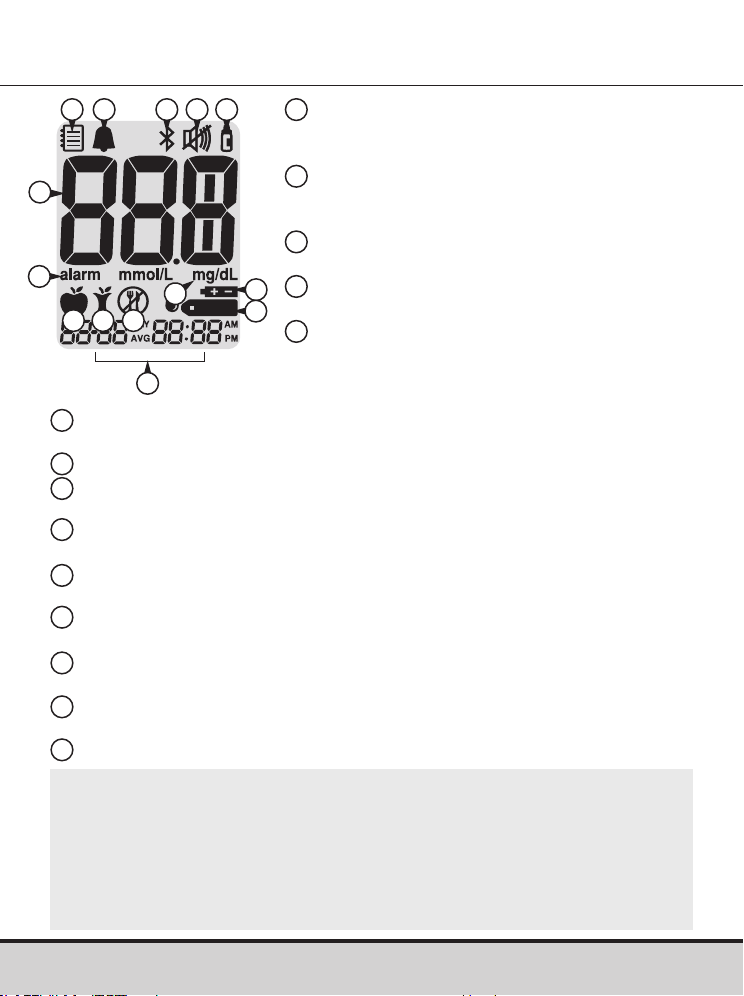
www.arkrayusa.com 17
Modo de recuperación de valores de la
memoria: aparece cuando se muestran
los resultados guardados en la memoria.
Alarma PP2: aparece cuando se ha
configurado la alarma posterior a una
comida.
Símbolo Bluetooth®: aparece cuando
está activada la función Bluetooth®.
Símbolo de silencio: aparece solo
cuando está desactivado (OFF) el sonido.
Marca de prueba con solución de
control: aparece cuando se guardan o
muestran resultados de pruebas con
solución de control.
Resultados de prueba: panel de visualización de los resultados de
las pruebas.
alarm: aparece cuando se ha configurado la alarma de la hora.
mg/dL: unidad de medida de la concentración de glucosa en
la sangre.
Símbolo de pila: indica que escasea la carga del medidor y que
hay que cambiar las pilas.
Símbolo de inserción de gota: indica que el medidor está listo
para la aplicación de una gota de sangre o solución de control.
Marca de prueba previa a una comida: se usa para pruebas
realizadas antes de comer.
Marca de prueba posterior a una comida: se usa para pruebas
realizadas después de comer.
Marca de prueba en ayunas: se usa para pruebas realizadas
después de ayunar al menos durante 8 horas.
Mes/día/hora/minuto
Pantalla del medidor de glucosa en sangre
GLUCOCARD Shine Connex
10
12
7
8
9
11
13
14
1
2 3 4
6
7
14
4
5
1
2
3
6
5
8
9
10
11
12 13
NOTA
• Se recomienda verificar si la pantalla coincide con la ilustración
anterior cada vez que se encienda el medidor.
• No use el medidor si la pantalla no coincide exactamente con
la ilustración, ya que en ese caso el medidor podría mostrar
resultados incorrectos.
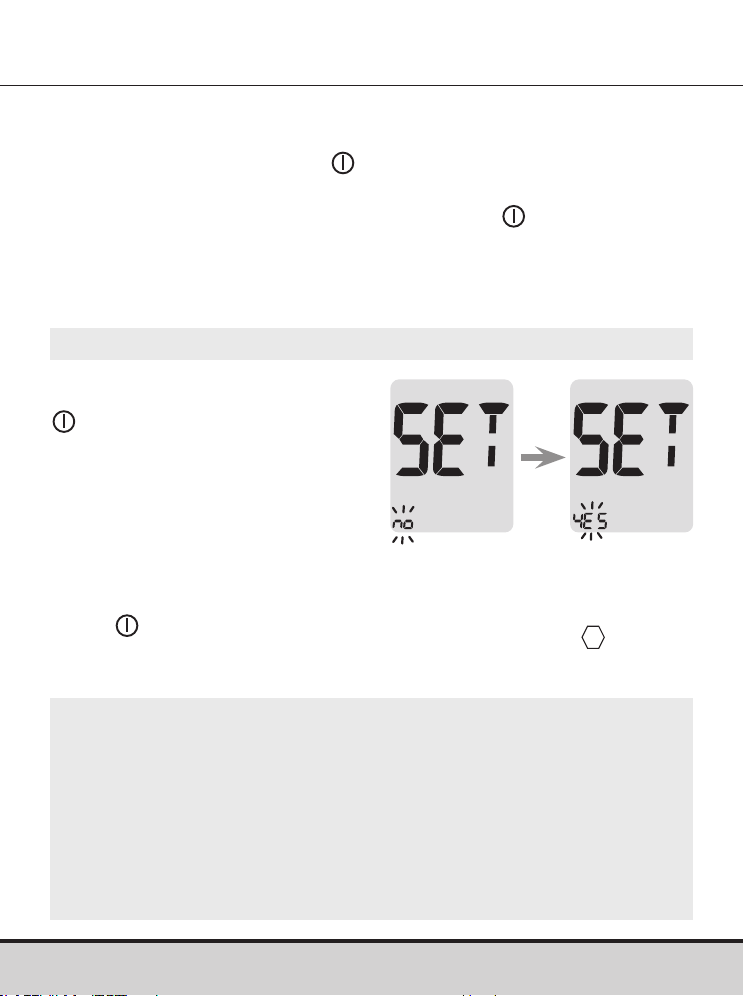
18 www.arkrayusa.com
Configuración del sistema GLUCOCARD Shine Connex
Antes de usar el medidor o después de cambiarle las pilas es
necesario revisar y actualizar sus ajustes (como la fecha y la hora).
Mantenga oprimido el botón
durante tres segundos para
ingresar al modo de configuración (SET). Una vez configurados
todos los ajustes, mantenga oprimido el botón durante tres
segundos para apagar el medidor.
Oprima el botón < o > para cambiar los valores. Mantenga
oprimido el botón < o > para desplazarse más rápido.
Paso 1: Ingreso al modo de
configuración
Mantenga oprimido el botón
durante tres segundos
para ingresar al modo de
configuración (SET). Después
de que todos los segmentos
destellen por la pantalla, se
mostrará “SET”.
Oprima el botón < o > para
seleccionar “YES” y luego el
botón
para ir al siguiente paso.
NOTA
• Siga el paso 2 para emparejar el medidor con un teléfono
inteligente.
• El emparejamiento permite que el medidor se comunique
con su teléfono inteligente de forma inalámbrica.
• Asegúrese de que los dispositivos se encuentren dentro del
intervalo máximo de Bluetooth® (32 pies [10 metros]).
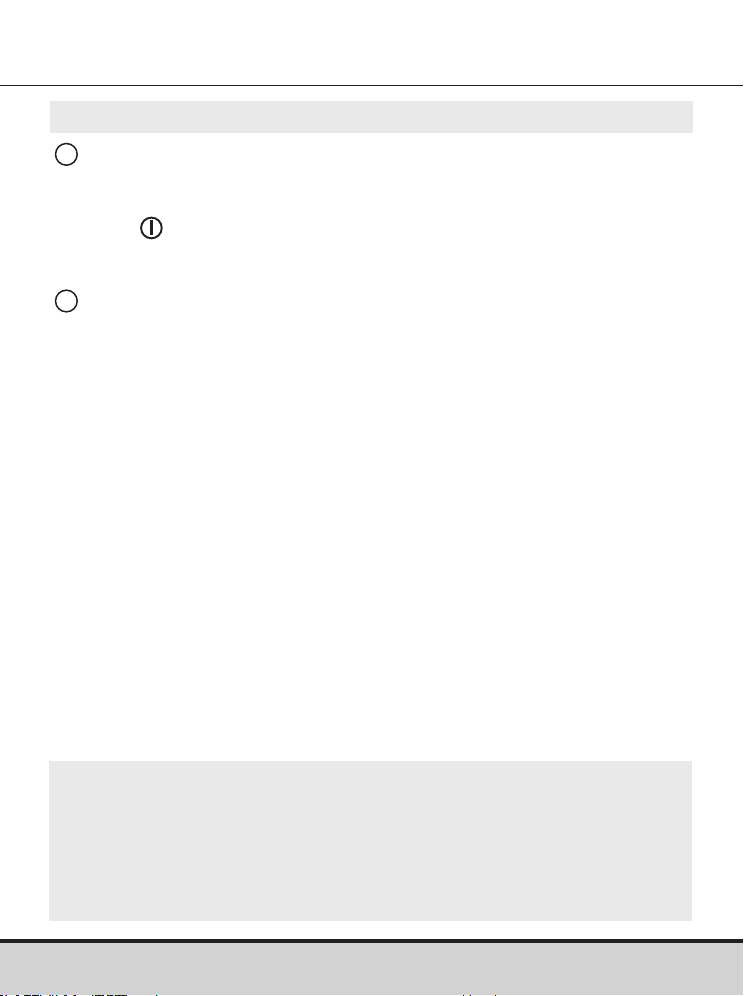
www.arkrayusa.com 19
Configuración del sistema GLUCOCARD Shine Connex
Paso 2: Emparejamiento Bluetooth®
1
Configuración de Bluetooth®: Por defecto, su medidor
GLUCOCARD Shine Connex tendrá activada la función
Bluetooth®. Si desea desactivar Bluetooth®, oprima el botón <
o > y para confirmar su selección. El medidor avanzará al
paso 3, Configuración del año.
2
Emparejamiento de su medidor y otro dispositivo y/o
aplicación Bluetooth®: Inicie el modo de emparejamiento
Bluetooth® de su medidor mediante uno de los dos métodos
siguientes:
• Tome una lectura de glucosa en sangre. Tras retirar la tira
de prueba, el medidor pasará automáticamente al modo de
emparejamiento Bluetooth®. O bien mantenga oprimido
el botón de flecha a la derecha del medidor durante
tres segundos. Esto colocará su medidor en el modo de
emparejamiento Bluetooth®.
• El icono Bluetooth® parpadeará, indicando que el medidor
está en el modo de emparejamiento Bluetooth®.
• Siga las instrucciones de emparejamiento del dispositivo
y/o aplicación Bluetooth® con los que esté emparejando
su medidor.
NOTA
Visite datamanagement.arkrayusa.com para obtener
información sobre aplicaciones móviles que son compatibles
con su GLUCOCARD Shine Connex.

20 www.arkrayusa.com
NOTA
• Si la función Bluetooth® está
activada, en la pantalla aparecerá
el símbolo
.
• Si la función Bluetooth® está
desactivada, no aparece el
símbolo
.
• Para activar o desactivar la función Bluetooth®, oprima el
botón
cuando en la pantalla parpadee “On” u “OFF”.
NOTA
• Es posible que algunos teléfonos inteligentes, especialmente
los que no han sido evaluados o aprobados por el fabricante,
NO sean compatibles con su medidor.
• En App Store (Apple) y Google Play (Android) encontrará una
lista de teléfonos inteligentes compatibles.
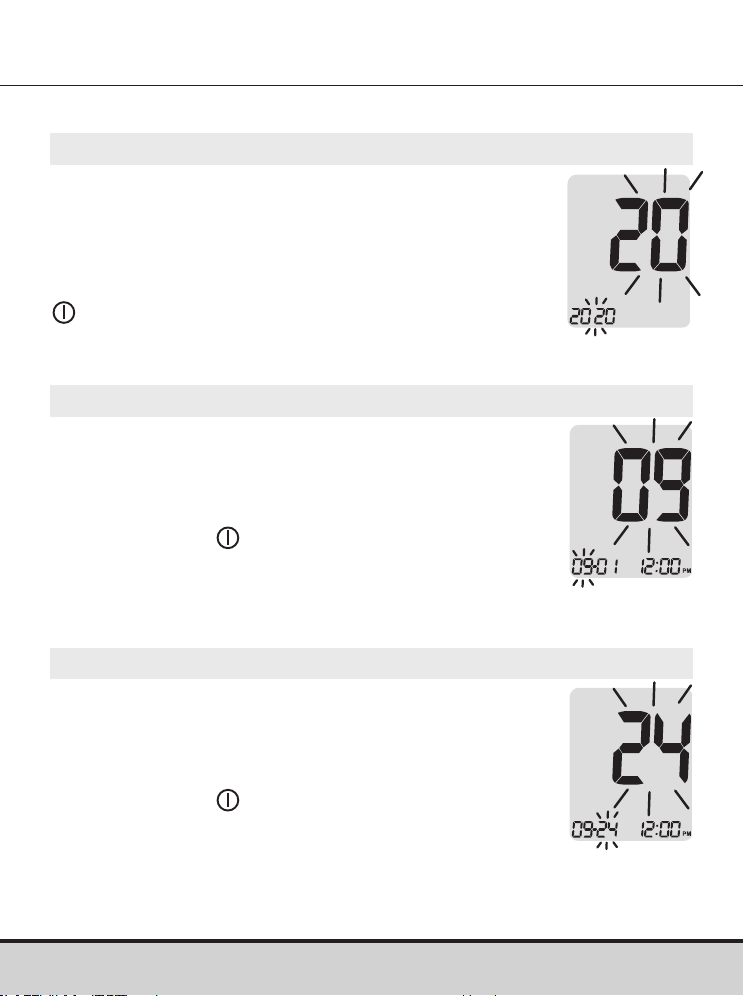
www.arkrayusa.com 21
Ajuste de la fecha y la hora
Paso 3: Configuración del año
En la pantalla parpadeará un número que indica
el año.
Oprima el botón < o > para ajustar hasta que
aparezca el año correcto.
Después de configurar el año, oprima el botón
para confirmar su selección e ir al siguiente
paso.
Paso 4: Configuración del mes
En la pantalla parpadeará un número que indica
el mes.
Oprima el botón < o > hasta que aparezca el mes
correcto.
Oprima el botón
para confirmar su selección
e ir al siguiente paso.
Paso 5: Configuración de la fecha
En la pantalla parpadeará un número que indica
la fecha.
Oprima el botón < o > hasta que aparezca la
fecha correcta.
Oprima el botón
para confirmar la fecha e ir al
siguiente paso.
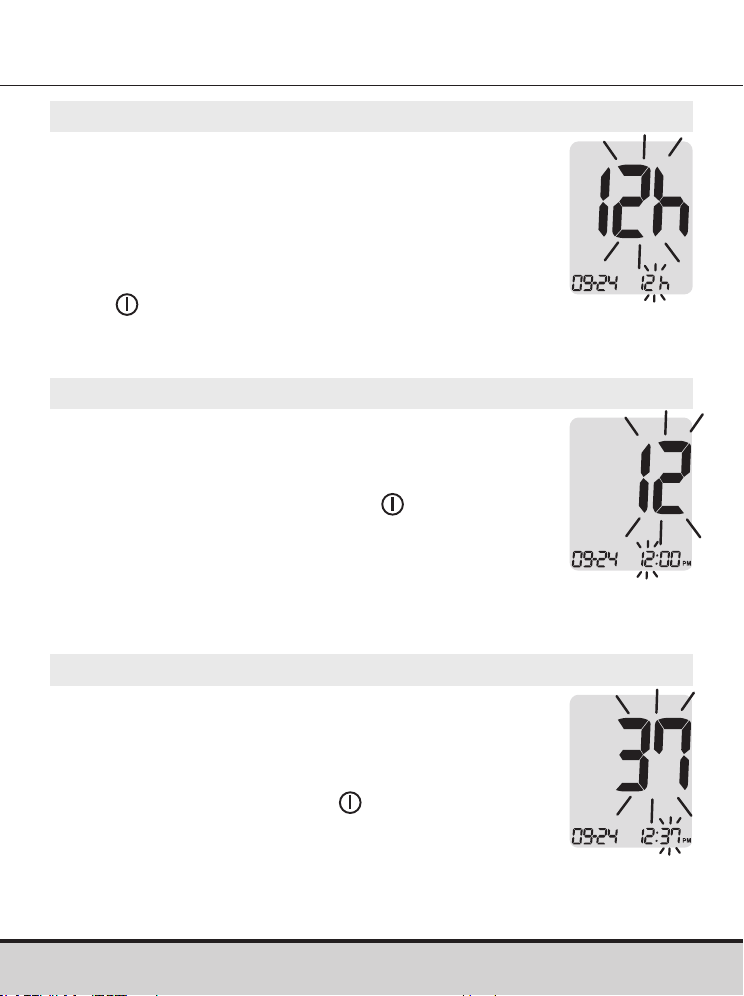
22 www.arkrayusa.com
Paso 8: Configuración de los minutos
En la pantalla parpadeará un número que
indica los minutos.
Oprima el botón < o > hasta que aparezca
el minuto correcto. Después de configurar
los minutos, oprima el botón
para ir al
siguiente paso.
Paso 7: Configuración de la hora
En la pantalla parpadeará un número que
indica la hora.
Oprima el botón < o > hasta que aparezca
la hora correcta. Oprima el botón
para
confirmar la hora e ir al siguiente paso.
Paso 6: Configuración del formato de la hora
Se puede configurar el medidor en formato de
reloj de 12 horas (AM/PM)o de 24horas.
Oprima el botón < o > para seleccionar uno de
los formatos. En el formato de 24horas no se
muestra el símbolo AM•PM.
Después de seleccionar el formato, oprima el
botón
para ir al siguiente paso.

www.arkrayusa.com 23
Paso 9
Si se oprime el botón < o >, la pantalla mostrará
“On” (activar) u “OFF” (desactivar). Oprima el
botón para confirmar la selección.
Si el sonido está activado (“On”), el medidor
emitirá un pitido en las siguientes circunstancias:
• Cuando se oprima un botón para encender
el medidor.
• Cuando se introduzca la tira de prueba en
el medidor.
• Cuando la muestra de sangre sea absorbida
dentro de la tira de prueba y comience
la prueba.
• Cuando se muestre el resultado de la prueba.
• Cuando se mantenga oprimido el botón < para
configurar la alarma posterior a una comida
(PP2).
• Cuando sea hora de efectuar una
prueba de
glucosa
en sangre preconfigurada.
Configuración del sonido en encendido o apagado
Si el sonido está desactivado (“OFF”), no funcionará ninguna de
las funciones sonoras. Después de configurar el sonido, oprima
el botón para avanzar al siguiente paso.
NOTA
• El símbolo
se muestra solamente cuando el sonido está
desactivado (“OFF”).
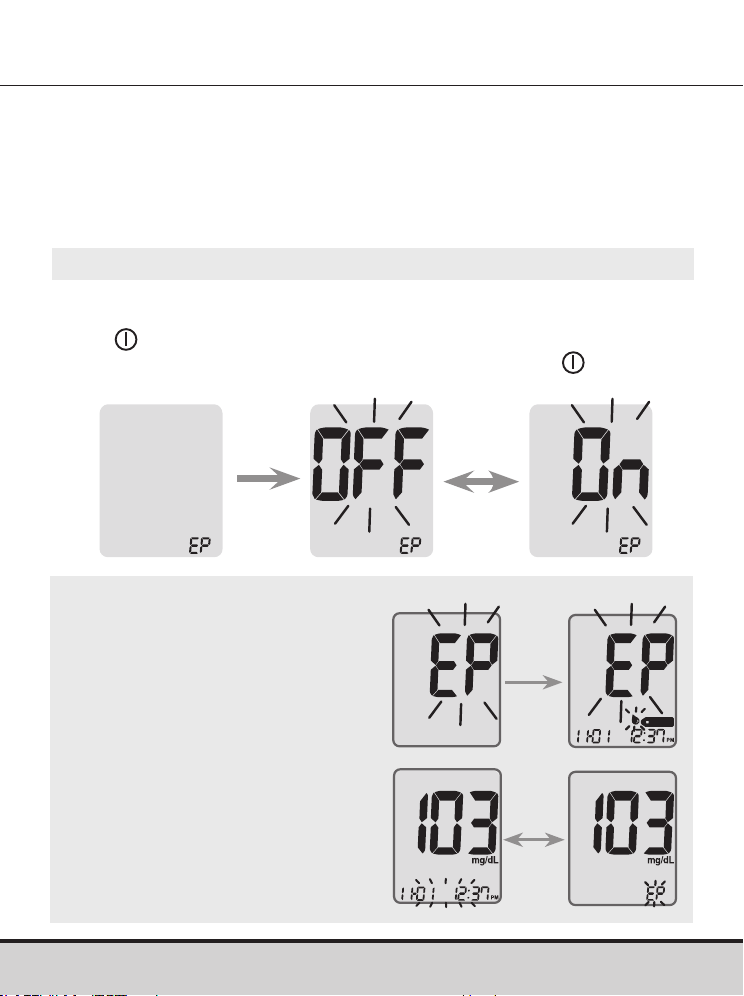
24 www.arkrayusa.com
Paso 10
Cuando en la pantalla aparezca “EP”, oprima el botón < o >. La
pantalla mostrará “On” (activar) u “OFF” (desactivar). Oprima el
botón
para confirmar el ajuste.
Si no desea configurar el indicador, oprima el botón
cuando la
pantalla muestre “OFF”.
Activación del indicador de la fecha de vencimiento de las
tiras de prueba
NOTA
• Si transcurre la fecha de
vencimiento preconfigurada, el
medidor mostrará “EP” en lo
que se inserte la tira de prueba.
• La pantalla alternará entre “EP”
y la fecha y hora del resultado
de la prueba, justo después de
la prueba.
• Si la fecha de vencimiento
está configurada para octubre
de 2022, el medidor mostrará
“EP” al comienzo de noviembre
de 2022.
Este ajuste permite activar (“On”) o desactivar (“OFF”) el
indicador de la fecha de vencimiento de las tiras de prueba. Este
ajuste solo activa o desactiva la función. Para configurar la fecha
de vencimiento de las tiras de prueba, consulte la página 26.

www.arkrayusa.com 25
Paso 11
Si se oprime el botón < o >, la pantalla mostrará “On” (activar) u
“OFF” (desactivar).
Cuando aparezca “On” (activar), oprima el botón
para ingresar
el ajuste.
Oprima el botón < o > hasta que aparezca el nivel deseado de
hipoglucemia entre 20 y 90 mg/dl.
Oprima el botón
durante tres segundos para confirmar el nivel,
guardar todos los ajustes y apagar el medidor.
Activación del indicador de hipoglucemia (HYPo)
CUIDADO
• Antes de configurar su nivel de hipoglucemia, pídale a su
profesional de la salud que le ayude a decidir cuál debería ser
este valor.
NOTA
• Si el resultado de la
prueba es inferior al
nivel de hipoglucemia
preconfigurado, el medidor
mostrará lo siguiente.
Este ajuste permite activar (“On”) o desactivar (“OFF”) el indicador
de hipoglucemia (posible baja de azúcar en la sangre) y seleccionar
el nivel deseado para el indicador. Recibirá un alerta cada vez que
el resultado de su prueba sea inferior al nivel seleccionado.
En la
esquina
inferior
izquierda
parpadeará
la
advertencia
HYPo.
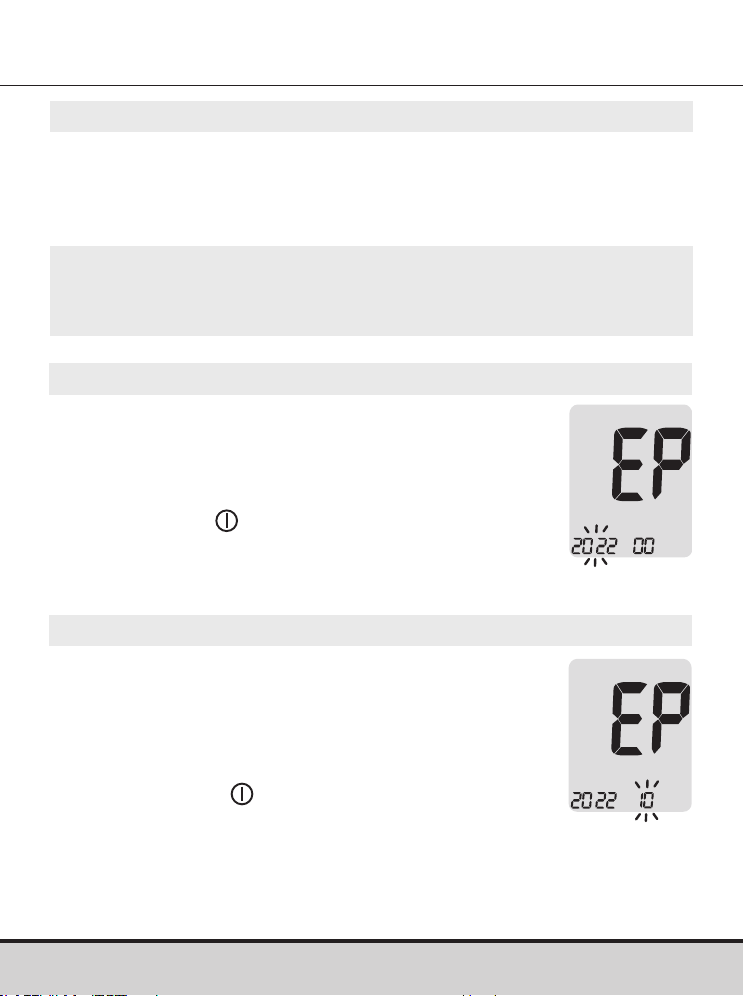
26 www.arkrayusa.com
Configuración del indicador de la fecha de
vencimiento de las tiras de prueba
Paso 1: Ingreso del ajuste de fecha de vencimiento
Mantenga oprimidos los botones < y > al mismo tiempo
durante tres segundos para ingresar los ajustes de la fecha de
vencimiento. Después de que todos los segmentos destellen por
la pantalla, se mostrará “EP”.
Paso 2: Configuración del año de vencimiento
En la esquina izquierda de la pantalla parpadeará
un número que indica el año.
Oprima el botón < o > hasta que aparezca el año
correcto.
Oprima el botón
para confirmar el año e ir al
siguiente paso.
NOTA
• La fecha de vencimiento de las tiras de prueba está impresa
en su frasco.
Paso 3: Configuración del mes de vencimiento
En la parte inferior de la pantalla parpadeará un
número que indica el mes.
Oprima el botón < o > hasta que aparezca el
mes correcto.
Después de configurar el mes, mantenga
oprimido el botón
durante tres segundos
para guardar su ajuste y apagar el medidor.

www.arkrayusa.com 27
Configuración del indicador de la fecha de
vencimiento de las tiras de prueba
NOTA
• Use solo soluciones de control GLUCOCARD Shine (disponibles
para adquirirse por separado).
• Verifique la fecha de vencimiento impresa en el frasco. Tan pronto
abra un frasco de solución de control por primera vez, anote la
fecha en que debe eliminarla (la fecha de apertura más tres meses)
en el espacio que se suministra para este fin en la etiqueta.
• Asegúrese de que el medidor, las tiras de prueba y las soluciones
de control estén a temperatura ambiente antes de realizar la
prueba. Las pruebas con solución de control se deben realizar a
temperatura ambiente: 68-77 ºF (20-25 ºC).
• Antes de usar la solución de control, agite el frasco, deseche la
primera o segunda gota y limpie la punta.
• Cierre el frasco de solución de control herméticamente y
almacénelo a temperaturas de 46-86ºF (8-30ºC).
Verificación del sistema
Debe comprobarse el funcionamiento del medidor
GLUCOCARD Shine Connex y las tiras de prueba de glucosa
en sangre GLUCOCARD Shine con las soluciones de control
GLUCOCARD Shine (disponibles en dos niveles: 1 y 2).
Las soluciones de control GLUCOCARD Shine contienen
cantidades conocidas de glucosa y se utilizan para verificar
que el medidor y las tiras de prueba estén funcionando
correctamente.
Los frascos de tiras de prueba tienen los intervalos de las
soluciones de control GLUCOCARD Shine impresos en sus
etiquetas.
Compare el resultado de prueba que se muestra en el medidor
con el intervalo de las soluciones de control GLUCOCARD
Shine impreso en el frasco de tiras de prueba.
Antes de usar un medidor o frasco de tiras de prueba nuevos,
debe realizar una prueba con solución de control siguiendo el
procedimiento indicado en las páginas 28-30.
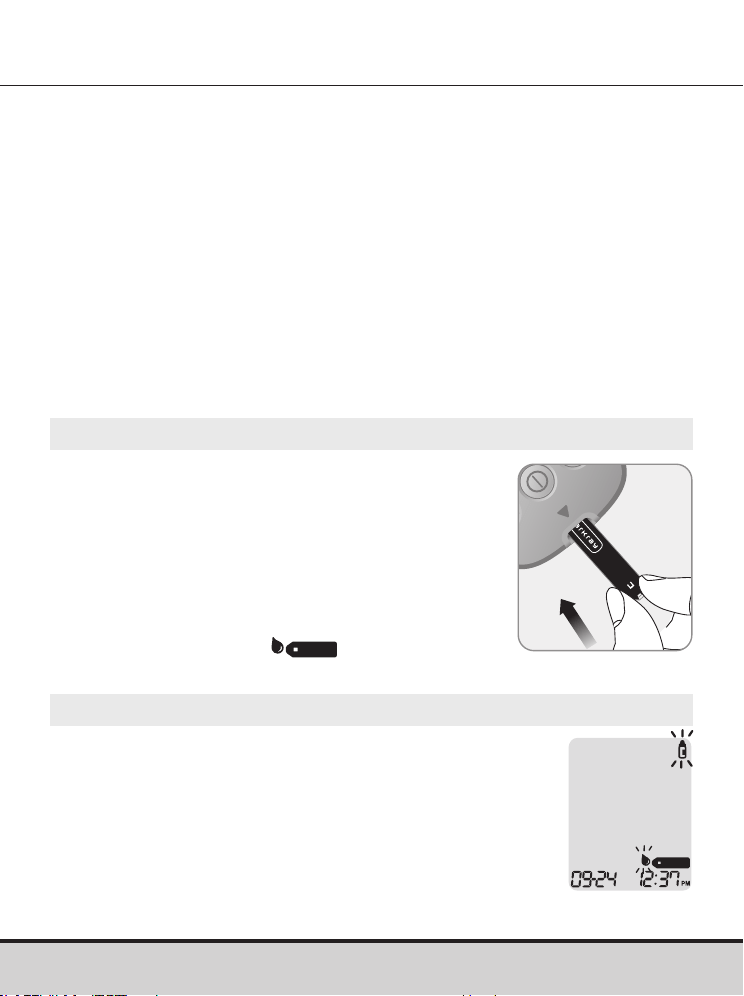
28 www.arkrayusa.com
Prueba con la solución de control
Paso 1
Inserte una tira de prueba en el orificio
correspondiente del medidor, con las barras
de contacto orientadas hacia arriba.
Empuje ligeramente la tira de prueba en su
orificio hasta que el medidor emita un pitido.
Tenga cuidado de no doblar la tira de prueba
mientras la introduce.
Aparecerá el símbolo
.
Paso 2
Podrá marcar el resultado de prueba con solución
de control oprimiendo el botón > durante tres
segundos. Para quitar la marca de la solución
de control, vuelva a oprimir el botón > durante
tres segundos.
Use la solución de control GLUCOCARD® Shine:
• Cuando desee practicar el procedimiento de prueba con la
solución de control en lugar de sangre.
• Cuando use el medidor por primera vez.
• Cuando comience a usar un frasco nuevo de tiras de prueba.
• Si sospecha que el medidor y las tiras de prueba no funcionan
correctamente.
• Si piensa que los resultados de la prueba son erróneos o si no
reflejan cómo se siente.
• Si se cae o daña el medidor.
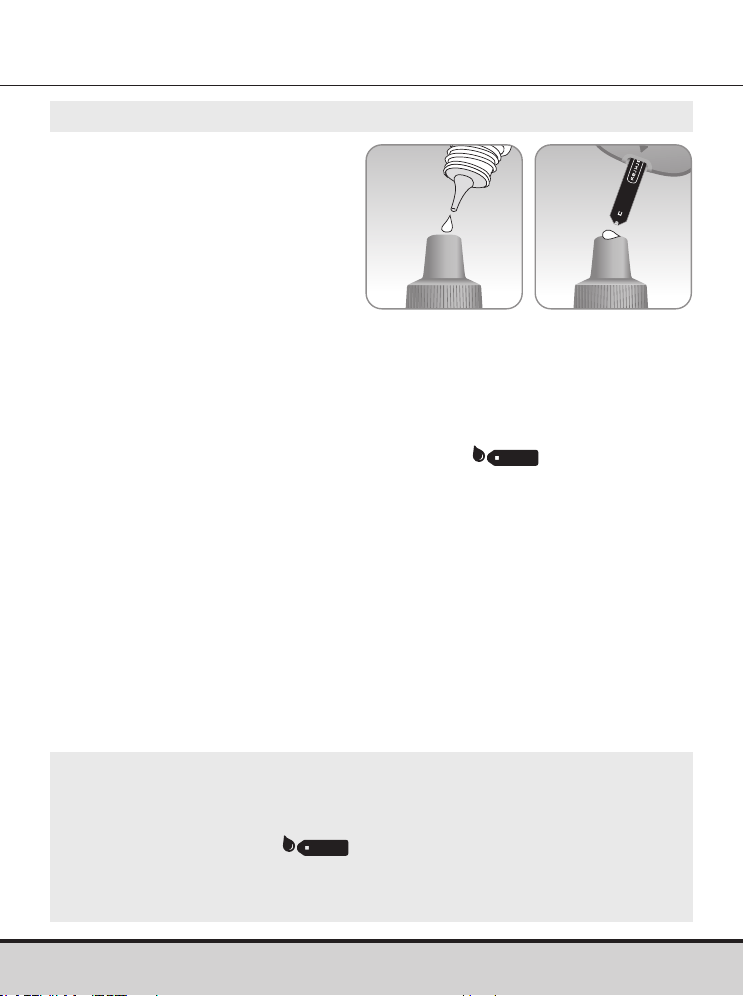
www.arkrayusa.com 29
Paso 3
Agite bien el frasco
de solución de control
GLUCOCARD Shine antes
de cada prueba.
Retire la tapa y apriete el
frasco para desechar la
primera o segunda gota.
Limpie la punta del frasco con un pañuelito de papel o paño
limpio. Dispense una gota de solución de control sobre una
superficie limpia y no absorbente. Le resultará útil apretar el
frasco para aplicar una gota a la parte superior de la tapa (como
se muestra).
Cuando en la pantalla aparezca el símbolo
, aplique
la solución al extremo angosto de la tira de prueba hasta que
el medidor emita un pitido. Asegúrese de que la ventana de
confirmación se llene por completo.
NOTA
• El medidor podría apagarse si no se aplica la muestra de
solución de control en los dos minutos después de que
aparezca el símbolo en la pantalla.
• Si se apaga el medidor, quite la tira de prueba, vuelva a
introducirla y comience desde el paso 1.
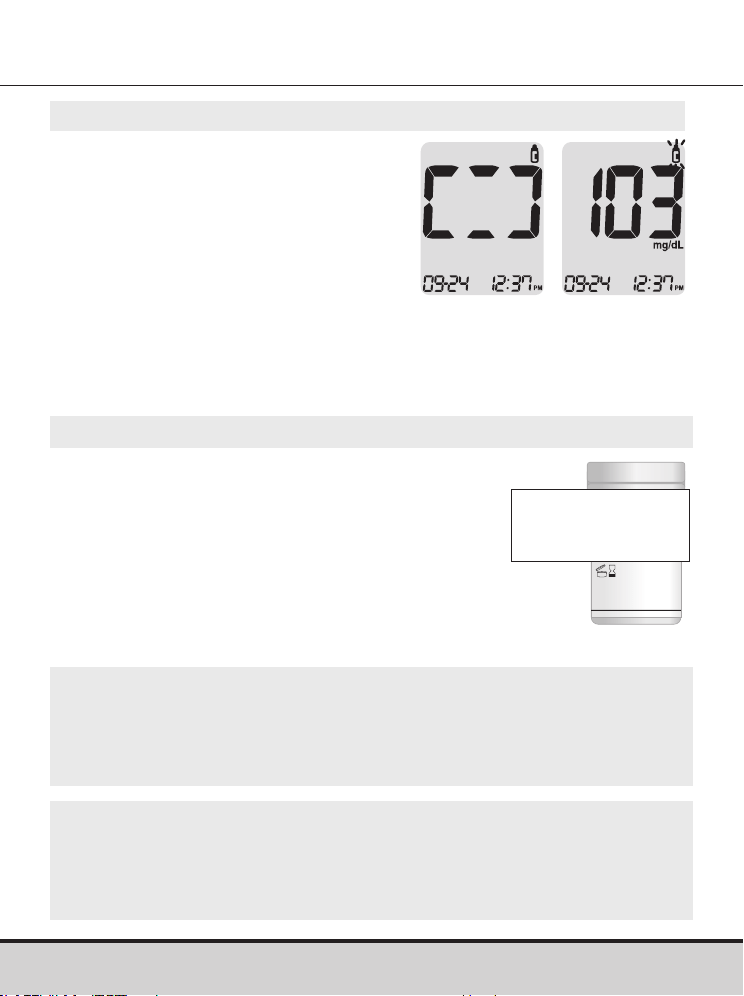
30 www.arkrayusa.com
Paso 4
Los segmentos de la pantalla
girarán en el sentido de las agujas
del reloj y aparecerá un resultado
de prueba después de que el
medidor cuente de forma regresiva
del “5” al “1”.
Los resultados de prueba marcados
se guardan en la memoria del
medidor pero no se incluyen en los
promedios.
Paso 5
Compare el resultado de prueba
que se muestra en el medidor con
el intervalo impreso en el frasco
de tiras de prueba. El resultado
de prueba debe estar dentro del
intervalo.
Intervalo de la solución
de control
Nivel 1: 101-151 mg/dl
Nivel 2: 184-276 mg/dl
NOTA
• Las soluciones de control GLUCOCARD Shine pueden pedirse
llamando al servicio técnico de atención al cliente de ARKRAY:
800.566.8558, 24 horas del día, 7 días de la semana.
CUIDADO
• El intervalo que aparece impreso en el frasco de tiras de prueba
es solo para las soluciones de control GLUCOCARD Shine. No
tiene nada que ver con su nivel de glucosa en sangre.
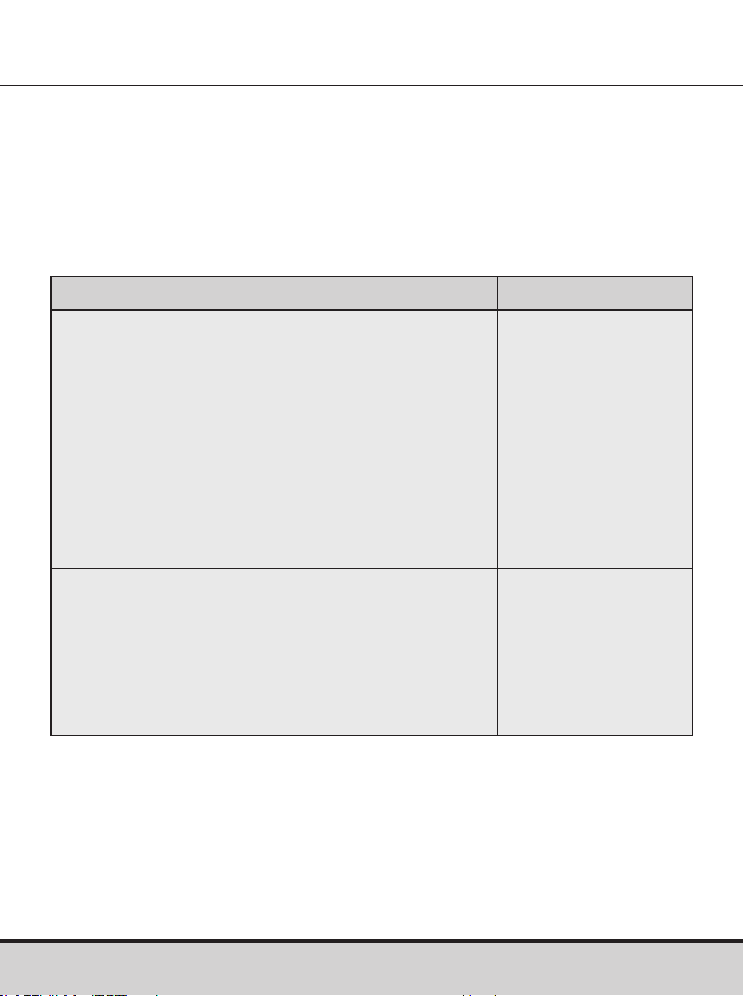
www.arkrayusa.com 31
Comparación de los resultados de una prueba con solución
de control
El resultado de prueba de cada solución de control debe estar dentro
del intervalo que aparece en la etiqueta del frasco de las tiras de
prueba. Repita la prueba con la solución de control si el resultado no
se encuentra dentro del intervalo. Podrían obtenerse resultados de
prueba fuera del intervalo en las siguientes situaciones:
Si los resultados siguen estando fuera del intervalo impreso en el
frasco de las tiras de prueba, puede que la tira de prueba de glucosa
en sangre GLUCOCARD Shine y el medidor GLUCOCARD Shine
Connex no estén funcionando correctamente.
No use el sistema y llame al servicio técnico de atención al cliente de
ARKRAY: 800.566.8558, 24 horas del día, 7 días de la semana.
Situaciones Haga esto
• Si el frasco de solución de control no se
agitó bien.
• Si el medidor, la tira de prueba o la solución
de control han estado expuestos
a temperaturas altas o bajas.
• Si no se desechó la primera o segunda gota
de la solución de control o si no se limpió la
punta del frasco.
• Si el medidor no está funcionando
correctamente.
Repita la prueba
con solución
de control tras
consultar las
páginas 28-30.
• Si ya pasó la fecha de vencimiento impresa
en el frasco de la solución de control.
• Si ya pasó la fecha de eliminación de la
solución de control (la fecha de apertura del
frasco más tres meses).
• Si la solución de control está contaminada.
Deseche la
solución de control
usada y repita
la prueba con
un nuevo frasco
de solución de
control.
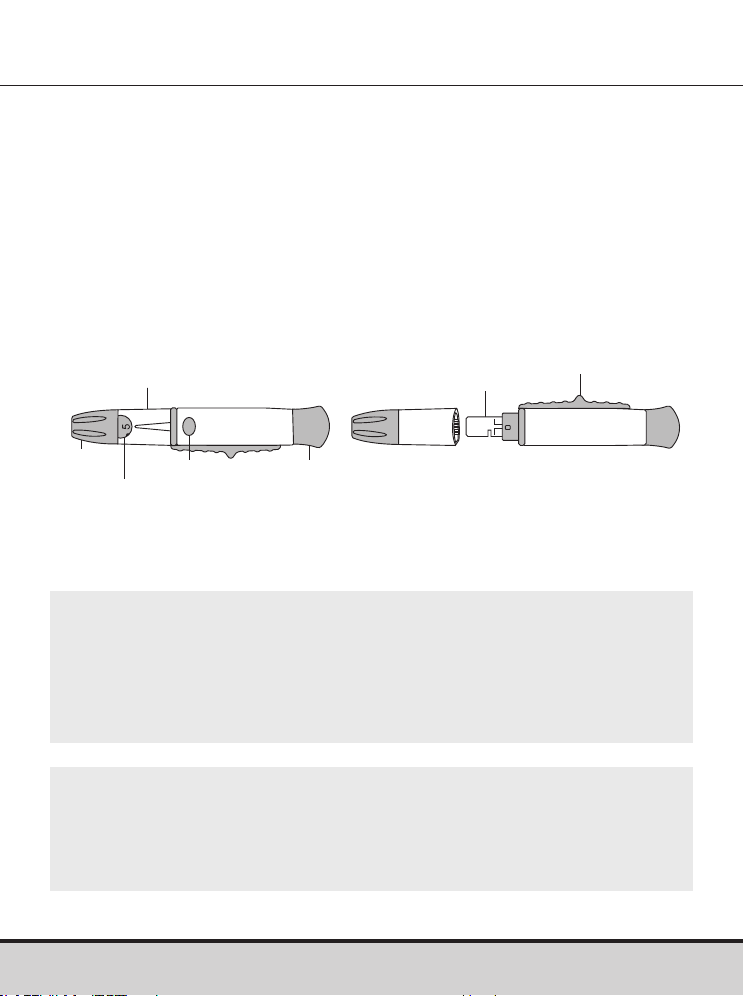
32 www.arkrayusa.com
CUIDADO
• Para evitar las infecciones al obtener una muestra, no use
ninguna lanceta más de una vez.
• No use lancetas usadas por otras personas.
• Use siempre lancetas nuevas estériles.
NOTA
• La punción reiterada del mismo lugar de muestreo podría
causar dolor o callos (piel engrosada y endurecida).
• Hágase la prueba en un sitio diferente cada vez.
Uso del dispositivo de punción
Para obtener una muestra de sangre se requiere un dispositivo
de punción.
Podrá usar el dispositivo de punción que se incluye con el
sistema de monitoreo de glucosa en sangre GLUCOCARD Shine
Connex o cualquier otro dispositivo de punción aprobado para
uso médico.
Para obtener instrucciones de uso específicas del dispositivo de
punción, consulte el correspondiente prospecto.
• El dispositivo de punción debe usarlo una sola persona y no
debe compartirse con nadie.
Capuchón
Dial de
profundidad
Botón de
disparo
Cargador
Vista frontal
Expulsor
Portalancetas
Vista posterior
Indicador de
profundidad

www.arkrayusa.com 33
Paso 1
Lávese las manos y el lugar de punción
con agua tibia y jabón. Enjuágueselos y
séqueselos a fondo.
Preparación del dispositivo de punción
Advertencia
• Para uso exclusivamente en una sola persona. Desinfecte los
componentes reutilizables siguiendo las instrucciones del
fabricante entre un uso y el siguiente.
• Las hojas de lancetas usadas deben desecharse de forma
segura después de un solo uso.
• No use este producto en más de una persona. El uso
inadecuado de lancetas de sangre puede aumentar el
riesgo de transmisión inadvertida de patógenos sanguíneos,
especialmente en entornos en que se hagan pruebas a múltiples
personas. Las instrucciones de limpieza y desinfección de este
dispositivo están destinadas únicamente a reducir el riesgo
de infección del lugar para usos locales, y no aumentarán la
seguridad de este dispositivo para usos en más de una persona.
• No extraiga más sangre de lo necesario para la prueba.
• En el caso de personas menores de 18años, el uso del
dispositivo debe ser supervisado o realizado por adultos.
• Riesgo de lesión. Las punciones hechas con demasiada
profundidad de penetración pueden lesionar a los niños. Antes
de usar el dispositivo de punción por primera vez en niños,
consulte con su profesional de la salud. Comience con la
profundidad de penetración más baja.
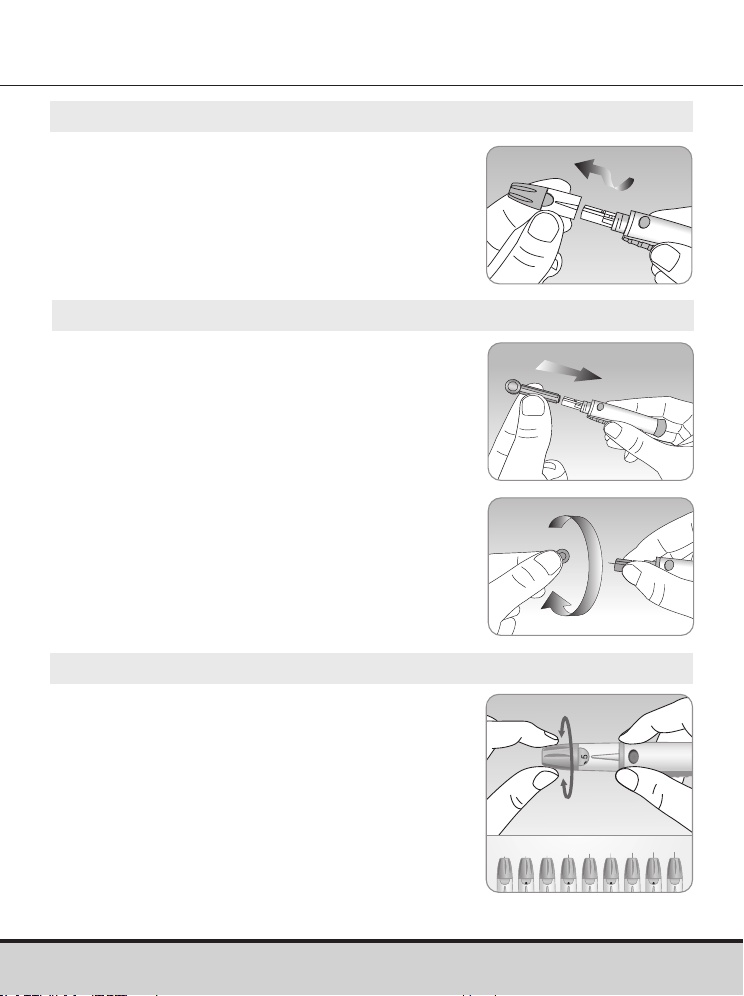
34 www.arkrayusa.com
Paso 4
El dispositivo de punción tiene múltiples
ajustes de profundidad de punción. Los
números más bajos son para punciones
más superficiales; los números más altos
son para punciones más profundas. Para
escoger la profundidad de la penetración,
gire la parte superior del capuchón ajustable
hasta que el número del ajuste corresponda
a la flecha. Si desea hacer ajustes más
finos, ponga la flecha entre dos números.
1 5432
Paso 3
Introduzca una lanceta nueva desechable
en el portalancetas.
Desenrosque la cubierta protectora de
la lanceta y póngala a un lado, luego
vuelva a colocar el capuchón ajustable.
Conserve la tapa protectora para volver a
colocarla sobre la lanceta usada después
de la prueba.
Paso 2
Desenrosque y quite el capuchón
del dispositivo de punción.
5
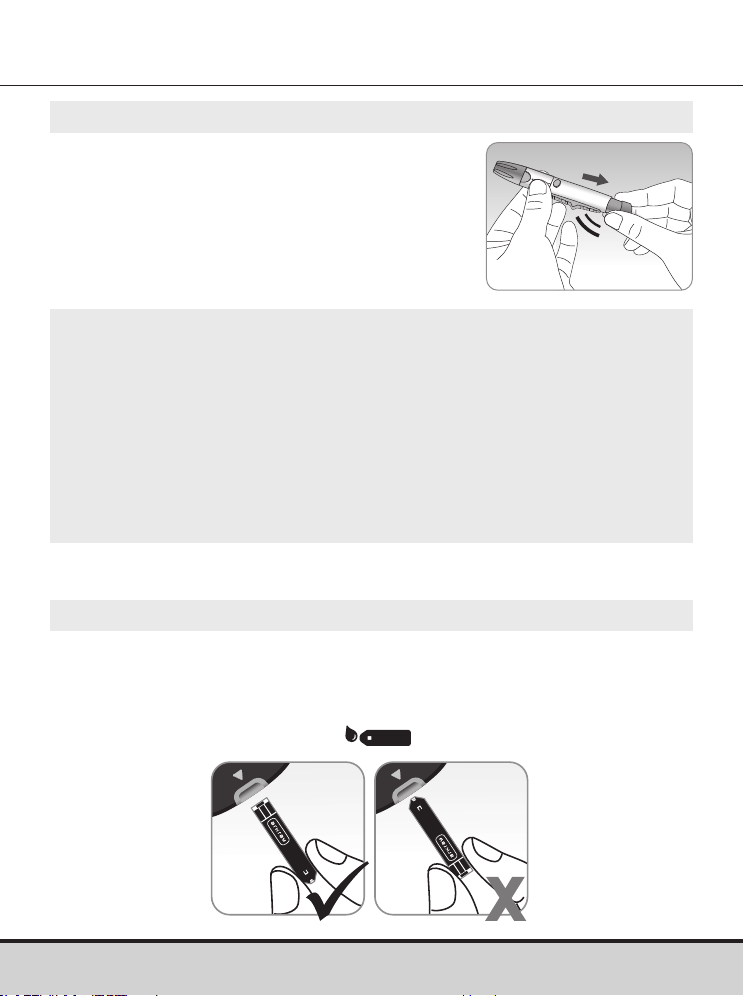
www.arkrayusa.com 35
Paso 5
Prepare el dispositivo de punción
sujetándolo por el cuerpo con una
mano y tirando del cargador hasta
oír un clic.
NOTA
• La profundidad de la piel a la que se obtengan las muestras
de sangre varía según la persona y los distintos lugares de
muestreo.
• El capuchón ajustable del dispositivo de punción permite
conseguir la mejor profundidad de penetración de la piel para
obtener una muestra de tamaño apropiado.
• El dispositivo de punción no podrá lograr la profundidad
seleccionada si la lanceta no está completamente insertada.
Paso 6
Inserte una tira de prueba en el orificio correspondiente del
medidor, con las barras de contacto orientadas hacia arriba.
Empuje ligeramente la tira de prueba hasta que el medidor emita
un pitido. Tenga cuidado de no doblar la tira de prueba. En la
pantalla aparecerá el símbolo
.
Preparación del medidor y la tira de prueba
3
5
clic
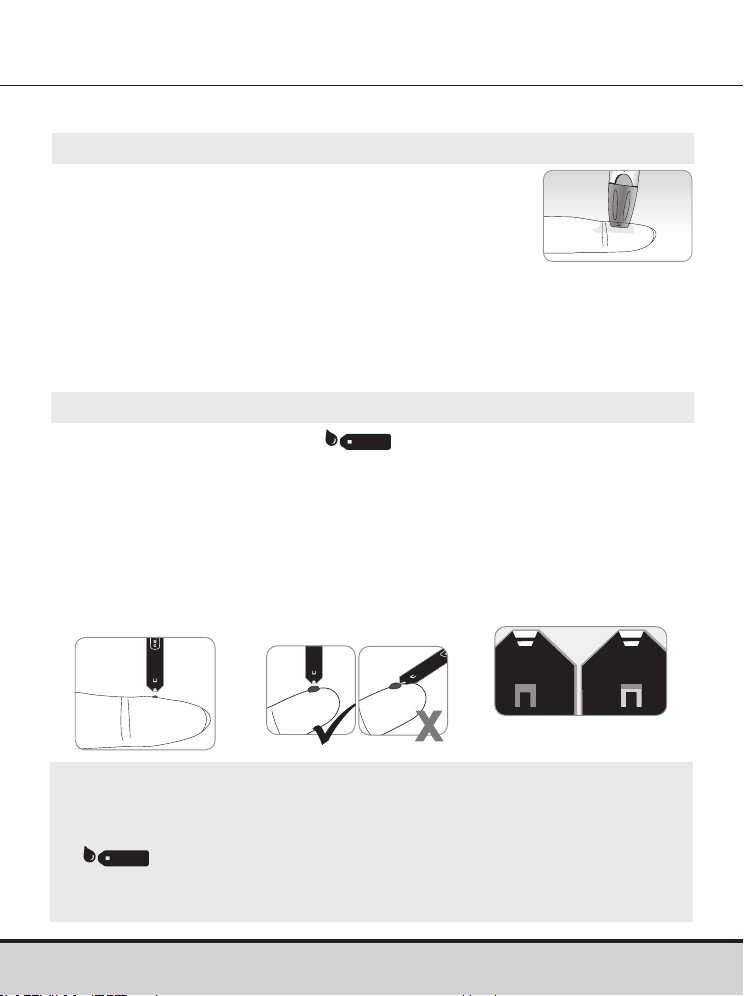
36 www.arkrayusa.com
Se recomienda colocar la tira de prueba verticalmente en el lugar de
muestreo de sangre (como se ilustra a continuación).
NOTA
• El medidor podría apagarse si no se aplica la muestra de
sangre en dos minutos después de que aparezca el símbolo
en la pantalla.
• Si se apaga el medidor, quite la tira de prueba, vuelva a
insertarla y comience desde el paso 2.
Paso 8
Cuando aparezca el símbolo
en la pantalla, aplique la
muestra de sangre al extremo angosto de la tira de prueba hasta que
el medidor emita un pitido.
Si la ventana de confirmación no se llena a tiempo debido a una
viscosidad (espesamiento y pegajosidad) anormal o a un volumen
insuficiente, podría aparecer el mensaje Er4.
Muestra
correcta
Muestra
insuficiente
Paso 7
Obtenga una muestra de sangre con el dispositivo
de punción. Coloque el dispositivo de punción
contra la yema del dedo. Los mejores lugares de
punción son el dedo medio o el anular.
Oprima el botón de liberación. Quite el dispositivo
de punción del dedo. Espere unos cuantos segundos para que se
forme una gota de sangre.
Se necesita un volumen mínimo de 0.5 μl para llenar la ventana de
confirmación. (tamaño aproximado de 0.5 μl:
•
).
Aplicación de la muestra de sangre
5
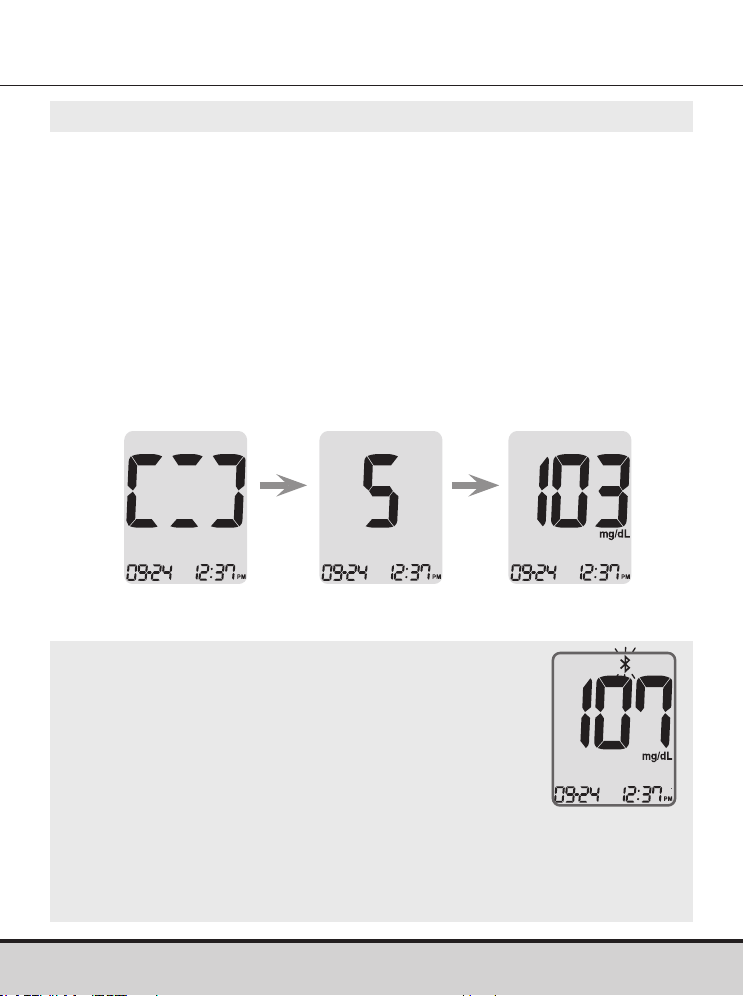
www.arkrayusa.com 37
NOTA
• Para transmitir datos de glucosa a través de la
función Bluetooth®:
– Debe estar activada la función Bluetooth® en
el medidor.
– El medidor y el teléfono inteligente deben estar
emparejados.
• El medidor transmitirá datos en los siguientes casos:
– Cuando se expulse la tira de prueba después de una medición.
– Cuando se encienda el medidor (únicamente si hay datos no
transmitidos).
Paso 9
En este momento los segmentos de la pantalla girarán en el sentido de las
agujas del reloj mientras la muestra de sangre entra en la tira de prueba.
Aparecerá el resultado de la prueba después de que el medidor cuente de
forma regresiva del “5” al “1”.
El resultado de prueba se almacenará automáticamente en la memoria del
medidor.
Si se extrae la tira de prueba después de que aparezca el resultado de la
prueba, el medidor se apagará automáticamente al cabo de tres segundos.
Elimine debidamente las tiras de prueba usadas en un recipiente desechable.
Si la función Bluetooth® está activada, el medidor enviará el resultado de la
prueba al teléfono inteligente conectado.
Resultado de
la prueba
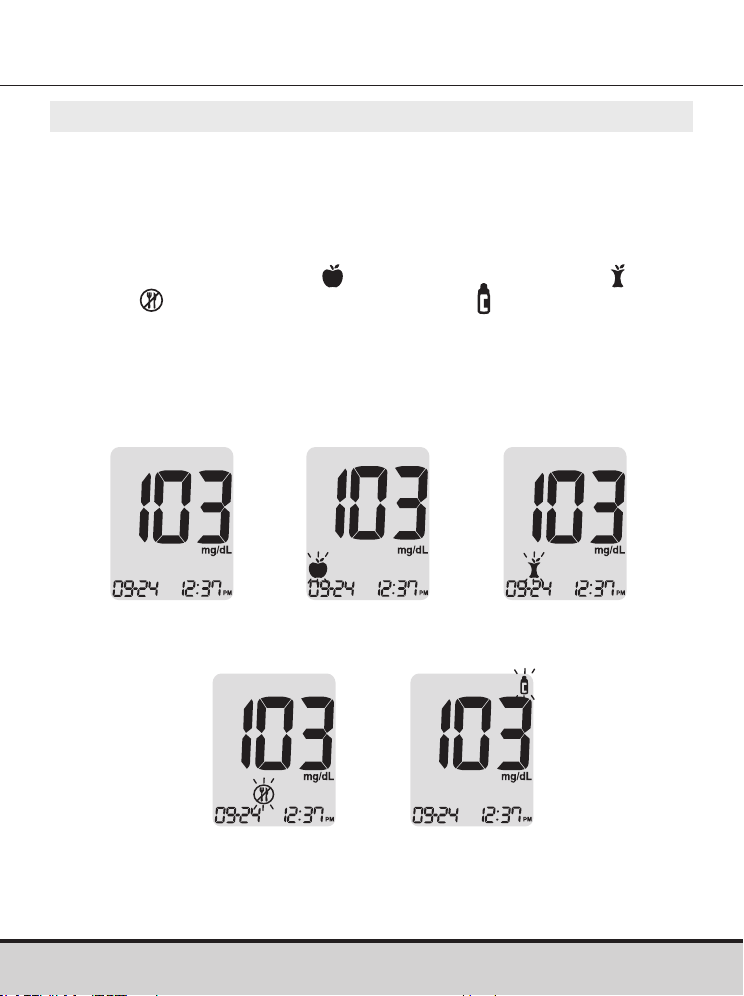
38 www.arkrayusa.com
Paso 10
Podrá adjuntar una marca a un resultado de prueba para indicar
situaciones particulares cuando la tira de prueba aún se
encuentre en el medidor.
Cuando se muestre el resultado inmediatamente después de una
prueba, oprima el botón < o > para seleccionar una marca de
valor previo a una comida (
), posterior a una comida ( ), en
ayunas ( ) o de una solución de control ( ).
Para almacenar el resultado de la prueba con la marca, saque la
tira de prueba cuando esté parpadeando la marca deseada.
Si no desea agregar marcas al resultado de la prueba, saque la
tira de prueba después de que aparezca dicho resultado.
Ninguna
marca
Marca de
prueba previa
a una comida
Marca de
prueba posterior
a una comida
Marca de
prueba en
ayunas
Marca de prueba
con solución
de control
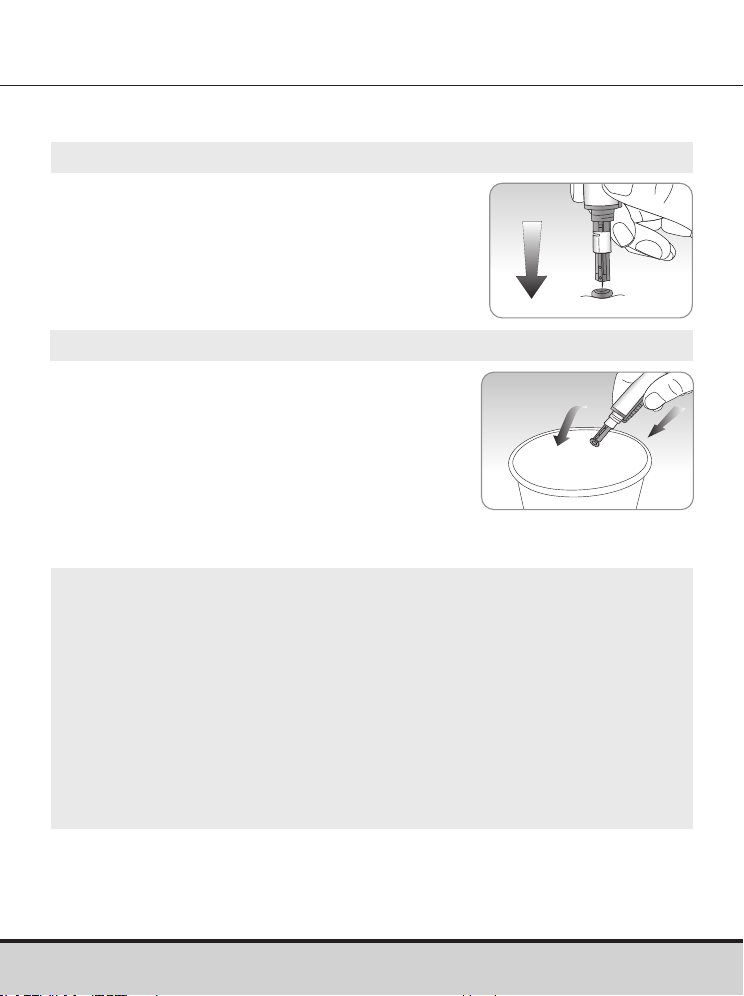
www.arkrayusa.com 39
Paso 1
Desenrosque el capuchón ajustable
del dispositivo de punción y cubra la
lanceta con su tapa protectora.
Paso 2
Retire la lanceta usada y deséchela en
un recipiente adecuado para riesgos
biológicos.
Eliminación de las lancetas usadas
CUIDADO
• Antes de usar la lanceta, compruebe que no esté dañada. Si
presenta daños, deséchela y use otra lanceta.
• La lanceta es muy puntiaguda. Manténgala fuera del alcance
de los niños pequeños.
• Conserve las lancetas en un lugar fresco y seco.
• La lanceta es de un solo uso. No comparta ni vuelva a usar
nunca las lancetas. Deseche siempre las lancetas de forma
adecuada.
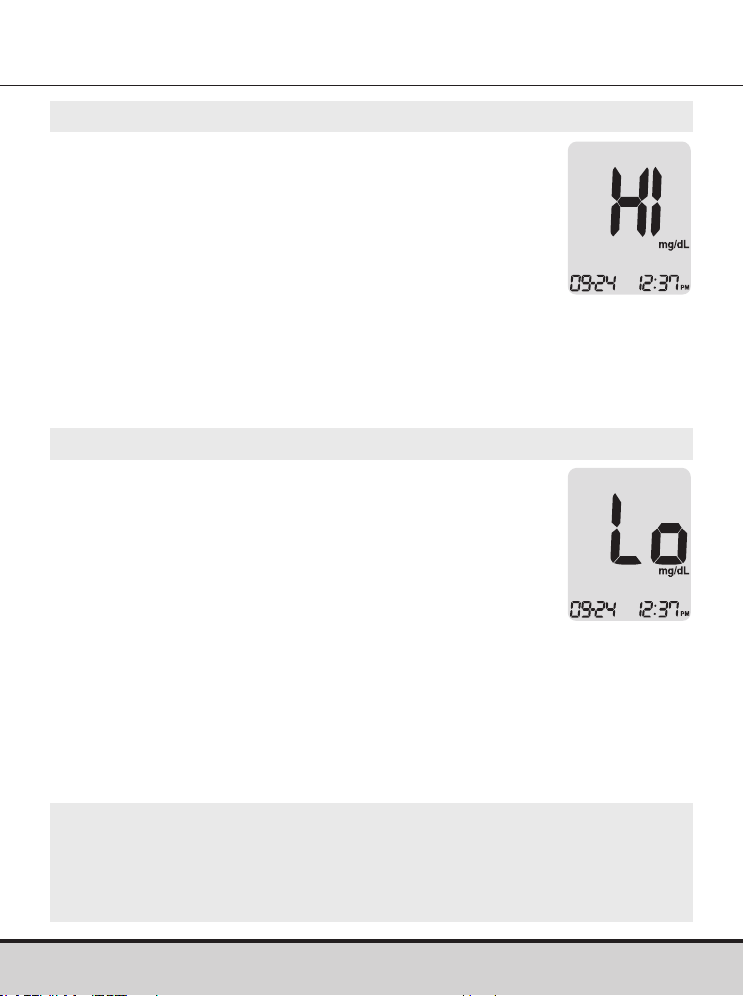
40 www.arkrayusa.com
NOTA
• Si el mensaje persiste, llame al servicio técnico de atención al
cliente de ARKRAY: 800.566.8558, 24 horas del día, 7 días de
la semana.
Mensajes “HI” y “Lo”
Mensaje “HI”
El medidor muestra resultados de prueba entre
20 y 600 mg/dl. El mensaje “HI” aparece cuando
el nivel de glucosa en sangre es mayor de
600 mg/dl e indica hiperglucemia grave (muy
superior a los niveles normales de glucosa).
Si al volver a realizar la prueba se muestra otra vez
el mensaje “HI”, comuníquese de inmediato con
su profesional de la salud.
Mensaje “Lo”
El mensaje “Lo” aparece cuando el resultado
de una prueba es menor de 20 mg/dl e indica
hipoglucemia grave (niveles muy bajos de
glucosa).
Si al volver a realizar la prueba se muestra otra
vez el mensaje “Lo”, comuníquese de inmediato
con su profesional de la salud.
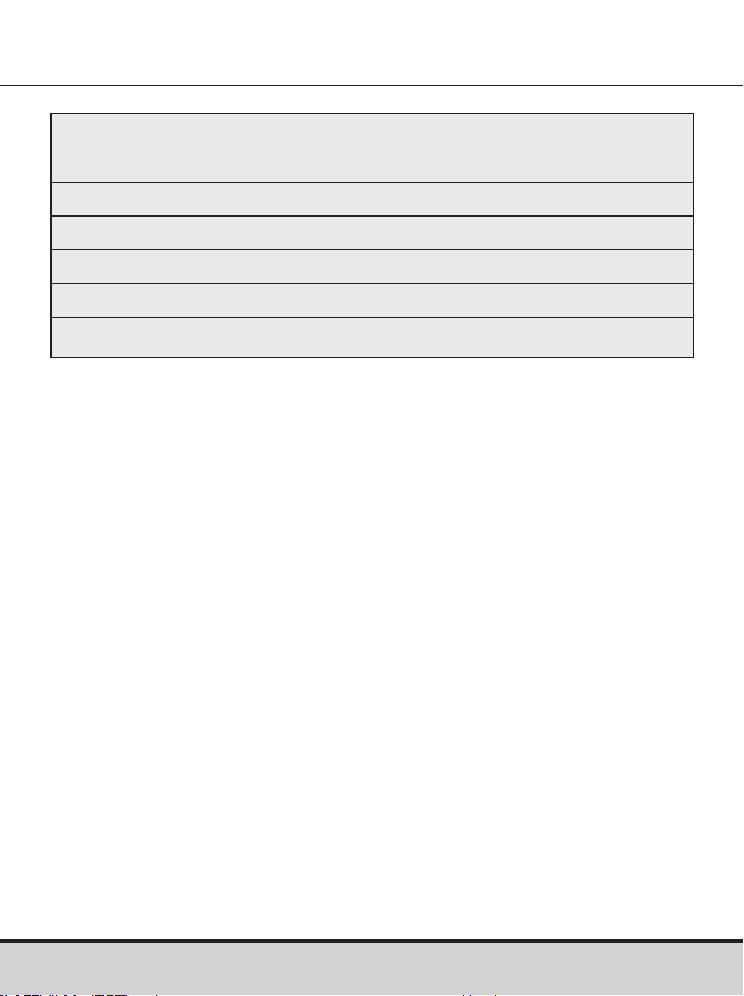
www.arkrayusa.com 41
Intervalos deseados de glucosa en sangre
Recordatorios
Hora del día
Antes del desayuno
Antes del almuerzo o cena
Una hora después de las comidas
Doshoras después de las comidas
Entre las 2 a.m. y las 4 a.m.
Valores previstos: Los niveles normales de glucosa en sangre
para adultos no diabéticos son inferiores a 100 mg/dl antes de
las comidas y en ayunas* e inferiores a 140 mg/dl dos horas
después de comer
1
.
*“En ayunas” se define como ningún consumo calórico durante
al menos ocho horas.
Bibliografía
1. American Diabetes Association (Standards of Medical Care
in Diabetes – 2021. Diabetes Care, enero de 2021, vol. 44,
suplemento 1, S15-S33)
Los intervalos deseados según
su profesional de la salud
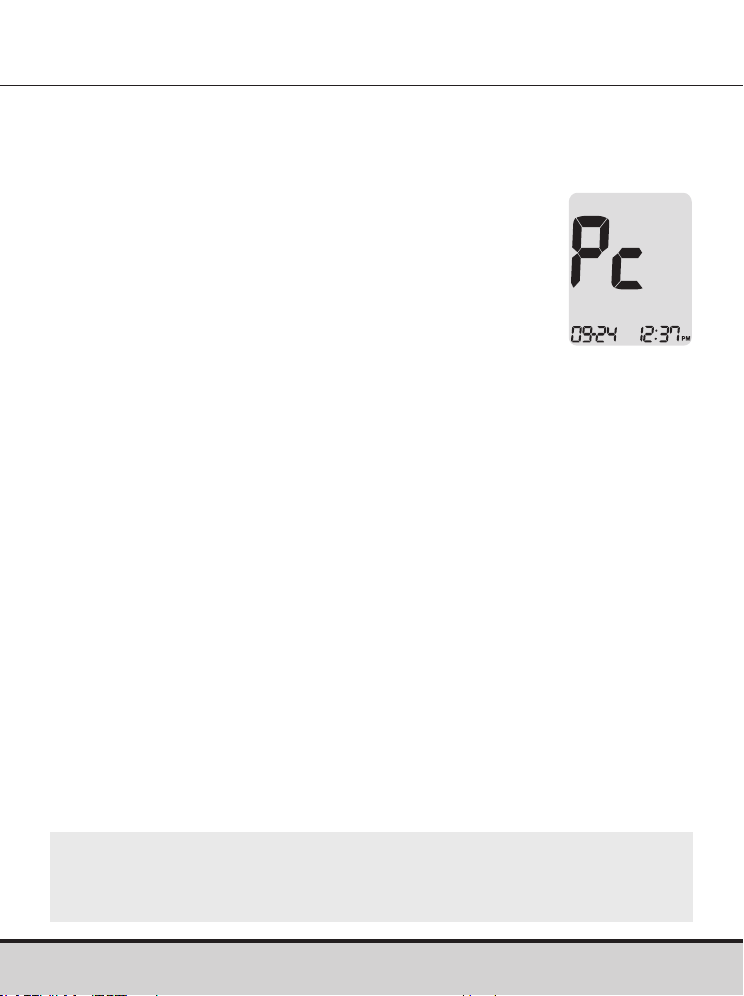
42 www.arkrayusa.com
Transferencia de los resultados de prueba
Los resultados de prueba almacenados en el medidor
GLUCOCARD Shine Connex pueden transferirse a una libreta de
registro electrónica mediante un cable de datos que conecte el
medidor con una computadora o una aplicación de
teléfono inteligente.
Para obtener más información, visite
datamanagement.arkrayusa.com o llame al
servicio de atención al cliente: 800.566.8558,
24horas del día, 7días de la semana.
NOTA
• Para emparejar el medidor con un teléfono inteligente,
consulte las páginas 19-20.
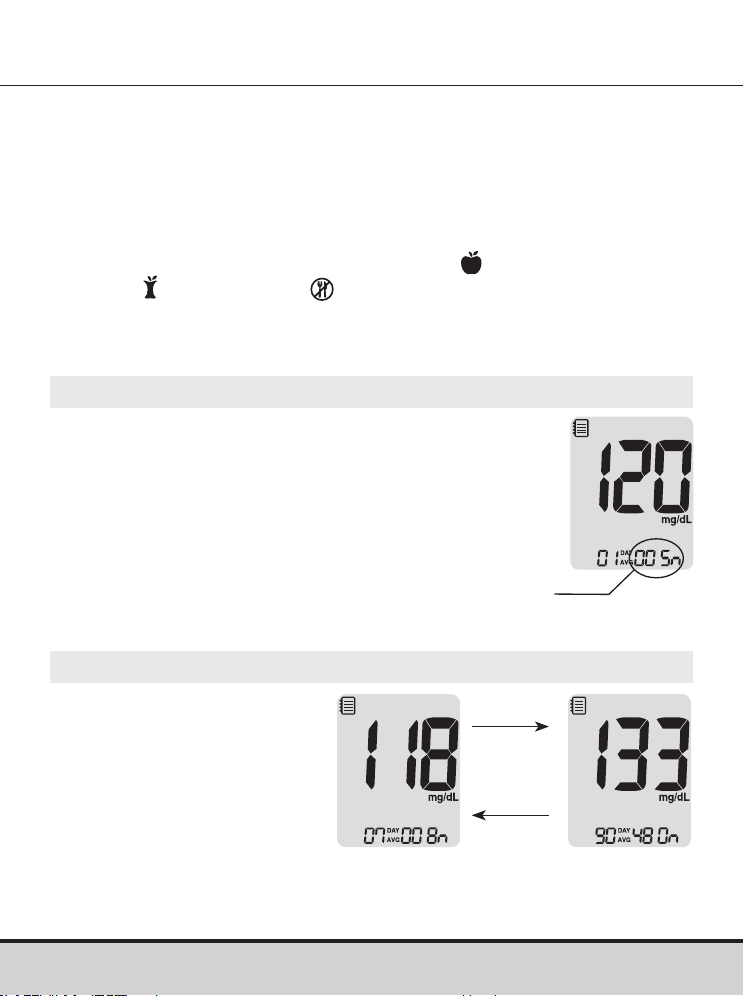
www.arkrayusa.com 43
Memoria del medidor
Paso 1
Oprima cualquier botón para encender el medidor.
Se mostrarán la fecha y hora actuales en la parte
inferior de la pantalla, seguidas del valor promedio
del día 1 y la cantidad de resultados de prueba
guardados dentro del día actual.
Visualización de los promedios de pruebas anteriores
El medidor de glucosa en sangre GLUCOCARD Shine Connex
puede guardar hasta 1,000 resultados de pruebas de glucosa
junto con su fecha y hora. Si la memoria está llena, se eliminará el
resultado de prueba más antiguo y se guardará el resultado de la
última prueba.
El medidor calcula y muestra los promedios de los resultados
de prueba totales, previos a una comida (
), posteriores a una
comida ( ) y en ayunas ( ) de los últimos 1, 7, 14, 30 y 90 días.
Cantidad de pruebas
dentro del día actual
Paso 2: Visualización de promedios
Oprima el botón < para
ver los valores promedio
de 1, 7, 14, 30 y 90 días
y la cantidad de pruebas
realizadas durante el último
período de pruebas.
Botón
>
Botón
<
Promedio
(1, 7, 14, 30
y 90 días)
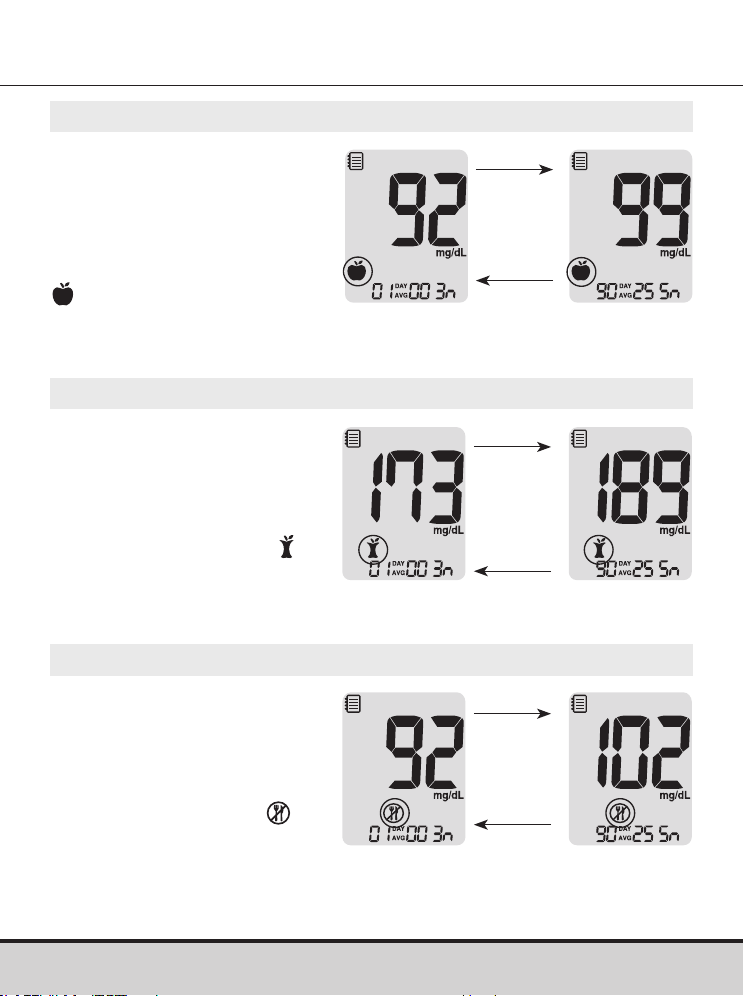
44 www.arkrayusa.com
Paso 3: Visualización de promedios previos a una comida
Siga oprimiendo el botón
< para ver los valores
promedio de 1, 7, 14, 30
y 90 días y la cantidad de
pruebas realizadas antes de
una comida con el símbolo
correspondientes al
último período de pruebas.
Paso 4: Visualización de promedios posteriores a una comida
Oprima el botón < para
ver los valores promedio
de 1, 7, 14, 30 y 90 días
y la cantidad de pruebas
realizadas después de una
comida con el símbolo
correspondientes al último
período de pruebas.
Botón
<
Botón
>
Promedio
posterior a
una comida
(1, 7, 14, 30 y
90 días)
Botón
<
Botón
>
Promedio
previo a una
comida
(1, 7, 14, 30 y
90 días)
Paso 5: Visualización de promedios durante el ayuno
Oprima el botón < para
ver los valores promedio
de 1, 7, 14, 30 y 90 días
y la cantidad de pruebas
realizadas durante el
ayuno con el símbolo
correspondientes al último
período de pruebas.
Botón
<
Botón
>
Promedio
en ayunas
(1, 7, 14, 30 y
90 días)
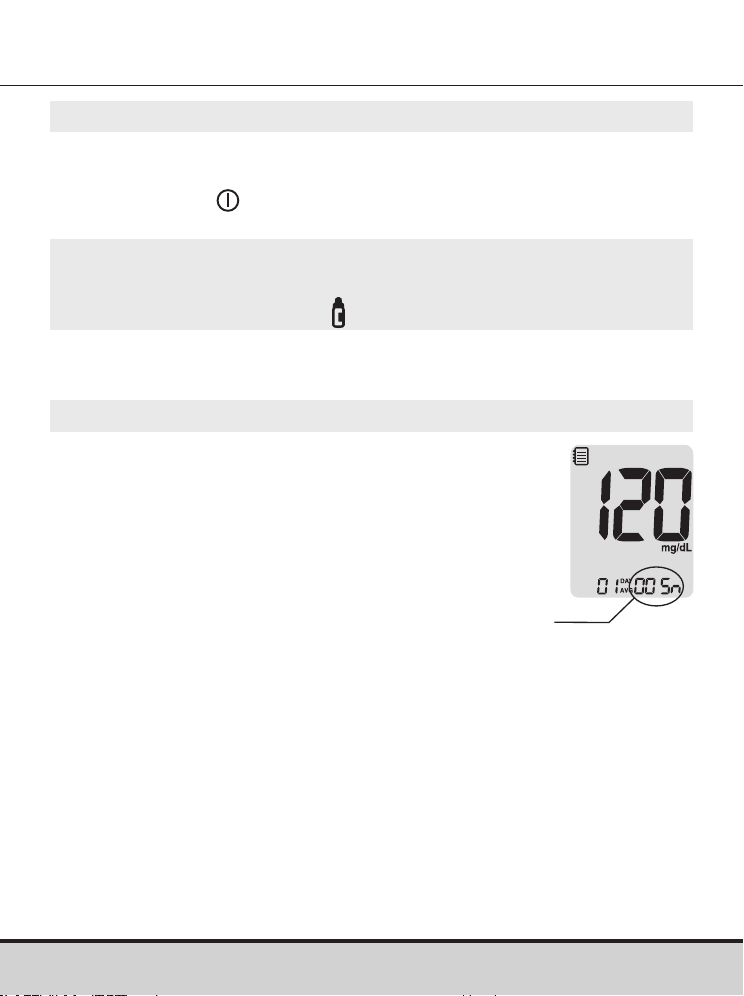
www.arkrayusa.com 45
Paso 1
Oprima cualquier botón
para encender el medidor.
Se mostrarán la fecha y hora actuales en la parte
inferior de la pantalla, seguidas del valor promedio
del día 1 y la cantidad de resultados de prueba
guardados dentro del día actual.
Visualización de los resultados de prueba
Cantidad de pruebas
dentro del día actual
Paso 6
Oprima el botón > para retroceder por los promedios vistos
anteriormente.
Oprima el botón
para apagar el medidor.
NOTA
• Los resultados de las pruebas con solución de control
guardados con el símbolo
no se incluyen en los promedios.

46 www.arkrayusa.com
Paso 2
Con el botón > desplácese
por los resultados de las
pruebas, comenzando desde
el más reciente y terminando
con el más antiguo.
Oprima el botón < para
regresar al resultado visto
anteriormente.
Después de verificar los
resultados de prueba
almacenados, mantenga
oprimido el botón
para
apagar el medidor.
NOTA
• Los resultados de pruebas con solución de control que
se hayan guardado con el símbolo
se mostrarán con
el símbolo cuando se revisen los resultados de prueba
almacenados.
Botón
>
Botón
<
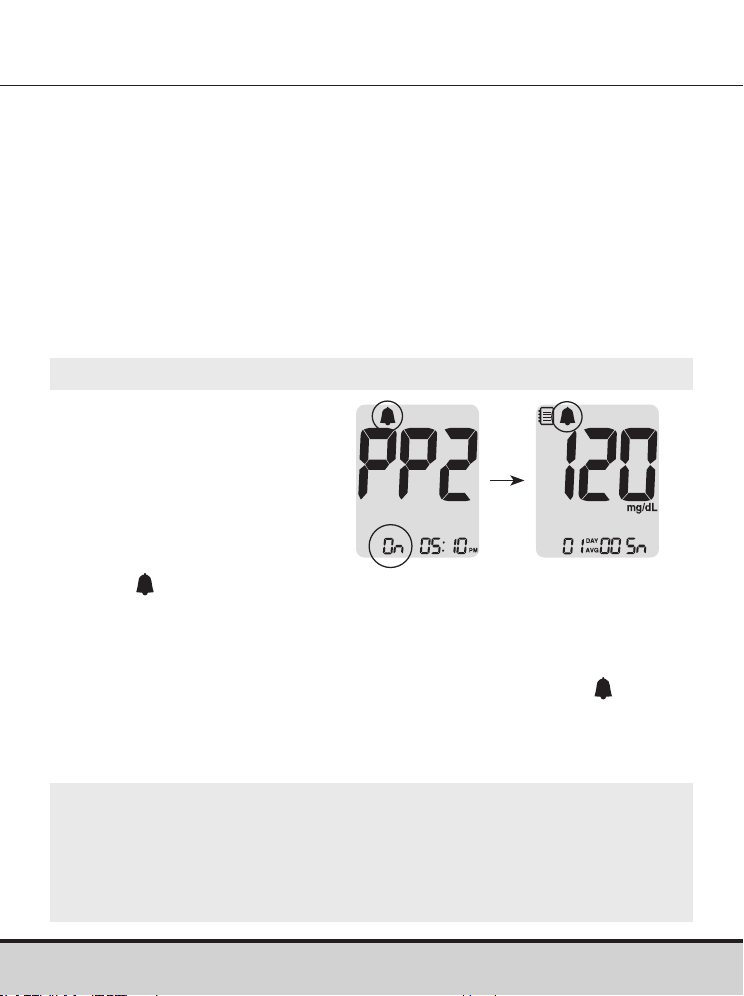
www.arkrayusa.com 47
Configuración de la función de alarmas
Paso 1: Activación de la alarma PP2
Sin insertar una tira de
prueba, mantenga oprimido
el botón < durante tres
segundos para configurar la
alarma posterior a
una comida.
Se mostrará “PP2”, el
símbolo
y “On”. La pantalla
cambiará automáticamente
al modo de recuperación de
valores de la memoria.
En este momento se mostrará en la pantalla el símbolo
, para
indicar que se ha configurado la alarma PP2.
En el medidor de glucosa en sangre GLUCOCARD Shine
Connex se pueden configurar cuatro tipos de alarma: una
alarma posterior a una comida (alarma PP2) y tres alarmas de
configuración de la hora (alarmas 1–3).
• La alarma PP2 suena dos horas después de configurarse.
• Las alarmas suenan durante 15 segundos y pueden silenciarse
oprimiendo cualquier botón o insertando una tira de prueba.
Configuración de la alarma posterior a una comida
(alarma PP2)
NOTA
• La alarma PP2 se desactivará automáticamente si el ajuste de
tiempo del medidor está configurado para más de dos horas
antes o justo después de la hora de la alarma PP2 activada
actualmente.

48 www.arkrayusa.com
Paso 2: Desactivación de la alarma PP2
Para desactivar la alarma PP2,
mantenga oprimido el botón <
durante tres segundos.
En la pantalla aparecerán “PP2”,
el símbolo
y “OFF”.
A continuación la pantalla
cambiará automáticamente al
modo de recuperación de valores
de la memoria sin que se muestre
el símbolo
.
desaparece
Paso 1
Sin insertar una tira de prueba, oprima los
botones < y al mismo tiempo durante
tres segundos para ingresar el ajuste de
alarma de hora.
En la pantalla aparecerá “alarm 1” mientras
parpadea “OFF”.
Configuración de las alarmas de hora (alarmas 1-3)
Paso 2
Cuando se oprime el botón > queda
configurada la alarma 1 y aparece “On” en
la pantalla.
Vuelva a oprimir el botón > para cancelar
la “alarma 1”.
En la pantalla parpadeará “OFF”.

www.arkrayusa.com 49
Paso 3
Oprima el botón < para ajustar la hora de la
“alarma 1”.
En la pantalla parpadeará un número que
representa la hora.
Oprima el botón > para configurar la hora
.
Paso 4
Cuando se oprima el botón < comenzará a
parpadear el número que indica los minutos.
Oprima el botón > para configurar el minuto
.
Paso 5
Oprima el botón para terminar e ir al
ajuste de la “alarma 2”.
Repita los pasos del 2 al 4 para configurar
las demás alarmas de hora (2-3).
Paso 6
Oprima el botón durante tres segundos para terminar y
apagar el medidor.

50 www.arkrayusa.com
Cuidado del sistema GLUCOCARD Shine Connex
• Para reducir al mínimo el riesgo de transmisión de patógenos
sanguíneos, se debe llevar a cabo el procedimiento de limpieza
previa y desinfección que se recomienda en las instrucciones
siguientes.
• Lávese bien las manos con agua y jabón después de manipular
el medidor, el dispositivo de punción o las tiras de prueba.
• Si hay una segunda persona que asiste al usuario con las
pruebas, se deben desinfectar el medidor y el dispositivo de
punción antes de que los manipule la segunda persona.
• Para el dispositivo de punción: Para uso exclusivo en una sola
persona. Desinfecte los componentes reutilizables siguiendo
las instrucciones del fabricante entre un uso y el siguiente.
• Inspeccione el dispositivo de punción después de limpiarlo.
Si quedan restos de sangre, residuos, polvo o pelusa, repita el
paso de limpieza. Si el dispositivo de punción no se ve limpio
después de repetir varias veces el paso de limpieza, no lo use.
Limpieza previa y desinfección
El procedimiento de limpieza previa es necesario para eliminar
tanto la suciedad como la sangre y demás líquidos corporales del
exterior del medidor y dispositivo de punción, antes de llevar a
cabo el procedimiento de desinfección.
El procedimiento de desinfección es necesario a fin de evitar la
transmisión de patógenos sanguíneos.
• El medidor y el dispositivo de punción requieren que esta
limpieza previa y desinfección se realicen una vez por semana.
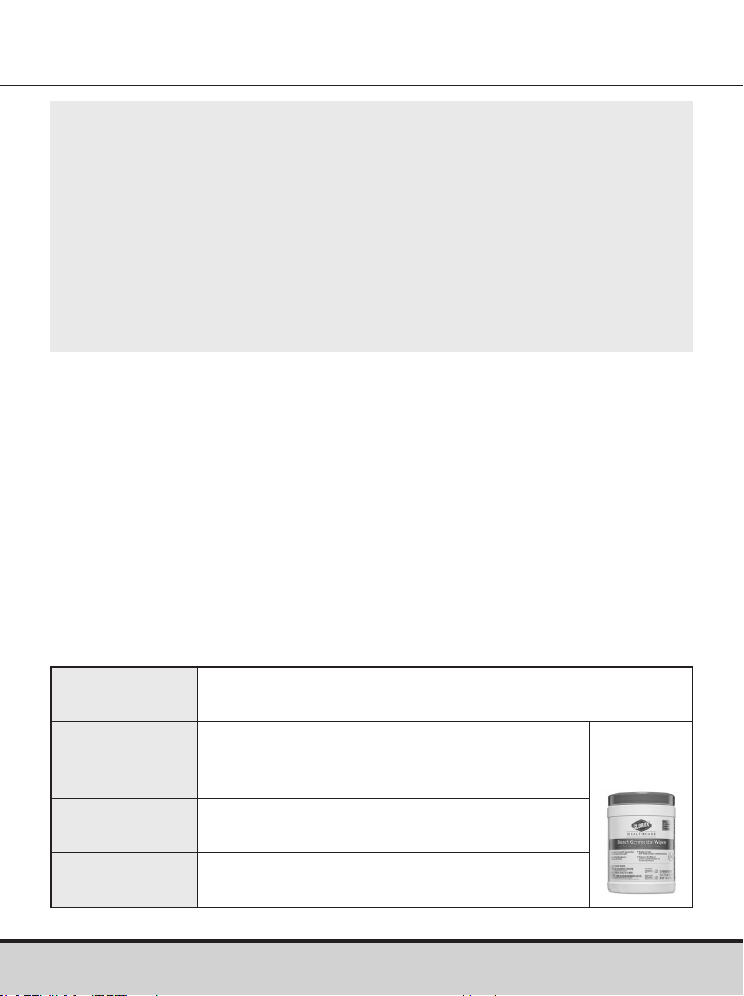
www.arkrayusa.com 51
NOTA
• El medidor GLUCOCARD Shine Connex tiene una vida útil de
cinco años. Recomendamos desinfectar tanto el medidor como
el dispositivo de punción al menos una vez por semana. Hemos
validado un total de 260 ciclos de limpieza y desinfección
(260 de limpieza previa y 260 de desinfección) para representar
la limpieza y desinfección semanales a lo largo de la vida útil del
medidor y el dispositivo de punción. 1 ciclo de limpieza previa y
1 ciclo de desinfección por semana x 52 semanas al año x 5 años =
260 ciclos de limpieza previa y 260 ciclos de desinfección.
Nombre
Toallitas germicidas Clorox Healthcare® Bleach
Germicidal Wipes
Fabricante Clorox® Professional Products Company
[Teléfono] 1.800.537.1415
[Sitio web] www.cloroxprofessional.com
Número de
registro EPA
67619-12
Ingredientes
activos
Hipoclorito de sodio: 0.55%
• Hemos validado las toallitas germicidas Clorox Healthcare Bleach
Germicidal Wipes con hipoclorito de sodio al 0.55% como el
ingrediente activo para desinfectar el medidor GLUCOCARD Shine
Connex y el dispositivo de punción. Se ha demostrado que este
desinfectante es seguro para usarlo con el medidor y el dispositivo
de punción.
• Este desinfectante está disponible en el comercio en forma
de toallitas.
• Además de las instrucciones del sistema de monitoreo de glucosa
en sangre GLUCOCARD Shine Connex, lea las instrucciones
suministradas por el fabricante de las toallitas germicidas
Clorox Healthcare Bleach Germicidal Wipes antes de usarlas.
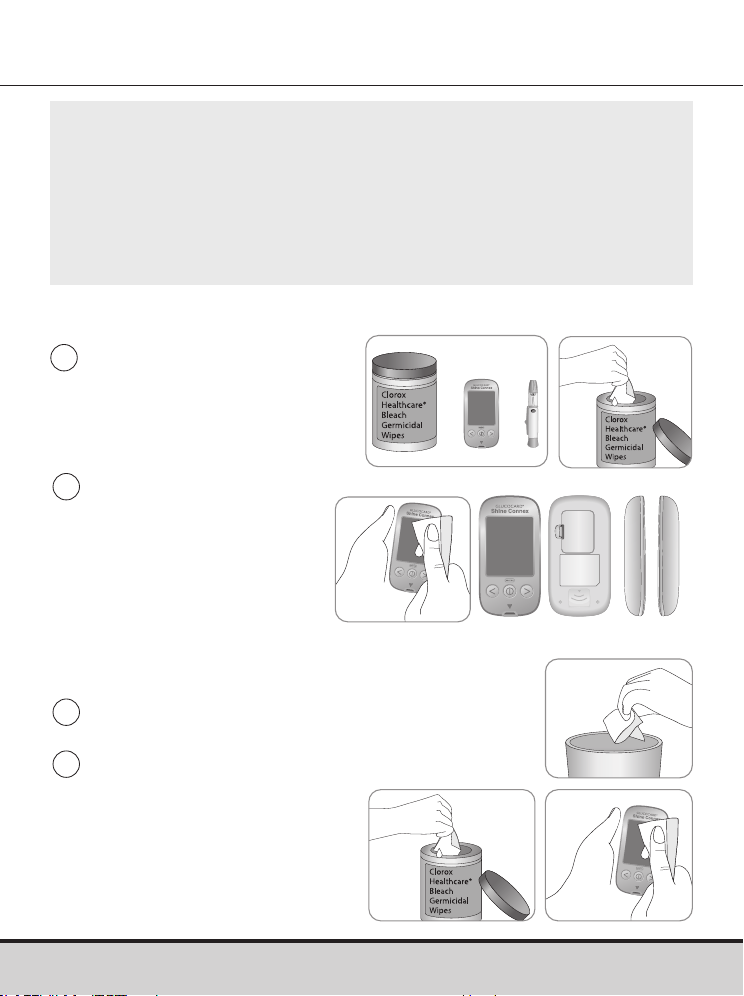
52 www.arkrayusa.com
Procedimientos de limpieza previa y desinfección
1
Abra la tapa del recipiente
de las toallitas germicidas
Clorox Healthcare Bleach
Germicidal Wipes, saque
una toallita y cierre la tapa.
4
Saque una toallita nueva
y pásela sobre toda la
superficie del medidor tres
veces de forma horizontal
y tres veces de forma
vertical para limpiarlo y
desinfectarlo.
2
Limpie toda la superficie
del medidor tres veces
en sentido horizontal y
tres veces en sentido
vertical con una toallita,
para hacer una limpieza
previa de los restos de
sangre y demás líquidos
corporales.
3
Deseche la toallita usada en el basurero.
Lado
anterior
Lado
posterior
Ambos
lados
NOTA
• El producto desinfectante se puede adquirir a través de
vendedores minoristas en línea (p. ej., Amazon o Walmart)
o llamando a la empresa Clorox®.
• Para obtener información sobre cómo adquirir el producto
desinfectante, póngase en contacto con la empresa Clorox® o
visite el sitio web que se indica anteriormente.
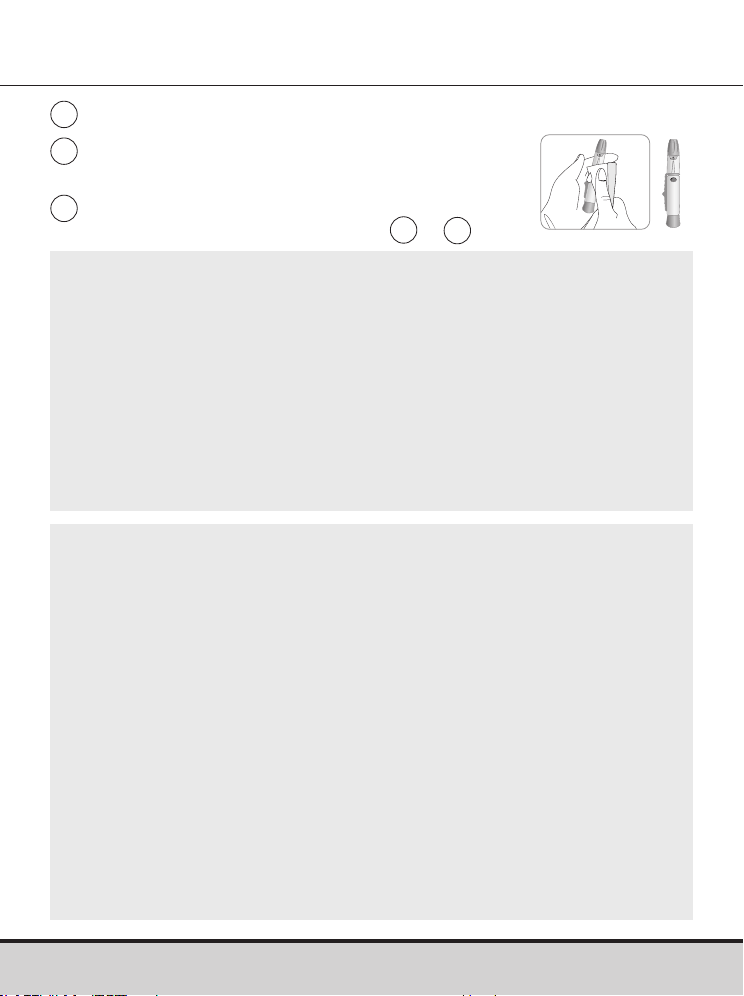
www.arkrayusa.com 53
6
Deje que las superficies externas permanezcan
mojadas durante un minuto.
5
Deseche la toallita usada en el basurero.
7
Repita el mismo procedimiento con el
dispositivo de punción (pasos de
1
a
6
).
NOTA
• Después del procedimiento de limpieza previa y desinfección y
antes de usar el medidor se debe analizar la solución de control
para confirmar que este funcione debidamente.
• Las pruebas con solución de control deben realizarse con dos niveles
(nivel 1 y nivel 2) de soluciones de control GLUCOCARD Shine.
• Verifique que los resultados de prueba se encuentren dentro del
intervalo impreso en el frasco de las tiras de prueba.
• Consulte las páginas 28-30 para ver cómo se realiza una prueba
con solución de control.
NOTA
Si se presenta cualquiera de los siguientes indicios de deterioro
después de la limpieza previa o desinfección, deje de utilizar el
sistema y póngase en contacto con el servicio técnico de atención
al cliente de ARKRAY: 800.566.8558, 24 horas del día, 7 días de
la semana.
• Si se han eliminado las inscripciones en el exterior del medidor
o el dispositivo de punción.
• Si el medidor o el dispositivo de punción han cambiado de color
o se han desteñido.
• Se forman grietas o asperezas en el medidor o el dispositivo
de punción.
• Si una parte del segmento de la pantalla del medidor no destella.
• Si los resultados de la prueba con solución de control no están
dentro del intervalo estipulado en el frasco de las tiras de prueba.

54 www.arkrayusa.com
CUIDADO
• No use ningún otro limpiador o desinfectante, porque no se
ha validado ninguna otra sustancia química y podría dañarse
el medidor.
• No introduzca líquidos por el orificio de las tiras de prueba,
el puerto de transmisión de datos o el compartimiento de las
pilas del medidor.
• No sumerja nunca el medidor ni lo mantenga bajo un chorro
de agua, pues esto lo dañará.
CUIDADO
Almacenamiento y manejo
• Almacene el medidor en un lugar fresco y seco a 32-122 °F
(0-50°C) y humedades relativas de 20-80%.
• No exponga el medidor a la luz solar directa, al calor o a un
exceso de humedad por períodos prolongados.
• No permita que entre suciedad, polvo, sangre ni agua en el
orificio de las tiras de prueba del medidor.
• No deje caer el medidor ni lo someta a golpes fuertes.
• No trate de arreglar ni modificar el medidor de ninguna
manera.
• Almacene todos los componentes del medidor en un estuche
para evitar que se pierdan y ayudar a mantener limpio el
medidor.
• Evite que el frasco de tiras de prueba entre en contacto con
líquidos o humedad; eso puede afectar las tiras y producir
resultados de prueba incorrectos.
• No aplique a la tira de prueba muestras que no sean sangre
entera capilar o solución de control.

www.arkrayusa.com 55
NOTA
• Para obtener información adicional o asistencia técnica,
llame al servicio técnico de atención al cliente de ARKRAY:
800.566.8558, 24 horas del día, 7 días de la semana.
CUIDADO
No deje que en el medidor entren sustancias extrañas o
líquidas (como suciedad, sangre o agua), ya que estas podrían
dañarlo o averiarlo. Para proteger el medidor contra posibles
daños, observe la información de advertencia indicada
a continuación.
• No aplique las muestras de sangre o solución de control
directamente al orificio de las tiras de prueba.
• No aplique las muestras de sangre o de solución de control
a la tira de prueba si el medidor tiene la punta de la tira
orientada hacia arriba, ya que podrían escurrirse por la
superficie de la tira de prueba y entrar en el respectivo
orificio de inserción.
• No almacene el medidor en lugares antihigiénicos o
contaminados.
• Asegúrese de seguir los procedimientos de limpieza previa
y desinfección que encontrará en la sección “Cuidado del
sistema GLUCOCARD Shine Connex” de este manual
del usuario.
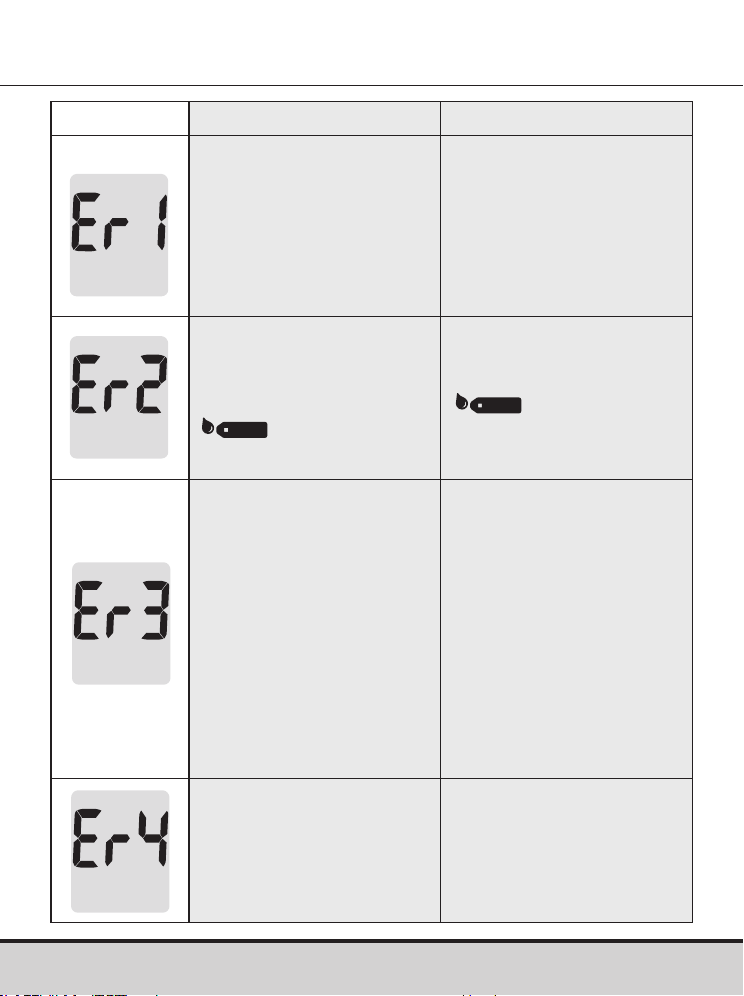
56 www.arkrayusa.com
Mensaje Significado Medida a tomar
Se insertó una tira de
prueba usada.
Repita la prueba con una
tira nueva.
La muestra de sangre o
solución de control fue
aplicada antes de que
apareciera el símbolo
.
Repita la prueba con una
tira nueva y espere hasta
que aparezca el símbolo
antes de aplicar
la muestra de sangre o
solución de control.
La temperatura durante
la prueba era superior
o inferior al intervalo de
funcionamiento.
Trasládese a una zona
en que la temperatura
se encuentre dentro
del intervalo de
funcionamiento de
42-111.2 ºF (6-44 ºC).
Repita la prueba una
vez que el medidor
y las tiras de prueba
hayan alcanzado una
temperatura dentro
del intervalo de
funcionamiento.
La muestra de sangre
tiene un volumen
insuficiente o la sangre es
demasiado espesa.
Repita la prueba después
de insertar una tira nueva.
Descripción de los mensajes de error

www.arkrayusa.com 57
Mensaje Significado Medida a tomar
Este mensaje de error
podría aparecer si se usa
una tira de prueba de
glucosa en sangre que
no sea la tira de prueba
GLUCOCARD Shine.
Repita la prueba con una
tira de prueba de glucosa
en sangre GLUCOCARD
Shine.
Hay un problema con el
medidor.
No use el medidor. Llame
al servicio técnico de
atención al cliente de
ARKRAY: 800.566.8558,
24 horas del día, 7 días de
la semana.
Hay un problema con
las comunicaciones
Bluetooth®
Llame al servicio técnico
de atención al cliente de
ARKRAY: 800.566.8558,
24 horas del día, 7 días de
la semana.
Se produjo un error
electrónico durante la
prueba.
Repita la prueba con una
tira nueva. Si el mensaje
de error persiste, llame
al servicio técnico de
atención al cliente de
ARKRAY: 800.566.8558,
24 horas del día, 7 días de
la semana.
NOTA
Si los mensajes de error persisten, llame al servicio técnico
de atención al cliente de ARKRAY: 800.566.8558, 24 horas
del día, 7 días de la semana.
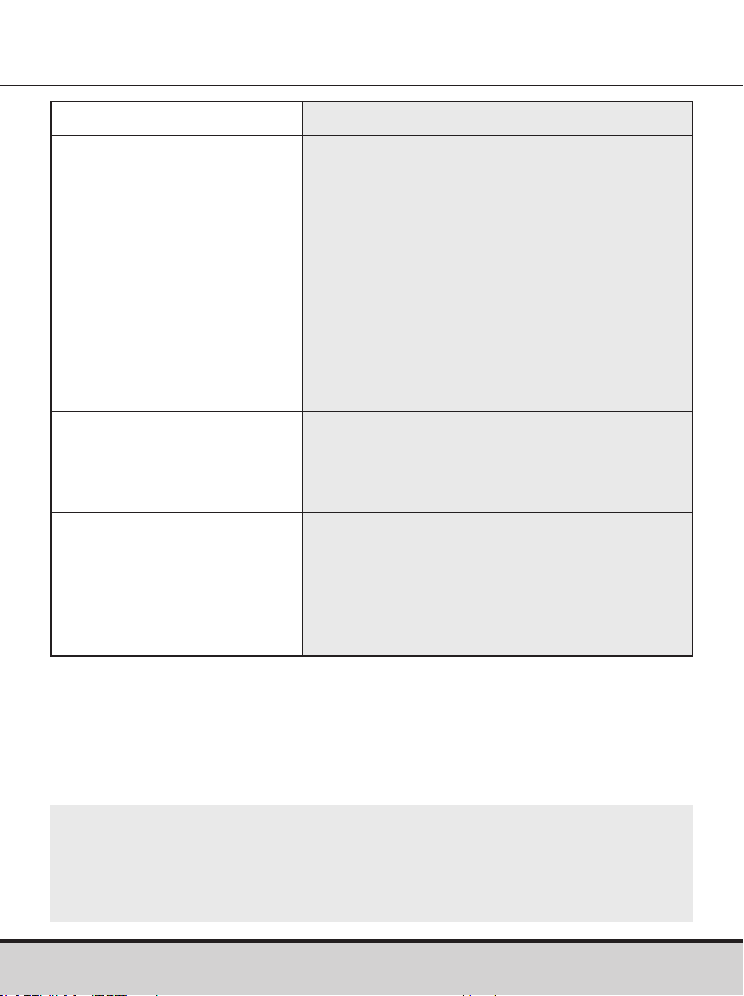
58 www.arkrayusa.com
Resolución de problemas generales
NOTA
Si el problema no se resuelve, llame al servicio técnico de
atención al cliente de ARKRAY: 800.566.8558, 24 horas del día,
7 días de la semana.
Problema Resolución de problemas
La pantalla está en blanco
incluso después de que se
inserta una tira de prueba.
• Compruebe que la tira de prueba
se haya insertado con las barras de
contacto orientadas hacia arriba.
Compruebe que la tira de prueba se
haya insertado completamente en el
orificio de inserción correspondiente.
• Compruebe que se haya usado la tira de
prueba correcta.
• Compruebe que las pilas estén con el
lado “+” orientado hacia arriba.
• Si la pantalla sigue en blanco, cambie
las pilas.
La prueba no se inicia, ni
siquiera después de aplicar
la muestra de sangre en la
tira de prueba.
• Asegúrese de que la ventana de
confirmación esté completamente llena.
• Repita la prueba después de insertar
una tira nueva.
Los resultados de la
prueba no reflejan cómo
se siente usted.
• Repita la prueba después de insertar
una tira nueva.
• Verifique la fecha de vencimiento de la
tira de prueba.
• Realice una prueba con solución
de control.
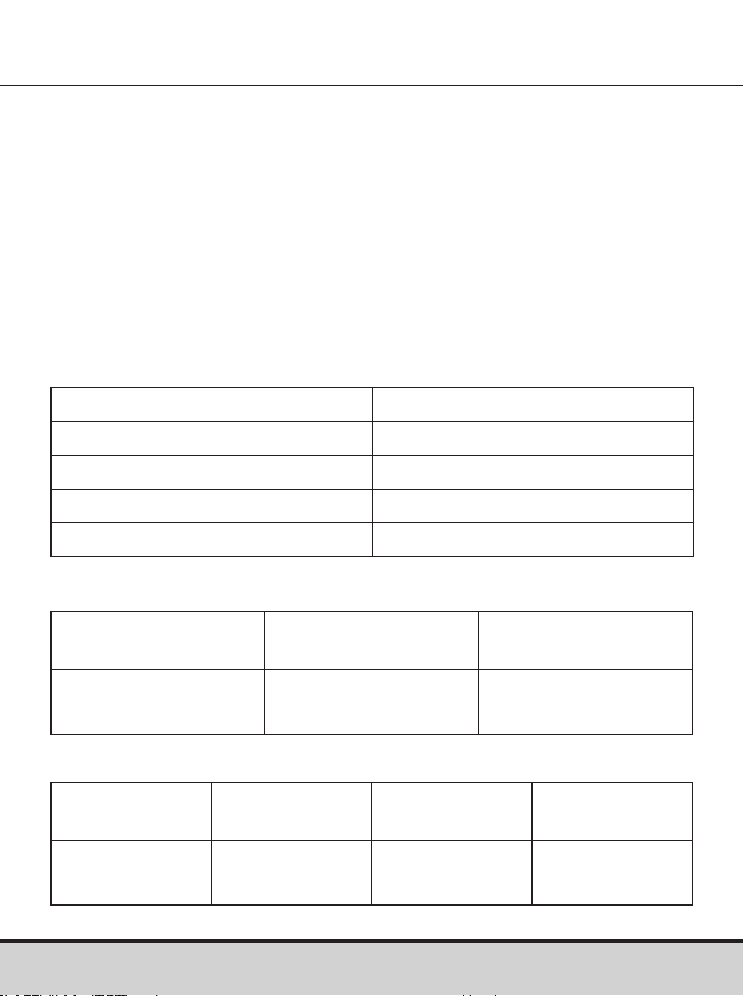
www.arkrayusa.com 59
Características de rendimiento
El rendimiento del sistema de monitoreo de glucosa en sangre
GLUCOCARD Shine Connex ha sido evaluado en el laboratorio y en
pruebas clínicas.
Exactitud
Se evaluó la exactitud del sistema de monitoreo de glucosa en
sangre GLUCOCARD Shine Connex. Para ello, se compararon los
resultados de glucosa en sangre obtenidos por pacientes con los
resultados obtenidos mediante el analizador de glucosa YSI modelo
2300 (un instrumento de laboratorio).
Los resultados siguientes fueron obtenidos por pacientes diabéticos
en centros clínicos.
Resultados de exactitud para una concentración de glucosa <75 mg/dl
Resultados de exactitud para una concentración de glucosa ≥75 mg/dl
Pendiente 1.0223
Ordenada en el origen (Y) -1.3686
Coeficiente de correlación (r) 0.9934
Número de sujetos 371
Intervalo evaluado 48-553 mg/dl
Dentro de
± 5 mg/dl
Dentro de
± 10 mg/dl
Dentro de
± 15 mg/dl
61.0%
(25/41)
97.6%
(40/41)
100%
(41/41)
Dentro de
± 5%
Dentro de
± 10%
Dentro de
± 15%
Dentro de
± 20%
70.0%
(231/330)
96.1%
(317/330)
100%
(330/330)
100%
(330/330)
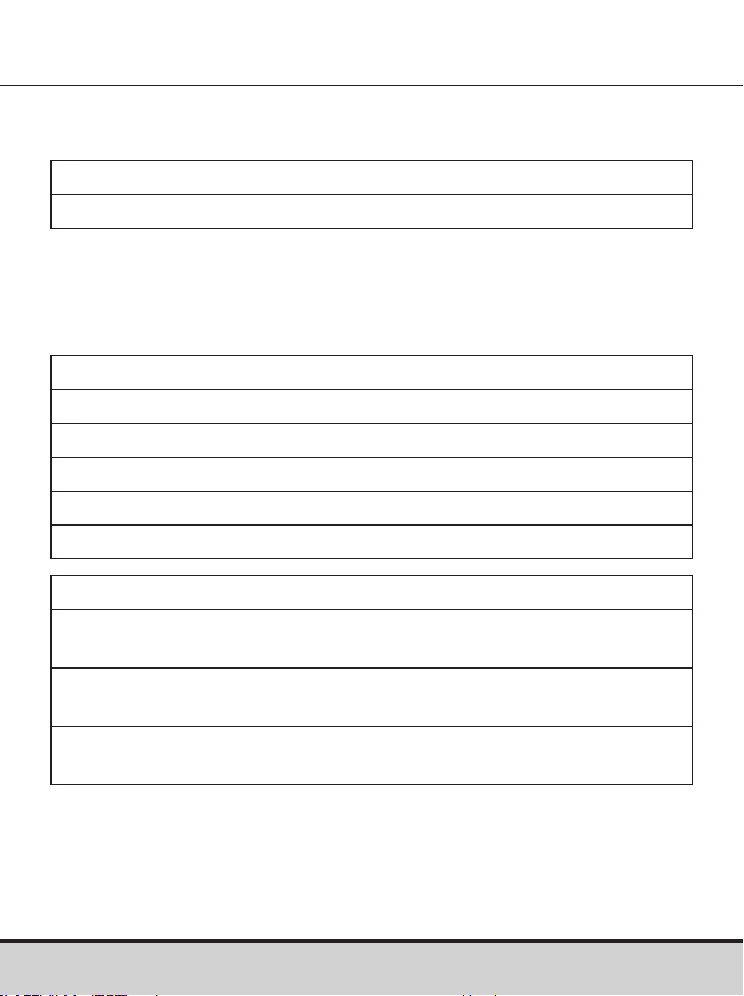
60 www.arkrayusa.com
Precisión
Se realizaron estudios en un laboratorio para determinar la precisión
del sistema de monitoreo de glucosa en sangre GLUCOCARD Shine
Connex.
Resultados de rendimiento para usuarios con concentraciones de
glucosa entre 48 y 553 mg/dl.
Dentro de ± 15 mg/dl y dentro del ± 20%
371/371 (100%)
Precisión intraensayo
Promedio para sangre 43 mg/dl DE = 1.9 mg/dl CV = 4.3%
Promedio para sangre 71 mg/dl DE = 2.1 mg/dl CV = 2.9%
Promedio para sangre 135 mg/dl DE = 3.8 mg/dl CV = 2.8%
Promedio para sangre 203 mg/dl DE = 5.2 mg/dl CV = 2.6%
Promedio para sangre 343 mg/dl DE = 11 mg/dl CV = 3.2%
Precisión interensayo
Promedio para solución
de control
36 mg/dl DE = 1.4 mg/dl CV = 3.8%
Promedio para solución
de control
114 mg/dl DE = 3.4 mg/dl CV = 3.0%
Promedio para solución
de control
341 mg/dl DE = 8.2 mg/dl CV = 2.4%

www.arkrayusa.com 61
Información de la garantía
Garantía
El fabricante garantiza que el medidor GLUCOCARD Shine Connex
estará exento de defectos en los materiales y la mano de obra con
su uso normal durante un plazo de cinco años.
El medidor debe haberse sometido a un uso normal. La garantía
no cubre el manejo, la manipulación, el uso o el servicio
incorrectos del medidor.
Cualquier reclamación deberá hacerse dentro del período
de garantía.
El fabricante reparará o sustituirá (a su discreción) un medidor
o pieza del mismo que presenten defectos y estén cubiertos por
esta garantía.
Como parte de nuestra política sobre garantías, el fabricante no
reembolsará al consumidor el precio de compra.
Obtención del servicio de garantía
Para recibir el servicio de garantía, debe devolver el medidor o
la pieza defectuosa junto con el comprobante de compra.
Devoluciones
Para obtener instrucciones sobre cómo devolver el medidor,
póngase en contacto con el servicio técnico de atención al cliente
de ARKRAY: 800.566.8558, 24 horas del día, 7 días de la semana.
No se aceptará ningún medidor devuelto sin esta autorización.

Esta página se ha dejado en
blanco intencionadamente