Technical Support and E-Warranty Certificate
www.vevor.com/support
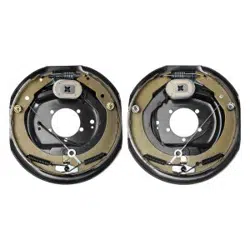
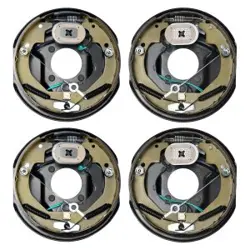
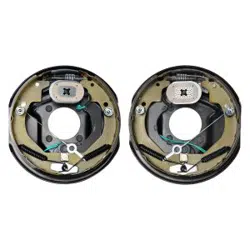
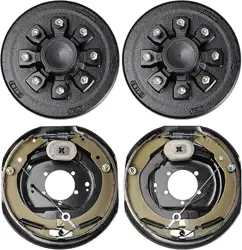
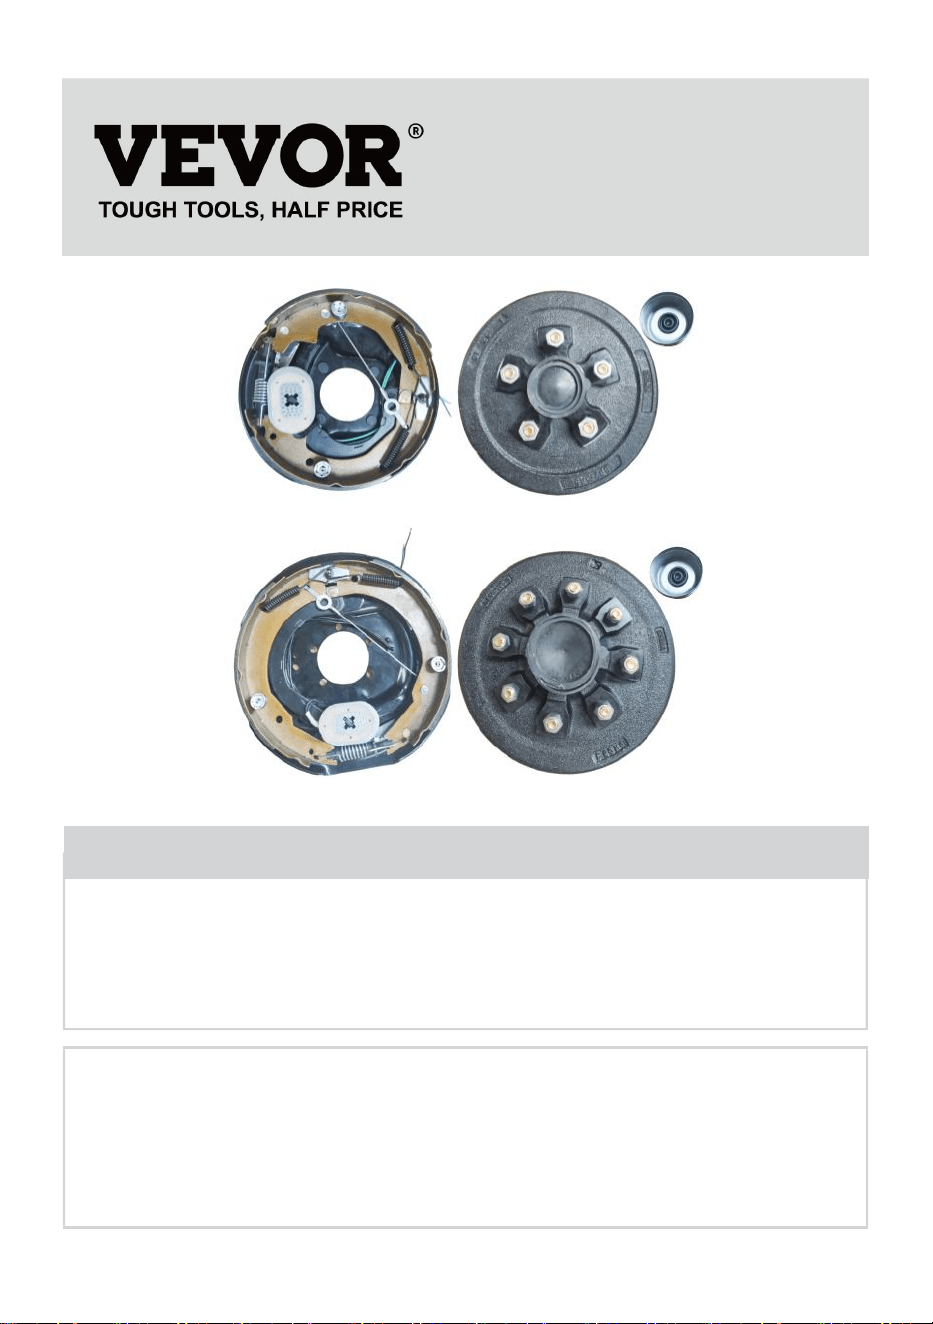
ELECTRIC TRAILER BRAKE
Model: BF10-Z01A*2,BF10-Z01A*4,BF10-Z01AB*2,
BF12-Z02A*2,BF12-Z02A*4,BF12-Z02AB*2
We continue to be committed to provide you tools with competitive price.
"Save Half", "Half Price" or any other similar expressions used by us only represents an
estimate of savings you might benefit from buying certain tools with us compared to the major
top brands and does not necessarily mean to cover all categories of tools offered by us. You
are kindly reminded to verify carefully when you are placing an order with us if you are
actually saving half in comparison with the top major brands.

- 1 -
Have product questions? Need technical support? Please feel free to
contact us:
Technical Support and E-Warranty Certificate
www.vevor.com/support
NEED HELP? CONTACT US!
This is the original instruction, please read all manual instructions
carefully before operating. VEVOR reserves a clear interpretation of our
user manual. The appearance of the product shall be subject to the
product you received. Please forgive us that we won't inform you again if
there are any technology or software updates on our product.
Electric Trailer Brake

- 2 -
1. Read carefully and understand all ASSEMBLY AND OPERATION
INSTRUCTIONS before operating.
2. Failure to follow the safety rules and other basic safety precautions may
result in serious personal injury.
GENERAL SAFETY RULES
1. Please select a brake type suitable for the axle.
2. Avoid water or oil on the brake shoes so as not to affect the braking
effect.
3. Avoid water or oil inside the brake drum so as not to affect the braking
effect.
4. Do not frequently use the brake to slow down, lest the brake
temperature is too high, affecting the service life of the brake.
5. Never try to repair or disassemble the product when there is a problem.
Ask a machinist or specialist for help.
6. Do not install the product when you are tired while under the influence of
alcohol, prescription medicines, or drugs.
7. The safety precautions and instructions given in this manual are unable
to cover in detail all the conditions and situations that may arise.
8. The operator and/or user must use common sense and caution when
operating the product, especially for any matters that are not referred to
above.
9. The use of any accessories other than those recommended by the
manufacturer or stated in the instructions manual may result in injury or
may cause damages.
SAVE THESE INSTRUCTIONS
- 3 -
MODEL AND PARAMETERS
Model
BF10-Z01
A×2
BF10-Z01
A×4
BF10-Z01
AB×2
BF12-Z02
A×2
BF12-Z02
A×4
BF12-Z02
AB×2
Suitable for
Trailer
3500lbs
3500lbs
3500lbs
7000lbs
7000lbs
7000lbs
Product Spec.
10"×2-1/4 "
10"×2-1/4 "
10"×2-1/4 "
12"×2 "
12"×2 "
12"×2 "
Electromagnet
Spec.
10",DC12V
/2.5-3.6A
10",DC12V
/2.5-3.6A
10",DC12V
/2.5-3.6A
12",DC12V
,2.8~4.2A
12",DC12V
/2.8-4.2A
12",DC12V
/2.8-4.2A
Brake Flange
Four studs,
7/16-20UN
F,PCD=
101.8mm
Four
Studs,
7/16-20UN
F,PCD=
101.8mm
Four
Studs,
7/16-20UN
F,PCD=
101.8mm
Five Holes,
PCD=
99mm
Five Holes,
PCD=
99mm
Five Holes,
PCD=
99mm
Adjust Method
Self-
adjusting
Self-
adjusting
Self-
adjusting
Self-
adjusting
Self-
adjusting
Self-
adjusting
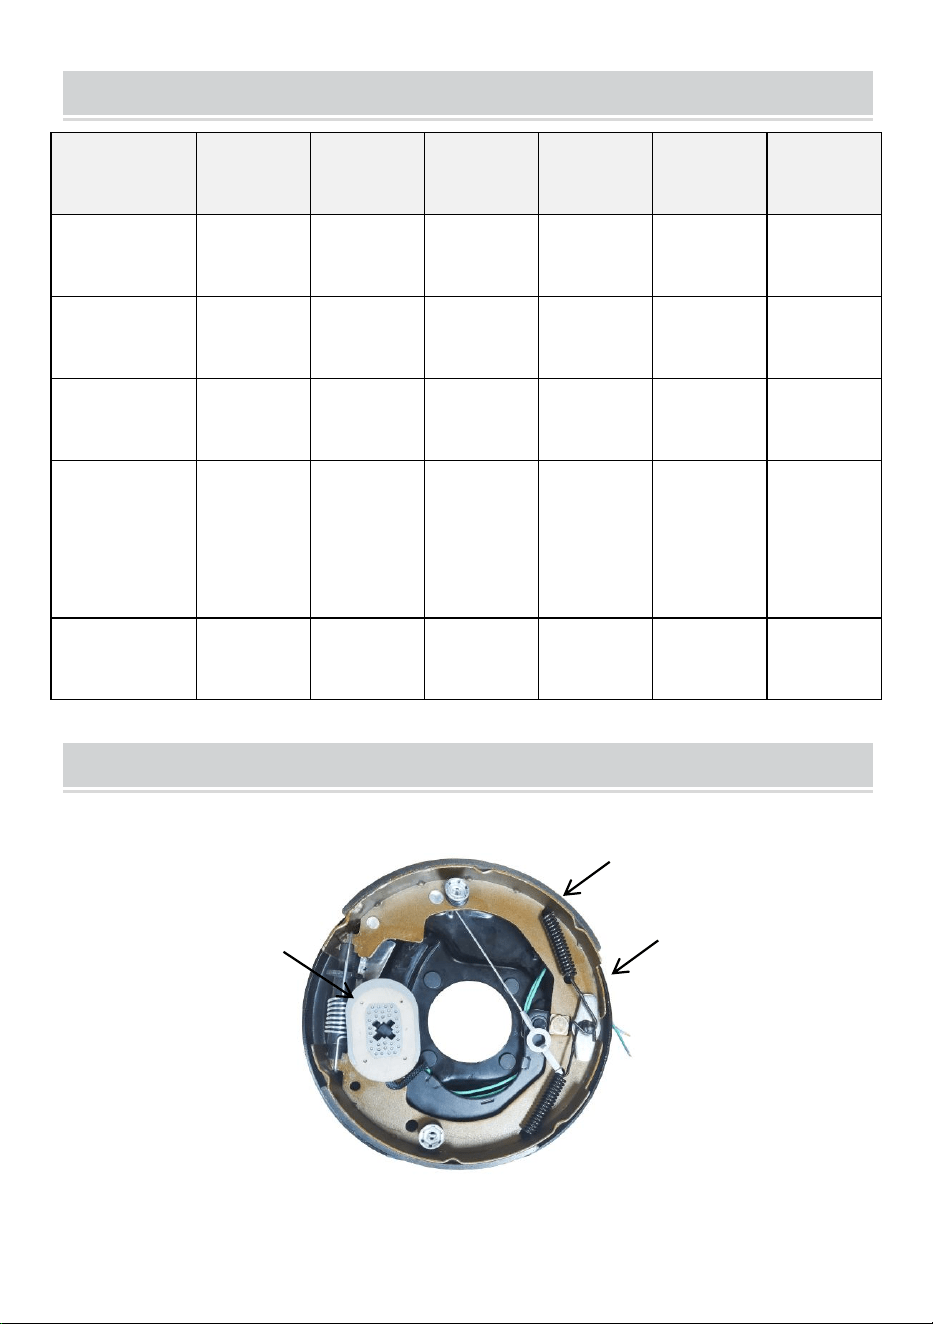
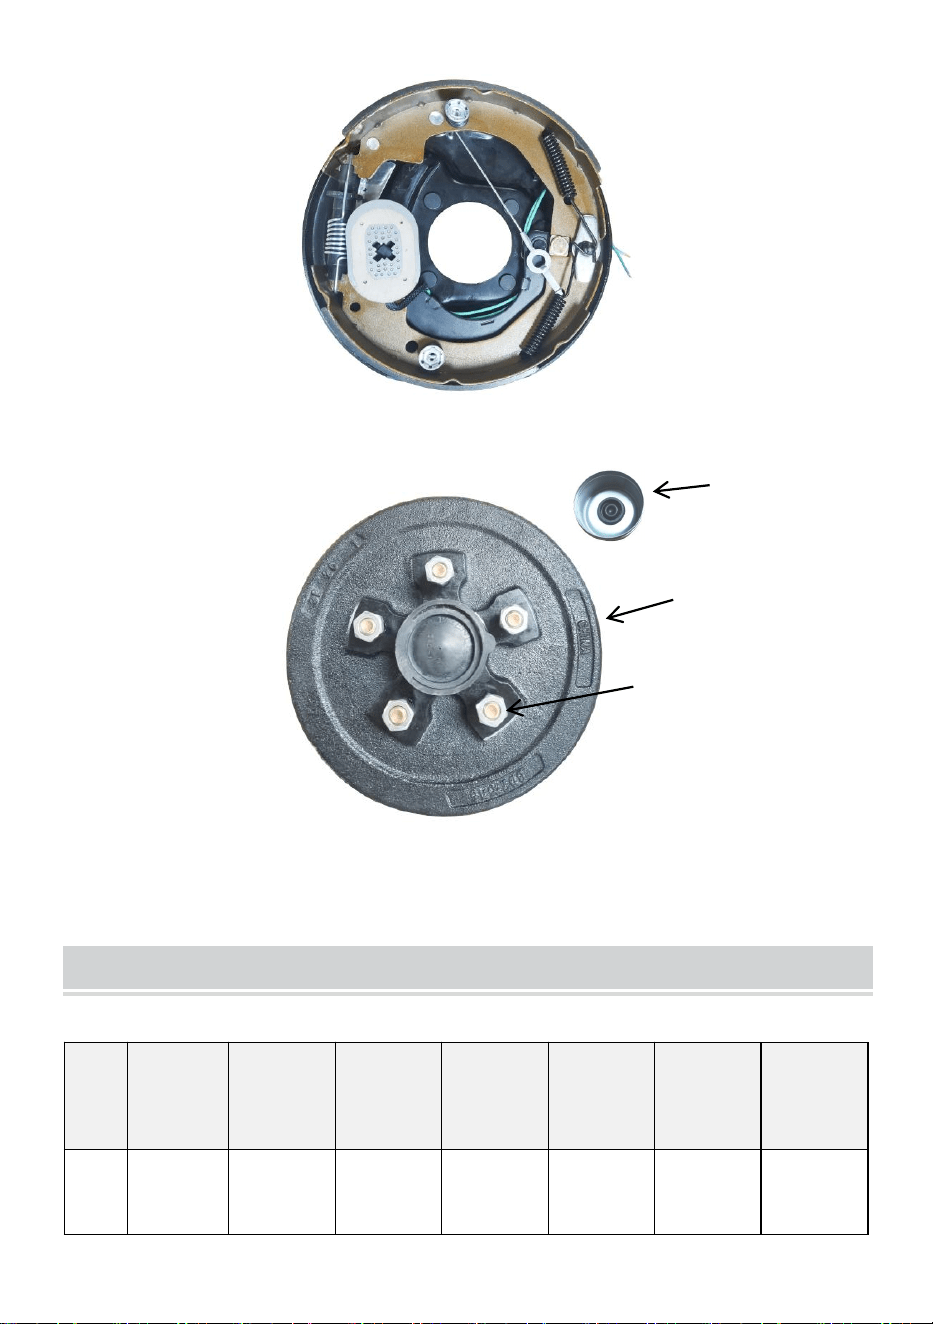
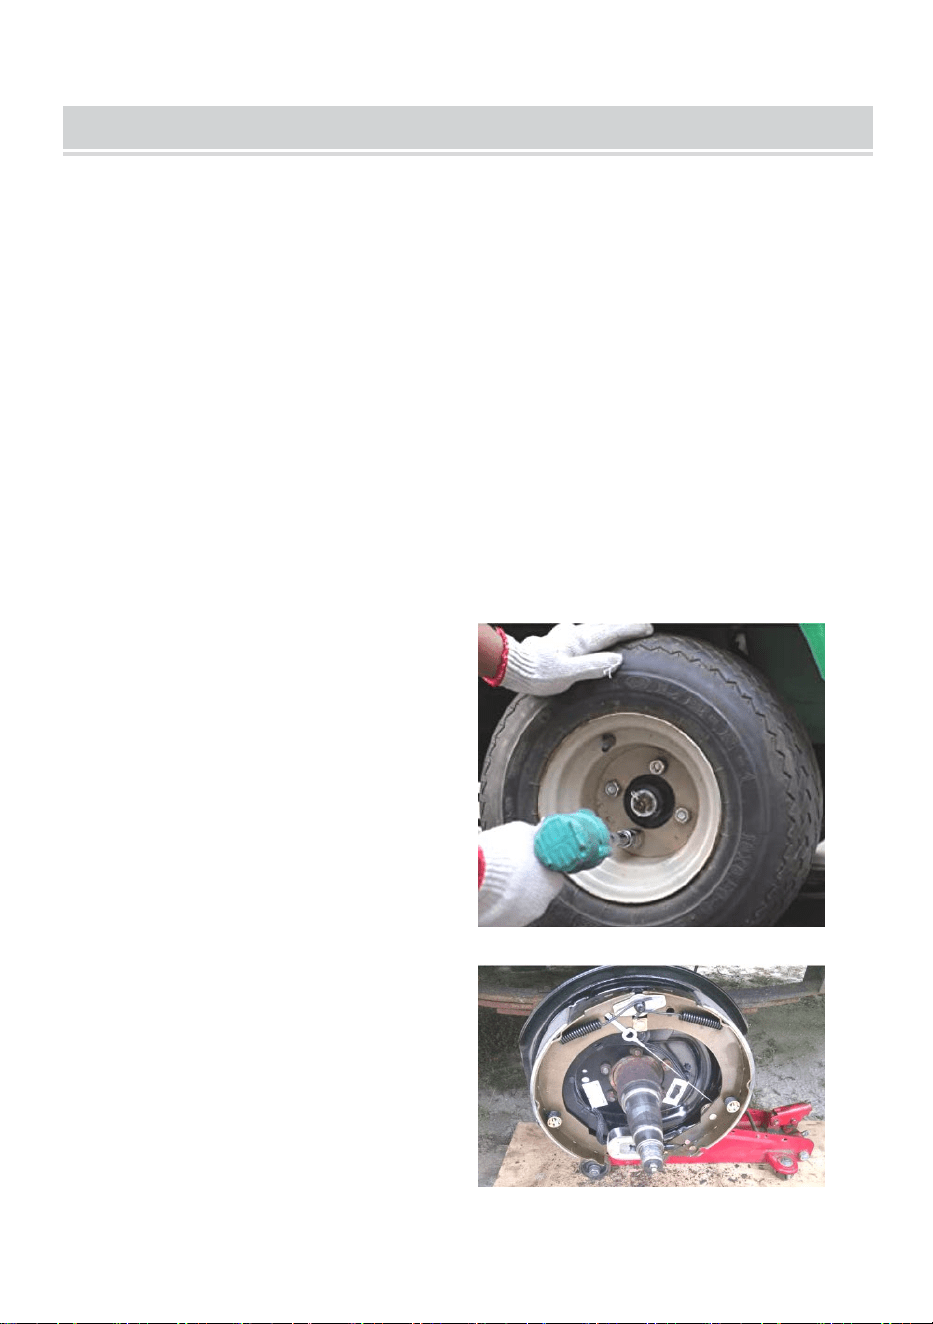
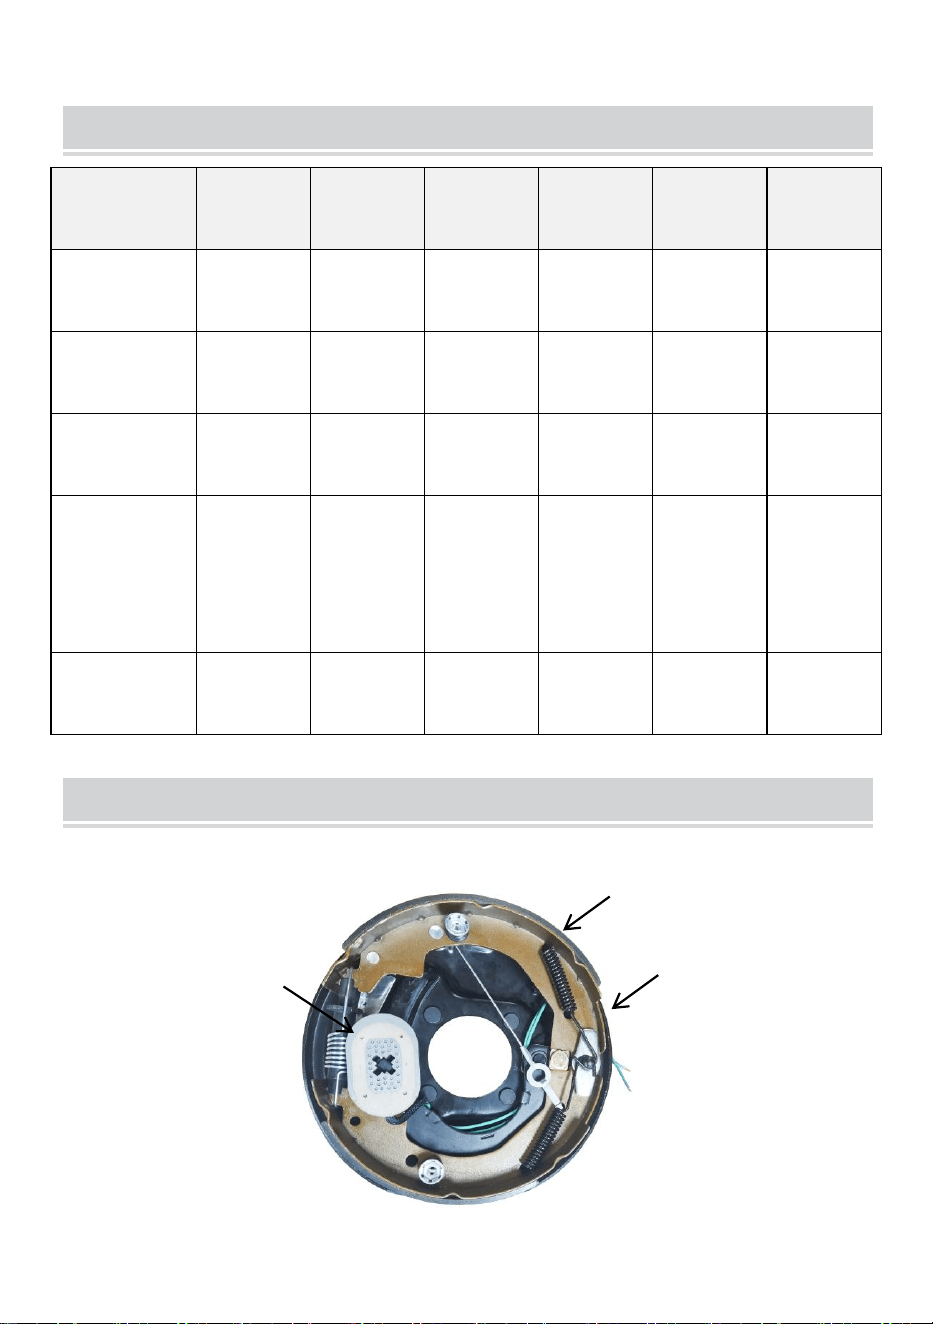
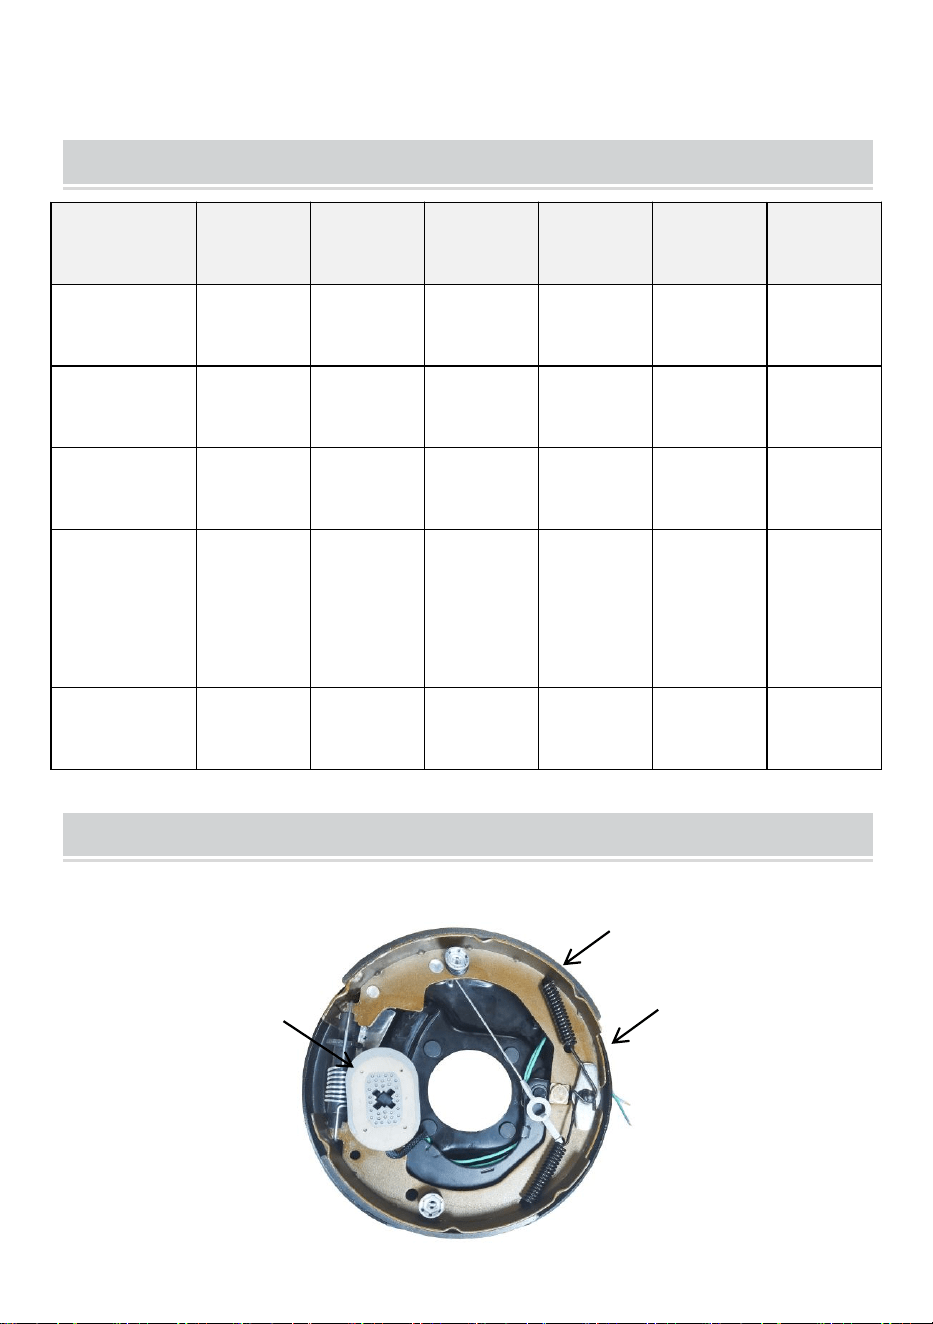
STRUCTURE DIAGRAM
Take BF10-Z01A×2 as an example.
1.Brake Shoe 2. Electric Brake 3. Electromagnet
2
1
3
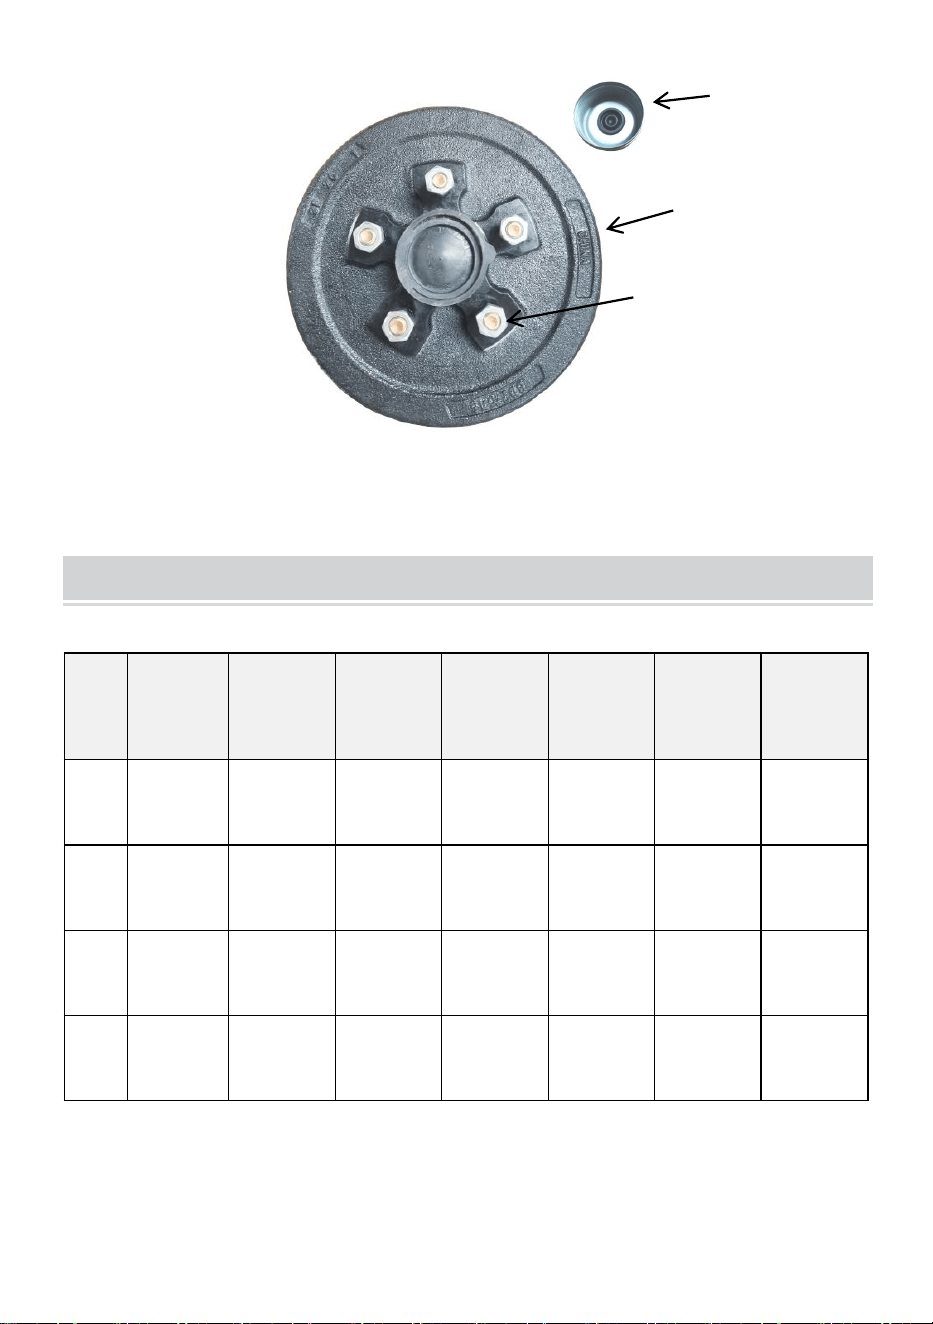
- 4 -
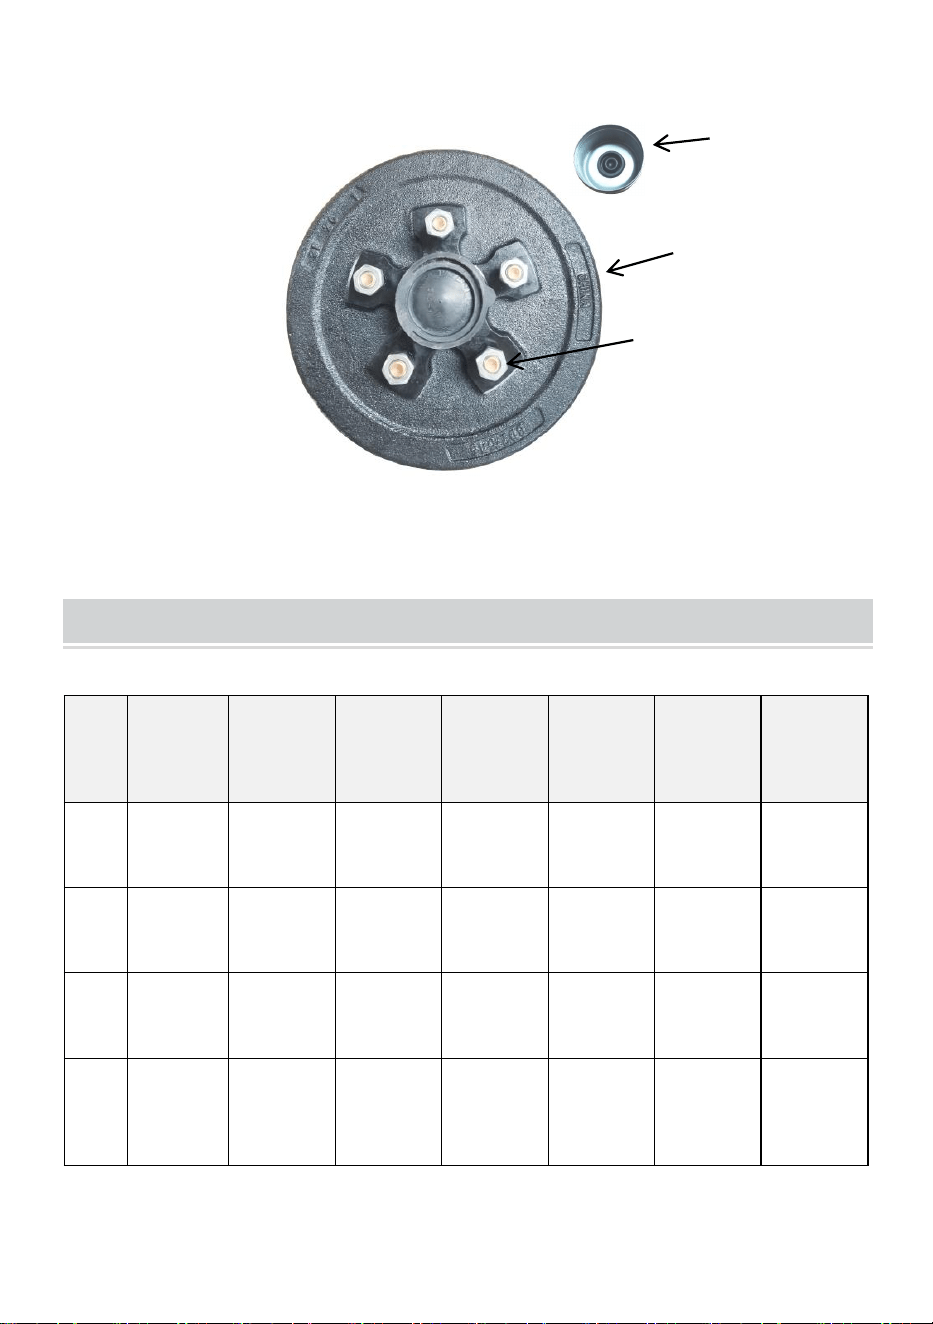
1.Brake Drum 2. Studs and Nuts 3. Dust Cap
COMPONENTS
NO.
Name
BF10-Z0
1A×2
BF10-Z0
1A×4
BF10-Z0
1AB×2
BF12-Z0
2A×2
BF12-Z0
2A×4
BF12-Z0
2AB×2
1
Brake
2
4
2
2
4
2
2
Brake
Drum
/
/
2
/
/
2
3
Dust
Cap
/
/
2
/
/
2
4
Nut(for
Drum)
/
/
10
/
/
16
1
2
3
- 5 -
ASSEMBLY
Installation Preparation:
1. Two or more people to move and assemble the product.
2. Please prepare a mat, and you need to spread out all the accessories.
3. Please prepare gloves to avoid being scratched by sharp parts that may
occur during installation.
4. Please open all the boxes to check that the accessories are complete
and in good condition.
5. If you need to use power tools to install this product, please set the
speed to low speed in advance.
The following describes only the installation procedure. The model
depends on the user's choice.
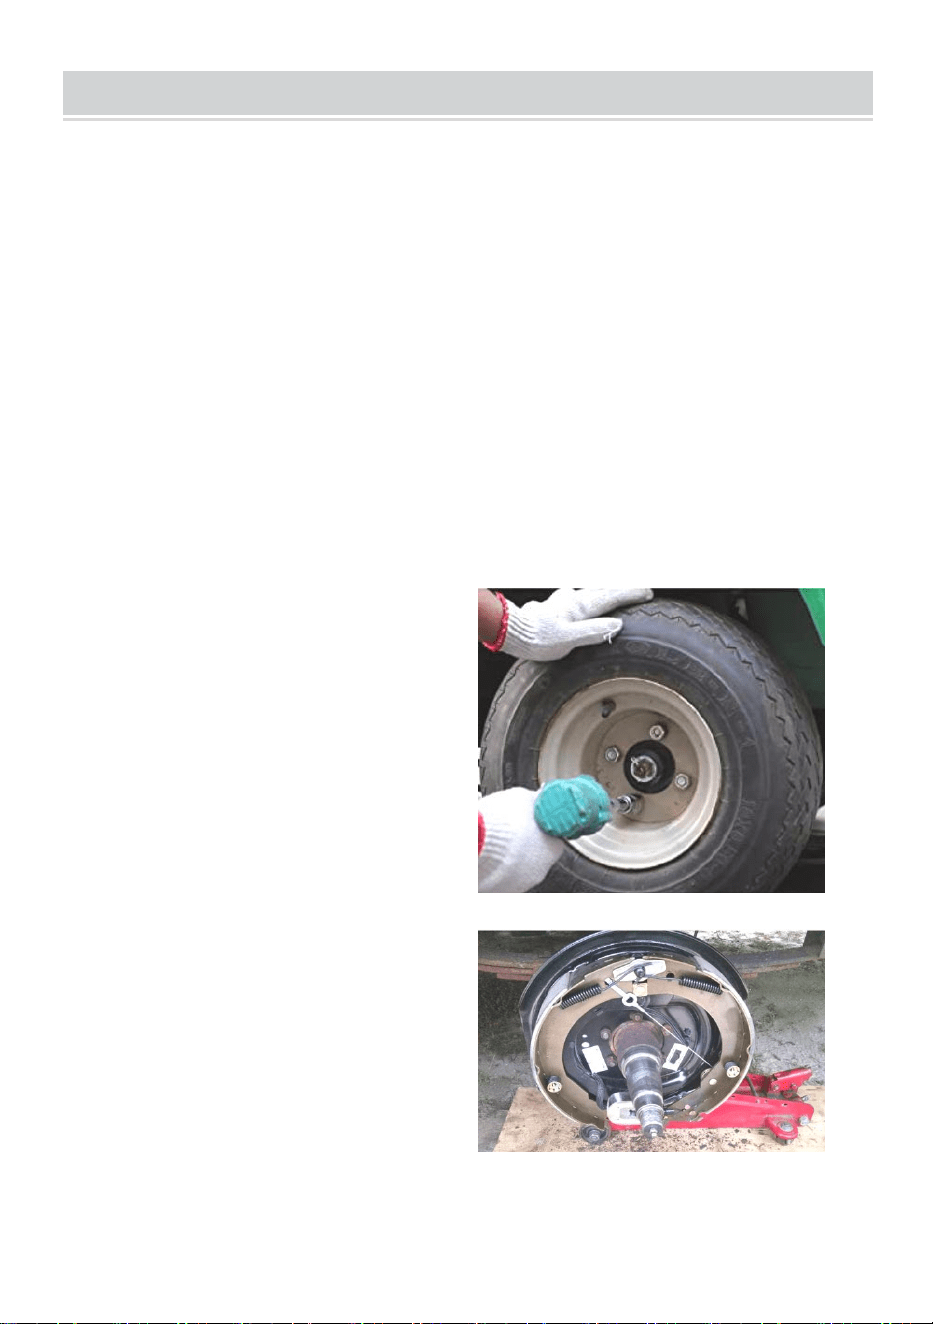
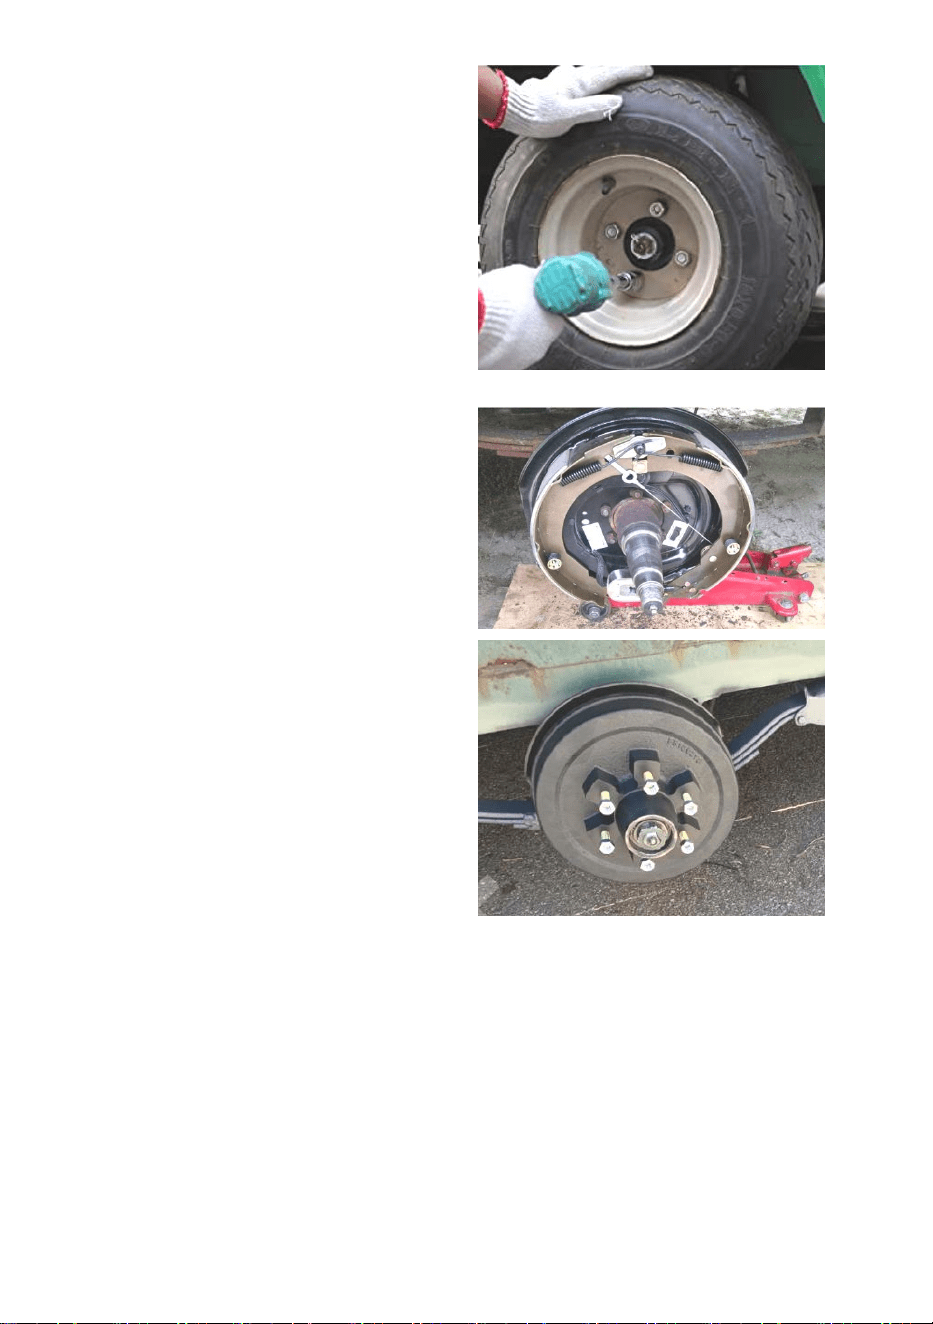
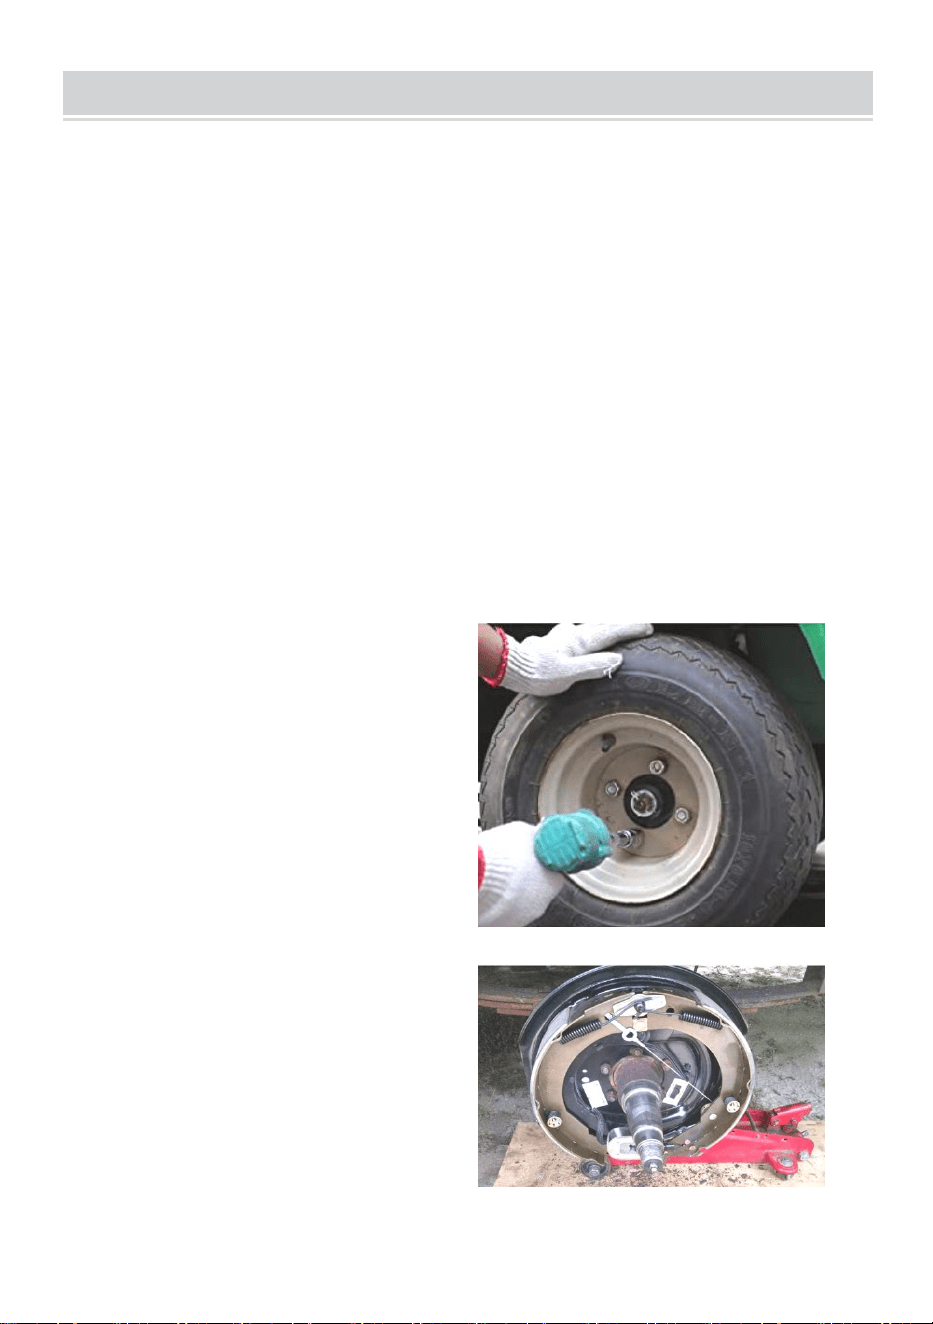
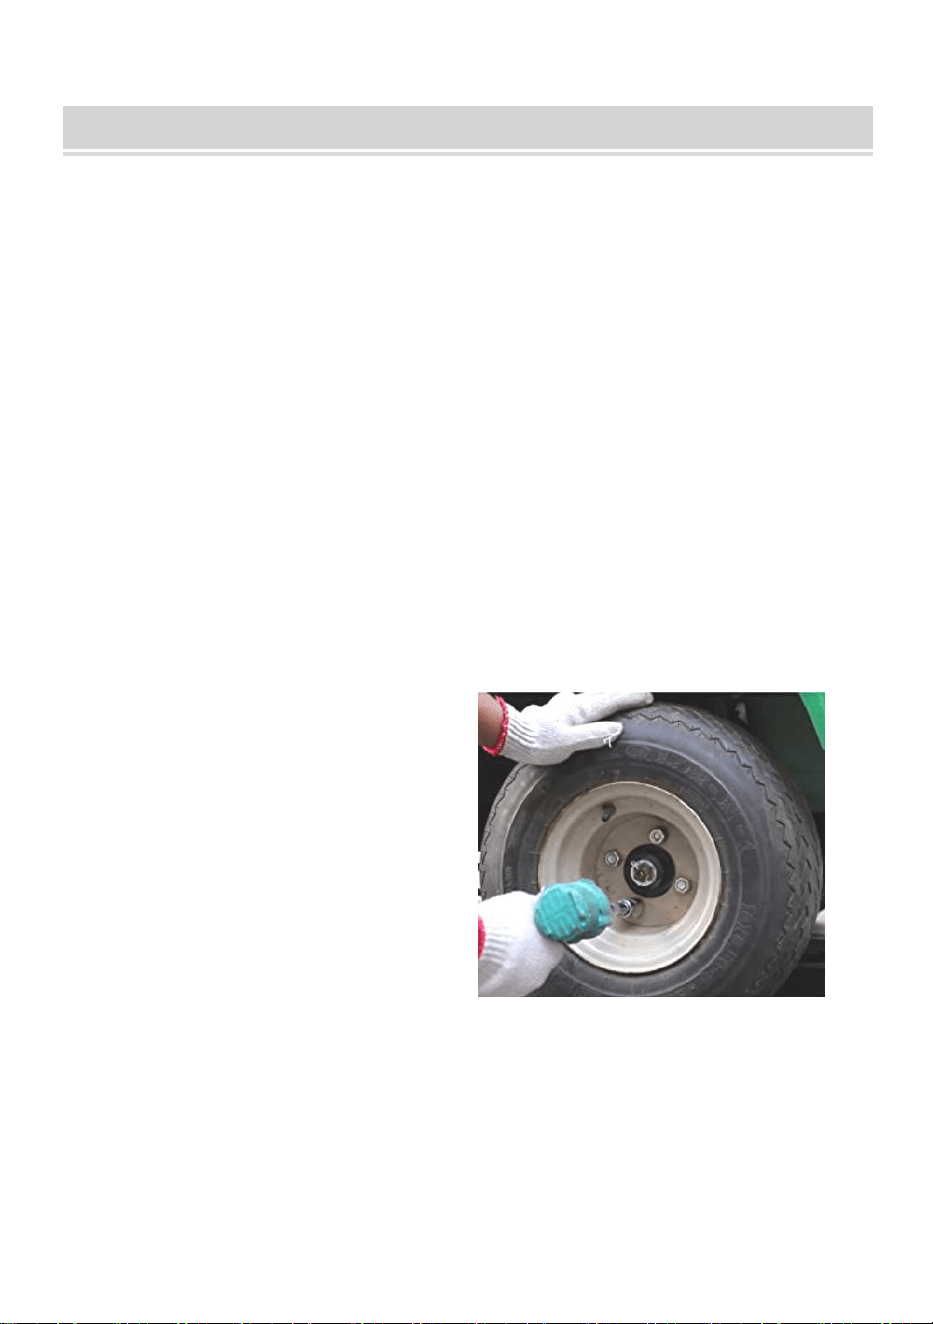
Step1:Jack the axle up with the
help of a jack. Remove the wheels
and tires.
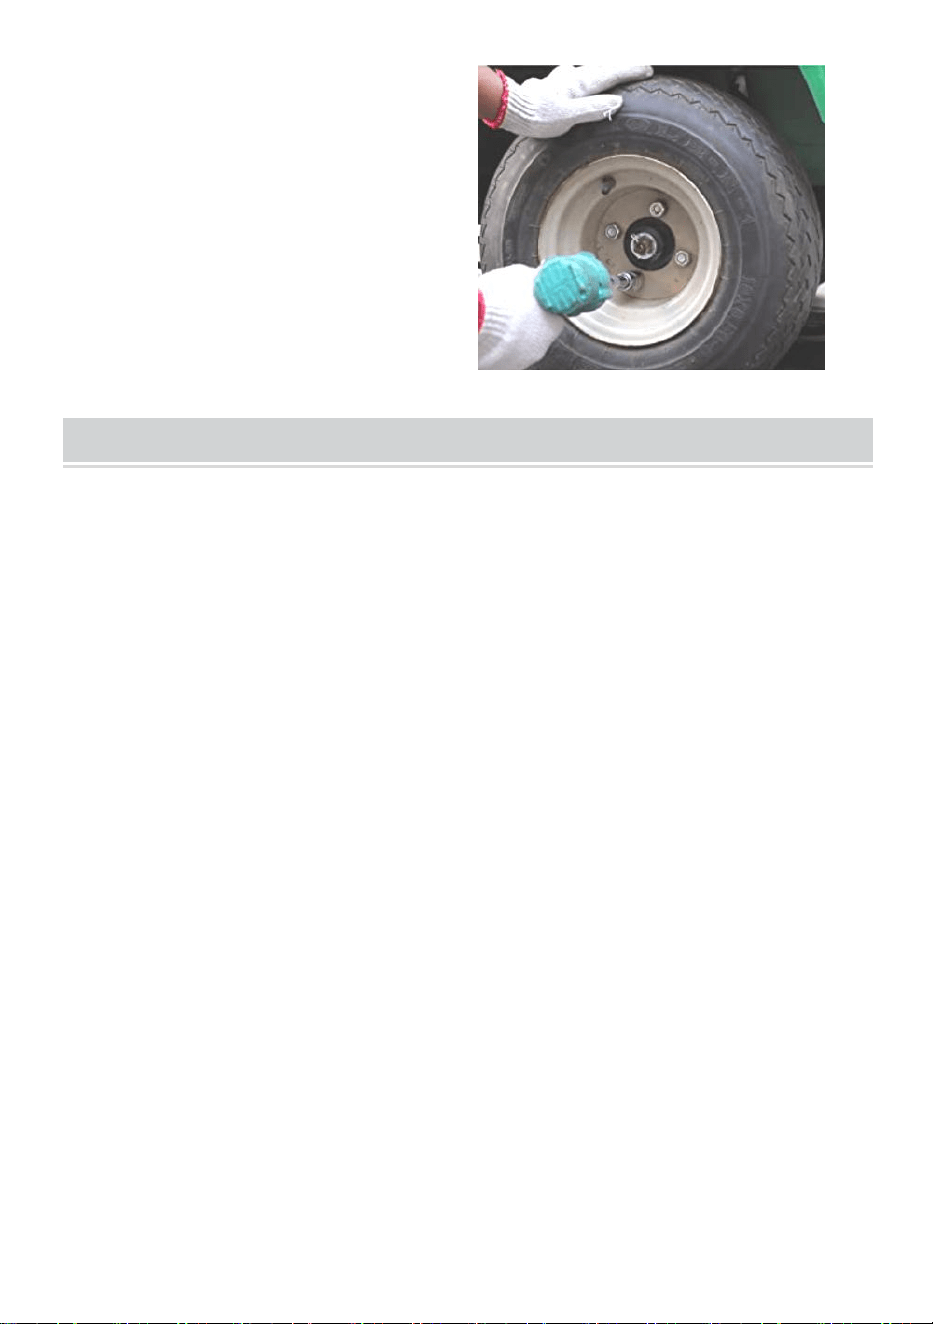
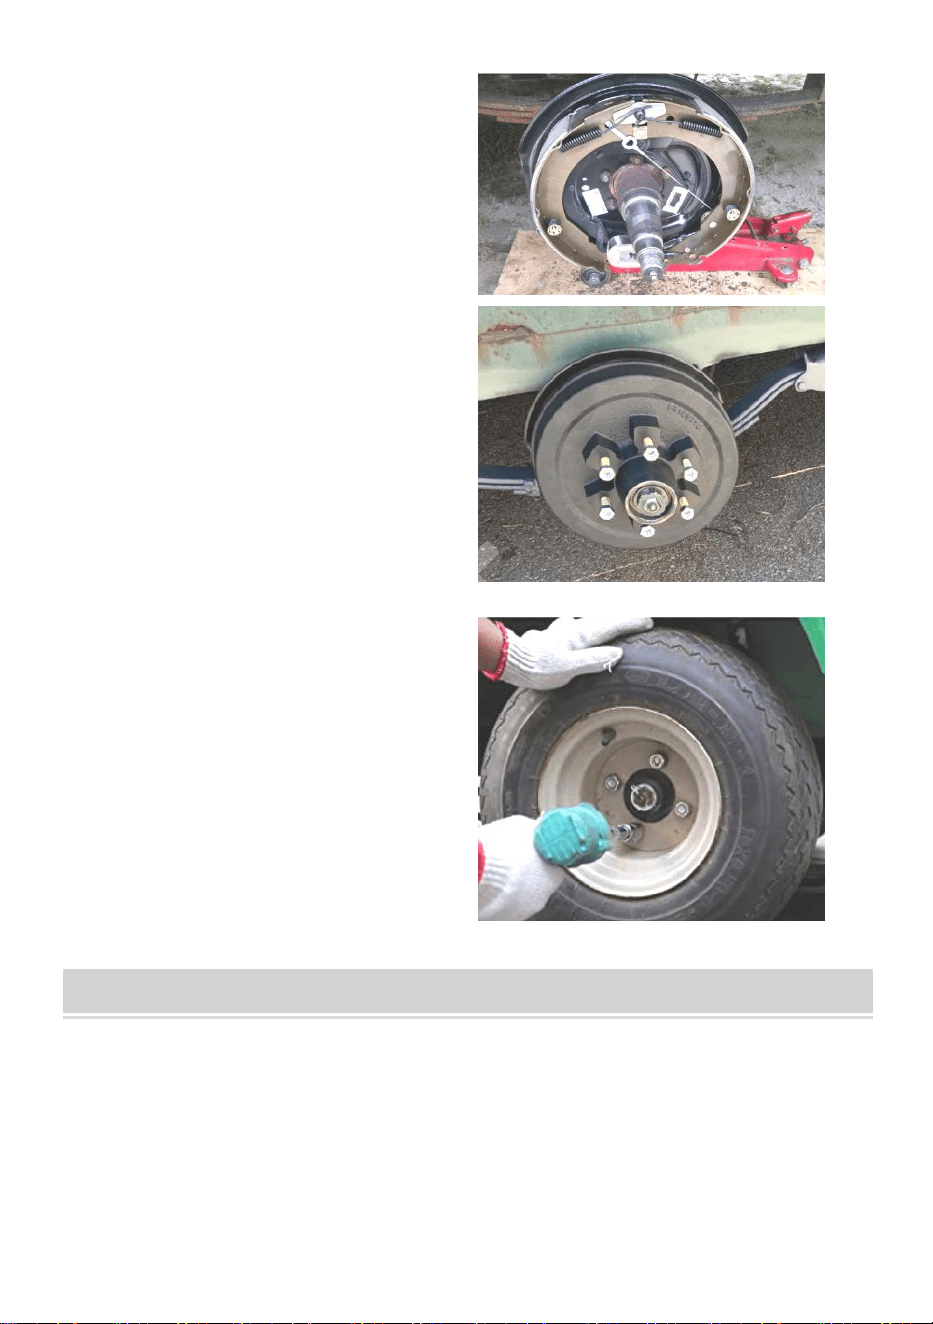
Step2:Install the brakes.

- 6 -
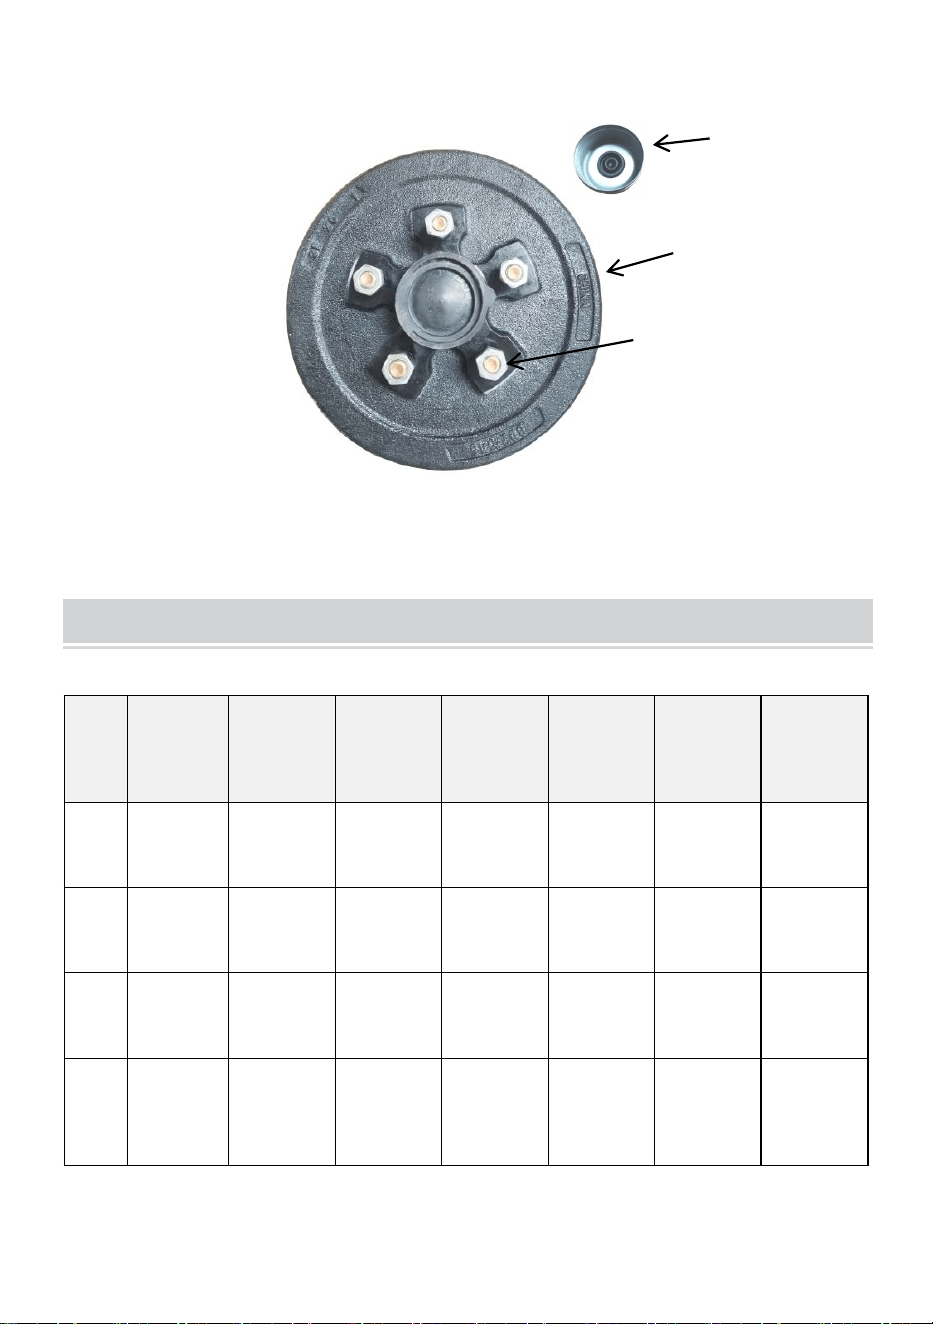
Step3:Install brake drum. Slowly
insert the brake drum onto the axle
and Lock nut and cotter pin. Finally,
install the dust cover.
Note:The brake drum is loaded with
bearings.
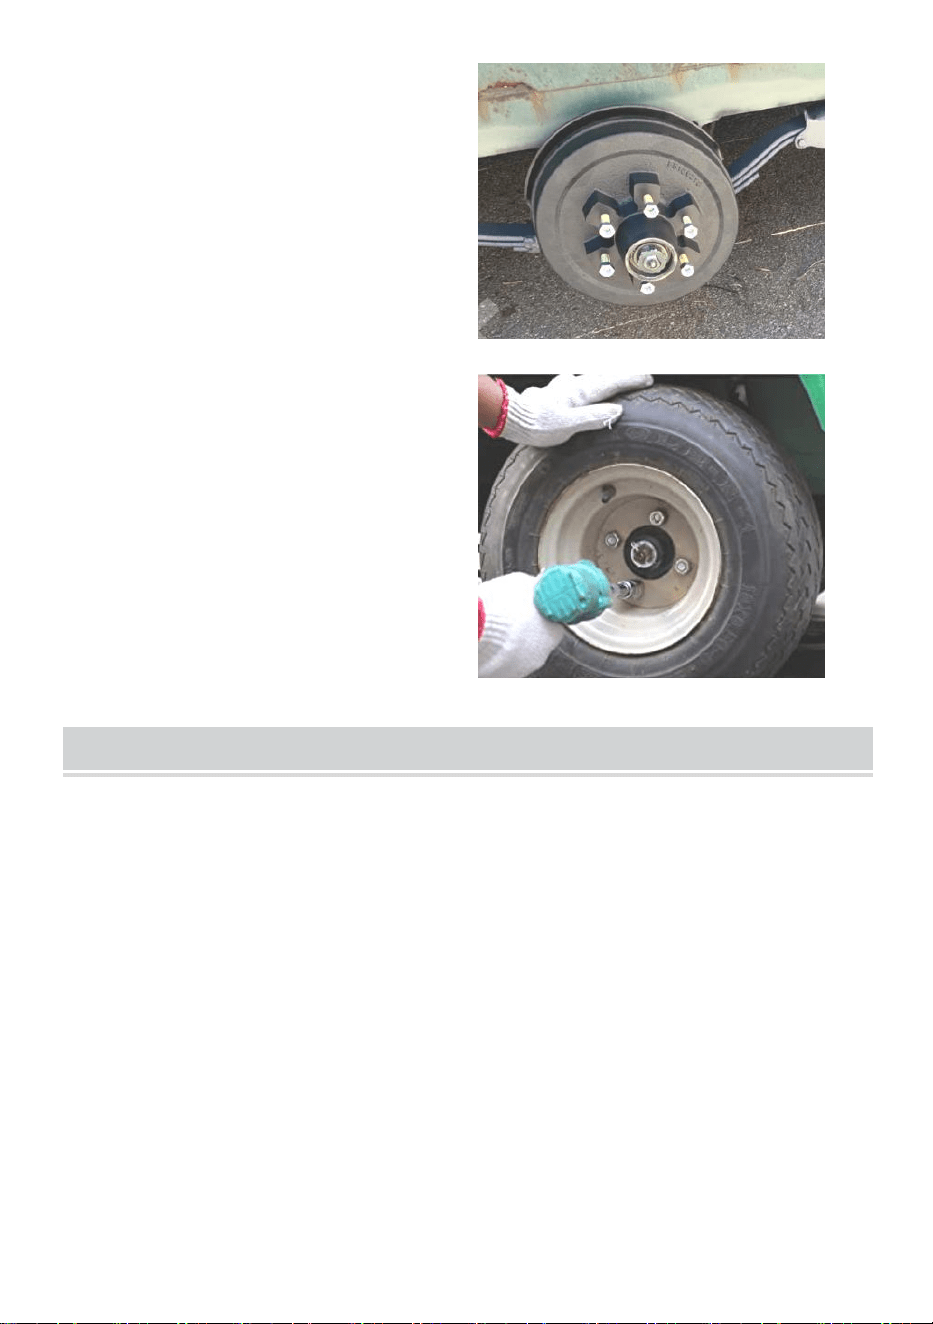
Step4:Install back tires. Connect
the electromagnet leads and
complete the installation.
MAINTENANCE
1. Inspect periodically all parts and accessories and replace them if
damaged or used.
2. Have damaged parts replaced by an authorized service center.
3. Check the nuts periodically and tighten them if they are loose.
4. Keep the product properly maintained and clean for better and safer
performance.
5. Check brake pads regularly and replace them in time if they are
seriously worn.
6. Check the bearing regularly and add lubricating grease if necessary
Sanven Technology Ltd.
Address: Suite 250, 9166 Anaheim Place, Rancho Cucamonga, CA 91730
Made In China


- 8 -
Technique Certificat d'assistance et de garantie électronique
www.vevor.com/support
FREIN DE REMORQUE ÉLECTRIQUE
Modèle: BF10-Z01A*2 , BF10-Z01A*4 , BF10-Z01AB*2 ,
BF12-Z02A*2 , BF12-Z02A*4 , BF12-Z02AB*2
We continue to be committed to provide you tools with competitive price.
"Save Half", "Half Price" or any other similar expressions used by us only represents an
estimate of savings you might benefit from buying certain tools with us compared to the major
top brands and does not necessarily mean to cover all categories of tools offered by us. You
are kindly reminded to verify carefully when you are placing an order with us if you are
actually saving half in comparison with the top major brands.

- 1 -
Have product questions? Need technical support? Please feel free to
contact us:
Technical Support and E-Warranty Certificate
www.vevor.com/support
NEED HELP? CONTACT US!
This is the original instruction, please read all manual instructions
carefully before operating. VEVOR reserves a clear interpretation of our
user manual. The appearance of the product shall be subject to the
product you received. Please forgive us that we won't inform you again if
there are any technology or software updates on our product.
Electric Trailer Brake

- 2 -
3. Lisez attentivement et comprenez toutes les INSTRUCTIONS
D'ASSEMBLAGE ET D'UTILISATION avant l'utilisation.
4. Le non-respect des règles de sécurité et des autres précautions de
sécurité de base peut entraîner des blessures corporelles graves.
GENERAL SAFETY RULES
1. Veuillez sélectionner un type de frein adapté à l'essieu .
2. Évitez l'eau ou l'huile sur les mâchoires de frein . afin de ne pas affecter
l'effet de freinage .
3. Évitez l'eau ou l'huile à l'intérieur du tambour de frein afin de ne pas
affecter l'effet de freinage .
4. N'utilisez pas fréquemment le frein pour ralentir, de peur que la
température du frein ne soit trop élevée, ce qui affecterait la durée de vie
du frein .
5. N'essayez jamais de réparer ou de démonter le produit en cas de
problème. Demandez de l’aide à un machiniste ou à un spécialiste.
6. N'installez pas le produit lorsque vous êtes fatigué ou sous l'influence de
l'alcool, de médicaments sur ordonnance ou de drogues.
7. Les précautions et instructions de sécurité données dans ce manuel ne
peuvent pas couvrir en détail toutes les conditions et situations qui peuvent
survenir.
8. L'opérateur et/ou l'utilisateur doit faire preuve de bon sens et de
prudence lors de l'utilisation du produit , en particulier pour toute question
qui n'est pas mentionnée ci-dessus.
9. L'utilisation d'accessoires autres que ceux recommandés par le
fabricant ou mentionnés dans le manuel d'instructions peut entraîner des
blessures ou causer des dommages.
CONSERVEZ CES INSTRUCTIONS

- 3 -
MODEL AND PARAMETERS
Modèle
BF10-Z01A
× 2
BF10-Z01A
× 4
BF10-Z01
AB × 2
BF12-Z02A
× 2
BF12-Z02A
× 4
BF12-Z02
AB × 2
Convient pour
remorque
3 500 livres
3 500 livres
3 500 livres
7000 livres
7000 livres
7000 livres
Spécifications
du produit
10"×2-1/4"
10" × 2-1/4
"
10" × 2-1/4
"
12" × 2 "
12" × 2 "
12" × 2 "
Électroaimant
S pec .
10", 12 V
CC/2,5-3,6
A
10", 12 V
CC/2,5-3,6
A
10", 12 V
CC/2,5-3,6
A
12", 12 V
CC, 2,8 à
4,2 A
12", 12 V
CC/2,8-4,2
A
12", 12 V
CC/2,8-4,2
A
Bride de frein
Quatre
crampons ,
7/16-20UN
F , PCD =
101,8 mm
Quatre
étalons ,
7/16-20UN
F , PCD =
101,8 mm
Quatre C
eillons ,
7/16-20UN
F , PCD =
101,8 mm
Cinq
Trous ,
PCD= 99
mm
Cinq
Trous ,
PCD= 99
mm
Cinq
Trous ,
PCD= 99
mm
Méthode
d'ajustement
Auto-régla
ble
Auto-régla
ble
Auto-régla
ble
Auto-régla
ble
Auto-régla
ble
Auto-régla
ble
STRUCTURE DIAGRAM
Prenons l
’
exemple du BF10-Z01A × 2 .
1
3
- 4 -
1. Mâchoire de frein 2. Frein électrique 3. Électroaimant
1. Tambour de frein 2. Goujons et écrous 3. Capuchon anti-poussière
COMPONENTS
NO
N.
Nom
BF10-Z0
1A × 2
BF10-Z0
1A × 4
BF10-Z0
1AB × 2
BF12-Z0
2A × 2
BF12-Z0
2A × 4
BF12-Z0
2AB × 2
1
Frein
2
4
2
2
4
2
2
1
2
3

- 5 -
ASSEMBLY
Préparation de l'installation :
6. Deux personnes ou plus pour déplacer et assembler le produit .
7. S'il vous plaît, préparez un tapis , et il faut étaler tous les accessoires.
8. Veuillez préparer des gants pour éviter d'être rayé par des pièces
tranchantes qui pourraient survenir lors de l'installation.
9. Veuillez ouvrir tous les cartons pour vérifier que les accessoires sont
complets et en bon état.
10. Si vous devez utiliser des outils électriques pour installer ce produit,
veuillez régler la vitesse sur basse à l'avance.
Ce qui suit décrit uniquement la procédure d'installation. Le modèle
dépend du choix de l'utilisateur .
2
Tambou
r de
frein
/
/
2
/
/
2
3
Capuch
on
anti-pou
ssière
/
/
2
/
/
2
4
Écrou
(pour
tambour
)
/
/
10
/
/
16

- 6 -
Étape 1 : Soulevez l’essieu à l’aide
d’un cric. Retirez les roues et les
pneus.
Étape 2 : Installez les freins .
Étape 3 : Installez le tambour de
frein. Insérez lentement le tambour
de frein sur l'essieu et bloquez
l'écrou et la goupille fendue. Enfin,
installez le cache-poussière .
Remarque : le tambour de frein est
chargé de roulements.

- 7 -
Étape 4 : Installez les pneus
arrière . Connectez les fils de
l’électro-aimant et terminez
l’installation.
MAINTENANCE
1. Inspectez périodiquement toutes les pièces et accessoires et
remplacez-les s'ils sont endommagés ou usés.
2. Faites remplacer les pièces endommagées par un centre de service
agréé.
3. Vérifiez régulièrement les écrous et serrez-les s'ils sont desserrés.
4. Maintenez le produit correctement entretenu et propre pour des
performances meilleures et plus sûres.
5. Vérifiez régulièrement les plaquettes de frein et remplacez-les à temps
si elles sont très usées.
6. Vérifiez régulièrement le roulement et ajoutez de la graisse lubrifiante si
nécessaire
Sanven Technologie Ltée.
Adresse : Suite 250, 9166 Anaheim Place, Rancho Cucamonga, CA 91730
Fabriqué en Chine


- 9 -
Technisch Support und E-Garantie-Zertifikat
www.vevor.com/support
ELEKTRISCHE ANHÄNGERBREMSE
Modell: BF10-Z01A*2 , BF10-Z01A*4 , BF10-Z01AB*2 ,
BF12-Z02A*2 , BF12-Z02A*4 , BF12-Z02AB*2
We continue to be committed to provide you tools with competitive price.
"Save Half", "Half Price" or any other similar expressions used by us only represents an
estimate of savings you might benefit from buying certain tools with us compared to the major
top brands and does not necessarily mean to cover all categories of tools offered by us. You
are kindly reminded to verify carefully when you are placing an order with us if you are
actually saving half in comparison with the top major brands.

- 1 -
Have product questions? Need technical support? Please feel free to
contact us:
Technical Support and E-Warranty Certificate
www.vevor.com/support
NEED HELP? CONTACT US!
This is the original instruction, please read all manual instructions
carefully before operating. VEVOR reserves a clear interpretation of our
user manual. The appearance of the product shall be subject to the
product you received. Please forgive us that we won't inform you again if
there are any technology or software updates on our product.
Electric Trailer Brake

- 2 -
5. Lesen Sie alle MONTAGE- UND BEDIENUNGSANLEITUNGEN vor
der Inbetriebnahme sorgfältig durch und stellen Sie sicher, dass Sie sie
verstanden haben .
6. Die Nichtbeachtung der Sicherheitsregeln und anderer grundlegender
Sicherheitsvorkehrungen kann zu schweren Verletzungen führen.
GENERAL SAFETY RULES
1. Bitte wählen Sie einen zur Achse passenden Bremsentyp aus .
2. Vermeiden Sie Wasser oder Öl auf den Bremsbacken um die
Bremswirkung nicht zu beeinträchtigen .
3. Vermeiden Sie Wasser oder Öl in der Bremstrommel um die
Bremswirkung nicht zu beeinträchtigen .
4. Verwenden Sie die Bremse nicht zu häufig zum Abbremsen. Andernfalls
kann die Bremstemperatur zu hoch werden und die Lebensdauer der
Bremse beeinträchtigt werden .
5. Versuchen Sie niemals, das Produkt zu reparieren oder zu zerlegen,
wenn ein Problem vorliegt. Bitten Sie einen Maschinisten oder Spezialisten
um Hilfe.
6. Installieren Sie das Produkt nicht, wenn Sie müde sind oder unter dem
Einfluss von Alkohol, verschreibungspflichtigen Medikamenten oder
Drogen stehen.
7. Die in diesem Handbuch enthaltenen Sicherheitsvorkehrungen und
Anweisungen können nicht alle Bedingungen und Situationen im Detail
abdecken, die auftreten können.
8. Der Bediener und/oder Benutzer muss bei der Bedienung des Produkts
gesunden Menschenverstand walten lassen und vorsichtig sein ,
insbesondere in Bezug auf alle oben nicht genannten Aspekte.
9. Die Verwendung von anderem Zubehör als dem vom Hersteller
empfohlenen oder in der Bedienungsanleitung angegebenen kann zu
Verletzungen oder Schäden führen.

- 3 -
BEWAHREN SIE DIESE ANLEITUNG AUF
MODEL AND PARAMETERS
Modell
BF10-Z01A
× 2
BF10-Z01A
× 4
BF10-Z01
AB × 2
BF12-Z02A
× 2
BF12-Z02A
× 4
BF12-Z02
AB × 2
Geeignet für
Anhänger
3500
Pfund
3500
Pfund
3500
Pfund
7000
Pfund
7000
Pfund
7000
Pfund
Produktspezifik
ation
10"×2-1/4 "
10" × 2-1/4
"
10" × 2-1/4
"
12" × 2 "
12" × 2 "
12" × 2 "
Elektromagnet
Spez .
10", DC 12
V/2,5-3,6 A
10", DC 12
V/2,5-3,6 A
10", DC 12
V/2,5-3,6 A
12", DC 12
V, 2,8 – 4,2
A
12", DC 12
V/2,8-4,2 A
12", DC 12
V/2,8-4,2 A
Bremsflansch
Vier
Bolzen ,
7/16-20UN
F ,
Lochkreisd
urchmesse
r = 101,8
mm
Vier
Bolzen ,
7/16-20UN
F ,
Lochkreisd
urchmesse
r = 101,8
mm
Vier
Bolzen ,
7/16-20UN
F ,
Lochkreisd
urchmesse
r = 101,8
mm
Fünf
Löcher ,
PCD = 99
mm
Fünf
Löcher ,
PCD = 99
mm
Fünf
Löcher ,
PCD = 99
mm
Methode
anpassen
Selbsteinst
ellend
Selbsteinst
ellend
Selbsteinst
ellend
Selbsteinst
ellend
Selbsteinst
ellend
Selbsteinst
ellend
STRUCTURE DIAGRAM
Nehmen Sie als Beispiel BF10-Z01A × 2 .
1
3

- 4 -
1. Bremsbacke 2. Elektrische Bremse 3. Elektromagnet
1. Bremstrommel 2. Bolzen und Muttern 3. Staubkappe
COMPONENTS
NEI
N.
Name
BF10-Z0
1A × 2
BF10-Z0
1A × 4
BF10-Z0
1AB × 2
BF12-Z0
2A × 2
BF12-Z0
2A × 4
BF12-Z0
2AB × 2
1
Bremse
2
4
2
2
4
2
2
1
2
3

- 5 -
ASSEMBLY
Vorbereitung der Installation:
11. Zwei oder mehr Personen zum Transport und Zusammenbau des
Produkts .
12. Bitte bereiten Sie eine Matte vor , und Sie müssen das gesamte
Zubehör ausbreiten.
13. Bitte halten Sie Handschuhe bereit, um Kratzer durch scharfe Teile zu
vermeiden, die bei der Installation auftreten können.
14. Bitte öffnen Sie alle Kartons um zu prüfen, ob das Zubehör vollständig
und in gutem Zustand ist.
15. Wenn Sie zur Installation dieses Produkts Elektrowerkzeuge
verwenden müssen, stellen Sie die Geschwindigkeit bitte vorab auf
niedrige Geschwindigkeit ein.
Nachfolgend wird nur die Installationsprozedur beschrieben. Das Modell
hängt von der Wahl des Benutzers ab .
2
Bremstr
ommel
/
/
2
/
/
2
3
Staubsc
hutzkap
pe
/
/
2
/
/
2
4
Mutter
(für
Tromme
l)
/
/
10
/
/
16
- 6 -
Schritt 1: Heben Sie die Achse mit
Hilfe eines Wagenhebers an.
Entfernen Sie die Räder und Reifen.
Schritt 2: Installieren Sie die
Bremsen .
Schritt 3: Bremstrommel einbauen.
Setzen Sie die Bremstrommel
langsam auf die Achse und sichern
Sie Mutter und Splint. Zum Schluss
montieren Sie die
Staubschutzkappe .
Hinweis: Die Bremstrommel ist mit
Lagern belastet.
- 7 -
Schritt 4: Hinterreifen montieren .
Schließen Sie die
Elektromagnetkabel an und
schließen Sie die Installation ab.
MAINTENANCE
1. Überprüfen Sie regelmäßig alle Teile und Zubehörteile und ersetzen Sie
sie, wenn sie beschädigt oder abgenutzt sind.
2. Lassen Sie beschädigte Teile von einem autorisierten Servicecenter
austauschen.
3. Überprüfen Sie die Muttern regelmäßig und ziehen Sie sie fest, wenn sie
locker sind.
4. Halten Sie das Produkt für eine bessere und sicherere Leistung
ordnungsgemäß instand und sauber.
5. Kontrollieren Sie die Bremsbeläge regelmäßig und tauschen Sie diese
bei starkem Verschleiß rechtzeitig aus.
6. Kontrollieren Sie das Lager regelmäßig und fügen Sie bei Bedarf
Schmierfett hinzu
Sanven Technology Ltd.
Adresse: Suite 250, 9166 Anaheim Place, Rancho Cucamonga, CA 91730
In China hergestellt


- 9 -
Tecnico Supporto e certificato di garanzia elettronica
www.vevor.com/support
FRENO ELETTRICO DEL RIMORCHIO
Modello: BF10-Z01A*2 , BF10-Z01A*4 , BF10-Z01AB*2 ,
BF12-Z02A*2 , BF12-Z02A*4 , BF12-Z02AB*2
We continue to be committed to provide you tools with competitive price.
"Save Half", "Half Price" or any other similar expressions used by us only represents an
estimate of savings you might benefit from buying certain tools with us compared to the major
top brands and does not necessarily mean to cover all categories of tools offered by us. You
are kindly reminded to verify carefully when you are placing an order with us if you are
actually saving half in comparison with the top major brands.

- 1 -
Have product questions? Need technical support? Please feel free to
contact us:
Technical Support and E-Warranty Certificate
www.vevor.com/support
NEED HELP? CONTACT US!
This is the original instruction, please read all manual instructions
carefully before operating. VEVOR reserves a clear interpretation of our
user manual. The appearance of the product shall be subject to the
product you received. Please forgive us that we won't inform you again if
there are any technology or software updates on our product.
Electric Trailer Brake

- 2 -
7. leggere attentamente e comprendere tutte le ISTRUZIONI DI
MONTAGGIO E FUNZIONAMENTO .
8. La mancata osservanza delle norme di sicurezza e di altre precauzioni
di sicurezza di base può causare gravi lesioni personali.
GENERAL SAFETY RULES
1. Selezionare un tipo di freno adatto all'asse .
2. Evitare che acqua o olio entrino nelle ganasce dei freni per non
compromettere l'effetto frenante .
3. Evitare che acqua o olio penetrino nel tamburo del freno per non
compromettere l'effetto frenante .
4. Non utilizzare frequentemente il freno per rallentare, altrimenti la
temperatura del freno potrebbe essere troppo elevata e compromettere la
durata utile del freno .
5. Non tentare mai di riparare o smontare il prodotto quando c'è un
problema. Chiedi aiuto a un macchinista o a uno specialista.
6. Non installare il prodotto quando si è stanchi o sotto l'effetto di alcol,
farmaci da prescrizione o droghe.
7. Le precauzioni di sicurezza e le istruzioni fornite nel presente manuale
non sono in grado di coprire in dettaglio tutte le condizioni e le situazioni
che potrebbero verificarsi.
8. L'operatore e/o l'utente devono usare buon senso e cautela quando
utilizzano il prodotto , in particolare per qualsiasi questione non
menzionata sopra.
9. L'uso di accessori diversi da quelli consigliati dal produttore o indicati nel
manuale di istruzioni può causare lesioni o danni.
SALVA LE ISTRUZIONI SE

- 3 -
MODEL AND PARAMETERS
Modello
Modello
BF10-Z01A
× 2
BF10-Z01A
× 4
Modello:
BF10-Z01
AB × 2
Modello
BF12-Z02A
× 2
Modello
BF12-Z02A
× 4
Modello
BF12-Z02
AB × 2
Adatto per
rimorchio
3500 libbre
3500 libbre
3500 libbre
7000 libbre
7000 libbre
7000 libbre
Specifiche del
prodotto.
10"×2-1/4"
10" ×
2-1/4"
10" ×
2-1/4"
12" × 2"
12" × 2"
12" × 2"
Elettromagnete
S pec .
10", CC 12
V/2,5-3,6 A
10", CC 12
V/2,5-3,6 A
10", CC 12
V/2,5-3,6 A
12", CC 12
V, 2,8 ~ 4,2
A
12",CC12V
/2,8-4,2A
12",CC12V
/2,8-4,2A
Flangia freno
Quattro
borchie ,
7/16-20UN
F , PCD=
101,8 mm
Quattro
borchie ,
7/16-20UN
F , PCD=
101,8 mm
Quattro
Borchie ,
7/16-20UN
F , PCD=
101,8 mm
Cinque
buchi ,
PCD= 99
millimetri
Cinque
buchi ,
PCD=
99mm
Cinque
buchi ,
PCD=
99mm
Metodo di
regolazione
Autoregola
nte
Autoregola
nte
Autoregola
nte
Autoregola
nte
Autoregola
nte
Autoregola
nte
STRUCTURE DIAGRAM
Prendiamo come esempio BF10-Z01A × 2 .
2
1
3
- 4 -
1. Ganasce freno 2. Freno elettrico 3. Elettromagnete
1. Tamburo del freno 2. Perni e dadi 3. Tappo antipolvere
COMPONENTS
NO.
Nome
Modello
BF10-Z0
1A × 2
BF10-Z0
1A × 4
Modello
BF10-Z0
1AB × 2
Modello
BF12-Z0
2A × 2
Modello
BF12-Z0
2A × 4
Modello
BF12-Z0
2AB × 2
1
Freno
2
4
2
2
4
2
2
Tambur
o del
freno
/
/
2
/
/
2
3
Tappo
antipolv
ere
/
/
2
/
/
2
4
Capotas
to (per
tamburo
)
/
/
10
/
/
16
1
2
3
- 5 -
ASSEMBLY
Preparazione all'installazione:
16. Due o più persone per spostare e montare il prodotto .
17. Per favore prepara un tappetino , e devi distribuire tutti gli accessori.
18. Si prega di indossare dei guanti per evitare di graffiarsi con parti
taglienti che potrebbero presentarsi durante l'installazione.
19. Si prega di aprire tutte le scatole per verificare che gli accessori siano
completi e in buone condizioni.
20. Se per installare questo prodotto è necessario utilizzare utensili
elettrici, impostare in anticipo la velocità su bassa.
Di seguito viene descritta solo la procedura di installazione. Il modello
dipende dalla scelta dell'utente .
Fase 1: sollevare l'assale con l'aiuto
di un cric. Rimuovere le ruote e gli
pneumatici.
Fase 2: installare i freni .

- 6 -
Fase 3: installare il tamburo del
freno. Inserire lentamente il tamburo
del freno sull'asse e bloccare il dado
e la coppiglia. Infine, installare la
copertura antipolvere .
Nota: il tamburo del freno è dotato di
cuscinetti.
Fase 4: installare gli pneumatici
posteriori . Collegare i cavi
dell'elettromagnete e completare
l'installazione.
MAINTENANCE
1. Ispezionare periodicamente tutte le parti e gli accessori e sostituirli se
danneggiati o usurati.
2. Far sostituire le parti danneggiate da un centro di assistenza
autorizzato.
3. Controllare periodicamente i dadi e serrarli se sono allentati.
4. Mantenere il prodotto pulito e sottoposto a manutenzione adeguata per
prestazioni migliori e più sicure.
5. Controllare regolarmente le pastiglie dei freni e sostituirle per tempo se
sono molto usurate.
6. Controllare regolarmente il cuscinetto e aggiungere grasso lubrificante
se necessario
Azienda

- 7 -
Indirizzo: Suite 250, 9166 Anaheim Place, Rancho Cucamonga, CA 91730
Made in China


- 9 -
Técnico Certificado de soporte y garantía electrónica
www.vevor.com/support
FRENO DE REMOLQUE ELÉCTRICO
Modelo: BF10-Z01A*2 , BF10-Z01A*4 , BF10-Z01AB*2 ,
BF12-Z02A*2 , BF12-Z02A*4 , BF12-Z02AB*2
We continue to be committed to provide you tools with competitive price.
"Save Half", "Half Price" or any other similar expressions used by us only represents an
estimate of savings you might benefit from buying certain tools with us compared to the major
top brands and does not necessarily mean to cover all categories of tools offered by us. You
are kindly reminded to verify carefully when you are placing an order with us if you are
actually saving half in comparison with the top major brands.

- 1 -
Have product questions? Need technical support? Please feel free to
contact us:
Technical Support and E-Warranty Certificate
www.vevor.com/support
NEED HELP? CONTACT US!
This is the original instruction, please read all manual instructions
carefully before operating. VEVOR reserves a clear interpretation of our
user manual. The appearance of the product shall be subject to the
product you received. Please forgive us that we won't inform you again if
there are any technology or software updates on our product.
Electric Trailer Brake

- 2 -
9. Lea atentamente y comprenda todas las INSTRUCCIONES DE
MONTAJE Y OPERACIÓN antes de operar.
10. El incumplimiento de las normas de seguridad y otras precauciones de
seguridad básicas puede provocar lesiones personales graves.
GENERAL SAFETY RULES
1. Seleccione un tipo de freno adecuado para el eje .
2. Evite que entre agua o aceite en las zapatas de freno . para no afectar el
efecto de frenado .
3. Evite que haya agua o aceite dentro del tambor de freno. para no afectar
el efecto de frenado .
4. No utilice el freno con frecuencia para reducir la velocidad, ya que la
temperatura del freno será demasiado alta y afectará la vida útil del freno .
5. Nunca intente reparar o desmontar el producto cuando haya un
problema. Pida ayuda a un maquinista o especialista.
6. No instale el producto si está cansado o bajo la influencia del alcohol,
medicamentos recetados o drogas.
7. Las precauciones e instrucciones de seguridad proporcionadas en este
manual no pueden cubrir en detalle todas las condiciones y situaciones
que puedan surgir.
8. El operador y/o usuario debe utilizar el sentido común y precaución al
operar el producto , especialmente en cualquier asunto no mencionado
anteriormente.
9. El uso de cualquier accesorio distinto a los recomendados por el
fabricante o indicados en el manual de instrucciones puede provocar
lesiones o causar daños.
GUARDE ESTAS INSTRUCCIONES
- 3 -
MODEL AND PARAMETERS
Modelo
BF10-Z01A
× 2
BF10-Z01A
× 4
BF10-Z01
AB × 2
BF12-Z02A
× 2
BF12-Z02A
× 4
BF12-Z02
AB × 2
Apto para
remolque
3500 libras
3500 libras
3500 libras
7000 libras
7000 libras
7000 libras
Especificacion
es del
producto.
10" × 2-1/4
"
10" × 2-1/4
"
10" × 2-1/4
"
12" × 2"
12" × 2"
12" × 2"
Espec .
electroimán .
10", CC 12
V/2,5-3,6 A
10", CC 12
V/2,5-3,6 A
10", CC 12
V/2,5-3,6 A
12", CC 12
V, 2,8 ~ 4,2
A
12", CC 12
V/2,8-4,2 A
12", CC 12
V/2,8-4,2 A
Brida de freno
Cuatro
tacos ,
7/16-20UN
F ,
diámetro
interior de
la punta de
la aguja =
101,8 mm
Cuatro
tacos ,
7/16-20UN
F ,
diámetro
interior de
la punta de
la aguja =
101,8 mm
Cuatro
Tachuelas ,
7/16-20UN
F ,
diámetro
interior de
la punta de
la aguja =
101,8 mm
Cinco
Agujeros ,
PCD= 99
milímetros
Cinco
Agujeros ,
PCD= 99
mm
Cinco
Agujeros ,
PCD= 99
mm
Método de
ajuste
Autoajusta
ble
Autoajusta
ble
Autoajusta
ble
Autoajusta
ble
Autoajusta
ble
Autoajusta
ble
STRUCTURE DIAGRAM
Tomemos como ejemplo BF10-Z01A × 2 .
2
1
3

- 4 -
1. Zapata de freno 2. Freno eléctrico 3. Electroimán
1. Tambor de freno 2. Pernos y tuercas 3. Tapa antipolvo
COMPONENTS
NO.
Nombre
BF10-Z0
1A × 2
BF10-Z0
1A × 4
BF10-Z0
1AB × 2
BF12-Z0
2A × 2
BF12-Z0
2A × 4
BF12-Z0
2AB × 2
1
Freno
2
4
2
2
4
2
2
Tambor
de freno
/
/
2
/
/
2
3
Tapa
antipolv
o
/
/
2
/
/
2
4
Tuerca
(para
tambor)
/
/
10
/
/
16
1
2
3
- 5 -
ASSEMBLY
Preparación de la instalación:
21. Dos o más personas para mover y montar el producto .
22. Por favor, prepare una estera , y necesitas distribuir todos los
accesorios.
23. Prepare guantes para evitar rayarse con las piezas afiladas que
puedan producirse durante la instalación.
24. Por favor abra todas las cajas para comprobar que los accesorios
estén completos y en buen estado.
25. Si necesita utilizar herramientas eléctricas para instalar este producto,
configure la velocidad a baja con antelación.
A continuación se describe únicamente el procedimiento de instalación. El
modelo depende de la elección del usuario .
Paso 1: Levante el eje con la ayuda
de un gato. Retire las ruedas y los
neumáticos.
Paso 2: Instale los frenos .
- 6 -
Paso 3: Instale el tambor de freno.
Inserte lentamente el tambor de
freno en el eje y la tuerca de
seguridad y el pasador de chaveta.
Por último, instale la cubierta
antipolvo .
Nota: El tambor de freno está
cargado con cojinetes.
Paso 4: Instale los neumáticos
traseros . Conecte los cables del
electroimán y complete la
instalación.
MAINTENANCE
1. Inspeccione periódicamente todas las piezas y accesorios y
reemplácelos si están dañados o usados.
2. Haga que un centro de servicio autorizado reemplace las piezas
dañadas.
3. Revise periódicamente las tuercas y apriételas si están flojas.
4. Mantenga el producto adecuadamente mantenido y limpio para un
rendimiento mejor y más seguro.
5. Revise periódicamente las pastillas de freno y reemplácelas a tiempo si
están muy desgastadas.
6. Revise periódicamente el rodamiento y agregue grasa lubricante si es
necesario.
Tecnología Sanven Ltd.

- 7 -
Dirección: Suite 250, 9166 Anaheim Place, Rancho Cucamonga, CA
91730
Hecho en china


- 9 -
Techniczny Wsparcie i certyfikat e-gwarancji
www.vevor.com/support
ELEKTRYCZNY HAMULEC PRZYCZEPY
Model: BF10-Z01A*2 , BF10-Z01A*4 , BF10-Z01AB*2 ,
BF12-Z02A*2 , BF12-Z02A*4 , BF12-Z02AB*2
We continue to be committed to provide you tools with competitive price.
"Save Half", "Half Price" or any other similar expressions used by us only represents an
estimate of savings you might benefit from buying certain tools with us compared to the major
top brands and does not necessarily mean to cover all categories of tools offered by us. You
are kindly reminded to verify carefully when you are placing an order with us if you are
actually saving half in comparison with the top major brands.

- 1 -
Have product questions? Need technical support? Please feel free to
contact us:
Technical Support and E-Warranty Certificate
www.vevor.com/support
NEED HELP? CONTACT US!
This is the original instruction, please read all manual instructions
carefully before operating. VEVOR reserves a clear interpretation of our
user manual. The appearance of the product shall be subject to the
product you received. Please forgive us that we won't inform you again if
there are any technology or software updates on our product.
Electric Trailer Brake

- 2 -
11. należy uważnie przeczytać i zrozumieć całą INSTRUKCJĘ MONTAŻU
I OBSŁUGI .
12. Nieprzestrzeganie zasad bezpieczeństwa i innych podstawowych
środków ostrożności może skutkować poważnymi obrażeniami ciała.
GENERAL SAFETY RULES
1. Proszę wybrać typ hamulca odpowiedni dla danej osi .
2. Unikaj kontaktu klocków hamulcowych z wodą lub olejem . aby nie
wpływać na skuteczność hamowania .
3. Unikaj przedostania się wody lub oleju do wnętrza bębna hamulcowego
aby nie wpływać na skuteczność hamowania .
4. Nie należy zbyt często używać hamulca w celu zwolnienia, ponieważ
może to spowodować zbyt wysoką temperaturę hamulca, co może mieć
wpływ na jego żywotność .
5. Nigdy nie próbuj naprawiać lub rozmontowywać produktu, gdy
występuje w nim jakiś problem. Zwróć się o pomoc do mechanika lub
specjalisty.
6. Nie instaluj produktu, jeśli jesteś zmęczony lub pod wpływem alkoholu,
leków na receptę lub narkotyków.
7. Środki ostrożności i instrukcje podane w niniejszej instrukcji nie są w
stanie szczegółowo objąć wszystkich warunków i sytuacji, jakie mogą
wystąpić.
8. Operator i/lub użytkownik musi zachować zdrowy rozsądek i ostrożność
podczas obsługi produktu , zwłaszcza w kwestiach, które nie zostały
wymienione powyżej.
9. Stosowanie akcesoriów innych niż zalecane przez producenta lub
wymienione w instrukcji obsługi może skutkować obrażeniami ciała lub
spowodować uszkodzenia.
ZAPISZ INSTRUKCJĘ SE

- 3 -
MODEL AND PARAMETERS
Model
BF10-Z01A
× 2
BF10-Z01A
× 4
BF10-Z01
AB × 2
BF12-Z02A
× 2
BF12-Z02A
× 4
BF12-Z02
AB × 2
Nadaje się do
przyczepy
3500
funtów
3500
funtów
3500
funtów
7000
funtów
7000
funtów
7000
funtów
Specyfikacja
produktu.
10"×2-1/4"
10" ×
2-1/4"
10" ×
2-1/4"
12" × 2"
12" × 2"
12" × 2"
Specyfikacja
elektromagnes
u
10", prąd
stały 12
V/2,5-3,6 A
10", prąd
stały 12
V/2,5-3,6 A
10", prąd
stały 12
V/2,5-3,6 A
12", prąd
stały 12 V,
2,8~4,2 A
12", prąd
stały 12
V/2,8-4,2 A
12", prąd
stały 12
V/2,8-4,2 A
Kołnierz
hamulcowy
Cztery
kołki ,
7/16-20UN
F ,PCD=
101,8 mm
Cztery
szpilki S ,
7/16-20UN
F ,PCD=
101,8 mm
Cztery
szpilki ,
7/16-20UN
F ,PCD=
101,8 mm
Pięć
Otwory ,
PCD=
99mm
Pięć
Otwory ,
PCD=
99mm
Pięć
Otwory ,
PCD=
99mm
Dostosuj
metodę
Samoregul
ujący
Samoregul
ujący
Samoregul
ujący
Samoregul
ujący
Samoregul
ujący
Samoregul
ujący
STRUCTURE DIAGRAM
Weźmy na przykład BF10-Z01A × 2 .
1
3

- 4 -
1. Szczęka hamulcowa 2. Hamulec elektryczny 3. Elektromagnes
1. Bęben hamulcowy 2. Szpilki i nakrętki 3. Osłona przeciwpyłowa
COMPONENTS
NIE.
Nazwa
BF10-Z0
1A × 2
BF10-Z0
1A × 4
BF10-Z0
1AB × 2
BF12-Z0
2A × 2
BF12-Z0
2A × 4
BF12-Z0
2AB × 2
1
Hamule
c
2
4
2
2
4
2
2
1
2
3

- 5 -
ASSEMBLY
Przygotowanie do instalacji:
26. produktu potrzebne są co najmniej dwie osoby .
27. Proszę przygotować matę , i trzeba rozłożyć wszystkie akcesoria.
28. Proszę przygotować rękawice, aby uniknąć zarysowań ostrymi
elementami, które mogą powstać w trakcie montażu.
29. Proszę otworzyć wszystkie pudełka, aby sprawdzić, czy akcesoria są
kompletne i w dobrym stanie.
30. Jeśli do montażu tego produktu konieczne będzie użycie
elektronarzędzi, należy wcześniej ustawić niską prędkość.
Poniżej opisano tylko procedurę instalacji. Model zależy od wyboru
użytkownika .
2
Bęben
hamulco
wy
/
/
2
/
/
2
3
Osłona
przeciw
pyłowa
/
/
2
/
/
2
4
Nakrętk
a (do
bębna)
/
/
10
/
/
16

- 6 -
Krok 1: Podnieś oś za pomocą
podnośnika. Zdejmij koła i opony.
Krok 2: Zamontuj hamulce .
Krok 3: Zamontuj bęben
hamulcowy. Powoli wsuń bęben
hamulcowy na oś i dokręć nakrętkę
zabezpieczającą oraz zawleczkę.
Na koniec zamontuj osłonę
przeciwpyłową .
Uwaga: Bęben hamulcowy jest
obciążony łożyskami.

- 7 -
Krok 4: Zamontuj tylne opony .
Podłącz przewody elektromagnesu i
zakończ instalację.
MAINTENANCE
1. Okresowo sprawdzaj wszystkie części i akcesoria i wymie ń je, jeśli
ulegną uszkodzeniu lub będą zużyte.
2. Uszkodzone części należy wymienić w autoryzowanym serwisie.
3. Sprawdzaj nakrętki okresowo i dokręć je, jeśli są luźne.
4. Aby zapewnić lepszą i bezpieczniejszą pracę, utrzymuj produkt w
odpowiedniej konserwacji i czystości.
5. Regularnie sprawdzaj stan klocków hamulcowych i wymień je, jeśli
ulegną znacznemu zużyciu.
6. Regularnie sprawdzaj stan łożyska i w razie potrzeby uzupełnij smarem.
Sanven Technology Ltd.
Adres: Suite 250, 9166 Anaheim Place, Rancho Cucamonga, CA 91730
Wyprodukowano w Chinach


- 9 -
Technisch Ondersteuning en E-garantiecertificaat
www.vevor.com/support
ELEKTRISCHE AANHANGERREM
Model: BF10-Z01A*2 , BF10-Z01A*4 , BF10-Z01AB*2 ,
BF12-Z02A*2 , BF12-Z02A*4 , BF12-Z02AB*2
We continue to be committed to provide you tools with competitive price.
"Save Half", "Half Price" or any other similar expressions used by us only represents an
estimate of savings you might benefit from buying certain tools with us compared to the major
top brands and does not necessarily mean to cover all categories of tools offered by us. You
are kindly reminded to verify carefully when you are placing an order with us if you are
actually saving half in comparison with the top major brands.
- 1 -
Have product questions? Need technical support? Please feel free to
contact us:
Technical Support and E-Warranty Certificate
www.vevor.com/support
NEED HELP? CONTACT US!
This is the original instruction, please read all manual instructions
carefully before operating. VEVOR reserves a clear interpretation of our
user manual. The appearance of the product shall be subject to the
product you received. Please forgive us that we won't inform you again if
there are any technology or software updates on our product.
Electric Trailer Brake

- 2 -
13. Lees alle MONTAGE- EN GEBRUIKSAANWIJZINGEN zorgvuldig
door en zorg dat u ze begrijpt voordat u het apparaat gaat gebruiken.
14. Het niet naleven van de veiligheidsregels en andere elementaire
veiligheidsmaatregelen kan leiden tot ernstig persoonlijk letsel.
GENERAL SAFETY RULES
1. Selecteer een remtype dat geschikt is voor de as .
2. Vermijd water of olie op de remblokken om de remwerking niet te
beïnvloeden .
3. Voorkom dat er water of olie in de remtrommel komt om de remwerking
niet te beïnvloeden .
4. Gebruik de rem niet te vaak om af te remmen, anders kan de
remtemperatuur te hoog oplopen, wat de levensduur van de rem
beïnvloedt .
5. Probeer nooit het product te repareren of te demonteren als er een
probleem is. Vraag een machinist of specialist om hulp.
6. Installeer het product niet als u moe bent of onder invloed bent van
alcohol, voorgeschreven medicijnen of drugs.
7. De veiligheidsmaatregelen en instructies in deze handleiding kunnen
niet in detail alle omstandigheden en situaties dekken die zich kunnen
voordoen.
8. De bediener en/of gebruiker moet bij het bedienen van het product zijn
gezonde verstand gebruiken en voorzichtig zijn , vooral bij zaken die
hierboven niet zijn genoemd.
9. Het gebruik van andere accessoires dan die welke door de fabrikant
worden aanbevolen of in de gebruiksaanwijzing worden vermeld, kan
leiden tot letsel of schade.
BEWAAR DE SE- INSTRUCTIES
- 3 -
MODEL AND PARAMETERS
Model
BF10-Z01A
× 2
BF10-Z01A
× 4
BF10-Z01
AB × 2
BF12-Z02A
× 2
BF12-Z02A
× 4
BF12-Z02
AB × 2
Geschikt voor
aanhanger
3500 pond
3500 pond
3500 pond
7000 pond
7000 pond
7000 pond
Productspecific
atie.
10"×2-1/4"
10" ×
2-1/4"
10" ×
2-1/4"
12" × 2"
12" × 2"
12" × 2"
Elektromagnee
t Spec .
10",
DC12V/2,5
-3,6A
10",
DC12V/2,5
-3,6A
10",
DC12V/2,5
-3,6A
12",
DC12V,
2,8~4,2A
12",
DC12V/2,8
-4,2A
12",
DC12V/2,8
-4,2A
Remflens
Vier
noppen ,
7/16-20UN
F ,PCD=
101,8 mm
Vier
Studs ,
7/16-20UN
F ,PCD=
101,8 mm
Vier
Studs ,
7/16-20UN
F ,PCD=
101,8 mm
Vijf
Gaten ,
PCD=
99mm
Vijf
Gaten ,
PCD=
99mm
Vijf
Gaten ,
PCD=
99mm
Methode
aanpassen
Zelfinstelle
nd
Zelfinstelle
nd
Zelfinstelle
nd
Zelfinstelle
nd
Zelfinstelle
nd
Zelfinstelle
nd
STRUCTURE DIAGRAM
Neem BF10-Z01A × 2 als voorbeeld .
2
1
3
- 4 -
1. Remschoen 2. Elektrische rem 3. Elektromagneet
1. Remtrommel 2. Bouten en moeren 3. Stofkap
COMPONENTS
NE
E.
Naam
BF10-Z0
1A × 2
BF10-Z0
1A × 4
BF10-Z0
1AB × 2
BF12-Z0
2A × 2
BF12-Z0
2A × 4
BF12-Z0
2AB × 2
1
Rem
2
4
2
2
4
2
2
Remtro
mmel
/
/
2
/
/
2
3
Stofkap
/
/
2
/
/
2
4
Moer
(voor
trommel
)
/
/
10
/
/
16
1
2
3
- 5 -
ASSEMBLY
Voorbereiding van de installatie:
31. Twee of meer personen om het product te verplaatsen en te
monteren .
32. Zorg dat je een matje klaar hebt liggen , en je moet alle accessoires
uitspreiden.
33. Zorg ervoor dat u handschoenen meeneemt om te voorkomen dat u
tijdens de installatie krassen oploopt door scherpe onderdelen.
34. Open alle dozen om te controleren of de accessoires compleet en in
goede staat zijn.
35. Als u elektrisch gereedschap nodig hebt om dit product te installeren,
stel de snelheid dan vooraf in op een lage snelheid.
Hieronder wordt alleen de installatieprocedure beschreven. Het model is
afhankelijk van de keuze van de gebruiker .
Stap 1: Krik de as op met behulp
van een krik. Verwijder de wielen en
banden.
- 6 -
Stap 2: Monteer de remmen .
Stap 3: Remtrommel monteren.
Plaats de remtrommel langzaam op
de as en borg de moer en splitpen.
Installeer ten slotte de stofkap .
Let op: De remtrommel is voorzien
van lagers.
Stap 4: Monteer de achterbanden .
Sluit de elektromagneetkabels aan
en voltooi de installatie.
MAINTENANCE
1. Controleer regelmatig alle onderdelen en accessoires en vervang ze als
ze beschadigd of versleten zijn.
2. Laat beschadigde onderdelen vervangen door een erkend
servicecentrum.
3. Controleer de moeren regelmatig en draai ze vast als ze los zitten.
4. Zorg ervoor dat het product goed onderhouden en schoon is, zodat het

- 7 -
beter en veiliger presteert.
5. Controleer de remblokken regelmatig en vervang ze tijdig als ze ernstig
versleten zijn.
6. Controleer het lager regelmatig en voeg indien nodig smeervet toe
Sanven Technologie Ltd.
Adres: Suite 250, 9166 Anaheim Place, Rancho Cucamonga, CA 91730
Gemaakt in China


- 9 -
Teknisk Support och e-garanticertifikat
www.vevor.com/support
ELEKTRISK SLÄPBROMS
Modell: BF10-Z01A*2 , BF10-Z01A*4 , BF10-Z01AB*2 ,
BF12-Z02A*2 , BF12-Z02A*4 , BF12-Z02AB*2
We continue to be committed to provide you tools with competitive price.
"Save Half", "Half Price" or any other similar expressions used by us only represents an
estimate of savings you might benefit from buying certain tools with us compared to the major
top brands and does not necessarily mean to cover all categories of tools offered by us. You
are kindly reminded to verify carefully when you are placing an order with us if you are
actually saving half in comparison with the top major brands.

- 1 -
Have product questions? Need technical support? Please feel free to
contact us:
Technical Support and E-Warranty Certificate
www.vevor.com/support
NEED HELP? CONTACT US!
This is the original instruction, please read all manual instructions
carefully before operating. VEVOR reserves a clear interpretation of our
user manual. The appearance of the product shall be subject to the
product you received. Please forgive us that we won't inform you again if
there are any technology or software updates on our product.
Electric Trailer Brake

- 2 -
15. Läs noggrant och förstå alla MONTERINGS- OCH
DRIFTINSTRUKTIONER innan användning.
16. Underlåtenhet att följa säkerhetsreglerna och andra grundläggande
säkerhetsåtgärder kan resultera i allvarliga personskador.
GENERAL SAFETY RULES
1. Välj en bromstyp som passar axeln .
2. Undvik vatten eller olja på bromsbackarna för att inte påverka
bromseffekten .
3. Undvik vatten eller olja inuti bromstrumman för att inte påverka
bromseffekten .
4. Använd inte bromsen ofta för att sakta ner, eftersom bromstemperaturen
inte blir för hög, vilket påverkar bromsens livslängd .
5. Försök aldrig att reparera eller ta isär produkten när det finns ett problem.
Be en maskinist eller specialist om hjälp.
6. Installera inte produkten när du är trött när du är påverkad av alkohol,
receptbelagda läkemedel eller droger.
7. Säkerhetsföreskrifterna och instruktionerna i denna handbok kan inte i
detalj täcka alla tillstånd och situationer som kan uppstå.
8. Operatören och/eller användaren måste använda sunt förnuft och
försiktighet vid användning av produkten , särskilt för alla frågor som inte
nämns ovan.
9. Användning av andra tillbehör än de som rekommenderas av tillverkaren
eller som anges i bruksanvisningen kan leda till personskada eller orsaka
skador.
SPARA SE- INSTRUKTIONERNA

- 3 -
MODEL AND PARAMETERS
Modell
BF10-Z01A
× 2
BF10-Z01A
× 4
BF10-Z01
AB × 2
BF12-Z02A
× 2
BF12-Z02A
× 4
BF12-Z02
AB × 2
Lämplig för
trailer
3500 pund
3500 pund
3500 pund
7000 pund
7000 pund
7000 pund
Produkt Spec.
10"×2-1/4"
10" ×
2-1/4"
10" ×
2-1/4"
12" × 2"
12" × 2"
12" × 2"
Elektromagnet
S pec .
10",DC12V
/2,5-3,6A
10",DC12V
/2,5-3,6A
10",DC12V
/2,5-3,6A
12",DC12V
,2,8~4,2A
12",DC12V
/2,8-4,2A
12",DC12V
/2,8-4,2A
Bromsfläns
Fyra
dubbar ,
7/16-20UN
F ,PCD=
101,8 mm
Fyra S
tuds ,
7/16-20UN
F ,PCD=
101,8 mm
Fyra S
tuds ,
7/16-20UN
F ,PCD=
101,8 mm
Fem H
oles ,
PCD= 99
mm
Fem H
oles ,
PCD= 99
mm
Fem H
oles ,
PCD= 99
mm
Justera metod
Självjuster
ande
Självjuster
ande
Självjuster
ande
Självjuster
ande
Självjuster
ande
Självjuster
ande
STRUCTURE DIAGRAM
Ta BF10-Z01A × 2 som ett exempel .
1.Bromsback 2. Elektrisk broms 3. Elektromagnet
2
1
3

- 4 -
1. Bromstrumma 2. Dubbar och muttrar 3. Dammskydd
COMPONENTS
ING
A.
Namn
BF10-Z0
1A × 2
BF10-Z0
1A × 4
BF10-Z0
1AB × 2
BF12-Z0
2A × 2
BF12-Z0
2A × 4
BF12-Z0
2AB × 2
1
Broms
2
4
2
2
4
2
2
Bromstr
umma
/
/
2
/
/
2
3
Damms
kydd
/
/
2
/
/
2
4
Mutter
(för
trumma)
/
/
10
/
/
16
1
2
3

- 5 -
ASSEMBLY
Installationsförberedelser:
36. Två eller flera personer ska flytta och montera produkten .
37. Vänligen förbered en matta , och du måste sprida ut alla tillbehör.
38. Förbered handskar för att undvika repor av vassa delar som kan
uppstå under installationen.
39. Öppna alla lådor för att kontrollera att tillbehören är kompletta och i
gott skick.
40. Om du behöver använda elverktyg för att installera den här produkten,
ställ in hastigheten på låg hastighet i förväg.
Följande beskriver endast installationsproceduren. Modellen beror på
användarens val .
Steg 1: Jacka upp axeln med hjälp
av en domkraft. Ta bort hjulen och
däcken.
Steg 2: Installera bromsarna .

- 6 -
Steg 3: Installera bromstrumman.
Sätt långsamt in bromstrumman på
axeln och låsmutter och saxsprint.
Installera slutligen dammskyddet .
Obs: Bromstrumman är laddad med
lager.
Steg 4: Installera bakdäck . Anslut
elektromagnetkablarna och slutför
installationen.
MAINTENANCE
1. Inspektera regelbundet alla delar och tillbehör och byt ut dem om de är
skadade eller används.
2. Låt ett auktoriserat servicecenter byta ut skadade delar.
3. Kontrollera muttrarna med jämna mellanrum och dra åt dem om de sitter
lösa.
4. Håll produkten ordentligt underhållen och ren för bättre och säkrare
prestanda.
5. Kontrollera bromsbelägg regelbundet och byt ut dem i tid om de är
allvarligt slitna.
6. Kontrollera lagret regelbundet och tillsätt smörjfett vid behov
Sanven Technology Ltd.
Adress: Suite 250, 9166 Anaheim Place, Rancho Cucamonga, CA 91730

- 7 -
Tillverkad i Kina