www.vytronix.com
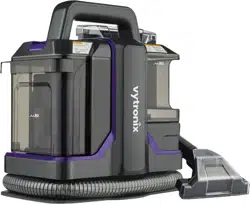
SWASH450P SPOT & STAIN
CARPET & UPHOLSTERY
CLEANER
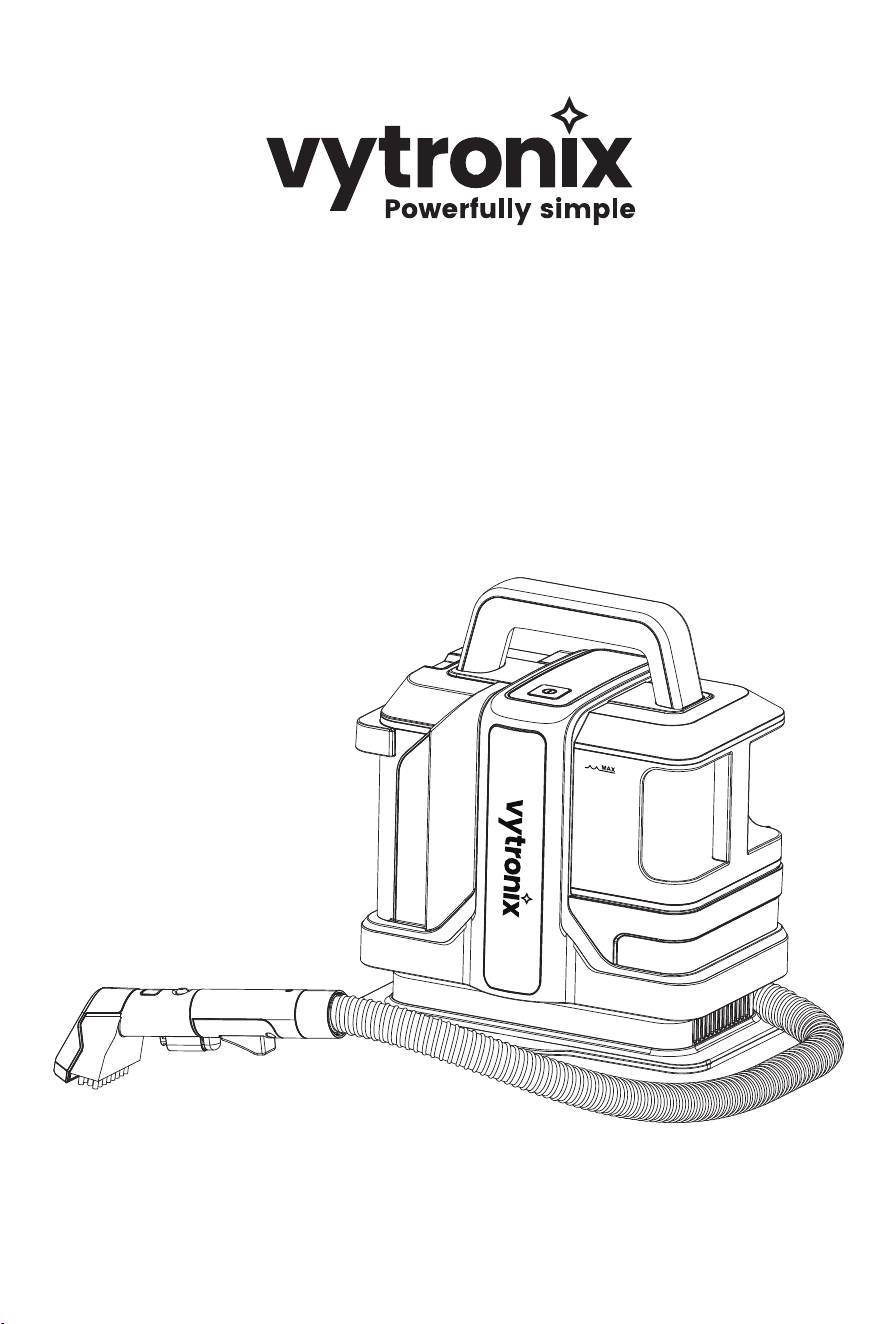
USER GUIDE
READ CAREFULLY BEFORE USING THIS APPLIANCE
IMPORTANT SAFETY INSTRUCTIONS
- 1 -
- 2 -
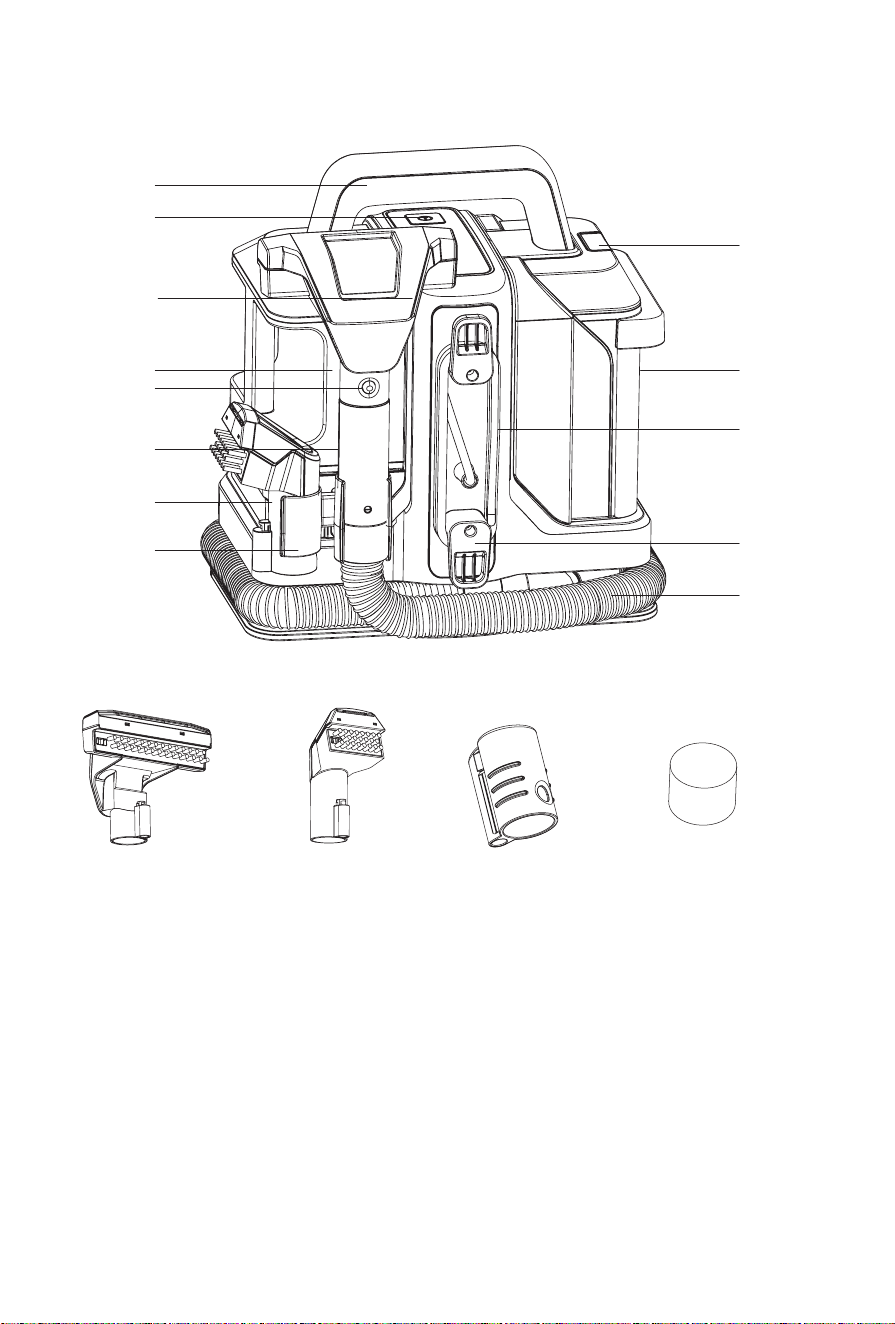
GETTING TO KNOW YOUR APPLIANCE
3 13
1. Carry handle
2. Power ON/OFF button
3. Large wash tool
4. Clean water tank
5. Release button for wash tool
6. Hose Handle
7. Wash tool retaining hook
8. Release button for dirty water tank
9. Dirty water tank
10. Power cord
11. Power cord storage hook
12. Hose
13. Small wash tool
14. Self cleaning nozzle
15. Foam filter
1
8
9
10
11
12
14 15
2
3
4
5
7
13
6
- 3 -
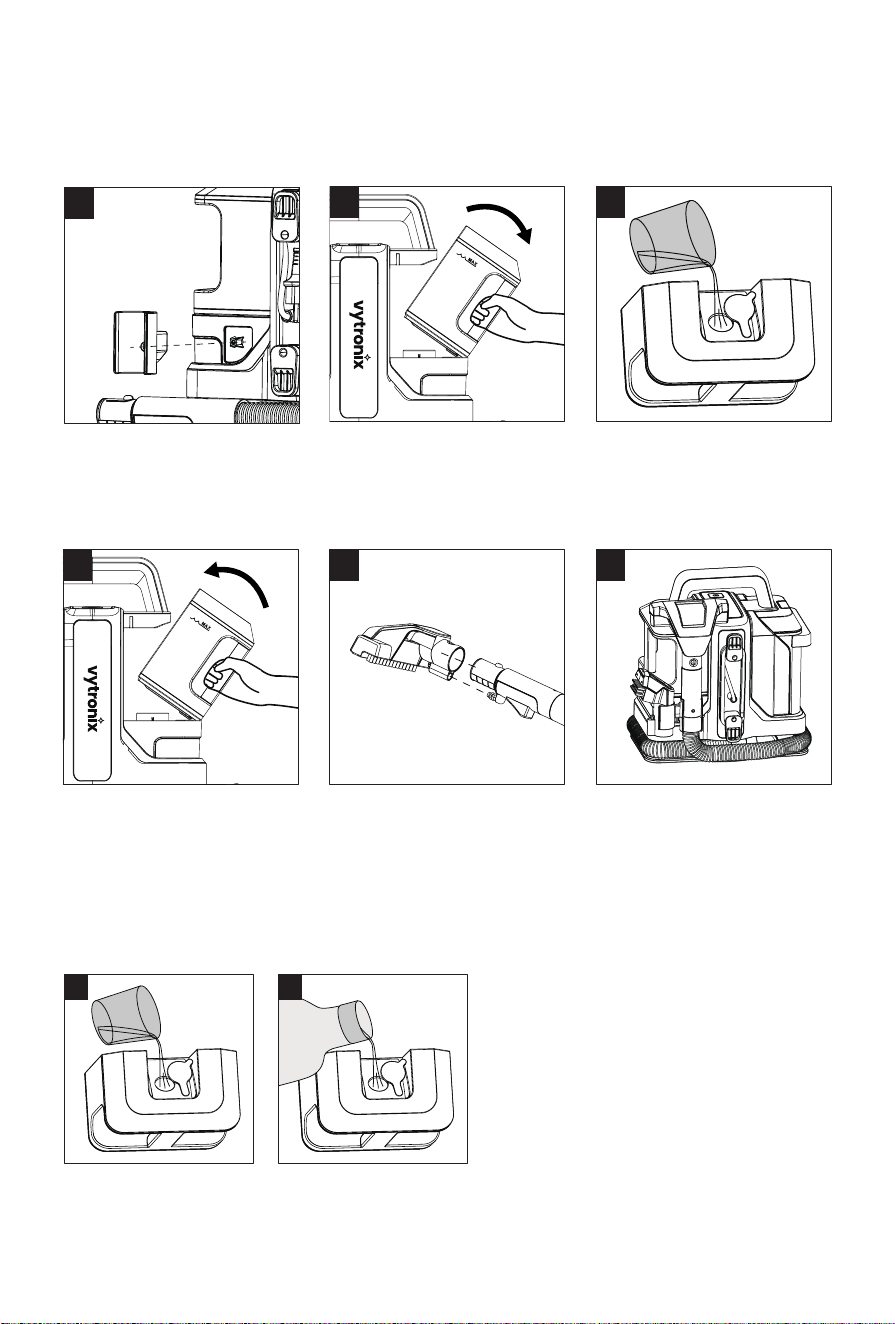
ASSEMBLY
BEFORE USING YOUR CLEANER
To assemble the wash tool
retaining hook; insert into
location below the clean water
tank and screw it tightly using
the screw provided.
1
2
Slide open the water inlet filling
seal, fill the tank with warm
water and close the seal.
*See below if you wish to add
detergent
3
Attach the wash tool to the hose
handle.
5
Wrap the hose around the base
and insert the wash tool and
hose handle into the wash tool
retaining hook.
6
Relocate the clean water tank.
Note: lock the bottom part to
the machine, then push the
clean water tank into place at
the top.
4
1 2
Remove the clean water tank.
Note: pull the clean water tank
at an angle of 30 degrees top to
bottom.
Use spot cleaning detergent to clean stubborn
stains. Mix the water and detergent directly in
the clean water tank following the detergent
guidelines ensuring the max line is not
exceeded.
CAUTION! Do not use carpet shampoo as this
foams, and is not designed for use in this
cleaner.
- 4 -
OPERATING YOUR SPOT & STAIN CLEANER
Unwrap the power cord and
plug into the mains. Switch the
cleaner on using the power
ON/OFF button.
2
Select the desired wash tool
suitable for the flooring/surface
and attach this to the hose
handle.
1
Suction inlet
Release the button to stop
spraying. Tilt the wash tool
forward so the brushes are not
in contact with the surface, to
ensure the suction inlet collects
the dirty water on the backward
stroke.
6
Press the water release button
to spray water (and detergent)
onto the surface.
3
Use the brush to agitate
stubborn stains.
4
For spills always pick up the
excess liquid before using water
or solution.
5
7
Power off after cleaning. Wrap
the hose around the base and
lock in the hook.
Note: Clean the dirty water
tank after every use to avoid
unpleasant smells.
IMPORTANT: Over or under tilting the hand tool may result in poor water pick up.
Suction inlet
x
- 5 -
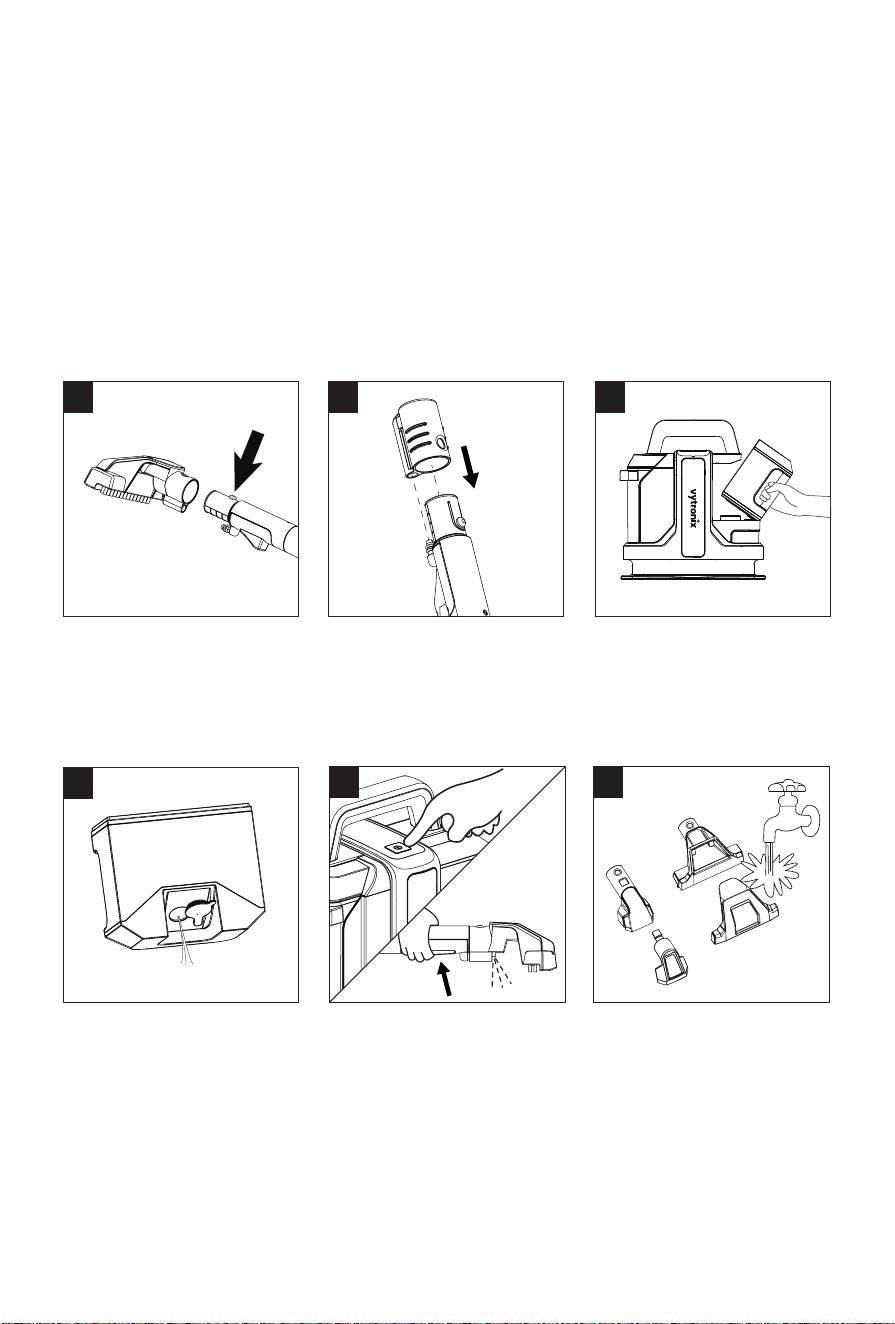
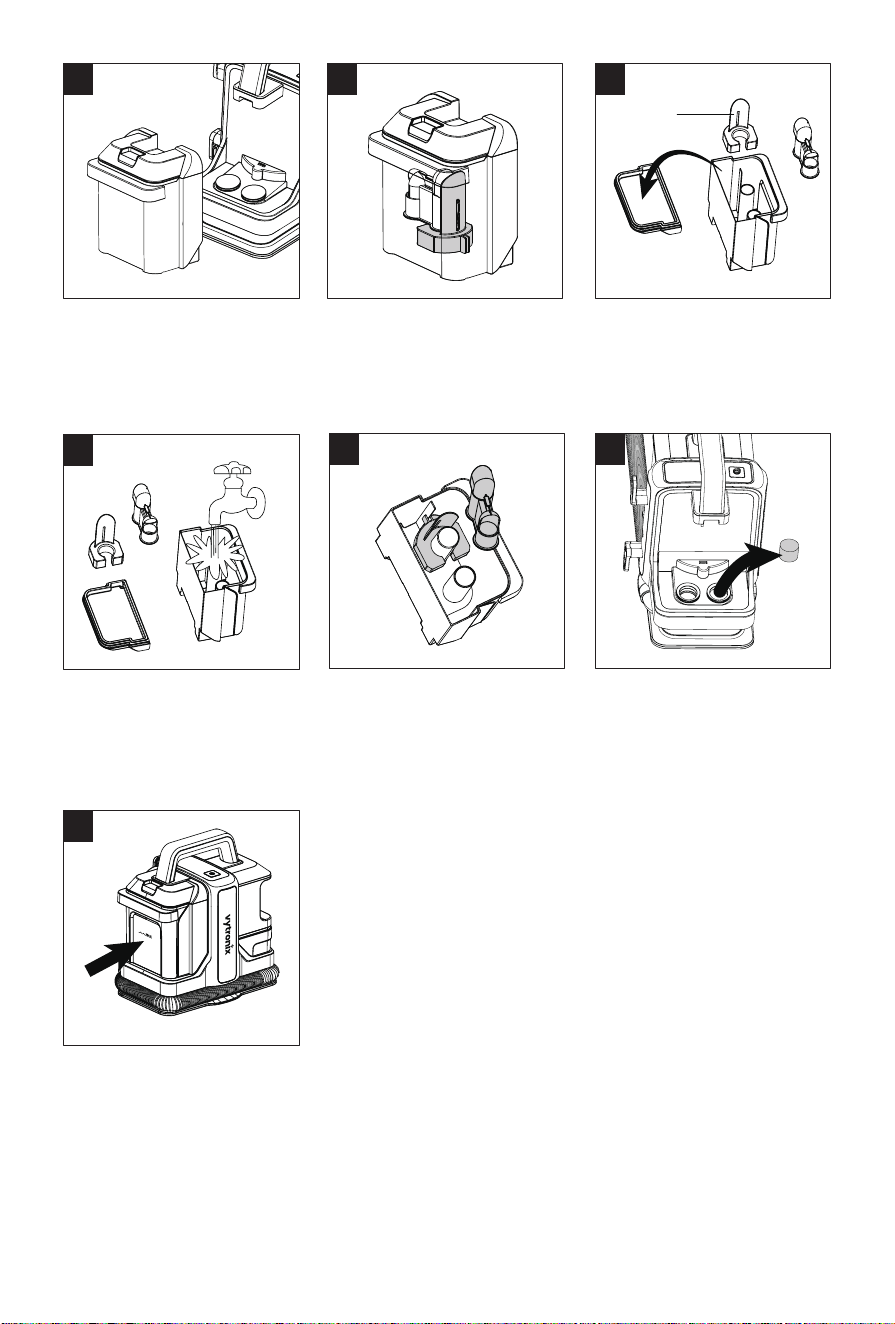
CLEANING CARE AND MAINTENANCE
Remove the clean water tank
from the main cleaner.
3
Pour water out of the tank.
4
Re-install the empty clean
water tank and power on, press
the water-spray button to
remove any excess water from
the tank.
5
Press the wash tool release
button and pull to remove
the tool from the hose.
1
Remove the wash tool brush
cover to clean by rinsing under
the tap. To replace; place cover
into position on the wash tool
until it clicks into place.
6
To prolong the life of your spot & stain cleaner and prevent blockages or problems occurring follow
this guide.
Always carry out cleaning when the product has been switched off for a short period of time.
CAUTION! never clean the cleaner or any parts of it whilst the plug is switched on at the mains.
This appliance can be cleaned by wiping a damp soft cloth to keep the outside free of dirt including
dust. Use a dry cloth to clean the power cord.
To avoid unpleasant damp smells clean both tanks and ensure they are fully air dried before storing
and after every use.
Half fill the clean water tank,
insert the self-cleaning nozzle
onto the handle, start the
machine and press the water
spray button. This process will
'self-clean' the hose.
2
- 6 -
Remove the dirty water tank
from the main cleaner.
7
Empty the dirty water tank after
every use or when the water level
reaches the max fill line. The float
inside will prevent suction if the
tank is full.
8
Remove the tank lid, remove the
water fill guide and float.
9
Float
Clean all parts with warm water
only. Do not use washing up
liquids or other chemicals.
10
Thoroughly wash and dry the
inside of the tank and refit the
float and water fill guide and
replace the tank lid.
11
Reinstall the dirty water tank
into place on the cleaner.
13
Remove small foam filter to
clean by rinsing under the tap.
Ensure this is fully dry before
replacing and using in the
appliance. TIP! Place on or near
a radiator to dry.
12
- 7 -

SAFE STORAGE
Problem Possible cause
TROUBLESHOOTING
Solution
No power
● The plug is not connected to
the mains.
● Fuse needs replacing
● The cord is damaged.
Always unplug from the mains when not in use.
Wrap the hose around the base for storage.
Ensure the tanks are empty, clean, and dried before storing, especially if storing in a cold area like a
garage or garden shed. Cold weather may cause water residue to freeze inside the tank/s.
No water releases
when pressing the
water release button
No suction / No water
collecting into the
dirty water tank
● Check the mains socket and plug.
● Check and change fuse (13amp
required)
● Contact vytronix support
● Water inlet tube is blocked.
● Wash tool is blocked.
● The clean water tank is not
correctly fitted
● Remove the wash tool and check
there is no obstruction.
● Check the connection between the
wash tool and the hose handle
and retry.
● Ensure the clean water tank is
correctly fitted.
● The cleaner is not on
● The dirty water tank is full.
● The hose is blocked.
● Floor nozzle inlet blocked.
● The water guide or float are not
correctly fitted.
● Turn on the power.
● Clean the dirty water tank.
● Check and clean the hose.
● Detach floor nozzle from the hose
and clean in warm water using a
bottle brush or gentle scrub
sponge to remove blockage.
● Clean or change the sponge filter
located under the dirty water tank
and check the float is correctly
fitted in the tank.
Excessive noise –
high pitched tone
● The float in the dirty water tank
has activated.
● The hose or wash tool is blocked.
● The dirty water tank is not
correctly fitted.
● Empty the dirty water tank.
● Check and clean the hose to
remove the blockage.
● Remove and check the wash tool
for blockages.
● Refit the dirty water tank.
Foaming or soapy
residue inside the
tank or on the
floor/surface
● Incorrect detergent has been
used.
● Incorrect amount of detergent
has been used.
● Fully clean the tanks and refill with
warm water only, pump the water
through the machine using the
hose cleaning tool to remove
excess foam / residue.
● Spray additional water only onto
the flooring or surface before
collecting the water and solution
residue into the tank
- 8 -