Technical Support and E-Warranty Certificate
www.vevor.com/support
PET BIKE TRAILER
MODEL: TS812
We continue to be committed to provide you tools with competitive price.
"Save Half", "Half Price" or any other similar expressions used by us only represents an
estimate of savings you might benefit from buying certain tools with us compared to the major
top brands and does not necessarily mean to cover all categories of tools offered by us. You
are kindly reminded to verify carefully when you are placing an order with us if you are
actually saving half in comparison with the top major brands.

- 1 -
MODEL: TS812
Important: Keep these instructions for future reference
Have product questions? Need technical support? Please feel free to
contact us:
Technical Support and E-Warranty Certificate
www.vevor.com/support
NEED HELP? CONTACT US!
This is the original instruction, please read all manual instructions
carefully before operating. VEVOR reserves a clear interpretation of our
user manual. The appearance of the product shall be subject to the
product you received. Please forgive us that we won't inform you again if
there are any technology or software updates on our product.
PET BIKE TRAILER

- 2 -
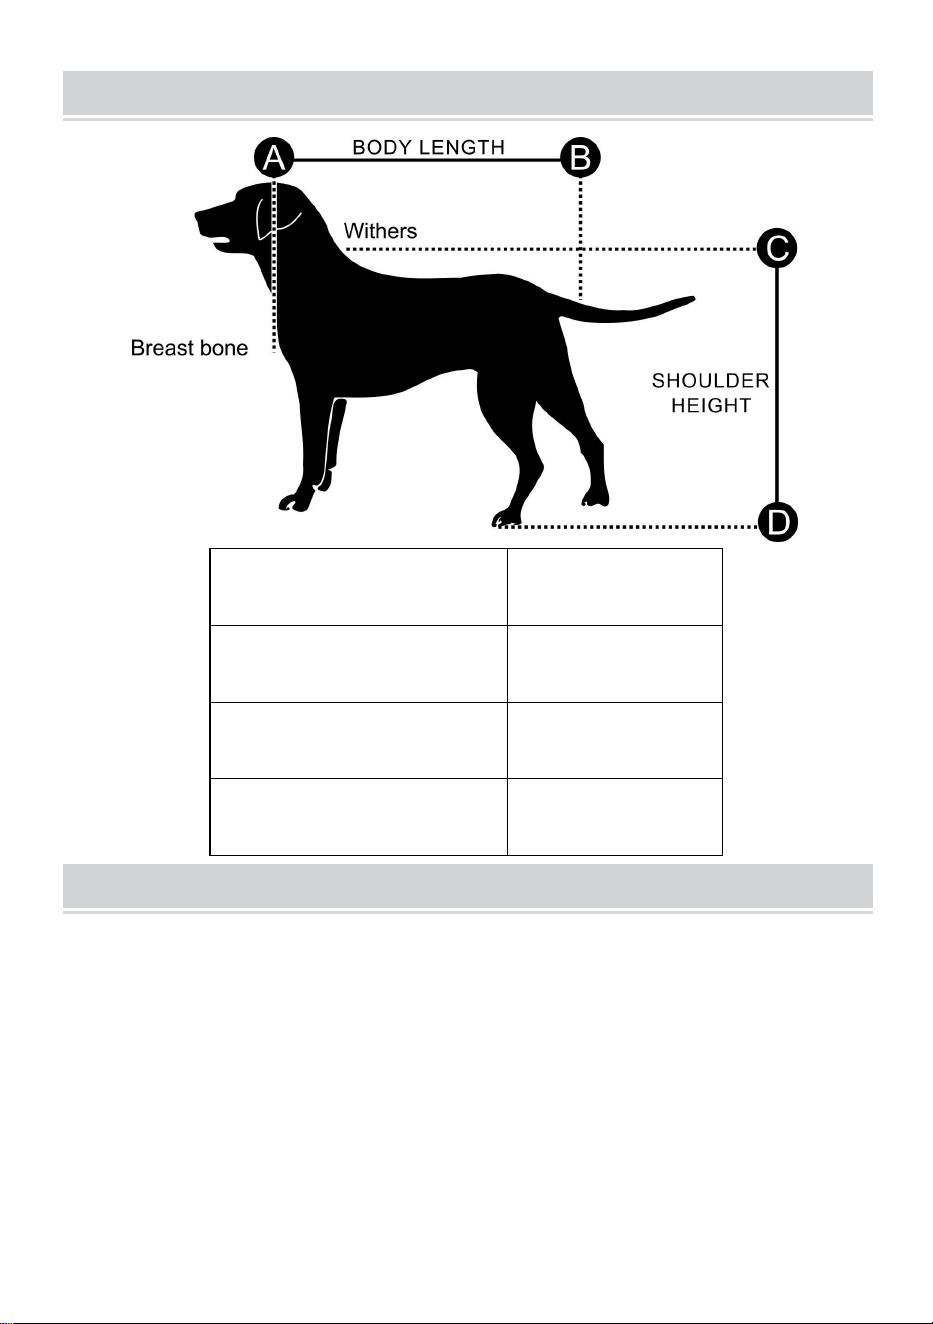
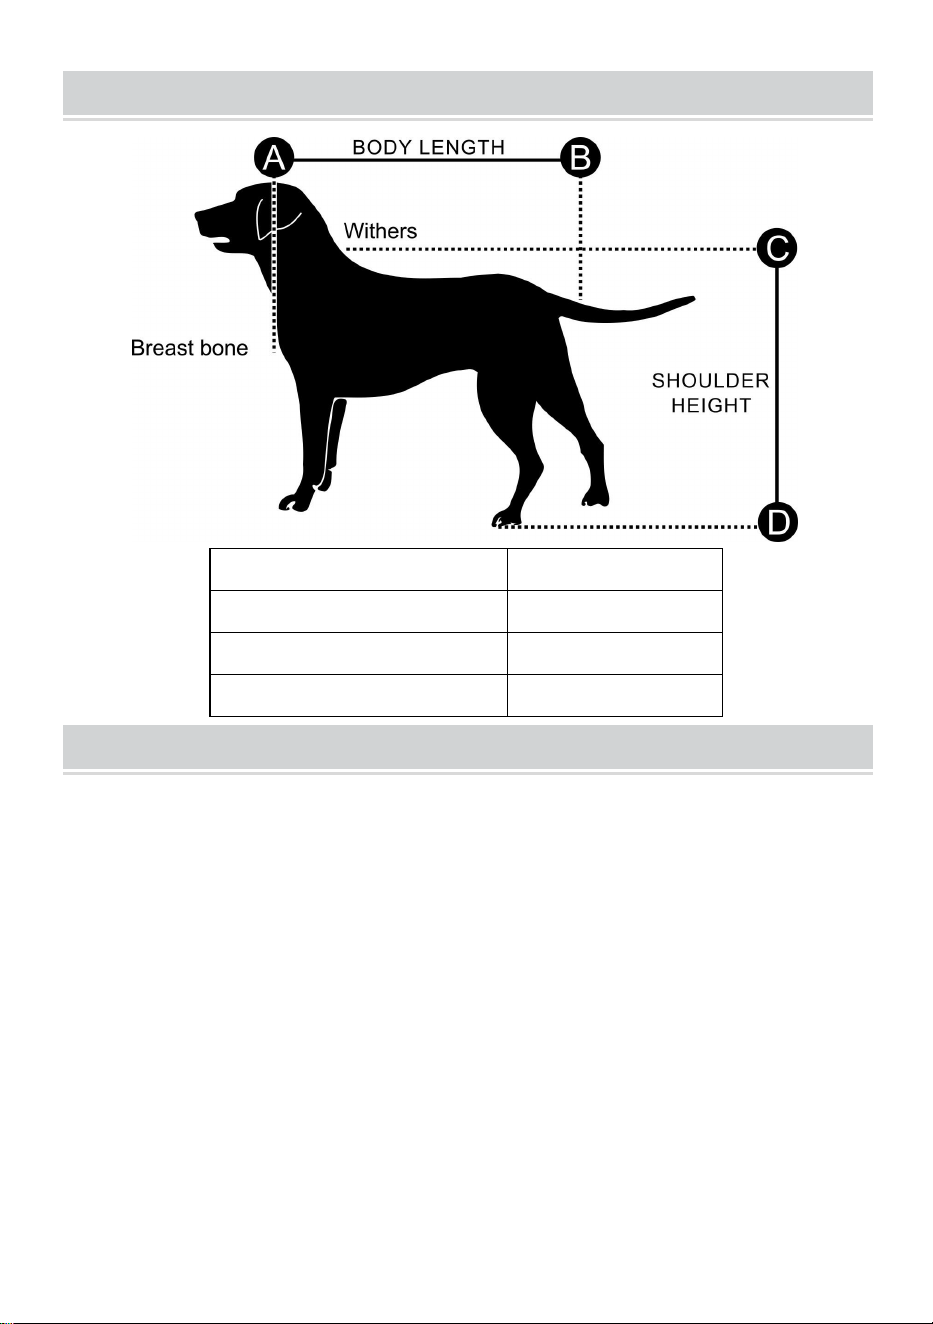
CHOOSE THE RIGHT SIZE OF TRAILER
Trailer Size
X-Large
Max. Body Length
35 in. (90 cm)
Max. Shoulder Height
26 in. (66 cm)
Max. Weight
100 lbs. (45 kg)
SAFETY INSTRUCTIONS
⚠ WARNING
Do read instructions before driving. Failure to comply with the
instructions and warnings in this manual could result in serious
injury or death.
Consult a veterinarian to ensure it is safe for your pet to ride in a trailer.
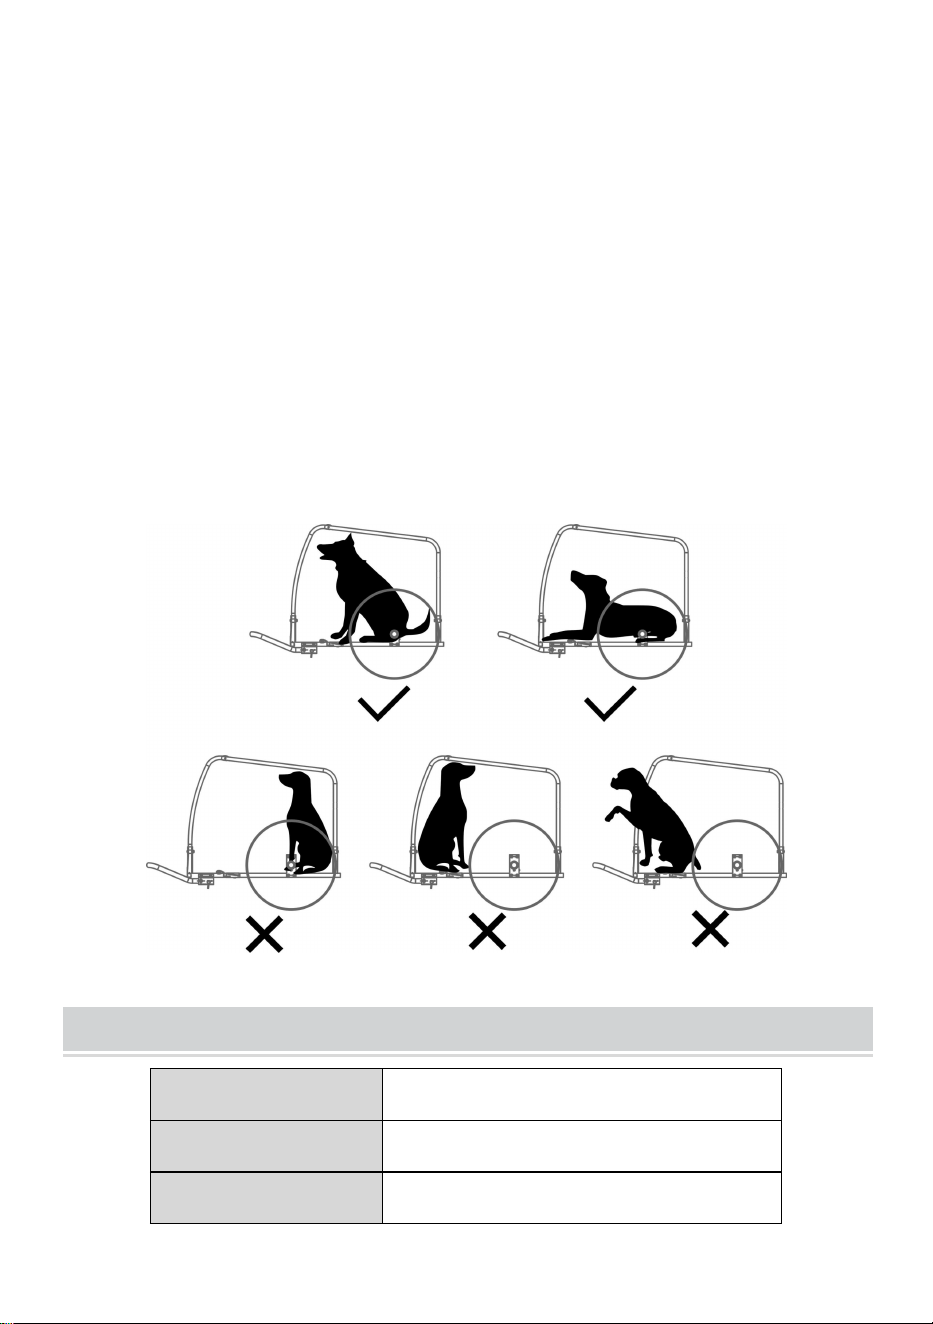
Make sure pet cannot make contact with the wheel spokes.
Check comfort and safety of pet frequently, especially during hot or
cold weather.
Never leave pet unattended and ALWAYS HOLD THE
TRAILER/STROLLER FROM TIPPING BACKWARD WHEN DOG IS
ENTERING OR LEAVING THE TRAILER.
DO NOT use with a total load that exceeds 100 lbs. (45kg).
Never use pet trailer for transporting child or cargo.

- 3 -
DO NOT make any modifications to the product. Any parcels placed on
the trailer may cause the trailer to become unstable.
DO NOT over-inflate the tires. Failure to comply with the rated pressure
on the tire sidewall may lead to explosion of the tire and possible injury.
Before each ride, be sure the trailer does not interfere with braking,
pedaling or steering of the bicycle.
Always comply with local regulations when using the trailer on public
roadways.
Never ride a bicycle at night without adequate lighting. Obey all local
legal requirements for lighting.
When using your trailer, you are towing extra weight and a bigger
vehicle. You must allow more time for braking, slowing, stopping and
starting, and allow more room for turns and passageways. Experiment
with the loaded trailer in an uncongested area until you become familiar
with how your bike handles towing a trailer.
Avoid rocks, curbs, hard braking and sudden swerving. Avoid riding
over obstacles with one wheel, as this may cause the trailer to tip over.
Always ride with the front and rear doors fully closed to protect pet from
flying debris and prevent pet from jumping from the trailer
The rider of the bicycle must be at least 16 years old.
Recommended speed limits: - 10 mph (16 km/h) on smooth, straight
roads – 5 mph (8 km/h) when turning or on uneven roads.
Trailer weight must be properly distributed for safe handling. The
weight on the hitch connector should be between 30 N (≈6.6 lbs. or 3
kg) and 80 N (≈17.6 lbs. or 8 kg). To measure this, load your trailer and
place it next to bathroom scale. Step on scale and make a note of your
weight. Standing on scale, lift up the end of the tow bar one foot
(approximately 25cm) off the ground. If the weight is too low, the rear
wheel of the bicycle could lose traction. If it is too high the hitch may be
overloaded.
Never overload the trailer and never ride with a tow bar load that is outside
the specified range of 6.6 to 17.6 lbs. (3 – 8 kg). Always distribute the load
evenly. Failure to do so could result in accidents with serious injury or
death.

- 4 -
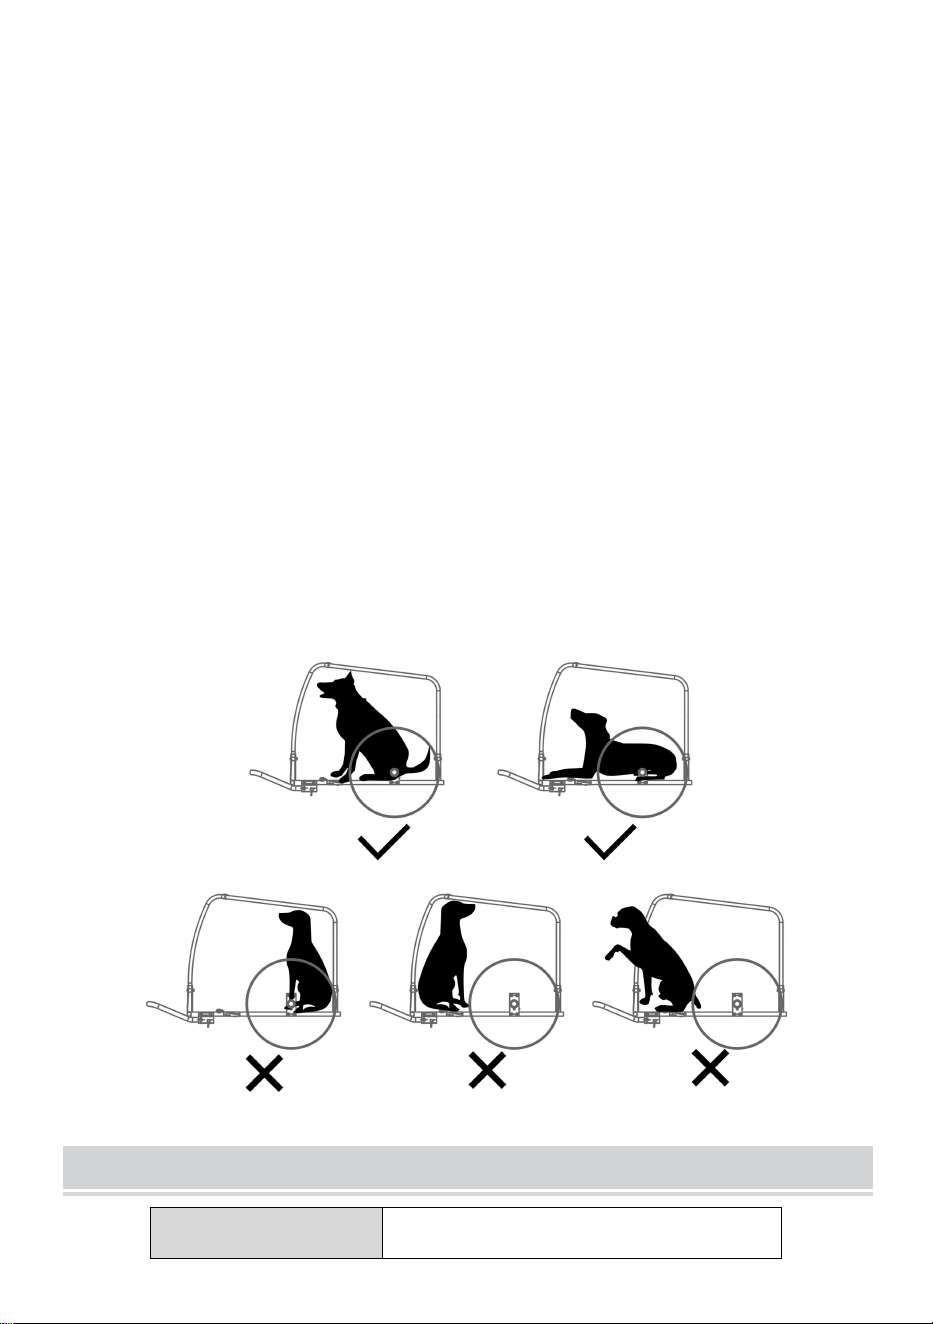
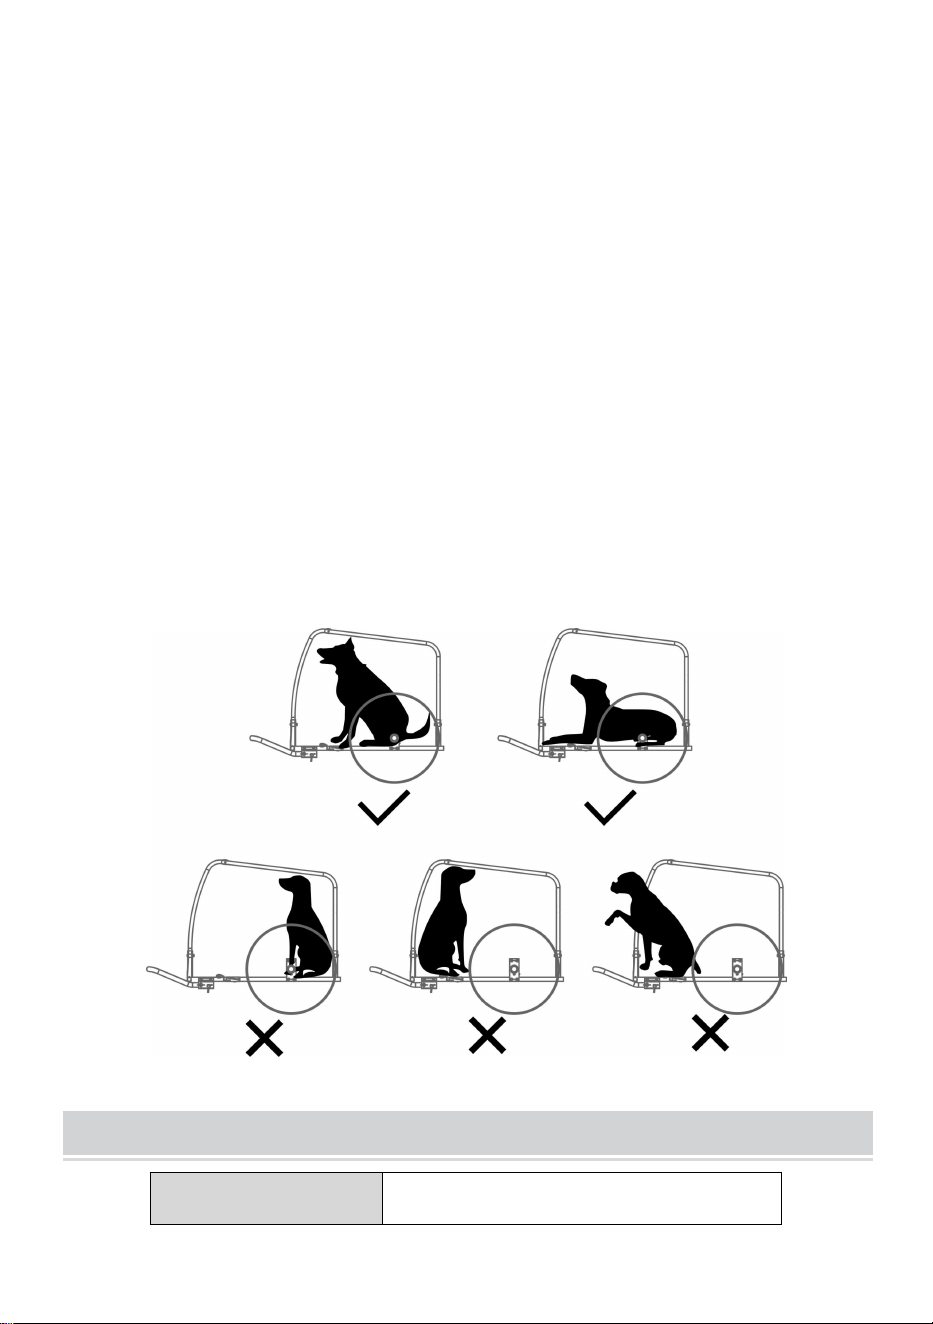
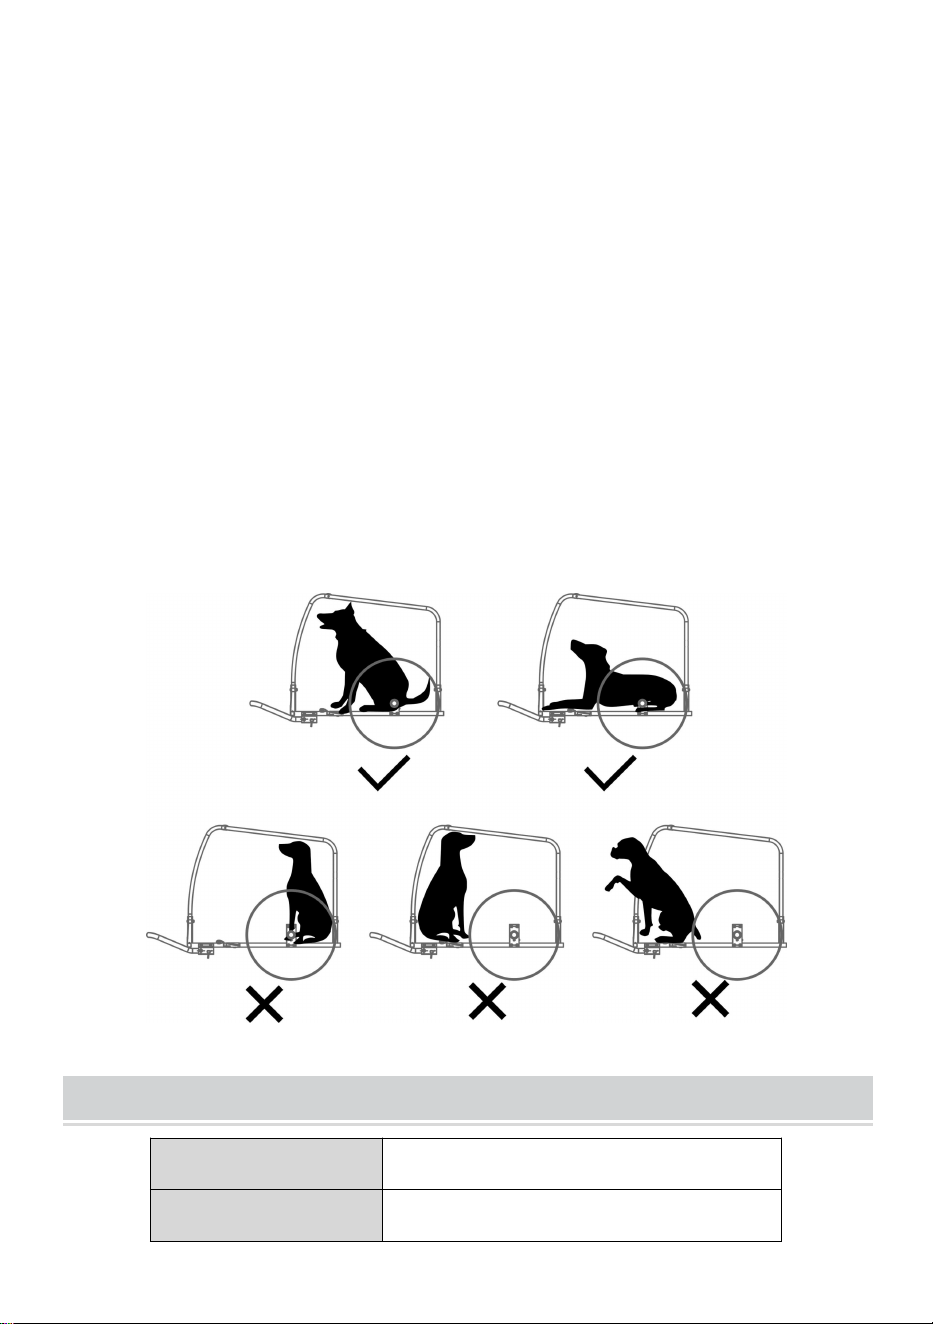
Tip: Make sure that your dog is positioned with its center of gravity as close
as possible to the wheel axle. This is the best way to ride with an optimal
weight distribution.
MODEL AND PARAMETERS
Model
TS812
Type
Tow/Hand Push
Max. Load
100lbs
Bin Size
31.8*22*23.6inch
Wheels
Steel,16*2.125inch(Rear)
Pneumatic rubber tyre,12inch(Front)
Material
Steel,600D Oxford cloth
Color
Black&Grey
- 5 -
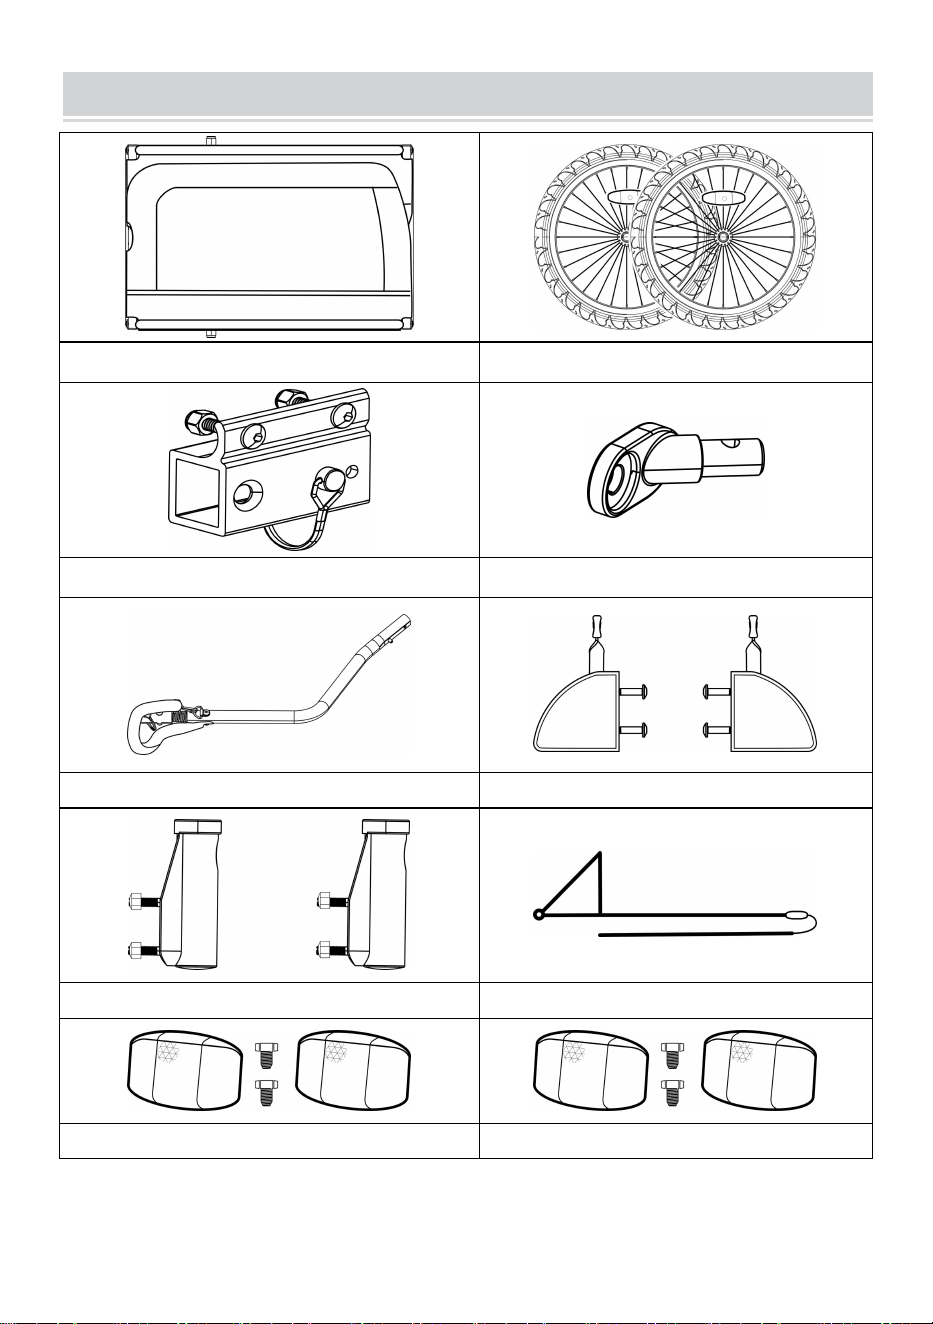
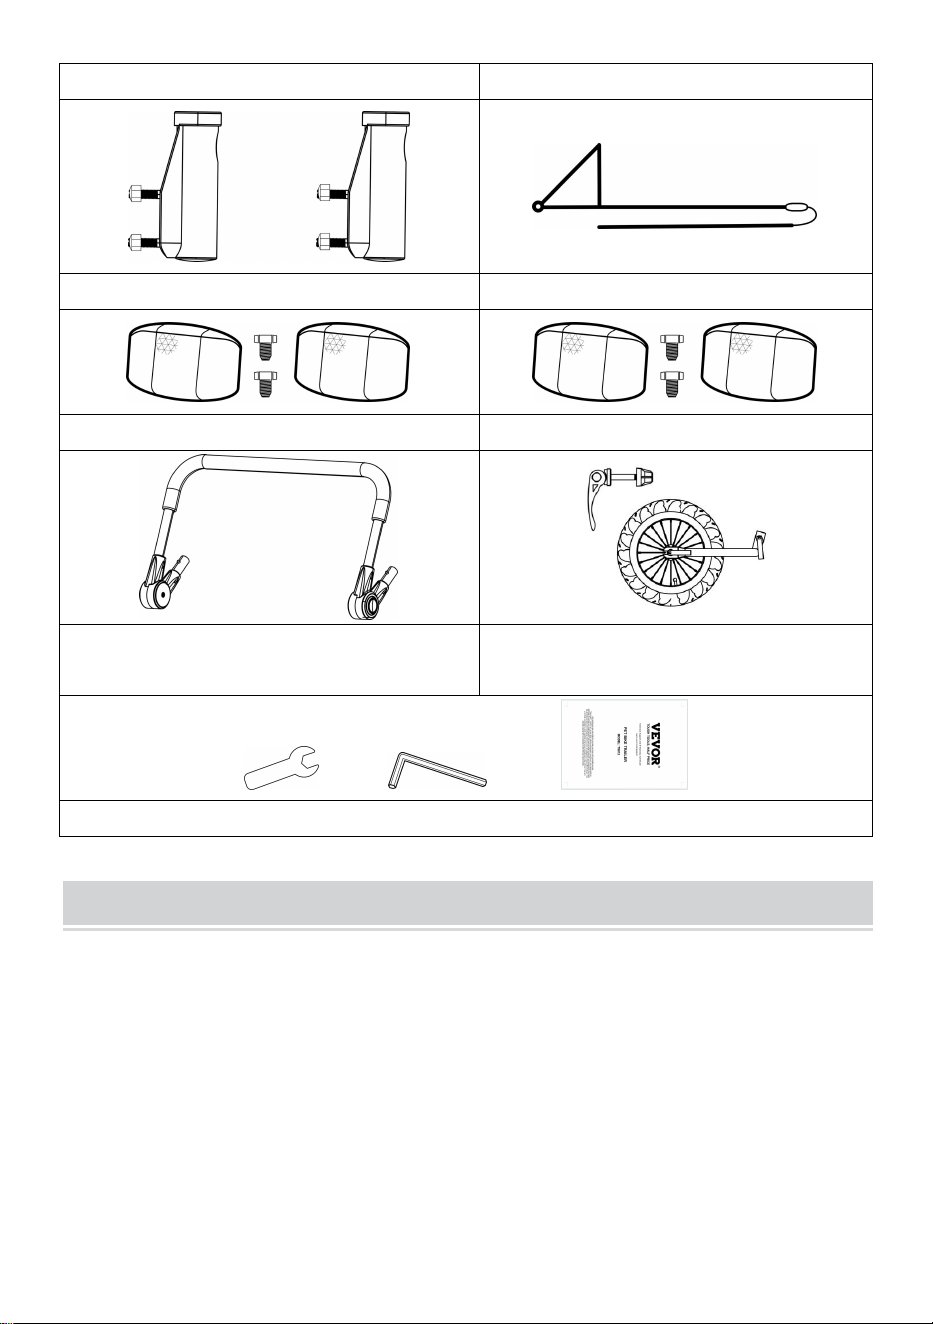
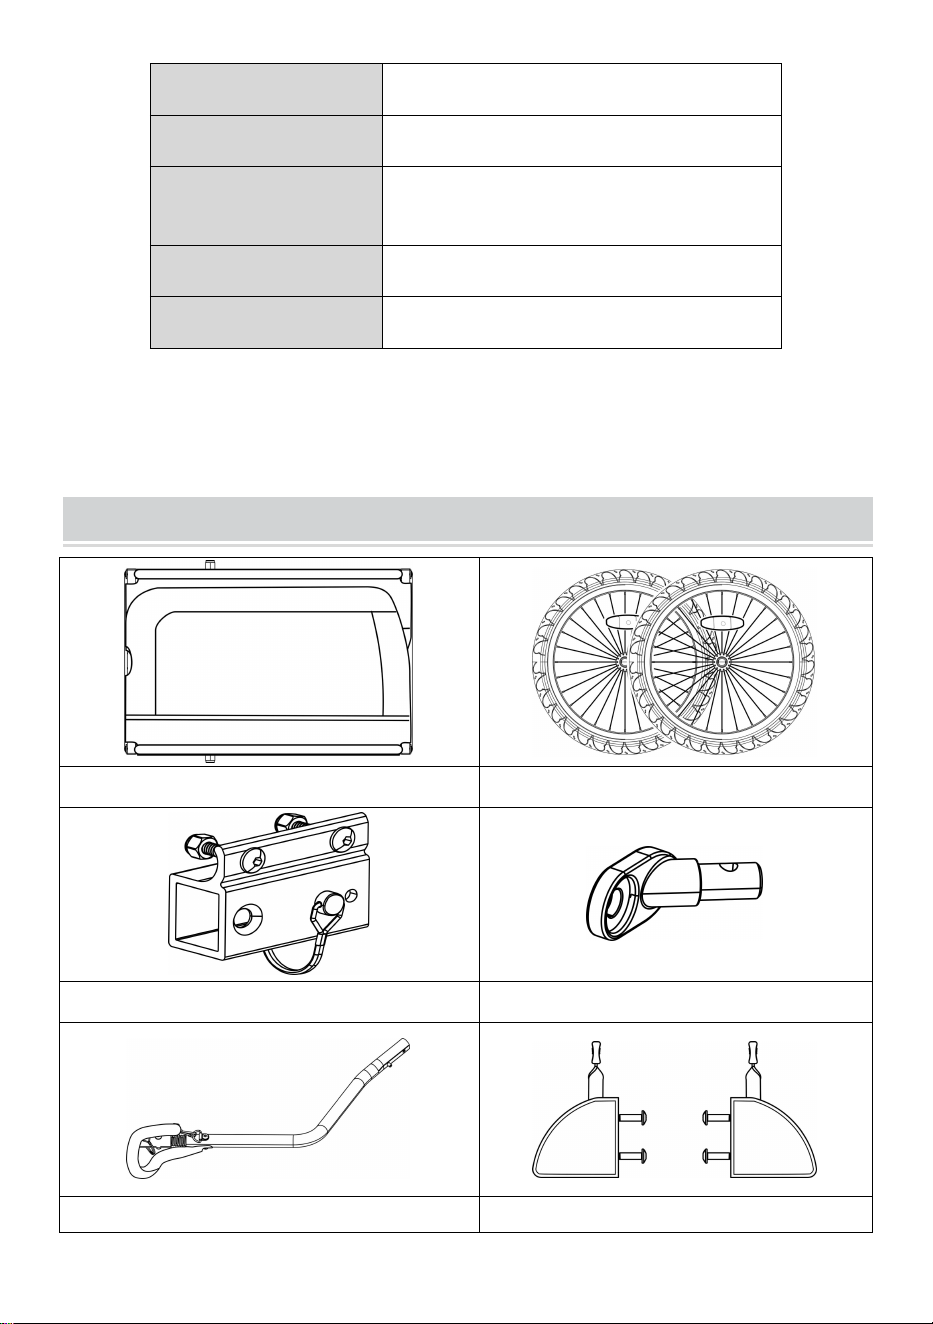
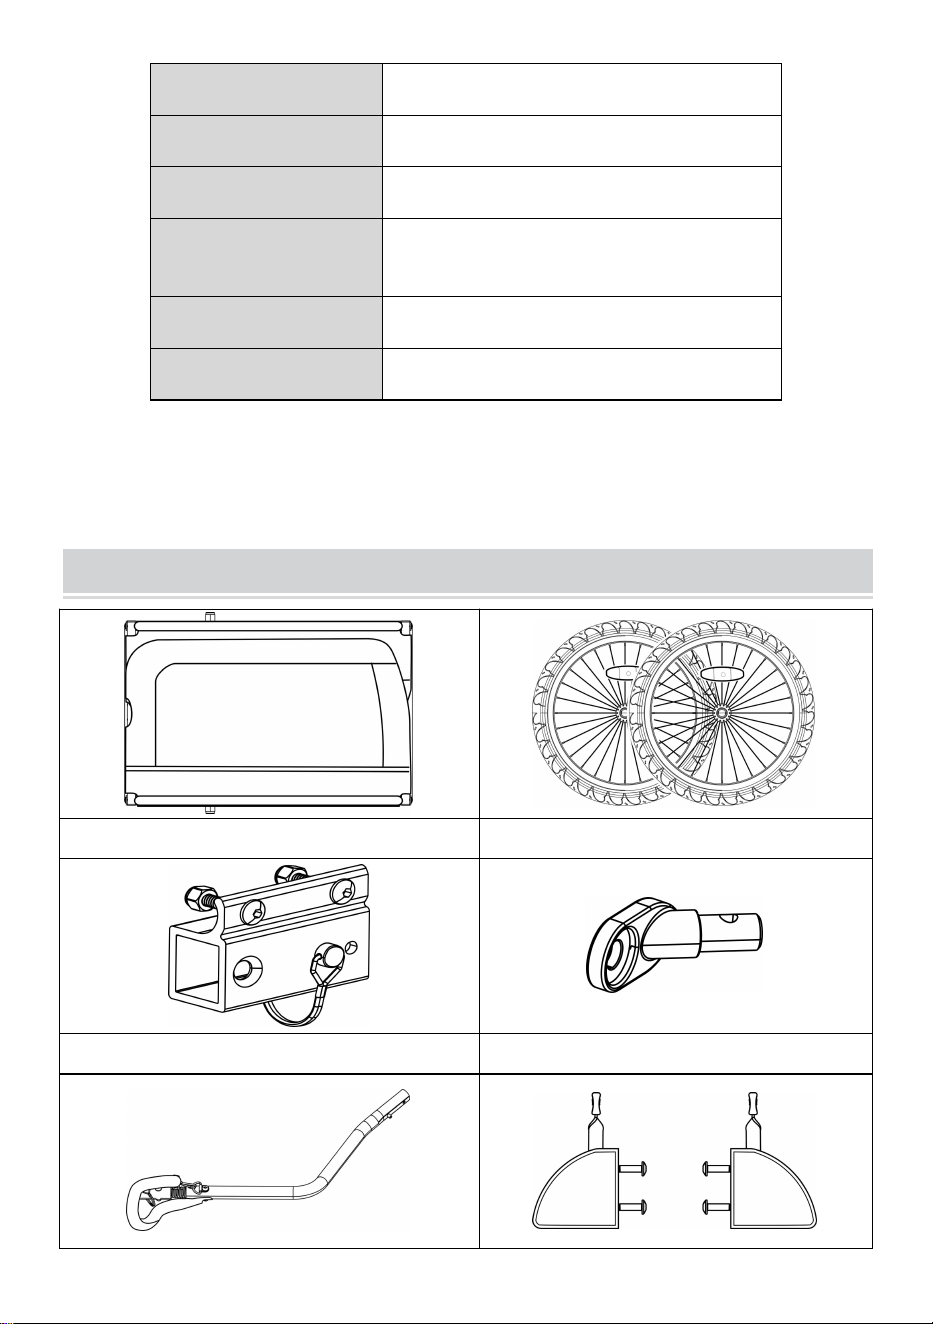
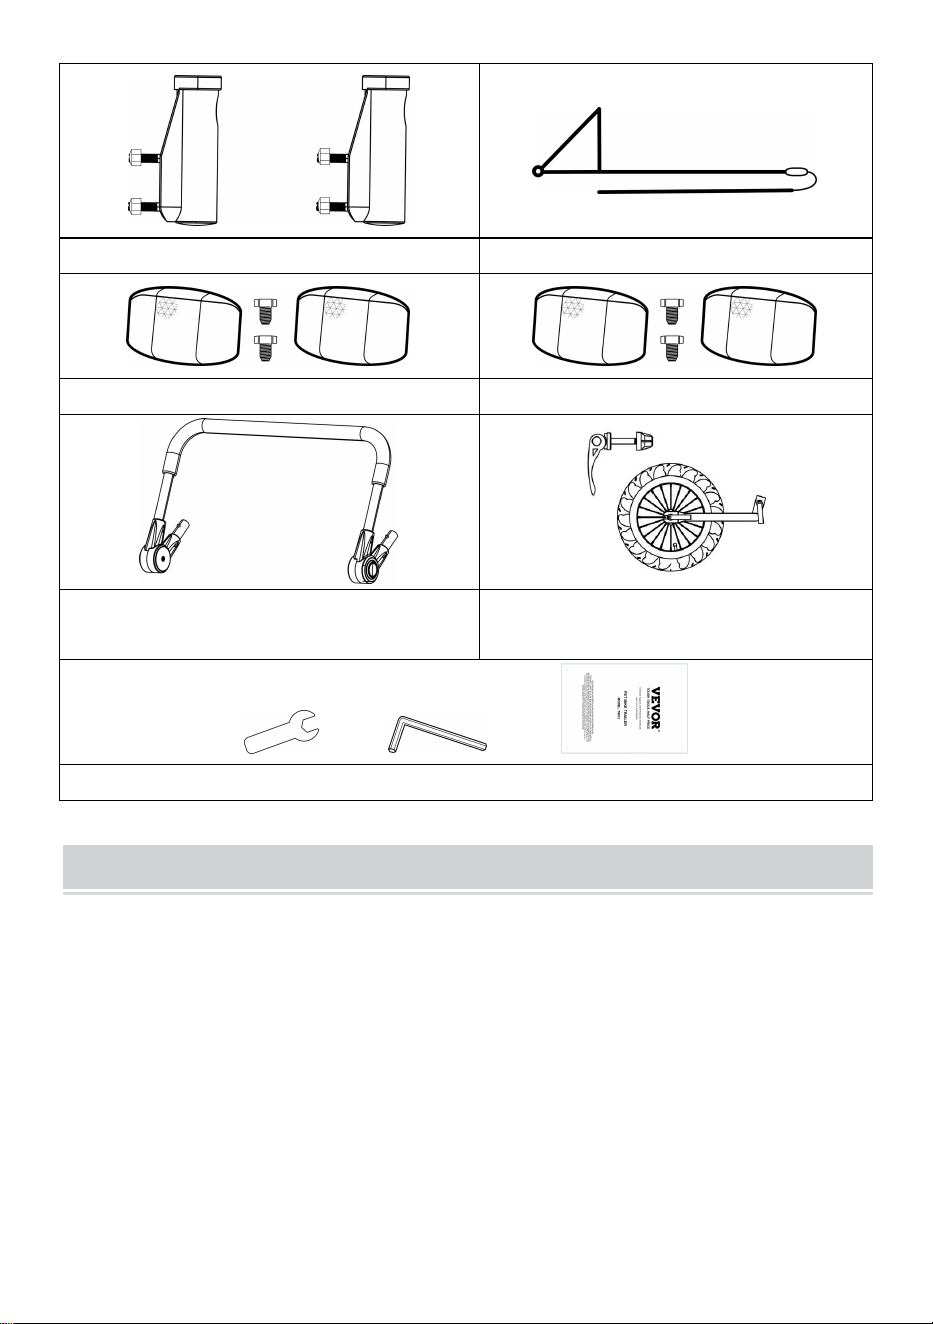
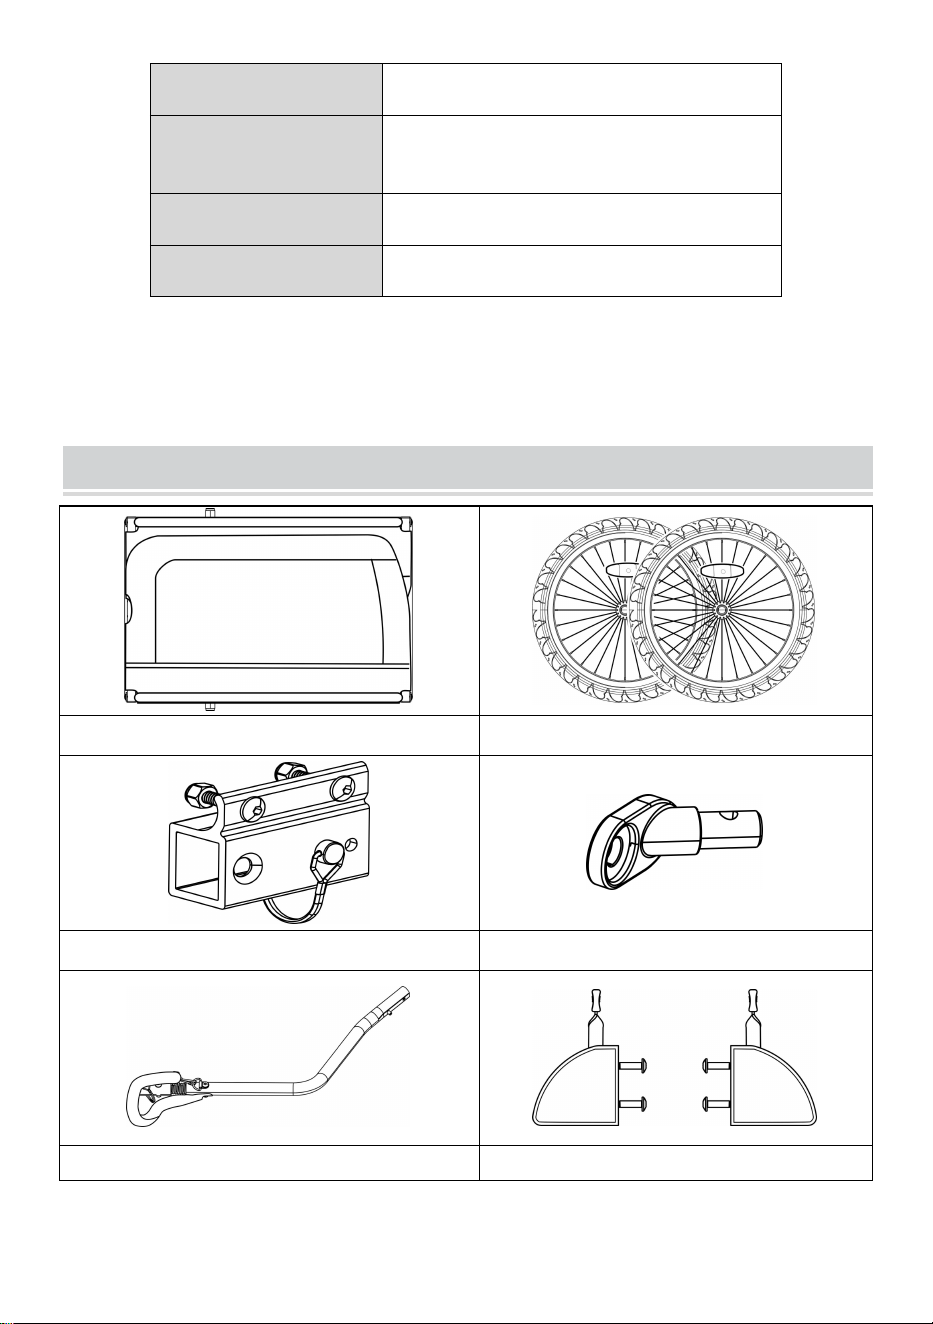
CONTENTS
1 x Main frame
2 x Wheels
1 x Tow bar receiver
1 x Universal hitch
1 x Tow bar
2 x Wheel guard
2 x Handle bar holder
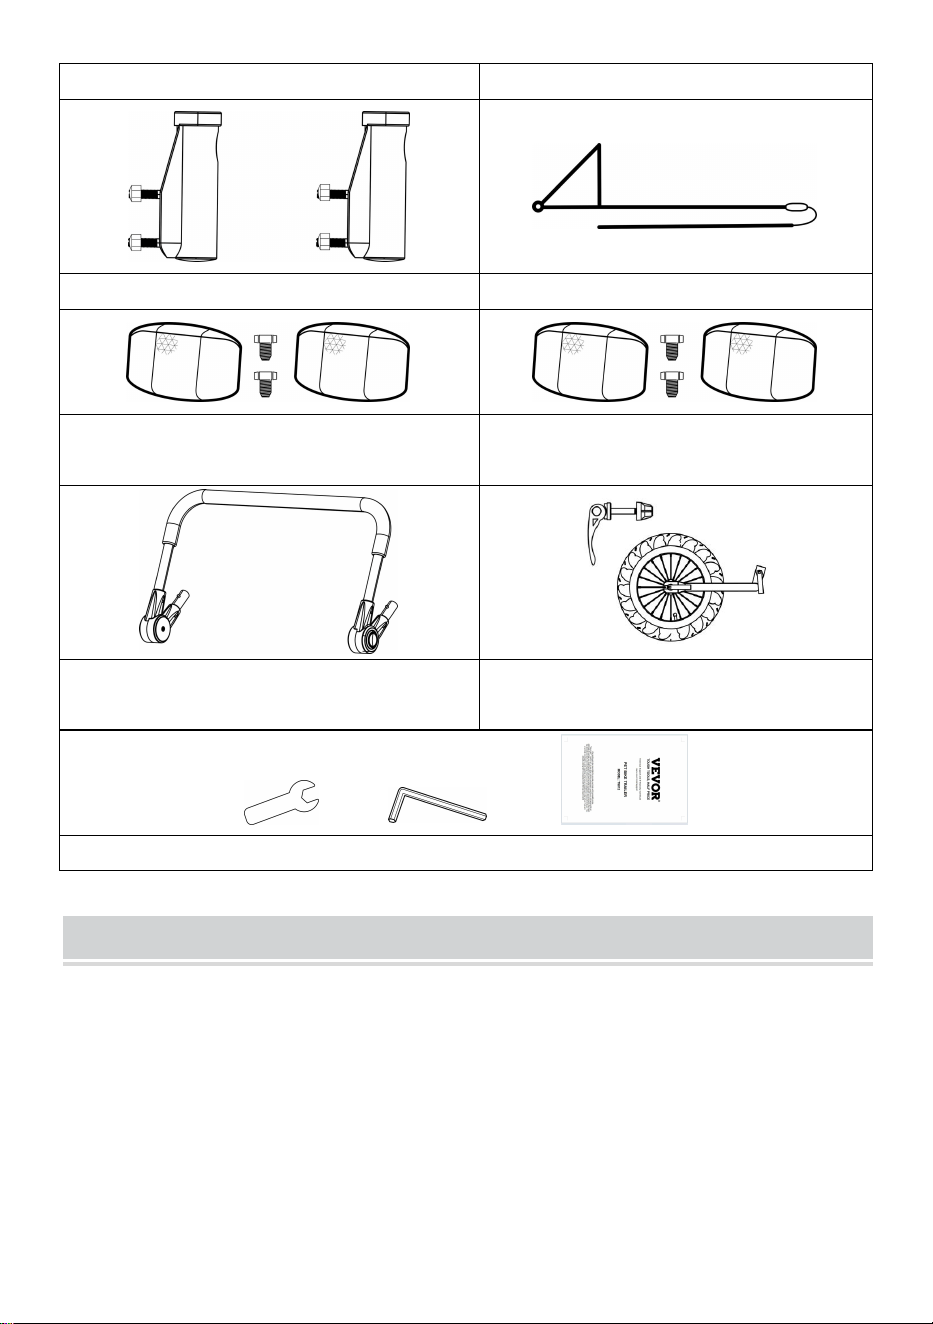
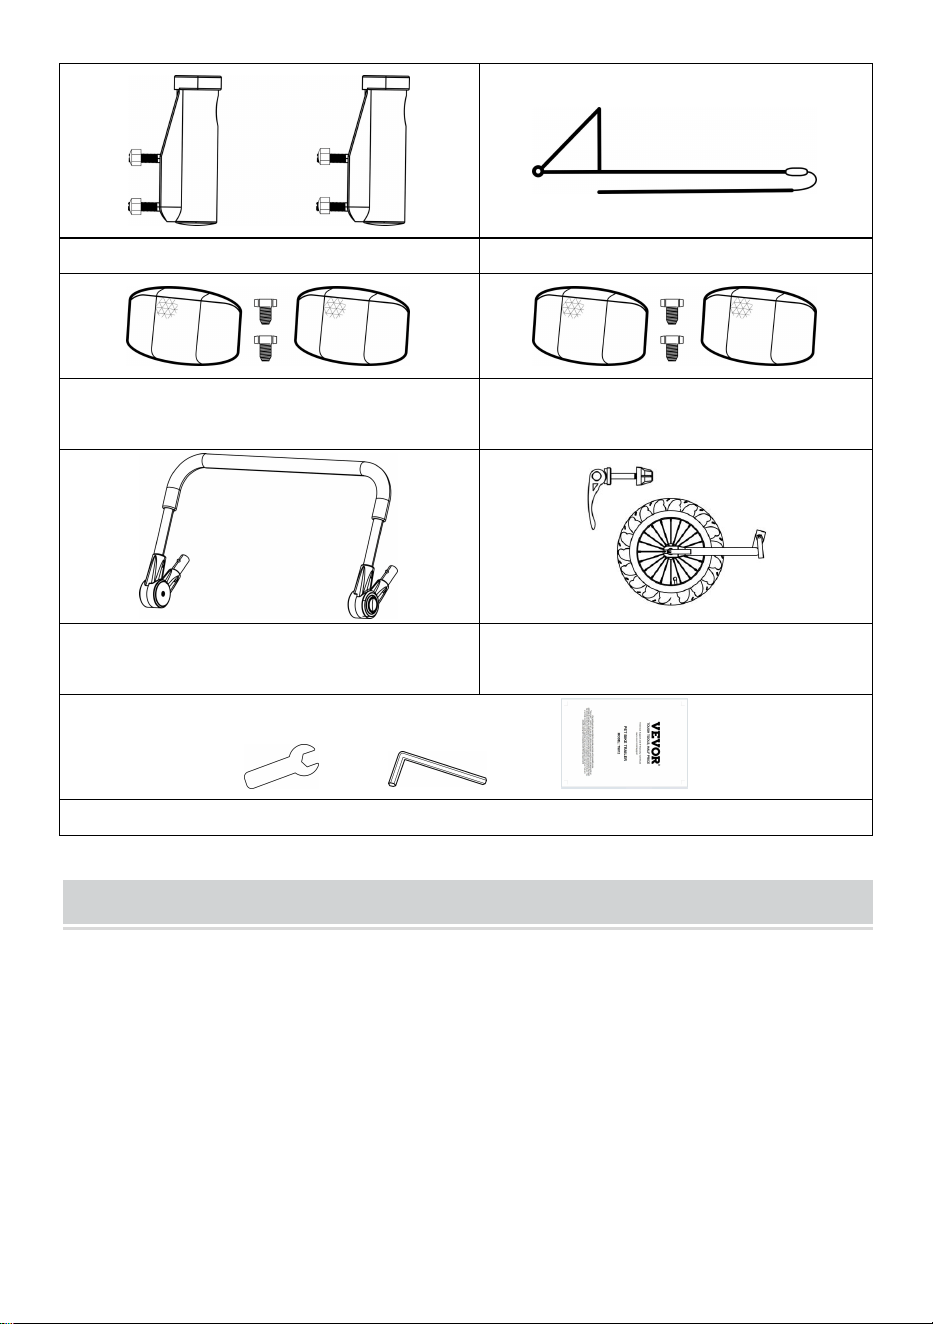
1 x Flag
2 x Rear reflectors (red)
2 x Front reflectors (white)

- 6 -
1 x Handle bar
1 x front wheel with quick-release
skewer
+ +
1 x 11mm Wrench +1 x
Hex key+
1 x User Manual
How to Assemble
1. Opening the Main Frame
Figure 1
Take out the trailer's main frame
and all other components from
the carton. Remove black
protective caps on 4 corners.
Raise both side panels to an
upright position (Figure 1).
Fasten the crossbar to the top part of the main frame. Raise and lock
the cross bar using the safety pin attached to the bolt (Figure 2). Make
sure that safety pins are properly locked in place as shown (Figure 3).
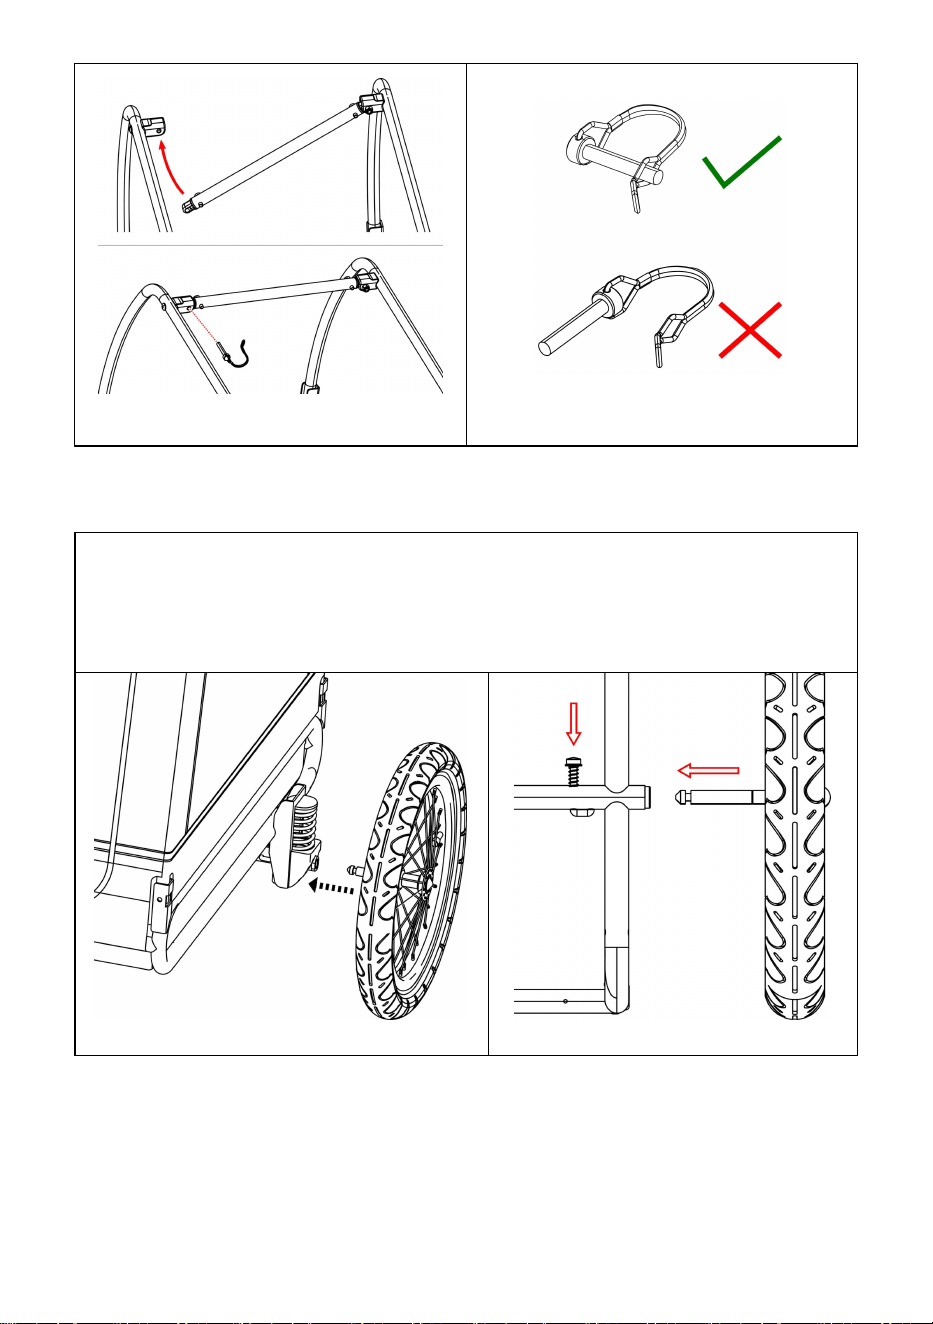
- 7 -
Figure 2
Figure 3
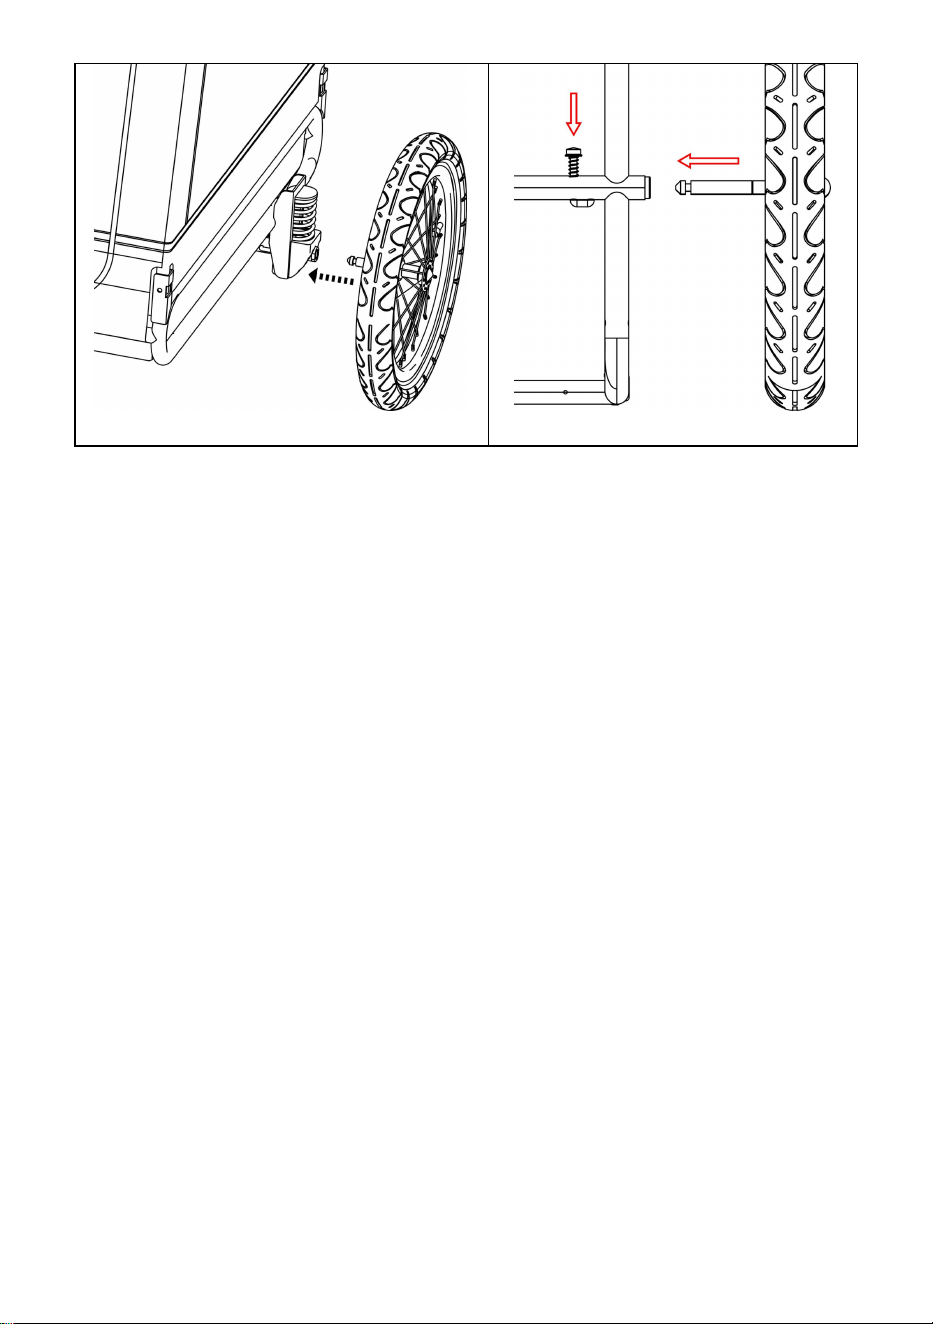
2. Attaching the Wheels
Insert wheel axle into axle receiver underneath the trailer frame until it snaps
in place (Figure 4, Figure 5). Pull firmly on wheel to confirm the axle is fully
engaged. Repeat to attach the second wheel on other side.
To remove the wheel, press the L-shape hook under the trailer and pull it out.
Figure 4
Figure 5
- 8 -
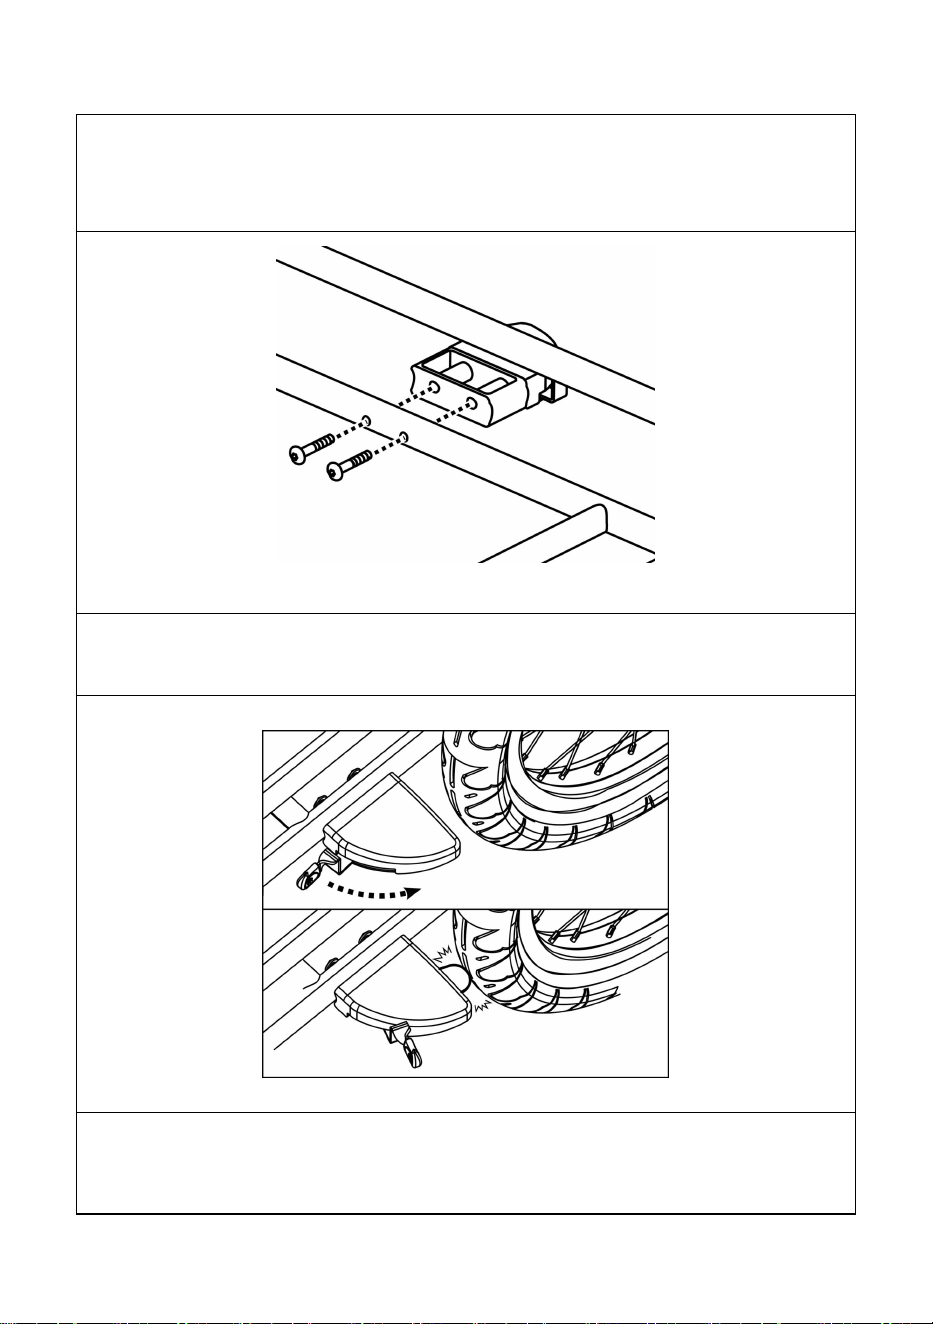
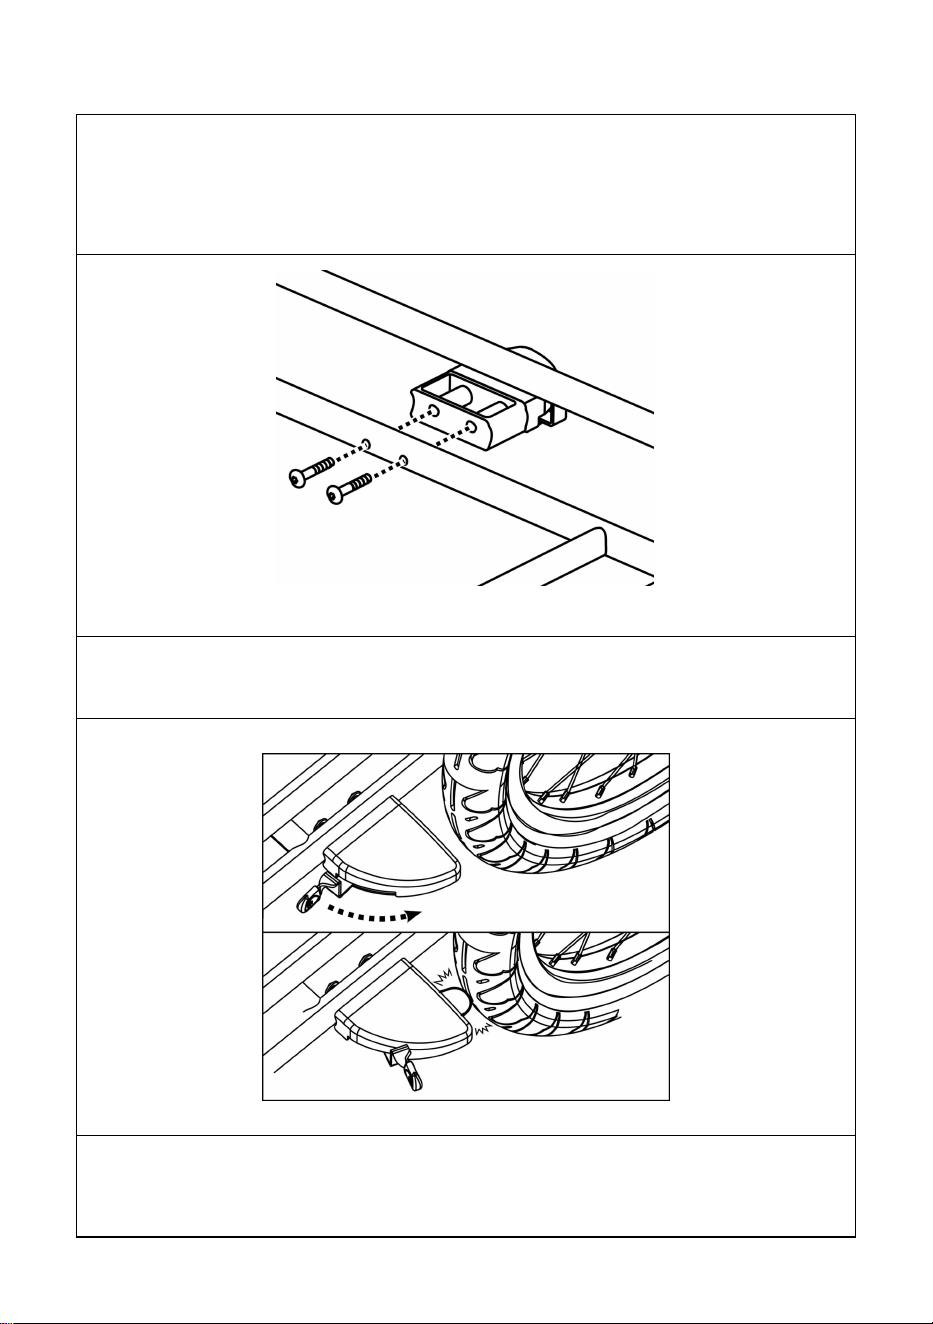
3. Installing the Parking Brakes/Wheel Guards
Insert wheel guard bolts through frame tube. Match holes in wheel
guards to bolts. Tighten securely with hex key (Figure 6). Repeat for
wheel guard on other side.
Figure 6
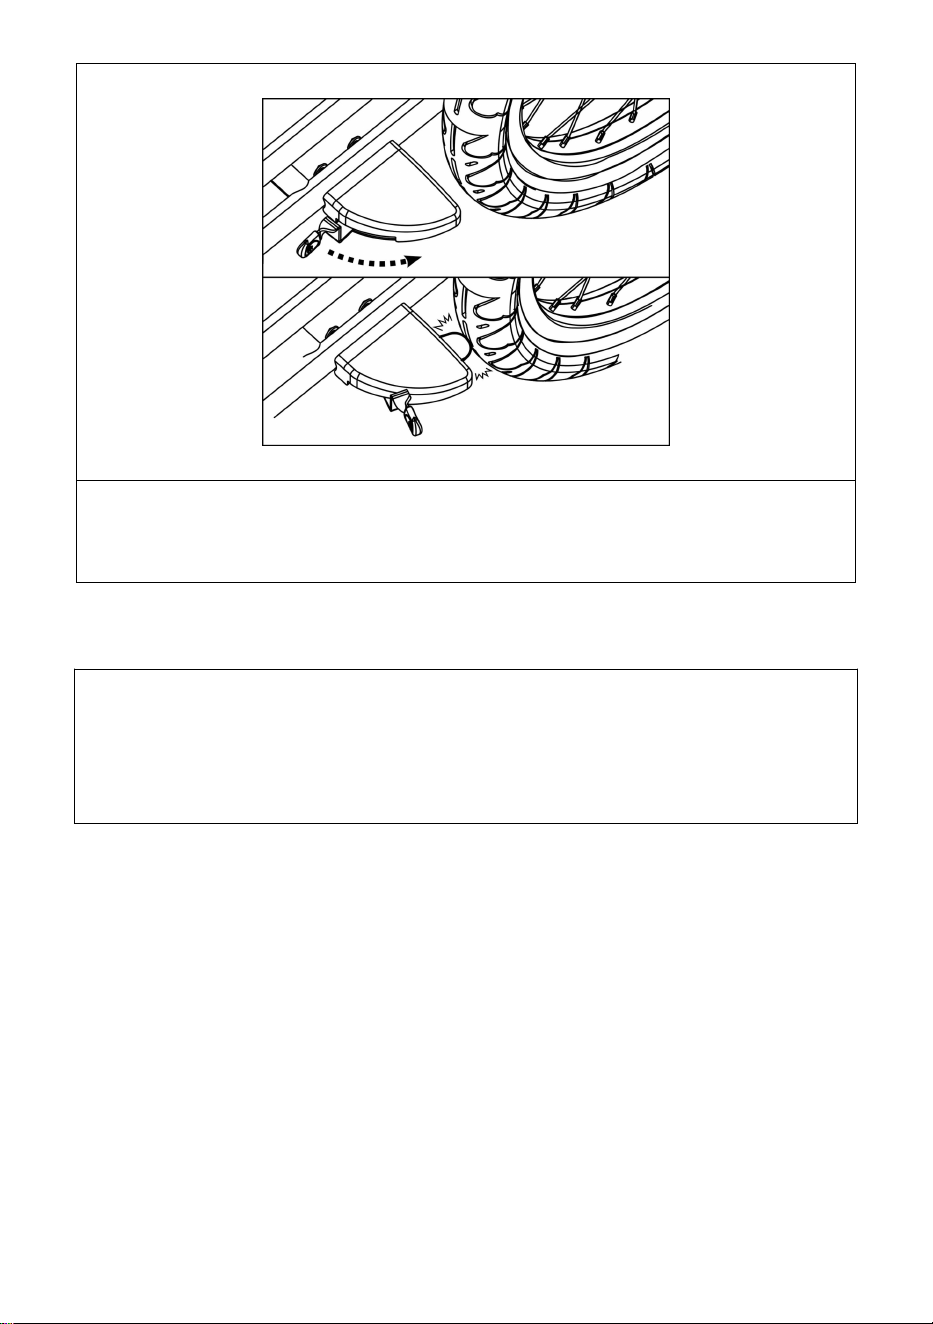
Pull outward the handle on wheel guard to brake. Push back the
handle to release (Figure 7).
Figure 7
⚠ WARNING
Always engage the brakes when not riding/pushing.
- 9 -
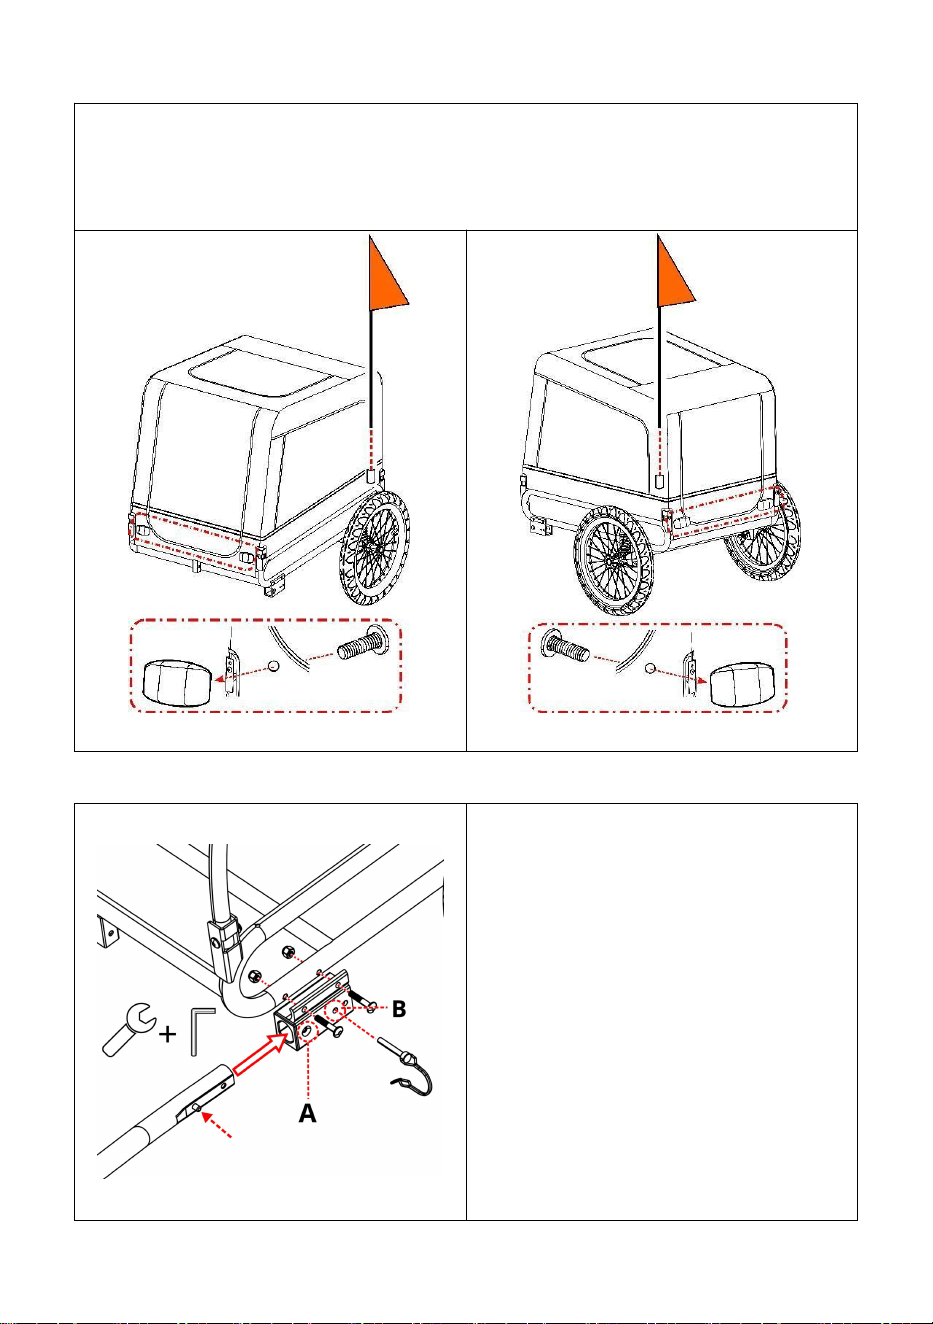
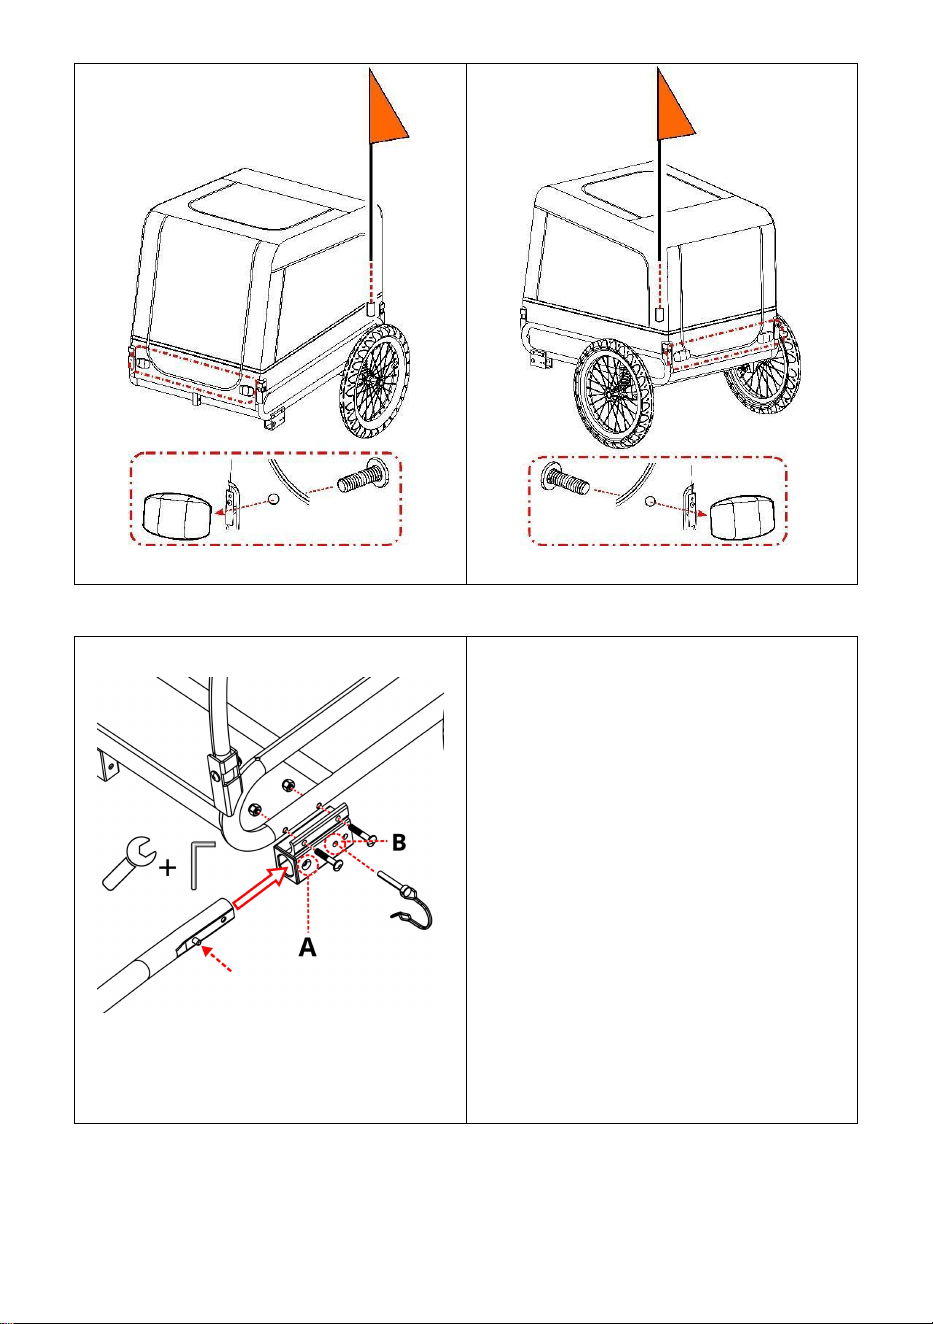
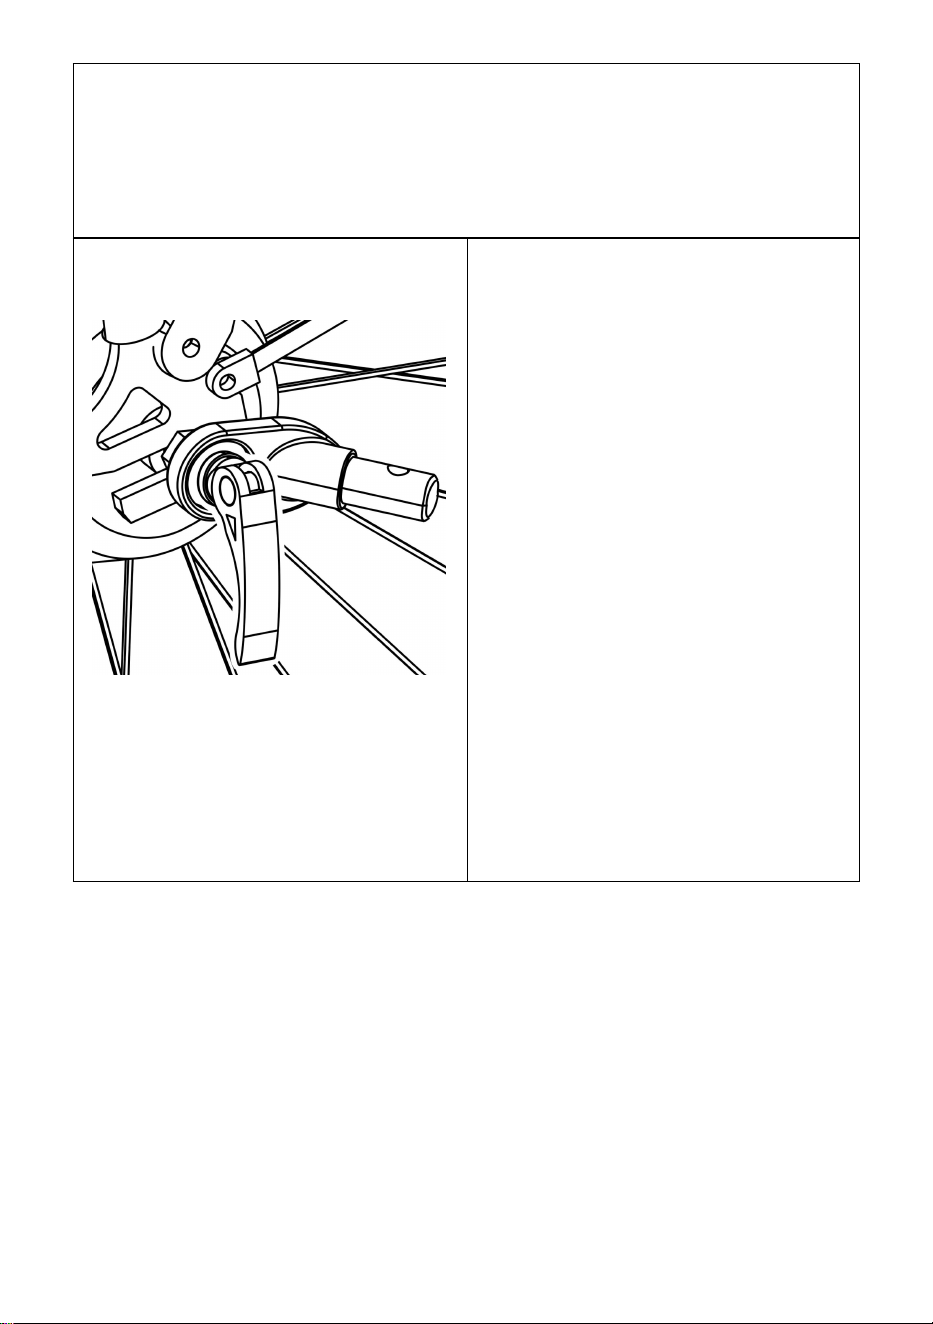
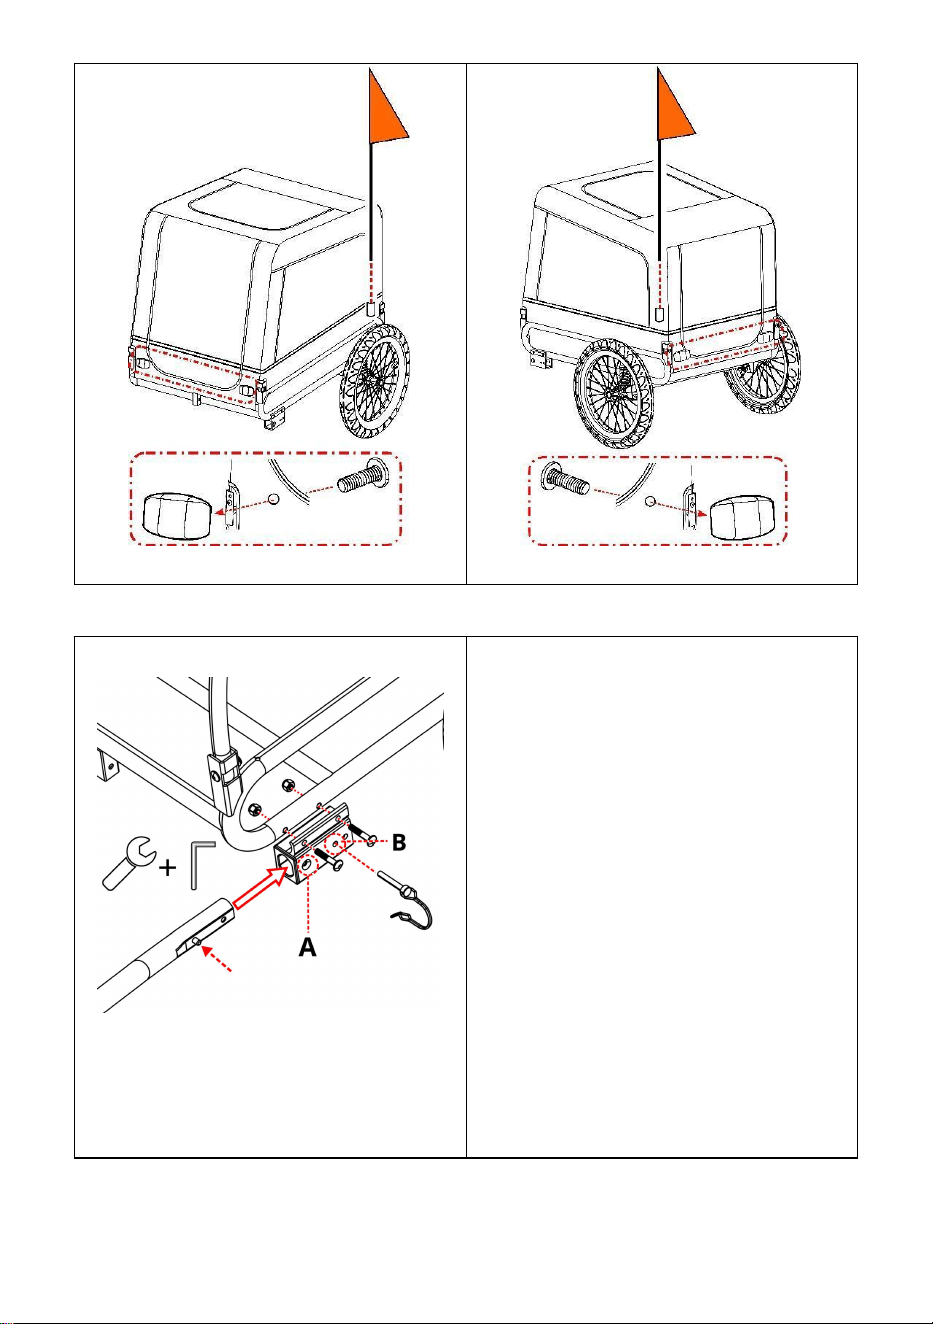
4. Attaching the Flag
Insert the flag pole into the flagpole pocket at the left rear corner of the
side panel (Figure 8, Figure 9).
Insert screws into holes on the cover to fasten front (white) and rear
(red) reflectors.
Figure 8
Figure 9
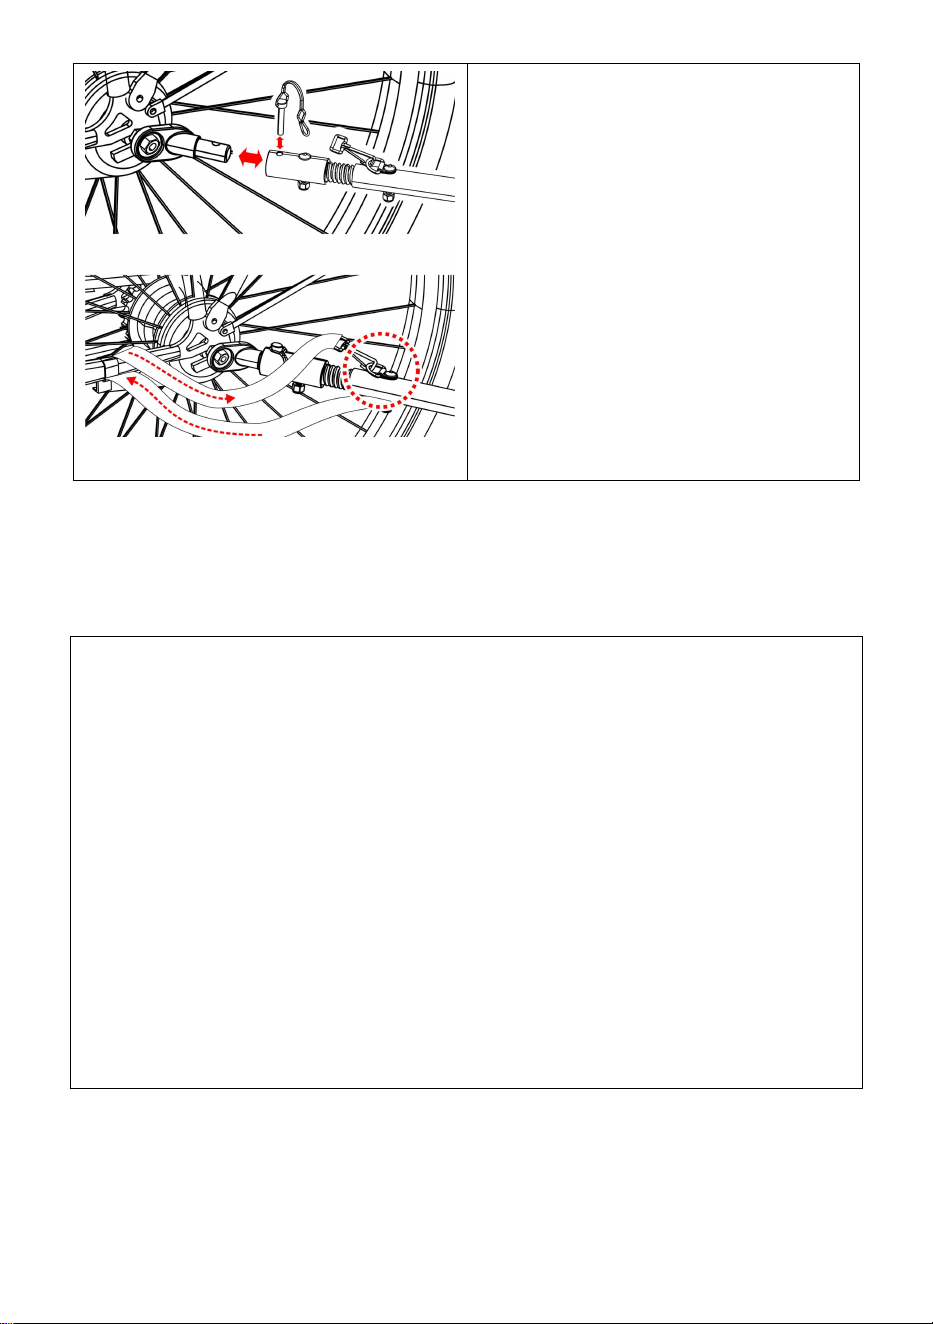
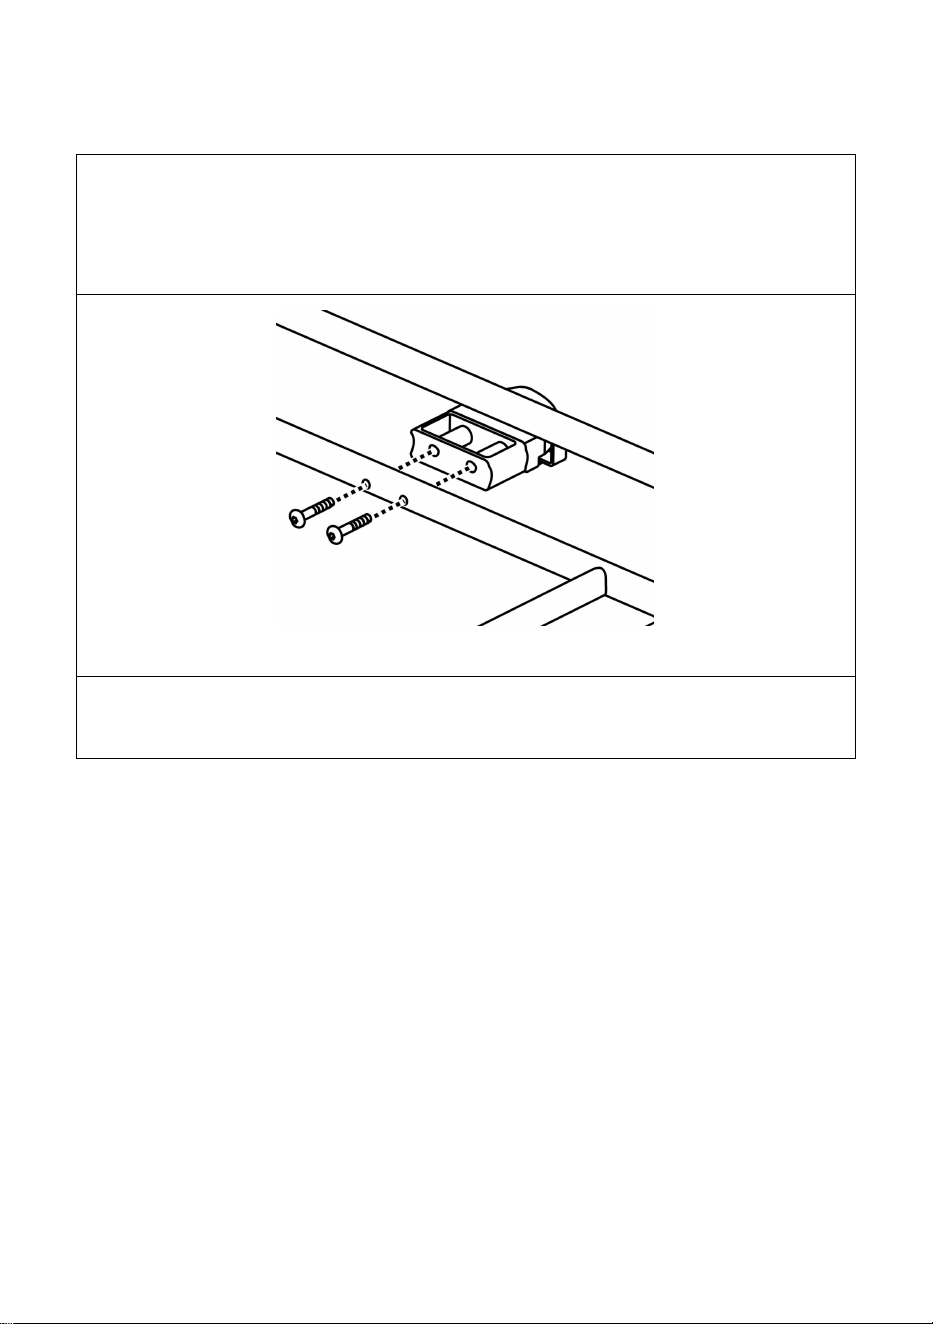
5. Installing the Tow Bar
Figure 10
Fix the tow bar receiver to main
frame as shown (Figure 10)
Pressing the spring button, slide
the tow bar into the tow bar
receiver until the spring button
comes out of the hole A. Insert the
safety pin from the hole B through
the other side. Make sure the
safety pin is properly locked in
place.

- 10 -
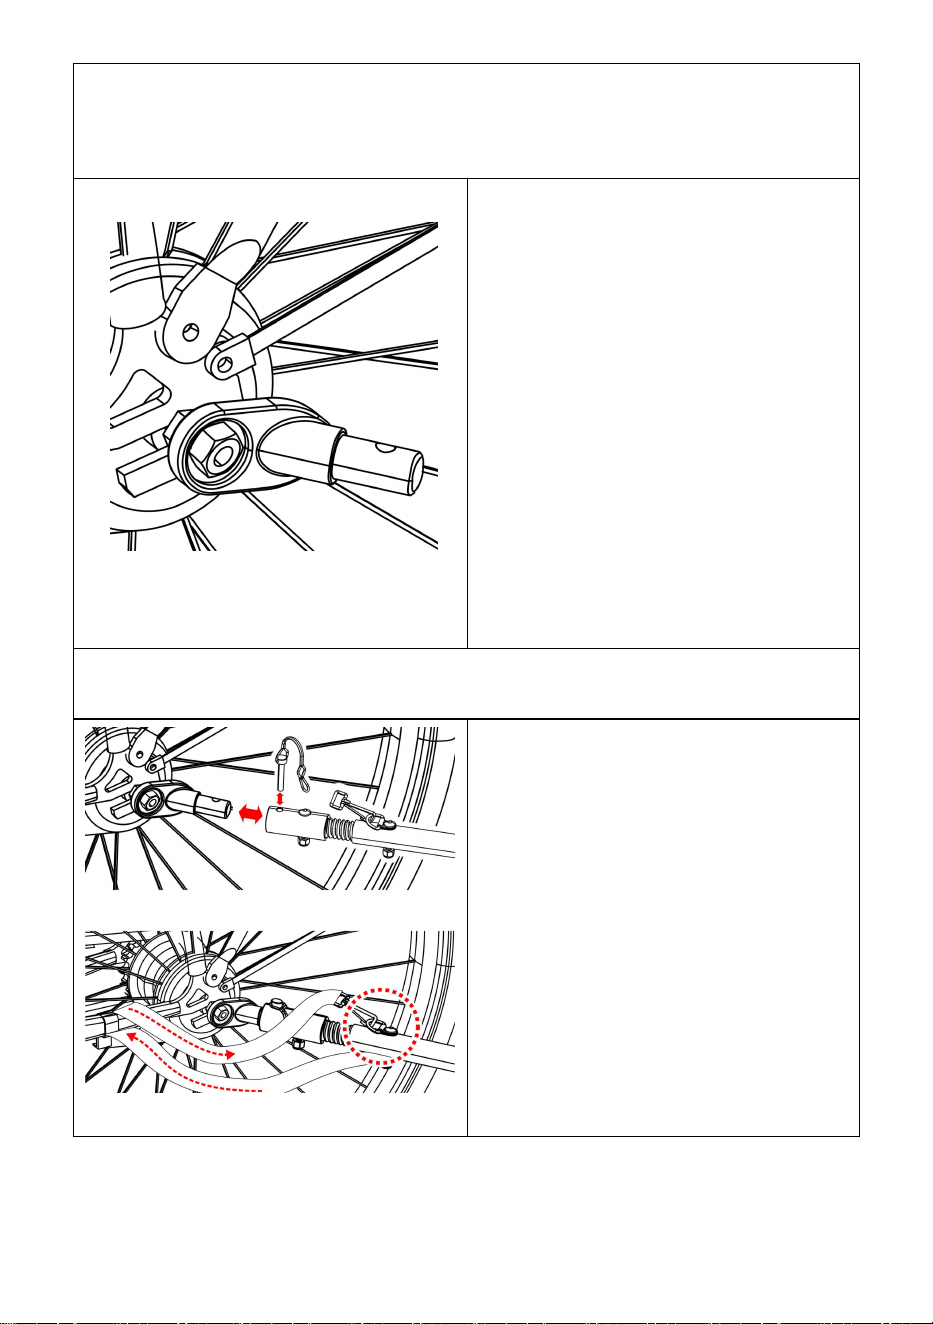
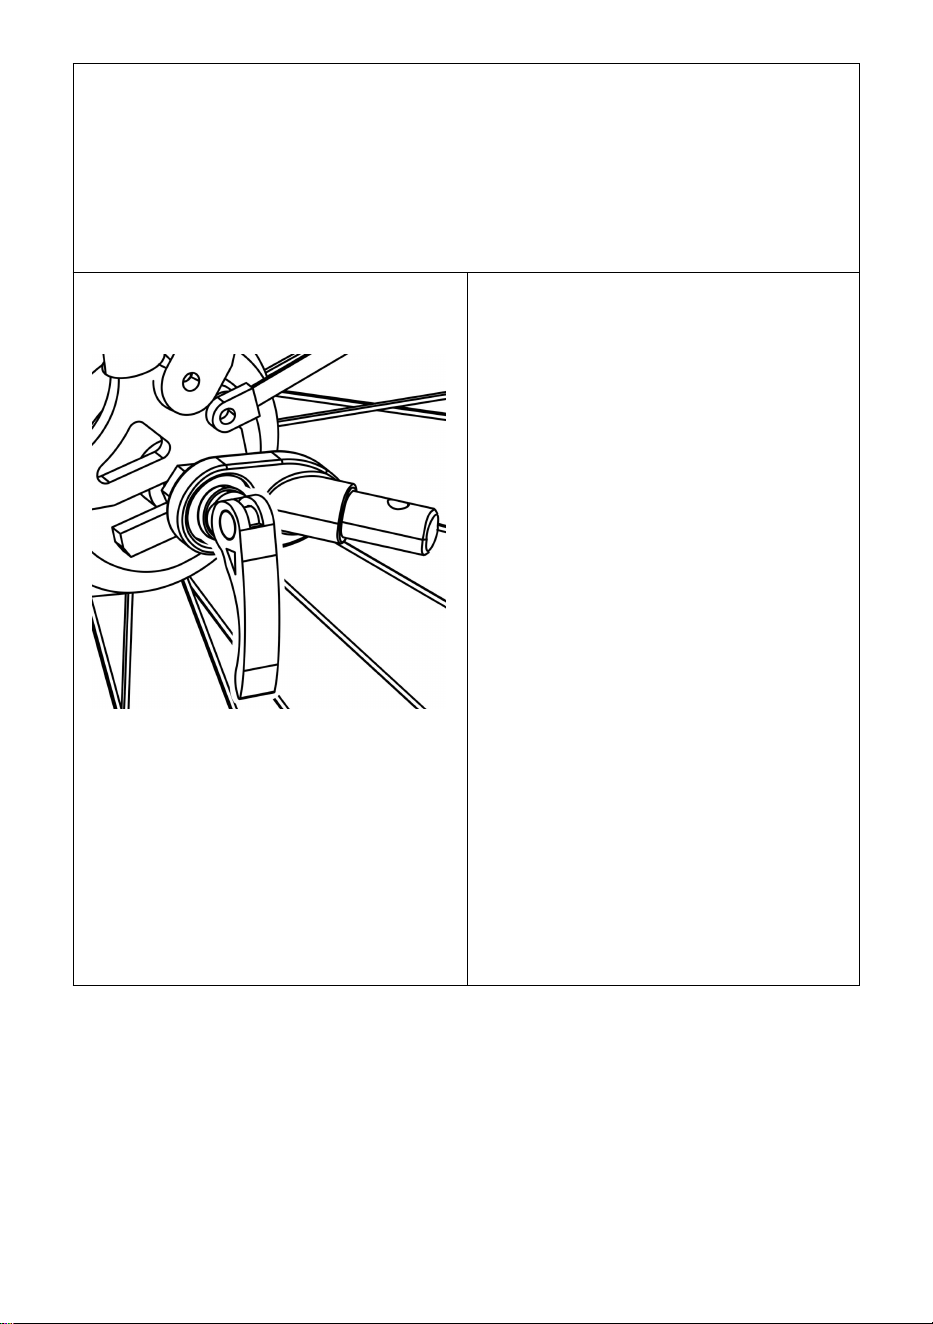
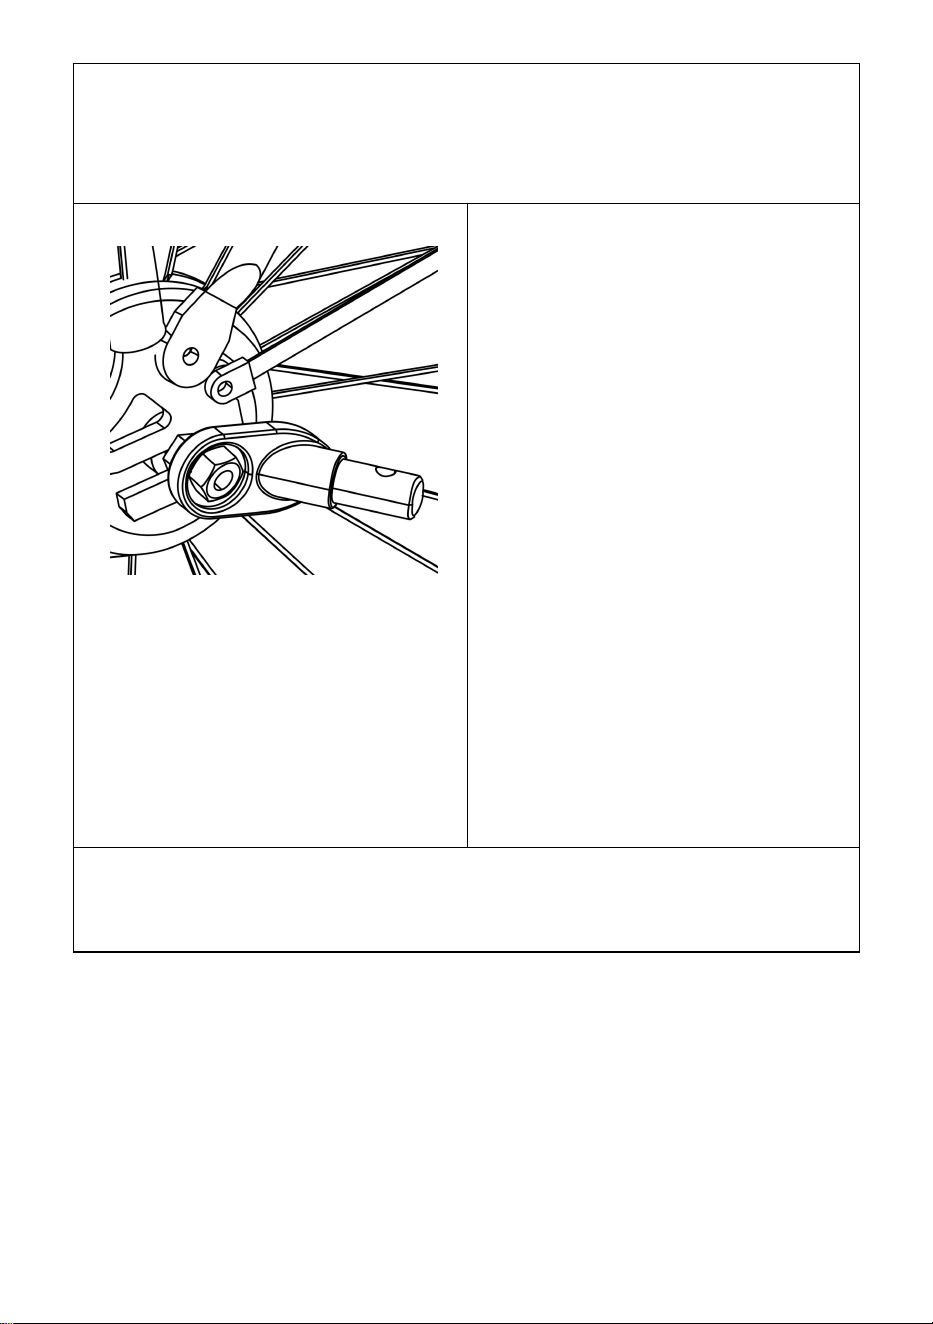
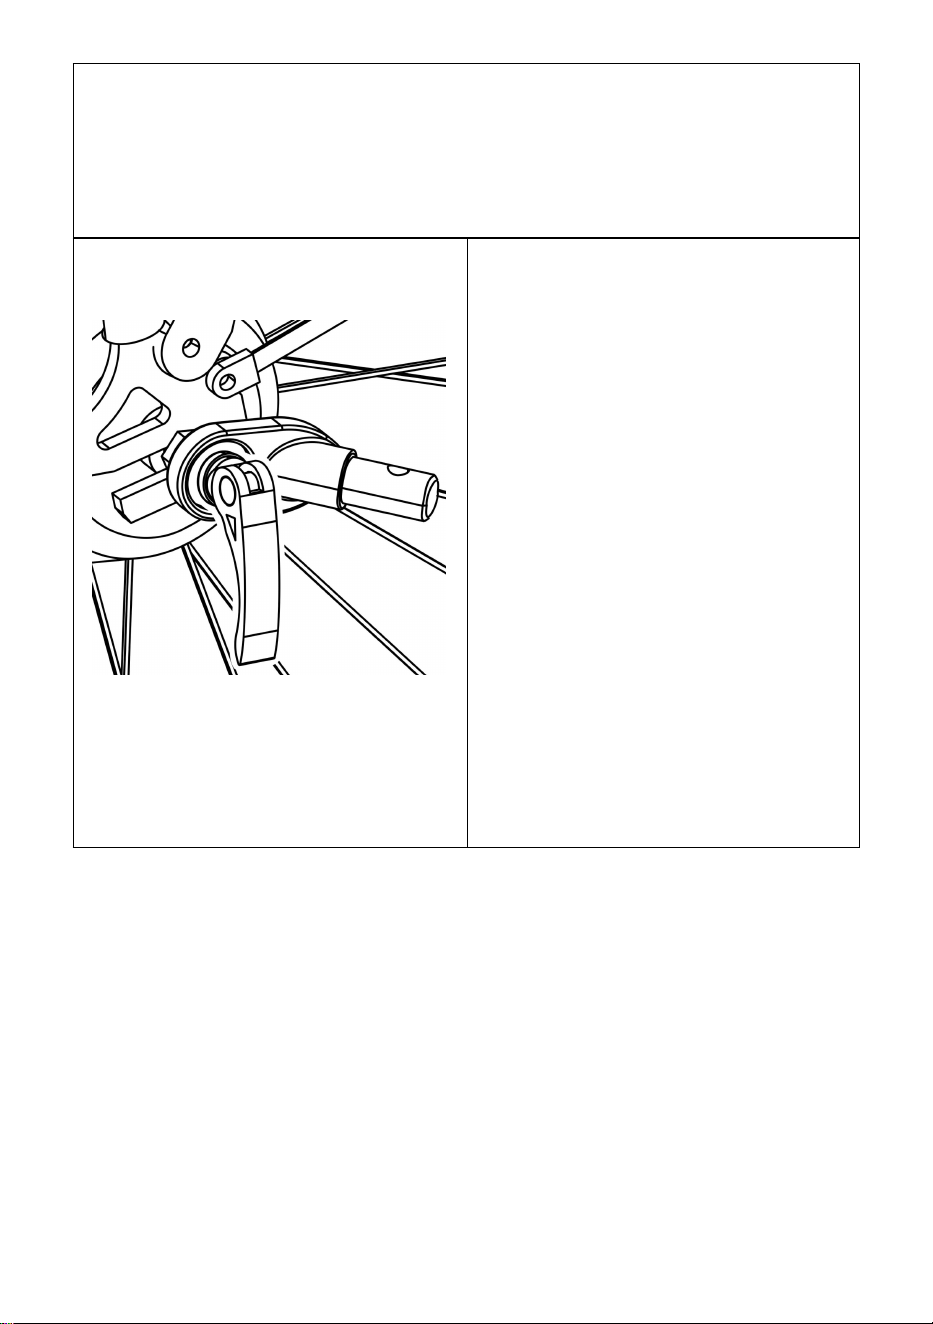
6. Attaching Trailer to Bicycle
1. Quick-release Axle: Remove the quick-release from the left side of
bike’s rear axle. Install the hitch between the quick-release and frame.
Tighten the quick-release following the bike manufacturer’s manual.
Hitch can remain on the bike when the trailer is removed (Figure 11).
Figure 11
⚠ WARNING
The tension-adjusting nut must
engage the threads for at least
five full turns in order to ensure
adequate clamping force for
holding the rear wheel securely.
Failure to tighten the
tension-adjusting nut fully may
result in accidents with serious
injury or death. If the quick
release skewer is too short, it
must be replaced. Consult a
professional bicycle mechanic for
the appropriate parts and
assistance.
- 11 -
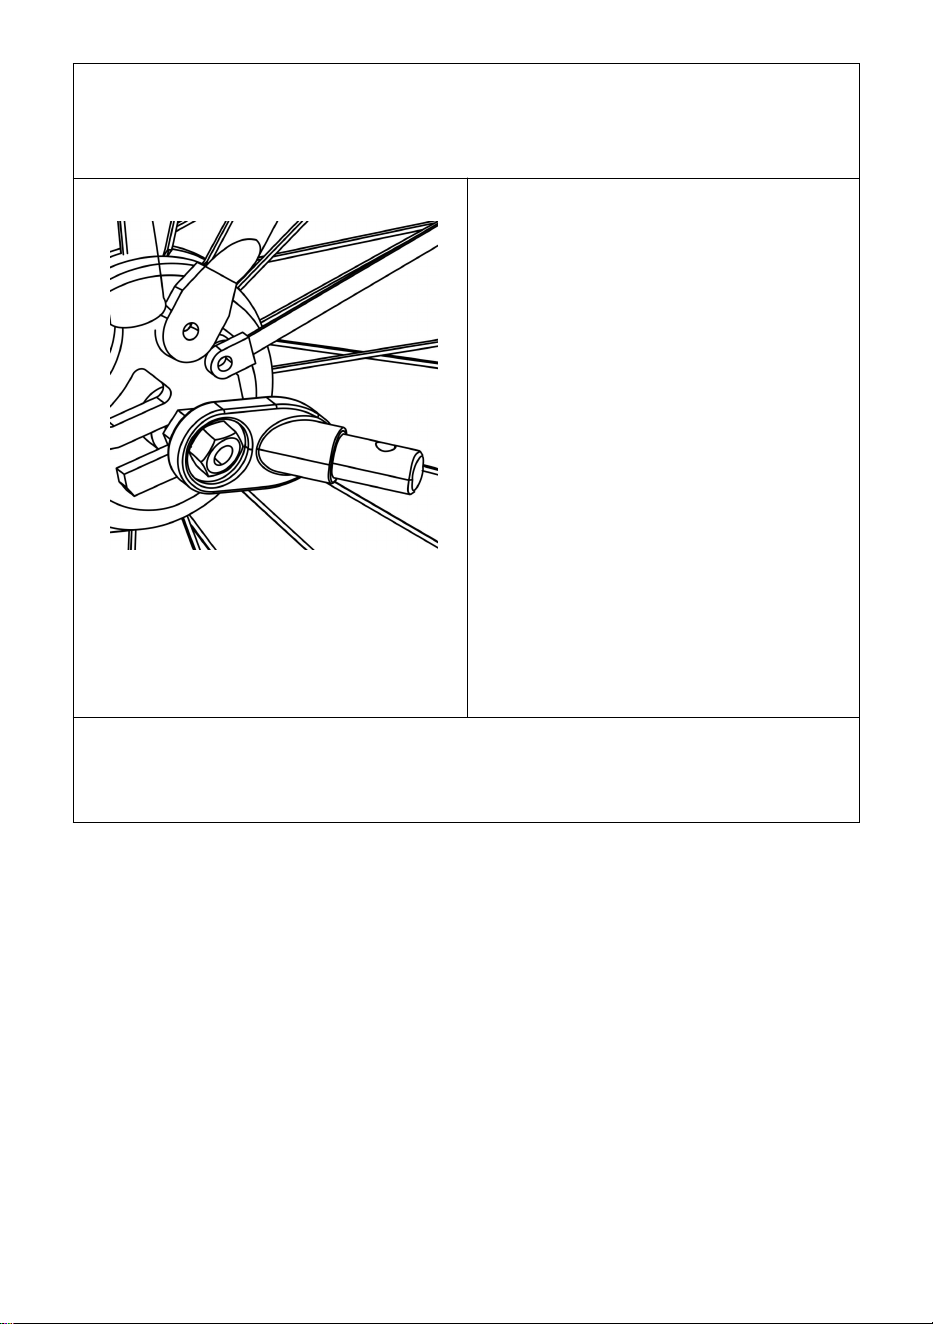
2. Nutted Axle: Unscrew the nut with washer from the left side of
bike’s rear axle. Install the hitch onto the axle and screw the nut back
on with the washer(Figure 12).
Figure 12
⚠ WARNING
The axle nut must engage the
threads for at least five full turns
in order to ensure adequate
clamping force for holding the
rear wheel securely. Failure to
tighten the nut fully may result in
accidents with serious injury or
death. If the axle is too short, the
Universal Hitch cannot be used!
Consult a professional bicycle
mechanic for the appropriate
parts and assistance.
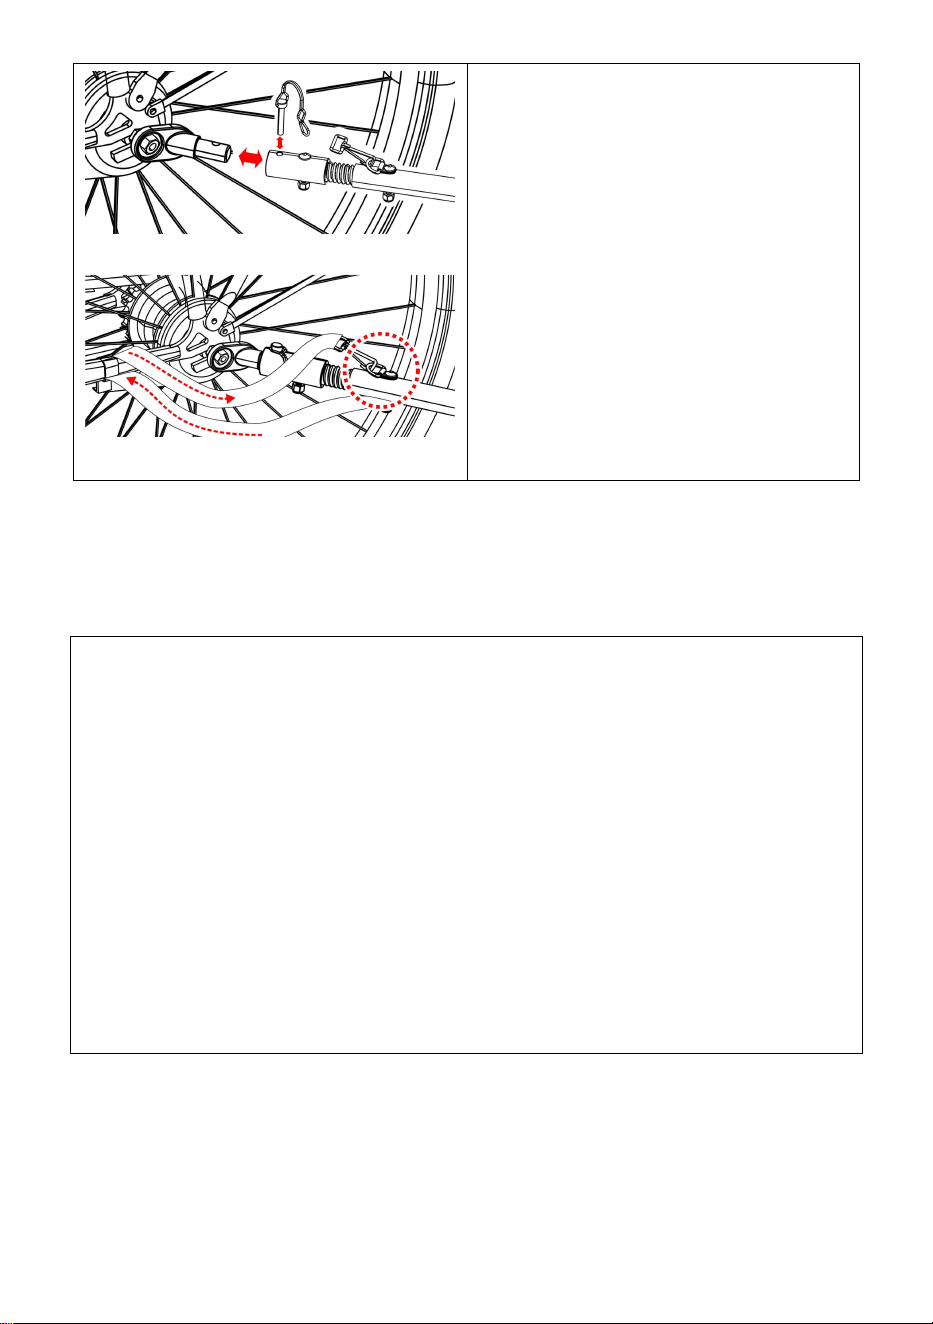
3. Thru Axle: The universal hitch doesn’t fit a bike with thru axle.
Please consult the retailer for possible solution.
Figure 13
Connect the coupler on the tow
bar and secure the safety pin
(Figure 13). Once the tow bar is
attached, wrap safety belt around
the frame of the bike and hook
onto the D-ring on the tow bar.

- 12 -
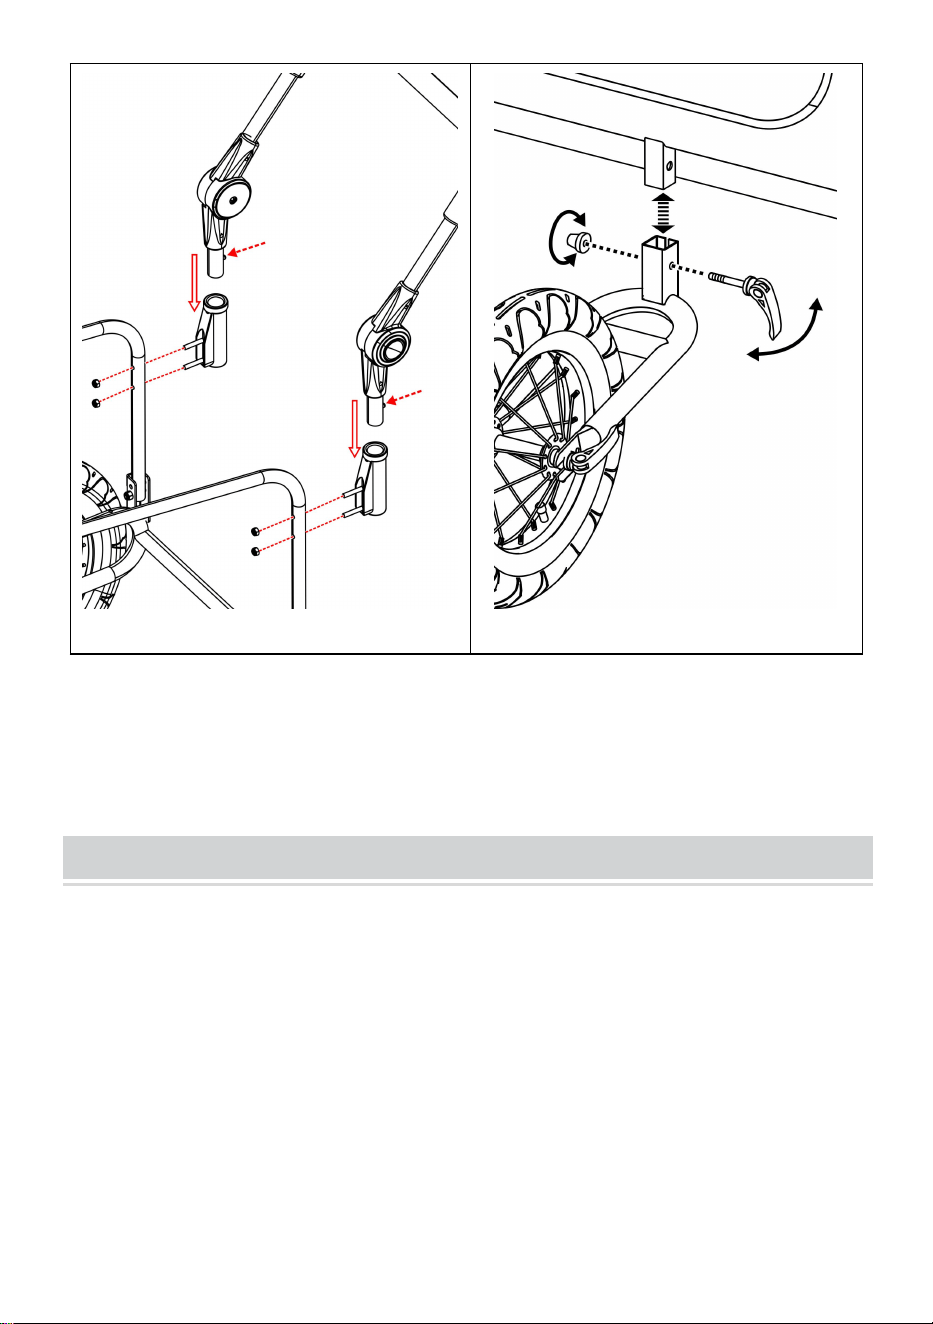
7. Installing the Stroller Kit
Fix two handle receivers onto the rear tubes of frame by tightening the
nuts. On handle ends, press the spring buttons and slide the handle
into handlebar receivers until two spring buttons pop up through the
holes (Figure 14). To remove handle, push buttons and pull up on
handle.
Insert the rectangle tube on the front wheel into the rectangle holder
underneath the front frame of the trailer. Make sure that holes on both
rectangle tubes line up. Lock the front wheel using the quick-release
skewer (Figure 15).
IMPORTANT:Tow bar must be removed before using the stroller kit.
Figure 14
Figure 15

- 13 -
Before You Ride
Check before each use:
1. Wheels are properly secured to the trailer
2. Tires are inflated to recommended pressure on the tire side wall
3. Tow bar is properly secured to the trailer
4. Hitch is properly secured to the bicycle
5. All safety pins are securely locked in place.
6. Safety strap on the tow bar is properly installed
7. Weight of tow bar at coupler is greater than 6.6 lbs. (3 kg) but does not
exceed 17.6 lbs. (8 kg) with fully loaded trailer
8. Make sure that bicycle is in proper working order, especially brakes
and tires (refer to bicycle manufacturer’s instructions)
9. Safety flag is in place
10. Always leash your dog/pet in the trailer.
MAINTENANCE
Storage: For longer product life, store trailer indoors. The trailer should not
be stored at temperatures less than -10°F (-23°C) or greater than 150°F
(65°C).
Fabric Care: Hand wash fabric parts with warm water and mild soap. DO
NOT use bleach or solvents. Wipe dry and store out of direct sunlight in a
dry, well-ventilated area. Clean windows with a damp, soft cloth


- 2 -
Assistance technique et certificat de garantie électronique
www.vevor.com/support
REMORQUE DE VÉLO POUR ANIMAUX
DE COMPAGNIE
MODÈLE : TS812
We continue to be committed to provide you tools with competitive price.
"Save Half", "Half Price" or any other similar expressions used by us only represents an
estimate of savings you might benefit from buying certain tools with us compared to the major
top brands and does not necessarily mean to cover all categories of tools offered by us. You
are kindly reminded to verify carefully when you are placing an order with us if you are
actually saving half in comparison with the top major brands.

- 1 -
MODÈLE : TS812
Important : conservez ces instructions pour référence future
Have product questions? Need technical support? Please feel free to
contact us:
Technical Support and E-Warranty Certificate
www.vevor.com/support
NEED HELP? CONTACT US!
This is the original instruction, please read all manual instructions
carefully before operating. VEVOR reserves a clear interpretation of our
user manual. The appearance of the product shall be subject to the
product you received. Please forgive us that we won't inform you again if
there are any technology or software updates on our product.
PET BIKE TRAILER

- 2 -
CHOOSE THE RIGHT SIZE OF TRAILER
Taille de la remorque
X- Grand
Max. La longueur du
corps
3 5 po ( 9 0 cm)
Max. Hauteur des
épaules
26 po ( 66 cm)
Max. Poids
100 livres. ( 45 kg)
SAFETY INSTRUCTIONS
⚠ AVERTISSEMENT
Lisez les instructions avant de conduire. Le non-respect des
instructions et des avertissements de ce manuel peut entraîner des
blessures graves, voire la mort.
Consultez un vétérinaire pour vous assurer que votre animal peut
voyager en toute sécurité dans une remorque.
Assurez-vous que l'animal ne puisse pas entrer en contact avec les
rayons de la roue.
Vérifiez fréquemment le confort et la sécurité de votre animal, surtout
par temps chaud ou froid.
Ne laissez jamais votre animal sans surveillance et tenez TOUJOURS

- 3 -
LA REMORQUE/POUSSEUSE POUR NE PAS BASCULER VERS
L'ARRIÈRE LORSQUE LE CHIEN ENTRE OU SORTE DE LA
REMORQUE.
NE PAS utiliser avec une charge totale dépassant 100 lb. ( 45 kg).
N'utilisez jamais de remorque pour animaux de compagnie pour
transporter un enfant ou une cargaison.
N'apportez AUCUNE modification au produit. Tout colis placé sur la
remorque peut rendre la remorque instable.
NE PAS trop gonfler les pneus. Le non-respect de la pression nominale
indiquée sur le flanc du pneu peut entraîner une explosion du pneu et
des blessures possibles.
Avant chaque sortie, assurez-vous que la remorque ne gêne pas le
freinage, le pédalage ou la direction du vélo.
Respectez toujours les réglementations locales lorsque vous utilisez la
remorque sur la voie publique.
Ne faites jamais de vélo la nuit sans un éclairage adéquat. Respectez
toutes les exigences légales locales en matière d’éclairage.
Lorsque vous utilisez votre remorque, vous remorquez un poids
supplémentaire et un véhicule plus gros. Vous devez prévoir plus de
temps pour freiner, ralentir, arrêter et démarrer, et laisser plus d'espace
pour les virages et les passages. Expérimentez avec la remorque
chargée dans une zone non encombrée jusqu'à ce que vous soyez
familier avec la façon dont votre vélo gère le remorquage d'une
remorque.
Évitez les rochers, les trottoirs, les freinages brusques et les
embardées brusques. Évitez de franchir des obstacles avec une seule
roue, car cela pourrait faire basculer la remorque.
Roulez toujours avec les portes avant et arrière complètement fermées
pour protéger l'animal des débris volants et empêcher l'animal de
sauter de la remorque.
Le cycliste doit être âgé d'au moins 16 ans.
Limites de vitesse recommandées : - 10 mph (16 km/h) sur des routes
lisses et droites – 5 mph (8 km/h) dans les virages ou sur des routes
inégales.
- 4 -
Le poids de la remorque doit être correctement réparti pour une
manipulation sécuritaire. Le poids sur le connecteur d'attelage doit être
compris entre 30 N ( ≈ 6,6 lb ou 3 kg) et 80 N (≈17,6 lb ou 8 kg). Pour
mesurer cela, chargez votre remorque et placez -la à côté du
pèse-personne. Montez sur la balance et notez votre poids. Debout sur
la balance, soulevez l'extrémité de la barre de remorquage à un pied
(environ 25 cm) du sol. Si le poids est trop faible, la roue arrière du vélo
pourrait perdre de la traction. S'il est trop haut, l'attelage risque d'être
surchargé.
Ne surchargez jamais la remorque et ne roulez jamais avec une charge sur
la barre de remorquage qui se situe en dehors de la plage spécifiée de 6,6
à 17,6 lb. (3 à 8 kg). Répartissez toujours la charge uniformément. Ne pas
le faire pourrait entraîner des accidents entraînant des blessures graves,
voire la mort.
Astuce : Assurez-vous que votre chien soit positionné avec son centre de
gravité le plus près possible de l'axe de la roue. C'est la meilleure façon de
rouler avec une répartition optimale du poids.
MODEL AND PARAMETERS
Modèle
TS812

- 5 -
Taper
Remorquage/poussée manuelle
Max. Charger
100 livres
Taille du bac
31,8*22*23,6 pouces
roues
Acier, 16*2,125 pouces (arrière)
Pneu pneumatique en caoutchouc, 12
pouces (avant)
Matériel
Acier, tissu Oxford 600D
Couleur
Gris noir
CONTENTS
1 x cadre principal
2 x Roues
1 x récepteur de barre de remorquage
1 x attelage universel
- 6 -
1 x barre de remorquage
2 x protège-roue
2 x support de barre de poignée
1 x drapeau
2 x réflecteurs arrière ( rouge )
2 x réflecteurs avant ( blancs )
1 x barre de poignée
1 x roue avant avec broche à
dégagement rapide
+ +
1 x clé de 1 1 mm + 1 x
clé hexagonale +
1 x manuel d'utilisation
How to Assemble
8. Ouverture du cadre principal

- 7 -
Figure 1
Sortez le châssis principal de la
remorque et tous les autres
composants du carton. Retirez les
capuchons de protection noirs
aux 4 coins. Soulevez les deux
panneaux latéraux en position
verticale ( Figure 1 ).
Fixez la barre transversale à la partie supérieure du cadre principal.
Soulevez et verrouillez la barre transversale à l'aide de la goupille de
sécurité fixée au boulon ( Figure 2 ). Assurez-vous que les épingles de
sûreté sont correctement verrouillées en place, comme indiqué (
Figure 3 ).
Figure 2
Figure 3
9. Fixation des roues
Insérez l'essieu de roue dans le récepteur d'essieu sous le châssis de la
remorque jusqu'à ce qu'il s'enclenche ( Figure 4 , Figure 5 ). Tirez fermement
sur la roue pour confirmer que l'essieu est complètement engagé. Répétez
l’opération pour fixer la deuxième roue de l’autre côté.
Pour retirer la roue, appuyez sur le crochet en forme de L sous la remorque et

- 8 -
retirez -le .
Figure 4
Figure 5

- 9 -
10. Installation des freins de stationnement/des protections de
roue
Insérez les boulons de protection de roue dans le tube du cadre.
Faites correspondre les trous des protections de roue avec les
boulons. Serrez solidement avec une clé hexagonale ( Figure 6 ).
Répétez l’opération pour le protège-roue de l’autre côté.
Figure 6
Tirez vers l’extérieur la poignée du protège-roue pour freiner.
Repoussez la poignée pour la libérer ( Figure 7 ).

- 10 -
Figure 7
⚠ AVERTISSEMENT
Engagez toujours les freins lorsque vous ne roulez pas ou ne poussez pas.
11. Attacher le drapeau
Insérez le mât de drapeau dans la poche pour mât de drapeau située
dans le coin arrière gauche du panneau latéral ( Figure 8 , Figure 9 ).
Insérez les vis dans les trous du couvercle pour fixer les réflecteurs
avant (blancs) et arrière (rouges).
- 11 -
Figure 8
Figure 9
12. Installation de la barre de remorquage
Figure 10
Fixez le récepteur de barre de
remorquage au châssis principal
comme indiqué ( Figure 10 ).
En appuyant sur le bouton à
ressort, faites glisser la barre de
remorquage dans le récepteur de
barre de remorquage jusqu'à ce
que le bouton à ressort sorte du
trou A. Insérez la goupille de
sécurité du trou B de l'autre côté.
Assurez-vous que la goupille de
sécurité est correctement
verrouillée en place.
13. Attacher la remorque au vélo
- 12 -
à dégagement rapide : retirez le système de dégagement rapide du
côté gauche de l'essieu arrière du vélo. Installez l'attelage entre le
système de fixation rapide et le cadre. Serrez le système de fixation
rapide en suivant le manuel du fabricant du vélo. L'attelage peut rester
sur le vélo lorsque la remorque est retirée ( Figure 1 1 ).
Figure 11
⚠ AVERTISSEMENT
L'écrou de réglage de la tension
doit s'engager dans les filetages
pendant au moins cinq tours
complets afin de garantir une
force de serrage adéquate pour
maintenir solidement la roue
arrière. Le fait de ne pas serrer
complètement l'écrou de réglage
de la tension peut entraîner des
accidents entraînant des
blessures graves, voire la mort. Si
la broche à dégagement rapide
est trop courte, elle doit être
remplacée. Consultez un
mécanicien de vélo professionnel
pour obtenir les pièces et
l'assistance appropriées.

- 13 -
2. Axe écroué : dévissez l'écrou avec la rondelle du côté gauche de
l'essieu arrière du vélo. Installez l'attelage sur l'essieu et revissez
l'écrou avec la rondelle ( Figure 1 2 ).
Figure 12
⚠ AVERTISSEMENT
L'écrou d'essieu doit s'engager
dans les filetages pendant au
moins cinq tours complets afin de
garantir une force de serrage
adéquate pour maintenir
solidement la roue arrière. Ne pas
serrer complètement l'écrou peut
entraîner des accidents
entraînant des blessures graves,
voire la mort. Si l'essieu est trop
court, l'attelage universel ne peut
pas être utilisé ! Consultez un
mécanicien de vélo professionnel
pour obtenir les pièces et
l'assistance appropriées.
3. Axe traversant : L'attelage universel ne convient pas aux vélos
équipés d'un axe traversant. Veuillez consulter le détaillant pour une
solution possible.
- 14 -
Figure 13
Connectez le coupleur sur la
barre de remorquage et fixez la
goupille de sécurité ( Figure 1
3 ). Une fois la barre de
remorquage fixée, enroulez la
ceinture de sécurité autour du
cadre du vélo et accrochez-la à
l'anneau en D de la barre de
remorquage.
14. Installation du kit poussette
Fixez les deux récepteurs de poignée sur les tubes arrière du cadre en
serrant les écrous. Aux extrémités de la poignée, appuyez sur les
boutons à ressort et faites glisser la poignée dans les récepteurs du
guidon jusqu'à ce que deux boutons à ressort sortent des trous ( Figure
1 4 ). Pour retirer la poignée, appuyez sur les boutons et tirez sur la
poignée.
Insérez le tube rectangulaire sur la roue avant dans le support
rectangulaire sous le cadre avant de la remorque. Assurez-vous que
les trous des deux tubes rectangulaires sont alignés. Verrouillez la roue
avant à l'aide de la brochette de dégagement rapide ( Figure 1 5 ).
IMPORTANT :La barre de remorquage doit être retirée avant d'utiliser le
kit poussette.

- 15 -
Figure 14
Figure 1 5
Before You Ride
Vérifiez avant chaque utilisation :
11. Les roues sont correctement fixées à la remorque
12. Les pneus sont gonflés à la pression recommandée sur le flanc du
pneu
13. La barre de remorquage est correctement fixée à la remorque
14. L'attelage est correctement fixé au vélo
15. Toutes les épingles de sûreté sont solidement verrouillées en place.
16. La sangle de sécurité sur la barre de remorquage est correctement
installée
17. Le poids de la barre de remorquage au niveau du coupleur est

- 16 -
supérieur à 6,6 lb. (3 kg) mais ne dépasse pas 17,6 lb. (8 kg) avec
remorque entièrement chargée
18. Assurez-vous que le vélo est en bon état de fonctionnement,
notamment les freins et les pneus (se référer aux instructions du
fabricant du vélo)
19. Le drapeau de sécurité est en place
20. Laissez toujours votre chien/animal de compagnie en laisse dans la
remorque.
MAINTENANCE
Stockage : Pour une durée de vie plus longue du produit, stockez la
remorque à l'intérieur. La remorque ne doit pas être stockée à des
températures inférieures à -10°F (-23°C) ou supérieures à 150°F (65°C).
Entretien du tissu : Lavez les pièces en tissu à la main avec de l’eau
tiède et du savon doux. NE PAS utiliser d'eau de Javel ni de solvants.
Essuyez et conservez à l'abri de la lumière directe du soleil dans un endroit
sec et bien ventilé. Nettoyer les vitres avec un chiffon doux et humide

- 17 -


- 2 -
Zertifikat für technischen Support und E-Garantie
www.vevor.com/support
FAHRRADANHÄNGER FÜR HAUSTIERE
MODELL: TS812
We continue to be committed to provide you tools with competitive price.
"Save Half", "Half Price" or any other similar expressions used by us only represents an
estimate of savings you might benefit from buying certain tools with us compared to the major
top brands and does not necessarily mean to cover all categories of tools offered by us. You
are kindly reminded to verify carefully when you are placing an order with us if you are
actually saving half in comparison with the top major brands.
- 1 -
MODELL: TS812
Wichtig: Bewahren Sie diese Anleitung zum späteren Nachschlagen
auf
Have product questions? Need technical support? Please feel free to
contact us:
Technical Support and E-Warranty Certificate
www.vevor.com/support
NEED HELP? CONTACT US!
This is the original instruction, please read all manual instructions
carefully before operating. VEVOR reserves a clear interpretation of our
user manual. The appearance of the product shall be subject to the
product you received. Please forgive us that we won't inform you again if
there are any technology or software updates on our product.
PET BIKE TRAILER

- 2 -
CHOOSE THE RIGHT SIZE OF TRAILER
Anhängergröße
X- Groß
Max. Körper Länge
3 5 Zoll ( 9,0 cm)
Max. Schulterhöhe
26 Zoll ( 66 cm)
Max. Gewicht
100 Pfund. ( 45 kg)
SAFETY INSTRUCTIONS
⚠ WARNUNG
Lesen Sie die Anweisungen vor der Fahrt. Die Nichtbeachtung der
Anweisungen und Warnungen in diesem Handbuch kann zu
schweren oder tödlichen Verletzungen führen.
Konsultieren Sie einen Tierarzt, um sicherzustellen, dass die Mitfahrt
Ihres Haustiers in einem Anhänger sicher ist.
Stellen Sie sicher, dass das Haustier nicht mit den Radspeichen in
Kontakt kommen kann.
Überprüfen Sie häufig den Komfort und die Sicherheit Ihres Haustiers,
insbesondere bei heißem oder kaltem Wetter.
Lassen Sie das Haustier niemals unbeaufsichtigt und halten Sie den
Anhänger/Kinderwagen immer daran, nach hinten zu kippen,
wenn der Hund den Anhänger betritt oder verlässt.

- 3 -
NICHT mit einer Gesamtlast von mehr als 100 Pfund verwenden. ( 45
kg).
Benutzen Sie niemals einen Haustieranhänger zum Transport von
Kindern oder Ladung.
Nehmen Sie KEINE Änderungen am Produkt vor. Auf dem Anhänger
platzierte Pakete können dazu führen, dass der Anhänger instabil wird.
Pumpen Sie die Reifen NICHT zu stark auf. Die Nichteinhaltung des
Nenndrucks an der Reifenseitenwand kann zur Explosion des Reifens
und möglichen Verletzungen führen.
Stellen Sie vor jeder Fahrt sicher, dass der Anhänger das Bremsen,
Treten oder Lenken des Fahrrads nicht behindert.
Beachten Sie stets die örtlichen Vorschriften, wenn Sie den Anhänger
auf öffentlichen Straßen verwenden.
Fahren Sie nachts niemals ohne ausreichende Beleuchtung Fahrrad.
Befolgen Sie alle örtlichen gesetzlichen Vorschriften für die
Beleuchtung.
Wenn Sie Ihren Anhänger verwenden, ziehen Sie zusätzliches Gewicht
und ein größeres Fahrzeug. Sie müssen mehr Zeit zum Bremsen,
Verlangsamen, Anhalten und Anfahren einplanen und mehr Platz für
Kurven und Durchgänge lassen. Experimentieren Sie mit dem
beladenen Anhänger an einem freien Ort, bis Sie mit der Handhabung
Ihres Fahrrads beim Ziehen eines Anhängers vertraut sind.
Vermeiden Sie Steine, Bordsteine, starkes Bremsen und plötzliches
Ausweichen. Vermeiden Sie es, mit einem Rad über Hindernisse zu
fahren, da dies zum Umkippen des Anhängers führen kann.
geschlossener Vorder- und Hintertür, um das Haustier vor
herumfliegenden Trümmern zu schützen und zu verhindern, dass es
vom Anhänger springt
Der Fahrer des Fahrrades muss mindestens 16 Jahre alt sein.
Empfohlene Geschwindigkeitsbegrenzungen: - 10 mph (16 km/h) auf
glatten, geraden Straßen – 5 mph (8 km/h) beim Abbiegen oder auf
unebenen Straßen.
Für eine sichere Handhabung muss das Gewicht des Anhängers richtig
verteilt sein. Das Gewicht auf dem Kupplungsstecker sollte zwischen

- 4 -
30 N ( ≈ 6,6 lbs. oder 3 kg) und 80 N (≈17,6 lbs. oder 8 kg) liegen. Um
dies zu messen, beladen Sie Ihren Anhänger und stellen Sie ihn neben
die Personenwaage. Steigen Sie auf die Waage und notieren Sie Ihr
Gewicht. Stellen Sie sich auf die Waage und heben Sie das Ende der
Anhängerkupplung etwa einen Fuß (ca. 25 cm) über den Boden. Bei zu
geringem Gewicht könnte das Hinterrad des Fahrrads an
Bodenhaftung verlieren. Wenn es zu hoch ist, kann es zu einer
Überlastung der Anhängerkupplung kommen.
Überladen Sie den Anhänger niemals und fahren Sie niemals mit einer
Anhängerlast, die außerhalb des angegebenen Bereichs von 6,6 bis 17,6
lbs liegt. (3 – 8 kg). Verteilen Sie die Last immer gleichmäßig. Andernfalls
kann es zu Unfällen mit schweren oder tödlichen Verletzungen kommen.
Tipp : Achten Sie darauf, dass Ihr Hund mit seinem Schwerpunkt möglichst
nah an der Radachse positioniert ist. Dies ist die beste Art, mit einer
optimalen Gewichtsverteilung zu fahren.
MODEL AND PARAMETERS
Modell
TS812
Typ
Schleppen/Handschieben
- 5 -
Max. Belastung
100 Pfund
Behältergröße
31,8 * 22 * 23,6 Zoll
Räder
Stahl, 16 * 2,125 Zoll (hinten)
Luftgummireifen, 12 Zoll (vorne)
Material
Stahl, 600D Oxford-Stoff
Farbe
Schwarzgrau
CONTENTS
1 x Hauptrahmen
2 x Räder
1 x Anhängerkupplungsempfänger
1 x Universalkupplung
1 x Anhängerkupplung
2 x Radschutz

- 6 -
2 x Lenkerhalter
1 x Flagge
2 x Rückstrahler ( rot )
2 x Frontreflektoren ( weiß )
1 x Griffstange
1 x Vorderrad mit Schnellspanner
+ +
1 x 1 1- mm-Schraubenschlüssel + 1 x Innensechskantschlüssel + 1 x
Benutzerhandbuch
How to Assemble
15. Öffnen des Hauptrahmens

- 7 -
Abbildung 1
Nehmen Sie den Hauptrahmen
des Anhängers und alle anderen
Komponenten aus dem Karton.
Schwarze Schutzkappen an 4
Ecken entfernen. Heben Sie
beide Seitenwände in eine
aufrechte Position ( Abbildung 1 ).
Befestigen Sie die Querstange am oberen Teil des Hauptrahmens.
Heben Sie die Querstange an und verriegeln Sie sie mit dem am
Bolzen befestigten Sicherheitsstift ( Abbildung 2 ). Stellen Sie sicher,
dass die Sicherheitsstifte ordnungsgemäß eingerastet sind ( Abbildung
3 ).
Abbildung 2
Abbildung 3
16. Anbringen der Räder
Stecken Sie die Radachse in die Achsaufnahme unter dem Anhängerrahmen,
bis sie einrastet ( Abbildung 4 , Abbildung 5 ). Ziehen Sie fest am Rad, um
sicherzustellen, dass die Achse vollständig eingerastet ist. Wiederholen Sie
den Vorgang, um das zweite Rad auf der anderen Seite zu befestigen.
Um das Rad zu entfernen, drücken Sie den L - förmigen Haken unter dem

- 8 -
Anhänger und ziehen Sie ihn heraus.
Abbildung 4
Abbildung 5
- 9 -
17. Einbau der Feststellbremsen/Radschützer
Führen Sie die Radschutzschrauben durch das Rahmenrohr ein.
Passen Sie die Löcher im Radschutz an die Schrauben an. Mit
Inbusschlüssel fest anziehen ( Abbildung 6 ). Wiederholen Sie den
Vorgang für den Radschutz auf der anderen Seite.
Abbildung 6
Zum Bremsen den Griff am Radschutz nach außen ziehen. Drücken
Sie den Griff zurück, um ihn zu lösen ( Abbildung 7 ).
Abbildung 7
⚠ WARNUNG
Betätigen Sie immer die Bremsen, wenn Sie nicht fahren/schieben.

- 10 -
18. Anbringen der Flagge
Stecken Sie den Fahnenmast in die Fahnenmasttasche an der linken
hinteren Ecke der Seitenwand ( Abbildung 8 , Abbildung 9 ).
Stecken Sie Schrauben in die Löcher an der Abdeckung, um die
vorderen (weißen) und hinteren (roten) Reflektoren zu befestigen.
- 11 -
Abbildung 8
Abbildung 9
19. Einbau der Anhängerkupplung
Abbildung 10
Befestigen Sie die
Anhängerkupplungsaufnahme
wie gezeigt am Hauptrahmen (
Abbildung 10 ).
Drücken Sie den Federknopf und
schieben Sie die
Anhängerkupplung in die
Anhängerkupplungsaufnahme,
bis der Federknopf aus Loch A
herauskommt. Führen Sie den
Sicherheitsstift aus Loch B durch
die andere Seite ein. Stellen Sie
sicher, dass der Sicherheitsstift
richtig eingerastet ist.
20. Anhänger am Fahrrad befestigen
- 12 -
1. Schnellspanner - Achse: Entfernen Sie den Schnellspanner von
der linken Seite der Hinterachse des Fahrrads. Montieren Sie die
Kupplung zwischen Schnellspanner und Rahmen. Ziehen Sie den
Schnellspanner gemäß der Anleitung des Fahrradherstellers fest. Die
Anhängerkupplung kann beim Abnehmen des Anhängers am Fahrrad
verbleiben ( Abbildung 1 1 ).
Abbildung 11
⚠ WARNUNG
Die Spannungseinstellmutter
muss mindestens fünf volle
Umdrehungen in das Gewinde
eingreifen, um eine ausreichende
Klemmkraft zum sicheren Halten
des Hinterrads zu gewährleisten.
Wenn die
Spannungseinstellmutter nicht
vollständig festgezogen wird,
kann es zu Unfällen mit schweren
oder tödlichen Verletzungen
kommen. Sollte der
Schnellspanner zu kurz sein,
muss er ausgetauscht werden.
Wenden Sie sich für die
entsprechenden Teile und
Unterstützung an einen
professionellen
Fahrradmechaniker.
- 13 -
2. Mit Mutter versehene Achse: Schrauben Sie die Mutter mit
Unterlegscheibe von der linken Seite der Hinterachse des Fahrrads
ab. Montieren Sie die Kupplung an der Achse und schrauben Sie die
Mutter mit der Unterlegscheibe wieder fest ( Abbildung 1 2 ).
Abbildung 12
⚠ WARNUNG
Die Achsmutter muss mindestens
fünf volle Umdrehungen in das
Gewinde eingreifen, um eine
ausreichende Klemmkraft für den
sicheren Halt des Hinterrads zu
gewährleisten. Wenn die Mutter
nicht vollständig festgezogen
wird, kann es zu Unfällen mit
schweren oder tödlichen
Verletzungen kommen. Bei zu
kurzer Achse kann die
Universalkupplung nicht
verwendet werden! Wenden Sie
sich für die entsprechenden Teile
und Unterstützung an einen
professionellen
Fahrradmechaniker.
3. Steckachse: Die Universalkupplung passt nicht auf ein Fahrrad mit
Steckachse. Bitte wenden Sie sich für eine mögliche Lösung an den
Händler.
- 14 -
Abbildung 13
Schließen Sie die Kupplung an
der Anhängerkupplung an und
sichern Sie den Sicherheitsstift
( Abbildung 1 3 ). Sobald die
Anhängerkupplung befestigt ist,
wickeln Sie den Sicherheitsgurt
um den Rahmen des Fahrrads
und haken Sie ihn in den D-Ring
an der Anhängerkupplung ein.
21. Installieren des Kinderwagen-Kits
Befestigen Sie zwei Griffaufnahmen an den hinteren Rahmenrohren,
indem Sie die Muttern festziehen. Drücken Sie an den Griffenden die
Federknöpfe und schieben Sie den Griff in die Lenkeraufnahmen, bis
zwei Federknöpfe durch die Löcher herausspringen ( Abbildung 1 4 ).
Um den Griff zu entfernen, drücken Sie die Knöpfe und ziehen Sie den
Griff nach oben.
Stecken Sie das Rechteckrohr am Vorderrad in die Rechteckhalterung
unter dem Vorderrahmen des Anhängers. Stellen Sie sicher, dass die
Löcher an beiden Rechteckrohren ausgerichtet sind. Arretieren Sie das
Vorderrad mit dem Schnellspanner ( Abbildung 1 5 ).
WICHTIG : Die Anhängerkupplung muss vor der Verwendung des
Kinderwagen-Sets entfernt werden.
- 15 -
Abbildung 14
Abbildung 1 5
Before You Ride
Überprüfen Sie vor jedem Gebrauch:
21. Die Räder sind ordnungsgemäß am Anhänger befestigt
22. Die Reifen werden auf den empfohlenen Druck an der
Reifenseitenwand aufgepumpt
23. Die Anhängerkupplung ist ordnungsgemäß am Anhänger befestigt
24. Die Anhängerkupplung ist ordnungsgemäß am Fahrrad befestigt
25. Alle Sicherheitsnadeln sind sicher eingerastet.
26. Der Sicherheitsgurt an der Anhängerkupplung ist ordnungsgemäß
angebracht
27. Das Gewicht der Anhängerkupplung an der Kupplung beträgt mehr als

- 16 -
6,6 Pfund. (3 kg), aber nicht mehr als 17,6 lbs. (8 kg) bei voll
beladenem Anhänger
28. Stellen Sie sicher, dass das Fahrrad ordnungsgemäß funktioniert,
insbesondere Bremsen und Reifen (siehe Anweisungen des
Fahrradherstellers).
29. Sicherheitsflagge ist vorhanden
30. Leinen Sie Ihren Hund/Haustier im Anhänger immer an der Leine.
MAINTENANCE
Lagerung: Für eine längere Produktlebensdauer den Anhänger im
Innenbereich lagern. Der Anhänger sollte nicht bei Temperaturen unter
-10 °F (-23 °C) oder über 150 °F (65 °C) gelagert werden.
Stoffpflege: Stoffteile von Hand mit warmem Wasser und milder Seife
waschen. KEINE Bleichmittel oder Lösungsmittel verwenden. Trocken
abwischen und an einem trockenen, gut belüfteten Ort vor direkter
Sonneneinstrahlung schützen. Reinigen Sie die Fenster mit einem
feuchten, weichen Tuch


- 2 -
Supporto tecnico e certificato di garanzia elettronica
www.vevor.com/support
RIMORCHIO PER BICI PER ANIMALI
DOMESTICI
MODELLO: TS812
We continue to be committed to provide you tools with competitive price.
"Save Half", "Half Price" or any other similar expressions used by us only represents an
estimate of savings you might benefit from buying certain tools with us compared to the major
top brands and does not necessarily mean to cover all categories of tools offered by us. You
are kindly reminded to verify carefully when you are placing an order with us if you are
actually saving half in comparison with the top major brands.

- 1 -
MODELLO: TS812
Importante: conservare queste istruzioni per riferimento futuro
Have product questions? Need technical support? Please feel free to
contact us:
Technical Support and E-Warranty Certificate
www.vevor.com/support
NEED HELP? CONTACT US!
This is the original instruction, please read all manual instructions
carefully before operating. VEVOR reserves a clear interpretation of our
user manual. The appearance of the product shall be subject to the
product you received. Please forgive us that we won't inform you again if
there are any technology or software updates on our product.
PET BIKE TRAILER
- 2 -
CHOOSE THE RIGHT SIZE OF TRAILER
Dimensioni del
rimorchio
X- Grande
Massimo. Lunghezza del
corpo
3 5 pollici ( 9 0 cm)
Massimo. Altezza delle
spalle
26 pollici ( 66 cm)
Massimo. Peso
100 libbre ( 45
chilogrammi)
SAFETY INSTRUCTIONS
⚠ ATTENZIONE
Leggere le istruzioni prima di mettersi alla guida. Il mancato rispetto
delle istruzioni e delle avvertenze contenute nel presente manuale
potrebbe provocare lesioni gravi o mortali.
Consulta un veterinario per assicurarti che sia sicuro trasportare il tuo
animale domestico in un rimorchio.
Assicurarsi che l'animale non possa entrare in contatto con i raggi delle
ruote.
Controllare frequentemente il comfort e la sicurezza dell'animale,

- 3 -
soprattutto durante la stagione calda o fredda.
Non lasciare mai l'animale incustodito e TENERE SEMPRE CHE IL
RIMORCHIO/ PASSEGGINO NON SI INCLINI ALL'INDIETRO
QUANDO IL CANE ENTRA O LASCIA DAL RIMORCHIO.
NON utilizzare con un carico totale superiore a 100 libbre. ( 45
chilogrammi).
Non utilizzare mai il rimorchio per animali domestici per trasportare
bambini o merci.
NON apportare alcuna modifica al prodotto. Eventuali pacchi
posizionati sul rimorchio potrebbero renderlo instabile.
NON gonfiare eccessivamente i pneumatici. Il mancato rispetto della
pressione nominale sul fianco dello pneumatico può provocare
l'esplosione dello pneumatico e possibili lesioni.
Prima di ogni utilizzo, assicurarsi che il rimorchio non interferisca con la
frenata, la pedalata o lo sterzo della bicicletta.
Rispettare sempre le normative locali quando si utilizza il rimorchio su
strade pubbliche.
Non andare mai in bicicletta di notte senza un'illuminazione adeguata.
Rispettare tutti i requisiti legali locali per l'illuminazione.
Quando usi il tuo rimorchio, stai trainando un peso extra e un veicolo
più grande. È necessario concedere più tempo per frenare, rallentare,
fermarsi e partire e lasciare più spazio per svolte e passaggi.
Sperimenta con il rimorchio carico in un'area non congestionata finché
non acquisisci familiarità con il modo in cui la tua bicicletta gestisce il
traino di un rimorchio.
Evitare sassi, cordoli, frenate brusche e sterzate improvvise. Evitare di
superare gli ostacoli con una ruota poiché ciò potrebbe causare il
ribaltamento del rimorchio.
Viaggiare sempre con le porte anteriore e posteriore completamente
chiuse per proteggere l'animale dai detriti volanti ed evitare che salti
dal rimorchio
Il conducente della bicicletta deve avere almeno 16 anni.
Limiti di velocità consigliati: - 10 mph (16 km/h) su strade lisce e diritte
– 5 mph (8 km/h) in curva o su strade sconnesse.
- 4 -
Il peso del rimorchio deve essere distribuito correttamente per una
movimentazione sicura. Il peso sul connettore dell'attacco deve essere
compreso tra 30 N ( ≈ 6,6 lbs. o 3 kg) e 80 N (≈ 17,6 lbs. o 8 kg). Per
misurarlo, carica il rimorchio e posizionalo accanto alla bilancia
pesapersone. Sali sulla bilancia e prendi nota del tuo peso. Stando
sulla bilancia, sollevare l'estremità della barra di traino di un piede
(circa 25 cm) da terra. Se il peso è troppo basso, la ruota posteriore
della bicicletta potrebbe perdere trazione. Se è troppo alto, l'attacco
potrebbe essere sovraccaricato.
Non sovraccaricare mai il rimorchio e non viaggiare mai con un carico sulla
barra di traino che non rientra nell'intervallo specificato compreso tra 6,6 e
17,6 libbre. (3 – 8 kg). Distribuire sempre il carico in modo uniforme. In
caso contrario, potrebbero verificarsi incidenti con lesioni gravi o mortali.
Suggerimento : assicurati che il tuo cane sia posizionato con il baricentro
il più vicino possibile all'asse della ruota. Questo è il modo migliore per
pedalare con una distribuzione ottimale del peso.
MODEL AND PARAMETERS
Modello
TS812
- 5 -
Tipo
Traino/spinta manuale
Massimo. Carico
100 libbre
Dimensione
contenitore
31,8 * 22 * 23,6 pollici
Ruote
Acciaio, 16*2.125 pollici (posteriore)
Pneumatico in gomma, 12 pollici
(anteriore)
Materiale
Acciaio, tessuto Oxford 600D
Colore
Nero&Grigio
CONTENTS
1 telaio principale
2 ruote
1 ricevitore per barra di traino
1 attacco universale
- 6 -
1 barra di traino
2 protezioni per ruote
2 supporti per manubrio
1 bandiera
2 x catarifrangenti posteriori ( rossi )
2 x catarifrangenti anteriori
( bianchi )
1 manubrio
1 ruota anteriore con bloccaggio a
sgancio rapido
+ +
1 chiave inglese da 1 mm + 1
chiave esagonale +
1 manuale utente
How to Assemble
22. Apertura del telaio principale

- 7 -
Figura 1
Estrarre il telaio principale del
rimorchio e tutti gli altri
componenti dal cartone.
Rimuovere i cappucci protettivi
neri sui 4 angoli. Sollevare
entrambi i pannelli laterali in
posizione verticale ( Figura 1 ).
Fissare la traversa alla parte superiore del telaio principale. Sollevare
e bloccare la barra trasversale utilizzando il perno di sicurezza fissato
al bullone ( Figura 2 ). Assicurarsi che i perni di sicurezza siano
correttamente bloccati in posizione come mostrato ( Figura 3 ).
Figura 2
Figura 3
23. Montaggio delle ruote
Inserire l'asse della ruota nel ricevitore dell'asse sotto il telaio del rimorchio
finché non scatta in posizione ( Figura 4 , Figura 5 ). Tirare con decisione la
ruota per verificare che l'asse sia completamente innestato. Ripetere per
fissare la seconda ruota sull'altro lato.
Per rimuovere la ruota, premere il gancio a L sotto il rimorchio ed estrarla .

- 8 -
Figura 4
Figura 5
- 9 -
24. Installazione dei freni di stazionamento/protezioni delle
ruote
Inserire i bulloni della protezione della ruota attraverso il tubo del
telaio. Abbinare i fori nelle protezioni delle ruote ai bulloni. Stringere
saldamente con la chiave esagonale ( Figura 6 ). Ripetere per la
protezione della ruota sull'altro lato.
Figura 6
Tirare verso l'esterno la maniglia sulla protezione della ruota per
frenare. Spingere indietro la maniglia per rilasciare ( Figura 7 ).
- 10 -
Figura 7
⚠ ATTENZIONE
Azionare sempre i freni quando non si guida/si spinge.
25. Attaccare la bandiera
Inserire l'asta della bandiera nella tasca dell'asta della bandiera
nell'angolo posteriore sinistro del pannello laterale ( Figura 8 , Figura
9 ).
Inserire le viti nei fori sul coperchio per fissare i catarifrangenti anteriori
(bianchi) e posteriori (rossi).

- 11 -
Figura 8
Figura 9
26. Installazione della barra di traino
Figura 10
Fissare il ricevitore della barra di
traino al telaio principale come
mostrato ( Figura 10 )
Premendo il pulsante a molla, far
scorrere la barra di traino nel
relativo alloggiamento finché il
pulsante a molla non fuoriesce
dal foro A. Inserire il perno di
sicurezza dal foro B attraverso
l'altro lato. Assicurarsi che il perno
di sicurezza sia bloccato
correttamente in posizione.
27. Collegamento del rimorchio alla bicicletta
- 12 -
a sgancio rapido : R imuovere lo sgancio rapido dal lato sinistro
dell'asse posteriore della bicicletta. Installare l'attacco tra lo sgancio
rapido e il telaio. Stringere lo sgancio rapido seguendo il manuale del
produttore della bicicletta. Il gancio può rimanere sulla bicicletta
quando il rimorchio viene rimosso ( Figura 1 1 ).
Figura 11
⚠ ATTENZIONE
Il dado di regolazione della
tensione deve impegnarsi nella
filettatura per almeno cinque giri
completi per garantire una forza
di bloccaggio adeguata per
trattenere saldamente la ruota
posteriore. Il mancato serraggio
completo del dado di regolazione
della tensione può provocare
incidenti con lesioni gravi o
mortali. Se il perno a sgancio
rapido è troppo corto, deve
essere sostituito. Consultare un
meccanico di biciclette
professionista per le parti
appropriate e l'assistenza.
- 13 -
2. Asse con dadi: svitare il dado con rondella dal lato sinistro dell'asse
posteriore della bicicletta. Installare il gancio sull'asse e riavvitare il
dado con la rondella ( Figura 1 2 ).
Figura 12
⚠ ATTENZIONE
Il dado dell'asse deve impegnarsi
nella filettatura per almeno cinque
giri completi per garantire una
forza di serraggio adeguata per
trattenere saldamente la ruota
posteriore. Il mancato serraggio
completo del dado può provocare
incidenti con lesioni gravi o
mortali. Se l'asse è troppo corto,
l'attacco universale non può
essere utilizzato! Consultare un
meccanico di biciclette
professionista per le parti
appropriate e l'assistenza.
3. Perno passante: l'attacco universale non è adatto a biciclette con
perno passante. Si prega di consultare il rivenditore per una possibile
soluzione.

- 14 -
Figura 13
Collegare l'accoppiatore alla
barra di traino e fissare il perno
di sicurezza ( Figura 1 3 ). Una
volta fissata la barra di traino,
avvolgere la cintura di sicurezza
attorno al telaio della bicicletta e
agganciarla all'anello a D sulla
barra di traino.
28. Installazione del kit passeggino
F issare i due ricevitori della maniglia sui tubi posteriori del telaio
stringendo i dadi. Alle estremità della maniglia, premere i pulsanti a
molla e far scorrere la maniglia nei ricevitori del manubrio finché due
pulsanti a molla non fuoriescono dai fori ( Figura 1 4 ). Per rimuovere la
maniglia, premere i pulsanti e sollevare la maniglia.
Inserire il tubo rettangolare sulla ruota anteriore nel supporto
rettangolare sotto il telaio anteriore del rimorchio. Assicurati che i fori su
entrambi i tubi rettangolari siano allineati. Bloccare la ruota anteriore
utilizzando il bloccaggio a sgancio rapido ( Figura 1 5 ).
IMPORTANTE : il gancio di traino deve essere rimosso prima di utilizzare
il kit passeggino.

- 15 -
Figura 14
Figura 15 _
Before You Ride
Controllare prima di ogni utilizzo:
31. Le ruote sono adeguatamente fissate al rimorchio
32. Gli pneumatici vengono gonfiati alla pressione consigliata sulla parete
laterale dello pneumatico
33. La barra di traino è fissata correttamente al rimorchio
34. L'attacco è adeguatamente fissato alla bicicletta
35. Tutti i perni di sicurezza sono bloccati saldamente in posizione.
36. La cinghia di sicurezza sulla barra di traino è installata correttamente
37. Il peso della barra di traino sull'attacco è superiore a 6,6 libbre. (3 kg)
ma non supera i 17,6 libbre. (8 kg) con rimorchio a pieno carico

- 16 -
38. Assicurarsi che la bicicletta sia in buone condizioni di funzionamento,
in particolare freni e pneumatici (fare riferimento alle istruzioni del
produttore della bicicletta)
39. La bandiera di sicurezza è a posto
40. Tieni sempre il tuo cane/animale domestico al guinzaglio nel rimorchio.
MAINTENANCE
Stoccaggio: per una maggiore durata del prodotto, conservare il rimorchio
al chiuso. Il rimorchio non deve essere conservato a temperature inferiori a
-23 °C (-10 °F) o superiori a 65 °C (150 °F).
Cura del tessuto: lavare a mano le parti in tessuto con acqua tiepida e
sapone neutro. NON utilizzare candeggina o solventi. Asciugare e
conservare al riparo dalla luce solare diretta in un'area asciutta e ben
ventilata. Pulisci le finestre con un panno umido e morbido


- 2 -
Soporte técnico y certificado de garantía electrónica
www.vevor.com/support
REMOLQUE DE BICICLETA PARA
MASCOTAS
MODELO: TS812
We continue to be committed to provide you tools with competitive price.
"Save Half", "Half Price" or any other similar expressions used by us only represents an
estimate of savings you might benefit from buying certain tools with us compared to the major
top brands and does not necessarily mean to cover all categories of tools offered by us. You
are kindly reminded to verify carefully when you are placing an order with us if you are
actually saving half in comparison with the top major brands.

- 1 -
MODELO: TS812
Importante: guarde estas instrucciones para consultarlas en el futuro
Have product questions? Need technical support? Please feel free to
contact us:
Technical Support and E-Warranty Certificate
www.vevor.com/support
NEED HELP? CONTACT US!
This is the original instruction, please read all manual instructions
carefully before operating. VEVOR reserves a clear interpretation of our
user manual. The appearance of the product shall be subject to the
product you received. Please forgive us that we won't inform you again if
there are any technology or software updates on our product.
PET BIKE TRAILER

- 2 -
CHOOSE THE RIGHT SIZE OF TRAILER
Tamaño del remolque
X- Grande
Máx. Longitud corporal
3 5 pulgadas ( 9 0
cm)
Máx. Altura de los
hombros
26 pulgadas ( 66
cm)
Máx. Peso
100 libras. ( 45
kilos)
SAFETY INSTRUCTIONS
⚠ ADVERTENCIA
Lea las instrucciones antes de conducir. El incumplimiento de las
instrucciones y advertencias de este manual podría provocar
lesiones graves o la muerte.
Consulte a un veterinario para asegurarse de que sea seguro que su
mascota viaje en un remolque.
Asegúrese de que la mascota no pueda hacer contacto con los radios
de la rueda.
Verifique la comodidad y seguridad de su mascota con frecuencia,
especialmente durante climas cálidos o fríos.

- 3 -
Nunca deje a la mascota desatendida y SIEMPRE MANTENGA EL
REMOLQUE/COCHECITO PARA QUE NO SE VUELCA HACIA
ATRÁS CUANDO EL PERRO ENTRA O SALGA DEL REMOLQUE.
NO lo use con una carga total que exceda las 100 libras. ( 45
kilogramos).
Nunca utilice un remolque para mascotas para transportar niños o
carga.
NO realice ninguna modificación al producto. Cualquier paquete
colocado en el remolque puede hacer que éste se vuelva inestable.
NO infle demasiado los neumáticos. El incumplimiento de la presión
nominal en el flanco del neumático puede provocar una explosión del
neumático y posibles lesiones.
Antes de cada paseo, asegúrese de que el remolque no interfiera con
el frenado, el pedaleo o la dirección de la bicicleta.
Cumpla siempre con las normas locales cuando utilice el remolque en
vías públicas.
Nunca andes en bicicleta de noche sin la iluminación adecuada.
Obedezca todos los requisitos legales locales para la iluminación.
Cuando usa su remolque, está remolcando peso adicional y un
vehículo más grande. Debe dejar más tiempo para frenar, reducir la
velocidad, detenerse y arrancar, y dejar más espacio para giros y
pasillos. Experimente con el remolque cargado en un área no
congestionada hasta que se familiarice con cómo se maneja su
bicicleta al arrastrar un remolque.
Evite rocas, bordillos, frenadas bruscas y virajes repentinos. Evite
pasar obstáculos con una rueda, ya que esto puede provocar que el
remolque se vuelque.
Conduzca siempre con las puertas delantera y trasera completamente
cerradas para proteger a la mascota de los escombros voladores y
evitar que la mascota salte del remolque.
El ciclista de la bicicleta debe tener al menos 16 años.
Límites de velocidad recomendados: - 16 km/h (10 mph) en carreteras
rectas y lisas – 8 km/h (5 mph) al girar o en carreteras irregulares.
El peso del remolque debe distribuirse adecuadamente para un
- 4 -
manejo seguro. El peso en el conector del enganche debe estar entre
30 N ( ≈ 6,6 lbs o 3 kg) y 80 N (≈17,6 lbs u 8 kg). Para medir esto,
cargue su remolque y colóquelo junto a la báscula de baño. Súbete a
la báscula y toma nota de tu peso. De pie sobre la báscula, levante el
extremo de la barra de remolque a un pie (aproximadamente 25 cm)
del suelo. Si el peso es demasiado bajo, la rueda trasera de la bicicleta
podría perder tracción. Si es demasiado alto el enganche puede estar
sobrecargado.
Nunca sobrecargue el remolque y nunca viaje con una carga en la barra
de remolque que esté fuera del rango especificado de 6,6 a 17,6 libras.
(3-8 kilos). Distribuya siempre la carga de manera uniforme. De lo
contrario, podrían producirse accidentes con lesiones graves o la muerte.
Consejo : asegúrese de que su perro esté colocado con el centro de
gravedad lo más cerca posible del eje de la rueda. Esta es la mejor
manera de montar con una distribución óptima del peso.
MODEL AND PARAMETERS
Modelo
TS812
Tipo
Remolque/empuje manual

- 5 -
Máx. Carga
100 libras
Tamaño del
contenedor
31,8*22*23,6 pulgadas
Ruedas
Acero, 16*2.125 pulgadas (trasero)
Neumático de caucho, 12 pulgadas
(delantero)
Material
Acero, tela Oxford 600D.
Color
Gris oscuro
CONTENTS
1 marco principal.
2 ruedas
1 x receptor de barra de remolque
1 enganche universal.
1 x barra de remolque
2 x protector de rueda
- 6 -
2 soportes para manillar.
1 bandera.
2 x reflectores traseros ( rojos )
2 x reflectores frontales ( blancos )
1 manillar.
1 x rueda delantera con cierre
rápido
+ +
1 llave de 1 1 mm + 1 llave hexagonal + 1 manual de usuario
How to Assemble
29. Abrir el marco principal
- 7 -
Figura 1
Saque el marco principal del
remolque y todos los demás
componentes de la caja. Retire
las tapas protectoras negras en
las 4 esquinas. Levante ambos
paneles laterales a una posición
vertical ( Figura 1 ).
Fije la barra transversal a la parte superior del marco principal.
Levante y bloquee la barra transversal usando el pasador de
seguridad adjunto al perno ( Figura 2 ). Asegúrese de que los
pasadores de seguridad estén correctamente bloqueados en su lugar
como se muestra ( Figura 3 ).
Figura 2
Figura 3
30. Colocar las ruedas
Inserte el eje de la rueda en el receptor del eje debajo del marco del
remolque hasta que encaje en su lugar ( Figura 4 , Figura 5 ). Tire firmemente
de la rueda para confirmar que el eje esté completamente acoplado. Repita
para colocar la segunda rueda en el otro lado.
Para quitar la rueda, presione el gancho en forma de L debajo del remolque y

- 8 -
extráigalo .
Figura 4
Figura 5

- 9 -
31. Instalación de los frenos de estacionamiento/protectores
de ruedas
Inserte los pernos del protector de la rueda a través del tubo del
bastidor. Haga coincidir los orificios de los protectores de ruedas con
los pernos. Apriete firmemente con una llave hexagonal ( Figura 6 ).
Repita lo mismo con el protector de rueda del otro lado.
Figura 6
Tire hacia afuera la manija del protector de la rueda para frenar.
Empuje hacia atrás la manija para soltarla ( Figura 7 ).

- 10 -
Figura 7
⚠ ADVERTENCIA
Siempre ponga los frenos cuando no esté conduciendo o empujando.
32. Adjuntar la bandera
Inserte el mástil de la bandera en el bolsillo del mástil en la esquina
trasera izquierda del panel lateral ( Figura 8 , Figura 9 ).
Inserte tornillos en los orificios de la cubierta para fijar los reflectores
delantero (blanco) y trasero (rojo).

- 11 -
Figura 8
Figura 9
33. Instalación de la barra de remolque
Figura 10
Fije el receptor de la barra de
remolque al bastidor principal
como se muestra ( Figura 10 ).
Presionando el botón de resorte,
deslice la barra de remolque
dentro del receptor de la barra de
remolque hasta que el botón de
resorte salga del orificio A. Inserte
el pasador de seguridad del
orificio B por el otro lado.
Asegúrese de que el pasador de
seguridad esté correctamente
bloqueado en su lugar.
34. Colocar remolque en bicicleta

- 12 -
de liberación rápida : Retire el mecanismo de liberación rápida del
lado izquierdo del eje trasero de la bicicleta. Instale el enganche entre
el cierre rápido y el marco. Apriete el cierre rápido siguiendo el manual
del fabricante de la bicicleta. El enganche puede permanecer en la
bicicleta cuando se retira el remolque ( Figura 1 1 ).
Figura 11
⚠ ADVERTENCIA
La tuerca de ajuste de tensión
debe enganchar las roscas
durante al menos cinco vueltas
completas para garantizar una
fuerza de sujeción adecuada para
sujetar la rueda trasera de forma
segura. No apretar
completamente la tuerca de
ajuste de tensión puede provocar
accidentes con lesiones graves o
la muerte. Si el cierre rápido es
demasiado corto, deberá
sustituirse. Consulte a un
mecánico de bicicletas
profesional para obtener las
piezas y la asistencia adecuadas.

- 13 -
2. Eje con tuerca: Desenrosque la tuerca con arandela del lado
izquierdo del eje trasero de la bicicleta. Instale el enganche en el eje y
vuelva a atornillar la tuerca con la arandela ( Figura 1 2 ).
Figura 12
⚠ ADVERTENCIA
La tuerca del eje debe enganchar
las roscas durante al menos cinco
vueltas completas para garantizar
una fuerza de sujeción adecuada
para sujetar la rueda trasera de
forma segura. No apretar la
tuerca completamente puede
provocar accidentes con lesiones
graves o la muerte. ¡Si el eje es
demasiado corto, no se puede
utilizar el enganche universal!
Consulte a un mecánico de
bicicletas profesional para
obtener las piezas y la asistencia
adecuadas.
3. Eje pasante: El enganche universal no se adapta a bicicletas con
eje pasante. Consulte al minorista para conocer una posible solución.

- 14 -
Figura 13
Conecte el acoplador en la
barra de remolque y asegure el
pasador de seguridad ( Figura
1 3 ). Una vez que la barra de
remolque esté colocada, enrolle
el cinturón de seguridad
alrededor del cuadro de la
bicicleta y engánchelo al anillo en
D de la barra de remolque.
35. Instalación del kit de cochecito
F ije dos receptores de manija en los tubos traseros del marco
apretando las tuercas. En los extremos del mango, presione los
botones de resorte y deslice el mango dentro de los receptores del
manillar hasta que dos botones de resorte salgan a través de los
orificios ( Figura 1 4 ). Para quitar la manija, presione los botones y tire
hacia arriba de la manija.
Inserte el tubo rectangular de la rueda delantera en el soporte
rectangular debajo del marco delantero del remolque. Asegúrese de
que los orificios de ambos tubos rectangulares estén alineados.
Bloquee la rueda delantera con el cierre rápido ( Figura 1 5 ).
IMPORTANTE : Se debe retirar la barra de remolque antes de usar el kit
de cochecito.

- 15 -
Figura 14
Figura 1 5
Before You Ride
Comprobar antes de cada uso:
41. Las ruedas están correctamente aseguradas al remolque.
42. Los neumáticos están inflados a la presión recomendada en la pared
lateral del neumático.
43. La barra de remolque está correctamente asegurada al remolque.
44. El enganche está correctamente asegurado a la bicicleta.
45. Todos los pasadores de seguridad están bloqueados de forma segura
en su lugar.
46. La correa de seguridad en la barra de remolque está correctamente
instalada.

- 16 -
47. El peso de la barra de remolque en el acoplador es superior a 6,6
libras. (3 kg) pero no supera las 17,6 lbs. (8 kg) con remolque
completamente cargado
48. Asegúrese de que la bicicleta esté en buen estado de funcionamiento,
especialmente los frenos y neumáticos (consulte las instrucciones del
fabricante de la bicicleta)
49. La bandera de seguridad está colocada
50. Siempre ate a su perro/mascota en el remolque.
MAINTENANCE
Almacenamiento: Para prolongar la vida útil del producto, almacene el
remolque en el interior. El remolque no debe almacenarse a temperaturas
inferiores a -10 °F (-23 °C) o superiores a 150 °F (65 °C).
Cuidado de la tela: Lave las piezas de tela a mano con agua tibia y jabón
suave. NO use lejía ni solventes. Seque y almacene fuera de la luz solar
directa en un área seca y bien ventilada. Limpiar ventanas con un paño
suave y húmedo.


- 2 -
Wsparcie techniczne i certyfikat e-gwarancji
www.vevor.com/support
PRZYCZEPKA ROWEROWA DLA
ZWIERZĄT
MODEL: TS812
We continue to be committed to provide you tools with competitive price.
"Save Half", "Half Price" or any other similar expressions used by us only represents an
estimate of savings you might benefit from buying certain tools with us compared to the major
top brands and does not necessarily mean to cover all categories of tools offered by us. You
are kindly reminded to verify carefully when you are placing an order with us if you are
actually saving half in comparison with the top major brands.
- 1 -
MODEL: TS812
Ważne: Zachowaj tę instrukcję do wykorzystania w przyszłości
Have product questions? Need technical support? Please feel free to
contact us:
Technical Support and E-Warranty Certificate
www.vevor.com/support
NEED HELP? CONTACT US!
This is the original instruction, please read all manual instructions
carefully before operating. VEVOR reserves a clear interpretation of our
user manual. The appearance of the product shall be subject to the
product you received. Please forgive us that we won't inform you again if
there are any technology or software updates on our product.
PET BIKE TRAILER
- 2 -
CHOOSE THE RIGHT SIZE OF TRAILER
Rozmiar przyczepy
X- duży
Maks. Wzrost
3 5 cali ( 9 0 cm)
Maks. Wysokość ramion
26 cali ( 66 cm)
Maks. Waga
100 funtów ( 45kg )
SAFETY INSTRUCTIONS
⚠ OSTRZEŻENIE
Przeczytaj instrukcje przed jazdą. Niezastosowanie się do instrukcji i
ostrzeżeń zawartych w tej instrukcji może spowodować poważne
obrażenia lub śmierć.
Skonsultuj się z weterynarzem, aby upewnić się, że podróżowanie w
przyczepie jest bezpieczne dla Twojego zwierzaka.
Upewnij się, że zwierzę nie może mieć kontaktu ze szprychami koła.
Często sprawdzaj komfort i bezpieczeństwo swojego zwierzaka,
zwłaszcza podczas upałów lub mrozów.
Nigdy nie zostawiaj zwierzęcia bez opieki i ZAWSZE TRZYMAJ
PRZYCZEPĘ/WÓZEK, ABY NIE PRZEWRÓCIŁ SIĘ DO TYŁU, GDY
PIES WCHODZI LUB WYCHODZI Z PRZYCZEPY.
NIE używać przy całkowitym obciążeniu przekraczającym 100 funtów.

- 3 -
( 45kg ).
Nigdy nie używaj przyczepki dla zwierząt do przewożenia dziecka lub
ładunku.
NIE wprowadzaj żadnych modyfikacji produktu. Wszelkie paczki
umieszczone na przyczepie mogą spowodować, że przyczepa stanie
się niestabilna.
NIE pompuj opon nadmiernie. Nieprzestrzeganie ciśnienia
znamionowego na boku opony może spowodować eksplozję opony i
możliwe obrażenia.
Przed każdą jazdą należy upewnić się, że przyczepka nie utrudnia
hamowania, pedałowania lub kierowania rowerem.
Używając przyczepy na drogach publicznych, należy zawsze
przestrzegać lokalnych przepisów.
Nigdy nie jedź rowerem w nocy bez odpowiedniego oświetlenia. Należy
przestrzegać wszystkich lokalnych wymagań prawnych dotyczących
oświetlenia.
Korzystając z przyczepy, holujesz dodatkowy ciężar i większy pojazd.
Musisz zapewnić więcej czasu na hamowanie, zwalnianie,
zatrzymywanie i ruszanie oraz zapewnić więcej miejsca na zakręty i
przejścia. Eksperymentuj z załadowaną przyczepką w niezatłoczonym
miejscu, aż poznasz, jak Twój rower radzi sobie z holowaniem
przyczepy.
Unikaj kamieni, krawężników, gwałtownego hamowania i nagłych
skrętów. Unikaj przejeżdżania przez przeszkody jednym kołem, gdyż
może to spowodować przewrócenie się przyczepki.
drzwiami przednimi i tylnymi, aby chronić zwierzę przed latającymi
odłamkami i wyskakiwać z przyczepki
Osoba jadąca na rowerze musi mieć ukończone 16 lat.
Zalecane ograniczenia prędkości: - 16 km/h na gładkich, prostych
drogach – 5 mil na godzinę (8 km/h) podczas skręcania lub na
nierównych drogach.
Aby zapewnić bezpieczną obsługę, ciężar przyczepy musi być
odpowiednio rozłożony. Ciężar złącza zaczepu powinien mieścić się w
zakresie od 30 N ( ≈ 6,6 funta lub 3 kg) do 80 N (≈17,6 funta lub 8 kg).
- 4 -
Aby to zmierzyć, załaduj przyczepę i umieść ją obok wagi łazienkowej.
Wejdź na wagę i zanotuj swoją wagę. Stojąc na wadze, podnieś koniec
haka holowniczego na wysokość jednej stopy (około 25 cm) nad
podłoże. Jeżeli masa jest zbyt niska, tylne koło roweru może stracić
przyczepność. Jeśli jest za wysoka, zaczep może być przeciążony.
Nigdy nie przeciążaj przyczepy i nigdy nie jeździj z obciążeniem haka
holowniczego przekraczającego określony zakres od 6,6 do 17,6 funta. (3
– 8 kg). Zawsze rozkładaj ładunek równomiernie. Niezastosowanie się do
tego zalecenia może spowodować wypadek skutkujący poważnymi
obrażeniami lub śmiercią.
Wskazówka : Upewnij się, że Twój pies znajduje się tak, aby jego środek
ciężkości znajdował się jak najbliżej osi koła. To najlepszy sposób jazdy
przy optymalnym rozłożeniu ciężaru.
MODEL AND PARAMETERS
Model
TS812
Typ
Holowanie/pchanie ręczne
Maks. Obciążenie
100 funtów
- 5 -
Rozmiar pojemnika
31,8 * 22 * 23,6 cala
Koła
Stal, 16*2,125 cala (tył)
Pneumatyczna opona gumowa, 12
cali (przód)
Materiał
Stal, tkanina Oxford 600D
Kolor
Czarny szary
CONTENTS
1 x rama główna
2x koła
1 x odbiornik haka holowniczego
1 x zaczep uniwersalny
1 x hak holowniczy
2 x osłona koła
- 6 -
2 x uchwyt na kierownicę
1 x flaga
2 x tylne światła odblaskowe
( czerwone )
2 x reflektory przednie ( białe )
1 x uchwyt
1 x przednie koło z
szybkozamykaczem
+ +
1 x klucz 1 1 mm +1 x klucz sześciokątny + 1 x instrukcja obsługi
How to Assemble
36. Otwieranie ramy głównej

- 7 -
Rysunek 1
Wyjmij ramę główną przyczepy i
wszystkie pozostałe elementy z
kartonu. Zdjąć czarne zaślepki
ochronne z 4 rogów. Podnieś oba
panele boczne do pozycji
pionowej ( Rysunek 1 ).
Przymocuj poprzeczkę do górnej części ramy głównej. Podnieś i
zablokuj poprzeczkę za pomocą zawleczki przymocowanej do śruby (
Rysunek 2 ). Upewnij się, że agrafki są prawidłowo zablokowane w
miejscu, jak pokazano ( Rysunek 3 ).
Rysunek 2
Rysunek 3
37. Mocowanie kół
Włóż oś koła do mocowania osi pod ramą przyczepy, aż zatrzaśnie się na
swoim miejscu ( Rysunek 4 , Rysunek 5 ). Pociągnij mocno za koło, aby
upewnić się, że oś jest całkowicie włączona. Powtórz tę czynność, aby
przymocować drugie koło po drugiej stronie.
Aby zdjąć koło należy wcisnąć hak w kształcie litery L znajdujący się pod
przyczepką i wyciągnąć koło .
- 8 -
Rysunek 4
Rysunek 5

- 9 -
38. Montaż hamulców postojowych/osłon kół
Włóż śruby osłony koła przez rurę ramy. Dopasuj otwory w osłonach
kół do śrub. Dokręć mocno kluczem sześciokątnym ( Rysunek 6 ).
Powtórzyć dla osłony koła po drugiej stronie.
Rysunek 6
Aby zahamować, pociągnij na zewnątrz uchwyt na osłonie koła.
Naciśnij uchwyt do tyłu, aby go zwolnić ( Rysunek 7 ).
Rysunek 7
⚠ OSTRZEŻENIE
Zawsze włączaj hamulce, gdy nie jeździsz/pchasz.

- 10 -
39. Mocowanie flagi
Włóż maszt flagowy do kieszeni masztu w lewym tylnym rogu panelu
bocznego ( Rysunek 8 , Rysunek 9 ).
Włóż śruby w otwory w osłonie, aby przymocować przednie (białe) i
tylne (czerwone) światła odblaskowe.
Rysunek 8
Rysunek 9
40. Montaż haka holowniczego
Rysunek 10
Przymocuj uchwyt haka
holowniczego do ramy głównej,
jak pokazano ( Rysunek 10 ).
Naciskając przycisk sprężynowy,
wsuwaj dyszel w uchwyt dyszla,
aż przycisk sprężynowy wysunie
się z otworu A. Włóż agrafkę z
otworu B przez drugą stronę.
Upewnij się, że zawleczka
zabezpieczająca jest prawidłowo
zablokowana na swoim miejscu.

- 11 -
41. Mocowanie przyczepki do roweru
1. Oś szybkozamykająca : Zdejmij szybkozamykacz z lewej strony
tylnej osi roweru. Zamontować zaczep pomiędzy szybkozamykaczem
a ramą. Dokręć szybkozamykacz zgodnie z instrukcją producenta
roweru. Zaczep może pozostać na rowerze po zdjęciu przyczepki (
Rysunek 1 1 ).
Rysunek 11
⚠ OSTRZEŻENIE
Nakrętka regulująca napięcie
musi łączyć się z gwintem przez
co najmniej pięć pełnych obrotów,
aby zapewnić odpowiednią siłę
docisku i pewne trzymanie
tylnego koła. Niedokręcenie
nakrętki regulującej napięcie
może spowodować wypadek
skutkujący poważnymi
obrażeniami lub śmiercią. Jeżeli
szybkozamykacz jest za krótki,
należy go wymienić. Aby uzyskać
odpowiednie części i pomoc,
skonsultuj się z profesjonalnym
mechanikiem rowerowym.

- 12 -
2. Oś nakrętkowa: Odkręć nakrętkę z podkładką z lewej strony tylnej
osi roweru. Zamontuj zaczep na osi i ponownie przykręć nakrętkę z
podkładką ( Rysunek 1 2 ).
Rysunek 12
⚠ OSTRZEŻENIE
Nakrętka osi musi łączyć się z
gwintem przez co najmniej pięć
pełnych obrotów, aby zapewnić
odpowiednią siłę zacisku i pewne
trzymanie tylnego koła.
Niedokręcenie nakrętki do końca
może spowodować wypadek
skutkujący poważnymi
obrażeniami lub śmiercią. Jeśli oś
jest za krótka, nie można
zastosować zaczepu
uniwersalnego! Aby uzyskać
odpowiednie części i pomoc,
skonsultuj się z profesjonalnym
mechanikiem rowerowym.
3. Oś przelotowa: Uniwersalny zaczep nie pasuje do roweru z osią
przelotową. Aby uzyskać możliwe rozwiązanie, skontaktuj się ze
sprzedawcą.

- 13 -
Rysunek 13
Podłącz łącznik do haka
holowniczego i zabezpiecz
zawleczką ( Rysunek 1 3 ). Po
zamocowaniu haka holowniczego
owiń pas bezpieczeństwa wokół
ramy roweru i zaczep go o
pierścień D na haku holowniczym.
42. Instalowanie zestawu wózka
Zamocuj dwa uchwyty na tylnych rurach ramy, dokręcając nakrętki. Na
końcach uchwytów naciśnij przyciski sprężynowe i wsuń uchwyt w
gniazda kierownicy, aż dwa przyciski sprężynowe wysuną się z
otworów ( Rysunek 1 4 ). Aby zdjąć uchwyt, naciśnij przyciski i pociągnij
uchwyt.
Włóż prostokątną rurę przedniego koła do prostokątnego uchwytu pod
przednią ramą przyczepy. Upewnij się, że otwory na obu prostokątnych
rurach pokrywają się. Zablokuj przednie koło za pomocą
szybkozamykacza ( Rysunek 1 5 ).
WAŻNE : Przed użyciem zestawu spacerowego należy zdemontować hak
holowniczy.

- 14 -
Rysunek 14
Rysunek 1 5
Before You Ride
Sprawdź przed każdym użyciem:
51. Koła są prawidłowo przymocowane do przyczepy
52. Opony są napompowane do zalecanego ciśnienia na bocznej ściance
opony
53. Hak holowniczy jest prawidłowo przymocowany do przyczepy
54. Zaczep jest prawidłowo przymocowany do roweru
55. Wszystkie agrafki są bezpiecznie zablokowane na swoim miejscu.
56. Pasek zabezpieczający na haku holowniczym jest prawidłowo
zamontowany
57. Masa haka holowniczego na sprzęgu jest większa niż 6,6 funta. (3 kg),

- 15 -
ale nie przekracza 17,6 funta. (8 kg) z całkowicie załadowaną
przyczepą
58. Upewnij się, że rower jest w dobrym stanie, szczególnie hamulce i
opony (patrz instrukcja producenta roweru)
59. Flaga bezpieczeństwa jest na swoim miejscu
60. Zawsze prowadź psa/zwierzę w przyczepie.
MAINTENANCE
Przechowywanie: Aby przedłużyć żywotność produktu, przechowuj
przyczepę w pomieszczeniu zamkniętym. Przyczepy nie należy
przechowywać w temperaturze niższej niż -10°F (-23°C) ani wyższej niż
150°F (65°C).
Pielęgnacja tkanin: Części tkaniny prać ręcznie ciepłą wodą i łagodnym
mydłem. NIE używaj wybielaczy ani rozpuszczalników. Wytrzeć do sucha i
przechowywać z dala od bezpośredniego światła słonecznego w suchym,
dobrze wentylowanym miejscu. Czyść okna wilgotną, miękką ściereczką


- 2 -
Technische ondersteuning en e-garantiecertificaat
www.vevor.com/support
FIETSKAR VOOR HUISDIEREN
MODEL: TS812
We continue to be committed to provide you tools with competitive price.
"Save Half", "Half Price" or any other similar expressions used by us only represents an
estimate of savings you might benefit from buying certain tools with us compared to the major
top brands and does not necessarily mean to cover all categories of tools offered by us. You
are kindly reminded to verify carefully when you are placing an order with us if you are
actually saving half in comparison with the top major brands.

- 1 -
MODEL: TS812
Belangrijk: Bewaar deze instructies voor toekomstig gebruik
Have product questions? Need technical support? Please feel free to
contact us:
Technical Support and E-Warranty Certificate
www.vevor.com/support
NEED HELP? CONTACT US!
This is the original instruction, please read all manual instructions
carefully before operating. VEVOR reserves a clear interpretation of our
user manual. The appearance of the product shall be subject to the
product you received. Please forgive us that we won't inform you again if
there are any technology or software updates on our product.
PET BIKE TRAILER

- 2 -
CHOOSE THE RIGHT SIZE OF TRAILER
Aanhangwagengrootte
X- groot
Max. Lichaamslengte
3 5 inch ( 9 0 cm)
Max. Schouder hoogte
26 inch ( 66 cm)
Max. Gewicht
100 pond. ( 45 kg)
SAFETY INSTRUCTIONS
⚠ WAARSCHUWING
Lees de instructies voordat u gaat rijden. Het niet naleven van de
instructies en waarschuwingen in deze handleiding kan leiden tot
ernstig letsel of de dood.
Raadpleeg een dierenarts om er zeker van te zijn dat uw huisdier veilig
in een trailer kan rijden.
Zorg ervoor dat het huisdier geen contact kan maken met de
wielspaken.
Controleer regelmatig het comfort en de veiligheid van uw huisdier,
vooral tijdens warm of koud weer.
Laat uw huisdier nooit onbeheerd achter en zorg er ALTIJD voor dat
de aanhangwagen/wandelwagen niet achterover kantelt wanneer
de hond de aanhangwagen binnengaat of verlaat.

- 3 -
NIET gebruiken met een totale belasting van meer dan 100 lbs.
( 45kg ).
Gebruik nooit een huisdierenkar voor het vervoeren van kinderen of
vracht.
Breng GEEN wijzigingen aan het product aan. Pakketten die op de
aanhangwagen worden geplaatst, kunnen ervoor zorgen dat de
aanhangwagen instabiel wordt.
Pomp de banden NIET te hard op. Het niet naleven van de nominale
spanning op de zijwand van de band kan leiden tot explosie van de
band en mogelijk letsel.
Controleer vóór elke rit of de aanhanger het remmen, trappen of sturen
van de fiets niet hindert.
Houd u altijd aan de plaatselijke regelgeving als u de aanhanger op de
openbare weg gebruikt.
Fiets nooit 's nachts zonder voldoende verlichting. Houd u aan alle
lokale wettelijke vereisten voor verlichting.
Wanneer u uw aanhangwagen gebruikt, sleept u extra gewicht en een
groter voertuig. U moet meer tijd vrijmaken voor remmen, vertragen,
stoppen en starten, en meer ruimte laten voor bochten en doorgangen.
Experimenteer met de beladen aanhanger in een rustige omgeving
totdat u vertrouwd raakt met hoe uw fiets omgaat met het trekken van
een aanhanger.
Vermijd rotsen, stoepranden, hard remmen en plotseling uitwijken.
Vermijd het rijden over obstakels met één wiel, omdat de aanhanger
hierdoor kan kantelen.
Rijd altijd met de voor- en achterdeur volledig gesloten om uw huisdier
te beschermen tegen rondvliegend vuil en om te voorkomen dat uw
huisdier uit de aanhanger springt
De berijder van de fiets moet minimaal 16 jaar oud zijn.
Aanbevolen snelheidslimieten: - 16 km/u (10 mph) op gladde, rechte
wegen – 8 km/u (5 mph) in bochten of op oneffen wegen.
Voor een veilige hantering moet het gewicht van de aanhanger goed
worden verdeeld. Het gewicht op de trekhaak moet tussen 30 N ( ≈ 6,6
lbs. of 3 kg) en 80 N (≈17,6 lbs. of 8 kg) liggen. Om dit te meten, laadt u
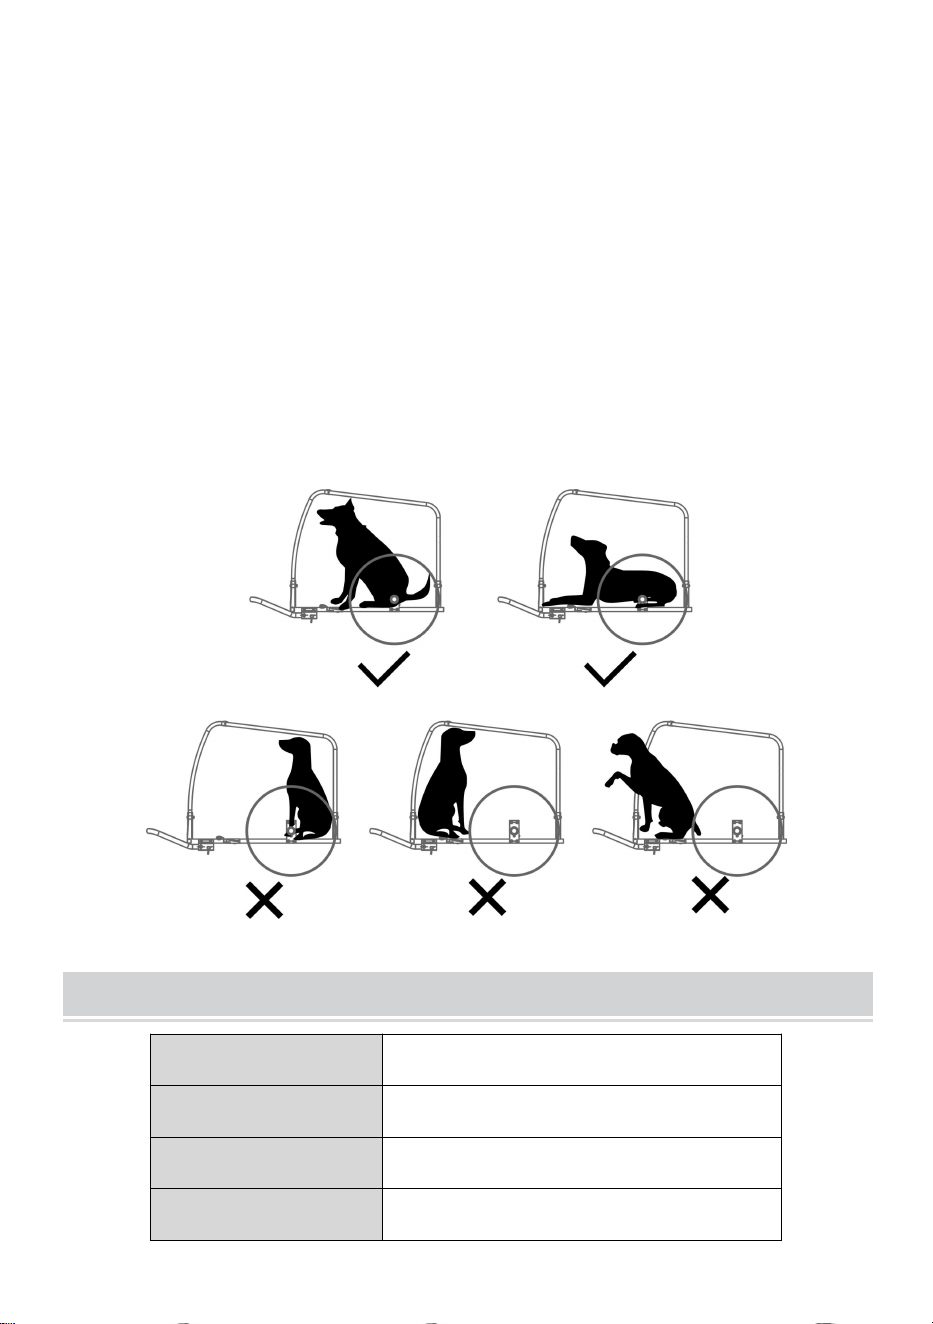
- 4 -
uw aanhanger en plaatst u deze naast de weegschaal. Stap op de
weegschaal en noteer uw gewicht. Terwijl u op de weegschaal staat, tilt
u het uiteinde van de trekhaak één voet (ongeveer 25 cm) van de
grond. Als het gewicht te laag is, kan het achterwiel van de fiets grip
verliezen. Als deze te hoog is, kan de trekhaak overbelast raken.
Overbelast de aanhangwagen nooit en rijd nooit met een
trekhaakbelasting die buiten het gespecificeerde bereik van 6,6 tot 17,6 lbs
ligt. (3 – 8 kg). Verdeel de last altijd gelijkmatig. Als u dit niet doet, kan dit
leiden tot ongelukken met ernstig letsel of de dood.
Tip : Zorg ervoor dat uw hond met zijn zwaartepunt zo dicht mogelijk bij de
wielas zit. Dit is de beste manier om met een optimale gewichtsverdeling te
rijden.
MODEL AND PARAMETERS
Model
TS812
Type
Slepen/handduwen
Max. Laden
100 pond
Bakgrootte
31,8*22*23,6 inch
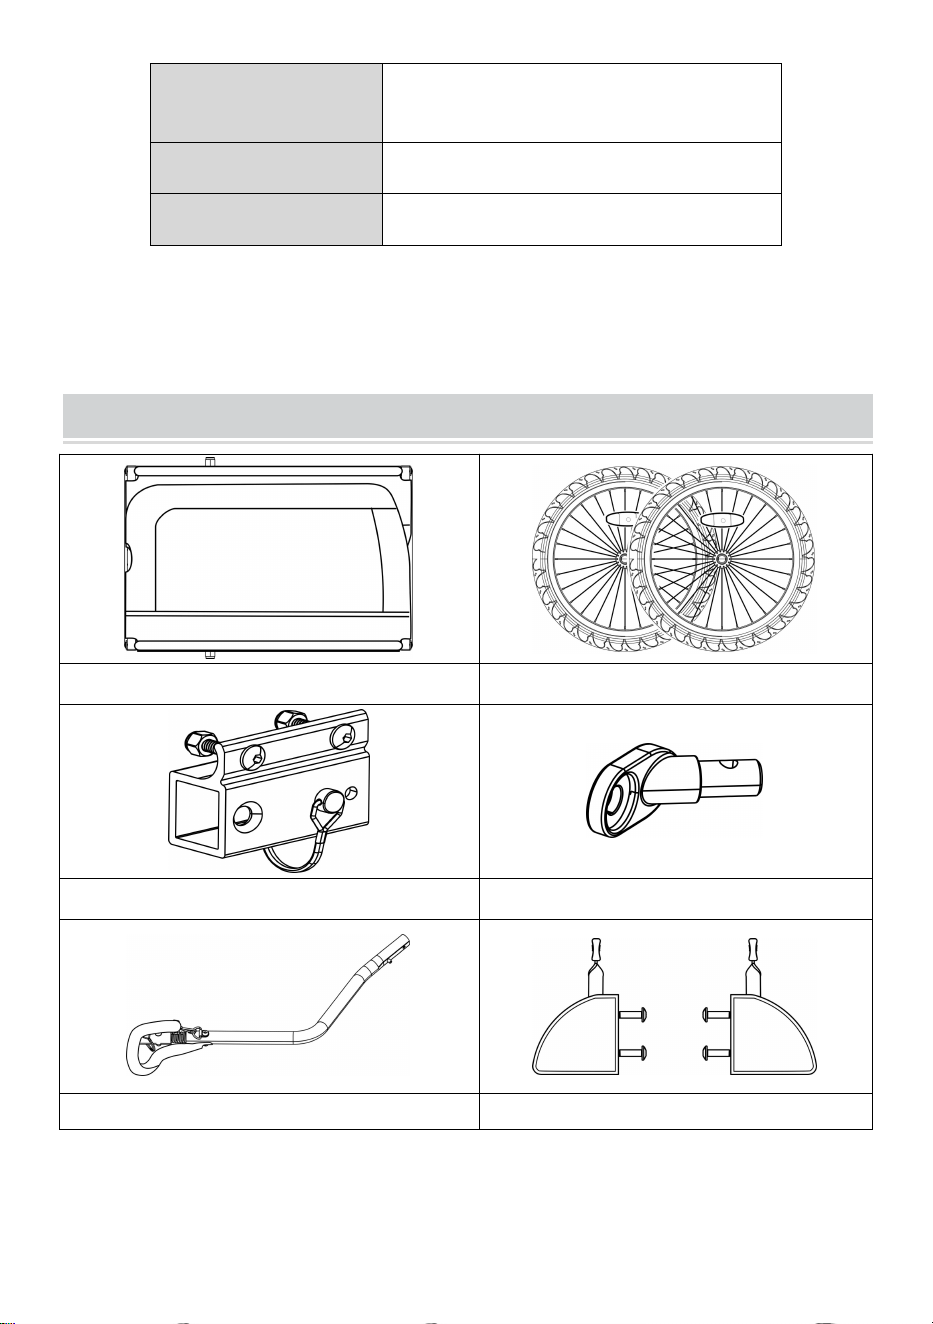
- 5 -
Wielen
Staal, 16*2.125 inch (achterkant)
Pneumatische rubberen band, 12 inch
(voorkant)
Materiaal
Staal, 600D Oxford-doek
Kleur
Zwart grijs
CONTENTS
1 x hoofdframe
2 x wielen
1 x Trekhaakontvanger
1 x universele trekhaak
1x Trekhaak
2 x wielbeschermer
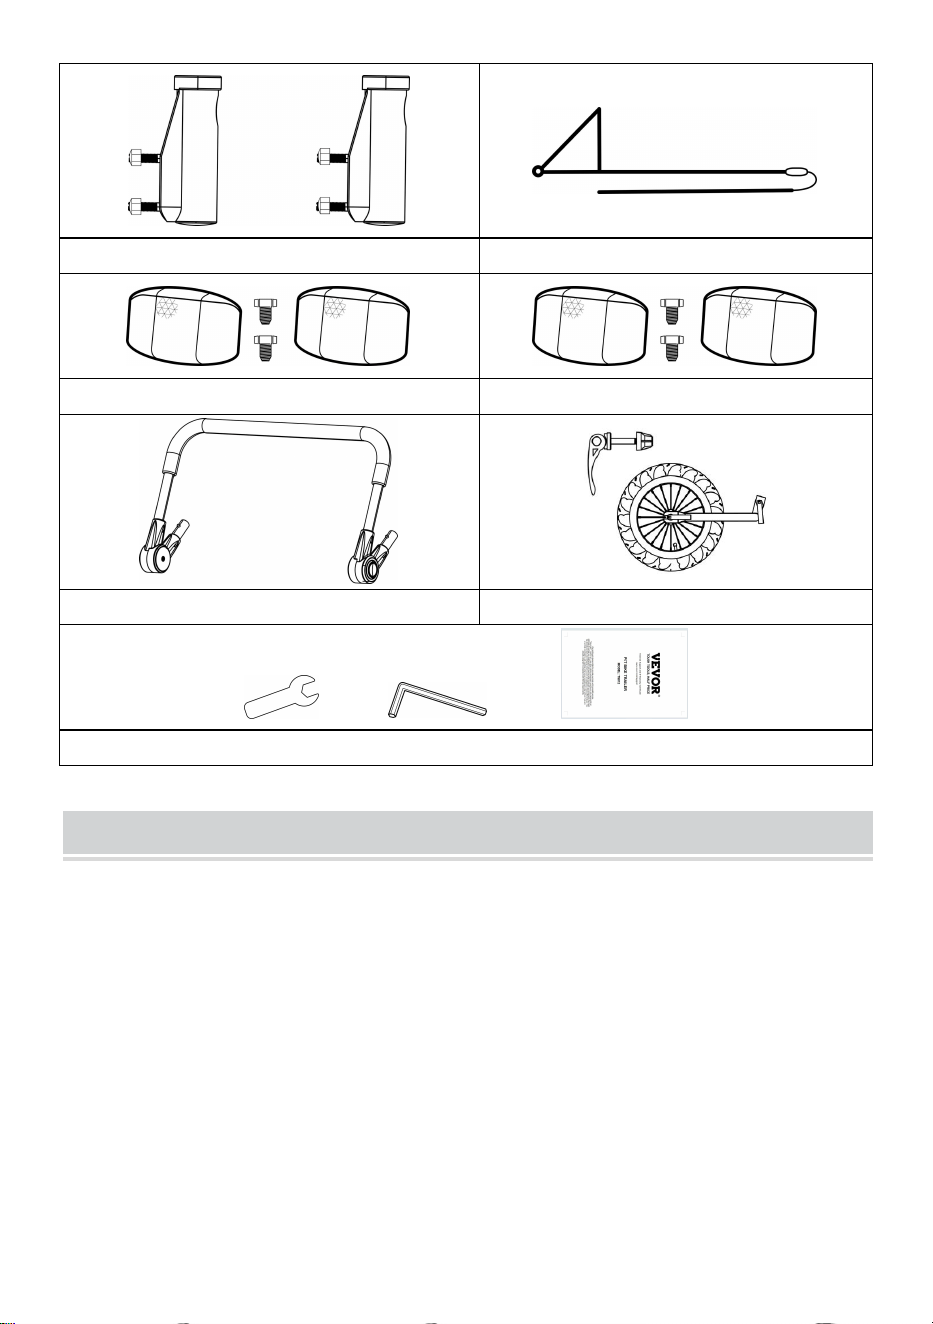
- 6 -
2 x Stuurhouder
1x Vlag
2 x achterreflectoren ( rood )
2 x frontreflectoren ( wit )
1 x stuurstang
x voorwiel met snelspanner
+ +
1 x 1 1 mm sleutel + 1 x inbussleutel + 1 x gebruikershandleiding
How to Assemble
43. Het hoofdframe openen

- 7 -
Figuur 1
Haal het hoofdframe van de
aanhanger en alle andere
onderdelen uit de doos. Verwijder
de zwarte beschermkappen op 4
hoeken. Breng beide zijpanelen
omhoog tot ze rechtop staan (
Figuur 1 ).
Bevestig de dwarsbalk aan het bovenste deel van het hoofdframe.
Breng de dwarsbalk omhoog en vergrendel deze met behulp van de
veiligheidspin die aan de bout is bevestigd ( Figuur 2 ). Zorg ervoor dat
de veiligheidspinnen goed op hun plaats zijn vergrendeld, zoals
weergegeven ( Figuur 3 ).
Figuur 2
Figuur 3
44. De wielen bevestigen
Steek de wielas in de asontvanger onder het frame van de aanhanger totdat
deze op zijn plaats klikt ( Figuur 4 , Figuur 5 ). Trek stevig aan het wiel om te
controleren of de as volledig is ingeschakeld. Herhaal dit om het tweede wiel
aan de andere kant te bevestigen.
Om het wiel te verwijderen, drukt u op de L - vormige haak onder de
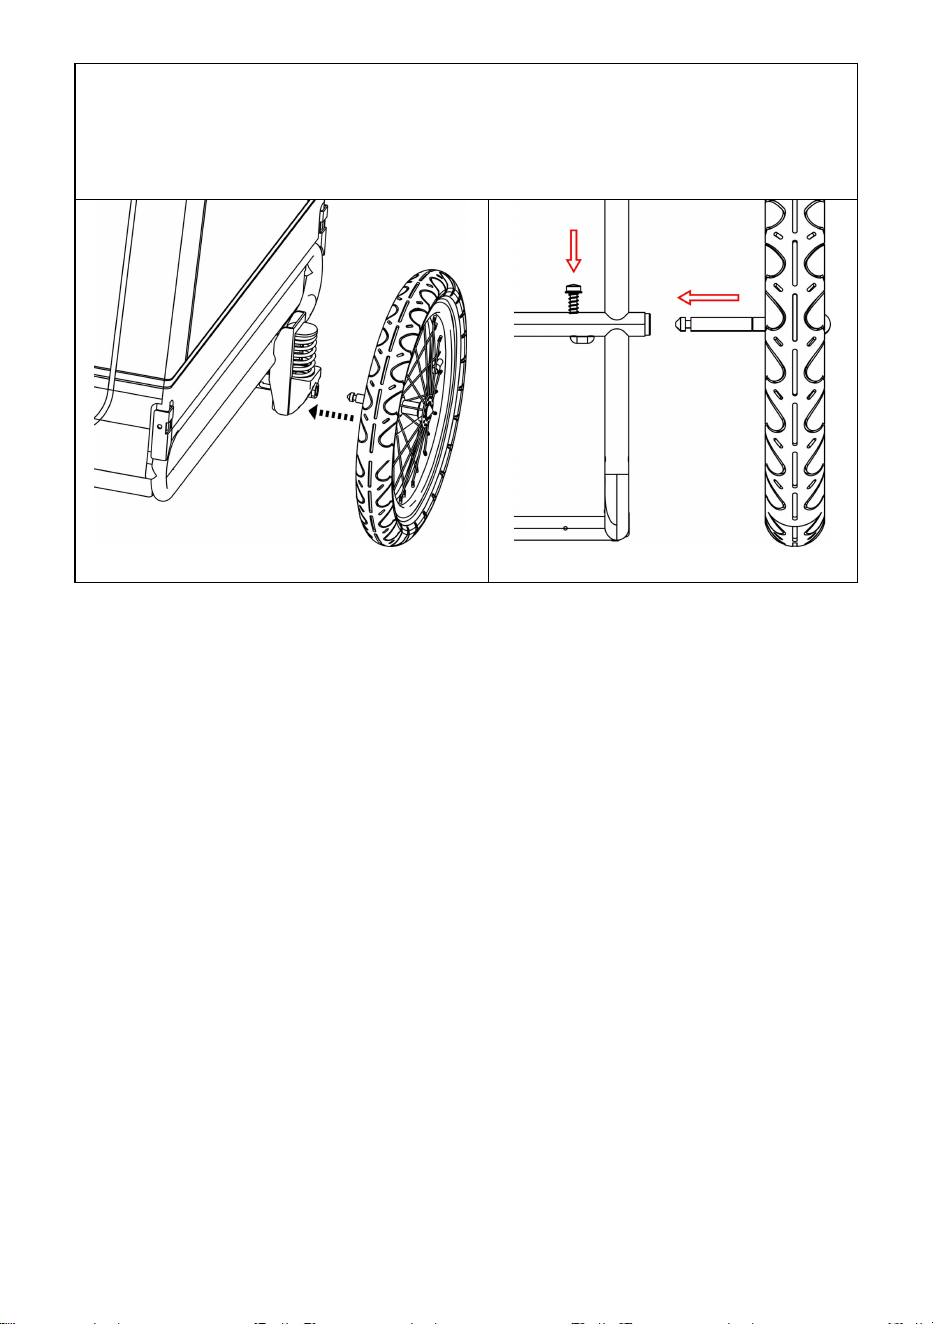
- 8 -
aanhanger en trekt u deze eruit.
Figuur 4
Figuur 5
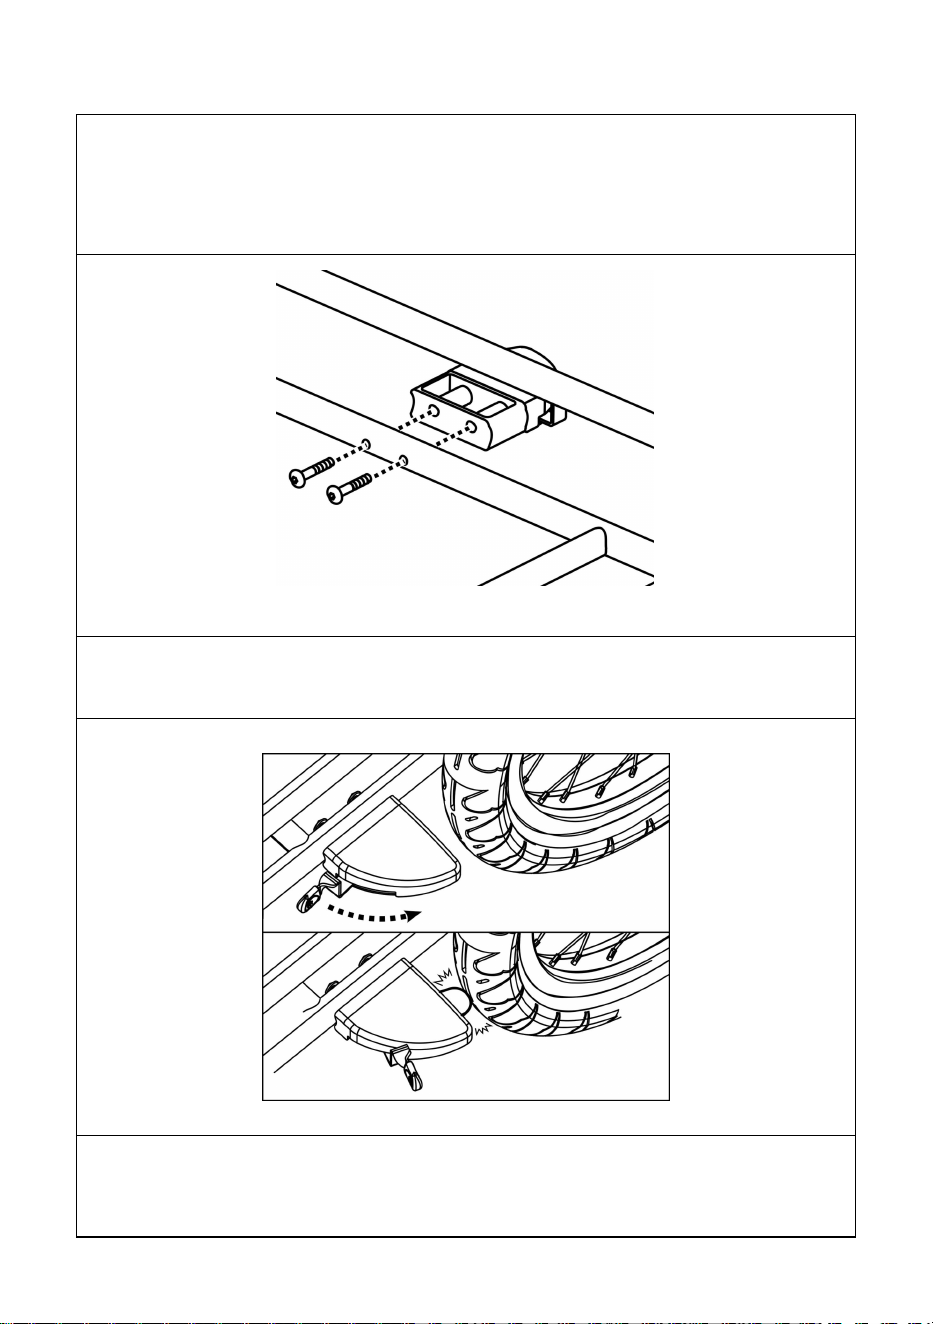
- 9 -
45. De parkeerremmen/wielbeschermers installeren
Steek de wielbeschermingsbouten door de framebuis. Zorg ervoor dat
de gaten in de wielbeschermers overeenkomen met de bouten. Draai
stevig vast met een inbussleutel ( Figuur 6 ). Herhaal dit voor de
wielbeschermer aan de andere kant.
Figuur 6
Trek de hendel op de wielbeschermer naar buiten om te remmen.
Duw de hendel naar achteren om deze los te maken ( Figuur 7 ).
Figuur 7
⚠ WAARSCHUWING
Schakel altijd de remmen in als u niet rijdt/duwt.

- 10 -
46. Het bevestigen van de vlag
Steek de vlaggenmast in het vlaggenmastvak in de linkerachterhoek
van het zijpaneel ( Figuur 8 , Figuur 9 ).
Steek schroeven in de gaten op het deksel om de voorste (witte) en
achterste (rode) reflectoren te bevestigen.

- 11 -
Figuur 8
Figuur 9
47. Het monteren van de trekhaak
Figuur 10
Bevestig de trekhaakontvanger
aan het hoofdframe zoals
afgebeeld ( Figuur 10 )
Druk op de veerknop en schuif de
trekhaak in de trekhaakontvanger
totdat de veerknop uit gat A komt.
Steek de veiligheidspin uit gat B
door de andere kant. Zorg ervoor
dat de veiligheidsspeld goed op
zijn plaats zit.
48. Aanhangwagen aan fiets bevestigen

- 12 -
1. Snelspanneras : Verwijder de snelspanner aan de linkerkant van
de achteras van de fiets. Monteer de trekhaak tussen de snelspanner
en het frame. Draai de snelspanner vast volgens de handleiding van
de fietsfabrikant. De trekhaak kan op de fiets blijven zitten als de
aanhanger is verwijderd ( Figuur 1 1 ).
Figuur 11
⚠ WAARSCHUWING
De spanningsafstelmoer moet
minimaal vijf volledige slagen in
de schroefdraad grijpen om
voldoende klemkracht te
garanderen om het achterwiel
stevig vast te houden. Als u de
spanningsafstelmoer niet volledig
vastdraait, kan dit leiden tot
ongelukken met ernstig letsel of
de dood. Als de snelspanner te
kort is, moet deze worden
vervangen. Raadpleeg een
professionele fietsenmaker voor
de juiste onderdelen en hulp.
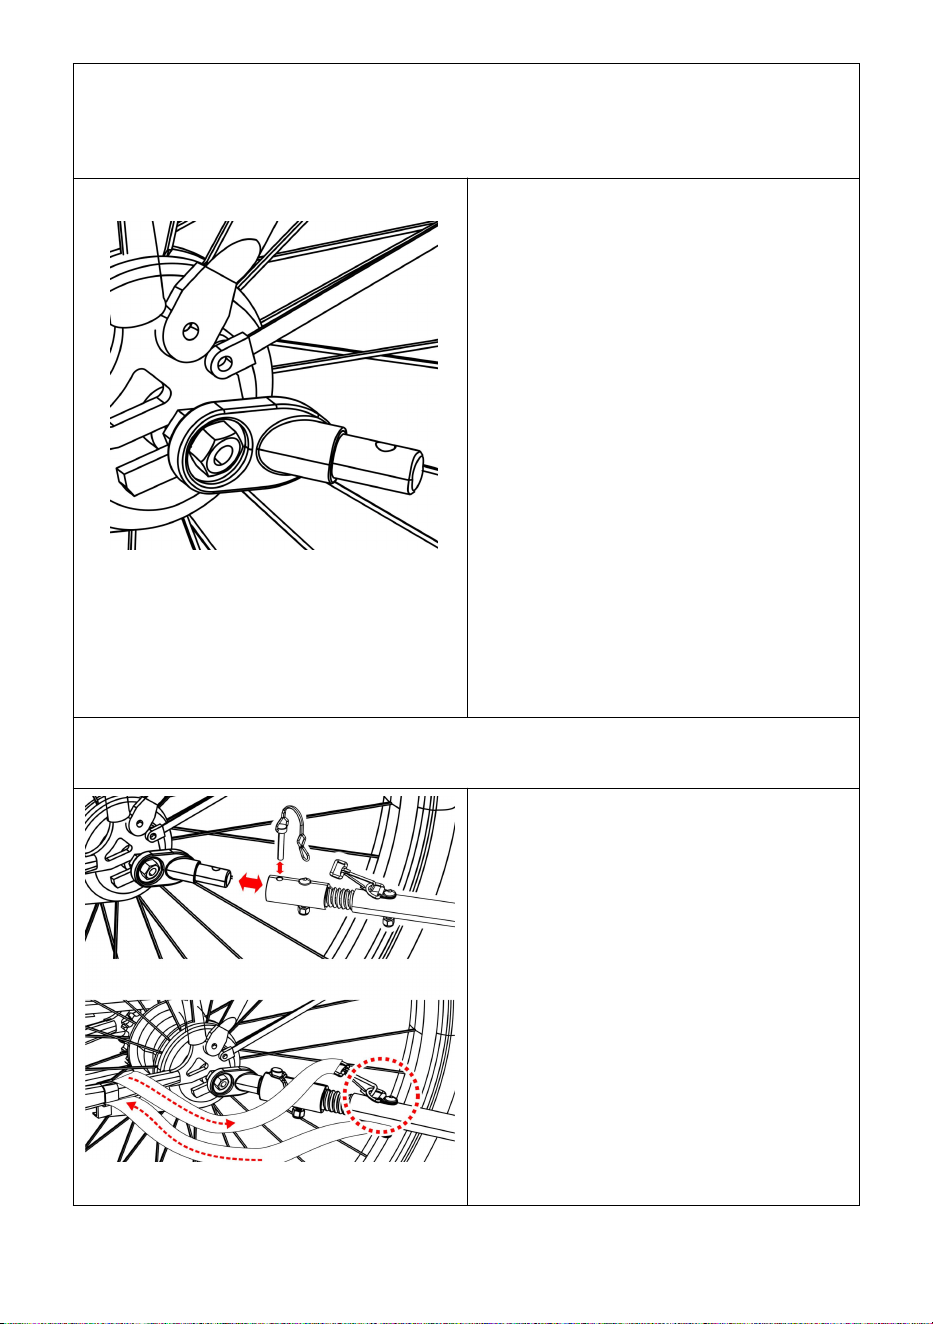
- 13 -
2. As met moer: Draai de moer met ring los van de linkerkant van de
achteras van de fiets. Monteer de trekhaak op de as en schroef de
moer weer vast met de sluitring ( Figuur 1 2 ).
Figuur 12
⚠ WAARSCHUWING
De asmoer moet minimaal vijf
volledige slagen in de
schroefdraad grijpen om
voldoende klemkracht te
garanderen om het achterwiel
stevig vast te houden. Als u de
moer niet volledig vastdraait, kan
dit leiden tot ongelukken met
ernstig letsel of de dood. Als de
as te kort is, kan de universele
trekhaak niet worden gebruikt!
Raadpleeg een professionele
fietsenmaker voor de juiste
onderdelen en hulp.
3. Steekas: De universele trekhaak past niet op een fiets met steekas.
Raadpleeg de verkoper voor een mogelijke oplossing.
Figuur 13
Sluit de koppeling aan op de
trekhaak en zet de
veiligheidspin vast ( Figuur 1
3 ). Zodra de trekhaak is
bevestigd, wikkelt u de
veiligheidsgordel om het frame
van de fiets en haakt u deze aan
de D-ring op de trekhaak.
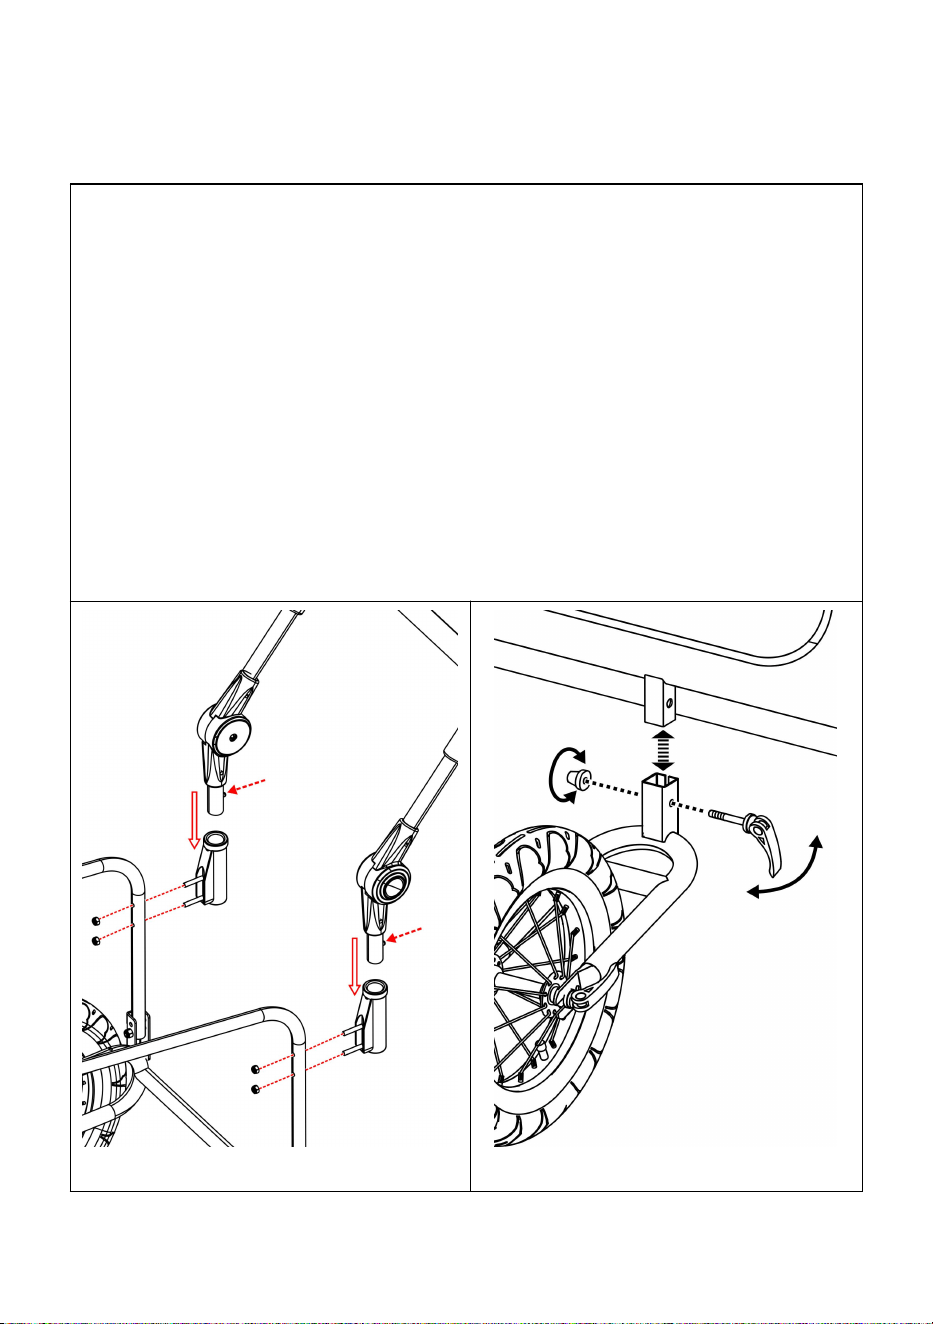
- 14 -
49. De kinderwagenset installeren
Bevestig twee handgreepontvangers op de achterste buizen van het
frame door de moeren aan te draaien. Druk aan de uiteinden van de
handgreep op de veerknoppen en schuif de handgreep in de
stuurhouders totdat twee veerknoppen door de gaten omhoog steken (
Figuur 1 4 ). Om de handgreep te verwijderen, drukt u op de knoppen
en trekt u de handgreep omhoog.
Steek de rechthoekige buis op het voorwiel in de rechthoekige houder
onder het voorframe van de aanhanger. Zorg ervoor dat de gaten in
beide rechthoekige buizen op één lijn liggen. Vergrendel het voorwiel
met behulp van de snelspanner ( Figuur 1 5 ).
BELANGRIJK : De trekhaak moet worden verwijderd voordat u de
kinderwagenset gebruikt.
Figuur 14
Figuur 1 5

- 15 -
Before You Ride
Controleer vóór elk gebruik:
61. De wielen zijn goed vastgezet aan de aanhanger
62. De banden worden opgepompt tot de aanbevolen spanning op de
zijwand van de band
63. De trekhaak is goed vastgemaakt aan de aanhanger
64. De trekhaak is goed vastgemaakt aan de fiets
65. Alle veiligheidsspelden zijn veilig op hun plaats vergrendeld.
66. De veiligheidsriem op de trekhaak is correct geïnstalleerd
67. Het gewicht van de trekhaak bij de koppeling is groter dan 6,6 lbs. (3
kg), maar niet meer dan 17,6 lbs. (8 kg) met volgeladen aanhanger
68. Zorg ervoor dat de fiets in goede staat verkeert, vooral de remmen en
banden (raadpleeg de instructies van de fietsfabrikant)
69. De veiligheidsvlag is aanwezig
70. Laat uw hond/huisdier altijd aangelijnd in de aanhanger.
MAINTENANCE
Opslag: Voor een langere levensduur van het product kunt u de trailer
binnenshuis opslaan. De aanhangwagen mag niet worden opgeslagen bij
temperaturen lager dan -23 °C of hoger dan 65 °C.
Onderhoud van de stof: was de stoffen onderdelen met de hand met
warm water en milde zeep. Gebruik GEEN bleekmiddel of oplosmiddelen.
Droogvegen en buiten direct zonlicht bewaren in een droge, goed
geventileerde ruimte. Maak ramen schoon met een vochtige, zachte doek


- 2 -
Teknisk support och e-garanticertifikat
www.vevor.com/support
HUSDJURSCYKELVAGN
MODELL: TS812
We continue to be committed to provide you tools with competitive price.
"Save Half", "Half Price" or any other similar expressions used by us only represents an
estimate of savings you might benefit from buying certain tools with us compared to the major
top brands and does not necessarily mean to cover all categories of tools offered by us. You
are kindly reminded to verify carefully when you are placing an order with us if you are
actually saving half in comparison with the top major brands.

- 1 -
MODELL: TS812
Viktigt: Spara dessa instruktioner för framtida referens
Have product questions? Need technical support? Please feel free to
contact us:
Technical Support and E-Warranty Certificate
www.vevor.com/support
NEED HELP? CONTACT US!
This is the original instruction, please read all manual instructions
carefully before operating. VEVOR reserves a clear interpretation of our
user manual. The appearance of the product shall be subject to the
product you received. Please forgive us that we won't inform you again if
there are any technology or software updates on our product.
PET BIKE TRAILER

- 2 -
CHOOSE THE RIGHT SIZE OF TRAILER
Trailerstorlek
X- Large
Max. Kroppslängd
3 5 tum ( 9 0 cm)
Max. Axelhöjd
26 tum ( 66 cm)
Max. Vikt
100 lbs. ( 45 kg)
SAFETY INSTRUCTIONS
⚠ VARNING
Läs instruktionerna innan du kör. Underlåtenhet att följa
instruktionerna och varningarna i denna handbok kan leda till
allvarliga skador eller dödsfall.
Rådgör med en veterinär för att säkerställa att det är säkert för ditt
husdjur att åka i en släpvagn.
Se till att husdjuret inte kan komma i kontakt med hjulekrarna.
Kontrollera bekvämligheten och säkerheten hos husdjuret ofta, särskilt
under varmt eller kallt väder.
Lämna aldrig husdjuret utan uppsikt och HÅLL ALLTID SLÄPVAGNEN
FRÅN ATT VÄLTA BAKÅT NÄR HUND KÖR IN ELLER LÄMNAR
VAGNEN.
ANVÄND INTE med en total belastning som överstiger 100 lbs. ( 45

- 3 -
kg).
Använd aldrig husdjurssläp för att transportera barn eller gods.
GÖR INTE några modifieringar på produkten. Eventuella paket som
placeras på släpet kan göra att släpet blir instabilt.
Pumpa INTE upp däcken för mycket. Underlåtenhet att följa det
nominella trycket på däckets sidovägg kan leda till explosion av däcket
och möjlig skada.
Före varje åktur, se till att släpet inte stör bromsning, trampning eller
styrning av cykeln.
Följ alltid lokala föreskrifter när du använder släpvagnen på allmänna
vägar.
Cykla aldrig på natten utan tillräcklig belysning. Följ alla lokala lagkrav
för belysning.
När du använder din släpvagn drar du extra vikt och ett större fordon.
Du måste ge mer tid för att bromsa, bromsa, stanna och starta, och ge
mer utrymme för svängar och passager. Experimentera med den
lastade släpvagnen i ett obelastat område tills du blir bekant med hur
din cykel hanterar att dra släp.
Undvik stenar, trottoarkanter, hård inbromsning och plötslig svängning.
Undvik att åka över hinder med ett hjul, eftersom det kan få släpet att
välta.
Kör alltid med den främre och bakre dörren helt stängd för att skydda
husdjuret från flygande skräp och förhindra att husdjuret hoppar från
släpet
Cykelföraren måste vara minst 16 år gammal.
Rekommenderade hastighetsgränser: - 10 mph (16 km/h) på jämna,
raka vägar - 5 mph (8 km/h) vid svängning eller på ojämna vägar.
Släpvagnsvikten måste fördelas korrekt för säker hantering. Vikten på
kopplingsdonet bör vara mellan 30 N ( ≈ 6,6 lbs. eller 3 kg) och 80 N
(≈17,6 lbs. eller 8 kg). För att mäta detta, lasta din släpvagn och
placera den bredvid badrumsvågen. Stig på vågen och notera din vikt.
Stå på vågen och lyft upp änden av dragkroken en fot (cirka 25 cm)
från marken. Om vikten är för låg kan cykelns bakhjul tappa greppet.
Om den är för hög kan dragkroken bli överbelastad.
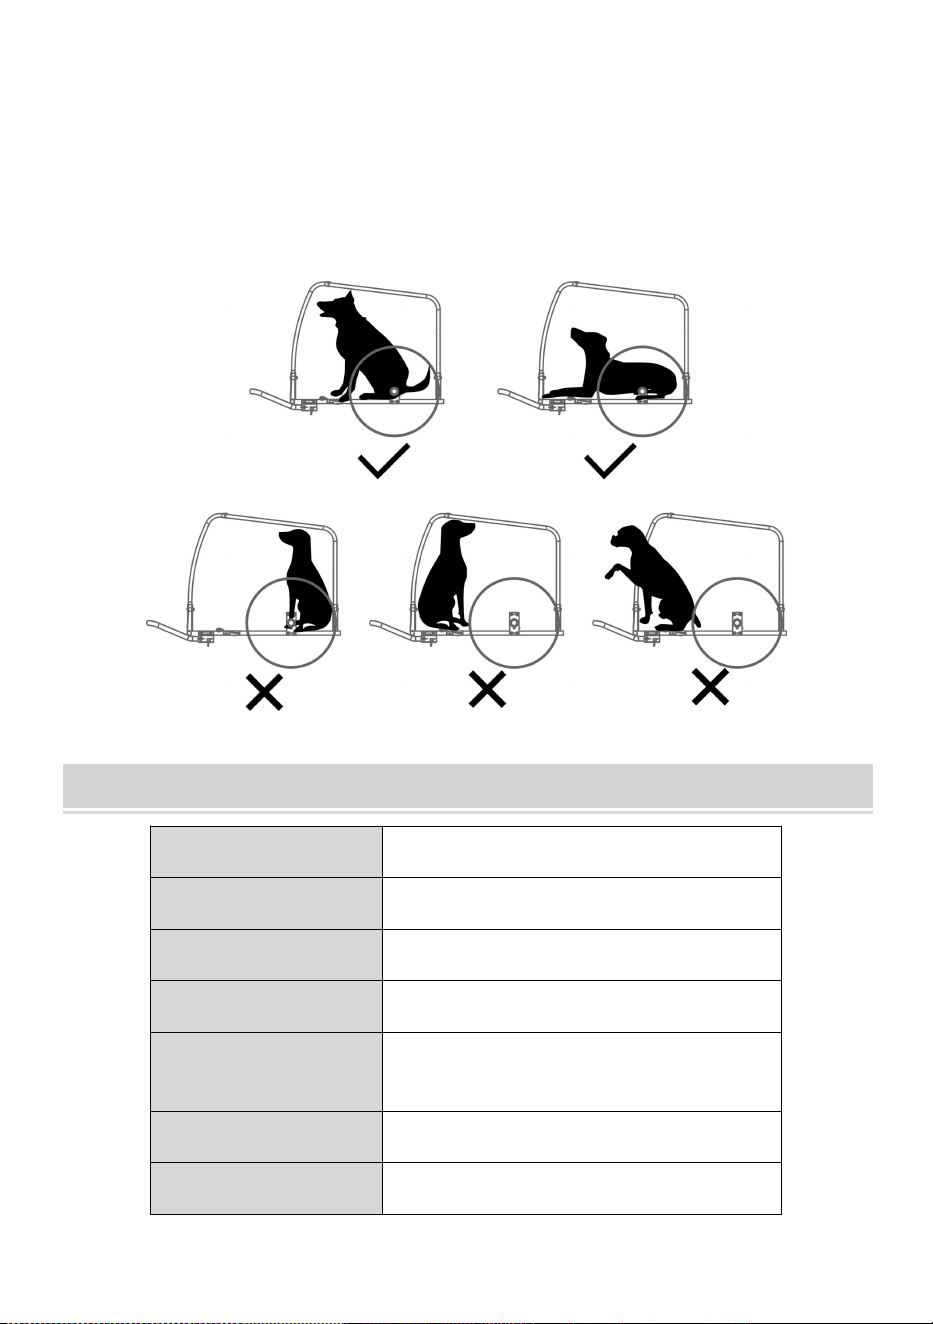
- 4 -
Överbelasta aldrig släpvagnen och åk aldrig med en dragstångsbelastning
som ligger utanför det specificerade intervallet 6,6 till 17,6 lbs. (3 – 8 kg).
Fördela alltid lasten jämnt. Underlåtenhet att göra det kan leda till olyckor
med allvarliga skador eller dödsfall.
Tips : Se till att din hund är placerad med sin tyngdpunkt så nära hjulaxeln
som möjligt. Detta är det bästa sättet att åka med en optimal viktfördelning.
MODEL AND PARAMETERS
Modell
TS812
Typ
Bogser/handskjutning
Max. Ladda
100 pund
Bin Storlek
31,8*22*23,6tum
Hjul
Stål, 16*2,125 tum (bak)
Pneumatiskt gummidäck, 12 tum
(framtill)
Material
Stål, 600D Oxfordduk
Färg
Svart & Grå
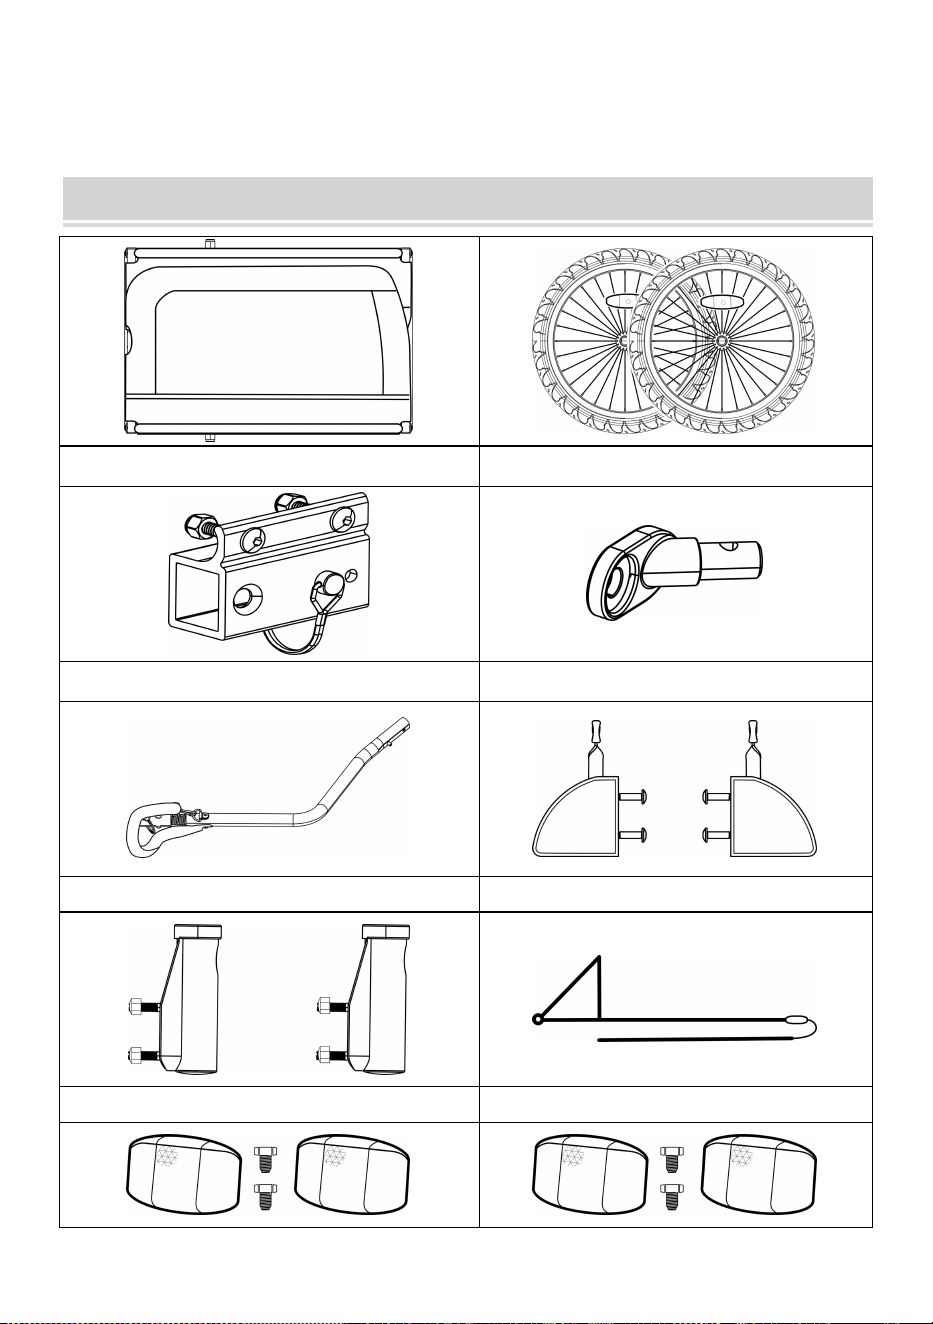
- 5 -
CONTENTS
1 x Huvudram
2 x hjul
1 x Dragkrokmottagare
1 x Universalfäste
1 x Dragkrok
2 x Hjulskydd
2 x Styrhållare
1 x Flagga
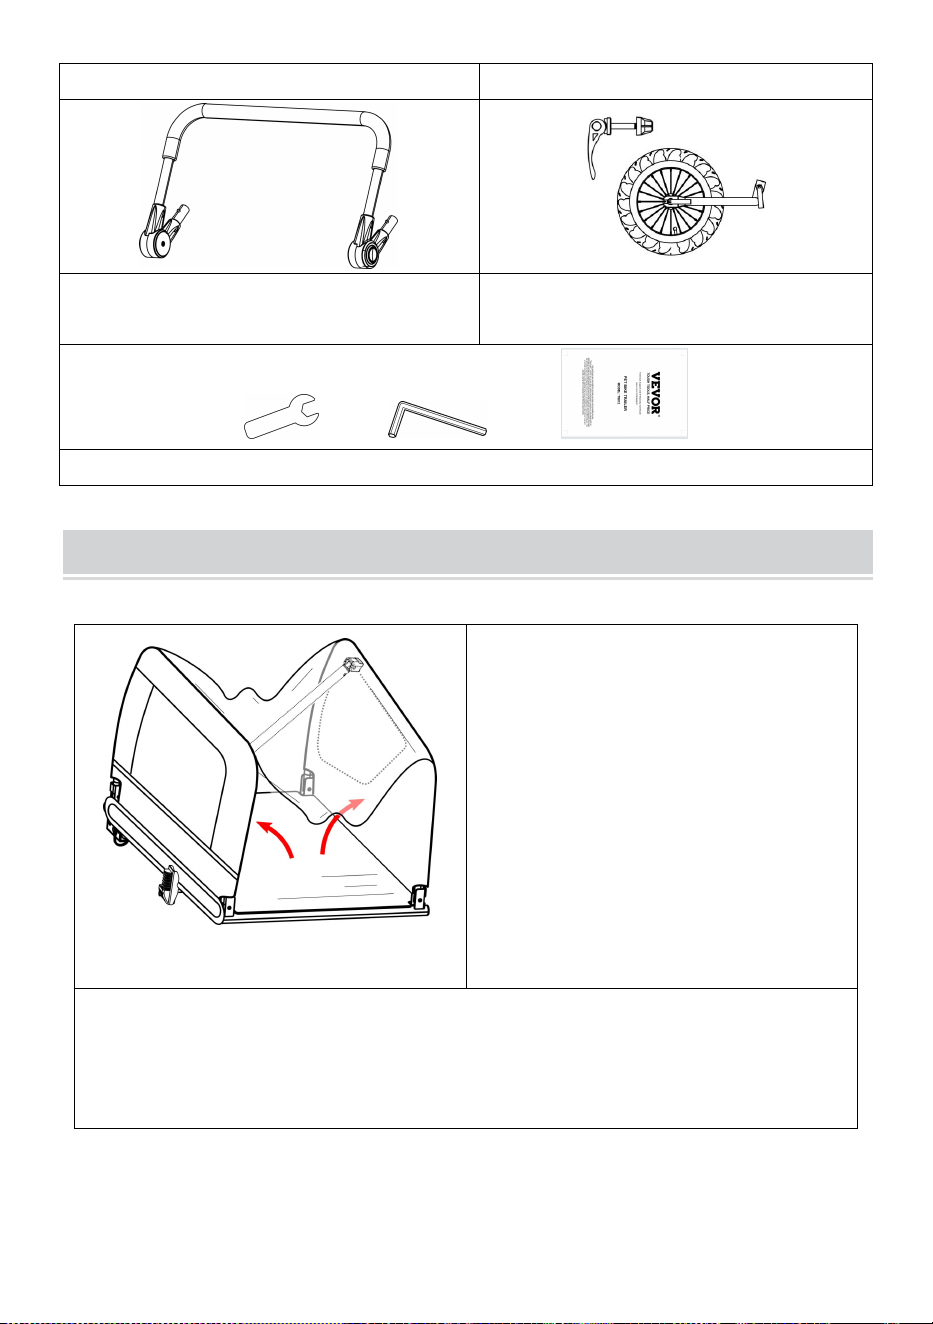
- 6 -
2 x Bakre reflexer ( röda )
2 x främre reflexer ( vita )
1 x Styre
x framhjul med
snabbkopplingsspett
+ +
1 x 1 1 mm skiftnyckel +1 x sexkantnyckel + 1 x användarmanual
How to Assemble
50. Öppna huvudramen
Figur 1
Ta ut vagnens huvudram och alla
andra komponenter från
kartongen. Ta bort svarta
skyddskåpor på 4 hörn. Lyft upp
båda sidopanelerna till upprätt
läge ( Figur 1) .
Fäst tvärbalken på den övre delen av huvudramen. Lyft och lås
tvärstången med hjälp av säkerhetsnålen som är fäst vid bulten ( Figur
2) . Se till att säkerhetsnålar är ordentligt låsta på plats enligt bilden (
Figur 3) .
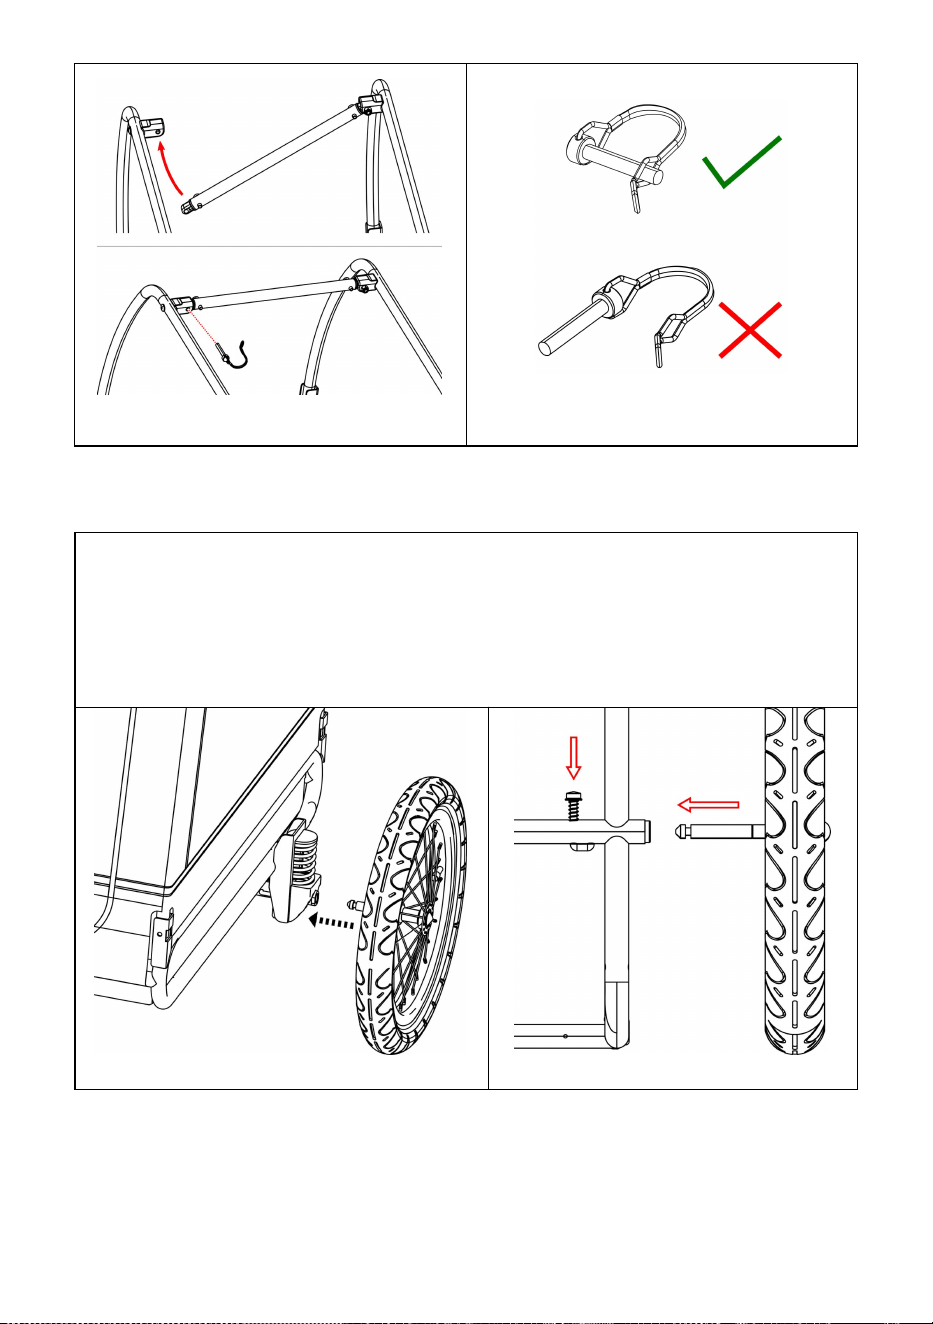
- 7 -
Figur 2
Figur 3
51. Fästa hjulen
Sätt in hjulaxeln i axelupptagaren under släpvagnsramen tills den snäpper på
plats ( Figur 4 , Figur 5 ). Dra bestämt i hjulet för att bekräfta att axeln är helt
inkopplad. Upprepa för att fästa det andra hjulet på andra sidan.
För att ta bort hjulet, tryck på den L - formade kroken under släpet och dra ut
den .
Figur 4
Bild 5

- 8 -
52. Installation av parkeringsbromsar/hjulskydd
Sätt in hjulskyddsbultarna genom ramröret. Matcha hålen i
hjulskydden med bultar. Dra åt ordentligt med insexnyckel ( Figur 6 ).
Upprepa för hjulskydd på andra sidan.
Bild 6
Dra ut handtaget på hjulskyddet för att bromsa. Tryck tillbaka
handtaget för att släppa ( Figur 7 ).
Bild 7
⚠ VARNING
Dra alltid i bromsarna när du inte cyklar/kör.

- 9 -
53. Att fästa flaggan
Sätt in flaggstången i flaggstångsfickan i det vänstra bakre hörnet av
sidopanelen ( Figur 8 , Figur 9 ).
Sätt i skruvarna i hålen på locket för att fästa främre (vita) och bakre
(röda) reflexer.
Bild 8
Bild 9
54. Installation av dragkroken
Bild 10
Fäst dragkrokens mottagare på
huvudramen enligt bilden ( Figur
10 )
Tryck på fjäderknappen och skjut
in dragkroken i dragkrokens
mottagare tills fjäderknappen
kommer ut ur hålet A. För in
säkerhetsnålen från hålet B
genom den andra sidan. Se till att
säkerhetsnålen är ordentligt låst
på plats.

- 10 -
55. Fästa släp på cykel
1. Snabbkopplingsaxel : Ta bort snabbkopplingen från vänster sida
av cykelns bakaxel. Montera kopplingen mellan snabbkopplingen och
ramen. Dra åt snabblåset enligt cykeltillverkarens manual. Hitch kan
sitta kvar på cykeln när släpet tas bort ( Figur 1 1 ).
Bild 11
⚠ VARNING
Spänningsmuttern måste ha i
gängorna i minst fem hela varv för
att säkerställa tillräcklig klämkraft
för att hålla bakhjulet säkert.
Underlåtenhet att dra åt
spänningsjusterande mutter helt
kan resultera i olyckor med
allvarlig skada eller dödsfall. Om
snabbspetten är för kort måste
den bytas ut. Rådfråga en
professionell cykelmekaniker för
lämpliga delar och hjälp.
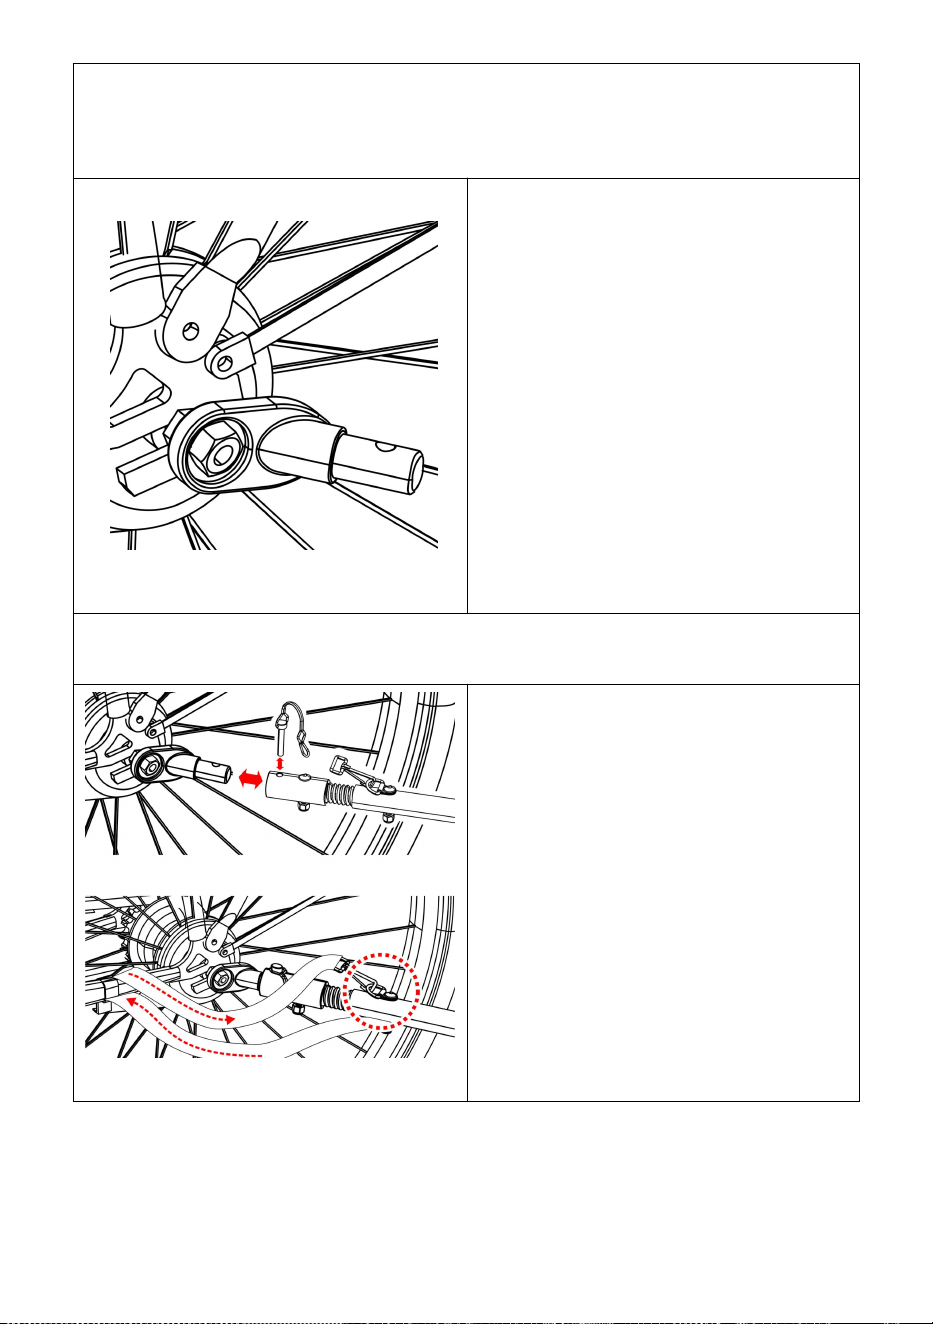
- 11 -
2. Nutted Axle: Skruva loss muttern med bricka från vänster sida av
cykelns bakaxel. Montera kopplingen på axeln och skruva tillbaka
muttern med brickan ( Figur 1 2 ).
Bild 12
⚠ VARNING
Axelmuttern måste ha i gängorna
i minst fem hela varv för att
säkerställa tillräcklig klämkraft för
att hålla bakhjulet säkert.
Underlåtenhet att dra åt muttern
helt kan leda till olyckor med
allvarliga skador eller dödsfall.
Om axeln är för kort kan Universal
Hitch inte användas! Rådfråga en
professionell cykelmekaniker för
lämpliga delar och hjälp.
3. Genomgående axel: Universalkopplingen passar inte en cykel med
genomgående axel. Kontakta återförsäljaren för möjlig lösning.
Bild 13
Anslut kopplingen på
dragkroken och fäst
säkerhetssprinten ( Figur 1 3 ).
När dragkroken är fäst, vira
säkerhetsbältet runt cykelns ram
och haka fast i D-ringen på
dragkroken.
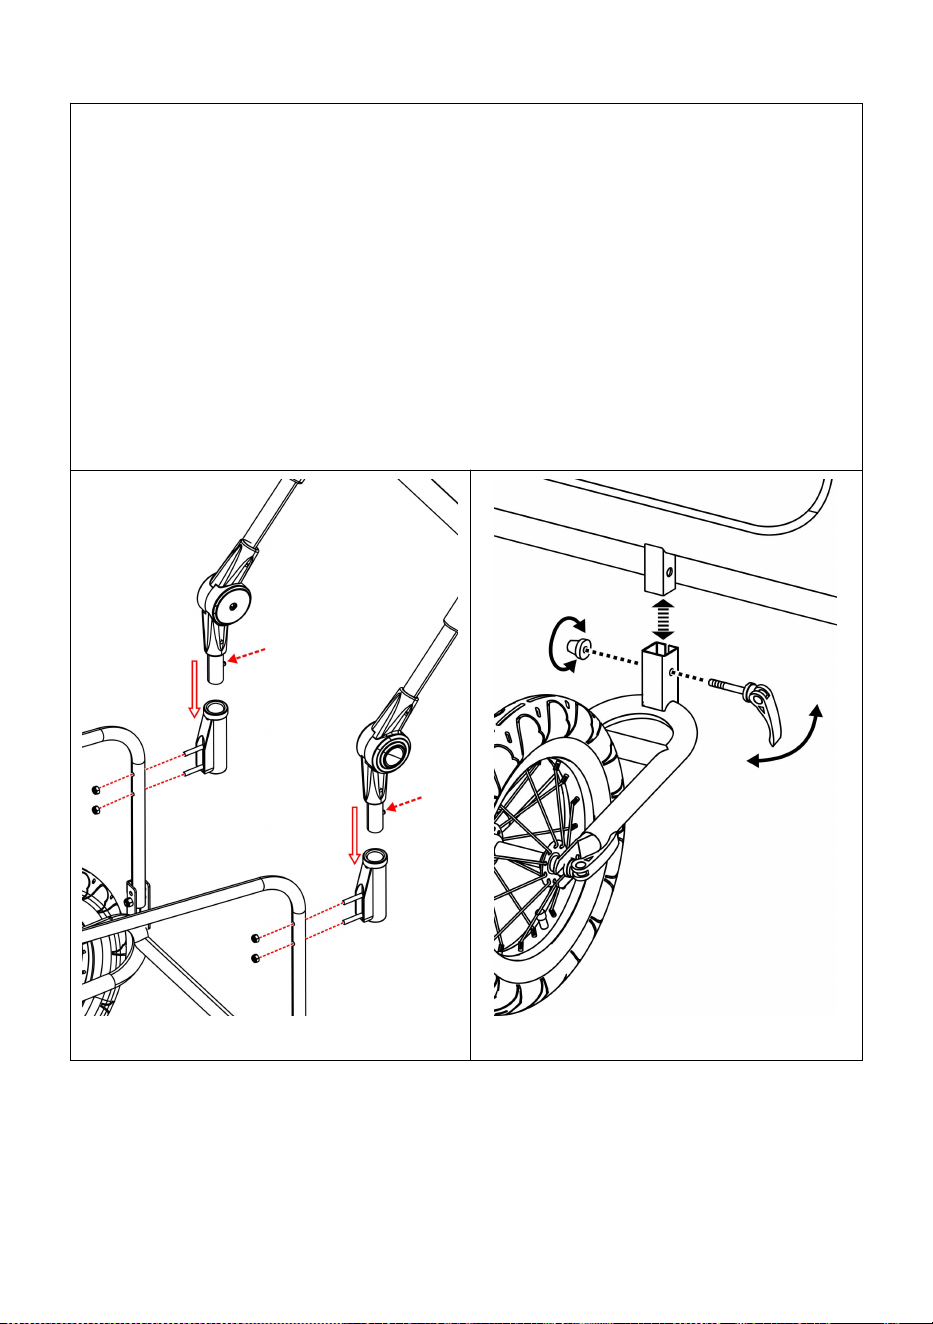
- 12 -
56. Installation av barnvagnssatsen
Fäst två handtagsmottagare på ramens bakre rör genom att dra åt
muttrarna. På handtagets ändar, tryck på fjäderknapparna och skjut in
handtaget i styrets hållare tills två fjäderknappar dyker upp genom
hålen ( Figur 1 4 ). För att ta bort handtaget, tryck på knapparna och
dra upp handtaget.
Sätt in rektangelröret på framhjulet i rektangelhållaren under släpets
främre ram. Se till att hålen på båda rektangulära rören är i linje med
varandra. Lås framhjulet med snabbspettet ( Figur 1 5 ).
VIKTIGT : Dragkroken måste tas bort innan du använder
barnvagnssatsen.
Bild 14
Bild 1 5

- 13 -
Before You Ride
Kontrollera före varje användning:
71. Hjulen är ordentligt fastsatta på släpet
72. Däcken är pumpade till rekommenderat tryck på däckets sidovägg
73. Dragkroken är ordentligt fastsatt på släpet
74. Hitch är ordentligt fastsatt på cykeln
75. Alla säkerhetsnålar är säkert låsta på plats.
76. Säkerhetsremmen på dragkroken är korrekt monterad
77. Vikten på dragkroken vid kopplingen är större än 6,6 lbs. (3 kg) men
inte överstiger 17,6 lbs. (8 kg) med fullastad släp
78. Se till att cykeln är i gott skick, särskilt bromsar och däck (se
cykeltillverkarens instruktioner)
79. Säkerhetsflaggan är på plats
80. Koppla alltid din hund/husdjur i släpet.
MAINTENANCE
Förvaring: För längre produktlivslängd, förvara släpvagnen inomhus.
Släpvagnen bör inte förvaras vid temperaturer lägre än -23°C eller högre
än 65°C.
Tygvård: Handtvätt tygdelar med varmt vatten och mild tvål. ANVÄND
INTE blekmedel eller lösningsmedel. Torka torrt och förvara borta från
direkt solljus i ett torrt, välventilerat utrymme. Rengör fönster med en fuktig,
mjuk trasa